
Service Connectors abstract away complexity and implement security best practices
 Fetching details about the S3 bucket resource type:
```sh
zenml service-connector describe-type aws --resource-type s3-bucket
```
{% code title="Example Command Output" %}
```
╔══════════════════════════════════════════════════════════════════════════════╗
║ 📦 AWS S3 bucket (resource type: s3-bucket) ║
╚══════════════════════════════════════════════════════════════════════════════╝
Authentication methods: implicit, secret-key, sts-token, iam-role,
session-token, federation-token
Supports resource instances: True
Authentication methods:
• 🔒 implicit
• 🔒 secret-key
• 🔒 sts-token
• 🔒 iam-role
• 🔒 session-token
• 🔒 federation-token
Allows users to connect to S3 buckets. When used by Stack Components, they are
provided a pre-configured boto3 S3 client instance.
The configured credentials must have at least the following AWS IAM permissions
associated with the ARNs of S3 buckets that the connector will be allowed to
access (e.g. arn:aws:s3:::* and arn:aws:s3:::*/* represent all the available S3
buckets).
• s3:ListBucket
• s3:GetObject
• s3:PutObject
• s3:DeleteObject
• s3:ListAllMyBuckets
• s3:GetBucketVersioning
• s3:ListBucketVersions
• s3:DeleteObjectVersion
If set, the resource name must identify an S3 bucket using one of the following
formats:
• S3 bucket URI (canonical resource name): s3://{bucket-name}
• S3 bucket ARN: arn:aws:s3:::{bucket-name}
• S3 bucket name: {bucket-name}
────────────────────────────────────────────────────────────────────────────────
```
{% endcode %}
Dashboard equivalent:
Displaying information about the AWS Session Token authentication method:
```sh
zenml service-connector describe-type aws --auth-method session-token
```
{% code title="Example Command Output" %}
```
╔══════════════════════════════════════════════════════════════════════════════╗
║ 🔒 AWS Session Token (auth method: session-token) ║
╚══════════════════════════════════════════════════════════════════════════════╝
Supports issuing temporary credentials: True
Generates temporary session STS tokens for IAM users. The connector needs to be
configured with an AWS secret key associated with an IAM user or AWS account
root user (not recommended). The connector will generate temporary STS tokens
upon request by calling the GetSessionToken STS API.
These STS tokens have an expiration period longer that those issued through the
AWS IAM Role authentication method and are more suitable for long-running
processes that cannot automatically re-generate credentials upon expiration.
An AWS region is required and the connector may only be used to access AWS
resources in the specified region.
The default expiration period for generated STS tokens is 12 hours with a
minimum of 15 minutes and a maximum of 36 hours. Temporary credentials obtained
by using the AWS account root user credentials (not recommended) have a maximum
duration of 1 hour.
As a precaution, when long-lived credentials (i.e. AWS Secret Keys) are detected
on your environment by the Service Connector during auto-configuration, this
authentication method is automatically chosen instead of the AWS Secret Key
authentication method alternative.
Generated STS tokens inherit the full set of permissions of the IAM user or AWS
account root user that is calling the GetSessionToken API. Depending on your
security needs, this may not be suitable for production use, as it can lead to
accidental privilege escalation. Instead, it is recommended to use the AWS
Federation Token or AWS IAM Role authentication methods to restrict the
permissions of the generated STS tokens.
For more information on session tokens and the GetSessionToken AWS API, see: the
official AWS documentation on the subject.
Attributes:
• aws_access_key_id {string, secret, required}: AWS Access Key ID
• aws_secret_access_key {string, secret, required}: AWS Secret Access Key
• region {string, required}: AWS Region
• endpoint_url {string, optional}: AWS Endpoint URL
────────────────────────────────────────────────────────────────────────────────
```
{% endcode %}
Dashboard equivalent:
Fetching details about the S3 bucket resource type:
```sh
zenml service-connector describe-type aws --resource-type s3-bucket
```
{% code title="Example Command Output" %}
```
╔══════════════════════════════════════════════════════════════════════════════╗
║ 📦 AWS S3 bucket (resource type: s3-bucket) ║
╚══════════════════════════════════════════════════════════════════════════════╝
Authentication methods: implicit, secret-key, sts-token, iam-role,
session-token, federation-token
Supports resource instances: True
Authentication methods:
• 🔒 implicit
• 🔒 secret-key
• 🔒 sts-token
• 🔒 iam-role
• 🔒 session-token
• 🔒 federation-token
Allows users to connect to S3 buckets. When used by Stack Components, they are
provided a pre-configured boto3 S3 client instance.
The configured credentials must have at least the following AWS IAM permissions
associated with the ARNs of S3 buckets that the connector will be allowed to
access (e.g. arn:aws:s3:::* and arn:aws:s3:::*/* represent all the available S3
buckets).
• s3:ListBucket
• s3:GetObject
• s3:PutObject
• s3:DeleteObject
• s3:ListAllMyBuckets
• s3:GetBucketVersioning
• s3:ListBucketVersions
• s3:DeleteObjectVersion
If set, the resource name must identify an S3 bucket using one of the following
formats:
• S3 bucket URI (canonical resource name): s3://{bucket-name}
• S3 bucket ARN: arn:aws:s3:::{bucket-name}
• S3 bucket name: {bucket-name}
────────────────────────────────────────────────────────────────────────────────
```
{% endcode %}
Dashboard equivalent:
Displaying information about the AWS Session Token authentication method:
```sh
zenml service-connector describe-type aws --auth-method session-token
```
{% code title="Example Command Output" %}
```
╔══════════════════════════════════════════════════════════════════════════════╗
║ 🔒 AWS Session Token (auth method: session-token) ║
╚══════════════════════════════════════════════════════════════════════════════╝
Supports issuing temporary credentials: True
Generates temporary session STS tokens for IAM users. The connector needs to be
configured with an AWS secret key associated with an IAM user or AWS account
root user (not recommended). The connector will generate temporary STS tokens
upon request by calling the GetSessionToken STS API.
These STS tokens have an expiration period longer that those issued through the
AWS IAM Role authentication method and are more suitable for long-running
processes that cannot automatically re-generate credentials upon expiration.
An AWS region is required and the connector may only be used to access AWS
resources in the specified region.
The default expiration period for generated STS tokens is 12 hours with a
minimum of 15 minutes and a maximum of 36 hours. Temporary credentials obtained
by using the AWS account root user credentials (not recommended) have a maximum
duration of 1 hour.
As a precaution, when long-lived credentials (i.e. AWS Secret Keys) are detected
on your environment by the Service Connector during auto-configuration, this
authentication method is automatically chosen instead of the AWS Secret Key
authentication method alternative.
Generated STS tokens inherit the full set of permissions of the IAM user or AWS
account root user that is calling the GetSessionToken API. Depending on your
security needs, this may not be suitable for production use, as it can lead to
accidental privilege escalation. Instead, it is recommended to use the AWS
Federation Token or AWS IAM Role authentication methods to restrict the
permissions of the generated STS tokens.
For more information on session tokens and the GetSessionToken AWS API, see: the
official AWS documentation on the subject.
Attributes:
• aws_access_key_id {string, secret, required}: AWS Access Key ID
• aws_secret_access_key {string, secret, required}: AWS Secret Access Key
• region {string, required}: AWS Region
• endpoint_url {string, optional}: AWS Endpoint URL
────────────────────────────────────────────────────────────────────────────────
```
{% endcode %}
Dashboard equivalent:
| 🪄 The complete guide to Service Connectors | Everything you need to know to unlock the power of Service Connectors in your project. | https://docs.zenml.io/stacks/service-connectors/auth-management | |
| ✅ Security Best Practices | Best practices concerning the various authentication methods implemented by Service Connectors. | https://docs.zenml.io/stacks/service-connectors/best-security-practices | |
| 🐋 Docker Service Connector | Use the Docker Service Connector to connect ZenML to a generic Docker container registry. | https://docs.zenml.io/stacks/service-connectors/connector-types/docker-service-connector | |
| 🌀 Kubernetes Service Connector | Use the Kubernetes Service Connector to connect ZenML to a generic Kubernetes cluster. | https://docs.zenml.io/stacks/service-connectors/connector-types/kubernetes-service-connector | |
| 🔶 AWS Service Connector | Use the AWS Service Connector to connect ZenML to AWS cloud resources. | https://docs.zenml.io/stacks/service-connectors/connector-types/aws-service-connector | |
| 🔵 GCP Service Connector | Use the GCP Service Connector to connect ZenML to GCP cloud resources. | https://docs.zenml.io/stacks/service-connectors/connector-types/gcp-service-connector | |
| 🅰️ Azure Service Connector | Use the Azure Service Connector to connect ZenML to Azure cloud resources. | https://docs.zenml.io/stacks/service-connectors/connector-types/azure-service-connector | |
| 🤖 HyperAI Service Connector | Use the HyperAI Service Connector to connect ZenML to HyperAI resources. | https://docs.zenml.io/stacks/service-connectors/connector-types/hyperai-service-connector |

Sequence of events that happen when running a pipeline on a remote stack with a code repository
Sequence of events that happen when running a pipeline on a full cloud stack.

A visual representation of how the code repository fits into the general ZenML architecture.
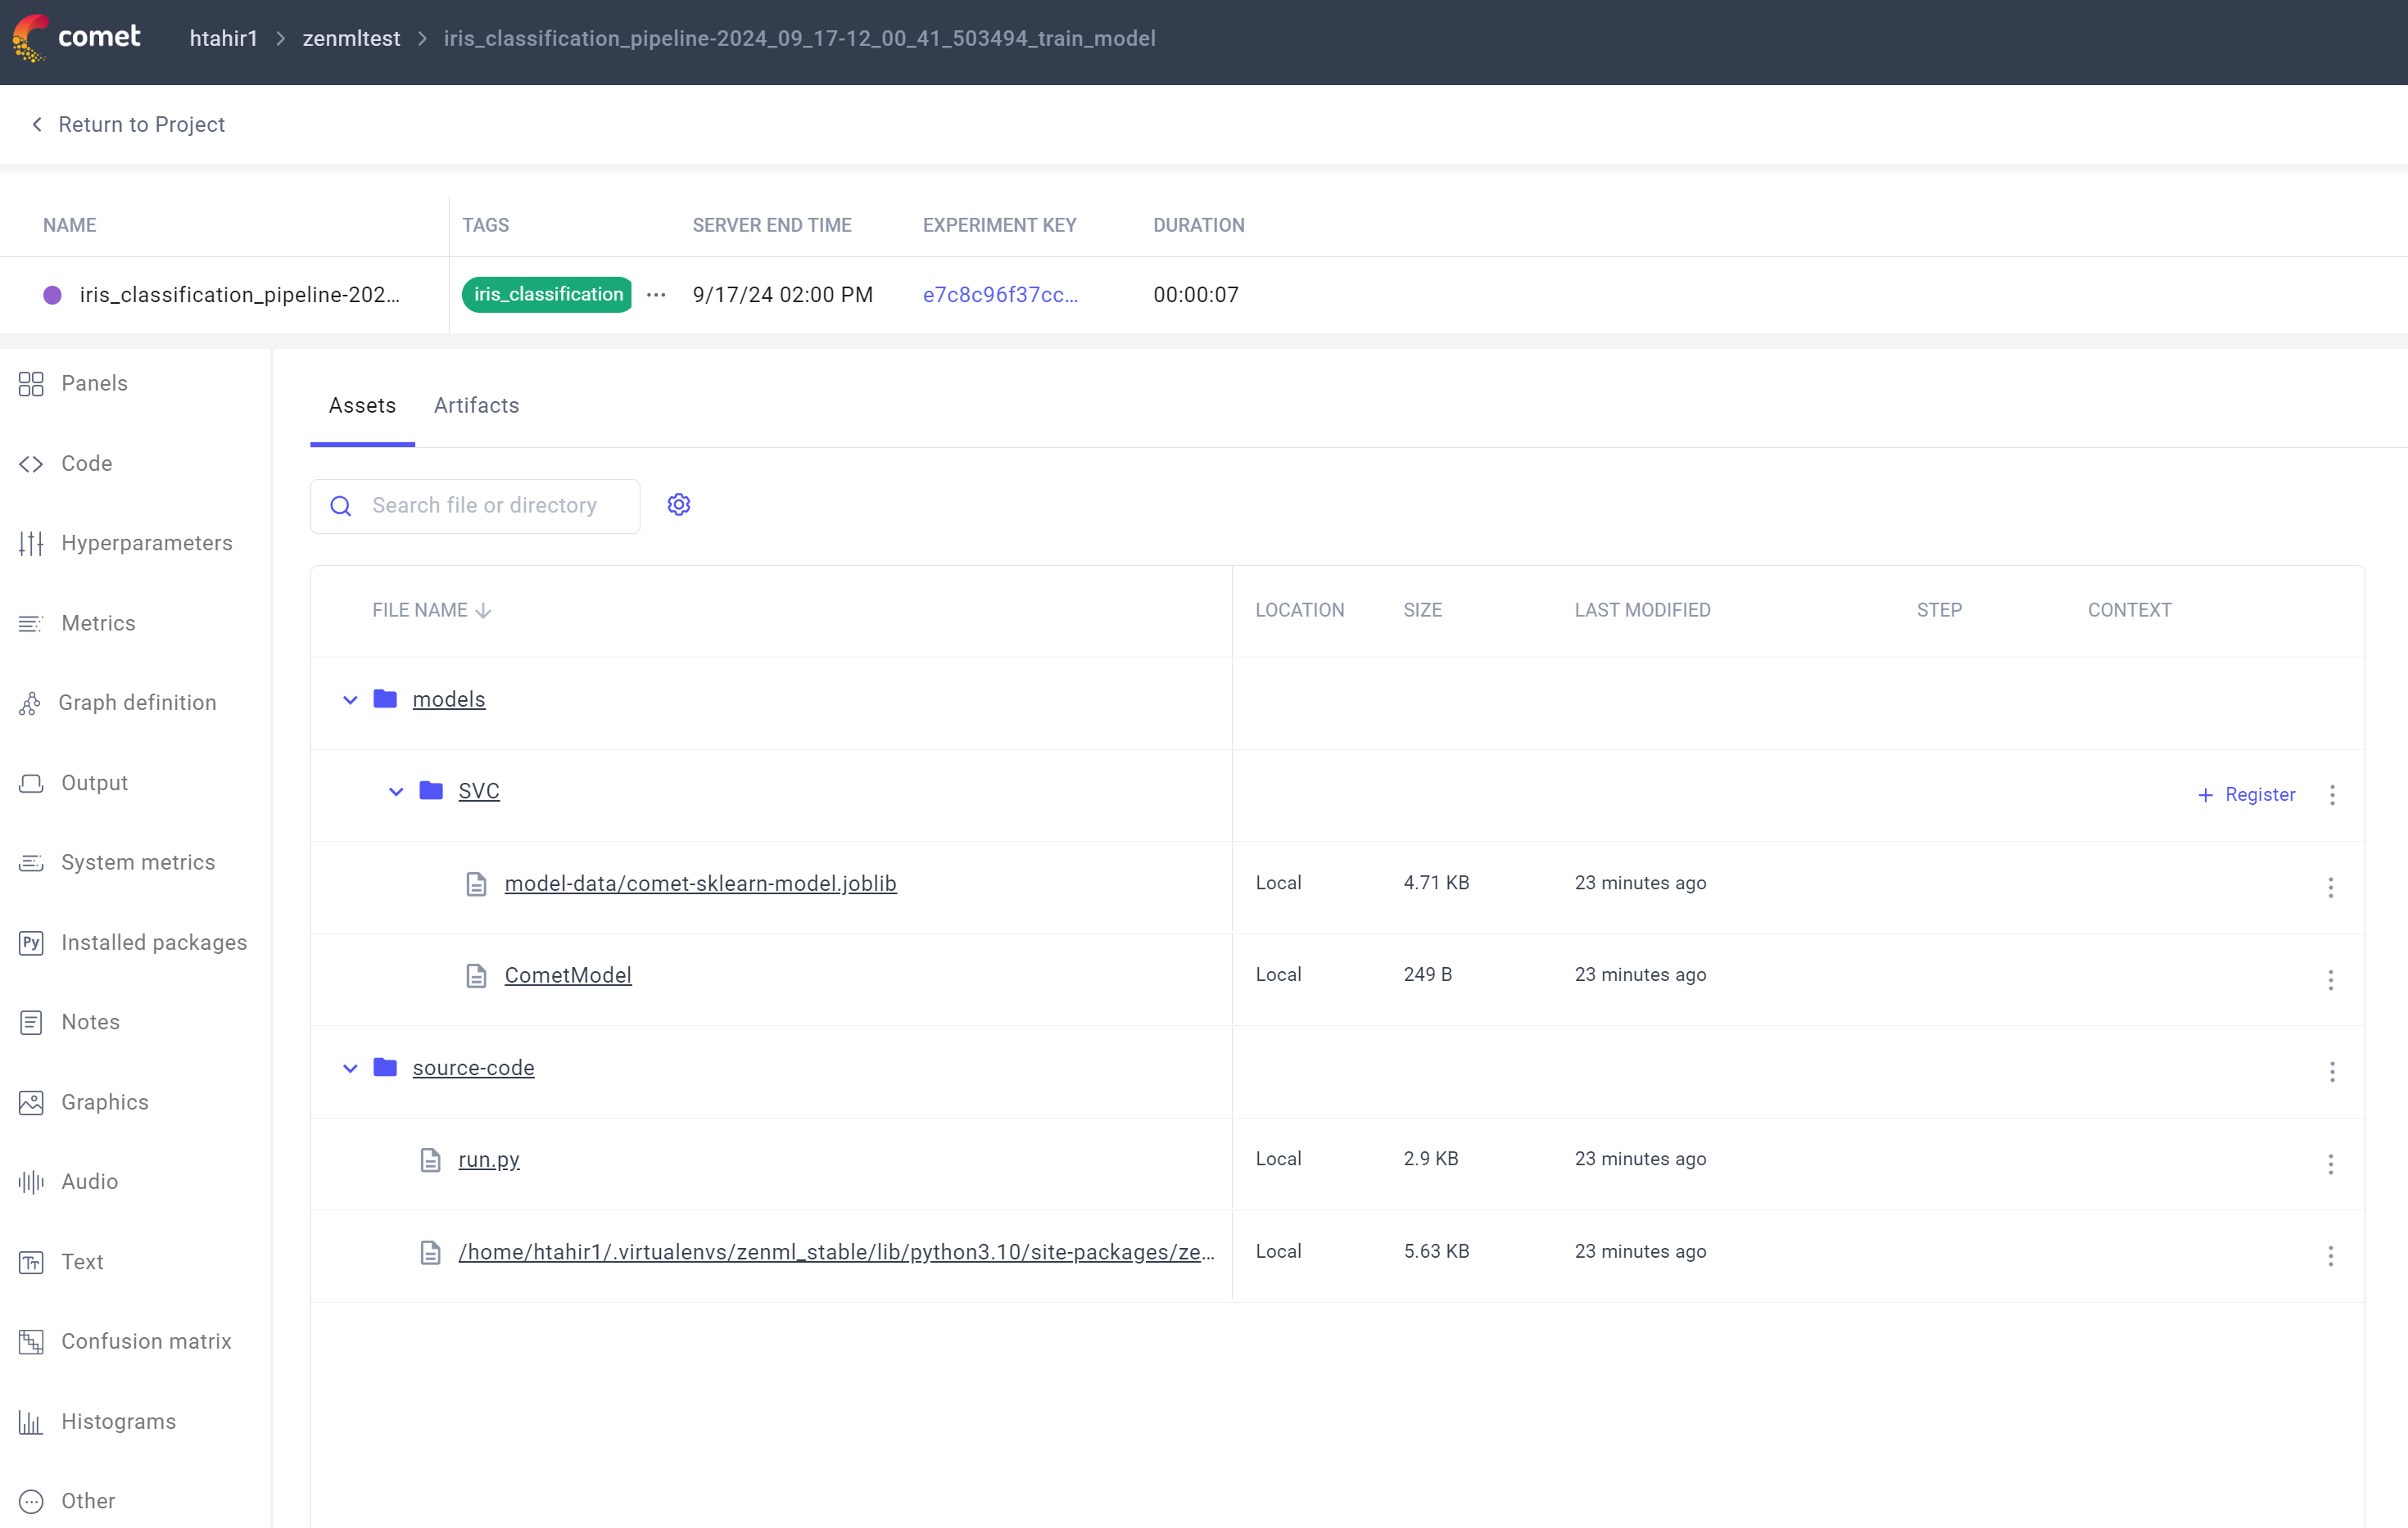
A pipeline with a Comet experiment tracker url as metadata

A stack with the Comet experiment tracker
A confusion matrix logged in the Comet UI
A model tracked in the Comet UI
A pipeline with a Comet experiment tracker url as metadata
| Orchestrator | Orchestrating the runs of your pipeline | deployer.png | orchestrators |
| Deployer | Deploying pipelines as long-running HTTP services | deployer.png | deployers |
| Artifact Store | Storage for the artifacts created by your pipelines | artifact-store.png | artifact-stores |
| Container Registry | Store for your containers | container-registry.png | container-registries |
| Data Validator | Data and model validation | data-validator.png | data-validators |
| Experiment Tracker | Tracking your ML experiments | experiment-tracker.png | experiment-trackers |
| Model Deployer | Services/platforms responsible for online model serving | model-deployer.png | model-deployers |
| Step Operator | Execution of individual steps in specialized runtime environments | step-operator.png | step-operators |
| Alerter | Sending alerts through specified channels | alerter.png | alerters |
| Image Builder | Builds container images. | image-builder.png | image-builders |
| Annotator | Labeling and annotating data | annotator.png | annotators |
| Model Registry | Manage and interact with ML Models | model-registry.png | model-registries |
| Feature Store | Management of your data/features | feature-store.png | feature-stores |
| Component Flavors | How to write a custom stack component flavor | flavors.png | https://docs.zenml.io/stacks/contribute/custom-stack-component |
| Custom orchestrator guide | Learn how to develop a custom orchestrator | custom-orchestrator.png | custom |
| Control Plane | Authentication, RBAC, identity provider integration, network requirements, and resource recommendations. | config-control-plane |
| Workspace Server | Database configuration, network requirements, workload manager setup for running pipelines from UI, high availability, and resource recommendations. | config-workspace-server |
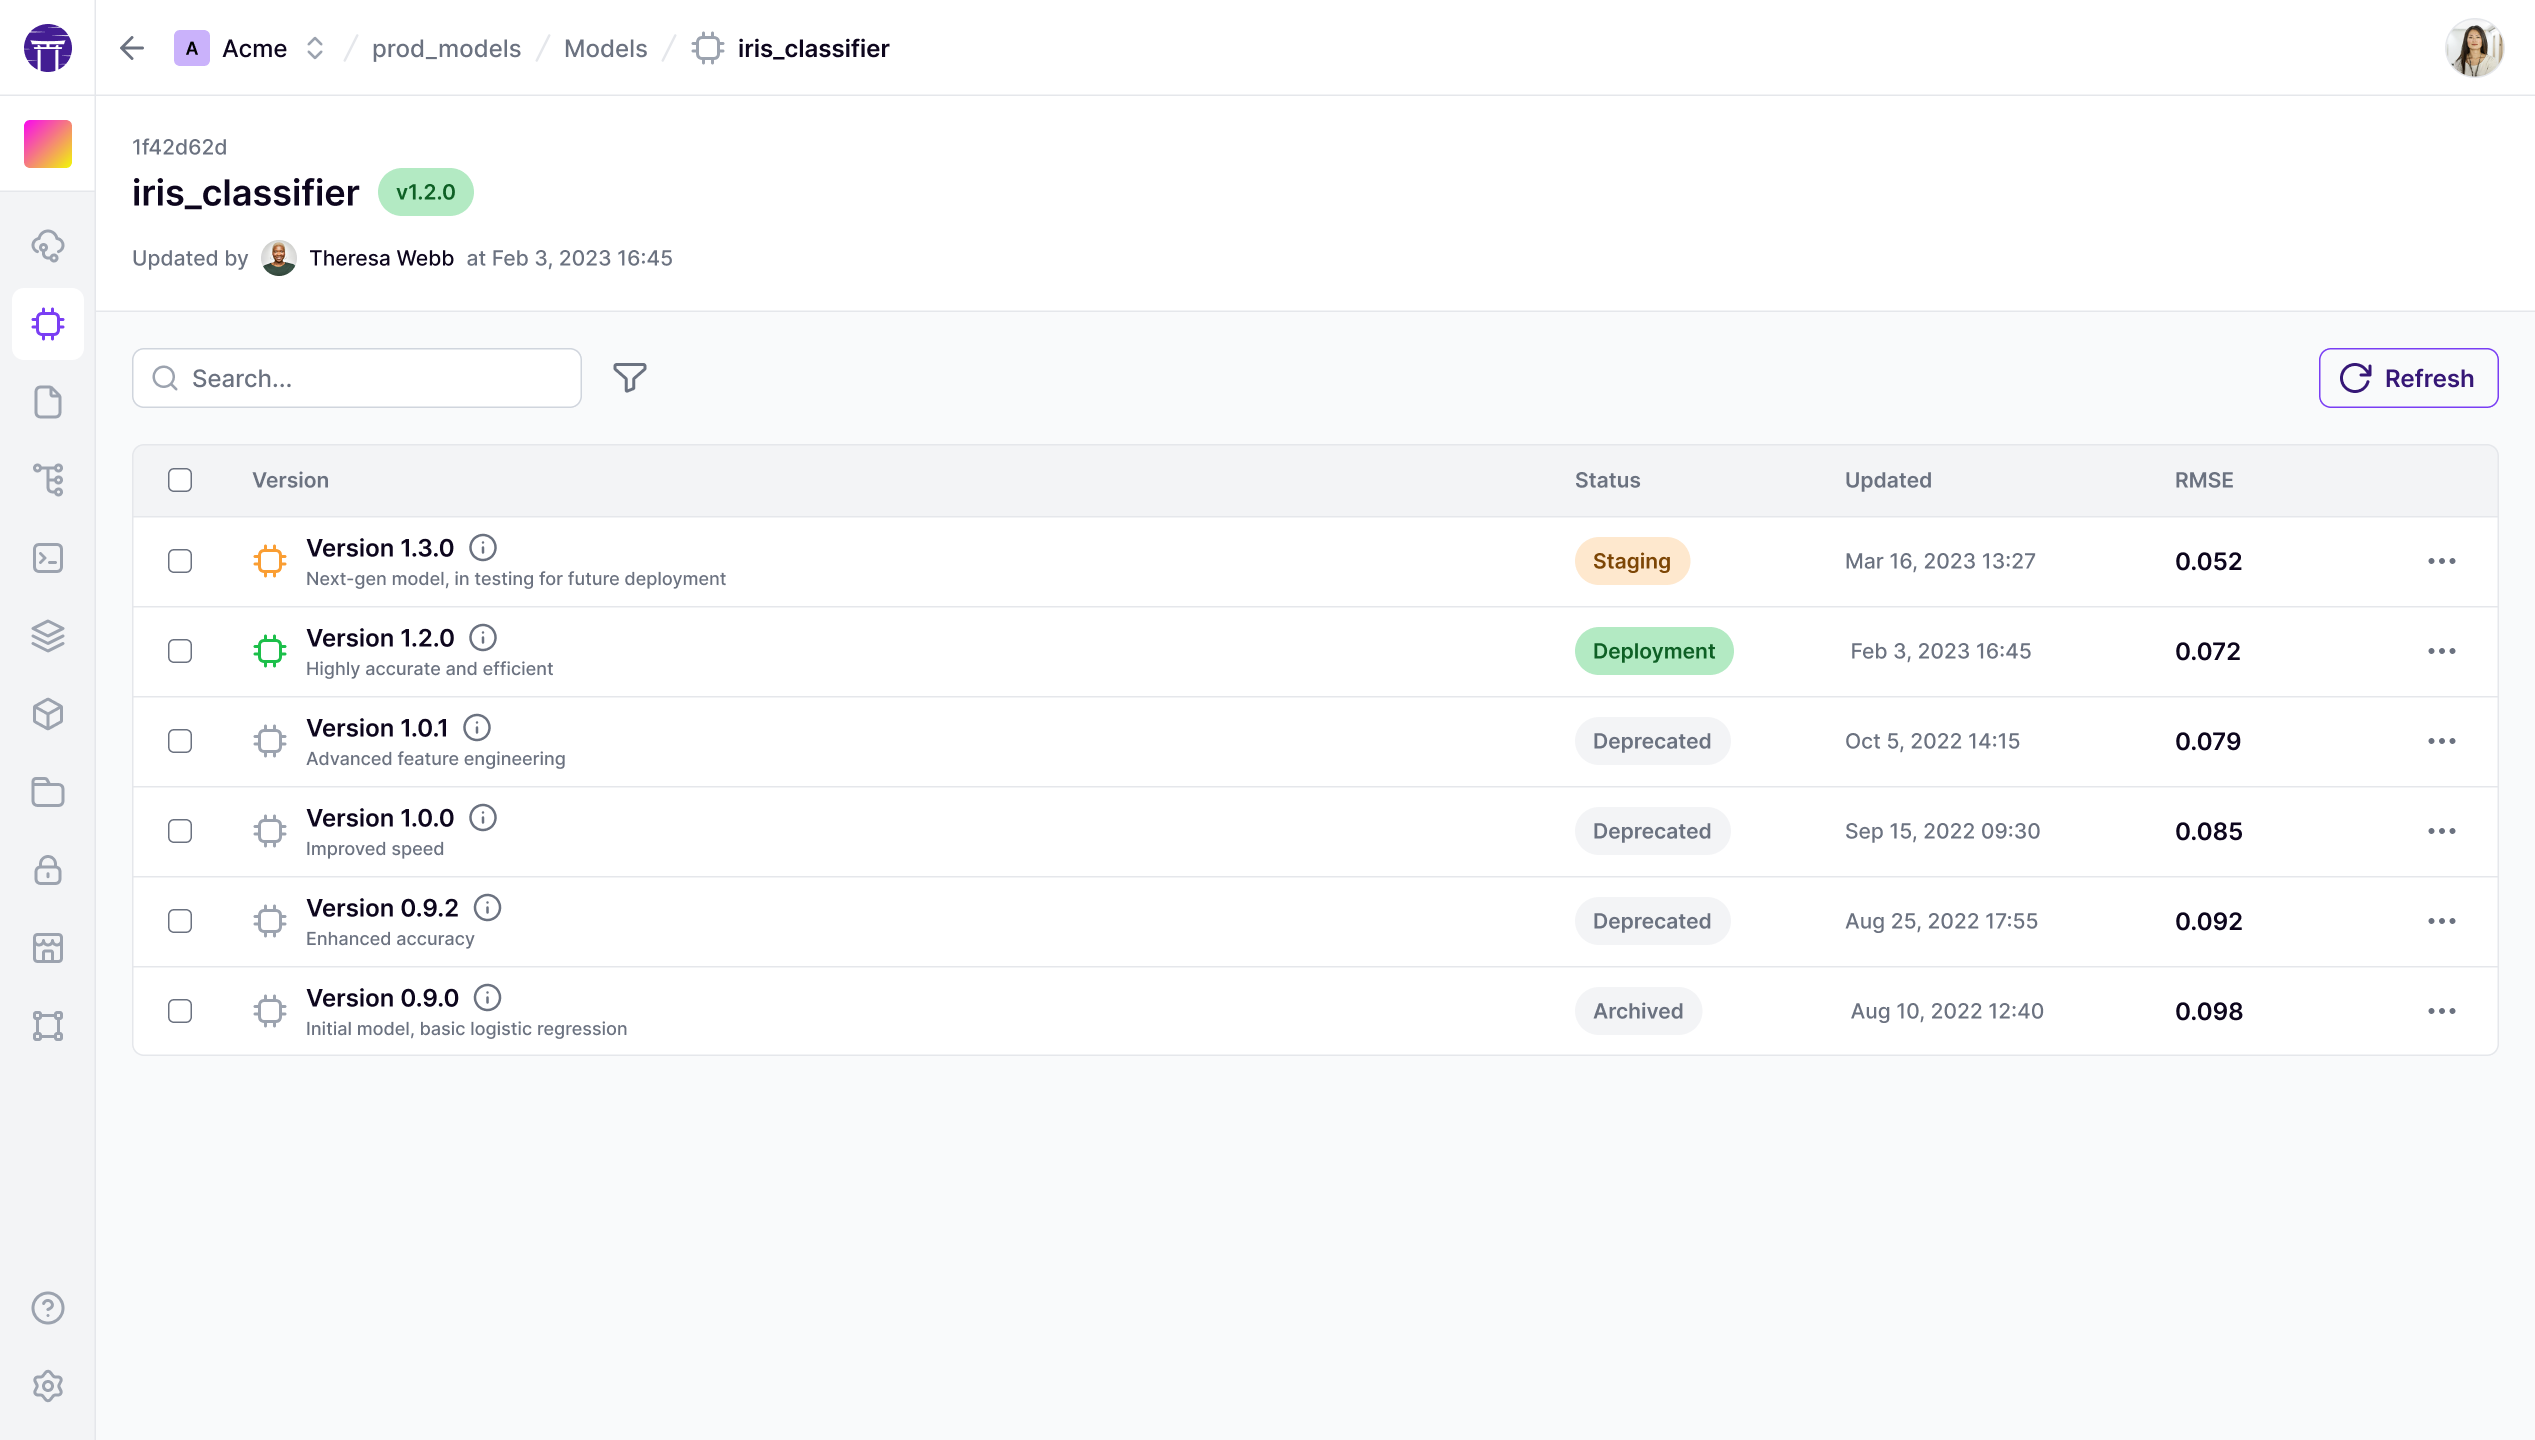
All model versions listed

Left box is the client environment, middle is the zenml server environment, and the right most contains the build environments
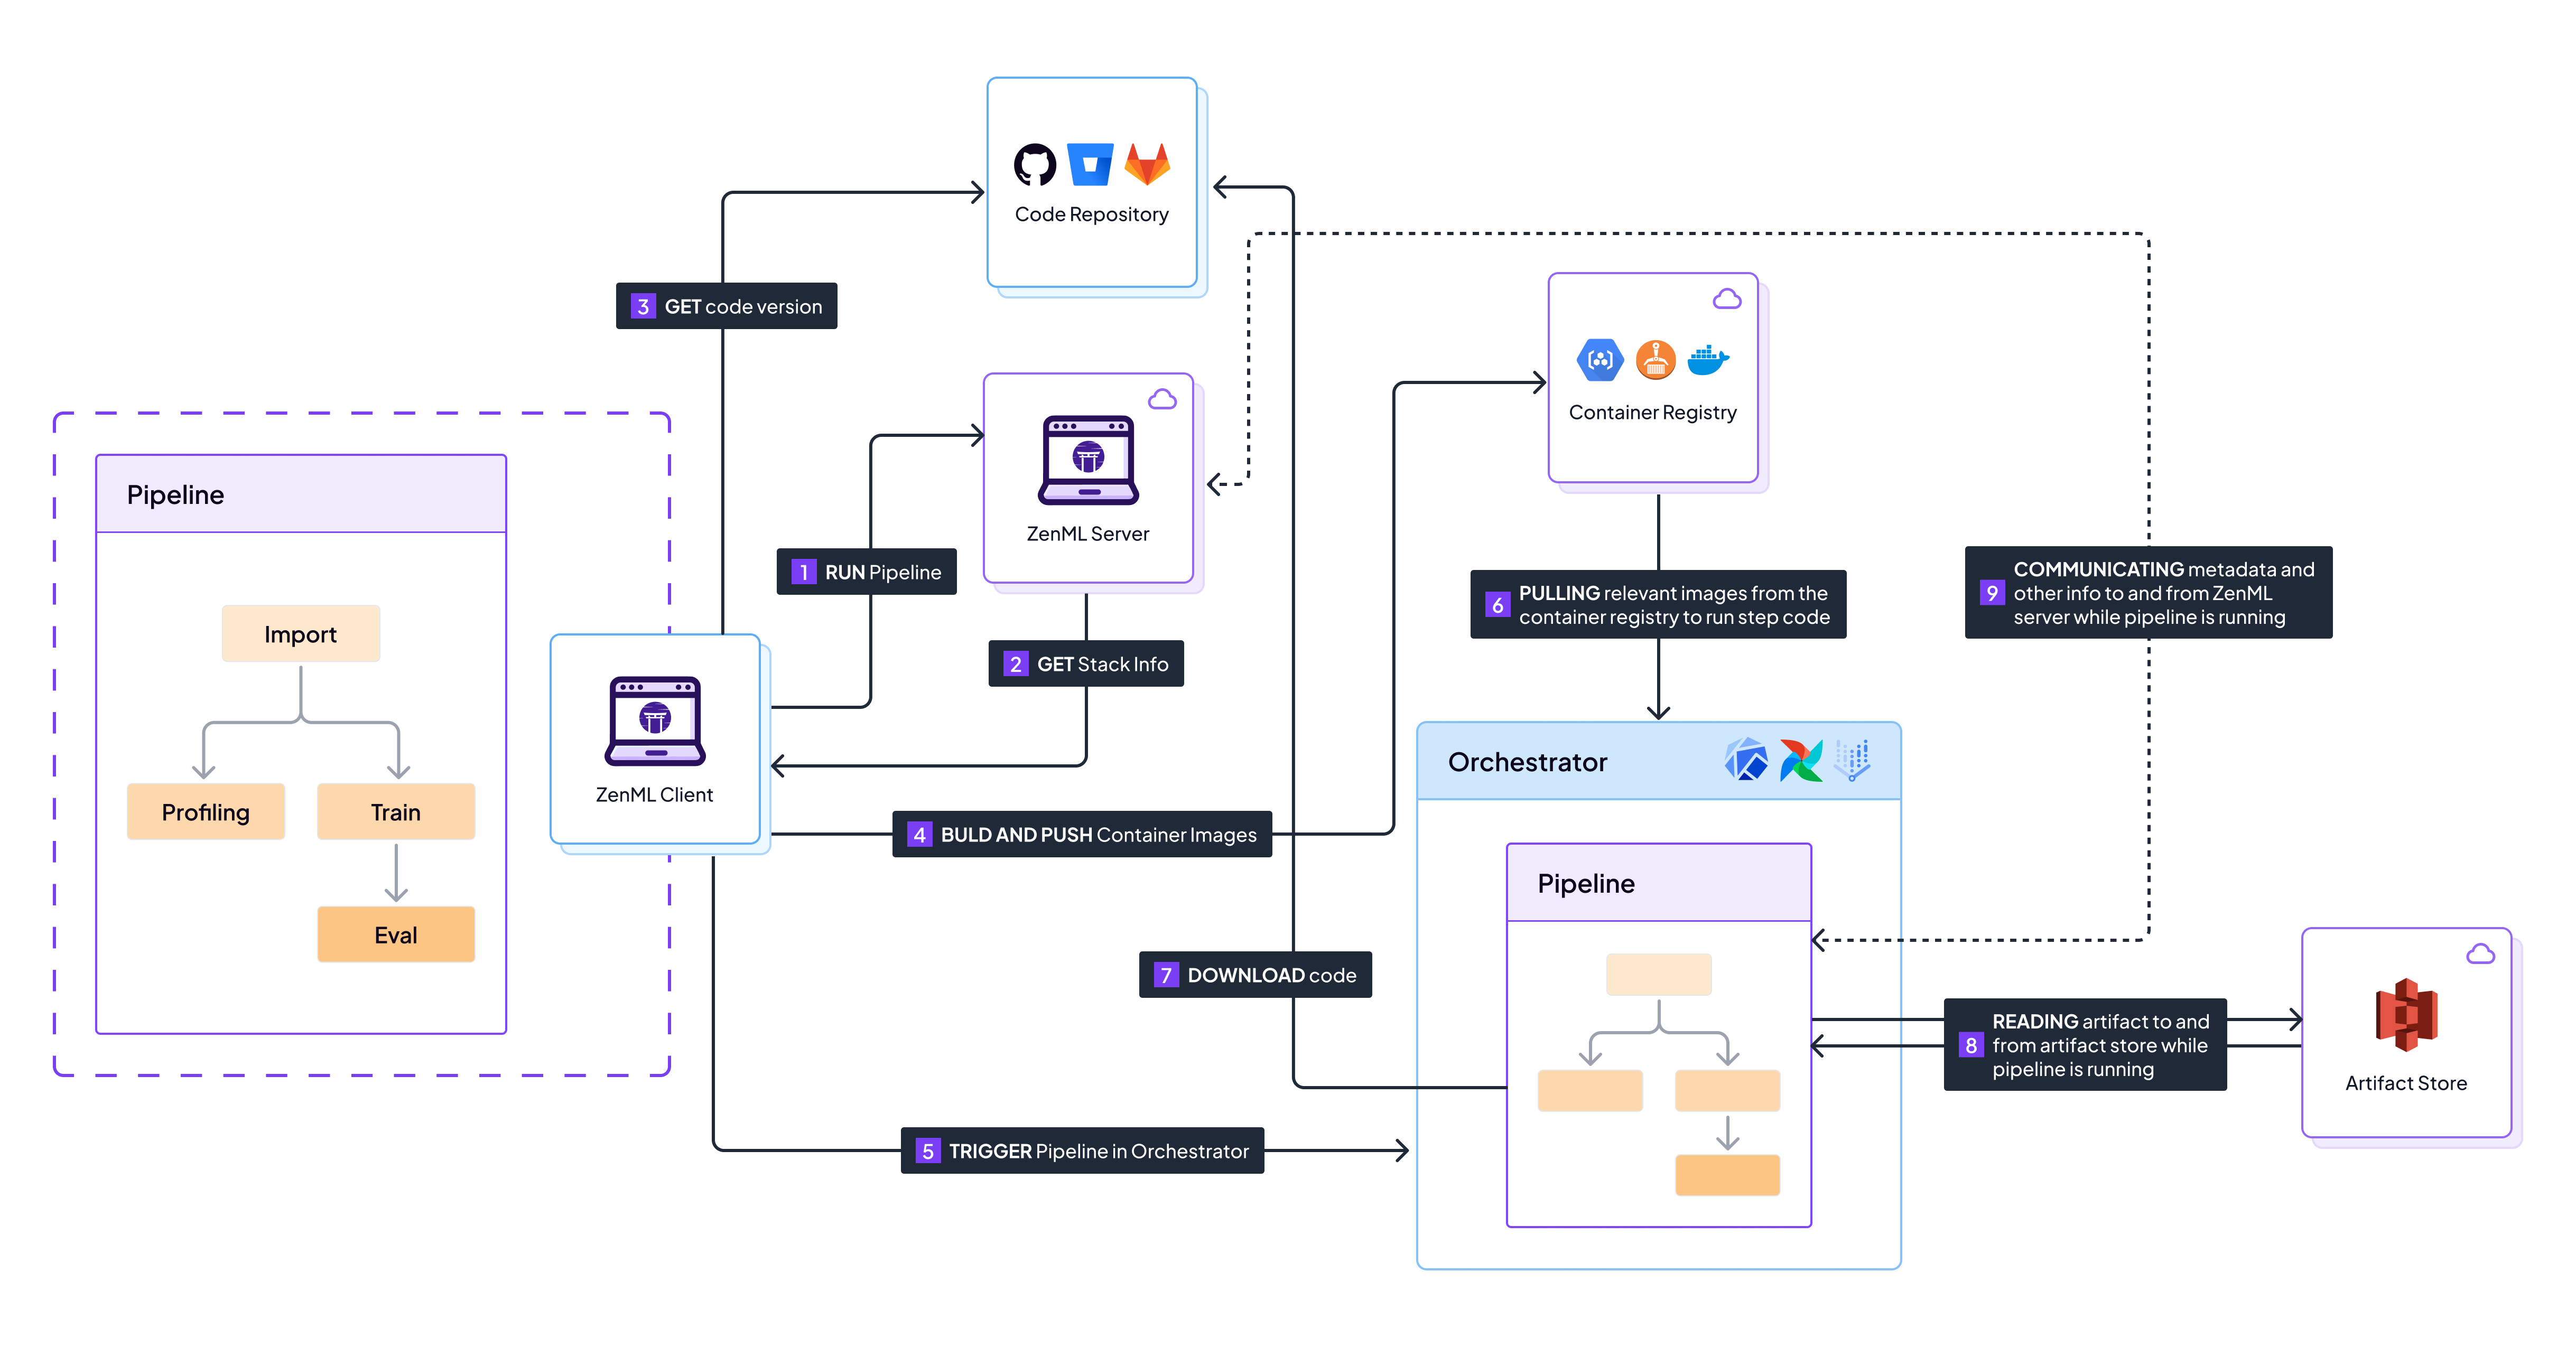
Sequence of events that happen when running a pipeline on a remote stack with a code repository