# Zapier
> ## Documentation Index
---
# Source: https://docs.zapier.com/platform/news/2025/4xx-errors-refreshAccessToken.md
> ## Documentation Index
> Fetch the complete documentation index at: https://docs.zapier.com/llms.txt
> Use this file to discover all available pages before exploring further.
# No more manual handling of 4xx errors in refreshAccessToken
> We now automatically handle 4xx error responses when refreshing OAuth2 access tokens.
*Effective: 2025-09-08*
We made a change to how we handle error responses when refreshing OAuth2 access tokens.
## Old behavior
When an app gives an error response (status code 4xx or 5xx) while refreshing the OAuth2 access token, Zapier keeps retrying the Zap step indefinitely or until it hits a certain limit, depending on the user's settings.
## New behavior
When an app encounter a 4xx error response (except for the ones listed below) while refreshing the access token, Zapier will mark the connect as stale, and send an email telling the user to reconnect.
Exceptions: The following 4xx errors often indicate a temporary issue so they still have the same behavior as before:
* 408 (Request Timeout)
* 409 (Conflict)
* 423 (Locked)
* 425 (Too Early)
* 429 (Too Many Requests)
This is how Zapier handles a stale connection:
* If the stale connection is used by a trigger step, the trigger polling system will skip polling when the scheduled time comes.
* If the stale connection is used by an action step, the Zap run will be put on hold until the user reconnects and replays the run.
## What does it mean to you?
You don't need to handle 4xx error responses in `refreshAccessToken` anymore. For example, you might have been catching 4xx errors in `refreshAccessToken` by enabling `skipThrowForStatus` and throwing `ExpiredAuthError`:
```js theme={null}
const refreshAccessToken = async (z, bundle) => {
const response = await z.request({
url: "https://example.com/token/refresh",
method: "POST",
body: {
refresh_token: bundle.authData.refresh_token,
client_id: process.env.CLIENT_ID,
client_secret: process.env.CLIENT_SECRET,
grant_type: "refresh_token",
},
headers: {
"Content-Type": "application/x-www-form-urlencoded",
},
skipThrowForStatus: true,
});
if (response.status >= 400 && response.status < 500) {
throw new z.errors.ExpiredAuthError(
"Authentication issue. Please reconnect.",
);
}
return response.data;
};
```
This is no longer necessary. Now you can simplify your code as follows and let the platform handle it:
```js theme={null}
const refreshAccessToken = async (z, bundle) => {
const response = await z.request({
url: "https://example.com/token/refresh",
method: "POST",
body: {
refresh_token: bundle.authData.refresh_token,
client_id: process.env.CLIENT_ID,
client_secret: process.env.CLIENT_SECRET,
grant_type: "refresh_token",
},
headers: {
"Content-Type": "application/x-www-form-urlencoded",
},
});
return response.data;
};
```
No need to upgrade zapier-platform-core; this change is implemented in the Zapier backend.
---
# Source: https://docs.zapier.com/CLAUDE.md
> ## Documentation Index
> Fetch the complete documentation index at: https://docs.zapier.com/llms.txt
> Use this file to discover all available pages before exploring further.
# null
# CLAUDE.md
This file provides guidance to Claude Code (claude.ai/code) when working with code in this repository.
## Project Overview
This is Zapier's public API documentation site built with Mintlify. The docs are structured as a monorepo containing documentation for multiple Zapier products and solutions:
* **Developer Platform** - Integration development tools and documentation
* **Powered by Zapier** - Embeddable workflow APIs and components
* **AI Actions** - AI-powered automation APIs
* **MCP** - Model Context Protocol integration
## Development Commands
### Local Development
```bash theme={null}
# Install dependencies
pnpm i
# Run locally
pnpm run dev
```
### Build and Quality Checks
```bash theme={null}
# Format TypeScript files
pnpm run format
# Compile TypeScript
pnpm run compile
# Full build process (format + compile + scriptify)
pnpm run build
# Check for broken links
pnpx mintlify broken-links
```
### Pre-commit Hook
The repository includes a TypeScript pre-commit hook (`pre-commit.ts`) that:
* Downloads and processes OpenAPI schemas
* Updates navigation configuration automatically
* Validates links and routes
* Ensures documentation consistency
## Project Structure
### Configuration Files
* `docs.json` - Main Mintlify configuration with navigation structure
* `package.json` - Node.js dependencies and scripts
* `tsconfig.json` - TypeScript compilation settings
* `ignore-endpoints` - Lists API endpoints to exclude from auto-generation
### Content Organization
* `ai-actions/` - AI Actions API documentation and guides
* `mcp/` - Model Context Protocol documentation
* `platform/` - Developer Platform docs (CLI, UI, reference)
* `powered-by-zapier/` - Embeddable workflows and APIs
* `images/` - Static image assets
* `snippets/` - Reusable content snippets
### Build Process
The pre-commit hook automatically:
1. Fetches OpenAPI schemas from configured endpoints
2. Generates Mintlify documentation pages
3. Updates navigation configuration in `docs.json`
4. Validates all internal links and routes
5. Filters out ignored endpoints per `ignore-endpoints` file
## Key Architecture Notes
* **Mintlify-based**: Uses Mintlify's documentation framework
* **Auto-generated API docs**: OpenAPI schemas are automatically converted to MDX pages
* **Multi-product structure**: Each major product has its own section with dedicated navigation
* **Validation pipeline**: Automated checks ensure documentation consistency and link validity
* **TypeScript tooling**: Build scripts and validation tools are written in TypeScript
## Working with Documentation
* All content files use `.mdx` format
* Navigation must be declared in `docs.json` to appear on the site
* New pages require adding entries to the navigation configuration
* API reference pages are auto-generated from OpenAPI schemas
* Images should be placed in the `images/` directory
* Use `snippets/` for content that needs to be reused across multiple pages
## Testing and Validation
* Run `mintlify dev` for local development server
* Use `pnpx mintlify broken-links` to check for broken internal links
* The pre-commit hook validates route configurations automatically
* Python script `check_redirects.py` can validate external links against localhost:3000
---
# Source: https://docs.zapier.com/powered-by-zapier/api-reference/common-types/action.md
# Source: https://docs.zapier.com/platform/build/action.md
> ## Documentation Index
> Fetch the complete documentation index at: https://docs.zapier.com/llms.txt
> Use this file to discover all available pages before exploring further.
# Action
> Every Zap starts with a single trigger that watches for new or updated data, starting the user's workflow. Action steps then make use of that data.
Zapier actions create or update a single item in your app through API calls that include multiple details from user customized [input fields](/platform/build/add-fields).
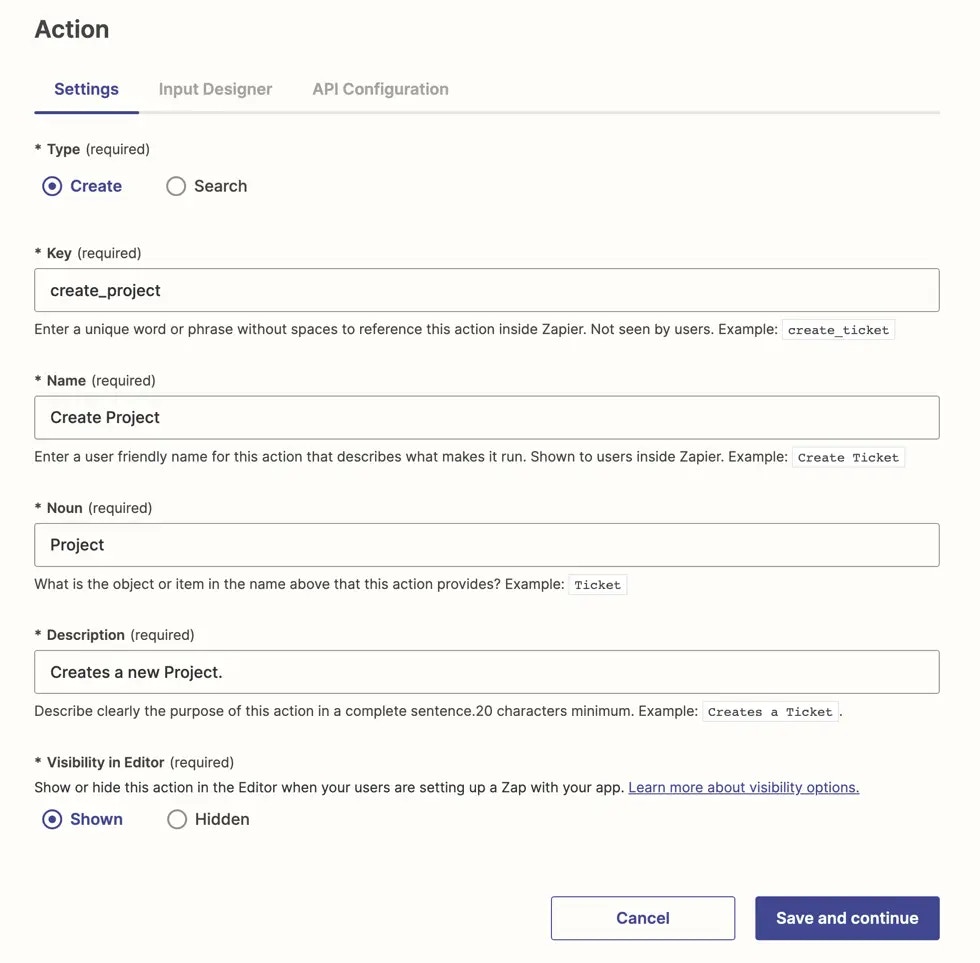 Zaps can have one or more actions.
There are two types of actions to select.
## 1. Create actions
Most Zapier integrations should at a minimum include create actions to let users add items to their app automatically. Common actions by app category [here](/platform/quickstart/must-have-triggers-and-actions) should be used for inspiration when building your app.
*Create* actions in Zaps can create new items in an app or update existing items. The output returned should be an object containing individual fields that will be parsed for mapping into subsequent Zap steps.
The [output returned](/platform/build/response-types) by a *create* should be an object containing individual fields about the item that was created such as IDs, details about the new item including a link if possible, and any other useful data about the record. Do not return just a `success` message.
Unsucessful actions should return `4xx` errors. If your API returns a `2xx` error, add custom code to your API call to replace it with a correct error.
Update actions should be separate from create actions.
Actions may create multiple items if needed, using the same data, though you will likely need to customize the API call code to create multiple items at once. Only do this for linked items, such as if an app stores customers and customer addresses separately. If the multiple items that need to be created are top-level, complex items in your app, they should be separate actions within Zapier. You can then link the two with a drop-down menu in the action to select the paired item, add a search action for users to find the specific item they need, and then let them match the items with the [*Use a Custom Value* option](https://help.zapier.com/hc/en-us/articles/8496241696141) in Zapier.
## 2. Search actions
*Search* actions find existing items in an app and can optionally be paired with *create* actions to [add a new item](/platform/build/search-or-create) if the search does not return a result.
Search actions let users do more with the data they've already added to your app; such as avoiding adding duplicate items or look up info about an item, for example weather, conversion, and contact lookup, to use in a subsequent step.
Most useful searches return one individual item that will likely be needed in another Zap step.
The [output returned](/platform/build/response-types) by a *search* should be a JSON-formatted array sorted with the best match first. Only the first item will be returned. For no match found, a `200` with an empty array must be returned. If your API returns a `404` error for searches without results, add custom code to your API call to replace it with an empty array.
## 3. Delete actions
Zapier recommends careful consideration of action steps that fully delete or remove data. To prevent data loss, action steps should only add or update data.
If you are considering adding a delete action to your app, consider alternative actions for items such as deactivating, unsubscribing, or canceling, instead of deleting items completely.
If you do add a delete action, make sure to include a `Copy` field to clarify to users that the action is irreversible once the API request is made.
***
*Need help? [Tell us about your problem](https://developer.zapier.com/contact) and we'll connect you with the right resource or contact support.*
---
# Source: https://docs.zapier.com/platform/manage/active-users.md
> ## Documentation Index
> Fetch the complete documentation index at: https://docs.zapier.com/llms.txt
> Use this file to discover all available pages before exploring further.
# Active users retention
> At Zapier, churn means a user used your integration in their Zaps 29 - 56 days ago, but hasn't run a successful task in one of those Zaps in the past 28 days. This user is considered to have churned from the integration. Maybe they switched to using a competing integration or their workflow had a more periodic or seasonal cadence.
But, it could also mean they got so frustrated with the experience of trying to get their Zap working and *keep* it working successfully - they turned it off, deleted it, and walked away.
Active users are the percentage of users who haven't churned.
## Key Zapier insights
Lowered active user retention rates don't necessarily mean poor integration health. Some apps lend themselves to use-cases with shorter lifespans than others. That said, spikes in churn rate not related to seasonal variations in usage could be indicators of a problem with something not functioning as expected.
Active user retention is not a leading indicator. In fact, it's quite a lagging one that may only start indicating a problem up to 28 days after it has been an issue. That doesn't deem it useless, we just have to know how to make full use of it.
## Best practices
Approaching active user retention with a long-term strategy can help maintain a consistently high level of retention:
* [Embed](https://platform.zapier.com/embed/overview) the Zapier experience with copy-and-paste and customizable code within your platform to provide automation value directly to users. Embeds have proven to [reduce churn](https://platform.zapier.com/partner_success_stories/all) on Partners' platforms. Learn about embedding options in the [guide](https://learn.zapier.com/surface-your-zapier-integration-within-your-app).
* [Share use cases](/platform/publish/partner-faq#tip-4-share-zapier-use-cases-in-your-onboarding) widely during your platform's onboarding process. Having multiple Zaps using your integration increases stickiness of users not only to the Zapier integration, but also to your platform.
* Update the integration regularly with features as your platform evolves. [Invite stakeholders to your integration](/platform/manage/add-team) to give them admin or read-only access to insights, metrics, and feedback to prioritize and align improvements.
***
*Need help? [Tell us about your problem](https://developer.zapier.com/contact) and we'll connect you with the right resource or contact support.*
---
# Source: https://docs.zapier.com/platform/build/add-fields.md
> ## Documentation Index
> Fetch the complete documentation index at: https://docs.zapier.com/llms.txt
> Use this file to discover all available pages before exploring further.
# Add input fields to triggers and actions
> When building in the Platform UI, you'll use the Input Designer to create the form users will input data into, to send to your app's API.
The Input Designer works similarly to other form builder tools, building a form that lives inside the Platform UI. Add fields to your form for each bit of data your app needs from users. Use the same name for items as used in your app's UI. Configure each field's settings, then reorder them to match the logical order users would add or view data in your app.
{" "}
Zaps can have one or more actions.
There are two types of actions to select.
## 1. Create actions
Most Zapier integrations should at a minimum include create actions to let users add items to their app automatically. Common actions by app category [here](/platform/quickstart/must-have-triggers-and-actions) should be used for inspiration when building your app.
*Create* actions in Zaps can create new items in an app or update existing items. The output returned should be an object containing individual fields that will be parsed for mapping into subsequent Zap steps.
The [output returned](/platform/build/response-types) by a *create* should be an object containing individual fields about the item that was created such as IDs, details about the new item including a link if possible, and any other useful data about the record. Do not return just a `success` message.
Unsucessful actions should return `4xx` errors. If your API returns a `2xx` error, add custom code to your API call to replace it with a correct error.
Update actions should be separate from create actions.
Actions may create multiple items if needed, using the same data, though you will likely need to customize the API call code to create multiple items at once. Only do this for linked items, such as if an app stores customers and customer addresses separately. If the multiple items that need to be created are top-level, complex items in your app, they should be separate actions within Zapier. You can then link the two with a drop-down menu in the action to select the paired item, add a search action for users to find the specific item they need, and then let them match the items with the [*Use a Custom Value* option](https://help.zapier.com/hc/en-us/articles/8496241696141) in Zapier.
## 2. Search actions
*Search* actions find existing items in an app and can optionally be paired with *create* actions to [add a new item](/platform/build/search-or-create) if the search does not return a result.
Search actions let users do more with the data they've already added to your app; such as avoiding adding duplicate items or look up info about an item, for example weather, conversion, and contact lookup, to use in a subsequent step.
Most useful searches return one individual item that will likely be needed in another Zap step.
The [output returned](/platform/build/response-types) by a *search* should be a JSON-formatted array sorted with the best match first. Only the first item will be returned. For no match found, a `200` with an empty array must be returned. If your API returns a `404` error for searches without results, add custom code to your API call to replace it with an empty array.
## 3. Delete actions
Zapier recommends careful consideration of action steps that fully delete or remove data. To prevent data loss, action steps should only add or update data.
If you are considering adding a delete action to your app, consider alternative actions for items such as deactivating, unsubscribing, or canceling, instead of deleting items completely.
If you do add a delete action, make sure to include a `Copy` field to clarify to users that the action is irreversible once the API request is made.
***
*Need help? [Tell us about your problem](https://developer.zapier.com/contact) and we'll connect you with the right resource or contact support.*
---
# Source: https://docs.zapier.com/platform/manage/active-users.md
> ## Documentation Index
> Fetch the complete documentation index at: https://docs.zapier.com/llms.txt
> Use this file to discover all available pages before exploring further.
# Active users retention
> At Zapier, churn means a user used your integration in their Zaps 29 - 56 days ago, but hasn't run a successful task in one of those Zaps in the past 28 days. This user is considered to have churned from the integration. Maybe they switched to using a competing integration or their workflow had a more periodic or seasonal cadence.
But, it could also mean they got so frustrated with the experience of trying to get their Zap working and *keep* it working successfully - they turned it off, deleted it, and walked away.
Active users are the percentage of users who haven't churned.
## Key Zapier insights
Lowered active user retention rates don't necessarily mean poor integration health. Some apps lend themselves to use-cases with shorter lifespans than others. That said, spikes in churn rate not related to seasonal variations in usage could be indicators of a problem with something not functioning as expected.
Active user retention is not a leading indicator. In fact, it's quite a lagging one that may only start indicating a problem up to 28 days after it has been an issue. That doesn't deem it useless, we just have to know how to make full use of it.
## Best practices
Approaching active user retention with a long-term strategy can help maintain a consistently high level of retention:
* [Embed](https://platform.zapier.com/embed/overview) the Zapier experience with copy-and-paste and customizable code within your platform to provide automation value directly to users. Embeds have proven to [reduce churn](https://platform.zapier.com/partner_success_stories/all) on Partners' platforms. Learn about embedding options in the [guide](https://learn.zapier.com/surface-your-zapier-integration-within-your-app).
* [Share use cases](/platform/publish/partner-faq#tip-4-share-zapier-use-cases-in-your-onboarding) widely during your platform's onboarding process. Having multiple Zaps using your integration increases stickiness of users not only to the Zapier integration, but also to your platform.
* Update the integration regularly with features as your platform evolves. [Invite stakeholders to your integration](/platform/manage/add-team) to give them admin or read-only access to insights, metrics, and feedback to prioritize and align improvements.
***
*Need help? [Tell us about your problem](https://developer.zapier.com/contact) and we'll connect you with the right resource or contact support.*
---
# Source: https://docs.zapier.com/platform/build/add-fields.md
> ## Documentation Index
> Fetch the complete documentation index at: https://docs.zapier.com/llms.txt
> Use this file to discover all available pages before exploring further.
# Add input fields to triggers and actions
> When building in the Platform UI, you'll use the Input Designer to create the form users will input data into, to send to your app's API.
The Input Designer works similarly to other form builder tools, building a form that lives inside the Platform UI. Add fields to your form for each bit of data your app needs from users. Use the same name for items as used in your app's UI. Configure each field's settings, then reorder them to match the logical order users would add or view data in your app.
{" "}
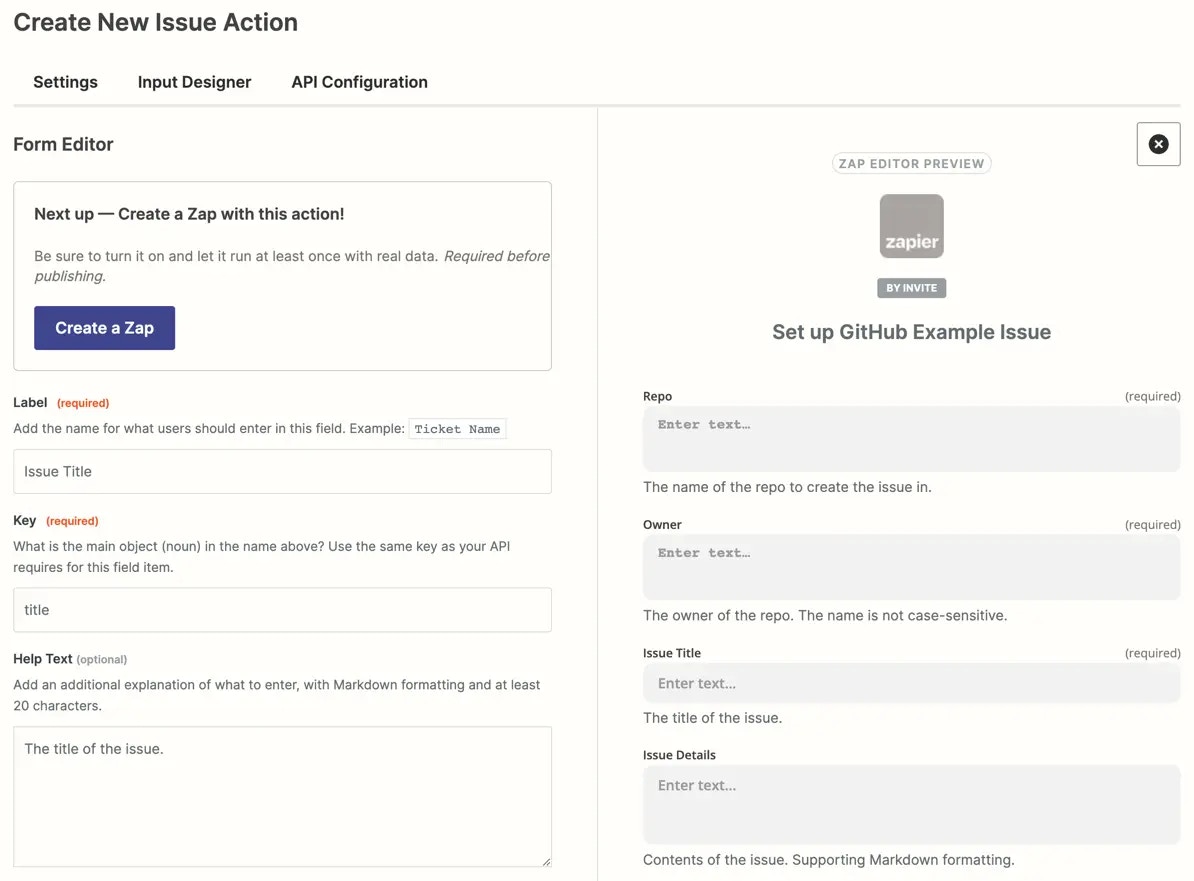 {" "}
Actions require an input form, as they always need a way for users to send data to your app's API to find, update, or create a new object. An input form is optional for triggers.
In this guide we will cover:
* Add an input field to a trigger or action
* Set field options
* Reorder input fields
* Remove input fields
## Add an input field to a trigger or action
1. Log into the [Platform UI](https://zapier.com/app/developer).
2. Select your **integration**.
3. In the *Build* section in the left sidebar, click on your **trigger** or **action**.
4. Click the **Input Designer** tab.
5. For triggers, click **Add User Input Field**. For actions, click **Add** and select **Input Field**.
6. In the Form editor, add in details about your input field:
* **Key**: A unique identifier for the field, without spaces, ideally with the same key as your API, such as `first_name`.
* **Label**: A user friendly name for the field, such as `First Name`.
* **Help Text**: (optional) A 20 character or longer description that appears under the field label, with [Markdown](https://zapier.com/blog/beginner-ultimate-guide-markdown/) formatting. Do not include redundant help text in input fields that repeats the name of the field. Use field help text to tell users what to do, for example “Choose the directory to watch for new files”. Always use active voice.
* **Type**: From the dropdown menu, select type of data you want user's to enter. Learn more in [field definitions and types](/platform/build/field-definitions):
* String
* Text
* Integer
* Number
* Boolean
* DateTime
* Password
* Dictionary
* **Default Text**: (optional) Value to include in the field if the user leaves it blank; only include if this value would work for API requests made to every user's account.
* **Options** (optional):
* Select the **Required** checkbox to make it mandatory for users to add data into this input field.
* Select **Allows Multiples** checkbox if you want users to add multiple enteries into the same input field.
* Select **Alters Dynamic Fields** to have Zapier automatically recompute any dynamic fields any time this field is changed.
* Select **Dropdown** 7. Once you've finished adding details for your input field, click **Save**.
## Setting field options
### Required
An email app like MailChimp requires an email address to add a new email subscription, and a calendar app like Google Calendar requires an event title, date, and time to add new events.
Check the *Required* option on those fields if your trigger or action step requires any data to make the API request. Zapier will show a red `(required)` label beside the field name in the Zap editor, and will not let users complete the Zap step without adding data to that field.
{" "}
{" "}
Actions require an input form, as they always need a way for users to send data to your app's API to find, update, or create a new object. An input form is optional for triggers.
In this guide we will cover:
* Add an input field to a trigger or action
* Set field options
* Reorder input fields
* Remove input fields
## Add an input field to a trigger or action
1. Log into the [Platform UI](https://zapier.com/app/developer).
2. Select your **integration**.
3. In the *Build* section in the left sidebar, click on your **trigger** or **action**.
4. Click the **Input Designer** tab.
5. For triggers, click **Add User Input Field**. For actions, click **Add** and select **Input Field**.
6. In the Form editor, add in details about your input field:
* **Key**: A unique identifier for the field, without spaces, ideally with the same key as your API, such as `first_name`.
* **Label**: A user friendly name for the field, such as `First Name`.
* **Help Text**: (optional) A 20 character or longer description that appears under the field label, with [Markdown](https://zapier.com/blog/beginner-ultimate-guide-markdown/) formatting. Do not include redundant help text in input fields that repeats the name of the field. Use field help text to tell users what to do, for example “Choose the directory to watch for new files”. Always use active voice.
* **Type**: From the dropdown menu, select type of data you want user's to enter. Learn more in [field definitions and types](/platform/build/field-definitions):
* String
* Text
* Integer
* Number
* Boolean
* DateTime
* Password
* Dictionary
* **Default Text**: (optional) Value to include in the field if the user leaves it blank; only include if this value would work for API requests made to every user's account.
* **Options** (optional):
* Select the **Required** checkbox to make it mandatory for users to add data into this input field.
* Select **Allows Multiples** checkbox if you want users to add multiple enteries into the same input field.
* Select **Alters Dynamic Fields** to have Zapier automatically recompute any dynamic fields any time this field is changed.
* Select **Dropdown** 7. Once you've finished adding details for your input field, click **Save**.
## Setting field options
### Required
An email app like MailChimp requires an email address to add a new email subscription, and a calendar app like Google Calendar requires an event title, date, and time to add new events.
Check the *Required* option on those fields if your trigger or action step requires any data to make the API request. Zapier will show a red `(required)` label beside the field name in the Zap editor, and will not let users complete the Zap step without adding data to that field.
{" "}
 {" "}
Include a description on required fields to let users know exactly what type of data they should add to this field. Never mark fields as required if the integration could work without them.
### Allows multiples
If users could add multiple entries in the same field, check the *Allows Multiples* option.
{" "}
{" "}
Include a description on required fields to let users know exactly what type of data they should add to this field. Never mark fields as required if the integration could work without them.
### Allows multiples
If users could add multiple entries in the same field, check the *Allows Multiples* option.
{" "}
 {" "}
That will add another entry row to allow the user to input another entry for that field. An [array containing a comma separated list of entries](/images/95938b473edfee13663161ee3c8e5ea4.webp) is sent in the API request. Never ask users to type in a comma separated list, rather use this functionality.
### Alters dynamic fields
For each [dynamic field](/platform/build/dynamic-field) in your integration, Zapier runs code to decide whether to show a field or what to show in a field.
Check the *Alters Dynamic Fields* option, to have Zapier automatically recompute any dynamic fields in your Zapier integration anytime this field is changed. Do not check the *Alters Dynamic Fields* option unless the field is needed for your integrations' dynamic fields.
{" "}
{" "}
That will add another entry row to allow the user to input another entry for that field. An [array containing a comma separated list of entries](/images/95938b473edfee13663161ee3c8e5ea4.webp) is sent in the API request. Never ask users to type in a comma separated list, rather use this functionality.
### Alters dynamic fields
For each [dynamic field](/platform/build/dynamic-field) in your integration, Zapier runs code to decide whether to show a field or what to show in a field.
Check the *Alters Dynamic Fields* option, to have Zapier automatically recompute any dynamic fields in your Zapier integration anytime this field is changed. Do not check the *Alters Dynamic Fields* option unless the field is needed for your integrations' dynamic fields.
{" "}
 {" "}
Only dropdowns support *Alters Dynamic Fields*.
### Dropdown
#### Static Dropdown
To offer users pre-set options to choose from in a field, set your field type as `String`, then check the *Dropdown* option.
{" "}
{" "}
Only dropdowns support *Alters Dynamic Fields*.
### Dropdown
#### Static Dropdown
To offer users pre-set options to choose from in a field, set your field type as `String`, then check the *Dropdown* option.
{" "}
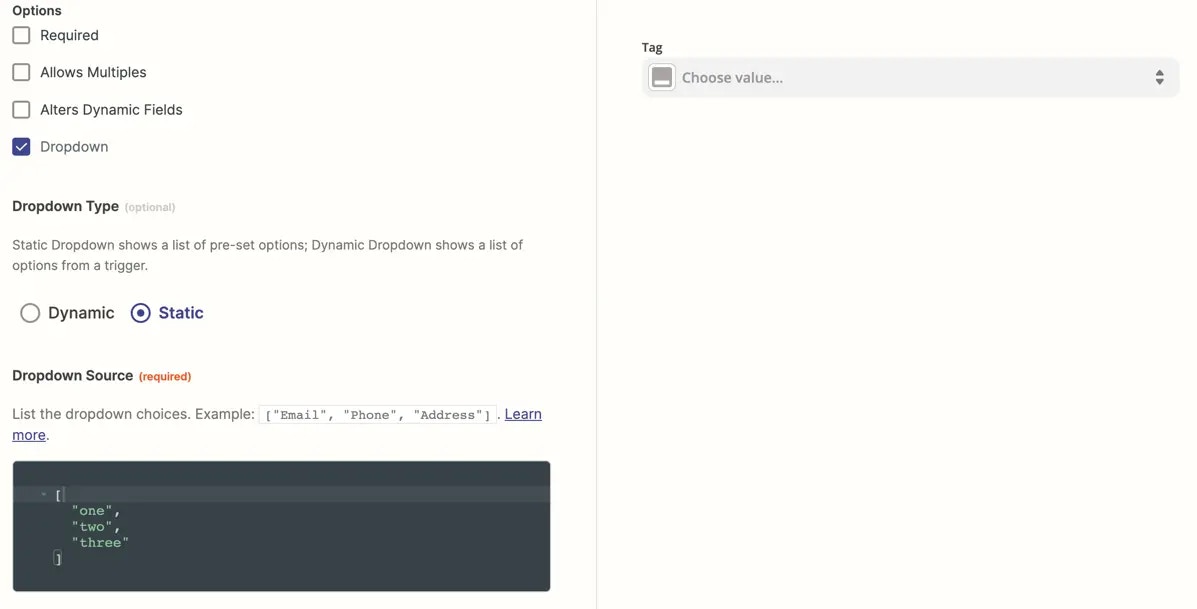 {" "}
You'll see the default *Static* selected, or *Dynamic*. To add a Static menu of choices, type the options in a comma separated list, with quotes around each item and square brackets around the set, such as:
`["one", "two","three"]`
Enter the fields as used in your API, as Zapier will pass the exact value users select to your app. Zapier will capitalize each item in your dropdown menu in the Zap Editor, and will add spaces instead of any underscores, so an option like `first_name` would show in the menu as `First Name` to users.
**Static Dropdown with Key Value Pairs**
If your API requires different values for the field than the text you want to show to users inside the dropdown menu in Zapier, make a key value pair that includes the value to send to your API, the sample value to show users ([should be the same as the value](https://github.com/zapier/zapier-platform/blob/master/packages/schema/docs/build/schema.md#fieldchoicewithlabelschema)), and a user-friendly label.
{" "}
{" "}
You'll see the default *Static* selected, or *Dynamic*. To add a Static menu of choices, type the options in a comma separated list, with quotes around each item and square brackets around the set, such as:
`["one", "two","three"]`
Enter the fields as used in your API, as Zapier will pass the exact value users select to your app. Zapier will capitalize each item in your dropdown menu in the Zap Editor, and will add spaces instead of any underscores, so an option like `first_name` would show in the menu as `First Name` to users.
**Static Dropdown with Key Value Pairs**
If your API requires different values for the field than the text you want to show to users inside the dropdown menu in Zapier, make a key value pair that includes the value to send to your API, the sample value to show users ([should be the same as the value](https://github.com/zapier/zapier-platform/blob/master/packages/schema/docs/build/schema.md#fieldchoicewithlabelschema)), and a user-friendly label.
{" "}
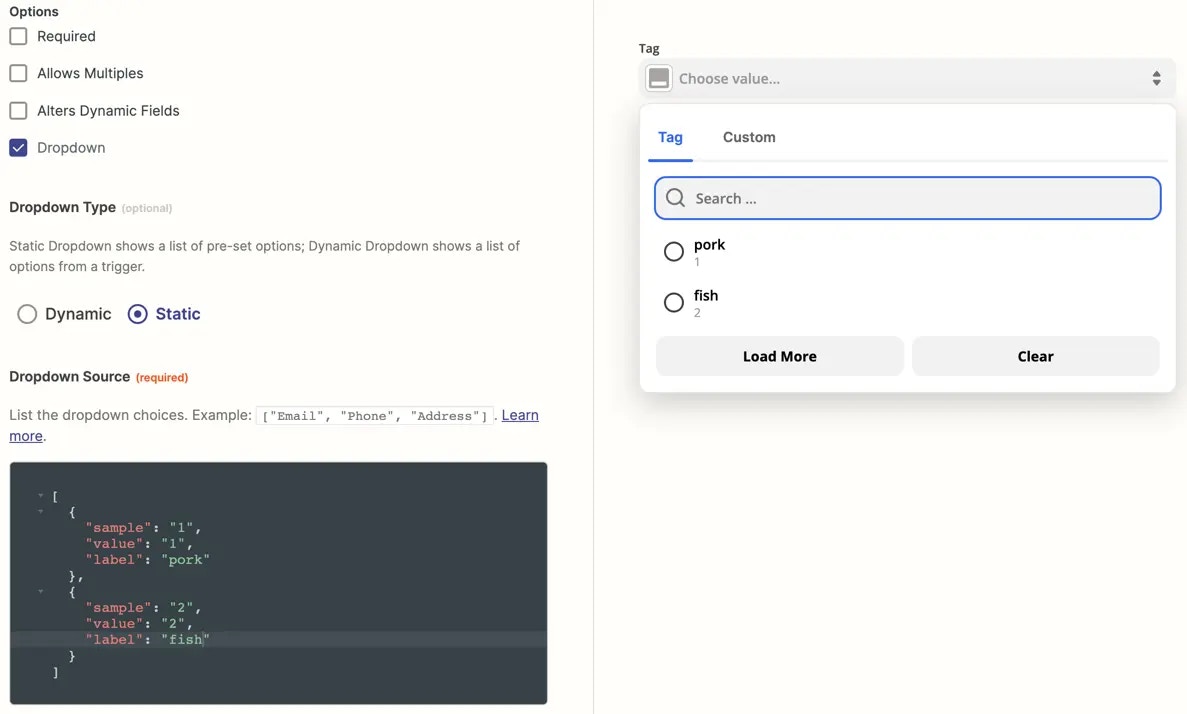 {" "}
To do that, add each menu item inside an object (curly brackets); with the sample, value, and label comma separated. List the item first and the value second, both wrapped in quotes. Separate each menu item with commas, and wrap the whole set in an array (square brackets).
For example, if your API expects a value of `1` or `2`, but `1` actually means `pork` and `2` actually means `fish` to a user, you could use the following code to add the dropdown menu pictured:
```JSON theme={null}
[
{
"sample": "1",
"value": "1",
"label": "Pork"
},
{
"sample": "2",
"value": "2",
"label": "Fish"
}
]
```
Alternatively, you can also use the syntax of `value:label`, which shows to users as follows:
{" "}
{" "}
To do that, add each menu item inside an object (curly brackets); with the sample, value, and label comma separated. List the item first and the value second, both wrapped in quotes. Separate each menu item with commas, and wrap the whole set in an array (square brackets).
For example, if your API expects a value of `1` or `2`, but `1` actually means `pork` and `2` actually means `fish` to a user, you could use the following code to add the dropdown menu pictured:
```JSON theme={null}
[
{
"sample": "1",
"value": "1",
"label": "Pork"
},
{
"sample": "2",
"value": "2",
"label": "Fish"
}
]
```
Alternatively, you can also use the syntax of `value:label`, which shows to users as follows:
{" "}
 {" "}
{" "}
{" "}
{" "}
 {" "}
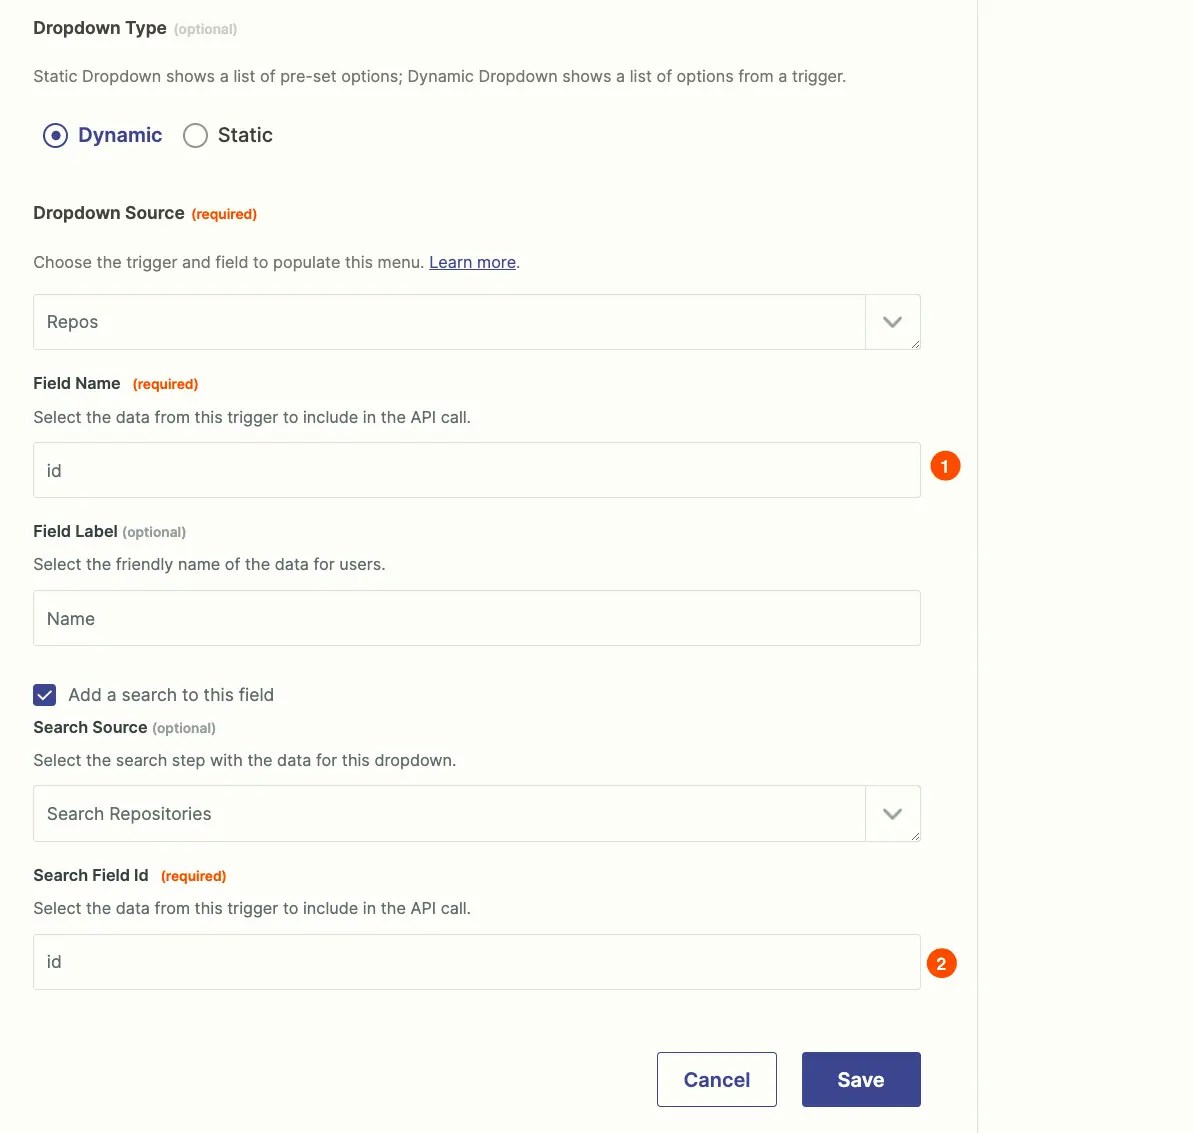
#### Dynamic Dropdown
If users need to select data from their account in your app — such as a project, folder, team member, or other user-specific detail with a corresponding ID — then you would use a dynamic dropdown. For dynamic dropdowns, Zapier first fetches data from your API and then displays it in a menu. Never make users type in an ID number, rather use this functionality or [add a search action](/platform/build/search) to find the ID number automatically.
The best way to make a dynamic dropdown is to use a dedicated trigger to fetch the values for the menu.
**1. Build a trigger to fetch dynamic dropdown data**
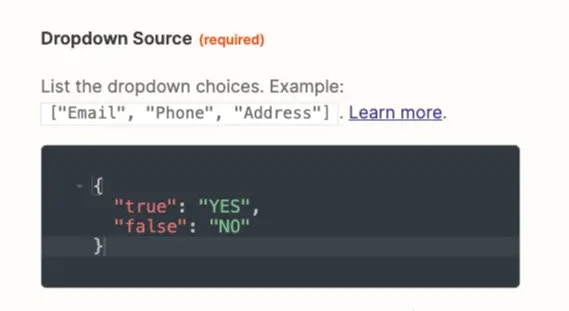
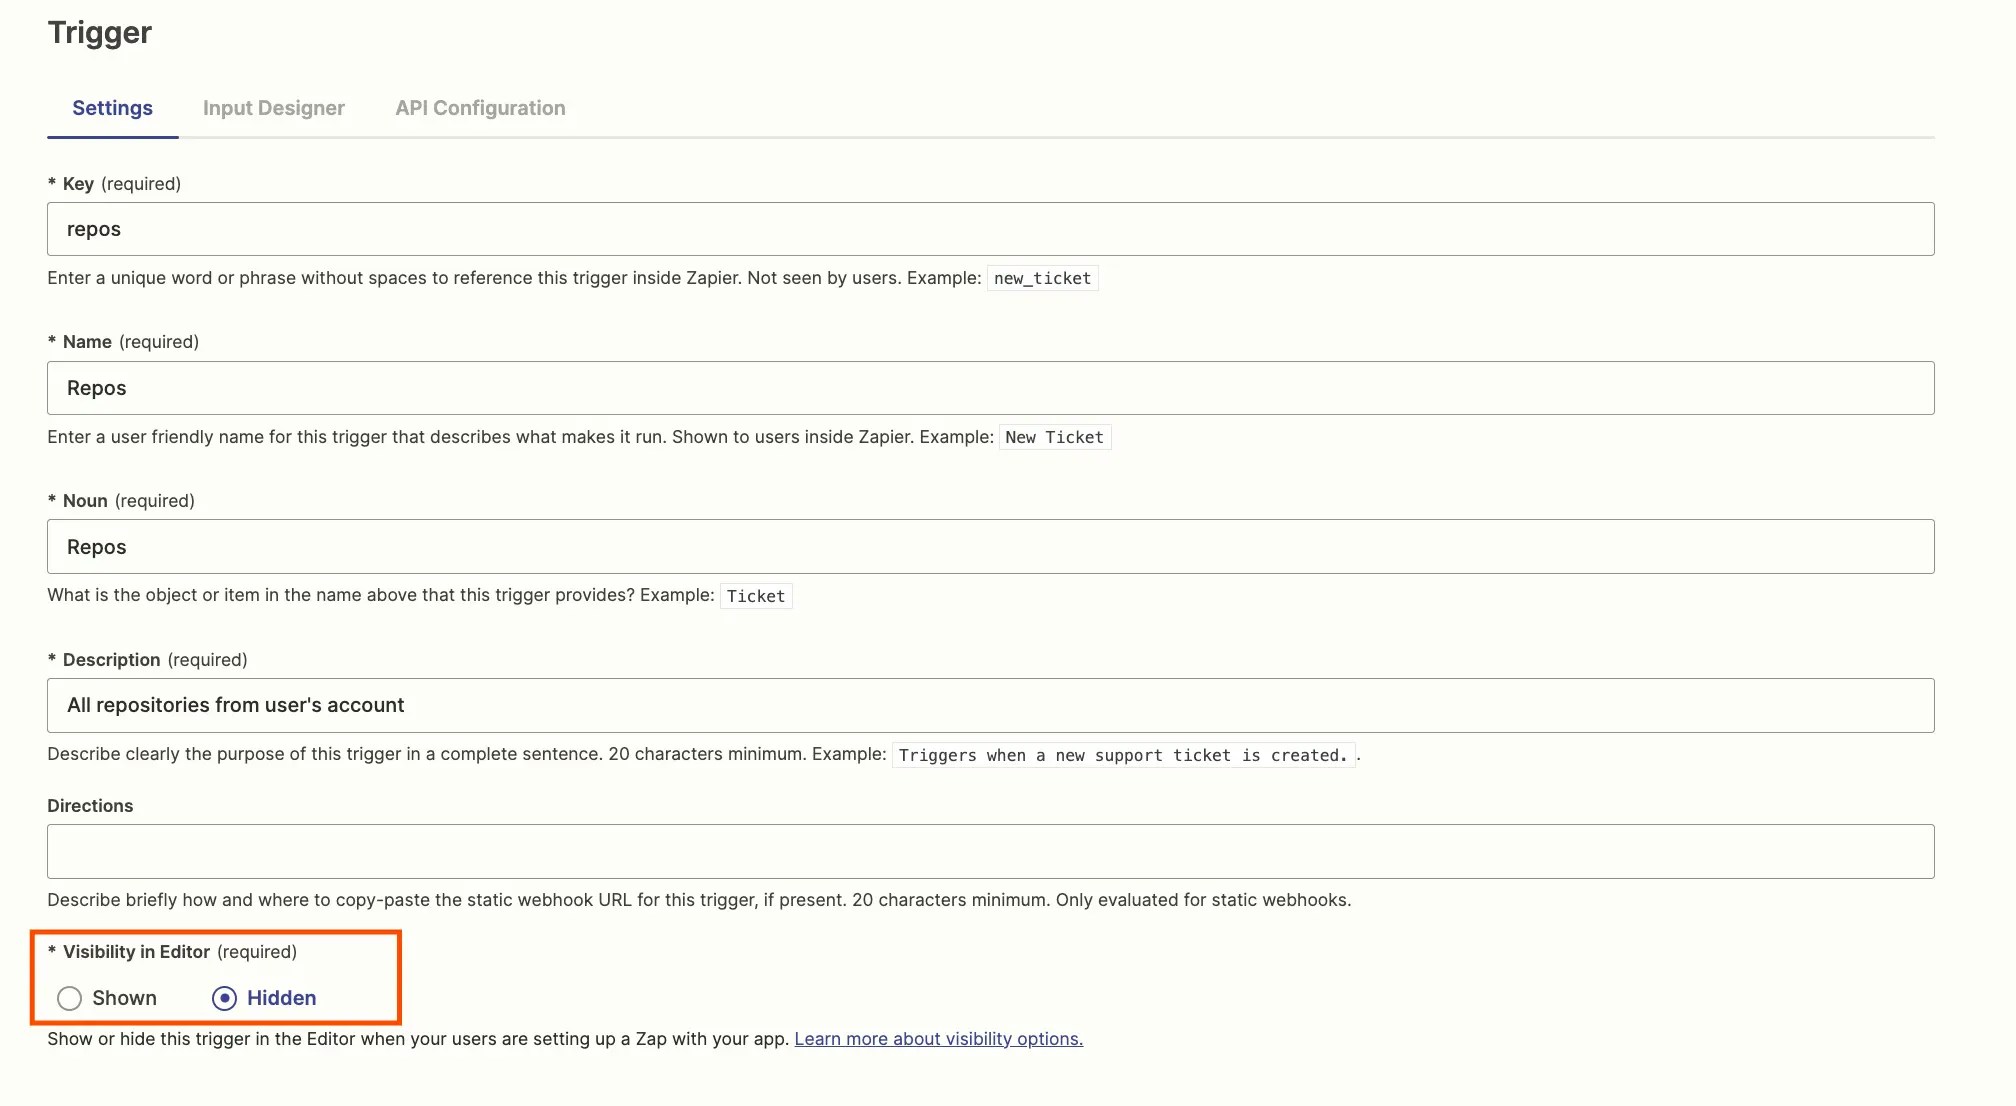
Create a new trigger, with a key, name, and noun. This trigger is usually configured to not be seen by users but you may wish to include a description for your internal team's awareness. In the *Visibility in Editor* field, select `Hidden` to hide this trigger from your app's trigger list in Zapier.
{" "}
{" "}
#### Dynamic Dropdown
If users need to select data from their account in your app — such as a project, folder, team member, or other user-specific detail with a corresponding ID — then you would use a dynamic dropdown. For dynamic dropdowns, Zapier first fetches data from your API and then displays it in a menu. Never make users type in an ID number, rather use this functionality or [add a search action](/platform/build/search) to find the ID number automatically.
The best way to make a dynamic dropdown is to use a dedicated trigger to fetch the values for the menu.
**1. Build a trigger to fetch dynamic dropdown data**
Create a new trigger, with a key, name, and noun. This trigger is usually configured to not be seen by users but you may wish to include a description for your internal team's awareness. In the *Visibility in Editor* field, select `Hidden` to hide this trigger from your app's trigger list in Zapier.
{" "}
 {" "}
You can also use an existing, visible trigger to power a dynamic dropdown if applicable.
Skip the *Input Designer* tab, as the dynamic dropdown cannot require any user input.
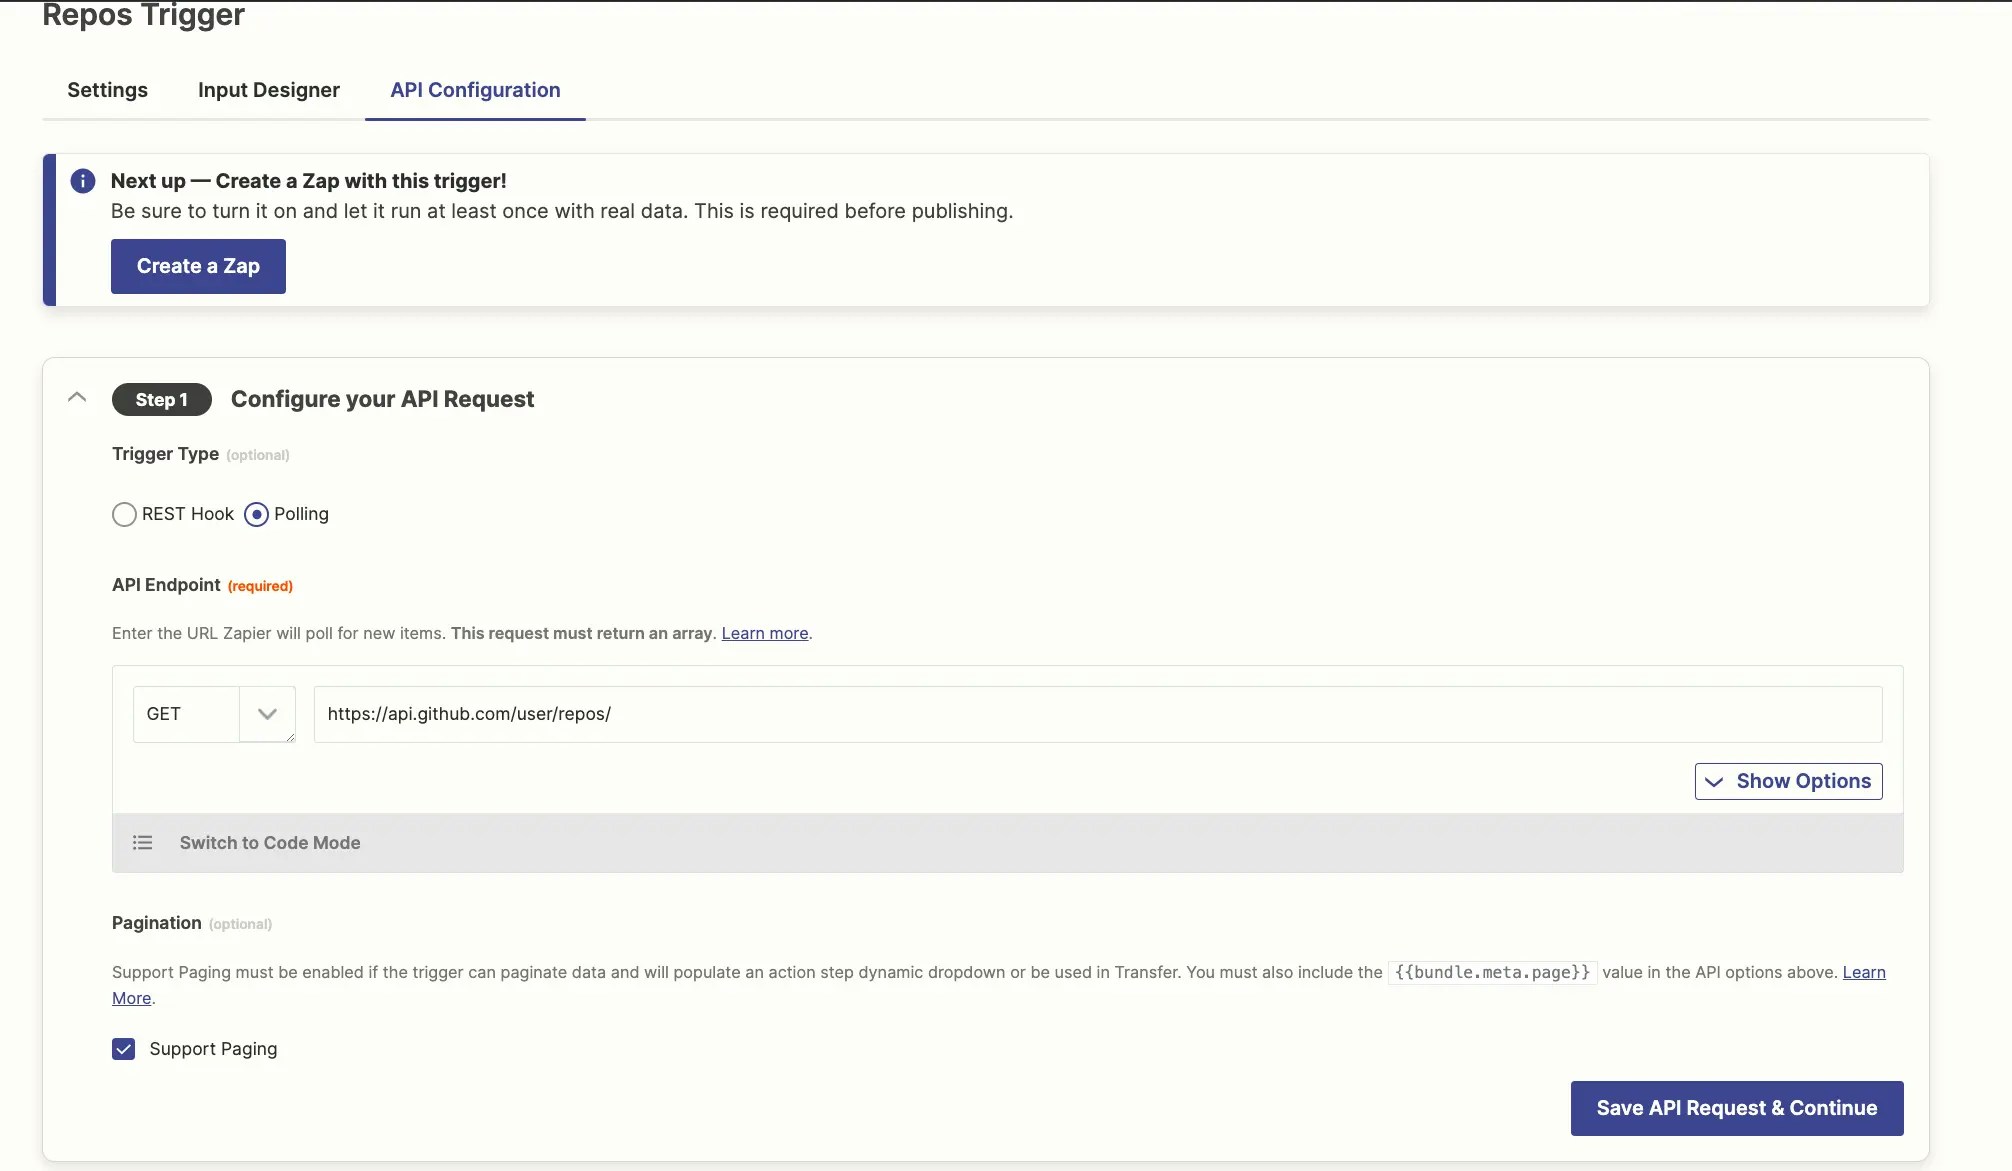
Select the *API Configuration* tab, and add the API call where Zapier can fetch the data from your API. For standard Zapier triggers, you would use an API call that fetches new or updated items. For dynamic dropdowns, instead use an API call that pulls in a list of the items that the user can select from.
{" "}
{" "}
You can also use an existing, visible trigger to power a dynamic dropdown if applicable.
Skip the *Input Designer* tab, as the dynamic dropdown cannot require any user input.
Select the *API Configuration* tab, and add the API call where Zapier can fetch the data from your API. For standard Zapier triggers, you would use an API call that fetches new or updated items. For dynamic dropdowns, instead use an API call that pulls in a list of the items that the user can select from.
{" "}
 {" "}
API calls will usually require additional configuration to pull in data in the order that makes most sense in your menu. You may want to sort options in the order they were added or updated, or want to have the API fetch more items at once than the default. Set these parameters from the *Show Options* menu.
{" "}
{" "}
API calls will usually require additional configuration to pull in data in the order that makes most sense in your menu. You may want to sort options in the order they were added or updated, or want to have the API fetch more items at once than the default. Set these parameters from the *Show Options* menu.
{" "}
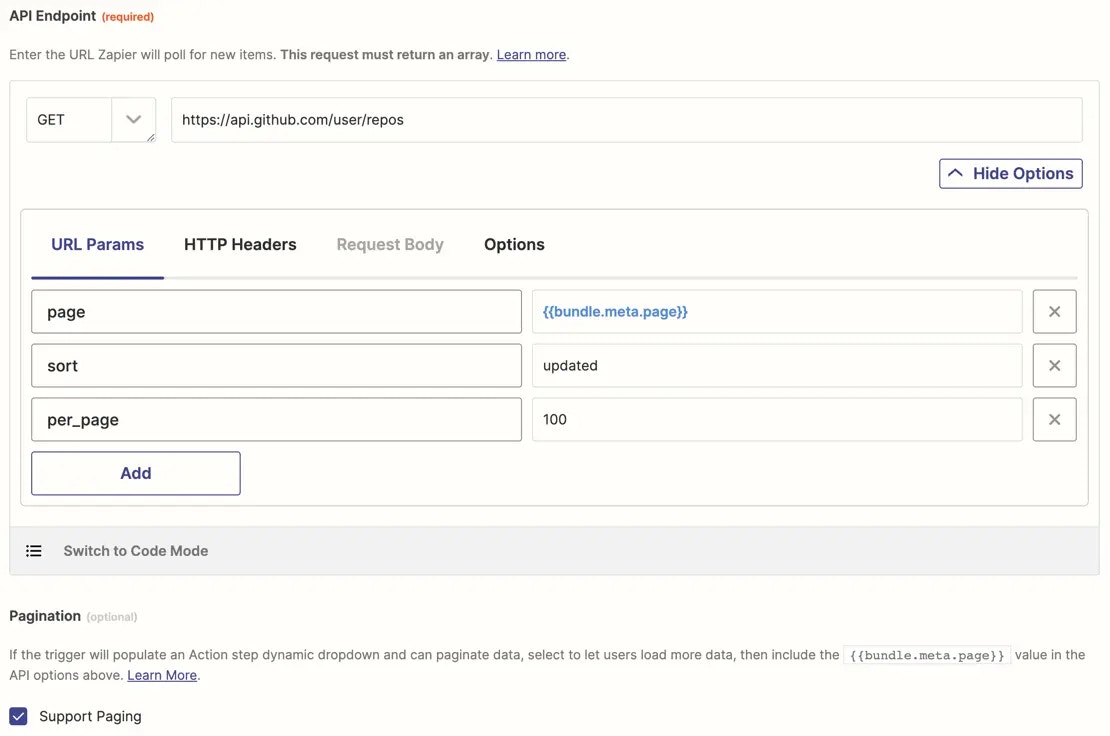 {" "}
If your API supports pagination, you can allow users to load additional data in
the menu by checking the *Support Paging* box. The first API call might pull in
20 items; if the user requests additional items, Zapier would call the API again
and request the second page for the next 20 items. *per\_page* and *limit* are
common parameters to indicate how many items to pull (controlling the page
size). Confirm which parameter to use from your API's documentation.
Customize the pagination using [Code Mode](/platform/build/code-mode). Learn more about [how to use pagination in triggers](/platform/build/trigger#how-to-use-pagination).
Zapier shows the data in the dropdown menu in the order your API sends it to Zapier. If your API sends the data in alphabetical order, or numerical order, it will show as such in your drop-down menu. If your API call supports sorting, include the sorting parameter in your API call that would return data in the order you want it to show in your drop-down.
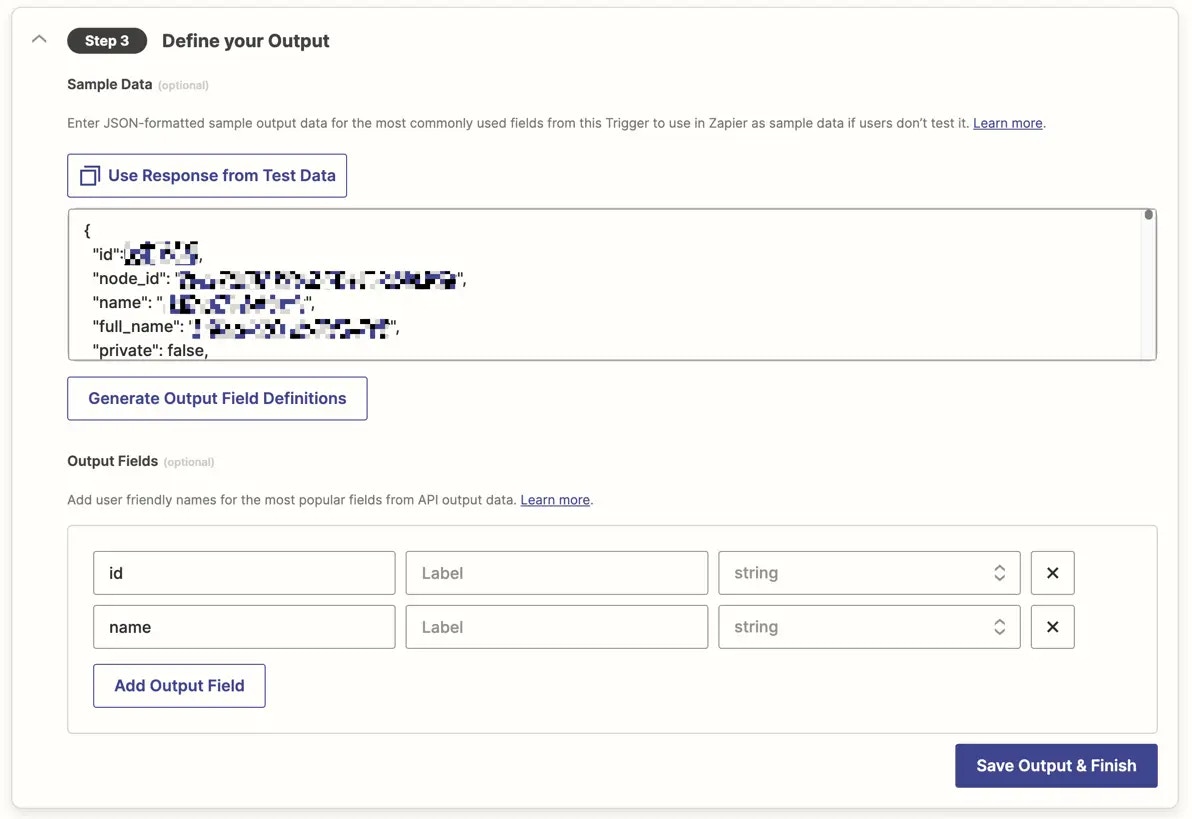
Define the fields from this hidden trigger that you need to use in the dynamic dropdown input field. To do so, test your trigger and identify the output fields needed, adding them to the *Output Fields* list at the end of your settings page. Include at least a field with the data that Zapier needs to send to your API in the action (for example `id`), along with a field that includes a user-friendly `name` for the data in that field.
{" "}
{" "}
If your API supports pagination, you can allow users to load additional data in
the menu by checking the *Support Paging* box. The first API call might pull in
20 items; if the user requests additional items, Zapier would call the API again
and request the second page for the next 20 items. *per\_page* and *limit* are
common parameters to indicate how many items to pull (controlling the page
size). Confirm which parameter to use from your API's documentation.
Customize the pagination using [Code Mode](/platform/build/code-mode). Learn more about [how to use pagination in triggers](/platform/build/trigger#how-to-use-pagination).
Zapier shows the data in the dropdown menu in the order your API sends it to Zapier. If your API sends the data in alphabetical order, or numerical order, it will show as such in your drop-down menu. If your API call supports sorting, include the sorting parameter in your API call that would return data in the order you want it to show in your drop-down.
Define the fields from this hidden trigger that you need to use in the dynamic dropdown input field. To do so, test your trigger and identify the output fields needed, adding them to the *Output Fields* list at the end of your settings page. Include at least a field with the data that Zapier needs to send to your API in the action (for example `id`), along with a field that includes a user-friendly `name` for the data in that field.
{" "}
 {" "}
**2. Add an input field with dynamic fields**
To use the data from the hidden trigger you've configured, add a new input field to the trigger/action you're working on, and set the label, key, and other details as normal. Check the *Dropdown* box and select the *Dynamic* toggle. Choose the hidden trigger you've configured for this menu in the *Dropdown Source* option.
{" "}
{" "}
**2. Add an input field with dynamic fields**
To use the data from the hidden trigger you've configured, add a new input field to the trigger/action you're working on, and set the label, key, and other details as normal. Check the *Dropdown* box and select the *Dynamic* toggle. Choose the hidden trigger you've configured for this menu in the *Dropdown Source* option.
{" "}
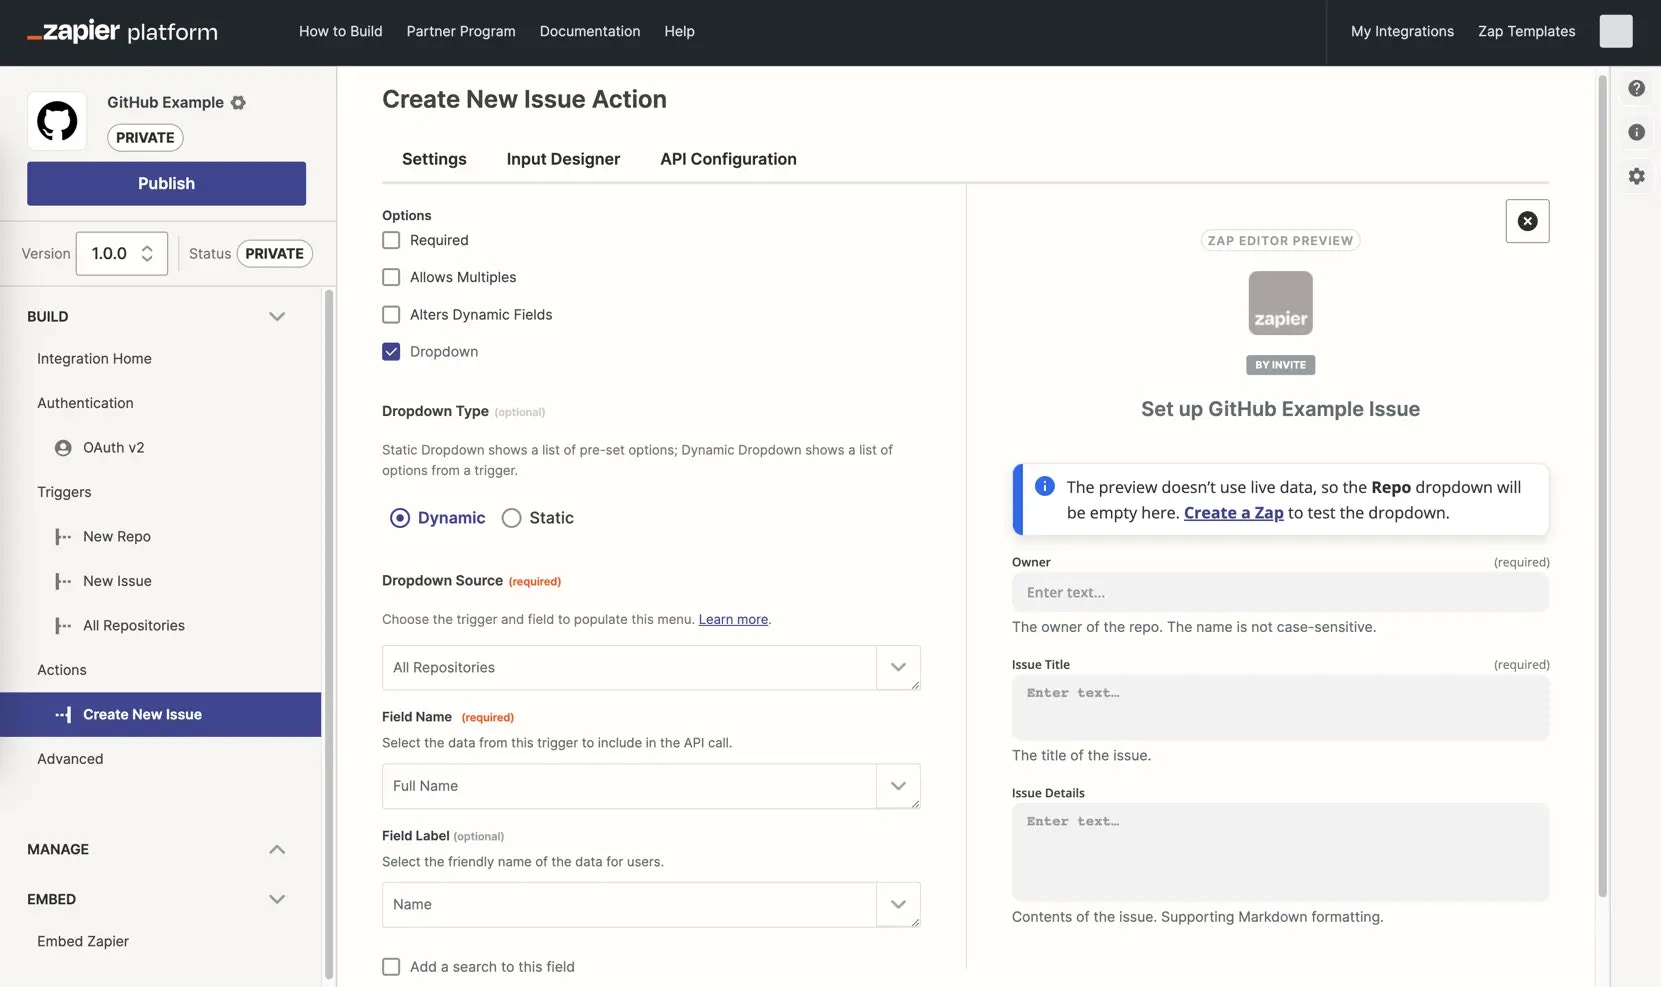 {" "}
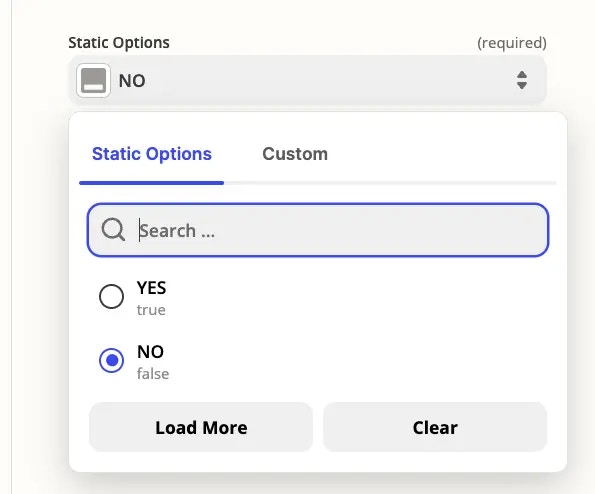
Select the field with the data your API needs for this action in the *Field Name* menu, and the field with a human-friendly name for the data in the *Field Label* menu. The [preview will indicate the presence of the field](/images/4780bb34f2f3d24062d2eb556ed1e3a9.webp), but you will need to use your trigger/action in a Zap to test the menu and pull in real data.
When this trigger/action is selected in a Zap, the user will see a dropdown as Zapier polls your API for the data from that hidden trigger, parse the entries and extract the fields you specified, showing them in a user-friendly dropdown menu. The human-friendly name will be in larger, darker text, and the value to be sent to the API in smaller, lighter text.
{" "}
{" "}
Select the field with the data your API needs for this action in the *Field Name* menu, and the field with a human-friendly name for the data in the *Field Label* menu. The [preview will indicate the presence of the field](/images/4780bb34f2f3d24062d2eb556ed1e3a9.webp), but you will need to use your trigger/action in a Zap to test the menu and pull in real data.
When this trigger/action is selected in a Zap, the user will see a dropdown as Zapier polls your API for the data from that hidden trigger, parse the entries and extract the fields you specified, showing them in a user-friendly dropdown menu. The human-friendly name will be in larger, darker text, and the value to be sent to the API in smaller, lighter text.
{" "}
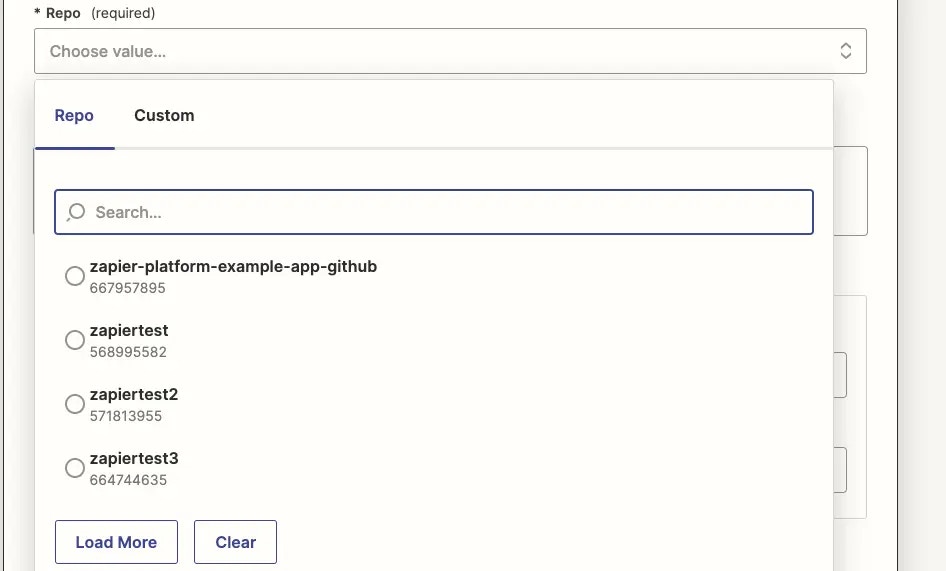 {" "}
It is important to provide the API value (example `id`) for users to know what type of data the field expects. Users can also choose to [enter a custom value](/images/f72a12759a3b3b391025f6500f6c7904.webp)
and map data from other Zap steps into this field. Being able to see what type of value to map is extremely helpful.
**3. Add search to a dynamic field (optional)**
Dynamic Dropdown menus can optionally include an additional *Add a Search Step* button beside the dropdown menu. This lets users dynamically select the correct item from a dynamic field based on input from previous Zap steps.
{" "}
{" "}
It is important to provide the API value (example `id`) for users to know what type of data the field expects. Users can also choose to [enter a custom value](/images/f72a12759a3b3b391025f6500f6c7904.webp)
and map data from other Zap steps into this field. Being able to see what type of value to map is extremely helpful.
**3. Add search to a dynamic field (optional)**
Dynamic Dropdown menus can optionally include an additional *Add a Search Step* button beside the dropdown menu. This lets users dynamically select the correct item from a dynamic field based on input from previous Zap steps.
{" "}
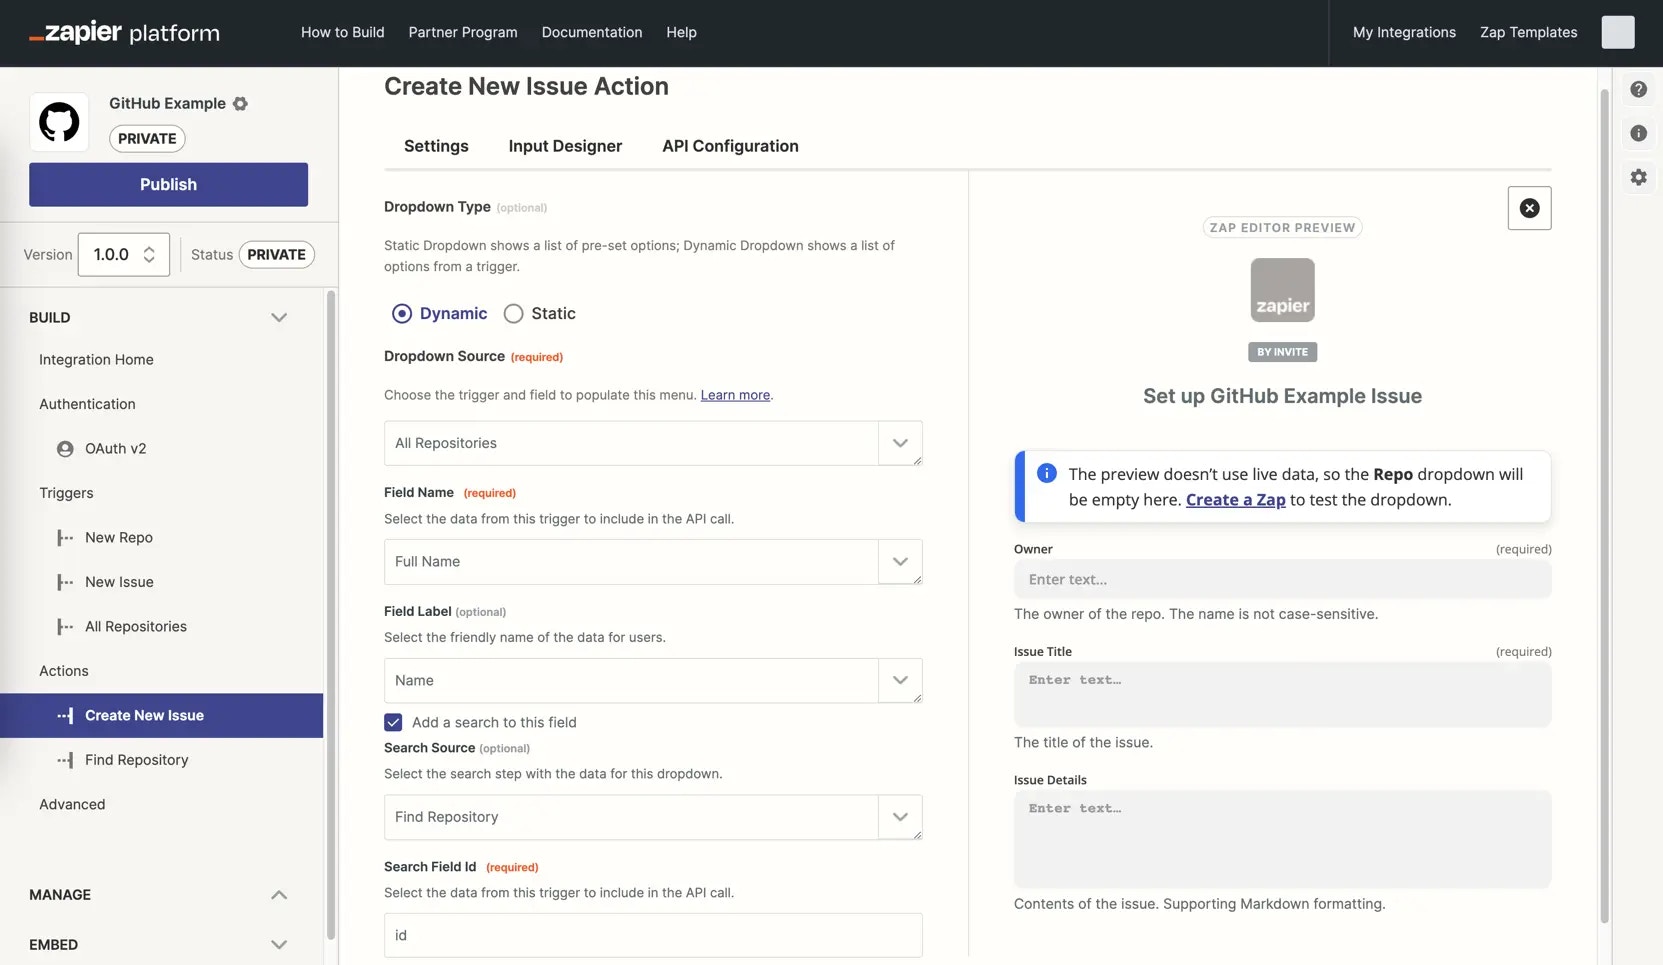 {" "}
You'll need to add a [Search Action](/platform/build/action#how-to-add-a-search-action) to find the items used in this dropdown menu. Then check the *Add a search to this field* option under the dynamic dropdown you've built, choose that action, and enter the ID of the field from that trigger that Zapier needs to pass with this API call (which should include the same data as the *Field Name* you selected before for the dynamic menu).
{" "}
{" "}
You'll need to add a [Search Action](/platform/build/action#how-to-add-a-search-action) to find the items used in this dropdown menu. Then check the *Add a search to this field* option under the dynamic dropdown you've built, choose that action, and enter the ID of the field from that trigger that Zapier needs to pass with this API call (which should include the same data as the *Field Name* you selected before for the dynamic menu).
{" "}
 {" "}
When users click or add a search step in their Zap, Zapier will add a new search step before this action step.
This allows the user to enter the details to search for the item they need, and Zapier will automatically map the correct output value from that search to this dynamic dropdown field [as a custom value](https://help.zapier.com/hc/en-us/articles/8496241696141-Add-custom-values-to-dropdown-menu-fields-in-Zaps#01H7FR09FBWT481ZJ77VVR0HBR).
We have a video tutorial on Dynamic Dropdowns which you can view here:
## Reorder input fields
Reordering input fields in triggers or actions can help improve readability and usability.
List the most important, required fields first, with less important, optional fields near the bottom. Have related fields (such as first and last name) near each other. Ordering fields in Zapier similar to the order of fields in any input forms in your app will increase ease of use.
{" "}
{" "}
When users click or add a search step in their Zap, Zapier will add a new search step before this action step.
This allows the user to enter the details to search for the item they need, and Zapier will automatically map the correct output value from that search to this dynamic dropdown field [as a custom value](https://help.zapier.com/hc/en-us/articles/8496241696141-Add-custom-values-to-dropdown-menu-fields-in-Zaps#01H7FR09FBWT481ZJ77VVR0HBR).
We have a video tutorial on Dynamic Dropdowns which you can view here:
## Reorder input fields
Reordering input fields in triggers or actions can help improve readability and usability.
List the most important, required fields first, with less important, optional fields near the bottom. Have related fields (such as first and last name) near each other. Ordering fields in Zapier similar to the order of fields in any input forms in your app will increase ease of use.
{" "}
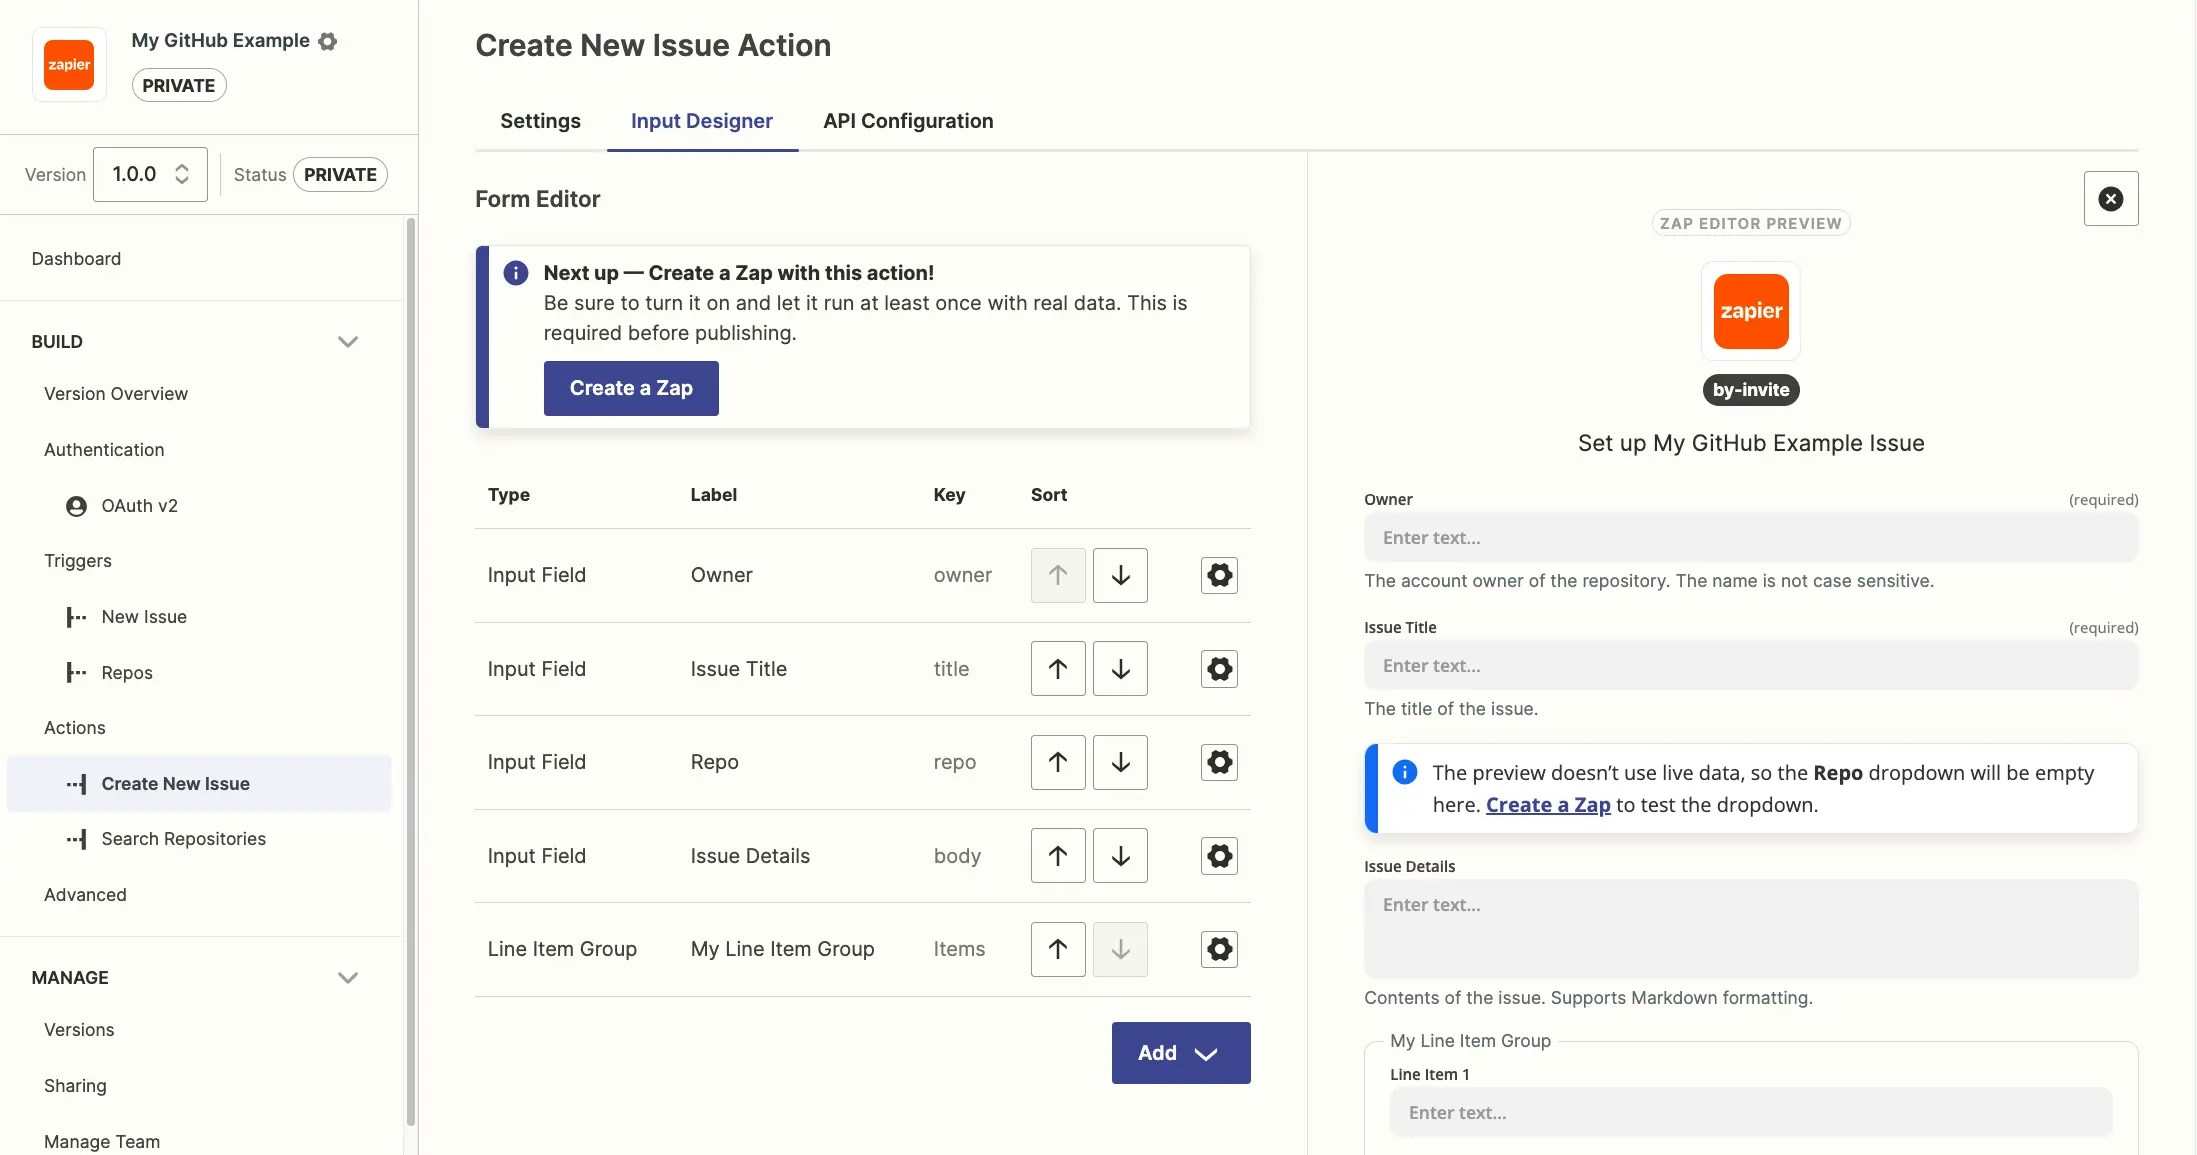 {" "}
In your trigger or action settings:
1. Click the **Input Designer** tab.
2. In the *Sort* column, click the **up**
{" "}
{" "}
In your trigger or action settings:
1. Click the **Input Designer** tab.
2. In the *Sort* column, click the **up**
{" "}
 {" "}
or **down**
{" "}
{" "}
or **down**
{" "}
 {" "}
arrow to move the fields to the order you want in the Form Editor screen.
3. The preview on the right shows how the finished form looks to users inside Zapier.
4. A pop-up message will appear to confirm your changes have been saved.
## Remove input fields
Make sure to delete only unnecessary fields, as a previous version of the input form cannot be restored. You cannot remove input fields from public integrations; you must [create a new version of your integration](/platform/manage/versions) before changing input fields and [consider the impacts of the change](/platform/manage/planning-changes#changing-form-field-keys).
In your trigger or action settings:
1. Click the **Input Designer** tab.
2. Click the **gear icon**
{" "}
arrow to move the fields to the order you want in the Form Editor screen.
3. The preview on the right shows how the finished form looks to users inside Zapier.
4. A pop-up message will appear to confirm your changes have been saved.
## Remove input fields
Make sure to delete only unnecessary fields, as a previous version of the input form cannot be restored. You cannot remove input fields from public integrations; you must [create a new version of your integration](/platform/manage/versions) before changing input fields and [consider the impacts of the change](/platform/manage/planning-changes#changing-form-field-keys).
In your trigger or action settings:
1. Click the **Input Designer** tab.
2. Click the **gear icon**  beside the input field you want to delete.
3. Click **Delete**.
4. Click **Confirm** to remove the input field from your integration.
5. A pop-up message will appear to confirm your changes have been saved.
***
*Need help? [Tell us about your problem](https://developer.zapier.com/contact) and we'll connect you with the right resource or contact support.*
---
# Source: https://docs.zapier.com/platform/publish/add-or-modify-branding.md
> ## Documentation Index
> Fetch the complete documentation index at: https://docs.zapier.com/llms.txt
> Use this file to discover all available pages before exploring further.
# Add or modify integration branding and details
> When creating a new integration in the Platform UI from the link `https://developer.zapier.com/app/new`, you'll be prompted to add the app name, description, homepage URL and logo.
## Platform UI
beside the input field you want to delete.
3. Click **Delete**.
4. Click **Confirm** to remove the input field from your integration.
5. A pop-up message will appear to confirm your changes have been saved.
***
*Need help? [Tell us about your problem](https://developer.zapier.com/contact) and we'll connect you with the right resource or contact support.*
---
# Source: https://docs.zapier.com/platform/publish/add-or-modify-branding.md
> ## Documentation Index
> Fetch the complete documentation index at: https://docs.zapier.com/llms.txt
> Use this file to discover all available pages before exploring further.
# Add or modify integration branding and details
> When creating a new integration in the Platform UI from the link `https://developer.zapier.com/app/new`, you'll be prompted to add the app name, description, homepage URL and logo.
## Platform UI
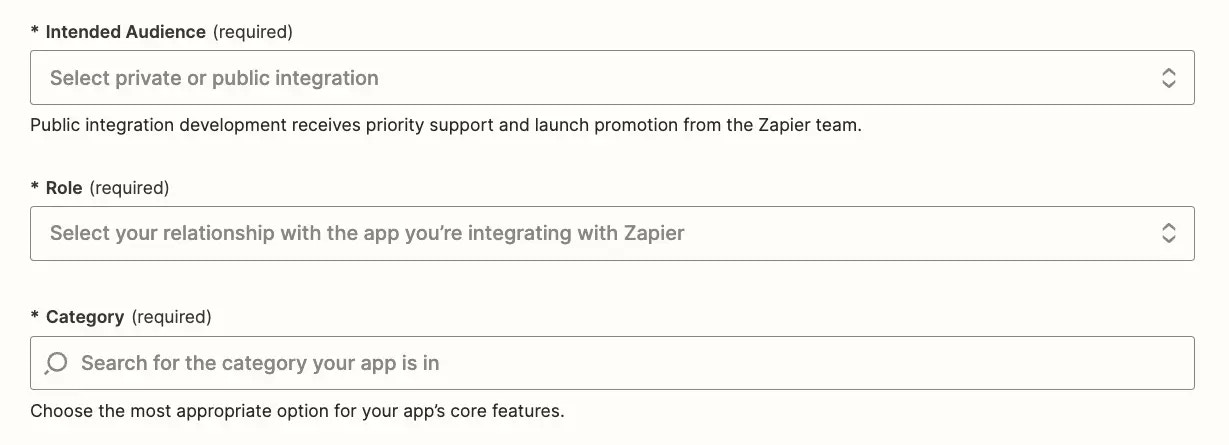
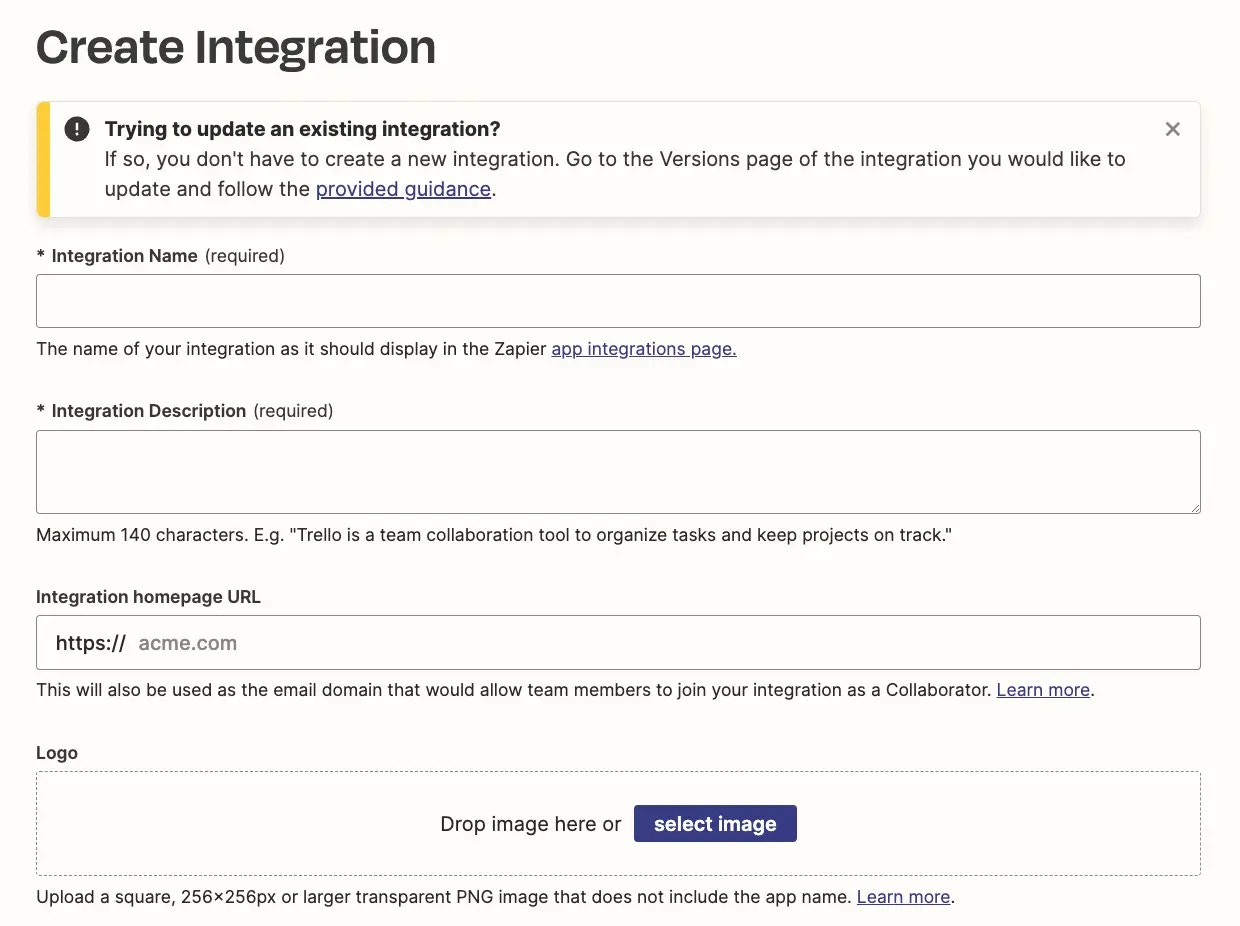 It is also required to complete the Intended Audience, your role and the app's category.
 ## Platform CLI
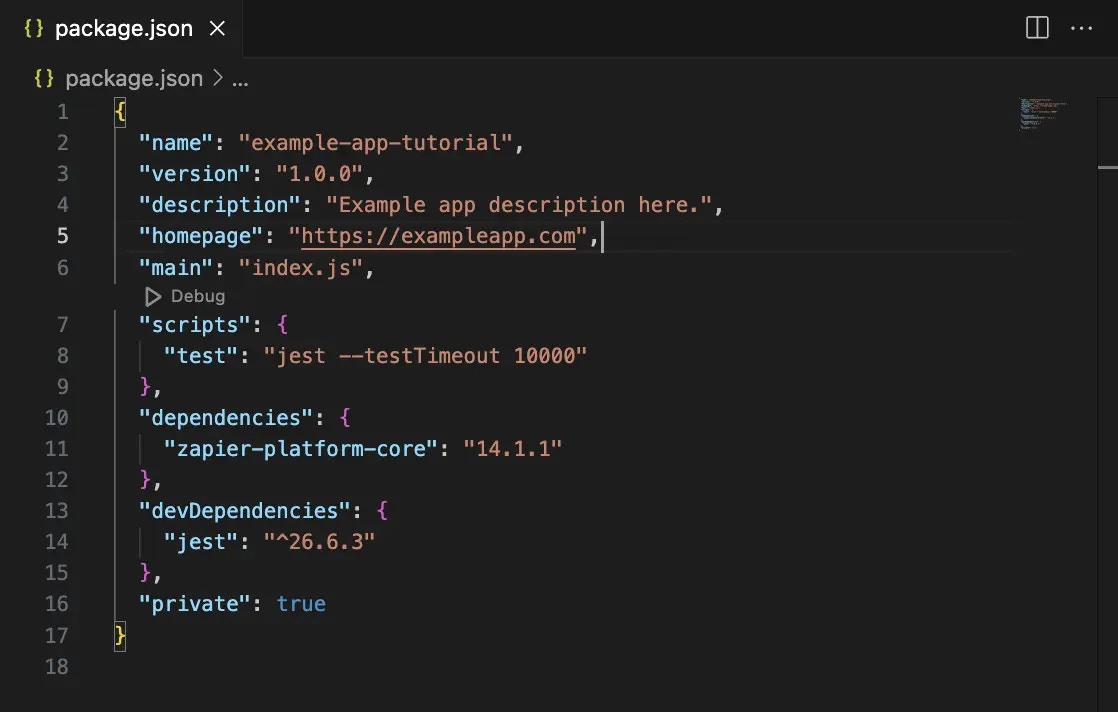
When creating a new integration in the Platform CLI, you can optionally add the app name, description, and homepage URL to the `package.json` file. The rest of your app's branding needs to be added in the Platform UI once you `zapier-platform push` (or deprecated `zapier push`) your integration for the first time.
## Platform CLI
When creating a new integration in the Platform CLI, you can optionally add the app name, description, and homepage URL to the `package.json` file. The rest of your app's branding needs to be added in the Platform UI once you `zapier-platform push` (or deprecated `zapier push`) your integration for the first time.
 Build your integration locally first. Once you've added your app's core details, authentication, triggers, and actions, push your integration to Zapier with a `zapier-platform push` (or deprecated `zapier push`) command. Zapier will use the name you added in the CLI integration settings, along with a placeholder icon for your app.
Next, add your app's branding via the Platform UI at [developer.zapier.com/](https://developer.zapier.com/). There you will see every Zapier integration you've built. The *My integrations* section includes every app you've added via Zapier's Platform UI or CLI. Look for the integration you built with Zapier CLI and select.
Build your integration locally first. Once you've added your app's core details, authentication, triggers, and actions, push your integration to Zapier with a `zapier-platform push` (or deprecated `zapier push`) command. Zapier will use the name you added in the CLI integration settings, along with a placeholder icon for your app.
Next, add your app's branding via the Platform UI at [developer.zapier.com/](https://developer.zapier.com/). There you will see every Zapier integration you've built. The *My integrations* section includes every app you've added via Zapier's Platform UI or CLI. Look for the integration you built with Zapier CLI and select.
 Only the branding for your CLI-built app can be edited in the UI; authentication, triggers, and actions must be edited in your local environment and pushed to Zapier.
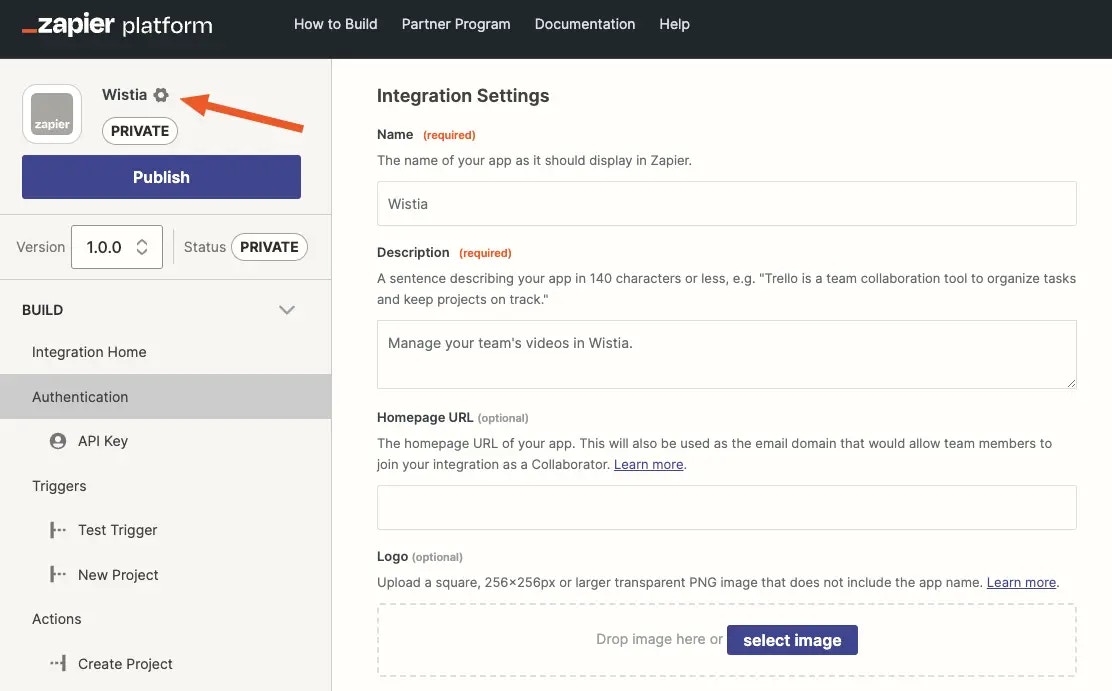
To edit branding, select the gear icon in the upper left hand corner near your app's name and placeholder icon. Edit your integration's name and description, and upload your app's logo (a square, transparent PNG at least 256x256px), meeting [requirements](/platform/publish/branding-guidelines). Below that, set your app's Intended Audience, your role and the app's category. Select *Save*.
## Modify or rebrand your integration
### Private integrations
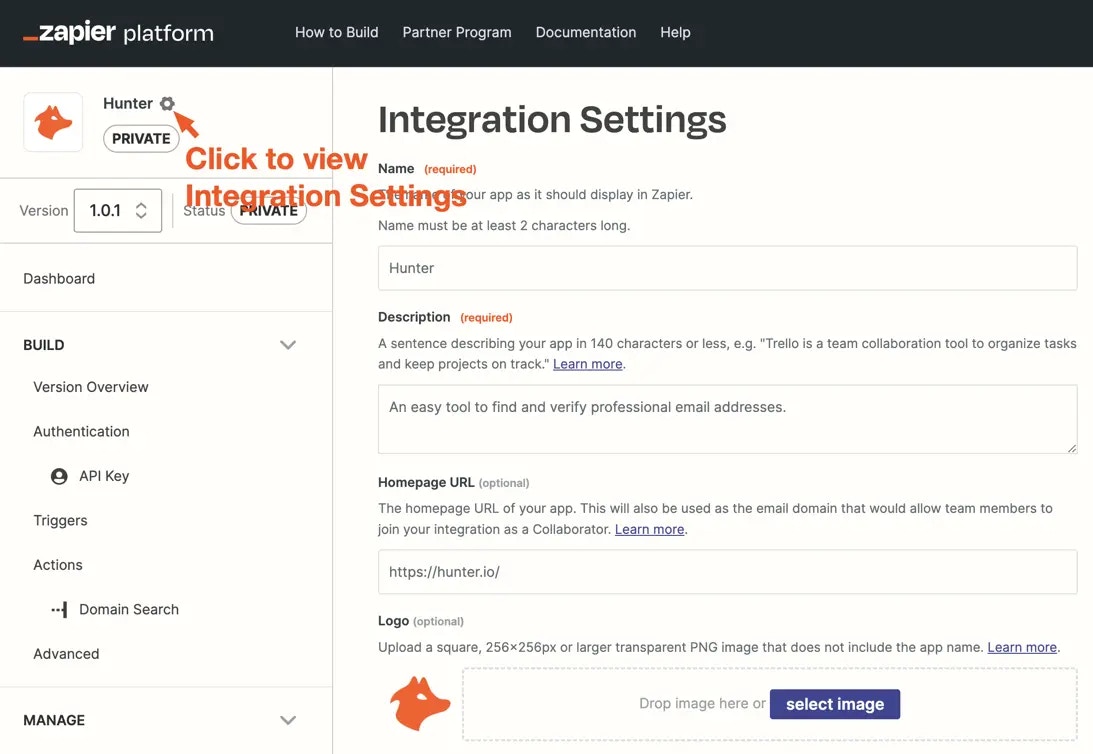
For integrations in `private` status, branding can be updated anytime on the Integration Settings page. Access Integration Settings by clicking the gear icon to the right of the integration name.
Only the branding for your CLI-built app can be edited in the UI; authentication, triggers, and actions must be edited in your local environment and pushed to Zapier.
To edit branding, select the gear icon in the upper left hand corner near your app's name and placeholder icon. Edit your integration's name and description, and upload your app's logo (a square, transparent PNG at least 256x256px), meeting [requirements](/platform/publish/branding-guidelines). Below that, set your app's Intended Audience, your role and the app's category. Select *Save*.
## Modify or rebrand your integration
### Private integrations
For integrations in `private` status, branding can be updated anytime on the Integration Settings page. Access Integration Settings by clicking the gear icon to the right of the integration name.
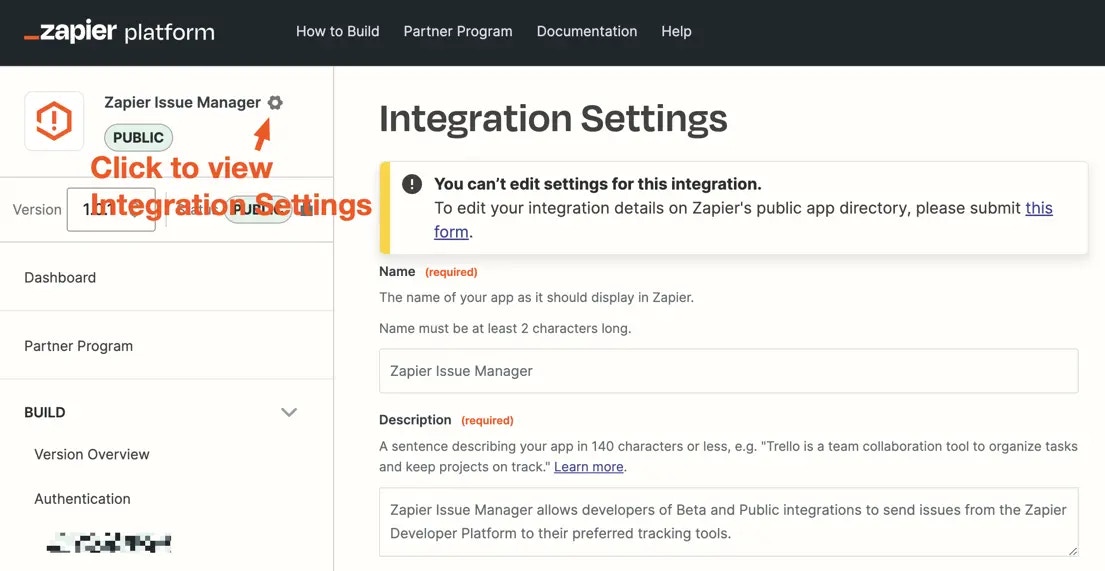
 ### Public/Beta integrations
For integrations in `public` or `beta` status, branding changes need to be processed by our Partner Support team. To request branding changes, visit the Integration Settings page and click the form linked at the top of the page.
The app ID and your Zapier account email will automatically populate into the form. Provide only the details you want updated on your integration's directory page, and submit the form. You'll receive a confirmation email of your submission, and the Partner Support team will process the changes within 1 business day. You'll receive a second email confirming once the changes have been made.
### Public/Beta integrations
For integrations in `public` or `beta` status, branding changes need to be processed by our Partner Support team. To request branding changes, visit the Integration Settings page and click the form linked at the top of the page.
The app ID and your Zapier account email will automatically populate into the form. Provide only the details you want updated on your integration's directory page, and submit the form. You'll receive a confirmation email of your submission, and the Partner Support team will process the changes within 1 business day. You'll receive a second email confirming once the changes have been made.
 ***
*Need help? [Tell us about your problem](https://developer.zapier.com/contact) and we'll connect you with the right resource or contact support.*
---
# Source: https://docs.zapier.com/platform/manage/add-team.md
> ## Documentation Index
> Fetch the complete documentation index at: https://docs.zapier.com/llms.txt
> Use this file to discover all available pages before exploring further.
# Invite team members to your integration
> Integrations do not have a dedicated owner, instead they are managed by a team that can be modified as needed. Add team members to your integration to collaborate, contribute, and view analytics data for your integration on the Developer Platform. Your integration team can have up to 200 team members, regardless of whether your integration is Private or Public.
Team members added to your integration will be assigned one of the following roles:
* **Admin**: Admins are granted read and write access to the integration. This role is ideal for developers and individuals actively involved in building and maintaining the integration.
* **Collaborator**: Collaborators are granted read-only access to the integration. Collaborator access is recommended for product, leadership, partnership, marketing, and other teams seeking access to integration data for analysis and record-keeping without direct involvement in its creation and maintenance. While they cannot make direct changes to the integration, they can:
* View performance data
* View the integration history
* Review and comment on feature requests and bug reports
* Access tools to embed your integration throughout your site to drive user adoption
## Invite team members
To add team members to your integration, follow these steps:
1. Log into the [Developer Platform](https://zapier.com/app/developer)
2. Choose your integration
3. In the *Manage* section on the left sidebar, select *Manage Team*
4. Select *Invite Team Member*
5. Enter the email address of the team member that you want to invite
6. Select the role that you wish to assign to the team member
7. A note will be included in the invitation email. You can either use the default message provided, or customize it with your own text
8. Click *Send Invite*.
**Note**: Admins can invite both Admins and Collaborators, while Collaborators
can only invite Collaborators.
Once you click *Send Invite*, an email invitation will be sent to the invitee, requesting their acceptance. If the invitee does not already have a Zapier account associated with the invited email, they will need to create an account first. Upon accepting the invitation, they will gain access to the integration through their Zapier account on the Developer Platform.
## Self-serve Collaborator access
Depending on your [integration settings](https://cdn.zappy.app/b2637f3ad910c36c4e8c8224c349beee.png), users have the option to self-serve and join an integration team as Collaborators. This feature employs domain-name verification and is managed by integration Admins. Currently, this feature is only available for integrations listed in [Zapier's directory](https://zapier.com/apps).
### Enable or disable self-serve Collaborator access
To toggle the “Join an Integration as Collaborators” feature, please follow these steps:
1. Log into the [Developer Platform](https://zapier.com/app/developer)
2. Choose your integration
3. In the *Manage* section on the left sidebar, select *Manage Team*
4. Select *Settings*
5. Click the toggle to enable or disable self-serve join as Collaborator
### Manage eligible email domains for self-serve Collaborator access
1. Log into the [Developer Platform](https://zapier.com/app/developer)
2. Choose your integration
3. In the *Manage* section on the left sidebar, select *Manage Team*
4. Select *Settings*
5. Click “Edit email domains”
6. Add/remove the domain(s) to be allowed
### Join an integration team via self-serve Collaborator access
1. Log into the [Developer Platform](https://zapier.com/app/developer)
2. Click “Get Access” under Join an Integration as Collaborators
3. Search for and select your integration, then click “Submit”
4. If the Zapier account you're using is associated with an approved domain, you'll receive an invitation to join via email
## View and remove team members
You can view a list of invited team members (both accepted and pending invites) from the *Manage Team* page. Admins have the ability to remove team members (both other Admins and Collaborators) from this page. Collaborators can only remove other Collaborators. You can also remove yourself from the team, regardless of your role. It's important to note that if you are removed as an Admin, you can regain Admin access only if invited by an existing Admin.
## Assign marketing and technical contacts
Admins have the ability to assign dedicated marketing and technical contacts on the integration team. Assigning these contacts allows us to better streamline outbound communication, and ensures the right contacts receive timely information. Please note that Zapier's support teams might reach out to the technical contact for technical support. E.g. we might contact this person so we can collaborate on trickier Customer Support tickets on Zaps that involve your integration.
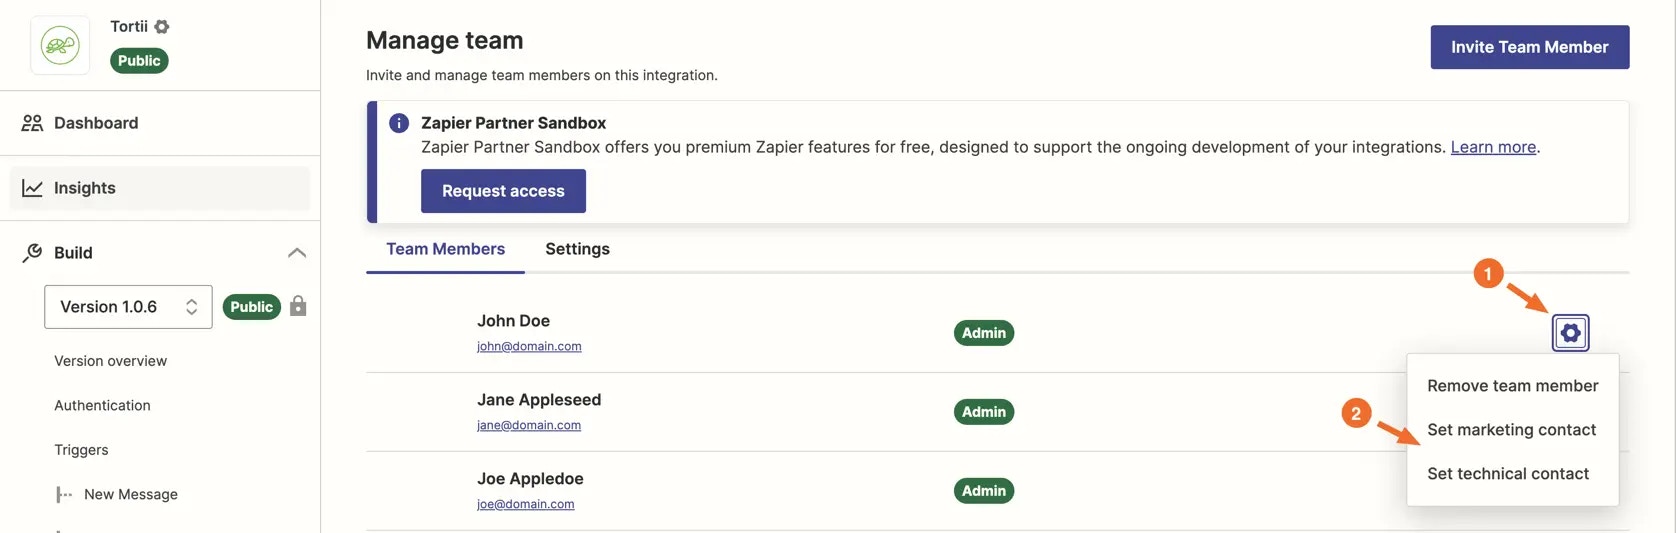
### How to assign contacts
1. Navigate to the “Manage team” page in the developer platform
2. Click the “Settings” icon for the user you want to assign a role to
3. Click either “Set marketing contact” or “Set technical contact”
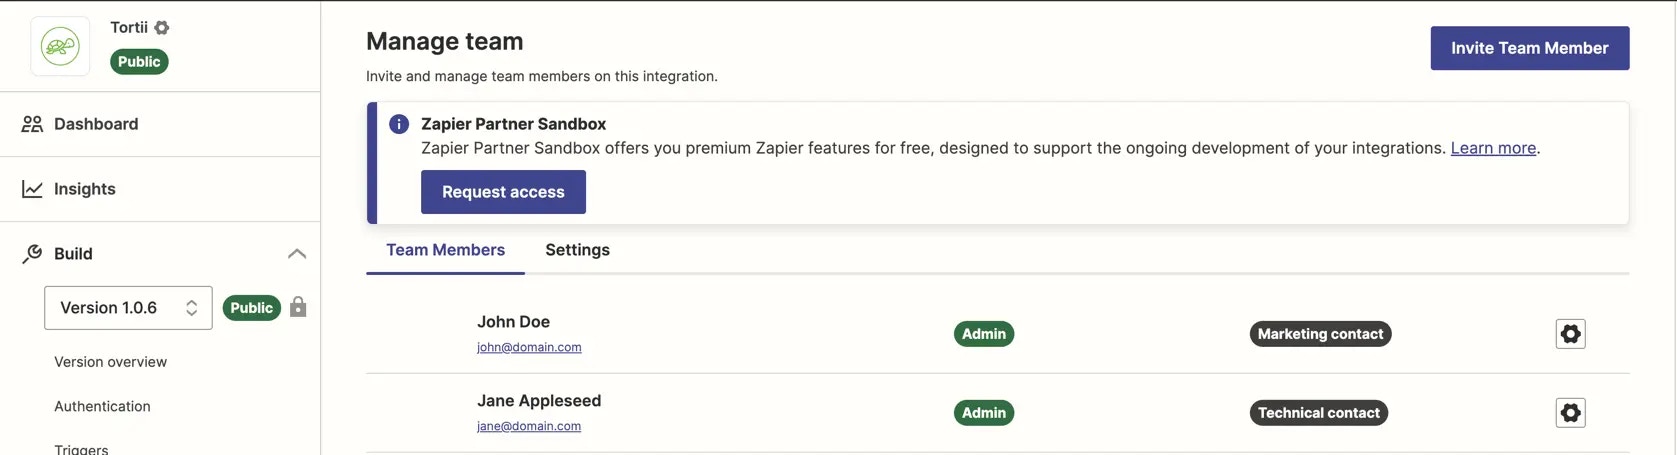
4. Users will be tagged with the role they are assigned
***
*Need help? [Tell us about your problem](https://developer.zapier.com/contact) and we'll connect you with the right resource or contact support.*
---
# Source: https://docs.zapier.com/platform/manage/add-team.md
> ## Documentation Index
> Fetch the complete documentation index at: https://docs.zapier.com/llms.txt
> Use this file to discover all available pages before exploring further.
# Invite team members to your integration
> Integrations do not have a dedicated owner, instead they are managed by a team that can be modified as needed. Add team members to your integration to collaborate, contribute, and view analytics data for your integration on the Developer Platform. Your integration team can have up to 200 team members, regardless of whether your integration is Private or Public.
Team members added to your integration will be assigned one of the following roles:
* **Admin**: Admins are granted read and write access to the integration. This role is ideal for developers and individuals actively involved in building and maintaining the integration.
* **Collaborator**: Collaborators are granted read-only access to the integration. Collaborator access is recommended for product, leadership, partnership, marketing, and other teams seeking access to integration data for analysis and record-keeping without direct involvement in its creation and maintenance. While they cannot make direct changes to the integration, they can:
* View performance data
* View the integration history
* Review and comment on feature requests and bug reports
* Access tools to embed your integration throughout your site to drive user adoption
## Invite team members
To add team members to your integration, follow these steps:
1. Log into the [Developer Platform](https://zapier.com/app/developer)
2. Choose your integration
3. In the *Manage* section on the left sidebar, select *Manage Team*
4. Select *Invite Team Member*
5. Enter the email address of the team member that you want to invite
6. Select the role that you wish to assign to the team member
7. A note will be included in the invitation email. You can either use the default message provided, or customize it with your own text
8. Click *Send Invite*.
**Note**: Admins can invite both Admins and Collaborators, while Collaborators
can only invite Collaborators.
Once you click *Send Invite*, an email invitation will be sent to the invitee, requesting their acceptance. If the invitee does not already have a Zapier account associated with the invited email, they will need to create an account first. Upon accepting the invitation, they will gain access to the integration through their Zapier account on the Developer Platform.
## Self-serve Collaborator access
Depending on your [integration settings](https://cdn.zappy.app/b2637f3ad910c36c4e8c8224c349beee.png), users have the option to self-serve and join an integration team as Collaborators. This feature employs domain-name verification and is managed by integration Admins. Currently, this feature is only available for integrations listed in [Zapier's directory](https://zapier.com/apps).
### Enable or disable self-serve Collaborator access
To toggle the “Join an Integration as Collaborators” feature, please follow these steps:
1. Log into the [Developer Platform](https://zapier.com/app/developer)
2. Choose your integration
3. In the *Manage* section on the left sidebar, select *Manage Team*
4. Select *Settings*
5. Click the toggle to enable or disable self-serve join as Collaborator
### Manage eligible email domains for self-serve Collaborator access
1. Log into the [Developer Platform](https://zapier.com/app/developer)
2. Choose your integration
3. In the *Manage* section on the left sidebar, select *Manage Team*
4. Select *Settings*
5. Click “Edit email domains”
6. Add/remove the domain(s) to be allowed
### Join an integration team via self-serve Collaborator access
1. Log into the [Developer Platform](https://zapier.com/app/developer)
2. Click “Get Access” under Join an Integration as Collaborators
3. Search for and select your integration, then click “Submit”
4. If the Zapier account you're using is associated with an approved domain, you'll receive an invitation to join via email
## View and remove team members
You can view a list of invited team members (both accepted and pending invites) from the *Manage Team* page. Admins have the ability to remove team members (both other Admins and Collaborators) from this page. Collaborators can only remove other Collaborators. You can also remove yourself from the team, regardless of your role. It's important to note that if you are removed as an Admin, you can regain Admin access only if invited by an existing Admin.
## Assign marketing and technical contacts
Admins have the ability to assign dedicated marketing and technical contacts on the integration team. Assigning these contacts allows us to better streamline outbound communication, and ensures the right contacts receive timely information. Please note that Zapier's support teams might reach out to the technical contact for technical support. E.g. we might contact this person so we can collaborate on trickier Customer Support tickets on Zaps that involve your integration.
### How to assign contacts
1. Navigate to the “Manage team” page in the developer platform
2. Click the “Settings” icon for the user you want to assign a role to
3. Click either “Set marketing contact” or “Set technical contact”
4. Users will be tagged with the role they are assigned
 ### Notes
* Each integration team can have only one designated marketing contact and one designated technical contact at a time
* A single user can be labelled as both the technical and marketing contact, they do not need to be separate users
* Users are not alerted when they are assigned or removed from a role
* Only Admins can assign roles, Collaborators cannot assign roles
* To remove a role from a user, you will need to assign the role to another user on the integration team
* Assigning a role already assigned to a new user will cause the role to automatically be removed from the original user
* Only integration team members that have accepted an invite to join the integration team can be assigned a role (ie team members that are Invitation Pending cannot be assigned a role)
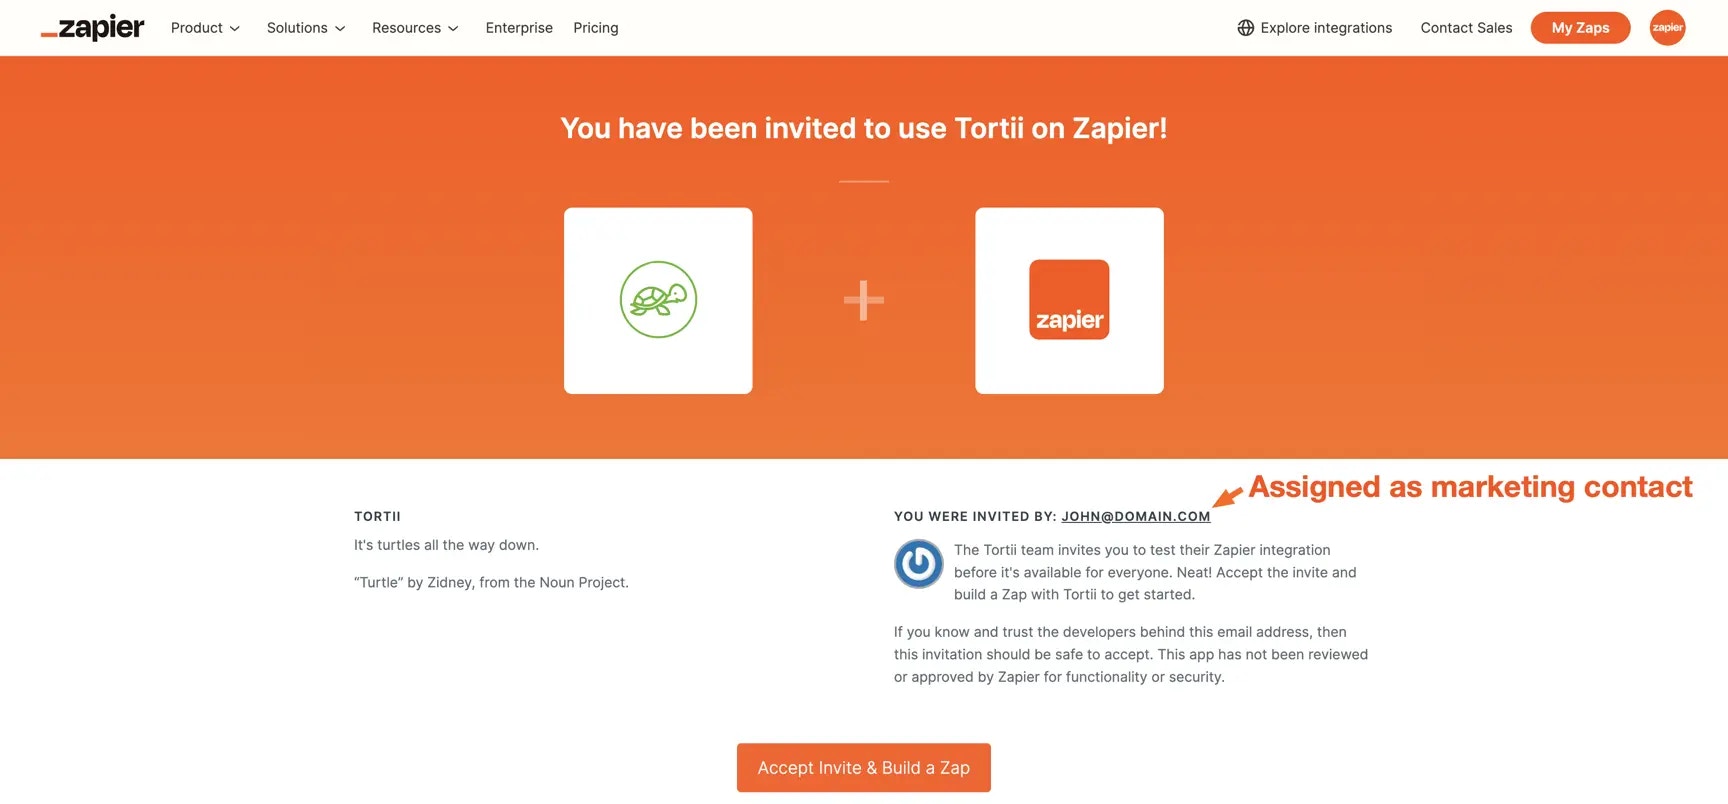
* The user assigned as the marketing contact will be shown as the contact on invite sharing pages
* A user assigned as either the marketing or technical contact cannot be removed from the integration team. To remove a user from an integration team, you will first need to assign the marketing/technical contact role to another user
### Notes
* Each integration team can have only one designated marketing contact and one designated technical contact at a time
* A single user can be labelled as both the technical and marketing contact, they do not need to be separate users
* Users are not alerted when they are assigned or removed from a role
* Only Admins can assign roles, Collaborators cannot assign roles
* To remove a role from a user, you will need to assign the role to another user on the integration team
* Assigning a role already assigned to a new user will cause the role to automatically be removed from the original user
* Only integration team members that have accepted an invite to join the integration team can be assigned a role (ie team members that are Invitation Pending cannot be assigned a role)
* The user assigned as the marketing contact will be shown as the contact on invite sharing pages
* A user assigned as either the marketing or technical contact cannot be removed from the integration team. To remove a user from an integration team, you will first need to assign the marketing/technical contact role to another user
 ## Manage email subscriptions relating to your integration
### General marketing updates
Zapier sends out general partner marketing updates related to your integrations and the Developer Platform. These emails include:
* Monthly Partner Newsletter with integration data insights
* Outreach about partnership and co-marketing opportunities
To control your subscription for these emails, visit the [email preferences page](https://developer.zapier.com/partner-settings/email) in the developer dashboard and opt in or out per each integration you are a team member of.
### Platform and Partner Program updates
All members of your integration's team will also receive Zapier Platform and Partner Program Updates. These emails include:
* Alerts about user [Bugs and Feature Requests](/platform/manage/integration-insights)
* Critical Platform and Program Updates
You cannot unsubscribe from Zapier Platform and Partner Program Updates unless an existing integration team member removes you from the integration team entirely. These emails deliver essential announcements about the Partner Program, Zapier Platform features, product updates, and compliance with integration quality standards to ensure you're always up-to-date with changes that could impact your use of the Zapier Platform.
**Note: An Admin can remove another Admin or Collaborator from the integration
team. A Collaborator can only remove other Collaborators from the integration
team.**
### Opting team members into emails
If you want to ensure that your team members receive partner marketing emails:
1. [Invite your team members](/platform/manage/add-team) to the integration team as either an Admin or Collaborator and ensure they accept the invite.
2. Team members who accept the invite will automatically receive Platform and Partner Program Updates.
3. If they want to receive General Partner Marketing updates, have them visit their [email preferences](https://developer.zapier.com/partner-settings/email) in the developer platform and ensure they're opted into emails for the integration you want them to receive alerts for.
## Video Tutorial
You can refer to this video on managing integration team members:
***
*Need help? [Tell us about your problem](https://developer.zapier.com/contact) and we'll connect you with the right resource or contact support.*
---
# Source: https://docs.zapier.com/powered-by-zapier/managing-app-authentication/adding-app-authentications.md
> ## Documentation Index
> Fetch the complete documentation index at: https://docs.zapier.com/llms.txt
> Use this file to discover all available pages before exploring further.
# Adding App Authentications
> Reduce friction when adding an authentication to your own app.
### Adding an authentication to your own app
When you created your app on Zapier's Developer Platform, a required step was to [define the fields required for authentication](https://platform.zapier.com/build/auth). Depending on your authentication scheme the `authentication_fields` below will differ.
Leveraging the [Create Authentication](/powered-by-zapier/api-reference/authentications/create-authentication) endpoint, supply your app's required `authentication_fields` in the request.
```js Example with Basic Authentication theme={null}
// POST /authentications
"data": {
"app": "{MY_APP_ID}",
"title": "{AUTHENTICATION_NAME}",
"authentication_fields": {
"username": "{MY_USERS_USERNAME}",
"password": "{MY_USERS_PASSWORD}"
}
}
```
```js Example with API Key Authentication theme={null}
// POST /authentications
"data": {
"app": "{MY_APP_ID}",
"title": "{AUTHENTICATION_NAME}",
"authentication_fields": {
"api_key": "{MY_USERS_API_KEY}",
}
}
```
Be sure to supply whatever `authentication_fields` are required by your apps' authentication scheme.
Pick an authentication name that'll be recognizeable to a user should they find it outside of this flow, such as "Carter's LinkedIn Authentication", or "Micah's Slack Authentication"
A successful response from this request will include an `id`, which can be used in subsequent steps.
---
# Source: https://docs.zapier.com/platform/reference/ai-actions.md
> ## Documentation Index
> Fetch the complete documentation index at: https://docs.zapier.com/llms.txt
> Use this file to discover all available pages before exploring further.
# AI actions
> Zapier's [AI Actions](https://actions.zapier.com/) is an AI alpha product designed to work with natural language-based products. It leverages the Zapier platform, with over [6000 apps](https://zapier.com/apps). You can include the capabilities of Zapier's platform in your own product.
With the Natural Language Actions API, you can:
* Access Zapier's platform of 6000+ apps within your own product.
* Integrate with chatbots or [large language models](https://en.wikipedia.org/wiki/Large_language_model).
* Power any integration project.
Learn more in our [AI Actions documentation](https://actions.zapier.com/).
## Get access to the AI Actions API
AI Actions API is available for any Zapier partner or developer to build on.
It's free to use by visiting our [Getting Started with AI Actions page](https://actions.zapier.com/).
> **Note**: By signing up for API access, you agree to [Zapier's Platform Agreement](https://zapier.com/platform/tos) and [Privacy Policy](https://zapier.com/privacy).
***
*Need help? [Tell us about your problem](https://developer.zapier.com/contact) and we'll connect you with the right resource or contact support.*
---
# Source: https://docs.zapier.com/platform/reference/ai-app.md
> ## Documentation Index
> Fetch the complete documentation index at: https://docs.zapier.com/llms.txt
> Use this file to discover all available pages before exploring further.
# Zapier integration structure for an AI app
> AI app integrations built on Zapier allow users to automate tasks using AI capabilities. Here are some common pain points and recommendations when building AI apps on Zapier.
## Pain Points
### 1. Long-Running Actions
**Pain Point:** Actions that take a long time to process can cause issues, especially with Zapier's execution time limits. Test steps in the Zapier editor are limited to 50 seconds, and live Zap executions default to 30 seconds.
**Recommendations:**
* Use `z.generateCallbackUrl()` and `performResume`
* `z.generateCallbackUrl()`: This method generates a callback URL that your service can call once the long-running task is complete.
* `performResume`: This function allows the action to pause until the callback URL is called, resuming once the task is complete.
* **Why:** These tools help handle tasks that exceed Zapier's execution time limits by offloading the wait to an external service and resuming only when the task is done.
* [Documentation](/platform/build-cli/core#z-generatecallbackurl)
### 2. Handling Samples for Long-Running Tasks
**Pain Point:** Generating accurate samples for long-running tasks can be tricky, especially during the initial setup.
**Recommendation:**
* Use `bundle.meta.isLoadingSample`:
* When `bundle.meta.isLoadingSample` is true, return a simplified or cached version of the data that represents a typical response.
* **Why:** This approach ensures that users get a quick response during setup, avoiding delays caused by the actual long-running task.
* [Documentation](/platform/build-cli/core#bundle-meta)
### 3. Hiding Complex Fields in Actions
**Pain Point:** Complex configuration fields can overwhelm users, making the setup process cumbersome.
**Recommendation:**
* Use Custom Input Fields:
* You can create an input field that depends on another. For example, you could create an “Advanced Features” input field at the bottom of all of your other ones that has the property `altersDynamicFields: true` so when it's updated, all of the other fields refresh. Then any additional input fields could be dependent on whether that “Advanced Features” input field is true, then display the more advanced ones that are not necessarily required for all users. (ie. `if (bundle.inputData.advanced === true)`)
* These custom input fields can hide complex fields behind simpler user interfaces.
* **Why:** Simplifying the user interface makes it more user-friendly, leading to a better experience and fewer setup errors.
* [Documentation](/platform/build-cli/core#custom-dynamic-fields)
### 4. Use-Case Specific Actions
**Pain Point:** Users may struggle with setting up generalized actions that require specific configurations.
**Recommendations:**
* Create Use-Case Specific Actions:
* For example, a “ChatGPT Summarize Text” action can hide the configuration and prompt details behind the scenes. This can be accomplished by hardcoding a prompt into the action configuration itself and then just have the user input the text that needs to be summarized.
* Why: Pre-configured actions tailored to specific use cases streamline the user experience, making it easier for users to set up and use your app effectively.
* Create Use-Case Specific Dropdown:
* For example, a “Send Prompt” action could have a dropdown of available “use-cases” that when selected, pre-fill input fields for the user. This can be accomplished by having a mapping of sorts for your use-cases and some complex logic using `altersDynamicFields: true` to then have all of your input fields as custom ones which are loaded in via functions based on the the use-case selected and the default of them pre-filled.
* **Why:** Pre-configured AI prompts tailored to specific use cases streamline the user experience, making it easier for users to set up and use your app effectively and for them to understand how the AI is working where they could then tweak the prompt/other input fields themselves if need be.
* [Documentation](https://github.com/zapier/zapier-platform/blob/main/packages/schema/docs/build/schema.md#fieldschema)
### 5. Value of Zap Templates
**Pain Point:** Users often need help figuring out how to set up Zaps for common use cases.
**Recommendation:**
* Provide [Zap Templates](/platform/publish/zap-templates):
* Create templates for common use cases with pre-mapped variables and good starter prompts.
* **Why:** Templates serve as a starting point, helping users quickly set up their Zaps without having to configure everything from scratch.
By addressing these pain points with the recommended strategies, you can significantly improve the user experience and functionality of AI apps on the Zapier platform. For detailed guidance and support, always refer to the [Zapier Developer Documentation](https://platform.zapier.com/docs) or contact the [Zapier support team](https://developer.zapier.com/contact).
***
*Need help? [Tell us about your problem](https://developer.zapier.com/contact) and we'll connect you with the right resource or contact support.*
---
# Source: https://docs.zapier.com/platform/manage/api-outage.md
> ## Documentation Index
> Fetch the complete documentation index at: https://docs.zapier.com/llms.txt
> Use this file to discover all available pages before exploring further.
> Zapier recognizes that temporary unavailability is sometimes inevitable for your API.
# null
To accommodate these situations, we recommend configuring [custom error response handling](https://github.com/zapier/zapier-platform/blob/main/packages/cli/README.md#general-errors) to:
* Present a meaningful, user-friendly message to users
* Refrain from disabling Zaps due to error-ratios
* Potentially reattempt the action after a given delay window
## 1. Default behavior
Zap runs that encounter a 5xx error from your API throw an exception and receive the “Stopped / Errored” status. This will [display an error message to the user](https://help.zapier.com/hc/en-us/articles/20505304170637-Review-Zap-run-statuses); allowing them to replay the Run.
If the user has [Autoreplay](https://help.zapier.com/hc/en-us/articles/8496241726989-Replay-failed-Zap-runs#how-autoreplay-works-0-4) enabled, then the errored steps will be retried on [a defined schedule](https://help.zapier.com/hc/en-us/articles/8496241726989-Replay-failed-Zap-runs#how-autoreplay-works-0-4). Only when all Autoreplay attempts have also failed will the Zap Run be assigned the “Stopped / Errored” status.
If [95% of a Zap's runs in the last 7 days are assigned the “Stopped / Errored” status](https://help.zapier.com/hc/en-us/articles/8496037690637-Troubleshoot-errors-in-Zapier#500-series-error-codes-0-3), the Zap will be paused automatically. The Zap will not run again until the user manually enables it.
## 2. Avoid automatic Zap disablement
### Platform CLI
When building in the [CLI](https://github.com/zapier/zapier-platform/blob/main/packages/cli/README.md), you can [make use of HTTP middleware](https://github.com/zapier/zapier-platform/blob/main/packages/cli/README.md#using-http-middleware) to implement [custom error response handling](https://github.com/zapier/zapier-platform/blob/main/packages/cli/README.md#error-handling).
This allows you to write a single script that applies across the entire integration to detect a specific error from the API, and act accordingly. For example, if the API's outage duration is known, you could catch 503 responses during the `afterResponse` middleware and throw a [`ThrottledError`](https://github.com/zapier/zapier-platform/blob/main/packages/cli/README.md#handling-throttled-requests) like this:
```js theme={null}
const yourAfterResponse = (resp) => {
if (resp.status === 503) {
throw new z.errors.ThrottledError(
"Service is temporarily unavailable. Retrying in 60 seconds.",
60,
); // Zapier will retry in 60 seconds
}
return resp;
};
```
> **Note:** You need to set [`skipThrowForStatus`](https://github.com/zapier/zapier-platform/blob/main/packages/cli/README.md#http-response-object) to `true` when invoking `z.request()`.
### Platform UI
When building in the [UI](https://developer.zapier.com/), custom error handling needs to be added to each individual element of the integration (authentication, triggers, actions) using [Code Mode](/platform/build/code-mode).
For example:
```js theme={null}
const options = {
url: `https://example.app/api/endpoint`,
skipThrowForStatus: true,
method: "POST",
headers: {
"Content-Type": "application/json",
Accept: "application/json",
},
params: {},
body: {},
};
return z.request(options).then((response) => {
if (response.status === 503) {
throw new z.errors.ThrottledError(
"Service is temporarily unavailable. Retrying in 60 seconds.",
60,
); // Zapier will retry in 60 seconds
}
const results = response.json;
return results;
});
```
## Manage email subscriptions relating to your integration
### General marketing updates
Zapier sends out general partner marketing updates related to your integrations and the Developer Platform. These emails include:
* Monthly Partner Newsletter with integration data insights
* Outreach about partnership and co-marketing opportunities
To control your subscription for these emails, visit the [email preferences page](https://developer.zapier.com/partner-settings/email) in the developer dashboard and opt in or out per each integration you are a team member of.
### Platform and Partner Program updates
All members of your integration's team will also receive Zapier Platform and Partner Program Updates. These emails include:
* Alerts about user [Bugs and Feature Requests](/platform/manage/integration-insights)
* Critical Platform and Program Updates
You cannot unsubscribe from Zapier Platform and Partner Program Updates unless an existing integration team member removes you from the integration team entirely. These emails deliver essential announcements about the Partner Program, Zapier Platform features, product updates, and compliance with integration quality standards to ensure you're always up-to-date with changes that could impact your use of the Zapier Platform.
**Note: An Admin can remove another Admin or Collaborator from the integration
team. A Collaborator can only remove other Collaborators from the integration
team.**
### Opting team members into emails
If you want to ensure that your team members receive partner marketing emails:
1. [Invite your team members](/platform/manage/add-team) to the integration team as either an Admin or Collaborator and ensure they accept the invite.
2. Team members who accept the invite will automatically receive Platform and Partner Program Updates.
3. If they want to receive General Partner Marketing updates, have them visit their [email preferences](https://developer.zapier.com/partner-settings/email) in the developer platform and ensure they're opted into emails for the integration you want them to receive alerts for.
## Video Tutorial
You can refer to this video on managing integration team members:
***
*Need help? [Tell us about your problem](https://developer.zapier.com/contact) and we'll connect you with the right resource or contact support.*
---
# Source: https://docs.zapier.com/powered-by-zapier/managing-app-authentication/adding-app-authentications.md
> ## Documentation Index
> Fetch the complete documentation index at: https://docs.zapier.com/llms.txt
> Use this file to discover all available pages before exploring further.
# Adding App Authentications
> Reduce friction when adding an authentication to your own app.
### Adding an authentication to your own app
When you created your app on Zapier's Developer Platform, a required step was to [define the fields required for authentication](https://platform.zapier.com/build/auth). Depending on your authentication scheme the `authentication_fields` below will differ.
Leveraging the [Create Authentication](/powered-by-zapier/api-reference/authentications/create-authentication) endpoint, supply your app's required `authentication_fields` in the request.
```js Example with Basic Authentication theme={null}
// POST /authentications
"data": {
"app": "{MY_APP_ID}",
"title": "{AUTHENTICATION_NAME}",
"authentication_fields": {
"username": "{MY_USERS_USERNAME}",
"password": "{MY_USERS_PASSWORD}"
}
}
```
```js Example with API Key Authentication theme={null}
// POST /authentications
"data": {
"app": "{MY_APP_ID}",
"title": "{AUTHENTICATION_NAME}",
"authentication_fields": {
"api_key": "{MY_USERS_API_KEY}",
}
}
```
Be sure to supply whatever `authentication_fields` are required by your apps' authentication scheme.
Pick an authentication name that'll be recognizeable to a user should they find it outside of this flow, such as "Carter's LinkedIn Authentication", or "Micah's Slack Authentication"
A successful response from this request will include an `id`, which can be used in subsequent steps.
---
# Source: https://docs.zapier.com/platform/reference/ai-actions.md
> ## Documentation Index
> Fetch the complete documentation index at: https://docs.zapier.com/llms.txt
> Use this file to discover all available pages before exploring further.
# AI actions
> Zapier's [AI Actions](https://actions.zapier.com/) is an AI alpha product designed to work with natural language-based products. It leverages the Zapier platform, with over [6000 apps](https://zapier.com/apps). You can include the capabilities of Zapier's platform in your own product.
With the Natural Language Actions API, you can:
* Access Zapier's platform of 6000+ apps within your own product.
* Integrate with chatbots or [large language models](https://en.wikipedia.org/wiki/Large_language_model).
* Power any integration project.
Learn more in our [AI Actions documentation](https://actions.zapier.com/).
## Get access to the AI Actions API
AI Actions API is available for any Zapier partner or developer to build on.
It's free to use by visiting our [Getting Started with AI Actions page](https://actions.zapier.com/).
> **Note**: By signing up for API access, you agree to [Zapier's Platform Agreement](https://zapier.com/platform/tos) and [Privacy Policy](https://zapier.com/privacy).
***
*Need help? [Tell us about your problem](https://developer.zapier.com/contact) and we'll connect you with the right resource or contact support.*
---
# Source: https://docs.zapier.com/platform/reference/ai-app.md
> ## Documentation Index
> Fetch the complete documentation index at: https://docs.zapier.com/llms.txt
> Use this file to discover all available pages before exploring further.
# Zapier integration structure for an AI app
> AI app integrations built on Zapier allow users to automate tasks using AI capabilities. Here are some common pain points and recommendations when building AI apps on Zapier.
## Pain Points
### 1. Long-Running Actions
**Pain Point:** Actions that take a long time to process can cause issues, especially with Zapier's execution time limits. Test steps in the Zapier editor are limited to 50 seconds, and live Zap executions default to 30 seconds.
**Recommendations:**
* Use `z.generateCallbackUrl()` and `performResume`
* `z.generateCallbackUrl()`: This method generates a callback URL that your service can call once the long-running task is complete.
* `performResume`: This function allows the action to pause until the callback URL is called, resuming once the task is complete.
* **Why:** These tools help handle tasks that exceed Zapier's execution time limits by offloading the wait to an external service and resuming only when the task is done.
* [Documentation](/platform/build-cli/core#z-generatecallbackurl)
### 2. Handling Samples for Long-Running Tasks
**Pain Point:** Generating accurate samples for long-running tasks can be tricky, especially during the initial setup.
**Recommendation:**
* Use `bundle.meta.isLoadingSample`:
* When `bundle.meta.isLoadingSample` is true, return a simplified or cached version of the data that represents a typical response.
* **Why:** This approach ensures that users get a quick response during setup, avoiding delays caused by the actual long-running task.
* [Documentation](/platform/build-cli/core#bundle-meta)
### 3. Hiding Complex Fields in Actions
**Pain Point:** Complex configuration fields can overwhelm users, making the setup process cumbersome.
**Recommendation:**
* Use Custom Input Fields:
* You can create an input field that depends on another. For example, you could create an “Advanced Features” input field at the bottom of all of your other ones that has the property `altersDynamicFields: true` so when it's updated, all of the other fields refresh. Then any additional input fields could be dependent on whether that “Advanced Features” input field is true, then display the more advanced ones that are not necessarily required for all users. (ie. `if (bundle.inputData.advanced === true)`)
* These custom input fields can hide complex fields behind simpler user interfaces.
* **Why:** Simplifying the user interface makes it more user-friendly, leading to a better experience and fewer setup errors.
* [Documentation](/platform/build-cli/core#custom-dynamic-fields)
### 4. Use-Case Specific Actions
**Pain Point:** Users may struggle with setting up generalized actions that require specific configurations.
**Recommendations:**
* Create Use-Case Specific Actions:
* For example, a “ChatGPT Summarize Text” action can hide the configuration and prompt details behind the scenes. This can be accomplished by hardcoding a prompt into the action configuration itself and then just have the user input the text that needs to be summarized.
* Why: Pre-configured actions tailored to specific use cases streamline the user experience, making it easier for users to set up and use your app effectively.
* Create Use-Case Specific Dropdown:
* For example, a “Send Prompt” action could have a dropdown of available “use-cases” that when selected, pre-fill input fields for the user. This can be accomplished by having a mapping of sorts for your use-cases and some complex logic using `altersDynamicFields: true` to then have all of your input fields as custom ones which are loaded in via functions based on the the use-case selected and the default of them pre-filled.
* **Why:** Pre-configured AI prompts tailored to specific use cases streamline the user experience, making it easier for users to set up and use your app effectively and for them to understand how the AI is working where they could then tweak the prompt/other input fields themselves if need be.
* [Documentation](https://github.com/zapier/zapier-platform/blob/main/packages/schema/docs/build/schema.md#fieldschema)
### 5. Value of Zap Templates
**Pain Point:** Users often need help figuring out how to set up Zaps for common use cases.
**Recommendation:**
* Provide [Zap Templates](/platform/publish/zap-templates):
* Create templates for common use cases with pre-mapped variables and good starter prompts.
* **Why:** Templates serve as a starting point, helping users quickly set up their Zaps without having to configure everything from scratch.
By addressing these pain points with the recommended strategies, you can significantly improve the user experience and functionality of AI apps on the Zapier platform. For detailed guidance and support, always refer to the [Zapier Developer Documentation](https://platform.zapier.com/docs) or contact the [Zapier support team](https://developer.zapier.com/contact).
***
*Need help? [Tell us about your problem](https://developer.zapier.com/contact) and we'll connect you with the right resource or contact support.*
---
# Source: https://docs.zapier.com/platform/manage/api-outage.md
> ## Documentation Index
> Fetch the complete documentation index at: https://docs.zapier.com/llms.txt
> Use this file to discover all available pages before exploring further.
> Zapier recognizes that temporary unavailability is sometimes inevitable for your API.
# null
To accommodate these situations, we recommend configuring [custom error response handling](https://github.com/zapier/zapier-platform/blob/main/packages/cli/README.md#general-errors) to:
* Present a meaningful, user-friendly message to users
* Refrain from disabling Zaps due to error-ratios
* Potentially reattempt the action after a given delay window
## 1. Default behavior
Zap runs that encounter a 5xx error from your API throw an exception and receive the “Stopped / Errored” status. This will [display an error message to the user](https://help.zapier.com/hc/en-us/articles/20505304170637-Review-Zap-run-statuses); allowing them to replay the Run.
If the user has [Autoreplay](https://help.zapier.com/hc/en-us/articles/8496241726989-Replay-failed-Zap-runs#how-autoreplay-works-0-4) enabled, then the errored steps will be retried on [a defined schedule](https://help.zapier.com/hc/en-us/articles/8496241726989-Replay-failed-Zap-runs#how-autoreplay-works-0-4). Only when all Autoreplay attempts have also failed will the Zap Run be assigned the “Stopped / Errored” status.
If [95% of a Zap's runs in the last 7 days are assigned the “Stopped / Errored” status](https://help.zapier.com/hc/en-us/articles/8496037690637-Troubleshoot-errors-in-Zapier#500-series-error-codes-0-3), the Zap will be paused automatically. The Zap will not run again until the user manually enables it.
## 2. Avoid automatic Zap disablement
### Platform CLI
When building in the [CLI](https://github.com/zapier/zapier-platform/blob/main/packages/cli/README.md), you can [make use of HTTP middleware](https://github.com/zapier/zapier-platform/blob/main/packages/cli/README.md#using-http-middleware) to implement [custom error response handling](https://github.com/zapier/zapier-platform/blob/main/packages/cli/README.md#error-handling).
This allows you to write a single script that applies across the entire integration to detect a specific error from the API, and act accordingly. For example, if the API's outage duration is known, you could catch 503 responses during the `afterResponse` middleware and throw a [`ThrottledError`](https://github.com/zapier/zapier-platform/blob/main/packages/cli/README.md#handling-throttled-requests) like this:
```js theme={null}
const yourAfterResponse = (resp) => {
if (resp.status === 503) {
throw new z.errors.ThrottledError(
"Service is temporarily unavailable. Retrying in 60 seconds.",
60,
); // Zapier will retry in 60 seconds
}
return resp;
};
```
> **Note:** You need to set [`skipThrowForStatus`](https://github.com/zapier/zapier-platform/blob/main/packages/cli/README.md#http-response-object) to `true` when invoking `z.request()`.
### Platform UI
When building in the [UI](https://developer.zapier.com/), custom error handling needs to be added to each individual element of the integration (authentication, triggers, actions) using [Code Mode](/platform/build/code-mode).
For example:
```js theme={null}
const options = {
url: `https://example.app/api/endpoint`,
skipThrowForStatus: true,
method: "POST",
headers: {
"Content-Type": "application/json",
Accept: "application/json",
},
params: {},
body: {},
};
return z.request(options).then((response) => {
if (response.status === 503) {
throw new z.errors.ThrottledError(
"Service is temporarily unavailable. Retrying in 60 seconds.",
60,
); // Zapier will retry in 60 seconds
}
const results = response.json;
return results;
});
```
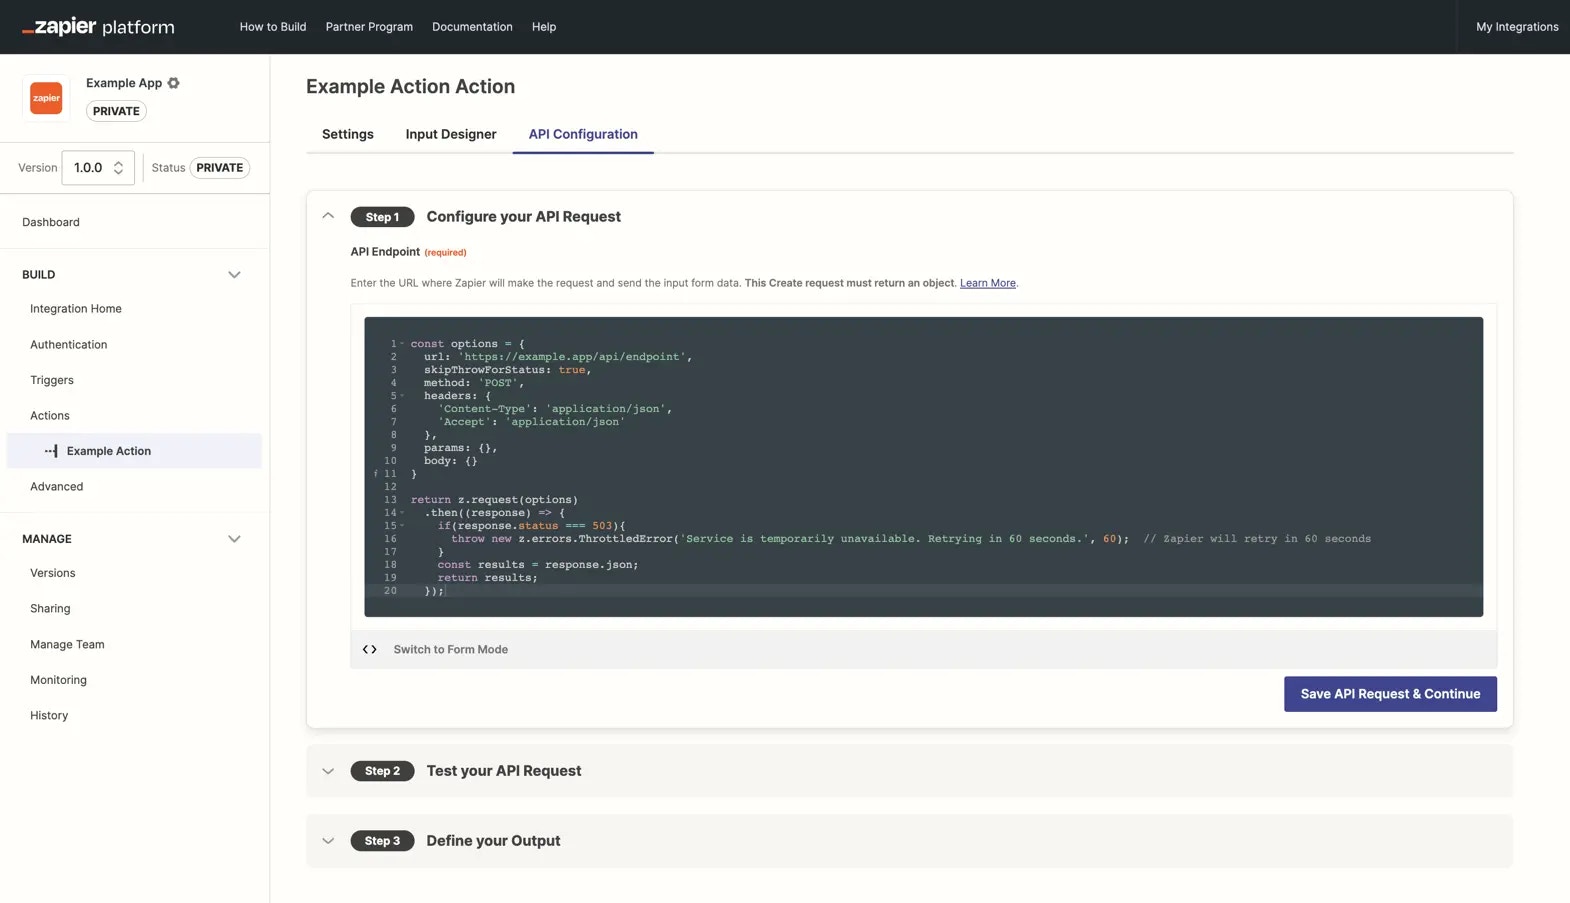 > **Note:** Integrations built with the Zapier Platform UI can enable the *skipThrowForStatus* toggle under [Advanced/Settings](/platform/build/errors) to On to use [`skipThrowForStatus:true`](https://cdn.zappy.app/8ac6af91f6b27c4a473d566f1534b27e.png) on every request
## 3. Specify how long Zapier should wait before retrying
The `ThrottledError(message,delay)` method accepts two input parameters; a custom error message (string) and a delay expressed in seconds (integer).
Include a Retry-After header with responses provided by your API during downtime, to specify the amount of time until the service is expected to be back online and Zapier should retry the request. Your [custom error handling script](https://github.com/zapier/zapier-platform/blob/main/packages/cli/README.md#error-response-handling) can read this header and pass it to the delay parameter for `ThrottledError()`, like this:
```js theme={null}
if (response.status === 503) {
const delay = response.getHeader("retry-after");
const message = `Service is temporarily unavailable. Retrying in ${delay} seconds.`;
throw new z.errors.ThrottledError(message, delay);
}
```
## 4. Scheduled API maintenance
For periods of scheduled maintenance, a status of an app (API) as “unhealthy” can be set between a specific start and end time on request. A “Scheduled Maintenance” message will then be posted to our [status page](https://status.zapier.com) for [example](https://status.zapier.com/incidents/njgw7lrhn5hs).
> **Note:** Integrations built with the Zapier Platform UI can enable the *skipThrowForStatus* toggle under [Advanced/Settings](/platform/build/errors) to On to use [`skipThrowForStatus:true`](https://cdn.zappy.app/8ac6af91f6b27c4a473d566f1534b27e.png) on every request
## 3. Specify how long Zapier should wait before retrying
The `ThrottledError(message,delay)` method accepts two input parameters; a custom error message (string) and a delay expressed in seconds (integer).
Include a Retry-After header with responses provided by your API during downtime, to specify the amount of time until the service is expected to be back online and Zapier should retry the request. Your [custom error handling script](https://github.com/zapier/zapier-platform/blob/main/packages/cli/README.md#error-response-handling) can read this header and pass it to the delay parameter for `ThrottledError()`, like this:
```js theme={null}
if (response.status === 503) {
const delay = response.getHeader("retry-after");
const message = `Service is temporarily unavailable. Retrying in ${delay} seconds.`;
throw new z.errors.ThrottledError(message, delay);
}
```
## 4. Scheduled API maintenance
For periods of scheduled maintenance, a status of an app (API) as “unhealthy” can be set between a specific start and end time on request. A “Scheduled Maintenance” message will then be posted to our [status page](https://status.zapier.com) for [example](https://status.zapier.com/incidents/njgw7lrhn5hs).
 The app will also have a status of “unhealthy” on the [*App Status* tab.](https://status.zapier.com/#app-status)
During a set maintenance window, Zaps impacted by the downtime will be affected as follows:
**Actions/Searches:** Zap runs with affected actions/searches will have the status of “Playing” in the Zap History page. The action/search will be delayed until the incident resolves, or up to five times. On the fifth time, Zapier will attempt it regardless of the app status. If it fails, Zap runs will error and [normal manual replay mechanisms](https://help.zapier.com/hc/en-us/articles/8496241726989-Replay-failed-Zap-runs) can be used to try to replay any affected Zap runs.
**Triggers:** *most* Zaps with affected (polling) triggers won't run and so (for the most part) there will be no Zap runs in [Zap History](https://help.zapier.com/hc/en-us/articles/8496291148685-View-and-manage-your-Zap-history).
In more detail, Zapier will “skip” 90% of polls, allowing 10% through, so typically *some* runs will occur for *some* Zaps. After 15 minutes, all polling is re-enabled to check if the API is healthy again. If not, Zapier will again “skip” 90% of polls. This will be repeated until the API is healthy. Once the API is healthy, Zaps will be triggered and “catch up” on missed data, subject to normal polling limitations such as [pagination](/platform/build/trigger#how-to-use-pagination).
If Zap runs error users will be notified via email based on their [notification settings](https://help.zapier.com/hc/en-us/articles/8496289225229-Manage-notifications-when-errors-occur-in-Zaps).
If you would like to schedule a maintenance window for your app, please send across the following information to [Developer Support](https://developer.zapier.com/contact)
* Start date and time (in UTC)
* End date and time (in UTC)
* Further details about how the API will respond during the downtime if called; eg. will it return an [HTTP 503](https://www.webfx.com/web-development/glossary/http-status-codes/what-is-a-503-status-code/) “Service Unavailable” status code or not respond at all.
***
*Need help? [Tell us about your problem](https://developer.zapier.com/contact) and we'll connect you with the right resource or contact support.*
---
# Source: https://docs.zapier.com/platform/build/apikeyauth.md
> ## Documentation Index
> Fetch the complete documentation index at: https://docs.zapier.com/llms.txt
> Use this file to discover all available pages before exploring further.
# Add authentication with API Key
> API Key authentication passes along a user-entered API Key with every API call. In your Zapier integration using API Key authentication, the API key—and optionally any other data your API needs—is included every time a Zap step runs.
The app will also have a status of “unhealthy” on the [*App Status* tab.](https://status.zapier.com/#app-status)
During a set maintenance window, Zaps impacted by the downtime will be affected as follows:
**Actions/Searches:** Zap runs with affected actions/searches will have the status of “Playing” in the Zap History page. The action/search will be delayed until the incident resolves, or up to five times. On the fifth time, Zapier will attempt it regardless of the app status. If it fails, Zap runs will error and [normal manual replay mechanisms](https://help.zapier.com/hc/en-us/articles/8496241726989-Replay-failed-Zap-runs) can be used to try to replay any affected Zap runs.
**Triggers:** *most* Zaps with affected (polling) triggers won't run and so (for the most part) there will be no Zap runs in [Zap History](https://help.zapier.com/hc/en-us/articles/8496291148685-View-and-manage-your-Zap-history).
In more detail, Zapier will “skip” 90% of polls, allowing 10% through, so typically *some* runs will occur for *some* Zaps. After 15 minutes, all polling is re-enabled to check if the API is healthy again. If not, Zapier will again “skip” 90% of polls. This will be repeated until the API is healthy. Once the API is healthy, Zaps will be triggered and “catch up” on missed data, subject to normal polling limitations such as [pagination](/platform/build/trigger#how-to-use-pagination).
If Zap runs error users will be notified via email based on their [notification settings](https://help.zapier.com/hc/en-us/articles/8496289225229-Manage-notifications-when-errors-occur-in-Zaps).
If you would like to schedule a maintenance window for your app, please send across the following information to [Developer Support](https://developer.zapier.com/contact)
* Start date and time (in UTC)
* End date and time (in UTC)
* Further details about how the API will respond during the downtime if called; eg. will it return an [HTTP 503](https://www.webfx.com/web-development/glossary/http-status-codes/what-is-a-503-status-code/) “Service Unavailable” status code or not respond at all.
***
*Need help? [Tell us about your problem](https://developer.zapier.com/contact) and we'll connect you with the right resource or contact support.*
---
# Source: https://docs.zapier.com/platform/build/apikeyauth.md
> ## Documentation Index
> Fetch the complete documentation index at: https://docs.zapier.com/llms.txt
> Use this file to discover all available pages before exploring further.
# Add authentication with API Key
> API Key authentication passes along a user-entered API Key with every API call. In your Zapier integration using API Key authentication, the API key—and optionally any other data your API needs—is included every time a Zap step runs.
 {" "}
Use API Key authentication if your API primarily uses an API key to identify accounts, especially with apps for weather, maps, content verification, file conversion, and other data tools that require a key for access to the service but do not contain user-specific content.
Since API Key authentication allows you to create a custom input form, you can use it for any custom authentication type with username and password-based logins that don't fit other authentication scheme types.
## 1. Build input form
* Open the *Authentication* tab in Zapier visual builder and select *API key*.
{" "}
Use API Key authentication if your API primarily uses an API key to identify accounts, especially with apps for weather, maps, content verification, file conversion, and other data tools that require a key for access to the service but do not contain user-specific content.
Since API Key authentication allows you to create a custom input form, you can use it for any custom authentication type with username and password-based logins that don't fit other authentication scheme types.
## 1. Build input form
* Open the *Authentication* tab in Zapier visual builder and select *API key*.
 {" "}
* Add authentication input fields where users will enter their API key and any other required authentication details. Check your API documentation for what fields are required, including user or account names, domains, and more. Note any details users may need on how to find that data in your app. API keys especially are often hidden under settings menus and you'll need to include those details in your input form's help text.
{" "}
* Add authentication input fields where users will enter their API key and any other required authentication details. Check your API documentation for what fields are required, including user or account names, domains, and more. Note any details users may need on how to find that data in your app. API keys especially are often hidden under settings menus and you'll need to include those details in your input form's help text.
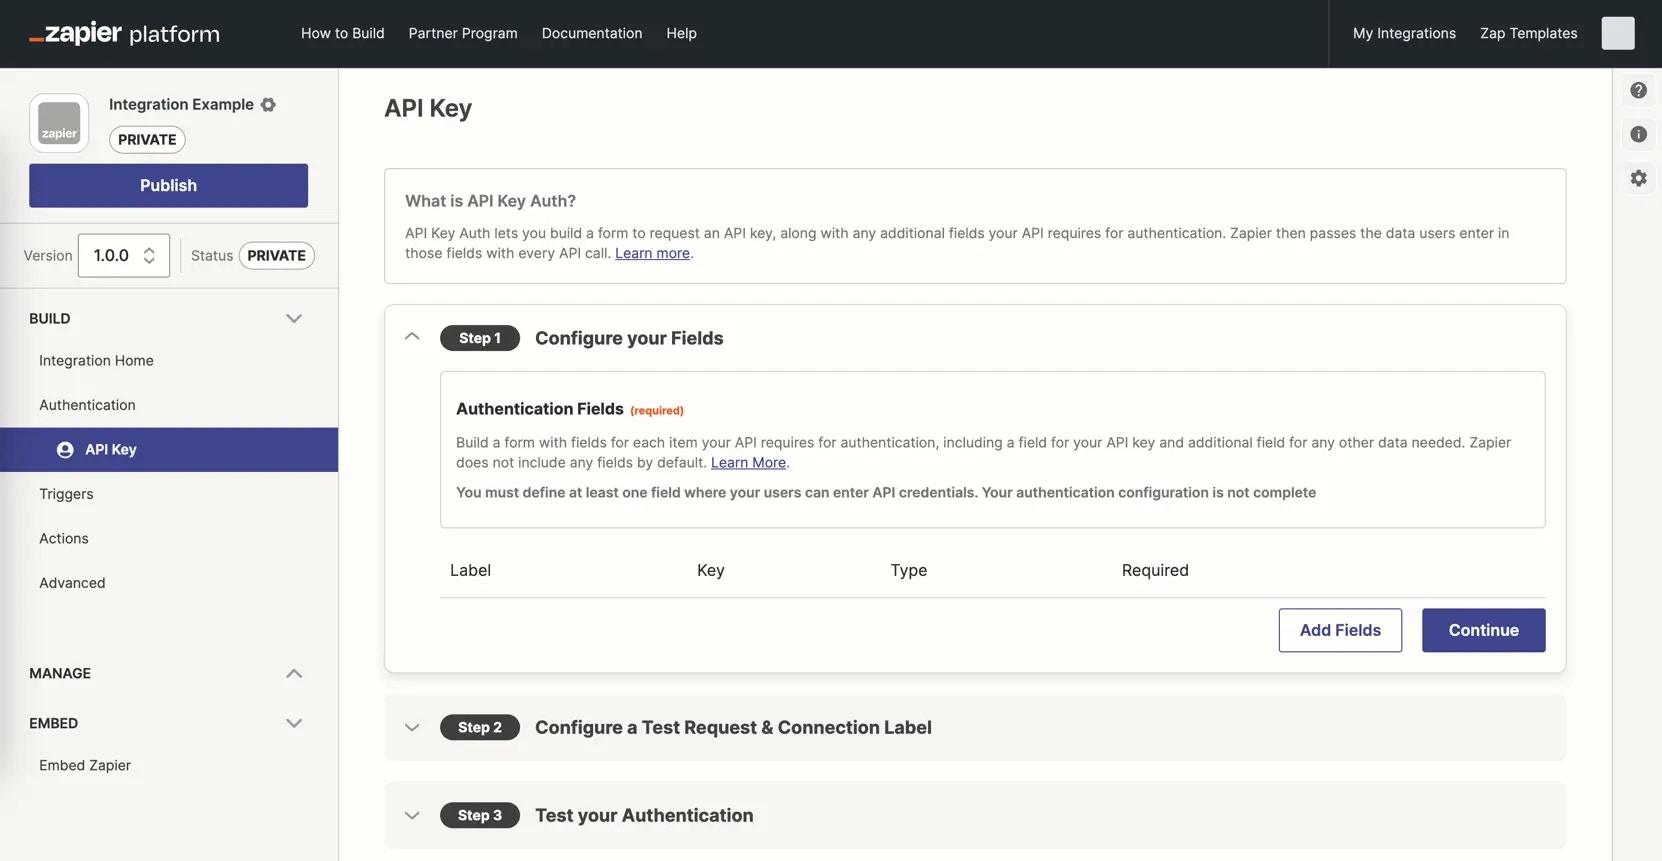 {" "}
* Click the *Add Fields* button and fill in the details for your field. Add the most commonly needed fields first, in the order users expect, as you cannot reorder fields once added.
* Add the required *Key*, the name your API uses to reference this field.
{" "}
* Click the *Add Fields* button and fill in the details for your field. Add the most commonly needed fields first, in the order users expect, as you cannot reorder fields once added.
* Add the required *Key*, the name your API uses to reference this field.
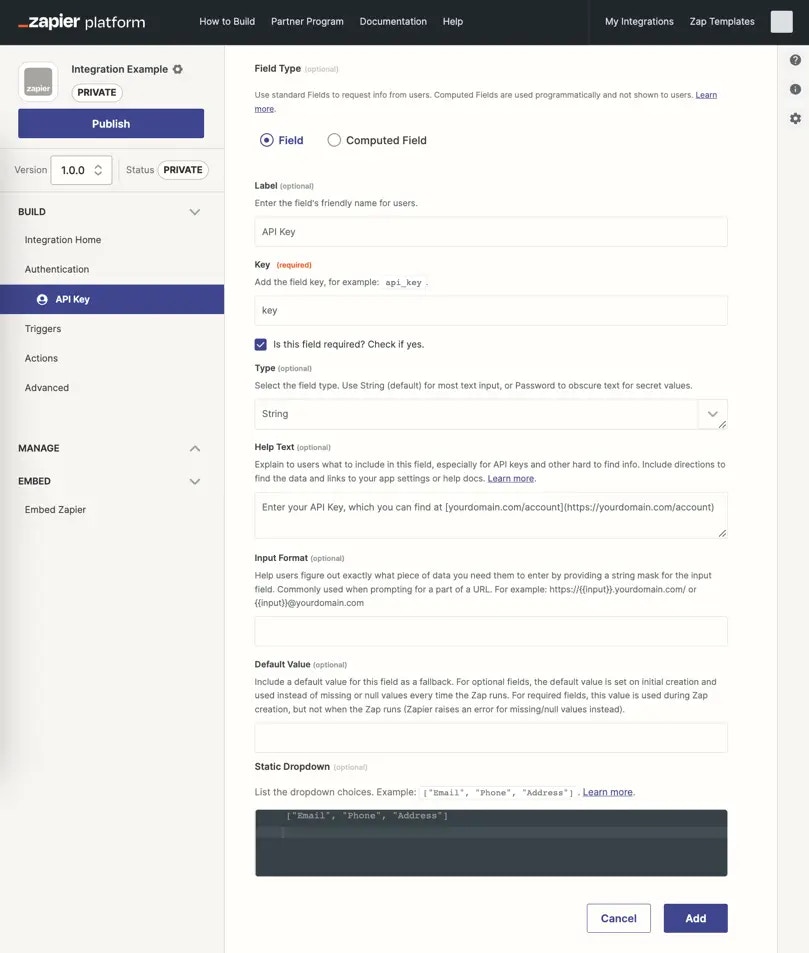 {" "}
* Fill in the optional fields, as appropriate, especially the *Label*:
– **Label**: A human-friendly name for this field that will be shown to users in the authentication form.
– **Required? (checkbox)**: Check if this field is required for successful authentication.
– **Type**: All input fields use the `string` text field by default; select `password` instead if you would like to obscure the data as users enter it.
– **Help Text**: Include a direct URL formatted with [Markdown](https://zapier.com/blog/beginner-ultimate-guide-markdown/) where users can obtain their API key from your app. If there is no direct link, include as clear of directions as possible to help users find the API key.
– **Input Format**: (optional) Help users figure out exactly what piece of data you need them to enter. For example, for [a subdomain](/platform/build/subdomain-validation), [https://.yourdomain.com/](https://.yourdomain.com/).
– **Default Value**: Include a value for this field to be used as a fallback. For optional fields, the default value is set on initial connection creation and used in the API call instead of missing or null values every time the Zap runs. For required fields, this value is used during connection creation, but not when the Zap runs (Zapier raises an error for missing/null values instead).
* Input fields marked as password and all authentication fields with sensitive, private data such as API keys from API Key auth are automatically censored at runtime. These values are stored in the Auth bundle and used in API calls, but are replaced in Zapier's logs with a censored value like this `:censored:6:82a3be9927:`. Due to this, it is not possible to view the exact tokens or keys in Zapier's logs. To verify that the same token as was returned by the authentication, is being used in subsequent API calls; you can compare censored value characters, for example `:censored:6:82a3be9927:` would have the same value ending in 9927 when used in a subsequent call.
* Computed fields are not applicable to API Key authentication and are only used with OAuth v2 and Session Auth.
* Each input field is listed with its label, key, type, and required status in your authentication settings. Click the field to edit it, or click the gear icon and select *Delete* to remove a field.
{" "}
* Fill in the optional fields, as appropriate, especially the *Label*:
– **Label**: A human-friendly name for this field that will be shown to users in the authentication form.
– **Required? (checkbox)**: Check if this field is required for successful authentication.
– **Type**: All input fields use the `string` text field by default; select `password` instead if you would like to obscure the data as users enter it.
– **Help Text**: Include a direct URL formatted with [Markdown](https://zapier.com/blog/beginner-ultimate-guide-markdown/) where users can obtain their API key from your app. If there is no direct link, include as clear of directions as possible to help users find the API key.
– **Input Format**: (optional) Help users figure out exactly what piece of data you need them to enter. For example, for [a subdomain](/platform/build/subdomain-validation), [https://.yourdomain.com/](https://.yourdomain.com/).
– **Default Value**: Include a value for this field to be used as a fallback. For optional fields, the default value is set on initial connection creation and used in the API call instead of missing or null values every time the Zap runs. For required fields, this value is used during connection creation, but not when the Zap runs (Zapier raises an error for missing/null values instead).
* Input fields marked as password and all authentication fields with sensitive, private data such as API keys from API Key auth are automatically censored at runtime. These values are stored in the Auth bundle and used in API calls, but are replaced in Zapier's logs with a censored value like this `:censored:6:82a3be9927:`. Due to this, it is not possible to view the exact tokens or keys in Zapier's logs. To verify that the same token as was returned by the authentication, is being used in subsequent API calls; you can compare censored value characters, for example `:censored:6:82a3be9927:` would have the same value ending in 9927 when used in a subsequent call.
* Computed fields are not applicable to API Key authentication and are only used with OAuth v2 and Session Auth.
* Each input field is listed with its label, key, type, and required status in your authentication settings. Click the field to edit it, or click the gear icon and select *Delete* to remove a field.
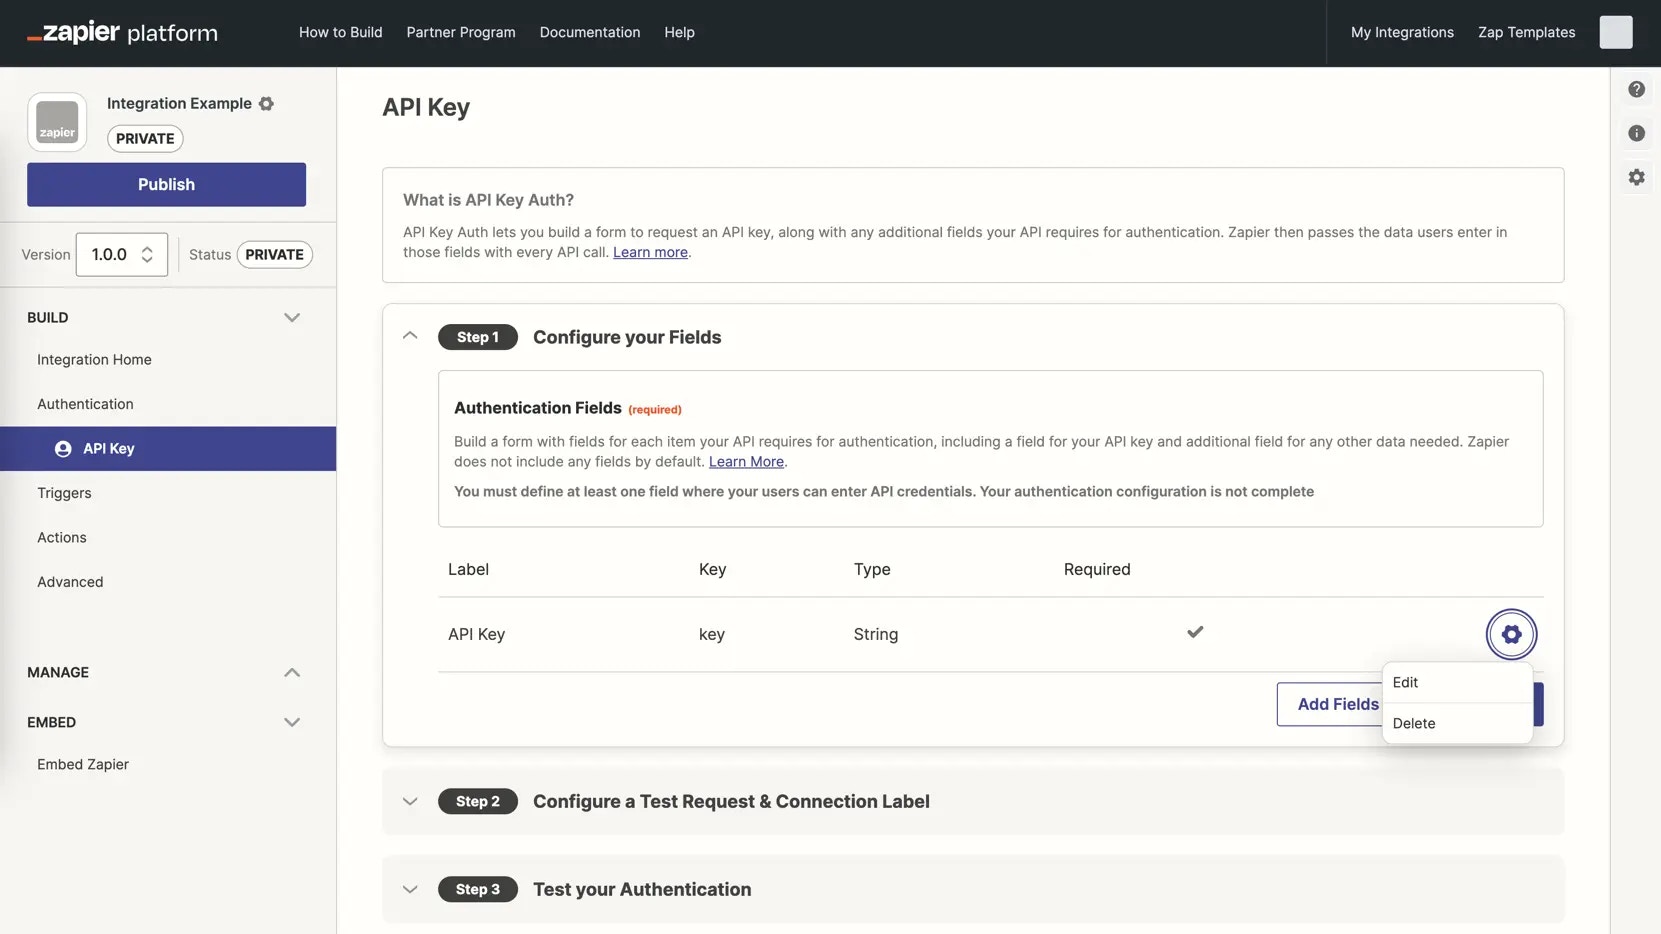 {" "}
* Once you've added all the input fields to your authentication form, select *Continue*
## 2. Add a Test API Request
* Add an API call to your API that requires no configuration, typically a `/user` or `/me` call. Add the URL for the API call, and set the call type, typically a `GET`. This will test the user-entered API key and any other credentials to ensure it enables a successful API call to your app.
{" "}
* Once you've added all the input fields to your authentication form, select *Continue*
## 2. Add a Test API Request
* Add an API call to your API that requires no configuration, typically a `/user` or `/me` call. Add the URL for the API call, and set the call type, typically a `GET`. This will test the user-entered API key and any other credentials to ensure it enables a successful API call to your app.
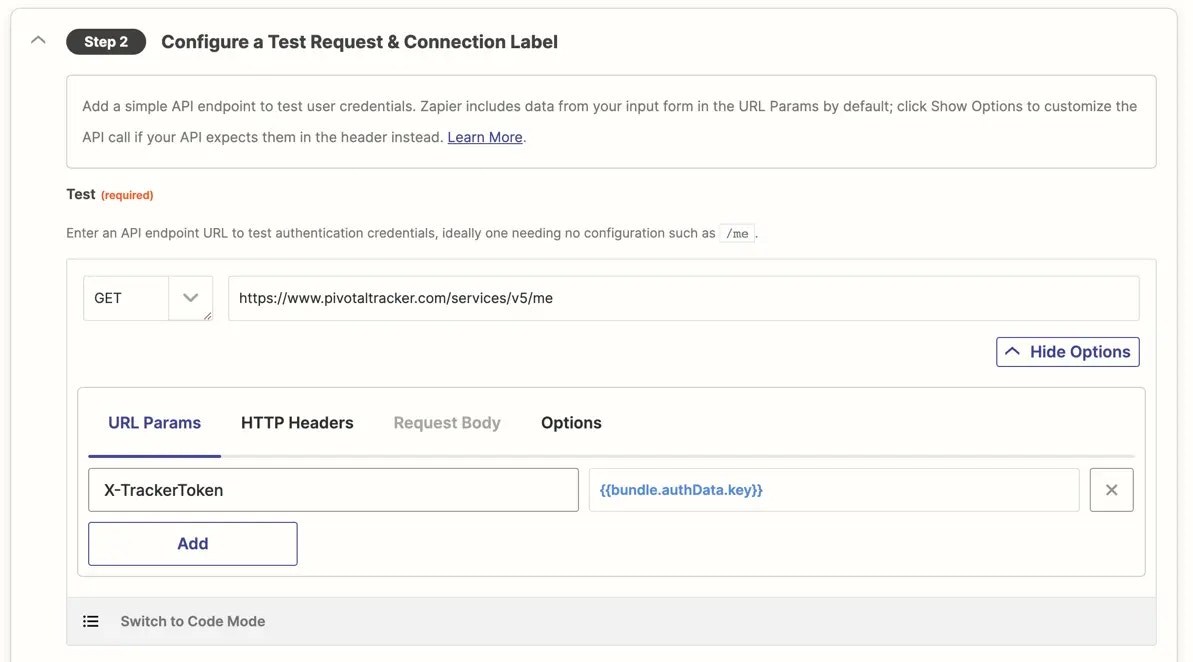 {" "}
* The API key and any additional input fields are automatically included in the URL Params and the HTTP Headers. Click *Show Options* to remove the details where they are not needed. It is typically not recommended to pass any sensitive information such as the API key in the URL Params. Passing it through the headers or even the body is preferable.
* To customize the test API request, select *Switch to Code Mode* and write custom JavaScript code to handle your test API call and the response parsing as needed. The first time you click the toggle, Zapier will convert your API call to code. If you switch back to Form Mode though, Zapier will not convert your code changes to the Form mode, nor will any subsequent changes in the form be added to your code.
{" "}
* The API key and any additional input fields are automatically included in the URL Params and the HTTP Headers. Click *Show Options* to remove the details where they are not needed. It is typically not recommended to pass any sensitive information such as the API key in the URL Params. Passing it through the headers or even the body is preferable.
* To customize the test API request, select *Switch to Code Mode* and write custom JavaScript code to handle your test API call and the response parsing as needed. The first time you click the toggle, Zapier will convert your API call to code. If you switch back to Form Mode though, Zapier will not convert your code changes to the Form mode, nor will any subsequent changes in the form be added to your code.
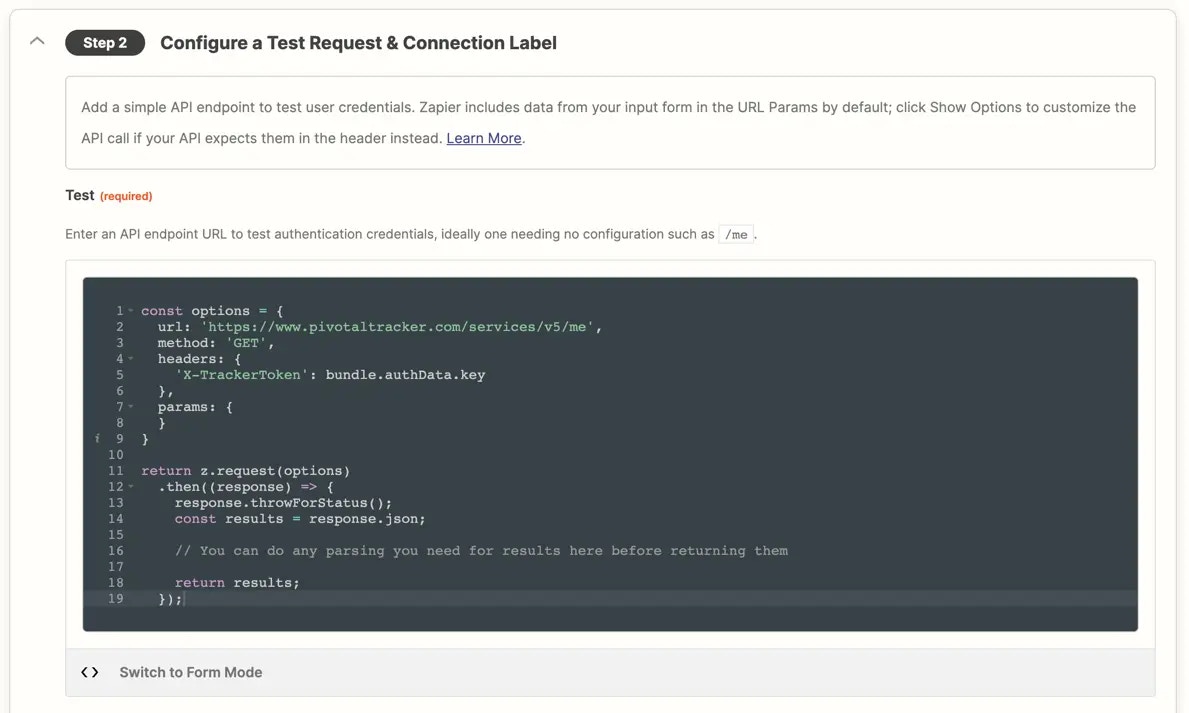 {" "}
## 3. Configure a Connection Label
Review [connection label documentation](/platform/build/connection-label) to optionally differentiate the app accounts users connect.
## 4. Test your authentication
Connect a valid user account to [test authentication](/platform/build/test-auth).
***
*Need help? [Tell us about your problem](https://developer.zapier.com/contact) and we'll connect you with the right resource or contact support.*
---
# Source: https://docs.zapier.com/powered-by-zapier/authentication/methods/app-access-token.md
> ## Documentation Index
> Fetch the complete documentation index at: https://docs.zapier.com/llms.txt
> Use this file to discover all available pages before exploring further.
# App Access Token
> How to authenticate with an App Access Token
### Prerequisites
* Your app needs to be published as a [public integration](https://platform.zapier.com/quickstart/private-vs-public-integrations) in Zapier's App Directory.
### Retrieving and Using an App Access Token
While many API endpoints require a user access token to perform actions on behalf of a user, some (like [unenrolling a user from a promotion](https://docs.zapier.com/powered-by-zapier/api-reference/promotions/delete-enrollment)) require an App Access Token.
You can find your Client ID and Client Secret in the [Zapier Developer Platform](https://developer.zapier.com/) under `Embed` → `Settings` → `Credentials`

Your application's **Client ID** and **Client Secret** are only available after you've published your app as a [public integration in Zapier's App Directory](https://platform.zapier.com/quickstart/private-vs-public-integrations).
Regenerating your client secret will invalidate any previous secret.
The various endpoints of the Zapier Workflow API require different OAuth scopes. Information on specific scopes required is included within the API reference for each endpoint.
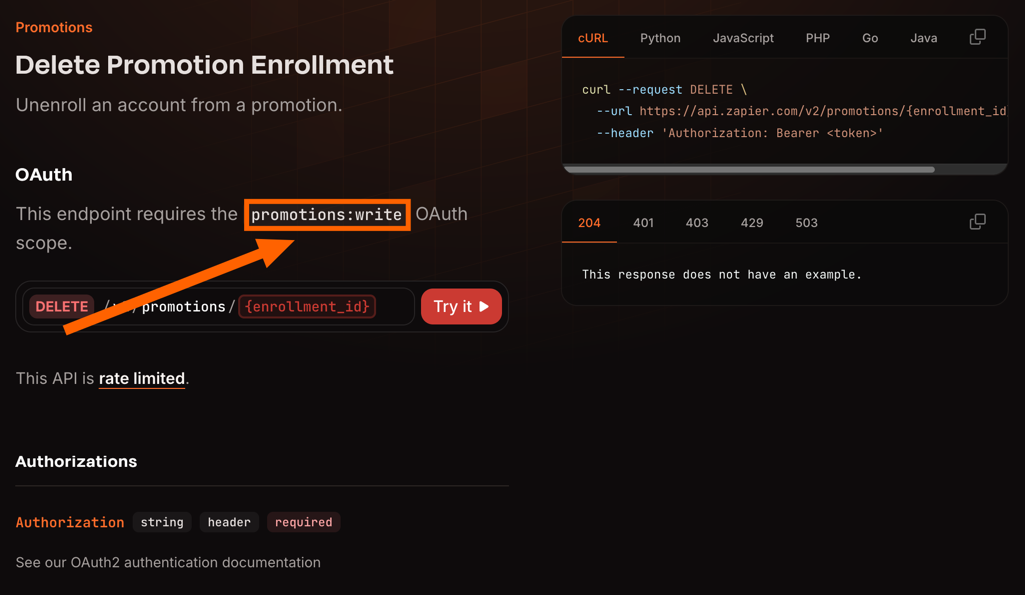
The final step is to exchange the **client credentials** for an **access token** that can be used to make authorized requests to the Zapier Workflow API. You make the exchange with a `POST` request to Zapier's token endpoint `https://zapier.com/oauth/token/`.
Below is an example of a request that can be used to do the exchange.
```sh cURL theme={null}
curl -v -u {CLIENT_ID}:{CLIENT_SECRET} \
-H "Content-Type: multipart/form-data" \
-F grant_type=client_credentials \
-F scope="{SCOPE}" \
https://zapier.com/oauth/token/
```
```python Python theme={null}
import requests
data = 'grant_type=client_credentials&scope={SCOPE}'
response = requests.post('https://zapier.com/oauth/token/', headers=headers, data=data, auth=('{CLIENT_ID}', '{CLIENT_SECRET}'))
```
```js Javascript theme={null}
fetch('https://zapier.com/oauth/token/', {
method: 'POST',
headers: {
'Content-Type': 'multipart/form-data',
'Authorization': 'Basic ' + btoa('{CLIENT_ID}:{CLIENT_SECRET}')
},
body: 'grant_type=client_credentials&scope={SCOPE}'
});
```
```php PHP theme={null}
| Parameter | Meaning |
| --------------- | ----------------------------------------------------------------------------------------------------------------------------------------- |
| `CLIENT_ID` | This will be same client id that you retrieved in step #1. |
| `CLIENT_SECRET` | This is a secret known only to your application and the authorization server. It will be the client secret that you retrieved in step #1. |
| `SCOPE` | This is the one or more scope(s) needed from step #2, separated by spaces. |
Note that, in addition to client id and secret being passed as a Basic Authentication header as above, they can be
passed as part of the body, using the keys `client_id` and `client_secret`.
You'll recieve a response that looks like this:
```js theme={null}
HTTP/1.1 200 OK
Content-Type: multipart/form-data
Cache-Control: no-store
Pragma: no-cache
{
"access_token": "jk8s9dGJK39JKD93jkd03JD",
"expires_in": 36000,
"token_type": "Bearer",
"scope": "promotions:read promotions:write"
}
```
This response contains the `access_token` that you'll use to make API request on your app's behalf.
The access token **MUST** be stored securely on your server, to protect your app's security and your users' privacy. It **MAY NOT** be used in browser (frontend) requests.
The access token should be passed with requests as an `Authorization` header. For example:
```
Authorization: Bearer jk8s9dGJK39JKD93jkd03JD
```
---
# Source: https://docs.zapier.com/platform/quickstart/app-developer-services.md
> ## Documentation Index
> Fetch the complete documentation index at: https://docs.zapier.com/llms.txt
> Use this file to discover all available pages before exploring further.
# App Developer Services
> If you don't have the time or resources to dedicate towards developing your own integration, Zapier has Solution Partners who may be able to assist you. Solution Partners can build and maintain Zapier integrations for you, including private integrations, public integrations, and custom actions, making them a smart way to extend your dev team’s capacity.
## Featured Solution Partners
If you're looking for additional Solution Partners or help with Zap workflows, contact one of our [Solution Partners](https://zapier.com/partnerdirectory/) who can help you out.
**Note:** *Solution Partners are third parties and not Zapier. When working
with a Solution Partner on integration development, ensure you have a plan for
long-term support and maintenance, whether through the original Solution
Partner or a dedicated in-house team.*
*Need help?* [Tell us about your problem](https://developer.zapier.com/contact) *and we'll connect you with the right resource or contact support.*
---
# Source: https://docs.zapier.com/powered-by-zapier/api-reference/common-types/app.md
> ## Documentation Index
> Fetch the complete documentation index at: https://docs.zapier.com/llms.txt
> Use this file to discover all available pages before exploring further.
# null
---
# Source: https://docs.zapier.com/platform/manage/auth-keys.md
> ## Documentation Index
> Fetch the complete documentation index at: https://docs.zapier.com/llms.txt
> Use this file to discover all available pages before exploring further.
# Change authentication field keys
## Change scenario
You want to change the key of one or more [authentication input fields](/platform/build/basicauth#1-build-an-input-form) required when a user authenticates your app to Zapier.
## Impact to users
This is a **breaking change**.
Modifying the key of an existing authentication field constitutes a breaking change. Without adequate precautions, existing app connections may break as [migration](/platform/manage/migrate) is not possible. Users will need to establish a new connection to your integration and manually refresh each of their Zaps.
## Best practices
We strongly encourage you to **avoid changing authentication field keys** whenever possible.
### Workaround
If your API endpoint requires a different property for authentication, think about adjusting the property key rather than amending the form field input's key. This modification must be made in each trigger, action, search request, as well as in the authentication.
> NOTE: Form field input keys do not need to match directly with the properties your API expects.
For example, let's say you have a form field input with the key `API-KEY`and are sending the field's value to your API using the same property name of `API-KEY`.
{" "}
## 3. Configure a Connection Label
Review [connection label documentation](/platform/build/connection-label) to optionally differentiate the app accounts users connect.
## 4. Test your authentication
Connect a valid user account to [test authentication](/platform/build/test-auth).
***
*Need help? [Tell us about your problem](https://developer.zapier.com/contact) and we'll connect you with the right resource or contact support.*
---
# Source: https://docs.zapier.com/powered-by-zapier/authentication/methods/app-access-token.md
> ## Documentation Index
> Fetch the complete documentation index at: https://docs.zapier.com/llms.txt
> Use this file to discover all available pages before exploring further.
# App Access Token
> How to authenticate with an App Access Token
### Prerequisites
* Your app needs to be published as a [public integration](https://platform.zapier.com/quickstart/private-vs-public-integrations) in Zapier's App Directory.
### Retrieving and Using an App Access Token
While many API endpoints require a user access token to perform actions on behalf of a user, some (like [unenrolling a user from a promotion](https://docs.zapier.com/powered-by-zapier/api-reference/promotions/delete-enrollment)) require an App Access Token.
You can find your Client ID and Client Secret in the [Zapier Developer Platform](https://developer.zapier.com/) under `Embed` → `Settings` → `Credentials`

Your application's **Client ID** and **Client Secret** are only available after you've published your app as a [public integration in Zapier's App Directory](https://platform.zapier.com/quickstart/private-vs-public-integrations).
Regenerating your client secret will invalidate any previous secret.
The various endpoints of the Zapier Workflow API require different OAuth scopes. Information on specific scopes required is included within the API reference for each endpoint.

The final step is to exchange the **client credentials** for an **access token** that can be used to make authorized requests to the Zapier Workflow API. You make the exchange with a `POST` request to Zapier's token endpoint `https://zapier.com/oauth/token/`.
Below is an example of a request that can be used to do the exchange.
```sh cURL theme={null}
curl -v -u {CLIENT_ID}:{CLIENT_SECRET} \
-H "Content-Type: multipart/form-data" \
-F grant_type=client_credentials \
-F scope="{SCOPE}" \
https://zapier.com/oauth/token/
```
```python Python theme={null}
import requests
data = 'grant_type=client_credentials&scope={SCOPE}'
response = requests.post('https://zapier.com/oauth/token/', headers=headers, data=data, auth=('{CLIENT_ID}', '{CLIENT_SECRET}'))
```
```js Javascript theme={null}
fetch('https://zapier.com/oauth/token/', {
method: 'POST',
headers: {
'Content-Type': 'multipart/form-data',
'Authorization': 'Basic ' + btoa('{CLIENT_ID}:{CLIENT_SECRET}')
},
body: 'grant_type=client_credentials&scope={SCOPE}'
});
```
```php PHP theme={null}
| Parameter | Meaning |
| --------------- | ----------------------------------------------------------------------------------------------------------------------------------------- |
| `CLIENT_ID` | This will be same client id that you retrieved in step #1. |
| `CLIENT_SECRET` | This is a secret known only to your application and the authorization server. It will be the client secret that you retrieved in step #1. |
| `SCOPE` | This is the one or more scope(s) needed from step #2, separated by spaces. |
Note that, in addition to client id and secret being passed as a Basic Authentication header as above, they can be
passed as part of the body, using the keys `client_id` and `client_secret`.
You'll recieve a response that looks like this:
```js theme={null}
HTTP/1.1 200 OK
Content-Type: multipart/form-data
Cache-Control: no-store
Pragma: no-cache
{
"access_token": "jk8s9dGJK39JKD93jkd03JD",
"expires_in": 36000,
"token_type": "Bearer",
"scope": "promotions:read promotions:write"
}
```
This response contains the `access_token` that you'll use to make API request on your app's behalf.
The access token **MUST** be stored securely on your server, to protect your app's security and your users' privacy. It **MAY NOT** be used in browser (frontend) requests.
The access token should be passed with requests as an `Authorization` header. For example:
```
Authorization: Bearer jk8s9dGJK39JKD93jkd03JD
```
---
# Source: https://docs.zapier.com/platform/quickstart/app-developer-services.md
> ## Documentation Index
> Fetch the complete documentation index at: https://docs.zapier.com/llms.txt
> Use this file to discover all available pages before exploring further.
# App Developer Services
> If you don't have the time or resources to dedicate towards developing your own integration, Zapier has Solution Partners who may be able to assist you. Solution Partners can build and maintain Zapier integrations for you, including private integrations, public integrations, and custom actions, making them a smart way to extend your dev team’s capacity.
## Featured Solution Partners
If you're looking for additional Solution Partners or help with Zap workflows, contact one of our [Solution Partners](https://zapier.com/partnerdirectory/) who can help you out.
**Note:** *Solution Partners are third parties and not Zapier. When working
with a Solution Partner on integration development, ensure you have a plan for
long-term support and maintenance, whether through the original Solution
Partner or a dedicated in-house team.*
*Need help?* [Tell us about your problem](https://developer.zapier.com/contact) *and we'll connect you with the right resource or contact support.*
---
# Source: https://docs.zapier.com/powered-by-zapier/api-reference/common-types/app.md
> ## Documentation Index
> Fetch the complete documentation index at: https://docs.zapier.com/llms.txt
> Use this file to discover all available pages before exploring further.
# null
---
# Source: https://docs.zapier.com/platform/manage/auth-keys.md
> ## Documentation Index
> Fetch the complete documentation index at: https://docs.zapier.com/llms.txt
> Use this file to discover all available pages before exploring further.
# Change authentication field keys
## Change scenario
You want to change the key of one or more [authentication input fields](/platform/build/basicauth#1-build-an-input-form) required when a user authenticates your app to Zapier.
## Impact to users
This is a **breaking change**.
Modifying the key of an existing authentication field constitutes a breaking change. Without adequate precautions, existing app connections may break as [migration](/platform/manage/migrate) is not possible. Users will need to establish a new connection to your integration and manually refresh each of their Zaps.
## Best practices
We strongly encourage you to **avoid changing authentication field keys** whenever possible.
### Workaround
If your API endpoint requires a different property for authentication, think about adjusting the property key rather than amending the form field input's key. This modification must be made in each trigger, action, search request, as well as in the authentication.
> NOTE: Form field input keys do not need to match directly with the properties your API expects.
For example, let's say you have a form field input with the key `API-KEY`and are sending the field's value to your API using the same property name of `API-KEY`.
 ```bash theme={null}
headers: {
"API-KEY": bundle.authData.api_key; // original
}
```
Next, your API changes and expects the request property to be `X-API-KEY` instead. You can change the request property key (left) as needed. But still refer to the original form field input (right).
```bash theme={null}
headers: {
"API-KEY": bundle.authData.api_key; // original
}
```
Next, your API changes and expects the request property to be `X-API-KEY` instead. You can change the request property key (left) as needed. But still refer to the original form field input (right).
 ```bash theme={null}
headers: {
"X-API-KEY": bundle.authData.api_key; // new - request key and field key can differ
}
```
***
*Need help? [Tell us about your problem](https://developer.zapier.com/contact) and we'll connect you with the right resource or contact support.*
---
# Source: https://docs.zapier.com/platform/manage/auth-required.md
> ## Documentation Index
> Fetch the complete documentation index at: https://docs.zapier.com/llms.txt
> Use this file to discover all available pages before exploring further.
# Add required authentication field
## Change scenario
You'd like to add, remove, or change an optional input field to be required in your current authentication schema.
## Impact to users
This will cause a breaking change which will have the following significant effects to users:
* Existing connected accounts will not work: All existing connected accounts will no longer be functional with your integration until users re-authenticate manually.
* Manual updates are required for all Zaps: Zaps cannot be migrated due to a breaking change, users will have to edit each Zap individually before they can start running tasks again. For example, if a user has 20 Zaps set up with your integration, they will need to manually update each one of those Zaps.
## Best practices
* **Add the field as optional:** Use field \[help text]\(/ and [custom error handling](https://github.com/zapier/zapier-platform/blob/main/packages/cli/README.md#error-handling) (if you're using our Code Mode or the CLI platform) to validate that the newly required field is provided, while keeping it set to optional. Also, consider using custom code to set the field's default value in your API call if left blank.
* **Set a default value:** If possible, provide a default value for the required field that can be overwritten if necessary. This ensures that users who do not provide explicit values for these fields can continue to use your integration without issues.
For example in the case of updated API endpoints for geographical region or site domain, it is possible to account for an added **required** inputField with scripting to ensure existing authentications are backward compatible, allowing existing users to be migrated to the new version.
In this example code, the default URL for US region is updated when the user selects AU or CA when authenticating.
```js theme={null}
let baseURL = "theUsApiBaseUrl";
switch (authData.region) {
case "AU":
baseURL = "theAuApiBaseUrl";
break;
case "CA":
//other regions can be easily supported by adding cases like this
baseURL = "theCaApiBaseUrl";
break;
default:
console.log("Legacy credentials are in use, defaulting to US Base URL.");
}
```
***
*Need help? [Tell us about your problem](https://developer.zapier.com/contact) and we'll connect you with the right resource or contact support.*
---
# Source: https://docs.zapier.com/platform/manage/auth-scheme.md
> ## Documentation Index
> Fetch the complete documentation index at: https://docs.zapier.com/llms.txt
> Use this file to discover all available pages before exploring further.
# Change authentication type
> If your API's authentication method changes, you’ll also need to update how Zapier authenticates user accounts in your integration.
## Impact to users
Changing your integration's authentication type (e.g., Basic Auth, API Key, or OAuth) is considered a **breaking change**. Zapier does not currently support automatic migration between different auth types. This means that users would need to make a new connection to your integration and manually modify each of their Zaps.
Because of this implication, any authentication change should be planned carefully to minimize disruption.
## Best practices
**If you must change your authentication method**, we recommend the following:
### Designing a Smooth Transition
1. Ensure your API can support both the old and new auth methods during the transition period.
2. Avoid immediately invalidating the old authentication credentials (e.g., API keys) after issuing new ones, so users aren’t abruptly disconnected.
### Creating a New Version
* [Clone](/platform/manage/clone) your integration to create a new version.
* [Remove](/platform/build/auth#how-to-remove-or-change-zapier-integration-authentication-scheme) the current authentication method and implement the new one.
* Once tested and ready, [promote](/platform/manage/promote) this new version so new users connect using the updated auth type.
### Managing Existing Users
* If the old auth method can continue working for a while, keep the older version available. This allows users to maintain their existing connections temporarily.
* New Zaps will always default to the promoted version, so users will be asked to reconnect using the new auth type when setting up new workflows.
## What to do before changing auth types
Changing your integration’s authentication type has broad impact. Please [contact us](https://developer.zapier.com/contact) as early as possible to let us know your plans.
While we can’t currently guarantee support for migrating user accounts across auth types, starting the conversation early allows us to:
* Better understand your use case
* Provide tailored guidance
* Coordinate timing to reduce disruption for your users
## Deprecating legacy authentication scheme
If you plan to discontinue support for the old authentication method:
* You’ll need to [deprecate](/platform/manage/deprecate) the integration version that uses it.
* Be aware this may be disruptive for users and should be carefully planned.
* Make sure users are informed and given ample time to transition.
> NOTE: This process is not supported for apps built in the legacy web builder. To update the authentication method, you must rebuild all triggers, actions, and searches in the new builder. Simply deleting and re-adding the authentication method will not work with components built in the legacy builder.
***
*Need help? [Tell us about your problem](https://developer.zapier.com/contact) and we'll connect you with the right resource or contact support.*
---
# Source: https://docs.zapier.com/platform/manage/auth-scope.md
> ## Documentation Index
> Fetch the complete documentation index at: https://docs.zapier.com/llms.txt
> Use this file to discover all available pages before exploring further.
# Change OAuth scope
> How to add or remove OAuth scopes.
## Impact to users
When an action in a new version of your integration requires additional OAuth scopes, there is no way around asking users to reconnect existing connected accounts before they can use the new action.
You can remove scopes only if no actions need it anymore. Note that existing connected accounts may still have been granted the scopes, and will only lose them when they get reconnected.
## Best practices
Follow these steps to provide the best user experience when adding new scopes.
1. In the new version where you need the additional scopes, try using the action with a existing connected account, and use [error handling](/platform/build/errors) to ensure that the error message instructs users to reconnect the account.
2. In the new version, add the required scopes to the *Scope* field [in the UI](/platform/build/oauth#add-oauth-endpoint-configuration) or `scope` [in the CLI](https://github.com/zapier/zapier-platform/blob/main/packages/schema/docs/build/schema.md#authenticationoauth2configschema).
You may need to select the scopes for the OAuth client used by the
integration as well, in order for us to be able to request them.
3. Verify that the action now works by connecting an account using the new version.
4. [Promote](/platform/manage/promote) the new version.
5. [Migrate](/platform/manage/migrate) 100% of users to the new version.
The last two steps are critical to enable users to adopt the new scopes by
reconnecting existing connected accounts.
---
# Source: https://docs.zapier.com/platform/build/auth.md
> ## Documentation Index
> Fetch the complete documentation index at: https://docs.zapier.com/llms.txt
> Use this file to discover all available pages before exploring further.
# Authentication
> Connecting an app to Zapier starts with authentication. Users select an app they wish to use in their Zap, authenticating their account with that app to allow Zapier to access their data.
Zapier will have access to the account until the authorization expires, is revoked, or credentials are changed. Zapier will automatically refresh OAuth v2 and session authentications when refresh token functionality is enabled in the integration.
Once users authenticate an app account to Zapier, they can use any of that app's triggers/actions in their Zaps without authenticating again. Users would authenticate another connection if they wish to use additional accounts from an app with Zapier, for example if they have a work and personal account in one app.
Zapier integration builders define how Zapier connects to your app to authenticate users, adding an API call where Zapier tests the account authentication.
All Zapier integrations that can access or add private data for users require authentication. The only apps that don't require authentication include data feeds (such as news or weather updates) or utilities (such as file format conversion tools or public search engines). If you're building an integration for any app that stores private data and requires an account to use, your integration will require authentication.
## Zapier Supported Authentication Schemes
Zapier supports the following five authentication schemes in the Platform UI, each with their own settings:
```bash theme={null}
headers: {
"X-API-KEY": bundle.authData.api_key; // new - request key and field key can differ
}
```
***
*Need help? [Tell us about your problem](https://developer.zapier.com/contact) and we'll connect you with the right resource or contact support.*
---
# Source: https://docs.zapier.com/platform/manage/auth-required.md
> ## Documentation Index
> Fetch the complete documentation index at: https://docs.zapier.com/llms.txt
> Use this file to discover all available pages before exploring further.
# Add required authentication field
## Change scenario
You'd like to add, remove, or change an optional input field to be required in your current authentication schema.
## Impact to users
This will cause a breaking change which will have the following significant effects to users:
* Existing connected accounts will not work: All existing connected accounts will no longer be functional with your integration until users re-authenticate manually.
* Manual updates are required for all Zaps: Zaps cannot be migrated due to a breaking change, users will have to edit each Zap individually before they can start running tasks again. For example, if a user has 20 Zaps set up with your integration, they will need to manually update each one of those Zaps.
## Best practices
* **Add the field as optional:** Use field \[help text]\(/ and [custom error handling](https://github.com/zapier/zapier-platform/blob/main/packages/cli/README.md#error-handling) (if you're using our Code Mode or the CLI platform) to validate that the newly required field is provided, while keeping it set to optional. Also, consider using custom code to set the field's default value in your API call if left blank.
* **Set a default value:** If possible, provide a default value for the required field that can be overwritten if necessary. This ensures that users who do not provide explicit values for these fields can continue to use your integration without issues.
For example in the case of updated API endpoints for geographical region or site domain, it is possible to account for an added **required** inputField with scripting to ensure existing authentications are backward compatible, allowing existing users to be migrated to the new version.
In this example code, the default URL for US region is updated when the user selects AU or CA when authenticating.
```js theme={null}
let baseURL = "theUsApiBaseUrl";
switch (authData.region) {
case "AU":
baseURL = "theAuApiBaseUrl";
break;
case "CA":
//other regions can be easily supported by adding cases like this
baseURL = "theCaApiBaseUrl";
break;
default:
console.log("Legacy credentials are in use, defaulting to US Base URL.");
}
```
***
*Need help? [Tell us about your problem](https://developer.zapier.com/contact) and we'll connect you with the right resource or contact support.*
---
# Source: https://docs.zapier.com/platform/manage/auth-scheme.md
> ## Documentation Index
> Fetch the complete documentation index at: https://docs.zapier.com/llms.txt
> Use this file to discover all available pages before exploring further.
# Change authentication type
> If your API's authentication method changes, you’ll also need to update how Zapier authenticates user accounts in your integration.
## Impact to users
Changing your integration's authentication type (e.g., Basic Auth, API Key, or OAuth) is considered a **breaking change**. Zapier does not currently support automatic migration between different auth types. This means that users would need to make a new connection to your integration and manually modify each of their Zaps.
Because of this implication, any authentication change should be planned carefully to minimize disruption.
## Best practices
**If you must change your authentication method**, we recommend the following:
### Designing a Smooth Transition
1. Ensure your API can support both the old and new auth methods during the transition period.
2. Avoid immediately invalidating the old authentication credentials (e.g., API keys) after issuing new ones, so users aren’t abruptly disconnected.
### Creating a New Version
* [Clone](/platform/manage/clone) your integration to create a new version.
* [Remove](/platform/build/auth#how-to-remove-or-change-zapier-integration-authentication-scheme) the current authentication method and implement the new one.
* Once tested and ready, [promote](/platform/manage/promote) this new version so new users connect using the updated auth type.
### Managing Existing Users
* If the old auth method can continue working for a while, keep the older version available. This allows users to maintain their existing connections temporarily.
* New Zaps will always default to the promoted version, so users will be asked to reconnect using the new auth type when setting up new workflows.
## What to do before changing auth types
Changing your integration’s authentication type has broad impact. Please [contact us](https://developer.zapier.com/contact) as early as possible to let us know your plans.
While we can’t currently guarantee support for migrating user accounts across auth types, starting the conversation early allows us to:
* Better understand your use case
* Provide tailored guidance
* Coordinate timing to reduce disruption for your users
## Deprecating legacy authentication scheme
If you plan to discontinue support for the old authentication method:
* You’ll need to [deprecate](/platform/manage/deprecate) the integration version that uses it.
* Be aware this may be disruptive for users and should be carefully planned.
* Make sure users are informed and given ample time to transition.
> NOTE: This process is not supported for apps built in the legacy web builder. To update the authentication method, you must rebuild all triggers, actions, and searches in the new builder. Simply deleting and re-adding the authentication method will not work with components built in the legacy builder.
***
*Need help? [Tell us about your problem](https://developer.zapier.com/contact) and we'll connect you with the right resource or contact support.*
---
# Source: https://docs.zapier.com/platform/manage/auth-scope.md
> ## Documentation Index
> Fetch the complete documentation index at: https://docs.zapier.com/llms.txt
> Use this file to discover all available pages before exploring further.
# Change OAuth scope
> How to add or remove OAuth scopes.
## Impact to users
When an action in a new version of your integration requires additional OAuth scopes, there is no way around asking users to reconnect existing connected accounts before they can use the new action.
You can remove scopes only if no actions need it anymore. Note that existing connected accounts may still have been granted the scopes, and will only lose them when they get reconnected.
## Best practices
Follow these steps to provide the best user experience when adding new scopes.
1. In the new version where you need the additional scopes, try using the action with a existing connected account, and use [error handling](/platform/build/errors) to ensure that the error message instructs users to reconnect the account.
2. In the new version, add the required scopes to the *Scope* field [in the UI](/platform/build/oauth#add-oauth-endpoint-configuration) or `scope` [in the CLI](https://github.com/zapier/zapier-platform/blob/main/packages/schema/docs/build/schema.md#authenticationoauth2configschema).
You may need to select the scopes for the OAuth client used by the
integration as well, in order for us to be able to request them.
3. Verify that the action now works by connecting an account using the new version.
4. [Promote](/platform/manage/promote) the new version.
5. [Migrate](/platform/manage/migrate) 100% of users to the new version.
The last two steps are critical to enable users to adopt the new scopes by
reconnecting existing connected accounts.
---
# Source: https://docs.zapier.com/platform/build/auth.md
> ## Documentation Index
> Fetch the complete documentation index at: https://docs.zapier.com/llms.txt
> Use this file to discover all available pages before exploring further.
# Authentication
> Connecting an app to Zapier starts with authentication. Users select an app they wish to use in their Zap, authenticating their account with that app to allow Zapier to access their data.
Zapier will have access to the account until the authorization expires, is revoked, or credentials are changed. Zapier will automatically refresh OAuth v2 and session authentications when refresh token functionality is enabled in the integration.
Once users authenticate an app account to Zapier, they can use any of that app's triggers/actions in their Zaps without authenticating again. Users would authenticate another connection if they wish to use additional accounts from an app with Zapier, for example if they have a work and personal account in one app.
Zapier integration builders define how Zapier connects to your app to authenticate users, adding an API call where Zapier tests the account authentication.
All Zapier integrations that can access or add private data for users require authentication. The only apps that don't require authentication include data feeds (such as news or weather updates) or utilities (such as file format conversion tools or public search engines). If you're building an integration for any app that stores private data and requires an account to use, your integration will require authentication.
## Zapier Supported Authentication Schemes
Zapier supports the following five authentication schemes in the Platform UI, each with their own settings:
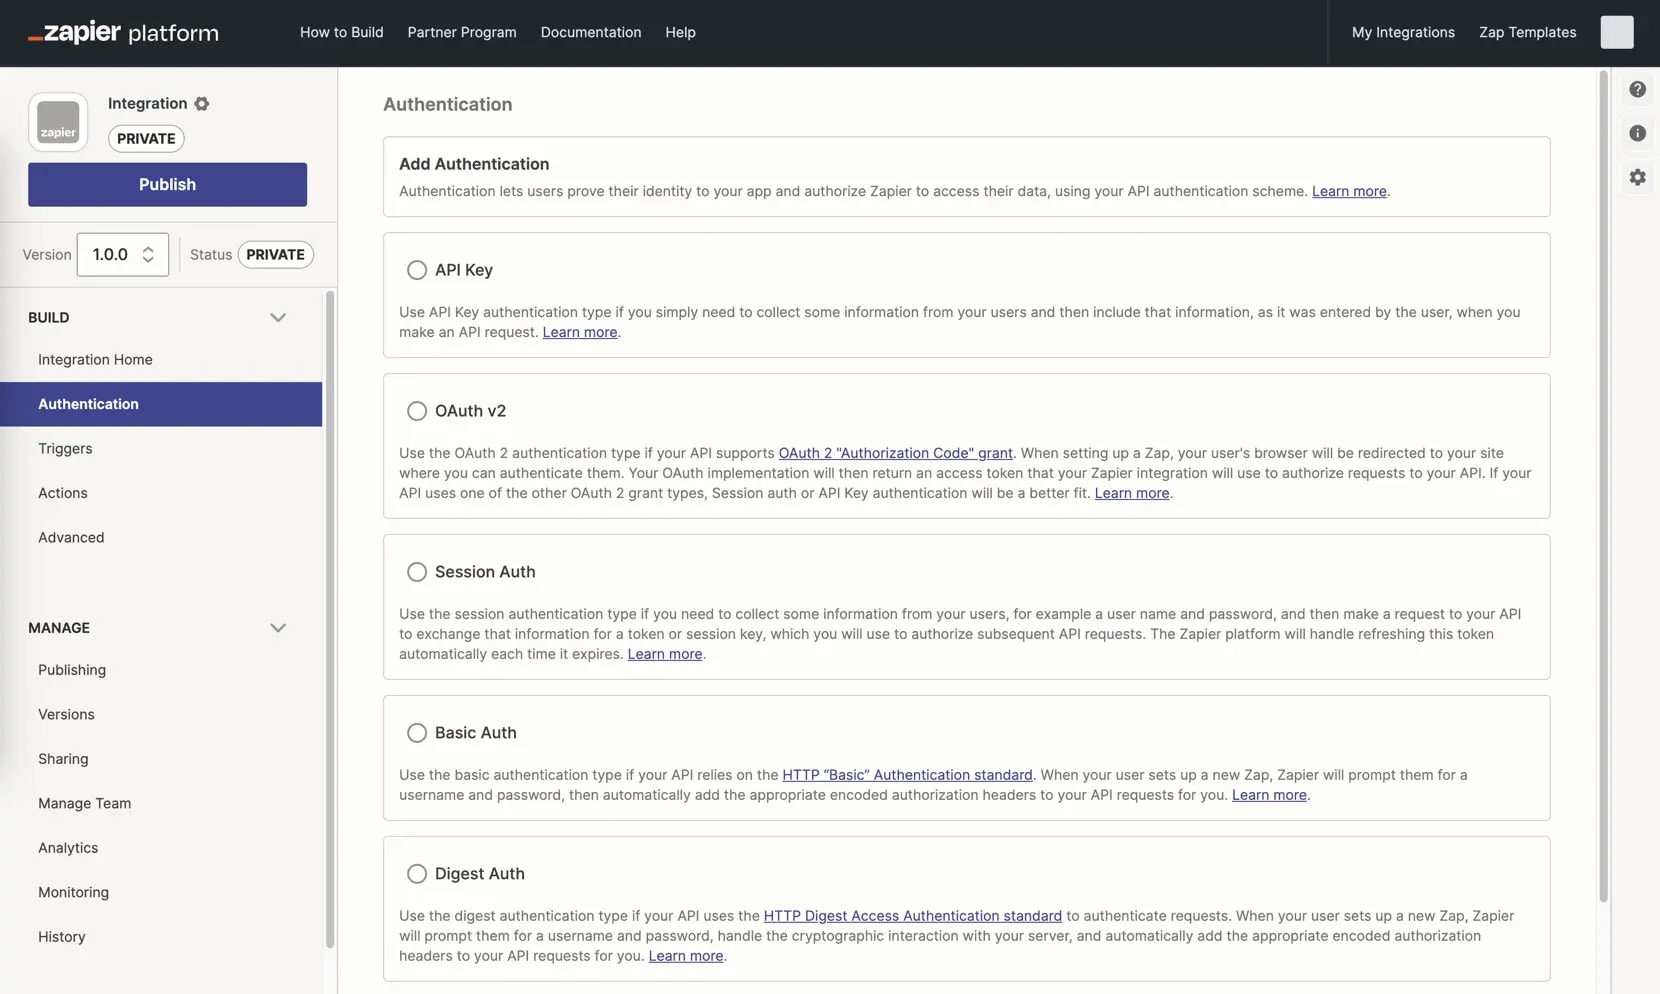 {" "}
Where possible, OAuth v2 authentication is the preferred scheme to simplify a user's account connection and minimize set up time. During the authentication flow via Zapier, a familiar popup window appears from your app to select their account or log in, then verify the connection. This fits the flow most modern apps use for integration authentication.
API Key authentication is next best. Users must be able to obtain their API key from your app without human intervention. Your integration won't be [approved for publishing](/platform/quickstart/private-vs-public-integrations) if your service requires users to email or call your team in order to receive an API key or access to your API.
Basic authentication, while acceptable, is the least appropriate authentication type to use for a third party service like Zapier, as users must type their account credentials directly into Zapier's UI.
For more custom authentication schemes, switch to the [Platform CLI](/platform/manage/export-cli).
## How to Remove or Change Type of Authentication Scheme
You cannot change an integration's authentication scheme directly. First, remove the existing integration's authentication scheme, then add a new authentication scheme.
> **Note:** You can only do this for a (new) integration version that has not yet been promoted and has less than 5 active users, since this will break connected accounts for the version. If an integration's authentication scheme needs to be changed, clone a new major version and add the new authentication. [Learn more](/platform/manage/versions)
To remove a Zapier integration's authentication scheme in the Platform UI, open the *Authentication* page. Click the gear icon beside the existing authentication scheme, click *Delete*, then confirm to remove the authentication.
{" "}
Where possible, OAuth v2 authentication is the preferred scheme to simplify a user's account connection and minimize set up time. During the authentication flow via Zapier, a familiar popup window appears from your app to select their account or log in, then verify the connection. This fits the flow most modern apps use for integration authentication.
API Key authentication is next best. Users must be able to obtain their API key from your app without human intervention. Your integration won't be [approved for publishing](/platform/quickstart/private-vs-public-integrations) if your service requires users to email or call your team in order to receive an API key or access to your API.
Basic authentication, while acceptable, is the least appropriate authentication type to use for a third party service like Zapier, as users must type their account credentials directly into Zapier's UI.
For more custom authentication schemes, switch to the [Platform CLI](/platform/manage/export-cli).
## How to Remove or Change Type of Authentication Scheme
You cannot change an integration's authentication scheme directly. First, remove the existing integration's authentication scheme, then add a new authentication scheme.
> **Note:** You can only do this for a (new) integration version that has not yet been promoted and has less than 5 active users, since this will break connected accounts for the version. If an integration's authentication scheme needs to be changed, clone a new major version and add the new authentication. [Learn more](/platform/manage/versions)
To remove a Zapier integration's authentication scheme in the Platform UI, open the *Authentication* page. Click the gear icon beside the existing authentication scheme, click *Delete*, then confirm to remove the authentication.
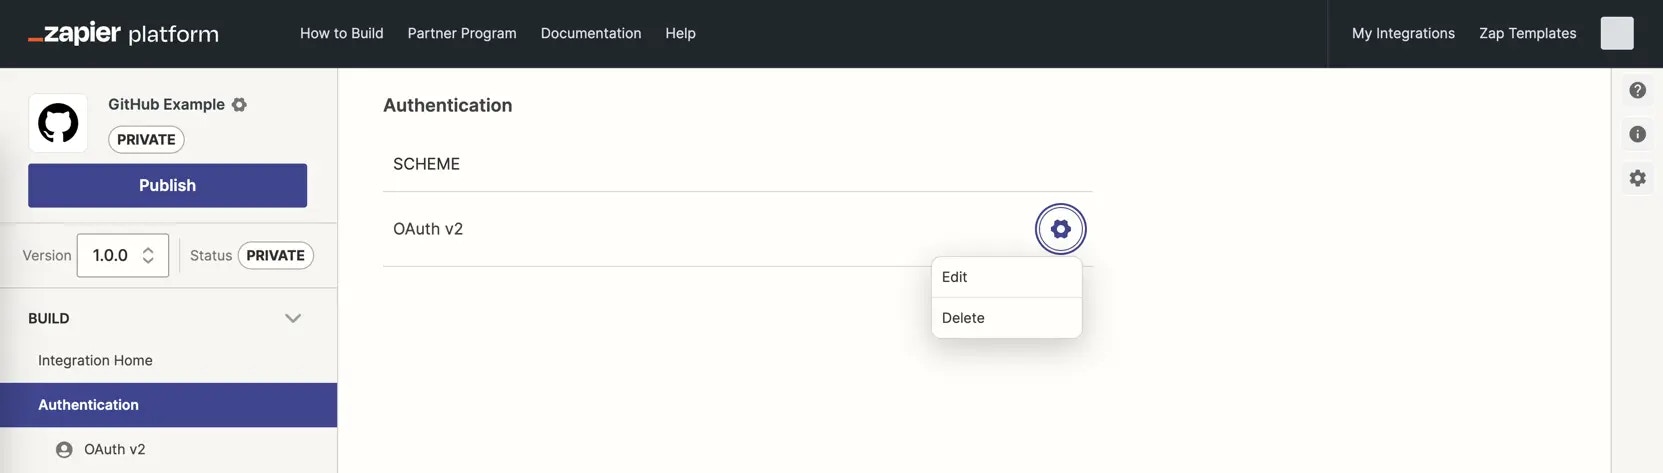 {" "}
Then add your app's new authentication scheme to the Zapier integration instead.
> **Note:** Again, to not break connected accounts, you can normally not migrate existing users' Zaps and connected accounts to a new version that has a different authentication scheme. For public integrations that meet certain conditions, we can provide support to migrate connected accounts between authentication schemes. [Learn more](/platform/manage/auth-scheme)
## Common Authentication Error Messages
When the test API call to verify users' credentials is unsuccessful, an error message shows in the Test section of your Zapier integration. Zapier shows a simplified error message in the *Response* tab by default.
{" "}
Then add your app's new authentication scheme to the Zapier integration instead.
> **Note:** Again, to not break connected accounts, you can normally not migrate existing users' Zaps and connected accounts to a new version that has a different authentication scheme. For public integrations that meet certain conditions, we can provide support to migrate connected accounts between authentication schemes. [Learn more](/platform/manage/auth-scheme)
## Common Authentication Error Messages
When the test API call to verify users' credentials is unsuccessful, an error message shows in the Test section of your Zapier integration. Zapier shows a simplified error message in the *Response* tab by default.
 {" "}
The original API response with the full error message is shown in the *HTTP* tab under *Response Content*.
{" "}
The original API response with the full error message is shown in the *HTTP* tab under *Response Content*.
 {" "}
The most common errors include:
### 404
The standard HTTP 404 `Not Found` error is commonly returned when:
* Test API endpoint URL is incorrect
* Test API call method is incorrect
{" "}
The most common errors include:
### 404
The standard HTTP 404 `Not Found` error is commonly returned when:
* Test API endpoint URL is incorrect
* Test API call method is incorrect
 {" "}
Verify both the API endpoint URL and the call method (typically `GET`). Ensure both are set to what your API expects, then click the *Save & Continue* button, and click the *Test Connected Account* button again.
### 401 or 403
The standard HTTP 401 `Unauthorized` or HTTP 403 `Forbidden` error is commonly returned when:
* User account credentials are incorrect, expired, or revoked
Try authenticating your app user account with Zapier again. Click *Connect an Account*, add credentials for an active account on the app, then try the test again.
{" "}
Verify both the API endpoint URL and the call method (typically `GET`). Ensure both are set to what your API expects, then click the *Save & Continue* button, and click the *Test Connected Account* button again.
### 401 or 403
The standard HTTP 401 `Unauthorized` or HTTP 403 `Forbidden` error is commonly returned when:
* User account credentials are incorrect, expired, or revoked
Try authenticating your app user account with Zapier again. Click *Connect an Account*, add credentials for an active account on the app, then try the test again.
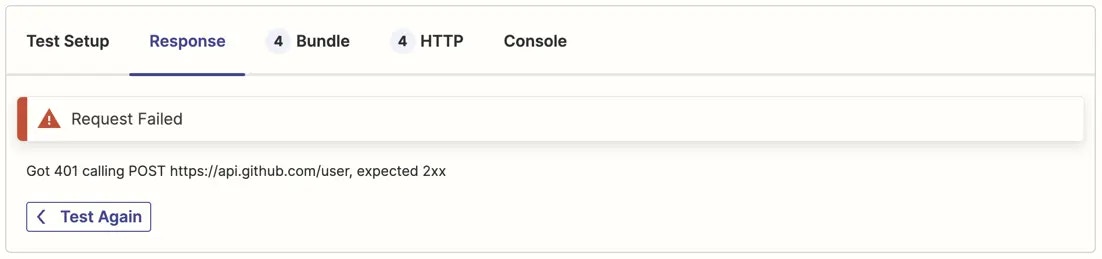 {" "}
### 400
The standard HTTP 400 `Bad Request` error is often returned when:
* OAuth v2 Client ID and/or Secret are incorrect or expired
* Some other part of your request is malformed, particularly a token exchange request
Check the full error message from the error or Zapier's testing logs to see if it lists why the call failed, then correct that part of your authentication flow. Verify each part of your authentication flow is entered correctly, including the request headers, URL parameters, and request body for each part of your authentication flow.
{" "}
### 400
The standard HTTP 400 `Bad Request` error is often returned when:
* OAuth v2 Client ID and/or Secret are incorrect or expired
* Some other part of your request is malformed, particularly a token exchange request
Check the full error message from the error or Zapier's testing logs to see if it lists why the call failed, then correct that part of your authentication flow. Verify each part of your authentication flow is entered correctly, including the request headers, URL parameters, and request body for each part of your authentication flow.
 {" "}
### Error Parsing Response
The *Error Parsing Response* error is commonly returned when:
* API returns non-standard and especially non-JSON output
* Test API endpoint URL is incorrect
{" "}
### Error Parsing Response
The *Error Parsing Response* error is commonly returned when:
* API returns non-standard and especially non-JSON output
* Test API endpoint URL is incorrect
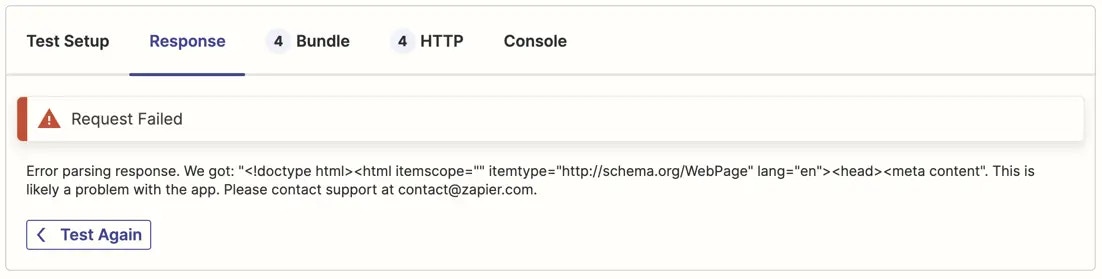 {" "}
Verify the test API URL is entered correctly. If a normal webpage URL is entered in the test field, the site will return its raw HTML content to Zapier and that will likely result in this error. If you do change the URL, click *Save & Continue*, then test your connection again.
If your API call is correct and returning data in a format [Zapier does not expect](/platform/build/response-types), you will need to switch to [Code mode](/platform/build/code-mode) and add custom parsing for your API response. Under the *Test* API call in the top of your app's Authentication settings, click *Switch to Code Mode*, then add custom JavaScript code to parse your API response.
### Authentication Failed Task Timed Out
The *Authentication Failed* error, often including *Task Timed Out*, is commonly returned when:
* The API request does not return a response to Zapier within 30 seconds
* The API request is formatted incorrectly and the server does not respond with an error code
Check your Zapier test logs to see if it shows which URL timed out, then verify you've entered the correct URL in all of your integration authentication settings. Finally, check the API provider to see if their site or API are temporarily down.
If the request seems to be successful but the task still times out, your API call may be taking too long to respond, or could be returning more data than Zapier can parse within the time limit. Use a testing API call in authentication that returns as little data as possible, such as a `/me` call that returns the connected user's account data. Or, if your API supports pagination and/or filtering, enable that and have the API return only the most recent result. Then test again to ensure the call works successfully.
{" "}
Verify the test API URL is entered correctly. If a normal webpage URL is entered in the test field, the site will return its raw HTML content to Zapier and that will likely result in this error. If you do change the URL, click *Save & Continue*, then test your connection again.
If your API call is correct and returning data in a format [Zapier does not expect](/platform/build/response-types), you will need to switch to [Code mode](/platform/build/code-mode) and add custom parsing for your API response. Under the *Test* API call in the top of your app's Authentication settings, click *Switch to Code Mode*, then add custom JavaScript code to parse your API response.
### Authentication Failed Task Timed Out
The *Authentication Failed* error, often including *Task Timed Out*, is commonly returned when:
* The API request does not return a response to Zapier within 30 seconds
* The API request is formatted incorrectly and the server does not respond with an error code
Check your Zapier test logs to see if it shows which URL timed out, then verify you've entered the correct URL in all of your integration authentication settings. Finally, check the API provider to see if their site or API are temporarily down.
If the request seems to be successful but the task still times out, your API call may be taking too long to respond, or could be returning more data than Zapier can parse within the time limit. Use a testing API call in authentication that returns as little data as possible, such as a `/me` call that returns the connected user's account data. Or, if your API supports pagination and/or filtering, enable that and have the API return only the most recent result. Then test again to ensure the call works successfully.
 {" "}
### 500
The HTTP 500 error is the default, unformatted error that may be returned without specifying what went wrong or why. If you encounter this error, check the API endpoint URL that gave the error, and verify your API call is configured correctly with the expected URL params, HTTP headers, and Request Body.
{" "}
### 500
The HTTP 500 error is the default, unformatted error that may be returned without specifying what went wrong or why. If you encounter this error, check the API endpoint URL that gave the error, and verify your API call is configured correctly with the expected URL params, HTTP headers, and Request Body.
 {" "}
***
*Need help? [Tell us about your problem](https://developer.zapier.com/contact) and we'll connect you with the right resource or contact support.*
---
# Source: https://docs.zapier.com/powered-by-zapier/api-reference/common-types/authentication.md
> ## Documentation Index
> Fetch the complete documentation index at: https://docs.zapier.com/llms.txt
> Use this file to discover all available pages before exploring further.
# null
---
# Source: https://docs.zapier.com/platform/build/basicauth.md
> ## Documentation Index
> Fetch the complete documentation index at: https://docs.zapier.com/llms.txt
> Use this file to discover all available pages before exploring further.
# Add authentication with Basic Authentication
> APIs using Basic Authentication will authenticate users with a username and password. In your Zapier integration using Basic Auth, Zapier includes the username and password credentials in the API request bundle every time Zapier polls an API endpoint for new data or posts new data to an API endpoint.
{" "}
***
*Need help? [Tell us about your problem](https://developer.zapier.com/contact) and we'll connect you with the right resource or contact support.*
---
# Source: https://docs.zapier.com/powered-by-zapier/api-reference/common-types/authentication.md
> ## Documentation Index
> Fetch the complete documentation index at: https://docs.zapier.com/llms.txt
> Use this file to discover all available pages before exploring further.
# null
---
# Source: https://docs.zapier.com/platform/build/basicauth.md
> ## Documentation Index
> Fetch the complete documentation index at: https://docs.zapier.com/llms.txt
> Use this file to discover all available pages before exploring further.
# Add authentication with Basic Authentication
> APIs using Basic Authentication will authenticate users with a username and password. In your Zapier integration using Basic Auth, Zapier includes the username and password credentials in the API request bundle every time Zapier polls an API endpoint for new data or posts new data to an API endpoint.
 {" "}
Use Basic Auth if your API requires a username and password or other basic fields, needs no special configuration, and specifically if your API leverages “[HTTP Basic Authentication](https://en.wikipedia.org/wiki/Basic_access_authentication)”. For further customization of your login flow or to request additional data from users, [API Key authentication](https://platform.zapier.com/docs/apikey) may be a better fit.
## 1. Build an input form
* Open the *Authentication* tab in Zapier visual builder and select *Basic Auth*.
{" "}
Use Basic Auth if your API requires a username and password or other basic fields, needs no special configuration, and specifically if your API leverages “[HTTP Basic Authentication](https://en.wikipedia.org/wiki/Basic_access_authentication)”. For further customization of your login flow or to request additional data from users, [API Key authentication](https://platform.zapier.com/docs/apikey) may be a better fit.
## 1. Build an input form
* Open the *Authentication* tab in Zapier visual builder and select *Basic Auth*.
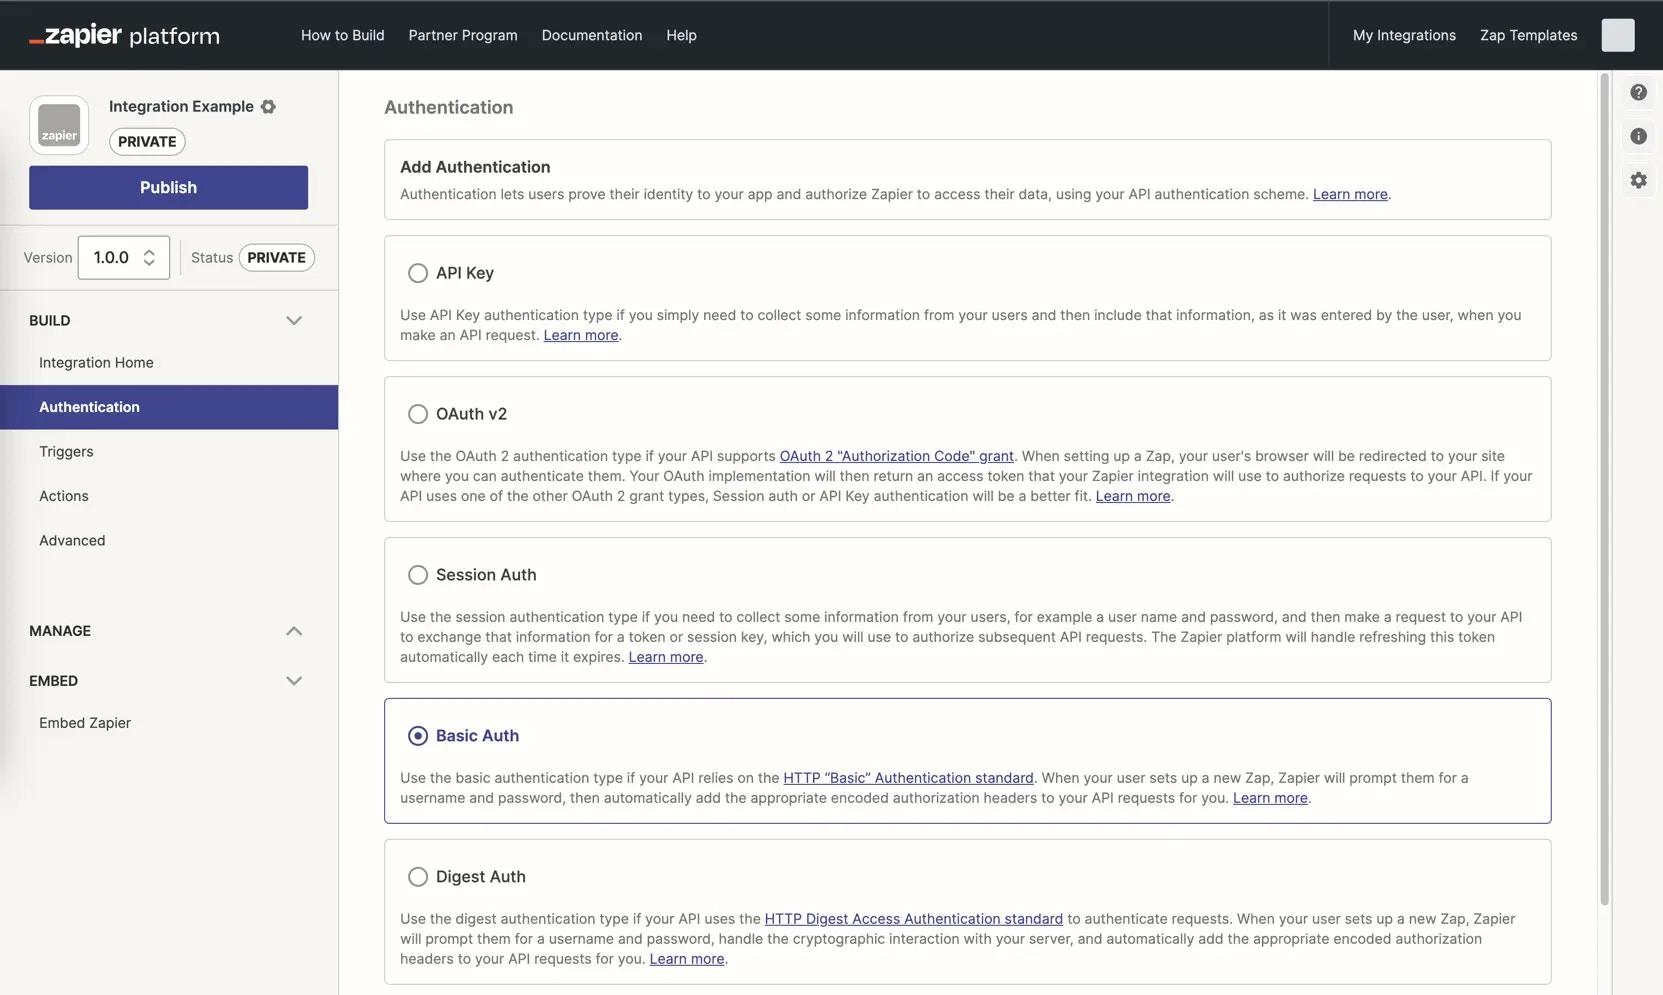 {" "}
* The pre-built input form for Basic Authentication includes a username and password field already.
* Add additional fields if your API documentation requires it by selecting *Add Fields* and fill in the details for your field. Add the most commonly needed fields first, in the order users expect, as you cannot reorder fields once added.
{" "}
* The pre-built input form for Basic Authentication includes a username and password field already.
* Add additional fields if your API documentation requires it by selecting *Add Fields* and fill in the details for your field. Add the most commonly needed fields first, in the order users expect, as you cannot reorder fields once added.
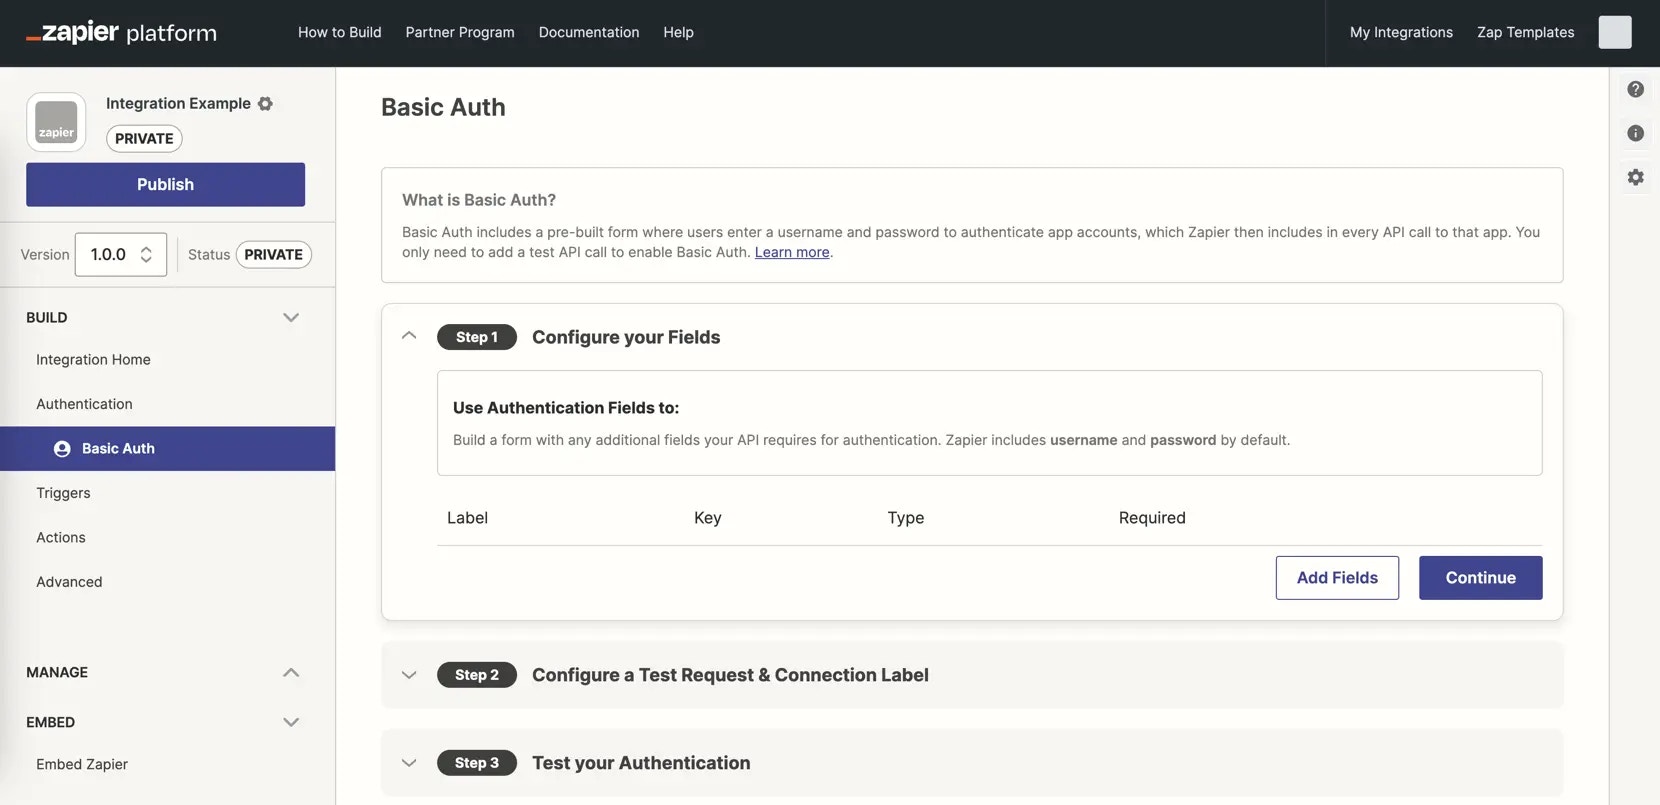 {" "}
* Add the required *Key*, the name your API uses to reference this field.
* Fill in the optional fields, as appropriate, especially the *Label*:
– **Label**: A human-friendly name for this field that will be shown to users in the authentication form.
– **Required? (checkbox)**: Check if this field is required for successful authentication.
– **Type**: All input fields use the `string` text field by default; select `password` instead if you would like to obscure the data as users enter it.
– **Help Text**: Include details to assist users in authenticating with your app, especially if they may be unsure where to find the data needed within your app. Format text with [Markdown](https://zapier.com/blog/beginner-ultimate-guide-markdown/), and include a hyperlink if needed.
– **Input Format**: (optional) Help users figure out exactly what piece of data you need them to enter. For example, for [a subdomain](/platform/build/subdomain-validation), [https://.yourdomain.com/](https://.yourdomain.com/).
– **Default Value**: Include a value for this field to be used as a fallback. For optional fields, the default value is set on initial connection creation and used in the API call instead of missing or null values every time the Zap runs. For required fields, this value is used during connection creation, but not when the Zap runs (Zapier raises an error for missing/null values instead).
{" "}
* Add the required *Key*, the name your API uses to reference this field.
* Fill in the optional fields, as appropriate, especially the *Label*:
– **Label**: A human-friendly name for this field that will be shown to users in the authentication form.
– **Required? (checkbox)**: Check if this field is required for successful authentication.
– **Type**: All input fields use the `string` text field by default; select `password` instead if you would like to obscure the data as users enter it.
– **Help Text**: Include details to assist users in authenticating with your app, especially if they may be unsure where to find the data needed within your app. Format text with [Markdown](https://zapier.com/blog/beginner-ultimate-guide-markdown/), and include a hyperlink if needed.
– **Input Format**: (optional) Help users figure out exactly what piece of data you need them to enter. For example, for [a subdomain](/platform/build/subdomain-validation), [https://.yourdomain.com/](https://.yourdomain.com/).
– **Default Value**: Include a value for this field to be used as a fallback. For optional fields, the default value is set on initial connection creation and used in the API call instead of missing or null values every time the Zap runs. For required fields, this value is used during connection creation, but not when the Zap runs (Zapier raises an error for missing/null values instead).
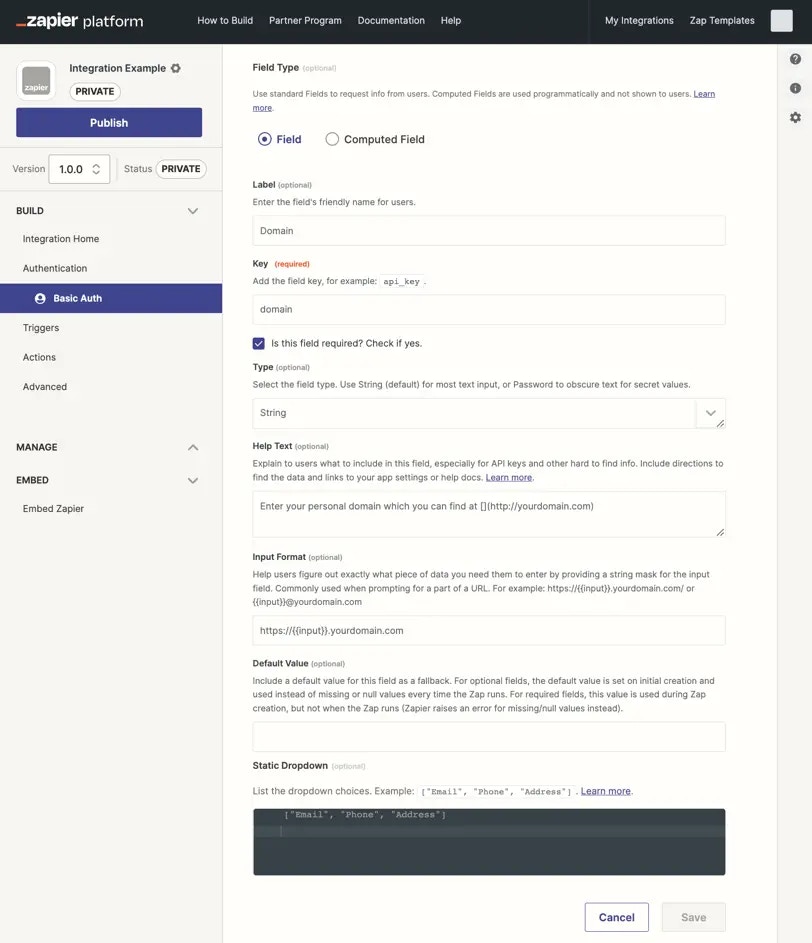 {" "}
* Input fields marked as password and all authentication fields with sensitive, private data such as both username and password from Basic Auth are automatically censored at runtime. These values are stored in the Auth bundle and used in API calls, but are replaced in Zapier's logs with a censored value like this `:censored:6:82a3be9927:`. Due to this, it is not possible to view the exact tokens or keys in Zapier's logs. To verify that the same token as was returned by the authentication, is being used in subsequent API calls; you can compare censored value characters, for example `:censored:6:82a3be9927:` would have the same value ending in 9927 when used in a subsequent call.
* Computed fields are not applicable to Basic Authentication and are only used with OAuth v2 and Session Auth.
* Each input field is listed with its label, key, type, and required status in your authentication settings. Click the field to edit it, or click the gear icon and select *Delete* to remove a field.
{" "}
* Input fields marked as password and all authentication fields with sensitive, private data such as both username and password from Basic Auth are automatically censored at runtime. These values are stored in the Auth bundle and used in API calls, but are replaced in Zapier's logs with a censored value like this `:censored:6:82a3be9927:`. Due to this, it is not possible to view the exact tokens or keys in Zapier's logs. To verify that the same token as was returned by the authentication, is being used in subsequent API calls; you can compare censored value characters, for example `:censored:6:82a3be9927:` would have the same value ending in 9927 when used in a subsequent call.
* Computed fields are not applicable to Basic Authentication and are only used with OAuth v2 and Session Auth.
* Each input field is listed with its label, key, type, and required status in your authentication settings. Click the field to edit it, or click the gear icon and select *Delete* to remove a field.
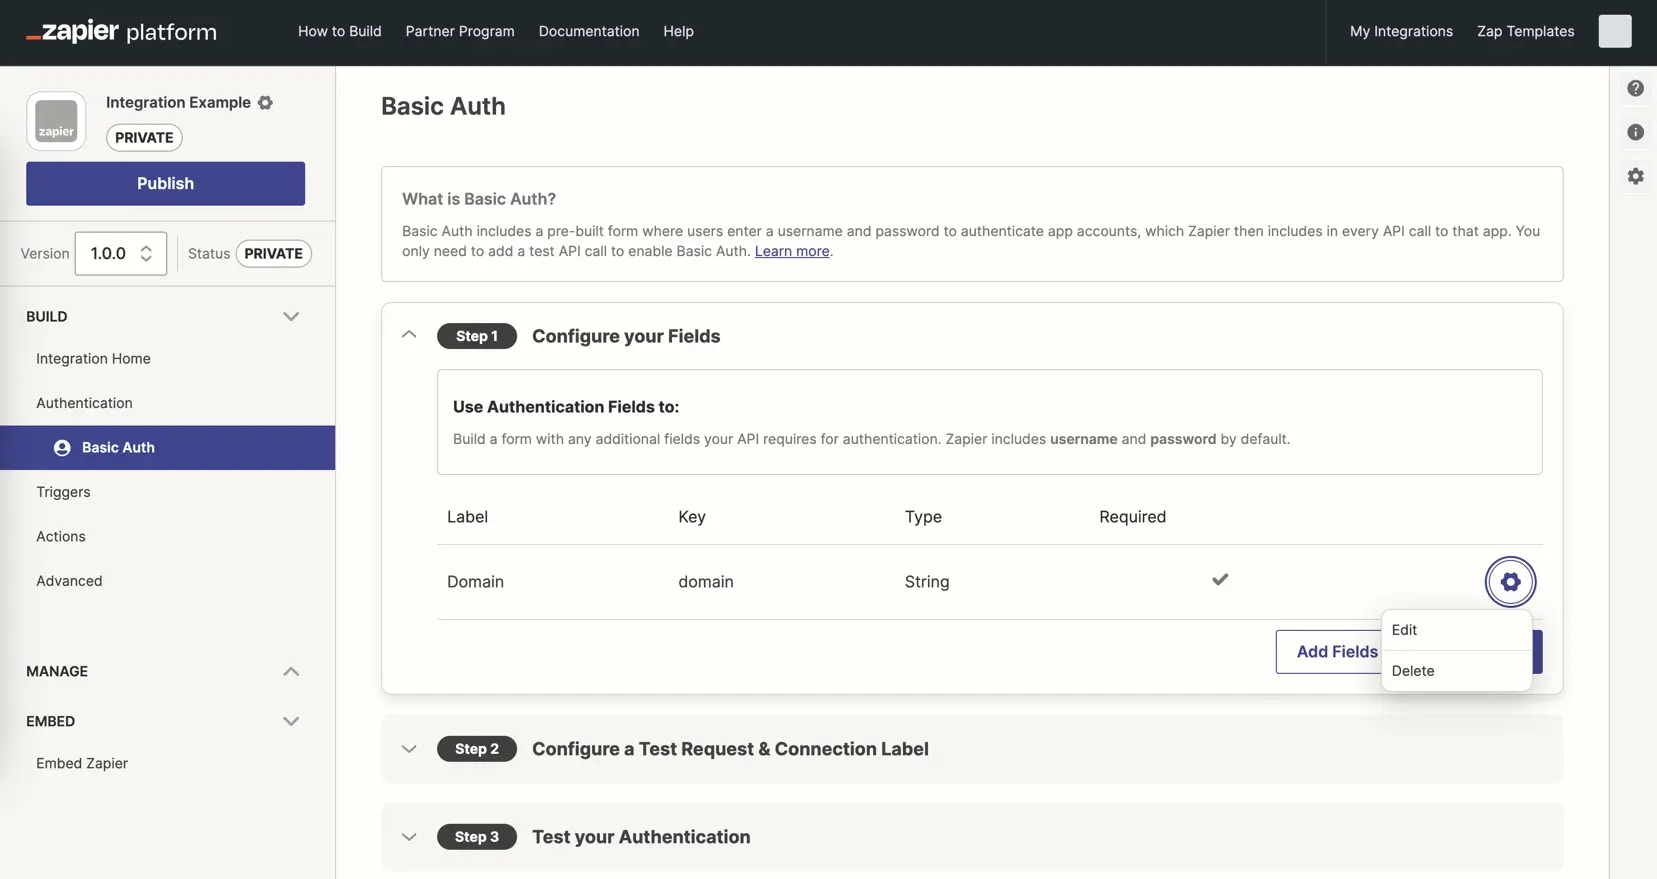 {" "}
* Once you've added all the input fields to your authentication form, select *Continue*
## 2. Add a Test API Request
* Add an API call to your API that requires no configuration, typically a `/user` or `/me` call. Add the URL for the API call, and set the call type, typically a `GET`. This will test the user-entered credentials to ensure it enables a successful API call to your app.
* The username and password input fields are automatically included in the URL Params and the HTTP Headers. Click *Show Options* to remove the details where they are not needed. It is typically not recommended to pass any sensitive information such as the password in the URL Params. Passing it through the headers or even the body is preferable.
{" "}
* Once you've added all the input fields to your authentication form, select *Continue*
## 2. Add a Test API Request
* Add an API call to your API that requires no configuration, typically a `/user` or `/me` call. Add the URL for the API call, and set the call type, typically a `GET`. This will test the user-entered credentials to ensure it enables a successful API call to your app.
* The username and password input fields are automatically included in the URL Params and the HTTP Headers. Click *Show Options* to remove the details where they are not needed. It is typically not recommended to pass any sensitive information such as the password in the URL Params. Passing it through the headers or even the body is preferable.
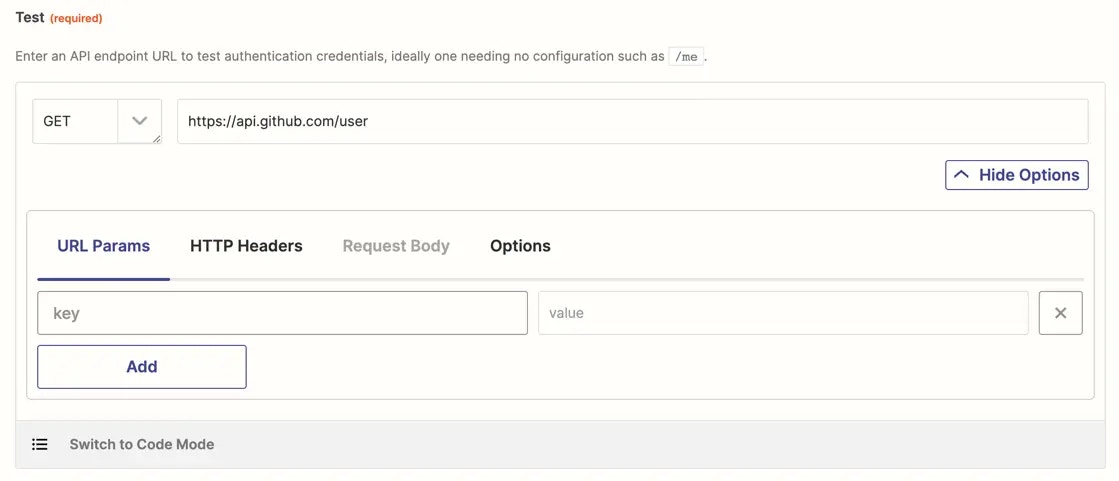 {" "}
* To customize the test API request, select *Switch to Code Mode* and write custom JavaScript code to handle your test API call and the response parsing as needed. The first time you click the toggle, Zapier will convert your API call to code. If you switch back to Form Mode though, Zapier will not convert your code changes to the Form Mode, nor will any subsequent changes in the form be added to your code.
{" "}
* To customize the test API request, select *Switch to Code Mode* and write custom JavaScript code to handle your test API call and the response parsing as needed. The first time you click the toggle, Zapier will convert your API call to code. If you switch back to Form Mode though, Zapier will not convert your code changes to the Form Mode, nor will any subsequent changes in the form be added to your code.
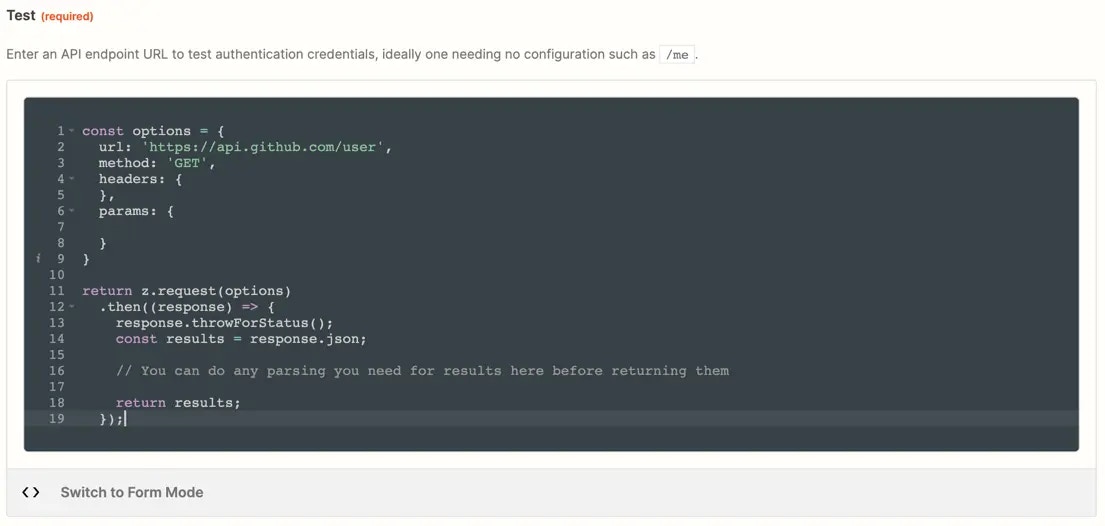 {" "}
## 3. Configure a Connection Label
Review [connection label documentation](/platform/build/connection-label) to optionally differentiate the app accounts users connect.
## 4. Test your authentication
Connect a valid user account to [test authentication](/platform/build/test-auth).
***
*Need help? [Tell us about your problem](https://developer.zapier.com/contact) and we'll connect you with the right resource or contact support.*
---
# Source: https://docs.zapier.com/platform/publish/benefits-guide.md
> ## Documentation Index
> Fetch the complete documentation index at: https://docs.zapier.com/llms.txt
> Use this file to discover all available pages before exploring further.
# Guide to Zapier Partner Program Benefits
> Zapier offers a variety of marketing and support benefits to partners. This cheat sheet is designed to help you understand when and how you can access each of these benefits as you unlock them.
## Accelerate your access to these benefits by embedding
**Unlock the benefits of the Zapier Partner Program faster by embedding your integration into your product via your help docs, integration pages, or blog posts.** There are two ways to do this:
1. If you're in Beta, you'll exit Beta the day after we detect a signup that originates from your embed
2. If you're already a Partner, you can access some of the benefits of the next tier faster if you meet these requirements:
* we detect a signup from an embed that originates on your site
* your integration has a Healthy or Exceptional health score
* your integration meets a minimum active user count (40 for early Silver benefits, 300 for early Gold benefits, 2,500 for early Platinum benefits)
Embedding your integration not only enhances your product's functionality but also fast-tracks your access to higher-tier benefits. It's our way of incentivizing partners to integrate with Zapier and reap the rewards sooner.
## Next steps
* Review your integration tier on the Partner Program page in the developer dashboard
* Plan benefit redemption around your integrations' marketing calendar (and keep track of the annual usage limit of each benefit)
* Highlight your integration in your product and marketing assets with our [partner embedding tools](https://zapier.com/l/partner/solutions)
## Benefits
### Support
#### Developer support
**Access to our Partner Support team**
Access to integration best practices through our dedicated Support team.
* **How to access this benefit:** Submit our [contact form](https://developer.zapier.com/contact)
* **Eligible tiers:** Bronze+
#### Priority developer support
**Get expert technical guidance to grow and improve your integration**
Request dedicated support for your integration and product roadmap from a Zapier Solutions Engineer. Technical troubleshooting and code review are available.
* **Eligble tiers:** Platinum
* **How to redeem:** Email [partners@zapier.com](mailto:partners@zapier.com) to redeem this benefit.
* **Opportunity:** Use this tailored benefit to approach adding new features or fixing new bugs on your integration, based on your product goals.
#### 1:1 integration advocacy session
**Unlock personalized guidance to elevate your integration and expand its impact**
Get expert 1:1 support from Zapier's Solution Engineering or Marketing teams to optimize your integration and boost visibility.
* **Eligble tiers:** Platinum
* **How to redeem:** Email us at [partners@zapier.com](mailto:partners@zapier.com) stating your interest in redeeming this benefit.
* **Best used:** Achieve more with less while keeping Zapier at the center of your automation journey. You'll uncover niche use cases that can help deliver new features and functionalities.
### Integration quality
#### Zapier Partner Sandbox
**Complimentary Zapier account for testing integration updates**
Access to a complimentary workspace with premium features, giving your integration team access to features to support the ongoing development and maintenance of your integration.
* **Eligble tiers:** Bronze+
* **How to redeem:** Submit the form linked at the top of the “Manage Team” page for your eligible integration on the developer platform.
* **Opportunity:** Use Zapier Partner Sandbox to test integration updates before promoting them to users.
### App directory
#### Get leads from Zapier's App Directory
**App directory listing lead generation button**
A “Learn More” button ([example](https://cdn.zappy.app/8a9c2c36af184c011c6377dbd7b8d54c.png)) is added to your app's listing in the App Directory. This way, anyone who lands on this page can directly visit your site for more information on your product.
* **Eligble tiers:** Silver+
* **How to redeem:** Automatically redeemed for you. Customize this button with UTM parameters of your choice by submitting the form linked at the top of the "Integration Settings" page on the developer platform.
* **Opportunity:** Make it easy for potential users to explore your product with just one click through the “Learn More” button for enhanced lead generation.
#### Be a featured integration in the Zapier App Directory
**Featured Integration in the App Directory**
Boost your integration's exposure through a feature placement in our app directory ([example](https://cdn.zappy.app/c18cd47ae39d442aa2f6ea8aadc5cc82.png)).
* **Eligble tiers:** Silver+
* **How to redeem:** Select a 1-week period where you anticipate high customer engagement and email [partners@zapier.com](mailto:partners@zapier.com) requesting to redeem.
* **Opportunity:** Users are more likely to discover your integration when they're viewing your integration's category in our app directory.
* **Frequency:** Once every 365 days (rolling)
### Marketing
#### Integration announcements on the Zapier Community
**Community post inclusion of your integration updates**
We showcase new triggers, actions, and searches added to your integration, as well as user-reported issues closed with a “Resolved” statues in a monthly Community post.
* **Eligible tiers:** Silver+
* **How to redeem:** Automatically redeemed for you. We capture new triggers, actions, and searches added to your integration, as well as user-reported issues closed with a “Resolved” status, and include them in a Community post.
* **Opportunity:** Actively requests feedback from our mutual users on these updates, fostering direct engagement with users and enhancing the overall user experience.
* **Best used:** Don't miss a chance to promote these updates with your users, and engage with users by responding to their comments.
#### Spotlight in the weekly Zapier blog email newsletter
**Showcase your integration to 20,000 engaged Zapier users**
* **Eligble tiers:** Silver+
* **How to redeem:** Email us at [partners@zapier.com](mailto:partners@zapier.com) stating your interest in redeeming this benefit
* **Best used:** Extend the spotlight on LinkedIn by posting a screenshot of your banner, and be sure to tag @Zapier - we'll amplify it!
* **Frequency:** Once every 365 days (rolling)
#### Integraiton announcements on the Zapier Product Blog
**Blog feature of your integration updates**
We highlight new triggers, actions, and searches added to your integration in a monthly blog post (shared with a large Zapier audience).
* **Eligble tiers:** Gold+
* **How to redeem:** Automatically redeemed for you. We capture new triggers and actions added to your integration and promote them in the blog post.
* **Opportunity:** If you add a feature to an existing trigger or action that you think customers will love, send us an email.
* **Best used:** Don't miss a chance to promote these updates with your users by linking this announcement to a post on your networks.
#### Featured flyover in "Best of" blog post
**Spotlight your app in front of thousands of engaged automation users**
Get your app highlighted in a high-visibility card on a Zapier "Best of" blog post for one week, with your logo, name, and a direct link to your dedicated page in Zapier's app directory.
* **Eligble tiers:** Silver+
* **How to redeem:** Email us at [partners@zapier.com](mailto:partners@zapier.com) stating your interest in redeeming this benefit
* **Best used:** When launching a new feature or during strategic campaigns where added visibility can help boost engagement and conversions
#### Prioritized marketing inclusion
**Amplify your brand through curated, high-impact campaigns led by Zapier**
Get ahead with early access to Zapier-initiated co-marketing campaigns, giving your integration more exposure and engagement opportunities.
* **Eligble tiers:** Platinum
* **How to redeem:** Automatically included. We'll prioritize invites for Platinum Partners to participate in our co-marketing campaigns.
* **Opportunity:** Boost your integration's visibility and user engagement by being featured in high-impact marketing efforts.
* **Best used:** Take advantage of early access to promote your integration effectively across multiple channels.
***
*Need help? [Tell us about your problem](https://developer.zapier.com/contact) and we'll connect you with the right resource or contact support.*
---
# Source: https://docs.zapier.com/platform/publish/best-practices.md
> ## Documentation Index
> Fetch the complete documentation index at: https://docs.zapier.com/llms.txt
> Use this file to discover all available pages before exploring further.
# Best practices for showcasing your integration
> Sharing well-crafted content about your Zapier integration can help you improve user adoption, highlight key use cases, and simplify integration processes. Need some inspiration? The following examples show how some of our partners are effectively communicating their Zapier integrations across different platforms.
## Go-to-market plan
A well-executed launch can drive immediate adoption of your Zapier integration. Create a coordinated campaign that reaches users through multiple touchpoints.
To launch effectively:
* Announce via email — Send a dedicated announcement to your user base highlighting your top 3-5 use cases
* Leverage social media — Share quick wins and time-saving examples across your social channels
* Enable your team — Provide your sales and support teams with key talking points
Ready to get started? [Generate your custom GTM plan](https://partnerforms.zapier.app/marketing-plan) to access ready-to-use messaging, templates, and best practices for launching your integration.
## Integration pages
A popular option for showcasing your integration is to create a dedicated, visually engaging landing page for Zapier on your website’s integrations directory.
To drive faster adoption, follow these best practices for your page:
* **Link to customer stories** — Share customer success stories that reference how Zapier has saved your users time and effort.
* **Add quotes** — Feature quotes that showcase how Zapier has driven meaningful improvements in users’ workflow efficiencies.
* **Embed Zap templates** — Show the most relevant use cases for your customers, and embed related Zap templates directly onto the page with our [embed tools](https://zapier.com/developer-platform/embed-tools). That way, users can easily build Zaps—without ever having to leave the integration page.
*Examples*: [BrightHR](https://www.brighthr.com/ca/integrations/zapier/), [SwagUp](https://www.swagup.com/integrations/zapier), [TrueReview](https://www.truereview.co/app/zaps), [Pipedrive](https://www.pipedrive.com/en/marketplace/app/zapier/10f6b602cda330ef)
## Help documentation
Write help documentation with clear, step-by-step instructions for integrating Zapier with your app.
These best practices can help your docs stand out:
* **Embed Zap templates** — Just like with your integration pages, embedding Zap templates directly in help docs can help reduce the friction of setup.
* **Be detailed** — Guide users who might be completely new to automation with detailed instructions.
* **Use visuals** — Keeping the docs visually engaging can complement your copy, building your users’ confidence even more.
*Examples*: [Jotform](https://www.jotform.com/help/how-to-use-zapier-with-jotform/), [Kajabi](https://help.kajabi.com/hc/en-us/articles/360037178613-How-to-Use-Zapier-With-Kajabi), [ClickSend SMS](https://help.clicksend.com/article/0to8xcbzq8-integrate-clicksend-with-zapier)
## Blog posts
Your blog is a fantastic space for communicating updates to your Zapier integration.
For the most engaging posts, apply these best practices:
* **Explore new features** — Announce new Zapier features in your posts and give users ideas about how they can apply those features to their work.
* **Spotlight benefits** — Inspire users by directly referencing which apps they can connect to through Zapier and how those connections support their work.
*Example*: [Buffer](https://buffer.com/resources/buffer-zapier-integration/)
## Video tutorials
A well-made video can help break down complex ideas into easily digestible concepts—perfect for explaining Zapier to new users.
Here are two great starter videos you can create:
* **Welcome to Zapier** — Create an introductory video that walks users through a high-level overview of Zapier to help get them started.
* **Setup deep dive** — Break down the technical setup process in a thorough, engaging tutorial.
*Examples*: Adalo ([Intro video](https://www.youtube.com/watch?v=2IrXNEJkvcQ\&t=2s), [deep dive video](https://www.youtube.com/watch?v=nS4C7-7D14M\&t=1s))
---
# Source: https://docs.zapier.com/platform/publish/branding-cli.md
> ## Documentation Index
> Fetch the complete documentation index at: https://docs.zapier.com/llms.txt
> Use this file to discover all available pages before exploring further.
# Add integration branding in Platform CLI
> When you make a new integration in Zapier CLI, you can add the app's name, description, and homepage to the `package.json` file.
{" "}
## 3. Configure a Connection Label
Review [connection label documentation](/platform/build/connection-label) to optionally differentiate the app accounts users connect.
## 4. Test your authentication
Connect a valid user account to [test authentication](/platform/build/test-auth).
***
*Need help? [Tell us about your problem](https://developer.zapier.com/contact) and we'll connect you with the right resource or contact support.*
---
# Source: https://docs.zapier.com/platform/publish/benefits-guide.md
> ## Documentation Index
> Fetch the complete documentation index at: https://docs.zapier.com/llms.txt
> Use this file to discover all available pages before exploring further.
# Guide to Zapier Partner Program Benefits
> Zapier offers a variety of marketing and support benefits to partners. This cheat sheet is designed to help you understand when and how you can access each of these benefits as you unlock them.
## Accelerate your access to these benefits by embedding
**Unlock the benefits of the Zapier Partner Program faster by embedding your integration into your product via your help docs, integration pages, or blog posts.** There are two ways to do this:
1. If you're in Beta, you'll exit Beta the day after we detect a signup that originates from your embed
2. If you're already a Partner, you can access some of the benefits of the next tier faster if you meet these requirements:
* we detect a signup from an embed that originates on your site
* your integration has a Healthy or Exceptional health score
* your integration meets a minimum active user count (40 for early Silver benefits, 300 for early Gold benefits, 2,500 for early Platinum benefits)
Embedding your integration not only enhances your product's functionality but also fast-tracks your access to higher-tier benefits. It's our way of incentivizing partners to integrate with Zapier and reap the rewards sooner.
## Next steps
* Review your integration tier on the Partner Program page in the developer dashboard
* Plan benefit redemption around your integrations' marketing calendar (and keep track of the annual usage limit of each benefit)
* Highlight your integration in your product and marketing assets with our [partner embedding tools](https://zapier.com/l/partner/solutions)
## Benefits
### Support
#### Developer support
**Access to our Partner Support team**
Access to integration best practices through our dedicated Support team.
* **How to access this benefit:** Submit our [contact form](https://developer.zapier.com/contact)
* **Eligible tiers:** Bronze+
#### Priority developer support
**Get expert technical guidance to grow and improve your integration**
Request dedicated support for your integration and product roadmap from a Zapier Solutions Engineer. Technical troubleshooting and code review are available.
* **Eligble tiers:** Platinum
* **How to redeem:** Email [partners@zapier.com](mailto:partners@zapier.com) to redeem this benefit.
* **Opportunity:** Use this tailored benefit to approach adding new features or fixing new bugs on your integration, based on your product goals.
#### 1:1 integration advocacy session
**Unlock personalized guidance to elevate your integration and expand its impact**
Get expert 1:1 support from Zapier's Solution Engineering or Marketing teams to optimize your integration and boost visibility.
* **Eligble tiers:** Platinum
* **How to redeem:** Email us at [partners@zapier.com](mailto:partners@zapier.com) stating your interest in redeeming this benefit.
* **Best used:** Achieve more with less while keeping Zapier at the center of your automation journey. You'll uncover niche use cases that can help deliver new features and functionalities.
### Integration quality
#### Zapier Partner Sandbox
**Complimentary Zapier account for testing integration updates**
Access to a complimentary workspace with premium features, giving your integration team access to features to support the ongoing development and maintenance of your integration.
* **Eligble tiers:** Bronze+
* **How to redeem:** Submit the form linked at the top of the “Manage Team” page for your eligible integration on the developer platform.
* **Opportunity:** Use Zapier Partner Sandbox to test integration updates before promoting them to users.
### App directory
#### Get leads from Zapier's App Directory
**App directory listing lead generation button**
A “Learn More” button ([example](https://cdn.zappy.app/8a9c2c36af184c011c6377dbd7b8d54c.png)) is added to your app's listing in the App Directory. This way, anyone who lands on this page can directly visit your site for more information on your product.
* **Eligble tiers:** Silver+
* **How to redeem:** Automatically redeemed for you. Customize this button with UTM parameters of your choice by submitting the form linked at the top of the "Integration Settings" page on the developer platform.
* **Opportunity:** Make it easy for potential users to explore your product with just one click through the “Learn More” button for enhanced lead generation.
#### Be a featured integration in the Zapier App Directory
**Featured Integration in the App Directory**
Boost your integration's exposure through a feature placement in our app directory ([example](https://cdn.zappy.app/c18cd47ae39d442aa2f6ea8aadc5cc82.png)).
* **Eligble tiers:** Silver+
* **How to redeem:** Select a 1-week period where you anticipate high customer engagement and email [partners@zapier.com](mailto:partners@zapier.com) requesting to redeem.
* **Opportunity:** Users are more likely to discover your integration when they're viewing your integration's category in our app directory.
* **Frequency:** Once every 365 days (rolling)
### Marketing
#### Integration announcements on the Zapier Community
**Community post inclusion of your integration updates**
We showcase new triggers, actions, and searches added to your integration, as well as user-reported issues closed with a “Resolved” statues in a monthly Community post.
* **Eligible tiers:** Silver+
* **How to redeem:** Automatically redeemed for you. We capture new triggers, actions, and searches added to your integration, as well as user-reported issues closed with a “Resolved” status, and include them in a Community post.
* **Opportunity:** Actively requests feedback from our mutual users on these updates, fostering direct engagement with users and enhancing the overall user experience.
* **Best used:** Don't miss a chance to promote these updates with your users, and engage with users by responding to their comments.
#### Spotlight in the weekly Zapier blog email newsletter
**Showcase your integration to 20,000 engaged Zapier users**
* **Eligble tiers:** Silver+
* **How to redeem:** Email us at [partners@zapier.com](mailto:partners@zapier.com) stating your interest in redeeming this benefit
* **Best used:** Extend the spotlight on LinkedIn by posting a screenshot of your banner, and be sure to tag @Zapier - we'll amplify it!
* **Frequency:** Once every 365 days (rolling)
#### Integraiton announcements on the Zapier Product Blog
**Blog feature of your integration updates**
We highlight new triggers, actions, and searches added to your integration in a monthly blog post (shared with a large Zapier audience).
* **Eligble tiers:** Gold+
* **How to redeem:** Automatically redeemed for you. We capture new triggers and actions added to your integration and promote them in the blog post.
* **Opportunity:** If you add a feature to an existing trigger or action that you think customers will love, send us an email.
* **Best used:** Don't miss a chance to promote these updates with your users by linking this announcement to a post on your networks.
#### Featured flyover in "Best of" blog post
**Spotlight your app in front of thousands of engaged automation users**
Get your app highlighted in a high-visibility card on a Zapier "Best of" blog post for one week, with your logo, name, and a direct link to your dedicated page in Zapier's app directory.
* **Eligble tiers:** Silver+
* **How to redeem:** Email us at [partners@zapier.com](mailto:partners@zapier.com) stating your interest in redeeming this benefit
* **Best used:** When launching a new feature or during strategic campaigns where added visibility can help boost engagement and conversions
#### Prioritized marketing inclusion
**Amplify your brand through curated, high-impact campaigns led by Zapier**
Get ahead with early access to Zapier-initiated co-marketing campaigns, giving your integration more exposure and engagement opportunities.
* **Eligble tiers:** Platinum
* **How to redeem:** Automatically included. We'll prioritize invites for Platinum Partners to participate in our co-marketing campaigns.
* **Opportunity:** Boost your integration's visibility and user engagement by being featured in high-impact marketing efforts.
* **Best used:** Take advantage of early access to promote your integration effectively across multiple channels.
***
*Need help? [Tell us about your problem](https://developer.zapier.com/contact) and we'll connect you with the right resource or contact support.*
---
# Source: https://docs.zapier.com/platform/publish/best-practices.md
> ## Documentation Index
> Fetch the complete documentation index at: https://docs.zapier.com/llms.txt
> Use this file to discover all available pages before exploring further.
# Best practices for showcasing your integration
> Sharing well-crafted content about your Zapier integration can help you improve user adoption, highlight key use cases, and simplify integration processes. Need some inspiration? The following examples show how some of our partners are effectively communicating their Zapier integrations across different platforms.
## Go-to-market plan
A well-executed launch can drive immediate adoption of your Zapier integration. Create a coordinated campaign that reaches users through multiple touchpoints.
To launch effectively:
* Announce via email — Send a dedicated announcement to your user base highlighting your top 3-5 use cases
* Leverage social media — Share quick wins and time-saving examples across your social channels
* Enable your team — Provide your sales and support teams with key talking points
Ready to get started? [Generate your custom GTM plan](https://partnerforms.zapier.app/marketing-plan) to access ready-to-use messaging, templates, and best practices for launching your integration.
## Integration pages
A popular option for showcasing your integration is to create a dedicated, visually engaging landing page for Zapier on your website’s integrations directory.
To drive faster adoption, follow these best practices for your page:
* **Link to customer stories** — Share customer success stories that reference how Zapier has saved your users time and effort.
* **Add quotes** — Feature quotes that showcase how Zapier has driven meaningful improvements in users’ workflow efficiencies.
* **Embed Zap templates** — Show the most relevant use cases for your customers, and embed related Zap templates directly onto the page with our [embed tools](https://zapier.com/developer-platform/embed-tools). That way, users can easily build Zaps—without ever having to leave the integration page.
*Examples*: [BrightHR](https://www.brighthr.com/ca/integrations/zapier/), [SwagUp](https://www.swagup.com/integrations/zapier), [TrueReview](https://www.truereview.co/app/zaps), [Pipedrive](https://www.pipedrive.com/en/marketplace/app/zapier/10f6b602cda330ef)
## Help documentation
Write help documentation with clear, step-by-step instructions for integrating Zapier with your app.
These best practices can help your docs stand out:
* **Embed Zap templates** — Just like with your integration pages, embedding Zap templates directly in help docs can help reduce the friction of setup.
* **Be detailed** — Guide users who might be completely new to automation with detailed instructions.
* **Use visuals** — Keeping the docs visually engaging can complement your copy, building your users’ confidence even more.
*Examples*: [Jotform](https://www.jotform.com/help/how-to-use-zapier-with-jotform/), [Kajabi](https://help.kajabi.com/hc/en-us/articles/360037178613-How-to-Use-Zapier-With-Kajabi), [ClickSend SMS](https://help.clicksend.com/article/0to8xcbzq8-integrate-clicksend-with-zapier)
## Blog posts
Your blog is a fantastic space for communicating updates to your Zapier integration.
For the most engaging posts, apply these best practices:
* **Explore new features** — Announce new Zapier features in your posts and give users ideas about how they can apply those features to their work.
* **Spotlight benefits** — Inspire users by directly referencing which apps they can connect to through Zapier and how those connections support their work.
*Example*: [Buffer](https://buffer.com/resources/buffer-zapier-integration/)
## Video tutorials
A well-made video can help break down complex ideas into easily digestible concepts—perfect for explaining Zapier to new users.
Here are two great starter videos you can create:
* **Welcome to Zapier** — Create an introductory video that walks users through a high-level overview of Zapier to help get them started.
* **Setup deep dive** — Break down the technical setup process in a thorough, engaging tutorial.
*Examples*: Adalo ([Intro video](https://www.youtube.com/watch?v=2IrXNEJkvcQ\&t=2s), [deep dive video](https://www.youtube.com/watch?v=nS4C7-7D14M\&t=1s))
---
# Source: https://docs.zapier.com/platform/publish/branding-cli.md
> ## Documentation Index
> Fetch the complete documentation index at: https://docs.zapier.com/llms.txt
> Use this file to discover all available pages before exploring further.
# Add integration branding in Platform CLI
> When you make a new integration in Zapier CLI, you can add the app's name, description, and homepage to the `package.json` file.
 The rest of your app's branding needs to be added in Zapier's online Platform UI.
Focus first on building your integration. When you've added your app's core details, authentication, triggers, and actions, push your integration to Zapier with a `zapier-platform push` (or deprecated `zapier push`) command. Zapier will use the name you added in the CLI integration settings, along with a placeholder icon for your app.
Then, before launching your integration, add your app's branding via Zapier's Platform UI at [zapier.com/app/developer](https://zapier.com/app/developer). There you will see every Zapier integration you've built. The top *Integrations* section includes every app you've added via Zapier's Platform UI or CLI. Look for the integration you built with Zapier CLI and click its name.
You can't edit authentication, triggers, and actions in Zapier's Platform UI for integrations built with Zapier's CLI. But you can edit branding.
To do that, click the gear icon in the upper left hand corner near your app's name and placeholder icon. You can then edit your integration's name and description, and upload your app's icon (a square, transparent PNG at least 256x256px). Below that, you can set your app's category and other brand settings. Click *Update* to save your settings.
You can then make further changes to your integration in your Zapier CLI code and push them to Zapier anytime without affecting your branding. If you ever need to change your app icon or other branding again, just come back to the [Zapier Platform UI](https://zapier.com/app/developer) and edit it as before.
*→ Check [Zapier's app logo, name, and description guidelines](https://platform.zapier.com/partners/planning-guide#app-logo) to ensure your app's branding fits into the Zapier platform.*
***
*Need help? [Tell us about your problem](https://developer.zapier.com/contact) and we'll connect you with the right resource or contact support.*
---
# Source: https://docs.zapier.com/platform/publish/branding-guidelines.md
> ## Documentation Index
> Fetch the complete documentation index at: https://docs.zapier.com/llms.txt
> Use this file to discover all available pages before exploring further.
# Integration branding guidelines
> When creating your integration, you'll add your app’s name, logo, description, category, and primary brand color. Consistent branding is essential for helping users recognize and discover your app on Zapier.
The journey starts at the [Zapier app directory](https://zapier.com/apps/), where apps are ranked by popularity and category. Users search for new apps and integrations here.
The rest of your app's branding needs to be added in Zapier's online Platform UI.
Focus first on building your integration. When you've added your app's core details, authentication, triggers, and actions, push your integration to Zapier with a `zapier-platform push` (or deprecated `zapier push`) command. Zapier will use the name you added in the CLI integration settings, along with a placeholder icon for your app.
Then, before launching your integration, add your app's branding via Zapier's Platform UI at [zapier.com/app/developer](https://zapier.com/app/developer). There you will see every Zapier integration you've built. The top *Integrations* section includes every app you've added via Zapier's Platform UI or CLI. Look for the integration you built with Zapier CLI and click its name.
You can't edit authentication, triggers, and actions in Zapier's Platform UI for integrations built with Zapier's CLI. But you can edit branding.
To do that, click the gear icon in the upper left hand corner near your app's name and placeholder icon. You can then edit your integration's name and description, and upload your app's icon (a square, transparent PNG at least 256x256px). Below that, you can set your app's category and other brand settings. Click *Update* to save your settings.
You can then make further changes to your integration in your Zapier CLI code and push them to Zapier anytime without affecting your branding. If you ever need to change your app icon or other branding again, just come back to the [Zapier Platform UI](https://zapier.com/app/developer) and edit it as before.
*→ Check [Zapier's app logo, name, and description guidelines](https://platform.zapier.com/partners/planning-guide#app-logo) to ensure your app's branding fits into the Zapier platform.*
***
*Need help? [Tell us about your problem](https://developer.zapier.com/contact) and we'll connect you with the right resource or contact support.*
---
# Source: https://docs.zapier.com/platform/publish/branding-guidelines.md
> ## Documentation Index
> Fetch the complete documentation index at: https://docs.zapier.com/llms.txt
> Use this file to discover all available pages before exploring further.
# Integration branding guidelines
> When creating your integration, you'll add your app’s name, logo, description, category, and primary brand color. Consistent branding is essential for helping users recognize and discover your app on Zapier.
The journey starts at the [Zapier app directory](https://zapier.com/apps/), where apps are ranked by popularity and category. Users search for new apps and integrations here.
 Each integration gets its own app profile page on Zapier, where your branding
stands out. Users can explore your app’s features and see how it works with
other apps.
App profiles feature [Zap Templates](https://platform.zapier.com/publish/zap-templates)—pre-built workflows that users can set up with just a few clicks. These templates are also shown in the Zapier dashboard for connected apps.
Inside Zapier's account dashboard, the *Start with a template* section shows Zap Templates for apps users have connected to their accounts.
Each integration gets its own app profile page on Zapier, where your branding
stands out. Users can explore your app’s features and see how it works with
other apps.
App profiles feature [Zap Templates](https://platform.zapier.com/publish/zap-templates)—pre-built workflows that users can set up with just a few clicks. These templates are also shown in the Zapier dashboard for connected apps.
Inside Zapier's account dashboard, the *Start with a template* section shows Zap Templates for apps users have connected to their accounts.
 In the Zap editor, your app’s logo and name appear when users select apps to connect.
 Follow these guidelines to ensure consistent, effective branding for your Zapier integration:
## App name
When possible, use your app’s current, public-facing name as it appears in your official branding. The app title on Zapier should match your actual app name, including correct capitalization and spacing. Do not include extra words or symbols like ™, ®, or © in the title.
Avoid adding adjectives, descriptors, or phrases unless required to distinguish between similarly named integrations. Only include your company name if it’s inseparably tied to your product branding.
Do not include the word “app” unless it is part of your official name. Abbreviations like FKA (formerly known as), AKA (also known as), and NKA (now known as) are not permitted. If your integration is rebranded, its title must use only the new name without referencing the previous name.
When naming collisions occur, i.e. when another integration already uses the same name, a tiered approach will be applied to distinguish your app while preserving brand clarity:
**Tier 1 (Preferred)**: App Name
Use this when your app name is unique across the Zapier platform and no other integration uses it. Examples:
* Evernote
* Google Sheets
* Trello
**Tier 2 (Next-best)**: App Name by Company
Use this if your app’s name is already taken and your company name is distinct from your product name. This helps differentiate between similar apps by clarifying the brand behind them. Examples:
\_ Ecwid by Lightspeed
\_ Bigin by Zoho CRM \* Grok by xAI
**Tier 3 (Last-resort)**: App Name (Descriptor)
Use this if both your app and company names are the same, and a name conflict exists. Add a short, descriptive tag that clearly differentiates your app. This could include your product’s category, function, or platform. Examples:
\_ Pulse (Business Chat)
\_ Pulse (Health Track)
\_ Nimbus (Notes & Docs)
\_ Nimbus (Weather)
## App logo
The logo you provide will be used across Zapier’s platform, including on your app’s dedicated directory page. Please ensure the logo you provide meets the following requirements:
* PNG, transparent
* Minimum 512x512px (identical height/width measurements)
* Minimum 72 DPI
This will ensure your logo displays properly throughout the site.
Please provide a bigger version if you have one available. If your icon is not square, make a square transparent image and center your icon inside the transparent square. Do not include the app name or other copy in the logo as it will not be legible at small sizes.
**Example**:
Follow these guidelines to ensure consistent, effective branding for your Zapier integration:
## App name
When possible, use your app’s current, public-facing name as it appears in your official branding. The app title on Zapier should match your actual app name, including correct capitalization and spacing. Do not include extra words or symbols like ™, ®, or © in the title.
Avoid adding adjectives, descriptors, or phrases unless required to distinguish between similarly named integrations. Only include your company name if it’s inseparably tied to your product branding.
Do not include the word “app” unless it is part of your official name. Abbreviations like FKA (formerly known as), AKA (also known as), and NKA (now known as) are not permitted. If your integration is rebranded, its title must use only the new name without referencing the previous name.
When naming collisions occur, i.e. when another integration already uses the same name, a tiered approach will be applied to distinguish your app while preserving brand clarity:
**Tier 1 (Preferred)**: App Name
Use this when your app name is unique across the Zapier platform and no other integration uses it. Examples:
* Evernote
* Google Sheets
* Trello
**Tier 2 (Next-best)**: App Name by Company
Use this if your app’s name is already taken and your company name is distinct from your product name. This helps differentiate between similar apps by clarifying the brand behind them. Examples:
\_ Ecwid by Lightspeed
\_ Bigin by Zoho CRM \* Grok by xAI
**Tier 3 (Last-resort)**: App Name (Descriptor)
Use this if both your app and company names are the same, and a name conflict exists. Add a short, descriptive tag that clearly differentiates your app. This could include your product’s category, function, or platform. Examples:
\_ Pulse (Business Chat)
\_ Pulse (Health Track)
\_ Nimbus (Notes & Docs)
\_ Nimbus (Weather)
## App logo
The logo you provide will be used across Zapier’s platform, including on your app’s dedicated directory page. Please ensure the logo you provide meets the following requirements:
* PNG, transparent
* Minimum 512x512px (identical height/width measurements)
* Minimum 72 DPI
This will ensure your logo displays properly throughout the site.
Please provide a bigger version if you have one available. If your icon is not square, make a square transparent image and center your icon inside the transparent square. Do not include the app name or other copy in the logo as it will not be legible at small sizes.
**Example**:
 Evernote's elephant icon is included in a transparent square rectangle.
 Todoist's icon includes transparent, rounded corners.
## App description copy
Write a short description (up to 160 characters) of your app’s core features and use cases in the form of "**Integration Name** is a....". The description should be less about selling the platform and more about what the platform actually does. Use proper English and full sentences. The copy should not include links or mentions of Zapier. Do not use flowery or overstated language, or make it appear your integration is associated with or endorsed by Zapier.
**Example**:
* `Trello is a team collaboration tool to organize anything on a kanban board.`, not `Trello is the best project management tool.`
* `Dropbox lets you store files online, sync them to all your devices, and share them easily.`, not `A file storage app.`
## Category
Select the category that best fits your app's core features and use case. If your app includes features from multiple categories, choose the category that best describes your app's primary use case today.
You may update your app's category in the future if needed, so do not select a category that fits your future ambitions for the app instead of its features today. Additionally, do not select a category that applies only to a secondary feature in your app or a narrow category that does not cover your app's broader focus.
### Available Categories
We offer a variety of categories for you to list your integration in. Each top-level category includes all integrations from its child categories. To maximize visibility for your integration, we recommend selecting a specific child category rather than a general parent category. Integrations within each category are ranked by popularity. By choosing a child category, your integration can achieve a higher ranking and greater visibility within that category.
* Artificial Intelligence - Tools that offer AI features such as natural language processing, image classification, and more.
* AI Agents - Tools that use AI to take action and complete tasks.
* AI Assistants - Tools that act as digital helpers for everyday tasks.
* AI Chatbots - Conversational bots that answer questions and automate support.
* AI Content Generation - Tools to create text, images, audio, or video with AI.
* AI Document Extraction - Tools that extract structured data from documents and files.
* AI Meeting Assistants - Tools that record, transcribe, and summarize meetings.
* AI Models - Services to build, host, or access AI/ML models.
* AI Safety, Compliance, Detection - Tools to detect AI content, moderate risks, and ensure compliance.
* AI Sales Tools - AI tools to find, qualify, and engage leads.
* AI Web Scraping - Tools that use AI to collect and structure web data.
* Model Context Protocol (MCP) - Tools built on the Model Context Protocol (MCP) standard.
* Business Intelligence - Tools to gather, analyze, and visualize business data.
* Analytics - Tools to measure and report on success.
* Dashboards - Tools to view your data on a full-screen dashboard.
* Reviews - Tools to manage your reviews and ratings.
* Commerce - Tools to facilitate all aspects of business transactions, both online and offline.
* Taxes - Tools for automating your taxes.
* Accounting - Tools for accounting and finance.
* eCommerce - Tools to sell your products online.
* Fundraising - Tools to set up fundraising events and projects.
* Payment Processing - Tools to process payments on your site or app.
* Proposal & Invoice Management - Tools to create and send proposals and invoices to clients.
* Communication - Tools to streamline and enhance communication across various channels.
* Call Tracking - Tools to monitor calls and track data from non-digital marketing campaigns.
* Email - Tools to manage your personal and business email correspondence.
* Fax - Tools to send documents over fax.
* Notifications - Tools to get customized notifications on your computer or mobile devices.
* Phone & SMS - Tools to make calls and send SMS messages.
* Team Chat - Tools to help teams collaborate together online with real-time chat.
* Team Collaboration - Tools for business social networking, file sharing, and chat to help teams work together more effectively.
* Video Conferencing - Tools to host team video calls and webinars.
* Content & Files - Tools to create, manage, and share various types of content and files.
* Documents - Tools to write, edit, and share text documents.
* File Management & Storage - Tools to organize, share, and sync files.
* Images & Design - Tools for creatives and those dealing with images.
* Notes - Tools to write down thoughts and organize them in notebooks.
* Transcription - Tools to transcribe audio into text.
* Video & Audio - Tools to store and share multimedia assets.
* Human Resources - Tools to manage all aspects of human resources, from hiring and recruitment to employee management and development.
* Education - Tools to enhance learning and teaching experiences
* HR Talent & Recruitment - Tools to manage your hiring and human resource department.
* Internet of Things - Tools to connect and manage IoT devices and services.
* Devices - Tools for connecting Internet of Things devices through Zapier.
* Printing - Tools to print your designs, either on your printer or on products such as t-shirts and stickers.
* IT Operations - Tools to manage and optimize IT infrastructure and services.
* Databases - Tools for developers to store and manage data.
* Developer - Tools to build and maintain software, services, and websites.
* Online Courses - Tools to publish lessons and educational material.
* Security & Identity - Tools to manage security and identity/permissions
* Server Monitoring - Tools that monitor services and application metrics.
* Lifestyle & Entertainment - Tools to enhance various aspects of your personal life and leisure activities.
* Fitness - Tools to track your workouts, food, and more.
* Gaming - Tools that are centered around video gaming.
* News & Lifestyle - Tools to keep you informed on news and lifestyle content.
* Marketing - Tools to plan, execute, and measure marketing campaigns across various channels.
* Ads & Conversion - Tools to track and reach an audience online.
* Drip Emails - Tools to send automated email messages on a set schedule.
* Email Newsletters - Tools to send regular email updates and newsletters to your subscribers.
* Event Management - Tools to manage events and attendees.
* Marketing Automation - Tools to market products, track interests, and turn visitors into customers.
* Social Media Accounts - Tools to connect and share with others online.
* Social Media Marketing - Tools to automatically share posts on social networks.
* Transactional Email - Tools to send email messages through your application.
* URL Shortener - Tools to shorten URLs.
* Webinars - Tools for scheduling and holding webinars.
* Productivity - Tools to enhance efficiency and organization in your personal and professional life.
* Bookmark Managers - Tools to save your favorite links to view and read later.
* Calendar - Tools to plan your events and schedule.
* Product Management - Tools to plan your product's lifecycle and roadmap.
* Project Management - Tools for managing projects.
* Spreadsheets - Tools to manage numbers and data.
* Task Management - Tools to manage your tasks on simple lists.
* Time Tracking Software - Tools to track time spent on work and projects.
* Sales & CRM - Tools to manage and optimize your sales processes and customer relationships.
* Contact Management - Tools to keep track of the people you need to keep in touch with most.
* CRM (Customer Relationship Management) - Tools for customer relationship management.
* Forms & Surveys - Tools to build forms and gather data from your website or apps.
* Scheduling & Booking - Tools to schedule appointments and events.
* Signatures - Tools to manage and sign legal documents online.
* Support - Tools to enhance customer satisfaction and provide effective assistance.
* Customer Appreciation - Tools that help you show appreciation to your customers.
* Customer Support - Tools to answer your customers' questions through email, chat, and documentation.
* Website & App Building - Tools to create and customize websites and applications.
* App Builder - Tools to build a custom app with forms and databases.
* Website Builders - Tools to help manage content and build websites for your business.
**Example**:
* *Gmail* is primarily an app to send and receive email messages, so it fits best in the `email` category alongside services like *Microsoft Office 365*, not in the `email newsletters` category with *Mailchimp*.
* *Slack* is primarily a team communication tool for chat, so it fits best in the `team chat` category alongside apps like *Discord* and *ChatWork*, not in the `video calls` category even though it does include a video call tool as a secondary feature.
* *Google Contacts* is primarily an address book that fits best with other `contacts` apps, while *HubSpot CRM* can manage contacts but also includes deals and contact tracking which makes it a better fit for the `CRM` category.
## Colors
When you release your Zapier integration to the public, Zapier requires your app's primary color. The primary color is the main color used in your app's logo or branding.
Todoist's icon includes transparent, rounded corners.
## App description copy
Write a short description (up to 160 characters) of your app’s core features and use cases in the form of "**Integration Name** is a....". The description should be less about selling the platform and more about what the platform actually does. Use proper English and full sentences. The copy should not include links or mentions of Zapier. Do not use flowery or overstated language, or make it appear your integration is associated with or endorsed by Zapier.
**Example**:
* `Trello is a team collaboration tool to organize anything on a kanban board.`, not `Trello is the best project management tool.`
* `Dropbox lets you store files online, sync them to all your devices, and share them easily.`, not `A file storage app.`
## Category
Select the category that best fits your app's core features and use case. If your app includes features from multiple categories, choose the category that best describes your app's primary use case today.
You may update your app's category in the future if needed, so do not select a category that fits your future ambitions for the app instead of its features today. Additionally, do not select a category that applies only to a secondary feature in your app or a narrow category that does not cover your app's broader focus.
### Available Categories
We offer a variety of categories for you to list your integration in. Each top-level category includes all integrations from its child categories. To maximize visibility for your integration, we recommend selecting a specific child category rather than a general parent category. Integrations within each category are ranked by popularity. By choosing a child category, your integration can achieve a higher ranking and greater visibility within that category.
* Artificial Intelligence - Tools that offer AI features such as natural language processing, image classification, and more.
* AI Agents - Tools that use AI to take action and complete tasks.
* AI Assistants - Tools that act as digital helpers for everyday tasks.
* AI Chatbots - Conversational bots that answer questions and automate support.
* AI Content Generation - Tools to create text, images, audio, or video with AI.
* AI Document Extraction - Tools that extract structured data from documents and files.
* AI Meeting Assistants - Tools that record, transcribe, and summarize meetings.
* AI Models - Services to build, host, or access AI/ML models.
* AI Safety, Compliance, Detection - Tools to detect AI content, moderate risks, and ensure compliance.
* AI Sales Tools - AI tools to find, qualify, and engage leads.
* AI Web Scraping - Tools that use AI to collect and structure web data.
* Model Context Protocol (MCP) - Tools built on the Model Context Protocol (MCP) standard.
* Business Intelligence - Tools to gather, analyze, and visualize business data.
* Analytics - Tools to measure and report on success.
* Dashboards - Tools to view your data on a full-screen dashboard.
* Reviews - Tools to manage your reviews and ratings.
* Commerce - Tools to facilitate all aspects of business transactions, both online and offline.
* Taxes - Tools for automating your taxes.
* Accounting - Tools for accounting and finance.
* eCommerce - Tools to sell your products online.
* Fundraising - Tools to set up fundraising events and projects.
* Payment Processing - Tools to process payments on your site or app.
* Proposal & Invoice Management - Tools to create and send proposals and invoices to clients.
* Communication - Tools to streamline and enhance communication across various channels.
* Call Tracking - Tools to monitor calls and track data from non-digital marketing campaigns.
* Email - Tools to manage your personal and business email correspondence.
* Fax - Tools to send documents over fax.
* Notifications - Tools to get customized notifications on your computer or mobile devices.
* Phone & SMS - Tools to make calls and send SMS messages.
* Team Chat - Tools to help teams collaborate together online with real-time chat.
* Team Collaboration - Tools for business social networking, file sharing, and chat to help teams work together more effectively.
* Video Conferencing - Tools to host team video calls and webinars.
* Content & Files - Tools to create, manage, and share various types of content and files.
* Documents - Tools to write, edit, and share text documents.
* File Management & Storage - Tools to organize, share, and sync files.
* Images & Design - Tools for creatives and those dealing with images.
* Notes - Tools to write down thoughts and organize them in notebooks.
* Transcription - Tools to transcribe audio into text.
* Video & Audio - Tools to store and share multimedia assets.
* Human Resources - Tools to manage all aspects of human resources, from hiring and recruitment to employee management and development.
* Education - Tools to enhance learning and teaching experiences
* HR Talent & Recruitment - Tools to manage your hiring and human resource department.
* Internet of Things - Tools to connect and manage IoT devices and services.
* Devices - Tools for connecting Internet of Things devices through Zapier.
* Printing - Tools to print your designs, either on your printer or on products such as t-shirts and stickers.
* IT Operations - Tools to manage and optimize IT infrastructure and services.
* Databases - Tools for developers to store and manage data.
* Developer - Tools to build and maintain software, services, and websites.
* Online Courses - Tools to publish lessons and educational material.
* Security & Identity - Tools to manage security and identity/permissions
* Server Monitoring - Tools that monitor services and application metrics.
* Lifestyle & Entertainment - Tools to enhance various aspects of your personal life and leisure activities.
* Fitness - Tools to track your workouts, food, and more.
* Gaming - Tools that are centered around video gaming.
* News & Lifestyle - Tools to keep you informed on news and lifestyle content.
* Marketing - Tools to plan, execute, and measure marketing campaigns across various channels.
* Ads & Conversion - Tools to track and reach an audience online.
* Drip Emails - Tools to send automated email messages on a set schedule.
* Email Newsletters - Tools to send regular email updates and newsletters to your subscribers.
* Event Management - Tools to manage events and attendees.
* Marketing Automation - Tools to market products, track interests, and turn visitors into customers.
* Social Media Accounts - Tools to connect and share with others online.
* Social Media Marketing - Tools to automatically share posts on social networks.
* Transactional Email - Tools to send email messages through your application.
* URL Shortener - Tools to shorten URLs.
* Webinars - Tools for scheduling and holding webinars.
* Productivity - Tools to enhance efficiency and organization in your personal and professional life.
* Bookmark Managers - Tools to save your favorite links to view and read later.
* Calendar - Tools to plan your events and schedule.
* Product Management - Tools to plan your product's lifecycle and roadmap.
* Project Management - Tools for managing projects.
* Spreadsheets - Tools to manage numbers and data.
* Task Management - Tools to manage your tasks on simple lists.
* Time Tracking Software - Tools to track time spent on work and projects.
* Sales & CRM - Tools to manage and optimize your sales processes and customer relationships.
* Contact Management - Tools to keep track of the people you need to keep in touch with most.
* CRM (Customer Relationship Management) - Tools for customer relationship management.
* Forms & Surveys - Tools to build forms and gather data from your website or apps.
* Scheduling & Booking - Tools to schedule appointments and events.
* Signatures - Tools to manage and sign legal documents online.
* Support - Tools to enhance customer satisfaction and provide effective assistance.
* Customer Appreciation - Tools that help you show appreciation to your customers.
* Customer Support - Tools to answer your customers' questions through email, chat, and documentation.
* Website & App Building - Tools to create and customize websites and applications.
* App Builder - Tools to build a custom app with forms and databases.
* Website Builders - Tools to help manage content and build websites for your business.
**Example**:
* *Gmail* is primarily an app to send and receive email messages, so it fits best in the `email` category alongside services like *Microsoft Office 365*, not in the `email newsletters` category with *Mailchimp*.
* *Slack* is primarily a team communication tool for chat, so it fits best in the `team chat` category alongside apps like *Discord* and *ChatWork*, not in the `video calls` category even though it does include a video call tool as a secondary feature.
* *Google Contacts* is primarily an address book that fits best with other `contacts` apps, while *HubSpot CRM* can manage contacts but also includes deals and contact tracking which makes it a better fit for the `CRM` category.
## Colors
When you release your Zapier integration to the public, Zapier requires your app's primary color. The primary color is the main color used in your app's logo or branding.
 Do not use pure white (`#FFFFFF`) as the color, as overlaid text would be unreadable. If your logo is black and white, use the next most common color from your branding.
Zapier uses the primary color as the background color in your app's Zapier App Directory listing, and may additionally use it in the Zapier app dashboard, Zapier blog marketing materials, and other parts of Zapier's app and content that promote your app's integrations.
## Frequently Asked Questions
Currently, we only allow 1 category per integration^. This is to maintain our categorization effectiveness, making it easier for users to find relevant integrations. Limiting integrations to 1 category also helps to improve your discoverability within the category.
*^Additional categories are limited to App Families and AI Tools at Zapier's discretion*
Yes, you can. Submit the Rebrand Form located at the top of the Settings page for your integration in the [Developer platform](https://developer.zapier.com).
Do not use pure white (`#FFFFFF`) as the color, as overlaid text would be unreadable. If your logo is black and white, use the next most common color from your branding.
Zapier uses the primary color as the background color in your app's Zapier App Directory listing, and may additionally use it in the Zapier app dashboard, Zapier blog marketing materials, and other parts of Zapier's app and content that promote your app's integrations.
## Frequently Asked Questions
Currently, we only allow 1 category per integration^. This is to maintain our categorization effectiveness, making it easier for users to find relevant integrations. Limiting integrations to 1 category also helps to improve your discoverability within the category.
*^Additional categories are limited to App Families and AI Tools at Zapier's discretion*
Yes, you can. Submit the Rebrand Form located at the top of the Settings page for your integration in the [Developer platform](https://developer.zapier.com).
 An app family refers to a collection of related integrations, typically developed by the same organization. Being added to an App Family is at the discretion of Zapier.
Being classified as a Premium app isn't something we currently offer to partner-owned integrations. The justification as to why a Zapier-owned integration might be classed as Premium varies, but is often due to an increased cost on our end to be able to offer that integration. Only users on a paid Zapier plan can use Premium integrations, which helps to ensure we can continue to invest in the development of that integration.
***
*Need help? [Tell us about your problem](https://developer.zapier.com/contact) and we'll connect you with the right resource or contact support.*
---
# Zapier MCP Contact Form
Please fill out the form below if you'd like to talk to the Zapier MCP team. Bug reports, feature requests, and ideas are always welcome!
**Zapier MCP is currently in beta.** While we'll support you as best we can during this phase, please note that full support may not be available just yet.
**Before reaching out**, you may find it useful to get in touch with the app you use Zapier MCP with (i.e. Claude / Cursor / Windsurf), as this is often the quickest path to resolution. You can also try our [MCP Helper Chatbot](https://mcp-helper.zapier.app/) which we're keeping up-to-date.
---
# Source: https://docs.zapier.com/platform/quickstart/build-integration.md
> ## Documentation Index
> Fetch the complete documentation index at: https://docs.zapier.com/llms.txt
> Use this file to discover all available pages before exploring further.
# Build your integration on Zapier
> This guide will walk you through what steps you need to take to build an integration from start to finish. There are no fees to build an integration with Zapier.
You can choose to build with either [Zapier Platform UI or Zapier Platform CLI](/platform/quickstart/ui-vs-cli).
## 1. Prerequisites
* The app you wish to integrate will need to have a [publicly-accessible API](https://zapier.com/learn/apis/)
* Create a [Zapier account](https://zapier.com/sign-up)
* If you haven't used Zapier before, learn the basics in our [Zapier Getting Started Guide](https://zapier.com/learn/zapier-quick-start-guide/)
## 2. Choose a developer tool
Select [one of the two ways](/platform/quickstart/ui-vs-cli) to build an integration on Zapier's Platform.
* The Platform UI lets you create a Zapier integration in your browser without code using API endpoint URLs. You can set any custom options your API may need, including custom URL params, HTTP headers, and request body items.
* Zapier Platform CLI lets you build a Zapier integration in your local development environment, collaborate with version control and CI tools, and push new versions of your integration from the command line.
Both of these tools run on the same Zapier platform, so choose the one that fits your workflow the best. You can try both methods out with the [Platform UI tutorial](/platform/quickstart/ui-tutorial) and the [Platform CLI tutorial](/platform/quickstart/cli-tutorial).
## 3. Create a new integration
Create and add details about your integration. Set your Intended audience.
* [Create an integration using Zapier Platform UI](https://developer.zapier.com/app/new)
* [Create an integration using Zapier Platform CLI](/platform/build-cli/overview#creating-a-local-integration)
## 3. Add an authentication scheme
Configuring authentication allows users to input credentials to authenticate with your API.
* [Authentication using Zapier Platform UI](/platform/build/auth)
* [Authentication using Zapier Platform CLI](/platform/build-cli/overview#authentication)
* [Authentication schema](https://github.com/zapier/zapier-platform/blob/main/packages/schema/docs/build/schema.md#authenticationschema)
## 4. Configure triggers
Triggers are how your app's users can start automated workflows whenever an item is added or updated in your app. Use webhook subscriptions or polling API endpoints to create triggers.
* [Configure a trigger using Zapier Platform UI](/platform/build/trigger)
* [Configure a trigger using Zapier Platform CLI](/platform/build-cli/overview#triggers-searches-creates)
* [Trigger schema](https://github.com/zapier/zapier-platform/blob/main/packages/schema/docs/build/schema.md#triggerschema)
## 5. Configure actions
Actions allow users to either create, search or update records in your app via your API.
* [Create an action using Zapier Platform UI](/platform/build/action)
* [Create an action using Zapier Platform CLI](/platform/build-cli/overview#triggers-searches-creates)
* [Search schema](https://github.com/zapier/zapier-platform/blob/main/packages/schema/docs/build/schema.md#searchschema)
* [Create schema](https://github.com/zapier/zapier-platform/blob/main/packages/schema/docs/build/schema.md#createschema)
## 6. Test your integration
While you're building your integration, you can test your API requests within the Platform UI. For developers building on Zapier Platform CLI, you can write unit tests that run locally, in a CI tool like [Travis](https://travis-ci.com/).
To get a sense of the user experience, it's recommended to test your integration within the Zap editor. [Create a new Zap](https://help.zapier.com/hc/en-us/articles/8496309697421) that uses your integration's triggers or actions to ensure they all work as expected. After you're done building, invite users to try your integration before making it available to a wider audience.
Learn more about testing your integration:
* [Testing using Zapier Platform UI](/platform/build/test-auth)
* [Testing using Zapier Platform CLI](/platform/build-cli/overview#testing)
## 7. Validate your integration
Run automated checks to identify errors and recommendations on how to improve the user experience of your private integration. These checks are required to pass for public integrations, and are recommended for a better user experience for private integrations.
* [Run automated checks using Zapier Platform UI](/platform/publish/integration-checks-reference)
* [Run automated checks using Zapier Platform CLI](https://github.com/zapier/zapier-platform/blob/main/packages/cli/docs/cli.md#validate)
## 8. Invite team members
You can assign different roles and permissions to team members who you're collaborating with on your private integration.
* [Invite team members using Zapier Platform UI](/platform/manage/add-team)
* [Invite team members using Zapier Platform CLI](https://github.com/zapier/zapier-platform/blob/main/packages/cli/docs/cli.md#teamadd)
## 9. Publish
Once you've built your integration, Publish it!
* [Share your integration](/platform/manage/sharing)
## 10. Conclusion
Once you've built your integration, continue to make further improvements and manage versions of your integration.
* [Manage integration versions using Zapier Platform UI](/platform/manage/versions#managing-versions-in-platform-ui)
* [Manage integration versions using Zapier Platform CLI](/platform/manage/versions#managing-versions-in-platform-cli)
**Tip**: Learn from the Zapier team and other [Zapier Platform developers in
our community forum](https://community.zapier.com/p/developer-zone).
---
# Source: https://docs.zapier.com/platform/build/bundle.md
> ## Documentation Index
> Fetch the complete documentation index at: https://docs.zapier.com/llms.txt
> Use this file to discover all available pages before exploring further.
# Reference user-entered details with data bundles
> Zapier stores data from users' authentication and input forms for API calls in the `bundle` object. You can reference that data in your integration using either `{{bundle.bundleName.field}}` or `${bundle.bundleName.field}`, depending on the context. Replace `bundleName` with the bundle name and `field` with the input field key or API response field key you need.
You can reference a field in the `bundle` object in these ways:
* In Form Mode (the default mode), use `{{bundle.bundleName.field}}`
* In Code Mode, use standard JavaScript syntax. For example:
* Reference the field directly like `return bundle.bundleName.field`
* Use a template literal like `${bundle.bundleName.field}`
See also: [When to use placeholders or curlies?](/platform/build-cli/faqs#when-to-use-placeholders-or-curlies%3F)
To reference a nested field in the `bundle` object, use dot notation like `field.nestedfield`. For example, `{{bundle.inputData.data.name}}` refers to the `name` field nested inside the `data` field.
Zapier integrations include the following bundles:
* `bundle`
* `authData`
* `inputData`
* `meta`
* `rawRequest` and `cleanedRequest`
* `outputData`
* `targetURL`
* `subscribeData`
* `process.env`
## `authData`
Reference with: `{{bundle.authData.field}}` or `${bundle.authData.field}`
Includes data users enter into the authentication input form, such as the `username` field for [basic authentication](/platform/build/basicauth) and any additional fields configured in the authentication input form for API Key, Basic, Session, and Digest authentication methods.
For these methods, fields from the input form or the Token Exchange Endpoint can be accessed using `{{bundle.authData.field}}`, where "field" matches the field name.
However, when using the OAuth v2 authentication method, data entered by users into the authentication input form is not included in `{{bundle.authData}}`. Instead, it is available in `{{bundle.inputData}}`.
Additionally, with OAuth v2, session authentication, and digest authentication, `authData` includes all data returned by the Token Exchange Endpoint url, referenced with the following, replacing `field` with the field name from your API response: `{{bundle.authData.field}}`
For example, the Access Token value will often be accessed via `{{bundle.authData.access_token}}` or `{{bundle.authData.accessToken}}`.
However, the `authData` bundle does not support nested objects: all values returned from authentication functions need to be at the top level. This bundle also does not include values provided by intermediate steps in OAuth v2 or session authentication flows, like `redirect_uri`.
Commonly used authData fields include:
* Username: `{{bundle.authData.username}}`
* Password: `{{bundle.authData.password}}`
* Access Token: `{{bundle.authData.access_token}}`
## `inputData`
Reference with: `{{bundle.inputData.field}}` or `${bundle.inputData.field}`
In authentication configuration, including connection labels, `inputData` contains the fields returned from the test API call, as well as some values provided by intermediate steps in more complex auth flows, such as the OAuth v2 `redirect_uri`. Values returned by the test API call are typically used to add a [connection label](./auth#label) to new integration connections.
In triggers and actions, `inputData` contains the data that users enter into the input forms for this particular run of the trigger or action. The `{{curlies}}` (mapped fields from previous Zap steps) are rendered with their raw data from previous steps.
If you want the input field data with the original `{{curlies}}` and not the data from previous steps, use `{{bundle.inputDataRaw.field}}` instead. This is less common.
Commonly used inputData fields include:
* Zapier Redirect URI: `{{bundle.inputData.redirect_uri}}`
* Authorization Code: `{{bundle.inputData.code}}`
* ID of selected triggering event: `{{bundle.inputData.id}}`
### Note on OAuth Configuration Data
For OAuth configurations, user submitted data for authentication forms (via ["Request Template"](https://docs.zapier.com/platform/build/requesttemplate#add-authentication-fields-to-request-template)) are stored in `bundle.inputData`.
## `meta`
Reference with: `{{bundle.meta.field}}` or `${bundle.meta.field}`
`bundle.meta` contains information on what the user is doing. It has the following options for `field`:
| key | default | description |
| -------------------------- | ------- | ----------------------------------------------------------------------------------------------------------------------------------------------------------------------------------------------------------------------------------------------------------------------------------------------------------------------------- |
| `isLoadingSample` | `false` | If true, this run was initiated manually via the Zap Editor |
| `isFillingDynamicDropdown` | `false` | If true, this poll is being used to populate a dynamic dropdown. You only need to return the fields you specified (such as `id` and `name`), though returning everything is fine too |
| `isPopulatingDedupe` | `false` | If true, the results of this poll will be used to initialize the deduplication list rather than trigger a zap. You should grab as many items as possible. See also: [deduplication](#dedup) |
| `limit` | `-1` | The number of items you should fetch. `-1` indicates there's no limit. Build this into your calls insofar as you are able |
| `page` | `0` | Used in [paging](#paging) to uniquely identify which page of results should be returned |
| `isTestingAuth` | `false` | (legacy property) If true, the poll was triggered by a user testing their account (via [clicking “test”](https://cdn.zapier.com/storage/photos/5c94c304ce11b02c073a973466a7b846.png) or during setup). We use this data to populate the auth label, but it's mostly used to verify we made a successful authenticated request |
## `rawRequest` and `cleanedRequest`
**Note:** `bundle.rawRequest` and `bundle.cleanedRequest` are only available
in the `perform` for webhooks, `getAccessToken` for OAuth v2 and
`performResume` in callback actions.
Reference with: `{{bundle.rawRequest.field}}`, `{{bundle.cleanedRequest.field}}`, `${bundle.rawRequest.field}`, or `${bundle.cleanedRequest.field}`
It includes the raw or cleaned information, respectively, from the HTTP request that triggered the `perform` method, or from the user's browser request that triggers the `getAccessToken` call from OAuth v2 authentication. You can reference individual fields with `cleanedRequest`.
Use `bundle.rawRequest` if you need access to header data. In `bundle.rawRequest`, headers other than `Content-Length` and `Content-Type` will be prefixed with `Http-`, and all headers will be named in Camel-Case.
## `outputData`
Reference with: `{{bundle.outputData}}` or `${bundle.outputData}`
**Note:** `bundle.outputData` is only available in the `performResume` in a
callback action - read about that advanced functionality
[here](https://github.com/zapier/zapier-platform/blob/main/packages/cli/README.md#zgeneratecallbackurl).
Using `bundle.outputData` will return a whatever data you originally returned in the `perform`, allowing you to mix that with `bundle.rawRequest` or `bundle.cleanedRequest`.
## `targetUrl`
Referenced with: `{{bundle.targetUrl}}` or `${bundle.targetUrl}`
In triggers using REST hooks, this returns the URL your app should send data to when the triggering event occurs, such as `https://hooks.zapier.com/1234/abcd`.
## `subscribeData`
Referenced with: `{{bundle.subscribeData}}` or `${bundle.subscribeData}`
In triggers using REST hooks, this includes the data returned by your API from the `performSubscribe` function. This should include all information needed to send a `DELETE` request to your server to stop sending webhook data to Zapier when the user turns off a Zap.
## `process.env`
Reference with: `{{process.env.field}}` or `${process.env.field}`
Commonly used `process.env` fields include:
* Client Secret: `{{process.env.CLIENT_SECRET}}`
* Client ID: `{{process.env.CLIENT_ID}}`
***
*Need help? [Tell us about your problem](https://developer.zapier.com/contact) and we'll connect you with the right resource or contact support.*
---
# Source: https://docs.zapier.com/platform/manage/change-api.md
> ## Documentation Index
> Fetch the complete documentation index at: https://docs.zapier.com/llms.txt
> Use this file to discover all available pages before exploring further.
# Changes to your API can impact your integration
## Change scenario
When making changes to your API, consider how these will affect your Zapier integration. API updates can vary from small to significant changes and can have varying effects on your users' Zaps.
## Impact to users
Though not exhaustive, here are some potential major impacts to users:
* If a new version with breaking changes to authentication is promoted, users with existing Zaps will have to manually reconnect their account on Zapier.
* If a new version with breaking changes to any trigger, action, or search is promoted, users with existing Zaps will have to manually upgrade *each* Zap using your integration. Keep in mind: power users can have tens to hundreds of Zaps using your integration.
* Changes to a trigger, action, or search's response data can break or negatively affect the proceeding steps of the Zap.
* Changes to response data in polling triggers can prevent Zaps from triggering on new records or cause them to trigger on old records. This can lead to missed data and undesirable results for your users.
## Best practices
To mitigate the impact of API changes on your Zapier users, consider the following best practices:
* Maintain general backwards compatibility on existing endpoints. This ensures that the existing Zaps continue to work as expected, and your users won't need to modify them due to API changes.
* For polling triggers - changing the number of records returned from the endpoint can significantly impact the functionality of the users' Zaps.
* Implementing pagination on an endpoint can affect how much data is fetched and processed when a Zap polls that endpoint.
* Changing the sort order of response data returned can impact Zap triggers. For polling triggers, ensure that the data is always sorted in reverse chronological order to maintain compatibility.
By adhering to these best practices, you can minimize disruptions to your Zapier users when updating or modifying your API. A well-managed API transition process ensures that your users continue to have a seamless and efficient Zapier integration experience.
***
*Need help? [Tell us about your problem](https://developer.zapier.com/contact) and we'll connect you with the right resource or contact support.*
---
# Source: https://docs.zapier.com/platform/manage/change-keys.md
> ## Documentation Index
> Fetch the complete documentation index at: https://docs.zapier.com/llms.txt
> Use this file to discover all available pages before exploring further.
# Change trigger or action key
## Change scenario
In cases where a trigger/action/search's custom code needs to be rewritten or a new v2 is replacing an older v1.
## Impact to users
Deleting a trigger/action/search in a new version is a breaking change - which would prevent migration of your users to the new version. Updating an existing trigger/action/search's custom code would allow for migration but break users' Zaps if the output changes.
An app family refers to a collection of related integrations, typically developed by the same organization. Being added to an App Family is at the discretion of Zapier.
Being classified as a Premium app isn't something we currently offer to partner-owned integrations. The justification as to why a Zapier-owned integration might be classed as Premium varies, but is often due to an increased cost on our end to be able to offer that integration. Only users on a paid Zapier plan can use Premium integrations, which helps to ensure we can continue to invest in the development of that integration.
***
*Need help? [Tell us about your problem](https://developer.zapier.com/contact) and we'll connect you with the right resource or contact support.*
---
# Zapier MCP Contact Form
Please fill out the form below if you'd like to talk to the Zapier MCP team. Bug reports, feature requests, and ideas are always welcome!
**Zapier MCP is currently in beta.** While we'll support you as best we can during this phase, please note that full support may not be available just yet.
**Before reaching out**, you may find it useful to get in touch with the app you use Zapier MCP with (i.e. Claude / Cursor / Windsurf), as this is often the quickest path to resolution. You can also try our [MCP Helper Chatbot](https://mcp-helper.zapier.app/) which we're keeping up-to-date.
---
# Source: https://docs.zapier.com/platform/quickstart/build-integration.md
> ## Documentation Index
> Fetch the complete documentation index at: https://docs.zapier.com/llms.txt
> Use this file to discover all available pages before exploring further.
# Build your integration on Zapier
> This guide will walk you through what steps you need to take to build an integration from start to finish. There are no fees to build an integration with Zapier.
You can choose to build with either [Zapier Platform UI or Zapier Platform CLI](/platform/quickstart/ui-vs-cli).
## 1. Prerequisites
* The app you wish to integrate will need to have a [publicly-accessible API](https://zapier.com/learn/apis/)
* Create a [Zapier account](https://zapier.com/sign-up)
* If you haven't used Zapier before, learn the basics in our [Zapier Getting Started Guide](https://zapier.com/learn/zapier-quick-start-guide/)
## 2. Choose a developer tool
Select [one of the two ways](/platform/quickstart/ui-vs-cli) to build an integration on Zapier's Platform.
* The Platform UI lets you create a Zapier integration in your browser without code using API endpoint URLs. You can set any custom options your API may need, including custom URL params, HTTP headers, and request body items.
* Zapier Platform CLI lets you build a Zapier integration in your local development environment, collaborate with version control and CI tools, and push new versions of your integration from the command line.
Both of these tools run on the same Zapier platform, so choose the one that fits your workflow the best. You can try both methods out with the [Platform UI tutorial](/platform/quickstart/ui-tutorial) and the [Platform CLI tutorial](/platform/quickstart/cli-tutorial).
## 3. Create a new integration
Create and add details about your integration. Set your Intended audience.
* [Create an integration using Zapier Platform UI](https://developer.zapier.com/app/new)
* [Create an integration using Zapier Platform CLI](/platform/build-cli/overview#creating-a-local-integration)
## 3. Add an authentication scheme
Configuring authentication allows users to input credentials to authenticate with your API.
* [Authentication using Zapier Platform UI](/platform/build/auth)
* [Authentication using Zapier Platform CLI](/platform/build-cli/overview#authentication)
* [Authentication schema](https://github.com/zapier/zapier-platform/blob/main/packages/schema/docs/build/schema.md#authenticationschema)
## 4. Configure triggers
Triggers are how your app's users can start automated workflows whenever an item is added or updated in your app. Use webhook subscriptions or polling API endpoints to create triggers.
* [Configure a trigger using Zapier Platform UI](/platform/build/trigger)
* [Configure a trigger using Zapier Platform CLI](/platform/build-cli/overview#triggers-searches-creates)
* [Trigger schema](https://github.com/zapier/zapier-platform/blob/main/packages/schema/docs/build/schema.md#triggerschema)
## 5. Configure actions
Actions allow users to either create, search or update records in your app via your API.
* [Create an action using Zapier Platform UI](/platform/build/action)
* [Create an action using Zapier Platform CLI](/platform/build-cli/overview#triggers-searches-creates)
* [Search schema](https://github.com/zapier/zapier-platform/blob/main/packages/schema/docs/build/schema.md#searchschema)
* [Create schema](https://github.com/zapier/zapier-platform/blob/main/packages/schema/docs/build/schema.md#createschema)
## 6. Test your integration
While you're building your integration, you can test your API requests within the Platform UI. For developers building on Zapier Platform CLI, you can write unit tests that run locally, in a CI tool like [Travis](https://travis-ci.com/).
To get a sense of the user experience, it's recommended to test your integration within the Zap editor. [Create a new Zap](https://help.zapier.com/hc/en-us/articles/8496309697421) that uses your integration's triggers or actions to ensure they all work as expected. After you're done building, invite users to try your integration before making it available to a wider audience.
Learn more about testing your integration:
* [Testing using Zapier Platform UI](/platform/build/test-auth)
* [Testing using Zapier Platform CLI](/platform/build-cli/overview#testing)
## 7. Validate your integration
Run automated checks to identify errors and recommendations on how to improve the user experience of your private integration. These checks are required to pass for public integrations, and are recommended for a better user experience for private integrations.
* [Run automated checks using Zapier Platform UI](/platform/publish/integration-checks-reference)
* [Run automated checks using Zapier Platform CLI](https://github.com/zapier/zapier-platform/blob/main/packages/cli/docs/cli.md#validate)
## 8. Invite team members
You can assign different roles and permissions to team members who you're collaborating with on your private integration.
* [Invite team members using Zapier Platform UI](/platform/manage/add-team)
* [Invite team members using Zapier Platform CLI](https://github.com/zapier/zapier-platform/blob/main/packages/cli/docs/cli.md#teamadd)
## 9. Publish
Once you've built your integration, Publish it!
* [Share your integration](/platform/manage/sharing)
## 10. Conclusion
Once you've built your integration, continue to make further improvements and manage versions of your integration.
* [Manage integration versions using Zapier Platform UI](/platform/manage/versions#managing-versions-in-platform-ui)
* [Manage integration versions using Zapier Platform CLI](/platform/manage/versions#managing-versions-in-platform-cli)
**Tip**: Learn from the Zapier team and other [Zapier Platform developers in
our community forum](https://community.zapier.com/p/developer-zone).
---
# Source: https://docs.zapier.com/platform/build/bundle.md
> ## Documentation Index
> Fetch the complete documentation index at: https://docs.zapier.com/llms.txt
> Use this file to discover all available pages before exploring further.
# Reference user-entered details with data bundles
> Zapier stores data from users' authentication and input forms for API calls in the `bundle` object. You can reference that data in your integration using either `{{bundle.bundleName.field}}` or `${bundle.bundleName.field}`, depending on the context. Replace `bundleName` with the bundle name and `field` with the input field key or API response field key you need.
You can reference a field in the `bundle` object in these ways:
* In Form Mode (the default mode), use `{{bundle.bundleName.field}}`
* In Code Mode, use standard JavaScript syntax. For example:
* Reference the field directly like `return bundle.bundleName.field`
* Use a template literal like `${bundle.bundleName.field}`
See also: [When to use placeholders or curlies?](/platform/build-cli/faqs#when-to-use-placeholders-or-curlies%3F)
To reference a nested field in the `bundle` object, use dot notation like `field.nestedfield`. For example, `{{bundle.inputData.data.name}}` refers to the `name` field nested inside the `data` field.
Zapier integrations include the following bundles:
* `bundle`
* `authData`
* `inputData`
* `meta`
* `rawRequest` and `cleanedRequest`
* `outputData`
* `targetURL`
* `subscribeData`
* `process.env`
## `authData`
Reference with: `{{bundle.authData.field}}` or `${bundle.authData.field}`
Includes data users enter into the authentication input form, such as the `username` field for [basic authentication](/platform/build/basicauth) and any additional fields configured in the authentication input form for API Key, Basic, Session, and Digest authentication methods.
For these methods, fields from the input form or the Token Exchange Endpoint can be accessed using `{{bundle.authData.field}}`, where "field" matches the field name.
However, when using the OAuth v2 authentication method, data entered by users into the authentication input form is not included in `{{bundle.authData}}`. Instead, it is available in `{{bundle.inputData}}`.
Additionally, with OAuth v2, session authentication, and digest authentication, `authData` includes all data returned by the Token Exchange Endpoint url, referenced with the following, replacing `field` with the field name from your API response: `{{bundle.authData.field}}`
For example, the Access Token value will often be accessed via `{{bundle.authData.access_token}}` or `{{bundle.authData.accessToken}}`.
However, the `authData` bundle does not support nested objects: all values returned from authentication functions need to be at the top level. This bundle also does not include values provided by intermediate steps in OAuth v2 or session authentication flows, like `redirect_uri`.
Commonly used authData fields include:
* Username: `{{bundle.authData.username}}`
* Password: `{{bundle.authData.password}}`
* Access Token: `{{bundle.authData.access_token}}`
## `inputData`
Reference with: `{{bundle.inputData.field}}` or `${bundle.inputData.field}`
In authentication configuration, including connection labels, `inputData` contains the fields returned from the test API call, as well as some values provided by intermediate steps in more complex auth flows, such as the OAuth v2 `redirect_uri`. Values returned by the test API call are typically used to add a [connection label](./auth#label) to new integration connections.
In triggers and actions, `inputData` contains the data that users enter into the input forms for this particular run of the trigger or action. The `{{curlies}}` (mapped fields from previous Zap steps) are rendered with their raw data from previous steps.
If you want the input field data with the original `{{curlies}}` and not the data from previous steps, use `{{bundle.inputDataRaw.field}}` instead. This is less common.
Commonly used inputData fields include:
* Zapier Redirect URI: `{{bundle.inputData.redirect_uri}}`
* Authorization Code: `{{bundle.inputData.code}}`
* ID of selected triggering event: `{{bundle.inputData.id}}`
### Note on OAuth Configuration Data
For OAuth configurations, user submitted data for authentication forms (via ["Request Template"](https://docs.zapier.com/platform/build/requesttemplate#add-authentication-fields-to-request-template)) are stored in `bundle.inputData`.
## `meta`
Reference with: `{{bundle.meta.field}}` or `${bundle.meta.field}`
`bundle.meta` contains information on what the user is doing. It has the following options for `field`:
| key | default | description |
| -------------------------- | ------- | ----------------------------------------------------------------------------------------------------------------------------------------------------------------------------------------------------------------------------------------------------------------------------------------------------------------------------- |
| `isLoadingSample` | `false` | If true, this run was initiated manually via the Zap Editor |
| `isFillingDynamicDropdown` | `false` | If true, this poll is being used to populate a dynamic dropdown. You only need to return the fields you specified (such as `id` and `name`), though returning everything is fine too |
| `isPopulatingDedupe` | `false` | If true, the results of this poll will be used to initialize the deduplication list rather than trigger a zap. You should grab as many items as possible. See also: [deduplication](#dedup) |
| `limit` | `-1` | The number of items you should fetch. `-1` indicates there's no limit. Build this into your calls insofar as you are able |
| `page` | `0` | Used in [paging](#paging) to uniquely identify which page of results should be returned |
| `isTestingAuth` | `false` | (legacy property) If true, the poll was triggered by a user testing their account (via [clicking “test”](https://cdn.zapier.com/storage/photos/5c94c304ce11b02c073a973466a7b846.png) or during setup). We use this data to populate the auth label, but it's mostly used to verify we made a successful authenticated request |
## `rawRequest` and `cleanedRequest`
**Note:** `bundle.rawRequest` and `bundle.cleanedRequest` are only available
in the `perform` for webhooks, `getAccessToken` for OAuth v2 and
`performResume` in callback actions.
Reference with: `{{bundle.rawRequest.field}}`, `{{bundle.cleanedRequest.field}}`, `${bundle.rawRequest.field}`, or `${bundle.cleanedRequest.field}`
It includes the raw or cleaned information, respectively, from the HTTP request that triggered the `perform` method, or from the user's browser request that triggers the `getAccessToken` call from OAuth v2 authentication. You can reference individual fields with `cleanedRequest`.
Use `bundle.rawRequest` if you need access to header data. In `bundle.rawRequest`, headers other than `Content-Length` and `Content-Type` will be prefixed with `Http-`, and all headers will be named in Camel-Case.
## `outputData`
Reference with: `{{bundle.outputData}}` or `${bundle.outputData}`
**Note:** `bundle.outputData` is only available in the `performResume` in a
callback action - read about that advanced functionality
[here](https://github.com/zapier/zapier-platform/blob/main/packages/cli/README.md#zgeneratecallbackurl).
Using `bundle.outputData` will return a whatever data you originally returned in the `perform`, allowing you to mix that with `bundle.rawRequest` or `bundle.cleanedRequest`.
## `targetUrl`
Referenced with: `{{bundle.targetUrl}}` or `${bundle.targetUrl}`
In triggers using REST hooks, this returns the URL your app should send data to when the triggering event occurs, such as `https://hooks.zapier.com/1234/abcd`.
## `subscribeData`
Referenced with: `{{bundle.subscribeData}}` or `${bundle.subscribeData}`
In triggers using REST hooks, this includes the data returned by your API from the `performSubscribe` function. This should include all information needed to send a `DELETE` request to your server to stop sending webhook data to Zapier when the user turns off a Zap.
## `process.env`
Reference with: `{{process.env.field}}` or `${process.env.field}`
Commonly used `process.env` fields include:
* Client Secret: `{{process.env.CLIENT_SECRET}}`
* Client ID: `{{process.env.CLIENT_ID}}`
***
*Need help? [Tell us about your problem](https://developer.zapier.com/contact) and we'll connect you with the right resource or contact support.*
---
# Source: https://docs.zapier.com/platform/manage/change-api.md
> ## Documentation Index
> Fetch the complete documentation index at: https://docs.zapier.com/llms.txt
> Use this file to discover all available pages before exploring further.
# Changes to your API can impact your integration
## Change scenario
When making changes to your API, consider how these will affect your Zapier integration. API updates can vary from small to significant changes and can have varying effects on your users' Zaps.
## Impact to users
Though not exhaustive, here are some potential major impacts to users:
* If a new version with breaking changes to authentication is promoted, users with existing Zaps will have to manually reconnect their account on Zapier.
* If a new version with breaking changes to any trigger, action, or search is promoted, users with existing Zaps will have to manually upgrade *each* Zap using your integration. Keep in mind: power users can have tens to hundreds of Zaps using your integration.
* Changes to a trigger, action, or search's response data can break or negatively affect the proceeding steps of the Zap.
* Changes to response data in polling triggers can prevent Zaps from triggering on new records or cause them to trigger on old records. This can lead to missed data and undesirable results for your users.
## Best practices
To mitigate the impact of API changes on your Zapier users, consider the following best practices:
* Maintain general backwards compatibility on existing endpoints. This ensures that the existing Zaps continue to work as expected, and your users won't need to modify them due to API changes.
* For polling triggers - changing the number of records returned from the endpoint can significantly impact the functionality of the users' Zaps.
* Implementing pagination on an endpoint can affect how much data is fetched and processed when a Zap polls that endpoint.
* Changing the sort order of response data returned can impact Zap triggers. For polling triggers, ensure that the data is always sorted in reverse chronological order to maintain compatibility.
By adhering to these best practices, you can minimize disruptions to your Zapier users when updating or modifying your API. A well-managed API transition process ensures that your users continue to have a seamless and efficient Zapier integration experience.
***
*Need help? [Tell us about your problem](https://developer.zapier.com/contact) and we'll connect you with the right resource or contact support.*
---
# Source: https://docs.zapier.com/platform/manage/change-keys.md
> ## Documentation Index
> Fetch the complete documentation index at: https://docs.zapier.com/llms.txt
> Use this file to discover all available pages before exploring further.
# Change trigger or action key
## Change scenario
In cases where a trigger/action/search's custom code needs to be rewritten or a new v2 is replacing an older v1.
## Impact to users
Deleting a trigger/action/search in a new version is a breaking change - which would prevent migration of your users to the new version. Updating an existing trigger/action/search's custom code would allow for migration but break users' Zaps if the output changes.
 The triggers, actions, and searches are identified by their **key**, such as `new_contact` or `create_post`, so if you remove that key from the app's definition, or change it (possible in CLI apps only), this message appears when you attempt to migrate.
## Best practices
* If you have already renamed the **key** (possible in CLI apps only) for a trigger/action/search, you'll need to switch it back to the previous **key** to proceed with migrating users.
* If you need to remove a trigger/action/search, change its visibility to **hidden** instead. Use the Visibility Options dropdown in the [UI](https://platform.zapier.com/polling-trigger#1-add-the-trigger-settings), or the `hidden` key in the [CLI](https://github.com/zapier/zapier-platform/blob/main/packages/schema/docs/build/schema.md#basicdisplayschema).
The triggers, actions, and searches are identified by their **key**, such as `new_contact` or `create_post`, so if you remove that key from the app's definition, or change it (possible in CLI apps only), this message appears when you attempt to migrate.
## Best practices
* If you have already renamed the **key** (possible in CLI apps only) for a trigger/action/search, you'll need to switch it back to the previous **key** to proceed with migrating users.
* If you need to remove a trigger/action/search, change its visibility to **hidden** instead. Use the Visibility Options dropdown in the [UI](https://platform.zapier.com/polling-trigger#1-add-the-trigger-settings), or the `hidden` key in the [CLI](https://github.com/zapier/zapier-platform/blob/main/packages/schema/docs/build/schema.md#basicdisplayschema).
 Migrated Zaps that used the hidden trigger/action/search will now show it as Deprecated in the Zap editor, but will continue to function as long as the endpoints remain valid.
 Once a user selects a different trigger/action/search when editing their Zap, they will not be able to retrieve the hidden one. New users will not see any `hidden` trigger/action/search as available for selection.
* If you need to add a new trigger/action/search that replaces the hidden one, create a duplicate and give it a new **key** (such as appending `_v2` on the end), and keep the Name and Description the same if the functionality for a user is the same.
Once a user selects a different trigger/action/search when editing their Zap, they will not be able to retrieve the hidden one. New users will not see any `hidden` trigger/action/search as available for selection.
* If you need to add a new trigger/action/search that replaces the hidden one, create a duplicate and give it a new **key** (such as appending `_v2` on the end), and keep the Name and Description the same if the functionality for a user is the same.
 * This way existing Zaps continue to work once migrated with the previous (and now hidden) definition, and new Zaps will only be able to select the new definition.
* In cases where the endpoint in the hidden trigger/action/search will be sunset and begin to return errors in the future, the impact to users would be as follows:
Once the API has been sunset, active Zaps (turned on) using the impacted trigger/action/search will produce errors when they run. Depending on [user's email notification settings](https://help.zapier.com/hc/en-us/articles/8496289225229), owners of these Zaps will be sent email notifications about these errors.
If those Zaps exceed the error ratio **and** users have not [overridden related settings in their Zaps](https://help.zapier.com/hc/en-us/articles/8496037690637-Troubleshoot-errors-in-Zapier#i-want-my-zap-to-continue-running-even-when-there-are-errors--0-6), those Zaps will be automatically turned off.
* If you'd like to add custom errors within Zapier for the hidden trigger/action/search at the time of the endpoint sunset, you could consider the following:
Create a new version of the integration that immediately throws a `z.errors.Error` exception in the `perform` method of the impacted trigger/action/search. Learn more for apps maintained in the [UI](/platform/manage/planning-changes#custom-error-handling-in-the-ui) or the [CLI](https://github.com/zapier/zapier-platform/blob/main/packages/cli/README.md#zerrors).
*Promote* and then *migrate* users to this new version as close to the sunset date as possible.
The benefits of this approach are:
* Throwing an explicit exception will ensure impacted Zaps will hit the error ratio (and be turned off) at the earliest possible time.
* You can add a user-friendly message to the exception that users will see in both Zaps Runs on the [Zap History](https://help.zapier.com/hc/en-us/articles/8496291148685-View-and-manage-your-Zap-history) and also in email error notifications, e.g. *This function has been deprecated and is no longer available.*
* Here's an example of how a custom error message would be displayed on an action in the Zap History:
* This way existing Zaps continue to work once migrated with the previous (and now hidden) definition, and new Zaps will only be able to select the new definition.
* In cases where the endpoint in the hidden trigger/action/search will be sunset and begin to return errors in the future, the impact to users would be as follows:
Once the API has been sunset, active Zaps (turned on) using the impacted trigger/action/search will produce errors when they run. Depending on [user's email notification settings](https://help.zapier.com/hc/en-us/articles/8496289225229), owners of these Zaps will be sent email notifications about these errors.
If those Zaps exceed the error ratio **and** users have not [overridden related settings in their Zaps](https://help.zapier.com/hc/en-us/articles/8496037690637-Troubleshoot-errors-in-Zapier#i-want-my-zap-to-continue-running-even-when-there-are-errors--0-6), those Zaps will be automatically turned off.
* If you'd like to add custom errors within Zapier for the hidden trigger/action/search at the time of the endpoint sunset, you could consider the following:
Create a new version of the integration that immediately throws a `z.errors.Error` exception in the `perform` method of the impacted trigger/action/search. Learn more for apps maintained in the [UI](/platform/manage/planning-changes#custom-error-handling-in-the-ui) or the [CLI](https://github.com/zapier/zapier-platform/blob/main/packages/cli/README.md#zerrors).
*Promote* and then *migrate* users to this new version as close to the sunset date as possible.
The benefits of this approach are:
* Throwing an explicit exception will ensure impacted Zaps will hit the error ratio (and be turned off) at the earliest possible time.
* You can add a user-friendly message to the exception that users will see in both Zaps Runs on the [Zap History](https://help.zapier.com/hc/en-us/articles/8496291148685-View-and-manage-your-Zap-history) and also in email error notifications, e.g. *This function has been deprecated and is no longer available.*
* Here's an example of how a custom error message would be displayed on an action in the Zap History:
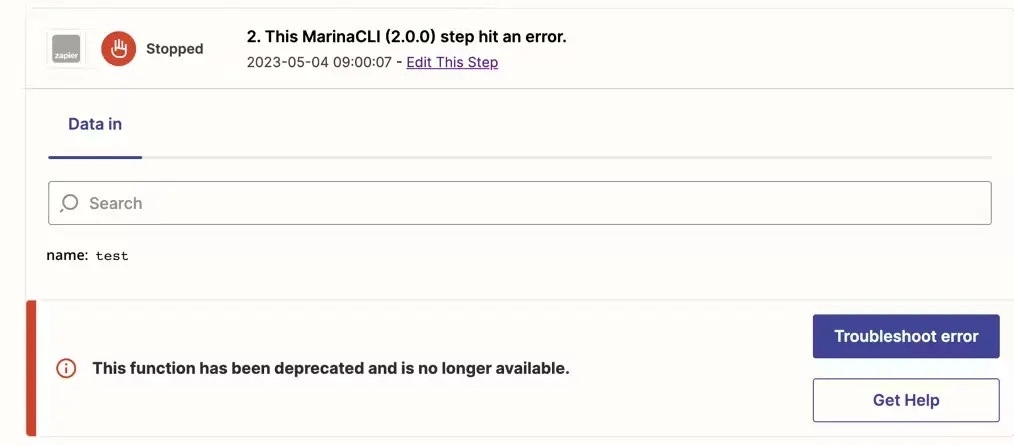 ***
*Need help? [Tell us about your problem](https://developer.zapier.com/contact) and we'll connect you with the right resource or contact support.*
---
# Source: https://docs.zapier.com/platform/manage/change-perform.md
> ## Documentation Index
> Fetch the complete documentation index at: https://docs.zapier.com/llms.txt
> Use this file to discover all available pages before exploring further.
# Update perform method for polling trigger
## Change scenario
It is generally safe to update a polling trigger's [perform method](https://github.com/zapier/zapier-platform/blob/main/packages/schema/docs/build/schema.md#basicpollingoperationschema) (Platform CLI) or [API Configuration](/platform/build/polling-trigger) (Platform UI), as long as the changes maintain backward compatibility in the returned response data. This means that the output fields and output data structure should remain consistent with previous version's.
## Impact to users
Updating a polling trigger's perform method or API Configuration might cause deduplication issues and cause old records to trigger a Zap if any of the following changes occur:
* The [primary key](/platform/build/deduplication) (usually an `id` field) is changed or removed from the API response.
* The perform method's endpoint is modified, resulting in fundamental changes to the primary key value.
For example, if the API or endpoint previously returned dedupe IDs as integers -1,2,3,4 - and is now updated to return alphanumeric values - 1-abc, 2-bcd, 3-cde, 4-def - records that were previously processed will fire again since the new IDs aren't saved in the deduplication table that Zapier references during each poll.
## Best practices
* Ensure the primary key remains unchanged: If the API response changes the primary key, use [custom code](/platform/build/deduplication#custom-primary-keys) to maintain consistency and prevent deduplication issues.
* Maintain reverse chronological order: the trigger should continue to return data in reverse chronological order to prevent unintended records triggering the Zap.
***
*Need help? [Tell us about your problem](https://developer.zapier.com/contact) and we'll connect you with the right resource or contact support.*
---
# Source: https://docs.zapier.com/platform/manage/change-trigger.md
> ## Documentation Index
> Fetch the complete documentation index at: https://docs.zapier.com/llms.txt
> Use this file to discover all available pages before exploring further.
# Change trigger from polling to REST Hook
## Change scenario
Your app needs to change how it notifies Zapier of new records - changing the type of trigger - from Zapier polling an app endpoint for new items to instead a REST Hook subscription where the app notifies Zapier of new records; or vice versa.
## Impact to users
This is a breaking change. Edits to an existing trigger's type will cause your users' Zaps to stop working and they would need to create new Zaps with the new trigger type, and manually re-create their actions. Using the [Duplicate feature](https://help.zapier.com/hc/en-us/articles/15408145778829-Duplicate-your-Zap) would help, but each Zap would need to be mapped individually with the new trigger.
## Best practices
* Copy the trigger configuration into a new trigger and give it a new **key** (such as appending `_v2` on the end), change the type for this new trigger, and **hide** the previous trigger. This way existing Zaps continue to work with the previous (and now hidden) trigger definition, and new Zaps will use the new trigger definition.
* This is the recommended path forward whether using the Platform UI or the Platform CLI, with the only difference being using the *Visibility: Hidden* toggle in the UI and setting the `hidden` key as `true` [in the CLI](https://github.com/zapier/zapier-platform/blob/main/packages/schema/docs/build/schema.md#basicdisplayschema).
***
*Need help? [Tell us about your problem](https://developer.zapier.com/contact) and we'll connect you with the right resource or contact support.*
---
# Source: https://docs.zapier.com/platform/manage/changeset-workflow.md
> ## Documentation Index
> Fetch the complete documentation index at: https://docs.zapier.com/llms.txt
> Use this file to discover all available pages before exploring further.
# Integration CI Pipelines using Changesets and Snapshot Versions
> Use changesets with snapshot versions to set up an automated pipeline for integration version updates.
Changesets are a third-party npm package and therefore only available to Platform CLI integrations.
This guide suggests some ways to automate version management and deployment for Zapier integrations using CI pipelines and changesets. Instead of manually updating version numbers and pushing snapshot versions, you can use automated workflows to handle these tasks consistently and reliably.
## Benefits of Automation
Automating your versioning and deployment workflow provides several advantages:
* **Consistency**: Version bumps follow semantic versioning rules automatically
* **Speed**: Deploy snapshot versions for testing without manual intervention
* **LLM Integration**: Changesets are easier for AI tools to work with, compared to manual version number bumps
* **Reduced Errors**: Eliminate mistakes from manual version number updates
* **Team Collaboration**: Multiple developers can work in parallel without worrying about conflicting version bumps
## What are Changesets?
[Changesets](https://github.com/changesets/changesets) is a tool for managing versioning and changelogs in monorepos and single-package projects. Instead of manually editing `package.json` and `CHANGELOG.md`, developers create small markdown files that describe their changes and specify the version bump type (patch, minor, or major).
When you're ready to release, changesets processes these files to:
* Bump version numbers in `package.json`
* Generate changelog entries
* Remove the processed changeset files
This workflow separates "what changed" from "when to release," making it easier to batch changes and coordinate releases.
## The Complete Workflow
This guide covers four automated jobs we recommend adding, and how they can work together.
We recognize all codebases and CI flows are different. These are the jobs we've found most useful in our integration development, but feel free to pick and choose from these jobs per your workflow needs.
1. **Snapshot Deployment**: Deploys labeled snapshot versions to Zapier for testing
2. **Integration Validation**: Validates your integration code, configuration, and optional changelog format as you go
3. **Changeset Validation**: Verifies changeset files are properly formatted and version numbers haven't been manually changed
4. **Changeset Processing**: Processes changesets to update versions and changelogs
## Common Integration Patterns
### Pattern 1: Continuous Snapshot Deployment
Deploy snapshot versions on every commit to a pull request for easy testing:
* Snapshot deployment runs on every PR commit
* Uses branch name as the snapshot label
* Enables immediate testing of changes without waiting for version releases
### Pattern 2: Pull Request Validation
Run validation jobs on pull requests to catch issues early:
* Integration validation runs on any PR to verify code and configuration
* Changeset validation runs only when changeset files are added or modified
### Pattern 3: Pre-Publication Processing
Process changesets before publishing:
* Changeset processing runs before publishing your integration version (when changeset files exist)
* Updates version numbers and changelogs in preparation for release
## Job 1: Snapshot Deployment
### Purpose
Deploys labeled snapshot versions to Zapier using the `zapier push --snapshot` command. This enables testing specific branches or features without creating official version releases. Running this on every PR commit allows for continuous testing of changes.
### What It Does
```yaml theme={null}
- name: Deploy snapshot version
script:
- Extract snapshot label from branch name (max 12 characters)
- Install dependencies
- Run `zapier push --snapshot LABEL`
```
The `zapier push --snapshot LABEL` command:
* Creates a version labeled `0.0.0-LABEL`
* Deploys this version to Zapier
* Enables testing without affecting production versions
Please reference [documentation for the `zapier push --snapshot` flag here.](https://github.com/zapier/zapier-platform/blob/main/packages/cli/docs/cli.md#push)
### When to Run
* On every commit to a pull request for continuous testing
* On feature branches for testing
* Manually triggered for specific branches
* Based on branch name patterns or labels
Consider allowing this job to fail without blocking the pipeline, as snapshot deployments are often optional.
***
## Job 2: Integration Validation
### Purpose
Validates your integration code and configuration using the `zapier validate` command. This catches common issues with authentication, triggers, actions, and other integration components before deployment. Optionally, you can also validate that your `CHANGELOG.md` format is compatible with changesets.
### What It Does
```yaml theme={null}
- name: Validate integration
script:
- Install dependencies
- Run `zapier validate`
- Optionally check CHANGELOG.md format for changesets compatibility
```
Please reference [documentation on the `zapier validate` command here](https://github.com/zapier/zapier-platform/blob/main/packages/cli/docs/cli.md#validate).
### When to Run
* On every pull request
* As part of your standard test suite
* Before processing any changesets
* Before publishing your integration version
### Additional Considerations
If you're using changesets, you may also want to validate that your `CHANGELOG.md` format is compatible. Changesets expects the file to start with an H1 header (e.g., `# App Name`) that is not a version number.
```yaml theme={null}
- name: Validate CHANGELOG format (optional)
script:
- Check that CHANGELOG.md starts with an H1 header
- Verify the H1 header is not a version number (e.g., not "# 1.2.3")
```
***
## Job 3: Changeset Validation
### Purpose
Validates that changesets are properly formatted and ensures developers haven't manually modified version numbers in `package.json`. This prevents double version bumps (one manual, one from changesets).
### What It Does
```yaml theme={null}
- name: Validate changesets
script:
- Compare current package.json version with previous commit
- Fail if version number has changed manually
- Run `npx changeset status` to validate changeset format
- Confirm changeset references the correct app/package
```
The `npx changeset status` command:
* Lists all pending changesets
* Shows which packages will be affected
* Validates changeset file format
* Does not fail if no changesets exist
### When to Run
* On pull requests that add or modify changeset files
* Before publishing your integration version
* Use CI rules to only trigger when `.changeset/*.md` files change
### Additional Considerations
* This job requires access to git history to compare versions
* Ensure the CI checkout isn't in a detached HEAD state
***
## Job 4: Changeset Processing
### Purpose
Processes all pending changesets to update version numbers and changelogs before publishing your integration version. This prepares your integration for release by consolidating all pending changes.
### What It Does
```yaml theme={null}
- name: Process changesets
script:
- Run `npx changeset version`
- Review updated files (package.json, CHANGELOG.md)
```
The `npx changeset version` command:
* Reads all pending changeset files
* Bumps version numbers in `package.json` based on changeset types
* Updates `CHANGELOG.md` with new entries
* Deletes processed changeset files
### When to Run
* Before publishing your integration version (when changesets exist)
* Manually triggered for release preparation
* As part of your release workflow
* Use CI rules to only trigger when `.changeset/*.md` files exist
### Additional Considerations
* Run this job when you're ready to prepare a new version for publication
* Review the updated version number and changelog entries before publishing
* You can run this locally or as part of a CI workflow
* After processing, use `zapier push` to publish the new version to Zapier
***
## Setting Up Changesets
To use these workflows, follow the instructions in the [Changesets Github repo](https://github.com/changesets/changesets/blob/main/docs/intro-to-using-changesets.md) to set up Changesets in your codebase.
## Creating a Changeset
Developers create changesets using:
```bash theme={null}
npx changeset add
```
This interactive CLI prompts for:
* Which packages are changing
* The version bump type (patch, minor, major)
* A description of the changes
The tool creates a markdown file in `.changeset/` with this information.
## Example: Complete Workflow in Action
1. Developer creates a feature branch and makes changes
2. Developer pushes the branch and opens a pull request
3. CI runs **snapshot deployment** on every commit, pushing version `0.0.0-LABEL` to Zapier
4. Team can immediately test the snapshot version as development continues
5. Developer runs `npx changeset add` and creates a changeset file describing the changes
6. CI runs **integration validation** and **changeset validation** on the PR
7. After PR approval, changes are merged
8. When ready to publish a new version, team runs **changeset processing**, which:
* Updates version in `package.json`
* Adds entry to `CHANGELOG.md`
* Deletes the changeset file
9. Team reviews the updated version and changelog, then uses `zapier push` to publish the version
***
## Additional Resources
* [Changesets Documentation](https://github.com/changesets/changesets)
* [Changesets CLI Reference](https://github.com/changesets/changesets/blob/main/packages/cli/README.md)
* [Zapier CLI Documentation](https://github.com/zapier/zapier-platform/blob/main/packages/cli/README.md)
* [Zapier Labeled Versions](https://docs.zapier.com/platform/manage/labeled-versions)
---
# Source: https://docs.zapier.com/powered-by-zapier/api-reference/common-types/choice.md
> ## Documentation Index
> Fetch the complete documentation index at: https://docs.zapier.com/llms.txt
> Use this file to discover all available pages before exploring further.
# null
---
# Source: https://docs.zapier.com/platform/build/cli-hook-trigger.md
> ## Documentation Index
> Fetch the complete documentation index at: https://docs.zapier.com/llms.txt
> Use this file to discover all available pages before exploring further.
# Add an instant trigger using REST Hooks in Zapier Platform CLI
> REST Hooks are an alternative to polling. The main differences are allowing your customers' Zaps to trigger instantly; and avoiding polling triggers' numerous - and sometimes unnecessary - requests to your API's endpoints to check for new data.
REST Hook triggers are marked as *Instant* [in the Zap editor](https://cdn.zappy.app/f510859bf90c0e341bc94997a75f9626.png).
When building in the [Platform CLI](/platform/quickstart/ui-vs-cli), use the [example implementation](https://github.com/zapier/zapier-platform/tree/main/example-apps/rest-hooks) for guidance.
With a REST Hook trigger, Zapier subscribes to your server using a unique URL per activated Zap and your app sends a payload of data back to the unique URL to trigger that particular Zap whenever that trigger event occurs in your app.
REST Hooks differ from static webhooks. With static webhooks, your customer needs to manually copy and paste a specific URL per Zap to connect your app and their Zap together, whereas with REST Hooks this is all handled automatically for them between Zapier and your app.
Zapier does not support Identity Confirmation for webhook subscriptions.
## Prerequisites
* Your app supports REST Hooks - webhook subscriptions that can be manipulated through a REST API.
* A way to store the unique URLs we send you, such as a database.
* A way to send payloads in JSON format to each stored URL, when a specific event happens that you want to trigger the associated Zap on.
* One or more endpoint(s) to receive subscribe and unsubscribe payloads (these can be the same endpoint(s) or separate ones)
* If your webhook subscriptions expire, make sure the subscribe endpoint returns an `expiration_date` property containing an ISO8601 date. The platform will automatically attempt to resubscribe after the expiration date. [More details below](/platform/build/cli-hook-trigger#handling-expiring-webhook-subscriptions).
When a Zap is turned on, the `subscribeHook` function is called with a payload of data that includes the unique URL to send data to in order to trigger the Zap. Store this URL, associating it with an id and use it whenever you want to trigger this Zap. Return that id in the response back to Zapier to be used later in the Unsubscribe.
When the Zap is turned off, the `unsubscribeHook` function is called to notify your app to delete the unique URL previously stored for this Zap.
## 1. Write the `subscribeHook` Function
The first function to implement is the `subscribeHook` function which provides the URL you will use to trigger the Zap. Include the following parameters:
* `url` should be `bundle.targetUrl` which is an URL Zapier automatically generates for each activated Zap.
* Any other data you want to send from any [inputFields](https://github.com/zapier/zapier-platform/blob/main/packages/cli/README.md#input-fields)
```js theme={null}
const subscribeHook = (z, bundle) => {
const data = {
url: bundle.targetUrl,
field: bundle.inputData.field,
// etc
};
const options = {
url: "subscription endpoint url",
method: "POST",
body: data,
};
// make the request and parse the response - this does not include any error handling.
return z.request(options).then((response) => response.data);
};
```
This function is called in the `performSubscribe` method on the module for the Trigger:
```js theme={null}
module.exports = {
// Other data about the Trigger, e.g. key, name, etc. omitted
performSubscribe: subscribeHook,
};
```
This function will run every time a Zap is turned on.
### Handling Expiring Webhook Subscriptions
Some APIs require webhook subscriptions to include an expiration date in the subscription request and return that expiration in the response. For these cases, the trigger configuration must include an `expiration_date` property (ISO8601 format) in the data returned from `subscribeHook`. Zapier will automatically attempt to resubscribe before the expiration date to keep the Zap active.
In this example, the API requires an `expirationDateTime` to be specified when creating the subscription, with a maximum duration of 24 hours. The subscription response includes this expiration, which we map to `expiration_date` for Zapier to monitor:
```js theme={null}
// Max number of minutes for a subscription to be active before requiring reauthorization
const MAX_SUBSCRIPTION_DURATION = 1440; // 24 hours
const getExpirationDateTime = (minutesFromNow) =>
`${new Date(Date.now() + minutesFromNow * 60000).toISOString().slice(0, -5)}.0000000+00:00`;
const subscribeHook = async (z, bundle) => {
const targetUrl = `${bundle.targetUrl}`;
const data = {
changeType: "created",
notificationUrl: targetUrl,
lifecycleNotificationUrl: targetUrl,
resource: `users/${bundle.inputData.userId}/resource`,
expirationDateTime: getExpirationDateTime(MAX_SUBSCRIPTION_DURATION),
};
const options = {
url: `${API_URL}/subscriptions`,
method: "POST",
body: data,
};
const subscriptionResponse = await z.request(options);
const subscriptionData = {
...subscriptionResponse.data,
expiration_date: subscriptionResponse.data.expirationDateTime, // Zapier will automatically refresh expiring subscriptions based on expiration_date
};
return subscriptionData;
};
```
## 2. Write the `unsubscribeHook` Function
The next function to implement is the `unsubscribeHook` function which will be called when a Zap is turned off. This notifies your servers to delete the URL you've been storing and stop sending payloads to it. If your API continues posting notification payloads to the Zap after it has unsubscribed, you can expect to see a 410 response from Zapier.
`bundle.subscribeData.id` is required — this is the ID of the hook in question. You could assign it to a `hookID` variable or similar.
Include the following parameters:
```js theme={null}
const unsubscribeHook = (z, bundle) => {
// bundle.subscribeData contains the parsed response JSON from the subscribe request.
const hookId = bundle.subscribeData.id;
const options = {
url: `unsubscription endpoint url/${hookId}`,
method: "DELETE",
};
return z.request(options).then((response) => response.data);
};
```
This function is called in the `performUnsubscribe` method on the module for the Trigger:
```js theme={null}
module.exports = {
// Other data about the Trigger, e.g. key, name, etc. omitted
performUnsubscribe: unsubscribeHook,
};
```
A REST Hook trigger missing a Subscribe or Unsubscribe function, is presented to users as a [Static Webhook](https://cdn.zappy.app/3b35908a6a0c232087b5da807cf9d6fb.png). Static hooks are [not supported in public integrations](/platform/publish/integration-checks-reference#d017---static-hook-is-discouraged), but they could be used if the integration intends to remain private.
## 3. Write the `perform` Function
The next function to implement is the `perform` function which is called each time your app delivers a notification payload to Zapier. This is what actually triggers the Zap. Typically, you would simply return the cleaned request in an array. The data returned by the request [must be an array](https://github.com/zapier/zapier-platform/blob/master/packages/cli/README.md#return-types).
```js theme={null}
const parseHookPayload = (z, bundle) => {
// bundle.cleanedRequest will include the parsed JSON object (if it's not a
// test poll) and also a .querystring property with the URL's query string.
const payload = {
id: bundle.cleanedRequest.id,
name: bundle.cleanedRequest.name,
directions: bundle.cleanedRequest.directions,
style: bundle.cleanedRequest.style,
authorId: bundle.cleanedRequest.authorId,
createdAt: bundle.cleanedRequest.createdAt,
};
return [payload];
};
```
followed by:
```js theme={null}
module.exports = {
// Other data about the Trigger, e.g. key, name, etc. omitted
perform: parseHookPayload,
};
```
## 4. Write the `performList` Function
The final function to implement is the `performList` function, used when testing the Trigger to collect sample data in the Zap editor. Though optional, not defining a performList is a sub-optimal experience for users and is [required for public apps](/platform/quickstart/private-vs-public-integrations).
Most commonly this is a GET request to an endpoint of your API which will provide a response from the user's account with the exact same schema as the data delivered via webhook when a trigger event happens.
Response data returned must be an array, even if the array contains only one object. It must have the exact same schema as the data delivered via webhook when a trigger event happens otherwise fields mapped from this sample in subsequent steps of a Zap will break when it runs live.
```js theme={null}
const getFallbackSample = (z, bundle) => {
// For the test poll, you should get some real data, to aid the setup process.
const options = {
url: "sample endpoint here",
method: "GET",
params: {
style: bundle.inputData.style,
},
};
return z.request(options).then((response) => response.data);
};
```
followed by:
```js theme={null}
module.exports = {
// Other data about the Trigger, e.g. key, name, etc. omitted
performList: getFallbackSample,
};
```
## 5. Test your API Request
To test the REST Hook trigger, [build a Zap in the editor](/platform/build/test-triggers-actions).
## 6. Define sample and outputFields
Define sample data and output fields following [the guide](https://github.com/zapier/zapier-platform/blob/main/packages/cli/README.md#output-fields). You can see an example of this [here](https://github.com/zapier/zapier-platform-example-app-rest-hooks/blob/master/triggers/recipe.js#L102-L122).
## BasicHookOperationSchema
### `subscribeHook`
Function that sends a payload of data to an endpoint you control. You need to grab the `targetUrl` parameter and store it securely as this URL is used to send data from your app to Zapier when the triggering event occurs, and thus trigger the Zap. You can see an example of this [here](https://github.com/zapier/zapier-platform-example-app-rest-hooks/blob/master/triggers/recipe.js#L1-L22).
### `unsubscribeHook`
Function that calls an endpoint you control with a payload of data, including the `targetUrl` parameter. You need to deactivate or delete the URL from your storage completely as the Zap associated will no longer trigger when requests are made to it. If your API continues posting notification payloads to the Zap after it has unsubscribed, you can expect to see a 410 response from Zapier. You can see an example of this [here](https://github.com/zapier/zapier-platform-example-app-rest-hooks/blob/master/triggers/recipe.js#L24-L39).
### `perform`
This should be a function that processes the inbound webhook request. No `HTTP` request has to made here. As seen in the example app [here](https://github.com/zapier/zapier-platform-example-app-rest-hooks/blob/master/triggers/recipe.js#L41-L54), this can simply take the data from `bundle.cleanedRequest` and build a new object that is returned within an array. It's important to return this object within an array as specified [here](https://github.com/zapier/zapier-platform/blob/master/packages/cli/README.md#return-types).
### `performList`
Testing a REST Hook trigger in the Zap editor will only call `performList`, not `perform`. `performList` ideally should make a `HTTP` request to an endpoint that can return sample data to be mapped into subsequent steps of the user's Zap. You can see an example of this [here](https://github.com/zapier/zapier-platform-example-app-rest-hooks/blob/master/triggers/recipe.js#L56-L67). Required for public apps and highly recommended for private apps to avoid user confusion when setting up a Zap.
***
*Need help? [Tell us about your problem](https://developer.zapier.com/contact) and we'll connect you with the right resource or contact support.*
---
# Source: https://docs.zapier.com/platform/quickstart/cli-tutorial.md
> ## Documentation Index
> Fetch the complete documentation index at: https://docs.zapier.com/llms.txt
> Use this file to discover all available pages before exploring further.
# Platform CLI tutorial
> This tutorial walks you through the process of building, testing, and pushing an example app to Zapier using Platform CLI. We'll use a mock API for recipes in this tutorial, but for production Zapier apps, you'd want to connect to a real API.
## Prerequisites
* You'll need a [Zapier account](https://zapier.com/sign-up).
* Your dev environment meets the [requirements for running Platform CLI](/platform/build-cli/overview#requirements) with the proper version of Node.js installed.
* Install the Platform CLI tool
```bash theme={null}
# Install the CLI globally
npm install -g zapier-platform-cli
```
To see a list of all the available commands in Platform CLI, try `zapier help`.
* Next you'll need to identify yourself via the CLI.
```bash theme={null}
# Setup auth to Zapier's platform with a deploy key
zapier login
```
Zapier writes your deploy key to `~/.zapierrc`. You'll want to keep that file safe and not check it into source control.
## 1. Start an integration
Use the `init` command to setup the [needed structure](https://github.com/zapier/zapier-platform/tree/main/example-apps). You'll be presented with a list of available templates to start with.
```bash theme={null}
# Create a directory with the minimum required files and choose a template
zapier init example-app --template minimal
# Move into the new directory
cd example-app
```
Inside the directory, you'll see a few files. `package.json` is a typical requirements file of any Node.js application. It's pre-populated with a few dependencies, most notably the `zapier-platform-core`, which is what makes your app work with the Zapier Platform. There is also an `index.js` file and a test directory (more on those later). Before we go any further, we need to install the dependencies for our app:
```bash theme={null}
npm install
```
### `index.js`
`index.js` is the entry point to your app. This is where the Platform will look to understand how your app will interact with Zapier. Open the app directory you created in your code editor of choice.
You may see the following in `index.js`:
* a single `module.exports` definition which will be interpreted by Zapier
* `triggers` will describe ways to trigger off of data in your app
* `searches` will describe ways to find data in your app
* `creates` will describe ways to create data in your app
* `resources` are purely optional but convenient ways to describe CRUD-like objects in your app (see [an example resources app](https://github.com/zapier/zapier-platform/tree/main/example-apps/resource))
* `beforeRequest` & `afterResponse` are hooks into the HTTP client to manipulate the request/response on every call
## 2. Add a trigger
Add a [**trigger**](/platform/build-cli/overview#triggers-searches-creates) configured to read data from a mock API:
```bash theme={null}
zapier scaffold trigger recipe
```
The [scaffold](https://github.com/zapier/zapier-platform/blob/main/packages/cli/docs/cli.md#scaffold) creates a new file `recipe.js` in the `triggers` folder. When building your own integration, you'll likely name your JS files with nouns like `contact.js`, `lead.js` or `order.js`.
Open `triggers/recipe.js` (file created by `zapier scaffold trigger recipe`) and **replace** it with:
```js theme={null}
const listRecipes = async (z, bundle) => {
const response = await z.request(
"http://57b20fb546b57d1100a3c405.mockapi.io/api/recipes",
);
return response.data;
};
module.exports = {
key: "recipe",
noun: "Recipe",
display: {
label: "New Recipe",
description: "Triggers when a new recipe is created.",
},
operation: {
perform: listRecipes,
sample: {
id: 1,
createdAt: 1472069465,
name: "Best Spaghetti Ever",
authorId: 1,
directions: "1. Boil Noodles\n2.Serve with sauce",
style: "italian",
},
},
};
```
To try out the trigger locally, try running `zapier invoke`. The command will ask you which action you'd like to invoke. Now we only have one trigger `recipe`, so you can choose that one.
```
# (deprecated) $ zapier invoke
$ zapier-platform invoke
? Which action type would you like to invoke? trigger
? Which "trigger" key would you like to invoke? recipe
✔ Invoking triggers.recipe.operation.inputFields
✔ Invoking triggers.recipe.operation.perform
[
{
"id": "1",
"createdAt": 1471984289,
"name": "name 1",
"authorId": 63,
"directions": "directions 1",
"style": "style 1"
},
]
```
Let's review the code. The function definition for `listRecipes` handles the API work, making the HTTP request and returning the parsed response data.
In JavaScript, `async/await` are syntactic sugar built on top of [Promises](https://developer.mozilla.org/en-US/docs/Web/JavaScript/Reference/Global_Objects/Promise). Be sure to use `await` or `.then()` when you call asynchronous functions.
The `listRecipes` function receives two arguments, a `z` object and a `bundle` object.
* The [Z Object](/platform/build-cli/core#z-object) is a collection of utilities needed when working with APIs. In our snippet, we use `z.request` to make the HTTP call.
* The [Bundle Object](/platform/build-cli/core#bundle-object) contains any data needed to make API calls, like authentication credentials or data for a POST body. In our snippet the Bundle is not used, since we don't require any of those to make our simple GET request.
It is possible to accomplish the same tasks using alternate Node.js libraries, but it is preferable to use the `z` object as there are features built into these utilities that augment the Zapier experience like logging of HTTP calls and error handling.
In `module.exports`, we export some metadata plus our `listRecipes` function and a sample. We'll explain later how Zapier uses this metadata and exposes it to the end user. For now, know that it satisfies the minimum info required to define a trigger.
As well as defining the trigger, the `scaffold` command has done the following:
`index.js` file now includes:
```bash theme={null}
const getRecipe = require('./triggers/recipe')
```
```js theme={null}
module.exports = {
// ...
triggers: {
[getRecipe.key]: getRecipe,
},
// ...
};
```
In test/triggers folder, the `recipe.test.js` file was created:
```js theme={null}
const App = require("../../index");
const appTester = zapier.createAppTester(App);
// read the `.env` file into the environment, if available
zapier.tools.env.inject();
describe("triggers.recipe", () => {
it("should run", async () => {
const bundle = { inputData: {} };
const results = await appTester(
App.triggers.recipe.operation.perform,
bundle,
);
expect(results).toBeDefined();
// TODO: add more assertions
});
});
```
You should be able to run the test with `zapier-platform test` (or the deprecated `zapier test`) and see it pass:
```bash theme={null}
# (deprecated) $ zapier test
$ zapier-platform test
Validating project locally
No structural errors found during validation routine.
This project is structurally sound!
✔ Running integration checks ... 23 checks passed
Integration checks passed, no issues found.
Adding /Users/marinahand/.zapierrc to environment as ZAPIER_DEPLOY_KEY...
Running test suite with the following command:
npm run --silent test --
PASS test/triggers/recipe.test.js
PASS test/triggers.test.js (7.52 s)
Test Suites: 2 passed, 2 total
Tests: 3 passed, 3 total
Snapshots: 0 total
Time: 9.429 s
Ran all test suites.
```
For this example, we'll stick to a single test, but you can see what multiple tests look like in [another of the example apps](https://github.com/zapier/zapier-platform/blob/main/example-apps/trigger/test/triggers.js).
## 3. Modify a trigger
To let users tweak the cuisine style of recipes they are triggering on, you can provide an input field a user can fill out.
In `triggers/recipe.js`, **replace** the file with:
```js theme={null}
const listRecipes = async (z, bundle) => {
const params = {};
if (bundle.inputData.style) {
params.style = bundle.inputData.style;
}
const requestOptions = {
url: "http://57b20fb546b57d1100a3c405.mockapi.io/api/recipes",
params: params,
};
const response = await z.request(requestOptions);
return response.data;
};
module.exports = {
key: "recipe",
noun: "Recipe",
display: {
label: "New Recipe",
description: "Triggers when a new recipe is created.",
},
operation: {
inputFields: [
{
key: "style",
type: "string",
helpText: "Which styles of cuisine this should trigger on.",
required: false,
},
],
perform: listRecipes,
sample: {
id: 1,
createdAt: 1472069465,
name: "Best Spagetti Ever",
authorId: 1,
directions: "1. Boil Noodles\n2.Serve with sauce",
style: "italian",
},
outputFields: [
{ key: "id", label: "ID" },
{ key: "createdAt", label: "Created At" },
{ key: "name", label: "Name" },
{ key: "directions", label: "Directions" },
{ key: "authorId", label: "Author ID" },
{ key: "style", label: "Style" },
],
},
};
```
See how the input field key `"style"` was added in the following places:
* In the `inputFields` on `operation` - this defines the field as exposed in the Zap Editor for the user to see. The field is not required, so it could be null.
* In the `listRecipes` function - we use the provided style via the bundle `bundle.inputData.style`.
Since you are developing locally, rerun `zapier invoke` to verify everything still works. This time, let's skip those interactive prompts. Specify the action type (`trigger`), the key (`recipe`), and the input data in the command, and you'll see:
```
# (deprecated) $ zapier invoke trigger recipe --inputData '{"style":"style 20"}'
$ zapier-platform invoke trigger recipe --inputData '{"style":"style 20"}'
✔ Invoking triggers.recipe.operation.inputFields
✔ Invoking triggers.recipe.operation.perform
[
{
"id": "20",
"createdAt": 1578590011,
"name": "name 20",
"authorId": 90,
"directions": "directions 20",
"style": "style 20"
}
]
```
Let's also tweak the test. In test/trigger, replace the `recipe.test.js` file with:
```js theme={null}
const zapier = require("zapier-platform-core");
const App = require("../../index");
const appTester = zapier.createAppTester(App);
describe("triggers", () => {
describe("new recipe trigger", () => {
it("should load recipes", async () => {
const bundle = {
inputData: {
style: "style 2",
},
};
const results = await appTester(
App.triggers.recipe.operation.perform,
bundle,
);
expect(results.length).toBeGreaterThan(1);
const firstRecipe = results[0];
expect(firstRecipe.name).toEqual("name 2");
expect(firstRecipe.directions).toEqual("directions 2");
});
it("should load recipes without filters", async () => {
const bundle = {};
const results = await appTester(
App.triggers.recipe.operation.perform,
bundle,
);
expect(results.length).toBeGreaterThan(1);
const firstRecipe = results[0];
expect(firstRecipe.name).toEqual("name 1");
expect(firstRecipe.directions).toEqual("directions 1");
});
});
});
```
You can run your test again and make sure everything still works:
```js theme={null}
zapier test
```
## 4. Deploy an integration
To take your local app integration and make it available to use in a Zap, you'll need to push it to Zapier.
You can have many versions of an app, which simplifies making breaking changes and testing in the future. For now, you will push a single version.
Since this is your first time pushing your app version, you'll need to register your app with Zapier. Run the `zapier-platform register` command (or the deprecated `zapier register`) and Zapier will ask you to provide a name and some details about your app. Follow the prompt and then you can push your app using `zapier-platform push`:
Zapier will ask you to provide a name and some details about your app. Follow the prompts and then push your app again.
```
# (deprecated) $ zapier push
$ zapier-platform push
✔ Copying project to temp directory
✔ Installing project dependencies
✔ Applying entry point file
✔ Building app definition.json
✔ Validating project schema and style
✔ Zipping project and dependencies
✔ Testing build
✔ Cleaning up temp directory
✔ Uploading version 1.0.0
Push complete! Built build/build.zip and build/source.zip and uploaded them to Zapier.
```
Log in and visit the [Zap editor](https://zapier.com/app/editor) to create a Zap with your new integration.
For the trigger step, choose your app and the "New Recipe" trigger, where you can see the label and description that were defined in `triggers/recipe.js`.
In the Zap editor, see the input field `"style"` and fill it out. Run the trigger test and the `listRecipes` function associated with the trigger runs, making the API request and returning the result to Zapier.
Go back to your terminal. Use the `zapier-platform logs --type http` command (or the deprecated `zapier logs --type http`) to see the HTTP requests Zapier made.
```
# (deprecated) $ zapier logs --type http
$ zapier-platform logs --type http
The logs of your app "Example App" listed below.
┌────────┬────────┬────────────────────────────────────────────────────────┬───────────────┬─────────┬──────────────────────────────────────┬───────────────────────────┐
│ Status │ Method │ URL │ Querystring │ Version │ Step │ Timestamp │
├────────┼────────┼────────────────────────────────────────────────────────┼───────────────┼─────────┼──────────────────────────────────────┼───────────────────────────┤
│ 200 │ GET │ http://57b20fb546b57d1100a3c405.mockapi.io/api/recipes │ style=italian │ 1.0.0 │ a9055e16-fc0d-4fb2-a3e6-9d442d1f70e8 │ 2016-09-13T15:11:30-05:00 │
└────────┴────────┴────────────────────────────────────────────────────────┴───────────────┴─────────┴──────────────────────────────────────┴───────────────────────────┘
Most recent logs near the bottom.
```
## 5. Add authentication
Authentication is crucial to interacting with most APIs. Zapier supports a number of different [authentication schemes](/platform/build-cli/overview#authentication). In this example, you are going to set it up to include an API Key in a header.
For different types of authentication, see these example apps:
Define the `authentication` section for the example app you've built. In `index.js`, **add** the following to `module.exports`:
```js theme={null}
authentication: {
type: 'custom',
fields: [{ key: 'apiKey', type: 'string' }],
test: async (z, bundle) => {
const response = await z.request('http://57b20fb546b57d1100a3c405.mockapi.io/api/me');
return response.data;
},
},
```
The above snippet defines the two required properties of `authentication`:
* `fields` is where we define our auth fields. This works similar to the `inputFields` of triggers. When users connect their account to Zapier, they'll be prompted to fill in this field, and the value they enter becomes available in the `bundle.authData`. Not every authentication type will include `inputFields`.
* `test` is a function used during the account connection process to verify that the user entered valid credentials. The goal of the function is to make an authenticated API request whose response indicates if the credentials are correct. A profile in the connected app, such as a `/me` endpoint, is a common choice. If valid, the test function can return anything. On invalid credentials, the test needs to raise an error. Since `z.request()` already throws an error for non-2xx responses, we don't need to throw an error explicitly in this case.
Next, make sure the API key is included in all the requests your app makes.
In `index.js`, **edit** the file to include:
```js theme={null}
// Add this helper function above `module.exports`:
const addApiKeyToHeader = (request, z, bundle) => {
request.headers["My-Auth-Header"] = bundle.authData.apiKey;
return request;
};
// module.exports = ...
```
The helper function `addApiKeyToHeader`, adds the user-provided API key as a request header called `My-Auth-Header`. The name chosen is illustrative, the header would be whatever the API you are integrating with requires. Sometimes, an API would require it in a query parameter instead of a header, and/or encoded first. You'll want to reference the API documentation for the expected format.
Finally, to ensure the helper function takes effect, it needs to be registered in the app.
In `index.js`, **edit** `module.exports` to also include:
```js theme={null}
beforeRequest: [
addApiKeyToHeader, // new line of code
],
```
`beforeRequest` is a list of functions that are called before every HTTP request that uses `z.request`. It's where you add headers, query params, or whatever is needed to be within *all outbound requests*. With this addition, every outgoing HTTP request made by `z.request` will now have the API key added in a header.
The `zapier-platform invoke` command has `auth test` subcommand that essentially calls the `authentication.test` function for you to verify the credentials locally. But first, you need to initialize the auth credentials with the `auth start` subcommand:
```
# (deprecated) $ zapier invoke auth start
$ zapier-platform invoke auth start
The .env file does not exist or is empty. You may need to set some environment variables in there if your code uses process.env.
? apiKey | string: mock-api-key
Auth data appended to .env file. Run `zapier invoke auth test` to test it.
```
Next, run the `auth test` subcommand to verify the credentials. You'll know you have the right API key if you can see the response data from the `/me` endpoint:
To check progress, re-push the app.
```
# (deprecated) $ zapier invoke auth test
$ zapier-platform invoke auth test
✔ Invoking authentication.test
[
{
"id": "1",
"createdAt": 1473801403,
"userName": "userName 1"
}
]
```
Re-push the app to Zapier to deploy the changes:
```bash theme={null}
# (deprecated) zapier push
zapier-platform push
```
Go back to your Zap at [https://zapier.com/app/zaps](https://zapier.com/app/zaps). It will now have a new ["Account" item](https://cdn.zappy.app/9096a3bc1d6cd8147fb695bb460692b2.png) in your "New Recipe" trigger.
Add an account by entering any value you like for the API key, the mock API does not care.
As soon as you add the account, Zapier will run your app's `authentication.test` function to confirm the credentials are valid.
We can verify the header is present in the request by looking at the logs again.
```
# (deprecated) $ zapier logs --type http --detailed --limit=1
$ zapier-platform logs --type http --detailed --limit=1
The logs of your app "Example App" listed below.
┌─────────────────────┬────────────────────────────────────────────────────────────────────────────────────────┐
│ Status │ 200 │
│ Method │ GET │
│ URL │ http://57b20fb546b57d1100a3c405.mockapi.io/api/me │
│ Querystring │ │
│ Version │ 1.0.0 │
│ Step │ │
│ Timestamp │ 2016-09-16T15:57:51-05:00 │
│ Request Headers │ user-agent: Zapier │
│ │ My-Auth-Header: :censored:6:b1af149262: │
│ Request Body │ │
│ Response Headers │ server: Cowboy │
│ │ connection: close │
│ │ x-powered-by: Express │
│ │ access-control-allow-origin: * │
│ │ access-control-allow-methods: GET,PUT,POST,DELETE,OPTIONS │
│ │ access-control-allow-headers: X-Requested-With,Content-Type,Cache-Control,access_token │
│ │ content-type: application/json │
│ │ content-length: 59 │
│ │ etag: "-80491811" │
│ │ vary: Accept-Encoding │
│ │ date: Fri, 16 Sep 2016 20:57:51 GMT │
│ │ via: 1.1 vegur │
│ Response Body │ [{"id":"1","createdAt":1473801403,"userName":"userName 1"}] │
└─────────────────────┴────────────────────────────────────────────────────────────────────────────────────────┘
```
You can see from the detailed log that the request included our auth header. The value appears as `:censored:6:b1af149262:`, which is intentional. Zapier does not log authentication credentials in plain text.
## 6. Invite team members to help manage your integration
Share your integration with your team of fellow developers so it shows up in their [developer dashboard](https://developer.zapier.com/).
From the Zapier CLI, run either of these:
* `zapier team:add user@example.com admin` to invite a team member [as an admin](https://platform.zapier.com/manage/add-team) for the app.
* `zapier team:add user@example.com collaborator` to invite a team member [as a collaborator](https://platform.zapier.com/manage/add-team) for the app.
Replace the example email address with the user you want to invite.
## 7. Share users to your integration
Once you have at least one trigger or action, you'll want to share your integration with some of your users. Early feedback helps make sure you're building functionality that will be used.
From the Zapier CLI, run `zapier users:add user@example.com 1.0.0` to email this user to let them view and use the app version 1.0.0 in their Zaps.
Replace the example email address with the user you want to invite. You'll see a confirmation prompt, type `Y`.
The alternative way to invite anyone to use your app in their Zaps is via a link to the app. Run `zapier users:links` to see a public sharing link per specific version or a link to all versions. The link looks something like `https://zapier.com/platform/public-invite/1/222dcd03aed943a8676dc80e2427a40d/`. You can put this in your help docs, post it to your website, add it to your email campaign, etc. Access shared via these links cannot be revoked once shared with your users.
## 8. Modify your integration
If you need to make any changes to your integration in [a new version](/platform/build-cli/overview#deploying-an-integration-version). Versions helps to track and manage changes to your integration over time.
Public integrations or private integrations with more than 5 users **require** a new version to make any edits. It is still recommended to make changes for private integrations with fewer than 5 users in a new version as well and [consider Zapier's best practices](/platform/manage/planning-changes) when doing so.
Integrations created with the Platform CLI cannot be edited in the Platform UI. You can't add triggers or actions, edit code or configurations - these options will be grayed out in the UI.
The following details of your CLI integration can be managed from the UI if preferred:
* Invite team members
* Monitor integration usage
* Submit your integration to be made publicly available
* Promote a new integration version to public
* Migrate users between versions
## Learn more
* [Z object](/platform/build-cli/core#z-object)
* [Bundle object](/platform/build-cli/core#bundle-object) for functionalities available within the `perform` functions
* [Different authentication schemes and search/create implementations examples](https://github.com/zapier/zapier-platform/tree/main/example-apps)
* [Interactive tutorial](https://developer.zapier.com/cli-guide/introduction) that uses the GitHub API (a little outdated)
* About [different types of support](/platform/quickstart/get-help) available to help you build your integration
*Need help? [Tell us about your problem](https://developer.zapier.com/contact) and we'll connect you with the right resource or contact support.*
---
# Source: https://docs.zapier.com/powered-by-zapier/authentication/methods/client-id.md
> ## Documentation Index
> Fetch the complete documentation index at: https://docs.zapier.com/llms.txt
> Use this file to discover all available pages before exploring further.
# Client ID
> How to authenticate with your Client ID
Most endpoints require app or user access token authentication. However, a smaller number of endpoints require only a valid Client ID in order to be accessed.
### Prerequisites
* Your app needs to be published as a [public integration](https://platform.zapier.com/quickstart/private-vs-public-integrations) in Zapier's App Directory.
### Retrieving and Using your Client ID
You can find your Client ID in the [Zapier Developer Platform](https://developer.zapier.com/) under `Embed` → `Settings` → `Credentials`

Your application's **Client ID** and **Client Secret** are only available after you've published your app as a [public integration in Zapier's App Directory](https://platform.zapier.com/quickstart/private-vs-public-integrations).
Regenerating your client secret will invalidate any previous secret.
From there, simply pass your `client_id` as a query param to any V1 endpoints that require it.
```js Example for Zap-templates theme={null}
https://api.zapier.com/v1/zap-templates?client_id={YOUR_CLIENT_ID}
```
---
# Source: https://docs.zapier.com/mcp/clients.md
> ## Documentation Index
> Fetch the complete documentation index at: https://docs.zapier.com/llms.txt
> Use this file to discover all available pages before exploring further.
# null
Zapier MCP integrates with a variety of Model Context Protocol (MCP) clients, allowing you to connect your AI workflows with different development environments and platforms.
## Supported Clients
Zapier MCP currently supports the following official MCP clients:
### AI Platforms & APIs
* **Anthropic API** - Direct integration with Anthropic's API
* **Claude** - Claude desktop application
* **Claude Code** - Claude's code-focused interface
* **OpenAI API** - Direct integration with OpenAI's API
* **ChatGPT** - Zapier MCP as a Custom Connector for use in [ChatGPT Developer Mode](https://platform.openai.com/docs/guides/developer-mode)
* **Microsoft Copilot Studio** - Create Microsoft Copilot Agents with Tools
### Development Environments
* **Cursor** - AI-powered code editor
* **VS Code** - Visual Studio Code with MCP extension
* **Windsurf** - Modern development environment
### Voice Assistants
* **ElevenLabs** - AI-powered voice assistant
* **Vapi** - Voice agents for developers
### Programming Languages
* **Python** - MCP client for Python applications
* **TypeScript** - MCP client for TypeScript/JavaScript applications
### Other Integrations
* **Other** - Additional community and third-party clients
## Request a New Client
Looking to get your MCP client featured as an official client compatible with Zapier MCP?
[Submit a Client Request →](https://mcp.zapier.app/client-request)
### Requirements for New Clients
To ensure compatibility with Zapier MCP, your client must:
* **Support streamable HTTP** - We no longer support SSE MCP servers
Not a requirement, but preferred:
* **Implement OAuth with Dynamic Client Registration** - As outlined in the [official MCP authorization specification](https://modelcontextprotocol.io/specification/2025-06-18/basic/authorization#authorization-flow)
These requirements ensure secure, scalable integration with Zapier's infrastructure while providing the best experience for users.
## Disconnecting OAuth-Connected Clients
If you need to revoke or sever the connection between Zapier MCP and an OAuth-connected client (such as Claude or Microsoft Copilot Studio), you can do so by deleting the server itself. This will immediately terminate the connection and prevent further access to your Zapier MCP account from that client.
You'll need to re-authenticate if you recreate the server.
---
# Source: https://docs.zapier.com/platform/manage/clone.md
> ## Documentation Index
> Fetch the complete documentation index at: https://docs.zapier.com/llms.txt
> Use this file to discover all available pages before exploring further.
# Clone a version
> Cloning allows you to duplicate an existing version of your integration. This is particularly useful when you want to introduce new features or fixes without altering the original integration. When a previous version of your integration has more than 5 active users, you will need to clone that version to make modifications.
> **Note**: The term “cloning” is specific to the Platform UI and is not used with Platform CLI. However, the concept is similar to updating the version number in your `package.json` file and running [`zapier push`](https://github.com/zapier/zapier-platform/blob/main/packages/cli/docs/cli.md#push) to create a new version you can access within your Zaps for testing.
## How to clone an integration version
1. Log into the [Platform UI](https://zapier.com/app/developer).
2. Select your **integration**.
3. In the *Manage* section in the left sidebar, click **Versions**.
4. On your existing version, click the **three dots icon**
***
*Need help? [Tell us about your problem](https://developer.zapier.com/contact) and we'll connect you with the right resource or contact support.*
---
# Source: https://docs.zapier.com/platform/manage/change-perform.md
> ## Documentation Index
> Fetch the complete documentation index at: https://docs.zapier.com/llms.txt
> Use this file to discover all available pages before exploring further.
# Update perform method for polling trigger
## Change scenario
It is generally safe to update a polling trigger's [perform method](https://github.com/zapier/zapier-platform/blob/main/packages/schema/docs/build/schema.md#basicpollingoperationschema) (Platform CLI) or [API Configuration](/platform/build/polling-trigger) (Platform UI), as long as the changes maintain backward compatibility in the returned response data. This means that the output fields and output data structure should remain consistent with previous version's.
## Impact to users
Updating a polling trigger's perform method or API Configuration might cause deduplication issues and cause old records to trigger a Zap if any of the following changes occur:
* The [primary key](/platform/build/deduplication) (usually an `id` field) is changed or removed from the API response.
* The perform method's endpoint is modified, resulting in fundamental changes to the primary key value.
For example, if the API or endpoint previously returned dedupe IDs as integers -1,2,3,4 - and is now updated to return alphanumeric values - 1-abc, 2-bcd, 3-cde, 4-def - records that were previously processed will fire again since the new IDs aren't saved in the deduplication table that Zapier references during each poll.
## Best practices
* Ensure the primary key remains unchanged: If the API response changes the primary key, use [custom code](/platform/build/deduplication#custom-primary-keys) to maintain consistency and prevent deduplication issues.
* Maintain reverse chronological order: the trigger should continue to return data in reverse chronological order to prevent unintended records triggering the Zap.
***
*Need help? [Tell us about your problem](https://developer.zapier.com/contact) and we'll connect you with the right resource or contact support.*
---
# Source: https://docs.zapier.com/platform/manage/change-trigger.md
> ## Documentation Index
> Fetch the complete documentation index at: https://docs.zapier.com/llms.txt
> Use this file to discover all available pages before exploring further.
# Change trigger from polling to REST Hook
## Change scenario
Your app needs to change how it notifies Zapier of new records - changing the type of trigger - from Zapier polling an app endpoint for new items to instead a REST Hook subscription where the app notifies Zapier of new records; or vice versa.
## Impact to users
This is a breaking change. Edits to an existing trigger's type will cause your users' Zaps to stop working and they would need to create new Zaps with the new trigger type, and manually re-create their actions. Using the [Duplicate feature](https://help.zapier.com/hc/en-us/articles/15408145778829-Duplicate-your-Zap) would help, but each Zap would need to be mapped individually with the new trigger.
## Best practices
* Copy the trigger configuration into a new trigger and give it a new **key** (such as appending `_v2` on the end), change the type for this new trigger, and **hide** the previous trigger. This way existing Zaps continue to work with the previous (and now hidden) trigger definition, and new Zaps will use the new trigger definition.
* This is the recommended path forward whether using the Platform UI or the Platform CLI, with the only difference being using the *Visibility: Hidden* toggle in the UI and setting the `hidden` key as `true` [in the CLI](https://github.com/zapier/zapier-platform/blob/main/packages/schema/docs/build/schema.md#basicdisplayschema).
***
*Need help? [Tell us about your problem](https://developer.zapier.com/contact) and we'll connect you with the right resource or contact support.*
---
# Source: https://docs.zapier.com/platform/manage/changeset-workflow.md
> ## Documentation Index
> Fetch the complete documentation index at: https://docs.zapier.com/llms.txt
> Use this file to discover all available pages before exploring further.
# Integration CI Pipelines using Changesets and Snapshot Versions
> Use changesets with snapshot versions to set up an automated pipeline for integration version updates.
Changesets are a third-party npm package and therefore only available to Platform CLI integrations.
This guide suggests some ways to automate version management and deployment for Zapier integrations using CI pipelines and changesets. Instead of manually updating version numbers and pushing snapshot versions, you can use automated workflows to handle these tasks consistently and reliably.
## Benefits of Automation
Automating your versioning and deployment workflow provides several advantages:
* **Consistency**: Version bumps follow semantic versioning rules automatically
* **Speed**: Deploy snapshot versions for testing without manual intervention
* **LLM Integration**: Changesets are easier for AI tools to work with, compared to manual version number bumps
* **Reduced Errors**: Eliminate mistakes from manual version number updates
* **Team Collaboration**: Multiple developers can work in parallel without worrying about conflicting version bumps
## What are Changesets?
[Changesets](https://github.com/changesets/changesets) is a tool for managing versioning and changelogs in monorepos and single-package projects. Instead of manually editing `package.json` and `CHANGELOG.md`, developers create small markdown files that describe their changes and specify the version bump type (patch, minor, or major).
When you're ready to release, changesets processes these files to:
* Bump version numbers in `package.json`
* Generate changelog entries
* Remove the processed changeset files
This workflow separates "what changed" from "when to release," making it easier to batch changes and coordinate releases.
## The Complete Workflow
This guide covers four automated jobs we recommend adding, and how they can work together.
We recognize all codebases and CI flows are different. These are the jobs we've found most useful in our integration development, but feel free to pick and choose from these jobs per your workflow needs.
1. **Snapshot Deployment**: Deploys labeled snapshot versions to Zapier for testing
2. **Integration Validation**: Validates your integration code, configuration, and optional changelog format as you go
3. **Changeset Validation**: Verifies changeset files are properly formatted and version numbers haven't been manually changed
4. **Changeset Processing**: Processes changesets to update versions and changelogs
## Common Integration Patterns
### Pattern 1: Continuous Snapshot Deployment
Deploy snapshot versions on every commit to a pull request for easy testing:
* Snapshot deployment runs on every PR commit
* Uses branch name as the snapshot label
* Enables immediate testing of changes without waiting for version releases
### Pattern 2: Pull Request Validation
Run validation jobs on pull requests to catch issues early:
* Integration validation runs on any PR to verify code and configuration
* Changeset validation runs only when changeset files are added or modified
### Pattern 3: Pre-Publication Processing
Process changesets before publishing:
* Changeset processing runs before publishing your integration version (when changeset files exist)
* Updates version numbers and changelogs in preparation for release
## Job 1: Snapshot Deployment
### Purpose
Deploys labeled snapshot versions to Zapier using the `zapier push --snapshot` command. This enables testing specific branches or features without creating official version releases. Running this on every PR commit allows for continuous testing of changes.
### What It Does
```yaml theme={null}
- name: Deploy snapshot version
script:
- Extract snapshot label from branch name (max 12 characters)
- Install dependencies
- Run `zapier push --snapshot LABEL`
```
The `zapier push --snapshot LABEL` command:
* Creates a version labeled `0.0.0-LABEL`
* Deploys this version to Zapier
* Enables testing without affecting production versions
Please reference [documentation for the `zapier push --snapshot` flag here.](https://github.com/zapier/zapier-platform/blob/main/packages/cli/docs/cli.md#push)
### When to Run
* On every commit to a pull request for continuous testing
* On feature branches for testing
* Manually triggered for specific branches
* Based on branch name patterns or labels
Consider allowing this job to fail without blocking the pipeline, as snapshot deployments are often optional.
***
## Job 2: Integration Validation
### Purpose
Validates your integration code and configuration using the `zapier validate` command. This catches common issues with authentication, triggers, actions, and other integration components before deployment. Optionally, you can also validate that your `CHANGELOG.md` format is compatible with changesets.
### What It Does
```yaml theme={null}
- name: Validate integration
script:
- Install dependencies
- Run `zapier validate`
- Optionally check CHANGELOG.md format for changesets compatibility
```
Please reference [documentation on the `zapier validate` command here](https://github.com/zapier/zapier-platform/blob/main/packages/cli/docs/cli.md#validate).
### When to Run
* On every pull request
* As part of your standard test suite
* Before processing any changesets
* Before publishing your integration version
### Additional Considerations
If you're using changesets, you may also want to validate that your `CHANGELOG.md` format is compatible. Changesets expects the file to start with an H1 header (e.g., `# App Name`) that is not a version number.
```yaml theme={null}
- name: Validate CHANGELOG format (optional)
script:
- Check that CHANGELOG.md starts with an H1 header
- Verify the H1 header is not a version number (e.g., not "# 1.2.3")
```
***
## Job 3: Changeset Validation
### Purpose
Validates that changesets are properly formatted and ensures developers haven't manually modified version numbers in `package.json`. This prevents double version bumps (one manual, one from changesets).
### What It Does
```yaml theme={null}
- name: Validate changesets
script:
- Compare current package.json version with previous commit
- Fail if version number has changed manually
- Run `npx changeset status` to validate changeset format
- Confirm changeset references the correct app/package
```
The `npx changeset status` command:
* Lists all pending changesets
* Shows which packages will be affected
* Validates changeset file format
* Does not fail if no changesets exist
### When to Run
* On pull requests that add or modify changeset files
* Before publishing your integration version
* Use CI rules to only trigger when `.changeset/*.md` files change
### Additional Considerations
* This job requires access to git history to compare versions
* Ensure the CI checkout isn't in a detached HEAD state
***
## Job 4: Changeset Processing
### Purpose
Processes all pending changesets to update version numbers and changelogs before publishing your integration version. This prepares your integration for release by consolidating all pending changes.
### What It Does
```yaml theme={null}
- name: Process changesets
script:
- Run `npx changeset version`
- Review updated files (package.json, CHANGELOG.md)
```
The `npx changeset version` command:
* Reads all pending changeset files
* Bumps version numbers in `package.json` based on changeset types
* Updates `CHANGELOG.md` with new entries
* Deletes processed changeset files
### When to Run
* Before publishing your integration version (when changesets exist)
* Manually triggered for release preparation
* As part of your release workflow
* Use CI rules to only trigger when `.changeset/*.md` files exist
### Additional Considerations
* Run this job when you're ready to prepare a new version for publication
* Review the updated version number and changelog entries before publishing
* You can run this locally or as part of a CI workflow
* After processing, use `zapier push` to publish the new version to Zapier
***
## Setting Up Changesets
To use these workflows, follow the instructions in the [Changesets Github repo](https://github.com/changesets/changesets/blob/main/docs/intro-to-using-changesets.md) to set up Changesets in your codebase.
## Creating a Changeset
Developers create changesets using:
```bash theme={null}
npx changeset add
```
This interactive CLI prompts for:
* Which packages are changing
* The version bump type (patch, minor, major)
* A description of the changes
The tool creates a markdown file in `.changeset/` with this information.
## Example: Complete Workflow in Action
1. Developer creates a feature branch and makes changes
2. Developer pushes the branch and opens a pull request
3. CI runs **snapshot deployment** on every commit, pushing version `0.0.0-LABEL` to Zapier
4. Team can immediately test the snapshot version as development continues
5. Developer runs `npx changeset add` and creates a changeset file describing the changes
6. CI runs **integration validation** and **changeset validation** on the PR
7. After PR approval, changes are merged
8. When ready to publish a new version, team runs **changeset processing**, which:
* Updates version in `package.json`
* Adds entry to `CHANGELOG.md`
* Deletes the changeset file
9. Team reviews the updated version and changelog, then uses `zapier push` to publish the version
***
## Additional Resources
* [Changesets Documentation](https://github.com/changesets/changesets)
* [Changesets CLI Reference](https://github.com/changesets/changesets/blob/main/packages/cli/README.md)
* [Zapier CLI Documentation](https://github.com/zapier/zapier-platform/blob/main/packages/cli/README.md)
* [Zapier Labeled Versions](https://docs.zapier.com/platform/manage/labeled-versions)
---
# Source: https://docs.zapier.com/powered-by-zapier/api-reference/common-types/choice.md
> ## Documentation Index
> Fetch the complete documentation index at: https://docs.zapier.com/llms.txt
> Use this file to discover all available pages before exploring further.
# null
---
# Source: https://docs.zapier.com/platform/build/cli-hook-trigger.md
> ## Documentation Index
> Fetch the complete documentation index at: https://docs.zapier.com/llms.txt
> Use this file to discover all available pages before exploring further.
# Add an instant trigger using REST Hooks in Zapier Platform CLI
> REST Hooks are an alternative to polling. The main differences are allowing your customers' Zaps to trigger instantly; and avoiding polling triggers' numerous - and sometimes unnecessary - requests to your API's endpoints to check for new data.
REST Hook triggers are marked as *Instant* [in the Zap editor](https://cdn.zappy.app/f510859bf90c0e341bc94997a75f9626.png).
When building in the [Platform CLI](/platform/quickstart/ui-vs-cli), use the [example implementation](https://github.com/zapier/zapier-platform/tree/main/example-apps/rest-hooks) for guidance.
With a REST Hook trigger, Zapier subscribes to your server using a unique URL per activated Zap and your app sends a payload of data back to the unique URL to trigger that particular Zap whenever that trigger event occurs in your app.
REST Hooks differ from static webhooks. With static webhooks, your customer needs to manually copy and paste a specific URL per Zap to connect your app and their Zap together, whereas with REST Hooks this is all handled automatically for them between Zapier and your app.
Zapier does not support Identity Confirmation for webhook subscriptions.
## Prerequisites
* Your app supports REST Hooks - webhook subscriptions that can be manipulated through a REST API.
* A way to store the unique URLs we send you, such as a database.
* A way to send payloads in JSON format to each stored URL, when a specific event happens that you want to trigger the associated Zap on.
* One or more endpoint(s) to receive subscribe and unsubscribe payloads (these can be the same endpoint(s) or separate ones)
* If your webhook subscriptions expire, make sure the subscribe endpoint returns an `expiration_date` property containing an ISO8601 date. The platform will automatically attempt to resubscribe after the expiration date. [More details below](/platform/build/cli-hook-trigger#handling-expiring-webhook-subscriptions).
When a Zap is turned on, the `subscribeHook` function is called with a payload of data that includes the unique URL to send data to in order to trigger the Zap. Store this URL, associating it with an id and use it whenever you want to trigger this Zap. Return that id in the response back to Zapier to be used later in the Unsubscribe.
When the Zap is turned off, the `unsubscribeHook` function is called to notify your app to delete the unique URL previously stored for this Zap.
## 1. Write the `subscribeHook` Function
The first function to implement is the `subscribeHook` function which provides the URL you will use to trigger the Zap. Include the following parameters:
* `url` should be `bundle.targetUrl` which is an URL Zapier automatically generates for each activated Zap.
* Any other data you want to send from any [inputFields](https://github.com/zapier/zapier-platform/blob/main/packages/cli/README.md#input-fields)
```js theme={null}
const subscribeHook = (z, bundle) => {
const data = {
url: bundle.targetUrl,
field: bundle.inputData.field,
// etc
};
const options = {
url: "subscription endpoint url",
method: "POST",
body: data,
};
// make the request and parse the response - this does not include any error handling.
return z.request(options).then((response) => response.data);
};
```
This function is called in the `performSubscribe` method on the module for the Trigger:
```js theme={null}
module.exports = {
// Other data about the Trigger, e.g. key, name, etc. omitted
performSubscribe: subscribeHook,
};
```
This function will run every time a Zap is turned on.
### Handling Expiring Webhook Subscriptions
Some APIs require webhook subscriptions to include an expiration date in the subscription request and return that expiration in the response. For these cases, the trigger configuration must include an `expiration_date` property (ISO8601 format) in the data returned from `subscribeHook`. Zapier will automatically attempt to resubscribe before the expiration date to keep the Zap active.
In this example, the API requires an `expirationDateTime` to be specified when creating the subscription, with a maximum duration of 24 hours. The subscription response includes this expiration, which we map to `expiration_date` for Zapier to monitor:
```js theme={null}
// Max number of minutes for a subscription to be active before requiring reauthorization
const MAX_SUBSCRIPTION_DURATION = 1440; // 24 hours
const getExpirationDateTime = (minutesFromNow) =>
`${new Date(Date.now() + minutesFromNow * 60000).toISOString().slice(0, -5)}.0000000+00:00`;
const subscribeHook = async (z, bundle) => {
const targetUrl = `${bundle.targetUrl}`;
const data = {
changeType: "created",
notificationUrl: targetUrl,
lifecycleNotificationUrl: targetUrl,
resource: `users/${bundle.inputData.userId}/resource`,
expirationDateTime: getExpirationDateTime(MAX_SUBSCRIPTION_DURATION),
};
const options = {
url: `${API_URL}/subscriptions`,
method: "POST",
body: data,
};
const subscriptionResponse = await z.request(options);
const subscriptionData = {
...subscriptionResponse.data,
expiration_date: subscriptionResponse.data.expirationDateTime, // Zapier will automatically refresh expiring subscriptions based on expiration_date
};
return subscriptionData;
};
```
## 2. Write the `unsubscribeHook` Function
The next function to implement is the `unsubscribeHook` function which will be called when a Zap is turned off. This notifies your servers to delete the URL you've been storing and stop sending payloads to it. If your API continues posting notification payloads to the Zap after it has unsubscribed, you can expect to see a 410 response from Zapier.
`bundle.subscribeData.id` is required — this is the ID of the hook in question. You could assign it to a `hookID` variable or similar.
Include the following parameters:
```js theme={null}
const unsubscribeHook = (z, bundle) => {
// bundle.subscribeData contains the parsed response JSON from the subscribe request.
const hookId = bundle.subscribeData.id;
const options = {
url: `unsubscription endpoint url/${hookId}`,
method: "DELETE",
};
return z.request(options).then((response) => response.data);
};
```
This function is called in the `performUnsubscribe` method on the module for the Trigger:
```js theme={null}
module.exports = {
// Other data about the Trigger, e.g. key, name, etc. omitted
performUnsubscribe: unsubscribeHook,
};
```
A REST Hook trigger missing a Subscribe or Unsubscribe function, is presented to users as a [Static Webhook](https://cdn.zappy.app/3b35908a6a0c232087b5da807cf9d6fb.png). Static hooks are [not supported in public integrations](/platform/publish/integration-checks-reference#d017---static-hook-is-discouraged), but they could be used if the integration intends to remain private.
## 3. Write the `perform` Function
The next function to implement is the `perform` function which is called each time your app delivers a notification payload to Zapier. This is what actually triggers the Zap. Typically, you would simply return the cleaned request in an array. The data returned by the request [must be an array](https://github.com/zapier/zapier-platform/blob/master/packages/cli/README.md#return-types).
```js theme={null}
const parseHookPayload = (z, bundle) => {
// bundle.cleanedRequest will include the parsed JSON object (if it's not a
// test poll) and also a .querystring property with the URL's query string.
const payload = {
id: bundle.cleanedRequest.id,
name: bundle.cleanedRequest.name,
directions: bundle.cleanedRequest.directions,
style: bundle.cleanedRequest.style,
authorId: bundle.cleanedRequest.authorId,
createdAt: bundle.cleanedRequest.createdAt,
};
return [payload];
};
```
followed by:
```js theme={null}
module.exports = {
// Other data about the Trigger, e.g. key, name, etc. omitted
perform: parseHookPayload,
};
```
## 4. Write the `performList` Function
The final function to implement is the `performList` function, used when testing the Trigger to collect sample data in the Zap editor. Though optional, not defining a performList is a sub-optimal experience for users and is [required for public apps](/platform/quickstart/private-vs-public-integrations).
Most commonly this is a GET request to an endpoint of your API which will provide a response from the user's account with the exact same schema as the data delivered via webhook when a trigger event happens.
Response data returned must be an array, even if the array contains only one object. It must have the exact same schema as the data delivered via webhook when a trigger event happens otherwise fields mapped from this sample in subsequent steps of a Zap will break when it runs live.
```js theme={null}
const getFallbackSample = (z, bundle) => {
// For the test poll, you should get some real data, to aid the setup process.
const options = {
url: "sample endpoint here",
method: "GET",
params: {
style: bundle.inputData.style,
},
};
return z.request(options).then((response) => response.data);
};
```
followed by:
```js theme={null}
module.exports = {
// Other data about the Trigger, e.g. key, name, etc. omitted
performList: getFallbackSample,
};
```
## 5. Test your API Request
To test the REST Hook trigger, [build a Zap in the editor](/platform/build/test-triggers-actions).
## 6. Define sample and outputFields
Define sample data and output fields following [the guide](https://github.com/zapier/zapier-platform/blob/main/packages/cli/README.md#output-fields). You can see an example of this [here](https://github.com/zapier/zapier-platform-example-app-rest-hooks/blob/master/triggers/recipe.js#L102-L122).
## BasicHookOperationSchema
### `subscribeHook`
Function that sends a payload of data to an endpoint you control. You need to grab the `targetUrl` parameter and store it securely as this URL is used to send data from your app to Zapier when the triggering event occurs, and thus trigger the Zap. You can see an example of this [here](https://github.com/zapier/zapier-platform-example-app-rest-hooks/blob/master/triggers/recipe.js#L1-L22).
### `unsubscribeHook`
Function that calls an endpoint you control with a payload of data, including the `targetUrl` parameter. You need to deactivate or delete the URL from your storage completely as the Zap associated will no longer trigger when requests are made to it. If your API continues posting notification payloads to the Zap after it has unsubscribed, you can expect to see a 410 response from Zapier. You can see an example of this [here](https://github.com/zapier/zapier-platform-example-app-rest-hooks/blob/master/triggers/recipe.js#L24-L39).
### `perform`
This should be a function that processes the inbound webhook request. No `HTTP` request has to made here. As seen in the example app [here](https://github.com/zapier/zapier-platform-example-app-rest-hooks/blob/master/triggers/recipe.js#L41-L54), this can simply take the data from `bundle.cleanedRequest` and build a new object that is returned within an array. It's important to return this object within an array as specified [here](https://github.com/zapier/zapier-platform/blob/master/packages/cli/README.md#return-types).
### `performList`
Testing a REST Hook trigger in the Zap editor will only call `performList`, not `perform`. `performList` ideally should make a `HTTP` request to an endpoint that can return sample data to be mapped into subsequent steps of the user's Zap. You can see an example of this [here](https://github.com/zapier/zapier-platform-example-app-rest-hooks/blob/master/triggers/recipe.js#L56-L67). Required for public apps and highly recommended for private apps to avoid user confusion when setting up a Zap.
***
*Need help? [Tell us about your problem](https://developer.zapier.com/contact) and we'll connect you with the right resource or contact support.*
---
# Source: https://docs.zapier.com/platform/quickstart/cli-tutorial.md
> ## Documentation Index
> Fetch the complete documentation index at: https://docs.zapier.com/llms.txt
> Use this file to discover all available pages before exploring further.
# Platform CLI tutorial
> This tutorial walks you through the process of building, testing, and pushing an example app to Zapier using Platform CLI. We'll use a mock API for recipes in this tutorial, but for production Zapier apps, you'd want to connect to a real API.
## Prerequisites
* You'll need a [Zapier account](https://zapier.com/sign-up).
* Your dev environment meets the [requirements for running Platform CLI](/platform/build-cli/overview#requirements) with the proper version of Node.js installed.
* Install the Platform CLI tool
```bash theme={null}
# Install the CLI globally
npm install -g zapier-platform-cli
```
To see a list of all the available commands in Platform CLI, try `zapier help`.
* Next you'll need to identify yourself via the CLI.
```bash theme={null}
# Setup auth to Zapier's platform with a deploy key
zapier login
```
Zapier writes your deploy key to `~/.zapierrc`. You'll want to keep that file safe and not check it into source control.
## 1. Start an integration
Use the `init` command to setup the [needed structure](https://github.com/zapier/zapier-platform/tree/main/example-apps). You'll be presented with a list of available templates to start with.
```bash theme={null}
# Create a directory with the minimum required files and choose a template
zapier init example-app --template minimal
# Move into the new directory
cd example-app
```
Inside the directory, you'll see a few files. `package.json` is a typical requirements file of any Node.js application. It's pre-populated with a few dependencies, most notably the `zapier-platform-core`, which is what makes your app work with the Zapier Platform. There is also an `index.js` file and a test directory (more on those later). Before we go any further, we need to install the dependencies for our app:
```bash theme={null}
npm install
```
### `index.js`
`index.js` is the entry point to your app. This is where the Platform will look to understand how your app will interact with Zapier. Open the app directory you created in your code editor of choice.
You may see the following in `index.js`:
* a single `module.exports` definition which will be interpreted by Zapier
* `triggers` will describe ways to trigger off of data in your app
* `searches` will describe ways to find data in your app
* `creates` will describe ways to create data in your app
* `resources` are purely optional but convenient ways to describe CRUD-like objects in your app (see [an example resources app](https://github.com/zapier/zapier-platform/tree/main/example-apps/resource))
* `beforeRequest` & `afterResponse` are hooks into the HTTP client to manipulate the request/response on every call
## 2. Add a trigger
Add a [**trigger**](/platform/build-cli/overview#triggers-searches-creates) configured to read data from a mock API:
```bash theme={null}
zapier scaffold trigger recipe
```
The [scaffold](https://github.com/zapier/zapier-platform/blob/main/packages/cli/docs/cli.md#scaffold) creates a new file `recipe.js` in the `triggers` folder. When building your own integration, you'll likely name your JS files with nouns like `contact.js`, `lead.js` or `order.js`.
Open `triggers/recipe.js` (file created by `zapier scaffold trigger recipe`) and **replace** it with:
```js theme={null}
const listRecipes = async (z, bundle) => {
const response = await z.request(
"http://57b20fb546b57d1100a3c405.mockapi.io/api/recipes",
);
return response.data;
};
module.exports = {
key: "recipe",
noun: "Recipe",
display: {
label: "New Recipe",
description: "Triggers when a new recipe is created.",
},
operation: {
perform: listRecipes,
sample: {
id: 1,
createdAt: 1472069465,
name: "Best Spaghetti Ever",
authorId: 1,
directions: "1. Boil Noodles\n2.Serve with sauce",
style: "italian",
},
},
};
```
To try out the trigger locally, try running `zapier invoke`. The command will ask you which action you'd like to invoke. Now we only have one trigger `recipe`, so you can choose that one.
```
# (deprecated) $ zapier invoke
$ zapier-platform invoke
? Which action type would you like to invoke? trigger
? Which "trigger" key would you like to invoke? recipe
✔ Invoking triggers.recipe.operation.inputFields
✔ Invoking triggers.recipe.operation.perform
[
{
"id": "1",
"createdAt": 1471984289,
"name": "name 1",
"authorId": 63,
"directions": "directions 1",
"style": "style 1"
},
]
```
Let's review the code. The function definition for `listRecipes` handles the API work, making the HTTP request and returning the parsed response data.
In JavaScript, `async/await` are syntactic sugar built on top of [Promises](https://developer.mozilla.org/en-US/docs/Web/JavaScript/Reference/Global_Objects/Promise). Be sure to use `await` or `.then()` when you call asynchronous functions.
The `listRecipes` function receives two arguments, a `z` object and a `bundle` object.
* The [Z Object](/platform/build-cli/core#z-object) is a collection of utilities needed when working with APIs. In our snippet, we use `z.request` to make the HTTP call.
* The [Bundle Object](/platform/build-cli/core#bundle-object) contains any data needed to make API calls, like authentication credentials or data for a POST body. In our snippet the Bundle is not used, since we don't require any of those to make our simple GET request.
It is possible to accomplish the same tasks using alternate Node.js libraries, but it is preferable to use the `z` object as there are features built into these utilities that augment the Zapier experience like logging of HTTP calls and error handling.
In `module.exports`, we export some metadata plus our `listRecipes` function and a sample. We'll explain later how Zapier uses this metadata and exposes it to the end user. For now, know that it satisfies the minimum info required to define a trigger.
As well as defining the trigger, the `scaffold` command has done the following:
`index.js` file now includes:
```bash theme={null}
const getRecipe = require('./triggers/recipe')
```
```js theme={null}
module.exports = {
// ...
triggers: {
[getRecipe.key]: getRecipe,
},
// ...
};
```
In test/triggers folder, the `recipe.test.js` file was created:
```js theme={null}
const App = require("../../index");
const appTester = zapier.createAppTester(App);
// read the `.env` file into the environment, if available
zapier.tools.env.inject();
describe("triggers.recipe", () => {
it("should run", async () => {
const bundle = { inputData: {} };
const results = await appTester(
App.triggers.recipe.operation.perform,
bundle,
);
expect(results).toBeDefined();
// TODO: add more assertions
});
});
```
You should be able to run the test with `zapier-platform test` (or the deprecated `zapier test`) and see it pass:
```bash theme={null}
# (deprecated) $ zapier test
$ zapier-platform test
Validating project locally
No structural errors found during validation routine.
This project is structurally sound!
✔ Running integration checks ... 23 checks passed
Integration checks passed, no issues found.
Adding /Users/marinahand/.zapierrc to environment as ZAPIER_DEPLOY_KEY...
Running test suite with the following command:
npm run --silent test --
PASS test/triggers/recipe.test.js
PASS test/triggers.test.js (7.52 s)
Test Suites: 2 passed, 2 total
Tests: 3 passed, 3 total
Snapshots: 0 total
Time: 9.429 s
Ran all test suites.
```
For this example, we'll stick to a single test, but you can see what multiple tests look like in [another of the example apps](https://github.com/zapier/zapier-platform/blob/main/example-apps/trigger/test/triggers.js).
## 3. Modify a trigger
To let users tweak the cuisine style of recipes they are triggering on, you can provide an input field a user can fill out.
In `triggers/recipe.js`, **replace** the file with:
```js theme={null}
const listRecipes = async (z, bundle) => {
const params = {};
if (bundle.inputData.style) {
params.style = bundle.inputData.style;
}
const requestOptions = {
url: "http://57b20fb546b57d1100a3c405.mockapi.io/api/recipes",
params: params,
};
const response = await z.request(requestOptions);
return response.data;
};
module.exports = {
key: "recipe",
noun: "Recipe",
display: {
label: "New Recipe",
description: "Triggers when a new recipe is created.",
},
operation: {
inputFields: [
{
key: "style",
type: "string",
helpText: "Which styles of cuisine this should trigger on.",
required: false,
},
],
perform: listRecipes,
sample: {
id: 1,
createdAt: 1472069465,
name: "Best Spagetti Ever",
authorId: 1,
directions: "1. Boil Noodles\n2.Serve with sauce",
style: "italian",
},
outputFields: [
{ key: "id", label: "ID" },
{ key: "createdAt", label: "Created At" },
{ key: "name", label: "Name" },
{ key: "directions", label: "Directions" },
{ key: "authorId", label: "Author ID" },
{ key: "style", label: "Style" },
],
},
};
```
See how the input field key `"style"` was added in the following places:
* In the `inputFields` on `operation` - this defines the field as exposed in the Zap Editor for the user to see. The field is not required, so it could be null.
* In the `listRecipes` function - we use the provided style via the bundle `bundle.inputData.style`.
Since you are developing locally, rerun `zapier invoke` to verify everything still works. This time, let's skip those interactive prompts. Specify the action type (`trigger`), the key (`recipe`), and the input data in the command, and you'll see:
```
# (deprecated) $ zapier invoke trigger recipe --inputData '{"style":"style 20"}'
$ zapier-platform invoke trigger recipe --inputData '{"style":"style 20"}'
✔ Invoking triggers.recipe.operation.inputFields
✔ Invoking triggers.recipe.operation.perform
[
{
"id": "20",
"createdAt": 1578590011,
"name": "name 20",
"authorId": 90,
"directions": "directions 20",
"style": "style 20"
}
]
```
Let's also tweak the test. In test/trigger, replace the `recipe.test.js` file with:
```js theme={null}
const zapier = require("zapier-platform-core");
const App = require("../../index");
const appTester = zapier.createAppTester(App);
describe("triggers", () => {
describe("new recipe trigger", () => {
it("should load recipes", async () => {
const bundle = {
inputData: {
style: "style 2",
},
};
const results = await appTester(
App.triggers.recipe.operation.perform,
bundle,
);
expect(results.length).toBeGreaterThan(1);
const firstRecipe = results[0];
expect(firstRecipe.name).toEqual("name 2");
expect(firstRecipe.directions).toEqual("directions 2");
});
it("should load recipes without filters", async () => {
const bundle = {};
const results = await appTester(
App.triggers.recipe.operation.perform,
bundle,
);
expect(results.length).toBeGreaterThan(1);
const firstRecipe = results[0];
expect(firstRecipe.name).toEqual("name 1");
expect(firstRecipe.directions).toEqual("directions 1");
});
});
});
```
You can run your test again and make sure everything still works:
```js theme={null}
zapier test
```
## 4. Deploy an integration
To take your local app integration and make it available to use in a Zap, you'll need to push it to Zapier.
You can have many versions of an app, which simplifies making breaking changes and testing in the future. For now, you will push a single version.
Since this is your first time pushing your app version, you'll need to register your app with Zapier. Run the `zapier-platform register` command (or the deprecated `zapier register`) and Zapier will ask you to provide a name and some details about your app. Follow the prompt and then you can push your app using `zapier-platform push`:
Zapier will ask you to provide a name and some details about your app. Follow the prompts and then push your app again.
```
# (deprecated) $ zapier push
$ zapier-platform push
✔ Copying project to temp directory
✔ Installing project dependencies
✔ Applying entry point file
✔ Building app definition.json
✔ Validating project schema and style
✔ Zipping project and dependencies
✔ Testing build
✔ Cleaning up temp directory
✔ Uploading version 1.0.0
Push complete! Built build/build.zip and build/source.zip and uploaded them to Zapier.
```
Log in and visit the [Zap editor](https://zapier.com/app/editor) to create a Zap with your new integration.
For the trigger step, choose your app and the "New Recipe" trigger, where you can see the label and description that were defined in `triggers/recipe.js`.
In the Zap editor, see the input field `"style"` and fill it out. Run the trigger test and the `listRecipes` function associated with the trigger runs, making the API request and returning the result to Zapier.
Go back to your terminal. Use the `zapier-platform logs --type http` command (or the deprecated `zapier logs --type http`) to see the HTTP requests Zapier made.
```
# (deprecated) $ zapier logs --type http
$ zapier-platform logs --type http
The logs of your app "Example App" listed below.
┌────────┬────────┬────────────────────────────────────────────────────────┬───────────────┬─────────┬──────────────────────────────────────┬───────────────────────────┐
│ Status │ Method │ URL │ Querystring │ Version │ Step │ Timestamp │
├────────┼────────┼────────────────────────────────────────────────────────┼───────────────┼─────────┼──────────────────────────────────────┼───────────────────────────┤
│ 200 │ GET │ http://57b20fb546b57d1100a3c405.mockapi.io/api/recipes │ style=italian │ 1.0.0 │ a9055e16-fc0d-4fb2-a3e6-9d442d1f70e8 │ 2016-09-13T15:11:30-05:00 │
└────────┴────────┴────────────────────────────────────────────────────────┴───────────────┴─────────┴──────────────────────────────────────┴───────────────────────────┘
Most recent logs near the bottom.
```
## 5. Add authentication
Authentication is crucial to interacting with most APIs. Zapier supports a number of different [authentication schemes](/platform/build-cli/overview#authentication). In this example, you are going to set it up to include an API Key in a header.
For different types of authentication, see these example apps:
Define the `authentication` section for the example app you've built. In `index.js`, **add** the following to `module.exports`:
```js theme={null}
authentication: {
type: 'custom',
fields: [{ key: 'apiKey', type: 'string' }],
test: async (z, bundle) => {
const response = await z.request('http://57b20fb546b57d1100a3c405.mockapi.io/api/me');
return response.data;
},
},
```
The above snippet defines the two required properties of `authentication`:
* `fields` is where we define our auth fields. This works similar to the `inputFields` of triggers. When users connect their account to Zapier, they'll be prompted to fill in this field, and the value they enter becomes available in the `bundle.authData`. Not every authentication type will include `inputFields`.
* `test` is a function used during the account connection process to verify that the user entered valid credentials. The goal of the function is to make an authenticated API request whose response indicates if the credentials are correct. A profile in the connected app, such as a `/me` endpoint, is a common choice. If valid, the test function can return anything. On invalid credentials, the test needs to raise an error. Since `z.request()` already throws an error for non-2xx responses, we don't need to throw an error explicitly in this case.
Next, make sure the API key is included in all the requests your app makes.
In `index.js`, **edit** the file to include:
```js theme={null}
// Add this helper function above `module.exports`:
const addApiKeyToHeader = (request, z, bundle) => {
request.headers["My-Auth-Header"] = bundle.authData.apiKey;
return request;
};
// module.exports = ...
```
The helper function `addApiKeyToHeader`, adds the user-provided API key as a request header called `My-Auth-Header`. The name chosen is illustrative, the header would be whatever the API you are integrating with requires. Sometimes, an API would require it in a query parameter instead of a header, and/or encoded first. You'll want to reference the API documentation for the expected format.
Finally, to ensure the helper function takes effect, it needs to be registered in the app.
In `index.js`, **edit** `module.exports` to also include:
```js theme={null}
beforeRequest: [
addApiKeyToHeader, // new line of code
],
```
`beforeRequest` is a list of functions that are called before every HTTP request that uses `z.request`. It's where you add headers, query params, or whatever is needed to be within *all outbound requests*. With this addition, every outgoing HTTP request made by `z.request` will now have the API key added in a header.
The `zapier-platform invoke` command has `auth test` subcommand that essentially calls the `authentication.test` function for you to verify the credentials locally. But first, you need to initialize the auth credentials with the `auth start` subcommand:
```
# (deprecated) $ zapier invoke auth start
$ zapier-platform invoke auth start
The .env file does not exist or is empty. You may need to set some environment variables in there if your code uses process.env.
? apiKey | string: mock-api-key
Auth data appended to .env file. Run `zapier invoke auth test` to test it.
```
Next, run the `auth test` subcommand to verify the credentials. You'll know you have the right API key if you can see the response data from the `/me` endpoint:
To check progress, re-push the app.
```
# (deprecated) $ zapier invoke auth test
$ zapier-platform invoke auth test
✔ Invoking authentication.test
[
{
"id": "1",
"createdAt": 1473801403,
"userName": "userName 1"
}
]
```
Re-push the app to Zapier to deploy the changes:
```bash theme={null}
# (deprecated) zapier push
zapier-platform push
```
Go back to your Zap at [https://zapier.com/app/zaps](https://zapier.com/app/zaps). It will now have a new ["Account" item](https://cdn.zappy.app/9096a3bc1d6cd8147fb695bb460692b2.png) in your "New Recipe" trigger.
Add an account by entering any value you like for the API key, the mock API does not care.
As soon as you add the account, Zapier will run your app's `authentication.test` function to confirm the credentials are valid.
We can verify the header is present in the request by looking at the logs again.
```
# (deprecated) $ zapier logs --type http --detailed --limit=1
$ zapier-platform logs --type http --detailed --limit=1
The logs of your app "Example App" listed below.
┌─────────────────────┬────────────────────────────────────────────────────────────────────────────────────────┐
│ Status │ 200 │
│ Method │ GET │
│ URL │ http://57b20fb546b57d1100a3c405.mockapi.io/api/me │
│ Querystring │ │
│ Version │ 1.0.0 │
│ Step │ │
│ Timestamp │ 2016-09-16T15:57:51-05:00 │
│ Request Headers │ user-agent: Zapier │
│ │ My-Auth-Header: :censored:6:b1af149262: │
│ Request Body │ │
│ Response Headers │ server: Cowboy │
│ │ connection: close │
│ │ x-powered-by: Express │
│ │ access-control-allow-origin: * │
│ │ access-control-allow-methods: GET,PUT,POST,DELETE,OPTIONS │
│ │ access-control-allow-headers: X-Requested-With,Content-Type,Cache-Control,access_token │
│ │ content-type: application/json │
│ │ content-length: 59 │
│ │ etag: "-80491811" │
│ │ vary: Accept-Encoding │
│ │ date: Fri, 16 Sep 2016 20:57:51 GMT │
│ │ via: 1.1 vegur │
│ Response Body │ [{"id":"1","createdAt":1473801403,"userName":"userName 1"}] │
└─────────────────────┴────────────────────────────────────────────────────────────────────────────────────────┘
```
You can see from the detailed log that the request included our auth header. The value appears as `:censored:6:b1af149262:`, which is intentional. Zapier does not log authentication credentials in plain text.
## 6. Invite team members to help manage your integration
Share your integration with your team of fellow developers so it shows up in their [developer dashboard](https://developer.zapier.com/).
From the Zapier CLI, run either of these:
* `zapier team:add user@example.com admin` to invite a team member [as an admin](https://platform.zapier.com/manage/add-team) for the app.
* `zapier team:add user@example.com collaborator` to invite a team member [as a collaborator](https://platform.zapier.com/manage/add-team) for the app.
Replace the example email address with the user you want to invite.
## 7. Share users to your integration
Once you have at least one trigger or action, you'll want to share your integration with some of your users. Early feedback helps make sure you're building functionality that will be used.
From the Zapier CLI, run `zapier users:add user@example.com 1.0.0` to email this user to let them view and use the app version 1.0.0 in their Zaps.
Replace the example email address with the user you want to invite. You'll see a confirmation prompt, type `Y`.
The alternative way to invite anyone to use your app in their Zaps is via a link to the app. Run `zapier users:links` to see a public sharing link per specific version or a link to all versions. The link looks something like `https://zapier.com/platform/public-invite/1/222dcd03aed943a8676dc80e2427a40d/`. You can put this in your help docs, post it to your website, add it to your email campaign, etc. Access shared via these links cannot be revoked once shared with your users.
## 8. Modify your integration
If you need to make any changes to your integration in [a new version](/platform/build-cli/overview#deploying-an-integration-version). Versions helps to track and manage changes to your integration over time.
Public integrations or private integrations with more than 5 users **require** a new version to make any edits. It is still recommended to make changes for private integrations with fewer than 5 users in a new version as well and [consider Zapier's best practices](/platform/manage/planning-changes) when doing so.
Integrations created with the Platform CLI cannot be edited in the Platform UI. You can't add triggers or actions, edit code or configurations - these options will be grayed out in the UI.
The following details of your CLI integration can be managed from the UI if preferred:
* Invite team members
* Monitor integration usage
* Submit your integration to be made publicly available
* Promote a new integration version to public
* Migrate users between versions
## Learn more
* [Z object](/platform/build-cli/core#z-object)
* [Bundle object](/platform/build-cli/core#bundle-object) for functionalities available within the `perform` functions
* [Different authentication schemes and search/create implementations examples](https://github.com/zapier/zapier-platform/tree/main/example-apps)
* [Interactive tutorial](https://developer.zapier.com/cli-guide/introduction) that uses the GitHub API (a little outdated)
* About [different types of support](/platform/quickstart/get-help) available to help you build your integration
*Need help? [Tell us about your problem](https://developer.zapier.com/contact) and we'll connect you with the right resource or contact support.*
---
# Source: https://docs.zapier.com/powered-by-zapier/authentication/methods/client-id.md
> ## Documentation Index
> Fetch the complete documentation index at: https://docs.zapier.com/llms.txt
> Use this file to discover all available pages before exploring further.
# Client ID
> How to authenticate with your Client ID
Most endpoints require app or user access token authentication. However, a smaller number of endpoints require only a valid Client ID in order to be accessed.
### Prerequisites
* Your app needs to be published as a [public integration](https://platform.zapier.com/quickstart/private-vs-public-integrations) in Zapier's App Directory.
### Retrieving and Using your Client ID
You can find your Client ID in the [Zapier Developer Platform](https://developer.zapier.com/) under `Embed` → `Settings` → `Credentials`

Your application's **Client ID** and **Client Secret** are only available after you've published your app as a [public integration in Zapier's App Directory](https://platform.zapier.com/quickstart/private-vs-public-integrations).
Regenerating your client secret will invalidate any previous secret.
From there, simply pass your `client_id` as a query param to any V1 endpoints that require it.
```js Example for Zap-templates theme={null}
https://api.zapier.com/v1/zap-templates?client_id={YOUR_CLIENT_ID}
```
---
# Source: https://docs.zapier.com/mcp/clients.md
> ## Documentation Index
> Fetch the complete documentation index at: https://docs.zapier.com/llms.txt
> Use this file to discover all available pages before exploring further.
# null
Zapier MCP integrates with a variety of Model Context Protocol (MCP) clients, allowing you to connect your AI workflows with different development environments and platforms.
## Supported Clients
Zapier MCP currently supports the following official MCP clients:
### AI Platforms & APIs
* **Anthropic API** - Direct integration with Anthropic's API
* **Claude** - Claude desktop application
* **Claude Code** - Claude's code-focused interface
* **OpenAI API** - Direct integration with OpenAI's API
* **ChatGPT** - Zapier MCP as a Custom Connector for use in [ChatGPT Developer Mode](https://platform.openai.com/docs/guides/developer-mode)
* **Microsoft Copilot Studio** - Create Microsoft Copilot Agents with Tools
### Development Environments
* **Cursor** - AI-powered code editor
* **VS Code** - Visual Studio Code with MCP extension
* **Windsurf** - Modern development environment
### Voice Assistants
* **ElevenLabs** - AI-powered voice assistant
* **Vapi** - Voice agents for developers
### Programming Languages
* **Python** - MCP client for Python applications
* **TypeScript** - MCP client for TypeScript/JavaScript applications
### Other Integrations
* **Other** - Additional community and third-party clients
## Request a New Client
Looking to get your MCP client featured as an official client compatible with Zapier MCP?
[Submit a Client Request →](https://mcp.zapier.app/client-request)
### Requirements for New Clients
To ensure compatibility with Zapier MCP, your client must:
* **Support streamable HTTP** - We no longer support SSE MCP servers
Not a requirement, but preferred:
* **Implement OAuth with Dynamic Client Registration** - As outlined in the [official MCP authorization specification](https://modelcontextprotocol.io/specification/2025-06-18/basic/authorization#authorization-flow)
These requirements ensure secure, scalable integration with Zapier's infrastructure while providing the best experience for users.
## Disconnecting OAuth-Connected Clients
If you need to revoke or sever the connection between Zapier MCP and an OAuth-connected client (such as Claude or Microsoft Copilot Studio), you can do so by deleting the server itself. This will immediately terminate the connection and prevent further access to your Zapier MCP account from that client.
You'll need to re-authenticate if you recreate the server.
---
# Source: https://docs.zapier.com/platform/manage/clone.md
> ## Documentation Index
> Fetch the complete documentation index at: https://docs.zapier.com/llms.txt
> Use this file to discover all available pages before exploring further.
# Clone a version
> Cloning allows you to duplicate an existing version of your integration. This is particularly useful when you want to introduce new features or fixes without altering the original integration. When a previous version of your integration has more than 5 active users, you will need to clone that version to make modifications.
> **Note**: The term “cloning” is specific to the Platform UI and is not used with Platform CLI. However, the concept is similar to updating the version number in your `package.json` file and running [`zapier push`](https://github.com/zapier/zapier-platform/blob/main/packages/cli/docs/cli.md#push) to create a new version you can access within your Zaps for testing.
## How to clone an integration version
1. Log into the [Platform UI](https://zapier.com/app/developer).
2. Select your **integration**.
3. In the *Manage* section in the left sidebar, click **Versions**.
4. On your existing version, click the **three dots icon**
 5. From the dropdown menu, select **Clone**.
6. The *Clone Version* dialog box will appear. In the dropdown field, select which **version** you want to clone your existing version too.
* **Patch (e.g., 1.0.0 to 1.0.1)**: Ideal for backward-compatible changes such as bug fixes or updating help text.
* **Minor (e.g., 1.0.0 to 1.1.0)**: Use this for adding new functionalities that do not disrupt existing features, like creating a new trigger or action.
* **Major (e.g., 1.0.0 to 2.0.0)**: Choose this option for changes that are likely to break existing Zaps, like removing triggers or actions, altering authentication methods, or revamping the entire integration.
7. Click **Clone**.
8. A dialog box will appear confirming you've cloned your version.
Now you can make edits and improvements to your integration.
## Video Tutorial
You can refer to this video on cloning an integration version:
***
*Need help? [Tell us about your problem](https://developer.zapier.com/contact) and we'll connect you with the right resource or contact support.*
---
# Source: https://docs.zapier.com/platform/reference/cloning-a-version-tutorial.md
> ## Documentation Index
> Fetch the complete documentation index at: https://docs.zapier.com/llms.txt
> Use this file to discover all available pages before exploring further.
# Cloning a version
> Cloning allows you to duplicate an existing version of your integration. This is particularly useful when you want to introduce new features or fixes without altering the original integration. When a previous version of your integration has more than 5 active users, you will need to clone that version to make modifications.
---
# Source: https://docs.zapier.com/platform/build/code-mode.md
> ## Documentation Index
> Fetch the complete documentation index at: https://docs.zapier.com/llms.txt
> Use this file to discover all available pages before exploring further.
# Use Code Mode to refine your API call
5. From the dropdown menu, select **Clone**.
6. The *Clone Version* dialog box will appear. In the dropdown field, select which **version** you want to clone your existing version too.
* **Patch (e.g., 1.0.0 to 1.0.1)**: Ideal for backward-compatible changes such as bug fixes or updating help text.
* **Minor (e.g., 1.0.0 to 1.1.0)**: Use this for adding new functionalities that do not disrupt existing features, like creating a new trigger or action.
* **Major (e.g., 1.0.0 to 2.0.0)**: Choose this option for changes that are likely to break existing Zaps, like removing triggers or actions, altering authentication methods, or revamping the entire integration.
7. Click **Clone**.
8. A dialog box will appear confirming you've cloned your version.
Now you can make edits and improvements to your integration.
## Video Tutorial
You can refer to this video on cloning an integration version:
***
*Need help? [Tell us about your problem](https://developer.zapier.com/contact) and we'll connect you with the right resource or contact support.*
---
# Source: https://docs.zapier.com/platform/reference/cloning-a-version-tutorial.md
> ## Documentation Index
> Fetch the complete documentation index at: https://docs.zapier.com/llms.txt
> Use this file to discover all available pages before exploring further.
# Cloning a version
> Cloning allows you to duplicate an existing version of your integration. This is particularly useful when you want to introduce new features or fixes without altering the original integration. When a previous version of your integration has more than 5 active users, you will need to clone that version to make modifications.
---
# Source: https://docs.zapier.com/platform/build/code-mode.md
> ## Documentation Index
> Fetch the complete documentation index at: https://docs.zapier.com/llms.txt
> Use this file to discover all available pages before exploring further.
# Use Code Mode to refine your API call
 In the Platform UI, when building your authentication, triggers and actions, you will create each component of your integration using Form Mode. However if you need to add further customization to your API calls, you can use Code Mode.
You can use Code Mode to:
* Transform your API response into JSON format
* Add user authentication details and input form data to the API call
* Use ‘z' object library to customize your API call
* Improve error response handling
## Getting started with Code Mode
To use Code Mode, Zapier recommends for users to have an understanding of Javascript and making [HTTP requests](/platform/reference/cli-docs#making-http-requests).
Code Mode is available to use in the API request settings:
* For authentications, Code Mode is in the *Configure a Test Request & Connection Label* setting. Note, for OAuth v2, Code Mode is in the *OAuth v2 Endpoint Configuration* setting.
* For triggers and actions, Code Mode is in the *API Configuration* setting.
In the Platform UI, when building your authentication, triggers and actions, you will create each component of your integration using Form Mode. However if you need to add further customization to your API calls, you can use Code Mode.
You can use Code Mode to:
* Transform your API response into JSON format
* Add user authentication details and input form data to the API call
* Use ‘z' object library to customize your API call
* Improve error response handling
## Getting started with Code Mode
To use Code Mode, Zapier recommends for users to have an understanding of Javascript and making [HTTP requests](/platform/reference/cli-docs#making-http-requests).
Code Mode is available to use in the API request settings:
* For authentications, Code Mode is in the *Configure a Test Request & Connection Label* setting. Note, for OAuth v2, Code Mode is in the *OAuth v2 Endpoint Configuration* setting.
* For triggers and actions, Code Mode is in the *API Configuration* setting.
 Changes made in Code Mode are not saved automatically. Once you have added the code you want, click **Save & Continue**.
## Capabilities of Code Mode
### Use `z` object to customize your API call
You can write JavaScript code, using Zapier's default code as a base or writing custom code. Use the `z` object for Zapier specific features, including `z.console` to write to the console log, `z.JSON` to parse JSON and `z.errors` to handle errors. Learn more in [Zapier's CLI Z Object docs](https://github.com/zapier/zapier-platform/blob/main/packages/cli/README.md#z-object).
### Add user authentication details and input form data
You can use Zapier bundles to access authentication data, data from user input forms and request data. Learn more in [Zapier data bundles](https://platform.zapier.com/docs/advanced#bundle).
### Importing libraries
You can import from Node's standard library with `z.require`, for example, `z.require('querystring')` or `z.require('crypto')`. Zapier strongly recommend you keep it simple when coding in Platform UI. Building and testing complex code is better suited with the Platform CLI.
NPM modules are not supported within the Platform UI. You'd need to export your project to [Platform CLI](https://github.com/zapier/zapier-platform/blob/main/packages/cli/README.md) and use `npm` to add additional libraries.
### Performance considerations
Each trigger and action has a 30 second time limit. To ensure that Zaps run smoothly, keep your custom code as lightweight and efficient as possible. If your code takes longer than 30 seconds to run, it will time out and user's Zaps will error. We also can't guarantee that all imported libraries will be supported within our runtime environment.
Here are some specific things you can do to improve the performance of your custom code:
* Use efficient algorithms and data structures.
* Avoid unnecessary loops and recursions.
* Optimize your code for the specific task it is performing.
* Avoid using imported libraries that are not essential to triggers or actions.
### Error handling in Code Mode
When working in Code Mode, it's important to handle errors correctly so that Zapier can respond appropriately and ensure Zaps run as expected. While it might feel natural to throw a standard JavaScript `Error`, this will not work as expected in Zapier integrations. Instead, you should use the `z.error` error classes provided by the platform.
**Don't**
```javascript theme={null}
if (response.status === 401) {
throw new Error("Authentication failed. Please reconnect your account.");
}
```
**Do**
```javascript theme={null}
if (response.status === 401) {
throw new z.errors.RefreshAuthError();
}
```
Learn more in the [CLI Error Handling docs](https://docs.zapier.com/platform/build-cli/overview#error-handling).
## Switching between Form Mode to Code Mode
When you switch to Code Mode, Zapier uses your code when making API calls. Any previous settings from Form Mode will not be discarded. This is because Form Mode and Code Mode cannot be used together.
If you switch back to Form Mode, click **Switch to Form Mode**. Your previous Form Mode settings will be restored. Zapier will save the code you entered in Code Mode so you can use it again if you switch back to Code Mode.
## Code Mode resources
Here are some resources that will be helpful when using the code mode:
[14.x](https://github.com/zapier/zapier-platform/blob/zapier-platform-schema@14.1.2/packages/schema/docs/build/schema.md)
[13.x](https://github.com/zapier/zapier-platform/blob/zapier-platform-schema@13.0.0/packages/schema/docs/build/schema.md)
[12.x](https://github.com/zapier/zapier-platform/blob/zapier-platform-schema%4012.2.1/packages/schema/docs/build/schema.md)
***
[*Need help? Tell us about your problem and we'll connect you with the right resource or contact support.*](https://developer.zapier.com/contact)
---
# Source: https://docs.zapier.com/powered-by-zapier/api-reference/common-types/common-types.md
> ## Documentation Index
> Fetch the complete documentation index at: https://docs.zapier.com/llms.txt
> Use this file to discover all available pages before exploring further.
# Common Types
> Description Goes here
This section is not yet completed
---
# Source: https://docs.zapier.com/platform/build/computed-fields.md
> ## Documentation Index
> Fetch the complete documentation index at: https://docs.zapier.com/llms.txt
> Use this file to discover all available pages before exploring further.
# Use computed fields in OAuth or Session Authentication
> When adding a field in your integration's authentication configuration, Zapier offers two field type options; field and computed field. The field option allows users to enter account information needed for authentication.
The computed field option stores values returned by your integration's authentication response which you can then reference in subsequent API calls. You must maintain the same field key as your API uses for this field.
The computed field option only supports session and OAuth v2 authentication.
## Prerequisites
* Understanding of [Platform UI authentication configuration](/platform/build/auth)
* Familiarity with your API's authentication
## Steps
1. Log into the [Platform UI](https://zapier.com/app/developer).
2. Select your **integration**.
3. In the *Build* section in the left sidebar, click your **authentication**.
4. Click **Save**.
5. Click **Add Fields**.
6. Under *Field Type*, select **Computed Fields**.
7. Select the **Is this field required? Check if yes** checkbox. Zapier use your computed fields in the response data. This means that any omission of the fields marked as computed fields in the authentication response would cause Zapier to display an error.
8. Complete the rest of the relevant fields. Learn more in [Input Designer](/platform/build/field-definitions).
9. Click **Save**.
10. You can then reference the field in any subsequent API call from the input bundle. In [Code Mode](/platform/build/code-mode), you replace `field` with your field key in this text `{{bundle.authData.field}}`
Changes made in Code Mode are not saved automatically. Once you have added the code you want, click **Save & Continue**.
## Capabilities of Code Mode
### Use `z` object to customize your API call
You can write JavaScript code, using Zapier's default code as a base or writing custom code. Use the `z` object for Zapier specific features, including `z.console` to write to the console log, `z.JSON` to parse JSON and `z.errors` to handle errors. Learn more in [Zapier's CLI Z Object docs](https://github.com/zapier/zapier-platform/blob/main/packages/cli/README.md#z-object).
### Add user authentication details and input form data
You can use Zapier bundles to access authentication data, data from user input forms and request data. Learn more in [Zapier data bundles](https://platform.zapier.com/docs/advanced#bundle).
### Importing libraries
You can import from Node's standard library with `z.require`, for example, `z.require('querystring')` or `z.require('crypto')`. Zapier strongly recommend you keep it simple when coding in Platform UI. Building and testing complex code is better suited with the Platform CLI.
NPM modules are not supported within the Platform UI. You'd need to export your project to [Platform CLI](https://github.com/zapier/zapier-platform/blob/main/packages/cli/README.md) and use `npm` to add additional libraries.
### Performance considerations
Each trigger and action has a 30 second time limit. To ensure that Zaps run smoothly, keep your custom code as lightweight and efficient as possible. If your code takes longer than 30 seconds to run, it will time out and user's Zaps will error. We also can't guarantee that all imported libraries will be supported within our runtime environment.
Here are some specific things you can do to improve the performance of your custom code:
* Use efficient algorithms and data structures.
* Avoid unnecessary loops and recursions.
* Optimize your code for the specific task it is performing.
* Avoid using imported libraries that are not essential to triggers or actions.
### Error handling in Code Mode
When working in Code Mode, it's important to handle errors correctly so that Zapier can respond appropriately and ensure Zaps run as expected. While it might feel natural to throw a standard JavaScript `Error`, this will not work as expected in Zapier integrations. Instead, you should use the `z.error` error classes provided by the platform.
**Don't**
```javascript theme={null}
if (response.status === 401) {
throw new Error("Authentication failed. Please reconnect your account.");
}
```
**Do**
```javascript theme={null}
if (response.status === 401) {
throw new z.errors.RefreshAuthError();
}
```
Learn more in the [CLI Error Handling docs](https://docs.zapier.com/platform/build-cli/overview#error-handling).
## Switching between Form Mode to Code Mode
When you switch to Code Mode, Zapier uses your code when making API calls. Any previous settings from Form Mode will not be discarded. This is because Form Mode and Code Mode cannot be used together.
If you switch back to Form Mode, click **Switch to Form Mode**. Your previous Form Mode settings will be restored. Zapier will save the code you entered in Code Mode so you can use it again if you switch back to Code Mode.
## Code Mode resources
Here are some resources that will be helpful when using the code mode:
[14.x](https://github.com/zapier/zapier-platform/blob/zapier-platform-schema@14.1.2/packages/schema/docs/build/schema.md)
[13.x](https://github.com/zapier/zapier-platform/blob/zapier-platform-schema@13.0.0/packages/schema/docs/build/schema.md)
[12.x](https://github.com/zapier/zapier-platform/blob/zapier-platform-schema%4012.2.1/packages/schema/docs/build/schema.md)
***
[*Need help? Tell us about your problem and we'll connect you with the right resource or contact support.*](https://developer.zapier.com/contact)
---
# Source: https://docs.zapier.com/powered-by-zapier/api-reference/common-types/common-types.md
> ## Documentation Index
> Fetch the complete documentation index at: https://docs.zapier.com/llms.txt
> Use this file to discover all available pages before exploring further.
# Common Types
> Description Goes here
This section is not yet completed
---
# Source: https://docs.zapier.com/platform/build/computed-fields.md
> ## Documentation Index
> Fetch the complete documentation index at: https://docs.zapier.com/llms.txt
> Use this file to discover all available pages before exploring further.
# Use computed fields in OAuth or Session Authentication
> When adding a field in your integration's authentication configuration, Zapier offers two field type options; field and computed field. The field option allows users to enter account information needed for authentication.
The computed field option stores values returned by your integration's authentication response which you can then reference in subsequent API calls. You must maintain the same field key as your API uses for this field.
The computed field option only supports session and OAuth v2 authentication.
## Prerequisites
* Understanding of [Platform UI authentication configuration](/platform/build/auth)
* Familiarity with your API's authentication
## Steps
1. Log into the [Platform UI](https://zapier.com/app/developer).
2. Select your **integration**.
3. In the *Build* section in the left sidebar, click your **authentication**.
4. Click **Save**.
5. Click **Add Fields**.
6. Under *Field Type*, select **Computed Fields**.
7. Select the **Is this field required? Check if yes** checkbox. Zapier use your computed fields in the response data. This means that any omission of the fields marked as computed fields in the authentication response would cause Zapier to display an error.
8. Complete the rest of the relevant fields. Learn more in [Input Designer](/platform/build/field-definitions).
9. Click **Save**.
10. You can then reference the field in any subsequent API call from the input bundle. In [Code Mode](/platform/build/code-mode), you replace `field` with your field key in this text `{{bundle.authData.field}}`
 ***
*Need help? [Tell us about your problem](https://developer.zapier.com/contact) and we'll connect you with the right resource or contact support.*
---
# Source: https://docs.zapier.com/platform/build/computed-test-field.md
> ## Documentation Index
> Fetch the complete documentation index at: https://docs.zapier.com/llms.txt
> Use this file to discover all available pages before exploring further.
# Compute a field from the data of the Test API call
> Zapier doesn't store the responses from the test API call for OAuth v2 and session authentication. Using computed fields, you can use data from a test API call later in your Zapier integration.
## Prerequisites
* Knowledge of working with APIs
* Understanding of computed field concept
* Familiarity with JavaScript
## Steps
1. Log into the [Platform UI](https://zapier.com/app/developer).
2. Select your **integration**.
3. In the *Build* section in the left sidebar, click your **authentication**.
* For Session authentication:
* Click **Configure a Token Exchange Request**
* Click **Switch to Code Mode**.
* For OAuth v2 authentication:
* Click **Add OAuth v2 Endpoint Configuration**.
* Click **Switch to Code Mode**.
4. Add **custom JavaScript code** to instruct Zapier to call both the URLs necessary for the authorization process and your test API call.
5. Click **Save & Continue**.
6. The *Test Request* section remains unchanged.
7. Return [computed fields](https://github.com/zapier/zapier-platform/blob/main/packages/cli/README.md#computed-fields) for data returned from either API call so you can reference those fields in subsequent steps as `bundle.authData.field` where `field` is the field's name from your test API call response.
Upon completion, you will be able to use data from a test API call as a computed field in later stages of your Zapier integration.
***
*Need help? [Tell us about your problem](https://developer.zapier.com/contact) and we'll connect you with the right resource or contact support.*
---
# Source: https://docs.zapier.com/powered-by-zapier/embedding-zapier-mcp/guides/connecting-your-agent.md
> ## Documentation Index
> Fetch the complete documentation index at: https://docs.zapier.com/llms.txt
> Use this file to discover all available pages before exploring further.
# Connecting Your Agent
> Learn how to connect your agent to Zapier MCP servers.
This is a very basic guide to get you started with connecting your agent to
Zapier MCP servers. Please check out the official Model Context Protocol (MCP)
[documentation](https://modelcontextprotocol.io/docs/develop/build-client) for
more detailed information.
# Connection examples
Below are examples of connecting to Zapier MCP from your MCP client using the server URL and secret.
## Installation
```javascript TypeScript theme={null}
npm install @modelcontextprotocol/sdk
// or
pnpm add @modelcontextprotocol/sdk
```
```python Python theme={null}
pip install mcp
# or
uv pip install mcp
```
## Usage
```javascript TypeScript theme={null}
import { Client } from "@modelcontextprotocol/sdk/client/index.js";
import { StreamableHTTPClientTransport } from "@modelcontextprotocol/sdk/client/streamableHttp.js";
/**
* Connect to the Zapier MCP server
*
* @param serverUrl URL for the MCP server for a specific user
* @param secret Your Zapier MCP embed secret
* @returns MCP client
*/
async function connectToZapierMcp(serverUrl: string, secret: string) {
const transport = new StreamableHTTPClientTransport(new URL(serverUrl), {
requestInit: {
headers: {
Authorization: `Bearer ${secret}`,
},
},
});
const client = new Client({
name: "zapier-mcp",
version: "1.0.0",
});
await client.connect(transport);
return client;
}
async function main() {
const client = await connectToZapierMcp(serverUrl, secret);
const tools = await client.listTools();
console.log("Available tools:", tools);
await client.transport?.close();
await client.close();
}
```
```python Python theme={null}
import asyncio
from mcp import ClientSession
from mcp.client.streamable_http import streamablehttp_client
def connect_to_zapier_mcp(server_url: str, secret: str):
"""
Connect to the Zapier MCP server
Args:
server_url: URL for the MCP server for a specific user
secret: Your Zapier MCP embed secret
"""
return streamablehttp_client(
server_url,
headers={
"Authorization": f"Bearer {secret}",
},
)
async def main():
async with connect_to_zapier_mcp(server_url, secret) as (
read_stream,
write_stream,
_,
):
async with ClientSession(read_stream, write_stream) as session:
await session.initialize()
tools = await session.list_tools()
print("Available tools:", tools)
```
---
# Source: https://docs.zapier.com/platform/build/connection-label.md
> ## Documentation Index
> Fetch the complete documentation index at: https://docs.zapier.com/llms.txt
> Use this file to discover all available pages before exploring further.
# Add a connection label
> Zapier users can authenticate multiple accounts for any app. By default, every new app account added to Zapier is identified by the app's name, followed by a number (#2, #3, …) for accounts connected after the first.
A connection label in the integration authentication options adds optional text as the name of each account connection to help users distinguish between their authenticated accounts.
***
*Need help? [Tell us about your problem](https://developer.zapier.com/contact) and we'll connect you with the right resource or contact support.*
---
# Source: https://docs.zapier.com/platform/build/computed-test-field.md
> ## Documentation Index
> Fetch the complete documentation index at: https://docs.zapier.com/llms.txt
> Use this file to discover all available pages before exploring further.
# Compute a field from the data of the Test API call
> Zapier doesn't store the responses from the test API call for OAuth v2 and session authentication. Using computed fields, you can use data from a test API call later in your Zapier integration.
## Prerequisites
* Knowledge of working with APIs
* Understanding of computed field concept
* Familiarity with JavaScript
## Steps
1. Log into the [Platform UI](https://zapier.com/app/developer).
2. Select your **integration**.
3. In the *Build* section in the left sidebar, click your **authentication**.
* For Session authentication:
* Click **Configure a Token Exchange Request**
* Click **Switch to Code Mode**.
* For OAuth v2 authentication:
* Click **Add OAuth v2 Endpoint Configuration**.
* Click **Switch to Code Mode**.
4. Add **custom JavaScript code** to instruct Zapier to call both the URLs necessary for the authorization process and your test API call.
5. Click **Save & Continue**.
6. The *Test Request* section remains unchanged.
7. Return [computed fields](https://github.com/zapier/zapier-platform/blob/main/packages/cli/README.md#computed-fields) for data returned from either API call so you can reference those fields in subsequent steps as `bundle.authData.field` where `field` is the field's name from your test API call response.
Upon completion, you will be able to use data from a test API call as a computed field in later stages of your Zapier integration.
***
*Need help? [Tell us about your problem](https://developer.zapier.com/contact) and we'll connect you with the right resource or contact support.*
---
# Source: https://docs.zapier.com/powered-by-zapier/embedding-zapier-mcp/guides/connecting-your-agent.md
> ## Documentation Index
> Fetch the complete documentation index at: https://docs.zapier.com/llms.txt
> Use this file to discover all available pages before exploring further.
# Connecting Your Agent
> Learn how to connect your agent to Zapier MCP servers.
This is a very basic guide to get you started with connecting your agent to
Zapier MCP servers. Please check out the official Model Context Protocol (MCP)
[documentation](https://modelcontextprotocol.io/docs/develop/build-client) for
more detailed information.
# Connection examples
Below are examples of connecting to Zapier MCP from your MCP client using the server URL and secret.
## Installation
```javascript TypeScript theme={null}
npm install @modelcontextprotocol/sdk
// or
pnpm add @modelcontextprotocol/sdk
```
```python Python theme={null}
pip install mcp
# or
uv pip install mcp
```
## Usage
```javascript TypeScript theme={null}
import { Client } from "@modelcontextprotocol/sdk/client/index.js";
import { StreamableHTTPClientTransport } from "@modelcontextprotocol/sdk/client/streamableHttp.js";
/**
* Connect to the Zapier MCP server
*
* @param serverUrl URL for the MCP server for a specific user
* @param secret Your Zapier MCP embed secret
* @returns MCP client
*/
async function connectToZapierMcp(serverUrl: string, secret: string) {
const transport = new StreamableHTTPClientTransport(new URL(serverUrl), {
requestInit: {
headers: {
Authorization: `Bearer ${secret}`,
},
},
});
const client = new Client({
name: "zapier-mcp",
version: "1.0.0",
});
await client.connect(transport);
return client;
}
async function main() {
const client = await connectToZapierMcp(serverUrl, secret);
const tools = await client.listTools();
console.log("Available tools:", tools);
await client.transport?.close();
await client.close();
}
```
```python Python theme={null}
import asyncio
from mcp import ClientSession
from mcp.client.streamable_http import streamablehttp_client
def connect_to_zapier_mcp(server_url: str, secret: str):
"""
Connect to the Zapier MCP server
Args:
server_url: URL for the MCP server for a specific user
secret: Your Zapier MCP embed secret
"""
return streamablehttp_client(
server_url,
headers={
"Authorization": f"Bearer {secret}",
},
)
async def main():
async with connect_to_zapier_mcp(server_url, secret) as (
read_stream,
write_stream,
_,
):
async with ClientSession(read_stream, write_stream) as session:
await session.initialize()
tools = await session.list_tools()
print("Available tools:", tools)
```
---
# Source: https://docs.zapier.com/platform/build/connection-label.md
> ## Documentation Index
> Fetch the complete documentation index at: https://docs.zapier.com/llms.txt
> Use this file to discover all available pages before exploring further.
# Add a connection label
> Zapier users can authenticate multiple accounts for any app. By default, every new app account added to Zapier is identified by the app's name, followed by a number (#2, #3, …) for accounts connected after the first.
A connection label in the integration authentication options adds optional text as the name of each account connection to help users distinguish between their authenticated accounts.
 ## Prerequisites
* A configured authentication scheme in the Platform UI
## Steps
1. Enter your desired value into the *Connection Label* field in the authentication configuration, as the name of the field, surrounded by double curly braces
2. Zapier always includes the app's name in each account label, so it is redundant to add any hard coded app name into your connection label.
3. Instead, add either:
* Data that users enter in the authentication form
* Output fields from your app's authentication test API call
For example, if your auth configuration includes a `username` field, your connection label could look like:
`{{username}}`
Alternatively, you can use an output field from your test API call in the Connection Label. If you aren't sure what fields will be returned, you'll want to test your authentication first, and return to the connection label.
After connecting an account, check the *Response* tab to see the fields returned from the test request.
4. Field keys from the authentication form and the test request are both pulled up to the top level.
You can also refer to the fields with `{{bundle.authData.field}}` for input fields from the authentication form, replacing `field` with your input field key. Use `{{bundle.inputData.field}}` for fields returned from the test request, replacing `field` with the field key from the API response.
If you need to use a nested field from your API call results, reference it as `field.nestedfield`. For example, if your test API response includes a `name` field nested under `details`, you would reference it as:
`{{bundle.inputData.details.name}}`
Any field your authentication test API call returns can be used in the connection label. The best fields to use are usernames, domain names (if your app is self-hosted), account numbers, email addresses, or other identifiable but not fully private data. Never use passwords, API keys, or other critical, private info in connection labels.
5. Customize your connection label further with JavaScript code as needed.
Custom code for connection labels is best used for:
* Using code to manipulate data from an auth or test call before using it in a connection label, such as to format a number or date
* Logging additional data
* Making a new API call to access data to use in the connection label
Select *Edit Code* to switch to *[Code Mode](/platform/build/connection-label)*. When\_Code Mode\_ is enabled, Zapier will only use the code to create your connection label, and will ignore any text that was in the *Connection Label* field in the regular string mode.
To switch back to the regular string field, click the *Delete Code* button to delete your custom connection label code and revert to using the text entered in the *Connection Label* field.
When writing code for the connection label, fields are not pulled up to the top level of the `bundle` object - use `bundle.authData` for auth input fields, or `bundle.inputData` for fields returned from the test API request. For example, your code might look like this:
```bash theme={null}
return bundle.authData.username;
```
```bash theme={null}
This is equivalent to using `{{username}}` in the regular string mode.
Add custom data to Zapier's console log with the `z.console.log` function to assist with testing and monitoring your app authentication.
```
## Prerequisites
* A configured authentication scheme in the Platform UI
## Steps
1. Enter your desired value into the *Connection Label* field in the authentication configuration, as the name of the field, surrounded by double curly braces
2. Zapier always includes the app's name in each account label, so it is redundant to add any hard coded app name into your connection label.
3. Instead, add either:
* Data that users enter in the authentication form
* Output fields from your app's authentication test API call
For example, if your auth configuration includes a `username` field, your connection label could look like:
`{{username}}`
Alternatively, you can use an output field from your test API call in the Connection Label. If you aren't sure what fields will be returned, you'll want to test your authentication first, and return to the connection label.
After connecting an account, check the *Response* tab to see the fields returned from the test request.
4. Field keys from the authentication form and the test request are both pulled up to the top level.
You can also refer to the fields with `{{bundle.authData.field}}` for input fields from the authentication form, replacing `field` with your input field key. Use `{{bundle.inputData.field}}` for fields returned from the test request, replacing `field` with the field key from the API response.
If you need to use a nested field from your API call results, reference it as `field.nestedfield`. For example, if your test API response includes a `name` field nested under `details`, you would reference it as:
`{{bundle.inputData.details.name}}`
Any field your authentication test API call returns can be used in the connection label. The best fields to use are usernames, domain names (if your app is self-hosted), account numbers, email addresses, or other identifiable but not fully private data. Never use passwords, API keys, or other critical, private info in connection labels.
5. Customize your connection label further with JavaScript code as needed.
Custom code for connection labels is best used for:
* Using code to manipulate data from an auth or test call before using it in a connection label, such as to format a number or date
* Logging additional data
* Making a new API call to access data to use in the connection label
Select *Edit Code* to switch to *[Code Mode](/platform/build/connection-label)*. When\_Code Mode\_ is enabled, Zapier will only use the code to create your connection label, and will ignore any text that was in the *Connection Label* field in the regular string mode.
To switch back to the regular string field, click the *Delete Code* button to delete your custom connection label code and revert to using the text entered in the *Connection Label* field.
When writing code for the connection label, fields are not pulled up to the top level of the `bundle` object - use `bundle.authData` for auth input fields, or `bundle.inputData` for fields returned from the test API request. For example, your code might look like this:
```bash theme={null}
return bundle.authData.username;
```
```bash theme={null}
This is equivalent to using `{{username}}` in the regular string mode.
Add custom data to Zapier's console log with the `z.console.log` function to assist with testing and monitoring your app authentication.
```
 ***
*Need help? [Tell us about your problem](https://developer.zapier.com/contact) and we'll connect you with the right resource or contact support.*
---
# Source: https://docs.zapier.com/platform/build-cli/core.md
> ## Documentation Index
> Fetch the complete documentation index at: https://docs.zapier.com/llms.txt
> Use this file to discover all available pages before exploring further.
# Core reference
> Reference for `zapier-platform-core`
Most functions get called with `(z, bundle)`. This document is a reference for how to use these objects.
> If you use TypeScript, you can import `ZObject`, `Bundle` and `PerformFunction` from `zapier-platform-core`.
## `z` Object
We provide several methods off of the `z` object, which is provided as the first argument to all function calls in your integration.
> The `z` object is passed into your functions as the first argument - IE: `perform: (z) => {}`.
### `z.request([url], options)`
`z.request([url], options)` is a promise based HTTP client with some Zapier-specific goodies. See [Making HTTP Requests](/platform/build-cli/overview#making-http-requests). `z.request()` will [percent-encode](https://developer.mozilla.org/en-US/docs/Glossary/Percent-encoding) non-ascii characters and these reserved characters: ``:$/?#[]@$&+,;=^@`\``. Use [`skipEncodingChars`](https://github.com/zapier/zapier-platform/blob/main/packages/schema/docs/build/schema.md#requestschema) to modify this behaviour.
### `z.console`
`z.console.log(message)` is a logging console, similar to Node.js `console` but logs remotely, as well as to stdout in tests. See [Log Statements](/platform/build-cli/overview#console-logging)
### `z.dehydrate(func, inputData)`
`z.dehydrate(func, inputData)` is used to lazily evaluate a function, perfect to avoid API calls during polling or for reuse. See [Dehydration](/platform/build-cli/overview#dehydration).
### `z.dehydrateFile(func, inputData)`
`z.dehydrateFile` is used to lazily download a file, perfect to avoid API calls during polling or for reuse. See [File Dehydration](/platform/build-cli/overview#file-dehydration).
### `z.stashFile(bufferStringStream, [knownLength], [filename], [contentType])`
`z.stashFile(bufferStringStream, [knownLength], [filename], [contentType])` is a promise based file stasher that returns a URL file pointer. See [Stashing Files](/platform/build-cli/overview#stashing-files).
### `z.JSON`
`z.JSON` is similar to the JSON built-in like `z.JSON.parse('...')`, but catches errors and produces nicer tracebacks.
### `z.hash()`
`z.hash()` is a crypto tool for doing things like `z.hash('sha256', 'my password')`
### `z.errors`
`z.errors` is a collection error classes that you can throw in your code, like `throw new z.errors.HaltedError('...')`.
The available errors are:
* `Error` (*added in v9.3.0*) - Stops the current operation, allowing for (auto) replay. Read more on [General Errors](/platform/build-cli/overview#general-errors)
* `HaltedError` - Stops current operation, but will never turn off Zap. Read more on [Halting Execution](/platform/build-cli/overview#halting-execution)
* `ExpiredAuthError` - Stops the current operation and emails user to manually reconnect. Read more on [Stale Authentication Credentials](/platform/build-cli/overview#stale-authentication-credentials)
* `RefreshAuthError` - (OAuth2 or Session Auth) Tells Zapier to refresh credentials and retry operation. Read more on [Stale Authentication Credentials](/platform/build-cli/overview#stale-authentication-credentials)
* `ThrottledError` (*new in v11.2.0*) - Tells Zapier to retry the current operation after a delay specified in seconds. Read more on [Handling Throttled Requests](/platform/build-cli/overview#handling-throttled-requests)
For more details on error handling in general, see [here](/platform/build-cli/overview#error-handling).
### `z.cursor`
The `z.cursor` object exposes two methods:
* `z.cursor.get(): Promise`
* `z.cursor.set(string): Promise`
Any data you `set` will be available to that Zap for about an hour (or until it's overwritten). For more information, see: [paging](/platform/build-cli/overview#paging).
### `z.generateCallbackUrl()`
The `z.generateCallbackUrl()` will return a callback URL your app can `POST` to later for handling long running tasks (like transcription or encoding jobs). In the meantime, the Zap and Task will wait for your response and the user will see the Task marked as waiting.
For example, in your `perform` you might do:
```js theme={null}
const perform = async (z, bundle) => {
// something like this url:
// https://zapier.com/hooks/callback/123/abcdef01-2345-6789-abcd-ef0123456789/abcdef0123456789abcdef0123456789abcdef01/
// consider checking bundle.meta.isLoadingSample to determine if this is a test run or real run!
const callbackUrl = z.generateCallbackUrl();
await z.request({
url: "https://example.com/api/slow-job",
method: "POST",
body: {
// ... whatever your integration needs
url: callbackUrl,
},
});
return { hello: "world" }; // available later in bundle.outputData
};
```
And in your own `/api/slow-job` view (or more likely, an async job) you'd make this request to Zapier when the long-running job completes to populate `bundle.cleanedRequest`:
```http theme={null}
POST /hooks/callback/123/abcdef01-2345-6789-abcd-ef0123456789/abcdef0123456789abcdef0123456789abcdef01/ HTTP/1.1
Host: zapier.com
Content-Type: application/json
{"foo":"bar"}
```
> Callbacks are fully supported during sample testing in the Zap Editor, including `performResume` execution. However, when possible, it's preferable to avoid using callbacks during sampling (check `bundle.meta.isLoadingSample`) for a better testing experience.
By default the payload `POST`ed to the callback URL will augment the data returned from the initial `perform` to compose the final value.
If you need to customize what the final value should be you can define a `performResume` method that receives three bundle properties:
* `bundle.outputData` is `{"hello": "world"}`, the data returned from the initial `perform`
* `bundle.cleanedRequest` is `{"foo": "bar"}`, the payload from the callback URL
* `bundle.rawRequest` is the full request object corresponding to `bundle.cleanedRequest`
```js theme={null}
const performResume = async (z, bundle) => {
// this will give a final value of: {"hello": "world", "foo": "bar"}
// which is the default behavior when a custom `performResume` is not
// defined.
return { ...bundle.outputData, ...bundle.cleanedRequest };
};
```
> The app will have a maximum of 30 days to `POST` to the callback URL. If a user deletes or modifies the Zap or Task in the meantime, we will not resume the task.
Some considerations:
* `performResume` is not supported by the Platform UI at the moment. It can only be used by integrations built with the CLI.
* In a search-or-write step, if the search part fails and proceeds to the write part, the callback URL generated for the write step might not be recognized or waited for. This can result in the `performResume` operation not being executed, leading to issues in the task flow.
* When migrating actions that use `performResume`, it is important to ensure that the `performResume` code for the new API is backward compatible. This ensures that if a migration occurs while a run is waiting for a callback, it will succeed after being migrated
## `bundle` Object
This object holds the user's auth details and the data for the API requests.
> The `bundle` object is passed into your functions as the second argument - IE: `perform: (z, bundle) => {}`.
### `bundle.authData`
`bundle.authData` is user-provided authentication data, like `api_key` or `access_token`. [Read more on authentication.](/platform/build-cli/overview#authentication)
### `bundle.inputData`
`bundle.inputData` is user-provided data for this particular run of the trigger/search/create, as defined by the [`inputFields`](/platform/build-cli/input-fields). For example:
```js theme={null}
{
createdBy: 'his name is Bobby Flay',
style: 'he cooks mediterranean',
scheduledAt: "2021-09-09T09:00:00-07:00"
}
```
### `bundle.inputDataRaw`
`bundle.inputDataRaw` is like `bundle.inputData`, but before processing such as interpreting friendly datetimes and rendering `{{curlies}}`:
```js theme={null}
{
createdBy: 'his name is {{123__chef_name}}',
style: 'he cooks {{456__style}}',
scheduledAt: "today"
}
```
> "curlies" represent data mapped in from previous steps. They take the form `{{NODE_ID__key_name}}`.
You'll usually want to use `bundle.inputData` instead.
### `bundle.meta`
`bundle.meta` contains extra information useful for doing advanced behaviors depending on what the user is doing. It has the following options:
| key | default | description |
| -------------------------- | ----------- | ----------------------------------------------------------------------------------------------------------------------------------------------------------------------------------------------------------------------------------------------------------------------------------------------------------------------------------------------------------------------------------------------------------------------------------------------------------------------------------------------------- |
| `isLoadingSample` | `false` | If true, this run was initiated manually via the Zap Editor |
| `isFillingDynamicDropdown` | `false` | If true, this poll is being used to populate a dynamic dropdown. You only need to return the fields you specified (such as `id` and `name`), though returning everything is fine too |
| `isPopulatingDedupe` | `false` | If true, the results of this poll will be used to initialize the deduplication list rather than trigger a zap. You should grab as many items as possible. See also: [deduplication](/platform/build/deduplication) |
| `limit` | `-1` | The number of items you should fetch. `-1` indicates there's no limit. Build this into your calls insofar as you are able |
| `page` | `0` | Used in [paging](/platform/build-cli/faqs#whats-the-deal-with-pagination-when-is-it-used-and-how-does-it-work) to uniquely identify which page of results should be returned |
| `timezone` | `null` | The timezone the user has configured for their account or specfic automation. Received as [TZ identifier](https://en.wikipedia.org/wiki/List_of_tz_database_time_zones), such as "America/New\_York". |
| `isTestingAuth` | `false` | (legacy property) If true, the poll was triggered by a user testing their account (via [clicking "test"](https://cdn.zapier.com/storage/photos/5c94c304ce11b02c073a973466a7b846.png) or during setup). We use this data to populate the auth label, but it's mostly used to verify we made a successful authenticated request |
| `withSearch` | `undefined` | When a create is called as part of a search-or-create step, `withSearch` will be the key of the search. |
| `inputFields` | `{}` | Contains extra input field context if one or more input fields define this data via their respective `meta` property. If defined, then this object's keys are the respective input field `key` values, and the values for each `key` are an object corresponding to that input field's `meta` object value. See the [FieldSchema reference](https://github.com/zapier/zapier-platform/blob/main/packages/schema/docs/build/schema.md#fieldschema) for more details on how to define input field meta. |
> Before v8.0.0, the information in `bundle.meta` was different. See [the old docs](https://github.com/zapier/zapier-platform-cli/blob/a058e6d538a75d215d2e0c52b9f49a97218640c4/README.md#bundlemeta) for the previous values and [the wiki](https://github.com/zapier/zapier-platform/wiki/bundle.meta-changes) for a mapping of old values to new.
Here's an example of a polling trigger that is also used to power a dynamic dropdown:
```js theme={null}
const perform = async (z, bundle) => {
const params = { per_page: 100 }; // poll for the most recent 100 teams
if (bundle.meta.isFillingDynamicDropdown) {
// dynamic dropdowns support pagination
params.per_page = 30;
params.offset = params.per_page * bundle.meta.page;
}
const response = await z.request({
url: `${API_BASE_URL}/teams`,
params,
});
return response.json;
};
// ...
```
### `bundle.rawRequest`
> `bundle.rawRequest` is only available in the `perform` for webhooks, `getAccessToken` for OAuth authentication methods, and `performResume` in a callback action.
`bundle.rawRequest` holds raw information about the HTTP request that triggered the `perform` method or that represents the user's browser request that triggered the `getAccessToken` call:
```
{
method: 'POST',
querystring: 'foo=bar&baz=qux',
headers: {
'Content-Type': 'application/json'
},
content: '{"hello": "world"}'
}
```
In `bundle.rawRequest`, headers other than `Content-Length` and `Content-Type` will be prefixed with `Http-`, and all headers will be named in Camel-Case. For example, the header `X-Time-GMT` would become `Http-X-Time-Gmt`.
### `bundle.cleanedRequest`
> `bundle.cleanedRequest` is only available in the `perform` for webhooks, `getAccessToken` for OAuth authentication methods, and `performResume` in a callback action.
`bundle.cleanedRequest` will return a formatted and parsed version of the request. Some or all of the following will be available:
```
{
method: 'POST',
querystring: {
foo: 'bar',
baz: 'qux'
},
headers: {
'Content-Type': 'application/json'
},
content: {
hello: 'world'
}
}
```
### `bundle.outputData`
> `bundle.outputData` is only available in the `performResume` in a callback action.
`bundle.outputData` will return a whatever data you originally returned in the `perform`, allowing you to mix that with `bundle.rawRequest` or `bundle.cleanedRequest`.
### `bundle.targetUrl`
> `bundle.targetUrl` is only available in the `performSubscribe` and `performUnsubscribe` methods for webhooks.
This the URL to which you should send hook data. It'll look something like [`https://hooks.zapier.com/1234/abcd`.](https://hooks.zapier.com/1234/abcd.) We provide it so you can make a POST request to your server. Your server should store this URL and use is as a destination when there's new data to report.
For example:
```js theme={null}
const subscribeHook = async (z, bundle) => {
const options = {
url: "https://57b20fb546b57d1100a3c405.mockapi.io/api/hooks",
method: "POST",
body: {
url: bundle.targetUrl, // bundle.targetUrl has the Hook URL this app should call
},
};
const response = await z.request(options);
return response.data; // or response.json if you're using core v9 or older
};
module.exports = {
// ...
performSubscribe: subscribeHook,
// ...
};
```
Read more in the [REST hook example](https://github.com/zapier/zapier-platform/blob/main/example-apps/rest-hooks/triggers/recipe.js).
### `bundle.subscribeData`
> `bundle.subscribeData` is available in the `perform` and `performUnsubscribe` method for webhooks.
This is an object that contains the data you returned from the `performSubscribe` function. It should contain whatever information you need send a `DELETE` request to your server to stop sending webhooks to Zapier.
Read more in the [REST hook example](https://github.com/zapier/zapier-platform/blob/main/example-apps/rest-hooks/triggers/recipe.js).
## `bufferedBundle` Object
*Added in v15.15.0.*
This object holds a user's auth details (`bufferedBundle.authData`) and the buffered data (`bufferedBundle.buffer`) for the API requests. It is used only with a `create` action's `performBuffer` function.
> The `bufferedBundle` object is passed into the `performBuffer` function as the second argument - IE: `performBuffer: async (z, bufferedBundle) => {}`.
### `bufferedBundle.authData`
It is a user-provided authentication data, like `api_key` or `access_token`. [Read more on authentication.](/platform/build-cli/overview#authentication)
### `bufferedBundle.groupedBy`
It is a user-provided data for a set of selected [`inputFields`](/platform/build-cli/input-fields) to group the multiple runs of a `create` action by.
### `bufferedBundle.buffer`
It is an array of objects of user-provided data and some meta data to allow multiple runs of a `create` action be processed in a single API request.
#### `bufferedBundle.buffer[].inputData`
It is a user-provided data for a particular run of a `create` action in the buffer, as defined by the [`inputFields`](/platform/build-cli/input-fields).
#### `bufferedBundle.buffer[].meta`
It contains an idempotency `id` provided to the `create` action to identify each run's data in the buffered data.
---
# Source: https://docs.zapier.com/powered-by-zapier/api-reference/zaps/create-a-zap.md
> ## Documentation Index
> Fetch the complete documentation index at: https://docs.zapier.com/llms.txt
> Use this file to discover all available pages before exploring further.
# Create a Zap
> This URL creates a Zap based on the given steps and title.
#### When using OAuth
This endpoint requires the `zap:write` OAuth scope.
This API is [rate limited](/powered-by-zapier/api-reference/rate-limiting).
## OpenAPI
````yaml https://api.zapier.com/schema post /v2/zaps
openapi: 3.1.0
info:
title: Partner API
version: 2024.11.0
description: >
## Introduction
The Partner API is the best tool for complete style control over a user's
Zapier experience within your app.
Essentially, it lets you customize how you present Zapier within your
product without sacrificing your app's look,
feel, and flow.
Think of it as a native Zapier integration, helping you showcase your best
Zapier-powered workflows where it's most
helpful to your users (within the flow of your tool). You can customize
styling, streamline Zap set-up for users,
expose relevant Zap information, and more!
With the Partner API, you can:
- Get a list of all the apps available in Zapier's app directory so you can
power your app directory and show your
users all the integration possibilities with your Zapier integration.
- Have complete style control over how you present Zap templates in your
product. The Partner API gives you access
to the raw Zap Template data so you can give your users access to your Zap
template with your product's style, look
and feel.
- Get access to all your Zap templates and give your users the ability to
search to quickly find the one they need.
- Streamline Zap setup by pre-filling fields on behalf of your users.
- Show users the Zaps they have set up from right within your product
keeping them on your site longer and giving them
complete confidence in their Zapier integration.
- Embed our Zapier Editor to allow your users to create new Zaps and modify
existing ones, without needing to leave
your product.
## Authentication
There are two ways to authenticate with the Partner API.
1. Your application's `client_id` which you will receive once you are
approved for access to the API
(Client ID Authentication)
2. A user's access token (Access Token Authentication).
Which authentication method you should use depends on which endpoint(s) you
are using.
Review each endpoint's documentation to understand which parameters are
required.
> Note: while we do generate a `client_secret`, the type of grant we use
(implicit) doesn't
need it so it's not something we provide.'
## Learn more
See the [Workflow API
documentation](https://docs.zapier.com/partner-solutions/workflow-api/intro)
for more information.
contact:
name: Zapier
url: https://developer.zapier.com/contact
servers:
- url: https://api.zapier.com
security: []
tags:
- name: Accounts
description: Refers to resources interacting with 'Accounts' associated resources
- name: Actions
description: Refers to resources interacting with 'Actions' associated resources
- name: Apps
description: Refers to resources interacting with 'Apps' associated resources
- name: Authentications
description: >-
Refers to resources interacting with 'Authentications' associated
resources
- name: Categories
description: Refers to resources interacting with 'Categories' associated resources
- name: Experimental
description: Refers to resources interacting with 'Experimental' associated resources
- name: Inputs
description: Refers to resources interacting with 'Inputs' associated resources
- name: Outputs
description: Refers to resources interacting with 'Outputs' associated resources
- name: Zaps
description: Refers to resources interacting with 'Zaps' associated resources
- name: Zap Templates
description: Refers to resources interacting with 'Zap Templates' associated resources
paths:
/v2/zaps:
post:
tags:
- Zaps
summary: Create a Zap
description: |-
This URL creates a Zap based on the given steps and title.
#### When using OAuth
This endpoint requires the `zap:write` OAuth scope.
operationId: post-zaps
parameters:
- in: query
name: expand
schema:
type: string
description: >-
A comma separated list of Zap fields that should be expanded from
ids to full objects in the response. Fields that may not be expanded
will remain as ids.
example: steps.action
requestBody:
content:
application/json:
schema:
$ref: '#/components/schemas/ZapRequest'
examples:
ToBeCreatedZap:
value:
data:
steps:
- action: example_core:5m2y9p7J
inputs:
code: >-
output = [{id: Math.round(Date.now()/1000), n:
Math.random()}];
authentication: null
alias: null
- action: example_core:VBz2NGB5
inputs:
code: 'output = [{ id: inputData.id, n: inputData.n * 2}];'
inputs:
'n': '{{n}}'
id: '{{id}}'
authentication: null
alias: null
title: My Critically Important Program
summary: To be created Zap
ManyStepZap:
value:
data:
steps:
- action: core:9QKqnTZ54VnrL2opYbkJJKveKEr2GJ
inputs: {}
authentication: Vx4PEEeV
alias: slack_new_saved_message
- action: core:2oY5MSxlgML1jb43A0nroedgjdnVM
inputs:
to:
- chang.hsiao@irohalen.example
subject: 3 step zap - new message saved in slack
body: |-
Saved new message from:
{{slack_new_saved_message.user__real_name}}
Message Content:
{{text}}
authentication: k0QBMMDK
alias: null
- action: core:vDakLS1PLO4J29eodDRLa5okErEn0
inputs:
channel: U036ZHWNHU2
text: |-
Saved new message from:
{{slack_new_saved_message.user__real_name}}
Email thread id:
{{threadId}}
Message Content:
{{slack_new_saved_message.text}}
authentication: Vx4PEEeV
alias: slack_send_direct_message
title: My 3 step zap
summary: Many Step Zap
required: true
responses:
'201':
content:
application/json:
schema:
$ref: '#/components/schemas/ExpandedZap'
examples:
CustomCreatedZap:
value:
type: zap
id: 033cc069f2d3-4d63-8666-10c07ab38dac
is_enabled: true
last_successful_run_date: '2019-08-24T14:15:22Z'
updated_at: '2024-03-14T22:02:36+00:00'
title: My Critically Important Program
links:
html_editor: >-
https://zapier.com/editor/104826178?utm_source=partner&utm_medium=embed&utm_campaign=partner_api&referer=zapier
steps:
- action: example_core:Vn7xbE60
authentication: 2kyXZ8VJ
inputs: {}
title: null
- action: example_core:V7GpzX40
authentication: null
inputs: null
title: null
summary: Custom created zap
description: ''
'400':
content:
application/json:
schema:
$ref: '#/components/schemas/ErrorResponse'
examples:
MalformedRequest.:
value:
errors:
- status: 400
code: parse_error
title: ParseError
detail: Malformed request.
source: null
meta:
source: ZAPIER
full_details:
message: Malformed request.
code: parse_error
summary: Malformed request.
description: This schema can be expected for 4xx 'Malformed request.' errors
'401':
content:
application/json:
schema:
$ref: '#/components/schemas/ErrorResponse'
description: 401 Response
'403':
content:
application/json:
schema:
$ref: '#/components/schemas/ErrorResponse'
description: 403 Response
'409':
content:
application/json:
schema:
$ref: '#/components/schemas/ErrorResponse'
description: 409 Response
'429':
headers:
Retry-After:
schema:
type: string
format: uri
description: Indicates when to retry the request
X-RateLimit-Limit:
schema:
type: string
format: uri
description: >-
The maximum number of requests you're permitted to make per
hour.
X-RateLimit-Remaining:
schema:
type: string
format: uri
description: >-
The number of requests remaining in the current rate limit
window.
X-RateLimit-Reset:
schema:
type: string
format: uri
description: >-
The time at which the current rate limit window resets in UTC
epoch seconds.
content:
application/json:
schema:
$ref: '#/components/schemas/ErrorResponse'
description: 429 Response
'500':
content:
application/json:
schema:
$ref: '#/components/schemas/ErrorResponse'
examples:
AServerErrorOccurred.:
value:
errors:
- status: 500
code: error
title: APIException
detail: A server error occurred.
source: null
meta:
source: ZAPIER
full_details:
message: A server error occurred.
code: error
summary: A server error occurred.
description: >-
This schema can be expected for 5xx 'A server error occurred.'
errors
'503':
headers:
Retry-After:
schema:
type: string
format: uri
description: Indicates when to retry the request
X-RateLimit-Limit:
schema:
type: string
format: uri
description: >-
The maximum number of requests you're permitted to make per
hour.
X-RateLimit-Remaining:
schema:
type: string
format: uri
description: >-
The number of requests remaining in the current rate limit
window.
X-RateLimit-Reset:
schema:
type: string
format: uri
description: >-
The time at which the current rate limit window resets in UTC
epoch seconds.
content:
application/json:
schema:
$ref: '#/components/schemas/ErrorResponse'
description: 503 Response
'504':
content:
application/json:
schema:
$ref: '#/components/schemas/ErrorResponse'
description: 504 Response
security:
- OAuth:
- zap:write
components:
schemas:
ZapRequest:
type: object
properties:
data:
$ref: '#/components/schemas/CreateZapRequest'
required:
- data
ExpandedZap:
type: object
description: >-
A Zap is an automated workflow that connects your apps and services
together.
properties:
type:
type: string
readOnly: true
description: The type of this object.
id:
type: string
readOnly: true
description: A unique identifier of the Zap.
is_enabled:
type: boolean
default: true
description: Whether the Zap is enabled (running) or not.
last_successful_run_date:
type:
- string
- 'null'
readOnly: true
description: >-
The date/time at which this Zap last ran successfully. A null value
indicates that a Zap has never run successfully.
updated_at:
type: string
readOnly: true
description: The last time this Zap was updated
title:
type: string
description: The human readable name of the Zap.
links:
type: object
additionalProperties: {}
readOnly: true
description: Link to open this Zap in the Zapier Editor
steps:
description: A list of the steps this Zap consists of
type: array
items:
oneOf:
- $ref: '#/components/schemas/ExpandedZapStep'
- type: string
required:
- id
- last_successful_run_date
- links
- steps
- title
- type
- updated_at
ErrorResponse:
type: object
properties:
errors:
type: array
items:
$ref: '#/components/schemas/Error'
description: An array of error objects.
required:
- errors
CreateZapRequest:
type: object
description: See our Building a Zap guide to get started.
properties:
steps:
type: array
items:
$ref: '#/components/schemas/CreateZapRequestStep'
description: The list of steps that the Zap should consist of
title:
type: string
description: The title to be set for this Zap
required:
- steps
- title
ExpandedZapStep:
type: object
description: An ordered list of steps that define the logic of the Zap.
properties:
action:
description: Action
oneOf:
- $ref: '#/components/schemas/Action'
- type: string
authentication:
description: Authentication
oneOf:
- $ref: '#/components/schemas/Authentication'
- type:
- string
- 'null'
inputs:
readOnly: true
description: The inputs for this specific Zap's step
title:
type:
- string
- 'null'
readOnly: true
description: >-
The custom title of a Zap Step. If a step has not been given a
custom title by the user, then the value will be null.
required:
- action
- authentication
- inputs
- title
Error:
type: object
description: Base Error definition
properties:
status:
type: integer
description: The HTTP status code applicable to this problem.
code:
type: string
description: A unique identifier for this particular occurrence of the problem.
title:
type: string
description: A short summary of the problem.
detail:
type: string
description: >-
A human-readable explanation specific to this occurrence of the
problem.
source:
oneOf:
- $ref: '#/components/schemas/ErrorSource'
- type: 'null'
description: An object containing references to the primary source of the error.
meta:
type:
- object
- 'null'
additionalProperties: {}
description: Freeform metadata about the error
CreateZapRequestStep:
type: object
properties:
action:
type: string
description: The ID of the Action to be associated with this step
inputs:
type: object
additionalProperties: {}
description: The inputs for the Action associated with this step
authentication:
type:
- string
- 'null'
description: The authentication, if required, for this Action to run
alias:
type:
- string
- 'null'
description: >-
Optional alias for this step to be referenced by later steps
(snake_case, max 64 chars)
maxLength: 64
pattern: ^[a-z][a-z0-9_]*$
required:
- action
- authentication
- inputs
Action:
type: object
description: >-
An Action is an operation that can be performed against a third-party
API; either a read or a write. A Zap is composed of a read, followed by
one or more writes.
properties:
id:
type: string
description: >-
The ID to refer to this action (unstable, may change when referenced
app changes)
key:
type: string
description: The developer provided identifier for this Action (stable)
app:
description: Apps
oneOf:
- $ref: '#/components/schemas/Apps'
- type: string
type:
allOf:
- $ref: '#/components/schemas/ActionTypeEnum'
description: |-
The type of this object
* `action` - action
action_type:
allOf:
- $ref: '#/components/schemas/ActionTypeEnum'
description: |-
The type of this Action
* `READ` - READ
* `READ_BULK` - READ_BULK
* `WRITE` - WRITE
* `SEARCH` - SEARCH
* `SEARCH_OR_WRITE` - SEARCH_OR_WRITE
* `SEARCH_AND_WRITE` - SEARCH_AND_WRITE
* `FILTER` - FILTER
is_instant:
type: boolean
description: >-
Will be set to `true` if this Action triggers instantly. May only be
`true` when `type` is `READ`.
title:
type: string
description: The title of this Action.
description:
type: string
description: >-
A longer description of this Action, usually describing what it does
in more detail.
required:
- action_type
- app
- description
- id
- is_instant
- key
- title
- type
Authentication:
type: object
description: >-
An Authentication contains various fields, often credentials such as API
tokens, used to access Partner APIs on
behalf of a user. The actual fields are held securely by Zapier
properties:
type:
allOf:
- $ref: '#/components/schemas/AuthenticationTypeEnum'
readOnly: true
default: authentication
description: |-
The type of this object.
* `authentication` - authentication
id:
type: string
description: The identifier for this specific Authentication
app:
description: An app that integrates with Zapier.
oneOf:
- $ref: '#/components/schemas/Apps'
- type: string
is_expired:
type: boolean
description: >-
If `true`, this Authentication has expired. It will not be usable,
and the user needs to be directed to reconnect it.
title:
type: string
description: The title of this specific Authentication
required:
- app
- id
- is_expired
- title
- type
ErrorSource:
type: object
description: Populates the `source` object inside our error responses.
properties:
pointer:
type: string
description: >-
Pointer to the value in the request document that caused the error
e.g. `/actions`.
parameter:
type: string
description: A string indicating which URI query parameter caused the error.
header:
type: string
description: >-
A string indicating the name of a single request header which caused
the error.
Apps:
type: object
description: An app that integrates with Zapier
properties:
id:
type: string
description: Unique id of the app
type:
type: string
default: app
description: The type of this object.
image:
type: string
description: Default image/icon to represent the app.
links:
type: object
additionalProperties: {}
description: >-
A url that, when visited, will direct the user to authenticate with
the app and allow Zapier access to the app, thus creating a new
Authentication.
If value is `null`, then no authentication is required to use the app. Client ID-authenticated requests will never have this object's fields populated.
action_types:
type: array
items: {}
description: A list of action types for this specific App
title:
type: string
description: Human readable name of the app
images:
allOf:
- $ref: '#/components/schemas/AppsImages'
description: The URL of images (of various sizes) for this specific App
hex_color:
type: string
description: A branded color that can be used to represent the app.
categories:
type: array
items:
$ref: '#/components/schemas/Category'
description: >-
A list of categories to which this app belongs. Helpful in
identifying apps by type and functionality.
description:
type: string
description: Human readable description of the app.
required:
- action_types
- categories
- description
- hex_color
- id
- image
- images
- links
- title
ActionTypeEnum:
enum:
- action
type: string
description: '* `action` - action'
AuthenticationTypeEnum:
enum:
- authentication
type: string
description: '* `authentication` - authentication'
AppsImages:
type: object
description: Images/icons of various resolutions to represent the app.
properties:
url_16x16:
type: string
description: 16x16 resolution image URL
url_32x32:
type: string
description: 32x32 resolution image URL
url_64x64:
type: string
description: 64x64 resolution image URL
url_128x128:
type: string
description: 128x128 resolution image URL
required:
- url_128x128
- url_16x16
- url_32x32
- url_64x64
Category:
type: object
description: Category an app belongs to.
properties:
slug:
type: string
description: The shortened slug name for this category
required:
- slug
securitySchemes:
OAuth:
type: oauth2
description: >-
See our OAuth2 authentication documentation here:
https://docs.zapier.com/powered-by-zapier/api-reference/authentication
flows:
authorizationCode:
authorizationUrl: https://zapier.com/oauth/authorize/
tokenUrl: https://zapier.com/oauth/token/
refreshUrl: https://zapier.com/oauth/token/
scopes:
profile: Read profile information about the currently-authenticated user
zap: Read Zaps
zap:write: Write Zaps
authentication: Read Authentications
authentication:write: Write Authentications
zap:runs: Read Zap Runs
action:run: Run an Action
zap:all: Read Zaps accessible to the account
implicit:
authorizationUrl: https://zapier.com/oauth/authorize/
scopes:
profile: Read profile information about the currently-authenticated user
zap: Read Zaps
zap:write: Write Zaps
authentication: Read Authentications
authentication:write: Write Authentications
zap:runs: Read Zap Runs
action:run: Run an Action
zap:all: Read Zaps accessible to the account
````
---
# Source: https://docs.zapier.com/powered-by-zapier/api-reference/accounts/create-account.md
> ## Documentation Index
> Fetch the complete documentation index at: https://docs.zapier.com/llms.txt
> Use this file to discover all available pages before exploring further.
# Create Account
> Create a new user and obtain an access token. See our Quick Account Creation guide to get started.
⚠️ *This is not a regular API endpoint that returns JSON.*
👉 **It is a flow that includes account creation and OAuth authorization**.
This URL should be opened in a popup window. See the [Quick Account
Creation](/powered-by-zapier/managed-authentication/quick-account-creation) page
for more information about allowing your customers to sign up for Zapier easily.
## Main page example
Start with this example code in order to build a correct `/v2/authorize` API
call in a well-sized popup window and `await` the completion of the flow. Then
you can use the other API endpoints to retrieve your needed information.
**zapier.js**
```js theme={null}
/**
* Ensure the user has a Zapier account and has authorized this
* site to access it. If not, a log in form or sign up form
* will be shown to the user along the way.
*
* @param {Object} options
* @param {String} options.clientId - The OAuth client ID
* @param {String} options.signUpEmail - The user's email to use for pre-filling the sign up form.
* @param {String} options.signUpFirstName - The user's first name to use for pre-filling the sign up form.
* @param {String} options.signUpLastName - The user's last name to use for pre-filling the sign up form.
*/
export async function zapierAuthorize(options) {
const root = "https://api.zapier.com";
const url = new URL("/v2/authorize", root);
const params = url.searchParams;
params.set("client_id", options.clientId);
params.set("redirect_uri", location.href);
params.set("response_type", "code");
const scopes = ["zap", "profile"];
params.set("scope", scopes.join(" "));
//
// These parameters are optional but highly recommended.
// Users will receive a prefilled sign up form,
// allowing them to continue with a single click
// (or edit the values).
//
params.set("sign_up_email", options.signUpEmail);
params.set("sign_up_first_name", options.signUpFirstName);
params.set("sign_up_last_name", options.signUpLastName);
// Navigate to the /v2/authorize API, which will eventually
// redirect back to `location.href` but with `?code=
***
*Need help? [Tell us about your problem](https://developer.zapier.com/contact) and we'll connect you with the right resource or contact support.*
---
# Source: https://docs.zapier.com/platform/build-cli/core.md
> ## Documentation Index
> Fetch the complete documentation index at: https://docs.zapier.com/llms.txt
> Use this file to discover all available pages before exploring further.
# Core reference
> Reference for `zapier-platform-core`
Most functions get called with `(z, bundle)`. This document is a reference for how to use these objects.
> If you use TypeScript, you can import `ZObject`, `Bundle` and `PerformFunction` from `zapier-platform-core`.
## `z` Object
We provide several methods off of the `z` object, which is provided as the first argument to all function calls in your integration.
> The `z` object is passed into your functions as the first argument - IE: `perform: (z) => {}`.
### `z.request([url], options)`
`z.request([url], options)` is a promise based HTTP client with some Zapier-specific goodies. See [Making HTTP Requests](/platform/build-cli/overview#making-http-requests). `z.request()` will [percent-encode](https://developer.mozilla.org/en-US/docs/Glossary/Percent-encoding) non-ascii characters and these reserved characters: ``:$/?#[]@$&+,;=^@`\``. Use [`skipEncodingChars`](https://github.com/zapier/zapier-platform/blob/main/packages/schema/docs/build/schema.md#requestschema) to modify this behaviour.
### `z.console`
`z.console.log(message)` is a logging console, similar to Node.js `console` but logs remotely, as well as to stdout in tests. See [Log Statements](/platform/build-cli/overview#console-logging)
### `z.dehydrate(func, inputData)`
`z.dehydrate(func, inputData)` is used to lazily evaluate a function, perfect to avoid API calls during polling or for reuse. See [Dehydration](/platform/build-cli/overview#dehydration).
### `z.dehydrateFile(func, inputData)`
`z.dehydrateFile` is used to lazily download a file, perfect to avoid API calls during polling or for reuse. See [File Dehydration](/platform/build-cli/overview#file-dehydration).
### `z.stashFile(bufferStringStream, [knownLength], [filename], [contentType])`
`z.stashFile(bufferStringStream, [knownLength], [filename], [contentType])` is a promise based file stasher that returns a URL file pointer. See [Stashing Files](/platform/build-cli/overview#stashing-files).
### `z.JSON`
`z.JSON` is similar to the JSON built-in like `z.JSON.parse('...')`, but catches errors and produces nicer tracebacks.
### `z.hash()`
`z.hash()` is a crypto tool for doing things like `z.hash('sha256', 'my password')`
### `z.errors`
`z.errors` is a collection error classes that you can throw in your code, like `throw new z.errors.HaltedError('...')`.
The available errors are:
* `Error` (*added in v9.3.0*) - Stops the current operation, allowing for (auto) replay. Read more on [General Errors](/platform/build-cli/overview#general-errors)
* `HaltedError` - Stops current operation, but will never turn off Zap. Read more on [Halting Execution](/platform/build-cli/overview#halting-execution)
* `ExpiredAuthError` - Stops the current operation and emails user to manually reconnect. Read more on [Stale Authentication Credentials](/platform/build-cli/overview#stale-authentication-credentials)
* `RefreshAuthError` - (OAuth2 or Session Auth) Tells Zapier to refresh credentials and retry operation. Read more on [Stale Authentication Credentials](/platform/build-cli/overview#stale-authentication-credentials)
* `ThrottledError` (*new in v11.2.0*) - Tells Zapier to retry the current operation after a delay specified in seconds. Read more on [Handling Throttled Requests](/platform/build-cli/overview#handling-throttled-requests)
For more details on error handling in general, see [here](/platform/build-cli/overview#error-handling).
### `z.cursor`
The `z.cursor` object exposes two methods:
* `z.cursor.get(): Promise`
* `z.cursor.set(string): Promise`
Any data you `set` will be available to that Zap for about an hour (or until it's overwritten). For more information, see: [paging](/platform/build-cli/overview#paging).
### `z.generateCallbackUrl()`
The `z.generateCallbackUrl()` will return a callback URL your app can `POST` to later for handling long running tasks (like transcription or encoding jobs). In the meantime, the Zap and Task will wait for your response and the user will see the Task marked as waiting.
For example, in your `perform` you might do:
```js theme={null}
const perform = async (z, bundle) => {
// something like this url:
// https://zapier.com/hooks/callback/123/abcdef01-2345-6789-abcd-ef0123456789/abcdef0123456789abcdef0123456789abcdef01/
// consider checking bundle.meta.isLoadingSample to determine if this is a test run or real run!
const callbackUrl = z.generateCallbackUrl();
await z.request({
url: "https://example.com/api/slow-job",
method: "POST",
body: {
// ... whatever your integration needs
url: callbackUrl,
},
});
return { hello: "world" }; // available later in bundle.outputData
};
```
And in your own `/api/slow-job` view (or more likely, an async job) you'd make this request to Zapier when the long-running job completes to populate `bundle.cleanedRequest`:
```http theme={null}
POST /hooks/callback/123/abcdef01-2345-6789-abcd-ef0123456789/abcdef0123456789abcdef0123456789abcdef01/ HTTP/1.1
Host: zapier.com
Content-Type: application/json
{"foo":"bar"}
```
> Callbacks are fully supported during sample testing in the Zap Editor, including `performResume` execution. However, when possible, it's preferable to avoid using callbacks during sampling (check `bundle.meta.isLoadingSample`) for a better testing experience.
By default the payload `POST`ed to the callback URL will augment the data returned from the initial `perform` to compose the final value.
If you need to customize what the final value should be you can define a `performResume` method that receives three bundle properties:
* `bundle.outputData` is `{"hello": "world"}`, the data returned from the initial `perform`
* `bundle.cleanedRequest` is `{"foo": "bar"}`, the payload from the callback URL
* `bundle.rawRequest` is the full request object corresponding to `bundle.cleanedRequest`
```js theme={null}
const performResume = async (z, bundle) => {
// this will give a final value of: {"hello": "world", "foo": "bar"}
// which is the default behavior when a custom `performResume` is not
// defined.
return { ...bundle.outputData, ...bundle.cleanedRequest };
};
```
> The app will have a maximum of 30 days to `POST` to the callback URL. If a user deletes or modifies the Zap or Task in the meantime, we will not resume the task.
Some considerations:
* `performResume` is not supported by the Platform UI at the moment. It can only be used by integrations built with the CLI.
* In a search-or-write step, if the search part fails and proceeds to the write part, the callback URL generated for the write step might not be recognized or waited for. This can result in the `performResume` operation not being executed, leading to issues in the task flow.
* When migrating actions that use `performResume`, it is important to ensure that the `performResume` code for the new API is backward compatible. This ensures that if a migration occurs while a run is waiting for a callback, it will succeed after being migrated
## `bundle` Object
This object holds the user's auth details and the data for the API requests.
> The `bundle` object is passed into your functions as the second argument - IE: `perform: (z, bundle) => {}`.
### `bundle.authData`
`bundle.authData` is user-provided authentication data, like `api_key` or `access_token`. [Read more on authentication.](/platform/build-cli/overview#authentication)
### `bundle.inputData`
`bundle.inputData` is user-provided data for this particular run of the trigger/search/create, as defined by the [`inputFields`](/platform/build-cli/input-fields). For example:
```js theme={null}
{
createdBy: 'his name is Bobby Flay',
style: 'he cooks mediterranean',
scheduledAt: "2021-09-09T09:00:00-07:00"
}
```
### `bundle.inputDataRaw`
`bundle.inputDataRaw` is like `bundle.inputData`, but before processing such as interpreting friendly datetimes and rendering `{{curlies}}`:
```js theme={null}
{
createdBy: 'his name is {{123__chef_name}}',
style: 'he cooks {{456__style}}',
scheduledAt: "today"
}
```
> "curlies" represent data mapped in from previous steps. They take the form `{{NODE_ID__key_name}}`.
You'll usually want to use `bundle.inputData` instead.
### `bundle.meta`
`bundle.meta` contains extra information useful for doing advanced behaviors depending on what the user is doing. It has the following options:
| key | default | description |
| -------------------------- | ----------- | ----------------------------------------------------------------------------------------------------------------------------------------------------------------------------------------------------------------------------------------------------------------------------------------------------------------------------------------------------------------------------------------------------------------------------------------------------------------------------------------------------- |
| `isLoadingSample` | `false` | If true, this run was initiated manually via the Zap Editor |
| `isFillingDynamicDropdown` | `false` | If true, this poll is being used to populate a dynamic dropdown. You only need to return the fields you specified (such as `id` and `name`), though returning everything is fine too |
| `isPopulatingDedupe` | `false` | If true, the results of this poll will be used to initialize the deduplication list rather than trigger a zap. You should grab as many items as possible. See also: [deduplication](/platform/build/deduplication) |
| `limit` | `-1` | The number of items you should fetch. `-1` indicates there's no limit. Build this into your calls insofar as you are able |
| `page` | `0` | Used in [paging](/platform/build-cli/faqs#whats-the-deal-with-pagination-when-is-it-used-and-how-does-it-work) to uniquely identify which page of results should be returned |
| `timezone` | `null` | The timezone the user has configured for their account or specfic automation. Received as [TZ identifier](https://en.wikipedia.org/wiki/List_of_tz_database_time_zones), such as "America/New\_York". |
| `isTestingAuth` | `false` | (legacy property) If true, the poll was triggered by a user testing their account (via [clicking "test"](https://cdn.zapier.com/storage/photos/5c94c304ce11b02c073a973466a7b846.png) or during setup). We use this data to populate the auth label, but it's mostly used to verify we made a successful authenticated request |
| `withSearch` | `undefined` | When a create is called as part of a search-or-create step, `withSearch` will be the key of the search. |
| `inputFields` | `{}` | Contains extra input field context if one or more input fields define this data via their respective `meta` property. If defined, then this object's keys are the respective input field `key` values, and the values for each `key` are an object corresponding to that input field's `meta` object value. See the [FieldSchema reference](https://github.com/zapier/zapier-platform/blob/main/packages/schema/docs/build/schema.md#fieldschema) for more details on how to define input field meta. |
> Before v8.0.0, the information in `bundle.meta` was different. See [the old docs](https://github.com/zapier/zapier-platform-cli/blob/a058e6d538a75d215d2e0c52b9f49a97218640c4/README.md#bundlemeta) for the previous values and [the wiki](https://github.com/zapier/zapier-platform/wiki/bundle.meta-changes) for a mapping of old values to new.
Here's an example of a polling trigger that is also used to power a dynamic dropdown:
```js theme={null}
const perform = async (z, bundle) => {
const params = { per_page: 100 }; // poll for the most recent 100 teams
if (bundle.meta.isFillingDynamicDropdown) {
// dynamic dropdowns support pagination
params.per_page = 30;
params.offset = params.per_page * bundle.meta.page;
}
const response = await z.request({
url: `${API_BASE_URL}/teams`,
params,
});
return response.json;
};
// ...
```
### `bundle.rawRequest`
> `bundle.rawRequest` is only available in the `perform` for webhooks, `getAccessToken` for OAuth authentication methods, and `performResume` in a callback action.
`bundle.rawRequest` holds raw information about the HTTP request that triggered the `perform` method or that represents the user's browser request that triggered the `getAccessToken` call:
```
{
method: 'POST',
querystring: 'foo=bar&baz=qux',
headers: {
'Content-Type': 'application/json'
},
content: '{"hello": "world"}'
}
```
In `bundle.rawRequest`, headers other than `Content-Length` and `Content-Type` will be prefixed with `Http-`, and all headers will be named in Camel-Case. For example, the header `X-Time-GMT` would become `Http-X-Time-Gmt`.
### `bundle.cleanedRequest`
> `bundle.cleanedRequest` is only available in the `perform` for webhooks, `getAccessToken` for OAuth authentication methods, and `performResume` in a callback action.
`bundle.cleanedRequest` will return a formatted and parsed version of the request. Some or all of the following will be available:
```
{
method: 'POST',
querystring: {
foo: 'bar',
baz: 'qux'
},
headers: {
'Content-Type': 'application/json'
},
content: {
hello: 'world'
}
}
```
### `bundle.outputData`
> `bundle.outputData` is only available in the `performResume` in a callback action.
`bundle.outputData` will return a whatever data you originally returned in the `perform`, allowing you to mix that with `bundle.rawRequest` or `bundle.cleanedRequest`.
### `bundle.targetUrl`
> `bundle.targetUrl` is only available in the `performSubscribe` and `performUnsubscribe` methods for webhooks.
This the URL to which you should send hook data. It'll look something like [`https://hooks.zapier.com/1234/abcd`.](https://hooks.zapier.com/1234/abcd.) We provide it so you can make a POST request to your server. Your server should store this URL and use is as a destination when there's new data to report.
For example:
```js theme={null}
const subscribeHook = async (z, bundle) => {
const options = {
url: "https://57b20fb546b57d1100a3c405.mockapi.io/api/hooks",
method: "POST",
body: {
url: bundle.targetUrl, // bundle.targetUrl has the Hook URL this app should call
},
};
const response = await z.request(options);
return response.data; // or response.json if you're using core v9 or older
};
module.exports = {
// ...
performSubscribe: subscribeHook,
// ...
};
```
Read more in the [REST hook example](https://github.com/zapier/zapier-platform/blob/main/example-apps/rest-hooks/triggers/recipe.js).
### `bundle.subscribeData`
> `bundle.subscribeData` is available in the `perform` and `performUnsubscribe` method for webhooks.
This is an object that contains the data you returned from the `performSubscribe` function. It should contain whatever information you need send a `DELETE` request to your server to stop sending webhooks to Zapier.
Read more in the [REST hook example](https://github.com/zapier/zapier-platform/blob/main/example-apps/rest-hooks/triggers/recipe.js).
## `bufferedBundle` Object
*Added in v15.15.0.*
This object holds a user's auth details (`bufferedBundle.authData`) and the buffered data (`bufferedBundle.buffer`) for the API requests. It is used only with a `create` action's `performBuffer` function.
> The `bufferedBundle` object is passed into the `performBuffer` function as the second argument - IE: `performBuffer: async (z, bufferedBundle) => {}`.
### `bufferedBundle.authData`
It is a user-provided authentication data, like `api_key` or `access_token`. [Read more on authentication.](/platform/build-cli/overview#authentication)
### `bufferedBundle.groupedBy`
It is a user-provided data for a set of selected [`inputFields`](/platform/build-cli/input-fields) to group the multiple runs of a `create` action by.
### `bufferedBundle.buffer`
It is an array of objects of user-provided data and some meta data to allow multiple runs of a `create` action be processed in a single API request.
#### `bufferedBundle.buffer[].inputData`
It is a user-provided data for a particular run of a `create` action in the buffer, as defined by the [`inputFields`](/platform/build-cli/input-fields).
#### `bufferedBundle.buffer[].meta`
It contains an idempotency `id` provided to the `create` action to identify each run's data in the buffered data.
---
# Source: https://docs.zapier.com/powered-by-zapier/api-reference/zaps/create-a-zap.md
> ## Documentation Index
> Fetch the complete documentation index at: https://docs.zapier.com/llms.txt
> Use this file to discover all available pages before exploring further.
# Create a Zap
> This URL creates a Zap based on the given steps and title.
#### When using OAuth
This endpoint requires the `zap:write` OAuth scope.
This API is [rate limited](/powered-by-zapier/api-reference/rate-limiting).
## OpenAPI
````yaml https://api.zapier.com/schema post /v2/zaps
openapi: 3.1.0
info:
title: Partner API
version: 2024.11.0
description: >
## Introduction
The Partner API is the best tool for complete style control over a user's
Zapier experience within your app.
Essentially, it lets you customize how you present Zapier within your
product without sacrificing your app's look,
feel, and flow.
Think of it as a native Zapier integration, helping you showcase your best
Zapier-powered workflows where it's most
helpful to your users (within the flow of your tool). You can customize
styling, streamline Zap set-up for users,
expose relevant Zap information, and more!
With the Partner API, you can:
- Get a list of all the apps available in Zapier's app directory so you can
power your app directory and show your
users all the integration possibilities with your Zapier integration.
- Have complete style control over how you present Zap templates in your
product. The Partner API gives you access
to the raw Zap Template data so you can give your users access to your Zap
template with your product's style, look
and feel.
- Get access to all your Zap templates and give your users the ability to
search to quickly find the one they need.
- Streamline Zap setup by pre-filling fields on behalf of your users.
- Show users the Zaps they have set up from right within your product
keeping them on your site longer and giving them
complete confidence in their Zapier integration.
- Embed our Zapier Editor to allow your users to create new Zaps and modify
existing ones, without needing to leave
your product.
## Authentication
There are two ways to authenticate with the Partner API.
1. Your application's `client_id` which you will receive once you are
approved for access to the API
(Client ID Authentication)
2. A user's access token (Access Token Authentication).
Which authentication method you should use depends on which endpoint(s) you
are using.
Review each endpoint's documentation to understand which parameters are
required.
> Note: while we do generate a `client_secret`, the type of grant we use
(implicit) doesn't
need it so it's not something we provide.'
## Learn more
See the [Workflow API
documentation](https://docs.zapier.com/partner-solutions/workflow-api/intro)
for more information.
contact:
name: Zapier
url: https://developer.zapier.com/contact
servers:
- url: https://api.zapier.com
security: []
tags:
- name: Accounts
description: Refers to resources interacting with 'Accounts' associated resources
- name: Actions
description: Refers to resources interacting with 'Actions' associated resources
- name: Apps
description: Refers to resources interacting with 'Apps' associated resources
- name: Authentications
description: >-
Refers to resources interacting with 'Authentications' associated
resources
- name: Categories
description: Refers to resources interacting with 'Categories' associated resources
- name: Experimental
description: Refers to resources interacting with 'Experimental' associated resources
- name: Inputs
description: Refers to resources interacting with 'Inputs' associated resources
- name: Outputs
description: Refers to resources interacting with 'Outputs' associated resources
- name: Zaps
description: Refers to resources interacting with 'Zaps' associated resources
- name: Zap Templates
description: Refers to resources interacting with 'Zap Templates' associated resources
paths:
/v2/zaps:
post:
tags:
- Zaps
summary: Create a Zap
description: |-
This URL creates a Zap based on the given steps and title.
#### When using OAuth
This endpoint requires the `zap:write` OAuth scope.
operationId: post-zaps
parameters:
- in: query
name: expand
schema:
type: string
description: >-
A comma separated list of Zap fields that should be expanded from
ids to full objects in the response. Fields that may not be expanded
will remain as ids.
example: steps.action
requestBody:
content:
application/json:
schema:
$ref: '#/components/schemas/ZapRequest'
examples:
ToBeCreatedZap:
value:
data:
steps:
- action: example_core:5m2y9p7J
inputs:
code: >-
output = [{id: Math.round(Date.now()/1000), n:
Math.random()}];
authentication: null
alias: null
- action: example_core:VBz2NGB5
inputs:
code: 'output = [{ id: inputData.id, n: inputData.n * 2}];'
inputs:
'n': '{{n}}'
id: '{{id}}'
authentication: null
alias: null
title: My Critically Important Program
summary: To be created Zap
ManyStepZap:
value:
data:
steps:
- action: core:9QKqnTZ54VnrL2opYbkJJKveKEr2GJ
inputs: {}
authentication: Vx4PEEeV
alias: slack_new_saved_message
- action: core:2oY5MSxlgML1jb43A0nroedgjdnVM
inputs:
to:
- chang.hsiao@irohalen.example
subject: 3 step zap - new message saved in slack
body: |-
Saved new message from:
{{slack_new_saved_message.user__real_name}}
Message Content:
{{text}}
authentication: k0QBMMDK
alias: null
- action: core:vDakLS1PLO4J29eodDRLa5okErEn0
inputs:
channel: U036ZHWNHU2
text: |-
Saved new message from:
{{slack_new_saved_message.user__real_name}}
Email thread id:
{{threadId}}
Message Content:
{{slack_new_saved_message.text}}
authentication: Vx4PEEeV
alias: slack_send_direct_message
title: My 3 step zap
summary: Many Step Zap
required: true
responses:
'201':
content:
application/json:
schema:
$ref: '#/components/schemas/ExpandedZap'
examples:
CustomCreatedZap:
value:
type: zap
id: 033cc069f2d3-4d63-8666-10c07ab38dac
is_enabled: true
last_successful_run_date: '2019-08-24T14:15:22Z'
updated_at: '2024-03-14T22:02:36+00:00'
title: My Critically Important Program
links:
html_editor: >-
https://zapier.com/editor/104826178?utm_source=partner&utm_medium=embed&utm_campaign=partner_api&referer=zapier
steps:
- action: example_core:Vn7xbE60
authentication: 2kyXZ8VJ
inputs: {}
title: null
- action: example_core:V7GpzX40
authentication: null
inputs: null
title: null
summary: Custom created zap
description: ''
'400':
content:
application/json:
schema:
$ref: '#/components/schemas/ErrorResponse'
examples:
MalformedRequest.:
value:
errors:
- status: 400
code: parse_error
title: ParseError
detail: Malformed request.
source: null
meta:
source: ZAPIER
full_details:
message: Malformed request.
code: parse_error
summary: Malformed request.
description: This schema can be expected for 4xx 'Malformed request.' errors
'401':
content:
application/json:
schema:
$ref: '#/components/schemas/ErrorResponse'
description: 401 Response
'403':
content:
application/json:
schema:
$ref: '#/components/schemas/ErrorResponse'
description: 403 Response
'409':
content:
application/json:
schema:
$ref: '#/components/schemas/ErrorResponse'
description: 409 Response
'429':
headers:
Retry-After:
schema:
type: string
format: uri
description: Indicates when to retry the request
X-RateLimit-Limit:
schema:
type: string
format: uri
description: >-
The maximum number of requests you're permitted to make per
hour.
X-RateLimit-Remaining:
schema:
type: string
format: uri
description: >-
The number of requests remaining in the current rate limit
window.
X-RateLimit-Reset:
schema:
type: string
format: uri
description: >-
The time at which the current rate limit window resets in UTC
epoch seconds.
content:
application/json:
schema:
$ref: '#/components/schemas/ErrorResponse'
description: 429 Response
'500':
content:
application/json:
schema:
$ref: '#/components/schemas/ErrorResponse'
examples:
AServerErrorOccurred.:
value:
errors:
- status: 500
code: error
title: APIException
detail: A server error occurred.
source: null
meta:
source: ZAPIER
full_details:
message: A server error occurred.
code: error
summary: A server error occurred.
description: >-
This schema can be expected for 5xx 'A server error occurred.'
errors
'503':
headers:
Retry-After:
schema:
type: string
format: uri
description: Indicates when to retry the request
X-RateLimit-Limit:
schema:
type: string
format: uri
description: >-
The maximum number of requests you're permitted to make per
hour.
X-RateLimit-Remaining:
schema:
type: string
format: uri
description: >-
The number of requests remaining in the current rate limit
window.
X-RateLimit-Reset:
schema:
type: string
format: uri
description: >-
The time at which the current rate limit window resets in UTC
epoch seconds.
content:
application/json:
schema:
$ref: '#/components/schemas/ErrorResponse'
description: 503 Response
'504':
content:
application/json:
schema:
$ref: '#/components/schemas/ErrorResponse'
description: 504 Response
security:
- OAuth:
- zap:write
components:
schemas:
ZapRequest:
type: object
properties:
data:
$ref: '#/components/schemas/CreateZapRequest'
required:
- data
ExpandedZap:
type: object
description: >-
A Zap is an automated workflow that connects your apps and services
together.
properties:
type:
type: string
readOnly: true
description: The type of this object.
id:
type: string
readOnly: true
description: A unique identifier of the Zap.
is_enabled:
type: boolean
default: true
description: Whether the Zap is enabled (running) or not.
last_successful_run_date:
type:
- string
- 'null'
readOnly: true
description: >-
The date/time at which this Zap last ran successfully. A null value
indicates that a Zap has never run successfully.
updated_at:
type: string
readOnly: true
description: The last time this Zap was updated
title:
type: string
description: The human readable name of the Zap.
links:
type: object
additionalProperties: {}
readOnly: true
description: Link to open this Zap in the Zapier Editor
steps:
description: A list of the steps this Zap consists of
type: array
items:
oneOf:
- $ref: '#/components/schemas/ExpandedZapStep'
- type: string
required:
- id
- last_successful_run_date
- links
- steps
- title
- type
- updated_at
ErrorResponse:
type: object
properties:
errors:
type: array
items:
$ref: '#/components/schemas/Error'
description: An array of error objects.
required:
- errors
CreateZapRequest:
type: object
description: See our Building a Zap guide to get started.
properties:
steps:
type: array
items:
$ref: '#/components/schemas/CreateZapRequestStep'
description: The list of steps that the Zap should consist of
title:
type: string
description: The title to be set for this Zap
required:
- steps
- title
ExpandedZapStep:
type: object
description: An ordered list of steps that define the logic of the Zap.
properties:
action:
description: Action
oneOf:
- $ref: '#/components/schemas/Action'
- type: string
authentication:
description: Authentication
oneOf:
- $ref: '#/components/schemas/Authentication'
- type:
- string
- 'null'
inputs:
readOnly: true
description: The inputs for this specific Zap's step
title:
type:
- string
- 'null'
readOnly: true
description: >-
The custom title of a Zap Step. If a step has not been given a
custom title by the user, then the value will be null.
required:
- action
- authentication
- inputs
- title
Error:
type: object
description: Base Error definition
properties:
status:
type: integer
description: The HTTP status code applicable to this problem.
code:
type: string
description: A unique identifier for this particular occurrence of the problem.
title:
type: string
description: A short summary of the problem.
detail:
type: string
description: >-
A human-readable explanation specific to this occurrence of the
problem.
source:
oneOf:
- $ref: '#/components/schemas/ErrorSource'
- type: 'null'
description: An object containing references to the primary source of the error.
meta:
type:
- object
- 'null'
additionalProperties: {}
description: Freeform metadata about the error
CreateZapRequestStep:
type: object
properties:
action:
type: string
description: The ID of the Action to be associated with this step
inputs:
type: object
additionalProperties: {}
description: The inputs for the Action associated with this step
authentication:
type:
- string
- 'null'
description: The authentication, if required, for this Action to run
alias:
type:
- string
- 'null'
description: >-
Optional alias for this step to be referenced by later steps
(snake_case, max 64 chars)
maxLength: 64
pattern: ^[a-z][a-z0-9_]*$
required:
- action
- authentication
- inputs
Action:
type: object
description: >-
An Action is an operation that can be performed against a third-party
API; either a read or a write. A Zap is composed of a read, followed by
one or more writes.
properties:
id:
type: string
description: >-
The ID to refer to this action (unstable, may change when referenced
app changes)
key:
type: string
description: The developer provided identifier for this Action (stable)
app:
description: Apps
oneOf:
- $ref: '#/components/schemas/Apps'
- type: string
type:
allOf:
- $ref: '#/components/schemas/ActionTypeEnum'
description: |-
The type of this object
* `action` - action
action_type:
allOf:
- $ref: '#/components/schemas/ActionTypeEnum'
description: |-
The type of this Action
* `READ` - READ
* `READ_BULK` - READ_BULK
* `WRITE` - WRITE
* `SEARCH` - SEARCH
* `SEARCH_OR_WRITE` - SEARCH_OR_WRITE
* `SEARCH_AND_WRITE` - SEARCH_AND_WRITE
* `FILTER` - FILTER
is_instant:
type: boolean
description: >-
Will be set to `true` if this Action triggers instantly. May only be
`true` when `type` is `READ`.
title:
type: string
description: The title of this Action.
description:
type: string
description: >-
A longer description of this Action, usually describing what it does
in more detail.
required:
- action_type
- app
- description
- id
- is_instant
- key
- title
- type
Authentication:
type: object
description: >-
An Authentication contains various fields, often credentials such as API
tokens, used to access Partner APIs on
behalf of a user. The actual fields are held securely by Zapier
properties:
type:
allOf:
- $ref: '#/components/schemas/AuthenticationTypeEnum'
readOnly: true
default: authentication
description: |-
The type of this object.
* `authentication` - authentication
id:
type: string
description: The identifier for this specific Authentication
app:
description: An app that integrates with Zapier.
oneOf:
- $ref: '#/components/schemas/Apps'
- type: string
is_expired:
type: boolean
description: >-
If `true`, this Authentication has expired. It will not be usable,
and the user needs to be directed to reconnect it.
title:
type: string
description: The title of this specific Authentication
required:
- app
- id
- is_expired
- title
- type
ErrorSource:
type: object
description: Populates the `source` object inside our error responses.
properties:
pointer:
type: string
description: >-
Pointer to the value in the request document that caused the error
e.g. `/actions`.
parameter:
type: string
description: A string indicating which URI query parameter caused the error.
header:
type: string
description: >-
A string indicating the name of a single request header which caused
the error.
Apps:
type: object
description: An app that integrates with Zapier
properties:
id:
type: string
description: Unique id of the app
type:
type: string
default: app
description: The type of this object.
image:
type: string
description: Default image/icon to represent the app.
links:
type: object
additionalProperties: {}
description: >-
A url that, when visited, will direct the user to authenticate with
the app and allow Zapier access to the app, thus creating a new
Authentication.
If value is `null`, then no authentication is required to use the app. Client ID-authenticated requests will never have this object's fields populated.
action_types:
type: array
items: {}
description: A list of action types for this specific App
title:
type: string
description: Human readable name of the app
images:
allOf:
- $ref: '#/components/schemas/AppsImages'
description: The URL of images (of various sizes) for this specific App
hex_color:
type: string
description: A branded color that can be used to represent the app.
categories:
type: array
items:
$ref: '#/components/schemas/Category'
description: >-
A list of categories to which this app belongs. Helpful in
identifying apps by type and functionality.
description:
type: string
description: Human readable description of the app.
required:
- action_types
- categories
- description
- hex_color
- id
- image
- images
- links
- title
ActionTypeEnum:
enum:
- action
type: string
description: '* `action` - action'
AuthenticationTypeEnum:
enum:
- authentication
type: string
description: '* `authentication` - authentication'
AppsImages:
type: object
description: Images/icons of various resolutions to represent the app.
properties:
url_16x16:
type: string
description: 16x16 resolution image URL
url_32x32:
type: string
description: 32x32 resolution image URL
url_64x64:
type: string
description: 64x64 resolution image URL
url_128x128:
type: string
description: 128x128 resolution image URL
required:
- url_128x128
- url_16x16
- url_32x32
- url_64x64
Category:
type: object
description: Category an app belongs to.
properties:
slug:
type: string
description: The shortened slug name for this category
required:
- slug
securitySchemes:
OAuth:
type: oauth2
description: >-
See our OAuth2 authentication documentation here:
https://docs.zapier.com/powered-by-zapier/api-reference/authentication
flows:
authorizationCode:
authorizationUrl: https://zapier.com/oauth/authorize/
tokenUrl: https://zapier.com/oauth/token/
refreshUrl: https://zapier.com/oauth/token/
scopes:
profile: Read profile information about the currently-authenticated user
zap: Read Zaps
zap:write: Write Zaps
authentication: Read Authentications
authentication:write: Write Authentications
zap:runs: Read Zap Runs
action:run: Run an Action
zap:all: Read Zaps accessible to the account
implicit:
authorizationUrl: https://zapier.com/oauth/authorize/
scopes:
profile: Read profile information about the currently-authenticated user
zap: Read Zaps
zap:write: Write Zaps
authentication: Read Authentications
authentication:write: Write Authentications
zap:runs: Read Zap Runs
action:run: Run an Action
zap:all: Read Zaps accessible to the account
````
---
# Source: https://docs.zapier.com/powered-by-zapier/api-reference/accounts/create-account.md
> ## Documentation Index
> Fetch the complete documentation index at: https://docs.zapier.com/llms.txt
> Use this file to discover all available pages before exploring further.
# Create Account
> Create a new user and obtain an access token. See our Quick Account Creation guide to get started.
⚠️ *This is not a regular API endpoint that returns JSON.*
👉 **It is a flow that includes account creation and OAuth authorization**.
This URL should be opened in a popup window. See the [Quick Account
Creation](/powered-by-zapier/managed-authentication/quick-account-creation) page
for more information about allowing your customers to sign up for Zapier easily.
## Main page example
Start with this example code in order to build a correct `/v2/authorize` API
call in a well-sized popup window and `await` the completion of the flow. Then
you can use the other API endpoints to retrieve your needed information.
**zapier.js**
```js theme={null}
/**
* Ensure the user has a Zapier account and has authorized this
* site to access it. If not, a log in form or sign up form
* will be shown to the user along the way.
*
* @param {Object} options
* @param {String} options.clientId - The OAuth client ID
* @param {String} options.signUpEmail - The user's email to use for pre-filling the sign up form.
* @param {String} options.signUpFirstName - The user's first name to use for pre-filling the sign up form.
* @param {String} options.signUpLastName - The user's last name to use for pre-filling the sign up form.
*/
export async function zapierAuthorize(options) {
const root = "https://api.zapier.com";
const url = new URL("/v2/authorize", root);
const params = url.searchParams;
params.set("client_id", options.clientId);
params.set("redirect_uri", location.href);
params.set("response_type", "code");
const scopes = ["zap", "profile"];
params.set("scope", scopes.join(" "));
//
// These parameters are optional but highly recommended.
// Users will receive a prefilled sign up form,
// allowing them to continue with a single click
// (or edit the values).
//
params.set("sign_up_email", options.signUpEmail);
params.set("sign_up_first_name", options.signUpFirstName);
params.set("sign_up_last_name", options.signUpLastName);
// Navigate to the /v2/authorize API, which will eventually
// redirect back to `location.href` but with `?code=`
// in the URL parameters. At this point you will need to
// exchange the OAuth code for an OAuth token.
const popup = window.open(
url.href,
// If you give an opened window a name, it will prevent there
// from being more than one window open at the same time with
// that name. The new URL supplied to `open` will navigate
// existing window.
"zapier-authorize",
// Ensure a comfortable amount of space in the popup
"width=1024,height=1280",
);
if (!popup) {
alert("Failed to open popup window. Please allow popups and try again.");
}
const data = await waitForPopupClose(popup);
}
/**
* Waits for the given popup window to close,
* or for it to send a message that passes the `callback` function supplied.
*
* @param {Window} popup - The popup window created by `window.open`
*/
async function waitForPopupClose(popup) {
return await new Promise((resolve) => {
function onMessage(event) {
if (
typeof event.data === "object" &&
event.data &&
event.data.type === "zapier.popup.close"
) {
popup.close();
finishAndCleanUp(event.data);
} else {
console.warn("unhandled message event: (data)", event.data);
}
}
function finishAndCleanUp() {
resolve(undefined);
removeEventListener("message", onMessage);
clearInterval(interval);
}
// Wait for `postMessage` event
addEventListener("message", onMessage);
// Wait for popup to be closed if the message wasn't received
const interval = setInterval(() => {
if (popup.closed) {
// The interval may have run after the popup closed and before onMessage
// had a chance to process messages. This prevents a frequent race
// condition in Firefox, where finishAndCleanUp was called here before
// onMessage could call finishAndCleanUp.
setTimeout(() => {
finishAndCleanUp(undefined);
});
}
});
});
}
```
## Redirect URI page example
The redirect URI page must exchange the OAuth code for an OAuth token within 2
minutes. The resulting token MAY NOT be stored in an insecure manner. The
suggested location is in your application's database, in a data model for the
current user.
See the [OAuth 2.0 Token
Exchange](https://datatracker.ietf.org/doc/html/rfc8693) RFC for more detail.
```js theme={null}
const url = new URL(request.url);
const code = url.searchParams.get("code");
const token = await EXCHANGE_CODE_FOR_TOKEN(code);
await SAVE_TOKEN_TO_DATABASE(CURRENT_USER_ID, token);
```
## OpenAPI
````yaml https://api.zapier.com/schema get /v2/authorize
openapi: 3.1.0
info:
title: Partner API
version: 2024.11.0
description: >
## Introduction
The Partner API is the best tool for complete style control over a user's
Zapier experience within your app.
Essentially, it lets you customize how you present Zapier within your
product without sacrificing your app's look,
feel, and flow.
Think of it as a native Zapier integration, helping you showcase your best
Zapier-powered workflows where it's most
helpful to your users (within the flow of your tool). You can customize
styling, streamline Zap set-up for users,
expose relevant Zap information, and more!
With the Partner API, you can:
- Get a list of all the apps available in Zapier's app directory so you can
power your app directory and show your
users all the integration possibilities with your Zapier integration.
- Have complete style control over how you present Zap templates in your
product. The Partner API gives you access
to the raw Zap Template data so you can give your users access to your Zap
template with your product's style, look
and feel.
- Get access to all your Zap templates and give your users the ability to
search to quickly find the one they need.
- Streamline Zap setup by pre-filling fields on behalf of your users.
- Show users the Zaps they have set up from right within your product
keeping them on your site longer and giving them
complete confidence in their Zapier integration.
- Embed our Zapier Editor to allow your users to create new Zaps and modify
existing ones, without needing to leave
your product.
## Authentication
There are two ways to authenticate with the Partner API.
1. Your application's `client_id` which you will receive once you are
approved for access to the API
(Client ID Authentication)
2. A user's access token (Access Token Authentication).
Which authentication method you should use depends on which endpoint(s) you
are using.
Review each endpoint's documentation to understand which parameters are
required.
> Note: while we do generate a `client_secret`, the type of grant we use
(implicit) doesn't
need it so it's not something we provide.'
## Learn more
See the [Workflow API
documentation](https://docs.zapier.com/partner-solutions/workflow-api/intro)
for more information.
contact:
name: Zapier
url: https://developer.zapier.com/contact
servers:
- url: https://api.zapier.com
security: []
tags:
- name: Accounts
description: Refers to resources interacting with 'Accounts' associated resources
- name: Actions
description: Refers to resources interacting with 'Actions' associated resources
- name: Apps
description: Refers to resources interacting with 'Apps' associated resources
- name: Authentications
description: >-
Refers to resources interacting with 'Authentications' associated
resources
- name: Categories
description: Refers to resources interacting with 'Categories' associated resources
- name: Experimental
description: Refers to resources interacting with 'Experimental' associated resources
- name: Inputs
description: Refers to resources interacting with 'Inputs' associated resources
- name: Outputs
description: Refers to resources interacting with 'Outputs' associated resources
- name: Zaps
description: Refers to resources interacting with 'Zaps' associated resources
- name: Zap Templates
description: Refers to resources interacting with 'Zap Templates' associated resources
paths:
/v2/authorize:
get:
tags:
- Accounts
summary: Create Account
description: >-
Create a new user and obtain an access token. See our Quick Account
Creation guide to get started.
operationId: v2_authorize_list
parameters:
- in: query
name: client_id
schema:
type: string
minLength: 1
description: Your application Client ID.
required: true
- in: query
name: redirect_uri
schema:
type: string
minLength: 1
description: The page the user will be redirect to after OAuth flow.
required: true
- in: query
name: referer
schema:
type: string
minLength: 1
- in: query
name: response_type
schema:
type: string
minLength: 1
description: Only OAuth response type `code` is supported
required: true
- in: query
name: scope
schema:
type: string
minLength: 1
description: Space (`%20`) separated values
required: true
- in: query
name: sign_up_email
schema:
type: string
format: email
minLength: 1
description: Email of the user signing up.
- in: query
name: sign_up_first_name
schema:
type: string
minLength: 1
description: First name of the user signing up.
- in: query
name: sign_up_last_name
schema:
type: string
minLength: 1
description: Last name of the user signing up.
- in: query
name: utm_campaign
schema:
type: string
default: workflow_api
minLength: 1
- in: query
name: utm_content
schema:
type: string
minLength: 1
- in: query
name: utm_medium
schema:
type: string
default: embed
minLength: 1
- in: query
name: utm_source
schema:
type: string
default: partner
minLength: 1
responses:
'302':
description: Redirect to authorization URL
'400':
content:
application/json:
schema:
$ref: '#/components/schemas/ErrorResponse'
examples:
MalformedRequest.:
value:
errors:
- status: 400
code: parse_error
title: ParseError
detail: Malformed request.
source: null
meta:
source: ZAPIER
full_details:
message: Malformed request.
code: parse_error
summary: Malformed request.
description: This schema can be expected for 4xx 'Malformed request.' errors
'401':
content:
application/json:
schema:
$ref: '#/components/schemas/ErrorResponse'
description: 401 Response
'403':
content:
application/json:
schema:
$ref: '#/components/schemas/ErrorResponse'
description: 403 Response
'409':
content:
application/json:
schema:
$ref: '#/components/schemas/ErrorResponse'
description: 409 Response
'429':
headers:
Retry-After:
schema:
type: string
format: uri
description: Indicates when to retry the request
X-RateLimit-Limit:
schema:
type: string
format: uri
description: >-
The maximum number of requests you're permitted to make per
hour.
X-RateLimit-Remaining:
schema:
type: string
format: uri
description: >-
The number of requests remaining in the current rate limit
window.
X-RateLimit-Reset:
schema:
type: string
format: uri
description: >-
The time at which the current rate limit window resets in UTC
epoch seconds.
content:
application/json:
schema:
$ref: '#/components/schemas/ErrorResponse'
description: 429 Response
'500':
content:
application/json:
schema:
$ref: '#/components/schemas/ErrorResponse'
examples:
AServerErrorOccurred.:
value:
errors:
- status: 500
code: error
title: APIException
detail: A server error occurred.
source: null
meta:
source: ZAPIER
full_details:
message: A server error occurred.
code: error
summary: A server error occurred.
description: >-
This schema can be expected for 5xx 'A server error occurred.'
errors
'503':
headers:
Retry-After:
schema:
type: string
format: uri
description: Indicates when to retry the request
X-RateLimit-Limit:
schema:
type: string
format: uri
description: >-
The maximum number of requests you're permitted to make per
hour.
X-RateLimit-Remaining:
schema:
type: string
format: uri
description: >-
The number of requests remaining in the current rate limit
window.
X-RateLimit-Reset:
schema:
type: string
format: uri
description: >-
The time at which the current rate limit window resets in UTC
epoch seconds.
content:
application/json:
schema:
$ref: '#/components/schemas/ErrorResponse'
description: 503 Response
'504':
content:
application/json:
schema:
$ref: '#/components/schemas/ErrorResponse'
description: 504 Response
security:
- ClientIDAuthentication: []
components:
schemas:
ErrorResponse:
type: object
properties:
errors:
type: array
items:
$ref: '#/components/schemas/Error'
description: An array of error objects.
required:
- errors
Error:
type: object
description: Base Error definition
properties:
status:
type: integer
description: The HTTP status code applicable to this problem.
code:
type: string
description: A unique identifier for this particular occurrence of the problem.
title:
type: string
description: A short summary of the problem.
detail:
type: string
description: >-
A human-readable explanation specific to this occurrence of the
problem.
source:
oneOf:
- $ref: '#/components/schemas/ErrorSource'
- type: 'null'
description: An object containing references to the primary source of the error.
meta:
type:
- object
- 'null'
additionalProperties: {}
description: Freeform metadata about the error
ErrorSource:
type: object
description: Populates the `source` object inside our error responses.
properties:
pointer:
type: string
description: >-
Pointer to the value in the request document that caused the error
e.g. `/actions`.
parameter:
type: string
description: A string indicating which URI query parameter caused the error.
header:
type: string
description: >-
A string indicating the name of a single request header which caused
the error.
securitySchemes:
ClientIDAuthentication:
type: apiKey
in: query
name: client_id
description: See our authentication documentation for how to find your Client ID
x-zapier-auth-scheme-exempt: true
````
---
# Source: https://docs.zapier.com/powered-by-zapier/running-actions/create-action-run.md
> ## Documentation Index
> Fetch the complete documentation index at: https://docs.zapier.com/llms.txt
> Use this file to discover all available pages before exploring further.
# Creating Action Runs
## Prerequisites
Before you begin, make sure:
* You have access to a **public Zapier integration**.
* You’ve [registered your app and authenticated](/powered-by-zapier/authentication/methods/user-access-token) to use the API.
* You have at least one **action** configured in your integration, with required fields and sample data tested in the Zapier UI or via the API.
***
To trigger an action, make a `POST` request to [/v2/action-runs/](/powered-by-zapier/api-reference/actions/create-an-action-run)
**Important:** Before every action run, for the `action` attribute on your request body you should retreive a new/unique `id` from the [Get Actions](/powered-by-zapier/api-reference/actions/get-actions) endpoint for the action that you'd like to execute. This ensures that the action run can be uniquely tracked, that it can be properly debugged, and that attributions are properly reported.
**Note:** *The `id` attribute will be unique for every lookup on the [Get Actions](/powered-by-zapier/api-reference/actions/get-actions) endpoint, and the `key` attribute will be the action's consistent developer-provided identifier.*
### Request Example
```http theme={null}
POST https://api.zapier.com/v2/action-runs/
Authorization: Bearer YOUR_ACCESS_TOKEN
Content-Type: application/json
{
"action": "core:89sg4uhs5g85gh53hso59hs399hgs59",
"authentication": "UHsi8e6K",
"input": {
"email": "user@example.com",
"message": "Hello from Powered by Zapier!"
}
}
```
### Parameters
| Field | Type | Description |
| ---------------- | ------ | ------------------------------------------------------- |
| `action` | string | The unique identifier of the action you want to run. |
| `authentication` | string | The authentication id needed to run this action. |
| `input` | object | Key-value pairs of input fields required by the action. |
### Response Example
```json theme={null}
{
"data": {
"type": "run",
"id": "arun_abc123"
}
}
```
You can use this run's `id` to poll for the run’s status and result.
---
# Source: https://docs.zapier.com/powered-by-zapier/api-reference/actions/create-an-action-run.md
> ## Documentation Index
> Fetch the complete documentation index at: https://docs.zapier.com/llms.txt
> Use this file to discover all available pages before exploring further.
# Create an Action Run
> Runs an action (step) in the third party API, using the provided authentication and inputs.
This endpoint is asynchronous, and the response will contain an Action Run ID. You can use the `/v2/action-runs/:id` endpoint to check the status of the run and retrieve the results.
#### When using OAuth
This endpoint requires the `action:run` OAuth scope.
Running actions via the Workflow API is currently in limited beta. If you
would like access to run actions, please use [this
form](https://zapier.com/developer-platform#form) to request access.
This API is [rate limited](/powered-by-zapier/api-reference/rate-limiting).
## OpenAPI
````yaml https://api.zapier.com/schema post /v2/action-runs
openapi: 3.1.0
info:
title: Partner API
version: 2024.11.0
description: >
## Introduction
The Partner API is the best tool for complete style control over a user's
Zapier experience within your app.
Essentially, it lets you customize how you present Zapier within your
product without sacrificing your app's look,
feel, and flow.
Think of it as a native Zapier integration, helping you showcase your best
Zapier-powered workflows where it's most
helpful to your users (within the flow of your tool). You can customize
styling, streamline Zap set-up for users,
expose relevant Zap information, and more!
With the Partner API, you can:
- Get a list of all the apps available in Zapier's app directory so you can
power your app directory and show your
users all the integration possibilities with your Zapier integration.
- Have complete style control over how you present Zap templates in your
product. The Partner API gives you access
to the raw Zap Template data so you can give your users access to your Zap
template with your product's style, look
and feel.
- Get access to all your Zap templates and give your users the ability to
search to quickly find the one they need.
- Streamline Zap setup by pre-filling fields on behalf of your users.
- Show users the Zaps they have set up from right within your product
keeping them on your site longer and giving them
complete confidence in their Zapier integration.
- Embed our Zapier Editor to allow your users to create new Zaps and modify
existing ones, without needing to leave
your product.
## Authentication
There are two ways to authenticate with the Partner API.
1. Your application's `client_id` which you will receive once you are
approved for access to the API
(Client ID Authentication)
2. A user's access token (Access Token Authentication).
Which authentication method you should use depends on which endpoint(s) you
are using.
Review each endpoint's documentation to understand which parameters are
required.
> Note: while we do generate a `client_secret`, the type of grant we use
(implicit) doesn't
need it so it's not something we provide.'
## Learn more
See the [Workflow API
documentation](https://docs.zapier.com/partner-solutions/workflow-api/intro)
for more information.
contact:
name: Zapier
url: https://developer.zapier.com/contact
servers:
- url: https://api.zapier.com
security: []
tags:
- name: Accounts
description: Refers to resources interacting with 'Accounts' associated resources
- name: Actions
description: Refers to resources interacting with 'Actions' associated resources
- name: Apps
description: Refers to resources interacting with 'Apps' associated resources
- name: Authentications
description: >-
Refers to resources interacting with 'Authentications' associated
resources
- name: Categories
description: Refers to resources interacting with 'Categories' associated resources
- name: Experimental
description: Refers to resources interacting with 'Experimental' associated resources
- name: Inputs
description: Refers to resources interacting with 'Inputs' associated resources
- name: Outputs
description: Refers to resources interacting with 'Outputs' associated resources
- name: Zaps
description: Refers to resources interacting with 'Zaps' associated resources
- name: Zap Templates
description: Refers to resources interacting with 'Zap Templates' associated resources
paths:
/v2/action-runs:
post:
tags:
- Experimental
summary: Create an Action Run
description: >-
Runs an action (step) in the third party API, using the provided
authentication and inputs.
This endpoint is asynchronous, and the response will contain an Action
Run ID. You can use the `/v2/action-runs/:id` endpoint to check the
status of the run and retrieve the results.
#### When using OAuth
This endpoint requires the `action:run` OAuth scope.
operationId: create-action-run
requestBody:
content:
application/json:
schema:
$ref: '#/components/schemas/RunActionRequest'
examples:
CreatingAnActionRun(runningAnAction):
value:
data:
action: example_core:Vn7xbE60
authentication: example_QVaAreV1
inputs:
email: me@example.com
summary: Creating an Action Run (running an action)
required: true
responses:
'200':
content:
application/json:
schema:
$ref: '#/components/schemas/RunActionResponse'
examples:
CreateActionRunResponse:
value:
data:
type: run
id: 123e4567-e89b-12d3-a456-426614174000
summary: Create Action Run Response
description: ''
'400':
content:
application/json:
schema:
$ref: '#/components/schemas/ErrorResponse'
examples:
MalformedRequest.:
value:
errors:
- status: 400
code: parse_error
title: ParseError
detail: Malformed request.
source: null
meta:
source: ZAPIER
full_details:
message: Malformed request.
code: parse_error
summary: Malformed request.
description: This schema can be expected for 4xx 'Malformed request.' errors
'401':
content:
application/json:
schema:
$ref: '#/components/schemas/ErrorResponse'
description: 401 Response
'403':
content:
application/json:
schema:
$ref: '#/components/schemas/ErrorResponse'
description: 403 Response
'409':
content:
application/json:
schema:
$ref: '#/components/schemas/ErrorResponse'
description: 409 Response
'429':
headers:
Retry-After:
schema:
type: string
format: uri
description: Indicates when to retry the request
X-RateLimit-Limit:
schema:
type: string
format: uri
description: >-
The maximum number of requests you're permitted to make per
hour.
X-RateLimit-Remaining:
schema:
type: string
format: uri
description: >-
The number of requests remaining in the current rate limit
window.
X-RateLimit-Reset:
schema:
type: string
format: uri
description: >-
The time at which the current rate limit window resets in UTC
epoch seconds.
content:
application/json:
schema:
$ref: '#/components/schemas/ErrorResponse'
description: 429 Response
'500':
content:
application/json:
schema:
$ref: '#/components/schemas/ErrorResponse'
examples:
AServerErrorOccurred.:
value:
errors:
- status: 500
code: error
title: APIException
detail: A server error occurred.
source: null
meta:
source: ZAPIER
full_details:
message: A server error occurred.
code: error
summary: A server error occurred.
description: >-
This schema can be expected for 5xx 'A server error occurred.'
errors
'503':
headers:
Retry-After:
schema:
type: string
format: uri
description: Indicates when to retry the request
X-RateLimit-Limit:
schema:
type: string
format: uri
description: >-
The maximum number of requests you're permitted to make per
hour.
X-RateLimit-Remaining:
schema:
type: string
format: uri
description: >-
The number of requests remaining in the current rate limit
window.
X-RateLimit-Reset:
schema:
type: string
format: uri
description: >-
The time at which the current rate limit window resets in UTC
epoch seconds.
content:
application/json:
schema:
$ref: '#/components/schemas/ErrorResponse'
description: 503 Response
'504':
content:
application/json:
schema:
$ref: '#/components/schemas/ErrorResponse'
description: 504 Response
security:
- OAuth:
- action:run
components:
schemas:
RunActionRequest:
type: object
properties:
data:
allOf:
- $ref: '#/components/schemas/_RunActionRequest'
description: Data for the Action Run
required:
- data
RunActionResponse:
type: object
properties:
data:
$ref: '#/components/schemas/_RunActionResponse'
required:
- data
ErrorResponse:
type: object
properties:
errors:
type: array
items:
$ref: '#/components/schemas/Error'
description: An array of error objects.
required:
- errors
_RunActionRequest:
type: object
properties:
action:
type: string
description: The ID for the Action to be run
authentication:
type:
- string
- 'null'
description: The ID for Authentication (if required)
inputs:
type: object
additionalProperties: {}
description: >-
Inputs to be provided to the Action referenced by the ID field, when
run
required:
- action
- authentication
- inputs
_RunActionResponse:
type: object
description: The response after an Action Run
properties:
type:
allOf:
- $ref: '#/components/schemas/RunTypeEnum'
description: |-
The type of this object
* `run` - Run
id:
type: string
format: uuid
description: The UUID of this Action Run
required:
- id
- type
Error:
type: object
description: Base Error definition
properties:
status:
type: integer
description: The HTTP status code applicable to this problem.
code:
type: string
description: A unique identifier for this particular occurrence of the problem.
title:
type: string
description: A short summary of the problem.
detail:
type: string
description: >-
A human-readable explanation specific to this occurrence of the
problem.
source:
oneOf:
- $ref: '#/components/schemas/ErrorSource'
- type: 'null'
description: An object containing references to the primary source of the error.
meta:
type:
- object
- 'null'
additionalProperties: {}
description: Freeform metadata about the error
RunTypeEnum:
enum:
- run
type: string
description: '* `run` - Run'
ErrorSource:
type: object
description: Populates the `source` object inside our error responses.
properties:
pointer:
type: string
description: >-
Pointer to the value in the request document that caused the error
e.g. `/actions`.
parameter:
type: string
description: A string indicating which URI query parameter caused the error.
header:
type: string
description: >-
A string indicating the name of a single request header which caused
the error.
securitySchemes:
OAuth:
type: oauth2
description: >-
See our OAuth2 authentication documentation here:
https://docs.zapier.com/powered-by-zapier/api-reference/authentication
flows:
authorizationCode:
authorizationUrl: https://zapier.com/oauth/authorize/
tokenUrl: https://zapier.com/oauth/token/
refreshUrl: https://zapier.com/oauth/token/
scopes:
profile: Read profile information about the currently-authenticated user
zap: Read Zaps
zap:write: Write Zaps
authentication: Read Authentications
authentication:write: Write Authentications
zap:runs: Read Zap Runs
action:run: Run an Action
zap:all: Read Zaps accessible to the account
implicit:
authorizationUrl: https://zapier.com/oauth/authorize/
scopes:
profile: Read profile information about the currently-authenticated user
zap: Read Zaps
zap:write: Write Zaps
authentication: Read Authentications
authentication:write: Write Authentications
zap:runs: Read Zap Runs
action:run: Run an Action
zap:all: Read Zaps accessible to the account
````
---
# Source: https://docs.zapier.com/powered-by-zapier/api-reference/authentications/create-authentication.md
> ## Documentation Index
> Fetch the complete documentation index at: https://docs.zapier.com/llms.txt
> Use this file to discover all available pages before exploring further.
# Create Authentication
> Creates a new Authentication for the provided App. See our Adding an Authentication guide to get started.
#### When using OAuth
This endpoint requires the `authentication:write` OAuth scope.
This API is [rate limited](/powered-by-zapier/api-reference/rate-limiting).
## OpenAPI
````yaml https://api.zapier.com/schema post /v2/authentications
openapi: 3.1.0
info:
title: Partner API
version: 2024.11.0
description: >
## Introduction
The Partner API is the best tool for complete style control over a user's
Zapier experience within your app.
Essentially, it lets you customize how you present Zapier within your
product without sacrificing your app's look,
feel, and flow.
Think of it as a native Zapier integration, helping you showcase your best
Zapier-powered workflows where it's most
helpful to your users (within the flow of your tool). You can customize
styling, streamline Zap set-up for users,
expose relevant Zap information, and more!
With the Partner API, you can:
- Get a list of all the apps available in Zapier's app directory so you can
power your app directory and show your
users all the integration possibilities with your Zapier integration.
- Have complete style control over how you present Zap templates in your
product. The Partner API gives you access
to the raw Zap Template data so you can give your users access to your Zap
template with your product's style, look
and feel.
- Get access to all your Zap templates and give your users the ability to
search to quickly find the one they need.
- Streamline Zap setup by pre-filling fields on behalf of your users.
- Show users the Zaps they have set up from right within your product
keeping them on your site longer and giving them
complete confidence in their Zapier integration.
- Embed our Zapier Editor to allow your users to create new Zaps and modify
existing ones, without needing to leave
your product.
## Authentication
There are two ways to authenticate with the Partner API.
1. Your application's `client_id` which you will receive once you are
approved for access to the API
(Client ID Authentication)
2. A user's access token (Access Token Authentication).
Which authentication method you should use depends on which endpoint(s) you
are using.
Review each endpoint's documentation to understand which parameters are
required.
> Note: while we do generate a `client_secret`, the type of grant we use
(implicit) doesn't
need it so it's not something we provide.'
## Learn more
See the [Workflow API
documentation](https://docs.zapier.com/partner-solutions/workflow-api/intro)
for more information.
contact:
name: Zapier
url: https://developer.zapier.com/contact
servers:
- url: https://api.zapier.com
security: []
tags:
- name: Accounts
description: Refers to resources interacting with 'Accounts' associated resources
- name: Actions
description: Refers to resources interacting with 'Actions' associated resources
- name: Apps
description: Refers to resources interacting with 'Apps' associated resources
- name: Authentications
description: >-
Refers to resources interacting with 'Authentications' associated
resources
- name: Categories
description: Refers to resources interacting with 'Categories' associated resources
- name: Experimental
description: Refers to resources interacting with 'Experimental' associated resources
- name: Inputs
description: Refers to resources interacting with 'Inputs' associated resources
- name: Outputs
description: Refers to resources interacting with 'Outputs' associated resources
- name: Zaps
description: Refers to resources interacting with 'Zaps' associated resources
- name: Zap Templates
description: Refers to resources interacting with 'Zap Templates' associated resources
paths:
/v2/authentications:
post:
tags:
- Authentications
summary: Create Authentication
description: >-
Creates a new Authentication for the provided App. See our Adding an
Authentication guide to get started.
#### When using OAuth
This endpoint requires the `authentication:write` OAuth scope.
operationId: create-authentication
requestBody:
content:
application/json:
schema:
$ref: '#/components/schemas/AuthenticationCreateRequest'
examples:
NewAuthentication:
value:
data:
title: My new auth
app: 8cdbc496-c95c-4f19-b3a3-fee03ed5f924
authentication_fields:
secret: example_E4CrHVvRuxTXrPFLyyZFeRJwJcx2ELQZ
summary: New Authentication
required: true
responses:
'201':
content:
application/json:
schema:
$ref: '#/components/schemas/AuthenticationResponse'
examples:
CreatedAuth:
value:
links:
next: null
prev: null
meta:
count: 1
limit: 1
offset: 0
data:
- type: authentication
id: example_DOb4nWkz
app: a8aaed31-e257-4479-aaa9-ca02fe2fab04
is_expired: false
title: 'Example zapier@example.com #5'
summary: Created Auth
description: ''
'400':
content:
application/json:
schema:
$ref: '#/components/schemas/ErrorResponse'
examples:
MalformedRequest.:
value:
errors:
- status: 400
code: parse_error
title: ParseError
detail: Malformed request.
source: null
meta:
source: ZAPIER
full_details:
message: Malformed request.
code: parse_error
summary: Malformed request.
description: This schema can be expected for 4xx 'Malformed request.' errors
'401':
content:
application/json:
schema:
$ref: '#/components/schemas/ErrorResponse'
description: 401 Response
'403':
content:
application/json:
schema:
$ref: '#/components/schemas/ErrorResponse'
description: 403 Response
'409':
content:
application/json:
schema:
$ref: '#/components/schemas/ErrorResponse'
description: 409 Response
'429':
headers:
Retry-After:
schema:
type: string
format: uri
description: Indicates when to retry the request
X-RateLimit-Limit:
schema:
type: string
format: uri
description: >-
The maximum number of requests you're permitted to make per
hour.
X-RateLimit-Remaining:
schema:
type: string
format: uri
description: >-
The number of requests remaining in the current rate limit
window.
X-RateLimit-Reset:
schema:
type: string
format: uri
description: >-
The time at which the current rate limit window resets in UTC
epoch seconds.
content:
application/json:
schema:
$ref: '#/components/schemas/ErrorResponse'
description: 429 Response
'500':
content:
application/json:
schema:
$ref: '#/components/schemas/ErrorResponse'
examples:
AServerErrorOccurred.:
value:
errors:
- status: 500
code: error
title: APIException
detail: A server error occurred.
source: null
meta:
source: ZAPIER
full_details:
message: A server error occurred.
code: error
summary: A server error occurred.
description: >-
This schema can be expected for 5xx 'A server error occurred.'
errors
'503':
headers:
Retry-After:
schema:
type: string
format: uri
description: Indicates when to retry the request
X-RateLimit-Limit:
schema:
type: string
format: uri
description: >-
The maximum number of requests you're permitted to make per
hour.
X-RateLimit-Remaining:
schema:
type: string
format: uri
description: >-
The number of requests remaining in the current rate limit
window.
X-RateLimit-Reset:
schema:
type: string
format: uri
description: >-
The time at which the current rate limit window resets in UTC
epoch seconds.
content:
application/json:
schema:
$ref: '#/components/schemas/ErrorResponse'
description: 503 Response
'504':
content:
application/json:
schema:
$ref: '#/components/schemas/ErrorResponse'
description: 504 Response
security:
- OAuth:
- authentication:write
components:
schemas:
AuthenticationCreateRequest:
type: object
description: Inputs to create a new Authentication
properties:
data:
$ref: '#/components/schemas/_AuthenticationCreateRequest'
required:
- data
AuthenticationResponse:
type: object
description: |-
Base Response definition to be used in other Response Serializers.
Be sure to include the `data` field after using this class
properties:
links:
allOf:
- $ref: '#/components/schemas/Links'
description: The links object returned in paginated response bodies.
meta:
allOf:
- $ref: '#/components/schemas/BaseMeta'
description: The meta object returned in paginated response bodies.
data:
type: array
items:
$ref: '#/components/schemas/Authentication'
description: The Authentications present, provided they exist
required:
- links
- meta
ErrorResponse:
type: object
properties:
errors:
type: array
items:
$ref: '#/components/schemas/Error'
description: An array of error objects.
required:
- errors
_AuthenticationCreateRequest:
type: object
description: The object used to create a new Authentication
properties:
title:
type: string
description: The title of the authentication.
maxLength: 255
app:
type: string
format: uuid
description: A canonical App ID, as provided by the `/apps` endpoint.
authentication_fields:
type: object
additionalProperties: {}
description: >-
Required values to create an authentication. These values will be
used by the target integration to successfully create the
Authentication. See our Adding an Authentication guide for more
information.
required:
- app
- authentication_fields
- title
Links:
type: object
description: The links object returned in paginated response bodies.
properties:
next:
type:
- string
- 'null'
description: The URL of the next page of paginated results.
prev:
type:
- string
- 'null'
description: The URL of the previous page of paginated results.
BaseMeta:
type: object
description: The meta object returned in paginated response bodies.
properties:
count:
type: integer
minimum: 0
description: >-
The total number of objects in the collection represented by the
endpoint.
limit:
type:
- integer
- 'null'
minimum: 1
description: The limit value used in the request.
offset:
type: integer
minimum: 0
default: 0
description: The offset value used in the request.
required:
- count
- limit
Authentication:
type: object
description: >-
An Authentication contains various fields, often credentials such as API
tokens, used to access Partner APIs on
behalf of a user. The actual fields are held securely by Zapier
properties:
type:
allOf:
- $ref: '#/components/schemas/AuthenticationTypeEnum'
readOnly: true
default: authentication
description: |-
The type of this object.
* `authentication` - authentication
id:
type: string
description: The identifier for this specific Authentication
app:
description: An app that integrates with Zapier.
oneOf:
- $ref: '#/components/schemas/Apps'
- type: string
is_expired:
type: boolean
description: >-
If `true`, this Authentication has expired. It will not be usable,
and the user needs to be directed to reconnect it.
title:
type: string
description: The title of this specific Authentication
required:
- app
- id
- is_expired
- title
- type
Error:
type: object
description: Base Error definition
properties:
status:
type: integer
description: The HTTP status code applicable to this problem.
code:
type: string
description: A unique identifier for this particular occurrence of the problem.
title:
type: string
description: A short summary of the problem.
detail:
type: string
description: >-
A human-readable explanation specific to this occurrence of the
problem.
source:
oneOf:
- $ref: '#/components/schemas/ErrorSource'
- type: 'null'
description: An object containing references to the primary source of the error.
meta:
type:
- object
- 'null'
additionalProperties: {}
description: Freeform metadata about the error
AuthenticationTypeEnum:
enum:
- authentication
type: string
description: '* `authentication` - authentication'
Apps:
type: object
description: An app that integrates with Zapier
properties:
id:
type: string
description: Unique id of the app
type:
type: string
default: app
description: The type of this object.
image:
type: string
description: Default image/icon to represent the app.
links:
type: object
additionalProperties: {}
description: >-
A url that, when visited, will direct the user to authenticate with
the app and allow Zapier access to the app, thus creating a new
Authentication.
If value is `null`, then no authentication is required to use the app. Client ID-authenticated requests will never have this object's fields populated.
action_types:
type: array
items: {}
description: A list of action types for this specific App
title:
type: string
description: Human readable name of the app
images:
allOf:
- $ref: '#/components/schemas/AppsImages'
description: The URL of images (of various sizes) for this specific App
hex_color:
type: string
description: A branded color that can be used to represent the app.
categories:
type: array
items:
$ref: '#/components/schemas/Category'
description: >-
A list of categories to which this app belongs. Helpful in
identifying apps by type and functionality.
description:
type: string
description: Human readable description of the app.
required:
- action_types
- categories
- description
- hex_color
- id
- image
- images
- links
- title
ErrorSource:
type: object
description: Populates the `source` object inside our error responses.
properties:
pointer:
type: string
description: >-
Pointer to the value in the request document that caused the error
e.g. `/actions`.
parameter:
type: string
description: A string indicating which URI query parameter caused the error.
header:
type: string
description: >-
A string indicating the name of a single request header which caused
the error.
AppsImages:
type: object
description: Images/icons of various resolutions to represent the app.
properties:
url_16x16:
type: string
description: 16x16 resolution image URL
url_32x32:
type: string
description: 32x32 resolution image URL
url_64x64:
type: string
description: 64x64 resolution image URL
url_128x128:
type: string
description: 128x128 resolution image URL
required:
- url_128x128
- url_16x16
- url_32x32
- url_64x64
Category:
type: object
description: Category an app belongs to.
properties:
slug:
type: string
description: The shortened slug name for this category
required:
- slug
securitySchemes:
OAuth:
type: oauth2
description: >-
See our OAuth2 authentication documentation here:
https://docs.zapier.com/powered-by-zapier/api-reference/authentication
flows:
authorizationCode:
authorizationUrl: https://zapier.com/oauth/authorize/
tokenUrl: https://zapier.com/oauth/token/
refreshUrl: https://zapier.com/oauth/token/
scopes:
profile: Read profile information about the currently-authenticated user
zap: Read Zaps
zap:write: Write Zaps
authentication: Read Authentications
authentication:write: Write Authentications
zap:runs: Read Zap Runs
action:run: Run an Action
zap:all: Read Zaps accessible to the account
implicit:
authorizationUrl: https://zapier.com/oauth/authorize/
scopes:
profile: Read profile information about the currently-authenticated user
zap: Read Zaps
zap:write: Write Zaps
authentication: Read Authentications
authentication:write: Write Authentications
zap:runs: Read Zap Runs
action:run: Run an Action
zap:all: Read Zaps accessible to the account
````
---
# Source: https://docs.zapier.com/powered-by-zapier/api-reference/promotions/create-enrollment.md
> ## Documentation Index
> Fetch the complete documentation index at: https://docs.zapier.com/llms.txt
> Use this file to discover all available pages before exploring further.
# Create Promotion Enrollment
> Enrolls an account into an existing promotion.
Endpoint available to Partners only.
The request must be authenticated by an [access token](https://docs.zapier.com/powered-by-zapier/api-reference/authentication#retrieving-a-user-access-token)
that the user has granted to the Partner for the account.
The `enrollment_id`, returned after successfully enrolling a user,
**must** be stored by the partner in order to [retrieve](https://docs.zapier.com/powered-by-zapier/api-reference/promotions/get-enrollment)
or [delete](https://docs.zapier.com/powered-by-zapier/api-reference/promotions/delete-enrollment) the enrollment.
#### OAuth
This endpoint requires the `promotions:write` OAuth scope.
This API is [rate limited](/powered-by-zapier/api-reference/rate-limiting).
## OpenAPI
````yaml powered-by-zapier/api-reference/promotions-openapi.yaml post /v2/promotions
openapi: 3.1.0
info:
title: Powered by Zapier Promotions API
version: promotions
description: >-
The API to define promotions, powered by Zapier. See
https://docs.zapier.com/powered-by-zapier/introduction for more information.
contact:
name: Partner Sharing
servers:
- url: https://api.zapier.com
description: Production
security: []
tags:
- name: Promotions
description: Operations related to managing Promotions
- name: Experimental
description: >-
Operations that are not to be considered finalized, and are subject to
change
paths:
/v2/promotions:
post:
tags:
- Promotions
- Experimental
summary: Create a promotion enrollment
description: >-
Enrolls an account into an existing promotion.
Endpoint available to Partners only.
The request must be authenticated by an [access
token](https://docs.zapier.com/powered-by-zapier/api-reference/authentication#retrieving-a-user-access-token)
that the user has granted to the Partner for the account.
The `enrollment_id`, returned after successfully enrolling a user,
**must** be stored by the partner in order to
[retrieve](https://docs.zapier.com/powered-by-zapier/api-reference/promotions/get-enrollment)
or
[delete](https://docs.zapier.com/powered-by-zapier/api-reference/promotions/delete-enrollment)
the enrollment.
#### OAuth
This endpoint requires the `promotions:write` OAuth scope.
operationId: root_create
requestBody:
content:
application/json:
schema:
$ref: '#/components/schemas/PromotionEnrollment'
examples:
EnrollInAPromotion:
value:
promotion_id: promo_12345
summary: Enroll in a promotion
required: true
responses:
'201':
content:
application/json:
schema:
$ref: '#/components/schemas/PromotionEnrollmentResponse'
description: Successful Enrollment
'401':
content:
application/json:
schema:
$ref: '#/components/schemas/PromotionErrorResponse'
examples:
Access:
value:
errors:
- status: '401'
code: not_authenticated
title: User Not Authenticated
detail: >-
User must be authenticated to access this resource. No
valid user access token was provided.
description: >-
Access denied: User does not have permission for enrollment_id:
enroll_67890
'403':
content:
application/json:
schema:
$ref: '#/components/schemas/PromotionErrorResponse'
examples:
Forbidden:
value:
errors:
- status: '403'
code: permission_denied
title: Permission Denied
detail: You do not have permission to perform this action.
description: Forbidden - User lacks permission to access this location
'404':
content:
application/json:
schema:
$ref: '#/components/schemas/PromotionErrorResponse'
examples:
'404':
value:
errors:
- status: '404'
code: promotion_not_found
title: Promotion Not Found
detail: >-
The requested promotion was not found. The specified
promotion_id may be invalid.
description: 404 Not Found
'409':
content:
application/json:
schema:
$ref: '#/components/schemas/PromotionErrorResponse'
examples:
Conflict:
value:
errors:
- status: '409'
code: already_enrolled
title: Already Enrolled
detail: >-
The provided account is already enrolled in the
specified promotion.
description: Conflict - User is already enrolled in this promotion
'429':
headers:
Retry-After:
schema:
type: string
format: uri
description: Indicates when to retry the request
X-RateLimit-Limit:
schema:
type: string
format: uri
description: >-
The maximum number of requests you're permitted to make per
hour.
X-RateLimit-Remaining:
schema:
type: string
format: uri
description: >-
The number of requests remaining in the current rate limit
window.
X-RateLimit-Reset:
schema:
type: string
format: uri
description: >-
The time at which the current rate limit window resets in UTC
epoch seconds.
content:
application/json:
schema:
$ref: '#/components/schemas/PromotionErrorResponse'
description: ''
'503':
headers:
Retry-After:
schema:
type: string
format: uri
description: Indicates when to retry the request
X-RateLimit-Limit:
schema:
type: string
format: uri
description: >-
The maximum number of requests you're permitted to make per
hour.
X-RateLimit-Remaining:
schema:
type: string
format: uri
description: >-
The number of requests remaining in the current rate limit
window.
X-RateLimit-Reset:
schema:
type: string
format: uri
description: >-
The time at which the current rate limit window resets in UTC
epoch seconds.
content:
application/json:
schema:
$ref: '#/components/schemas/PromotionErrorResponse'
description: ''
security:
- OAuth:
- promotions:write
components:
schemas:
PromotionEnrollment:
type: object
properties:
promotion_id:
type: string
description: The unique identifier for the promotions
required:
- promotion_id
PromotionEnrollmentResponse:
type: object
description: Successful Enrollment
properties:
enrollment_id:
type: string
description: >-
The unique identifier for the enrollment. This must be stored by
partners.
required:
- enrollment_id
PromotionErrorResponse:
type: object
properties:
errors:
type: array
items:
$ref: '#/components/schemas/PromotionError'
description: Errors encountered processing the request
required:
- errors
PromotionError:
type: object
properties:
status:
type: string
description: HTTP status code of the error
code:
type: string
description: Machine-readable error code
title:
type: string
description: Human-readable error title
detail:
type: string
description: Detailed description of the error
required:
- code
- detail
- status
- title
securitySchemes:
OAuth:
type: oauth2
description: >-
The user access token for the user you would like to enroll. See our
[OAuth2 authentication
documentation](https://docs.zapier.com/powered-by-zapier/api-reference/authentication#retrieving-a-user-access-token).
flows:
authorizationCode:
authorizationUrl: https://zapier.com/oauth/authorize/
tokenUrl: https://zapier.com/oauth/token/
refreshUrl: https://zapier.com/oauth/token/
scopes:
promotions:write: Enroll or unenroll accounts into promotions
promotions:read: View usage of promotions you manage on an account
clientCredentials:
tokenUrl: /oauth/token
scopes:
promotions:write: Unenroll accounts from promotions
````
---
# Source: https://docs.zapier.com/platform/build/create.md
> ## Documentation Index
> Fetch the complete documentation index at: https://docs.zapier.com/llms.txt
> Use this file to discover all available pages before exploring further.
# Add a create action
## 1. Add the action settings
* Open the *Actions* tab in Zapier's Platform UI from the sidebar on the left, and select **Add Action**, selecting your action type. New actions are *create* type by default, and they add new data or update existing data to your app.
 **Note**: You cannot change an action type once you click *Save and Continue*
on a new action. If you need to change the action type, delete the action and
recreate it.
* On the Settings page, specify the following:
– **Key**: A unique identifier for this action, used to reference the action inside Zapier. Does not need to be the same identifier as used in your API. Not shown to users.
– **Name**: A human friendly plain text name for this action, typically with a verb such as *Add* or *Create* followed by the name of the item this action will create in your app. The title-case name is shown inside the Zap editor and on Zapier's app directory marketing pages.
– **Noun**: A single noun that describes what this action creates, used by Zapier to auto-generate text in Zaps about your action.
– **Description**: A plain text sentence that describes what the action does and when it should be used. Shown inside the Zap editor and on Zapier's app directory marketing pages. Starts with the phrase “Creates a new”.
– **Visibility Options**: An option to select when this action will be shown. *Shown* is chosen by default. Choose `Hidden` if this action should not be shown to users. `Hidden` is usually selected if you build a *create* action solely to [pair with a search action](/platform/build/search-or-create) but do not want it used on its own.
* Click on the *Save and Continue* button.
## 2. Complete the Input Designer
On the *Input Designer* page, add user [input fields](/platform/build/add-fields) for this action. All action steps *must* include an input form for Zapier to gather the data needed to create or find items in your app. Add at least one input field to your action.
Before building your action's input form, list each piece of data your app needs to create a new item. For example, if building an action to send an email, fields for the email address, subject, and email body would be needed. Your action will likely have several required fields, along with others that are optional, such as for tags or other details.
Add action fields for each piece of data your app needs to create or find this item in your app. Add the fields in the order they're listed in your app, with *required* fields first, for the best user experience.
## 3. Set up the API Configuration
The final page of building your action tells Zapier how to send the data to your API.
A `POST` call populates for *create* actions by default, sending a single item to the provided API endpoint. Zapier then expects a response with an object containing a single item, to be evaluated by [isPlainObject](https://lodash.com/docs#isPlainObject) and parsed into individual fields for use in subsequent Zap steps.
Select the correct API call if your app expects something other than the default, then paste the URL for your API call in the box under *API Endpoint*. Zapier will include each of your input form fields in the *Request Body* automatically.
If your API call expects input data in the core URL, reference any input field's key with the following text, replacing `key` with your field key:
`{{bundle.inputData.key}}`
The defaults on all other settings work for most basic API calls. If you need to configure more options, click *Show Options* to add URL Params, HTTP Headers, set your action to omit empty parameters, or customize the request body. Alternately, switch to [Code Mode](/platform/build/code-mode) to write custom JavaScript code for your action.
**Note**: You cannot change an action type once you click *Save and Continue*
on a new action. If you need to change the action type, delete the action and
recreate it.
* On the Settings page, specify the following:
– **Key**: A unique identifier for this action, used to reference the action inside Zapier. Does not need to be the same identifier as used in your API. Not shown to users.
– **Name**: A human friendly plain text name for this action, typically with a verb such as *Add* or *Create* followed by the name of the item this action will create in your app. The title-case name is shown inside the Zap editor and on Zapier's app directory marketing pages.
– **Noun**: A single noun that describes what this action creates, used by Zapier to auto-generate text in Zaps about your action.
– **Description**: A plain text sentence that describes what the action does and when it should be used. Shown inside the Zap editor and on Zapier's app directory marketing pages. Starts with the phrase “Creates a new”.
– **Visibility Options**: An option to select when this action will be shown. *Shown* is chosen by default. Choose `Hidden` if this action should not be shown to users. `Hidden` is usually selected if you build a *create* action solely to [pair with a search action](/platform/build/search-or-create) but do not want it used on its own.
* Click on the *Save and Continue* button.
## 2. Complete the Input Designer
On the *Input Designer* page, add user [input fields](/platform/build/add-fields) for this action. All action steps *must* include an input form for Zapier to gather the data needed to create or find items in your app. Add at least one input field to your action.
Before building your action's input form, list each piece of data your app needs to create a new item. For example, if building an action to send an email, fields for the email address, subject, and email body would be needed. Your action will likely have several required fields, along with others that are optional, such as for tags or other details.
Add action fields for each piece of data your app needs to create or find this item in your app. Add the fields in the order they're listed in your app, with *required* fields first, for the best user experience.
## 3. Set up the API Configuration
The final page of building your action tells Zapier how to send the data to your API.
A `POST` call populates for *create* actions by default, sending a single item to the provided API endpoint. Zapier then expects a response with an object containing a single item, to be evaluated by [isPlainObject](https://lodash.com/docs#isPlainObject) and parsed into individual fields for use in subsequent Zap steps.
Select the correct API call if your app expects something other than the default, then paste the URL for your API call in the box under *API Endpoint*. Zapier will include each of your input form fields in the *Request Body* automatically.
If your API call expects input data in the core URL, reference any input field's key with the following text, replacing `key` with your field key:
`{{bundle.inputData.key}}`
The defaults on all other settings work for most basic API calls. If you need to configure more options, click *Show Options* to add URL Params, HTTP Headers, set your action to omit empty parameters, or customize the request body. Alternately, switch to [Code Mode](/platform/build/code-mode) to write custom JavaScript code for your action.
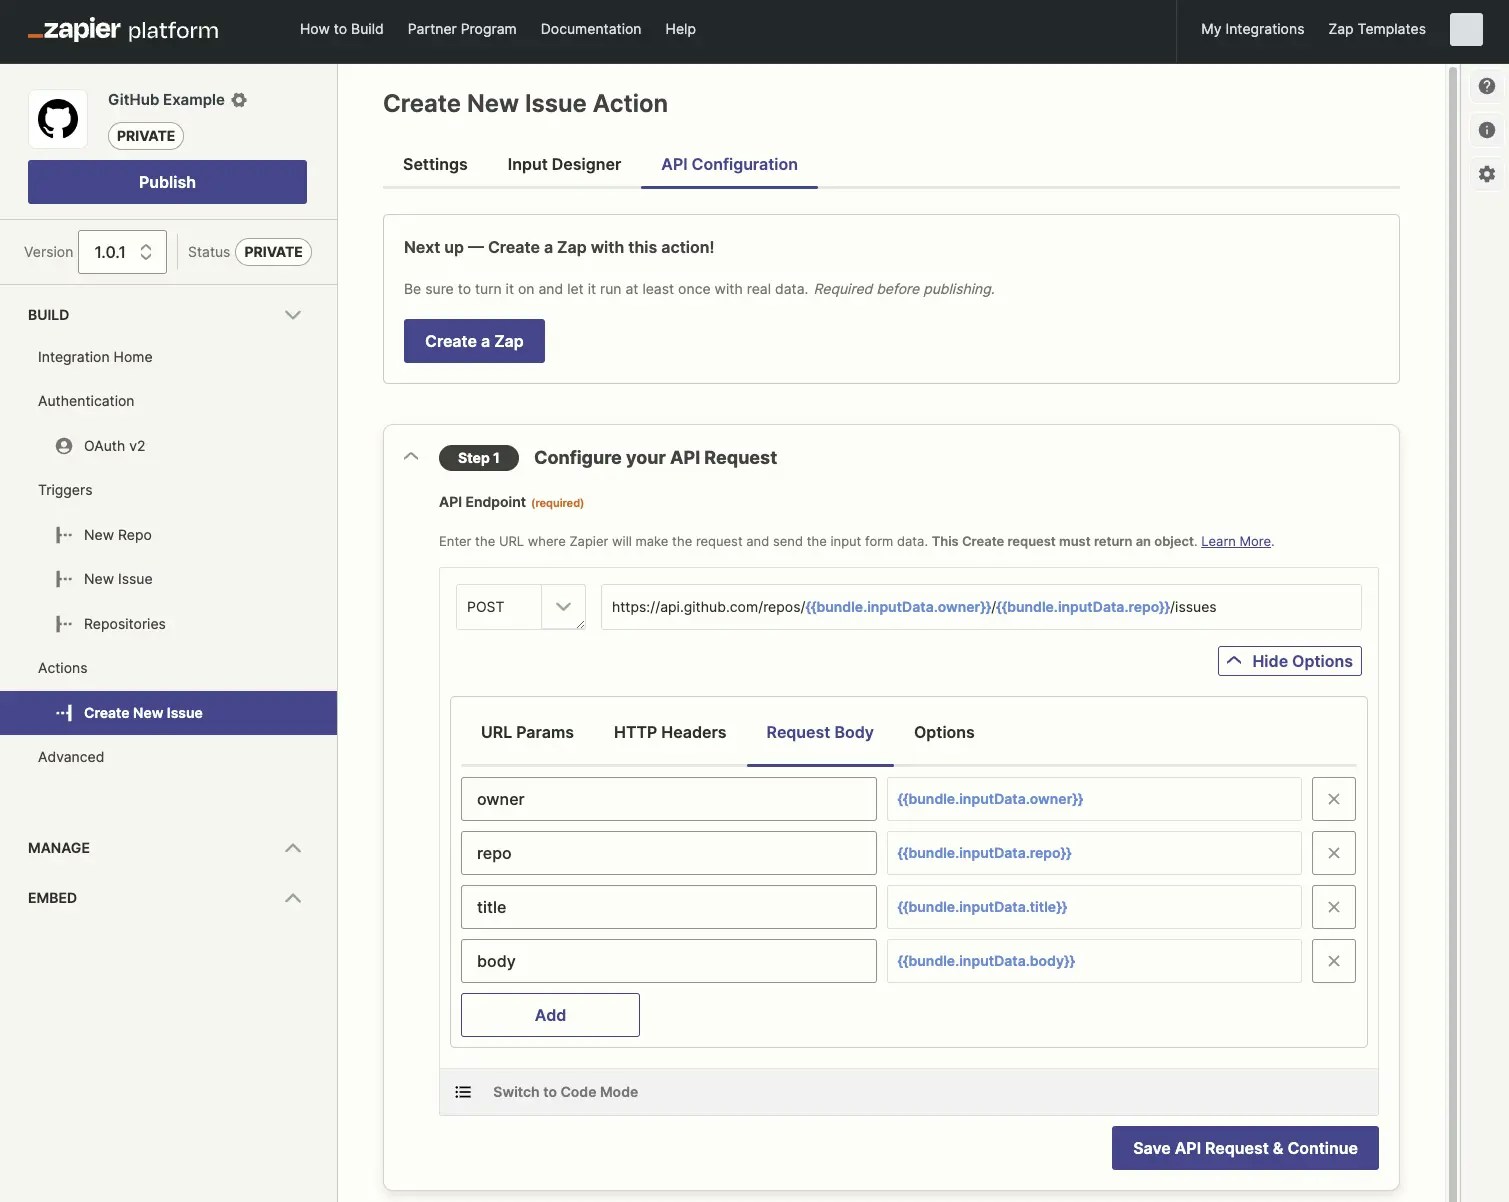 ## 4. Test your API request
Configure test data to [test the *create* action](/platform/build/test-triggers-actions). Note that testing a POST or PUT request will create or update the item in your app.
## 5. Define your output
Define sample data and output fields following [the guide](/platform/build/sample-data).
***
*Need help? [Tell us about your problem](https://developer.zapier.com/contact) and we'll connect you with the right resource or contact support.*
---
# Source: https://docs.zapier.com/platform/reference/crm-app.md
> ## Documentation Index
> Fetch the complete documentation index at: https://docs.zapier.com/llms.txt
> Use this file to discover all available pages before exploring further.
# Zapier integration structure for a CRM app
> CRM (customer relationship management) apps are detailed databases that link contacts with companies, companies with deals, and more.
To add a CRM app integration in the Platform UI:
## Prerequisites
* A [Zapier account](https://zapier.com/sign-up).
* If you haven't used Zapier before, you'll want to learn the basics in our [Zapier Getting Started Guide](https://zapier.com/learn/zapier-quick-start-guide/).
* Familiarity with your app's API documentation and available endpoints.
* Review the [Platform UI Tutorial](/platform/quickstart/ui-tutorial).
## 1. Add triggers for common record types in the CRM
* Check out the [common record types](/platform/quickstart/must-have-triggers-and-actions#crm-customer-relationship-management) used as triggers by other CRM apps.
* Build separate triggers for new and updated records. *Updated* triggers for CRMs are most useful when users are able to specify which field(s) to watch for updates on, instead of triggering on any and all updates.
* Include filter options if your app lets users add custom filters or views. Displaying an optional [dynamic dropdown](/platform/build/field-definitions#dynamic-dropdown) of the user's filters and ordering them by the most recently added is best practice.
## 4. Test your API request
Configure test data to [test the *create* action](/platform/build/test-triggers-actions). Note that testing a POST or PUT request will create or update the item in your app.
## 5. Define your output
Define sample data and output fields following [the guide](/platform/build/sample-data).
***
*Need help? [Tell us about your problem](https://developer.zapier.com/contact) and we'll connect you with the right resource or contact support.*
---
# Source: https://docs.zapier.com/platform/reference/crm-app.md
> ## Documentation Index
> Fetch the complete documentation index at: https://docs.zapier.com/llms.txt
> Use this file to discover all available pages before exploring further.
# Zapier integration structure for a CRM app
> CRM (customer relationship management) apps are detailed databases that link contacts with companies, companies with deals, and more.
To add a CRM app integration in the Platform UI:
## Prerequisites
* A [Zapier account](https://zapier.com/sign-up).
* If you haven't used Zapier before, you'll want to learn the basics in our [Zapier Getting Started Guide](https://zapier.com/learn/zapier-quick-start-guide/).
* Familiarity with your app's API documentation and available endpoints.
* Review the [Platform UI Tutorial](/platform/quickstart/ui-tutorial).
## 1. Add triggers for common record types in the CRM
* Check out the [common record types](/platform/quickstart/must-have-triggers-and-actions#crm-customer-relationship-management) used as triggers by other CRM apps.
* Build separate triggers for new and updated records. *Updated* triggers for CRMs are most useful when users are able to specify which field(s) to watch for updates on, instead of triggering on any and all updates.
* Include filter options if your app lets users add custom filters or views. Displaying an optional [dynamic dropdown](/platform/build/field-definitions#dynamic-dropdown) of the user's filters and ordering them by the most recently added is best practice.
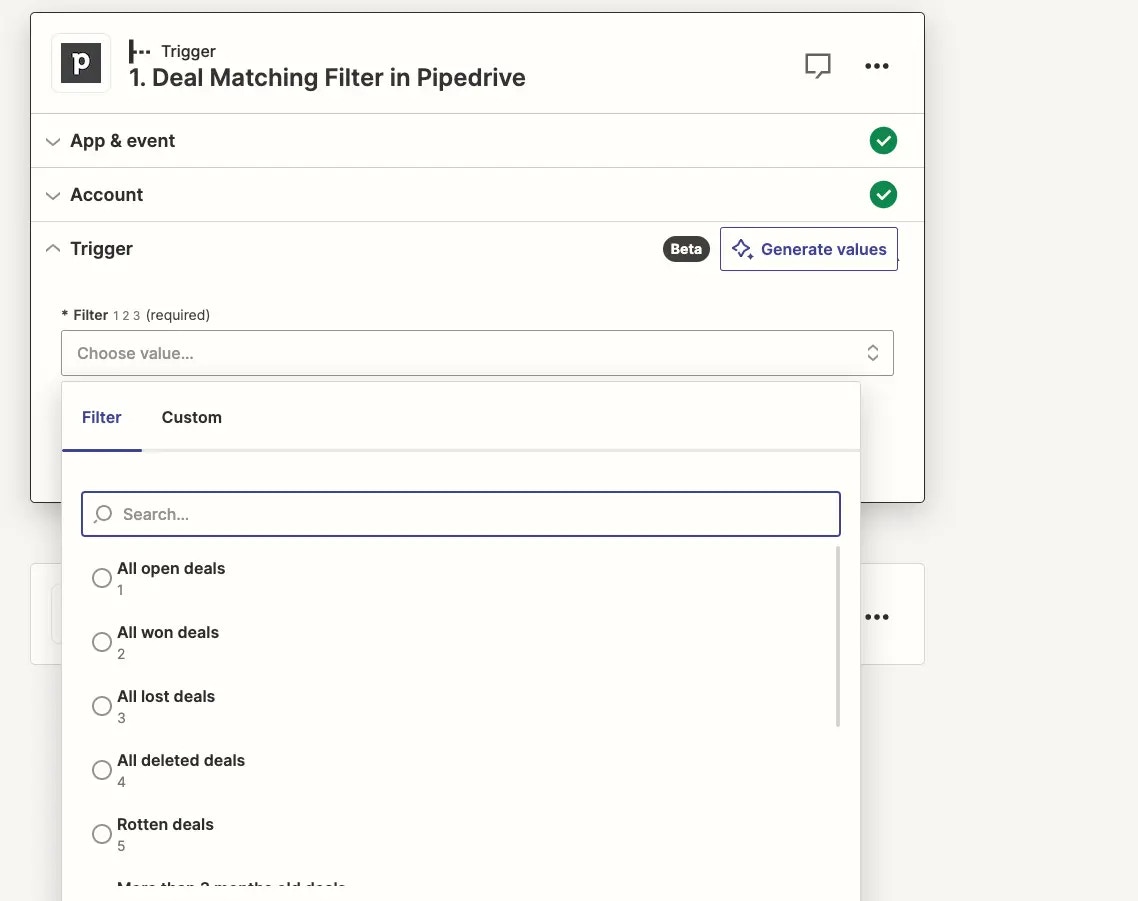 ## 2. Choose trigger type under API Configuration
### REST Hook trigger
* If your app supports webhook subscriptions that can be manipulated through a REST API, use [REST hooks](/platform/build/trigger#rest-hook-trigger) for your trigger to send new records to Zapier as soon as they are added to the CRM.
* Webhook triggers are marked as *Instant* [in the Zap Editor](https://cdn.zappy.app/6b696dfaf34664b181b6df651067cfd3.png).
* When your user has many app records created in a short space of time, webhooks make your integration more robust, preventing the possibility that a high number of new records will exceed the page size of polling results.
* With REST hooks, Zapier won't need to repeatedly poll your API to check for new responses.
### Polling trigger
* When using a Polling trigger, and for the *Perform List* URL for REST Hook triggers, the Polling URL should return the most recent record created or updated (if the trigger is an ‘Updated Record' trigger)
* If there are no recent new records, return an empty array. Zapier will then encourage the user to create a sample and re-test their trigger in the Zap Editor to finish mapping their Zap.
## 3. Additional considerations for Updated Record triggers
* Users expect updated triggers to run whenever a record has new data added, or when relational data is added or removed.
* For REST hook triggers, ensure that when relational data is reapplied to a record, your app sends Zapier that updated record.
* For polling triggers, to account for [deduplication](/platform/build/deduplication), you will need to customize your API call's code to ensure each record has a unique primary key (usually an `id` field). This could mean [copying a unqiue timestamp](/platform/build/deduplication#custom-primary-keys) to the `id` field or [setting `primary` to true](https://github.com/zapier/zapier-platform/blob/main/packages/cli/README.md#how-does-deduplication-work) for some output fields.
### Include linked information in trigger response
* CRM records are one part of a linked ecosystem of data. For example, if your trigger is “New Contact” and newly added contacts are linked to organizations, users expect to see full organization data, too.
* Include both IDs for linked data in the response output so they can be mapped to your app's action steps, as well as human-readable data such as individual fields for their name and contact info.
* If your record API endpoint does not automatically return additional linked data beyond the ID or name of the record, add custom code to your trigger API call to fetch relevant data linked to the record as well.
### Handle custom fields
* Use \[pagination]\((/platform/build/trigger#how-to-use-pagination) to retrieve custom fields a user might expect.
### Handle tags
* Return tags on records as either an array of strings or a comma-delimited list in a single string, for users to be be able to easily map them into other app actions.
## 4. Include common search actions
* Users expect to have searches for common records available for CRM integrations and for those searches to have parity with the fields returned for those same record triggers. For example, a user might have a *New Contact* trigger, and then want to find out more information about the organization the contact is associated with by using a *Find Organization* search. If the *New Contact* trigger only provides the associated organization ID, it doesn't make sense for the *Find Organization* search to only allow searches for the organization name.
* Configure the search to find an existing record, returning it in the same format the trigger returns records to give a consistent experience and allow the data to be used in the same manner in later actions.
* Offer multiple search key and value options where applicable.
* Prevent deduplication problems for unique fields (such as email) though, by offering only a single search query for that field instead of multiple options. This prevents users from searching on a different field, trying to create a new record, and seeing an error that a record with that email already exists.
* If a record cannot be found, do not return an error. Instead return a `200` success response with an empty array. That way, users can pair the search with a *Create* action to let users search for records and create them if they don't exist. Users will see a halted exception instead of an error.
\_ Read more about pairing [searches and creates](/platform/build/search-or-create).
## 5. Include common create actions
* Check out the [common record types](/platform/quickstart/must-have-triggers-and-actions#crm-customer-relationship-management) other CRM apps have create actions for.
* Use the standard *Create* or *Add* naming pattern to show users that this action creates a new record in your app
* Add corresponding *Update* actions with available *Search* actions to make it easier for users to update the correct record.
* Account for linked records in action input fields, so when your app's UI allows users to create a contact and link it to existing companies or stages, the same action is available through Zapier, via a [dynamic dropdown](/platform/build/field-definitions#dynamic-dropdown) to fetch linked record options and let users select them.
* Optionally link a [search connector](https://cdn.zappy.app/103626b1313602fa33c33711ed44ff56.png) to linked record input fields if users need to have the Zap find the correct related record, and map the found ID to the input field. To add that user prompt you'll need to work in the [Platform CLI](https://github.com/zapier/zapier-platform/blob/main/packages/cli/README.md#search-powered-fields).
* Do not have a single action create multiple records. When a user creates a new contact through Zapier, this should only create new contacts, and should not also create other linked records at the same time. Rather include a separate action to create the other linked record, along with a contact update action to link the contact after the other record is created. This reduces the chance for errors and record redundancy.
* Account for [custom fields in action input fields](/platform/build/dynamic-field), displaying the human-readable label instead of the internal ID.
* The first version of your integration doesn't need to have every possible action available, but add compatible functionality users expect or request in future updates.
## 6. Support in-app workflows
* If new records created in your app get automatically added to in-app workflows, sequences, follow-ups, or campaigns, make sure records created via the API by Zaps will also get automatically added to workflows.
* Optionally add a boolean field to your action input fields to let users select if they want this contact added to a workflow, or include a [dynamic dropdown](/platform/build/field-definitions#dynamic-dropdown) to select the workflow they want.
## 7. Test your triggers and actions
Make Zaps with the following criteria to ensure your app integration works as expected:
* Add a record in your app with many custom fields, and create a Zap to watch for new records to make sure each field is included when it triggers and is mappable in subsequent steps
* Create a multi-step Zap with at least one trigger, search, and action step where every step uses your app integration, to check the ease of linking one step to another.
* If you've included the option to link records in your integration's actions, verify these are linked correctly when creating records via a Zap.
***
*Need help? [Tell us about your problem](https://developer.zapier.com/contact) and we'll connect you with the right resource or contact support.*
---
# Source: https://docs.zapier.com/platform/reference/custom-actions-api-requests.md
> ## Documentation Index
> Fetch the complete documentation index at: https://docs.zapier.com/llms.txt
> Use this file to discover all available pages before exploring further.
# Custom actions and API requests actions
> [Custom Actions](https://help.zapier.com/hc/en-us/articles/16276574838925-App-Extensions-in-Zapier) and [API Requests](https://help.zapier.com/hc/en-us/articles/12899607716493-Set-up-an-API-request-action#prerequisites-0-0) are features that have been developed internally at Zapier, designed to help our mutual customers achieve the most value out of your app integration.
## What are Custom Actions and API Requests?
Custom Actions and API Requests enable Zapier users to build raw API requests with public APIs while leveraging your app integration's existing authentication protocol.
Since the launch, we've seen that the feature has been embraced and users are increasingly building and testing Custom Actions and API Requests. As customers build these requests, they may experience certain challenges with them – issues related to client permissions, malformed API URLs, or bad requests, for instance. These challenges, however, are neither unique nor unexpected, as they occur consistently in other similar settings like Zapier's built-in [Webhooks functionality](https://help.zapier.com/hc/en-us/sections/16074864820109-Webhooks-Code).
The Zapier support team stands ready to help users understand the feature and ensure it works as anticipated. However, it is essential for the user to correct and resolve the API error themselves, which is analogous to Zapier's support policy for Webhooks. This empowers users to receive the best experience from the platform while strengthening their skills.
## Can I enable Custom Actions and API Requests for my integration if it's not currently enabled?
As of July 1, 2024, we are not supporting Custom Actions or API Requests for new integrations. However, we are committed to enhancing the experience for all users. If you are interested in enabling Custom Actions or API Requests for your integration, we encourage you to contact our Platform Support Team via our [contact form](https://developer.zapier.com/contact). Your feedback is invaluable and helps us understand the significance of this feature for our partners.
## Can I opt-out of Custom Actions and API Requests if it's already enabled?
We currently aren't supporting an opt-out initiative. However, we are committed to bettering experiences for every user and encourage you to voice your concerns or feedback regarding this feature. Should you continue to experience any challenges or have specific pain points you're encountering, we would be glad to work on those to improve your experience.
We understand that you may have apprehensions regarding the potential support load, especially with respect to users building their own API requests. Be assured, we are dedicated to helping alleviate any impacts that this may cause. The primary goal is to empower users with more control over their API requests, presenting them with a richer experience and a superior level of customization. We believe our users derive significant value from these direct API requests.
Do not hesitate to reach out with more questions and feedback via our [contact form](https://developer.zapier.com/contact). We are always open to dialogue aimed at improving our services and our working relationship with our partners.
***
*Need help? [Tell us about your problem](https://developer.zapier.com/contact) and we'll connect you with the right resource or contact support.*
---
# Source: https://docs.zapier.com/platform/build/deduplication.md
> ## Documentation Index
> Fetch the complete documentation index at: https://docs.zapier.com/llms.txt
> Use this file to discover all available pages before exploring further.
# How deduplication works in Zapier
> Zapier automatically deduplicates incoming trigger data for your integration, so that Zaps do not run multiple times on the same data. Consider the following requirements for your “New Item” and “Updated Item” triggers to work as users expect.
* Provide a unique primary key.
* By default, the field with the key `id` is used as the primary key.
* Alternatively, if you're using the CLI, you can choose other fields as the primary key by enabling `primary` in `outputFields`. See [more information](https://github.com/zapier/zapier-platform/blob/main/packages/cli/README.md#how-does-deduplication-work) in the CLI docs.
* Sort reverse-chronologically by time created.
The API endpoint must list new or updated items in an array sorted in reverse chronological order.
[Polling](/platform/build/trigger) usually returns many results, most of which Zapier has seen before. Since a Zap should not trigger multiple times when an item in your app exists in multiple distinct polls, the data must be deduplicated.
For example, say your endpoint for new items returns a list of tasks:
```json theme={null}
[
{
"id": 7,
"created": "Mon, 25 Jun 2023 16:41:54 -0400",
"list_id": 1,
"description": "integrate our api with zapier",
"complete": false
},
{
"id": 6,
"created": "Mon, 25 Jun 2023 16:41:45 -0400",
"list_id": 1,
"description": "get published in zapier library",
"complete": false
}
]
```
The following assumes you're using the default primary key, the `id` field. When a Zap is first turned on, Zapier makes an initial call to your API to retrieve existing data, and caches and stores each `id` field in our database. When the Zap is turned off, that list is cleared.
Active Zaps then [poll at an interval](https://help.zapier.com/hc/en-us/articles/8496181725453#01H8C8M008GXFT36C42W1157P0) (based on a [customer's plan](https://zapier.com/pricing)) and compare the `id`s to all those seen before, trigger on new items, and update the list of seen `id`s.
Now let's say the user created a new task:
```json theme={null}
[
{
"id": 8,
"created": "Mon, 25 Jun 2023 16:42:09 -0400",
"list_id": 1,
"description": "re-do our api to support webhooks",
"complete": false
},
{
"id": 7,
"created": "Mon, 25 Jun 2023 16:41:54 -0400",
"list_id": 1,
"description": "integrate our api with zapier",
"complete": false
},
{
"id": 6,
"created": "Mon, 25 Jun 2023 16:41:45 -0400",
"list_id": 1,
"description": "get published in zapier library",
"complete": false
}
]
```
On the next poll after the new task is created, your API returns all tasks, but only the first task with `id` equal to `8` will be seen as a new item. That particular JSON object will then trigger the user's Zap and complete any subsequent action steps the user has defined. The essence of deduplication is that the other `id`s in the poll, `6` and `7` will be ignored, since their `id`s have been seen in previous polls.
In order for deduplication to work, the `id` field should always be supplied and unique amongst all items in the result.
Your API must return results in reverse-chronological order to make sure new/updated items can be found on the first page of results, as Zapier polling triggers don't automatically fetch additional pages. If your API lists items in a different order by default, but allows for sorting, include an order or sorting field in your polling request to ensure newest records are returned on the first page of results. [Github is a great example](https://docs.github.com/en/rest/issues/issues?apiVersion=2022-11-28#list-repository-issues) of an API that supports sorting on multiple fields in the `asc` or `desc` direction.
## Re-ordering returning items
If your API cannot order its results in reverse-chronological order, you can use [Code Mode](/platform/build/code-mode) to make additional requests, if necessary.
One possible scenario could be:
1. Fetch the first page, containing the oldest items, but also the total number of pages.
2. Fetch the last page and reverse the order of the items before returning results in an array.
When adding additional requests to your custom code, all requests and processing code for a trigger must [finish within 30 seconds](/platform/build/operating-constraints#timeouts-triggers). It is not recommended to attempt to fetch all pages of results.
If the items your API returns do not have an `id` field or you're adding an Updated Item trigger, you will use [Code Mode](/platform/build/code-mode) to modify the API response.
## Custom primary keys
In older, [legacy Zapier Web Builder apps](/platform/manage/versions-legacy), Zapier guessed what fields made a unique key if `id` wasn't present. It is now required that you define one or more fields as the primary key.
By default, Zapier uses the field with the key `id` as the primary key if no `outputFields` has `primary: true`. The `id` field would be required in this case. Otherwise, your trigger would run into an error at runtime. If your API's items have a differently-named unique field, adapt this code snippet to ensure this test passes:
```javascript theme={null}
// ...
let items = response.data.items; // or response.json.items if you're using core v9 or older
return items.map((item) => {
item.id = item.contactId;
return item;
});
```
Alternatively, if you're using the CLI, you can use non-id fields as the primary key. See [“How does deduplication work?”](https://github.com/zapier/zapier-platform/blob/main/packages/cli/README.md#how-does-deduplication-work) in the CLI docs for example code.
## Updated Item triggers
When triggering on updated items, you'll want to define the `id` field to be used for deduplication. Assuming your task API has an endpoint that can return tasks sorted by `updatedAt` in descending direction, here's example code to incorporate the `updatedAt` value with the `id`, so that Zapier recognizes a new update as a new item. Assuming that you have configured `options` with the appropriate API request URL and parameters:
```javascript theme={null}
return z.request(options).then((response) => {
response.throwForStatus();
const results = response.json;
results.forEach(function (result) {
result.originalId = result.id;
result.id = result.id + "-" + result.updatedAt;
});
return results;
});
```
Notice how the code preserves the original `id` value before setting `id` to a new combined value that is unique for every update of a task. This is useful to ensure that the original ID can still be used for other purposes, such as performing a search or associating records together.
Alternatively, if you're using the CLI, you can set `primary: true` for the `id` and `updatedAt` fields. See [“How does deduplication work?”](https://github.com/zapier/zapier-platform/blob/main/packages/cli/README.md#how-does-deduplication-work) in the CLI docs for example code.
***
*Need help? [Tell us about your problem](https://developer.zapier.com/contact) and we'll connect you with the right resource or contact support.*
---
# Source: https://docs.zapier.com/powered-by-zapier/api-reference/promotions/delete-enrollment.md
> ## Documentation Index
> Fetch the complete documentation index at: https://docs.zapier.com/llms.txt
> Use this file to discover all available pages before exploring further.
# Delete Promotion Enrollment
> Unenroll an account from a promotion.
Endpoint available to Partners only.
The request must be authenticated by an app access token the
Partner has received using the Client Credentials flow.
#### OAuth
This endpoint requires the `promotions:write` OAuth scope.
This API is [rate limited](/powered-by-zapier/api-reference/rate-limiting).
## OpenAPI
````yaml powered-by-zapier/api-reference/promotions-openapi.yaml delete /v2/promotions/{enrollment_id}
openapi: 3.1.0
info:
title: Powered by Zapier Promotions API
version: promotions
description: >-
The API to define promotions, powered by Zapier. See
https://docs.zapier.com/powered-by-zapier/introduction for more information.
contact:
name: Partner Sharing
servers:
- url: https://api.zapier.com
description: Production
security: []
tags:
- name: Promotions
description: Operations related to managing Promotions
- name: Experimental
description: >-
Operations that are not to be considered finalized, and are subject to
change
paths:
/v2/promotions/{enrollment_id}:
delete:
tags:
- Promotions
- Experimental
description: |-
Unenroll an account from a promotion.
Endpoint available to Partners only.
The request must be authenticated by an app access token the
Partner has received using the Client Credentials flow.
#### OAuth
This endpoint requires the `promotions:write` OAuth scope.
operationId: root_destroy
parameters:
- in: path
name: enrollment_id
schema:
type: string
required: true
responses:
'204':
description: No response body
'401':
content:
application/json:
schema:
$ref: '#/components/schemas/PromotionErrorResponse'
examples:
Access:
value:
errors:
- status: '401'
code: not_authenticated
title: User Not Authenticated
detail: >-
User must be authenticated to access this resource. No
valid user access token was provided.
description: >-
Access denied: User does not have permission for enrollment_id:
enroll_67890
'403':
content:
application/json:
schema:
$ref: '#/components/schemas/PromotionErrorResponse'
examples:
Forbidden:
value:
errors:
- status: '403'
code: permission_denied
title: Permission Denied
detail: You do not have permission to perform this action.
description: Forbidden - User lacks permission to access this location
'429':
headers:
Retry-After:
schema:
type: string
format: uri
description: Indicates when to retry the request
X-RateLimit-Limit:
schema:
type: string
format: uri
description: >-
The maximum number of requests you're permitted to make per
hour.
X-RateLimit-Remaining:
schema:
type: string
format: uri
description: >-
The number of requests remaining in the current rate limit
window.
X-RateLimit-Reset:
schema:
type: string
format: uri
description: >-
The time at which the current rate limit window resets in UTC
epoch seconds.
content:
application/json:
schema:
$ref: '#/components/schemas/PromotionErrorResponse'
description: ''
'503':
headers:
Retry-After:
schema:
type: string
format: uri
description: Indicates when to retry the request
X-RateLimit-Limit:
schema:
type: string
format: uri
description: >-
The maximum number of requests you're permitted to make per
hour.
X-RateLimit-Remaining:
schema:
type: string
format: uri
description: >-
The number of requests remaining in the current rate limit
window.
X-RateLimit-Reset:
schema:
type: string
format: uri
description: >-
The time at which the current rate limit window resets in UTC
epoch seconds.
content:
application/json:
schema:
$ref: '#/components/schemas/PromotionErrorResponse'
description: ''
security:
- OAuth:
- promotions:write
components:
schemas:
PromotionErrorResponse:
type: object
properties:
errors:
type: array
items:
$ref: '#/components/schemas/PromotionError'
description: Errors encountered processing the request
required:
- errors
PromotionError:
type: object
properties:
status:
type: string
description: HTTP status code of the error
code:
type: string
description: Machine-readable error code
title:
type: string
description: Human-readable error title
detail:
type: string
description: Detailed description of the error
required:
- code
- detail
- status
- title
securitySchemes:
OAuth:
type: oauth2
description: >-
The user access token for the user you would like to enroll. See our
[OAuth2 authentication
documentation](https://docs.zapier.com/powered-by-zapier/api-reference/authentication#retrieving-a-user-access-token).
flows:
authorizationCode:
authorizationUrl: https://zapier.com/oauth/authorize/
tokenUrl: https://zapier.com/oauth/token/
refreshUrl: https://zapier.com/oauth/token/
scopes:
promotions:write: Enroll or unenroll accounts into promotions
promotions:read: View usage of promotions you manage on an account
clientCredentials:
tokenUrl: /oauth/token
scopes:
promotions:write: Unenroll accounts from promotions
````
---
# Source: https://docs.zapier.com/platform/manage/deprecate.md
> ## Documentation Index
> Fetch the complete documentation index at: https://docs.zapier.com/llms.txt
> Use this file to discover all available pages before exploring further.
# Deprecate or delete a version
> Deprecation is an optional process that allows you to set a date from which an integration version cannot be used anymore. Zapier is normally a “set it and forget it” experience for users, so use this feature carefully. Only if the version will no longer function, should it be deprecated. Please note that deprecating a version is significantly disruptive to our mutual users if a migration to a different version is not possible.
When users use any but the promoted version, they will [see the version displayed](https://help.zapier.com/hc/en-us/articles/18755649454989-App-versions-in-Zapier) and be able to manually update to the promoted version.
## What happens after setting a version to deprecate
The deprecation date must be between 3 weeks and 1 year in the future. We won't communicate the deprecation until 2 weeks before the deprecation date. This gives you time to migrate users to a newer version, before we start notifying them that they need to manually migrate.
### 1. Email notification
A notification email will be sent exactly 14 days before the configured deprecation date. This email includes the deprecation reason that newer versions of the Zapier CLI ask you for. We do recommend supplementing these automated messages by also notifying your general user base through in-app announcements or email marketing campaigns. For privacy reasons, Zapier cannot provide you with an email list of users of your integration.
### 2. Deprecation date reached
* Zaps that haven't been updated will be automatically paused.
* A second email, titled “X Zaps paused over deprecated apps,” will be sent out to those users. Customizing this email is not possible.
* Any attempts to test triggers or actions on the deprecated version will result in an error, and Zaps that use it cannot be enabled.
* The deprecated version will be labelled as “Deprecated” in the Zap editor, with a prompt for users to update to the latest version.
### 3. Post-deprecation
After the deprecation date, the version will still be visible in the Versions page for your future reference. Users will not be able to see the version once they select a different version in their Zaps.
## Deprecate a version with Platform UI
To deprecate an integration version:
1. Log into the [Platform UI](https://zapier.com/app/developer).
2. Select your **integration**.
3. In the *Manage* section in the left sidebar, click **Version**.
4. Click the **three dot** icon in line with the integration version you want to deprecate.
5. Click **Deprecate**.
6. In the dialog box, add the **Deprecation Reason** and **Deprecation Date**. You can set a deprecation date anytime between 3 weeks and 1 year from the current date. The deprecation reason will be used in user notifications.
7. Click **Deprecate**.
8. Click **Close**
## Deprecate a version with Platform CLI
To deprecate an integration version use the command `zapier-platform deprecate` (or deprecated `zapier deprecate`). Learn more about [Platform CLI commands](https://github.com/zapier/zapier-platform/blob/main/packages/cli/docs/cli.md#deprecate).
## Deleting deprecated versions
After your version has been deprecated, you have the option to delete versions entirely. Exercise this option with extreme caution. Deleting a version makes it permanently inaccessible, both to you and to your users. Deleted versions cannot be restored by Zapier Developer Support. Deletion should be a last resort, used only when you are certain that the version will never be needed again.
Deletion is also only possible when 0 users remain on a version. The count of users on the *Versions* page includes live Zaps only. If you're seeing the error `Unable to delete app version`, this can be caused by users on that version not included in the visible count (paused Zaps, app authentications for example).
## 2. Choose trigger type under API Configuration
### REST Hook trigger
* If your app supports webhook subscriptions that can be manipulated through a REST API, use [REST hooks](/platform/build/trigger#rest-hook-trigger) for your trigger to send new records to Zapier as soon as they are added to the CRM.
* Webhook triggers are marked as *Instant* [in the Zap Editor](https://cdn.zappy.app/6b696dfaf34664b181b6df651067cfd3.png).
* When your user has many app records created in a short space of time, webhooks make your integration more robust, preventing the possibility that a high number of new records will exceed the page size of polling results.
* With REST hooks, Zapier won't need to repeatedly poll your API to check for new responses.
### Polling trigger
* When using a Polling trigger, and for the *Perform List* URL for REST Hook triggers, the Polling URL should return the most recent record created or updated (if the trigger is an ‘Updated Record' trigger)
* If there are no recent new records, return an empty array. Zapier will then encourage the user to create a sample and re-test their trigger in the Zap Editor to finish mapping their Zap.
## 3. Additional considerations for Updated Record triggers
* Users expect updated triggers to run whenever a record has new data added, or when relational data is added or removed.
* For REST hook triggers, ensure that when relational data is reapplied to a record, your app sends Zapier that updated record.
* For polling triggers, to account for [deduplication](/platform/build/deduplication), you will need to customize your API call's code to ensure each record has a unique primary key (usually an `id` field). This could mean [copying a unqiue timestamp](/platform/build/deduplication#custom-primary-keys) to the `id` field or [setting `primary` to true](https://github.com/zapier/zapier-platform/blob/main/packages/cli/README.md#how-does-deduplication-work) for some output fields.
### Include linked information in trigger response
* CRM records are one part of a linked ecosystem of data. For example, if your trigger is “New Contact” and newly added contacts are linked to organizations, users expect to see full organization data, too.
* Include both IDs for linked data in the response output so they can be mapped to your app's action steps, as well as human-readable data such as individual fields for their name and contact info.
* If your record API endpoint does not automatically return additional linked data beyond the ID or name of the record, add custom code to your trigger API call to fetch relevant data linked to the record as well.
### Handle custom fields
* Use \[pagination]\((/platform/build/trigger#how-to-use-pagination) to retrieve custom fields a user might expect.
### Handle tags
* Return tags on records as either an array of strings or a comma-delimited list in a single string, for users to be be able to easily map them into other app actions.
## 4. Include common search actions
* Users expect to have searches for common records available for CRM integrations and for those searches to have parity with the fields returned for those same record triggers. For example, a user might have a *New Contact* trigger, and then want to find out more information about the organization the contact is associated with by using a *Find Organization* search. If the *New Contact* trigger only provides the associated organization ID, it doesn't make sense for the *Find Organization* search to only allow searches for the organization name.
* Configure the search to find an existing record, returning it in the same format the trigger returns records to give a consistent experience and allow the data to be used in the same manner in later actions.
* Offer multiple search key and value options where applicable.
* Prevent deduplication problems for unique fields (such as email) though, by offering only a single search query for that field instead of multiple options. This prevents users from searching on a different field, trying to create a new record, and seeing an error that a record with that email already exists.
* If a record cannot be found, do not return an error. Instead return a `200` success response with an empty array. That way, users can pair the search with a *Create* action to let users search for records and create them if they don't exist. Users will see a halted exception instead of an error.
\_ Read more about pairing [searches and creates](/platform/build/search-or-create).
## 5. Include common create actions
* Check out the [common record types](/platform/quickstart/must-have-triggers-and-actions#crm-customer-relationship-management) other CRM apps have create actions for.
* Use the standard *Create* or *Add* naming pattern to show users that this action creates a new record in your app
* Add corresponding *Update* actions with available *Search* actions to make it easier for users to update the correct record.
* Account for linked records in action input fields, so when your app's UI allows users to create a contact and link it to existing companies or stages, the same action is available through Zapier, via a [dynamic dropdown](/platform/build/field-definitions#dynamic-dropdown) to fetch linked record options and let users select them.
* Optionally link a [search connector](https://cdn.zappy.app/103626b1313602fa33c33711ed44ff56.png) to linked record input fields if users need to have the Zap find the correct related record, and map the found ID to the input field. To add that user prompt you'll need to work in the [Platform CLI](https://github.com/zapier/zapier-platform/blob/main/packages/cli/README.md#search-powered-fields).
* Do not have a single action create multiple records. When a user creates a new contact through Zapier, this should only create new contacts, and should not also create other linked records at the same time. Rather include a separate action to create the other linked record, along with a contact update action to link the contact after the other record is created. This reduces the chance for errors and record redundancy.
* Account for [custom fields in action input fields](/platform/build/dynamic-field), displaying the human-readable label instead of the internal ID.
* The first version of your integration doesn't need to have every possible action available, but add compatible functionality users expect or request in future updates.
## 6. Support in-app workflows
* If new records created in your app get automatically added to in-app workflows, sequences, follow-ups, or campaigns, make sure records created via the API by Zaps will also get automatically added to workflows.
* Optionally add a boolean field to your action input fields to let users select if they want this contact added to a workflow, or include a [dynamic dropdown](/platform/build/field-definitions#dynamic-dropdown) to select the workflow they want.
## 7. Test your triggers and actions
Make Zaps with the following criteria to ensure your app integration works as expected:
* Add a record in your app with many custom fields, and create a Zap to watch for new records to make sure each field is included when it triggers and is mappable in subsequent steps
* Create a multi-step Zap with at least one trigger, search, and action step where every step uses your app integration, to check the ease of linking one step to another.
* If you've included the option to link records in your integration's actions, verify these are linked correctly when creating records via a Zap.
***
*Need help? [Tell us about your problem](https://developer.zapier.com/contact) and we'll connect you with the right resource or contact support.*
---
# Source: https://docs.zapier.com/platform/reference/custom-actions-api-requests.md
> ## Documentation Index
> Fetch the complete documentation index at: https://docs.zapier.com/llms.txt
> Use this file to discover all available pages before exploring further.
# Custom actions and API requests actions
> [Custom Actions](https://help.zapier.com/hc/en-us/articles/16276574838925-App-Extensions-in-Zapier) and [API Requests](https://help.zapier.com/hc/en-us/articles/12899607716493-Set-up-an-API-request-action#prerequisites-0-0) are features that have been developed internally at Zapier, designed to help our mutual customers achieve the most value out of your app integration.
## What are Custom Actions and API Requests?
Custom Actions and API Requests enable Zapier users to build raw API requests with public APIs while leveraging your app integration's existing authentication protocol.
Since the launch, we've seen that the feature has been embraced and users are increasingly building and testing Custom Actions and API Requests. As customers build these requests, they may experience certain challenges with them – issues related to client permissions, malformed API URLs, or bad requests, for instance. These challenges, however, are neither unique nor unexpected, as they occur consistently in other similar settings like Zapier's built-in [Webhooks functionality](https://help.zapier.com/hc/en-us/sections/16074864820109-Webhooks-Code).
The Zapier support team stands ready to help users understand the feature and ensure it works as anticipated. However, it is essential for the user to correct and resolve the API error themselves, which is analogous to Zapier's support policy for Webhooks. This empowers users to receive the best experience from the platform while strengthening their skills.
## Can I enable Custom Actions and API Requests for my integration if it's not currently enabled?
As of July 1, 2024, we are not supporting Custom Actions or API Requests for new integrations. However, we are committed to enhancing the experience for all users. If you are interested in enabling Custom Actions or API Requests for your integration, we encourage you to contact our Platform Support Team via our [contact form](https://developer.zapier.com/contact). Your feedback is invaluable and helps us understand the significance of this feature for our partners.
## Can I opt-out of Custom Actions and API Requests if it's already enabled?
We currently aren't supporting an opt-out initiative. However, we are committed to bettering experiences for every user and encourage you to voice your concerns or feedback regarding this feature. Should you continue to experience any challenges or have specific pain points you're encountering, we would be glad to work on those to improve your experience.
We understand that you may have apprehensions regarding the potential support load, especially with respect to users building their own API requests. Be assured, we are dedicated to helping alleviate any impacts that this may cause. The primary goal is to empower users with more control over their API requests, presenting them with a richer experience and a superior level of customization. We believe our users derive significant value from these direct API requests.
Do not hesitate to reach out with more questions and feedback via our [contact form](https://developer.zapier.com/contact). We are always open to dialogue aimed at improving our services and our working relationship with our partners.
***
*Need help? [Tell us about your problem](https://developer.zapier.com/contact) and we'll connect you with the right resource or contact support.*
---
# Source: https://docs.zapier.com/platform/build/deduplication.md
> ## Documentation Index
> Fetch the complete documentation index at: https://docs.zapier.com/llms.txt
> Use this file to discover all available pages before exploring further.
# How deduplication works in Zapier
> Zapier automatically deduplicates incoming trigger data for your integration, so that Zaps do not run multiple times on the same data. Consider the following requirements for your “New Item” and “Updated Item” triggers to work as users expect.
* Provide a unique primary key.
* By default, the field with the key `id` is used as the primary key.
* Alternatively, if you're using the CLI, you can choose other fields as the primary key by enabling `primary` in `outputFields`. See [more information](https://github.com/zapier/zapier-platform/blob/main/packages/cli/README.md#how-does-deduplication-work) in the CLI docs.
* Sort reverse-chronologically by time created.
The API endpoint must list new or updated items in an array sorted in reverse chronological order.
[Polling](/platform/build/trigger) usually returns many results, most of which Zapier has seen before. Since a Zap should not trigger multiple times when an item in your app exists in multiple distinct polls, the data must be deduplicated.
For example, say your endpoint for new items returns a list of tasks:
```json theme={null}
[
{
"id": 7,
"created": "Mon, 25 Jun 2023 16:41:54 -0400",
"list_id": 1,
"description": "integrate our api with zapier",
"complete": false
},
{
"id": 6,
"created": "Mon, 25 Jun 2023 16:41:45 -0400",
"list_id": 1,
"description": "get published in zapier library",
"complete": false
}
]
```
The following assumes you're using the default primary key, the `id` field. When a Zap is first turned on, Zapier makes an initial call to your API to retrieve existing data, and caches and stores each `id` field in our database. When the Zap is turned off, that list is cleared.
Active Zaps then [poll at an interval](https://help.zapier.com/hc/en-us/articles/8496181725453#01H8C8M008GXFT36C42W1157P0) (based on a [customer's plan](https://zapier.com/pricing)) and compare the `id`s to all those seen before, trigger on new items, and update the list of seen `id`s.
Now let's say the user created a new task:
```json theme={null}
[
{
"id": 8,
"created": "Mon, 25 Jun 2023 16:42:09 -0400",
"list_id": 1,
"description": "re-do our api to support webhooks",
"complete": false
},
{
"id": 7,
"created": "Mon, 25 Jun 2023 16:41:54 -0400",
"list_id": 1,
"description": "integrate our api with zapier",
"complete": false
},
{
"id": 6,
"created": "Mon, 25 Jun 2023 16:41:45 -0400",
"list_id": 1,
"description": "get published in zapier library",
"complete": false
}
]
```
On the next poll after the new task is created, your API returns all tasks, but only the first task with `id` equal to `8` will be seen as a new item. That particular JSON object will then trigger the user's Zap and complete any subsequent action steps the user has defined. The essence of deduplication is that the other `id`s in the poll, `6` and `7` will be ignored, since their `id`s have been seen in previous polls.
In order for deduplication to work, the `id` field should always be supplied and unique amongst all items in the result.
Your API must return results in reverse-chronological order to make sure new/updated items can be found on the first page of results, as Zapier polling triggers don't automatically fetch additional pages. If your API lists items in a different order by default, but allows for sorting, include an order or sorting field in your polling request to ensure newest records are returned on the first page of results. [Github is a great example](https://docs.github.com/en/rest/issues/issues?apiVersion=2022-11-28#list-repository-issues) of an API that supports sorting on multiple fields in the `asc` or `desc` direction.
## Re-ordering returning items
If your API cannot order its results in reverse-chronological order, you can use [Code Mode](/platform/build/code-mode) to make additional requests, if necessary.
One possible scenario could be:
1. Fetch the first page, containing the oldest items, but also the total number of pages.
2. Fetch the last page and reverse the order of the items before returning results in an array.
When adding additional requests to your custom code, all requests and processing code for a trigger must [finish within 30 seconds](/platform/build/operating-constraints#timeouts-triggers). It is not recommended to attempt to fetch all pages of results.
If the items your API returns do not have an `id` field or you're adding an Updated Item trigger, you will use [Code Mode](/platform/build/code-mode) to modify the API response.
## Custom primary keys
In older, [legacy Zapier Web Builder apps](/platform/manage/versions-legacy), Zapier guessed what fields made a unique key if `id` wasn't present. It is now required that you define one or more fields as the primary key.
By default, Zapier uses the field with the key `id` as the primary key if no `outputFields` has `primary: true`. The `id` field would be required in this case. Otherwise, your trigger would run into an error at runtime. If your API's items have a differently-named unique field, adapt this code snippet to ensure this test passes:
```javascript theme={null}
// ...
let items = response.data.items; // or response.json.items if you're using core v9 or older
return items.map((item) => {
item.id = item.contactId;
return item;
});
```
Alternatively, if you're using the CLI, you can use non-id fields as the primary key. See [“How does deduplication work?”](https://github.com/zapier/zapier-platform/blob/main/packages/cli/README.md#how-does-deduplication-work) in the CLI docs for example code.
## Updated Item triggers
When triggering on updated items, you'll want to define the `id` field to be used for deduplication. Assuming your task API has an endpoint that can return tasks sorted by `updatedAt` in descending direction, here's example code to incorporate the `updatedAt` value with the `id`, so that Zapier recognizes a new update as a new item. Assuming that you have configured `options` with the appropriate API request URL and parameters:
```javascript theme={null}
return z.request(options).then((response) => {
response.throwForStatus();
const results = response.json;
results.forEach(function (result) {
result.originalId = result.id;
result.id = result.id + "-" + result.updatedAt;
});
return results;
});
```
Notice how the code preserves the original `id` value before setting `id` to a new combined value that is unique for every update of a task. This is useful to ensure that the original ID can still be used for other purposes, such as performing a search or associating records together.
Alternatively, if you're using the CLI, you can set `primary: true` for the `id` and `updatedAt` fields. See [“How does deduplication work?”](https://github.com/zapier/zapier-platform/blob/main/packages/cli/README.md#how-does-deduplication-work) in the CLI docs for example code.
***
*Need help? [Tell us about your problem](https://developer.zapier.com/contact) and we'll connect you with the right resource or contact support.*
---
# Source: https://docs.zapier.com/powered-by-zapier/api-reference/promotions/delete-enrollment.md
> ## Documentation Index
> Fetch the complete documentation index at: https://docs.zapier.com/llms.txt
> Use this file to discover all available pages before exploring further.
# Delete Promotion Enrollment
> Unenroll an account from a promotion.
Endpoint available to Partners only.
The request must be authenticated by an app access token the
Partner has received using the Client Credentials flow.
#### OAuth
This endpoint requires the `promotions:write` OAuth scope.
This API is [rate limited](/powered-by-zapier/api-reference/rate-limiting).
## OpenAPI
````yaml powered-by-zapier/api-reference/promotions-openapi.yaml delete /v2/promotions/{enrollment_id}
openapi: 3.1.0
info:
title: Powered by Zapier Promotions API
version: promotions
description: >-
The API to define promotions, powered by Zapier. See
https://docs.zapier.com/powered-by-zapier/introduction for more information.
contact:
name: Partner Sharing
servers:
- url: https://api.zapier.com
description: Production
security: []
tags:
- name: Promotions
description: Operations related to managing Promotions
- name: Experimental
description: >-
Operations that are not to be considered finalized, and are subject to
change
paths:
/v2/promotions/{enrollment_id}:
delete:
tags:
- Promotions
- Experimental
description: |-
Unenroll an account from a promotion.
Endpoint available to Partners only.
The request must be authenticated by an app access token the
Partner has received using the Client Credentials flow.
#### OAuth
This endpoint requires the `promotions:write` OAuth scope.
operationId: root_destroy
parameters:
- in: path
name: enrollment_id
schema:
type: string
required: true
responses:
'204':
description: No response body
'401':
content:
application/json:
schema:
$ref: '#/components/schemas/PromotionErrorResponse'
examples:
Access:
value:
errors:
- status: '401'
code: not_authenticated
title: User Not Authenticated
detail: >-
User must be authenticated to access this resource. No
valid user access token was provided.
description: >-
Access denied: User does not have permission for enrollment_id:
enroll_67890
'403':
content:
application/json:
schema:
$ref: '#/components/schemas/PromotionErrorResponse'
examples:
Forbidden:
value:
errors:
- status: '403'
code: permission_denied
title: Permission Denied
detail: You do not have permission to perform this action.
description: Forbidden - User lacks permission to access this location
'429':
headers:
Retry-After:
schema:
type: string
format: uri
description: Indicates when to retry the request
X-RateLimit-Limit:
schema:
type: string
format: uri
description: >-
The maximum number of requests you're permitted to make per
hour.
X-RateLimit-Remaining:
schema:
type: string
format: uri
description: >-
The number of requests remaining in the current rate limit
window.
X-RateLimit-Reset:
schema:
type: string
format: uri
description: >-
The time at which the current rate limit window resets in UTC
epoch seconds.
content:
application/json:
schema:
$ref: '#/components/schemas/PromotionErrorResponse'
description: ''
'503':
headers:
Retry-After:
schema:
type: string
format: uri
description: Indicates when to retry the request
X-RateLimit-Limit:
schema:
type: string
format: uri
description: >-
The maximum number of requests you're permitted to make per
hour.
X-RateLimit-Remaining:
schema:
type: string
format: uri
description: >-
The number of requests remaining in the current rate limit
window.
X-RateLimit-Reset:
schema:
type: string
format: uri
description: >-
The time at which the current rate limit window resets in UTC
epoch seconds.
content:
application/json:
schema:
$ref: '#/components/schemas/PromotionErrorResponse'
description: ''
security:
- OAuth:
- promotions:write
components:
schemas:
PromotionErrorResponse:
type: object
properties:
errors:
type: array
items:
$ref: '#/components/schemas/PromotionError'
description: Errors encountered processing the request
required:
- errors
PromotionError:
type: object
properties:
status:
type: string
description: HTTP status code of the error
code:
type: string
description: Machine-readable error code
title:
type: string
description: Human-readable error title
detail:
type: string
description: Detailed description of the error
required:
- code
- detail
- status
- title
securitySchemes:
OAuth:
type: oauth2
description: >-
The user access token for the user you would like to enroll. See our
[OAuth2 authentication
documentation](https://docs.zapier.com/powered-by-zapier/api-reference/authentication#retrieving-a-user-access-token).
flows:
authorizationCode:
authorizationUrl: https://zapier.com/oauth/authorize/
tokenUrl: https://zapier.com/oauth/token/
refreshUrl: https://zapier.com/oauth/token/
scopes:
promotions:write: Enroll or unenroll accounts into promotions
promotions:read: View usage of promotions you manage on an account
clientCredentials:
tokenUrl: /oauth/token
scopes:
promotions:write: Unenroll accounts from promotions
````
---
# Source: https://docs.zapier.com/platform/manage/deprecate.md
> ## Documentation Index
> Fetch the complete documentation index at: https://docs.zapier.com/llms.txt
> Use this file to discover all available pages before exploring further.
# Deprecate or delete a version
> Deprecation is an optional process that allows you to set a date from which an integration version cannot be used anymore. Zapier is normally a “set it and forget it” experience for users, so use this feature carefully. Only if the version will no longer function, should it be deprecated. Please note that deprecating a version is significantly disruptive to our mutual users if a migration to a different version is not possible.
When users use any but the promoted version, they will [see the version displayed](https://help.zapier.com/hc/en-us/articles/18755649454989-App-versions-in-Zapier) and be able to manually update to the promoted version.
## What happens after setting a version to deprecate
The deprecation date must be between 3 weeks and 1 year in the future. We won't communicate the deprecation until 2 weeks before the deprecation date. This gives you time to migrate users to a newer version, before we start notifying them that they need to manually migrate.
### 1. Email notification
A notification email will be sent exactly 14 days before the configured deprecation date. This email includes the deprecation reason that newer versions of the Zapier CLI ask you for. We do recommend supplementing these automated messages by also notifying your general user base through in-app announcements or email marketing campaigns. For privacy reasons, Zapier cannot provide you with an email list of users of your integration.
### 2. Deprecation date reached
* Zaps that haven't been updated will be automatically paused.
* A second email, titled “X Zaps paused over deprecated apps,” will be sent out to those users. Customizing this email is not possible.
* Any attempts to test triggers or actions on the deprecated version will result in an error, and Zaps that use it cannot be enabled.
* The deprecated version will be labelled as “Deprecated” in the Zap editor, with a prompt for users to update to the latest version.
### 3. Post-deprecation
After the deprecation date, the version will still be visible in the Versions page for your future reference. Users will not be able to see the version once they select a different version in their Zaps.
## Deprecate a version with Platform UI
To deprecate an integration version:
1. Log into the [Platform UI](https://zapier.com/app/developer).
2. Select your **integration**.
3. In the *Manage* section in the left sidebar, click **Version**.
4. Click the **three dot** icon in line with the integration version you want to deprecate.
5. Click **Deprecate**.
6. In the dialog box, add the **Deprecation Reason** and **Deprecation Date**. You can set a deprecation date anytime between 3 weeks and 1 year from the current date. The deprecation reason will be used in user notifications.
7. Click **Deprecate**.
8. Click **Close**
## Deprecate a version with Platform CLI
To deprecate an integration version use the command `zapier-platform deprecate` (or deprecated `zapier deprecate`). Learn more about [Platform CLI commands](https://github.com/zapier/zapier-platform/blob/main/packages/cli/docs/cli.md#deprecate).
## Deleting deprecated versions
After your version has been deprecated, you have the option to delete versions entirely. Exercise this option with extreme caution. Deleting a version makes it permanently inaccessible, both to you and to your users. Deleted versions cannot be restored by Zapier Developer Support. Deletion should be a last resort, used only when you are certain that the version will never be needed again.
Deletion is also only possible when 0 users remain on a version. The count of users on the *Versions* page includes live Zaps only. If you're seeing the error `Unable to delete app version`, this can be caused by users on that version not included in the visible count (paused Zaps, app authentications for example).
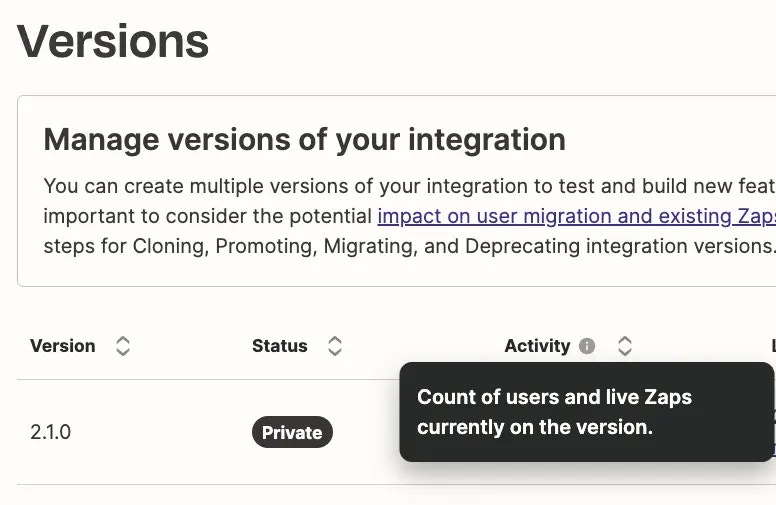 ***
### **We’re no longer supporting our integration and would like to remove it from the app listing. How can I unpublish the integration and deactivate it?**
For any public integration, the first step is to revert that integration to private, which will prevent new users from seeing it in the Zapier App Directory or in the Zap editor.
Once the integration is private, you can deprecate each version of that app (except the latest version, which will remain private if there are users still on the version). to deprecate an integration version, please follow the steps outlined above.
If the product's API endpoints will be shutdown, any users still using that now-private app in their Zaps, will begin to see errors when requests are made to those endpoints and their Zaps will eventually be turned off, no longer making requests.
That said, if you want to proceed with this, please reach out to Developer Support and we’ll help you revert your integration to private so that you can proceed with the next steps.
[*Need help? Tell us about your problem and we'll connect you with the right resource or contact support.*](https://developer.zapier.com/contact)
---
# Source: https://docs.zapier.com/platform/reference/dictionary-fields-tutorial.md
> ## Documentation Index
> Fetch the complete documentation index at: https://docs.zapier.com/llms.txt
> Use this file to discover all available pages before exploring further.
# Using Dictionary Fields
> Dictionary fields allows your users to directly send an object with their provided value sets to your API.
---
# Source: https://docs.zapier.com/platform/build/digestauth.md
> ## Documentation Index
> Fetch the complete documentation index at: https://docs.zapier.com/llms.txt
> Use this file to discover all available pages before exploring further.
# Add authentication with Digest Authentication
> Digest Auth prompts users to enter their username and password, optionally along with any additional data your API requires for authentication. Zapier makes an unauthenticated API call to get the nonce from your server, and uses it to encrypt and pass the authentication data to your server with each API call.
***
### **We’re no longer supporting our integration and would like to remove it from the app listing. How can I unpublish the integration and deactivate it?**
For any public integration, the first step is to revert that integration to private, which will prevent new users from seeing it in the Zapier App Directory or in the Zap editor.
Once the integration is private, you can deprecate each version of that app (except the latest version, which will remain private if there are users still on the version). to deprecate an integration version, please follow the steps outlined above.
If the product's API endpoints will be shutdown, any users still using that now-private app in their Zaps, will begin to see errors when requests are made to those endpoints and their Zaps will eventually be turned off, no longer making requests.
That said, if you want to proceed with this, please reach out to Developer Support and we’ll help you revert your integration to private so that you can proceed with the next steps.
[*Need help? Tell us about your problem and we'll connect you with the right resource or contact support.*](https://developer.zapier.com/contact)
---
# Source: https://docs.zapier.com/platform/reference/dictionary-fields-tutorial.md
> ## Documentation Index
> Fetch the complete documentation index at: https://docs.zapier.com/llms.txt
> Use this file to discover all available pages before exploring further.
# Using Dictionary Fields
> Dictionary fields allows your users to directly send an object with their provided value sets to your API.
---
# Source: https://docs.zapier.com/platform/build/digestauth.md
> ## Documentation Index
> Fetch the complete documentation index at: https://docs.zapier.com/llms.txt
> Use this file to discover all available pages before exploring further.
# Add authentication with Digest Authentication
> Digest Auth prompts users to enter their username and password, optionally along with any additional data your API requires for authentication. Zapier makes an unauthenticated API call to get the nonce from your server, and uses it to encrypt and pass the authentication data to your server with each API call.
 {" "}
Use Digest Auth if your API uses the [RFC 7616](https://tools.ietf.org/html/rfc7616) authentication standard, where users enter their username and password to be passed encrypted to your API with the nonce key your app sends to Zapier on the first API call.
## 1. Build an input form
* Open the *Authentication* tab in Zapier visual builder and select *Digest Auth*.
{" "}
Use Digest Auth if your API uses the [RFC 7616](https://tools.ietf.org/html/rfc7616) authentication standard, where users enter their username and password to be passed encrypted to your API with the nonce key your app sends to Zapier on the first API call.
## 1. Build an input form
* Open the *Authentication* tab in Zapier visual builder and select *Digest Auth*.
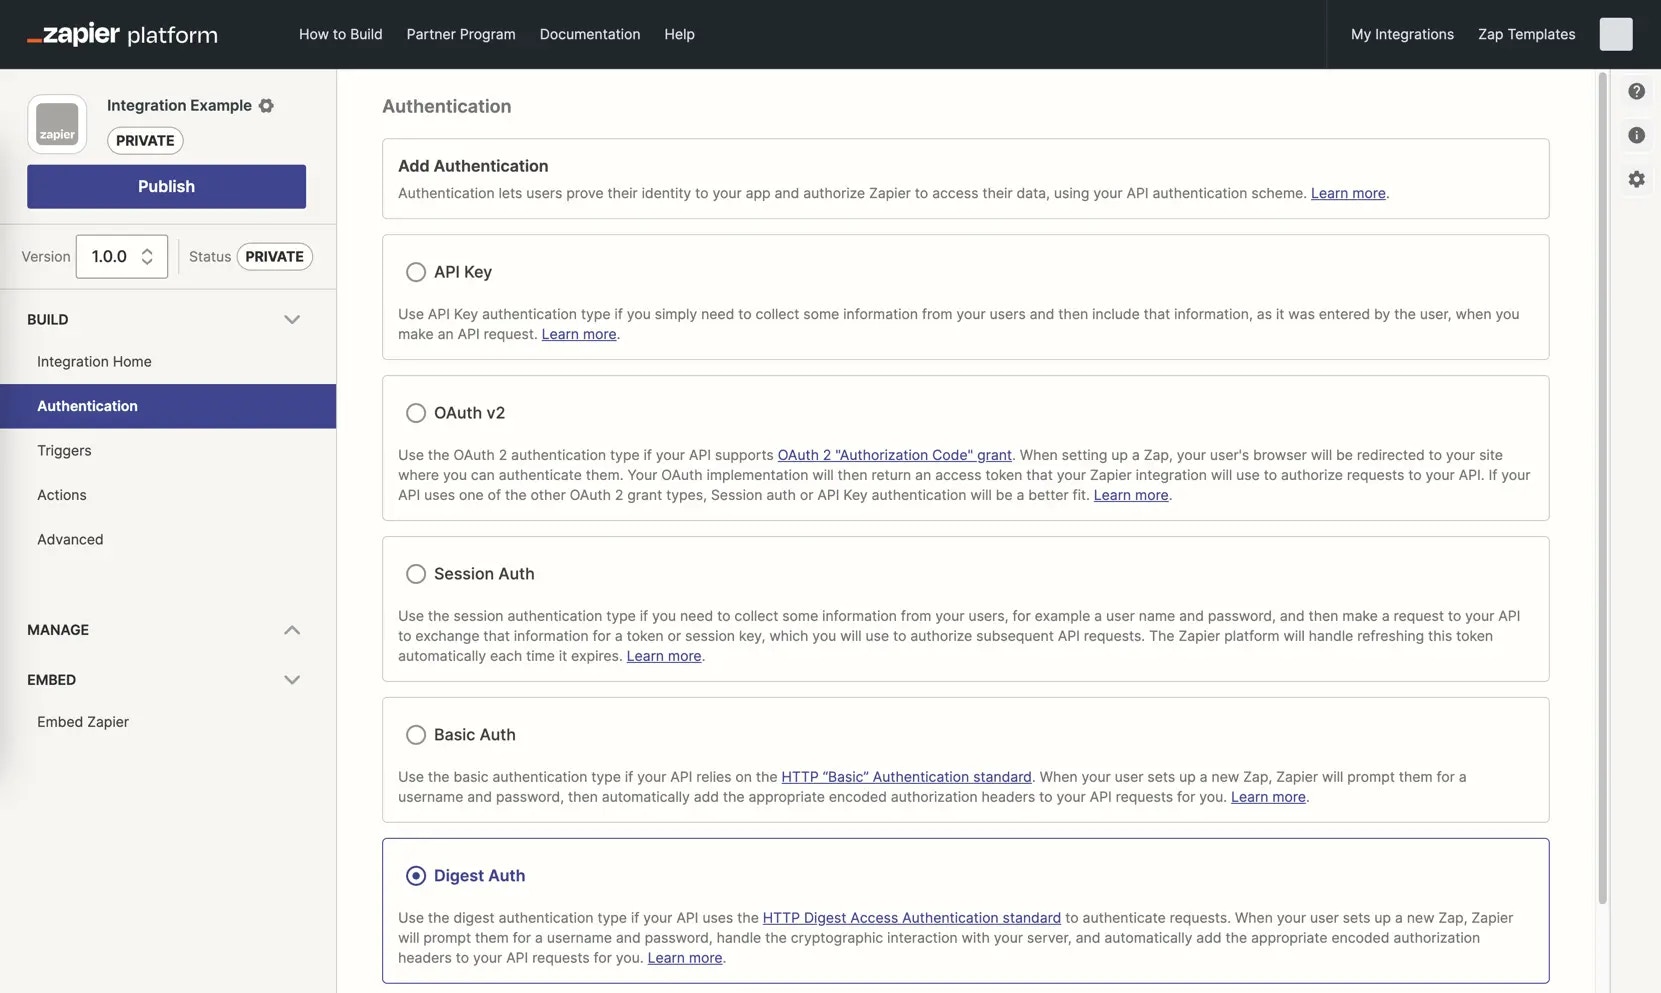 {" "}
* The pre-built input form includes username and password fields already.
* Add additional fields if your API documentation requires it by selecting *Add Fields* and fill in the details for your field. Add the most commonly needed fields first, in the order users expect, as you cannot reorder fields once added.
{" "}
* The pre-built input form includes username and password fields already.
* Add additional fields if your API documentation requires it by selecting *Add Fields* and fill in the details for your field. Add the most commonly needed fields first, in the order users expect, as you cannot reorder fields once added.
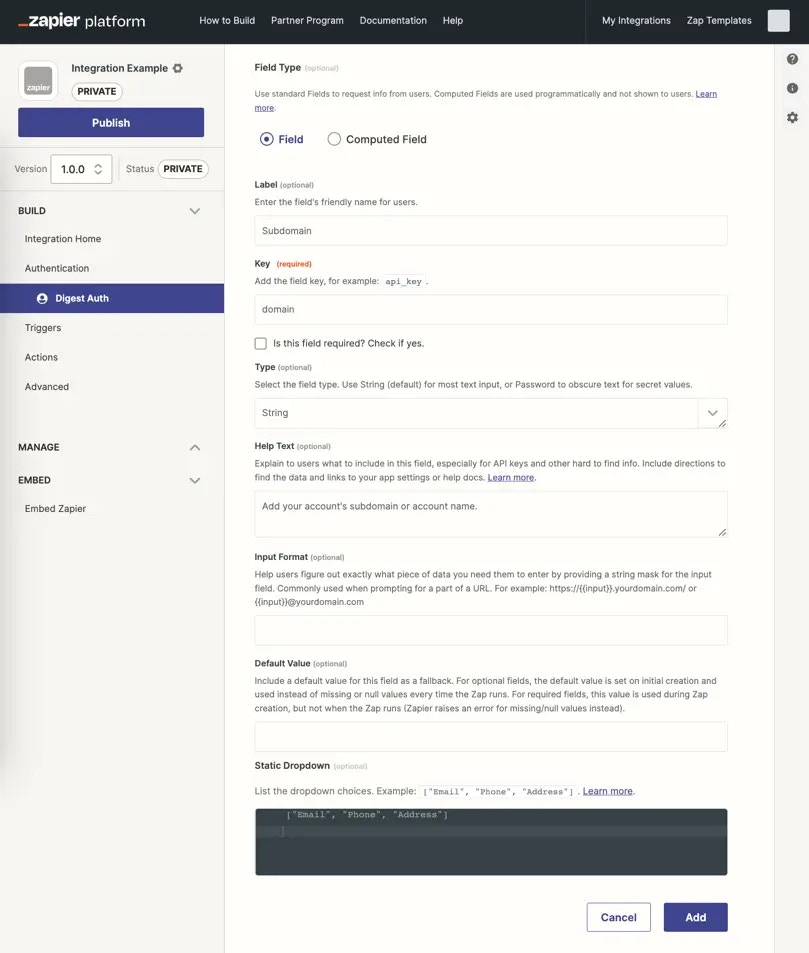 {" "}
* Add the required *Key*, the name your API uses to reference this field.
* Fill in the optional fields, as appropriate, especially the *Label*:
**Label**: A human-friendly name for this field. Enter what this value is called inside your app's UI.
**Is this field required**: Check this box for the API key field, and any other fields your API requires to authenticate.
**Type**: All input fields use the `string` text field by default; select `password` instead if you would like to obscure the data as users enter it.
**Help Text**: Include details to assist users in authenticating with your app, especially if they may be unsure where to find the data needed within your app. Format text with [Markdown](https://zapier.com/blog/beginner-ultimate-guide-markdown/), and include a hyperlink if needed.
**Default Value**: Include a value for this field to be used as a fallback. For optional fields, the default value is set on initial connection creation and used in the API call instead of missing or null values every time the Zap runs. For required fields, this value is used during connection creation, but not when the Zap runs (Zapier raises an error for missing/null values instead).
* Input fields marked as password and all authentication fields with sensitive, private data such as both username and password from Digest Auth are automatically censored at runtime. These values are stored in the Auth bundle and used in API calls, but are replaced in Zapier's logs with a censored value like this `:censored:6:82a3be9927:`. Due to this, it is not possible to view the exact tokens or keys in Zapier's logs. To verify that the same token as was returned by the authentication, is being used in subsequent API calls; you can compare censored value characters, for example `:censored:6:82a3be9927:` would have the same value ending in 9927 when used in a subsequent call.
* Computed fields are not applicable to Basic Authentication and are only used with OAuth v2 and Session Auth.
* Each input field is listed with its label, key, type, and required status in your authentication settings. Click the field to edit it, or click the gear icon and select *Delete* to remove a field.
{" "}
* Add the required *Key*, the name your API uses to reference this field.
* Fill in the optional fields, as appropriate, especially the *Label*:
**Label**: A human-friendly name for this field. Enter what this value is called inside your app's UI.
**Is this field required**: Check this box for the API key field, and any other fields your API requires to authenticate.
**Type**: All input fields use the `string` text field by default; select `password` instead if you would like to obscure the data as users enter it.
**Help Text**: Include details to assist users in authenticating with your app, especially if they may be unsure where to find the data needed within your app. Format text with [Markdown](https://zapier.com/blog/beginner-ultimate-guide-markdown/), and include a hyperlink if needed.
**Default Value**: Include a value for this field to be used as a fallback. For optional fields, the default value is set on initial connection creation and used in the API call instead of missing or null values every time the Zap runs. For required fields, this value is used during connection creation, but not when the Zap runs (Zapier raises an error for missing/null values instead).
* Input fields marked as password and all authentication fields with sensitive, private data such as both username and password from Digest Auth are automatically censored at runtime. These values are stored in the Auth bundle and used in API calls, but are replaced in Zapier's logs with a censored value like this `:censored:6:82a3be9927:`. Due to this, it is not possible to view the exact tokens or keys in Zapier's logs. To verify that the same token as was returned by the authentication, is being used in subsequent API calls; you can compare censored value characters, for example `:censored:6:82a3be9927:` would have the same value ending in 9927 when used in a subsequent call.
* Computed fields are not applicable to Basic Authentication and are only used with OAuth v2 and Session Auth.
* Each input field is listed with its label, key, type, and required status in your authentication settings. Click the field to edit it, or click the gear icon and select *Delete* to remove a field.
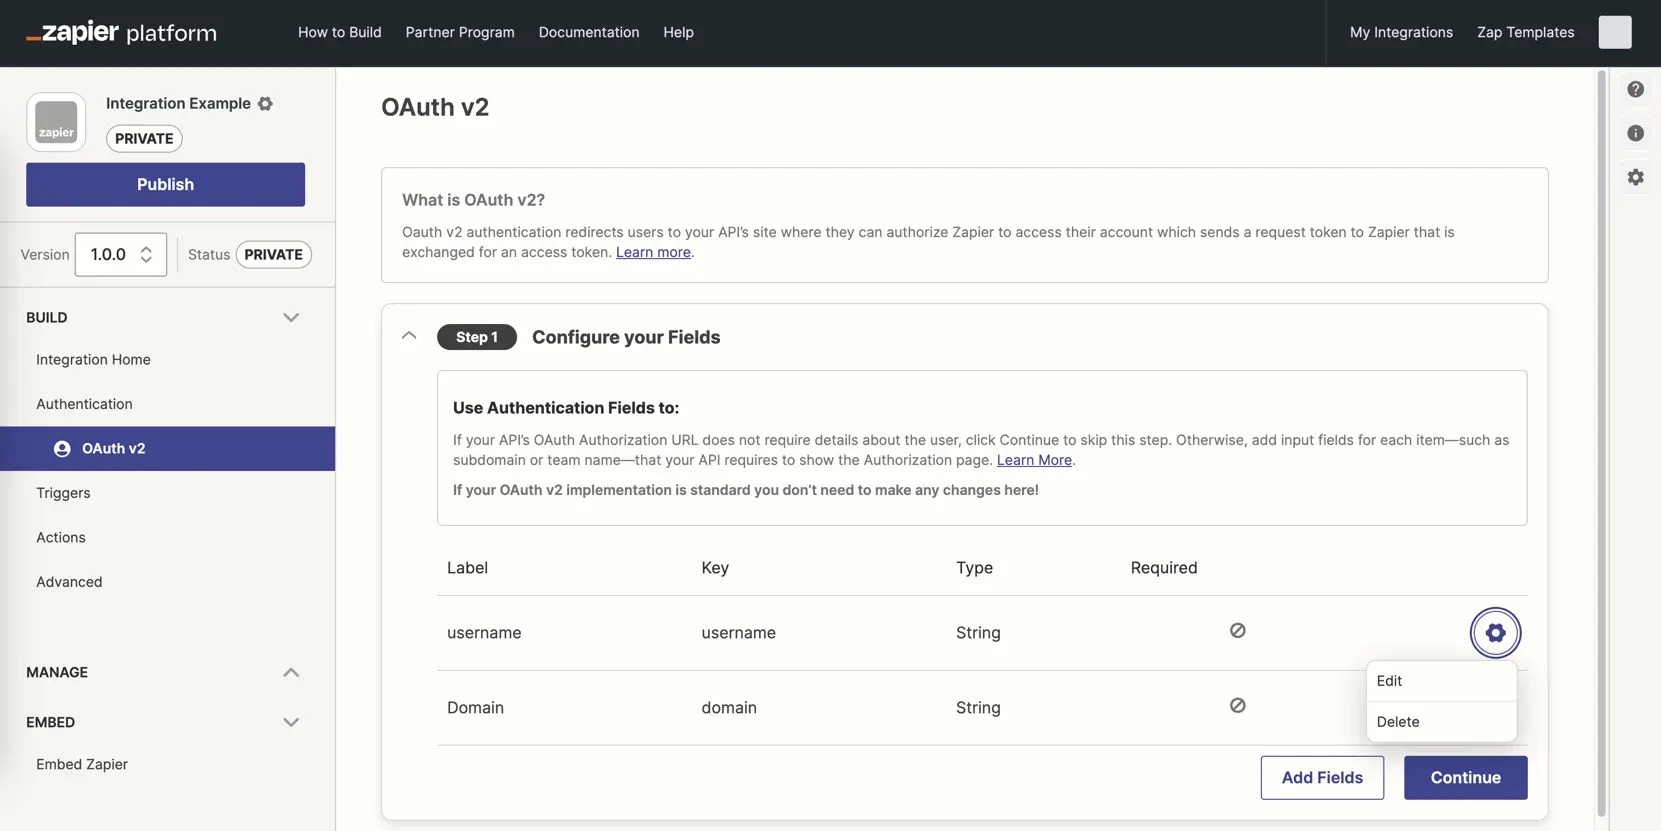 {" "}
## 2. Add a Test API Request
* Add an API call to your API that requires no configuration, typically a `/user` or `/me` call. Add the URL for the API call, and set the call type, typically a `GET`. This will test the user-entered credentials to ensure it enables a successful API call to your app.
* The Digest input fields you configured earlier are automatically included in the URL Params and the HTTP Headers. Click *Show Options* to remove the details where they are not needed or add any custom URL params or HTTP headers your API requires. It is typically not recommended to pass any sensitive information such as the password in the URL Params. Passing it through the headers or even the body is preferable.
{" "}
## 2. Add a Test API Request
* Add an API call to your API that requires no configuration, typically a `/user` or `/me` call. Add the URL for the API call, and set the call type, typically a `GET`. This will test the user-entered credentials to ensure it enables a successful API call to your app.
* The Digest input fields you configured earlier are automatically included in the URL Params and the HTTP Headers. Click *Show Options* to remove the details where they are not needed or add any custom URL params or HTTP headers your API requires. It is typically not recommended to pass any sensitive information such as the password in the URL Params. Passing it through the headers or even the body is preferable.
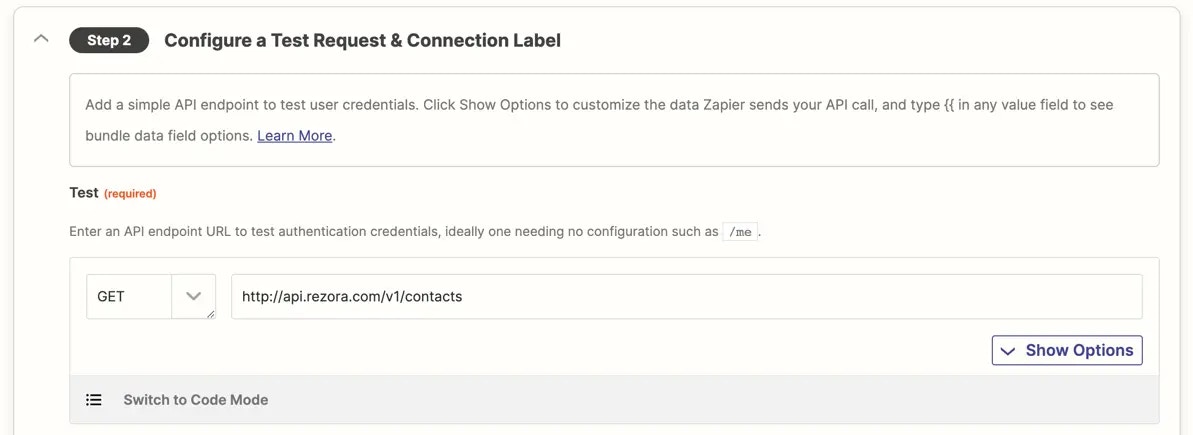 {" "}
* To customize the test API request, select *Switch to Code Mode* and write custom JavaScript code to handle your test API call and the response parsing as needed. The first time you click the toggle, Zapier will [convert your API call to code](/platform/build/code-mode). If you switch back to Form Mode though, Zapier will not convert your code changes to the Form Mode, nor will any subsequent changes in the form be added to your code.
## 3. Configure a Connection Label
Review [connection label documentation](/platform/build/connection-label) to optionally differentiate the app accounts users connect.
## 4. Test your authentication
Connect a valid user account to [test authentication](/platform/build/test-auth).
***
*Need help? [Tell us about your problem](https://developer.zapier.com/contact) and we'll connect you with the right resource or contact support.*
---
# Source: https://docs.zapier.com/platform/build-cli/download-source-code.md
> ## Documentation Index
> Fetch the complete documentation index at: https://docs.zapier.com/llms.txt
> Use this file to discover all available pages before exploring further.
# Download the source code of a CLI integration
> If at any point you do not have the source code for your CLI integration and need it to make changes, you can download a zip file of the source code directly from the Platform UI.
## Prerequisites
Before doing this, you would have to ensure that:
* You are an admin for the integration. If you are not, you can have an admin [invite you](https://docs.zapier.com/platform/manage/add-team) to be a member of the integration team.
* Your dev environment meets the [requirements for running Platform CLI](https://docs.zapier.com/platform/build-cli/overview#requirements) with the proper version of Node.js installed.
* You have installed the Platform CLI tool in your local environment and set up your authentication.
```bash theme={null}
# install the CLI globally
npm install -g zapier-platform-cli
# setup auth to Zapier's platform with a deploy key
zapier-platform login
```
## Downloading the source code
The steps to downloading the source code are:
1. Log in to the Platform UI and access the CLI integration for which you would like to get the source code.
2. On the sidebar, click on “Advanced”.
3. Go to the “View Source” section.
4. Click the “Download” button
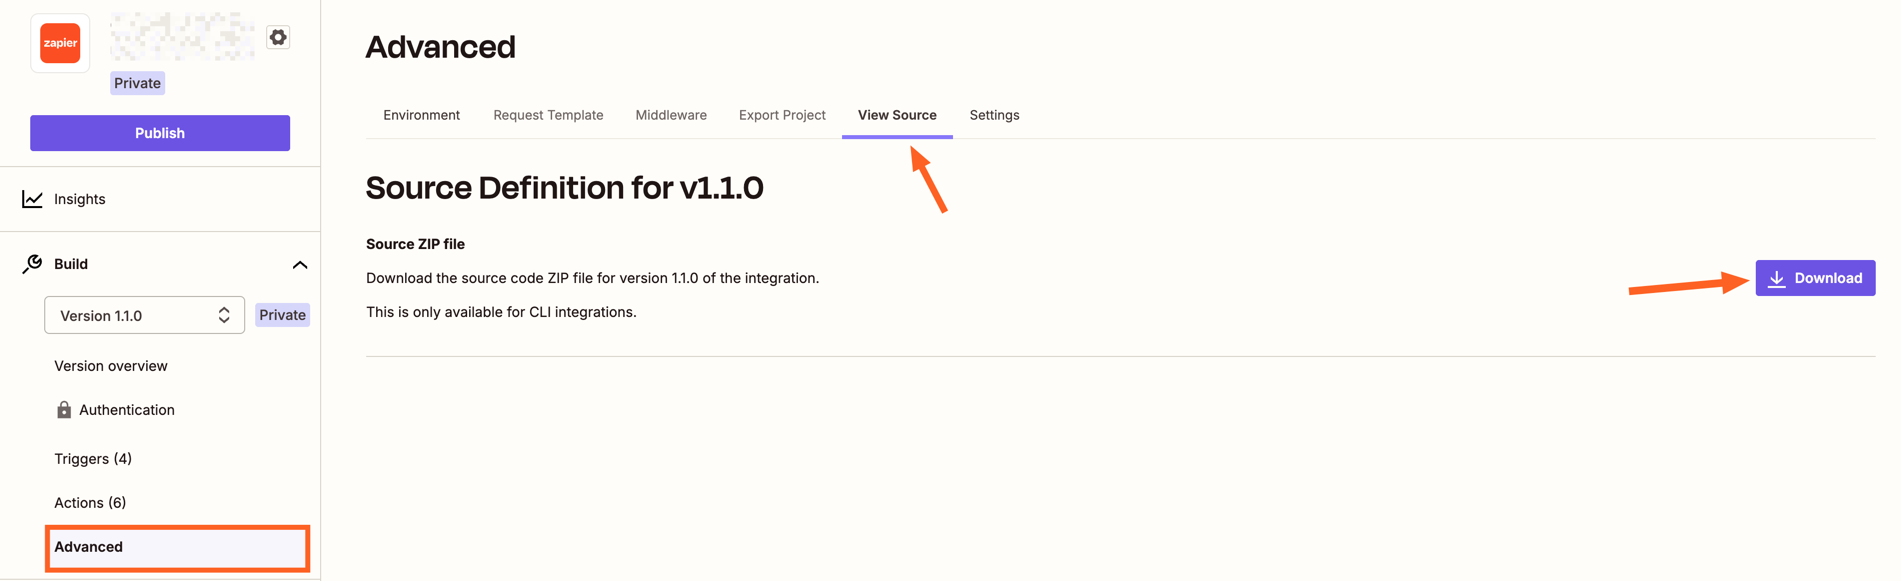
Note that, after getting the source code, you would need to go into the directory and run the `npm install` command in order to install all the libraries needed for your integration. Then you can start making changes to the integration code, following our [best practices](https://docs.zapier.com/platform/build-cli/overview).
***
[*Need help? Tell us about your problem and we'll connect you with the right resource or contact support.*](https://developer.zapier.com/contact)
---
# Source: https://docs.zapier.com/platform/reference/dynamic-dropdown-tutorial.md
> ## Documentation Index
> Fetch the complete documentation index at: https://docs.zapier.com/llms.txt
> Use this file to discover all available pages before exploring further.
# Creating dynamic dropdown fields
> Dynamic dropdown fields are useful when users need to select data from an existing list of similar data in their account on your app.
---
# Source: https://docs.zapier.com/platform/build-cli/dynamic-dropdowns.md
> ## Documentation Index
> Fetch the complete documentation index at: https://docs.zapier.com/llms.txt
> Use this file to discover all available pages before exploring further.
# Dynamic dropdowns
Sometimes, API endpoints require clients to specify a parent object in order to create or access the child resources. For instance, specifying a spreadsheet id in order to retrieve its worksheets. Since people don't speak in auto-incremented ID's, it is necessary that Zapier offer a simple way to select that parent using human readable handles.
Our solution is to present users a dropdown that is populated by making a live API call to fetch a list of parent objects. We call these special dropdowns "dynamic dropdowns."
## Definition
To define one you include the `dynamic` property on the `inputFields` object. The value for the property is a dot-separated *string* concatenation.
```js theme={null}
//...
issue: {
key: 'issue',
//...
create: {
//...
operation: {
inputFields: [
{
key: 'project_id',
required: true,
label: 'This is a dynamic dropdown',
dynamic: 'project.id.name'
}, // will call the trigger with a key of project
{
key: 'title',
required: true,
label: 'Title',
helpText: 'What is the name of the issue?'
}
]
}
}
}
```
The dot-separated string concatenation follows this pattern:
* The key of the trigger you want to use to power the dropdown. *required*
* The value to be made available in bundle.inputData. *required*
* The human friendly value to be shown on the left of the dropdown in bold. *optional*
In the above code example the dynamic property makes reference to a trigger with a key of project. Assuming the project trigger returns an array of objects and each object contains an id and name key, i.e.
```js theme={null}
[
{ id: "1", name: "First Option", dateCreated: "01/01/2000" },
{ id: "2", name: "Second Option", dateCreated: "01/01/2000" },
{ id: "3", name: "Third Option", dateCreated: "01/01/2000" },
{ id: "4", name: "Fourth Option", dateCreated: "01/01/2000" },
];
```
The dynamic dropdown would look something like this.
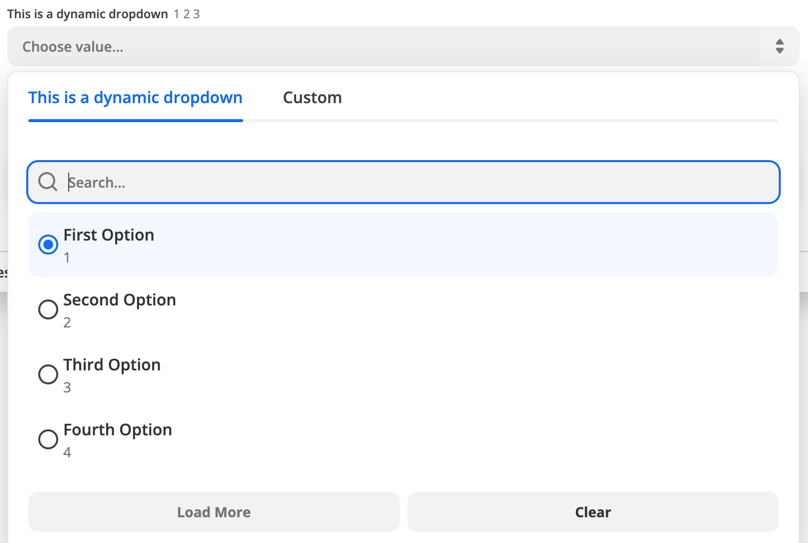
## Use a resource
In the first code example the dynamic dropdown is powered by a trigger. You can also use a resource to power a dynamic dropdown. To do this combine the resource key and the resource method using camel case.
```js index.js theme={null}
const App = {
// ...
resources: {
project: {
key: "project",
// ...
list: {
// ...
operation: {
perform: () => {
return [{ id: 123, name: "Project 1" }];
}, // called for project_id dropdown
},
},
},
issue: {
key: "issue",
// ...
create: {
// ...
operation: {
inputFields: [
{
key: "project_id",
required: true,
label: "Project",
dynamic: "projectList.id.name",
}, // calls project.list
{
key: "title",
required: true,
label: "Title",
helpText: "What is the name of the issue?",
},
],
},
},
},
},
};
```
## Hide the trigger
In some cases you will need to power a dynamic dropdown but do not want to make the Trigger available to the end user. Here it is best practice to create the trigger and set `hidden: true` on it's display object.
```js theme={null}
const App = {
// ...
triggers: {
new_project: {
key: "project",
noun: "Project",
// `display` controls the presentation in the Zapier Editor
display: {
label: "New Project",
description: "Triggers when a new project is added.",
hidden: true,
},
operation: {
perform: projectListRequest,
},
},
another_trigger: {
// Another trigger definition...
},
},
};
```
## Dependencies between dropdowns
You can have multiple dynamic dropdowns in a single trigger or action. In some cases, a dynamic dropdown depends on the value chosen in another dynamic dropdown when making its API call. The [Google Sheets](https://zapier.com/apps/google-sheets/integrations#triggers-and-actions) integration displays an example of this pattern.
The example below illustrates a 'New Worksheet' trigger that populates a dynamic dropdown input field to select a worksheet:
```js theme={null}
{
key: "worksheet",
// ...
operation: {
// ...
perform: async (z, bundle) => {
const response = await z.request("https://example.com/api/v2/projects.json", {
params: {
spreadsheet_id: bundle.inputData.spreadsheet_id,
},
});
// response.throwForStatus() if you're using core v9 or older
return response.data; // or response.json if you're using core v9 or older
}
}
}
```
Assume there is another `New Records` trigger with `Spreadsheet` and `Worksheet` dynamic dropdown input fields, which have keys `spreadsheet_id` and `worksheet_id` respectively. The selected spreadsheet value is available via `bundle.inputData.spreadsheet_id` to be used by the `Worksheet` trigger.
```js theme={null}
const App = {
// ...
triggers: {
// ...
issue: {
key: "new_records",
// ...
operation: {
inputFields: [
{
key: "spreadsheet_id",
required: true,
label: "Spreadsheet",
dynamic: "spreadsheet.id.name",
altersDynamicFields: true,
},
{
key: "worksheet_id",
required: true,
label: "Worksheet",
dynamic: "worksheet.id.name",
},
],
},
},
},
};
```
> Note: Be mindful that a dynamic dropdown can depend on the value chosen in another dynamic dropdown. Two types of dependencies can exist between fields:
>
> *Requirement dependency*: Affects how dependent fields are enabled or disabled within the UI
>
> * Setting `required: false` makes a field optional and always enabled in the UI.
> * Having no required value set makes a field optional and disabled until the dependencies are selected.
>
> *Value dependency*: Affects how dynamic dropdown field options are retrieved
>
> * Setting a required value or not does not affect how the options of a dynamic field are retrieved.
>
> So, if you have an optional dynamic dropdown that depends on another dropdown input field, that field should not have `required: false` set. Input fields are optional by default, but setting `required: false` on an optional dynamic dropdown field that depends on another removes the requirement dependency relationship.
> In the example above, the `worksheet_id` input field will be disabled until the `spreadsheet_id` input field has a value in Zapier's products such as the Zap editor. Notice that setting `altersDynamicFields: true` signifies other input fields need to be recomputed whenever the value of that field changes.
## Detect when a trigger is used for a dynamic dropdown
If you want your trigger to perform specific scripting for a dynamic dropdown you will need to make use of `bundle.meta.isFillingDynamicDropdown`. This can be useful if need to make use of [pagination](/platform/build-cli/faqs#whats-the-deal-with-pagination-when-is-it-used-and-how-does-it-work) in the dynamic dropdown to load more options.
```js theme={null}
const App = {
// ...
resources: {
project: {
key: "project",
// ...
list: {
// ...
operation: {
canPaginate: true,
perform: () => {
if (bundle.meta.isFillingDynamicDropdown) {
// perform pagination request here
} else {
return [{ id: 123, name: "Project 1" }];
}
},
},
},
},
issue: {
key: "issue",
// ...
create: {
// ...
operation: {
inputFields: [
{
key: "project_id",
required: true,
label: "Project",
dynamic: "projectList.id.name",
}, // calls project.list
{
key: "title",
required: true,
label: "Title",
helpText: "What is the name of the issue?",
},
],
},
},
},
},
};
```
## Link a search action
This feature makes it easier for users to handle the following scenario in a workflow that has multiple steps:
* The value for the input field depends on an output field from an earlier step.
* The value of that output field cannot be used directly.
* They need an additional search step that takes the output they *cannot* use directly, and translate it into something they *can*.
**Example:** Let's say the input field takes the ID of a lead. The user could select a lead from the dynamic dropdown, but then the workflow would act on the same lead every time it runs. An earlier step returns the email address of the lead, but not their ID. The user will need to prepend a search-step that takes the email address and returns the ID.
Users can do this themselves, but by using this feature, Zapier products can make this task easier.
### How it works for the user
In the Zap editor for example, dynamic dropdowns that use this feature will display a
button next to the dynamic dropdown. When the user clicks the button, the right search step is automatically prepended, and correct output field mapped into the dynamic dropdown.

### How to configure it
In the definition of the input field, configure `search` with a value of `.`.
* Replace `` with the `key` of the search action that should prepeded to the user's workflow.
* Replace `` with the `key` of the output field from that search action that should be mapped as value for the input field.
Here's an example:
```js theme={null}
{
key: 'project_id',
required: true,
label: 'Project',
dynamic: 'list_projects.id.name',
search: 'search_projects.id',
}
```
---
# Source: https://docs.zapier.com/platform/build/dynamic-field.md
> ## Documentation Index
> Fetch the complete documentation index at: https://docs.zapier.com/llms.txt
> Use this file to discover all available pages before exploring further.
# Send or receive dynamic user-defined fields through your API
> Dynamic fields are a type of field built from an API call. Custom code runs to show fields based on other input field data. These are especially useful with project management apps, CRM apps, databases, and any other app where users can add custom, user-defined fields.
## Add a dynamic field
You can use dynamic fields, to retrieve fields in three different contexts:
* Whenever the value of a field with `altersDynamicFields` is changed.
* Whenever the *Set up* section for the action is opened in the Zap editor.
* Whenever the *Refresh Fields* button is used on the action.
In the [Platform UI](https://zapier.com/app/developer):
1. In the *Build* section in the left sidebar, click on your **action**.
2. Click the **Input Designer** tab.
3. Click **Add** and select **Dynamic Field**.
4. A code box will appear. Add your **JavaScript code** to make an API call and fetch the fields from your app's API. Use Zapier's `z.request` to make the API call. Your code should return each custom field's key and name to Zapier in an array, so they display correctly in the Zap editor. Learn more about using [Z Object to call a function](https://github.com/zapier/zapier-platform/blob/master/packages/cli/README.md#z-object).
5. Once you've added your JavaScript code, click **Save**.
**Note**:
* Do not rely on any input fields already having a value, since they won't have one the first time the Zap editor loads.
* Dynamic fields using `z.request` will not show in the Zap editor preview.
* Dynamic fields can only be added to actions, not triggers.
{" "}
* To customize the test API request, select *Switch to Code Mode* and write custom JavaScript code to handle your test API call and the response parsing as needed. The first time you click the toggle, Zapier will [convert your API call to code](/platform/build/code-mode). If you switch back to Form Mode though, Zapier will not convert your code changes to the Form Mode, nor will any subsequent changes in the form be added to your code.
## 3. Configure a Connection Label
Review [connection label documentation](/platform/build/connection-label) to optionally differentiate the app accounts users connect.
## 4. Test your authentication
Connect a valid user account to [test authentication](/platform/build/test-auth).
***
*Need help? [Tell us about your problem](https://developer.zapier.com/contact) and we'll connect you with the right resource or contact support.*
---
# Source: https://docs.zapier.com/platform/build-cli/download-source-code.md
> ## Documentation Index
> Fetch the complete documentation index at: https://docs.zapier.com/llms.txt
> Use this file to discover all available pages before exploring further.
# Download the source code of a CLI integration
> If at any point you do not have the source code for your CLI integration and need it to make changes, you can download a zip file of the source code directly from the Platform UI.
## Prerequisites
Before doing this, you would have to ensure that:
* You are an admin for the integration. If you are not, you can have an admin [invite you](https://docs.zapier.com/platform/manage/add-team) to be a member of the integration team.
* Your dev environment meets the [requirements for running Platform CLI](https://docs.zapier.com/platform/build-cli/overview#requirements) with the proper version of Node.js installed.
* You have installed the Platform CLI tool in your local environment and set up your authentication.
```bash theme={null}
# install the CLI globally
npm install -g zapier-platform-cli
# setup auth to Zapier's platform with a deploy key
zapier-platform login
```
## Downloading the source code
The steps to downloading the source code are:
1. Log in to the Platform UI and access the CLI integration for which you would like to get the source code.
2. On the sidebar, click on “Advanced”.
3. Go to the “View Source” section.
4. Click the “Download” button

Note that, after getting the source code, you would need to go into the directory and run the `npm install` command in order to install all the libraries needed for your integration. Then you can start making changes to the integration code, following our [best practices](https://docs.zapier.com/platform/build-cli/overview).
***
[*Need help? Tell us about your problem and we'll connect you with the right resource or contact support.*](https://developer.zapier.com/contact)
---
# Source: https://docs.zapier.com/platform/reference/dynamic-dropdown-tutorial.md
> ## Documentation Index
> Fetch the complete documentation index at: https://docs.zapier.com/llms.txt
> Use this file to discover all available pages before exploring further.
# Creating dynamic dropdown fields
> Dynamic dropdown fields are useful when users need to select data from an existing list of similar data in their account on your app.
---
# Source: https://docs.zapier.com/platform/build-cli/dynamic-dropdowns.md
> ## Documentation Index
> Fetch the complete documentation index at: https://docs.zapier.com/llms.txt
> Use this file to discover all available pages before exploring further.
# Dynamic dropdowns
Sometimes, API endpoints require clients to specify a parent object in order to create or access the child resources. For instance, specifying a spreadsheet id in order to retrieve its worksheets. Since people don't speak in auto-incremented ID's, it is necessary that Zapier offer a simple way to select that parent using human readable handles.
Our solution is to present users a dropdown that is populated by making a live API call to fetch a list of parent objects. We call these special dropdowns "dynamic dropdowns."
## Definition
To define one you include the `dynamic` property on the `inputFields` object. The value for the property is a dot-separated *string* concatenation.
```js theme={null}
//...
issue: {
key: 'issue',
//...
create: {
//...
operation: {
inputFields: [
{
key: 'project_id',
required: true,
label: 'This is a dynamic dropdown',
dynamic: 'project.id.name'
}, // will call the trigger with a key of project
{
key: 'title',
required: true,
label: 'Title',
helpText: 'What is the name of the issue?'
}
]
}
}
}
```
The dot-separated string concatenation follows this pattern:
* The key of the trigger you want to use to power the dropdown. *required*
* The value to be made available in bundle.inputData. *required*
* The human friendly value to be shown on the left of the dropdown in bold. *optional*
In the above code example the dynamic property makes reference to a trigger with a key of project. Assuming the project trigger returns an array of objects and each object contains an id and name key, i.e.
```js theme={null}
[
{ id: "1", name: "First Option", dateCreated: "01/01/2000" },
{ id: "2", name: "Second Option", dateCreated: "01/01/2000" },
{ id: "3", name: "Third Option", dateCreated: "01/01/2000" },
{ id: "4", name: "Fourth Option", dateCreated: "01/01/2000" },
];
```
The dynamic dropdown would look something like this.

## Use a resource
In the first code example the dynamic dropdown is powered by a trigger. You can also use a resource to power a dynamic dropdown. To do this combine the resource key and the resource method using camel case.
```js index.js theme={null}
const App = {
// ...
resources: {
project: {
key: "project",
// ...
list: {
// ...
operation: {
perform: () => {
return [{ id: 123, name: "Project 1" }];
}, // called for project_id dropdown
},
},
},
issue: {
key: "issue",
// ...
create: {
// ...
operation: {
inputFields: [
{
key: "project_id",
required: true,
label: "Project",
dynamic: "projectList.id.name",
}, // calls project.list
{
key: "title",
required: true,
label: "Title",
helpText: "What is the name of the issue?",
},
],
},
},
},
},
};
```
## Hide the trigger
In some cases you will need to power a dynamic dropdown but do not want to make the Trigger available to the end user. Here it is best practice to create the trigger and set `hidden: true` on it's display object.
```js theme={null}
const App = {
// ...
triggers: {
new_project: {
key: "project",
noun: "Project",
// `display` controls the presentation in the Zapier Editor
display: {
label: "New Project",
description: "Triggers when a new project is added.",
hidden: true,
},
operation: {
perform: projectListRequest,
},
},
another_trigger: {
// Another trigger definition...
},
},
};
```
## Dependencies between dropdowns
You can have multiple dynamic dropdowns in a single trigger or action. In some cases, a dynamic dropdown depends on the value chosen in another dynamic dropdown when making its API call. The [Google Sheets](https://zapier.com/apps/google-sheets/integrations#triggers-and-actions) integration displays an example of this pattern.
The example below illustrates a 'New Worksheet' trigger that populates a dynamic dropdown input field to select a worksheet:
```js theme={null}
{
key: "worksheet",
// ...
operation: {
// ...
perform: async (z, bundle) => {
const response = await z.request("https://example.com/api/v2/projects.json", {
params: {
spreadsheet_id: bundle.inputData.spreadsheet_id,
},
});
// response.throwForStatus() if you're using core v9 or older
return response.data; // or response.json if you're using core v9 or older
}
}
}
```
Assume there is another `New Records` trigger with `Spreadsheet` and `Worksheet` dynamic dropdown input fields, which have keys `spreadsheet_id` and `worksheet_id` respectively. The selected spreadsheet value is available via `bundle.inputData.spreadsheet_id` to be used by the `Worksheet` trigger.
```js theme={null}
const App = {
// ...
triggers: {
// ...
issue: {
key: "new_records",
// ...
operation: {
inputFields: [
{
key: "spreadsheet_id",
required: true,
label: "Spreadsheet",
dynamic: "spreadsheet.id.name",
altersDynamicFields: true,
},
{
key: "worksheet_id",
required: true,
label: "Worksheet",
dynamic: "worksheet.id.name",
},
],
},
},
},
};
```
> Note: Be mindful that a dynamic dropdown can depend on the value chosen in another dynamic dropdown. Two types of dependencies can exist between fields:
>
> *Requirement dependency*: Affects how dependent fields are enabled or disabled within the UI
>
> * Setting `required: false` makes a field optional and always enabled in the UI.
> * Having no required value set makes a field optional and disabled until the dependencies are selected.
>
> *Value dependency*: Affects how dynamic dropdown field options are retrieved
>
> * Setting a required value or not does not affect how the options of a dynamic field are retrieved.
>
> So, if you have an optional dynamic dropdown that depends on another dropdown input field, that field should not have `required: false` set. Input fields are optional by default, but setting `required: false` on an optional dynamic dropdown field that depends on another removes the requirement dependency relationship.
> In the example above, the `worksheet_id` input field will be disabled until the `spreadsheet_id` input field has a value in Zapier's products such as the Zap editor. Notice that setting `altersDynamicFields: true` signifies other input fields need to be recomputed whenever the value of that field changes.
## Detect when a trigger is used for a dynamic dropdown
If you want your trigger to perform specific scripting for a dynamic dropdown you will need to make use of `bundle.meta.isFillingDynamicDropdown`. This can be useful if need to make use of [pagination](/platform/build-cli/faqs#whats-the-deal-with-pagination-when-is-it-used-and-how-does-it-work) in the dynamic dropdown to load more options.
```js theme={null}
const App = {
// ...
resources: {
project: {
key: "project",
// ...
list: {
// ...
operation: {
canPaginate: true,
perform: () => {
if (bundle.meta.isFillingDynamicDropdown) {
// perform pagination request here
} else {
return [{ id: 123, name: "Project 1" }];
}
},
},
},
},
issue: {
key: "issue",
// ...
create: {
// ...
operation: {
inputFields: [
{
key: "project_id",
required: true,
label: "Project",
dynamic: "projectList.id.name",
}, // calls project.list
{
key: "title",
required: true,
label: "Title",
helpText: "What is the name of the issue?",
},
],
},
},
},
},
};
```
## Link a search action
This feature makes it easier for users to handle the following scenario in a workflow that has multiple steps:
* The value for the input field depends on an output field from an earlier step.
* The value of that output field cannot be used directly.
* They need an additional search step that takes the output they *cannot* use directly, and translate it into something they *can*.
**Example:** Let's say the input field takes the ID of a lead. The user could select a lead from the dynamic dropdown, but then the workflow would act on the same lead every time it runs. An earlier step returns the email address of the lead, but not their ID. The user will need to prepend a search-step that takes the email address and returns the ID.
Users can do this themselves, but by using this feature, Zapier products can make this task easier.
### How it works for the user
In the Zap editor for example, dynamic dropdowns that use this feature will display a
button next to the dynamic dropdown. When the user clicks the button, the right search step is automatically prepended, and correct output field mapped into the dynamic dropdown.

### How to configure it
In the definition of the input field, configure `search` with a value of `.`.
* Replace `` with the `key` of the search action that should prepeded to the user's workflow.
* Replace `` with the `key` of the output field from that search action that should be mapped as value for the input field.
Here's an example:
```js theme={null}
{
key: 'project_id',
required: true,
label: 'Project',
dynamic: 'list_projects.id.name',
search: 'search_projects.id',
}
```
---
# Source: https://docs.zapier.com/platform/build/dynamic-field.md
> ## Documentation Index
> Fetch the complete documentation index at: https://docs.zapier.com/llms.txt
> Use this file to discover all available pages before exploring further.
# Send or receive dynamic user-defined fields through your API
> Dynamic fields are a type of field built from an API call. Custom code runs to show fields based on other input field data. These are especially useful with project management apps, CRM apps, databases, and any other app where users can add custom, user-defined fields.
## Add a dynamic field
You can use dynamic fields, to retrieve fields in three different contexts:
* Whenever the value of a field with `altersDynamicFields` is changed.
* Whenever the *Set up* section for the action is opened in the Zap editor.
* Whenever the *Refresh Fields* button is used on the action.
In the [Platform UI](https://zapier.com/app/developer):
1. In the *Build* section in the left sidebar, click on your **action**.
2. Click the **Input Designer** tab.
3. Click **Add** and select **Dynamic Field**.
4. A code box will appear. Add your **JavaScript code** to make an API call and fetch the fields from your app's API. Use Zapier's `z.request` to make the API call. Your code should return each custom field's key and name to Zapier in an array, so they display correctly in the Zap editor. Learn more about using [Z Object to call a function](https://github.com/zapier/zapier-platform/blob/master/packages/cli/README.md#z-object).
5. Once you've added your JavaScript code, click **Save**.
**Note**:
* Do not rely on any input fields already having a value, since they won't have one the first time the Zap editor loads.
* Dynamic fields using `z.request` will not show in the Zap editor preview.
* Dynamic fields can only be added to actions, not triggers.
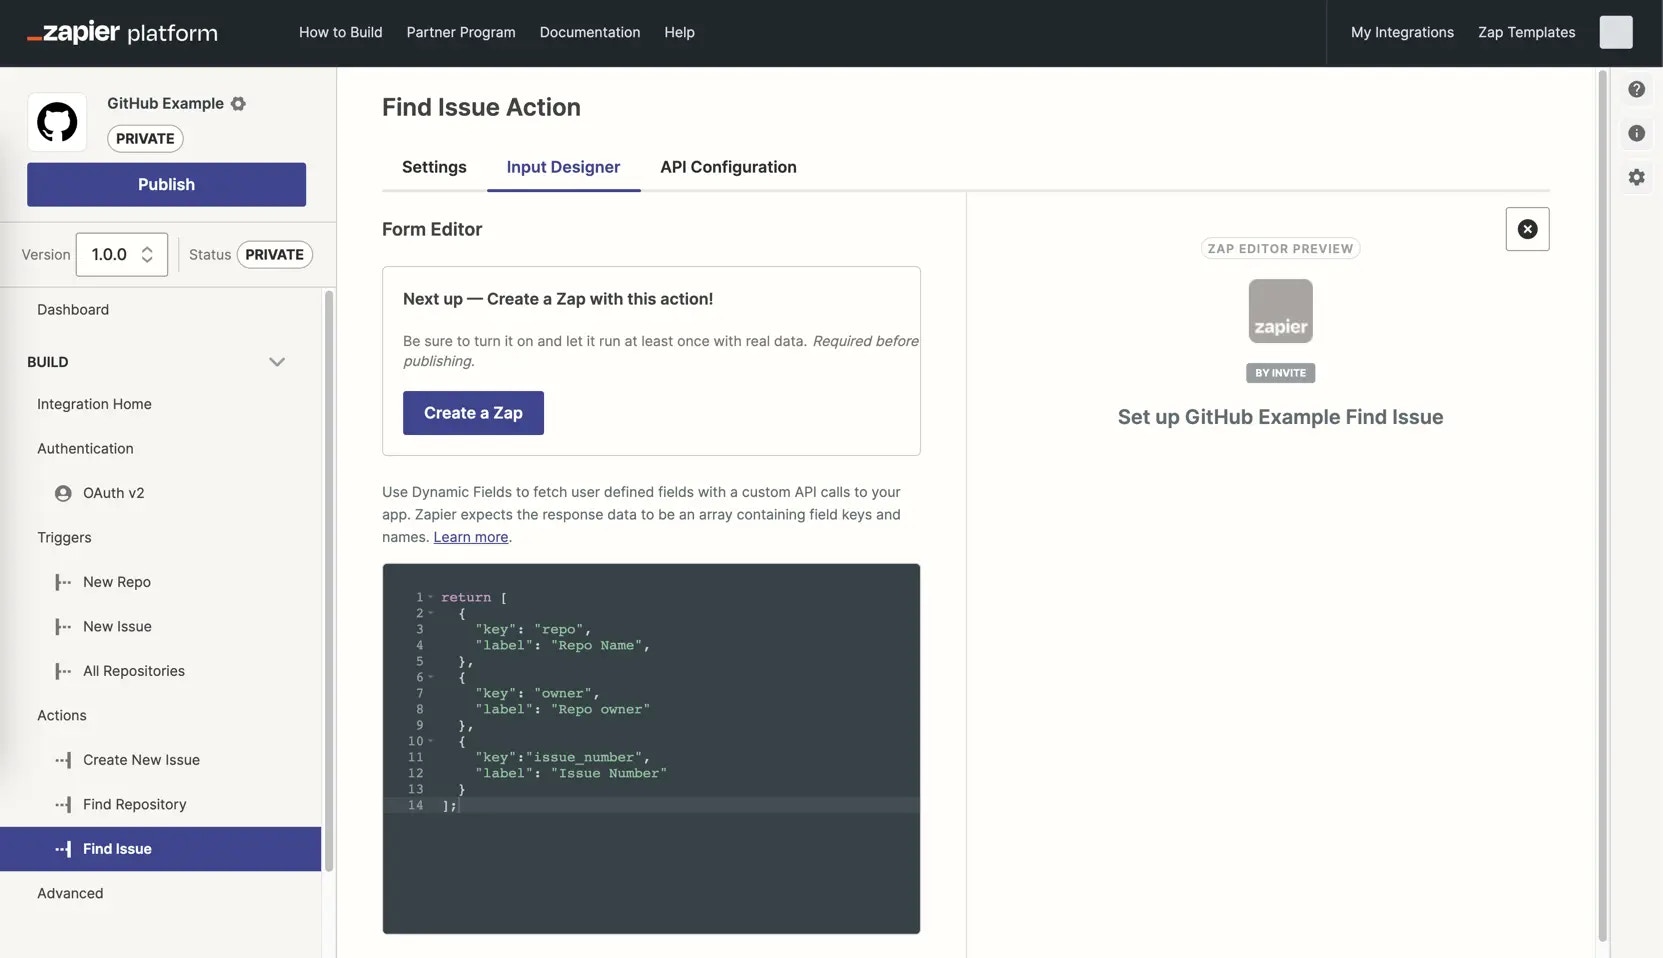 ## Create a dynamic field based on previous input field data
In the [Platform UI](https://zapier.com/app/developer):
1. In the *Build* section in the left sidebar, click on your **action**.
2. Click the **Input Designer** tab.
3. Review your input field settings, you'll need at least one input field that has **Alters Dynamic Fields** selected. This is the field that Zapier will use to decide if the dynamic field should be shown.
4. Click **Add** and select **Dynamic Field**.
5. A code box will appear. Add your JavaScript code that evaluates data from previous fields (referencing `bundle.inputData.field_key` where `field_key` is replaced with the actual key of the prior input field that must be checked), including logic and details on another field to show depending on the value of the former.
6. Once you've added your JavasScript code, click **Save**.
## Send dynamic field data to your API
In the [Platform UI](https://zapier.com/app/developer):
1. In the *Build* section in the left sidebar, click on your **action**.
2. Click the **API Configuration** tab.
3. Click **Switch to Code Mode**
4. In the dialog box, click **Switch to Code Mode**
5. A code box will appear. Add your Javascript code, that include `body: { ...bundle.inputData }` to send every input field, including pre-defined or dynamic fields in the body of your API call to your app. You can also use `bundle.inputData.field_key` to include individual lists of dynamic fields.
6. Once you've added your JavasScript code, click **Save**.
## Test a dynamic field
To test how your dynamic fields will appear in the Zap editor:
1. [Create a new Zap](https://zapier.com/app/editor/).
2. Add the action to your Zap that includes your dynamic field. This will allow for you to test how your action will appear to users.
If you want more details about the API calls being made, in the [Platform UI](https://zapier.com/app/developer):
* In the *Manage* section in the left sidebar, click **Monitoring**.
* You'll see a graph and be able to click on data points to view events and details to troubleshoot your setup further.
***
*Need help? [Tell us about your problem](https://developer.zapier.com/contact) and we'll connect you with the right resource or contact support.*
---
# Source: https://docs.zapier.com/powered-by-zapier/embedding-zapier/elements-security.md
> ## Documentation Index
> Fetch the complete documentation index at: https://docs.zapier.com/llms.txt
> Use this file to discover all available pages before exploring further.
# Element Security
> Keeping our elements secure and usable is critical at Zapier
User security is paramount. By default, Zapier denies any embedding of our product unless you provide us with a list of domains that you expect to embed Zapier in.
This protects the user from malicious activities like [Clickjacking](https://www.owasp.org/index.php/Clickjacking). :

## Provide a list of domains
If you've already embedded our Product, this would have already been captured and your product domains are permitted.
* To add domains, navigate to the Settings tab under the Embed section in the sidebar of your integration's [Platform UI](https://developer.zapier.com/), and add the missing domains under the 'Embedding Domains' section.

These specific domains are then permitted to embed Zapier. The domains provided by you should be registered with your company with a public registrar. That is to say a `randomcnamedomain.com` is not valid for the same reason that a user or bad actor could register that domain.
## Troubleshooting
* `localhost`, `yourcomp.local` and `127.0.0.1` are not valid supported domains. An option during your embed development would be to use a tunnel service like [ngrok](https://ngrok.com/) and to register that ngrok tunnel with us. Be advised, that we will ask for a static domain from ngrok.com or similar tunneling service.
* If the domain you're embedding on is added to the allowlist within *Manage Domains*, but you're seeing the `This embed is blocked` error, the [CSP](https://developer.mozilla.org/en-US/docs/Web/HTTP/CSP) may be too restrictive/overly strict. You'll want to check Console/Network for the appropriate request to see the [referrer-policy](https://developer.mozilla.org/en-US/docs/Web/HTTP/Headers/Referrer-Policy) header. Using `strict-origin-when-cross-origin` as the referrer-policy is recommended.
* For local development, use [ngrok](https://ngrok.com/) to make `https` test URLs when needed, as using `http` would be blocked, even if the domain has been added to the allowlist.
---
# Source: https://docs.zapier.com/platform/manage/embed-activation.md
> ## Documentation Index
> Fetch the complete documentation index at: https://docs.zapier.com/llms.txt
> Use this file to discover all available pages before exploring further.
# Embed activation rates
> Consider all the user clicks on Zap Templates surfaced in your embeds. The embed activation rate is the percentage of those Zaps that actually activated within 24 hours of creation, meaning the Zap ran at least one successful task. It measures the efefctiveness of the Zapier embeds in your product at converting user clicks on Zap Templates to Zap activations.
In your integration's *Insights*, along with activation rate, see a funnel-view of users who signed up for Zapier, created Zaps, enabled Zaps, and activated Zaps from Zap Templates in your embeds.
## Create a dynamic field based on previous input field data
In the [Platform UI](https://zapier.com/app/developer):
1. In the *Build* section in the left sidebar, click on your **action**.
2. Click the **Input Designer** tab.
3. Review your input field settings, you'll need at least one input field that has **Alters Dynamic Fields** selected. This is the field that Zapier will use to decide if the dynamic field should be shown.
4. Click **Add** and select **Dynamic Field**.
5. A code box will appear. Add your JavaScript code that evaluates data from previous fields (referencing `bundle.inputData.field_key` where `field_key` is replaced with the actual key of the prior input field that must be checked), including logic and details on another field to show depending on the value of the former.
6. Once you've added your JavasScript code, click **Save**.
## Send dynamic field data to your API
In the [Platform UI](https://zapier.com/app/developer):
1. In the *Build* section in the left sidebar, click on your **action**.
2. Click the **API Configuration** tab.
3. Click **Switch to Code Mode**
4. In the dialog box, click **Switch to Code Mode**
5. A code box will appear. Add your Javascript code, that include `body: { ...bundle.inputData }` to send every input field, including pre-defined or dynamic fields in the body of your API call to your app. You can also use `bundle.inputData.field_key` to include individual lists of dynamic fields.
6. Once you've added your JavasScript code, click **Save**.
## Test a dynamic field
To test how your dynamic fields will appear in the Zap editor:
1. [Create a new Zap](https://zapier.com/app/editor/).
2. Add the action to your Zap that includes your dynamic field. This will allow for you to test how your action will appear to users.
If you want more details about the API calls being made, in the [Platform UI](https://zapier.com/app/developer):
* In the *Manage* section in the left sidebar, click **Monitoring**.
* You'll see a graph and be able to click on data points to view events and details to troubleshoot your setup further.
***
*Need help? [Tell us about your problem](https://developer.zapier.com/contact) and we'll connect you with the right resource or contact support.*
---
# Source: https://docs.zapier.com/powered-by-zapier/embedding-zapier/elements-security.md
> ## Documentation Index
> Fetch the complete documentation index at: https://docs.zapier.com/llms.txt
> Use this file to discover all available pages before exploring further.
# Element Security
> Keeping our elements secure and usable is critical at Zapier
User security is paramount. By default, Zapier denies any embedding of our product unless you provide us with a list of domains that you expect to embed Zapier in.
This protects the user from malicious activities like [Clickjacking](https://www.owasp.org/index.php/Clickjacking). :

## Provide a list of domains
If you've already embedded our Product, this would have already been captured and your product domains are permitted.
* To add domains, navigate to the Settings tab under the Embed section in the sidebar of your integration's [Platform UI](https://developer.zapier.com/), and add the missing domains under the 'Embedding Domains' section.

These specific domains are then permitted to embed Zapier. The domains provided by you should be registered with your company with a public registrar. That is to say a `randomcnamedomain.com` is not valid for the same reason that a user or bad actor could register that domain.
## Troubleshooting
* `localhost`, `yourcomp.local` and `127.0.0.1` are not valid supported domains. An option during your embed development would be to use a tunnel service like [ngrok](https://ngrok.com/) and to register that ngrok tunnel with us. Be advised, that we will ask for a static domain from ngrok.com or similar tunneling service.
* If the domain you're embedding on is added to the allowlist within *Manage Domains*, but you're seeing the `This embed is blocked` error, the [CSP](https://developer.mozilla.org/en-US/docs/Web/HTTP/CSP) may be too restrictive/overly strict. You'll want to check Console/Network for the appropriate request to see the [referrer-policy](https://developer.mozilla.org/en-US/docs/Web/HTTP/Headers/Referrer-Policy) header. Using `strict-origin-when-cross-origin` as the referrer-policy is recommended.
* For local development, use [ngrok](https://ngrok.com/) to make `https` test URLs when needed, as using `http` would be blocked, even if the domain has been added to the allowlist.
---
# Source: https://docs.zapier.com/platform/manage/embed-activation.md
> ## Documentation Index
> Fetch the complete documentation index at: https://docs.zapier.com/llms.txt
> Use this file to discover all available pages before exploring further.
# Embed activation rates
> Consider all the user clicks on Zap Templates surfaced in your embeds. The embed activation rate is the percentage of those Zaps that actually activated within 24 hours of creation, meaning the Zap ran at least one successful task. It measures the efefctiveness of the Zapier embeds in your product at converting user clicks on Zap Templates to Zap activations.
In your integration's *Insights*, along with activation rate, see a funnel-view of users who signed up for Zapier, created Zaps, enabled Zaps, and activated Zaps from Zap Templates in your embeds.
 A low activation doesn't necessarily mean something is broken. Both your integration and embed(s) could be implemented correctly and in good health, but you could still be seeing low activation rates. Embed insights can help identify where in their journey users are hitting challenges with activating, whether it's the Zapier sign up, Zap setup or enablement stage.
## Key Zapier insights
Embed insights and activation rates are strong indicators of user awareness and integration usability. If the click-to-sign-up ratio is really low, perhaps you haven't set sufficient context and expectations where the embed is placed for users to feel confident when they land on Zapier.com. If the create-to-enabled ratio is low, users could be having trouble with authenticating or field mapping once they're in the Zap editor creating a Zap from the template.
## Best practices
* If there are no *Embed insights* in your Dashboard, there are no embeds associated with the integration. Check out the *Embed* tab of your integration's Dashboard or our [Powered by Zapier](https://zapier.com/l/partner/solutions) documentation to see how you can start embedding. Embed features are only available for public integrations.
* We offer a variety of [embed tools](https://platform.zapier.com/embed/overview) as different options work best for different Partners and their platforms. Implement a combination of our partner tools and compare metrics to see which implementations are most successful for your use case.
* Users are more likely to sign-up when they are aware of Zapier and the value we provide by integrating to your app. Give context of Zapier via a brief onboarding flow or link to help docs so users know what to expect.
***
*Need help? [Tell us about your problem](https://developer.zapier.com/contact) and we'll connect you with the right resource or contact support.*
---
# Source: https://docs.zapier.com/powered-by-zapier/embedding-zapier/embed-insights.md
# Source: https://docs.zapier.com/platform/manage/embed-insights.md
> ## Documentation Index
> Fetch the complete documentation index at: https://docs.zapier.com/llms.txt
> Use this file to discover all available pages before exploring further.
# Embed insights definitions
> Embed features are available for public integrations.
All metrics can be filtered by *All Embeds* or [individual embeds](https://cdn.zappy.app/195883ab4fd7897224bcec00b7bf9b13.png), and the [last 7, 30, and 90 days](https://cdn.zappy.app/e3d334462ad532540710a7ce0d975942.png), hover over the metric to see the percentage and count figures.
Definitions for each of the metrics provided in the integration dashboard below:
| **Metric** | Definition |
| -------------------------------------- | ---------------------------------------------------------------------------- |
| **Total conversion** | Percentage of users who clicked on Zap Templates and activated a Zap. |
| **Users who clicked on Zap Templates** | Percentage and count of users who clicked on a Zap Template in an embed. |
| **Users who signed up for Zapier** | Percentage and count of users who signed up for a new account on Zapier. |
| **Users who created Zaps** | Percentage and count of users who started a Zap in the editor. |
| **Users who enabled Zaps** | Percentage and count of users who created and successfully published a Zap. |
| **Users who activated Zaps** | Percentage and count of users who created a Zap that successfully ran tasks. |
## Best practices
* Test different iterations of embeds and compare rates to see which ones resonate most with your users. Do certain sets of Zap Templates garner more clicks and activations than others? Does enabling “App search” on the Full Zapier Experience, so users can see all the apps they can integrate with, increase activations?
* Improve your Zap Templates with short, descriptive titles, and as much [prefilled field mapping](https://platform.zapier.com/embed/zap-editor#prefill-options) as possible, so users are immediately aware of the use case and can activate the Zap with the least amount of clicks.
* Provide context with your embed through help docs or an onboarding flow guiding users on how to connect your app with others using Zapier to improve the *Users who signed up for Zapier* rate.
***
*Need help? [Tell us about your problem](https://developer.zapier.com/contact) and we'll connect you with the right resource or contact support.*
---
# Source: https://docs.zapier.com/platform/build-cli/empty-values-in-input-data.md
> ## Documentation Index
> Fetch the complete documentation index at: https://docs.zapier.com/llms.txt
> Use this file to discover all available pages before exploring further.
# Empty values in input data
> Handing empty values in `bundle.inputData` in your `perform*` functions
zapier-platform-core v18 introduced a new flag named `cleanInputData`. This flag allows you to tell Zapier whether it should automatically remove empty values, including `null`, `[]` (empty arrays), and `{}` (empty objects), from `bundle.inputData` before passing it to your `perform*` functions.
By default, the `cleanInputData` flag defaults to true, which matches the behavior of all versions prior to v18. Starting with v18, we encourage you to **explicitly set this flag to false**, either globally in `App.flags` or per trigger/action in the `operation` object. For example:
```javascript theme={null}
const App = {
flags: {
cleanInputData: false, // global flag (defaults to true if not set)
},
triggers: {
recipe: {
operation: {
cleanInputData: false, // per-action flag, can be omitted if same as global
},
},
},
creates: {
recipe: {
operation: {
cleanInputData: true, // only enable for this action, overrides global flag
},
},
},
};
```
## When `cleanInputData` is true
When `cleanInputData` is true, Zapier removes any empty values **recursively** from `bundle.inputData` before passing it to your `perform*` (including `perform`, `performList`, `performGet`, etc) functions. For example, given the following input data:
```json theme={null}
{
"name": "Chocolate Cake",
"description": "",
"tags": [null, "", "dessert"],
"metadata": {
"author": null,
"ratings": {},
"comments": []
}
}
```
The resulting `bundle.inputData` passed to your `perform` function would be:
```json theme={null}
{
"name": "Chocolate Cake",
"tags": ["dessert"]
}
```
## When `cleanInputData` is false
When `cleanInputData` is false, Zapier preserves all empty values in `bundle.inputData`. Using the same example input data above, the resulting `bundle.inputData` would be:
```json theme={null}
{
"name": "Chocolate Cake",
"description": "",
"tags": [null, "", "dessert"],
"metadata": {
"author": null,
"ratings": {},
"comments": []
}
}
```
Your `perform` function would then need to handle these empty values appropriately.
We recommend setting `cleanInputData` to false and handling empty values explicitly in your code. This approach provides greater control for developers and avoids unexpected behavior, especially when dealing with nested input data (e.g., line items).
If your `perform*` functions didn't previously handle empty values, **setting
`cleanInputData` to false may break your code!** Make sure to test your
triggers or actions before rolling out this change to users.
---
# Zapier MCP Enterprise Access Request
Thanks for your interest in using Zapier MCP!
If you're currently on a Zapier Enterprise plan, you can request access below.
## Form Fields
### Full Name (required)
### Email (required)
### Company Name (required)
### What will you use Zapier MCP for? (required)
[Submit]
---
# Source: https://docs.zapier.com/platform/build/env.md
> ## Documentation Index
> Fetch the complete documentation index at: https://docs.zapier.com/llms.txt
> Use this file to discover all available pages before exploring further.
# Use environment variables in your API call
> Integrations can define environment variables that are available when the app's code executes. They are useful when you have data like an OAuth client ID and secret that you don't want to commit to source control. Environment variables can also be used as a way to toggle between a staging and production environment during app development and this would be recommended instead of the use of an independent integration for staging purposes.
Environment variables are defined on a per-version basis. Much like in local development environments such as the one in the [Platform CLI](https://github.com/zapier/zapier-platform/blob/main/packages/cli/README.md#environment), environment variables store key and value pairs outside of your app's API calls. Instead of hardcoding critical, secret values into your API authentication, trigger, and action calls, it's best to add them as environment variables in your integration, then reference the environment variable in your API calls.
If using OAuth v2 Authentication, the client ID and client secret fields are reserved environment variables. You'll need to use custom variable names for any other variables.
## 1. Add environment variables
A low activation doesn't necessarily mean something is broken. Both your integration and embed(s) could be implemented correctly and in good health, but you could still be seeing low activation rates. Embed insights can help identify where in their journey users are hitting challenges with activating, whether it's the Zapier sign up, Zap setup or enablement stage.
## Key Zapier insights
Embed insights and activation rates are strong indicators of user awareness and integration usability. If the click-to-sign-up ratio is really low, perhaps you haven't set sufficient context and expectations where the embed is placed for users to feel confident when they land on Zapier.com. If the create-to-enabled ratio is low, users could be having trouble with authenticating or field mapping once they're in the Zap editor creating a Zap from the template.
## Best practices
* If there are no *Embed insights* in your Dashboard, there are no embeds associated with the integration. Check out the *Embed* tab of your integration's Dashboard or our [Powered by Zapier](https://zapier.com/l/partner/solutions) documentation to see how you can start embedding. Embed features are only available for public integrations.
* We offer a variety of [embed tools](https://platform.zapier.com/embed/overview) as different options work best for different Partners and their platforms. Implement a combination of our partner tools and compare metrics to see which implementations are most successful for your use case.
* Users are more likely to sign-up when they are aware of Zapier and the value we provide by integrating to your app. Give context of Zapier via a brief onboarding flow or link to help docs so users know what to expect.
***
*Need help? [Tell us about your problem](https://developer.zapier.com/contact) and we'll connect you with the right resource or contact support.*
---
# Source: https://docs.zapier.com/powered-by-zapier/embedding-zapier/embed-insights.md
# Source: https://docs.zapier.com/platform/manage/embed-insights.md
> ## Documentation Index
> Fetch the complete documentation index at: https://docs.zapier.com/llms.txt
> Use this file to discover all available pages before exploring further.
# Embed insights definitions
> Embed features are available for public integrations.
All metrics can be filtered by *All Embeds* or [individual embeds](https://cdn.zappy.app/195883ab4fd7897224bcec00b7bf9b13.png), and the [last 7, 30, and 90 days](https://cdn.zappy.app/e3d334462ad532540710a7ce0d975942.png), hover over the metric to see the percentage and count figures.
Definitions for each of the metrics provided in the integration dashboard below:
| **Metric** | Definition |
| -------------------------------------- | ---------------------------------------------------------------------------- |
| **Total conversion** | Percentage of users who clicked on Zap Templates and activated a Zap. |
| **Users who clicked on Zap Templates** | Percentage and count of users who clicked on a Zap Template in an embed. |
| **Users who signed up for Zapier** | Percentage and count of users who signed up for a new account on Zapier. |
| **Users who created Zaps** | Percentage and count of users who started a Zap in the editor. |
| **Users who enabled Zaps** | Percentage and count of users who created and successfully published a Zap. |
| **Users who activated Zaps** | Percentage and count of users who created a Zap that successfully ran tasks. |
## Best practices
* Test different iterations of embeds and compare rates to see which ones resonate most with your users. Do certain sets of Zap Templates garner more clicks and activations than others? Does enabling “App search” on the Full Zapier Experience, so users can see all the apps they can integrate with, increase activations?
* Improve your Zap Templates with short, descriptive titles, and as much [prefilled field mapping](https://platform.zapier.com/embed/zap-editor#prefill-options) as possible, so users are immediately aware of the use case and can activate the Zap with the least amount of clicks.
* Provide context with your embed through help docs or an onboarding flow guiding users on how to connect your app with others using Zapier to improve the *Users who signed up for Zapier* rate.
***
*Need help? [Tell us about your problem](https://developer.zapier.com/contact) and we'll connect you with the right resource or contact support.*
---
# Source: https://docs.zapier.com/platform/build-cli/empty-values-in-input-data.md
> ## Documentation Index
> Fetch the complete documentation index at: https://docs.zapier.com/llms.txt
> Use this file to discover all available pages before exploring further.
# Empty values in input data
> Handing empty values in `bundle.inputData` in your `perform*` functions
zapier-platform-core v18 introduced a new flag named `cleanInputData`. This flag allows you to tell Zapier whether it should automatically remove empty values, including `null`, `[]` (empty arrays), and `{}` (empty objects), from `bundle.inputData` before passing it to your `perform*` functions.
By default, the `cleanInputData` flag defaults to true, which matches the behavior of all versions prior to v18. Starting with v18, we encourage you to **explicitly set this flag to false**, either globally in `App.flags` or per trigger/action in the `operation` object. For example:
```javascript theme={null}
const App = {
flags: {
cleanInputData: false, // global flag (defaults to true if not set)
},
triggers: {
recipe: {
operation: {
cleanInputData: false, // per-action flag, can be omitted if same as global
},
},
},
creates: {
recipe: {
operation: {
cleanInputData: true, // only enable for this action, overrides global flag
},
},
},
};
```
## When `cleanInputData` is true
When `cleanInputData` is true, Zapier removes any empty values **recursively** from `bundle.inputData` before passing it to your `perform*` (including `perform`, `performList`, `performGet`, etc) functions. For example, given the following input data:
```json theme={null}
{
"name": "Chocolate Cake",
"description": "",
"tags": [null, "", "dessert"],
"metadata": {
"author": null,
"ratings": {},
"comments": []
}
}
```
The resulting `bundle.inputData` passed to your `perform` function would be:
```json theme={null}
{
"name": "Chocolate Cake",
"tags": ["dessert"]
}
```
## When `cleanInputData` is false
When `cleanInputData` is false, Zapier preserves all empty values in `bundle.inputData`. Using the same example input data above, the resulting `bundle.inputData` would be:
```json theme={null}
{
"name": "Chocolate Cake",
"description": "",
"tags": [null, "", "dessert"],
"metadata": {
"author": null,
"ratings": {},
"comments": []
}
}
```
Your `perform` function would then need to handle these empty values appropriately.
We recommend setting `cleanInputData` to false and handling empty values explicitly in your code. This approach provides greater control for developers and avoids unexpected behavior, especially when dealing with nested input data (e.g., line items).
If your `perform*` functions didn't previously handle empty values, **setting
`cleanInputData` to false may break your code!** Make sure to test your
triggers or actions before rolling out this change to users.
---
# Zapier MCP Enterprise Access Request
Thanks for your interest in using Zapier MCP!
If you're currently on a Zapier Enterprise plan, you can request access below.
## Form Fields
### Full Name (required)
### Email (required)
### Company Name (required)
### What will you use Zapier MCP for? (required)
[Submit]
---
# Source: https://docs.zapier.com/platform/build/env.md
> ## Documentation Index
> Fetch the complete documentation index at: https://docs.zapier.com/llms.txt
> Use this file to discover all available pages before exploring further.
# Use environment variables in your API call
> Integrations can define environment variables that are available when the app's code executes. They are useful when you have data like an OAuth client ID and secret that you don't want to commit to source control. Environment variables can also be used as a way to toggle between a staging and production environment during app development and this would be recommended instead of the use of an independent integration for staging purposes.
Environment variables are defined on a per-version basis. Much like in local development environments such as the one in the [Platform CLI](https://github.com/zapier/zapier-platform/blob/main/packages/cli/README.md#environment), environment variables store key and value pairs outside of your app's API calls. Instead of hardcoding critical, secret values into your API authentication, trigger, and action calls, it's best to add them as environment variables in your integration, then reference the environment variable in your API calls.
If using OAuth v2 Authentication, the client ID and client secret fields are reserved environment variables. You'll need to use custom variable names for any other variables.
## 1. Add environment variables
 To add environment variables:
* Log into the [Platform UI](https://zapier.com/app/developer).
* Select your **integration**.
* In the *Build* section in the left sidebar, click **Advanced** . There you can add your environment variables including a key and a value for each.
* Click **Add** to include additional environment variables, or click the `x` icon to remove variables if needed.
* Once you've completed adding a key and value, click **Save**.
## 2. Reference environment variables
To add environment variables:
* Log into the [Platform UI](https://zapier.com/app/developer).
* Select your **integration**.
* In the *Build* section in the left sidebar, click **Advanced** . There you can add your environment variables including a key and a value for each.
* Click **Add** to include additional environment variables, or click the `x` icon to remove variables if needed.
* Once you've completed adding a key and value, click **Save**.
## 2. Reference environment variables
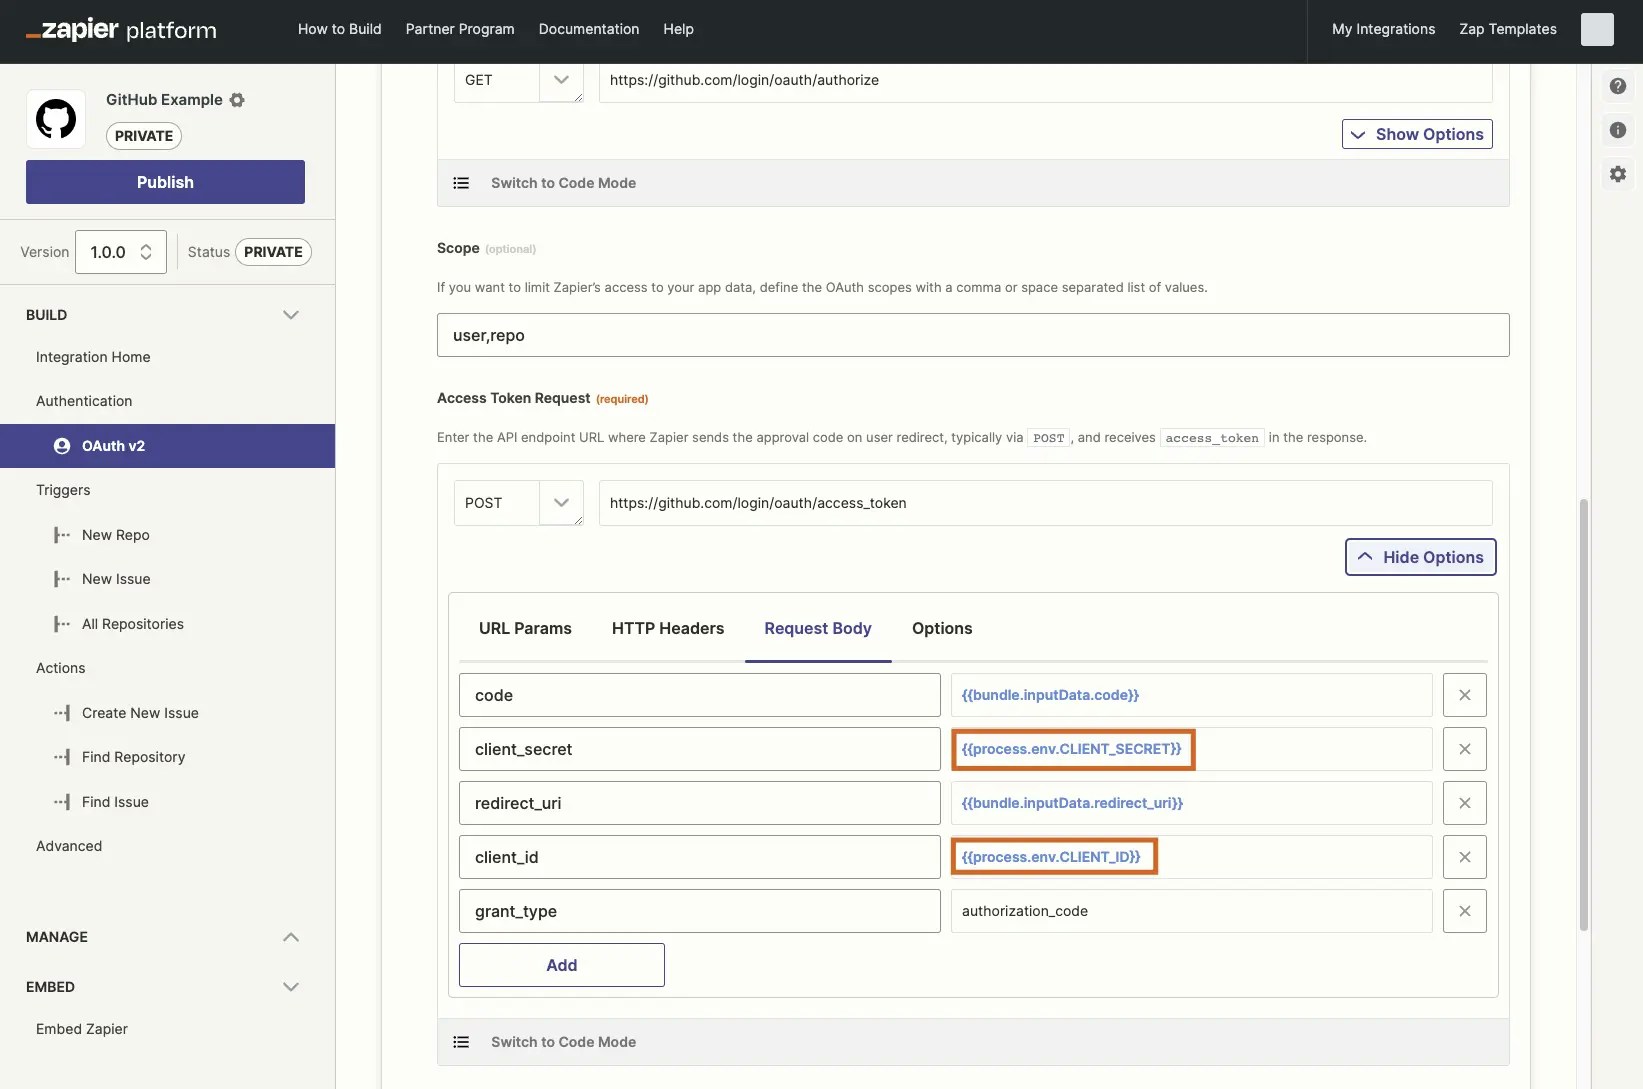 Use environment variables in any Zapier integration API call through the form's *Show Options* link, selecting *Request Body*, *URL Params* or *HTTP Headers* as your API expects. Reference the environment variable you've configured under *Advanced*, in the form with the following text, replacing `YOUR_KEY` with your actual key: `{{process.env.YOUR_KEY}}` Zapier will then replace that variable with the value for that key from your *Advanced* settings and will use the correct value every time if you change it in the future. You can also reference environment variables in custom code if you switch your API call to code mode.
## 3. Change environment variables
Use environment variables in any Zapier integration API call through the form's *Show Options* link, selecting *Request Body*, *URL Params* or *HTTP Headers* as your API expects. Reference the environment variable you've configured under *Advanced*, in the form with the following text, replacing `YOUR_KEY` with your actual key: `{{process.env.YOUR_KEY}}` Zapier will then replace that variable with the value for that key from your *Advanced* settings and will use the correct value every time if you change it in the future. You can also reference environment variables in custom code if you switch your API call to code mode.
## 3. Change environment variables
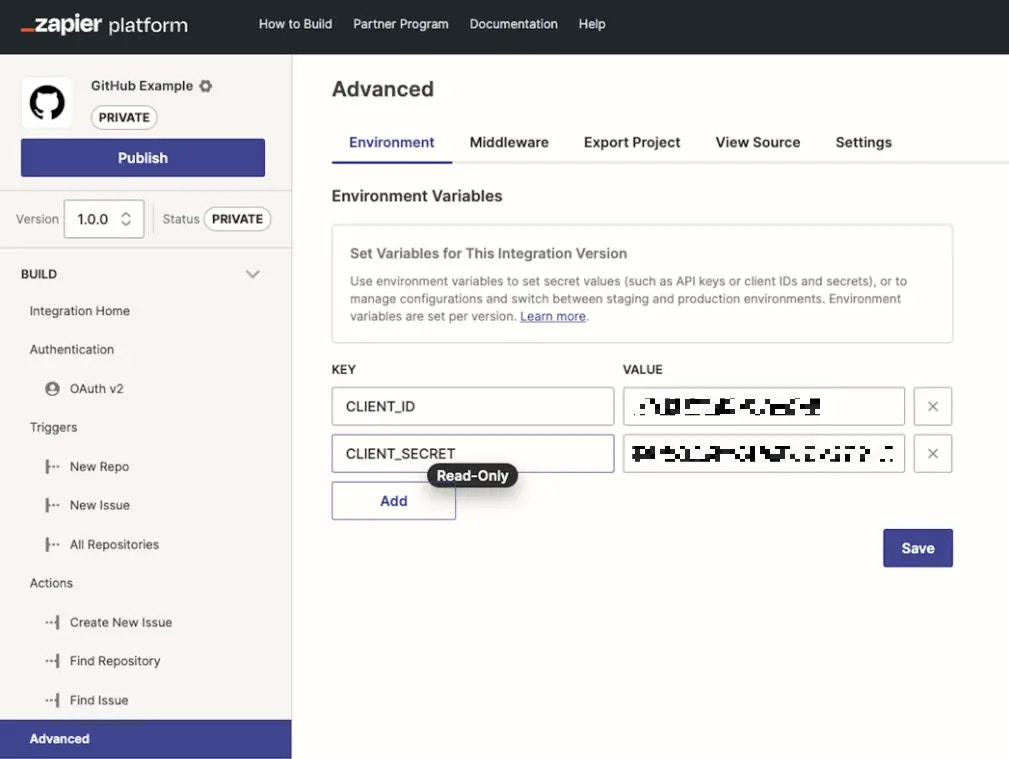 It is possible to change your environment variables in a new version of your integration, or when switching from dev to production endpoints for the release of your integration to the public.
To change an environment variable:
1. Log into the [Platform UI](https://zapier.com/app/developer).
2. Select your **integration**.
3. In the *Build* section in the left sidebar, click **Advanced**.
4. Edit the text in the **Values** column with the new variable values. You cannot edit the *Key*. If you need to change a key and its value, first delete the old key, then add a new one instead.
## 4. Use environment variables for staging and production versions
We strongly recommend against the use of an independent integration for staging purposes. By utilising [version control](/platform/manage/versions) and environment variables instead, the deployment, integration and user management processes (eg. migration) will be significantly improved for your integration. It also helps [Developer Support](https://developer.zapier.com/contact) establish exactly what you're working on and identifying relevant logs.
It is conventional to reserve one version for testing/staging and one version for production, setting the applicable environment variables under *Advanced* in each.
If you want to be able to work with both environments in development in one version, one approach is the following:
* Set environment variables for both domains you want to call
* Set another environment variable for the domain you want to work with. For example, `key: ENVFLAG / value: staging`
It is possible to change your environment variables in a new version of your integration, or when switching from dev to production endpoints for the release of your integration to the public.
To change an environment variable:
1. Log into the [Platform UI](https://zapier.com/app/developer).
2. Select your **integration**.
3. In the *Build* section in the left sidebar, click **Advanced**.
4. Edit the text in the **Values** column with the new variable values. You cannot edit the *Key*. If you need to change a key and its value, first delete the old key, then add a new one instead.
## 4. Use environment variables for staging and production versions
We strongly recommend against the use of an independent integration for staging purposes. By utilising [version control](/platform/manage/versions) and environment variables instead, the deployment, integration and user management processes (eg. migration) will be significantly improved for your integration. It also helps [Developer Support](https://developer.zapier.com/contact) establish exactly what you're working on and identifying relevant logs.
It is conventional to reserve one version for testing/staging and one version for production, setting the applicable environment variables under *Advanced* in each.
If you want to be able to work with both environments in development in one version, one approach is the following:
* Set environment variables for both domains you want to call
* Set another environment variable for the domain you want to work with. For example, `key: ENVFLAG / value: staging`
 * Throughout the app, in [Code Mode](/platform/build/code-mode), check the value of the latter variable and conditionally reference the corresponding domain environment variable.
For example:
```js theme={null}
let domain;
if (process.env.ENVFLAG === "staging") {
domain = process.env.STAGING
} else {
domain = process.env.PRODUCTION
}
const options = {
url: domain // conditional, depending on envFlag
method: 'POST',
headers: {
// headers
},
body: {
// body
}
}
```
Thus, during development, you can toggle the value of one environment variable to conditionally call the corresponding domain.
However, once a version is pushed to production, the variables are fixed, so in the case of a [public app](/platform/quickstart/private-vs-public-integrations) make sure to set the flag environment variable accordingly before promoting.
## 5. Allow users to select an environment
Certain apps need to allow users to select the domain during authentication. To do so, create an [input field in the authentication form](/platform/build/oauth#optional-input-form), allowing the user to pick which domain they want their connection to interact with.
* Throughout the app, in [Code Mode](/platform/build/code-mode), check the value of the latter variable and conditionally reference the corresponding domain environment variable.
For example:
```js theme={null}
let domain;
if (process.env.ENVFLAG === "staging") {
domain = process.env.STAGING
} else {
domain = process.env.PRODUCTION
}
const options = {
url: domain // conditional, depending on envFlag
method: 'POST',
headers: {
// headers
},
body: {
// body
}
}
```
Thus, during development, you can toggle the value of one environment variable to conditionally call the corresponding domain.
However, once a version is pushed to production, the variables are fixed, so in the case of a [public app](/platform/quickstart/private-vs-public-integrations) make sure to set the flag environment variable accordingly before promoting.
## 5. Allow users to select an environment
Certain apps need to allow users to select the domain during authentication. To do so, create an [input field in the authentication form](/platform/build/oauth#optional-input-form), allowing the user to pick which domain they want their connection to interact with.
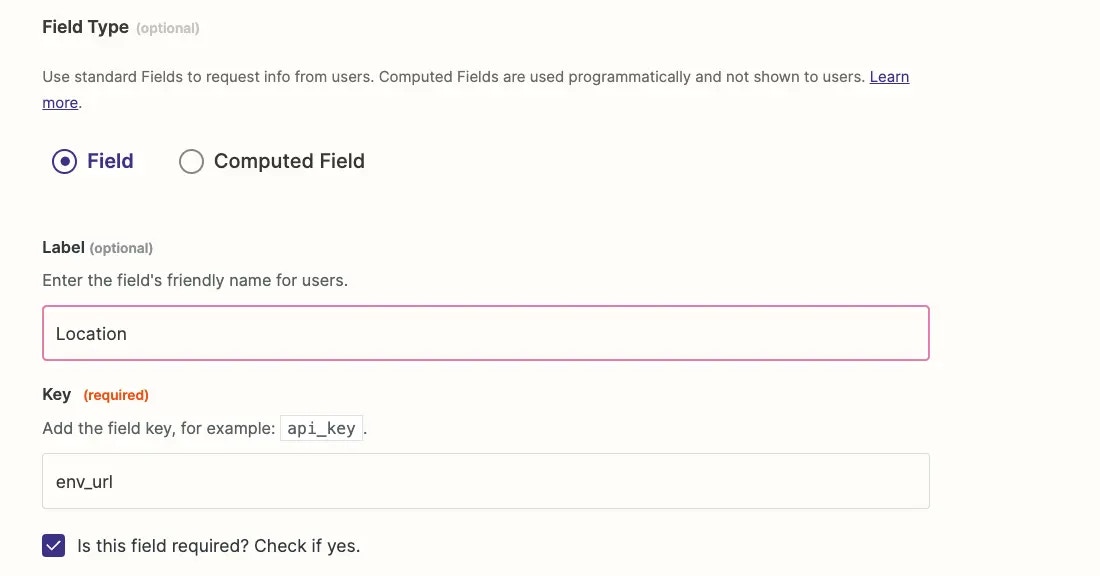
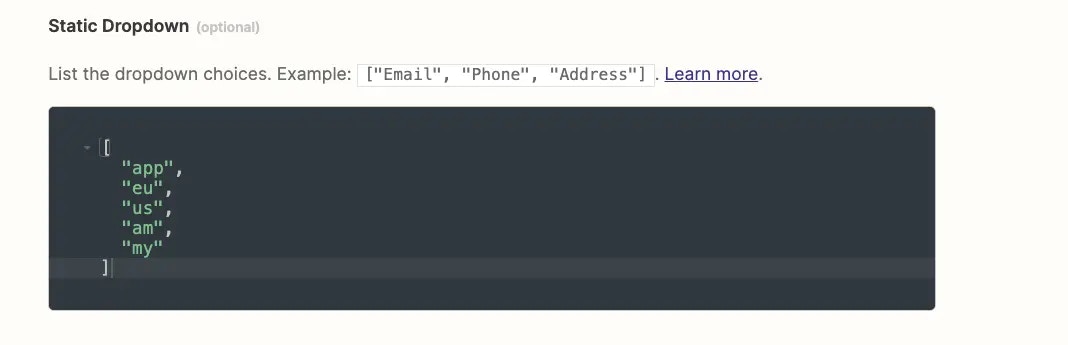 Reference the user's selection with `{{bundle.authData.env_url}}` throughout the integration to conditionally call the corresponding domain.
## Video Tutorial
You can refer to this video on using environment variables:
***
*Need help? [Tell us about your problem](https://developer.zapier.com/contact) and we'll connect you with the right resource or contact support.*
---
# Source: https://docs.zapier.com/platform/build/error-array-expected.md
> ## Documentation Index
> Fetch the complete documentation index at: https://docs.zapier.com/llms.txt
> Use this file to discover all available pages before exploring further.
# Error: An array is expected
> When you add a polling trigger or search action to your integration, the Zapier platform [expects a bare array of new or found items returned](/platform/build/response-types), sorted in reverse chronological order. An API may instead return a result _object_ that contains the array of items the trigger/search needs.
## Error shown
For example, for a “Find Issue” search action with GitHub's API, we might start with a `https://api.github.com/repos/{{bundle.inputData.owner}}/ {{bundle.inputData.repo}}/issues/{{bundle.inputData.issue_number}}` request:
{" "}
Reference the user's selection with `{{bundle.authData.env_url}}` throughout the integration to conditionally call the corresponding domain.
## Video Tutorial
You can refer to this video on using environment variables:
***
*Need help? [Tell us about your problem](https://developer.zapier.com/contact) and we'll connect you with the right resource or contact support.*
---
# Source: https://docs.zapier.com/platform/build/error-array-expected.md
> ## Documentation Index
> Fetch the complete documentation index at: https://docs.zapier.com/llms.txt
> Use this file to discover all available pages before exploring further.
# Error: An array is expected
> When you add a polling trigger or search action to your integration, the Zapier platform [expects a bare array of new or found items returned](/platform/build/response-types), sorted in reverse chronological order. An API may instead return a result _object_ that contains the array of items the trigger/search needs.
## Error shown
For example, for a “Find Issue” search action with GitHub's API, we might start with a `https://api.github.com/repos/{{bundle.inputData.owner}}/ {{bundle.inputData.repo}}/issues/{{bundle.inputData.issue_number}}` request:
{" "}
 {" "}
When tested, Zapier will show an error message `Results must be an array, got: object,`
{" "}
{" "}
When tested, Zapier will show an error message `Results must be an array, got: object,`
{" "}
 {" "}
Check the API response in the HTTP tab of the *[Test your API Request](/platform/build/test-triggers-actions)* section, and you'll see an *object* that contains the array of items we need was returned, not the array itself:
{" "}
{" "}
Check the API response in the HTTP tab of the *[Test your API Request](/platform/build/test-triggers-actions)* section, and you'll see an *object* that contains the array of items we need was returned, not the array itself:
{" "}
 {" "}
## Solution
Instead, return that array of channels to Zapier. To do that switch to [Code Mode](/platform/build/code-mode) in your request. That will allow you to provide a JavaScript function to handle the request, and make needed changes to the structure or content of the result before returning data to the Zapier platform.
For this request, wrap the response with an array instead of the default `return results`, to have Zapier return an array of issues.
{" "}
{" "}
## Solution
Instead, return that array of channels to Zapier. To do that switch to [Code Mode](/platform/build/code-mode) in your request. That will allow you to provide a JavaScript function to handle the request, and make needed changes to the structure or content of the result before returning data to the Zapier platform.
For this request, wrap the response with an array instead of the default `return results`, to have Zapier return an array of issues.
{" "}
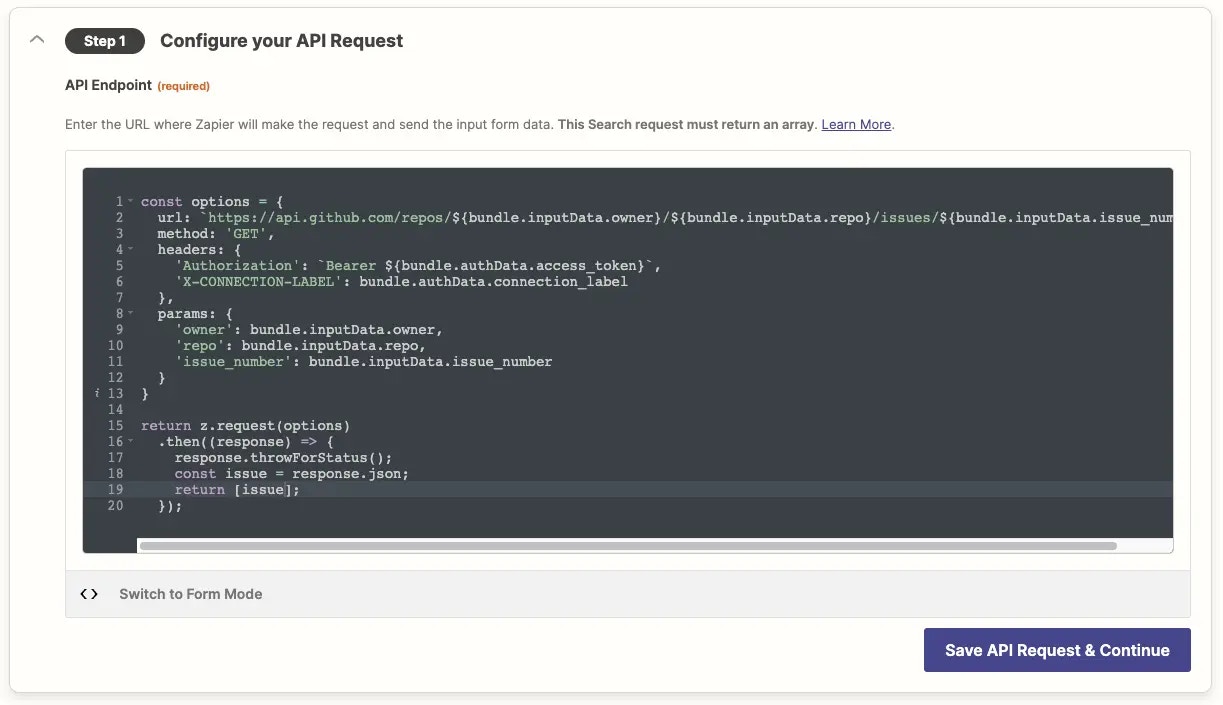 {" "}
> Remember: [Code Mode](/platform/build/code-mode) is a toggle; if you switch back to Form Mode your code will be ignored!
Now, retest the request and it should run successfully.
{" "}
{" "}
> Remember: [Code Mode](/platform/build/code-mode) is a toggle; if you switch back to Form Mode your code will be ignored!
Now, retest the request and it should run successfully.
{" "}
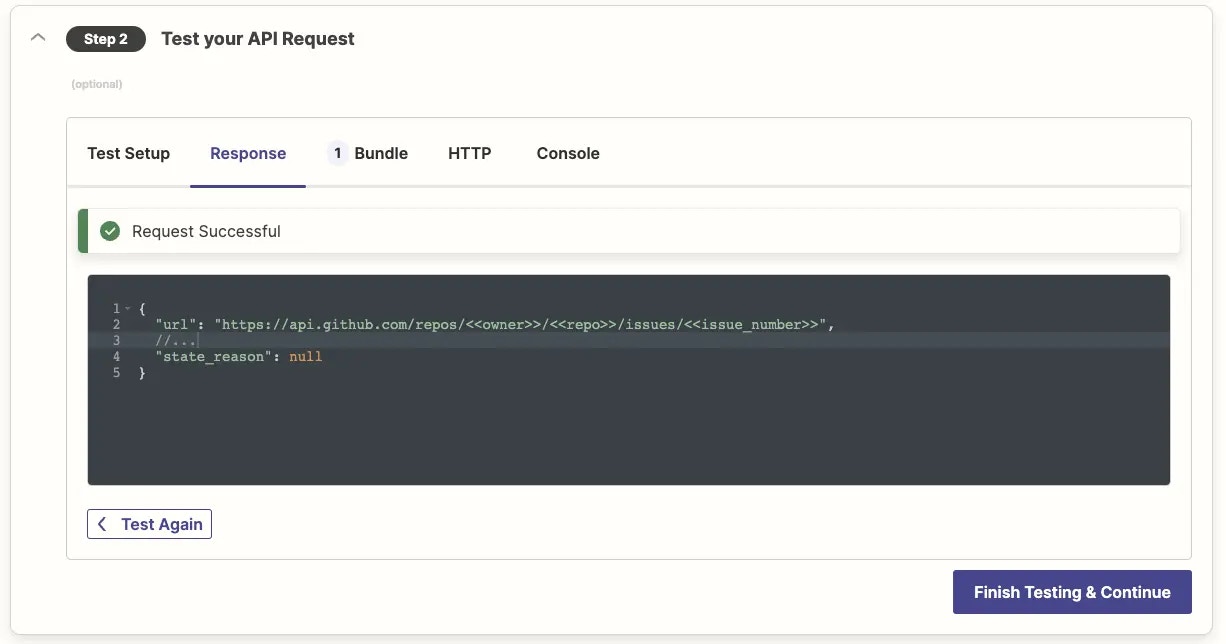 {" "}
***
*Need help? [Tell us about your problem](https://developer.zapier.com/contact) and we'll connect you with the right resource or contact support.*
---
# Source: https://docs.zapier.com/platform/build/error-cannot-retrieve-app.md
> ## Documentation Index
> Fetch the complete documentation index at: https://docs.zapier.com/llms.txt
> Use this file to discover all available pages before exploring further.
# Error: Cannot retrieve App******CLIAPI@*** app
## Error shown
When attempting to use a Zap that has a private integration in a Team and Enterprise Zapier account, the private integration step could show an error that says:
`Cannot retrieve App******CLIAPI@*** app`
This occurs in Team and Enterprise Zapier accounts, and it happens when the private integration has not been explicitly [shared](/platform/manage/sharing) with the Zap owner.
This can happen if the Zap changes ownership, or if the Zap owner was removed from using the private integration, after it has been previously shared with them.
## Solution
To resolve this, an integration admin would need to [share](/platform/manage/sharing) the private integration with the owner of the Zap so that they have access to use the private integration on their Zaps.
***
*Need help? [Tell us about your problem](https://developer.zapier.com/contact) and we'll connect you with the right resource or contact support.*
---
# Source: https://docs.zapier.com/platform/reference/error-handling-tutorial.md
> ## Documentation Index
> Fetch the complete documentation index at: https://docs.zapier.com/llms.txt
> Use this file to discover all available pages before exploring further.
# Implementing Error Handling
> Error handling enables you dictate how your integration should function when certain errors are returned from your API.
---
# Source: https://docs.zapier.com/platform/manage/error-handling.md
> ## Documentation Index
> Fetch the complete documentation index at: https://docs.zapier.com/llms.txt
> Use this file to discover all available pages before exploring further.
# Improve error response handling
> Errors from your API cause pain for users at two vital points:
* During the Zap setup process, stopping them from enabling and activating their Zaps
* During the Zap's runtime, once it has been turned on, preventing the Zap from completing all actions successfully
Zap runs that encounter an error response status code when making a request to your API throw an exception and receive the “Stopped / Errored” status. This will [display an error message to the user](https://help.zapier.com/hc/en-us/articles/20505304170637-Review-Zap-run-statuses) in their Zap History and they will be notified via email based on their [notification settings](https://help.zapier.com/hc/en-us/articles/8496289225229-Manage-notifications-when-errors-occur-in-Zaps).
Even if the `message` included in the response details an error, users should **never receive** a success/200 response if there was an error in the request as this will not show up as an error in the Zap history.
If [95% of a Zap's runs in the last 7 days are assigned the “Stopped / Errored” status](https://help.zapier.com/hc/en-us/articles/8496037690637-Troubleshoot-errors-in-Zapier#500-series-error-codes-0-3), the Zap will be automatically turned off. The Zap will not run again until the user manually enables it, so only return an error if the scenario is truly an error that needs to be fixed.
Monitor spikes in errors from the the *Monitoring* page in the Platform UI as leading indicators of problems users are facing within your integration.
The more descriptive and thorough [error handling](https://github.com/zapier/zapier-platform/blob/main/packages/cli/README.md#error-handling) your API and integration have in place, the easier it will be for users to resolve their own issues and for Zapier's support team to assist with debugging.
If you don't have control to make changes to the API itself, utilize custom error handling to improve your error messages:
* Elaborate on briefly worded errors with user-friendly messaging.
* When writing user-facing error messages however, keep the message below 250 characters total as Zapier truncates errors from integrations at 250 characters when displaying them to users.
* Update “not\_authenticated” to “Your API Key is invalid. Please reconnect your account.”
* Surface specific information to users regarding the field and why it's producing an error. This empowers users to fix Zap issues independently.
* Instead of “Provided data is invalid”, return “Contact name is invalid”.
* Improve “Contact name is invalid” with “Contact name exceeds character limit.”
* Format the error to include a second, optional argument code machines can use to identify the type of error, and last, optional argument of a HTTP status code. `throw new z.errors.Error('Contact name exceeds character limit.', 'InvalidData', 400);`
Your app integration can use custom code to improve the user experience in Zapier by returning a user-friendly message and optional error and status code. Typically, this will be prettifying 4xx responses or APIs that return errors as 200s with a payload that describes the error. The code and status is used by Zapier to provide relevant troubleshooting to the user when communicating the error.
## Prerequisites
* Documentation for the API you're working with that includes the response status codes per endpoint
* Familiarity with [general error handling in Zapier](https://github.com/zapier/zapier-platform/blob/main/packages/cli/README.md#general-errors).
## 1. Custom errors in Platform CLI
Switching to the [Platform CLI](/platform/manage/export-cli), allows you to [make use of HTTP middleware](https://github.com/zapier/zapier-platform/blob/main/packages/cli/README.md#using-http-middleware) to implement any [custom error response handling](https://github.com/zapier/zapier-platform/blob/main/packages/cli/README.md#error-response-handling).
This will allow you to write a single script that applies across the entire integration to detect a specific error from the API, and show the relevant message to the user within Zapier.
## 2. Custom errors in Platform UI
When you build and maintain your app in the UI, custom error handling can still be implemented. The main difference is that you'll need to add it to each individual element of the integration (triggers, actions, searches, authentication) that could encounter the error.
In the UI, `skipThrowForStatus` is set from the [Advanced tab](/platform/build/errors). This allows for custom error handling for status codes above 400. Note that 401 status codes will throw a `RefreshAuthError` [regardless](https://github.com/zapier/zapier-platform/blob/main/packages/cli/README.md#user-content-error-response-handling).
{" "}
***
*Need help? [Tell us about your problem](https://developer.zapier.com/contact) and we'll connect you with the right resource or contact support.*
---
# Source: https://docs.zapier.com/platform/build/error-cannot-retrieve-app.md
> ## Documentation Index
> Fetch the complete documentation index at: https://docs.zapier.com/llms.txt
> Use this file to discover all available pages before exploring further.
# Error: Cannot retrieve App******CLIAPI@*** app
## Error shown
When attempting to use a Zap that has a private integration in a Team and Enterprise Zapier account, the private integration step could show an error that says:
`Cannot retrieve App******CLIAPI@*** app`
This occurs in Team and Enterprise Zapier accounts, and it happens when the private integration has not been explicitly [shared](/platform/manage/sharing) with the Zap owner.
This can happen if the Zap changes ownership, or if the Zap owner was removed from using the private integration, after it has been previously shared with them.
## Solution
To resolve this, an integration admin would need to [share](/platform/manage/sharing) the private integration with the owner of the Zap so that they have access to use the private integration on their Zaps.
***
*Need help? [Tell us about your problem](https://developer.zapier.com/contact) and we'll connect you with the right resource or contact support.*
---
# Source: https://docs.zapier.com/platform/reference/error-handling-tutorial.md
> ## Documentation Index
> Fetch the complete documentation index at: https://docs.zapier.com/llms.txt
> Use this file to discover all available pages before exploring further.
# Implementing Error Handling
> Error handling enables you dictate how your integration should function when certain errors are returned from your API.
---
# Source: https://docs.zapier.com/platform/manage/error-handling.md
> ## Documentation Index
> Fetch the complete documentation index at: https://docs.zapier.com/llms.txt
> Use this file to discover all available pages before exploring further.
# Improve error response handling
> Errors from your API cause pain for users at two vital points:
* During the Zap setup process, stopping them from enabling and activating their Zaps
* During the Zap's runtime, once it has been turned on, preventing the Zap from completing all actions successfully
Zap runs that encounter an error response status code when making a request to your API throw an exception and receive the “Stopped / Errored” status. This will [display an error message to the user](https://help.zapier.com/hc/en-us/articles/20505304170637-Review-Zap-run-statuses) in their Zap History and they will be notified via email based on their [notification settings](https://help.zapier.com/hc/en-us/articles/8496289225229-Manage-notifications-when-errors-occur-in-Zaps).
Even if the `message` included in the response details an error, users should **never receive** a success/200 response if there was an error in the request as this will not show up as an error in the Zap history.
If [95% of a Zap's runs in the last 7 days are assigned the “Stopped / Errored” status](https://help.zapier.com/hc/en-us/articles/8496037690637-Troubleshoot-errors-in-Zapier#500-series-error-codes-0-3), the Zap will be automatically turned off. The Zap will not run again until the user manually enables it, so only return an error if the scenario is truly an error that needs to be fixed.
Monitor spikes in errors from the the *Monitoring* page in the Platform UI as leading indicators of problems users are facing within your integration.
The more descriptive and thorough [error handling](https://github.com/zapier/zapier-platform/blob/main/packages/cli/README.md#error-handling) your API and integration have in place, the easier it will be for users to resolve their own issues and for Zapier's support team to assist with debugging.
If you don't have control to make changes to the API itself, utilize custom error handling to improve your error messages:
* Elaborate on briefly worded errors with user-friendly messaging.
* When writing user-facing error messages however, keep the message below 250 characters total as Zapier truncates errors from integrations at 250 characters when displaying them to users.
* Update “not\_authenticated” to “Your API Key is invalid. Please reconnect your account.”
* Surface specific information to users regarding the field and why it's producing an error. This empowers users to fix Zap issues independently.
* Instead of “Provided data is invalid”, return “Contact name is invalid”.
* Improve “Contact name is invalid” with “Contact name exceeds character limit.”
* Format the error to include a second, optional argument code machines can use to identify the type of error, and last, optional argument of a HTTP status code. `throw new z.errors.Error('Contact name exceeds character limit.', 'InvalidData', 400);`
Your app integration can use custom code to improve the user experience in Zapier by returning a user-friendly message and optional error and status code. Typically, this will be prettifying 4xx responses or APIs that return errors as 200s with a payload that describes the error. The code and status is used by Zapier to provide relevant troubleshooting to the user when communicating the error.
## Prerequisites
* Documentation for the API you're working with that includes the response status codes per endpoint
* Familiarity with [general error handling in Zapier](https://github.com/zapier/zapier-platform/blob/main/packages/cli/README.md#general-errors).
## 1. Custom errors in Platform CLI
Switching to the [Platform CLI](/platform/manage/export-cli), allows you to [make use of HTTP middleware](https://github.com/zapier/zapier-platform/blob/main/packages/cli/README.md#using-http-middleware) to implement any [custom error response handling](https://github.com/zapier/zapier-platform/blob/main/packages/cli/README.md#error-response-handling).
This will allow you to write a single script that applies across the entire integration to detect a specific error from the API, and show the relevant message to the user within Zapier.
## 2. Custom errors in Platform UI
When you build and maintain your app in the UI, custom error handling can still be implemented. The main difference is that you'll need to add it to each individual element of the integration (triggers, actions, searches, authentication) that could encounter the error.
In the UI, `skipThrowForStatus` is set from the [Advanced tab](/platform/build/errors). This allows for custom error handling for status codes above 400. Note that 401 status codes will throw a `RefreshAuthError` [regardless](https://github.com/zapier/zapier-platform/blob/main/packages/cli/README.md#user-content-error-response-handling).
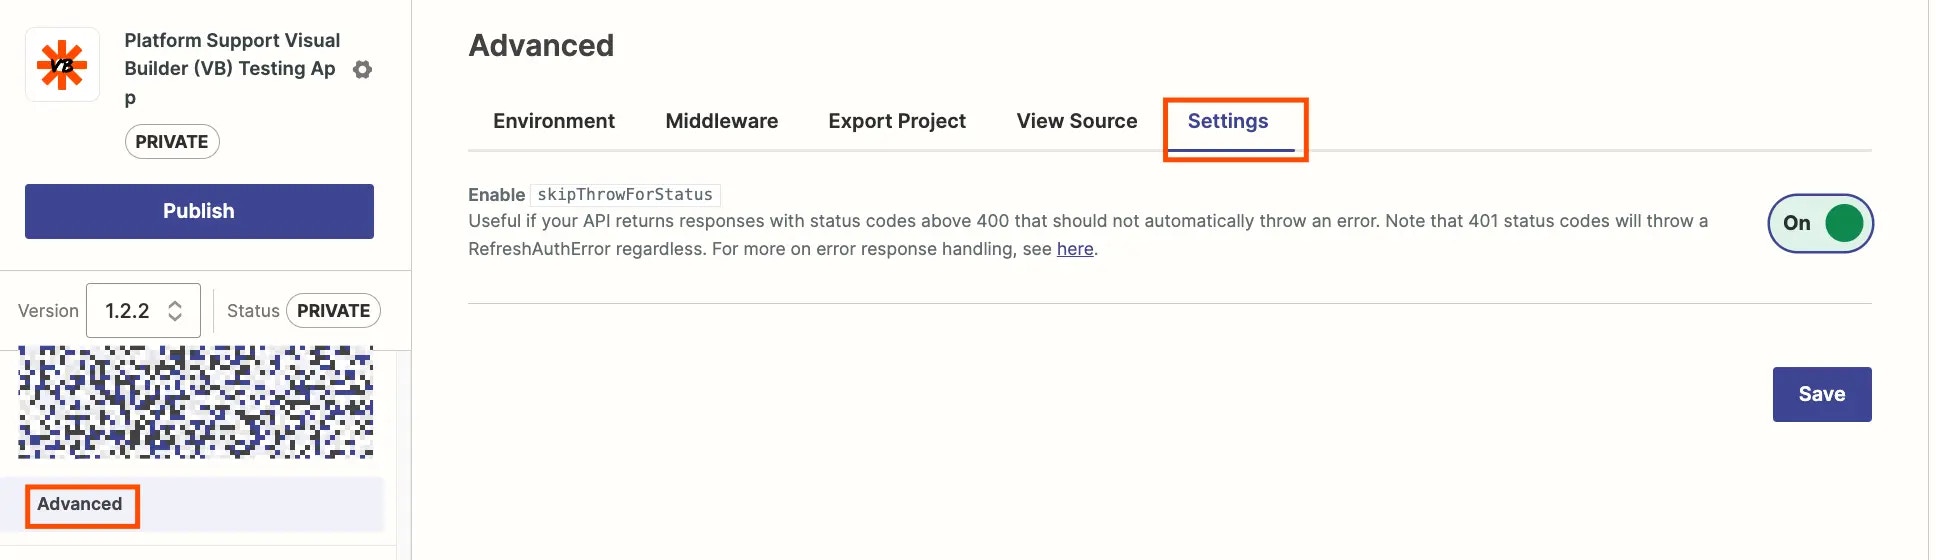 Once set, you can add [error handling](https://github.com/zapier/zapier-platform/blob/main/packages/cli/README.md#general-errors) when in Code Mode within the API Configuration for each trigger/action/search.
```js theme={null}
return z.request(options).then((response) => {
if (response.status === 404) {
throw new z.errors.Error(
"An error was returned. Help!",
"InvalidData",
404,
);
}
return response.json;
});
```
Once set, you can add [error handling](https://github.com/zapier/zapier-platform/blob/main/packages/cli/README.md#general-errors) when in Code Mode within the API Configuration for each trigger/action/search.
```js theme={null}
return z.request(options).then((response) => {
if (response.status === 404) {
throw new z.errors.Error(
"An error was returned. Help!",
"InvalidData",
404,
);
}
return response.json;
});
```
 ***
*Need help? [Tell us about your problem](https://developer.zapier.com/contact) and we'll connect you with the right resource or contact support.*
---
# Source: https://docs.zapier.com/platform/build/error-non-object-array.md
> ## Documentation Index
> Fetch the complete documentation index at: https://docs.zapier.com/llms.txt
> Use this file to discover all available pages before exploring further.
# Error: Got a non-object result in the array, expected only objects
> When using a REST Hook trigger, the data returned by the perform must be an array.
## Error shown
If an API returns a non-object result within the array, or an array of arrays, the following error will show.
`Got a non-object result in the array, expected only objects ( )`
The non-object result will be wrapped in the parentheses for the error message.
## Solution
If the data included in the webhook needs to be transformed, or includes multiple objects, you can add custom code to parse the response data in `bundle.cleanedRequest` within the Perform into an array of objects.
If your webhook already provides an array, remove the wrapping array that Zapier includes by default and simply return `bundle.cleanedRequest`.
{" "}
***
*Need help? [Tell us about your problem](https://developer.zapier.com/contact) and we'll connect you with the right resource or contact support.*
---
# Source: https://docs.zapier.com/platform/build/error-non-object-array.md
> ## Documentation Index
> Fetch the complete documentation index at: https://docs.zapier.com/llms.txt
> Use this file to discover all available pages before exploring further.
# Error: Got a non-object result in the array, expected only objects
> When using a REST Hook trigger, the data returned by the perform must be an array.
## Error shown
If an API returns a non-object result within the array, or an array of arrays, the following error will show.
`Got a non-object result in the array, expected only objects ( )`
The non-object result will be wrapped in the parentheses for the error message.
## Solution
If the data included in the webhook needs to be transformed, or includes multiple objects, you can add custom code to parse the response data in `bundle.cleanedRequest` within the Perform into an array of objects.
If your webhook already provides an array, remove the wrapping array that Zapier includes by default and simply return `bundle.cleanedRequest`.
{" "}
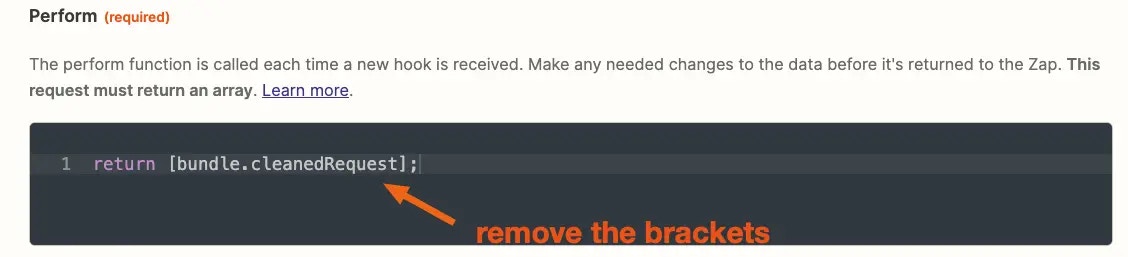 {" "}
***
*Need help? [Tell us about your problem](https://developer.zapier.com/contact) and we'll connect you with the right resource or contact support.*
---
# Source: https://docs.zapier.com/platform/build/error-non-object.md
> ## Documentation Index
> Fetch the complete documentation index at: https://docs.zapier.com/llms.txt
> Use this file to discover all available pages before exploring further.
# Error: Got a non-object result, expected an object from create
## Error shown
When you add a create action to your integration, the Zapier platform [expects a single object to be returned](/platform/build/response-types), containing an `id` and details about the new item created. If an API returns a non-object result, the following error will show.
`CheckError: Invalid API Response: - Got a non-object result, expected an object from create`
## Solution
Instead, make sure your API returns an object to Zapier. To do that switch to [Code Mode](/platform/build/code-mode) in your request. That will allow you to provide a JavaScript function to handle the request, and make needed changes to the structure or content of the result before returning data to the Zapier platform.
If an array is returned, you would parse the response to return the object, without being enclosed in an array.
This could be by enclosing the `results` in a `{ }`, or reaching into the array and pull out the object that represents what you want to return to the user.
Remember: [Code Mode](/platform/build/code-mode) is a toggle; if you switch
back to Form Mode your code will be ignored!
Once you retest the create request, it should run successfully.
***
*Need help? [Tell us about your problem](https://developer.zapier.com/contact) and we'll connect you with the right resource or contact support.*
---
# Source: https://docs.zapier.com/powered-by-zapier/api-reference/common-types/errors.md
# Source: https://docs.zapier.com/platform/build/errors.md
> ## Documentation Index
> Fetch the complete documentation index at: https://docs.zapier.com/llms.txt
> Use this file to discover all available pages before exploring further.
# Add error response handling
> If your API returns responses with a status code above 400 that should not automatically throw an error then Zapier recommends enabling skipThrowForStatus.
This feature allows you to create custom error handling script for status codes above 400. Note that 401 status codes will throw a `RefreshAuthError` [regardless](https://github.com/zapier/zapier-platform/blob/main/packages/cli/README.md#user-content-error-response-handling).
To enable `skipThrowForStatus`:
## 1. Enable skipThrowForStatus
* Log into the [Platform UI](https://zapier.com/app/developer).
* Select your **integration**.
* In the *Build* section in the left sidebar, click **Advanced**.
* Click the **Settings** tab.
* Click the **On** toggle next to *Enable skipThrowForStatus*.
* Click **Save**.
## 2. Use Code Mode to add error handling script
You'll need to add error handling script to your authentication, triggers, actions that could encounter the error using [Code Mode](/platform/build/code-mode).
```js theme={null}
return z.request(options).then((response) => {
if (response.status === 404) {
throw new z.errors.Error(
"Insert error message to user here",
"InvalidData",
404,
);
}
return response.json;
});
```
Learn more about [general error handling in Zapier](https://github.com/zapier/zapier-platform/blob/main/packages/cli/README.md#general-errors).
## Video Tutorial
You can refer to this video on implementing error handling:
***
*Need help? [Tell us about your problem](https://developer.zapier.com/contact) and we'll connect you with the right resource or contact support.*
---
# Source: https://docs.zapier.com/platform/manage/essential-tips-iq.md
> ## Documentation Index
> Fetch the complete documentation index at: https://docs.zapier.com/llms.txt
> Use this file to discover all available pages before exploring further.
# Essential tips for integrating quality health practices
> Our shared customers rely on Zapier and your integration for business-critical workflows. Addressing feedback early and often ensures users have the best experience, both with Zapier's platform and yours. Follow these tips on how.
## 1. Embrace early bug resolution
Early bug resolution prevents minor issues from escalating into significant problems, ensuring your users have a smooth and reliable experience.
## 2. Prioritize user-requested features
Requests for new features are invaluable insights into your user needs and pain points. Prioritizing these requests in your development roadmap can help enhance the functionality of your integration and significantly boost user retention and loyalty.
> Pro tip: Explore users' most valued and widely used features per app category! Head over to our [must-have triggers and actions](/platform/quickstart/must-have-triggers-and-actions) page for details.
## 3. Make Zapier an integral part of your product strategy
Your integration is a powerful tool for automating workflow, increasing productivity, and providing value to your users. Including it in your product expansion strategy and product roadmap planning, ensures it evolves in tandem with your core offerings.
> Pro tip: Read on how you can [prioritize user feedback](https://zapier.com/blog/prioritize-user-feedback-with-beamer/) in your product roadmap planning.
## 4. Spread the word about your integration's new features
Highlight new features and enhancements to your integration in your marketing materials. Adding these to newsletters, blogs, and in-product messages (IPMs), can help drive engagement and encourage users to explore new functionalities, leading to increased adoption and deeper integration into their daily workflows.
> Pro Tip: Get your integration in front of more users by embedding [Powered by Zapier](https://zapier.com/partner/solutions/plug-and-play) directly into your product.
## 5. Keep your integration fresh with regular updates
Regular updates signal to your users that you are committed to continuously improving their experience. Establish a cadence for updates that align with your sprint cycles.
> Pro tip: Add them to your calendar.
**Next Steps:**
* Actively monitor user feedback
* [Leave a comment](/platform/manage/user-feedback) on the Bugs & Feature Requests section inside your Partner Dashboard
* When promoting a version, link any open bug reports and feature requests that the newly promoted version addresses
* *Only possible when promoting within the Platform UI*
* Leverage [Quick Account Creation](https://platform.zapier.com/embed/quick-account-creation) to ease user signup friction and enhance security, through your embed placement
* Make staying on top of your open bugs and feature requests a priority by leveraging [Zapier Issue Manager](/platform/manage/user-feedback#3-consider-zapier-issue-manager)
***
*Need help? [Tell us about your problem](https://developer.zapier.com/contact) and we'll connect you with the right resource or contact support.*
---
# Source: https://docs.zapier.com/platform/manage/export-cli.md
> ## Documentation Index
> Fetch the complete documentation index at: https://docs.zapier.com/llms.txt
> Use this file to discover all available pages before exploring further.
# Export integration to Platform CLI
> The Zapier Platform CLI (Command Line Interface) is a toolset you install and run in your local development environment. It allows you to build, test, and manage your Zapier integration through JavaScript code and terminal commands.
Platform UI is the way for users with API experience that are more comfortable with a visual form editor to build integrations on Zapier.
The CLI is, on the other hand, the most powerful tool for professional developers and teams. Some of the advantages:
* Access to all [features](/platform/quickstart/ui-vs-cli) of the Zapier Platform
* Ability to better optimize your code. Move shared logic into modules. Leverage middleware to centralize request & response processing.
* Easier team collaboration. You'll be able to check all the code for your Zapier integration into your team's source control repo.
* Set up automated regression tests, to catch errors each time you push a change.
To export your existing Platform UI integration to Platform CLI:
## 1. Install and configure the Zapier CLI on your development environment
Follow the steps in the setup section in our [quickstart guide](/platform/reference/cli-docs#quick-setup-guide)
## 2. Run the `convert` command to create a CLI version of your project locally
Create a new directory for your Zapier project and from the command line `cd` into it. Then run:
`zapier convert {your integration id} . --version={integration version you want to convert}`
Your integration ID can be found in the browser location bar in the Platform UI:
{" "}
***
*Need help? [Tell us about your problem](https://developer.zapier.com/contact) and we'll connect you with the right resource or contact support.*
---
# Source: https://docs.zapier.com/platform/build/error-non-object.md
> ## Documentation Index
> Fetch the complete documentation index at: https://docs.zapier.com/llms.txt
> Use this file to discover all available pages before exploring further.
# Error: Got a non-object result, expected an object from create
## Error shown
When you add a create action to your integration, the Zapier platform [expects a single object to be returned](/platform/build/response-types), containing an `id` and details about the new item created. If an API returns a non-object result, the following error will show.
`CheckError: Invalid API Response: - Got a non-object result, expected an object from create`
## Solution
Instead, make sure your API returns an object to Zapier. To do that switch to [Code Mode](/platform/build/code-mode) in your request. That will allow you to provide a JavaScript function to handle the request, and make needed changes to the structure or content of the result before returning data to the Zapier platform.
If an array is returned, you would parse the response to return the object, without being enclosed in an array.
This could be by enclosing the `results` in a `{ }`, or reaching into the array and pull out the object that represents what you want to return to the user.
Remember: [Code Mode](/platform/build/code-mode) is a toggle; if you switch
back to Form Mode your code will be ignored!
Once you retest the create request, it should run successfully.
***
*Need help? [Tell us about your problem](https://developer.zapier.com/contact) and we'll connect you with the right resource or contact support.*
---
# Source: https://docs.zapier.com/powered-by-zapier/api-reference/common-types/errors.md
# Source: https://docs.zapier.com/platform/build/errors.md
> ## Documentation Index
> Fetch the complete documentation index at: https://docs.zapier.com/llms.txt
> Use this file to discover all available pages before exploring further.
# Add error response handling
> If your API returns responses with a status code above 400 that should not automatically throw an error then Zapier recommends enabling skipThrowForStatus.
This feature allows you to create custom error handling script for status codes above 400. Note that 401 status codes will throw a `RefreshAuthError` [regardless](https://github.com/zapier/zapier-platform/blob/main/packages/cli/README.md#user-content-error-response-handling).
To enable `skipThrowForStatus`:
## 1. Enable skipThrowForStatus
* Log into the [Platform UI](https://zapier.com/app/developer).
* Select your **integration**.
* In the *Build* section in the left sidebar, click **Advanced**.
* Click the **Settings** tab.
* Click the **On** toggle next to *Enable skipThrowForStatus*.
* Click **Save**.
## 2. Use Code Mode to add error handling script
You'll need to add error handling script to your authentication, triggers, actions that could encounter the error using [Code Mode](/platform/build/code-mode).
```js theme={null}
return z.request(options).then((response) => {
if (response.status === 404) {
throw new z.errors.Error(
"Insert error message to user here",
"InvalidData",
404,
);
}
return response.json;
});
```
Learn more about [general error handling in Zapier](https://github.com/zapier/zapier-platform/blob/main/packages/cli/README.md#general-errors).
## Video Tutorial
You can refer to this video on implementing error handling:
***
*Need help? [Tell us about your problem](https://developer.zapier.com/contact) and we'll connect you with the right resource or contact support.*
---
# Source: https://docs.zapier.com/platform/manage/essential-tips-iq.md
> ## Documentation Index
> Fetch the complete documentation index at: https://docs.zapier.com/llms.txt
> Use this file to discover all available pages before exploring further.
# Essential tips for integrating quality health practices
> Our shared customers rely on Zapier and your integration for business-critical workflows. Addressing feedback early and often ensures users have the best experience, both with Zapier's platform and yours. Follow these tips on how.
## 1. Embrace early bug resolution
Early bug resolution prevents minor issues from escalating into significant problems, ensuring your users have a smooth and reliable experience.
## 2. Prioritize user-requested features
Requests for new features are invaluable insights into your user needs and pain points. Prioritizing these requests in your development roadmap can help enhance the functionality of your integration and significantly boost user retention and loyalty.
> Pro tip: Explore users' most valued and widely used features per app category! Head over to our [must-have triggers and actions](/platform/quickstart/must-have-triggers-and-actions) page for details.
## 3. Make Zapier an integral part of your product strategy
Your integration is a powerful tool for automating workflow, increasing productivity, and providing value to your users. Including it in your product expansion strategy and product roadmap planning, ensures it evolves in tandem with your core offerings.
> Pro tip: Read on how you can [prioritize user feedback](https://zapier.com/blog/prioritize-user-feedback-with-beamer/) in your product roadmap planning.
## 4. Spread the word about your integration's new features
Highlight new features and enhancements to your integration in your marketing materials. Adding these to newsletters, blogs, and in-product messages (IPMs), can help drive engagement and encourage users to explore new functionalities, leading to increased adoption and deeper integration into their daily workflows.
> Pro Tip: Get your integration in front of more users by embedding [Powered by Zapier](https://zapier.com/partner/solutions/plug-and-play) directly into your product.
## 5. Keep your integration fresh with regular updates
Regular updates signal to your users that you are committed to continuously improving their experience. Establish a cadence for updates that align with your sprint cycles.
> Pro tip: Add them to your calendar.
**Next Steps:**
* Actively monitor user feedback
* [Leave a comment](/platform/manage/user-feedback) on the Bugs & Feature Requests section inside your Partner Dashboard
* When promoting a version, link any open bug reports and feature requests that the newly promoted version addresses
* *Only possible when promoting within the Platform UI*
* Leverage [Quick Account Creation](https://platform.zapier.com/embed/quick-account-creation) to ease user signup friction and enhance security, through your embed placement
* Make staying on top of your open bugs and feature requests a priority by leveraging [Zapier Issue Manager](/platform/manage/user-feedback#3-consider-zapier-issue-manager)
***
*Need help? [Tell us about your problem](https://developer.zapier.com/contact) and we'll connect you with the right resource or contact support.*
---
# Source: https://docs.zapier.com/platform/manage/export-cli.md
> ## Documentation Index
> Fetch the complete documentation index at: https://docs.zapier.com/llms.txt
> Use this file to discover all available pages before exploring further.
# Export integration to Platform CLI
> The Zapier Platform CLI (Command Line Interface) is a toolset you install and run in your local development environment. It allows you to build, test, and manage your Zapier integration through JavaScript code and terminal commands.
Platform UI is the way for users with API experience that are more comfortable with a visual form editor to build integrations on Zapier.
The CLI is, on the other hand, the most powerful tool for professional developers and teams. Some of the advantages:
* Access to all [features](/platform/quickstart/ui-vs-cli) of the Zapier Platform
* Ability to better optimize your code. Move shared logic into modules. Leverage middleware to centralize request & response processing.
* Easier team collaboration. You'll be able to check all the code for your Zapier integration into your team's source control repo.
* Set up automated regression tests, to catch errors each time you push a change.
To export your existing Platform UI integration to Platform CLI:
## 1. Install and configure the Zapier CLI on your development environment
Follow the steps in the setup section in our [quickstart guide](/platform/reference/cli-docs#quick-setup-guide)
## 2. Run the `convert` command to create a CLI version of your project locally
Create a new directory for your Zapier project and from the command line `cd` into it. Then run:
`zapier convert {your integration id} . --version={integration version you want to convert}`
Your integration ID can be found in the browser location bar in the Platform UI:
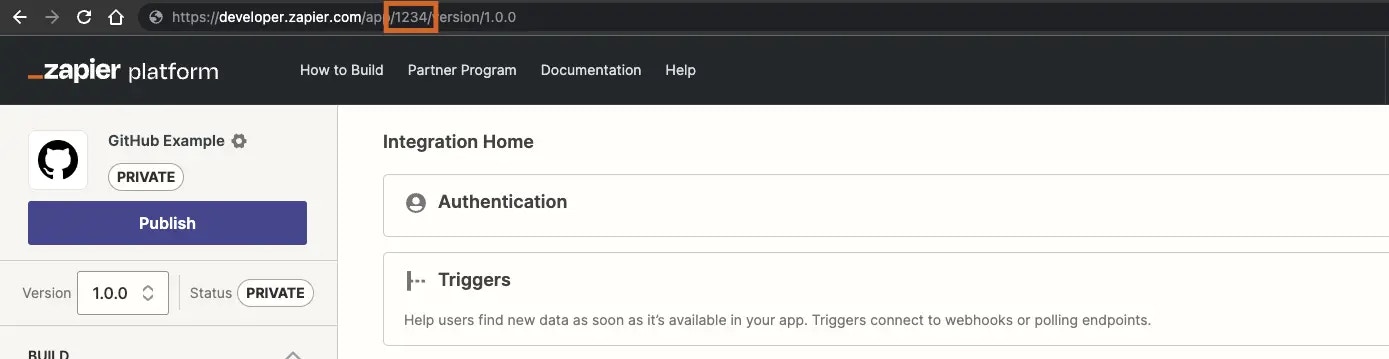 Similarly, your version can be found there, and elsewhere throughout the Platform UI:
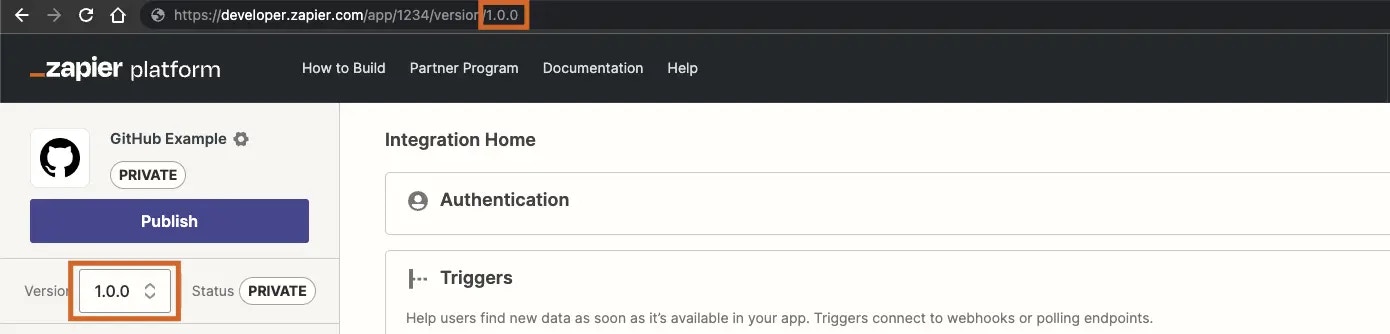 Using this example, to create our project in the current directory our command would be:
`zapier convert 1234 . --version=1.0.0`
## 3. Explore your new CLI project and get familiar with the tool
Check out the resources available in the [CLI section](/platform/reference/cli-docs) of the docs to learn all about the Zapier CLI.
If you need a refresher on JavaScript, it's well worth the time to check out some of the many great resources available [online](https://javascript.info/). The Zapier Platform uses promises pretty heavily, so this is a good JavaScript topic to get familiar with.
## 4. Deploy
When you ran convert and created your new local CLI project, it was automatically associated with your Zapier integration (using the `.zapierapprc` file).
A couple of important notes before deploying:
* When you push the CLI project to the server it will create a *new version* of your integration. If you haven't gotten familiar with how versions work you might take a moment and learn about those [here](/platform/manage/versions).
* Take a look at the version number in your `package.json` file. When you created your project with the `convert` tool we automatically incremented the version you converted. You can change this to a different version number depending on your needs, but make sure a version with that number doesn't already exist in your integration. Run `zapier versions` from your project directory to see what's already been created.
* Integrations converted with the `zapier convert` command will include `convertedByCLIVersion` in the `package.json` for informational purposes.
When you're ready to deploy your CLI version run:
`zapier-platform push`
When that completes you'll be able to see the new version in the Platform UI in the Manage > Versions section, and will be able to make Zaps with your new CLI-built version.
You will not be able to edit your new CLI-built version from the *Build* section of the Platform UI, the attributes of this version will all [show a lock icon](https://cdn.zappy.app/f048ffc4c905bcbb332e344ce0ce52ba.png).
You can still use all the other functions of the Platform UI, though, including version management, embed management and your Partner Dashboard. Your earlier versions, created within the Platform UI, are also still available and can still be edited and used.
If you decide that the Platform CLI is not for you, you can delete your new version from Manage > Versions and continue where you left off in the Platform UI.
***
*Need help? [Tell us about your problem](https://developer.zapier.com/contact) and we'll connect you with the right resource or contact support.*
---
# Source: https://docs.zapier.com/platform/manage/export-ui.md
> ## Documentation Index
> Fetch the complete documentation index at: https://docs.zapier.com/llms.txt
> Use this file to discover all available pages before exploring further.
# Export integration to Platform UI
> The Zapier Platform UI is the easiest way for anyone with API experience to build Zapier integrations. It is for users more comfortable with a visual form editor.
Some advanced calls and response parsing can still be performed in the Platform UI when using [Code Mode](/platform/build/code-mode).
The Platform UI has the following advantages over the CLI:
* A graphic user-interface with form-based editor.
* A live form preview that shows how changes made to your integration would appear in the Zap editor.
If you have an integration in the Platform CLI that you would like to edit in the Platform UI instead, you can create a new version in the Platform UI.
When moving an app from CLI to the Platform UI, we cannot migrate users from previous versions or apps. Existing users will be able to continue using the version they're on, but must upgrade to the new version manually. Existing users would see this [prompt in the Zap editor](https://help.zapier.com/hc/en-us/articles/18755649454989-Update-to-the-latest-app-version-in-Zaps) to optionally encourage them to make the update.
Zapier does not automatically notify all existing users of a new version's availability, but new users would only see the currently promoted/Public version when searching for the app name. We also recommend announcing the changes/new integration version to your general user base via in-app or email marketing to encourage users to switch over.
To export your existing Platform CLI integration to Platform UI:
## 1. Contact Developer Support to create an empty version of your integration
Hiding an app and replacing it with a new app ID built in the preferred tool is [not supported](/platform/publish/integration-publishing-requirements#23-replacement-integration). To export your Platform CLI integration to the Platform UI, contact the [Developer Support](https://developer.zapier.com/contact) team to create an empty version associated with the same app ID.
## 2. Rebuild the integration from scratch
Rebuild the integration from scratch on this newly created empty version in the Platform UI and ensure that this new version has feature parity to the previous CLI version. This new version can then be maintained in the Platform UI by your team. For [Public apps](/platform/quickstart/private-vs-public-integrations), this avoids a repeat of the app review process; as well as retaining previous versions, associated bug reports and feature requests.
> Allow users to remain on the (now legacy) CLI version until they switch over manually, as long as the endpoints are functional. If [Deprecation](/platform/manage/deprecate) is necessary, please note this is significantly more disruptive to our mutual users and should be considered carefully.
When the conversion has been completed, you will be able to see this version and the previous CLI versions in the Platform UI's **Manage > Versions** section.
While you can see the previous CLI versions in the Platform UI, you would not be able edit those versions there. The previous CLI versions would show a lock icon on the various attributes under the *Build* section as they can only be edited from the CLI environment.
You can however, manage the integration, set up and manage embeds (for public integrations) and view the partner dashboard for the integration from the Platform UI.
***
*Need help? [Tell us about your problem](https://developer.zapier.com/contact) and we'll connect you with the right resource or contact support.*
---
# Source: https://docs.zapier.com/platform/build-cli/faqs.md
> ## Documentation Index
> Fetch the complete documentation index at: https://docs.zapier.com/llms.txt
> Use this file to discover all available pages before exploring further.
# Frequently Asked Questions
### Why doesn't Zapier support newer versions of Node.js?
We run your code on AWS Lambda, which only supports a few [versions](https://docs.aws.amazon.com/lambda/latest/dg/programming-model.html) of Node. Sometimes that doesn't include the latest version. Additionally, with thousands of integrations running on the Zapier platform, we have to be sure upgrading to the latest Node version will not have a negative impact.
### How do I manually set the Node.js version to run my integration with?
Update your `zapier-platform-core` dependency in `package.json`. Each major version ties to a specific version of Node.js. You can find the mapping [here](https://github.com/zapier/zapier-platform/blob/main/packages/cli/src/version-store.js). We only support the version(s) supported by [AWS Lambda](https://docs.aws.amazon.com/lambda/latest/dg/programming-model.html).
**IMPORTANT CAVEAT:** AWS periodically deprecates Node versions as they reach EOL. They announce this [on their blog](https://aws.amazon.com/blogs/developer/node-js-6-is-approaching-end-of-life-upgrade-your-aws-lambda-functions-to-the-node-js-10-lts/). Similar info and dates are available on [github](https://github.com/nodejs/Release). Well before this date, we'll have a version of `core` that targets the newer Node version.
If you don't upgrade before the cutoff date, there's a chance that AWS will throw an error when attempting to run your integration's code. If that's the case, we'll instead run it under the oldest Node version still supported. All that is to say, **we may run your code on a newer version of Node.js than you intend** if you don't update your integration's dependencies periodically.
### Does Zapier support XML (SOAP) APIs?
Not natively, but it can! Users have reported that the following `npm` modules are compatible with the CLI Platform:
* [pixl-xml](https://github.com/jhuckaby/pixl-xml)
* [xml2js](https://github.com/Leonidas-from-XIV/node-xml2js)
* [fast-xml-parser](https://github.com/NaturalIntelligence/fast-xml-parser)
Since core v10, it's possible for [shorthand requests](/platform/build-cli/overview#shorthand-http-requests) to parse XML. Use an `afterResponse` [middleware](/platform/build-cli/overview#using-http-middleware) that sets `response.data` to the parsed XML:
```js theme={null}
const xml = require("pixl-xml");
const App = {
// ...
afterResponse: [
(response, z, bundle) => {
// Only works on core v10+!
response.throwForStatus();
response.data = xml.parse(response.content);
return response;
},
],
// ...
};
```
### What's the deal with pagination? When is it used and how does it work?
Moved to [paging](/platform/build-cli/overview#paging).
### How does deduplication work?
Each time a polling Zap runs, Zapier extracts a unique "primary key" for each item in the response. Zapier needs to decide which of the items should trigger the Zap. To do this, we compare the primary keys to all those we've seen before, trigger on new objects, and update the list of seen primary keys. When a Zap is turned on, we initialize the list of seen primary keys with a single poll. When it's turned off, we clear that list. For this reason, it's important that calls to a polling endpoint always return the newest items.
For example, the initial poll returns objects 4, 5, and 6 (where a higher primary key is newer). If a later poll increases the limit and returns objects 1-6, then 1, 2, and 3 will be (incorrectly) treated like new objects.
By default, the primary key is the item's `id` field. Since v15.6.0, you can customize the primary key by setting `primary` to true in `outputFields`.
There's a more in-depth explanation [here](/platform/build/deduplication).
### Why are my triggers complaining if I don't provide an explicit `id` field?
For deduplication to work, we need to be able to identify and use a unique field. In older, legacy Zapier Web Builder integrations, we guessed if `id` wasn't present. In order to ensure we don't guess wrong, we now require that the developers send us an `id` field. If your objects have a differently-named unique field, feel free to adapt this snippet and ensure this test passes:
```js theme={null}
// ...
let items = response.data.items; // or response.json.items if you're using core v9 or older
return items.map((item) => {
item.id = item.contactId;
return item;
});
```
Since v15.6.0, instead of using the default `id` field, you can also define one or more `outputFields` as `primary`. For example:
```js theme={null}
{
triggers: {
recipe: {
operation: {
outputField: [
{ key: "userId", primary: true },
{ key: "slug", primary: true },
{ key: "name" },
];
}
}
}
}
```
will tell Zapier to use `(userId, slug)` as the unique primary key to deduplicate items when running a polling trigger.
**Limitation:** The `primary` option currently doesn't support mixing top-level fields with nested fields that use double underscores in their keys. For example, if you set `primary: true` on both `id` and `user__id`, the `primary` setting on the `user__id` field will be ignored; only `id` will be used for deduplication. However, if all the `primary` fields are all nested, such as `user__id` + `user__name`, it will work as expected.
### Node X No Longer Supported
If you're seeing errors like the following:
```
InvalidParameterValueException An error occurred (InvalidParameterValueException) when calling the CreateFunction operation: The runtime parameter of nodejs6.10 is no longer supported for creating or updating AWS Lambda functions. We recommend you use the new runtime (nodejsX.Y) while creating or updating functions.
```
... then you need to update your `zapier-platform-core` dependency to a non-deprecated version that uses a newer version of Node.js. Complete the following instructions as soon as possible:
1. Edit `package.json` to depend on a later major version of `zapier-platform-core`. There's a list of all breaking changes (marked with a :exclamation:) in the corresponding changelog in [Platform News](/platform/news).
2. Increment the `version` property in `package.json`
3. Ensure you're using version `v18` (or greater) of node locally (`node -v`). Use [nvm](https://github.com/nvm-sh/nvm) to use a different one if need be.
4. Run `rm -rf node_modules && npm i` to get a fresh copy of everything
5. Run `zapier-platform test` (or deprecated `zapier test`) to ensure your tests still pass
6. Run `zapier-platform push` (or deprecated `zapier push`)
7. Run `zapier-platform promote YOUR_NEW_VERSION` (or deprecated `zapier promote YOUR_NEW_VERSION`) (from step 2)
8. Migrate your users from the previous version (`zapier migrate OLD_VERSION YOUR_NEW_VERSION`)
### What Analytics are Collected?
Starting with v8.4.0, Zapier collects information about each invocation of the CLI tool.
This data is collected purely to improve the CLI experience and will **never** be used for advertising or any non-product purpose. There are 3 collection modes that are set on a per-computer basis.
**Anonymous**
When you run a command with analytics in `anonymous` mode, the following data is sent to Zapier:
* which command you ran
* if that command is a known command
* how many arguments you supplied (but not the contents of the arguments)
* which flags you used (but not their contents)
* the version of CLI that you're using
* the integration app the CLI commands are run in
**Enabled** (the default)
When analytics are fully `enabled`, the above is sent, plus:
* your operating system (the result of calling [`process.platform`](https://nodejs.org/api/process.html#process_process_platform))
* your Zapier user id
**Disabled**
Lastly, analytics can be `disabled` entirely, either by running `zapier analytics --mode disabled` or setting the `DISABLE_ZAPIER_ANALYTICS` environment variable to `1`.
We take great care not to collect any information about your filesystem or anything otherwise secret. You can see exactly what's being collecting at runtime by prefixing any command with `DEBUG=zapier:analytics`.
### What's the Difference Between an "App" and an "Integration"?
We're in the process of doing some renaming across our Zapier marketing terms. Eventually we'll use "integration" everywhere. Until then, know that these terms are interchangeable and describe the code that you write that connects your API to Zapier.
### What does performGet do?
The `performGet` method is an optional feature in Zapier that allows you to retrieve detailed information about an object. For instance, if your `create` action's `perform` method only returns the new object's `ID`, you can use `performGet` to fetch the object's full properties using that `ID`.
`performGet` is only available for `Create` or `Search` actions and is most useful when the initial `perform` result is limited, and additional information is needed.
The results from `perform` are automatically passed to `performGet` via `bundle.inputData` each time the `create` or `search` runs, allowing you to retrieve more comprehensive details.
It's important to note that `performGet` is only invoked when the result returned by `perform` is not empty.
---
# Source: https://docs.zapier.com/platform/build/field-definitions.md
> ## Documentation Index
> Fetch the complete documentation index at: https://docs.zapier.com/llms.txt
> Use this file to discover all available pages before exploring further.
# Field types
Three types of fields exist for users to see in the Zap editor:
* Input fields
* Dynamic fields
* Line item groups
## Input fields
Input fields are most commonly used and include 9 types that look and act differently in the Zap editor. Depending on the type, users can either enter plain text data, make a selection or map variables from previous triggers and actions. Zapier does not validate the data to ensure users added the correct item for that field type.
### String
The default input field, which accepts text input. Typically used to gather individual text values such as a name or email address.
{" "}
Using this example, to create our project in the current directory our command would be:
`zapier convert 1234 . --version=1.0.0`
## 3. Explore your new CLI project and get familiar with the tool
Check out the resources available in the [CLI section](/platform/reference/cli-docs) of the docs to learn all about the Zapier CLI.
If you need a refresher on JavaScript, it's well worth the time to check out some of the many great resources available [online](https://javascript.info/). The Zapier Platform uses promises pretty heavily, so this is a good JavaScript topic to get familiar with.
## 4. Deploy
When you ran convert and created your new local CLI project, it was automatically associated with your Zapier integration (using the `.zapierapprc` file).
A couple of important notes before deploying:
* When you push the CLI project to the server it will create a *new version* of your integration. If you haven't gotten familiar with how versions work you might take a moment and learn about those [here](/platform/manage/versions).
* Take a look at the version number in your `package.json` file. When you created your project with the `convert` tool we automatically incremented the version you converted. You can change this to a different version number depending on your needs, but make sure a version with that number doesn't already exist in your integration. Run `zapier versions` from your project directory to see what's already been created.
* Integrations converted with the `zapier convert` command will include `convertedByCLIVersion` in the `package.json` for informational purposes.
When you're ready to deploy your CLI version run:
`zapier-platform push`
When that completes you'll be able to see the new version in the Platform UI in the Manage > Versions section, and will be able to make Zaps with your new CLI-built version.
You will not be able to edit your new CLI-built version from the *Build* section of the Platform UI, the attributes of this version will all [show a lock icon](https://cdn.zappy.app/f048ffc4c905bcbb332e344ce0ce52ba.png).
You can still use all the other functions of the Platform UI, though, including version management, embed management and your Partner Dashboard. Your earlier versions, created within the Platform UI, are also still available and can still be edited and used.
If you decide that the Platform CLI is not for you, you can delete your new version from Manage > Versions and continue where you left off in the Platform UI.
***
*Need help? [Tell us about your problem](https://developer.zapier.com/contact) and we'll connect you with the right resource or contact support.*
---
# Source: https://docs.zapier.com/platform/manage/export-ui.md
> ## Documentation Index
> Fetch the complete documentation index at: https://docs.zapier.com/llms.txt
> Use this file to discover all available pages before exploring further.
# Export integration to Platform UI
> The Zapier Platform UI is the easiest way for anyone with API experience to build Zapier integrations. It is for users more comfortable with a visual form editor.
Some advanced calls and response parsing can still be performed in the Platform UI when using [Code Mode](/platform/build/code-mode).
The Platform UI has the following advantages over the CLI:
* A graphic user-interface with form-based editor.
* A live form preview that shows how changes made to your integration would appear in the Zap editor.
If you have an integration in the Platform CLI that you would like to edit in the Platform UI instead, you can create a new version in the Platform UI.
When moving an app from CLI to the Platform UI, we cannot migrate users from previous versions or apps. Existing users will be able to continue using the version they're on, but must upgrade to the new version manually. Existing users would see this [prompt in the Zap editor](https://help.zapier.com/hc/en-us/articles/18755649454989-Update-to-the-latest-app-version-in-Zaps) to optionally encourage them to make the update.
Zapier does not automatically notify all existing users of a new version's availability, but new users would only see the currently promoted/Public version when searching for the app name. We also recommend announcing the changes/new integration version to your general user base via in-app or email marketing to encourage users to switch over.
To export your existing Platform CLI integration to Platform UI:
## 1. Contact Developer Support to create an empty version of your integration
Hiding an app and replacing it with a new app ID built in the preferred tool is [not supported](/platform/publish/integration-publishing-requirements#23-replacement-integration). To export your Platform CLI integration to the Platform UI, contact the [Developer Support](https://developer.zapier.com/contact) team to create an empty version associated with the same app ID.
## 2. Rebuild the integration from scratch
Rebuild the integration from scratch on this newly created empty version in the Platform UI and ensure that this new version has feature parity to the previous CLI version. This new version can then be maintained in the Platform UI by your team. For [Public apps](/platform/quickstart/private-vs-public-integrations), this avoids a repeat of the app review process; as well as retaining previous versions, associated bug reports and feature requests.
> Allow users to remain on the (now legacy) CLI version until they switch over manually, as long as the endpoints are functional. If [Deprecation](/platform/manage/deprecate) is necessary, please note this is significantly more disruptive to our mutual users and should be considered carefully.
When the conversion has been completed, you will be able to see this version and the previous CLI versions in the Platform UI's **Manage > Versions** section.
While you can see the previous CLI versions in the Platform UI, you would not be able edit those versions there. The previous CLI versions would show a lock icon on the various attributes under the *Build* section as they can only be edited from the CLI environment.
You can however, manage the integration, set up and manage embeds (for public integrations) and view the partner dashboard for the integration from the Platform UI.
***
*Need help? [Tell us about your problem](https://developer.zapier.com/contact) and we'll connect you with the right resource or contact support.*
---
# Source: https://docs.zapier.com/platform/build-cli/faqs.md
> ## Documentation Index
> Fetch the complete documentation index at: https://docs.zapier.com/llms.txt
> Use this file to discover all available pages before exploring further.
# Frequently Asked Questions
### Why doesn't Zapier support newer versions of Node.js?
We run your code on AWS Lambda, which only supports a few [versions](https://docs.aws.amazon.com/lambda/latest/dg/programming-model.html) of Node. Sometimes that doesn't include the latest version. Additionally, with thousands of integrations running on the Zapier platform, we have to be sure upgrading to the latest Node version will not have a negative impact.
### How do I manually set the Node.js version to run my integration with?
Update your `zapier-platform-core` dependency in `package.json`. Each major version ties to a specific version of Node.js. You can find the mapping [here](https://github.com/zapier/zapier-platform/blob/main/packages/cli/src/version-store.js). We only support the version(s) supported by [AWS Lambda](https://docs.aws.amazon.com/lambda/latest/dg/programming-model.html).
**IMPORTANT CAVEAT:** AWS periodically deprecates Node versions as they reach EOL. They announce this [on their blog](https://aws.amazon.com/blogs/developer/node-js-6-is-approaching-end-of-life-upgrade-your-aws-lambda-functions-to-the-node-js-10-lts/). Similar info and dates are available on [github](https://github.com/nodejs/Release). Well before this date, we'll have a version of `core` that targets the newer Node version.
If you don't upgrade before the cutoff date, there's a chance that AWS will throw an error when attempting to run your integration's code. If that's the case, we'll instead run it under the oldest Node version still supported. All that is to say, **we may run your code on a newer version of Node.js than you intend** if you don't update your integration's dependencies periodically.
### Does Zapier support XML (SOAP) APIs?
Not natively, but it can! Users have reported that the following `npm` modules are compatible with the CLI Platform:
* [pixl-xml](https://github.com/jhuckaby/pixl-xml)
* [xml2js](https://github.com/Leonidas-from-XIV/node-xml2js)
* [fast-xml-parser](https://github.com/NaturalIntelligence/fast-xml-parser)
Since core v10, it's possible for [shorthand requests](/platform/build-cli/overview#shorthand-http-requests) to parse XML. Use an `afterResponse` [middleware](/platform/build-cli/overview#using-http-middleware) that sets `response.data` to the parsed XML:
```js theme={null}
const xml = require("pixl-xml");
const App = {
// ...
afterResponse: [
(response, z, bundle) => {
// Only works on core v10+!
response.throwForStatus();
response.data = xml.parse(response.content);
return response;
},
],
// ...
};
```
### What's the deal with pagination? When is it used and how does it work?
Moved to [paging](/platform/build-cli/overview#paging).
### How does deduplication work?
Each time a polling Zap runs, Zapier extracts a unique "primary key" for each item in the response. Zapier needs to decide which of the items should trigger the Zap. To do this, we compare the primary keys to all those we've seen before, trigger on new objects, and update the list of seen primary keys. When a Zap is turned on, we initialize the list of seen primary keys with a single poll. When it's turned off, we clear that list. For this reason, it's important that calls to a polling endpoint always return the newest items.
For example, the initial poll returns objects 4, 5, and 6 (where a higher primary key is newer). If a later poll increases the limit and returns objects 1-6, then 1, 2, and 3 will be (incorrectly) treated like new objects.
By default, the primary key is the item's `id` field. Since v15.6.0, you can customize the primary key by setting `primary` to true in `outputFields`.
There's a more in-depth explanation [here](/platform/build/deduplication).
### Why are my triggers complaining if I don't provide an explicit `id` field?
For deduplication to work, we need to be able to identify and use a unique field. In older, legacy Zapier Web Builder integrations, we guessed if `id` wasn't present. In order to ensure we don't guess wrong, we now require that the developers send us an `id` field. If your objects have a differently-named unique field, feel free to adapt this snippet and ensure this test passes:
```js theme={null}
// ...
let items = response.data.items; // or response.json.items if you're using core v9 or older
return items.map((item) => {
item.id = item.contactId;
return item;
});
```
Since v15.6.0, instead of using the default `id` field, you can also define one or more `outputFields` as `primary`. For example:
```js theme={null}
{
triggers: {
recipe: {
operation: {
outputField: [
{ key: "userId", primary: true },
{ key: "slug", primary: true },
{ key: "name" },
];
}
}
}
}
```
will tell Zapier to use `(userId, slug)` as the unique primary key to deduplicate items when running a polling trigger.
**Limitation:** The `primary` option currently doesn't support mixing top-level fields with nested fields that use double underscores in their keys. For example, if you set `primary: true` on both `id` and `user__id`, the `primary` setting on the `user__id` field will be ignored; only `id` will be used for deduplication. However, if all the `primary` fields are all nested, such as `user__id` + `user__name`, it will work as expected.
### Node X No Longer Supported
If you're seeing errors like the following:
```
InvalidParameterValueException An error occurred (InvalidParameterValueException) when calling the CreateFunction operation: The runtime parameter of nodejs6.10 is no longer supported for creating or updating AWS Lambda functions. We recommend you use the new runtime (nodejsX.Y) while creating or updating functions.
```
... then you need to update your `zapier-platform-core` dependency to a non-deprecated version that uses a newer version of Node.js. Complete the following instructions as soon as possible:
1. Edit `package.json` to depend on a later major version of `zapier-platform-core`. There's a list of all breaking changes (marked with a :exclamation:) in the corresponding changelog in [Platform News](/platform/news).
2. Increment the `version` property in `package.json`
3. Ensure you're using version `v18` (or greater) of node locally (`node -v`). Use [nvm](https://github.com/nvm-sh/nvm) to use a different one if need be.
4. Run `rm -rf node_modules && npm i` to get a fresh copy of everything
5. Run `zapier-platform test` (or deprecated `zapier test`) to ensure your tests still pass
6. Run `zapier-platform push` (or deprecated `zapier push`)
7. Run `zapier-platform promote YOUR_NEW_VERSION` (or deprecated `zapier promote YOUR_NEW_VERSION`) (from step 2)
8. Migrate your users from the previous version (`zapier migrate OLD_VERSION YOUR_NEW_VERSION`)
### What Analytics are Collected?
Starting with v8.4.0, Zapier collects information about each invocation of the CLI tool.
This data is collected purely to improve the CLI experience and will **never** be used for advertising or any non-product purpose. There are 3 collection modes that are set on a per-computer basis.
**Anonymous**
When you run a command with analytics in `anonymous` mode, the following data is sent to Zapier:
* which command you ran
* if that command is a known command
* how many arguments you supplied (but not the contents of the arguments)
* which flags you used (but not their contents)
* the version of CLI that you're using
* the integration app the CLI commands are run in
**Enabled** (the default)
When analytics are fully `enabled`, the above is sent, plus:
* your operating system (the result of calling [`process.platform`](https://nodejs.org/api/process.html#process_process_platform))
* your Zapier user id
**Disabled**
Lastly, analytics can be `disabled` entirely, either by running `zapier analytics --mode disabled` or setting the `DISABLE_ZAPIER_ANALYTICS` environment variable to `1`.
We take great care not to collect any information about your filesystem or anything otherwise secret. You can see exactly what's being collecting at runtime by prefixing any command with `DEBUG=zapier:analytics`.
### What's the Difference Between an "App" and an "Integration"?
We're in the process of doing some renaming across our Zapier marketing terms. Eventually we'll use "integration" everywhere. Until then, know that these terms are interchangeable and describe the code that you write that connects your API to Zapier.
### What does performGet do?
The `performGet` method is an optional feature in Zapier that allows you to retrieve detailed information about an object. For instance, if your `create` action's `perform` method only returns the new object's `ID`, you can use `performGet` to fetch the object's full properties using that `ID`.
`performGet` is only available for `Create` or `Search` actions and is most useful when the initial `perform` result is limited, and additional information is needed.
The results from `perform` are automatically passed to `performGet` via `bundle.inputData` each time the `create` or `search` runs, allowing you to retrieve more comprehensive details.
It's important to note that `performGet` is only invoked when the result returned by `perform` is not empty.
---
# Source: https://docs.zapier.com/platform/build/field-definitions.md
> ## Documentation Index
> Fetch the complete documentation index at: https://docs.zapier.com/llms.txt
> Use this file to discover all available pages before exploring further.
# Field types
Three types of fields exist for users to see in the Zap editor:
* Input fields
* Dynamic fields
* Line item groups
## Input fields
Input fields are most commonly used and include 9 types that look and act differently in the Zap editor. Depending on the type, users can either enter plain text data, make a selection or map variables from previous triggers and actions. Zapier does not validate the data to ensure users added the correct item for that field type.
### String
The default input field, which accepts text input. Typically used to gather individual text values such as a name or email address.
{" "}
 {" "}
### Text
Displays large, `
{" "}
### Text
Displays large, `