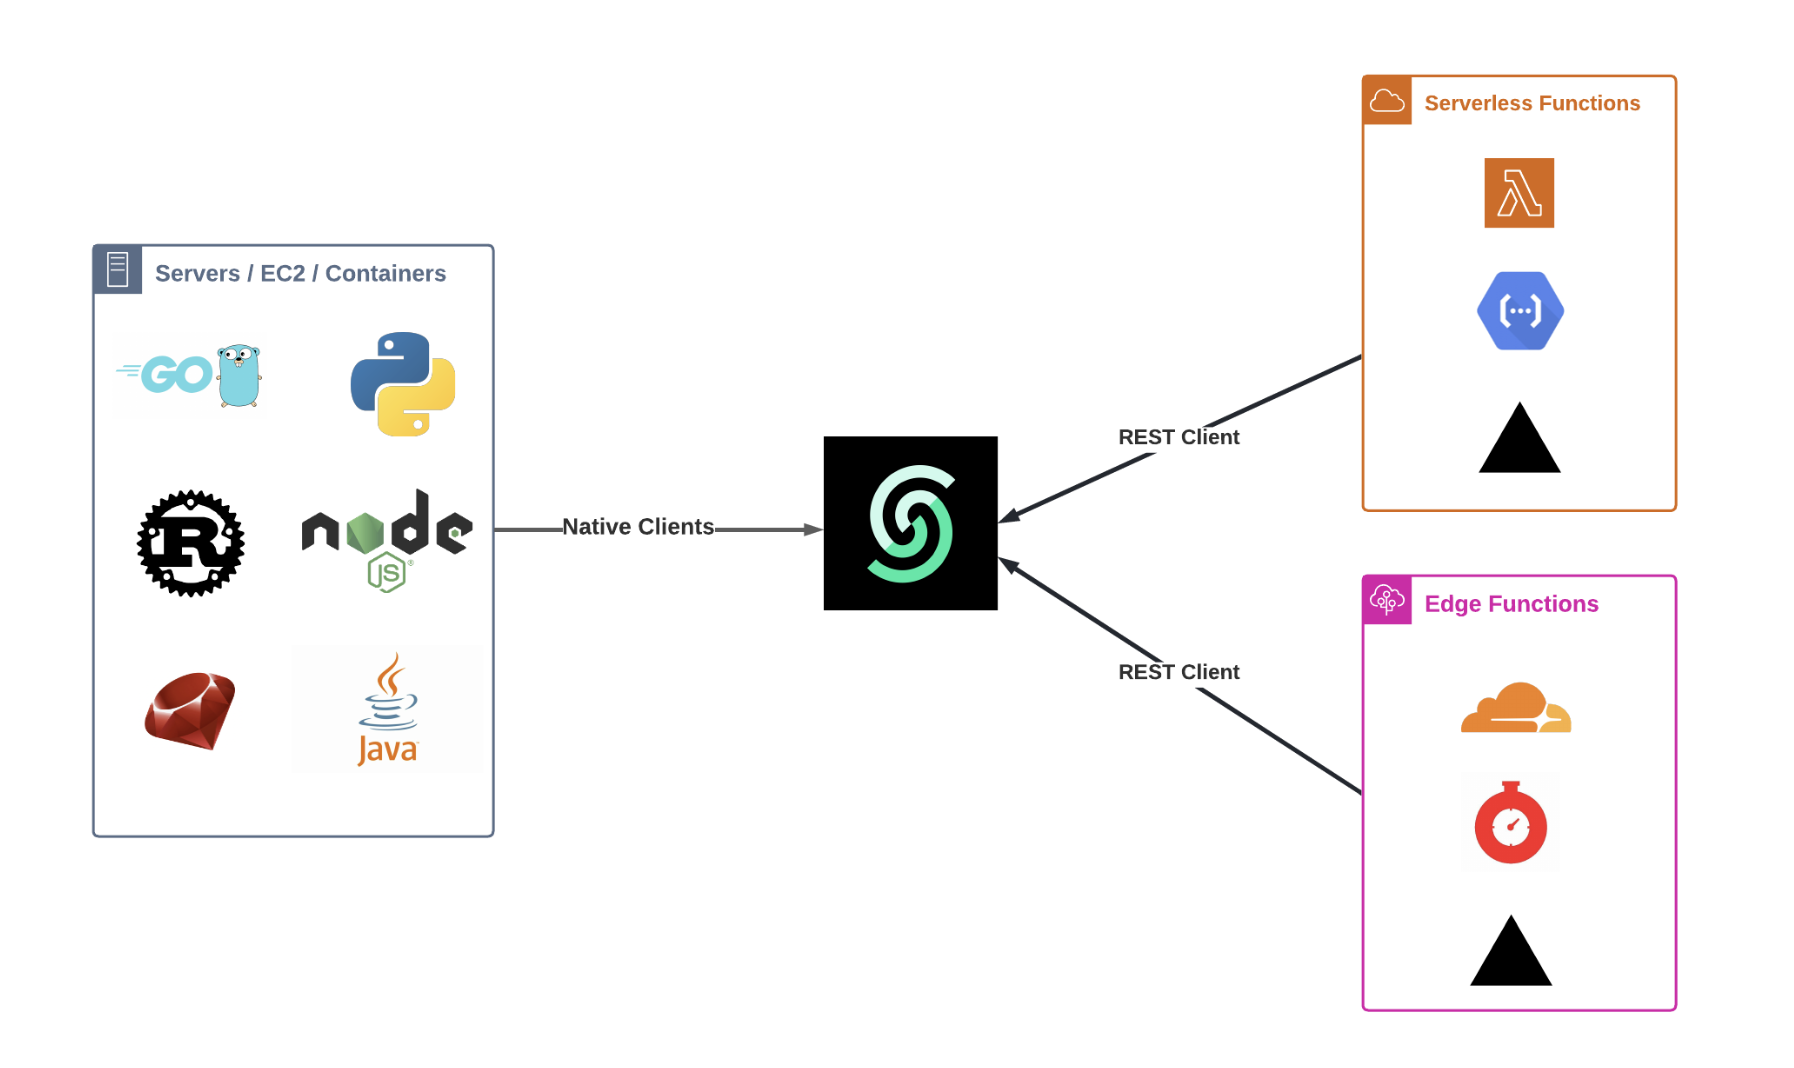
 ### SDKs for Popular Languages
To enhance the developer experience, Upstash is developing SDKs in various popular programming languages. These SDKs simplify the process of integrating Upstash services with your applications by providing straightforward methods and functions that abstract the underlying REST API calls.
### Resources
[Redis REST API Docs](/redis/features/restapi)
[QStash REST API Docs](/qstash/api/authentication)
[Redis SDK - Typescript](https://github.com/upstash/upstash-redis)
[Redis SDK - Python](https://github.com/upstash/redis-python)
[QStash SDK - Typescript](https://github.com/upstash/sdk-qstash-ts)
---
# Source: https://upstash.com/docs/common/help/account.md
> ## Documentation Index
> Fetch the complete documentation index at: https://upstash.com/docs/llms.txt
> Use this file to discover all available pages before exploring further.
# Account & Teams
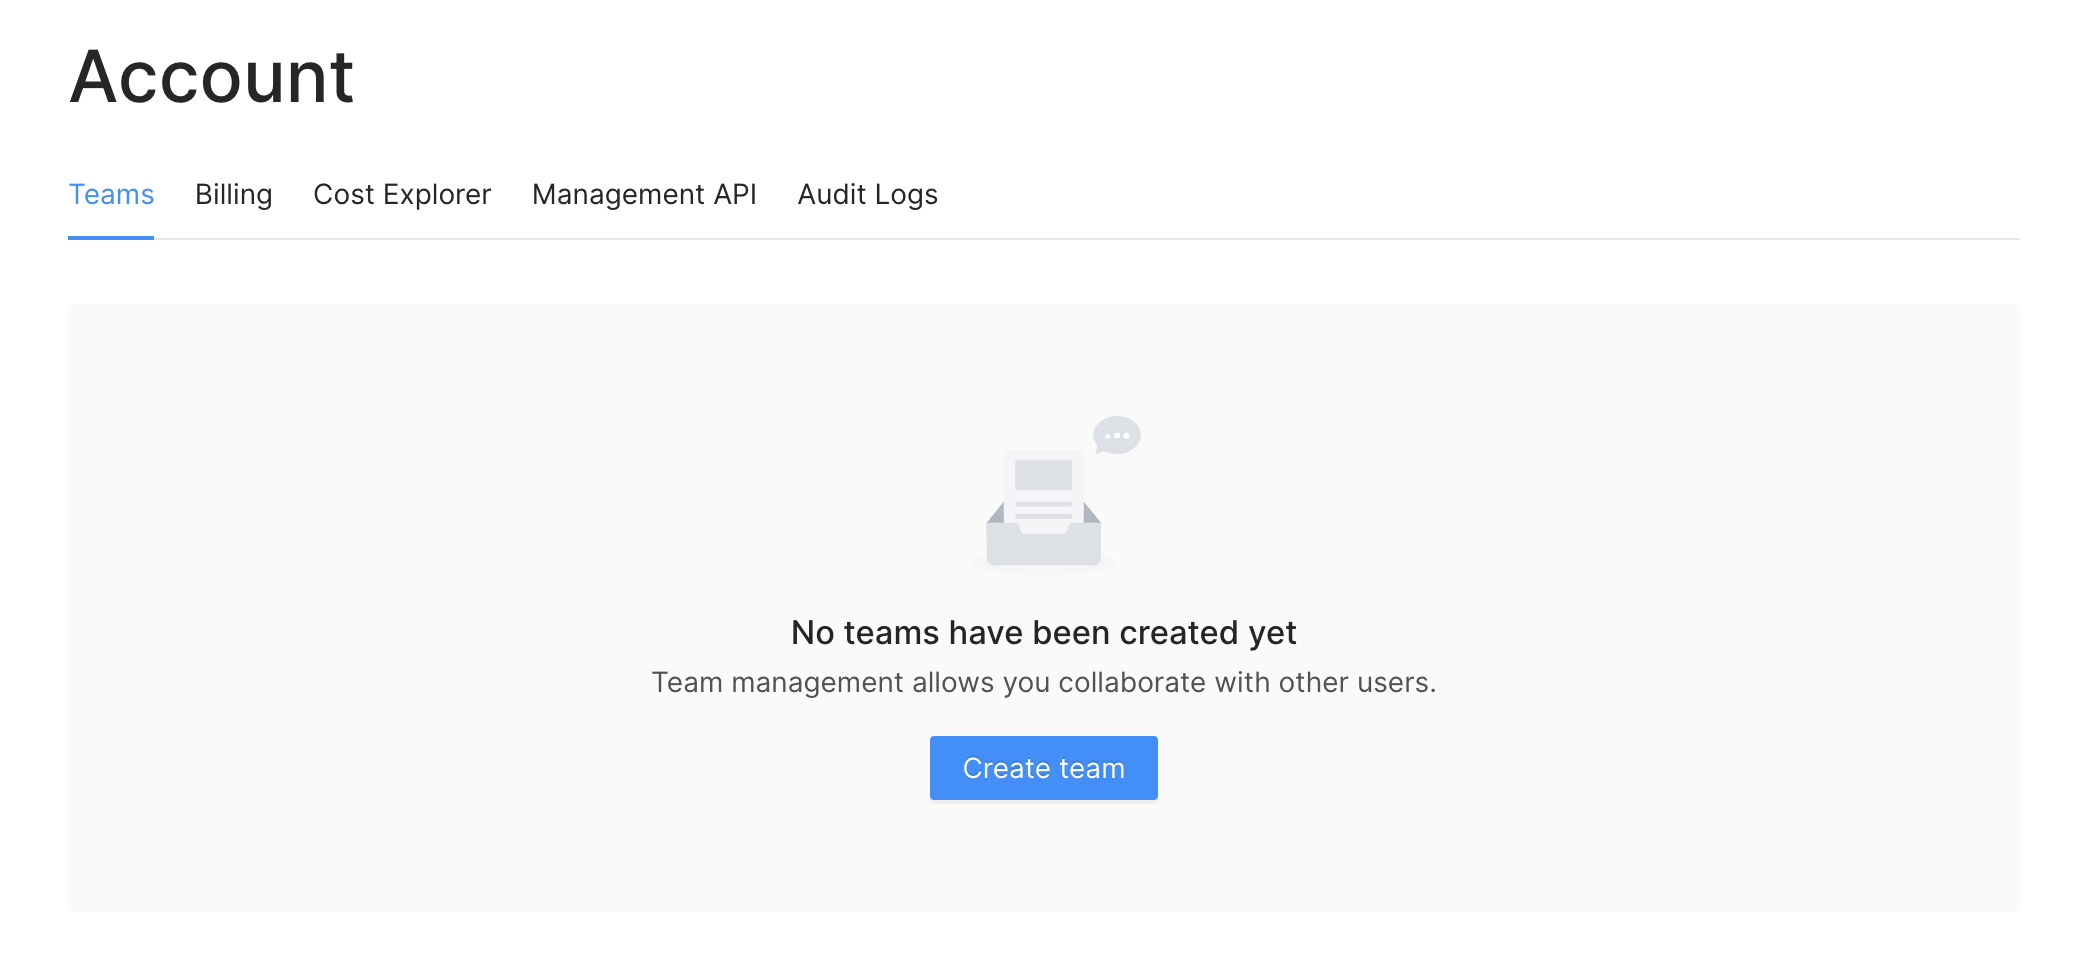
## Create an Account
You can sign up to
### SDKs for Popular Languages
To enhance the developer experience, Upstash is developing SDKs in various popular programming languages. These SDKs simplify the process of integrating Upstash services with your applications by providing straightforward methods and functions that abstract the underlying REST API calls.
### Resources
[Redis REST API Docs](/redis/features/restapi)
[QStash REST API Docs](/qstash/api/authentication)
[Redis SDK - Typescript](https://github.com/upstash/upstash-redis)
[Redis SDK - Python](https://github.com/upstash/redis-python)
[QStash SDK - Typescript](https://github.com/upstash/sdk-qstash-ts)
---
# Source: https://upstash.com/docs/common/help/account.md
> ## Documentation Index
> Fetch the complete documentation index at: https://upstash.com/docs/llms.txt
> Use this file to discover all available pages before exploring further.
# Account & Teams
## Create an Account
You can sign up to 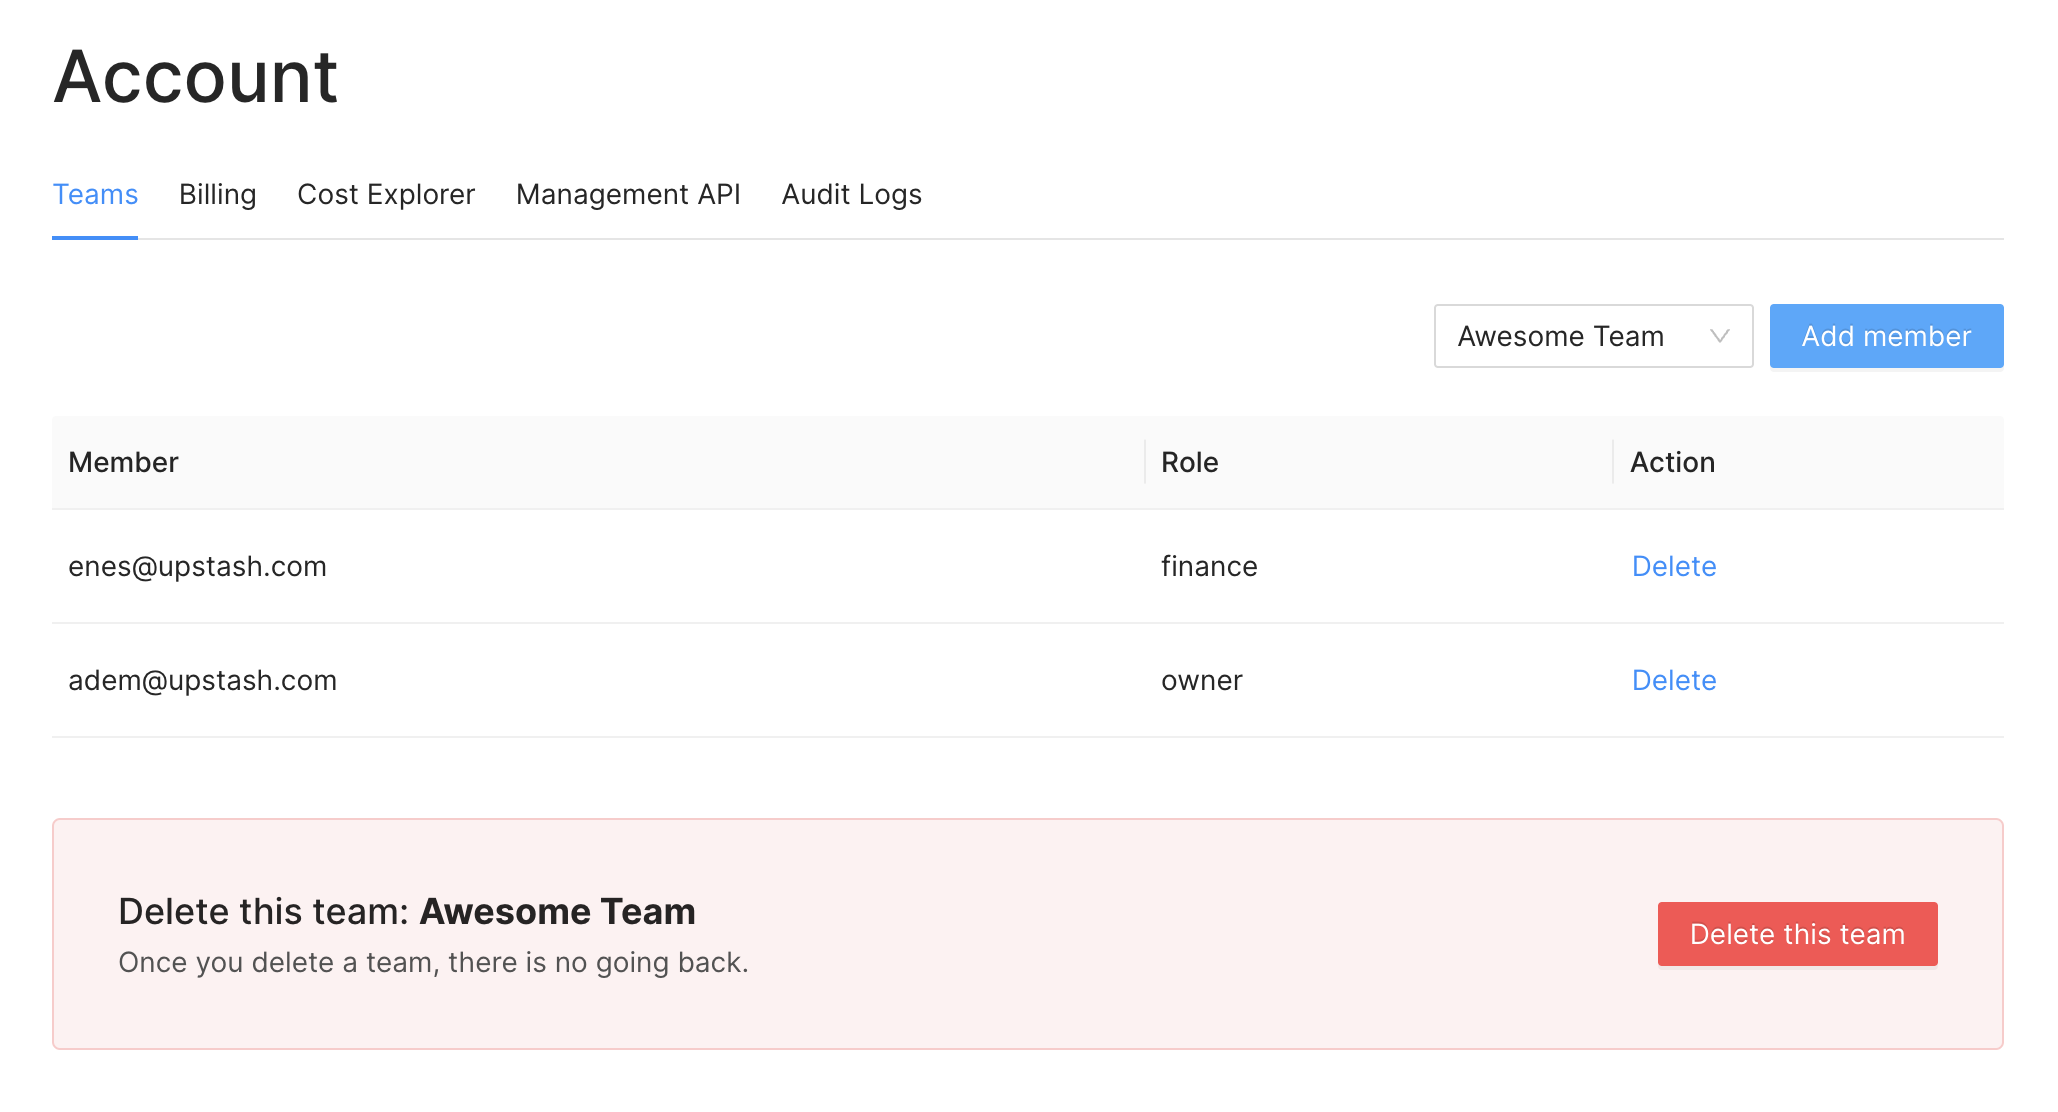 ## Teams
### Create Team
You can create a team using the menu `Account > Teams`
## Teams
### Create Team
You can create a team using the menu `Account > Teams`
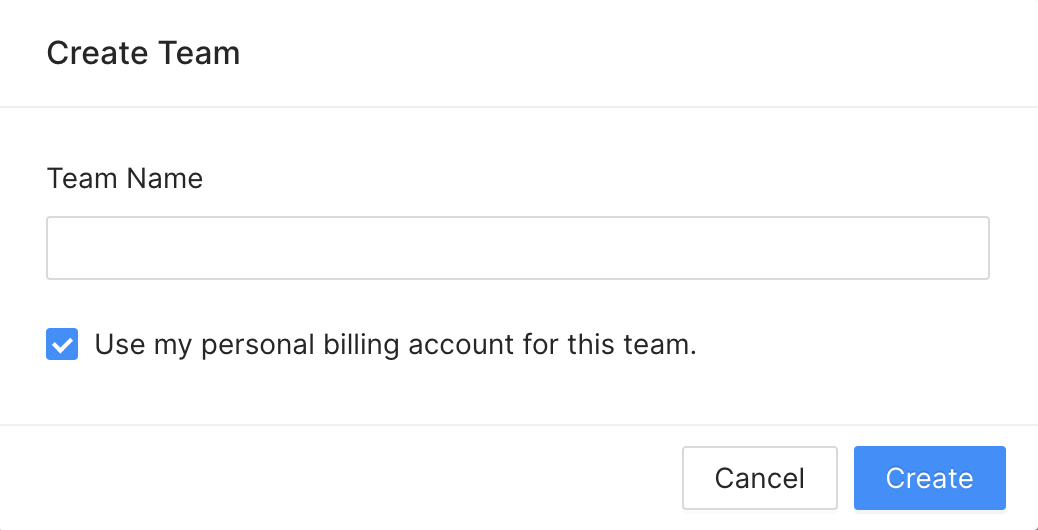 > A user can create up to 5 teams. You can be part of even more teams but only
> be the owner of 5 teams. If you need to own more teams please email us at
> [support@upstash.com](mailto:support@upstash.com).
You can still continue using your personal account or switch to a team.
> The databases in your personal account are not shared with anyone. If you want
> your database to be accessible by other users, you need to create it under a
> team.
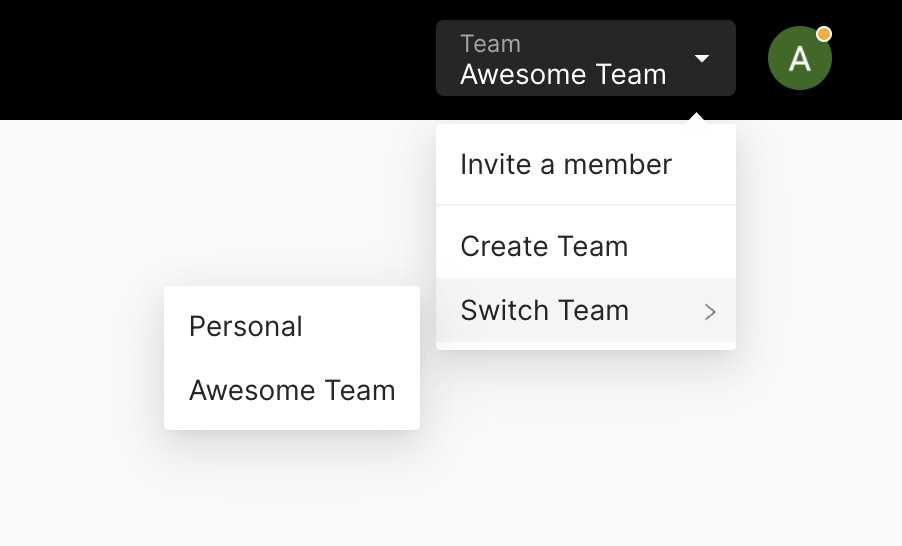
### Switch Team
You need to switch to the team to create databases shared with other team
members. You can switch to the team via the switch button in the team table. Or
you can click your profile pic in the top right and switch to any team listed
there.
> A user can create up to 5 teams. You can be part of even more teams but only
> be the owner of 5 teams. If you need to own more teams please email us at
> [support@upstash.com](mailto:support@upstash.com).
You can still continue using your personal account or switch to a team.
> The databases in your personal account are not shared with anyone. If you want
> your database to be accessible by other users, you need to create it under a
> team.
### Switch Team
You need to switch to the team to create databases shared with other team
members. You can switch to the team via the switch button in the team table. Or
you can click your profile pic in the top right and switch to any team listed
there.
 ### Add/Remove Team Member
Once you switched to a team, you can add team members in `Account > Teams` if
you are Owner or Admin for of the team. Entering email will be enough. The email
may not registered to Upstash yet, it is not a problem. Once the user registers
with that email, he/she will be able to switch to the team. We do not send
invitation, so when you add a member, he/she becomes a member directly. You can
remove the members from the same page.
> Only Admins or the Owner can add/remove users.
### Add/Remove Team Member
Once you switched to a team, you can add team members in `Account > Teams` if
you are Owner or Admin for of the team. Entering email will be enough. The email
may not registered to Upstash yet, it is not a problem. Once the user registers
with that email, he/she will be able to switch to the team. We do not send
invitation, so when you add a member, he/she becomes a member directly. You can
remove the members from the same page.
> Only Admins or the Owner can add/remove users.
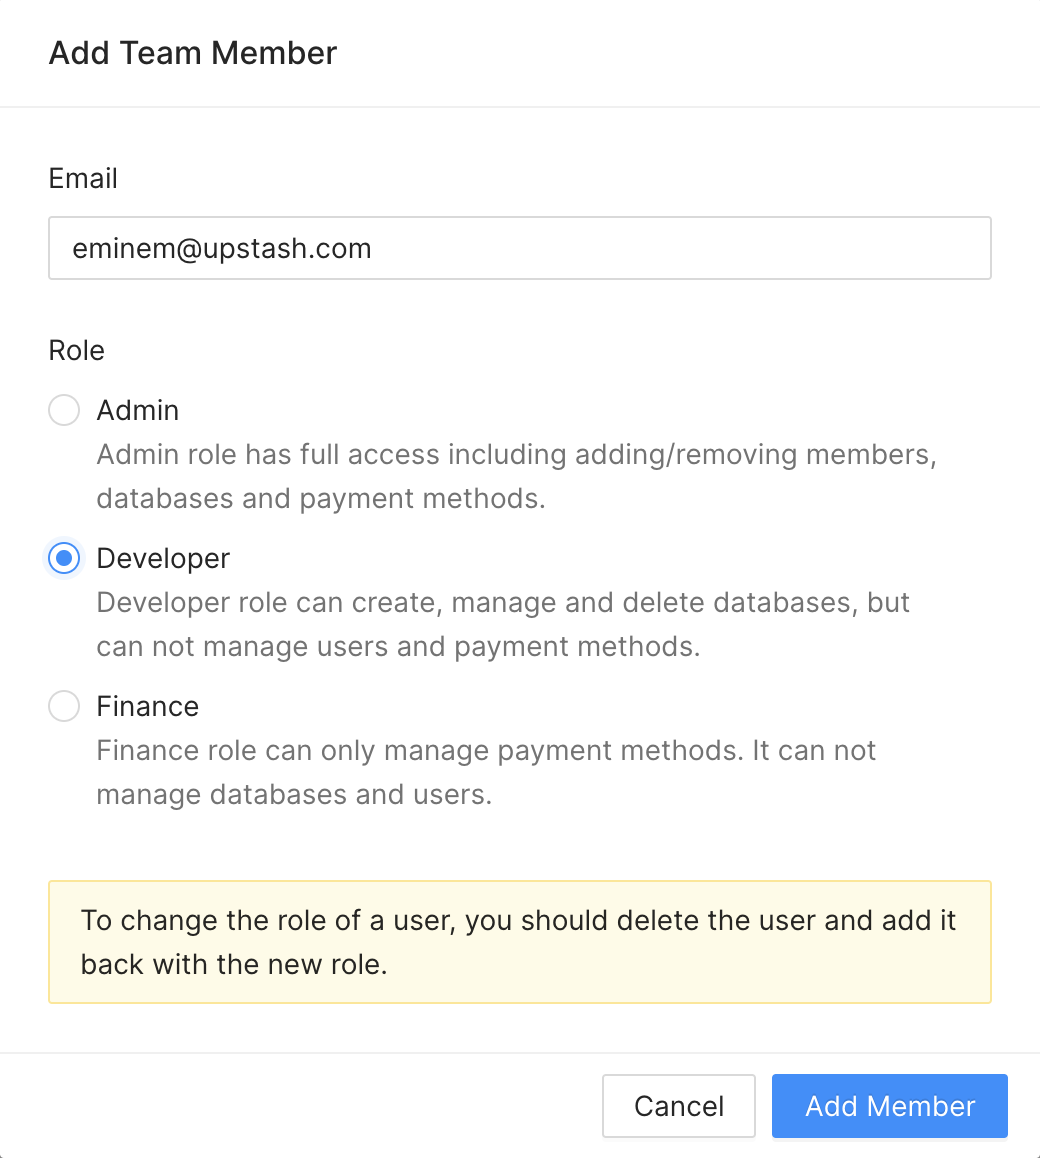 ### Roles
While adding a team member you need to select a role. Here the privileges of
each role:
* Admin: This role has full access including adding removing members, databases,
payment methods.
* Dev: This role can create, manage and delete databases. It can not manage
users and payment methods.
* Finance: This role can only manage payment methods. It can not manage the
databases and users.
* Owner: Owner has all the privileges that admin has. In addition he is the only
person who can delete the team. This role is assigned to the user who created
the team. So you can not create a member with Owner role.
> If you want change role of a user, you need to delete and add again.
### Delete Team
Only the original creator (owner) can delete a team. Also the team should not
have any active databases, namely all databases under the team should be deleted
first. To delete your team, first you need to switch your personal account then
you can delete your team in the team list under `Account > Teams`.
### Roles
While adding a team member you need to select a role. Here the privileges of
each role:
* Admin: This role has full access including adding removing members, databases,
payment methods.
* Dev: This role can create, manage and delete databases. It can not manage
users and payment methods.
* Finance: This role can only manage payment methods. It can not manage the
databases and users.
* Owner: Owner has all the privileges that admin has. In addition he is the only
person who can delete the team. This role is assigned to the user who created
the team. So you can not create a member with Owner role.
> If you want change role of a user, you need to delete and add again.
### Delete Team
Only the original creator (owner) can delete a team. Also the team should not
have any active databases, namely all databases under the team should be deleted
first. To delete your team, first you need to switch your personal account then
you can delete your team in the team list under `Account > Teams`.
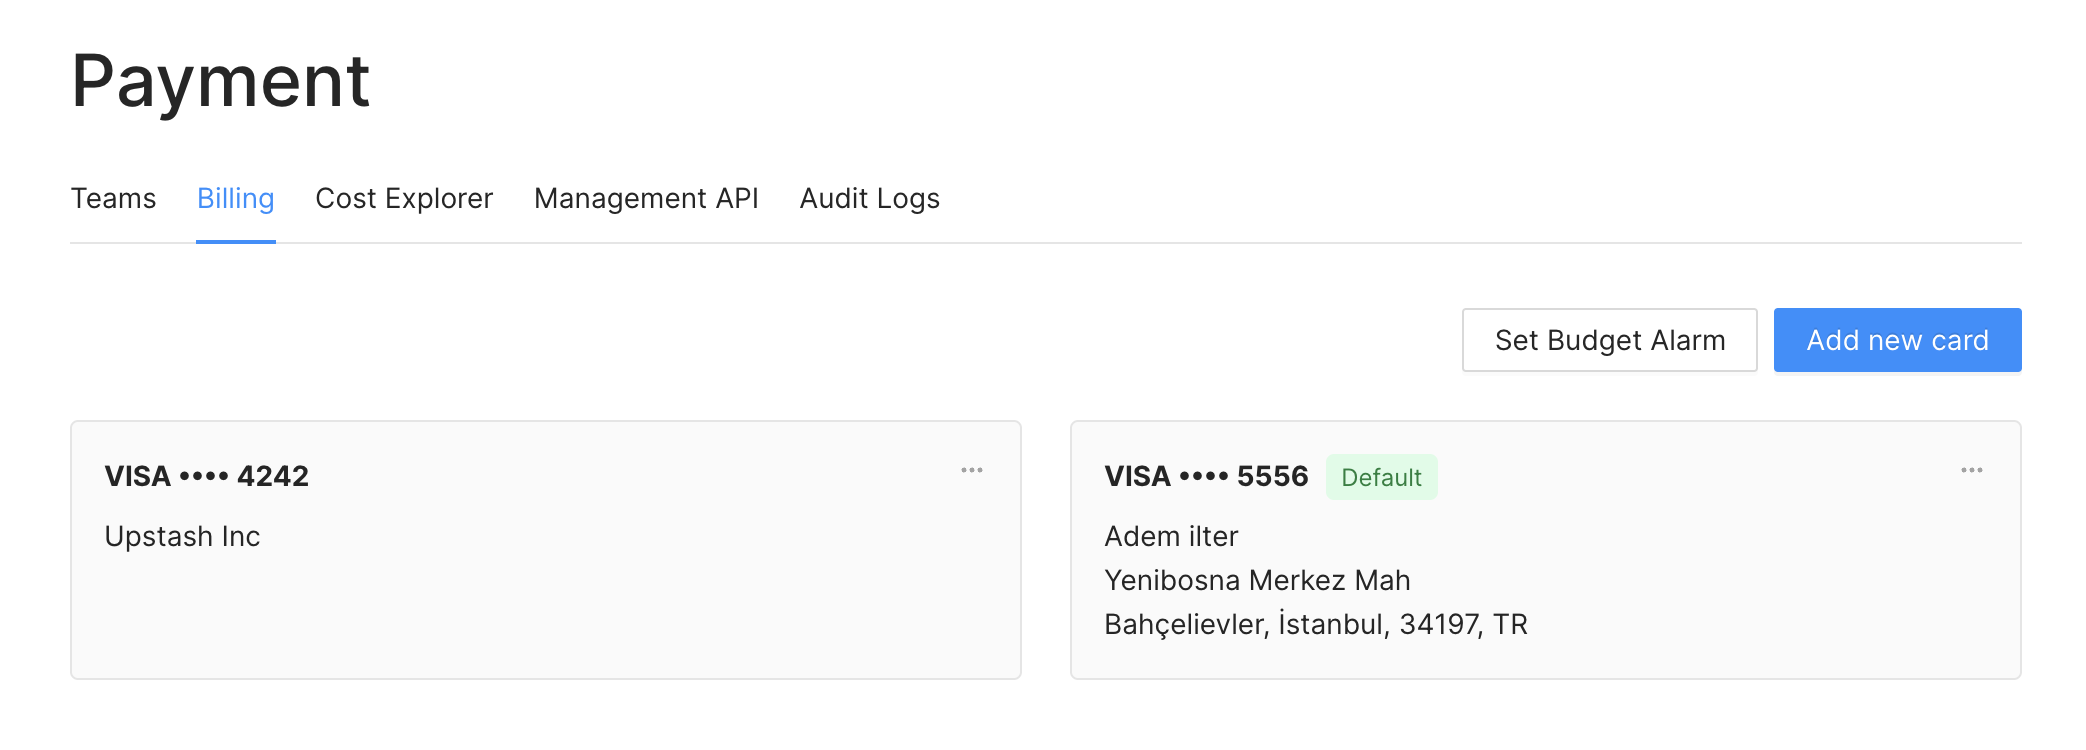
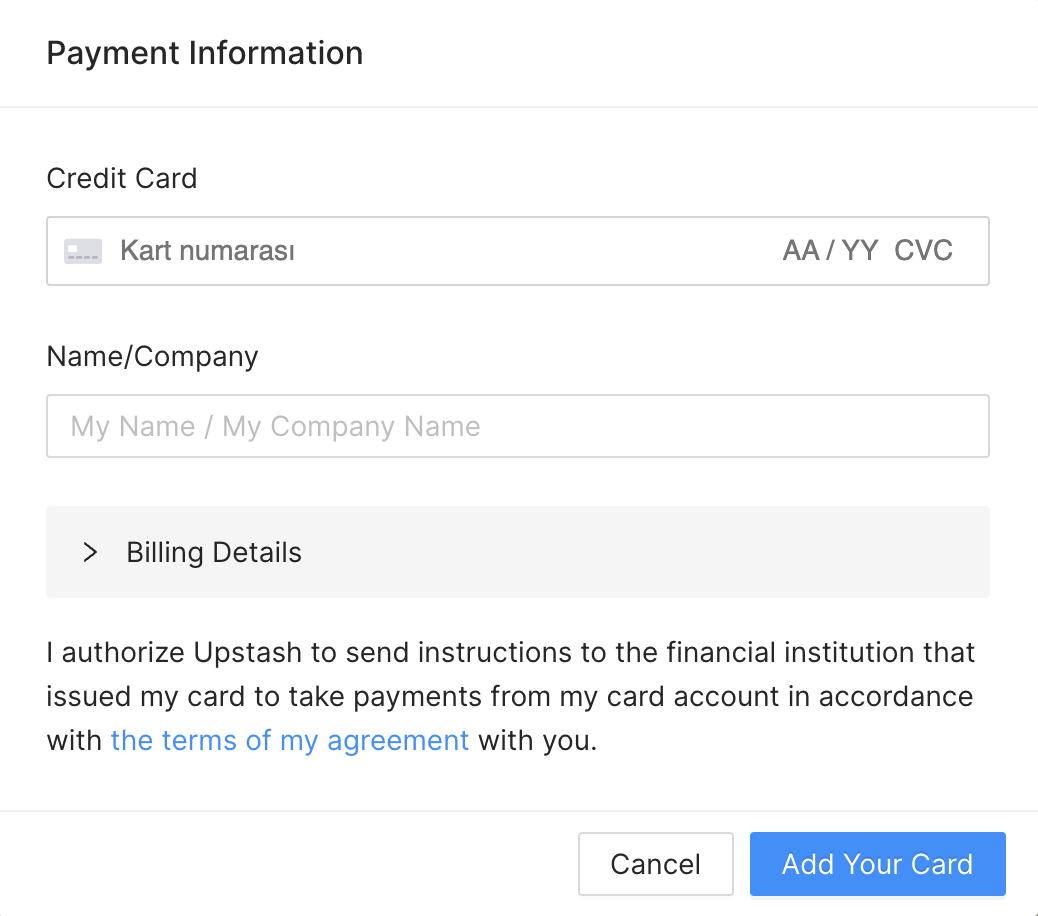 You can enter multiple credit cards and set one of them as the default one. The
payments will be charged from the default credit card.
You can enter multiple credit cards and set one of them as the default one. The
payments will be charged from the default credit card.
 ## Payment Security
Upstash does not store users' credit card information in its servers. We use
Stripe Inc payment processing company to handle payments. You can read more
about payment security in Stripe
[here](https://stripe.com/docs/security/stripe).
---
# Source: https://upstash.com/docs/search/features/advanced-settings.md
> ## Documentation Index
> Fetch the complete documentation index at: https://upstash.com/docs/llms.txt
> Use this file to discover all available pages before exploring further.
# Advanced Settings
This page covers the advanced configuration options available in the Upstash Search. These parameters allow you to fine-tune search behavior for your specific use case and requirements.
## Reranking
The `reranking` parameter enables enhanced search result reranking using advanced AI models. It's disabled by default (`false`) and incurs additional costs when enabled.
## Payment Security
Upstash does not store users' credit card information in its servers. We use
Stripe Inc payment processing company to handle payments. You can read more
about payment security in Stripe
[here](https://stripe.com/docs/security/stripe).
---
# Source: https://upstash.com/docs/search/features/advanced-settings.md
> ## Documentation Index
> Fetch the complete documentation index at: https://upstash.com/docs/llms.txt
> Use this file to discover all available pages before exploring further.
# Advanced Settings
This page covers the advanced configuration options available in the Upstash Search. These parameters allow you to fine-tune search behavior for your specific use case and requirements.
## Reranking
The `reranking` parameter enables enhanced search result reranking using advanced AI models. It's disabled by default (`false`) and incurs additional costs when enabled.
RAG Chatbot with Upstash Vector
{/* Render messages */}
{messages.map(m => (
{/* Text input */}
{m.role}:
))}
{/* If the model calls a tool, show which tool it called */}
{m.content.length > 0 ? (
m.content
) : (
calling tool: {m?.toolInvocations?.[0]?.toolName}
)}
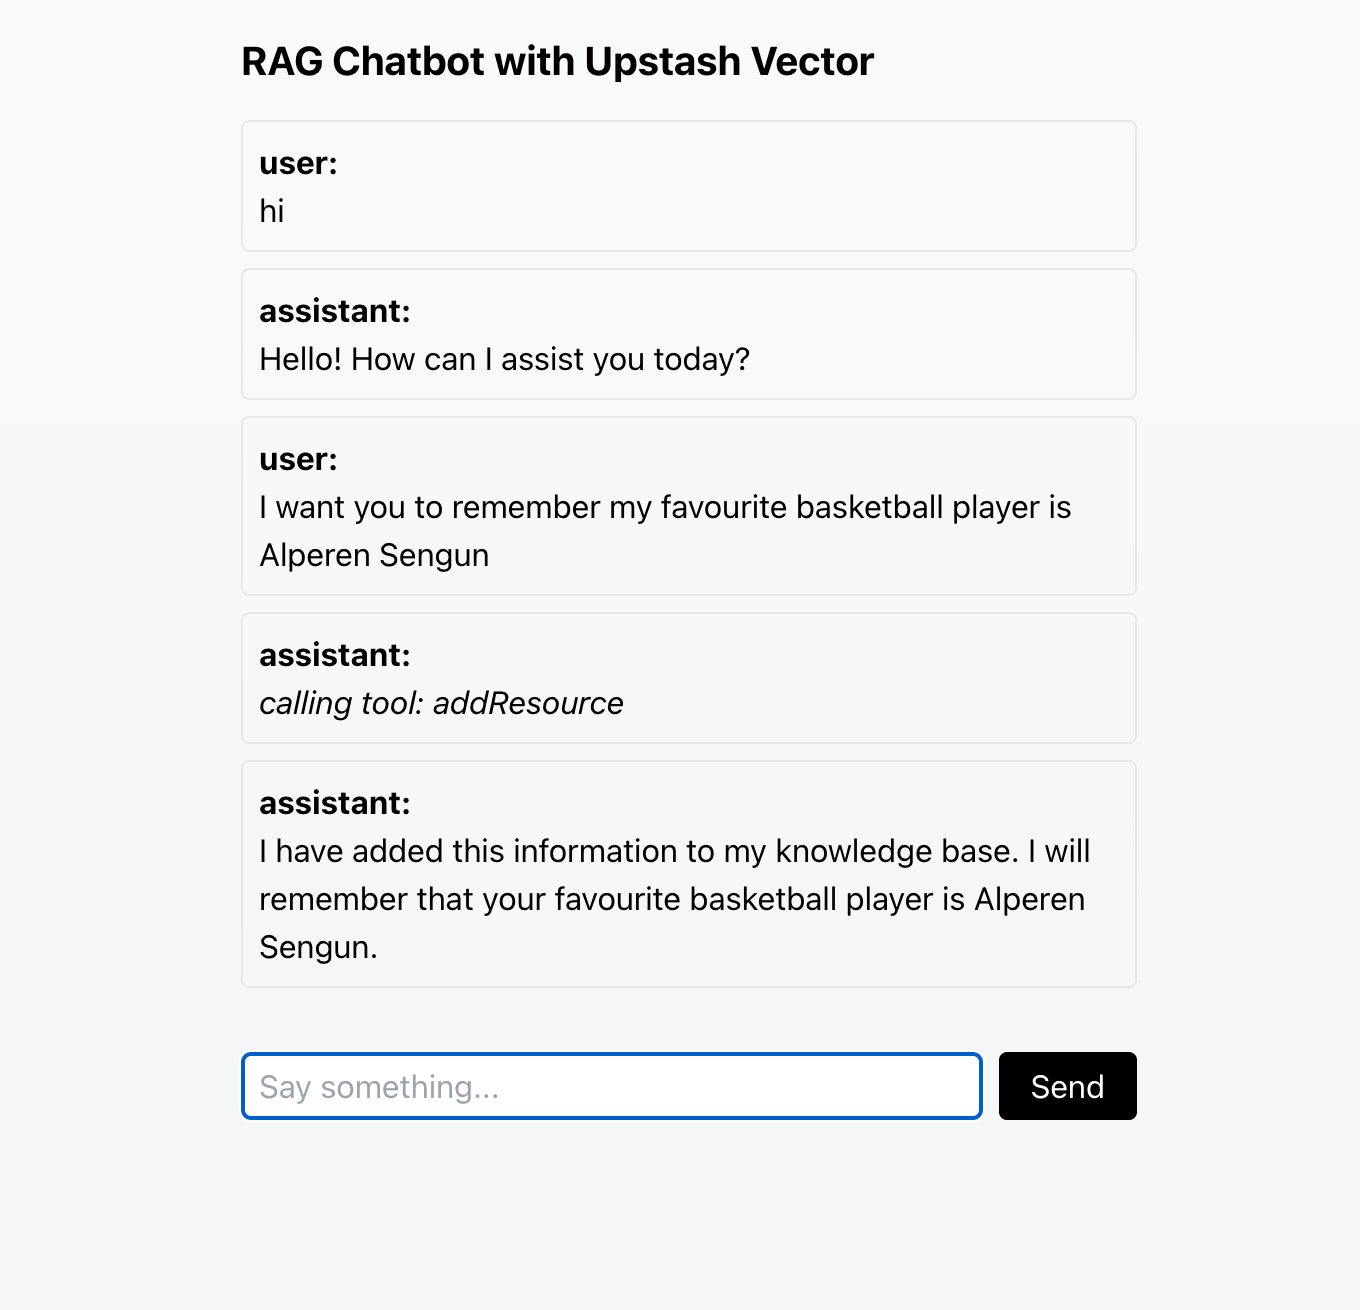

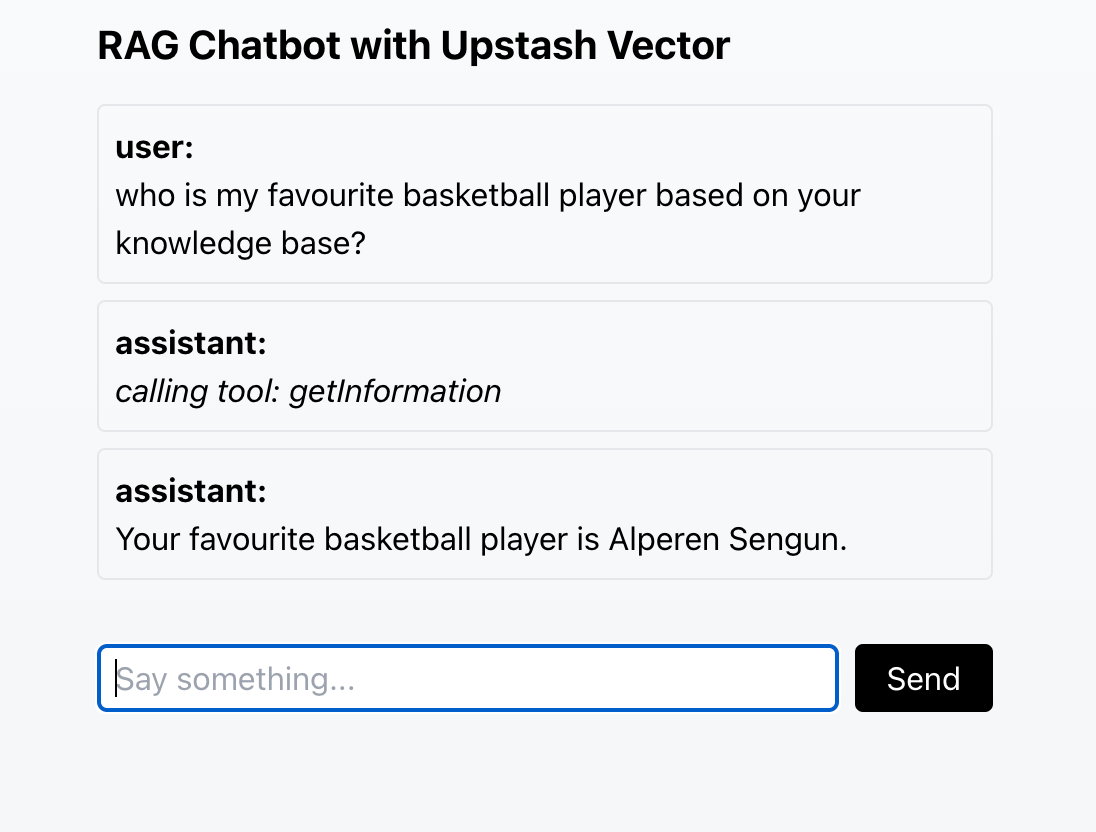 If you would like to see the entire code of a slightly revised version of this chatbot, you can check out the [GitHub repository](https://github.com/Abdusshh/rag-chatbot-ai-sdk). In this version, the user chooses which embedding model to use through the UI.
## Conclusion
Congratulations! You have successfully created a RAG chatbot that uses Upstash Vector to store and retrieve information. To learn more about Upstash Vector, please visit the [Upstash Vector documentation](/vector).
To learn more about the AI SDK, visit the [Vercel AI SDK documentation](https://sdk.vercel.ai/docs/introduction). While creating this tutorial, we used the [RAG Chatbot guide](https://sdk.vercel.ai/docs/guides/rag-chatbot) created by Vercel, which uses PostgreSQL with pgvector as a vector database. Make sure to check it out if you want to learn how to create a RAG chatbot using pgvector.
---
# Source: https://upstash.com/docs/workflow/integrations/aisdk.md
> ## Documentation Index
> Fetch the complete documentation index at: https://upstash.com/docs/llms.txt
> Use this file to discover all available pages before exploring further.
# Vercel AI SDK
If you would like to see the entire code of a slightly revised version of this chatbot, you can check out the [GitHub repository](https://github.com/Abdusshh/rag-chatbot-ai-sdk). In this version, the user chooses which embedding model to use through the UI.
## Conclusion
Congratulations! You have successfully created a RAG chatbot that uses Upstash Vector to store and retrieve information. To learn more about Upstash Vector, please visit the [Upstash Vector documentation](/vector).
To learn more about the AI SDK, visit the [Vercel AI SDK documentation](https://sdk.vercel.ai/docs/introduction). While creating this tutorial, we used the [RAG Chatbot guide](https://sdk.vercel.ai/docs/guides/rag-chatbot) created by Vercel, which uses PostgreSQL with pgvector as a vector database. Make sure to check it out if you want to learn how to create a RAG chatbot using pgvector.
---
# Source: https://upstash.com/docs/workflow/integrations/aisdk.md
> ## Documentation Index
> Fetch the complete documentation index at: https://upstash.com/docs/llms.txt
> Use this file to discover all available pages before exploring further.
# Vercel AI SDK
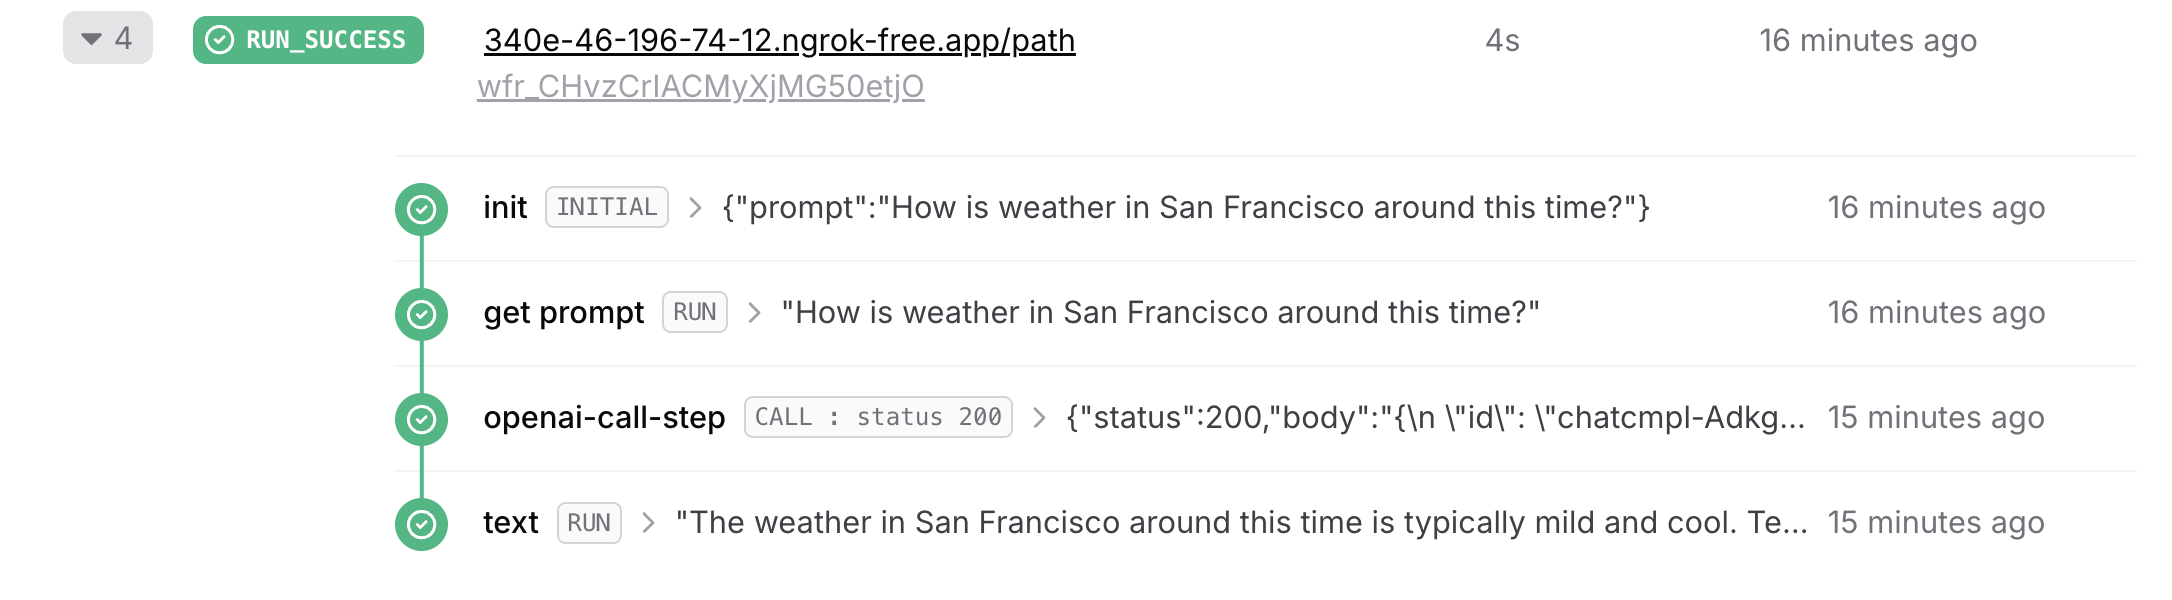 ### Advanced Implementation with Tools
Tools allow the AI model to perform specific actions during text generation. You can learn more about tools in the [Vercel AI SDK documentation](https://sdk.vercel.ai/docs/ai-sdk-core/tools-and-tool-calling).
When using tools with Upstash Workflow, each tool execution must be wrapped in a workflow step.
### Advanced Implementation with Tools
Tools allow the AI model to perform specific actions during text generation. You can learn more about tools in the [Vercel AI SDK documentation](https://sdk.vercel.ai/docs/ai-sdk-core/tools-and-tool-calling).
When using tools with Upstash Workflow, each tool execution must be wrapped in a workflow step.
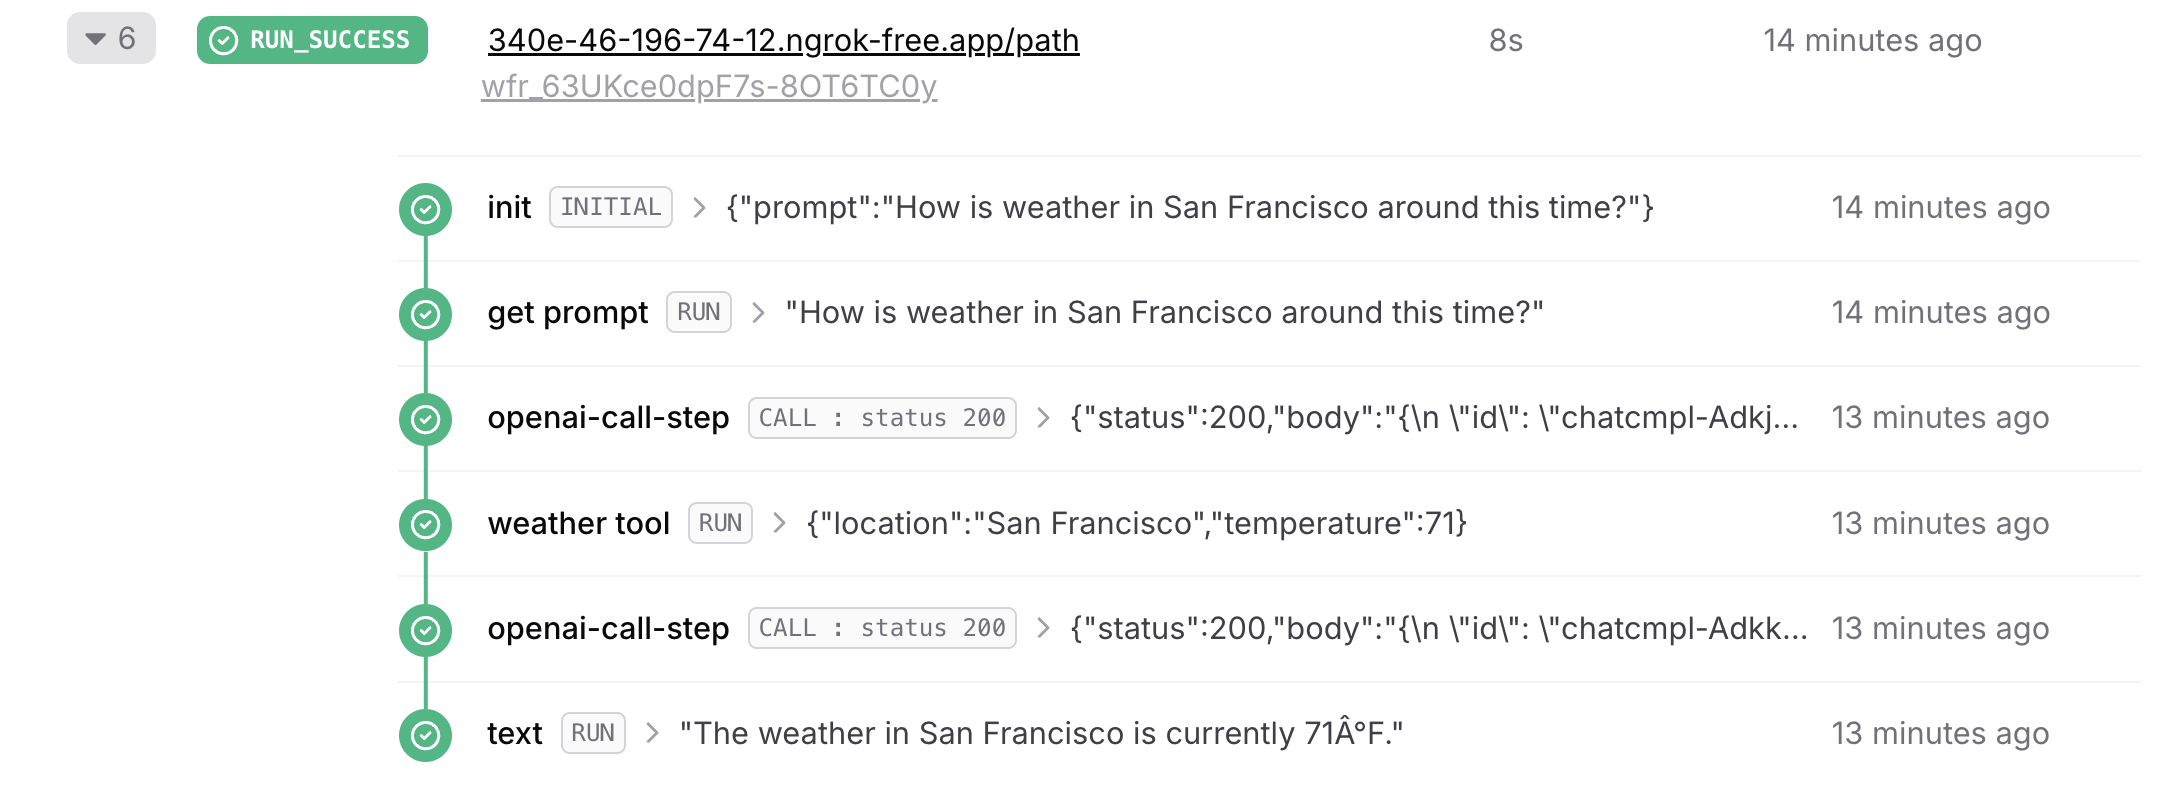 ## Important Considerations
When using Upstash Workflow with the Vercel AI SDK, there are several critical requirements that must be followed:
### Step Execution Order
The most critical requirement is that `generateText` cannot be called before any workflow step. Always have a step before `generateText`. This could be a step which gets the prompt:
## Important Considerations
When using Upstash Workflow with the Vercel AI SDK, there are several critical requirements that must be followed:
### Step Execution Order
The most critical requirement is that `generateText` cannot be called before any workflow step. Always have a step before `generateText`. This could be a step which gets the prompt:
#### QStash Price Decrease (Sep 15, 2022) The price is \$1 per 100K requests.
#### [Pulumi Provider is available](https://upstash.com/blog/upstash-pulumi-provider) (August 4, 2022)
#### [QStash is released and announced](https://upstash.com/blog/qstash-announcement) (July 18, 2022)
#### [Announcing Upstash CLI](https://upstash.com/blog/upstash-cli) (May 16, 2022)
#### [Introducing Redis 6 Compatibility](https://upstash.com/blog/redis-6) (April 10, 2022)
#### Strong Consistency Deprecated (March 29, 2022) We have deprecated Strong Consistency mode for Redis databases due to its performance impact. This will not be available for new databases. We are planning to disable it on existing databases before the end of 2023. The database owners will be notified via email.
#### [Announcing Upstash Redis SDK v1.0.0](https://upstash.com/blog/upstash-redis-sdk-v1) (March 14, 2022)
#### Support for Google Cloud (June 8, 2021) Google Cloud is available for Upstash Redis databases. We initially support US-Central-1 (Iowa) region. Check the [get started guide](https://docs.upstash.com/redis/howto/getstartedgooglecloudfunctions).
#### Support for AWS Japan (March 1, 2021) こんにちは日本 Support for AWS Tokyo Region was the most requested feature by our users. Now our users can create their database in AWS Asia Pacific (Tokyo) region (ap-northeast-1). In addition to Japan, Upstash is available in the regions us-west-1, us-east-1, eu-west-1. Click [here](https://console.upstash.com) to start your database for free. Click [here](https://roadmap.upstash.com) to request new regions to be supported.
#### Vercel Integration (February 22, 2021) Upstash\&Vercel integration has been released. Now you are able to integrate Upstash to your project easily. We believe Upstash is the perfect database for your applications thanks to its: * Low latency data * Per request pricing * Durable storage * Ease of use Below are the resources about the integration: See [how to guide](https://docs.upstash.com/redis/howto/vercelintegration). See [integration page](https://vercel.com/integrations/upstash). See [Roadmap Voting app](https://github.com/upstash/roadmap) as a showcase for the integration. --- # Source: https://upstash.com/docs/workflow/integrations/anthropic.md # Source: https://upstash.com/docs/qstash/integrations/anthropic.md > ## Documentation Index > Fetch the complete documentation index at: https://upstash.com/docs/llms.txt > Use this file to discover all available pages before exploring further. # LLM with Anthropic QStash integrates smoothly with Anthropic's API, allowing you to send LLM requests and leverage QStash features like retries, callbacks, and batching. This is especially useful when working in serverless environments where LLM response times vary and traditional timeouts may be limiting. QStash provides an HTTP timeout of up to 2 hours, which is ideal for most LLM cases. ### Example: Publishing and Enqueueing Requests Specify the `api` as `llm` with the provider set to `anthropic()` when publishing requests. Use the `Upstash-Callback` header to handle responses asynchronously, as streaming completions aren’t supported for this integration. #### Publishing a Request ```typescript theme={"system"} import { anthropic, Client } from "@upstash/qstash"; const client = new Client({ token: "
It works!
", }, headers: { "content-type": "application/json", }, }); ```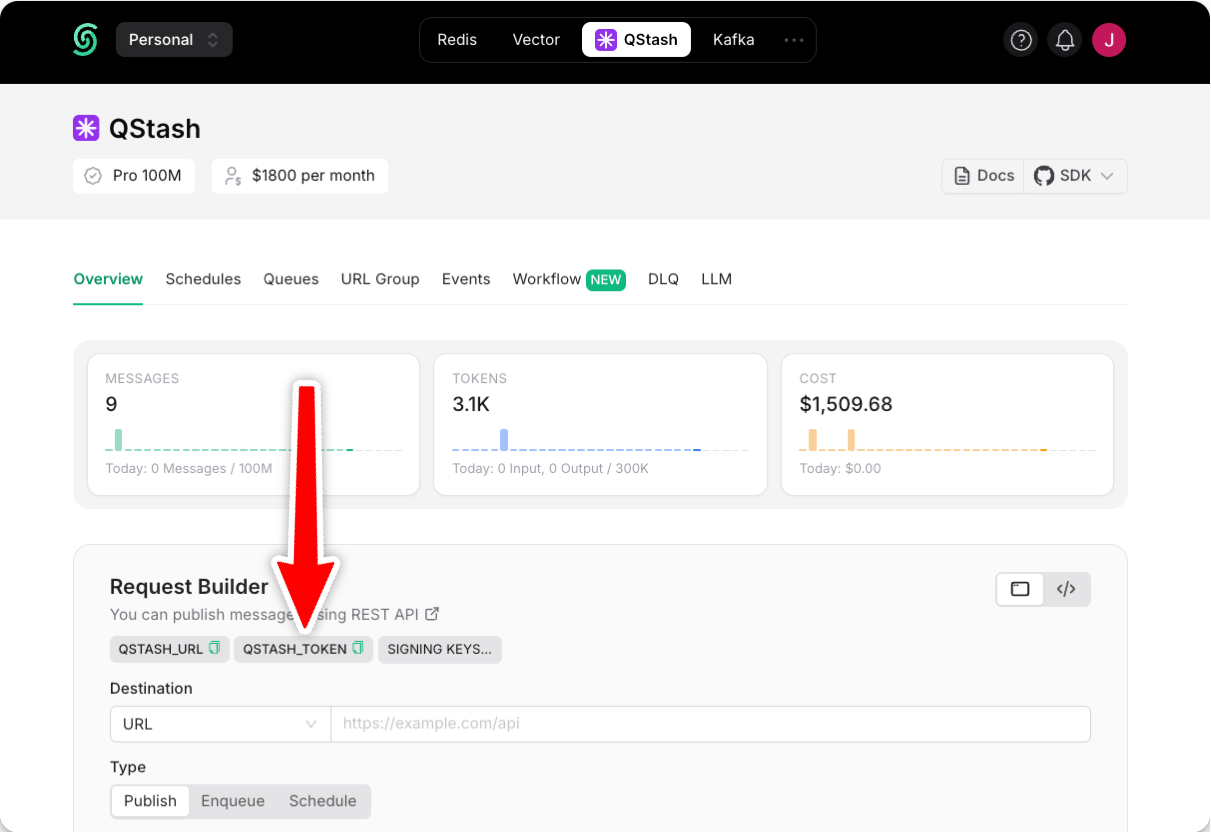 Using a local tunnel connects your endpoint to the production QStash, enabling you to view workflow logs in the Upstash Console.
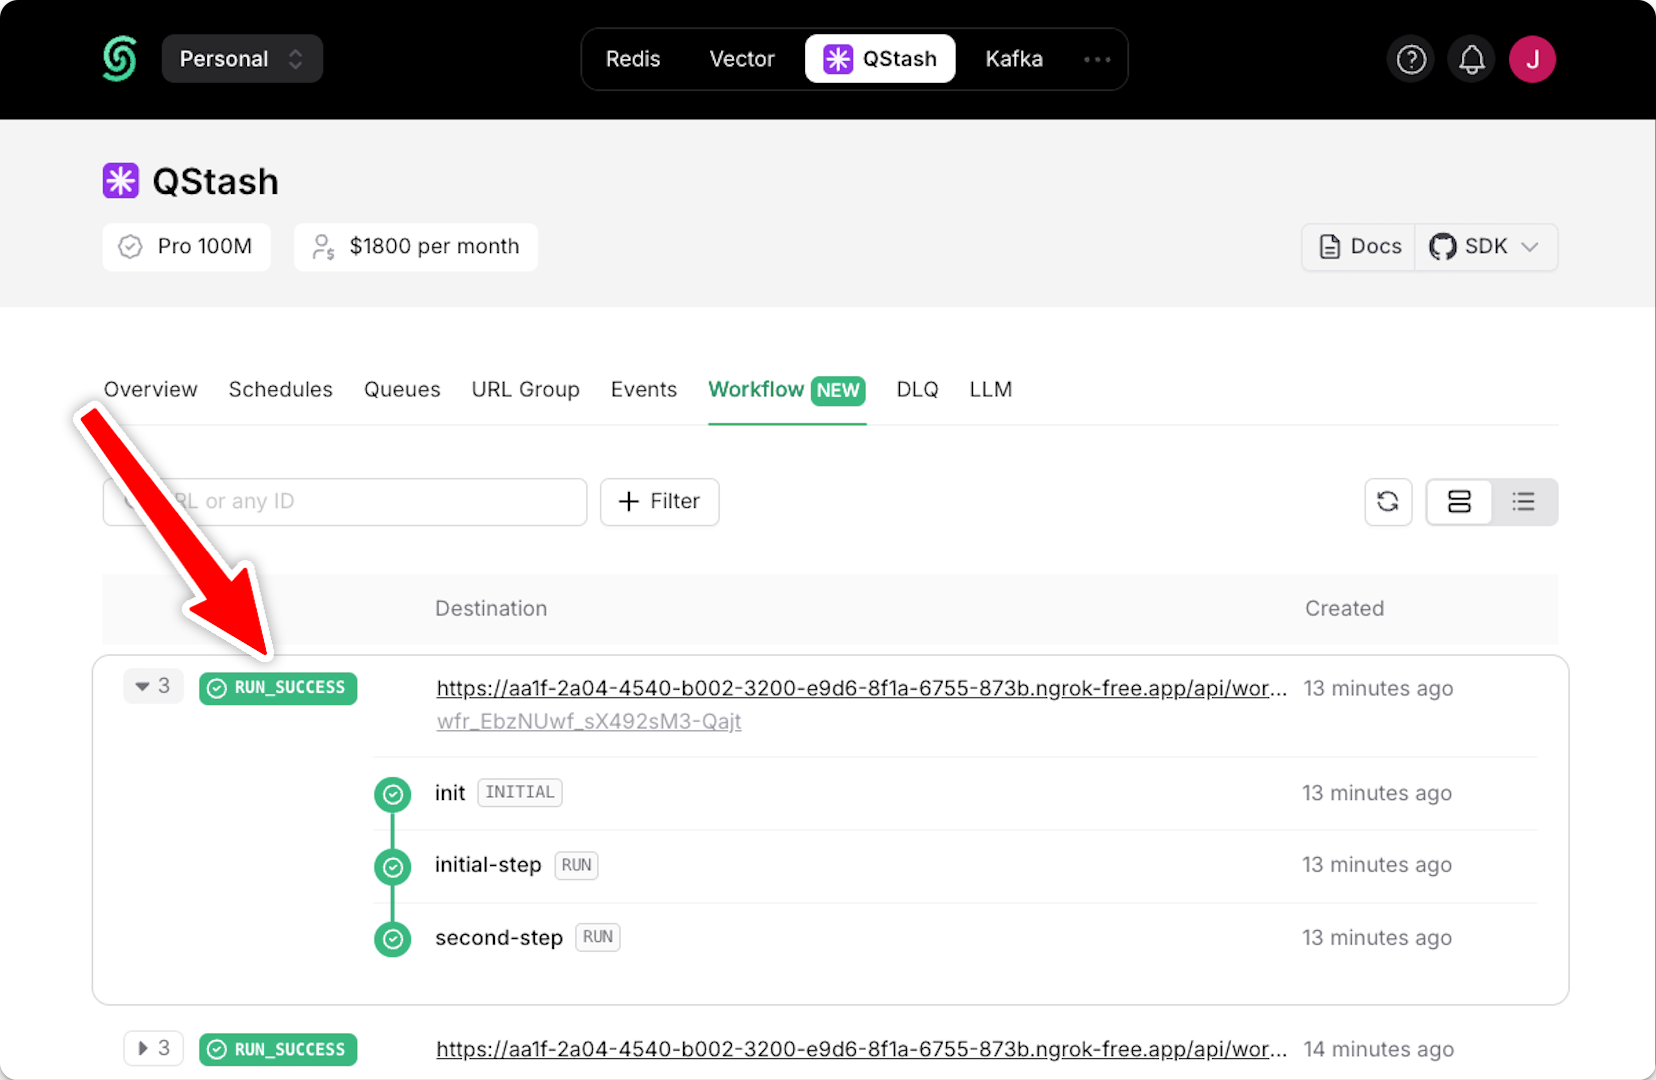
## Step 3: Create a Workflow Endpoint
A workflow endpoint allows you to define a set of steps that, together, make up a workflow. Each step contains a piece of business logic that is automatically retried on failure, with easy monitoring via our visual workflow dashboard.
To define a workflow endpoint with Astro, navigate into your entrypoint file (usually `src/index.ts`) and add the following code:
Using a local tunnel connects your endpoint to the production QStash, enabling you to view workflow logs in the Upstash Console.
## Step 3: Create a Workflow Endpoint
A workflow endpoint allows you to define a set of steps that, together, make up a workflow. Each step contains a piece of business logic that is automatically retried on failure, with easy monitoring via our visual workflow dashboard.
To define a workflow endpoint with Astro, navigate into your entrypoint file (usually `src/index.ts`) and add the following code:
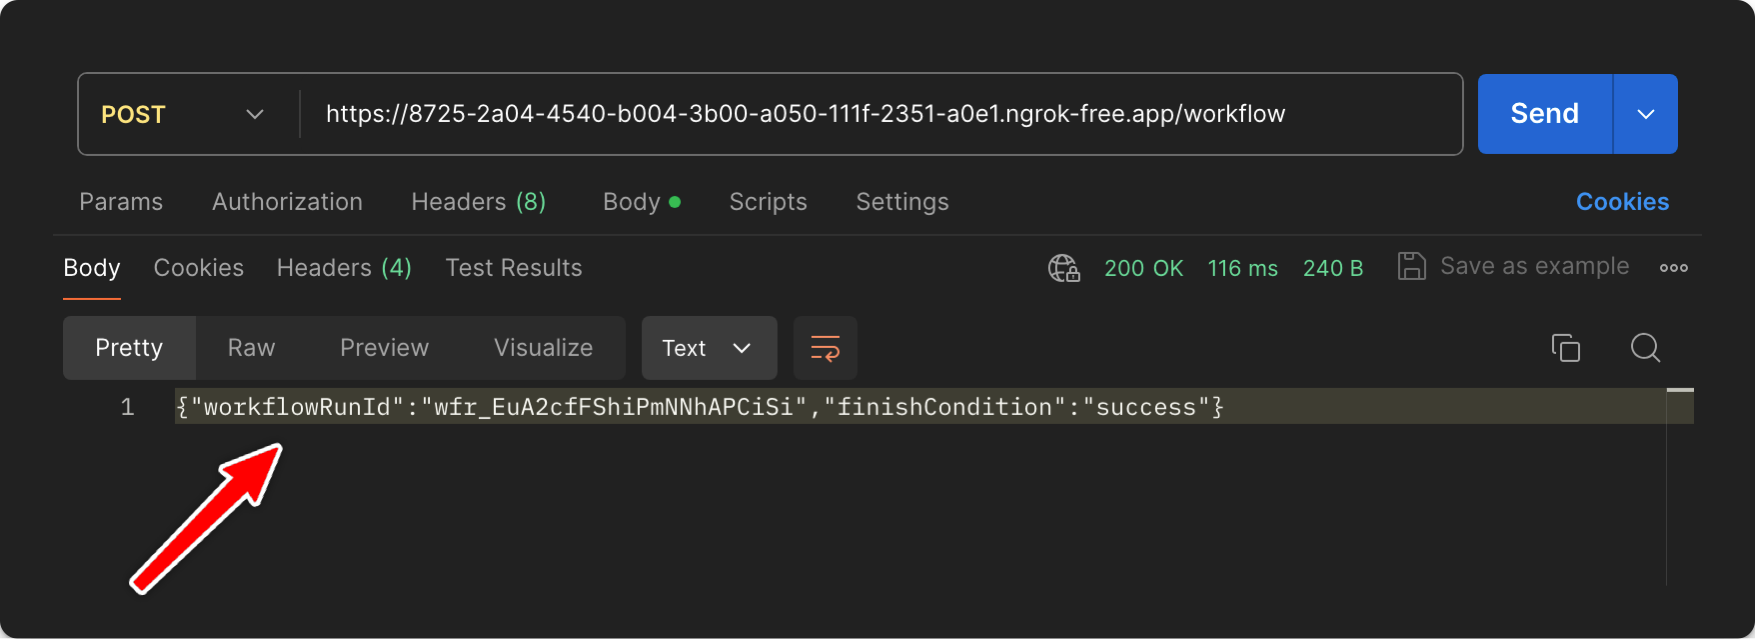 If you are using a local tunnel, you can use this ID to track the workflow run and see its status in your QStash workflow dashboard. All steps are listed with their statuses, headers, and body for a detailed overview of your workflow from start to finish. Click on a step to see its detailed logs.
 ## Step 5: Deploying to Production
When deploying your Astro app with Upstash Workflow to production, there are a few key points to keep in mind:
1. **Environment Variables**: Make sure that all necessary environment variables from your `.env` file are set in your Vercel project settings. For example, your `QSTASH_TOKEN`, and any other configuration variables your workflow might need.
2. **Remove Local Development Settings**: In your production code, you can remove or conditionally exclude any local development settings. For example, if you used [local tunnel for local development](/workflow/howto/local-development#local-tunnel-with-ngrok)
3. **Deployment**: Deploy your Astro app to production as you normally would, for example to Vercel, Heroku, or AWS.
4. **Verify Workflow Endpoint**: After deployment, verify that your workflow endpoint is accessible by making a POST request to your production URL:
```bash Terminal theme={"system"}
curl -X POST
## Step 5: Deploying to Production
When deploying your Astro app with Upstash Workflow to production, there are a few key points to keep in mind:
1. **Environment Variables**: Make sure that all necessary environment variables from your `.env` file are set in your Vercel project settings. For example, your `QSTASH_TOKEN`, and any other configuration variables your workflow might need.
2. **Remove Local Development Settings**: In your production code, you can remove or conditionally exclude any local development settings. For example, if you used [local tunnel for local development](/workflow/howto/local-development#local-tunnel-with-ngrok)
3. **Deployment**: Deploy your Astro app to production as you normally would, for example to Vercel, Heroku, or AWS.
4. **Verify Workflow Endpoint**: After deployment, verify that your workflow endpoint is accessible by making a POST request to your production URL:
```bash Terminal theme={"system"}
curl -X POST 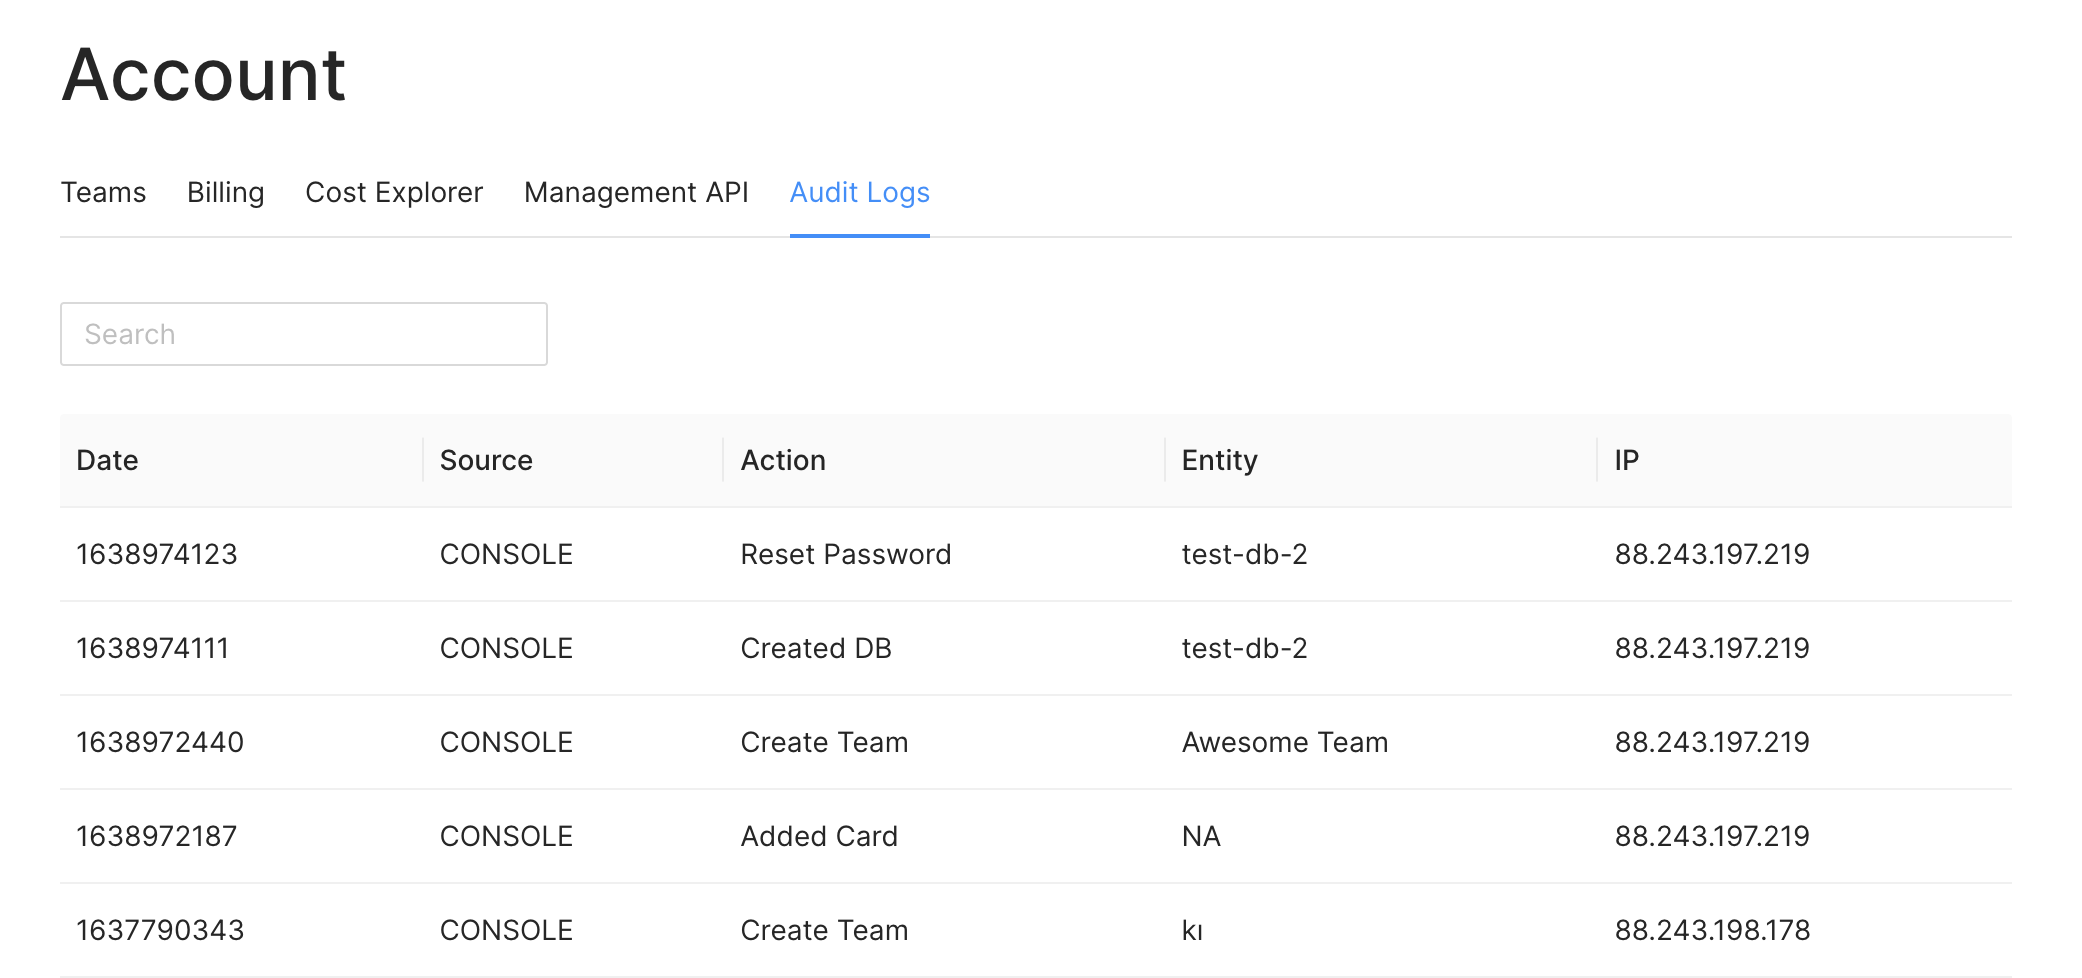 Here the `Source` column shows if the action has been called by the console or via
an API key. The `Entity` column gives you the name of the resource that has been
affected by the action. For example, when you delete a database, the name of the
database will be shown here. Also, you can see the IP address which performed the
action.
## Security
You can track your audit logs to detect any unusual activity on your account and
databases. When you suspect any security breach, you should delete the API key
related to suspicious activity and inform us by emailing
[support@upstash.com](mailto:support@upstash.com)
## Retention period
After the retention period, the audit logs are deleted. The retention period for free databases is 7 days, for pay-as-you-go databases, it is 30 days, and for the Pro tier, it is one year.
---
# Source: https://upstash.com/docs/workflow/examples/authWebhook.md
> ## Documentation Index
> Fetch the complete documentation index at: https://upstash.com/docs/llms.txt
> Use this file to discover all available pages before exploring further.
# Auth Provider Webhook
This example demonstrates an authentication provider webhook process using Upstash Workflow.
The workflow handles the user creation, trial management, email reminders and notifications.
## Use Case
Our workflow will:
1. Receive a webhook event from an authentication provider (e.g. Firebase, Auth0, Clerk etc.)
2. Create a new user in our database
3. Create a new user in Stripe
4. Start a trial in Stripe
5. Send a welcome email
6. Send a reminder email if the user hasn't solved any questions in the last 7 days
7. Send a trial warning email if the user hasn't upgraded 2 days before the trial ends
8. Send a trial ended email if the user hasn't upgraded
## Code Example
Here the `Source` column shows if the action has been called by the console or via
an API key. The `Entity` column gives you the name of the resource that has been
affected by the action. For example, when you delete a database, the name of the
database will be shown here. Also, you can see the IP address which performed the
action.
## Security
You can track your audit logs to detect any unusual activity on your account and
databases. When you suspect any security breach, you should delete the API key
related to suspicious activity and inform us by emailing
[support@upstash.com](mailto:support@upstash.com)
## Retention period
After the retention period, the audit logs are deleted. The retention period for free databases is 7 days, for pay-as-you-go databases, it is 30 days, and for the Pro tier, it is one year.
---
# Source: https://upstash.com/docs/workflow/examples/authWebhook.md
> ## Documentation Index
> Fetch the complete documentation index at: https://upstash.com/docs/llms.txt
> Use this file to discover all available pages before exploring further.
# Auth Provider Webhook
This example demonstrates an authentication provider webhook process using Upstash Workflow.
The workflow handles the user creation, trial management, email reminders and notifications.
## Use Case
Our workflow will:
1. Receive a webhook event from an authentication provider (e.g. Firebase, Auth0, Clerk etc.)
2. Create a new user in our database
3. Create a new user in Stripe
4. Start a trial in Stripe
5. Send a welcome email
6. Send a reminder email if the user hasn't solved any questions in the last 7 days
7. Send a trial warning email if the user hasn't upgraded 2 days before the trial ends
8. Send a trial ended email if the user hasn't upgraded
## Code Example
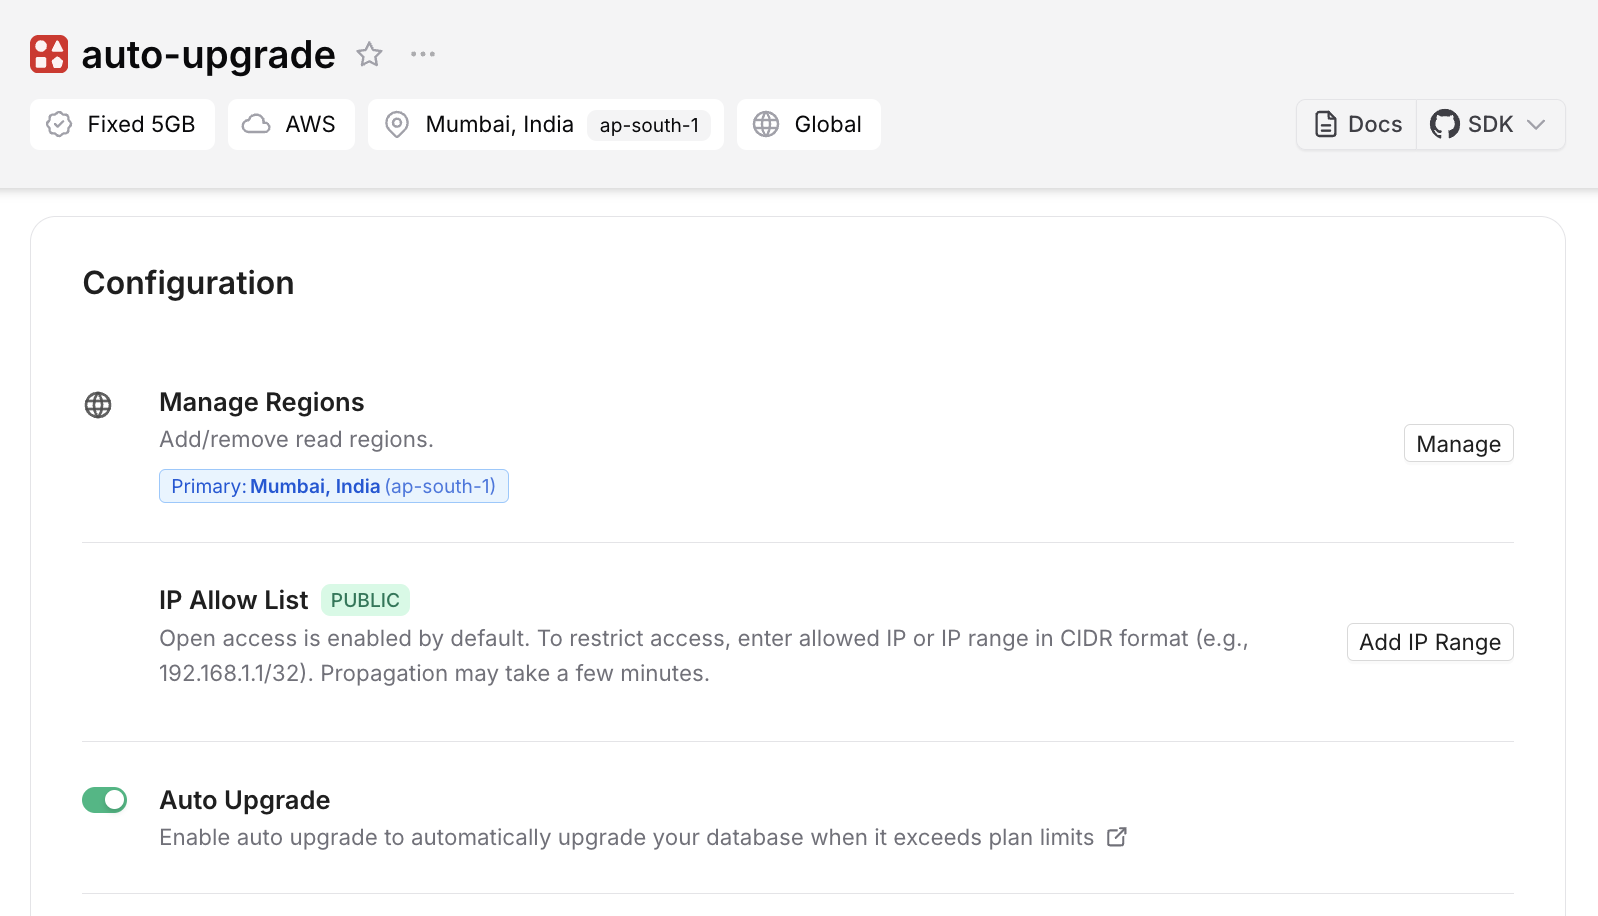
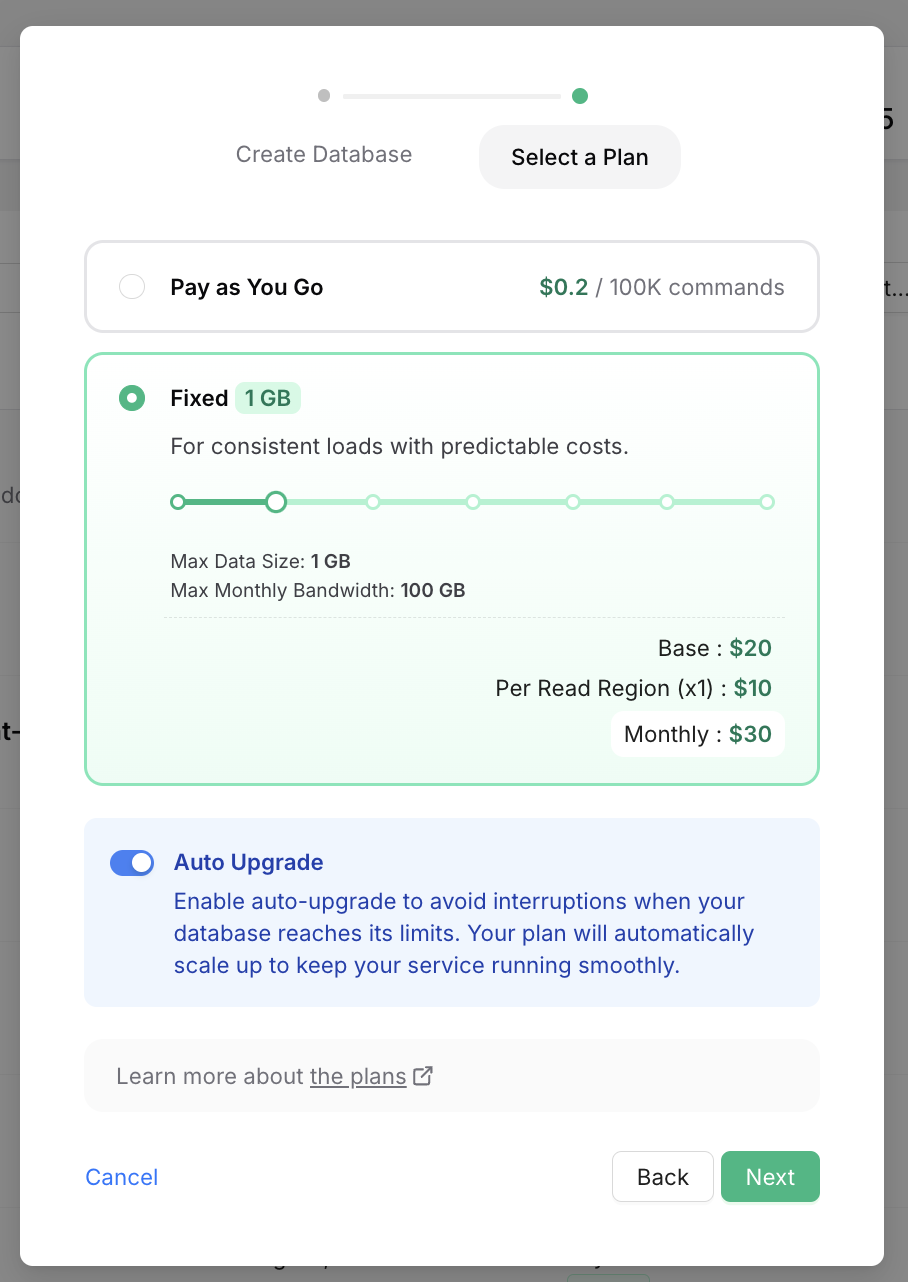 * Or for an existing database by clicking Enable in the Configuration/Auto Upgrade box in the database details page:
 ---
# Source: https://upstash.com/docs/redis/tutorials/auto_complete_with_serverless_redis.md
> ## Documentation Index
> Fetch the complete documentation index at: https://upstash.com/docs/llms.txt
> Use this file to discover all available pages before exploring further.
# Autocomplete API with Serverless Redis
This tutorial implements an autocomplete API powered by serverless Redis. See
[the demo](https://auto-complete-example.vercel.app/) and
[API endpoint](https://wfgz7cju24.execute-api.us-east-1.amazonaws.com/query?term=ca)
and
[the source code](https://github.com/upstash/examples/tree/main/examples/auto-complete-api).
We will keep country names in a Redis Sorted set. In Redis sorted set, elements
with the same score are sorted lexicographically. So in our case, all country
names will have the same score, 0. We keep all prefixes of country and use ZRANK
to find the terms to suggest. See
[this blog post](https://oldblog.antirez.com/post/autocomplete-with-redis.html)
for the details of the algorithm.
### Step 1: Project Setup
---
# Source: https://upstash.com/docs/redis/tutorials/auto_complete_with_serverless_redis.md
> ## Documentation Index
> Fetch the complete documentation index at: https://upstash.com/docs/llms.txt
> Use this file to discover all available pages before exploring further.
# Autocomplete API with Serverless Redis
This tutorial implements an autocomplete API powered by serverless Redis. See
[the demo](https://auto-complete-example.vercel.app/) and
[API endpoint](https://wfgz7cju24.execute-api.us-east-1.amazonaws.com/query?term=ca)
and
[the source code](https://github.com/upstash/examples/tree/main/examples/auto-complete-api).
We will keep country names in a Redis Sorted set. In Redis sorted set, elements
with the same score are sorted lexicographically. So in our case, all country
names will have the same score, 0. We keep all prefixes of country and use ZRANK
to find the terms to suggest. See
[this blog post](https://oldblog.antirez.com/post/autocomplete-with-redis.html)
for the details of the algorithm.
### Step 1: Project Setup
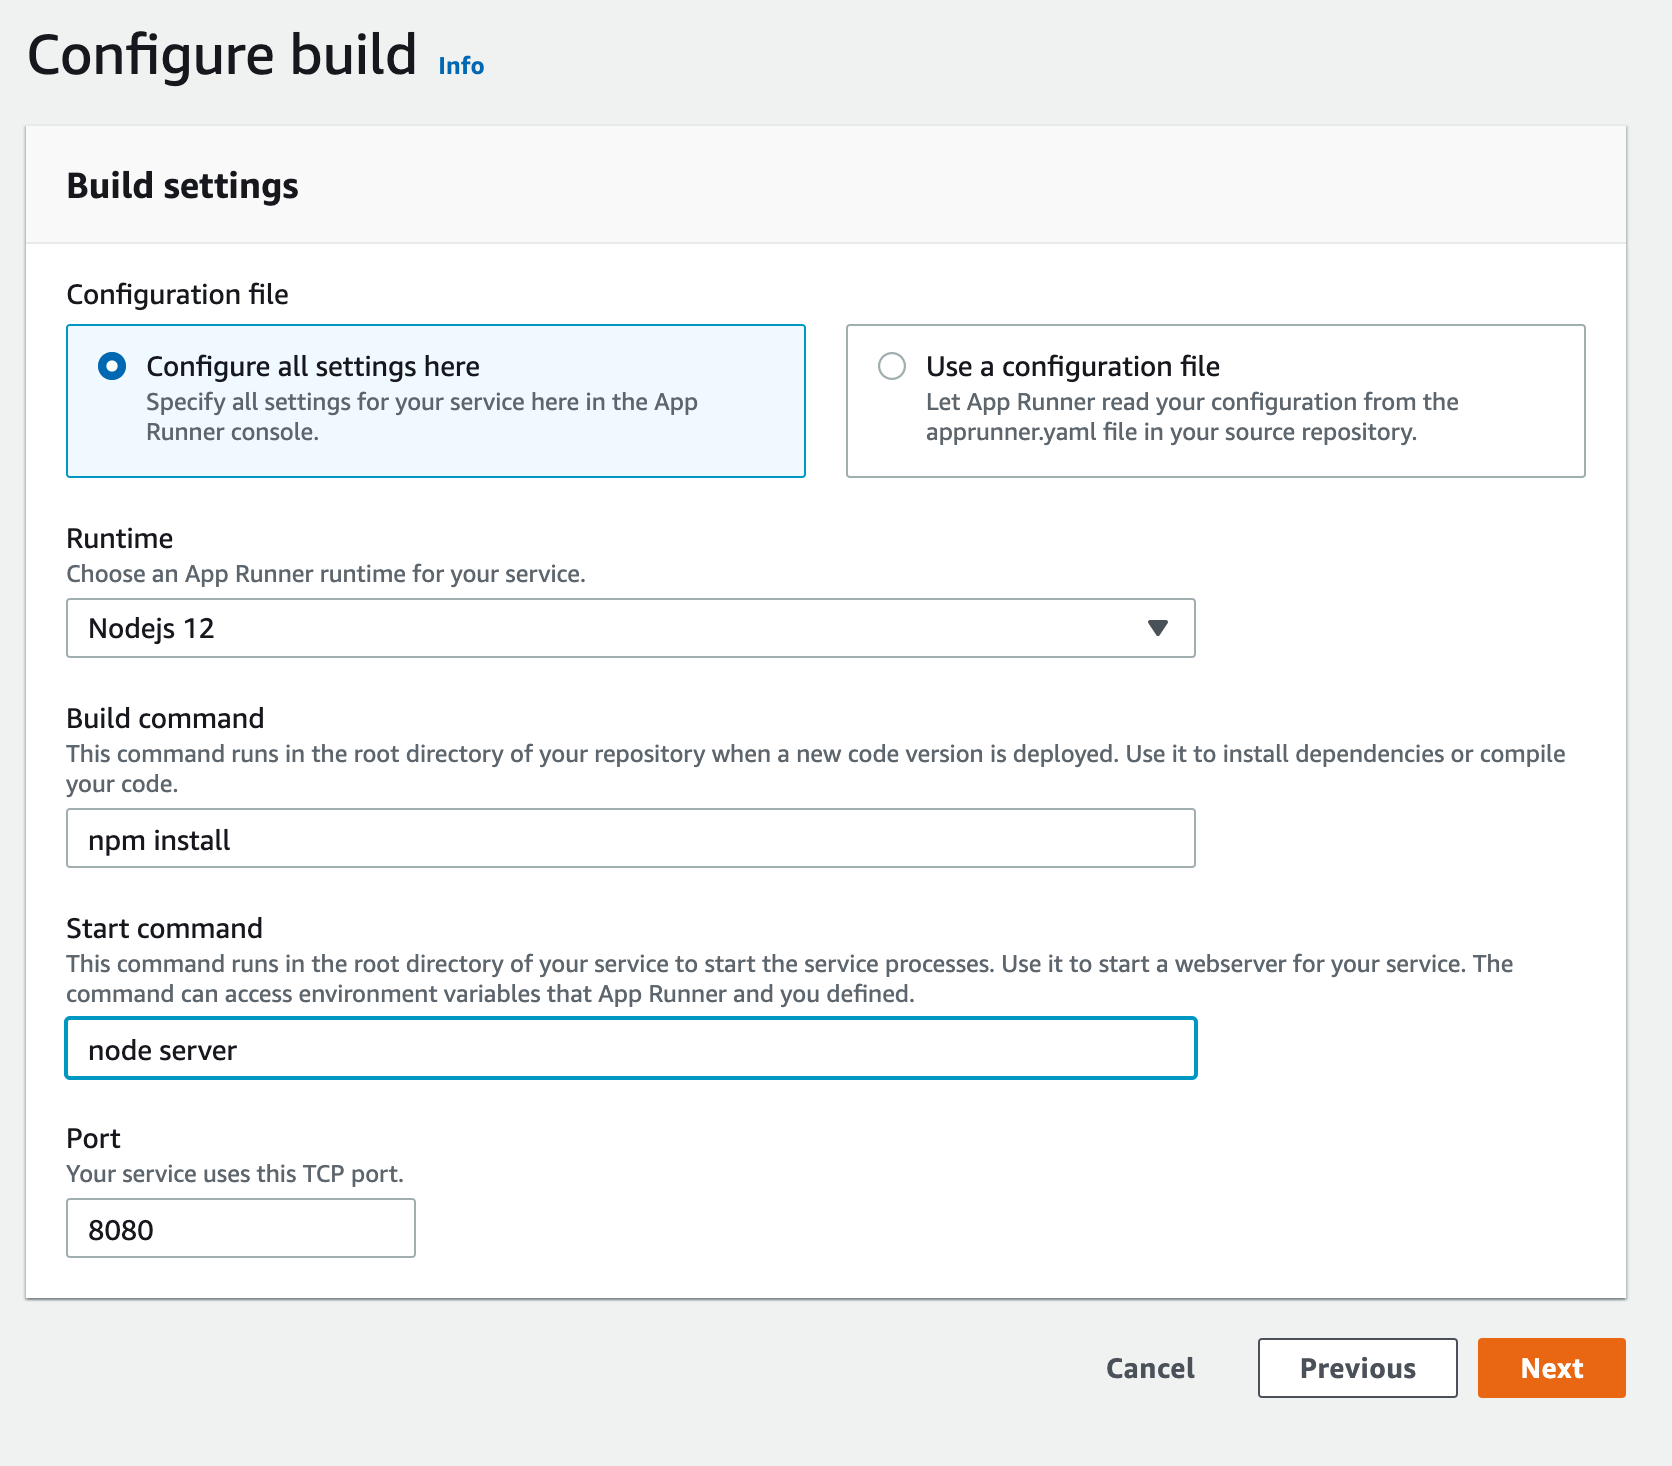
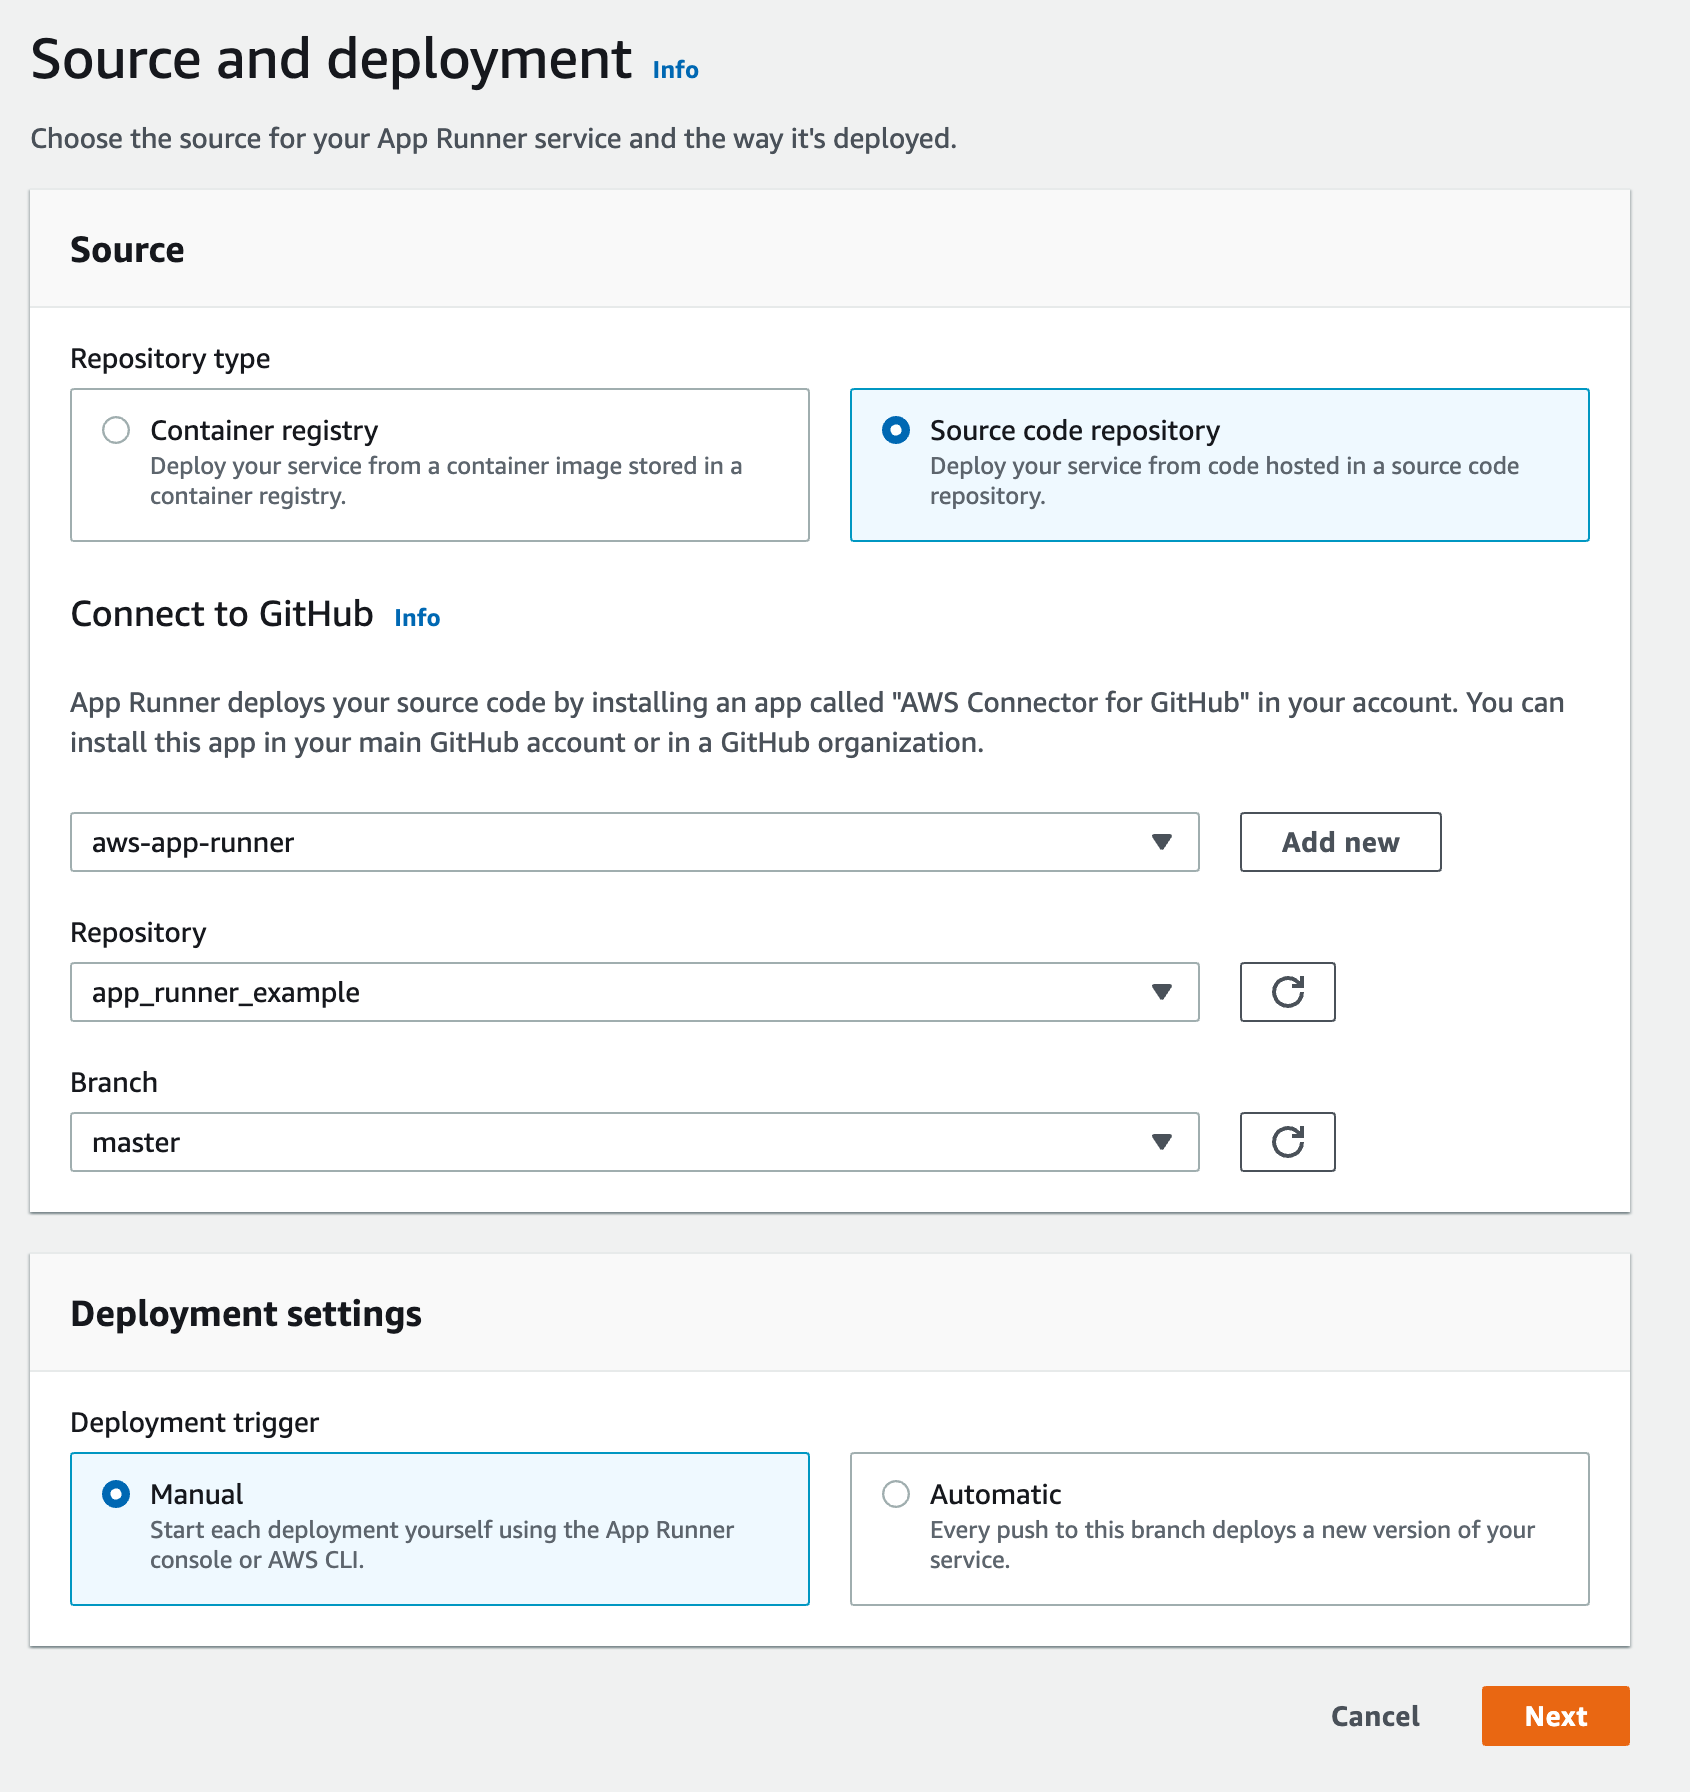 In the next page, choose `Nodejs 12` as your runtime, `npm install` as your
build command, `node server` as your start command and `8080` as your port.
In the next page, choose `Nodejs 12` as your runtime, `npm install` as your
build command, `node server` as your start command and `8080` as your port.
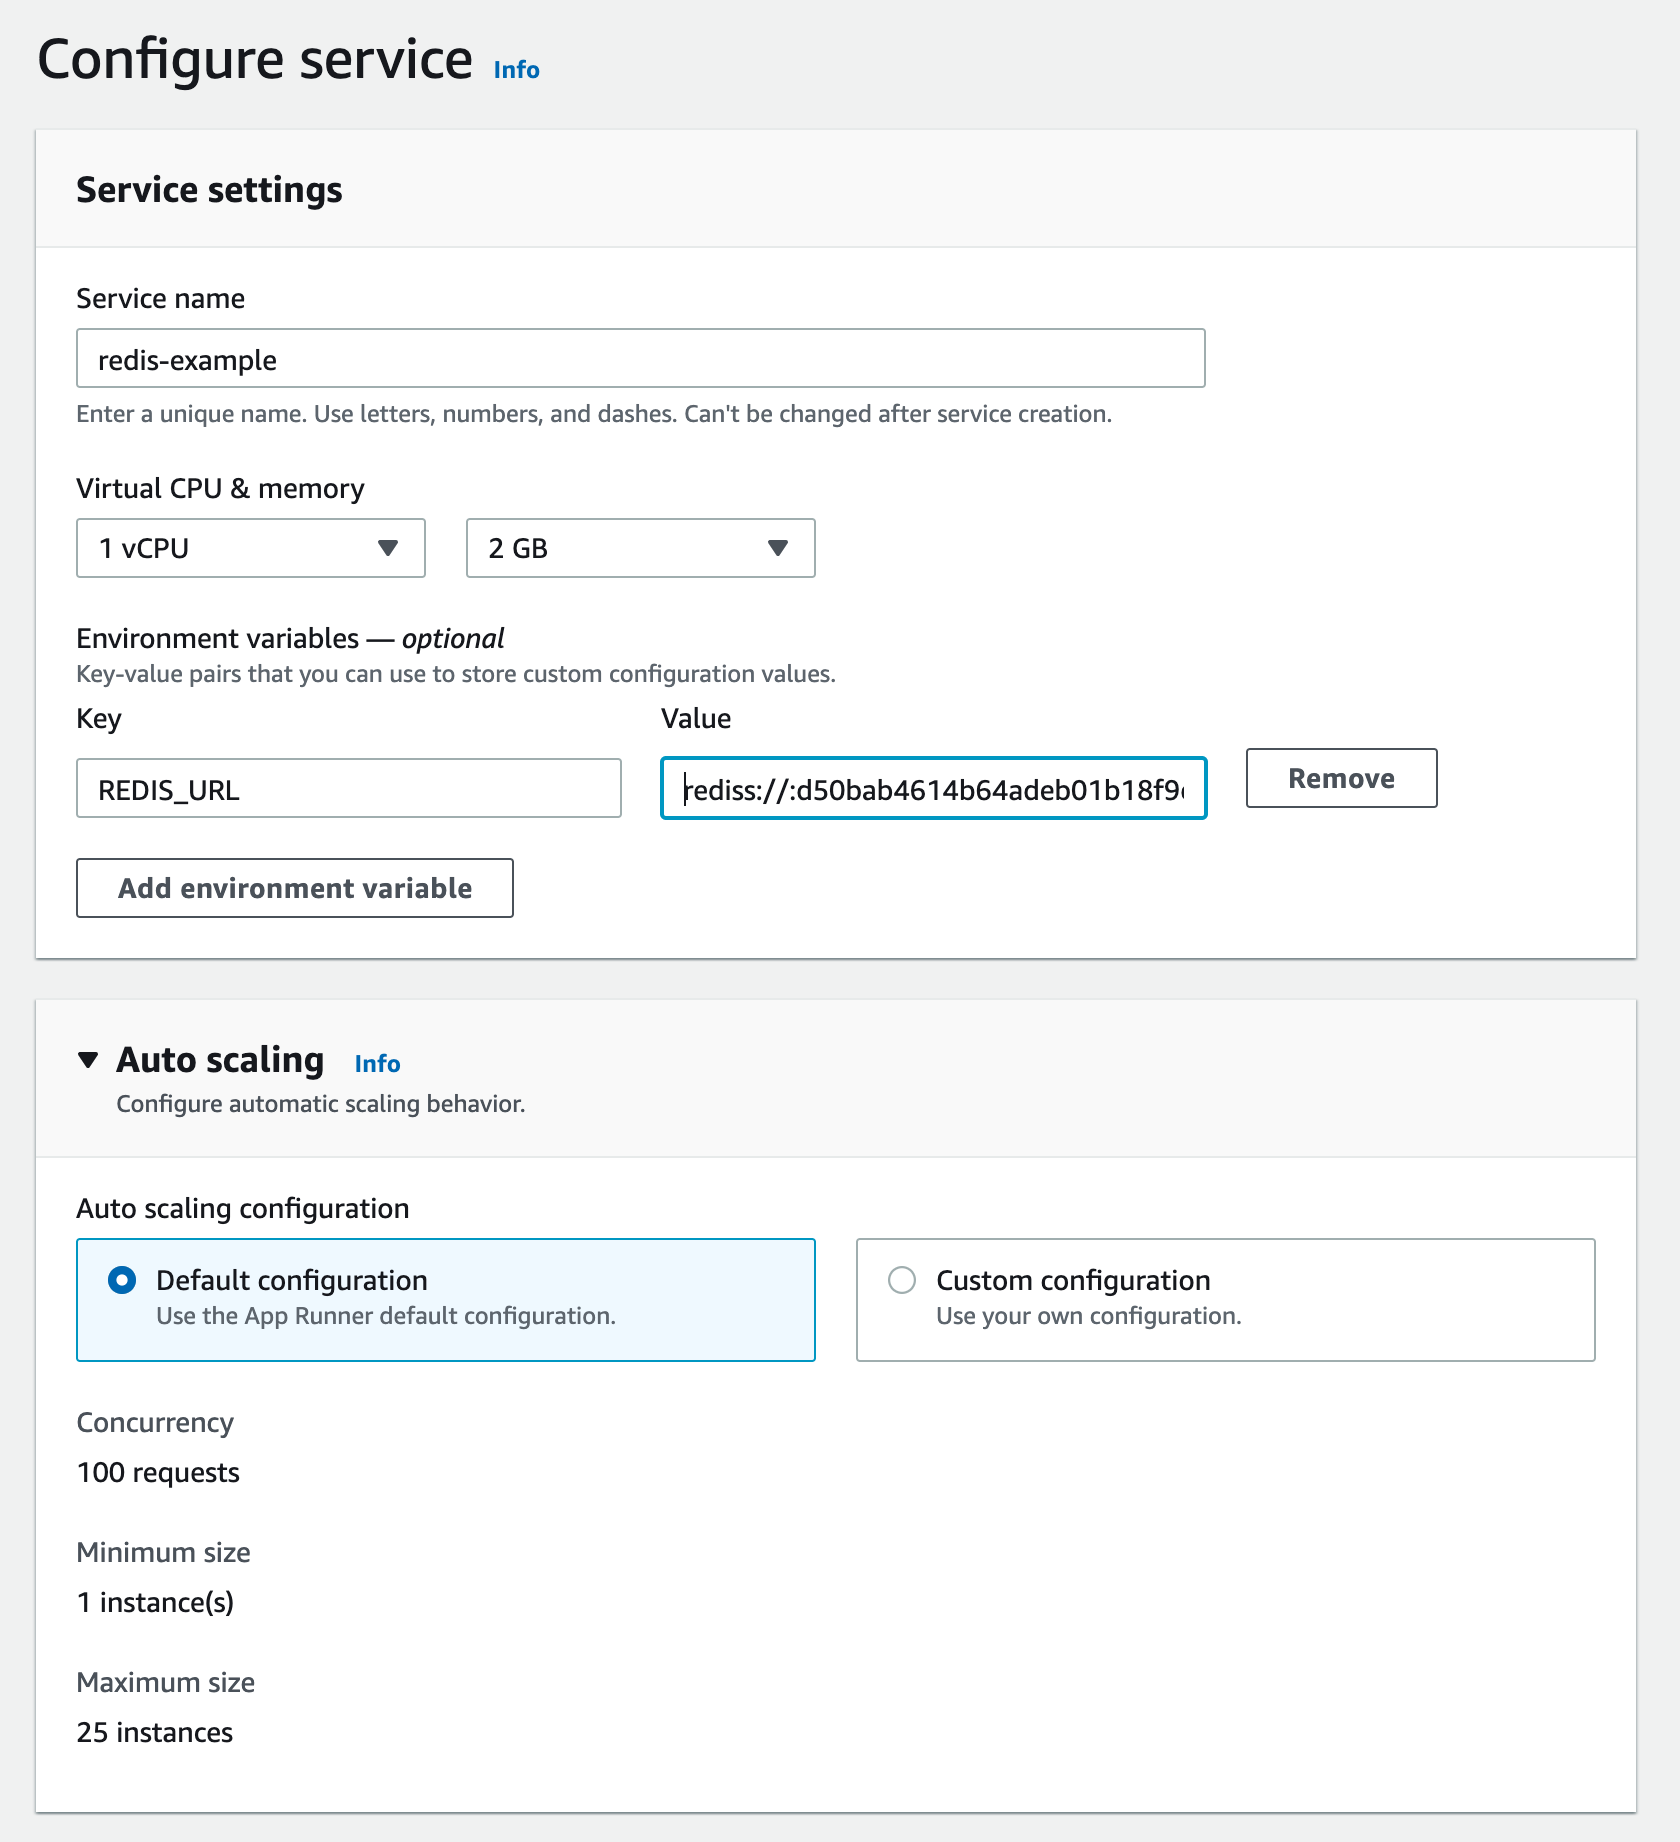
 The next page configures your App Runner service. Set a name for your service.
Set your Redis URL that you copied from Upstash console as `REDIS_URL`
environment variable. Your Redis URL should be something like this:
`rediss://:d34baef614b6fsdeb01b25@us1-lasting-panther-33618.upstash.io:33618`
You can leave other settings as default.
The next page configures your App Runner service. Set a name for your service.
Set your Redis URL that you copied from Upstash console as `REDIS_URL`
environment variable. Your Redis URL should be something like this:
`rediss://:d34baef614b6fsdeb01b25@us1-lasting-panther-33618.upstash.io:33618`
You can leave other settings as default.
 Click on `Create and Deploy` at the next page. Your service will be ready in a
few minutes. Click on the default domain, you should see the page with a view
counter as [here](https://xmzuanrpf3.us-east-1.awsapprunner.com/).
### App Runner vs AWS Lambda
* AWS Lambda runs functions, App Runner runs applications. So with App Runner
you do not need to split your application to functions.
* App Runner is a more portable solution. You can move your application from App
Runner to any other container service.
* AWS Lambda price scales to zero, App Runner's does not. With App Runner you
need to pay for an at least one instance unless you pause the system.
App Runner is great alternative when you need more control on your serverless
runtime and application. Check out
[this video](https://www.youtube.com/watch?v=x_1X_4j16A4) to learn more about
App Runner.
---
# Source: https://upstash.com/docs/common/account/awsmarketplace.md
> ## Documentation Index
> Fetch the complete documentation index at: https://upstash.com/docs/llms.txt
> Use this file to discover all available pages before exploring further.
# AWS Marketplace
Click on `Create and Deploy` at the next page. Your service will be ready in a
few minutes. Click on the default domain, you should see the page with a view
counter as [here](https://xmzuanrpf3.us-east-1.awsapprunner.com/).
### App Runner vs AWS Lambda
* AWS Lambda runs functions, App Runner runs applications. So with App Runner
you do not need to split your application to functions.
* App Runner is a more portable solution. You can move your application from App
Runner to any other container service.
* AWS Lambda price scales to zero, App Runner's does not. With App Runner you
need to pay for an at least one instance unless you pause the system.
App Runner is great alternative when you need more control on your serverless
runtime and application. Check out
[this video](https://www.youtube.com/watch?v=x_1X_4j16A4) to learn more about
App Runner.
---
# Source: https://upstash.com/docs/common/account/awsmarketplace.md
> ## Documentation Index
> Fetch the complete documentation index at: https://upstash.com/docs/llms.txt
> Use this file to discover all available pages before exploring further.
# AWS Marketplace
 Once you click subscribe, you will be prompted to select which personal or team account you wish to link with your AWS Subscription.
 Once your account is linked, regardless of which Upstash product you use, all of your usage will be billed to your AWS Account. You can also upgrade or downgrade your subscription through Upstash console.
 ---
# Source: https://upstash.com/docs/redis/quickstarts/azure-functions.md
> ## Documentation Index
> Fetch the complete documentation index at: https://upstash.com/docs/llms.txt
> Use this file to discover all available pages before exploring further.
# Azure Functions
---
# Source: https://upstash.com/docs/redis/quickstarts/azure-functions.md
> ## Documentation Index
> Fetch the complete documentation index at: https://upstash.com/docs/llms.txt
> Use this file to discover all available pages before exploring further.
# Azure Functions
 To view a more detailed Next.js quick start guide for setting up QStash, refer to the [quick start](/qstash/quickstarts/vercel-nextjs) guide.
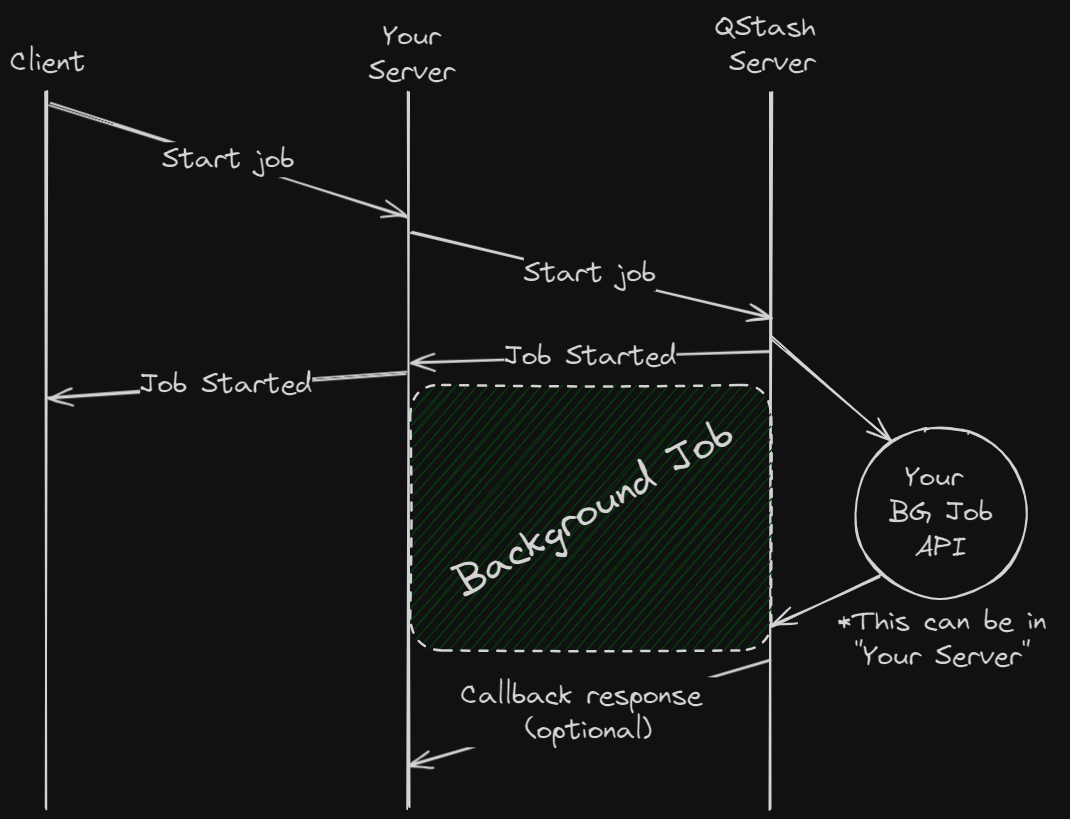
It's also possible to schedule a background job to run at a later time using [schedules](/qstash/features/schedules).
If you'd like to invoke another endpoint when the background job is complete, you can use [callbacks](/qstash/features/callbacks).
---
# Source: https://upstash.com/docs/redis/features/backup.md
> ## Documentation Index
> Fetch the complete documentation index at: https://upstash.com/docs/llms.txt
> Use this file to discover all available pages before exploring further.
# Backup/Restore
You can create backups of your Redis database and restore them when needed. Backups allow you to preserve your data and recover it to any database in your account or team.
## Creating a Backup
To view a more detailed Next.js quick start guide for setting up QStash, refer to the [quick start](/qstash/quickstarts/vercel-nextjs) guide.
It's also possible to schedule a background job to run at a later time using [schedules](/qstash/features/schedules).
If you'd like to invoke another endpoint when the background job is complete, you can use [callbacks](/qstash/features/callbacks).
---
# Source: https://upstash.com/docs/redis/features/backup.md
> ## Documentation Index
> Fetch the complete documentation index at: https://upstash.com/docs/llms.txt
> Use this file to discover all available pages before exploring further.
# Backup/Restore
You can create backups of your Redis database and restore them when needed. Backups allow you to preserve your data and recover it to any database in your account or team.
## Creating a Backup
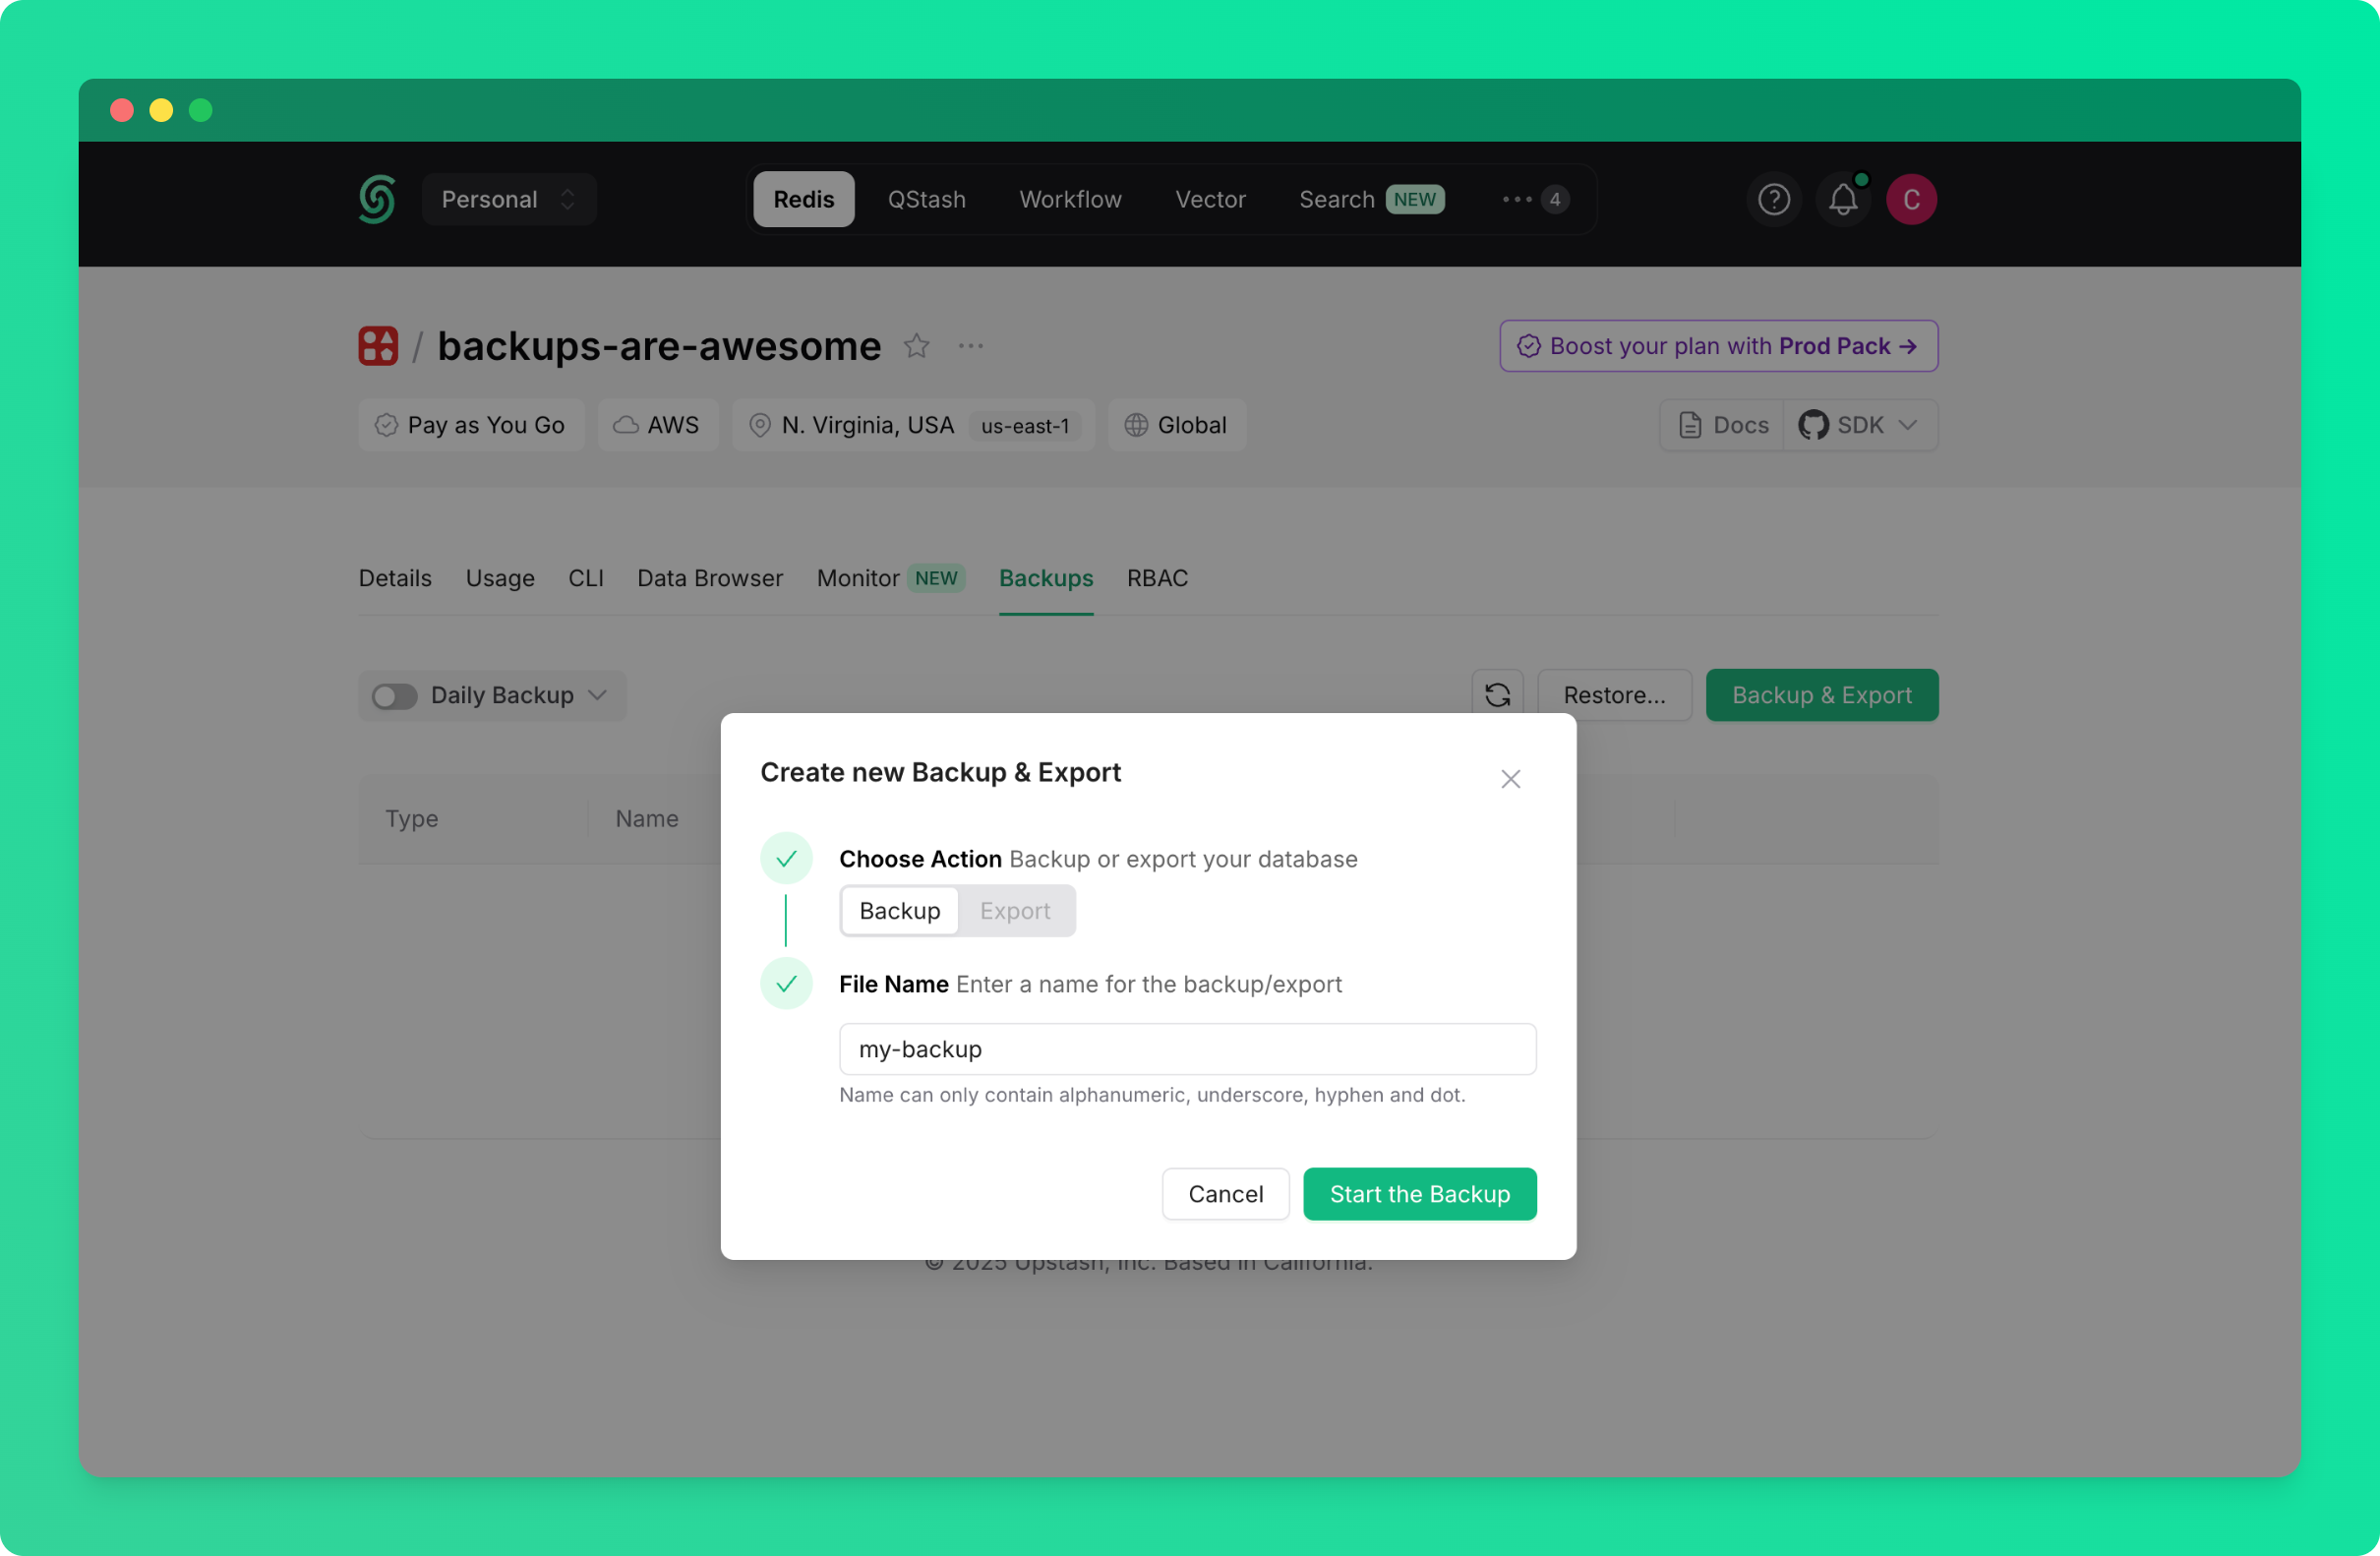 Backup process will start and will appear in the backups table below.
### Schedule Periodic Backups
To automatically create backups on a regular schedule:
* Go to the database details page and navigate to the `Backups` tab
* Click the switch next to `Daily Backup` to enable daily backup or click on `Daily Backup` text itself to select how long the backup is to be stored (1 or 3 days)
Backup process will start and will appear in the backups table below.
### Schedule Periodic Backups
To automatically create backups on a regular schedule:
* Go to the database details page and navigate to the `Backups` tab
* Click the switch next to `Daily Backup` to enable daily backup or click on `Daily Backup` text itself to select how long the backup is to be stored (1 or 3 days)
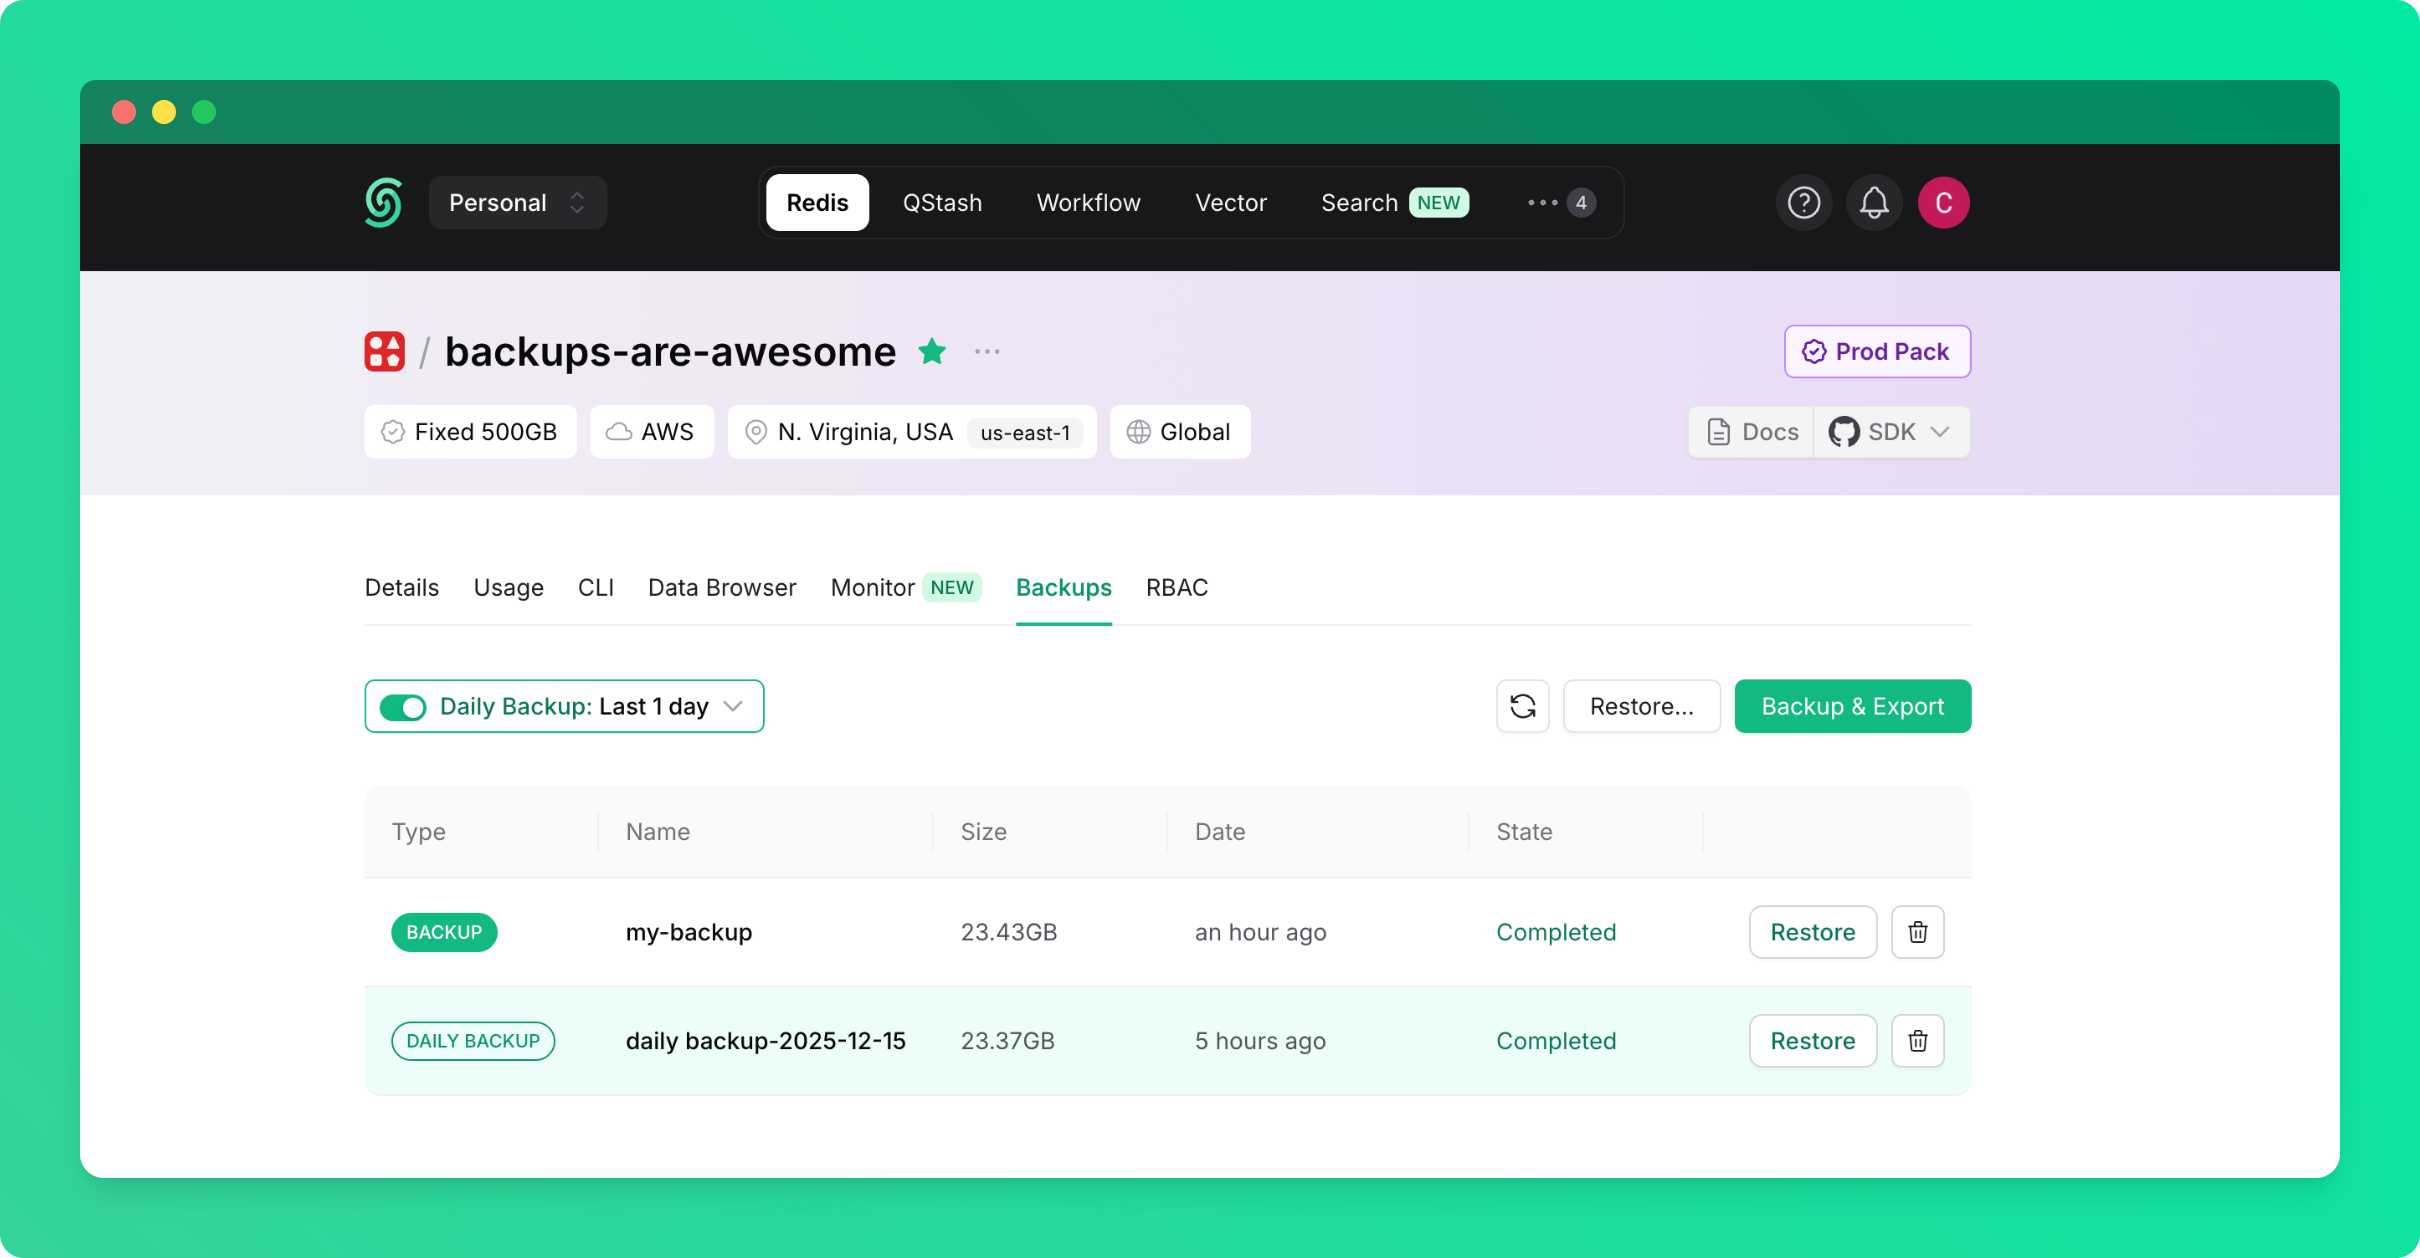 With daily backups enabled, your database will be automatically backed up every day.
### Managing Backups
All created backups are displayed in the backups table in the `Backups` tab. From this table, you can:
* View backup details (name, creation date, size)
* Restore your database from any backup
* Delete backups you no longer need
## Restoring from Backup
With daily backups enabled, your database will be automatically backed up every day.
### Managing Backups
All created backups are displayed in the backups table in the `Backups` tab. From this table, you can:
* View backup details (name, creation date, size)
* Restore your database from any backup
* Delete backups you no longer need
## Restoring from Backup
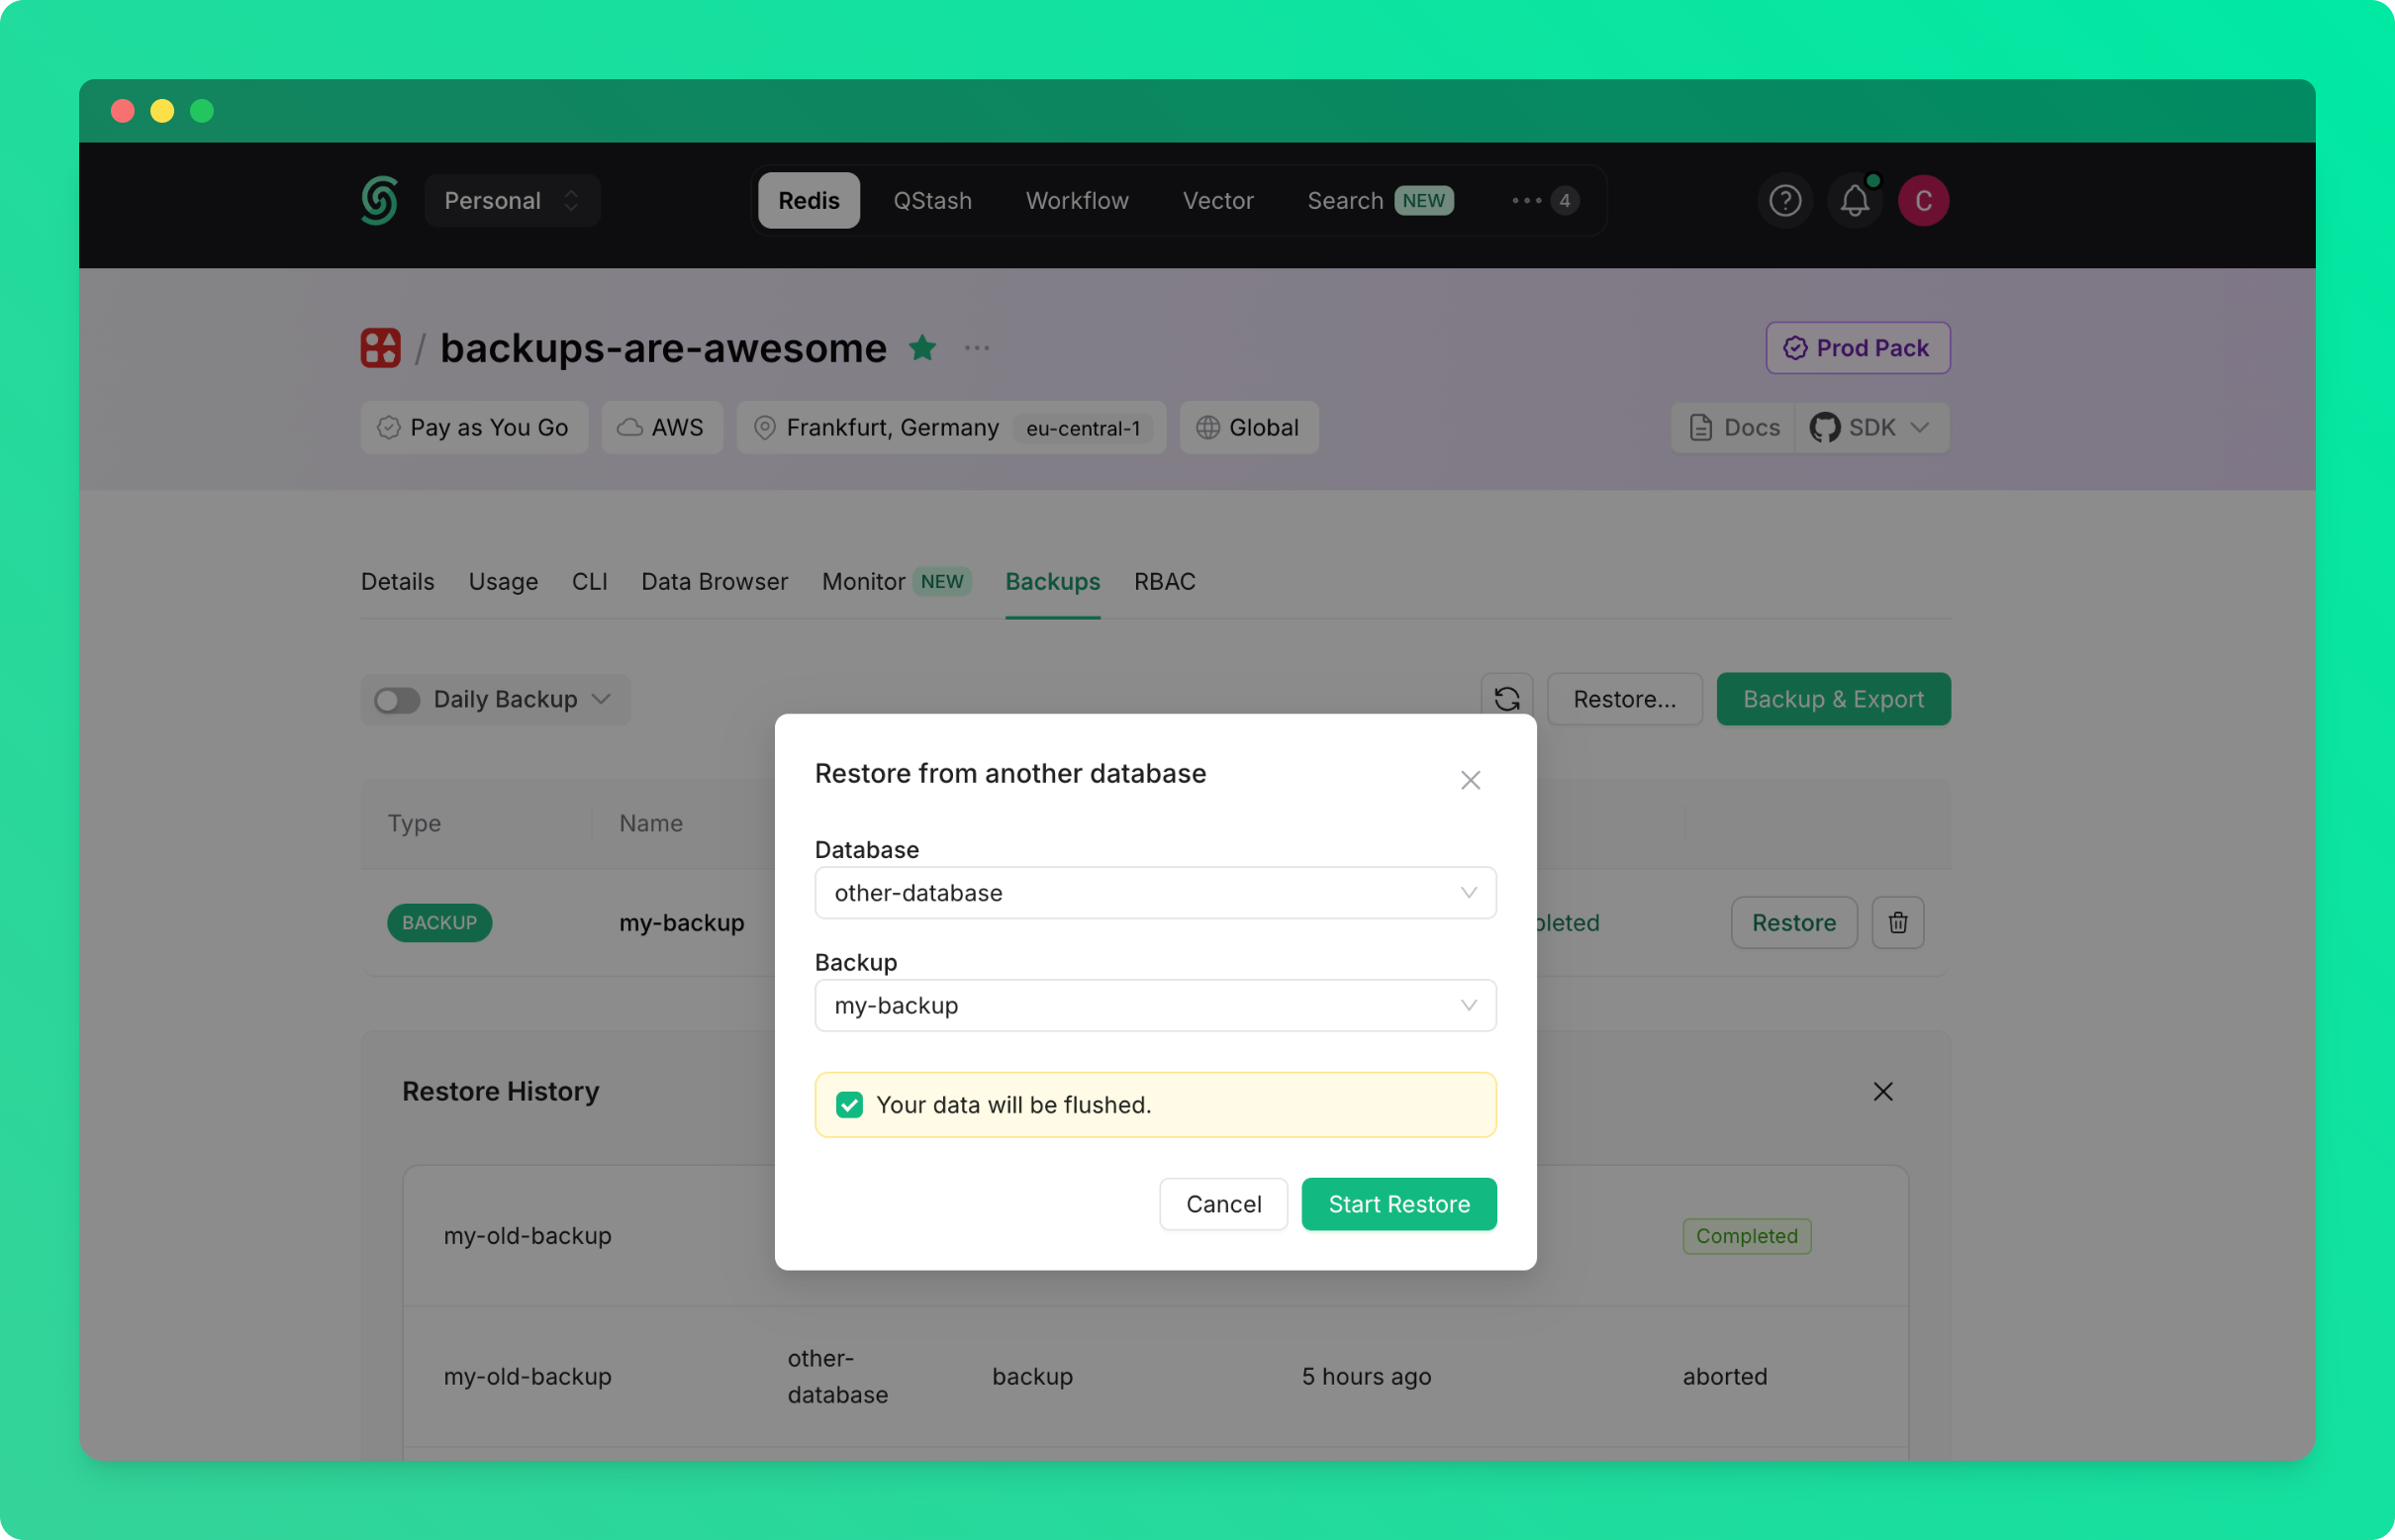
 ### Restore from Any Database Backup
To restore from a backup created from any database in your account or team:
* Go to the database details page and navigate to the `Backups` tab
* Click on the `Restore...` button
* Select the source database (the database from which the backup was created)
* Select the backup you want to restore
* Click on `Start Restore`
### Restore from Any Database Backup
To restore from a backup created from any database in your account or team:
* Go to the database details page and navigate to the `Backups` tab
* Click on the `Restore...` button
* Select the source database (the database from which the backup was created)
* Select the backup you want to restore
* Click on `Start Restore`
 ### Restore from the Redis List Page
You can also restore databases directly from the Redis list page. This method is explained in detail in the [Import/Export documentation](/redis/howto/importexport).
---
# Source: https://upstash.com/docs/workflow/howto/realtime/basic.md
> ## Documentation Index
> Fetch the complete documentation index at: https://upstash.com/docs/llms.txt
> Use this file to discover all available pages before exploring further.
# Realtime Quickstart
[**Upstash Realtime**](/realtime/overall/quickstart) lets you emit events from your workflow and subscribe to them in real-time on your frontend.
## How It Works
Upstash Realtime is powered by Upstash Redis and provides a clean, 100% type-safe API for publishing and subscribing to events:
* Your frontend can subscribe to events
* When you **emit** an event, it's instantly delivered to live subscribers on the frontend
* You can also replay events that happened in the past
This guide shows you how to integrate Upstash Workflow with Upstash Realtime to display real-time progress updates in your frontend.
## Setup
### 1. Install Packages
```bash theme={"system"}
npm install @upstash/workflow @upstash/realtime @upstash/redis zod
```
### 2. Configure Upstash Realtime
Create a Realtime instance in `lib/realtime.ts`:
```typescript theme={"system"}
import { InferRealtimeEvents, Realtime } from "@upstash/realtime"
import { Redis } from "@upstash/redis"
import z from "zod/v4"
const redis = Redis.fromEnv()
const schema = {
workflow: {
runFinish: z.object({}),
stepFinish: z.object({
stepName: z.string(),
result: z.unknown().optional(),
}),
},
}
export const realtime = new Realtime({ schema, redis })
export type RealtimeEvents = InferRealtimeEvents
### Restore from the Redis List Page
You can also restore databases directly from the Redis list page. This method is explained in detail in the [Import/Export documentation](/redis/howto/importexport).
---
# Source: https://upstash.com/docs/workflow/howto/realtime/basic.md
> ## Documentation Index
> Fetch the complete documentation index at: https://upstash.com/docs/llms.txt
> Use this file to discover all available pages before exploring further.
# Realtime Quickstart
[**Upstash Realtime**](/realtime/overall/quickstart) lets you emit events from your workflow and subscribe to them in real-time on your frontend.
## How It Works
Upstash Realtime is powered by Upstash Redis and provides a clean, 100% type-safe API for publishing and subscribing to events:
* Your frontend can subscribe to events
* When you **emit** an event, it's instantly delivered to live subscribers on the frontend
* You can also replay events that happened in the past
This guide shows you how to integrate Upstash Workflow with Upstash Realtime to display real-time progress updates in your frontend.
## Setup
### 1. Install Packages
```bash theme={"system"}
npm install @upstash/workflow @upstash/realtime @upstash/redis zod
```
### 2. Configure Upstash Realtime
Create a Realtime instance in `lib/realtime.ts`:
```typescript theme={"system"}
import { InferRealtimeEvents, Realtime } from "@upstash/realtime"
import { Redis } from "@upstash/redis"
import z from "zod/v4"
const redis = Redis.fromEnv()
const schema = {
workflow: {
runFinish: z.object({}),
stepFinish: z.object({
stepName: z.string(),
result: z.unknown().optional(),
}),
},
}
export const realtime = new Realtime({ schema, redis })
export type RealtimeEvents = InferRealtimeEvents
{isRunFinished &&
)
}
```
## How It All Works Together
1. **User triggers workflow**: The frontend calls `/api/trigger`, which returns a `workflowRunId`
2. **Frontend subscribes**: Using the `workflowRunId`, the frontend subscribes to the Realtime channel
3. **Workflow executes**: The workflow runs as a background job, emitting events at each step
4. **Real-time updates**: As the workflow emits events, they're instantly delivered to the frontend via Server-Sent Events
## Full Example
For a complete working example with all steps, error handling, and UI components, check out the [Upstash Realtime example on GitHub](https://github.com/upstash/workflow-js/tree/main/examples/upstash-realtime).
## Next Steps
* Learn about [human-in-the-loop workflows with Realtime](./human-in-the-loop)
* Explore [Realtime features](/realtime/overall/quickstart)
* Check out [Workflow configuration options](/workflow/howto/configure)
---
# Source: https://upstash.com/docs/qstash/api-refence/messages/batch-messages.md
> ## Documentation Index
> Fetch the complete documentation index at: https://upstash.com/docs/llms.txt
> Use this file to discover all available pages before exploring further.
# Batch Messages
> Send multiple messages in a single request
## OpenAPI
````yaml qstash/openapi.yaml post /v2/batch
openapi: 3.1.0
info:
title: QStash REST API
description: |
QStash is a message queue and scheduler built on top of Upstash Redis.
version: 2.0.0
contact:
name: Upstash
url: https://upstash.com
servers:
- url: https://qstash.upstash.io
security:
- bearerAuth: []
- bearerAuthQuery: []
tags:
- name: Messages
description: Publish and manage messages
- name: Queues
description: Manage message queues
- name: Schedules
description: Create and manage scheduled messages
- name: URL Groups
description: Manage URL groups and endpoints
- name: DLQ
description: Dead Letter Queue operations
- name: Logs
description: Log operations
- name: Signing Keys
description: Manage signing keys
- name: Flow Control
description: Monitor flow control keys
paths:
/v2/batch:
post:
tags:
- Messages
summary: Batch Messages
description: Send multiple messages in a single request
requestBody:
required: true
content:
application/json:
schema:
type: array
items:
type: object
required:
- destination
properties:
destination:
type: string
description: >
Destination can either be a valid URL where the message
gets sent to, or a URL Group name.
- If the destination is a URL, make sure the URL is
prefixed with a valid protocol (http:// or https://)
- If the destination is a URL Group, a new message will be
created for each endpoint in the group.
Note that destination must be publicly accessible over the
internet. If you are working with local endpoints,
consider using QStash local development server or a public
tunnel service.
body:
type: string
description: The raw request message passed to the endpoints as is
headers:
type: object
additionalProperties:
type: string
description: >-
HTTP headers of the message. You can pass all the headers
supported in the single publish API.
queue:
type: string
description: Queue name to enqueue the message to if desired.
responses:
'200':
description: Messages published successfully
content:
application/json:
schema:
type: array
items:
$ref: '#/components/schemas/PublishResponse'
'400':
description: Bad request
content:
application/json:
schema:
$ref: '#/components/schemas/Error'
components:
schemas:
PublishResponse:
type: object
properties:
messageId:
type: string
description: >-
Unique identifier for the published message or the old message ID if
deduplicated
deduplicated:
type: boolean
description: >-
Whether this message is a duplicate and was not sent to the
destination.
Error:
type: object
required:
- error
properties:
error:
type: string
description: Error message
securitySchemes:
bearerAuth:
type: http
scheme: bearer
bearerFormat: JWT
description: QStash authentication token
bearerAuthQuery:
type: apiKey
in: query
name: qstash_token
description: QStash authentication token passed as a query parameter
````
---
# Source: https://upstash.com/docs/qstash/features/batch.md
> ## Documentation Index
> Fetch the complete documentation index at: https://upstash.com/docs/llms.txt
> Use this file to discover all available pages before exploring further.
# Batching
[Publishing](/qstash/howto/publishing) is great for sending one message
at a time, but sometimes you want to send a batch of messages at once.
This can be useful to send messages to a single or multiple destinations.
QStash provides the `batch` endpoint to help
you with this.
If the format of the messages are valid, the response will be an array of
responses for each message in the batch. When batching URL Groups, the response
will be an array of responses for each destination in the URL Group. If one
message fails to be sent, that message will have an error response, but the
other messages will still be sent.
✅ Workflow Finished!
}Workflow Steps:
{steps.map((step, index) => (
{step.stepName}
{Boolean(step.result) && : {JSON.stringify(step.result)}}
))}
{
window.open(result.metadata?.url as string, "_blank")
}}>
{result.content.title}
)}
Docs
Search Upstash Documentation
Find exactly what you're looking for in our comprehensive documentation. Search through guides, APIs, tutorials, and more with lightning-fast results.
Lightning Fast
Get instant search results powered by advanced indexing
Accurate Results
Reranking ensures the most relevant content appears first
Comprehensive
Search across all documentation, guides, and API references

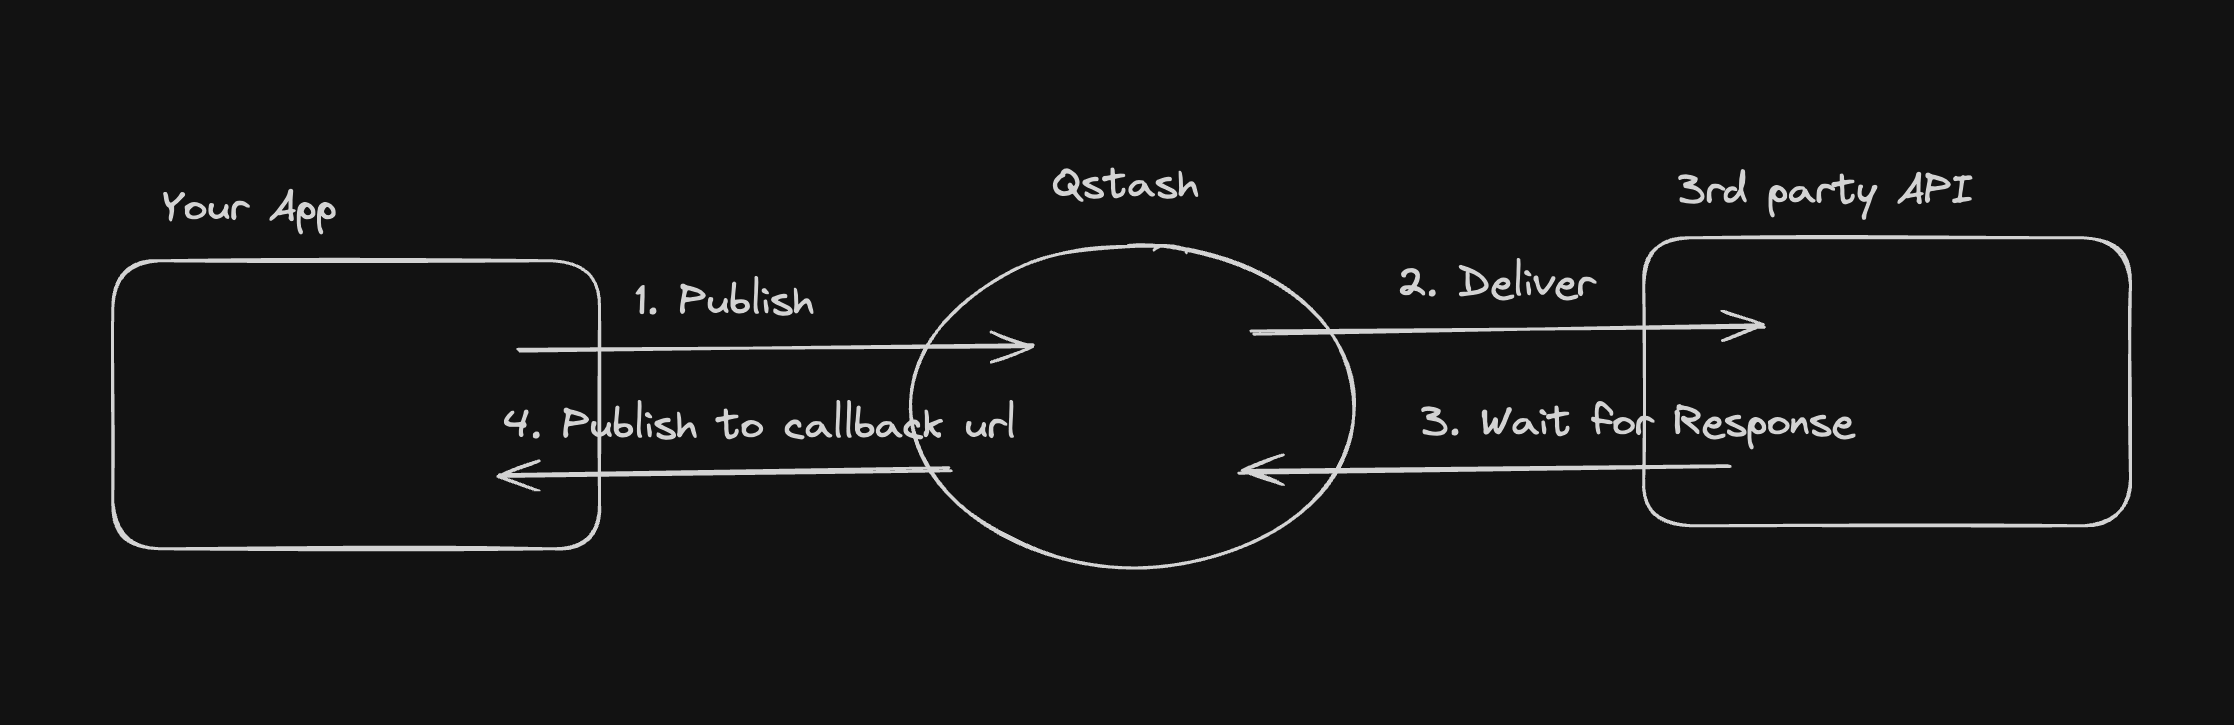 1. You publish a message to QStash using the `/v2/publish` endpoint
2. QStash will enqueue the message and deliver it to the destination
3. QStash waits for the response from the destination
4. When the response is ready, QStash calls your callback URL with the response
Callbacks publish a new message with the response to the callback URL. Messages
created by callbacks are charged as any other message.
## How do I use Callbacks?
You can add a callback url in the `Upstash-Callback` header when publishing a
message. The value must be a valid URL.
1. You publish a message to QStash using the `/v2/publish` endpoint
2. QStash will enqueue the message and deliver it to the destination
3. QStash waits for the response from the destination
4. When the response is ready, QStash calls your callback URL with the response
Callbacks publish a new message with the response to the callback URL. Messages
created by callbacks are charged as any other message.
## How do I use Callbacks?
You can add a callback url in the `Upstash-Callback` header when publishing a
message. The value must be a valid URL.
Active channels: {channels.join(", ")}
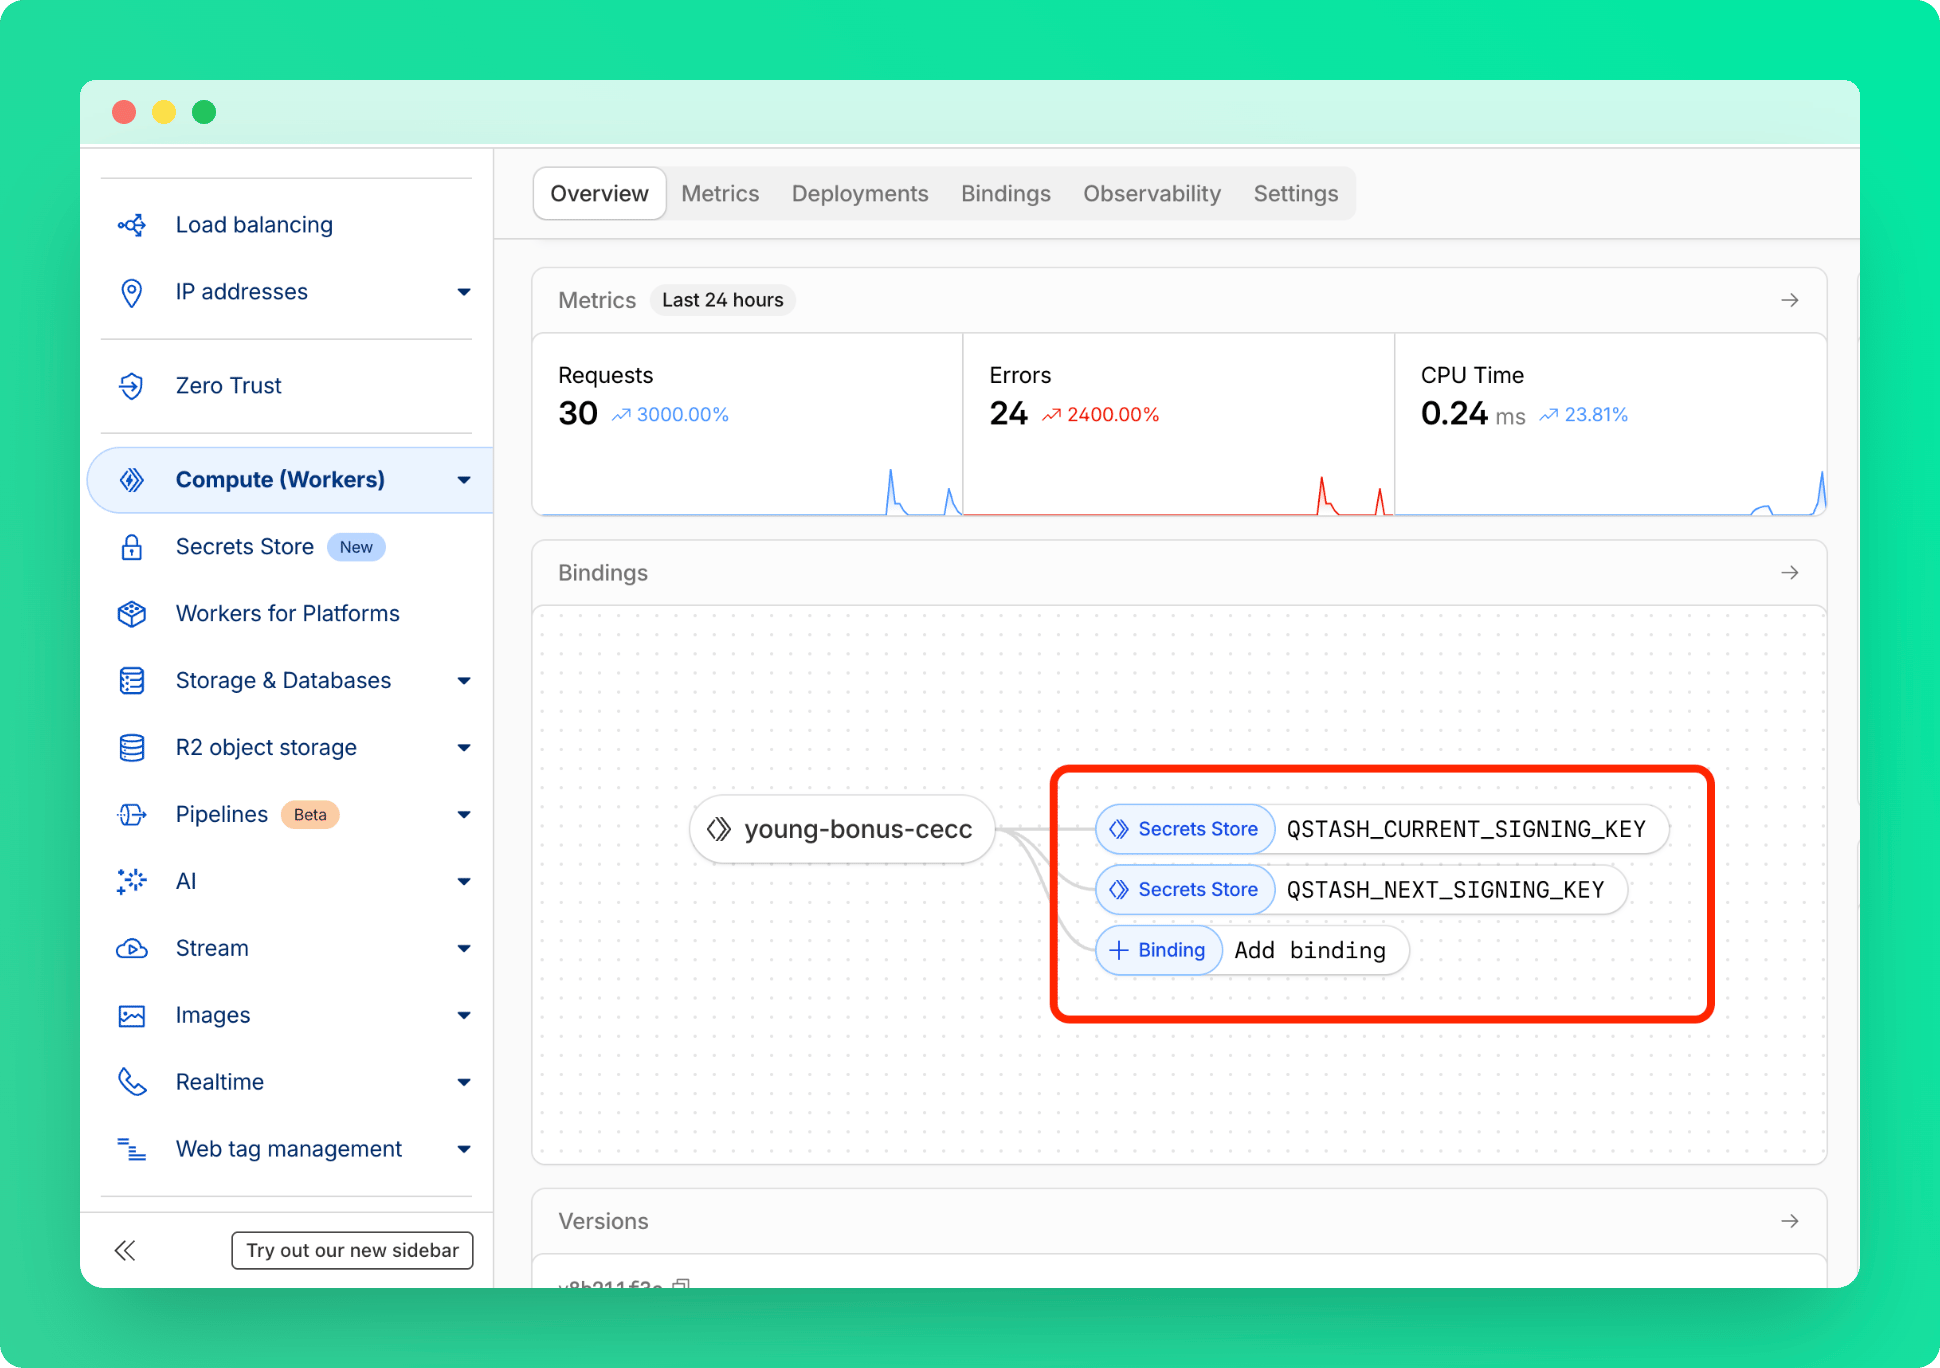
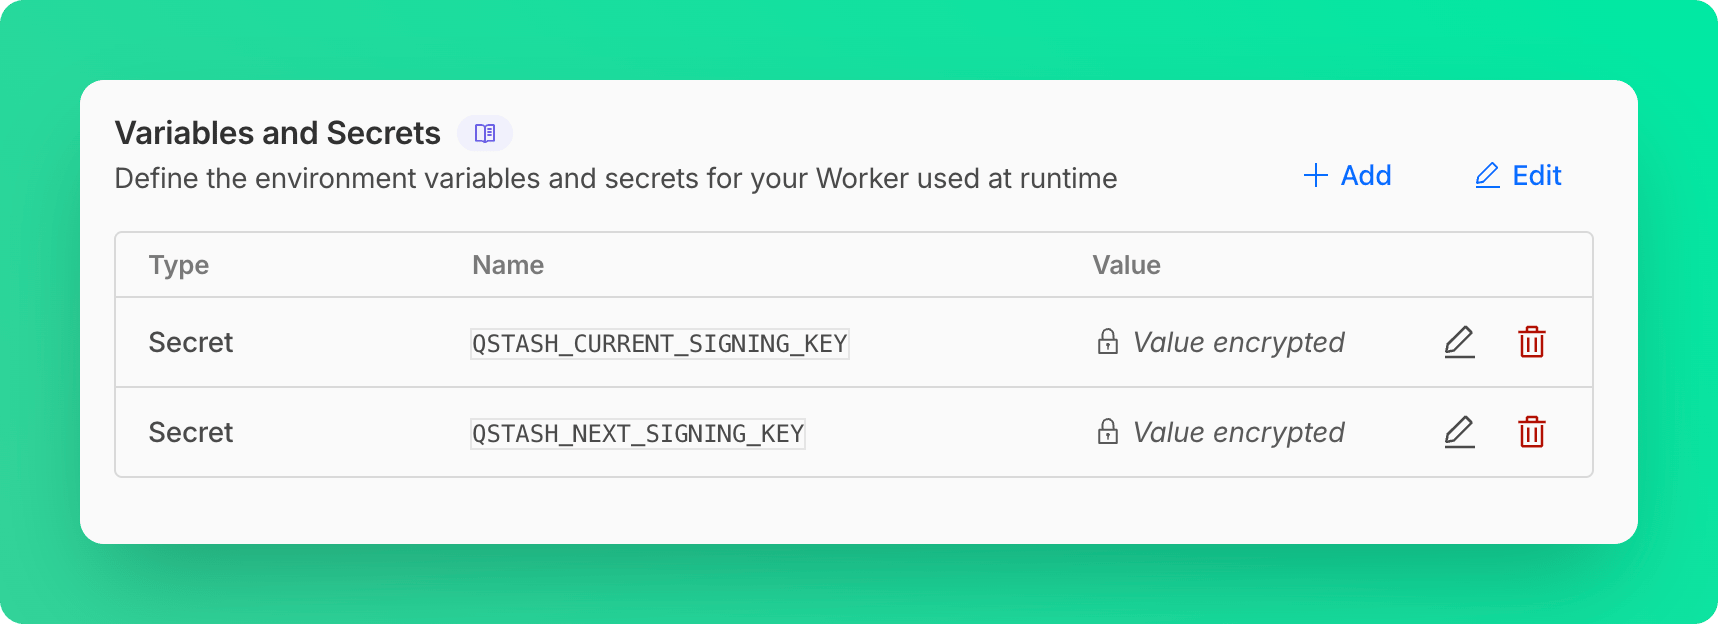 #### Using Cloudflare Secrets Store (Account Level Secrets)
This method requires a few modifications in the worker code, see [Access to Secret on Env Object](https://developers.cloudflare.com/secrets-store/integrations/workers/#3-access-the-secret-on-the-env-object)
```ts src/index.ts theme={"system"}
import { Receiver } from "@upstash/qstash";
export interface Env {
QSTASH_CURRENT_SIGNING_KEY: SecretsStoreSecret;
QSTASH_NEXT_SIGNING_KEY: SecretsStoreSecret;
}
export default {
async fetch(request, env, ctx): Promise
#### Using Cloudflare Secrets Store (Account Level Secrets)
This method requires a few modifications in the worker code, see [Access to Secret on Env Object](https://developers.cloudflare.com/secrets-store/integrations/workers/#3-access-the-secret-on-the-env-object)
```ts src/index.ts theme={"system"}
import { Receiver } from "@upstash/qstash";
export interface Env {
QSTASH_CURRENT_SIGNING_KEY: SecretsStoreSecret;
QSTASH_NEXT_SIGNING_KEY: SecretsStoreSecret;
}
export default {
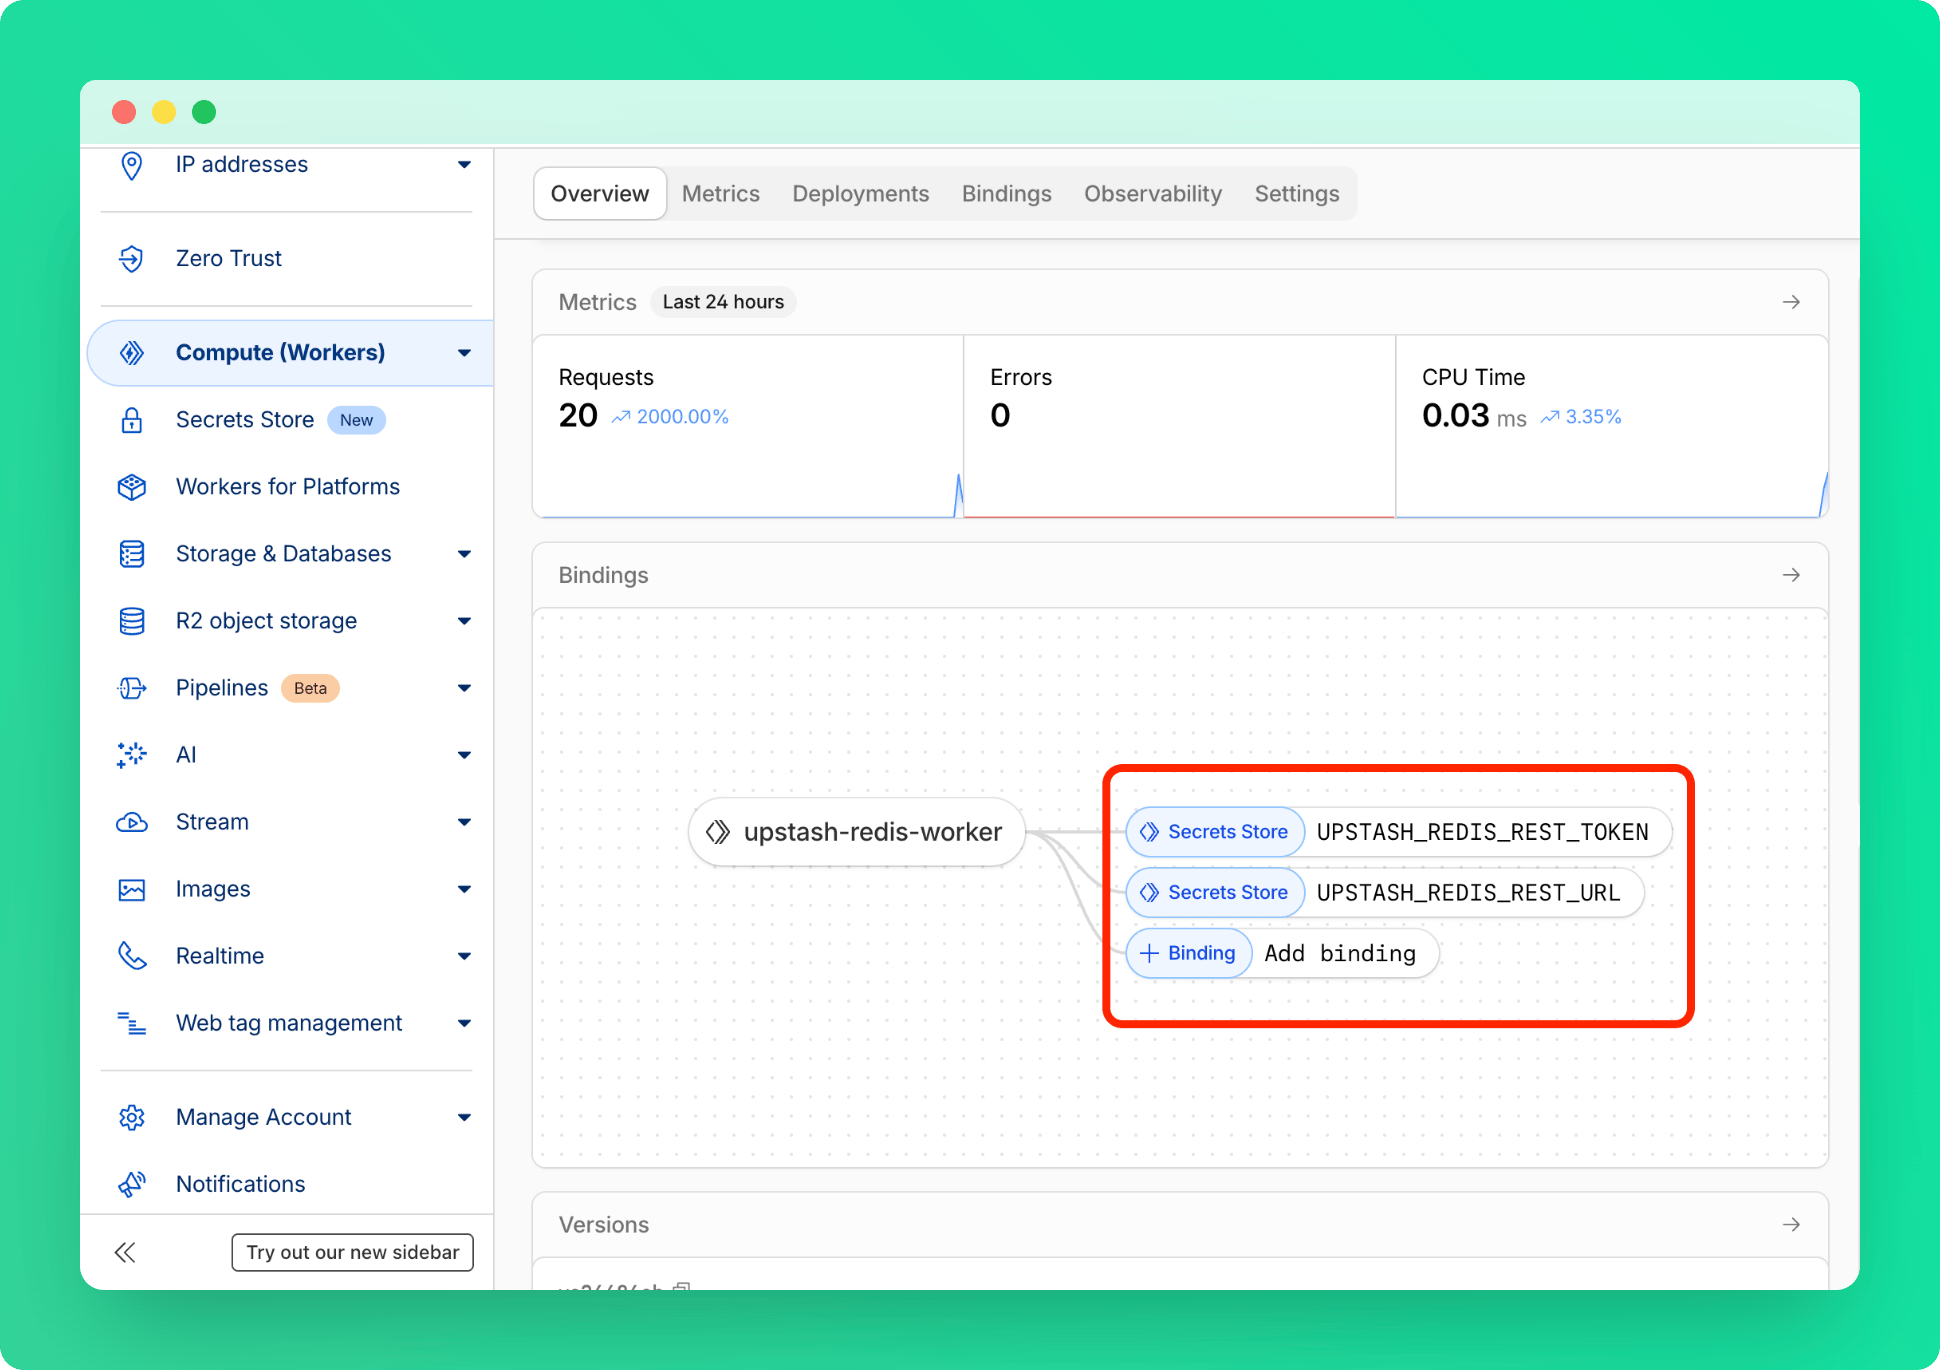
async fetch(request, env, ctx): Promise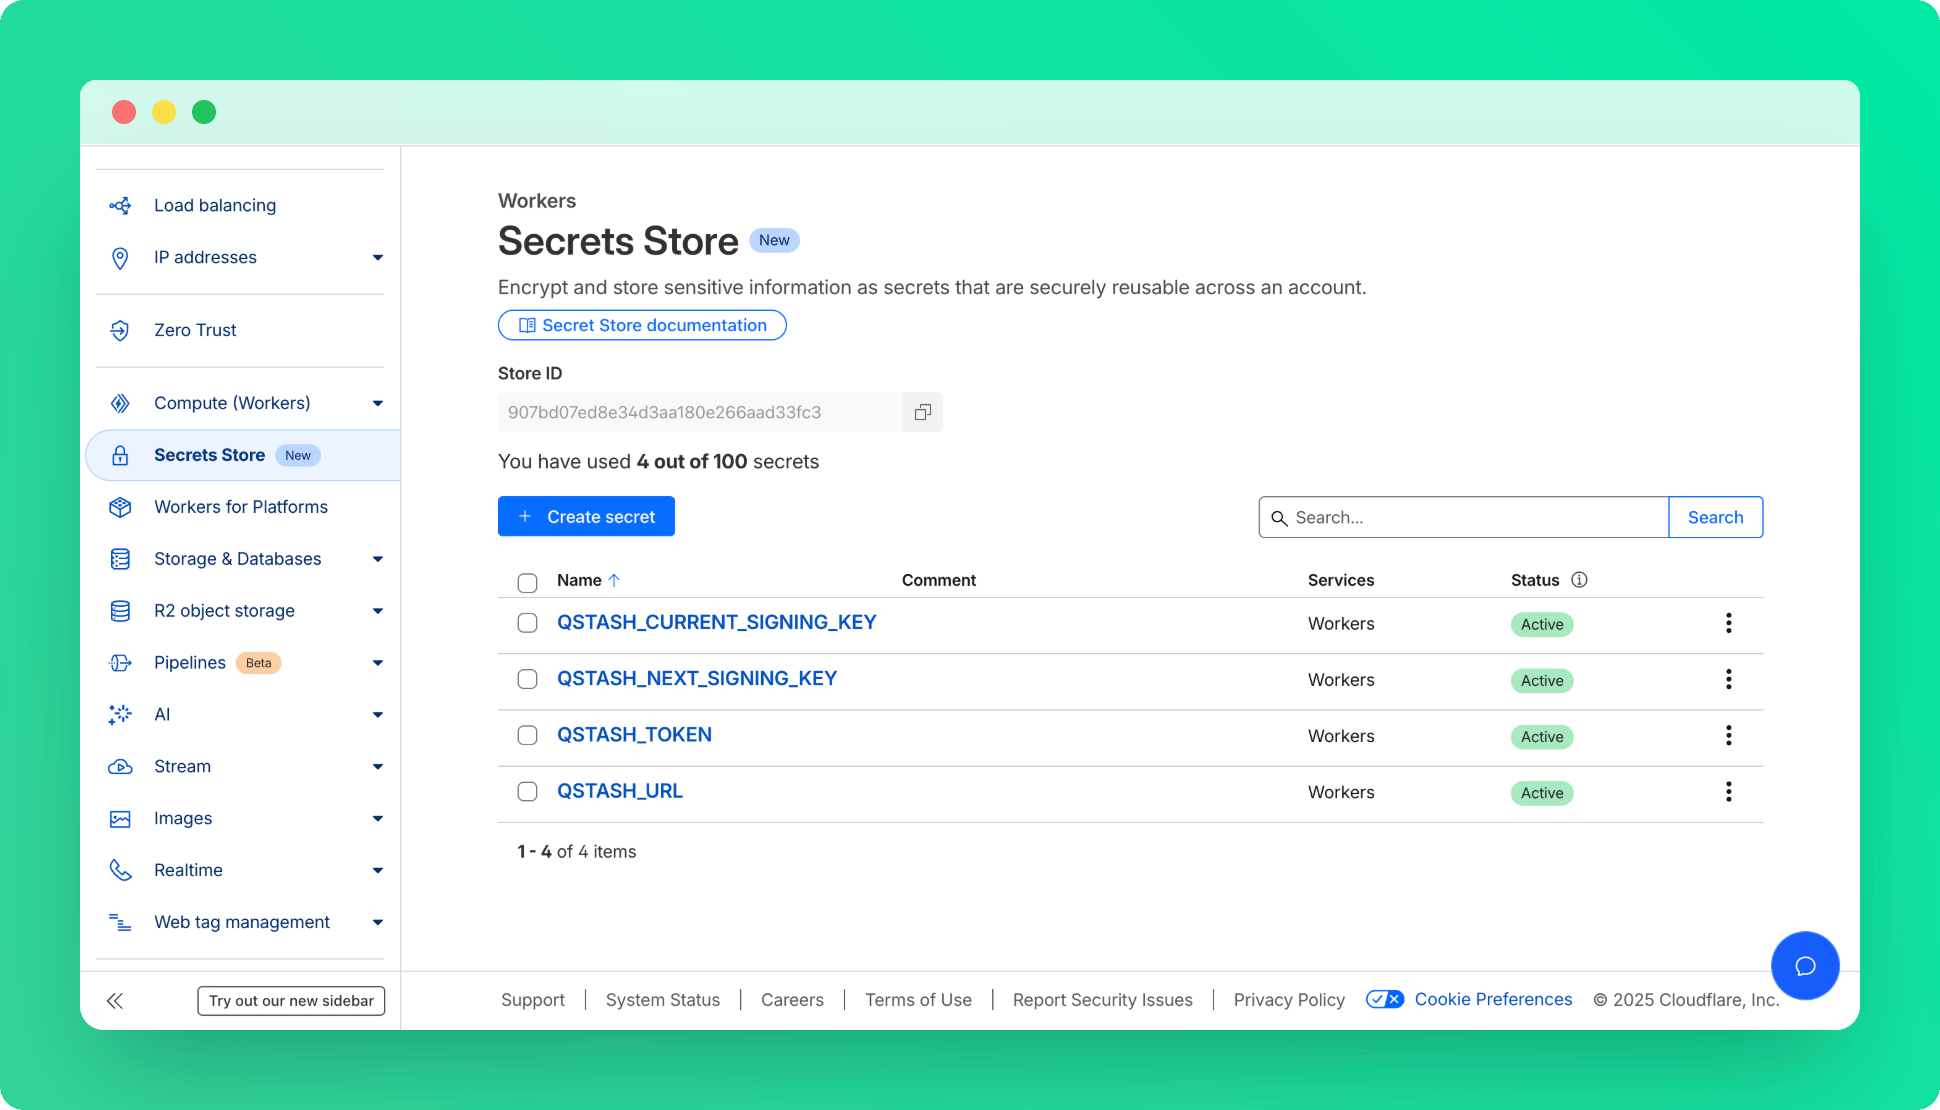 * Under **Compute (Workers)** > **Workers & Pages**, find your worker and add these secrets as bindings.
 ### Deployment
 ### Greetings Function Setup
Update `src/index.ts`:
```typescript src/index.ts theme={"system"}
import { Redis } from '@upstash/redis/cloudflare';
type RedisEnv = {
UPSTASH_REDIS_REST_URL: string;
UPSTASH_REDIS_REST_TOKEN: string;
};
export default {
async fetch(request: Request, env: RedisEnv) {
const redis = Redis.fromEnv(env);
const country = request.headers.get('cf-ipcountry');
if (country) {
const greeting = await redis.get
### Greetings Function Setup
Update `src/index.ts`:
```typescript src/index.ts theme={"system"}
import { Redis } from '@upstash/redis/cloudflare';
type RedisEnv = {
UPSTASH_REDIS_REST_URL: string;
UPSTASH_REDIS_REST_TOKEN: string;
};
export default {
async fetch(request: Request, env: RedisEnv) {
const redis = Redis.fromEnv(env);
const country = request.headers.get('cf-ipcountry');
if (country) {
const greeting = await redis.get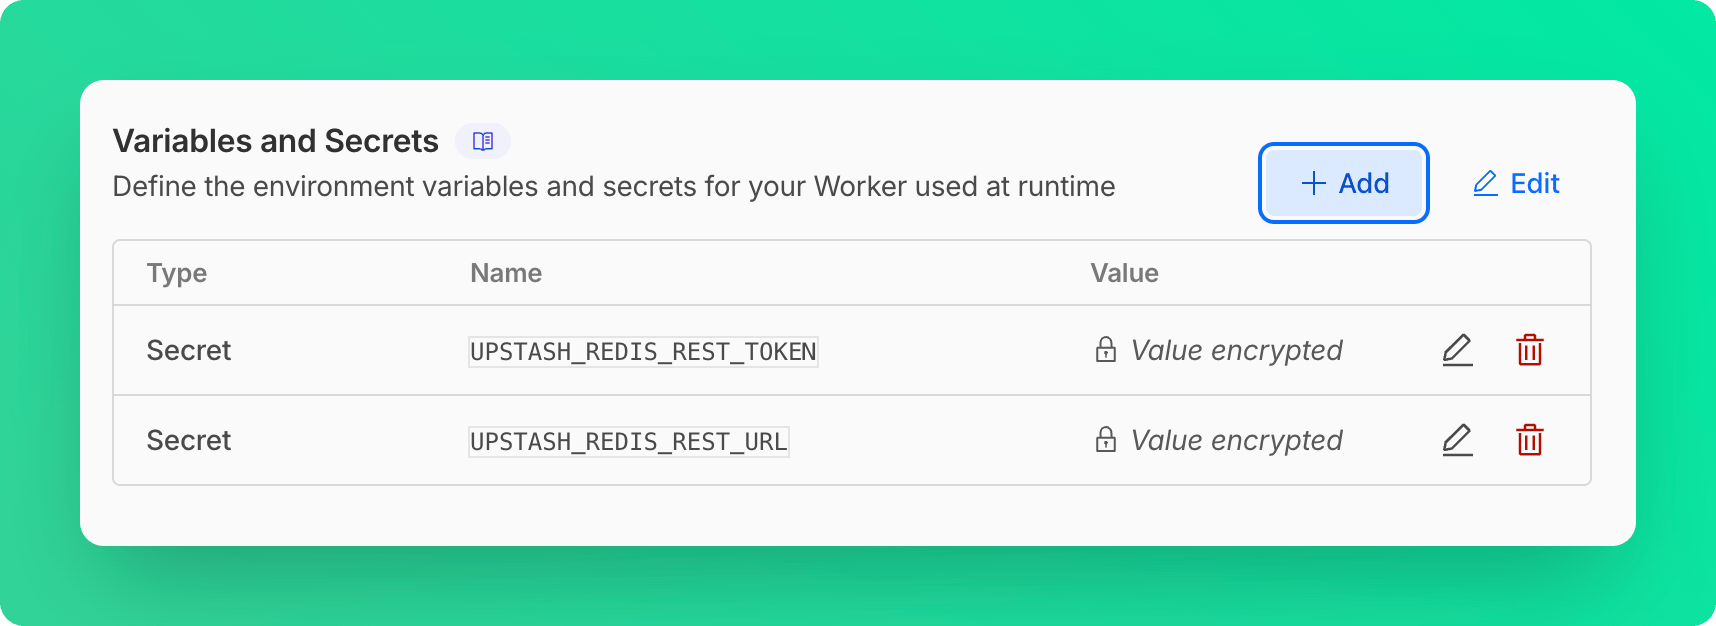 #### Using Cloudflare Secrets Store (Account Level Secrets)
This method requires a few modifications in the worker code, see [Access to Secret on Env Object](https://developers.cloudflare.com/secrets-store/integrations/workers/#3-access-the-secret-on-the-env-object)
```ts src/index.ts theme={"system"}
import { Redis } from "@upstash/redis/cloudflare";
export interface Env {
UPSTASH_REDIS_REST_URL: SecretsStoreSecret;
UPSTASH_REDIS_REST_TOKEN: SecretsStoreSecret;
}
export default {
async fetch(request, env, ctx): Promise
#### Using Cloudflare Secrets Store (Account Level Secrets)
This method requires a few modifications in the worker code, see [Access to Secret on Env Object](https://developers.cloudflare.com/secrets-store/integrations/workers/#3-access-the-secret-on-the-env-object)
```ts src/index.ts theme={"system"}
import { Redis } from "@upstash/redis/cloudflare";
export interface Env {
UPSTASH_REDIS_REST_URL: SecretsStoreSecret;
UPSTASH_REDIS_REST_TOKEN: SecretsStoreSecret;
}
export default {
async fetch(request, env, ctx): Promise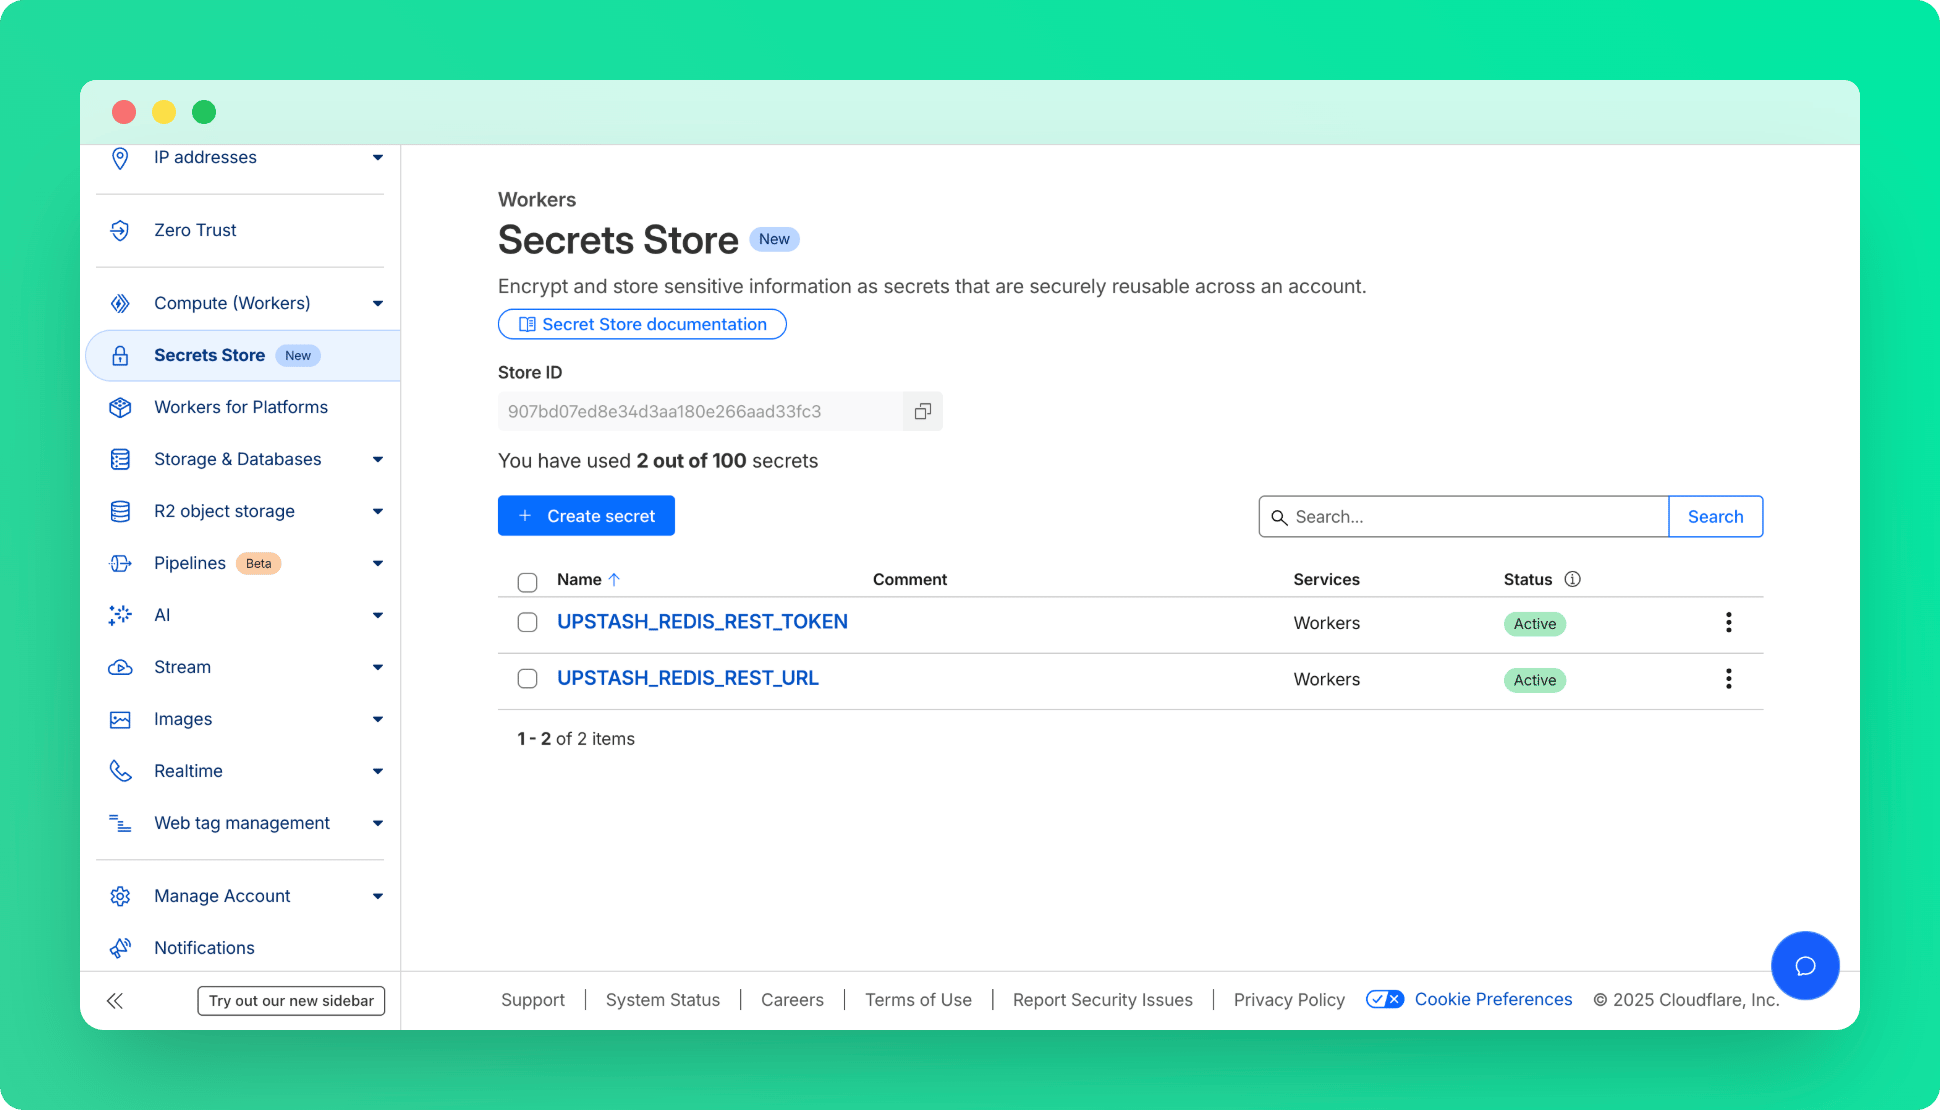 * Under **Compute (Workers)** > **Workers & Pages**, find your worker and add these secrets as bindings.
 ### Deployment
 ## Motivation
We want to give a use case where you can use the GraphQL API without any backend
code. The use case is publicly available read only data for web applications
where you need low latency. The data is updated frequently by another backend
application, you want your users to see the last updated data. Examples:
Leaderboards, news list, blog list, product list, top N items in the homepages.
### `1` Project Setup:
Create a Next application: `npx create-next-app`.
Install Apollo GraphQL client: `npm i @apollo/client`
### `2` Database Setup
If you do not have one, create a database following this
[guide](../overall/getstarted). Connect your database via Redis CLI and run:
```shell theme={"system"}
rpush coins '{ "name" : "Bitcoin", "price": 56819, "image": "https://s2.coinmarketcap.com/static/img/coins/64x64/1.png"}' '{ "name" : "Ethereum", "price": 2130, "image": "https://s2.coinmarketcap.com/static/img/coins/64x64/1027.png"}' '{ "name" : "Cardano", "price": 1.2, "image": "https://s2.coinmarketcap.com/static/img/coins/64x64/2010.png"}' '{ "name" : "Polkadot", "price": 35.96, "image": "https://s2.coinmarketcap.com/static/img/coins/64x64/6636.png"}' '{ "name" : "Stellar", "price": 0.506, "image": "https://s2.coinmarketcap.com/static/img/coins/64x64/512.png"}'
```
### `3` Code
In the Upstash console, copy the read only access key in your API configuration
page (GraphQL Explorer > Configure API). In the `_app.js` create the Apollo
client and replace the your access key as below:
## Motivation
We want to give a use case where you can use the GraphQL API without any backend
code. The use case is publicly available read only data for web applications
where you need low latency. The data is updated frequently by another backend
application, you want your users to see the last updated data. Examples:
Leaderboards, news list, blog list, product list, top N items in the homepages.
### `1` Project Setup:
Create a Next application: `npx create-next-app`.
Install Apollo GraphQL client: `npm i @apollo/client`
### `2` Database Setup
If you do not have one, create a database following this
[guide](../overall/getstarted). Connect your database via Redis CLI and run:
```shell theme={"system"}
rpush coins '{ "name" : "Bitcoin", "price": 56819, "image": "https://s2.coinmarketcap.com/static/img/coins/64x64/1.png"}' '{ "name" : "Ethereum", "price": 2130, "image": "https://s2.coinmarketcap.com/static/img/coins/64x64/1027.png"}' '{ "name" : "Cardano", "price": 1.2, "image": "https://s2.coinmarketcap.com/static/img/coins/64x64/2010.png"}' '{ "name" : "Polkadot", "price": 35.96, "image": "https://s2.coinmarketcap.com/static/img/coins/64x64/6636.png"}' '{ "name" : "Stellar", "price": 0.506, "image": "https://s2.coinmarketcap.com/static/img/coins/64x64/512.png"}'
```
### `3` Code
In the Upstash console, copy the read only access key in your API configuration
page (GraphQL Explorer > Configure API). In the `_app.js` create the Apollo
client and replace the your access key as below:
Coin Price List
|
|
{item.name} | ${item.price} |

|
For example, if the prefix is `@strapi`, the key will be `@strapi:
For example, `["GET", "POST"]`
Some examples:
* `path: "/api/restaurants/:id"`
* `path: "/api/restaurants"`
Available sources are:
* `ip`: The IP address of the user.
* `header`: The value of a header key. You should pass the source in the `header.
For example, `header.Authorization` will use the value of the `Authorization`
* `fixed-window`: The fixed-window algorithm divides time into fixed intervals. Each interval has a set limit of allowed requests. When a new interval starts, the count resets.
* `sliding-window`: The sliding-window algorithm uses a rolling time frame. It considers requests from the past X time units, continuously moving forward. This provides a smoother distribution of requests over time.
* `token-bucket`: The token-bucket algorithm uses a bucket that fills with tokens at a steady rate. Each request consumes a token. If the bucket is empty, requests are denied. This allows for bursts of traffic while maintaining a long-term rate limit.
For example, `20s` means 20 seconds.
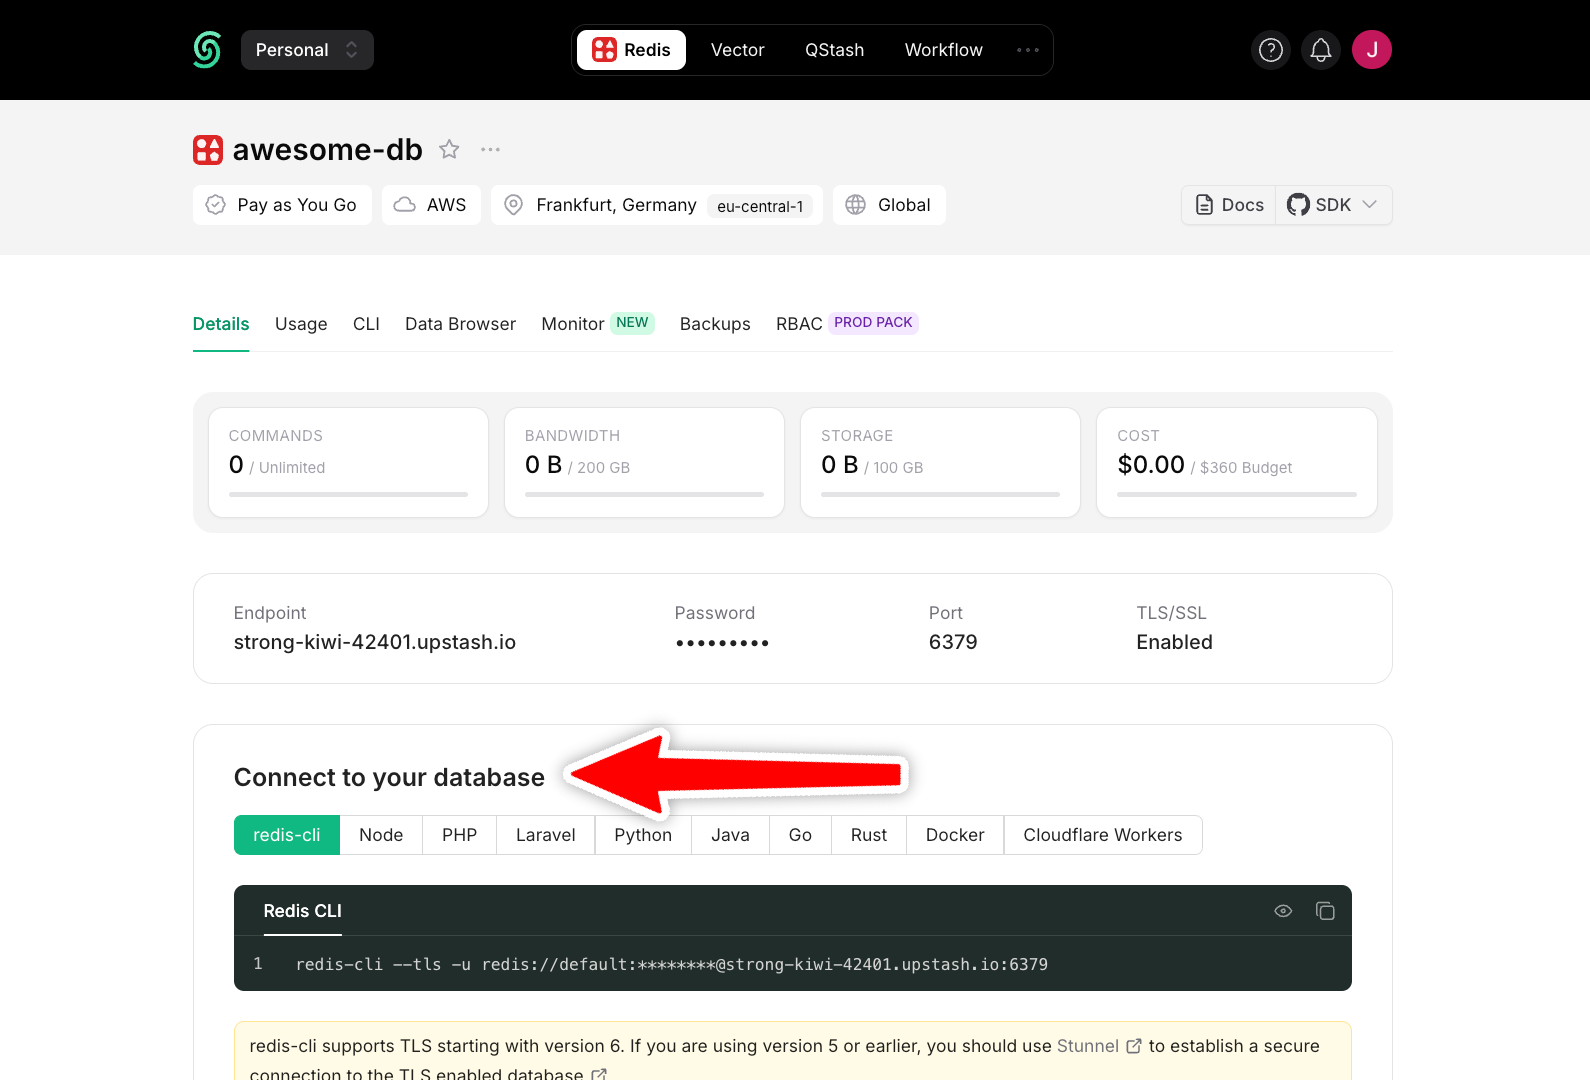 The information required for Redis clients is displayed here as **Endpoint**,
**Port** and **Password**. Also when you click on `Clipboard` button on **Connect to your database** section, you can copy
the code that is required for your client.
Below, we will provide examples from popular Redis clients, but the information above should help you configure all Redis clients similarly.
The information required for Redis clients is displayed here as **Endpoint**,
**Port** and **Password**. Also when you click on `Clipboard` button on **Connect to your database** section, you can copy
the code that is required for your client.
Below, we will provide examples from popular Redis clients, but the information above should help you configure all Redis clients similarly.
 You can select a specific month to view the cost breakdown for that period. Here's the explanation of the fields in the report:
**Request:** This represents the total number of requests sent to the database.
**Storage:** This indicates the average size of the total storage consumed. Upstash database includes a persistence layer for data durability. For example, if you have 1 GB of data in your database throughout the entire month, this value will be 1 GB. Even if your database is empty for the first 29 days of the month and then expands to 30 GB on the last day, this value will still be 1 GB.
**Cost:** This field represents the total cost of your database in US Dollars.
> The values for the current month is updated hourly, so values can be stale up
> to 1 hour.
---
# Source: https://upstash.com/docs/redis/sdks/ratelimit-ts/costs.md
> ## Documentation Index
> Fetch the complete documentation index at: https://upstash.com/docs/llms.txt
> Use this file to discover all available pages before exploring further.
# Costs
This page details the cost of the Ratelimit algorithms in terms of the number of Redis commands. Note that these are calculated for Regional Ratelimits. For [Multi Region Ratelimit](/redis/sdks/ratelimit-ts/features#multi-region), costs will be higher. Additionally, if a Global Upstash Redis is used as the database, number of commands should be calculated as `(1+readRegionCount) * writeCommandCount + readCommandCount` and plus 1 if analytics is enabled.
The Rate Limit SDK minimizes Redis calls to reduce latency overhead and cost. Number of commands executed by the Rate Limit algorithm depends on the chosen algorithm, as well as the state of the algorithm and the caching.
#### Algorithm State
By state of the algorithm, we refer to the entry in our Redis store regarding some identifier `ip1`. You can imagine that there is a state for every identifier. We name these states in the following manner for the purpose of attributing costs to each one:
| State | Success | Explanation |
| ------------ | ------- | ------------------------------------------------------------------------ |
| First | true | First time the Ratelimit was called with identifier `ip1` |
| Intermediate | true | Second or some other time the Ratelimit was called with identifier `ip1` |
| Rate-Limited | false | Requests with identifier `ip1` which are rate limited. |
For instance, first time we call the algorithm with `ip1`, `PEXPIRE` is called so that the key expires after some time. In the following calls, we still use the same script but don't call `PEXPIRE`. In the rate-limited state, we may avoid using Redis altogether if we can make use of the cache.
#### Cache Result
We distinguish the two cases when the identifier `ip1` is found in cache, resulting in a "hit" and the case when the identifier `ip1` is not found in the cache, resulting in a "miss". The cache only exists in the runtime environment and is independent of the Redis database. The state of the cache is especially relevant for serverless contexts, where the cache will usually be empty because of a cold start.
| Result | Explanation |
| ------ | ------------------------------------------------------------------------------------------------------- |
| Hit | Identifier `ip1` is found in the runtime cache |
| Miss | Identifier `ip1` is not found in cache or the value in the cache doesn't block (rate-limit) the request |
An identifier is saved in the cache only when a request is rate limited after a call to the Redis database. The request to Redis returns a timestamp for the time when such a request won't be rate limited anymore. We save this timestamp in the cache and this allows us to reject any request before this timestamp without having to consult the Redis database.
See the [section on caching](/redis/sdks/ratelimit-ts/features) for more details.
# Costs
### `limit()`
#### Fixed Window
| Cache Result | Algorithm State | Command Count | Commands |
| ------------ | --------------- | ------------- | ------------------- |
| Hit/Miss | First | 3 | EVAL, INCR, PEXPIRE |
| Hit/Miss | Intermediate | 2 | EVAL, INCR |
| Miss | Rate-Limited | 2 | EVAL, INCR |
| Hit | Rate-Limited | 0 | *utilized cache* |
#### Sliding Window
| Cache Result | Algorithm State | Command Count | Commands |
| ------------ | --------------- | ------------- | ----------------------------- |
| Hit/Miss | First | 5 | EVAL, GET, GET, INCR, PEXPIRE |
| Hit/Miss | Intermediate | 4 | EVAL, GET, GET, INCR |
| Miss | Rate-Limited | 3 | EVAL, GET, GET |
| Hit | Rate-Limited | 0 | *utilized cache* |
#### Token Bucket
| Cache Result | Algorithm State | Command Count | Commands |
| ------------ | ------------------ | ------------- | -------------------------- |
| Hit/Miss | First/Intermediate | 4 | EVAL, HMGET, HSET, PEXPIRE |
| Miss | Rate-Limited | 2 | EVAL, HMGET |
| Hit | Rate-Limited | 0 | *utilized cache* |
### `getRemaining()`
This method doesn't use the cache or it doesn't have a state it depends on. Therefore, every call
results in the same number of commands in Redis.
| Algorithm | Command Count | Commands |
| -------------- | ------------- | -------------- |
| Fixed Window | 2 | EVAL, GET |
| Sliding Window | 3 | EVAL, GET, GET |
| Token Bucket | 2 | EVAL, HMGET |
### `resetUsedTokens()`
This method starts with a `SCAN` command and deletes every key that matches with `DEL` commands:
| Algorithm | Command Count | Commands |
| -------------- | ------------- | -------------------- |
| Fixed Window | 3 | EVAL, SCAN, DEL |
| Sliding Window | 4 | EVAL, SCAN, DEL, DEL |
| Token Bucket | 3 | EVAL, SCAN, DEL |
### `blockUntilReady()`
Works the same as `limit()`.
# Deny List
Enabling deny lists introduces a cost of 2 additional command per `limit` call.
Values passed in `identifier`, `ip`, `userAgent` and `country` are checked with a single `SMISMEMBER` command.
The other command is TTL which is for checking the status of the current ip deny list to figure out whether
it is expired, valid or disabled.
If [Auto IP deny list](/redis/sdks/ratelimit-ts/features#auto-ip-deny-list) is enabled,
the Ratelimit SDK will update the ip deny list everyday, in the first `limit` invocation after 2 AM UTC.
This will consume 9 commands per day.
If a value is found in the deny list at redis, the client saves this value in the cache and denies
any further requests with that value for a minute without calling Redis (except for analytics).
# Analytics
If analytics is enabled, all calls of `limit` will result in 1 more command since `ZINCRBY` will be called to update the analytics.
# Dynamic Limits
When [dynamic limits](/redis/sdks/ratelimit-ts/features#dynamic-limits) are enabled, each `limit` and `getRemaining` call will execute one additional command.
Both `setDynamicLimit` and `getDynamicLimit` execute 1 command each.
---
# Source: https://upstash.com/docs/qstash/api-refence/schedules/create-a-schedule.md
> ## Documentation Index
> Fetch the complete documentation index at: https://upstash.com/docs/llms.txt
> Use this file to discover all available pages before exploring further.
# Create a Schedule
> Create a schedule to send messages periodically
## OpenAPI
````yaml qstash/openapi.yaml post /v2/schedules/{destination}
openapi: 3.1.0
info:
title: QStash REST API
description: |
QStash is a message queue and scheduler built on top of Upstash Redis.
version: 2.0.0
contact:
name: Upstash
url: https://upstash.com
servers:
- url: https://qstash.upstash.io
security:
- bearerAuth: []
- bearerAuthQuery: []
tags:
- name: Messages
description: Publish and manage messages
- name: Queues
description: Manage message queues
- name: Schedules
description: Create and manage scheduled messages
- name: URL Groups
description: Manage URL groups and endpoints
- name: DLQ
description: Dead Letter Queue operations
- name: Logs
description: Log operations
- name: Signing Keys
description: Manage signing keys
- name: Flow Control
description: Monitor flow control keys
paths:
/v2/schedules/{destination}:
post:
tags:
- Schedules
summary: Create a Schedule
description: Create a schedule to send messages periodically
parameters:
- name: destination
in: path
required: true
schema:
type: string
description: >
Destination can either be a valid URL where the message gets sent
to, or a URL Group name.
- If the destination is a URL, make sure the URL is prefixed with a
valid protocol (http:// or https://)
- If the destination is a URL Group, a new message will be created
for each endpoint in the group.
- name: Upstash-Cron
in: header
required: true
schema:
type: string
examples:
- '*/5 * * * *'
- CRON_TZ=America/New_York */5 * * * *
description: >
Cron expression defining the schedule frequency. QStash republishes
this message whenever the cron expression triggers.
Timezones are supported and can be specified with the cron
expression.
The maximum schedule resolution is 1 minute.
- name: Upstash-Schedule-Id
in: header
schema:
type: string
description: >
Assign a custom schedule ID to the created schedule. This header
allows you to set the schedule ID yourself instead of QStash
assigning a random ID.
If a schedule with the provided ID exists, the settings of the
existing schedule will be updated with the new settings.
- name: Content-Type
in: header
schema:
type: string
description: >
`Content-Type` is the MIME type of the message.
We highly recommend sending a `Content-Type` header along, as this
will help your destination API to understand the content of the
message.
Set this to whatever data you are sending through QStash, if your
message is json, then use `application/json`. Some frameworks like
Next.js will not parse your body correctly if the content type is
not correct.
Examples:
- `application/json`
- `application/xml`
- `application/octet-stream`
- `text/plain`
- name: Upstash-Method
in: header
schema:
type: string
enum:
- GET
- POST
- PUT
- PATCH
- DELETE
default: POST
description: The HTTP method to use when sending the request to your API.
- name: Upstash-Timeout
in: header
schema:
type: string
examples:
- 5s
- 2m
- 1h
description: >
Specifies the maximum duration the request is allowed to take before
timing out.
This parameter can be used to shorten the default allowed timeout
value on your plan. See Max HTTP Connection Timeout on the pricing
page for default values.
The format of this header is `
You can select a specific month to view the cost breakdown for that period. Here's the explanation of the fields in the report:
**Request:** This represents the total number of requests sent to the database.
**Storage:** This indicates the average size of the total storage consumed. Upstash database includes a persistence layer for data durability. For example, if you have 1 GB of data in your database throughout the entire month, this value will be 1 GB. Even if your database is empty for the first 29 days of the month and then expands to 30 GB on the last day, this value will still be 1 GB.
**Cost:** This field represents the total cost of your database in US Dollars.
> The values for the current month is updated hourly, so values can be stale up
> to 1 hour.
---
# Source: https://upstash.com/docs/redis/sdks/ratelimit-ts/costs.md
> ## Documentation Index
> Fetch the complete documentation index at: https://upstash.com/docs/llms.txt
> Use this file to discover all available pages before exploring further.
# Costs
This page details the cost of the Ratelimit algorithms in terms of the number of Redis commands. Note that these are calculated for Regional Ratelimits. For [Multi Region Ratelimit](/redis/sdks/ratelimit-ts/features#multi-region), costs will be higher. Additionally, if a Global Upstash Redis is used as the database, number of commands should be calculated as `(1+readRegionCount) * writeCommandCount + readCommandCount` and plus 1 if analytics is enabled.
The Rate Limit SDK minimizes Redis calls to reduce latency overhead and cost. Number of commands executed by the Rate Limit algorithm depends on the chosen algorithm, as well as the state of the algorithm and the caching.
#### Algorithm State
By state of the algorithm, we refer to the entry in our Redis store regarding some identifier `ip1`. You can imagine that there is a state for every identifier. We name these states in the following manner for the purpose of attributing costs to each one:
| State | Success | Explanation |
| ------------ | ------- | ------------------------------------------------------------------------ |
| First | true | First time the Ratelimit was called with identifier `ip1` |
| Intermediate | true | Second or some other time the Ratelimit was called with identifier `ip1` |
| Rate-Limited | false | Requests with identifier `ip1` which are rate limited. |
For instance, first time we call the algorithm with `ip1`, `PEXPIRE` is called so that the key expires after some time. In the following calls, we still use the same script but don't call `PEXPIRE`. In the rate-limited state, we may avoid using Redis altogether if we can make use of the cache.
#### Cache Result
We distinguish the two cases when the identifier `ip1` is found in cache, resulting in a "hit" and the case when the identifier `ip1` is not found in the cache, resulting in a "miss". The cache only exists in the runtime environment and is independent of the Redis database. The state of the cache is especially relevant for serverless contexts, where the cache will usually be empty because of a cold start.
| Result | Explanation |
| ------ | ------------------------------------------------------------------------------------------------------- |
| Hit | Identifier `ip1` is found in the runtime cache |
| Miss | Identifier `ip1` is not found in cache or the value in the cache doesn't block (rate-limit) the request |
An identifier is saved in the cache only when a request is rate limited after a call to the Redis database. The request to Redis returns a timestamp for the time when such a request won't be rate limited anymore. We save this timestamp in the cache and this allows us to reject any request before this timestamp without having to consult the Redis database.
See the [section on caching](/redis/sdks/ratelimit-ts/features) for more details.
# Costs
### `limit()`
#### Fixed Window
| Cache Result | Algorithm State | Command Count | Commands |
| ------------ | --------------- | ------------- | ------------------- |
| Hit/Miss | First | 3 | EVAL, INCR, PEXPIRE |
| Hit/Miss | Intermediate | 2 | EVAL, INCR |
| Miss | Rate-Limited | 2 | EVAL, INCR |
| Hit | Rate-Limited | 0 | *utilized cache* |
#### Sliding Window
| Cache Result | Algorithm State | Command Count | Commands |
| ------------ | --------------- | ------------- | ----------------------------- |
| Hit/Miss | First | 5 | EVAL, GET, GET, INCR, PEXPIRE |
| Hit/Miss | Intermediate | 4 | EVAL, GET, GET, INCR |
| Miss | Rate-Limited | 3 | EVAL, GET, GET |
| Hit | Rate-Limited | 0 | *utilized cache* |
#### Token Bucket
| Cache Result | Algorithm State | Command Count | Commands |
| ------------ | ------------------ | ------------- | -------------------------- |
| Hit/Miss | First/Intermediate | 4 | EVAL, HMGET, HSET, PEXPIRE |
| Miss | Rate-Limited | 2 | EVAL, HMGET |
| Hit | Rate-Limited | 0 | *utilized cache* |
### `getRemaining()`
This method doesn't use the cache or it doesn't have a state it depends on. Therefore, every call
results in the same number of commands in Redis.
| Algorithm | Command Count | Commands |
| -------------- | ------------- | -------------- |
| Fixed Window | 2 | EVAL, GET |
| Sliding Window | 3 | EVAL, GET, GET |
| Token Bucket | 2 | EVAL, HMGET |
### `resetUsedTokens()`
This method starts with a `SCAN` command and deletes every key that matches with `DEL` commands:
| Algorithm | Command Count | Commands |
| -------------- | ------------- | -------------------- |
| Fixed Window | 3 | EVAL, SCAN, DEL |
| Sliding Window | 4 | EVAL, SCAN, DEL, DEL |
| Token Bucket | 3 | EVAL, SCAN, DEL |
### `blockUntilReady()`
Works the same as `limit()`.
# Deny List
Enabling deny lists introduces a cost of 2 additional command per `limit` call.
Values passed in `identifier`, `ip`, `userAgent` and `country` are checked with a single `SMISMEMBER` command.
The other command is TTL which is for checking the status of the current ip deny list to figure out whether
it is expired, valid or disabled.
If [Auto IP deny list](/redis/sdks/ratelimit-ts/features#auto-ip-deny-list) is enabled,
the Ratelimit SDK will update the ip deny list everyday, in the first `limit` invocation after 2 AM UTC.
This will consume 9 commands per day.
If a value is found in the deny list at redis, the client saves this value in the cache and denies
any further requests with that value for a minute without calling Redis (except for analytics).
# Analytics
If analytics is enabled, all calls of `limit` will result in 1 more command since `ZINCRBY` will be called to update the analytics.
# Dynamic Limits
When [dynamic limits](/redis/sdks/ratelimit-ts/features#dynamic-limits) are enabled, each `limit` and `getRemaining` call will execute one additional command.
Both `setDynamicLimit` and `getDynamicLimit` execute 1 command each.
---
# Source: https://upstash.com/docs/qstash/api-refence/schedules/create-a-schedule.md
> ## Documentation Index
> Fetch the complete documentation index at: https://upstash.com/docs/llms.txt
> Use this file to discover all available pages before exploring further.
# Create a Schedule
> Create a schedule to send messages periodically
## OpenAPI
````yaml qstash/openapi.yaml post /v2/schedules/{destination}
openapi: 3.1.0
info:
title: QStash REST API
description: |
QStash is a message queue and scheduler built on top of Upstash Redis.
version: 2.0.0
contact:
name: Upstash
url: https://upstash.com
servers:
- url: https://qstash.upstash.io
security:
- bearerAuth: []
- bearerAuthQuery: []
tags:
- name: Messages
description: Publish and manage messages
- name: Queues
description: Manage message queues
- name: Schedules
description: Create and manage scheduled messages
- name: URL Groups
description: Manage URL groups and endpoints
- name: DLQ
description: Dead Letter Queue operations
- name: Logs
description: Log operations
- name: Signing Keys
description: Manage signing keys
- name: Flow Control
description: Monitor flow control keys
paths:
/v2/schedules/{destination}:
post:
tags:
- Schedules
summary: Create a Schedule
description: Create a schedule to send messages periodically
parameters:
- name: destination
in: path
required: true
schema:
type: string
description: >
Destination can either be a valid URL where the message gets sent
to, or a URL Group name.
- If the destination is a URL, make sure the URL is prefixed with a
valid protocol (http:// or https://)
- If the destination is a URL Group, a new message will be created
for each endpoint in the group.
- name: Upstash-Cron
in: header
required: true
schema:
type: string
examples:
- '*/5 * * * *'
- CRON_TZ=America/New_York */5 * * * *
description: >
Cron expression defining the schedule frequency. QStash republishes
this message whenever the cron expression triggers.
Timezones are supported and can be specified with the cron
expression.
The maximum schedule resolution is 1 minute.
- name: Upstash-Schedule-Id
in: header
schema:
type: string
description: >
Assign a custom schedule ID to the created schedule. This header
allows you to set the schedule ID yourself instead of QStash
assigning a random ID.
If a schedule with the provided ID exists, the settings of the
existing schedule will be updated with the new settings.
- name: Content-Type
in: header
schema:
type: string
description: >
`Content-Type` is the MIME type of the message.
We highly recommend sending a `Content-Type` header along, as this
will help your destination API to understand the content of the
message.
Set this to whatever data you are sending through QStash, if your
message is json, then use `application/json`. Some frameworks like
Next.js will not parse your body correctly if the content type is
not correct.
Examples:
- `application/json`
- `application/xml`
- `application/octet-stream`
- `text/plain`
- name: Upstash-Method
in: header
schema:
type: string
enum:
- GET
- POST
- PUT
- PATCH
- DELETE
default: POST
description: The HTTP method to use when sending the request to your API.
- name: Upstash-Timeout
in: header
schema:
type: string
examples:
- 5s
- 2m
- 1h
description: >
Specifies the maximum duration the request is allowed to take before
timing out.
This parameter can be used to shorten the default allowed timeout
value on your plan. See Max HTTP Connection Timeout on the pricing
page for default values.
The format of this header is ` 3. Save the credentials shown in the modal:
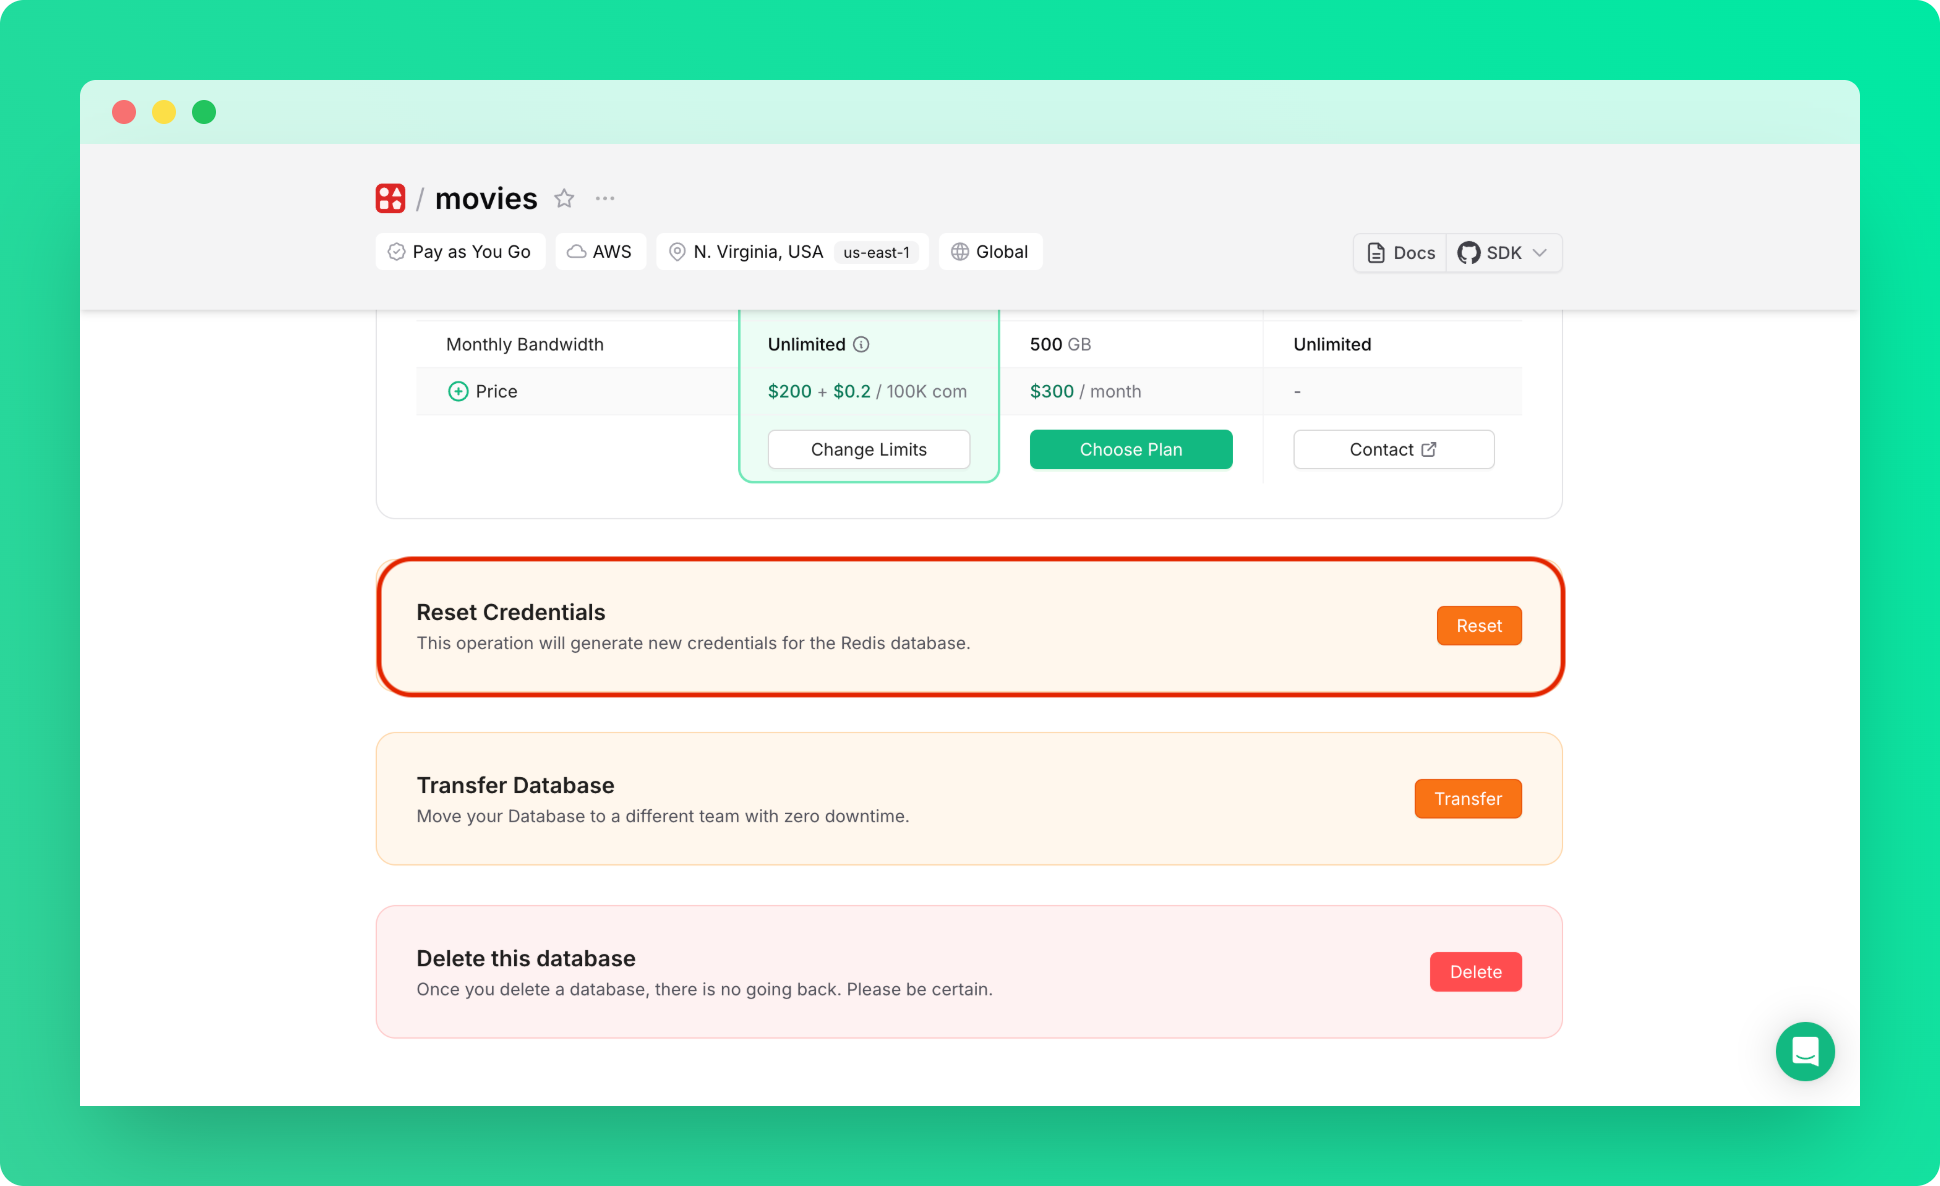 ---
# Source: https://upstash.com/docs/workflow/examples/customRetry.md
> ## Documentation Index
> Fetch the complete documentation index at: https://upstash.com/docs/llms.txt
> Use this file to discover all available pages before exploring further.
# Custom Retry Logic
## Key Features
This example demonstrates how to implement custom retry logic when using third-party services in your Upstash Workflow.
We'll use OpenAI as an example for such a third-party service. **Our retry logic uses response status codes and headers to control when to retry, sleep, or store the third-party API response**.
## Code Example
The following code:
1. Attempts to make an API call up to 10 times.
2. Dynamically adjusts request delays based on response headers or status.
3. Stores successful responses asynchronously.
---
# Source: https://upstash.com/docs/workflow/examples/customRetry.md
> ## Documentation Index
> Fetch the complete documentation index at: https://upstash.com/docs/llms.txt
> Use this file to discover all available pages before exploring further.
# Custom Retry Logic
## Key Features
This example demonstrates how to implement custom retry logic when using third-party services in your Upstash Workflow.
We'll use OpenAI as an example for such a third-party service. **Our retry logic uses response status codes and headers to control when to retry, sleep, or store the third-party API response**.
## Code Example
The following code:
1. Attempts to make an API call up to 10 times.
2. Dynamically adjusts request delays based on response headers or status.
3. Stores successful responses asynchronously.
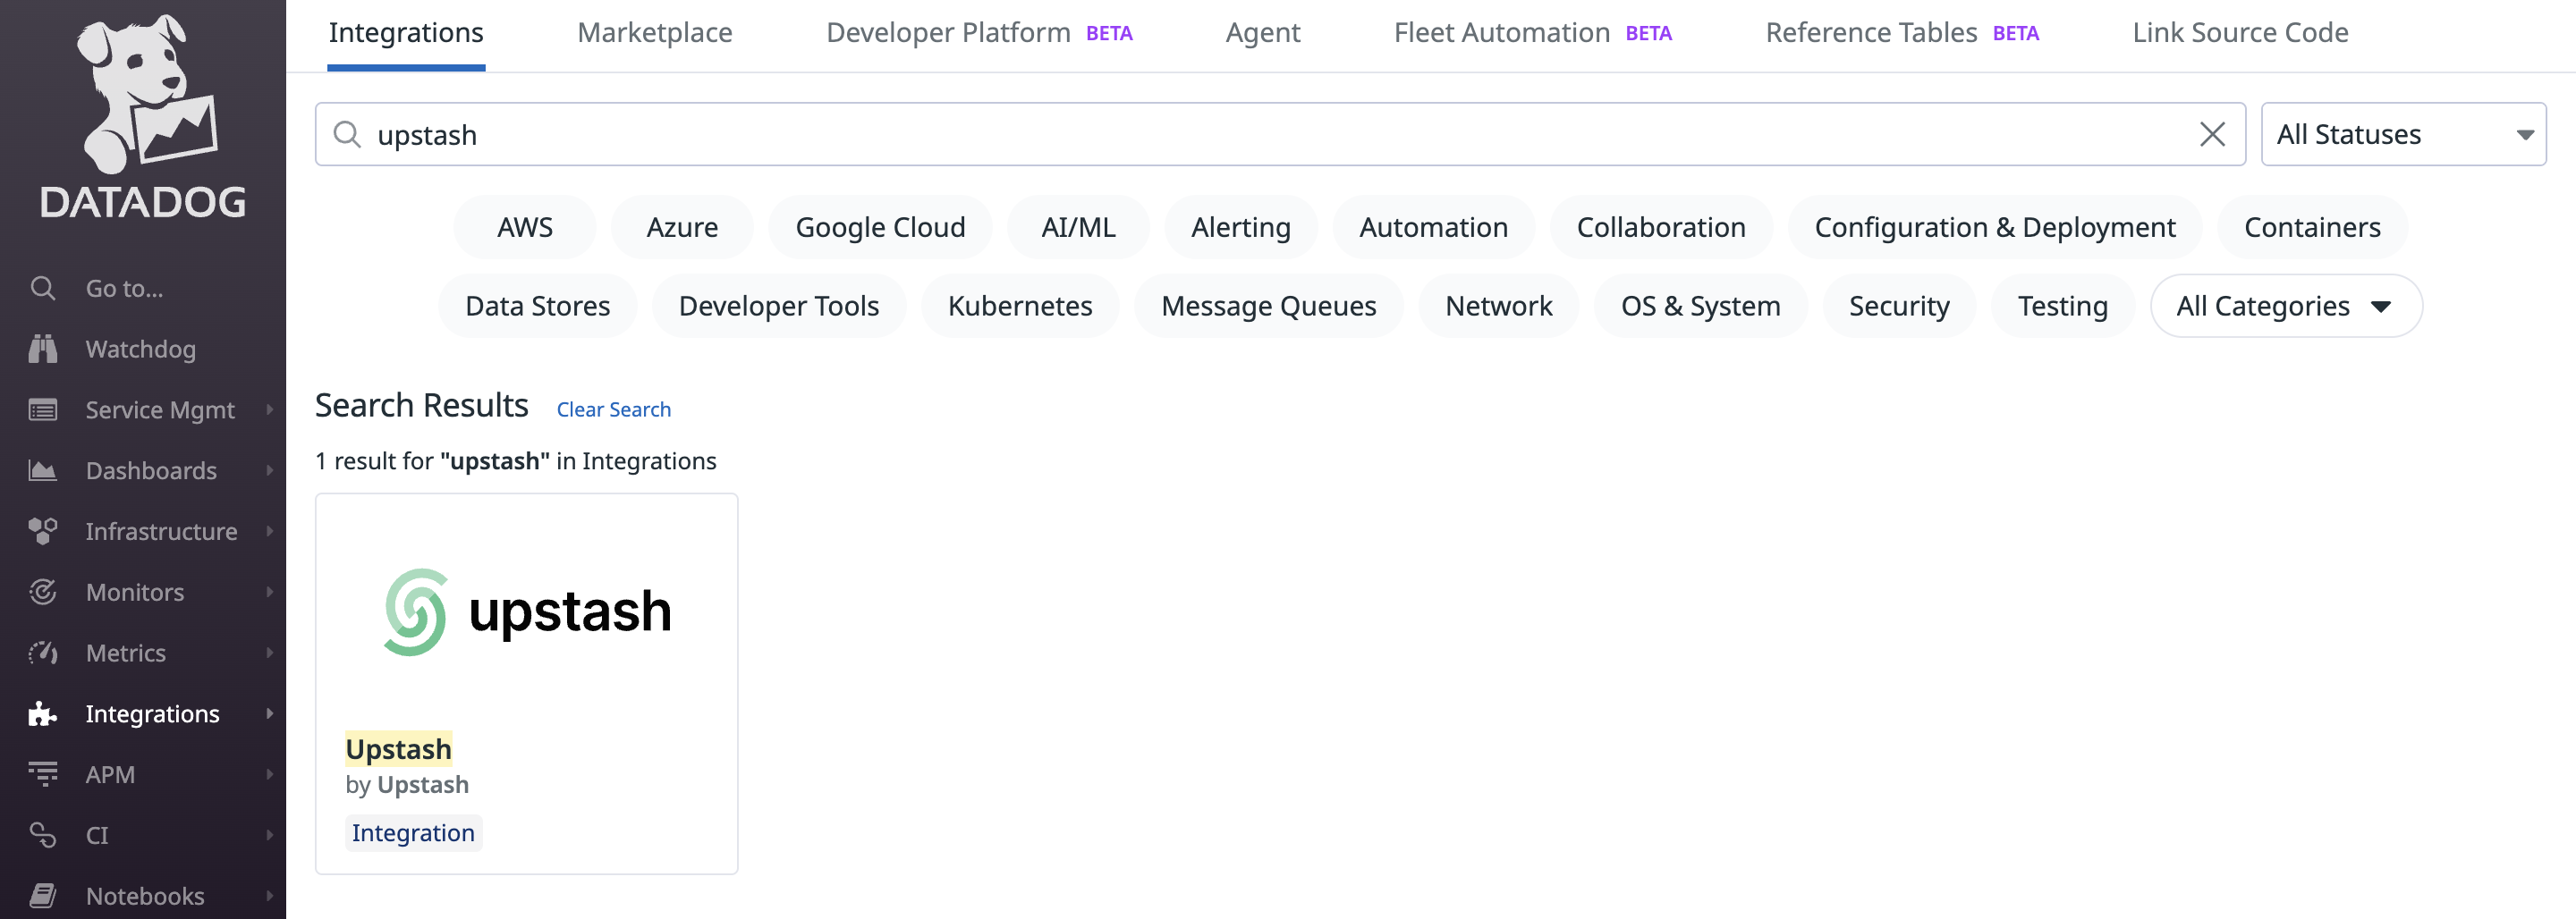 Click "Install" to add Upstash to your Datadog account.
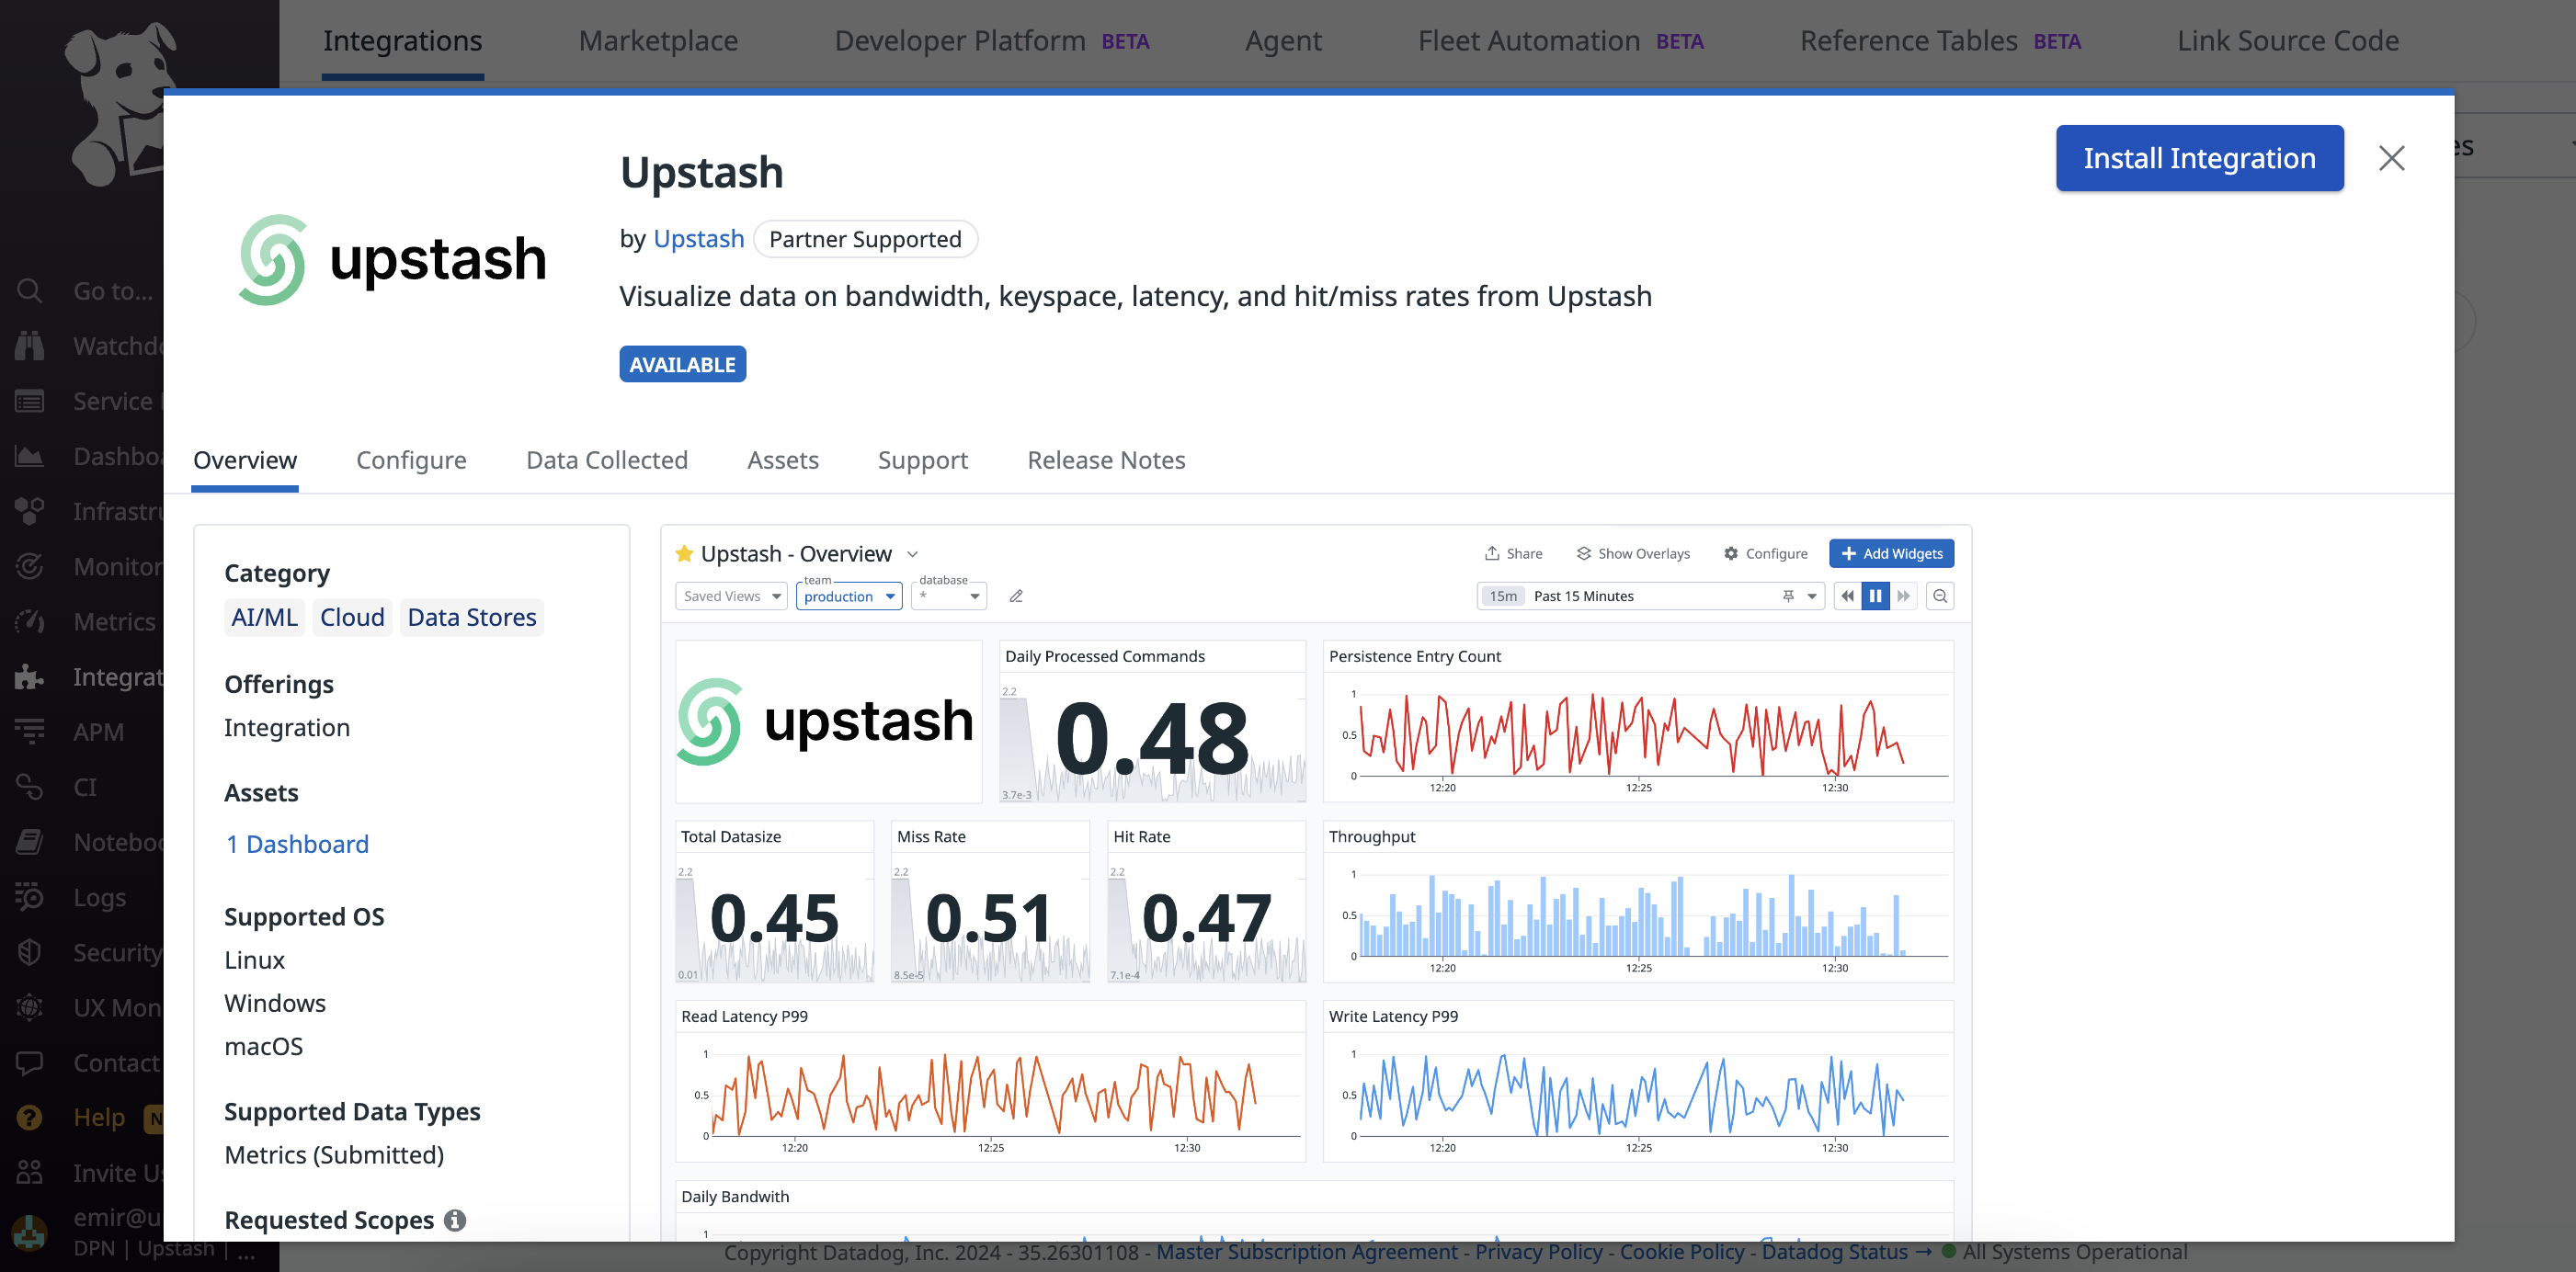 ## **Step 3: Connect Accounts**
After installing Upstash, click "Connect Accounts". Datadog will redirect you to Upstash to complete account linking.
## **Step 3: Connect Accounts**
After installing Upstash, click "Connect Accounts". Datadog will redirect you to Upstash to complete account linking.
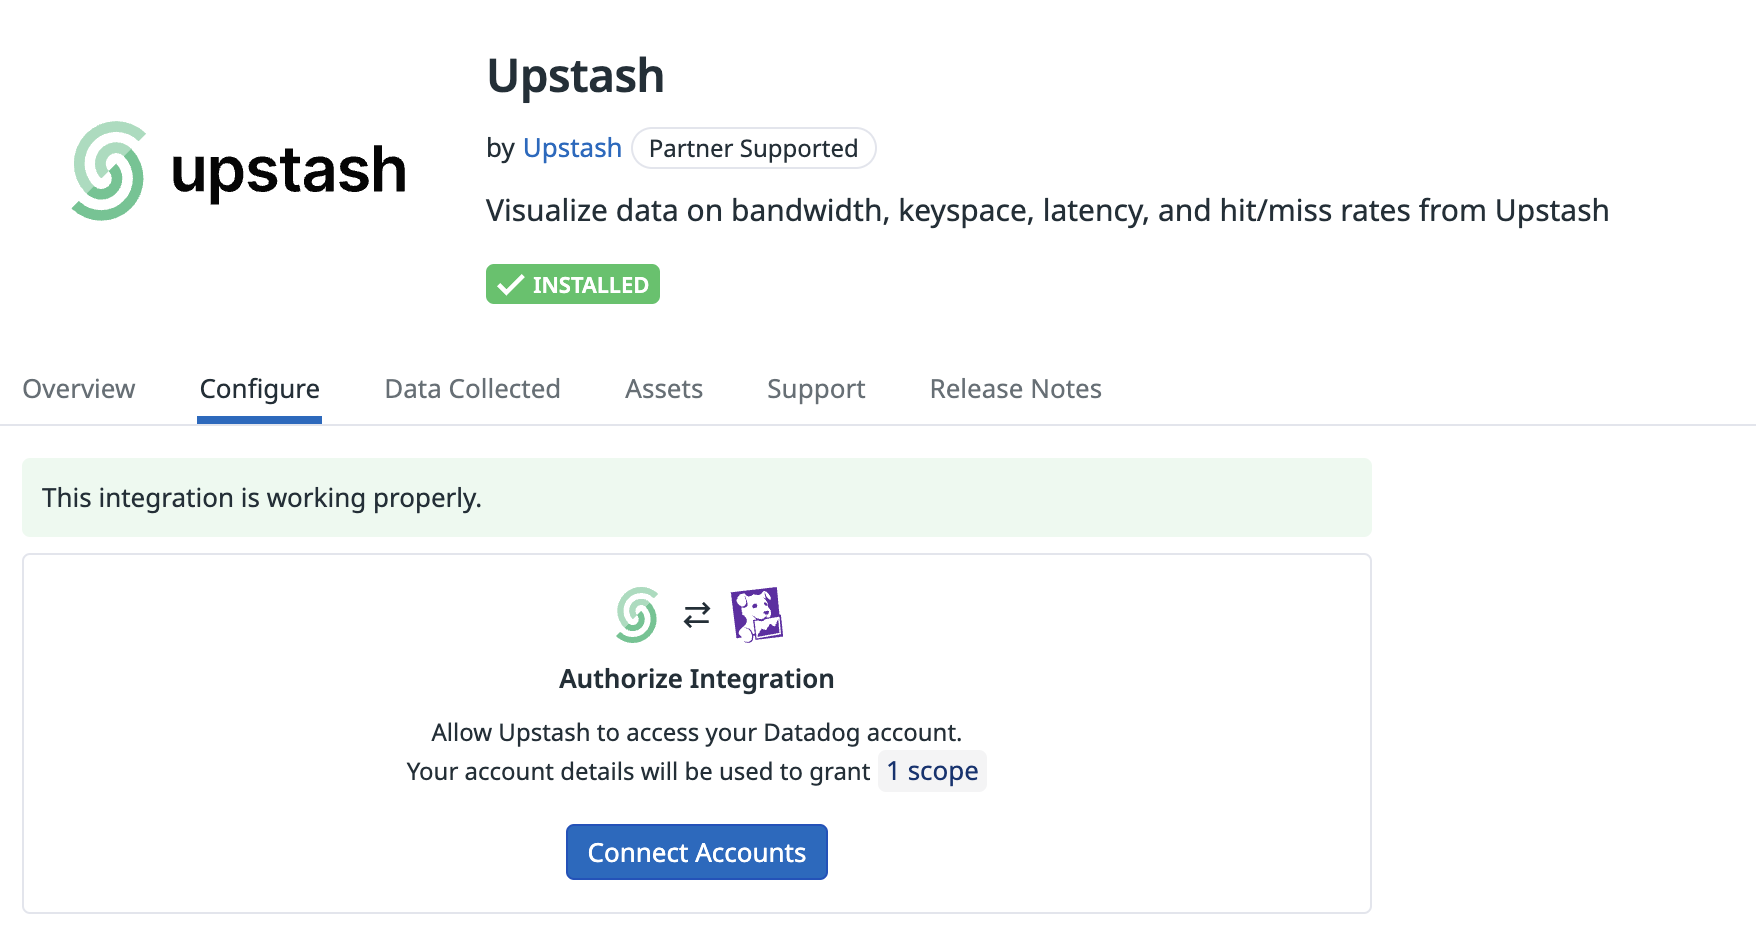 ## **Step 4: Select Account to Integrate**
1. On Upstash, select the Datadog account to integrate.
2. Personal and team accounts are supported.
**Caveats**
* The integration can be established once at a time. To change the account scope (e.g., add/remove teams), re-establish the integration from scratch.
## **Step 4: Select Account to Integrate**
1. On Upstash, select the Datadog account to integrate.
2. Personal and team accounts are supported.
**Caveats**
* The integration can be established once at a time. To change the account scope (e.g., add/remove teams), re-establish the integration from scratch.
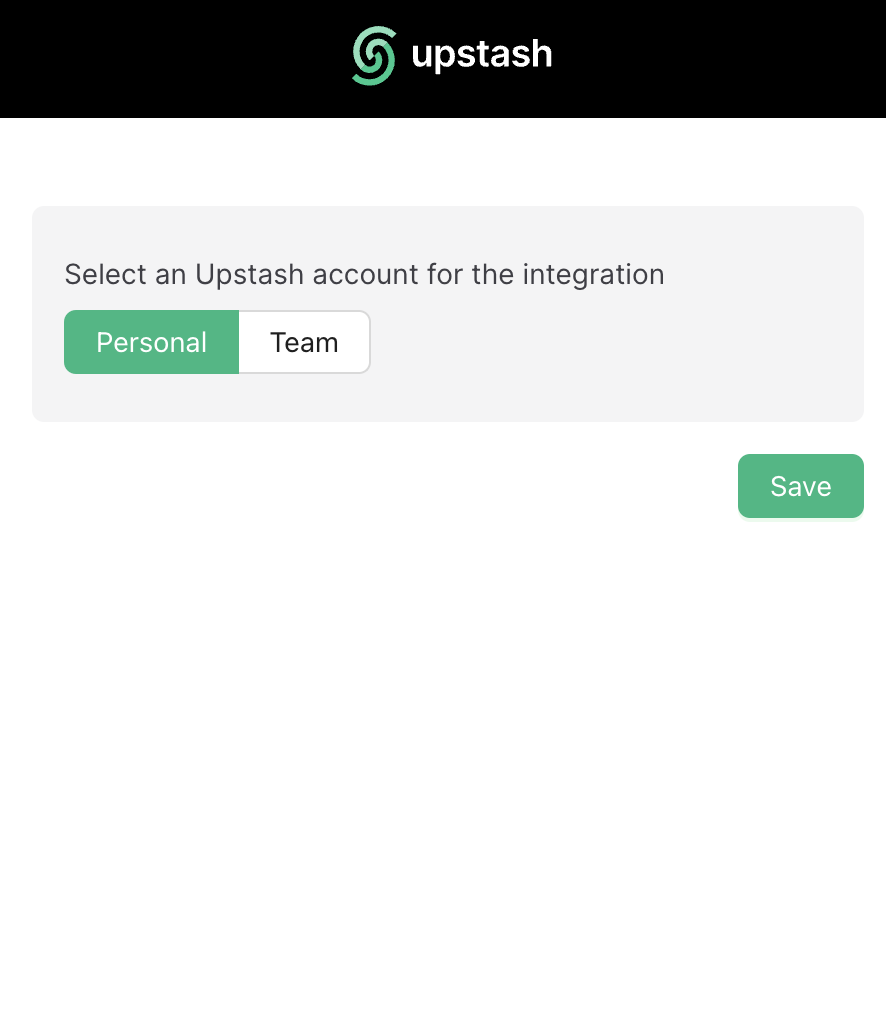
 ## **Step 5: Wait for Metrics Availability**
Once the integration is completed, metrics from QStash (publish counts, success/error rates, retries, DLQ, schedule executions) will start appearing in Datadog dashboards shortly.
## **Step 5: Wait for Metrics Availability**
Once the integration is completed, metrics from QStash (publish counts, success/error rates, retries, DLQ, schedule executions) will start appearing in Datadog dashboards shortly.
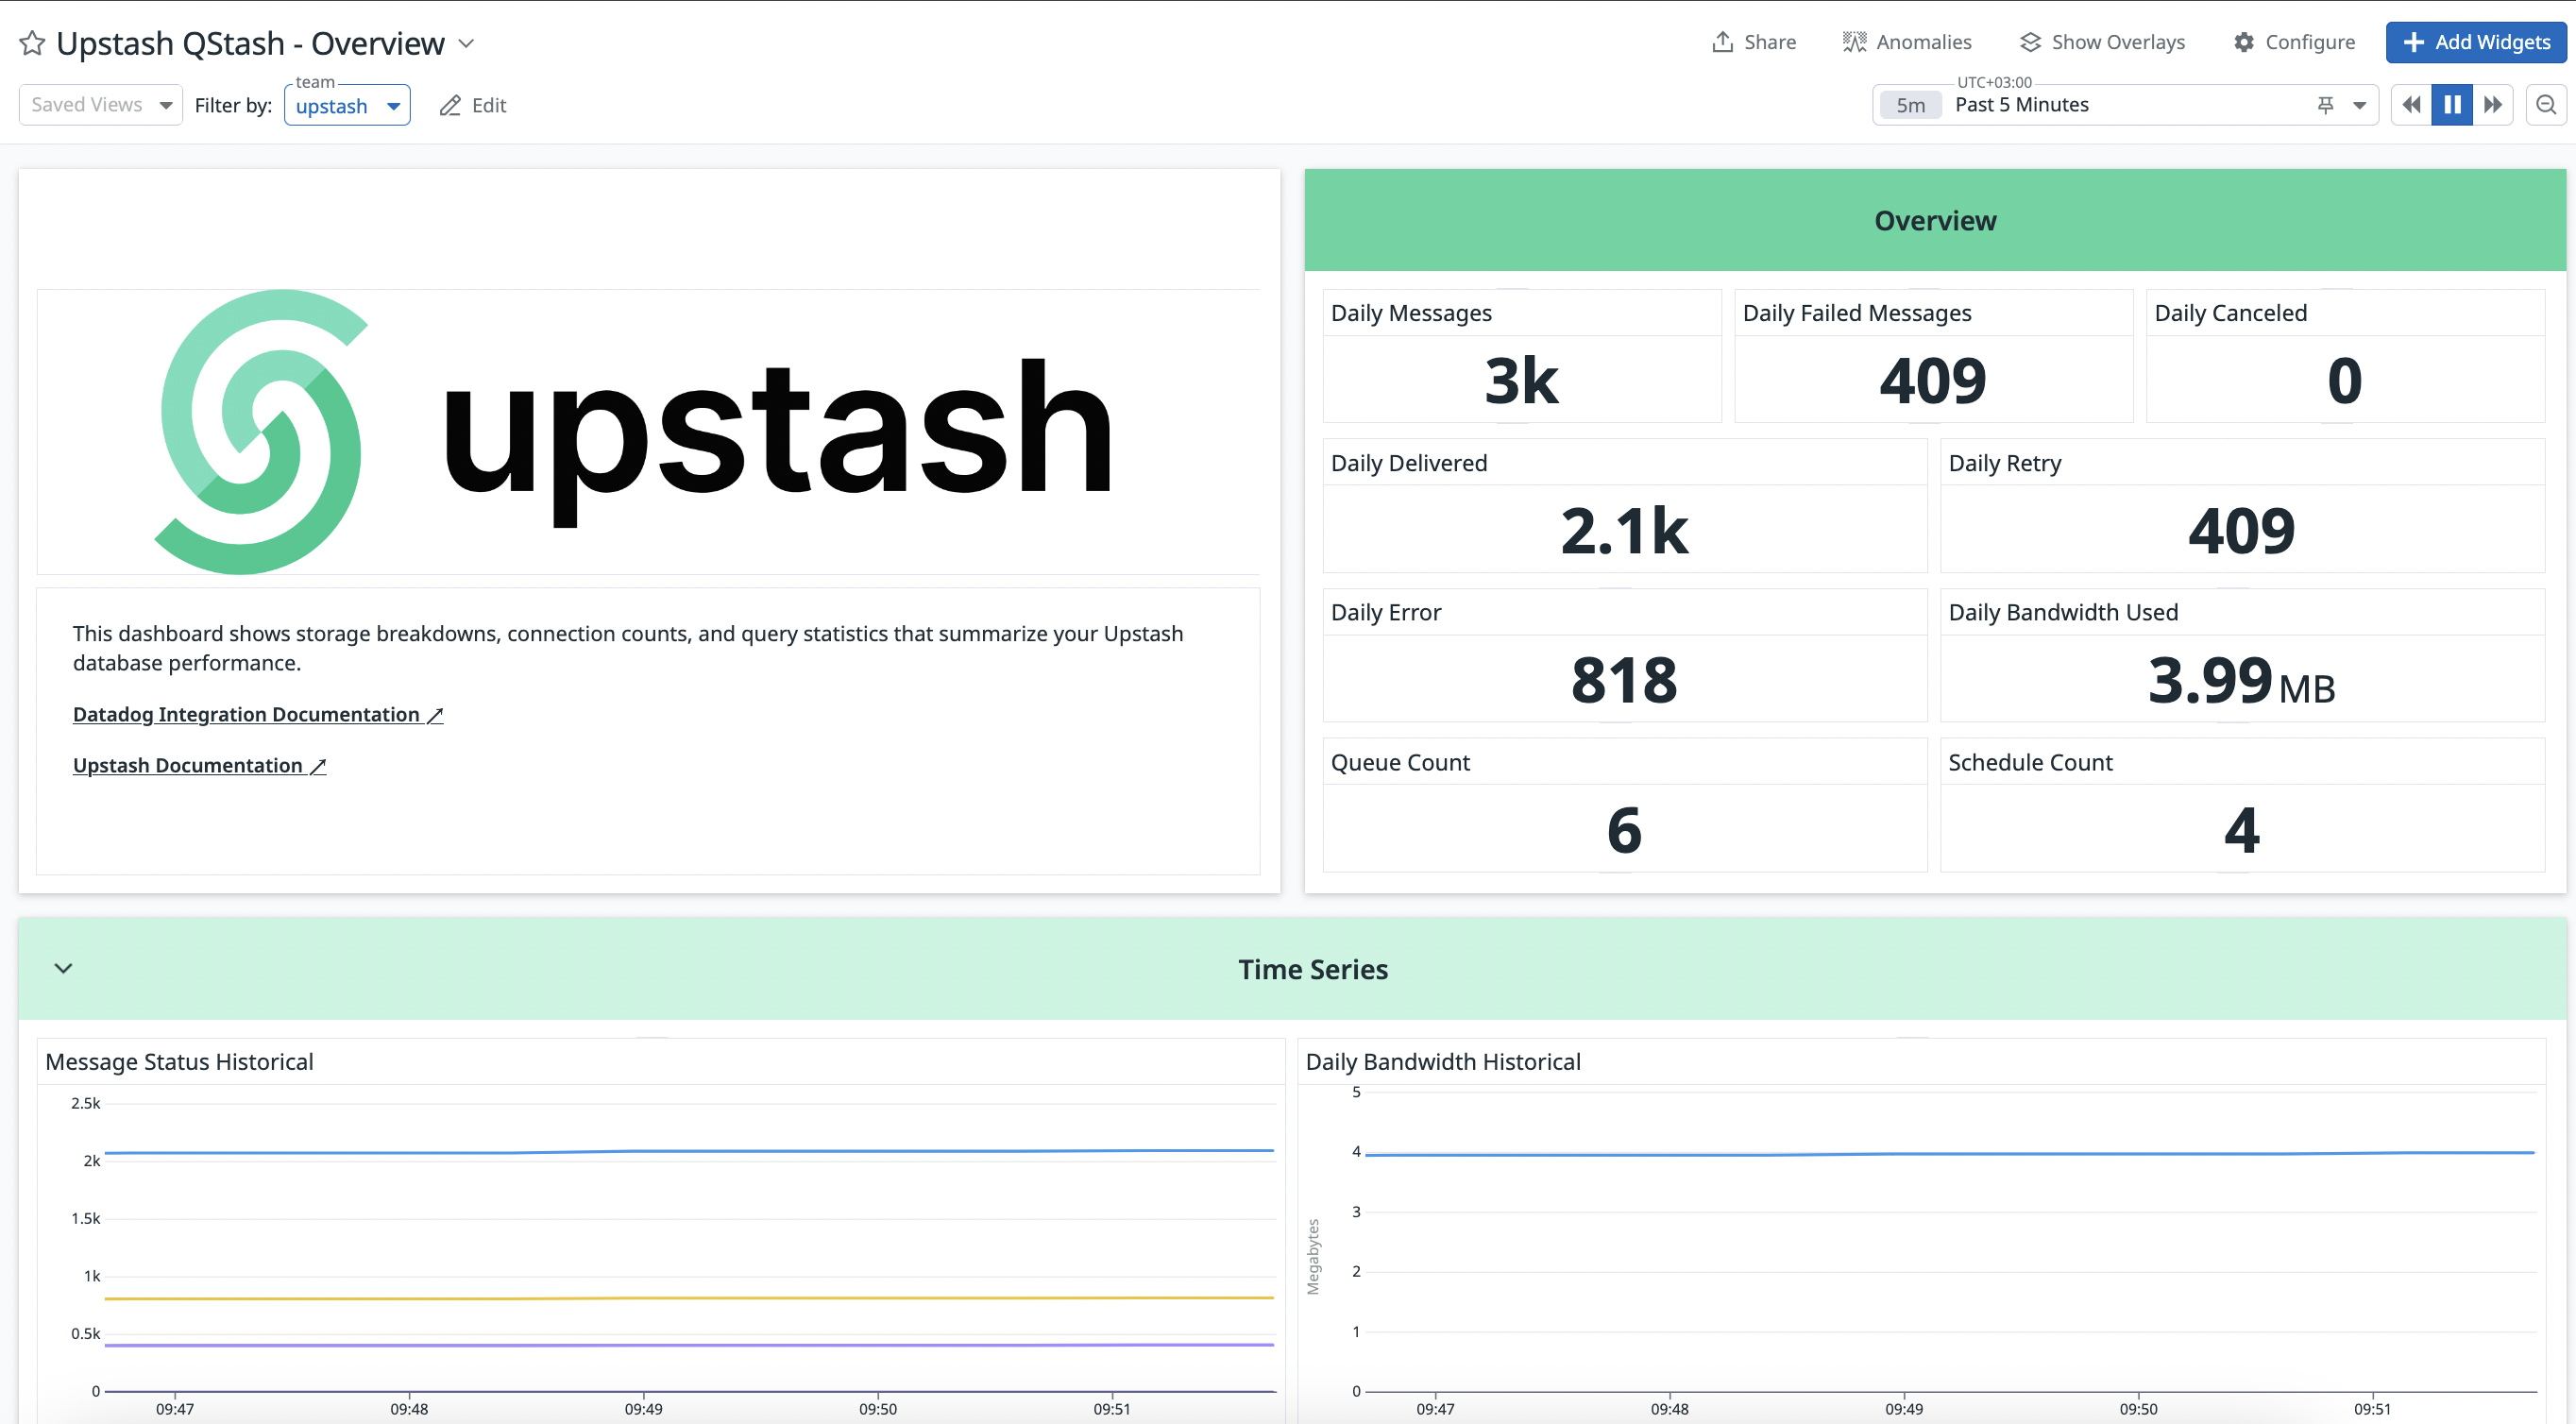 ## **Step 6: Datadog Integration Removal Process**
From Datadog → Integrations → Upstash, press "Remove" to break the connection.
### Confirm Removal
Upstash will stop publishing metrics after removal. Ensure any Datadog API keys/configurations for this integration are also removed on the Datadog side.
## **Conclusion**
You’ve connected Datadog with Upstash QStash. Explore Datadog dashboards to monitor message delivery performance and reliability.
If you need help, contact support.
---
# Source: https://upstash.com/docs/redis/troubleshooting/db_capacity_quota_exceeded.md
> ## Documentation Index
> Fetch the complete documentation index at: https://upstash.com/docs/llms.txt
> Use this file to discover all available pages before exploring further.
# ERR DB capacity quota exceeded
### Symptom
The client gets an exception similar to:
```
ReplyError: ERR DB capacity quota exceeded
```
### Diagnosis
Your total database size exceeds the max data size limit of your current plan. When this limit is reached,
write requests may be rejected. Read and delete requests will not be affected.
### Solution-1
You can manually delete some entries to allow further writes. Additionally you
can consider setting TTL (expiration time) for your keys or enable
[eviction](../features/eviction) for your database.
### Solution-2
You can upgrade your database to Pro for higher limits.
---
# Source: https://upstash.com/docs/redis/sdks/ts/commands/server/dbsize.md
# Source: https://upstash.com/docs/redis/sdks/py/commands/server/dbsize.md
> ## Documentation Index
> Fetch the complete documentation index at: https://upstash.com/docs/llms.txt
> Use this file to discover all available pages before exploring further.
# DBSIZE
> Count the number of keys in the database.
## Arguments
This command has no arguments
## Response
## **Step 6: Datadog Integration Removal Process**
From Datadog → Integrations → Upstash, press "Remove" to break the connection.
### Confirm Removal
Upstash will stop publishing metrics after removal. Ensure any Datadog API keys/configurations for this integration are also removed on the Datadog side.
## **Conclusion**
You’ve connected Datadog with Upstash QStash. Explore Datadog dashboards to monitor message delivery performance and reliability.
If you need help, contact support.
---
# Source: https://upstash.com/docs/redis/troubleshooting/db_capacity_quota_exceeded.md
> ## Documentation Index
> Fetch the complete documentation index at: https://upstash.com/docs/llms.txt
> Use this file to discover all available pages before exploring further.
# ERR DB capacity quota exceeded
### Symptom
The client gets an exception similar to:
```
ReplyError: ERR DB capacity quota exceeded
```
### Diagnosis
Your total database size exceeds the max data size limit of your current plan. When this limit is reached,
write requests may be rejected. Read and delete requests will not be affected.
### Solution-1
You can manually delete some entries to allow further writes. Additionally you
can consider setting TTL (expiration time) for your keys or enable
[eviction](../features/eviction) for your database.
### Solution-2
You can upgrade your database to Pro for higher limits.
---
# Source: https://upstash.com/docs/redis/sdks/ts/commands/server/dbsize.md
# Source: https://upstash.com/docs/redis/sdks/py/commands/server/dbsize.md
> ## Documentation Index
> Fetch the complete documentation index at: https://upstash.com/docs/llms.txt
> Use this file to discover all available pages before exploring further.
# DBSIZE
> Count the number of keys in the database.
## Arguments
This command has no arguments
## Response
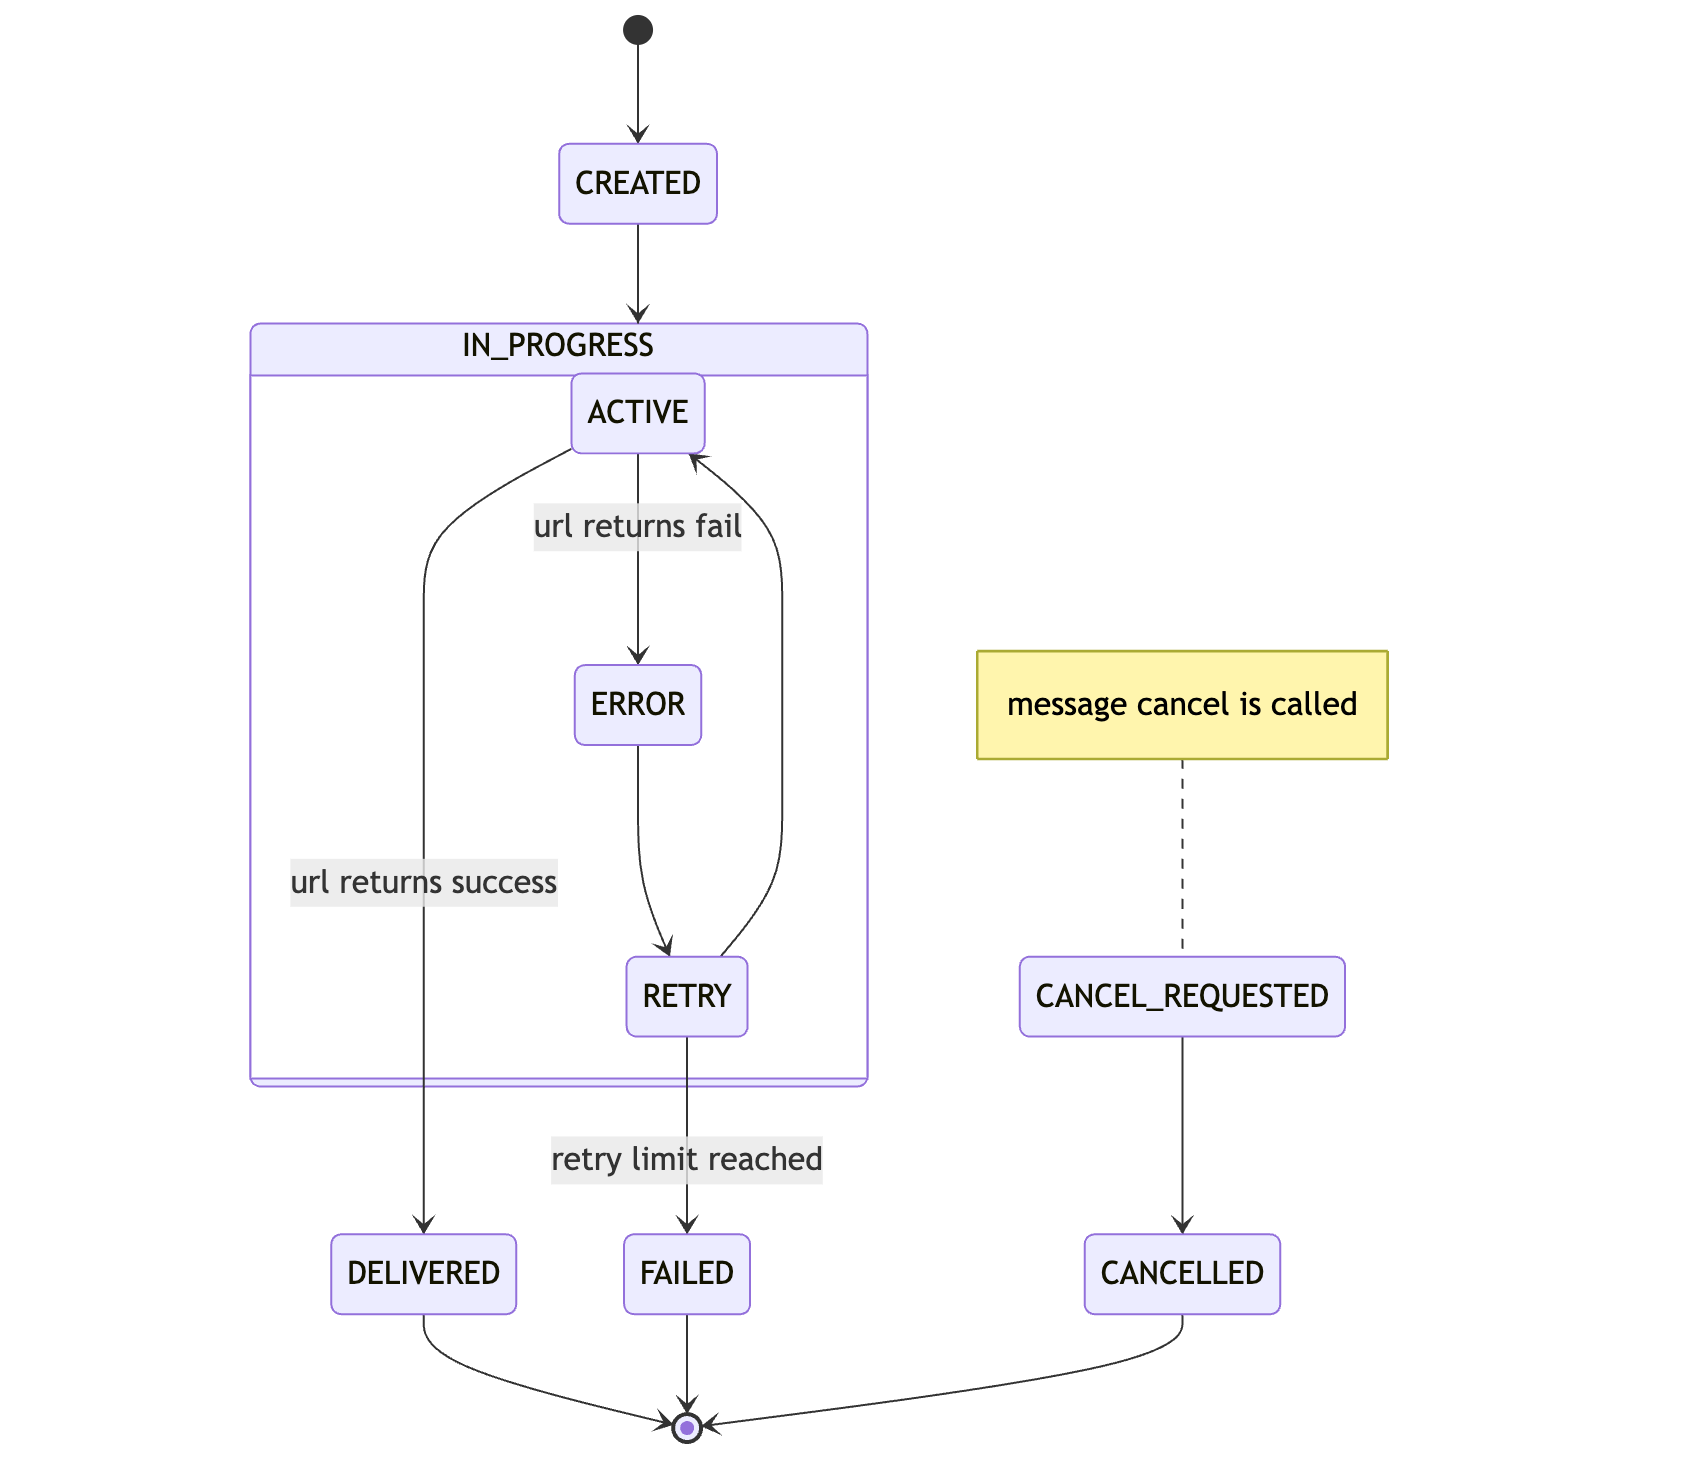 Either you or a previously setup schedule will create a message.
When a message is ready for execution, it will be become `ACTIVE` and a delivery to
your API is attempted.
If you API responds with a status code between `200 - 299`, the task is
considered successful and will be marked as `DELIVERED`.
Otherwise the message is being retried if there are any retries left and moves to `RETRY`. If all retries are exhausted, the task has `FAILED` and the message will be moved to the DLQ.
During all this a message can be cancelled via [DELETE /v2/messages/:messageId](https://docs.upstash.com/qstash/api/messages/cancel). When the request is received, `CANCEL_REQUESTED` will be logged first.
If retries are not exhausted yet, in the next deliver time, the message will be marked as `CANCELLED` and will be completely removed from the system.
## Console
Head over to the [Upstash Console](https://console.upstash.com/qstash) and go to
the `Logs` tab, where you can see the latest status of your messages.
---
# Source: https://upstash.com/docs/redis/sdks/ts/commands/string/decr.md
# Source: https://upstash.com/docs/redis/sdks/py/commands/string/decr.md
> ## Documentation Index
> Fetch the complete documentation index at: https://upstash.com/docs/llms.txt
> Use this file to discover all available pages before exploring further.
# DECR
> Decrement the integer value of a key by one
If a key does not exist, it is initialized as 0 before performing the operation. An error is returned if the key contains a value of the wrong type or contains a string that can not be represented as integer.
## Arguments
Either you or a previously setup schedule will create a message.
When a message is ready for execution, it will be become `ACTIVE` and a delivery to
your API is attempted.
If you API responds with a status code between `200 - 299`, the task is
considered successful and will be marked as `DELIVERED`.
Otherwise the message is being retried if there are any retries left and moves to `RETRY`. If all retries are exhausted, the task has `FAILED` and the message will be moved to the DLQ.
During all this a message can be cancelled via [DELETE /v2/messages/:messageId](https://docs.upstash.com/qstash/api/messages/cancel). When the request is received, `CANCEL_REQUESTED` will be logged first.
If retries are not exhausted yet, in the next deliver time, the message will be marked as `CANCELLED` and will be completely removed from the system.
## Console
Head over to the [Upstash Console](https://console.upstash.com/qstash) and go to
the `Logs` tab, where you can see the latest status of your messages.
---
# Source: https://upstash.com/docs/redis/sdks/ts/commands/string/decr.md
# Source: https://upstash.com/docs/redis/sdks/py/commands/string/decr.md
> ## Documentation Index
> Fetch the complete documentation index at: https://upstash.com/docs/llms.txt
> Use this file to discover all available pages before exploring further.
# DECR
> Decrement the integer value of a key by one
If a key does not exist, it is initialized as 0 before performing the operation. An error is returned if the key contains a value of the wrong type or contains a string that can not be represented as integer.
## Arguments
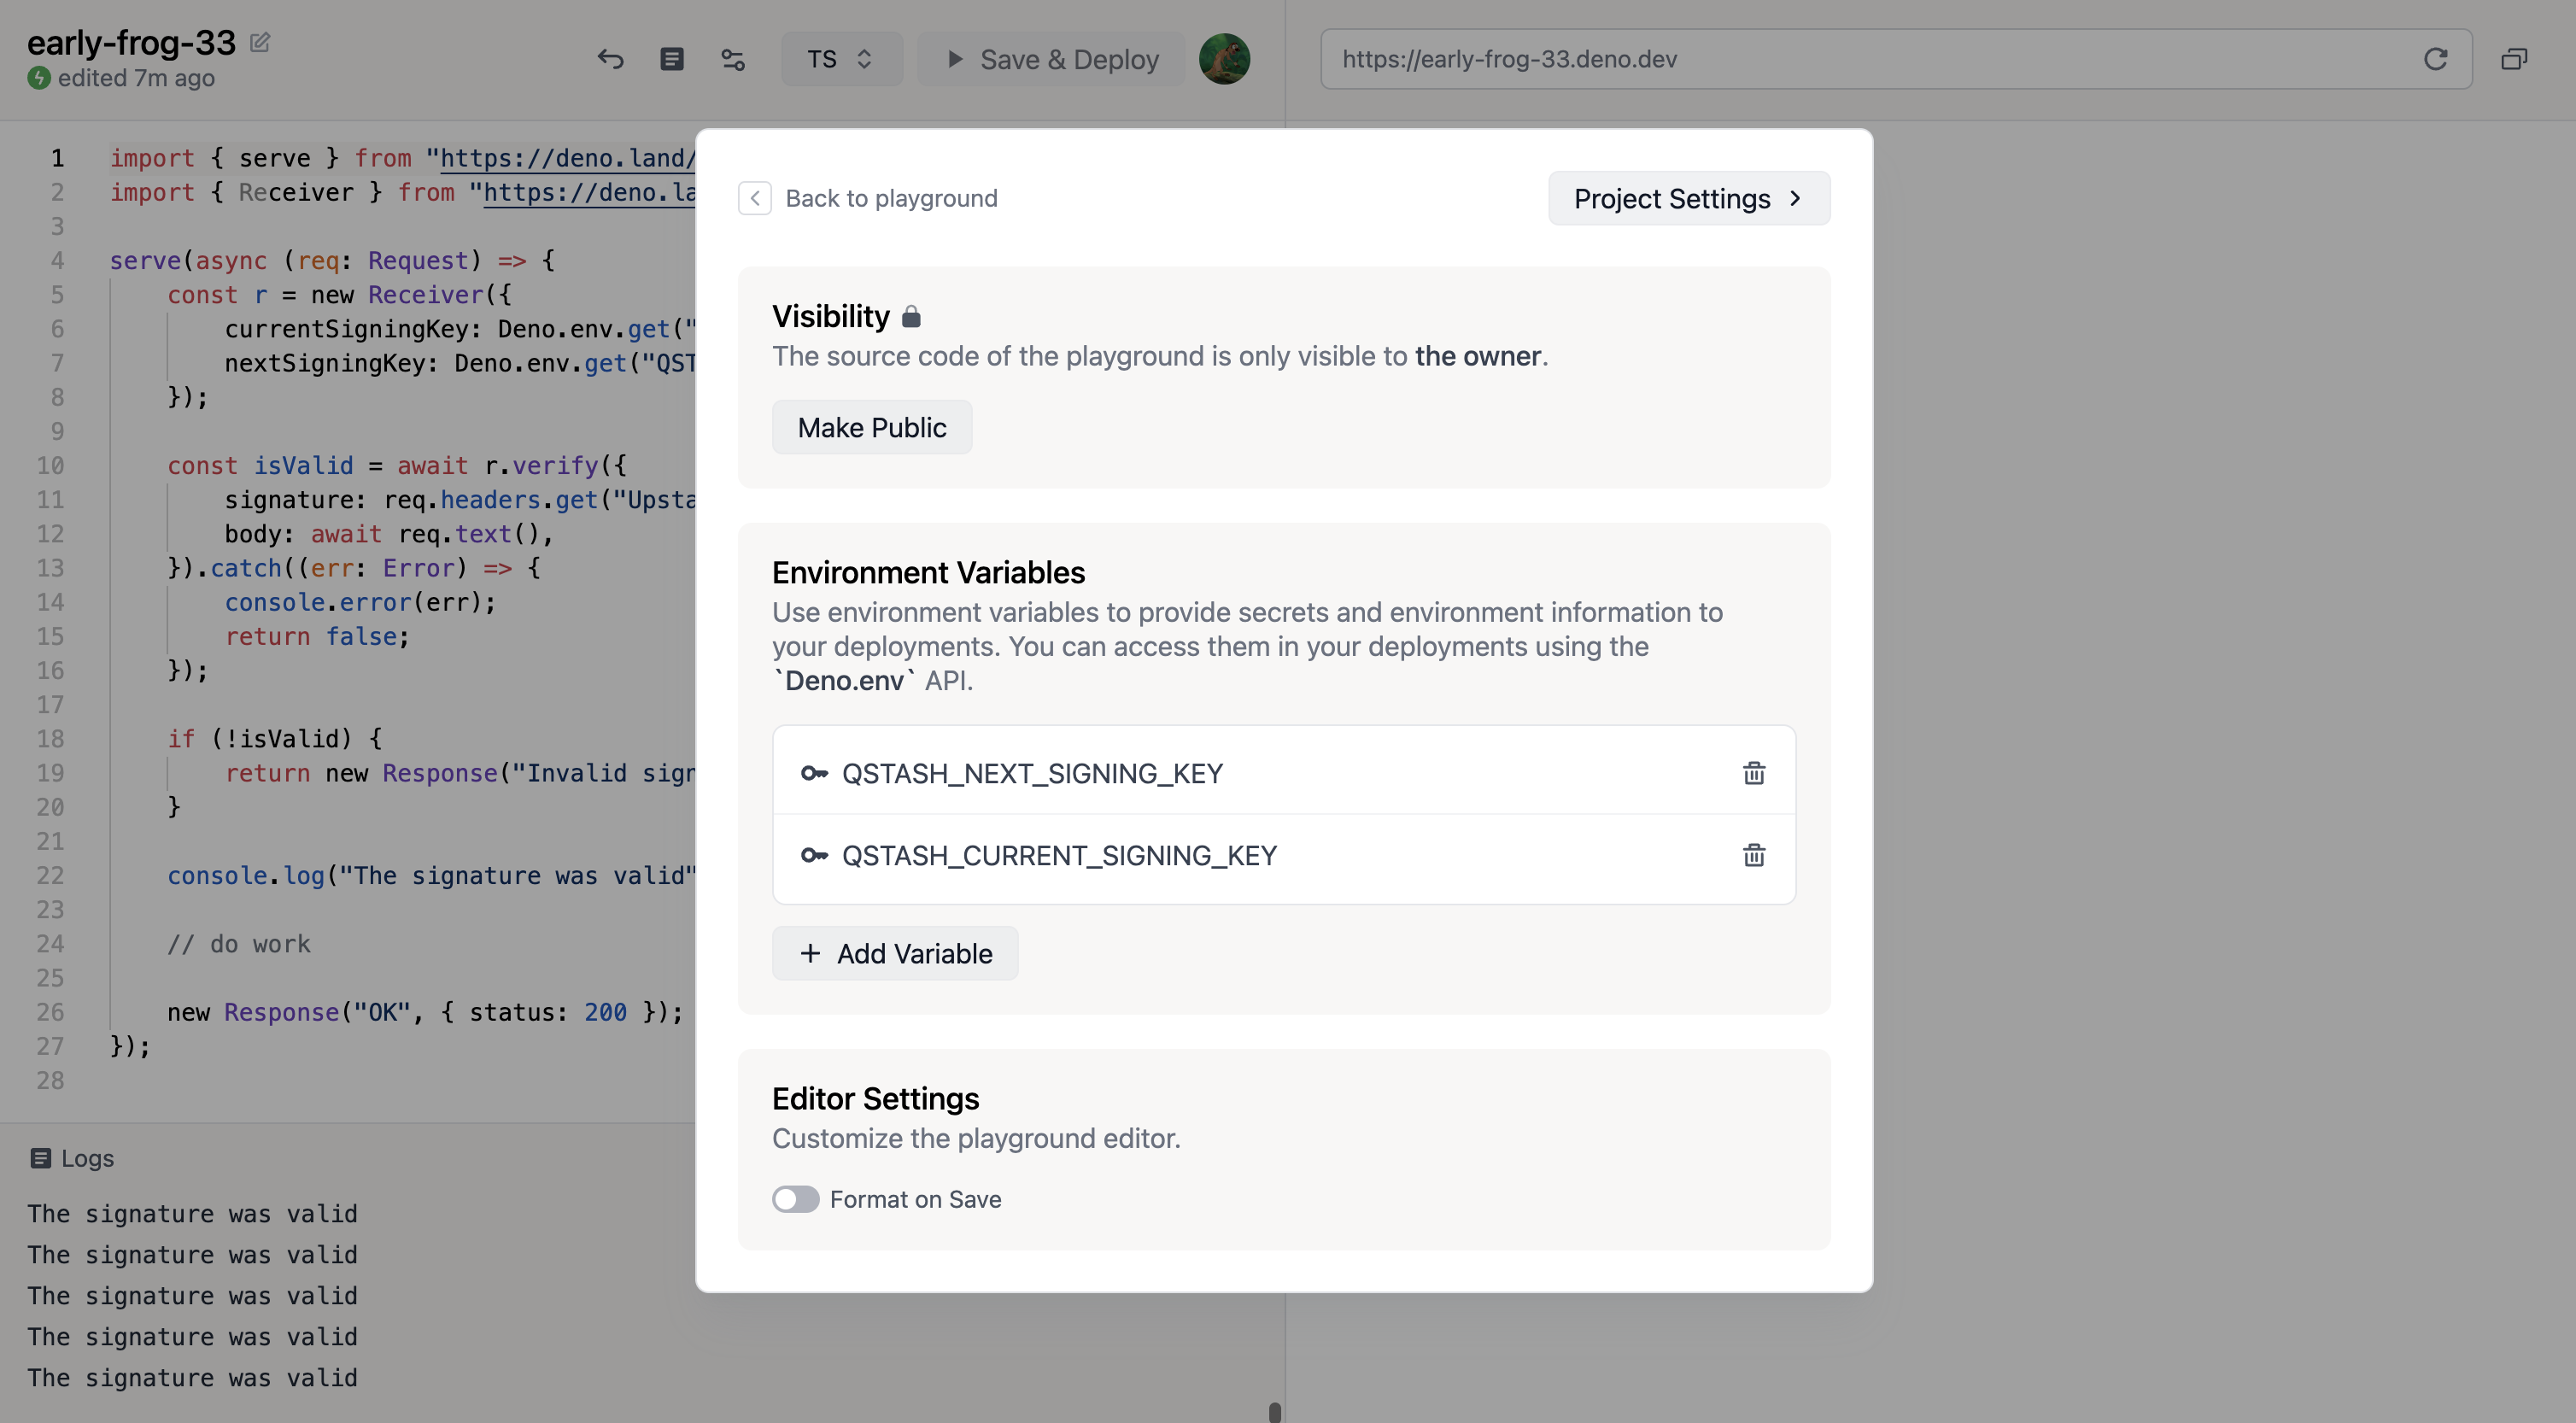 ### 4. Deploy
Simply click on `Save & Deploy` at the top of the screen.
### 5. Publish a message
Make note of the url displayed in the top right. This is the public url of your
project.
```bash theme={"system"}
curl --request POST "https://qstash.upstash.io/v2/publish/https://early-frog-33.deno.dev" \
-H "Authorization: Bearer
### 4. Deploy
Simply click on `Save & Deploy` at the top of the screen.
### 5. Publish a message
Make note of the url displayed in the top right. This is the public url of your
project.
```bash theme={"system"}
curl --request POST "https://qstash.upstash.io/v2/publish/https://early-frog-33.deno.dev" \
-H "Authorization: Bearer 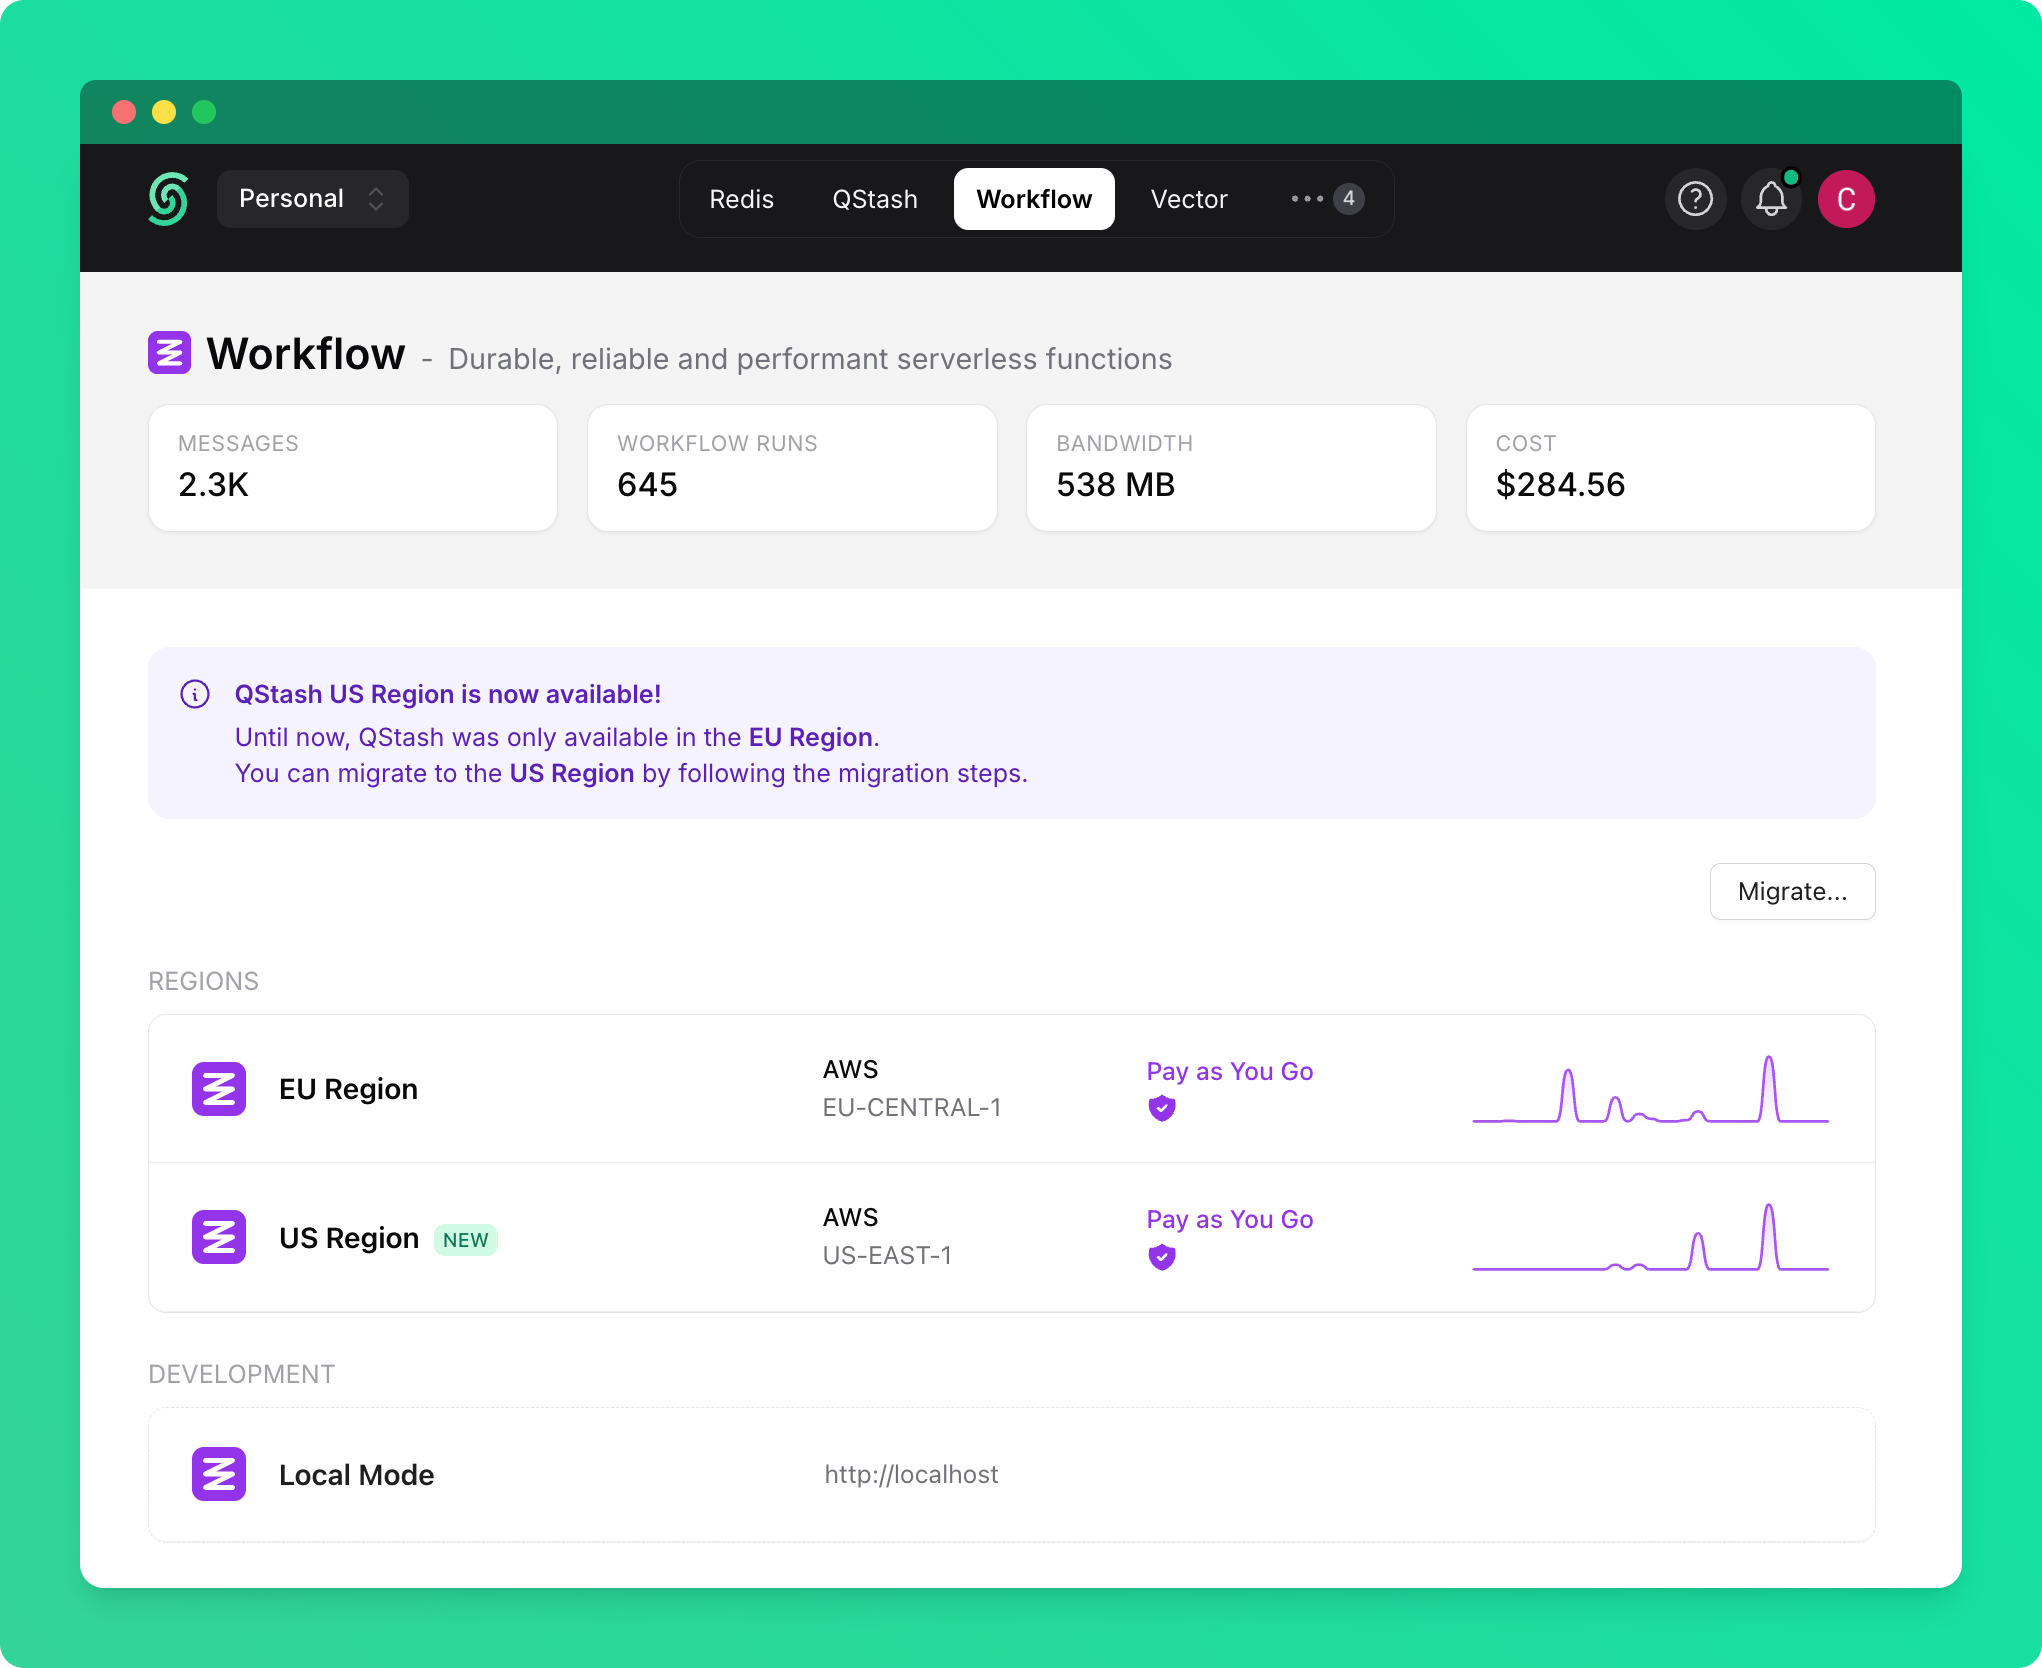
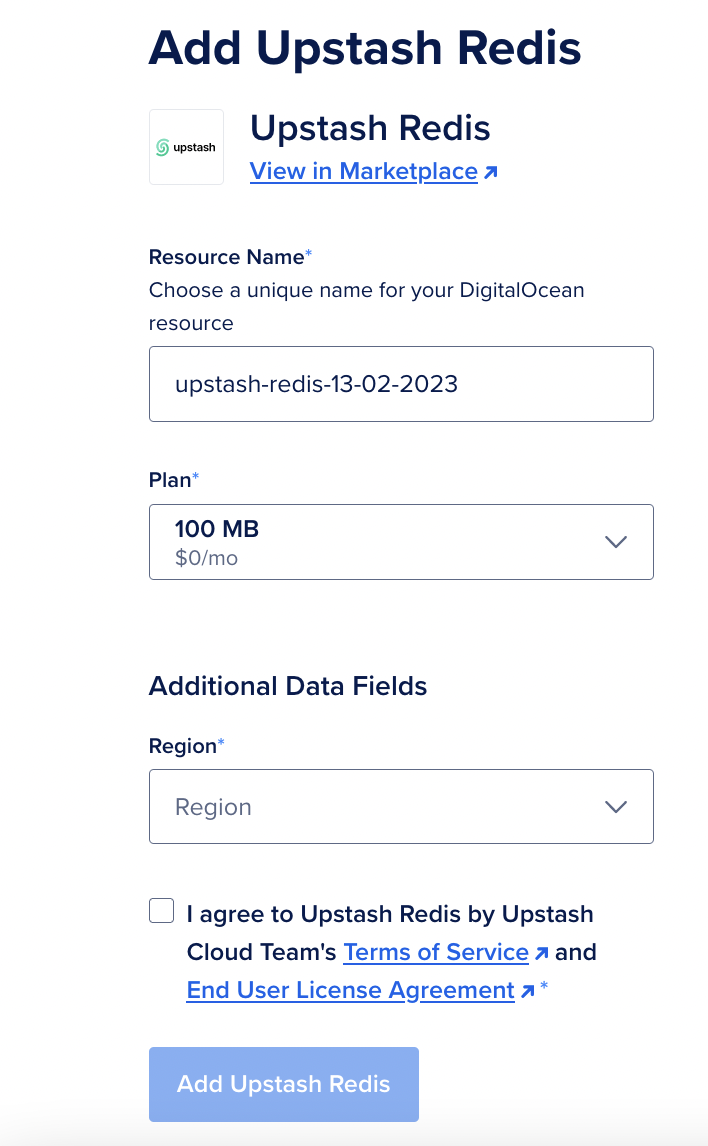 After selecting Name, Plan and Region, click `Add Upstash Redis` button.
### Connecting to Database - SSO
After creating database, Overview/Details page will be opened.
Environment variables can be shown in that page.
After selecting Name, Plan and Region, click `Add Upstash Redis` button.
### Connecting to Database - SSO
After creating database, Overview/Details page will be opened.
Environment variables can be shown in that page.
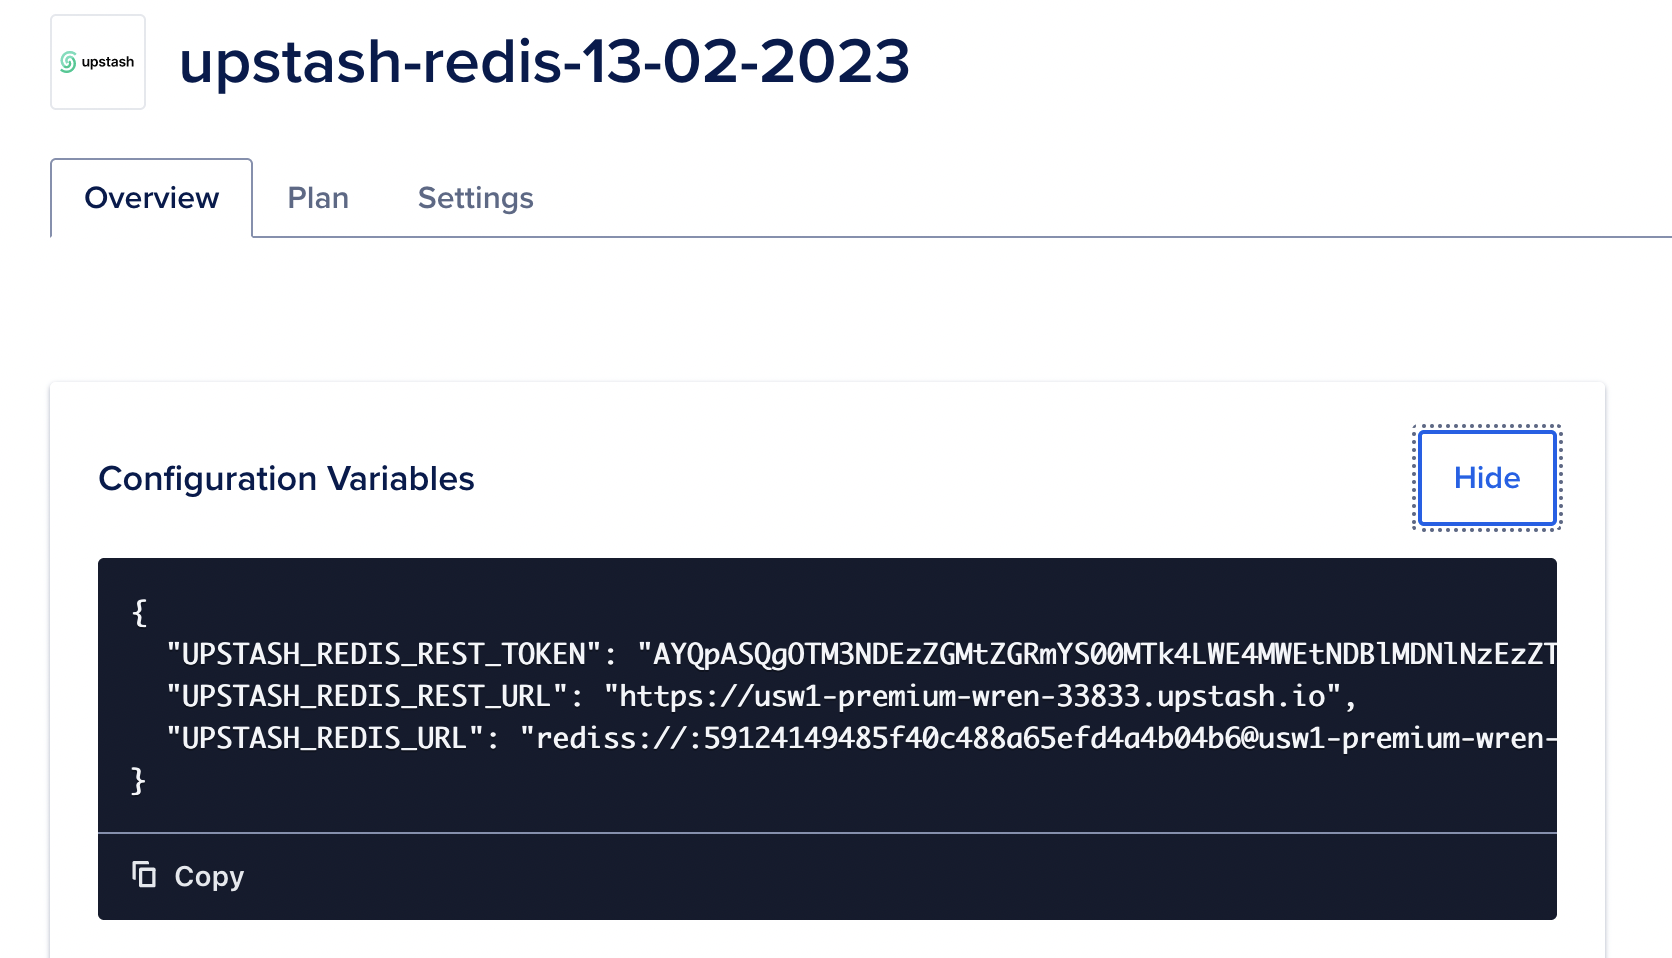 While creating a Droplet, Upstash Addon can be selected and environment
variables are automatically injected to Droplet.
These Steps can be followed: `Create --> Droplets --> Marketplace Add-Ons` then
select the previously created Upstash Redis Addon.
While creating a Droplet, Upstash Addon can be selected and environment
variables are automatically injected to Droplet.
These Steps can be followed: `Create --> Droplets --> Marketplace Add-Ons` then
select the previously created Upstash Redis Addon.
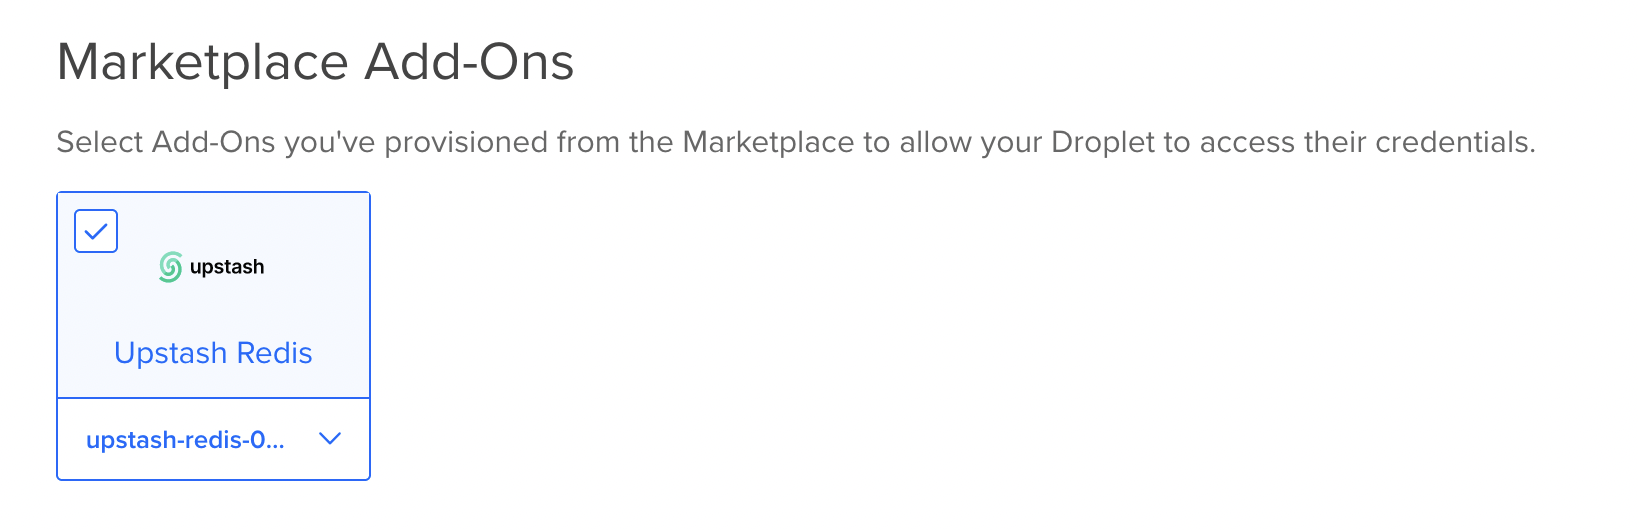 Upstash also support Single Sign-On from DigitalOcean to Upstash Console.
So databases created from DigitalOcean can benefit from Upstash Console
features.
In order to access Upstash Console from DigitalOcean just click `Dashboard` link
when you create the Upstash addon.
---
# Source: https://upstash.com/docs/devops/developer-api/redis/disable_autoscaling.md
> ## Documentation Index
> Fetch the complete documentation index at: https://upstash.com/docs/llms.txt
> Use this file to discover all available pages before exploring further.
# Disable Auto Upgrade
> This endpoint disables Auto Upgrade for given database.
## OpenAPI
````yaml devops/developer-api/openapi.yml post /redis/disable-autoupgrade/{id}
openapi: 3.0.4
info:
title: Developer API - Upstash
description: >-
This is a documentation to specify Developer API endpoints based on the
OpenAPI 3.0 specification.
contact:
name: Support Team
email: support@upstash.com
license:
name: Apache 2.0
url: https://www.apache.org/licenses/LICENSE-2.0.html
version: 1.0.0
servers:
- url: https://api.upstash.com/v2
security: []
tags:
- name: redis
description: Manage redis databases.
externalDocs:
description: Find out more
url: https://upstash.com/docs/devops/developer-api/introduction
- name: teams
description: Manage teams and team members.
externalDocs:
description: Find out more
url: https://upstash.com/docs/devops/developer-api/introduction
- name: vector
description: Manage vector indices.
externalDocs:
description: Find out more
url: https://upstash.com/docs/devops/developer-api/introduction
- name: search
description: Manage search indices.
externalDocs:
description: Find out more
url: https://upstash.com/docs/devops/developer-api/introduction
- name: qstash
description: Manage QStash.
externalDocs:
description: Find out more
url: https://upstash.com/docs/devops/developer-api/introduction
externalDocs:
description: Find out more about Upstash
url: https://upstash.com/
paths:
/redis/disable-autoupgrade/{id}:
post:
tags:
- redis
summary: Disable Auto Upgrade
description: This endpoint disables Auto Upgrade for given database.
operationId: disableAutoUpgrade
parameters:
- name: id
in: path
description: The ID of the database to disable auto upgrade
required: true
schema:
type: string
responses:
'200':
description: Auto upgrade disabled successfully
content:
application/json:
schema:
type: string
example: OK
security:
- basicAuth: []
components:
securitySchemes:
basicAuth:
type: http
scheme: basic
````
---
# Source: https://upstash.com/docs/devops/developer-api/redis/backup/disable_dailybackup.md
> ## Documentation Index
> Fetch the complete documentation index at: https://upstash.com/docs/llms.txt
> Use this file to discover all available pages before exploring further.
# Disable Daily Backup
> This endpoint disables daily backup for a Redis database.
## OpenAPI
````yaml devops/developer-api/openapi.yml patch /redis/disable-dailybackup/{id}
openapi: 3.0.4
info:
title: Developer API - Upstash
description: >-
This is a documentation to specify Developer API endpoints based on the
OpenAPI 3.0 specification.
contact:
name: Support Team
email: support@upstash.com
license:
name: Apache 2.0
url: https://www.apache.org/licenses/LICENSE-2.0.html
version: 1.0.0
servers:
- url: https://api.upstash.com/v2
security: []
tags:
- name: redis
description: Manage redis databases.
externalDocs:
description: Find out more
url: https://upstash.com/docs/devops/developer-api/introduction
- name: teams
description: Manage teams and team members.
externalDocs:
description: Find out more
url: https://upstash.com/docs/devops/developer-api/introduction
- name: vector
description: Manage vector indices.
externalDocs:
description: Find out more
url: https://upstash.com/docs/devops/developer-api/introduction
- name: search
description: Manage search indices.
externalDocs:
description: Find out more
url: https://upstash.com/docs/devops/developer-api/introduction
- name: qstash
description: Manage QStash.
externalDocs:
description: Find out more
url: https://upstash.com/docs/devops/developer-api/introduction
externalDocs:
description: Find out more about Upstash
url: https://upstash.com/
paths:
/redis/disable-dailybackup/{id}:
patch:
tags:
- redis
summary: Disable Daily Backup
description: This endpoint disables daily backup for a Redis database.
operationId: disableDailyBackup
parameters:
- name: id
in: path
description: The ID of the Redis database
required: true
schema:
type: string
responses:
'200':
description: Daily backup disabled successfully
content:
application/json:
schema:
type: string
example: OK
security:
- basicAuth: []
components:
securitySchemes:
basicAuth:
type: http
scheme: basic
````
---
# Source: https://upstash.com/docs/devops/developer-api/redis/disable_eviction.md
> ## Documentation Index
> Fetch the complete documentation index at: https://upstash.com/docs/llms.txt
> Use this file to discover all available pages before exploring further.
# Disable Eviction
> This endpoint disables eviction for given database.
## OpenAPI
````yaml devops/developer-api/openapi.yml post /redis/disable-eviction/{id}
openapi: 3.0.4
info:
title: Developer API - Upstash
description: >-
This is a documentation to specify Developer API endpoints based on the
OpenAPI 3.0 specification.
contact:
name: Support Team
email: support@upstash.com
license:
name: Apache 2.0
url: https://www.apache.org/licenses/LICENSE-2.0.html
version: 1.0.0
servers:
- url: https://api.upstash.com/v2
security: []
tags:
- name: redis
description: Manage redis databases.
externalDocs:
description: Find out more
url: https://upstash.com/docs/devops/developer-api/introduction
- name: teams
description: Manage teams and team members.
externalDocs:
description: Find out more
url: https://upstash.com/docs/devops/developer-api/introduction
- name: vector
description: Manage vector indices.
externalDocs:
description: Find out more
url: https://upstash.com/docs/devops/developer-api/introduction
- name: search
description: Manage search indices.
externalDocs:
description: Find out more
url: https://upstash.com/docs/devops/developer-api/introduction
- name: qstash
description: Manage QStash.
externalDocs:
description: Find out more
url: https://upstash.com/docs/devops/developer-api/introduction
externalDocs:
description: Find out more about Upstash
url: https://upstash.com/
paths:
/redis/disable-eviction/{id}:
post:
tags:
- redis
summary: Disable Eviction
description: This endpoint disables eviction for given database.
operationId: disableEviction
parameters:
- name: id
in: path
description: The ID of the database to disable eviction
required: true
schema:
type: string
responses:
'200':
description: Eviction disabled successfully
content:
application/json:
schema:
type: string
example: OK
security:
- basicAuth: []
components:
securitySchemes:
basicAuth:
type: http
scheme: basic
````
---
# Source: https://upstash.com/docs/redis/quickstarts/django.md
> ## Documentation Index
> Fetch the complete documentation index at: https://upstash.com/docs/llms.txt
> Use this file to discover all available pages before exploring further.
# Django
### Introduction
In this quickstart tutorial, we will demonstrate how to use Django with Upstash Redis to build a simple web application that increments a counter every time the homepage is accessed.
### Environment Setup
First, install Django and the Upstash Redis client for Python:
```shell theme={"system"}
pip install django
pip install upstash-redis
```
### Database Setup
Create a Redis database using the [Upstash Console](https://console.upstash.com) or [Upstash CLI](https://github.com/upstash/cli) and export the `UPSTASH_REDIS_REST_URL` and `UPSTASH_REDIS_REST_TOKEN` to your environment:
```shell theme={"system"}
export UPSTASH_REDIS_REST_URL=
Upstash also support Single Sign-On from DigitalOcean to Upstash Console.
So databases created from DigitalOcean can benefit from Upstash Console
features.
In order to access Upstash Console from DigitalOcean just click `Dashboard` link
when you create the Upstash addon.
---
# Source: https://upstash.com/docs/devops/developer-api/redis/disable_autoscaling.md
> ## Documentation Index
> Fetch the complete documentation index at: https://upstash.com/docs/llms.txt
> Use this file to discover all available pages before exploring further.
# Disable Auto Upgrade
> This endpoint disables Auto Upgrade for given database.
## OpenAPI
````yaml devops/developer-api/openapi.yml post /redis/disable-autoupgrade/{id}
openapi: 3.0.4
info:
title: Developer API - Upstash
description: >-
This is a documentation to specify Developer API endpoints based on the
OpenAPI 3.0 specification.
contact:
name: Support Team
email: support@upstash.com
license:
name: Apache 2.0
url: https://www.apache.org/licenses/LICENSE-2.0.html
version: 1.0.0
servers:
- url: https://api.upstash.com/v2
security: []
tags:
- name: redis
description: Manage redis databases.
externalDocs:
description: Find out more
url: https://upstash.com/docs/devops/developer-api/introduction
- name: teams
description: Manage teams and team members.
externalDocs:
description: Find out more
url: https://upstash.com/docs/devops/developer-api/introduction
- name: vector
description: Manage vector indices.
externalDocs:
description: Find out more
url: https://upstash.com/docs/devops/developer-api/introduction
- name: search
description: Manage search indices.
externalDocs:
description: Find out more
url: https://upstash.com/docs/devops/developer-api/introduction
- name: qstash
description: Manage QStash.
externalDocs:
description: Find out more
url: https://upstash.com/docs/devops/developer-api/introduction
externalDocs:
description: Find out more about Upstash
url: https://upstash.com/
paths:
/redis/disable-autoupgrade/{id}:
post:
tags:
- redis
summary: Disable Auto Upgrade
description: This endpoint disables Auto Upgrade for given database.
operationId: disableAutoUpgrade
parameters:
- name: id
in: path
description: The ID of the database to disable auto upgrade
required: true
schema:
type: string
responses:
'200':
description: Auto upgrade disabled successfully
content:
application/json:
schema:
type: string
example: OK
security:
- basicAuth: []
components:
securitySchemes:
basicAuth:
type: http
scheme: basic
````
---
# Source: https://upstash.com/docs/devops/developer-api/redis/backup/disable_dailybackup.md
> ## Documentation Index
> Fetch the complete documentation index at: https://upstash.com/docs/llms.txt
> Use this file to discover all available pages before exploring further.
# Disable Daily Backup
> This endpoint disables daily backup for a Redis database.
## OpenAPI
````yaml devops/developer-api/openapi.yml patch /redis/disable-dailybackup/{id}
openapi: 3.0.4
info:
title: Developer API - Upstash
description: >-
This is a documentation to specify Developer API endpoints based on the
OpenAPI 3.0 specification.
contact:
name: Support Team
email: support@upstash.com
license:
name: Apache 2.0
url: https://www.apache.org/licenses/LICENSE-2.0.html
version: 1.0.0
servers:
- url: https://api.upstash.com/v2
security: []
tags:
- name: redis
description: Manage redis databases.
externalDocs:
description: Find out more
url: https://upstash.com/docs/devops/developer-api/introduction
- name: teams
description: Manage teams and team members.
externalDocs:
description: Find out more
url: https://upstash.com/docs/devops/developer-api/introduction
- name: vector
description: Manage vector indices.
externalDocs:
description: Find out more
url: https://upstash.com/docs/devops/developer-api/introduction
- name: search
description: Manage search indices.
externalDocs:
description: Find out more
url: https://upstash.com/docs/devops/developer-api/introduction
- name: qstash
description: Manage QStash.
externalDocs:
description: Find out more
url: https://upstash.com/docs/devops/developer-api/introduction
externalDocs:
description: Find out more about Upstash
url: https://upstash.com/
paths:
/redis/disable-dailybackup/{id}:
patch:
tags:
- redis
summary: Disable Daily Backup
description: This endpoint disables daily backup for a Redis database.
operationId: disableDailyBackup
parameters:
- name: id
in: path
description: The ID of the Redis database
required: true
schema:
type: string
responses:
'200':
description: Daily backup disabled successfully
content:
application/json:
schema:
type: string
example: OK
security:
- basicAuth: []
components:
securitySchemes:
basicAuth:
type: http
scheme: basic
````
---
# Source: https://upstash.com/docs/devops/developer-api/redis/disable_eviction.md
> ## Documentation Index
> Fetch the complete documentation index at: https://upstash.com/docs/llms.txt
> Use this file to discover all available pages before exploring further.
# Disable Eviction
> This endpoint disables eviction for given database.
## OpenAPI
````yaml devops/developer-api/openapi.yml post /redis/disable-eviction/{id}
openapi: 3.0.4
info:
title: Developer API - Upstash
description: >-
This is a documentation to specify Developer API endpoints based on the
OpenAPI 3.0 specification.
contact:
name: Support Team
email: support@upstash.com
license:
name: Apache 2.0
url: https://www.apache.org/licenses/LICENSE-2.0.html
version: 1.0.0
servers:
- url: https://api.upstash.com/v2
security: []
tags:
- name: redis
description: Manage redis databases.
externalDocs:
description: Find out more
url: https://upstash.com/docs/devops/developer-api/introduction
- name: teams
description: Manage teams and team members.
externalDocs:
description: Find out more
url: https://upstash.com/docs/devops/developer-api/introduction
- name: vector
description: Manage vector indices.
externalDocs:
description: Find out more
url: https://upstash.com/docs/devops/developer-api/introduction
- name: search
description: Manage search indices.
externalDocs:
description: Find out more
url: https://upstash.com/docs/devops/developer-api/introduction
- name: qstash
description: Manage QStash.
externalDocs:
description: Find out more
url: https://upstash.com/docs/devops/developer-api/introduction
externalDocs:
description: Find out more about Upstash
url: https://upstash.com/
paths:
/redis/disable-eviction/{id}:
post:
tags:
- redis
summary: Disable Eviction
description: This endpoint disables eviction for given database.
operationId: disableEviction
parameters:
- name: id
in: path
description: The ID of the database to disable eviction
required: true
schema:
type: string
responses:
'200':
description: Eviction disabled successfully
content:
application/json:
schema:
type: string
example: OK
security:
- basicAuth: []
components:
securitySchemes:
basicAuth:
type: http
scheme: basic
````
---
# Source: https://upstash.com/docs/redis/quickstarts/django.md
> ## Documentation Index
> Fetch the complete documentation index at: https://upstash.com/docs/llms.txt
> Use this file to discover all available pages before exploring further.
# Django
### Introduction
In this quickstart tutorial, we will demonstrate how to use Django with Upstash Redis to build a simple web application that increments a counter every time the homepage is accessed.
### Environment Setup
First, install Django and the Upstash Redis client for Python:
```shell theme={"system"}
pip install django
pip install upstash-redis
```
### Database Setup
Create a Redis database using the [Upstash Console](https://console.upstash.com) or [Upstash CLI](https://github.com/upstash/cli) and export the `UPSTASH_REDIS_REST_URL` and `UPSTASH_REDIS_REST_TOKEN` to your environment:
```shell theme={"system"}
export UPSTASH_REDIS_REST_URL=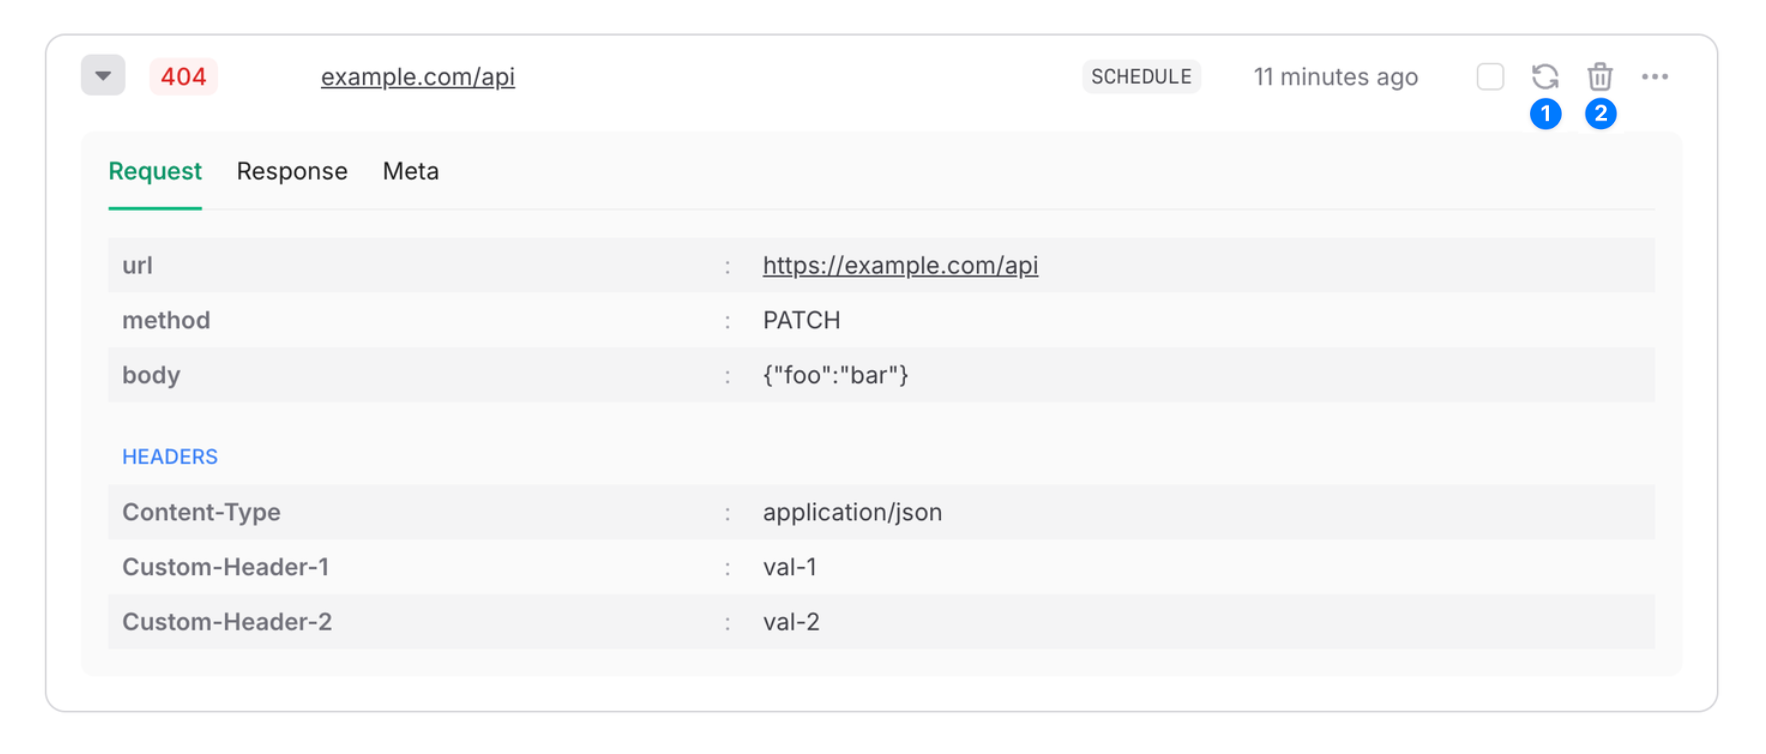 1. **Retry** - Republish the message and remove it from the dead letter queue. Republished messages are just like any other message and will be retried automatically if they fail.
2. **Delete** - Delete the message from the dead letter queue.
## Limitations
Dead letter queues are subject only to a retention period that depends on your plan. Messages are deleted when their retention period expires. See the “Max DLQ Retention” row on the [QStash Pricing](https://upstash.com/pricing/qstash) page.
---
# Source: https://upstash.com/docs/search/tools/documentationcrawler.md
> ## Documentation Index
> Fetch the complete documentation index at: https://upstash.com/docs/llms.txt
> Use this file to discover all available pages before exploring further.
# Documentation Crawler
> A tool to crawl docs and feed Upstash Search database
## Introduction
This tool helps you crawl documentation websites incrementally, extract their content, and create a search index in Upstash Search.
## Usage
It is available both as a CLI tool and a library.
### CLI Usage
You can run the CLI directly using `npx` (no installation required):
```sh theme={"system"}
npx @upstash/search-crawler
```
Or with command-line options:
```sh theme={"system"}
npx @upstash/search-crawler \
--upstash-url "UPSTASH_SEARCH_REST_URL" \
--upstash-token "UPSTASH_SEARCH_REST_TOKEN" \
--index-name "my-index" \
--doc-url "https://example.com/docs"
```
You will be prompted for any missing options:
* Your Upstash Search URL
* Your Upstash Search token
* (Optional) Custom index name
* The documentation URL to crawl
#### What the Tool Does
1. **Discover** all internal documentation links
2. **Crawl** each page and extract content
3. **Track** new or obsolete data
4. **Upsert** the new records into your Upstash Search index
### Library Usage
You can also use this as a library in your own code:
```typescript theme={"system"}
import {
crawlAndIndex,
type CrawlerOptions,
type CrawlerResult,
} from "@upstash/search-crawler";
const options: CrawlerOptions = {
upstashUrl: "UPSTASH_SEARCH_REST_URL",
upstashToken: "UPSTASH_SEARCH_REST_TOKEN",
indexName: "my-docs",
docUrl: "https://example.com/docs",
silent: true, // no console output
};
const result: CrawlerResult = await crawlAndIndex(options);
```
## Obtaining Upstash Credentials
1. Go to your [Upstash Console](https://console.upstash.com/).
2. Select your Search index. (See [How to Create Search Index](/search/overall/getstarted#create-a-database))
3. Under the **Details** section, copy your `UPSTASH_SEARCH_REST_URL` and `UPSTASH_SEARCH_REST_TOKEN`.
* `--upstash-url` corresponds to `UPSTASH_SEARCH_REST_URL`
* `--upstash-token` corresponds to `UPSTASH_SEARCH_REST_TOKEN`
## Further Reading
Try combining this tool with [Qstash Schedule](/qstash/features/schedules) to keep your database up to date with docs. You may deploy your crawler on a server and call it on a schedule regularly to fetch updates in your docs. Check out our example project for implementation details: [A modern documentation library to search and track the docs.](https://github.com/upstash/search-js/tree/main/examples/search-docs)
For further insights, see [@upstash/search-crawler](https://github.com/upstash/search-crawler)
---
# Source: https://upstash.com/docs/search/integrations/docusaurus.md
> ## Documentation Index
> Fetch the complete documentation index at: https://upstash.com/docs/llms.txt
> Use this file to discover all available pages before exploring further.
# Docusaurus Integration
> AI-powered search component for Docusaurus using Upstash Search.
## Features
* 🤖 AI-powered search results based on your documentation
* 🎨 Modern and responsive UI
* 🌜 Dark/Light mode support
## Installation
To install the package, run:
```bash theme={"system"}
npm install @upstash/docusaurus-theme-upstash-search
```
## Configuration
### Enabling the Searchbar
To enable the searchbar, add the following to your docusaurus config file:
```js theme={"system"}
export default {
themes: ['@upstash/docusaurus-theme-upstash-search'],
// ...
themeConfig: {
// ...
upstash: {
upstashSearchRestUrl: "UPSTASH_SEARCH_REST_URL",
upstashSearchReadOnlyRestToken: "UPSTASH_SEARCH_READ_ONLY_REST_TOKEN",
upstashSearchIndexName: "UPSTASH_SEARCH_INDEX_NAME",
},
},
};
```
The default index name is `docusaurus`. You can override it by setting the `upstashSearchIndexName` option.
You can fetch your URL and read only token from [Upstash Console](https://console.upstash.com/search). **Make sure to use the read only token!**
If you do not have a search database yet, you can create one from [Upstash Console](https://console.upstash.com/search). Make sure to use Upstash generated embedding model.
## Indexing Your Documentation
### Setting Up Environment Variables
To index your documentation, create a `.env` file with the following environment variables:
```bash theme={"system"}
UPSTASH_SEARCH_REST_URL=
UPSTASH_SEARCH_REST_TOKEN=
UPSTASH_SEARCH_INDEX_NAME=
DOCS_PATH=
```
You can fetch your URL and token from [Upstash Console](https://console.upstash.com/search). This time **do not use the read only token** since we are upserting data.
### Running the Indexing Script
After setting up your environment variables, run the indexing command:
```bash theme={"system"}
npx index-docs-upstash
```
### Configuration Options
* **DOCS\_PATH**: The indexing script looks for documentation in the `docs` directory by default. You can specify a different path using the `DOCS_PATH` option.
* **UPSTASH\_SEARCH\_INDEX\_NAME**: The default index name is `docusaurus`. You can override it by setting the `UPSTASH_SEARCH_INDEX_NAME` option. Make sure the name you set while indexing matches with your themeConfig `upstashSearchIndexName` option.
For more details on how this integration works, check out [the official repository](https://github.com/upstash/docusaurus-theme-upstash-search).
---
# Source: https://upstash.com/docs/redis/integrations/drizzle.md
> ## Documentation Index
> Fetch the complete documentation index at: https://upstash.com/docs/llms.txt
> Use this file to discover all available pages before exploring further.
# DrizzleORM with Upstash Redis
### Quickstart
DrizzleORM provides an `upstashCache()` helper to easily connect with Upstash Redis. To prevent surprises, the cache is always opt-in by default. Nothing is cached until you opt-in for a specific query or enable global caching.
First, install the drizzle package:
```bash theme={"system"}
npm install drizzle-orm
```
**Configure your Drizzle instance:**
```ts theme={"system"}
import { upstashCache } from "drizzle-orm/cache/upstash"
import { drizzle } from "drizzle-orm/..."
const db = drizzle(process.env.DB_URL!, {
cache: upstashCache(),
})
```
You can also explicitly define your Upstash credentials, enable global caching for all queries by default (opt-out) or pass custom caching options:
```ts theme={"system"}
import { upstashCache } from "drizzle-orm/cache/upstash"
import { drizzle } from "drizzle-orm/..."
const db = drizzle(process.env.DB_URL!, {
cache: upstashCache({
// 👇 Redis credentials (optional — can also be pulled from env vars)
url: "
1. **Retry** - Republish the message and remove it from the dead letter queue. Republished messages are just like any other message and will be retried automatically if they fail.
2. **Delete** - Delete the message from the dead letter queue.
## Limitations
Dead letter queues are subject only to a retention period that depends on your plan. Messages are deleted when their retention period expires. See the “Max DLQ Retention” row on the [QStash Pricing](https://upstash.com/pricing/qstash) page.
---
# Source: https://upstash.com/docs/search/tools/documentationcrawler.md
> ## Documentation Index
> Fetch the complete documentation index at: https://upstash.com/docs/llms.txt
> Use this file to discover all available pages before exploring further.
# Documentation Crawler
> A tool to crawl docs and feed Upstash Search database
## Introduction
This tool helps you crawl documentation websites incrementally, extract their content, and create a search index in Upstash Search.
## Usage
It is available both as a CLI tool and a library.
### CLI Usage
You can run the CLI directly using `npx` (no installation required):
```sh theme={"system"}
npx @upstash/search-crawler
```
Or with command-line options:
```sh theme={"system"}
npx @upstash/search-crawler \
--upstash-url "UPSTASH_SEARCH_REST_URL" \
--upstash-token "UPSTASH_SEARCH_REST_TOKEN" \
--index-name "my-index" \
--doc-url "https://example.com/docs"
```
You will be prompted for any missing options:
* Your Upstash Search URL
* Your Upstash Search token
* (Optional) Custom index name
* The documentation URL to crawl
#### What the Tool Does
1. **Discover** all internal documentation links
2. **Crawl** each page and extract content
3. **Track** new or obsolete data
4. **Upsert** the new records into your Upstash Search index
### Library Usage
You can also use this as a library in your own code:
```typescript theme={"system"}
import {
crawlAndIndex,
type CrawlerOptions,
type CrawlerResult,
} from "@upstash/search-crawler";
const options: CrawlerOptions = {
upstashUrl: "UPSTASH_SEARCH_REST_URL",
upstashToken: "UPSTASH_SEARCH_REST_TOKEN",
indexName: "my-docs",
docUrl: "https://example.com/docs",
silent: true, // no console output
};
const result: CrawlerResult = await crawlAndIndex(options);
```
## Obtaining Upstash Credentials
1. Go to your [Upstash Console](https://console.upstash.com/).
2. Select your Search index. (See [How to Create Search Index](/search/overall/getstarted#create-a-database))
3. Under the **Details** section, copy your `UPSTASH_SEARCH_REST_URL` and `UPSTASH_SEARCH_REST_TOKEN`.
* `--upstash-url` corresponds to `UPSTASH_SEARCH_REST_URL`
* `--upstash-token` corresponds to `UPSTASH_SEARCH_REST_TOKEN`
## Further Reading
Try combining this tool with [Qstash Schedule](/qstash/features/schedules) to keep your database up to date with docs. You may deploy your crawler on a server and call it on a schedule regularly to fetch updates in your docs. Check out our example project for implementation details: [A modern documentation library to search and track the docs.](https://github.com/upstash/search-js/tree/main/examples/search-docs)
For further insights, see [@upstash/search-crawler](https://github.com/upstash/search-crawler)
---
# Source: https://upstash.com/docs/search/integrations/docusaurus.md
> ## Documentation Index
> Fetch the complete documentation index at: https://upstash.com/docs/llms.txt
> Use this file to discover all available pages before exploring further.
# Docusaurus Integration
> AI-powered search component for Docusaurus using Upstash Search.
## Features
* 🤖 AI-powered search results based on your documentation
* 🎨 Modern and responsive UI
* 🌜 Dark/Light mode support
## Installation
To install the package, run:
```bash theme={"system"}
npm install @upstash/docusaurus-theme-upstash-search
```
## Configuration
### Enabling the Searchbar
To enable the searchbar, add the following to your docusaurus config file:
```js theme={"system"}
export default {
themes: ['@upstash/docusaurus-theme-upstash-search'],
// ...
themeConfig: {
// ...
upstash: {
upstashSearchRestUrl: "UPSTASH_SEARCH_REST_URL",
upstashSearchReadOnlyRestToken: "UPSTASH_SEARCH_READ_ONLY_REST_TOKEN",
upstashSearchIndexName: "UPSTASH_SEARCH_INDEX_NAME",
},
},
};
```
The default index name is `docusaurus`. You can override it by setting the `upstashSearchIndexName` option.
You can fetch your URL and read only token from [Upstash Console](https://console.upstash.com/search). **Make sure to use the read only token!**
If you do not have a search database yet, you can create one from [Upstash Console](https://console.upstash.com/search). Make sure to use Upstash generated embedding model.
## Indexing Your Documentation
### Setting Up Environment Variables
To index your documentation, create a `.env` file with the following environment variables:
```bash theme={"system"}
UPSTASH_SEARCH_REST_URL=
UPSTASH_SEARCH_REST_TOKEN=
UPSTASH_SEARCH_INDEX_NAME=
DOCS_PATH=
```
You can fetch your URL and token from [Upstash Console](https://console.upstash.com/search). This time **do not use the read only token** since we are upserting data.
### Running the Indexing Script
After setting up your environment variables, run the indexing command:
```bash theme={"system"}
npx index-docs-upstash
```
### Configuration Options
* **DOCS\_PATH**: The indexing script looks for documentation in the `docs` directory by default. You can specify a different path using the `DOCS_PATH` option.
* **UPSTASH\_SEARCH\_INDEX\_NAME**: The default index name is `docusaurus`. You can override it by setting the `UPSTASH_SEARCH_INDEX_NAME` option. Make sure the name you set while indexing matches with your themeConfig `upstashSearchIndexName` option.
For more details on how this integration works, check out [the official repository](https://github.com/upstash/docusaurus-theme-upstash-search).
---
# Source: https://upstash.com/docs/redis/integrations/drizzle.md
> ## Documentation Index
> Fetch the complete documentation index at: https://upstash.com/docs/llms.txt
> Use this file to discover all available pages before exploring further.
# DrizzleORM with Upstash Redis
### Quickstart
DrizzleORM provides an `upstashCache()` helper to easily connect with Upstash Redis. To prevent surprises, the cache is always opt-in by default. Nothing is cached until you opt-in for a specific query or enable global caching.
First, install the drizzle package:
```bash theme={"system"}
npm install drizzle-orm
```
**Configure your Drizzle instance:**
```ts theme={"system"}
import { upstashCache } from "drizzle-orm/cache/upstash"
import { drizzle } from "drizzle-orm/..."
const db = drizzle(process.env.DB_URL!, {
cache: upstashCache(),
})
```
You can also explicitly define your Upstash credentials, enable global caching for all queries by default (opt-out) or pass custom caching options:
```ts theme={"system"}
import { upstashCache } from "drizzle-orm/cache/upstash"
import { drizzle } from "drizzle-orm/..."
const db = drizzle(process.env.DB_URL!, {
cache: upstashCache({
// 👇 Redis credentials (optional — can also be pulled from env vars)
url: "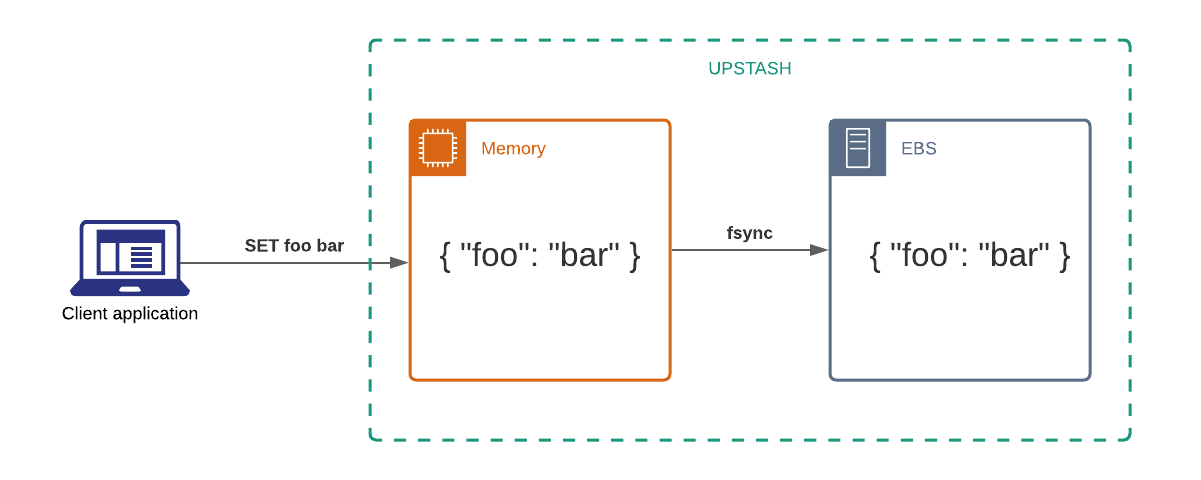
Redix Demo
<%= if @text do %> <%= @text %> <% end %> <%= if @weather do %>
<%= if @location do %>
Location:
<%= @location %>
<% end %>
<% end %>
Weather: <%= @weather %> °C
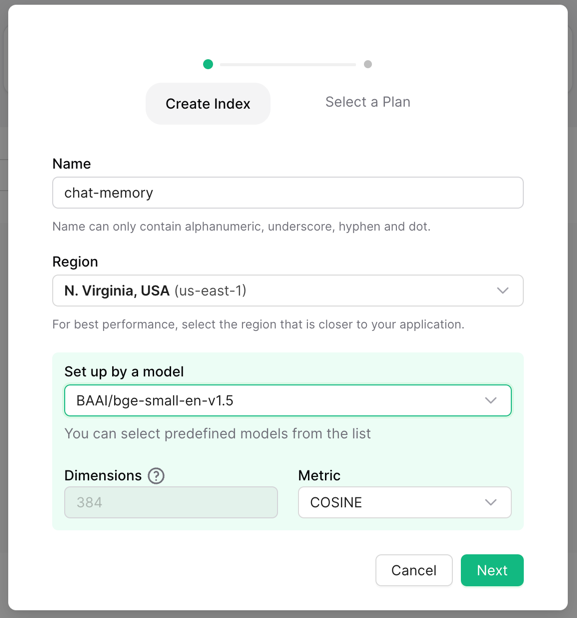 Then, you can start upserting and querying raw text data without any extra
setup.
Then, you can start upserting and querying raw text data without any extra
setup.
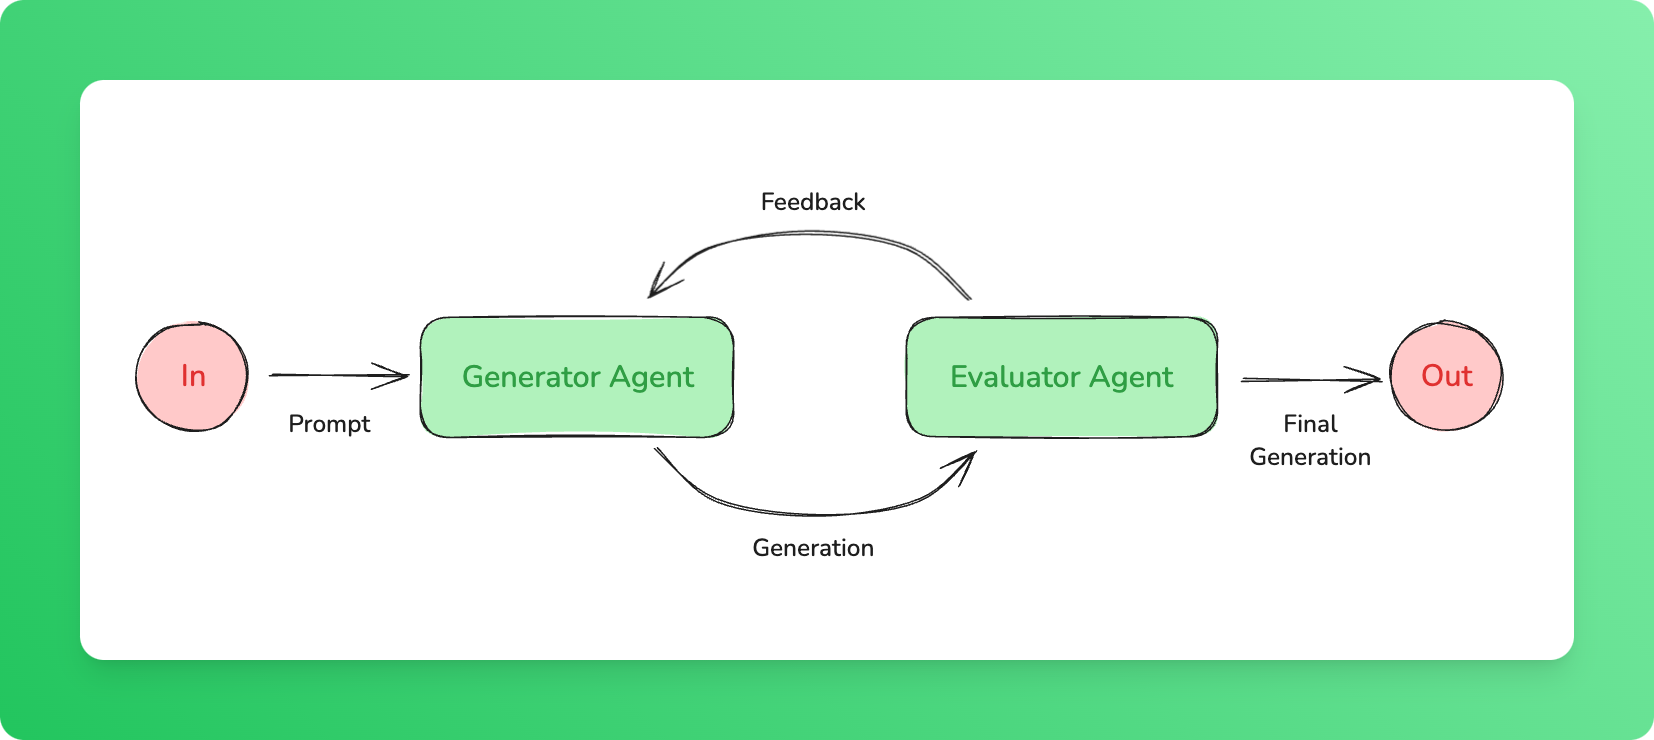 In this example, the generator creates output and passes it to the evaluator, which evaluates the response. If the evaluation fails, the evaluator returns corrections, and the generator is called again using the corrected output.
```ts theme={"system"}
import { serve } from "@upstash/workflow/nextjs";
import { agentWorkflow } from "@upstash/workflow-agents";
export const { POST } = serve(async (context) => {
const agents = agentWorkflow(context);
const model = agents.openai('gpt-3.5-turbo');
// Generator agent that generates content
const generator = agents.agent({
model,
name: 'generator',
maxSteps: 1,
background: 'You are an agent that generates text based on a prompt.',
tools: {}
});
// Evaluator agent that evaluates the text and gives corrections
const evaluator = agents.agent({
model,
name: 'evaluator',
maxSteps: 1,
background: 'You are an agent that evaluates the generated text and provides corrections if needed.',
tools: {}
});
let generatedText = '';
let evaluationResult = '';
const prompt = "Generate a short explanation of quantum mechanics.";
let nextPrompt = prompt;
for (let i = 0; i < 3; i++) {
// Construct prompt for generator:
// - If there's no evaluation, use the original prompt
// - If there's an evaluation, provide the prompt, the last generated text, and the evaluator's feedback
if (evaluationResult && evaluationResult !== "PASS") {
nextPrompt = `Please revise the answer to the question "${prompt}". Previous answer was: "${generatedText}", which received this feedback: "${evaluationResult}".`;
}
// Generate content
const generatedResponse = await agents.task({ agent: generator, prompt: nextPrompt }).run();
generatedText = generatedResponse.text
// Evaluate the generated content
const evaluationResponse = await agents.task({ agent: evaluator, prompt: `Evaluate and provide feedback for the following text: ${generatedText}` }).run();
evaluationResult = evaluationResponse.text
// If the evaluator accepts the content (i.e., "PASS"), stop
if (evaluationResult.includes("PASS")) {
break;
}
}
console.log(generatedText);
});
```
In this example, the generator creates output and passes it to the evaluator, which evaluates the response. If the evaluation fails, the evaluator returns corrections, and the generator is called again using the corrected output.
```ts theme={"system"}
import { serve } from "@upstash/workflow/nextjs";
import { agentWorkflow } from "@upstash/workflow-agents";
export const { POST } = serve(async (context) => {
const agents = agentWorkflow(context);
const model = agents.openai('gpt-3.5-turbo');
// Generator agent that generates content
const generator = agents.agent({
model,
name: 'generator',
maxSteps: 1,
background: 'You are an agent that generates text based on a prompt.',
tools: {}
});
// Evaluator agent that evaluates the text and gives corrections
const evaluator = agents.agent({
model,
name: 'evaluator',
maxSteps: 1,
background: 'You are an agent that evaluates the generated text and provides corrections if needed.',
tools: {}
});
let generatedText = '';
let evaluationResult = '';
const prompt = "Generate a short explanation of quantum mechanics.";
let nextPrompt = prompt;
for (let i = 0; i < 3; i++) {
// Construct prompt for generator:
// - If there's no evaluation, use the original prompt
// - If there's an evaluation, provide the prompt, the last generated text, and the evaluator's feedback
if (evaluationResult && evaluationResult !== "PASS") {
nextPrompt = `Please revise the answer to the question "${prompt}". Previous answer was: "${generatedText}", which received this feedback: "${evaluationResult}".`;
}
// Generate content
const generatedResponse = await agents.task({ agent: generator, prompt: nextPrompt }).run();
generatedText = generatedResponse.text
// Evaluate the generated content
const evaluationResponse = await agents.task({ agent: evaluator, prompt: `Evaluate and provide feedback for the following text: ${generatedText}` }).run();
evaluationResult = evaluationResponse.text
// If the evaluator accepts the content (i.e., "PASS"), stop
if (evaluationResult.includes("PASS")) {
break;
}
}
console.log(generatedText);
});
```
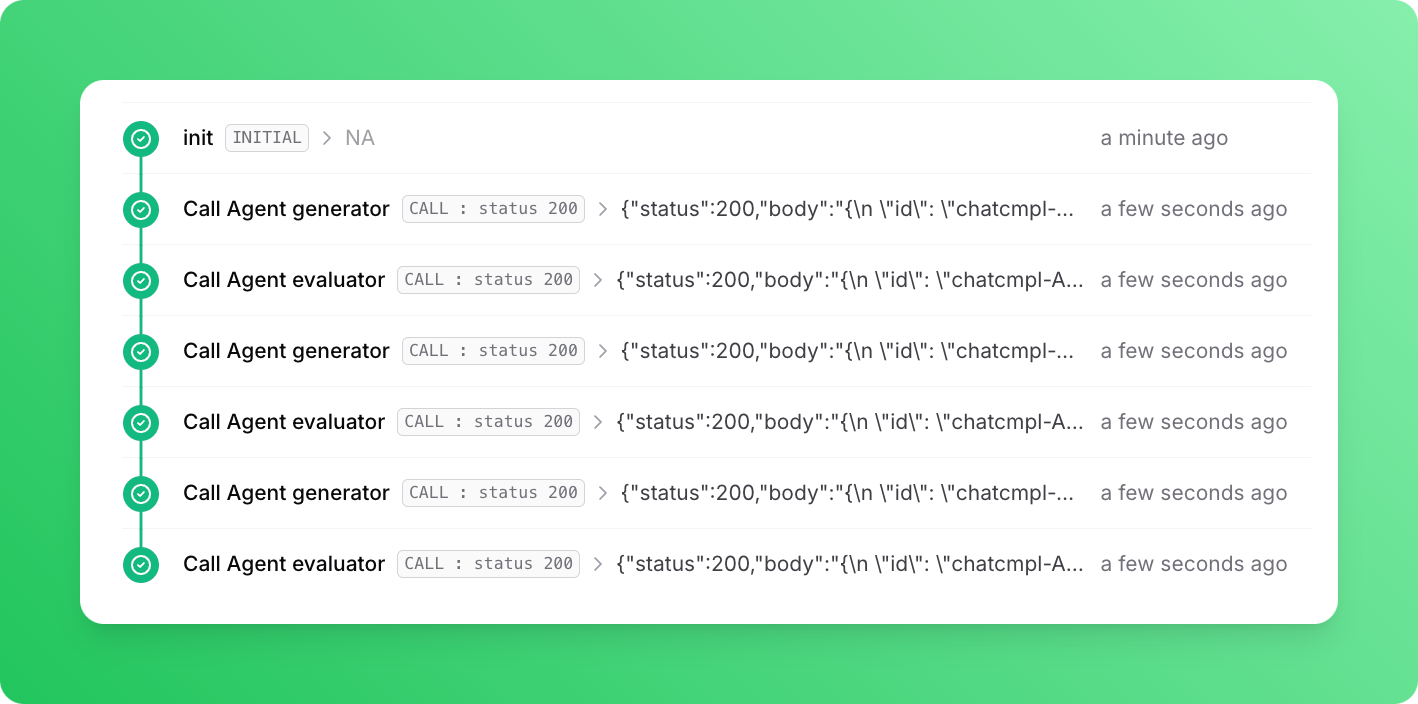 In response to the prompt, our agents generate this response:
```
Quantum mechanics is a branch of physics that describes the behavior of particles at the smallest scales, such as atoms and subatomic particles. It introduces the concept of quantized energy levels, wave-particle duality, and probabilistic nature of particles. In quantum mechanics, particles can exist in multiple states simultaneously until measured, and their behavior is governed by mathematical equations known as wave functions. This theory has revolutionized our understanding of the fundamental building blocks of the universe and has led to the development of technologies like quantum computing and quantum cryptography.
```
---
# Source: https://upstash.com/docs/workflow/howto/events.md
# Source: https://upstash.com/docs/qstash/sdks/py/examples/events.md
> ## Documentation Index
> Fetch the complete documentation index at: https://upstash.com/docs/llms.txt
> Use this file to discover all available pages before exploring further.
# Events
In response to the prompt, our agents generate this response:
```
Quantum mechanics is a branch of physics that describes the behavior of particles at the smallest scales, such as atoms and subatomic particles. It introduces the concept of quantized energy levels, wave-particle duality, and probabilistic nature of particles. In quantum mechanics, particles can exist in multiple states simultaneously until measured, and their behavior is governed by mathematical equations known as wave functions. This theory has revolutionized our understanding of the fundamental building blocks of the universe and has led to the development of technologies like quantum computing and quantum cryptography.
```
---
# Source: https://upstash.com/docs/workflow/howto/events.md
# Source: https://upstash.com/docs/qstash/sdks/py/examples/events.md
> ## Documentation Index
> Fetch the complete documentation index at: https://upstash.com/docs/llms.txt
> Use this file to discover all available pages before exploring further.
# Events
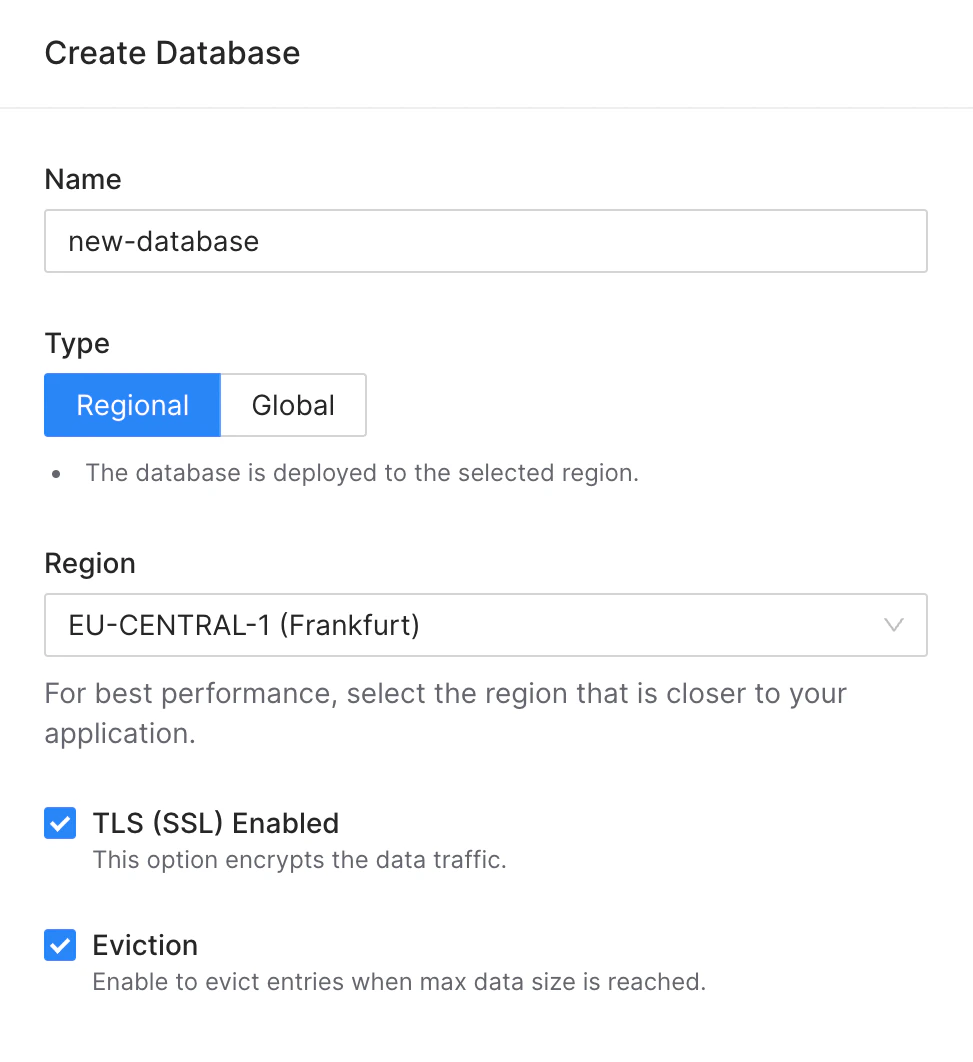 * Or for an existing database by clicking **Enable** in Configuration/Eviction
box in the database details page:
* Or for an existing database by clicking **Enable** in Configuration/Eviction
box in the database details page:
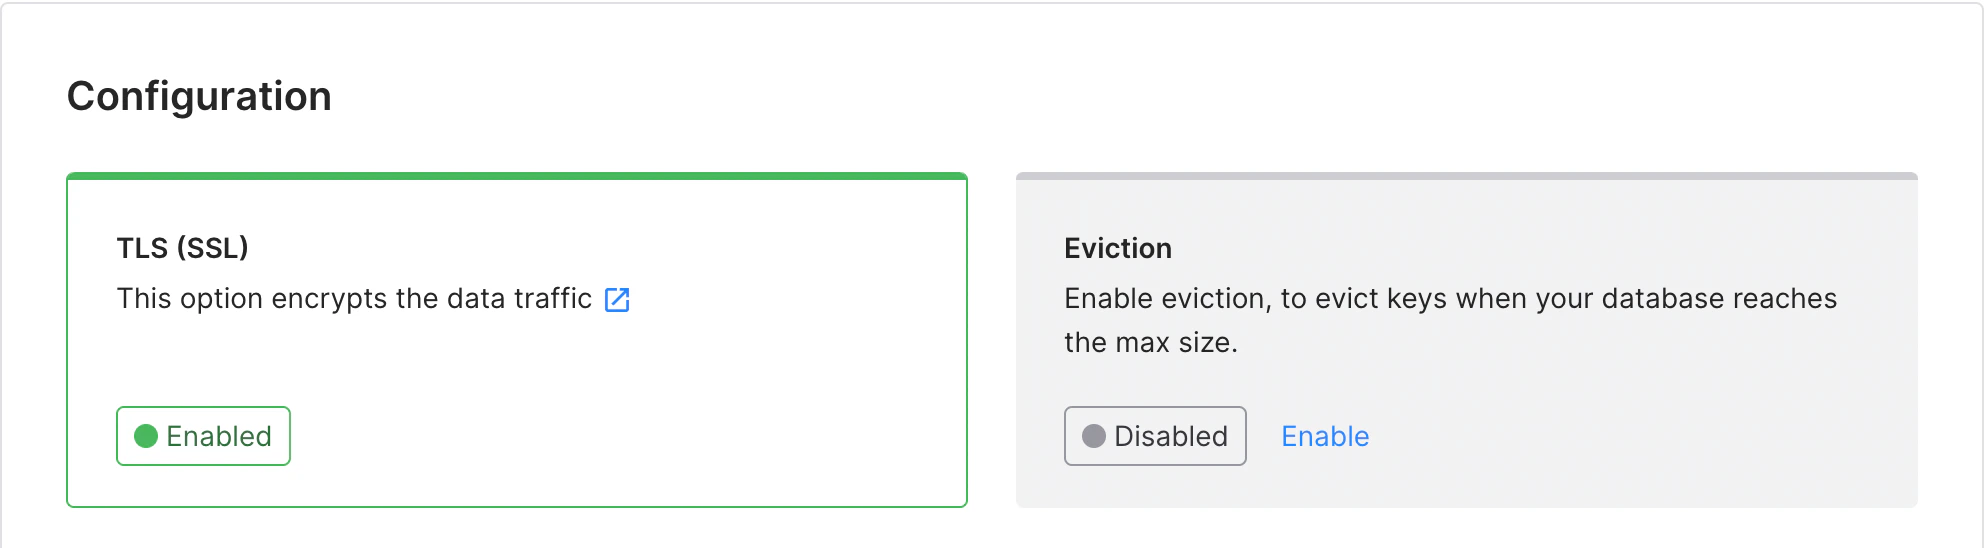 Upstash currently uses a single eviction algorithm, called
**optimistic-volatile**, which is a combination of *volatile-random* and
*allkeys-random* eviction policies available in
[the original Redis](https://redis.io/docs/manual/eviction/#eviction-policies).
Initially, Upstash employs random sampling to select keys for eviction, giving
priority to keys marked with a TTL (expire field). If there is a shortage of
volatile keys or they are insufficient to create space, additional non-volatile
keys are randomly chosen for eviction. In future releases, Upstash plans to
introduce more eviction policies, offering users a wider range of options to
customize the eviction behavior according to their specific needs.
---
# Source: https://upstash.com/docs/workflow/agents/examples.md
# Source: https://upstash.com/docs/vector/examples.md
# Source: https://upstash.com/docs/redis/examples.md
> ## Documentation Index
> Fetch the complete documentation index at: https://upstash.com/docs/llms.txt
> Use this file to discover all available pages before exploring further.
# Examples Index
> List of all Upstash Examples
TODO: fahreddin
import TagFilters from "../../src/components/Filter.js"
Using a local tunnel connects your endpoint to the production QStash, enabling you to view workflow logs in the Upstash Console.
## Step 3: Create a Workflow Endpoint
A workflow endpoint allows you to define a set of steps that, together, make up a workflow. Each step contains a piece of business logic that is automatically retried on failure, with easy monitoring via our visual workflow dashboard.
To define a workflow endpoint with Express.js, navigate into your entrypoint file (usually `src/index.ts`) and add the following code:
If you are using a local tunnel, you can use this ID to track the workflow run and see its status in your QStash workflow dashboard. All steps are listed with their statuses, headers, and body for a detailed overview of your workflow from start to finish. Click on a step to see its detailed logs.
## Step 5: Deploying to Production
When deploying your Hono app with Upstash Workflow to production, there are a few key points to keep in mind:
1. **Environment Variables**: Make sure that all necessary environment variables from your `.env` file are set in your Vercel project settings. For example, your `QSTASH_TOKEN`, and any other configuration variables your workflow might need.
2. **Remove Local Development Settings**: In your production code, you can remove or conditionally exclude any local development settings. For example, if you used [local tunnel for local development](/workflow/howto/local-development#local-tunnel-with-ngrok)
3. **Deployment**: Deploy your Express.js app to production as you normally would, for example to fly.io, Heroku, or AWS.
4. **Verify Workflow Endpoint**: After deployment, verify that your workflow endpoint is accessible by making a POST request to your production URL:
```bash Terminal theme={"system"}
curl -X POST
Upstash currently uses a single eviction algorithm, called
**optimistic-volatile**, which is a combination of *volatile-random* and
*allkeys-random* eviction policies available in
[the original Redis](https://redis.io/docs/manual/eviction/#eviction-policies).
Initially, Upstash employs random sampling to select keys for eviction, giving
priority to keys marked with a TTL (expire field). If there is a shortage of
volatile keys or they are insufficient to create space, additional non-volatile
keys are randomly chosen for eviction. In future releases, Upstash plans to
introduce more eviction policies, offering users a wider range of options to
customize the eviction behavior according to their specific needs.
---
# Source: https://upstash.com/docs/workflow/agents/examples.md
# Source: https://upstash.com/docs/vector/examples.md
# Source: https://upstash.com/docs/redis/examples.md
> ## Documentation Index
> Fetch the complete documentation index at: https://upstash.com/docs/llms.txt
> Use this file to discover all available pages before exploring further.
# Examples Index
> List of all Upstash Examples
TODO: fahreddin
import TagFilters from "../../src/components/Filter.js"
Using a local tunnel connects your endpoint to the production QStash, enabling you to view workflow logs in the Upstash Console.
## Step 3: Create a Workflow Endpoint
A workflow endpoint allows you to define a set of steps that, together, make up a workflow. Each step contains a piece of business logic that is automatically retried on failure, with easy monitoring via our visual workflow dashboard.
To define a workflow endpoint with Express.js, navigate into your entrypoint file (usually `src/index.ts`) and add the following code:
If you are using a local tunnel, you can use this ID to track the workflow run and see its status in your QStash workflow dashboard. All steps are listed with their statuses, headers, and body for a detailed overview of your workflow from start to finish. Click on a step to see its detailed logs.
## Step 5: Deploying to Production
When deploying your Hono app with Upstash Workflow to production, there are a few key points to keep in mind:
1. **Environment Variables**: Make sure that all necessary environment variables from your `.env` file are set in your Vercel project settings. For example, your `QSTASH_TOKEN`, and any other configuration variables your workflow might need.
2. **Remove Local Development Settings**: In your production code, you can remove or conditionally exclude any local development settings. For example, if you used [local tunnel for local development](/workflow/howto/local-development#local-tunnel-with-ngrok)
3. **Deployment**: Deploy your Express.js app to production as you normally would, for example to fly.io, Heroku, or AWS.
4. **Verify Workflow Endpoint**: After deployment, verify that your workflow endpoint is accessible by making a POST request to your production URL:
```bash Terminal theme={"system"}
curl -X POST 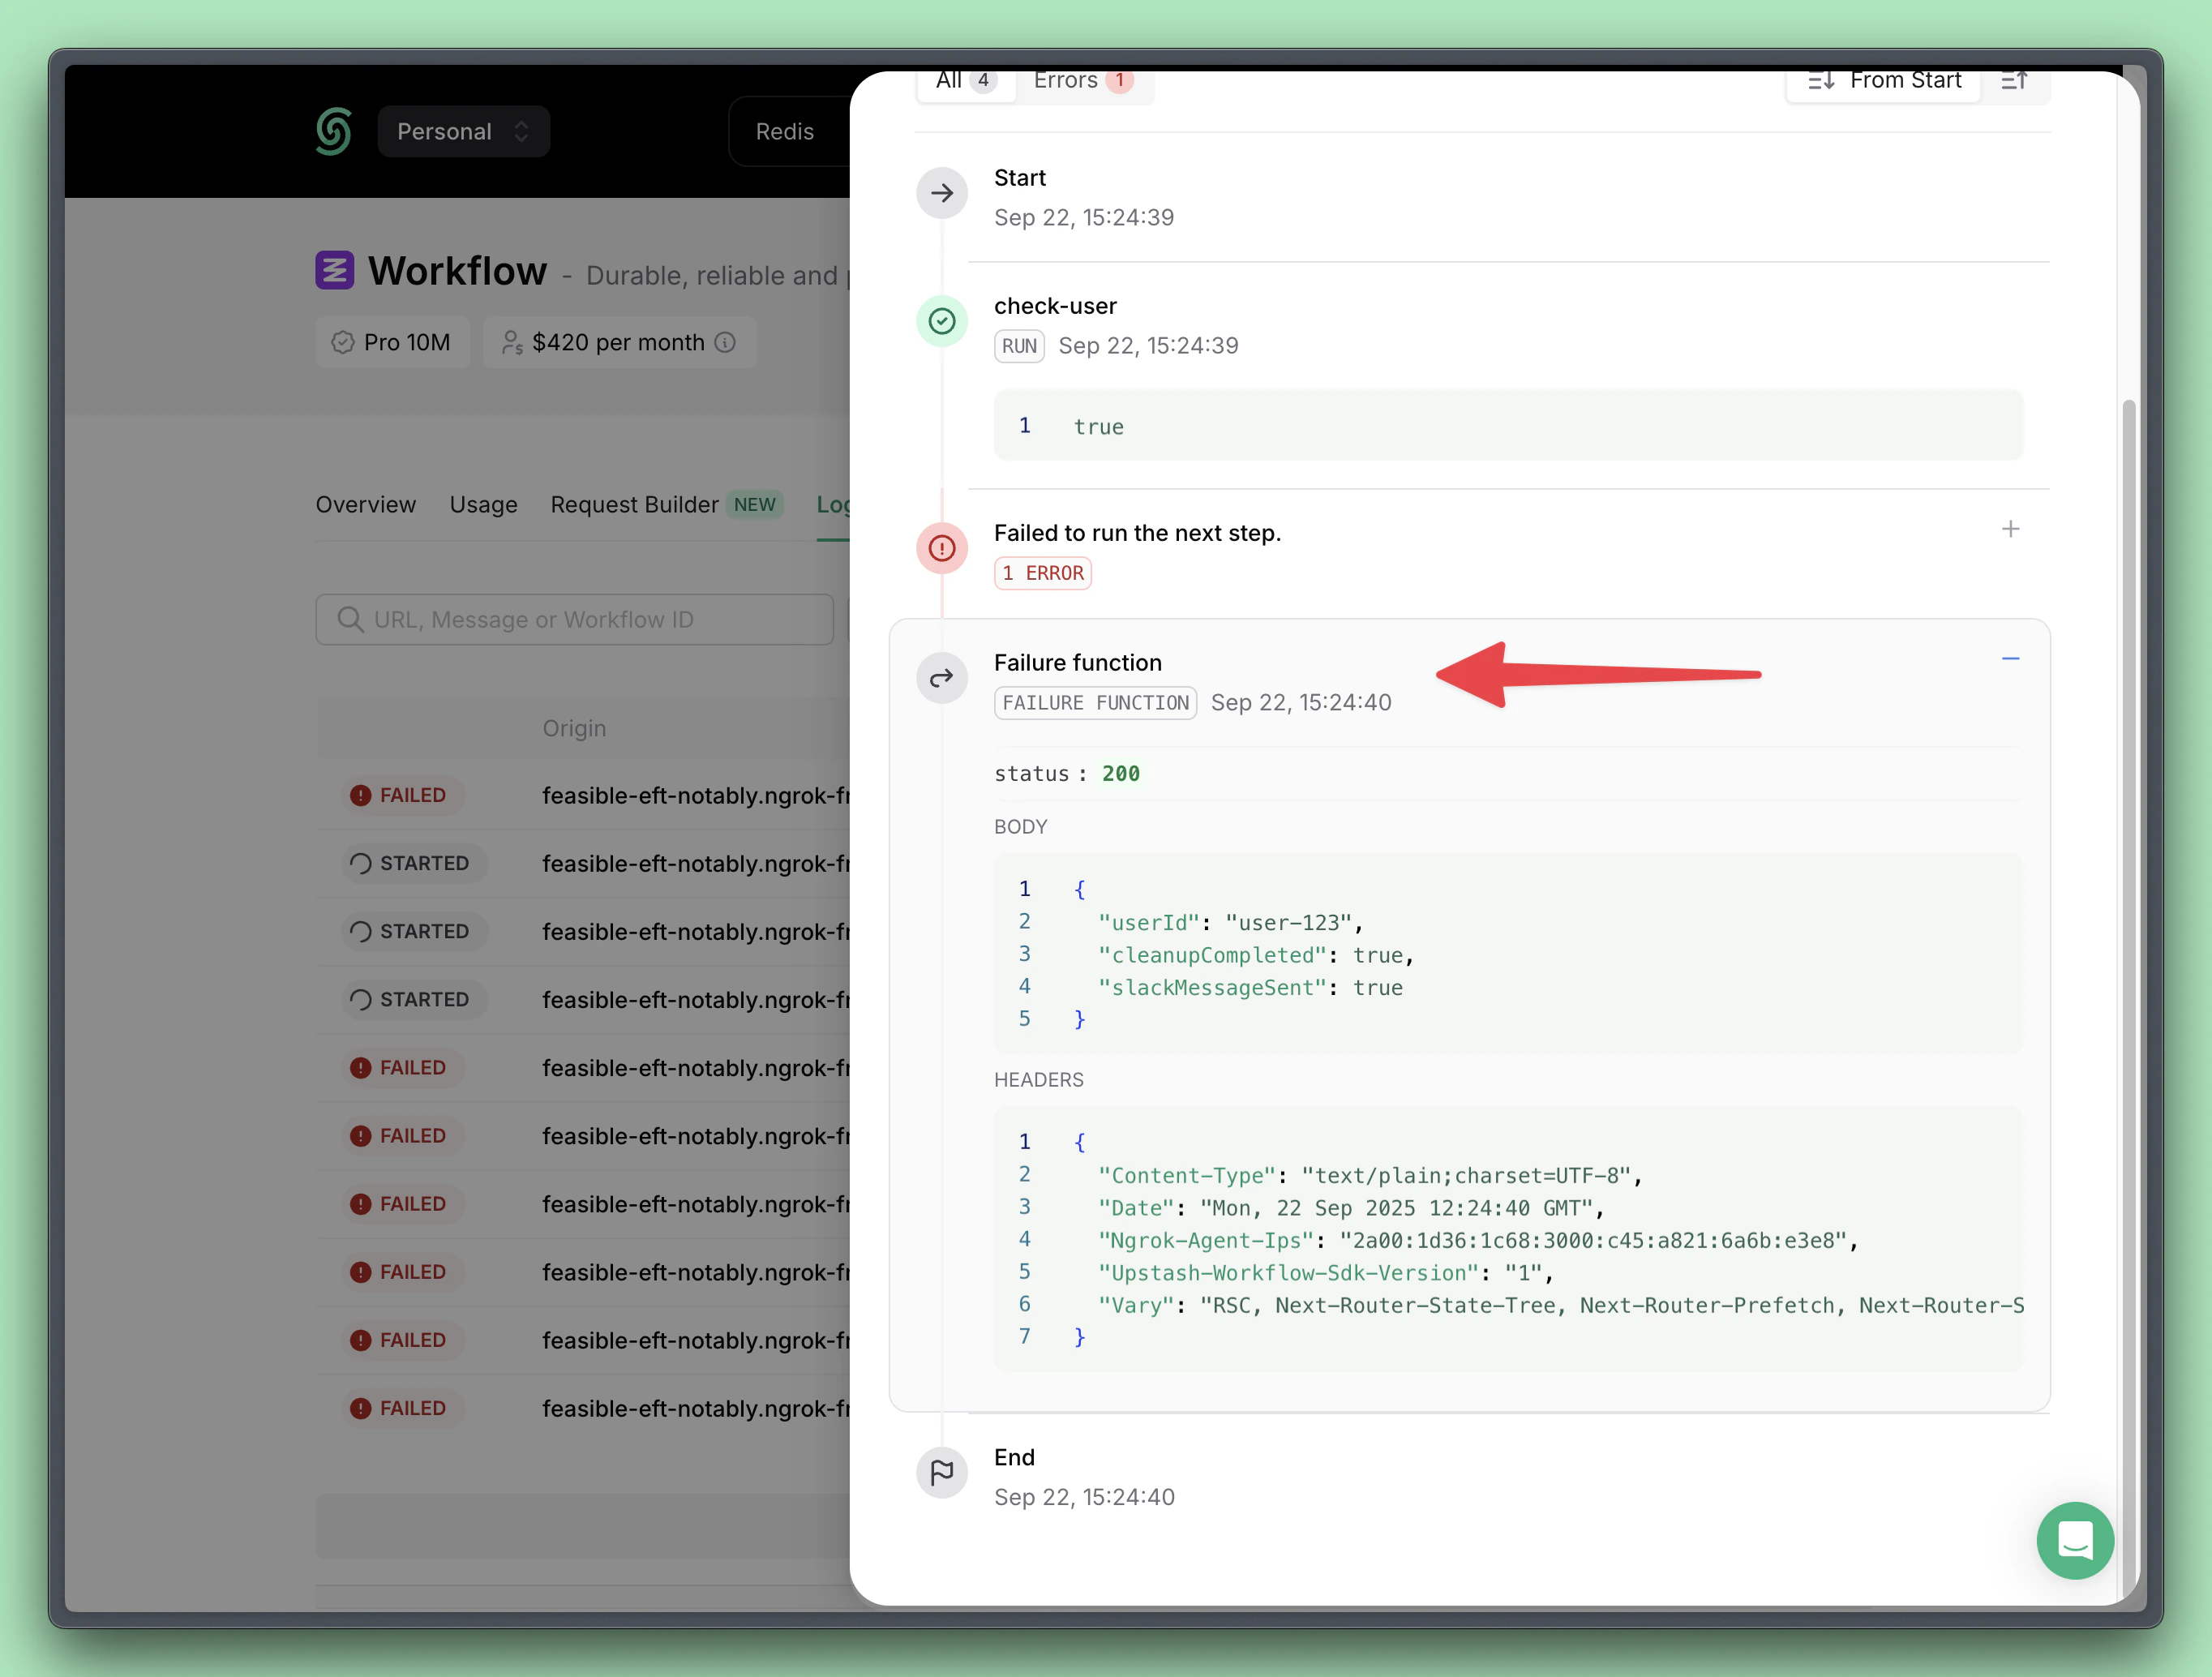 The failure function automatically receives the workflow run context and the reason for the failure, so you can decide how to handle it.
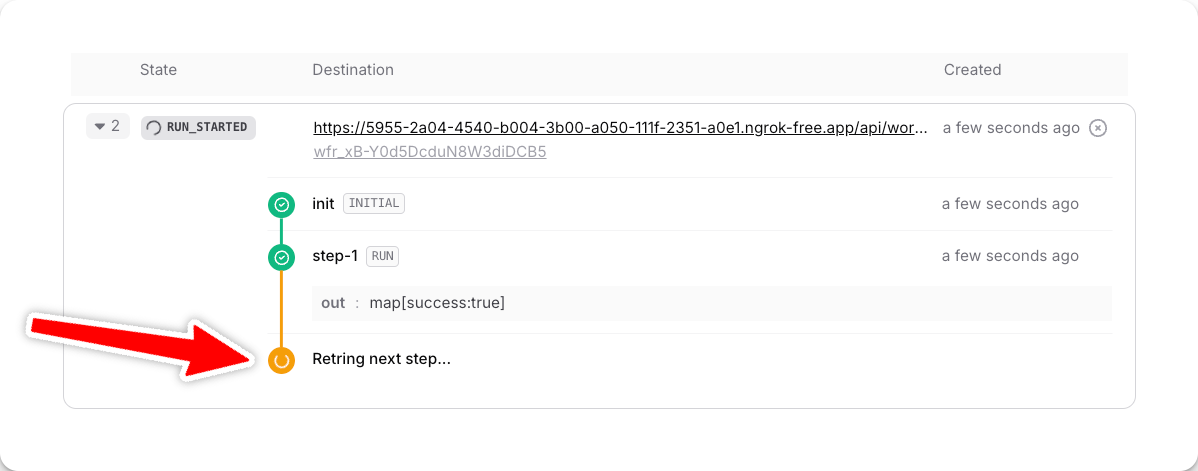 If, even after all retries, your step does not succeed, we'll move the failed run into your [Dead Letter Queue (DLQ)](/qstash/howto/handling-failures#dead-letter-queue). That way, you can always manually retry it again and debug the issue.
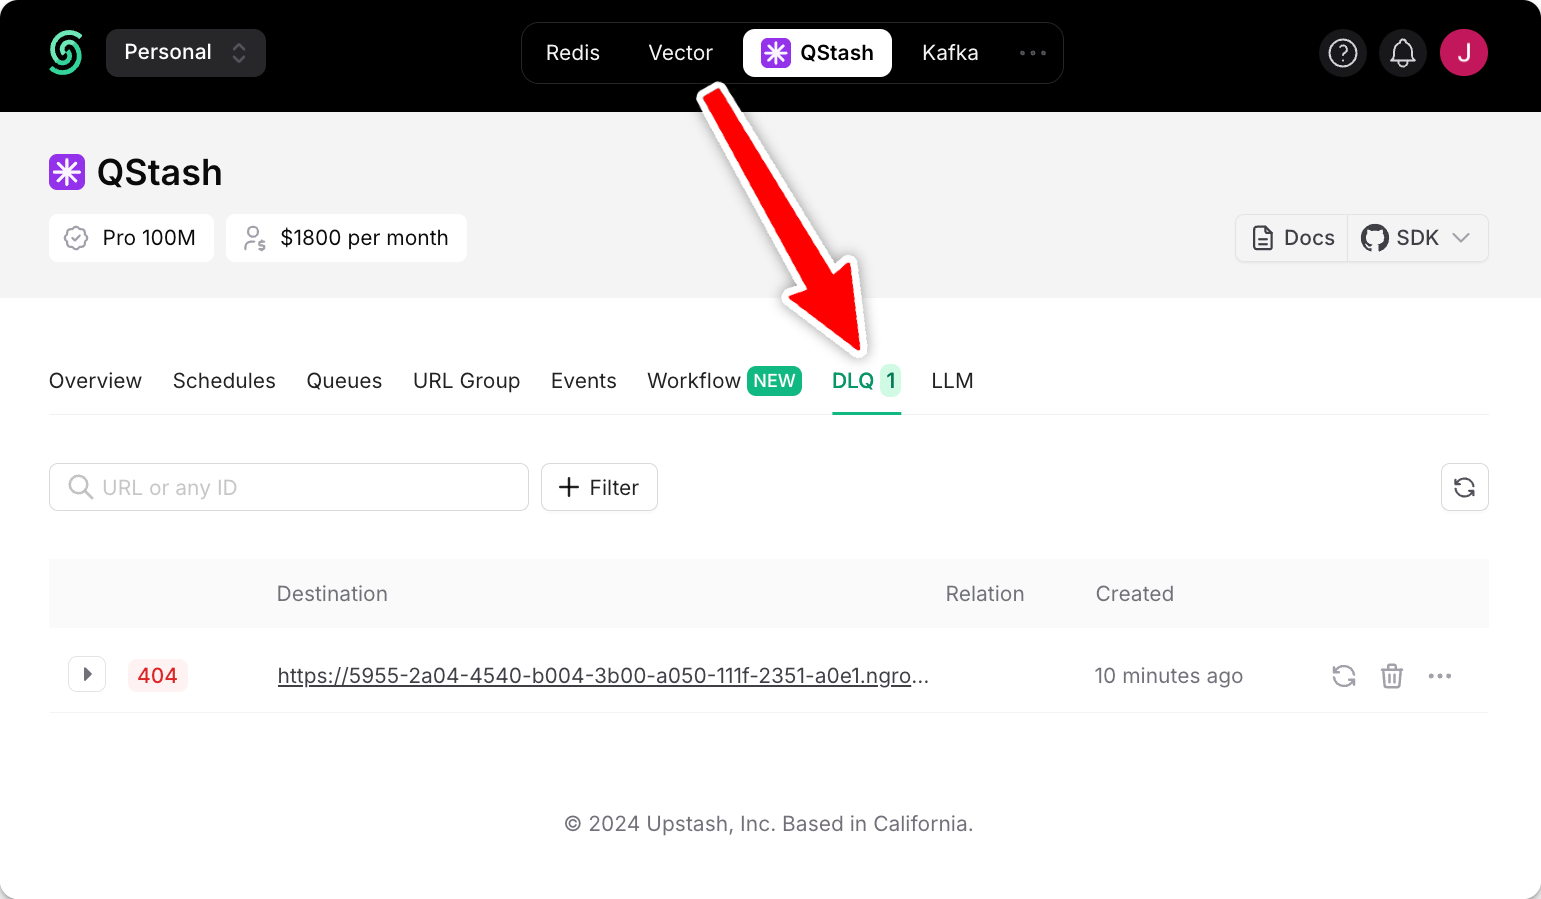 If you want to take an action (a cleanup/log), you can configure either `failureFunction` or a `failureUrl` on the `serve` method of your workflow.
These options allow you to define custom logic or an external endpoint that will be triggered when a failure occurs.
## Using a `failureFunction` (recommended)
The `serve` function you use to create a workflow endpoint accepts a `failureFunction` parameter - an easy way to gracefully handle errors (i.e. logging them to Sentry) or your custom handling logic.
If you want to take an action (a cleanup/log), you can configure either `failureFunction` or a `failureUrl` on the `serve` method of your workflow.
These options allow you to define custom logic or an external endpoint that will be triggered when a failure occurs.
## Using a `failureFunction` (recommended)
The `serve` function you use to create a workflow endpoint accepts a `failureFunction` parameter - an easy way to gracefully handle errors (i.e. logging them to Sentry) or your custom handling logic.
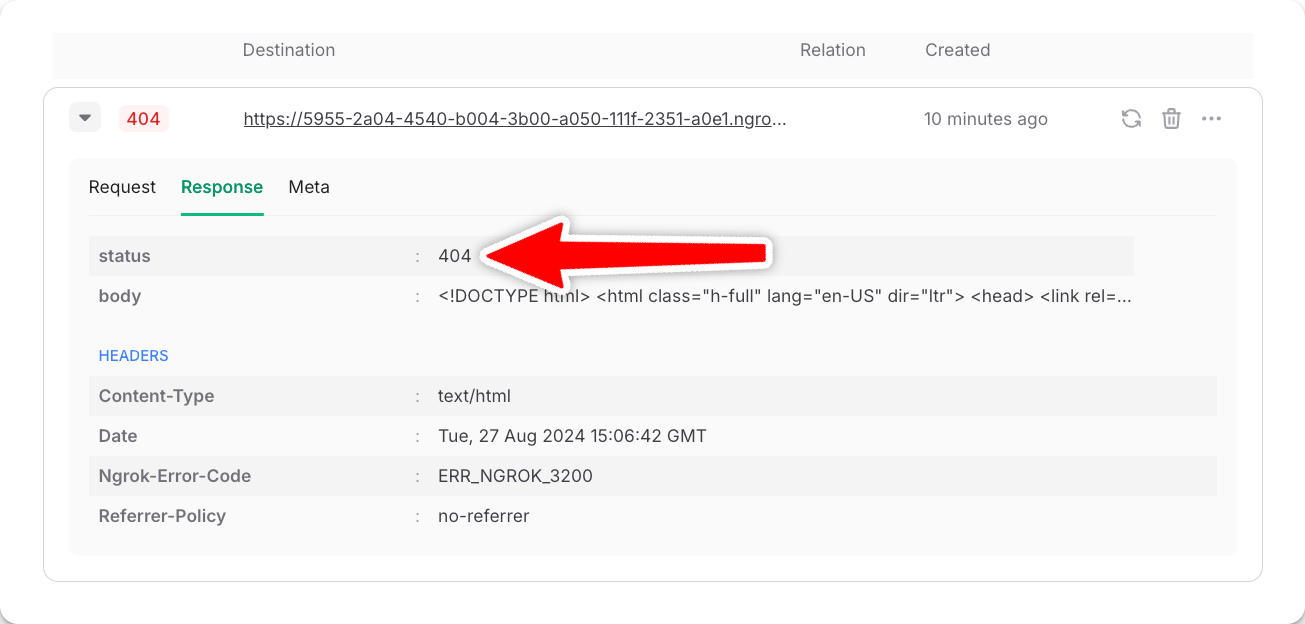 ---
# Source: https://upstash.com/docs/vector/help/faq.md
# Source: https://upstash.com/docs/search/help/faq.md
# Source: https://upstash.com/docs/redis/help/faq.md
# Source: https://upstash.com/docs/common/account/faq.md
> ## Documentation Index
> Fetch the complete documentation index at: https://upstash.com/docs/llms.txt
> Use this file to discover all available pages before exploring further.
# Account and Billing FAQ
## How can I delete my account?
You can delete your account from `Account` > `Settings` > `Delete Account`. You should first delete all your databases and clusters. After you delete your account, all your data and payment information will be deleted and you will not be able to recover it.
## How can I delete my credit card?
You can delete your credit card from `Account` > `Billing` page. However, you should first add a new credit card to be able to delete the existing one. If you want to delete all of your payment information, you should delete your account.
## How can I change my email address?
You can change your account e-mail address in `Account` > `Settings` page. In order to change your billing e-mail adress, please see `Account` > `Billing` page. If you encounter any issues, please contact us at [support@upstash.com](mailto:support@upstash.com) to change your email address.
## Can I set an upper spending limit, so I don't get surprises after an unexpected amount of high traffic?
On Pay as You Go model, you can set a budget for your Redis instances. When your monthly cost reaches the max budget, we send an email to inform you and throttle your instance. You will not be charged beyond your set budget.
To set the budget, you can go to the "Usage" tab of your Redis instance and click "Change Budget" under the cost metric.
## What happens if my payment fails?
If a payment failure occurs, we will retry the payment three more times before suspending the account. During this time, you will receive email notifications about the payment failure. If the account is suspended, all resources in the account will be inaccessible. If you add a valid payment method after the account suspension, your account will be automatically unsuspended during the next payment attempt.
## What happens if I unsubscribe from AWS Marketplace but I don't have any other payment methods?
We send a warning email three times before suspending an account. If no valid payment method is added, we suspend the account. Once the account is suspended, all resources within the account will be inaccessible. If you add a valid payment method after the account suspension, your account will be automatically unsuspended during the next system check.
## I have a question about my bill, who should I contact?
Please contact us at [support@upstash.com](mailto:support@upstash.com).
---
# Source: https://upstash.com/docs/workflow/quickstarts/fastapi.md
# Source: https://upstash.com/docs/redis/quickstarts/fastapi.md
> ## Documentation Index
> Fetch the complete documentation index at: https://upstash.com/docs/llms.txt
> Use this file to discover all available pages before exploring further.
# FastAPI
---
# Source: https://upstash.com/docs/vector/help/faq.md
# Source: https://upstash.com/docs/search/help/faq.md
# Source: https://upstash.com/docs/redis/help/faq.md
# Source: https://upstash.com/docs/common/account/faq.md
> ## Documentation Index
> Fetch the complete documentation index at: https://upstash.com/docs/llms.txt
> Use this file to discover all available pages before exploring further.
# Account and Billing FAQ
## How can I delete my account?
You can delete your account from `Account` > `Settings` > `Delete Account`. You should first delete all your databases and clusters. After you delete your account, all your data and payment information will be deleted and you will not be able to recover it.
## How can I delete my credit card?
You can delete your credit card from `Account` > `Billing` page. However, you should first add a new credit card to be able to delete the existing one. If you want to delete all of your payment information, you should delete your account.
## How can I change my email address?
You can change your account e-mail address in `Account` > `Settings` page. In order to change your billing e-mail adress, please see `Account` > `Billing` page. If you encounter any issues, please contact us at [support@upstash.com](mailto:support@upstash.com) to change your email address.
## Can I set an upper spending limit, so I don't get surprises after an unexpected amount of high traffic?
On Pay as You Go model, you can set a budget for your Redis instances. When your monthly cost reaches the max budget, we send an email to inform you and throttle your instance. You will not be charged beyond your set budget.
To set the budget, you can go to the "Usage" tab of your Redis instance and click "Change Budget" under the cost metric.
## What happens if my payment fails?
If a payment failure occurs, we will retry the payment three more times before suspending the account. During this time, you will receive email notifications about the payment failure. If the account is suspended, all resources in the account will be inaccessible. If you add a valid payment method after the account suspension, your account will be automatically unsuspended during the next payment attempt.
## What happens if I unsubscribe from AWS Marketplace but I don't have any other payment methods?
We send a warning email three times before suspending an account. If no valid payment method is added, we suspend the account. Once the account is suspended, all resources within the account will be inaccessible. If you add a valid payment method after the account suspension, your account will be automatically unsuspended during the next system check.
## I have a question about my bill, who should I contact?
Please contact us at [support@upstash.com](mailto:support@upstash.com).
---
# Source: https://upstash.com/docs/workflow/quickstarts/fastapi.md
# Source: https://upstash.com/docs/redis/quickstarts/fastapi.md
> ## Documentation Index
> Fetch the complete documentation index at: https://upstash.com/docs/llms.txt
> Use this file to discover all available pages before exploring further.
# FastAPI
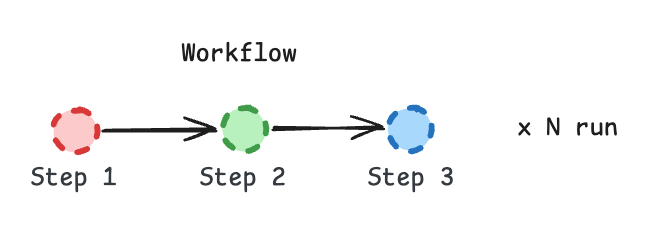 With the configuration above:
* **Rate:** At most 3 steps per minute can start across all workflow runs.
* **Parallelism:** At most 7 steps can be running at the same time.
Steps that exceed these limits are automatically queued and executed later.
With the configuration above:
* **Rate:** At most 3 steps per minute can start across all workflow runs.
* **Parallelism:** At most 7 steps can be running at the same time.
Steps that exceed these limits are automatically queued and executed later.
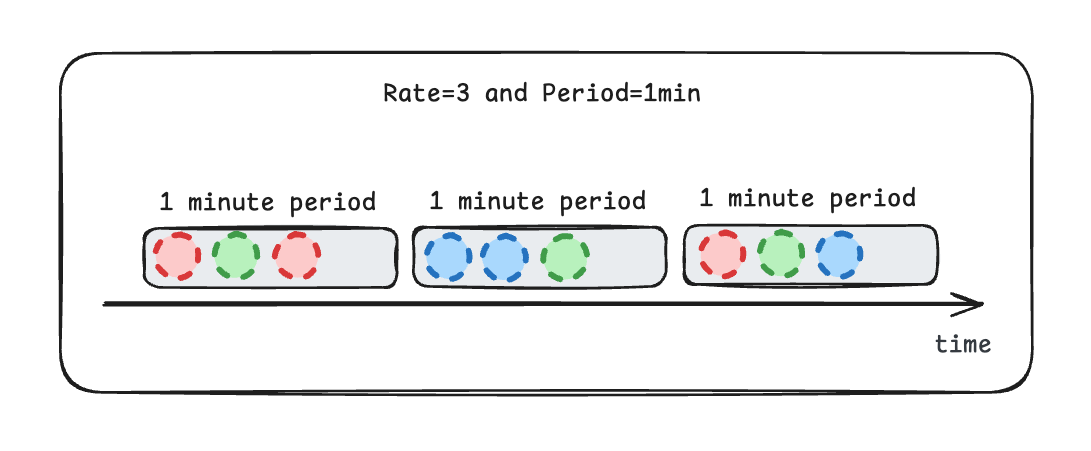 Note that each step above corresponds to a separate workflow run.
Because this workflow is sequential, each workflow run has only one pending step at a time.
In workflows with **parallel branches**, multiple steps from the same workflow run may appear in the schedule simultaneously.
Parallelism slots are consumed by running steps.
If no slots are available, new steps enter the **waitlist** until resources free up:
Note that each step above corresponds to a separate workflow run.
Because this workflow is sequential, each workflow run has only one pending step at a time.
In workflows with **parallel branches**, multiple steps from the same workflow run may appear in the schedule simultaneously.
Parallelism slots are consumed by running steps.
If no slots are available, new steps enter the **waitlist** until resources free up:
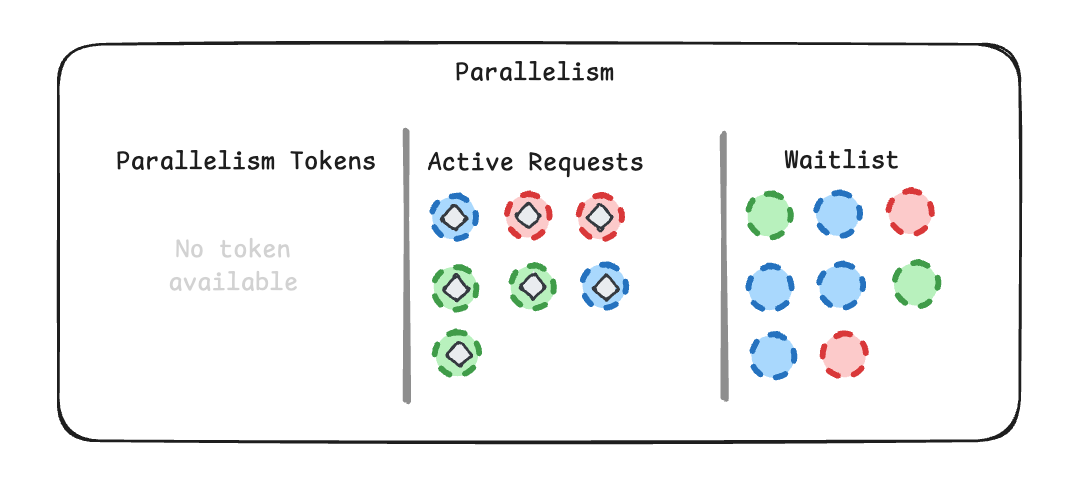
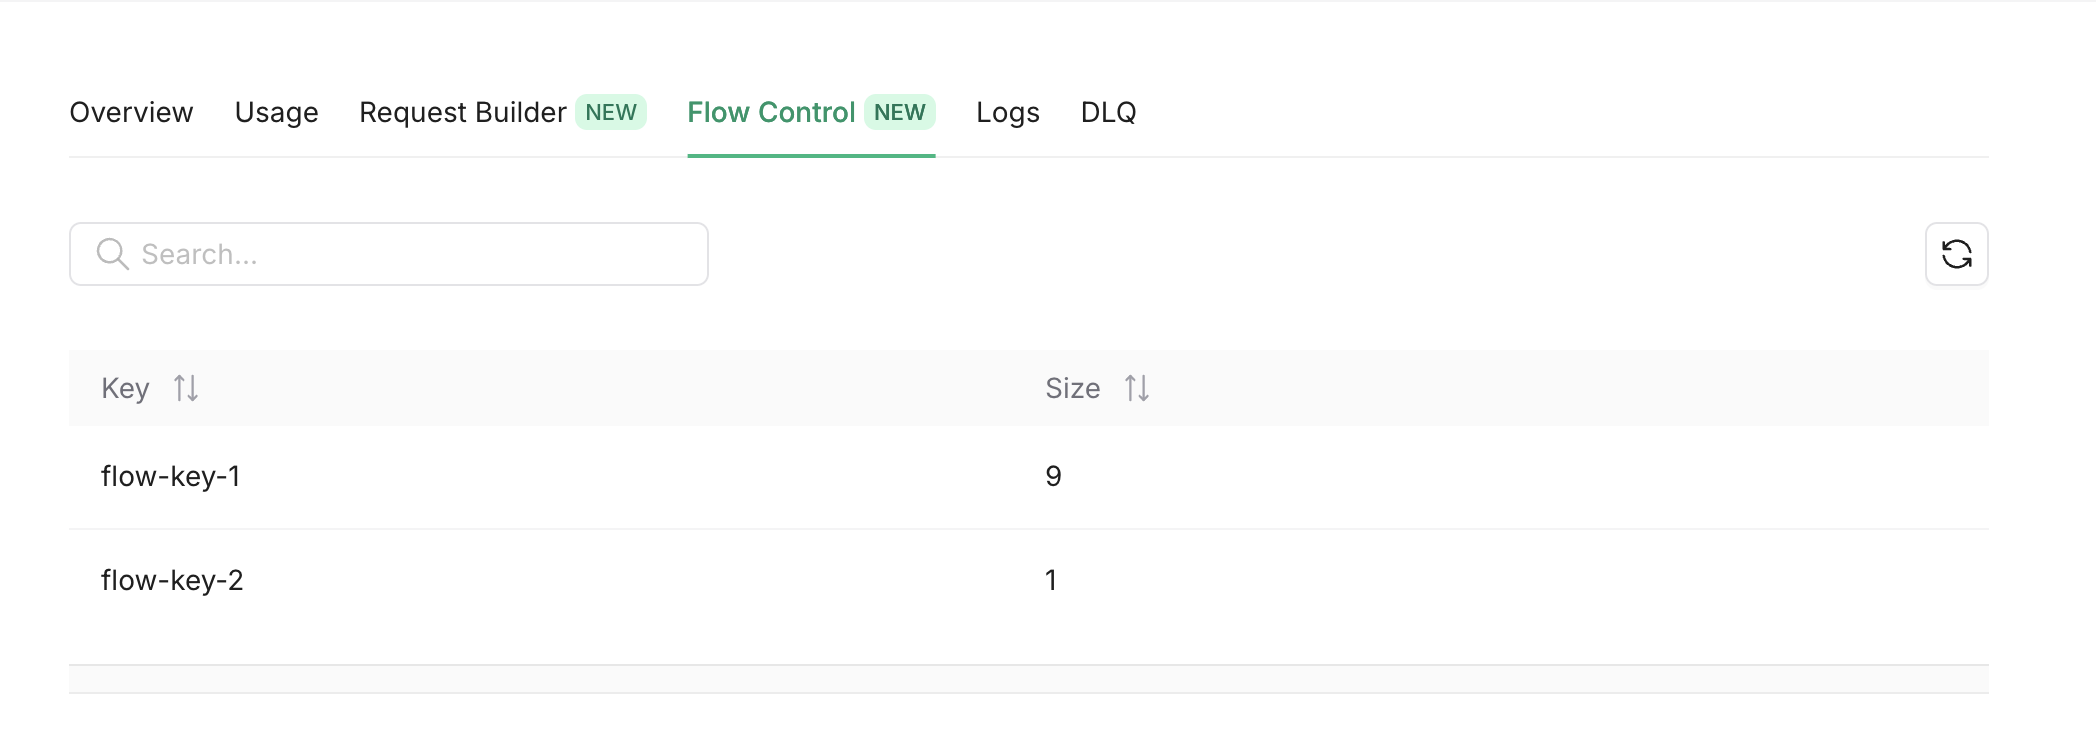 Also you can get the same info using the REST API.
* [List All Flow Control Keys](/qstash/api/flow-control/list).
* [Single Flow Control Key](/qstash/api/flow-control/get).
---
# Source: https://upstash.com/docs/vector/integrations/flowise.md
> ## Documentation Index
> Fetch the complete documentation index at: https://upstash.com/docs/llms.txt
> Use this file to discover all available pages before exploring further.
# Flowise with Upstash Vector and Redis
Flowise is an open source low-code tool for developers to build customized LLM orchestration flows & AI agents. With Upstash Vector and Upstash Redis, you can extend your Flowise flows to include semantic search, caching, and conversation memory.
## Install
To get started, you can install Flowise locally using npm. Run:
```bash theme={"system"}
npm install -g flowise
```
Start Flowise:
```bash theme={"system"}
npx flowise start
```
Open: [http://localhost:3000](http://localhost:3000)
You also need to set up Upstash services:
1. Create a **Vector Index** in the [Upstash Console](https://console.upstash.com/vector). To learn more about index creation, you can check out [this page](https://docs.upstash.com/vector/overall/getstarted).
2. Create a **Redis Database** in the [Upstash Console](https://console.upstash.com/redis). To learn more about Redis database creation, you can check out [this page](/redis/overall/getstarted).
## Nodes Overview
Flowise supports multiple Upstash integrations. Below are the nodes and their functionalities:
### 1. Upstash Vector Node
Use the **Upstash Vector** node to perform semantic search and store document embeddings. Connect the node to document loaders and embedding components for indexing and querying.
Also you can get the same info using the REST API.
* [List All Flow Control Keys](/qstash/api/flow-control/list).
* [Single Flow Control Key](/qstash/api/flow-control/get).
---
# Source: https://upstash.com/docs/vector/integrations/flowise.md
> ## Documentation Index
> Fetch the complete documentation index at: https://upstash.com/docs/llms.txt
> Use this file to discover all available pages before exploring further.
# Flowise with Upstash Vector and Redis
Flowise is an open source low-code tool for developers to build customized LLM orchestration flows & AI agents. With Upstash Vector and Upstash Redis, you can extend your Flowise flows to include semantic search, caching, and conversation memory.
## Install
To get started, you can install Flowise locally using npm. Run:
```bash theme={"system"}
npm install -g flowise
```
Start Flowise:
```bash theme={"system"}
npx flowise start
```
Open: [http://localhost:3000](http://localhost:3000)
You also need to set up Upstash services:
1. Create a **Vector Index** in the [Upstash Console](https://console.upstash.com/vector). To learn more about index creation, you can check out [this page](https://docs.upstash.com/vector/overall/getstarted).
2. Create a **Redis Database** in the [Upstash Console](https://console.upstash.com/redis). To learn more about Redis database creation, you can check out [this page](/redis/overall/getstarted).
## Nodes Overview
Flowise supports multiple Upstash integrations. Below are the nodes and their functionalities:
### 1. Upstash Vector Node
Use the **Upstash Vector** node to perform semantic search and store document embeddings. Connect the node to document loaders and embedding components for indexing and querying.
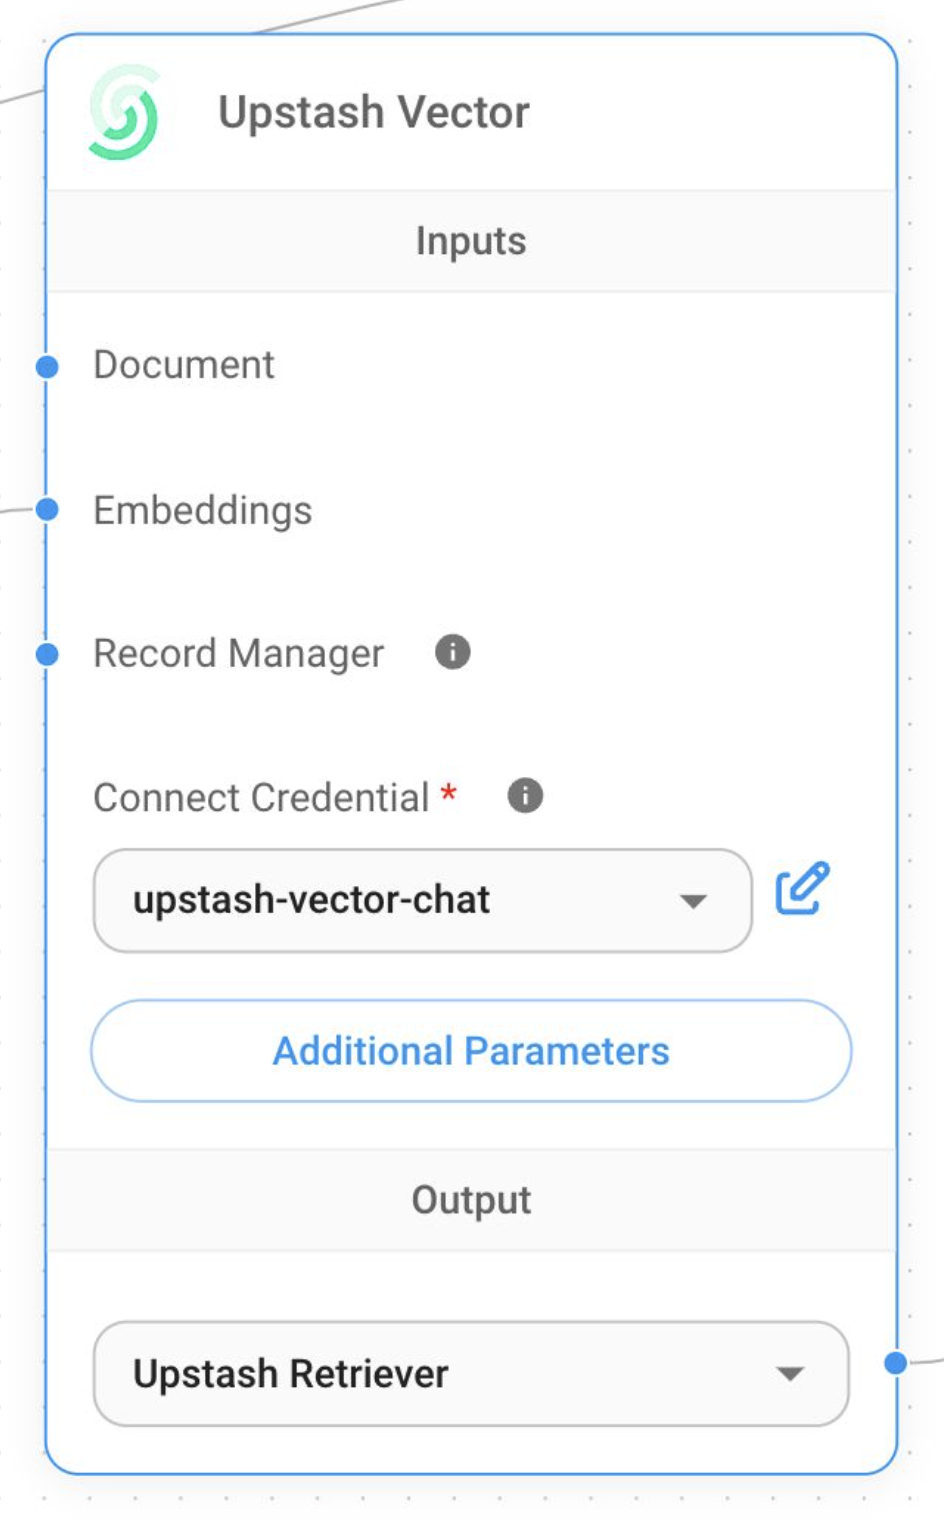 ### 2. Upstash Redis Cache Node
The **Upstash Redis Cache** node caches LLM responses in a serverless Redis database.
### 2. Upstash Redis Cache Node
The **Upstash Redis Cache** node caches LLM responses in a serverless Redis database.
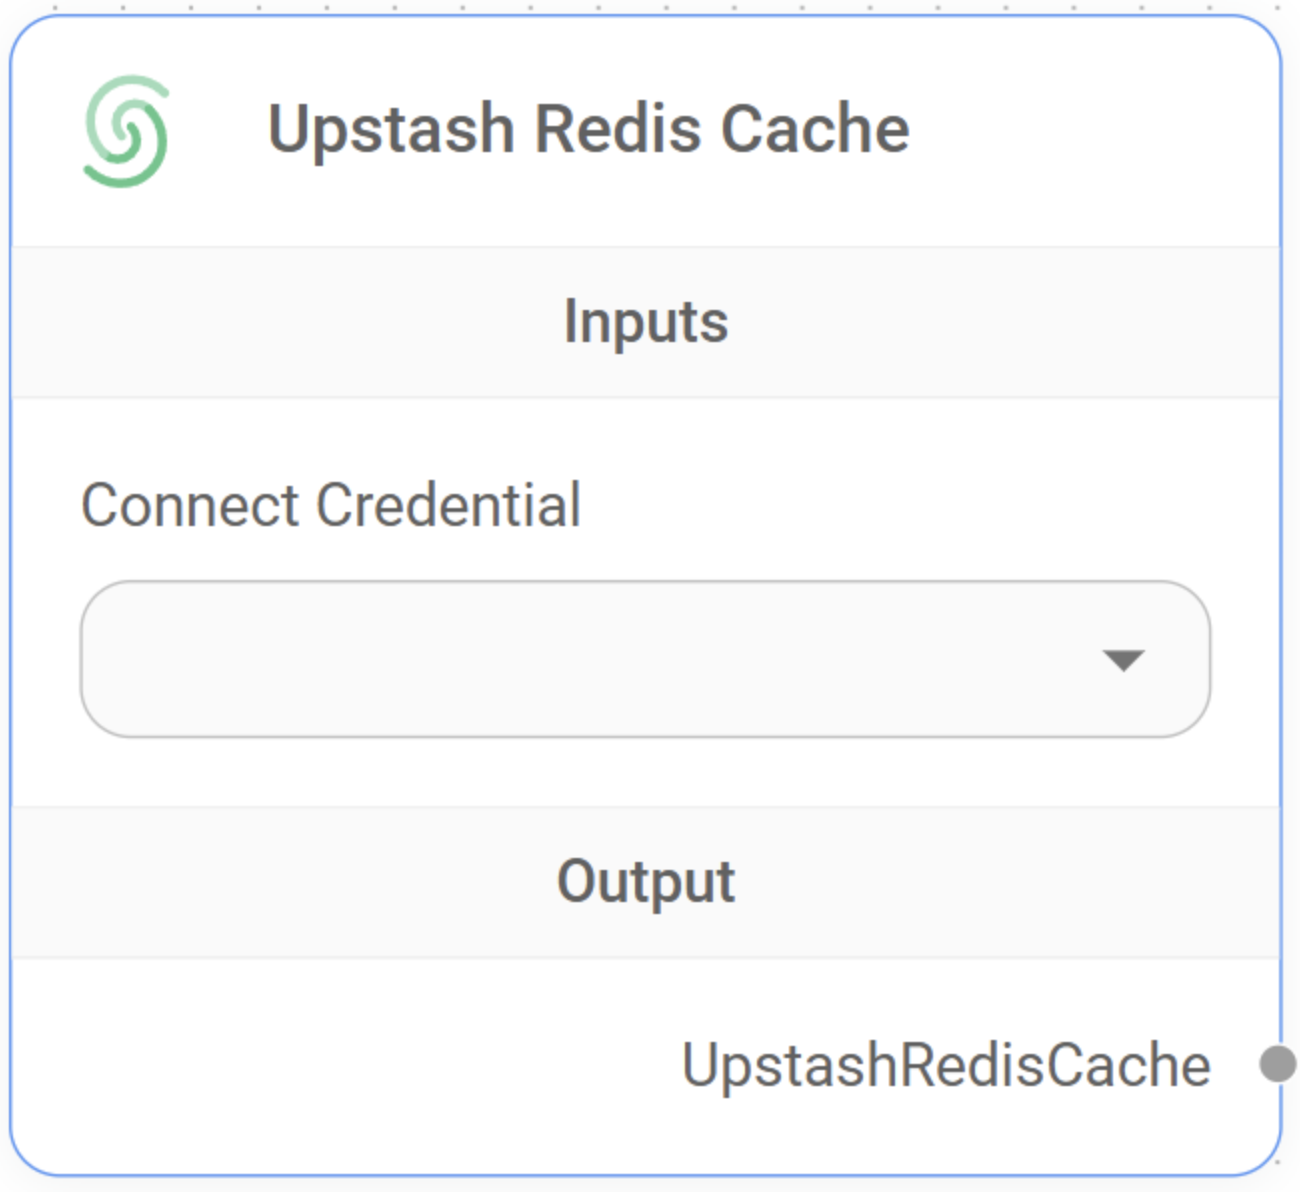 ### 3. Upstash Redis-Backed Chat Memory Node
The **Upstash Redis-Backed Chat Memory** node summarizes conversations and stores the memory in Redis. This enables persistent, context-aware interactions across multiple sessions.
### 3. Upstash Redis-Backed Chat Memory Node
The **Upstash Redis-Backed Chat Memory** node summarizes conversations and stores the memory in Redis. This enables persistent, context-aware interactions across multiple sessions.
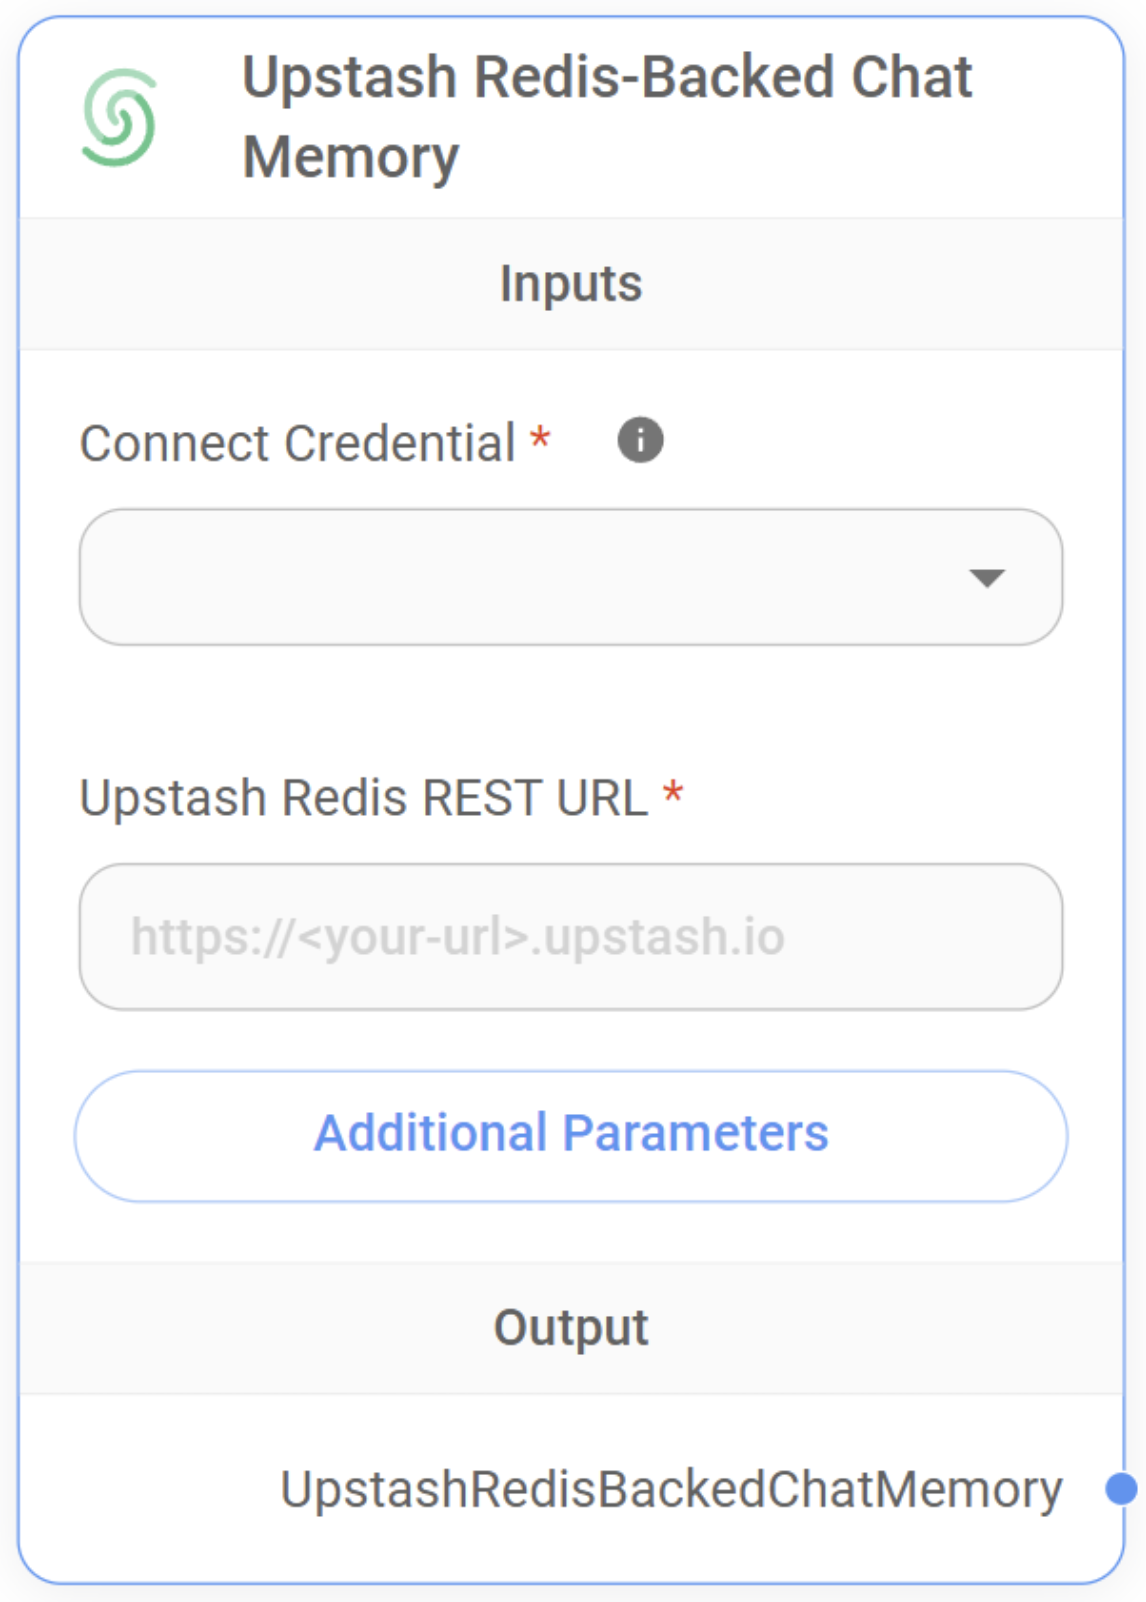 ## Example Flow
Below is an example flow using Upstash Vector:
## Example Flow
Below is an example flow using Upstash Vector:
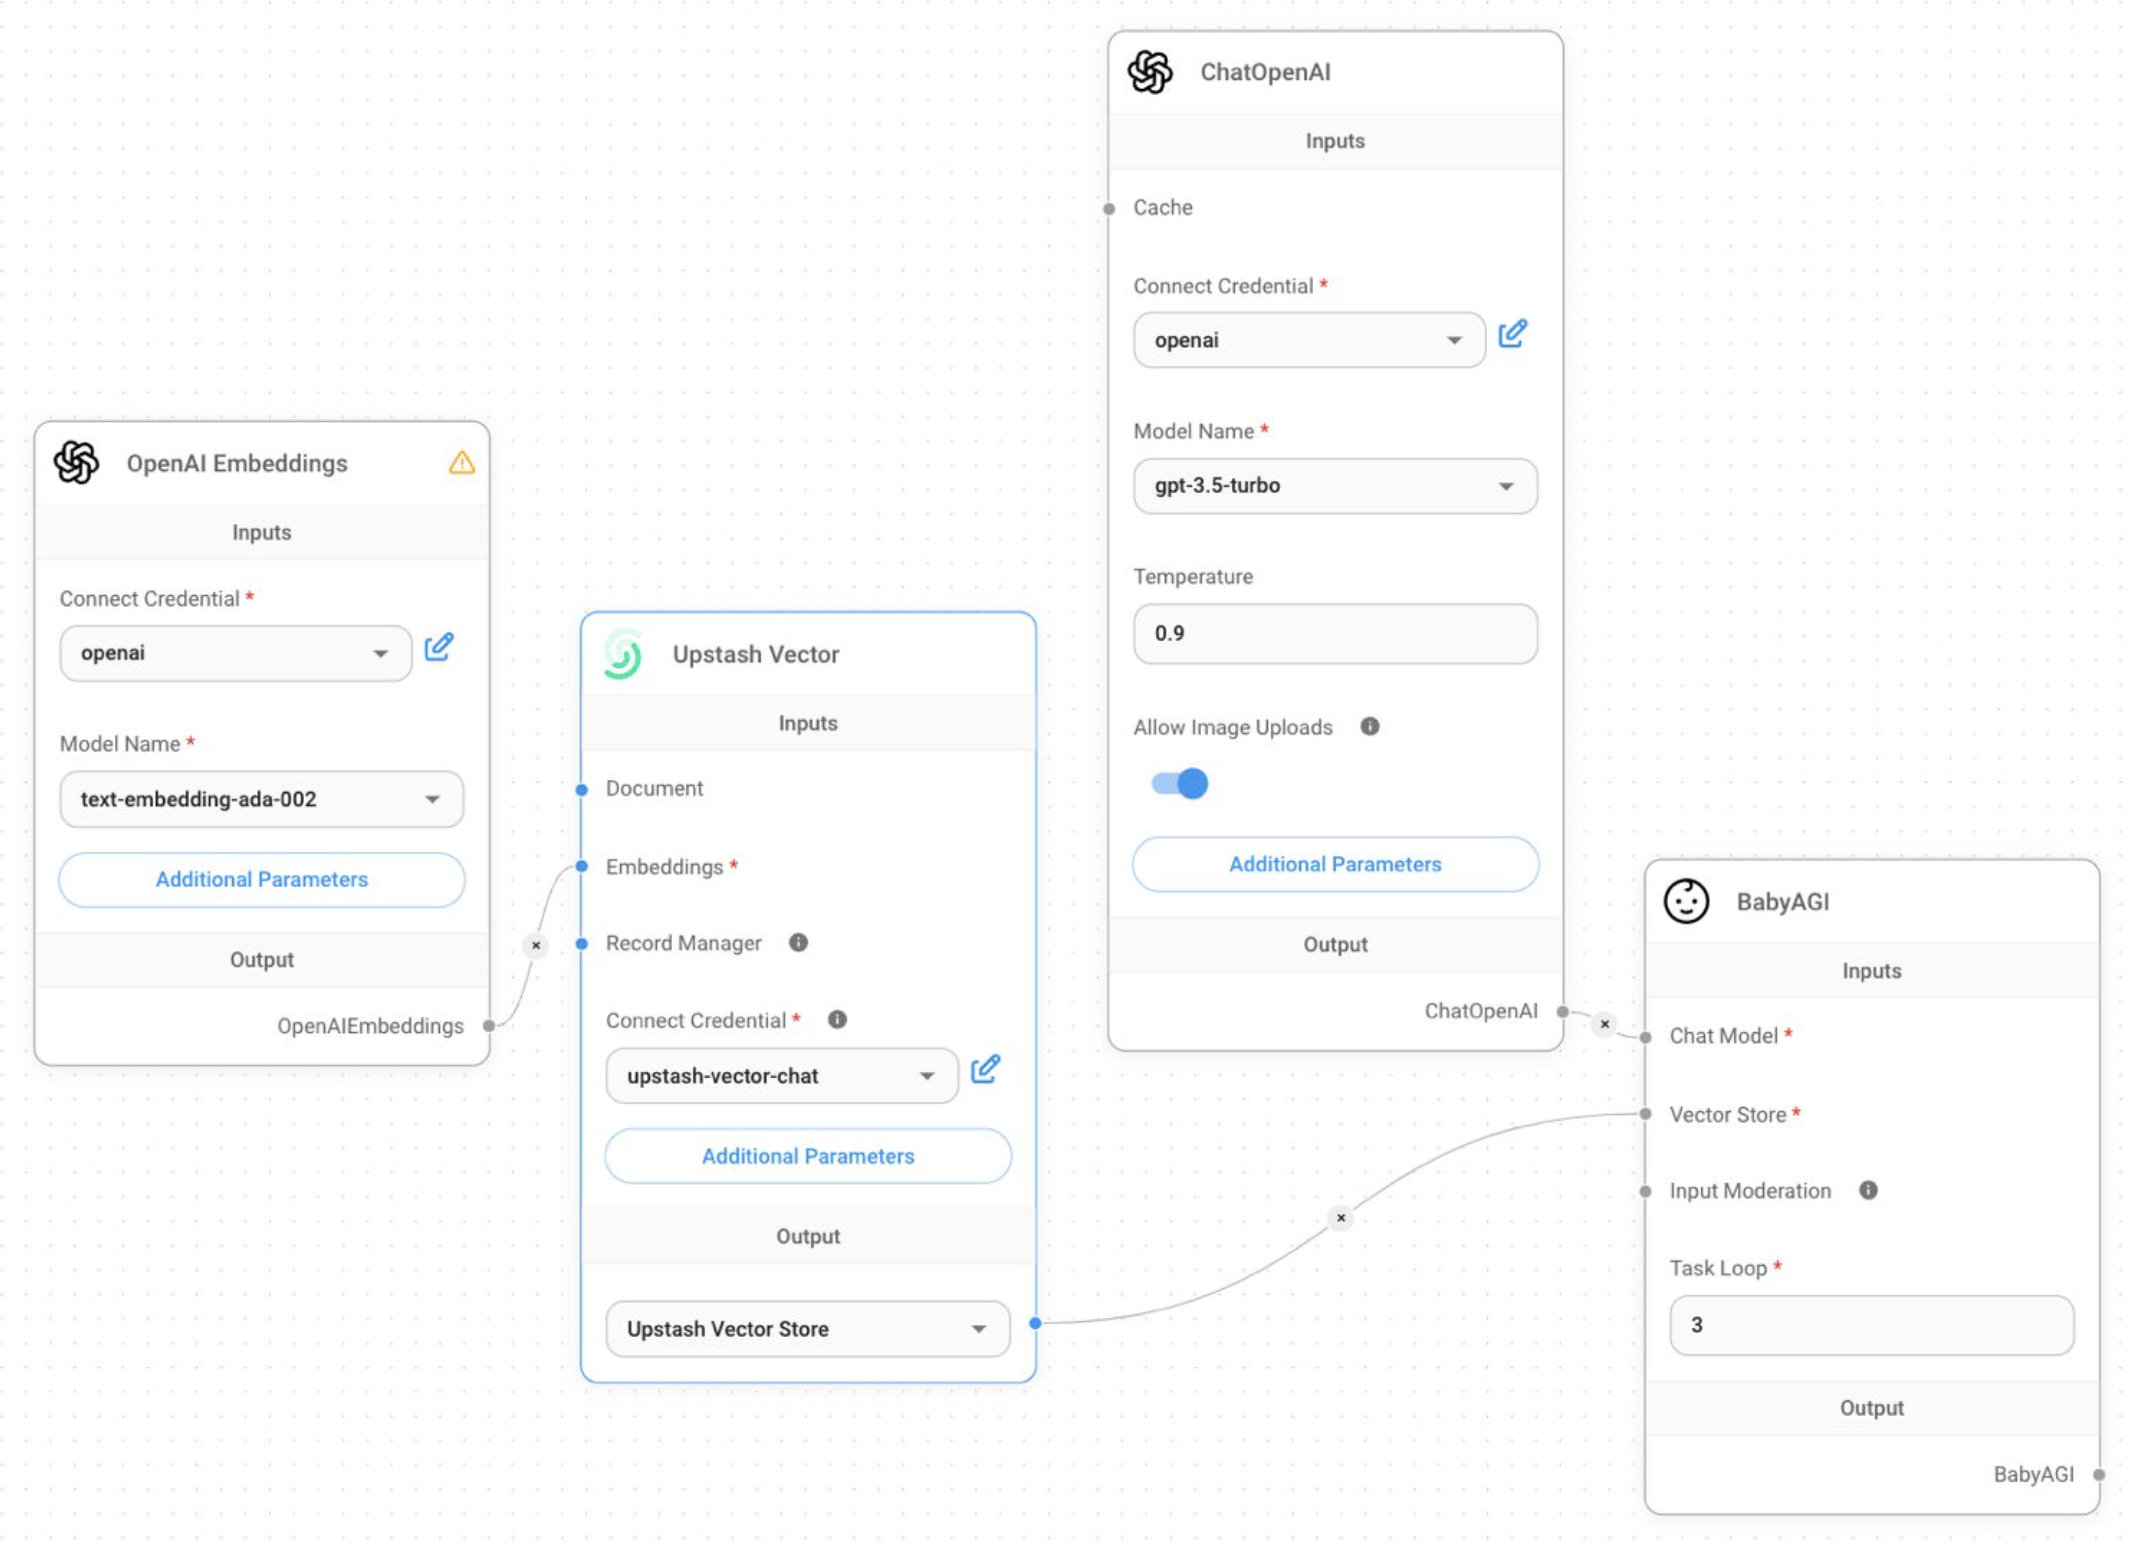 ## Learn More
For more details, visit the [Flowise documentation](https://docs.flowiseai.com/).
---
# Source: https://upstash.com/docs/redis/sdks/ts/commands/functions/flush.md
> ## Documentation Index
> Fetch the complete documentation index at: https://upstash.com/docs/llms.txt
> Use this file to discover all available pages before exploring further.
# FUNCTION FLUSH
> Delete all the libraries and functions.
## Response
## Learn More
For more details, visit the [Flowise documentation](https://docs.flowiseai.com/).
---
# Source: https://upstash.com/docs/redis/sdks/ts/commands/functions/flush.md
> ## Documentation Index
> Fetch the complete documentation index at: https://upstash.com/docs/llms.txt
> Use this file to discover all available pages before exploring further.
# FUNCTION FLUSH
> Delete all the libraries and functions.
## Response
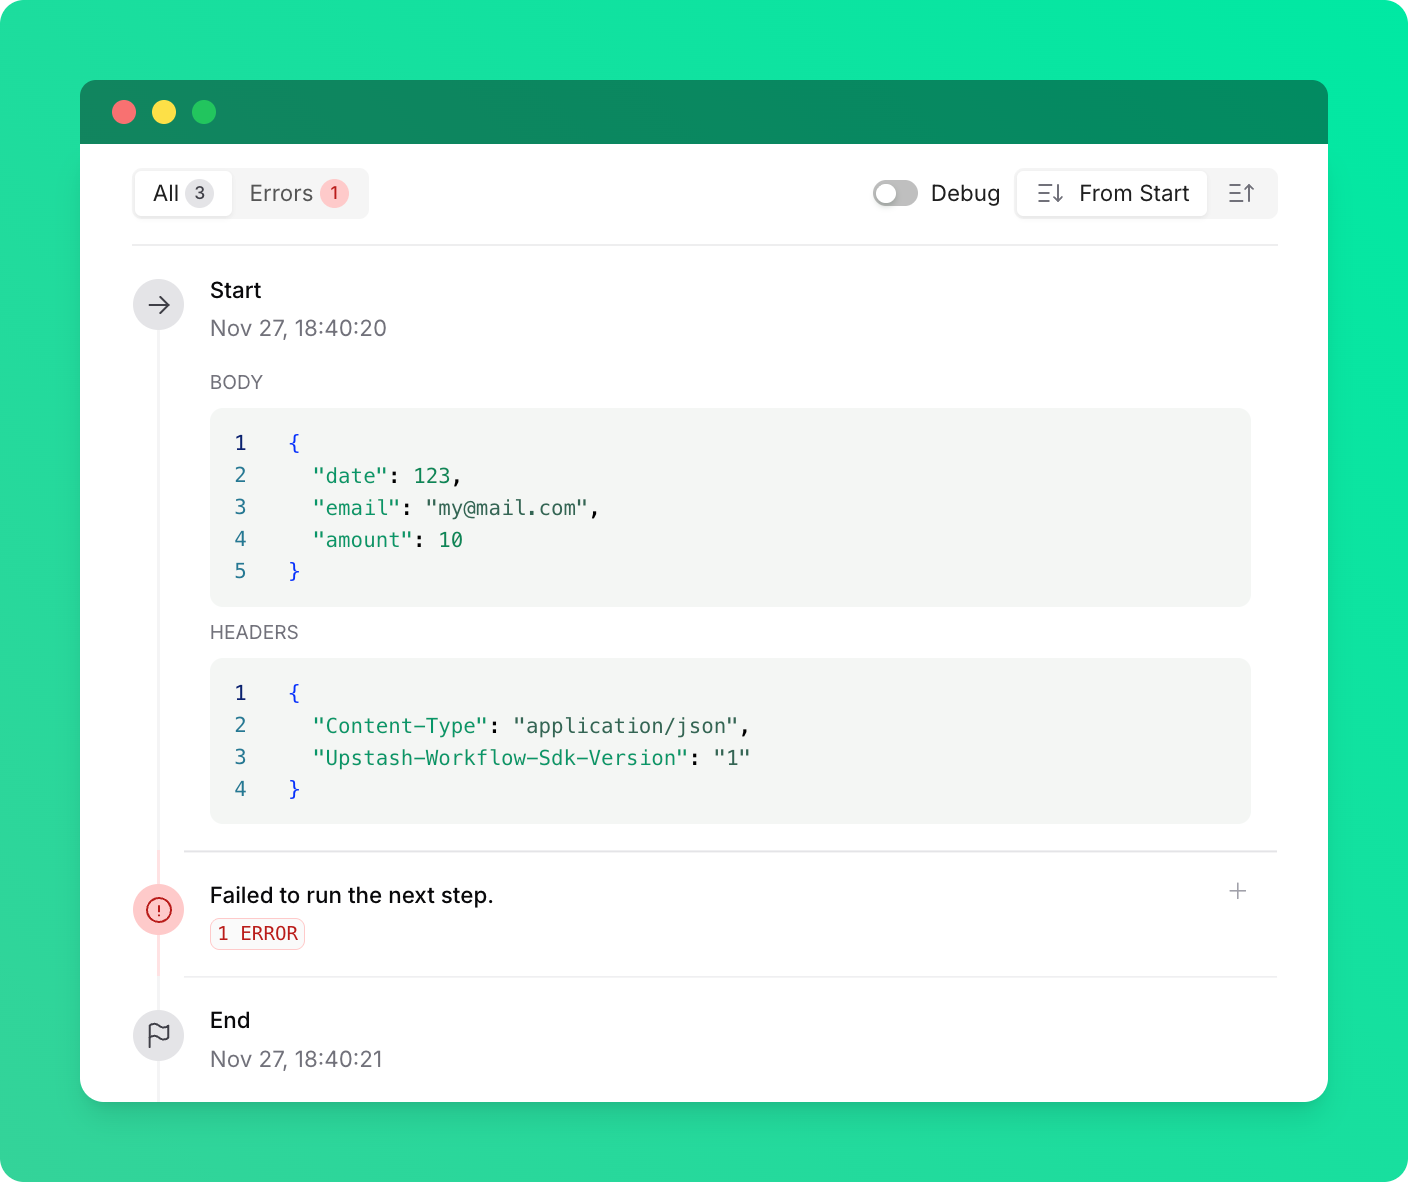 Another way you can encounter this error is if you are calling a workflow endpoint on an older SDK version (before 0.2.17 in TypeScript and 0.1.4 in Python) from a newer SDK version. If this happens, in the logs, you will see that the first step of the workflow run has completed successfully, but the workflow fails immediately after that with the same error.
To fix this error, ensure that:
* You are calling a valid workflow endpoint.
* Both the caller and the workflow endpoint are using the latest SDK versions.
---
# Source: https://upstash.com/docs/qstash/api-refence/dlq/get-a-dlq-message.md
> ## Documentation Index
> Fetch the complete documentation index at: https://upstash.com/docs/llms.txt
> Use this file to discover all available pages before exploring further.
# Get a DLQ message
> Get a specific message from the DLQ
## OpenAPI
````yaml qstash/openapi.yaml get /v2/dlq/{dlqId}
openapi: 3.1.0
info:
title: QStash REST API
description: |
QStash is a message queue and scheduler built on top of Upstash Redis.
version: 2.0.0
contact:
name: Upstash
url: https://upstash.com
servers:
- url: https://qstash.upstash.io
security:
- bearerAuth: []
- bearerAuthQuery: []
tags:
- name: Messages
description: Publish and manage messages
- name: Queues
description: Manage message queues
- name: Schedules
description: Create and manage scheduled messages
- name: URL Groups
description: Manage URL groups and endpoints
- name: DLQ
description: Dead Letter Queue operations
- name: Logs
description: Log operations
- name: Signing Keys
description: Manage signing keys
- name: Flow Control
description: Monitor flow control keys
paths:
/v2/dlq/{dlqId}:
get:
tags:
- DLQ
summary: Get a DLQ message
description: Get a specific message from the DLQ
parameters:
- name: dlqId
in: path
required: true
schema:
type: string
description: |
The DLQ ID of the message you want to retrieve.
responses:
'200':
description: DLQ message details
content:
application/json:
schema:
$ref: '#/components/schemas/DLQMessage'
'404':
description: >
If the message is not found in the DLQ, (either is has been removed
by you, or automatically), the endpoint returns a 404 status code.
content:
application/json:
schema:
$ref: '#/components/schemas/Error'
components:
schemas:
DLQMessage:
type: object
properties:
messageId:
type: string
description: Unique identifier for the message
url:
type: string
description: The URL to which the message should be delivered.
topicName:
type: string
description: >-
The URL Group (a.k.a. topic) name if this message was sent to a URL
Group.
endpointName:
type: string
description: >-
The endpoint name of the message if the endpoint is given a name
within the URL group.
method:
type: string
description: The HTTP method to use for the message.
header:
type: object
additionalProperties:
type: array
items:
type: string
description: The HTTP headers sent to your API.
body:
type: string
description: >-
The body of the message if it is composed of utf8 chars only, empty
otherwise.
bodyBase64:
type: string
description: >-
The base64 encoded body if the body contains a non-utf8 char only,
empty otherwise.
maxRetries:
type: integer
description: >-
The number of retries that should be attempted in case of delivery
failure.
notBefore:
type: integer
format: int64
description: >-
The unix timestamp in milliseconds before which the message should
not be delivered.
createdAt:
type: integer
format: int64
description: The unix timestamp in milliseconds when the message was created.
callback:
type: string
description: >-
The url where we send a callback each time the message is attempted
to be delivered.
failureCallback:
type: string
description: The url where we send a callback to after the message is failed
queueName:
type: string
description: The name of the queue if the message is enqueued to a queue.
scheduleId:
type: string
description: >-
The scheduleId of the message if the message is triggered by a
schedule
callerIP:
type: string
description: IP address of the publisher of this message.
label:
type: string
description: The label of the message assigned by the user.
flowControlKey:
type: string
description: The flow control key used for rate limiting.
rate:
type: integer
description: The rate value used for flow control.
period:
type: integer
description: The period value used for flow control.
parallelism:
type: integer
description: The parallelism value used for flow control.
responseStatus:
type: integer
description: The HTTP status code received from the destination API.
responseHeader:
type: object
additionalProperties:
type: array
items:
type: string
description: The HTTP response headers received from the destination API.
responseBody:
type: string
description: >-
The body of the response if it is composed of utf8 chars only, empty
otherwise.
responseBodyBase64:
type: string
description: >-
The base64 encoded body of the response if the body contains a
non-utf8 char only, empty otherwise.
Error:
type: object
required:
- error
properties:
error:
type: string
description: Error message
securitySchemes:
bearerAuth:
type: http
scheme: bearer
bearerFormat: JWT
description: QStash authentication token
bearerAuthQuery:
type: apiKey
in: query
name: qstash_token
description: QStash authentication token passed as a query parameter
````
---
# Source: https://upstash.com/docs/qstash/api-refence/messages/get-a-message.md
> ## Documentation Index
> Fetch the complete documentation index at: https://upstash.com/docs/llms.txt
> Use this file to discover all available pages before exploring further.
# Get a Message
> Retrieve details of a specific message
Another way you can encounter this error is if you are calling a workflow endpoint on an older SDK version (before 0.2.17 in TypeScript and 0.1.4 in Python) from a newer SDK version. If this happens, in the logs, you will see that the first step of the workflow run has completed successfully, but the workflow fails immediately after that with the same error.
To fix this error, ensure that:
* You are calling a valid workflow endpoint.
* Both the caller and the workflow endpoint are using the latest SDK versions.
---
# Source: https://upstash.com/docs/qstash/api-refence/dlq/get-a-dlq-message.md
> ## Documentation Index
> Fetch the complete documentation index at: https://upstash.com/docs/llms.txt
> Use this file to discover all available pages before exploring further.
# Get a DLQ message
> Get a specific message from the DLQ
## OpenAPI
````yaml qstash/openapi.yaml get /v2/dlq/{dlqId}
openapi: 3.1.0
info:
title: QStash REST API
description: |
QStash is a message queue and scheduler built on top of Upstash Redis.
version: 2.0.0
contact:
name: Upstash
url: https://upstash.com
servers:
- url: https://qstash.upstash.io
security:
- bearerAuth: []
- bearerAuthQuery: []
tags:
- name: Messages
description: Publish and manage messages
- name: Queues
description: Manage message queues
- name: Schedules
description: Create and manage scheduled messages
- name: URL Groups
description: Manage URL groups and endpoints
- name: DLQ
description: Dead Letter Queue operations
- name: Logs
description: Log operations
- name: Signing Keys
description: Manage signing keys
- name: Flow Control
description: Monitor flow control keys
paths:
/v2/dlq/{dlqId}:
get:
tags:
- DLQ
summary: Get a DLQ message
description: Get a specific message from the DLQ
parameters:
- name: dlqId
in: path
required: true
schema:
type: string
description: |
The DLQ ID of the message you want to retrieve.
responses:
'200':
description: DLQ message details
content:
application/json:
schema:
$ref: '#/components/schemas/DLQMessage'
'404':
description: >
If the message is not found in the DLQ, (either is has been removed
by you, or automatically), the endpoint returns a 404 status code.
content:
application/json:
schema:
$ref: '#/components/schemas/Error'
components:
schemas:
DLQMessage:
type: object
properties:
messageId:
type: string
description: Unique identifier for the message
url:
type: string
description: The URL to which the message should be delivered.
topicName:
type: string
description: >-
The URL Group (a.k.a. topic) name if this message was sent to a URL
Group.
endpointName:
type: string
description: >-
The endpoint name of the message if the endpoint is given a name
within the URL group.
method:
type: string
description: The HTTP method to use for the message.
header:
type: object
additionalProperties:
type: array
items:
type: string
description: The HTTP headers sent to your API.
body:
type: string
description: >-
The body of the message if it is composed of utf8 chars only, empty
otherwise.
bodyBase64:
type: string
description: >-
The base64 encoded body if the body contains a non-utf8 char only,
empty otherwise.
maxRetries:
type: integer
description: >-
The number of retries that should be attempted in case of delivery
failure.
notBefore:
type: integer
format: int64
description: >-
The unix timestamp in milliseconds before which the message should
not be delivered.
createdAt:
type: integer
format: int64
description: The unix timestamp in milliseconds when the message was created.
callback:
type: string
description: >-
The url where we send a callback each time the message is attempted
to be delivered.
failureCallback:
type: string
description: The url where we send a callback to after the message is failed
queueName:
type: string
description: The name of the queue if the message is enqueued to a queue.
scheduleId:
type: string
description: >-
The scheduleId of the message if the message is triggered by a
schedule
callerIP:
type: string
description: IP address of the publisher of this message.
label:
type: string
description: The label of the message assigned by the user.
flowControlKey:
type: string
description: The flow control key used for rate limiting.
rate:
type: integer
description: The rate value used for flow control.
period:
type: integer
description: The period value used for flow control.
parallelism:
type: integer
description: The parallelism value used for flow control.
responseStatus:
type: integer
description: The HTTP status code received from the destination API.
responseHeader:
type: object
additionalProperties:
type: array
items:
type: string
description: The HTTP response headers received from the destination API.
responseBody:
type: string
description: >-
The body of the response if it is composed of utf8 chars only, empty
otherwise.
responseBodyBase64:
type: string
description: >-
The base64 encoded body of the response if the body contains a
non-utf8 char only, empty otherwise.
Error:
type: object
required:
- error
properties:
error:
type: string
description: Error message
securitySchemes:
bearerAuth:
type: http
scheme: bearer
bearerFormat: JWT
description: QStash authentication token
bearerAuthQuery:
type: apiKey
in: query
name: qstash_token
description: QStash authentication token passed as a query parameter
````
---
# Source: https://upstash.com/docs/qstash/api-refence/messages/get-a-message.md
> ## Documentation Index
> Fetch the complete documentation index at: https://upstash.com/docs/llms.txt
> Use this file to discover all available pages before exploring further.
# Get a Message
> Retrieve details of a specific message
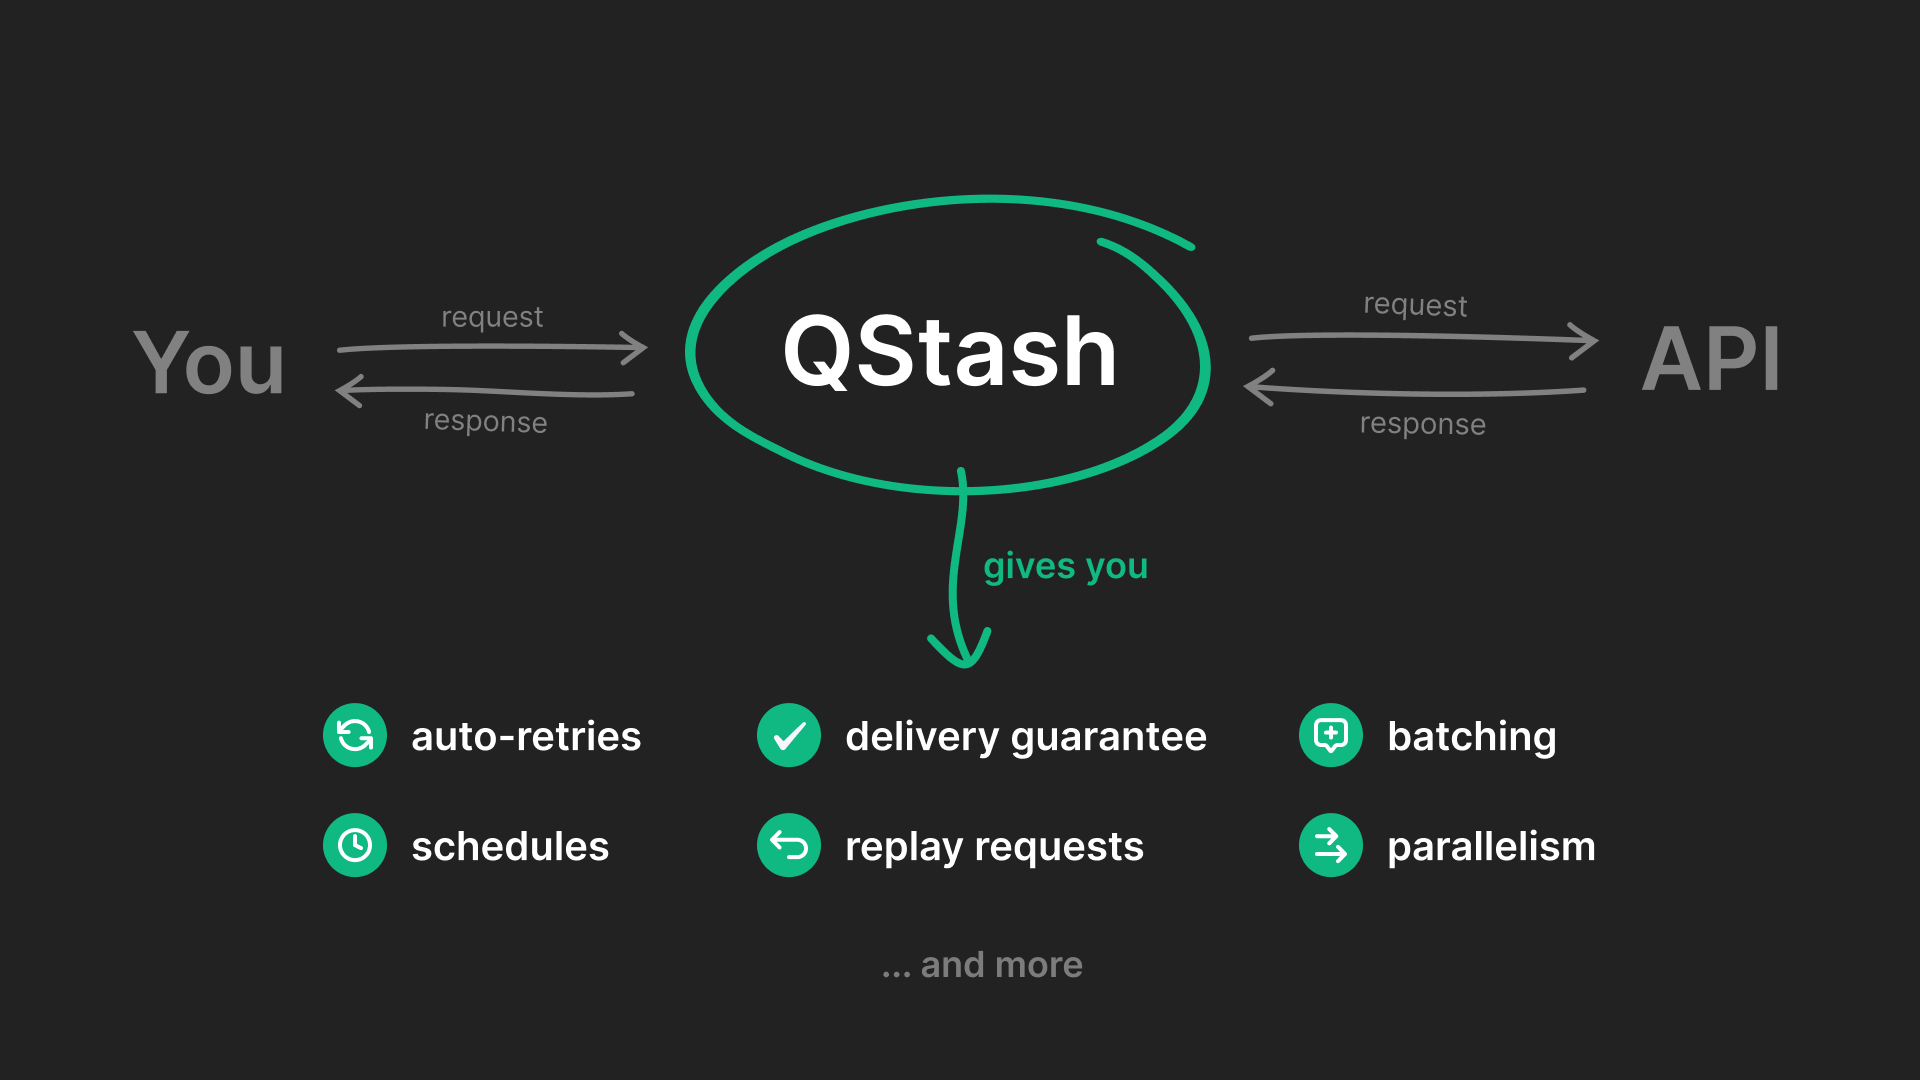
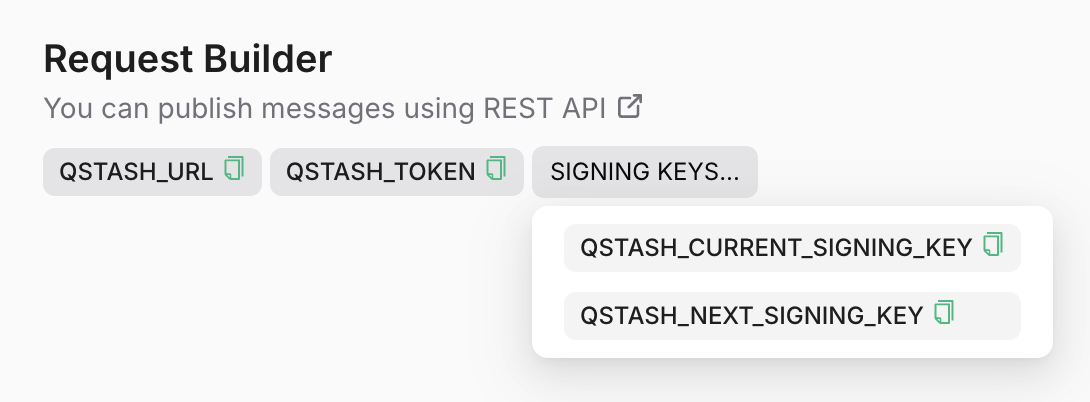 ### Publish a message
A message can be any shape or form: json, xml, binary, anything, that can be
transmitted in the http request body. We do not impose any restrictions other
than a size limit of 1 MB (which can be customized at your request).
In addition to the request body itself, you can also send HTTP headers. Learn
more about this in the [message publishing section](/qstash/howto/publishing).
### Publish a message
A message can be any shape or form: json, xml, binary, anything, that can be
transmitted in the http request body. We do not impose any restrictions other
than a size limit of 1 MB (which can be customized at your request).
In addition to the request body itself, you can also send HTTP headers. Learn
more about this in the [message publishing section](/qstash/howto/publishing).
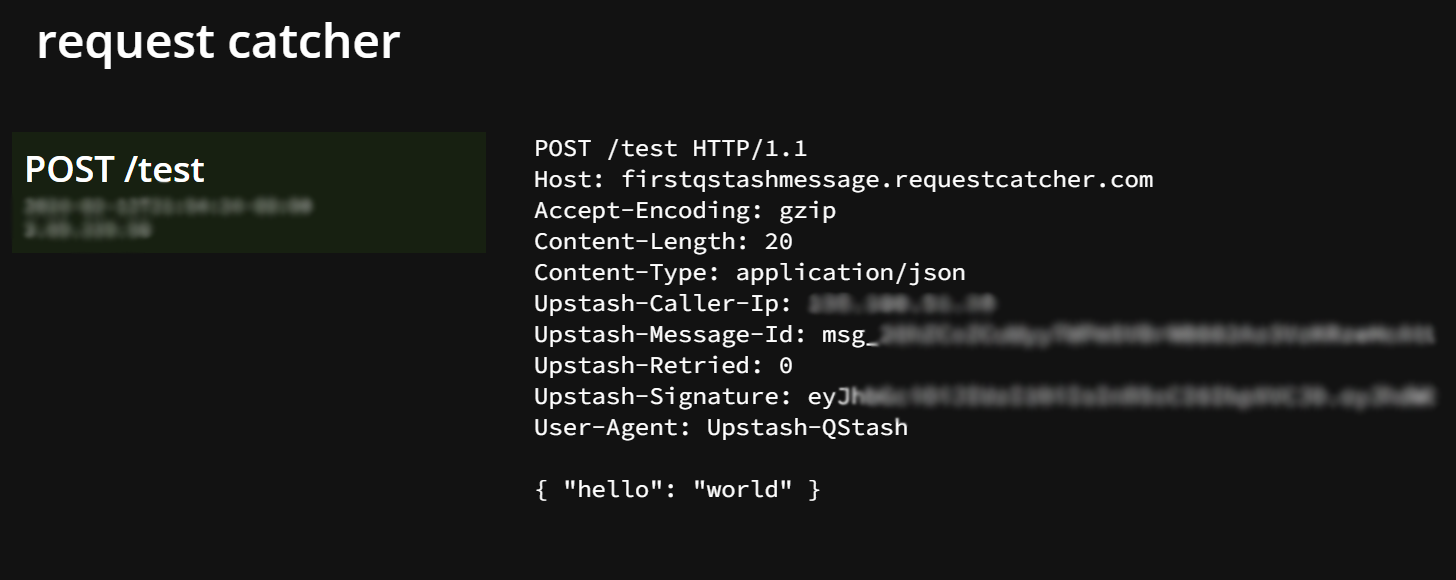 ### Check Message Status
Head over to [Upstash Console](https://console.upstash.com/qstash) and go to the
`Logs` tab where you can see your message activities.
### Check Message Status
Head over to [Upstash Console](https://console.upstash.com/qstash) and go to the
`Logs` tab where you can see your message activities.
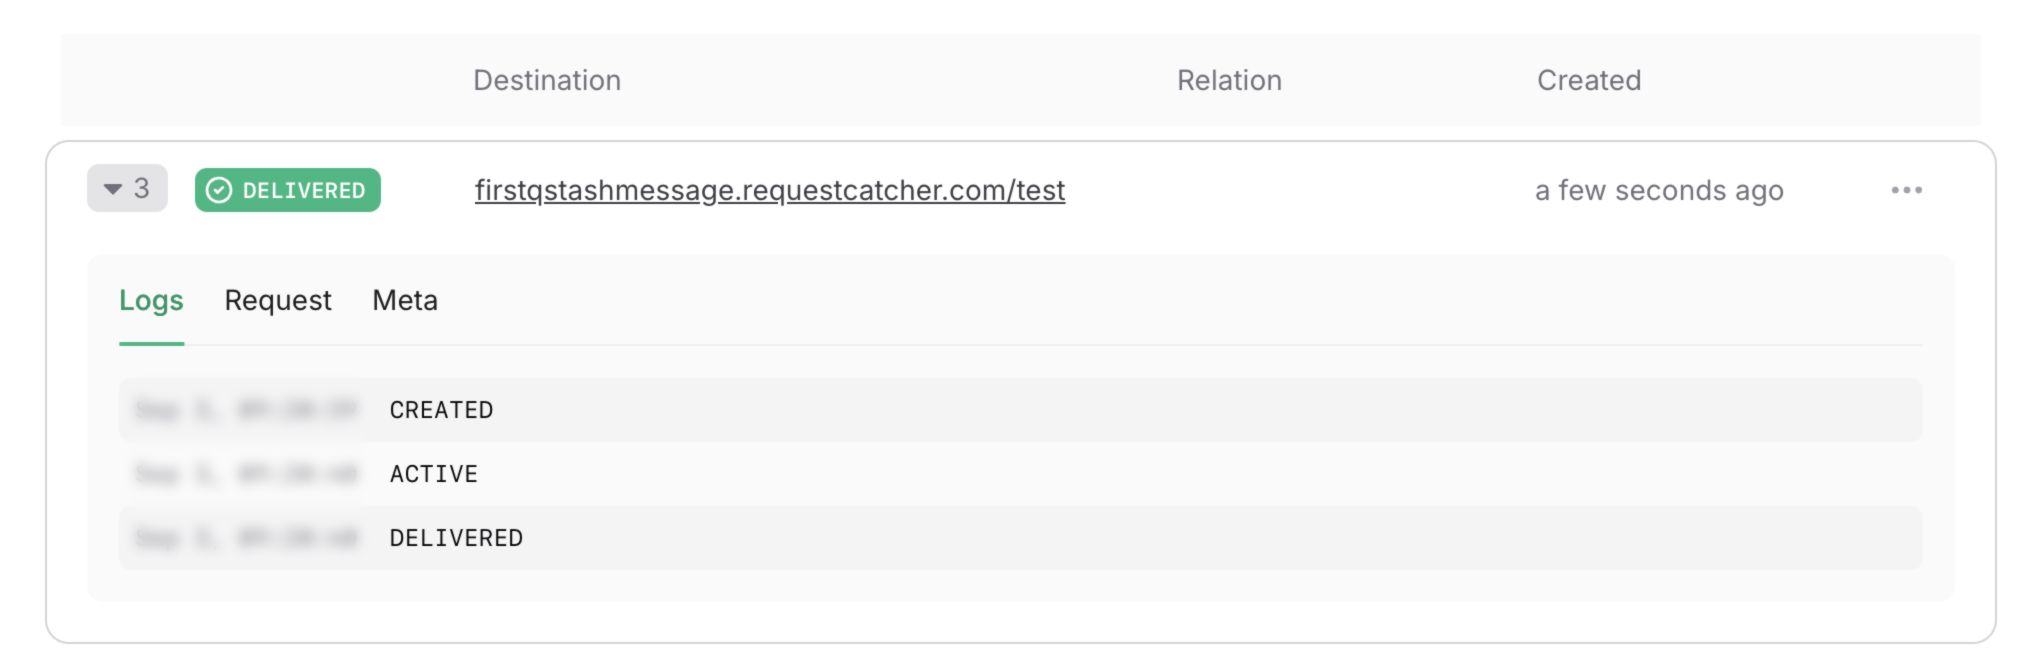 Learn more about different states [here](/qstash/howto/debug-logs).
## Features and Use Cases
Learn more about different states [here](/qstash/howto/debug-logs).
## Features and Use Cases
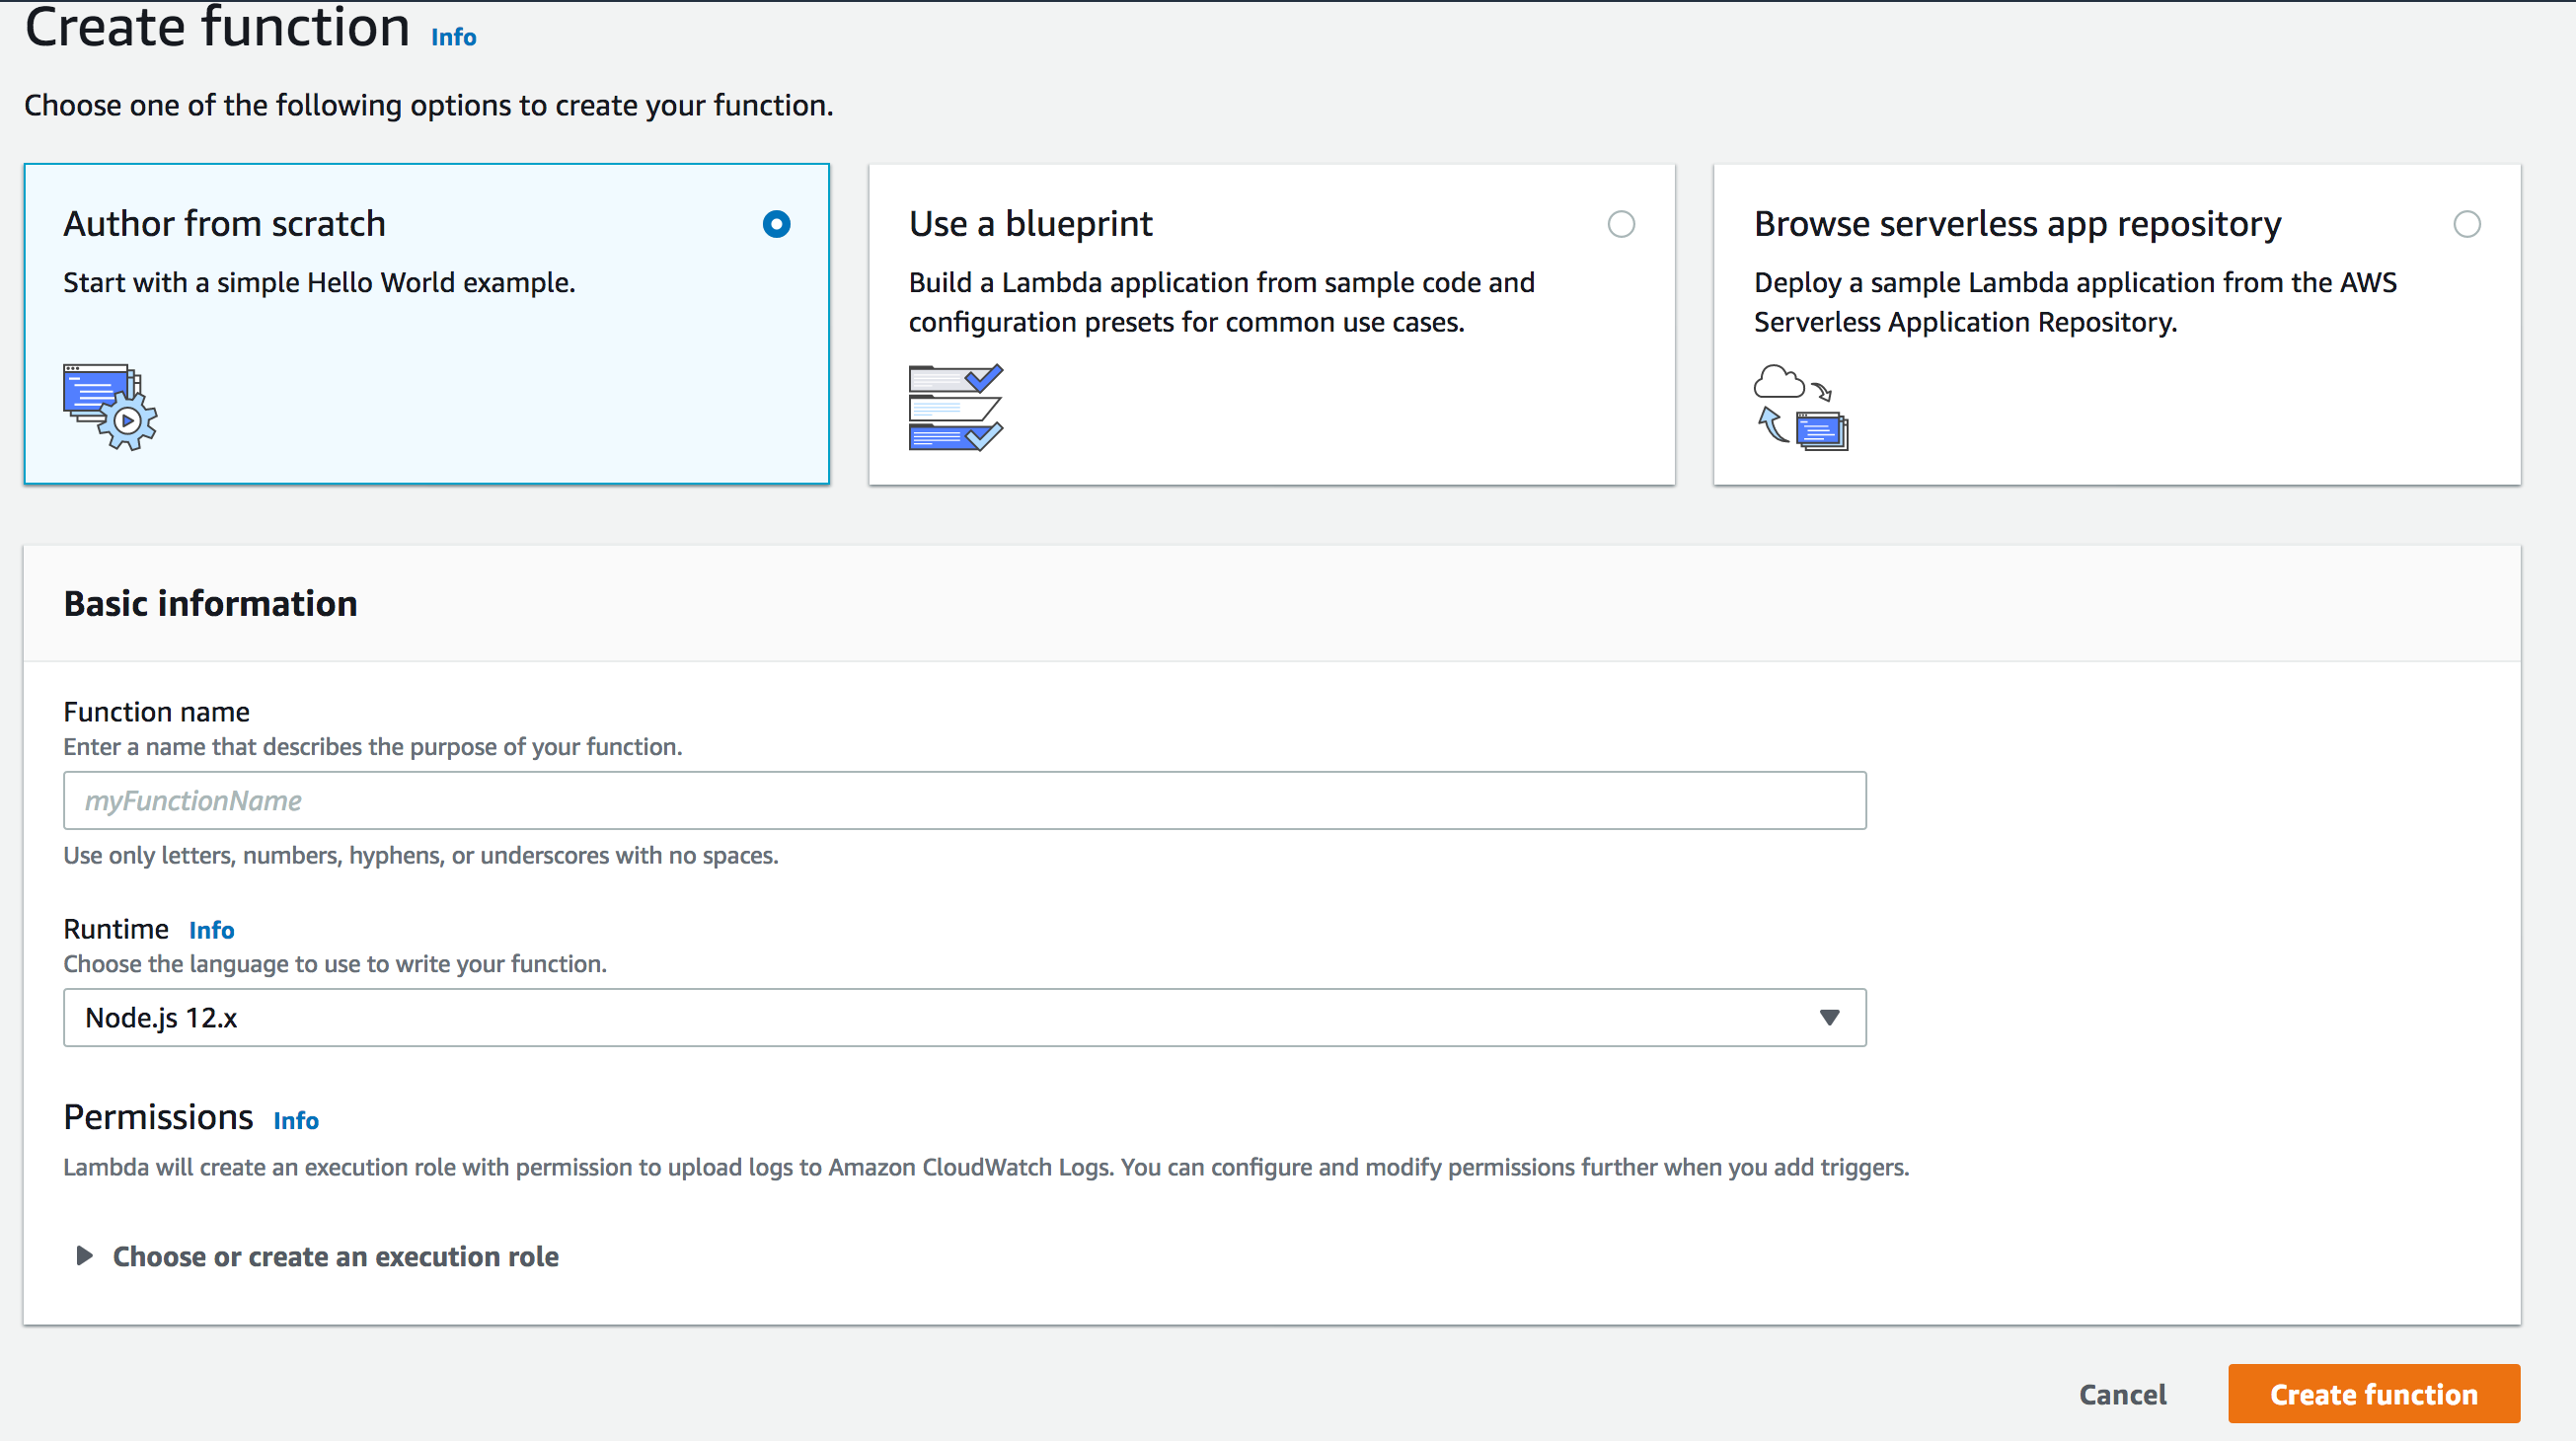 Enter a name for your function and select `Node.js 14.x` as runtime. Click
`Create Function`.
Now you are on the function screen, scroll below to `Function Code` section. On
`Code entry type` selection, select `Upload a .zip file`. Upload the `app.zip`
file you have just created and click on the `Save` button on the top-right. You
need to see your code as below:
Enter a name for your function and select `Node.js 14.x` as runtime. Click
`Create Function`.
Now you are on the function screen, scroll below to `Function Code` section. On
`Code entry type` selection, select `Upload a .zip file`. Upload the `app.zip`
file you have just created and click on the `Save` button on the top-right. You
need to see your code as below:
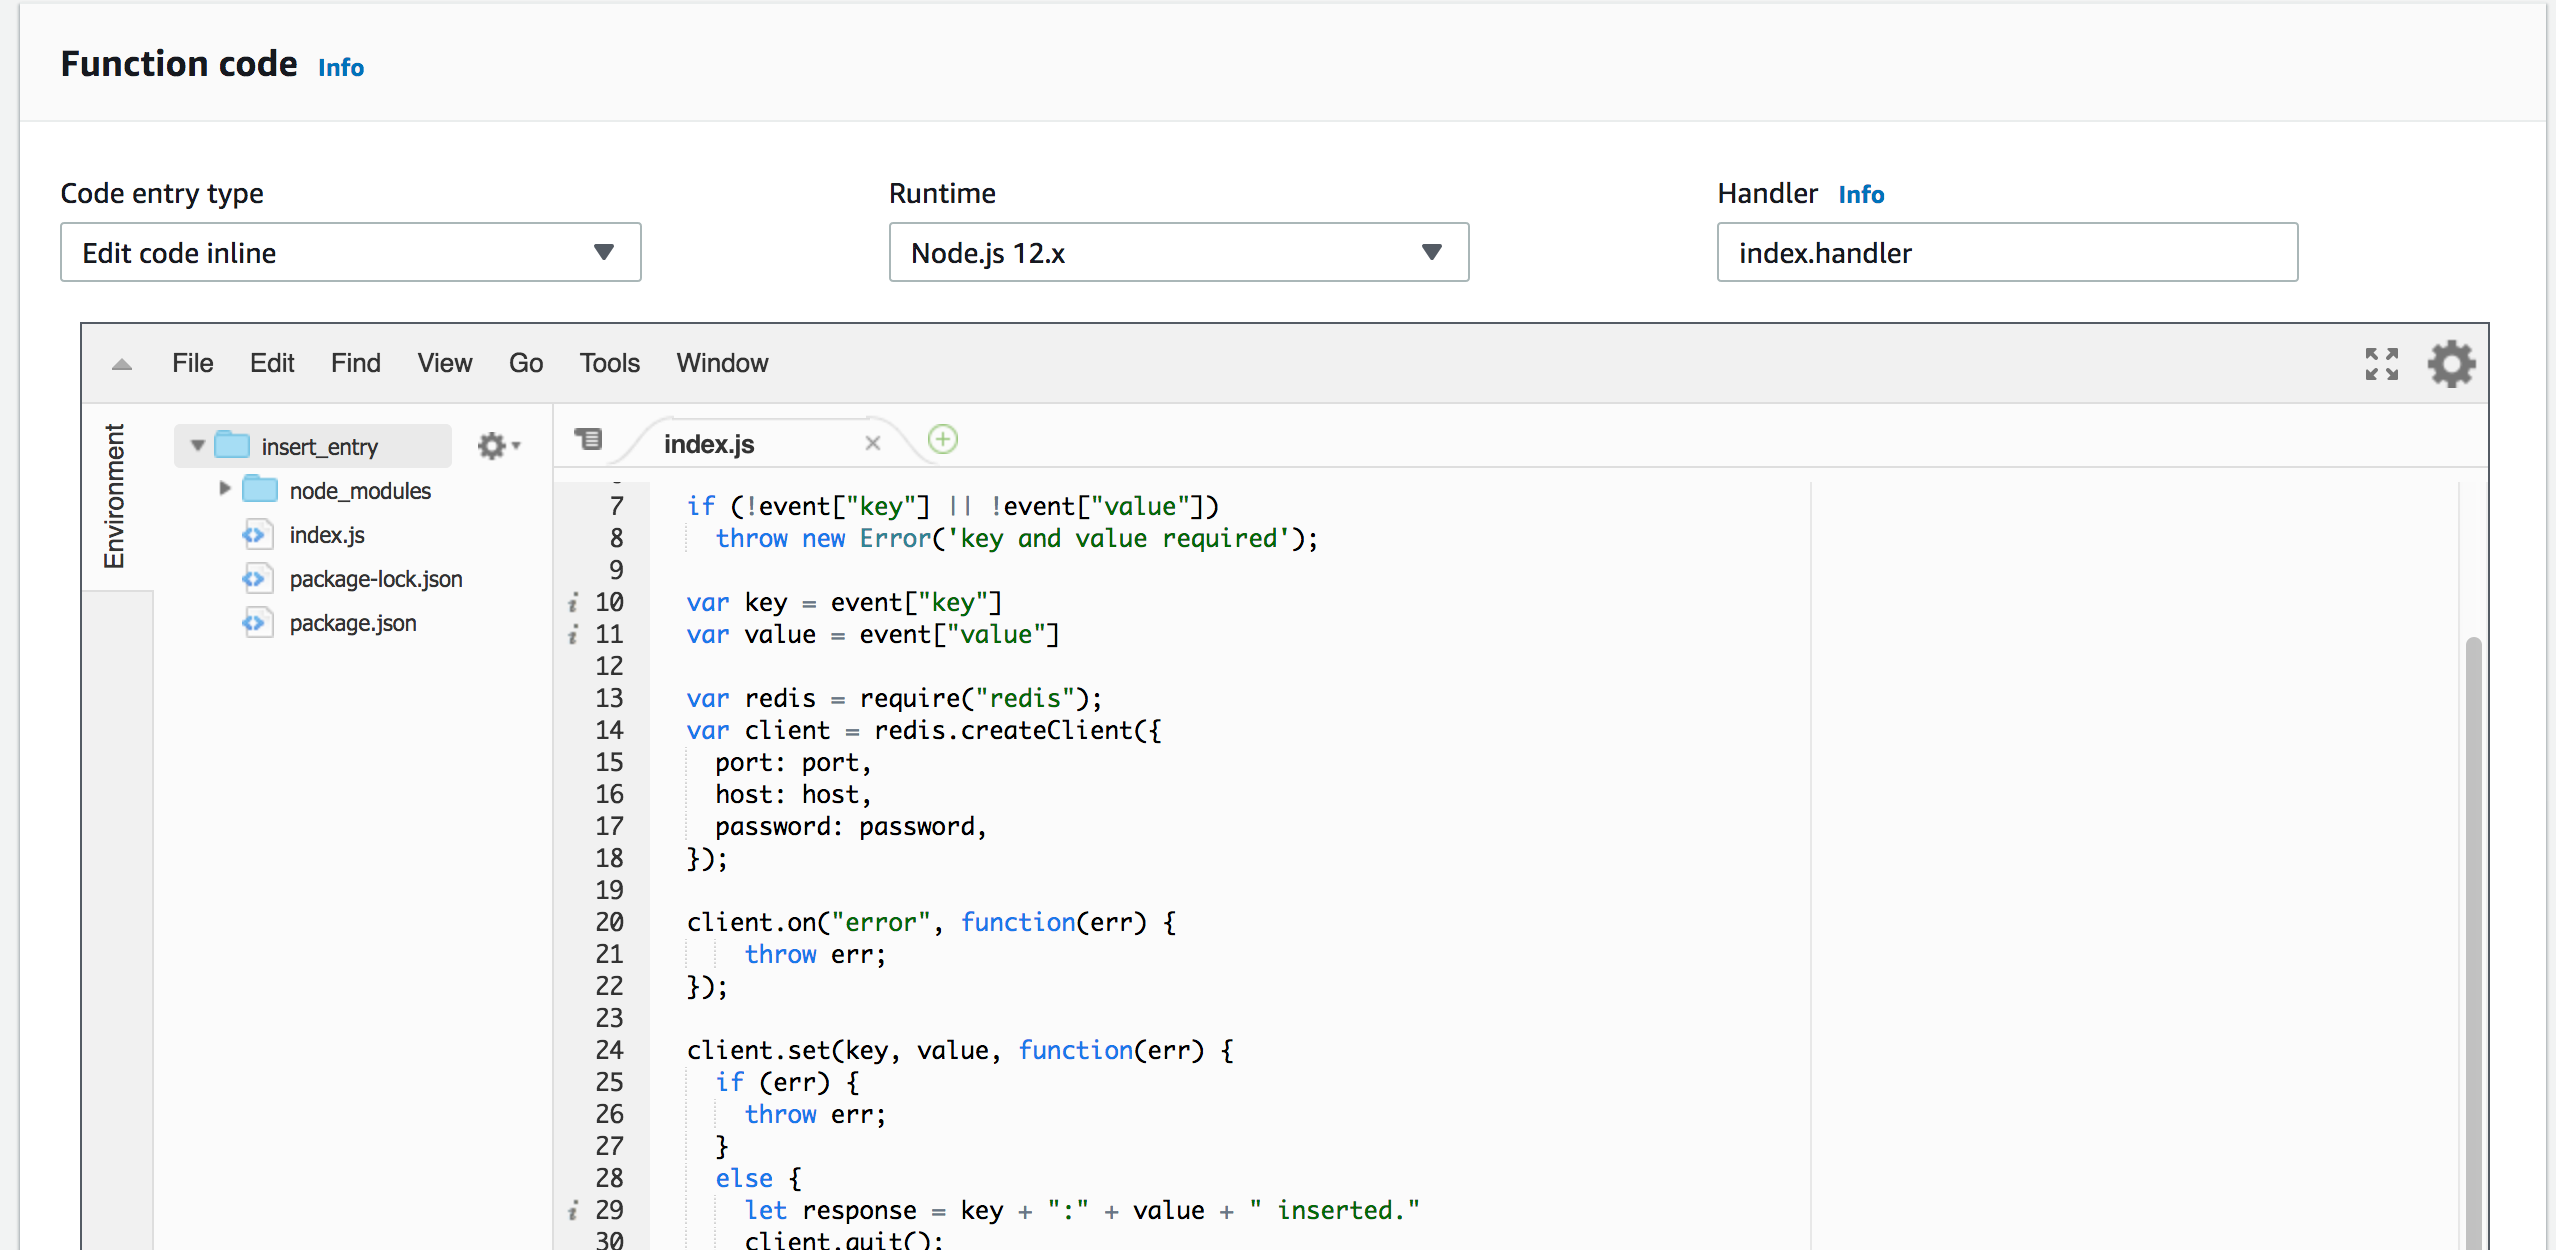 Now you can test your code. Click on the `Test` button on the top right. Create
an event like the below:
```
{
"key": "foo",
"value": "bar"
}
```
Now, click on Test. You will see something like this:
Now you can test your code. Click on the `Test` button on the top right. Create
an event like the below:
```
{
"key": "foo",
"value": "bar"
}
```
Now, click on Test. You will see something like this:
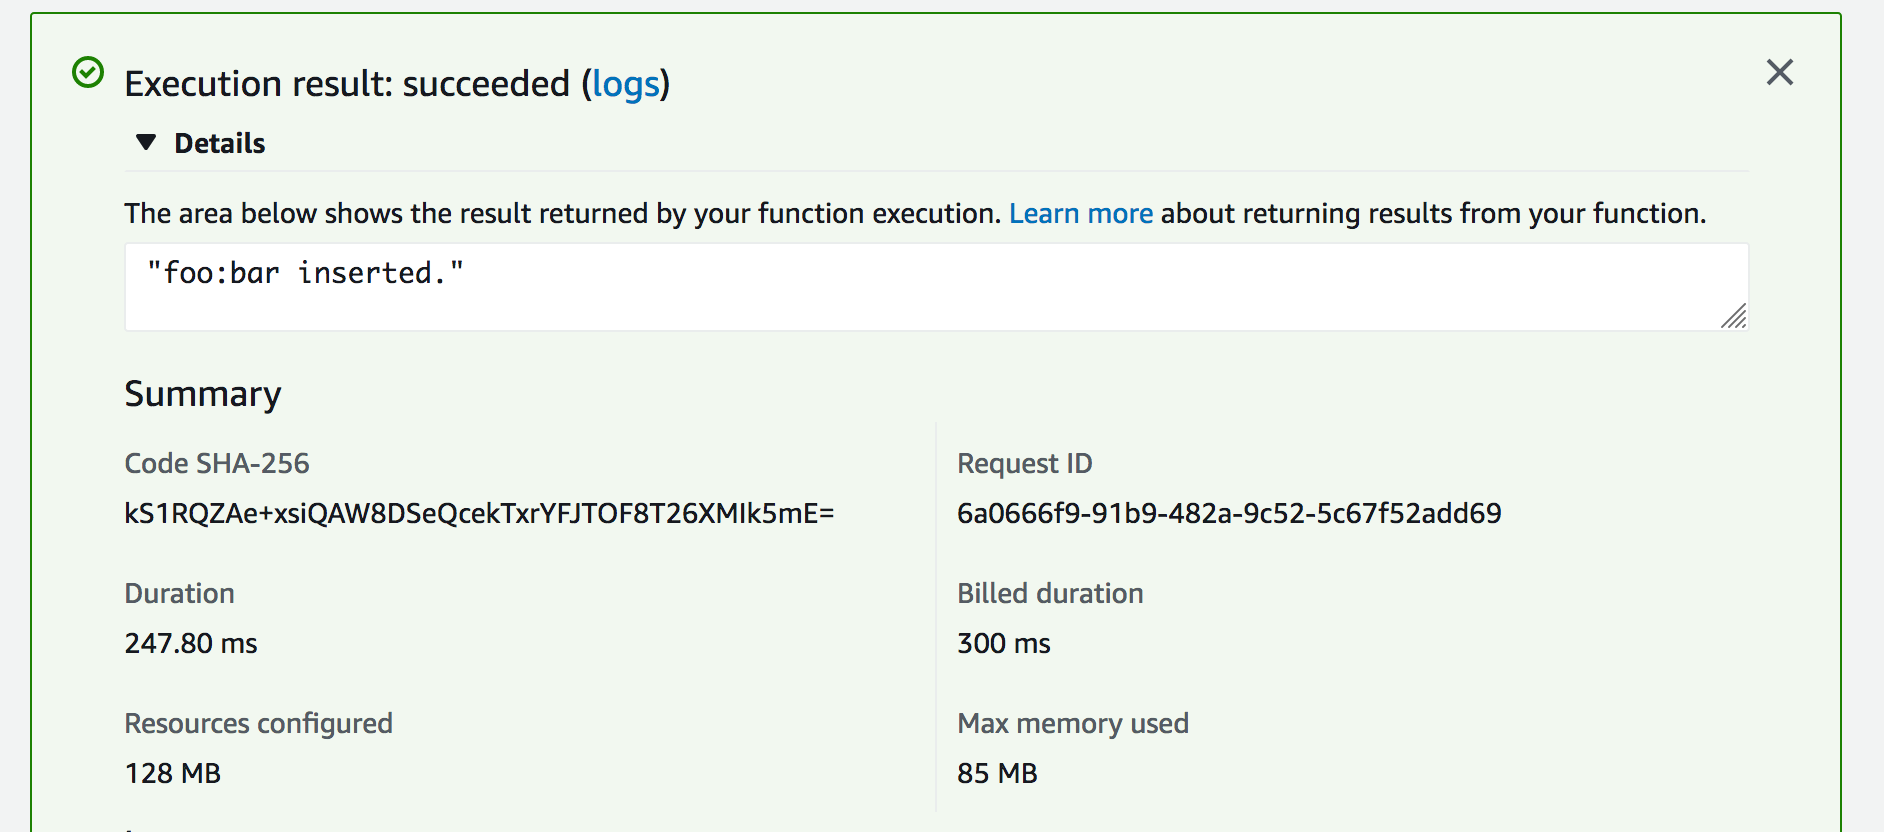 Congratulations, now your lambda function inserts entry to your Upstash
database.
**What can be the next?**
* You can write and deploy another function to just get values from the
database.
* You can learn better ways to deploy your functions such as
[serverless framework](https://serverless.com/) and
[AWS SAM](https://aws.amazon.com/serverless/sam/)
* You can integrate
[API Gateway](https://docs.aws.amazon.com/apigateway/latest/developerguide/api-gateway-create-api-as-simple-proxy-for-lambda.html)
so you can call your function via http.
* You can learn about how to monitor your functions from CloudWatch as described
[here](https://docs.aws.amazon.com/lambda/latest/dg//monitoring-functions-logs.html)
.
#### Redis Connections in AWS Lambda
Although Redis connections are very lightweight, a new connection inside each
Lambda function can cause a notable latency. On the other hand, reusing Redis
connections inside the AWS Lambda functions has its own drawbacks. When AWS
scales out Lambda functions, the number of open connections can rapidly
increase. Fortunately, Upstash detects and terminates the idle and zombie
connections thanks to its smart connection handling algorithm. Since this
algorithm is used; we have been recommending caching your Redis connection in
serverless functions.
Congratulations, now your lambda function inserts entry to your Upstash
database.
**What can be the next?**
* You can write and deploy another function to just get values from the
database.
* You can learn better ways to deploy your functions such as
[serverless framework](https://serverless.com/) and
[AWS SAM](https://aws.amazon.com/serverless/sam/)
* You can integrate
[API Gateway](https://docs.aws.amazon.com/apigateway/latest/developerguide/api-gateway-create-api-as-simple-proxy-for-lambda.html)
so you can call your function via http.
* You can learn about how to monitor your functions from CloudWatch as described
[here](https://docs.aws.amazon.com/lambda/latest/dg//monitoring-functions-logs.html)
.
#### Redis Connections in AWS Lambda
Although Redis connections are very lightweight, a new connection inside each
Lambda function can cause a notable latency. On the other hand, reusing Redis
connections inside the AWS Lambda functions has its own drawbacks. When AWS
scales out Lambda functions, the number of open connections can rapidly
increase. Fortunately, Upstash detects and terminates the idle and zombie
connections thanks to its smart connection handling algorithm. Since this
algorithm is used; we have been recommending caching your Redis connection in
serverless functions.
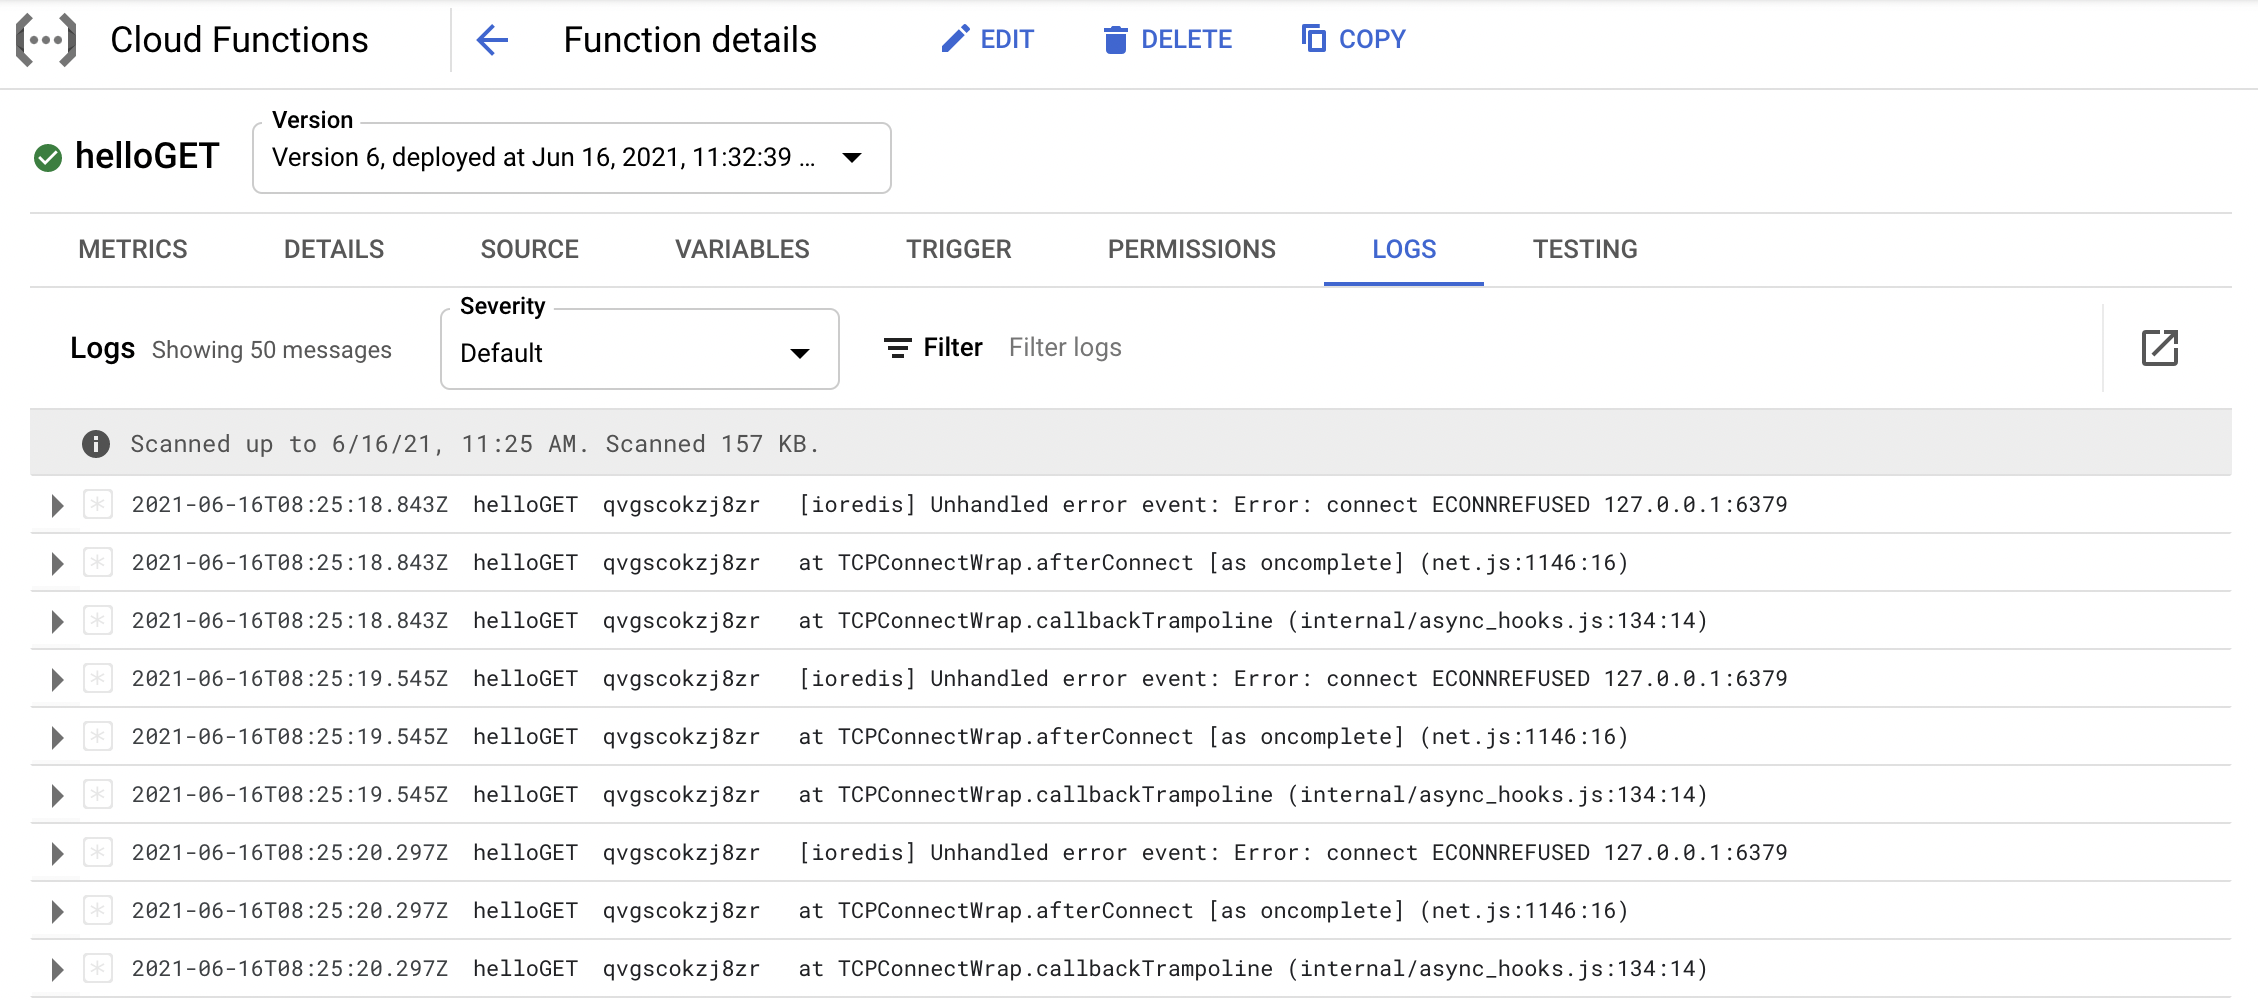 ---
# Source: https://upstash.com/docs/workflow/agents/getting-started.md
# Source: https://upstash.com/docs/vector/sdks/ts/getting-started.md
# Source: https://upstash.com/docs/vector/sdks/php/getting-started.md
# Source: https://upstash.com/docs/search/sdks/ts/getting-started.md
# Source: https://upstash.com/docs/redis/sdks/ratelimit-ts/integrations/strapi/getting-started.md
# Source: https://upstash.com/docs/redis/integrations/ratelimit/strapi/getting-started.md
> ## Documentation Index
> Fetch the complete documentation index at: https://upstash.com/docs/llms.txt
> Use this file to discover all available pages before exploring further.
# Upstash Ratelimit Strapi Integration
Strapi is an open-source, Node.js based, Headless CMS that saves developers a lot of development time, enabling them to build their application backends quickly by decreasing the lines of code necessary.
You can use Upstash's HTTP and Redis based [Ratelimit package](https://github.com/upstash/ratelimit-js) integration with Strapi to protect your APIs from abuse.
## Getting started
### Installation
---
# Source: https://upstash.com/docs/workflow/agents/getting-started.md
# Source: https://upstash.com/docs/vector/sdks/ts/getting-started.md
# Source: https://upstash.com/docs/vector/sdks/php/getting-started.md
# Source: https://upstash.com/docs/search/sdks/ts/getting-started.md
# Source: https://upstash.com/docs/redis/sdks/ratelimit-ts/integrations/strapi/getting-started.md
# Source: https://upstash.com/docs/redis/integrations/ratelimit/strapi/getting-started.md
> ## Documentation Index
> Fetch the complete documentation index at: https://upstash.com/docs/llms.txt
> Use this file to discover all available pages before exploring further.
# Upstash Ratelimit Strapi Integration
Strapi is an open-source, Node.js based, Headless CMS that saves developers a lot of development time, enabling them to build their application backends quickly by decreasing the lines of code necessary.
You can use Upstash's HTTP and Redis based [Ratelimit package](https://github.com/upstash/ratelimit-js) integration with Strapi to protect your APIs from abuse.
## Getting started
### Installation
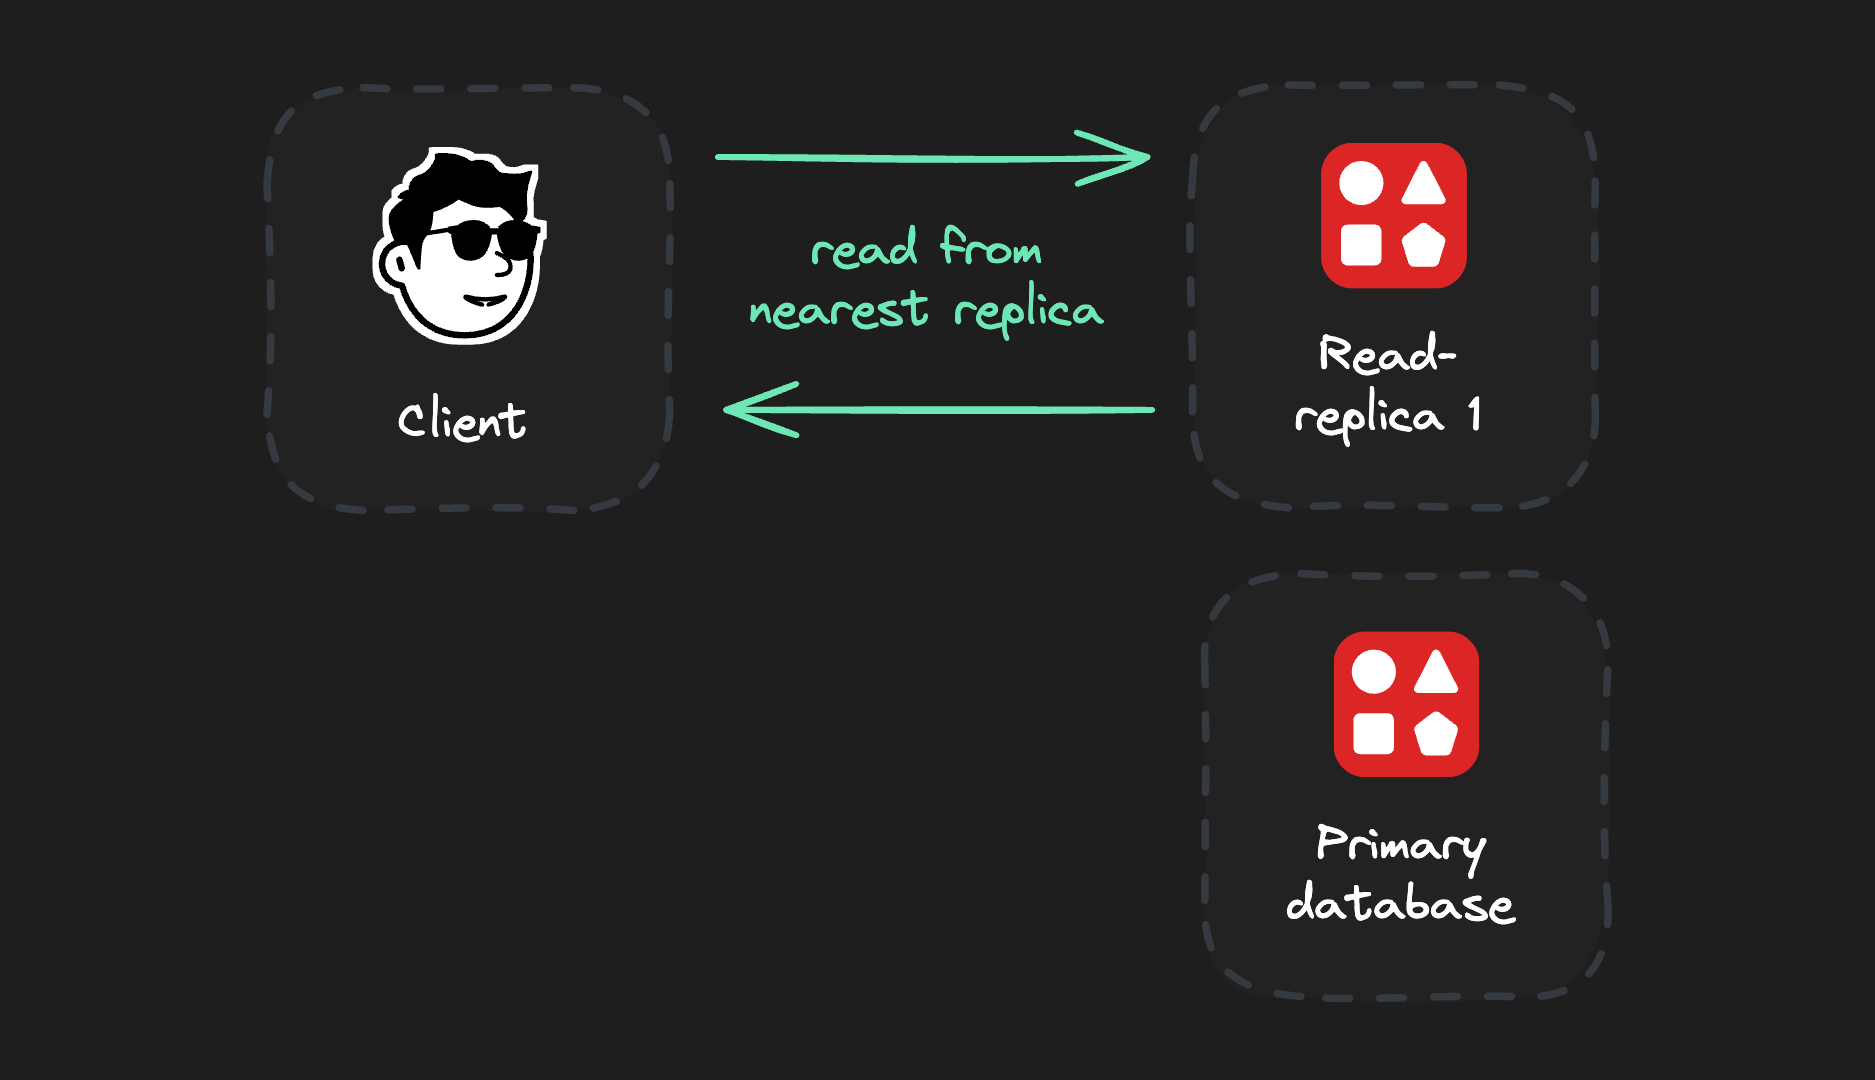 **Write commands go to the primary database** for consistency. After a successful write, they are replicated to all read replicas:
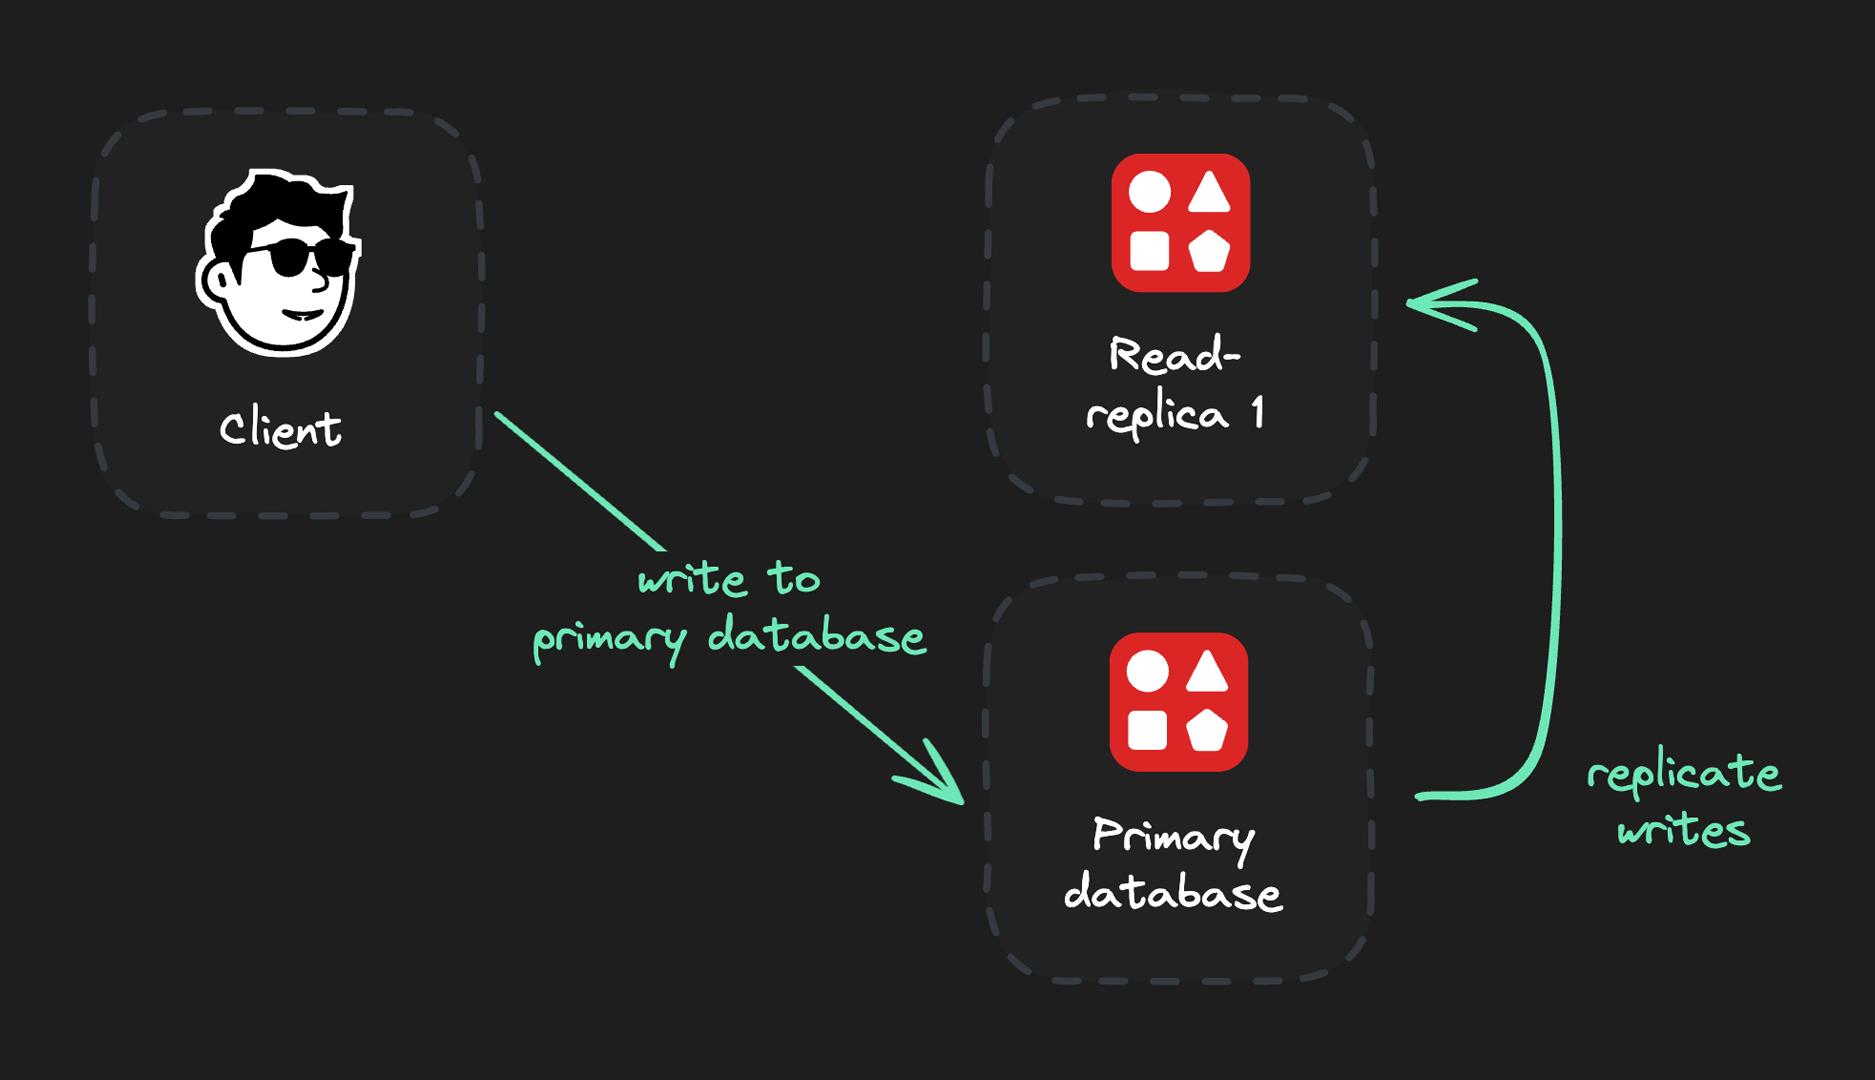 ***
## Available Regions
To create a globally distributed database, select a primary region and the number of read regions:
* Select a primary region for most write operations for best performance.
* Select read regions close to your users for optimized read speeds.
Each request is then automatically served by the closest read replica for maximum performance and minimum latency:
***
## Available Regions
To create a globally distributed database, select a primary region and the number of read regions:
* Select a primary region for most write operations for best performance.
* Select read regions close to your users for optimized read speeds.
Each request is then automatically served by the closest read replica for maximum performance and minimum latency:
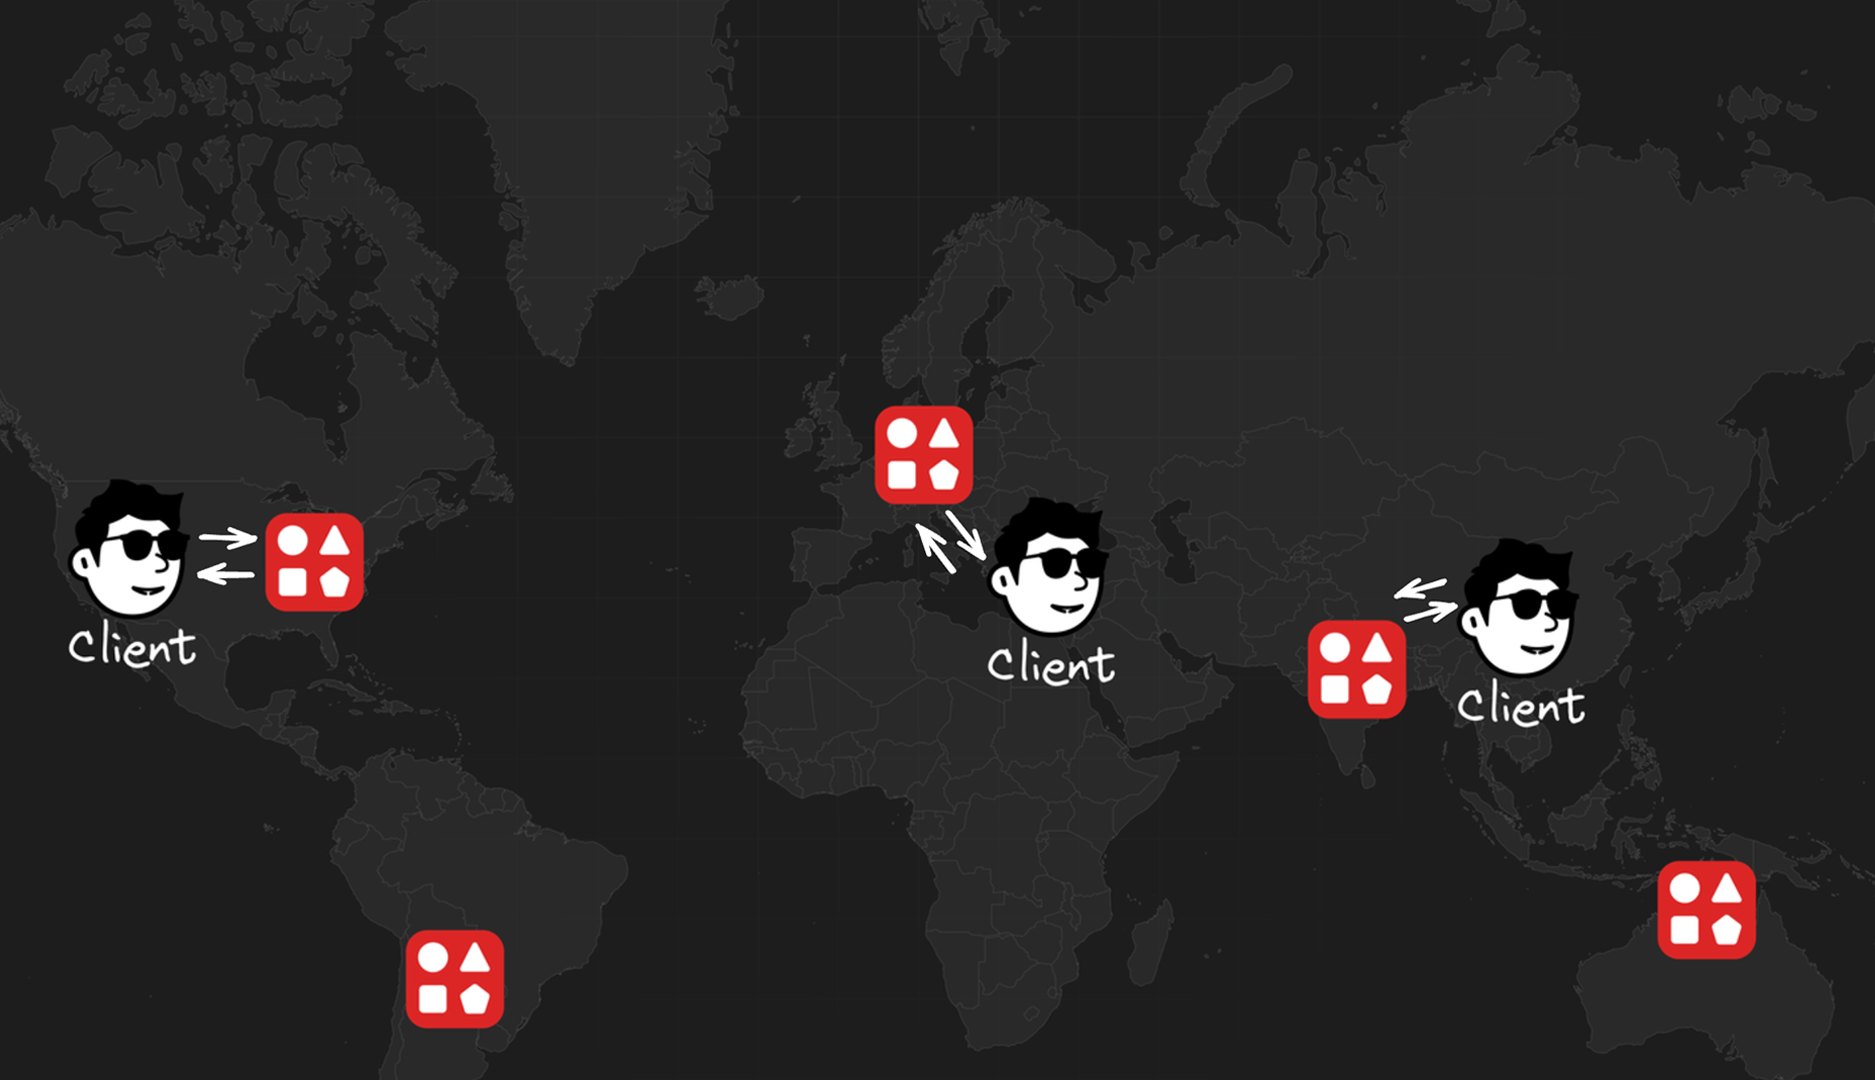 **You can create read replicas in the following regions:**
* AWS US-East-1 (North Virginia)
* AWS US-East-2 (Ohio)
* AWS US-West-1 (North California)
* AWS US-West-2 (Oregon)
* AWS EU-West-1 (Ireland)
* AWS EU-West-2 (London)
* AWS EU-Central-1 (Frankfurt)
* AWS AP-South-1 (Mumbai)
* AWS AP-Northeast-1 (Tokyo)
* AWS AP-Southeast-1 (Singapore)
* AWS AP-Southeast-2 (Sydney)
* AWS SA-East-1 (São Paulo)
Check out [our blog post](https://upstash.com/blog/global-database) to learn more about our global replication philosophy. You can also explore our [live benchmark](https://latency.upstash.com/) to see Upstash Redis latency from different locations around the world.
---
# Source: https://upstash.com/docs/redis/features/globaldatabase.md
> ## Documentation Index
> Fetch the complete documentation index at: https://upstash.com/docs/llms.txt
> Use this file to discover all available pages before exploring further.
# Global Database
In the global database, the replicas are distributed across multiple regions
around the world. The clients are routed to the nearest region. This helps with
minimizing latency for use cases where users can be anywhere in the world.
### Primary Region and Read Regions
The Upstash Global database is structured with a Primary Region and multiple
Read Regions. When a write command is issued, which can be initiated from any region, it is initially sent and processed
at the Primary Region. The write operation is then replicated to all the Read
Regions, ensuring data consistency across the database.
On the other hand, when a read command is executed, it is directed to the
nearest Read Region to optimize response time. By leveraging the Global
database's distributed architecture, read operations can be performed with
reduced latency, as data retrieval occurs from the closest available Read
Region.
The Global database's design thus aids in minimizing read operation latency by
efficiently distributing data across multiple regions and enabling requests to
be processed from the nearest Read Region.
User selects a single primary region and multiple read regions. For the best
performance, you should select the primary region in the same location where
your writes happen. Select the read regions where your clients that read the
Redis located. You may have your database with a single primary region but no
read regions which would be practically same with a single region (regional)
database. You can add or remove regions on a running Redis database.
Here the list of regions currently supported:
**You can create read replicas in the following regions:**
* AWS US-East-1 (North Virginia)
* AWS US-East-2 (Ohio)
* AWS US-West-1 (North California)
* AWS US-West-2 (Oregon)
* AWS EU-West-1 (Ireland)
* AWS EU-West-2 (London)
* AWS EU-Central-1 (Frankfurt)
* AWS AP-South-1 (Mumbai)
* AWS AP-Northeast-1 (Tokyo)
* AWS AP-Southeast-1 (Singapore)
* AWS AP-Southeast-2 (Sydney)
* AWS SA-East-1 (São Paulo)
Check out [our blog post](https://upstash.com/blog/global-database) to learn more about our global replication philosophy. You can also explore our [live benchmark](https://latency.upstash.com/) to see Upstash Redis latency from different locations around the world.
---
# Source: https://upstash.com/docs/redis/features/globaldatabase.md
> ## Documentation Index
> Fetch the complete documentation index at: https://upstash.com/docs/llms.txt
> Use this file to discover all available pages before exploring further.
# Global Database
In the global database, the replicas are distributed across multiple regions
around the world. The clients are routed to the nearest region. This helps with
minimizing latency for use cases where users can be anywhere in the world.
### Primary Region and Read Regions
The Upstash Global database is structured with a Primary Region and multiple
Read Regions. When a write command is issued, which can be initiated from any region, it is initially sent and processed
at the Primary Region. The write operation is then replicated to all the Read
Regions, ensuring data consistency across the database.
On the other hand, when a read command is executed, it is directed to the
nearest Read Region to optimize response time. By leveraging the Global
database's distributed architecture, read operations can be performed with
reduced latency, as data retrieval occurs from the closest available Read
Region.
The Global database's design thus aids in minimizing read operation latency by
efficiently distributing data across multiple regions and enabling requests to
be processed from the nearest Read Region.
User selects a single primary region and multiple read regions. For the best
performance, you should select the primary region in the same location where
your writes happen. Select the read regions where your clients that read the
Redis located. You may have your database with a single primary region but no
read regions which would be practically same with a single region (regional)
database. You can add or remove regions on a running Redis database.
Here the list of regions currently supported:
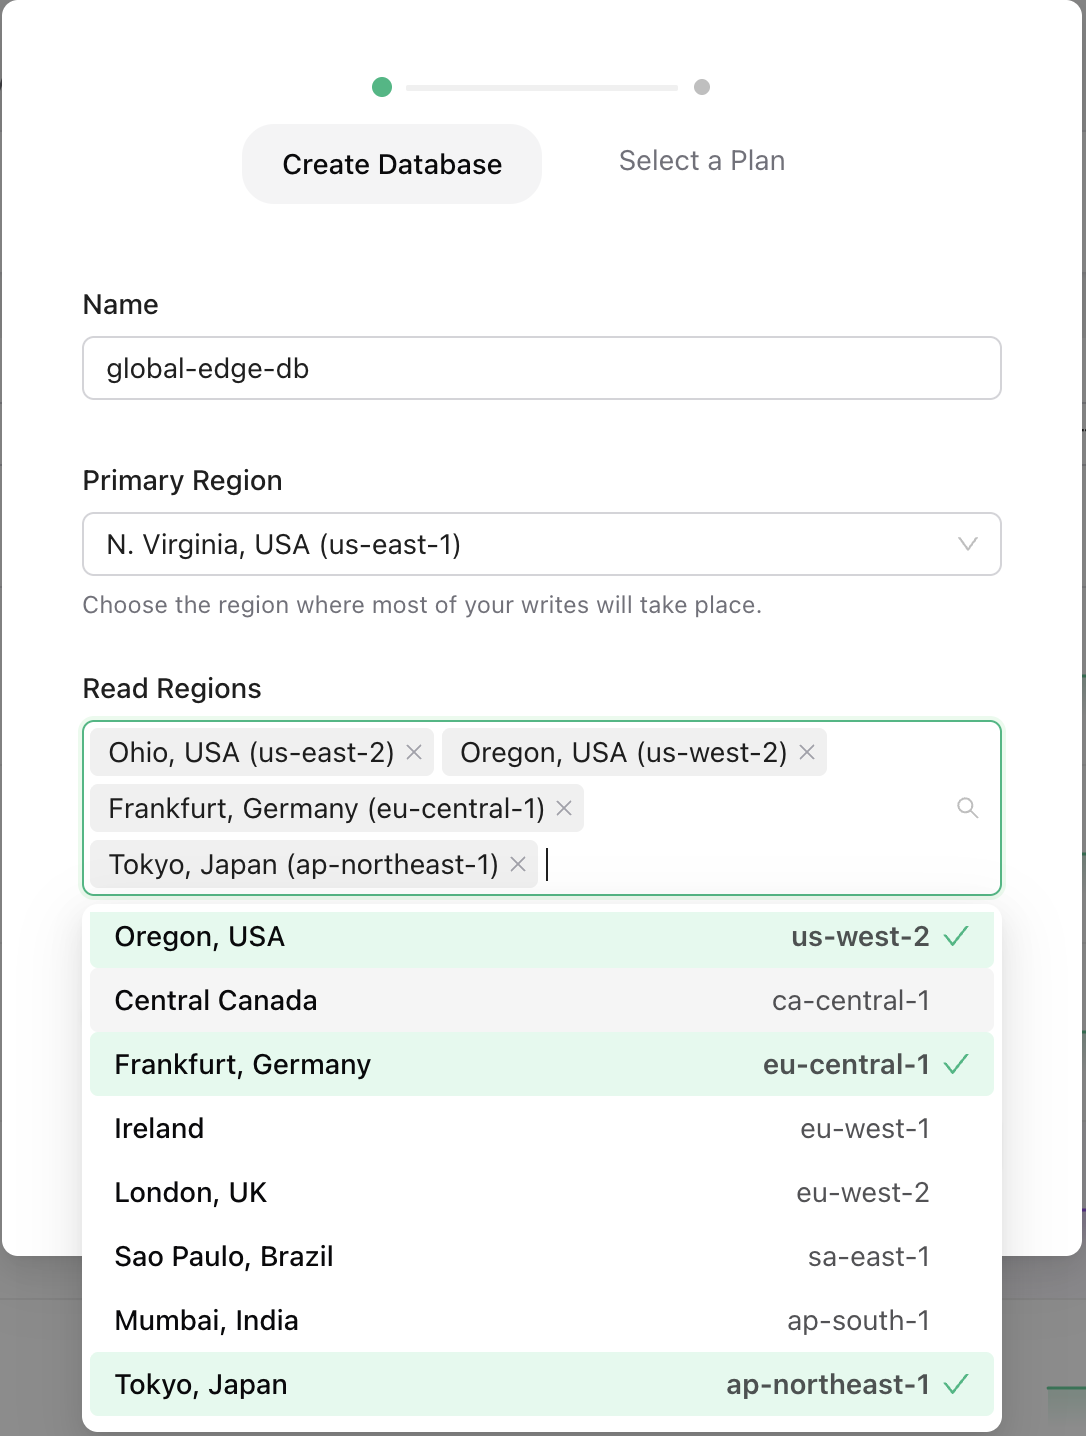 In our internal tests, we see the following latencies (99th percentile):
* Read latency from the same region \<1ms
* Write latency from the same region \<5ms
* Read/write latency from the same continent \<50ms
In our internal tests, we see the following latencies (99th percentile):
* Read latency from the same region \<1ms
* Write latency from the same region \<5ms
* Read/write latency from the same continent \<50ms
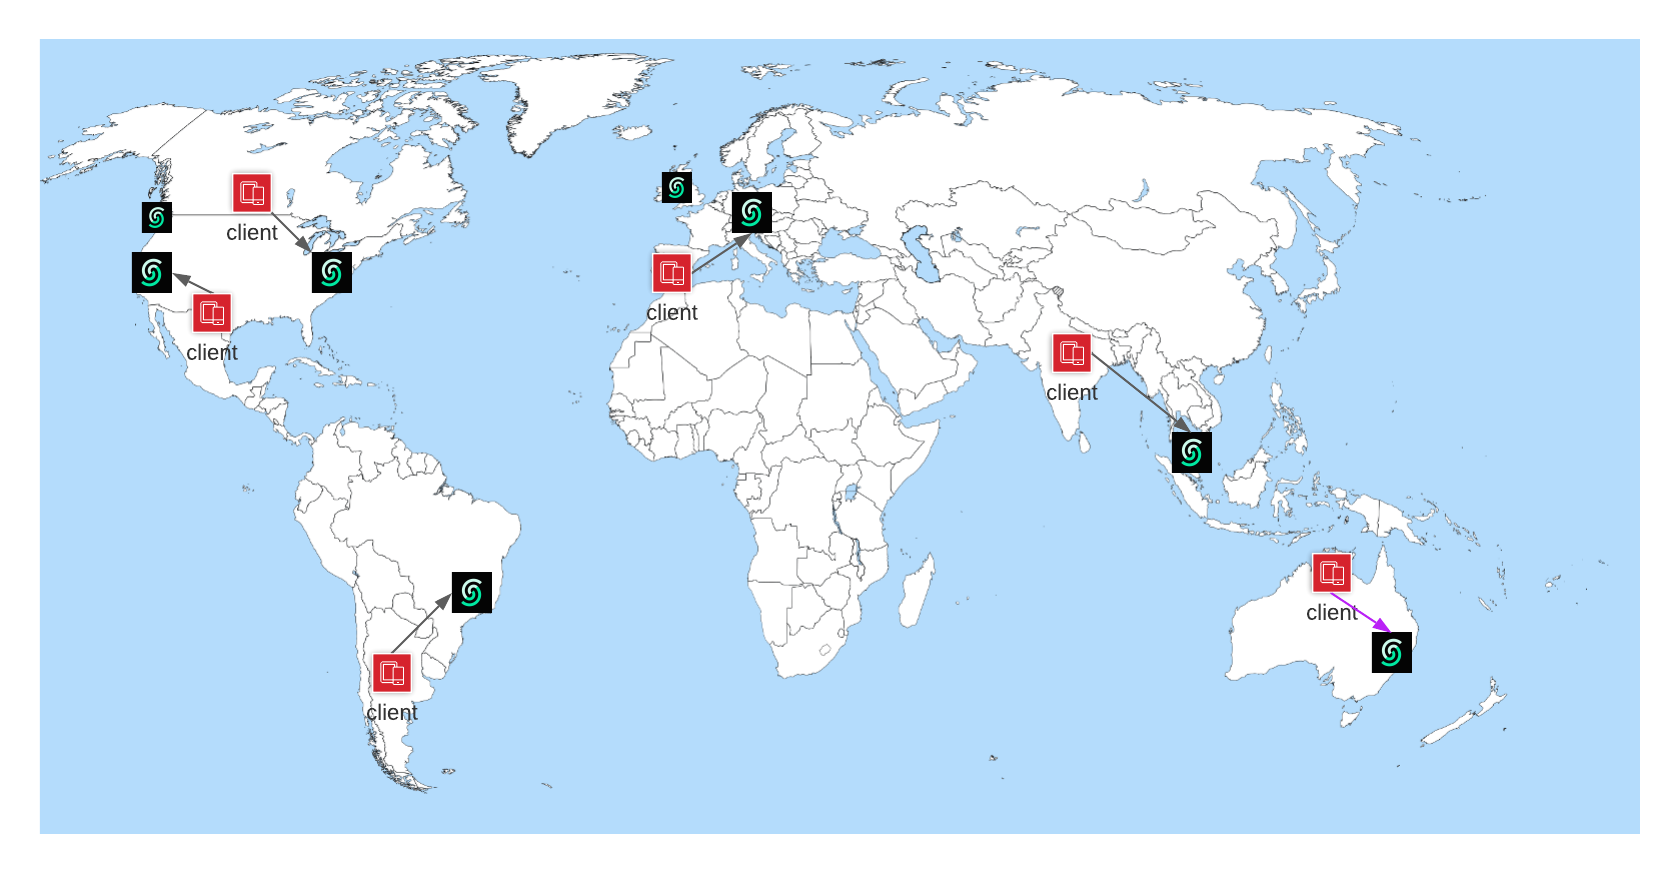 ### Architecture
In the multi region architecture, each key is owned by a primary replica which
is located at the region that you choose as primary region. Read replicas become
the backups of the primary for the related keys. The primary replica processes
the writes, then propagates them to the read replicas. Read requests are
processed by all replicas, this means you can read a value from any of the
replicas. This model gives a better write consistency and read scalability.
Each replica employs a failure detector to track the liveness of the primary
replica. When the primary replica fails for a reason, read replicas start a new
leader election round and elect a new leader (primary). This is the only
unavailability window for the cluster where your requests can be blocked for a
short period of time.
### Architecture
In the multi region architecture, each key is owned by a primary replica which
is located at the region that you choose as primary region. Read replicas become
the backups of the primary for the related keys. The primary replica processes
the writes, then propagates them to the read replicas. Read requests are
processed by all replicas, this means you can read a value from any of the
replicas. This model gives a better write consistency and read scalability.
Each replica employs a failure detector to track the liveness of the primary
replica. When the primary replica fails for a reason, read replicas start a new
leader election round and elect a new leader (primary). This is the only
unavailability window for the cluster where your requests can be blocked for a
short period of time.
If it is working, you can deploy your app to AWS by running `sam deploy --guided`. Enter a stack name and pick your region. After confirming changes, the deployment should begin. The command will output API Gateway endpoint URL, check the API in your browser. You can also check your deployment on your AWS console. You will see your function has been created.
Click on your function, you will see the code is uploaded and API Gateway is configured. ### Notes * Check the template.yaml file. You can add new functions and APIGateway endpoints editing this file. * It is a good practice to keep your Redis endpoint and password as environment variable. * You can use [serverless framework](https://www.serverless.com/) instead of AWS SAM to deploy your function. --- # Source: https://upstash.com/docs/redis/quickstarts/google-cloud-functions.md > ## Documentation Index > Fetch the complete documentation index at: https://upstash.com/docs/llms.txt > Use this file to discover all available pages before exploring further. # Google Cloud Functions
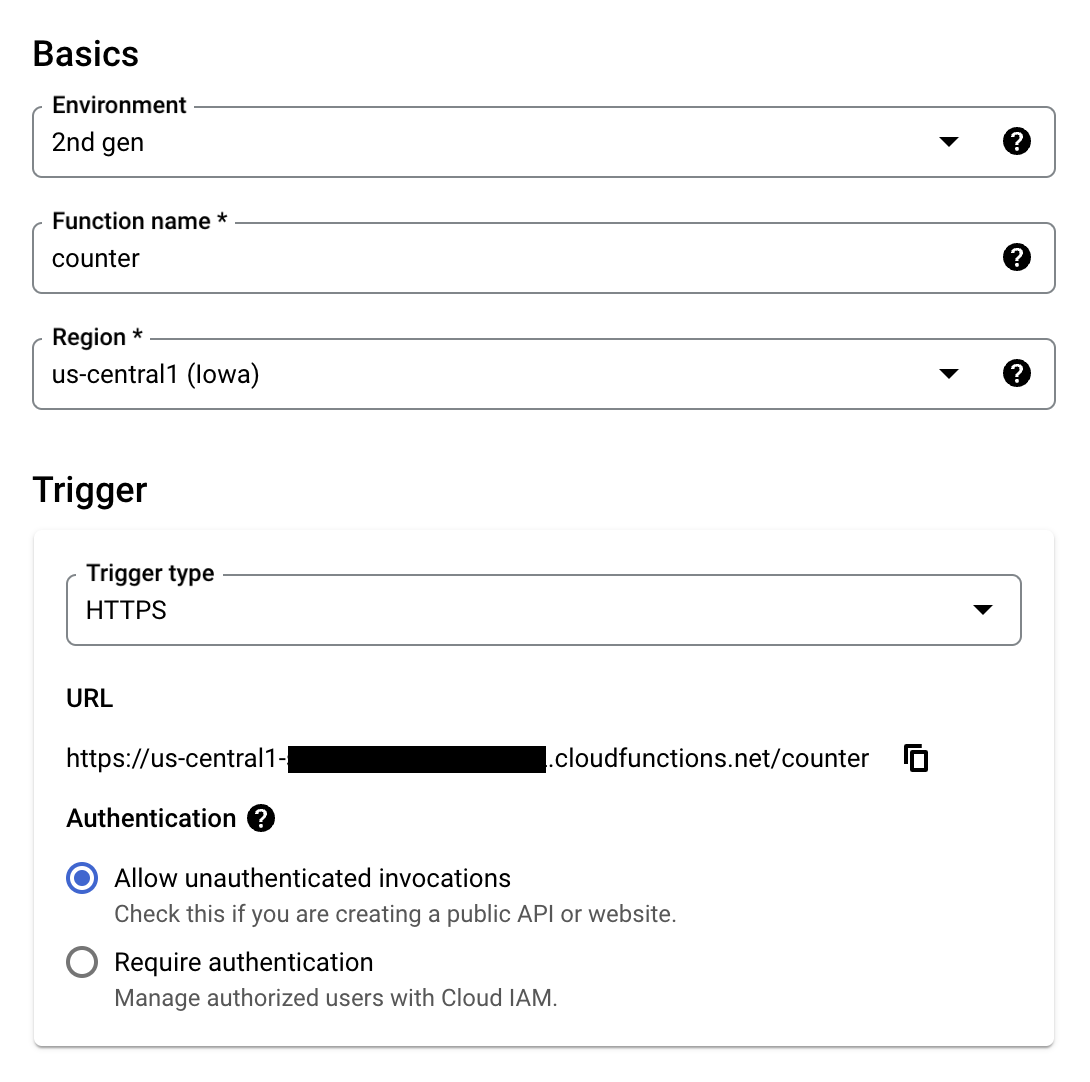 4. Using your `UPSTASH_REDIS_REST_URL` and `UPSTASH_REDIS_REST_TOKEN`, setup **Runtime environment variables** under **Runtime, build, connections and privacy settings** like below.
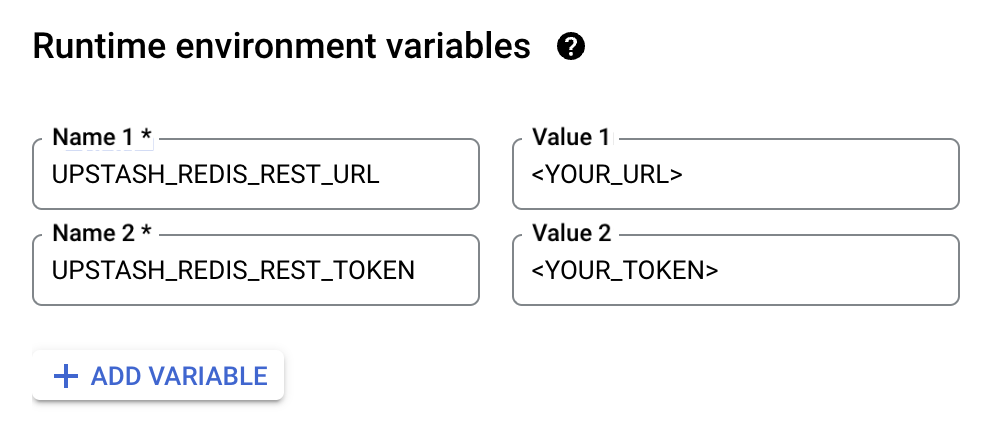 5. Click **Next**.
6. Set **Entry point** to `counter`.
7. Update `index.js`
```js index.js theme={"system"}
const { Redis } = require("@upstash/redis");
const functions = require('@google-cloud/functions-framework');
const redis = new Redis({
url: process.env.UPSTASH_REDIS_REST_URL,
token: process.env.UPSTASH_REDIS_REST_TOKEN
});
functions.http('counter', async (req, res) => {
const count = await redis.incr("counter");
res.send("Counter:" + count);
});
```
8. Update `package.json` to include `@upstash/redis`.
```json package.json theme={"system"}
{
"dependencies": {
"@google-cloud/functions-framework": "^3.0.0",
"@upstash/redis": "^1.31.6"
}
}
```
9. Click **Deploy**.
10. Visit the given URL.
---
# Source: https://upstash.com/docs/vector/tutorials/gradio-application.md
> ## Documentation Index
> Fetch the complete documentation index at: https://upstash.com/docs/llms.txt
> Use this file to discover all available pages before exploring further.
# Create and Deploy RAG Applications with Gradio
In this tutorial, we'll demonstrate how to use Gradio to build an interactive Semantic Search and Question Answering app using Hugging Face embeddings, Upstash Vector, and LangChain. Users can enter a question, and the app will retrieve relevant information and provide an answer.
### Important Note on Python Version
Recent Python versions may cause compatibility issues with `torch`, a dependency for Hugging Face models. Therefore, we recommend using **Python 3.9** to avoid any installation issues.
### Installation and Setup
First, we need to set up our environment and install the necessary libraries. Install the dependencies by running the following command:
```bash theme={"system"}
pip install gradio langchain sentence_transformers upstash-vector python-dotenv transformers langchain-community langchain-huggingface
```
Next, create a `.env` file in your project directory with the following content, replacing `your_upstash_url` and `your_upstash_token` with your actual Upstash credentials:
```
UPSTASH_VECTOR_REST_URL=your_upstash_url
UPSTASH_VECTOR_REST_TOKEN=your_upstash_token
```
This configuration file will allow us to load the required environment variables.
### Code
We will load our environment variables, initialize the Hugging Face embeddings model, set up Upstash Vector, and configure a Hugging Face Question Answering model.
```python theme={"system"}
# Import libraries
import gradio as gr
from dotenv import load_dotenv
from langchain_huggingface.embeddings import HuggingFaceEmbeddings
from langchain_community.vectorstores.upstash import UpstashVectorStore
from transformers import pipeline
from langchain.schema import Document
# Load environment variables
load_dotenv()
# Set up embeddings and Upstash Vector store
embeddings = HuggingFaceEmbeddings(model_name="sentence-transformers/all-mpnet-base-v2")
vector_store = UpstashVectorStore(embedding=embeddings)
```
Next, we will create sample documents, embed them using Hugging Face embeddings, and store them in Upstash Vector.
```python theme={"system"}
# Sample documents to embed and store
documents = [
Document(page_content="Global warming is causing sea levels to rise."),
Document(page_content="AI is transforming many industries."),
Document(page_content="Renewable energy is vital for sustainable development.")
]
vector_store.add_documents(documents=documents, batch_size=100, embedding_chunk_size=200)
```
When inserting documents, they are first embedded using the `Embeddings` object. Many embedding models, such as the Hugging Face models, support embedding multiple documents at once. This allows for efficient processing by batching documents and embedding them in parallel.
* The `embedding_chunk_size` parameter controls the number of documents processed in parallel when creating embeddings.
Once the embeddings are created, they are stored in Upstash Vector. To reduce the number of HTTP requests, the vectors are also batched when they are sent to Upstash Vector.
* The `batch_size` parameter controls the number of vectors included in each HTTP request when sending to Upstash Vector.
5. Click **Next**.
6. Set **Entry point** to `counter`.
7. Update `index.js`
```js index.js theme={"system"}
const { Redis } = require("@upstash/redis");
const functions = require('@google-cloud/functions-framework');
const redis = new Redis({
url: process.env.UPSTASH_REDIS_REST_URL,
token: process.env.UPSTASH_REDIS_REST_TOKEN
});
functions.http('counter', async (req, res) => {
const count = await redis.incr("counter");
res.send("Counter:" + count);
});
```
8. Update `package.json` to include `@upstash/redis`.
```json package.json theme={"system"}
{
"dependencies": {
"@google-cloud/functions-framework": "^3.0.0",
"@upstash/redis": "^1.31.6"
}
}
```
9. Click **Deploy**.
10. Visit the given URL.
---
# Source: https://upstash.com/docs/vector/tutorials/gradio-application.md
> ## Documentation Index
> Fetch the complete documentation index at: https://upstash.com/docs/llms.txt
> Use this file to discover all available pages before exploring further.
# Create and Deploy RAG Applications with Gradio
In this tutorial, we'll demonstrate how to use Gradio to build an interactive Semantic Search and Question Answering app using Hugging Face embeddings, Upstash Vector, and LangChain. Users can enter a question, and the app will retrieve relevant information and provide an answer.
### Important Note on Python Version
Recent Python versions may cause compatibility issues with `torch`, a dependency for Hugging Face models. Therefore, we recommend using **Python 3.9** to avoid any installation issues.
### Installation and Setup
First, we need to set up our environment and install the necessary libraries. Install the dependencies by running the following command:
```bash theme={"system"}
pip install gradio langchain sentence_transformers upstash-vector python-dotenv transformers langchain-community langchain-huggingface
```
Next, create a `.env` file in your project directory with the following content, replacing `your_upstash_url` and `your_upstash_token` with your actual Upstash credentials:
```
UPSTASH_VECTOR_REST_URL=your_upstash_url
UPSTASH_VECTOR_REST_TOKEN=your_upstash_token
```
This configuration file will allow us to load the required environment variables.
### Code
We will load our environment variables, initialize the Hugging Face embeddings model, set up Upstash Vector, and configure a Hugging Face Question Answering model.
```python theme={"system"}
# Import libraries
import gradio as gr
from dotenv import load_dotenv
from langchain_huggingface.embeddings import HuggingFaceEmbeddings
from langchain_community.vectorstores.upstash import UpstashVectorStore
from transformers import pipeline
from langchain.schema import Document
# Load environment variables
load_dotenv()
# Set up embeddings and Upstash Vector store
embeddings = HuggingFaceEmbeddings(model_name="sentence-transformers/all-mpnet-base-v2")
vector_store = UpstashVectorStore(embedding=embeddings)
```
Next, we will create sample documents, embed them using Hugging Face embeddings, and store them in Upstash Vector.
```python theme={"system"}
# Sample documents to embed and store
documents = [
Document(page_content="Global warming is causing sea levels to rise."),
Document(page_content="AI is transforming many industries."),
Document(page_content="Renewable energy is vital for sustainable development.")
]
vector_store.add_documents(documents=documents, batch_size=100, embedding_chunk_size=200)
```
When inserting documents, they are first embedded using the `Embeddings` object. Many embedding models, such as the Hugging Face models, support embedding multiple documents at once. This allows for efficient processing by batching documents and embedding them in parallel.
* The `embedding_chunk_size` parameter controls the number of documents processed in parallel when creating embeddings.
Once the embeddings are created, they are stored in Upstash Vector. To reduce the number of HTTP requests, the vectors are also batched when they are sent to Upstash Vector.
* The `batch_size` parameter controls the number of vectors included in each HTTP request when sending to Upstash Vector.
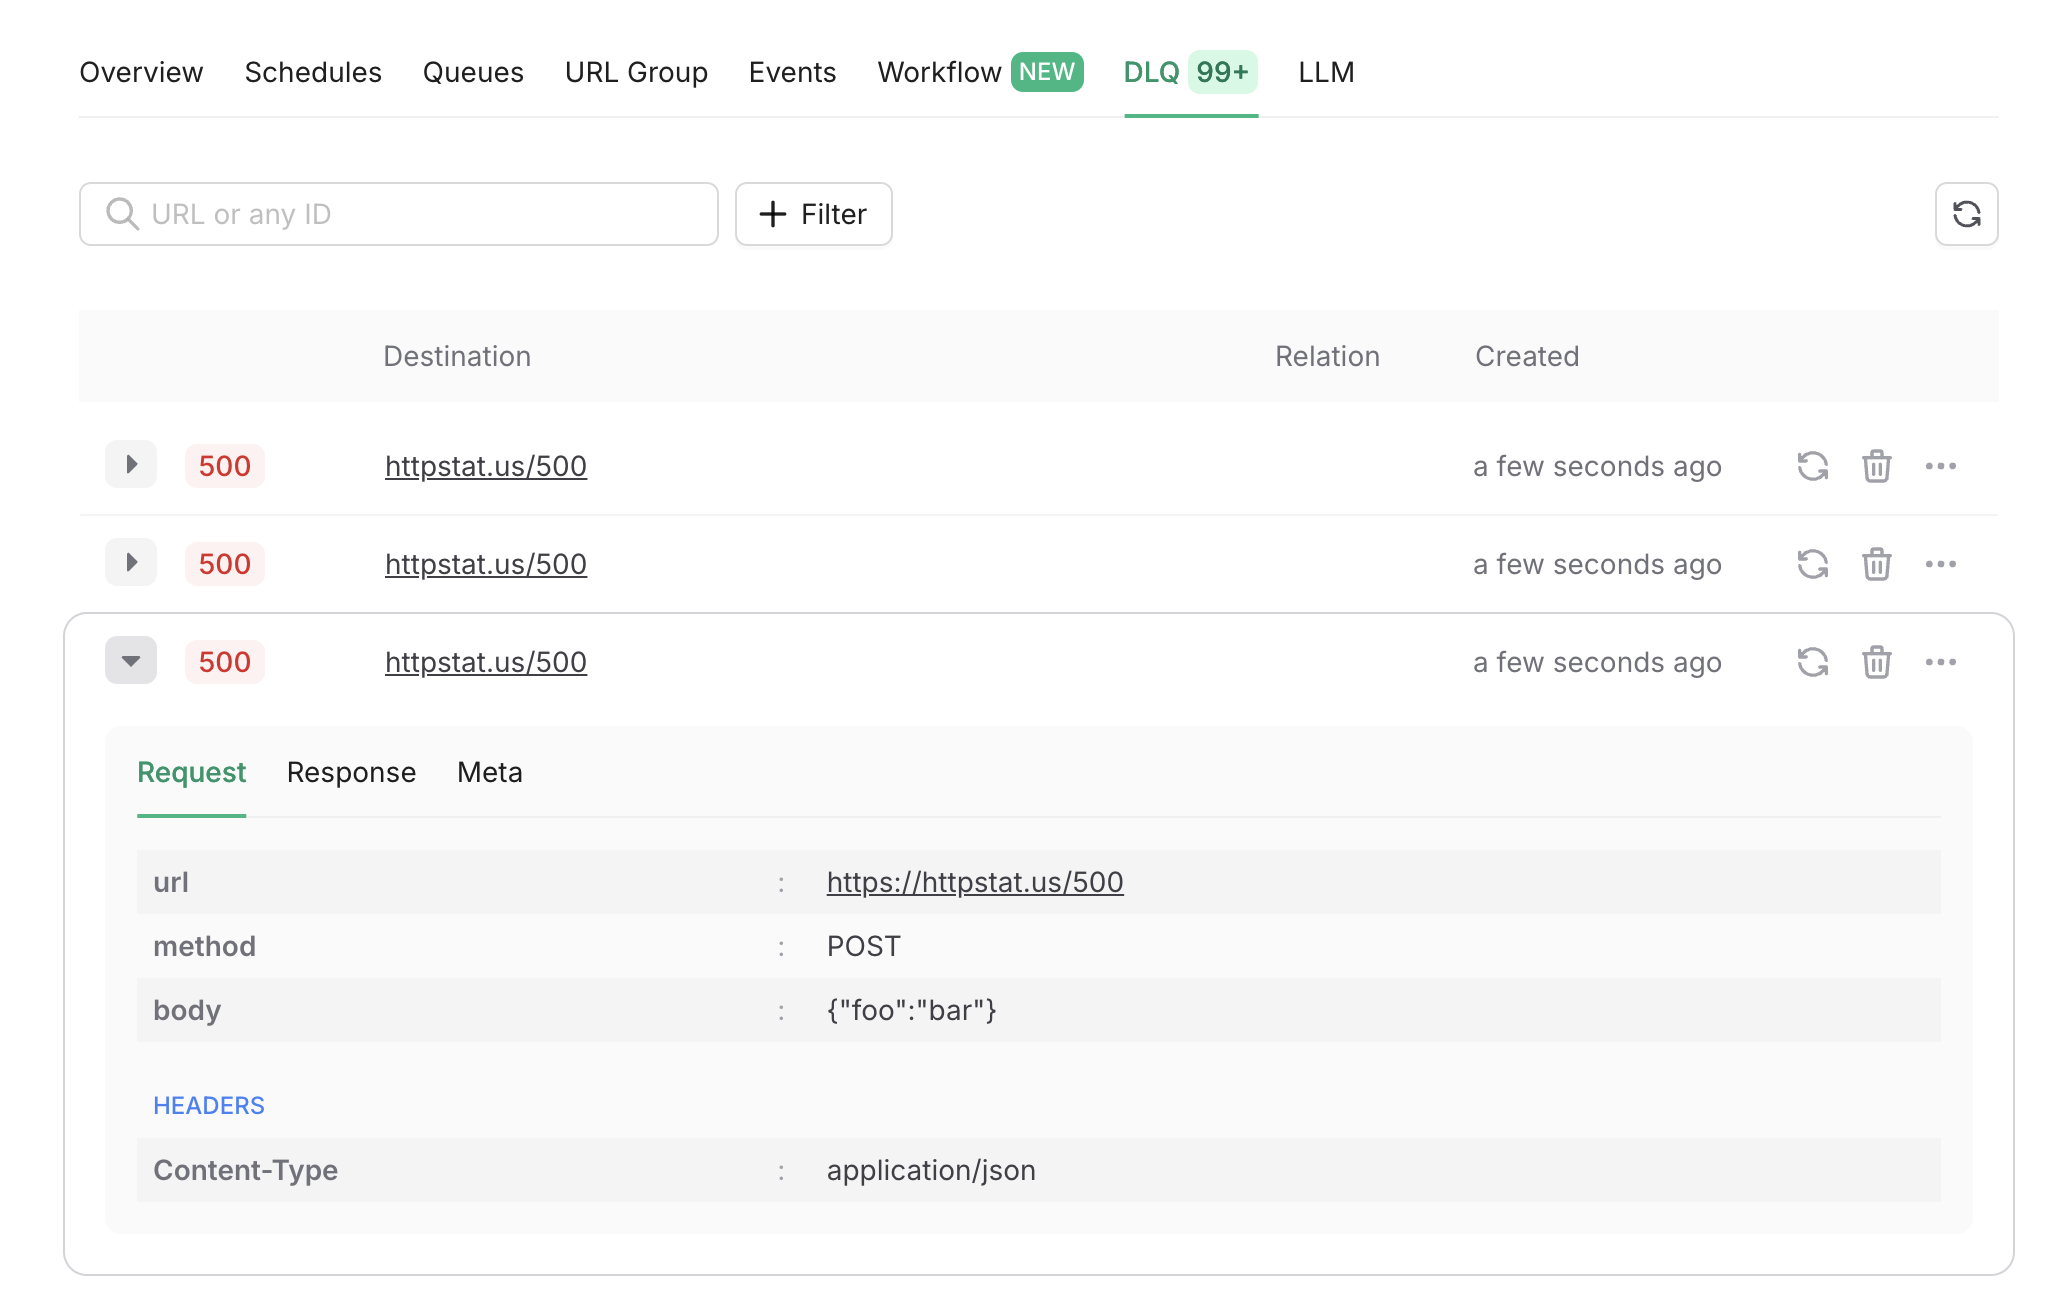 ---
# Source: https://upstash.com/docs/redis/sdks/ts/commands/hash/hdel.md
# Source: https://upstash.com/docs/redis/sdks/py/commands/hash/hdel.md
> ## Documentation Index
> Fetch the complete documentation index at: https://upstash.com/docs/llms.txt
> Use this file to discover all available pages before exploring further.
# HDEL
> Deletes one or more hash fields.
## Arguments
---
# Source: https://upstash.com/docs/redis/sdks/ts/commands/hash/hdel.md
# Source: https://upstash.com/docs/redis/sdks/py/commands/hash/hdel.md
> ## Documentation Index
> Fetch the complete documentation index at: https://upstash.com/docs/llms.txt
> Use this file to discover all available pages before exploring further.
# HDEL
> Deletes one or more hash fields.
## Arguments
{messages.map((msg, i) => (
)
}
```
{msg.sender}: {msg.text}
))}
{notifications.map((notif, i) => (
)
}
```
{notif}
))}
{activities.map((activity, i) => (
)
}
```
{activity.message}
))}
Using a local tunnel connects your endpoint to the production QStash, enabling you to view workflow logs in the Upstash Console.
## Step 3: Create a Workflow Endpoint
A workflow endpoint allows you to define a set of steps that, together, make up a workflow. Each step contains a piece of business logic that is automatically retried on failure, with easy monitoring via our visual workflow dashboard.
To define a workflow endpoint with Hono, navigate into your entrypoint file (usually `src/index.ts`) and add the following code:
 Then, make a POST request to your workflow endpoint. For each workflow run, a unique workflow run ID is returned:
```bash Terminal theme={"system"}
curl -X POST https://localhost:8787/workflow
# result: {"workflowRunId":"wfr_xxxxxx"}
```
See the [documentation on starting a workflow](/workflow/howto/start) for other ways you can start your workflow.
If you didn't set up local QStash development server, you can use this ID to track the workflow run and see its status in your QStash workflow dashboard. All steps are listed with their statuses, headers, and body for a detailed overview of your workflow from start to finish. Click on a step to see its detailed logs.
## Step 5: Deploying to Production
When deploying your Hono app with Upstash Workflow to production, there are a few key points to keep in mind:
1. **Environment Variables**: Make sure that all necessary environment variables from your `.dev.vars` file are set in your Cloudflare Worker project settings. For example, your `QSTASH_TOKEN`, and any other configuration variables your workflow might need.
2. **Remove Local Development Settings**: In your production code, you can remove or conditionally exclude any local development settings. For example, if you used [local tunnel for local development](/workflow/howto/local-development#local-tunnel-with-ngrok)
3. **Deployment**: Deploy your Hono app to production as you normally would, for example using the Cloudflare CLI:
```bash Terminal theme={"system"}
wrangler deploy
```
4. **Verify Workflow Endpoint**: After deployment, verify that your workflow endpoint is accessible by making a POST request to your production URL:
```bash Terminal theme={"system"}
curl -X POST https://
Then, make a POST request to your workflow endpoint. For each workflow run, a unique workflow run ID is returned:
```bash Terminal theme={"system"}
curl -X POST https://localhost:8787/workflow
# result: {"workflowRunId":"wfr_xxxxxx"}
```
See the [documentation on starting a workflow](/workflow/howto/start) for other ways you can start your workflow.
If you didn't set up local QStash development server, you can use this ID to track the workflow run and see its status in your QStash workflow dashboard. All steps are listed with their statuses, headers, and body for a detailed overview of your workflow from start to finish. Click on a step to see its detailed logs.
## Step 5: Deploying to Production
When deploying your Hono app with Upstash Workflow to production, there are a few key points to keep in mind:
1. **Environment Variables**: Make sure that all necessary environment variables from your `.dev.vars` file are set in your Cloudflare Worker project settings. For example, your `QSTASH_TOKEN`, and any other configuration variables your workflow might need.
2. **Remove Local Development Settings**: In your production code, you can remove or conditionally exclude any local development settings. For example, if you used [local tunnel for local development](/workflow/howto/local-development#local-tunnel-with-ngrok)
3. **Deployment**: Deploy your Hono app to production as you normally would, for example using the Cloudflare CLI:
```bash Terminal theme={"system"}
wrangler deploy
```
4. **Verify Workflow Endpoint**: After deployment, verify that your workflow endpoint is accessible by making a POST request to your production URL:
```bash Terminal theme={"system"}
curl -X POST https://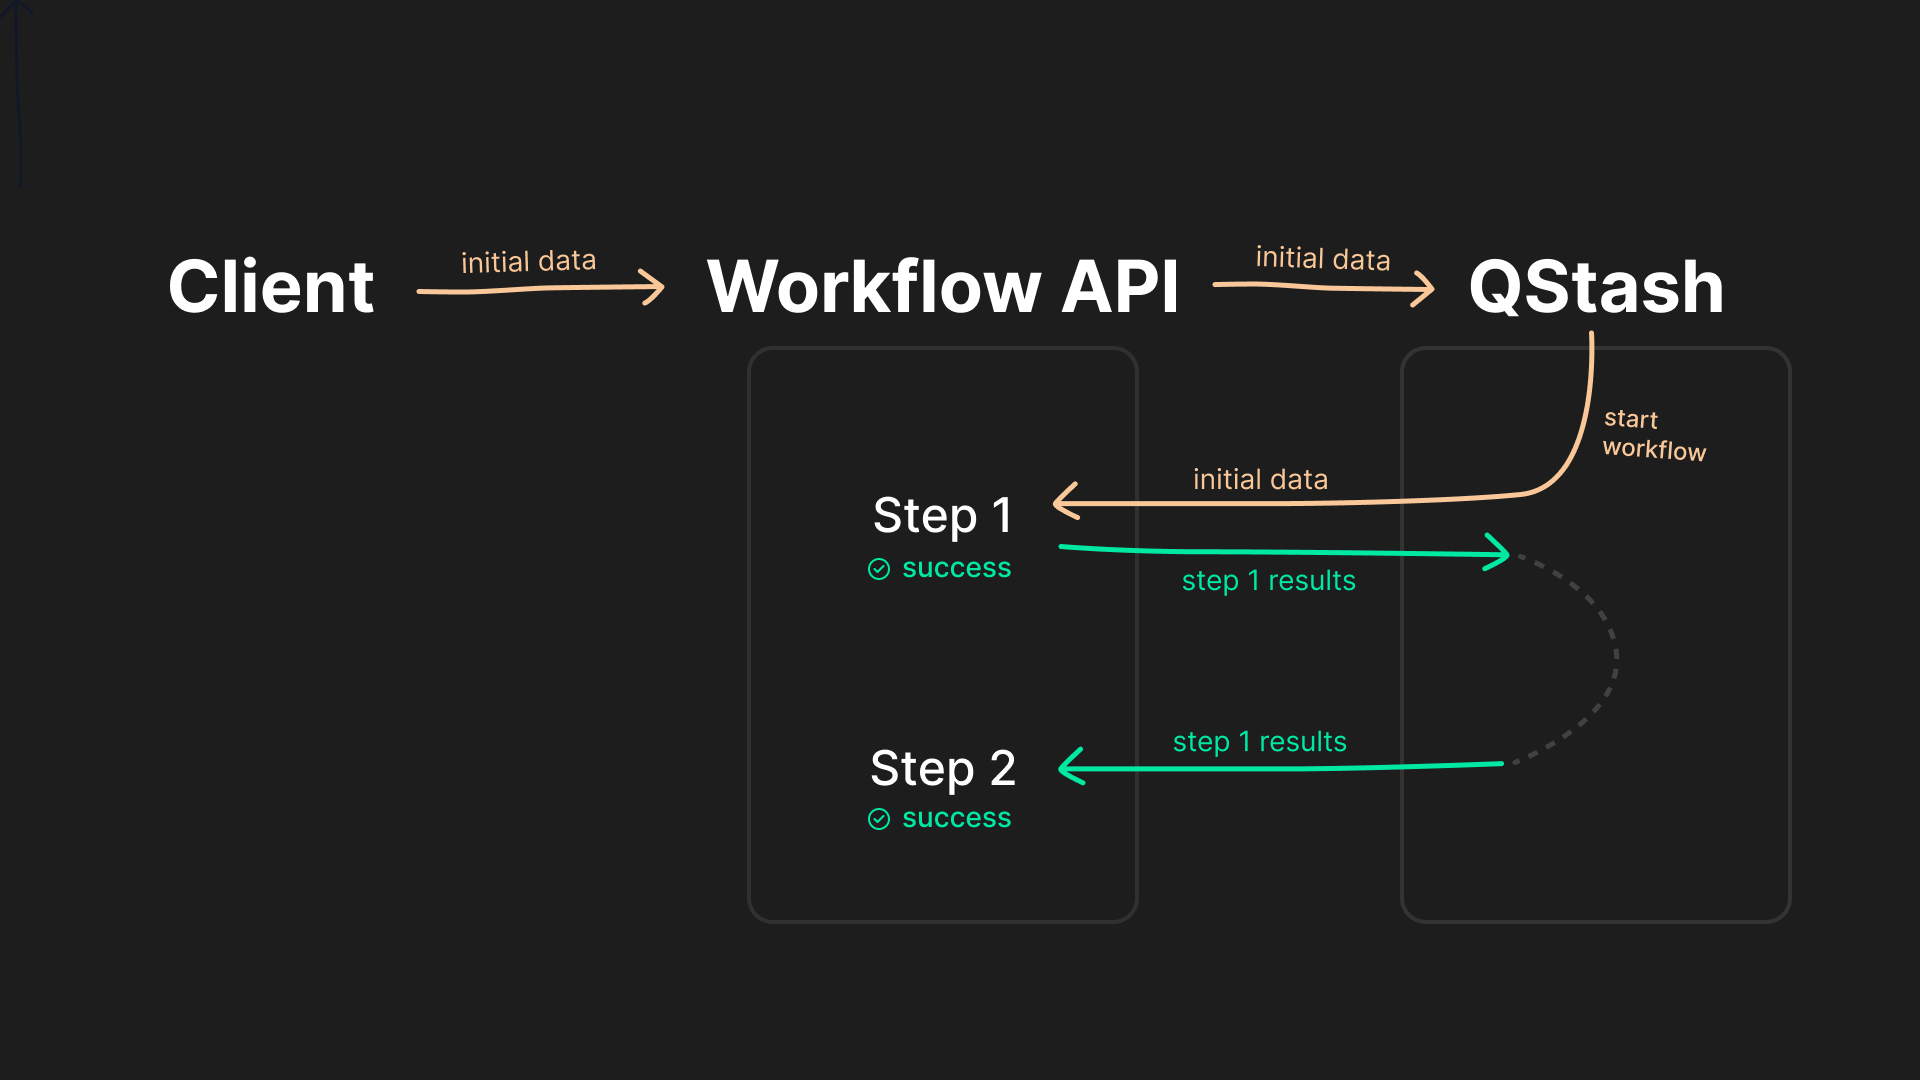 ***
## Extended Features
Upstash Workflow extends the basic step model with additional primitives:
* **Parallel Steps**
Define multiple steps (e.g. inside a `Promise.all()`). The engine detects independent work and runs steps concurrently as separate HTTP executions.
* **Delays / Sleep**
`context.sleep` and `context.sleepUntil` allow pausing a workflow for hours, days, or even months. No compute is held during the wait time; execution resumes when the delay has expired.
* **External Event Handling**
`context.waitForEvent` pauses execution until you notify the workflow externally (e.g. via webhook or user action). State is persisted until the event arrives.
* **External Calls**
Use `context.call` to have Upstash perform slow or unreliable HTTP calls. Instead of blocking your function, the call is handled by Upstash. When it completes, the workflow resumes with the response.
***
This architecture makes your serverless functions durable, reliable, and performance‑optimized, even in the face of runtime errors or temporary service outages.
It's quick and easy to get started: follow the [Quickstarts](/workflow/quickstarts/platforms) to define your first workflow in minutes.
---
# Source: https://upstash.com/docs/redis/sdks/ts/commands/hash/hpersist.md
# Source: https://upstash.com/docs/redis/sdks/py/commands/hash/hpersist.md
> ## Documentation Index
> Fetch the complete documentation index at: https://upstash.com/docs/llms.txt
> Use this file to discover all available pages before exploring further.
# HPERSIST
> Remove the expiration from one or more hash fields.
## Arguments
***
## Extended Features
Upstash Workflow extends the basic step model with additional primitives:
* **Parallel Steps**
Define multiple steps (e.g. inside a `Promise.all()`). The engine detects independent work and runs steps concurrently as separate HTTP executions.
* **Delays / Sleep**
`context.sleep` and `context.sleepUntil` allow pausing a workflow for hours, days, or even months. No compute is held during the wait time; execution resumes when the delay has expired.
* **External Event Handling**
`context.waitForEvent` pauses execution until you notify the workflow externally (e.g. via webhook or user action). State is persisted until the event arrives.
* **External Calls**
Use `context.call` to have Upstash perform slow or unreliable HTTP calls. Instead of blocking your function, the call is handled by Upstash. When it completes, the workflow resumes with the response.
***
This architecture makes your serverless functions durable, reliable, and performance‑optimized, even in the face of runtime errors or temporary service outages.
It's quick and easy to get started: follow the [Quickstarts](/workflow/quickstarts/platforms) to define your first workflow in minutes.
---
# Source: https://upstash.com/docs/redis/sdks/ts/commands/hash/hpersist.md
# Source: https://upstash.com/docs/redis/sdks/py/commands/hash/hpersist.md
> ## Documentation Index
> Fetch the complete documentation index at: https://upstash.com/docs/llms.txt
> Use this file to discover all available pages before exploring further.
# HPERSIST
> Remove the expiration from one or more hash fields.
## Arguments
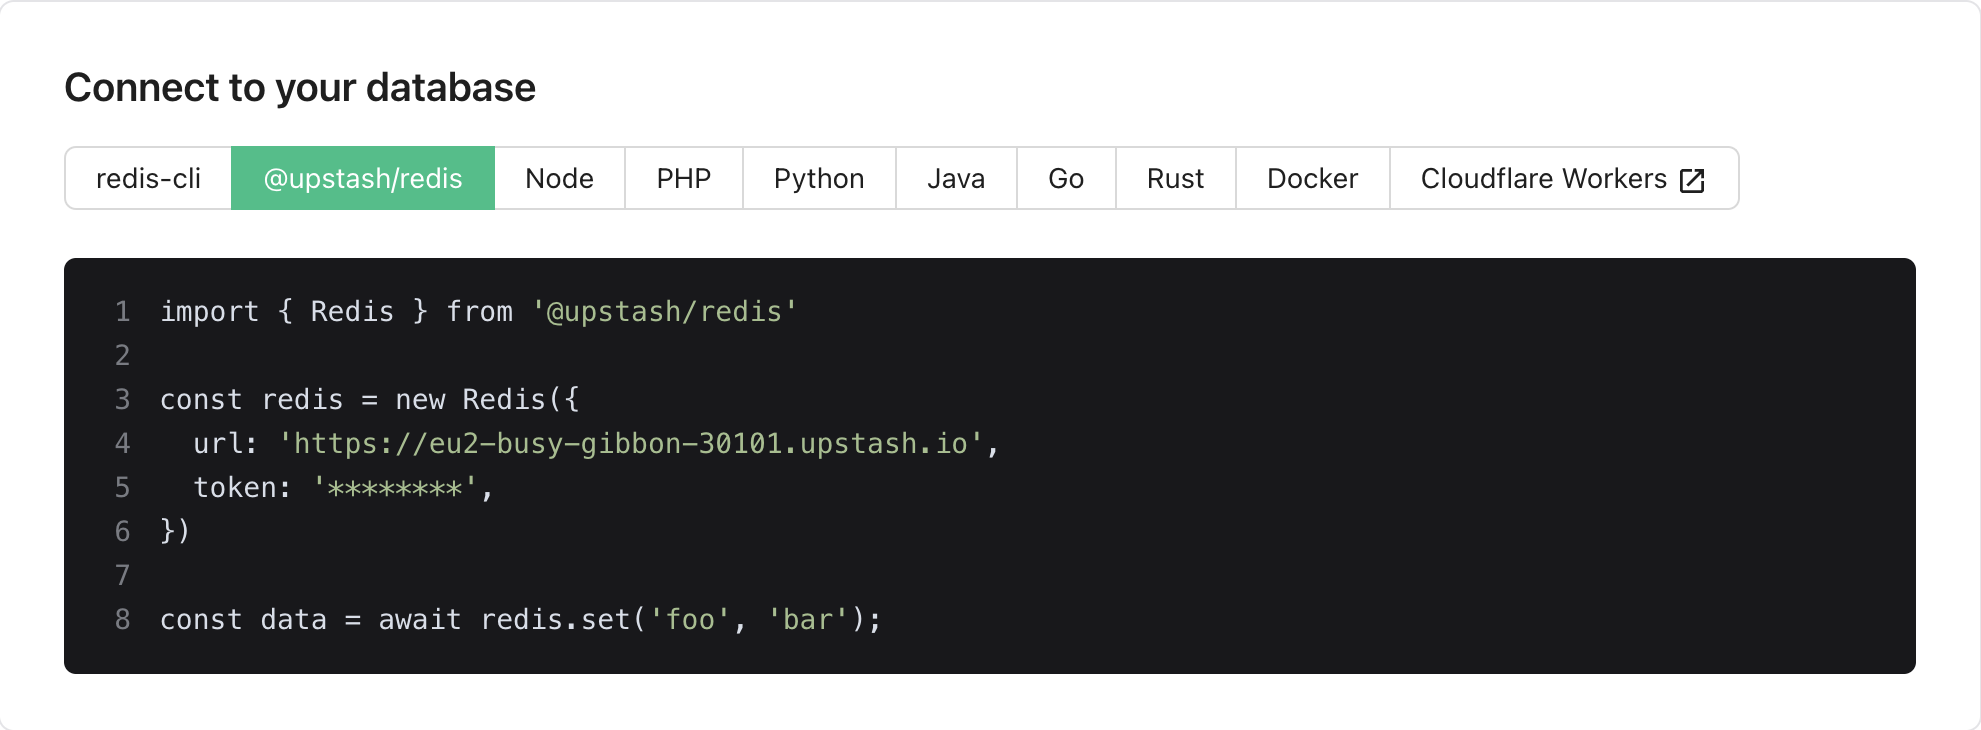 Or scroll further down to the `REST API` section and copy the
`UPSTASH_REDIS_REST_URL` and `UPSTASH_REDIS_REST_TOKEN` from there.
Or scroll further down to the `REST API` section and copy the
`UPSTASH_REDIS_REST_URL` and `UPSTASH_REDIS_REST_TOKEN` from there.
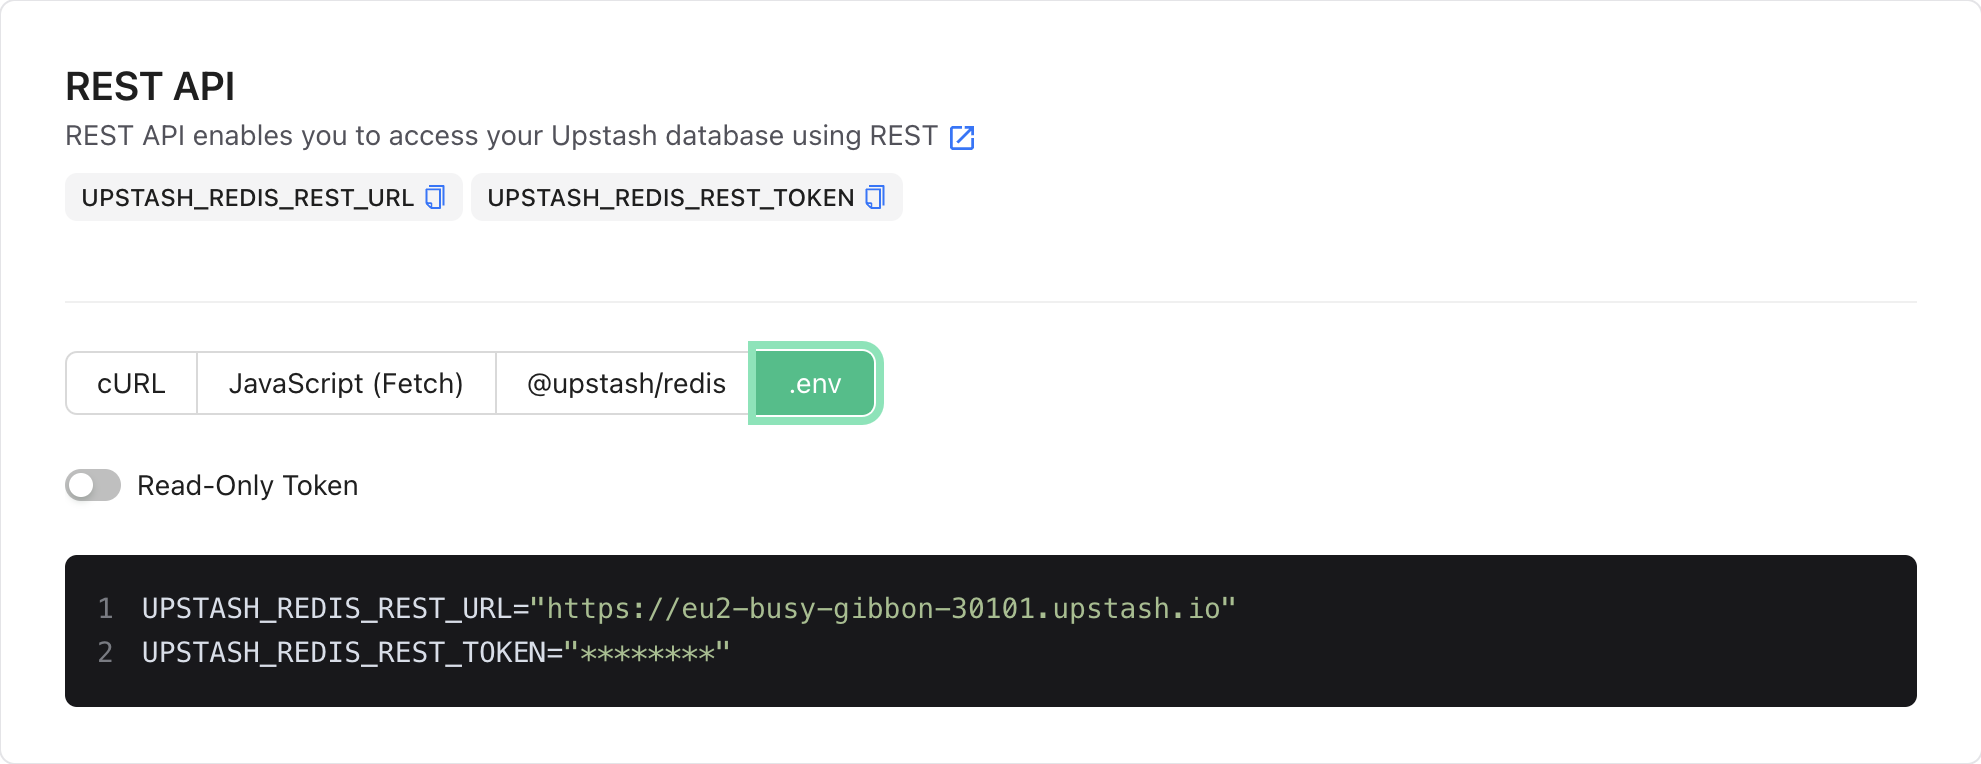 ---
# Source: https://upstash.com/docs/vector/tutorials/huggingface-embeddings.md
> ## Documentation Index
> Fetch the complete documentation index at: https://upstash.com/docs/llms.txt
> Use this file to discover all available pages before exploring further.
# Use Hugging Face Embeddings with Upstash Vector
In this tutorial, we'll demonstrate how to use Hugging Face embeddings with Upstash Vector and LangChain to perform a similarity search. We will upload a few sample documents, embed them using Hugging Face, and then perform a search query to find the most semantically similar documents.
### Important Note on Python Version
Recent Python versions may cause compatibility issues with `torch`, a dependency for Hugging Face models. Therefore, we recommend using **Python 3.9** to avoid any installation issues.
### Installation and Setup
First, we need to set up our environment and install the necessary libraries. Install the dependencies by running the following command:
```bash theme={"system"}
pip install langchain sentence_transformers upstash-vector python-dotenv langchain-community langchain-huggingface
```
Next, create a `.env` file in your project directory with the following content, replacing `your_upstash_url` and `your_upstash_token` with your actual Upstash credentials:
```
UPSTASH_VECTOR_REST_URL=your_upstash_url
UPSTASH_VECTOR_REST_TOKEN=your_upstash_token
```
This configuration file will allow us to load the required environment variables.
### Code
We will load our environment variables and initialize the Hugging Face embeddings model along with the Upstash Vector store.
```python theme={"system"}
# Load environment variables for API keys and Upstash configuration
from dotenv import load_dotenv
import os
load_dotenv()
# Import required libraries
from langchain_huggingface.embeddings import HuggingFaceEmbeddings
from langchain_community.vectorstores.upstash import UpstashVectorStore
# Initialize Hugging Face embeddings model
embeddings = HuggingFaceEmbeddings(model_name="sentence-transformers/all-mpnet-base-v2")
# Set up Upstash Vector Store (automatically uses the environment variables)
vector_store = UpstashVectorStore(embedding=embeddings)
```
Next, we will create sample documents and embed them using Hugging Face embeddings, then store them in Upstash Vector.
```python theme={"system"}
# Import the required Document class from LangChain
from langchain.schema import Document
# Sample documents to embed and store as Document objects
documents = [
Document(page_content="Global warming is causing sea levels to rise."),
Document(page_content="Artificial intelligence is transforming many industries."),
Document(page_content="Renewable energy is vital for sustainable development.")
]
# Embed documents and store in Upstash Vector with batching
vector_store.add_documents(
documents=documents,
batch_size=100,
embedding_chunk_size=200
)
print("Documents with embeddings have been stored in Upstash Vector.")
```
When inserting documents, they are first embedded using the `Embeddings` object. Many embedding models, such as the Hugging Face models, support embedding multiple documents at once. This allows for efficient processing by batching documents and embedding them in parallel.
* The `embedding_chunk_size` parameter controls the number of documents processed in parallel when creating embeddings.
Once the embeddings are created, they are stored in Upstash Vector. To reduce the number of HTTP requests, the vectors are also batched when they are sent to Upstash Vector.
* The `batch_size` parameter controls the number of vectors included in each HTTP request when sending to Upstash Vector.
---
# Source: https://upstash.com/docs/vector/tutorials/huggingface-embeddings.md
> ## Documentation Index
> Fetch the complete documentation index at: https://upstash.com/docs/llms.txt
> Use this file to discover all available pages before exploring further.
# Use Hugging Face Embeddings with Upstash Vector
In this tutorial, we'll demonstrate how to use Hugging Face embeddings with Upstash Vector and LangChain to perform a similarity search. We will upload a few sample documents, embed them using Hugging Face, and then perform a search query to find the most semantically similar documents.
### Important Note on Python Version
Recent Python versions may cause compatibility issues with `torch`, a dependency for Hugging Face models. Therefore, we recommend using **Python 3.9** to avoid any installation issues.
### Installation and Setup
First, we need to set up our environment and install the necessary libraries. Install the dependencies by running the following command:
```bash theme={"system"}
pip install langchain sentence_transformers upstash-vector python-dotenv langchain-community langchain-huggingface
```
Next, create a `.env` file in your project directory with the following content, replacing `your_upstash_url` and `your_upstash_token` with your actual Upstash credentials:
```
UPSTASH_VECTOR_REST_URL=your_upstash_url
UPSTASH_VECTOR_REST_TOKEN=your_upstash_token
```
This configuration file will allow us to load the required environment variables.
### Code
We will load our environment variables and initialize the Hugging Face embeddings model along with the Upstash Vector store.
```python theme={"system"}
# Load environment variables for API keys and Upstash configuration
from dotenv import load_dotenv
import os
load_dotenv()
# Import required libraries
from langchain_huggingface.embeddings import HuggingFaceEmbeddings
from langchain_community.vectorstores.upstash import UpstashVectorStore
# Initialize Hugging Face embeddings model
embeddings = HuggingFaceEmbeddings(model_name="sentence-transformers/all-mpnet-base-v2")
# Set up Upstash Vector Store (automatically uses the environment variables)
vector_store = UpstashVectorStore(embedding=embeddings)
```
Next, we will create sample documents and embed them using Hugging Face embeddings, then store them in Upstash Vector.
```python theme={"system"}
# Import the required Document class from LangChain
from langchain.schema import Document
# Sample documents to embed and store as Document objects
documents = [
Document(page_content="Global warming is causing sea levels to rise."),
Document(page_content="Artificial intelligence is transforming many industries."),
Document(page_content="Renewable energy is vital for sustainable development.")
]
# Embed documents and store in Upstash Vector with batching
vector_store.add_documents(
documents=documents,
batch_size=100,
embedding_chunk_size=200
)
print("Documents with embeddings have been stored in Upstash Vector.")
```
When inserting documents, they are first embedded using the `Embeddings` object. Many embedding models, such as the Hugging Face models, support embedding multiple documents at once. This allows for efficient processing by batching documents and embedding them in parallel.
* The `embedding_chunk_size` parameter controls the number of documents processed in parallel when creating embeddings.
Once the embeddings are created, they are stored in Upstash Vector. To reduce the number of HTTP requests, the vectors are also batched when they are sent to Upstash Vector.
* The `batch_size` parameter controls the number of vectors included in each HTTP request when sending to Upstash Vector.
{isRunFinished && (
)}
);
}
```
## How the Pattern Works
### Timeline of Events
1. **Initial processing**: `stepFinish` event → Frontend shows completed step
2. **Waiting for approval**: `waitingForInput` event → Frontend shows approval buttons
3. **User clicks approve/reject**: Frontend calls `/api/notify`
4. **Workflow resumes**: `inputResolved` event → Frontend hides approval buttons
5. **Processing continues**: More `stepFinish` events as workflow continues
6. **Workflow completes**: `runFinish` event → Frontend shows "Workflow Finished!"
## Benefits
* **Real-time feedback**: Users see exactly when their approval is needed
* **No polling**: Instant updates via Server-Sent Events
* **Timeout handling**: Workflows don't hang indefinitely waiting for input
## Full Example
For a complete working example with all steps, error handling, and full UI components, check out the [Upstash Realtime example on GitHub](https://github.com/upstash/workflow-js/tree/main/examples/upstash-realtime).
## Next Steps
* Review the [basic real-time workflow pattern](./basic)
* Learn about [workflow event handling](/workflow/features/wait-for-event)
* Explore [Realtime features](/realtime/overall/quickstart)
* Check out [workflow failure handling](/workflow/features/failure-callback)
---
# Source: https://upstash.com/docs/redis/sdks/ts/commands/hash/hvals.md
# Source: https://upstash.com/docs/redis/sdks/py/commands/hash/hvals.md
> ## Documentation Index
> Fetch the complete documentation index at: https://upstash.com/docs/llms.txt
> Use this file to discover all available pages before exploring further.
# HVALS
> Returns all values in the hash stored at key.
## Arguments
✅ Workflow Finished!
)} {/* Show workflow steps */}Workflow Steps:
{steps.map((step, index) => (
{/* Show approval UI when waiting for input */}
{waitingState && (
{step.stepName}
{Boolean(step.result) && : {JSON.stringify(step.result)}}
))}
{waitingState.message}
 You'll see a dialog with two import options:
### Option 1: Import from Backup
Import data from a backup of any existing database in your account or team:
* Select `From Backup` as the source
* Choose the source database (the database from which the backup was created)
* Select the backup you want to import from
* Select the target database (the database you want to import into)
* Click `Start Import`
You'll see a dialog with two import options:
### Option 1: Import from Backup
Import data from a backup of any existing database in your account or team:
* Select `From Backup` as the source
* Choose the source database (the database from which the backup was created)
* Select the backup you want to import from
* Select the target database (the database you want to import into)
* Click `Start Import`
 ### Option 2: Import from RDB File
Import data from an external Redis database by uploading an RDB file:
* Select `From RDB File` as the source
* Click `Upload RDB File` and select your RDB file
* Select the target database (the database you want to import into)
* Click `Start Import`
### Option 2: Import from RDB File
Import data from an external Redis database by uploading an RDB file:
* Select `From RDB File` as the source
* Click `Upload RDB File` and select your RDB file
* Select the target database (the database you want to import into)
* Click `Start Import`
 Your database will be exported as an RDB file. Once you start the export, you'll see the export progress in the backups table.
### Download Your Export
Once the export completes, you'll see a `Download` button in the backups table:
* Find your export in the backups table
* Click the `Download` button to download the RDB file
Your database will be exported as an RDB file. Once you start the export, you'll see the export progress in the backups table.
### Download Your Export
Once the export completes, you'll see a `Download` button in the backups table:
* Find your export in the backups table
* Click the `Download` button to download the RDB file
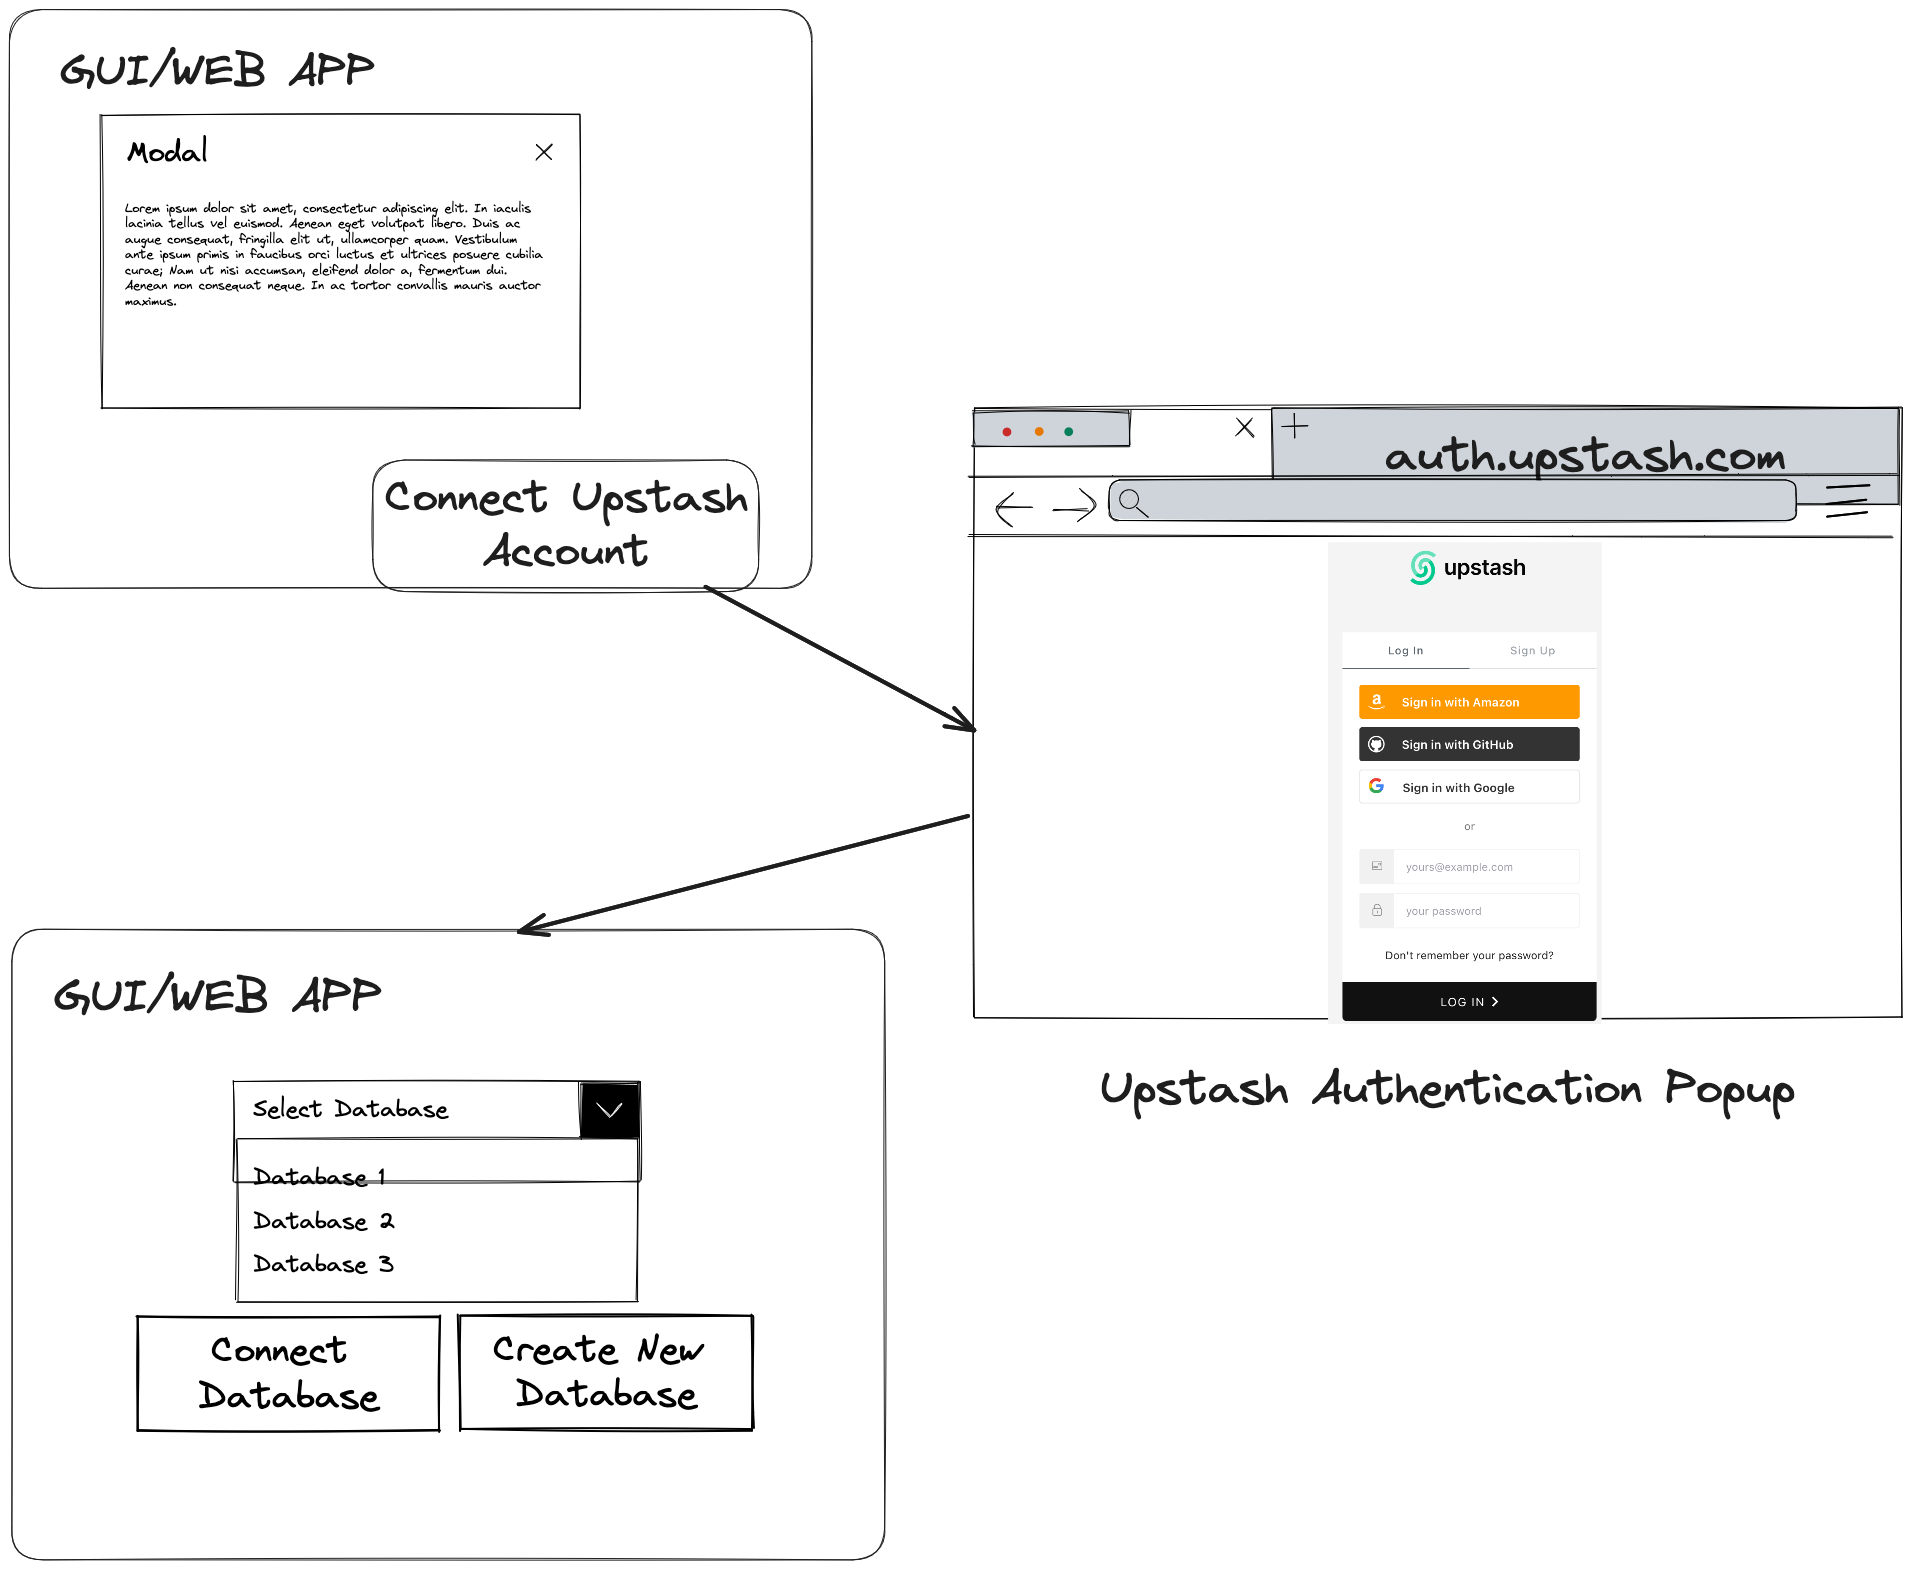 ## Introduction
In this guideline we will outline the steps to integrate Upstash into your platform (GUI or Web App) and allow your users to create and manage Upstash databases without leaving your interfaces. We will explain how to use OAuth2.0 as the underlying foundation to enable this access seamlessly.
If your product or service offering utilizes Redis, Vector or QStash or if there is a common use case that your end users enable by leveraging these database resources, we invite you to be a partner with us. By integrating Upstash into your platform, you can offer a more complete package for your customers and become a one stop shop. This will also position yourself at the forefront of innovative cloud computing trends such as serverless and expand your customer base.
This is the most commonly used partnership integration model that can be easily implemented by following this guideline. Recently [Cloudflare workers integration](https://blog.cloudflare.com/cloudflare-workers-database-integration-with-upstash/) is implemented through this methodology. For any further questions or partnership discussions please send us an email at [partnerships@upstash.com](mailto:partnerships@upstash.com)
## Introduction
In this guideline we will outline the steps to integrate Upstash into your platform (GUI or Web App) and allow your users to create and manage Upstash databases without leaving your interfaces. We will explain how to use OAuth2.0 as the underlying foundation to enable this access seamlessly.
If your product or service offering utilizes Redis, Vector or QStash or if there is a common use case that your end users enable by leveraging these database resources, we invite you to be a partner with us. By integrating Upstash into your platform, you can offer a more complete package for your customers and become a one stop shop. This will also position yourself at the forefront of innovative cloud computing trends such as serverless and expand your customer base.
This is the most commonly used partnership integration model that can be easily implemented by following this guideline. Recently [Cloudflare workers integration](https://blog.cloudflare.com/cloudflare-workers-database-integration-with-upstash/) is implemented through this methodology. For any further questions or partnership discussions please send us an email at [partnerships@upstash.com](mailto:partnerships@upstash.com)
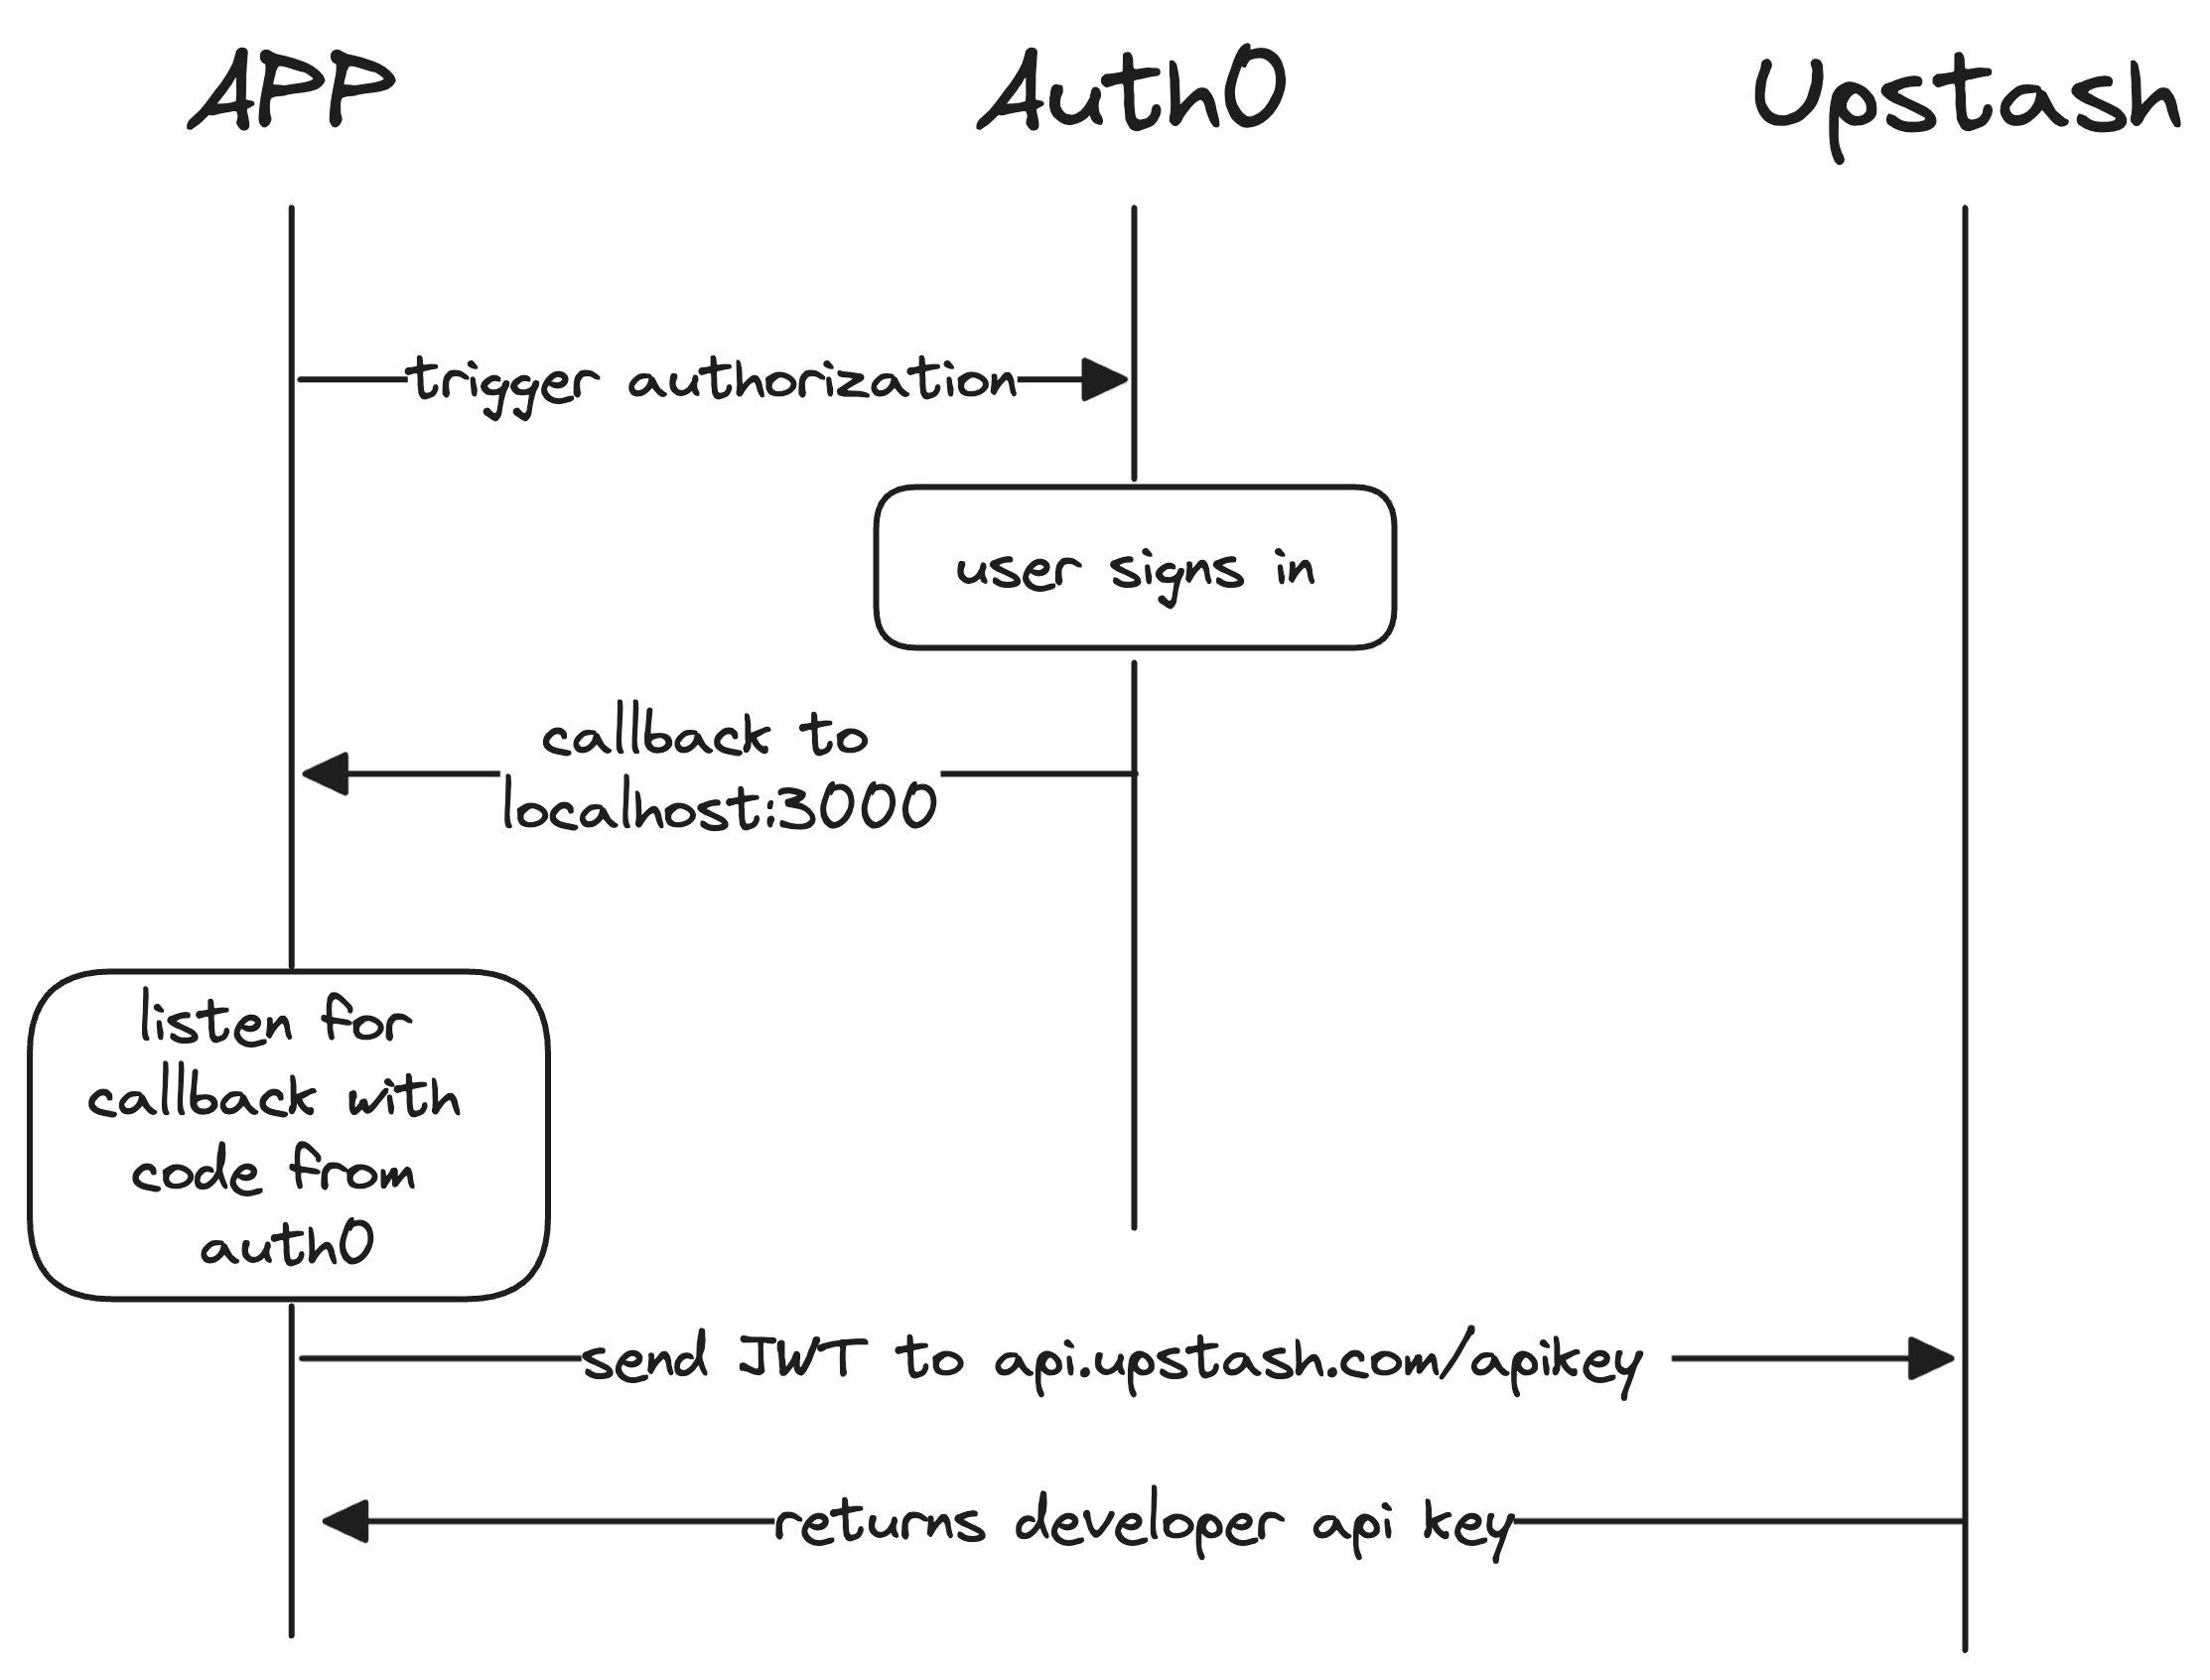 1. User clicks **`Connect Upstash`** button from web app.
2. Web app initiates Upstash OAuth 2.0 flow and it can use **[Auth0 native libraries](https://auth0.com/docs/libraries)**.
3. App will open new browser:
```
https://auth.upstash.com/authorize?response_type=code&audience=upstash-api&scope=offline_access&client_id=XXXXXXXXXX&redirect_uri=http%3A%2F%2Flocalhost:3000
```
1. User clicks **`Connect Upstash`** button from web app.
2. Web app initiates Upstash OAuth 2.0 flow and it can use **[Auth0 native libraries](https://auth0.com/docs/libraries)**.
3. App will open new browser:
```
https://auth.upstash.com/authorize?response_type=code&audience=upstash-api&scope=offline_access&client_id=XXXXXXXXXX&redirect_uri=http%3A%2F%2Flocalhost:3000
```
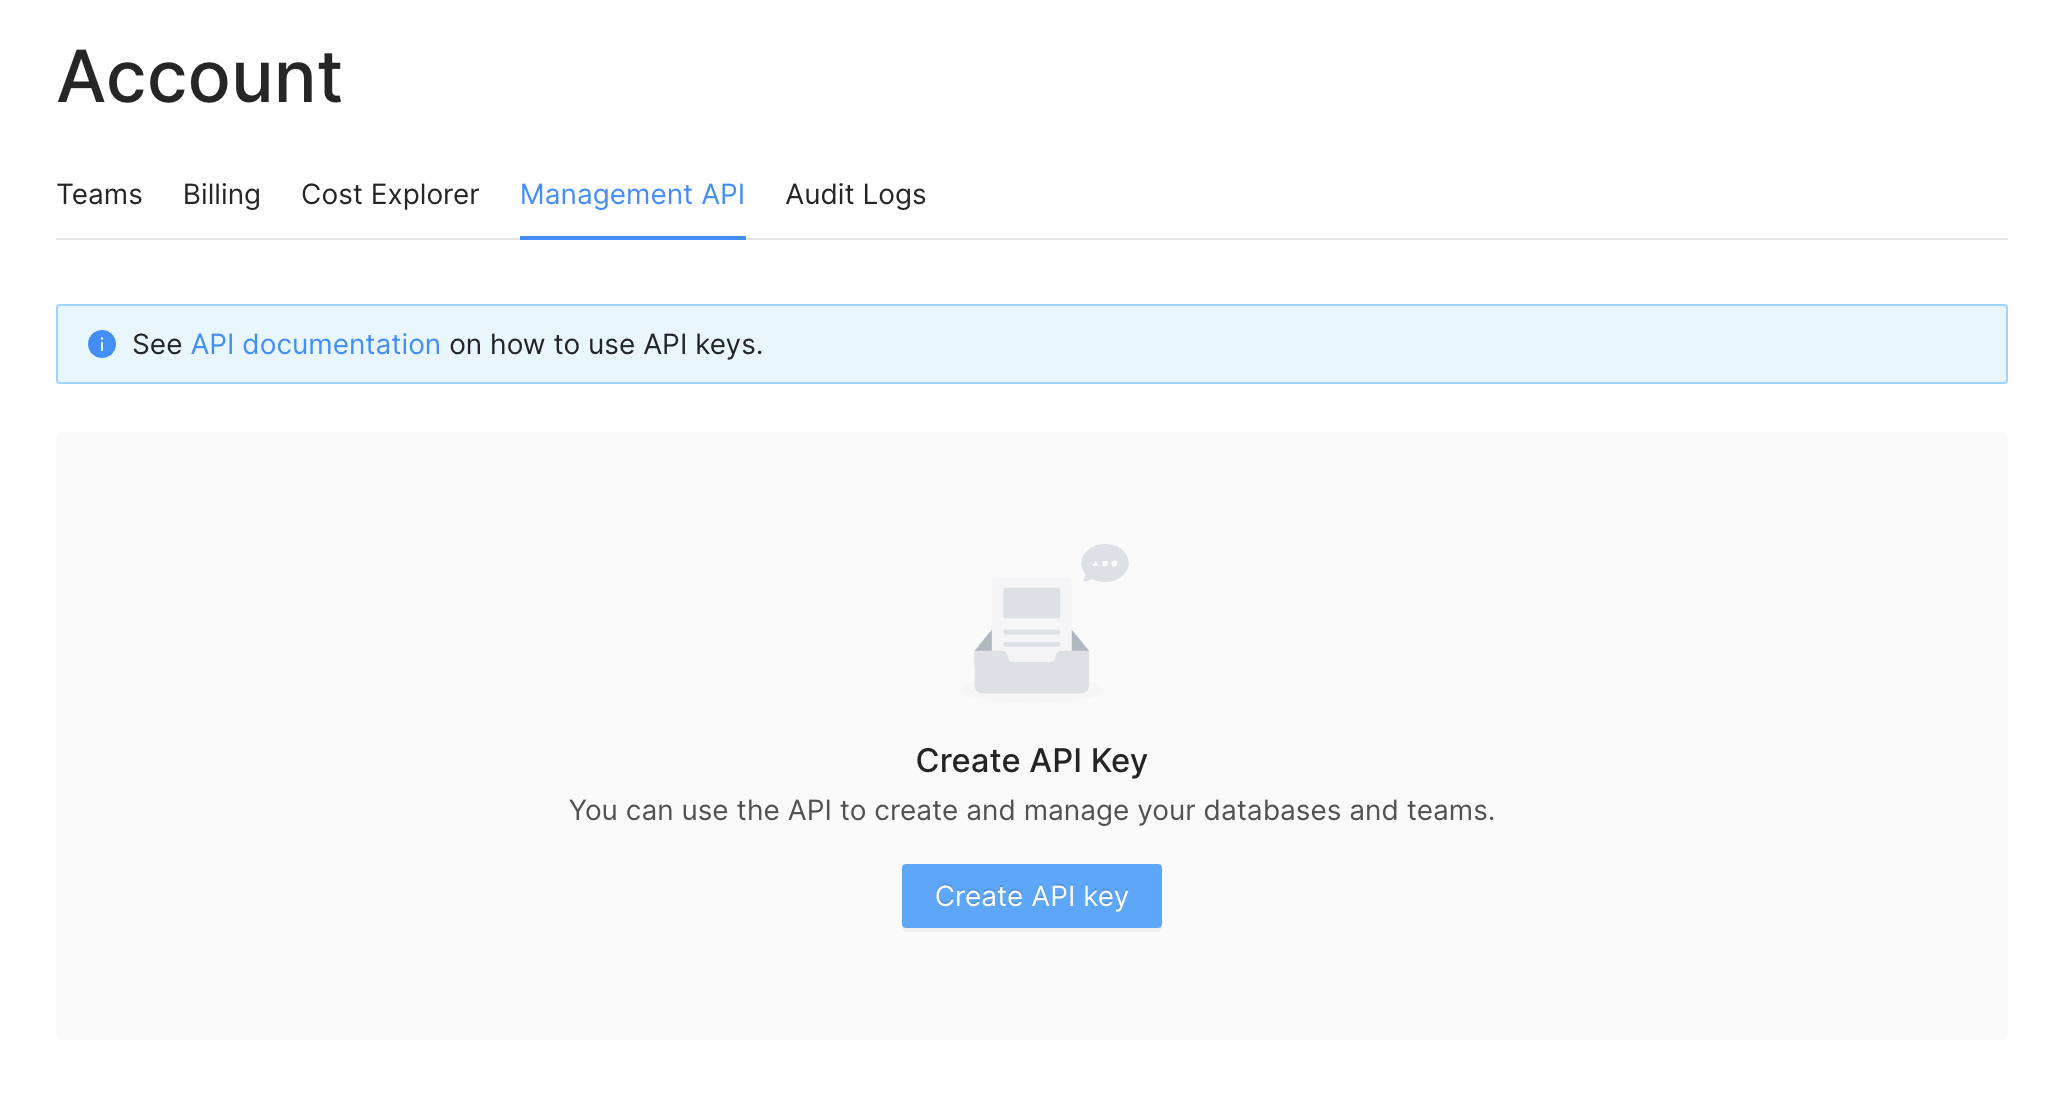 3. Enter a name for your key. You can not use the same name for multiple keys.
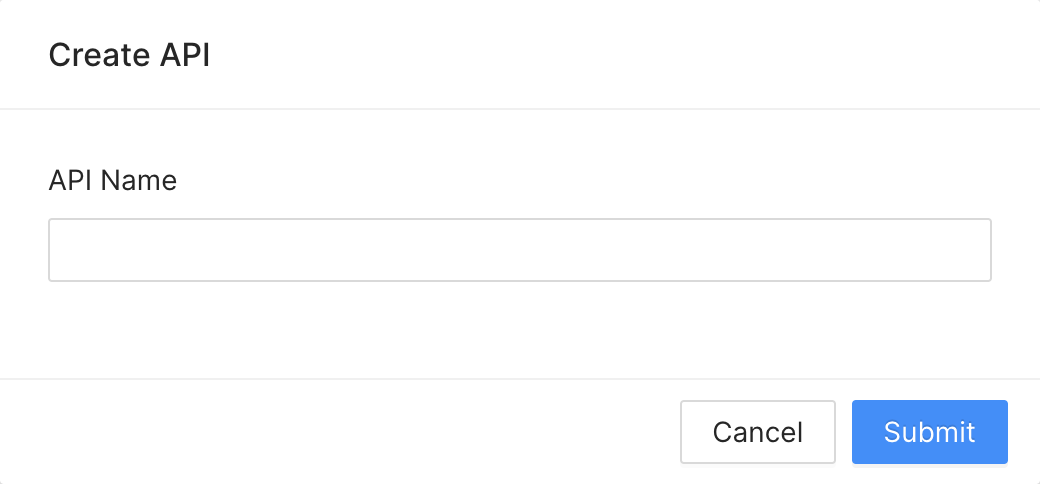
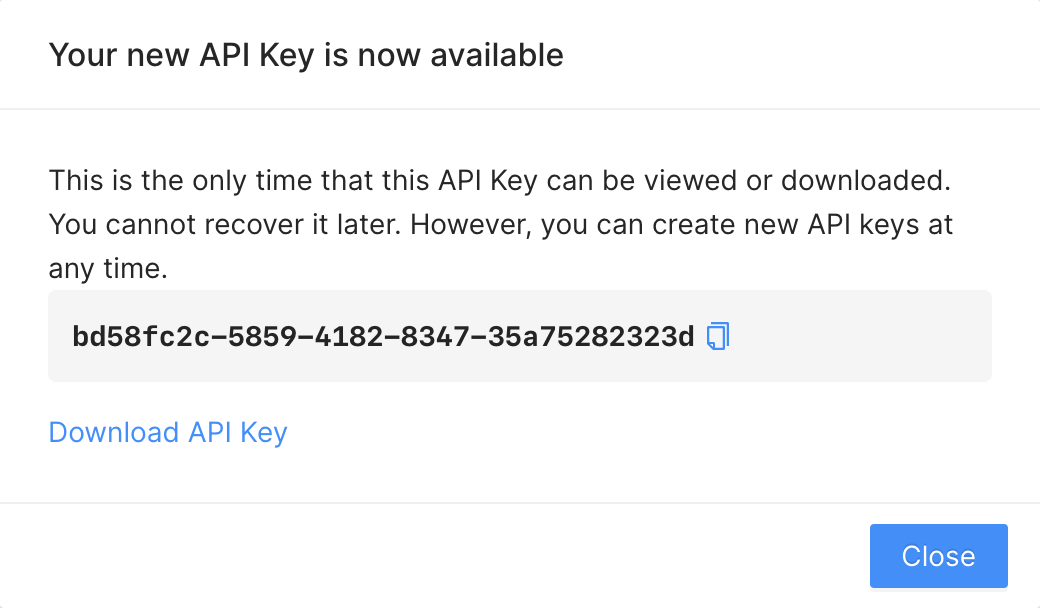 You need to download or copy/save your API key. Upstash does not remember or
keep your API for security reasons. So if you forget your API key, it becomes
useless; you need to create a new one.
You need to download or copy/save your API key. Upstash does not remember or
keep your API for security reasons. So if you forget your API key, it becomes
useless; you need to create a new one.
You can create multiple keys. It is recommended to use different keys in different applications. By default one user can create up to 37 API keys. If you need more than that, please send us an email at [support@upstash.com](mailto:support@upstash.com) ### Deleting an API key When an API key is exposed (e.g. accidentally shared in a public repository) or not being used anymore; you should delete it. You can delete the API keys in `Account > API Keys` screen. ### Roadmap **Role based access:** You will be able to create API keys with specific privileges. For example you will be able to create a key with read-only access. **Stats:** We will provide reports based on usage of your API keys. --- # Source: https://upstash.com/docs/workflow/features/invoke.md # Source: https://upstash.com/docs/workflow/basics/context/invoke.md > ## Documentation Index > Fetch the complete documentation index at: https://upstash.com/docs/llms.txt > Use this file to discover all available pages before exploring further. # context.invoke `context.invoke()` triggers another workflow run and pauses until the invoked workflow finishes. The calling workflow resumes once the invoked workflow either **succeeds**, **fails**, or is **canceled**.
Counter: {count}
 ## Enabling IP Allowlist
By default, any IP address can be used to connect to your database. You must add at least one IP range to enable the allowlist. You can manage added IP ranges in the `Configuration` section on the database details page. You can either provide
* IPv4 address, e.g. `37.237.15.43`
* CIDR block, e.g. `181.49.172.0/24`
## Enabling IP Allowlist
By default, any IP address can be used to connect to your database. You must add at least one IP range to enable the allowlist. You can manage added IP ranges in the `Configuration` section on the database details page. You can either provide
* IPv4 address, e.g. `37.237.15.43`
* CIDR block, e.g. `181.49.172.0/24`
 And consumer will log as below:
 ---
# Source: https://upstash.com/docs/redis/sdks/ts/commands/generic/keys.md
# Source: https://upstash.com/docs/redis/sdks/py/commands/generic/keys.md
# Source: https://upstash.com/docs/qstash/sdks/py/examples/keys.md
> ## Documentation Index
> Fetch the complete documentation index at: https://upstash.com/docs/llms.txt
> Use this file to discover all available pages before exploring further.
# Keys
---
# Source: https://upstash.com/docs/redis/sdks/ts/commands/generic/keys.md
# Source: https://upstash.com/docs/redis/sdks/py/commands/generic/keys.md
# Source: https://upstash.com/docs/qstash/sdks/py/examples/keys.md
> ## Documentation Index
> Fetch the complete documentation index at: https://upstash.com/docs/llms.txt
> Use this file to discover all available pages before exploring further.
# Keys
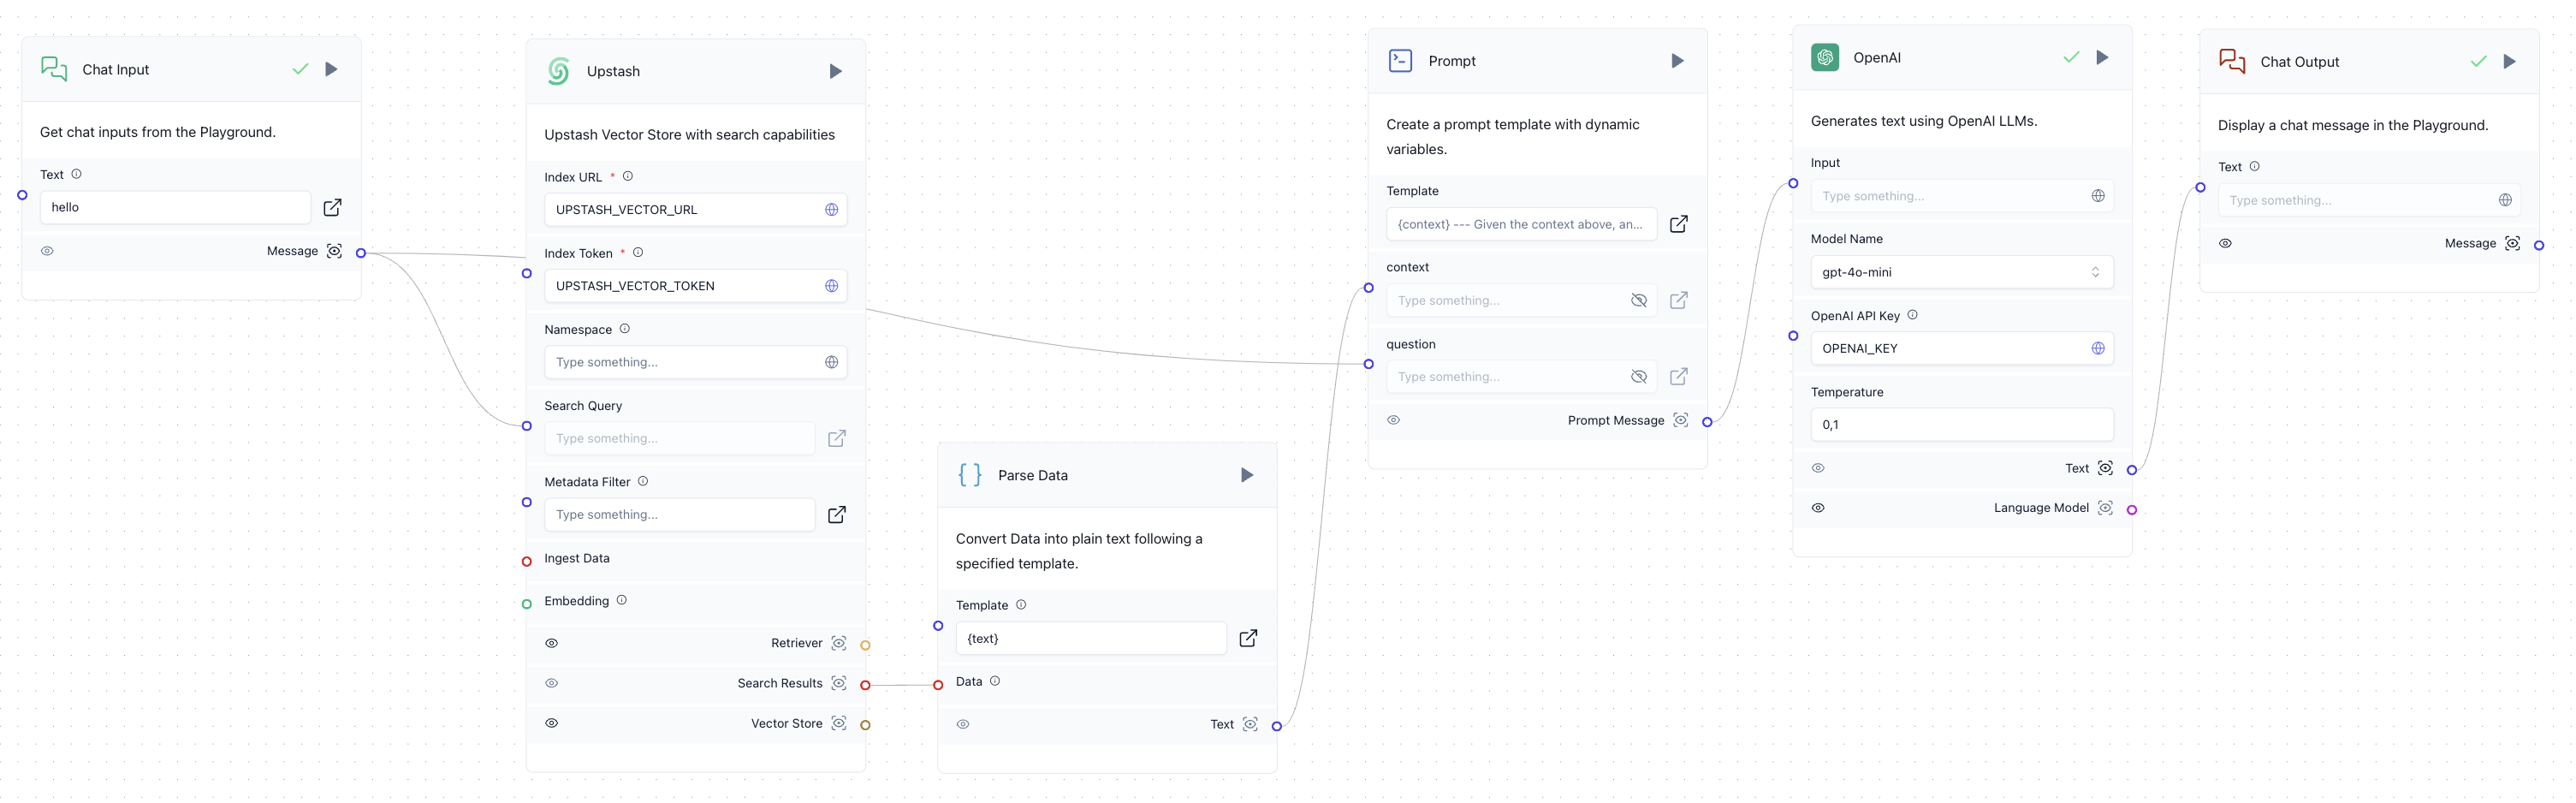 ## Install
To get started, install Langflow and Upstash Vector locally or use the Langflow dashboard from [DataStax](https://www.datastax.com/products/langflow). For local installation, run:
```bash theme={"system"}
pip install langflow upstash-vector
```
## Usage
### Creating an Upstash Vector Index
Visit the [Upstash Console](https://console.upstash.com/vector) to create a vector index. To learn more about index creation, you can check out [this page](https://docs.upstash.com/vector/overall/getstarted).
### Adding Upstash Vector to Langflow
In Langflow, you can integrate Upstash Vector for document indexing and semantic search. Use the following steps:
1. Create a workflow with the **File**, **Split**, and **Upstash** components to process and store documents in the Upstash Vector index.
2. Perform a vector search by connecting the **Upstash** component to your query input.
## Install
To get started, install Langflow and Upstash Vector locally or use the Langflow dashboard from [DataStax](https://www.datastax.com/products/langflow). For local installation, run:
```bash theme={"system"}
pip install langflow upstash-vector
```
## Usage
### Creating an Upstash Vector Index
Visit the [Upstash Console](https://console.upstash.com/vector) to create a vector index. To learn more about index creation, you can check out [this page](https://docs.upstash.com/vector/overall/getstarted).
### Adding Upstash Vector to Langflow
In Langflow, you can integrate Upstash Vector for document indexing and semantic search. Use the following steps:
1. Create a workflow with the **File**, **Split**, and **Upstash** components to process and store documents in the Upstash Vector index.
2. Perform a vector search by connecting the **Upstash** component to your query input.
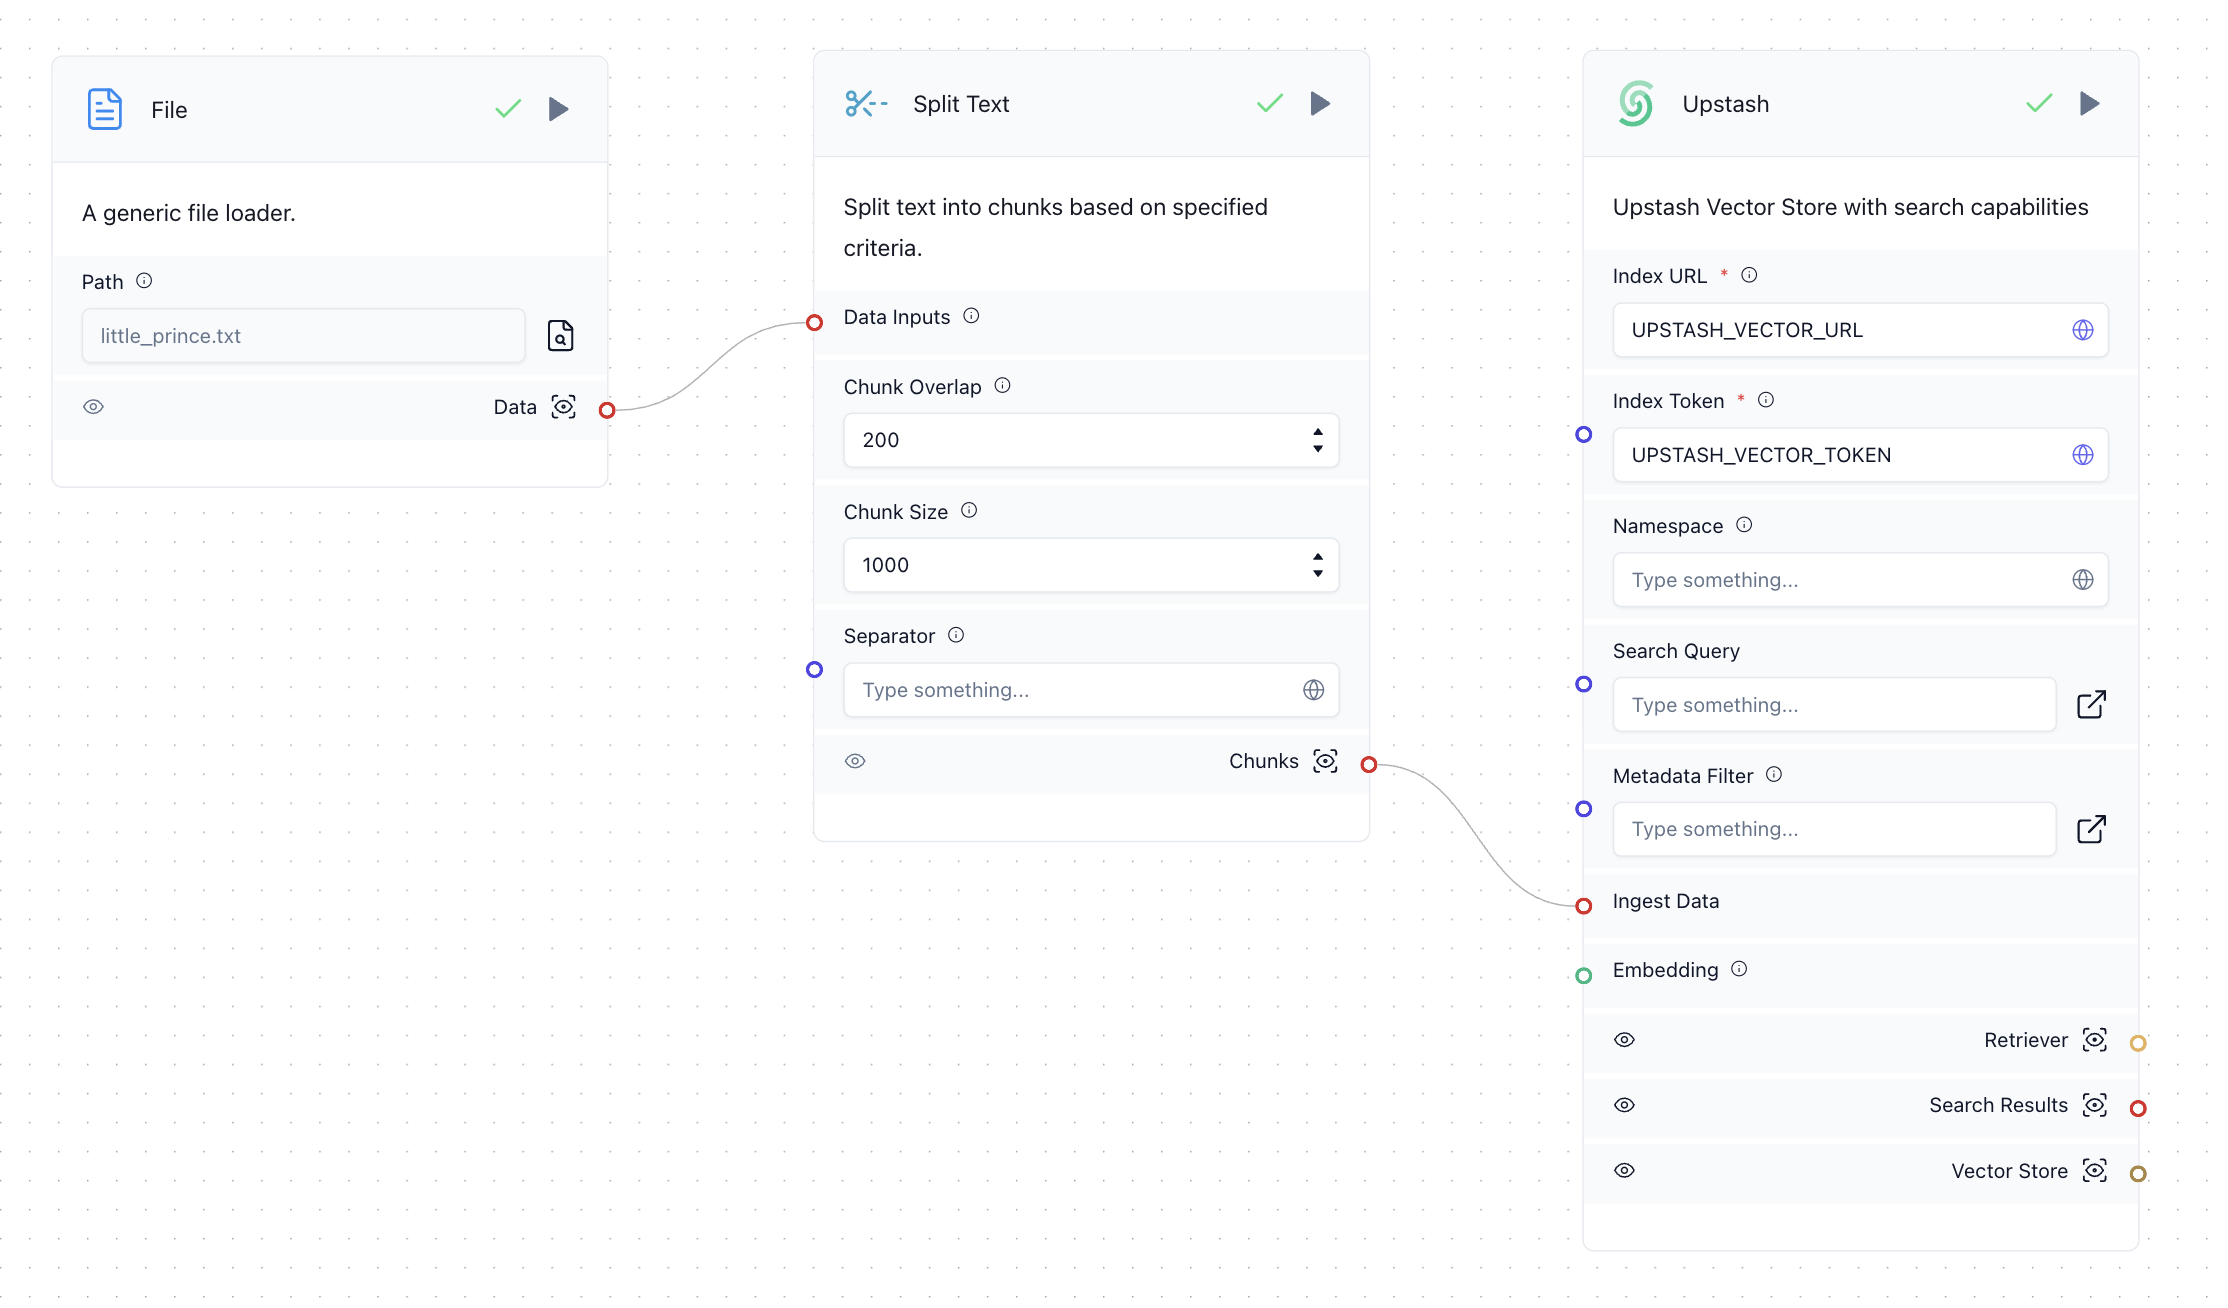 ### Example Workflow
Enhance your chatbot by combining Langflow’s OpenAI integration with Upstash Vector. Create a RAG workflow to retrieve relevant context from your index and use it to answer user queries.
## Learn More
For a detailed guide on building a RAG chatbot with Langflow and Upstash Vector, check out this [blog post](https://upstash.com/blog/langflow-upstash-vector).
---
# Source: https://upstash.com/docs/vector/sdks/php/laravel.md
# Source: https://upstash.com/docs/redis/quickstarts/laravel.md
> ## Documentation Index
> Fetch the complete documentation index at: https://upstash.com/docs/llms.txt
> Use this file to discover all available pages before exploring further.
# Laravel
## Project Setup
To get started, let’s create a new Laravel application. If you don’t have the Laravel CLI installed globally, install it first using Composer:
```shell theme={"system"}
composer global require laravel/installer
```
After installation, create your Laravel project:
```shell theme={"system"}
laravel new example-app
cd example-app
```
Alternatively, if you don’t want to install the Laravel CLI, you can create a project using Composer:
```shell theme={"system"}
composer create-project laravel/laravel example-app
cd example-app
```
## Database Setup
Create a Redis database using [Upstash Console](https://console.upstash.com). Go to the **Connect to your database** section and click on Laravel. Copy those values into your .env file:
```shell .env theme={"system"}
REDIS_HOST="
### Example Workflow
Enhance your chatbot by combining Langflow’s OpenAI integration with Upstash Vector. Create a RAG workflow to retrieve relevant context from your index and use it to answer user queries.
## Learn More
For a detailed guide on building a RAG chatbot with Langflow and Upstash Vector, check out this [blog post](https://upstash.com/blog/langflow-upstash-vector).
---
# Source: https://upstash.com/docs/vector/sdks/php/laravel.md
# Source: https://upstash.com/docs/redis/quickstarts/laravel.md
> ## Documentation Index
> Fetch the complete documentation index at: https://upstash.com/docs/llms.txt
> Use this file to discover all available pages before exploring further.
# Laravel
## Project Setup
To get started, let’s create a new Laravel application. If you don’t have the Laravel CLI installed globally, install it first using Composer:
```shell theme={"system"}
composer global require laravel/installer
```
After installation, create your Laravel project:
```shell theme={"system"}
laravel new example-app
cd example-app
```
Alternatively, if you don’t want to install the Laravel CLI, you can create a project using Composer:
```shell theme={"system"}
composer create-project laravel/laravel example-app
cd example-app
```
## Database Setup
Create a Redis database using [Upstash Console](https://console.upstash.com). Go to the **Connect to your database** section and click on Laravel. Copy those values into your .env file:
```shell .env theme={"system"}
REDIS_HOST="