For a **Business** account, before you click **API Keys**, make sure you have selected the organizational workspace you want to create an API key for. Each API key works with one and only one organizational workspace. [Learn more](/ui/account/workspaces#create-an-api-key-for-a-workspace). 2. Click **Generate API Key**.
3. Follow the on-screen instructions to finish generating the key.
4. Click the **Copy** icon next to your new key to add the key to your system's clipboard. If you lose this key, simply return and click the **Copy** icon again.
After you create the destination connector, add it along with a [source connector](/api-reference/workflow/sources/overview) to a [workflow](/api-reference/workflow/overview#workflows). Then run the worklow as a [job](/api-reference/workflow/overview#jobs). To learn how, try out the the notebook [Dropbox-To-Pinecone Connector API Quickstart for Unstructured](https://colab.research.google.com/github/Unstructured-IO/notebooks/blob/main/notebooks/Dropbox_To_Pinecone_Connector_Quickstart.ipynb), or watch the two 4-minute video tutorials for the [Unstructured Python SDK](/api-reference/workflow/overview#unstructured-python-sdk). You can also create destination connectors with the Unstructured user interface (UI). [Learn how](/ui/destinations/overview). If you need help, email Unstructured Support at [support@unstructured.io](mailto:support@unstructured.io). You are now ready to start creating a destination connector! Keep reading to learn how.
b. Click the **Serverless (vector)** tile, if it is not already selected.
c. For **Database name**, enter some unique name for the database.
d. Select a **Provider** and a **Region**, and then click **Create database**.
[Learn more](https://docs.datastax.com/en/astra-db-classic/databases/manage-create.html). * An application token for the database. To create an application token: a. After you sign in to DataStax, in the list of databases, click the name of the target database.
b. On the **Overview** tab, under **Database Details**, in the **Application Tokens** tile, click **Generate Token**.
c. Enter some **Token description** and select and **Expiration** time period, and then click **Generate token**.
d. Save the application token that is displayed to a secure location, and then click **Close**.
[Learn more](https://docs.datastax.com/en/astra-db-serverless/administration/manage-application-tokens.html). * A keyspace in the database. To create a keyspace: a. After you sign in to DataStax, in the list of databases, click the name of the target database.
b. On the **Data Explorer** tab, in the **Keyspace** list, select **Create keyspace**.
c. Enter some **Keyspace name**, and then click **Add keyspace**.
[Learn more](https://docs.datastax.com/en/astra-db-serverless/databases/manage-keyspaces.html#keyspaces). * A collection in the keyspace. For the [Unstructured UI](/ui/overview) and [Unstructured API](/api-reference/overview): * An existing collection is not required. At runtime, the collection behavior is as follows: * If an existing collection name is specified, and Unstructured generates embeddings, but the number of dimensions that are generated does not match the existing collection's embedding settings, the run will fail. You must change your Unstructured embedding settings or your existing collection's embedding settings to match, and try the run again. * If a collection name is not specified, Unstructured creates a new collection in your keyspace. If Unstructured generates embeddings, the new collection's name will be `u
c. In the **Collections** list, select **Create collection**.
d. Enter some **Collection name**.
e. Turn on **Vector-enabled collection**, if it is not already turned on.
f. Choose a mode for **Embedding generation method**. See [Astra DB generated embeddings](#astra-db-generated-embeddings).
g. If you chose **Bring my own**, enter the number of dimensions for the embedding model that you plan to use.
h. For **Similarity metric**, select **Cosine**.
i. Click **Create collection**.
[Learn more](https://docs.datastax.com/en/astra-db-serverless/databases/manage-collections.html#create-collection). To create an Astra DB destination connector, see the following examples.
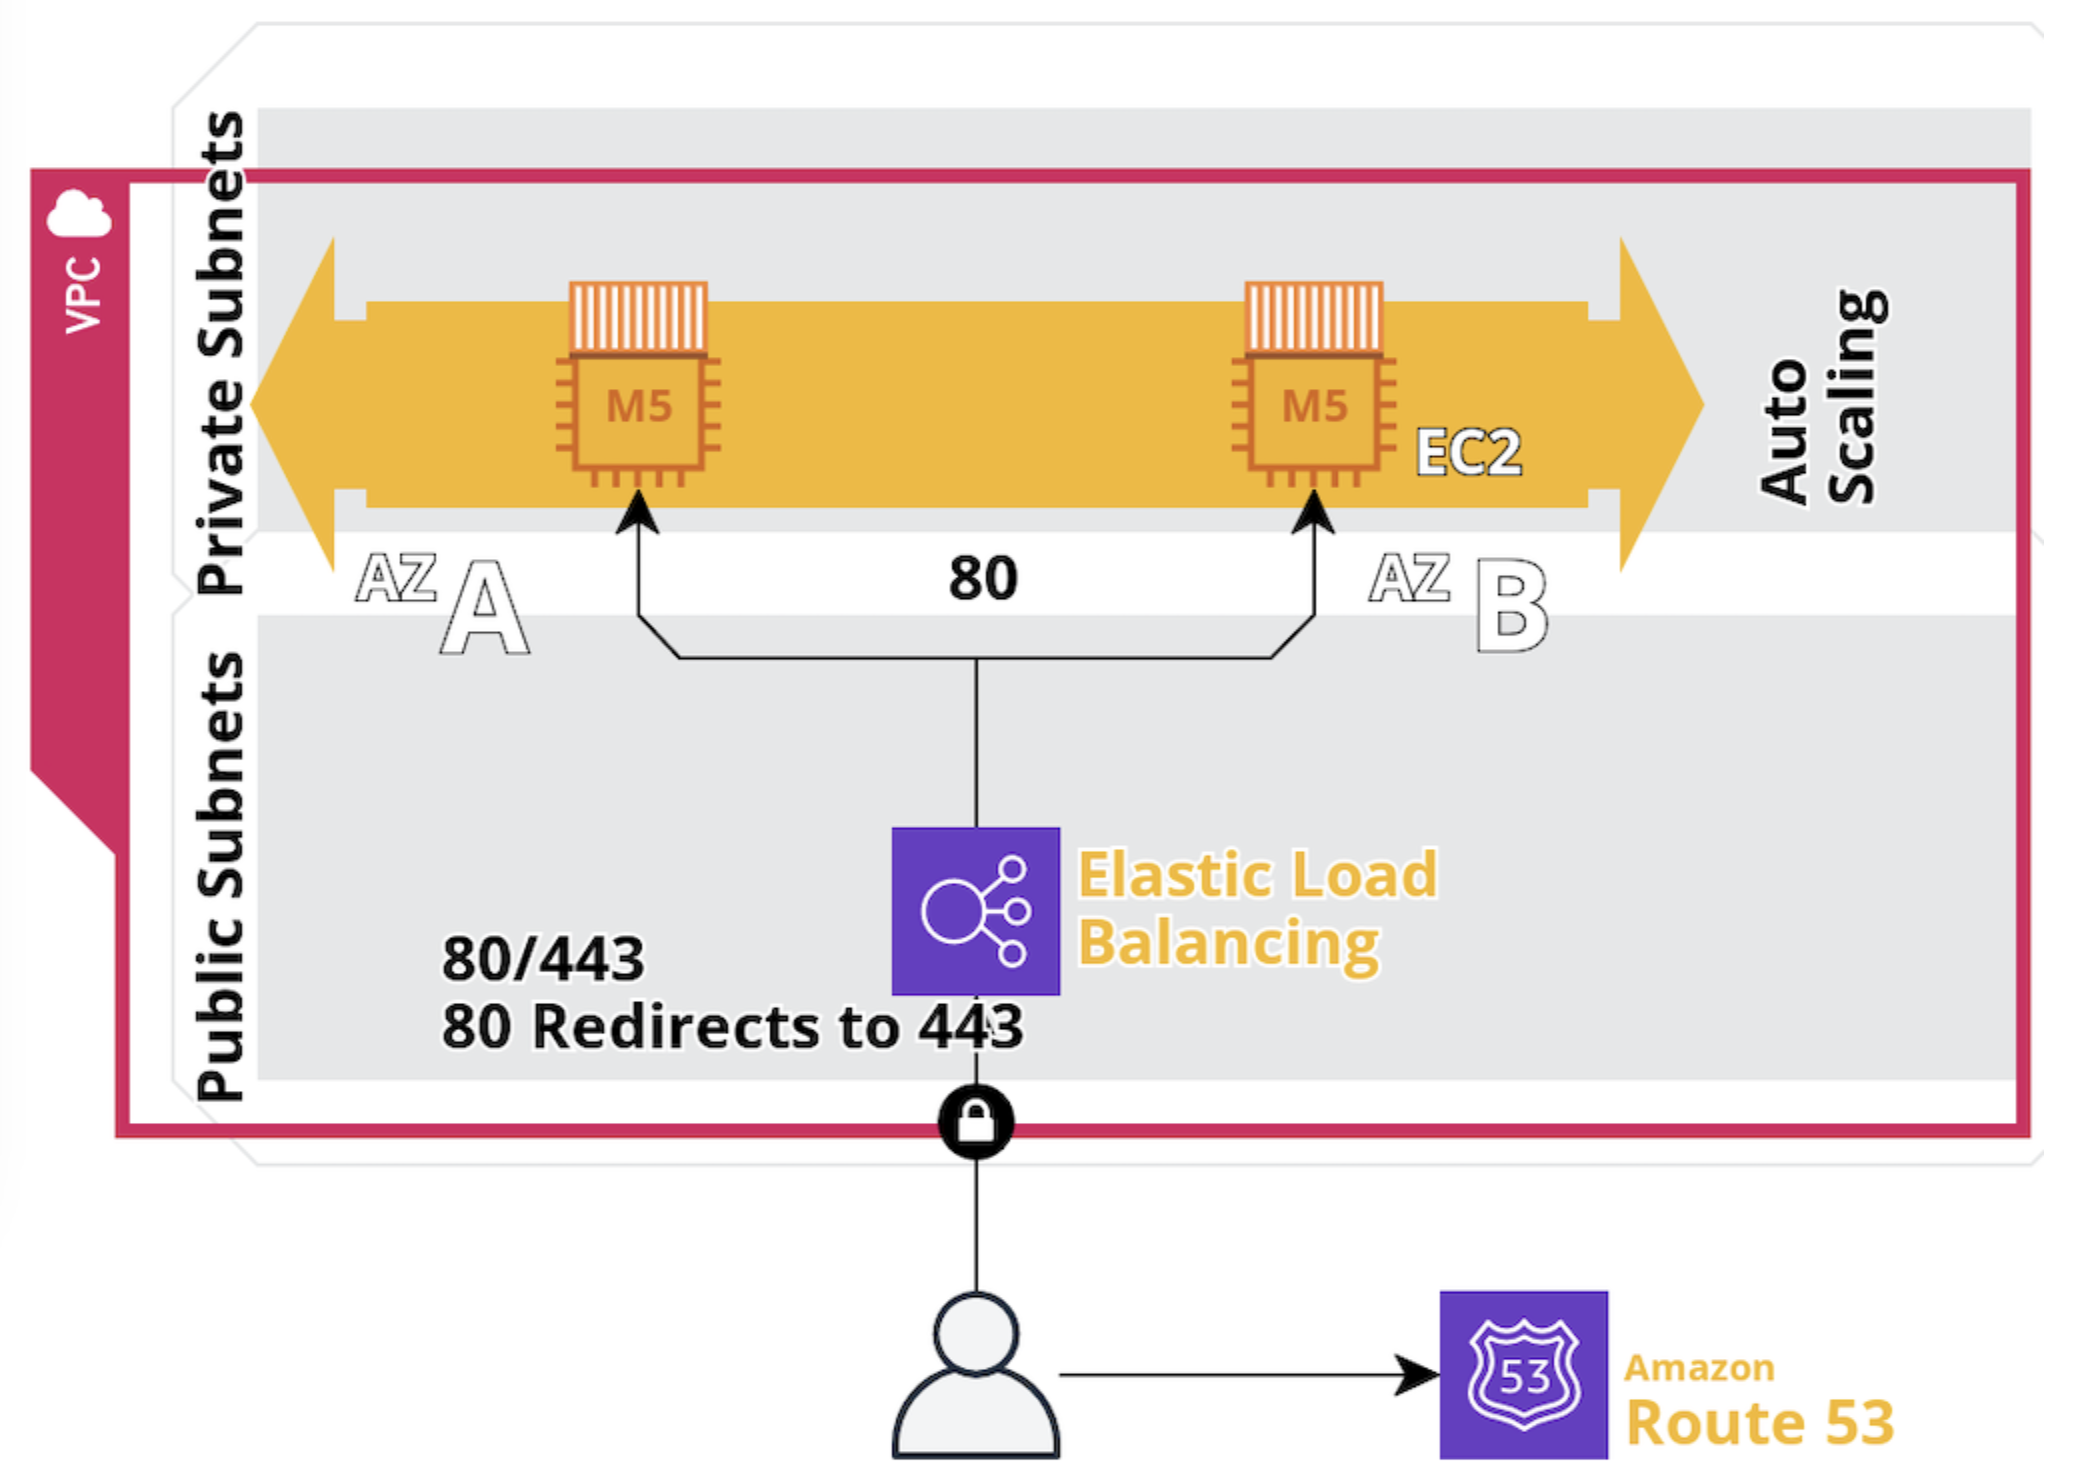
Manually stopping or terminating the associated Amazon EC2 instances alone will not reduce these ongoing charges.
To stop accruing all related ongoing charges, you must delete all of the associated AWS resources. To do this, see [Manage related AWS account costs](#manage-related-aws-account-costs).
 1. **Access the VPC dashboard**:
a. In the AWS Management Console, in the top menu bar, click **Services > Networking & Content Delivery > VPC**.
1. **Access the VPC dashboard**:
a. In the AWS Management Console, in the top menu bar, click **Services > Networking & Content Delivery > VPC**.b. In the sidebar, click **Your VPCs**, and then click **Create VPC**.
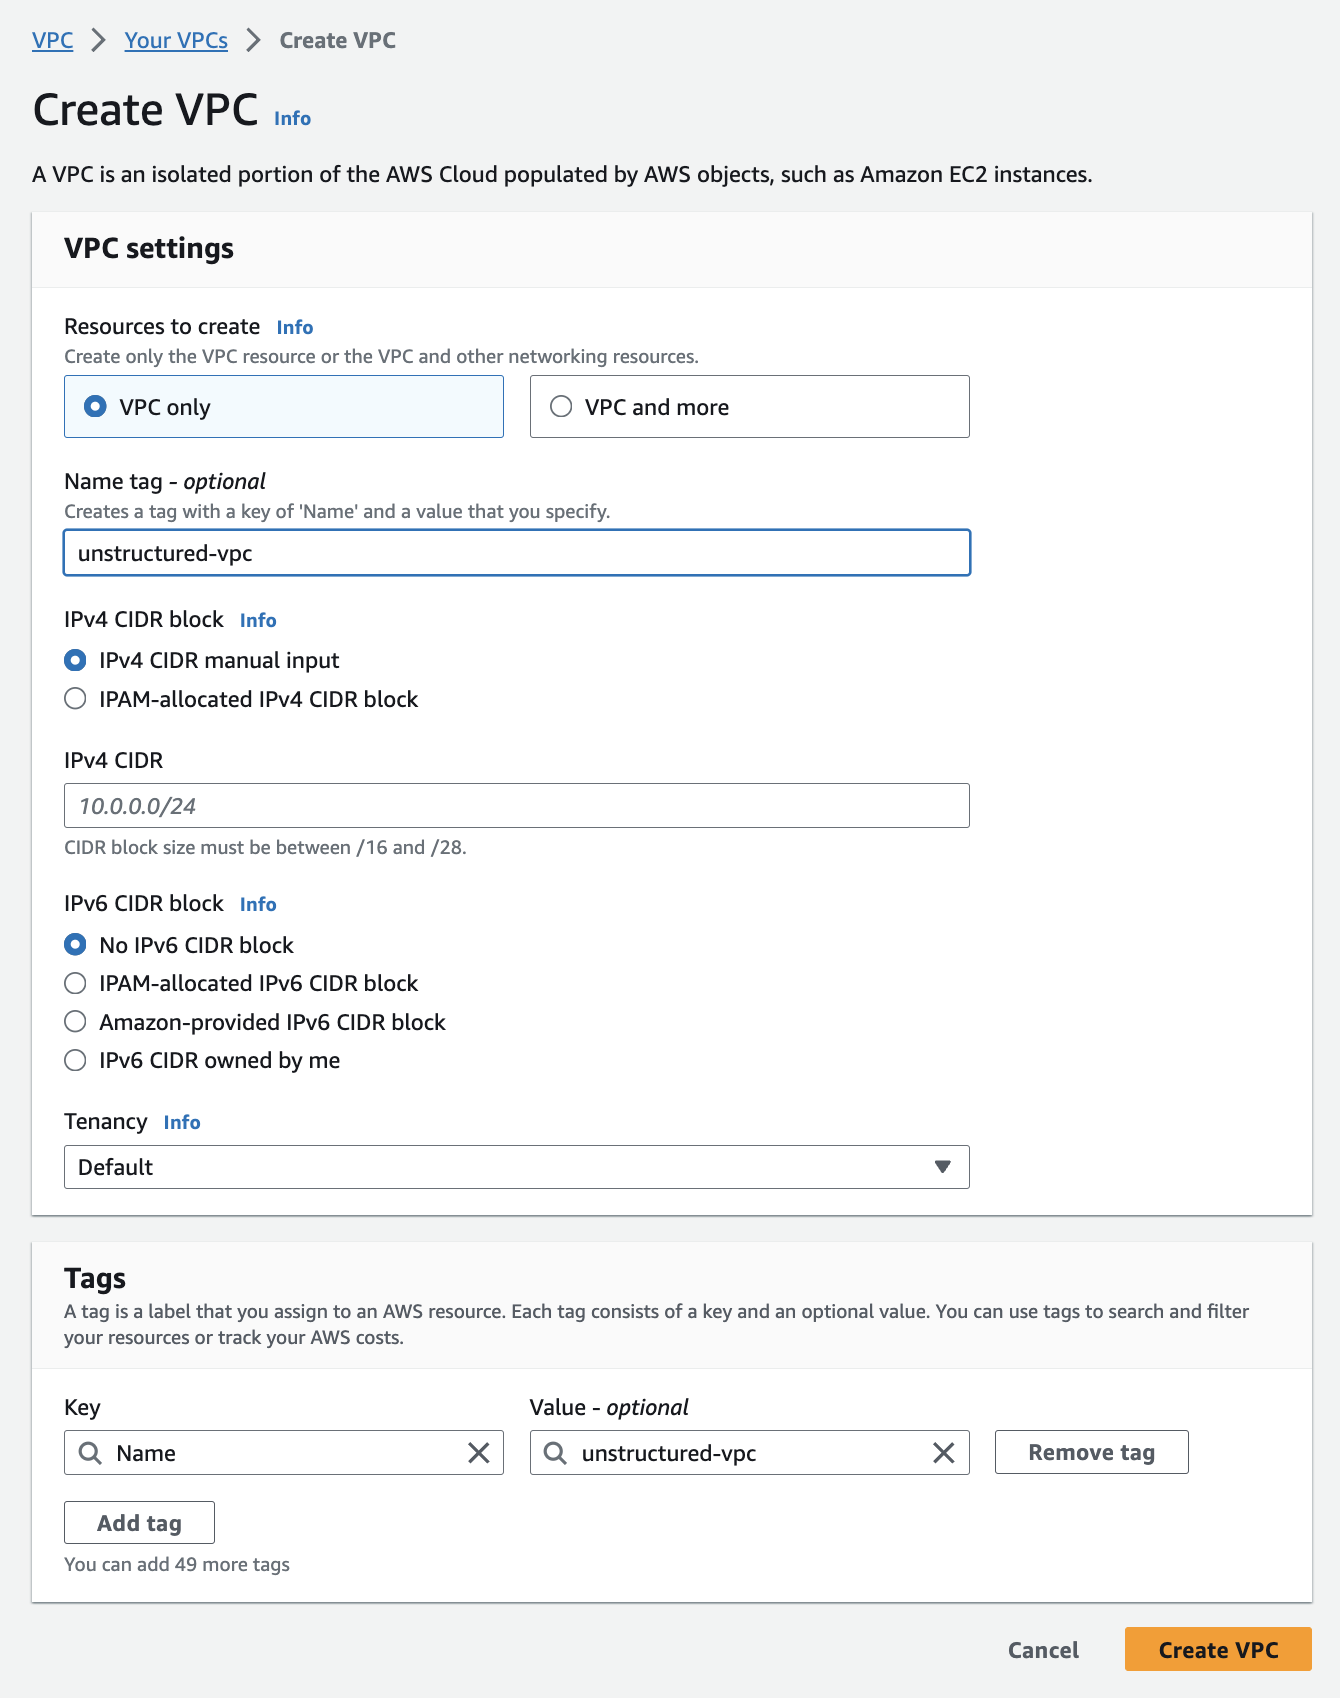
2. **Create the VPC**: a. Select **VPC only**.
b. Enter a **Name tag** for your VPC.
c. Specify the **IPv4 CIDR block** (for example, `10.0.0.0/16`).
d. You may leave **IPv6 CIDR block**, **Tenancy**, and **Tags** settings at their defaults.
e. Click **Create VPC**.
 3. **Create the subnets**:
a. After creating the VPC, in the sidebar, click **Subnets**.
3. **Create the subnets**:
a. After creating the VPC, in the sidebar, click **Subnets**.b. Click **Create subnet**.
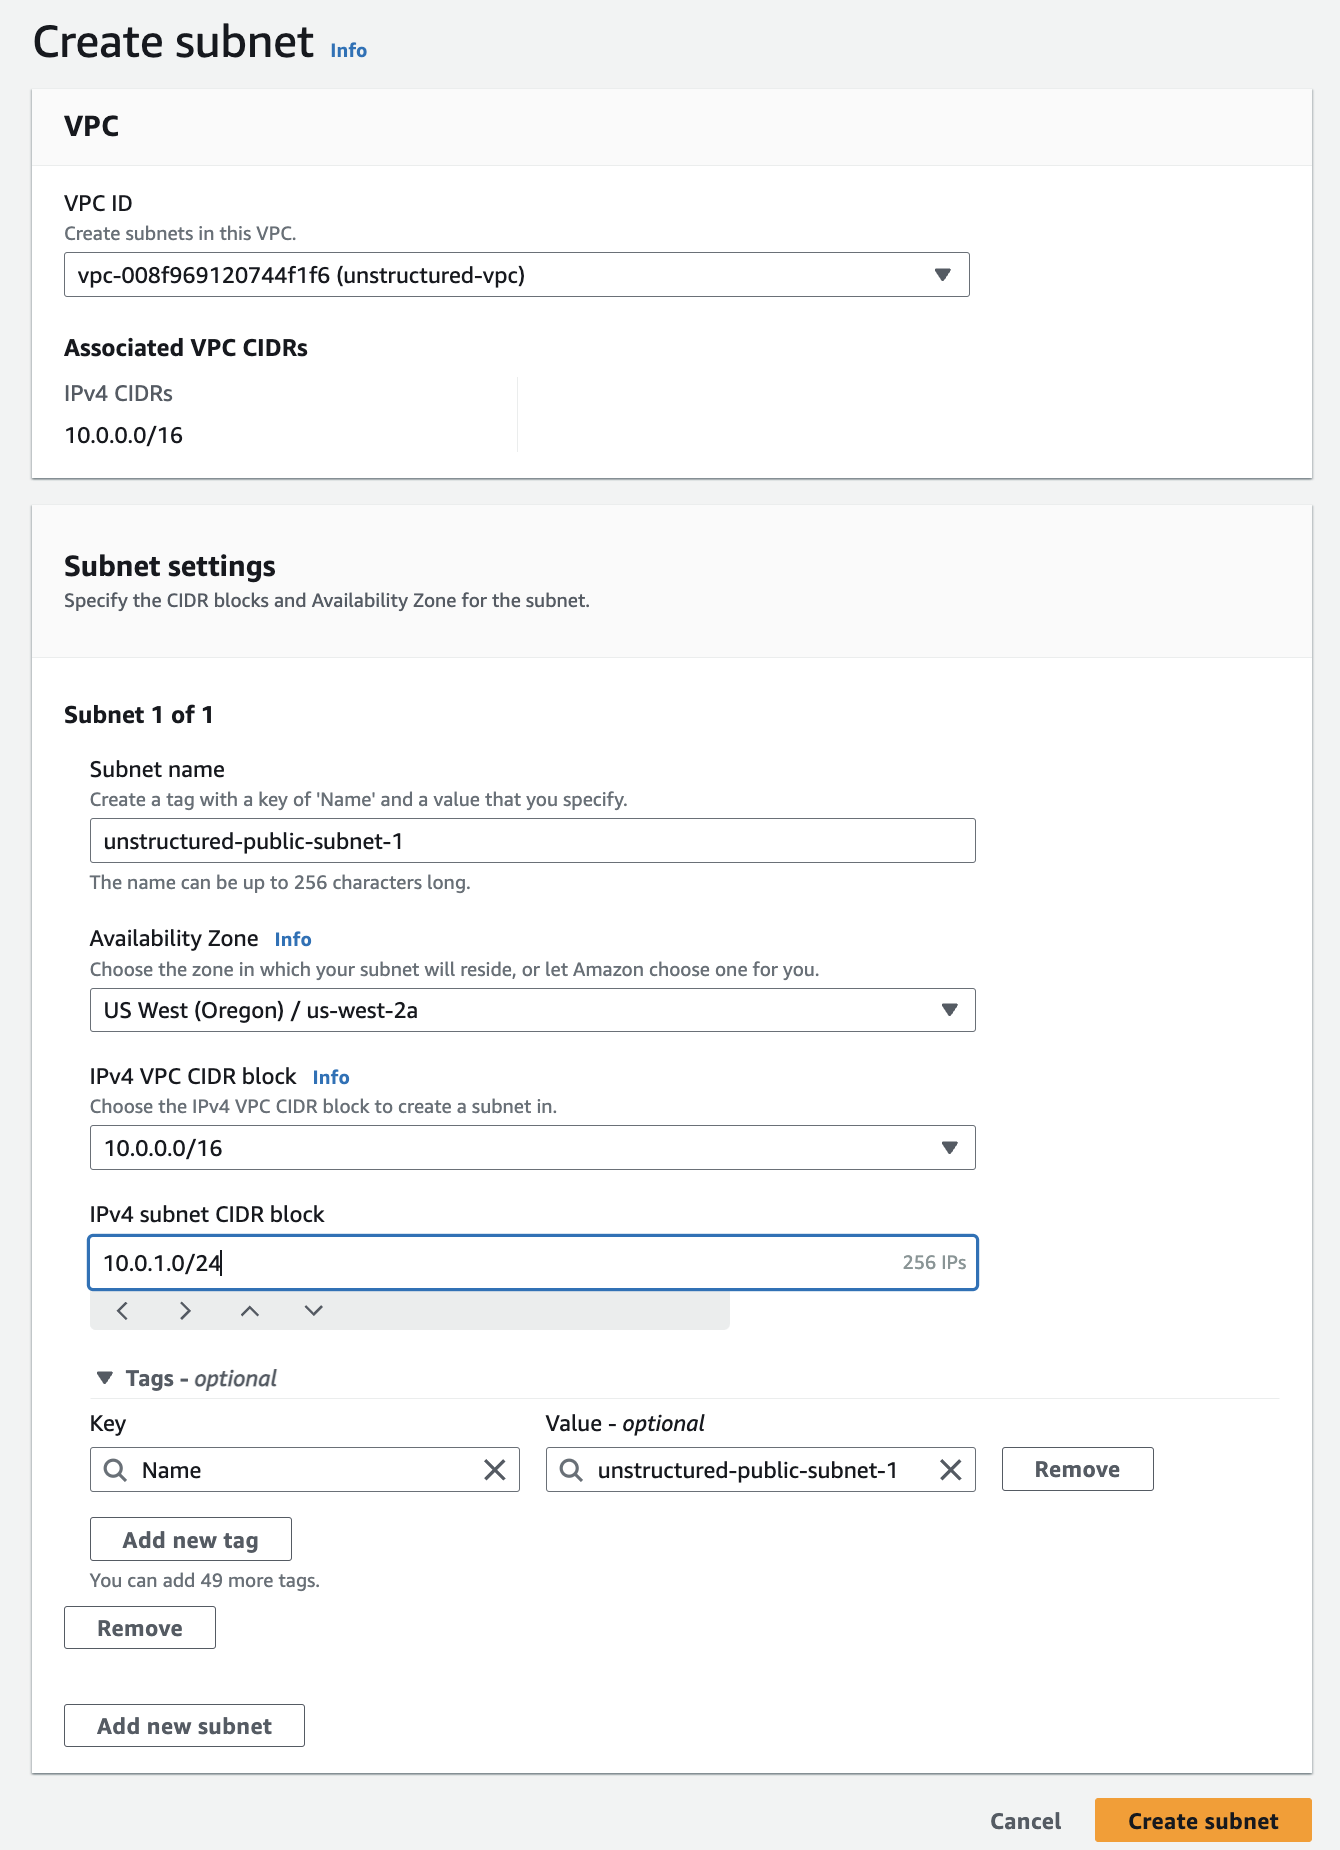
c. In the **VPC ID** dropdown menu. select the VPC that you just created.
d. For the first public subnet:
* Enter a **Subnet name**. * Select an **Availability Zone**. * Specify the **IPv4 CIDR block** (for example, `10.0.0.0/16`). * Specify the **IPv4 subnet CIDR block** (for example, `10.0.1.0/24`). * You may leave the **Tags** setting at its default. * Click **Add new subnet**. (Do not click **Create subnet** yet.) e. Repeat the process for the second public subnet with a different **Availability Zone** and **IPv4 subnet CIDR block** (for example, `10.0.2.0/24`).
* *Note: Each subnet must reside entirely within one Availability Zone and cannot span zones. If you specify the same Availability Zone or IPv4 subnet CIDR block as the first public subnet, AWS CloudFormation might fail in a later step*. * To learn more, see [Subnet basics](https://docs.aws.amazon.com/vpc/latest/userguide/configure-subnets.html#subnet-basics). * Click **Add new subnet**. (Do not click **Create subnet** yet.) f. Repeat the process for the private subnet with a different **Availability Zone** and **IPv4 subnet CIDR block** (for example, `10.0.3.0/24`).
* *Note: Each subnet must reside entirely within one Availability Zone and cannot span zones. If you specify the same Availability Zone or IPv4 subnet CIDR block as the first or second public subnets, AWS CloudFormation might fail in a later step*. g. Click **Create subnet**.
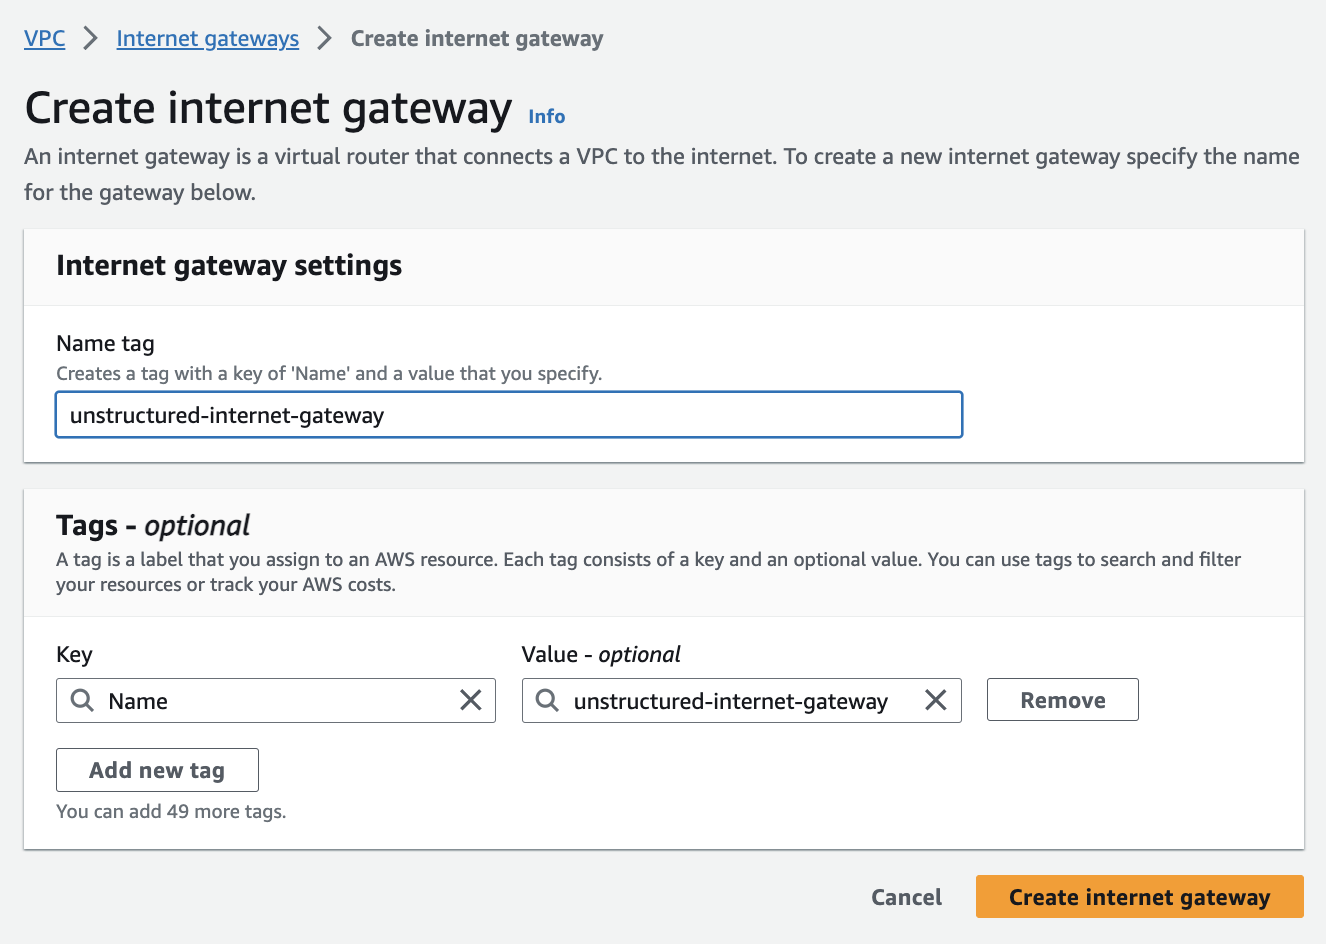
 4. **Create the internet gateway (for the public subnets)**:
a. In the sidebar, click **Internet gateways**.
4. **Create the internet gateway (for the public subnets)**:
a. In the sidebar, click **Internet gateways**.b. Click **Create internet gateway**, enter a **Name tag**, and click **Create internet gateway**.
c. In the sidebar, click **Internet gateways** again.
d. Click the **Internet gateway ID** for the internet gateway that you just created.
e. Click **Actions > Attach to VPC**.
f. In the **Available VPCs** dropdown list, select the VPC from *Step 2 - Create the VPC*.
g. Click **Attach internet gateway**.
 5. **Set up route tables (for the public subnets)**:
AWS automatically created a default route table in *Step 3 - Create the subnets*. To tailor your network architecture, you will create a new route table specifically for your public subnets, which will include a route to the internet gateway from *Step 4 - Create the internet gateway (for the public subnets)*.
a. In the sidebar, click *Route tables*.
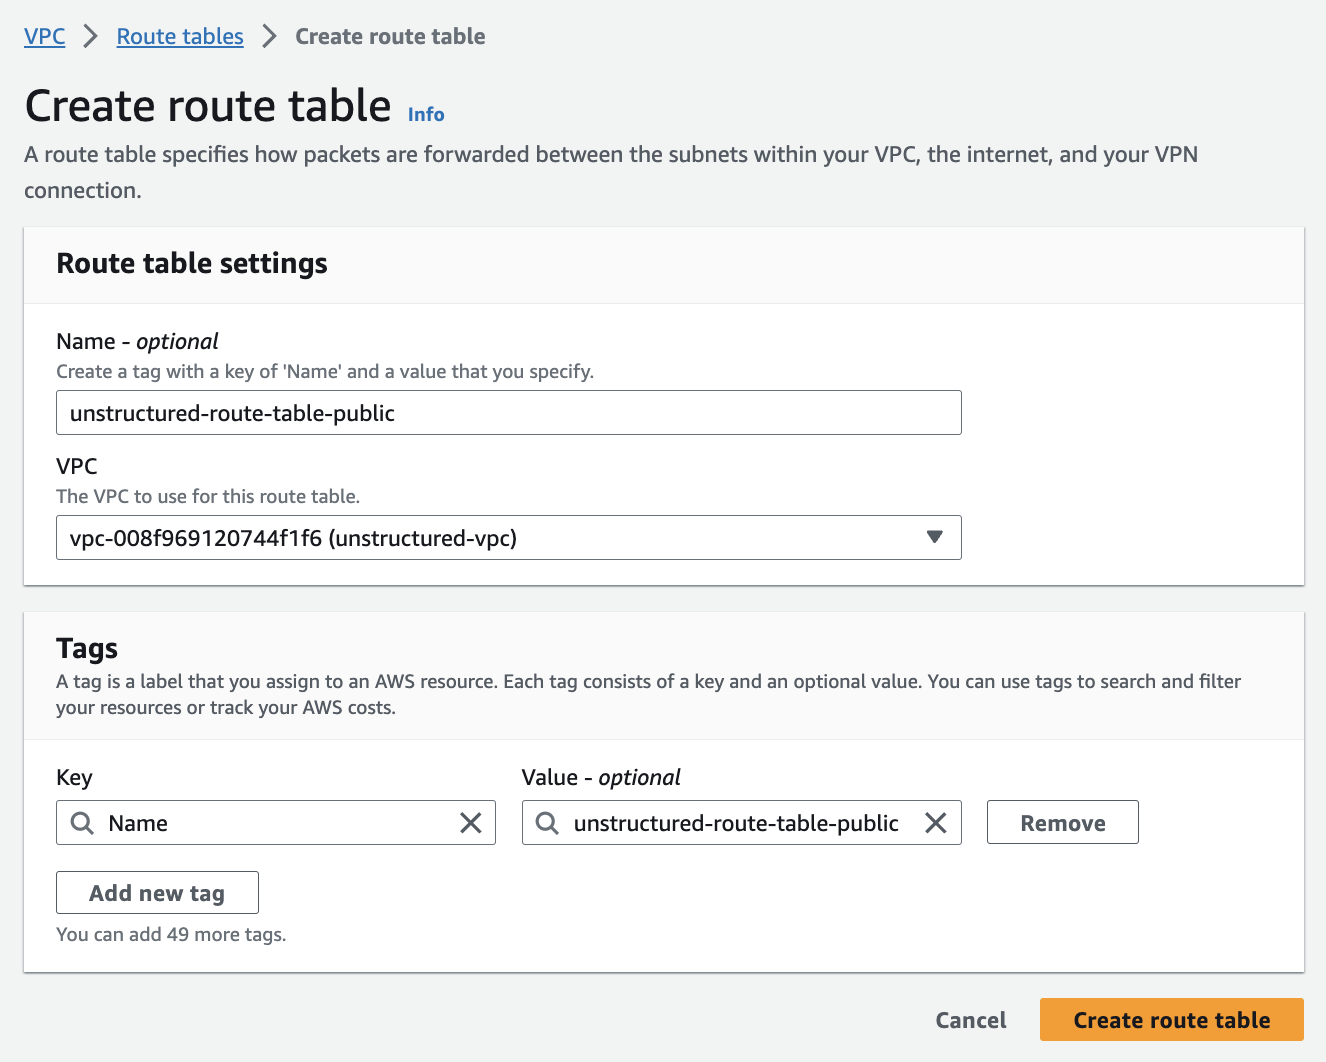
b. Click **Create route table**.
c. Enter a **Name**.
d. Select the **VPC** from *Step 2 - Create the VPC*.
e. Click **Create route table**.
5. **Set up route tables (for the public subnets)**:
AWS automatically created a default route table in *Step 3 - Create the subnets*. To tailor your network architecture, you will create a new route table specifically for your public subnets, which will include a route to the internet gateway from *Step 4 - Create the internet gateway (for the public subnets)*.
a. In the sidebar, click *Route tables*.
b. Click **Create route table**.
c. Enter a **Name**.
d. Select the **VPC** from *Step 2 - Create the VPC*.
e. Click **Create route table**.
 6. **Associate public subnets to the route table and internet gateway**:
a. Connect the **public subnets** to the **route table** from *Step 5 - Set up route tables (for the public subnets)*:
6. **Associate public subnets to the route table and internet gateway**:
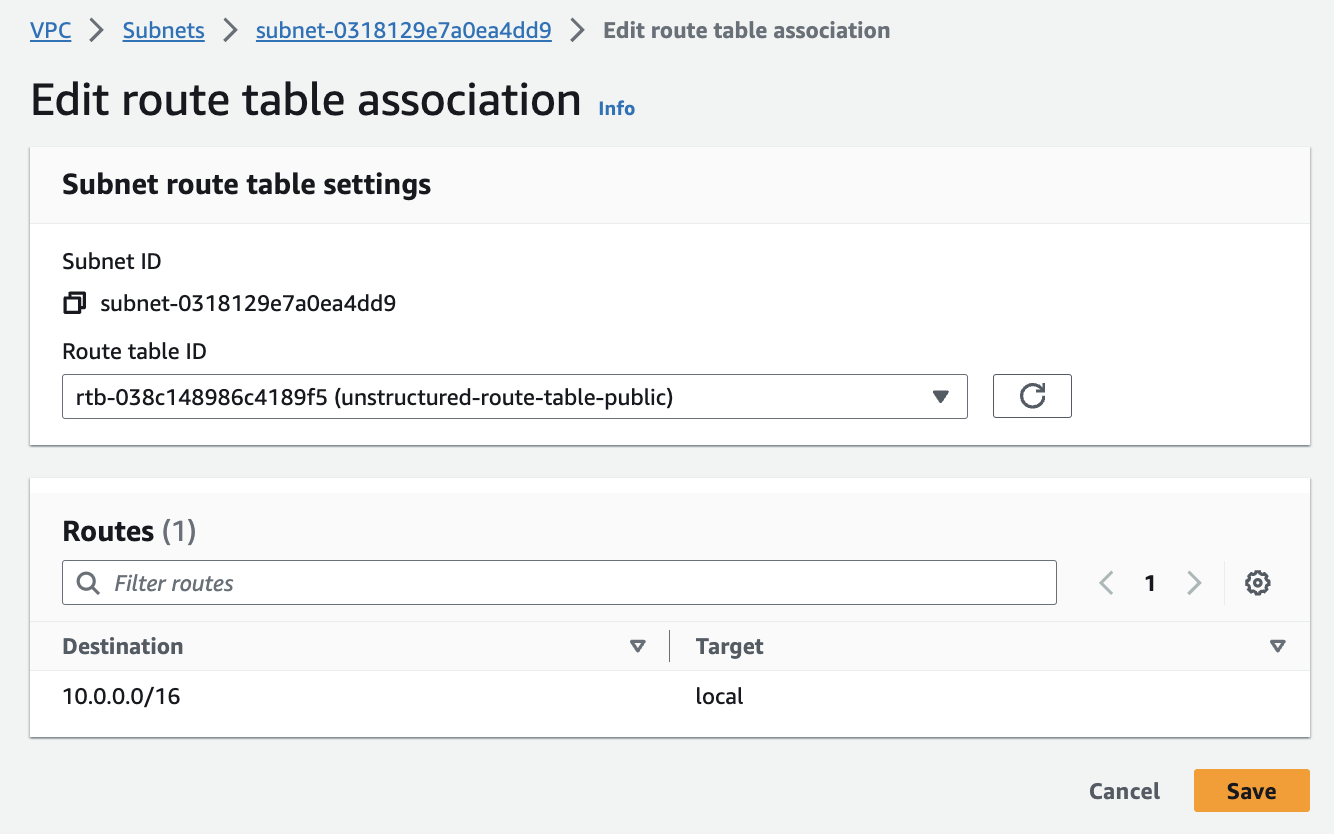
a. Connect the **public subnets** to the **route table** from *Step 5 - Set up route tables (for the public subnets)*:* In the sidebar, click **Subnets**. * Select the first public subnet from *Step 3 - Create the subnets*. * Click **Actions > Edit route table association**. * In the **Route table ID** dropdown list, select the route table from *Step 5 - Set up route tables (for the public subnets)*, and then click **Save**. * Repeat the process for the second public subnet. b. Now, you’ll ensure that the two public subnets can access the internet by connecting the route table to the internet gateway:
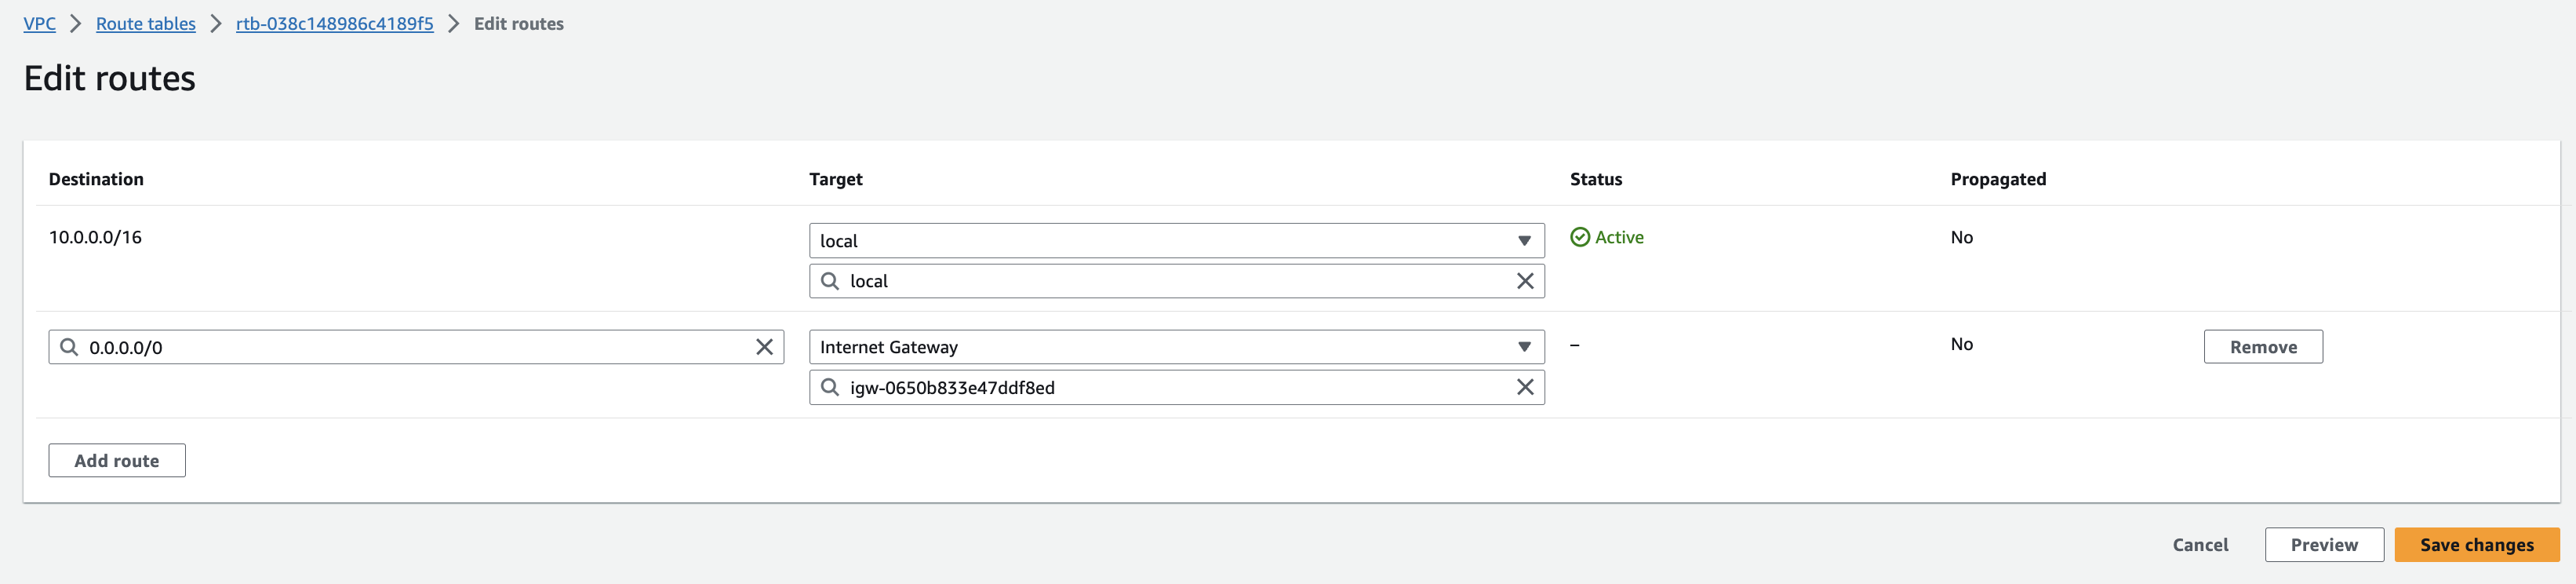
* In the sidebar, click **Route tables**. * Select the route table from *Step 5 - Set up route tables (for the public subnets)*. * Click **Actions > Edit routes**. * Click **Add route**, in the destination box, enter `0.0.0.0/0`, which represents all IP addresses. In the **Target** dropdown list, select **Internet Gateway**, and select the internet gateway from *Step 4 - Create the internet gateway (for the public subnets)*. * Click **Save changes** to establish the route, granting internet access to the first and second public subnets at the same time. c. For the **private subnet**: * In the sidebar, click **Subnets**. * Select the private subnet from *Step 3 - Create the subnets*. * Click **Actions > Edit route table association**. * In the **Route table ID** dropdown list, select the main route table, or create and then select a new route table without a route to the internet gateway. * Click **Save**.
 7. **Inspect the VPC resource map**:
You can check the configurations from the resource maps on the VPC details dashboard by clicking **Your VPCs** in the sidebar, clicking the **VPC ID** for your VPC, and then clicking the **Resource map** tab.
7. **Inspect the VPC resource map**:
You can check the configurations from the resource maps on the VPC details dashboard by clicking **Your VPCs** in the sidebar, clicking the **VPC ID** for your VPC, and then clicking the **Resource map** tab.
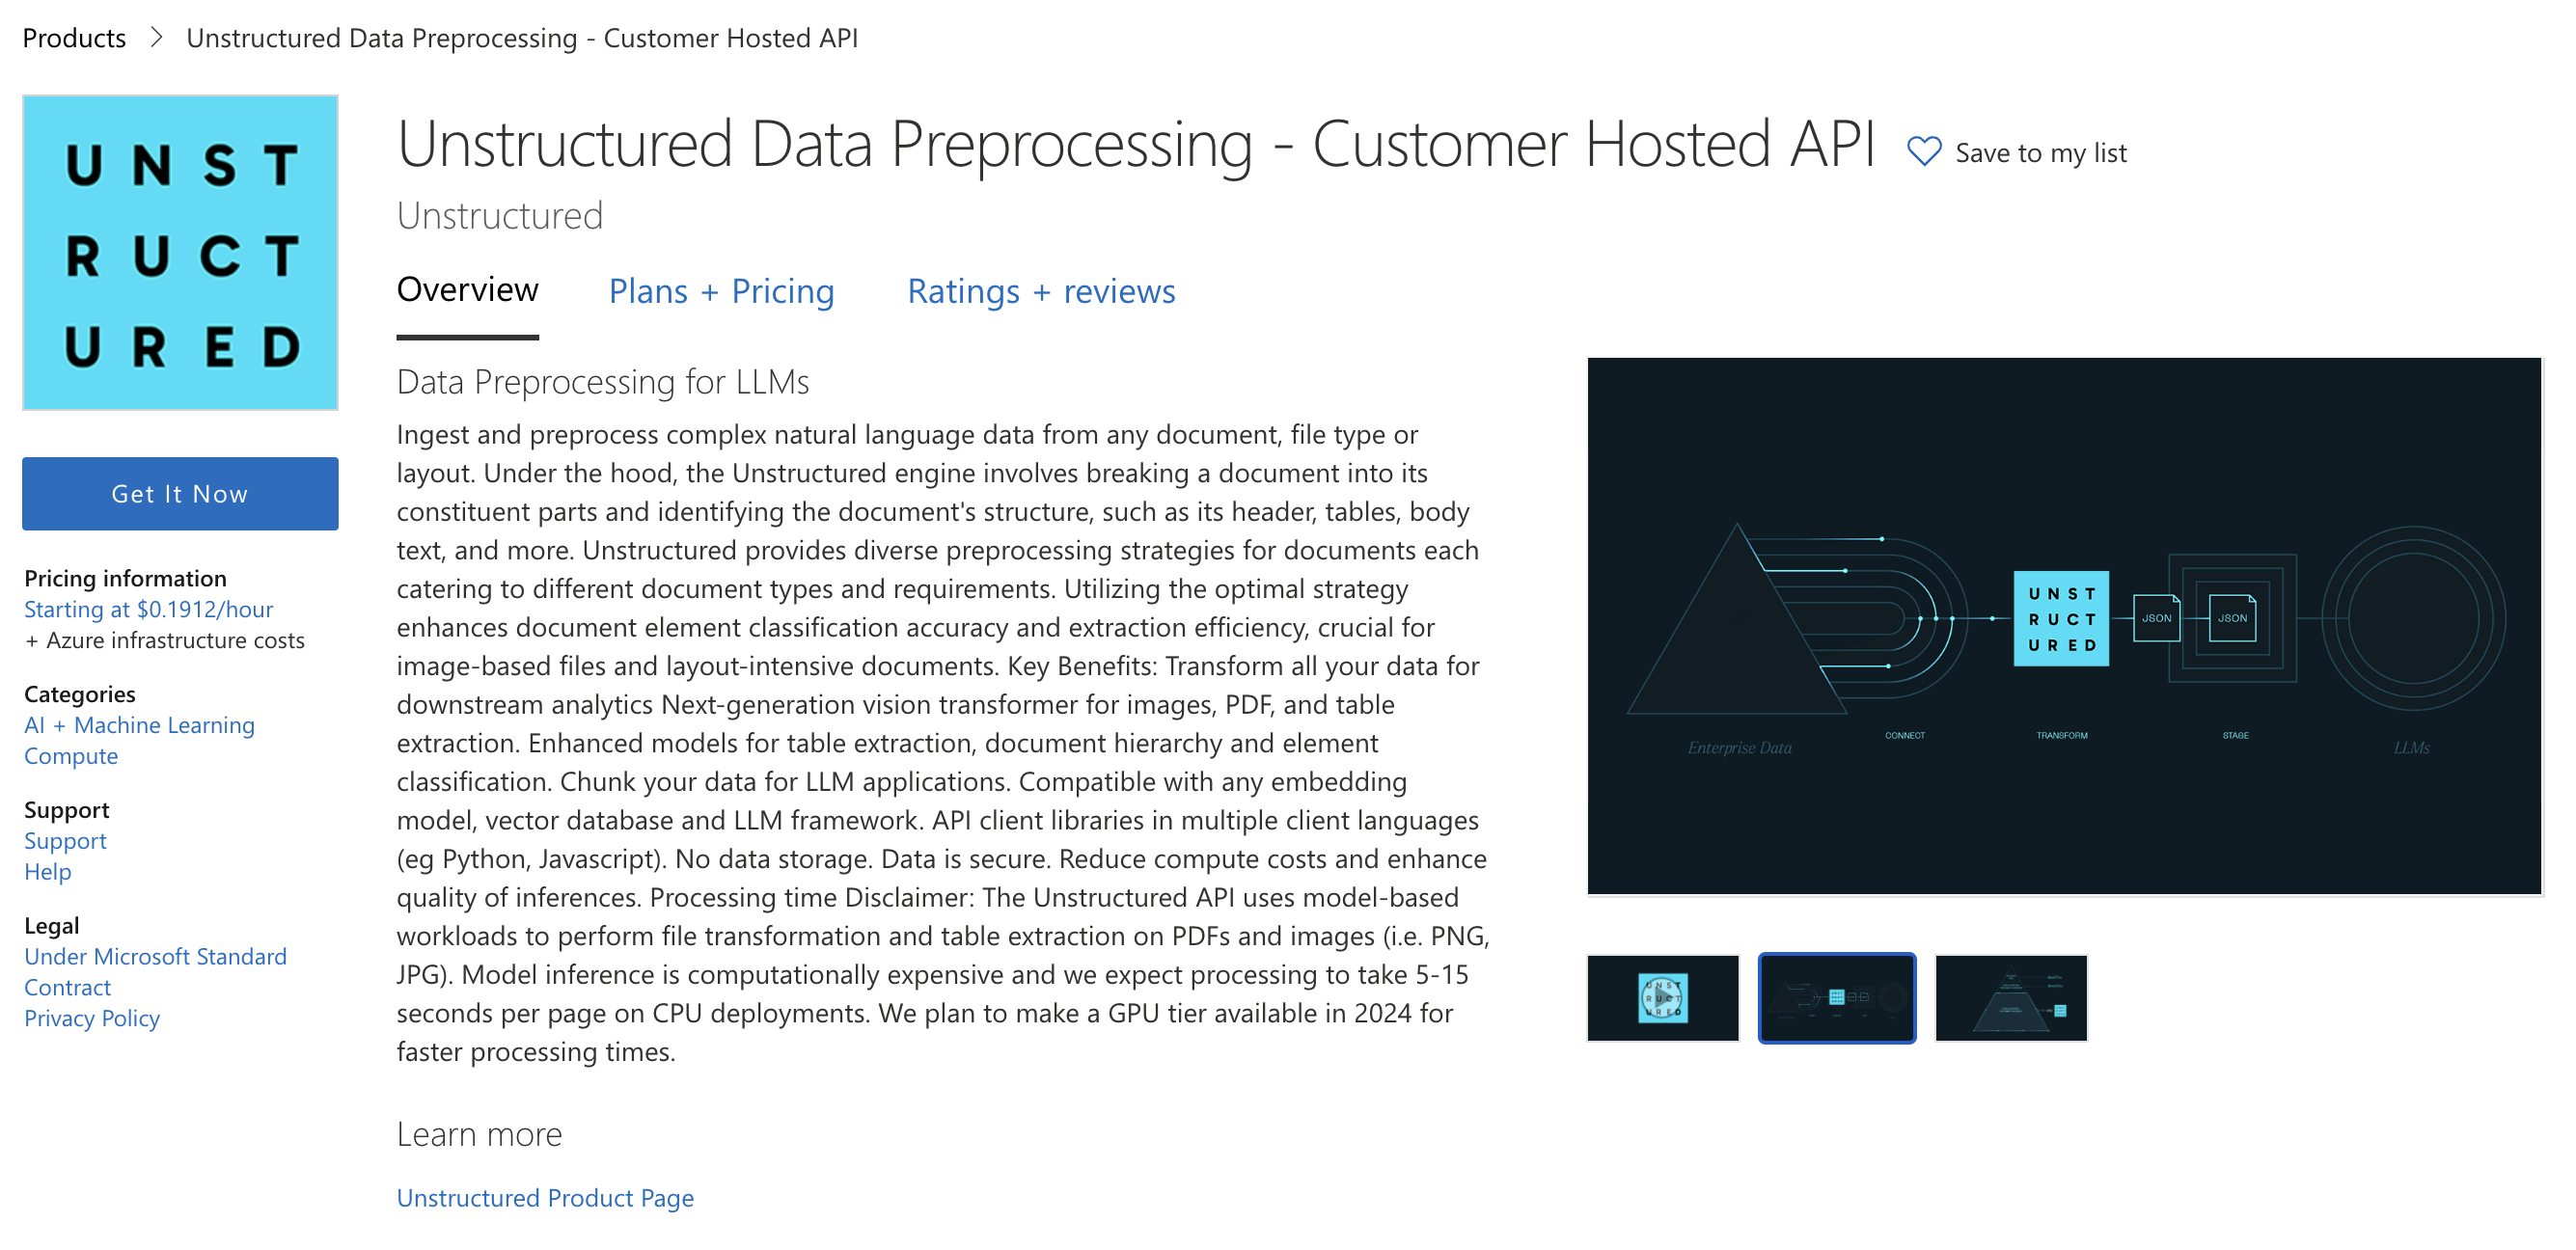
 ## Part II: Deploying the Unstructured API from the AWS Marketplace
8. **Go to the Unstructured API page on AWS Marketplace**:
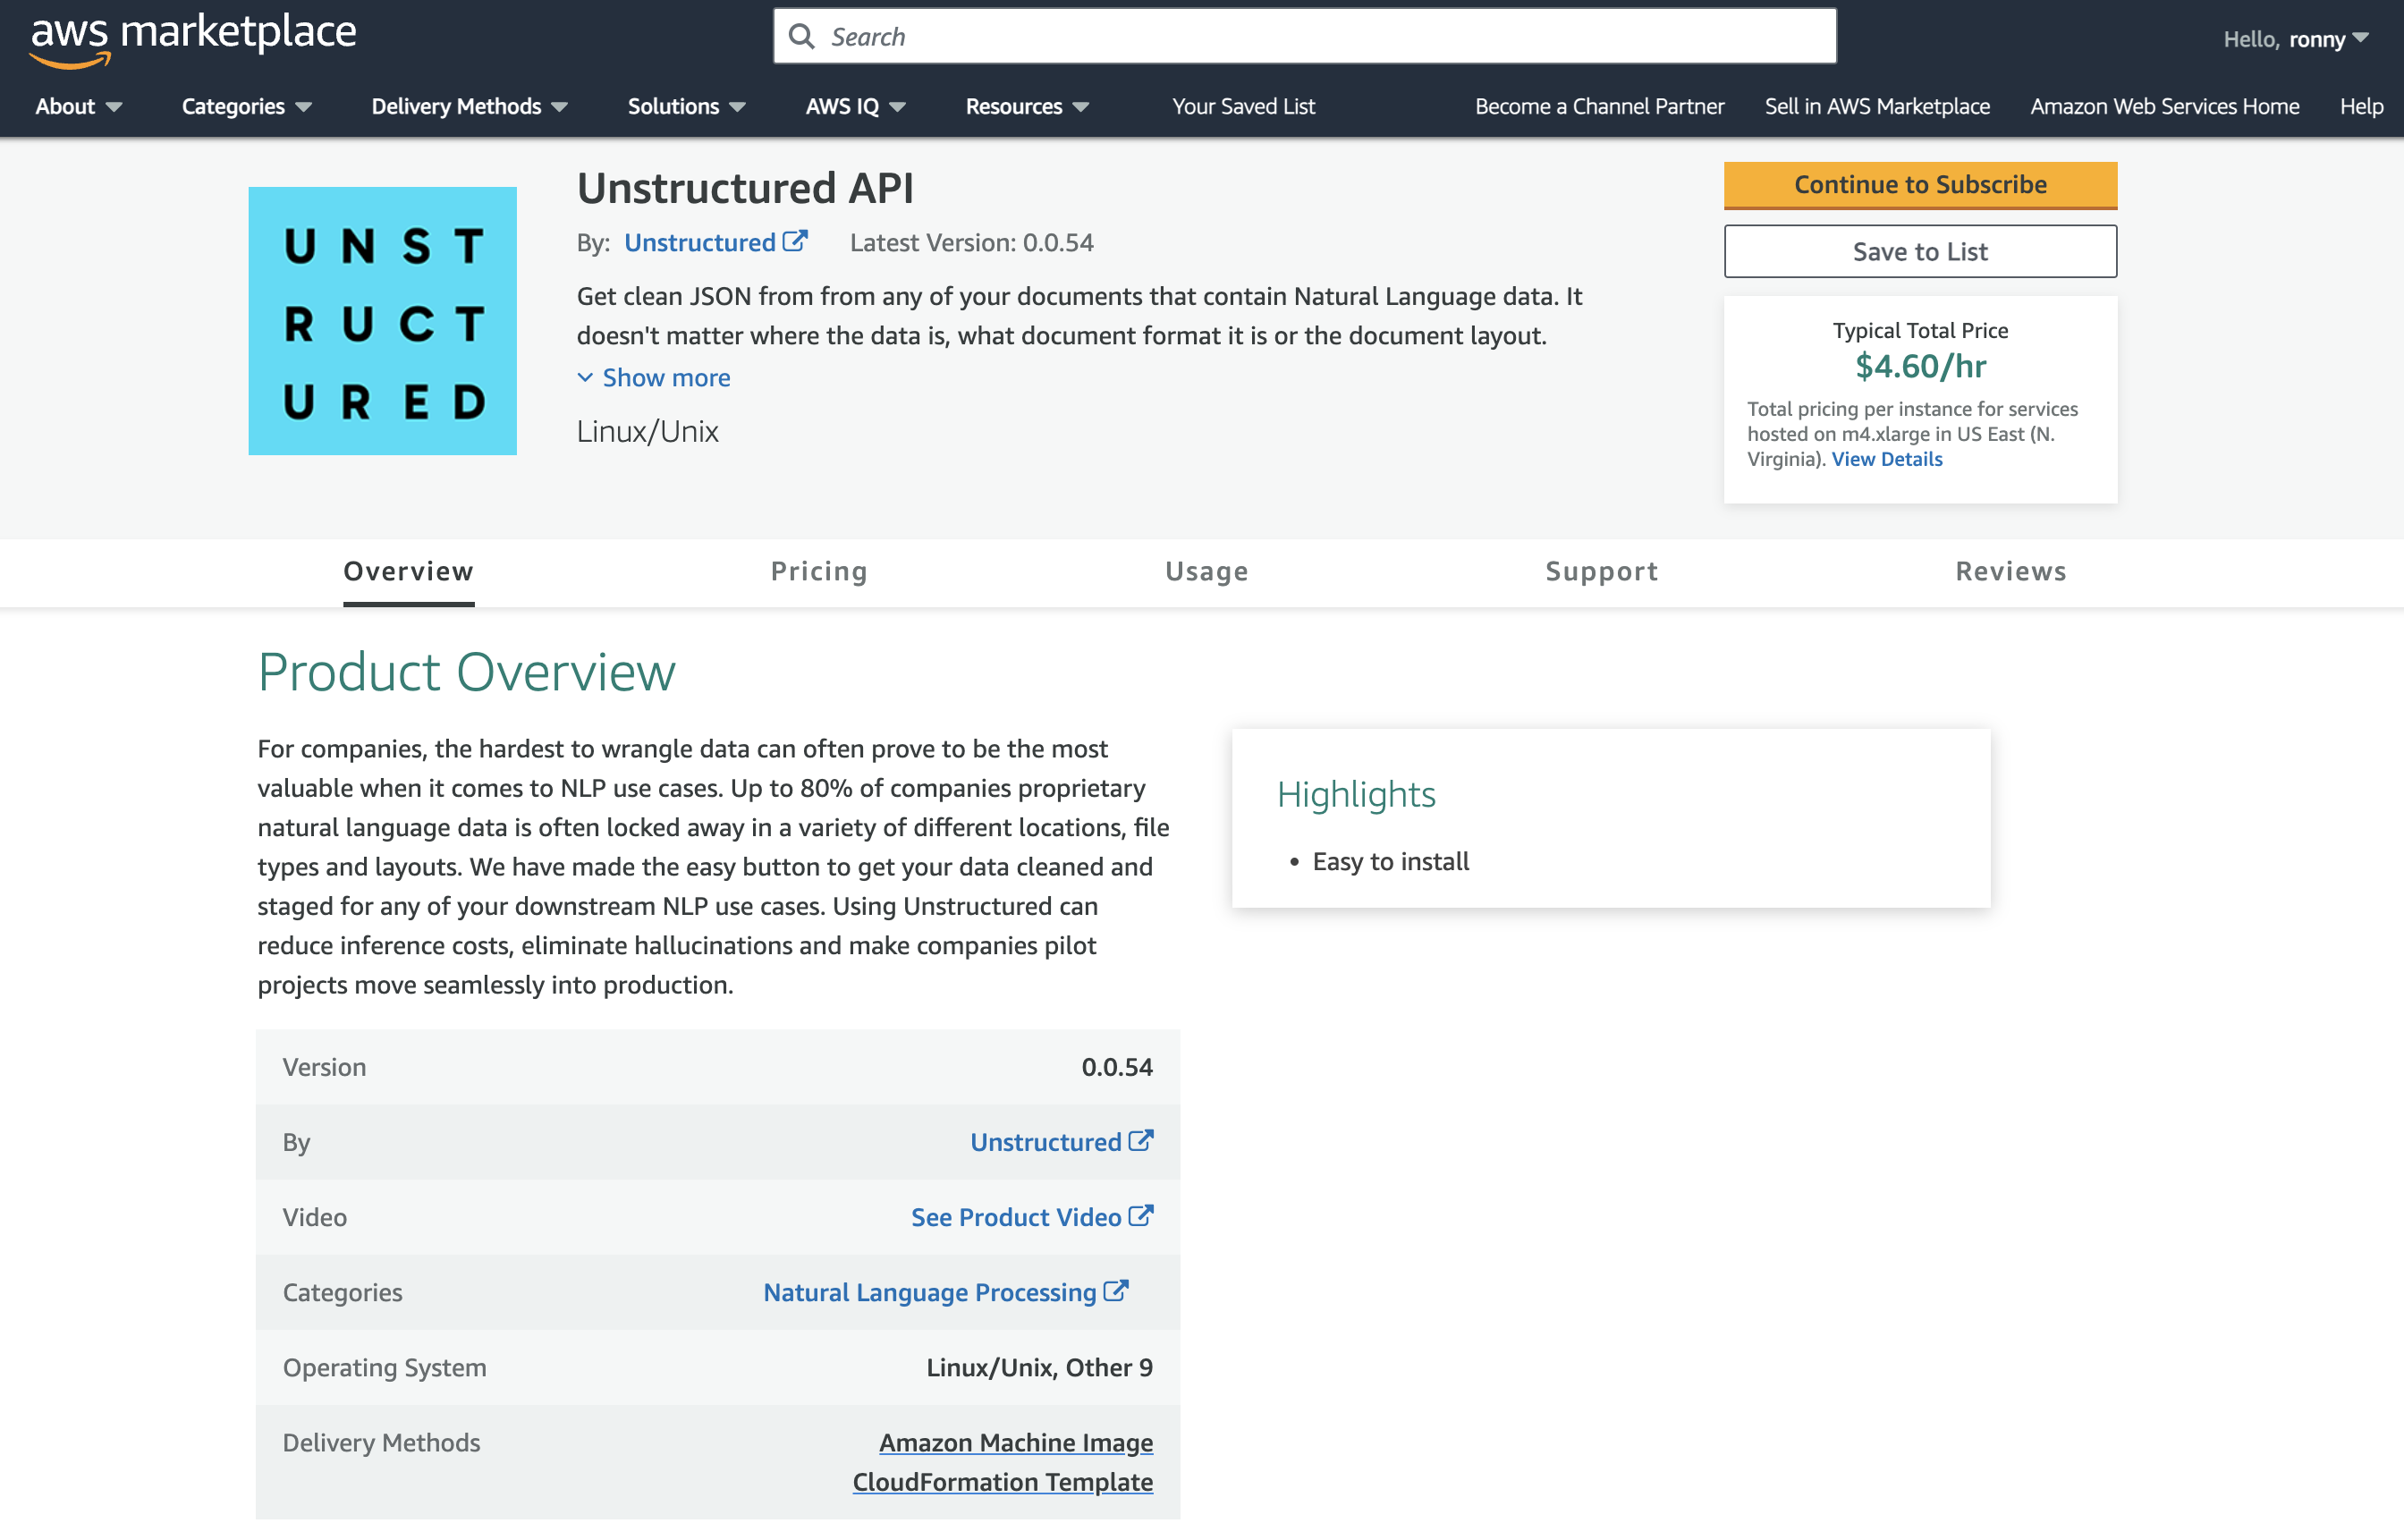
a. Leaving the VPC dashboard from Part I open, in a separate web browser tab, go to the [Unstructured API](http://aws.amazon.com/marketplace/pp/prodview-fuvslrofyuato) product page in the AWS Marketplace.
b. Click **Continue to Subscribe**.
c. Review the terms and conditions.
d. Click **Continue to Configuration**.
## Part II: Deploying the Unstructured API from the AWS Marketplace
8. **Go to the Unstructured API page on AWS Marketplace**:
a. Leaving the VPC dashboard from Part I open, in a separate web browser tab, go to the [Unstructured API](http://aws.amazon.com/marketplace/pp/prodview-fuvslrofyuato) product page in the AWS Marketplace.
b. Click **Continue to Subscribe**.
c. Review the terms and conditions.
d. Click **Continue to Configuration**.
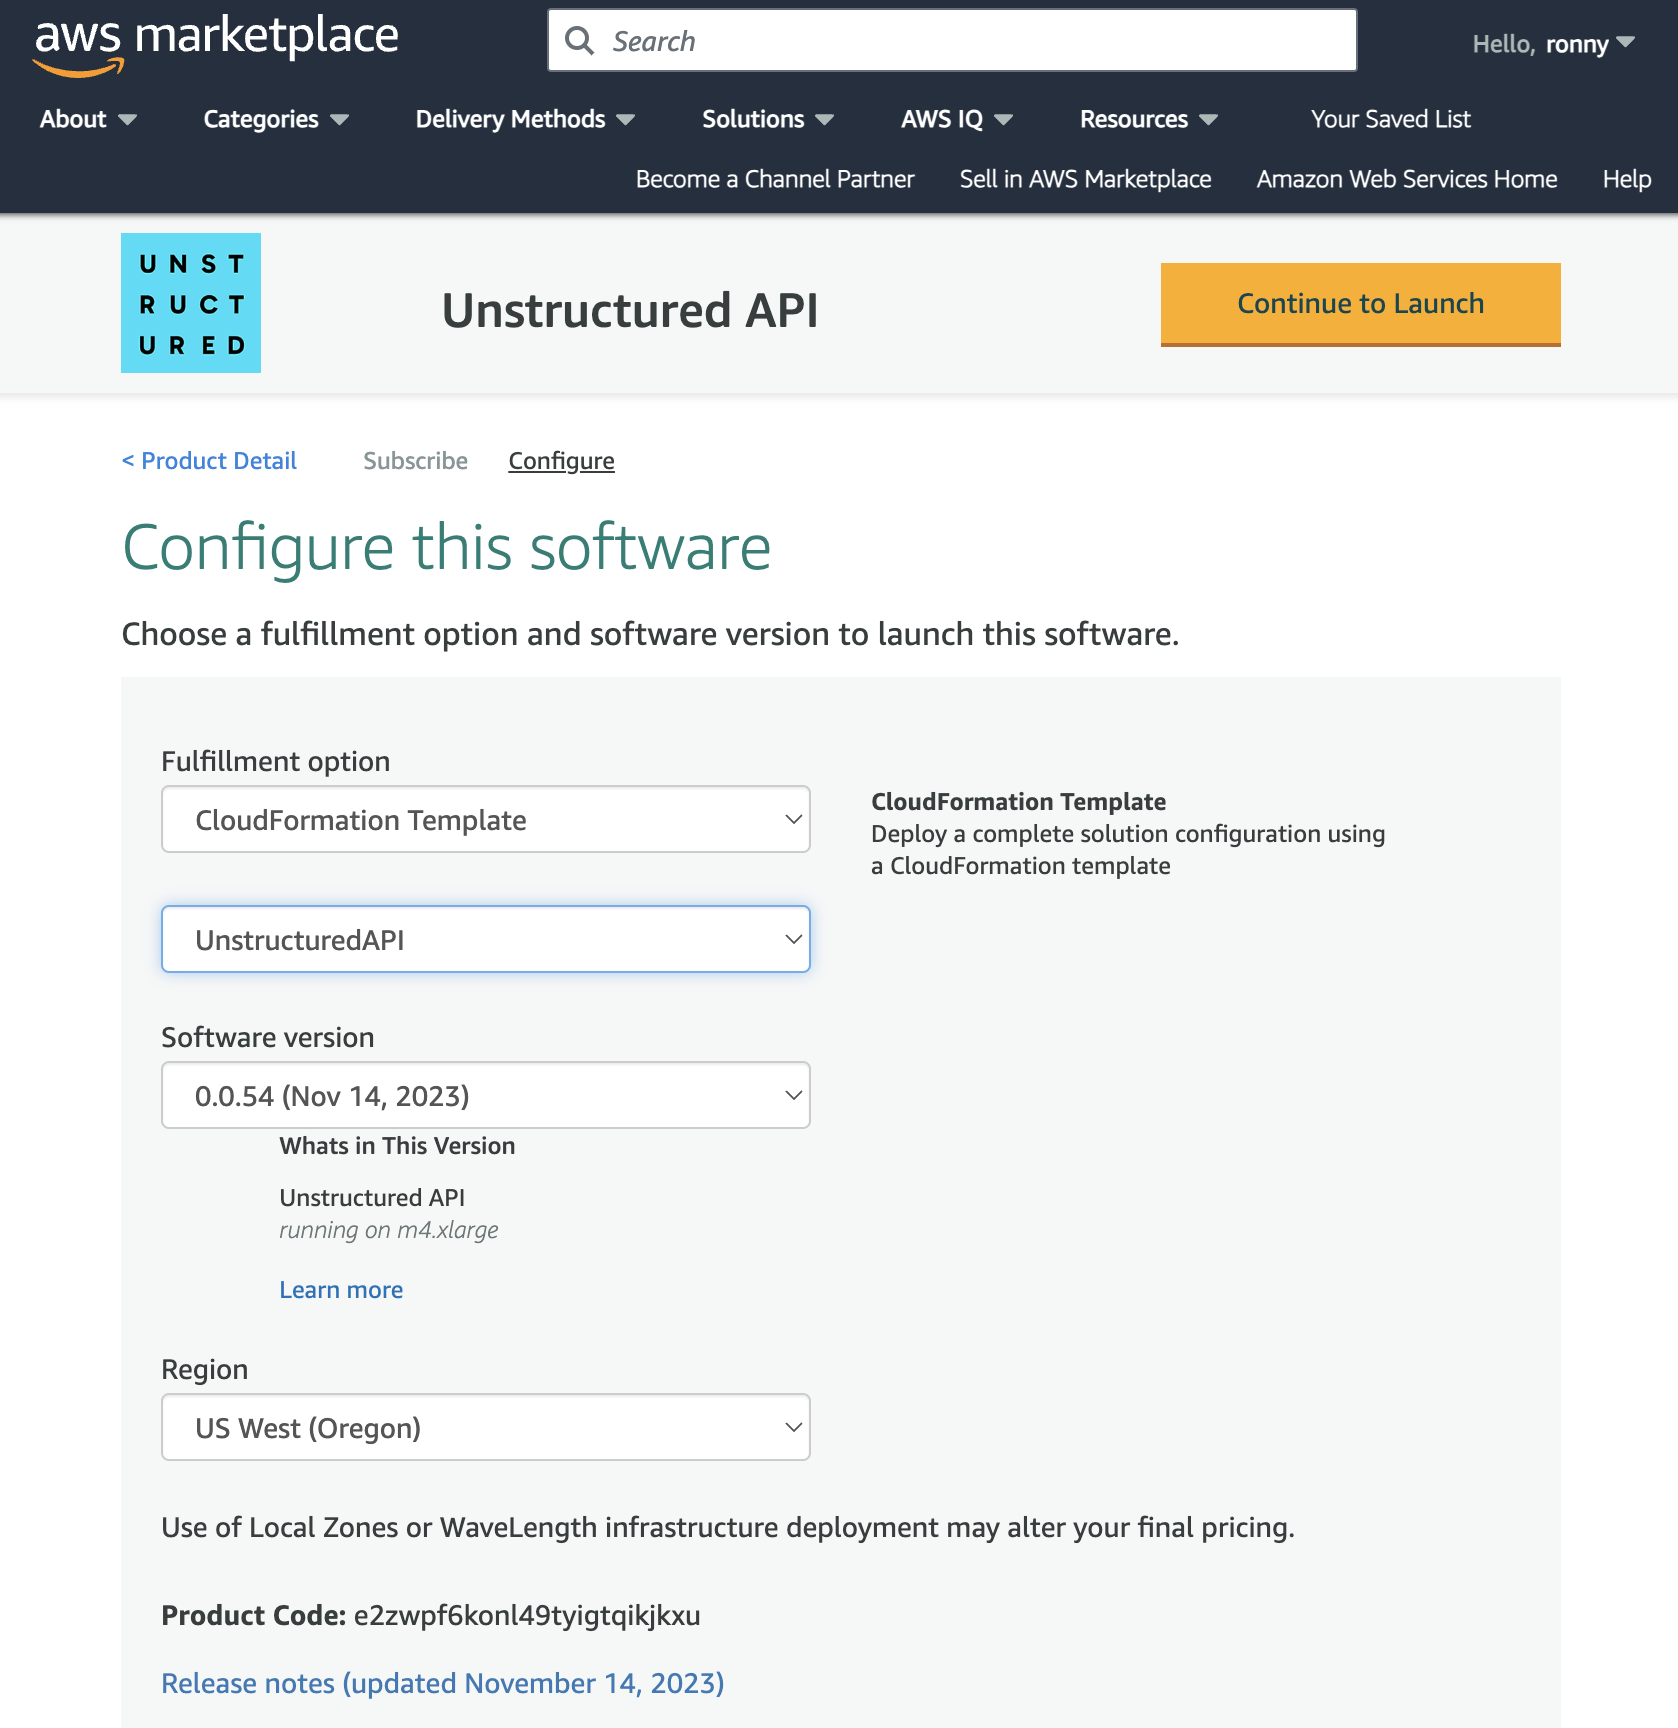
 9. **Configure the CloudFormation template**:
a. In the **Fulfillment option** dropdown list, select **CloudFormation Template**.
b. For **Fulfillment option** and **Software version**, leave the default `UnstructuredAPI` template and software version.
c. In the **Region** dropdown list, select the Region that corresponds to the VPC from Part I.
* *Note: You must select the same Region where you set up the VPC in Part I. To find the Region, on the VPC dashboard tab from Part I that you left open, with your VPC displayed, find the VPC's Region name next to your username in the top navigation bar.*
d. Click **Continue to Launch**.
e. In the **Choose Action** dropdown list, select **Launch CloudFormation**.
f. Click **Launch**.
9. **Configure the CloudFormation template**:
a. In the **Fulfillment option** dropdown list, select **CloudFormation Template**.
b. For **Fulfillment option** and **Software version**, leave the default `UnstructuredAPI` template and software version.
c. In the **Region** dropdown list, select the Region that corresponds to the VPC from Part I.
* *Note: You must select the same Region where you set up the VPC in Part I. To find the Region, on the VPC dashboard tab from Part I that you left open, with your VPC displayed, find the VPC's Region name next to your username in the top navigation bar.*
d. Click **Continue to Launch**.
e. In the **Choose Action** dropdown list, select **Launch CloudFormation**.
f. Click **Launch**.
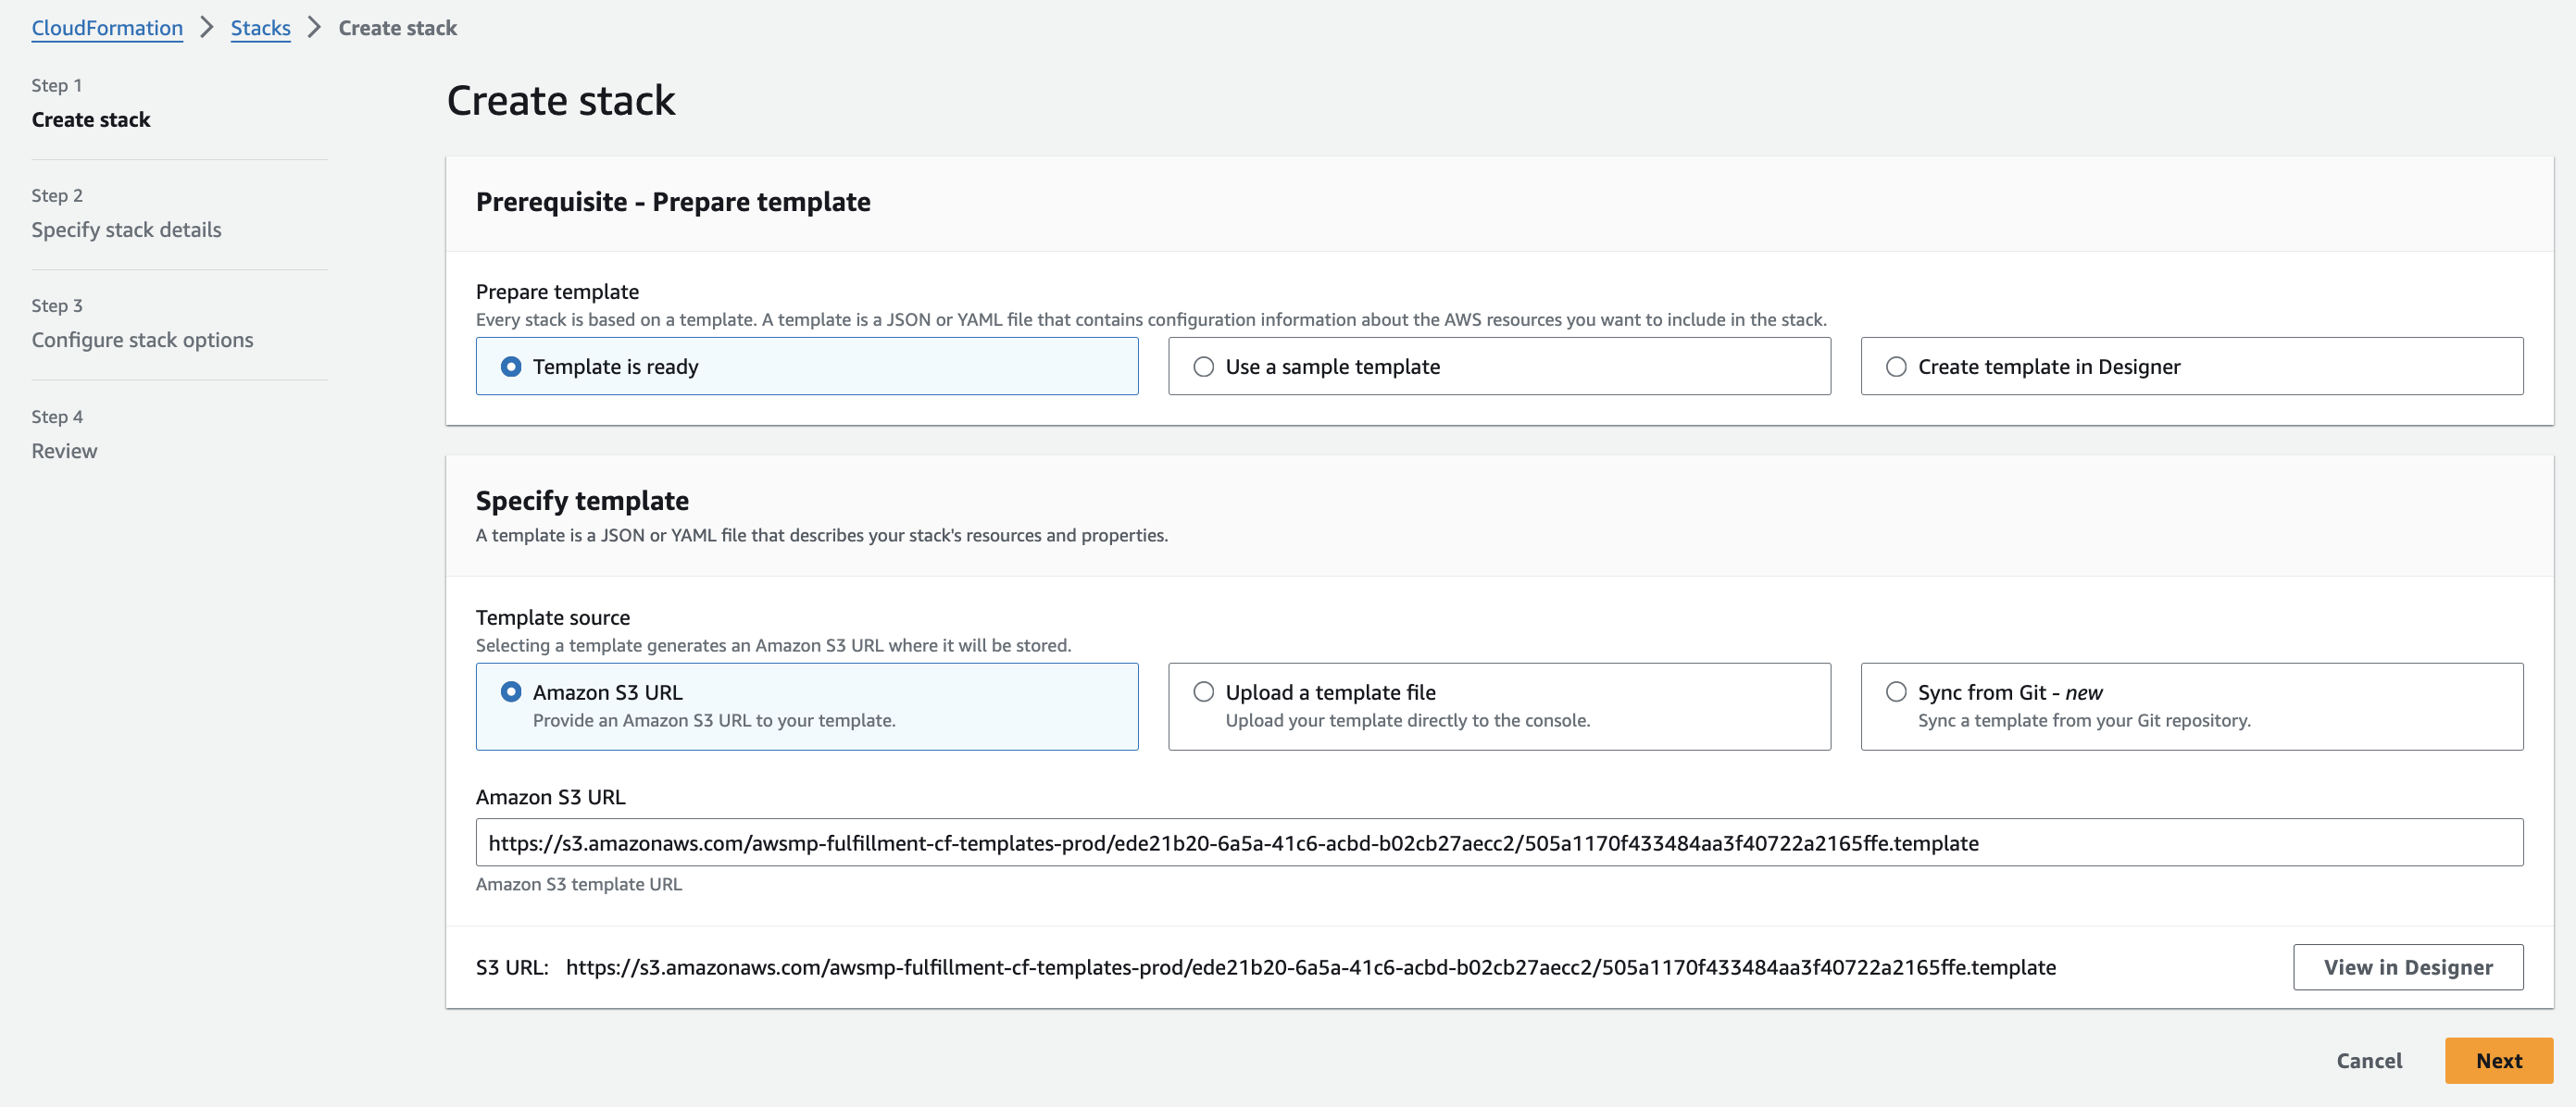
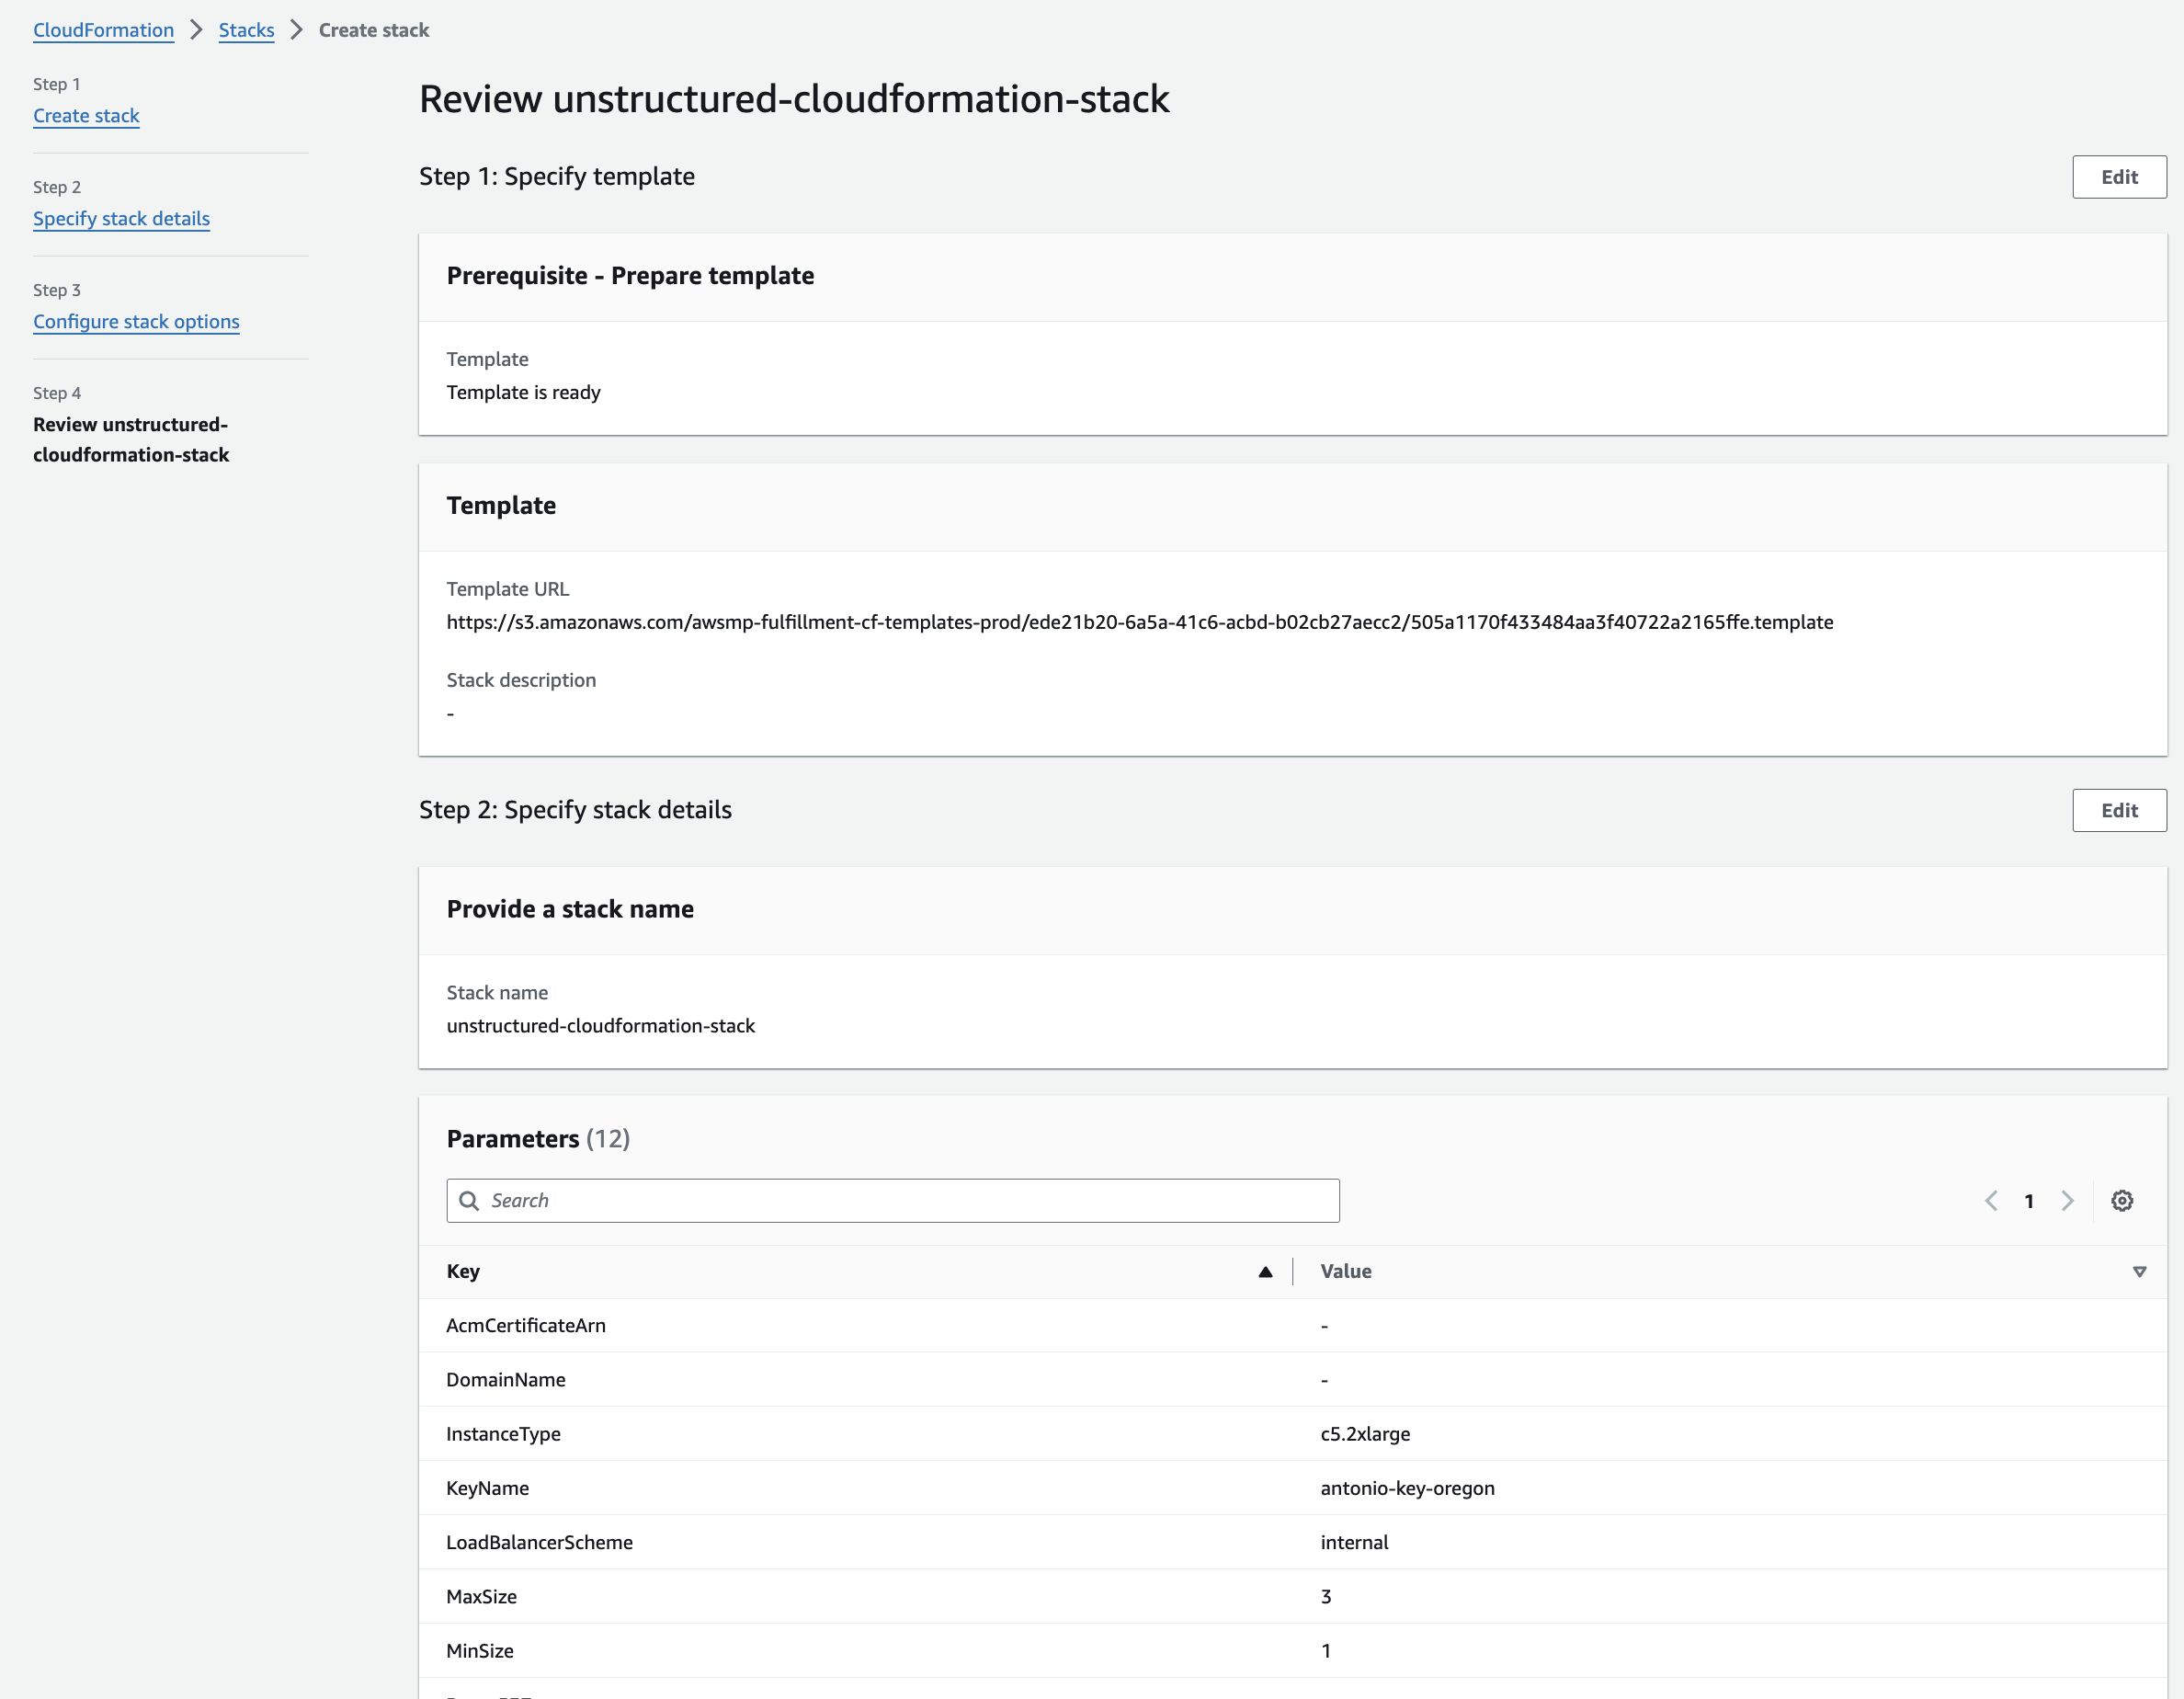
 10. **Create the CloudFormation stack**:
After you click **Launch**, the **Create stack** page appears in CloudFormation.
**Step 1: Create the stack**
a. Leave **Choose an existing template** selected.
b. Leave **Amazon S3 URL** selected and the default **Amazon S3 URL** value unchanged.
c. Click **Next**.
10. **Create the CloudFormation stack**:
After you click **Launch**, the **Create stack** page appears in CloudFormation.
**Step 1: Create the stack**
a. Leave **Choose an existing template** selected.
b. Leave **Amazon S3 URL** selected and the default **Amazon S3 URL** value unchanged.
c. Click **Next**.
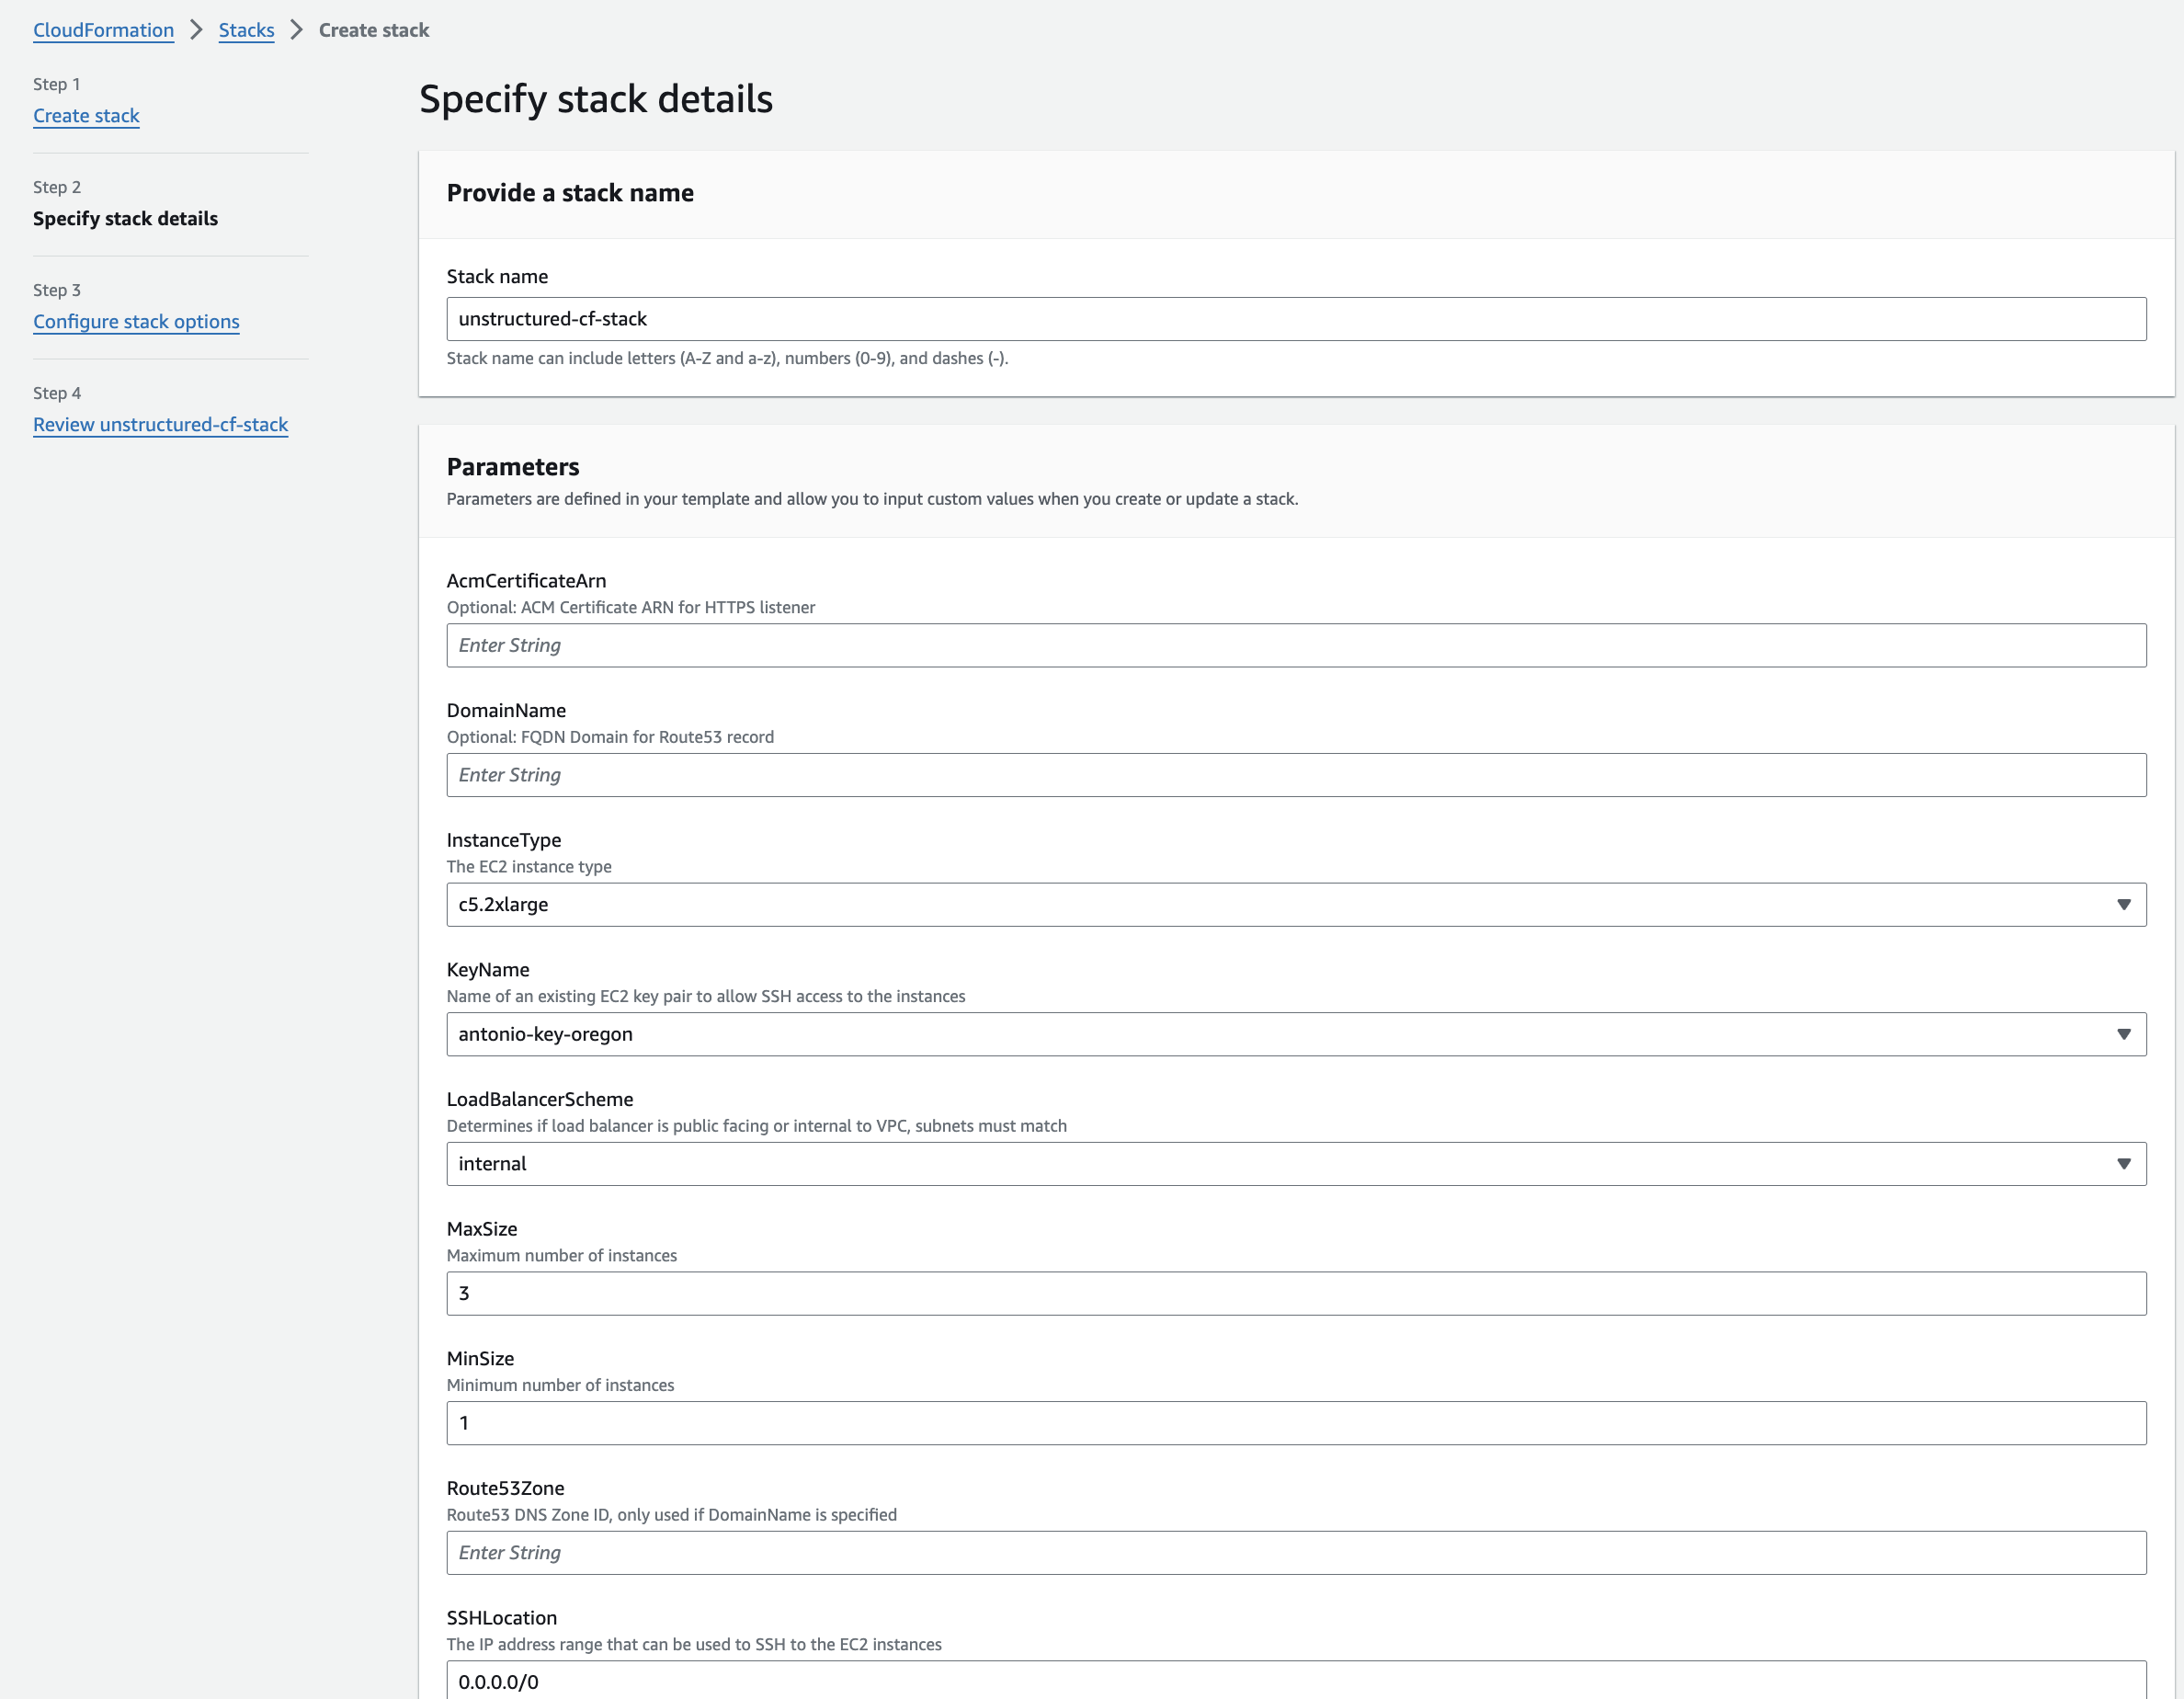
 **Step 2: Specify the stack's details**
a. Enter some unique **Stack name**.
b. In the **Parameters** section, in the **InstanceType** drop-down list, select **m5.xlarge**.
c. In the **KeyName** drop-down list, select the name of the SSH key pair from the beginning of this article.
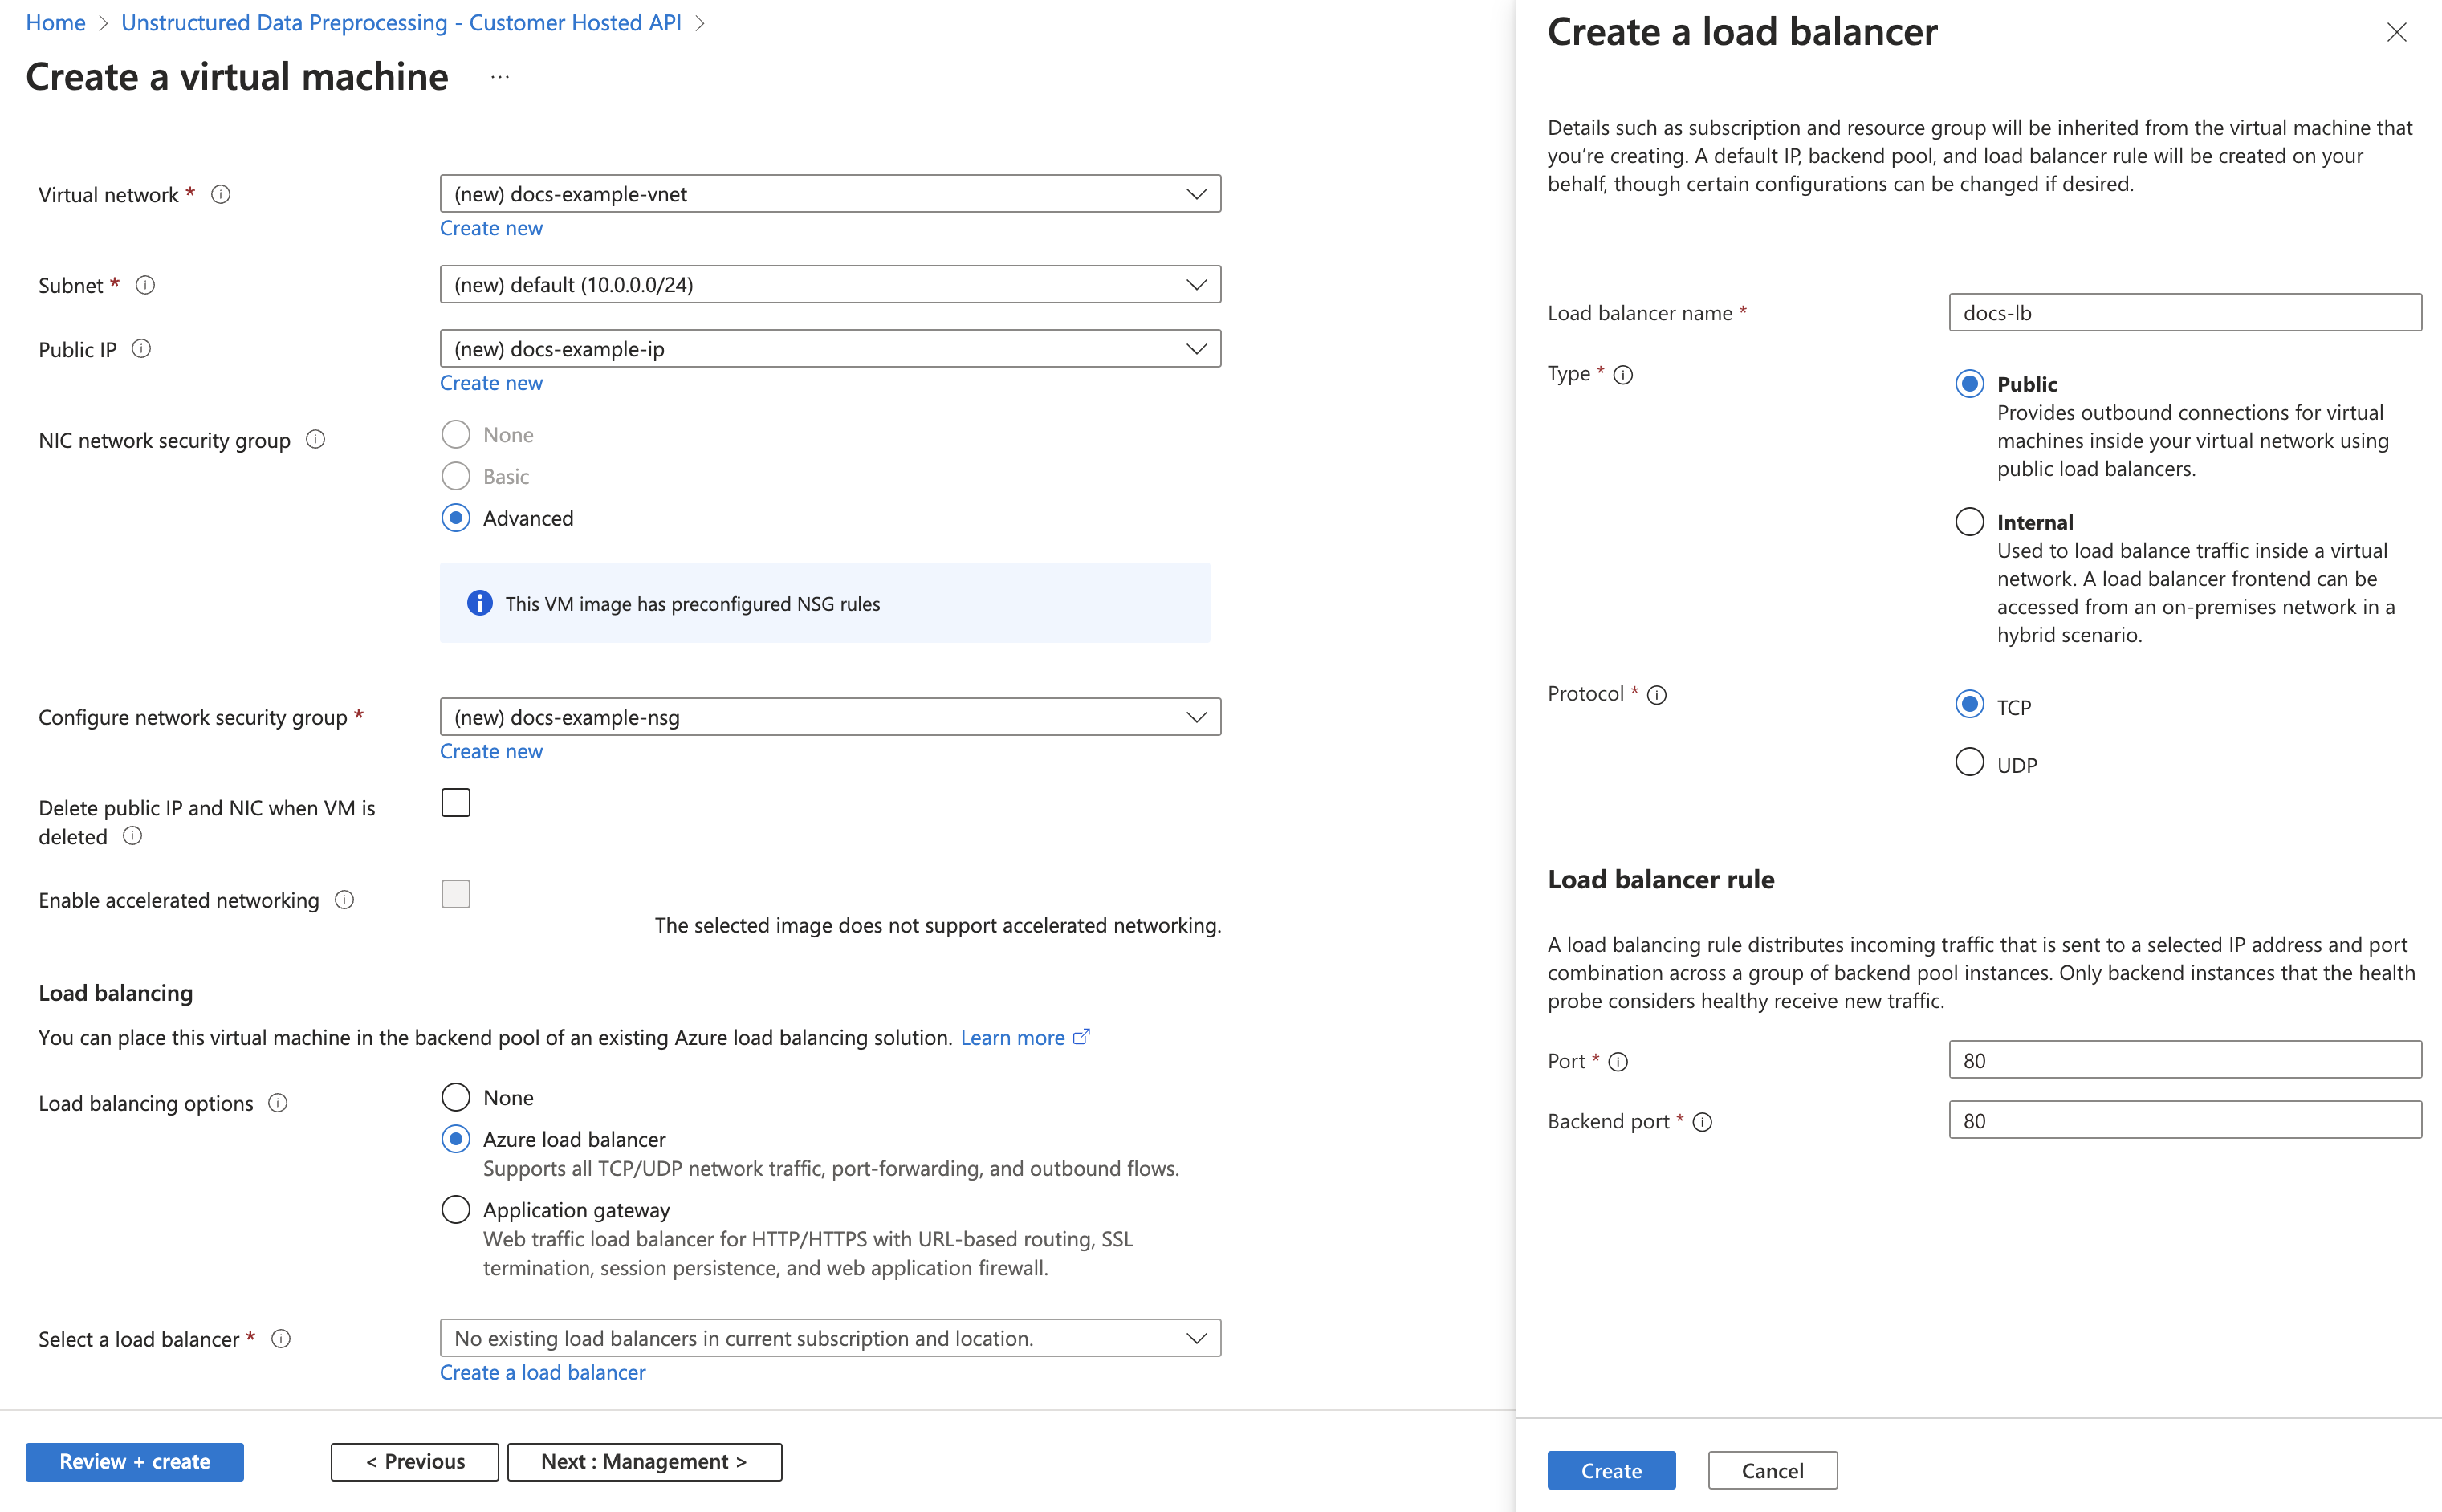
d. In the **LoadBalancerScheme** dropdown list, select **internet-facing**.
e. For **SSHLocation**, enter `0.0.0.0/0`, but only if you allow public access on the internet.
* **Note**: It is generally recommended to limit SSH access to a specific IP range for enhanced security. This can be done by setting the `SSHLocation` to the IP address or range associated with your organization. Please consult your IT department or VPN vendor to obtain the correct IP information for these settings.
* AWS provides `AWS Client VPN`, which is a managed client-based VPN service that enables secure access AWS resources and resources in your on-premises network. To learn more, see [Getting started with AWS Client VPN](https://docs.aws.amazon.com/vpn/latest/clientvpn-admin/cvpn-getting-started.html).
f. In the **Subnets** dropdown multiselect list, select the two public subnets and the private subnet from Part I.
g. In the **VPC** dropdown list, select the VPC from Part I.
h. You can leave the default values for all of the other **Parameters** fields.
i. Click **Next**.
**Step 2: Specify the stack's details**
a. Enter some unique **Stack name**.
b. In the **Parameters** section, in the **InstanceType** drop-down list, select **m5.xlarge**.
c. In the **KeyName** drop-down list, select the name of the SSH key pair from the beginning of this article.
d. In the **LoadBalancerScheme** dropdown list, select **internet-facing**.
e. For **SSHLocation**, enter `0.0.0.0/0`, but only if you allow public access on the internet.
* **Note**: It is generally recommended to limit SSH access to a specific IP range for enhanced security. This can be done by setting the `SSHLocation` to the IP address or range associated with your organization. Please consult your IT department or VPN vendor to obtain the correct IP information for these settings.
* AWS provides `AWS Client VPN`, which is a managed client-based VPN service that enables secure access AWS resources and resources in your on-premises network. To learn more, see [Getting started with AWS Client VPN](https://docs.aws.amazon.com/vpn/latest/clientvpn-admin/cvpn-getting-started.html).
f. In the **Subnets** dropdown multiselect list, select the two public subnets and the private subnet from Part I.
g. In the **VPC** dropdown list, select the VPC from Part I.
h. You can leave the default values for all of the other **Parameters** fields.
i. Click **Next**.
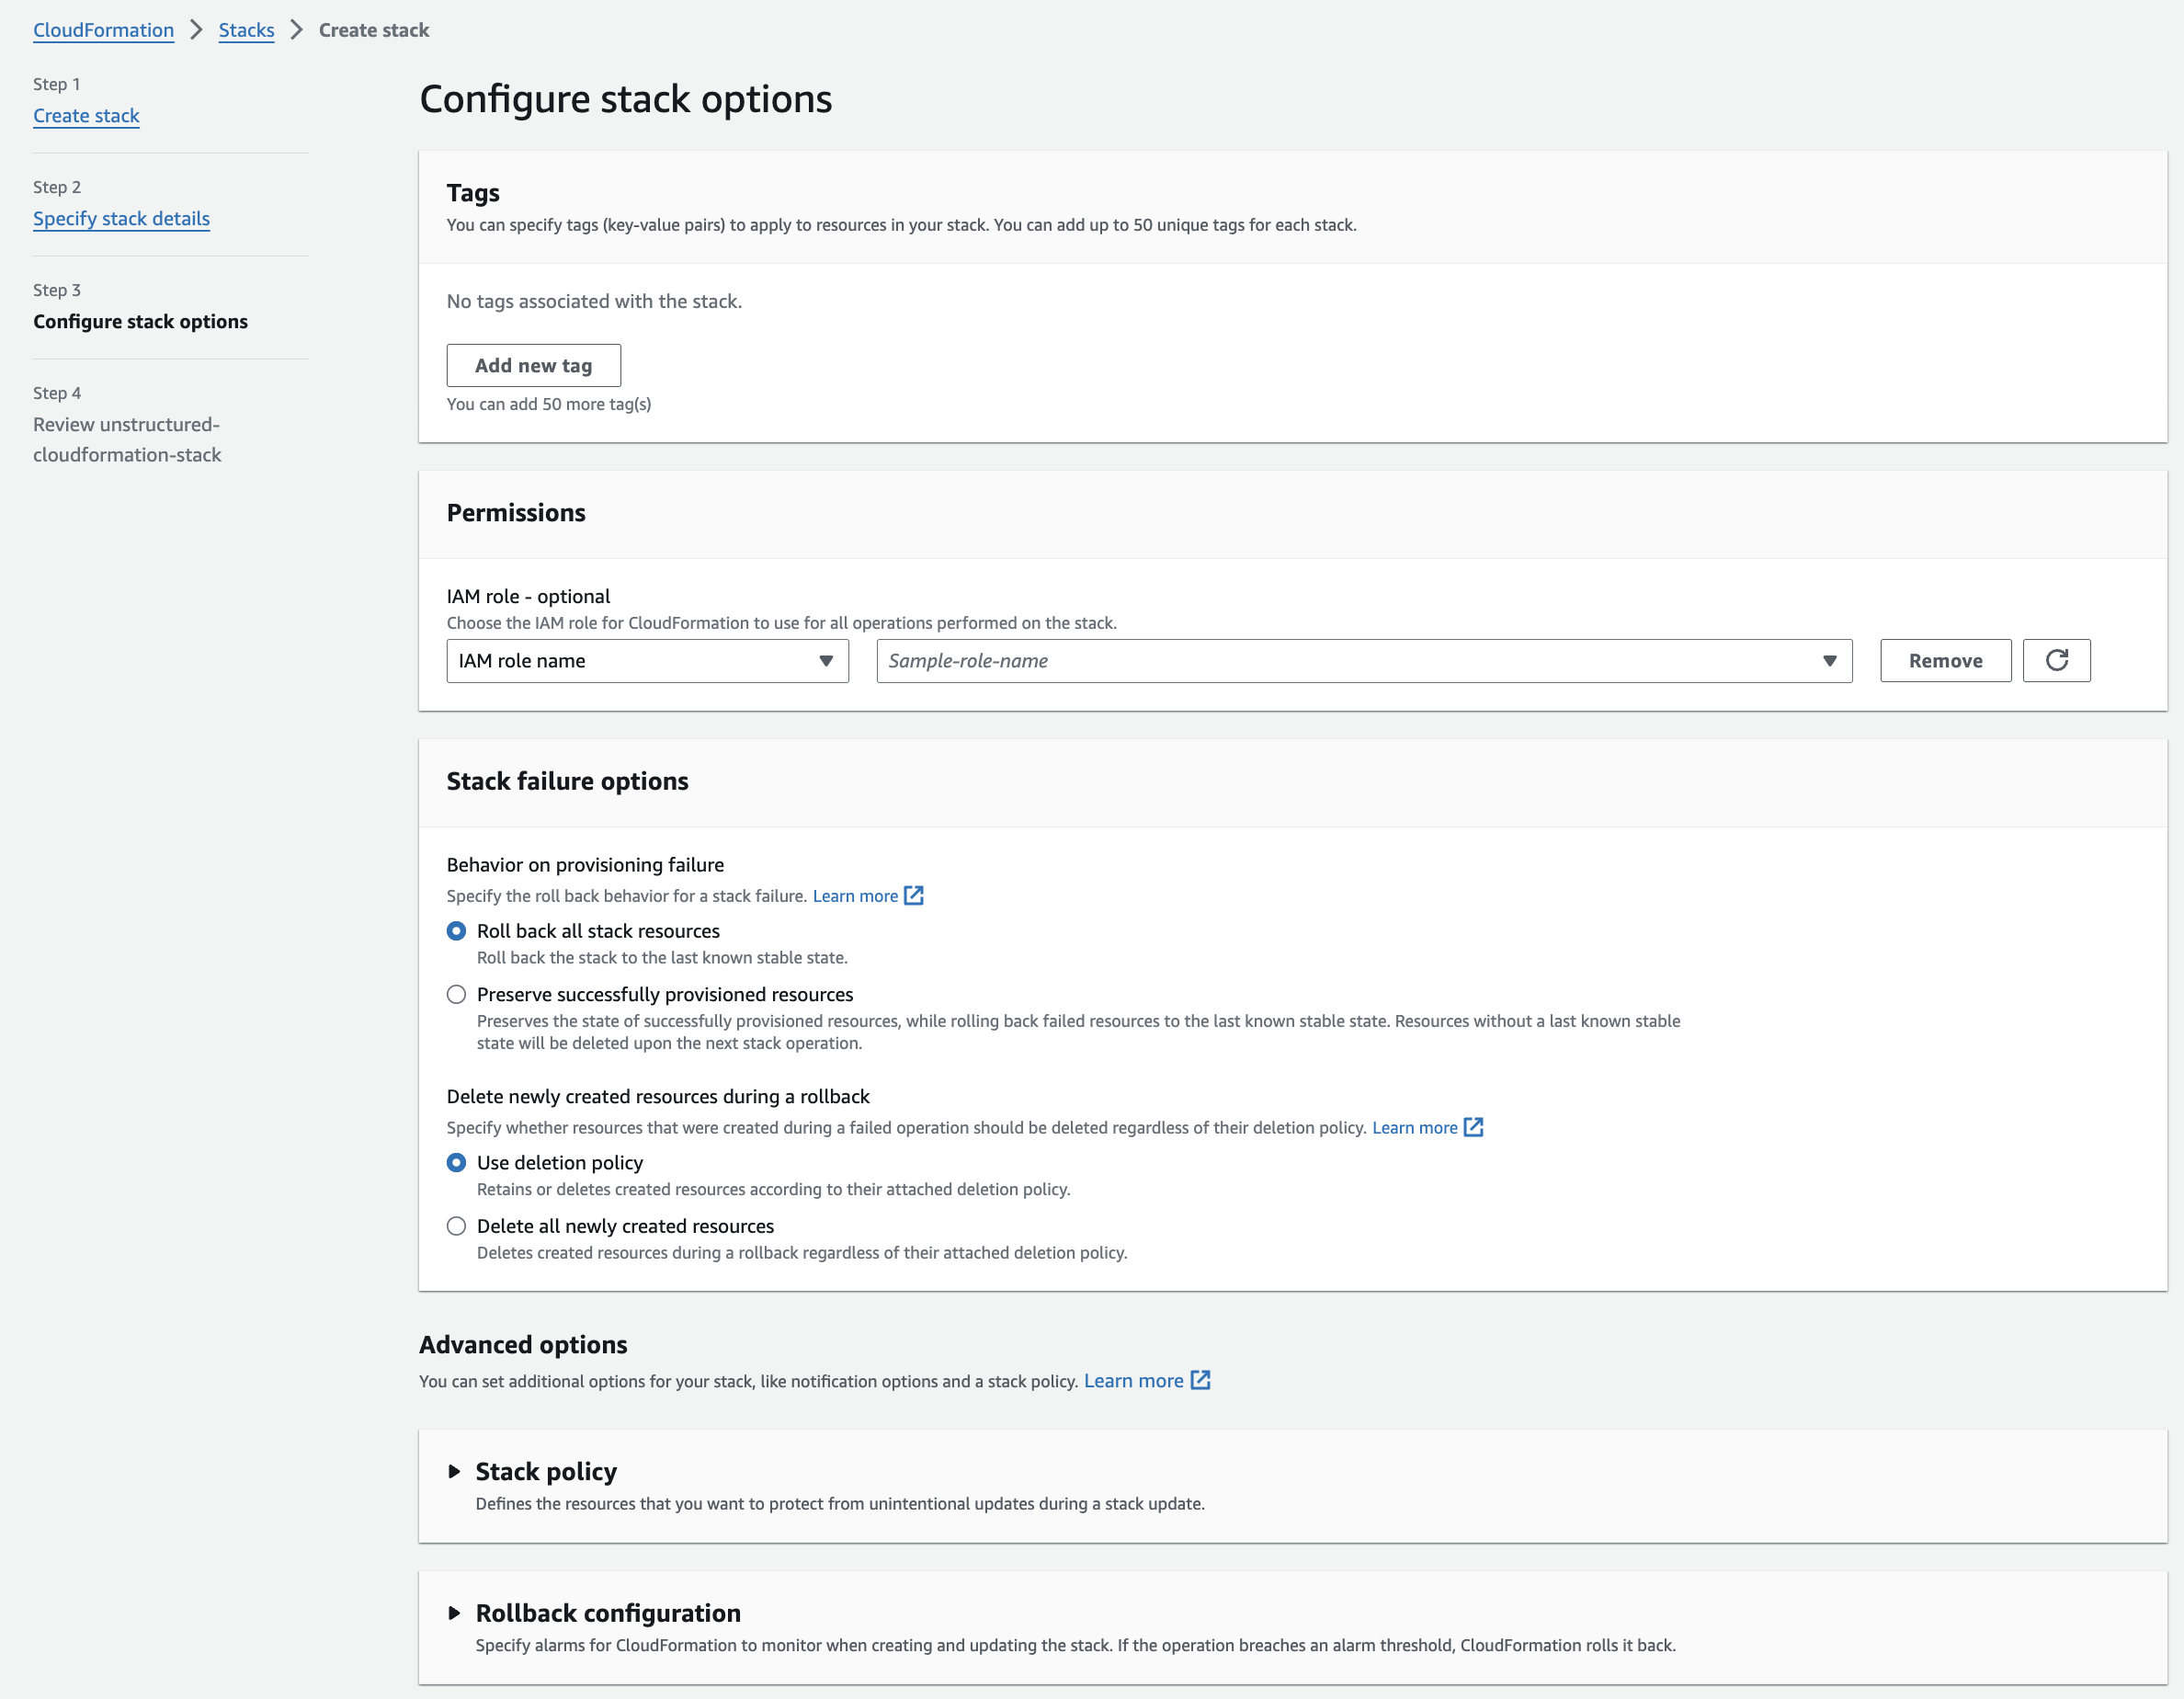
 **Step 3: Configure the stack's options**
a. You can leave the default values, or specify any non-default stack options.
b. Click **Next**.
**Step 3: Configure the stack's options**
a. You can leave the default values, or specify any non-default stack options.
b. Click **Next**.
 **Step 4: Review**
a. Review the stack's settings.
b. Click **Submit**.
**Step 4: Review**
a. Review the stack's settings.
b. Click **Submit**.
 11. **Get the Unstructured API endpoint**:
a. The CloudFormation details page for the stack appears. If you do not see it, on the sidebar, click **Stacks**, and then click the name of your stack.
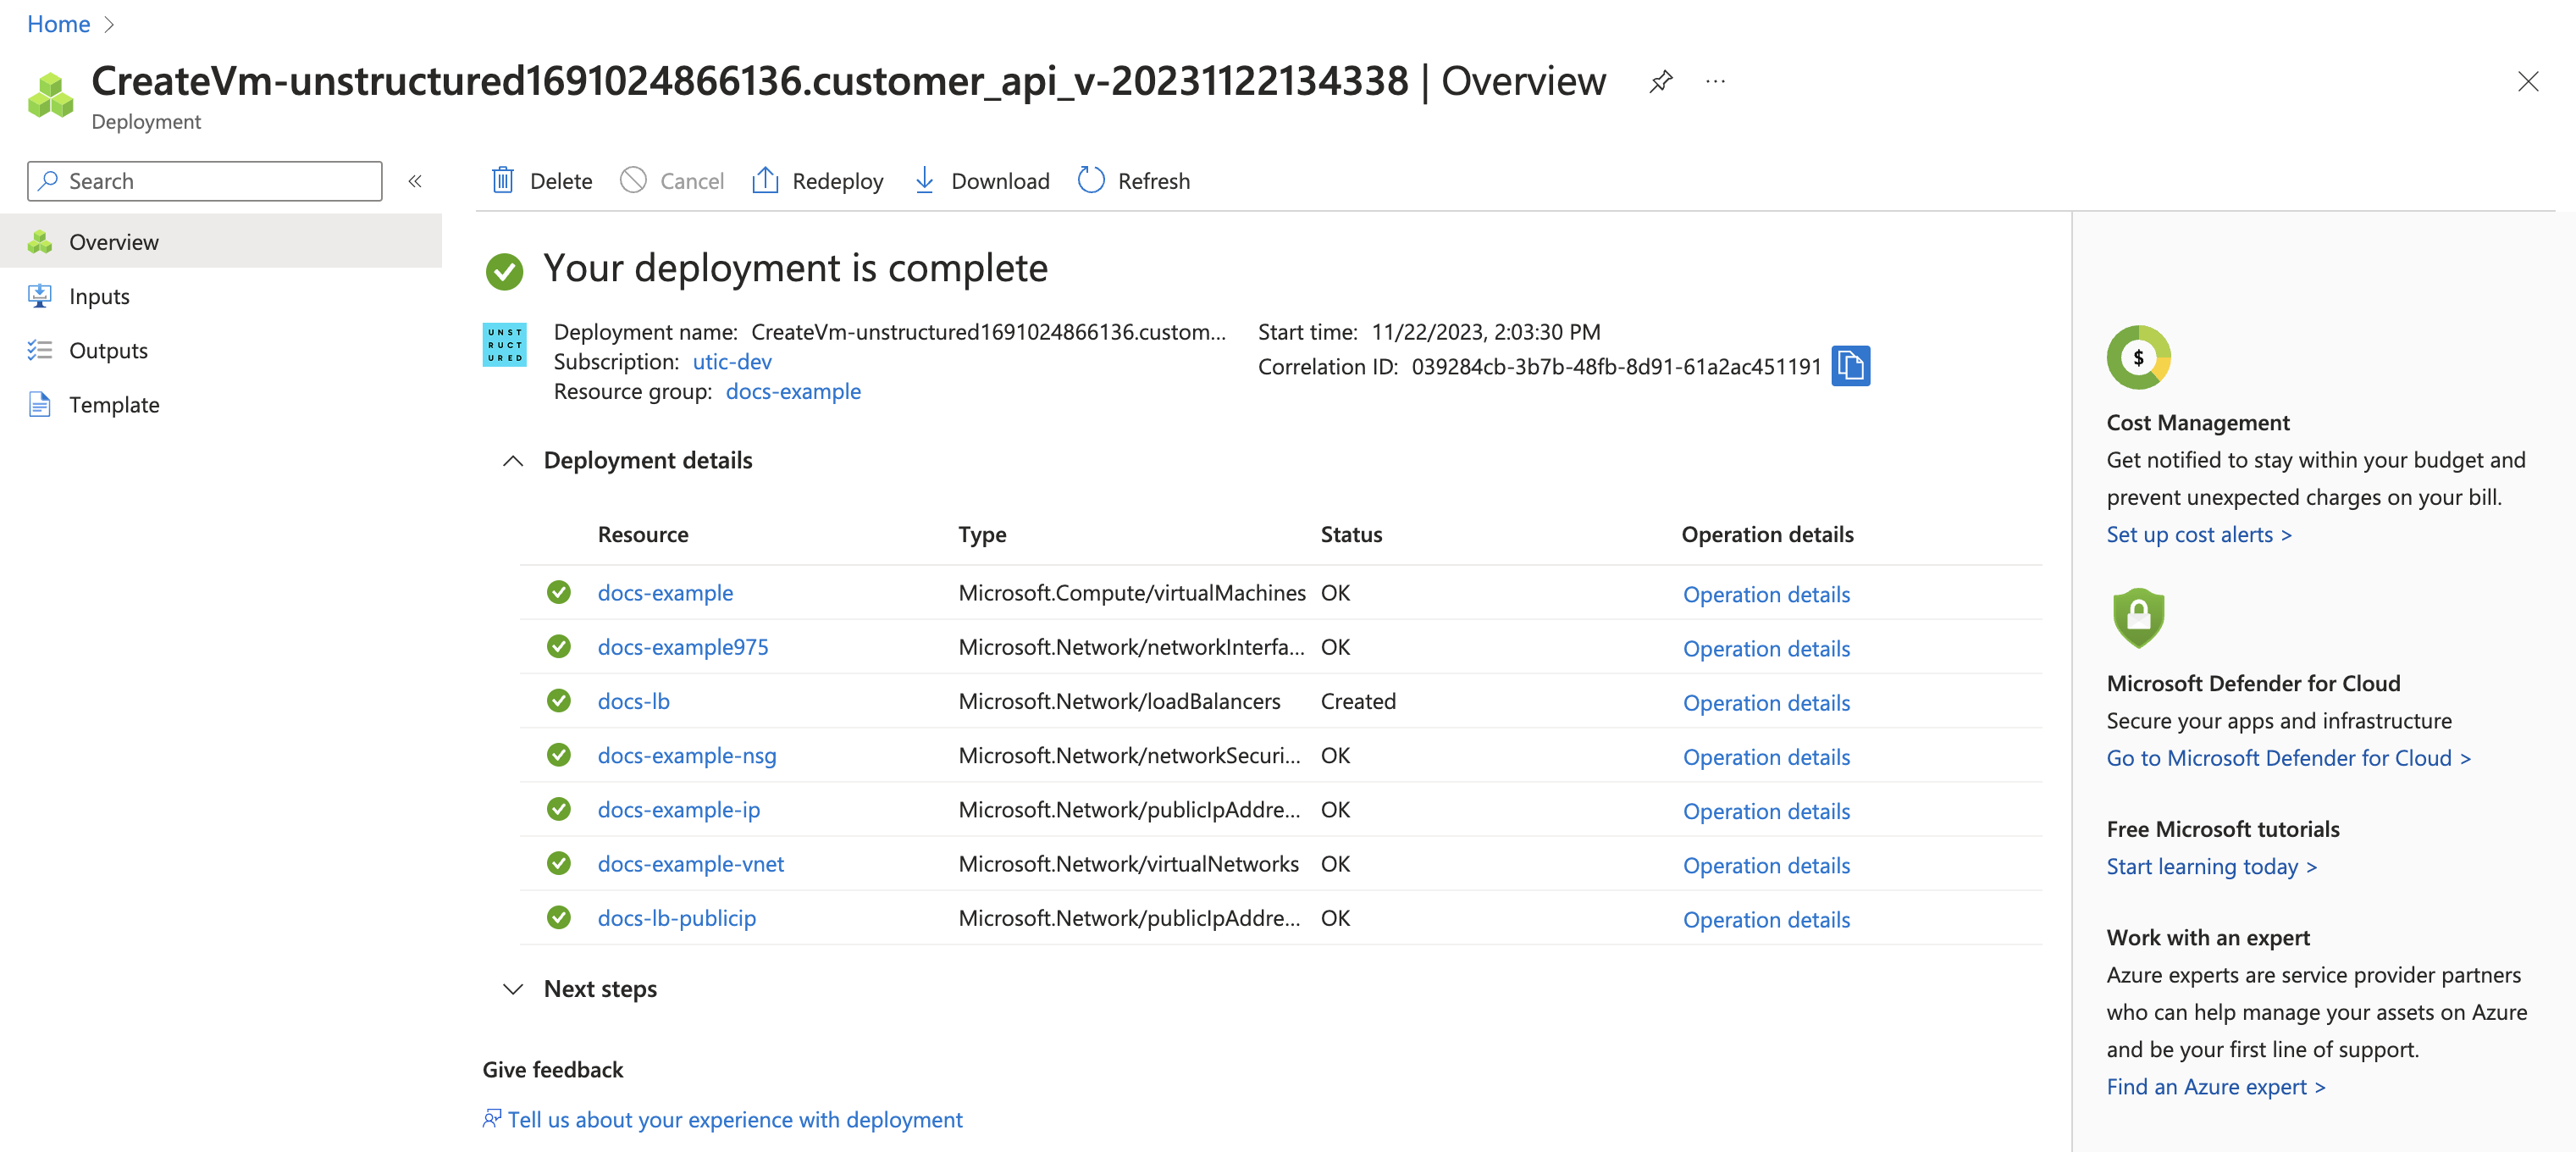
b. Check the status of the CloudFormation stack. A successful deployment will show a **CREATE\_COMPLETE** value for the **Status** field on the **Stack Info** tab on this stack's details page. The deployment can take several minutes.
c. After a successful deployment, click the **Resources** tab on this stack's details page. Then click the **Physical ID** link next to **ApplicationLoadBalancer** on this tab.
d. On the **EC2 > Load balancers > (Load balancer ID)** page that appears, copy the **DNS Name** value, which is shown as an **(A Record)** and ends with `.elb.amazonaws.com`.
* Note: You will use this **DNS Name** to replace the `
11. **Get the Unstructured API endpoint**:
a. The CloudFormation details page for the stack appears. If you do not see it, on the sidebar, click **Stacks**, and then click the name of your stack.
b. Check the status of the CloudFormation stack. A successful deployment will show a **CREATE\_COMPLETE** value for the **Status** field on the **Stack Info** tab on this stack's details page. The deployment can take several minutes.
c. After a successful deployment, click the **Resources** tab on this stack's details page. Then click the **Physical ID** link next to **ApplicationLoadBalancer** on this tab.
d. On the **EC2 > Load balancers > (Load balancer ID)** page that appears, copy the **DNS Name** value, which is shown as an **(A Record)** and ends with `.elb.amazonaws.com`.
* Note: You will use this **DNS Name** to replace the `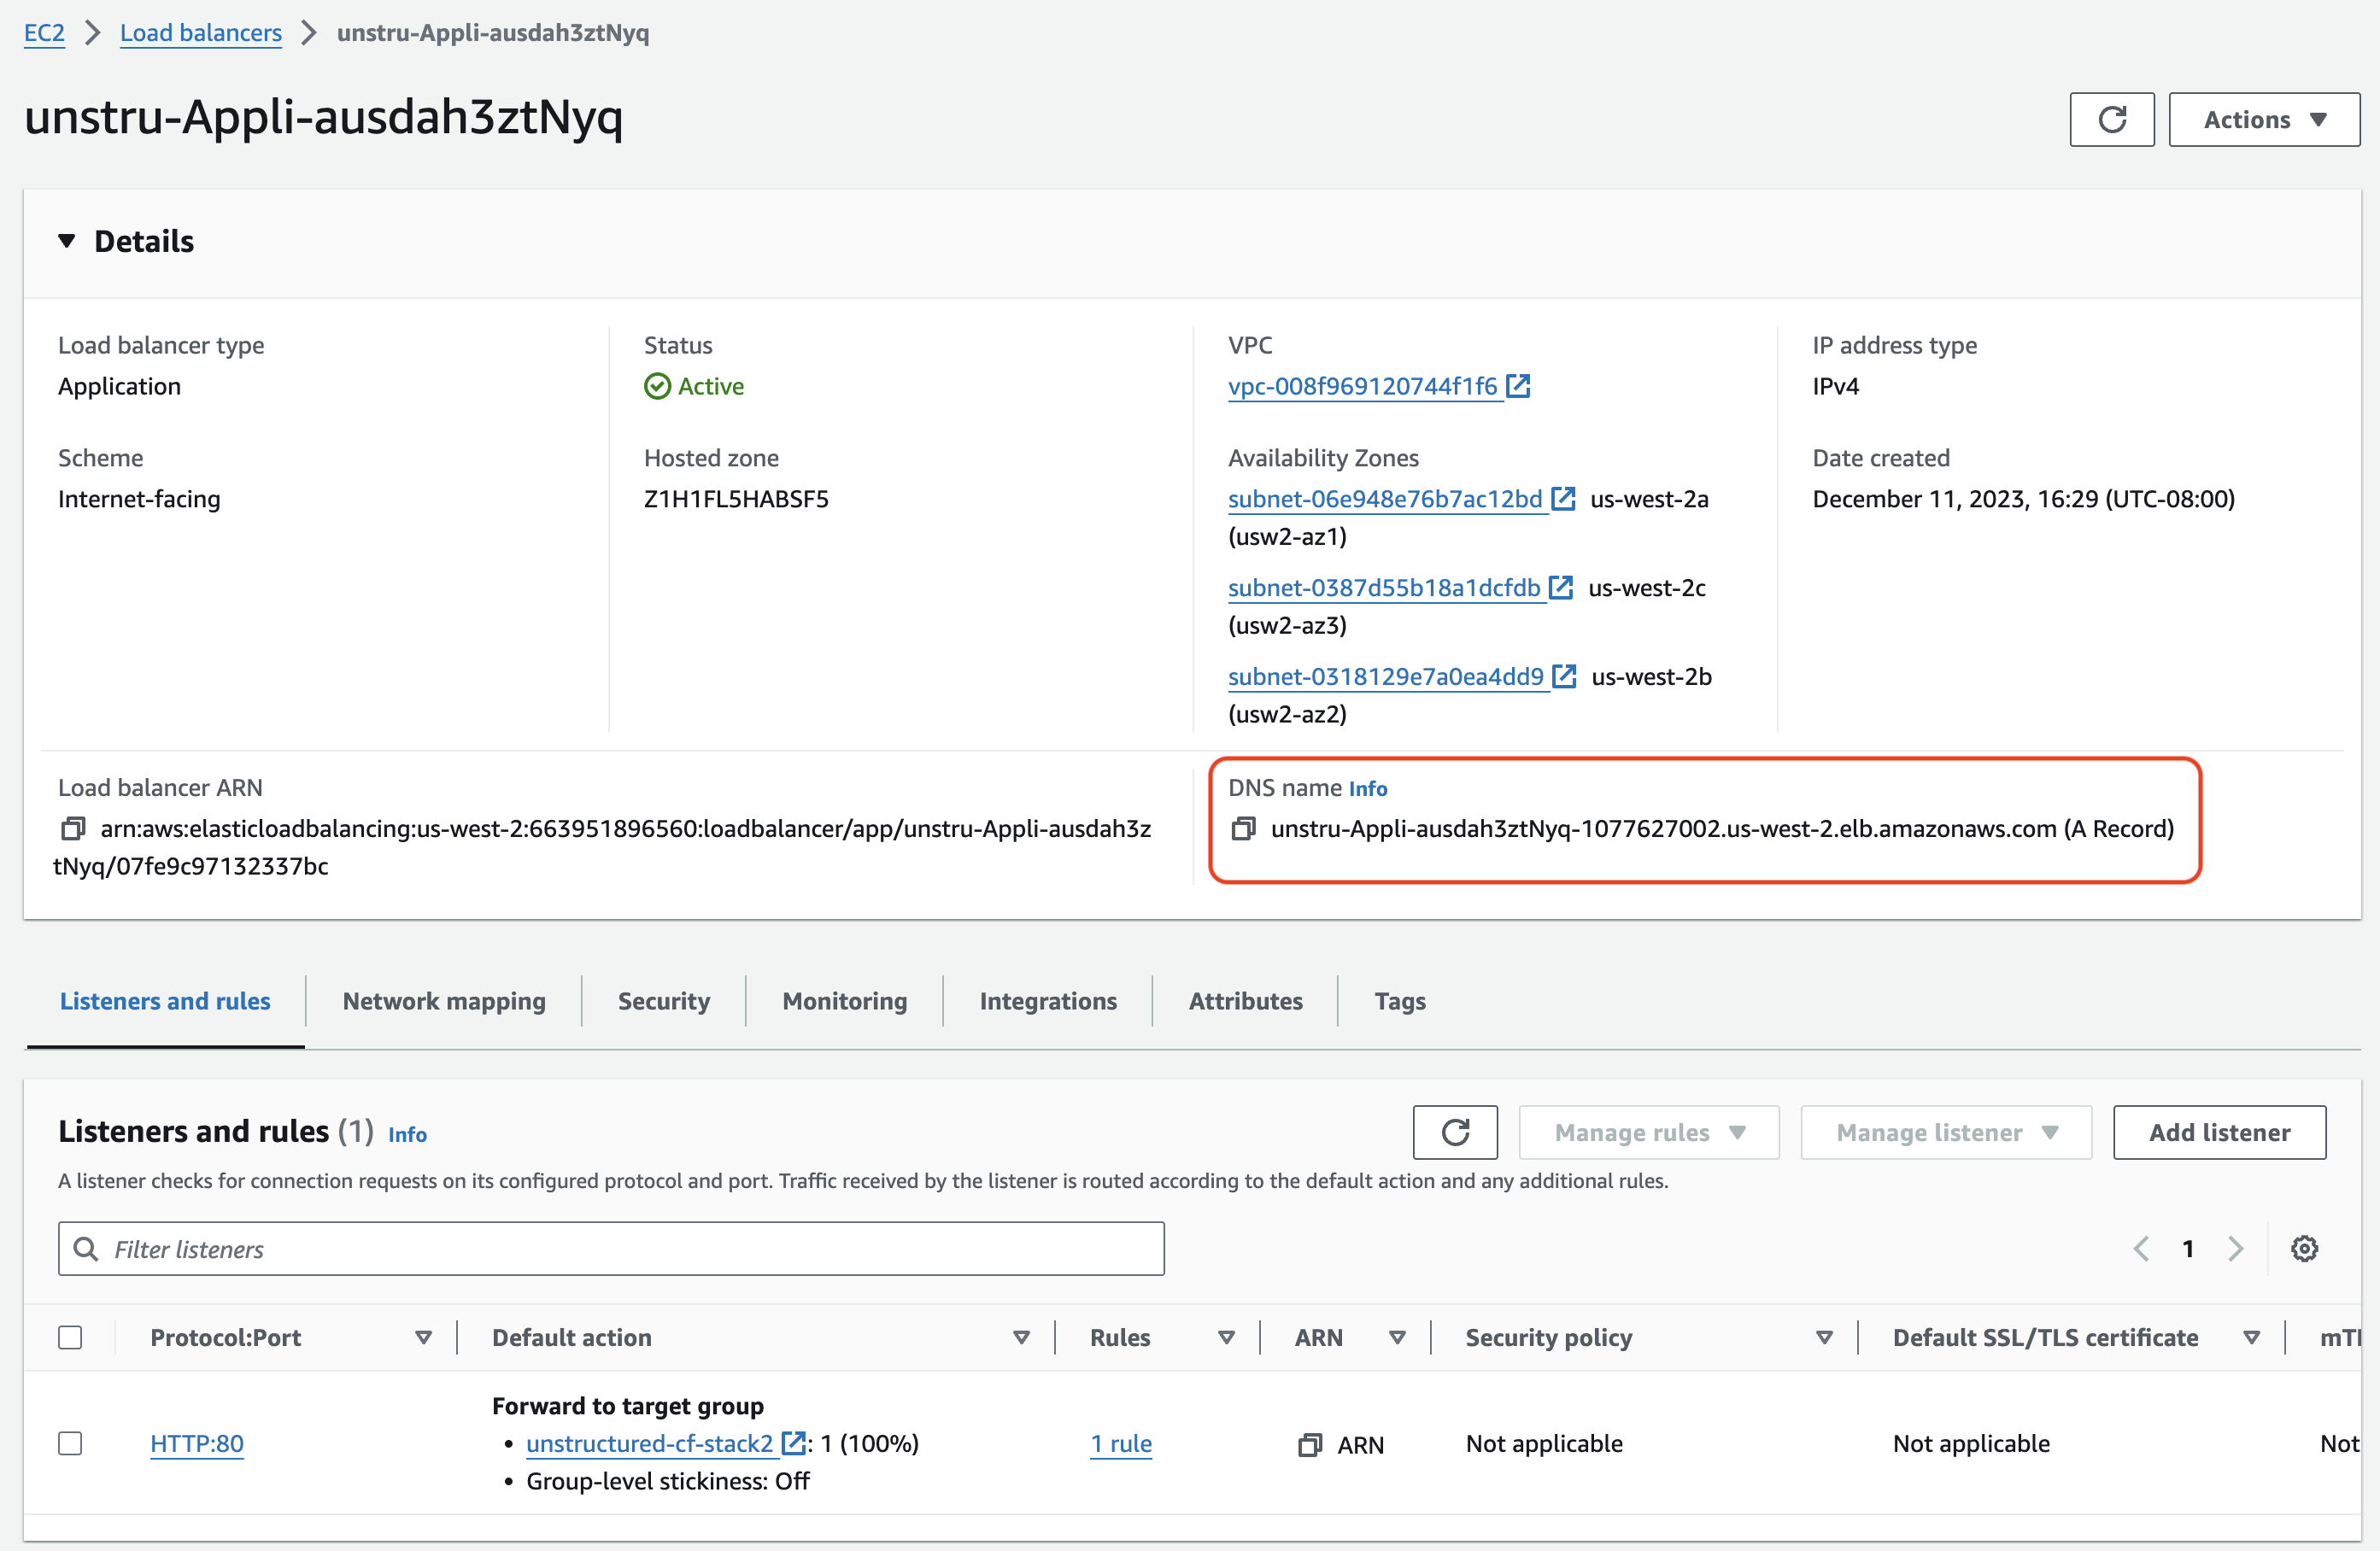 ## Healthcheck
Perform a health check by running this [curl](https://curl.se/) command from a terminal on your local machine, replacing `
## Healthcheck
Perform a health check by running this [curl](https://curl.se/) command from a terminal on your local machine, replacing ` ## Data processing
For example, run one of the following, setting the following environment variables to make your code more portable:
* Set `UNSTRUCTURED_API_URL` to `http://`, followed by your load balancer's DNS name, followed by `/general/v0/general`.
## Data processing
For example, run one of the following, setting the following environment variables to make your code more portable:
* Set `UNSTRUCTURED_API_URL` to `http://`, followed by your load balancer's DNS name, followed by `/general/v0/general`.
For a **Business** account, before you click **API Keys**, make sure you have selected the organizational workspace you want to create an API key for. Each API key works with one and only one organizational workspace. [Learn more](/ui/account/workspaces#create-an-api-key-for-a-workspace). 2. Click **Generate API Key**.
3. Follow the on-screen instructions to finish generating the key.
4. Click the **Copy** icon next to your new key to add the key to your system's clipboard. If you lose this key, simply return and click the **Copy** icon again.
After you create the destination connector, add it along with a [source connector](/api-reference/workflow/sources/overview) to a [workflow](/api-reference/workflow/overview#workflows). Then run the worklow as a [job](/api-reference/workflow/overview#jobs). To learn how, try out the the notebook [Dropbox-To-Pinecone Connector API Quickstart for Unstructured](https://colab.research.google.com/github/Unstructured-IO/notebooks/blob/main/notebooks/Dropbox_To_Pinecone_Connector_Quickstart.ipynb), or watch the two 4-minute video tutorials for the [Unstructured Python SDK](/api-reference/workflow/overview#unstructured-python-sdk). You can also create destination connectors with the Unstructured user interface (UI). [Learn how](/ui/destinations/overview). If you need help, email Unstructured Support at [support@unstructured.io](mailto:support@unstructured.io). You are now ready to start creating a destination connector! Keep reading to learn how.
a. After you sign in to your Unstructured **Let's Go**, **Pay-As-You-Go**, or **Business** account, click **API Keys** on the sidebar.
c. Follow the on-screen instructions to finish generating the key.
d. Click the **Copy** icon next to your new key to add the key to your system's clipboard. If you lose this key, simply return and click the **Copy** icon again.
* The Unstructured API's workflow operations URL for your account, as follows: 1. In the Unstructured UI, click **API Keys** on the sidebar.
2. Note the value of the **Unstructured API's workflow operations** field. ## Step 1: Create an Azure Function App 1. Sign in to your [Azure portal](https://portal.azure.com). 2. Click **+ Create a resource**. If **Function App** is not visible, in **Search services and marketplace** field, enter **Function App**. 3. Next to **Function App**, click **Create** or **Create > Function App**. 4. Under **Select a hosting option**, select the radio button next to **Consumption** to create an app that is most compatible with JavaScript. 5. Click **Select**. 6. On the **Basics** tab, set the following function app settings: | Setting | Suggested value | Description | | --------------------- | ------------------------- | ---------------------------------------------------------------------------------------------------------------------------------------------------------------------------------------------------------------------------------------------------------------------------------------------------------------------------------------------------------------------------------------------------------------------------- | | **Subscription** | Your subscription | The Azure subscription within which to create your new function app. | | **Resource Group** | **Create new** | After you click **Create new**, enter some name for the new resource group within which to create your new function app. You should create a new resource group because there are known limitations when creating new function apps in an existing resource group. [Learn more](https://learn.microsoft.com/azure/azure-functions/functions-scale#limitations-for-creating-new-function-apps-in-an-existing-resource-group). | | **Function App name** | Some globally unique name | Some name that identifies your new function app. Valid characters are `a`-`z` (case insensitive), `0`-`9`, and `-`. | | **Operating System** | **Windows** | Choose the operating system for your function app. This example uses Windows. | | **Runtime stack** | **Node.js** | Choose a runtime that supports your favorite function programming language. This example uses JavaScript (Node.js). | | **Version** | **20 LTS** | Choose the version of your selected runtime. This example uses Node.js 20 LTS. | | **Region** | Your preferred region | Select a region that's near you or near other services that your function can access. | 7. Click **Review + create**. 8. Click **Create**, and wait for the deployment to complete. 9. After the deployment is complete, click **Go to resource**. ## Step 2: Create a function 1. With the function app open from the previous step, on the sidebar, click **Overview**. 2. On the **Functions** tab, under **Create in Azure portal**, click **Create function**. 3. For **Select a template**, select **Azure Blob Storage trigger**, and then click **Next**. 4. For **Template details**, review the following values: | Setting | Suggested value | Description | | ------------------------------ | -------------------------- | ---------------------------------------------------------------------------------------------------------- | | **Function name** | `BlobTrigger1` | The name of the function to create. You can leave the default function name. | | **Path** | `samples-workitems/{name}` | The path to the Azure Blob Storage account that the function will monitor. You can leave the default path. | | **Storage account connection** | `AzureWebJobsStorage` | You can leave the default storage account connection name. |
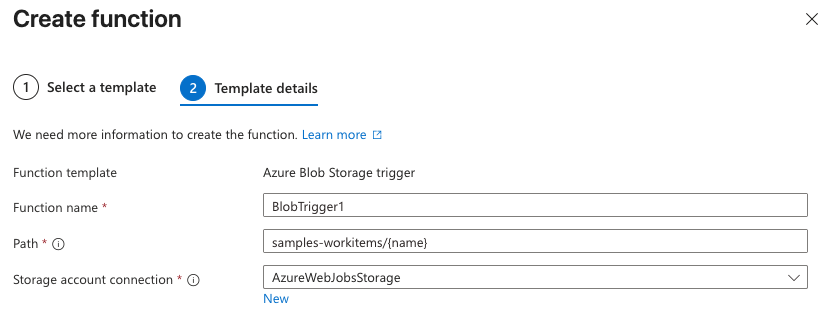 5. Click **Create**. The function is created, and the **Code + Test** page appears.
## Step 3: Customize the function for your workflow
1. With the **Code + Test** page open from the previous step, on the **Code + Test** tab, replace the content of the `index.js` file with the following code:
```javascript theme={null}
module.exports = async function (context, myBlob) {
context.log("JavaScript blob trigger function processed blob \n Blob:", context.bindingData.blobTrigger, "\n Blob Size:", myBlob.length, "Bytes");
const apiKey = process.env.UNSTRUCTURED_API_KEY;
const apiUrl = process.env.UNSTRUCTURED_API_URL;
const headers = {
"accept": "application/json",
"unstructured-api-key": apiKey
};
try {
const response = await fetch(apiUrl, {
method: "POST",
headers: headers
});
const data = await response.json();
context.log("POST response:", data);
} catch (error) {
context.log.error("Error calling external API:", error);
}
};
```
2. Click **Save**.
3. In the navigation breadcrumb toward the top of the page, click your function app's name. The function app's settings page appears.
4. In the sidebar, expand **Settings**, and then click **Environment variables**.
5. Click **+ Add**.
6. For **Name**, enter `UNSTRUCTURED_API_URL`.
7. For **Value**, enter your `
5. Click **Create**. The function is created, and the **Code + Test** page appears.
## Step 3: Customize the function for your workflow
1. With the **Code + Test** page open from the previous step, on the **Code + Test** tab, replace the content of the `index.js` file with the following code:
```javascript theme={null}
module.exports = async function (context, myBlob) {
context.log("JavaScript blob trigger function processed blob \n Blob:", context.bindingData.blobTrigger, "\n Blob Size:", myBlob.length, "Bytes");
const apiKey = process.env.UNSTRUCTURED_API_KEY;
const apiUrl = process.env.UNSTRUCTURED_API_URL;
const headers = {
"accept": "application/json",
"unstructured-api-key": apiKey
};
try {
const response = await fetch(apiUrl, {
method: "POST",
headers: headers
});
const data = await response.json();
context.log("POST response:", data);
} catch (error) {
context.log.error("Error calling external API:", error);
}
};
```
2. Click **Save**.
3. In the navigation breadcrumb toward the top of the page, click your function app's name. The function app's settings page appears.
4. In the sidebar, expand **Settings**, and then click **Environment variables**.
5. Click **+ Add**.
6. For **Name**, enter `UNSTRUCTURED_API_URL`.
7. For **Value**, enter your `Manually shutting down the associated Azure virtual machine when you are not using it can help reduce—but not fully eliminate—these ongoing charges.
To stop accruing all related ongoing charges, you must delete all of the associated Azure resources.
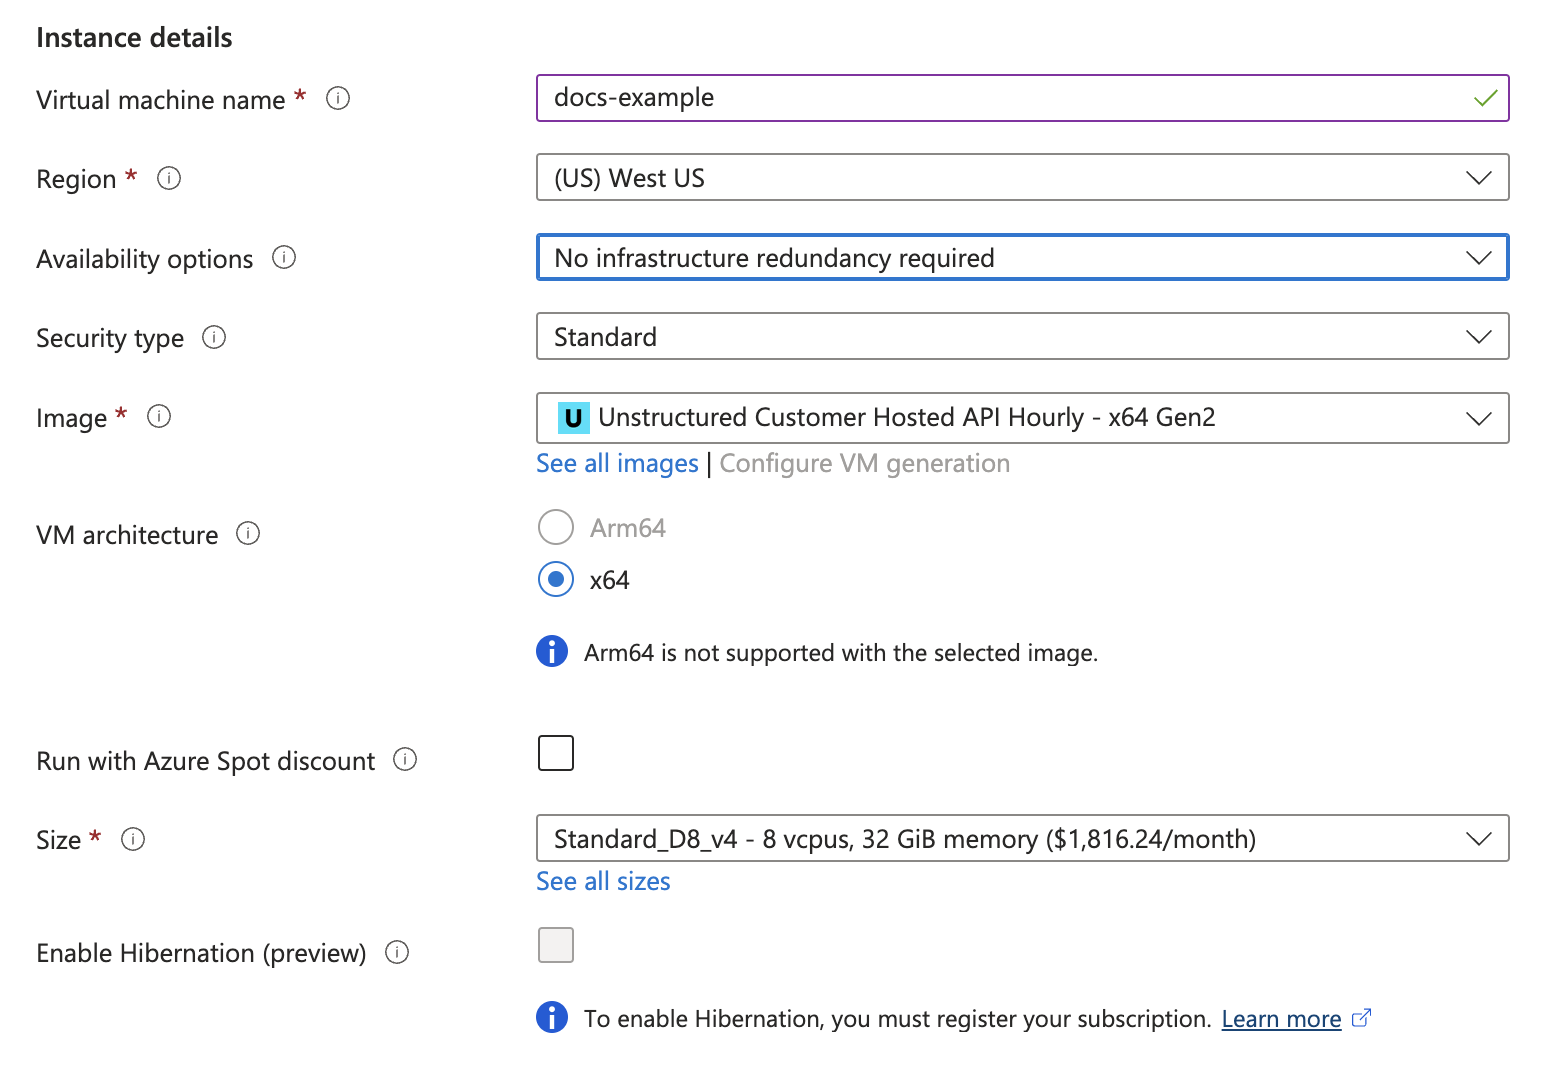
 3. In the **Instance details** section, enter a name in the **Virtual machine name** field. Note this name, as you will need it later steps.
4. Select a **Region** from the dropdown menu.
5. For **Image**, select **Unstructured Customer Hosted API Hourly - x64 Gen2** (*default*).
6. For **Size**, select a VM size from the dropdown menu, or leave the default VM size selection. To learn more, see [Azure VM comparisons](https://azure.microsoft.com/en-us/pricing/details/virtual-machines/linux/).
3. In the **Instance details** section, enter a name in the **Virtual machine name** field. Note this name, as you will need it later steps.
4. Select a **Region** from the dropdown menu.
5. For **Image**, select **Unstructured Customer Hosted API Hourly - x64 Gen2** (*default*).
6. For **Size**, select a VM size from the dropdown menu, or leave the default VM size selection. To learn more, see [Azure VM comparisons](https://azure.microsoft.com/en-us/pricing/details/virtual-machines/linux/).
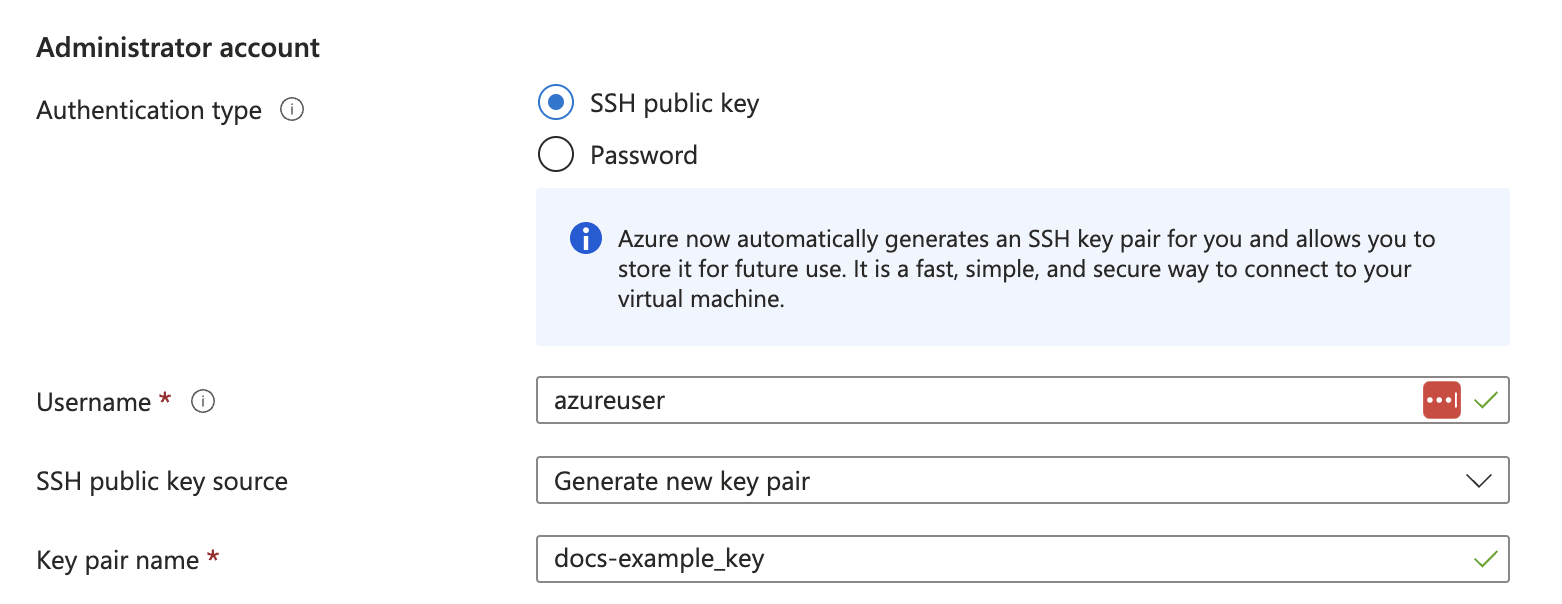
 7. In the **Administrator account** section, for **Authentication type**, select **SSH public key** or **Password**.
8. Enter the credential settings, depending on the authentication type.
7. In the **Administrator account** section, for **Authentication type**, select **SSH public key** or **Password**.
8. Enter the credential settings, depending on the authentication type.
 4. Click **Create**.
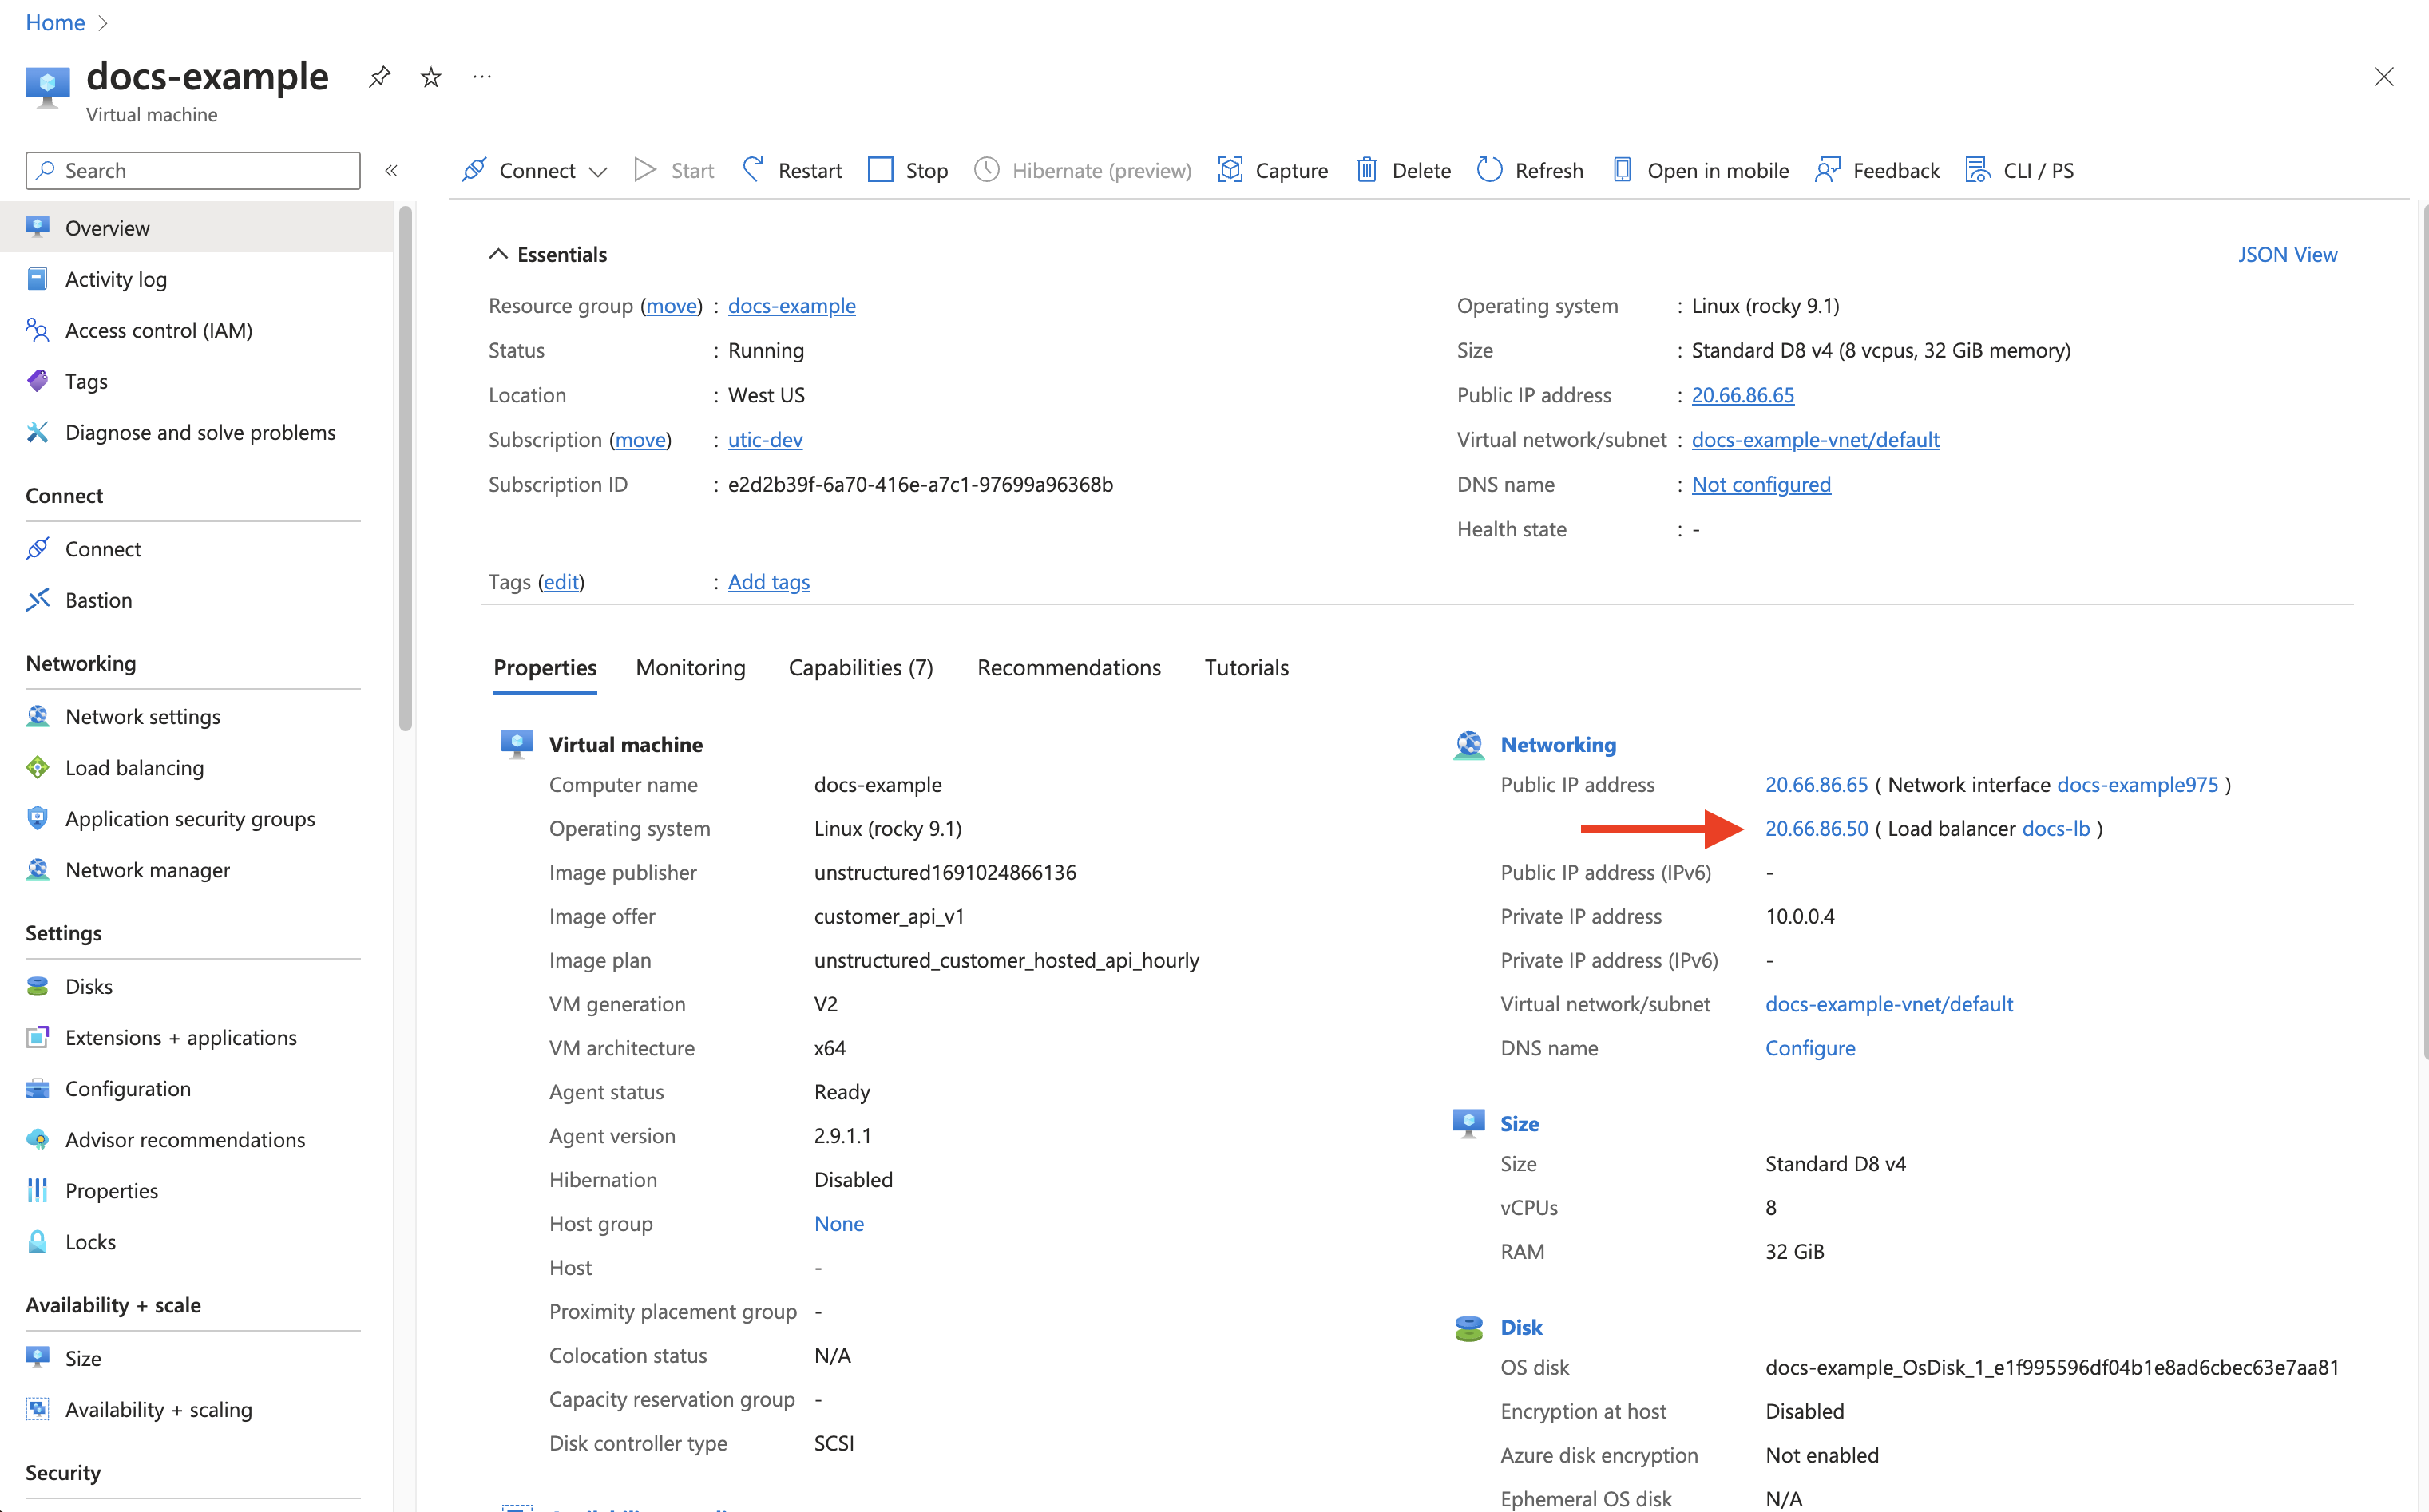 4. The deployed endpoint URL is **http\://\
For a **Business** account, before you click **API Keys**, make sure you have selected the organizational workspace you want to create an API key for. Each API key works with one and only one organizational workspace. [Learn more](/ui/account/workspaces#create-an-api-key-for-a-workspace). 2. Click **Generate API Key**.
3. Follow the on-screen instructions to finish generating the key.
4. Click the **Copy** icon next to your new key to add the key to your system's clipboard. If you lose this key, simply return and click the **Copy** icon again.
After you create the source connector, add it along with a [destination connector](/api-reference/workflow/destinations/overview) to a [workflow](/api-reference/workflow/overview#workflows). Then run the worklow as a [job](/api-reference/workflow/overview#jobs). To learn how, try out the the notebook [Dropbox-To-Pinecone Connector API Quickstart for Unstructured](https://colab.research.google.com/github/Unstructured-IO/notebooks/blob/main/notebooks/Dropbox_To_Pinecone_Connector_Quickstart.ipynb), or watch the two 4-minute video tutorials for the [Unstructured Python SDK](/api-reference/workflow/overview#unstructured-python-sdk). You can also create source connectors with the Unstructured user interface (UI). [Learn how](/ui/sources/overview). If you need help, email Unstructured Support at [support@unstructured.io](mailto:support@unstructured.io). You are now ready to start creating a source connector! Keep reading to learn how.
Hello 😀
""" elements = partition_html(text=text) elements[0].apply(bytes_string_to_string) # The output should be "Hello 😀" elements[0].text ``` For more information about the `bytes_string_to_string` function, you can check the [source code here](https://github.com/Unstructured-IO/unstructured/blob/main/unstructured/cleaners/core.py). ## `clean` Cleans a section of text with options including removing bullets, extra whitespace, dashes and trailing punctuation. Optionally, you can choose to lowercase the output. Options: * Applies `clean_bullets` if `bullets=True`. * Applies `clean_extra_whitespace` if `extra_whitespace=True`. * Applies `clean_dashes` if `dashes=True`. * Applies `clean_trailing_punctuation` if `trailing_punctuation=True`. * Lowercases the output if `lowercase=True`. Examples: ```python theme={null} from unstructured.cleaners.core import clean # Returns "an excellent point!" clean("● An excellent point!", bullets=True, lowercase=True) # Returns "ITEM 1A: RISK FACTORS" clean("ITEM 1A: RISK-FACTORS", extra_whitespace=True, dashes=True) ``` For more information about the `clean` function, you can check the [source code here](https://github.com/Unstructured-IO/unstructured/blob/main/unstructured/cleaners/core.py). ## `clean_bullets` Removes bullets from the beginning of text. Bullets that do not appear at the beginning of the text are not removed. Examples: ```python theme={null} from unstructured.cleaners.core import clean_bullets # Returns "An excellent point!" clean_bullets("● An excellent point!") # Returns "I love Morse Code! ●●●" clean_bullets("I love Morse Code! ●●●") ``` For more information about the `clean_bullets` function, you can check the [source code here](https://github.com/Unstructured-IO/unstructured/blob/main/unstructured/cleaners/core.py). ## `clean_dashes` Removes dashes from a section of text. Also handles special characters such as `\u2013`. Examples: ```python theme={null} from unstructured.cleaners.core import clean_dashes # Returns "ITEM 1A: RISK FACTORS" clean_dashes("ITEM 1A: RISK-FACTORS\u2013") ``` For more information about the `clean_dashes` function, you can check the [source code here](https://github.com/Unstructured-IO/unstructured/blob/main/unstructured/cleaners/core.py). ## `clean_non_ascii_chars` Removes non-ascii characters from a string. Examples: ```python theme={null} from unstructured.cleaners.core import clean_non_ascii_chars text = "\x88This text contains ®non-ascii characters!●" # Returns "This text contains non-ascii characters!" clean_non_ascii_chars(text) ``` For more information about the `clean_non_ascii_chars` function, you can check the [source code here](https://github.com/Unstructured-IO/unstructured/blob/main/unstructured/cleaners/core.py). ## `clean_ordered_bullets` Remove alphanumeric bullets from the beginning of text up to three “sub-section” levels. Examples: ```python theme={null} from unstructured.cleaners.core import clean_ordered_bullets # Returns "This is a very important point" clean_ordered_bullets("1.1 This is a very important point") # Returns "This is a very important point ●" clean_ordered_bullets("a.b This is a very important point ●") ``` For more information about the `clean_ordered_bullets` function, you can check the [source code here](https://github.com/Unstructured-IO/unstructured/blob/main/unstructured/cleaners/core.py). ## `clean_postfix` Removes the postfix from a string if they match a specified pattern. Options: * Ignores case if `ignore_case` is set to `True`. The default is `False`. * Strips trailing whitespace is `strip` is set to `True`. The default is `True`. Examples: ```python theme={null} from unstructured.cleaners.core import clean_postfix text = "The end! END" # Returns "The end!" clean_postfix(text, r"(END|STOP)", ignore_case=True) ``` For more information about the `clean_postfix` function, you can check the [source code here](https://github.com/Unstructured-IO/unstructured/blob/main/unstructured/cleaners/core.py). ## `clean_prefix` Removes the prefix from a string if they match a specified pattern. Options: * Ignores case if `ignore_case` is set to `True`. The default is `False`. * Strips leading whitespace is `strip` is set to `True`. The default is `True`. Examples: ```python theme={null} from unstructured.cleaners.core import clean_prefix text = "SUMMARY: This is the best summary of all time!" # Returns "This is the best summary of all time!" clean_prefix(text, r"(SUMMARY|DESCRIPTION):", ignore_case=True) ``` For more information about the `clean_prefix` function, you can check the [source code here](https://github.com/Unstructured-IO/unstructured/blob/main/unstructured/cleaners/core.py). ## `clean_trailing_punctuation` Removes trailing punctuation from a section of text. Examples: ```python theme={null} from unstructured.cleaners.core import clean_trailing_punctuation # Returns "ITEM 1A: RISK FACTORS" clean_trailing_punctuation("ITEM 1A: RISK FACTORS.") ``` For more information about the `clean_trailing_punctuation` function, you can check the [source code here](https://github.com/Unstructured-IO/unstructured/blob/main/unstructured/cleaners/core.py). ## `group_broken_paragraphs` Groups together paragraphs that are broken up with line breaks for visual or formatting purposes. This is common in `.txt` files. By default, `group_broken_paragraphs` groups together lines split by `\n`. You can change that behavior with the `line_split` kwarg. The function considers `\n\n` to be a paragraph break by default. You can change that behavior with the `paragraph_split` kwarg. Examples: ```python theme={null} from unstructured.cleaners.core import group_broken_paragraphs text = """The big brown fox was walking down the lane. At the end of the lane, the fox met a bear.""" group_broken_paragraphs(text) ``` ```python theme={null} import re from unstructured.cleaners.core import group_broken_paragraphs para_split_re = re.compile(r"(\s*\n\s*){3}") text = """The big brown fox was walking down the lane. At the end of the lane, the fox met a bear.""" group_broken_paragraphs(text, paragraph_split=para_split_re) ``` For more information about the `group_broken_paragraphs` function, you can check the [source code here](https://github.com/Unstructured-IO/unstructured/blob/main/unstructured/cleaners/core.py). ## `remove_punctuation` Removes ASCII and unicode punctuation from a string. Examples: ```python theme={null} from unstructured.cleaners.core import remove_punctuation # Returns "A lovely quote" remove_punctuation("“A lovely quote!”") ``` For more information about the `remove_punctuation` function, you can check the [source code here](https://github.com/Unstructured-IO/unstructured/blob/main/unstructured/cleaners/core.py). ## `replace_unicode_quotes` Replaces unicode quote characters such as `\x91` in strings. Examples: ``` from unstructured.cleaners.core import replace_unicode_quotes # Returns "“A lovely quote!”" replace_unicode_characters("\x93A lovely quote!\x94") # Returns ""‘A lovely quote!’" replace_unicode_characters("\x91A lovely quote!\x92") ``` For more information about the `replace_unicode_quotes` function, you can check the [source code here](https://github.com/Unstructured-IO/unstructured/blob/main/unstructured/cleaners/core.py). ## `translate_text` The `translate_text` cleaning functions translates text between languages. `translate_text` uses the [Helsinki NLP MT models](https://huggingface.co/Helsinki-NLP) from `transformers` for machine translation. Works for Russian, Chinese, Arabic, and many other languages. Parameters: * `text`: the input string to translate. * `source_lang`: the two letter language code for the source language of the text. If `source_lang` is not specified, the language will be detected using `langdetect`. * `target_lang`: the two letter language code for the target language for translation. Defaults to `"en"`. Examples: ```python theme={null} from unstructured.cleaners.translate import translate_text # Output is "I'm a Berliner!" translate_text("Ich bin ein Berliner!") # Output is "I can also translate Russian!" translate_text("Я тоже можно переводать русский язык!", "ru", "en") ``` For more information about the `translate_text` function, you can check the [source code here](https://github.com/Unstructured-IO/unstructured/blob/main/unstructured/cleaners/translate.py). --- # Source: https://docs.unstructured.io/support/issues/configuration-resource.md > ## Documentation Index > Fetch the complete documentation index at: https://docs.unstructured.io/llms.txt > Use this file to discover all available pages before exploring further. # Configuration and resource issues ## Issues When you try to connect Unstructured to a specific source or destination, you get one of the following error types: * `FileNotFoundError`: For example, for Amazon S3, a `path not found` error. * `ClientRequestException`: For example, for OneDrive, an `itemNotFound` error. * `ValueError`: For example, for Google Drive, a `File not found` error. For Amazon S3, an `Invalid endpoint` error. * `UserError`: For example, for Azure Blob Storage, a `DeploymentNotFound` error. * `ParamValidationError`: For example, for Amazon S3, an `Invalid bucket name` error. * `EndpointResolutionError`: For example, for Amazon S3, a `Custom endpoint not valid URI` error. * `ProgrammingError`: For example, for Snowflake, a `No active warehouse selected` error. * `UnboundLocalError`: For example, for SharePoint, a `cannot access 'site_drive_item'` error. * `HTTPError`: For example, for Confluence, a `404 Not Found` error for a specific page or attachment URL. * `KeyError`: For example, for Jira, an error containing the word 'total'. For Amazon S3, an error containing the word `Key`. ## Possible causes * Unstructured is configured to interact with a resource—such as a file, path, deployment, endpoint, or database object—that doesn't exist, is misnamed, or the configuration itself is invalid. * There is a typo in a bucket name, folder path, file ID, deployment name, hostname, site path, or database name. * The specified resource has been deleted or moved. * An endpoint URL is incorrectly formatted, for example, is missing `https://` or contains invalid characters. * An Amazon S3 bucket name is not formatted correctly. * A required configuration is missing in the source or destination connector, for example, there is no active Snowflake warehouse specified. * An Azure OpenAI deployment name is mismatched, failed, or does not exist. * An invalid URL is specified for an attachment or a link within a source document. * There is a specific configuration issue with a connector, for example, the specified SharePoint path does not lead to a valid drive. ## Possible solutions * **Verify names and paths**: Carefully check all configured names, IDs, and paths—such as for buckets, folders, files, sites, deployments, and endpoint URLs—for accuracy. Ensure they exist in the source and destination system. Case sensitivity often matters. * **Check formatting**: Ensure that URLs, bucket names, and other parameters adhere to the required format. * **Verify that the resource exists**: Confirm that the target file, folder, deployment, or other resource exists and has not been moved or deleted. * **Check configuration dependencies**: Ensure the necessary configurations are set in the source or destination, for example, select and start a Snowflake warehouse by running the `USE WAREHOUSE` command first. * For **Azure OpenAI**: Double-check that the Deployment Name matches a successful deployment in your Azure portal. * For **Confluence**: If a `404` error occurs during download, check if the page or attachment link is valid within Confluence itself. * For **SharePoint**: Verify the Site Path leads to a valid location containing document libraries. * **Reconfigure the connector**: Review and, as needed, correct any misconfigured settings in the source or destination connector. ## Additional resources To ask questions or get additional help with this issue, see [requesting support](/support/request). --- # Source: https://docs.unstructured.io/ui/sources/confluence.md # Source: https://docs.unstructured.io/open-source/ingestion/source-connectors/confluence.md # Source: https://docs.unstructured.io/api-reference/workflow/sources/confluence.md > ## Documentation Index > Fetch the complete documentation index at: https://docs.unstructured.io/llms.txt > Use this file to discover all available pages before exploring further. # ConfluenceFor a **Business** account, before you click **API Keys**, make sure you have selected the organizational workspace you want to create an API key for. Each API key works with one and only one organizational workspace. [Learn more](/ui/account/workspaces#create-an-api-key-for-a-workspace). 2. Click **Generate API Key**.
3. Follow the on-screen instructions to finish generating the key.
4. Click the **Copy** icon next to your new key to add the key to your system's clipboard. If you lose this key, simply return and click the **Copy** icon again.
After you create the source connector, add it along with a [destination connector](/api-reference/workflow/destinations/overview) to a [workflow](/api-reference/workflow/overview#workflows). Then run the worklow as a [job](/api-reference/workflow/overview#jobs). To learn how, try out the the notebook [Dropbox-To-Pinecone Connector API Quickstart for Unstructured](https://colab.research.google.com/github/Unstructured-IO/notebooks/blob/main/notebooks/Dropbox_To_Pinecone_Connector_Quickstart.ipynb), or watch the two 4-minute video tutorials for the [Unstructured Python SDK](/api-reference/workflow/overview#unstructured-python-sdk). You can also create source connectors with the Unstructured user interface (UI). [Learn how](/ui/sources/overview). If you need help, email Unstructured Support at [support@unstructured.io](mailto:support@unstructured.io). You are now ready to start creating a source connector! Keep reading to learn how.
For a **Business** account, before you click **API Keys**, make sure you have selected the organizational workspace you want to create an API key for. Each API key works with one and only one organizational workspace. [Learn more](/ui/account/workspaces#create-an-api-key-for-a-workspace). 2. Click **Generate API Key**.
3. Follow the on-screen instructions to finish generating the key.
4. Click the **Copy** icon next to your new key to add the key to your system's clipboard. If you lose this key, simply return and click the **Copy** icon again.
After you create the destination connector, add it along with a [source connector](/api-reference/workflow/sources/overview) to a [workflow](/api-reference/workflow/overview#workflows). Then run the worklow as a [job](/api-reference/workflow/overview#jobs). To learn how, try out the the notebook [Dropbox-To-Pinecone Connector API Quickstart for Unstructured](https://colab.research.google.com/github/Unstructured-IO/notebooks/blob/main/notebooks/Dropbox_To_Pinecone_Connector_Quickstart.ipynb), or watch the two 4-minute video tutorials for the [Unstructured Python SDK](/api-reference/workflow/overview#unstructured-python-sdk). You can also create destination connectors with the Unstructured user interface (UI). [Learn how](/ui/destinations/overview). If you need help, email Unstructured Support at [support@unstructured.io](mailto:support@unstructured.io). You are now ready to start creating a destination connector! Keep reading to learn how.
a. After you sign in to your Unstructured **Let's Go**, **Pay-As-You-Go**, or **Business** account, click **API Keys** on the sidebar.
c. Follow the on-screen instructions to finish generating the key.
d. Click the **Copy** icon next to your new key to add the key to your system's clipboard. If you lose this key, simply return and click the **Copy** icon again.
### Anthropic account and API key This walkthrough uses a Claude Opus 3 model from Anthropic. So, before you begin, you must also have an Anthropic account and an Anthropic API key for that account. [Sign in to or create your Anthropic account](https://console.anthropic.com/login). After you sign in to your Anthropic account, [get your Anthropic API key](https://console.anthropic.com/settings/keys). ### Amazon S3 bucket and access credentials This walkthrough uses an Amazon S3 bucket as both the workflow's source and destination. So, before you begin, you must also have a properly configured Amazon S3 bucket, with bucket access credentials consisting of an access key ID and a secret access key for the AWS IAM user that has access to the bucket. Follow the S3 connector instructions to [create and configure the bucket and get the bucket access credentials](/ui/sources/s3) if you do not already have this all set up. (In these instructions, do not follow the directions to use the Unstructured UI to create the S3 source connector. CrewAI will do this for you later automatically.) This walkthrough expects two folders to exist within the bucket, as follows: * An `input` folder, which contains the files to process. This `input` folder must contain at least one file to process. If you do not have any files available to upload into the `input` folder, you can get some from the [example-docs](https://github.com/Unstructured-IO/unstructured/tree/main/example-docs) folder in the Unstructured open source library repository on GitHub. * An `output` folder, which will contain the processed files' data from Unstructured after CrewAI runs the workflow. This `output` folder should be empty for now. ### Firecrawl account and API key This walkthrough uses Firecrawl to monitor job statuses. So, before you begin, you must also have a Firecrawl account and a Firecrawl API key for that account. [Sign in to or create your Firecrawl account](https://www.firecrawl.dev/signin/signup). After you sign in to your Firecrawl account, [get your Firecrawl API key](https://www.firecrawl.dev/app/api-keys). ### Python and CrewAI open-source toolchain and project setup Before you can start coding on your local machine, you must install Python, and you should also install a Python package and project manager to manage your project's code dependencies. This walkthrough uses the popular Python package and project manager [uv](https://docs.astral.sh/uv/) (although `uv` is not required to use CrewAI or the Unstructured API's workflow operations MCP Server).
For a **Business** account, before you click **API Keys**, make sure you have selected the organizational workspace you want to create an API key for. Each API key works with one and only one organizational workspace. [Learn more](/ui/account/workspaces#create-an-api-key-for-a-workspace). 2. Click **Generate API Key**.
3. Follow the on-screen instructions to finish generating the key.
4. Click the **Copy** icon next to your new key to add the key to your system's clipboard. If you lose this key, simply return and click the **Copy** icon again.
After you create the destination connector, add it along with a [source connector](/api-reference/workflow/sources/overview) to a [workflow](/api-reference/workflow/overview#workflows). Then run the worklow as a [job](/api-reference/workflow/overview#jobs). To learn how, try out the the notebook [Dropbox-To-Pinecone Connector API Quickstart for Unstructured](https://colab.research.google.com/github/Unstructured-IO/notebooks/blob/main/notebooks/Dropbox_To_Pinecone_Connector_Quickstart.ipynb), or watch the two 4-minute video tutorials for the [Unstructured Python SDK](/api-reference/workflow/overview#unstructured-python-sdk). You can also create destination connectors with the Unstructured user interface (UI). [Learn how](/ui/destinations/overview). If you need help, email Unstructured Support at [support@unstructured.io](mailto:support@unstructured.io). You are now ready to start creating a destination connector! Keep reading to learn how.
a. After you sign in to your Unstructured **Let's Go**, **Pay-As-You-Go**, or **Business** account, click **API Keys** on the sidebar.
c. Follow the on-screen instructions to finish generating the key.
d. Click the **Copy** icon next to your new key to add the key to your system's clipboard. If you lose this key, simply return and click the **Copy** icon again.
* The Unstructured API's workflow operations URL for your account, as follows: 1. In the Unstructured UI, click **API Keys** on the sidebar.
2. Note the value of the **Unstructured API's workflow operations** field. * A Databricks Volumes source connector in your Unstructured account. [Learn how](/ui/sources/databricks-volumes). * Some available [destination connector](/ui/destinations/overview) in your Unstructured account. * A workflow that uses the preceding source and destination connectors. [Learn how](/ui/workflows). ## Step 1: Create a notebook to run the Unstructured workflow 1. Sign in to the Databricks workspace within your Databricks account for AWS, Azure, or GCP that corresponds to the workspace you specified for your Databricks Volumes source connector. 2. On the sidebar, click **+ New > Notebook**. 3. Click the notebook's title and change it to something more descriptive, such as `Unstructured Workflow Runner Notebook`. 4. In the notebook's first cell, add the following code: ```python theme={null} !pip install requests ``` 5. Click **Edit > Insert cell below**. 6. In this second cell, add the following code: ```python theme={null} import requests, os url = '
b. In the list of catalogs, expand the catalog that contains the volume you want to monitor.
c. In the list of schemas (formerly known as databases), expand the schema that contains the volume you want to monitor.
d. Expand **Volumes**.
e. Click the volume you want to monitor.
f. On the **Overview** tab, copy the path to the volume you want to monitor or, if you are monitoring a folder within that volume, click the path to the folder and then copy the path to that folder.
11. Click **Save**. ## Step 3: Trigger the job 1. With your Databricks workspace still open from the previous step, on the sidebar, click **Catalog**. 2. In the list of catalogs, expand the catalog that contains the volume that is being monitored. 3. In the list of schemas (formerly known as databases), expand the schema that contains the volume that is being monitored. 4. Expand **Volumes**. 5. Click the volume that is being monitored or, if you are monitoring a folder within that volume, click the folder. 6. Click **Upload to this volume**, and follow the on-screen instructions to upload a file to the volume or folder that is being monitored. ## Step 4: View trigger results 1. With your Databricks workspace still open from the previous step, on the sidebar, click **Jobs & Pipelines**. 2. On the **Jobs & pipelines** tab, click the name of the job you created earlier in Step 2. 3. On the **Runs** tab, wait until the current job run shows a **Status** of **Succeeded**. 4. In the Unstructured user interface for your account, click **Jobs** on the sidebar. 5. In the list of jobs, click the newly running job for your workflow. 6. After the job status shows **Finished**, go to your destination location to see the results. ## Step 5 (Optional): Pause the trigger To stop triggering the job, with your job in Lakeflow Jobs still open earlier from Step 4, in the **Job details** pane, under **Schedules & Triggers**, click **Pause**. --- # Source: https://docs.unstructured.io/ui/sources/databricks-volumes.md # Source: https://docs.unstructured.io/ui/destinations/databricks-volumes.md # Source: https://docs.unstructured.io/open-source/ingestion/source-connectors/databricks-volumes.md # Source: https://docs.unstructured.io/open-source/ingestion/destination-connectors/databricks-volumes.md # Source: https://docs.unstructured.io/api-reference/workflow/sources/databricks-volumes.md # Source: https://docs.unstructured.io/api-reference/workflow/destinations/databricks-volumes.md > ## Documentation Index > Fetch the complete documentation index at: https://docs.unstructured.io/llms.txt > Use this file to discover all available pages before exploring further. # Databricks Volumes
For a **Business** account, before you click **API Keys**, make sure you have selected the organizational workspace you want to create an API key for. Each API key works with one and only one organizational workspace. [Learn more](/ui/account/workspaces#create-an-api-key-for-a-workspace). 2. Click **Generate API Key**.
3. Follow the on-screen instructions to finish generating the key.
4. Click the **Copy** icon next to your new key to add the key to your system's clipboard. If you lose this key, simply return and click the **Copy** icon again.
After you create the destination connector, add it along with a [source connector](/api-reference/workflow/sources/overview) to a [workflow](/api-reference/workflow/overview#workflows). Then run the worklow as a [job](/api-reference/workflow/overview#jobs). To learn how, try out the the notebook [Dropbox-To-Pinecone Connector API Quickstart for Unstructured](https://colab.research.google.com/github/Unstructured-IO/notebooks/blob/main/notebooks/Dropbox_To_Pinecone_Connector_Quickstart.ipynb), or watch the two 4-minute video tutorials for the [Unstructured Python SDK](/api-reference/workflow/overview#unstructured-python-sdk). You can also create destination connectors with the Unstructured user interface (UI). [Learn how](/ui/destinations/overview). If you need help, email Unstructured Support at [support@unstructured.io](mailto:support@unstructured.io). You are now ready to start creating a destination connector! Keep reading to learn how.
, \, or \ tags within an HTML document or the indentation level of a bulleted list item in a Word document. |
| `image_base64` | A Base64 representation of the detected image or table. Only applicable to image and table elements when High Res partitioning is used. After chunking, `image_base64` is not preserved in the output. |
| `image_mime_type` | MIME type of the image. Only applicable to image elements. |
| `text_as_html` | HTML representation of extracted tables. Only applicable to table elements. |
| `languages` | Document Languages. At document level or element level. List is ordered by probability of being the primary language of the text. |
| `emphasized_text_contents` | Emphasized text (bold or italic) in the original document. |
| `emphasized_text_tags` | Tags on text that is emphasized in the original document. |
| `orig_elements` | For chunked elements, a list of the original elements that were used to create the current chunked element. |
| `is_continuation` | True if element is a continuation of a previous element. Only relevant for chunking, if an element was divided into two due to max\_characters. |
| `detection_class_prob` | Detection model class probabilities. From unstructured-inference, hi-res strategy. |
Notes on common metadata fields:
#### Metadata for document hierarchy
`parent_id` and `category_depth` enhance hierarchy detection to identify the document
structure in various file formats by measuring relative depth of an element within its category. This is especially
useful in documents with native hierarchies like HTML or Word files, where elements like headings or list items inherently define structure.
#### Element's coordinates
Some document types support location data for the elements, usually in the form of bounding boxes.
If it exists, an element's location data is available with `element.metadata.coordinates`. The `coordinates` property of an `ElementMetadata` stores:
* `points` : These specify the corners of the bounding box starting from the top left corner and proceeding counter-clockwise. The points represent pixels, the origin is in the top left and the `y` coordinate increases in the downward direction.
* `system`: The points have an associated coordinate system. A typical example of a coordinate system is `PixelSpace`, which is used for representing the coordinates of images. The coordinate system has a name, orientation, layout width, and layout height.
The Unstructured Open Source library offers a way to change the coordinates of an element to a new coordinate system by
using the `Element.convert_coordinates_to_new_system` method. If the `in_place` flag is `True`, the coordinate system
and points of the element are updated in place and the new coordinates are returned. If the `in_place` flag is `False`,
only the altered coordinates are returned.
```python theme={null}
from unstructured.documents.elements import Element
from unstructured.documents.coordinates import PixelSpace, RelativeCoordinateSystem
coordinates = ((10, 10), (10, 100), (200, 100), (200, 10))
coordinate_system = PixelSpace(width=850, height=1100)
element = Element(coordinates=coordinates, coordinate_system=coordinate_system)
print(element.metadata.coordinates.to_dict())
print(element.metadata.coordinates.system.orientation)
print(element.metadata.coordinates.system.width)
print(element.metadata.coordinates.system.height)
element.convert_coordinates_to_new_system(RelativeCoordinateSystem(), in_place=True)
# Should now be in terms of new coordinate system
print(element.metadata.coordinates.to_dict())
print(element.metadata.coordinates.system.orientation)
print(element.metadata.coordinates.system.width)
print(element.metadata.coordinates.system.height)
```
### Additional metadata fields by document type
| Field name | Applicable file types | Description |
| ---------------------- | --------------------- | -------------------------------------------------------------------------------------------------------------------------------------------------------------------- |
| `attached_to_filename` | MSG | The name of the file that the attached file is attached to. |
| `bcc_recipient` | EML | The related [email](#email) BCC recipient. |
| `cc_recipient` | EML | The related [email](#email) CC recipient. |
| `email_message_id` | EML | The related [email](#email) message ID. |
| `header_footer_type` | Word Doc | The pages that a header or footer applies to in a [Word document](#microsoft-word-files): `primary`, `even_only`, and `first_page`. |
| `image_path` | PDF | The path to the image. This is useful when you want to extract the image and save it in a specified path instead of serializing the image within the processed data. |
| `image_mime_type` | PDF | The MIME type of the image. |
| `image_url` | HTML | The URL to the image. |
| `link_start_indexes` | HTML, PDF | A list of the index locations within the extracted content where the `links` can be found. |
| `link_texts` | HTML | A list of text strings that are associated with the `link_urls`. |
| `link_urls` | HTML | A list of URLs within the extracted content. |
| `links` | PDF | A list of links within the extracted content. |
| `page_name` | XLSX | The related sheet's name in an [Excel file](#microsoft-excel-files). |
| `page_number` | DOCX, PDF, PPT, XLSX | The related file's page number. |
| `section` | EPUB | The book section title corresponding to a table of contents. |
| `sent_from` | EML | The related [email](#email) sender. |
| `sent_to` | EML | The related [email](#email) recipient. |
| `signature` | EML | The related [email](#email) signature. |
| `subject` | EML | The related [email](#email) subject. |
Notes on additional metadata by document type:
#### Email
For emails, metadata will contain the following fields, where available:
* `bcc_recipient`
* `cc_recipient`
* `email_message_id`
* `sent_from`
* `sent_to`
* `signature`
* `subject`
`sent_from` is a list of strings because the [RFC 822](https://www.rfc-editor.org/rfc/rfc822) spec for emails allows for multiple sent from email addresses.
#### Microsoft Excel documents
For Excel documents, `ElementMetadata` will contain a `page_name` element, which corresponds to the sheet name in the Excel
document.
#### Microsoft Word documents
Headers and footers in Word documents include a `header_footer_type` indicating which page a header or footer applies to.
Valid values are `"primary"`, `"even_only"`, and `"first_page"`.
### Table-specific metadata
For `Table` elements, the raw text of the table will be stored in the `text` attribute for the Element, and HTML representation
of the table will be available in the element metadata under `element.metadata.text_as_html`. By default,
Unstructured will automatically extract all tables for all doc types unless you set `skip_infer_table_types` parameter.
Here's an example of a table element. The `text` of the element will look like this:
```
Dataset Base Model1 Large Model Notes PubLayNet [38] F / M M Layouts of modern scientific documents PRImA [3] M - Layouts of scanned modern magazines and scientific reports Newspaper [17] F - Layouts of scanned US newspapers from the 20th century TableBank [18] F F Table region on modern scientific and business document HJDataset [31] F / M - Layouts of history Japanese documents
```
And the `text_as_html` metadata for the same element will look like this:
```py theme={null}
tags within an HTML document or the indentation level of a bulleted list item in a Word document. | | `image_base64` | A Base64 representation of the detected image or table. Only applicable to image and table elements when High Res partitioning is used. After chunking, `image_base64` is not preserved in the output. | | `image_mime_type` | MIME type of the image. Only applicable to image elements. | | `text_as_html` | HTML representation of extracted tables. Only applicable to table elements. | | `languages` | Document Languages. At document level or element level. List is ordered by probability of being the primary language of the text. | | `emphasized_text_contents` | Emphasized text (bold or italic) in the original document. | | `emphasized_text_tags` | Tags on text that is emphasized in the original document. | | `orig_elements` | For chunked elements, a list of the original elements that were used to create the current chunked element. | | `is_continuation` | True if element is a continuation of a previous element. Only relevant for chunking, if an element was divided into two due to max\_characters. | | `detection_class_prob` | Detection model class probabilities. From unstructured-inference, hi-res strategy. | Notes on common metadata fields: #### Metadata for document hierarchy `parent_id` and `category_depth` enhance hierarchy detection to identify the document structure in various file formats by measuring relative depth of an element within its category. This is especially useful in documents with native hierarchies like HTML or Word files, where elements like headings or list items inherently define structure. #### Element's coordinates Some document types support location data for the elements, usually in the form of bounding boxes. If it exists, an element's location data is available with `element.metadata.coordinates`. The `coordinates` property of an `ElementMetadata` stores: * `points` : These specify the corners of the bounding box starting from the top left corner and proceeding counter-clockwise. The points represent pixels, the origin is in the top left and the `y` coordinate increases in the downward direction. * `system`: The points have an associated coordinate system. A typical example of a coordinate system is `PixelSpace`, which is used for representing the coordinates of images. The coordinate system has a name, orientation, layout width, and layout height. The Unstructured Open Source library offers a way to change the coordinates of an element to a new coordinate system by using the `Element.convert_coordinates_to_new_system` method. If the `in_place` flag is `True`, the coordinate system and points of the element are updated in place and the new coordinates are returned. If the `in_place` flag is `False`, only the altered coordinates are returned. ```python theme={null} from unstructured.documents.elements import Element from unstructured.documents.coordinates import PixelSpace, RelativeCoordinateSystem coordinates = ((10, 10), (10, 100), (200, 100), (200, 10)) coordinate_system = PixelSpace(width=850, height=1100) element = Element(coordinates=coordinates, coordinate_system=coordinate_system) print(element.metadata.coordinates.to_dict()) print(element.metadata.coordinates.system.orientation) print(element.metadata.coordinates.system.width) print(element.metadata.coordinates.system.height) element.convert_coordinates_to_new_system(RelativeCoordinateSystem(), in_place=True) # Should now be in terms of new coordinate system print(element.metadata.coordinates.to_dict()) print(element.metadata.coordinates.system.orientation) print(element.metadata.coordinates.system.width) print(element.metadata.coordinates.system.height) ``` ### Additional metadata fields by document type | Field name | Applicable file types | Description | | ---------------------- | --------------------- | -------------------------------------------------------------------------------------------------------------------------------------------------------------------- | | `attached_to_filename` | MSG | The name of the file that the attached file is attached to. | | `bcc_recipient` | EML | The related [email](#email) BCC recipient. | | `cc_recipient` | EML | The related [email](#email) CC recipient. | | `email_message_id` | EML | The related [email](#email) message ID. | | `header_footer_type` | Word Doc | The pages that a header or footer applies to in a [Word document](#microsoft-word-files): `primary`, `even_only`, and `first_page`. | | `image_path` | PDF | The path to the image. This is useful when you want to extract the image and save it in a specified path instead of serializing the image within the processed data. | | `image_mime_type` | PDF | The MIME type of the image. | | `image_url` | HTML | The URL to the image. | | `link_start_indexes` | HTML, PDF | A list of the index locations within the extracted content where the `links` can be found. | | `link_texts` | HTML | A list of text strings that are associated with the `link_urls`. | | `link_urls` | HTML | A list of URLs within the extracted content. | | `links` | PDF | A list of links within the extracted content. | | `page_name` | XLSX | The related sheet's name in an [Excel file](#microsoft-excel-files). | | `page_number` | DOCX, PDF, PPT, XLSX | The related file's page number. | | `section` | EPUB | The book section title corresponding to a table of contents. | | `sent_from` | EML | The related [email](#email) sender. | | `sent_to` | EML | The related [email](#email) recipient. | | `signature` | EML | The related [email](#email) signature. | | `subject` | EML | The related [email](#email) subject. | Notes on additional metadata by document type: #### Email For emails, metadata will contain the following fields, where available: * `bcc_recipient` * `cc_recipient` * `email_message_id` * `sent_from` * `sent_to` * `signature` * `subject` `sent_from` is a list of strings because the [RFC 822](https://www.rfc-editor.org/rfc/rfc822) spec for emails allows for multiple sent from email addresses. #### Microsoft Excel documents For Excel documents, `ElementMetadata` will contain a `page_name` element, which corresponds to the sheet name in the Excel document. #### Microsoft Word documents Headers and footers in Word documents include a `header_footer_type` indicating which page a header or footer applies to. Valid values are `"primary"`, `"even_only"`, and `"first_page"`. ### Table-specific metadata For `Table` elements, the raw text of the table will be stored in the `text` attribute for the Element, and HTML representation of the table will be available in the element metadata under `element.metadata.text_as_html`. By default, Unstructured will automatically extract all tables for all doc types unless you set `skip_infer_table_types` parameter. Here's an example of a table element. The `text` of the element will look like this: ``` Dataset Base Model1 Large Model Notes PubLayNet [38] F / M M Layouts of modern scientific documents PRImA [3] M - Layouts of scanned modern magazines and scientific reports Newspaper [17] F - Layouts of scanned US newspapers from the 20th century TableBank [18] F F Table region on modern scientific and business document HJDataset [31] F / M - Layouts of history Japanese documents ``` And the `text_as_html` metadata for the same element will look like this: ```py theme={null}
| Dataset | | Base Model’ | | Notes |
|---|---|---|
| PubLayNet | [38] F/M | Layouts of modern scientific documents |
| PRImA [3] | M | Layouts of scanned modern magazines and scientific reports |
| Newspaper | F | Layouts of scanned US newspapers from the 20th century |
| TableBank | F | Table region on modern scientific and business document |
| HJDataset [31] | F/M | Layouts of history Japanese documents |
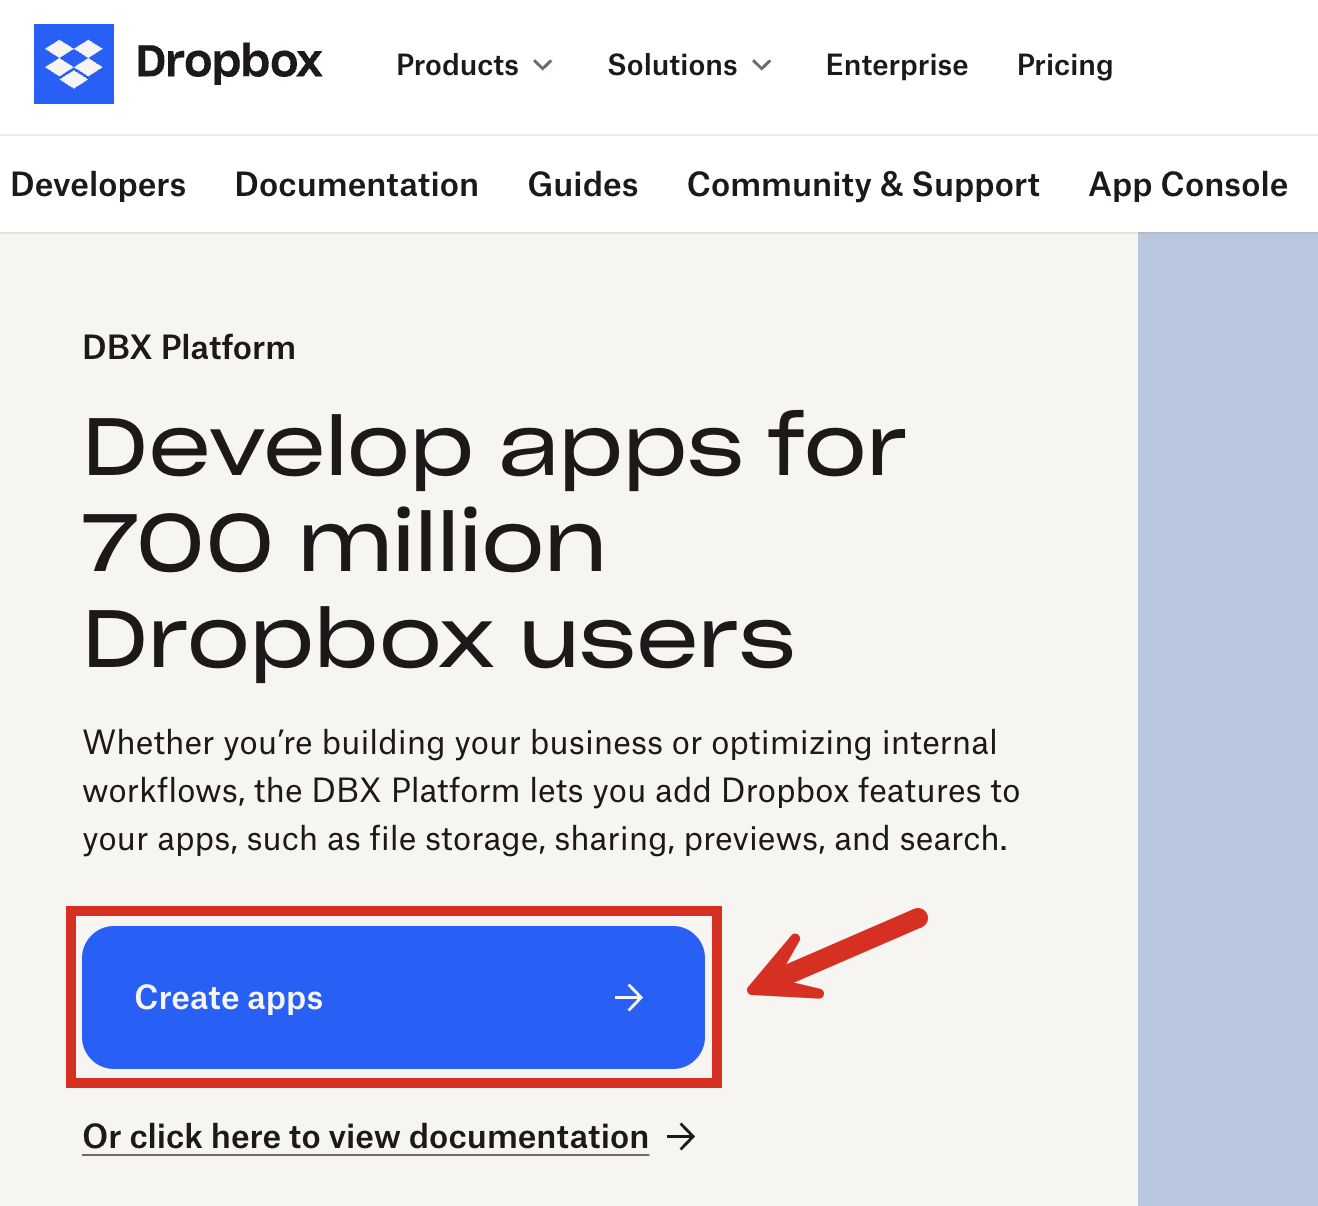
 ## Step 2: Create a Dropbox app
In this step, you create a Dropbox app in your Dropbox account. Unstructured will use this app to access your Dropbox account.
1. From a new tab in your web browser, open the Dropbox Developers page, at [https://www.dropbox.com/developers](https://www.dropbox.com/developers).
2. Click **Create apps**.
## Step 2: Create a Dropbox app
In this step, you create a Dropbox app in your Dropbox account. Unstructured will use this app to access your Dropbox account.
1. From a new tab in your web browser, open the Dropbox Developers page, at [https://www.dropbox.com/developers](https://www.dropbox.com/developers).
2. Click **Create apps**.
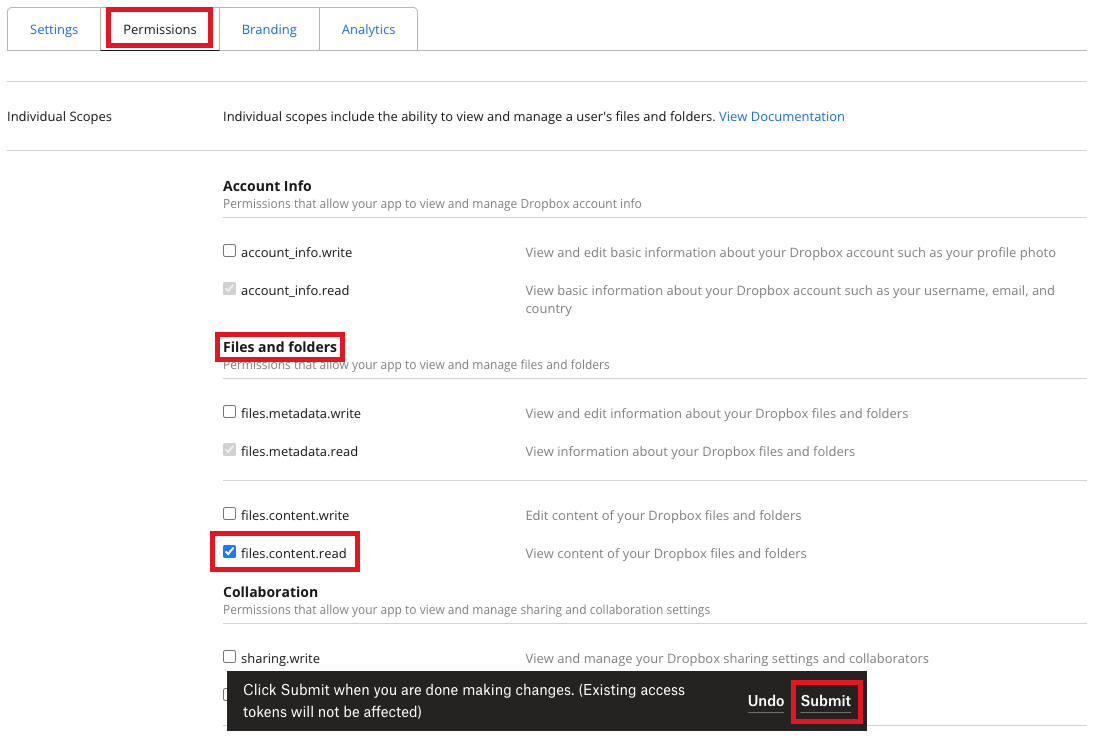
 8. On the Dropbox app's **Permissions** tab, under **Files and folders**, check the box labelled **files.content.read**, and then click **Submit**.
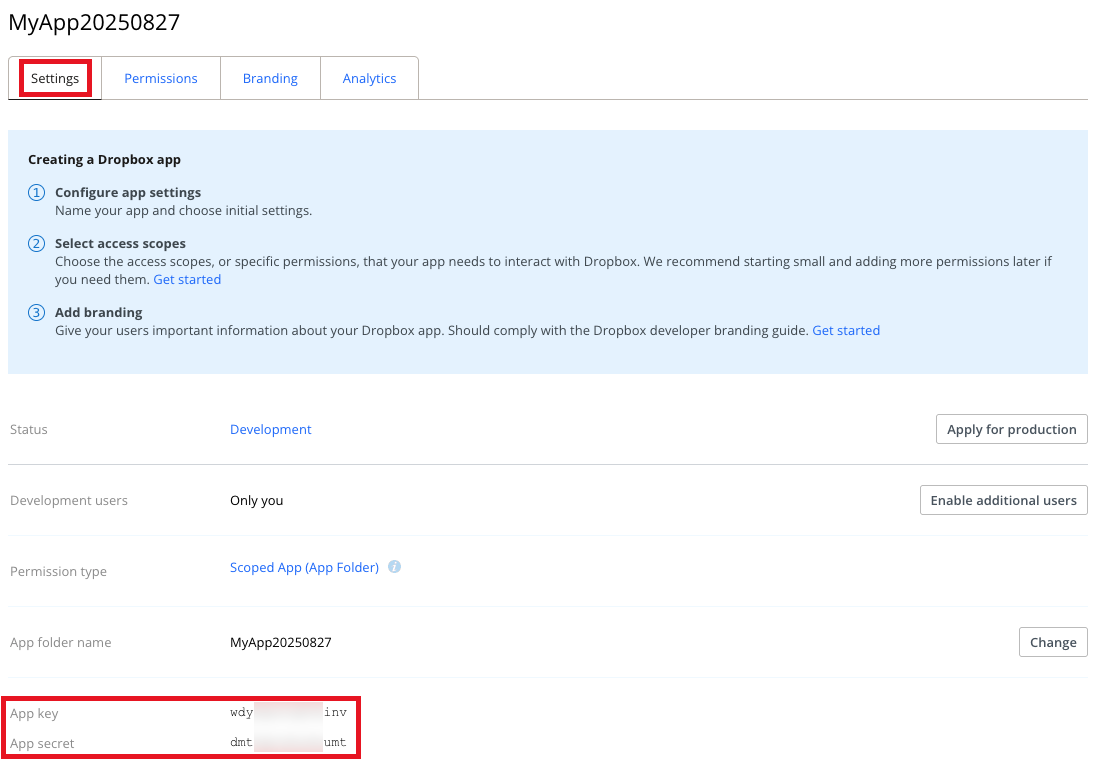
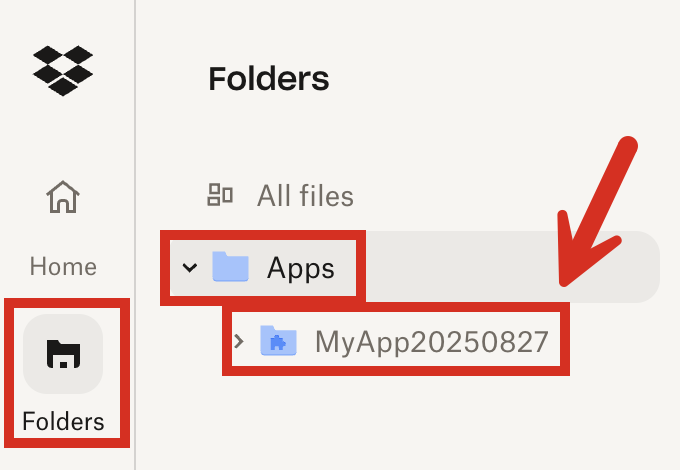
 9. On the app's **Settings** tab, note the value of the **App folder name** field. This is the name of the subfolder that Dropbox will create under the `Apps` top-level folder in your Dropbox account. Your new Dropbox app will use this subfolder for access.
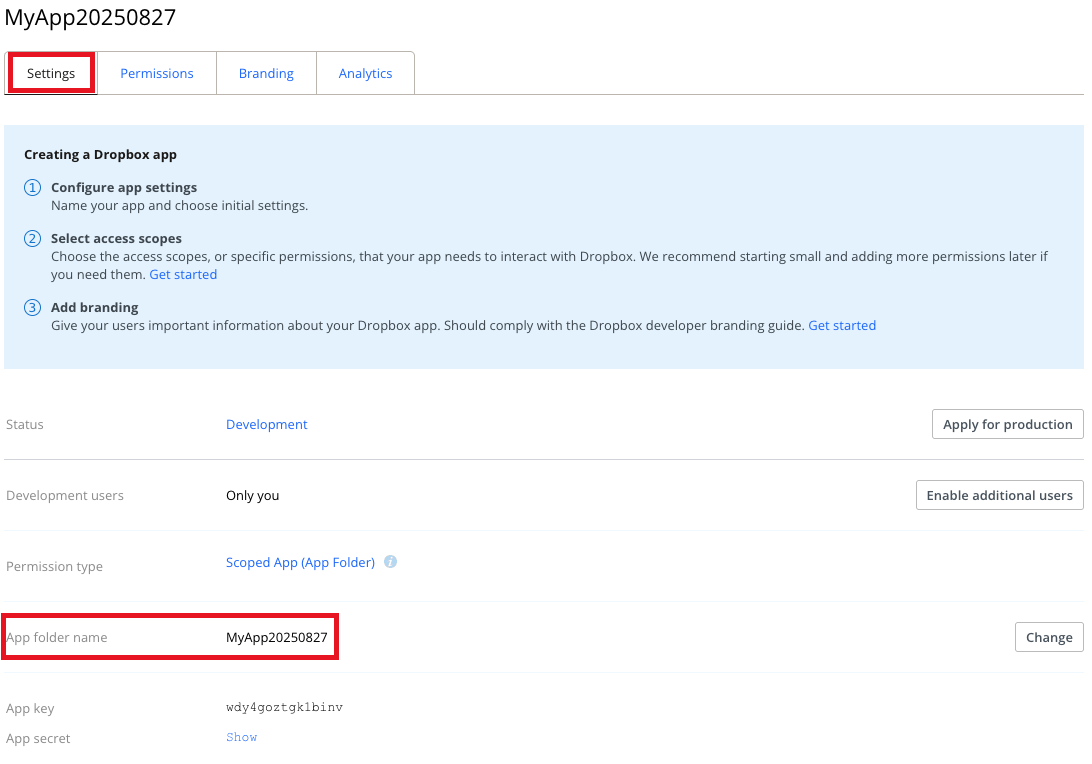 10. With the app's **Settings** tab still showing, scroll down to **App key**.
11. Next to **App secret**, click **Show**.
12. Note the values of **App key** and **App secret**, as you will need them later for Steps 3 and 5.
10. With the app's **Settings** tab still showing, scroll down to **App key**.
11. Next to **App secret**, click **Show**.
12. Note the values of **App key** and **App secret**, as you will need them later for Steps 3 and 5.
 ## Step 3: Get a refresh token for your Dropbox app
In this step, you get a refresh token for your Dropbox app. Unstructured needs this refresh token, along with the
**App key** and **App secret** from the previous step, to be able to use your Dropbox app to connect to your Dropbox account.
1. In a new tab in your web browser, enter the following address. In this address,
replace `
## Step 3: Get a refresh token for your Dropbox app
In this step, you get a refresh token for your Dropbox app. Unstructured needs this refresh token, along with the
**App key** and **App secret** from the previous step, to be able to use your Dropbox app to connect to your Dropbox account.
1. In a new tab in your web browser, enter the following address. In this address,
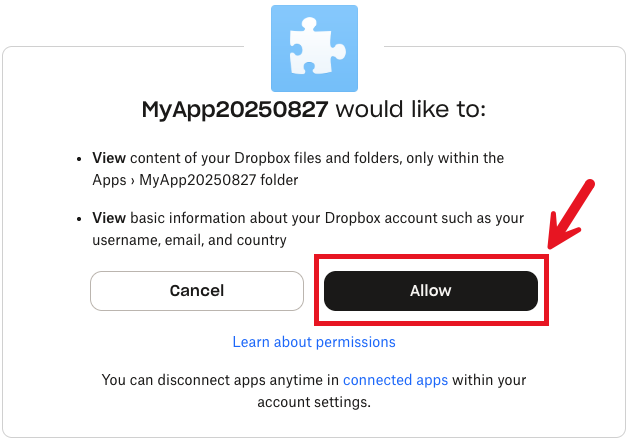
replace `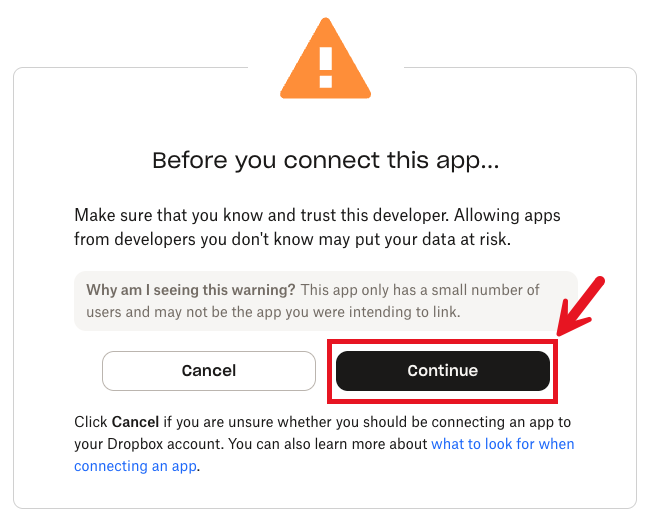 3. Click **Allow**.
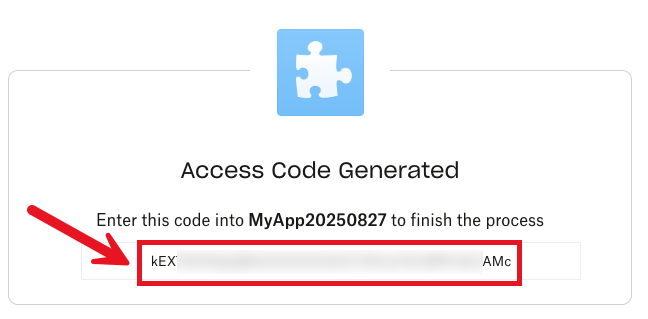
 4. Note the value in the **Access Code Generated** box.
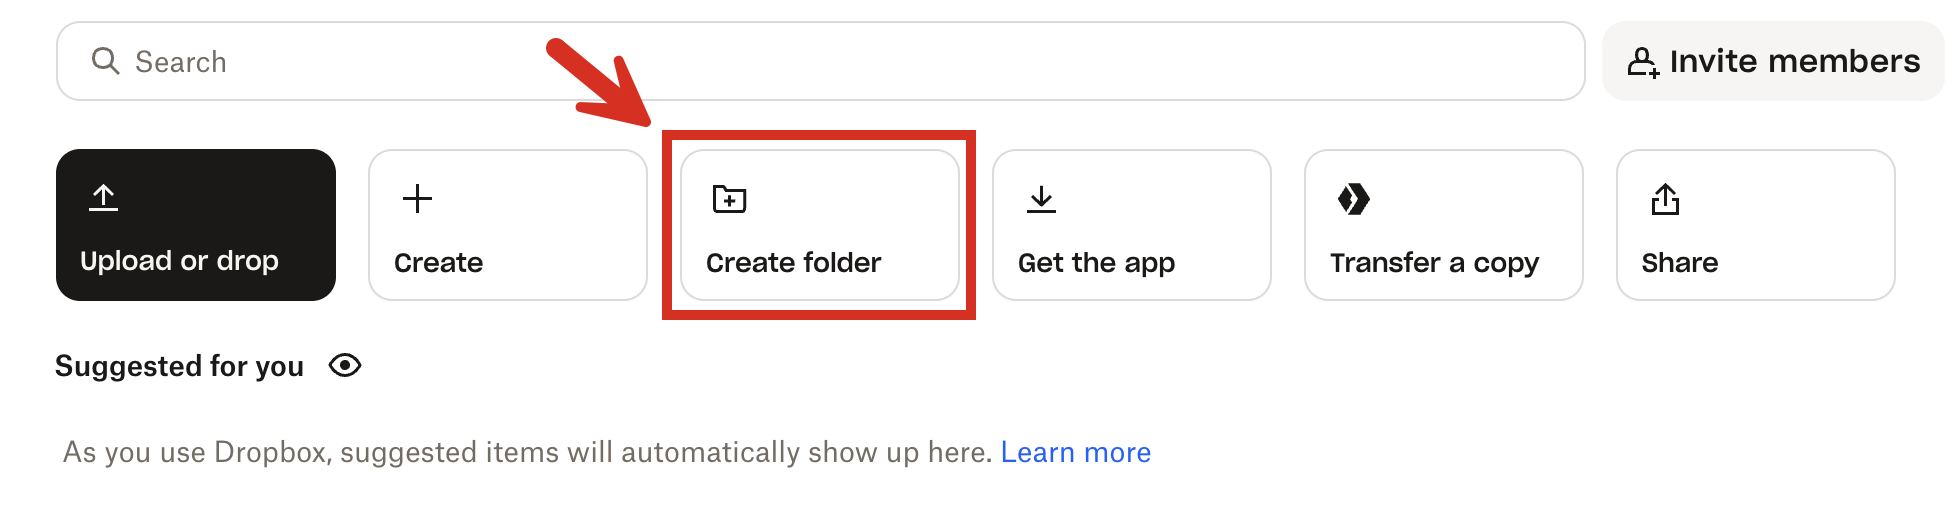 3. Give the subfolder a name, and then click **Create**.
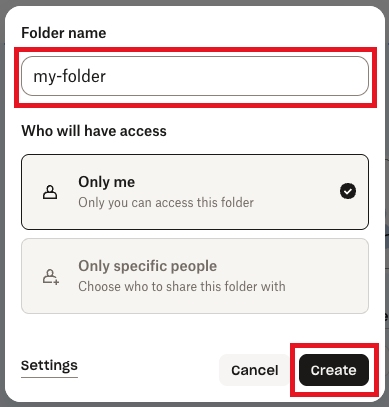 4. Click **Upload or drop** (or **Upload > Files** or **Upload > Folder**), and then follow the on-screen instructions to upload some documents to this subfolder in your Dropbox app folder.
For a Dropbox Basic account, the total size of all of the files you upload and store in your Dropbox account (not just this subfolder) cannot exceed 2 GB.
4. Click **Upload or drop** (or **Upload > Files** or **Upload > Folder**), and then follow the on-screen instructions to upload some documents to this subfolder in your Dropbox app folder.
For a Dropbox Basic account, the total size of all of the files you upload and store in your Dropbox account (not just this subfolder) cannot exceed 2 GB.
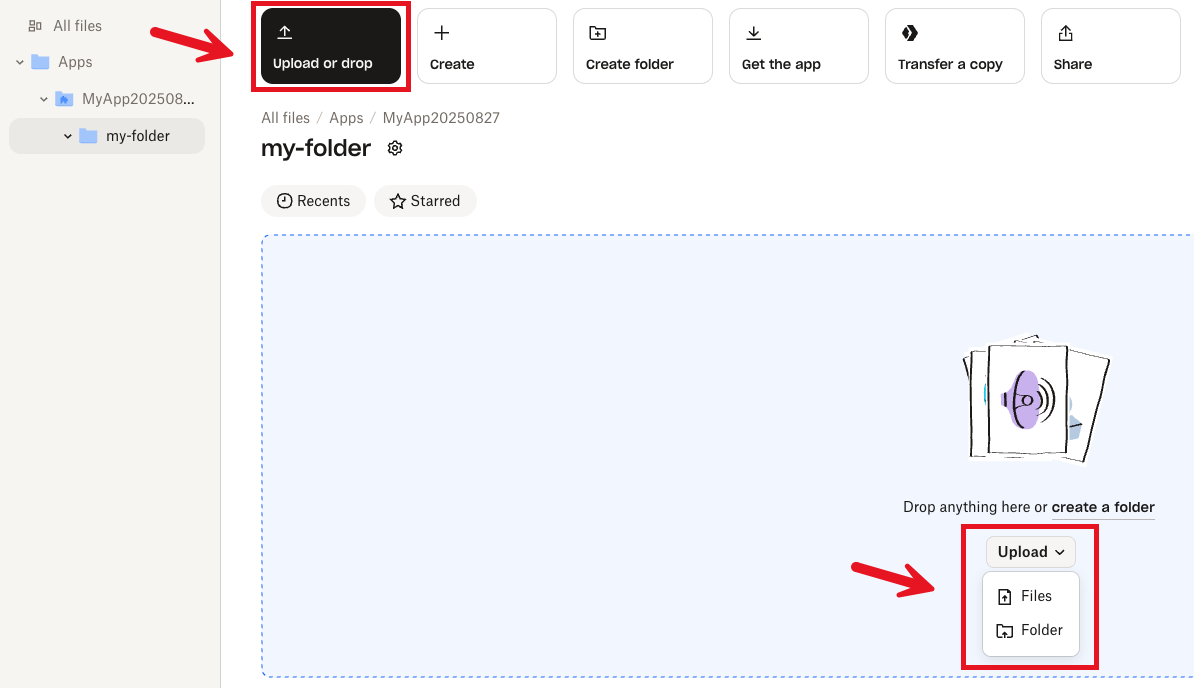 ## Step 5: Create the Dropbox source connector
In this step, you create a Dropbox source connector in your Unstructured account. This source connector
is used by Unstructured to connect to your Dropbox account and then process the documents in the specified folder.
1. If you do not already have an Unstructured account, [sign up for free](https://unstructured.io/?modal=try-for-free).
After you sign up, you are automatically signed in to your new Unstructured **Let's Go** account, at [https://platform.unstructured.io](https://platform.unstructured.io).
## Step 5: Create the Dropbox source connector
In this step, you create a Dropbox source connector in your Unstructured account. This source connector
is used by Unstructured to connect to your Dropbox account and then process the documents in the specified folder.
1. If you do not already have an Unstructured account, [sign up for free](https://unstructured.io/?modal=try-for-free).
After you sign up, you are automatically signed in to your new Unstructured **Let's Go** account, at [https://platform.unstructured.io](https://platform.unstructured.io).
 4. Click **+ New**.
5. Enter some unique name for this connector, for example `dropbox-source-connector`.
6. For **Type**, click **Source**.
7. For **Provider**, click **Dropbox**.
8. Click **Continue**.
4. Click **+ New**.
5. Enter some unique name for this connector, for example `dropbox-source-connector`.
6. For **Type**, click **Source**.
7. For **Provider**, click **Dropbox**.
8. Click **Continue**.
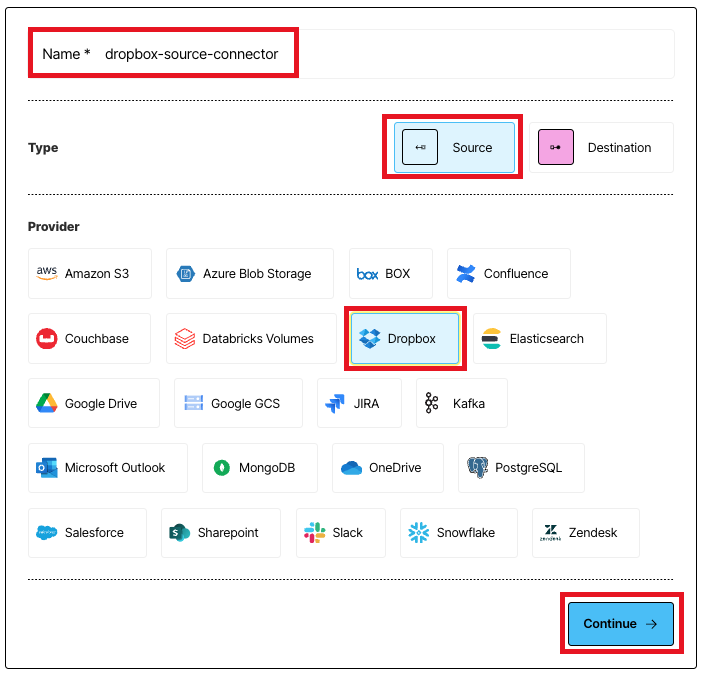 9. For **Data URL**, enter `dropbox://`, followed by the name of the subfolder you created in the previous step. For example,
if the name of the subfolder is `my-folder`, then the data URL would be `dropbox://my-folder`.
9. For **Data URL**, enter `dropbox://`, followed by the name of the subfolder you created in the previous step. For example,
if the name of the subfolder is `my-folder`, then the data URL would be `dropbox://my-folder`.
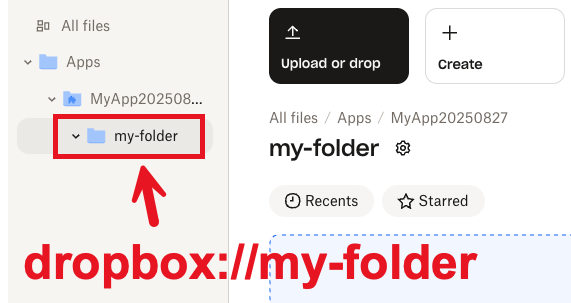 10. For **App key**, enter the **App key** you noted in Step 2.
11. For **App secret**, enter the **App secret** you noted in Step 2.
12. For **Refresh token**, enter the **Refresh token** you noted in Step 3.
13. Click **Save and Test**, and wait while Unstructured tests the connector.
10. For **App key**, enter the **App key** you noted in Step 2.
11. For **App secret**, enter the **App secret** you noted in Step 2.
12. For **Refresh token**, enter the **Refresh token** you noted in Step 3.
13. Click **Save and Test**, and wait while Unstructured tests the connector.
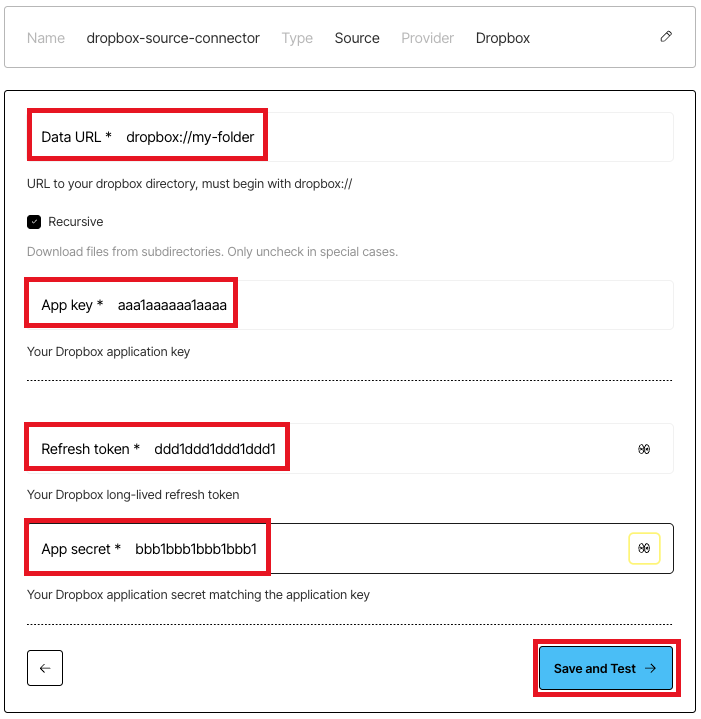 14. If a green **Successful** message appears, then you have successfully created the connector.
 If, however, a red error message appears, fix the issue, and try this step again.
If you cannot fix the issue, contact Unstructured Support at [support@unstructured.io](mailto:support@unstructured.io).
Congratulations! You have successfully created a Dropbox source connector in your Unstructured account.
If you are not able to complete these steps, contact Unstructured Support at [support@unstructured.io](mailto:support@unstructured.io).
## Next steps
* If you do not have a destination connector in your Unstructured account, then complete the [Pinecone destination connector quickstart](/ui/destinations/pinecone-destination-quickstart).
If you're not sure if you have a destination connector, click **Connectors** in your Unstructured account's sidebar, and then click **Destinations** to see if there are any listed.
* If you already have a destination connector, then you can add this Dropbox source connector as well as your destination connector to a workflow in your Unstructured account. To do this:
1. Click **Workflows** in your Unstructured account's sidebar.
If, however, a red error message appears, fix the issue, and try this step again.
If you cannot fix the issue, contact Unstructured Support at [support@unstructured.io](mailto:support@unstructured.io).
Congratulations! You have successfully created a Dropbox source connector in your Unstructured account.
If you are not able to complete these steps, contact Unstructured Support at [support@unstructured.io](mailto:support@unstructured.io).
## Next steps
* If you do not have a destination connector in your Unstructured account, then complete the [Pinecone destination connector quickstart](/ui/destinations/pinecone-destination-quickstart).
If you're not sure if you have a destination connector, click **Connectors** in your Unstructured account's sidebar, and then click **Destinations** to see if there are any listed.
* If you already have a destination connector, then you can add this Dropbox source connector as well as your destination connector to a workflow in your Unstructured account. To do this:
1. Click **Workflows** in your Unstructured account's sidebar.
 2. Click **New Workflow +**.
 3. With **Build it Myself** already selected, click **Continue**.
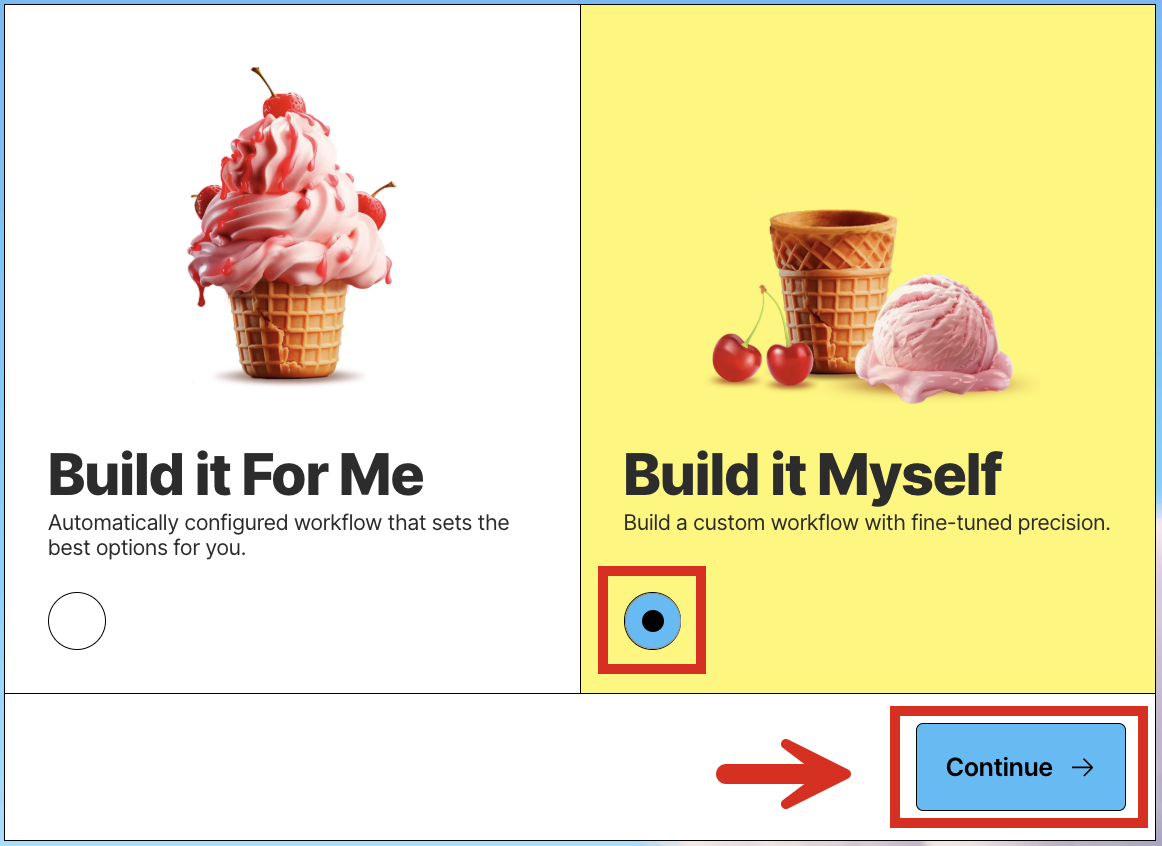 4. Click the **Source** node. (Do not click **Drop file to test**.)
 5. On the **Details** tab, click **Connectors**, and then click the name of your Dropbox source connector.
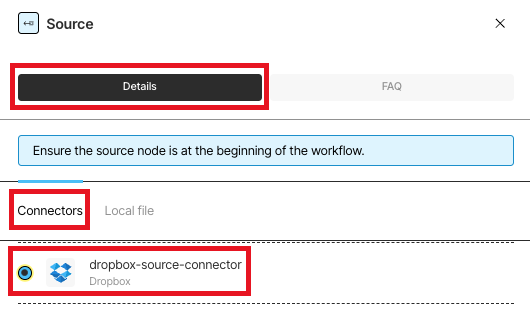 6. Click the **Destination** node.
 7. On the **Details** tab, click the name of your destination connector.
 8. Switch **Active** to on, and then click **Save**.
 10. Click **Jobs** in your Unstructured account's sidebar.
 11. After the job shows **Finished** with a green checkmark, go to your destination's location to see Unstructured's processed data output.
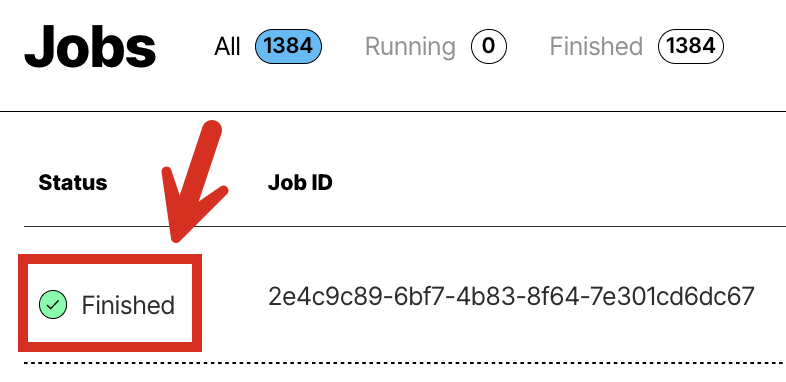 If you are not able to complete these steps, contact Unstructured Support at [support@unstructured.io](mailto:support@unstructured.io).
---
# Source: https://docs.unstructured.io/ui/sources/dropbox.md
# Source: https://docs.unstructured.io/open-source/ingestion/source-connectors/dropbox.md
# Source: https://docs.unstructured.io/open-source/ingestion/destination-connectors/dropbox.md
# Source: https://docs.unstructured.io/api-reference/workflow/sources/dropbox.md
> ## Documentation Index
> Fetch the complete documentation index at: https://docs.unstructured.io/llms.txt
> Use this file to discover all available pages before exploring further.
# Dropbox
If you are not able to complete these steps, contact Unstructured Support at [support@unstructured.io](mailto:support@unstructured.io).
---
# Source: https://docs.unstructured.io/ui/sources/dropbox.md
# Source: https://docs.unstructured.io/open-source/ingestion/source-connectors/dropbox.md
# Source: https://docs.unstructured.io/open-source/ingestion/destination-connectors/dropbox.md
# Source: https://docs.unstructured.io/api-reference/workflow/sources/dropbox.md
> ## Documentation Index
> Fetch the complete documentation index at: https://docs.unstructured.io/llms.txt
> Use this file to discover all available pages before exploring further.
# Dropbox
For a **Business** account, before you click **API Keys**, make sure you have selected the organizational workspace you want to create an API key for. Each API key works with one and only one organizational workspace. [Learn more](/ui/account/workspaces#create-an-api-key-for-a-workspace). 2. Click **Generate API Key**.
3. Follow the on-screen instructions to finish generating the key.
4. Click the **Copy** icon next to your new key to add the key to your system's clipboard. If you lose this key, simply return and click the **Copy** icon again.
After you create the source connector, add it along with a [destination connector](/api-reference/workflow/destinations/overview) to a [workflow](/api-reference/workflow/overview#workflows). Then run the worklow as a [job](/api-reference/workflow/overview#jobs). To learn how, try out the the notebook [Dropbox-To-Pinecone Connector API Quickstart for Unstructured](https://colab.research.google.com/github/Unstructured-IO/notebooks/blob/main/notebooks/Dropbox_To_Pinecone_Connector_Quickstart.ipynb), or watch the two 4-minute video tutorials for the [Unstructured Python SDK](/api-reference/workflow/overview#unstructured-python-sdk). You can also create source connectors with the Unstructured user interface (UI). [Learn how](/ui/sources/overview). If you need help, email Unstructured Support at [support@unstructured.io](mailto:support@unstructured.io). You are now ready to start creating a source connector! Keep reading to learn how.
b) Open your [App Console](https://www.dropbox.com/developers/apps).
c) Click **Create app**.
d) For **Choose an API**, select **Scoped access**.
e) For **Choose the type of access you need**, select **App folder**.
f) Enter a name for your app, and then click **Create app**.
g) On the app's **Permissions** tab, under **Files and folders**, check the boxes labelled **files.content.read** or **files.content.write** or both, depending on whether you want to read files, write files, or both. Then click **Submit**.
h) On the app's **Settings** tab, note the value of the **App folder name** field. This is the name of the app folder that Dropbox will create under the `Apps` top-level folder in your Dropbox account that the Dropbox app will use for access. If you change the value of **App folder name** field here, Dropbox will create an app folder with that name under the `Apps` top-level folder instead.
i) Under **OAuth 2**, next to **Generated access token**, click **Generate**. Copy the value of this access token. You should only click **Generate** after you have completed all of the preceding steps first. This is because the access token is scoped to the specific app folder and settings at the time the access token is generated. If you change the app folder name or any of the permissions later, you should regenerate the access token.
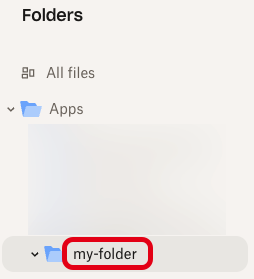
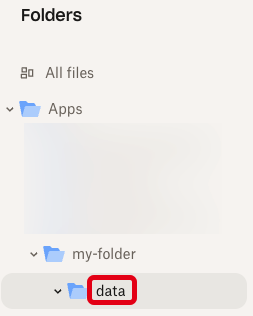 ## Replace an expired access token
Dropbox app access tokens are valid for **only four hours**. After this time, you can no longer use the expired access token.
To have Unstructured automatically replace expired access tokens on your behalf, do the following:
1. Get the app key and app secret values for your Dropbox app. To do this:
a) Sign in to the [Dropbox Developers](https://www.dropbox.com/developers) portal with the same credentials as your Dropbox account.
## Replace an expired access token
Dropbox app access tokens are valid for **only four hours**. After this time, you can no longer use the expired access token.
To have Unstructured automatically replace expired access tokens on your behalf, do the following:
1. Get the app key and app secret values for your Dropbox app. To do this:
a) Sign in to the [Dropbox Developers](https://www.dropbox.com/developers) portal with the same credentials as your Dropbox account.b) Open your [App Console](https://www.dropbox.com/developers/apps).
c) Click your Dropbox app's icon.
d) On the **Settings** tab, next to **App key**, copy the value of the app key.
e) Next to **App secret**, click **Show**, and then copy the value of the app secret. 2. Use your web browser to browse to the following URL, replacing `
For a **Business** account, before you click **API Keys**, make sure you have selected the organizational workspace you want to create an API key for. Each API key works with one and only one organizational workspace. [Learn more](/ui/account/workspaces#create-an-api-key-for-a-workspace). 2. Click **Generate API Key**.
3. Follow the on-screen instructions to finish generating the key.
4. Click the **Copy** icon next to your new key to add the key to your system's clipboard. If you lose this key, simply return and click the **Copy** icon again.
After you create the destination connector, add it along with a [source connector](/api-reference/workflow/sources/overview) to a [workflow](/api-reference/workflow/overview#workflows). Then run the worklow as a [job](/api-reference/workflow/overview#jobs). To learn how, try out the the notebook [Dropbox-To-Pinecone Connector API Quickstart for Unstructured](https://colab.research.google.com/github/Unstructured-IO/notebooks/blob/main/notebooks/Dropbox_To_Pinecone_Connector_Quickstart.ipynb), or watch the two 4-minute video tutorials for the [Unstructured Python SDK](/api-reference/workflow/overview#unstructured-python-sdk). You can also create destination connectors with the Unstructured user interface (UI). [Learn how](/ui/destinations/overview). If you need help, email Unstructured Support at [support@unstructured.io](mailto:support@unstructured.io). You are now ready to start creating a destination connector! Keep reading to learn how.
a. After you sign in to your Unstructured **Let's Go**, **Pay-As-You-Go**, or **Business** account, click **API Keys** on the sidebar.
c. Follow the on-screen instructions to finish generating the key.
d. Click the **Copy** icon next to your new key to add the key to your system's clipboard. If you lose this key, simply return and click the **Copy** icon again.
### Firecrawl account and API key Before you begin, you must have a Firecrawl account and a Firecrawl API key, as follows: 1. [Sign up or sign in to your Firecrawl account](https://www.firecrawl.dev/signin/signup). 2. After you sign in, [get your Firecrawl API key](https://www.firecrawl.dev/app/api-keys). ### Amazon S3 bucket with access permissions and credentials This walkthrough uses an Amazon S3 bucket as the Unstructured ETL+ workflow's source. So, before you begin, you must have an AWS account, and within that account, a properly configured Amazon S3 bucket with bucket access credentials consisting of an AWS access key ID and secret access key for the AWS IAM user that has access to the bucket. Follow the S3 connector instructions to [create and configure the bucket and get the bucket access credentials](/ui/sources/s3) if you do not already have this all set up. (In these instructions, do not follow the directions to use the Unstructured UI to create the S3 source connector. You will do this later when you create the Unstructured ETL+ workflow.) ### Pinecone account and API key Before you begin, you must have a Pinecone account and a Pinecone API key, as follows: 1. [Sign up](https://app.pinecone.io/?sessionType=signup) or [log in](https://app.pinecone.io/?sessionType=login) to your Pinecone account. 2. After you log in, [get your Pinecone API key](https://docs.pinecone.io/guides/projects/manage-api-keys#create-an-api-key). ### Python and development toolchain installation Before you can start coding on your local machine, you must install Python, and you should also install a Python package and project manager to manage your project's Firecrawl, AWS, Pinecone, and other code dependencies. This walkthrough uses the popular Python package and project manager [uv](https://docs.astral.sh/uv/) (although `uv` is not required to use Firecrawl, AWS, or Pinecone with Python).
b. Add the following environment variable to this `.env` file, and replace `
```text theme={null} FIRECRAWL_API_KEY=
a. After you sign in to your Unstructured **Let's Go**, **Pay-As-You-Go**, or **Business** account, click **API Keys** on the sidebar.
c. Follow the on-screen instructions to finish generating the key.
d. Click the **Copy** icon next to your new key to add the key to your system's clipboard. If you lose this key, simply return and click the **Copy** icon again.
* The Unstructured API's workflow operations URL for your account, as follows: 1. In the Unstructured UI, click **API Keys** on the sidebar.
2. Note the value of the **Unstructured API's workflow operations** field. * A Google Cloud Storage source connector in your Unstructured account. [Learn how](/ui/sources/google-cloud). * Some available [destination connector](/ui/destinations/overview) in your Unstructured account. * A workflow that uses the preceding source and destination connectors. [Learn how](/ui/workflows). * An OAuth 2.0 client ID and client secret to call the Google API, as follows: 1. Sign in to your [Google Cloud account](https://cloud.google.com). 2. Go to the [Google Cloud APIs dashboard](https://console.cloud.google.com/apis/dashboard). 3. Click **+ Enable APIs and services**. 4. In the **Search for APIs & Services** box, enter `Cloud Storage API`. 5. In the list of search results, click **Cloud Storage API**. 6. Make sure that **API Enabled** is shown. If not, click **Enable**. 7. Go to your [Google Cloud console welcome page](https://console.cloud.google.com/welcome). 8. In the **Search (/) for resources, docs, products, and more** box, enter `Credentials`. 9. Click **Credentials (APIs & Services)**. 10. Click **+ Create credentials > OAuth client ID**. 11. For **Application type**, select **Web application**. 12. (Optional) Enter some non-default **Name** for this OAuth 2.0 client to be shown in the list of created clients in your Google Cloud Console. 13. Click **Create**. 14. After the OAuth client is created, click **Download JSON** to save the client ID and client secret values to a JSON file on your local machine. Store this JSON file in a secure location. ## Step 1: Create the Google Apps Script project 1. Go to [http://script.google.com/](http://script.google.com/). 2. Click **+ New project**. 3. Click the new project's default name (such as **Untitled project**), and change it to something more descriptive, such as **Unstructured Scripts for GCS**. ## Step 2: Add the script 1. With the project still open, on the sidebar, click the **\< >** (**Editor**) icon. 2. In the **Files** tab, click **Code.gs**. 3. Replace the contents of the `Code.gs` file with the following code instead: ```javascript theme={null} // Configure the OAuth2 service. function getOAuthService() { return OAuth2.createService('GCS') .setAuthorizationBaseUrl('https://accounts.google.com/o/oauth2/auth') .setTokenUrl('https://oauth2.googleapis.com/token') .setClientId(CLIENT_ID) .setClientSecret(CLIENT_SECRET) .setCallbackFunction('authCallback') .setPropertyStore(PropertiesService.getUserProperties()) .setScope(OAUTH_SCOPE); } // OAuth2 callback function. function authCallback(request) { const service = getOAuthService(); const isAuthorized = service.handleCallback(request); return HtmlService.createHtmlOutput(isAuthorized ? 'Success!' : 'Denied'); } // Get a valid access token (refreshes automatically if expired). function getAccessToken() { const service = getOAuthService(); if (!service.hasAccess()) { const authorizationUrl = service.getAuthorizationUrl(); Logger.log('Open the following URL and re-run the script: %s', authorizationUrl); throw new Error('Authorization required. Open the URL in the log.'); } return service.getAccessToken(); } // Main function: checks for new or updated files in the bucket. function checkForNewOrUpdatedGCSFiles() { const thresholdMillis = 5 * 60 * 1000; // 5 minutes. const now = new Date(); // Get (and refresh if needed) the access token. const accessToken = getAccessToken(); // List objects in the bucket. const apiUrl = `https://storage.googleapis.com/storage/v1/b/${BUCKET_PATH}/o`; const response = UrlFetchApp.fetch(apiUrl, { method: 'get', headers: { 'Authorization': 'Bearer ' + accessToken, 'Accept': 'application/json' } }); const data = JSON.parse(response.getContentText()); const files = data.items || []; for (let i = 0; i < files.length; i++) { const file = files[i]; const fileName = file.name; const created = new Date(file.timeCreated); const updated = new Date(file.updated); const millisSinceCreated = now - created; const createdWithinThreshold = millisSinceCreated < thresholdMillis; const millisSinceUpdated = now - updated; const updatedWithinThreshold = millisSinceUpdated < thresholdMillis; console.log('File Name: ' + fileName); console.log('Created: ' + created); console.log('Last updated: ' + updated); console.log('Milliseconds since created: ' + millisSinceCreated); console.log('Milliseconds since last updated: ' + millisSinceUpdated); console.log('Created within threshold of ' + thresholdMillis + ' milliseconds? ' + createdWithinThreshold); console.log('Updated within threshold of ' + thresholdMillis + ' milliseconds? ' + updatedWithinThreshold); console.log('-----'); if (createdWithinThreshold || updatedWithinThreshold) { // Trigger your workflow. UrlFetchApp.fetch(UNSTRUCTURED_API_URL, { method: 'post', headers: { 'accept': 'application/json', 'unstructured-api-key': UNSTRUCTURED_API_KEY } }); console.log('At least one file created or updated within threshold of ' + thresholdMillis + ' milliseconds.'); console.log('Unstructured workflow request sent to ' + UNSTRUCTURED_API_URL); return; } } console.log('No files created or updated within threshold of ' + thresholdMillis + ' milliseconds. No Unstructured workflow request sent.'); } ``` 4. Click the **Save project to Drive** button. ## Step 3: Customize the script for your workflow 1. With the project still open, on the **Files** tab, click the **Add a file** button, and then click **Script**. 2. Name the new file `Constants`. The `.gs` extension is added automatically. 3. Replace the contents of the `Constants.gs` file with the following code instead: ```javascript theme={null} const BUCKET_PATH = '
 Before (vertical watermarked text, represented incorrectly):
```json theme={null}
{
"...": "...",
"text": "3 2 0 2 t c O 9 2 ] V C . s c [ 2 v 9 0 8 6 1 . 0 1 3 2 : v i X r",
"...": "..."
}
```
After (vertical watermarked text, now represented correctly from the original content):
```json theme={null}
{
"...": "...",
"text": "arXiv:2310.16809v2 [cs.CV] 29 Oct 2023",
"...": "..."
}
```
Example 2: Hyperlink
Before (vertical watermarked text, represented incorrectly):
```json theme={null}
{
"...": "...",
"text": "3 2 0 2 t c O 9 2 ] V C . s c [ 2 v 9 0 8 6 1 . 0 1 3 2 : v i X r",
"...": "..."
}
```
After (vertical watermarked text, now represented correctly from the original content):
```json theme={null}
{
"...": "...",
"text": "arXiv:2310.16809v2 [cs.CV] 29 Oct 2023",
"...": "..."
}
```
Example 2: Hyperlink
 Before (hyperlink, represented incorrectly):
```json theme={null}
{
"...": "...",
"text": "con/Yuliang-Liu/MultinodalOCR|",
"...": "..."
}
```
After (hyperlink, now represented correctly from the original content):
```json theme={null}
{
"...": "...",
"text": "https://github.com/Yuliang-Liu/MultimodalOCR",
"...": "..."
}
```
Example 3: Chinese characters
Before (hyperlink, represented incorrectly):
```json theme={null}
{
"...": "...",
"text": "con/Yuliang-Liu/MultinodalOCR|",
"...": "..."
}
```
After (hyperlink, now represented correctly from the original content):
```json theme={null}
{
"...": "...",
"text": "https://github.com/Yuliang-Liu/MultimodalOCR",
"...": "..."
}
```
Example 3: Chinese characters
 Before (Chinese characters, represented incorrectly):
```json theme={null}
{
"...": "...",
"text": "GT SHE GPT4-V: EHES",
"...": "..."
}
```
After (Chinese characters, now represented correctly from the original content, expressed as Unicode):
```json theme={null}
{
"...": "...",
"text": "GT : \u91d1\u724c\u70e7\u814a GPT4-V: \u6587\u9759\u5019\u9e1f",
"...": "..."
}
```
## Improve text fidelity with generative OCR
To produce generative OCR optimizations, in an **Enrichment** node in a workflow, click the following
in the node's settings pane's **Details** tab:
* **Image** under **Input Type**.
* One of the following providers and models:
* **Anthropic** under **Provider** and any choice under **Model**
* **OpenAI** under **Provider** and any choice under **Model**
* **Generative OCR** under **Task**.
Before (Chinese characters, represented incorrectly):
```json theme={null}
{
"...": "...",
"text": "GT SHE GPT4-V: EHES",
"...": "..."
}
```
After (Chinese characters, now represented correctly from the original content, expressed as Unicode):
```json theme={null}
{
"...": "...",
"text": "GT : \u91d1\u724c\u70e7\u814a GPT4-V: \u6587\u9759\u5019\u9e1f",
"...": "..."
}
```
## Improve text fidelity with generative OCR
To produce generative OCR optimizations, in an **Enrichment** node in a workflow, click the following
in the node's settings pane's **Details** tab:
* **Image** under **Input Type**.
* One of the following providers and models:
* **Anthropic** under **Provider** and any choice under **Model**
* **OpenAI** under **Provider** and any choice under **Model**
* **Generative OCR** under **Task**.
| Gels and karyotypes | 600 dpi (8 bit grayscale depth) |
| High pressure liquid chromatography | 300 |
For a **Business** account, before you click **API Keys**, make sure you have selected the organizational workspace you want to create an API key for. Each API key works with one and only one organizational workspace. [Learn more](/ui/account/workspaces#create-an-api-key-for-a-workspace). 2. Click **Generate API Key**.
3. Follow the on-screen instructions to finish generating the key.
4. Click the **Copy** icon next to your new key to add the key to your system's clipboard. If you lose this key, simply return and click the **Copy** icon again.
After you create the destination connector, add it along with a [source connector](/api-reference/workflow/sources/overview) to a [workflow](/api-reference/workflow/overview#workflows). Then run the worklow as a [job](/api-reference/workflow/overview#jobs). To learn how, try out the the notebook [Dropbox-To-Pinecone Connector API Quickstart for Unstructured](https://colab.research.google.com/github/Unstructured-IO/notebooks/blob/main/notebooks/Dropbox_To_Pinecone_Connector_Quickstart.ipynb), or watch the two 4-minute video tutorials for the [Unstructured Python SDK](/api-reference/workflow/overview#unstructured-python-sdk). You can also create destination connectors with the Unstructured user interface (UI). [Learn how](/ui/destinations/overview). If you need help, email Unstructured Support at [support@unstructured.io](mailto:support@unstructured.io). You are now ready to start creating a destination connector! Keep reading to learn how.