# Unifygtm
> ## Documentation Index
---
# Source: https://docs.unifygtm.com/reference/integrations/6sense.md
> ## Documentation Index
> Fetch the complete documentation index at: https://docs.unifygtm.com/llms.txt
> Use this file to discover all available pages before exploring further.
# 6sense Integration Guide
> Use your existing subscription to identify website visitors.
# Overview
Unify integrates with 6sense in two ways:
* If you already have a 6sense subscription, you can connect it to Unify by
providing your API key to identify website visitors.
* [Unify Intent](https://app.unifygtm.com/dashboard/settings/integrations/unify-intent)
identifies website visitors out of the box and is powered by 6sense as well as
other providers.
Unify uses 6sense along with various other providers to identify website
visitors. If you already have a 6sense subscription, you can connect it to Unify
by providing your API key.
# Setup
To connect your existing 6sense subscription to Unify, simply navigate to
[Settings -> Integrations -> 6sense](https://app.unifygtm.com/dashboard/settings/integrations/6sense)
and enter your API key. Unify will start using your 6sense account to identify
website visitors.
Some customers do not have their 6sense API token enabled by default. If you
don't see website visitors being identified soon after entering your API key and
setting up the website tag, this might be the case for you.
You can reach out to [support@6sense.com](mailto:support@6sense.com) or your dedicated CSM with the following
message:
> Hi there,
>
> We need an API token to hit the reveal ([https://epsilon.6sense.com/v3/company/details](https://epsilon.6sense.com/v3/company/details)) API in a server to server (not from the browser) mode.
>
> Could you please provide the API key?
>
> Thanks,
They should be able to enable access for you.
---
# Source: https://docs.unifygtm.com/reference/plays/actions.md
> ## Documentation Index
> Fetch the complete documentation index at: https://docs.unifygtm.com/llms.txt
> Use this file to discover all available pages before exploring further.
# Play Actions
> Actions are the building blocks of Unify Plays.
## Overview
Plays chain together actions to perform anything from simple automations to
complex and dynamic outbound campaigns. Below are the actions you can choose
from when creating a Play.
## Core actions
### AI qualification
AI agents are powerful tools for researching companies or people and answering
questions about them. In Plays, the answers provided by an agent can be used to
determine whether a company or person is qualified or not.
When you select the agent qualification action, you will be able to choose an
existing agent or create a new one. Every agent has a set of questions that it
will answer about the given record. In the action configuration panel, you can
select which answers are required for the record to be considered qualified.
### Assign owner
The owner assignment action allows you to assign a record to a specific owner in
Unify. Every company and person record in Unify has an owner, and this action
allows you to set or change the owner of a record.
When you connect a CRM to Unify, the owner of the corresponding records in the
CRM will be synced into Unify. For records that don't yet have an owner or don't
yet exist in the CRM, you can use this action to assign an owner. You can also
choose to update the owner if desired.
### Prospect
One of the most common use cases for Plays is to find new people to reach out
to. The prospecting action takes a company record as input and finds new people
at the company matching specific personas and criteria.
When you select the prospecting action, you can specify one or more personas to
search for. The personas are considered in order, so the first persona will be
preferred over the second, and so on.
You can also specify a limit on the number of people to find per company. If the
**Include existing people** option is enabled, existing people at the company
already in Unify will count towards this limit. This can be useful if you want
to save prospecting credits on companies you already have relevant contacts for.
### Sequence
The sequence enrollment action makes building automated outbound campaigns
easier than ever. You can choose which sequences to send people to based on
which personas they match.
The routing configuration provides a way to specify which mailboxes and
sequences should be used for people this action runs on. You can specify a
set of mailboxes to use or choose to use a mailbox associated with the [company
or person record owner](/reference/plays/actions#assign-owner-action).
You also have the option to set a limit on how many people to enroll per
company, which is generally recommended to avoid overtargeting a single company.
This limit applies globally across play runs, so if multiple Plays run on the
same company, this limit will be shared across all of them.
### Slack alert
The Slack alert action allows you to send a customized Slack message at any
point in a Play. You can send messages to any public channels or DM any users in
your workspace.
The contents of the messages can be customized with template variables, so you
can include information about the record that triggered the action.
If the value for a template variable is missing, the message will still be sent,
but the variable will be replaced with `Unknown`.
You may optionally tag the owner of the account (e.g. `@John Doe`), so they can
be easily notified of the alert. You can also include intent signal information
containing recent website visitors, G2 page views, and more.
This action is available when Slack connected to Unify. See the [Slack Integration Guide](/reference/integrations/slack)
for information on integrating Slack with Unify.
### Sync to HubSpot
The HubSpot sync action allows you to create or update a record in HubSpot based
on a company or person record in Unify. This action will use the settings you've
configured for HubSpot in the Unify settings.
You also have the option to specify additional default field values. These will
be written to HubSpot unless a different Unify field is already mapped to the
HubSpot field.
### Sync to Salesforce
The Salesforce sync action allows you to create or update a record in Salesforce
based on a company or person record in Unify. This action will use the settings
you've configured for Salesforce in the Unify settings.
You also have the option to specify additional default field values. These will
be written to Salesforce unless a different Unify field is already mapped to the
Salesforce field.
## Utility actions
### Loop
In order to fully understand the purpose of loops and how to use them
effectively, it's recommended that you read about action [inputs and outputs](/reference/plays/building-a-play#inputs-and-outputs) first.
Most actions run on one record at a time. Loops are a simple way to run one or
more actions on every record in a list.
For example, a **Prospect for new People** action will return a list of people.
You can connect a loop action to the prospecting action and then add actions
within the loop. The first action in the loop will receive one person at a time.
### If / Else
The if-else action creates a branch in a Play, evaluates some conditions for
records, and sends them down a specific path based on the result. This allows
you to perform different actions on different records based on criteria that you
specify.
This action enables you to solve a wide variety of more complex use cases using
Plays. For example, you can enroll people into different sequences based on
their company firmographics, exact job title, or custom CRM field values.
### A/B Test
The A/B test action allows you to route records down a specific path based on a set probability.
This is useful for testing different sequences or actions.
### Delay
The Delay action waits for a specified amount of time before continuing to the
next action in a Play. This can be useful for spacing out actions in a Play and
ensuring that actions are performed at the right time.
This action is particularly useful when combined with if-else actions. For
example, when a person visitors your website, it can be useful to wait a few
minutes before taking action to see which pages they end up visitor or whether
they fill out a form.
### Get Company
If you have a person record, you can use this action to fetch the company that
the person works at. If the person does not have a company associated with them,
this action will not return any result.
### Get People
If you have a company record, you can use this action to fetch people that work
at the company. Unlike the **Prospect for new People** action, this action only
looks for people that already exist in Unify rather than prspect for new people.
## Coming soon
There are lots of additional actions in the works including more powerful AI
features and deep integrations with third-party tools. If you're interested in
an action that isn't available yet, [let us know](mailto:support@unifygtm.com)!
We'll get you in the beta as soon as it's ready.
---
# Source: https://docs.unifygtm.com/reference/management/authentication.md
> ## Documentation Index
> Fetch the complete documentation index at: https://docs.unifygtm.com/llms.txt
> Use this file to discover all available pages before exploring further.
# Authentication Options
> Learn about the login methods available for your organization in Unify.
## Overview
Unify supports the following forms of authentication:
1. **Username and Password**: Users can log in with an email address and password managed by Unify.
2. **Google Workspace**: Users can log in using a Google account associated with your organization's Google Workspace.
3. **Single Sign-On (SSO) via SAML 2.0**: Unify supports SSO through the SAML 2.0 protocol. This allows your organization to use your existing identity provider (IdP), such as Okta or Azure AD, to authenticate your users.
All methods are powered by Auth0, the leading industry standard for secure authentication.
### Single Sign-On (SSO)
Our team will work directly with you to integrate Unify with your identify provider. Below are the steps and information we'll cover during this process.
Unify does charge an SSO fee which is a direct passthrough cost from our provider.
#### Supported Identity Providers (IdPs)
* Okta
* Azure Active Directory (AD)
* Any SAML 2.0 compliant IdP
#### Information required for SSO setup
* **Sign In URL**: The URL where SAML authentication requests are sent. This is also called the single sign-on (SSO) endpoint.
* **Sign Out URL**: The URL where SAML logout requests are sent. This is also called the single logout (SLO) endpoint.
* **X.509 Certificate**: A certificate used to verify the SAML response.
---
# Source: https://docs.unifygtm.com/reference/integrations/salesforce/bidirectional-syncs.md
# Source: https://docs.unifygtm.com/reference/integrations/hubspot/bidirectional-syncs.md
> ## Documentation Index
> Fetch the complete documentation index at: https://docs.unifygtm.com/llms.txt
> Use this file to discover all available pages before exploring further.
# How Bidirectional Syncs Work
> An in-depth explanation of how syncs work between HubSpot and Unify.
# Overview
Unify can create and update HubSpot records in response to Play runs and
sequence enrollments. This page summarizes the rules used to determine when and
how to create or update records in HubSpot.
# Overwriting data
Unify takes a very conservative approach to overwriting existing HubSpot data in
order to make data loss impossible. This approach is based around only a few
simple rules:
* **Creating new records:** When Unify is creating a new HubSpot record, it will
fill in all properties that are enabled for writing in the field mapping or
default values.
* **Updating existing records:** Unify will inspect whether the field is empty
or not. If the field already has a value, it will only be updated if it is a
Unify-specific field. These fields are prefixed with "Unify" and can be found [here](/reference/integrations/hubspot/field-mappings#available-fields).
These rules apply regardless of how the record was originally created (e.g., by
Unify or externally). If you're looking for more fine-grained control, you can
also limit the permissions granted to the Unify integration user in HubSpot.
# Duplicate prevention
Duplicates are strictly prevented within Unify. When creating new HubSpot
records, Unify will only ever create one record. If there is already an existing
HubSpot record of the same type, Unify will always update it rather than
creating a new one.
However, duplicates are a common problem in HubSpot and may already exist in
your HubSpot instance. In addition, users or other integrations may accidentally
create new duplicates over time.
In order to accommodate this reality, Unify follows specific rules to ensure
predictable behavior when updating duplicated HubSpot records. While Unify
cannot de-duplicate your HubSpot, it will *never* make the problem worse, and
in some situations may be able to help clarify the “source of truth” record.
### Contacts
If there is an existing contact that matches the Unify person being written, it
will be updated. Matches are determined based on email address. If there are no
matches, a new contact will be created.
If there are multiple contacts that match the Unify person, only one will be
updated. Specifically, the contact that was most recently modified within
HubSpot is the one that will be updated.
### Companies
HubSpot companies are written by Unify whenever a contact is created or updated.
They are also written if a HubSpot sync action runs within a Play that is
running on companies.
If there is an existing company that matches the Unify company being written, it
will be updated. Matches are determined based on the domain of the company
website. Domains are normalized, so URLs that redirect to different domains will
not result in duplicates. If there are no matches, a new company will be
created.
If there are multiple companies that match the Unify company, only one will be
updated. Specifically, the company that was most recently modified within
HubSpot will be updated.
### Email Messages
Unify does not update existing email messages in HubSpot; only emails sent
through Unify or received in response to those emails will be written to
HubSpot.
Email messages are written to HubSpot for all emails sent as a part of Unify
sequences if the corresponding person already exists in HubSpot. This means
that in order to write email messages for sequence enrollments, you should
ensure that the person already exists in HubSpot or that you include a Play
action to sync them to HubSpot.
---
# Source: https://docs.unifygtm.com/reference/plays/building-a-play.md
> ## Documentation Index
> Fetch the complete documentation index at: https://docs.unifygtm.com/llms.txt
> Use this file to discover all available pages before exploring further.
# Building a Play
> Learn the fundamentals of creating Plays in Unify.
export const PlayBuilderCompanyHandleDark = () => ;
export const PlayBuilderCompanyHandleLight = () => ;
export const PlayBuilderPersonListHandleDark = () => ;
export const PlayBuilderPersonListHandleLight = () => ;
export const PlayBuilderPersonHandleDark = () => ;
export const PlayBuilderPersonHandleLight = () => ;
## Actions and triggers
The building blocks of Plays are called *actions*. Each action is a different
step of a Play, each representing a different task that can be automated in
Unify.
Every Play stars with a special type of action called a *trigger*. A trigger is
the starting point of your Play which defines when the Play should be executed
and what data should be provided to it.
Here are a few of the triggers you can choose from:
* **Record enters an Audience**: Run a Play once on every company or person that
"enters" an Audience. Audiences can be reused across multiple Plays.
* **Record matches criteria**: Run a Play once on every company or person that
matches a set of filters. This trigger is similar to the audience trigger, but
it doesn't require you to create a separate audience. Useful when you don't
need to create a reusable audience.
* **Manual**: Only run a Play when it is manually triggered. For example, you
can send individual companies or people to a Play, or you can send an entire
audience.
Once the trigger is selected, you can start adding additional actions to the
Play. Each action performs a different task. Actions can be chained together or
perform branching logic based on the results of the previous action.
Here are some of the most commonly used actions:
* **AI Agent Qualification**: Perform AI-powered research to answer qualifying
questions about a company or person.
* **Prospect for new People**: Find new people at a company matching specific
personas. You can specify a limit on the number of people to find.
* **Sequence Enrollment**: Enroll a person in a sequence. You can route people
to different mailboxes and sequences based on their persona.
* **Write to Salesforce or HubSpot**: Sync a company or person to Salesforce or
HubSpot. This will create or update a record in your CRM.
You can find details about the full set of available triggers and actions in the
reference sections below:
See the full list of triggers available in Unify and how to use them.
See the full list of actions available in Unify and how to use them.
## Inputs and outputs
Each action receives an input and produces an output. Actions in the Play
Builder have small colored symbols that represent what type of input and output
they expect.
Here's what each symbol represents:
| Symbol | | Value |
| :-------------------------------------------------------------------------: | - | :------------------------------------ |
| {}{} | | A single person record. |
| {}{} | | A list of one or more person records. |
| {}{} | | A single company record. |
Plays work by connecting each action's output to a matching input on another
action. This is how data flows through the Play and how each action knows what
to do.
## Connecting actions
To connect two actions, click on the output symbol of the first action and drag
the connection to the input symbol of the second action.
When adding a new action to the Play Builder, you can drag and drop it on top of
another action to automatically connect them.
Another shortcut for connecting actions is to move any action near to another
action. Once the input and output symbols are close enough, they will
automatically be connected.
To delete a connection, click on the connection line and press the **Backspace**
or **Delete** key.
## Save and publish
When you first create a Play, it is automatically saved as a draft. You can
leave and return later to finish building the Play without losing your progress.
Once you're ready to start running the Play, you can publish it. Published Plays
will run automatically based on the trigger you've selected. To publish a Play,
click the **Publish** button in the top right corner of the Play Builder.
After publishing a Play, you can still make changes to it. Any changes you make
will be saved as a new draft. You can publish the new draft at any time by
clicking the **Publish** button again. You can also discard the draft and revert
to the last published version.
If you want to temporarily stop a Play from running, you can pause it by
toggling the pause button to the left of the **Publish** button. Pausing a Play
will prevent it from running until you resume it.
## View logs
Once a Play starts running, you can view the logs to see which companies and
people the Play has run on. In the top left corner of the Play Builder, click
on **Logs** to see the full history of Play executions.
Within the logs view, you can see the status of each Play execution, including
in-progress, completed, and failed executions. You can click on any row of the
logs table to see more details about that specific execution.
The exact path this record took through the Play is highlighted on the right
side of the details view. You can see exactly which actions ran and what the
results were at each step.
## View metrics
In addition to logs, you can view metrics for each Play to see how it's
performing over time. In the top left corner of the Play Builder, click on
**Metrics** to see overview metrics and charts for the Play and each of its
actions.
You can click on any action to see detailed information about how it's
performing. For example, clicking on an agent qualification action will let
you measure how many records are being qualified over time and why.
The action-specific metrics pages will also show you the records that have
passed through that action and their results.
---
# Source: https://docs.unifygtm.com/reference/agents/building-an-agent.md
> ## Documentation Index
> Fetch the complete documentation index at: https://docs.unifygtm.com/llms.txt
> Use this file to discover all available pages before exploring further.
# Building an Agent
> Learn the fundamentals of building Agents in Unify.
## Agent configuration
Every Agent has three components:
1. **Record Type**: Specify whether this agent will run on Company records or Person records.
2. **Questions**: Define research questions for the agent to answer.
3. (Optional) **Guidance**: Provide additional context or advice to the agent to improve the results.
Once you've configured your Agent, test it by running it on example Companies or People.
### Record type
Agents can run on Companies or People. Data from Unify for the underlying records will be made
available to the Agent as it performs research to answer your questions.
For example, an agent intended to perform account qualification will run on company records.
On the other hand, an agent that researches individual people for lead qualification will run on person records.
Once you save an Agent, you cannot change its record type.
### Questions
Define a set of questions that the Agent will answer for you.
Every question has an expected response type. The available response types are:
* **True / False**
* **Number**
* **Select**
View the [response types documentation](/reference/agents/response-types) for more details and examples.
Try to keep your questions straightforward and concise.
Use a [guidance prompt](#guidance-prompt) to guide define any special
terms or concepts that the Agent should know.
### Guidance prompt
Optionally, you may provide a prompt to help guide your Agent's thought process.
If there is any context the Agent needs to answer your question, this is the place to include it.
In most cases, providing guidance for the Agent is unnecessary.
The Agent already knows that it will be answering questions about a company or person,
so you do not need to include that information in the prompt.
Examples of things to include in a guidance prompt:
* What your company does
* Where to find specific information about the Person or Company to research
* Definitions for specialized terms and concepts
Unify provides deep customization of and visibility into Agents' thought processes.
You can take advantage of this to tweak questions or guidance and dial in the accuracy.
## Testing your Agent
Unify gives you best-in-class visibility into an AI's chain-of-thought.
Leverage this to test your Agent, diagnose any issues, and iterate on your
questions and guidance prompts.
Upon providing a valid Agent configuration, an extension will appear and prompt
you to test your Agent. Use the search bar to find a specific Company or Person to test your Agent on,
or use the shuffle button to randomly select a Company or Person. The Agent will run,
explain its reasoning, and provide responses to your questions.
Generate multiple examples simultaneously to speed up your workflow.
Navigate through these examples using the arrows at the top of the screen.
---
# Source: https://docs.unifygtm.com/reference/integrations/salesforce/bulk-update-records.md
> ## Documentation Index
> Fetch the complete documentation index at: https://docs.unifygtm.com/llms.txt
> Use this file to discover all available pages before exploring further.
# Bulk Update Records
> Use Salesforce reports to quickly update a large number of records in Salesforce.
## Explanation
If you need to update a large number of records in Salesforce, you can use Salesforce reports to simplify the process. A common use case is updating the value of a field across all records created by a Play. However, these steps are generally applicable to any set of Salesforce records.
## Steps
### Export the Records
1. Navigate to the **Reports** page.
In the top-right corner of the screen, if you click the menu icon and search for “reports”, you should see a link to get there.
2. In the top-right corner of the screen, select **New Report**
3. Choose a report type based on which type of records you need to update, and then click **Start Report** on the right
4. Be sure to add the `Id` column to your report in the sidebar, which is typically named after the record type you are selecting (e.g., `Account ID`, `Contact ID`, etc.)
5. Also add any additional columns that you wish to edit on the records
6. Add any filters or sorting options needed to narrow down the records you want to update
7. When ready, click **Save** in the top-right corner, enter a name, and then click **Save** again
8. Click **Run** in the top-right corner and verify these are the records you want to update
9. Click the dropdown arrow next to **Edit** in the top-right corner and select **Export**
10. Choose **Details Only** and **Comma Delimited .csv** as the format and then click **Export**
### Make Changes
1. Open the downloaded file and make any desired updates to the values
2. Save the changes as a new file so that the original is available as a backup
### Upload the Changed Records
1. Navigate to the **Setup** page in Salesforce
2. In the sidebar on the left, search for "data import wizard" and select the **Data Import Wizard** integration
3. Follow the on-screen instructions to update existing records and be sure to choose the option to match records by `Salesforce.com ID`
4. Ensure the mapping looks correct and that the ID column is mapped to `Salesforce.com ID`
5. Verify the details on the last page and then click **Start Import**
6. Once this bulk import is complete you’re all finished!
---
# Source: https://docs.unifygtm.com/reference/integrations/orum/call-campaigns.md
# Source: https://docs.unifygtm.com/reference/integrations/nooks/call-campaigns.md
> ## Documentation Index
> Fetch the complete documentation index at: https://docs.unifygtm.com/llms.txt
> Use this file to discover all available pages before exploring further.
# Running Call Campaigns with Nooks
> Launch and manage effective call campaigns using Nooks with your CRM integration.
## Prerequisites
Before starting your call campaign, ensure you have:
* Completed your CRM setup ([HubSpot](/reference/integrations/nooks/hubspot-setup) or [Salesforce](/reference/integrations/nooks/salesforce-setup))
## Setting Up Your Call Campaign
### 1. Create Your Sequence
Create a Unify Sequence that includes manual phone call steps. This will generate the call tasks that sync to your CRM and feed into Nooks. Learn more in our [Sequences guide](/reference/sequences/manual-steps#phone-call-steps).
### 2. Monitor the Sync
Sequence enrollments will appear in your CRM within 30 minutes of being created in Unify. These tasks will automatically be available in Nooks when you reset your call list.
### 3. Set Up Your Call Session
In Nooks, follow these steps to prepare your calling session:
1. Login to Nooks
2. Select your call sequence
### 4. Start Calling
Begin your call campaign! As you complete calls, results will automatically sync back to both your CRM and Unify, keeping all your systems up to date.
Need additional help? Contact our support team or visit the [Nooks documentation](https://support.devrev.ai/nooks/directories) for more detailed troubleshooting guides.
***
That's it! By following these steps, your team will run faster, more productive call campaigns with seamless integration between your CRM, Unify, and Nooks.
---
# Source: https://docs.unifygtm.com/reference/signals/champions.md
> ## Documentation Index
> Fetch the complete documentation index at: https://docs.unifygtm.com/llms.txt
> Use this file to discover all available pages before exploring further.
# Champion Tracking
> Automatically track your champions and take action on them.
## What is a Champion?
Your companies' champions are customers who have used and advocated for the adoption of your product or services.
## What is Champion Tracking?
With Champion Tracking, you can define filters to select your company's champions and automatically follow when they change jobs.
A champion who has changed jobs is indicative of an opportunity with an outsized probability of success.
When enabled, the job statuses of each of your champions will be checked once per month
and their new contact information will be found when they change jobs. This information is extremely
valuable for breaking into new accounts and performing retargeting campaigns.
Unify will automatically create an exclusion for the old contact records of your champions who have changed jobs.
This means that the old records won't appear in audiences nor be sequenced.
You will be charged one credit per champion tracked per month regardless of whether a job change was detected.
You can view the `Tracking` tab in the Champion Tracking Settings page to see who is being tracked.
### Set Up Champion Tracking
Define who your champions are.
#### Enabling
1. In the Unify app, go to [Settings -> Track -> Champions](https://app.unifygtm.com/dashboard/settings/champion-tracking).
2. Click the toggle at the top of the page to open the Champion Tracking Settings modal.
3. Define filters to identify your champions to track. For example, users commonly filter down to companies with Closed Won opportunities.
4. Click `Enable Champion Tracking`. Unify will track your champions once per month starting from the moment you enable Champion Tracking.
#### Disabling
1. In the Unify app, go to [Settings -> Track -> Champions](https://app.unifygtm.com/dashboard/settings/champion-tracking).
2. Click the toggle and click `Disable` to disable Champion Tracking. You will still be able to view job changes Unify has already detected throughout the app, but people will stop being tracked monthly.
### Take Action on Champion Job Changes
Take action when Unify detects a champion job change.
#### Champion Tracking Audience Filters
In the audience builder, you can add filters for champion job changes.
Connect these audiences to Plays, sequences, and Slack alerts to automate workflows triggered by these changes.
Here is an example of audience filters that includes all champions for whom Unify has ever detected a job change:
### Frequently Asked Questions
#### How can I be notified in Slack whenever a champion changes jobs?
Create an audience containing champions who have changed jobs and enable Slack alerts on the audience.
---
# Source: https://docs.unifygtm.com/reference/integrations/clearbit.md
> ## Documentation Index
> Fetch the complete documentation index at: https://docs.unifygtm.com/llms.txt
> Use this file to discover all available pages before exploring further.
# Clearbit Integration Guide
> Use your existing subscription to identify website visitors.
# Overview
Unify integrates with Clearbit in two ways:
* If you already have a Clearbit subscription, you can connect it to Unify by
providing your API key to identify website visitors.
* [Unify Intent](https://app.unifygtm.com/dashboard/settings/integrations/unify-intent)
identifies website visitors out of the box and is powered by Clearbit as well
as other providers.
Unify uses Clearbit along with various other providers to identify website
visitors. If you already have a Clearbit subscription, you can connect it to
Unify by providing your API key.
# Setup
To connect your existing Clearbit subscription to Unify, simply navigate to
[Settings -> Integrations -> Clearbit](https://app.unifygtm.com/dashboard/settings/integrations/clearbit)
and enter your API key. Unify will start using your Clearbit account to identify
website visitors.
---
# Source: https://docs.unifygtm.com/developers/intent-client/client-spec.md
> ## Documentation Index
> Fetch the complete documentation index at: https://docs.unifygtm.com/llms.txt
> Use this file to discover all available pages before exploring further.
# Intent Client Usage
> Learn how to send events using the Unify Intent Client.
The Unify Intent Client can be used to log user activity across multiple subdomains of the
same top-level domain. For example, if a user visits your marketing website at `www.yoursite.com`
and then logs into your production web application at `app.yoursite.com`, the activity in both
places will be attributed to the same person.
## Page View Events
Website page views are an indicator of buyer intent. You can log this information to the Unify platform
for usage with the `page` method.
There are two ways to collect page data with the Unify intent client:
1. Automatic monitoring of the current page
2. Manually via the client `page` method
Utilizing both of these methods when appropriate is recommended to take full advantage of intent data
within Unify.
### Automatic Page Monitoring
The Unify intent client is capable of automatically monitoring the user's current page to trigger
page events. This will happen by default when the client is installed via the [Unify Website tag](./website-tag).
If the client is installed via a package manager, you must pass the `autoPage` configuration option
when instantiating the client. See [Configuration](#configuration) below for more details.
Automatic page monitoring works in Single Page Apps, too!
In either case, this behavior can be enabled or disabled programmatically via the `startAutoPage`
and `stopAutoPage` methods on the client:
```ts theme={null}
// Initialize the client and tell it to automatically monitor pages
const unify = new UnifyIntentClient(
'YOUR_PUBLIC_WRITE_KEY',
{ autoPage: true },
);
unify.mount();
// Tell the client to stop monitoring pages
unify.stopAutoPage();
// Tell the client to start monitoring pages again
unify.startAutoPage();
```
### Manual Page Logging
You can also manually trigger a page event with the `page` method on the client. This is useful
when you do not want to trigger page events for every page.
```ts theme={null}
const unify = new UnifyIntentClient('YOUR_PUBLIC_WRITE_KEY');
unify.mount();
// Trigger a page event for whatever page the user is currently on
unify.page();
// Trigger a page event for a custom page other than the current page
unify.page({ pathname: '/some-custom-page' });
```
## Identify Events
All intent data collected for users by Unify is anonymous by default. When intent events are
logged, Unify will attempt to automatically de-anonymize the IP address of a user to associate
them with a specific company, but their personal identity will remain anonymous until an
identify event is triggered for them.
There are two ways to collect identity data with the Unify intent client:
1. Automatic monitoring of email input elements
2. Manually via the client `identify` method
Utilizing both of these methods when appropriate is recommended to take full advantage of intent
data within Unify.
### Automatic Input Monitoring
The Unify intent client is capable of automatically monitoring text and email input elements on
the page to collect user identity. This will happen by default when the client is installed via
the Unify JavaScript tag. If the client is installed via a package manager, you must pass the
`autoIdentify` configuration option when instantiating the client. See [Configuration](#configuration)
below for more details.
In either case, this behavior can be enabled or disabled programmatically via the `startAutoIdentify`
and `stopAutoIdentify` methods on the client:
```ts theme={null}
// Initialize the client and tell it to automatically monitor inputs
const unify = new UnifyIntentClient(
'YOUR_PUBLIC_WRITE_KEY',
{ autoIdentify: true },
);
unify.mount();
// Tell the client to stop monitoring inputs for now
unify.stopAutoIdentify();
// Tell the client to start monitoring inputs again
unify.startAutoIdentify();
```
### Manual Identification
You can also manually trigger an identify event with the identify method on the client. This is
useful when users log-in with OAuth or SSO, for example, because they do not enter their email
into an input on the page. The `identify` call accepts an optional second argument where you can
pass any standard Person or Company fields (the same ones used in imports and CRM integrations).
Those fields are forwarded to Unify and merged into the user/company profile. See the
[standard Person fields](/reference/integrations/salesforce/field-mappings#people) and
[standard Company fields](/reference/integrations/salesforce/field-mappings#companies) reference
for the full list.
```ts theme={null}
const unify = new UnifyIntentClient('YOUR_PUBLIC_WRITE_KEY');
unify.mount();
// However you determine the currently logged-in user
const currentUser = getCurrentUser();
// Identify the current user
unify.identify(currentUser.emailAddress, {
firstName: currentUser.firstName,
lastName: currentUser.lastName,
title: currentUser.title,
phone: currentUser.phone,
company: {
name: currentUser.companyName,
domain: currentUser.companyDomain,
industry: currentUser.industry,
employeeCount: currentUser.employeeCount,
},
});
```
## Configuration
The following configuration options can be passed when initializing the client:
If installed via the [Unify Website tag](./website-tag) then the `autoPage` config will default to `true`.
Tells the client to automatically log page events whenever the current page changes.
Works for static websites and Single Page Apps. Also logs a page event for the initial page.
If installed via the [Unify Website tag](./website-tag) then the `autoIdentify` config will default to `true`.
Tells the client to automatically monitor text and email input elements on the
page for changes. When the current user enters a valid email address into an input, the client
will log an identify event for that email address.
---
# Source: https://docs.unifygtm.com/reference/sequences/send-schedules/creating-send-schedules.md
> ## Documentation Index
> Fetch the complete documentation index at: https://docs.unifygtm.com/llms.txt
> Use this file to discover all available pages before exploring further.
# Creating a Custom Send Schedule
> Learn how to configure Custom Send Schedules for Sequences.
## Navigation
You can access the Custom Send Schedules page by navigating to:
**Settings → Organization → Sequences → Send Schedules**.
Once you are on this page, click the **+ New Schedule** button to create a new Custom Send Schedule.
## Configuring a new Custom Send Schedule
After clicking the **+ New Schedule** button, a configuration drawer will open, allowing you to define the parameters of your new Custom Send Schedule.
### General
Under the **General** section, you can configure the basic information for your Custom Send Schedule.
* **Name** — Provide a clear, descriptive name for your Custom Send Schedule (e.g., *North America Weekdays* or *APAC Morning Outreach*).
* **Time Zone** — Select the time zone in which the schedule will operate. This ensures that all send windows and skip dates align to the correct local time. (e.g., America/Los Angeles, Europe/London, Asia/Singapore)
> 💡 **Tip:** If your team operates globally, create separate Custom Send Schedules for each region to ensure messages are sent during local business hours.
***
### Windows
The **Windows** section defines when Unify is allowed to send automated messages through Sequences during the week.
For each day of the week, you can:
* Enable or disable sending (for example, enable Monday–Friday and disable Saturday–Sunday).
* Specify one or more **time windows** when messages can be sent (e.g., 9 AM–12 PM, 1 PM–5 PM).
**Example:**
If you want outreach to happen only during typical working hours, you might configure:
* Monday–Friday: 9:00 AM–4:30 PM
* Saturday & Sunday: Disabled
> **Note:** Messages queued outside of active windows will automatically be held until the next available send window.
***
### Skip Dates
Skip Dates allow you to automatically **pause sending on holidays or custom dates**.
This helps maintain deliverability and professionalism by avoiding sends on non-working days.
There are two ways to configure Skip Dates:
1. **U.S. Holidays** — Toggle this option to automatically skip sending on major U.S. federal holidays (e.g., New Year’s Day, Independence Day, Thanksgiving).
2. **Custom Dates** — Add specific dates or recurring dates (such as company offsites, local holidays, or yearly breaks).
You can specify whether custom dates repeat **annually** or occur **once**.
> 💡 **Tip:** Use Skip Dates to prevent outreach from occurring during out-of-office periods or industry-wide holidays that may impact engagement.
***
### Saving the Custom Send Schedule
Once you’ve configured the General settings, Windows, and Skip Dates, click **Create** to save your Custom Send Schedule.
It will now appear in the **Custom Send Schedules** list view, where you can edit, duplicate, or delete it at any time.
Your new Custom Send Schedule is now ready to use!
---
# Source: https://docs.unifygtm.com/reference/management/credit-system.md
> ## Documentation Index
> Fetch the complete documentation index at: https://docs.unifygtm.com/llms.txt
> Use this file to discover all available pages before exploring further.
# Unify Credit System
> Learn how credits work in Unify.
## Overview
Unify operates on a flexible, usage-based credit system that scales with your
needs. Credits are consumed by various activities such as prospecting,
enrichment, AI Agent runs, and certain intent signals.
## How credits work
Here are the key points to know about the credit system:
* **Credit Value**: Each Unify Credit represents a unit of platform usage.
* **Consumption**: Credits are deducted in real-time as features are used.
* **Replenishment**: Credits reset monthly or annually based on your plan. Add
credits at anytime on the [Usage](https://app.unifygtm.com/dashboard/settings/organization/usage)
page or upgrade your plan on the [Plans & Billing](https://app.unifygtm.com/dashboard/settings/billing)
page.
You can monitor your credit consumption on the [Usage](https://app.unifygtm.com/dashboard/settings/organization/usage)
page.
## Credit consumption
Different features consume credits at different rates. Here's a breakdown of the
credit consumption of each feature:
| Feature | Unify Credits | Unit | Description |
| ------------------------------ | ------------- | --------------------------------- | ---------------------------------------------------------------------------------------------------------------------------- |
| Website Reveals | 0.1 | Per website visitor revealed | Website reveals are triggered by adding our website tag and turning on Unify Intent. |
| Person Enriched (B2B Email) | 2 | Per person enriched | People that are uploaded via CSV without emails or prospected via the prospecting step are enriched when run through a Play. |
| Person Enriched (Phone Number) | 4 | Per person enriched | Phone number enrichment can be turned on in the prospecting node in Unify. |
| New Hire Tracking | 5 | Per new hire found | A new hire is returned when someone within the customer defined specifications that has moved jobs in the last 90 days. |
| Champion Tracking | 1 | Per champion track attempt | Champions are set up by users and are tracked on a monthly basis. |
| AI Agent | 0.1 | Per question answered per company | Agents can be configured to answer various per each company or person they are run on. |
## Best practices
* **Use Prospecting Limits**: Set limits on the number of people you want to prospect for at each company, especially when targeting only a couple personas.
* **Create Specific Personas**: Be as specific as possible when listing titles to include or exclude in your buyer persona to make sure you aren't prospecting for unqualified contacts.
* **Set Global Exclusions**: Exclusions are a helpful way to make sure that you are not prospecting, enriching, or tracking people who don't fit your ICP.
## Need Help?
* Contact [billing@unifygtm.com](mailto:billing@unifygtm.com) for credit-related questions
* Visit our [Reference Center](/reference/overview) for detailed guides on each feature
---
# Source: https://docs.unifygtm.com/reference/integrations/salesforce/default-values.md
# Source: https://docs.unifygtm.com/reference/integrations/hubspot/default-values.md
> ## Documentation Index
> Fetch the complete documentation index at: https://docs.unifygtm.com/llms.txt
> Use this file to discover all available pages before exploring further.
# Configure Default Values
> Learn how to set default values writing to HubSpot.
# Overview
When Unify creates or updates records in HubSpot, it will populate each HubSpot
property using the value in the corresponding Unify field. However, you can also
specify *default values* to be used as a fallback. This can useful in a few
different scenarios:
1. You may have custom fields in HubSpot that require a value
2. You may want to write a custom value to a field that is not available in the
field mappings
3. You may want to dynamically set a value in different Plays or Play actions
You can set global default values from [Settings -> Integrations -> HubSpot](https://app.unifygtm.com/dashboard/settings/integrations/hubspot).
These will be used for all writes to HubSpot unless overridden in a Play or by a
field mapping.
To learn how to set default values at the Play level instead, see the [Sync to HubSpot](/reference/plays/actions#sync-to-hubspot)
action reference.
---
# Source: https://docs.unifygtm.com/best-practices/deliverability.md
> ## Documentation Index
> Fetch the complete documentation index at: https://docs.unifygtm.com/llms.txt
> Use this file to discover all available pages before exploring further.
# Best Practices: Optimizing Your Email Outreach
## Sequence Copy
1. **Keep an individual sequence to 4 email touches max -** Within a four-touch sequence, we recommend alternating the structure between 2 new threads and 2 follow-up replies. The copy of these follow-up replies can be short and limited to 1-2 sentences. Example: "Any thoughts on my previous note?"
2. **Alternate case studies and value props between new threads -** You should vary the copy and angle you're approaching to pitch your product in email steps 1 and 3. For example, you can highlight different customer case studies or statistics across both emails.
3. **Shorten subject line and use personalization -** Keep subject titles concise and add custom variables to increase variability. This approach will also help improve deliverability. Example: "Unify x (Your Company Name)"
4. **Include statistics and case studies for social proof -** Incorporating very numbers-driven, concise impact statements can catch your prospect's attention. We recommend adding concise blurbs from customer case studies into your sequence copy.
5. **Add personalization with snippets -** You can use Unify's smart snippets to personalize copy based on relevant value prop, job title, work description, industry, and more. This will make your sequence copy more compelling with targeted pain points, use cases, or case studies. More variance in email copy will also help with deliverability.
6. **Keep it concise, focus on a single product or pain point -** Don't try to fit too many points into your email - you want to be decisive and mention the most relevant product or pain point to that individual to capture their attention! Keep the language simple and avoid business jargon. We generally recommend keeping each email between 50-200 words.
7. **End with a compelling call to action (CTA) -** Conclude each email with a clear, specific, and actionable request. This could include scheduling a call, booking a demo, or asking the prospect to reply with a specific piece of information relevant to their needs.
## Deliverability
1. **Limit the links -** Try not to overload your emails with multiple or duplicate links. Too many links can set off spam alarms - we generally recommend limiting the email touch to include 1-2 links maximum.
2. **Check link safety -** Ensure the links you include are secure and no warnings are displayed by the browser when visiting them.
3. **Mix up subject lines -** Don't stick with the same old subject lines, use template variables to keep them dynamic and interesting.
4. **No all caps -** Using all caps anywhere in your email can make it look spammy, so stick to normal capitalization.
5. **Easy on the exclamation -** Too many exclamation points can trigger spam filters, especially in the subject line. Use them sparingly!
6. **Send from multiple email addresses -** Sending emails from multiple mailboxes improves deliverability by distributing volume across different IP addresses and domains. This approach reduces the risk of being flagged as spam and increases overall sending capacity.
7. **Proofread for Typos**: Typos can make your email look unprofessional, especially when you're emailing multiple contacts at a company. Make sure to proofread and catch any errors.
---
# Source: https://docs.unifygtm.com/reference/integrations/demandbase.md
> ## Documentation Index
> Fetch the complete documentation index at: https://docs.unifygtm.com/llms.txt
> Use this file to discover all available pages before exploring further.
# Demandbase Integration Guide
> Identify website visitors with Demandbase and other providers.
# Overview
Unify provides out-of-the-box website visitor identification Demandbase and
other providers. To get started, simply enable [Unify Intent](https://app.unifygtm.com/dashboard/settings/integrations/unify-intent)
in your settings.
Once connected, Unify will automatically begin identifying website visitors
using Demandbase and other data sources for maximum coverage. Be sure to set up
the Unify Intent client on your website to start receiving visitors to identify.
---
# Source: https://docs.unifygtm.com/reference/deliverability/domain-configuration.md
# Domain Configuration
> Set up domain names for Unify-managed mailboxes.
## Overview
In order to send emails through Unify Managed Email Deliverability, you need to add one or more sending domain to
the platform. We recommend adding multiple sending domains in order to distribute volume and create redundancy.
## What domains can I use?
* **YES** — Secondary domains: The reputation of these secondary domains are isolated from your primary domain. You want to follow best practices when naming these secondary domains to ensure they don't get flagged as spam.
* **NO** — Domains installed on other ESPs: The product cannot be used with domains that are used on e.g. Google Workspace because MX records can only be installed for one ESP at a time. You would need to remove certain existing DNS records to ensure we can register the domain succesfully on Unify.
* **NO** — Primary domains: We do not recommend using your primary domain for high-volume sending. The reason for this is to ensure your primary domain reputation is always kept pristine.
## How should I name my domain?
We generally recommend aiming for a .com or .io name and avoiding hyphens if possible. Common naming conventions include mybusiness.io, trymybusiness.com, getmybusiness.com.
We do not recommend using misspelt variations of your domain like mybuziness.com, even if these domain names are only a few letters off from your primary domain or company name. Your email provder will potentially show spam warnings on these emails because they look like phishing attempts.
## Best practices
* `SPF`, `DKIM`, `DMARC` - Unify enforces and monitors email authentication to ensure that your emails pass the tests conducted by the ESPs.
* `Branded links` - Unify will automatically generate branded links with your domain. E.g. links.mybusiness.io. These are used for unsubscribe links and open tracking.
* `Primary Domain Forwarding` - Secondary domains and subdomains should forward the user to the primary domain. This improves deliverability as users can investigate the secondary domain and as it creates a link between your primary domain and secondary domain.
* `WHOIS` - WHOIS information should be provided on the domain.
Privacy Policy - The primary domain should have an easily accessible privacy policy.
* `Domain monitoring` - Unify will continuously monitor your domain health. For example by monitoring domain blocklists. If there is a problem you will be notified and sending can be paused.
## Purchasing a domain
The first step is to purchase a domain. This can be done through domain providers like CloudFlare, Google Domains, Squarespace, GoDaddy or Namecheap.
## Registering the domain in Unify
Navigate to the [domain settings page](https://app.unifygtm.com/dashboard/settings/deliverability/domains) and press "Add domain". Type in your domain name in the text box and press register. This process can take a few seconds, please wait for the registration to finish.
## DNS record overview
The screen will refresh showing you 7 DNS records to add. Below is an explanation of why we require each record:
* `SPF` - The SPF record authorizes Unify to send emails on your behalf. The SPF record must be exclusive to Unify as no other email providers can be used in conjunction.,
* `DKIM` - The DKIM record allows Unify to digitally sign your emails, enabling recipients to verify their authenticity and integrity.,
* `DMARC` - The DMARC record instructs recipient mail servers on how to handle emails from your domain that fail SPF or DKIM checks, enhancing your email security.,
* `MX` - Use priority 10. The MX record allows Unify to receive email messages on your behalf. The MX records must be exclusive to Unify as no other email providers can be used in conjunction. There are two MX records to create redundancy.
* `CNAME` - There are two CNAME records. The first CNAME record is an alias to Unify servers which allows branded links to be used for unsubscribes and open tracking. The second CNAME record is a validation record which authorizes Unify to accept HTTPS requests for the branded links.
## Adding the DNS records
1. Go to your domain provider (e.g. Squarespace or GoDaddy).
2. Navigate to the DNS settings.
3. Copy paste the DNS records. In order for the DNS records to propagate quickly you can use a TTL of 600 seconds.
4. Certain providers will ask you not to include the domain in the host name field. For example, `mybusiness.io` becomes `@` or sometimes just an empty string and `links.mybusiness.io` becomes just `links`.
5. It can take multiple minutes if not hours for the DNS records to propagate. You can use the refresh button in Unify to refresh the status.
6. Once the records are verified they will light up green with the text "Verified".
## Domain activation
Once the domain is verified we will automatically activate the domain which will enable you to register mailboxes under it. This process can take up to an hour.
#
---
# Source: https://docs.unifygtm.com/reference/integrations/salesforce/field-mappings.md
# Source: https://docs.unifygtm.com/reference/integrations/hubspot/field-mappings.md
> ## Documentation Index
> Fetch the complete documentation index at: https://docs.unifygtm.com/llms.txt
> Use this file to discover all available pages before exploring further.
# Field Mappings
> Understand how to configure and use HubSpot field mappings in Unify.
# Overview
Unify can sync data between HubSpot objects and Unify objects. However, the
exact fields in HubSpot differ from Unify, so Unify needs to understand how to
sync data between the two systems. This is done using *field mappings*.
# Setup
### Change field mappings
When you first connect your HubSpot instance, Unify will automatically prepare
the field mappings for you. If you use any custom properties in place of
default HubSpot properties, you may want to update the mappings before Unify
starts syncing data.
In the [HubSpot integration settings](https://app.unifygtm.com/dashboard/settings/integrations/hubspot),
look for the **Company** and **Person** field mappings at
the bottom of the page. Select one to view and edit the field configuration.
You can return to update these mappings any time in the future, so you don't
need to worry about getting them perfect right off the bat!
### (Optional) Create custom properties
You can write values to default properties and custom properties. In order to
write to custom properties, they must already exist in HubSpot.
While some of the fields Unify can write exist as standard properties in
HubSpot, many of them do not. In particular, Unify-specific fields (like the
name of the Sequence a person was enrolled in) do not exist in HubSpot by
default. In order to write these values to HubSpot, you will need to create
custom properties before mapping them.
Here's what the process looks like for adding **Contact** properties. First, in
HubSpot, navigate to **CRM -> Contacts**.
Select **Actions -> Edit properties**.
Navigate to **Groups -> Create group**.
Type in the name of the group (recommended title "Unify information") and click
**Create**.
Navigate to **Properties -> Create property**.
When editing the property details, make sure the **Object type** is set properly
(in this case, to **Contact**) and the **Group** is set to the group you
created earlier. You can fill in the **Label** and **Description** as desired.
Lastly, select the **Field type** and click **Create**.
This is what your **Contact** properties filtered to your new group might look
like after you've added them:
You can then repeat this process for **Company** properties as well.
# Available fields
Below is a full list of the values that can be configured in the field mappings
for each object type. Some of these are standard properties, while others
provide Unify-specific information, such as the name of the Sequence that a
person was enrolled in.
| Field | Description |
| -------------------------------------- | ----------------------------------------------------------------------------------------------------------------------------------------------------------------- |
| **Company Name** *Text* | Name of the company. |
| **Domain** *Text* | Web domain of the company. |
| **Address** *Text* | Physical address of the company. |
| **State or Province** *Text* | State, province, region, or territory the company is located in. |
| **Country** *Country* | Country the address is located in. |
| **City** *Text* | City, town, or village the company is located in. |
| **Postal Code** *Text* | Postal code for the company. |
| **Time Zone** *Text* | Time zone the company is located in. |
| **Corporate Phone** *Text* | Corporate phone number for the company. |
| **Status** *Text* | Status of the company in the sales lifecycle. |
| **LinkedIn URL** *Text* | URL to the company's LinkedIn page. |
| **Description** *Text* | Description of the company. |
| **Do Not Contact** *Boolean* | Flag indicating that the company should not be contacted. |
| **Founded** *Date* | Date the company was founded. |
| **Industry** *Text* | Industry the company is in. |
| **Employee Count** *Number* | Approximate number of employees at the company. |
| **Revenue** *Number* | Estimated annual revenue of the company. |
| **Revenue Currency** *Text* | Three-letter ISO 4217 code indicating the revenue value currency type. |
| **Account Source** *Text* | Channel this Company record was sourced from. |
| **Unify Metadata** *Text* | A unique identifier useful for tracking records that Unify writes to. |
| **Unify Created At** *Date* | Date and time the record was created by Unify. This will only be populated if Unify created the record; otherwise, it will remain empty. |
| **Unify Updated At** *Date* | Date and time the record was last updated by Unify. |
| **Unify First Written At** *Date* | Date and time the record was first written to by Unify. This will be populated when Unify first creates or updates the record, and it will not change after that. |
| **Unify Initial Play** *Text* | Name of the first Unify Play that ran on this record. |
| **Unify Initial Play At** *Date* | Date and time the first Unify Play ran on this record. |
| **Unify Most Recent Play** *Text* | Name of the most recent Unify Play that ran on this record. |
| **Unify Intent Level** *Text* | Intent level of the company (either **High**, **Medium**, **Low**, or **None**). |
| Field | Description |
| ------------------------------------------------------ | ----------------------------------------------------------------------------------------------------------------------------------------------------------------- |
| **Email** *Text* | Contact email address. |
| **Address** *Text* | Physical address of the person. |
| **Country** *Country* | Country the address is located in. |
| **Postal Code** *Text* | Postal code for the person. |
| **Email Opt Out** *Boolean* | Indicates whether the person has opted out of receiving emails. |
| **Status** *Text* | Status of the person in the sales lifecycle. |
| **First Name** *Text* | First name of the contact. |
| **First Name Suffix** *Text* | Suffix of the first name of the contact. |
| **Last Name** *Text* | Last name of the contact. |
| **Title** *Text* | Job title or position of the contact. |
| **Mobile Phone** *Text* | Mobile phone number of the contact. |
| **Work Phone** *Text* | Work phone number of the contact. |
| **Corporate Phone** *Text* | Corporate phone number of the contact. |
| **LinkedIn URL** *Text* | LinkedIn profile URL of the contact. |
| **Do Not Call** *Boolean* | Indicates whether the contact should receive phone calls or not. |
| **Do Not Email** *Boolean* | Indicates whether the contact should receive emails or not. |
| **EU Resident** *Boolean* | Indicates whether the contact is a resident of the European Union. |
| **Lead Source** *Text* | Channel this Person record was sourced from. |
| **Last Activity Date** *Date* | Date of the last activity or engagement with the contact. |
| **Unify Metadata** *Text* | A unique identifier useful for tracking records that Unify writes to. |
| **Unify Created At** *Date* | Date and time the record was created by Unify. This will only be populated if Unify created the record; otherwise, it will remain empty. |
| **Unify Updated At** *Date* | Date and time the record was last updated by Unify. |
| **Unify First Written At** *Date* | Date and time the record was first written to by Unify. This will be populated when Unify first creates or updates the record, and it will not change after that. |
| **Unify Initial Play** *Text* | Name of the first Unify Play that ran on this record. |
| **Unify Initial Play At** *Date* | Date and time the first Unify Play ran on this record. |
| **Unify Most Recent Play** *Text* | Name of the most recent Unify Play that ran on this record. |
| **Unify Most Recent Play At** *Date* | Date and time the most recent Unify Play ran on this record. |
| **Unify Initial Sequence** *Text* | Name of the first Unify Sequence this person was enrolled in. |
| **Unify Initial Sequence At** *Date* | Date and time this person was first enrolled in a Unify Sequence. |
| **Unify Initial Sequence Step At** *Date* | Date and time this person first completed a step in a Unify Sequence. |
| **Unify Most Recent Sequence** *Text* | Name of the most recent Unify Sequence this person was enrolled in. |
| **Unify Most Recent Sequence At** *Date* | Date and time this person was most recently enrolled in a Unify Sequence. |
| **Unify Most Recent Sequence Step At** *Date* | Date and time this person most recently completed a step in a Unify Sequence. |
| **Unify Most Recent Sequence Status** *Text* | Status of the most recent enrollment for this person. The statuses shown on enrollments in Unify are the same values that will be written to HubSpot. |
| **Unify Initial Reply Classification** *Text* | High-level classification of the initial reply received from a person. It will be either "Positive", "Objection", "Neutral", "Automated", or "Negative". |
| **Unify Most Recent Reply Classification** *Text* | High-level classification of the most recent reply received from a person. It will be either "Positive", "Objection", "Neutral", "Automated", or "Negative". |
| **Unify Initial Reply Tags** *Text* | Comma-separated list of classification tags of the initial reply received from a person. For example, "Ready to meet, Needs more information". |
| **Unify Most Recent Reply Tags** *Text* | Comma-separated list of classification tags of the most recent reply received from a person. For example, "Ready to meet, Needs more information". |
---
# Source: https://docs.unifygtm.com/reference/integrations/g2.md
> ## Documentation Index
> Fetch the complete documentation index at: https://docs.unifygtm.com/llms.txt
> Use this file to discover all available pages before exploring further.
# G2 Integration Guide
> Revealing anonymous visitors on your G2 profile.
# Overview
You can connect your G2 account to Unify to reveal anonymous visitors on your G2
profile, comparison pages, and more. These visitors can then be used to create
Audiences and Plays.
# Setup
To connect your existing G2 subscription to Unify, simply navigate to
[Settings -> Integrations -> G2](https://app.unifygtm.com/dashboard/settings/integrations/g2)
and enter your API token. Your API token can be found [here](https://my.g2.com/)
in the G2 dashboard. Once this is done, Unify will start using your G2 account
to identify visitors.
---
# Source: https://docs.unifygtm.com/reference/integrations/gmail.md
> ## Documentation Index
> Fetch the complete documentation index at: https://docs.unifygtm.com/llms.txt
> Use this file to discover all available pages before exploring further.
# Gmail Integration Guide
> This guide outlines how start sending and receiving emails via Gmail in Unify.
# Overview
Unify integrates with Gmail in order to send and receive emails in sequences. Once your mailbox is connected, you can start enrolling people in sequences and sending outbound emails.
# Connecting to Gmail
1. Go to [Settings -> Mailboxes](https://app.unifygtm.com/dashboard/settings/deliverability/mailboxes)
in Unify and select **New Mailbox**
2. After being redirected to Gmail's authorization page, select the mailbox you
want to connect and choose **Allow** to proceed
3. You will be redirected back to the mailbox settings page, where you can see
the status of your newly connected mailbox
---
# Source: https://docs.unifygtm.com/reference/integrations/google-tag-manager.md
> ## Documentation Index
> Fetch the complete documentation index at: https://docs.unifygtm.com/llms.txt
> Use this file to discover all available pages before exploring further.
# Google Tag Manager Integration Guide
> This guide outlines how to install the Unify website tag using Google Tag Manager.
# Overview
Unify provides several different ways to start collecting intent data from your
website. The quickest way to get started is by installing the Unify website tag
directly on your website.
If you're using Google Tag Manager, you can add the website tag as a custom HTML
tag. This allows you to manage all of your scripts in one place and easily
control when and where they are loaded.
# Installation
For instructions, see the [Website Tag](/developers/intent-client/website-tag)
installation guide.
---
# Source: https://docs.unifygtm.com/tutorials/how-to-create-a-play.md
> ## Documentation Index
> Fetch the complete documentation index at: https://docs.unifygtm.com/llms.txt
> Use this file to discover all available pages before exploring further.
# How to Create a Play
> Learn the fundamentals and build a Unify Play from start to finish.
export const PlayBuilderCompanyHandleDark = () => ;
export const PlayBuilderCompanyHandleLight = () => ;
export const PlayBuilderPersonListHandleDark = () => ;
export const PlayBuilderPersonListHandleLight = () => ;
export const PlayBuilderPersonHandleDark = () => ;
export const PlayBuilderPersonHandleLight = () => ;
## Overview
Plays are automated workflows that let you build and execute repeatable
strategies. In this guide, you'll learn the basics of how Plays work and create
one from scratch.
### What are Plays?
Building scalable and effective sales, marketing, and GTM strategies requires
successfully coordinating two key components:
* **Data**: Countless data sources go into building scalable automations. This
data is traditionally scattered across tools and databases, but Unify
centralizes it in one place.
* **Actions**: Researching companies, identifying decision-makers, executing
multi-channel outreach, and more. Taking the right action at the right time
is crucial to success.
Unify is a purpose-built system of action that solves this problem. Plays let
you define a series of actions that will be taken on companies or people at
exactly the right moment.
### Tutorial preview
One of the most popular use cases for Plays is to find prospects at companies
that are visiting your website and enroll them in outbound sequences. This is a
great example of a *warm outbound* campaign that targets key decision-makers
at companies showing buying intent.
In this guide, you'll create a Unify Play that runs on companies visiting your
website and performs the following actions:
1. **Prospect**: Find new people at the company that match your buyer personas.
2. **Sequence**: Enroll the new prospects in a sequence to send them emails.
3. **Sync to CRM**: Sync newly found people to Salesforce or HubSpot.
This standard Play is a great starting point to understand how Plays work and
kickstart your outbound strategy.
## Walkthrough
### Step 1: Create a new Play
Look for the [Plays](https://app.unifygtm.com/dashboard/plays) tab in the
sidebar and click on it. This is where you will create and manage all your
team's Plays. To create a new Play, click the **New Play** button.
### Step 2: Choose a trigger
Once you've created a new Play, you will see the Play Builder. The first step
when building any Play is to choose a *trigger*. The trigger lets you specify
exactly when the Play should run and which companies or people it should run on.
In the center of the builder, you will see an action that says **Select a trigger**.
Click on it to show the trigger configuration panel. For this Play, choose the
**Website visitors** template.
Here you have the option to further filter and refine the companies that this
Play will run on. For example, if you only want to run this Play on companies
with more than 100 employees, you can add a filter on **Employee Count**.
You can learn more about the available filters and how to use them in the tutorial
[How to Create an Audience](/tutorials/how-to-create-an-audience). You can always
return later to add or modify filters. Click **Done** to finish configuring the
trigger.
### Step 3: Add actions
Now that the trigger has been selected, it's time to start adding actions. There
are many actions to choose from, and you can configure them in countless ways.
For this Play, we're going to start simple and add three actions.
#### Prospect for people
Start by adding a prospecting action. This action will take the company coming
from the trigger and search for relevant prospects. Drag the **Prospect for People**
action from the action list and drop it into the builder.
If you drag and drop a new action on top of an existing action, it will
automatically be connected to it.
Once added, you will see the prospecting options shown in the configuration
panel on the left. Here are the most important selections to make:
* **Max. prospects per company**: This is how many prospects you want to find at
each company. We recommend starting with 2-4 prospects per company.
* **Personas**: These are the personas to search for. You can select from
existing personas or create new ones. Unify will find people matching these
personas in order, so list them in order of preference.
If you haven't defined any personas yet, you can learn how to do so in the
tutorial [How to Create Personas](/tutorials/how-to-use-personas).
#### Loop
Next, add a **Loop** action. The prospecting action will return a list of people
found at the company, and the loop will run subsequent actions once for each
person in the list.
Each action receives an input and produces an output. Actions in the Play
Builder have small colored symbols that represent what type of input and output
they expect.
Here's what each symbol represents:
| Symbol | | Value |
| :-------------------------------------------------------------------------: | - | :------------------------------------ |
| {}{} | | A single person record. |
| {}{} | | A list of one or more person records. |
| {}{} | | A single company record. |
Plays work by connecting each action's output to a matching input on another
action. This is how data flows through the Play and how each action knows what
to do.
Most actions run on one record at a time. The **Loop** action is how you take a
list of records and run actions on them one by one.
#### Sequence enrollment
Now place a **Sequence** action inside the loop. This will enroll each person
into a Unify Sequence.
Once you've dropped the action into the loop, you can drag it near the loop
action to automatically connect them. You can also manually draw connections
between the colored icons that represent action inputs and outputs.
Once added, you can configure the sequence enrollment action by routing personas
to the desired sequences and mailboxes. To speed up the process, click the
**Add prospect personas** button to automatically reuse all of the personas you
selected in the prospecting action.
#### Sync to CRM
Finally, add an action to sync each new person to your CRM. Depending on which
CRM you've connected in Unify, you will see either a **Sync to Salesforce** or
**Sync to HubSpot** action.
### Step 4: Publish and view logs
Once your Play is ready, click the **Publish** button in the top right corner of
the Play Builder. This will activate the Play and start running it on companies
that match the trigger criteria you defined earlier.
As the Play starts to run on companies, you will see them appear in the logs.
Click on the **Logs** tab at the top of the Play Builder to view the logs.
Click on any company to view the details of its run, including the exact actions
that were taken and the results of each action. Click on any action to view the
precise inputs, outputs, and result of that action.
## Conclusion
Congratulations on creating a Play! Combining website intent, prospecting, and
sequences into a single automated flow is a popular Play and an excellent
starting point.
For a comprehensive overview of Unify Plays, check out the reference guide:
Detailed reference guide that covers the fundamentals of plays, the actions
and triggers available to use, and more.
---
# Source: https://docs.unifygtm.com/tutorials/how-to-create-an-audience.md
> ## Documentation Index
> Fetch the complete documentation index at: https://docs.unifygtm.com/llms.txt
> Use this file to discover all available pages before exploring further.
# How to Create an Audience
> Create dynamic lists of companies and people to view and act on.
## What are Audiences?
In Unify, audiences are dynamic lists of companies and people that are generated
based on powerful filter criteria that you specify. Once defined, you can view and take
action on these companies and people in Unify.
Here are just a few examples of the
types of audiences you can define:
* Companies that have clicked on your pricing page in the past week
* People who have opened an email you sent them in the past month at least twice
without replying yet
* Champions for your business that have joined a new company matching your ICP
Typically, either sales leaders, revenue operations, or sales operations will
create the audiences to be used by sellers for building plays and taking action.
## Build a new audience
Access audiences by clicking on [Audiences](https://app.unifygtm.com/dashboard/audiences)
in the sidebar. You can view and edit existing audiences or create a new one by
selecting **New audience**.
Audience support a wide variety of filters. One of the most commonly used
options is to filter by fields in your CRM. To get started, click **Add condition**
and search for the field you want to filter by.
Another popular filter is website activity. You can filter by page views,
sessions, and visitors to your website. This is a great way to identify which
companies are showing interest in your business.
You can combine multiple filter criteria with **And** and **Or** groups to
build more complex audiences. For example, you might want to capture companies
that have visited your pricing page or that have filled out an inbound form.
The best way to to learn about the available filter options is to explore! As
you add and remove filters, the audience preview will update in real-time to
show the companies and people that match your criteria.
## Exclusions
Exclusions are a mechanism to prevent Unify from taking action on specific
companies or people. Common use cases for exclusions include preventing current
customers or competitors from appearing in your audiences or Plays.
Once you've defined exclusions, they will be automatically applied to all
audiences by default. Sometimes, you may want to disable an exclusion for a
specific audience. This can be done from the audience configuration page under
the **Advanced** section.
For more information on creating exclusions, see [How to Create an Exclusion](/tutorials/how-to-create-an-exclusion).
## What's next?
Audiences can be used for a variety of purposes, including building plays and
subscribing to Slack alerts. For more information, check out these tutorials:
Create a Play that runs on companies or people in an audience.
Receive Slack alerts when a new company or person enters an audience.
---
# Source: https://docs.unifygtm.com/tutorials/how-to-create-an-exclusion.md
> ## Documentation Index
> Fetch the complete documentation index at: https://docs.unifygtm.com/llms.txt
> Use this file to discover all available pages before exploring further.
# How to Create an Exclusion
> Prevent Unify from actioning on specific companies or people.
1. Excluding current customers
2. Exclude people who have unsubscribed from outbound campaigns
## How to create an exclusion
Let’s walk through how to exclude all Active Salesforce accounts.
### 1. Go to Exclusions in Settings
Navigate to [Settings > Exclusions](https://app.unifygtm.com/dashboard/settings/organization/exclusions) and click `New exclusion`
## 2. Select Companies or People
Select `Companies` in this case
## 3. Define criterion to filter
In this example, we’re creating an exclusion called `Current Customers` that excludes companies with Salesforce `Account Status` equal to `Active`
## 4. Hit Save
Here you’ll see an overview of your new exclusion. These lists will automatically be excluded from targeting.
## Upload exclusions from a CSV
Let's walk through how to set up an exclusion using a CSV of companies or people.
### 1. Create a column in your CSV called "Status"
Populate the "Status" column with the same value across all the rows in your CSV. This value usually indicates the type of contact you are excluding. Examples can include "Active Customer", "Competitor", etc.
### 2. Upload these contacts in the companies or people tab
If you're uploading companies, you'll need to include both the company name and domain. If you're uploading people, you'll need to include one of the following set of fields:
* Email
* First Name, Last Name, and Company Domain
* LinkedIn URL
### 3. Map the CSV fields to the Unify fields
You'll select the fields you want to map into Unify. Make sure to select "Status" field from Unify when mapping that same column from your CSV. The Unify "Status" field should then populate with the values you populated in the CSV under the column. Once these are mapped, you can finish the upload.
### 4. Create a new exclusion and add the "Status" field in the conditions
You'll then switch over into the "Exclusions" tab in your settings and create a new exclusion. Under either the people or companies filters, you will select the Unify status column and add the value from your CSV (i.e. "Active Customer"). Once you save this exclusion, this list should be excluded from future audiences and Plays moving forward!
***
Note that if you would like to add more companies or contacts to this exclusion list in the feature, you'll need to follow the same process as above and make sure the "Status" field is correctly mapped. This should automatically pull in the new exclusion after uploaded if the "Status" value is the same value in the filter.
---
# Source: https://docs.unifygtm.com/tutorials/how-to-receive-slack-alerts.md
> ## Documentation Index
> Fetch the complete documentation index at: https://docs.unifygtm.com/llms.txt
> Use this file to discover all available pages before exploring further.
# How to Receive Slack Alerts
> Receive real-time Slack alerts when companies or people enter an audience.
## Audience Entry Alerts
When a new entry is added to the audience, a notification will be sent to the selected Slack channel.
### Enabling
1. Go to the audience page and click on `Enable alert`.
2. Choose a channel from the dropdown menu.
3. After selecting a channel, click on `Enable`.
### Disabling
1. Go to the audience page and click on `Enabled`.
2. Click on `Disconnect`.
---
# Source: https://docs.unifygtm.com/tutorials/how-to-use-personas.md
> ## Documentation Index
> Fetch the complete documentation index at: https://docs.unifygtm.com/llms.txt
> Use this file to discover all available pages before exploring further.
# How to Define Personas
> Create personas to prospect and reach out to your ideal buyers.
## Overview
Personas are collections of job titles that you want to target. Each persona
consists of a list of titles that you want to include and exclude. Personas can
be used throughout Unify, such as when prospecting or routing people to
different sequences.
## Create a persona
Navigate to the [Personas](https://app.unifygtm.com/dashboard/settings/personas) tab in
the sidebar and select **New persona**. Here you can add job titles that you
wish to include or exclude when matching people against this persona.
You can also take advantage of AI-powered persona generation to automatically
find and add similar job titles to your persona. This lets you quickly define
comprehensive personas that match different variations of a job title.
Once you've added all the titles you want to include or exclude, click **Create
persona** to save your changes. This persona will now be available for use
throughout Unify.
## Title matching behavior
When evaluating whether a person's job title matches a persona, Unify adheres to
the following rules and heuristics:
* **Ignore capitalization**: For example, "RevOps Lead" and "Revops lead" are
considered equivalent.
* **Ignore punctuation**: For example, "Enterprise Sales, Lead" and "Enterprise
Sales Lead" are considered equivalent.
* **Ignore word order**: For example, "Lead Sales Engineer" and "Sales Engineer,
Lead" are considered equivalent.
* **Ignore extraneous words**: For example, "CEO" and "CEO and Founder" are
considered equivalent.
That means that you don't need to exhaustively list every possible variation of
a job title in your persona. Instead, you can focus on the most common keywords
and let Unify handle the details.
---
# Source: https://docs.unifygtm.com/reference/integrations/orum/hubspot-setup.md
# Source: https://docs.unifygtm.com/reference/integrations/nooks/hubspot-setup.md
> ## Documentation Index
> Fetch the complete documentation index at: https://docs.unifygtm.com/llms.txt
> Use this file to discover all available pages before exploring further.
# Nooks HubSpot Setup
> Configure Nooks integration with HubSpot for seamless call task management.
# HubSpot Setup for Nooks Integration
This guide walks you through how to set up the Nooks integration with HubSpot to synchronize call tasks.
## Prerequisites
Before you begin, make sure you have:
* Admin access to your HubSpot account
* An active Nooks subscription
## Setup Steps
1. **Admin**: Map users to their Hubspot profiles. Make sure your team has the proper permissions in your Hubspot to be able to create sequences, tasks or lists for themselves (If managers/admins are creating sequences and lists, this can be disregarded)
2. Create or Edit your Call Outcomes
3. Set up automation rules and/or filters to ensure proper hygiene and activities against your contacts.
For detailed step-by-step instructions, see [setup guide](https://support.devrev.ai/nooks/article/ART-120-getting-started-with-hubspot).
## Next Steps
With your HubSpot integration configured and Nooks connected, you're ready to [launch your first call campaign](/reference/integrations/nooks/call-campaigns)!
---
# Source: https://docs.unifygtm.com/reference/browser-extension/hubspot.md
> ## Documentation Index
> Fetch the complete documentation index at: https://docs.unifygtm.com/llms.txt
> Use this file to discover all available pages before exploring further.
# HubSpot
> Run the Unify Chrome extension in HubSpot.
While viewing Companies and Contacts in HubSpot, the extension will
automatically surface the corresponding Companies and People in Unify.
## HubSpot Company Page
From this view, you can view People in your Unify instance who work at this Company (and add
them to a Sequence) or instantly add this Company to a Play of your choosing.
## HubSpot Contact Page
From this view, you can check if this Person is currently enrolled in a Unify Sequence.
If they are not already enrolled, you can enroll them from here using any mailbox or
mailbox group in Unify. Additionally, you can instantly add this Person to any of the
Plays you’ve built. See more info on building Plays in Unify [here](/reference/plays/overview).
---
# Source: https://docs.unifygtm.com/reference/browser-extension/installation.md
> ## Documentation Index
> Fetch the complete documentation index at: https://docs.unifygtm.com/llms.txt
> Use this file to discover all available pages before exploring further.
# Introduction
> Get started with the Unify Chrome extension.
export const SalesforceLogo = () => ;
export const HubspotLogo = () => ;
export const ChromeLogo = () => ;
Unify offers a native Chrome extension.
Some notable features of the extension include the ability to:
* View details about any Company or Person in your Unify instance
* Enroll People into Sequences
* Add Companies and People to Plays
* Add People to Unify through enrichment
* Manually add new Companies and People to Unify
## Installation
} href="https://chromewebstore.google.com/detail/unify/badmdkkfomlfkcbjegcfjaoeegifdbmm" arrow="true" />
## Usage
The extension can be used anywhere on the web. Let's explore a few examples:
Lookup Companies in Unify and add them to Plays as soon as you discover them
on the web.
} href="/reference/browser-extension/salesforce">
Surface the corresponding Company or Person in Unify for Accounts, Contacts,
& Leads in Salesforce.
} href="/reference/browser-extension/hubspot">
Surface the corresponding Company or Person in Unify for Companies &
Contacts in HubSpot.
---
# Source: https://docs.unifygtm.com/best-practices/introduction.md
> ## Documentation Index
> Fetch the complete documentation index at: https://docs.unifygtm.com/llms.txt
> Use this file to discover all available pages before exploring further.
# Best Practices
> Unify's recommendations for high-performance GTM.
export const SequencesIcon = ({size = 24}) => ;
export const PlaysIcon = ({size = 24}) => ;
} href="/best-practices/plays">
Learn how to use Plays effectively to automate your outbound.
} href="/best-practices/deliverability">
Design your Sequences to maximize response rates and deliverability.
---
# Source: https://docs.unifygtm.com/developers/intent-client/js-client.md
> ## Documentation Index
> Fetch the complete documentation index at: https://docs.unifygtm.com/llms.txt
> Use this file to discover all available pages before exploring further.
# JavaScript Client
> Install the Unify Intent client in a frontend web application framework.
## Installation
You can install the Unify Intent JS Client with your preferred package manager:
```shell npm theme={null}
npm install @unifygtm/intent-client
```
```shell yarn theme={null}
yarn add @unifygtm/intent-client
```
```shell pnpm theme={null}
pnpm add @unifygtm/intent-client
```
## Usage
After installing the client, you must initialize it in your application code:
You should only initialize the client one time in your application.
```ts index.ts theme={null}
import { UnifyIntentClient, UnifyIntentClientConfig } from '@unifygtm/intent-client';
const writeKey = 'YOUR_PUBLIC_API_KEY';
const config: UnifyIntentClientConfig = {
autoPage: true,
autoIdentify: false,
};
const unify = new UnifyIntentClient(writeKey, config);
// Do not call mount during server side rendering. Only call it in a browser context.
unify.mount();
```
You can then use the resulting client instance to log intent data. See the
[Client Spec](./client-spec) for more details on how to use the client.
## Cleanup
When you are done using the client, if you wish to clean up the side effects
generated by it, you can do so with the `unmount` method:
```ts cleanup.ts theme={null}
import { UnifyIntentClient, UnifyIntentClientConfig } from '@unifygtm/intent-client';
const writeKey = 'YOUR_PUBLIC_API_KEY';
const unify = new UnifyIntentClient(writeKey);
unify.mount();
// Use the client for some time, then later...
unify.unmount();
```
---
# Source: https://docs.unifygtm.com/reference/integrations/salesforce/lead-assignment-rules.md
> ## Documentation Index
> Fetch the complete documentation index at: https://docs.unifygtm.com/llms.txt
> Use this file to discover all available pages before exploring further.
# Toggle Lead Assignment Rules in Salesforce
> Troubleshoot a common bug in Salesforce related to lead assignment rules.
## Explanation
Salesforce allows you to create "lead assignment rules" that automatically assign different owners to leads depending on custom criteria. However, sometimes these rules don’t work right off the bat due to a specific bug in Salesforce. The steps outlined here should resolve the issue.
## Steps
### Ensure you have an active lead assignment rule
Navigate to the **Setup** page in Salesforce by clicking the settings icon in the top-right corner of any Salesforce page.
Search for **Lead Assignment Rules** in the sidebar.
You should see at least one rule with a checkmark under the **Active** column.
### Toggle the rule off and on
In the **Lead Assignment Rules** page from the previous step, click on the name of your rule and then select **Edit**. Uncheck the checkbox next to **Active** to temporarily deactivate the rule.
Click **Save**. Then click **Edit** again, re-check the checkbox next to **Active**, and then choose **Save**.
### Test that leads are assigned correctly in the UI
Navigate to the **Leads** page in Salesforce. You can get there via the app launcher.
In the top-right corner of the screen, select **New** to create a new lead.
Check the **Assign using active assignment rule** checkbox in the lower-left corner.
Fill out the required lead fields with values that should trigger the lead assignment rule you created and then click **Save** in the bottom-right corner.
Lastly, verify that the lead was assigned to the correct owner.
---
# Source: https://docs.unifygtm.com/reference/signals/lookalike-companies.md
> ## Documentation Index
> Fetch the complete documentation index at: https://docs.unifygtm.com/llms.txt
> Use this file to discover all available pages before exploring further.
# Lookalike Companies
> Find companies similar to your most successful customers.
## Overview
We’ve partnered with [Ocean.io](https://www.ocean.io/) — a leading Lookalike data provider — so you can run automated Plays that target lookalikes of your most successful customers.
The integration is fully managed by Unify and included in your plan, so no additional subscription or setup is required.
## Setup
### Build a new Play
Start by setting up a new Play using the Find Lookalike Companies trigger. You can also get started with our [pre-built template](https://app.unifygtm.com/dashboard/plays?templateType=SEQUENCE_LOOKALIKE_COMPANIES).
### Configure the Trigger
First, configure the seed companies you want to find lookalike companies for. You can do this by adding filters to select companies that meet your criteria,
just like building audiences.
Next, configure the lookalike companies you want to find for each seed company.
You can set the number of lookalike companies per seed company, minimum relevance score, and more.
The previews on the right will show you a sample of the lookalike companies that will be found based on your configuration.
Build the rest of your Play as you need, then click Publish to begin finding lookalike companies and running them through your Play.
Learn more about building Plays [here](/reference/plays/overview).
## Frequently Asked Questions
Find your lookalike company in the Play Logs.
Click the Trigger node to see details like the seed company and the relevance score.
Depending on the number of seed companies the Play is running on, it can take up to several hours for Play Logs to appear.
Nope! Lookalike companies that fall under your exclusion rules will not run through the Play, and you will not be charged for them.
---
# Source: https://docs.unifygtm.com/reference/deliverability/mailbox-configuration.md
# Mailbox Configuration
> Provision Unify-managed mailboxes for your team to send from.
## Mailbox registration and ownership
Once your domain is verified and activated you can start setting up mailboxes in Unify. When setting up a mailbox you will provider the names of your senders to your CSM. Unify will choose then create email mailboxes for you (e.g. `jane@mybusiness.io`).
#### Sending emails
Through the Unify Sequencing product you will be able to send emails using your Unify managed mailboxes. The email signature and display name will be pulled from the owning user. Unify will automatically schedule your emails and manage the sending volume across your mailboxes.
#### Receiving emails
Replies to [`jane@mybusiness.io`](mailto:jane@mybusiness.io) will be forwarded to the user that owns the mailbox. For example, email replies sent to the Unify managed mailbox [`jane@mybusiness.io`](mailto:jane@mybusiness.io) will be forwarded to `Jane Doe's` primary email [`jane@mybusiness.com`](mailto:jane@mybusiness.com).
## Mailbox warmup
When a mailbox is created we will automatically start warming the mailbox to ensure high deliverability. Warming works by automatically sending emails to emails in a “warming network”. These emails will be automatically opened and replied to. If the warming emails land in the spam folder they will be taken out of the spam folder (a so called "spam rescue"). This tells the email service providers that your emails are high-quality and thus your deliverability improves. We continuously monitor the warmup process and after 3 weeks it will complete and your mailboxes will be ready to send. Once your mailboxes are warmed, we will send up to 65 emails per mailbox per day. By default, our send times are set to 9 AM - 4 PM PT on business days.
## Secondary forward
There are situations (such as vacation cover) where you need a second user to monitor an inbox of another user. You can set up a "Secondary forward" user. This user will receive a copy of all the replies sent to the mailbox. For example, if `John Doe` is helping `Jane Doe` out during her vacation, all emails sent to [`jane@mybusiness.io`](mailto:jane@mybusiness.io) will be forwarded to [`john@mybusiness.com`](mailto:john@mybusiness.com) (John's primary email). If you would like a secondary forwarding user set up on your Unify managed Gmail mailboxes, please contact [support@unifygtm.com](mailto:support@unifygtm.com) or your CSM.
---
# Source: https://docs.unifygtm.com/reference/sequences/manual-steps.md
> ## Documentation Index
> Fetch the complete documentation index at: https://docs.unifygtm.com/llms.txt
> Use this file to discover all available pages before exploring further.
# Manual Sequence Steps
> Bring human-in-the-loop actions to your Unify Sequences.
export const PhoneCallIcon = ({size = 24}) => <>
;
export const ManualEmailIcon = ({size = 24}) => <>
;
export const ActionItemIcon = ({size = 24}) => <>
;
Manual steps allow you to layer manual emails, phone calls, action items, and social touches into your Unify Sequences.
## Adding Manual steps to Sequences
In the Sequence Builder, click the `+` button to add a step and choose from the following options:
} href="#manual-email-steps">
Create an email that must be manually queued to send from Unify
} href="#phone-call-steps">
Create a task to call the prospect.
} href="#action-item-steps">
This will create a task to perform some generic action.
Each time a prospect runs through the Sequence, a corresponding task will be created in your Task Dashboard for each manual step.
## Manual email steps
Just like automated emails, manual email steps can be composed using
[template variables](/reference/sequences/template-variables)
or [snippets](/reference/sequences/smart-snippets). You can set the priority of
the task that will be created for the step and who to assign the task to.
## Phone call steps
Phone call steps can include notes that will appear on the call task once created.
[Template variables](/reference/sequences/template-variables) and
[snippets](/reference/sequences/smart-snippets) can be used to customize the notes.
## Action item steps
Action item steps can include notes that will appear on the task once created. These notes
can be used to generate instructions for the user to complete the task or simply contain information
about the prospect. [Template variables](/reference/sequences/template-variables) and
[snippets](/reference/sequences/smart-snippets) can be used to customize the notes.
---
# Source: https://docs.unifygtm.com/reference/signals/new-hires.md
> ## Documentation Index
> Fetch the complete documentation index at: https://docs.unifygtm.com/llms.txt
> Use this file to discover all available pages before exploring further.
# New Hire Tracking
> Automatically track new hires at companies and take action.
## What is New Hire Tracking?
A new hire is someone who has recently started a job at a new company within the past 90 days.
New Hire Tracking helps you identify and monitor individuals who have recently joined companies that align with your target profile. These new hires often play pivotal roles in shaping change within their organizations, making them valuable opportunities for outreach.
These are not people in your current Unify instance, they are net new prospects, meaning that they have not already been sourced through CRM integration, website intent, or uploaded manually.
By using New Hire Tracking, you can apply specific filters to define your target companies and personas, automatically keeping track of new hires at these organizations.
### Why is this a valuable signal?
New hires signify organizational shifts and often catalyze new purchasing decisions, presenting valuable opportunities for strategic outreach.
### How does New Hire Tracking work?
Once activated, Unify scans for new hires that match your selected personas at your target companies, delivering their contact details to you daily. Your target personas and companies can be customized to include or exclude specific job titles, industries, company size, and location. This enables you to build a dynamic, up-to-date list of key contacts for your team to engage through Audiences.
New hires will not track existing contacts synced over from your CRM today. If enabled, Champion Tracking will be tracking when contacts from existing customers change jobs. For more information, see the [Champion Tracking section](/reference/signals/champions).
Each tracked new hire costs two credits, regardless of whether the lead has been routed or engaged.
To view tracked new hires, navigate to the “New Hires” tab in the New Hire Tracking Settings.
### Setting Up New Hire Tracking
Define the personas and companies you want to track, then follow the steps below to get started.
#### How to Enable
1. In the Unify app, go to [Settings -> Track -> New Hires](https://app.unifygtm.com/dashboard/settings/new-hire-tracking).
2. Click the toggle at the top of the page to open the New Hire Tracking Settings.
3. Apply filters to fine-tune your new hire tracking. For best results, use all available filters to narrow down the most relevant target companies and personas.
4. Click `Enable New Hire Tracking`. Unify will begin tracking new hires daily from this point forward.
#### How to Disable
1. In the Unify app, go to [Settings -> Track -> New Hires](https://app.unifygtm.com/dashboard/settings/new-hire-tracking).
2. Click the toggle and select `Disable` to stop tracking new hires. Previously detected job changes will remain visible, but new hires will no longer be tracked.
### Acting on New Hires
When Unify identifies a new hire, you can immediately add these contacts to audiences and run Plays on them. Similar to setting up Plays to capture website intent or retarget CRM opportunities as they’re added, you can create Plays that consistently capture and engage with new hires added by Unify!
#### New Hire Tracking in Audience Filters
In the Audience Builder, you can add filters to focus on new hires.
These audiences can be linked to Plays, sequences, or Slack alerts, allowing you to automate workflows based on new hire data.
Here’s an example of filters used to track all new hires:
### Frequently Asked Questions
#### How can I get Slack notifications for new hires?
Create an audience for new hires, then enable Slack alerts for that audience to receive real-time notifications.
#### How do I stop tracking new hires?
Click the toggle to disable new hire tracking. Previously detected job changes will remain visible, but new hires will no longer be tracked.
#### Can I track new hires in a specific industry?
Yes, you can filter new hires by industry.
#### Can I track new hires by country?
At the moment, you can track new hires based on the location of their company. We’re actively working on expanding this feature to allow tracking new hires based on their individual country of residence.
#### How are you selecting the new contacts added to Unify?
We identify ideal new hire prospects who have changed roles within the last 90 days, using a combination of job title, company size, and industry. These prospects are then selected through a randomized process.
---
# Source: https://docs.unifygtm.com/getting-started/onboarding-guide.md
> ## Documentation Index
> Fetch the complete documentation index at: https://docs.unifygtm.com/llms.txt
> Use this file to discover all available pages before exploring further.
# Onboarding Guide
> Complete a few key steps to fully activate on Unify.
export const UnifyLogoLight = () => ;
export const UnifyLogoDark = () => ;
export const SixsenseLogoLight = () => ;
export const SixsenseLogoDark = () => ;
export const SegmentIcon = () => ;
export const SalesforceLogo = () => ;
export const PlaysIcon = ({size = 24}) => ;
export const PersonasIcon = ({size = 24}) => ;
export const OutlookLogo = () => ;
export const HubspotLogo = () => ;
export const GoogleWorkspaceLogo = () => ;
export const GmailLogo = () => ;
export const ExclusionsIcon = ({size = 24}) => ;
export const ClearbitLogo = () => ;
Connect Unify to your website traffic to start revealing visitors. There are several supported methods of integrating your website with Unify:
Add the Unify JavaScript snippet to your website with minimal setup.
For full customizability, install the Unify Intent client in your web app.
} horizontal>
Connect your existing Segment subscription to send traffic to Unify.
Typically this integration is owned by engineering or marketing.
Turn on website intent data so that you start revealing the companies behind anonymous website traffic. Unify provides intent data out of the box with no configuration required:
}
horizontal
>
Enable high-coverage website identification in just a few clicks. Unify Intent
combines multiple data sources to achieve best-in-class coverage.
Connect your CRM of choice to begin running plays on your existing data, finding new prospects, tracking champions, and more:
} horizontal>
Connect your Salesforce instance.
} horizontal>
Connect your HubSpot CRM.
Typically this integration is owned by a sales leader or sales/revenue operations team.
Unify provides several ways of setting up mailboxes to start sending emails. If
you have existing mailboxes, you can connect them in only a few clicks.
} horizontal>
Connect Gmail mailboxes.
You're ready to start using Unify! We recommend checking out some of the [Tutorials](/tutorials).
Here are a few of the most popular starting points:
} href="/tutorials/how-to-create-an-exclusion">
Prevent Unify from actioning on specific companies or people.
} href="/tutorials/how-to-use-personas">
Create personas to prospect and reach out to your ideal buyers.
} href="/tutorials/how-to-create-a-play">
Learn the fundamentals and build a Unify Play from start to finish.
You can also check out the [official YouTube channel](https://www.youtube.com/@Unifygtm)
where there are a number of video tutorials covering everything from the basics
to sophisticated growth campaigns.
---
# Source: https://docs.unifygtm.com/reference/management/organization-settings.md
> ## Documentation Index
> Fetch the complete documentation index at: https://docs.unifygtm.com/llms.txt
> Use this file to discover all available pages before exploring further.
# Organization Settings
> Configure your organization within Unify.
Users with suffient permission can configure their organization settings within Unify. There are a variety of available configuration options, including:
* **Company name**: The name of your organization.
* **Managed signature**: A standardized email signature to be included in all outbound emails sent by Unify users. This is a template that will dynamically construct each signature based on the user's profile information.
* **Custom user fields**: Additional fields that can be set for each user profile. These values can then be used with other Unify features, such as email signatures and snippets.
You will find these options within [Settings](https://app.unifygtm.com/dashboard/settings/organization/general).
---
# Source: https://docs.unifygtm.com/reference/signals/overview.md
# Source: https://docs.unifygtm.com/reference/sequences/send-schedules/overview.md
# Source: https://docs.unifygtm.com/reference/sequences/overview.md
# Source: https://docs.unifygtm.com/reference/plays/overview.md
# Source: https://docs.unifygtm.com/reference/overview.md
# Source: https://docs.unifygtm.com/reference/notifications/overview.md
# Source: https://docs.unifygtm.com/reference/integrations/salesforce/overview.md
# Source: https://docs.unifygtm.com/reference/integrations/overview.md
# Source: https://docs.unifygtm.com/reference/integrations/orum/overview.md
# Source: https://docs.unifygtm.com/reference/integrations/nooks/overview.md
# Source: https://docs.unifygtm.com/reference/integrations/hubspot/overview.md
# Source: https://docs.unifygtm.com/reference/ai-research/overview.md
# Source: https://docs.unifygtm.com/reference/agents/overview.md
# Source: https://docs.unifygtm.com/developers/intent-client/overview.md
> ## Documentation Index
> Fetch the complete documentation index at: https://docs.unifygtm.com/llms.txt
> Use this file to discover all available pages before exploring further.
# Intent Client Overview
> Learn how to start collecting website intent data in Unify.
Buyer intent data is at the core of what makes Unify tick. The easiest way to
start collecting this data is by installing the Unify Intent client on your
marketing website or web app.
# How it works
The Unify Intent client is a JavaScript library that allows you to collect
events from your website and send them to Unify. It currently supports Page and
Identify events. Track events are coming soon.
e.g. a user visits the pricing page of your marketing website
e.g. a user logs into your web application with their email address
e.g. a user clicks a button to open a pricing calculator modal
When you install the Unify Intent client on your website, it can automatically
start collecting these events and sending them to Unify. You can also customize
this behavior by sending events manually using the client's API.
The Unify Intent client is fully open source and available on [GitHub](https://github.com/unifygtm/intent-js-client).
# Installation
There are several different ways to install the Unify Intent client on your
website. Choose the one that best suits your use case:
Quickly set up the Unify Intent client on a static marketing website.
Install the Unify Intent client in a React app.
Install the Unify Intent client in a different frontend web application
framework.
If you aren't sure, we recommend starting with the **Website Tag** installation
method. This is the simplest way to get started and all you need for most
marketing websites.
# Usage
If you install the client using the **React Library** or **JavaScript Client**
methods, see our [Usage Guide](/developers/intent-client/client-spec) to learn
how to use the client and start adding events.
---
# Source: https://docs.unifygtm.com/best-practices/plays.md
> ## Documentation Index
> Fetch the complete documentation index at: https://docs.unifygtm.com/llms.txt
> Use this file to discover all available pages before exploring further.
# Best Practices: Plays to Book You Meetings
## Section 1: Best Practices
Unify is a sales engagement platform designed to help you generate pipeline. To ensure that you see the best results, we recommend a few general principles:
* **Act Quickly:** Act on intent signals within 24-48 hours to catch prospects before they make their decision. Intent gets stale quickly.
* **Engage with Every Lead:** Once you define your ICP in Unify, avoid selective outreach. Avoid introducing bias into how you prospect.
* **Multiple Touchpoints:** If you’ve found that a channel works best for your team, use Unify to lean into that. Unify excels at email - if that’s your preferred channel, great. If not, use email in addition to social or phone outreach. See section 4 below to see our recommendations for email and social outreach.
## Section 2: Actioning on Intent
There are two primary ways to act on intent data in Unify:
### Automatic Plays
* **When to use:** Both for low and high volume signals. Plays automate prospecting, qualifying, sequencing, and syncing leads to your CRM.
* **Benefits:** Reduce friction and improve intent to meeting booked conversion by immediately actioning on leads.
* Learn more about how to build Plays in [How to Create a Play](/tutorials/how-to-create-a-play).
### Manual Alerts
* **When to use:** Ideal for low volume, high value signals. It's important to ensure the sales team is accountable for acting on alerts to ensure hot leads don’t slip through the cracks.
* **Benefits:** Immediate and contextual information delivered to where your team is working.
* Most reps use Slack alerts to trigger manual workflows. Learn how to set these up in our [Slack Integration Guide](/reference/integrations/slack#slack-integration-guide)
## Section 3: Intent-Based Plays
Intent signals are indicators that there’s an opportunity to sell your product or book an intro meeting. Our customers have seen success with these intent-based Plays:
1. **Pricing Page Visits:** Checking out pricing pages indicates that prospects are seriously considering a purchase decision.
2. **[Repeat Buyers](https://www.unifygtm.com/plays/champion-tracking---outbound-to-past-customers-who-have-moved-jobs):** When someone you’ve sold to before is back on the website demonstrating high intent. This works well for businesses that have more transactional sales.
3. **[Inbound Form Submissions](https://www.unifygtm.com/plays/outbound-to-website-form-submitters):** A form submission is one of the strongest signs of intent. Convert those leads immediately by automating outreach as soon as they submit.
4. **[New Hires](https://www.unifygtm.com/plays/outbound-to-people-who-have-started-jobs-at-a-new-company):** People are more likely to purchase new tools in their first few months on a job. Targeting your ICPs that have just changed jobs can convert better.
5. **[Support Docs](https://www.unifygtm.com/plays/outbound-to-contacts-viewing-your-technical-docs):** Interest in support docs (e.g., integration details), suggests prospects are trying to understand how your product works and if it would work for them.
6. **[Product Tour Visits](https://www.unifygtm.com/plays/outbound-to-people-who-view-your-product-demo):** Interest in demo videos or product tours indicates a desire to understand specific product offerings in more granularity.
7. **[Retarget Paid Traffic](https://www.unifygtm.com/plays/retarget-paid-traffic):** Get more out of your spend on paid traffic by retargeting people based on UTM filters.
8. **[Closed-Lost Opportunities](https://www.unifygtm.com/plays/retarget-closed-lost-opportunities-when-they-revisit-website):** A revisit to your site by a closed-lost opportunities signals the prospect might be interested in re-engaging.
## Section 4: Section 4: Nailing Email or Social Outreach
Nailing email and social messages is key to booking the most possible meetings from Unify. A few guiding principles:
1. **Use Soft Messaging:** Use your judgement, but we typically recommend against direct mentions of website activity. Instead, tailor messages to address the pain points related to the product or service they showed interest in.
2. **Keep It Short:** Many senior leaders at your target accounts read emails on their phones, concise messages under 100 words are more likely to be read and understood. Remember that people are skimming emails.
3. **Persona-Specific Messaging:** Address specific pain points and perspectives of the different personas you sell to (e.g., sales and marketing for us). Avoid generic messages that try to cater to multiple personas, as they may resonate with none.
4. **Focus on One Product:** If you sell multiple products, pitch one per email. This approach minimizes the chances that your prospect gets confused about what you solve.
5. **Highlight Relevant Pain Points:** Rather than pitching your product, focus on speaking to a specific challenge or pain point that your prospect has. Educate the prospect on your product once you’re on the phone with them.
---
# Source: https://docs.unifygtm.com/reference/notifications/preferences.md
> ## Documentation Index
> Fetch the complete documentation index at: https://docs.unifygtm.com/llms.txt
> Use this file to discover all available pages before exploring further.
# Notification Preferences
> Set how you want to be notified for updates and activities on Unify.
export const WillingToMeetIcon = ({size = 24, inline}) => ;
export const PositiveToneIcon = ({size = 24, inline}) => ;
export const OutOfOfficeIcon = ({size = 24, inline}) => ;
export const NeedsMoreInfoIcon = ({size = 24, inline}) => ;
export const NeutralToneIcon = ({size = 24, inline}) => ;
export const AutomatedIcon = ({size = 24, inline}) => ;
Notification preferences allow you to control how and when you receive alerts for replies, tasks, and updates.
Preferences are divided into two categories: **Workspace notifications** (team-level notifications available for admins) and
**my notifications** (personal notifications available for all users).
## Workspace Notifications
Workspace notifications are only available to users with the **Admin** role.
Workspace notifications allow admins to have visibility into any notification for any team member, ensuring admins stay informed about important updates
across the team.
### Workspace Replies
Receive notifications when prospects reply to any Sequence. Admins can customize which reply classifications trigger notifications and choose where to receive them.
#### Reply Classifications
By default, the following reply classifications can be configured.
* **Positive** — The email response shows enthusiasm, agreement, or active engagement with the sender's offer, indicating a genuine interest in moving forward
* **Willing to meet** — The recipient's email indicates their openness to schedule a meeting, specifically about the offer mentioned in the initial outreach
* **Needs more info** — The recipient requests additional details or expresses uncertainty about the offer
* **Neutral** — The email is objective, factual, respectful, unemotional, and polite yet concise
You can add additional classifications if you want to receive notifications for other types of replies. For example, if you want to be notified
about **Out of Office** replies, you can add that classification in your settings.
See [Reply Classifications](/reference/sequences/replies#reply-classifications) for detailed definitions of all classification types.
#### Excluding Classifications
Some replies can have multiple classifications. You can exclude specific classifications from triggering notifications. **If a reply has any excluded classification, no notification will be sent**, even if it also has other classifications that would normally trigger an alert.
Common exclusions include:
* **OOO** (Out of Office) — Automated away messages
* **Automated** — Auto-responders and system-generated replies
### Workspace Tasks and Updates
Receive notifications for all tasks and updates created for anyone on your team. This allows admins to stay informed about task assignments and progress across the organization.
## My Notifications
Personal notifications are available to all users (both Admins and Reps) and allow you to manage alerts specific to you.
### Connecting Your Slack Account
To receive Slack notifications, you need to connect your personal Slack profile to Unify.
Admins must configure their tenant's connection to Slack before users can select their profiles.
Click on the Slack profile selector to connect your account. Slack notifications will be sent directly to your Unify Slack app.
If you don't see your Slack profile in the dropdown, or if the options are disabled,
make sure the Unify Slack app is installed in your workspace and you've been added to it.
### My Tasks and Updates
Receive notifications for tasks assigned to you and updates on those tasks.
**Notification channels:**
* **Slack** — Direct messages in Slack (requires Slack profile connection)
* **In app** — Notifications in the Unify notification feed
## Notification Channels
Unify supports two notification channels:
| Channel | Description | Requirements |
| ---------- | ------------------------------------------------- | ---------------------------------------------------- |
| **Slack** | Receive notifications as direct messages in Slack | Must connect your Slack Organization / Slack profile |
| **In app** | View notifications in the Unify notification feed | No setup required |
You can enable either or both channels for each notification type.
## Default Settings
All new users are configured with default notification preferences upon onboarding.
You can customize these settings at any time from the notification preferences page.
---
# Source: https://docs.unifygtm.com/best-practices/prompting.md
> ## Documentation Index
> Fetch the complete documentation index at: https://docs.unifygtm.com/llms.txt
> Use this file to discover all available pages before exploring further.
# Best Practices: Writing AI Prompts
## Section 1: General Tips
Unify has multiple AI features that can be used to improve qualification and outreach outcomes. To set yourself up for success, we recommend a few general principles for prompting when using these features:
* **Clear Instructions:** Be explicit about what you want the AI to do. Providing a clear set of instructions will help the AI understand what you want to accomplish and what steps to follow to complete the task(s).
* **Length =/= Quality:** Writing an overly detailed or essay length prompt does not mean that the AI will provide a better response. Excessive information can be detrimental unless it is properly structured and explained, as it can lead to confusion and misinterpretation of the prompt.
* **Provide Context:** Assume AI does not know your industry, company, or product as well as you do. Provide relevant context as you reference information about your company or your goals. For example, if you are referencing a niche keyword, provide a brief explanation of what it means, how it relates to your business, and the task you are giving the AI.
## Section 2: AI Agents
There are two primary ways that you can provide information and instruction to Unify's AI Agents.
### Questions
* **Questions:** Questions are the minimum required input to run an AI Agent. You can ask any question about a Company or Person and select the type of response you want the Agent to provide (e.g., True/False, Text, Multi-Select, Number).
* **What information to provide:** In the question, only include the research question you want the Agent to answer. Avoid adding clarifying information or instructions to keep it focused.
### Guidance
* **When to use:** Guidance is an optional field for AI Agents that enables you to provide additional context or instructions to the AI Agent. When asking more complex questions, when you have a set of instructions or requirements that you want the AI Agent to follow, or when you want to provide clarification on the research question, guidance is the best way to provide that information.
* **How To Structure Guidance:** Similar to Prompts, Guidance should be clear, concise, and specific. Use the guidance to provide specific directions about each question that you are asking, and additional context if there is a specific way that you want the AI Agent to conduct its research. For example, if you want the AI Agent to only use information from a specific source, you can include that information in the guidance. Or, if you want to provide more direction on when the AI Agent should select a specific answer for a multi select response type, that information should also be included in the guidance.
## Section 3: Smart Snippets
Smart Snippets are a powerful way to personalize messaging to your prospects.
* **Provide Context (Again!):** The model can only act on what you provide. This means you should specify the information you want to create copy from, select template variables to reference, or add Agent template variables to the Smart Snippet. Additionally, provide context around the template variable to create a coherent prompt. Think of template variables as placeholders for information and write sentences or blurbs surrounding those variables.
* **Adding References:** A common mistake is referencing information that you haven't provided to the model, which can lead to incorrect responses. To prevent this, ensure that if you're referencing data provided through a template variable or Agent output, you include that template variable in the Snippet.
### Agent Outputs in Smart Snippets
Using Agents to conduct research and then incorporating that research into a Smart Snippet is a great way to hyper-personalize your messaging. To use this feature effectively:
* **Separation of Concerns:** Use the Agent to conduct research only, and use the Snippet to generate the copy. Each feature is optimized for its respective task.
* **Structure the Snippet prompt around the Agent variables:** When writing a Smart Snippet prompt with Agent output template variables, provide context and labels about what each Agent output contains so the Snippet can handle it accordingly. For example, if you have an Agent Question that asks for a True/False or Number answer, write your prompt using the Agent template variable as a placeholder in your sentences to provide context to the Snippet.
* For example, if your Agent question was "What is the most recent product launch from this company?", your Snippet prompt should be something like: "Research indicates that this company just launched `{{Agent Question}}`. Write a sentence to congratulate them on the launch."
## Section 4: AI Research
AI Research is a powerful way to automate and customize research that you want to conduct about any company that you are engaging. AI Research is powered by Unify's Observation Model, which is the system that Unify uses to run completely customized research for your company on your prospects.
### Prompting AI Research
Writing prompts for AI Research is slightly different from writing prompts for AI Agents, as AI Research is designed to read as much relevant information as possible before generating a report for you. We recommend following the style of the Observation prompts we generated for you as a starting point. To prompt for AI Research, follow these guidelines:
* **Pick a General Signal:** The goal with an Observation prompt is to describe a specific piece of information to the system that you'd like to monitor for any given company. For example, if you know that a company using a specific technology has a high likelihood of becoming your customer, an Observation for that could be: "Company uses an outbound sequencer (Outreach, Salesloft, Apollo, etc.) and a data/intent source (ZoomInfo, 6sense, Bombora, Clearbit, Demandbase, G2 Intent)."
* **Test and Iterate:** Once you've written your prompt, take advantage of the settings page to generate examples and see what the resulting reports look like.
---
# Source: https://docs.unifygtm.com/reference/integrations/hubspot/property-options.md
> ## Documentation Index
> Fetch the complete documentation index at: https://docs.unifygtm.com/llms.txt
> Use this file to discover all available pages before exploring further.
# Property Options
> Find the options for a property in HubSpot.
# Explanation
Properties in HubSpot have a different name displayed in the UI than the value
used at the API level. For most properties, the dropdown options you see in the
UI will be the same as the values you see in Unify.
However, certain properties in HubSpot have options which Unify cannot access.
At the moment, this is a known HubSpot limitation. The steps outlined here can
help to work around the issue.
## Workaround
In order to support using these options for filtering in audiences and
exclusions, you can perform the following steps. This article uses the
**Lifecycle Stage** property on **Company** as an example, but the same steps
should work for other properties and objects.
In HubSpot, navigate to **CRM -> Companies** and select **Actions -> Edit properties**.
Search for the property by its name (in this case, **Lifecycle Stage**) and
select the property.
Navigate to **Field type**. You will see a list of options, with **LABEL** and
**INTERNAL NAME** values alongside the number of records that have that value.
You may want to copy these values to a secure separate location for easy future
reference. If you wish to filter records in Unify to a specific **LABEL** value,
you can do so by using the corresponding **INTERNAL NAME** value.
Here's what that looks like in Unify for the **LABEL** value "Lead" and
therefore **INTERNAL NAME** value "lead":
---
# Source: https://docs.unifygtm.com/developers/intent-client/react.md
> ## Documentation Index
> Fetch the complete documentation index at: https://docs.unifygtm.com/llms.txt
> Use this file to discover all available pages before exploring further.
# React
> Install the Unify Intent client in a React app.
## Installation
You can install the Unify Intent React library with your preferred package manager:
```shell npm theme={null}
npm install @unifygtm/intent-react
```
```shell yarn theme={null}
yarn add @unifygtm/intent-react
```
```shell pnpm theme={null}
pnpm add @unifygtm/intent-react
```
## Usage
First, wrap your React app in a `UnifyIntentProvider`:
```tsx index.tsx theme={null}
import {
UnifyIntentClient,
UnifyIntentClientConfig,
UnifyIntentProvider,
} from '@unifygtm/intent-react';
const writeKey = 'YOUR_PUBLIC_API_KEY';
const config: UnifyIntentClientConfig = {
autoPage: true,
autoIdentify: false,
};
const intentClient = new UnifyIntentClient(writeKey, config);
const root = ReactDOM.createRoot(
document.getElementById('root') as HTMLElement,
);
root.render(
);
```
The `UnifyIntentProvider` automatically takes care of mounting and unmounting the client
for you whenever the component mounts and unmounts. So any components rendered in your app
can freely access and use the intent client using the `useUnifyIntent` hook:
```tsx Example.tsx theme={null}
import { useUnifyIntent } from '@unifygtm/intent-react';
const Example = () => {
// Get the Unify Intent Client
const unify = useUnifyIntent();
// However you access the current user...
const currentUser = useCurrentUser();
useEffect(() => {
if (currentUser?.emailAddress) {
// Log an identify event for the current user
// You can pass any standard Person/Company fields in the optional payload
// (see /reference/integrations/salesforce/field-mappings for field lists)
unify.identify(currentUser.emailAddress, {
firstName: currentUser.firstName,
lastName: currentUser.lastName,
company: { name: currentUser.companyName, domain: currentUser.companyDomain },
});
}
}, [currentUser, unify]);
...
};
export default Example;
```
You can then use the resulting client instance to log intent data. See the
[Usage](./client-spec) page for more details on how to use the client.
---
# Source: https://docs.unifygtm.com/reference/sequences/replies.md
> ## Documentation Index
> Fetch the complete documentation index at: https://docs.unifygtm.com/llms.txt
> Use this file to discover all available pages before exploring further.
# Sequence Replies
> View and manage replies from prospects in your Sequences.
export const WillingToMeetIcon = ({size = 24, inline}) => ;
export const UpdatedContactInfoIcon = ({size = 24, inline}) => ;
export const SoftBounceIcon = ({size = 24, inline}) => ;
export const ReferralIcon = ({size = 24, inline}) => ;
export const PositiveToneIcon = ({size = 24, inline}) => ;
export const OutOfOfficeIcon = ({size = 24, inline}) => ;
export const OptOutIcon = ({size = 24, inline}) => ;
export const NsfwIcon = ({size = 24, inline}) => ;
export const NeutralToneIcon = ({size = 24, inline}) => ;
export const NegativeToneIcon = ({size = 24, inline}) => ;
export const NeedsMoreInfoIcon = ({size = 24, inline}) => ;
export const LeftJobIcon = ({size = 24, inline}) => ;
export const HasSolutionIcon = ({size = 24, inline}) => ;
export const HardBounceIcon = ({size = 24, inline}) => ;
export const BadTimingIcon = ({size = 24, inline}) => ;
export const AutomatedIcon = ({size = 24, inline}) => ;
## Overview
When prospects reply to your Sequence emails, Unify automatically captures and classifies those replies. All replies are accessible directly within the Unify app.
## Out-of-Thread Replies
In addition to direct replies to Sequence emails, Unify also captures **out-of-thread replies** from your prospects.
An out-of-thread reply is an email from a sequence enrollee that doesn't directly reply to a sequence email. This includes new email threads initiated by the prospect or separate conversations sent to your mailbox while they're engaged with your sequence.
## Reply Classifications
Unify automatically classifies replies using AI to help you prioritize your responses. Each reply receives one or more classification tags that indicate the prospect's intent or sentiment.
* **Positive** — The email response shows enthusiasm, agreement, or active engagement with the sender's offer, indicating a genuine interest in moving forward. This is not an automated reply.
* **Willing to meet** — The recipient's email indicates their openness to schedule a meeting, specifically about the offer mentioned in the initial outreach.
* **Needs more info** — The recipient requests additional details or expresses uncertainty about the offer. Providing clarification may result in a positive outcome.
* **Bad Timing** — The email conveys interest but explains that current budget constraints or timing prevent immediate action. Future actions may be possible if a timeframe is mentioned.
* **Has solution** — The recipient mentions that they are already using a different product or service to meet their needs.
* **Neutral** — The email is objective, factual, respectful, unemotional, and polite yet concise.
* **Left Job** — The email indicates the sender is no longer employed at their previous role or company.
* **Updated contact info** — The email notifies the sender of a new or updated email address for further communication.
* **Referral** — The email includes a suggestion to contact another person, and provides the referral's contact information.
* **Negative** — The email contains hostile, emotional, or adversarial language, such as anger or frustration.
* **NSFW** — The email includes content that is offensive or inappropriate.
* **Opt out** — The recipient explicitly requests to unsubscribe, threatens to block communication, or mentions reporting the sender.
* **OOO** — The recipient's email indicates they are out of office or currently unable to provide a complete response.
* **Soft Bounce** — The email indicates a temporary delivery failure, meaning the message might eventually be delivered.
* **Hard Bounce** — The email indicates a permanent delivery failure, suggesting the recipient's email address is invalid or no longer in use.
* **Automated** — The email appears to have been generated by an automated system, rather than sent by a person.
Reply classifications can be configured to trigger [notifications](/reference/notifications/preferences) so you're alerted when important replies come in.
---
# Source: https://docs.unifygtm.com/reference/integrations/salesforce/required-permissions.md
> ## Documentation Index
> Fetch the complete documentation index at: https://docs.unifygtm.com/llms.txt
> Use this file to discover all available pages before exploring further.
# Required Permissions and Settings
> Ensure your Salesforce user has the required permissions for Unify.
# Overview
The permissions that Unify requires fall into two categories:
1. **System Permissions**: These are permissions that apply to the entire
Salesforce instance and are required for Unify to function properly.
2. **Object Permissions**: These are permissions that apply to specific objects
(e.g., Account, Contact, etc.) and are required for Unify to read and write
data.
The exact permissions that Unify needs are detailed below along with
instructions on assigning these permissions to your integration user.
# Required Permissions
Access can be restricted as desired for sensitive records or fields that you
do not want Unify to access. However, Unify needs access to any records or
fields that you want to use for exclusions.
For example, to prevent Unify from engaging with current customers, Unify will
require access to the records that indicate current customers to evaluate the
exclusion rule.
| Permission | Reason |
| -------------------------------- | ----------------------------------------------------------- |
| **API Enabled** | Allows Unify to communicate with Salesforce via the API |
| **View All Users** | Enables Unify to link Salesforce users to Unify users |
| **View Setup and Configuration** | Enables Unify to provide details about missing permissions |
| **Edit Tasks** | Enables Unify to create and update tasks and email messages |
| Object | Permissions | Reason |
| ----------------- | -------------------- | ---------------------------------------------------------- |
| **Account** | *Read, Create, Edit* | Enables Unify to sync companies bidirectionally |
| **Contact** | *Read, Create, Edit* | Enables Unify to sync people bidirectionally |
| **Lead** | *Read, Create, Edit* | Enables Unify to sync companies and people bidirectionally |
| **Opportunity** | *Read* | Enables Unify to use and filter based on opportunities |
| **Email Message** | *Read, Create, Edit* | Enables Unify to write outbound emails and replies |
# Setup
### Assign required permissions
Depending on whether you are using profiles or permission sets, the steps to
assign the required permissions will differ slightly. Follow the instructions
below based on your setup.
If you're using a **Profile** to manage permissions, follow these steps:
1. Navigate to the **Setup** page in Salesforce by clicking the gear icon in
the top-right corner.
2. Go to **Users > Profiles**.
3. Choose the Profile assigned to your integration user.
4. Click **Edit**.
5. In the **Administrative Permissions** section, enable the following
options:
* **API Enabled**
* **View All Users**
* **View Setup and Configuration**
6. In the **General User Permissions** section, enable the following
options:
* **Access Activities**
7. In the **Standard Object Permissions** section, enable the following
options for each object:
* **Account**: Read, Create, Edit
* **Contact**: Read, Create, Edit
* **Lead**: Read, Create, Edit
* **Opportunity**: Read
* **Email Message**: Read, Create, Edit
8. Click **Save**.
If you're using a **Permission Set** to manage permissions, follow these steps:
1. Navigate to **Setup > Permission Sets**.
2. Create a new permission set (or modify an existing one).
3. Assign the permission set to your integration user.
4. Under **System Permissions**, enable the following options:
* **API Enabled**
* **View All Users**
* **View Setup and Configuration**
5. Under **App Permissions**, enable the following options:
* **Access Activities**
6. Under **Object Settings**, select each object and enable the following
options:
* **Account**: Read, Create, Edit
* **Contact**: Read, Create, Edit
* **Lead**: Read, Create, Edit
* **Opportunity**: Read
* **Email Message**: Read, Create, Edit
7. Click **Save**.
8. If you created a new permission set, assign it to your integration user.
Once you've assigned these permissions, you can verify they are correctly set up
by checking the **Permissions** widget in Unify. Navigate to
[Settings -> Integrations -> Salesforce](https://app.unifygtm.com/dashboard/settings/integrations/salesforce)
and look for the **Permissions** widget.
### Enable Enhanced Emails
To ensure Unify can write emails to Salesforce, the **Enhanced Email** feature
must be enabled. This allows Unify to write sent emails using the **Email Message**
object.
In most orgs, Enhanced Email is enabled by default. If you don’t see the
**Email Message** object, review the following guide to enable it.
Salesforce support article explaining how to enable Enhanced Email.
For more information:
* [Use Enhanced Email for More Email Functionality](https://help.salesforce.com/s/articleView?id=sf.emailadmin_enhanced_email_overview.htm\&type=5)
* [Considerations for Using Enhanced Email](https://help.salesforce.com/s/articleView?id=sf.emailadmin_enhanced_email_considerations.htm\&type=5)
---
# Source: https://docs.unifygtm.com/reference/agents/response-types.md
> ## Documentation Index
> Fetch the complete documentation index at: https://docs.unifygtm.com/llms.txt
> Use this file to discover all available pages before exploring further.
# Agent Response Types
> Control how Unify Agents respond to your questions.
## Overview
A single Agent can answer multiple questions, each with different response types.
Unify ensures that Agents adhere to the response types you specify to give
you fine-grained control over AI.
Unify Agents know what they don't know. If the Agent cannot find an
answer to your question, it will respond accordingly.
## Response types
### True / False
Agents will respond with either `True` or `False` to a question of this type. This is best for simple questions:
* *Does this company have an office in San Francisco?*
* *Is there a pricing page on this company's website?*
### Number
Agents will respond with a number to a question of this type. This is best for questions that require a numerical answer:
* *What was the revenue for this company last year?*
* *How many years of full-time experience does this person have?*
### Select
Agents will respond with a *single* option from a list that you specify.
This is best for multiple-choice questions:
* *Is this company B2B, B2C, or B2G?*
* Options: `B2B`, `B2C`, `B2G`
* Answer: `B2B`
In some cases, you may want the Agent to respond with *multiple* options from the list you provided.
Click the `Allow multiple options` checkbox to enable this.
When enabled, the Agent will respond with zero, one, or multiple options.
* *Which of the following funding rounds has this company completed?*
* Options: `Seed`, `Series A`, `Series B`, `Series C`, `Series D`, `Series E`
* Answer: `Seed`, `Series A`
---
# Source: https://docs.unifygtm.com/reference/integrations/orum/salesforce-setup.md
# Source: https://docs.unifygtm.com/reference/integrations/nooks/salesforce-setup.md
> ## Documentation Index
> Fetch the complete documentation index at: https://docs.unifygtm.com/llms.txt
> Use this file to discover all available pages before exploring further.
# Nooks Salesforce Setup
> Configure Nooks integration with Salesforce for call task synchronization.
# Salesforce Setup for Nooks Integration
This guide walks you through the steps required to set up call tasks in Salesforce and configure the Nooks integration for seamless call campaign management.
## Overview
You can bidirectionally sync your call tasks between Unify and Nooks using a Salesforce report. The instructions below will help you build a report to successfully set up the sync.
## Salesforce Report Setup
### Call Report Setup in Salesforce
To create call tasks in Salesforce, set up a new report with the following criteria:
1. Navigate to your Salesforce Reports tab
2. Click **New Report**
3. Configure the report with these settings:
* **Category**: Activities (Activities with Contacts)
* **Show Me**: All activities
* **Date**: All Time
* **Show**: Open Activities
* **Show**: Tasks
* **Assigned**: equals \$USER
* **Task Subtype**: equals Call
These report filters ensure that each user in Nooks only sees their own open call tasks
### Best Practices for Report Columns
We recommend including the following columns in your report for better visibility and alignment with Unify sequences:
1. Click **Customize** on your report
2. Add the following columns:
* Subject
* First Name
* Last Name
* Unify Sequence
## Nooks Integration Setup
**Sep 2025 Update: Installing Nooks as a Trusted App in Salesforce**
In September 2025, Salesforce made security changes regarding which apps can be connected to Salesforce (via OAuth) by individual reps. This can impact Nooks users who are connecting to Salesforce for the first time, or reconnecting Salesforce. They might see an "OAuth Error" like this:
Your Salesforce administrator will need to install Nooks as a trusted app in your Salesforce org. For more information, see: [Installing Nooks as a Trusted App in SFDC](https://support.devrev.ai/nooks/article/ART-115-getting-started-with-salesforce-sfdc#Sep%202025%20Update%3A%20Installing%20Nooks%20as%20a%20Trusted%20App%20in%20SFDC).
Once your Salesforce report is ready, connect Nooks to Salesforce:
1. Navigate to **Settings** in Nooks
2. Select **Integrations**
3. Select **Connect Salesforce** and authorize the connection
4. Install Nooks as an OAuth app. Nooks should appear as an app in the Salesforce Setup settings in the "Connected Apps OAuth Usage" section. Click "Install".
5. \[Recommended] Configure field mappings to optimize your call tasks:
* Navigate to **Settings** > **Salesforce** > **Field Mappings**
* Add your specific SFDC fields such as:
* Current Unify Sequence
* Current Unify Play
* Relevant prospect information for call tasks
You will need admin access to Salesforce to authorize this connection. For more information, see: [Nooks admin setup](https://support.devrev.ai/nooks/article/ART-115-getting-started-with-salesforce-sfdc) or reach our to your CSM.
## Next Steps
With your Salesforce integration configured and Nooks connected, you're ready to [launch your first call campaign](/reference/integrations/orum/call-campaigns)!
---
# Source: https://docs.unifygtm.com/reference/browser-extension/salesforce.md
> ## Documentation Index
> Fetch the complete documentation index at: https://docs.unifygtm.com/llms.txt
> Use this file to discover all available pages before exploring further.
# Salesforce
> Run the Unify Chrome extension in Salesforce.
While viewing Accounts, Contacts & Leads in Salesforce, the extension will
automatically surface the corresponding Companies and People in Unify.
## Salesforce Account Page
From this view, you can view People in your Unify instance who work at this Company (and add
them to a Sequence) or instantly add this Company to a Play of your choosing.
## Salesforce Contact & Lead Pages
From this view, you can check if this Person is currently enrolled in a Unify Sequence.
If they are not already enrolled, you can enroll them from here using any mailbox or
mailbox group in Unify. Additionally, you can instantly add this Person to any of the
Plays you’ve built. See more info on building Plays in Unify [here](/reference/plays/overview).
---
# Source: https://docs.unifygtm.com/reference/integrations/segment.md
> ## Documentation Index
> Fetch the complete documentation index at: https://docs.unifygtm.com/llms.txt
> Use this file to discover all available pages before exploring further.
# Segment Integration Guide
> This guide outlines how to connect your Segment workspace to Unify.
# Overview
If you use Segment to collect website analytics, Unify can be connected to your
Segment workspace as a destination in order to reveal web traffic data. This
will also let you build audiences and Plays using Segment analytics data.
# Steps
If you’re also using the Unify Tag, ensure it isn’t running on the same
pages as Segment. Otherwise, events may be double counted.
### Generate a key in Unify
1. Log in to Unify
2. Navigate to [Settings -> Integrations -> Segment](https://app.unifygtm.com/dashboard/settings/integrations/segment) and click **Setup**
3. Click the **Copy** button to copy the write key to your clipboard
### Add Segment destination
1. Log in to Segment and click on the **Destinations** tab in the sidebar
2. Click **Add destination** in the top right corner
3. Search for “webhook” and select the **Webhook (actions)** destination
4. Click **Add destination** again in the top right corner
5. Select website source whose data you want to send to Unify and then click **Next**
6. Give this destination a name, make sure **Fill in settings manually** is selected, and click **Create destination**
7. Click on the **Mappings** tab on the top and then select **New Mapping**
8. Choose the **Send** option
9. Fill in the following mapping values…
1. Under **Section 1**:
1. Unify currently supports Page and Identify event types. Track events will be supported soon. You should select **any** and then list these types.
2. If there are specific event types that you know you do not want to forward to Unify, you can safely omit them.
2. Under **Section 2**:
1. Click **Load Sample Event** to populate the box with an example Segment event
3. Under **Section 3**:
1. Next to **URL**, fill in the following value:
```
https://analytics.unifygtm.com/api/v1/webhooks/segment
```
2. List two values under **Headers** (click **Add Mapping Field** to add more boxes):
1. `` with the key you copied earlier
4. Under **Section 4**:
1. Send a test event to verify that it’s working
That’s it! If you see **Test succeeded**, you’re all set. Traffic should now be flowing into Unify.
---
# Source: https://docs.unifygtm.com/reference/integrations/slack.md
> ## Documentation Index
> Fetch the complete documentation index at: https://docs.unifygtm.com/llms.txt
> Use this file to discover all available pages before exploring further.
# Slack Integration Guide
> This guide details the process of integrating Unify with your Slack workspace.
To add an app to your Slack workspace, you need the necessary permissions as
per your organization's policy. Refer to [Slack's roles and
permissions](https://slack.com/help/articles/201314026-Permissions-by-role-in-Slack)
or consult with a workspace owner or admin.
# Connect to Slack
Go to [Settings -> Integrations -> Slack](https://app.unifygtm.com/dashboard/settings/integrations/slack) in Unify and press the **Connect** button.
You will be redirected to Slack's authorization page. Click **Allow** to proceed.
You will be redirected back to the Slack settings page, where you can view the status of your connection.
---
# Source: https://docs.unifygtm.com/reference/sequences/smart-snippets.md
> ## Documentation Index
> Fetch the complete documentation index at: https://docs.unifygtm.com/llms.txt
> Use this file to discover all available pages before exploring further.
# Smart Snippets
> Personalize your outreach with AI-powered email copy generation.
## Overview
Smart snippets allow you to personalize messages with AI-generated copy that's
unique to each recipient. You can use smart snippets to enhance your messaging,
improve deliverability, and increase engagement.
Smart snippets are concise, self-contained pieces of text that serve a clear
communicative purpose. Each snippet should be laser-focused on the parts of your
outbound message that change the most to fit each recipient differently.
## Creating a smart snippet
Navigate to the [Snippets](https://app.unifygtm.com/dashboard/snippets) tab in
the sidebar, select **New Snippet** in the top right corner, and choose
**Smart Snippet**. You will see the smart snippet creation screen.
To define a smart snippet, you provide a prompt that describes the content you
want to generate. The prompt should include template variables for any data you
want the model to use when writing the snippet. You can click on the quick
prompts to see example prompts for inspiration.
After you've entered your prompt, click **Generate examples** to see what the
smart snippet will generate for a sample of real people from your data. You can
edit the prompt and regenerate examples to iteratively refine your snippet.
Just like regular snippets, you should also define a fallback value for the case
where some of the template variables in the prompt are missing data. This will
prevent enrollments from being blocked by the missing data.
When you're satisfied with your prompt, click **Create** to save it. You will
now be able to use the snippet in your sequences.
## Recommendations
Here are a few practices we recommend to get the most out of smart snippets:
1. Always include at least one template variable for the model to use to
personalize the snippet. For example, include some details about the sender,
the recipient, or their company. This helps the model write more precise and
personalized copy.
2. Include 2-3 example outputs to guide the model. Examples help the model
understand the tone and structure you're trying to achieve. The model will
often pick up on vocabulary and stylistic choices from your examples.
3. Start small. Pick a specific part of the email—such as the salutation or
hook—and focus on personalizing that part. Smart snippets are most effective
when they're used to personalize small sections of your email. Remember that
you can use as many snippets in an email as you want!
---
# Source: https://docs.unifygtm.com/reference/integrations/snitcher.md
> ## Documentation Index
> Fetch the complete documentation index at: https://docs.unifygtm.com/llms.txt
> Use this file to discover all available pages before exploring further.
# Snitcher Integration Guide
> Identify website visitors with Snitcher and other providers.
# Overview
Unify provides out-of-the-box website visitor identification Snitcher and other
providers. To get started, simply enable [Unify Intent](https://app.unifygtm.com/dashboard/settings/integrations/unify-intent)
in your settings.
Once connected, Unify will automatically begin identifying website visitors
using Snitcher and other data sources for maximum coverage. Be sure to set up
the Unify Intent client on your website to start receiving visitors to identify.
---
# Source: https://docs.unifygtm.com/reference/sequences/template-variables.md
> ## Documentation Index
> Fetch the complete documentation index at: https://docs.unifygtm.com/llms.txt
> Use this file to discover all available pages before exploring further.
# Template Variables
> Use template variables to personalize your emails.
## Overview
Template variables are key to personalizing messages sent through Unify. You can
use template variables to insert dynamic values into your emails, such as a
person's name, company, or job title.
## Inserting variables
You can insert template variables into emails you write when creating sequences in Unify. To open the template variable dropdown, click on the template variable button in the sequence builder.
You can also press **`{`** on your keyboard to open the template variable dropdown. Once open, you can select a variable and insert it into your email.
When a person is enrolled in this sequence, this value will be filled in dynamically.
## Handling missing data
### Enrollment blocking
Sometimes, Unify won’t have data to populate variables used in a sequence email. In these cases, Unify will never send an email with a placeholder or missing value. Instead, Unify will *block* the sequence enrollment.
Blocked enrollments can be seen on the sequence details page. You can click on a blocked enrollment to edit the message and manually fill in any missing values.
The template variables with missing values will appear highlighted in orange. Once you’ve replaced the missing values, click **Save** and the blocked status will disappear.
The step will then be rescheduled and sent automatically as part of the sequence.
### Snippets
To avoid having to manually unblock enrollments that are missing a value, it's
highly recommended that you take advantage of *snippets*.
Snippets are reusable blocks of copy that can be inserted into messages the same
as template variables. However, snippets also allow you to define fallback text
which is used if any template variables are missing values.
You can access snippets by navigating to the [Snippets](https://app.unifygtm.com/dashboard/snippets)
tab in the sidebar. When defining a snippet, you can use template variables or
even other snippets in the copy. Underneath the snippet text area, there is a
second text area where you can define a fallback.
The fallback will be used in the event that any of the variables used in the
copy are missing. If you use snippets within snippets (which is called
*snippet-ception*), the fallback for the nested snippet will be used in the
top-level snippet.
---
# Source: https://docs.unifygtm.com/reference/plays/triggers.md
> ## Documentation Index
> Fetch the complete documentation index at: https://docs.unifygtm.com/llms.txt
> Use this file to discover all available pages before exploring further.
# Play Triggers
> Triggers represent the events and data sources that a Play runs on.
## Overview
Plays run on invidiual records, such as companies or people. Triggers define
when a Play should run and what data should be provided to it. Below are the
triggers you can choose from when creating a Play.
## Available triggers
### Champions
This trigger is a shortcut for running a Play on champions that Unify has
tracked for your business. Once selected, you can customize the matching
criteria similar to the record match trigger. This trigger always returns
People.
In order to use this trigger, you must have enabled and configured champion
tracking in your settings. For more information, see [Champion Tracking](/reference/signals/champions).
### Find lookalike companies
This trigger runs a Play on companies that are similar to a set of companies
you specify. This is useful for finding new companies that are similar to your
existing customers or ideal customer profile.
Once you've defined the criteria that specifies which companies to find
lookalikes for, you can define some additional options for the trigger, such as
additional filters to apply or exclusions to enable and disable.
This trigger is powered by [Ocean.io](https://www.ocean.io/). The integration is
fully managed by Unify and included in your plan, so no additional subscription
or setup is required.
### Record enters an Audience
This trigger runs a Play once on every company or person that "enters" an
audience. A record enters an audience when it meets the criteria of the audience
for the first time.
When you select an audience trigger, you will be prompted to select an audience
from the list of audiences you have created. Audiences are reusable in Unify,
which means you can use the same audience in multiple Plays.
You also have the choice to run the Play on either companies that enter the
audience or people that enter the audience. If you select companies, the output
of this trigger will be a company record. Otherwise, the output will be a person
record.
### Record matches criteria
This trigger runs a Play once on every company or person that matches a set of
filters. This trigger behaves the same as the audience trigger, but it doesn't
require that you already have an audience created. Instead, you can define the
filters directly in the Play.
When you select a criteria trigger, you will be prompted to add filters to
select the companies or people that the Play should run on. Just like building
audiences, you can add as many filters as you like and preview the records that
match the filters before saving the trigger.
As with audience triggers, you can choose to run the Play on either companies or
people. This will determine what type of record the trigger outputs.
### Website visitors
This trigger is a shortcut for running a Play on companies that visit your
website. Once selected, you can customize the matching criteria similar to the
record match trigger. This trigger always returns Companies.
## Coming soon
There are lots of additional triggers in the works including webhooks, third-party
events, schedules, and more. If you're interested in one that isn't available
yet, [let us know](mailto:support@unifygtm.com)! We'll get you in the beta as
soon as it's ready.
## FAQ
Audience triggers and record match triggers can both be used to accomplish
the same goal. The main difference is that audience triggers require you to
create an audience ahead of time, while record match triggers allow you to
define the filters directly in the Play.
Audiences can be reused in multiple Plays, which is useful if you have a set
of filters that you use frequently. Audiences can also be viewed, edited,
and exported from the **Audiences** tab.
Record match triggers are a great option for quickly iterating on a Play or
if you don't want to create an audience for a one-off Play. You can always
come back later, convert the filters into an audience, and then swap the
trigger out for an audience trigger.
Audiences are dynamic lists of companies and people that can change over
time according to the filters you specify. For example, an audience might
capture all companies that have visited your website in the last 30 days.
When you send an audience to a manual trigger, you are sending the current
list of companies or people that are in the audience at that moment. This
is useful if you want to run a Play on a snapshot of the audience but not on
a recurring basis.
By contrast, an audience trigger will run a Play on every company or person
that enters the audience in the future. This is useful if you want to run a
Play on every company or person that meets the audience criteria now and in
the future.
---
# Source: https://docs.unifygtm.com/reference/management/user-management.md
> ## Documentation Index
> Fetch the complete documentation index at: https://docs.unifygtm.com/llms.txt
> Use this file to discover all available pages before exploring further.
# User Management
> Invite users and set their roles directly in Unify.
Your teammates can be assigned two different roles in Unify:
* **Admin** — Designed for users who need access to all core Unify capabilities and settings in the organization.
* **Rep** — Designed for users who are primarily focused on creating and managing Sequences in Unify, and who don’t need access to edit Plays or manage organization settings.
## Role detail
Each role has a granular set of permissions available to them:
| Permission | Admin | Rep |
| --------------------------------------------- | :---------: | :--------------------: |
| Invite users and set roles | ✅ | ❌ |
| Edit Organization settings, including Billing | ✅ | ❌ |
| Edit Exclusion settings | ✅ | ❌ |
| Create and edit Plays | ✅ | ❌ |
| View Plays | ✅ | ✅ |
| Create and edit Sequences | ✅ | ✅ |
| Create and edit Audiences | ✅ | ✅ |
| Viewable tasks on Tasks dashboard | *All tasks* | *Tasks assigned to me* |
| Edit settings to make task skippable | ✅ | ❌ |
## Inviting a new user
To invite a new user, click the **+ Invite** button, and set their role. You can invite multiple users at one time.
You can always change this role after they accept the invite.
---
# Source: https://docs.unifygtm.com/reference/sequences/send-schedules/using-send-schedules.md
> ## Documentation Index
> Fetch the complete documentation index at: https://docs.unifygtm.com/llms.txt
> Use this file to discover all available pages before exploring further.
# Using a Custom Send Schedule
> Learn how to view and apply Custom Send Schedules for Sequences.
Custom Send Schedules define when automated emails in a Sequence are allowed to send. Once you’ve configured your Custom Send Schedule, you can assign them to individual Sequences.
***
## Accessing Sequence Settings
To view or edit the Custom Send Schedule assigned to a Sequence:
1. Open any Sequence from your **Sequences** list.
2. Click the **⚙️ cog icon** in the top-right corner to open **Sequence Settings**.
3. In the settings drawer, you’ll see a section labeled **Send schedule**, displaying the currently linked schedule and its details.
***
## Selecting a Custom Send Schedule
To change which Custom Send Schedule a Sequence uses:
1. Click **Edit** in the top-right corner of the Sequence Settings drawer.
2. Open the **Send schedule** dropdown.
3. Choose the desired schedule from the list. You’ll see details including:
* Schedule name
* Timezone
* Days enabled for sending
* Sending windows per day
* Skip dates
After you’ve selected a schedule, click **Save** to apply it.
***
## Important Notes
When linking a new Custom Send Schedule to an active Sequence, **Unify will
immediately reschedule all pending emails for that Sequence** according to the
new Custom Send Schedule configurations.
> 💡 **Tip:** If you’re running outreach across multiple regions, use different Custom Send Schedules for each region’s Sequences to optimize timing and engagement.
***
---
# Source: https://docs.unifygtm.com/reference/browser-extension/web.md
> ## Documentation Index
> Fetch the complete documentation index at: https://docs.unifygtm.com/llms.txt
> Use this file to discover all available pages before exploring further.
# Browsing the Web
> Run the Unify Chrome extension on other websites.
The extension can surface relevant information while browsing the web on
other sites, too. When you view a website with a domain that matches one
of the Companies in your Unify instance, the extension will automatically
surface details about that Company.
---
# Source: https://docs.unifygtm.com/reference/signals/website-visitors.md
> ## Documentation Index
> Fetch the complete documentation index at: https://docs.unifygtm.com/llms.txt
> Use this file to discover all available pages before exploring further.
# Website Visitor Intent
> Start revealing the companies and people visiting your website.
## Overview
By integrating with your website, Unify can reveal the companies and people
visiting your website in real-time. Beyond idenifying these visitors, Unify
enables you to take action based on which pages they're clicking on, where
they're visiting from, and how many sessions they've had.
## How to get started
### Step 1: Integrate Unify with your website
The first step is to integrate Unify with your website using either the official
Unify plugin for your website or a third-party analytics provider like Segment.
If you're not already using Segment, we recommend starting with the official
Unify plugin. You can find the installation instructions [here](/developers/intent-client/overview).
For customers already using Segment, you can find the instructions for setting
up the official Segment integration [here](/reference/integrations/segment).
### Step 2: Turn on website intent data
Once that's done, the only thing left to do is to enable the feature in Unify
and start revealing the companies and people visiting your website. Navigate to
[Settings -> Unify Intent](https://app.unifygtm.com/dashboard/settings/integrations/unify-intent)
to turn on this feature.
If you already have a subscription to 6sense or Clearbit Reveal, you can also
bring your own API key. See the [6sense](https://app.unifygtm.com/dashboard/settings/integrations/6sense)
and [Clearbit](https://app.unifygtm.com/dashboard/settings/integrations/clearbit)
integration settings pages to get started.
---
# Source: https://docs.unifygtm.com/tutorials/welcome.md
# Source: https://docs.unifygtm.com/getting-started/welcome.md
> ## Documentation Index
> Fetch the complete documentation index at: https://docs.unifygtm.com/llms.txt
> Use this file to discover all available pages before exploring further.
# Welcome to Unify
> Unify is the all-in-one solution for sales, marketing, and go-to-market teams.
Whether you're new to Unify and looking to get started or an experienced user
aiming to get the most out of the platform, we have the resources you need to
succeed.
Complete a few key steps to fully activate on Unify. For new customers
looking to get up and running quickly, this is the place to start.
Hit the ground running with our most popular plays and best practices.
Explore the full range of features available in Unify with our in-depth
reference guide.
Find answers to common questions and troubleshooting tips in our help
center.
For Pro and Enterprise customers, Unify offers white glove onboarding and
support. For more information, [book an intro
call](https://www.unifygtm.com/get-started) or reach out to
[support@unifygtm.com](mailto:support@unifygtm.com).
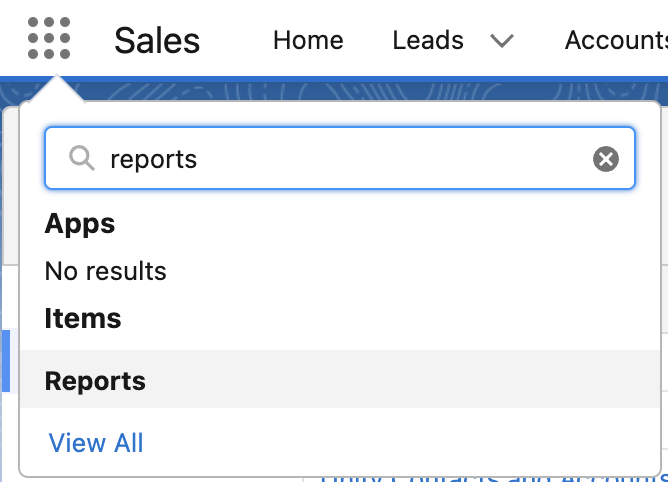
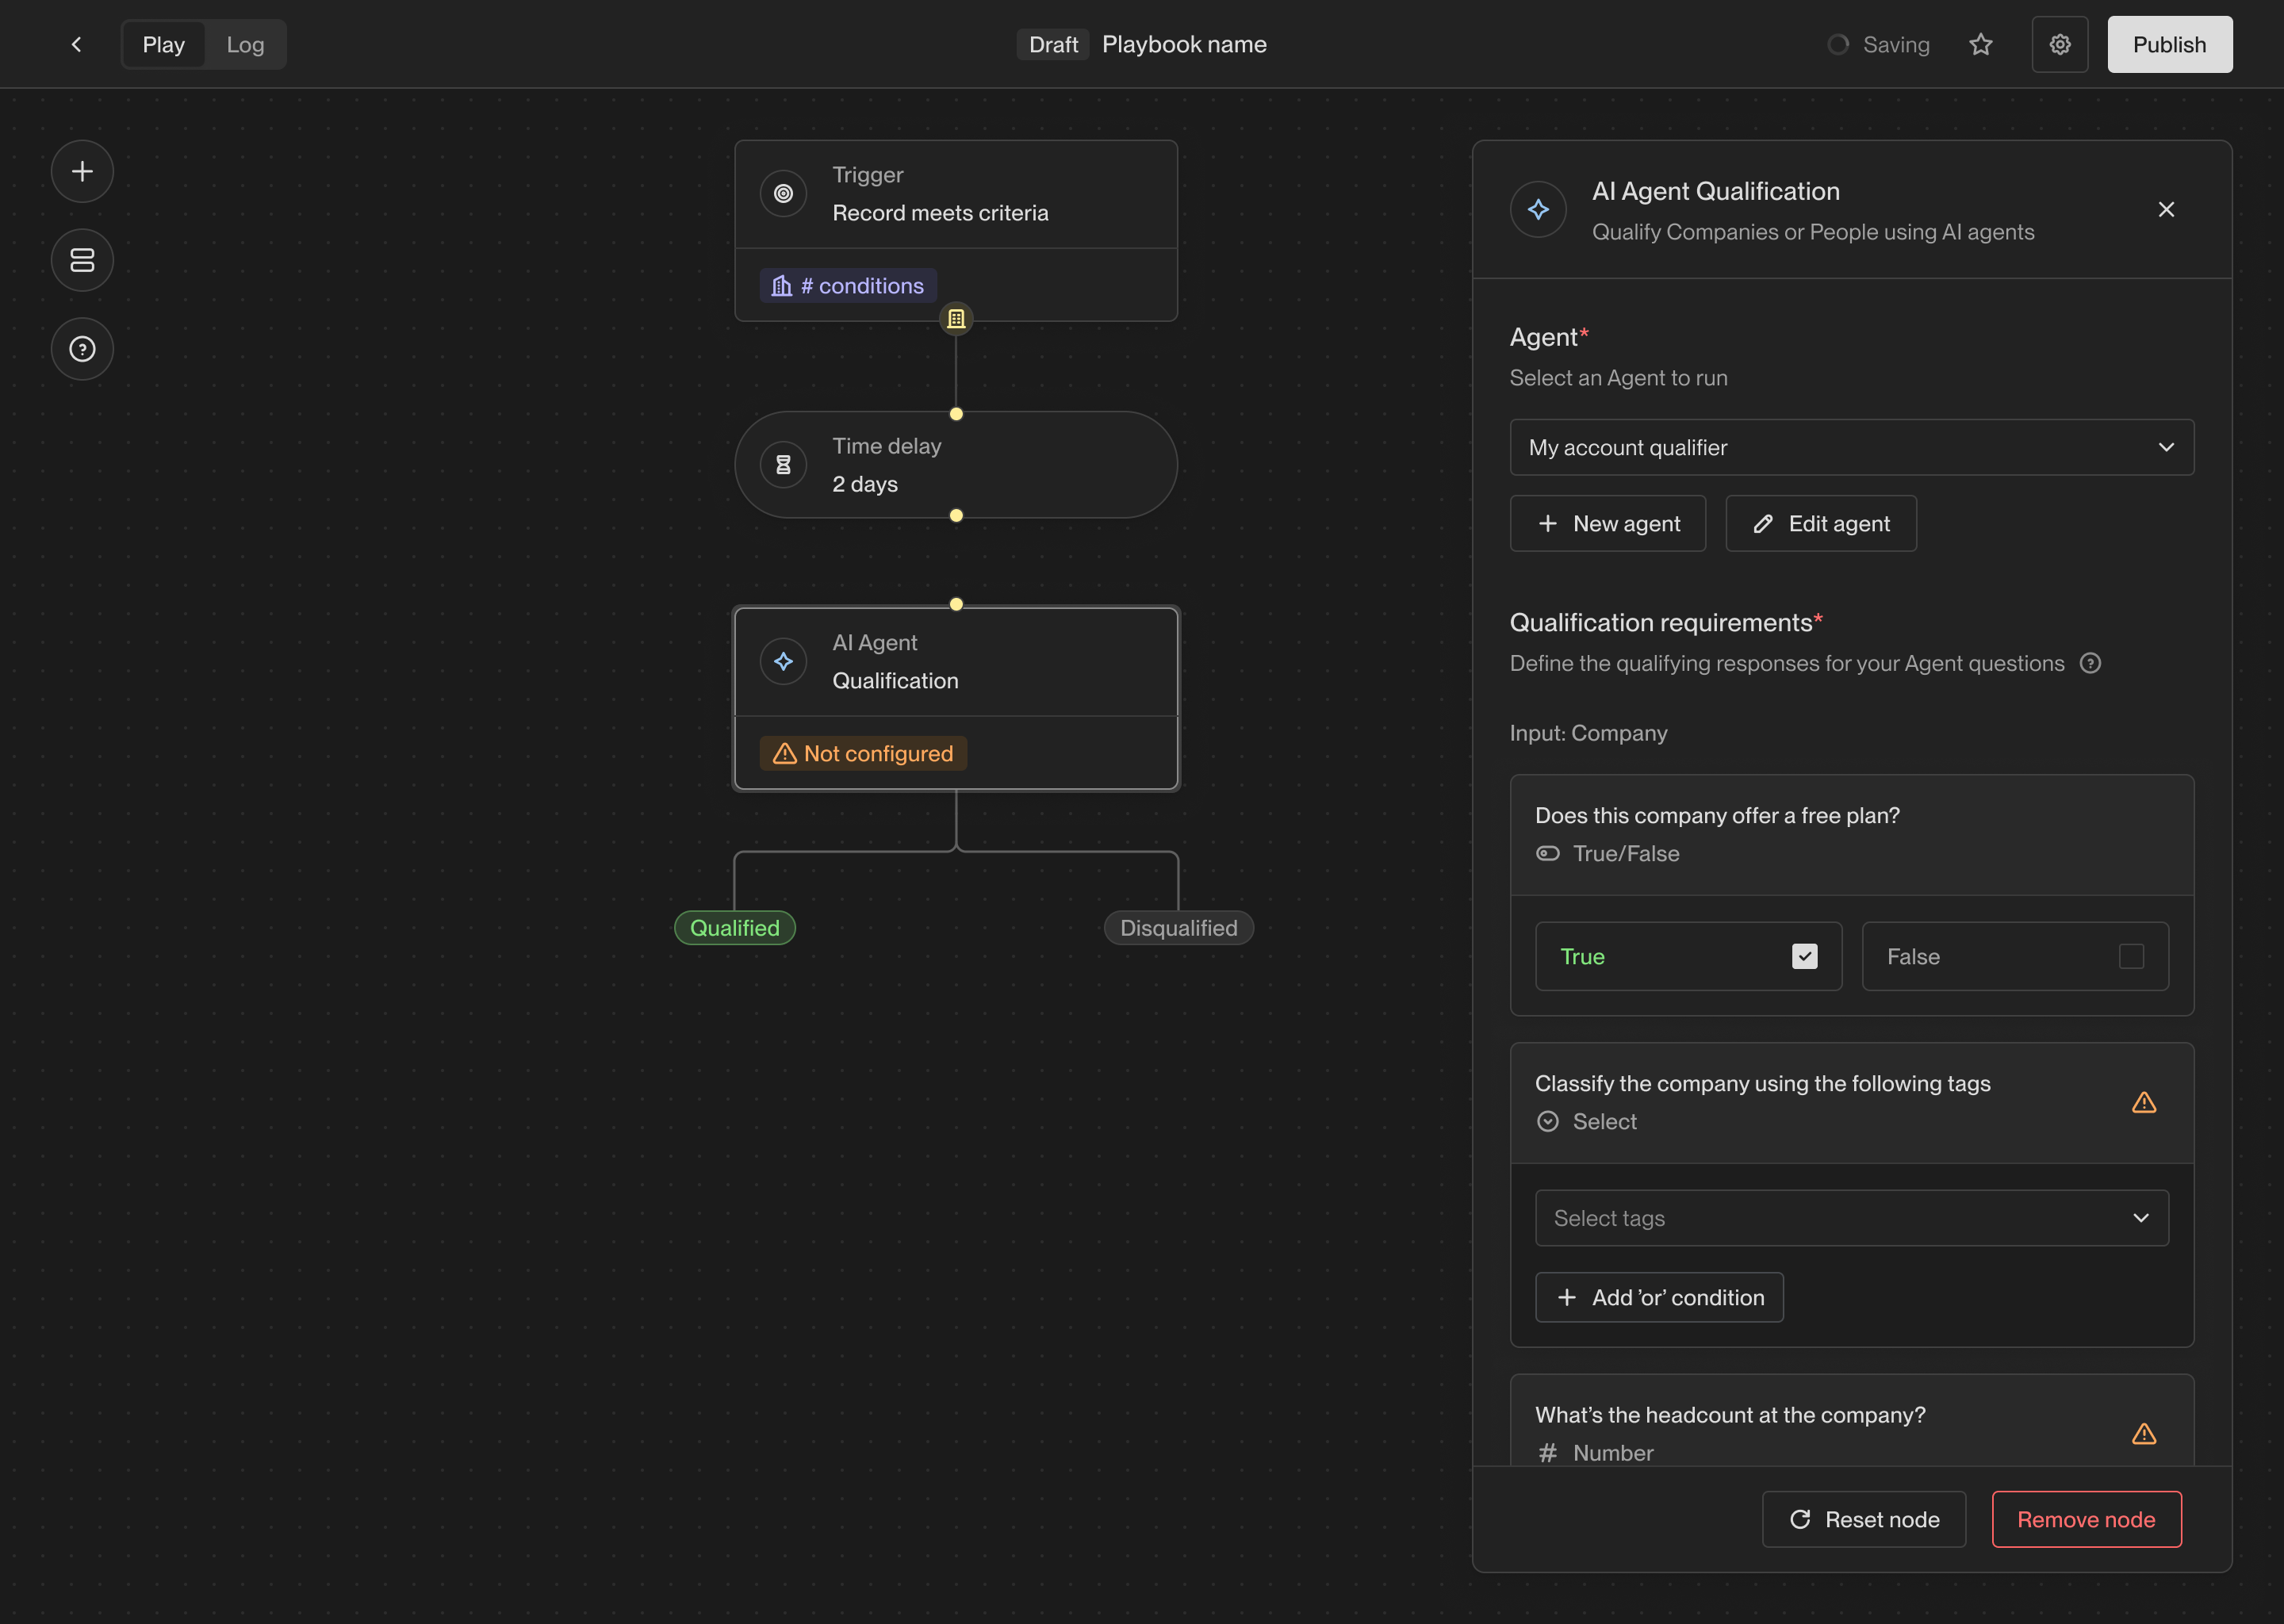 ### Assign owner
The owner assignment action allows you to assign a record to a specific owner in
Unify. Every company and person record in Unify has an owner, and this action
allows you to set or change the owner of a record.
### Assign owner
The owner assignment action allows you to assign a record to a specific owner in
Unify. Every company and person record in Unify has an owner, and this action
allows you to set or change the owner of a record.
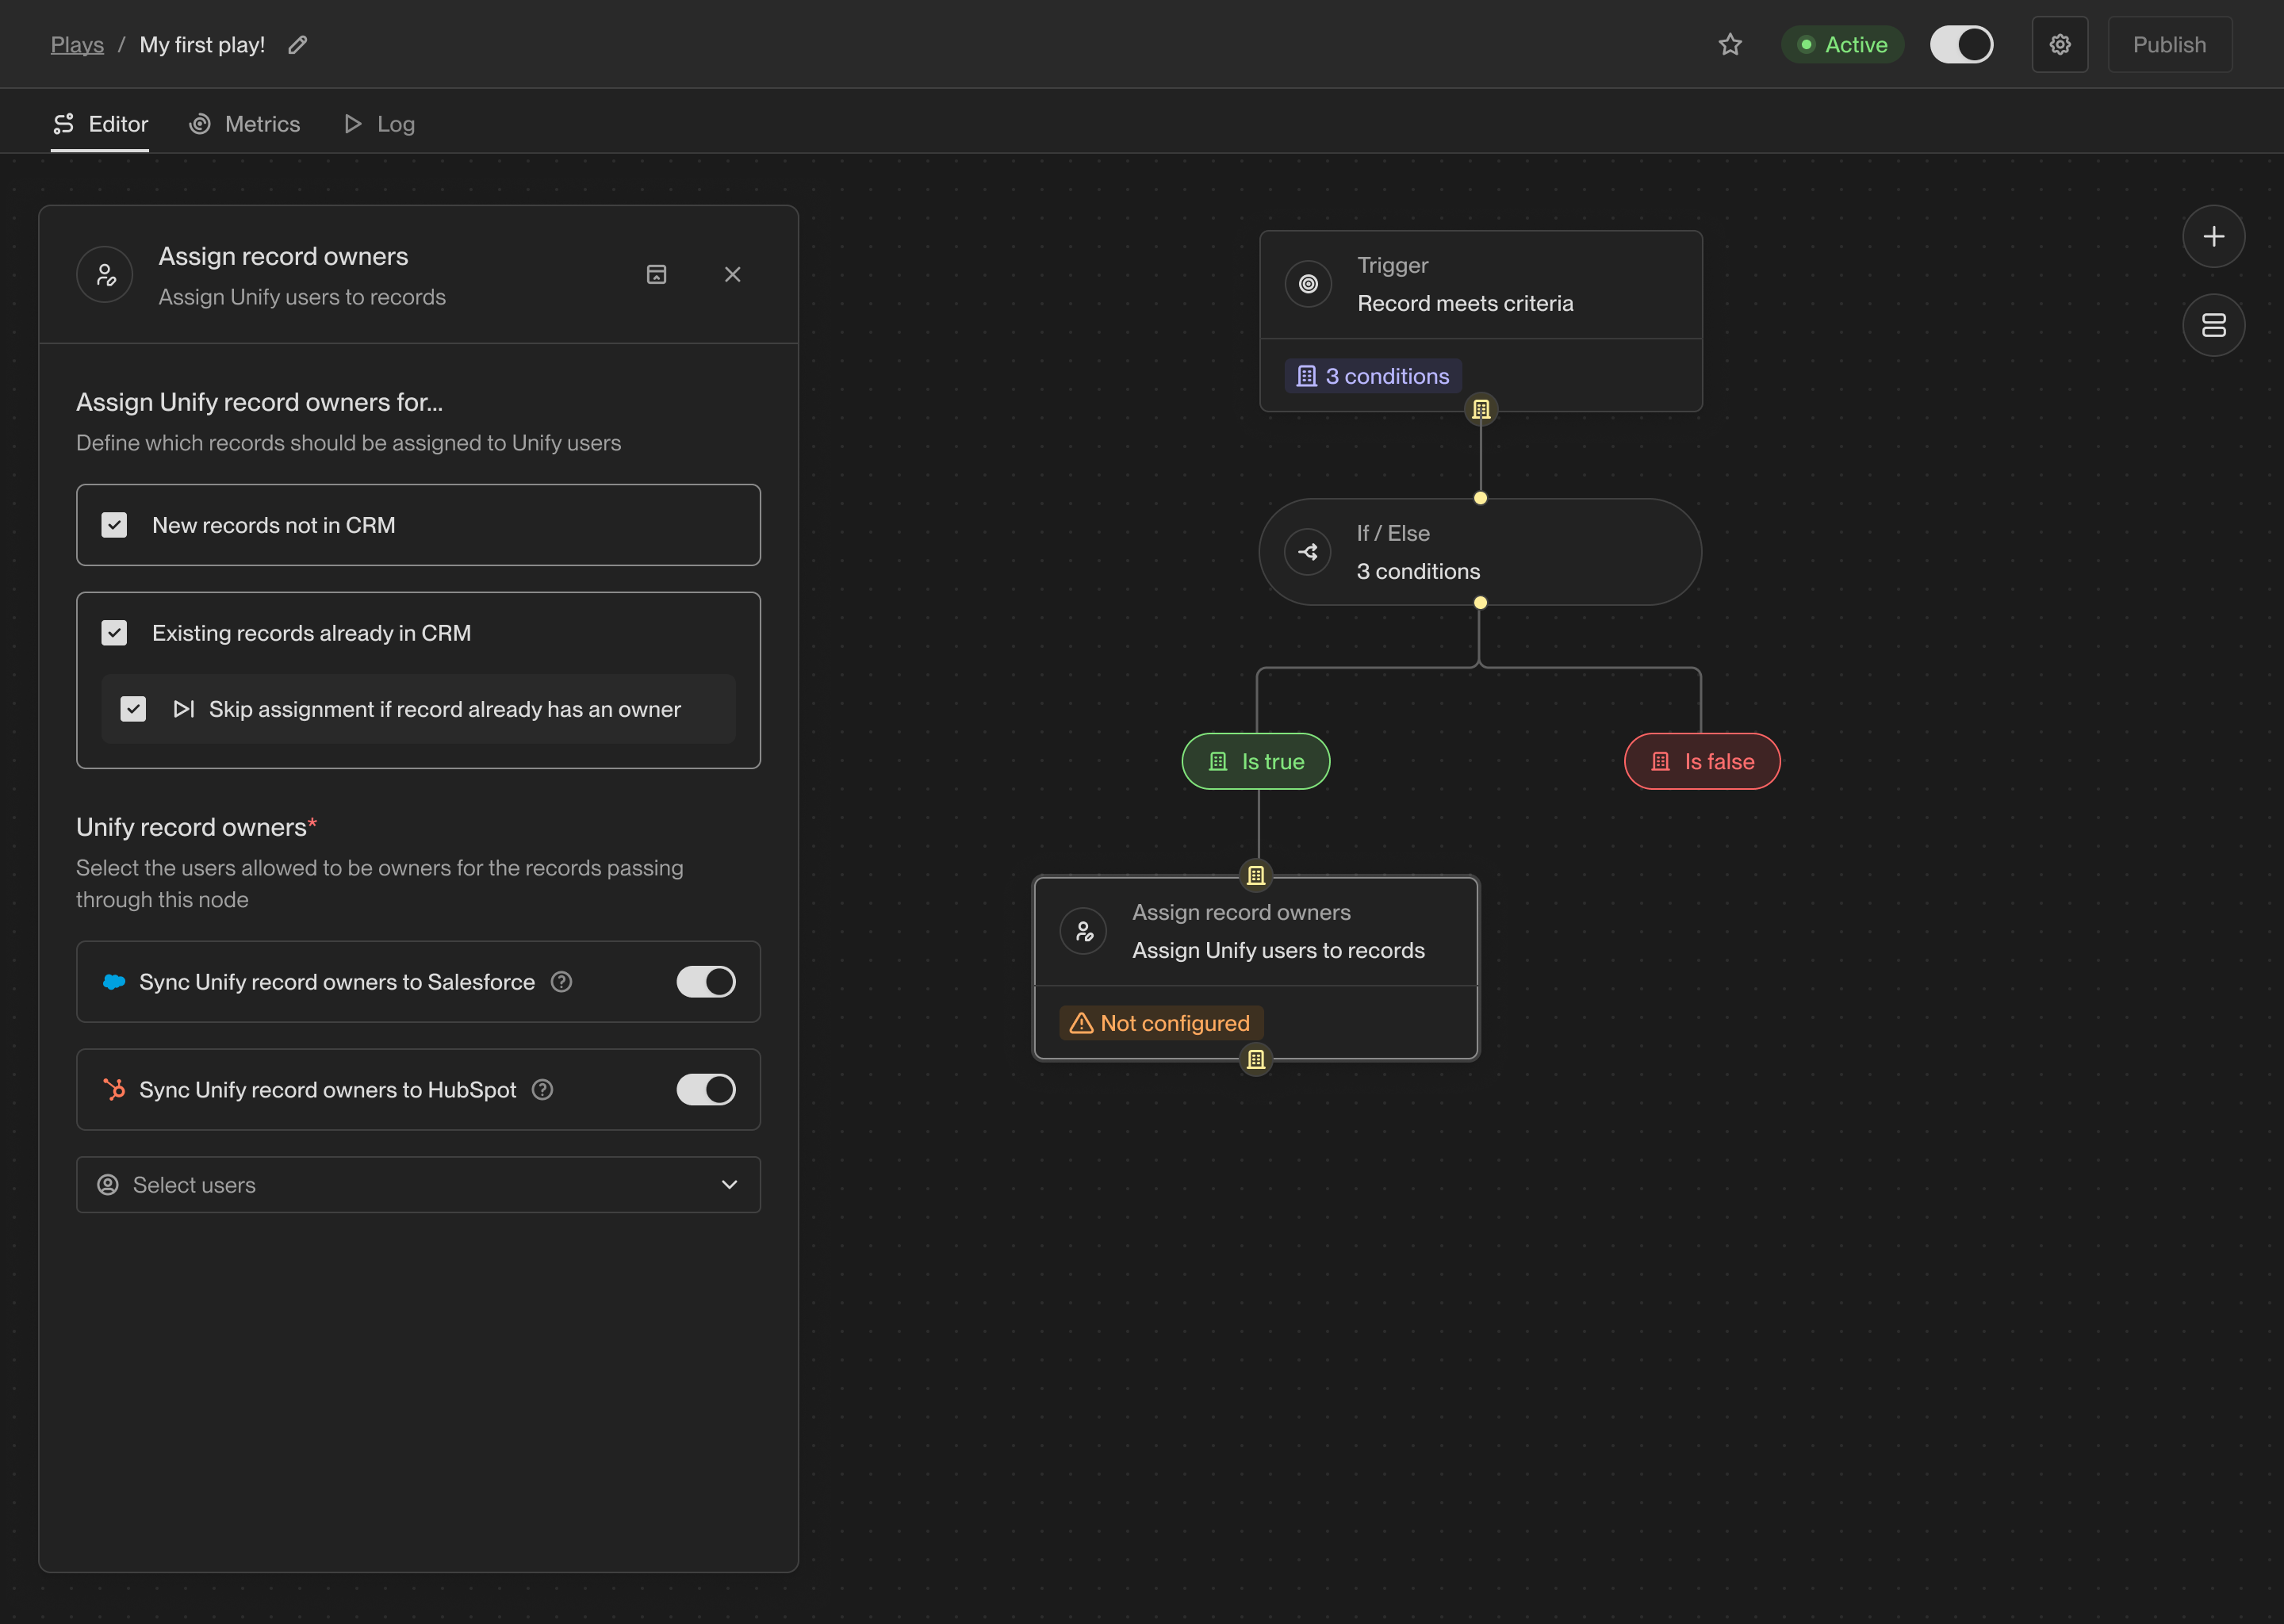 When you connect a CRM to Unify, the owner of the corresponding records in the
CRM will be synced into Unify. For records that don't yet have an owner or don't
yet exist in the CRM, you can use this action to assign an owner. You can also
choose to update the owner if desired.
### Prospect
One of the most common use cases for Plays is to find new people to reach out
to. The prospecting action takes a company record as input and finds new people
at the company matching specific personas and criteria.
When you select the prospecting action, you can specify one or more personas to
search for. The personas are considered in order, so the first persona will be
preferred over the second, and so on.
When you connect a CRM to Unify, the owner of the corresponding records in the
CRM will be synced into Unify. For records that don't yet have an owner or don't
yet exist in the CRM, you can use this action to assign an owner. You can also
choose to update the owner if desired.
### Prospect
One of the most common use cases for Plays is to find new people to reach out
to. The prospecting action takes a company record as input and finds new people
at the company matching specific personas and criteria.
When you select the prospecting action, you can specify one or more personas to
search for. The personas are considered in order, so the first persona will be
preferred over the second, and so on.
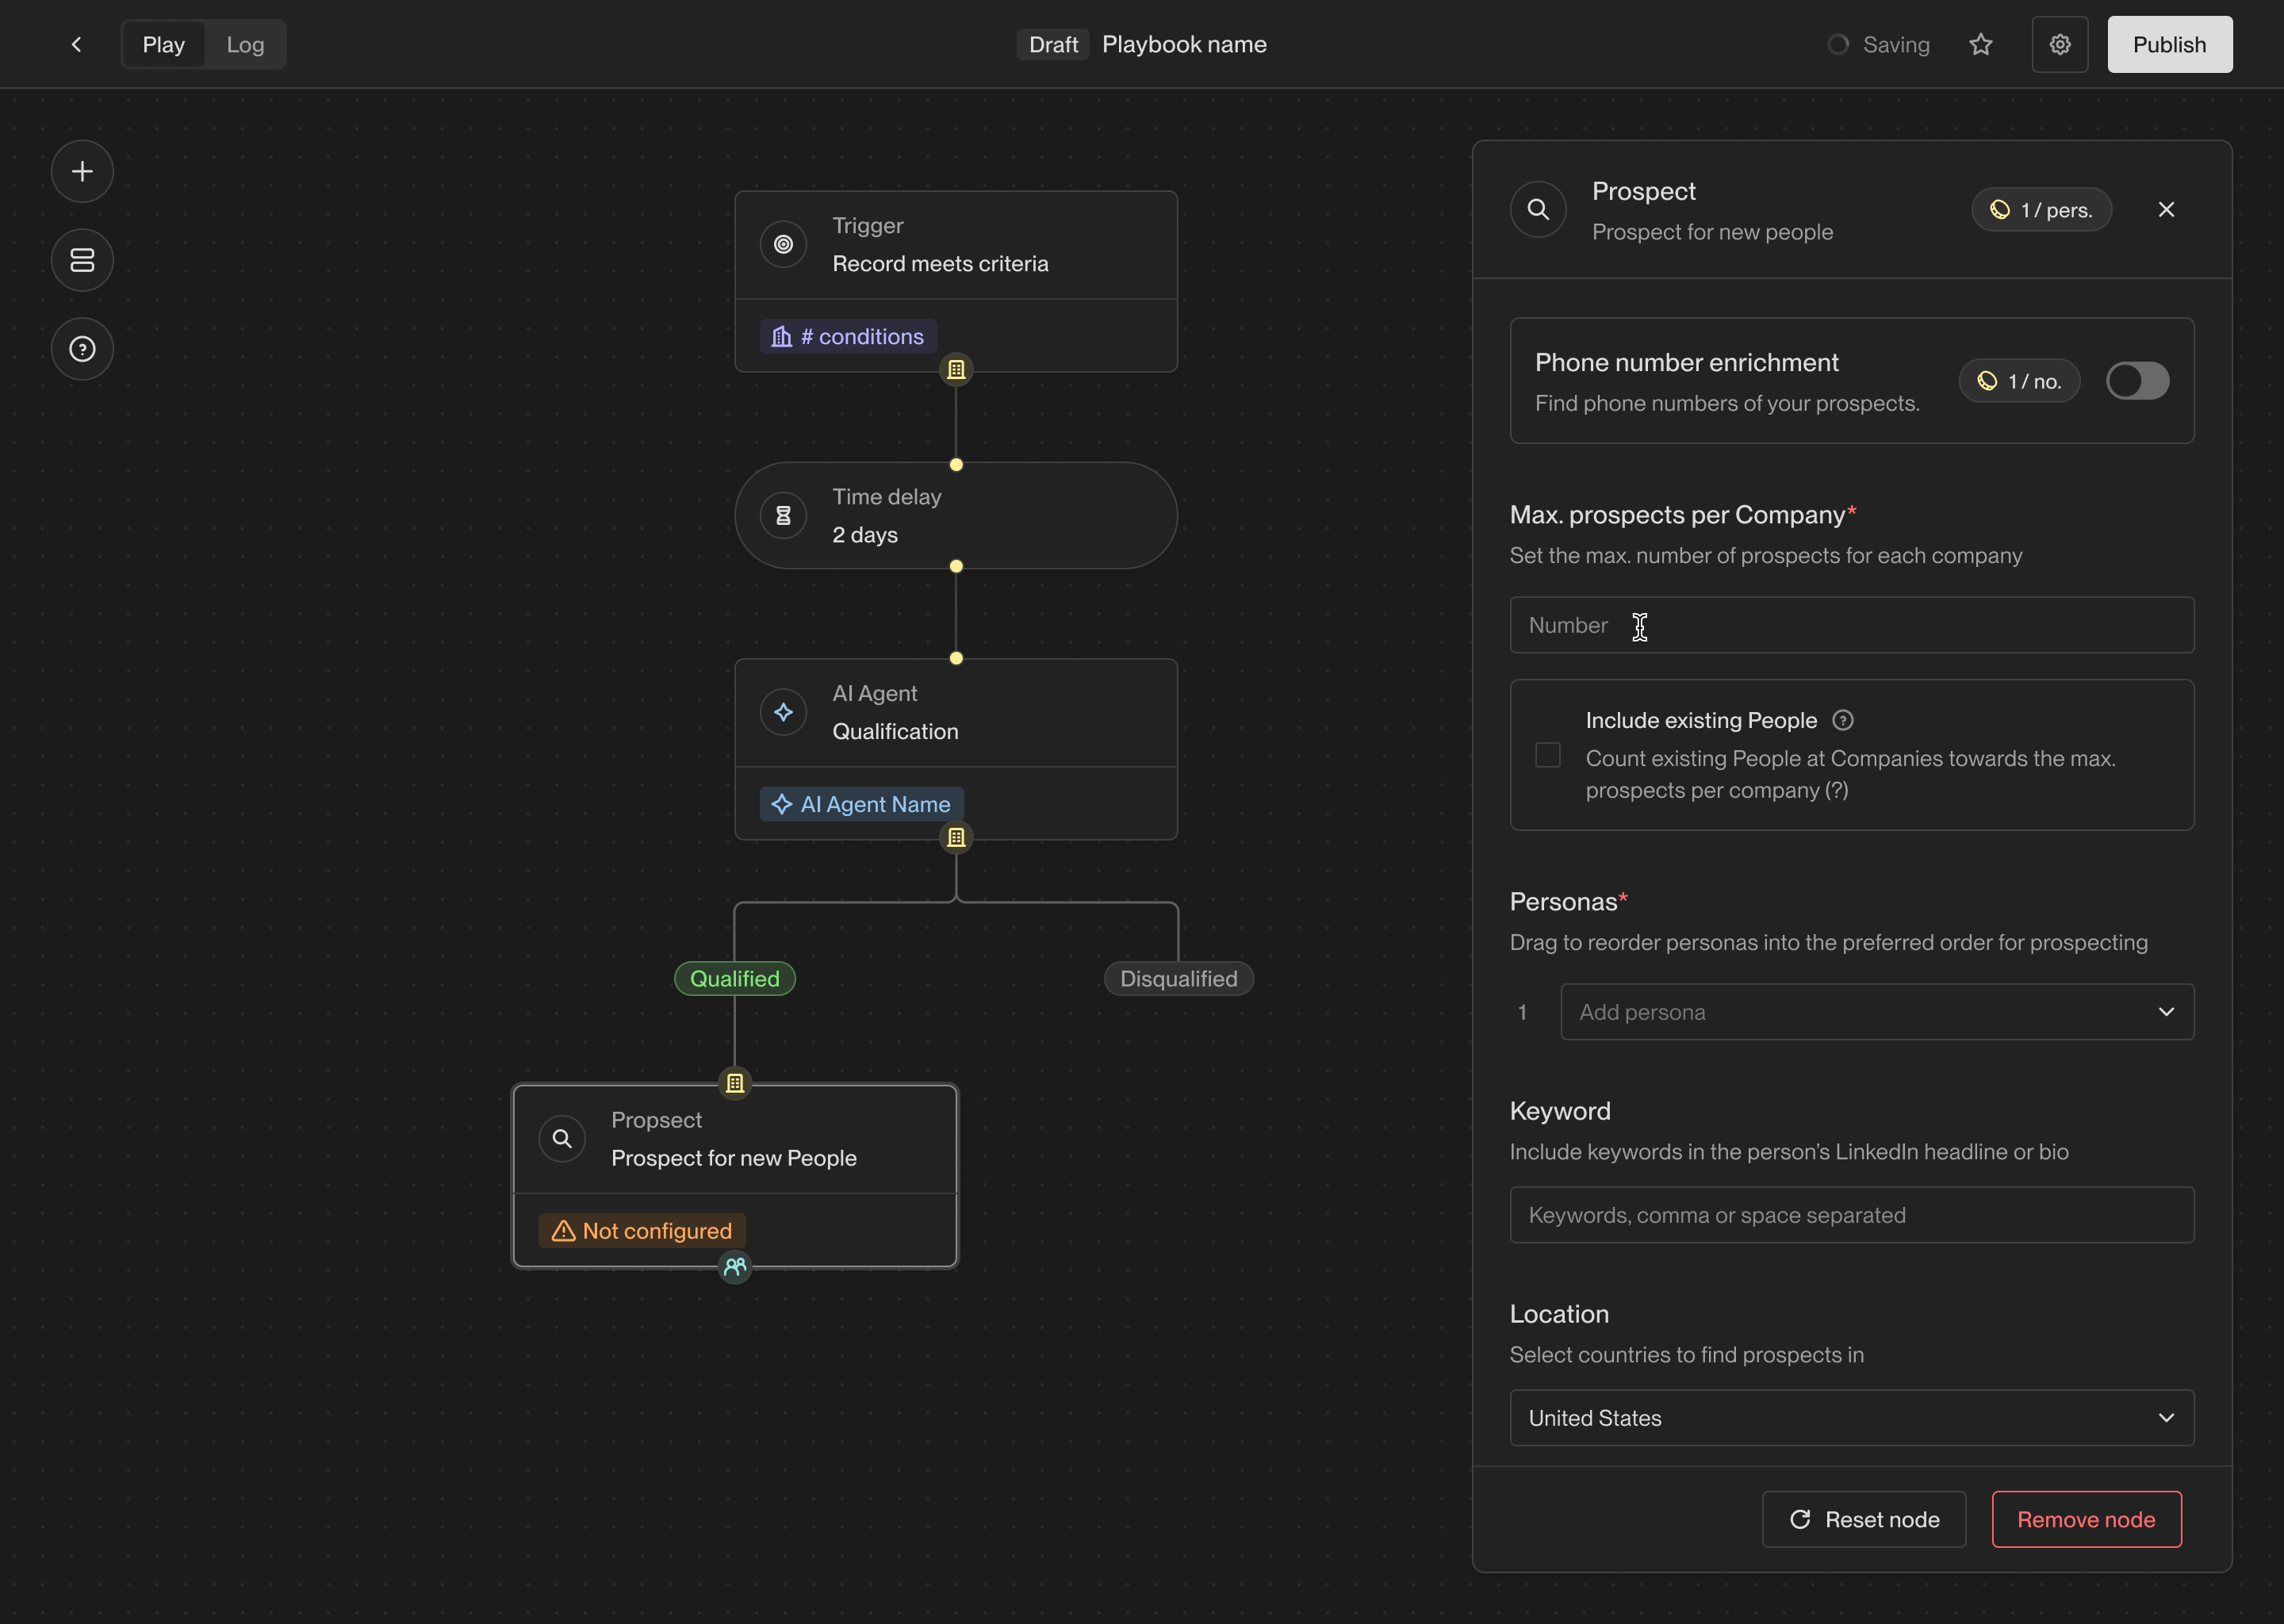 You can also specify a limit on the number of people to find per company. If the
**Include existing people** option is enabled, existing people at the company
already in Unify will count towards this limit. This can be useful if you want
to save prospecting credits on companies you already have relevant contacts for.
### Sequence
The sequence enrollment action makes building automated outbound campaigns
easier than ever. You can choose which sequences to send people to based on
which personas they match.
You can also specify a limit on the number of people to find per company. If the
**Include existing people** option is enabled, existing people at the company
already in Unify will count towards this limit. This can be useful if you want
to save prospecting credits on companies you already have relevant contacts for.
### Sequence
The sequence enrollment action makes building automated outbound campaigns
easier than ever. You can choose which sequences to send people to based on
which personas they match.
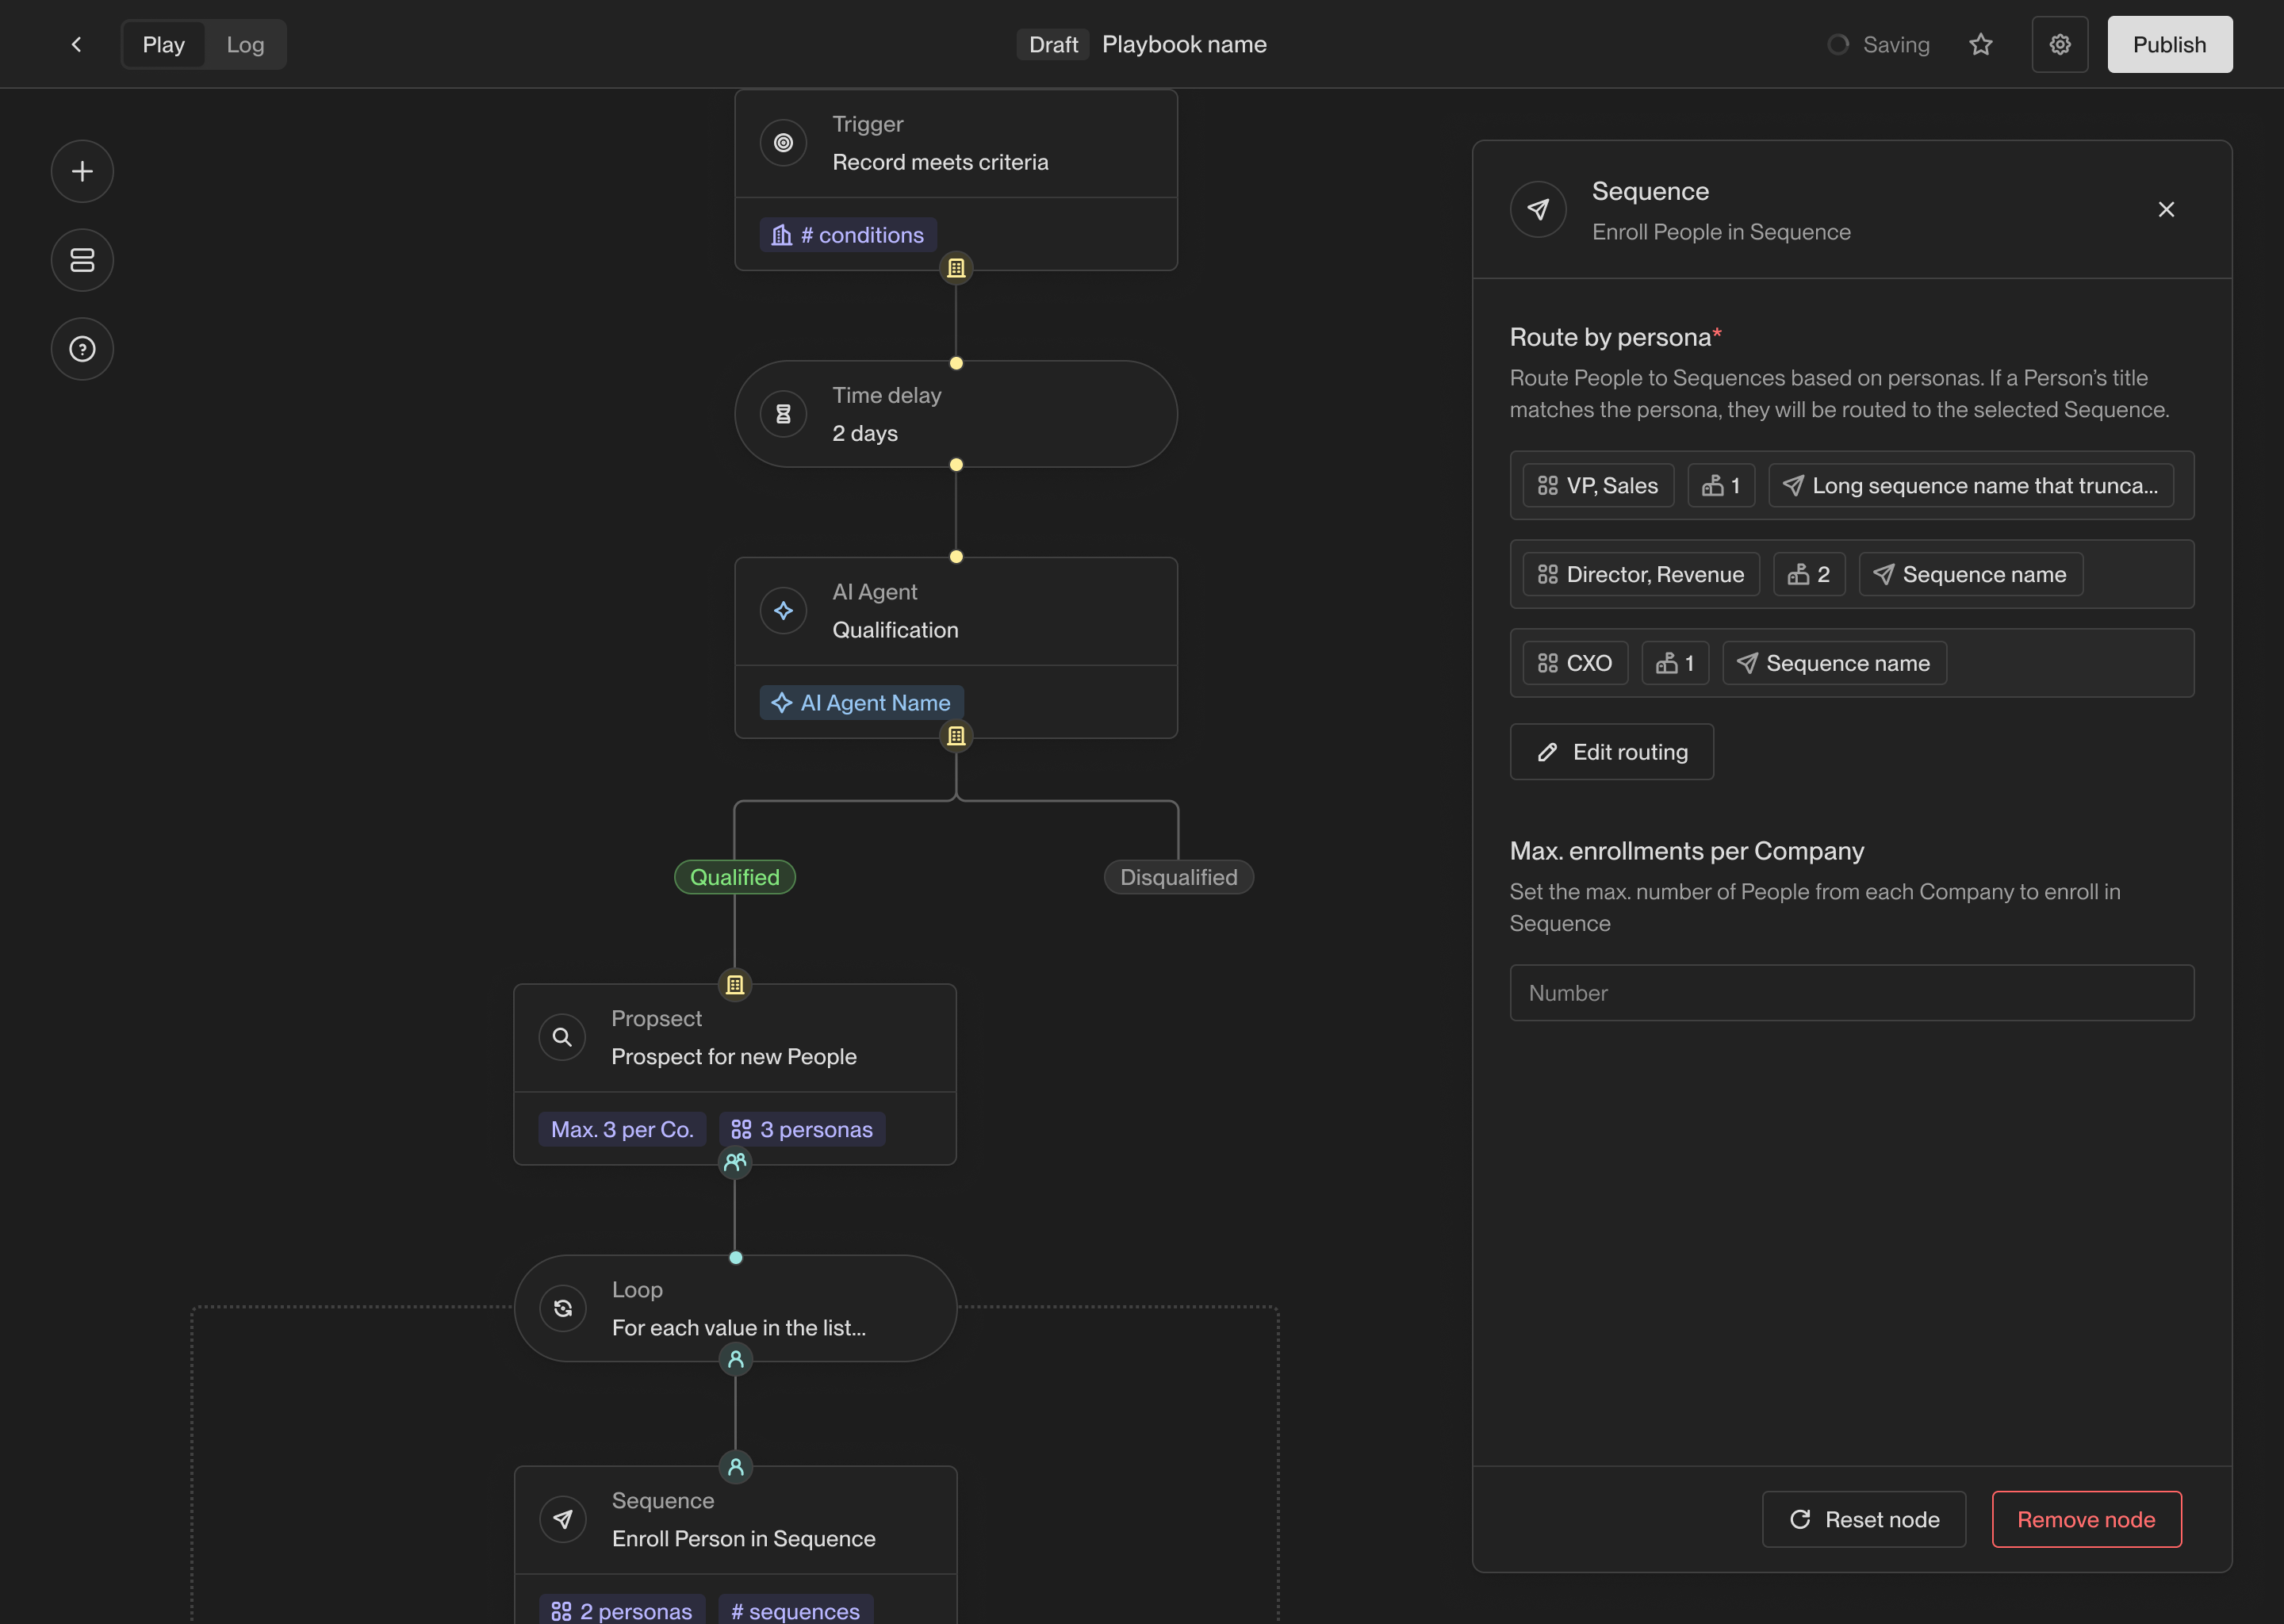 The routing configuration provides a way to specify which mailboxes and
sequences should be used for people this action runs on. You can specify a
set of mailboxes to use or choose to use a mailbox associated with the [company
or person record owner](/reference/plays/actions#assign-owner-action).
The routing configuration provides a way to specify which mailboxes and
sequences should be used for people this action runs on. You can specify a
set of mailboxes to use or choose to use a mailbox associated with the [company
or person record owner](/reference/plays/actions#assign-owner-action).
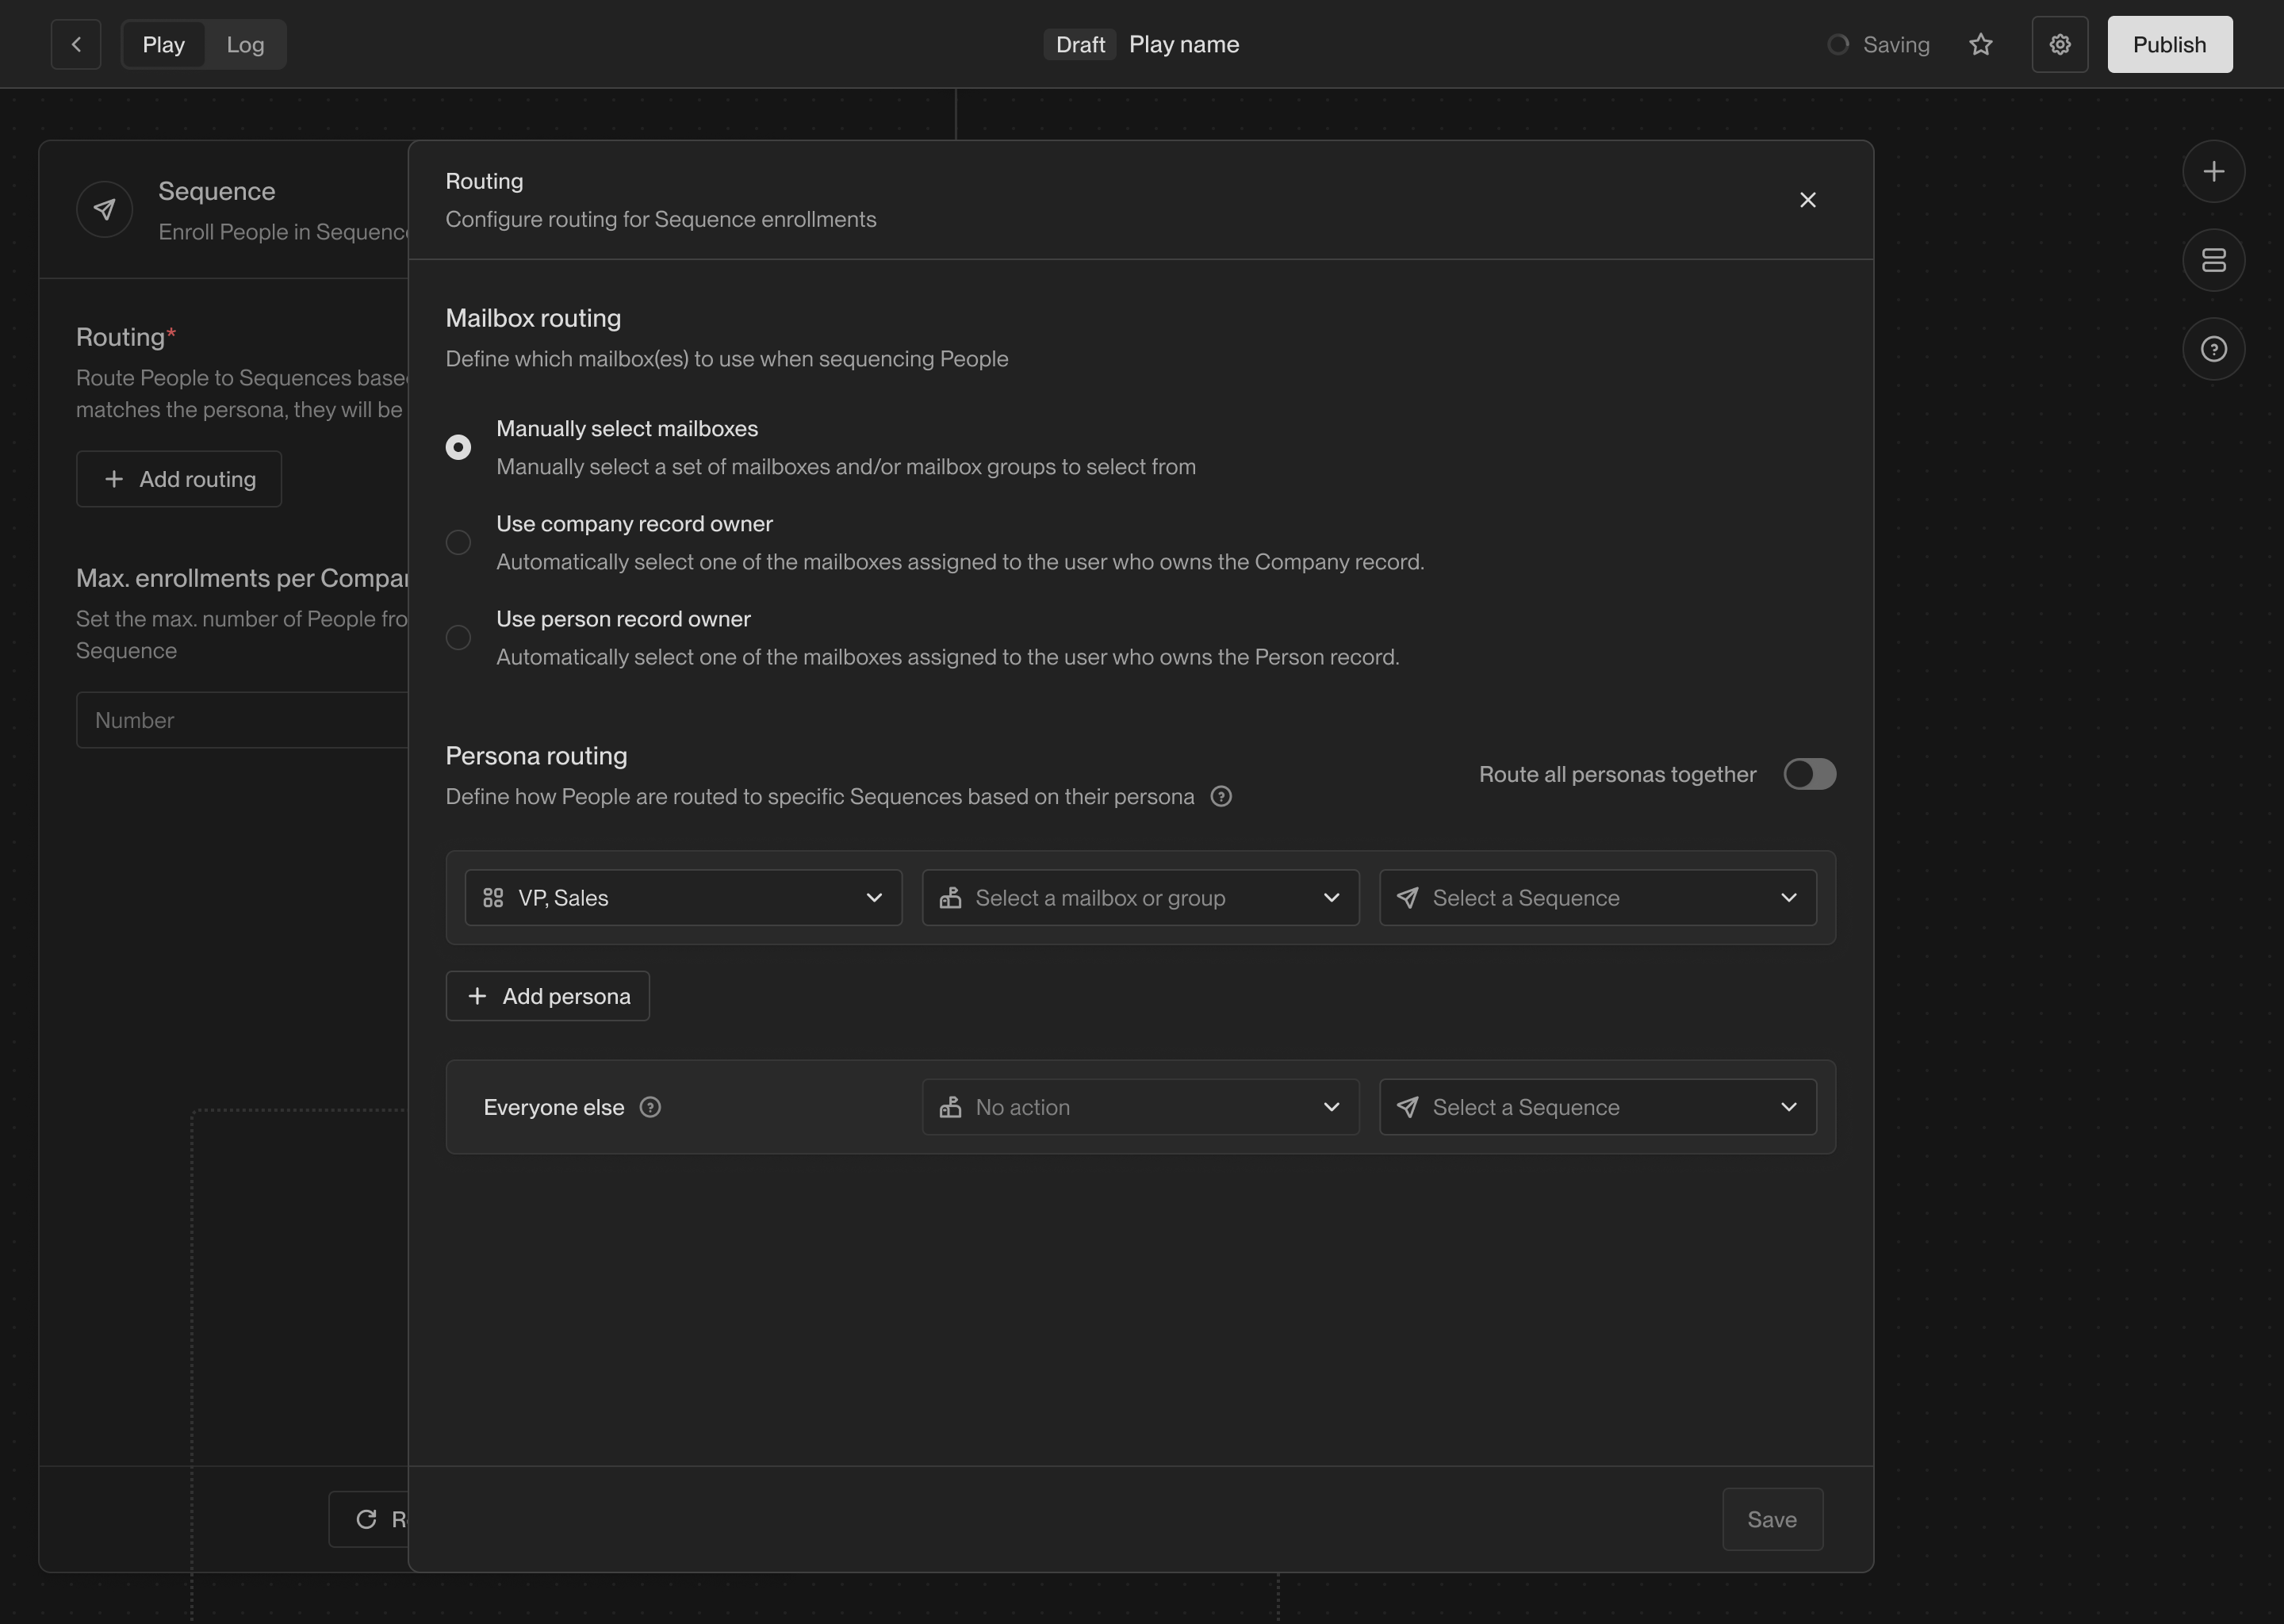 You also have the option to set a limit on how many people to enroll per
company, which is generally recommended to avoid overtargeting a single company.
This limit applies globally across play runs, so if multiple Plays run on the
same company, this limit will be shared across all of them.
### Slack alert
The Slack alert action allows you to send a customized Slack message at any
point in a Play. You can send messages to any public channels or DM any users in
your workspace.
You also have the option to set a limit on how many people to enroll per
company, which is generally recommended to avoid overtargeting a single company.
This limit applies globally across play runs, so if multiple Plays run on the
same company, this limit will be shared across all of them.
### Slack alert
The Slack alert action allows you to send a customized Slack message at any
point in a Play. You can send messages to any public channels or DM any users in
your workspace.
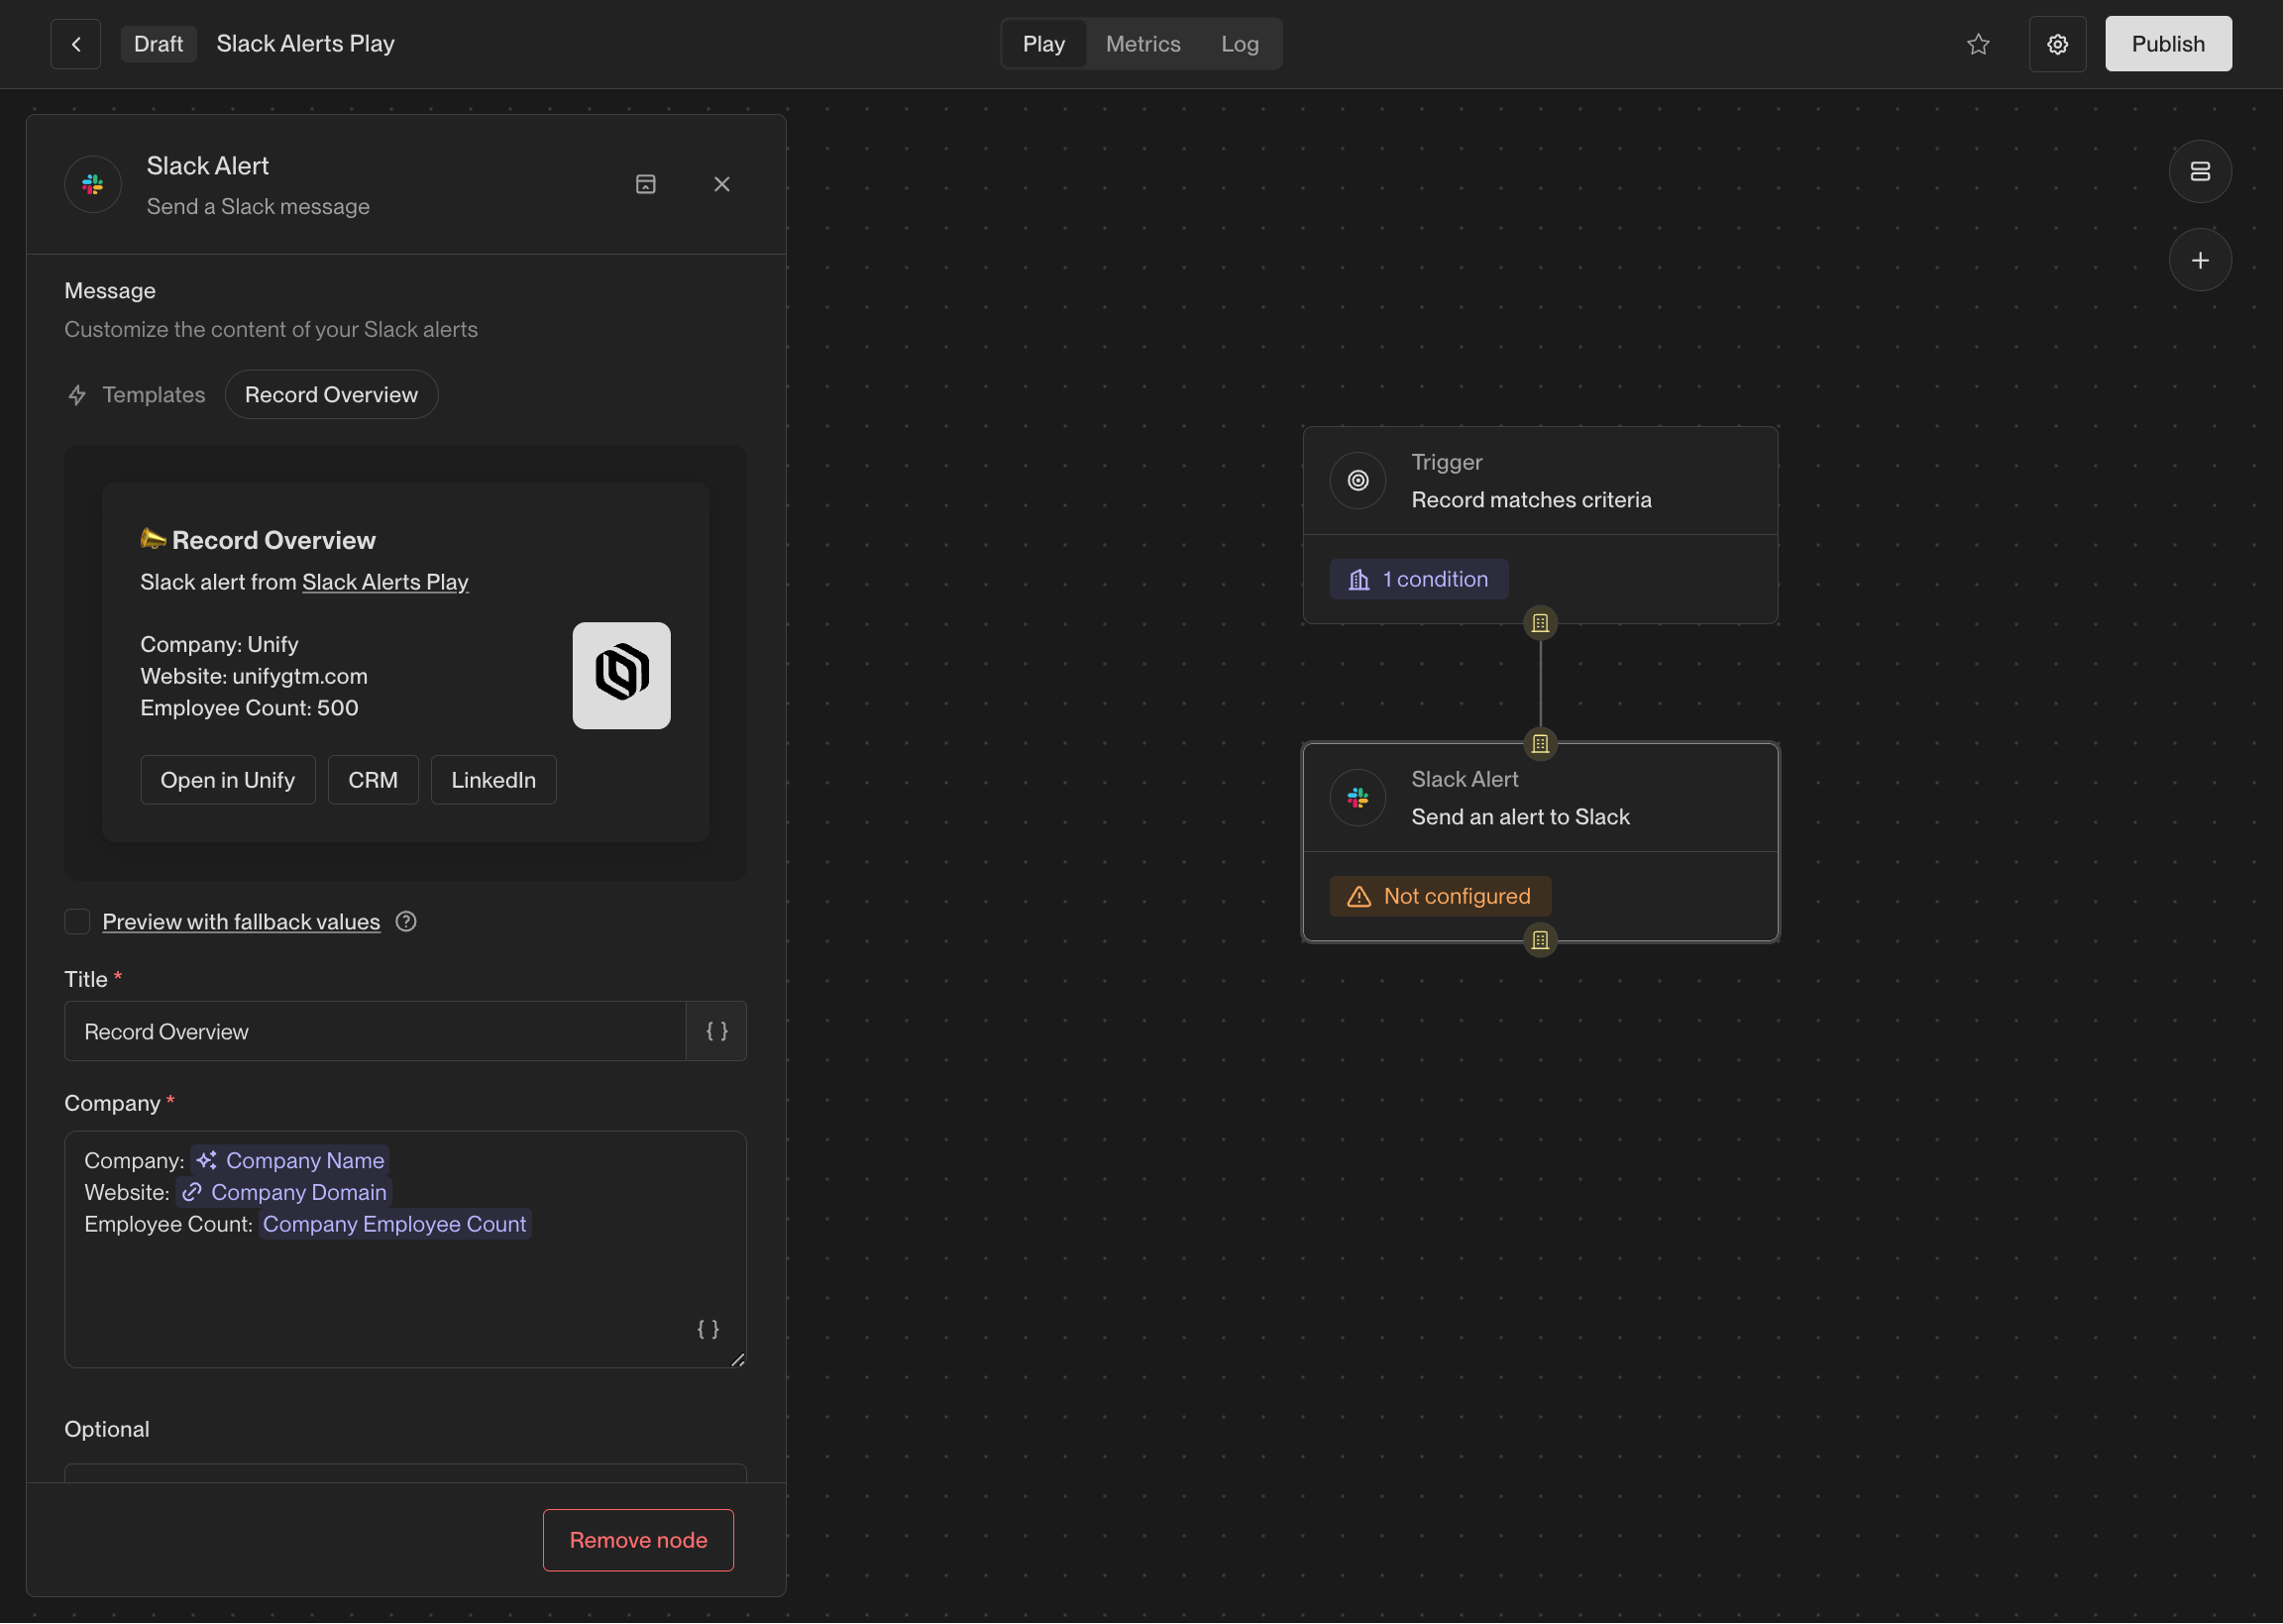 The contents of the messages can be customized with template variables, so you
can include information about the record that triggered the action.
The contents of the messages can be customized with template variables, so you
can include information about the record that triggered the action.
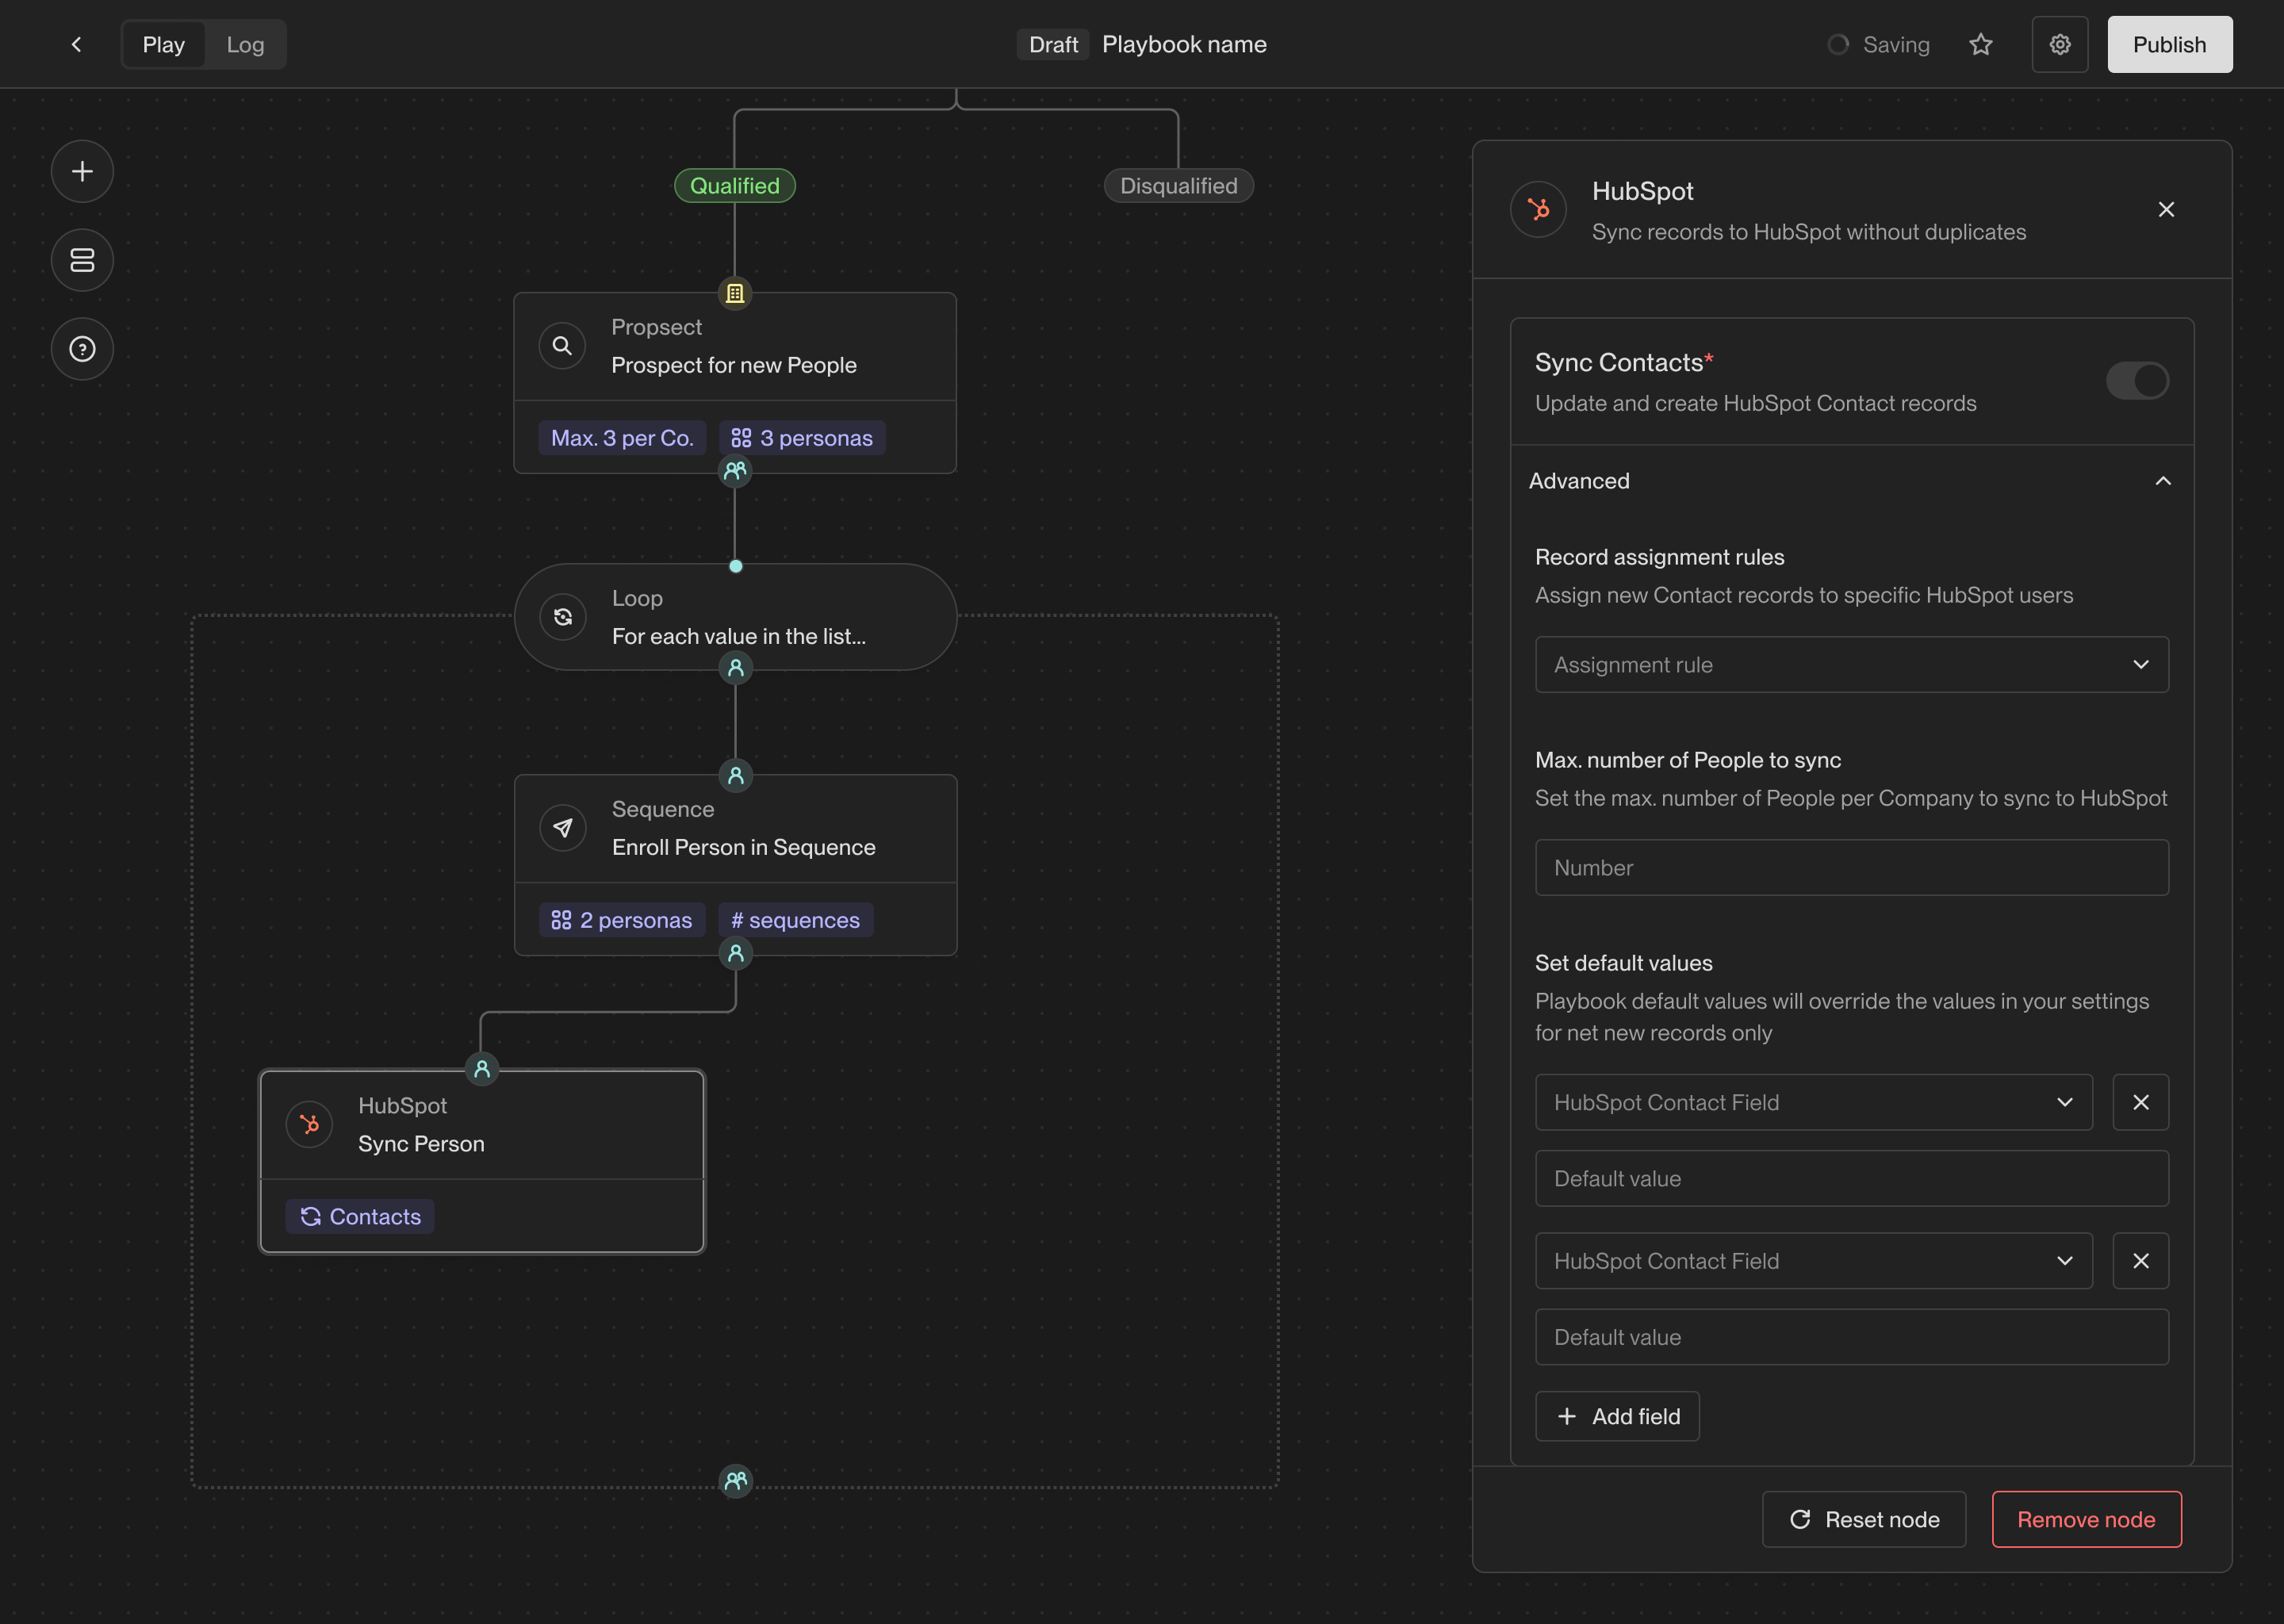 ### Sync to Salesforce
The Salesforce sync action allows you to create or update a record in Salesforce
based on a company or person record in Unify. This action will use the settings
you've configured for Salesforce in the Unify settings.
You also have the option to specify additional default field values. These will
be written to Salesforce unless a different Unify field is already mapped to the
Salesforce field.
### Sync to Salesforce
The Salesforce sync action allows you to create or update a record in Salesforce
based on a company or person record in Unify. This action will use the settings
you've configured for Salesforce in the Unify settings.
You also have the option to specify additional default field values. These will
be written to Salesforce unless a different Unify field is already mapped to the
Salesforce field.
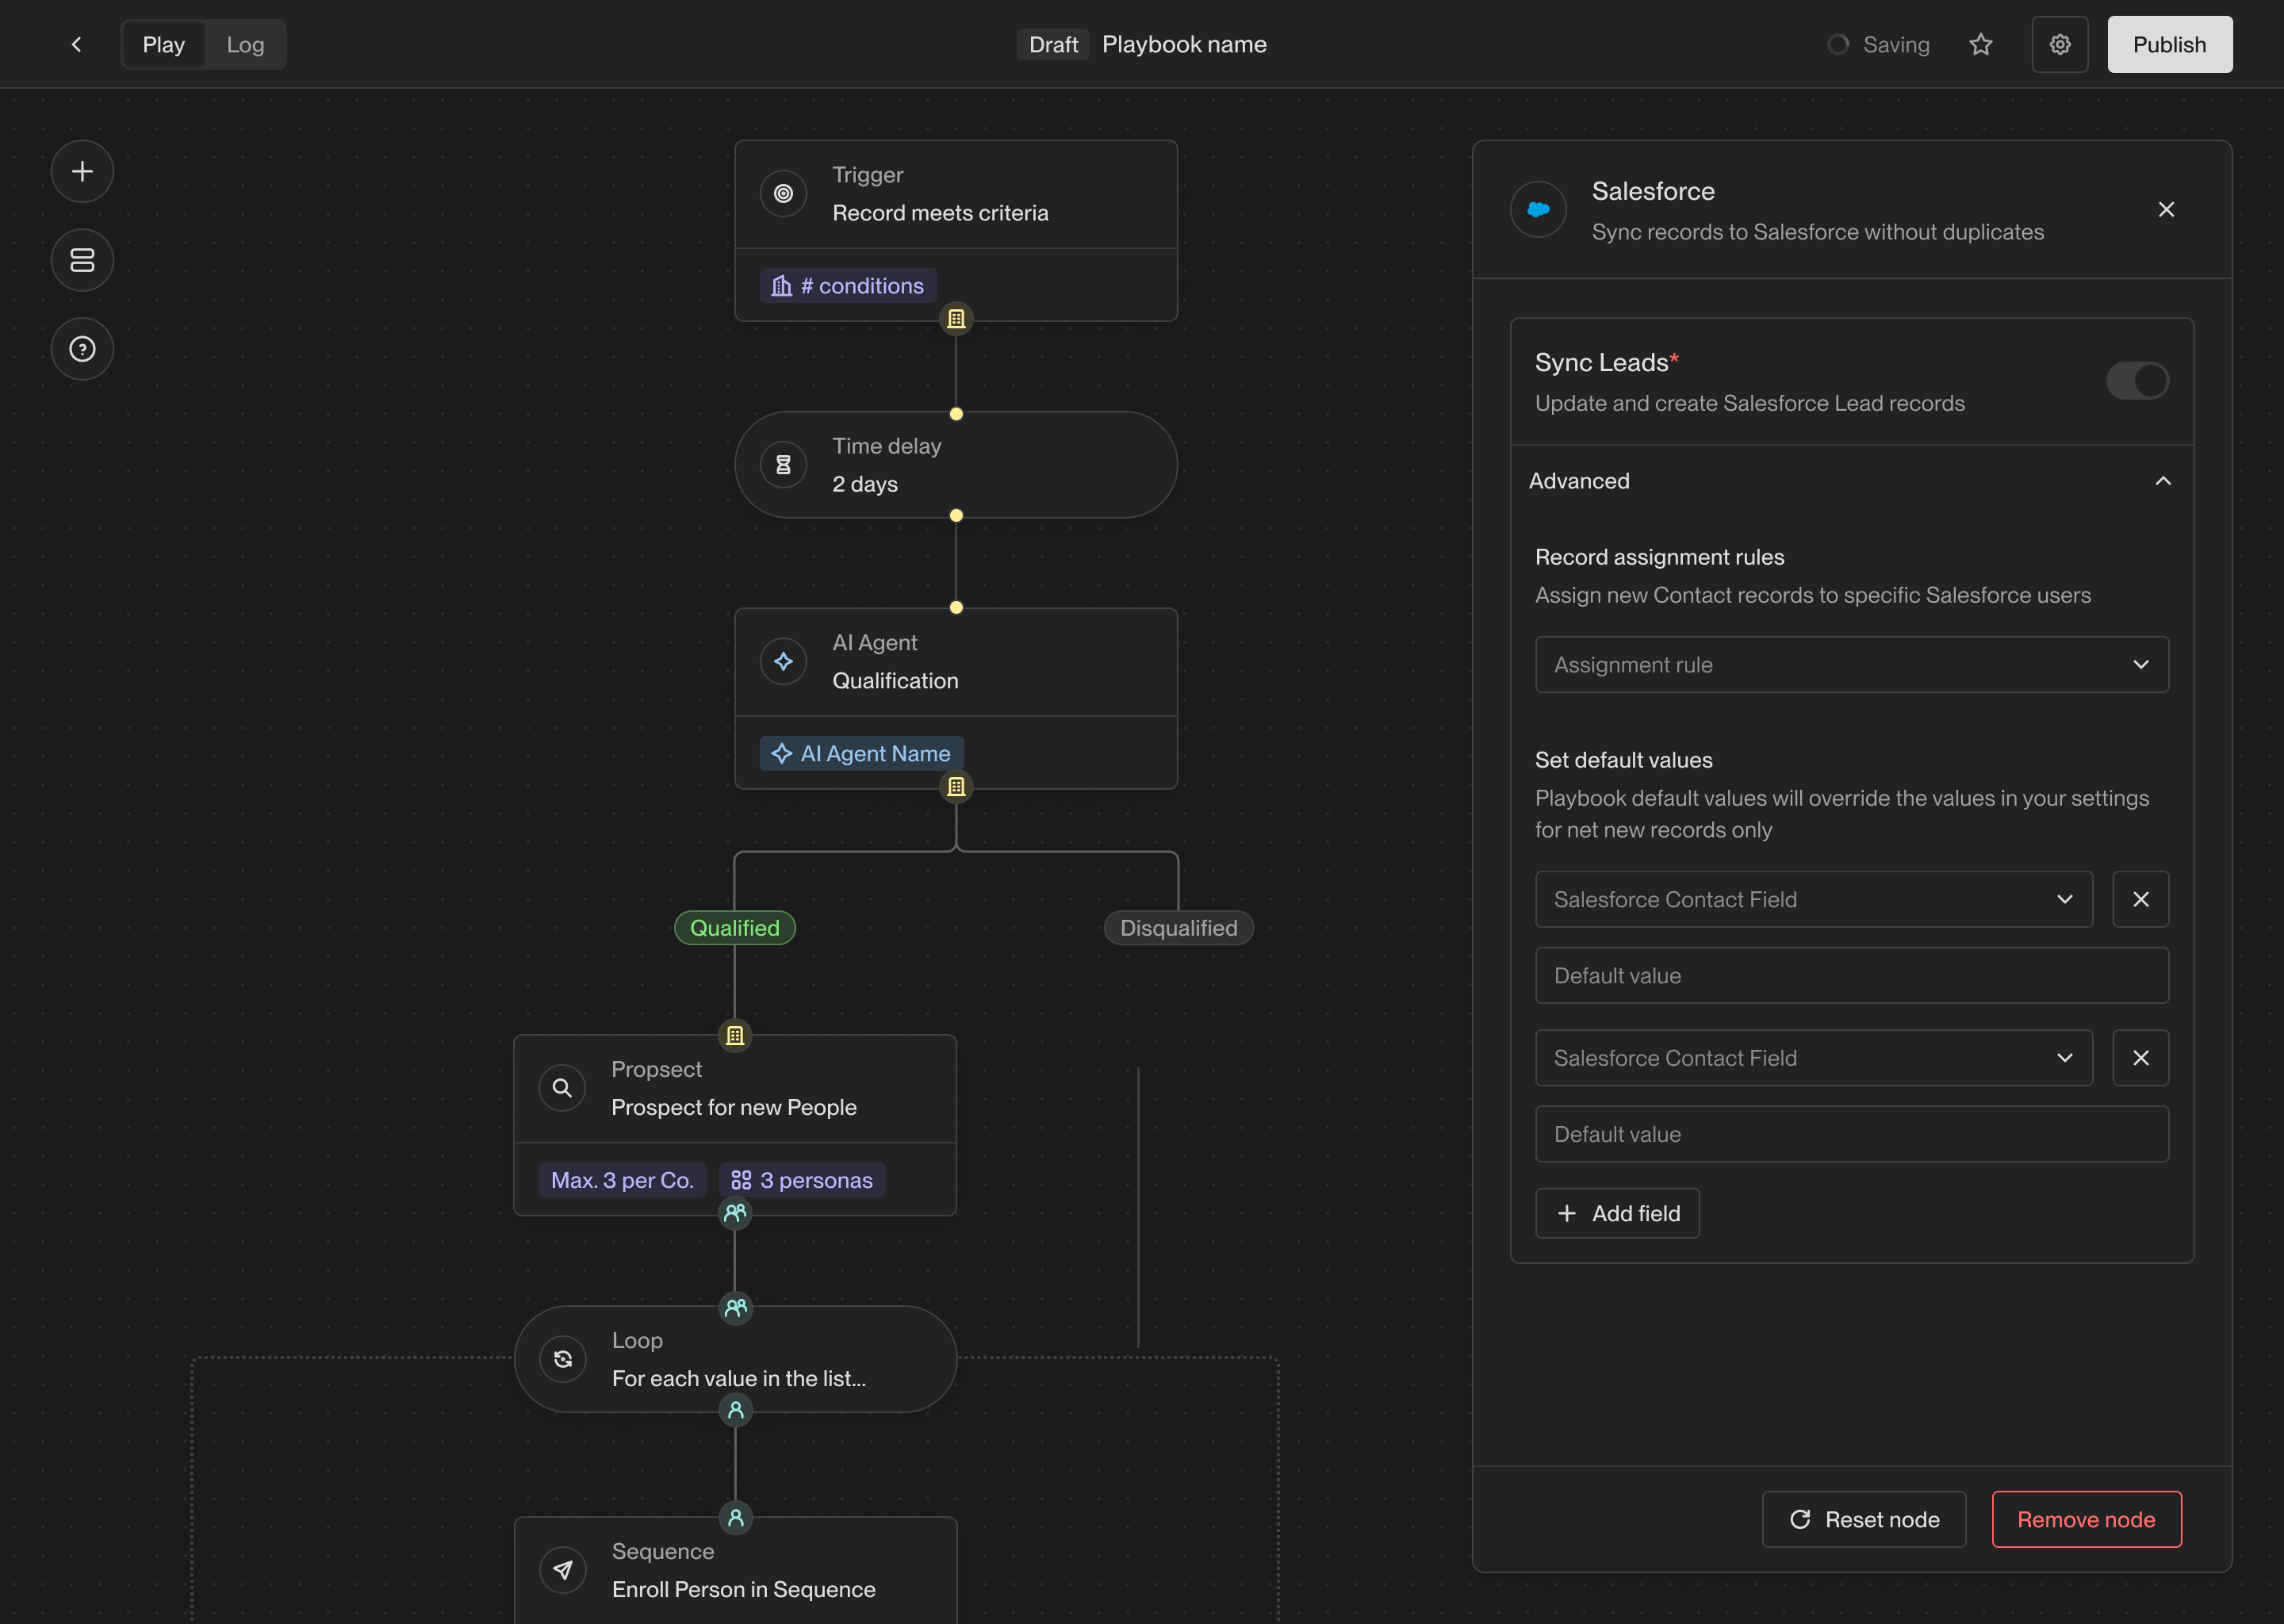 ## Utility actions
### Loop
## Utility actions
### Loop
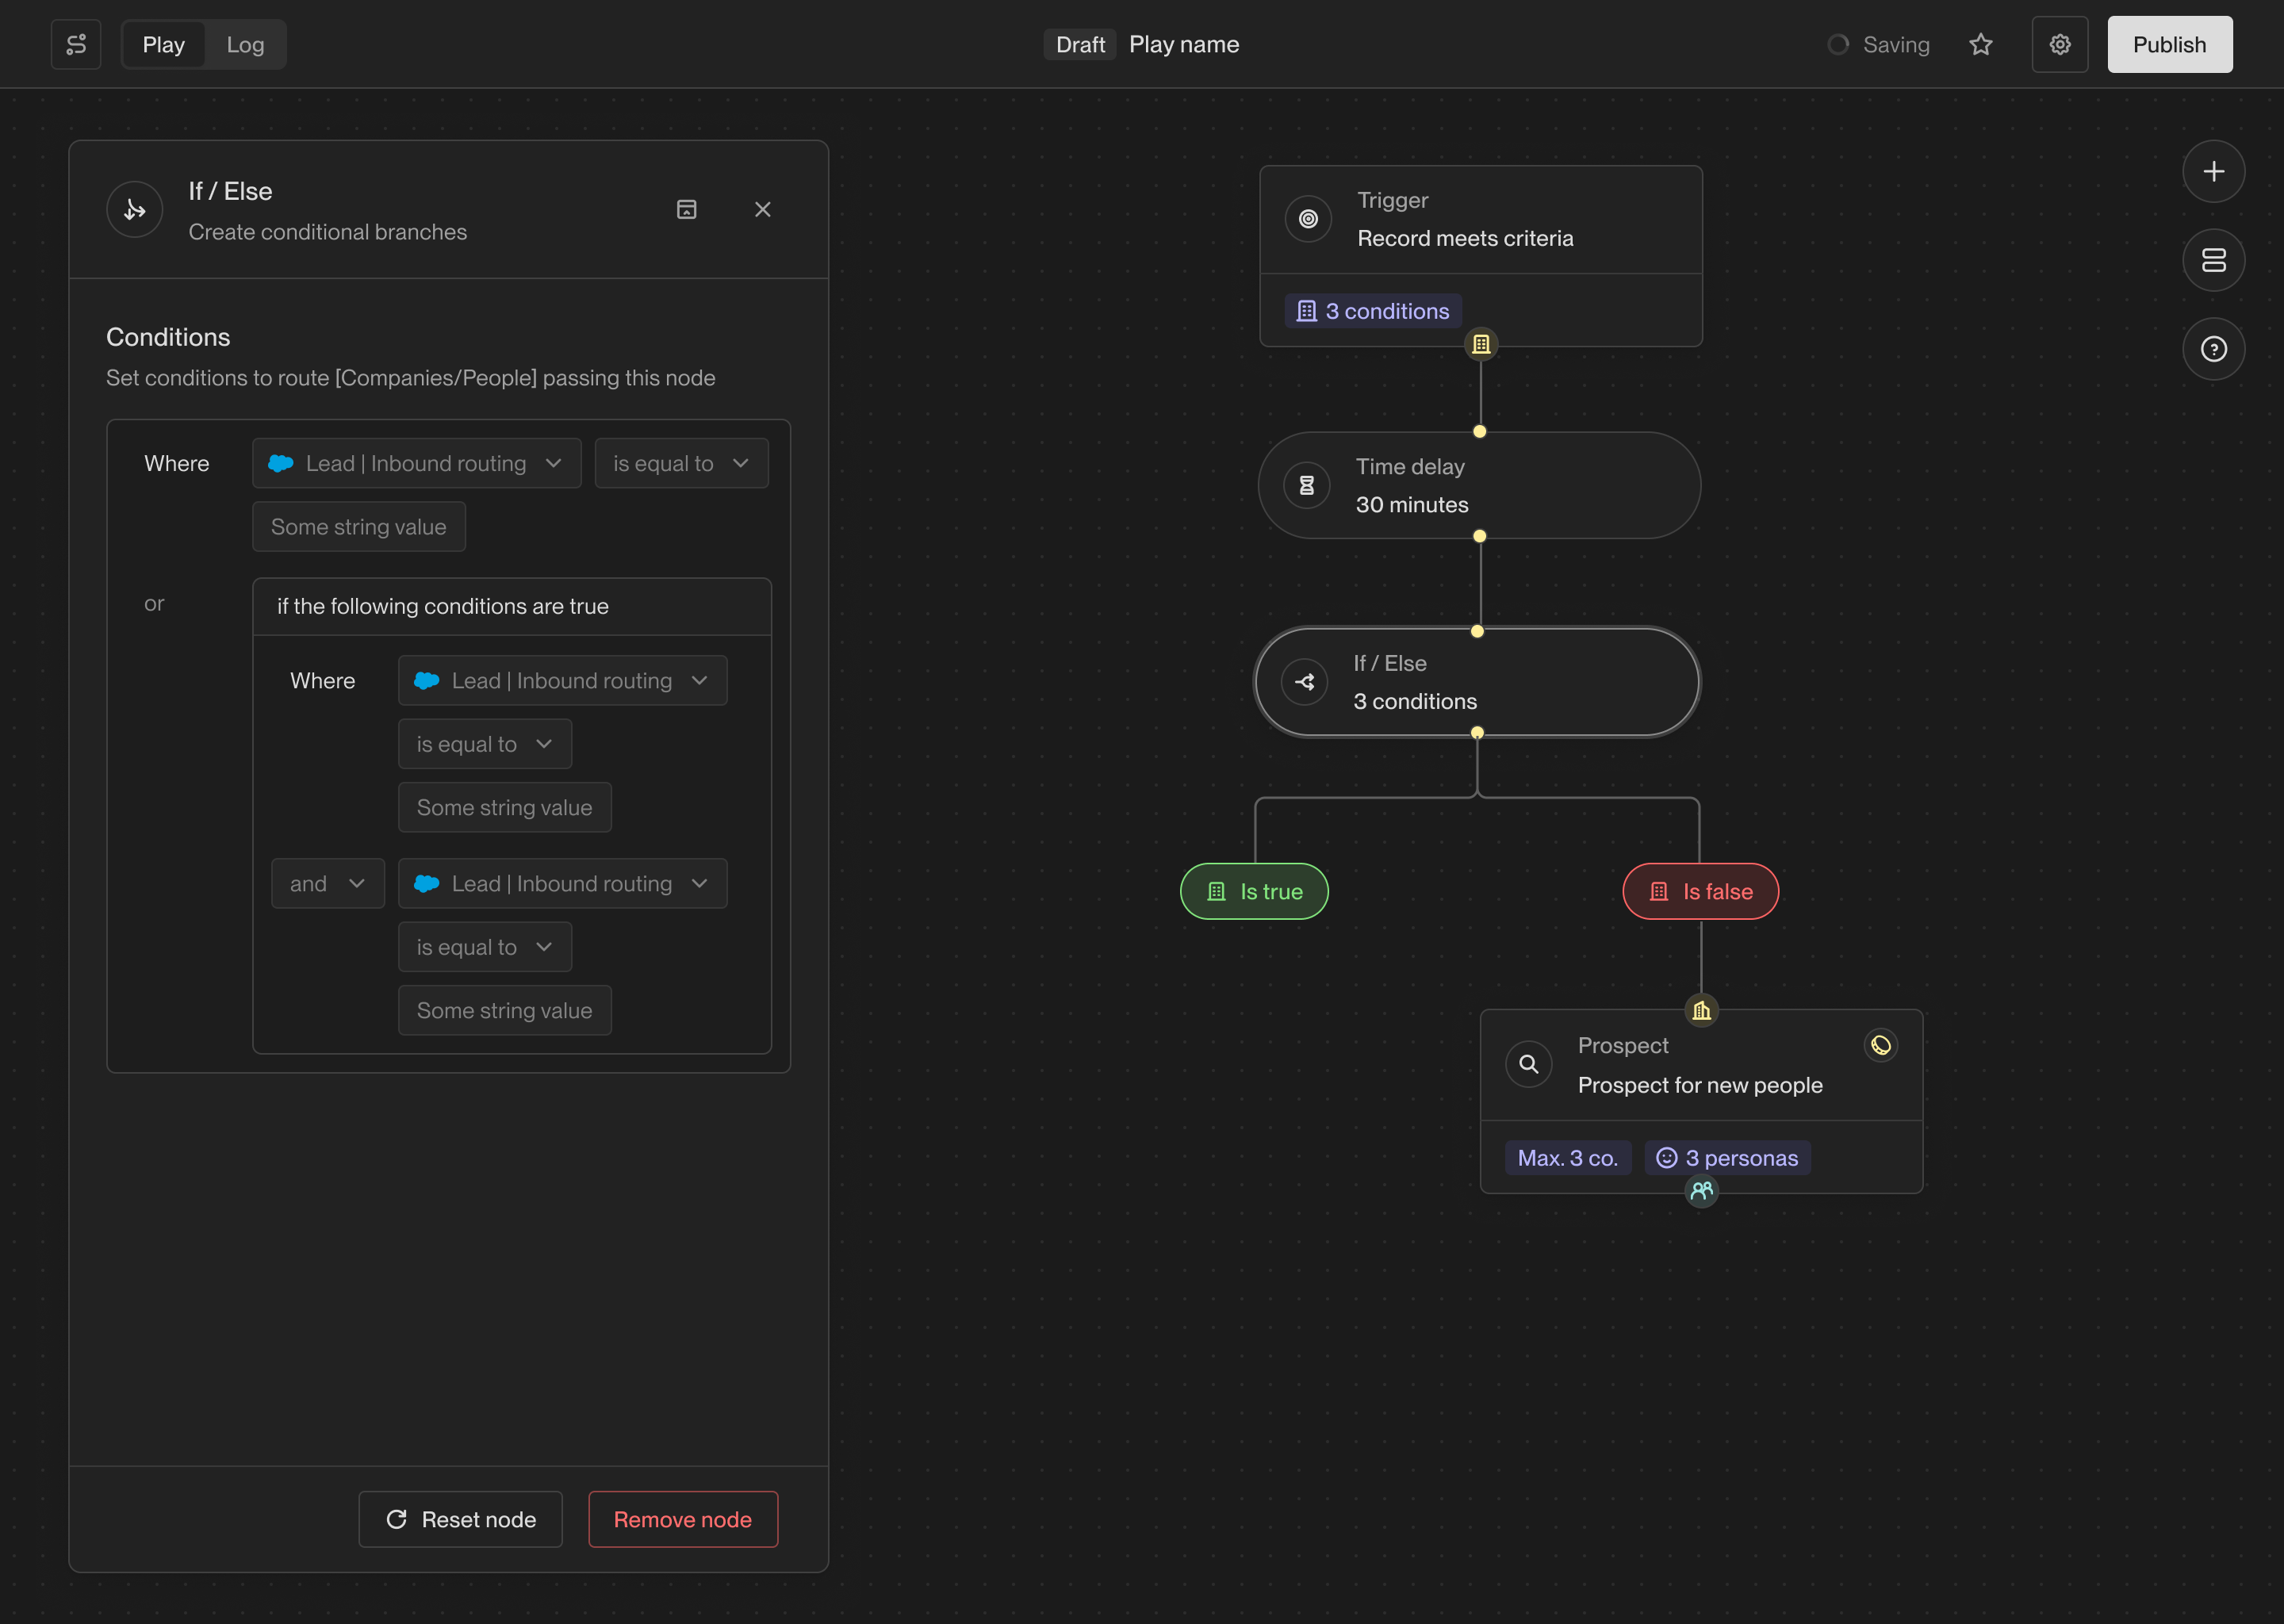 This action enables you to solve a wide variety of more complex use cases using
Plays. For example, you can enroll people into different sequences based on
their company firmographics, exact job title, or custom CRM field values.
### A/B Test
The A/B test action allows you to route records down a specific path based on a set probability.
This is useful for testing different sequences or actions.
This action enables you to solve a wide variety of more complex use cases using
Plays. For example, you can enroll people into different sequences based on
their company firmographics, exact job title, or custom CRM field values.
### A/B Test
The A/B test action allows you to route records down a specific path based on a set probability.
This is useful for testing different sequences or actions.
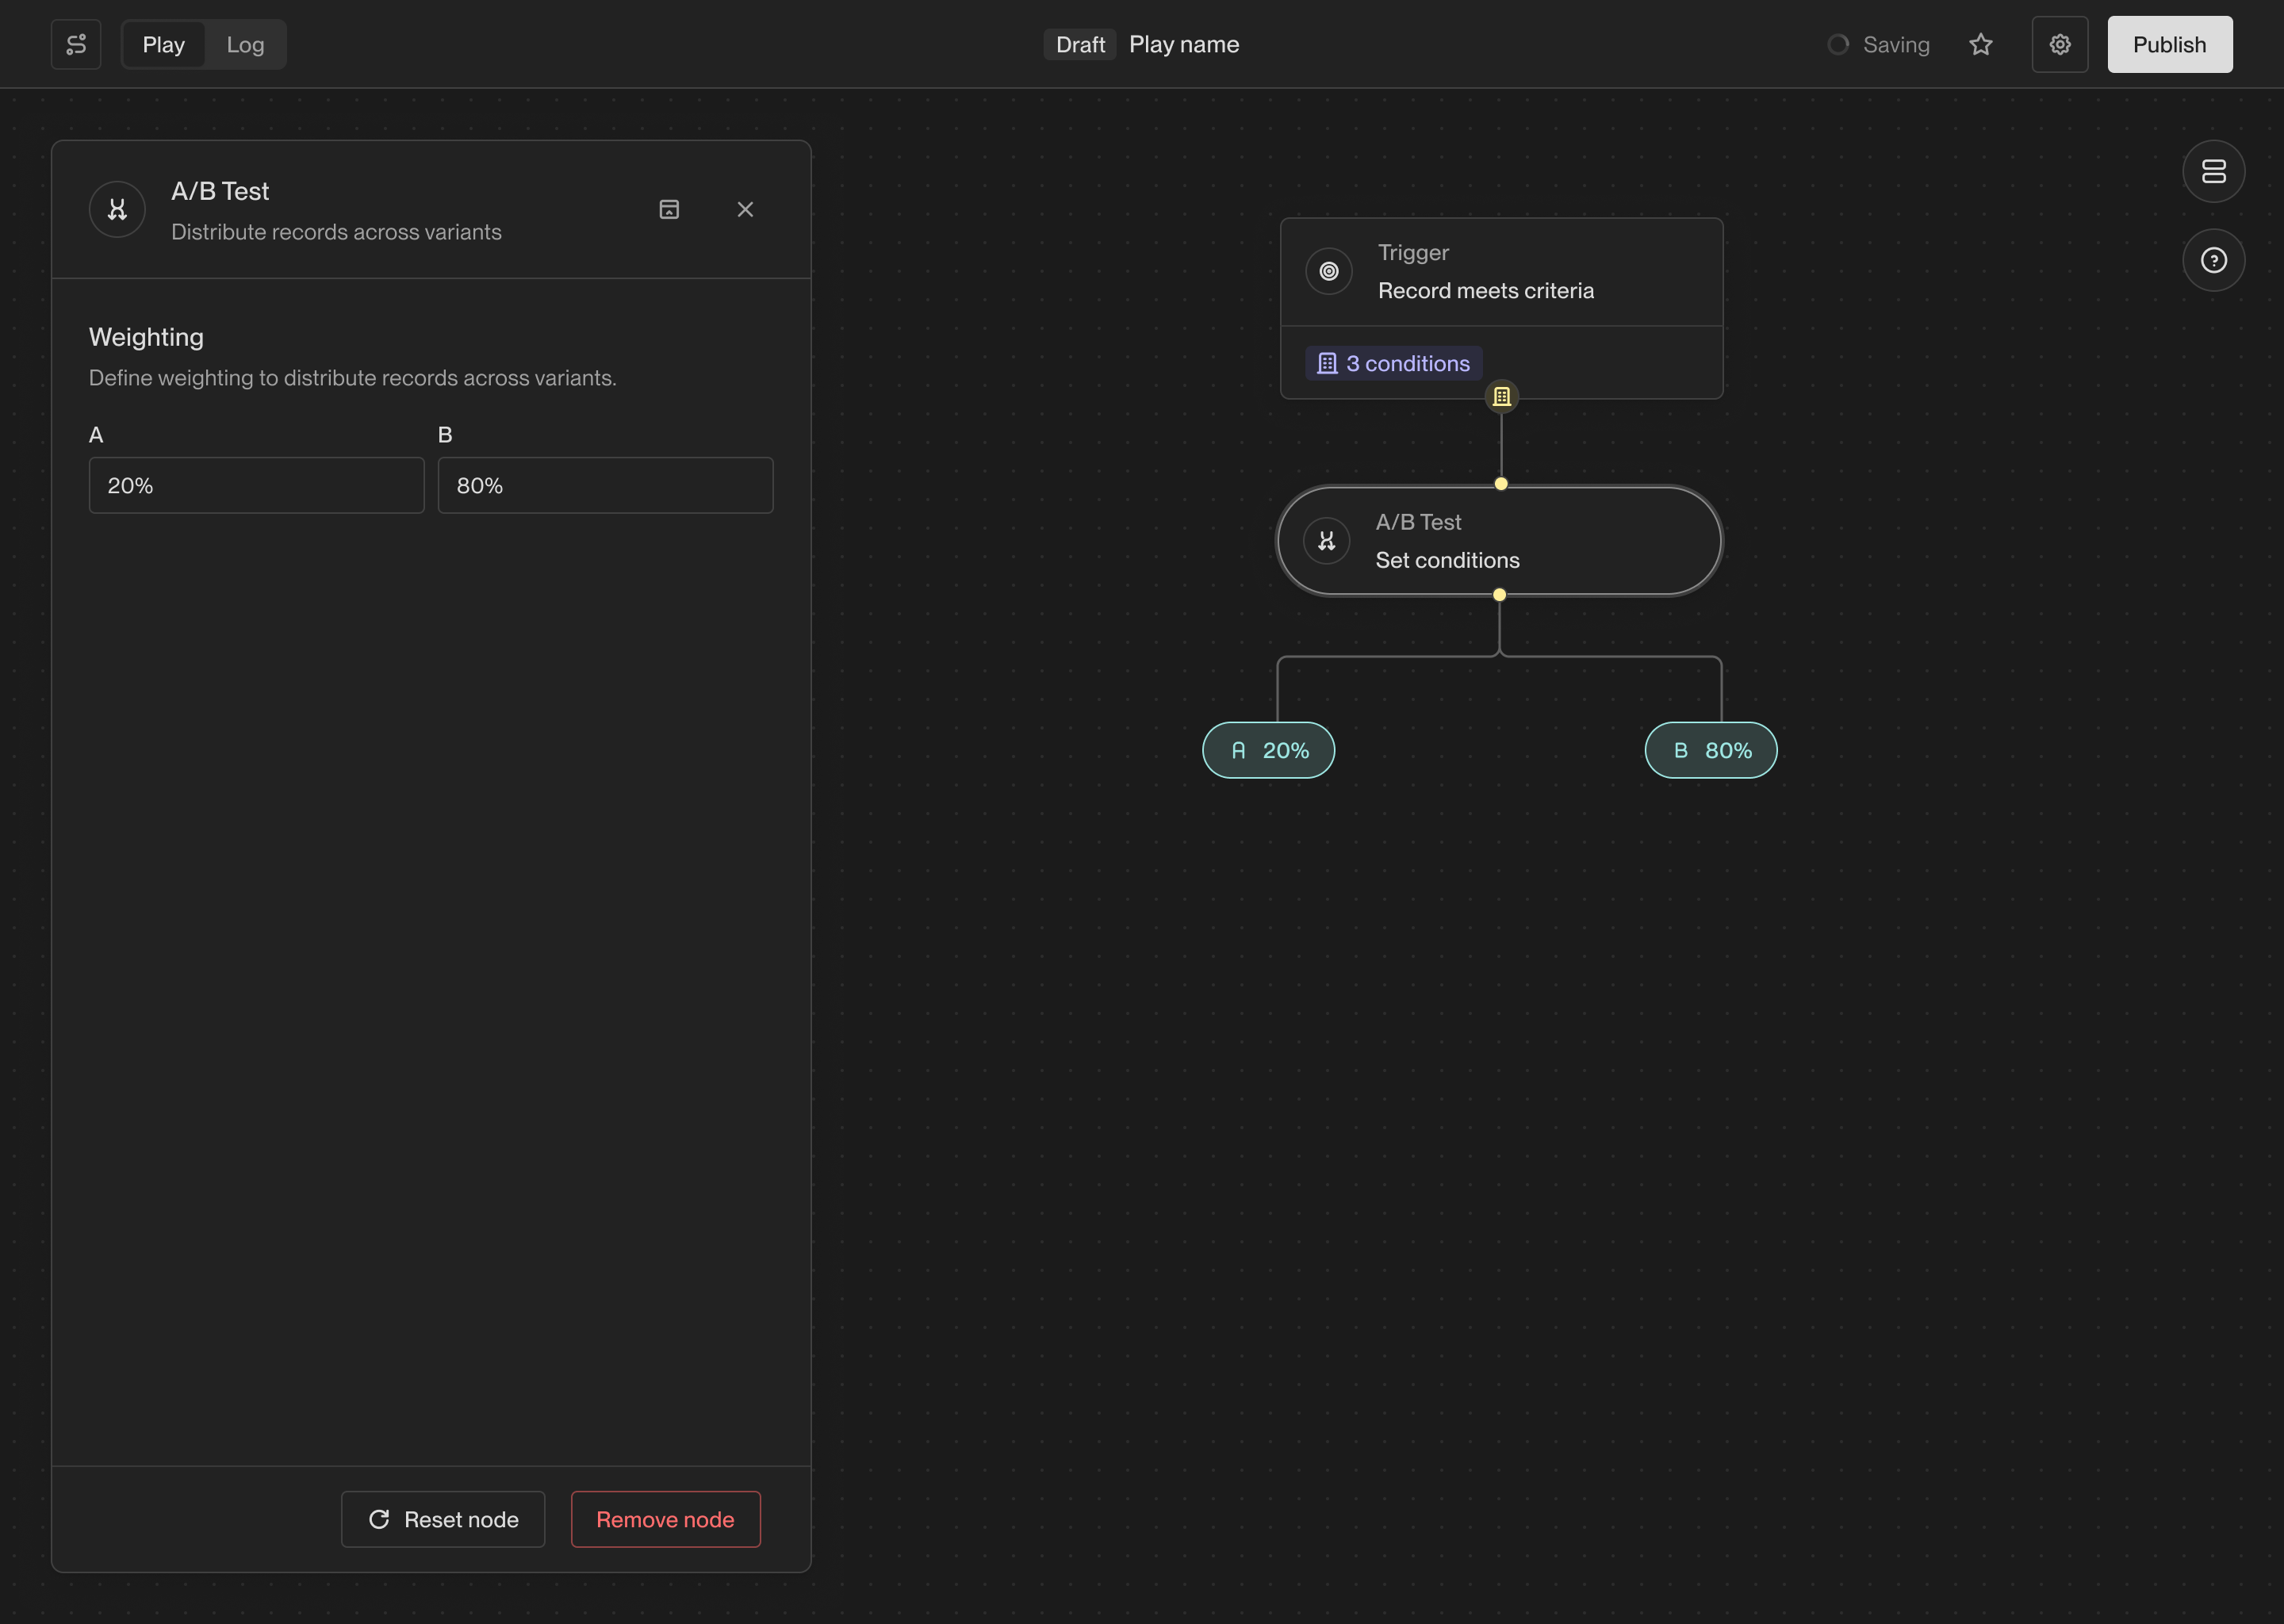 ### Delay
The Delay action waits for a specified amount of time before continuing to the
next action in a Play. This can be useful for spacing out actions in a Play and
ensuring that actions are performed at the right time.
### Delay
The Delay action waits for a specified amount of time before continuing to the
next action in a Play. This can be useful for spacing out actions in a Play and
ensuring that actions are performed at the right time.
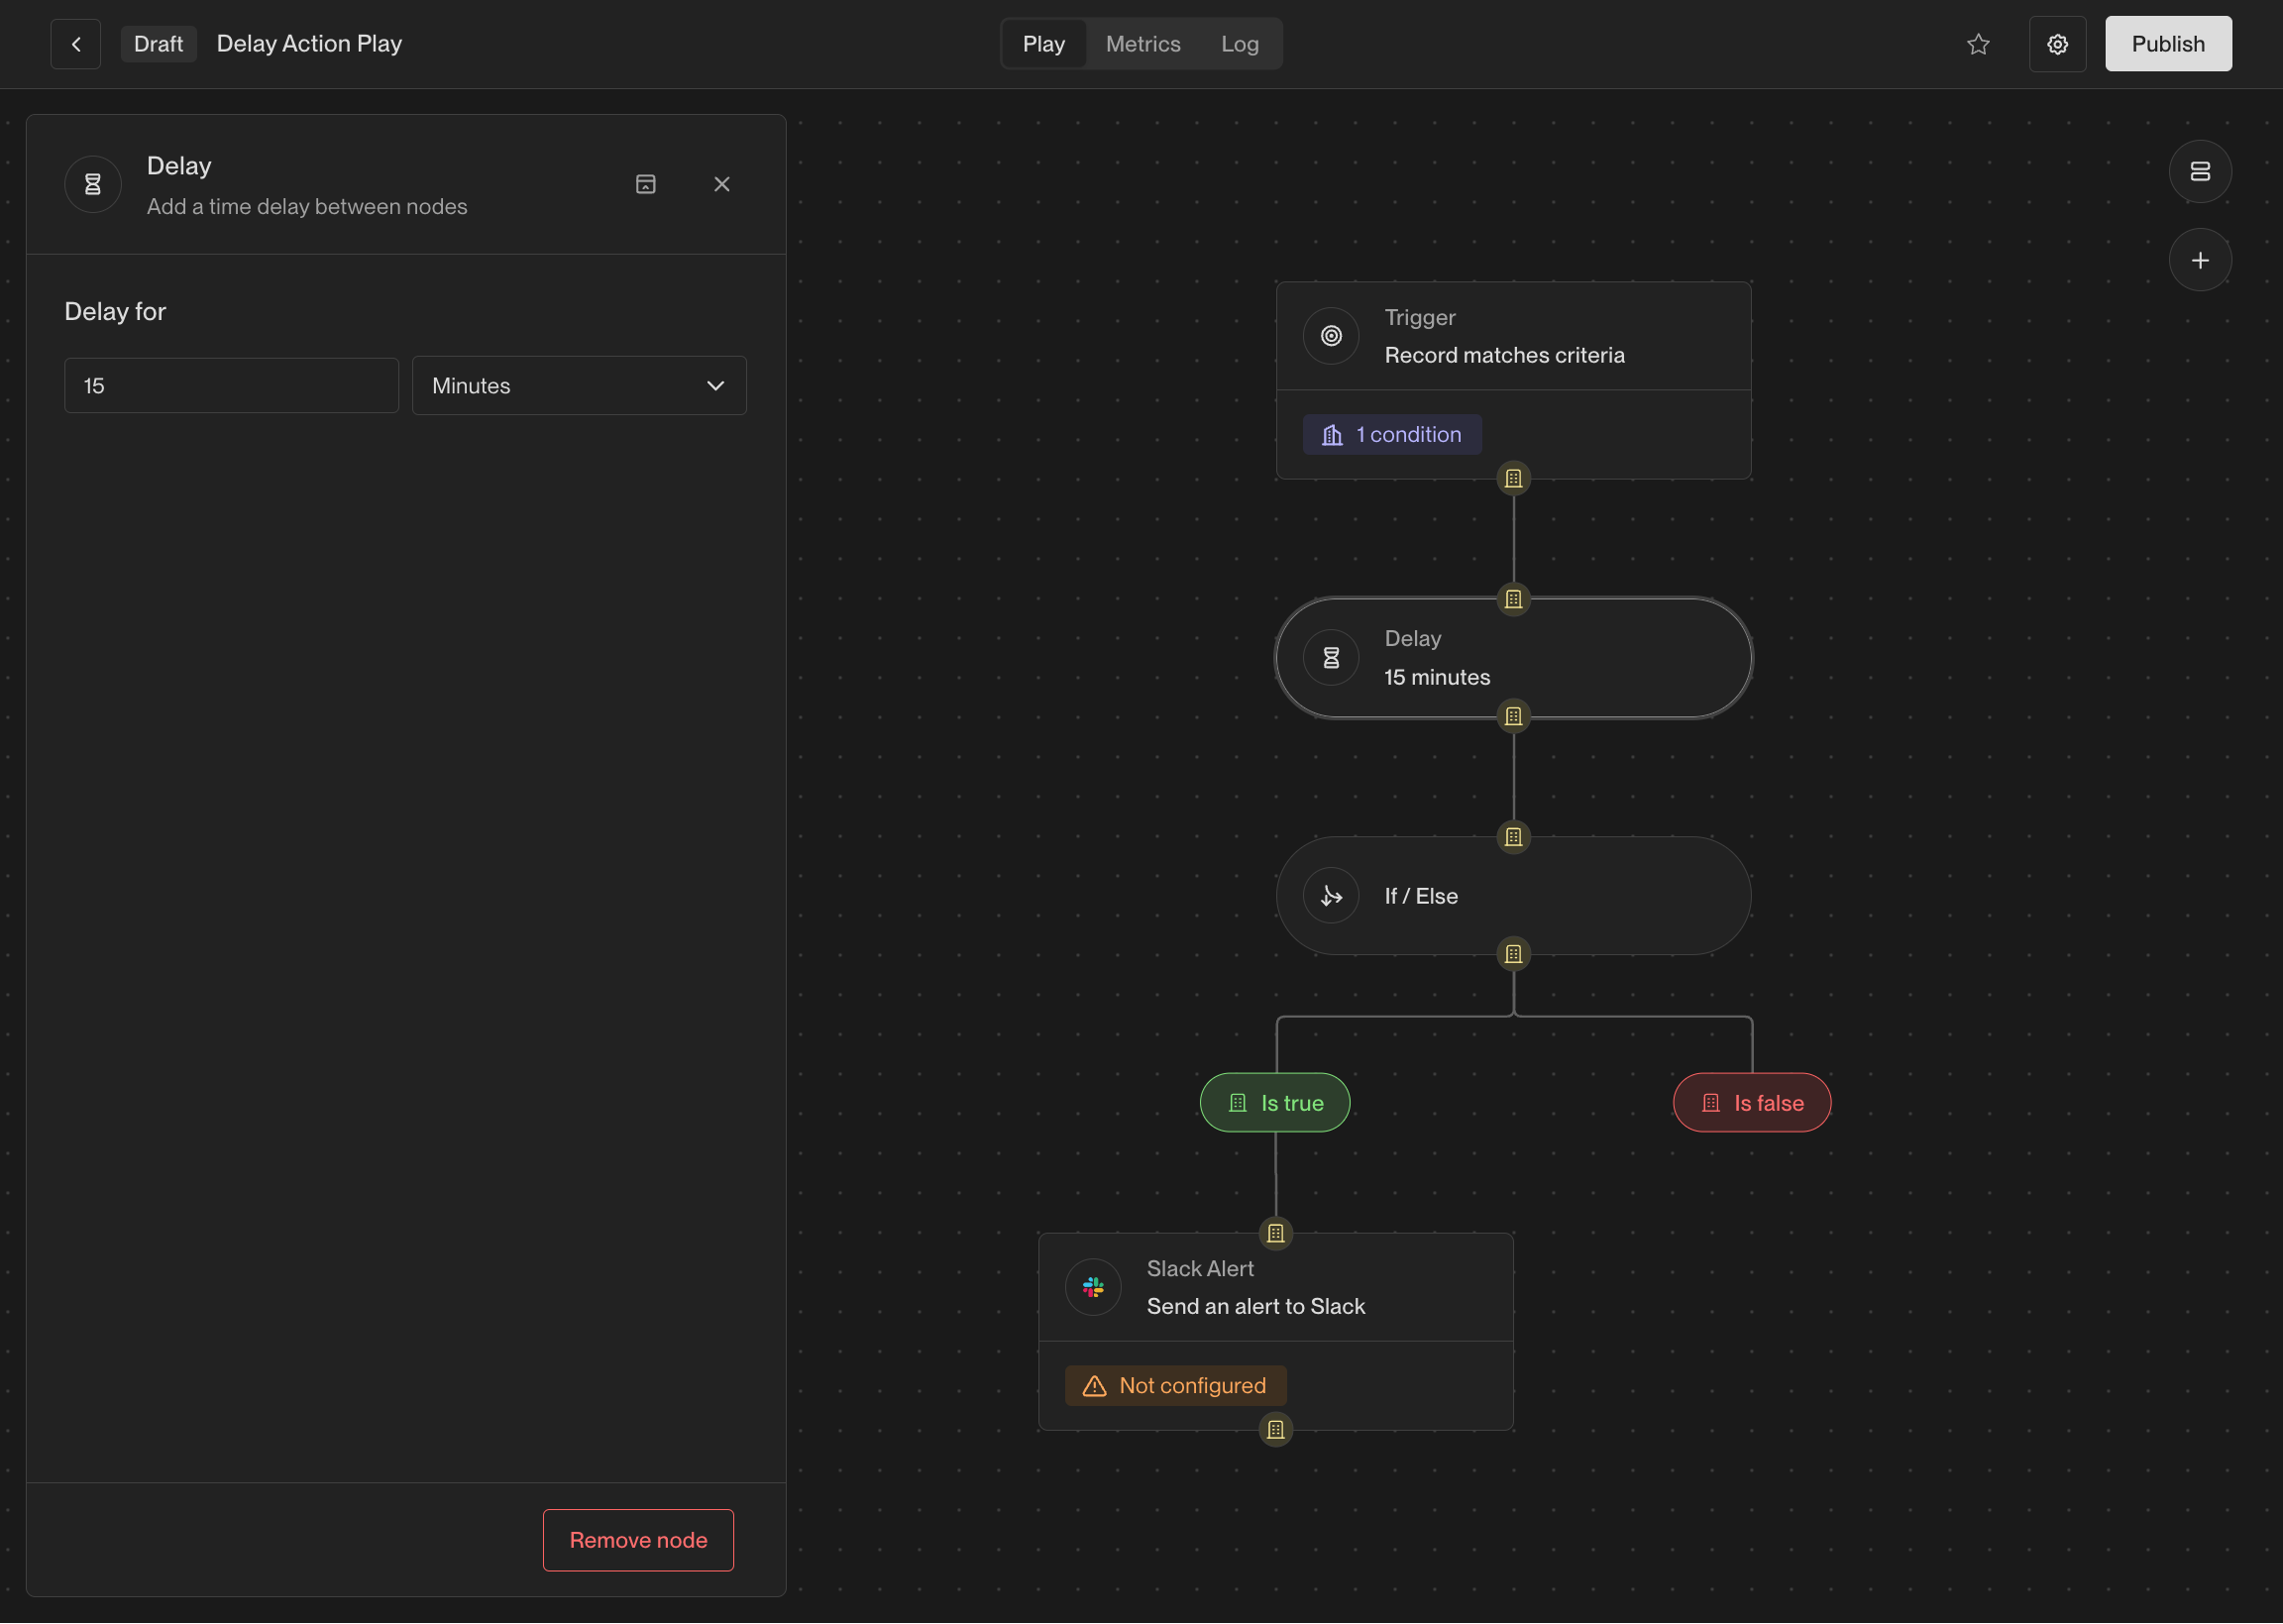 This action is particularly useful when combined with if-else actions. For
example, when a person visitors your website, it can be useful to wait a few
minutes before taking action to see which pages they end up visitor or whether
they fill out a form.
### Get Company
If you have a person record, you can use this action to fetch the company that
the person works at. If the person does not have a company associated with them,
this action will not return any result.
### Get People
If you have a company record, you can use this action to fetch people that work
at the company. Unlike the **Prospect for new People** action, this action only
looks for people that already exist in Unify rather than prspect for new people.
## Coming soon
There are lots of additional actions in the works including more powerful AI
features and deep integrations with third-party tools. If you're interested in
an action that isn't available yet, [let us know](mailto:support@unifygtm.com)!
We'll get you in the beta as soon as it's ready.
---
# Source: https://docs.unifygtm.com/reference/management/authentication.md
> ## Documentation Index
> Fetch the complete documentation index at: https://docs.unifygtm.com/llms.txt
> Use this file to discover all available pages before exploring further.
# Authentication Options
> Learn about the login methods available for your organization in Unify.
## Overview
Unify supports the following forms of authentication:
1. **Username and Password**: Users can log in with an email address and password managed by Unify.
2. **Google Workspace**: Users can log in using a Google account associated with your organization's Google Workspace.
3. **Single Sign-On (SSO) via SAML 2.0**: Unify supports SSO through the SAML 2.0 protocol. This allows your organization to use your existing identity provider (IdP), such as Okta or Azure AD, to authenticate your users.
All methods are powered by Auth0, the leading industry standard for secure authentication.
### Single Sign-On (SSO)
Our team will work directly with you to integrate Unify with your identify provider. Below are the steps and information we'll cover during this process.
Unify does charge an SSO fee which is a direct passthrough cost from our provider.
#### Supported Identity Providers (IdPs)
* Okta
* Azure Active Directory (AD)
* Any SAML 2.0 compliant IdP
#### Information required for SSO setup
* **Sign In URL**: The URL where SAML authentication requests are sent. This is also called the single sign-on (SSO) endpoint.
* **Sign Out URL**: The URL where SAML logout requests are sent. This is also called the single logout (SLO) endpoint.
* **X.509 Certificate**: A certificate used to verify the SAML response.
---
# Source: https://docs.unifygtm.com/reference/integrations/salesforce/bidirectional-syncs.md
# Source: https://docs.unifygtm.com/reference/integrations/hubspot/bidirectional-syncs.md
> ## Documentation Index
> Fetch the complete documentation index at: https://docs.unifygtm.com/llms.txt
> Use this file to discover all available pages before exploring further.
# How Bidirectional Syncs Work
> An in-depth explanation of how syncs work between HubSpot and Unify.
# Overview
Unify can create and update HubSpot records in response to Play runs and
sequence enrollments. This page summarizes the rules used to determine when and
how to create or update records in HubSpot.
# Overwriting data
Unify takes a very conservative approach to overwriting existing HubSpot data in
order to make data loss impossible. This approach is based around only a few
simple rules:
* **Creating new records:** When Unify is creating a new HubSpot record, it will
fill in all properties that are enabled for writing in the field mapping or
default values.
* **Updating existing records:** Unify will inspect whether the field is empty
or not. If the field already has a value, it will only be updated if it is a
Unify-specific field. These fields are prefixed with "Unify" and can be found [here](/reference/integrations/hubspot/field-mappings#available-fields).
These rules apply regardless of how the record was originally created (e.g., by
Unify or externally). If you're looking for more fine-grained control, you can
also limit the permissions granted to the Unify integration user in HubSpot.
# Duplicate prevention
Duplicates are strictly prevented within Unify. When creating new HubSpot
records, Unify will only ever create one record. If there is already an existing
HubSpot record of the same type, Unify will always update it rather than
creating a new one.
However, duplicates are a common problem in HubSpot and may already exist in
your HubSpot instance. In addition, users or other integrations may accidentally
create new duplicates over time.
In order to accommodate this reality, Unify follows specific rules to ensure
predictable behavior when updating duplicated HubSpot records. While Unify
cannot de-duplicate your HubSpot, it will *never* make the problem worse, and
in some situations may be able to help clarify the “source of truth” record.
### Contacts
If there is an existing contact that matches the Unify person being written, it
will be updated. Matches are determined based on email address. If there are no
matches, a new contact will be created.
If there are multiple contacts that match the Unify person, only one will be
updated. Specifically, the contact that was most recently modified within
HubSpot is the one that will be updated.
### Companies
HubSpot companies are written by Unify whenever a contact is created or updated.
They are also written if a HubSpot sync action runs within a Play that is
running on companies.
If there is an existing company that matches the Unify company being written, it
will be updated. Matches are determined based on the domain of the company
website. Domains are normalized, so URLs that redirect to different domains will
not result in duplicates. If there are no matches, a new company will be
created.
If there are multiple companies that match the Unify company, only one will be
updated. Specifically, the company that was most recently modified within
HubSpot will be updated.
### Email Messages
Unify does not update existing email messages in HubSpot; only emails sent
through Unify or received in response to those emails will be written to
HubSpot.
Email messages are written to HubSpot for all emails sent as a part of Unify
sequences if the corresponding person already exists in HubSpot. This means
that in order to write email messages for sequence enrollments, you should
ensure that the person already exists in HubSpot or that you include a Play
action to sync them to HubSpot.
---
# Source: https://docs.unifygtm.com/reference/plays/building-a-play.md
> ## Documentation Index
> Fetch the complete documentation index at: https://docs.unifygtm.com/llms.txt
> Use this file to discover all available pages before exploring further.
# Building a Play
> Learn the fundamentals of creating Plays in Unify.
export const PlayBuilderCompanyHandleDark = () => ;
export const PlayBuilderCompanyHandleLight = () => ;
export const PlayBuilderPersonListHandleDark = () => ;
export const PlayBuilderPersonListHandleLight = () => ;
export const PlayBuilderPersonHandleDark = () => ;
export const PlayBuilderPersonHandleLight = () => ;
## Actions and triggers
The building blocks of Plays are called *actions*. Each action is a different
step of a Play, each representing a different task that can be automated in
Unify.
Every Play stars with a special type of action called a *trigger*. A trigger is
the starting point of your Play which defines when the Play should be executed
and what data should be provided to it.
This action is particularly useful when combined with if-else actions. For
example, when a person visitors your website, it can be useful to wait a few
minutes before taking action to see which pages they end up visitor or whether
they fill out a form.
### Get Company
If you have a person record, you can use this action to fetch the company that
the person works at. If the person does not have a company associated with them,
this action will not return any result.
### Get People
If you have a company record, you can use this action to fetch people that work
at the company. Unlike the **Prospect for new People** action, this action only
looks for people that already exist in Unify rather than prspect for new people.
## Coming soon
There are lots of additional actions in the works including more powerful AI
features and deep integrations with third-party tools. If you're interested in
an action that isn't available yet, [let us know](mailto:support@unifygtm.com)!
We'll get you in the beta as soon as it's ready.
---
# Source: https://docs.unifygtm.com/reference/management/authentication.md
> ## Documentation Index
> Fetch the complete documentation index at: https://docs.unifygtm.com/llms.txt
> Use this file to discover all available pages before exploring further.
# Authentication Options
> Learn about the login methods available for your organization in Unify.
## Overview
Unify supports the following forms of authentication:
1. **Username and Password**: Users can log in with an email address and password managed by Unify.
2. **Google Workspace**: Users can log in using a Google account associated with your organization's Google Workspace.
3. **Single Sign-On (SSO) via SAML 2.0**: Unify supports SSO through the SAML 2.0 protocol. This allows your organization to use your existing identity provider (IdP), such as Okta or Azure AD, to authenticate your users.
All methods are powered by Auth0, the leading industry standard for secure authentication.
### Single Sign-On (SSO)
Our team will work directly with you to integrate Unify with your identify provider. Below are the steps and information we'll cover during this process.
Unify does charge an SSO fee which is a direct passthrough cost from our provider.
#### Supported Identity Providers (IdPs)
* Okta
* Azure Active Directory (AD)
* Any SAML 2.0 compliant IdP
#### Information required for SSO setup
* **Sign In URL**: The URL where SAML authentication requests are sent. This is also called the single sign-on (SSO) endpoint.
* **Sign Out URL**: The URL where SAML logout requests are sent. This is also called the single logout (SLO) endpoint.
* **X.509 Certificate**: A certificate used to verify the SAML response.
---
# Source: https://docs.unifygtm.com/reference/integrations/salesforce/bidirectional-syncs.md
# Source: https://docs.unifygtm.com/reference/integrations/hubspot/bidirectional-syncs.md
> ## Documentation Index
> Fetch the complete documentation index at: https://docs.unifygtm.com/llms.txt
> Use this file to discover all available pages before exploring further.
# How Bidirectional Syncs Work
> An in-depth explanation of how syncs work between HubSpot and Unify.
# Overview
Unify can create and update HubSpot records in response to Play runs and
sequence enrollments. This page summarizes the rules used to determine when and
how to create or update records in HubSpot.
# Overwriting data
Unify takes a very conservative approach to overwriting existing HubSpot data in
order to make data loss impossible. This approach is based around only a few
simple rules:
* **Creating new records:** When Unify is creating a new HubSpot record, it will
fill in all properties that are enabled for writing in the field mapping or
default values.
* **Updating existing records:** Unify will inspect whether the field is empty
or not. If the field already has a value, it will only be updated if it is a
Unify-specific field. These fields are prefixed with "Unify" and can be found [here](/reference/integrations/hubspot/field-mappings#available-fields).
These rules apply regardless of how the record was originally created (e.g., by
Unify or externally). If you're looking for more fine-grained control, you can
also limit the permissions granted to the Unify integration user in HubSpot.
# Duplicate prevention
Duplicates are strictly prevented within Unify. When creating new HubSpot
records, Unify will only ever create one record. If there is already an existing
HubSpot record of the same type, Unify will always update it rather than
creating a new one.
However, duplicates are a common problem in HubSpot and may already exist in
your HubSpot instance. In addition, users or other integrations may accidentally
create new duplicates over time.
In order to accommodate this reality, Unify follows specific rules to ensure
predictable behavior when updating duplicated HubSpot records. While Unify
cannot de-duplicate your HubSpot, it will *never* make the problem worse, and
in some situations may be able to help clarify the “source of truth” record.
### Contacts
If there is an existing contact that matches the Unify person being written, it
will be updated. Matches are determined based on email address. If there are no
matches, a new contact will be created.
If there are multiple contacts that match the Unify person, only one will be
updated. Specifically, the contact that was most recently modified within
HubSpot is the one that will be updated.
### Companies
HubSpot companies are written by Unify whenever a contact is created or updated.
They are also written if a HubSpot sync action runs within a Play that is
running on companies.
If there is an existing company that matches the Unify company being written, it
will be updated. Matches are determined based on the domain of the company
website. Domains are normalized, so URLs that redirect to different domains will
not result in duplicates. If there are no matches, a new company will be
created.
If there are multiple companies that match the Unify company, only one will be
updated. Specifically, the company that was most recently modified within
HubSpot will be updated.
### Email Messages
Unify does not update existing email messages in HubSpot; only emails sent
through Unify or received in response to those emails will be written to
HubSpot.
Email messages are written to HubSpot for all emails sent as a part of Unify
sequences if the corresponding person already exists in HubSpot. This means
that in order to write email messages for sequence enrollments, you should
ensure that the person already exists in HubSpot or that you include a Play
action to sync them to HubSpot.
---
# Source: https://docs.unifygtm.com/reference/plays/building-a-play.md
> ## Documentation Index
> Fetch the complete documentation index at: https://docs.unifygtm.com/llms.txt
> Use this file to discover all available pages before exploring further.
# Building a Play
> Learn the fundamentals of creating Plays in Unify.
export const PlayBuilderCompanyHandleDark = () => ;
export const PlayBuilderCompanyHandleLight = () => ;
export const PlayBuilderPersonListHandleDark = () => ;
export const PlayBuilderPersonListHandleLight = () => ;
export const PlayBuilderPersonHandleDark = () => ;
export const PlayBuilderPersonHandleLight = () => ;
## Actions and triggers
The building blocks of Plays are called *actions*. Each action is a different
step of a Play, each representing a different task that can be automated in
Unify.
Every Play stars with a special type of action called a *trigger*. A trigger is
the starting point of your Play which defines when the Play should be executed
and what data should be provided to it.
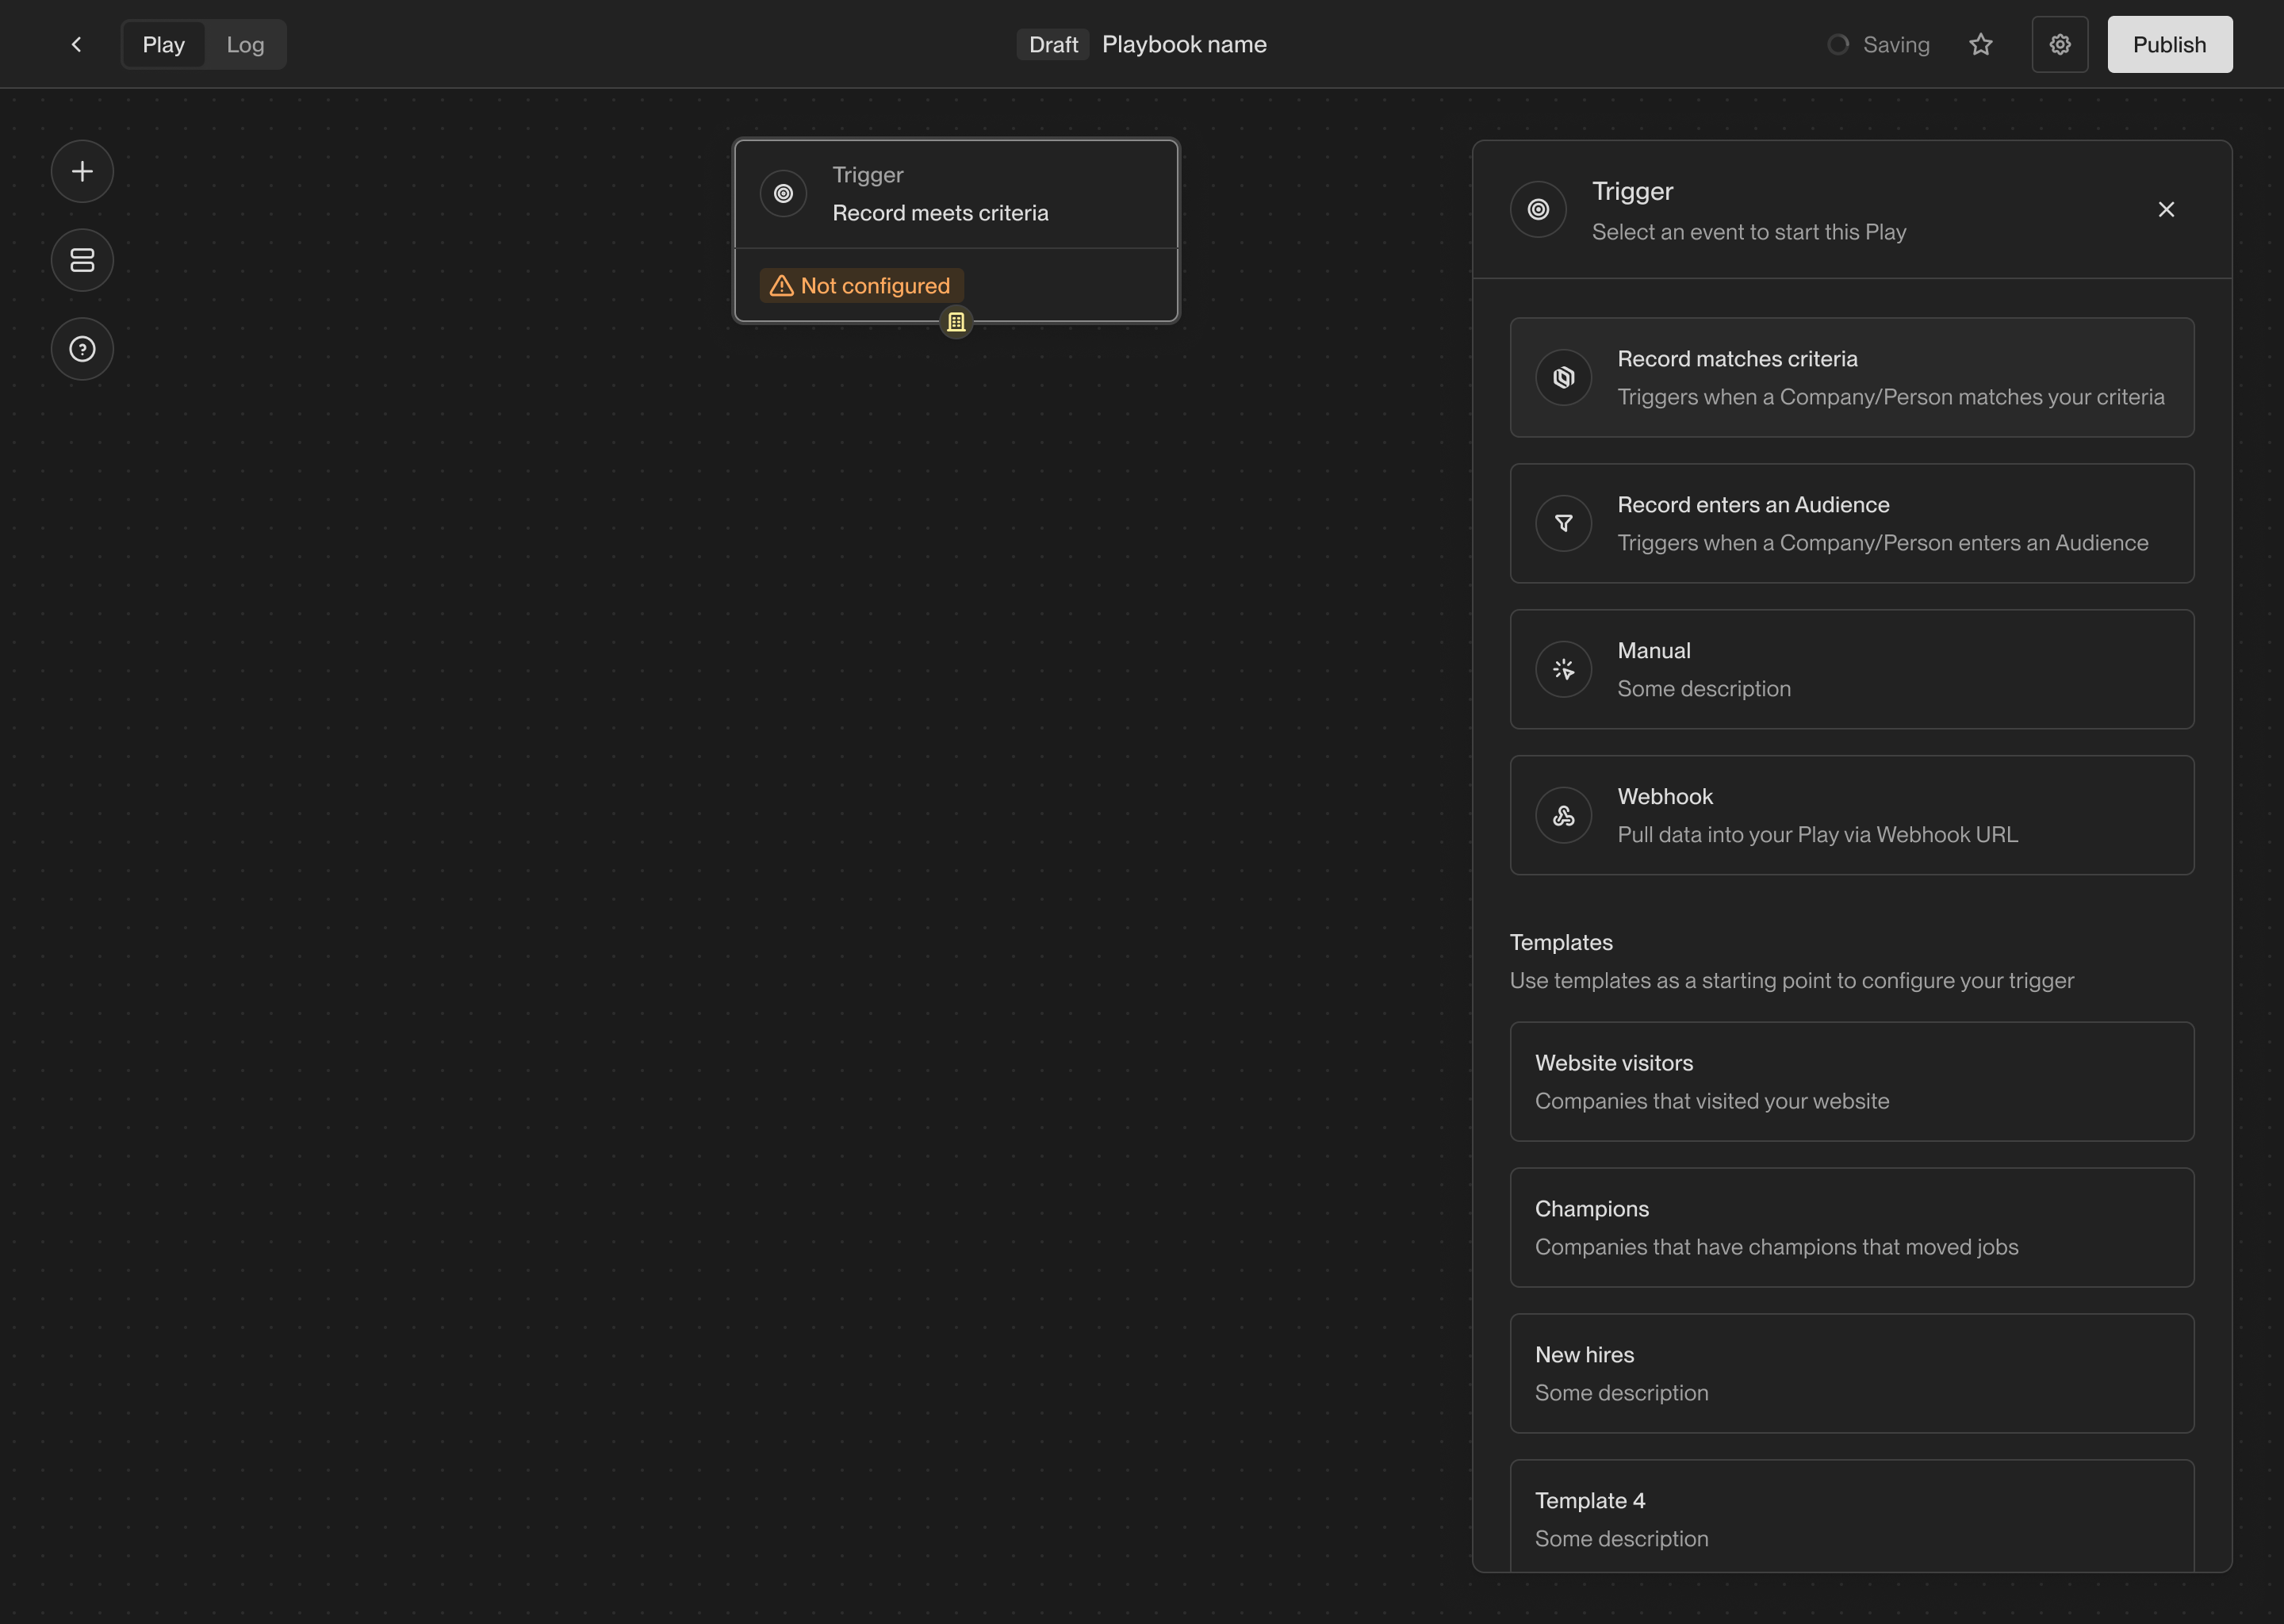 Here are a few of the triggers you can choose from:
* **Record enters an Audience**: Run a Play once on every company or person that
"enters" an Audience. Audiences can be reused across multiple Plays.
* **Record matches criteria**: Run a Play once on every company or person that
matches a set of filters. This trigger is similar to the audience trigger, but
it doesn't require you to create a separate audience. Useful when you don't
need to create a reusable audience.
* **Manual**: Only run a Play when it is manually triggered. For example, you
can send individual companies or people to a Play, or you can send an entire
audience.
Once the trigger is selected, you can start adding additional actions to the
Play. Each action performs a different task. Actions can be chained together or
perform branching logic based on the results of the previous action.
Here are some of the most commonly used actions:
* **AI Agent Qualification**: Perform AI-powered research to answer qualifying
questions about a company or person.
* **Prospect for new People**: Find new people at a company matching specific
personas. You can specify a limit on the number of people to find.
* **Sequence Enrollment**: Enroll a person in a sequence. You can route people
to different mailboxes and sequences based on their persona.
* **Write to Salesforce or HubSpot**: Sync a company or person to Salesforce or
HubSpot. This will create or update a record in your CRM.
You can find details about the full set of available triggers and actions in the
reference sections below:
Here are a few of the triggers you can choose from:
* **Record enters an Audience**: Run a Play once on every company or person that
"enters" an Audience. Audiences can be reused across multiple Plays.
* **Record matches criteria**: Run a Play once on every company or person that
matches a set of filters. This trigger is similar to the audience trigger, but
it doesn't require you to create a separate audience. Useful when you don't
need to create a reusable audience.
* **Manual**: Only run a Play when it is manually triggered. For example, you
can send individual companies or people to a Play, or you can send an entire
audience.
Once the trigger is selected, you can start adding additional actions to the
Play. Each action performs a different task. Actions can be chained together or
perform branching logic based on the results of the previous action.
Here are some of the most commonly used actions:
* **AI Agent Qualification**: Perform AI-powered research to answer qualifying
questions about a company or person.
* **Prospect for new People**: Find new people at a company matching specific
personas. You can specify a limit on the number of people to find.
* **Sequence Enrollment**: Enroll a person in a sequence. You can route people
to different mailboxes and sequences based on their persona.
* **Write to Salesforce or HubSpot**: Sync a company or person to Salesforce or
HubSpot. This will create or update a record in your CRM.
You can find details about the full set of available triggers and actions in the
reference sections below:
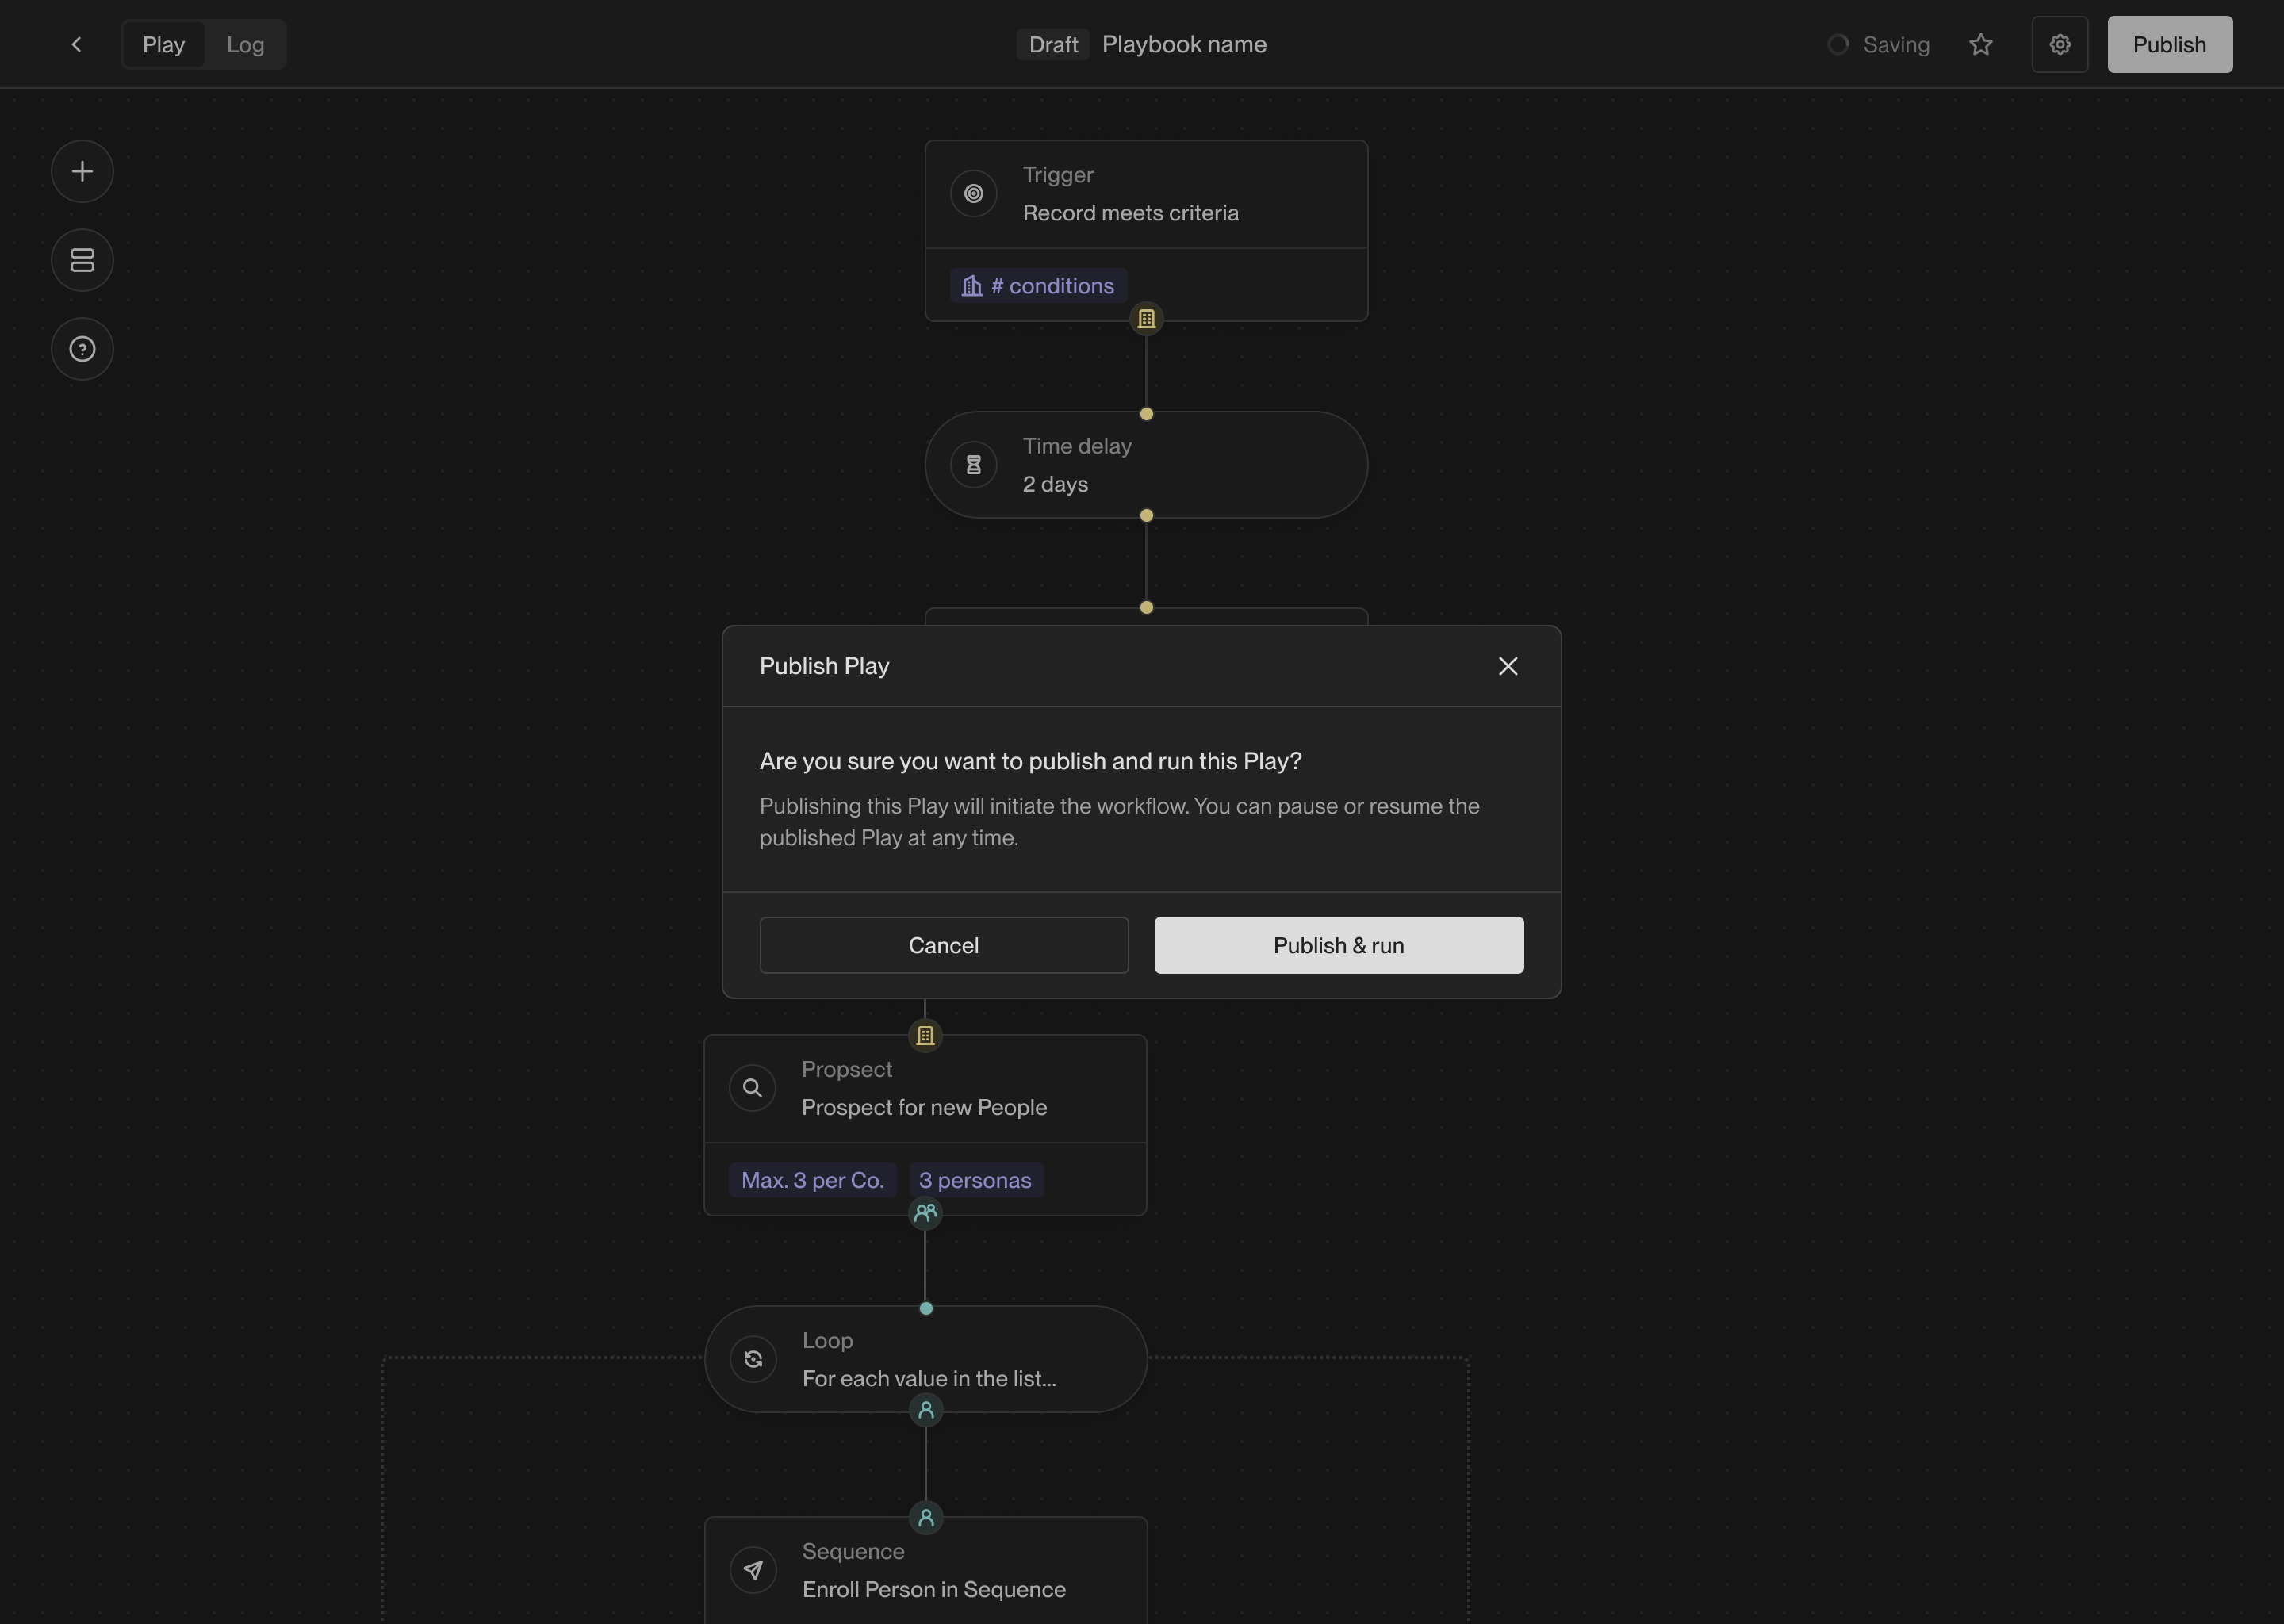 After publishing a Play, you can still make changes to it. Any changes you make
will be saved as a new draft. You can publish the new draft at any time by
clicking the **Publish** button again. You can also discard the draft and revert
to the last published version.
If you want to temporarily stop a Play from running, you can pause it by
toggling the pause button to the left of the **Publish** button. Pausing a Play
will prevent it from running until you resume it.
## View logs
Once a Play starts running, you can view the logs to see which companies and
people the Play has run on. In the top left corner of the Play Builder, click
on **Logs** to see the full history of Play executions.
After publishing a Play, you can still make changes to it. Any changes you make
will be saved as a new draft. You can publish the new draft at any time by
clicking the **Publish** button again. You can also discard the draft and revert
to the last published version.
If you want to temporarily stop a Play from running, you can pause it by
toggling the pause button to the left of the **Publish** button. Pausing a Play
will prevent it from running until you resume it.
## View logs
Once a Play starts running, you can view the logs to see which companies and
people the Play has run on. In the top left corner of the Play Builder, click
on **Logs** to see the full history of Play executions.
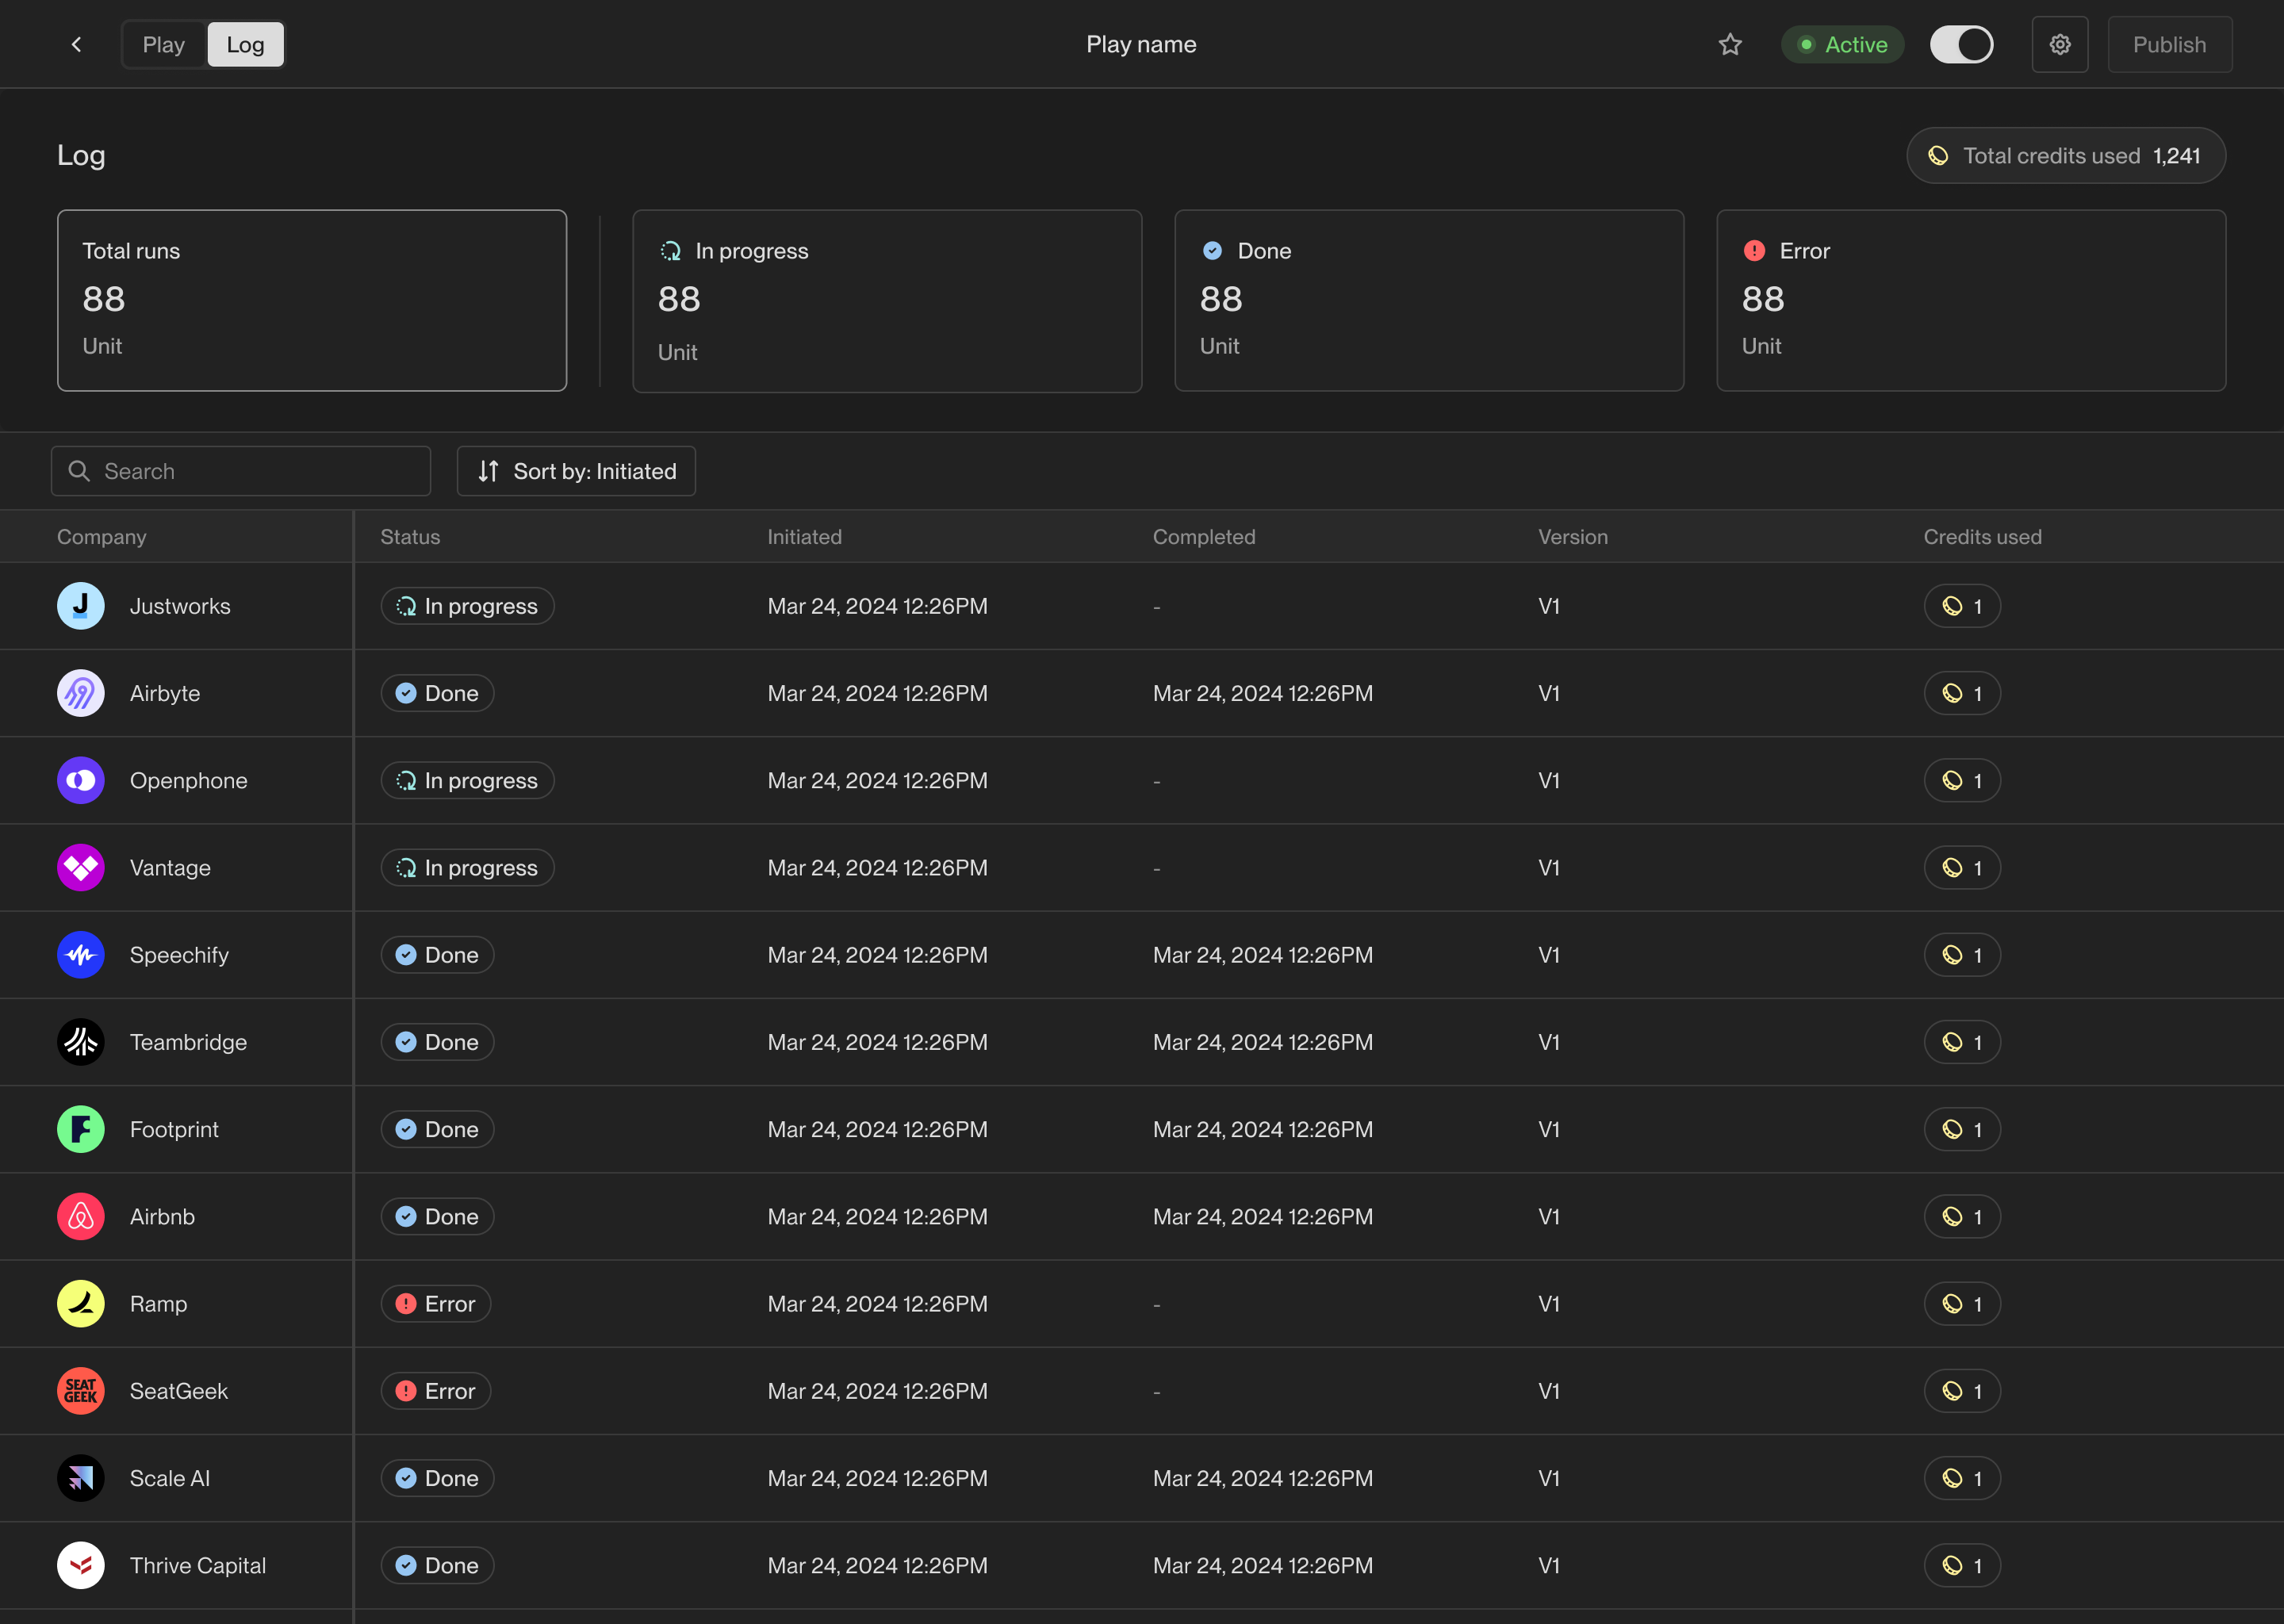 Within the logs view, you can see the status of each Play execution, including
in-progress, completed, and failed executions. You can click on any row of the
logs table to see more details about that specific execution.
Within the logs view, you can see the status of each Play execution, including
in-progress, completed, and failed executions. You can click on any row of the
logs table to see more details about that specific execution.
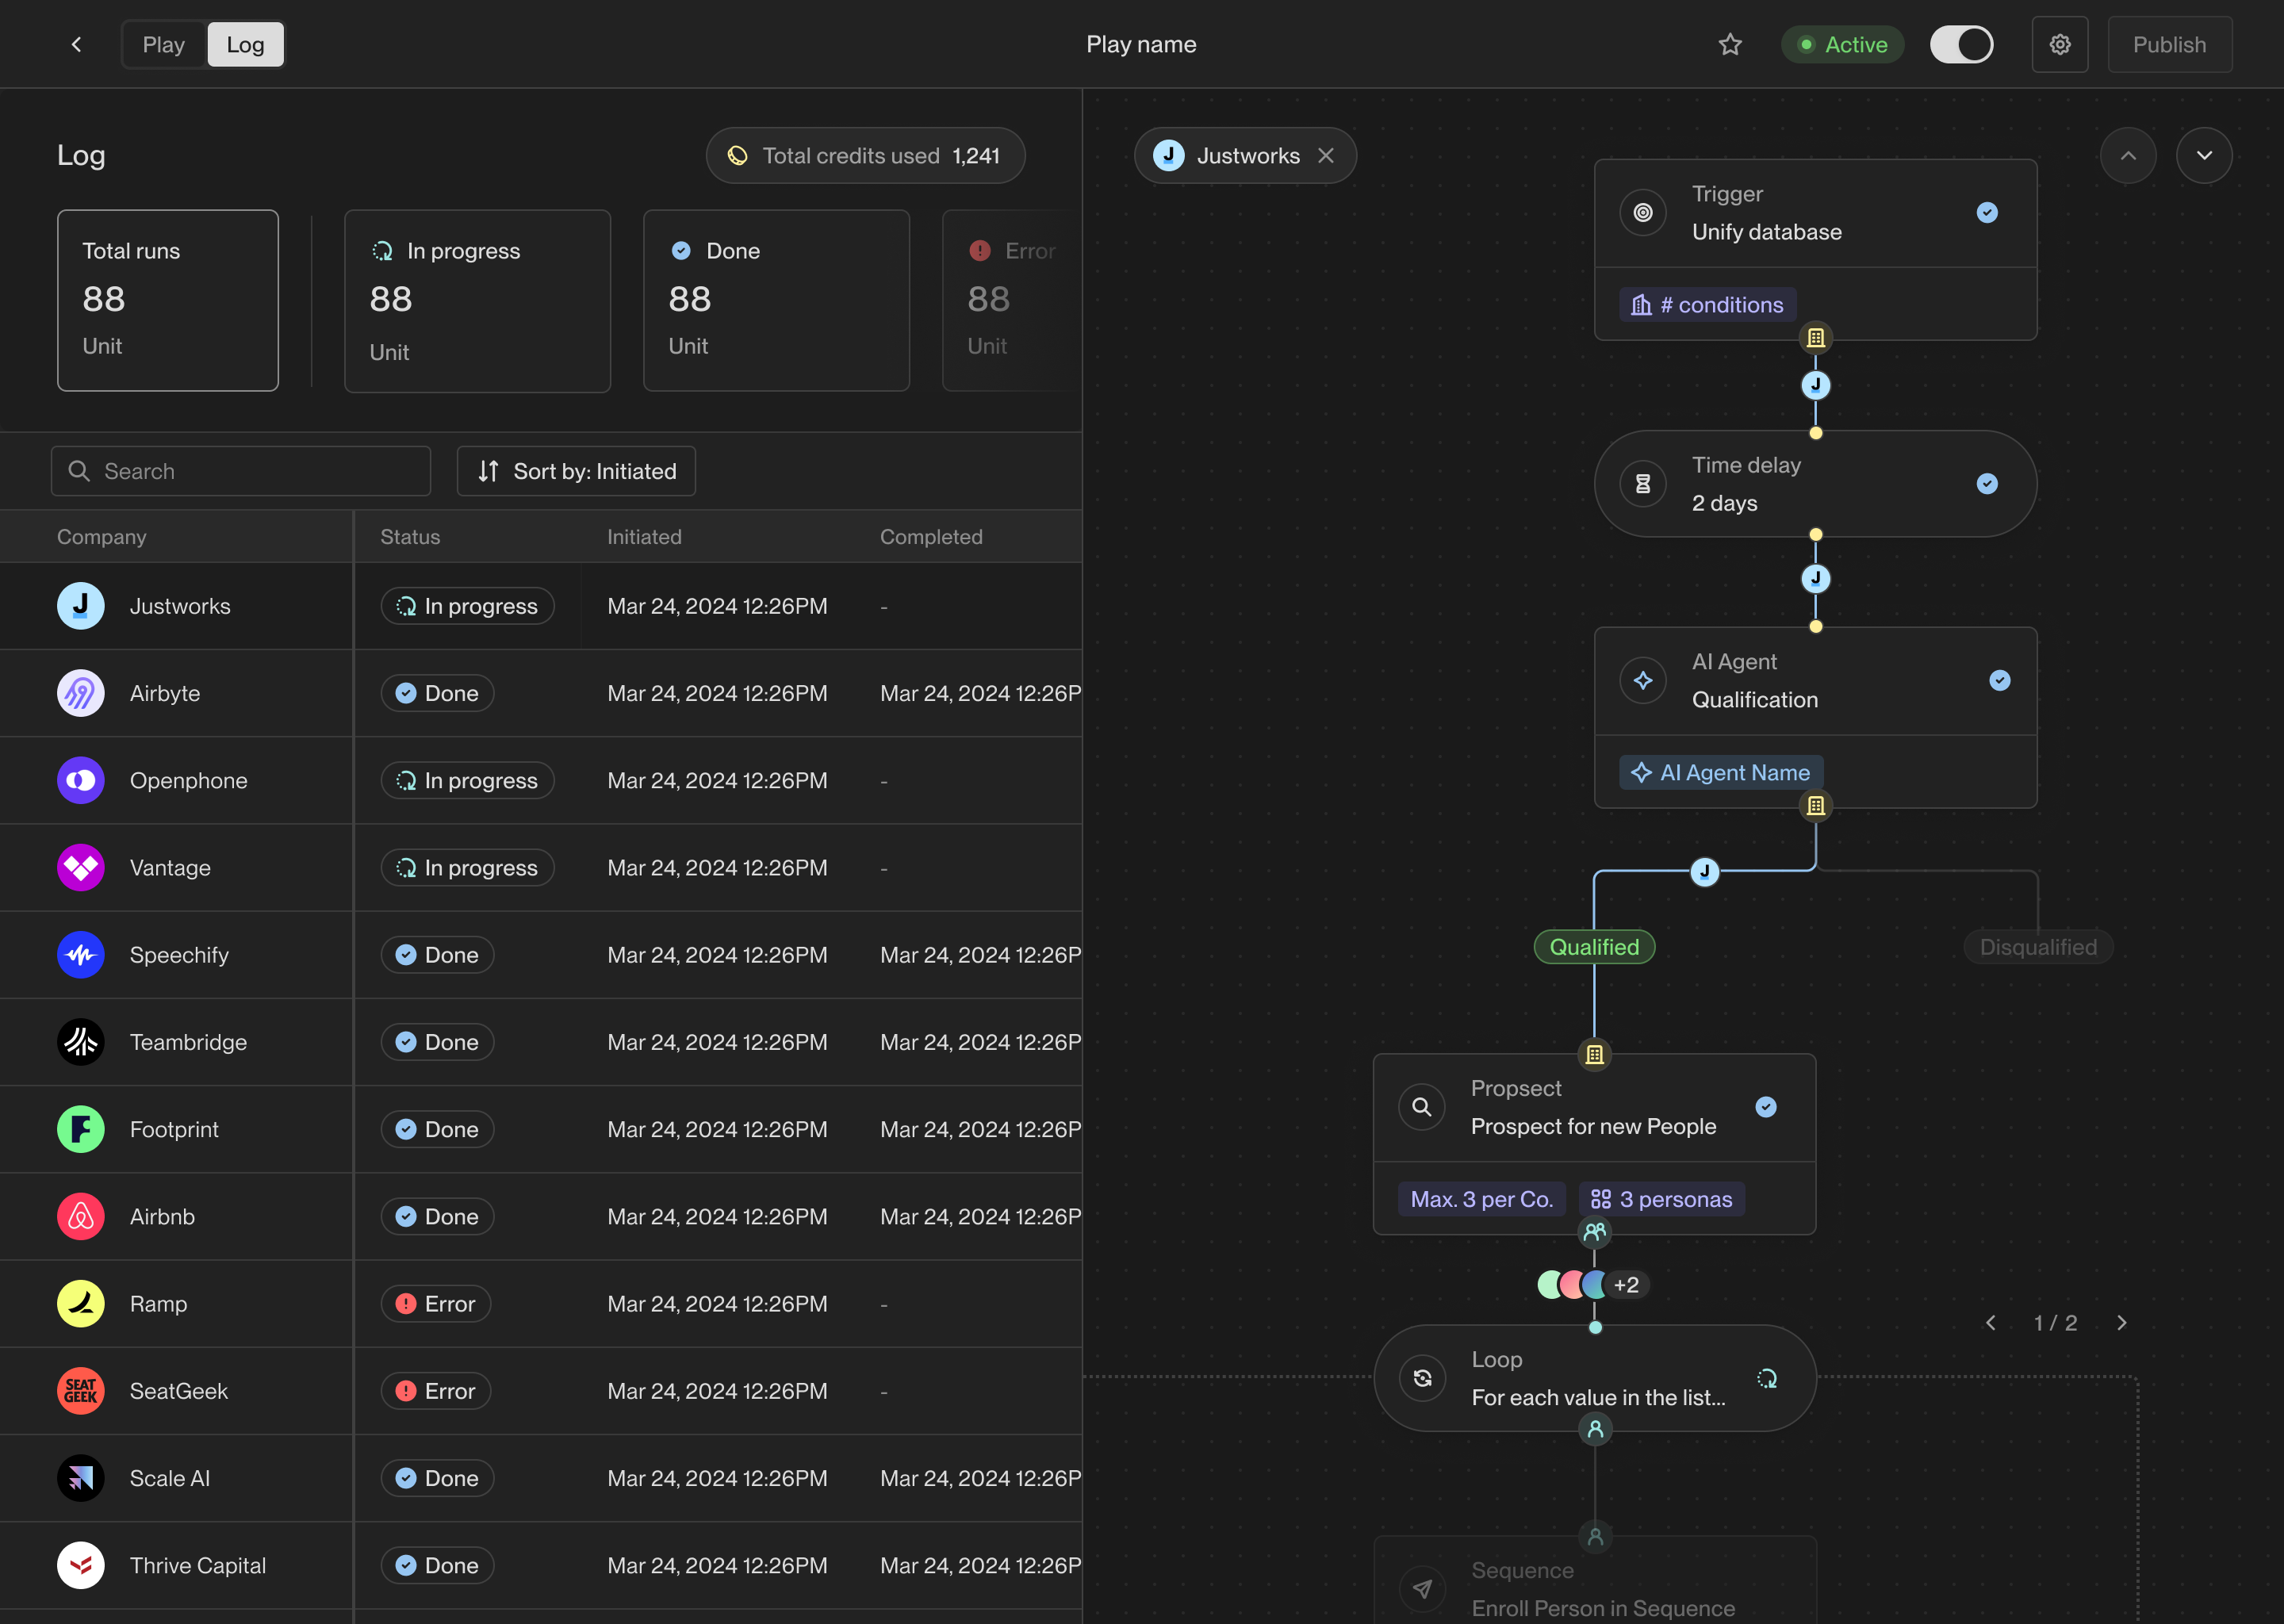 The exact path this record took through the Play is highlighted on the right
side of the details view. You can see exactly which actions ran and what the
results were at each step.
## View metrics
In addition to logs, you can view metrics for each Play to see how it's
performing over time. In the top left corner of the Play Builder, click on
**Metrics** to see overview metrics and charts for the Play and each of its
actions.
The exact path this record took through the Play is highlighted on the right
side of the details view. You can see exactly which actions ran and what the
results were at each step.
## View metrics
In addition to logs, you can view metrics for each Play to see how it's
performing over time. In the top left corner of the Play Builder, click on
**Metrics** to see overview metrics and charts for the Play and each of its
actions.
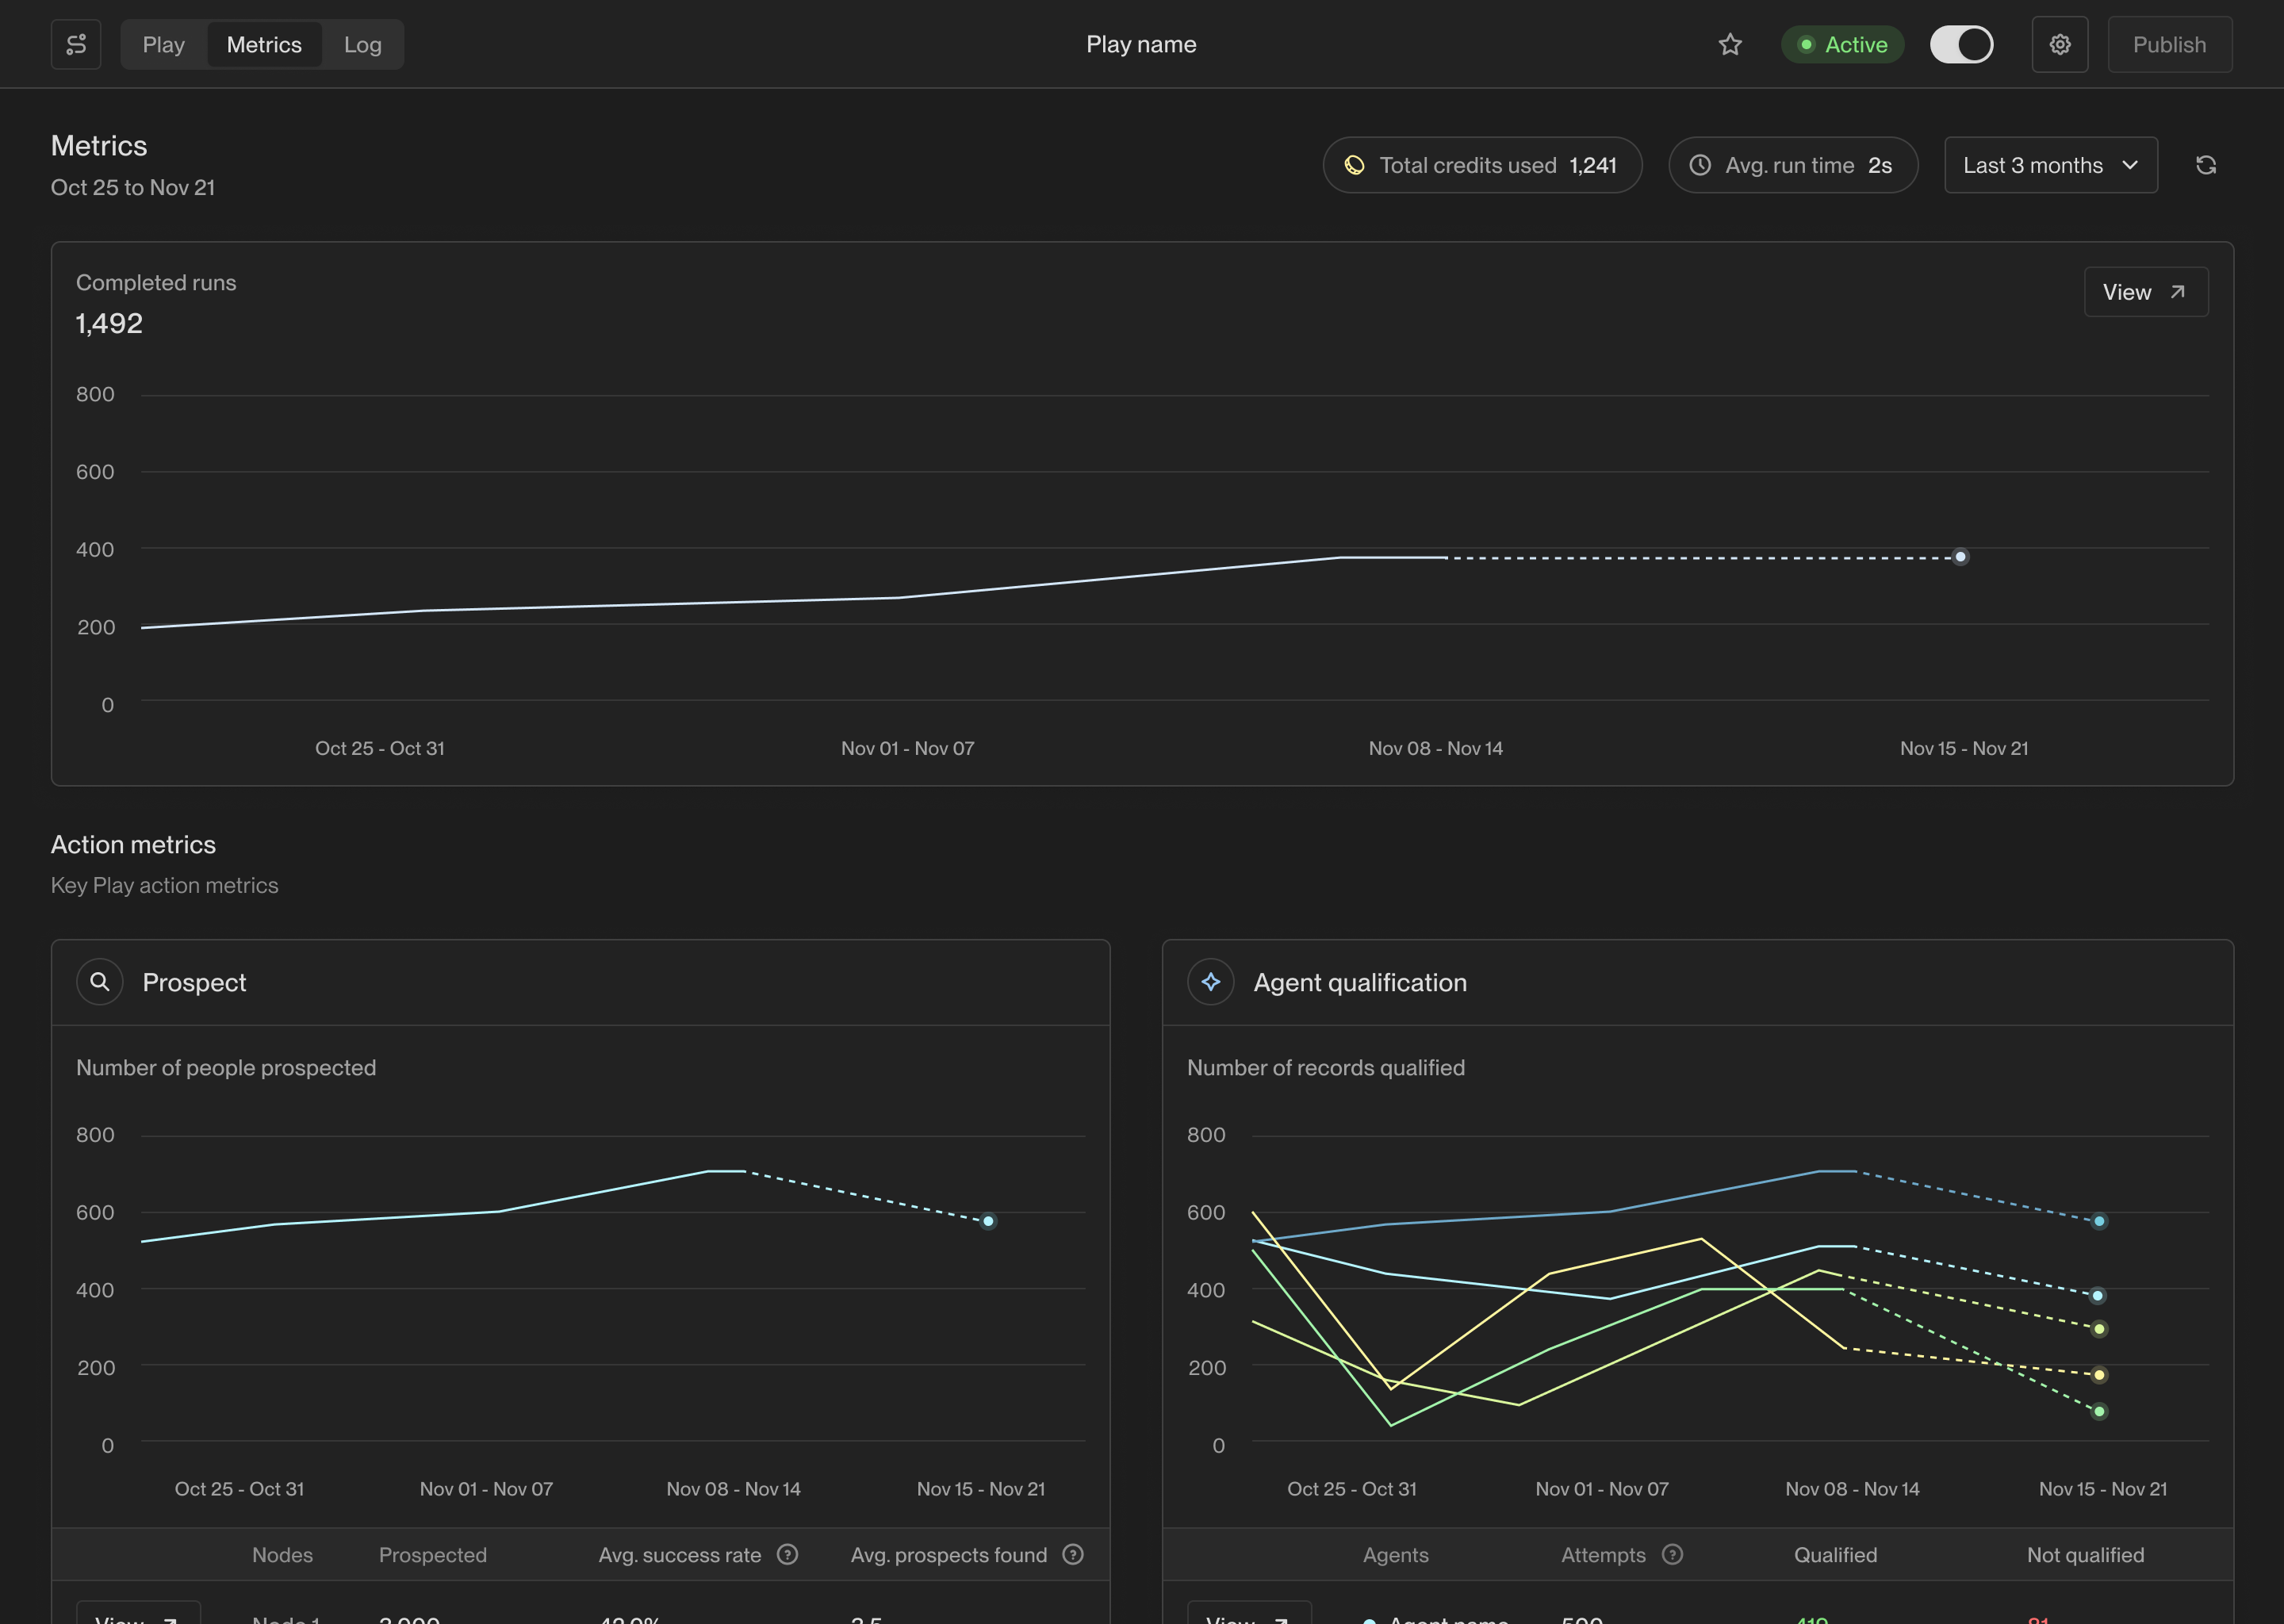 You can click on any action to see detailed information about how it's
performing. For example, clicking on an agent qualification action will let
you measure how many records are being qualified over time and why.
You can click on any action to see detailed information about how it's
performing. For example, clicking on an agent qualification action will let
you measure how many records are being qualified over time and why.
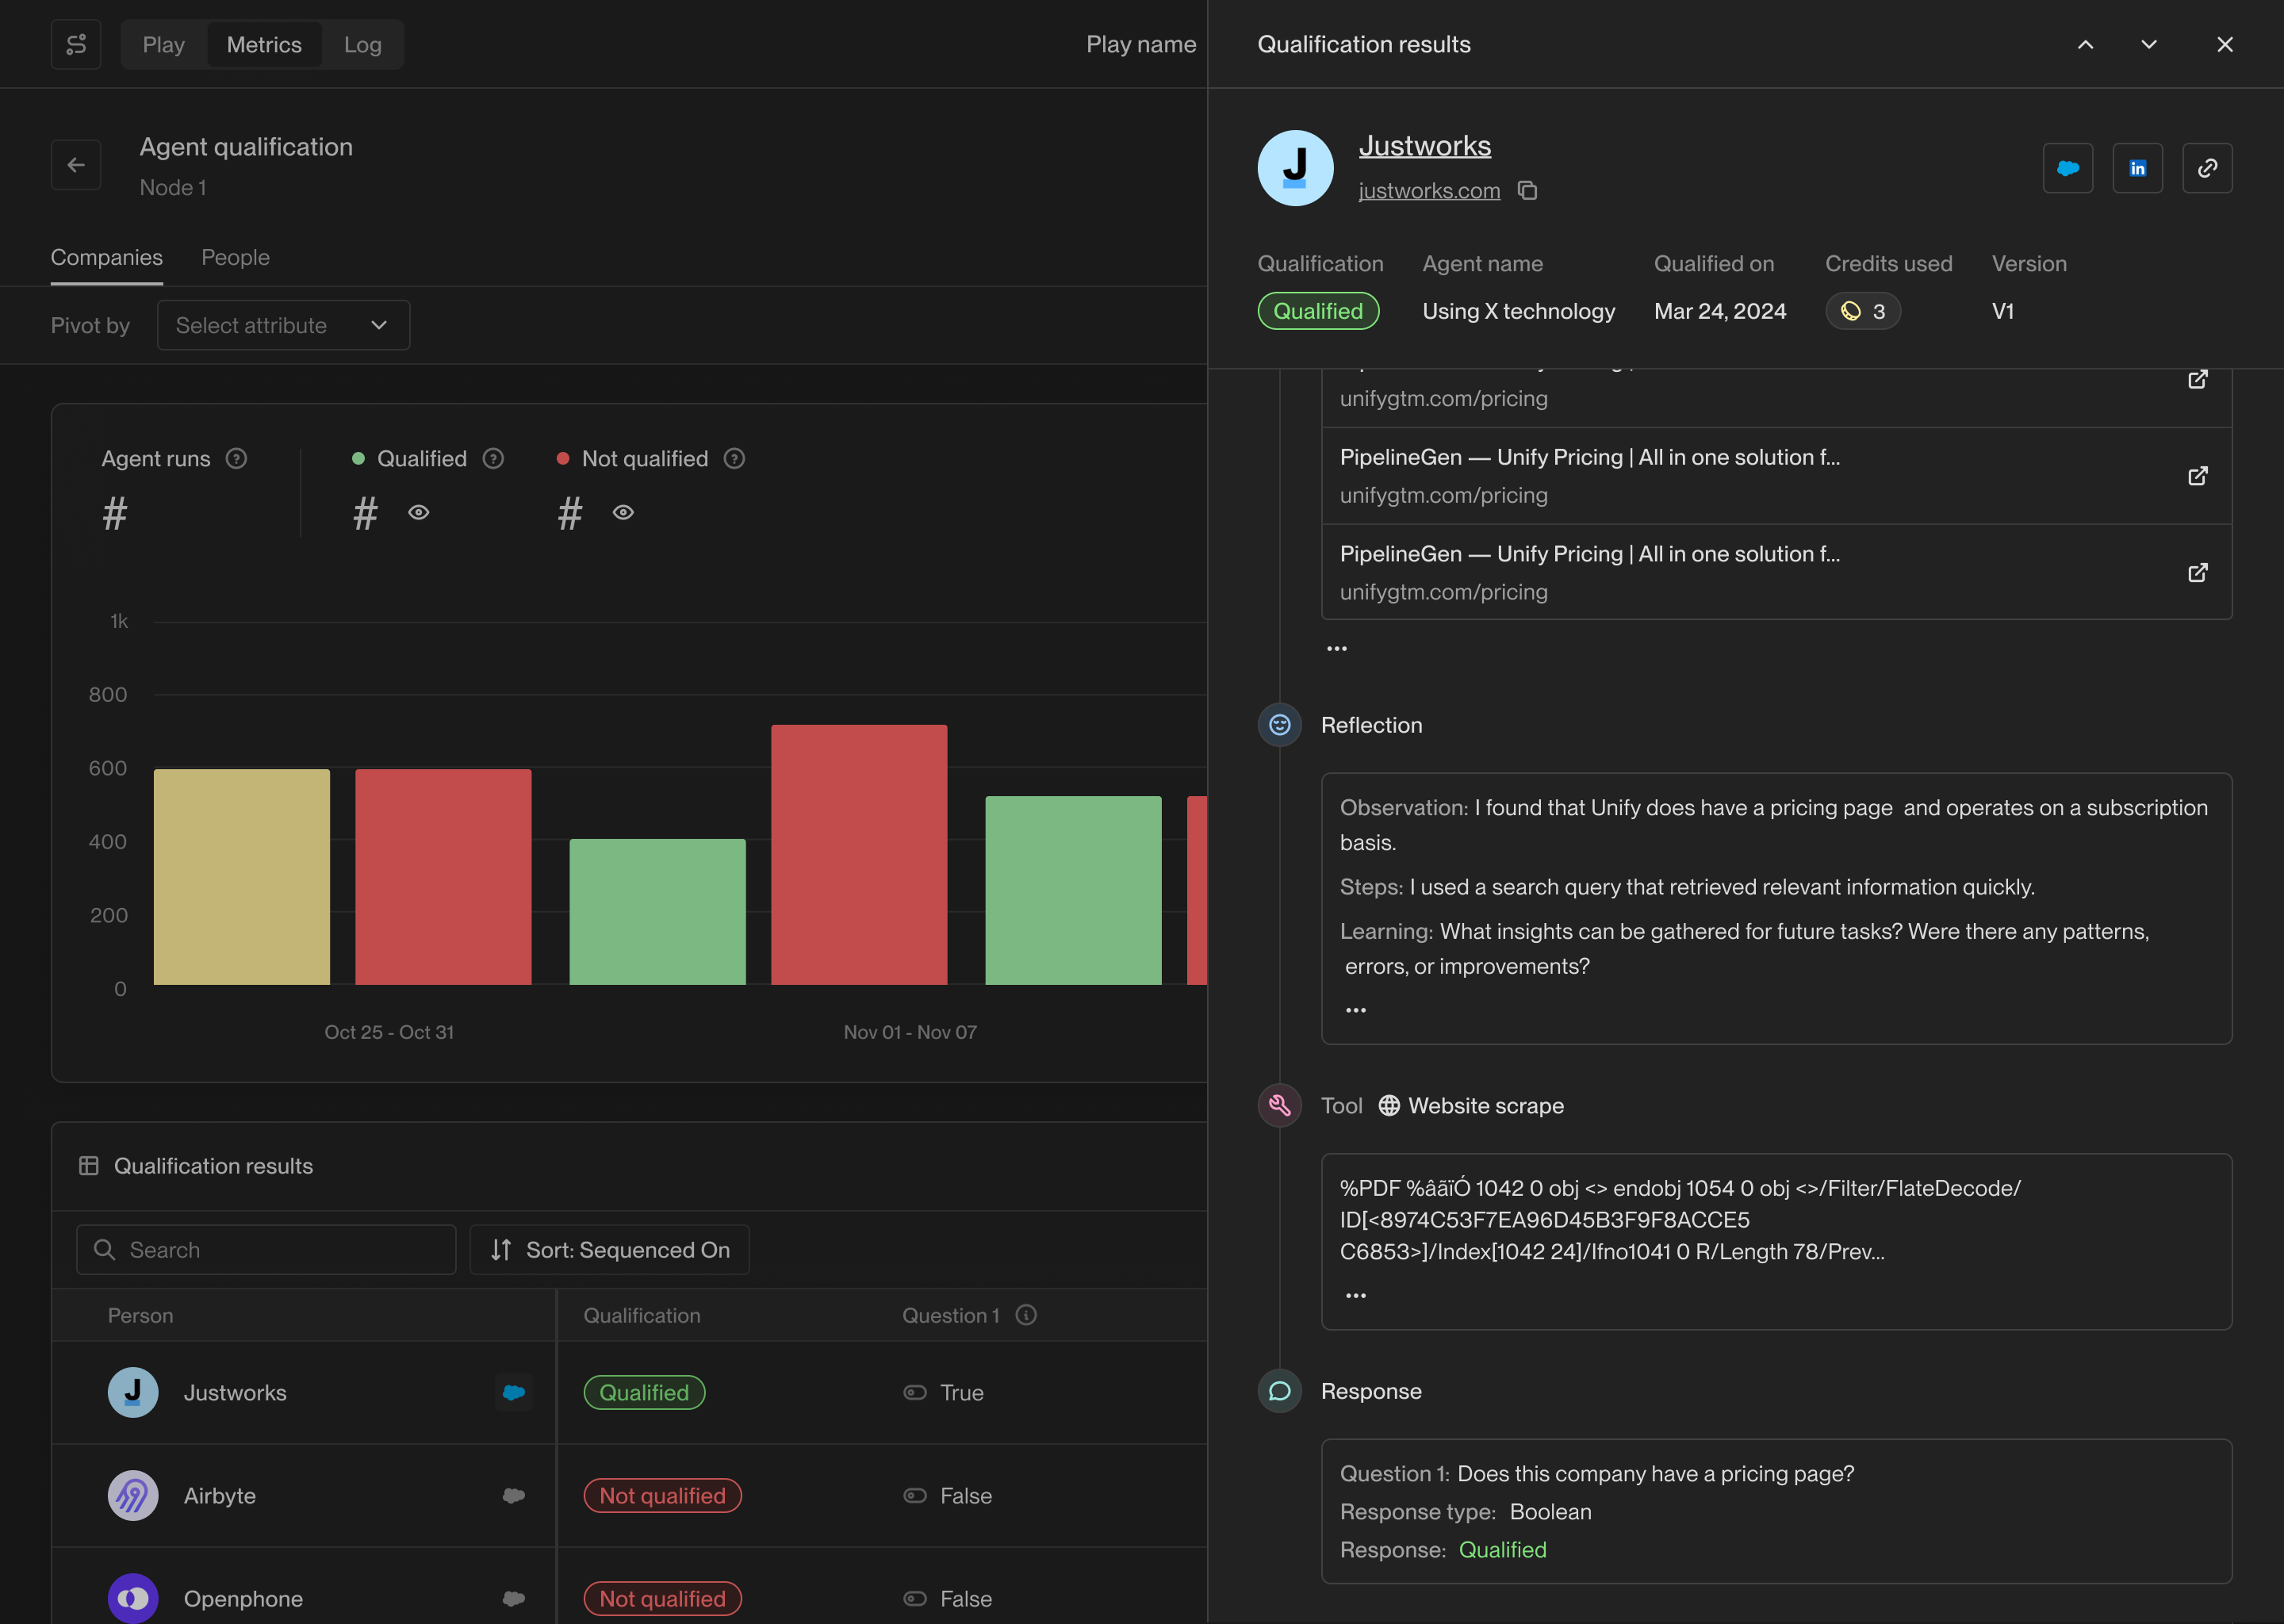 The action-specific metrics pages will also show you the records that have
passed through that action and their results.
---
# Source: https://docs.unifygtm.com/reference/agents/building-an-agent.md
> ## Documentation Index
> Fetch the complete documentation index at: https://docs.unifygtm.com/llms.txt
> Use this file to discover all available pages before exploring further.
# Building an Agent
> Learn the fundamentals of building Agents in Unify.
## Agent configuration
Every Agent has three components:
1. **Record Type**: Specify whether this agent will run on Company records or Person records.
2. **Questions**: Define research questions for the agent to answer.
3. (Optional) **Guidance**: Provide additional context or advice to the agent to improve the results.
Once you've configured your Agent, test it by running it on example Companies or People.
The action-specific metrics pages will also show you the records that have
passed through that action and their results.
---
# Source: https://docs.unifygtm.com/reference/agents/building-an-agent.md
> ## Documentation Index
> Fetch the complete documentation index at: https://docs.unifygtm.com/llms.txt
> Use this file to discover all available pages before exploring further.
# Building an Agent
> Learn the fundamentals of building Agents in Unify.
## Agent configuration
Every Agent has three components:
1. **Record Type**: Specify whether this agent will run on Company records or Person records.
2. **Questions**: Define research questions for the agent to answer.
3. (Optional) **Guidance**: Provide additional context or advice to the agent to improve the results.
Once you've configured your Agent, test it by running it on example Companies or People.
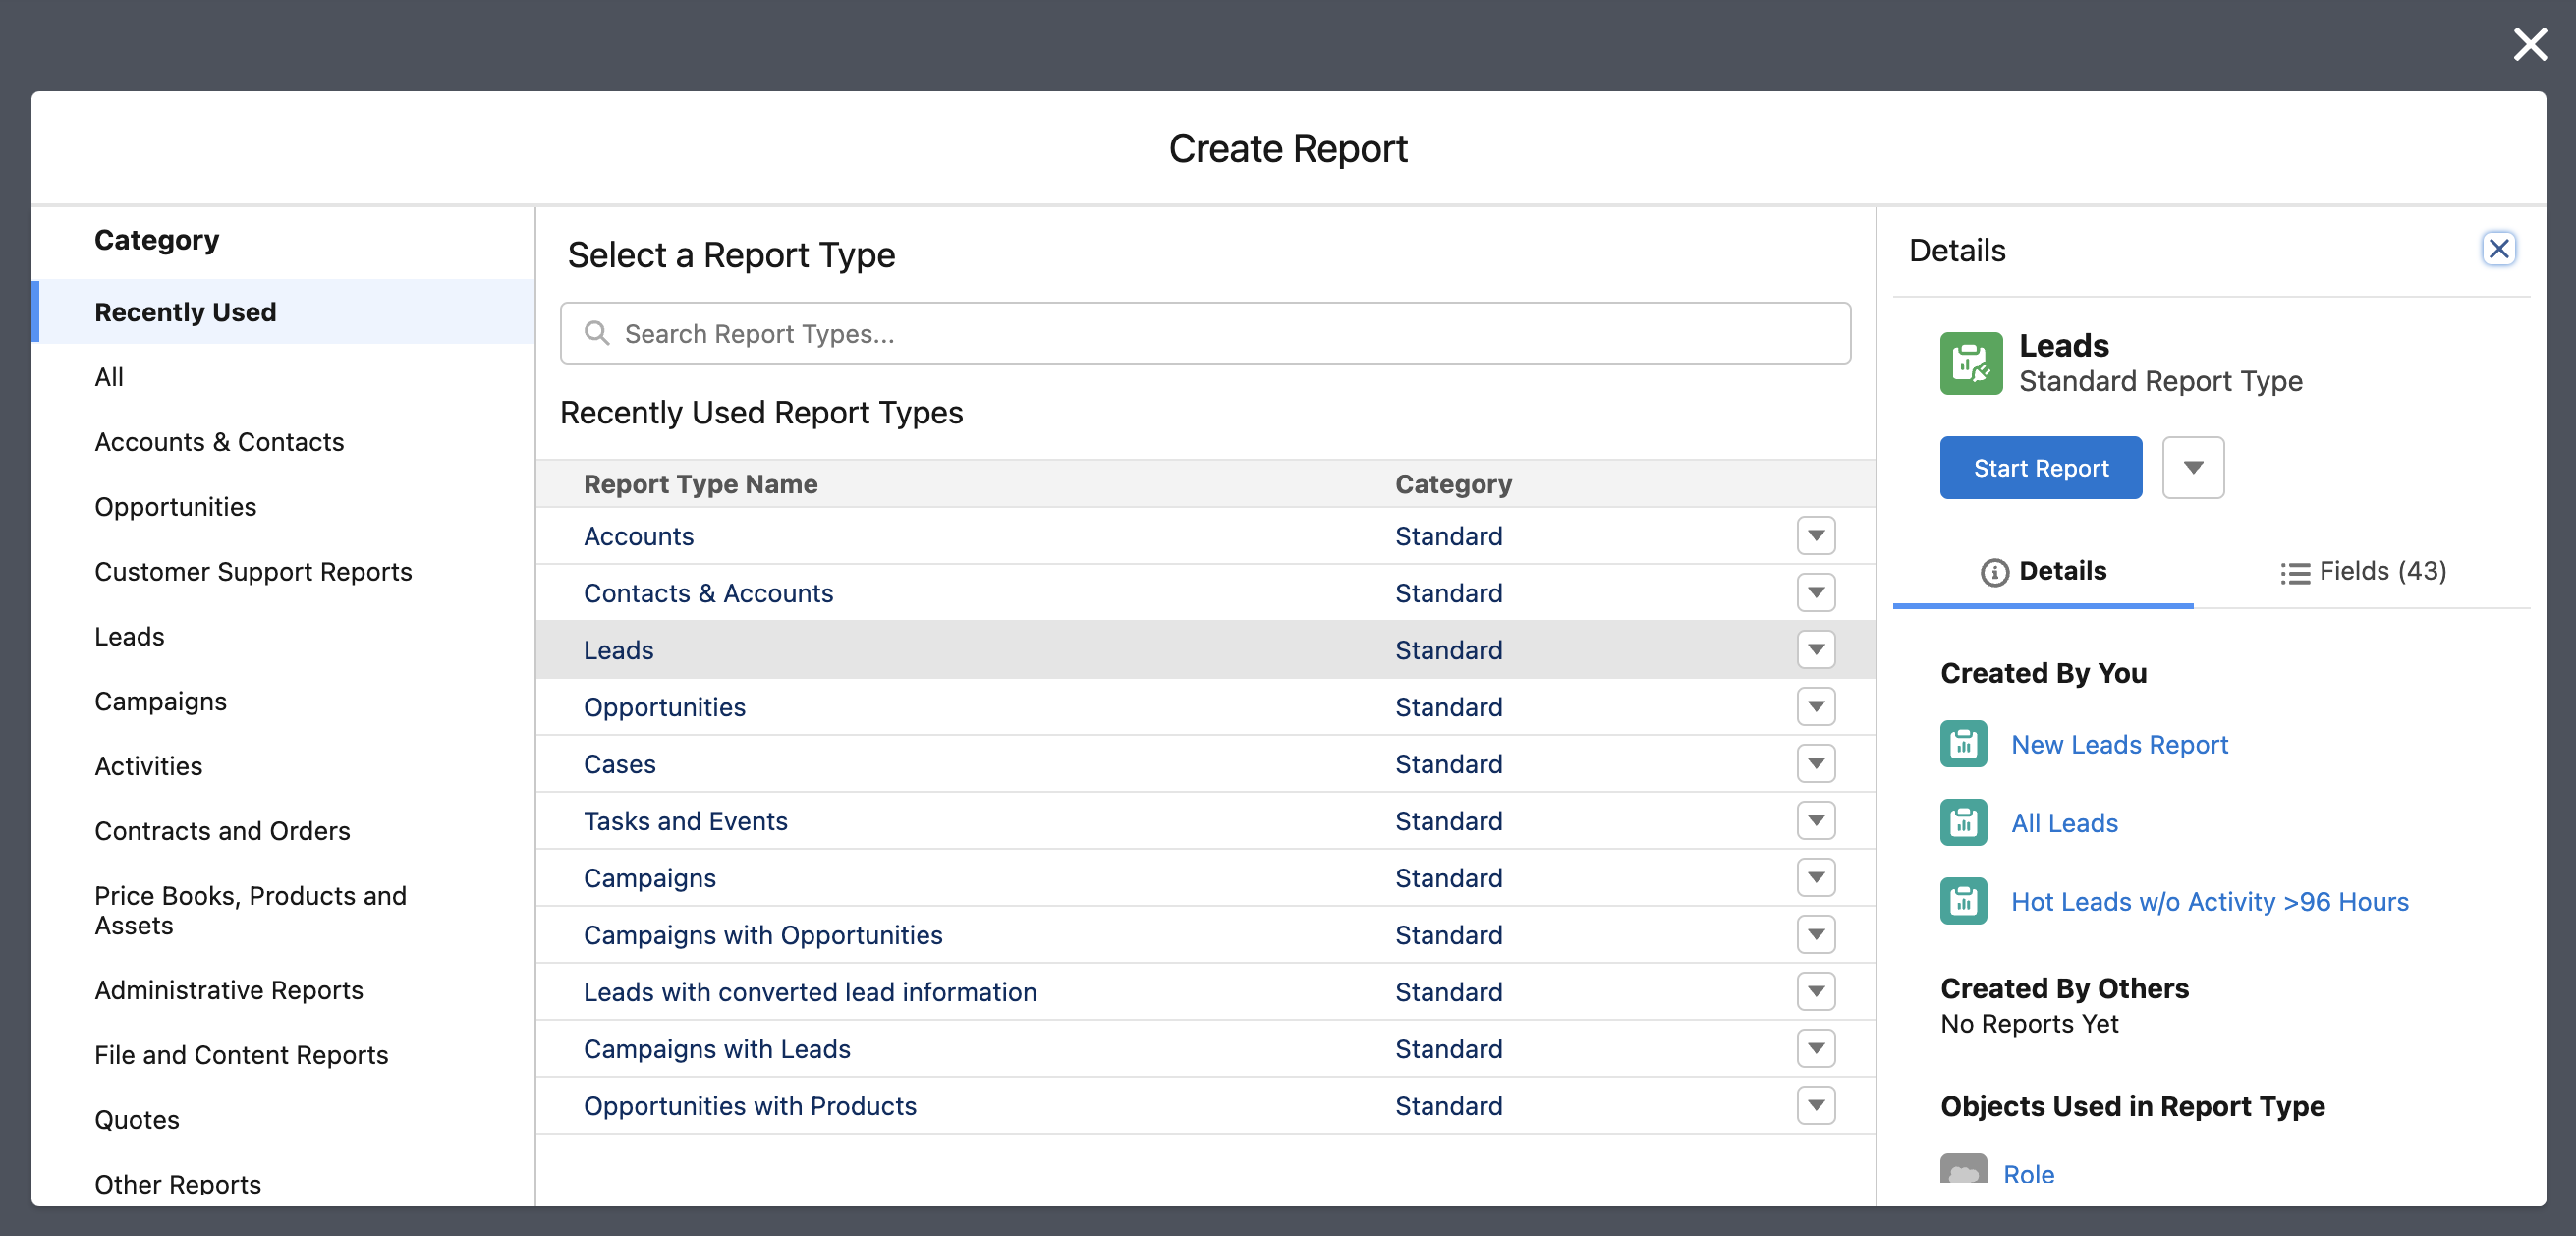 4. Be sure to add the `Id` column to your report in the sidebar, which is typically named after the record type you are selecting (e.g., `Account ID`, `Contact ID`, etc.)
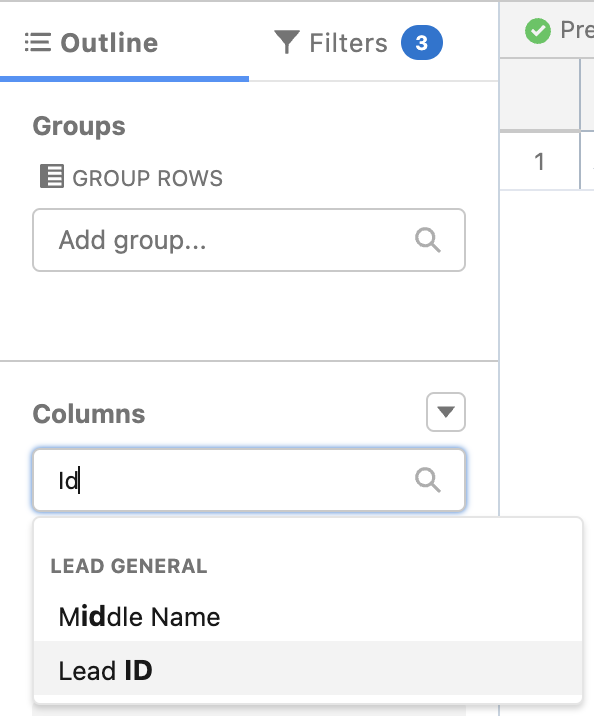 5. Also add any additional columns that you wish to edit on the records
6. Add any filters or sorting options needed to narrow down the records you want to update
5. Also add any additional columns that you wish to edit on the records
6. Add any filters or sorting options needed to narrow down the records you want to update
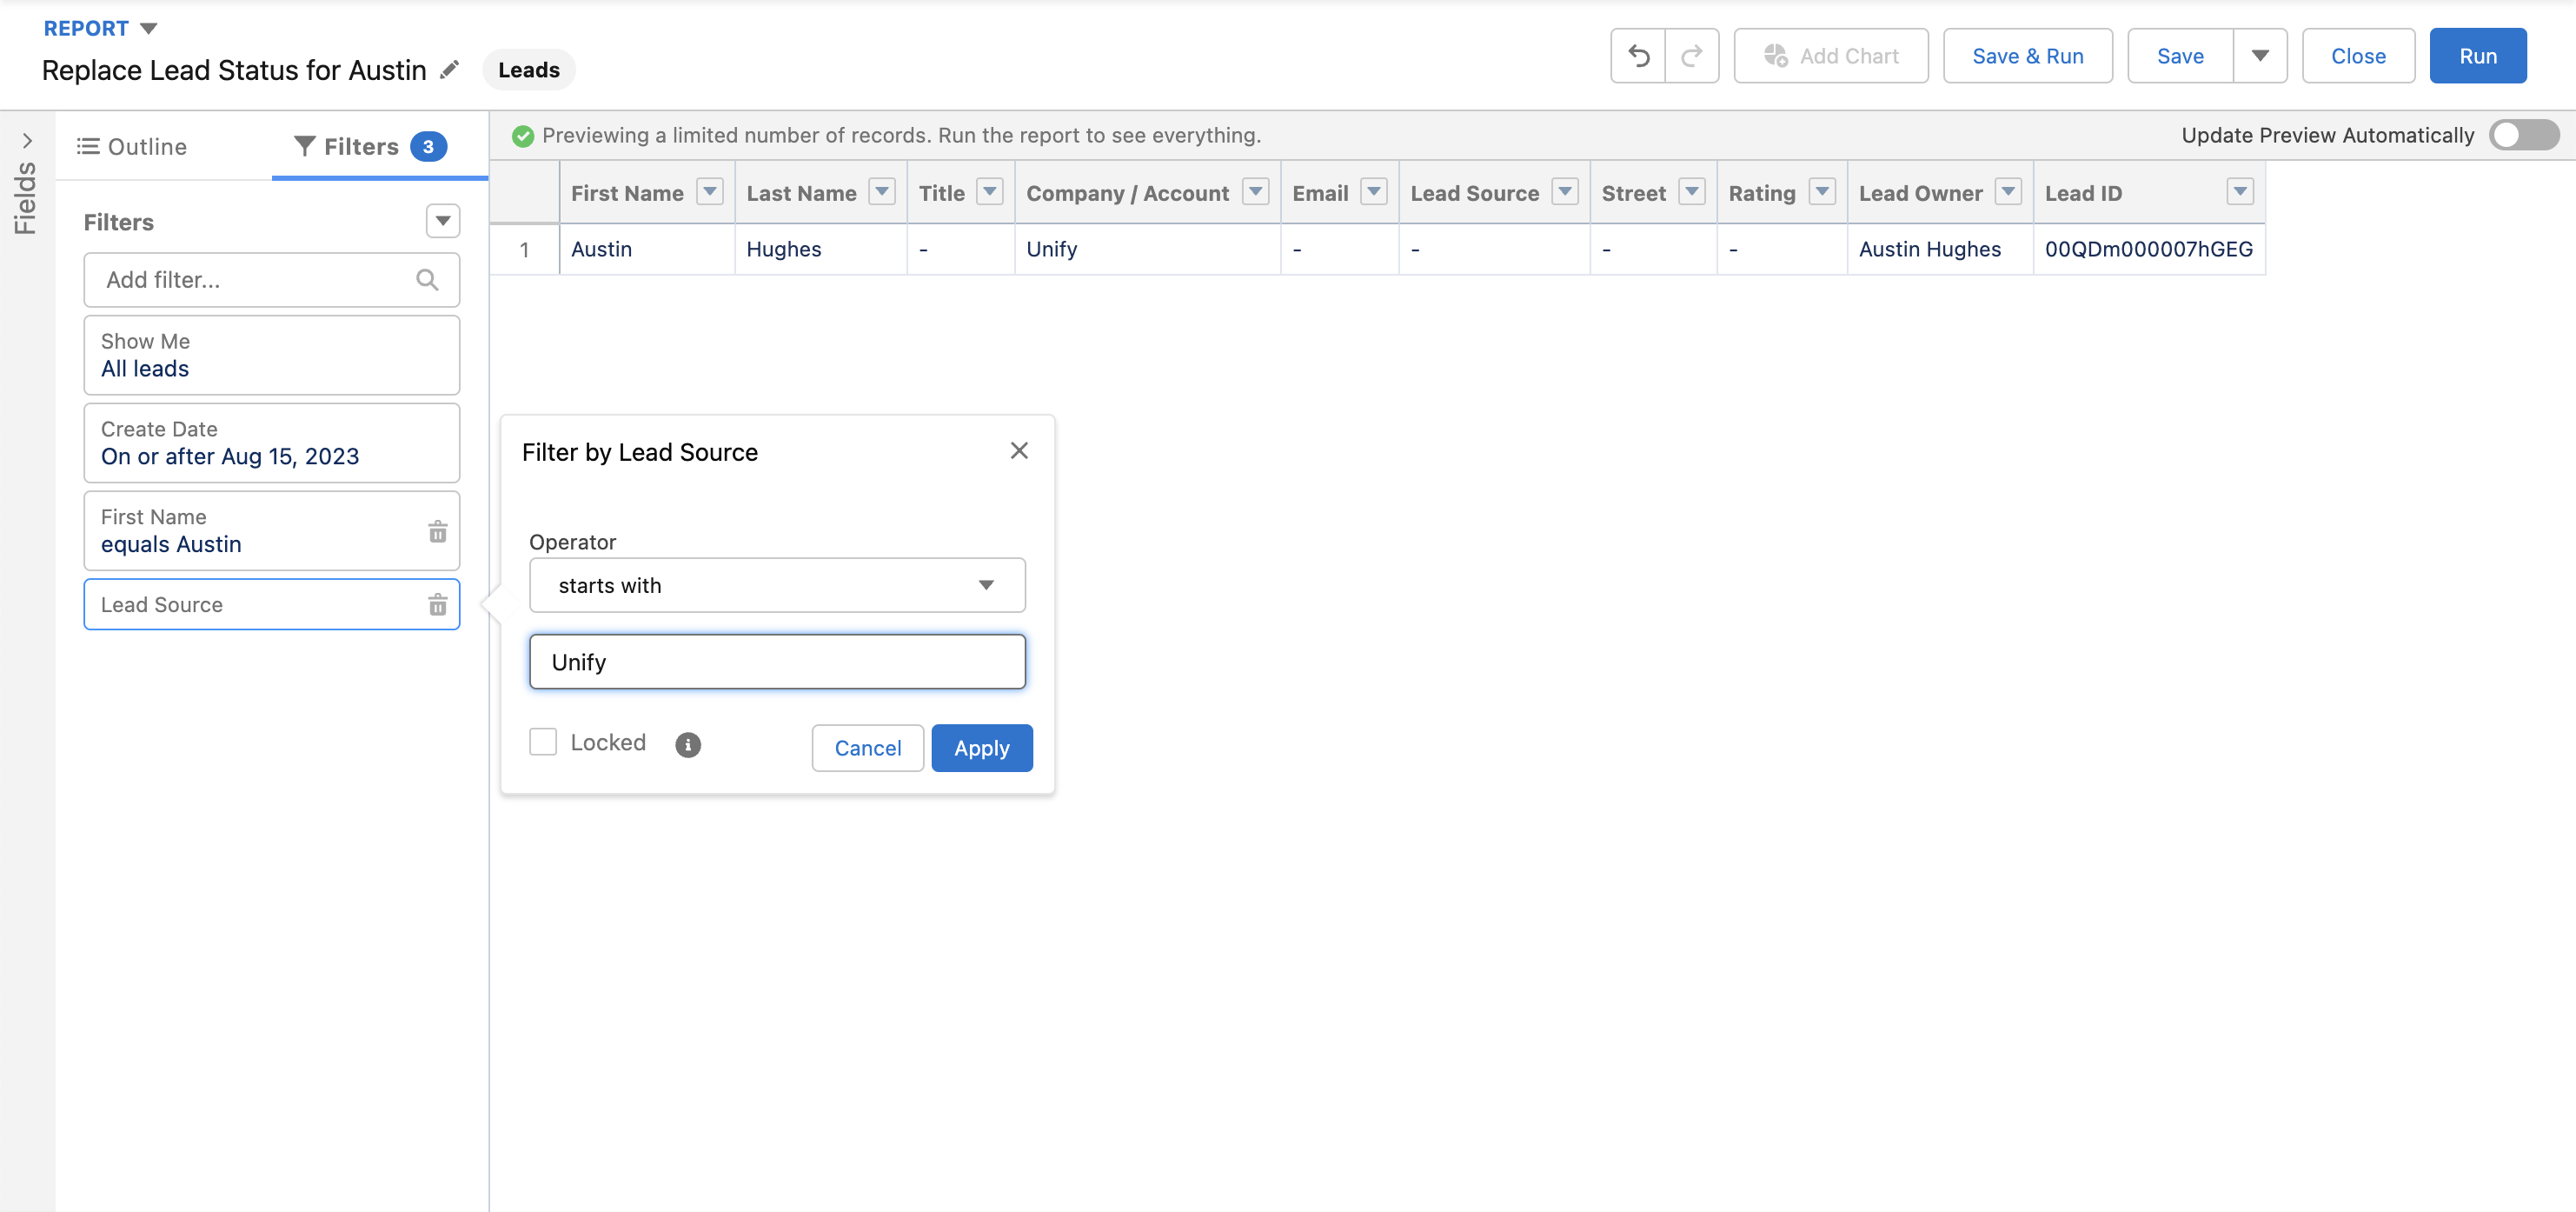 7. When ready, click **Save** in the top-right corner, enter a name, and then click **Save** again
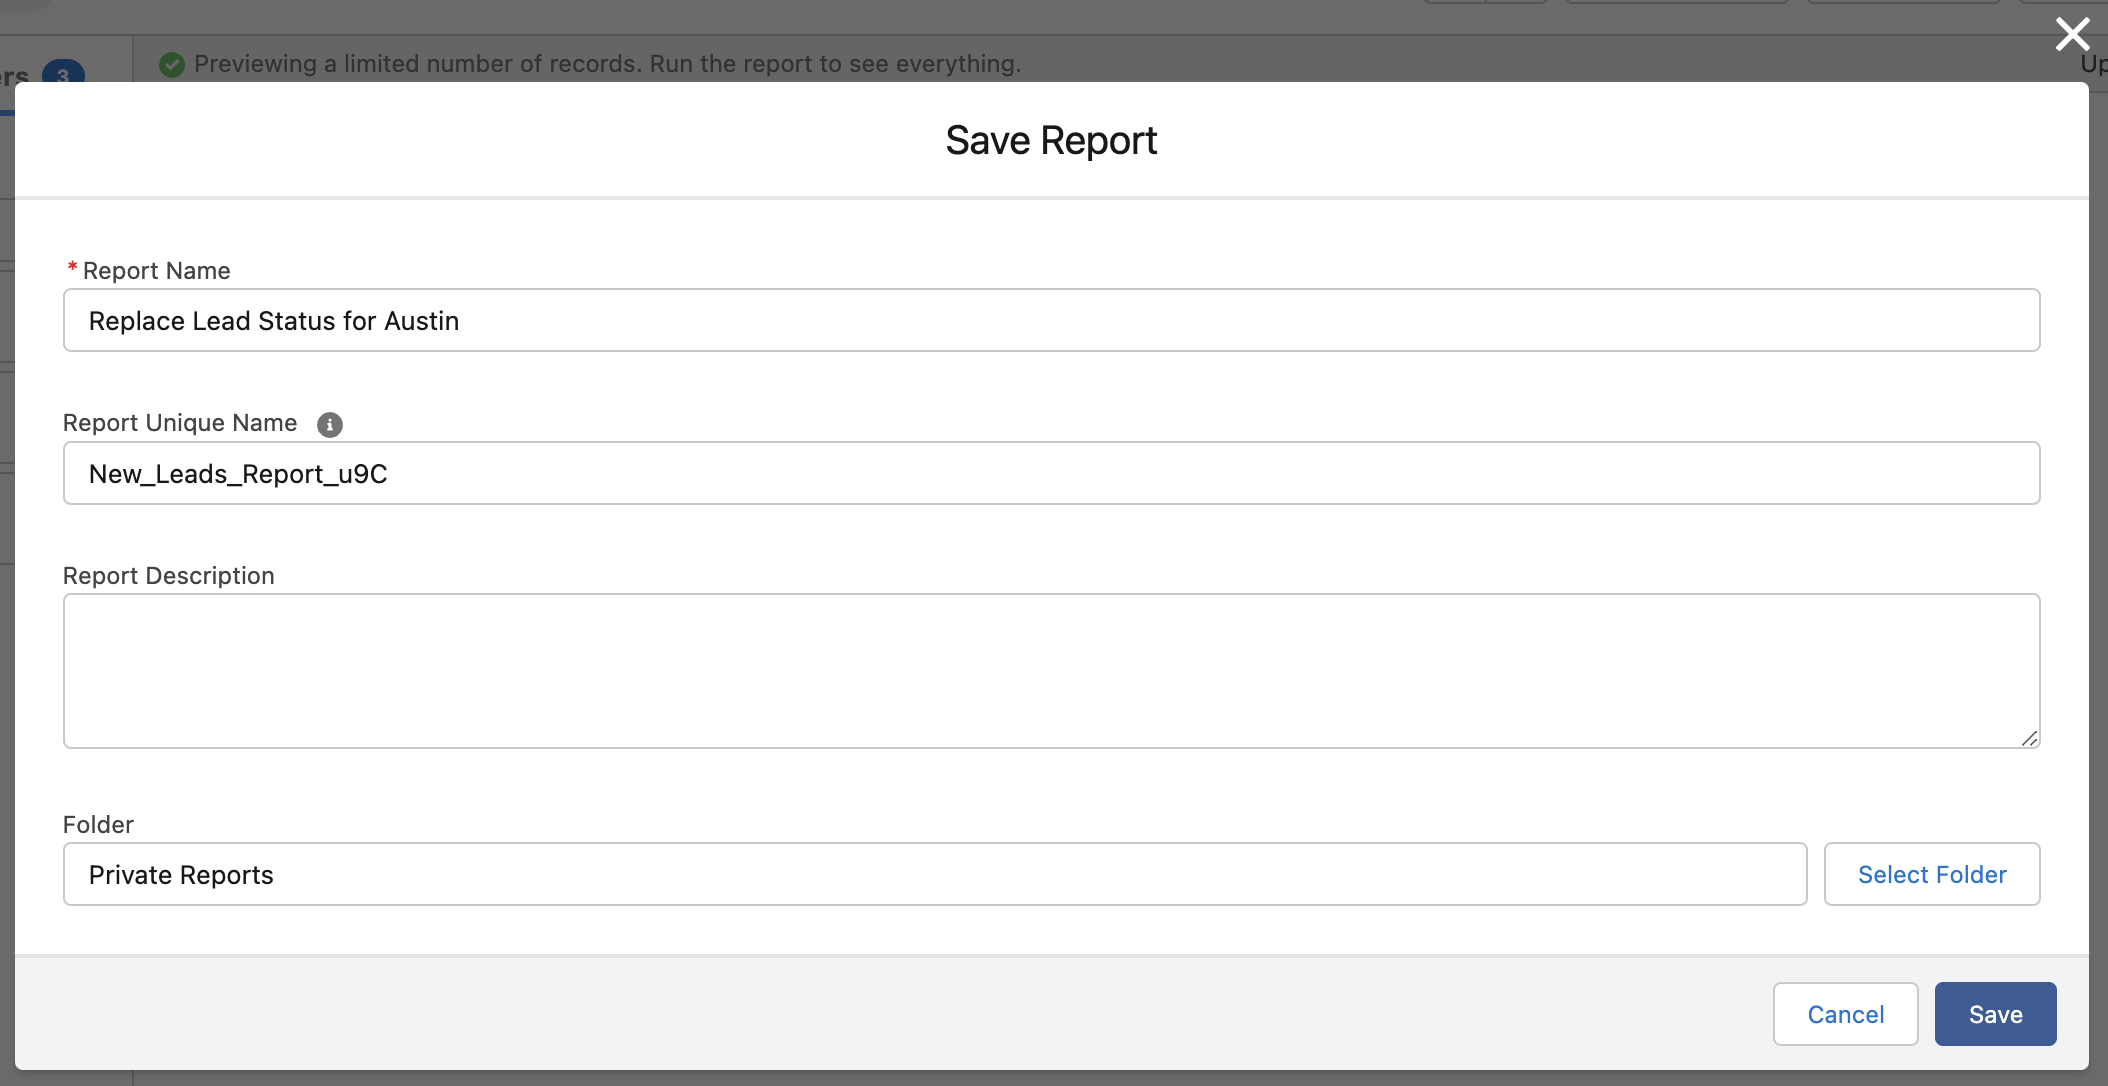 8. Click **Run** in the top-right corner and verify these are the records you want to update
9. Click the dropdown arrow next to **Edit** in the top-right corner and select **Export**
10. Choose **Details Only** and **Comma Delimited .csv** as the format and then click **Export**
8. Click **Run** in the top-right corner and verify these are the records you want to update
9. Click the dropdown arrow next to **Edit** in the top-right corner and select **Export**
10. Choose **Details Only** and **Comma Delimited .csv** as the format and then click **Export**
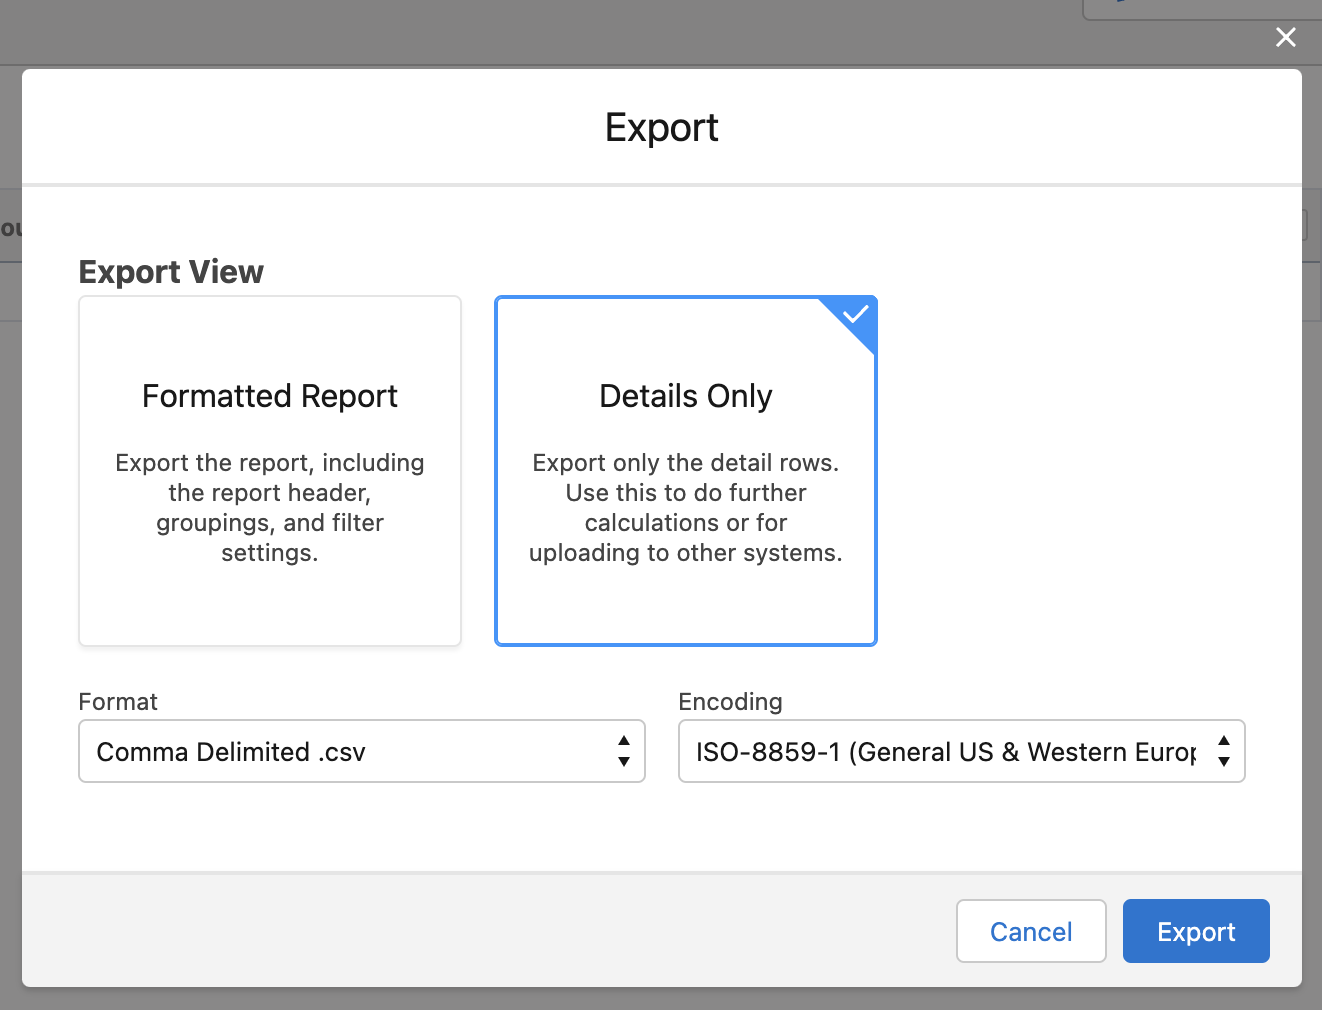 ### Make Changes
1. Open the downloaded file and make any desired updates to the values
2. Save the changes as a new file so that the original is available as a backup
### Upload the Changed Records
1. Navigate to the **Setup** page in Salesforce
2. In the sidebar on the left, search for "data import wizard" and select the **Data Import Wizard** integration
3. Follow the on-screen instructions to update existing records and be sure to choose the option to match records by `Salesforce.com ID`
### Make Changes
1. Open the downloaded file and make any desired updates to the values
2. Save the changes as a new file so that the original is available as a backup
### Upload the Changed Records
1. Navigate to the **Setup** page in Salesforce
2. In the sidebar on the left, search for "data import wizard" and select the **Data Import Wizard** integration
3. Follow the on-screen instructions to update existing records and be sure to choose the option to match records by `Salesforce.com ID`
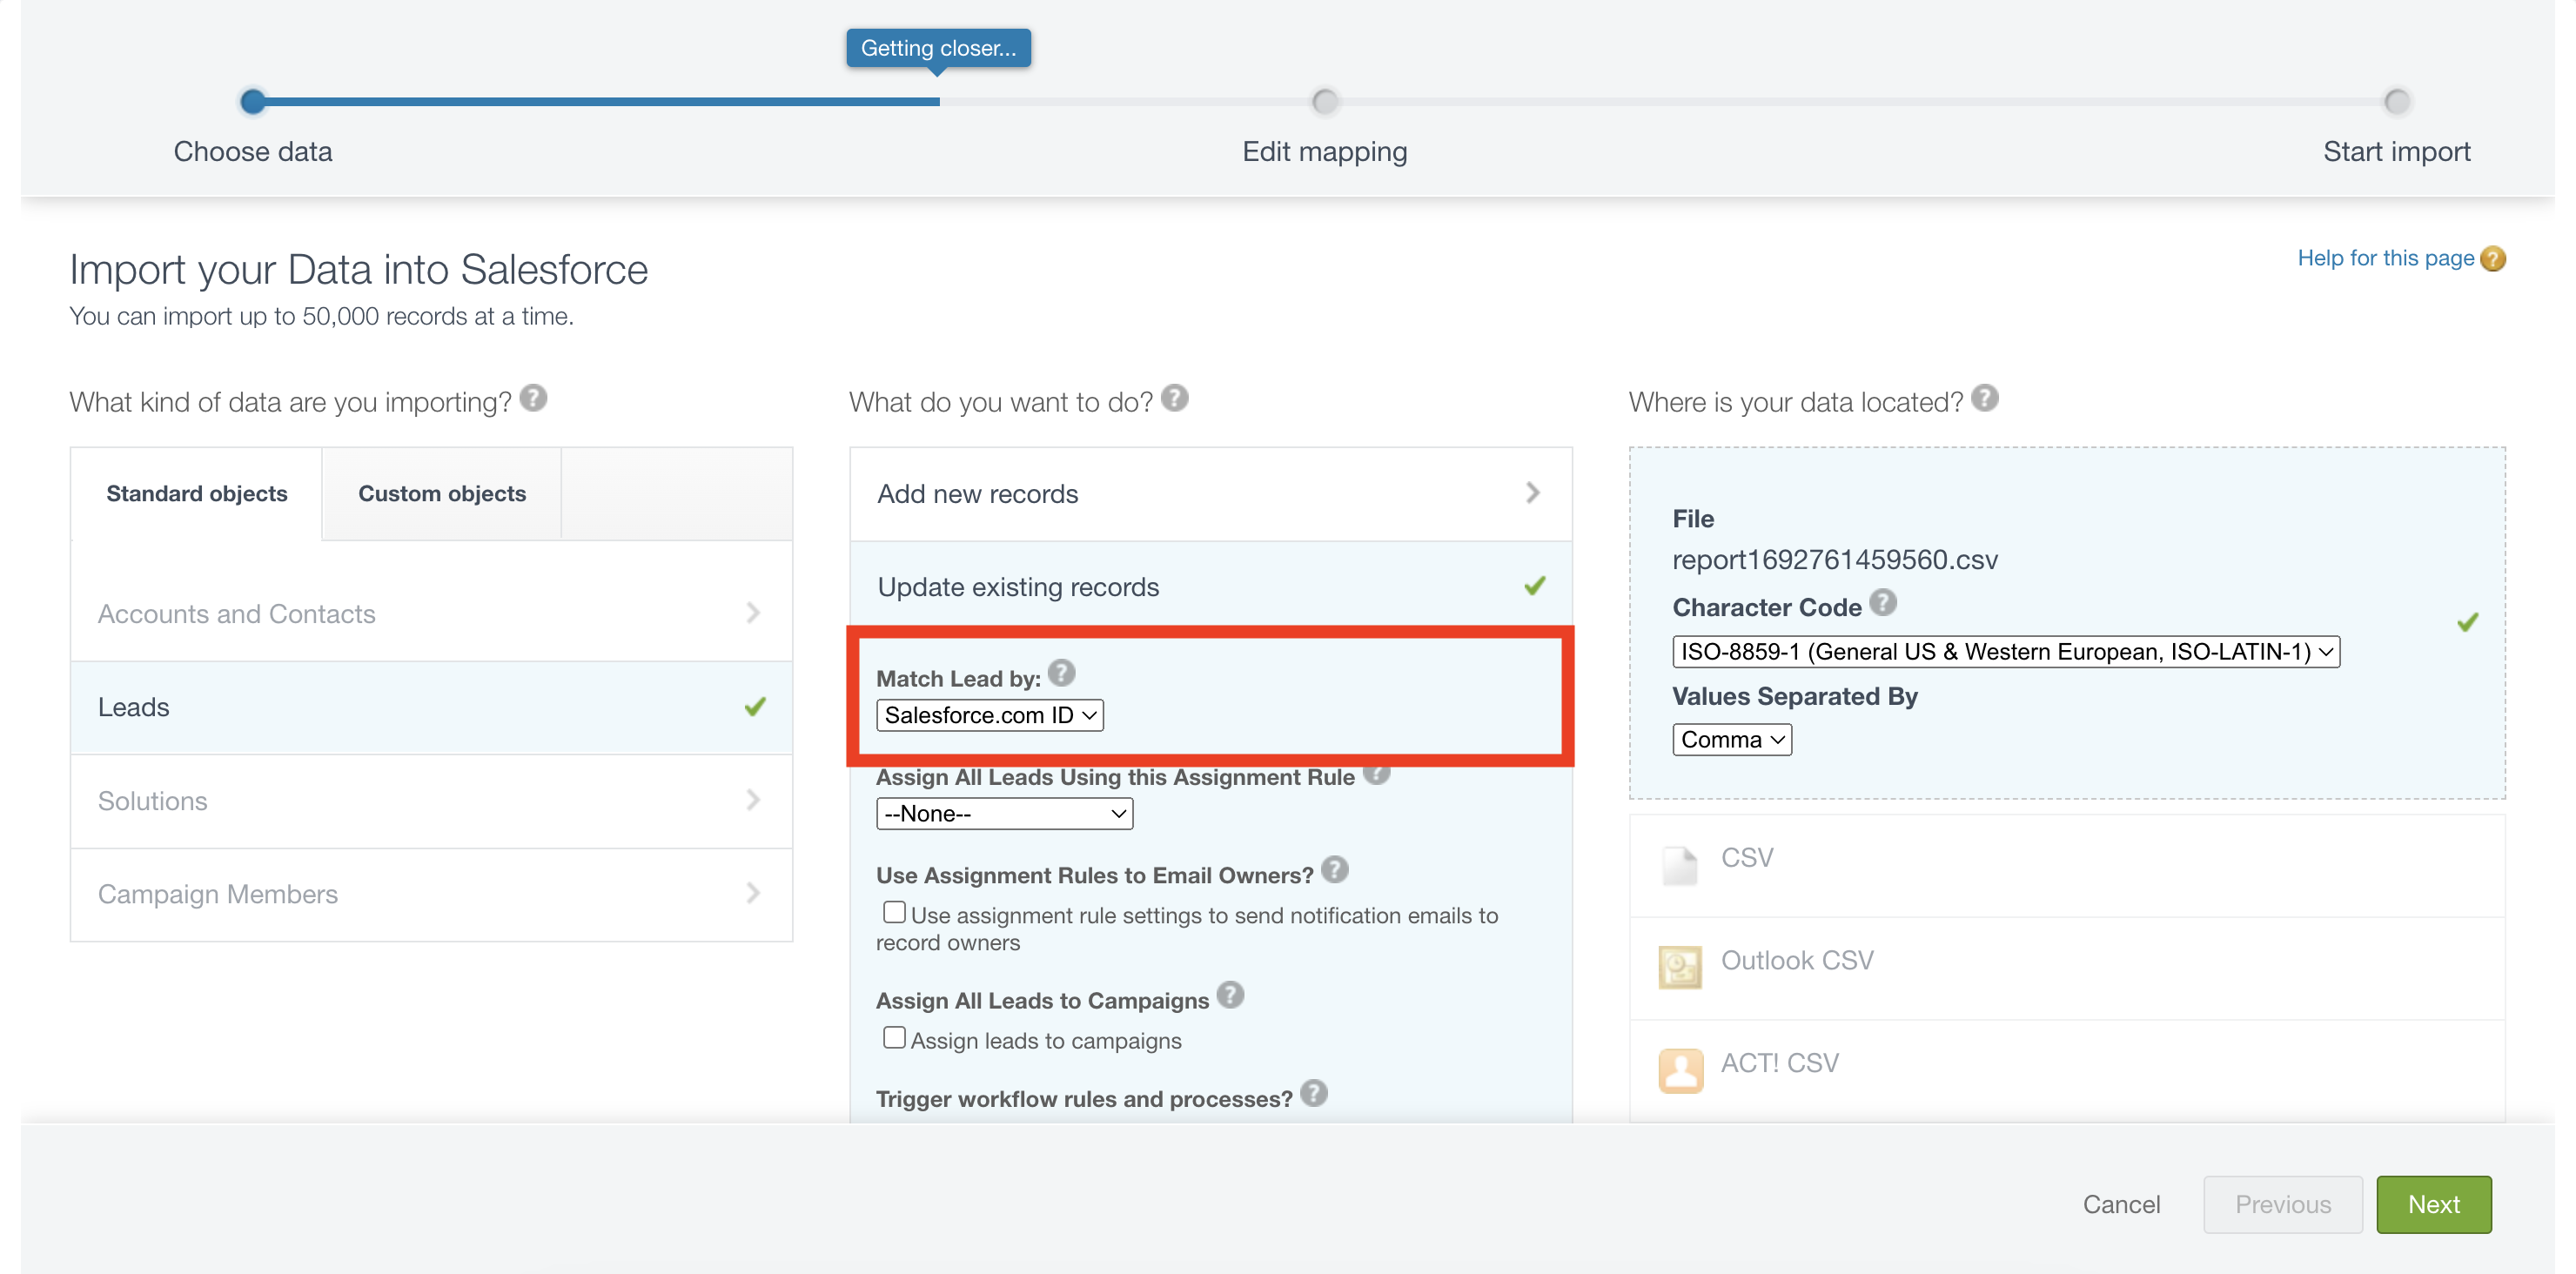 4. Ensure the mapping looks correct and that the ID column is mapped to `Salesforce.com ID`
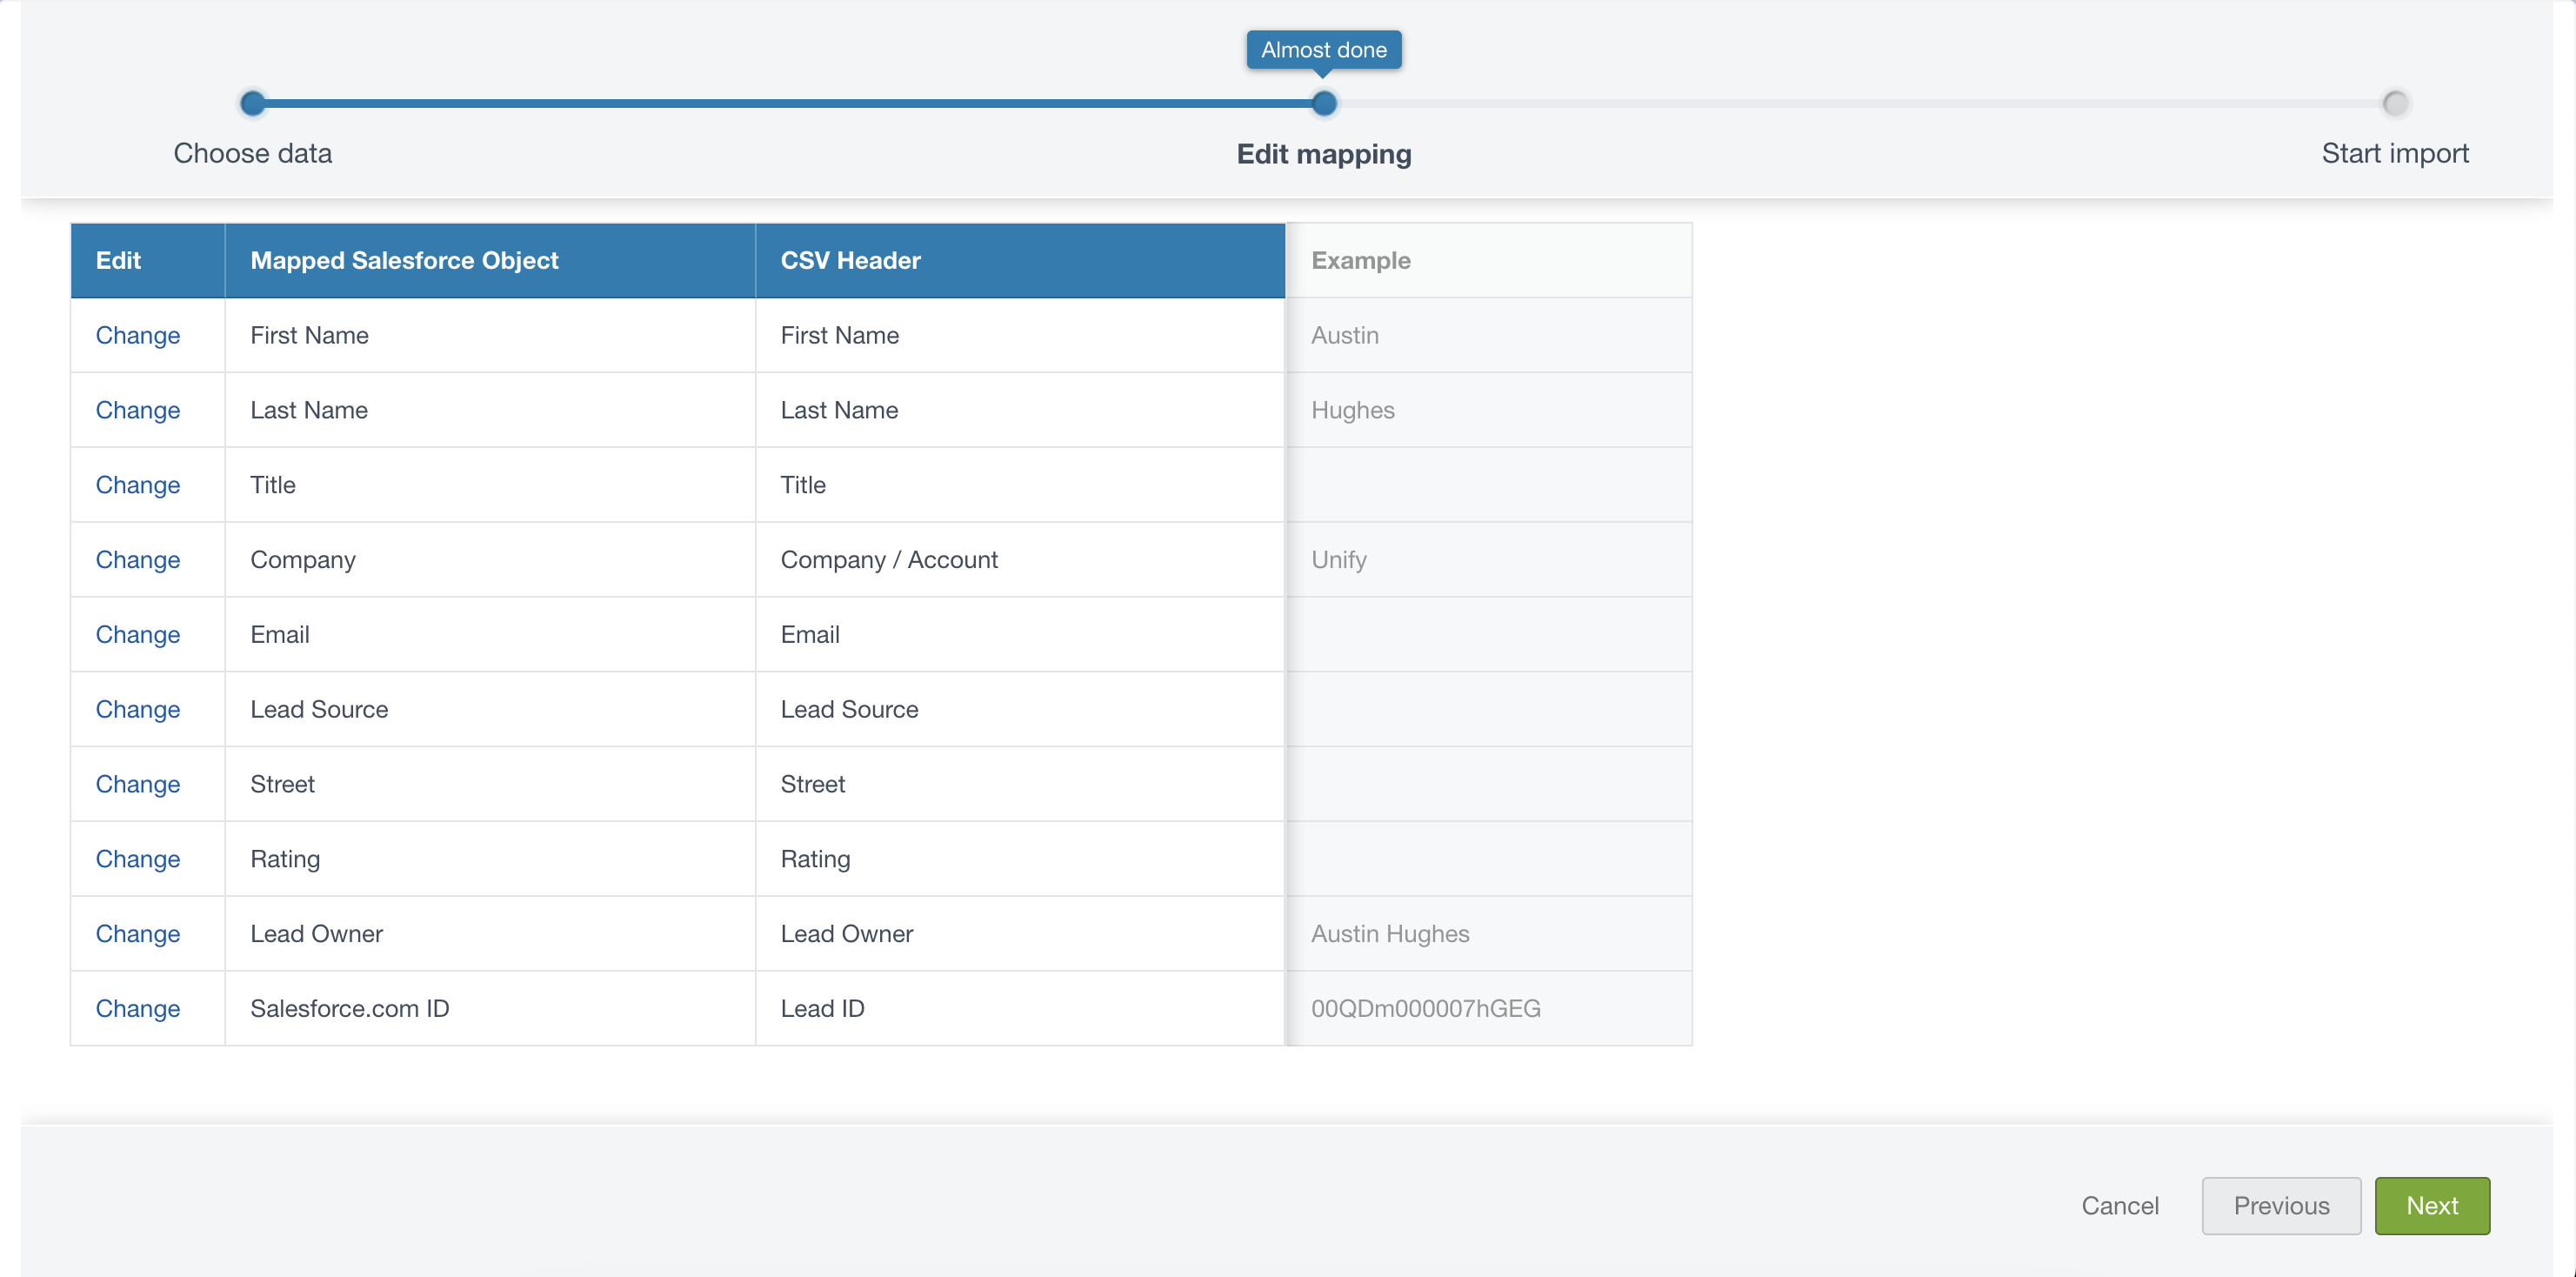 5. Verify the details on the last page and then click **Start Import**
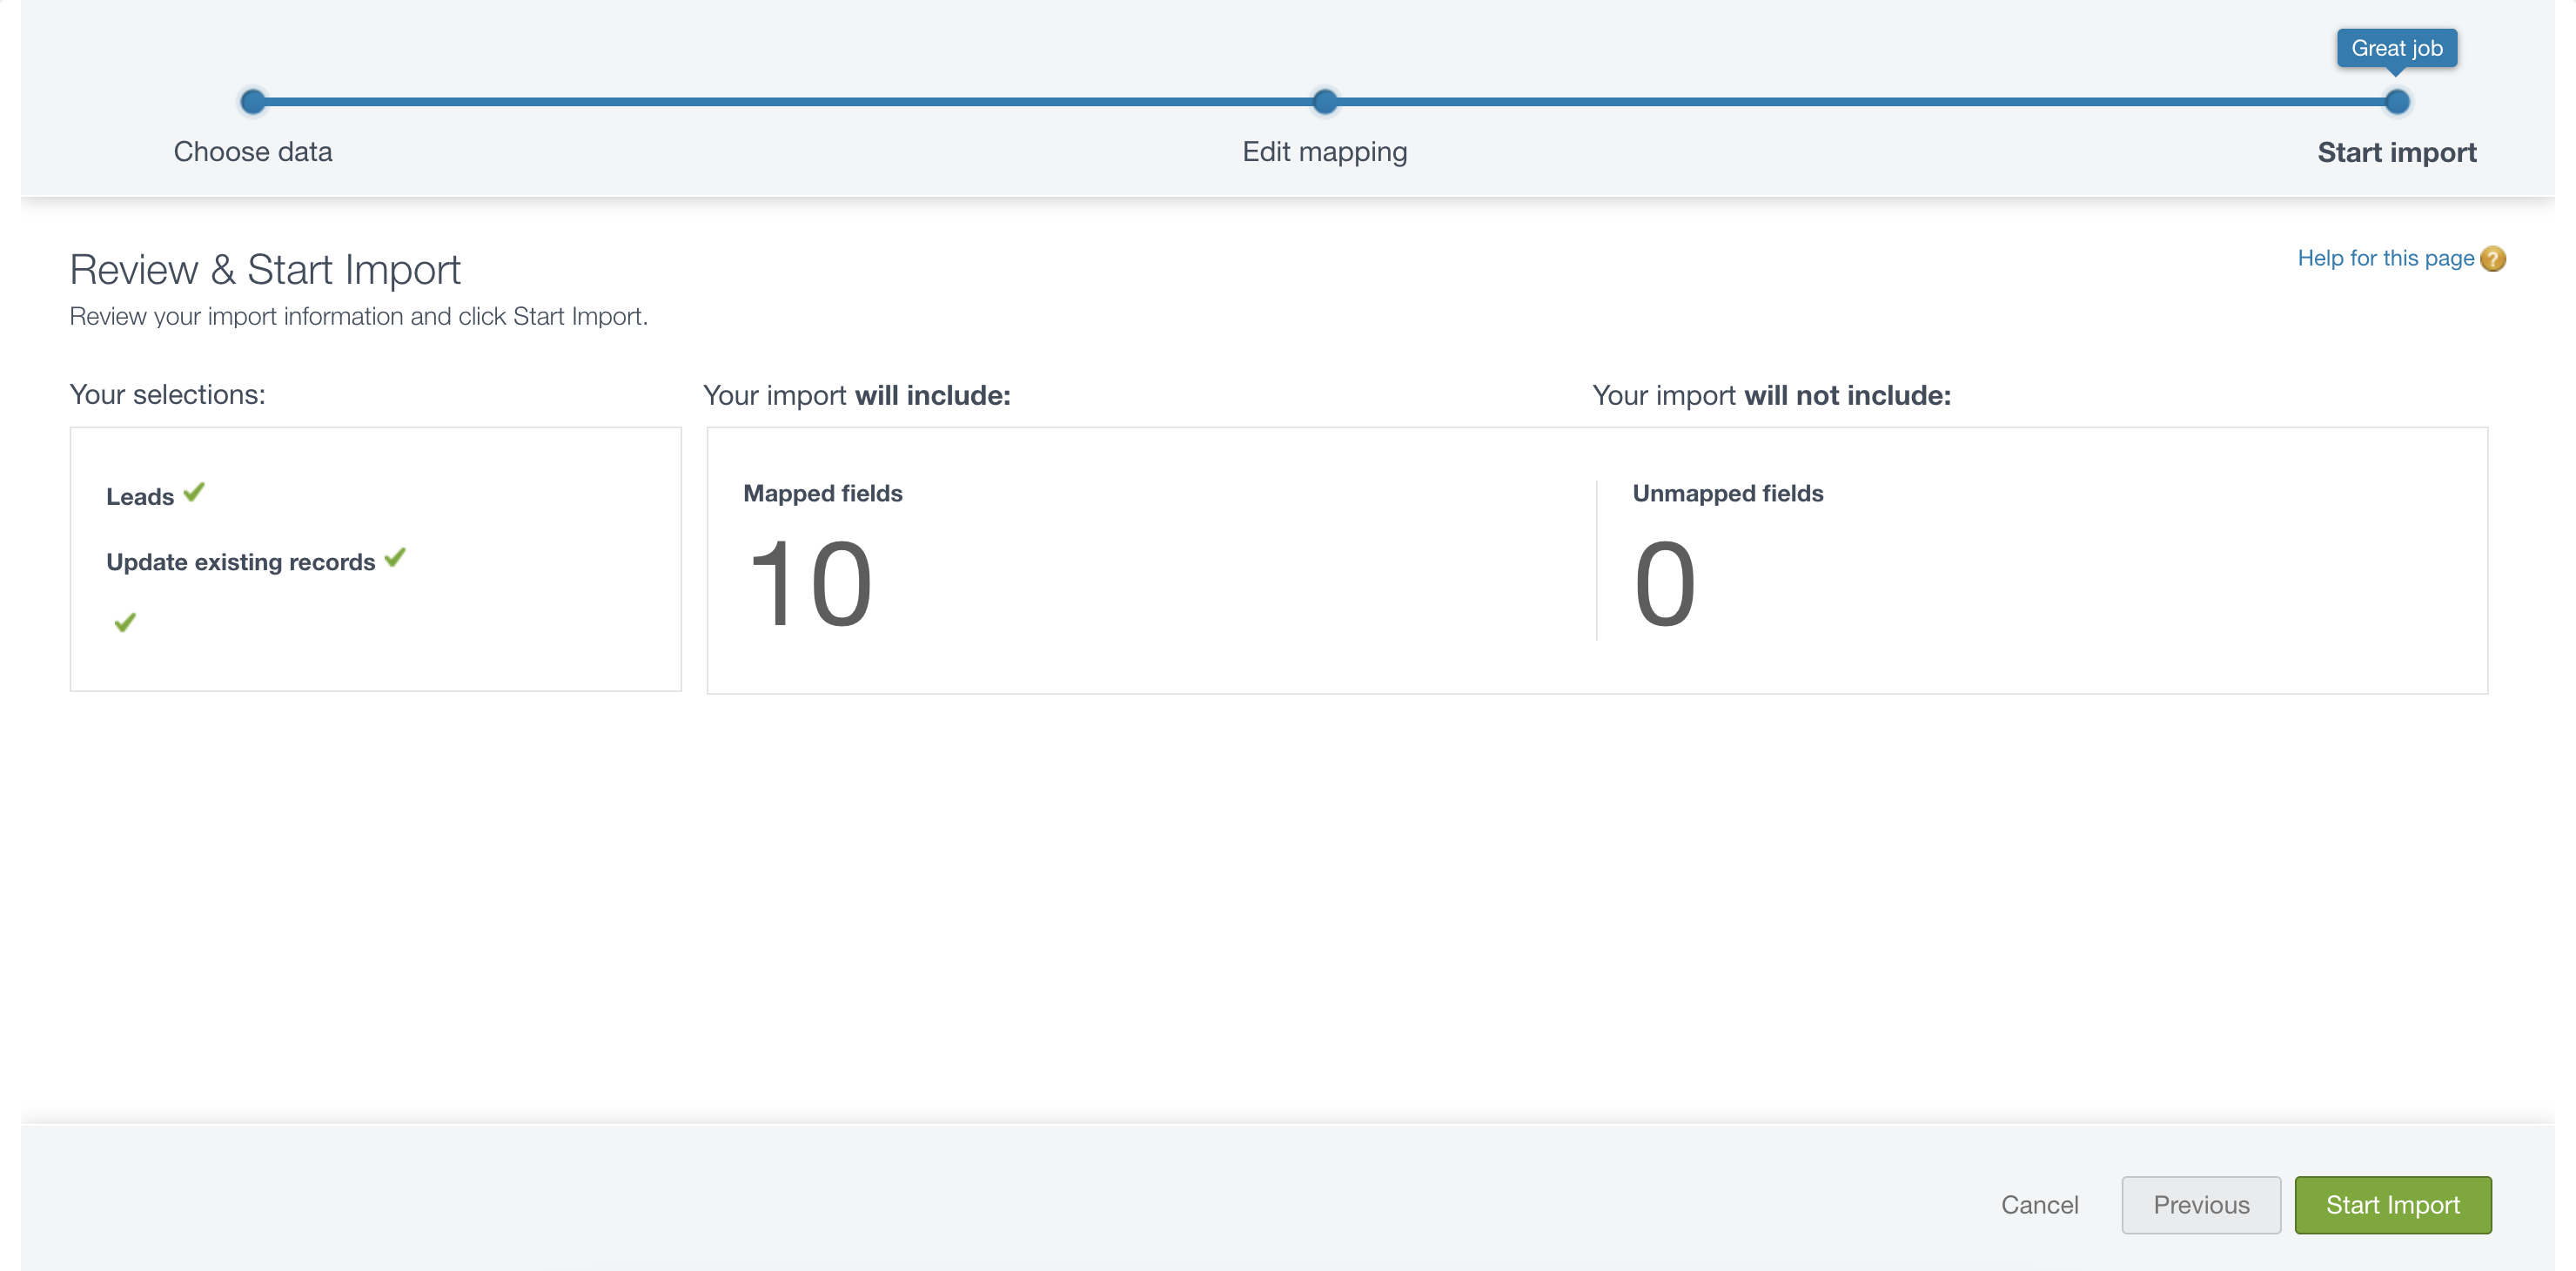 6. Once this bulk import is complete you’re all finished!
---
# Source: https://docs.unifygtm.com/reference/integrations/orum/call-campaigns.md
# Source: https://docs.unifygtm.com/reference/integrations/nooks/call-campaigns.md
> ## Documentation Index
> Fetch the complete documentation index at: https://docs.unifygtm.com/llms.txt
> Use this file to discover all available pages before exploring further.
# Running Call Campaigns with Nooks
> Launch and manage effective call campaigns using Nooks with your CRM integration.
## Prerequisites
Before starting your call campaign, ensure you have:
* Completed your CRM setup ([HubSpot](/reference/integrations/nooks/hubspot-setup) or [Salesforce](/reference/integrations/nooks/salesforce-setup))
## Setting Up Your Call Campaign
### 1. Create Your Sequence
Create a Unify Sequence that includes manual phone call steps. This will generate the call tasks that sync to your CRM and feed into Nooks. Learn more in our [Sequences guide](/reference/sequences/manual-steps#phone-call-steps).
### 2. Monitor the Sync
Sequence enrollments will appear in your CRM within 30 minutes of being created in Unify. These tasks will automatically be available in Nooks when you reset your call list.
### 3. Set Up Your Call Session
In Nooks, follow these steps to prepare your calling session:
1. Login to Nooks
2. Select your call sequence
### 4. Start Calling
Begin your call campaign! As you complete calls, results will automatically sync back to both your CRM and Unify, keeping all your systems up to date.
6. Once this bulk import is complete you’re all finished!
---
# Source: https://docs.unifygtm.com/reference/integrations/orum/call-campaigns.md
# Source: https://docs.unifygtm.com/reference/integrations/nooks/call-campaigns.md
> ## Documentation Index
> Fetch the complete documentation index at: https://docs.unifygtm.com/llms.txt
> Use this file to discover all available pages before exploring further.
# Running Call Campaigns with Nooks
> Launch and manage effective call campaigns using Nooks with your CRM integration.
## Prerequisites
Before starting your call campaign, ensure you have:
* Completed your CRM setup ([HubSpot](/reference/integrations/nooks/hubspot-setup) or [Salesforce](/reference/integrations/nooks/salesforce-setup))
## Setting Up Your Call Campaign
### 1. Create Your Sequence
Create a Unify Sequence that includes manual phone call steps. This will generate the call tasks that sync to your CRM and feed into Nooks. Learn more in our [Sequences guide](/reference/sequences/manual-steps#phone-call-steps).
### 2. Monitor the Sync
Sequence enrollments will appear in your CRM within 30 minutes of being created in Unify. These tasks will automatically be available in Nooks when you reset your call list.
### 3. Set Up Your Call Session
In Nooks, follow these steps to prepare your calling session:
1. Login to Nooks
2. Select your call sequence
### 4. Start Calling
Begin your call campaign! As you complete calls, results will automatically sync back to both your CRM and Unify, keeping all your systems up to date.
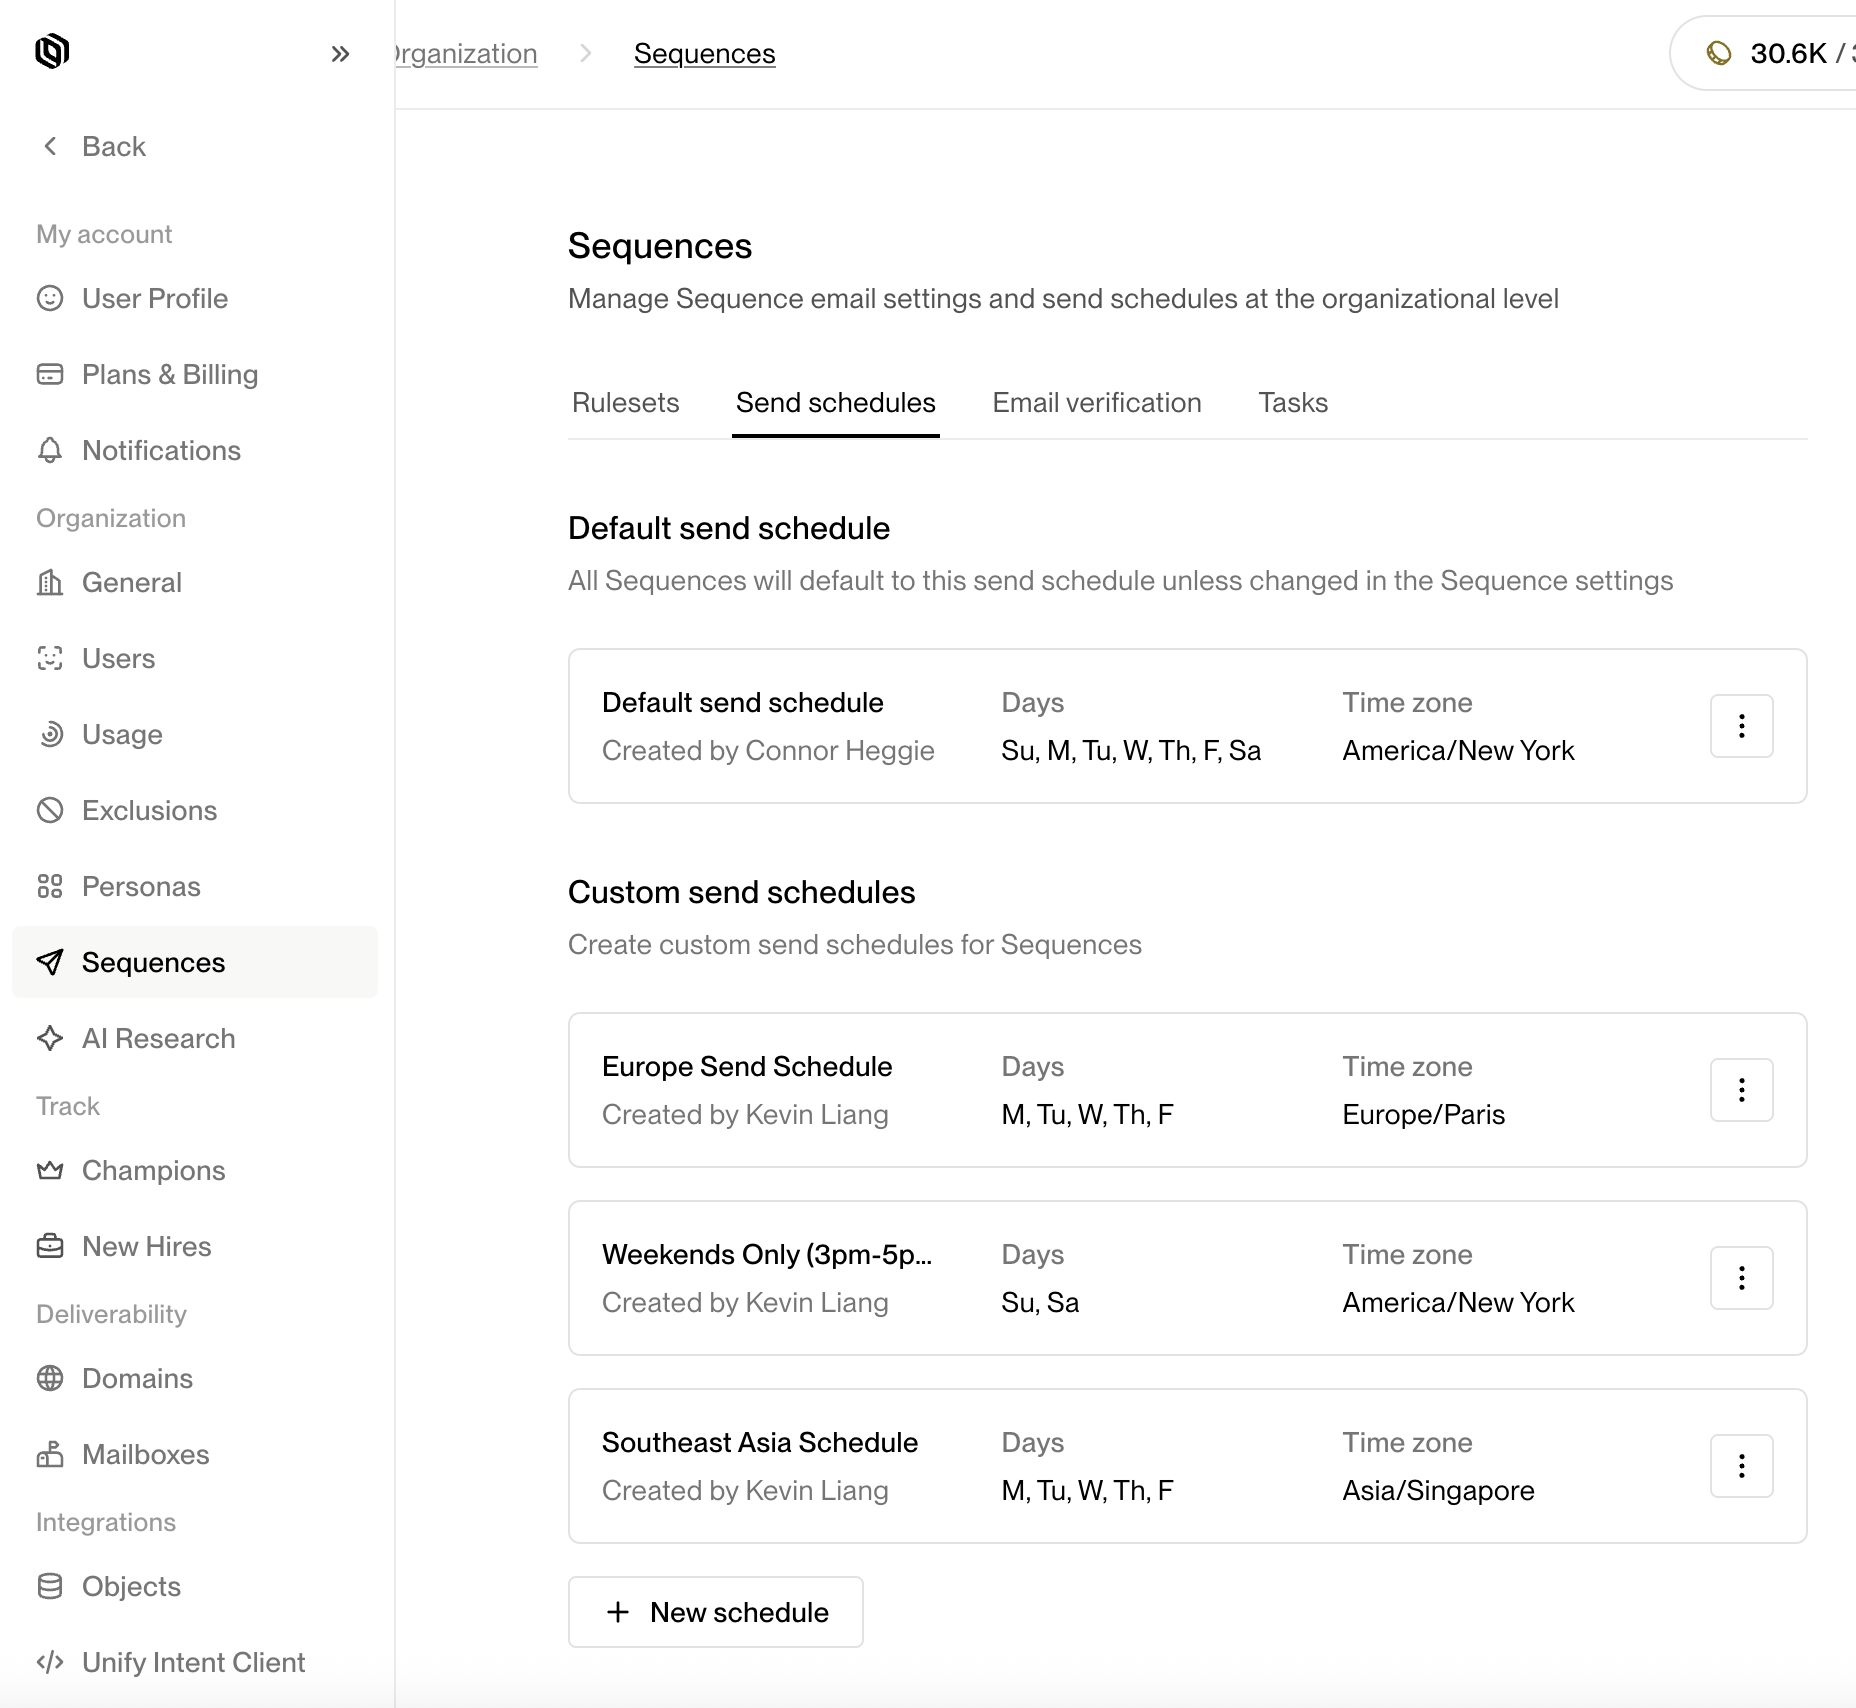 ## Configuring a new Custom Send Schedule
After clicking the **+ New Schedule** button, a configuration drawer will open, allowing you to define the parameters of your new Custom Send Schedule.
### General
Under the **General** section, you can configure the basic information for your Custom Send Schedule.
* **Name** — Provide a clear, descriptive name for your Custom Send Schedule (e.g., *North America Weekdays* or *APAC Morning Outreach*).
* **Time Zone** — Select the time zone in which the schedule will operate. This ensures that all send windows and skip dates align to the correct local time. (e.g., America/Los Angeles, Europe/London, Asia/Singapore)
## Configuring a new Custom Send Schedule
After clicking the **+ New Schedule** button, a configuration drawer will open, allowing you to define the parameters of your new Custom Send Schedule.
### General
Under the **General** section, you can configure the basic information for your Custom Send Schedule.
* **Name** — Provide a clear, descriptive name for your Custom Send Schedule (e.g., *North America Weekdays* or *APAC Morning Outreach*).
* **Time Zone** — Select the time zone in which the schedule will operate. This ensures that all send windows and skip dates align to the correct local time. (e.g., America/Los Angeles, Europe/London, Asia/Singapore)
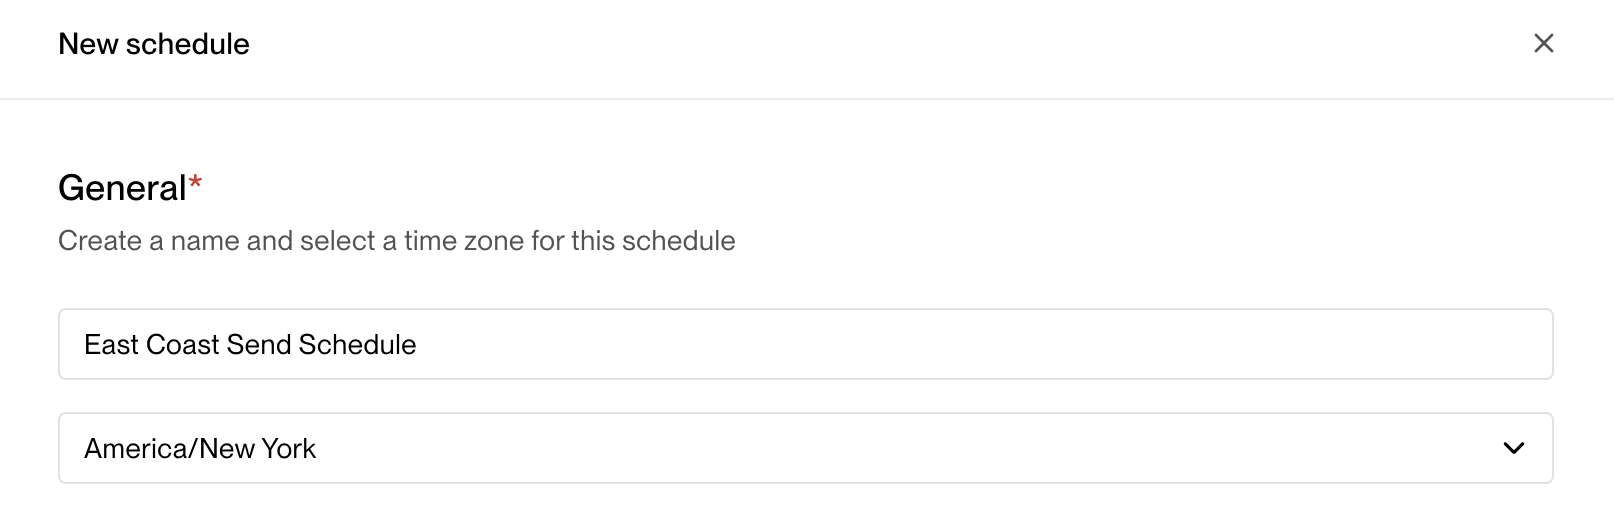 > 💡 **Tip:** If your team operates globally, create separate Custom Send Schedules for each region to ensure messages are sent during local business hours.
***
### Windows
The **Windows** section defines when Unify is allowed to send automated messages through Sequences during the week.
For each day of the week, you can:
* Enable or disable sending (for example, enable Monday–Friday and disable Saturday–Sunday).
* Specify one or more **time windows** when messages can be sent (e.g., 9 AM–12 PM, 1 PM–5 PM).
> 💡 **Tip:** If your team operates globally, create separate Custom Send Schedules for each region to ensure messages are sent during local business hours.
***
### Windows
The **Windows** section defines when Unify is allowed to send automated messages through Sequences during the week.
For each day of the week, you can:
* Enable or disable sending (for example, enable Monday–Friday and disable Saturday–Sunday).
* Specify one or more **time windows** when messages can be sent (e.g., 9 AM–12 PM, 1 PM–5 PM).
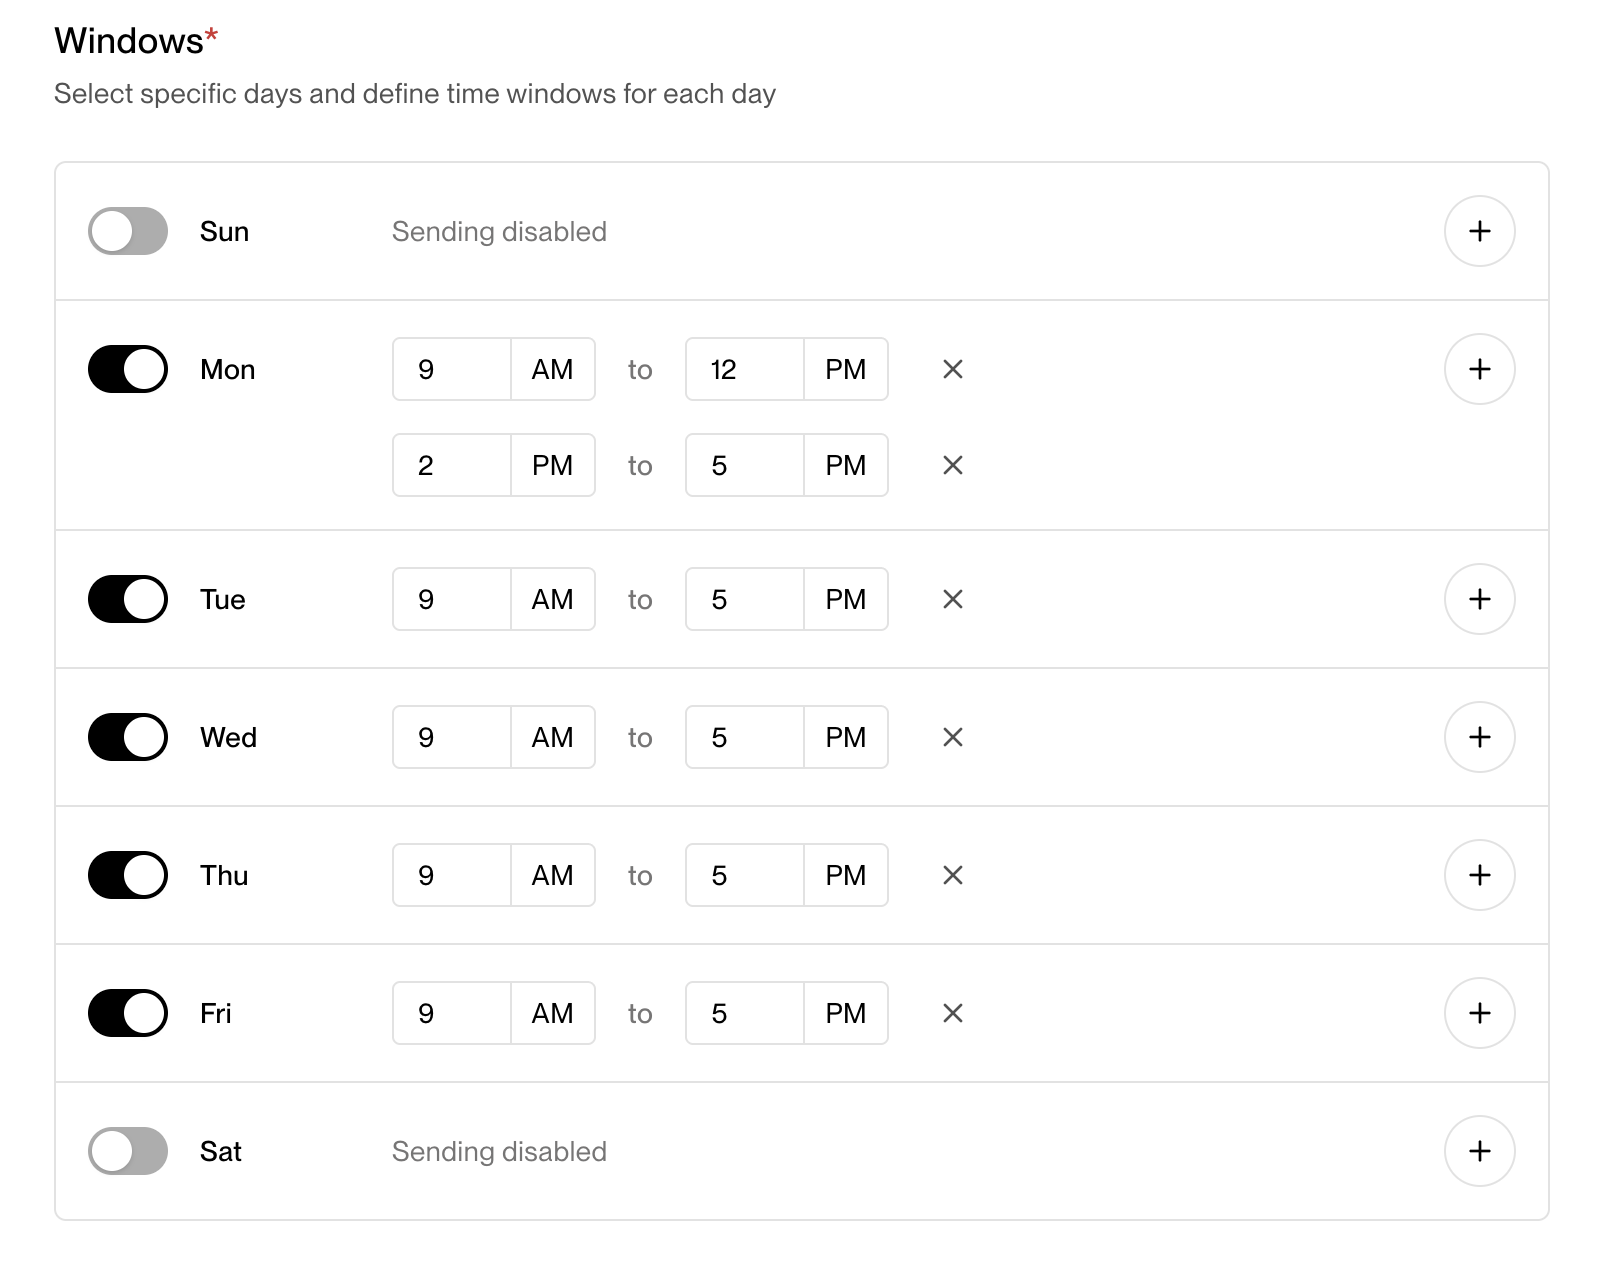 **Example:**
If you want outreach to happen only during typical working hours, you might configure:
* Monday–Friday: 9:00 AM–4:30 PM
* Saturday & Sunday: Disabled
> **Note:** Messages queued outside of active windows will automatically be held until the next available send window.
***
### Skip Dates
Skip Dates allow you to automatically **pause sending on holidays or custom dates**.
This helps maintain deliverability and professionalism by avoiding sends on non-working days.
There are two ways to configure Skip Dates:
1. **U.S. Holidays** — Toggle this option to automatically skip sending on major U.S. federal holidays (e.g., New Year’s Day, Independence Day, Thanksgiving).
2. **Custom Dates** — Add specific dates or recurring dates (such as company offsites, local holidays, or yearly breaks).
You can specify whether custom dates repeat **annually** or occur **once**.
**Example:**
If you want outreach to happen only during typical working hours, you might configure:
* Monday–Friday: 9:00 AM–4:30 PM
* Saturday & Sunday: Disabled
> **Note:** Messages queued outside of active windows will automatically be held until the next available send window.
***
### Skip Dates
Skip Dates allow you to automatically **pause sending on holidays or custom dates**.
This helps maintain deliverability and professionalism by avoiding sends on non-working days.
There are two ways to configure Skip Dates:
1. **U.S. Holidays** — Toggle this option to automatically skip sending on major U.S. federal holidays (e.g., New Year’s Day, Independence Day, Thanksgiving).
2. **Custom Dates** — Add specific dates or recurring dates (such as company offsites, local holidays, or yearly breaks).
You can specify whether custom dates repeat **annually** or occur **once**.
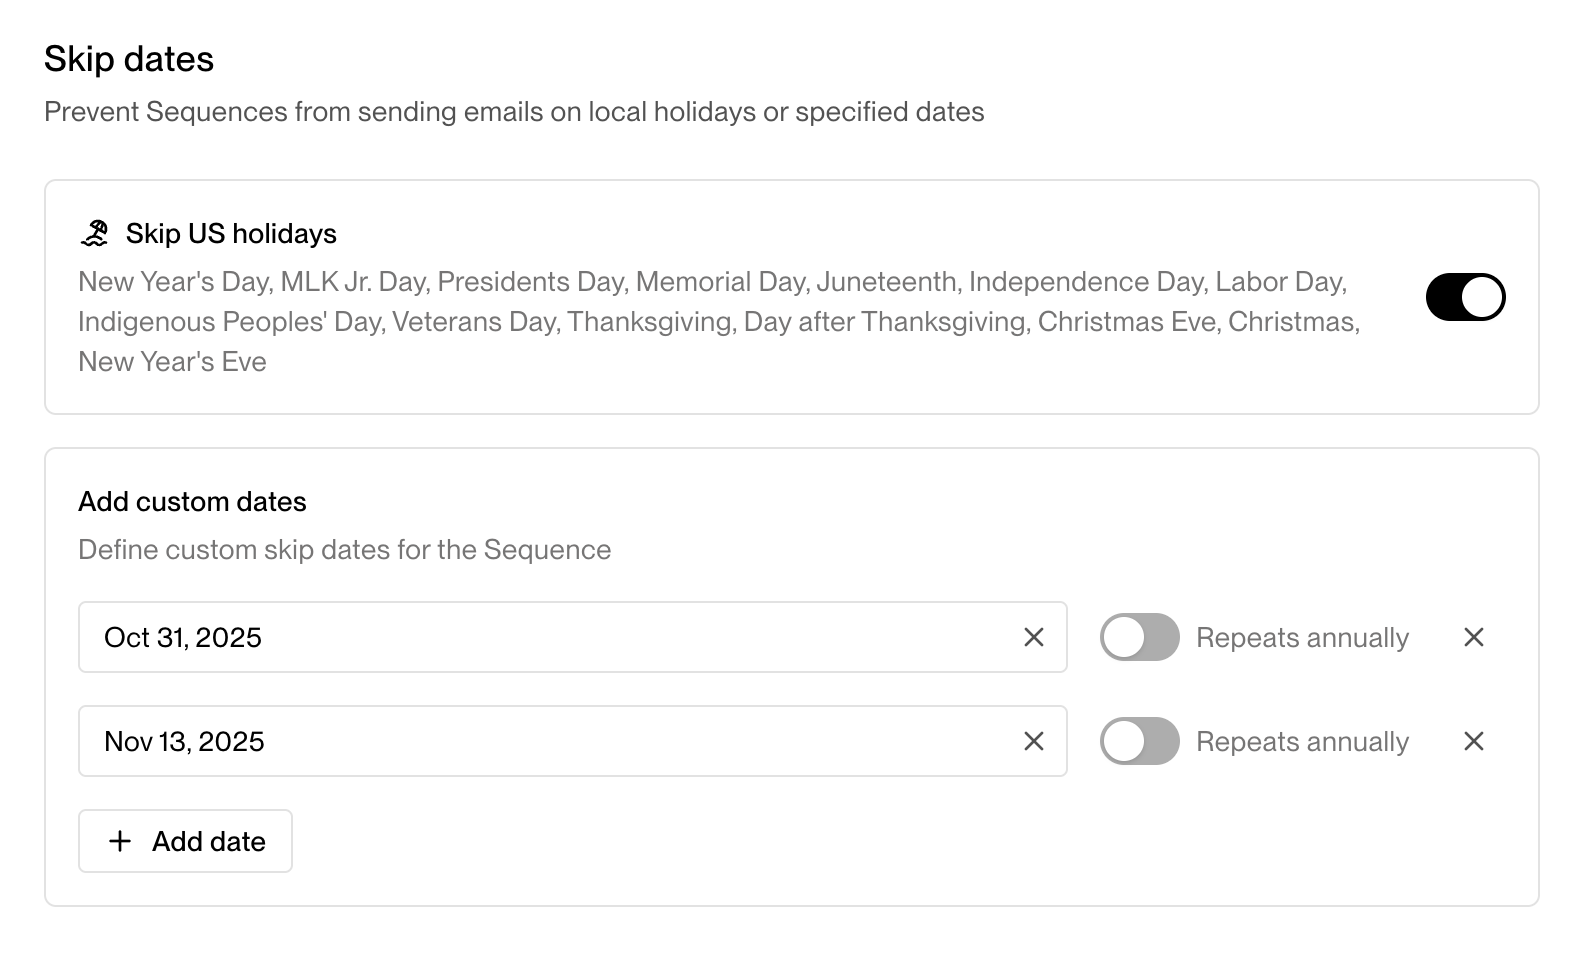 > 💡 **Tip:** Use Skip Dates to prevent outreach from occurring during out-of-office periods or industry-wide holidays that may impact engagement.
***
### Saving the Custom Send Schedule
Once you’ve configured the General settings, Windows, and Skip Dates, click **Create** to save your Custom Send Schedule.
It will now appear in the **Custom Send Schedules** list view, where you can edit, duplicate, or delete it at any time.
Your new Custom Send Schedule is now ready to use!
---
# Source: https://docs.unifygtm.com/reference/management/credit-system.md
> ## Documentation Index
> Fetch the complete documentation index at: https://docs.unifygtm.com/llms.txt
> Use this file to discover all available pages before exploring further.
# Unify Credit System
> Learn how credits work in Unify.
## Overview
Unify operates on a flexible, usage-based credit system that scales with your
needs. Credits are consumed by various activities such as prospecting,
enrichment, AI Agent runs, and certain intent signals.
## How credits work
Here are the key points to know about the credit system:
* **Credit Value**: Each Unify Credit represents a unit of platform usage.
* **Consumption**: Credits are deducted in real-time as features are used.
* **Replenishment**: Credits reset monthly or annually based on your plan. Add
credits at anytime on the [Usage](https://app.unifygtm.com/dashboard/settings/organization/usage)
page or upgrade your plan on the [Plans & Billing](https://app.unifygtm.com/dashboard/settings/billing)
page.
You can monitor your credit consumption on the [Usage](https://app.unifygtm.com/dashboard/settings/organization/usage)
page.
## Credit consumption
Different features consume credits at different rates. Here's a breakdown of the
credit consumption of each feature:
| Feature | Unify Credits | Unit | Description |
| ------------------------------ | ------------- | --------------------------------- | ---------------------------------------------------------------------------------------------------------------------------- |
| Website Reveals | 0.1 | Per website visitor revealed | Website reveals are triggered by adding our website tag and turning on Unify Intent. |
| Person Enriched (B2B Email) | 2 | Per person enriched | People that are uploaded via CSV without emails or prospected via the prospecting step are enriched when run through a Play. |
| Person Enriched (Phone Number) | 4 | Per person enriched | Phone number enrichment can be turned on in the prospecting node in Unify. |
| New Hire Tracking | 5 | Per new hire found | A new hire is returned when someone within the customer defined specifications that has moved jobs in the last 90 days. |
| Champion Tracking | 1 | Per champion track attempt | Champions are set up by users and are tracked on a monthly basis. |
| AI Agent | 0.1 | Per question answered per company | Agents can be configured to answer various per each company or person they are run on. |
## Best practices
* **Use Prospecting Limits**: Set limits on the number of people you want to prospect for at each company, especially when targeting only a couple personas.
* **Create Specific Personas**: Be as specific as possible when listing titles to include or exclude in your buyer persona to make sure you aren't prospecting for unqualified contacts.
* **Set Global Exclusions**: Exclusions are a helpful way to make sure that you are not prospecting, enriching, or tracking people who don't fit your ICP.
## Need Help?
* Contact [billing@unifygtm.com](mailto:billing@unifygtm.com) for credit-related questions
* Visit our [Reference Center](/reference/overview) for detailed guides on each feature
---
# Source: https://docs.unifygtm.com/reference/integrations/salesforce/default-values.md
# Source: https://docs.unifygtm.com/reference/integrations/hubspot/default-values.md
> ## Documentation Index
> Fetch the complete documentation index at: https://docs.unifygtm.com/llms.txt
> Use this file to discover all available pages before exploring further.
# Configure Default Values
> Learn how to set default values writing to HubSpot.
# Overview
When Unify creates or updates records in HubSpot, it will populate each HubSpot
property using the value in the corresponding Unify field. However, you can also
specify *default values* to be used as a fallback. This can useful in a few
different scenarios:
1. You may have custom fields in HubSpot that require a value
2. You may want to write a custom value to a field that is not available in the
field mappings
3. You may want to dynamically set a value in different Plays or Play actions
You can set global default values from [Settings -> Integrations -> HubSpot](https://app.unifygtm.com/dashboard/settings/integrations/hubspot).
These will be used for all writes to HubSpot unless overridden in a Play or by a
field mapping.
> 💡 **Tip:** Use Skip Dates to prevent outreach from occurring during out-of-office periods or industry-wide holidays that may impact engagement.
***
### Saving the Custom Send Schedule
Once you’ve configured the General settings, Windows, and Skip Dates, click **Create** to save your Custom Send Schedule.
It will now appear in the **Custom Send Schedules** list view, where you can edit, duplicate, or delete it at any time.
Your new Custom Send Schedule is now ready to use!
---
# Source: https://docs.unifygtm.com/reference/management/credit-system.md
> ## Documentation Index
> Fetch the complete documentation index at: https://docs.unifygtm.com/llms.txt
> Use this file to discover all available pages before exploring further.
# Unify Credit System
> Learn how credits work in Unify.
## Overview
Unify operates on a flexible, usage-based credit system that scales with your
needs. Credits are consumed by various activities such as prospecting,
enrichment, AI Agent runs, and certain intent signals.
## How credits work
Here are the key points to know about the credit system:
* **Credit Value**: Each Unify Credit represents a unit of platform usage.
* **Consumption**: Credits are deducted in real-time as features are used.
* **Replenishment**: Credits reset monthly or annually based on your plan. Add
credits at anytime on the [Usage](https://app.unifygtm.com/dashboard/settings/organization/usage)
page or upgrade your plan on the [Plans & Billing](https://app.unifygtm.com/dashboard/settings/billing)
page.
You can monitor your credit consumption on the [Usage](https://app.unifygtm.com/dashboard/settings/organization/usage)
page.
## Credit consumption
Different features consume credits at different rates. Here's a breakdown of the
credit consumption of each feature:
| Feature | Unify Credits | Unit | Description |
| ------------------------------ | ------------- | --------------------------------- | ---------------------------------------------------------------------------------------------------------------------------- |
| Website Reveals | 0.1 | Per website visitor revealed | Website reveals are triggered by adding our website tag and turning on Unify Intent. |
| Person Enriched (B2B Email) | 2 | Per person enriched | People that are uploaded via CSV without emails or prospected via the prospecting step are enriched when run through a Play. |
| Person Enriched (Phone Number) | 4 | Per person enriched | Phone number enrichment can be turned on in the prospecting node in Unify. |
| New Hire Tracking | 5 | Per new hire found | A new hire is returned when someone within the customer defined specifications that has moved jobs in the last 90 days. |
| Champion Tracking | 1 | Per champion track attempt | Champions are set up by users and are tracked on a monthly basis. |
| AI Agent | 0.1 | Per question answered per company | Agents can be configured to answer various per each company or person they are run on. |
## Best practices
* **Use Prospecting Limits**: Set limits on the number of people you want to prospect for at each company, especially when targeting only a couple personas.
* **Create Specific Personas**: Be as specific as possible when listing titles to include or exclude in your buyer persona to make sure you aren't prospecting for unqualified contacts.
* **Set Global Exclusions**: Exclusions are a helpful way to make sure that you are not prospecting, enriching, or tracking people who don't fit your ICP.
## Need Help?
* Contact [billing@unifygtm.com](mailto:billing@unifygtm.com) for credit-related questions
* Visit our [Reference Center](/reference/overview) for detailed guides on each feature
---
# Source: https://docs.unifygtm.com/reference/integrations/salesforce/default-values.md
# Source: https://docs.unifygtm.com/reference/integrations/hubspot/default-values.md
> ## Documentation Index
> Fetch the complete documentation index at: https://docs.unifygtm.com/llms.txt
> Use this file to discover all available pages before exploring further.
# Configure Default Values
> Learn how to set default values writing to HubSpot.
# Overview
When Unify creates or updates records in HubSpot, it will populate each HubSpot
property using the value in the corresponding Unify field. However, you can also
specify *default values* to be used as a fallback. This can useful in a few
different scenarios:
1. You may have custom fields in HubSpot that require a value
2. You may want to write a custom value to a field that is not available in the
field mappings
3. You may want to dynamically set a value in different Plays or Play actions
You can set global default values from [Settings -> Integrations -> HubSpot](https://app.unifygtm.com/dashboard/settings/integrations/hubspot).
These will be used for all writes to HubSpot unless overridden in a Play or by a
field mapping.
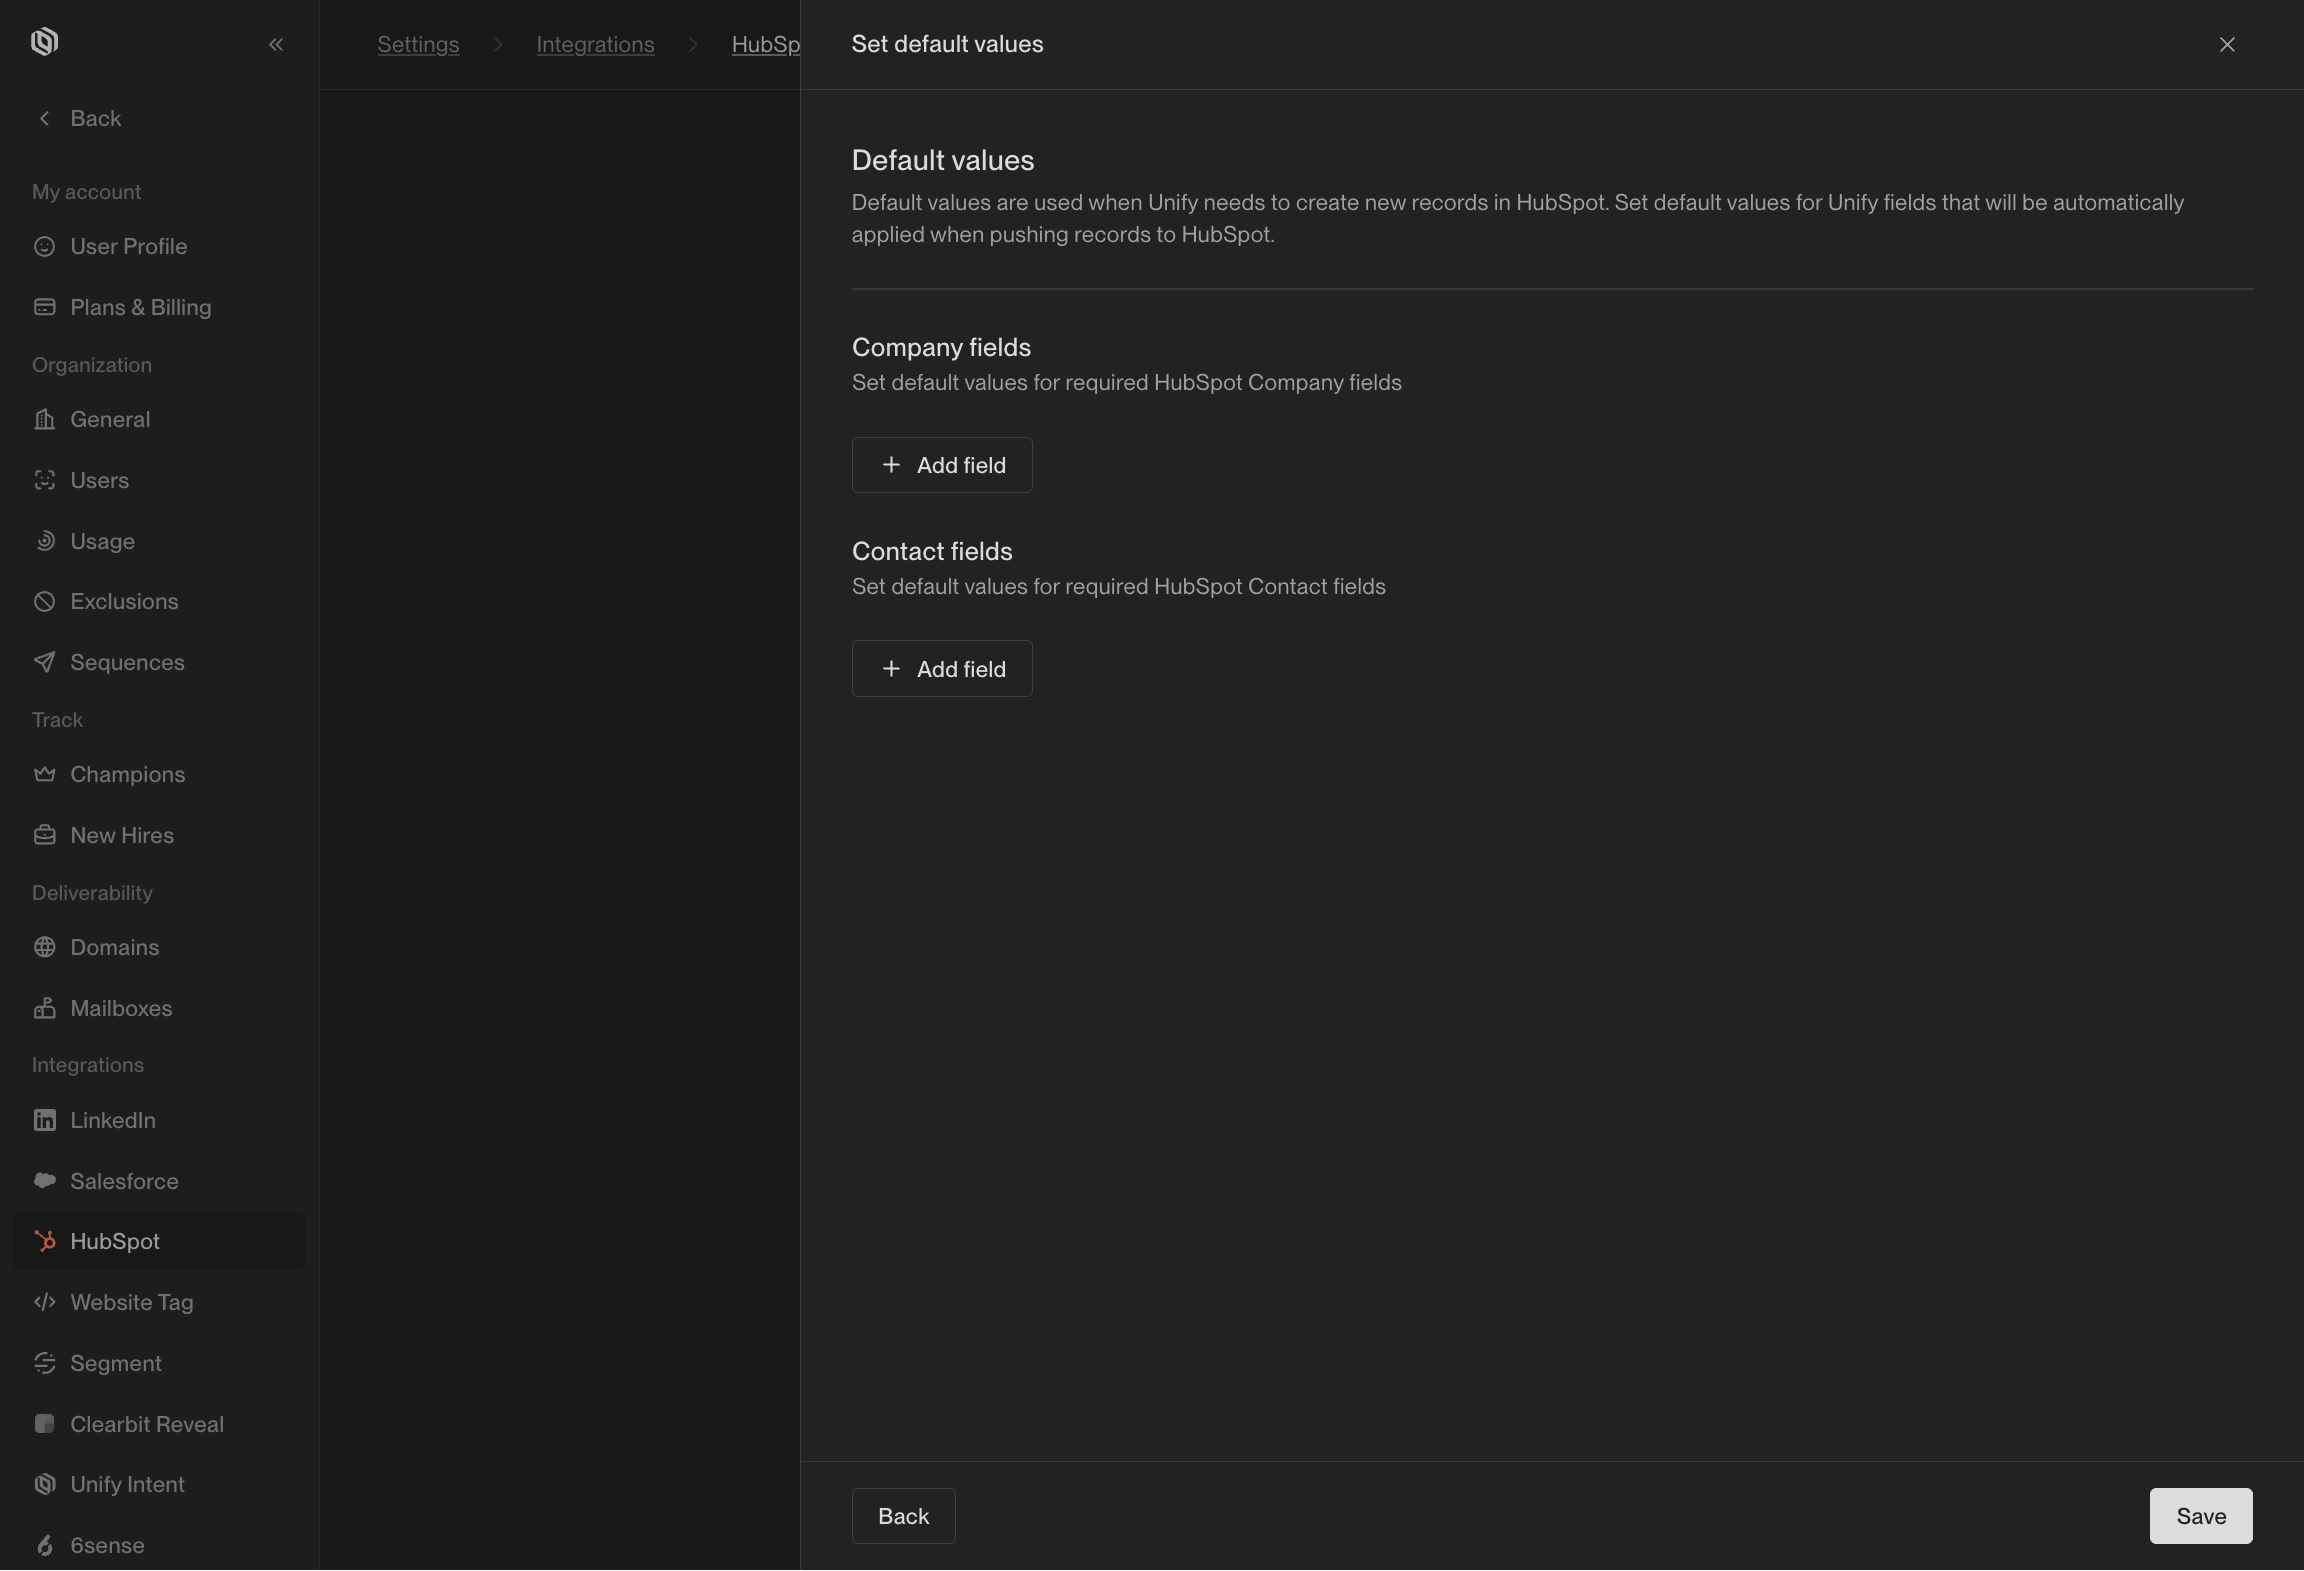 To learn how to set default values at the Play level instead, see the [Sync to HubSpot](/reference/plays/actions#sync-to-hubspot)
action reference.
---
# Source: https://docs.unifygtm.com/best-practices/deliverability.md
> ## Documentation Index
> Fetch the complete documentation index at: https://docs.unifygtm.com/llms.txt
> Use this file to discover all available pages before exploring further.
# Best Practices: Optimizing Your Email Outreach
## Sequence Copy
1. **Keep an individual sequence to 4 email touches max -** Within a four-touch sequence, we recommend alternating the structure between 2 new threads and 2 follow-up replies. The copy of these follow-up replies can be short and limited to 1-2 sentences. Example: "Any thoughts on my previous note?"
2. **Alternate case studies and value props between new threads -** You should vary the copy and angle you're approaching to pitch your product in email steps 1 and 3. For example, you can highlight different customer case studies or statistics across both emails.
3. **Shorten subject line and use personalization -** Keep subject titles concise and add custom variables to increase variability. This approach will also help improve deliverability. Example: "Unify x (Your Company Name)"
4. **Include statistics and case studies for social proof -** Incorporating very numbers-driven, concise impact statements can catch your prospect's attention. We recommend adding concise blurbs from customer case studies into your sequence copy.
5. **Add personalization with snippets -** You can use Unify's smart snippets to personalize copy based on relevant value prop, job title, work description, industry, and more. This will make your sequence copy more compelling with targeted pain points, use cases, or case studies. More variance in email copy will also help with deliverability.
6. **Keep it concise, focus on a single product or pain point -** Don't try to fit too many points into your email - you want to be decisive and mention the most relevant product or pain point to that individual to capture their attention! Keep the language simple and avoid business jargon. We generally recommend keeping each email between 50-200 words.
7. **End with a compelling call to action (CTA) -** Conclude each email with a clear, specific, and actionable request. This could include scheduling a call, booking a demo, or asking the prospect to reply with a specific piece of information relevant to their needs.
## Deliverability
1. **Limit the links -** Try not to overload your emails with multiple or duplicate links. Too many links can set off spam alarms - we generally recommend limiting the email touch to include 1-2 links maximum.
2. **Check link safety -** Ensure the links you include are secure and no warnings are displayed by the browser when visiting them.
3. **Mix up subject lines -** Don't stick with the same old subject lines, use template variables to keep them dynamic and interesting.
4. **No all caps -** Using all caps anywhere in your email can make it look spammy, so stick to normal capitalization.
5. **Easy on the exclamation -** Too many exclamation points can trigger spam filters, especially in the subject line. Use them sparingly!
6. **Send from multiple email addresses -** Sending emails from multiple mailboxes improves deliverability by distributing volume across different IP addresses and domains. This approach reduces the risk of being flagged as spam and increases overall sending capacity.
7. **Proofread for Typos**: Typos can make your email look unprofessional, especially when you're emailing multiple contacts at a company. Make sure to proofread and catch any errors.
---
# Source: https://docs.unifygtm.com/reference/integrations/demandbase.md
> ## Documentation Index
> Fetch the complete documentation index at: https://docs.unifygtm.com/llms.txt
> Use this file to discover all available pages before exploring further.
# Demandbase Integration Guide
> Identify website visitors with Demandbase and other providers.
# Overview
Unify provides out-of-the-box website visitor identification Demandbase and
other providers. To get started, simply enable [Unify Intent](https://app.unifygtm.com/dashboard/settings/integrations/unify-intent)
in your settings.
Once connected, Unify will automatically begin identifying website visitors
using Demandbase and other data sources for maximum coverage. Be sure to set up
the Unify Intent client on your website to start receiving visitors to identify.
---
# Source: https://docs.unifygtm.com/reference/deliverability/domain-configuration.md
# Domain Configuration
> Set up domain names for Unify-managed mailboxes.
## Overview
In order to send emails through Unify Managed Email Deliverability, you need to add one or more sending domain to
the platform. We recommend adding multiple sending domains in order to distribute volume and create redundancy.
## What domains can I use?
* **YES** — Secondary domains: The reputation of these secondary domains are isolated from your primary domain. You want to follow best practices when naming these secondary domains to ensure they don't get flagged as spam.
* **NO** — Domains installed on other ESPs: The product cannot be used with domains that are used on e.g. Google Workspace because MX records can only be installed for one ESP at a time. You would need to remove certain existing DNS records to ensure we can register the domain succesfully on Unify.
* **NO** — Primary domains: We do not recommend using your primary domain for high-volume sending. The reason for this is to ensure your primary domain reputation is always kept pristine.
## How should I name my domain?
We generally recommend aiming for a .com or .io name and avoiding hyphens if possible. Common naming conventions include mybusiness.io, trymybusiness.com, getmybusiness.com.
We do not recommend using misspelt variations of your domain like mybuziness.com, even if these domain names are only a few letters off from your primary domain or company name. Your email provder will potentially show spam warnings on these emails because they look like phishing attempts.
## Best practices
* `SPF`, `DKIM`, `DMARC` - Unify enforces and monitors email authentication to ensure that your emails pass the tests conducted by the ESPs.
* `Branded links` - Unify will automatically generate branded links with your domain. E.g. links.mybusiness.io. These are used for unsubscribe links and open tracking.
* `Primary Domain Forwarding` - Secondary domains and subdomains should forward the user to the primary domain. This improves deliverability as users can investigate the secondary domain and as it creates a link between your primary domain and secondary domain.
* `WHOIS` - WHOIS information should be provided on the domain.
Privacy Policy - The primary domain should have an easily accessible privacy policy.
* `Domain monitoring` - Unify will continuously monitor your domain health. For example by monitoring domain blocklists. If there is a problem you will be notified and sending can be paused.
## Purchasing a domain
The first step is to purchase a domain. This can be done through domain providers like CloudFlare, Google Domains, Squarespace, GoDaddy or Namecheap.
## Registering the domain in Unify
Navigate to the [domain settings page](https://app.unifygtm.com/dashboard/settings/deliverability/domains) and press "Add domain". Type in your domain name in the text box and press register. This process can take a few seconds, please wait for the registration to finish.
## DNS record overview
The screen will refresh showing you 7 DNS records to add. Below is an explanation of why we require each record:
To learn how to set default values at the Play level instead, see the [Sync to HubSpot](/reference/plays/actions#sync-to-hubspot)
action reference.
---
# Source: https://docs.unifygtm.com/best-practices/deliverability.md
> ## Documentation Index
> Fetch the complete documentation index at: https://docs.unifygtm.com/llms.txt
> Use this file to discover all available pages before exploring further.
# Best Practices: Optimizing Your Email Outreach
## Sequence Copy
1. **Keep an individual sequence to 4 email touches max -** Within a four-touch sequence, we recommend alternating the structure between 2 new threads and 2 follow-up replies. The copy of these follow-up replies can be short and limited to 1-2 sentences. Example: "Any thoughts on my previous note?"
2. **Alternate case studies and value props between new threads -** You should vary the copy and angle you're approaching to pitch your product in email steps 1 and 3. For example, you can highlight different customer case studies or statistics across both emails.
3. **Shorten subject line and use personalization -** Keep subject titles concise and add custom variables to increase variability. This approach will also help improve deliverability. Example: "Unify x (Your Company Name)"
4. **Include statistics and case studies for social proof -** Incorporating very numbers-driven, concise impact statements can catch your prospect's attention. We recommend adding concise blurbs from customer case studies into your sequence copy.
5. **Add personalization with snippets -** You can use Unify's smart snippets to personalize copy based on relevant value prop, job title, work description, industry, and more. This will make your sequence copy more compelling with targeted pain points, use cases, or case studies. More variance in email copy will also help with deliverability.
6. **Keep it concise, focus on a single product or pain point -** Don't try to fit too many points into your email - you want to be decisive and mention the most relevant product or pain point to that individual to capture their attention! Keep the language simple and avoid business jargon. We generally recommend keeping each email between 50-200 words.
7. **End with a compelling call to action (CTA) -** Conclude each email with a clear, specific, and actionable request. This could include scheduling a call, booking a demo, or asking the prospect to reply with a specific piece of information relevant to their needs.
## Deliverability
1. **Limit the links -** Try not to overload your emails with multiple or duplicate links. Too many links can set off spam alarms - we generally recommend limiting the email touch to include 1-2 links maximum.
2. **Check link safety -** Ensure the links you include are secure and no warnings are displayed by the browser when visiting them.
3. **Mix up subject lines -** Don't stick with the same old subject lines, use template variables to keep them dynamic and interesting.
4. **No all caps -** Using all caps anywhere in your email can make it look spammy, so stick to normal capitalization.
5. **Easy on the exclamation -** Too many exclamation points can trigger spam filters, especially in the subject line. Use them sparingly!
6. **Send from multiple email addresses -** Sending emails from multiple mailboxes improves deliverability by distributing volume across different IP addresses and domains. This approach reduces the risk of being flagged as spam and increases overall sending capacity.
7. **Proofread for Typos**: Typos can make your email look unprofessional, especially when you're emailing multiple contacts at a company. Make sure to proofread and catch any errors.
---
# Source: https://docs.unifygtm.com/reference/integrations/demandbase.md
> ## Documentation Index
> Fetch the complete documentation index at: https://docs.unifygtm.com/llms.txt
> Use this file to discover all available pages before exploring further.
# Demandbase Integration Guide
> Identify website visitors with Demandbase and other providers.
# Overview
Unify provides out-of-the-box website visitor identification Demandbase and
other providers. To get started, simply enable [Unify Intent](https://app.unifygtm.com/dashboard/settings/integrations/unify-intent)
in your settings.
Once connected, Unify will automatically begin identifying website visitors
using Demandbase and other data sources for maximum coverage. Be sure to set up
the Unify Intent client on your website to start receiving visitors to identify.
---
# Source: https://docs.unifygtm.com/reference/deliverability/domain-configuration.md
# Domain Configuration
> Set up domain names for Unify-managed mailboxes.
## Overview
In order to send emails through Unify Managed Email Deliverability, you need to add one or more sending domain to
the platform. We recommend adding multiple sending domains in order to distribute volume and create redundancy.
## What domains can I use?
* **YES** — Secondary domains: The reputation of these secondary domains are isolated from your primary domain. You want to follow best practices when naming these secondary domains to ensure they don't get flagged as spam.
* **NO** — Domains installed on other ESPs: The product cannot be used with domains that are used on e.g. Google Workspace because MX records can only be installed for one ESP at a time. You would need to remove certain existing DNS records to ensure we can register the domain succesfully on Unify.
* **NO** — Primary domains: We do not recommend using your primary domain for high-volume sending. The reason for this is to ensure your primary domain reputation is always kept pristine.
## How should I name my domain?
We generally recommend aiming for a .com or .io name and avoiding hyphens if possible. Common naming conventions include mybusiness.io, trymybusiness.com, getmybusiness.com.
We do not recommend using misspelt variations of your domain like mybuziness.com, even if these domain names are only a few letters off from your primary domain or company name. Your email provder will potentially show spam warnings on these emails because they look like phishing attempts.
## Best practices
* `SPF`, `DKIM`, `DMARC` - Unify enforces and monitors email authentication to ensure that your emails pass the tests conducted by the ESPs.
* `Branded links` - Unify will automatically generate branded links with your domain. E.g. links.mybusiness.io. These are used for unsubscribe links and open tracking.
* `Primary Domain Forwarding` - Secondary domains and subdomains should forward the user to the primary domain. This improves deliverability as users can investigate the secondary domain and as it creates a link between your primary domain and secondary domain.
* `WHOIS` - WHOIS information should be provided on the domain.
Privacy Policy - The primary domain should have an easily accessible privacy policy.
* `Domain monitoring` - Unify will continuously monitor your domain health. For example by monitoring domain blocklists. If there is a problem you will be notified and sending can be paused.
## Purchasing a domain
The first step is to purchase a domain. This can be done through domain providers like CloudFlare, Google Domains, Squarespace, GoDaddy or Namecheap.
## Registering the domain in Unify
Navigate to the [domain settings page](https://app.unifygtm.com/dashboard/settings/deliverability/domains) and press "Add domain". Type in your domain name in the text box and press register. This process can take a few seconds, please wait for the registration to finish.
## DNS record overview
The screen will refresh showing you 7 DNS records to add. Below is an explanation of why we require each record:
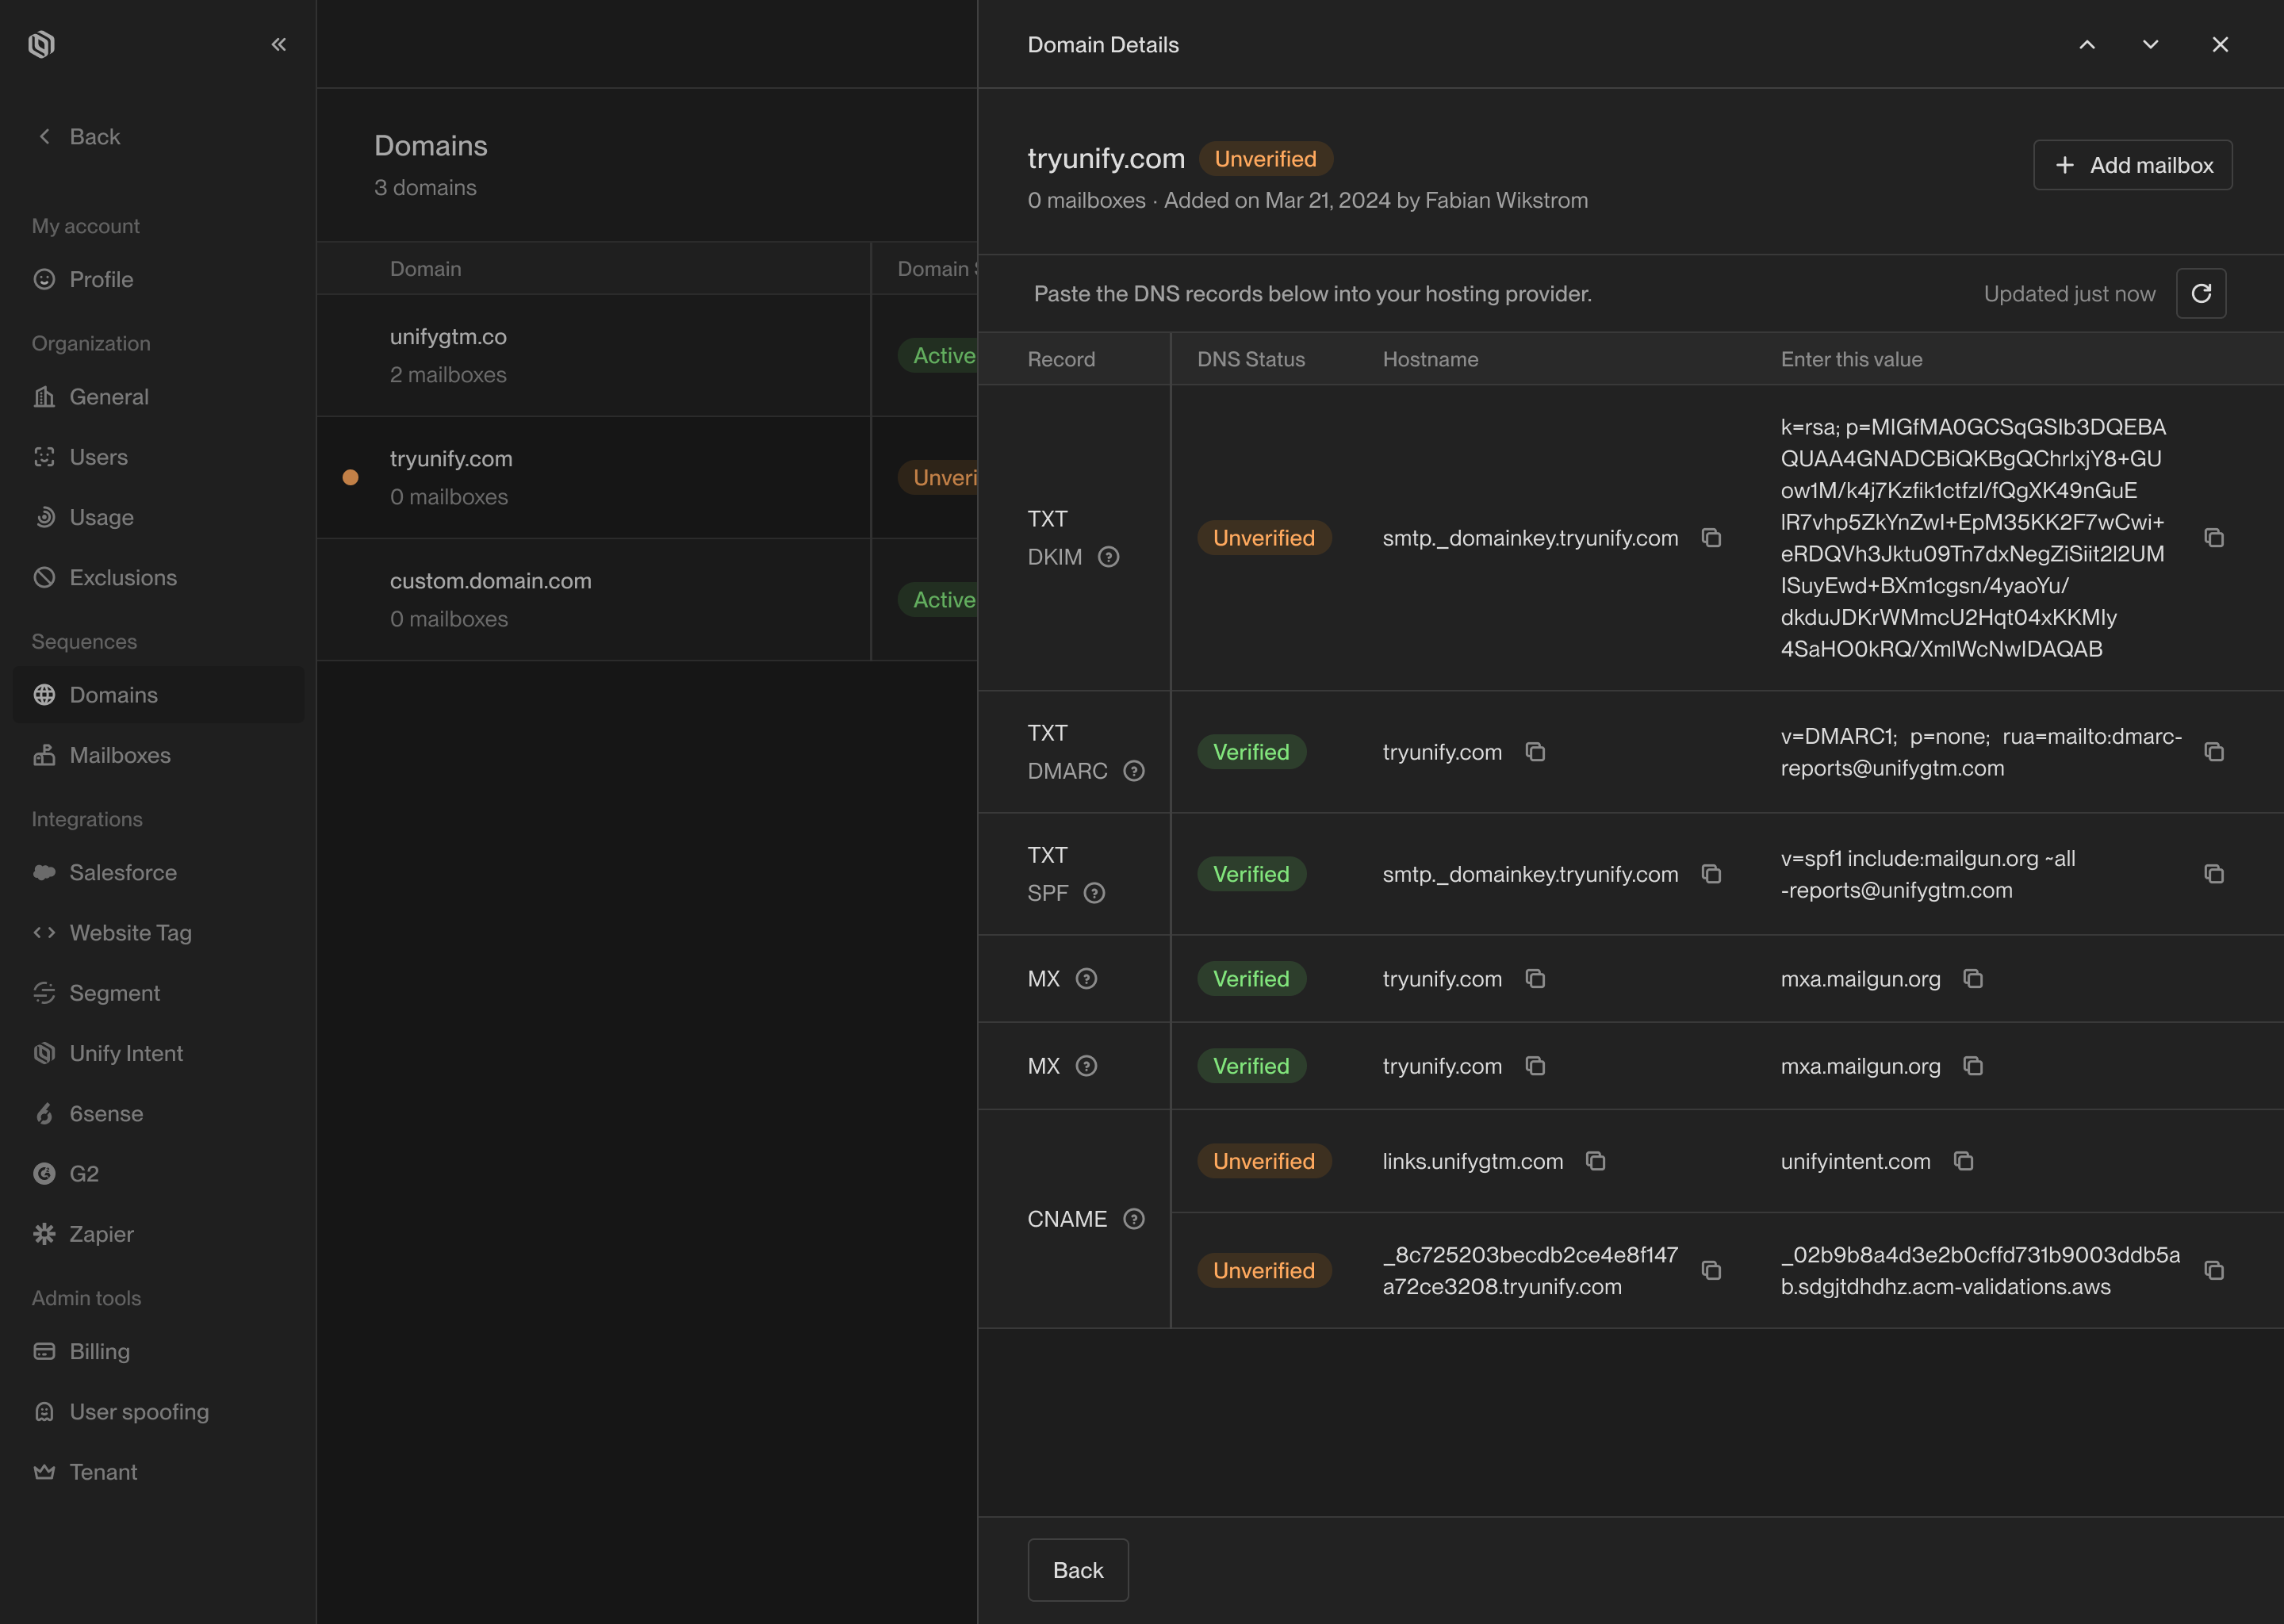 * `SPF` - The SPF record authorizes Unify to send emails on your behalf. The SPF record must be exclusive to Unify as no other email providers can be used in conjunction.,
* `DKIM` - The DKIM record allows Unify to digitally sign your emails, enabling recipients to verify their authenticity and integrity.,
* `DMARC` - The DMARC record instructs recipient mail servers on how to handle emails from your domain that fail SPF or DKIM checks, enhancing your email security.,
* `MX` - Use priority 10. The MX record allows Unify to receive email messages on your behalf. The MX records must be exclusive to Unify as no other email providers can be used in conjunction. There are two MX records to create redundancy.
* `CNAME` - There are two CNAME records. The first CNAME record is an alias to Unify servers which allows branded links to be used for unsubscribes and open tracking. The second CNAME record is a validation record which authorizes Unify to accept HTTPS requests for the branded links.
## Adding the DNS records
1. Go to your domain provider (e.g. Squarespace or GoDaddy).
2. Navigate to the DNS settings.
3. Copy paste the DNS records. In order for the DNS records to propagate quickly you can use a TTL of 600 seconds.
4. Certain providers will ask you not to include the domain in the host name field. For example, `mybusiness.io` becomes `@` or sometimes just an empty string and `links.mybusiness.io` becomes just `links`.
5. It can take multiple minutes if not hours for the DNS records to propagate. You can use the refresh button in Unify to refresh the status.
6. Once the records are verified they will light up green with the text "Verified".
## Domain activation
Once the domain is verified we will automatically activate the domain which will enable you to register mailboxes under it. This process can take up to an hour.
* `SPF` - The SPF record authorizes Unify to send emails on your behalf. The SPF record must be exclusive to Unify as no other email providers can be used in conjunction.,
* `DKIM` - The DKIM record allows Unify to digitally sign your emails, enabling recipients to verify their authenticity and integrity.,
* `DMARC` - The DMARC record instructs recipient mail servers on how to handle emails from your domain that fail SPF or DKIM checks, enhancing your email security.,
* `MX` - Use priority 10. The MX record allows Unify to receive email messages on your behalf. The MX records must be exclusive to Unify as no other email providers can be used in conjunction. There are two MX records to create redundancy.
* `CNAME` - There are two CNAME records. The first CNAME record is an alias to Unify servers which allows branded links to be used for unsubscribes and open tracking. The second CNAME record is a validation record which authorizes Unify to accept HTTPS requests for the branded links.
## Adding the DNS records
1. Go to your domain provider (e.g. Squarespace or GoDaddy).
2. Navigate to the DNS settings.
3. Copy paste the DNS records. In order for the DNS records to propagate quickly you can use a TTL of 600 seconds.
4. Certain providers will ask you not to include the domain in the host name field. For example, `mybusiness.io` becomes `@` or sometimes just an empty string and `links.mybusiness.io` becomes just `links`.
5. It can take multiple minutes if not hours for the DNS records to propagate. You can use the refresh button in Unify to refresh the status.
6. Once the records are verified they will light up green with the text "Verified".
## Domain activation
Once the domain is verified we will automatically activate the domain which will enable you to register mailboxes under it. This process can take up to an hour.
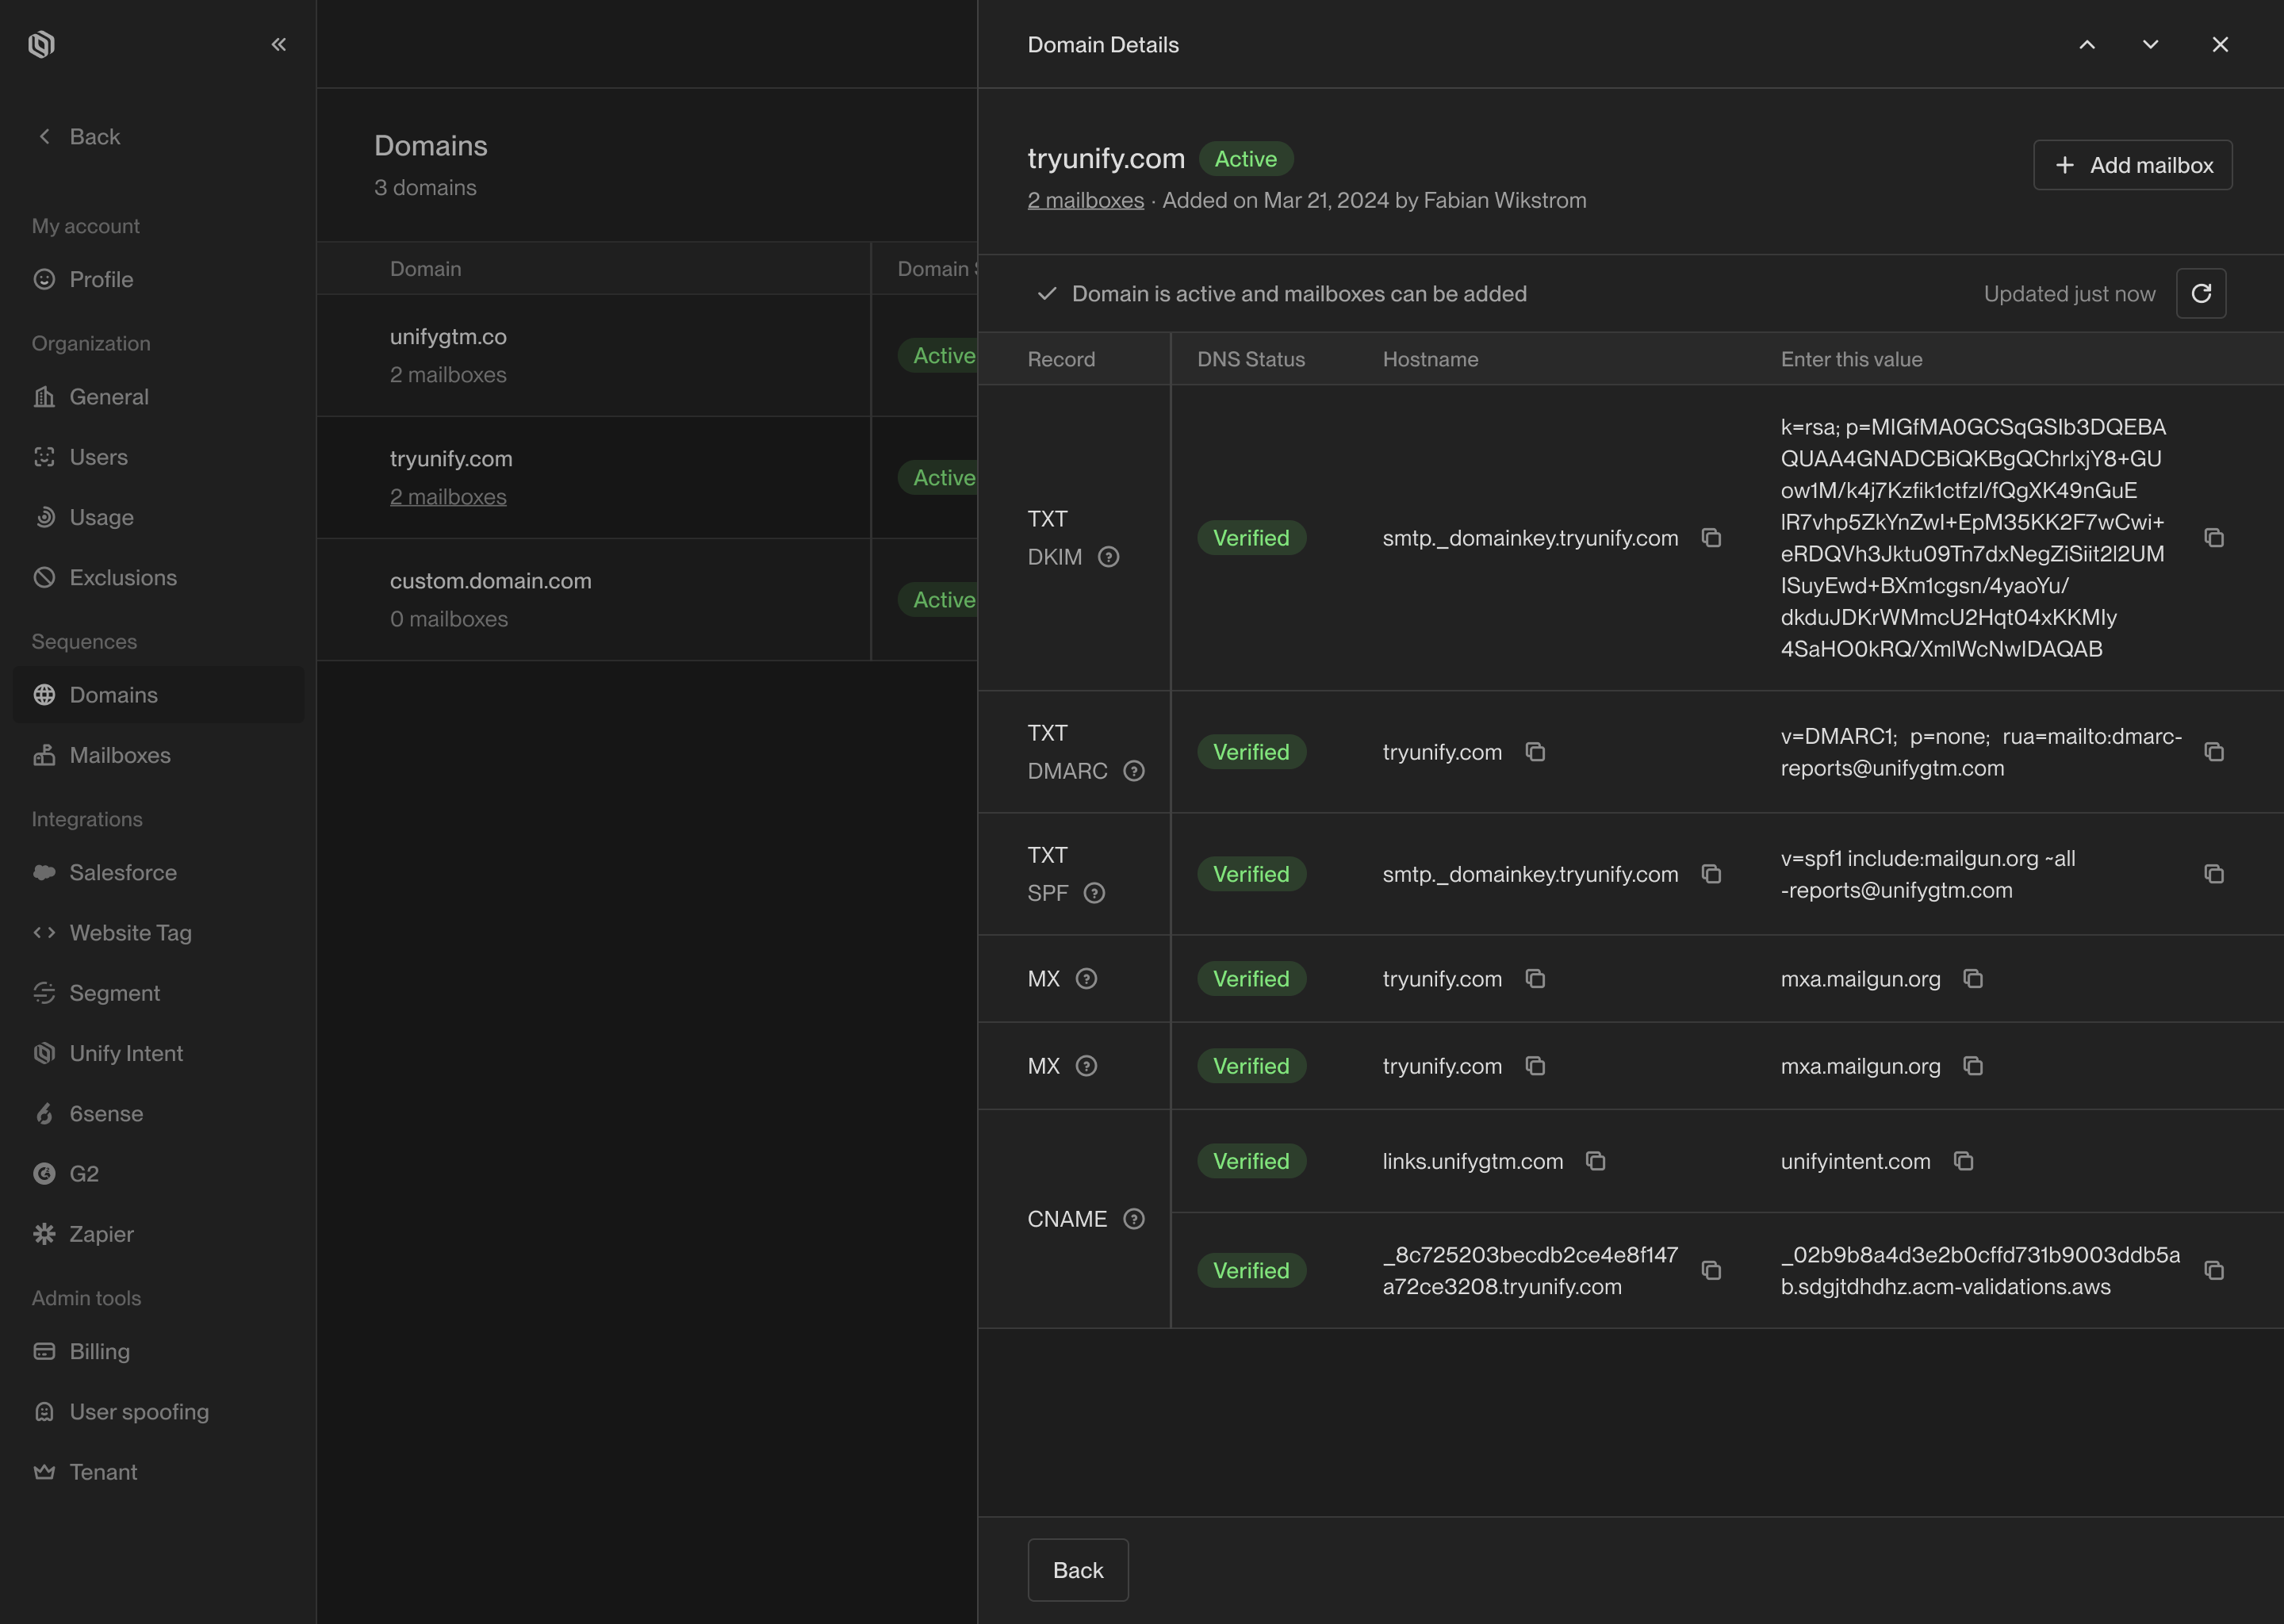 #
---
# Source: https://docs.unifygtm.com/reference/integrations/salesforce/field-mappings.md
# Source: https://docs.unifygtm.com/reference/integrations/hubspot/field-mappings.md
> ## Documentation Index
> Fetch the complete documentation index at: https://docs.unifygtm.com/llms.txt
> Use this file to discover all available pages before exploring further.
# Field Mappings
> Understand how to configure and use HubSpot field mappings in Unify.
# Overview
Unify can sync data between HubSpot objects and Unify objects. However, the
exact fields in HubSpot differ from Unify, so Unify needs to understand how to
sync data between the two systems. This is done using *field mappings*.
# Setup
### Change field mappings
When you first connect your HubSpot instance, Unify will automatically prepare
the field mappings for you. If you use any custom properties in place of
default HubSpot properties, you may want to update the mappings before Unify
starts syncing data.
In the [HubSpot integration settings](https://app.unifygtm.com/dashboard/settings/integrations/hubspot),
look for the **Company** and **Person** field mappings at
the bottom of the page. Select one to view and edit the field configuration.
#
---
# Source: https://docs.unifygtm.com/reference/integrations/salesforce/field-mappings.md
# Source: https://docs.unifygtm.com/reference/integrations/hubspot/field-mappings.md
> ## Documentation Index
> Fetch the complete documentation index at: https://docs.unifygtm.com/llms.txt
> Use this file to discover all available pages before exploring further.
# Field Mappings
> Understand how to configure and use HubSpot field mappings in Unify.
# Overview
Unify can sync data between HubSpot objects and Unify objects. However, the
exact fields in HubSpot differ from Unify, so Unify needs to understand how to
sync data between the two systems. This is done using *field mappings*.
# Setup
### Change field mappings
When you first connect your HubSpot instance, Unify will automatically prepare
the field mappings for you. If you use any custom properties in place of
default HubSpot properties, you may want to update the mappings before Unify
starts syncing data.
In the [HubSpot integration settings](https://app.unifygtm.com/dashboard/settings/integrations/hubspot),
look for the **Company** and **Person** field mappings at
the bottom of the page. Select one to view and edit the field configuration.
 You can return to update these mappings any time in the future, so you don't
need to worry about getting them perfect right off the bat!
### (Optional) Create custom properties
You can write values to default properties and custom properties. In order to
write to custom properties, they must already exist in HubSpot.
While some of the fields Unify can write exist as standard properties in
HubSpot, many of them do not. In particular, Unify-specific fields (like the
name of the Sequence a person was enrolled in) do not exist in HubSpot by
default. In order to write these values to HubSpot, you will need to create
custom properties before mapping them.
You can return to update these mappings any time in the future, so you don't
need to worry about getting them perfect right off the bat!
### (Optional) Create custom properties
You can write values to default properties and custom properties. In order to
write to custom properties, they must already exist in HubSpot.
While some of the fields Unify can write exist as standard properties in
HubSpot, many of them do not. In particular, Unify-specific fields (like the
name of the Sequence a person was enrolled in) do not exist in HubSpot by
default. In order to write these values to HubSpot, you will need to create
custom properties before mapping them.
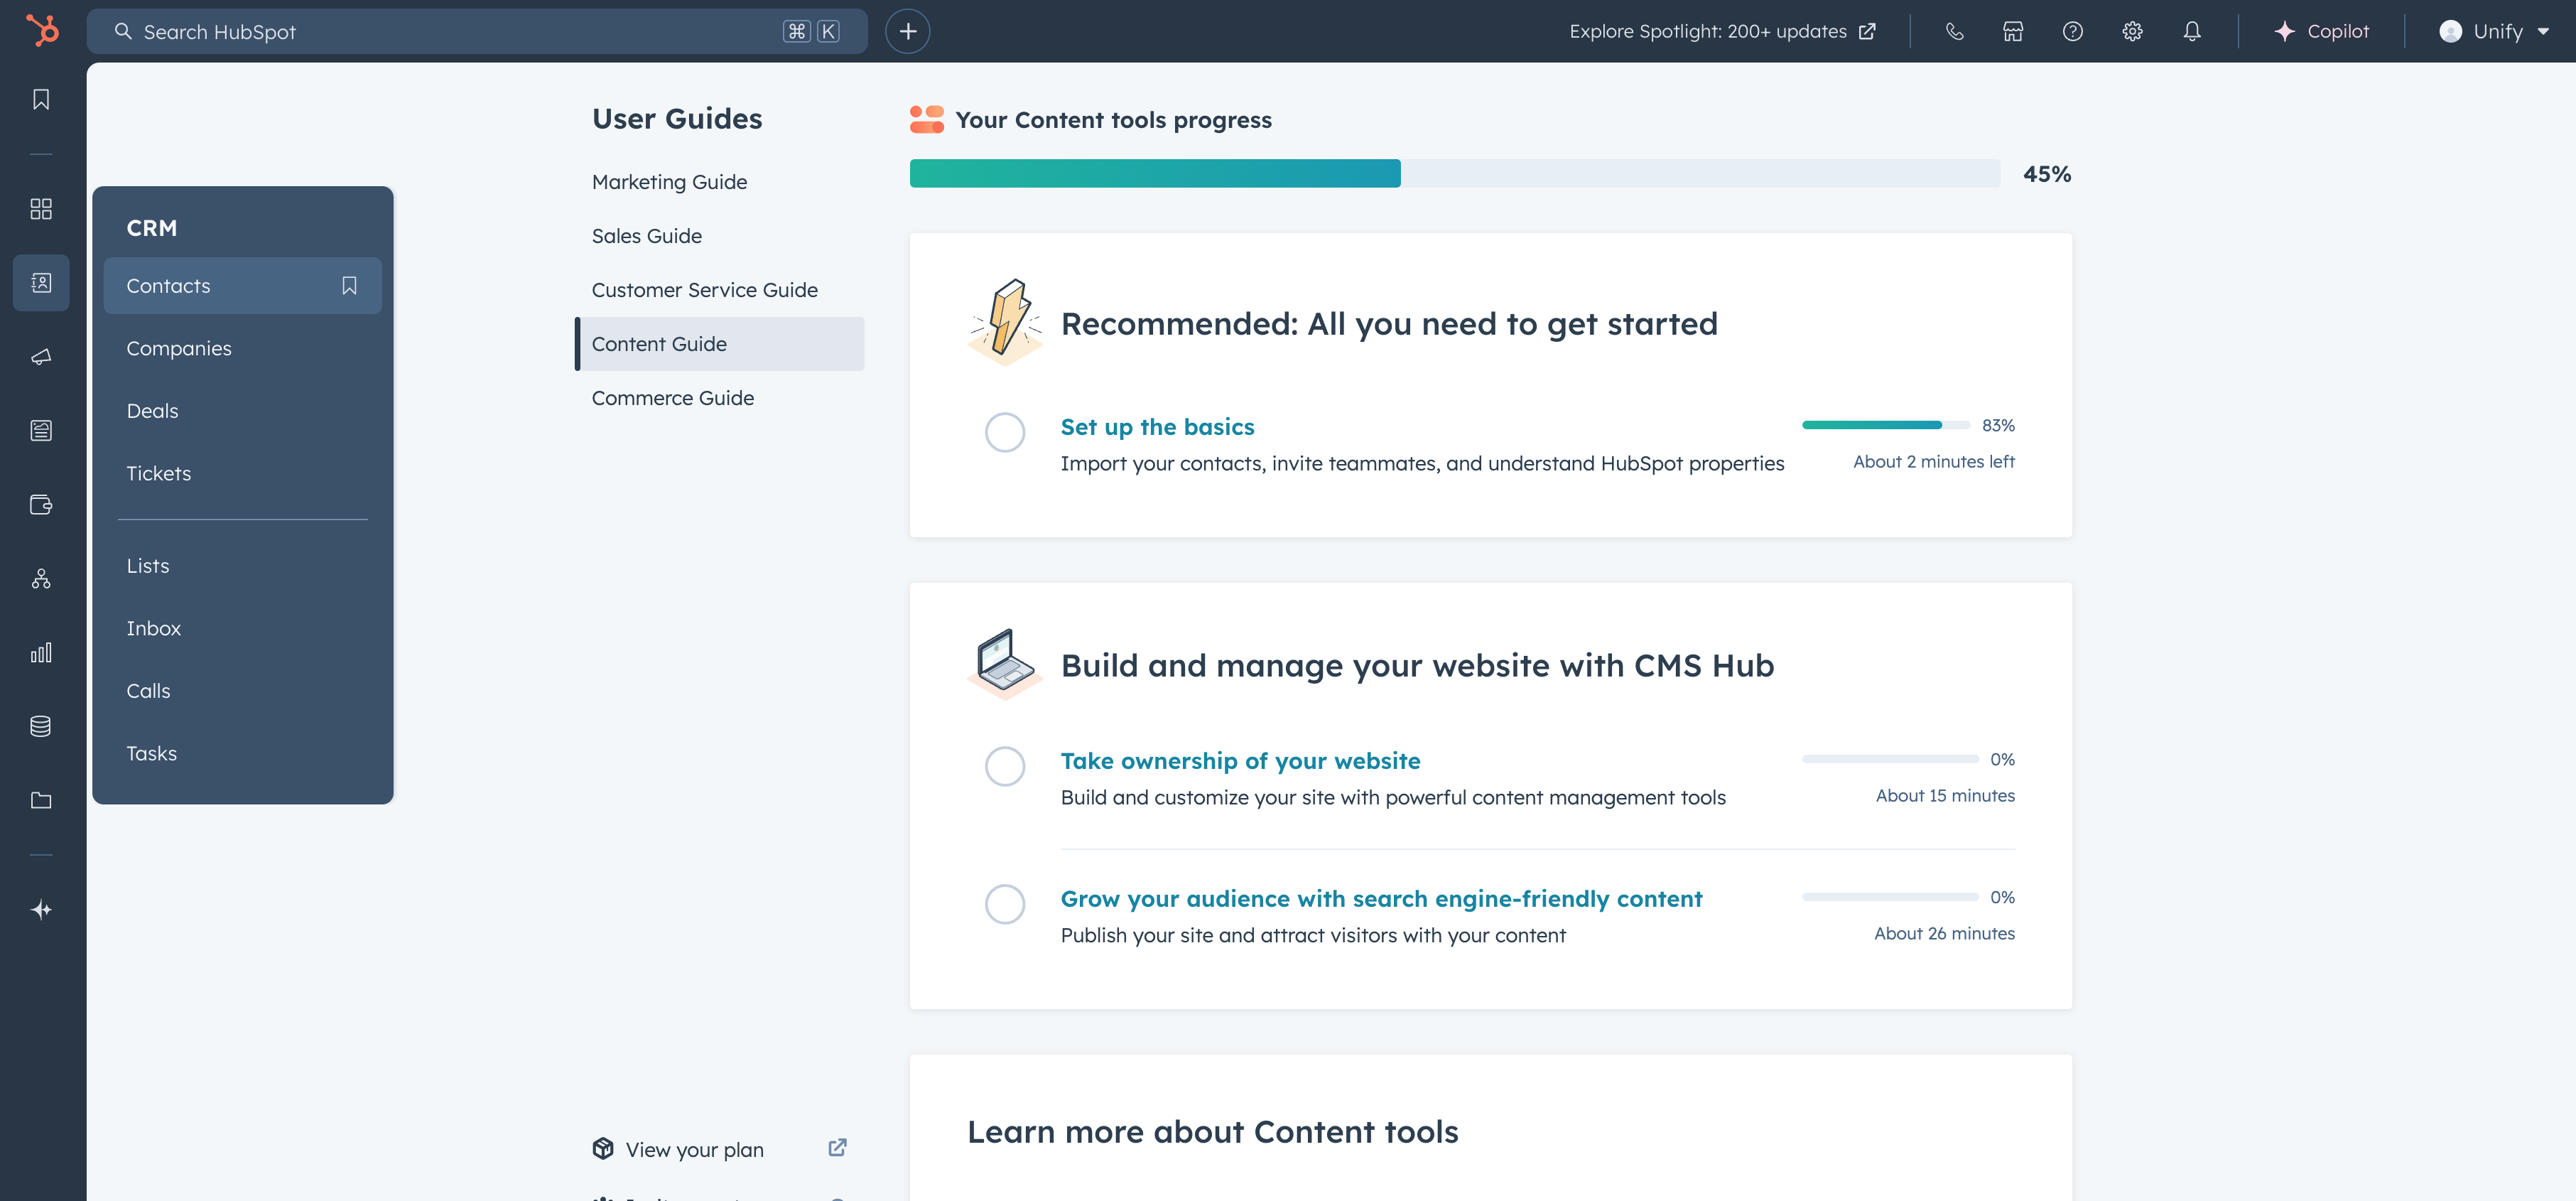 Select **Actions -> Edit properties**.
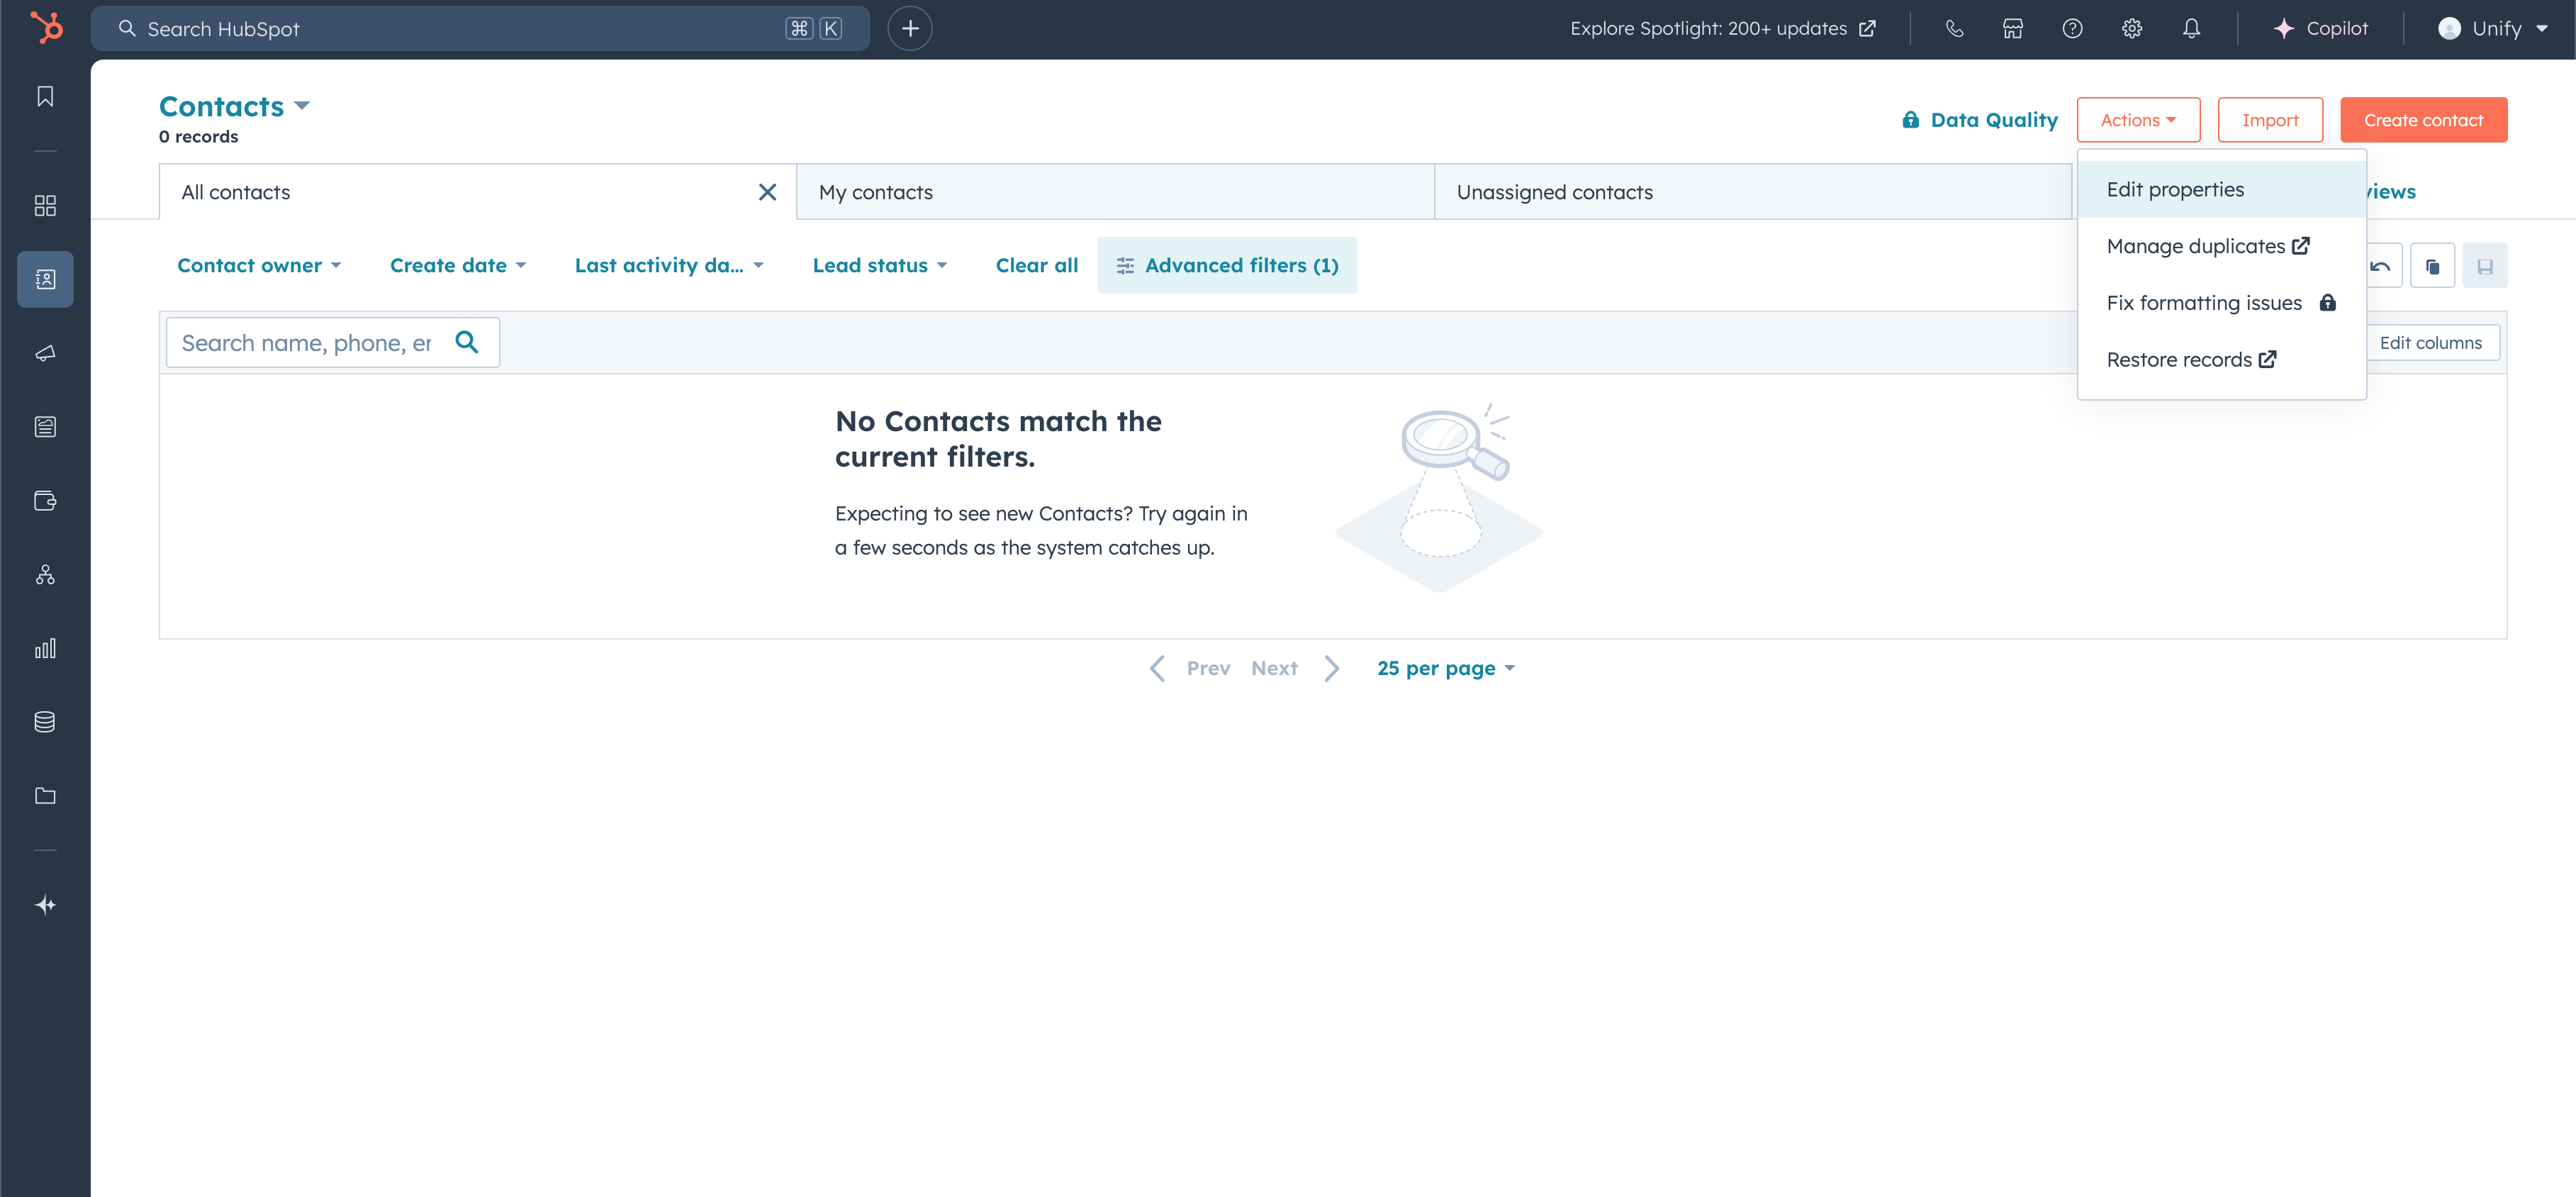 Navigate to **Groups -> Create group**.
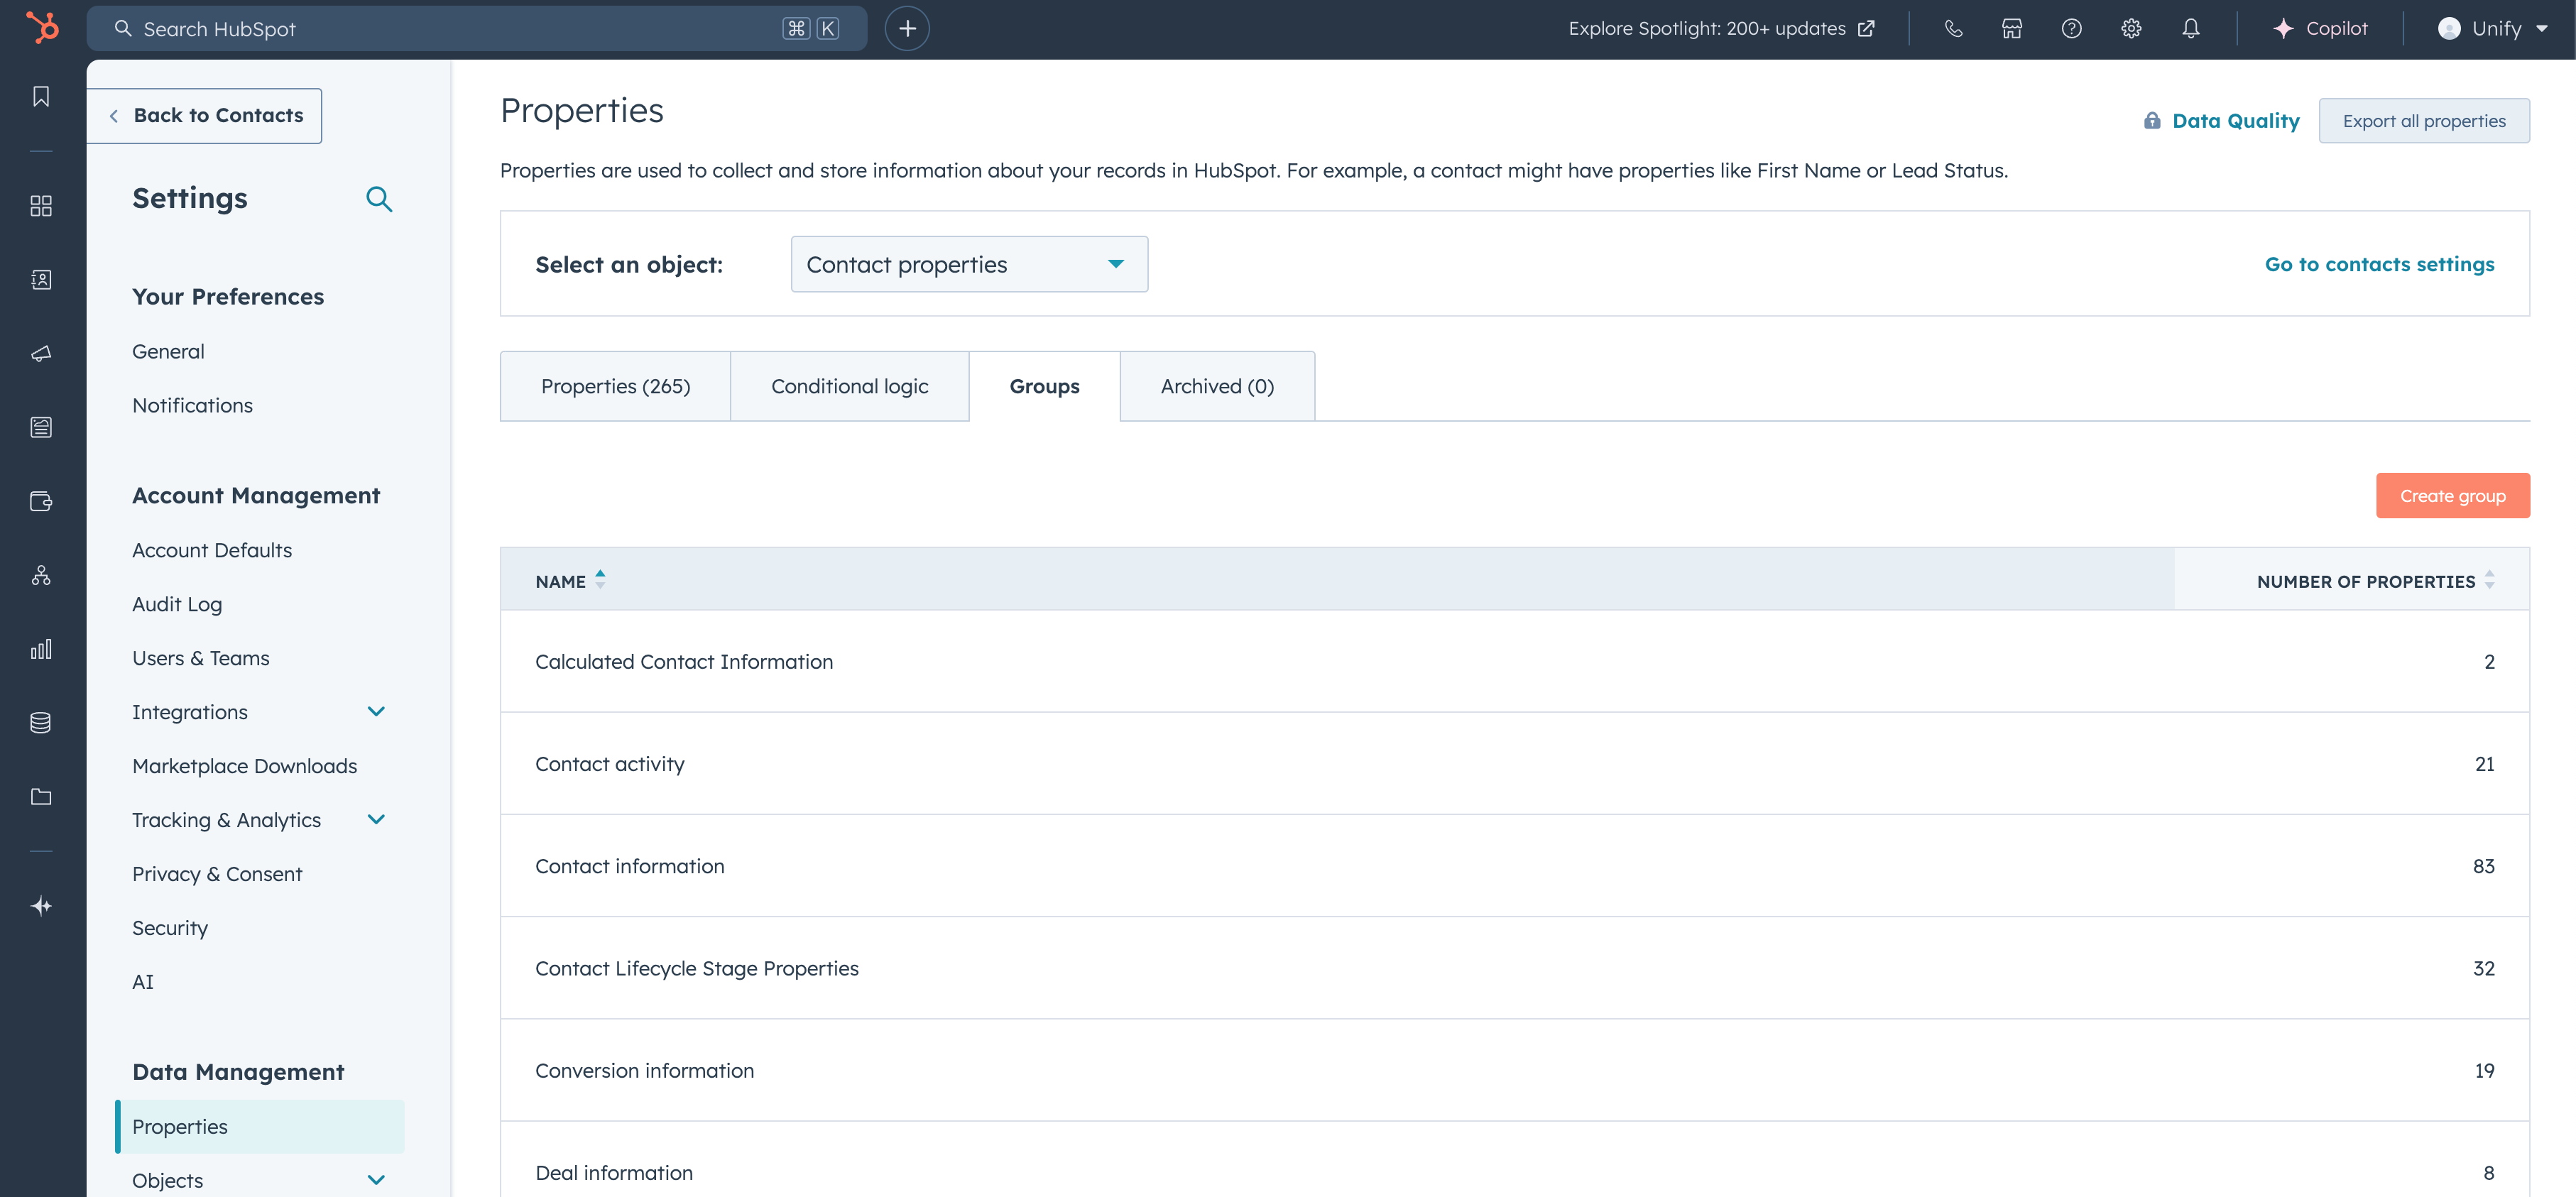 Type in the name of the group (recommended title "Unify information") and click
**Create**.
Type in the name of the group (recommended title "Unify information") and click
**Create**.
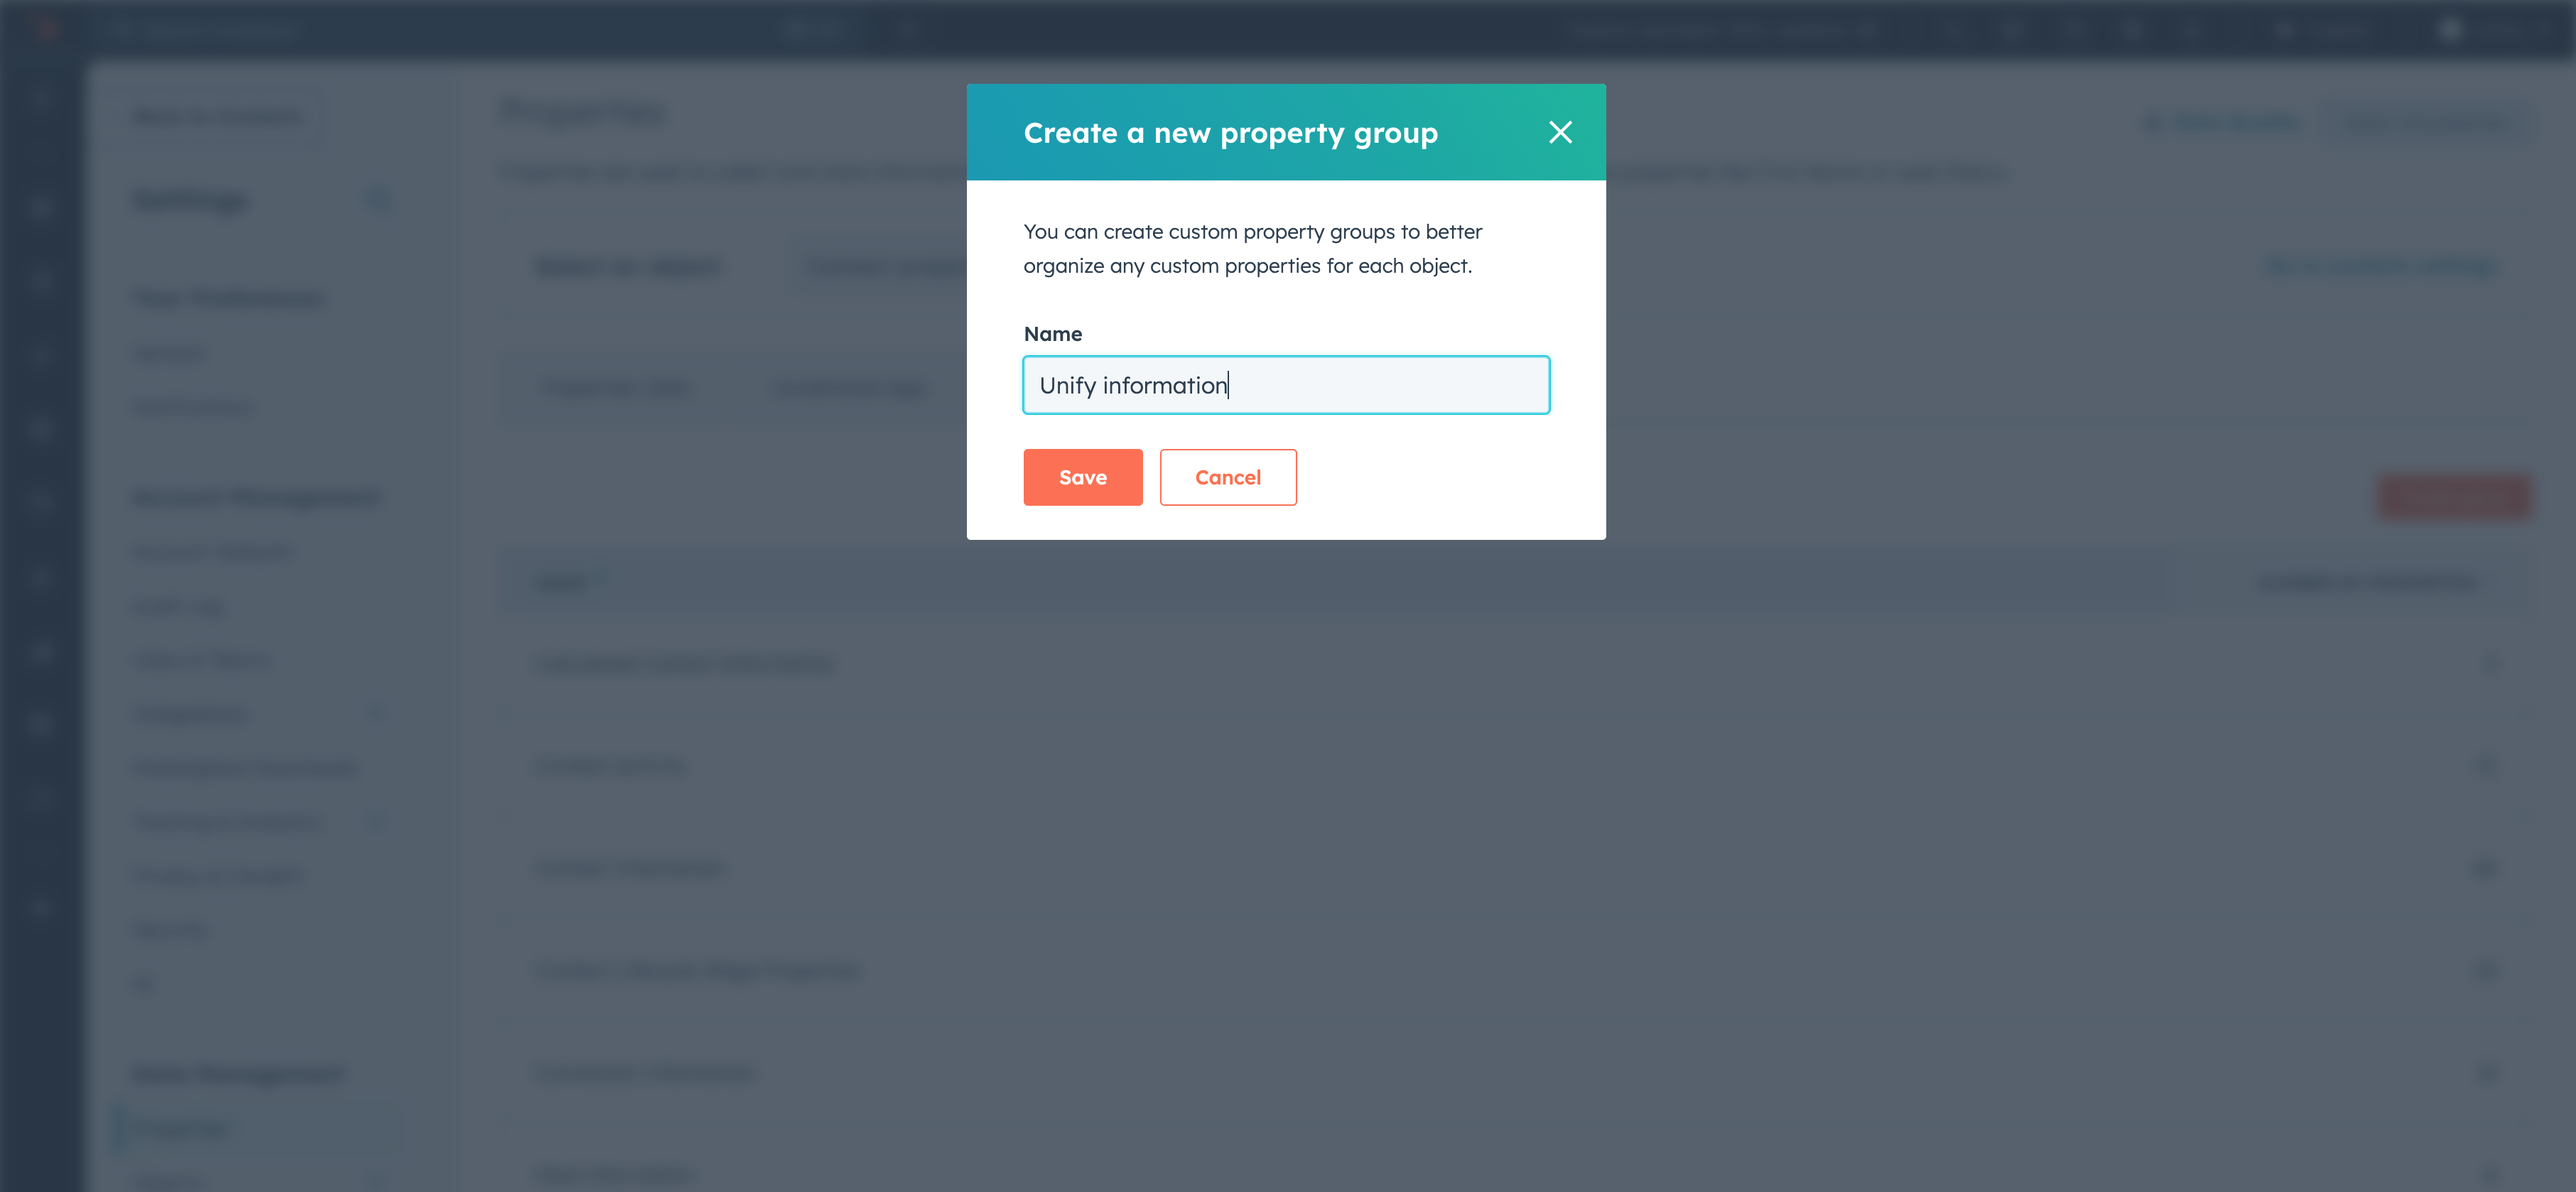 Navigate to **Properties -> Create property**.
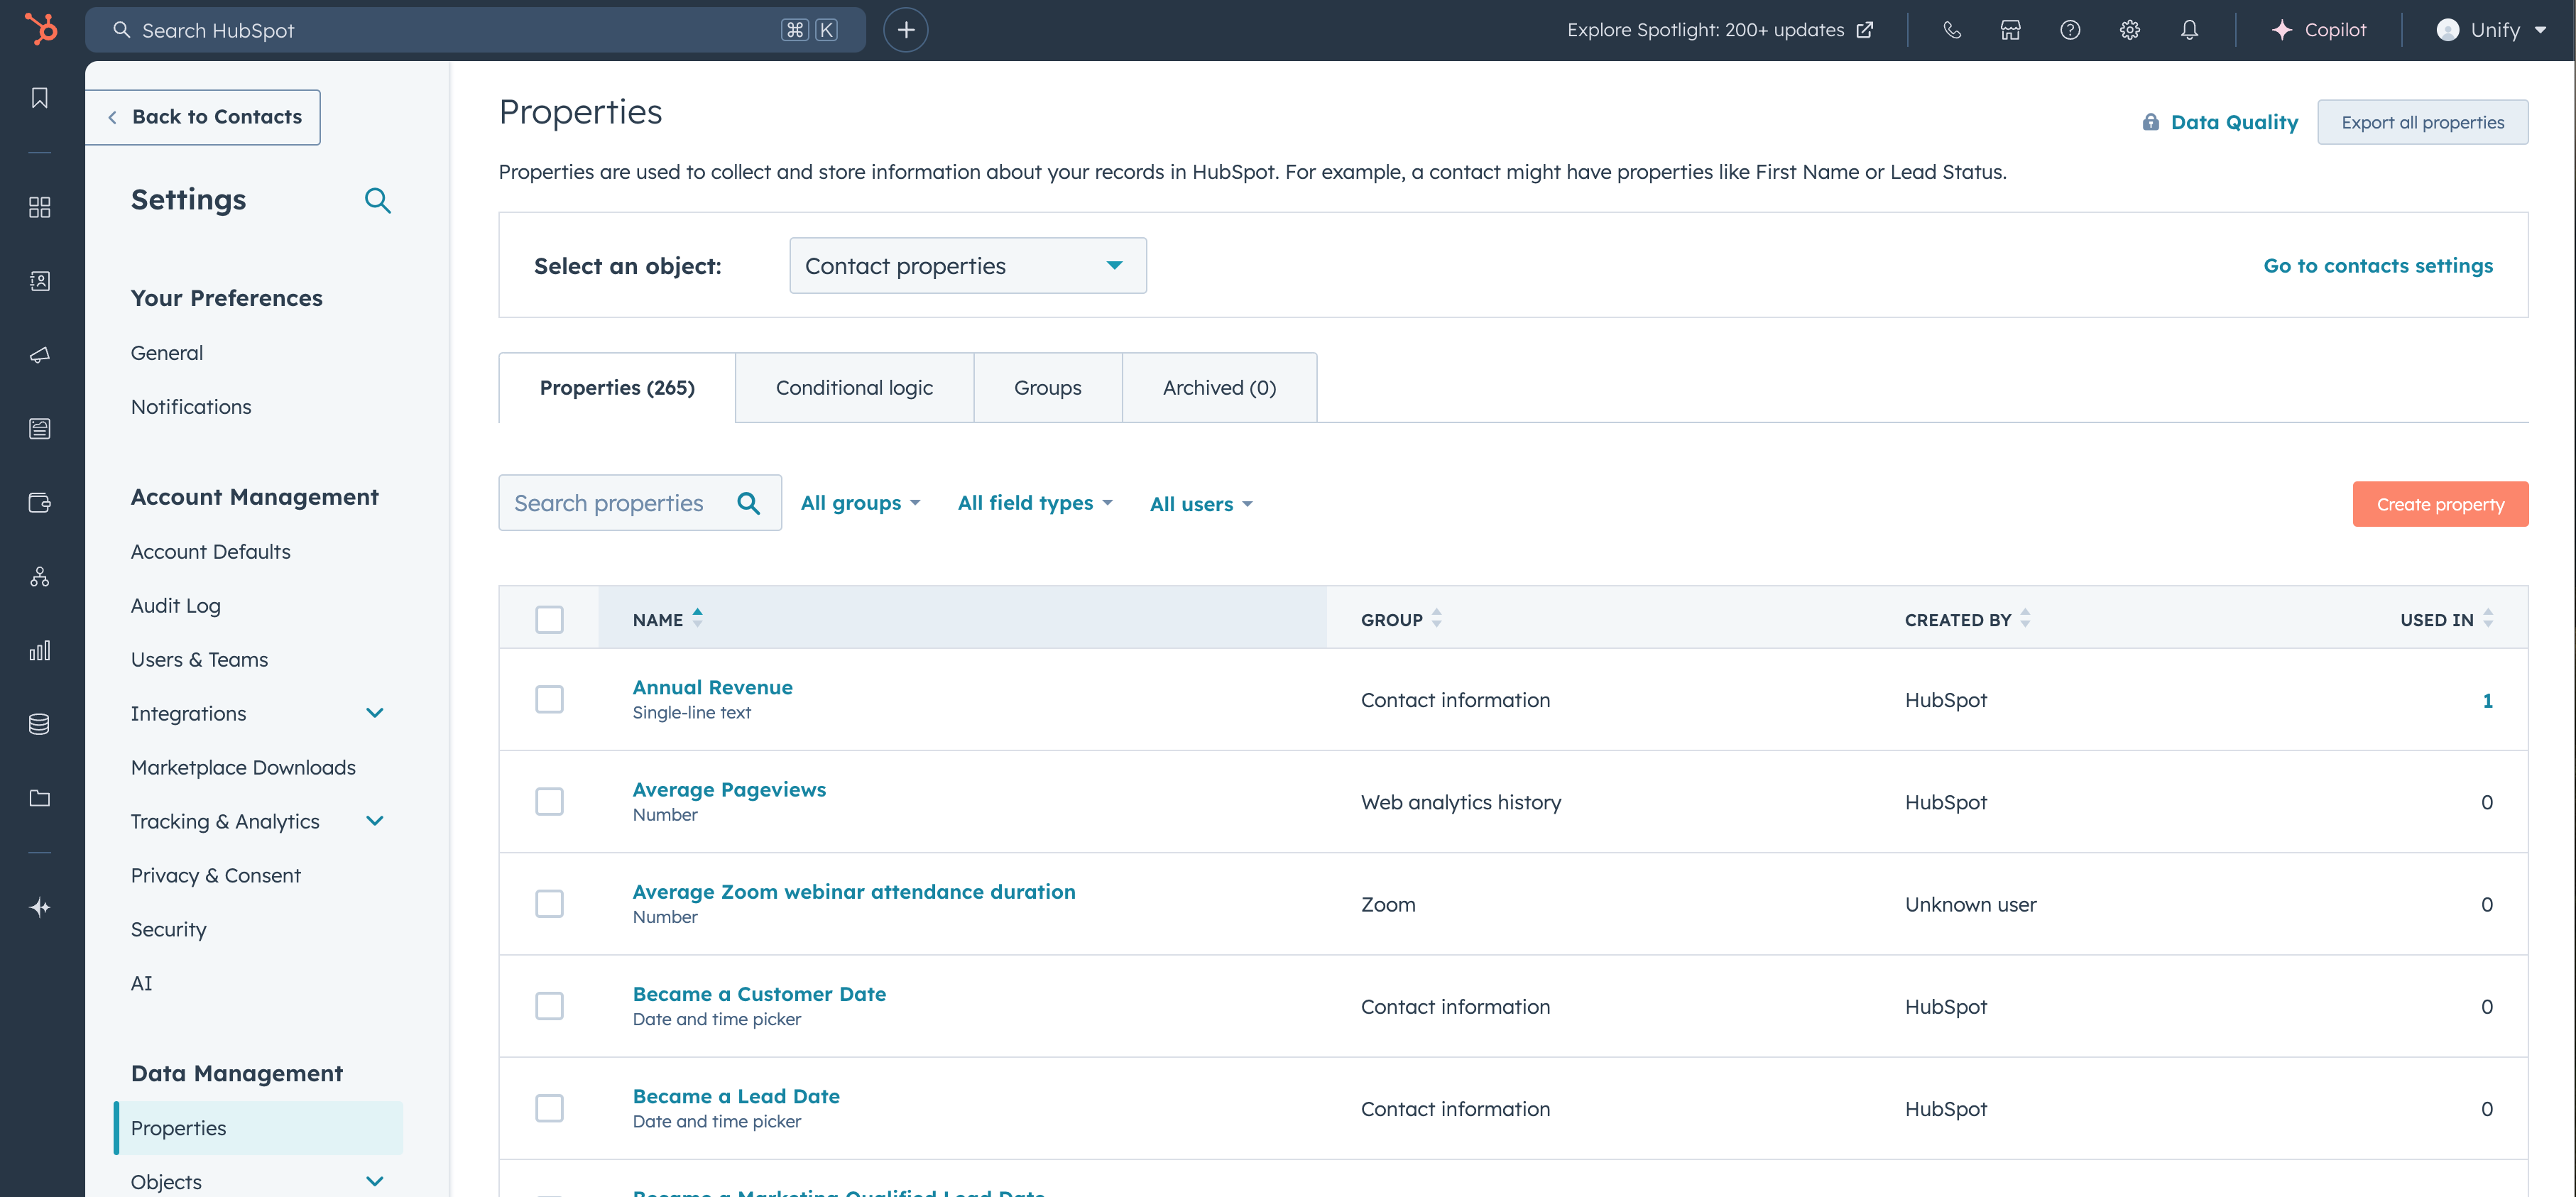 When editing the property details, make sure the **Object type** is set properly
(in this case, to **Contact**) and the **Group** is set to the group you
created earlier. You can fill in the **Label** and **Description** as desired.
When editing the property details, make sure the **Object type** is set properly
(in this case, to **Contact**) and the **Group** is set to the group you
created earlier. You can fill in the **Label** and **Description** as desired.
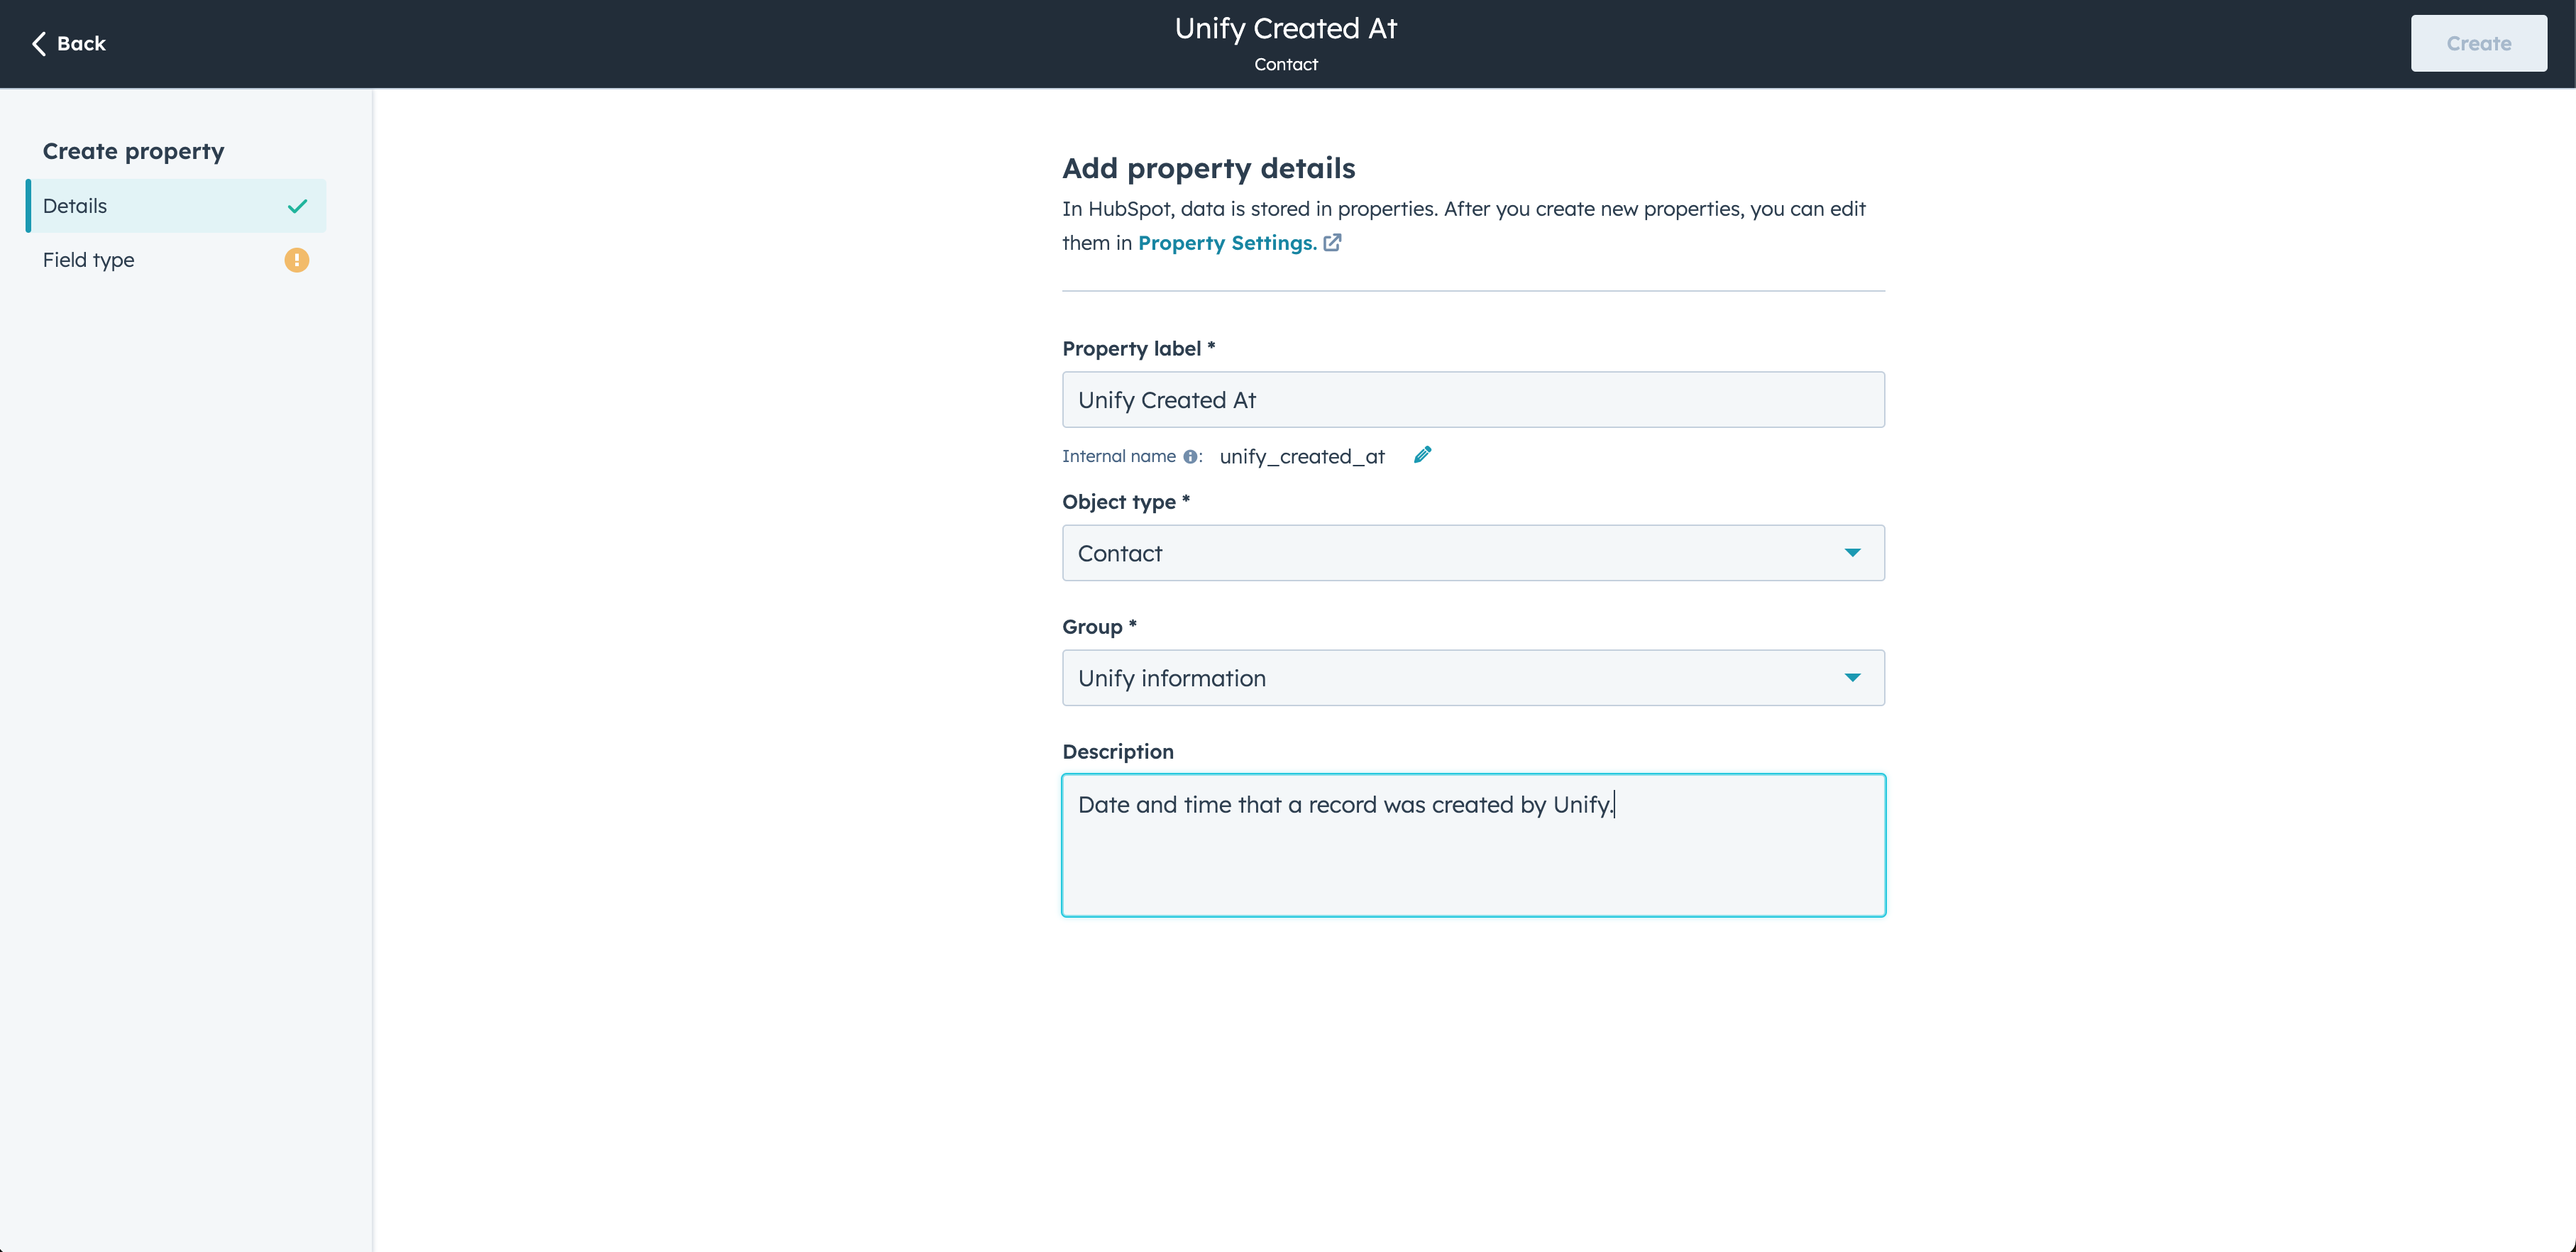 Lastly, select the **Field type** and click **Create**.
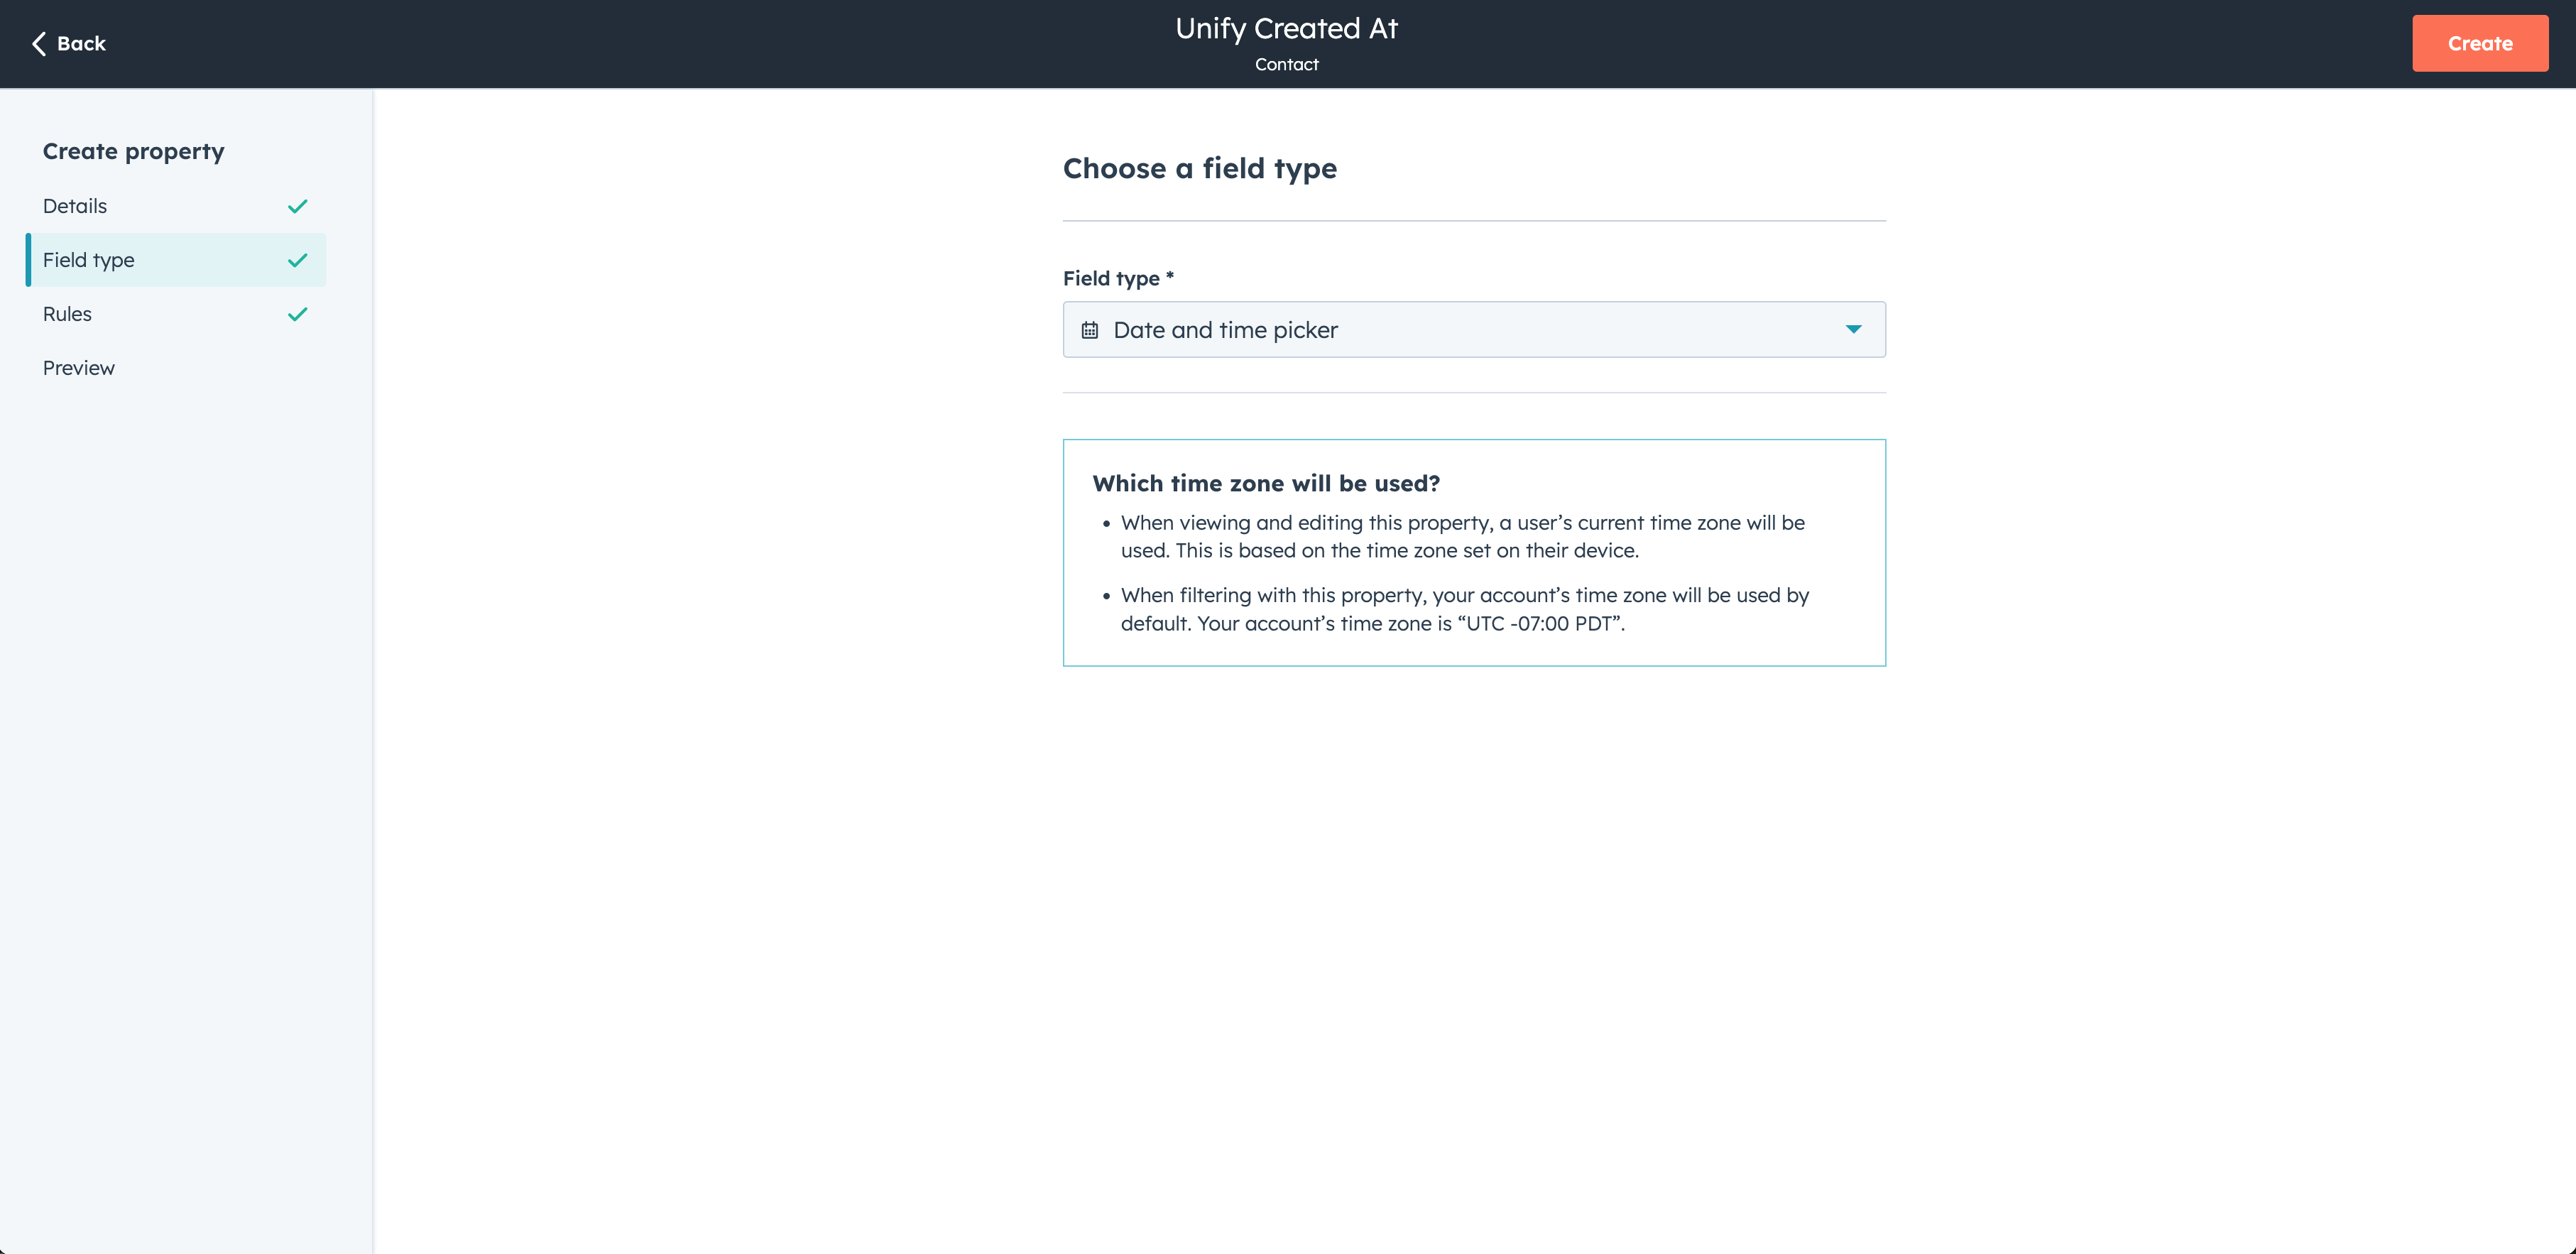 This is what your **Contact** properties filtered to your new group might look
like after you've added them:
This is what your **Contact** properties filtered to your new group might look
like after you've added them:
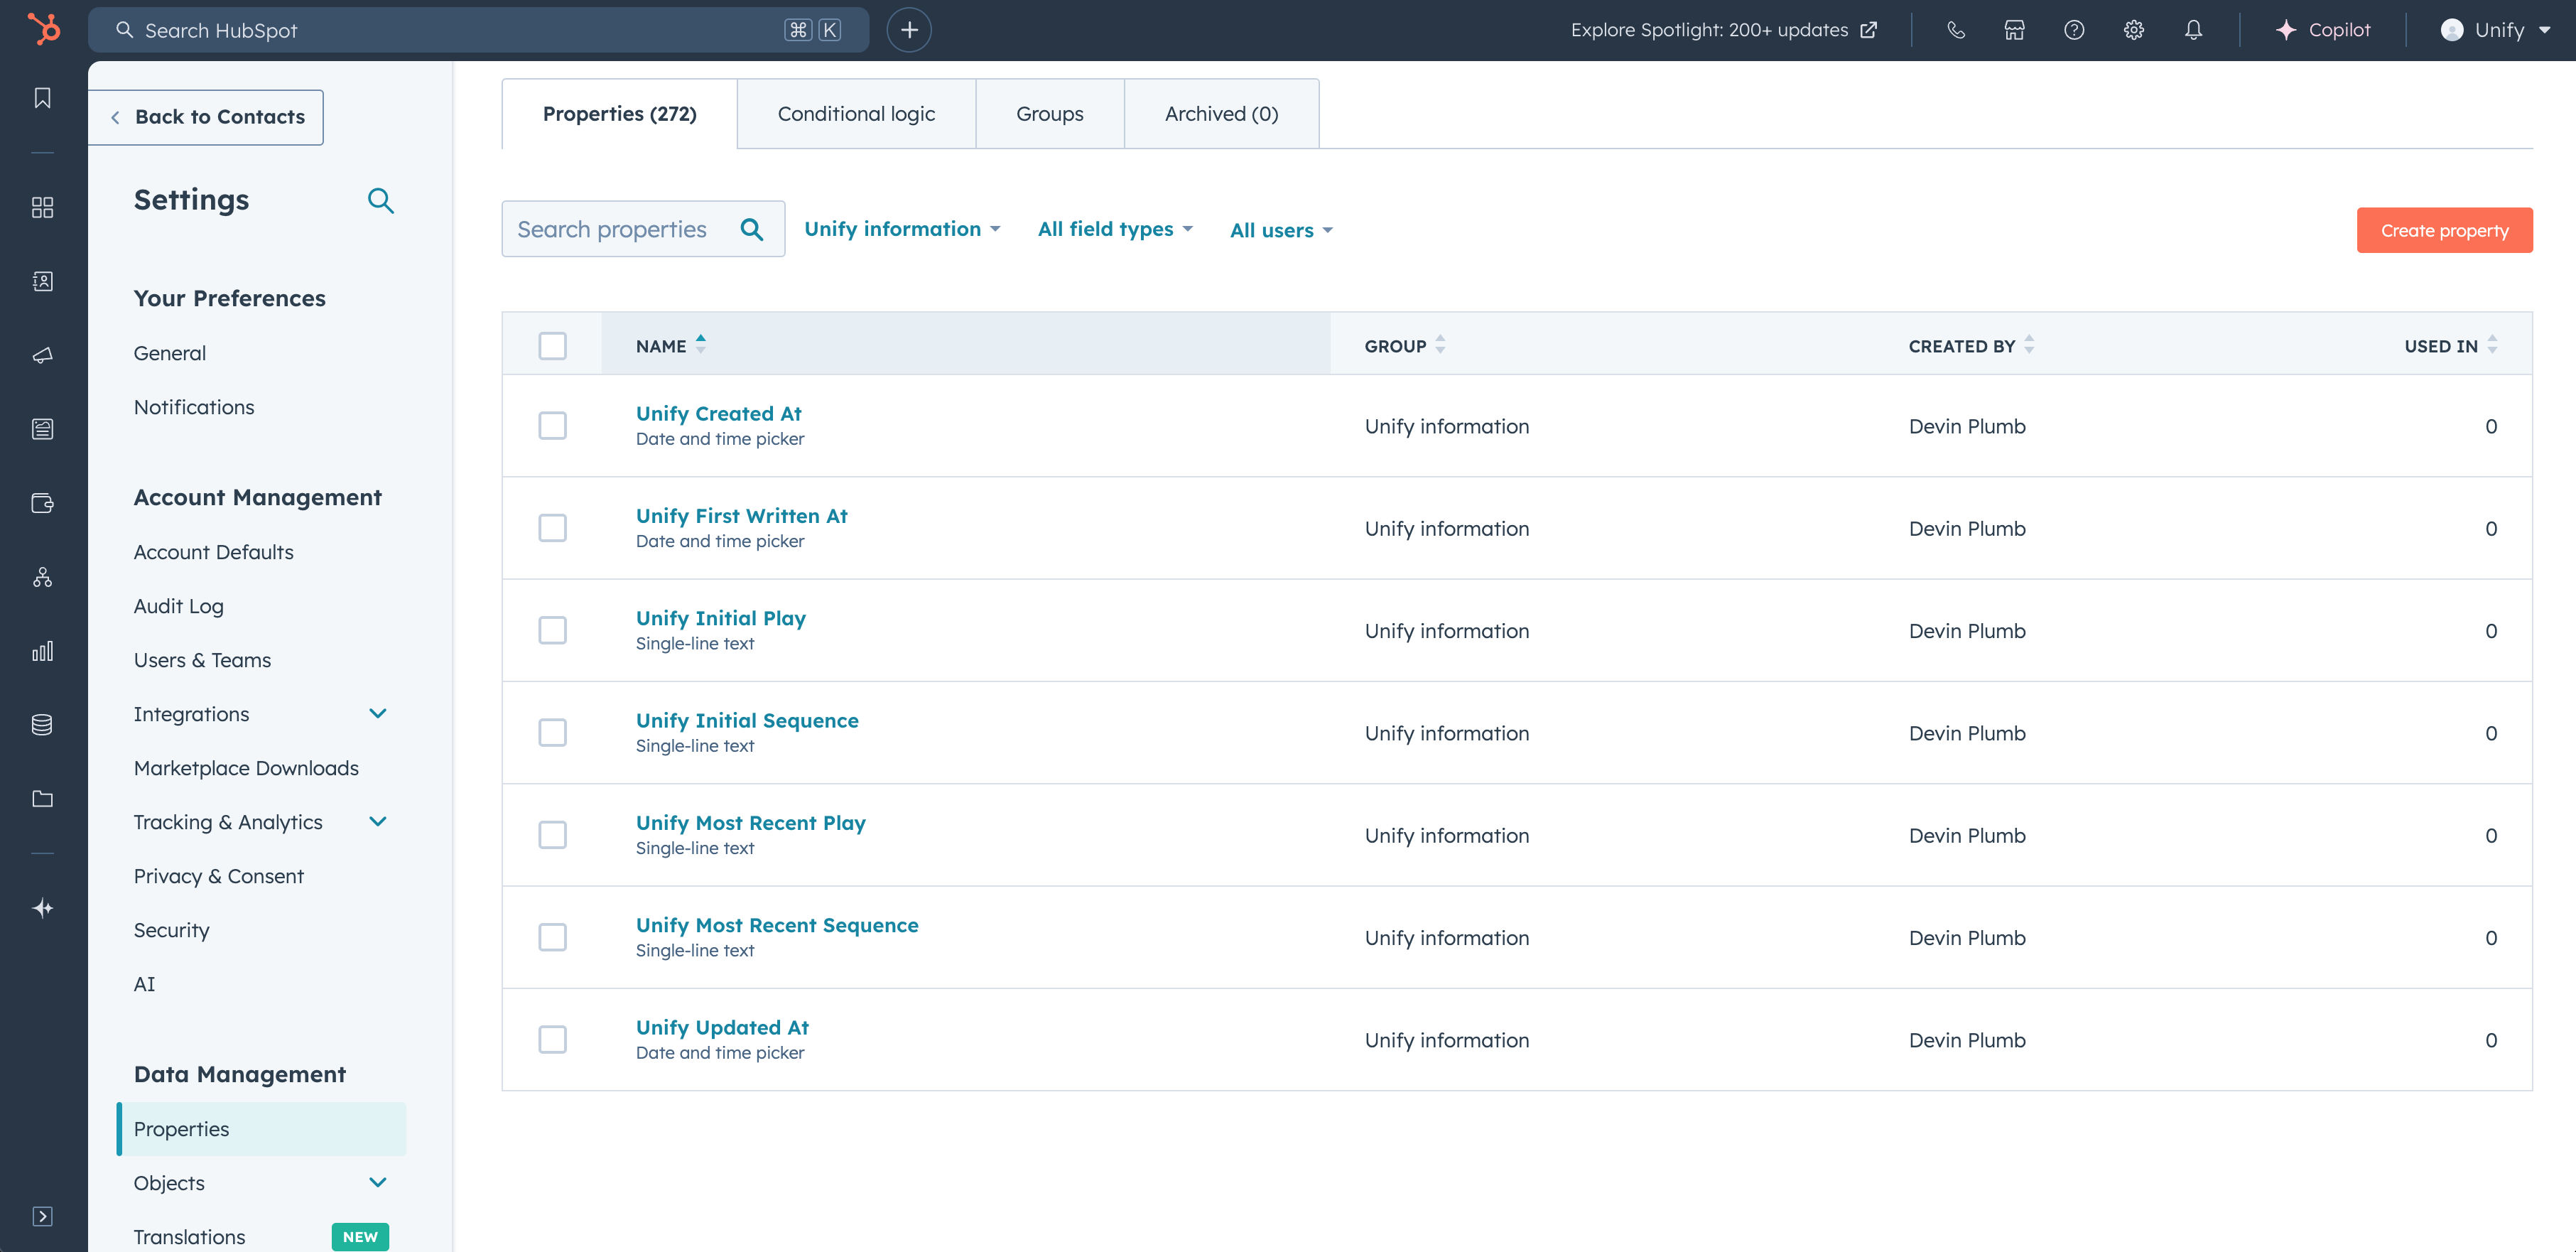 You can then repeat this process for **Company** properties as well.
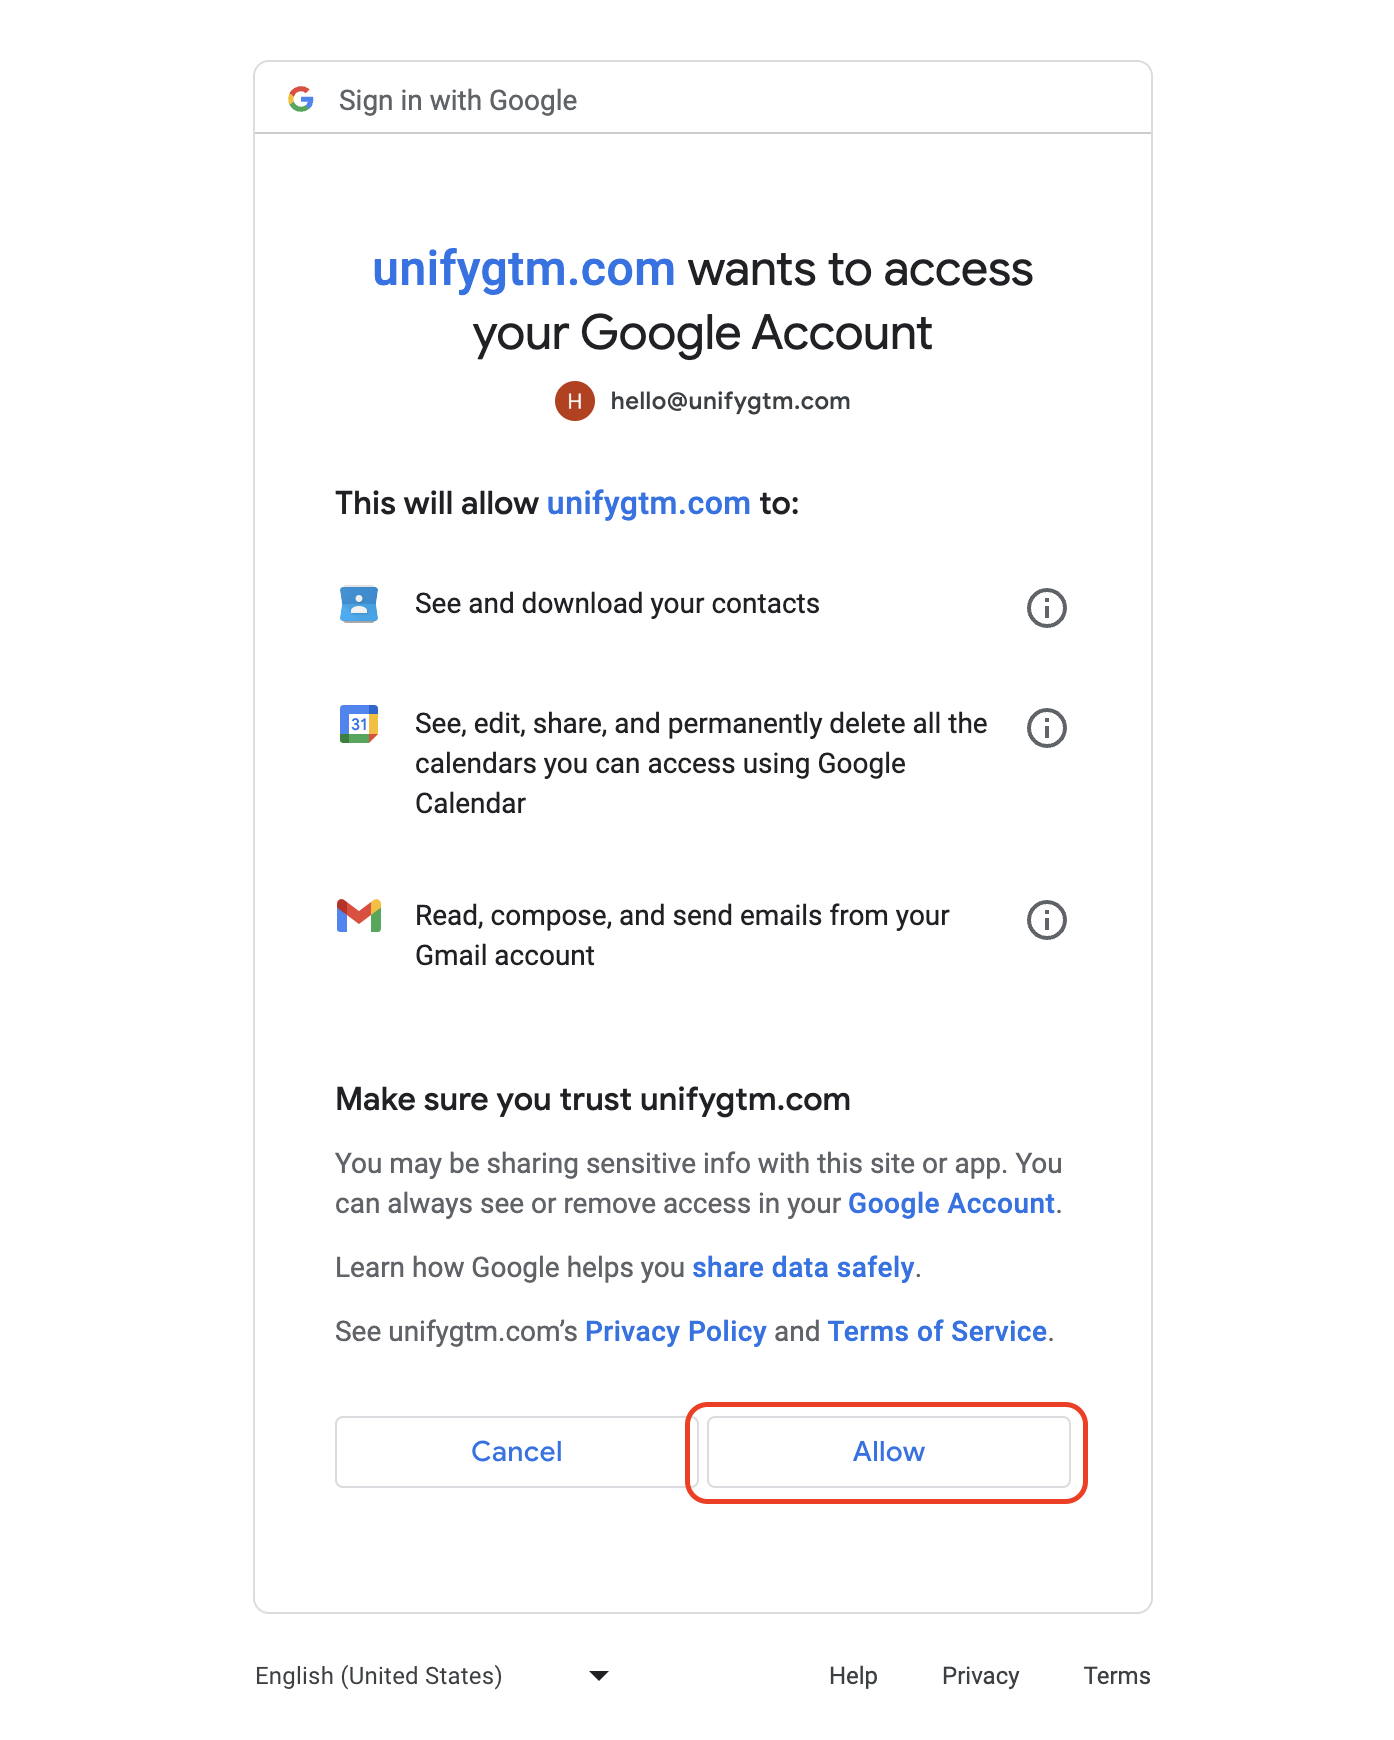 3. You will be redirected back to the mailbox settings page, where you can see
the status of your newly connected mailbox
---
# Source: https://docs.unifygtm.com/reference/integrations/google-tag-manager.md
> ## Documentation Index
> Fetch the complete documentation index at: https://docs.unifygtm.com/llms.txt
> Use this file to discover all available pages before exploring further.
# Google Tag Manager Integration Guide
> This guide outlines how to install the Unify website tag using Google Tag Manager.
# Overview
Unify provides several different ways to start collecting intent data from your
website. The quickest way to get started is by installing the Unify website tag
directly on your website.
If you're using Google Tag Manager, you can add the website tag as a custom HTML
tag. This allows you to manage all of your scripts in one place and easily
control when and where they are loaded.
# Installation
For instructions, see the [Website Tag](/developers/intent-client/website-tag)
installation guide.
---
# Source: https://docs.unifygtm.com/tutorials/how-to-create-a-play.md
> ## Documentation Index
> Fetch the complete documentation index at: https://docs.unifygtm.com/llms.txt
> Use this file to discover all available pages before exploring further.
# How to Create a Play
> Learn the fundamentals and build a Unify Play from start to finish.
export const PlayBuilderCompanyHandleDark = () => ;
export const PlayBuilderCompanyHandleLight = () => ;
export const PlayBuilderPersonListHandleDark = () => ;
export const PlayBuilderPersonListHandleLight = () => ;
export const PlayBuilderPersonHandleDark = () => ;
export const PlayBuilderPersonHandleLight = () => ;
## Overview
Plays are automated workflows that let you build and execute repeatable
strategies. In this guide, you'll learn the basics of how Plays work and create
one from scratch.
### What are Plays?
Building scalable and effective sales, marketing, and GTM strategies requires
successfully coordinating two key components:
* **Data**: Countless data sources go into building scalable automations. This
data is traditionally scattered across tools and databases, but Unify
centralizes it in one place.
* **Actions**: Researching companies, identifying decision-makers, executing
multi-channel outreach, and more. Taking the right action at the right time
is crucial to success.
Unify is a purpose-built system of action that solves this problem. Plays let
you define a series of actions that will be taken on companies or people at
exactly the right moment.
3. You will be redirected back to the mailbox settings page, where you can see
the status of your newly connected mailbox
---
# Source: https://docs.unifygtm.com/reference/integrations/google-tag-manager.md
> ## Documentation Index
> Fetch the complete documentation index at: https://docs.unifygtm.com/llms.txt
> Use this file to discover all available pages before exploring further.
# Google Tag Manager Integration Guide
> This guide outlines how to install the Unify website tag using Google Tag Manager.
# Overview
Unify provides several different ways to start collecting intent data from your
website. The quickest way to get started is by installing the Unify website tag
directly on your website.
If you're using Google Tag Manager, you can add the website tag as a custom HTML
tag. This allows you to manage all of your scripts in one place and easily
control when and where they are loaded.
# Installation
For instructions, see the [Website Tag](/developers/intent-client/website-tag)
installation guide.
---
# Source: https://docs.unifygtm.com/tutorials/how-to-create-a-play.md
> ## Documentation Index
> Fetch the complete documentation index at: https://docs.unifygtm.com/llms.txt
> Use this file to discover all available pages before exploring further.
# How to Create a Play
> Learn the fundamentals and build a Unify Play from start to finish.
export const PlayBuilderCompanyHandleDark = () => ;
export const PlayBuilderCompanyHandleLight = () => ;
export const PlayBuilderPersonListHandleDark = () => ;
export const PlayBuilderPersonListHandleLight = () => ;
export const PlayBuilderPersonHandleDark = () => ;
export const PlayBuilderPersonHandleLight = () => ;
## Overview
Plays are automated workflows that let you build and execute repeatable
strategies. In this guide, you'll learn the basics of how Plays work and create
one from scratch.
### What are Plays?
Building scalable and effective sales, marketing, and GTM strategies requires
successfully coordinating two key components:
* **Data**: Countless data sources go into building scalable automations. This
data is traditionally scattered across tools and databases, but Unify
centralizes it in one place.
* **Actions**: Researching companies, identifying decision-makers, executing
multi-channel outreach, and more. Taking the right action at the right time
is crucial to success.
Unify is a purpose-built system of action that solves this problem. Plays let
you define a series of actions that will be taken on companies or people at
exactly the right moment.
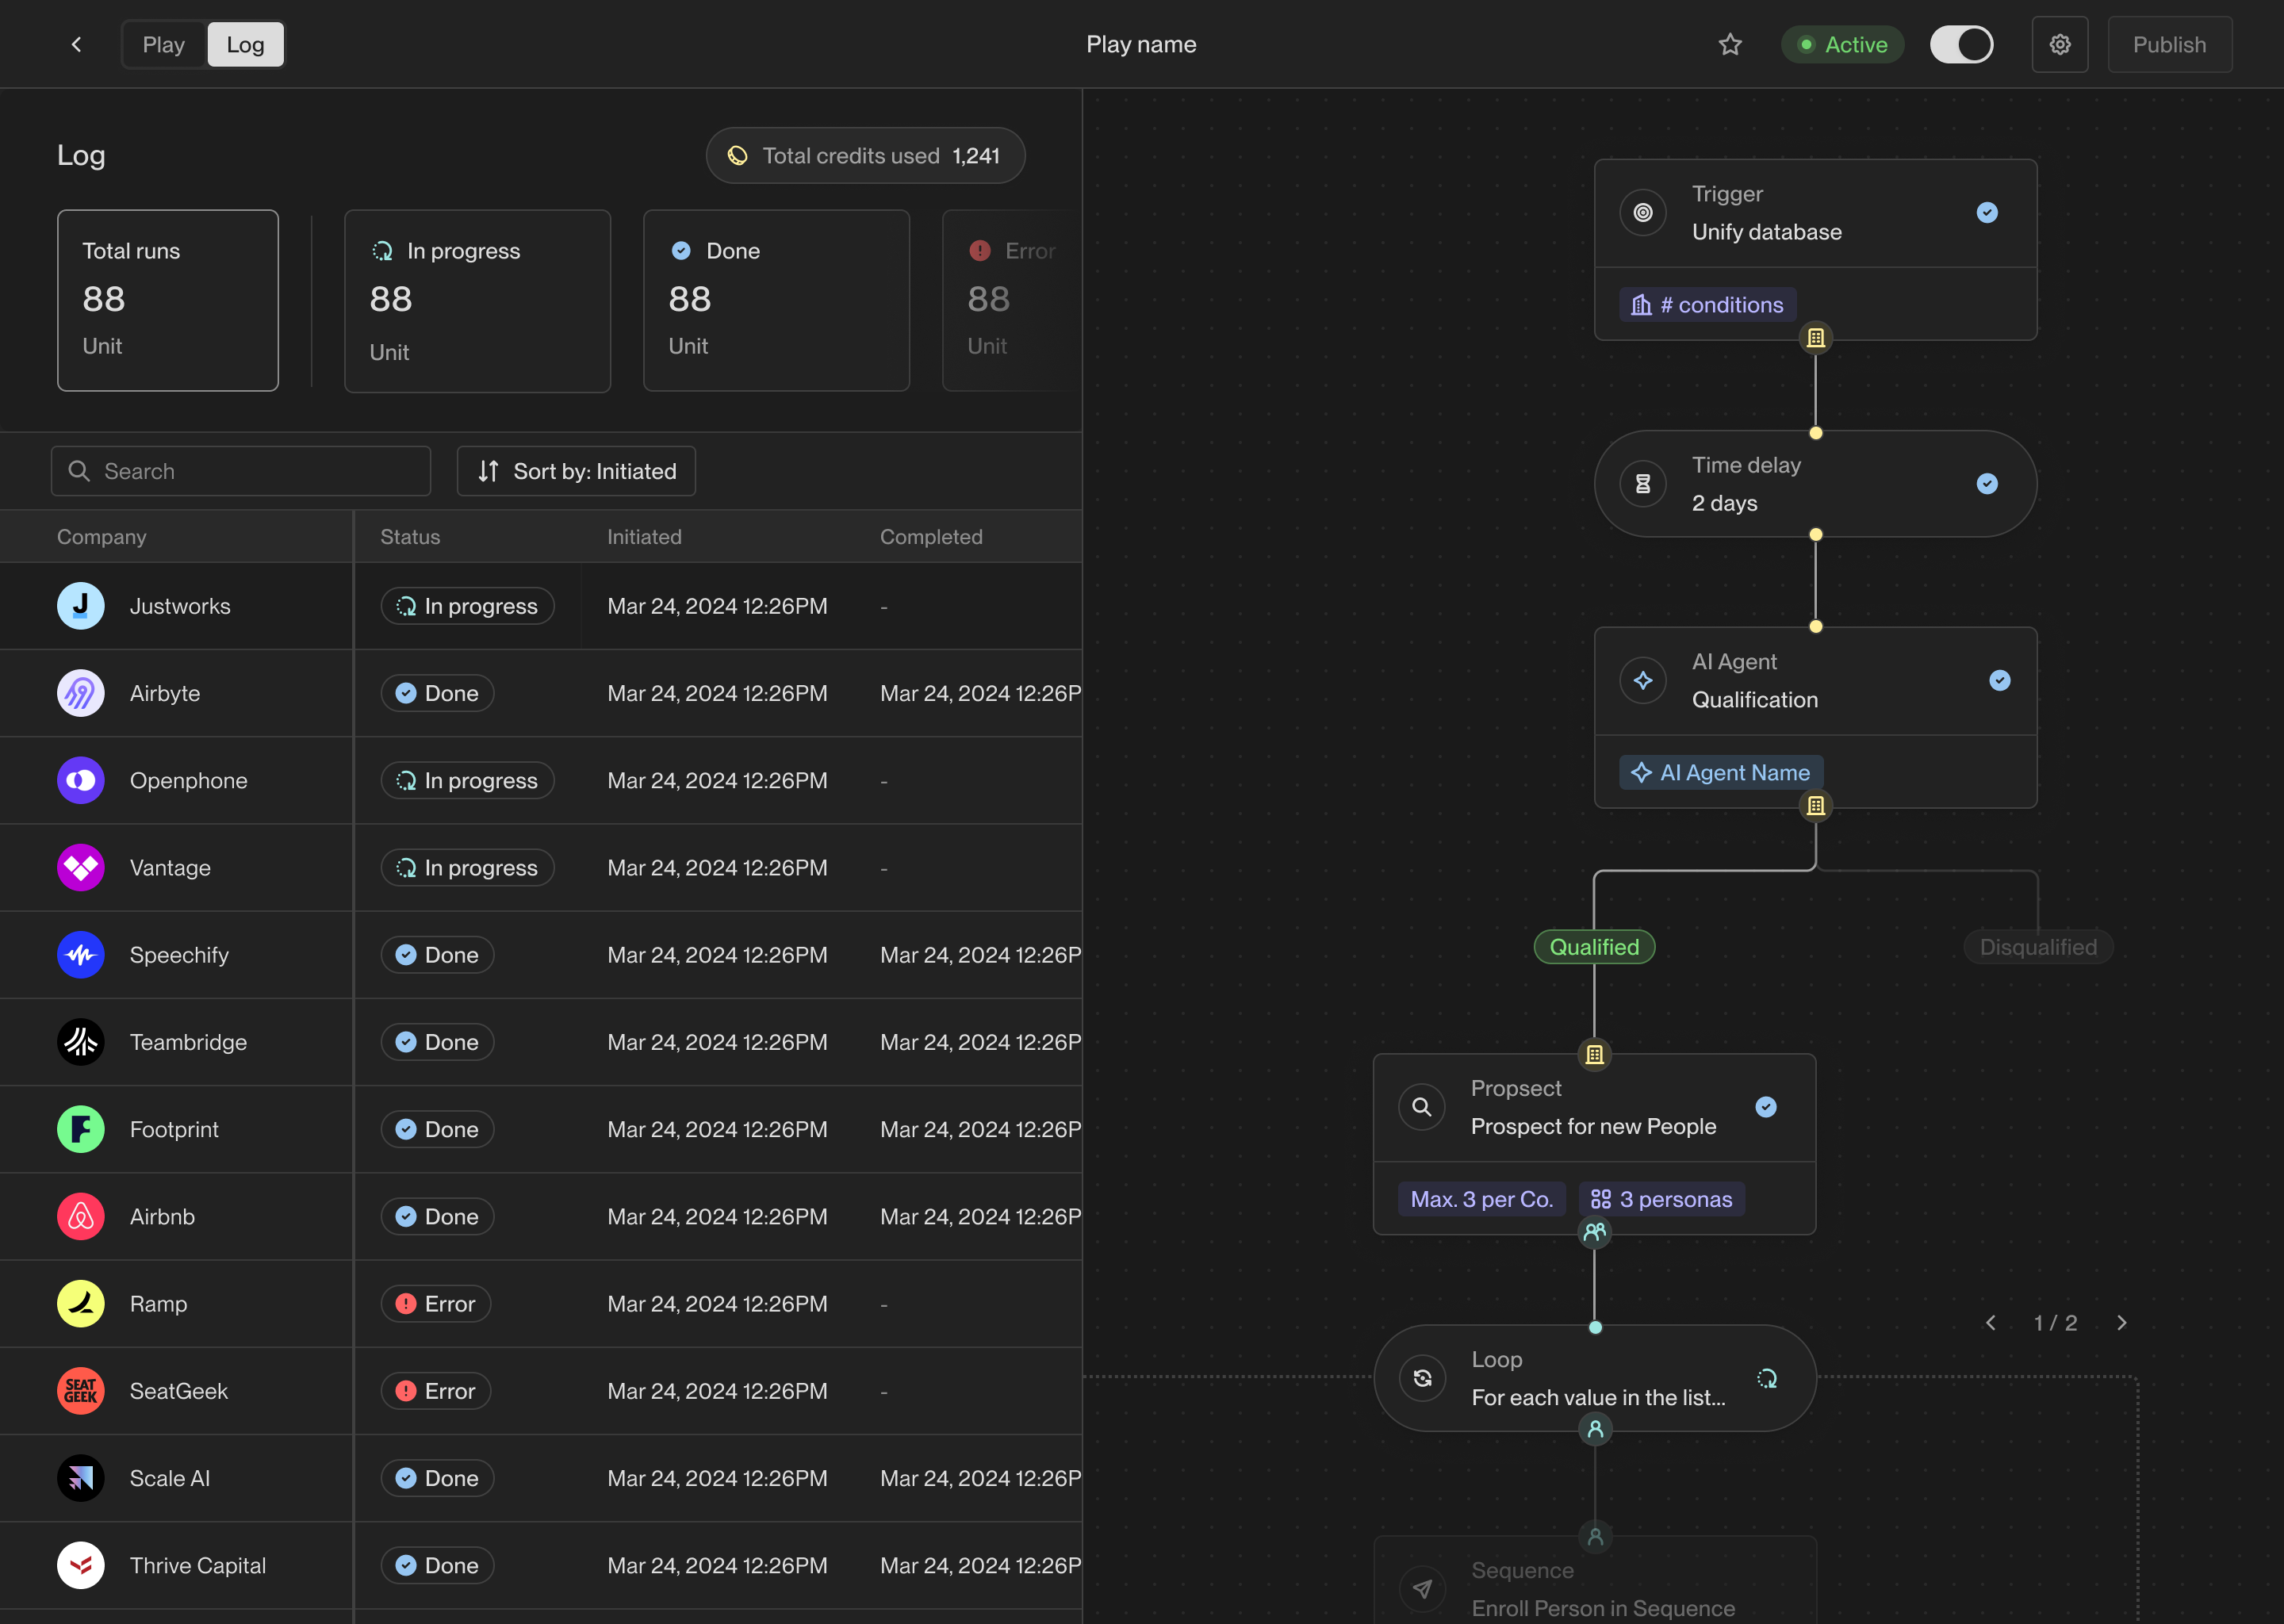 ### Tutorial preview
One of the most popular use cases for Plays is to find prospects at companies
that are visiting your website and enroll them in outbound sequences. This is a
great example of a *warm outbound* campaign that targets key decision-makers
at companies showing buying intent.
In this guide, you'll create a Unify Play that runs on companies visiting your
website and performs the following actions:
1. **Prospect**: Find new people at the company that match your buyer personas.
2. **Sequence**: Enroll the new prospects in a sequence to send them emails.
3. **Sync to CRM**: Sync newly found people to Salesforce or HubSpot.
This standard Play is a great starting point to understand how Plays work and
kickstart your outbound strategy.
## Walkthrough
### Step 1: Create a new Play
Look for the [Plays](https://app.unifygtm.com/dashboard/plays) tab in the
sidebar and click on it. This is where you will create and manage all your
team's Plays. To create a new Play, click the **New Play** button.
### Tutorial preview
One of the most popular use cases for Plays is to find prospects at companies
that are visiting your website and enroll them in outbound sequences. This is a
great example of a *warm outbound* campaign that targets key decision-makers
at companies showing buying intent.
In this guide, you'll create a Unify Play that runs on companies visiting your
website and performs the following actions:
1. **Prospect**: Find new people at the company that match your buyer personas.
2. **Sequence**: Enroll the new prospects in a sequence to send them emails.
3. **Sync to CRM**: Sync newly found people to Salesforce or HubSpot.
This standard Play is a great starting point to understand how Plays work and
kickstart your outbound strategy.
## Walkthrough
### Step 1: Create a new Play
Look for the [Plays](https://app.unifygtm.com/dashboard/plays) tab in the
sidebar and click on it. This is where you will create and manage all your
team's Plays. To create a new Play, click the **New Play** button.
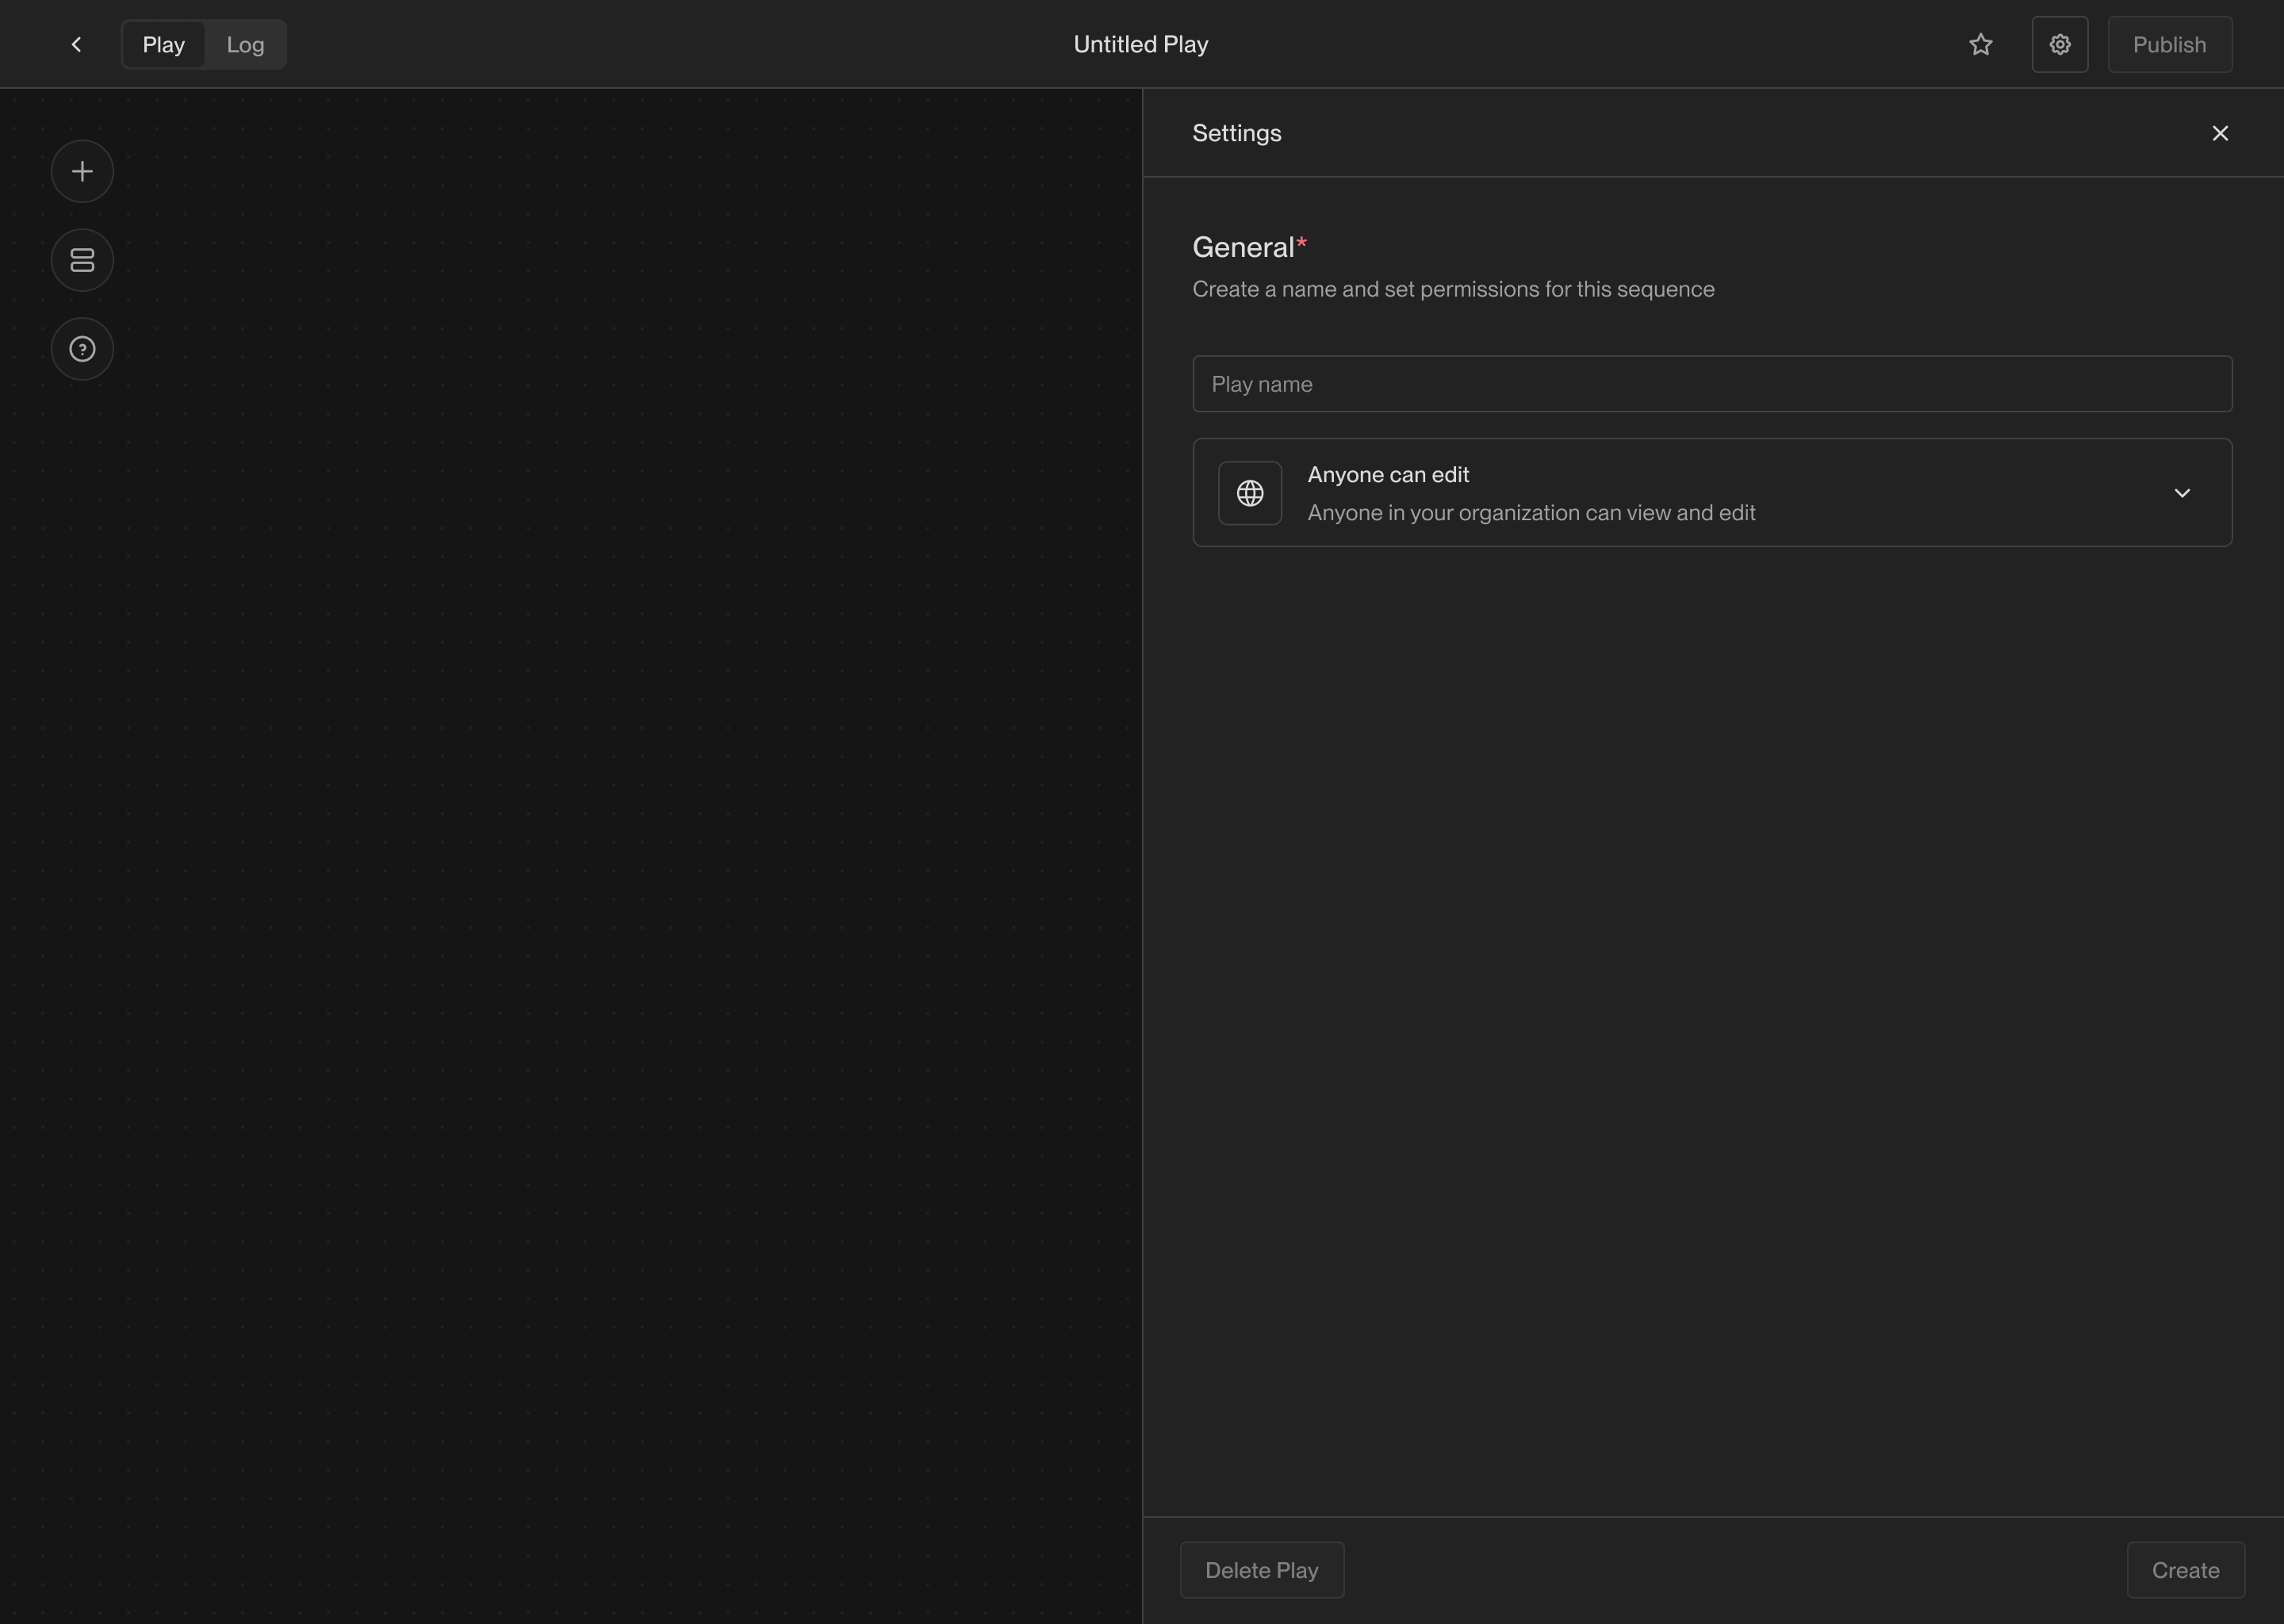
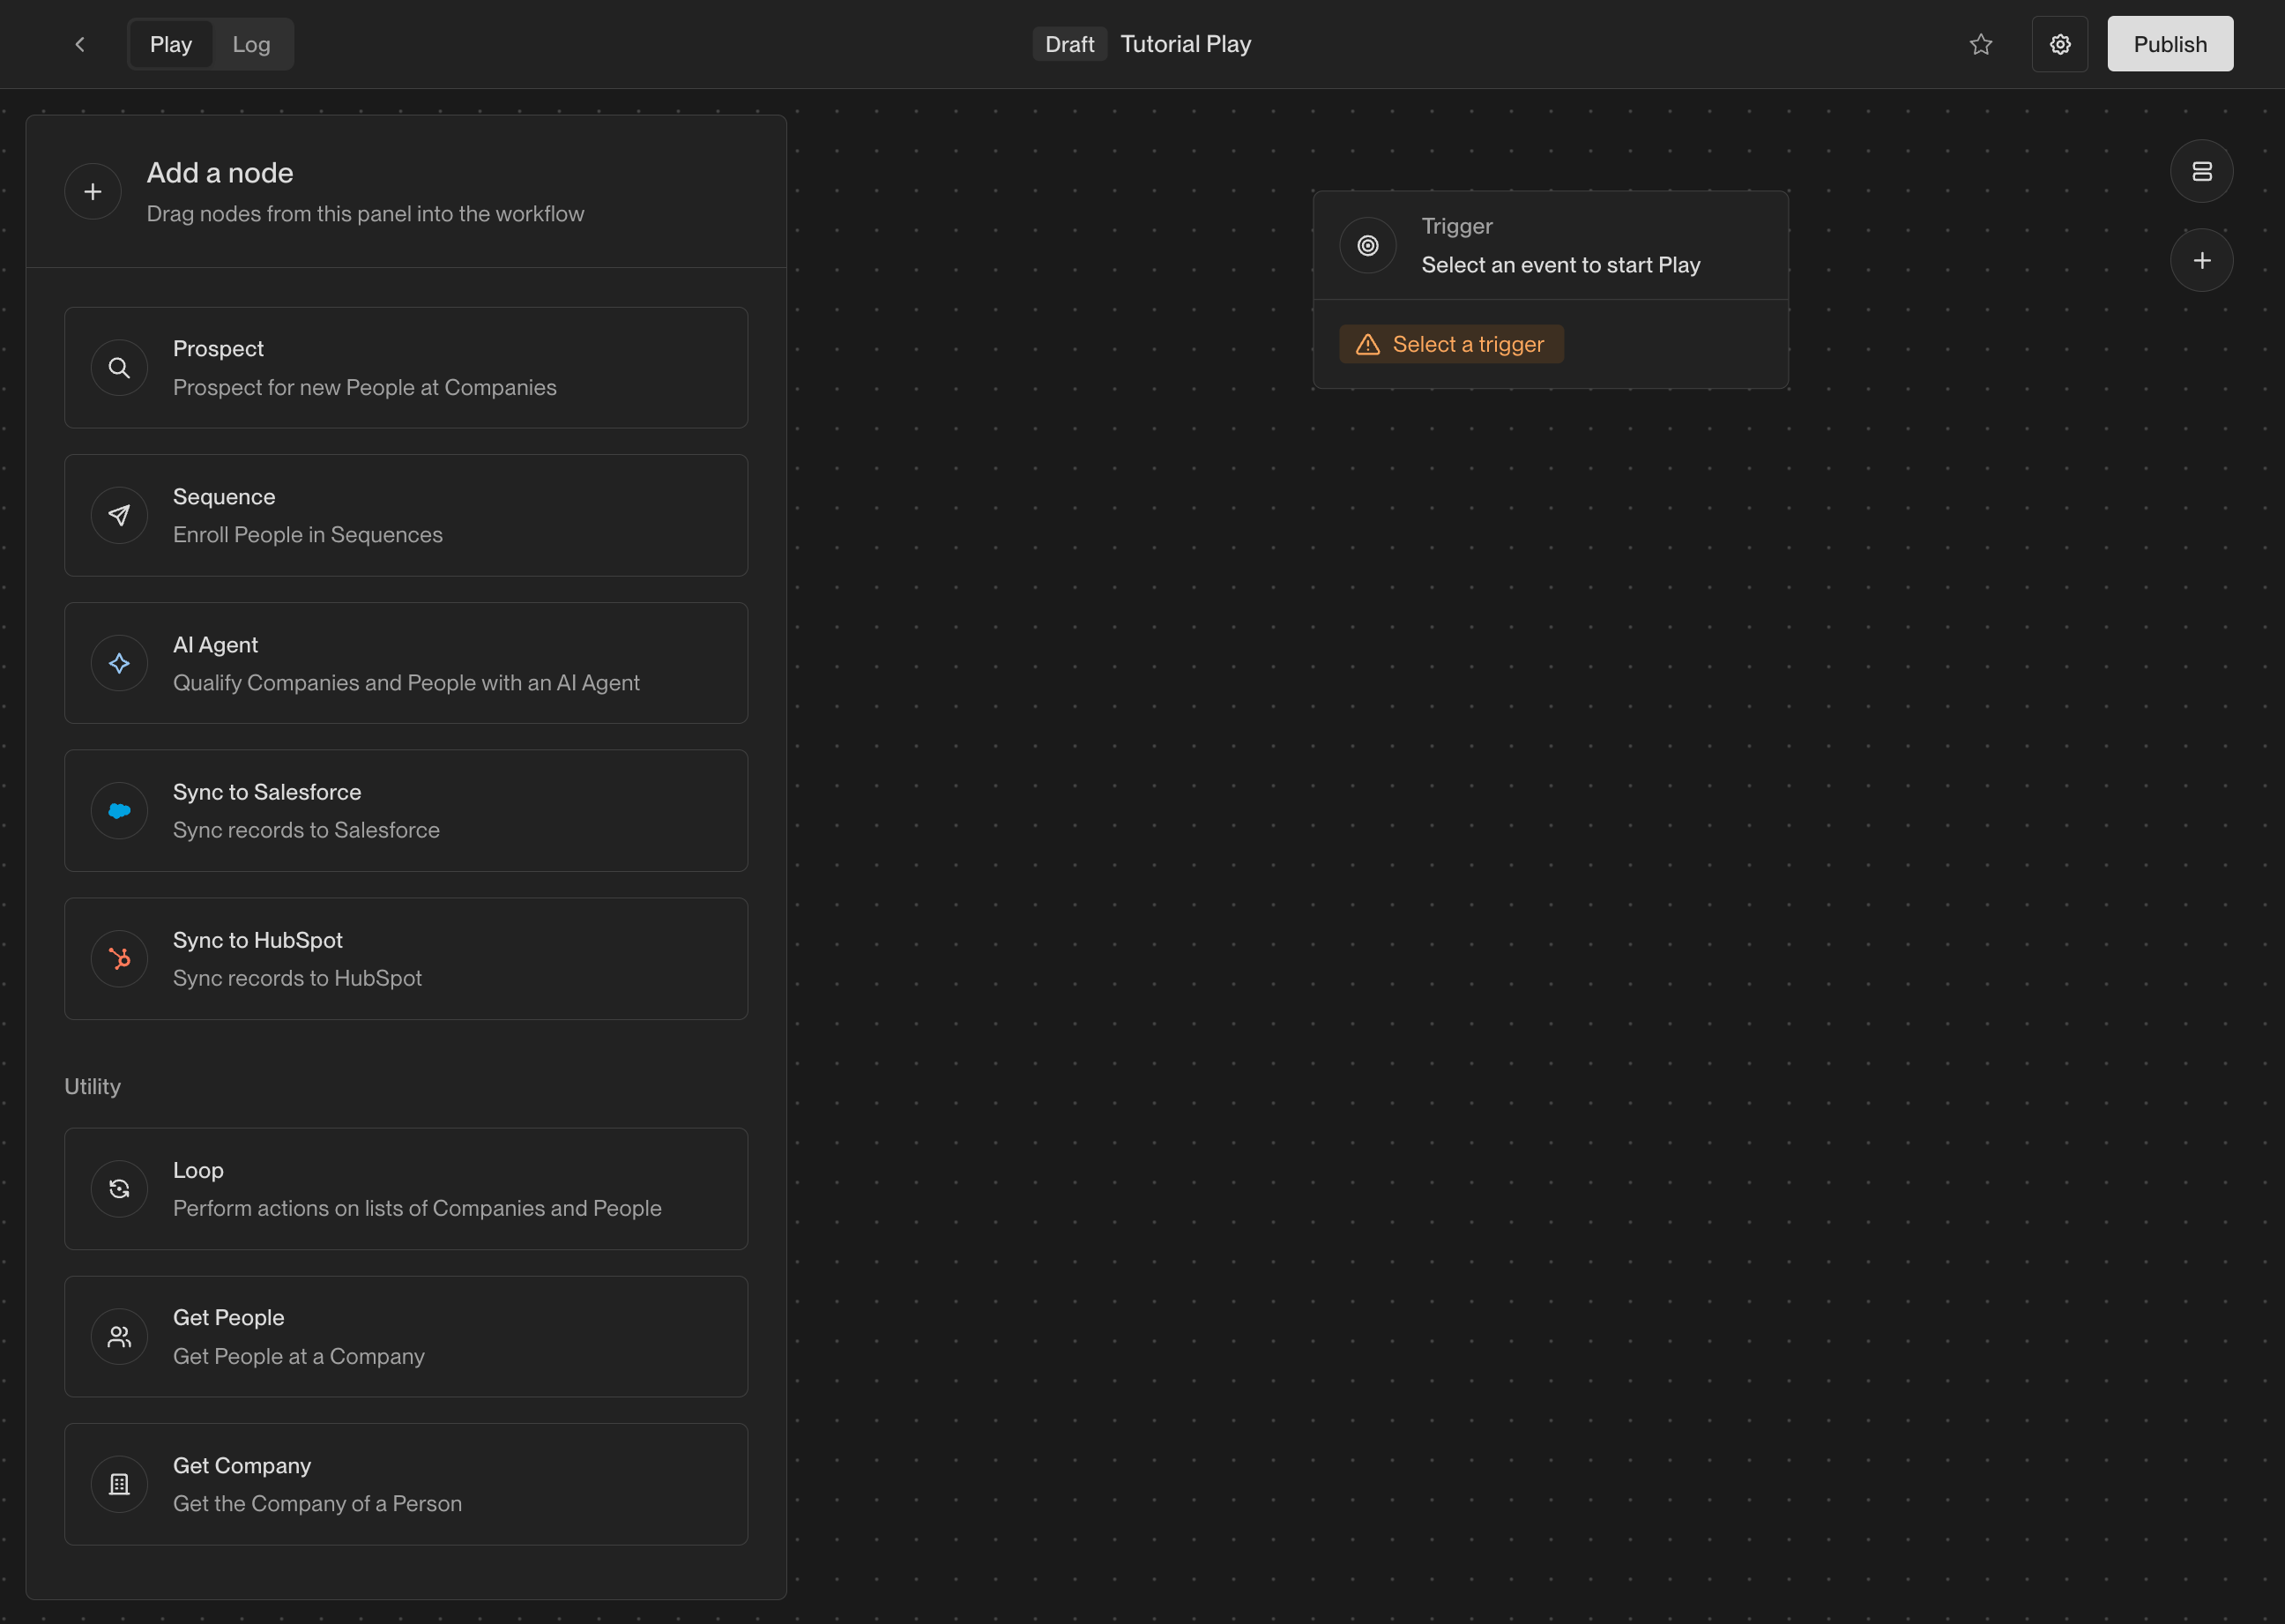 ### Step 2: Choose a trigger
Once you've created a new Play, you will see the Play Builder. The first step
when building any Play is to choose a *trigger*. The trigger lets you specify
exactly when the Play should run and which companies or people it should run on.
In the center of the builder, you will see an action that says **Select a trigger**.
Click on it to show the trigger configuration panel. For this Play, choose the
**Website visitors** template.
### Step 2: Choose a trigger
Once you've created a new Play, you will see the Play Builder. The first step
when building any Play is to choose a *trigger*. The trigger lets you specify
exactly when the Play should run and which companies or people it should run on.
In the center of the builder, you will see an action that says **Select a trigger**.
Click on it to show the trigger configuration panel. For this Play, choose the
**Website visitors** template.
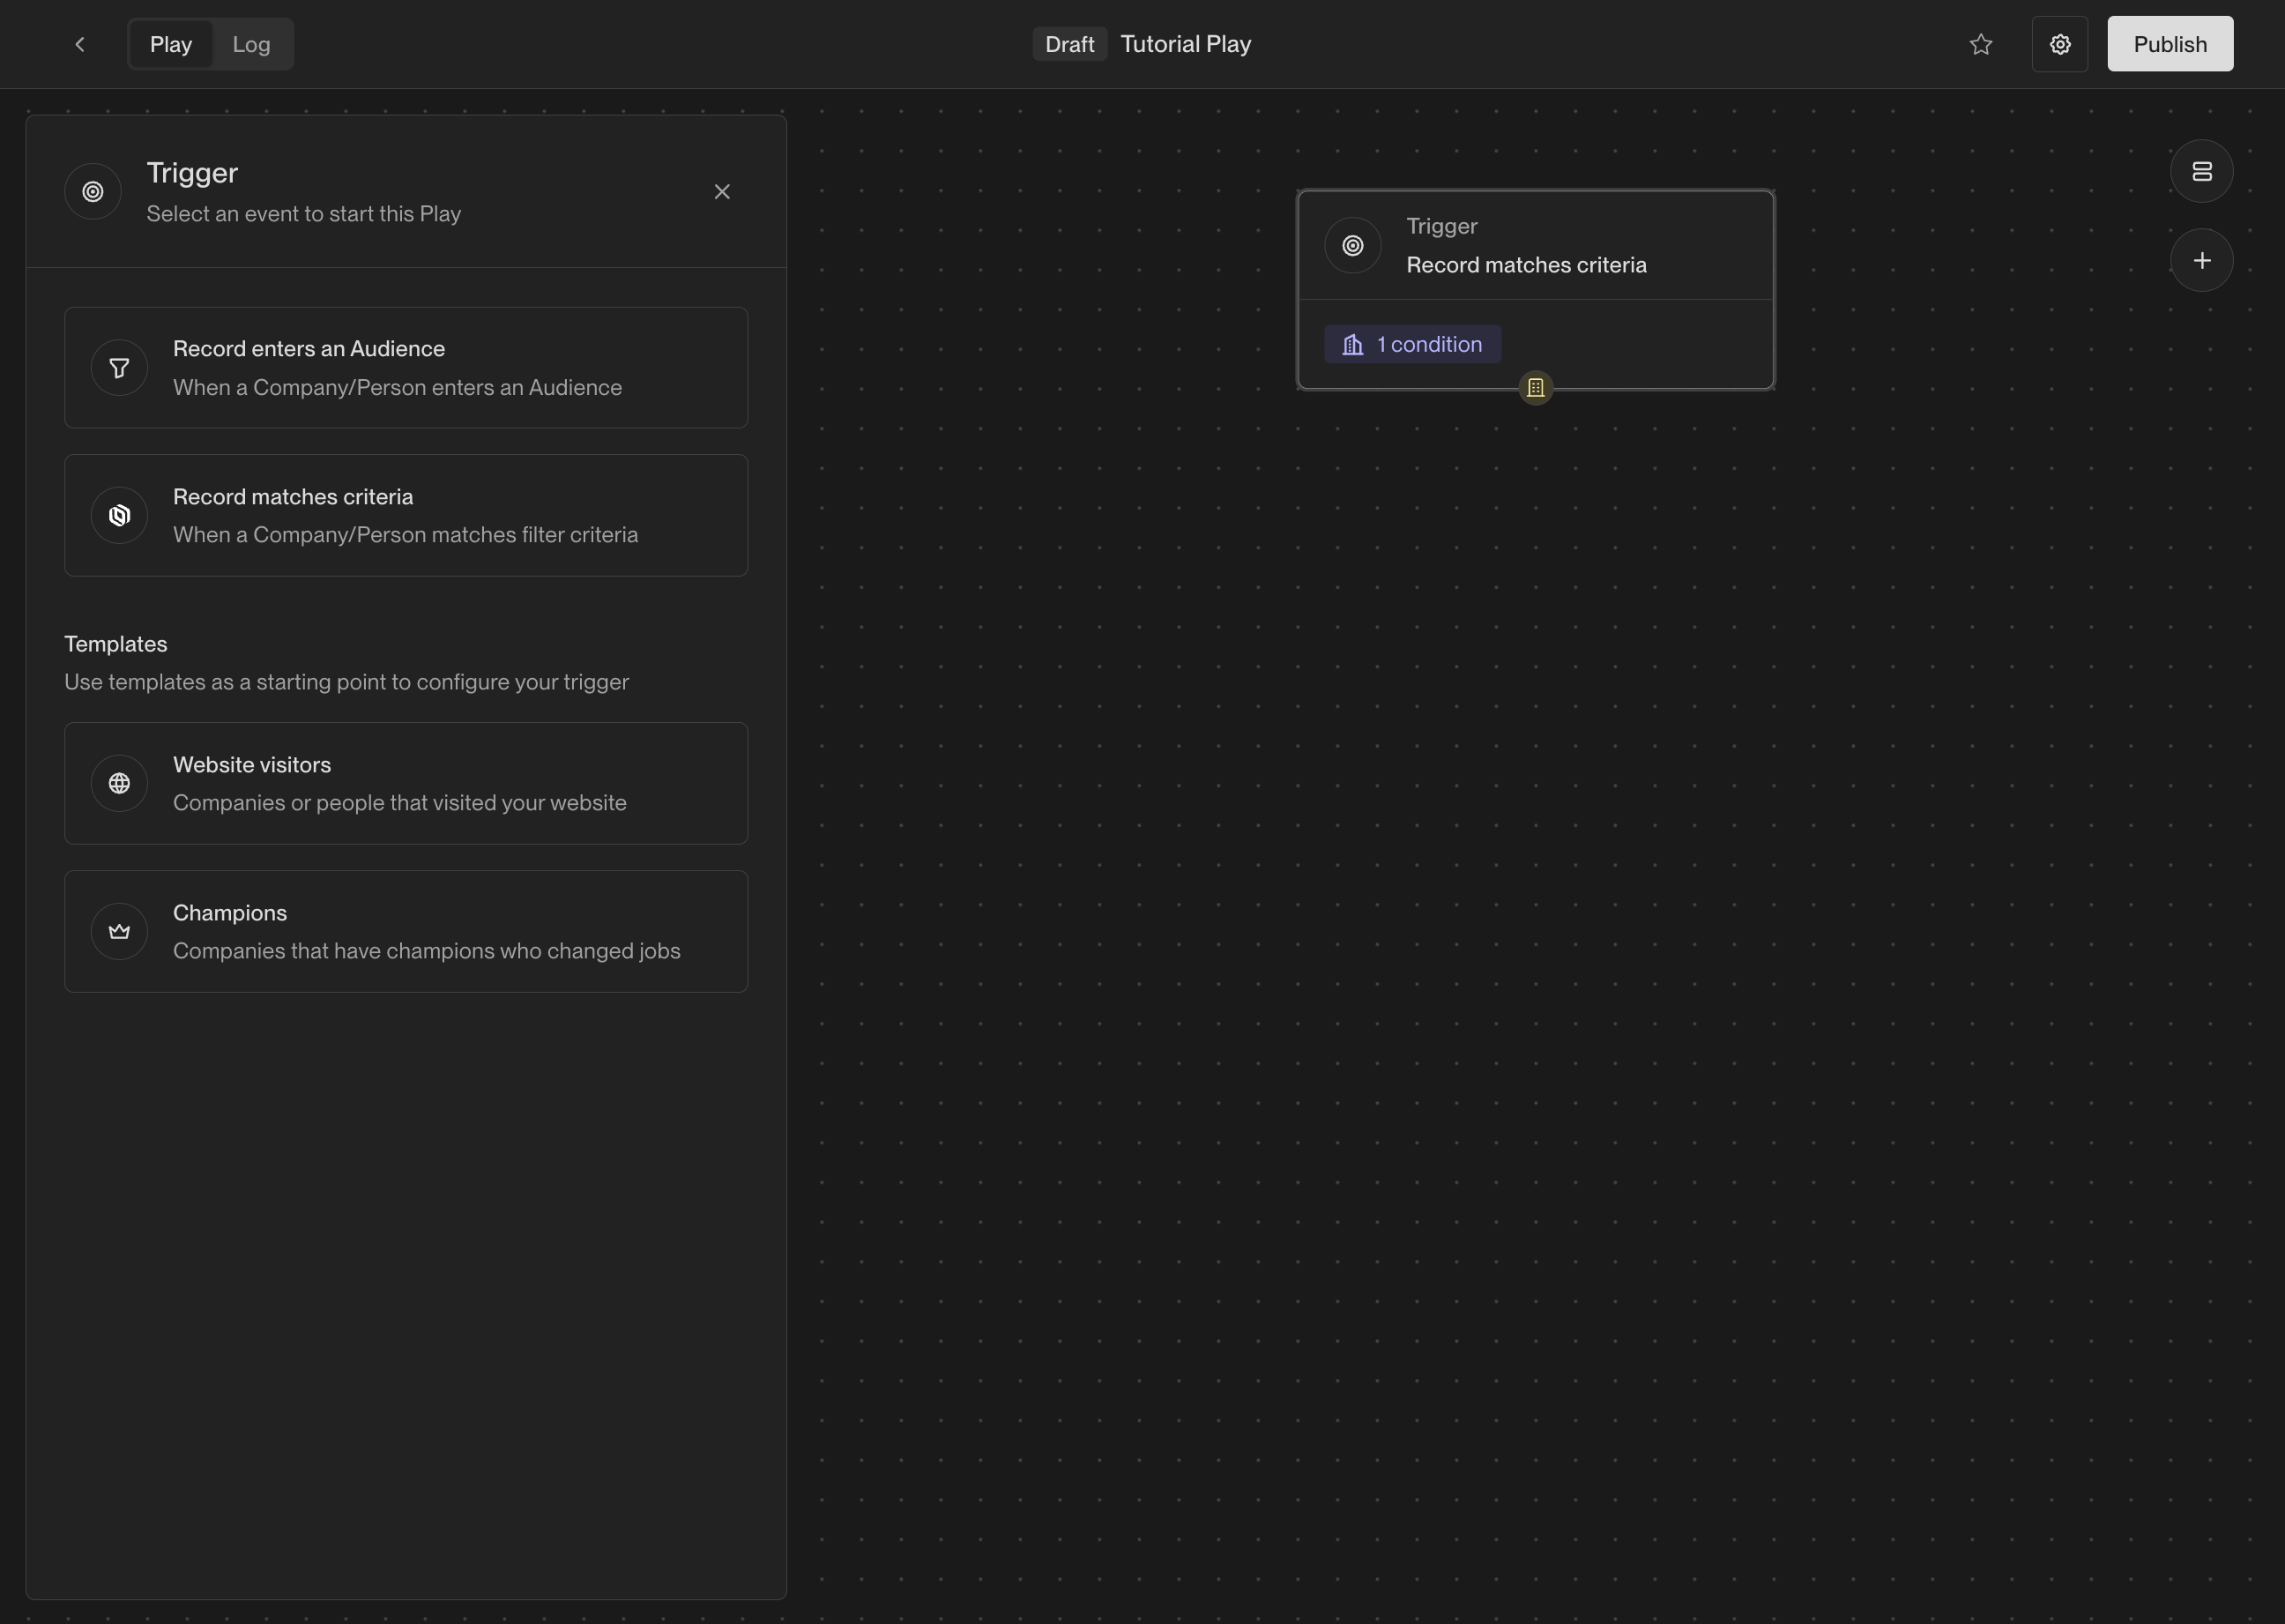
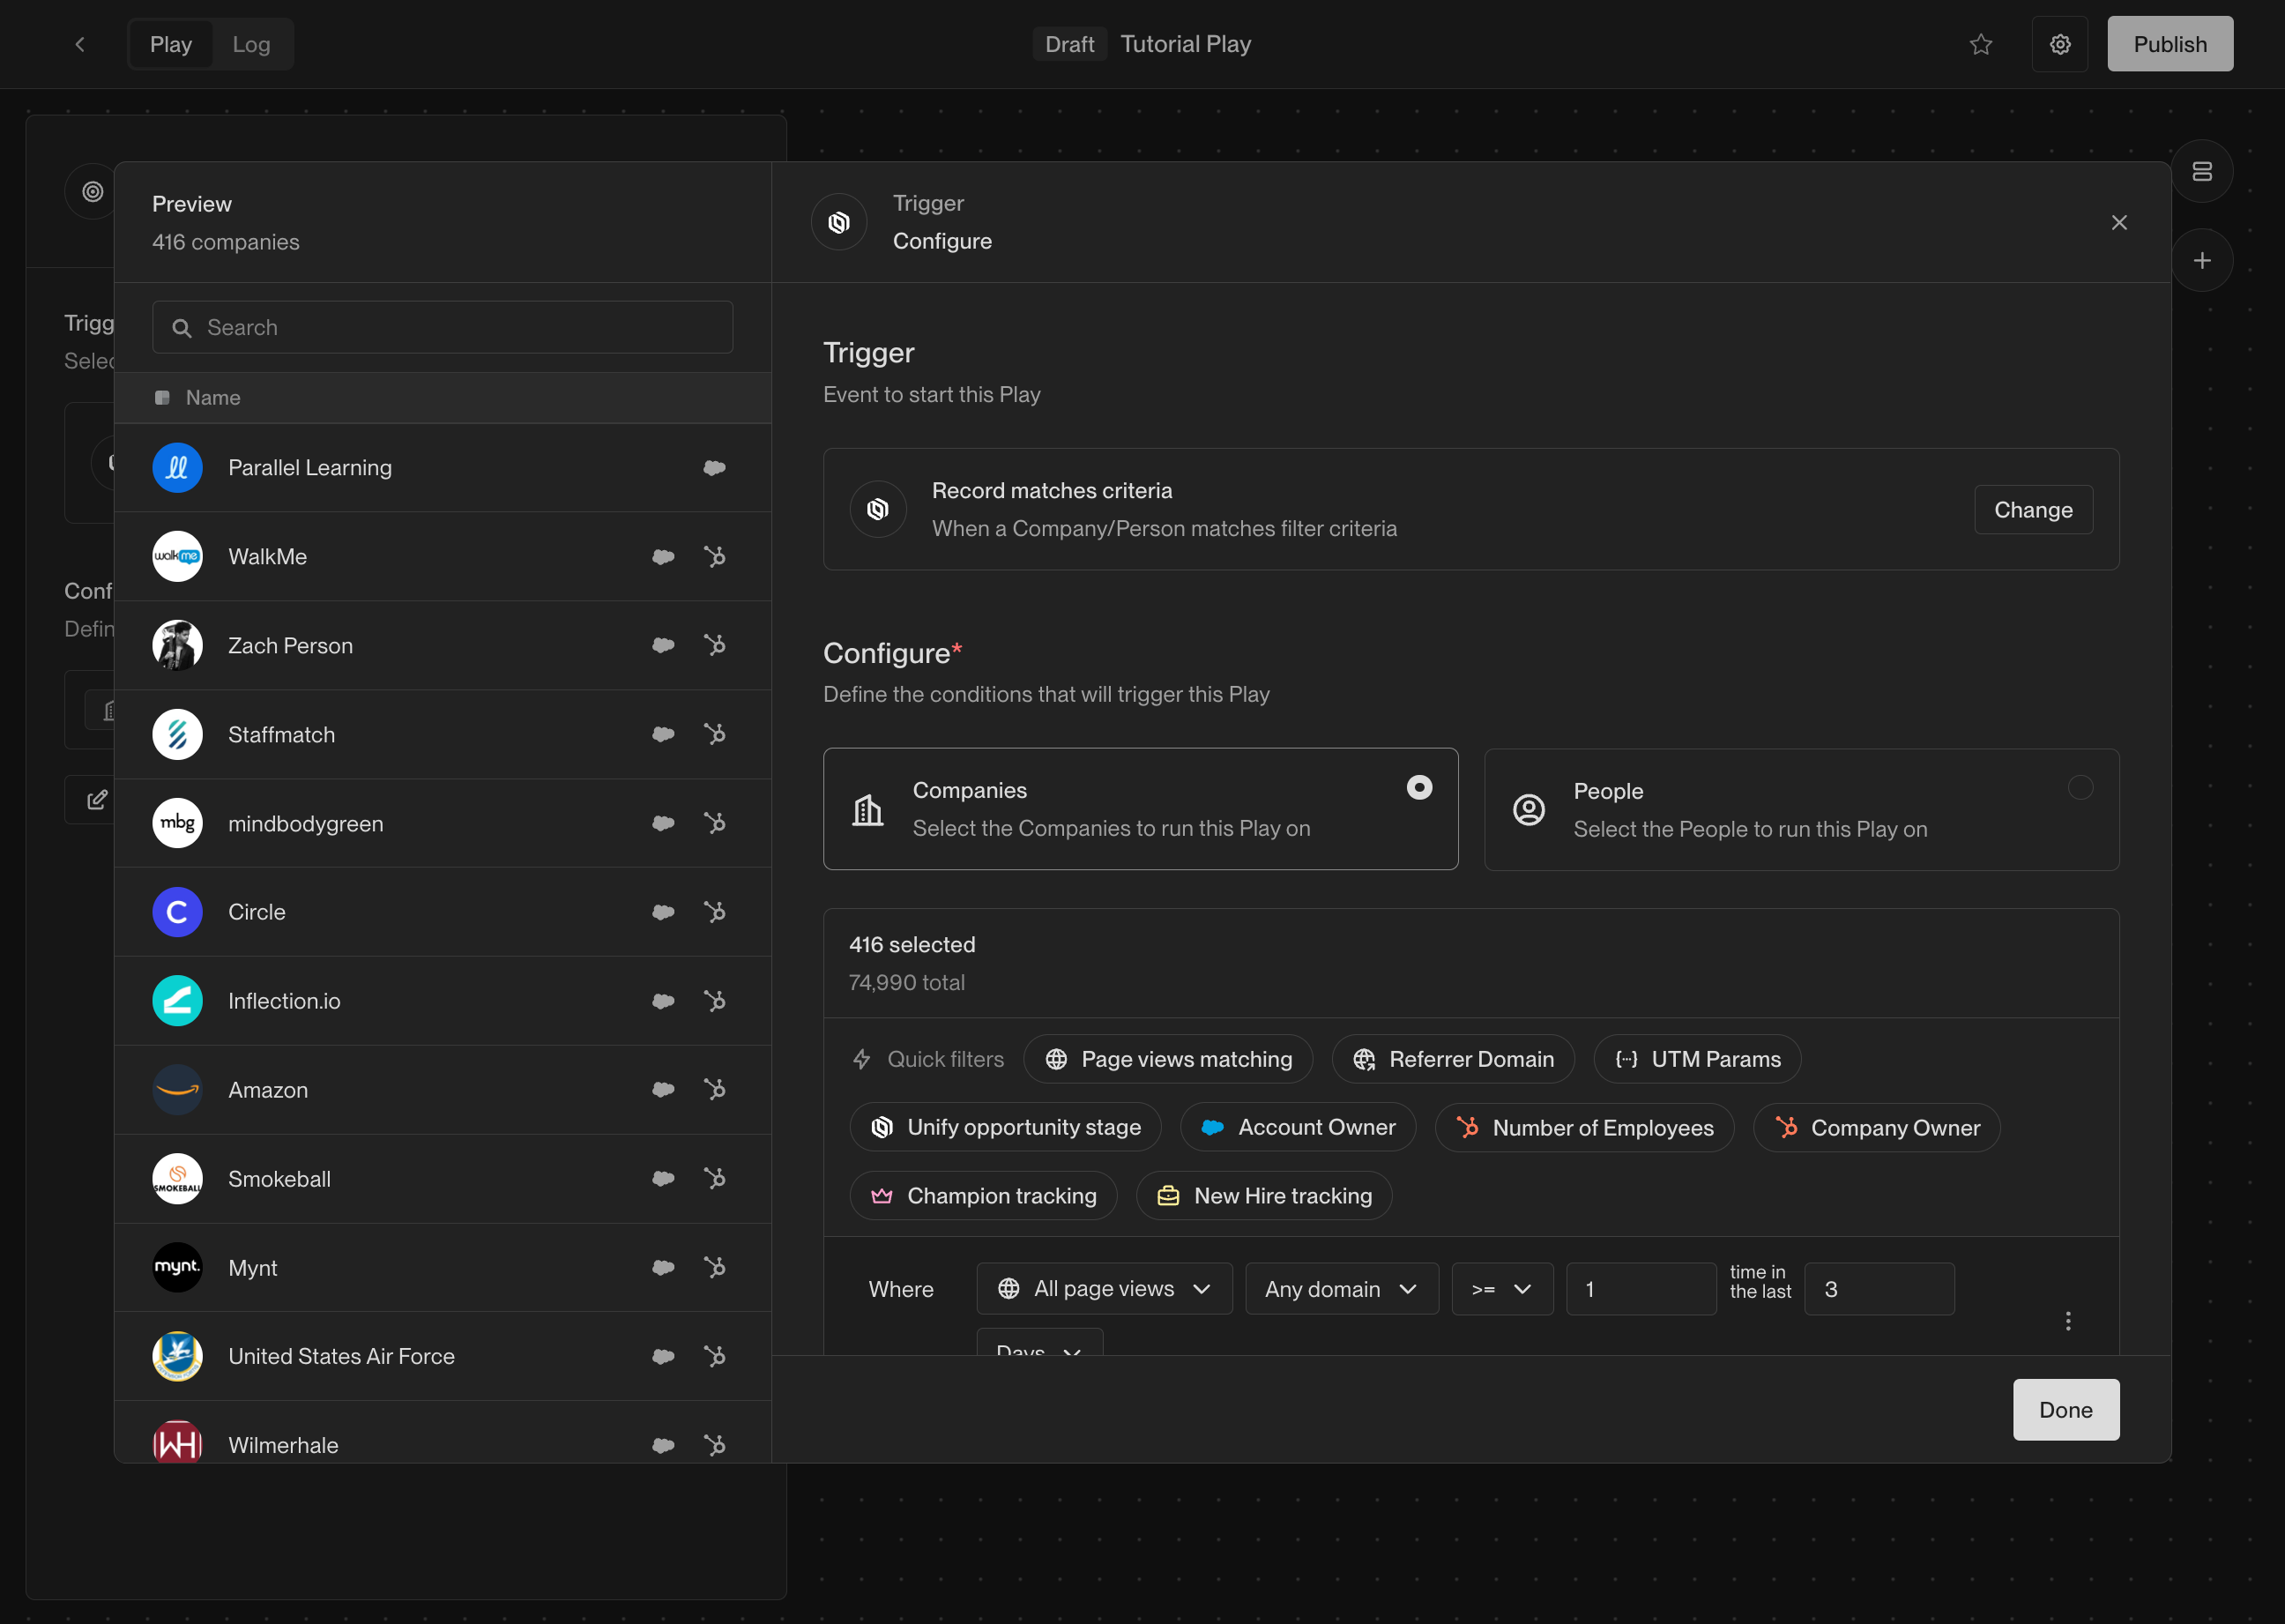 Here you have the option to further filter and refine the companies that this
Play will run on. For example, if you only want to run this Play on companies
with more than 100 employees, you can add a filter on **Employee Count**.
You can learn more about the available filters and how to use them in the tutorial
[How to Create an Audience](/tutorials/how-to-create-an-audience). You can always
return later to add or modify filters. Click **Done** to finish configuring the
trigger.
### Step 3: Add actions
Now that the trigger has been selected, it's time to start adding actions. There
are many actions to choose from, and you can configure them in countless ways.
For this Play, we're going to start simple and add three actions.
#### Prospect for people
Start by adding a prospecting action. This action will take the company coming
from the trigger and search for relevant prospects. Drag the **Prospect for People**
action from the action list and drop it into the builder.
Here you have the option to further filter and refine the companies that this
Play will run on. For example, if you only want to run this Play on companies
with more than 100 employees, you can add a filter on **Employee Count**.
You can learn more about the available filters and how to use them in the tutorial
[How to Create an Audience](/tutorials/how-to-create-an-audience). You can always
return later to add or modify filters. Click **Done** to finish configuring the
trigger.
### Step 3: Add actions
Now that the trigger has been selected, it's time to start adding actions. There
are many actions to choose from, and you can configure them in countless ways.
For this Play, we're going to start simple and add three actions.
#### Prospect for people
Start by adding a prospecting action. This action will take the company coming
from the trigger and search for relevant prospects. Drag the **Prospect for People**
action from the action list and drop it into the builder.
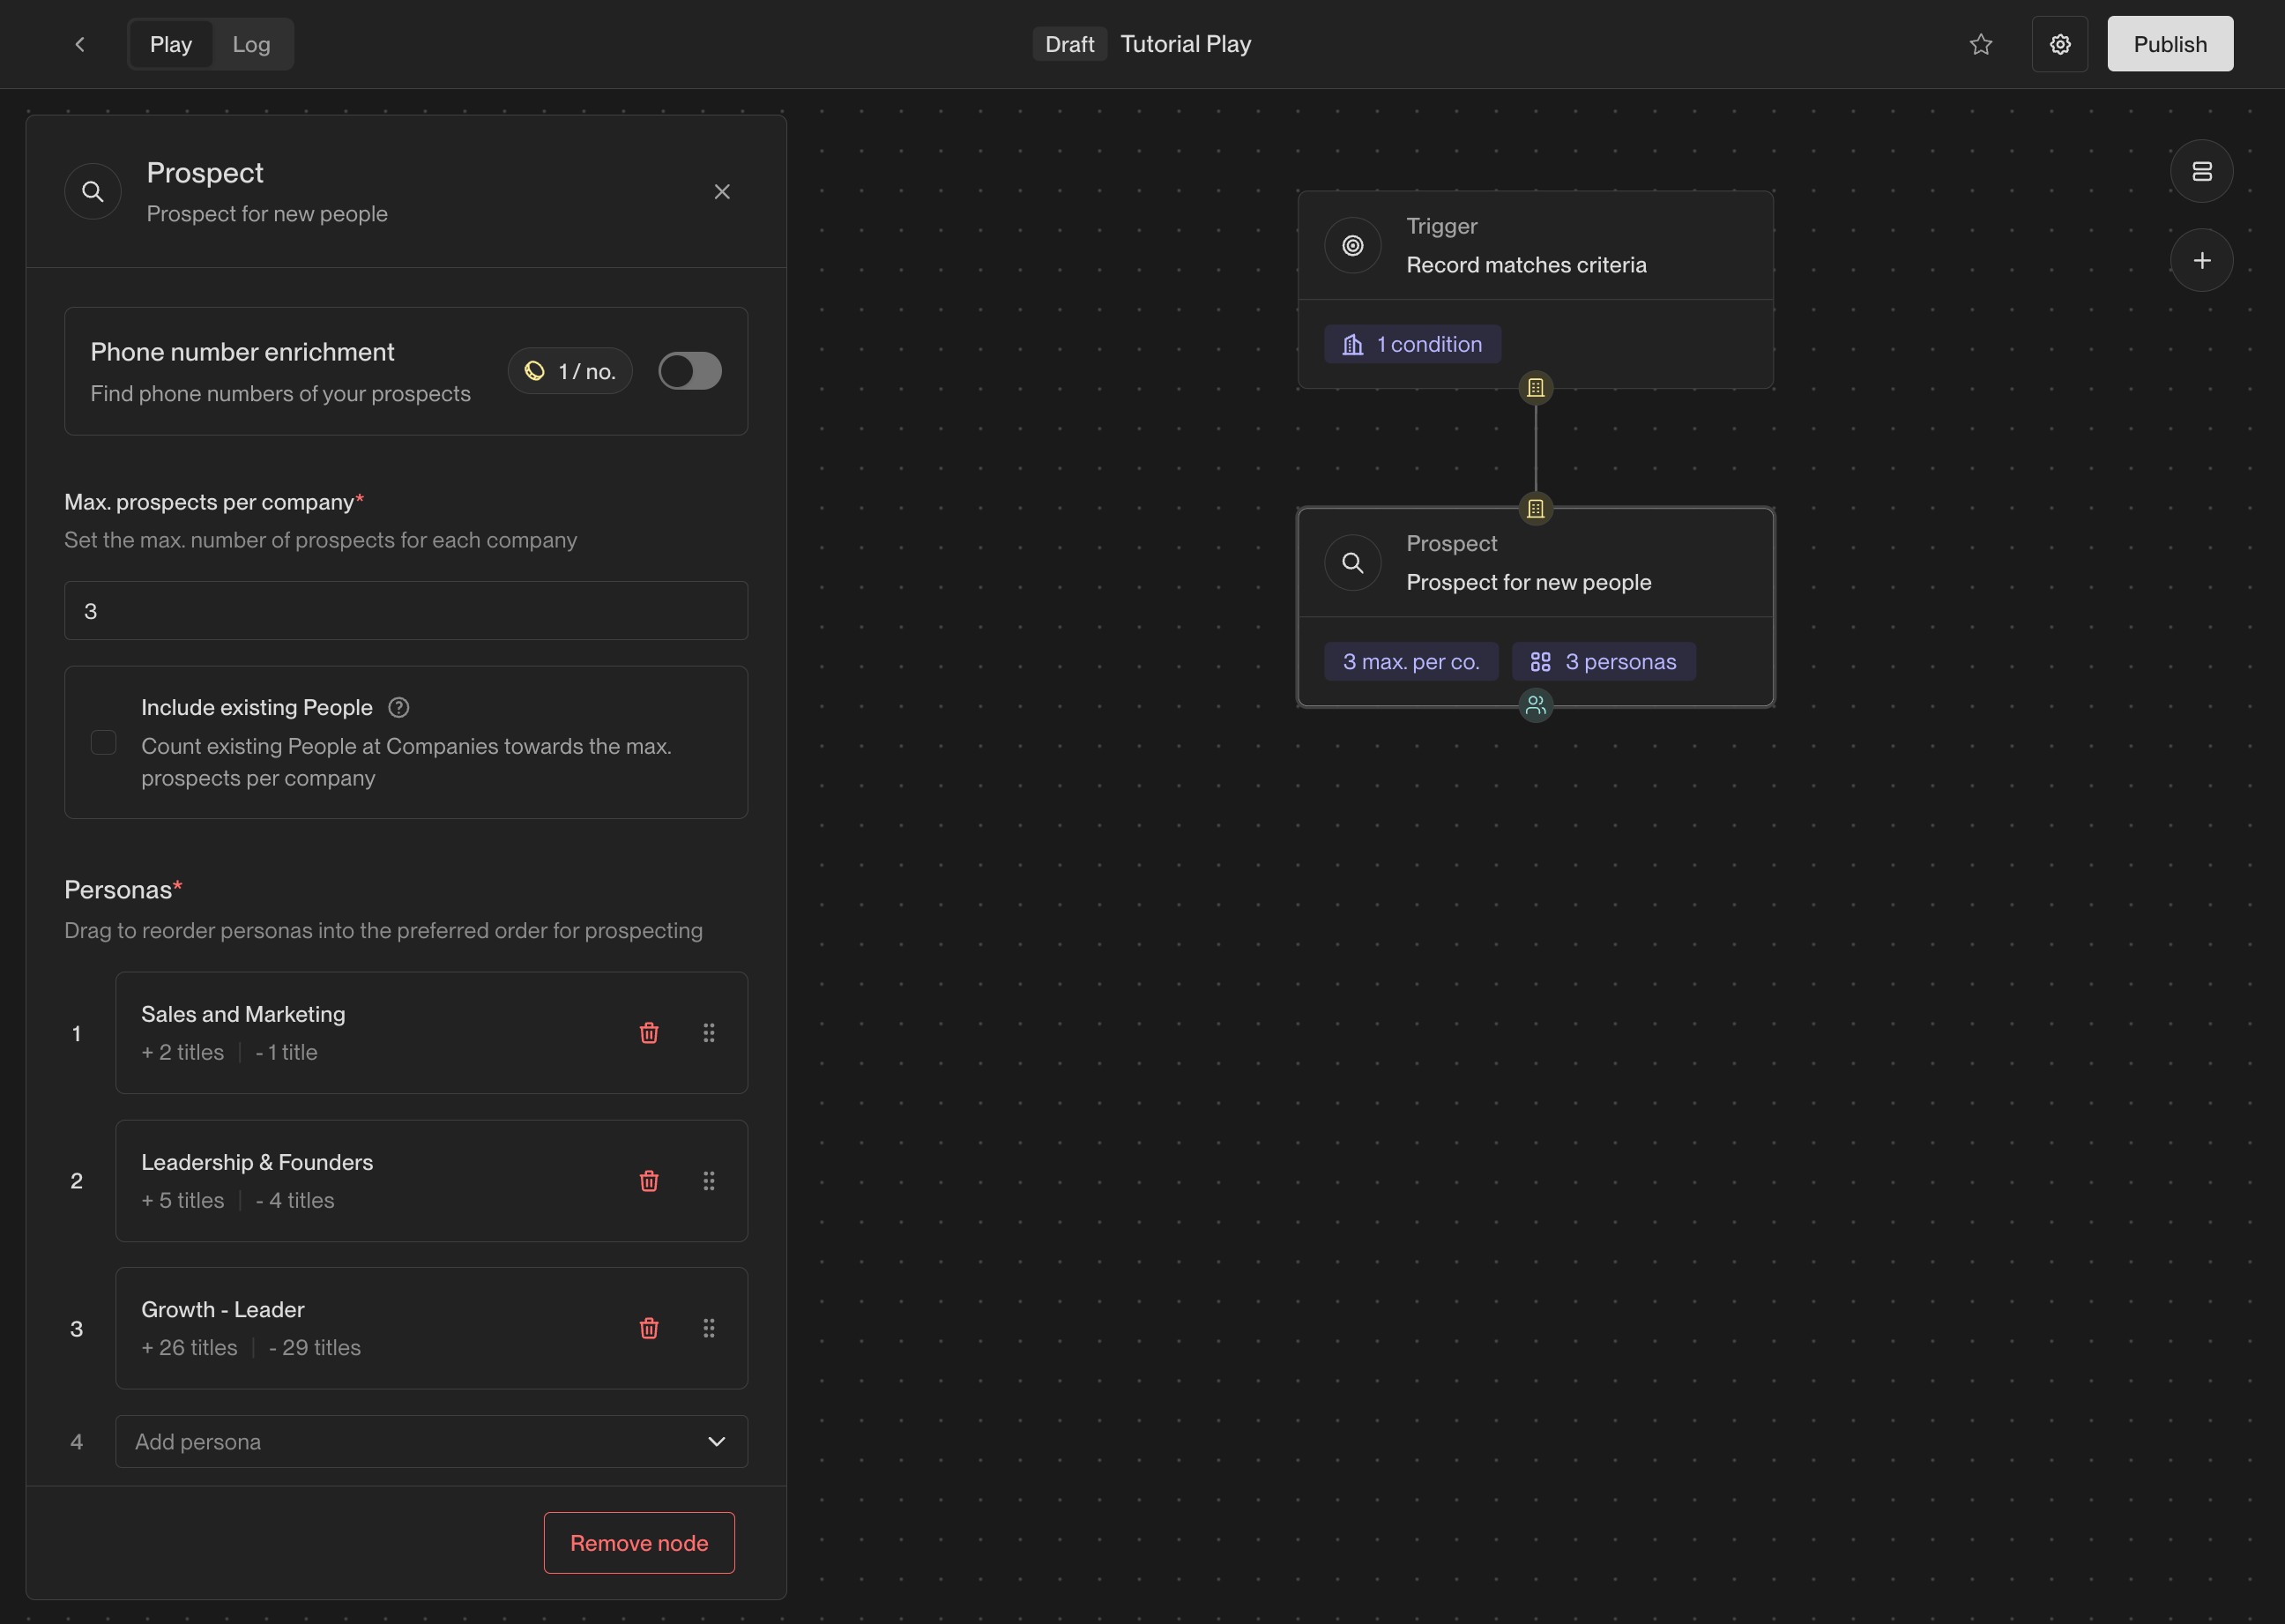 Once added, you will see the prospecting options shown in the configuration
panel on the left. Here are the most important selections to make:
* **Max. prospects per company**: This is how many prospects you want to find at
each company. We recommend starting with 2-4 prospects per company.
* **Personas**: These are the personas to search for. You can select from
existing personas or create new ones. Unify will find people matching these
personas in order, so list them in order of preference.
If you haven't defined any personas yet, you can learn how to do so in the
tutorial [How to Create Personas](/tutorials/how-to-use-personas).
#### Loop
Next, add a **Loop** action. The prospecting action will return a list of people
found at the company, and the loop will run subsequent actions once for each
person in the list.
Once added, you will see the prospecting options shown in the configuration
panel on the left. Here are the most important selections to make:
* **Max. prospects per company**: This is how many prospects you want to find at
each company. We recommend starting with 2-4 prospects per company.
* **Personas**: These are the personas to search for. You can select from
existing personas or create new ones. Unify will find people matching these
personas in order, so list them in order of preference.
If you haven't defined any personas yet, you can learn how to do so in the
tutorial [How to Create Personas](/tutorials/how-to-use-personas).
#### Loop
Next, add a **Loop** action. The prospecting action will return a list of people
found at the company, and the loop will run subsequent actions once for each
person in the list.
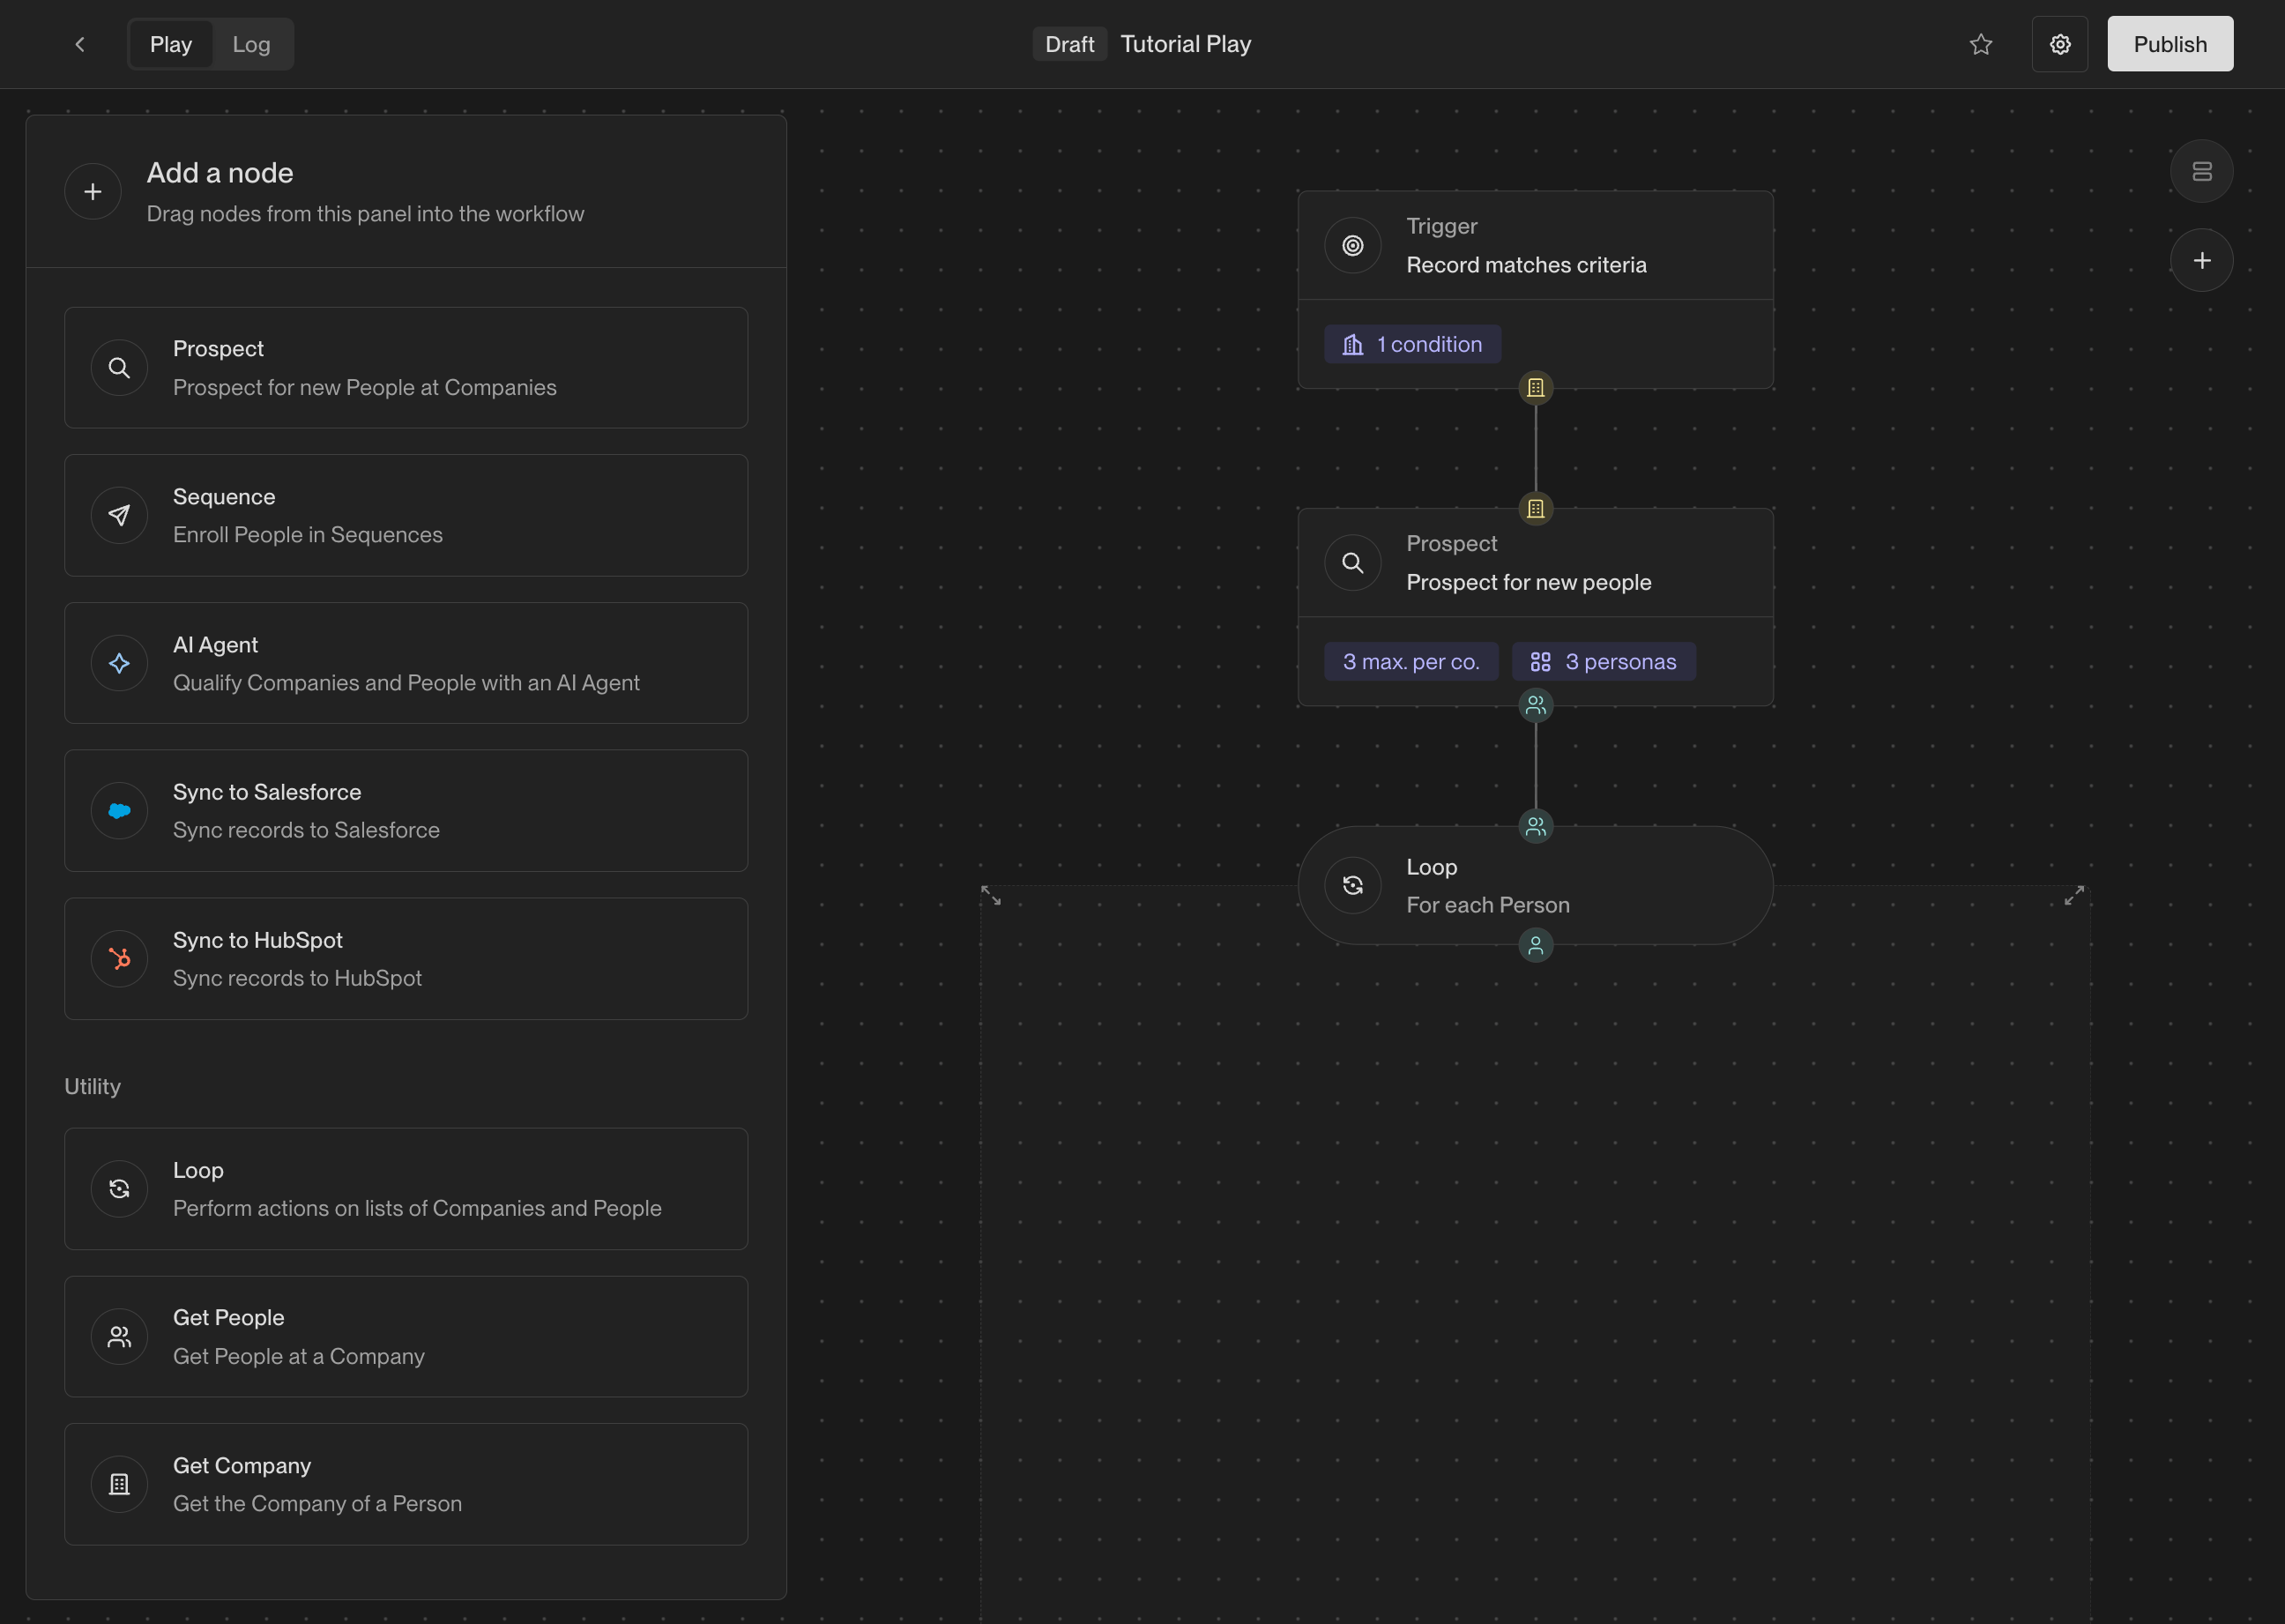 Each action receives an input and produces an output. Actions in the Play
Builder have small colored symbols that represent what type of input and output
they expect.
Here's what each symbol represents:
| Symbol | | Value |
| :-------------------------------------------------------------------------: | - | :------------------------------------ |
| {
Each action receives an input and produces an output. Actions in the Play
Builder have small colored symbols that represent what type of input and output
they expect.
Here's what each symbol represents:
| Symbol | | Value |
| :-------------------------------------------------------------------------: | - | :------------------------------------ |
| {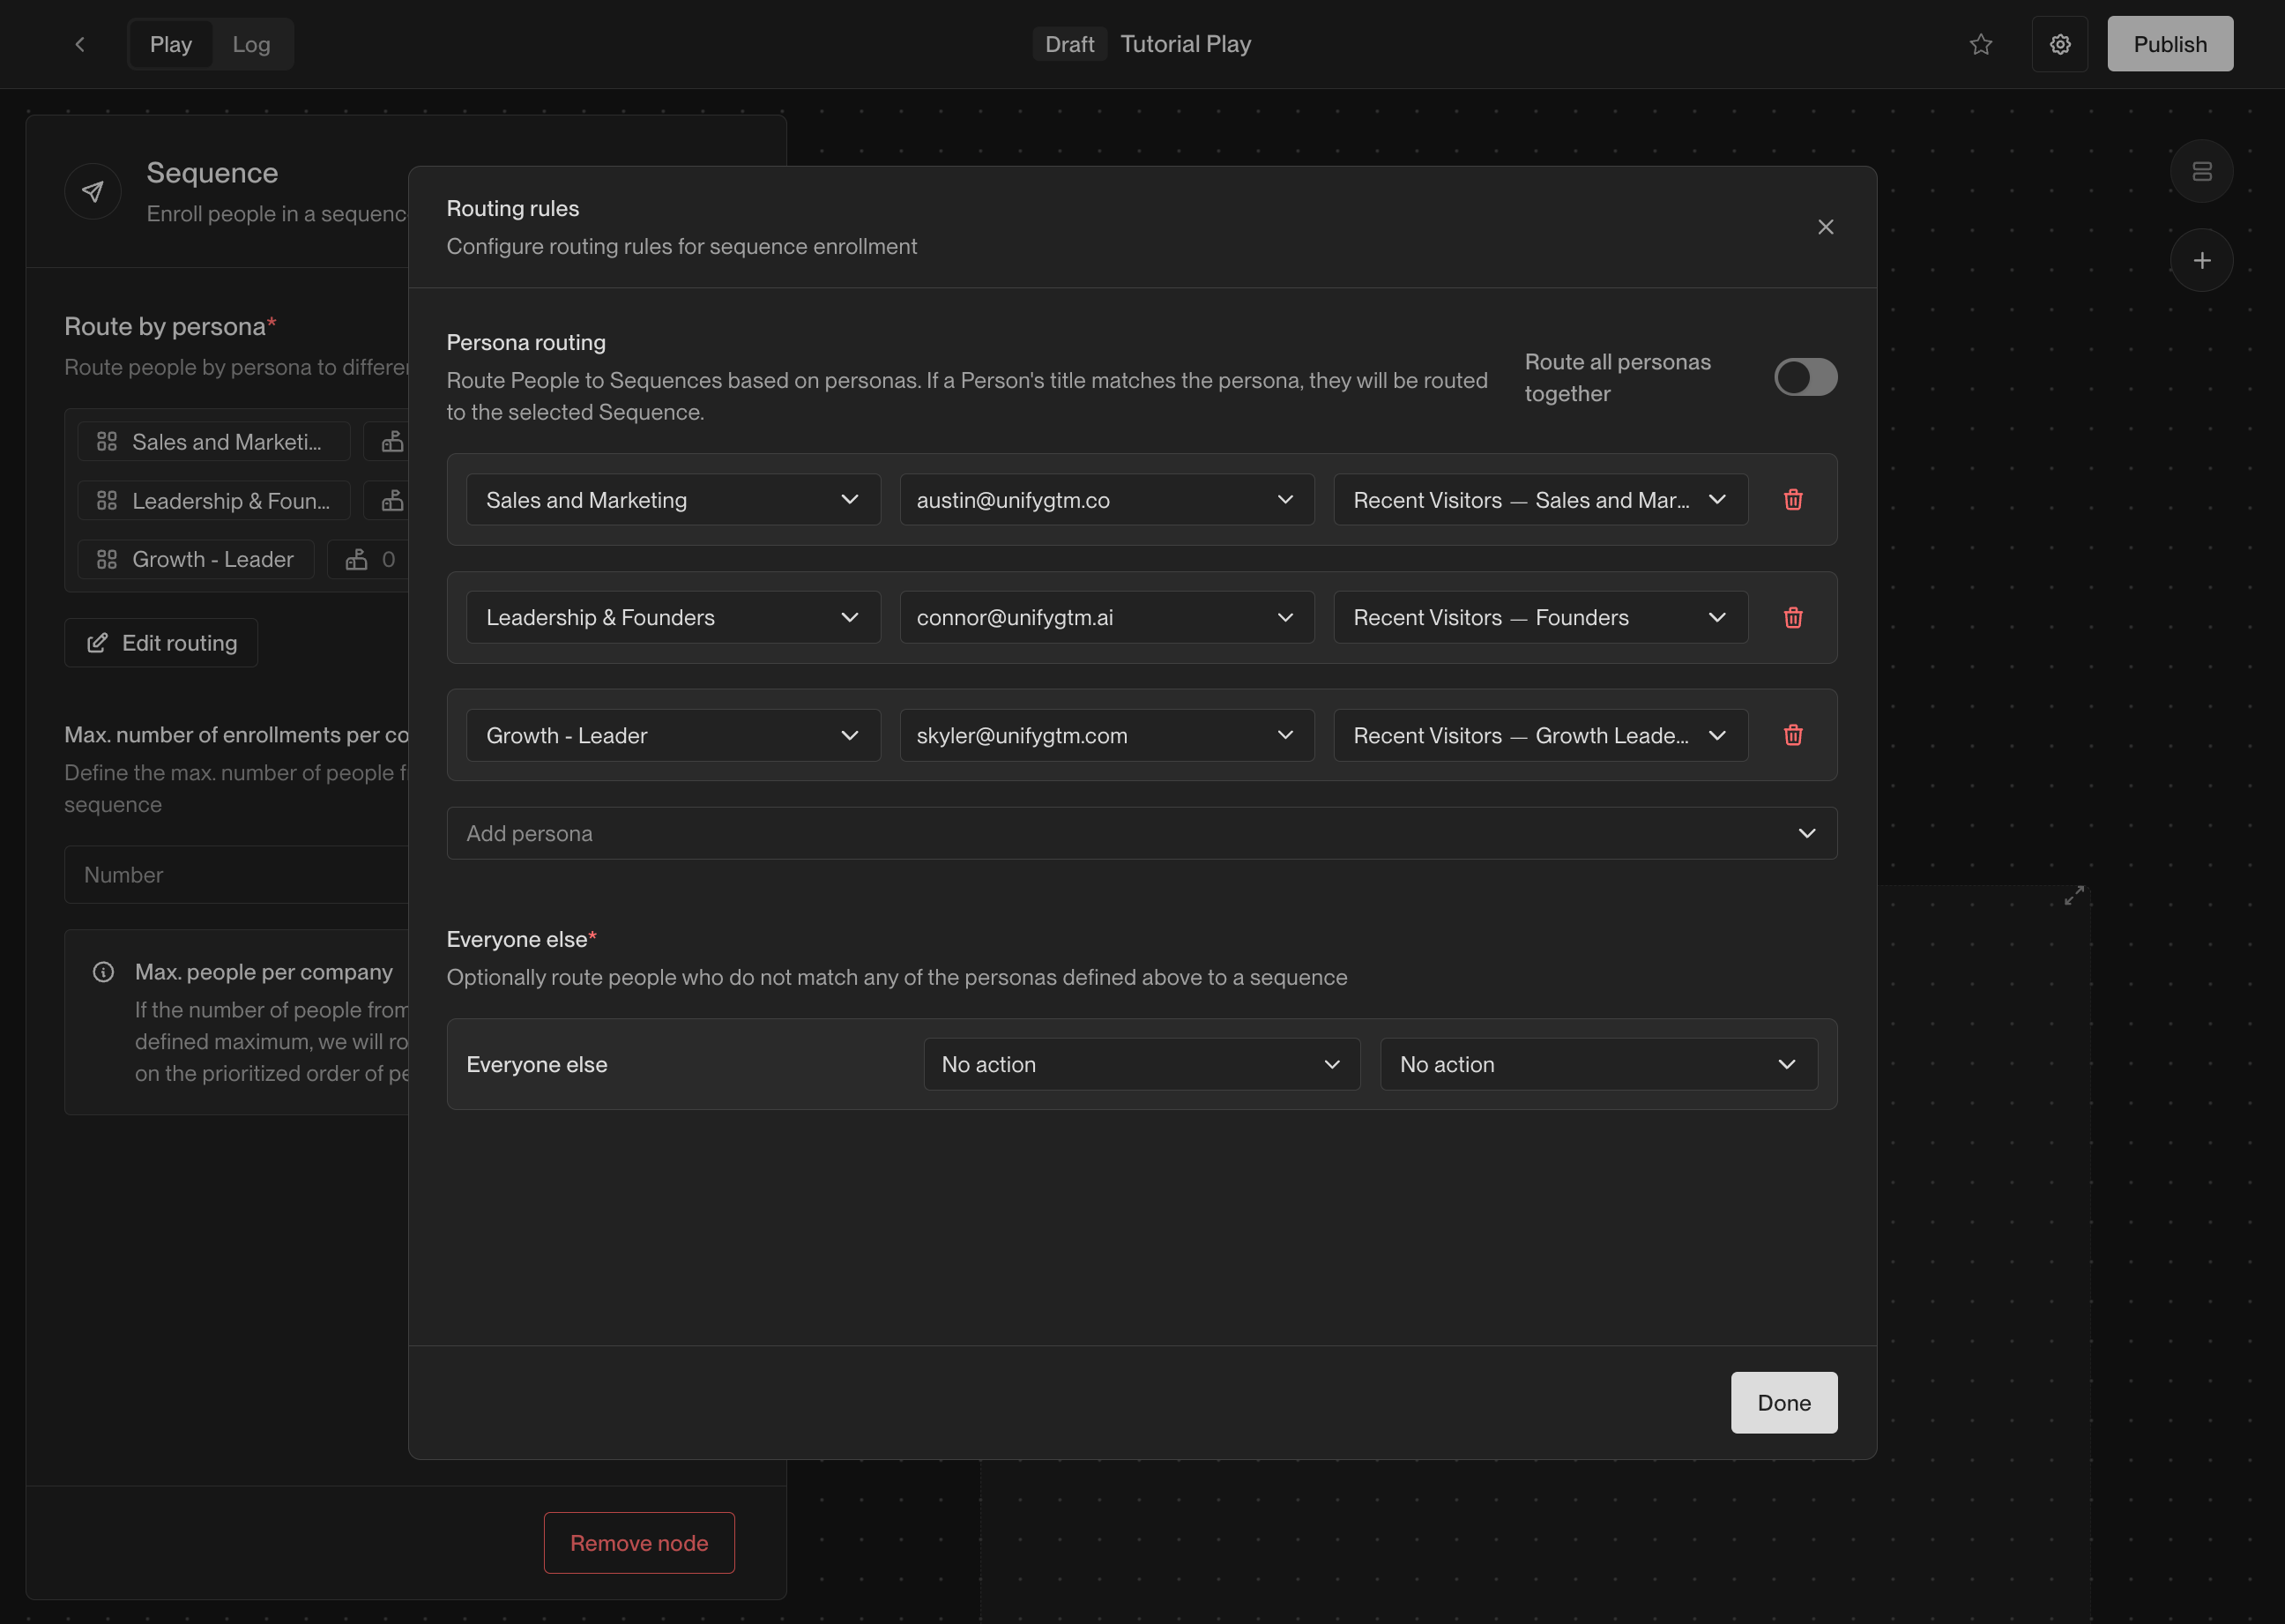
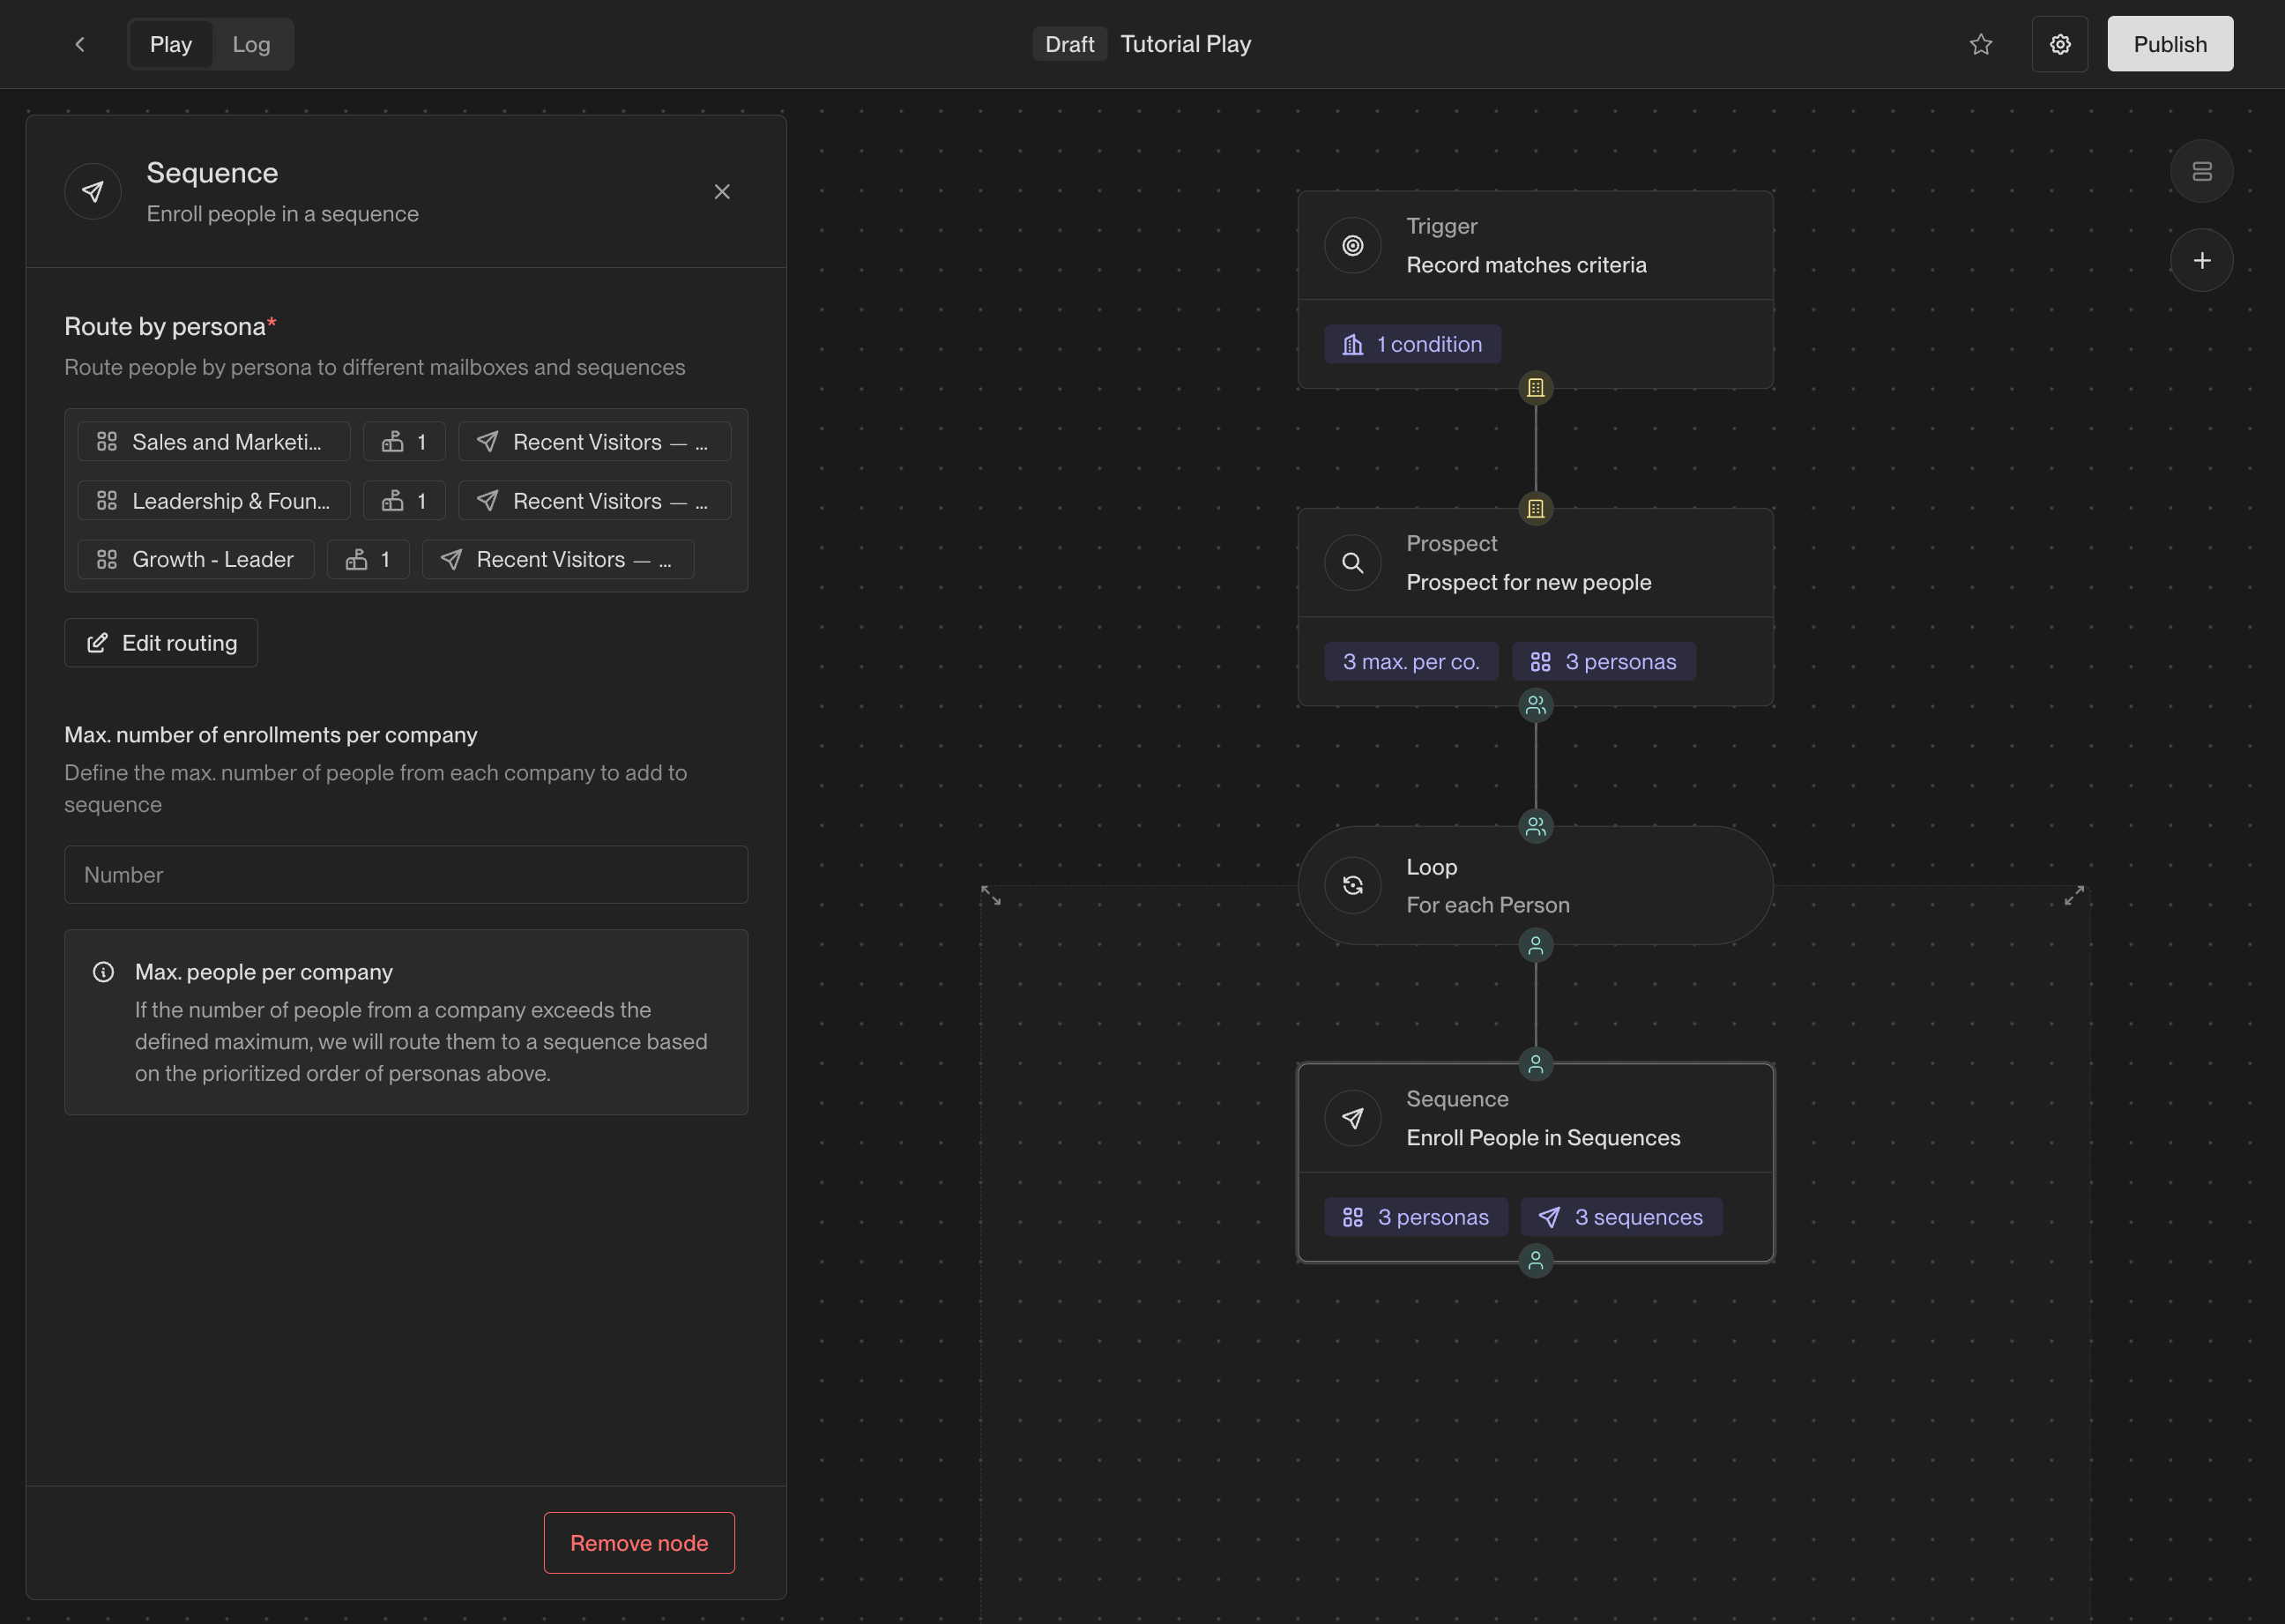 #### Sync to CRM
Finally, add an action to sync each new person to your CRM. Depending on which
CRM you've connected in Unify, you will see either a **Sync to Salesforce** or
**Sync to HubSpot** action.
#### Sync to CRM
Finally, add an action to sync each new person to your CRM. Depending on which
CRM you've connected in Unify, you will see either a **Sync to Salesforce** or
**Sync to HubSpot** action.
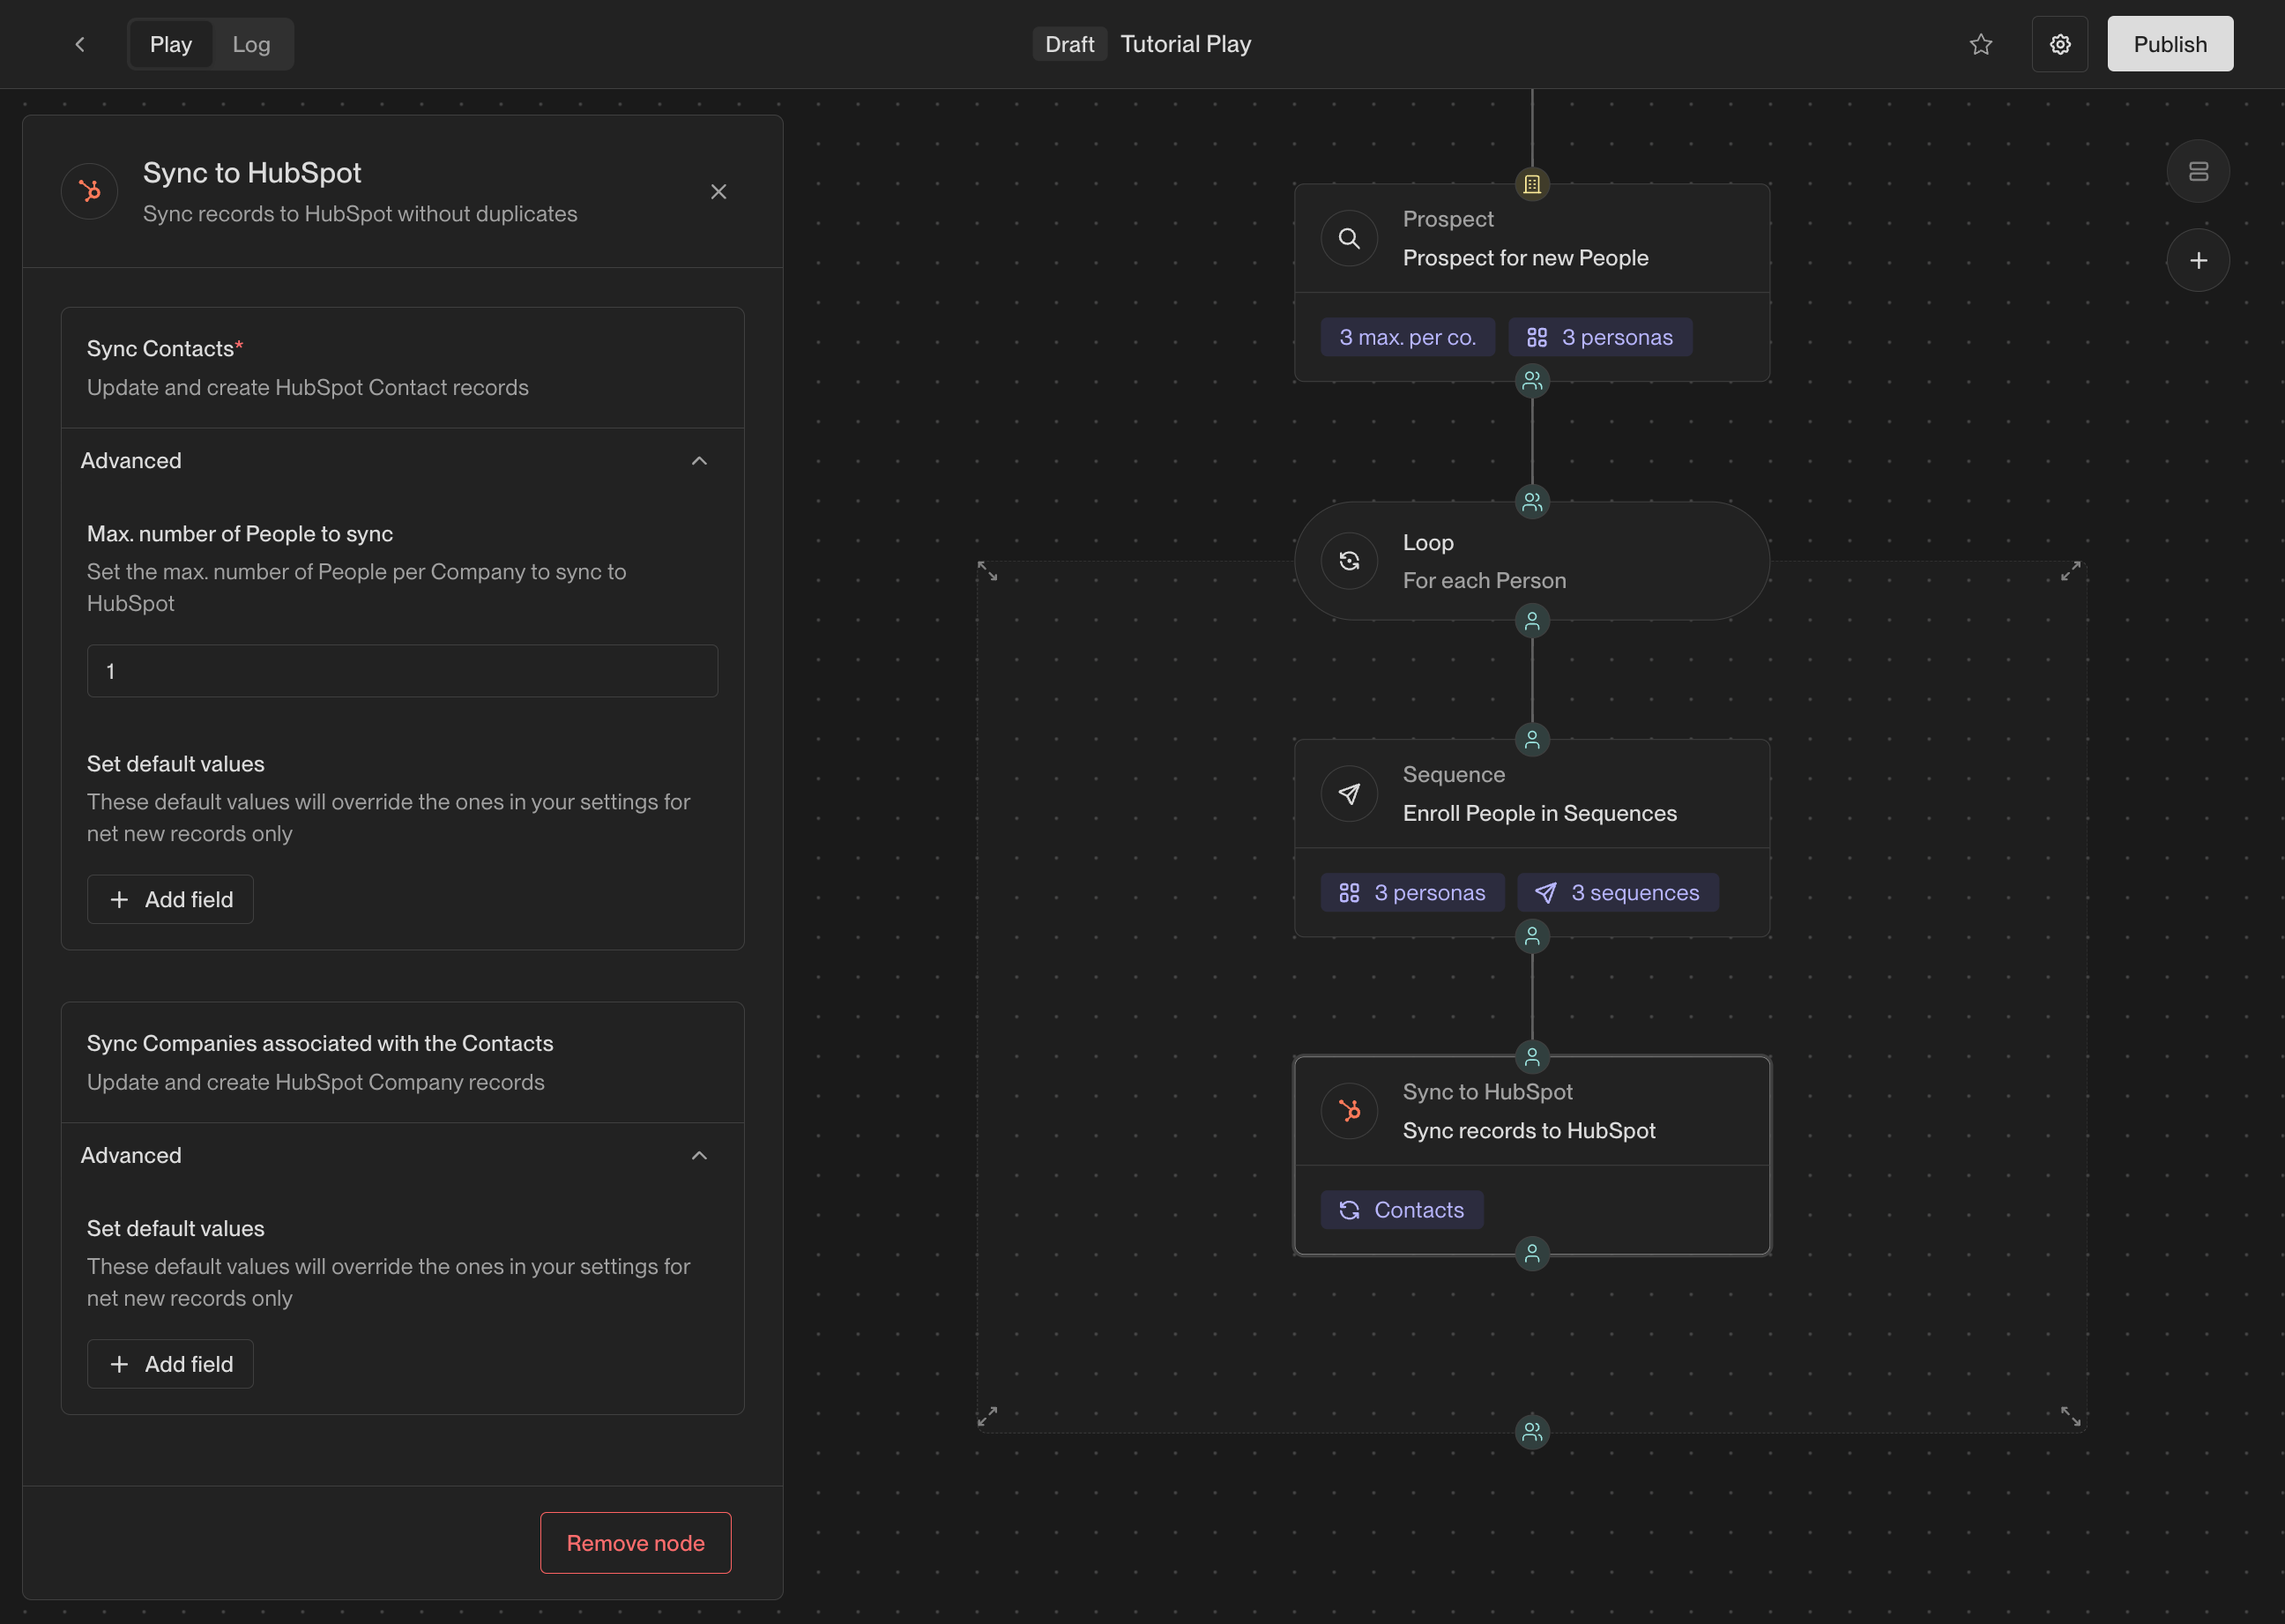 ### Step 4: Publish and view logs
Once your Play is ready, click the **Publish** button in the top right corner of
the Play Builder. This will activate the Play and start running it on companies
that match the trigger criteria you defined earlier.
### Step 4: Publish and view logs
Once your Play is ready, click the **Publish** button in the top right corner of
the Play Builder. This will activate the Play and start running it on companies
that match the trigger criteria you defined earlier.
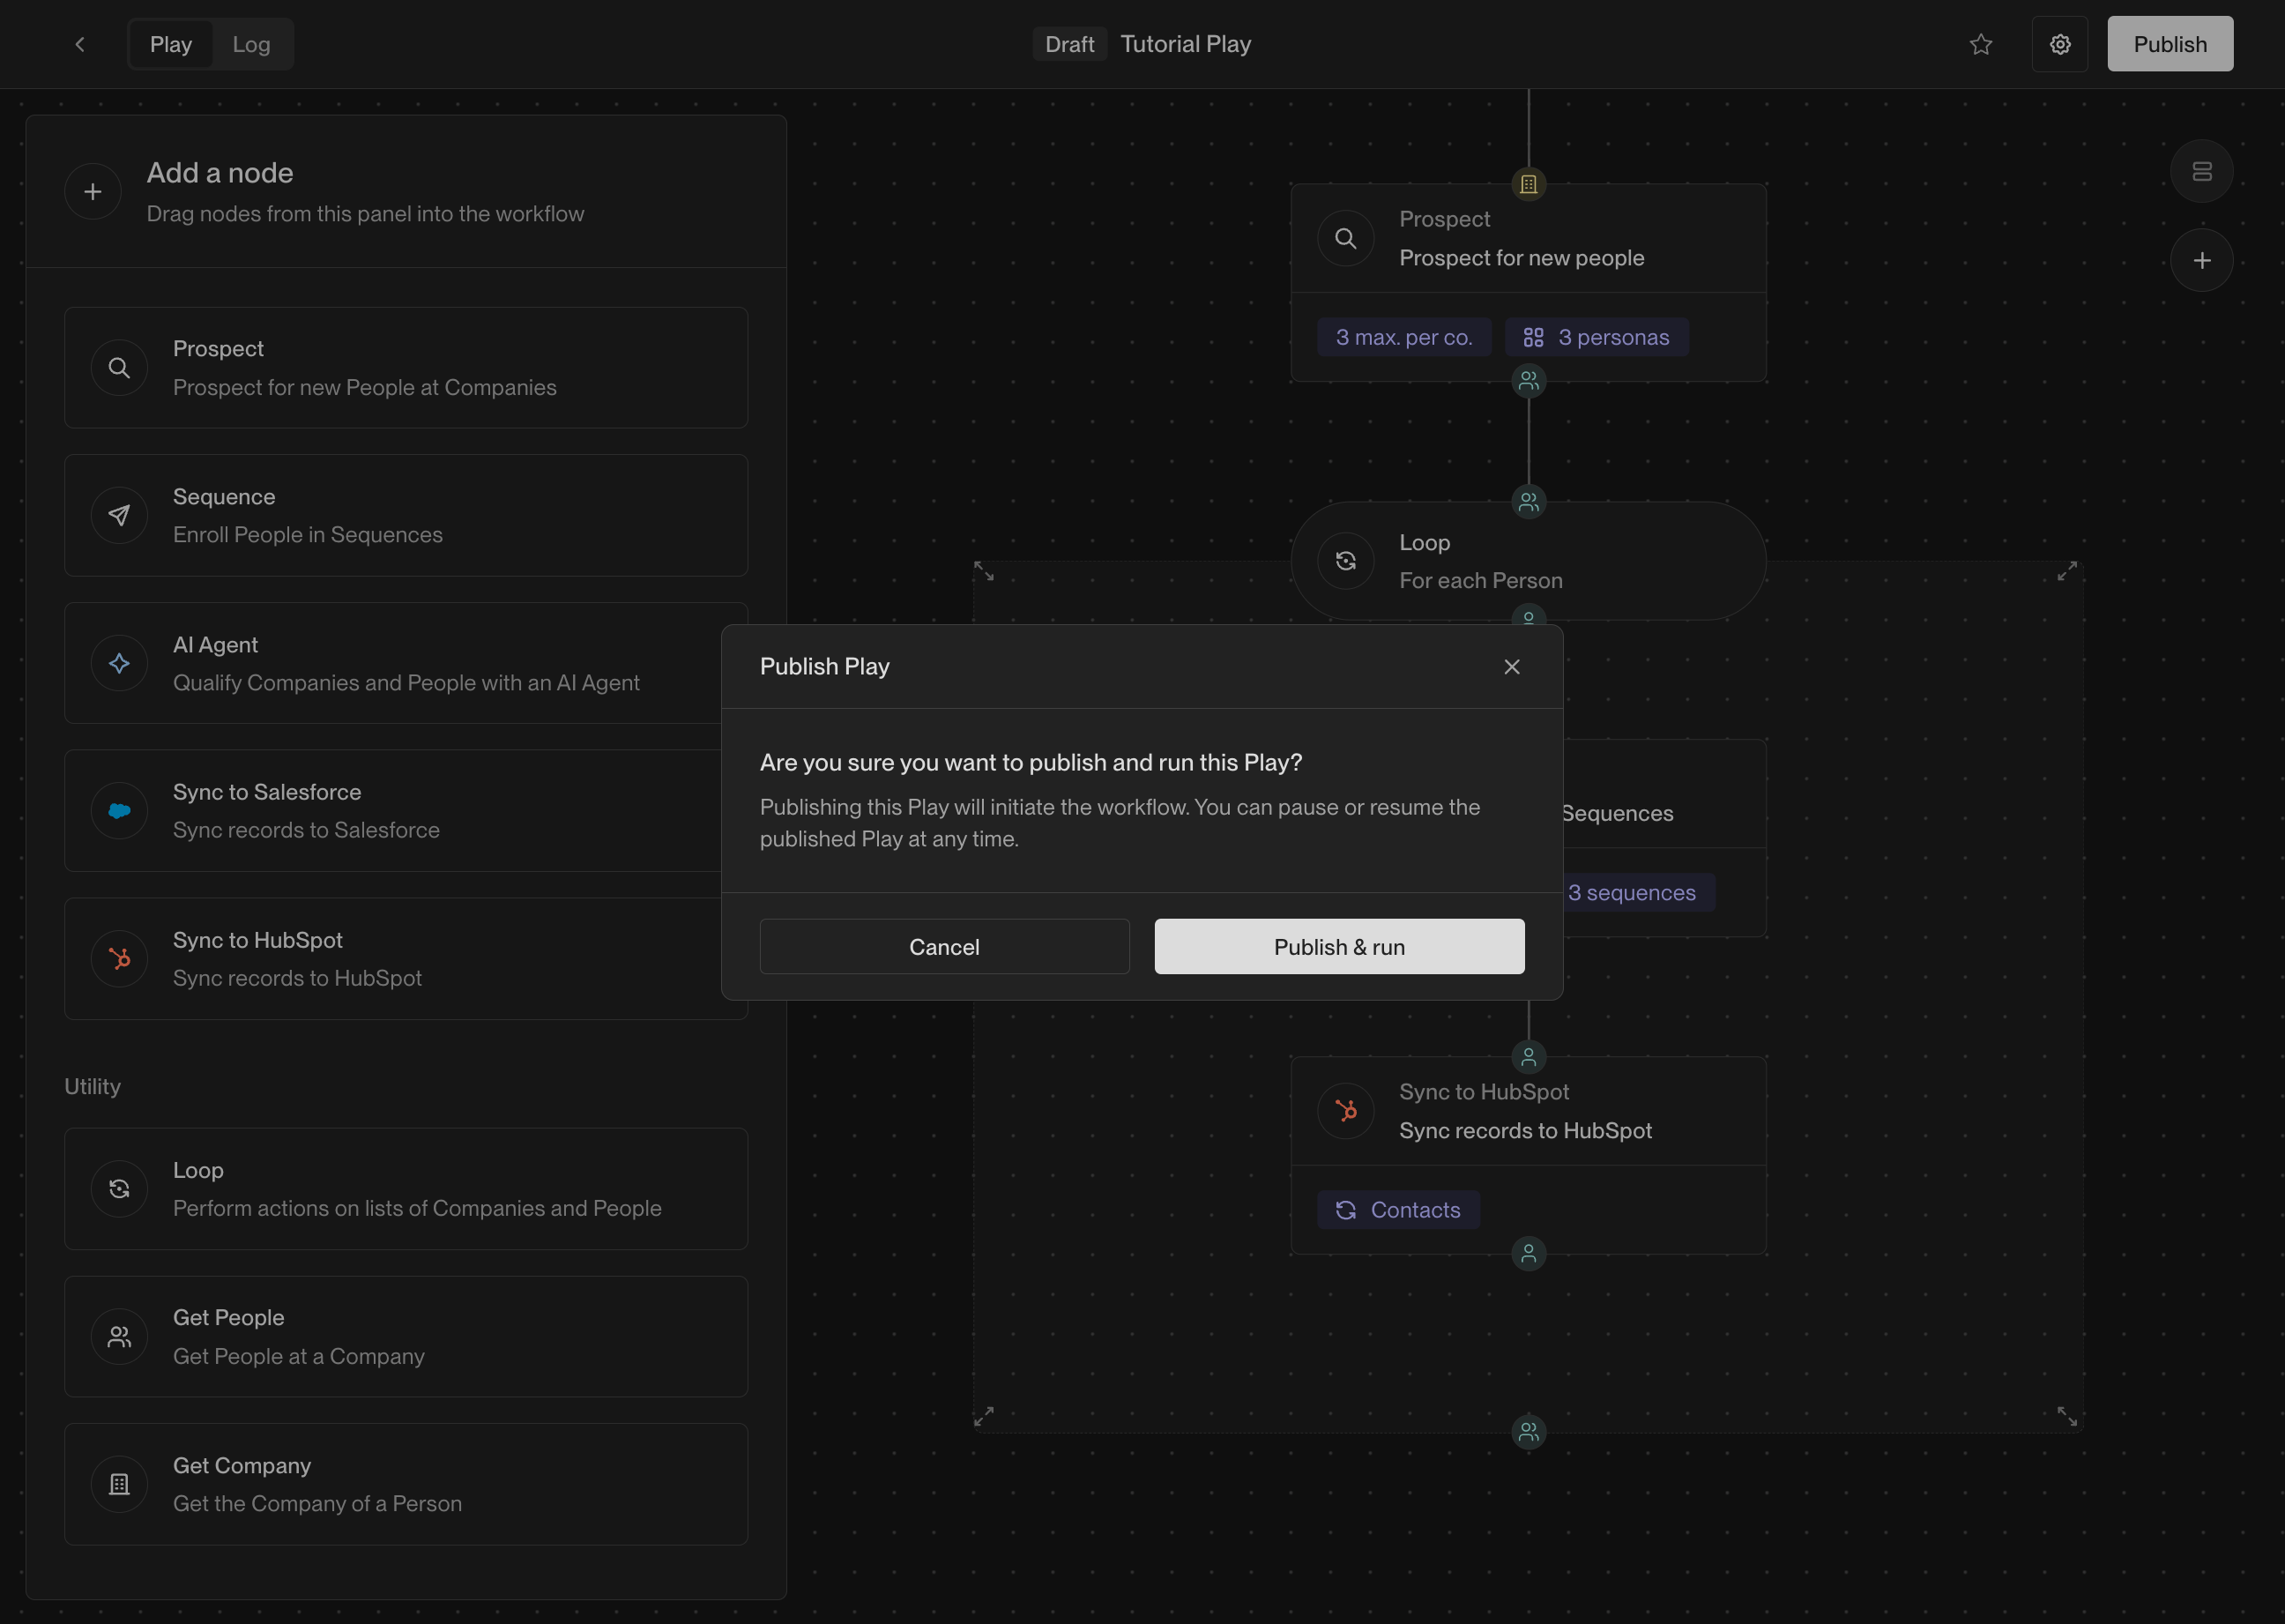 As the Play starts to run on companies, you will see them appear in the logs.
Click on the **Logs** tab at the top of the Play Builder to view the logs.
As the Play starts to run on companies, you will see them appear in the logs.
Click on the **Logs** tab at the top of the Play Builder to view the logs.
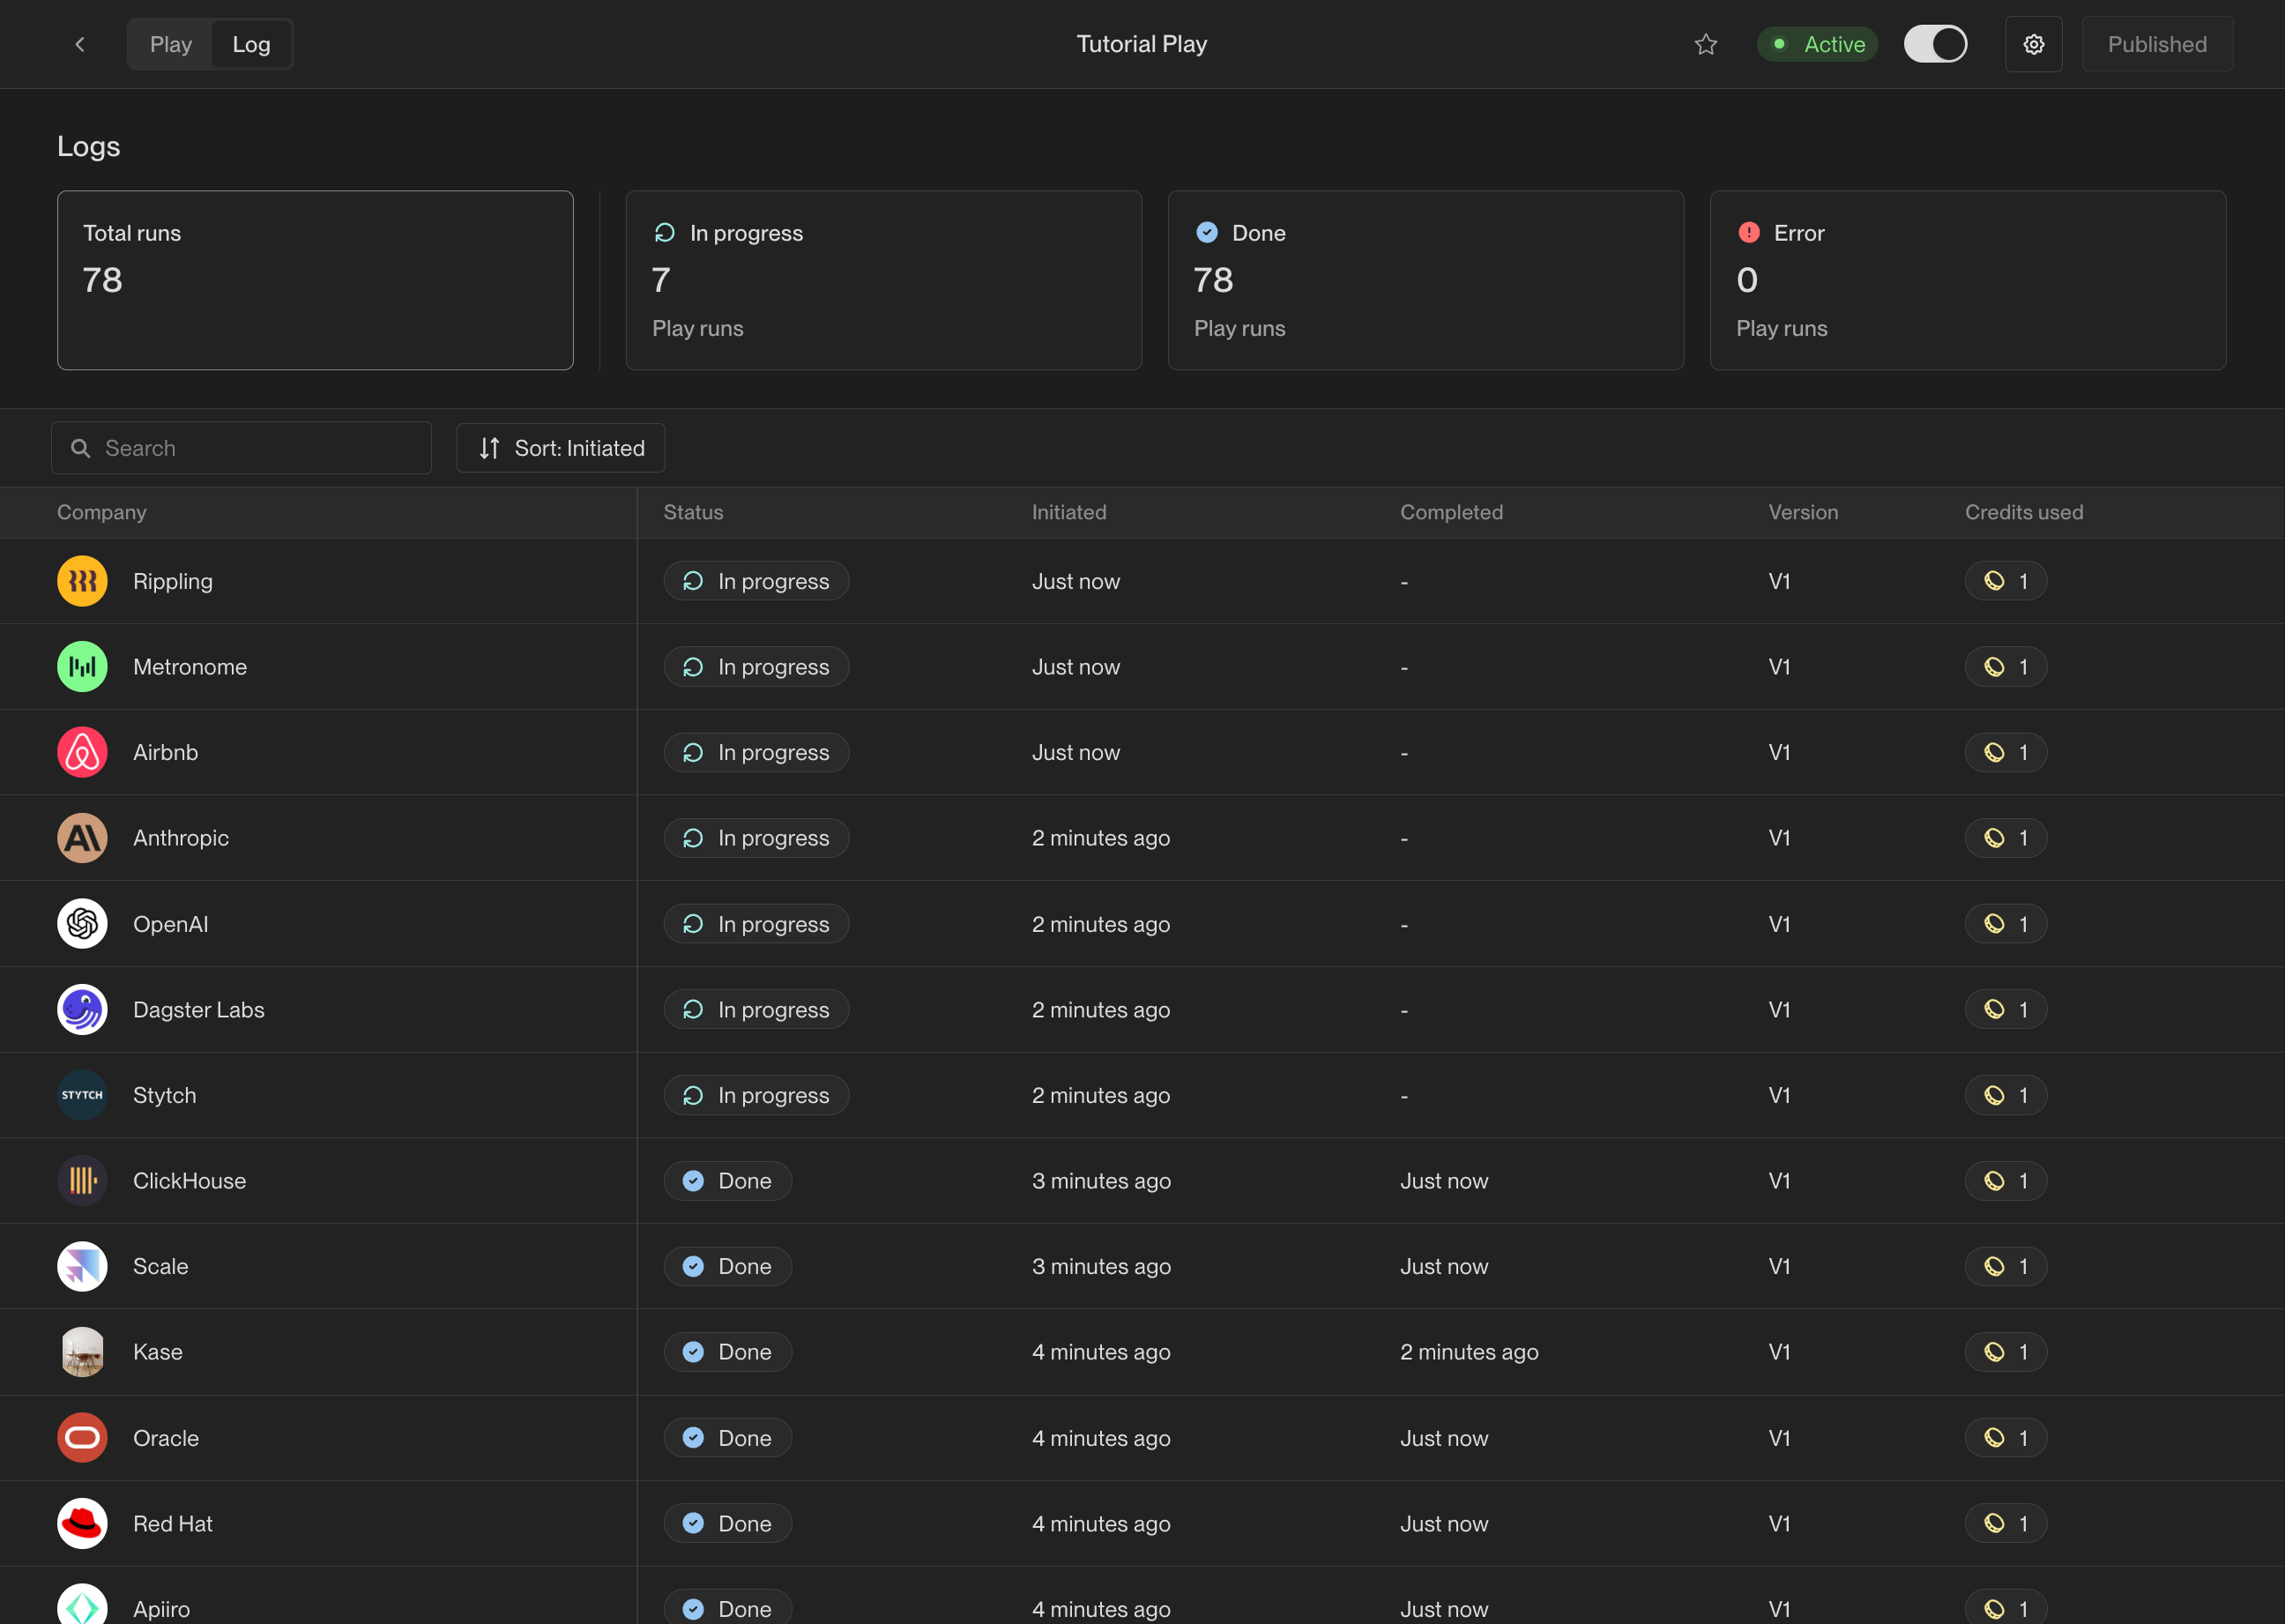 Click on any company to view the details of its run, including the exact actions
that were taken and the results of each action. Click on any action to view the
precise inputs, outputs, and result of that action.
Click on any company to view the details of its run, including the exact actions
that were taken and the results of each action. Click on any action to view the
precise inputs, outputs, and result of that action.
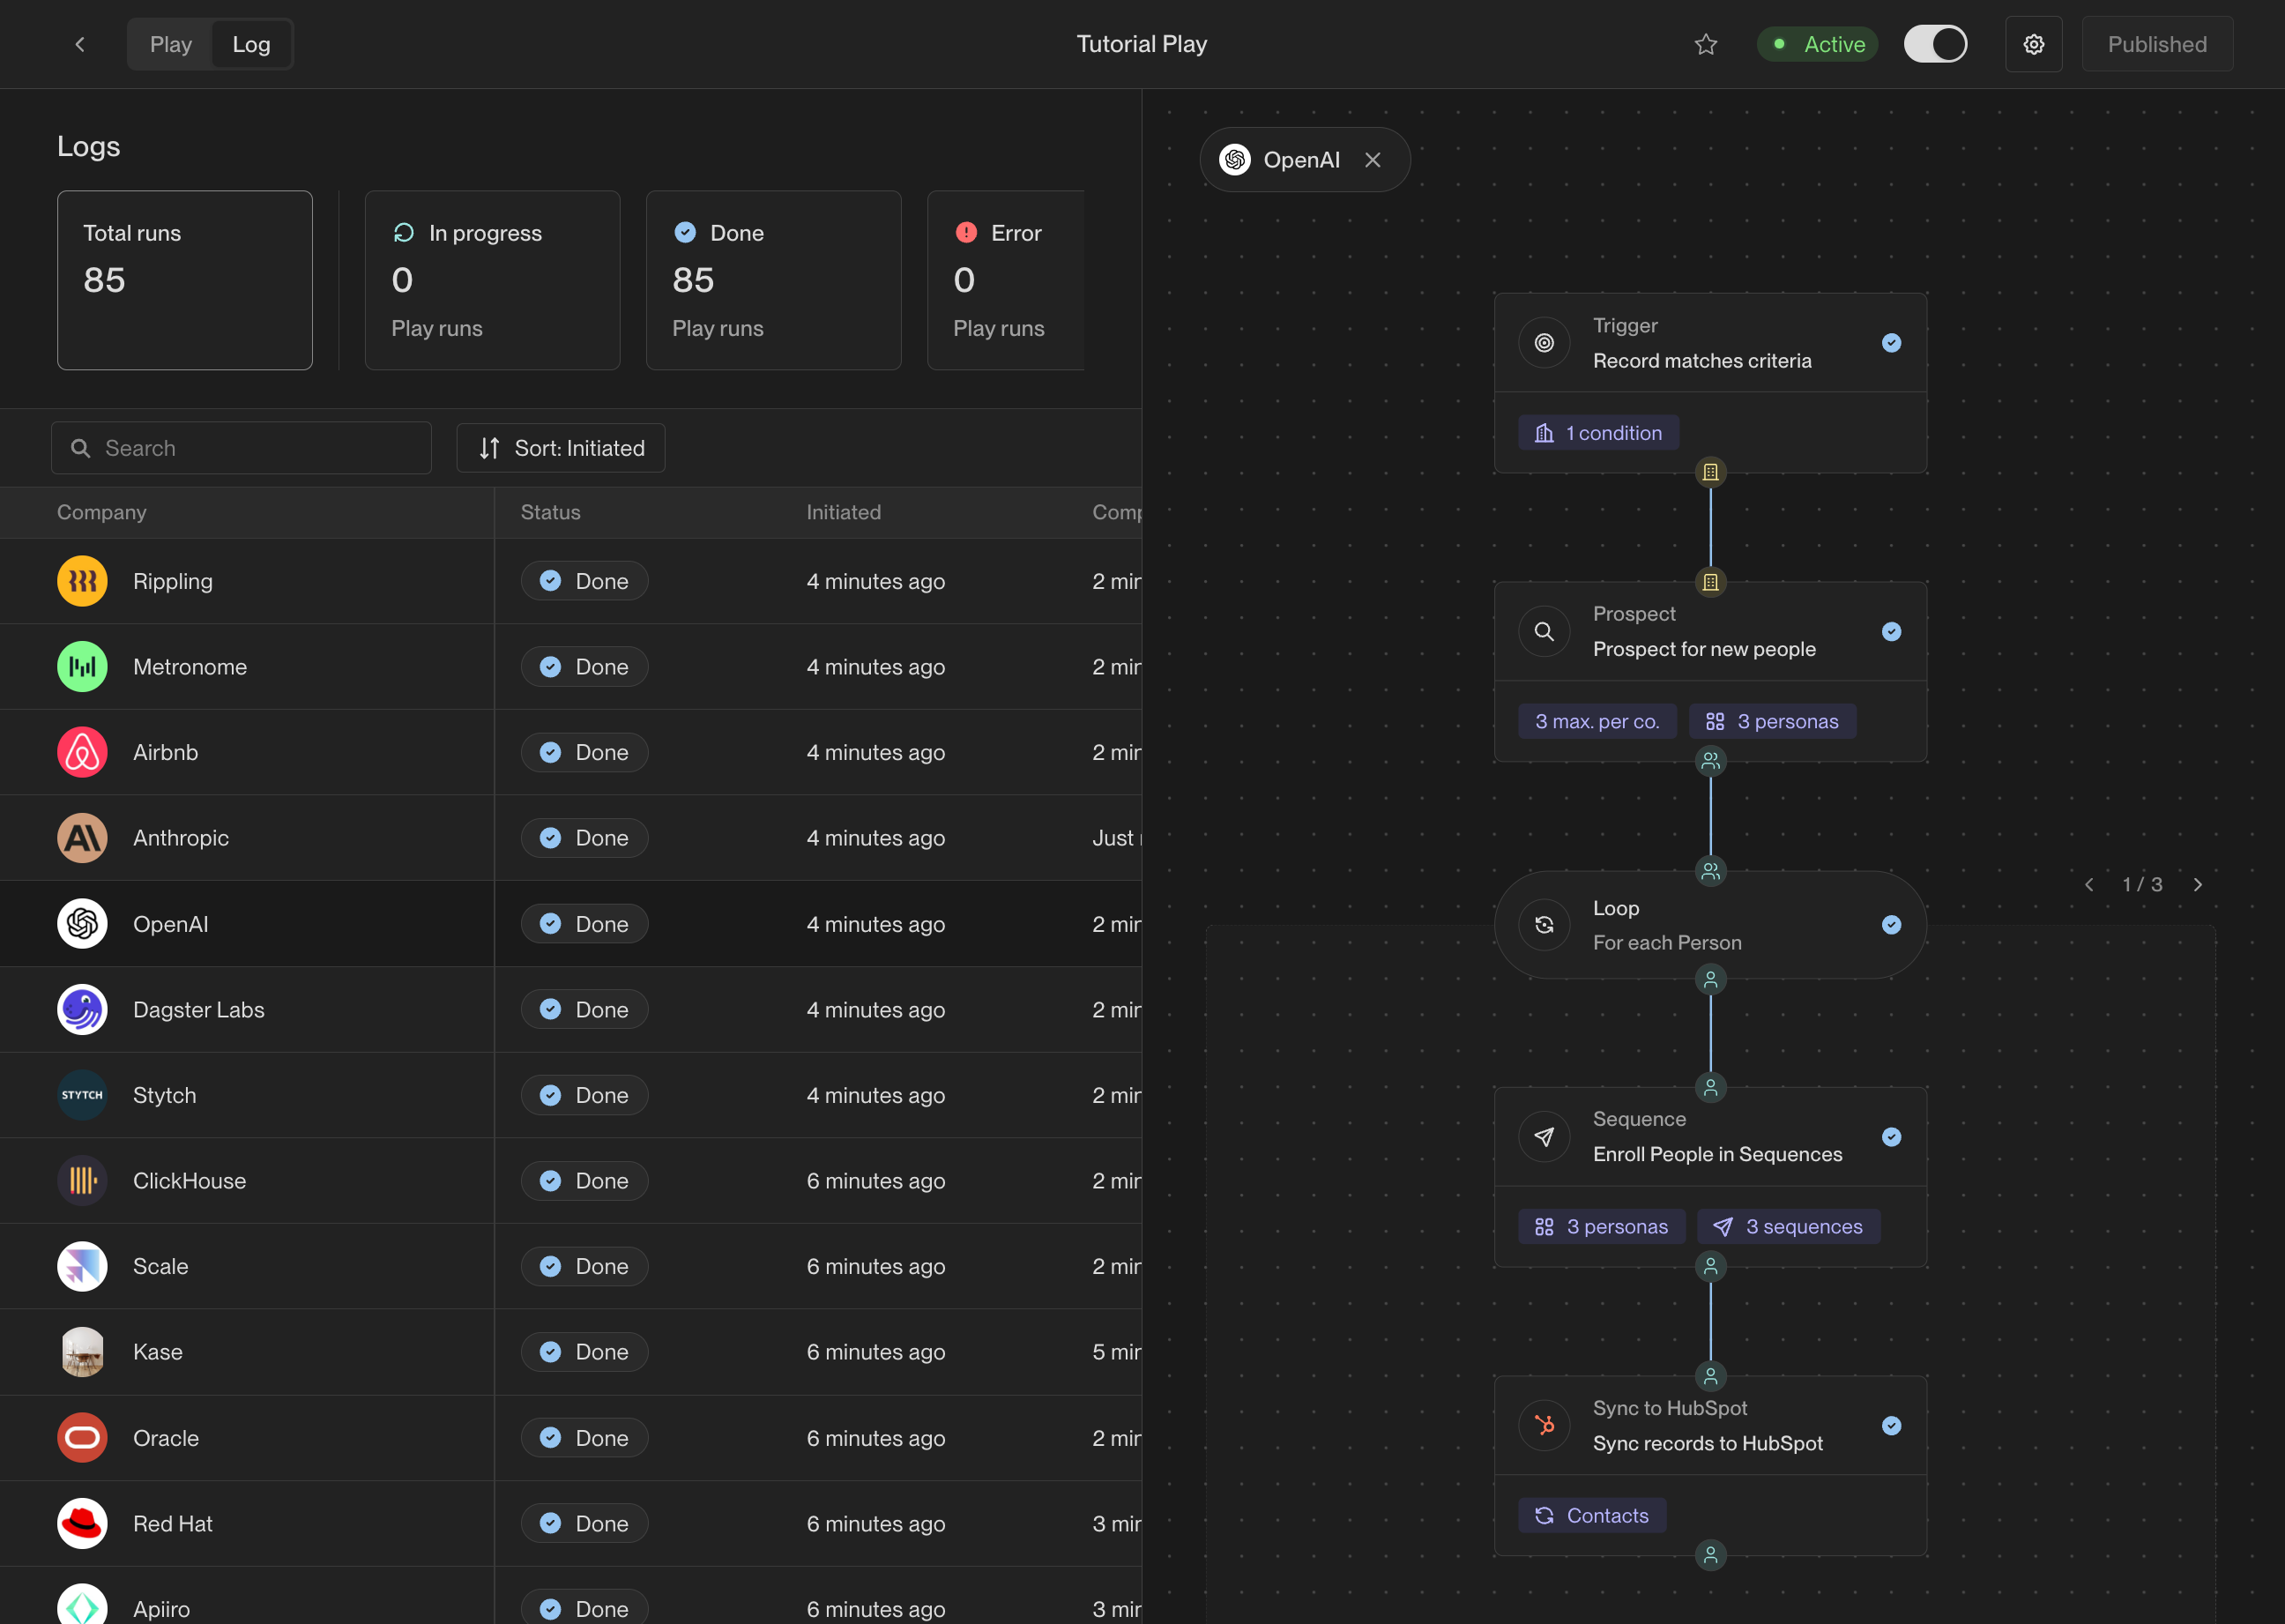
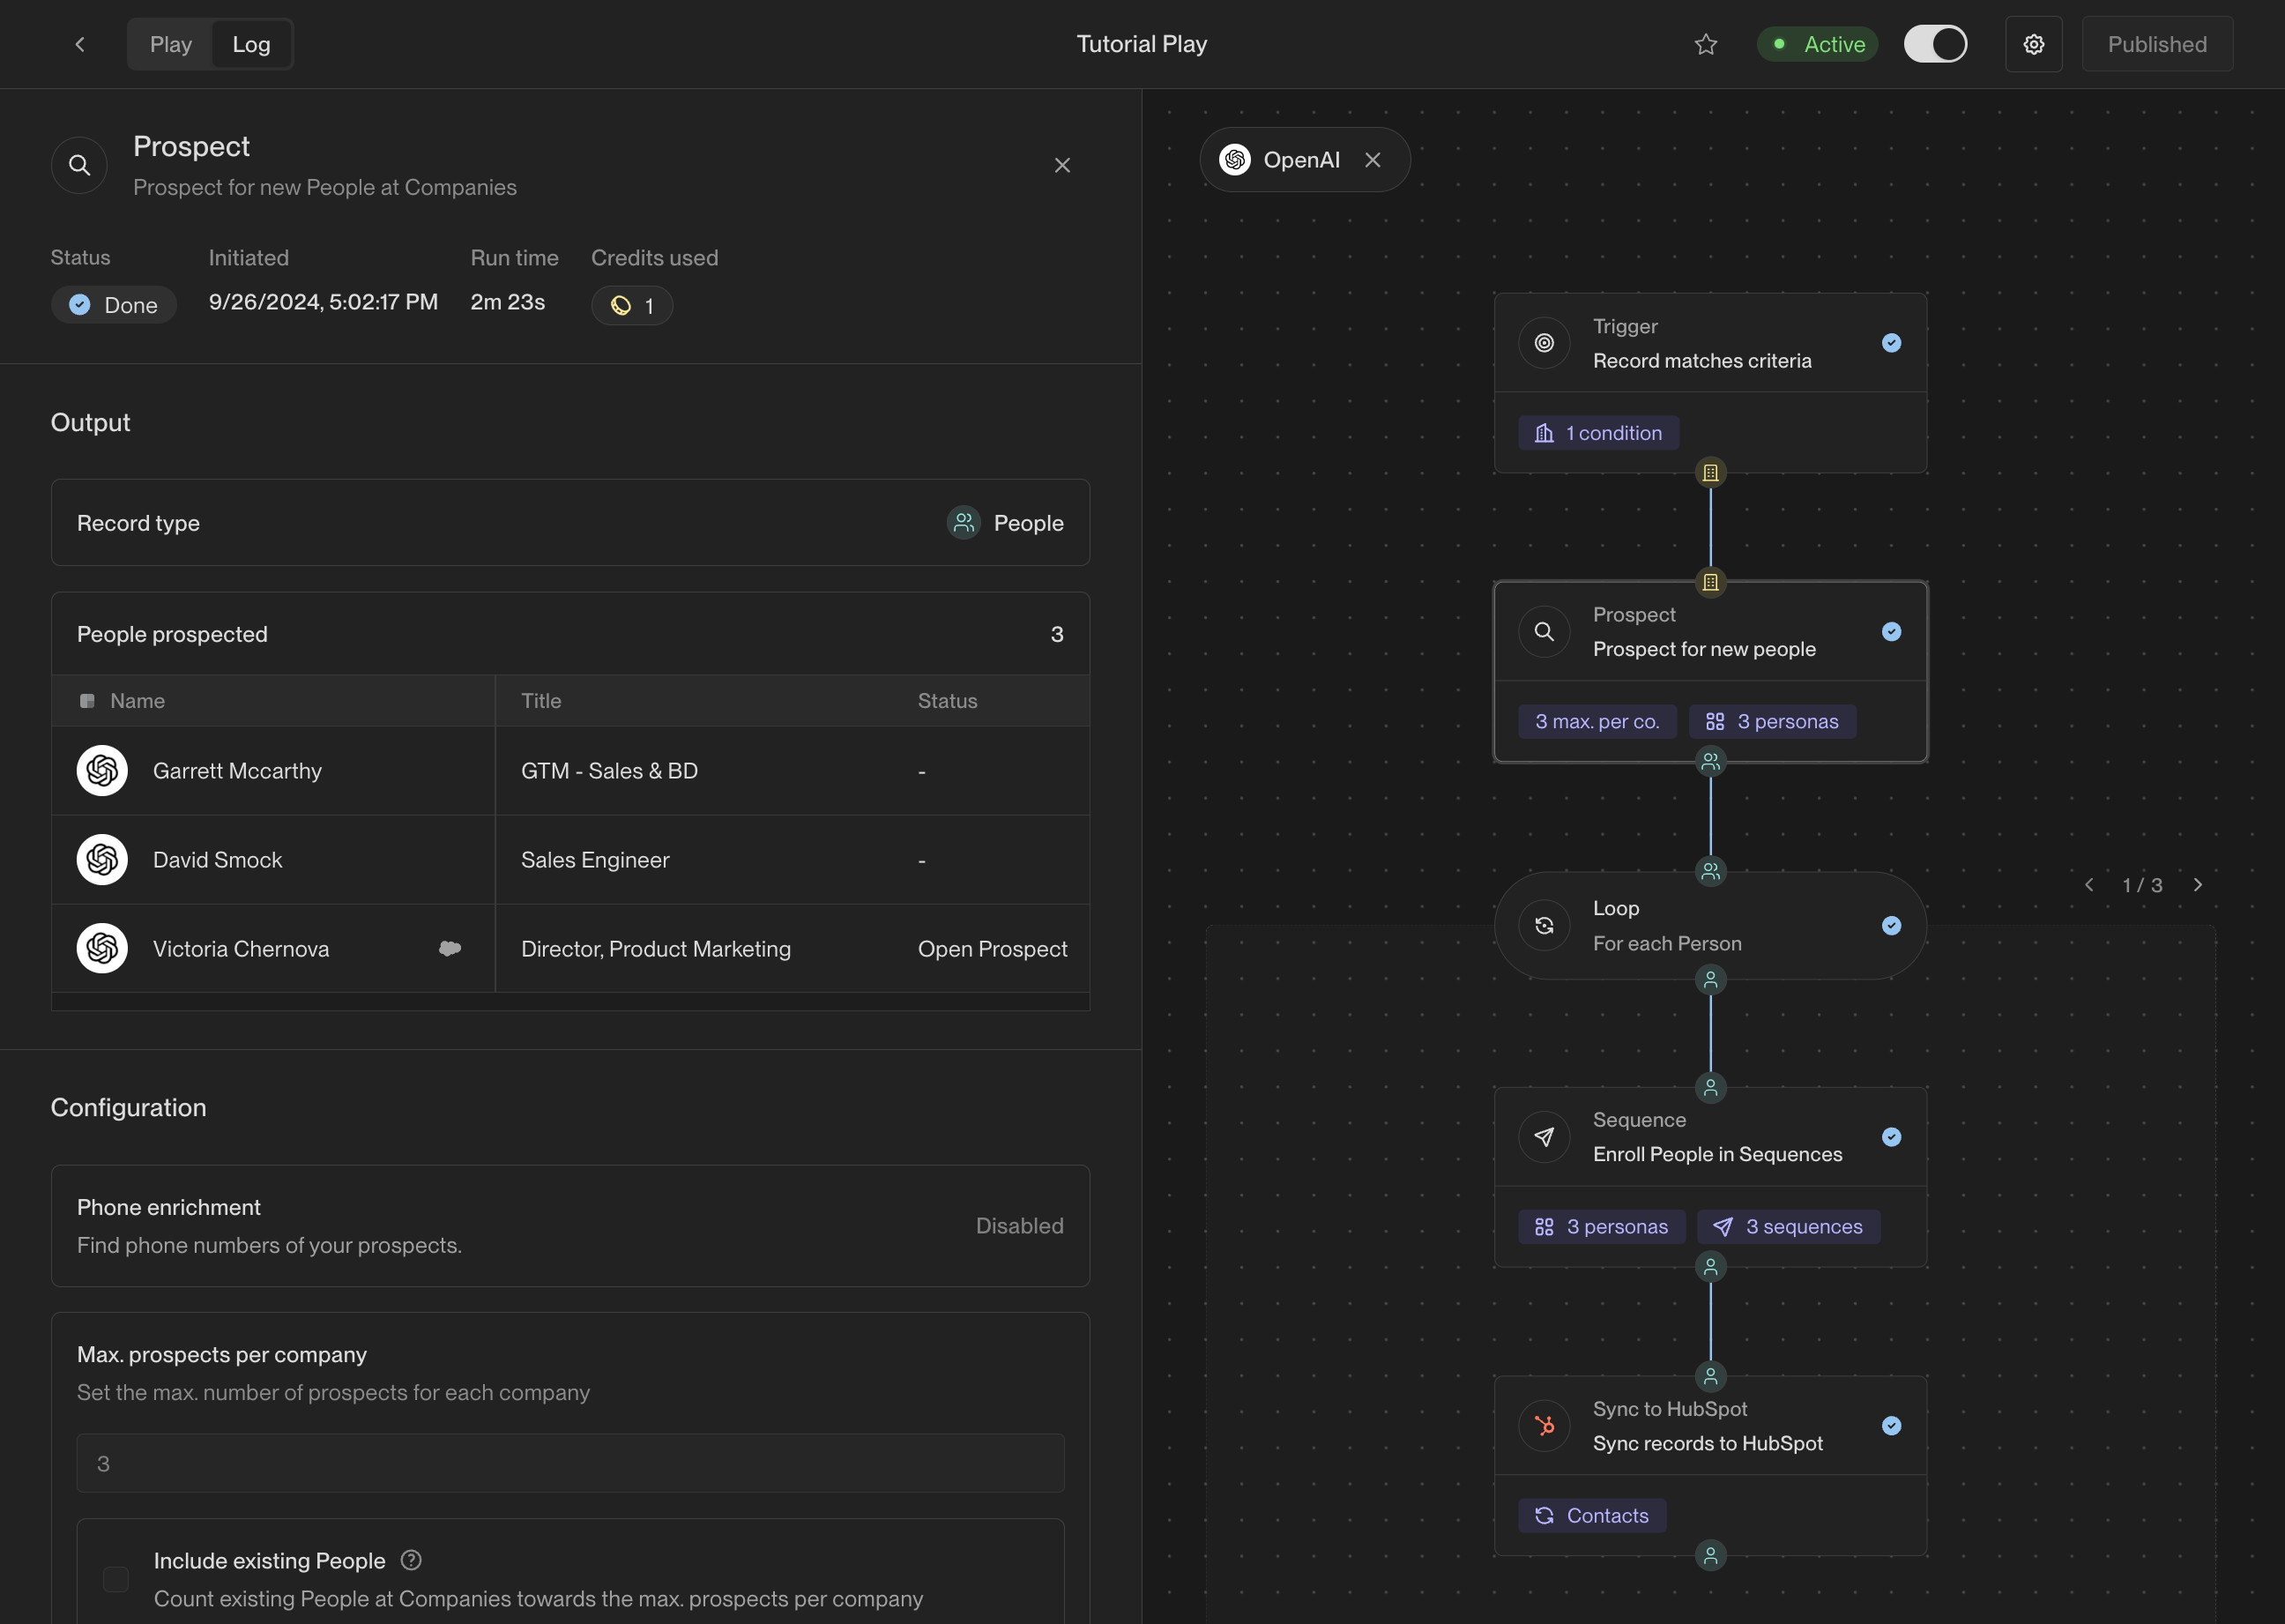
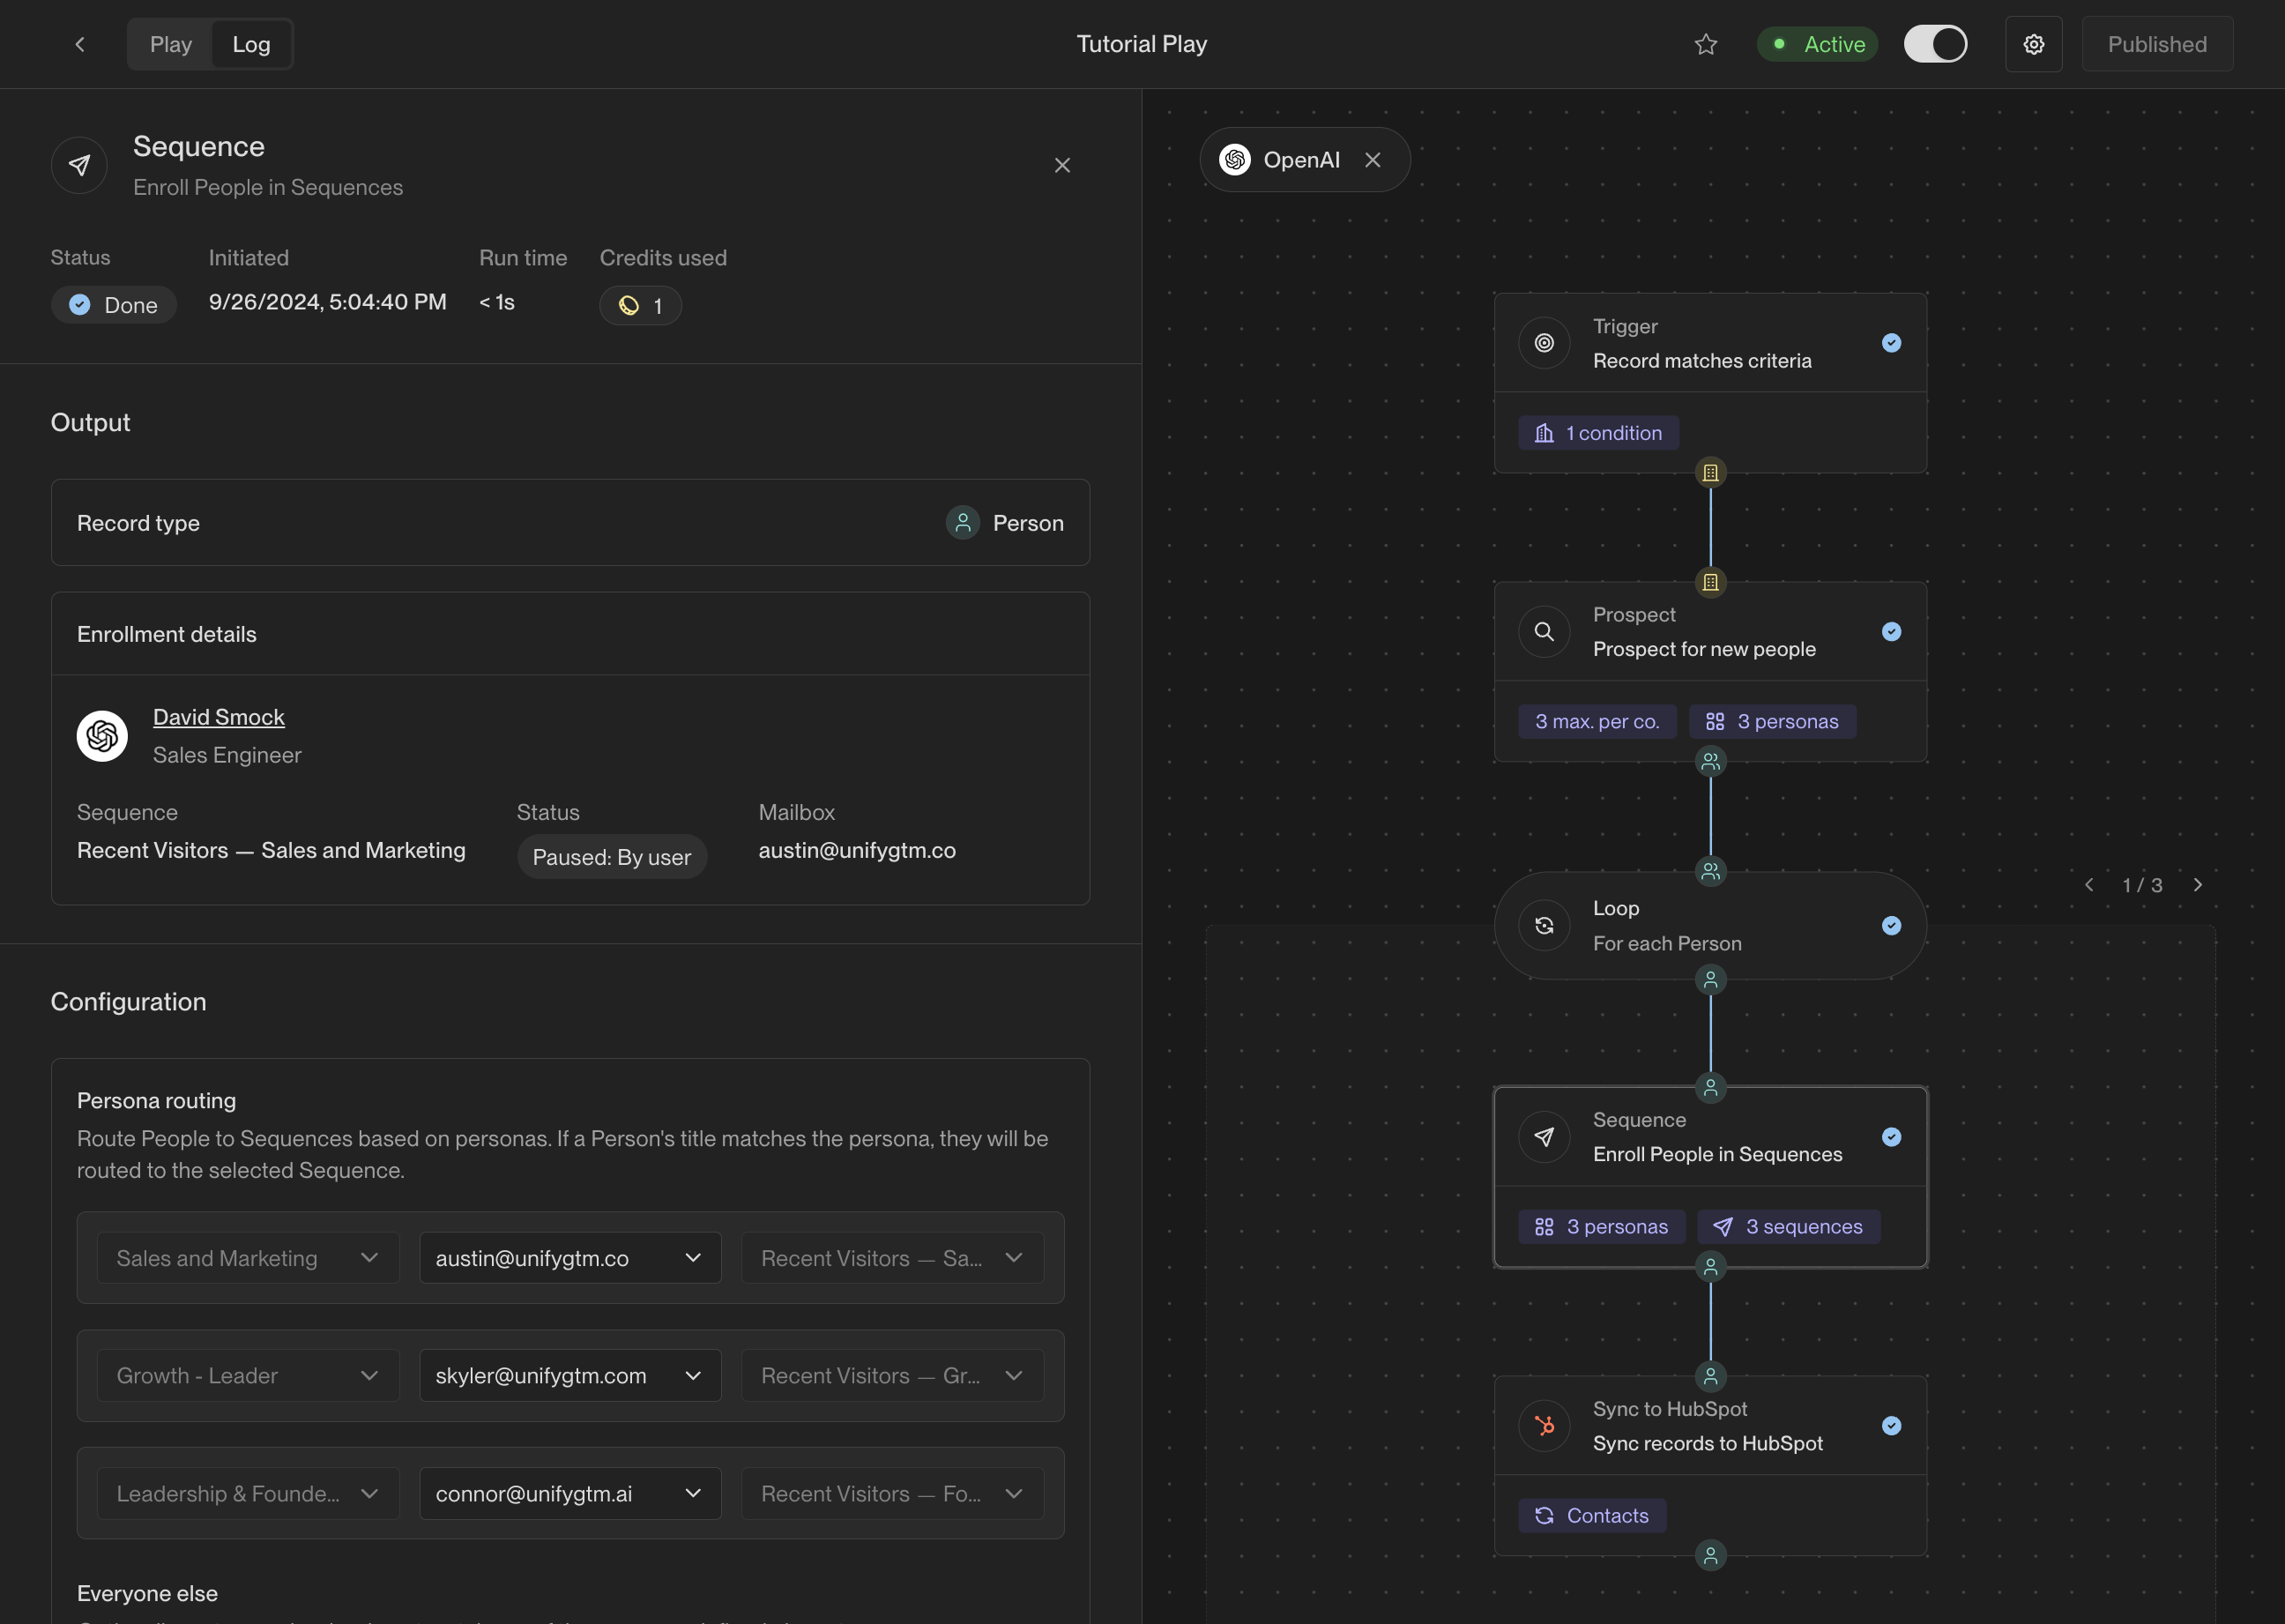 ## Conclusion
Congratulations on creating a Play! Combining website intent, prospecting, and
sequences into a single automated flow is a popular Play and an excellent
starting point.
For a comprehensive overview of Unify Plays, check out the reference guide:
## Conclusion
Congratulations on creating a Play! Combining website intent, prospecting, and
sequences into a single automated flow is a popular Play and an excellent
starting point.
For a comprehensive overview of Unify Plays, check out the reference guide:
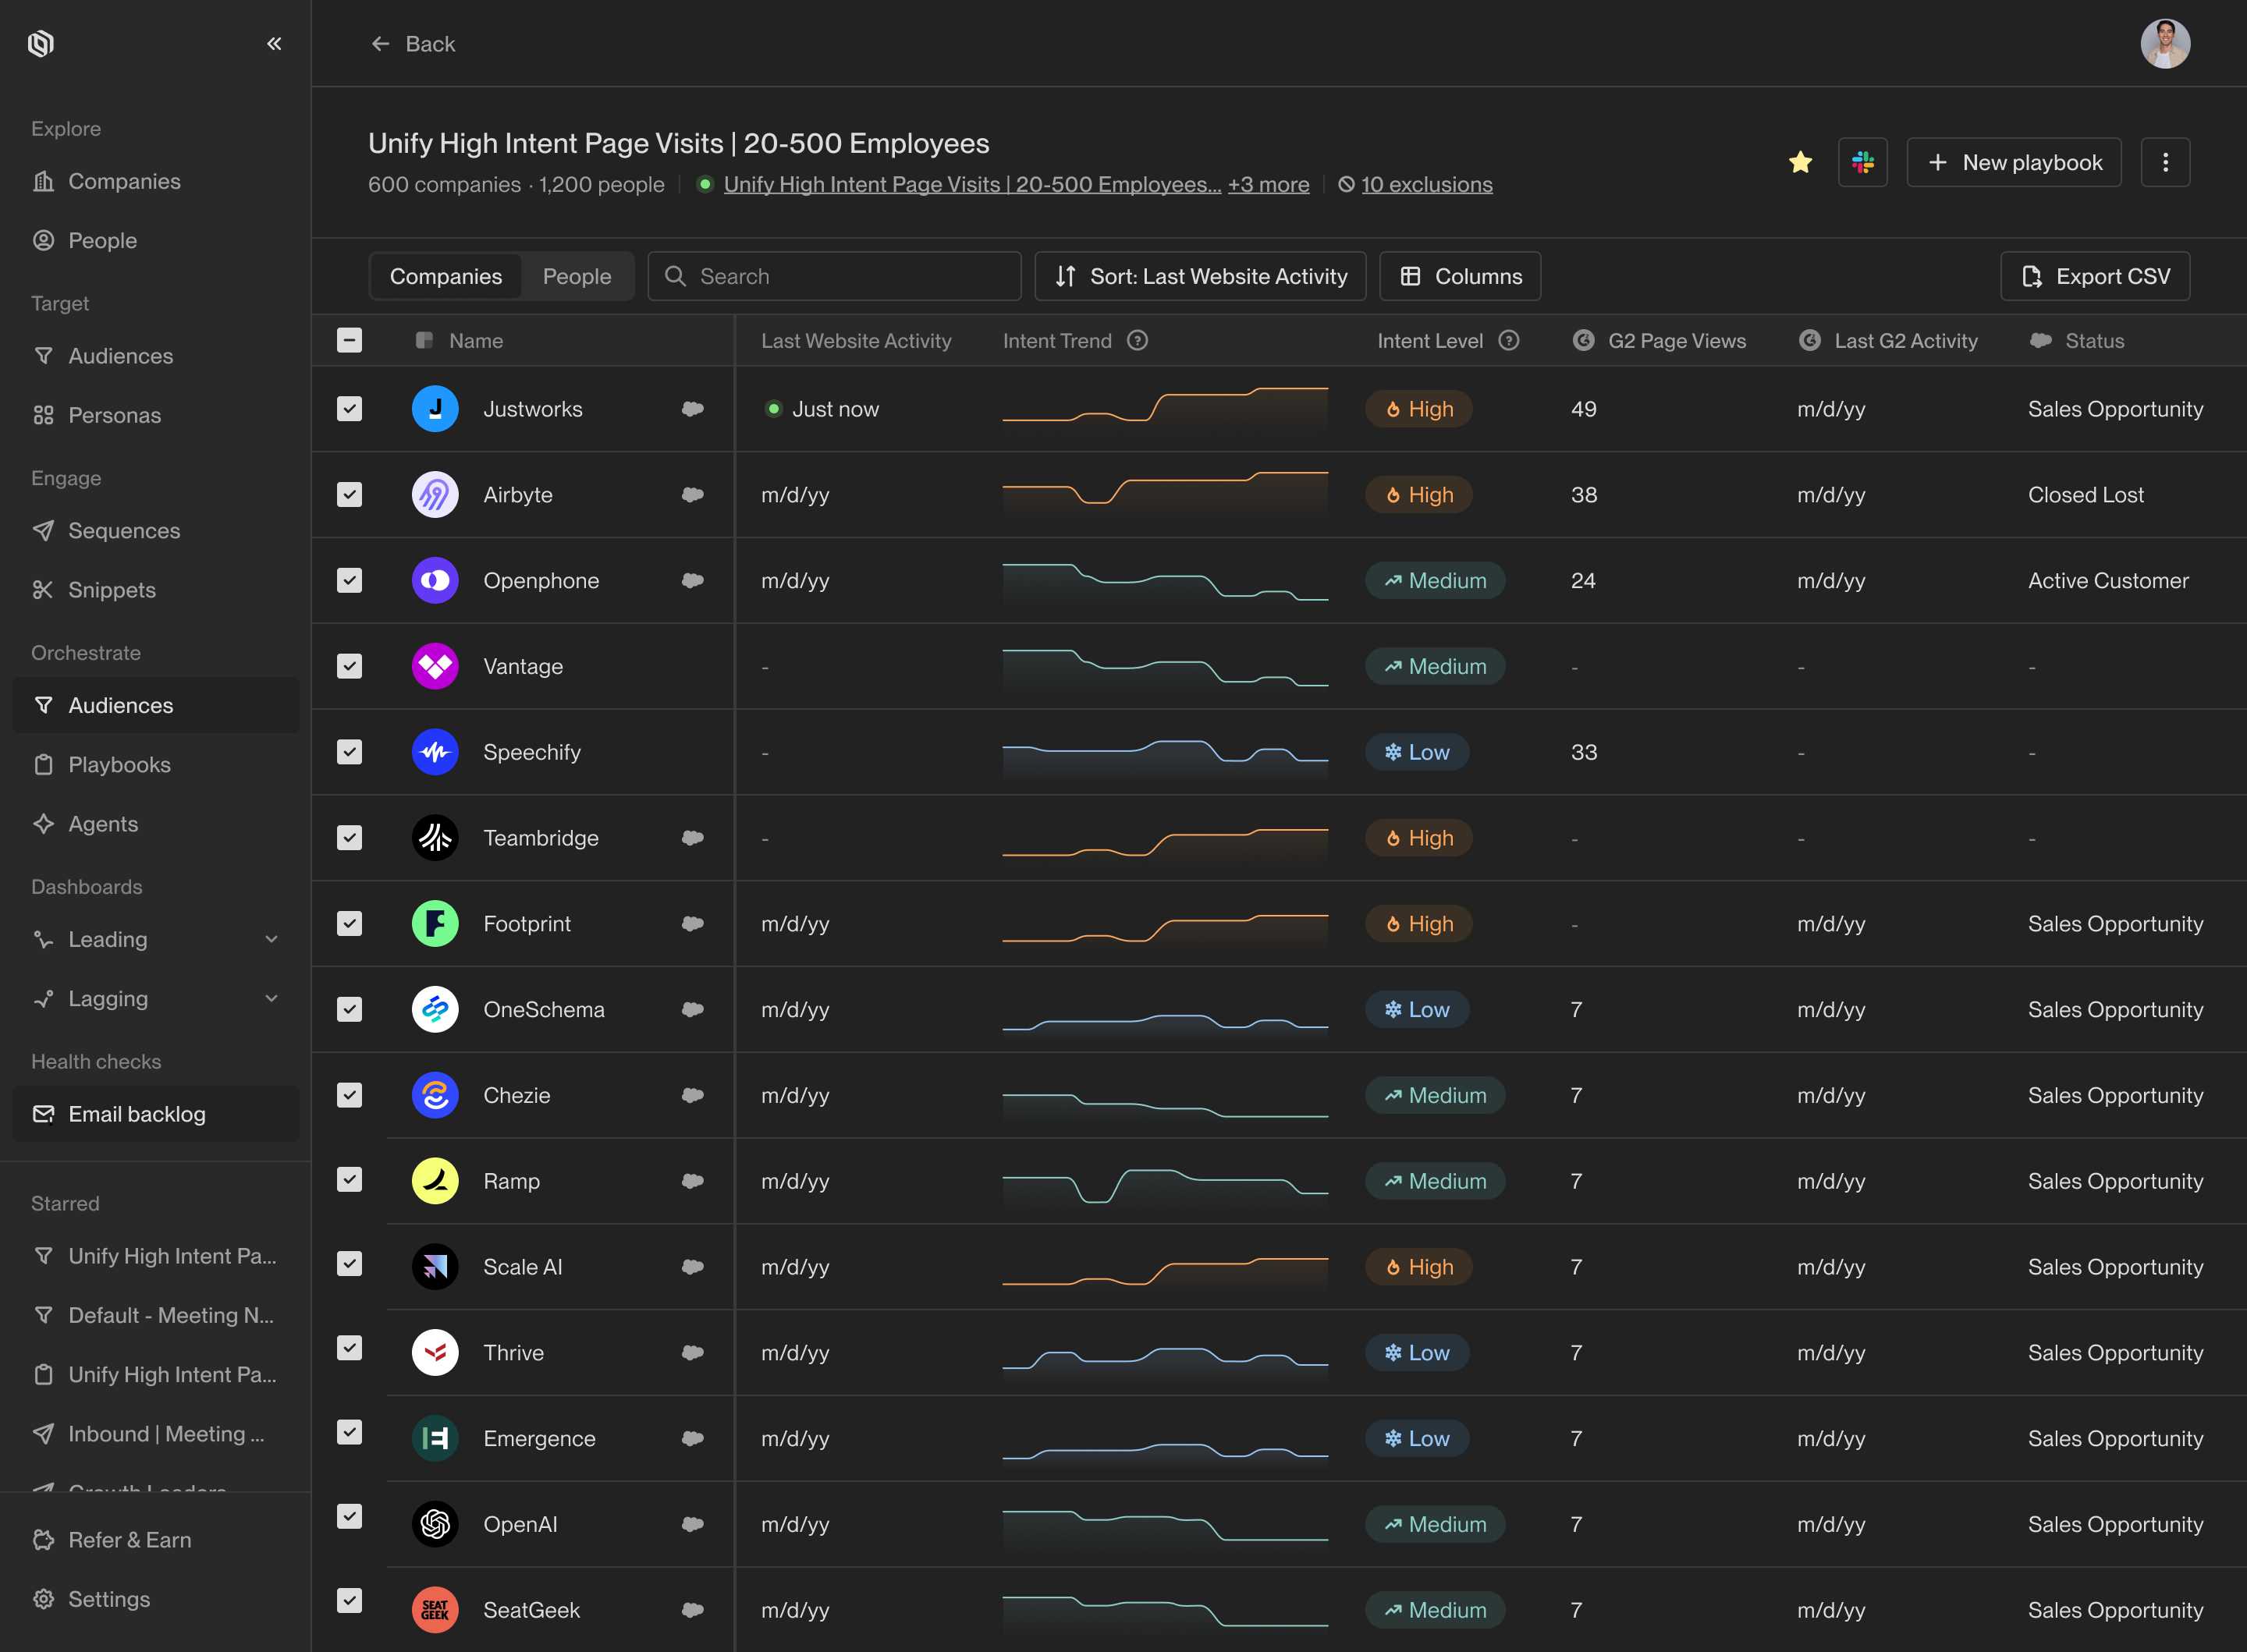 Here are just a few examples of the
types of audiences you can define:
* Companies that have clicked on your pricing page in the past week
* People who have opened an email you sent them in the past month at least twice
without replying yet
* Champions for your business that have joined a new company matching your ICP
Typically, either sales leaders, revenue operations, or sales operations will
create the audiences to be used by sellers for building plays and taking action.
## Build a new audience
Access audiences by clicking on [Audiences](https://app.unifygtm.com/dashboard/audiences)
in the sidebar. You can view and edit existing audiences or create a new one by
selecting **New audience**.
Audience support a wide variety of filters. One of the most commonly used
options is to filter by fields in your CRM. To get started, click **Add condition**
and search for the field you want to filter by.
Here are just a few examples of the
types of audiences you can define:
* Companies that have clicked on your pricing page in the past week
* People who have opened an email you sent them in the past month at least twice
without replying yet
* Champions for your business that have joined a new company matching your ICP
Typically, either sales leaders, revenue operations, or sales operations will
create the audiences to be used by sellers for building plays and taking action.
## Build a new audience
Access audiences by clicking on [Audiences](https://app.unifygtm.com/dashboard/audiences)
in the sidebar. You can view and edit existing audiences or create a new one by
selecting **New audience**.
Audience support a wide variety of filters. One of the most commonly used
options is to filter by fields in your CRM. To get started, click **Add condition**
and search for the field you want to filter by.
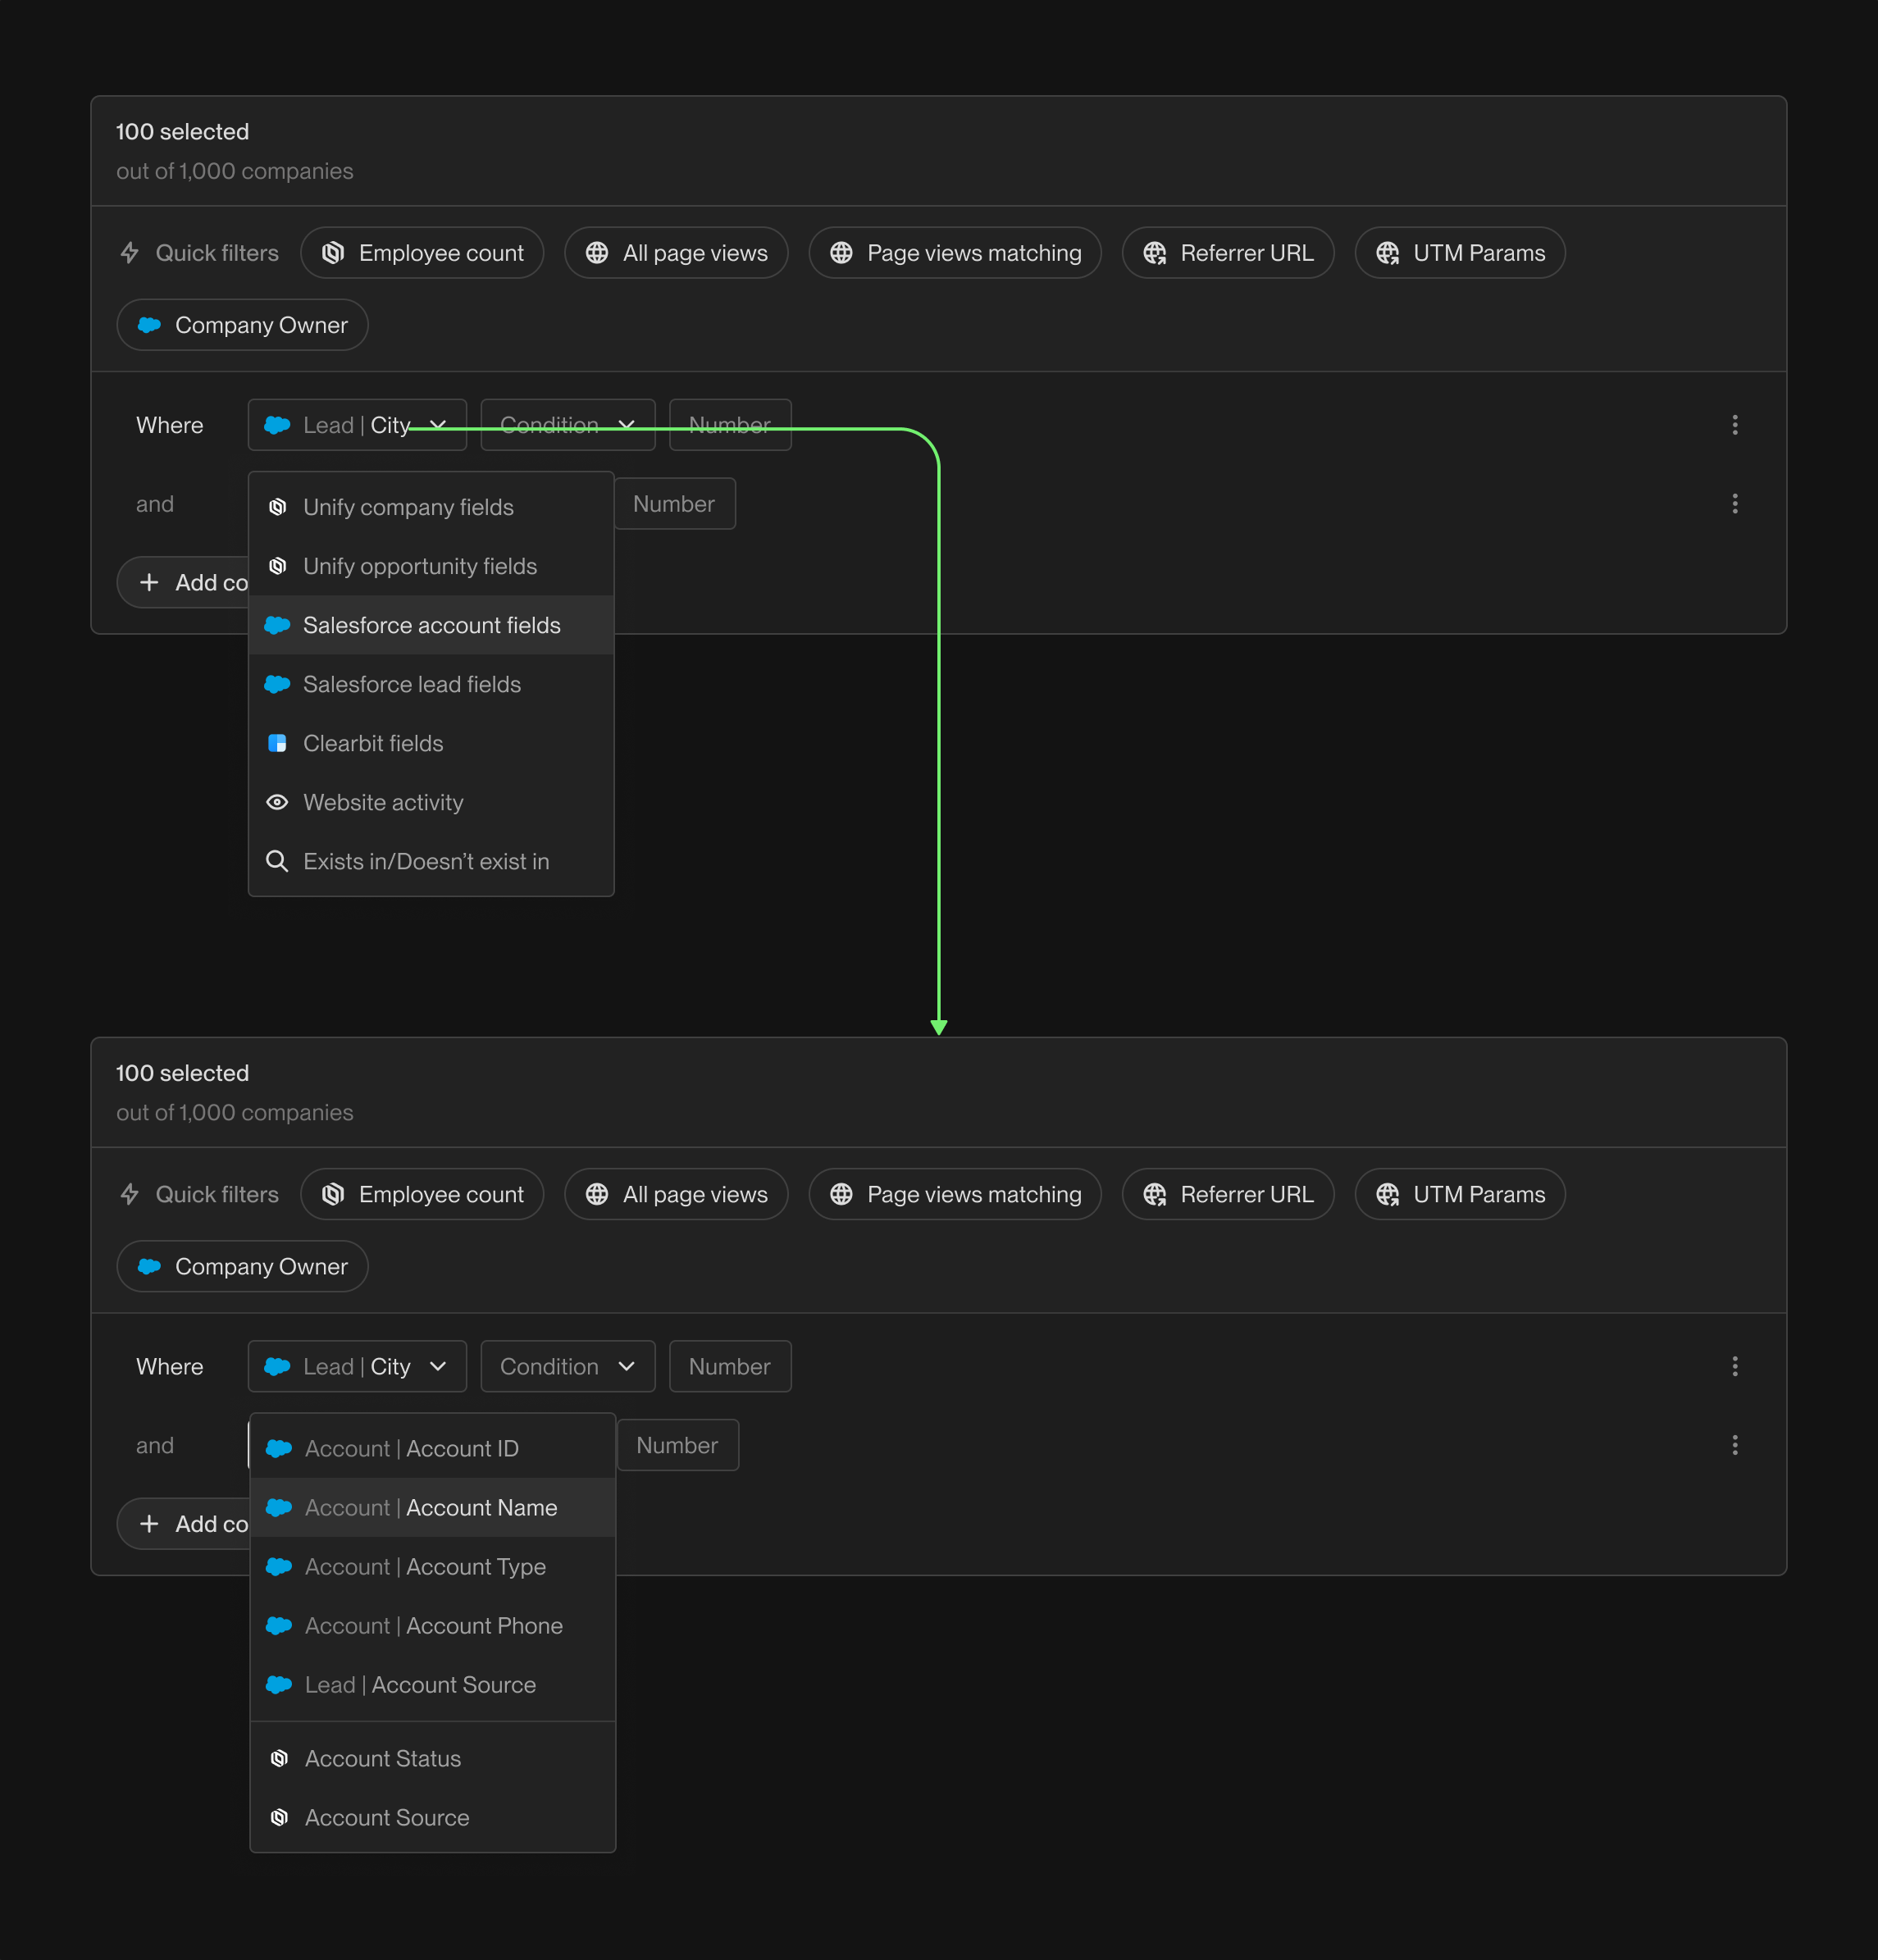 Another popular filter is website activity. You can filter by page views,
sessions, and visitors to your website. This is a great way to identify which
companies are showing interest in your business.
Another popular filter is website activity. You can filter by page views,
sessions, and visitors to your website. This is a great way to identify which
companies are showing interest in your business.
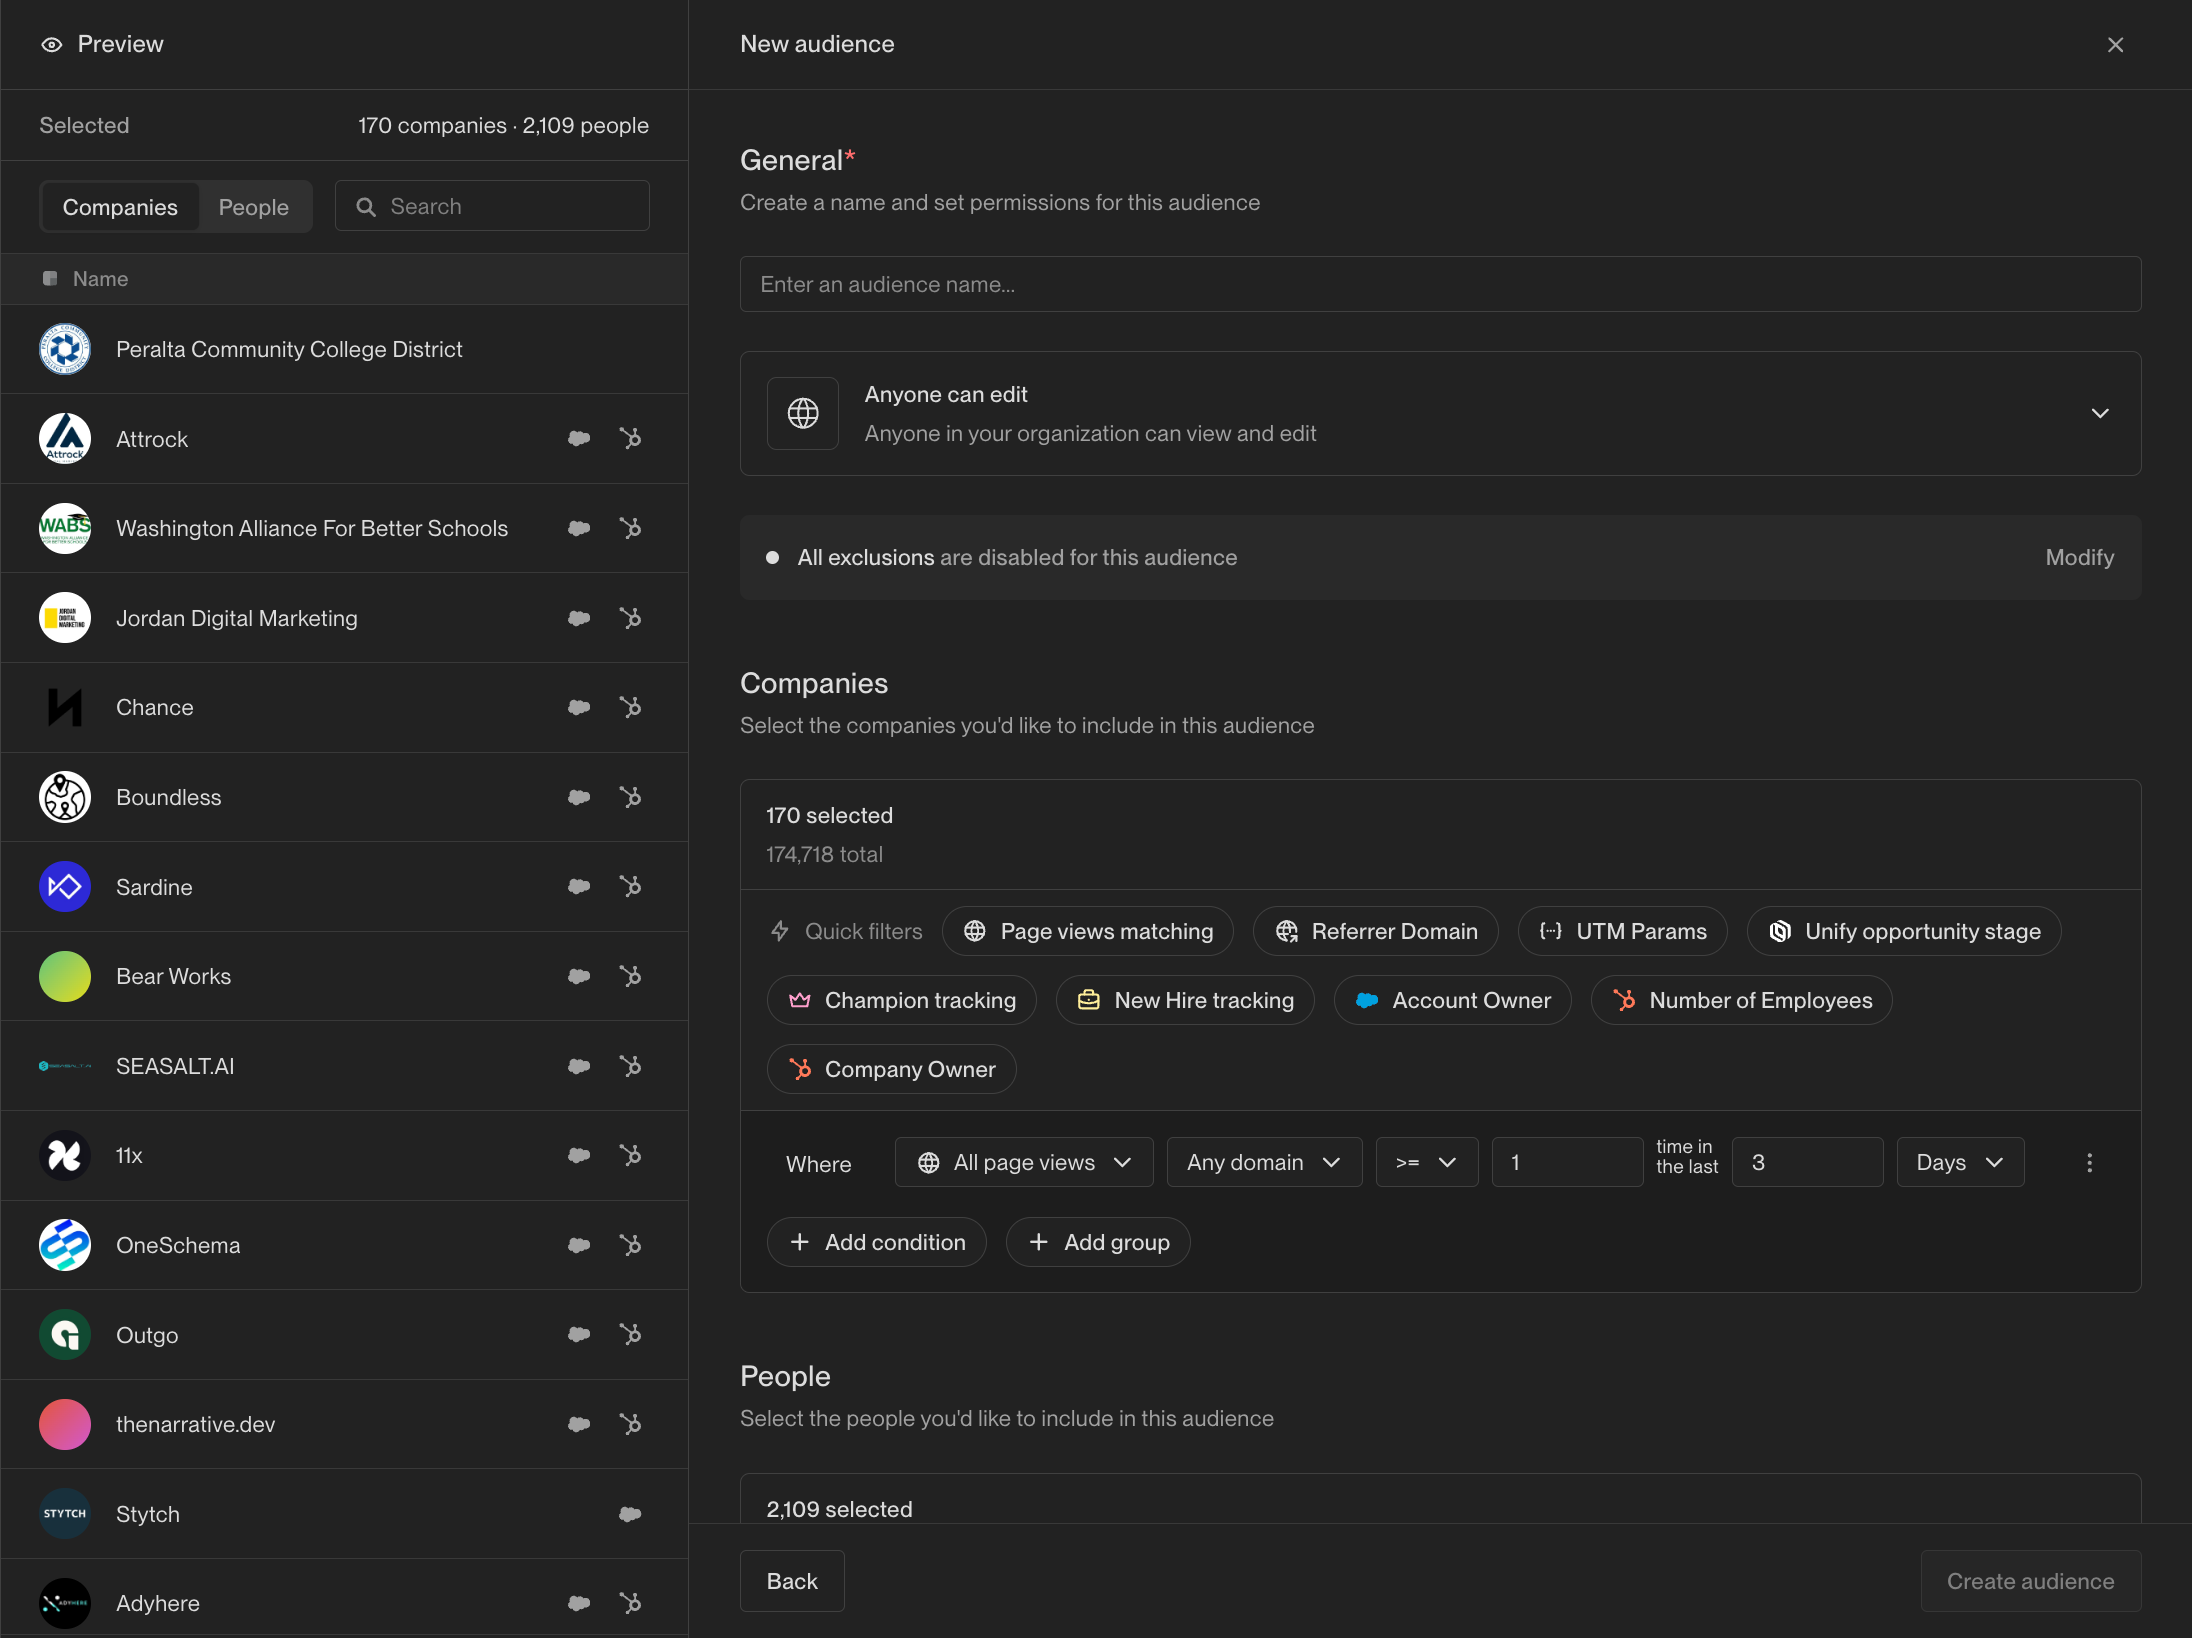 You can combine multiple filter criteria with **And** and **Or** groups to
build more complex audiences. For example, you might want to capture companies
that have visited your pricing page or that have filled out an inbound form.
You can combine multiple filter criteria with **And** and **Or** groups to
build more complex audiences. For example, you might want to capture companies
that have visited your pricing page or that have filled out an inbound form.
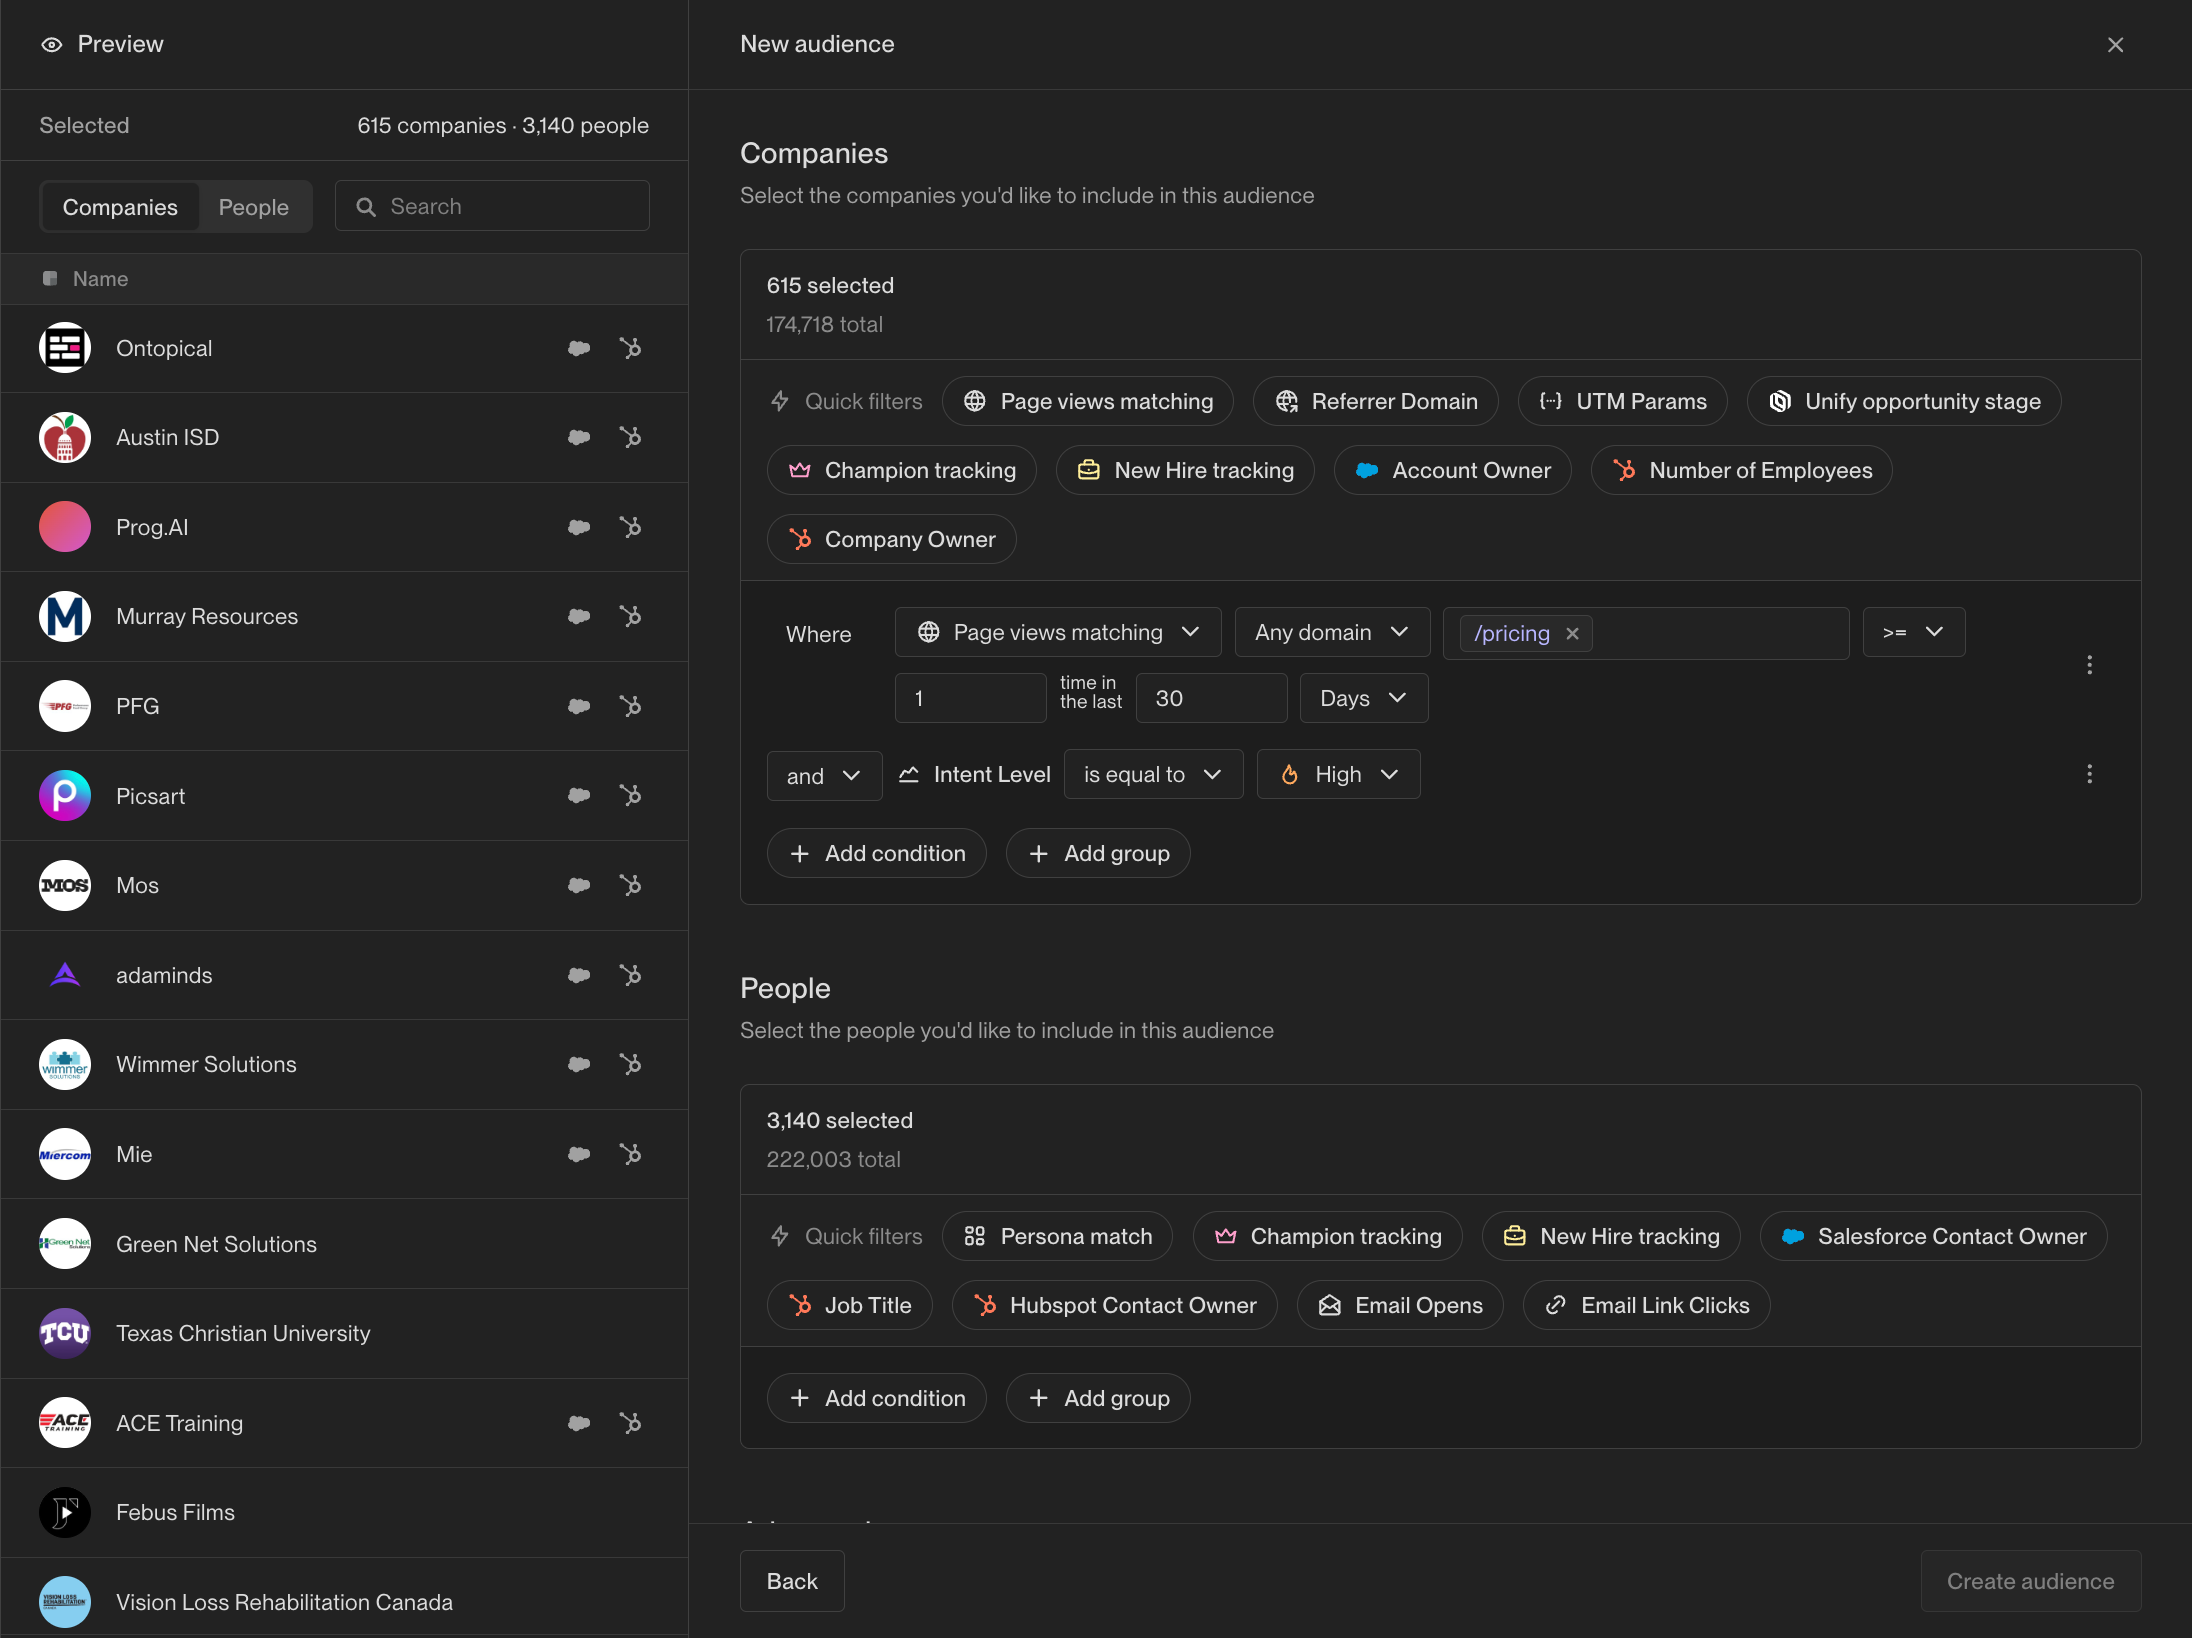 The best way to to learn about the available filter options is to explore! As
you add and remove filters, the audience preview will update in real-time to
show the companies and people that match your criteria.
## Exclusions
Exclusions are a mechanism to prevent Unify from taking action on specific
companies or people. Common use cases for exclusions include preventing current
customers or competitors from appearing in your audiences or Plays.
Once you've defined exclusions, they will be automatically applied to all
audiences by default. Sometimes, you may want to disable an exclusion for a
specific audience. This can be done from the audience configuration page under
the **Advanced** section.
The best way to to learn about the available filter options is to explore! As
you add and remove filters, the audience preview will update in real-time to
show the companies and people that match your criteria.
## Exclusions
Exclusions are a mechanism to prevent Unify from taking action on specific
companies or people. Common use cases for exclusions include preventing current
customers or competitors from appearing in your audiences or Plays.
Once you've defined exclusions, they will be automatically applied to all
audiences by default. Sometimes, you may want to disable an exclusion for a
specific audience. This can be done from the audience configuration page under
the **Advanced** section.
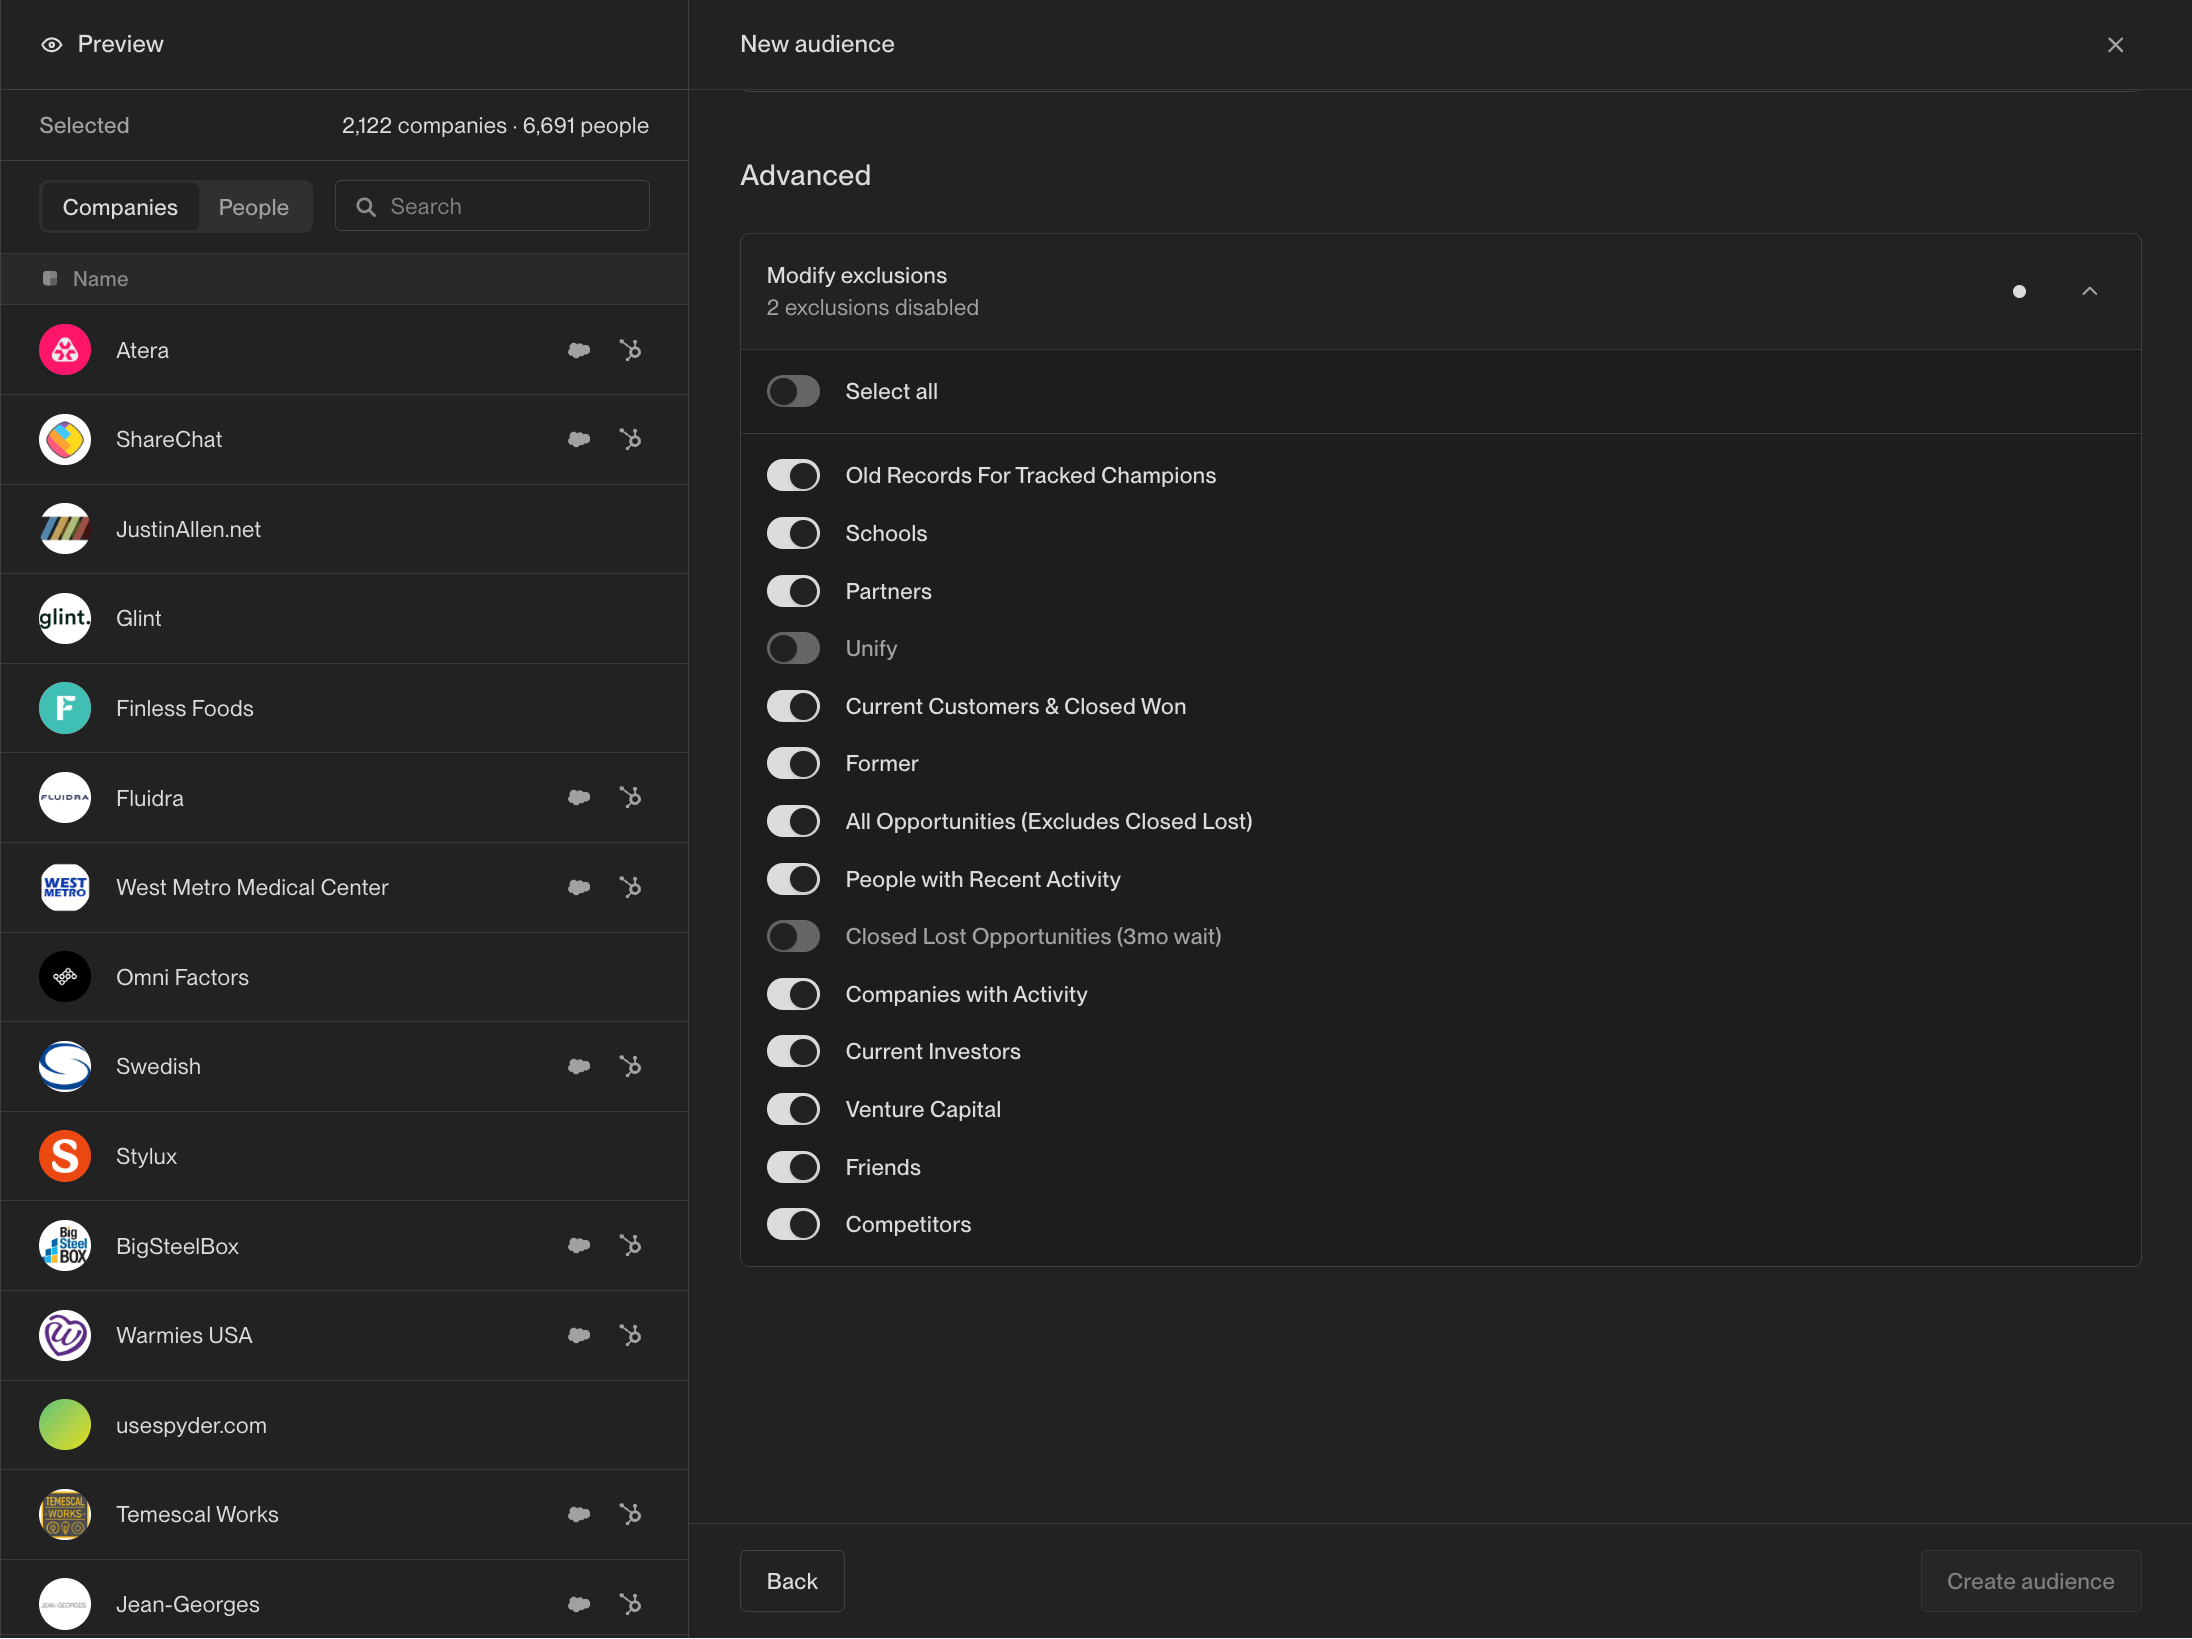 For more information on creating exclusions, see [How to Create an Exclusion](/tutorials/how-to-create-an-exclusion).
## What's next?
Audiences can be used for a variety of purposes, including building plays and
subscribing to Slack alerts. For more information, check out these tutorials:
For more information on creating exclusions, see [How to Create an Exclusion](/tutorials/how-to-create-an-exclusion).
## What's next?
Audiences can be used for a variety of purposes, including building plays and
subscribing to Slack alerts. For more information, check out these tutorials:
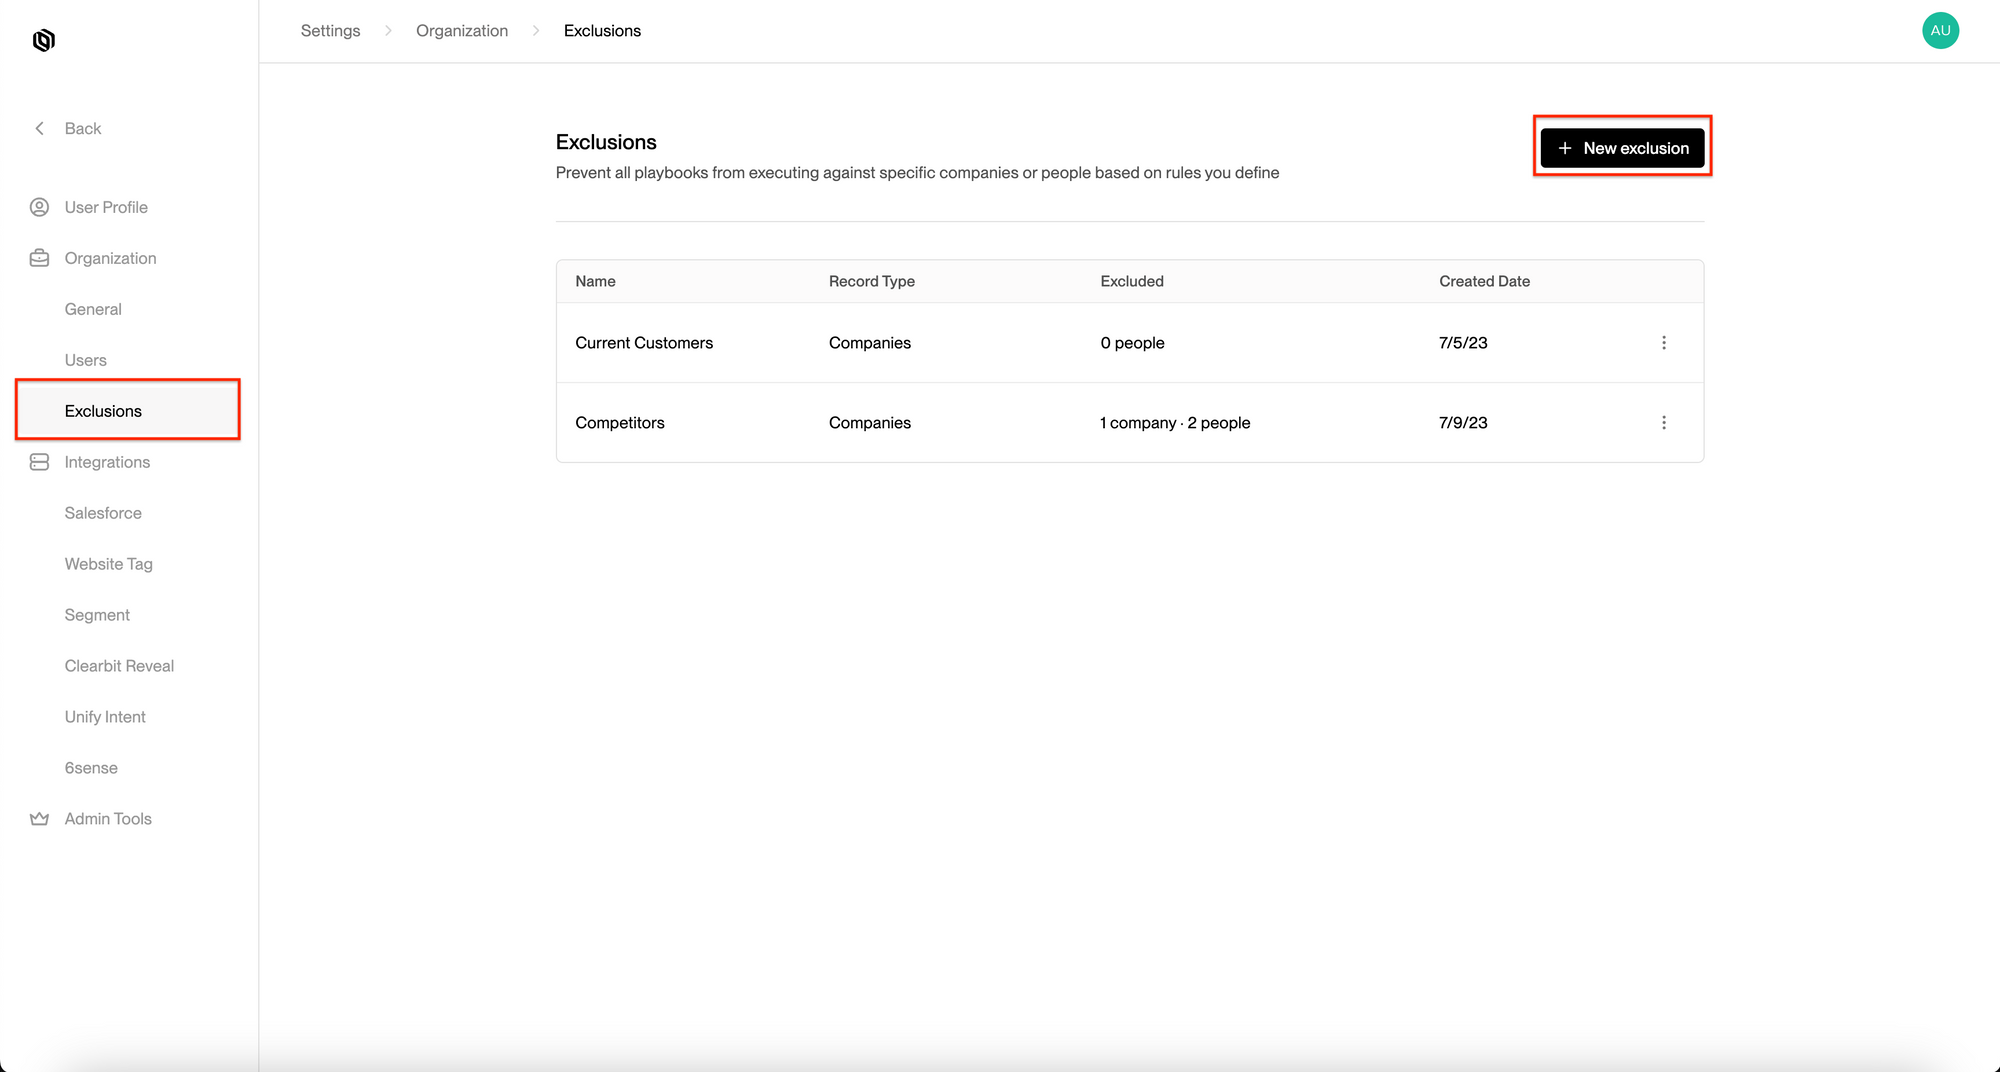 ## 2. Select Companies or People
Select `Companies` in this case
## 2. Select Companies or People
Select `Companies` in this case
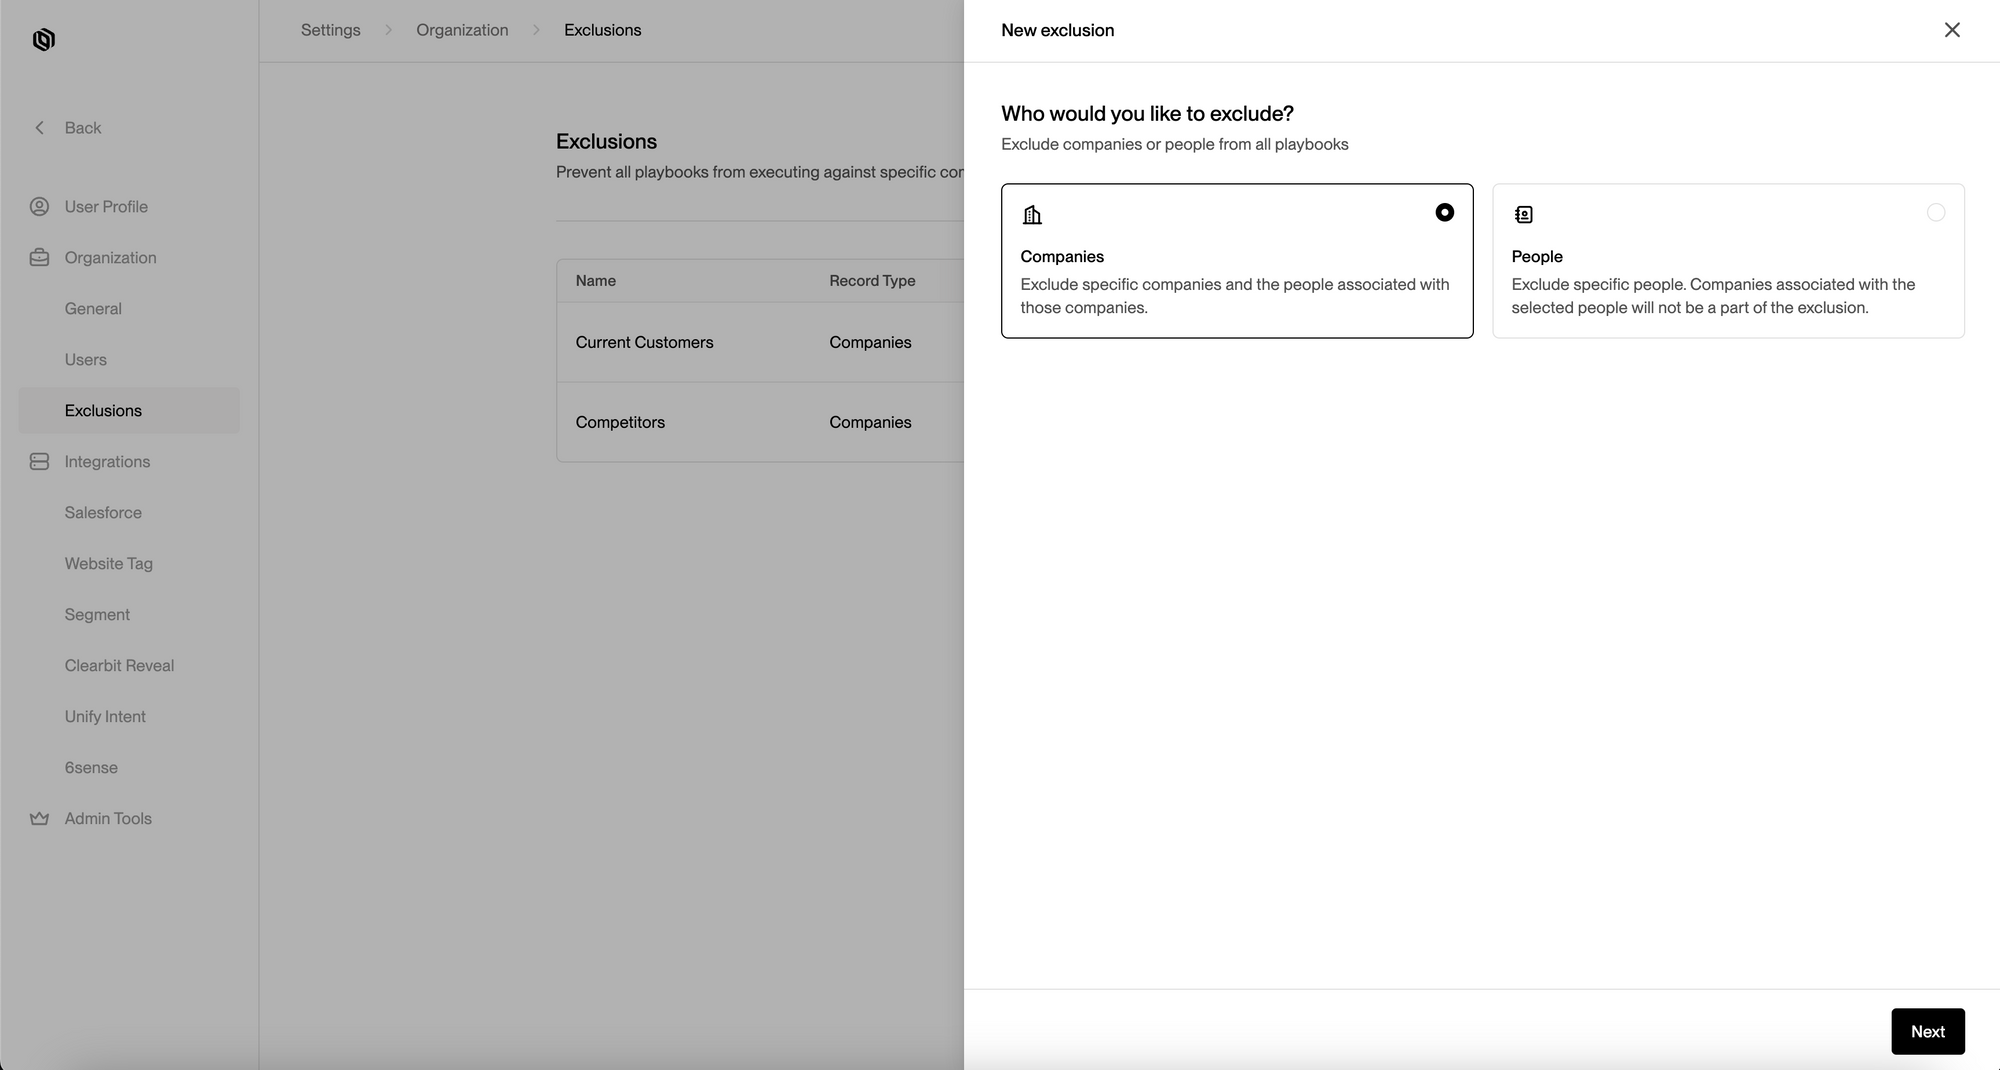 ## 3. Define criterion to filter
In this example, we’re creating an exclusion called `Current Customers` that excludes companies with Salesforce `Account Status` equal to `Active`
## 3. Define criterion to filter
In this example, we’re creating an exclusion called `Current Customers` that excludes companies with Salesforce `Account Status` equal to `Active`
 ## 4. Hit Save
Here you’ll see an overview of your new exclusion. These lists will automatically be excluded from targeting.
## 4. Hit Save
Here you’ll see an overview of your new exclusion. These lists will automatically be excluded from targeting.
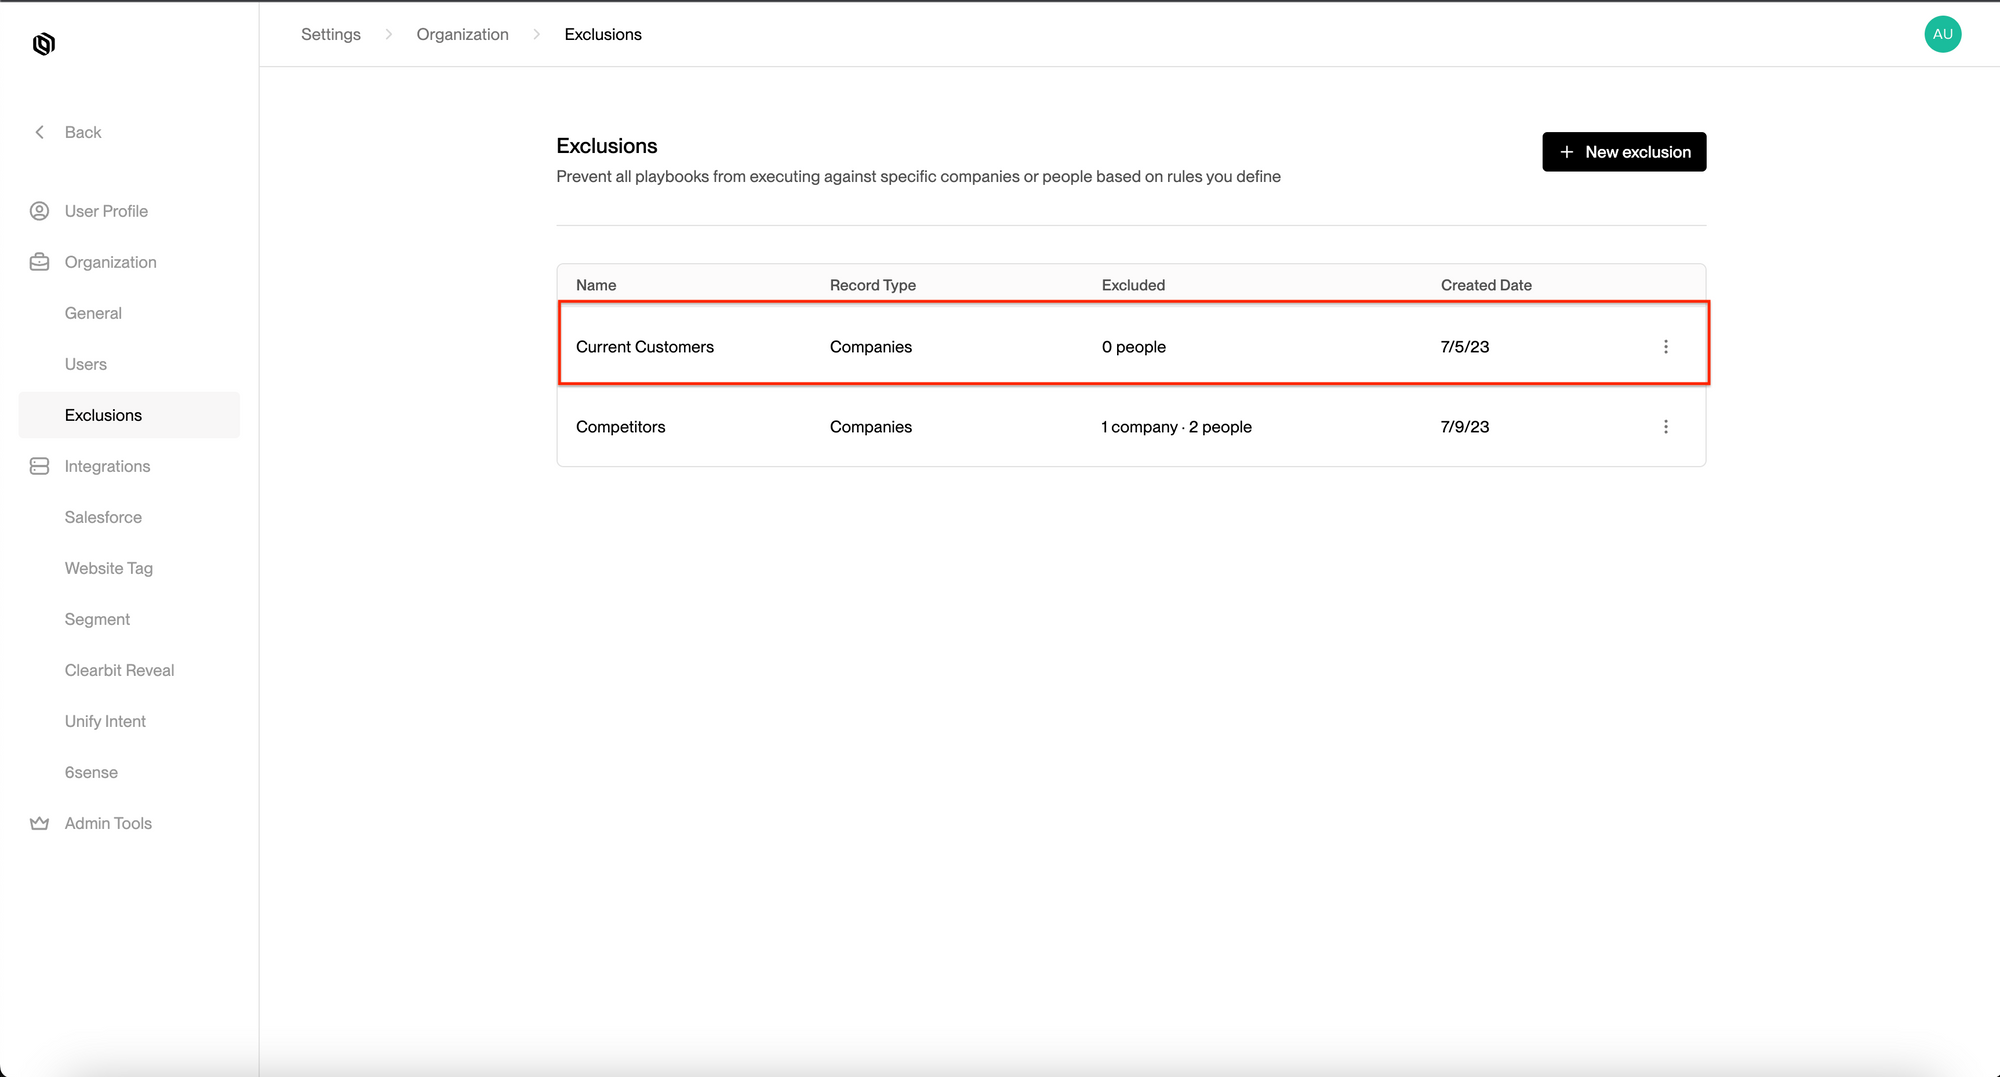 ## Upload exclusions from a CSV
Let's walk through how to set up an exclusion using a CSV of companies or people.
### 1. Create a column in your CSV called "Status"
Populate the "Status" column with the same value across all the rows in your CSV. This value usually indicates the type of contact you are excluding. Examples can include "Active Customer", "Competitor", etc.
### 2. Upload these contacts in the companies or people tab
If you're uploading companies, you'll need to include both the company name and domain. If you're uploading people, you'll need to include one of the following set of fields:
* Email
* First Name, Last Name, and Company Domain
* LinkedIn URL
### 3. Map the CSV fields to the Unify fields
You'll select the fields you want to map into Unify. Make sure to select "Status" field from Unify when mapping that same column from your CSV. The Unify "Status" field should then populate with the values you populated in the CSV under the column. Once these are mapped, you can finish the upload.
### 4. Create a new exclusion and add the "Status" field in the conditions
You'll then switch over into the "Exclusions" tab in your settings and create a new exclusion. Under either the people or companies filters, you will select the Unify status column and add the value from your CSV (i.e. "Active Customer"). Once you save this exclusion, this list should be excluded from future audiences and Plays moving forward!
***
Note that if you would like to add more companies or contacts to this exclusion list in the feature, you'll need to follow the same process as above and make sure the "Status" field is correctly mapped. This should automatically pull in the new exclusion after uploaded if the "Status" value is the same value in the filter.
---
# Source: https://docs.unifygtm.com/tutorials/how-to-receive-slack-alerts.md
> ## Documentation Index
> Fetch the complete documentation index at: https://docs.unifygtm.com/llms.txt
> Use this file to discover all available pages before exploring further.
# How to Receive Slack Alerts
> Receive real-time Slack alerts when companies or people enter an audience.
## Audience Entry Alerts
When a new entry is added to the audience, a notification will be sent to the selected Slack channel.
### Enabling
1. Go to the audience page and click on `Enable alert`.
## Upload exclusions from a CSV
Let's walk through how to set up an exclusion using a CSV of companies or people.
### 1. Create a column in your CSV called "Status"
Populate the "Status" column with the same value across all the rows in your CSV. This value usually indicates the type of contact you are excluding. Examples can include "Active Customer", "Competitor", etc.
### 2. Upload these contacts in the companies or people tab
If you're uploading companies, you'll need to include both the company name and domain. If you're uploading people, you'll need to include one of the following set of fields:
* Email
* First Name, Last Name, and Company Domain
* LinkedIn URL
### 3. Map the CSV fields to the Unify fields
You'll select the fields you want to map into Unify. Make sure to select "Status" field from Unify when mapping that same column from your CSV. The Unify "Status" field should then populate with the values you populated in the CSV under the column. Once these are mapped, you can finish the upload.
### 4. Create a new exclusion and add the "Status" field in the conditions
You'll then switch over into the "Exclusions" tab in your settings and create a new exclusion. Under either the people or companies filters, you will select the Unify status column and add the value from your CSV (i.e. "Active Customer"). Once you save this exclusion, this list should be excluded from future audiences and Plays moving forward!
***
Note that if you would like to add more companies or contacts to this exclusion list in the feature, you'll need to follow the same process as above and make sure the "Status" field is correctly mapped. This should automatically pull in the new exclusion after uploaded if the "Status" value is the same value in the filter.
---
# Source: https://docs.unifygtm.com/tutorials/how-to-receive-slack-alerts.md
> ## Documentation Index
> Fetch the complete documentation index at: https://docs.unifygtm.com/llms.txt
> Use this file to discover all available pages before exploring further.
# How to Receive Slack Alerts
> Receive real-time Slack alerts when companies or people enter an audience.
## Audience Entry Alerts
When a new entry is added to the audience, a notification will be sent to the selected Slack channel.
### Enabling
1. Go to the audience page and click on `Enable alert`.
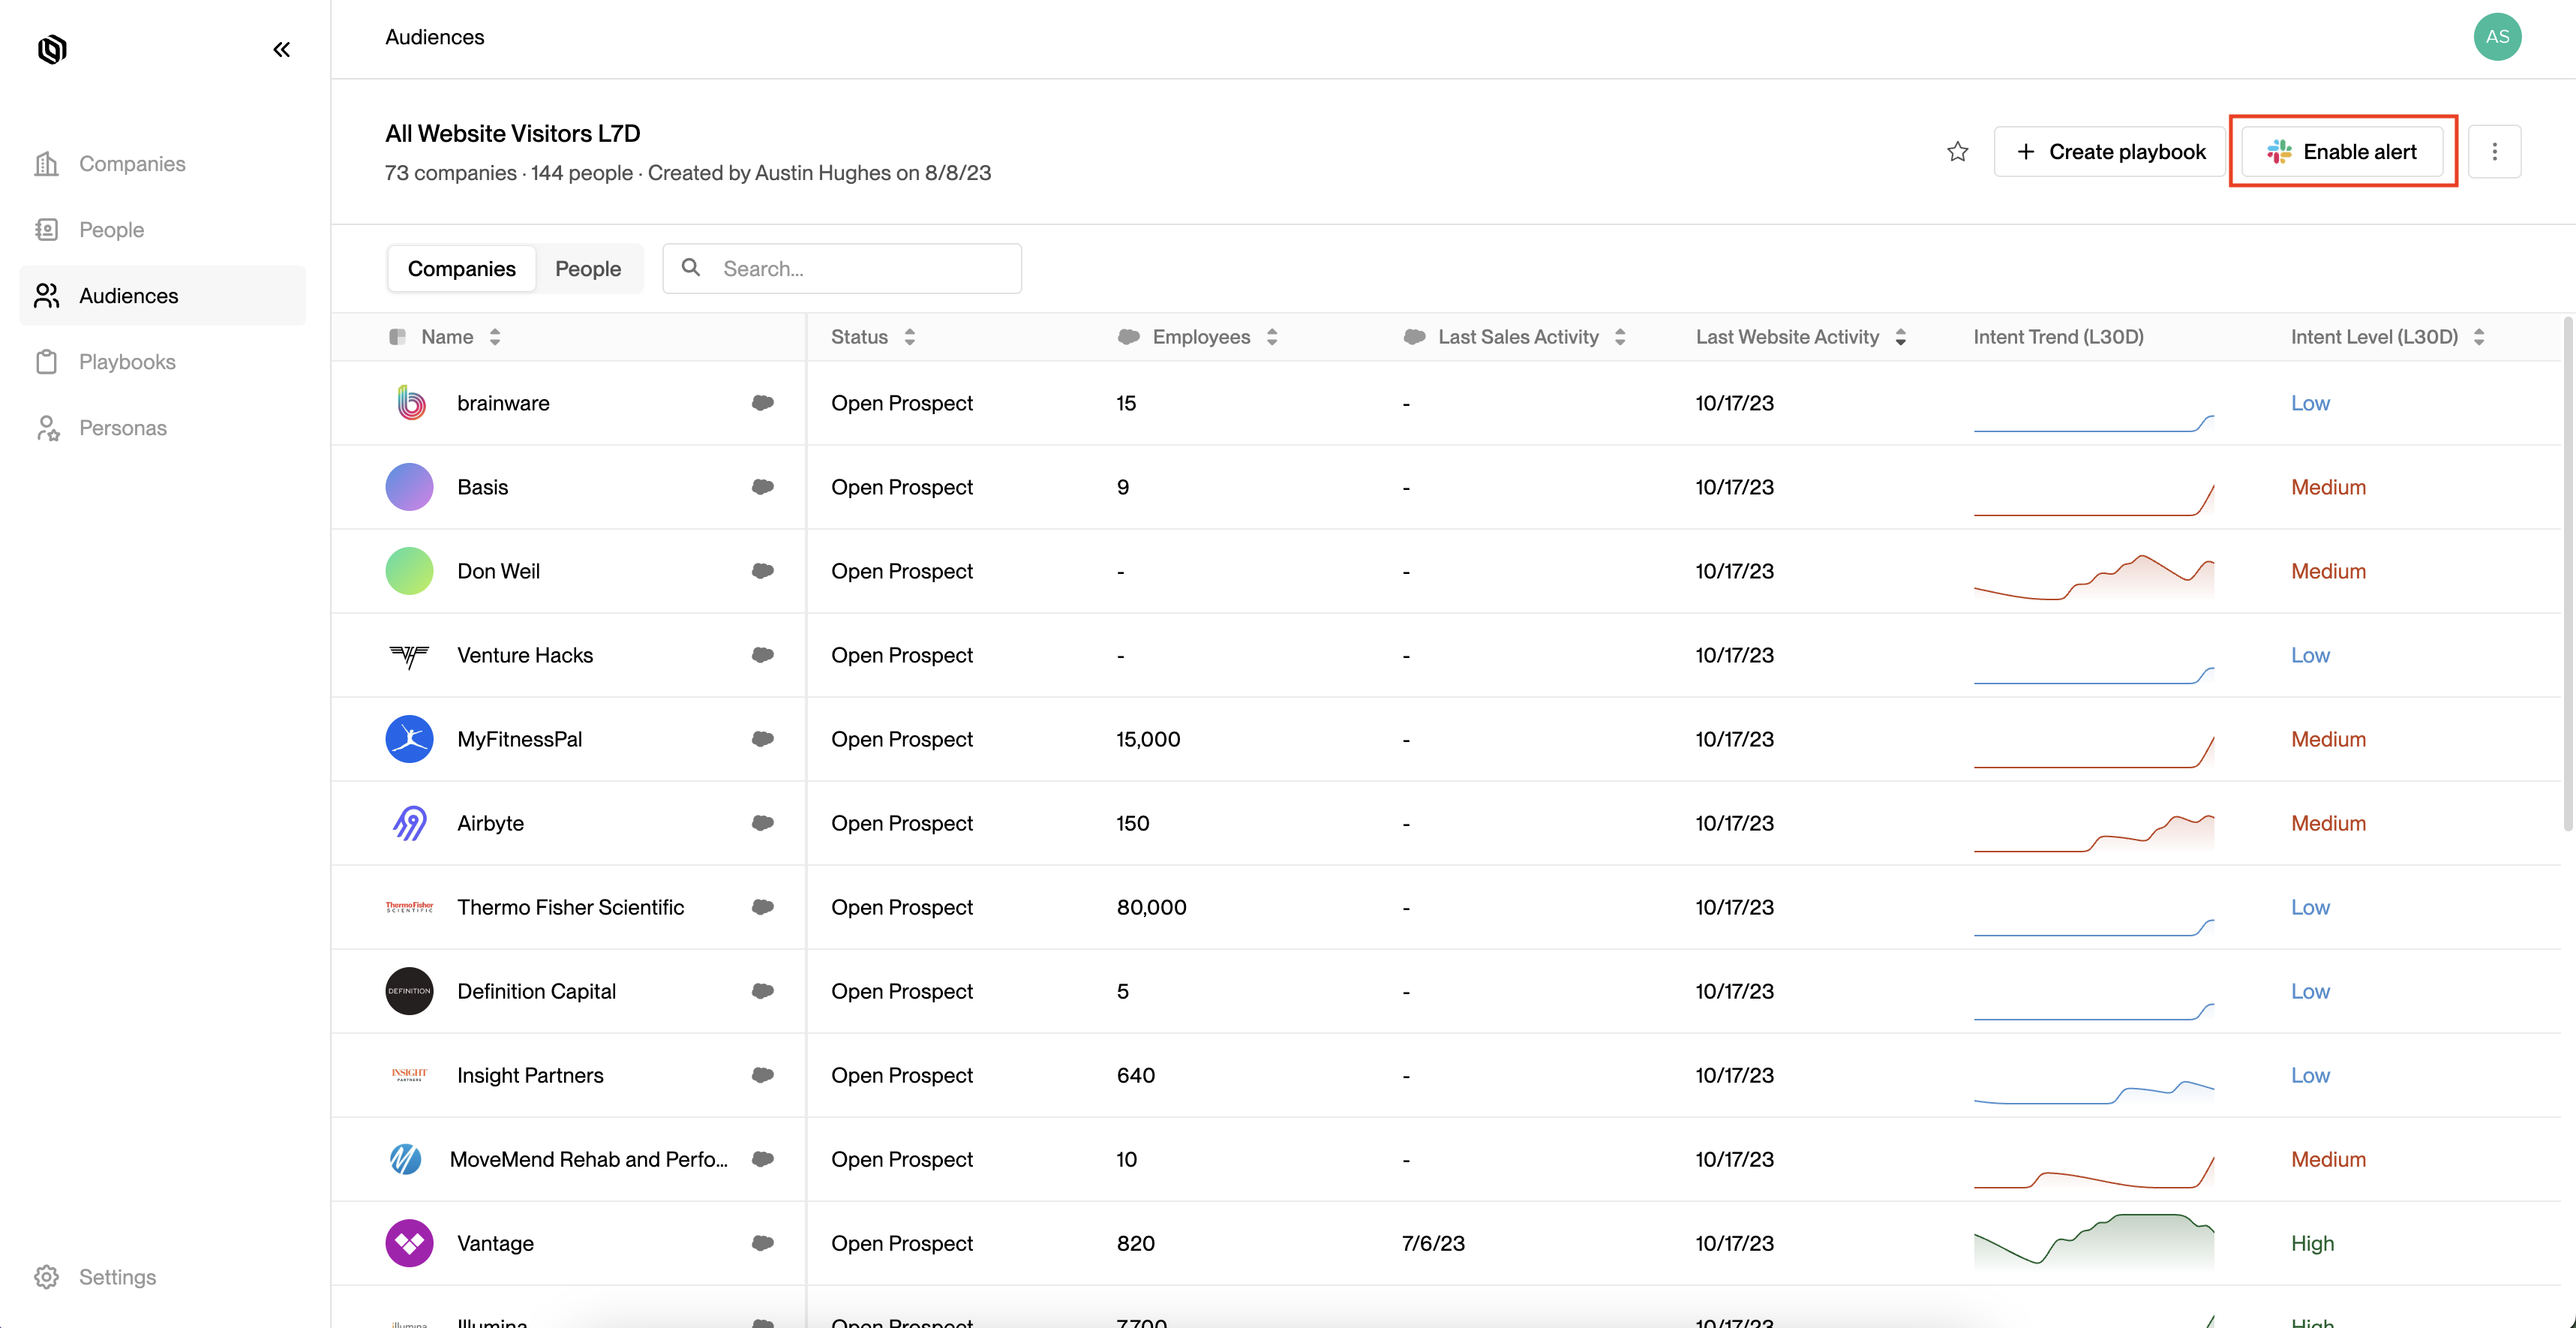 2. Choose a channel from the dropdown menu.

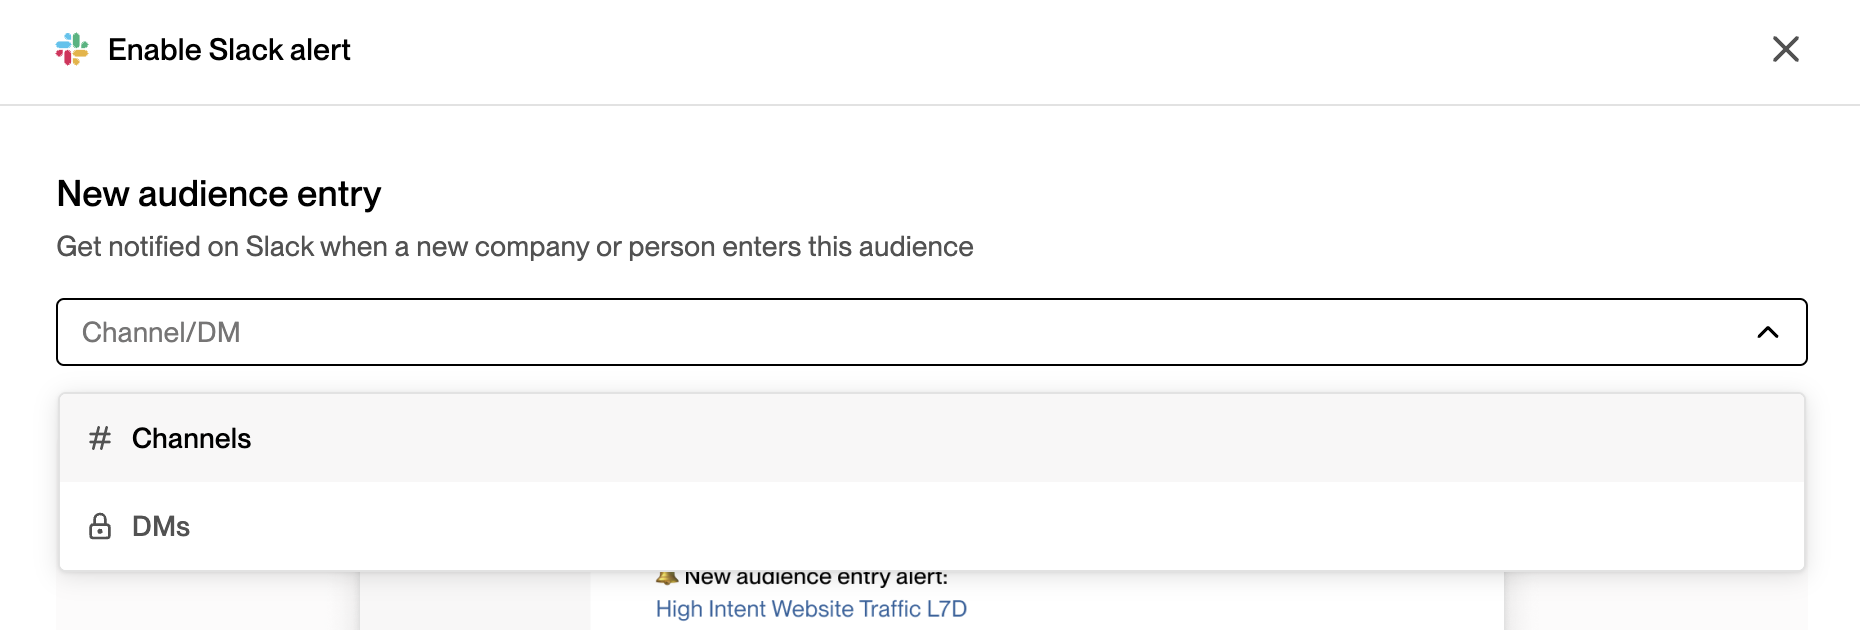 3. After selecting a channel, click on `Enable`.
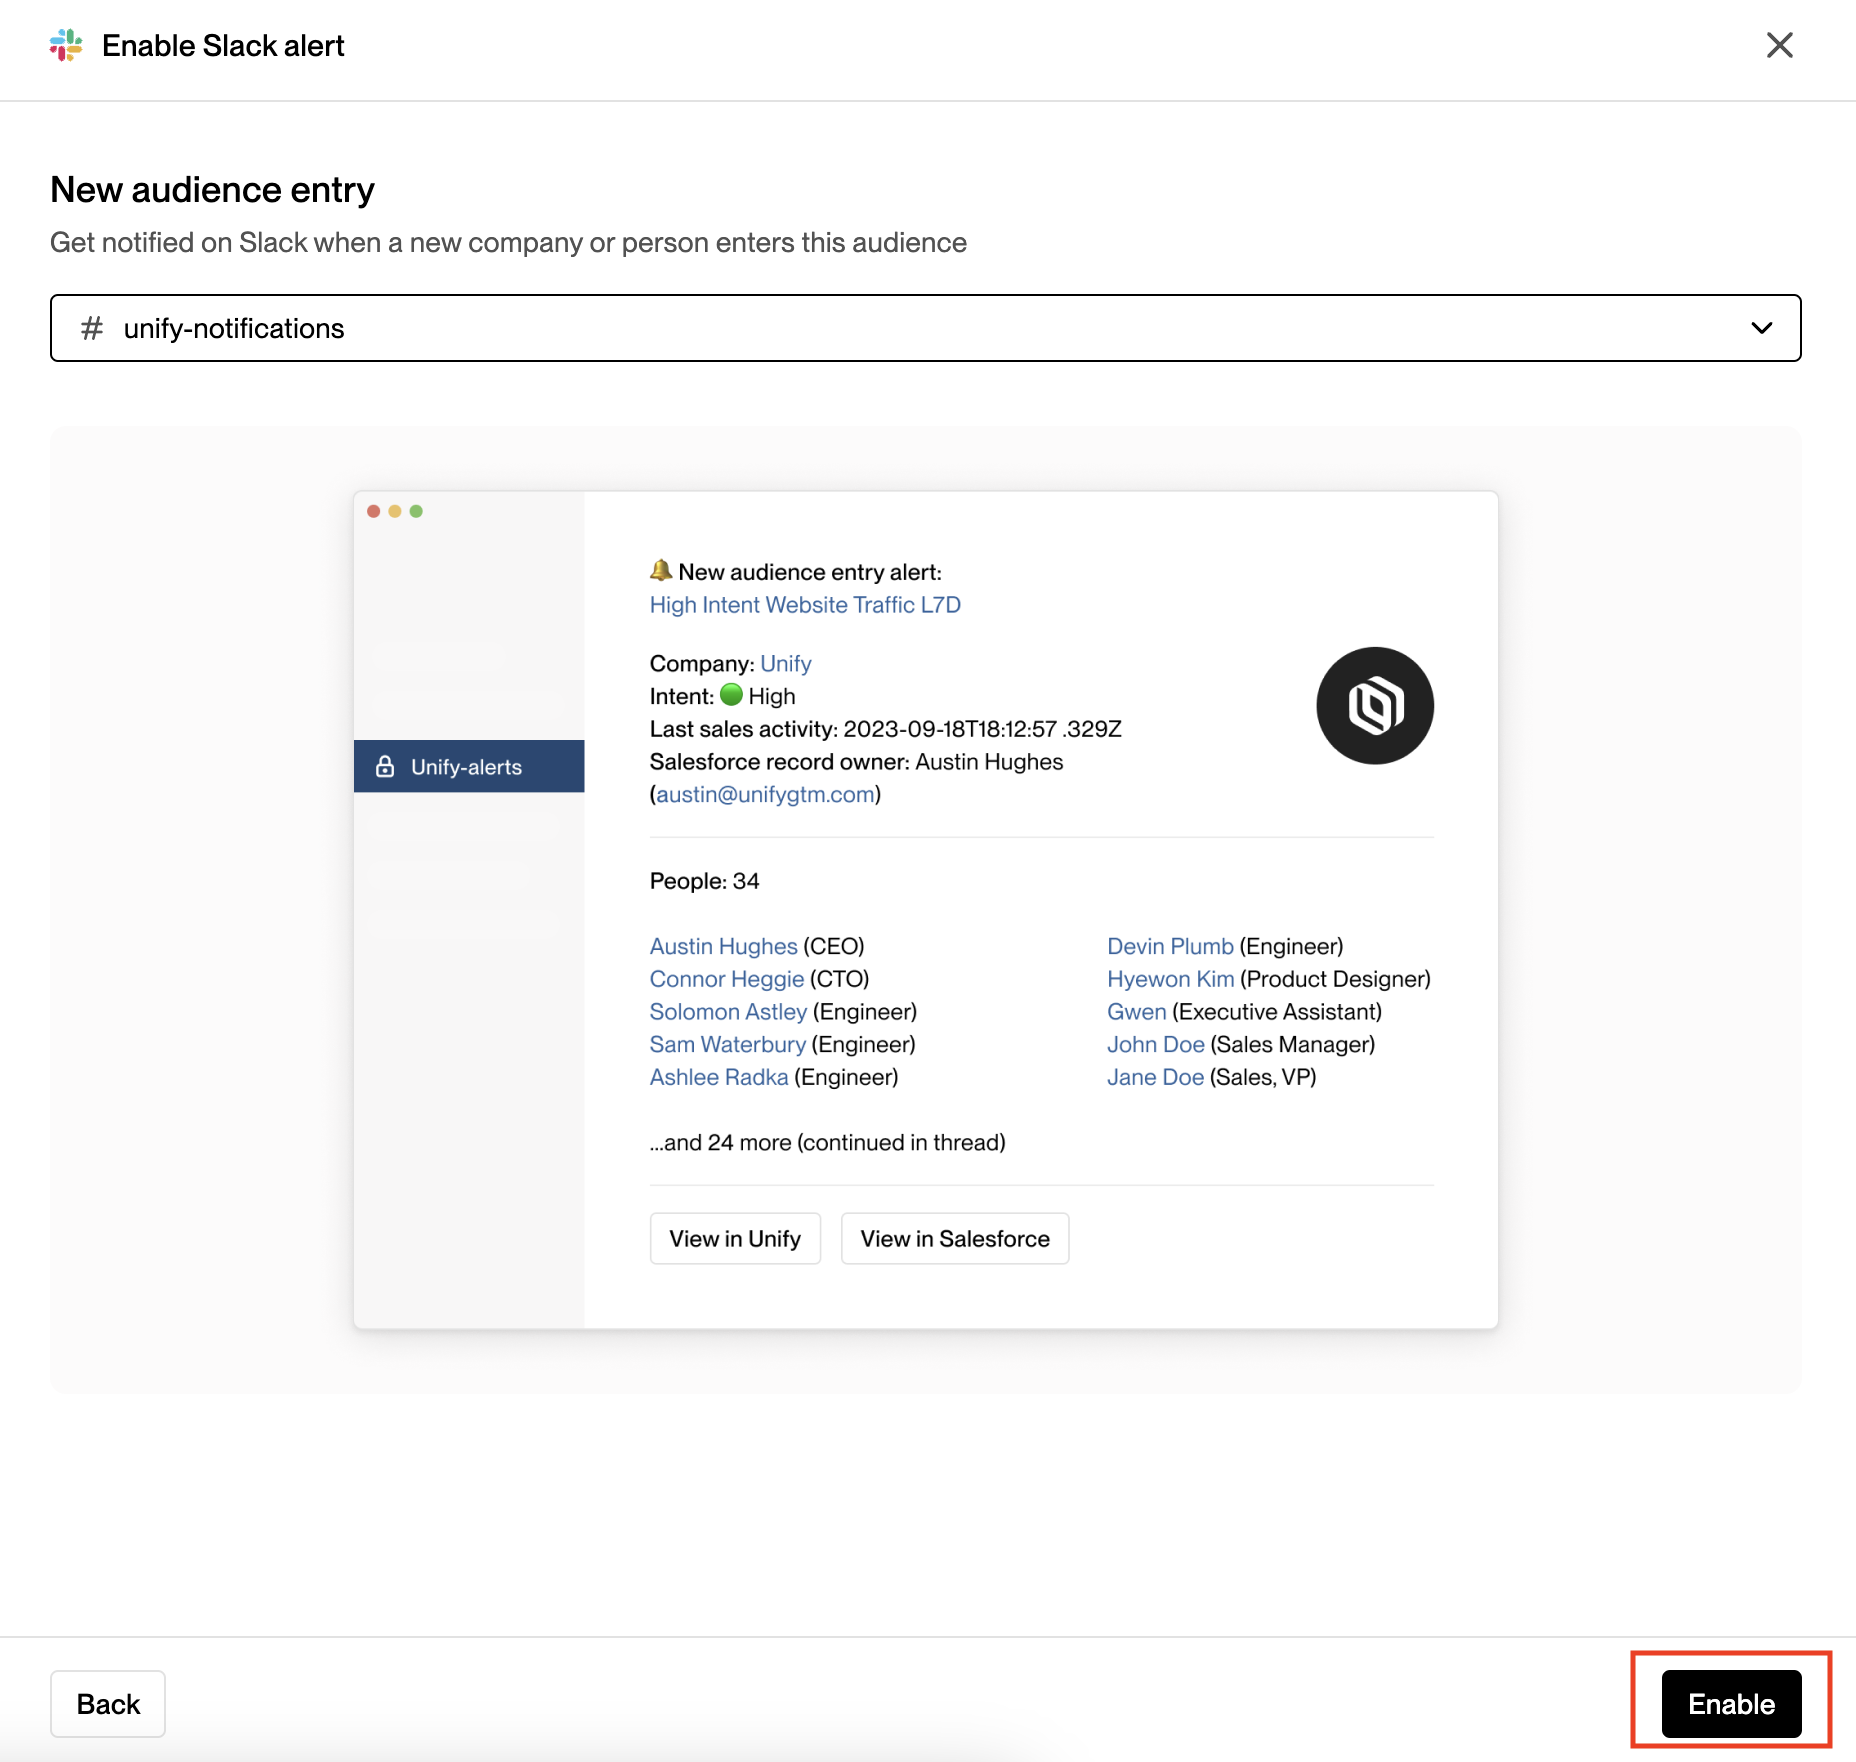 ### Disabling
1. Go to the audience page and click on `Enabled`.
### Disabling
1. Go to the audience page and click on `Enabled`.
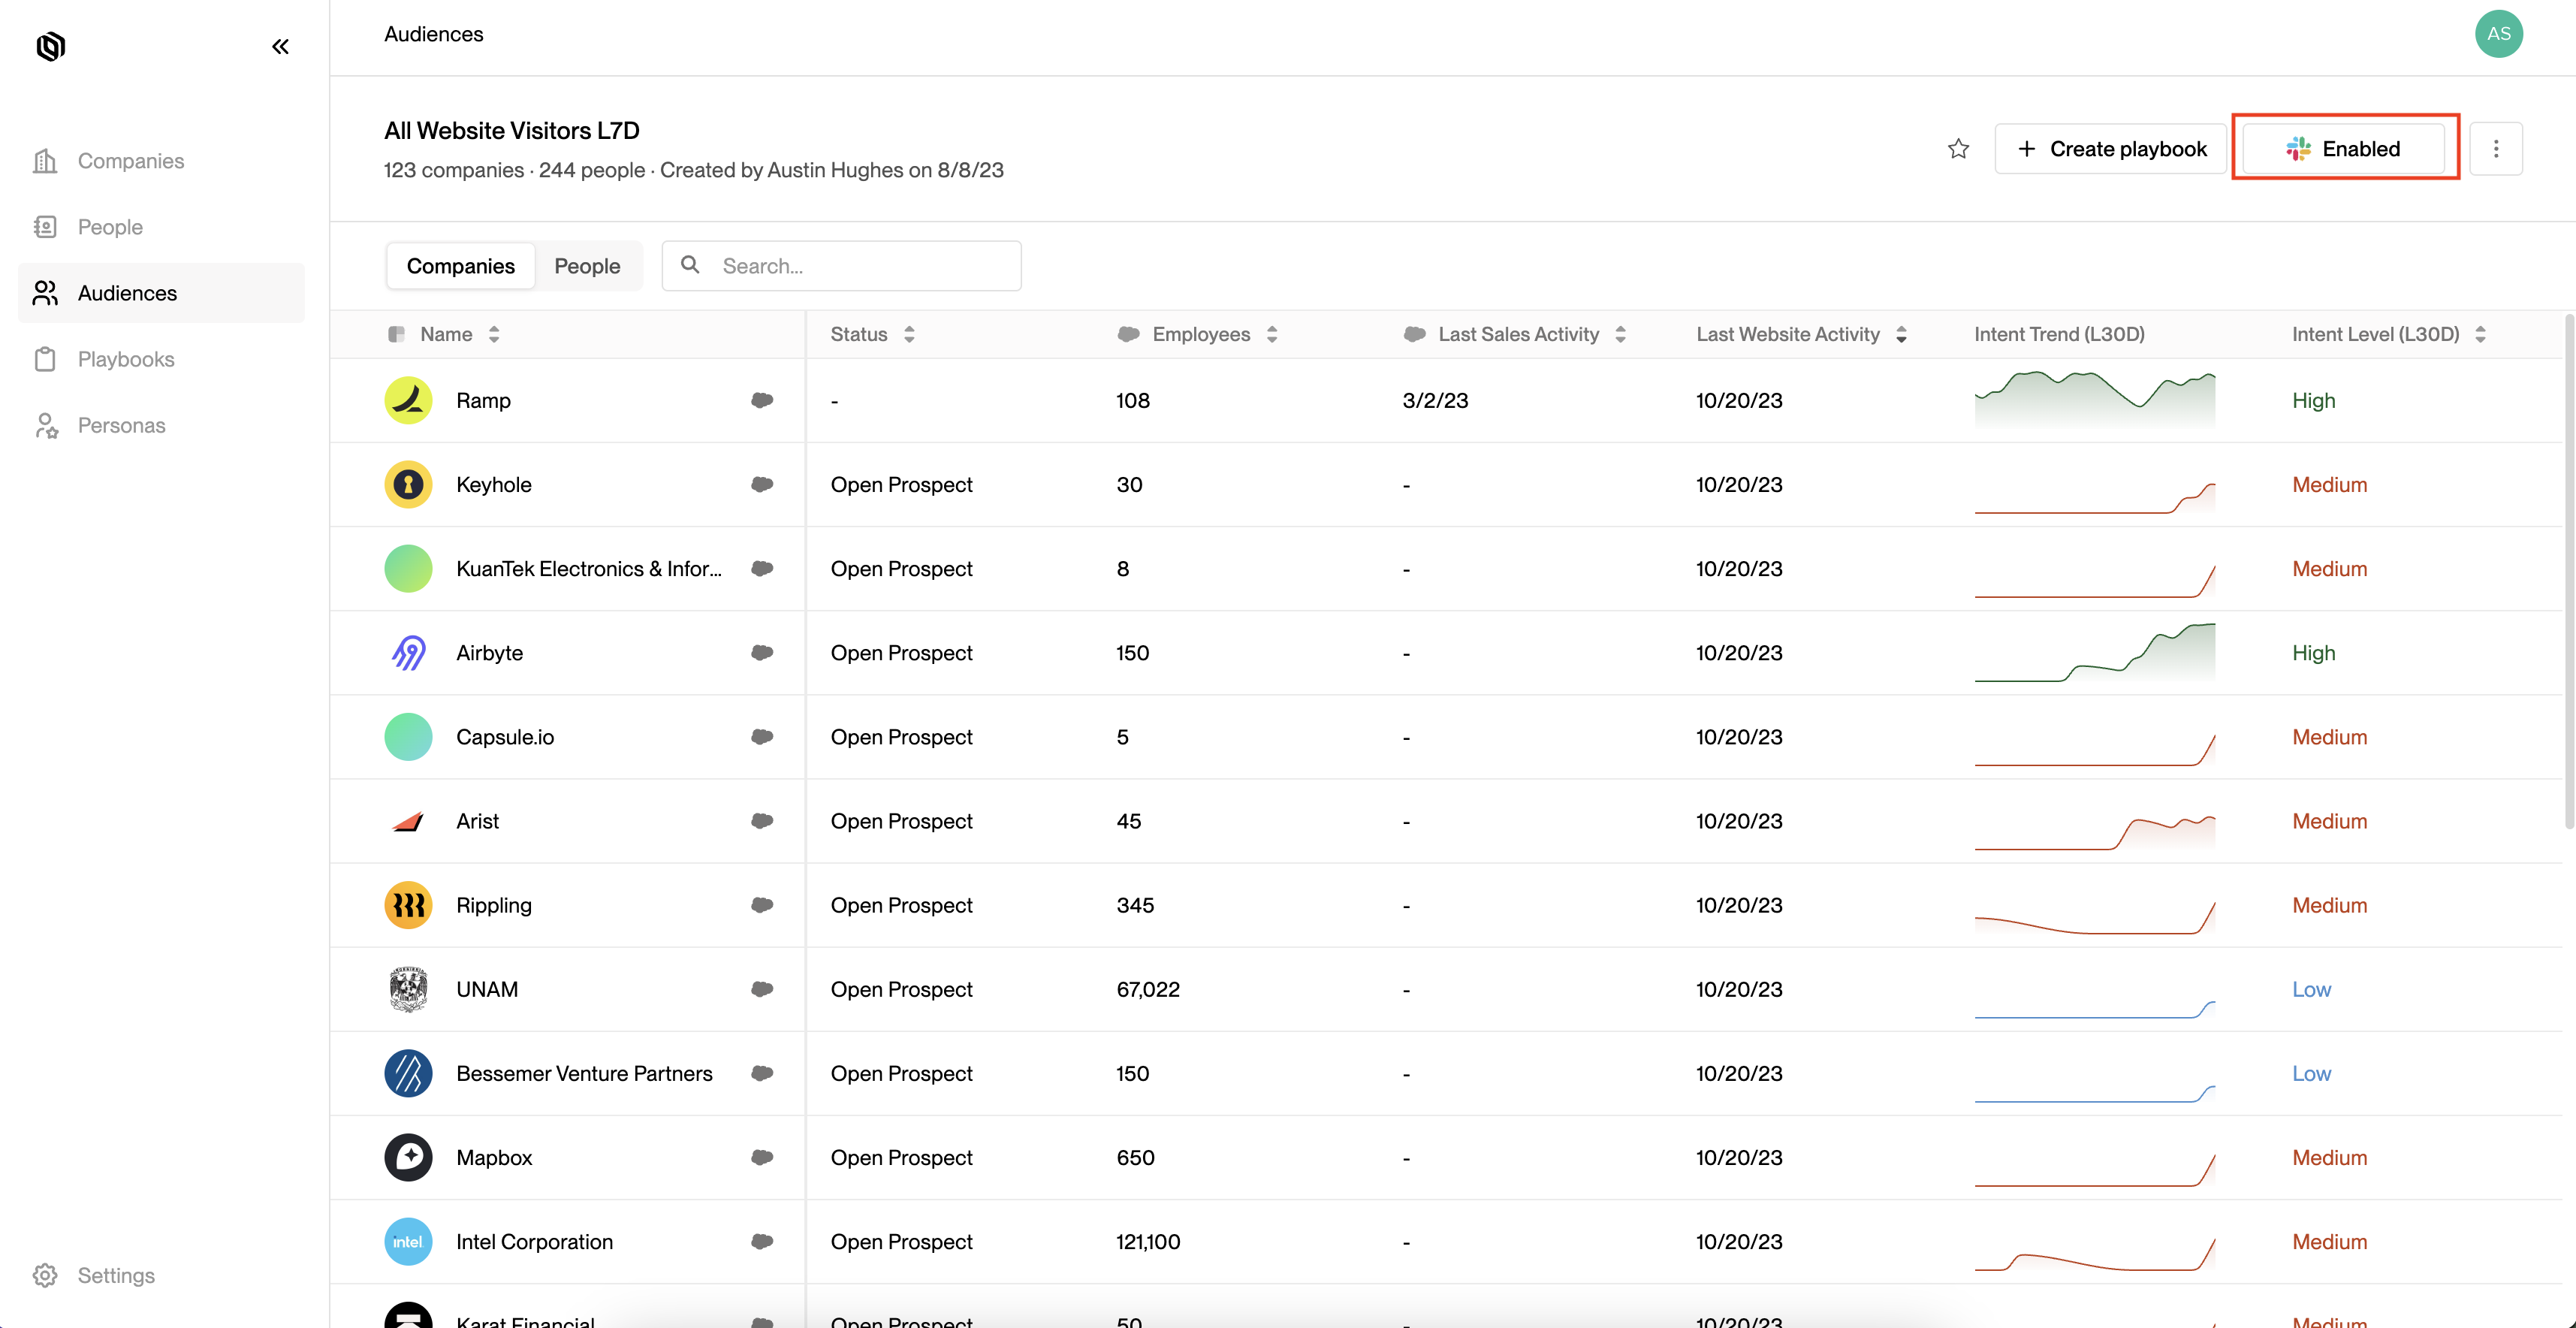 2. Click on `Disconnect`.
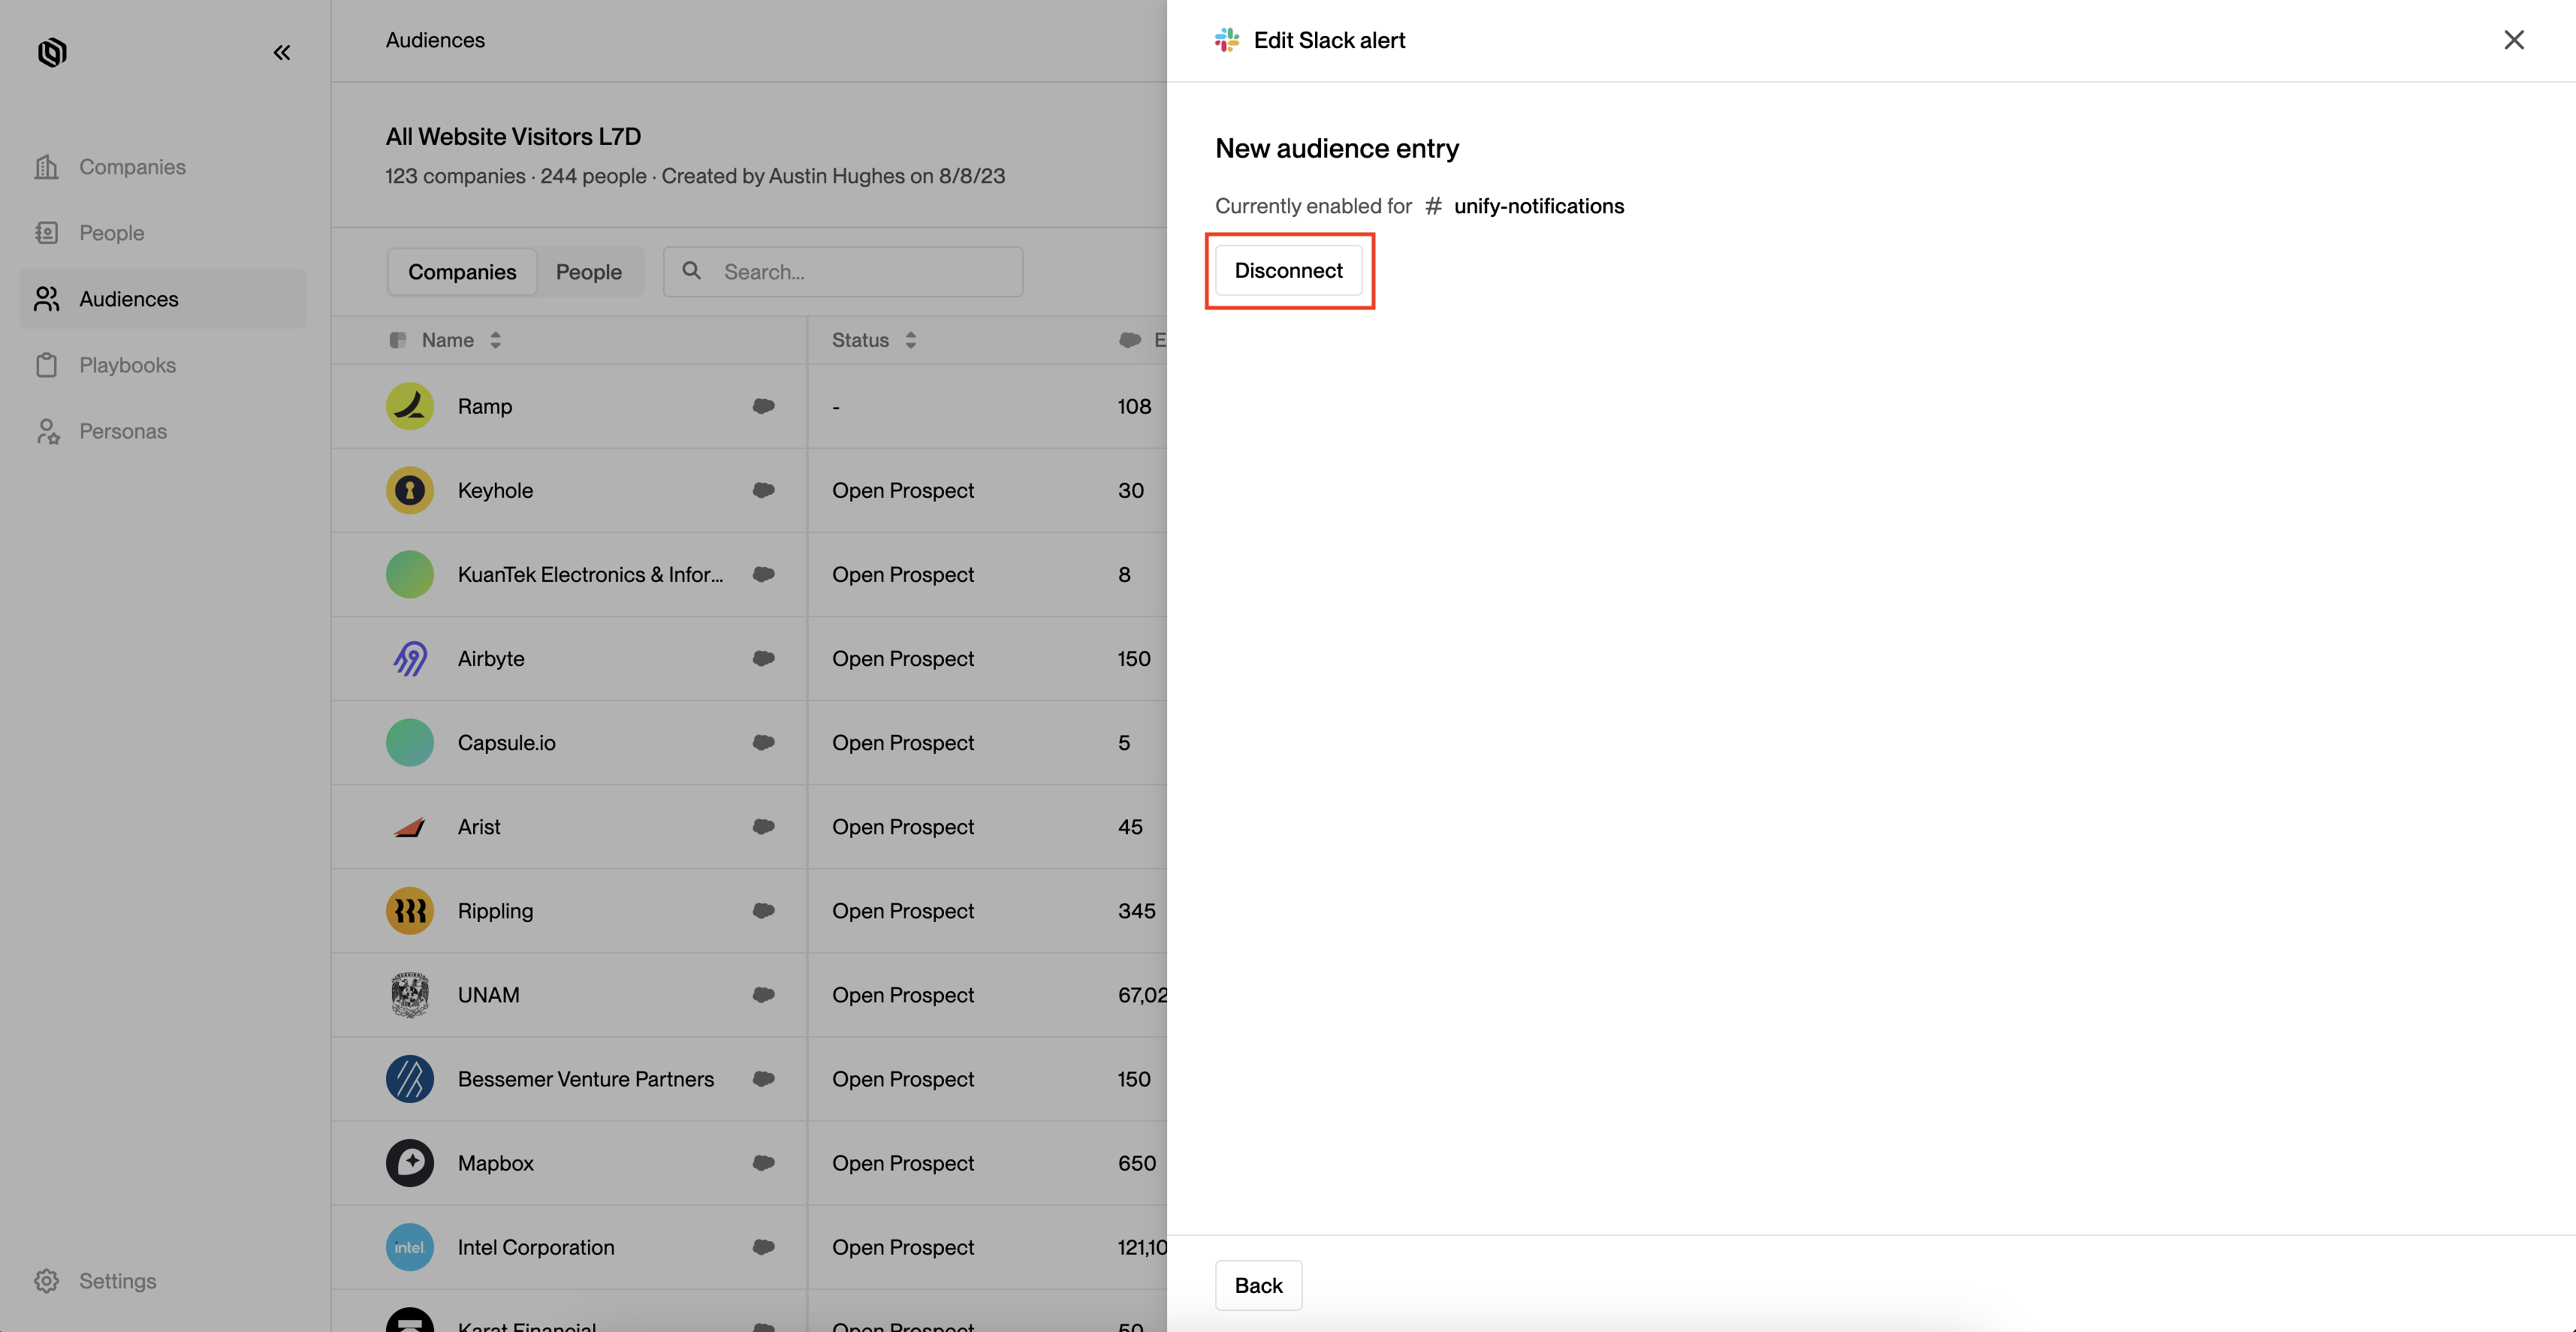 ---
# Source: https://docs.unifygtm.com/tutorials/how-to-use-personas.md
> ## Documentation Index
> Fetch the complete documentation index at: https://docs.unifygtm.com/llms.txt
> Use this file to discover all available pages before exploring further.
# How to Define Personas
> Create personas to prospect and reach out to your ideal buyers.
## Overview
Personas are collections of job titles that you want to target. Each persona
consists of a list of titles that you want to include and exclude. Personas can
be used throughout Unify, such as when prospecting or routing people to
different sequences.
## Create a persona
Navigate to the [Personas](https://app.unifygtm.com/dashboard/settings/personas) tab in
the sidebar and select **New persona**. Here you can add job titles that you
wish to include or exclude when matching people against this persona.
---
# Source: https://docs.unifygtm.com/tutorials/how-to-use-personas.md
> ## Documentation Index
> Fetch the complete documentation index at: https://docs.unifygtm.com/llms.txt
> Use this file to discover all available pages before exploring further.
# How to Define Personas
> Create personas to prospect and reach out to your ideal buyers.
## Overview
Personas are collections of job titles that you want to target. Each persona
consists of a list of titles that you want to include and exclude. Personas can
be used throughout Unify, such as when prospecting or routing people to
different sequences.
## Create a persona
Navigate to the [Personas](https://app.unifygtm.com/dashboard/settings/personas) tab in
the sidebar and select **New persona**. Here you can add job titles that you
wish to include or exclude when matching people against this persona.
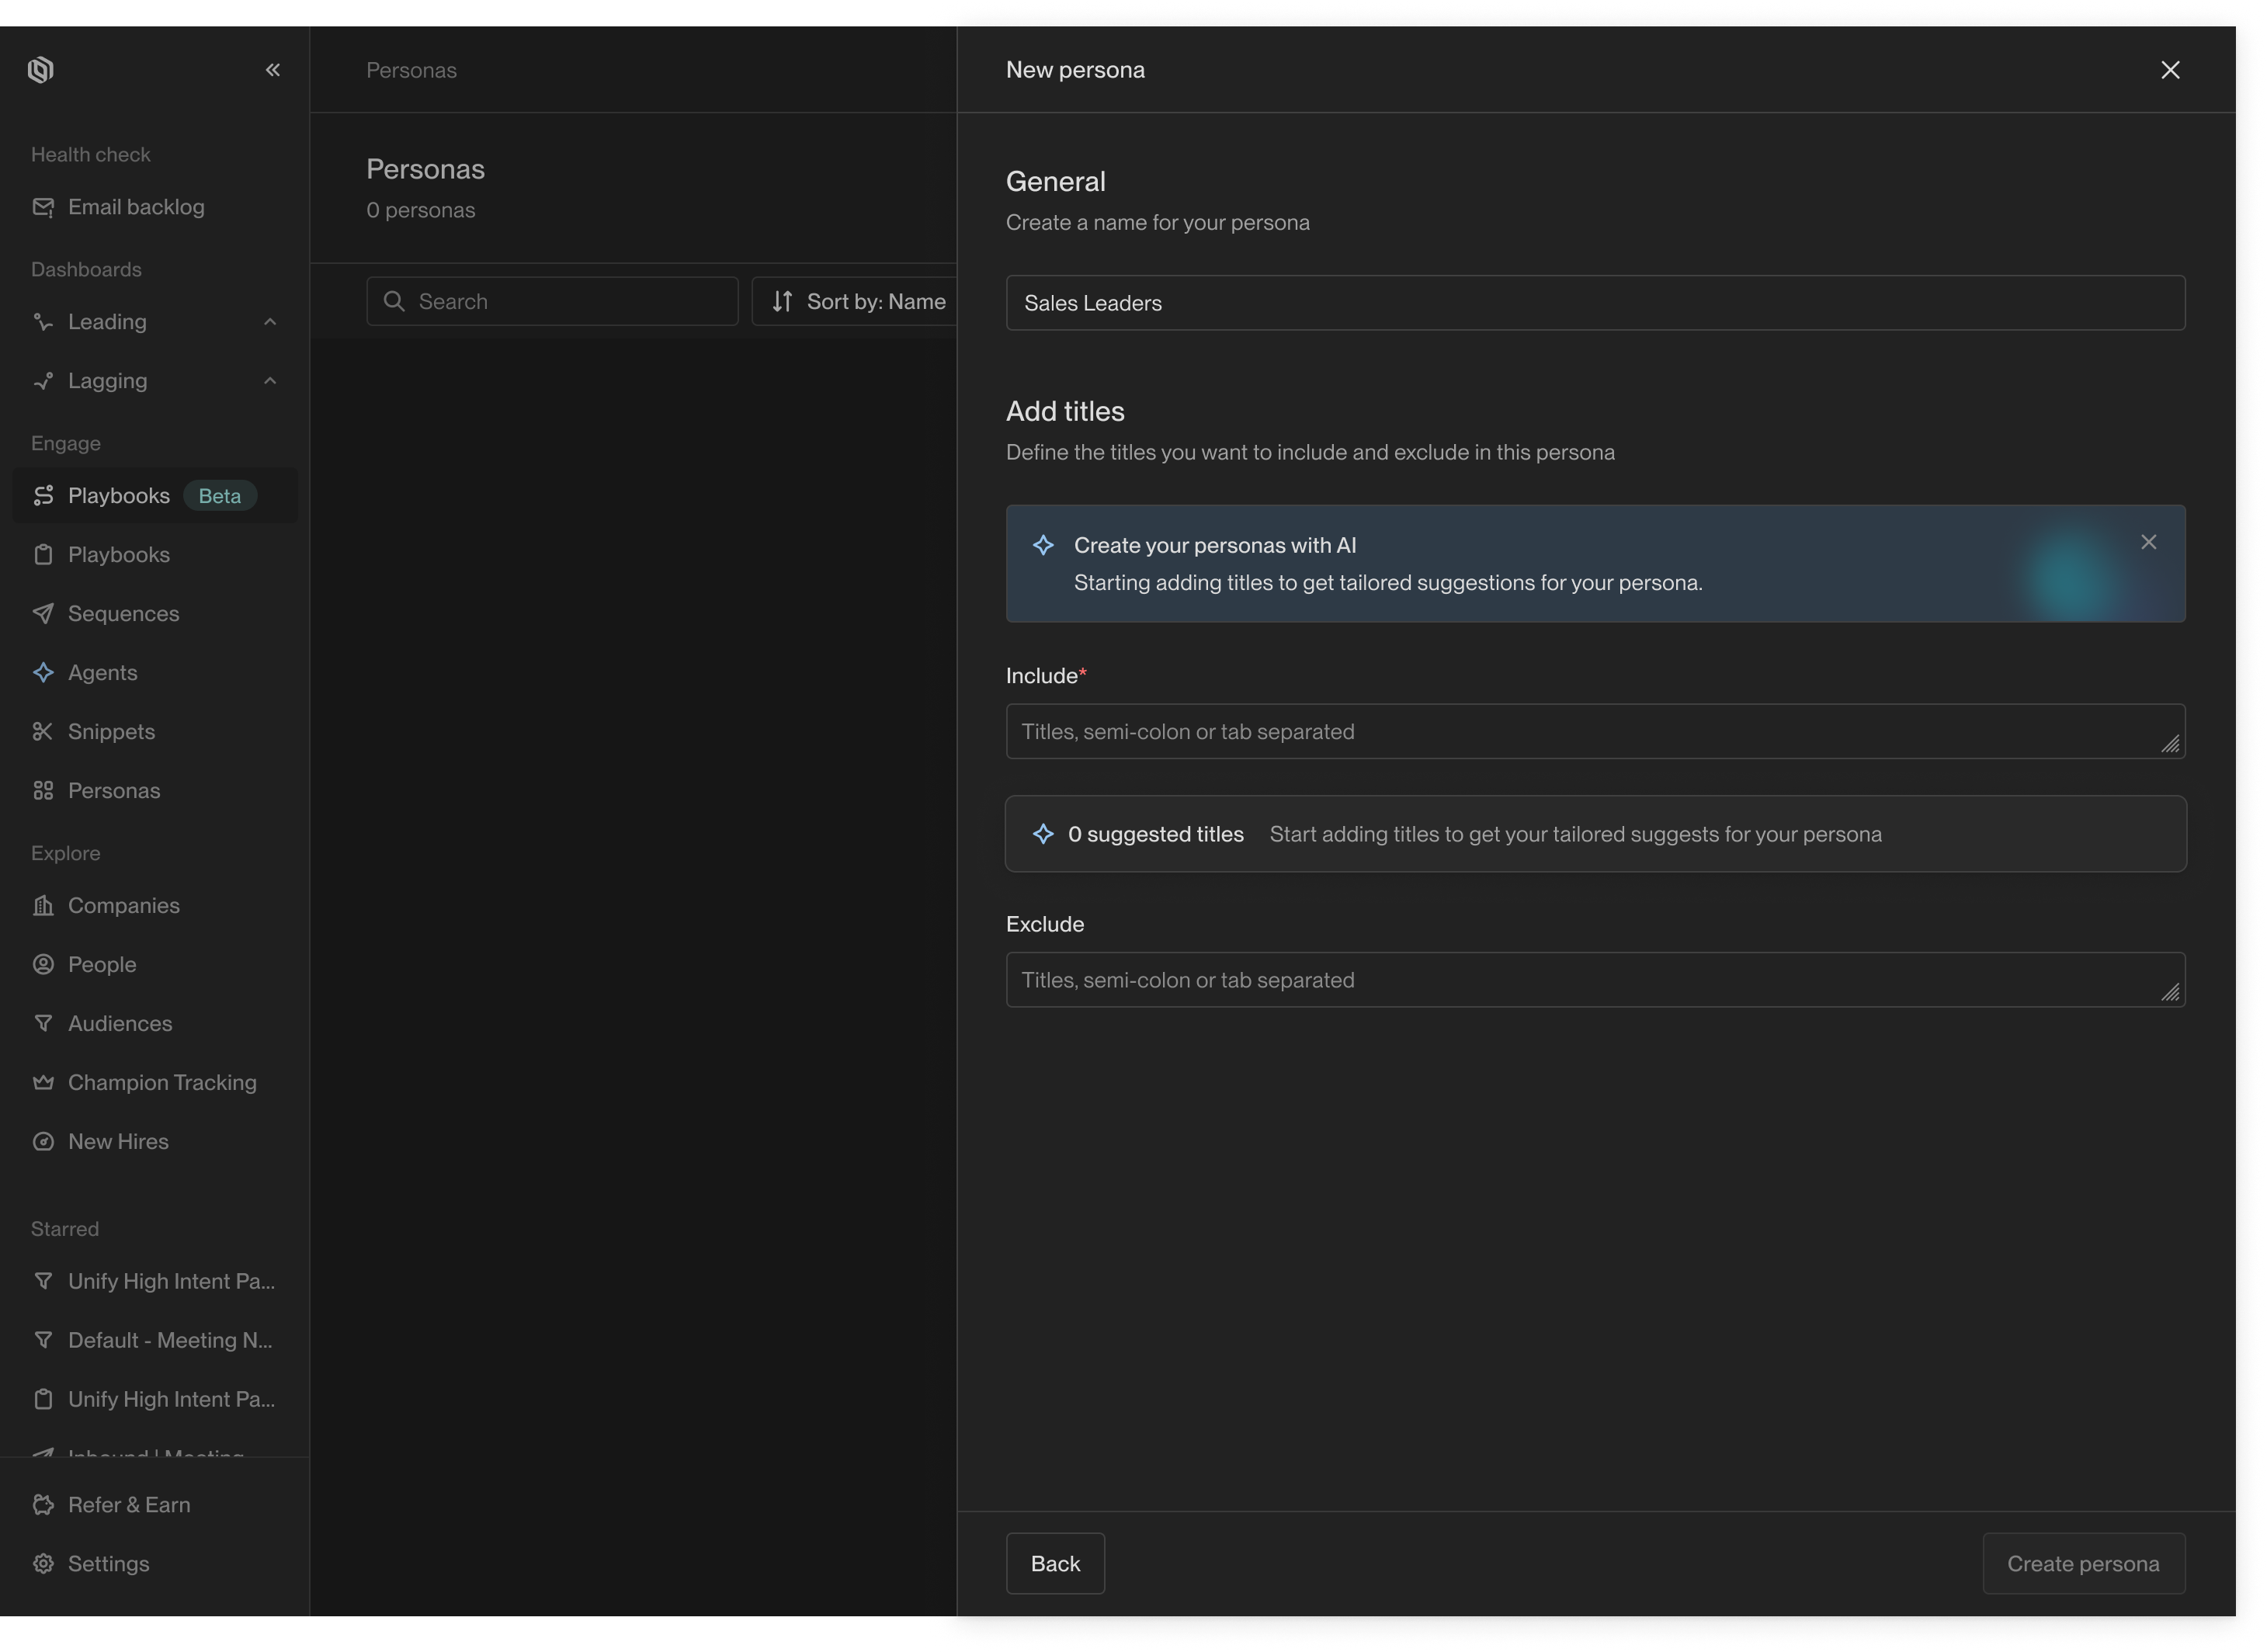 You can also take advantage of AI-powered persona generation to automatically
find and add similar job titles to your persona. This lets you quickly define
comprehensive personas that match different variations of a job title.
You can also take advantage of AI-powered persona generation to automatically
find and add similar job titles to your persona. This lets you quickly define
comprehensive personas that match different variations of a job title.
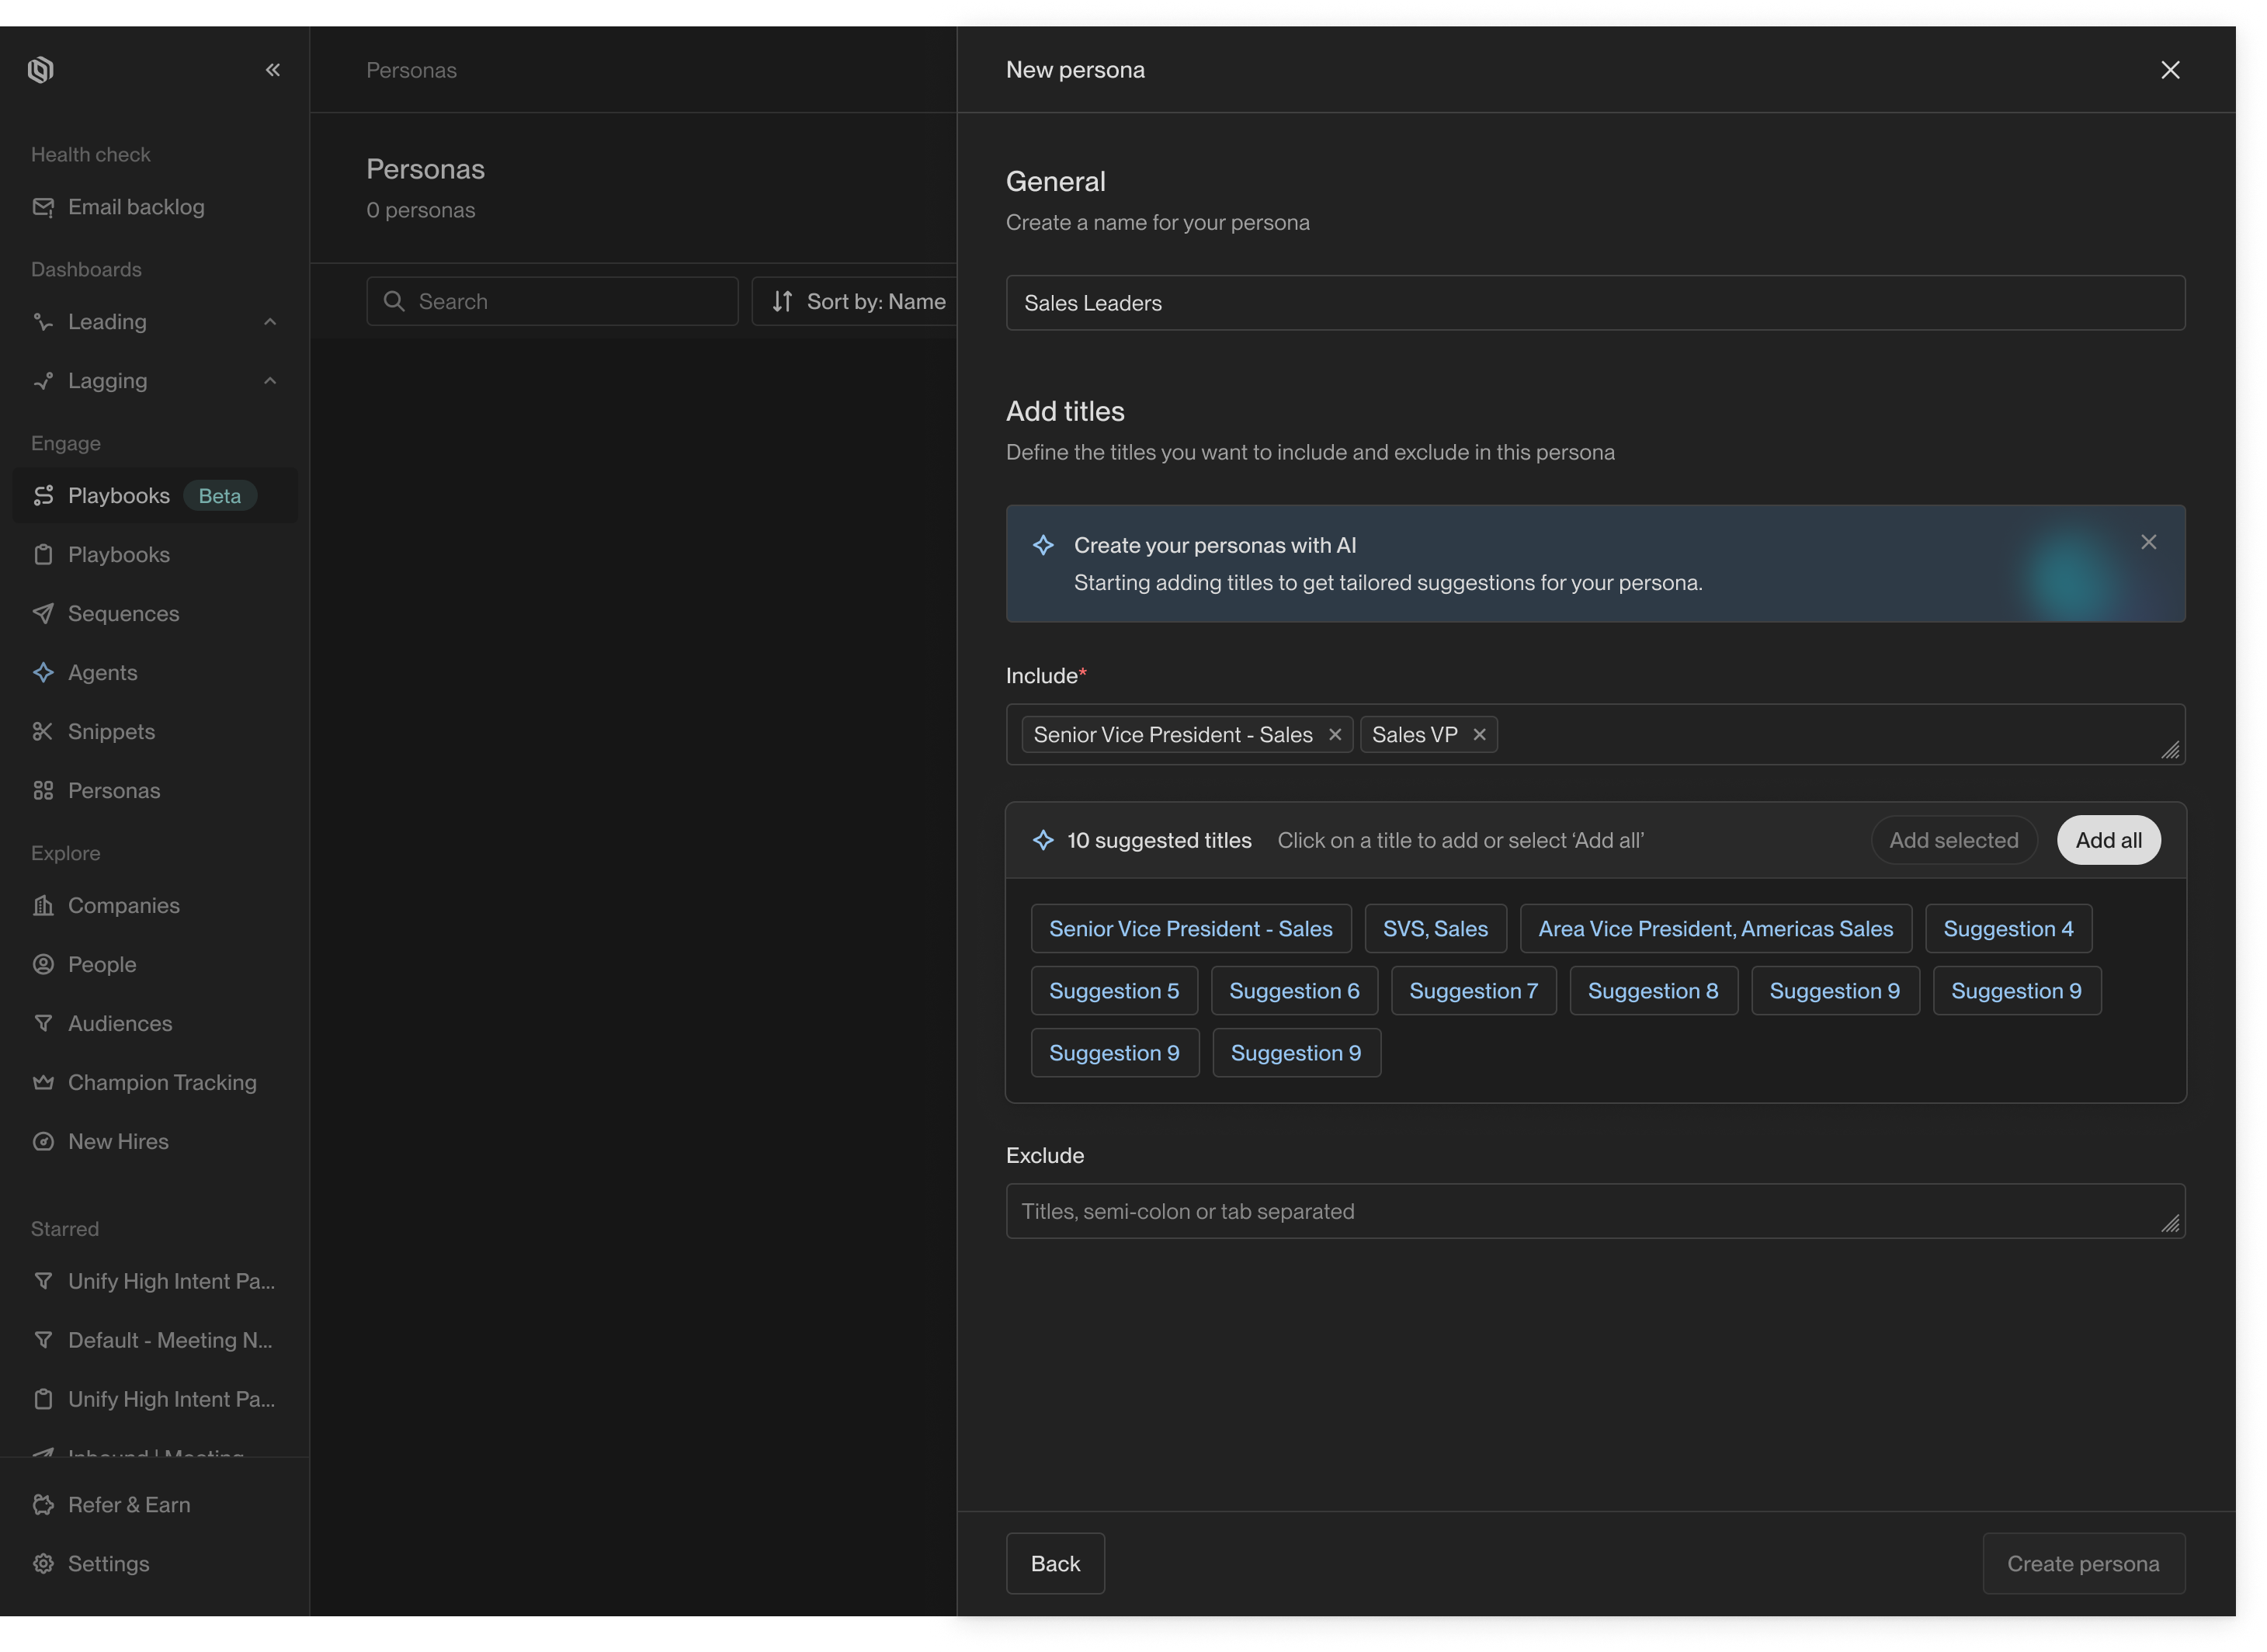 Once you've added all the titles you want to include or exclude, click **Create
persona** to save your changes. This persona will now be available for use
throughout Unify.
## Title matching behavior
When evaluating whether a person's job title matches a persona, Unify adheres to
the following rules and heuristics:
* **Ignore capitalization**: For example, "RevOps Lead" and "Revops lead" are
considered equivalent.
* **Ignore punctuation**: For example, "Enterprise Sales, Lead" and "Enterprise
Sales Lead" are considered equivalent.
* **Ignore word order**: For example, "Lead Sales Engineer" and "Sales Engineer,
Lead" are considered equivalent.
* **Ignore extraneous words**: For example, "CEO" and "CEO and Founder" are
considered equivalent.
That means that you don't need to exhaustively list every possible variation of
a job title in your persona. Instead, you can focus on the most common keywords
and let Unify handle the details.
---
# Source: https://docs.unifygtm.com/reference/integrations/orum/hubspot-setup.md
# Source: https://docs.unifygtm.com/reference/integrations/nooks/hubspot-setup.md
> ## Documentation Index
> Fetch the complete documentation index at: https://docs.unifygtm.com/llms.txt
> Use this file to discover all available pages before exploring further.
# Nooks HubSpot Setup
> Configure Nooks integration with HubSpot for seamless call task management.
# HubSpot Setup for Nooks Integration
This guide walks you through how to set up the Nooks integration with HubSpot to synchronize call tasks.
## Prerequisites
Before you begin, make sure you have:
* Admin access to your HubSpot account
* An active Nooks subscription
## Setup Steps
1. **Admin**: Map users to their Hubspot profiles. Make sure your team has the proper permissions in your Hubspot to be able to create sequences, tasks or lists for themselves (If managers/admins are creating sequences and lists, this can be disregarded)
2. Create or Edit your Call Outcomes
3. Set up automation rules and/or filters to ensure proper hygiene and activities against your contacts.
For detailed step-by-step instructions, see [setup guide](https://support.devrev.ai/nooks/article/ART-120-getting-started-with-hubspot).
## Next Steps
With your HubSpot integration configured and Nooks connected, you're ready to [launch your first call campaign](/reference/integrations/nooks/call-campaigns)!
---
# Source: https://docs.unifygtm.com/reference/browser-extension/hubspot.md
> ## Documentation Index
> Fetch the complete documentation index at: https://docs.unifygtm.com/llms.txt
> Use this file to discover all available pages before exploring further.
# HubSpot
> Run the Unify Chrome extension in HubSpot.
While viewing Companies and Contacts in HubSpot, the extension will
automatically surface the corresponding Companies and People in Unify.
## HubSpot Company Page
From this view, you can view People in your Unify instance who work at this Company (and add
them to a Sequence) or instantly add this Company to a Play of your choosing.
## HubSpot Contact Page
From this view, you can check if this Person is currently enrolled in a Unify Sequence.
If they are not already enrolled, you can enroll them from here using any mailbox or
mailbox group in Unify. Additionally, you can instantly add this Person to any of the
Plays you’ve built. See more info on building Plays in Unify [here](/reference/plays/overview).
---
# Source: https://docs.unifygtm.com/reference/browser-extension/installation.md
> ## Documentation Index
> Fetch the complete documentation index at: https://docs.unifygtm.com/llms.txt
> Use this file to discover all available pages before exploring further.
# Introduction
> Get started with the Unify Chrome extension.
export const SalesforceLogo = () => ;
export const HubspotLogo = () => ;
export const ChromeLogo = () => ;
Once you've added all the titles you want to include or exclude, click **Create
persona** to save your changes. This persona will now be available for use
throughout Unify.
## Title matching behavior
When evaluating whether a person's job title matches a persona, Unify adheres to
the following rules and heuristics:
* **Ignore capitalization**: For example, "RevOps Lead" and "Revops lead" are
considered equivalent.
* **Ignore punctuation**: For example, "Enterprise Sales, Lead" and "Enterprise
Sales Lead" are considered equivalent.
* **Ignore word order**: For example, "Lead Sales Engineer" and "Sales Engineer,
Lead" are considered equivalent.
* **Ignore extraneous words**: For example, "CEO" and "CEO and Founder" are
considered equivalent.
That means that you don't need to exhaustively list every possible variation of
a job title in your persona. Instead, you can focus on the most common keywords
and let Unify handle the details.
---
# Source: https://docs.unifygtm.com/reference/integrations/orum/hubspot-setup.md
# Source: https://docs.unifygtm.com/reference/integrations/nooks/hubspot-setup.md
> ## Documentation Index
> Fetch the complete documentation index at: https://docs.unifygtm.com/llms.txt
> Use this file to discover all available pages before exploring further.
# Nooks HubSpot Setup
> Configure Nooks integration with HubSpot for seamless call task management.
# HubSpot Setup for Nooks Integration
This guide walks you through how to set up the Nooks integration with HubSpot to synchronize call tasks.
## Prerequisites
Before you begin, make sure you have:
* Admin access to your HubSpot account
* An active Nooks subscription
## Setup Steps
1. **Admin**: Map users to their Hubspot profiles. Make sure your team has the proper permissions in your Hubspot to be able to create sequences, tasks or lists for themselves (If managers/admins are creating sequences and lists, this can be disregarded)
2. Create or Edit your Call Outcomes
3. Set up automation rules and/or filters to ensure proper hygiene and activities against your contacts.
For detailed step-by-step instructions, see [setup guide](https://support.devrev.ai/nooks/article/ART-120-getting-started-with-hubspot).
## Next Steps
With your HubSpot integration configured and Nooks connected, you're ready to [launch your first call campaign](/reference/integrations/nooks/call-campaigns)!
---
# Source: https://docs.unifygtm.com/reference/browser-extension/hubspot.md
> ## Documentation Index
> Fetch the complete documentation index at: https://docs.unifygtm.com/llms.txt
> Use this file to discover all available pages before exploring further.
# HubSpot
> Run the Unify Chrome extension in HubSpot.
While viewing Companies and Contacts in HubSpot, the extension will
automatically surface the corresponding Companies and People in Unify.
## HubSpot Company Page
From this view, you can view People in your Unify instance who work at this Company (and add
them to a Sequence) or instantly add this Company to a Play of your choosing.
## HubSpot Contact Page
From this view, you can check if this Person is currently enrolled in a Unify Sequence.
If they are not already enrolled, you can enroll them from here using any mailbox or
mailbox group in Unify. Additionally, you can instantly add this Person to any of the
Plays you’ve built. See more info on building Plays in Unify [here](/reference/plays/overview).
---
# Source: https://docs.unifygtm.com/reference/browser-extension/installation.md
> ## Documentation Index
> Fetch the complete documentation index at: https://docs.unifygtm.com/llms.txt
> Use this file to discover all available pages before exploring further.
# Introduction
> Get started with the Unify Chrome extension.
export const SalesforceLogo = () => ;
export const HubspotLogo = () => ;
export const ChromeLogo = () => ;
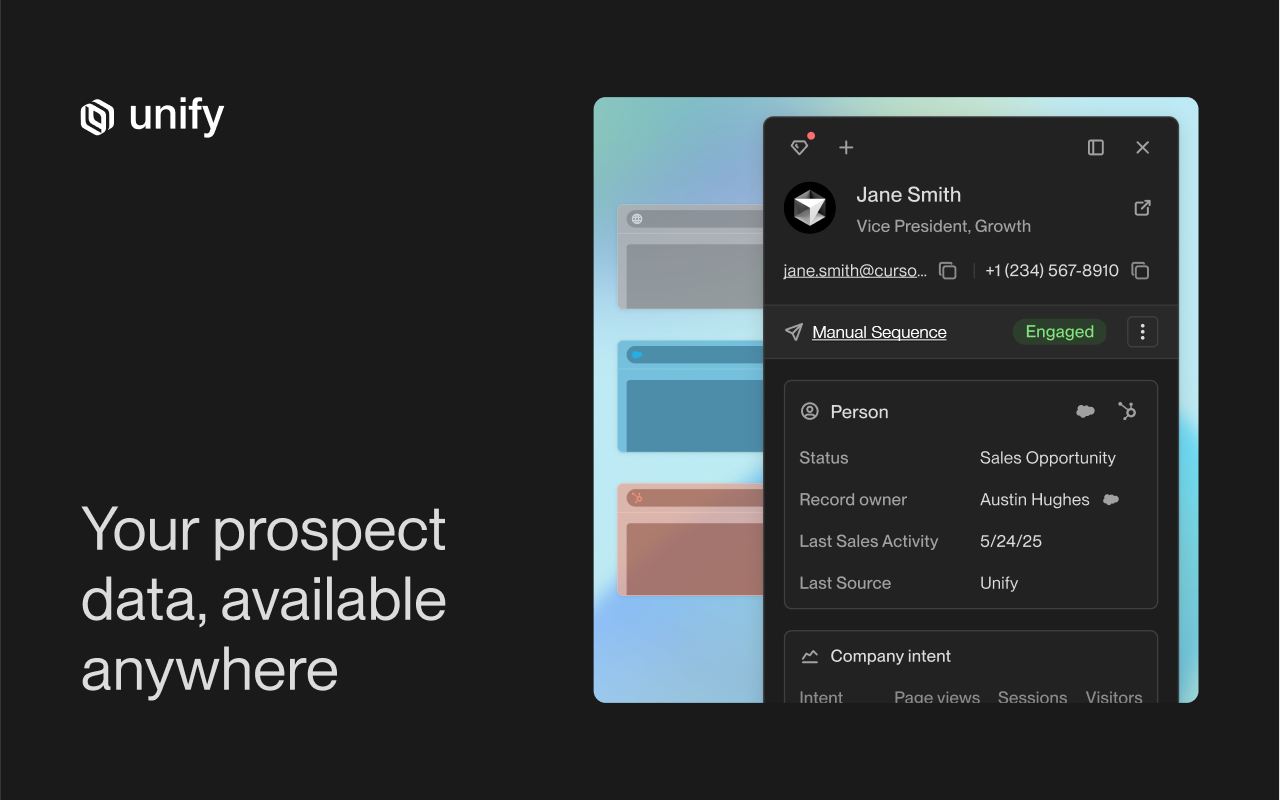 Unify offers a native Chrome extension.
Some notable features of the extension include the ability to:
* View details about any Company or Person in your Unify instance
* Enroll People into Sequences
* Add Companies and People to Plays
* Add People to Unify through enrichment
* Manually add new Companies and People to Unify
## Installation
Unify offers a native Chrome extension.
Some notable features of the extension include the ability to:
* View details about any Company or Person in your Unify instance
* Enroll People into Sequences
* Add Companies and People to Plays
* Add People to Unify through enrichment
* Manually add new Companies and People to Unify
## Installation
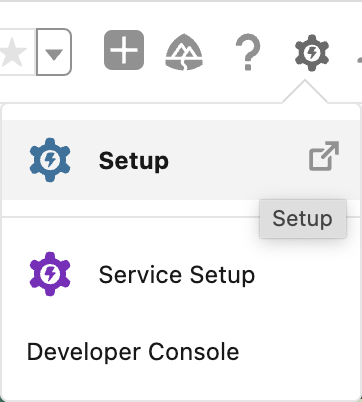 Search for **Lead Assignment Rules** in the sidebar.
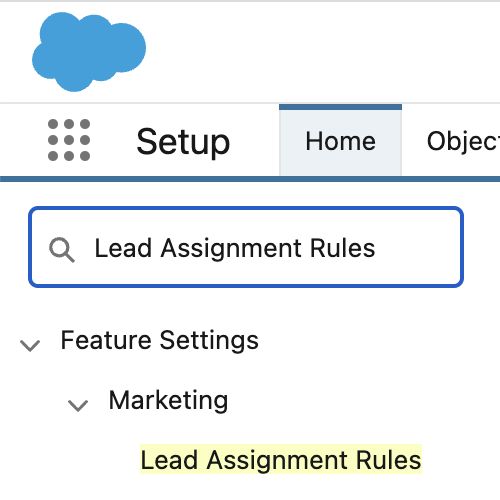 You should see at least one rule with a checkmark under the **Active** column.
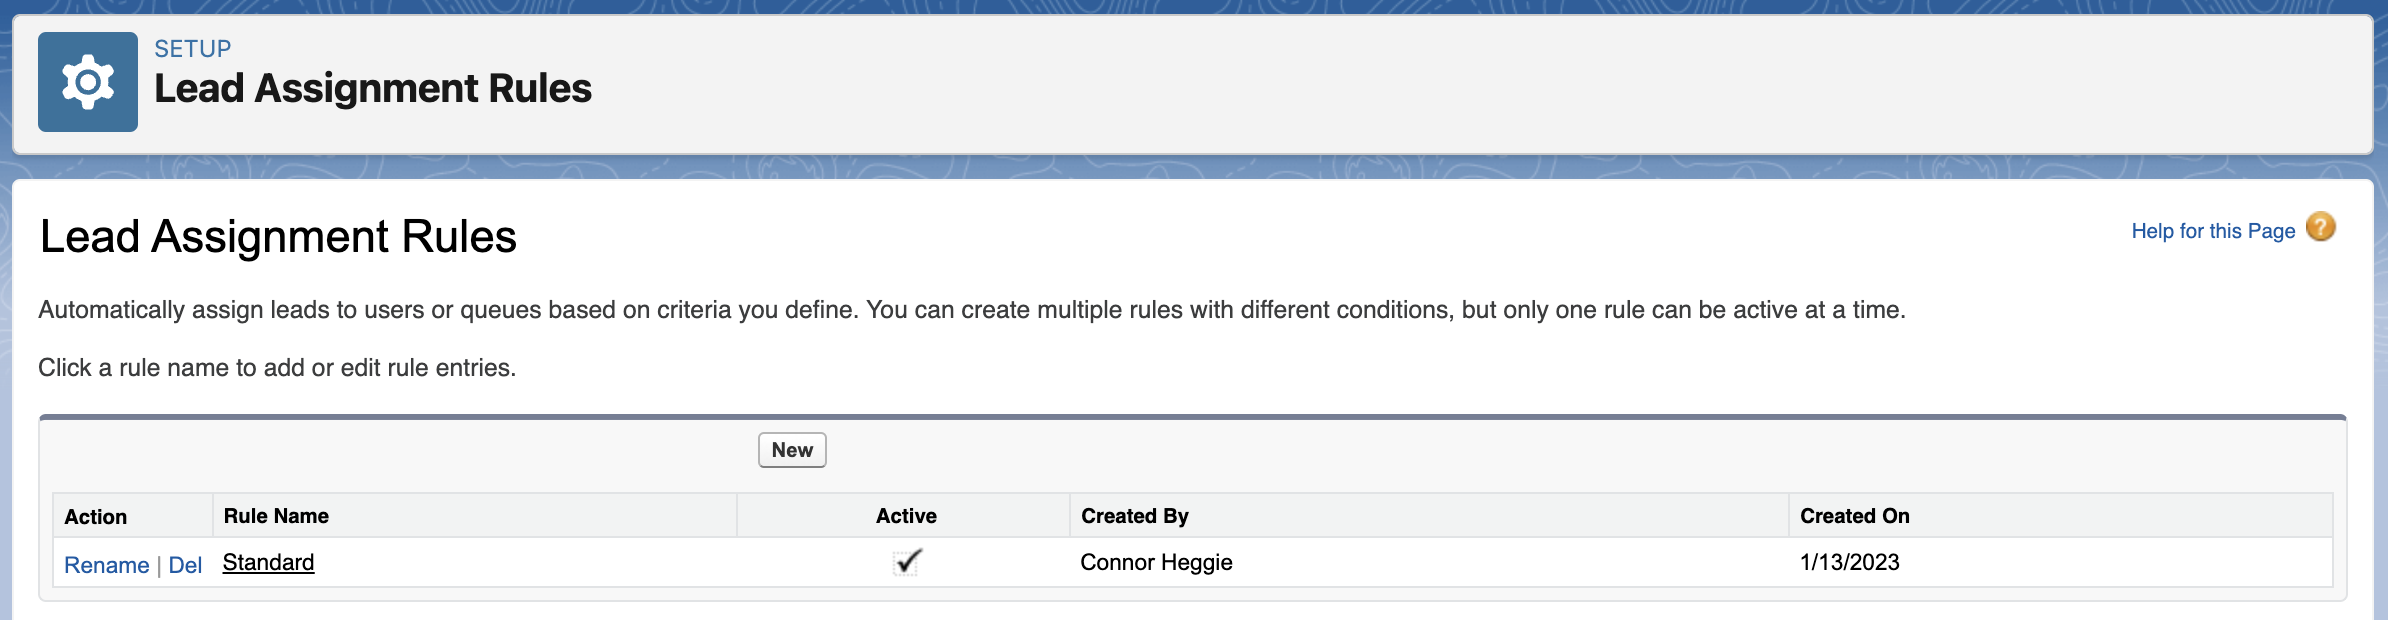 ### Toggle the rule off and on
In the **Lead Assignment Rules** page from the previous step, click on the name of your rule and then select **Edit**. Uncheck the checkbox next to **Active** to temporarily deactivate the rule.
### Toggle the rule off and on
In the **Lead Assignment Rules** page from the previous step, click on the name of your rule and then select **Edit**. Uncheck the checkbox next to **Active** to temporarily deactivate the rule.
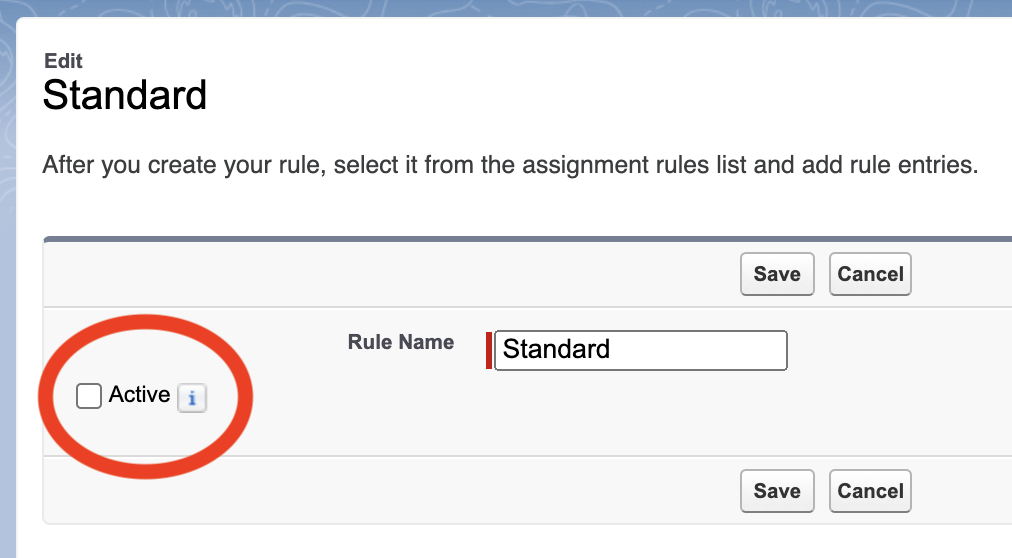 Click **Save**. Then click **Edit** again, re-check the checkbox next to **Active**, and then choose **Save**.
### Test that leads are assigned correctly in the UI
Navigate to the **Leads** page in Salesforce. You can get there via the app launcher.
Click **Save**. Then click **Edit** again, re-check the checkbox next to **Active**, and then choose **Save**.
### Test that leads are assigned correctly in the UI
Navigate to the **Leads** page in Salesforce. You can get there via the app launcher.
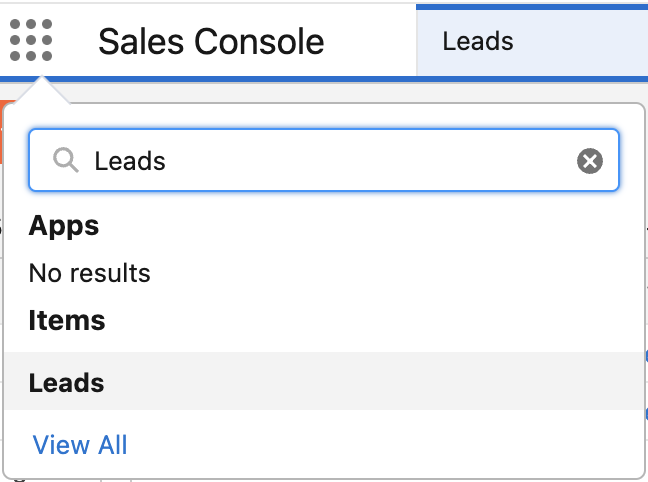 In the top-right corner of the screen, select **New** to create a new lead.
 Check the **Assign using active assignment rule** checkbox in the lower-left corner.
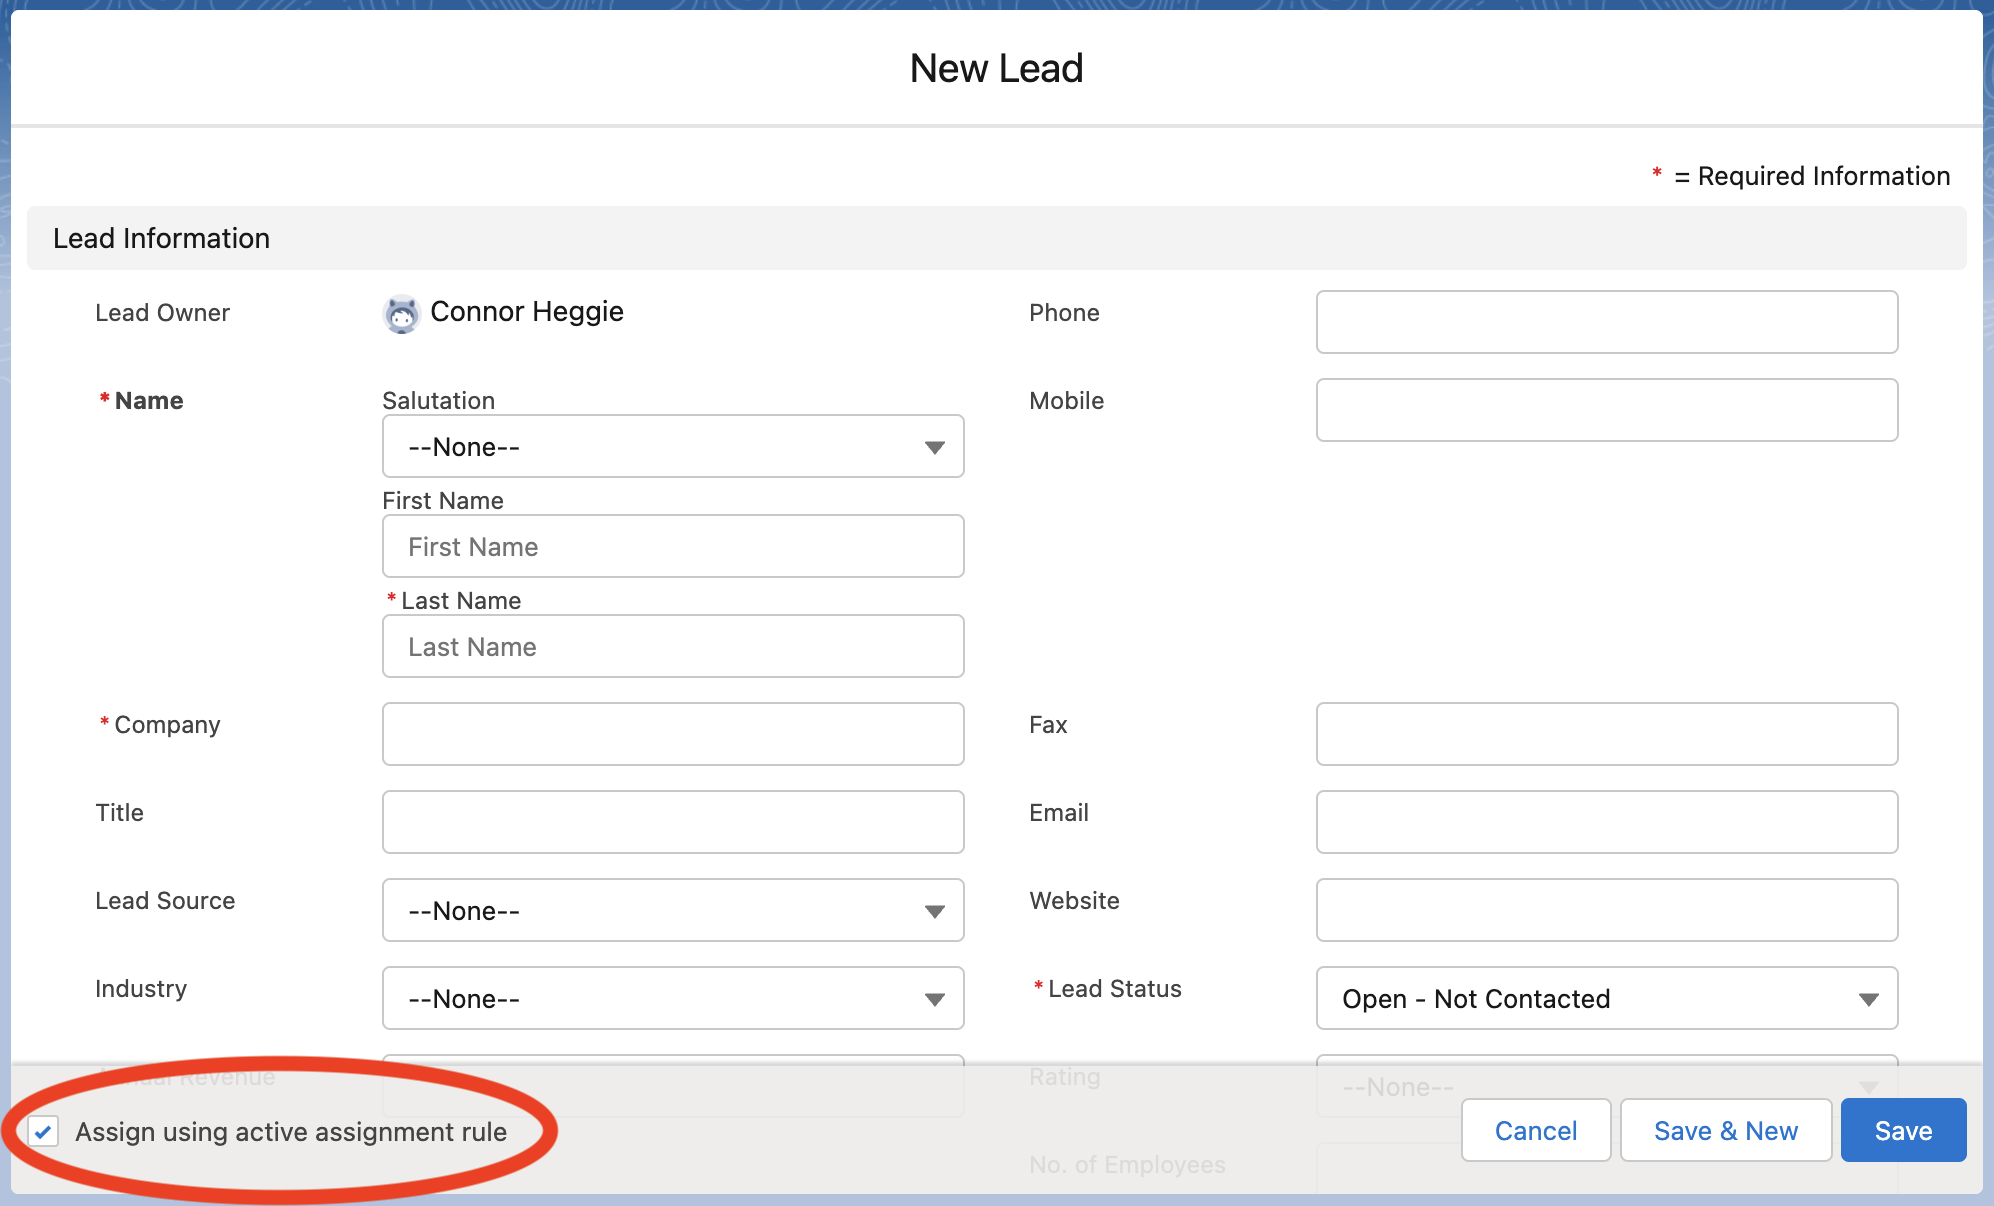 Fill out the required lead fields with values that should trigger the lead assignment rule you created and then click **Save** in the bottom-right corner.
Lastly, verify that the lead was assigned to the correct owner.
---
# Source: https://docs.unifygtm.com/reference/signals/lookalike-companies.md
> ## Documentation Index
> Fetch the complete documentation index at: https://docs.unifygtm.com/llms.txt
> Use this file to discover all available pages before exploring further.
# Lookalike Companies
> Find companies similar to your most successful customers.
## Overview
We’ve partnered with [Ocean.io](https://www.ocean.io/) — a leading Lookalike data provider — so you can run automated Plays that target lookalikes of your most successful customers.
The integration is fully managed by Unify and included in your plan, so no additional subscription or setup is required.
## Setup
### Build a new Play
Start by setting up a new Play using the Find Lookalike Companies trigger. You can also get started with our [pre-built template](https://app.unifygtm.com/dashboard/plays?templateType=SEQUENCE_LOOKALIKE_COMPANIES).
Fill out the required lead fields with values that should trigger the lead assignment rule you created and then click **Save** in the bottom-right corner.
Lastly, verify that the lead was assigned to the correct owner.
---
# Source: https://docs.unifygtm.com/reference/signals/lookalike-companies.md
> ## Documentation Index
> Fetch the complete documentation index at: https://docs.unifygtm.com/llms.txt
> Use this file to discover all available pages before exploring further.
# Lookalike Companies
> Find companies similar to your most successful customers.
## Overview
We’ve partnered with [Ocean.io](https://www.ocean.io/) — a leading Lookalike data provider — so you can run automated Plays that target lookalikes of your most successful customers.
The integration is fully managed by Unify and included in your plan, so no additional subscription or setup is required.
## Setup
### Build a new Play
Start by setting up a new Play using the Find Lookalike Companies trigger. You can also get started with our [pre-built template](https://app.unifygtm.com/dashboard/plays?templateType=SEQUENCE_LOOKALIKE_COMPANIES).
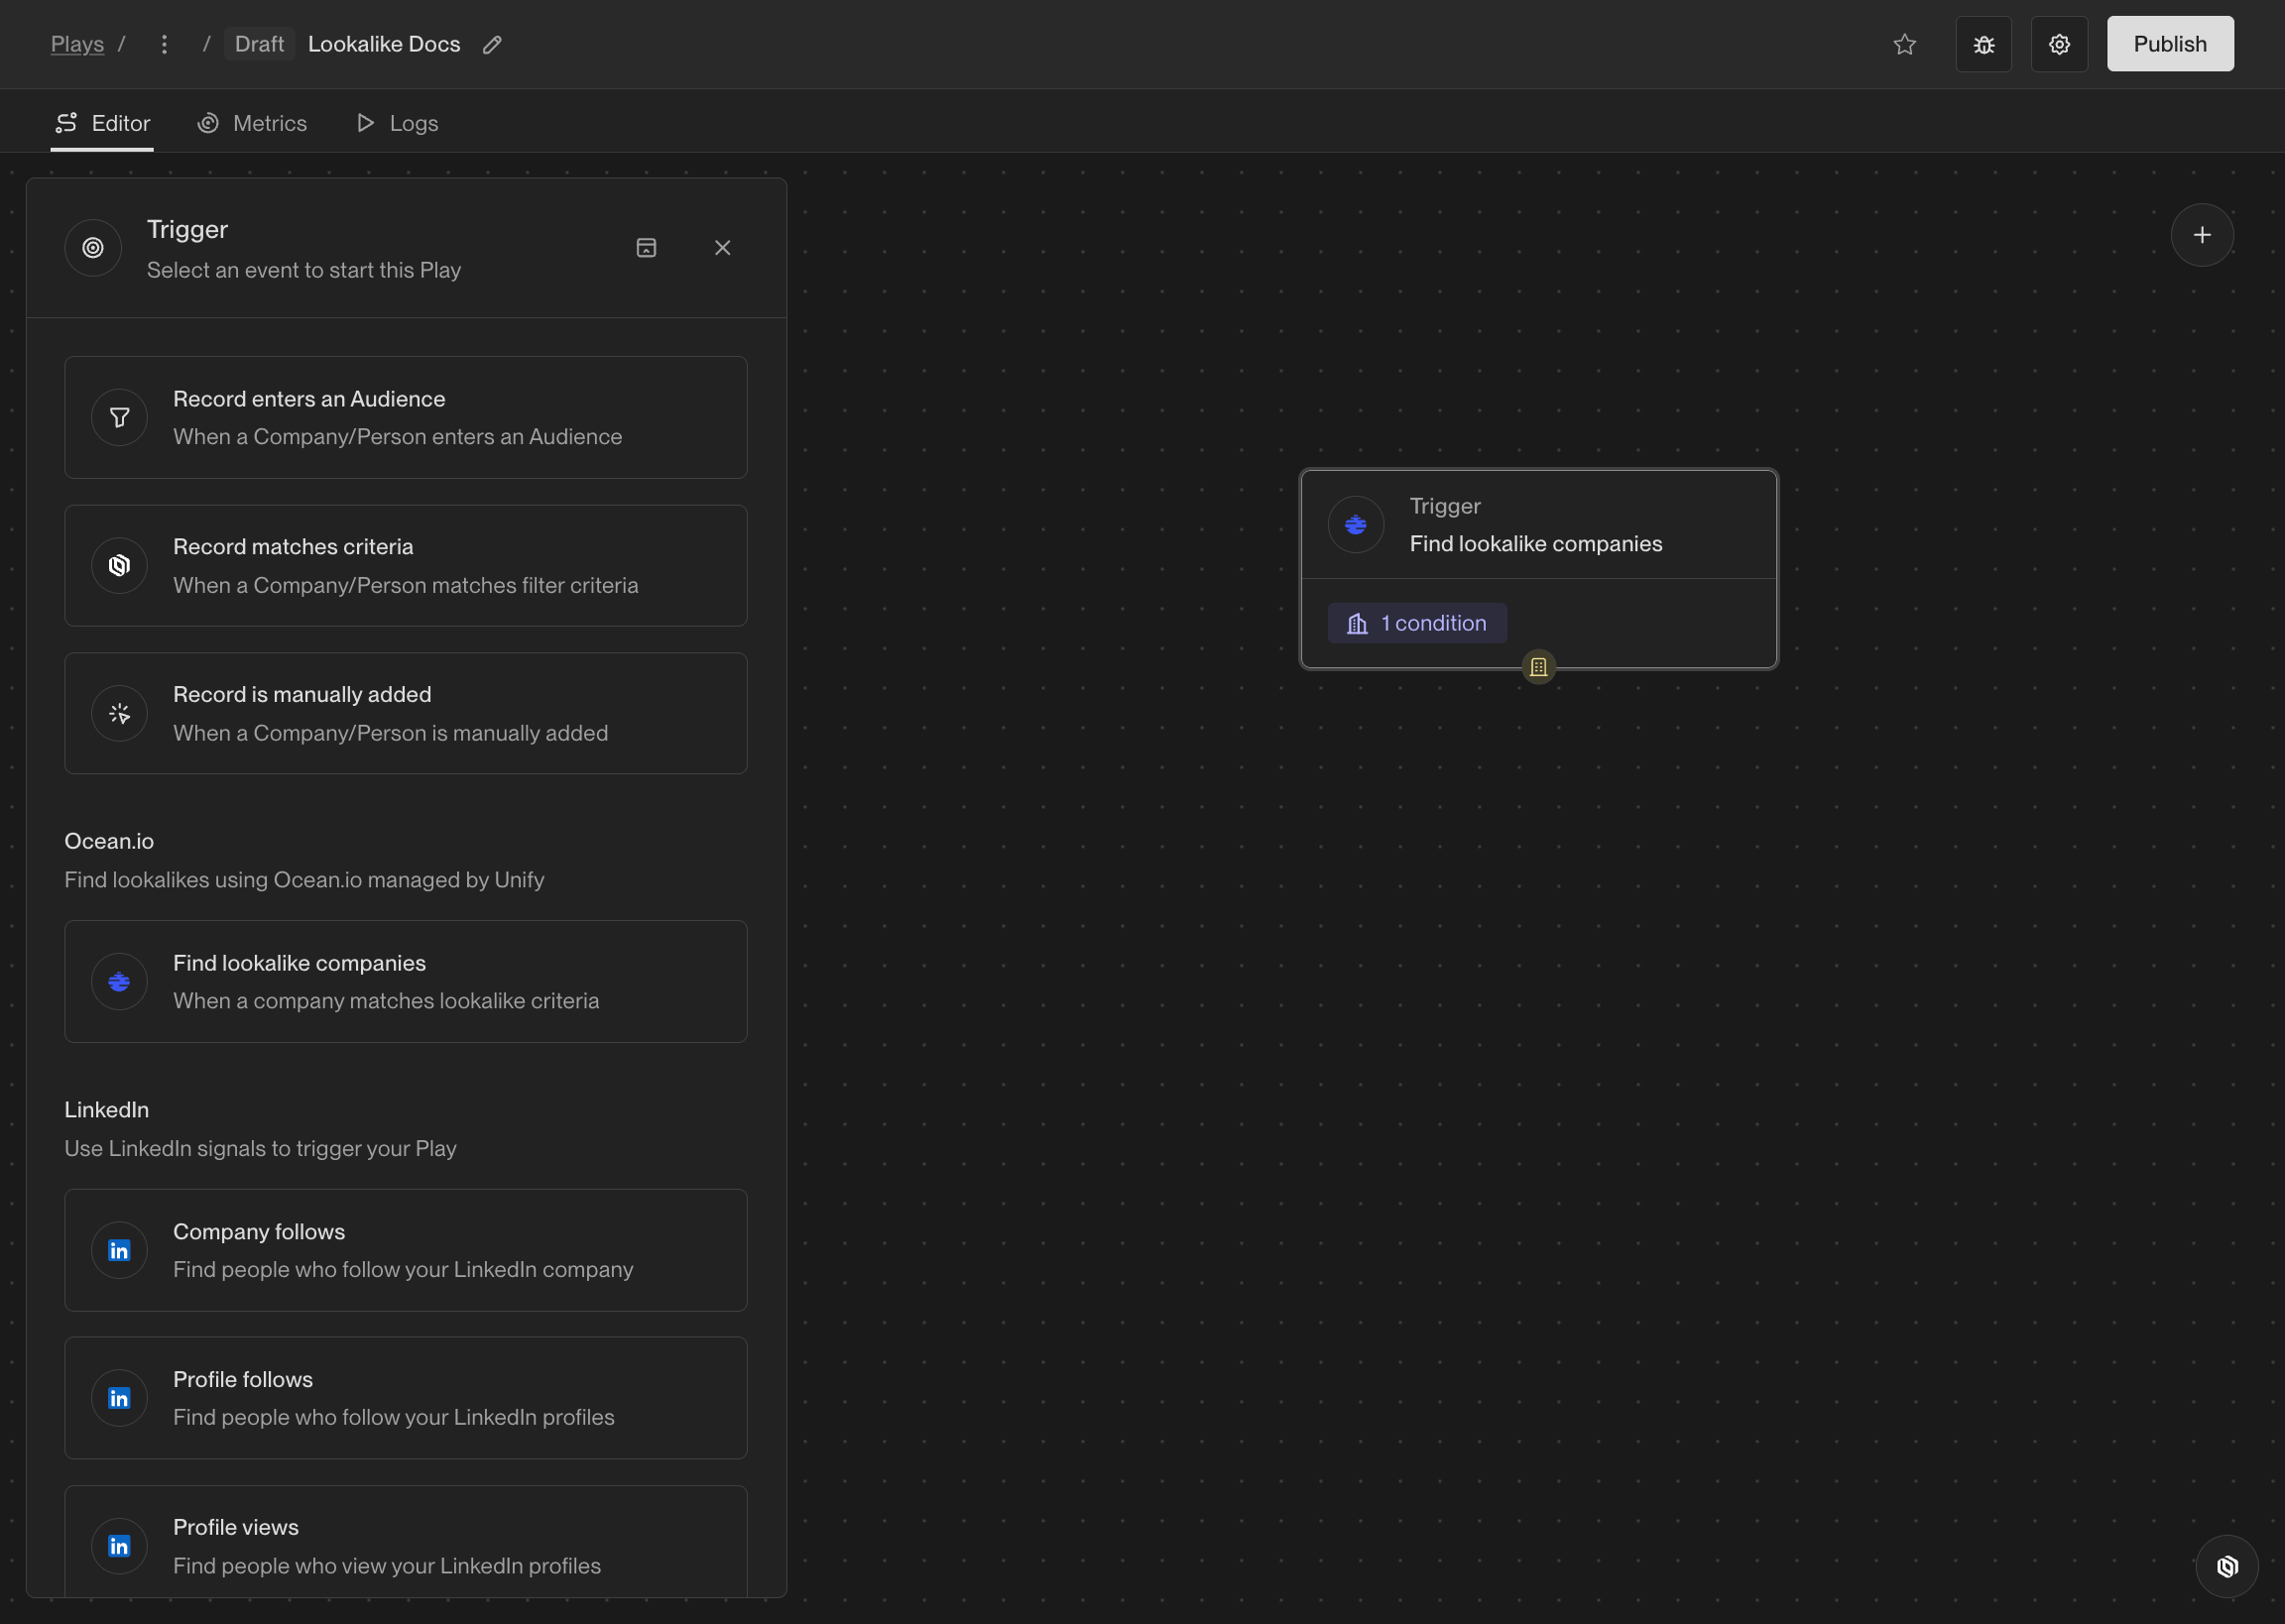 ### Configure the Trigger
First, configure the seed companies you want to find lookalike companies for. You can do this by adding filters to select companies that meet your criteria,
just like building audiences.
### Configure the Trigger
First, configure the seed companies you want to find lookalike companies for. You can do this by adding filters to select companies that meet your criteria,
just like building audiences.
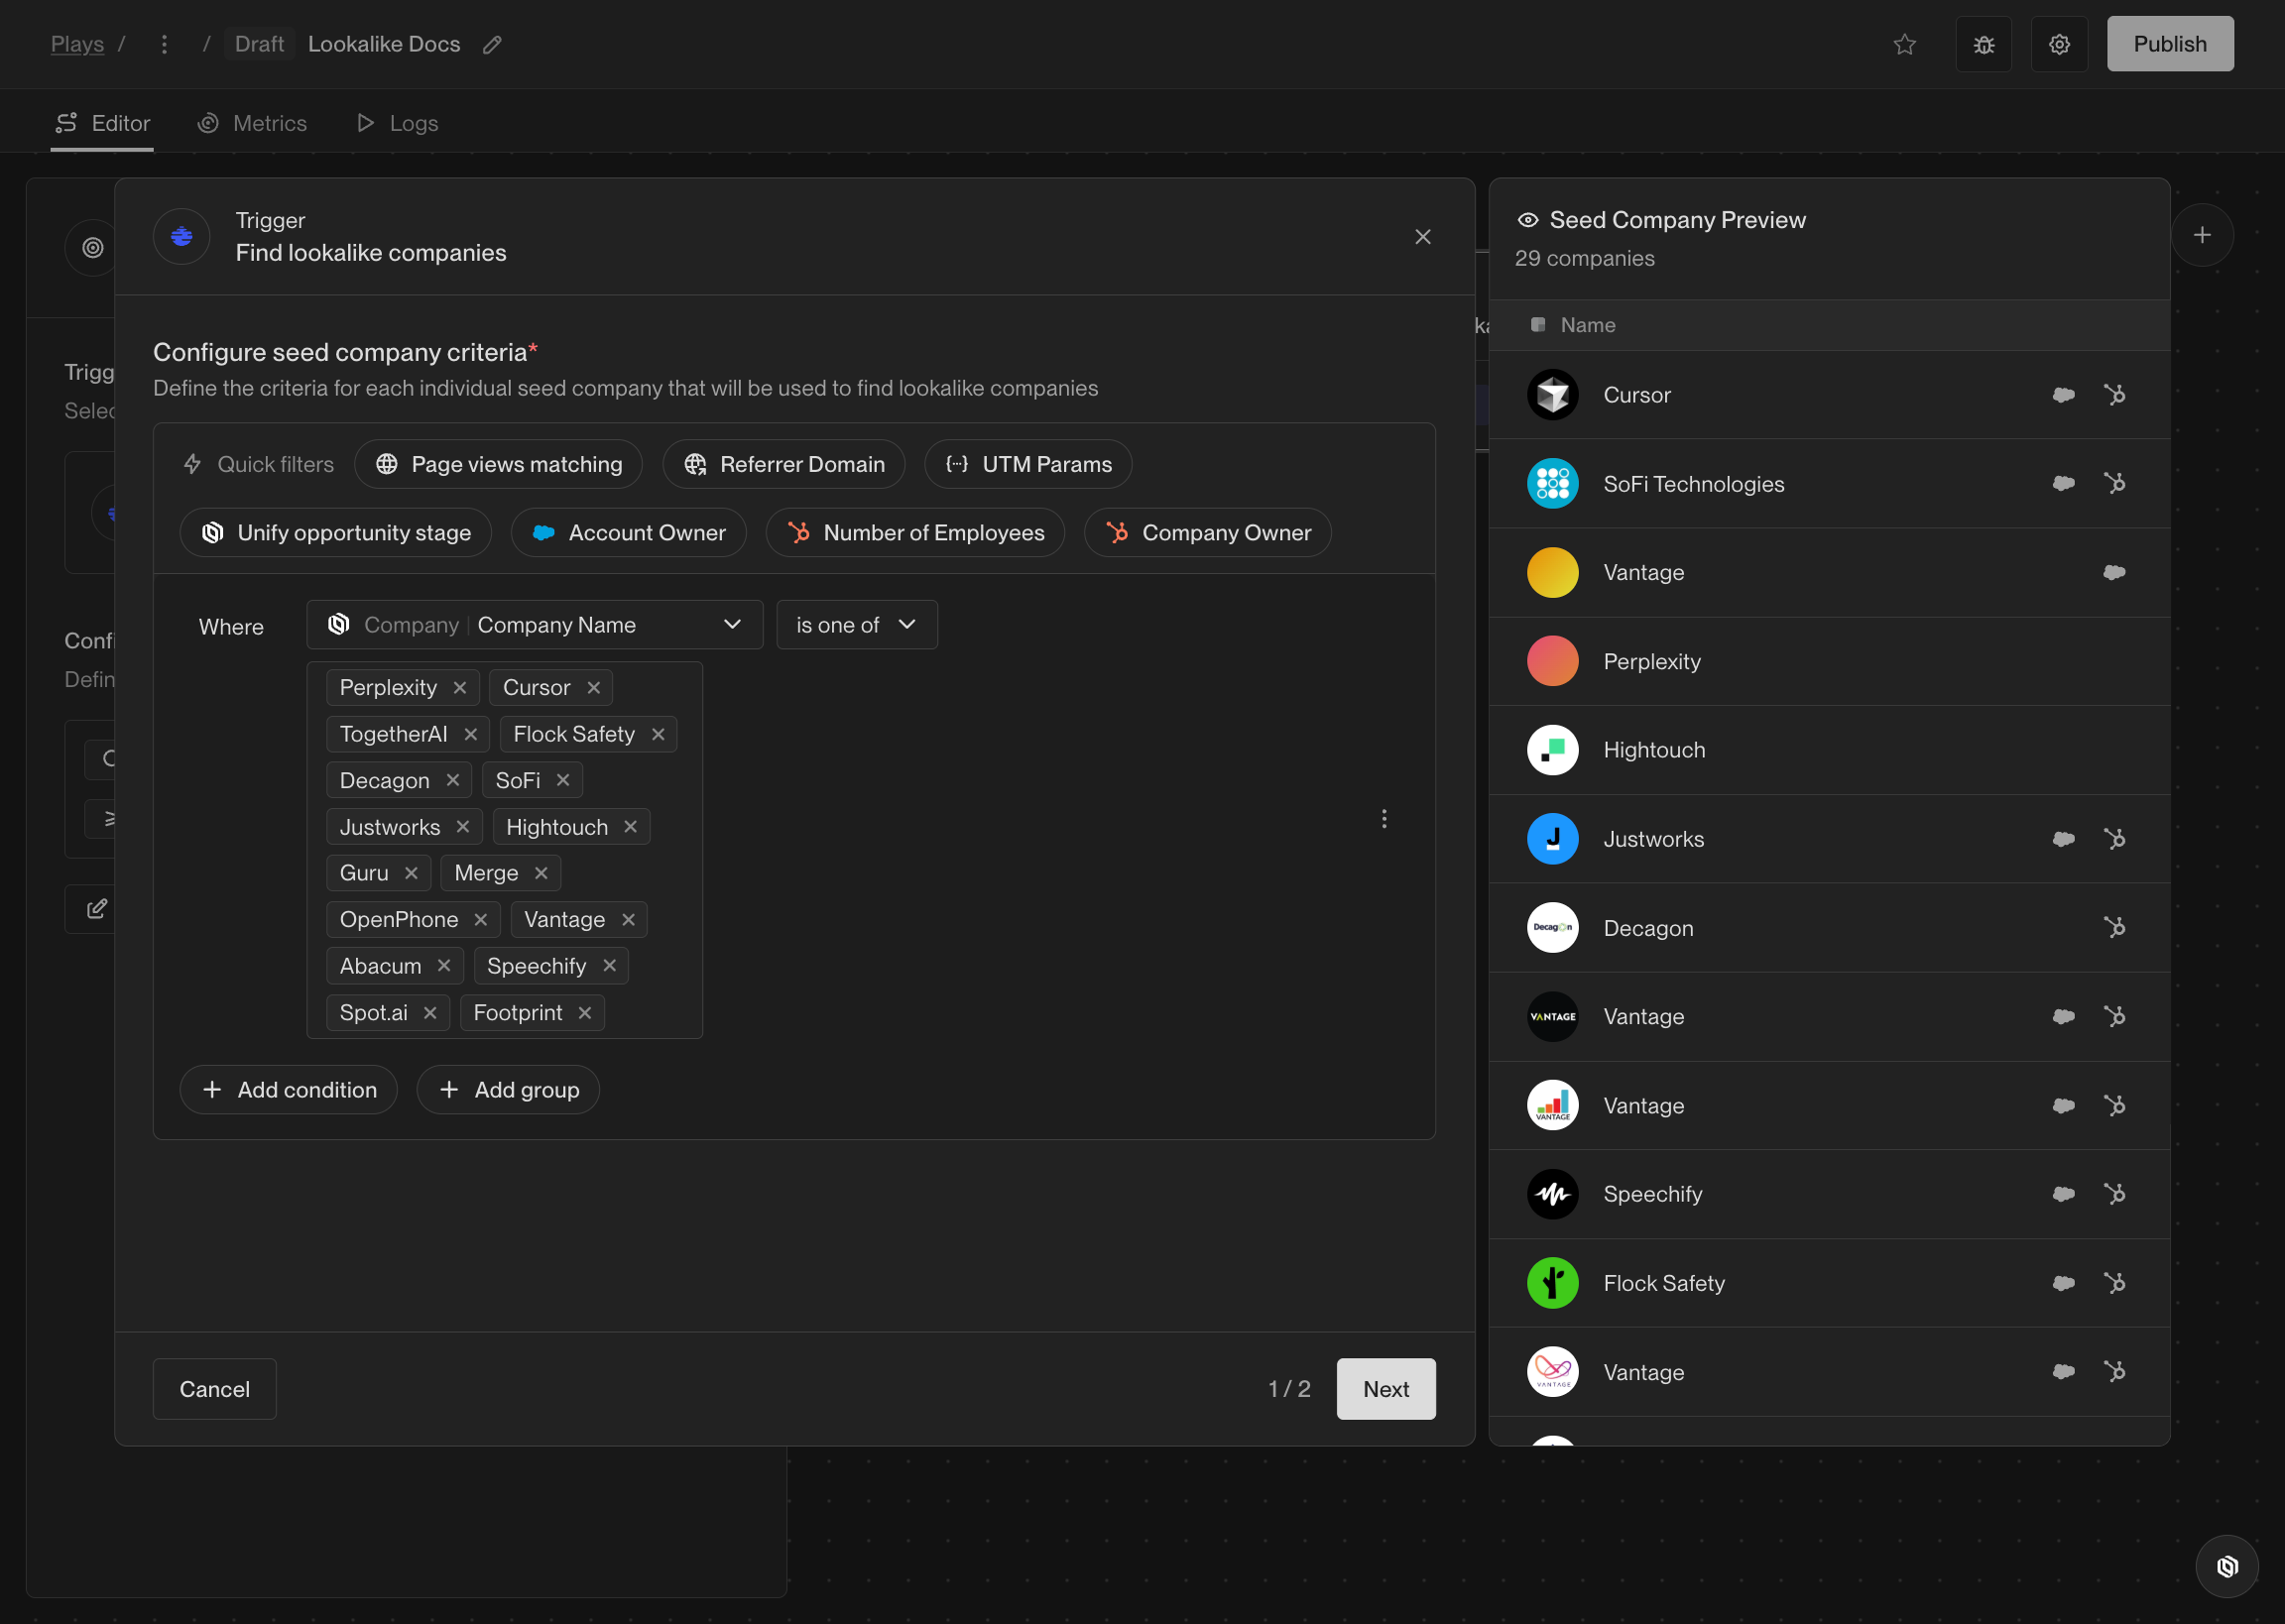 Next, configure the lookalike companies you want to find for each seed company.
You can set the number of lookalike companies per seed company, minimum relevance score, and more.
The previews on the right will show you a sample of the lookalike companies that will be found based on your configuration.
Next, configure the lookalike companies you want to find for each seed company.
You can set the number of lookalike companies per seed company, minimum relevance score, and more.
The previews on the right will show you a sample of the lookalike companies that will be found based on your configuration.
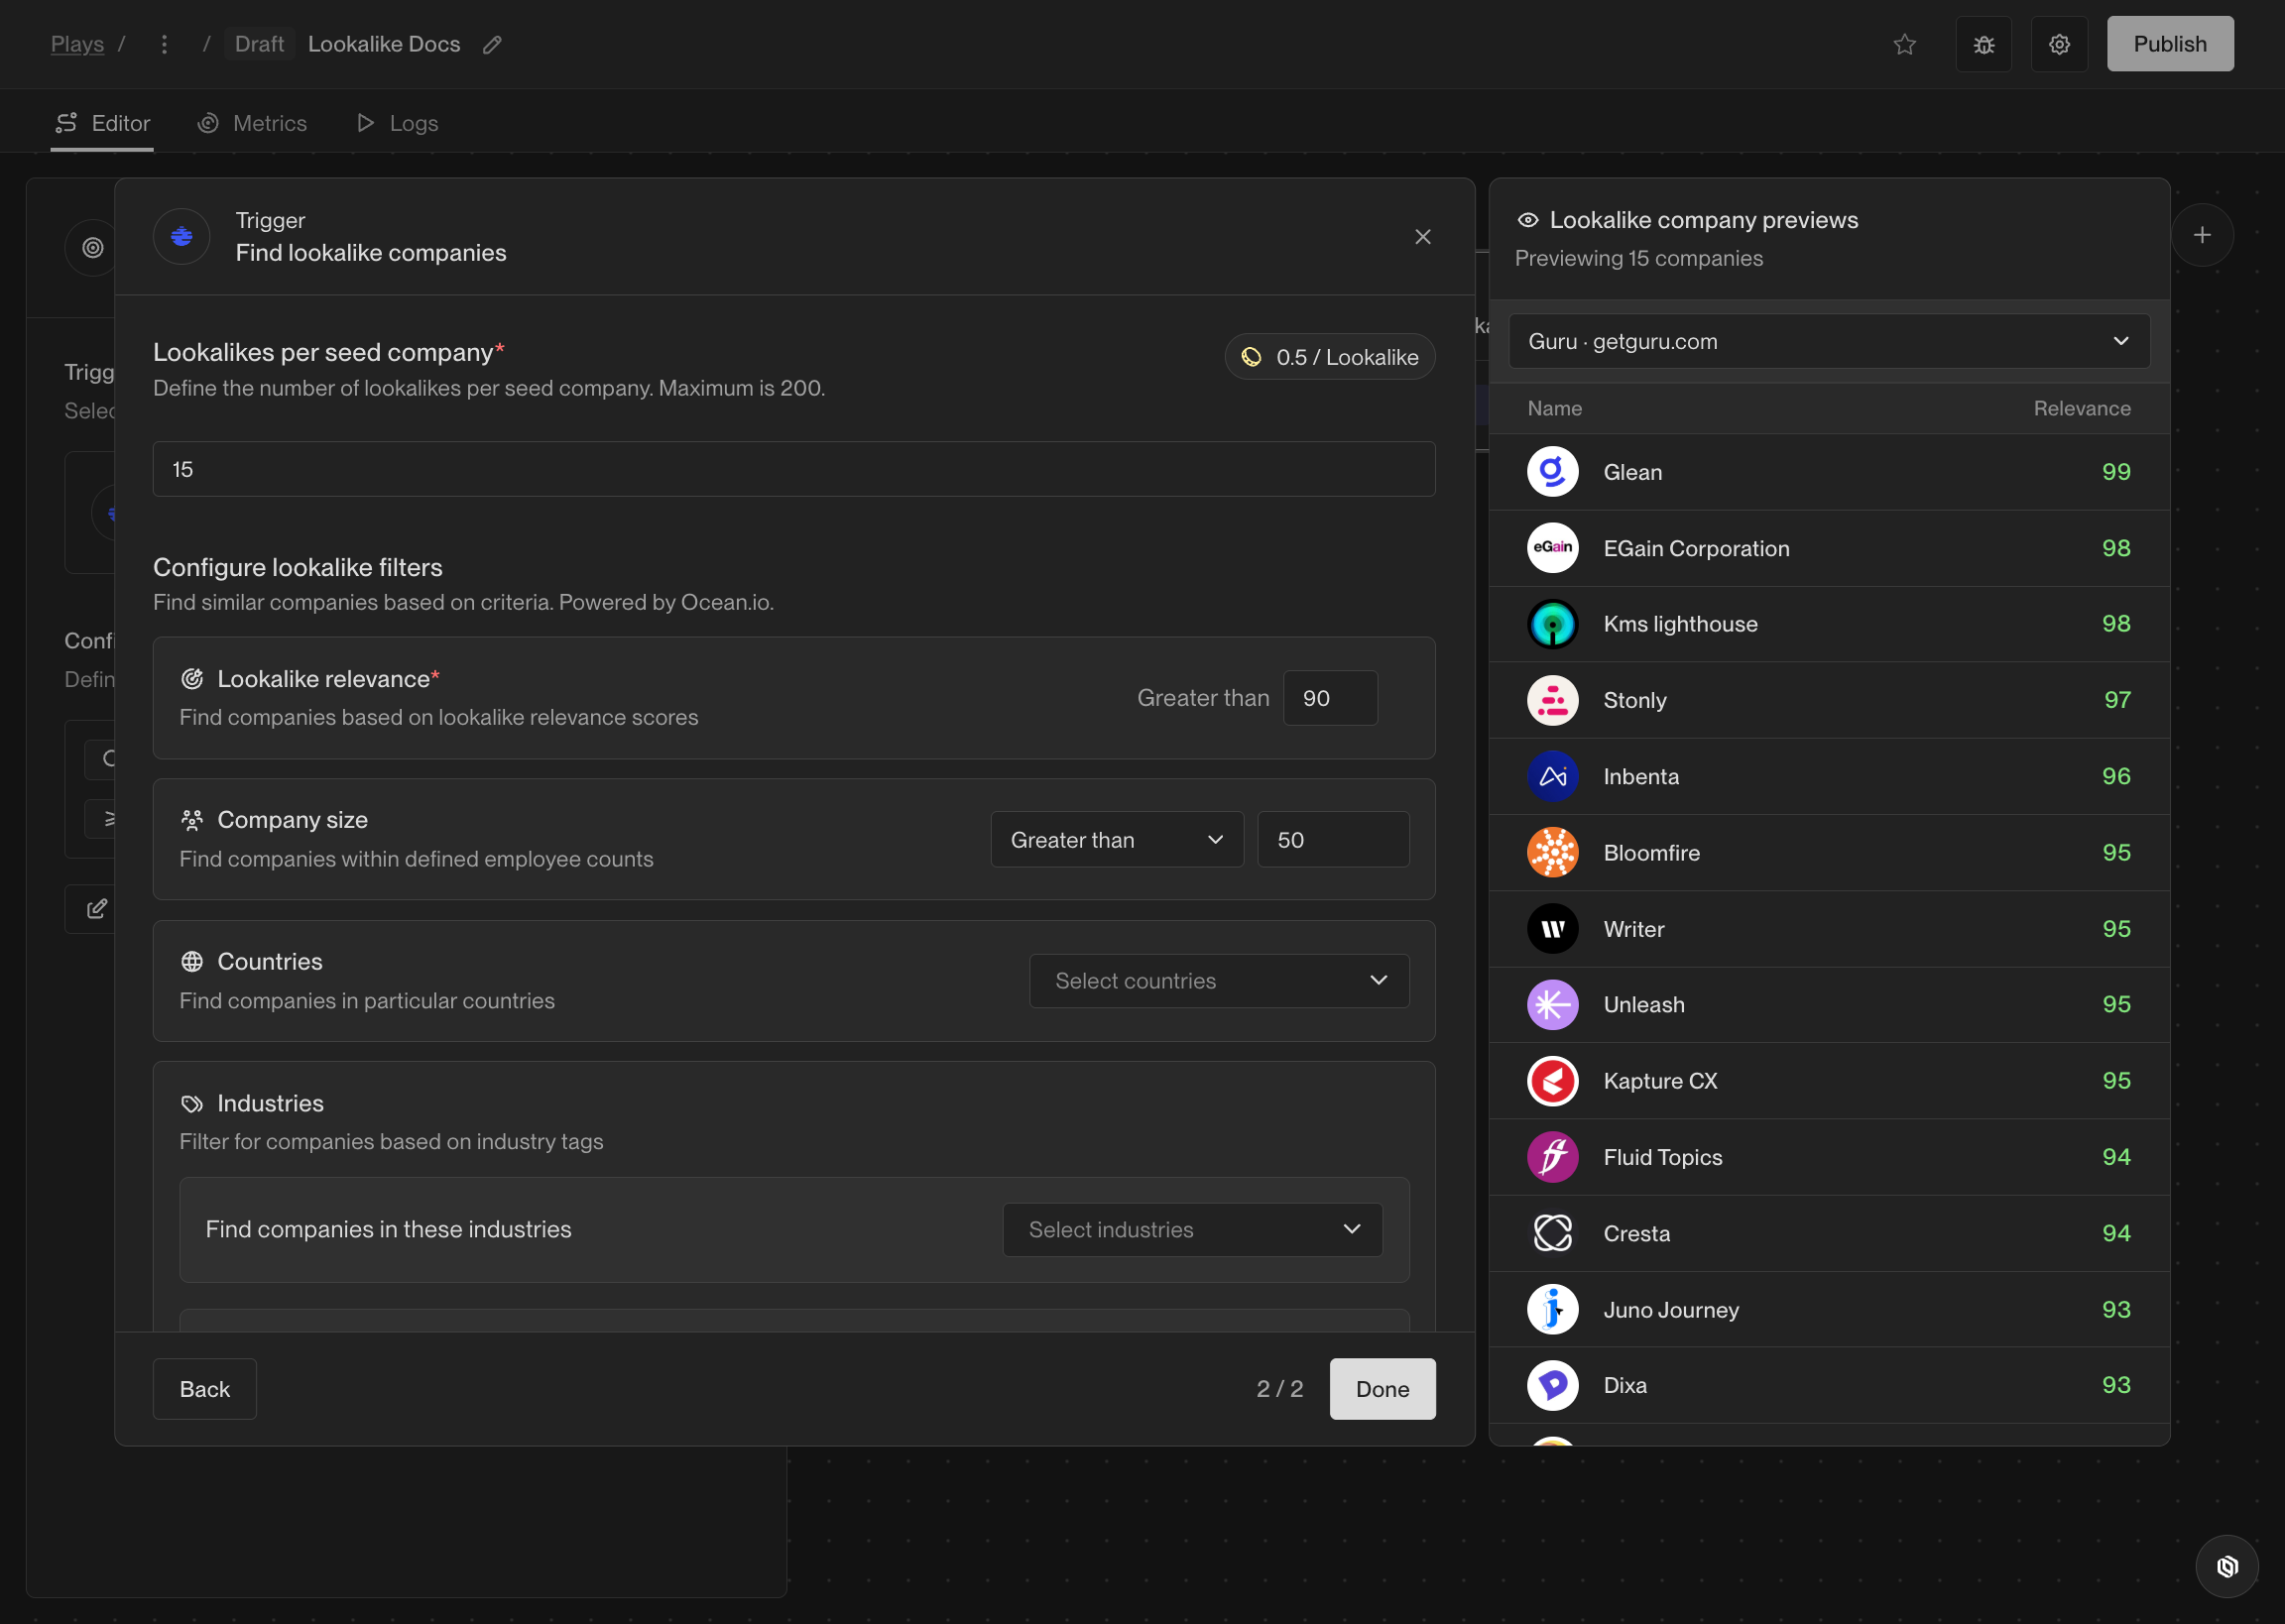 Build the rest of your Play as you need, then click Publish to begin finding lookalike companies and running them through your Play.
Learn more about building Plays [here](/reference/plays/overview).
## Frequently Asked Questions
Build the rest of your Play as you need, then click Publish to begin finding lookalike companies and running them through your Play.
Learn more about building Plays [here](/reference/plays/overview).
## Frequently Asked Questions
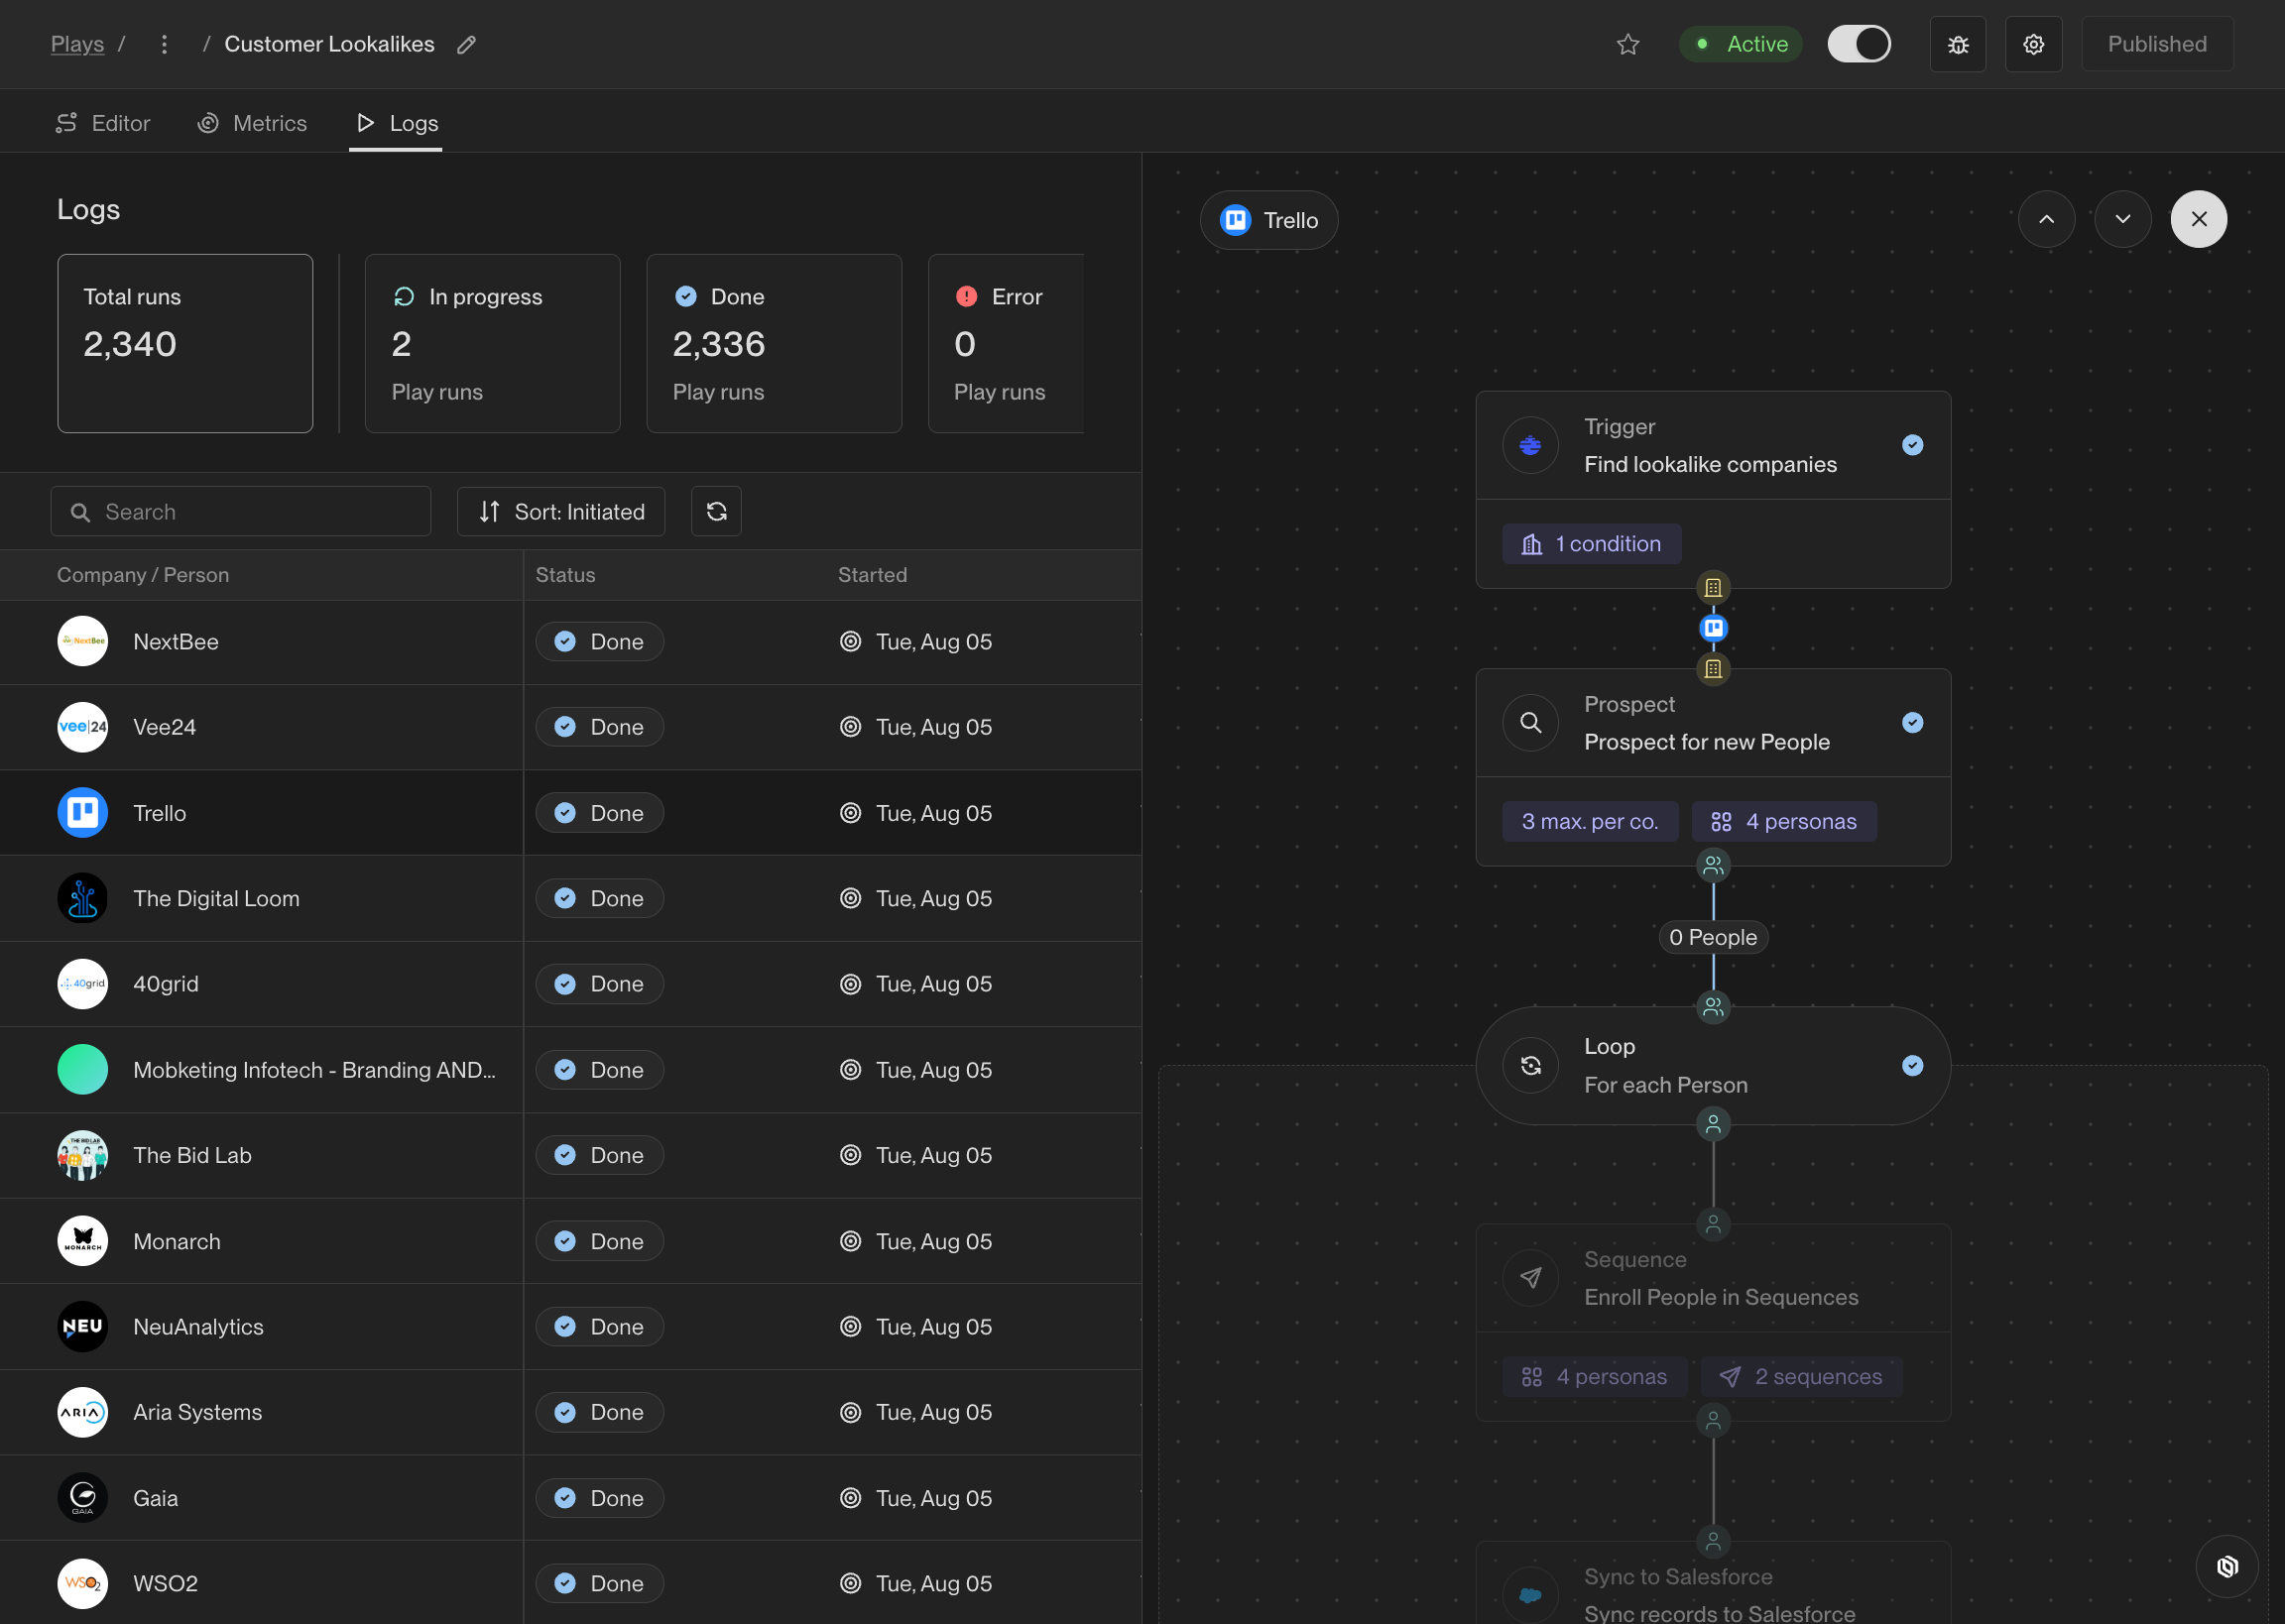 Click the Trigger node to see details like the seed company and the relevance score.
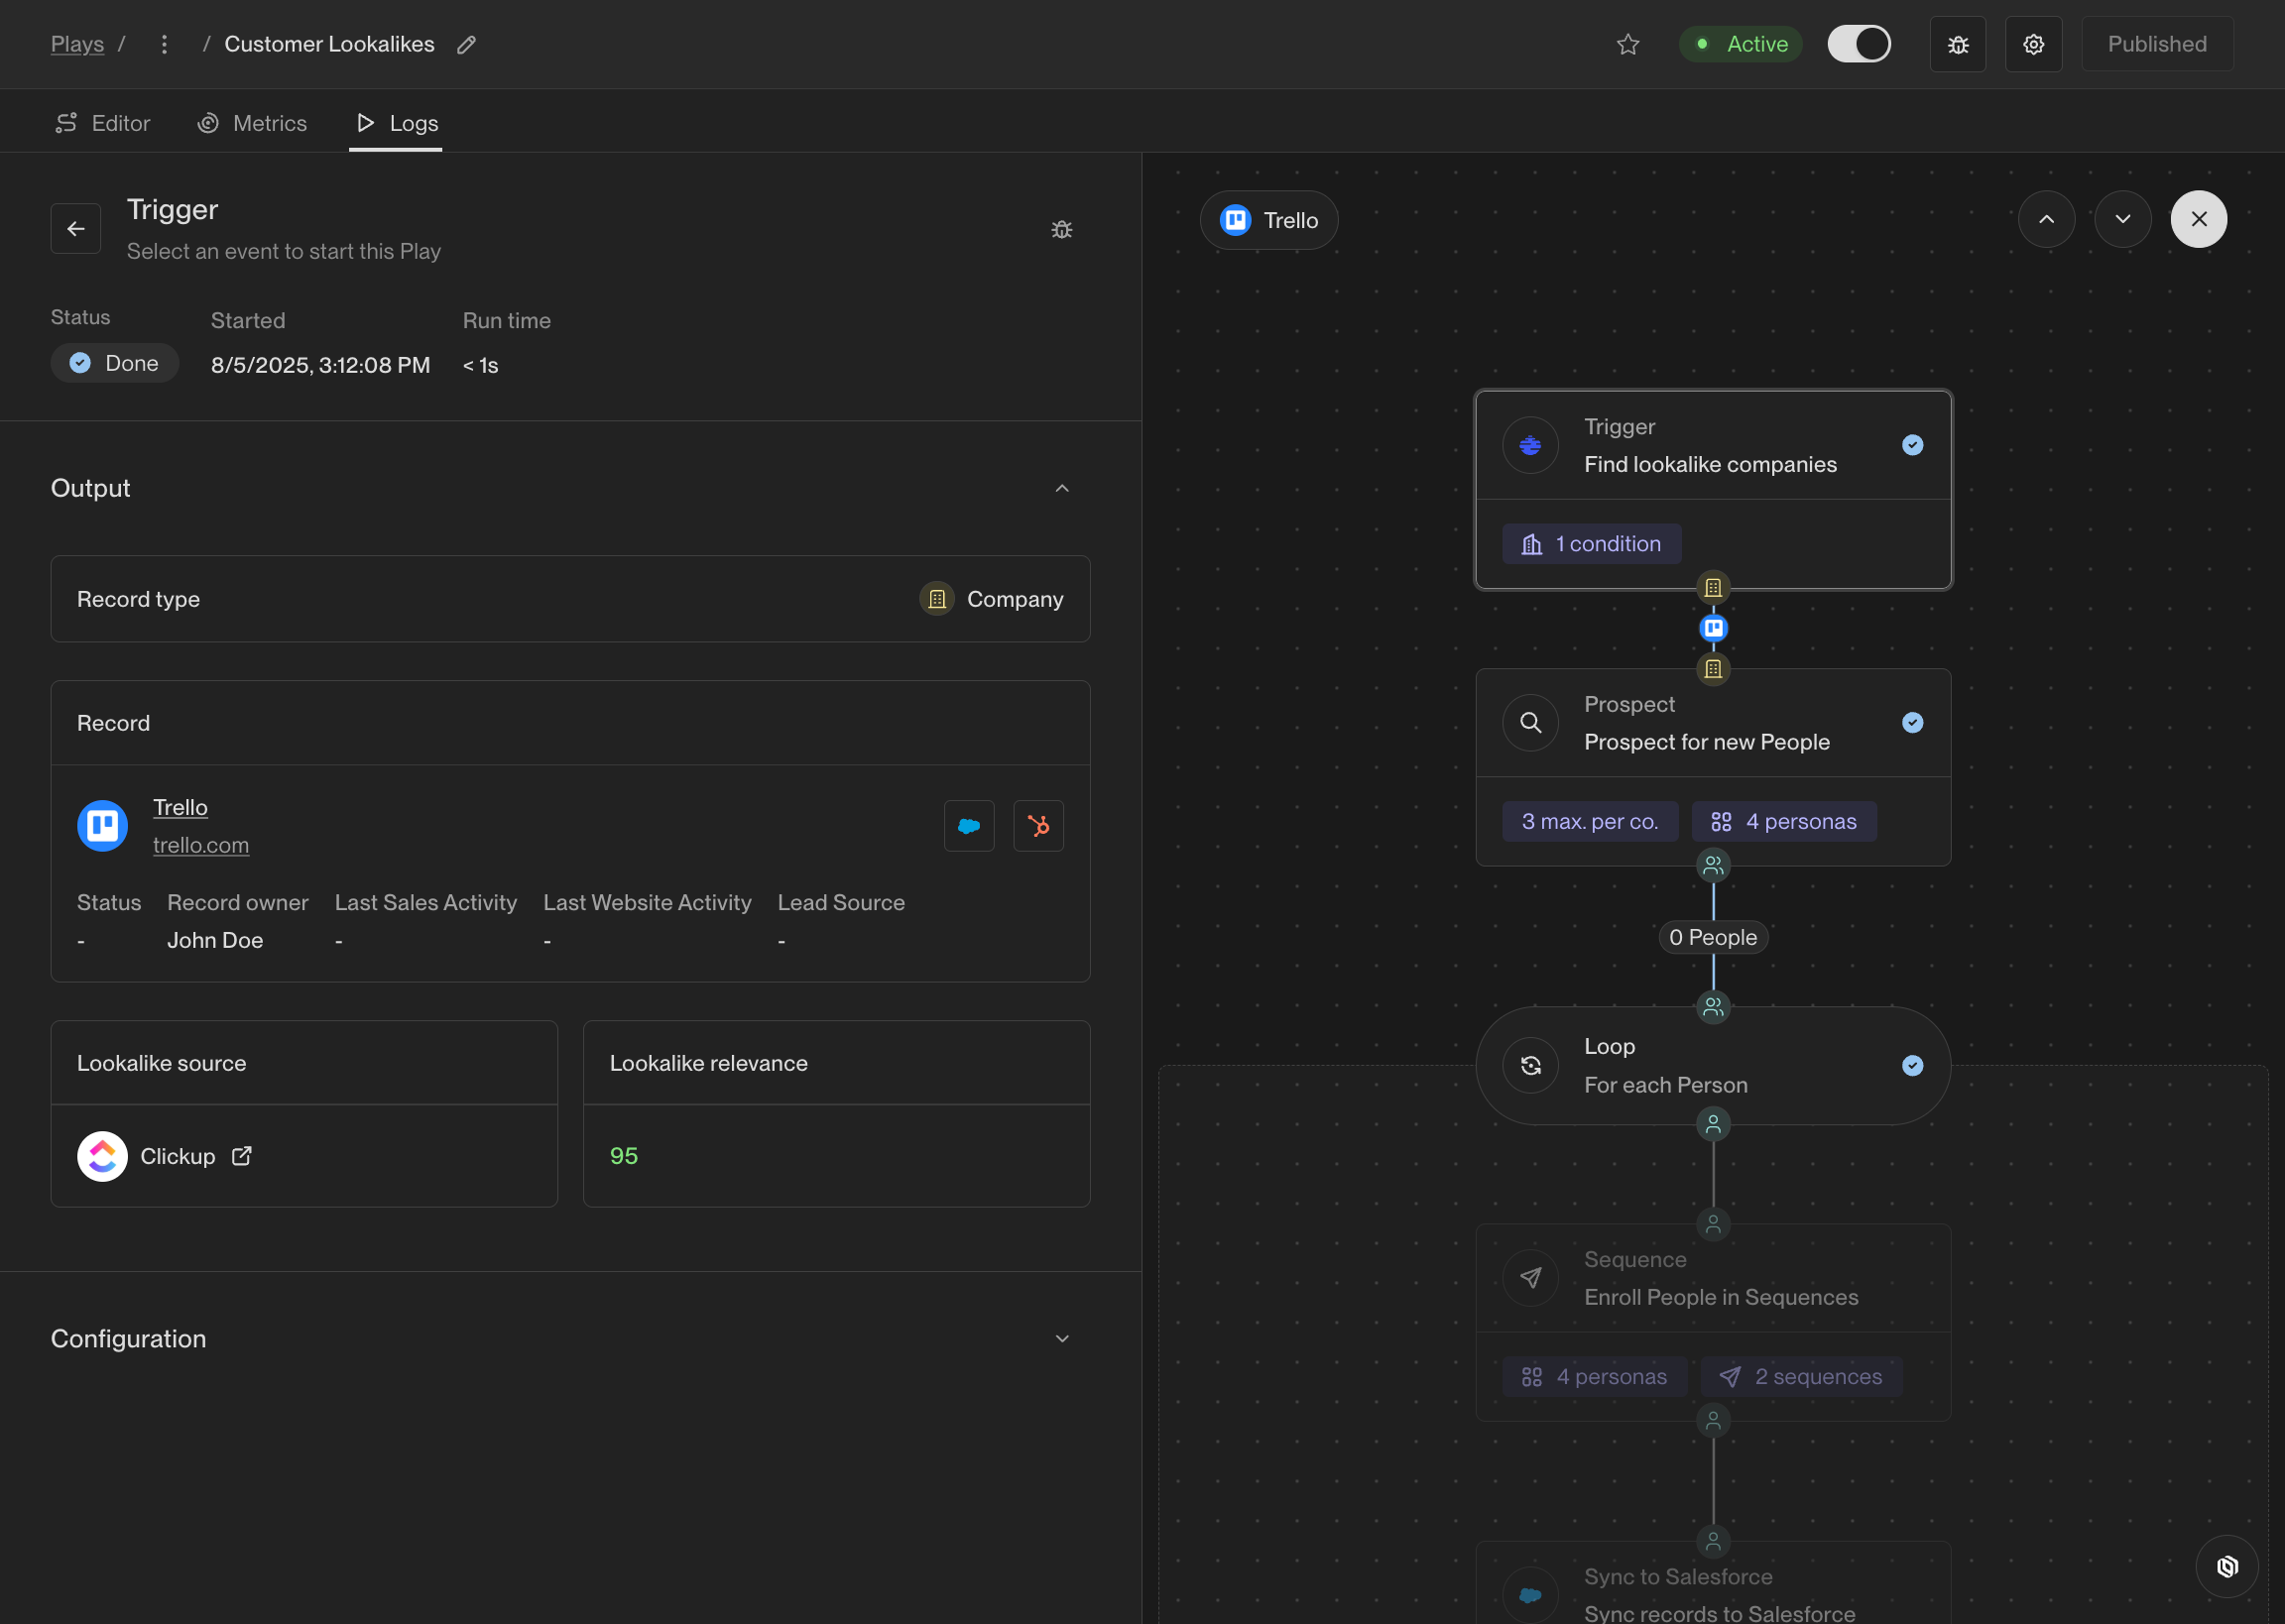
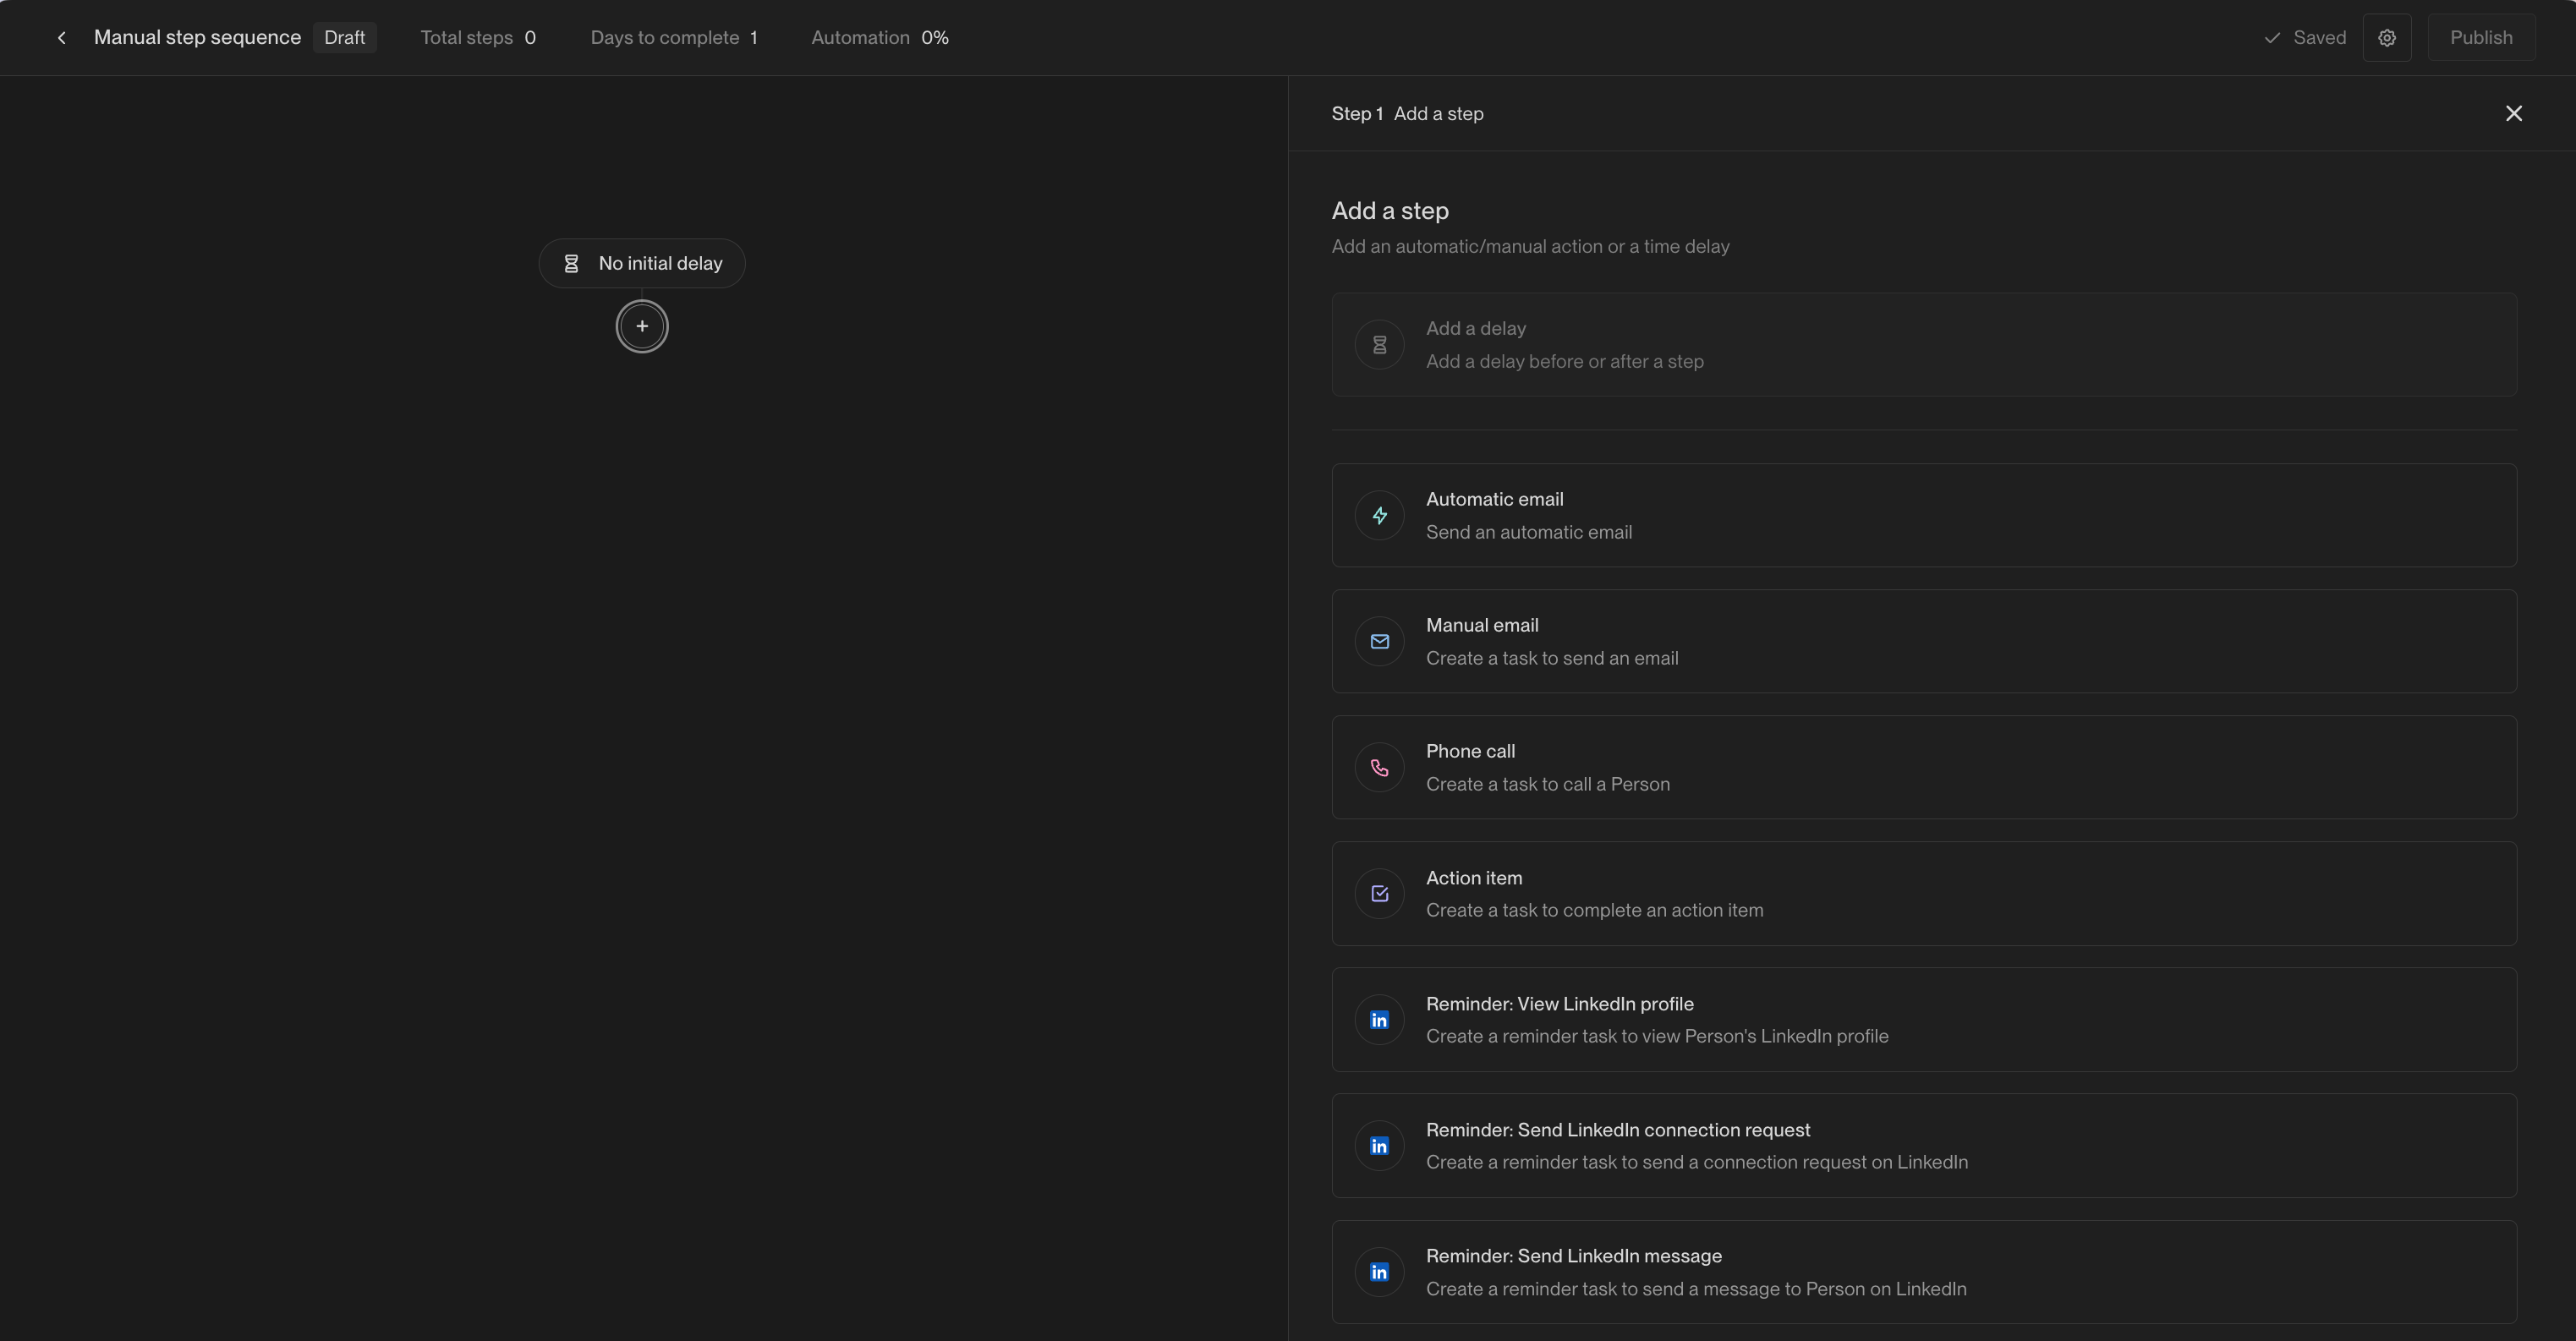 ## Manual email steps
Just like automated emails, manual email steps can be composed using
[template variables](/reference/sequences/template-variables)
or [snippets](/reference/sequences/smart-snippets). You can set the priority of
the task that will be created for the step and who to assign the task to.
## Manual email steps
Just like automated emails, manual email steps can be composed using
[template variables](/reference/sequences/template-variables)
or [snippets](/reference/sequences/smart-snippets). You can set the priority of
the task that will be created for the step and who to assign the task to.
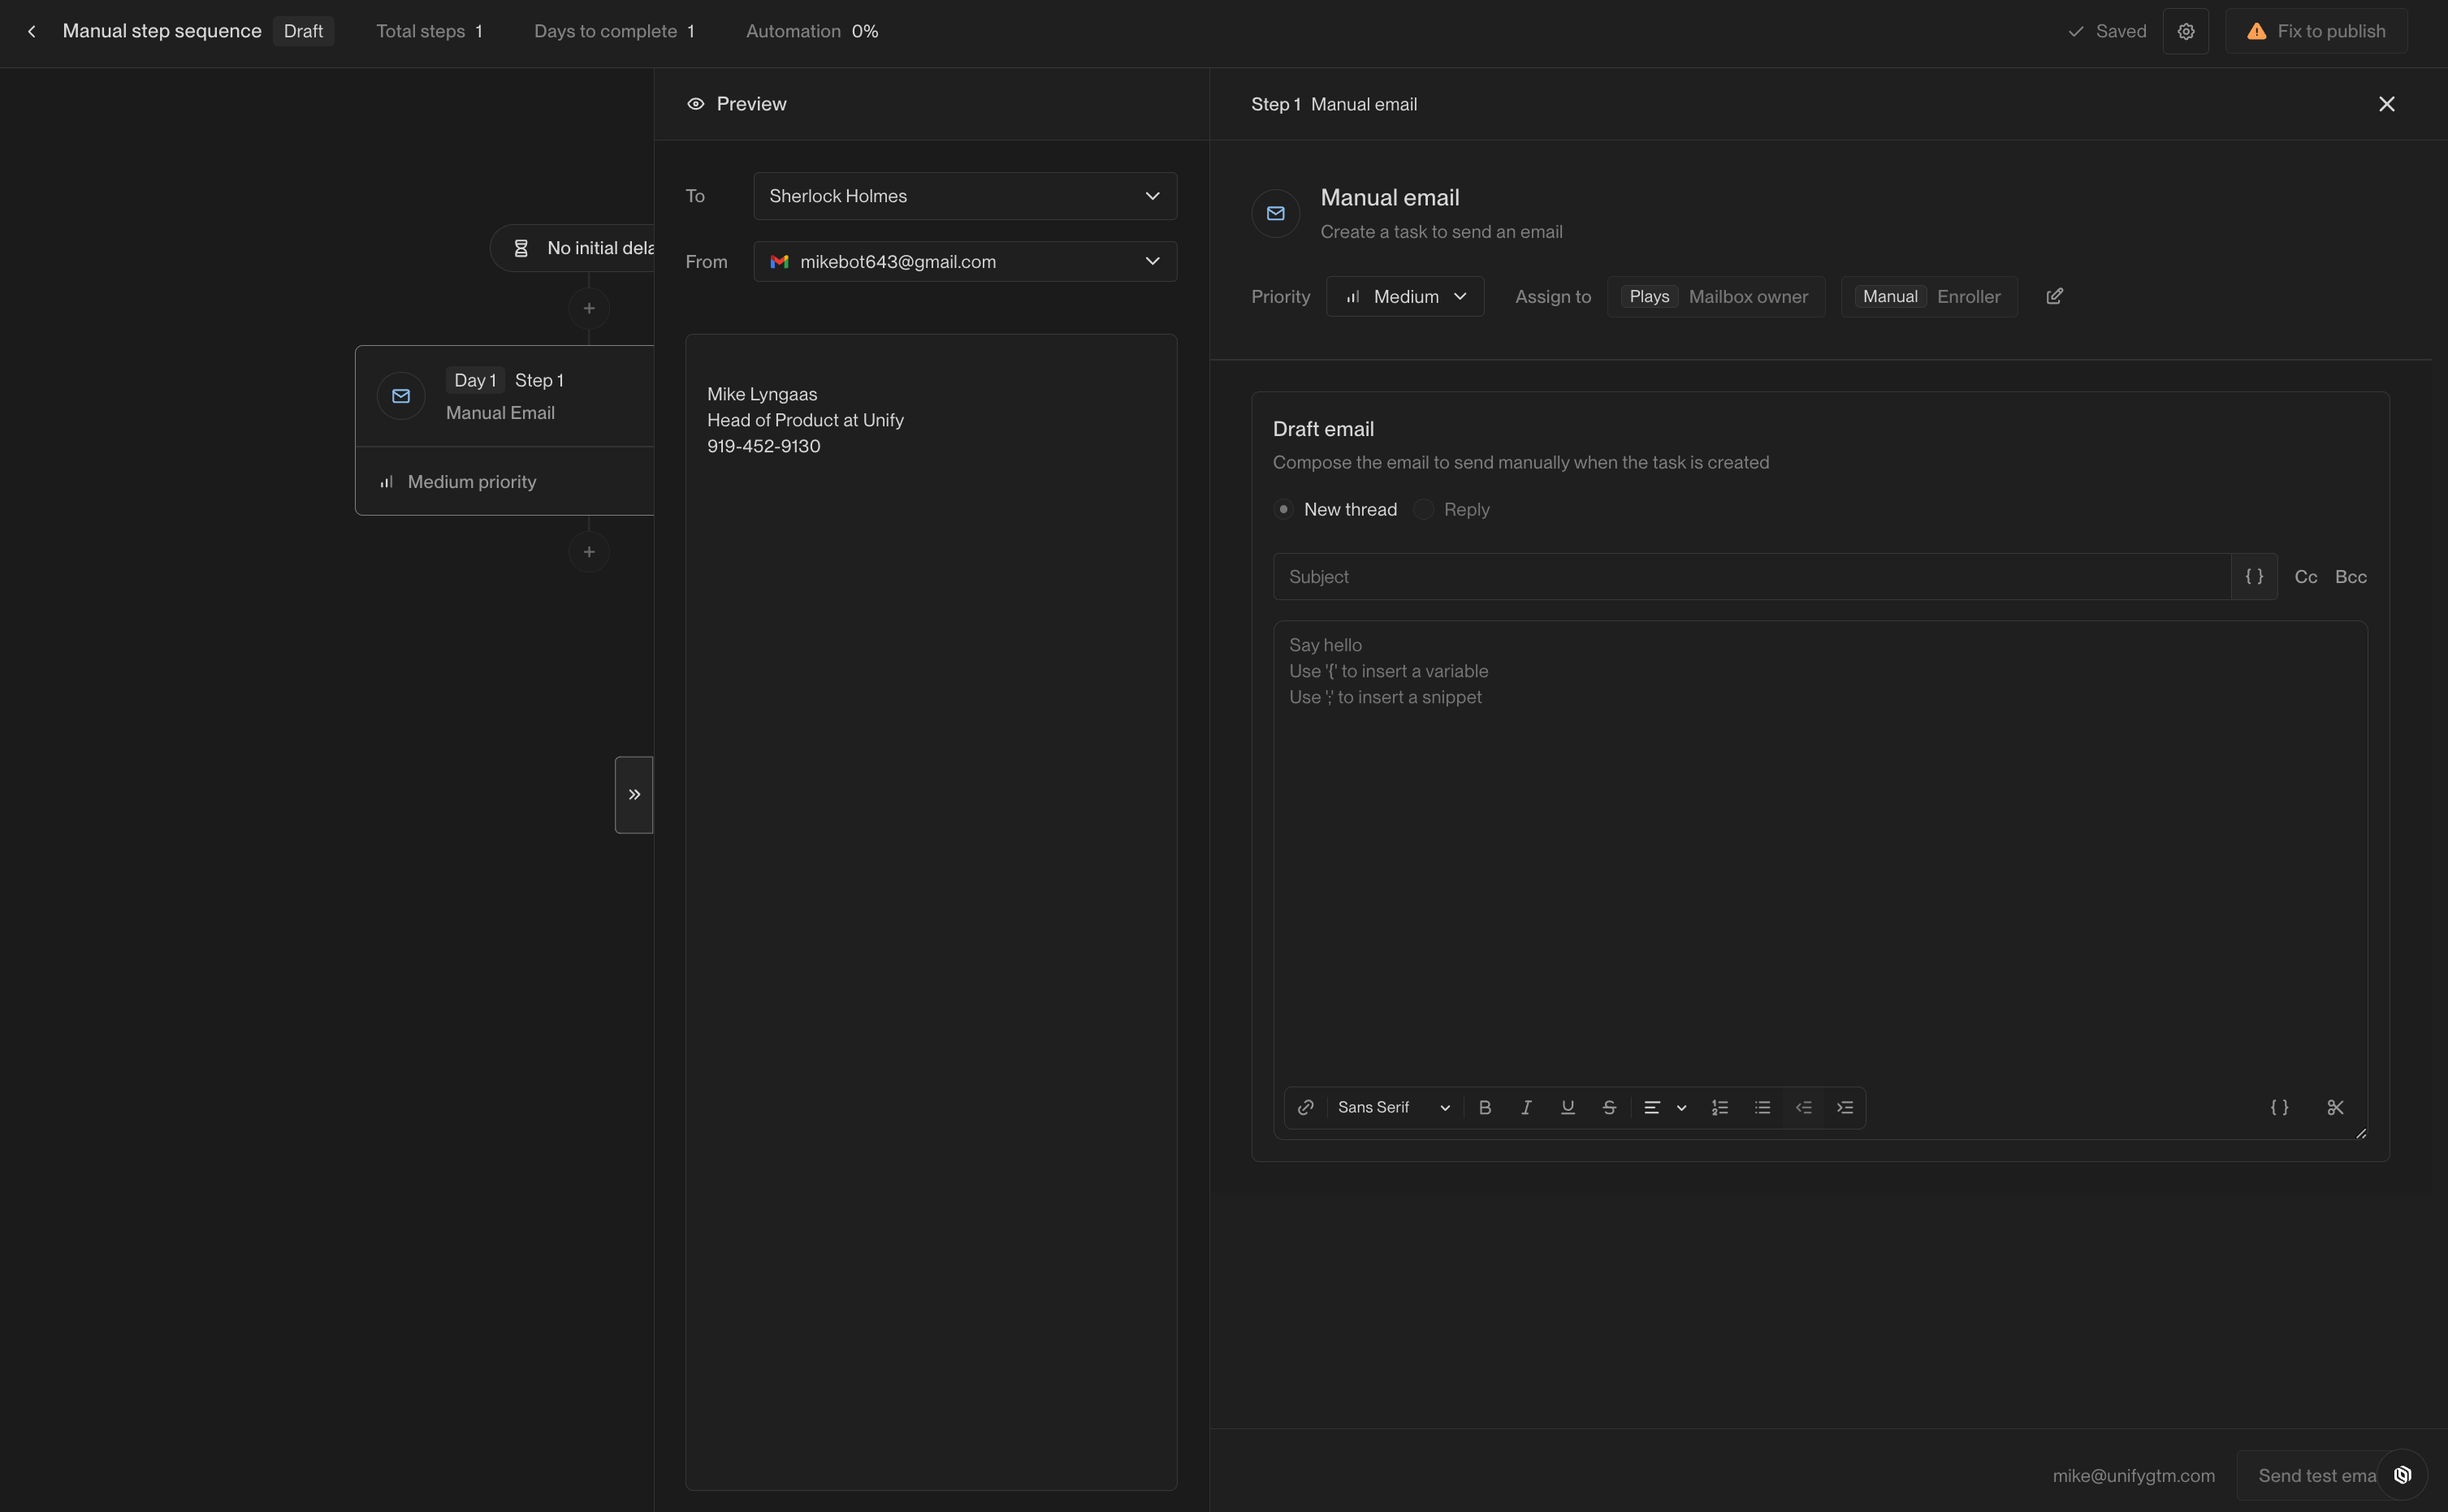 ## Phone call steps
Phone call steps can include notes that will appear on the call task once created.
[Template variables](/reference/sequences/template-variables) and
[snippets](/reference/sequences/smart-snippets) can be used to customize the notes.
## Phone call steps
Phone call steps can include notes that will appear on the call task once created.
[Template variables](/reference/sequences/template-variables) and
[snippets](/reference/sequences/smart-snippets) can be used to customize the notes.
 ## Action item steps
Action item steps can include notes that will appear on the task once created. These notes
can be used to generate instructions for the user to complete the task or simply contain information
about the prospect. [Template variables](/reference/sequences/template-variables) and
[snippets](/reference/sequences/smart-snippets) can be used to customize the notes.
## Action item steps
Action item steps can include notes that will appear on the task once created. These notes
can be used to generate instructions for the user to complete the task or simply contain information
about the prospect. [Template variables](/reference/sequences/template-variables) and
[snippets](/reference/sequences/smart-snippets) can be used to customize the notes.
 ---
# Source: https://docs.unifygtm.com/reference/signals/new-hires.md
> ## Documentation Index
> Fetch the complete documentation index at: https://docs.unifygtm.com/llms.txt
> Use this file to discover all available pages before exploring further.
# New Hire Tracking
> Automatically track new hires at companies and take action.
## What is New Hire Tracking?
A new hire is someone who has recently started a job at a new company within the past 90 days.
New Hire Tracking helps you identify and monitor individuals who have recently joined companies that align with your target profile. These new hires often play pivotal roles in shaping change within their organizations, making them valuable opportunities for outreach.
These are not people in your current Unify instance, they are net new prospects, meaning that they have not already been sourced through CRM integration, website intent, or uploaded manually.
By using New Hire Tracking, you can apply specific filters to define your target companies and personas, automatically keeping track of new hires at these organizations.
### Why is this a valuable signal?
New hires signify organizational shifts and often catalyze new purchasing decisions, presenting valuable opportunities for strategic outreach.
### How does New Hire Tracking work?
Once activated, Unify scans for new hires that match your selected personas at your target companies, delivering their contact details to you daily. Your target personas and companies can be customized to include or exclude specific job titles, industries, company size, and location. This enables you to build a dynamic, up-to-date list of key contacts for your team to engage through Audiences.
New hires will not track existing contacts synced over from your CRM today. If enabled, Champion Tracking will be tracking when contacts from existing customers change jobs. For more information, see the [Champion Tracking section](/reference/signals/champions).
Each tracked new hire costs two credits, regardless of whether the lead has been routed or engaged.
To view tracked new hires, navigate to the “New Hires” tab in the New Hire Tracking Settings.
### Setting Up New Hire Tracking
Define the personas and companies you want to track, then follow the steps below to get started.
#### How to Enable
1. In the Unify app, go to [Settings -> Track -> New Hires](https://app.unifygtm.com/dashboard/settings/new-hire-tracking).
---
# Source: https://docs.unifygtm.com/reference/signals/new-hires.md
> ## Documentation Index
> Fetch the complete documentation index at: https://docs.unifygtm.com/llms.txt
> Use this file to discover all available pages before exploring further.
# New Hire Tracking
> Automatically track new hires at companies and take action.
## What is New Hire Tracking?
A new hire is someone who has recently started a job at a new company within the past 90 days.
New Hire Tracking helps you identify and monitor individuals who have recently joined companies that align with your target profile. These new hires often play pivotal roles in shaping change within their organizations, making them valuable opportunities for outreach.
These are not people in your current Unify instance, they are net new prospects, meaning that they have not already been sourced through CRM integration, website intent, or uploaded manually.
By using New Hire Tracking, you can apply specific filters to define your target companies and personas, automatically keeping track of new hires at these organizations.
### Why is this a valuable signal?
New hires signify organizational shifts and often catalyze new purchasing decisions, presenting valuable opportunities for strategic outreach.
### How does New Hire Tracking work?
Once activated, Unify scans for new hires that match your selected personas at your target companies, delivering their contact details to you daily. Your target personas and companies can be customized to include or exclude specific job titles, industries, company size, and location. This enables you to build a dynamic, up-to-date list of key contacts for your team to engage through Audiences.
New hires will not track existing contacts synced over from your CRM today. If enabled, Champion Tracking will be tracking when contacts from existing customers change jobs. For more information, see the [Champion Tracking section](/reference/signals/champions).
Each tracked new hire costs two credits, regardless of whether the lead has been routed or engaged.
To view tracked new hires, navigate to the “New Hires” tab in the New Hire Tracking Settings.
### Setting Up New Hire Tracking
Define the personas and companies you want to track, then follow the steps below to get started.
#### How to Enable
1. In the Unify app, go to [Settings -> Track -> New Hires](https://app.unifygtm.com/dashboard/settings/new-hire-tracking).
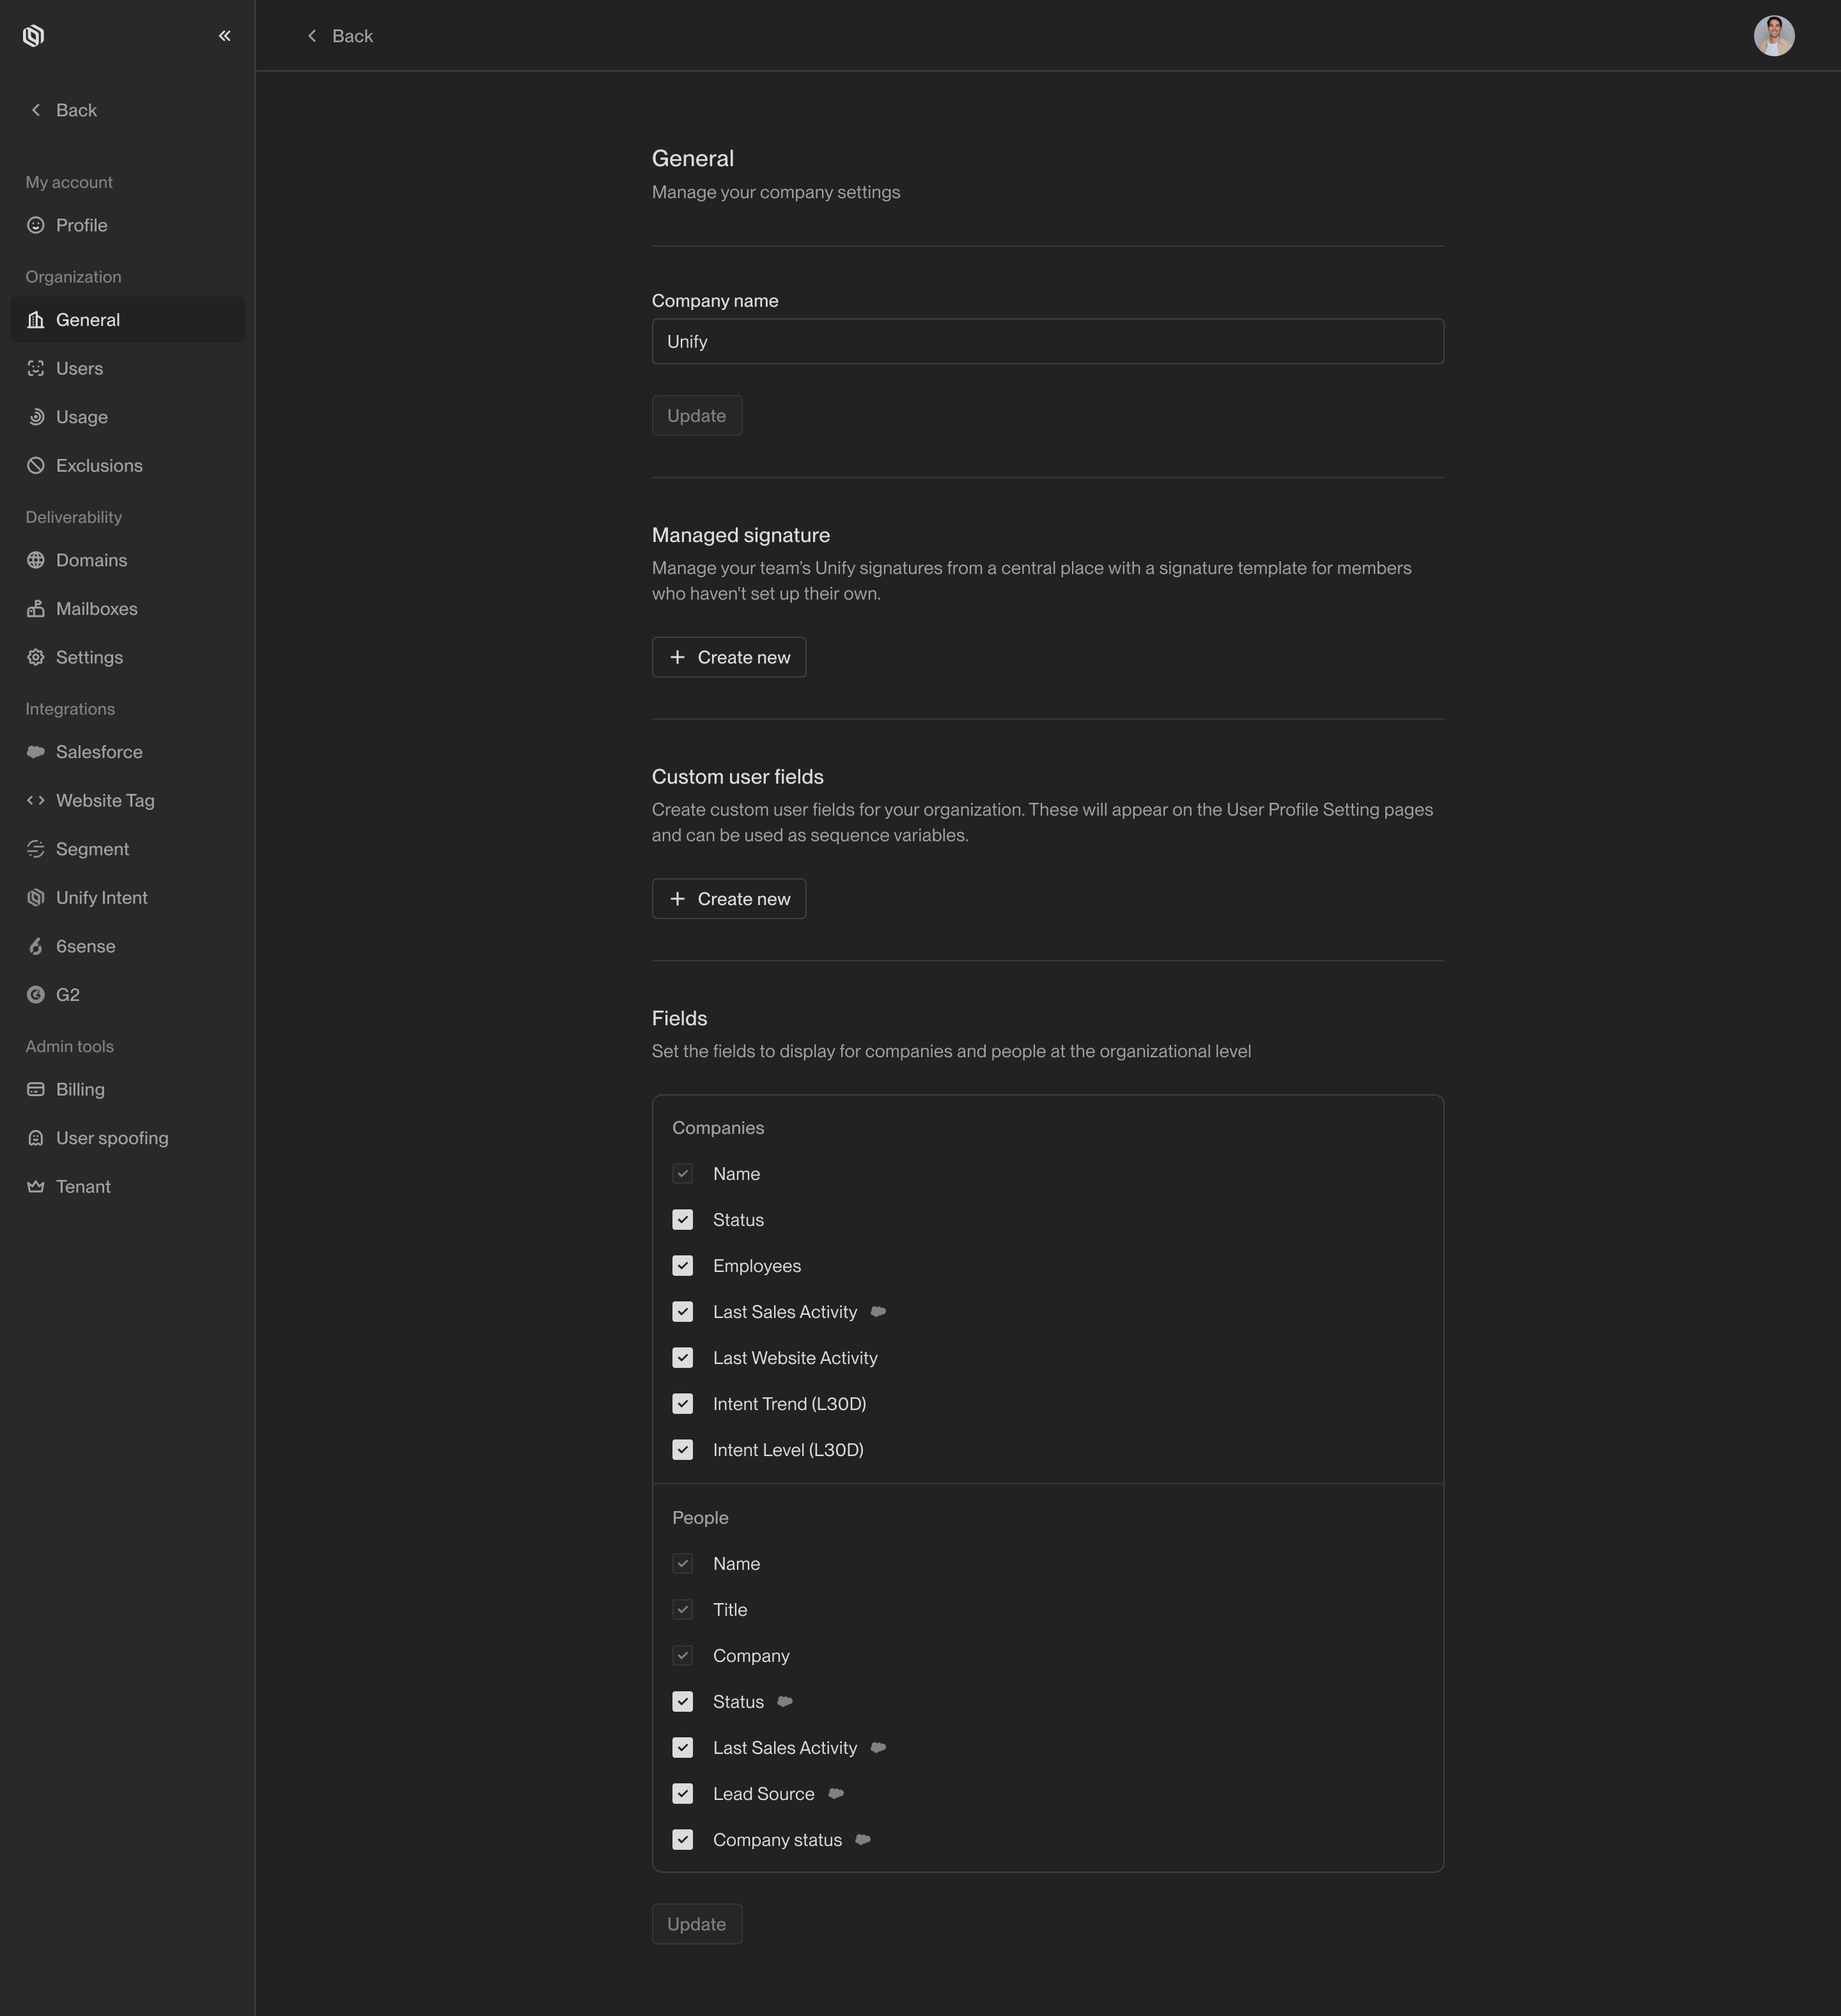 ---
# Source: https://docs.unifygtm.com/reference/signals/overview.md
# Source: https://docs.unifygtm.com/reference/sequences/send-schedules/overview.md
# Source: https://docs.unifygtm.com/reference/sequences/overview.md
# Source: https://docs.unifygtm.com/reference/plays/overview.md
# Source: https://docs.unifygtm.com/reference/overview.md
# Source: https://docs.unifygtm.com/reference/notifications/overview.md
# Source: https://docs.unifygtm.com/reference/integrations/salesforce/overview.md
# Source: https://docs.unifygtm.com/reference/integrations/overview.md
# Source: https://docs.unifygtm.com/reference/integrations/orum/overview.md
# Source: https://docs.unifygtm.com/reference/integrations/nooks/overview.md
# Source: https://docs.unifygtm.com/reference/integrations/hubspot/overview.md
# Source: https://docs.unifygtm.com/reference/ai-research/overview.md
# Source: https://docs.unifygtm.com/reference/agents/overview.md
# Source: https://docs.unifygtm.com/developers/intent-client/overview.md
> ## Documentation Index
> Fetch the complete documentation index at: https://docs.unifygtm.com/llms.txt
> Use this file to discover all available pages before exploring further.
# Intent Client Overview
> Learn how to start collecting website intent data in Unify.
Buyer intent data is at the core of what makes Unify tick. The easiest way to
start collecting this data is by installing the Unify Intent client on your
marketing website or web app.
# How it works
The Unify Intent client is a JavaScript library that allows you to collect
events from your website and send them to Unify. It currently supports Page and
Identify events. Track events are coming soon.
---
# Source: https://docs.unifygtm.com/reference/signals/overview.md
# Source: https://docs.unifygtm.com/reference/sequences/send-schedules/overview.md
# Source: https://docs.unifygtm.com/reference/sequences/overview.md
# Source: https://docs.unifygtm.com/reference/plays/overview.md
# Source: https://docs.unifygtm.com/reference/overview.md
# Source: https://docs.unifygtm.com/reference/notifications/overview.md
# Source: https://docs.unifygtm.com/reference/integrations/salesforce/overview.md
# Source: https://docs.unifygtm.com/reference/integrations/overview.md
# Source: https://docs.unifygtm.com/reference/integrations/orum/overview.md
# Source: https://docs.unifygtm.com/reference/integrations/nooks/overview.md
# Source: https://docs.unifygtm.com/reference/integrations/hubspot/overview.md
# Source: https://docs.unifygtm.com/reference/ai-research/overview.md
# Source: https://docs.unifygtm.com/reference/agents/overview.md
# Source: https://docs.unifygtm.com/developers/intent-client/overview.md
> ## Documentation Index
> Fetch the complete documentation index at: https://docs.unifygtm.com/llms.txt
> Use this file to discover all available pages before exploring further.
# Intent Client Overview
> Learn how to start collecting website intent data in Unify.
Buyer intent data is at the core of what makes Unify tick. The easiest way to
start collecting this data is by installing the Unify Intent client on your
marketing website or web app.
# How it works
The Unify Intent client is a JavaScript library that allows you to collect
events from your website and send them to Unify. It currently supports Page and
Identify events. Track events are coming soon.
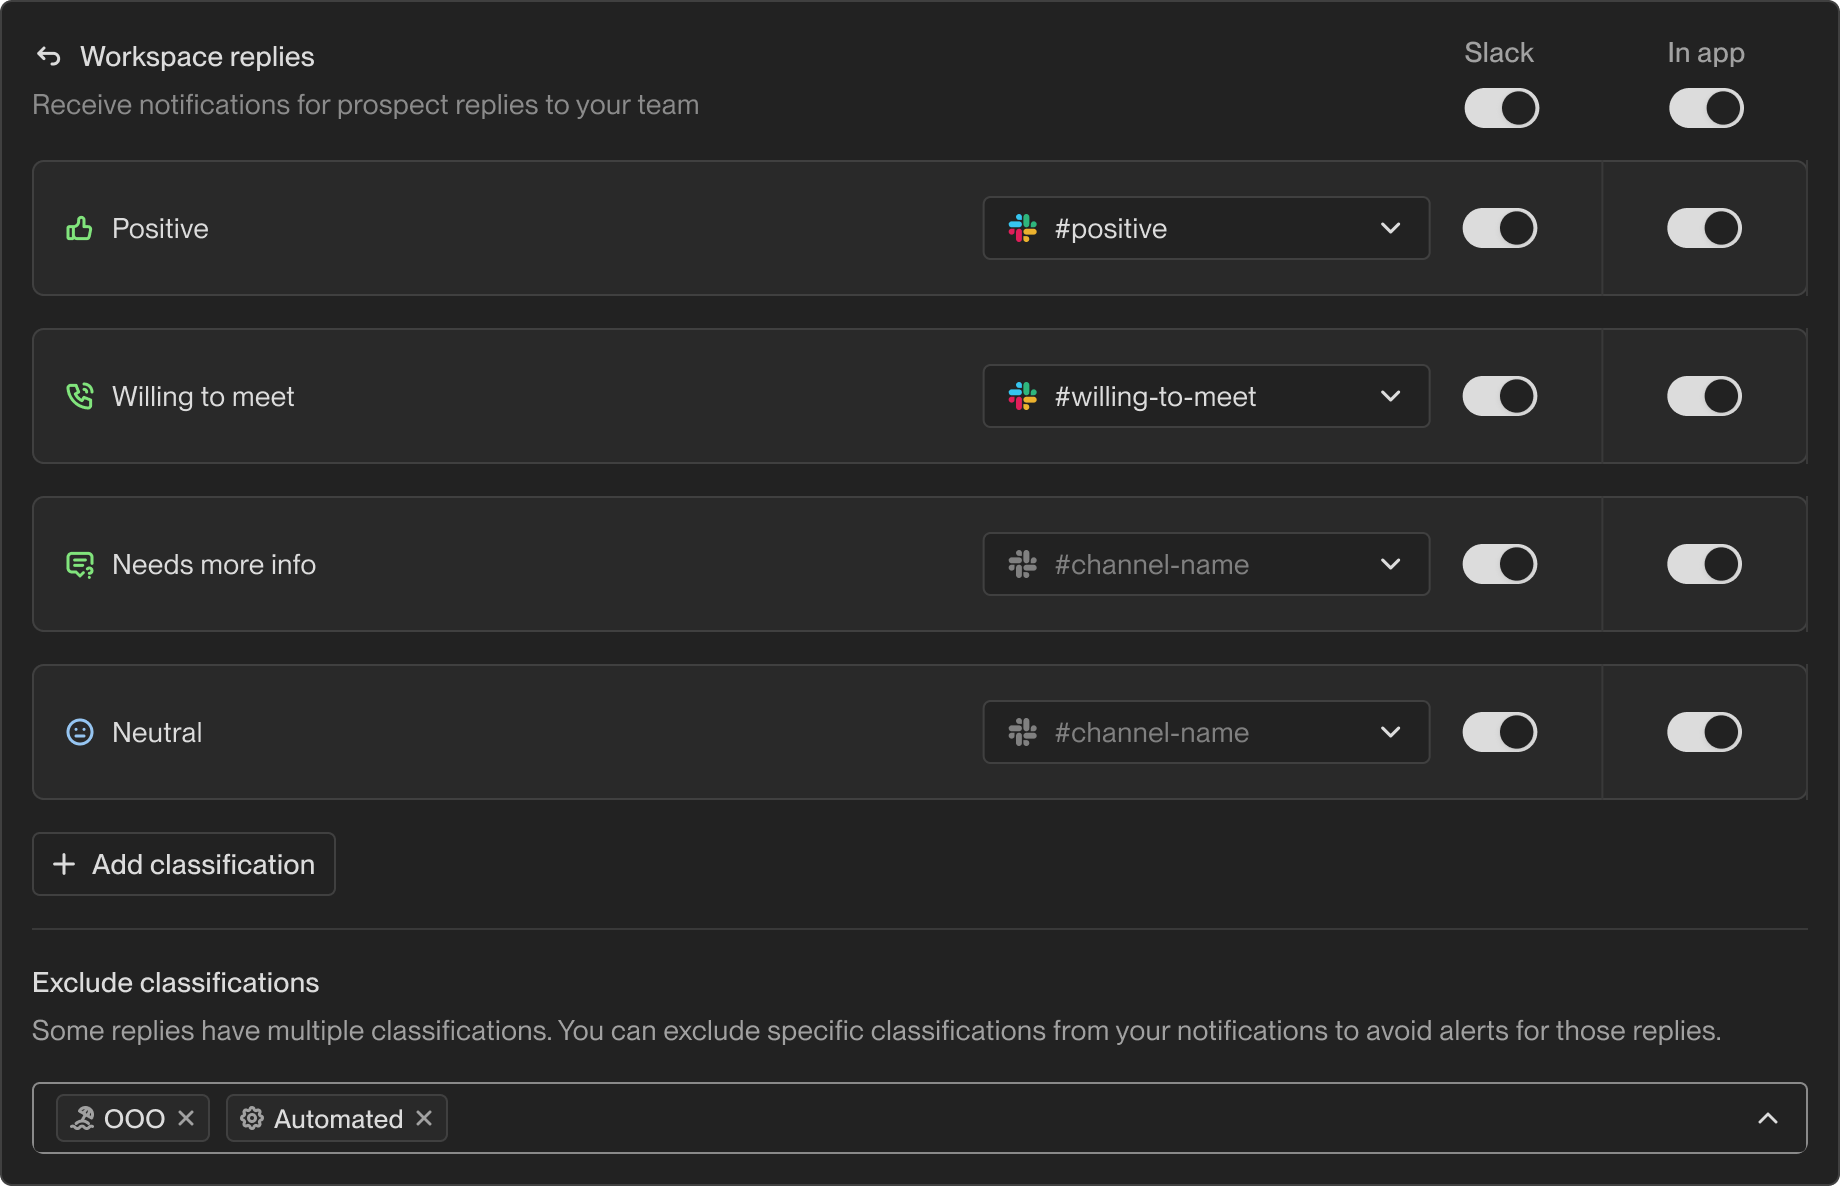 #### Reply Classifications
By default, the following reply classifications can be configured.
*
#### Reply Classifications
By default, the following reply classifications can be configured.
* 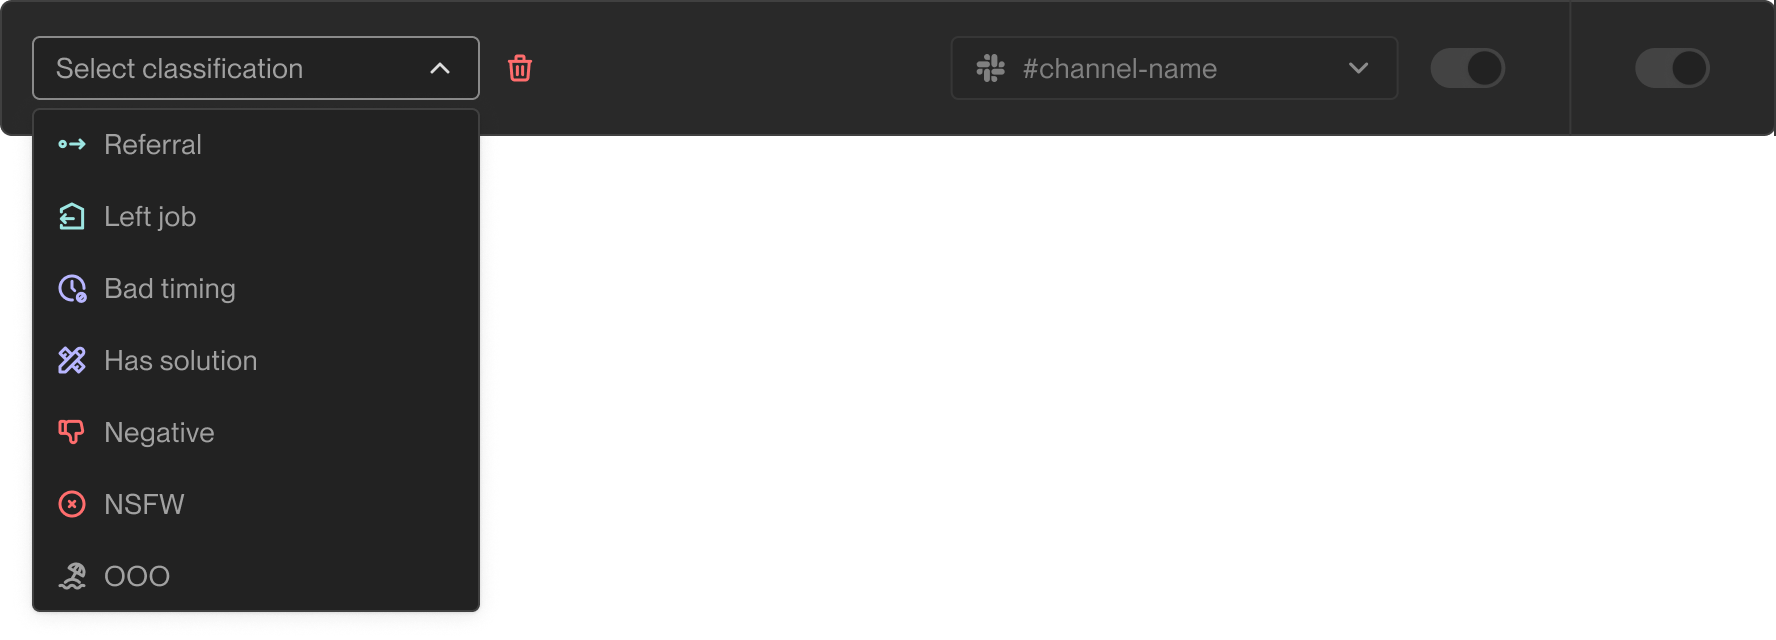 #### Excluding Classifications
Some replies can have multiple classifications. You can exclude specific classifications from triggering notifications. **If a reply has any excluded classification, no notification will be sent**, even if it also has other classifications that would normally trigger an alert.
Common exclusions include:
*
#### Excluding Classifications
Some replies can have multiple classifications. You can exclude specific classifications from triggering notifications. **If a reply has any excluded classification, no notification will be sent**, even if it also has other classifications that would normally trigger an alert.
Common exclusions include:
* 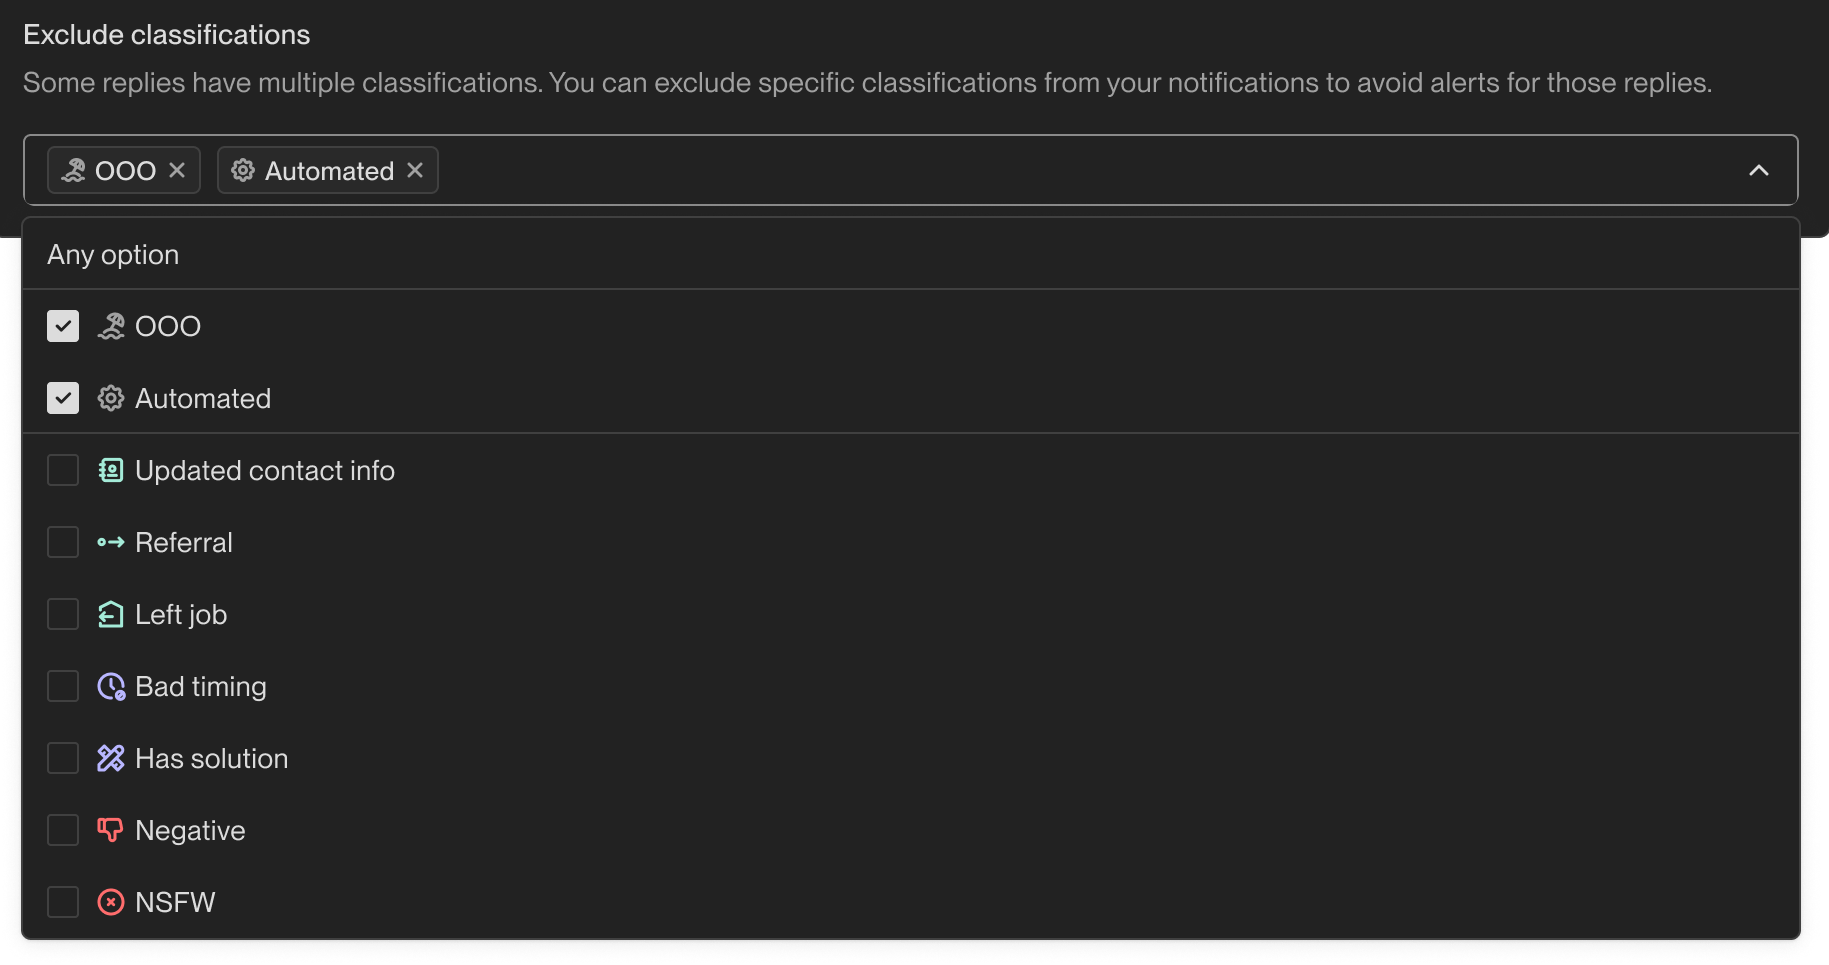 ### Workspace Tasks and Updates
Receive notifications for all tasks and updates created for anyone on your team. This allows admins to stay informed about task assignments and progress across the organization.
### Workspace Tasks and Updates
Receive notifications for all tasks and updates created for anyone on your team. This allows admins to stay informed about task assignments and progress across the organization.
 ## My Notifications
Personal notifications are available to all users (both Admins and Reps) and allow you to manage alerts specific to you.
## My Notifications
Personal notifications are available to all users (both Admins and Reps) and allow you to manage alerts specific to you.
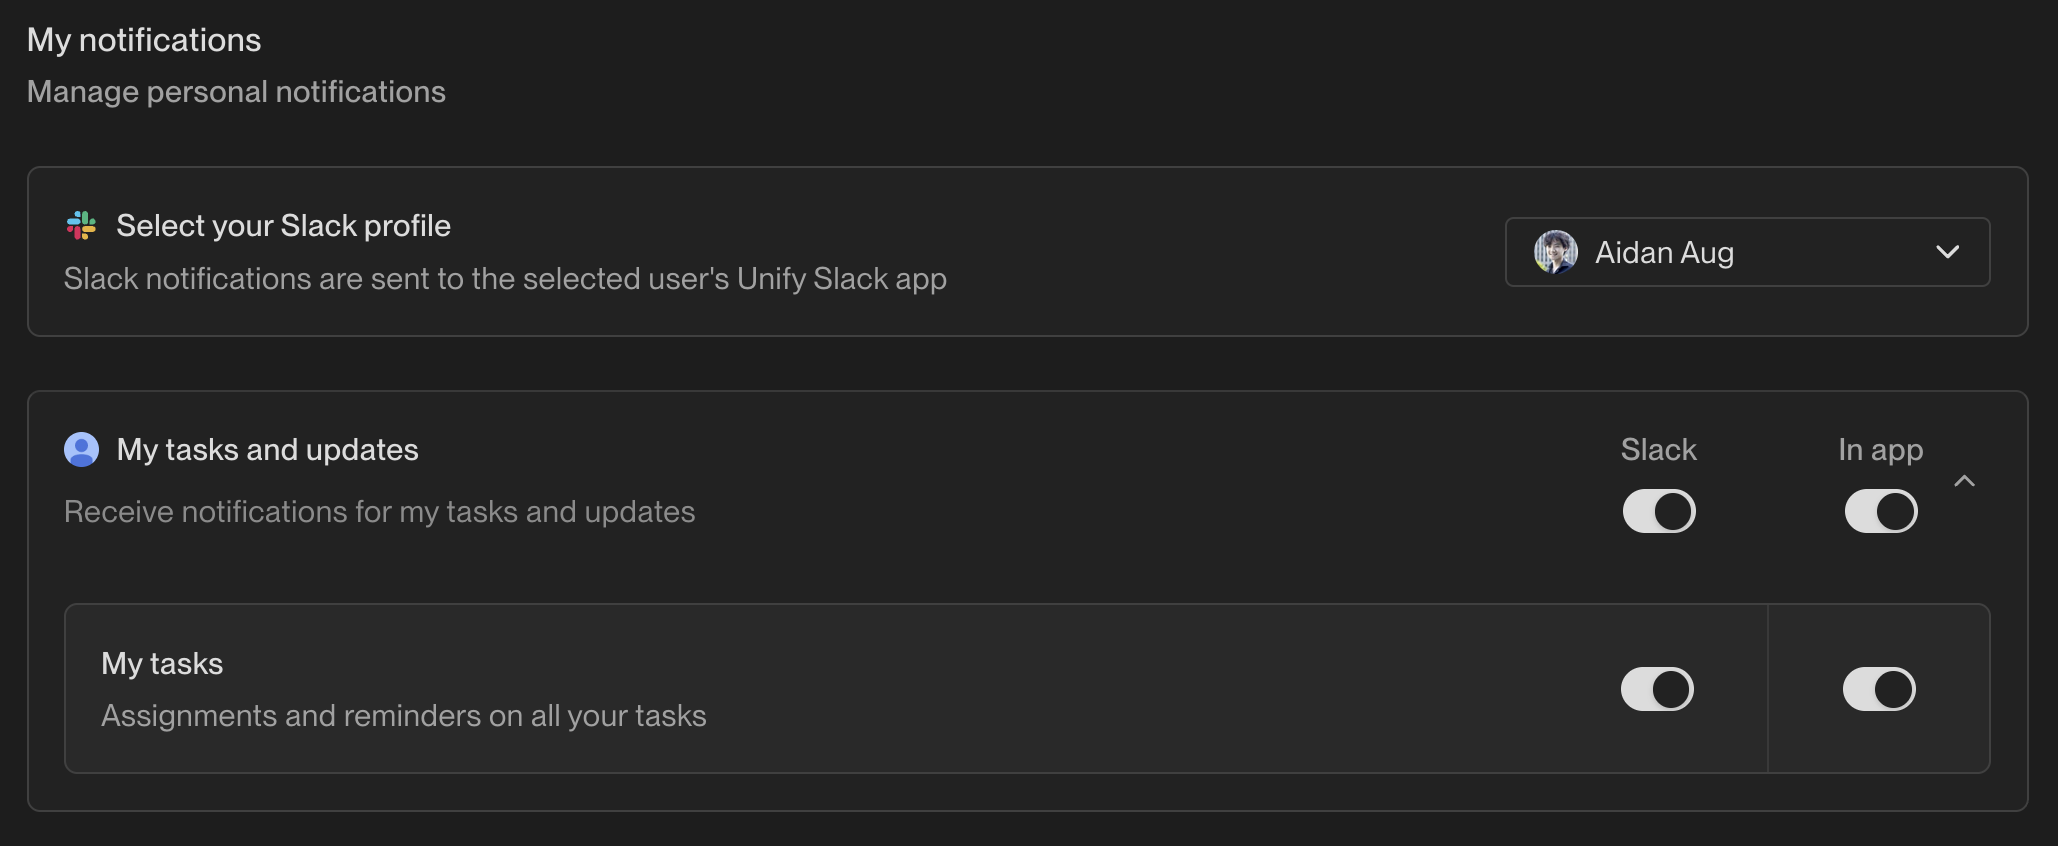 ### Connecting Your Slack Account
To receive Slack notifications, you need to connect your personal Slack profile to Unify.
### Connecting Your Slack Account
To receive Slack notifications, you need to connect your personal Slack profile to Unify.
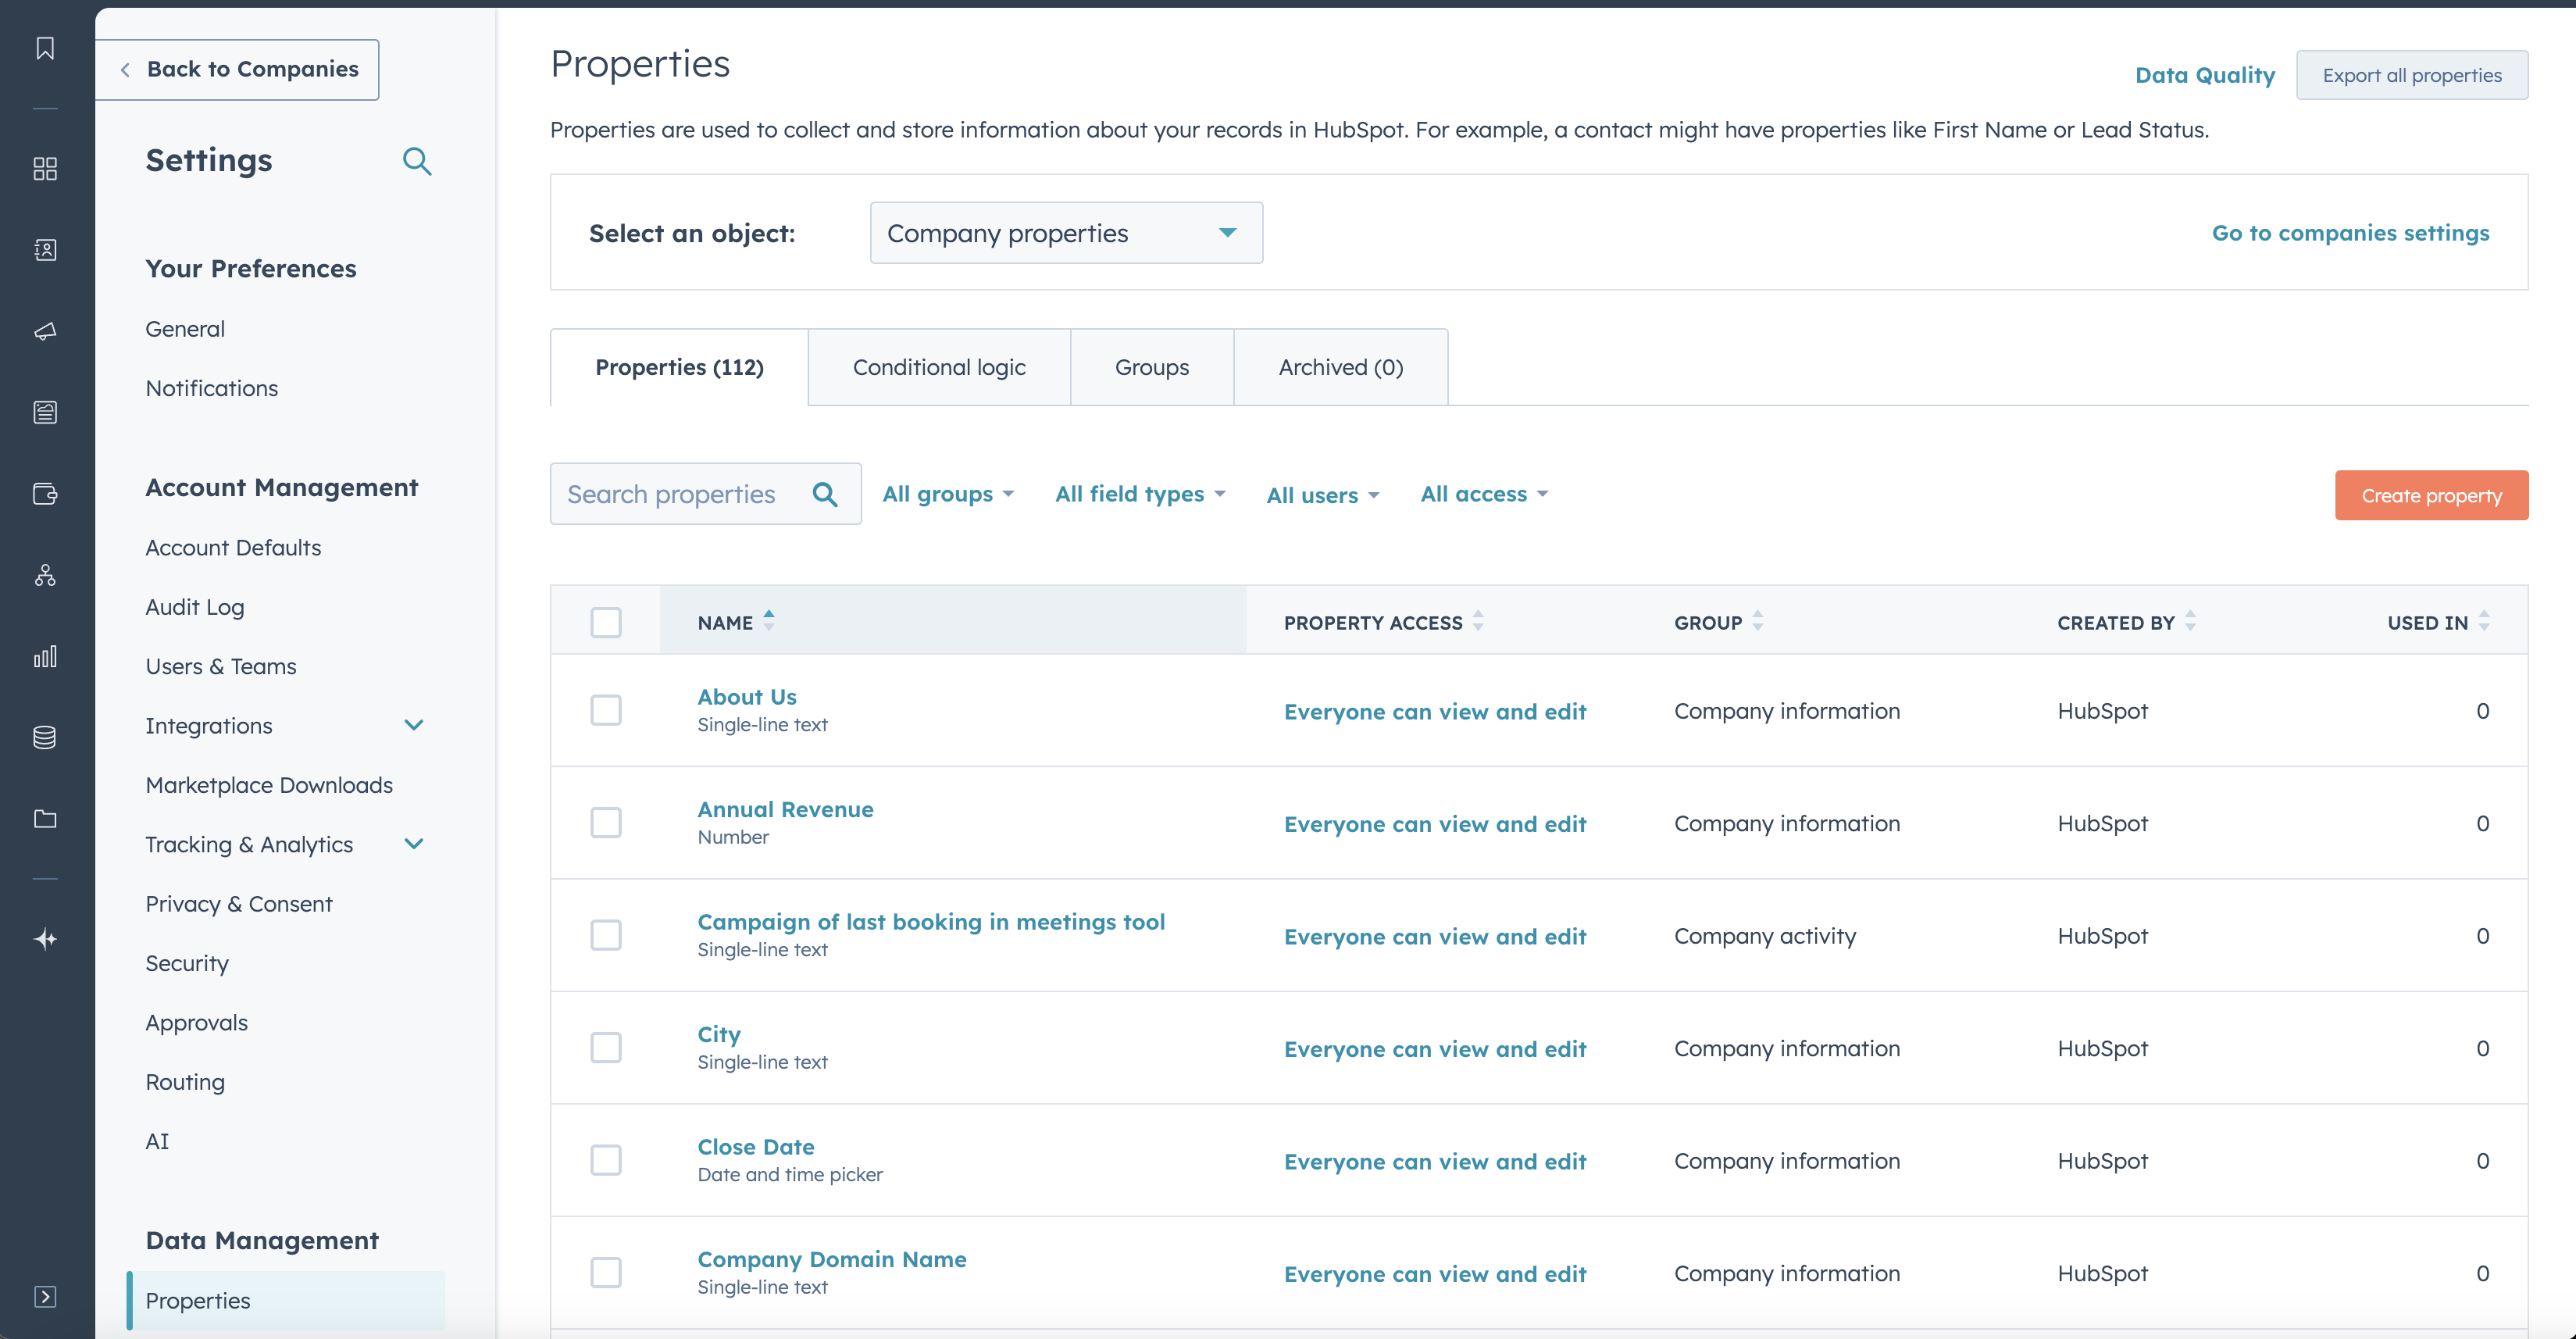 Search for the property by its name (in this case, **Lifecycle Stage**) and
select the property.
Search for the property by its name (in this case, **Lifecycle Stage**) and
select the property.
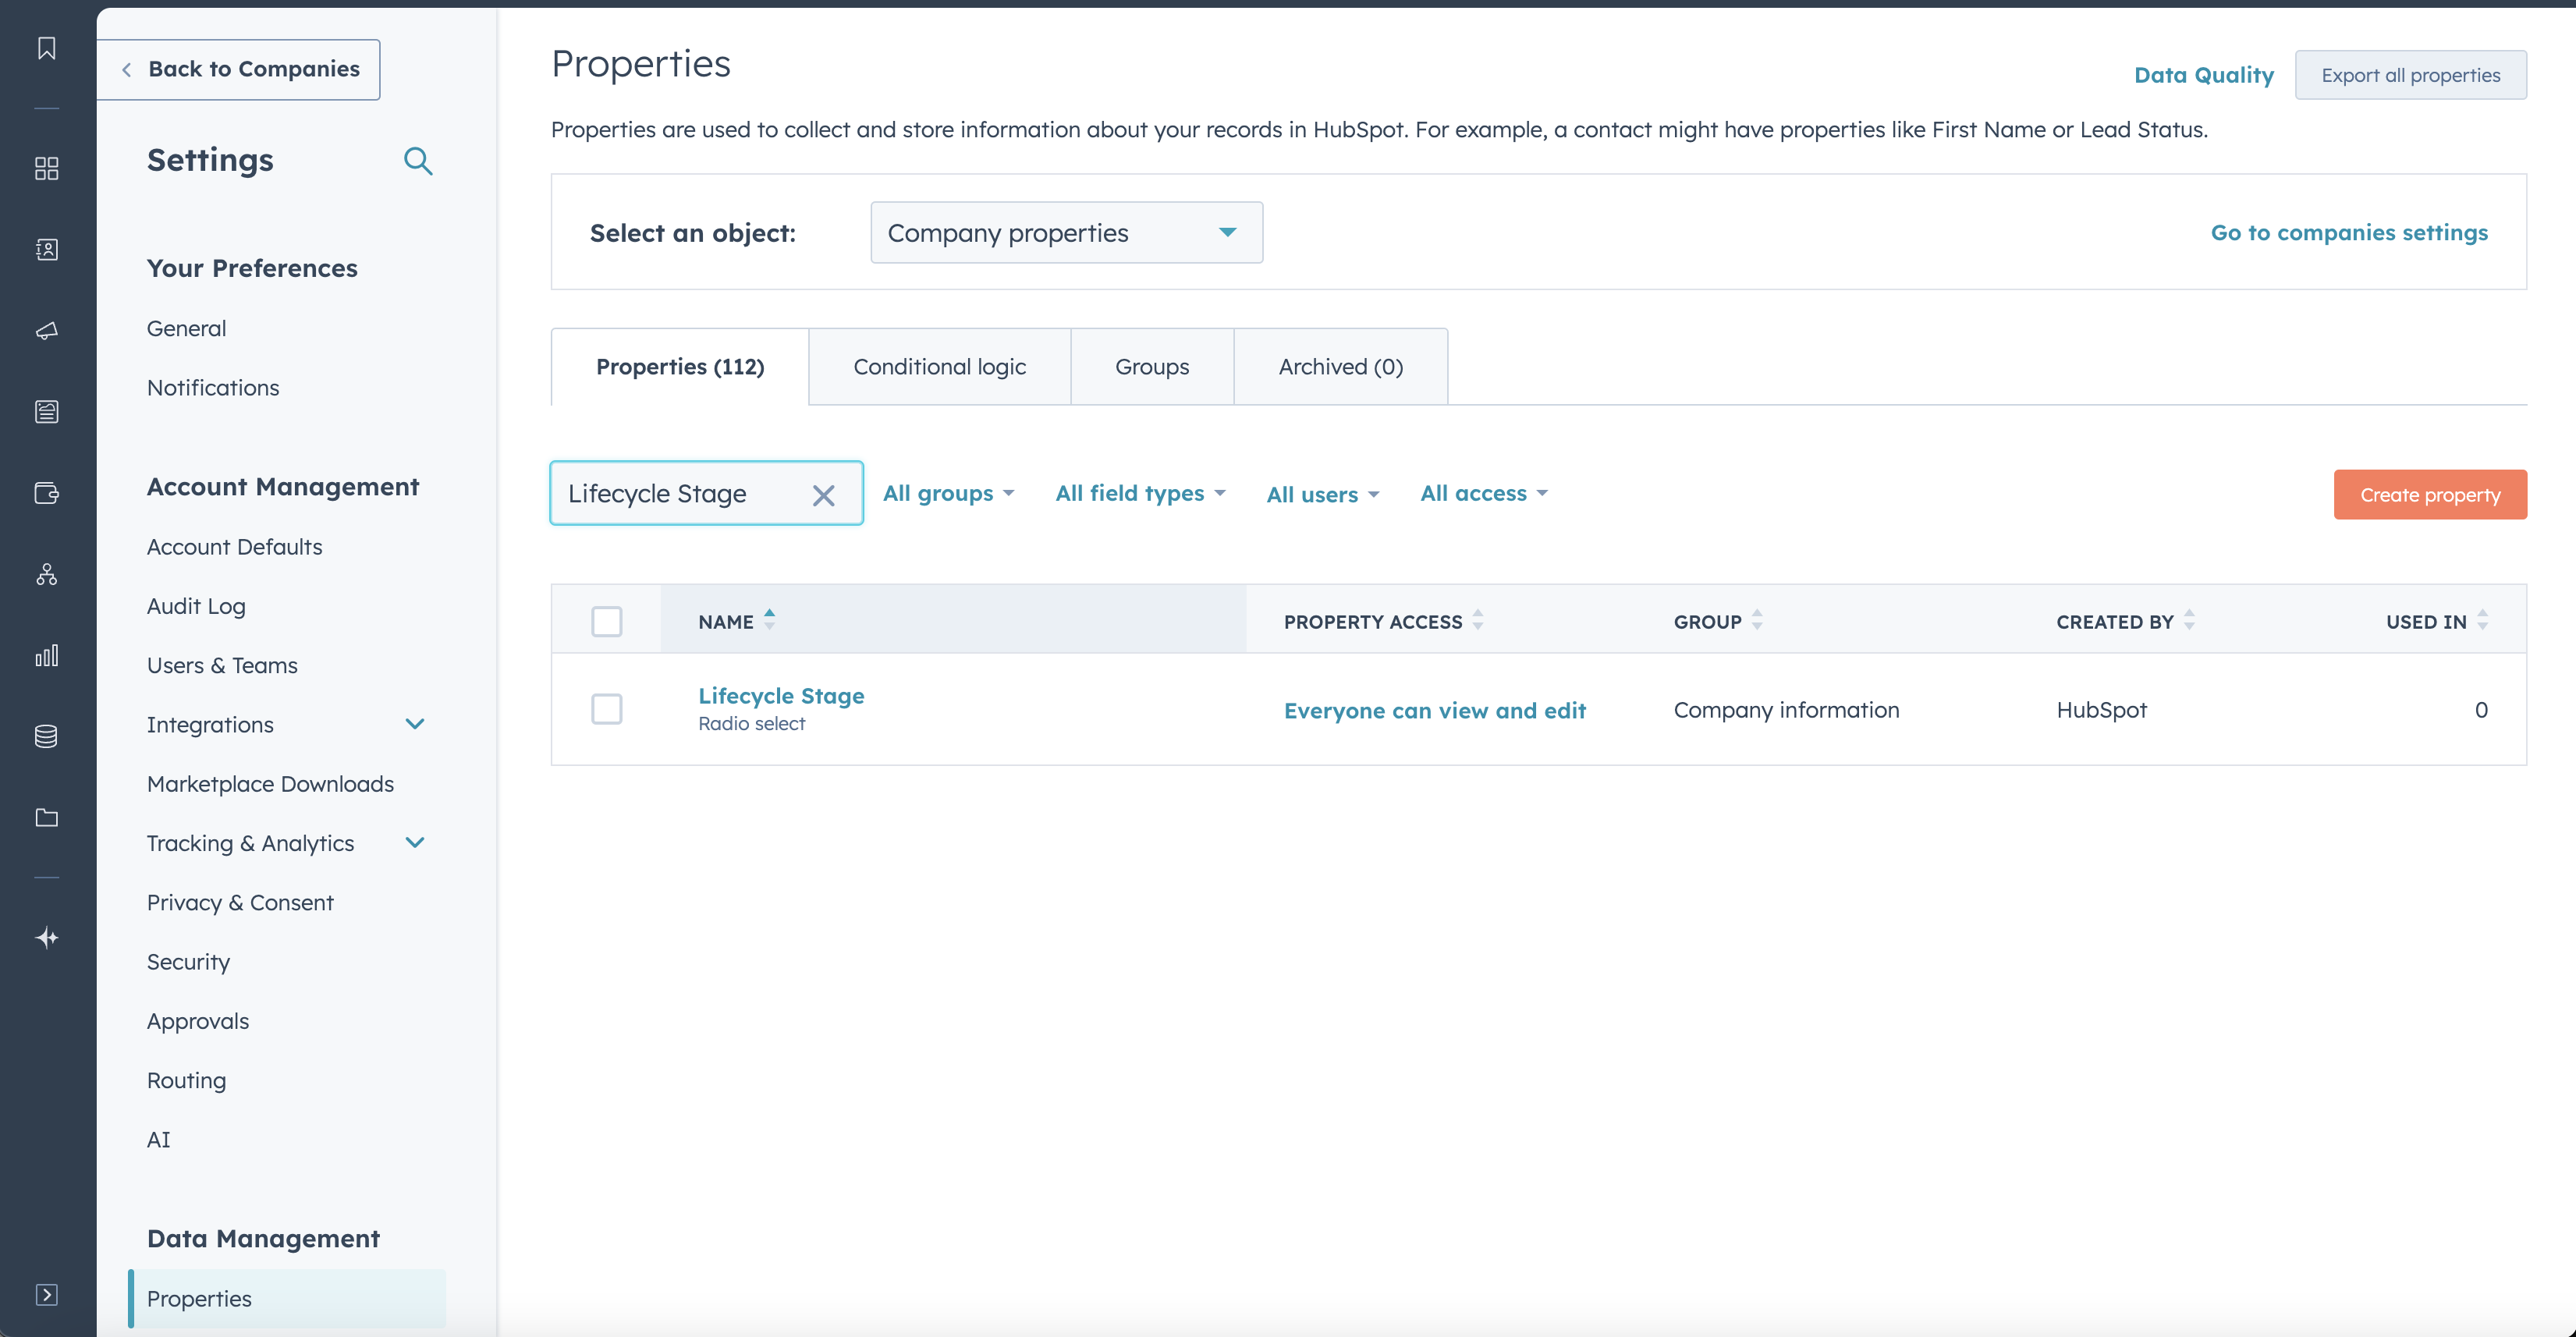
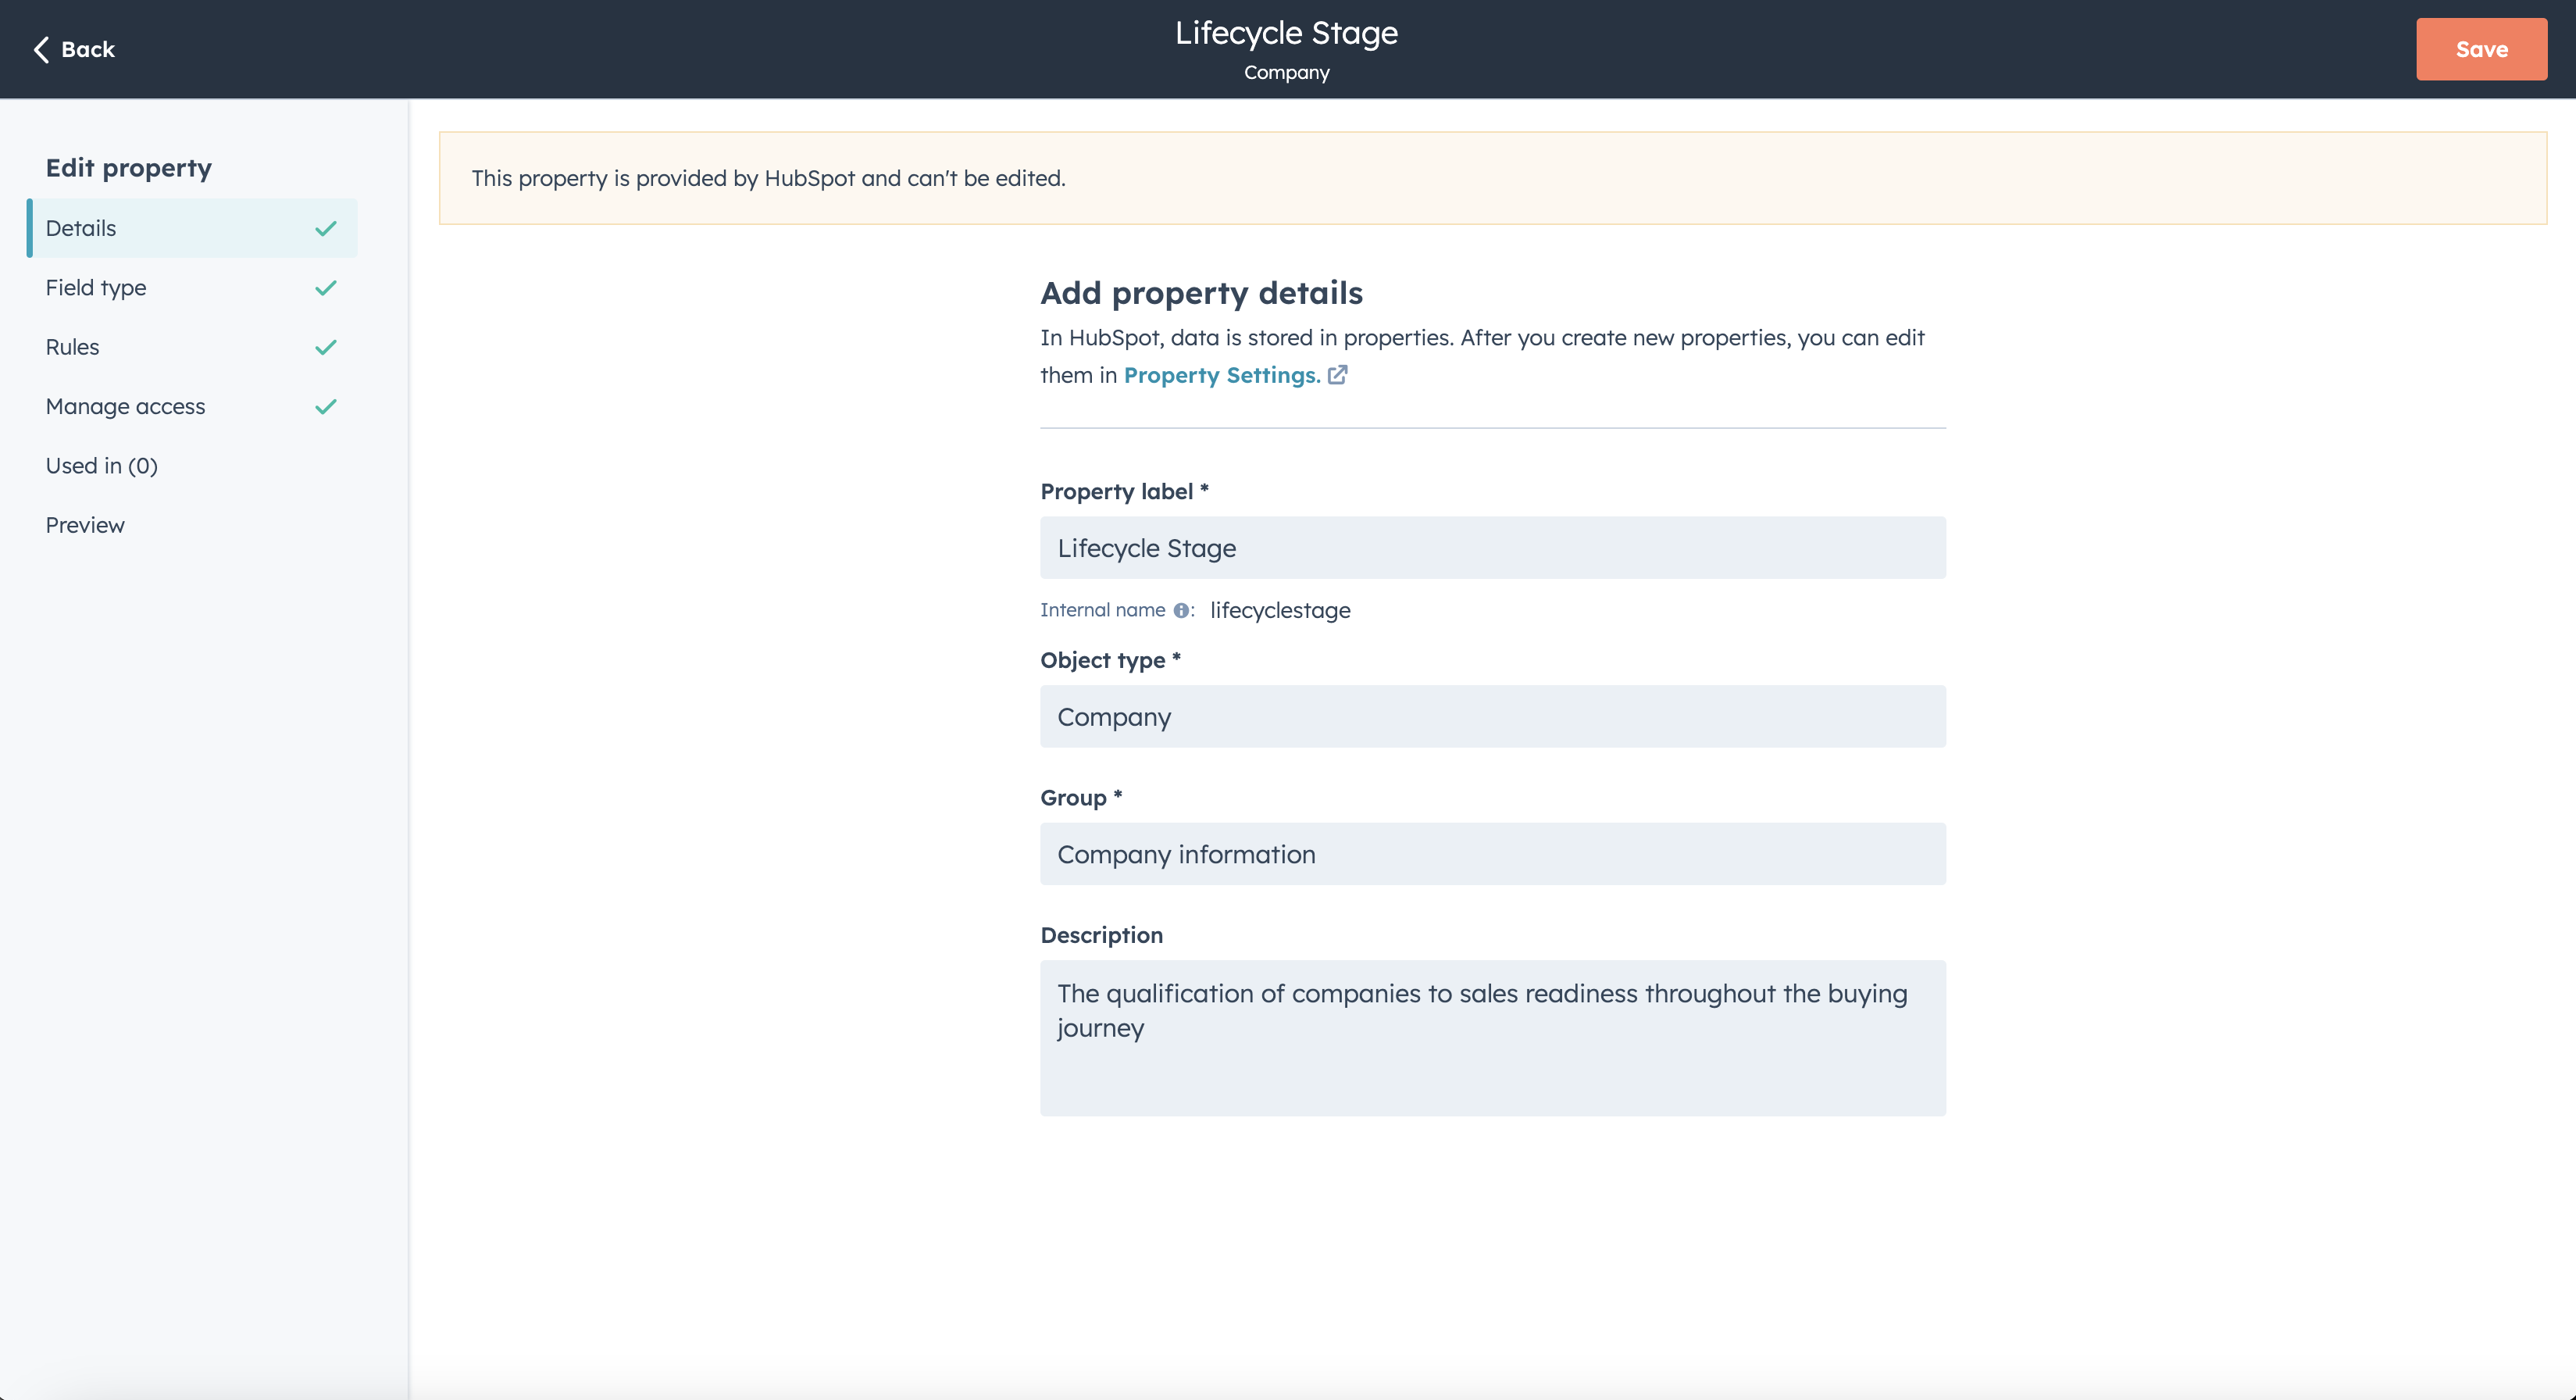 Navigate to **Field type**. You will see a list of options, with **LABEL** and
**INTERNAL NAME** values alongside the number of records that have that value.
You may want to copy these values to a secure separate location for easy future
reference. If you wish to filter records in Unify to a specific **LABEL** value,
you can do so by using the corresponding **INTERNAL NAME** value.
Navigate to **Field type**. You will see a list of options, with **LABEL** and
**INTERNAL NAME** values alongside the number of records that have that value.
You may want to copy these values to a secure separate location for easy future
reference. If you wish to filter records in Unify to a specific **LABEL** value,
you can do so by using the corresponding **INTERNAL NAME** value.
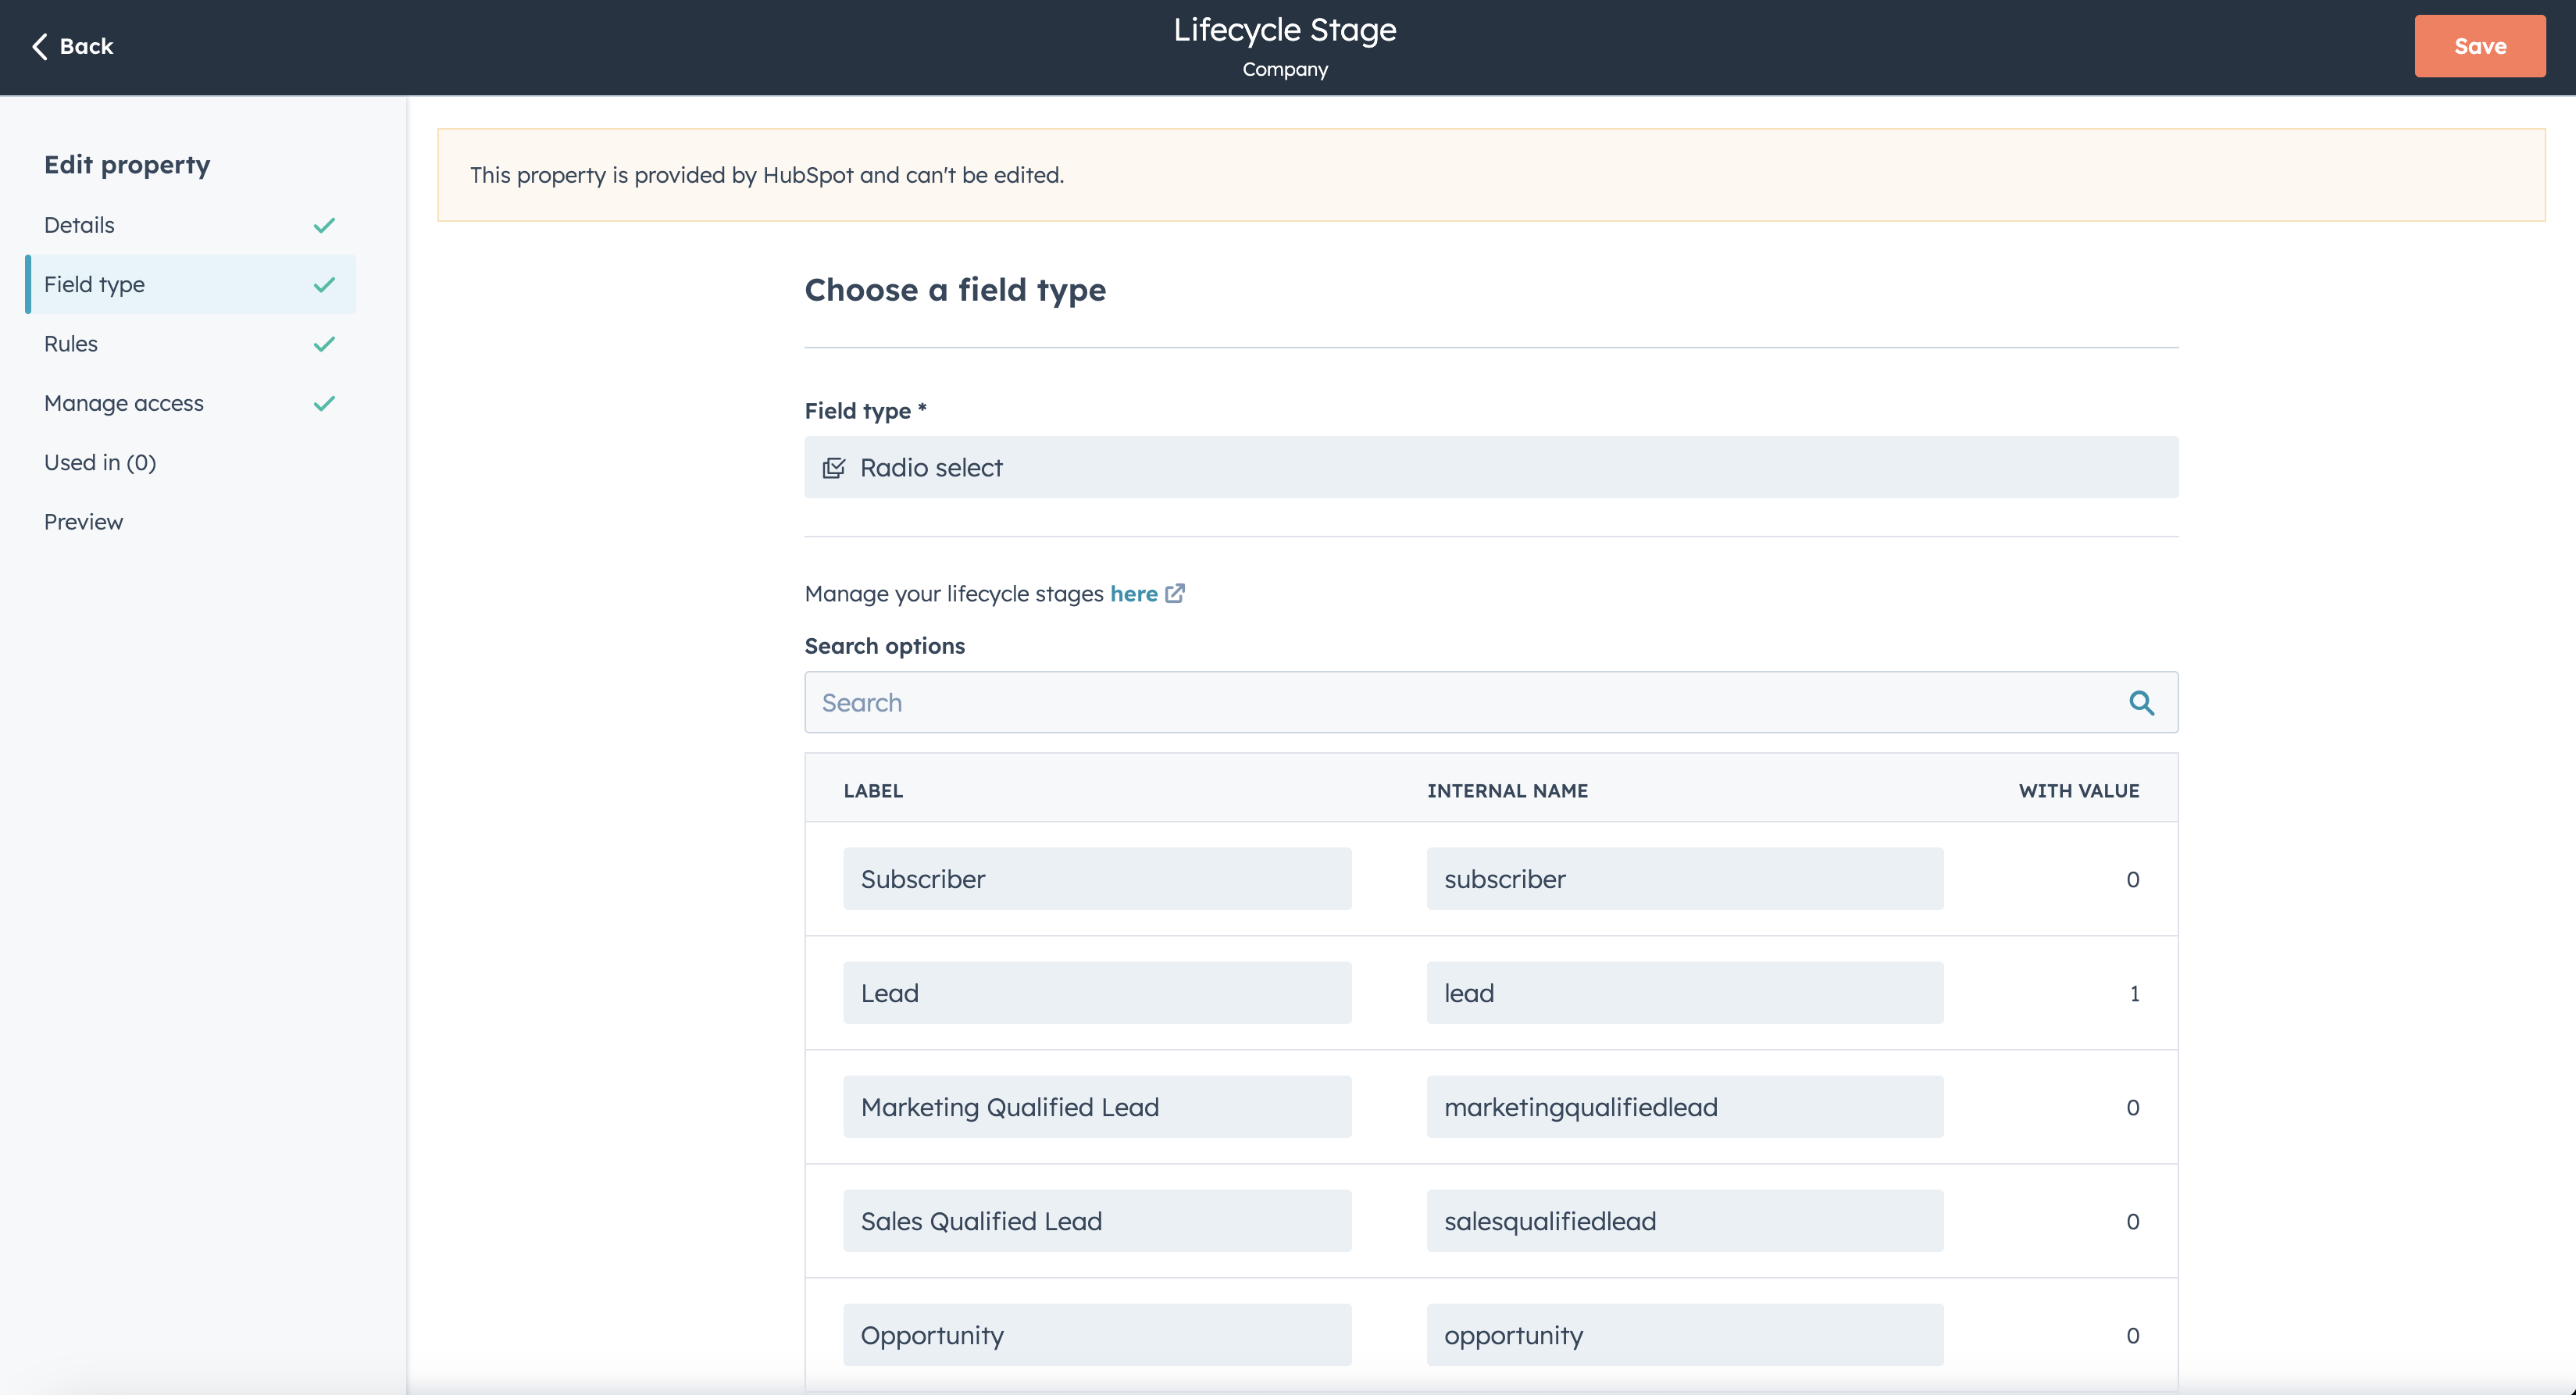 Here's what that looks like in Unify for the **LABEL** value "Lead" and
therefore **INTERNAL NAME** value "lead":
Here's what that looks like in Unify for the **LABEL** value "Lead" and
therefore **INTERNAL NAME** value "lead":
 ---
# Source: https://docs.unifygtm.com/developers/intent-client/react.md
> ## Documentation Index
> Fetch the complete documentation index at: https://docs.unifygtm.com/llms.txt
> Use this file to discover all available pages before exploring further.
# React
> Install the Unify Intent client in a React app.
---
# Source: https://docs.unifygtm.com/developers/intent-client/react.md
> ## Documentation Index
> Fetch the complete documentation index at: https://docs.unifygtm.com/llms.txt
> Use this file to discover all available pages before exploring further.
# React
> Install the Unify Intent client in a React app.
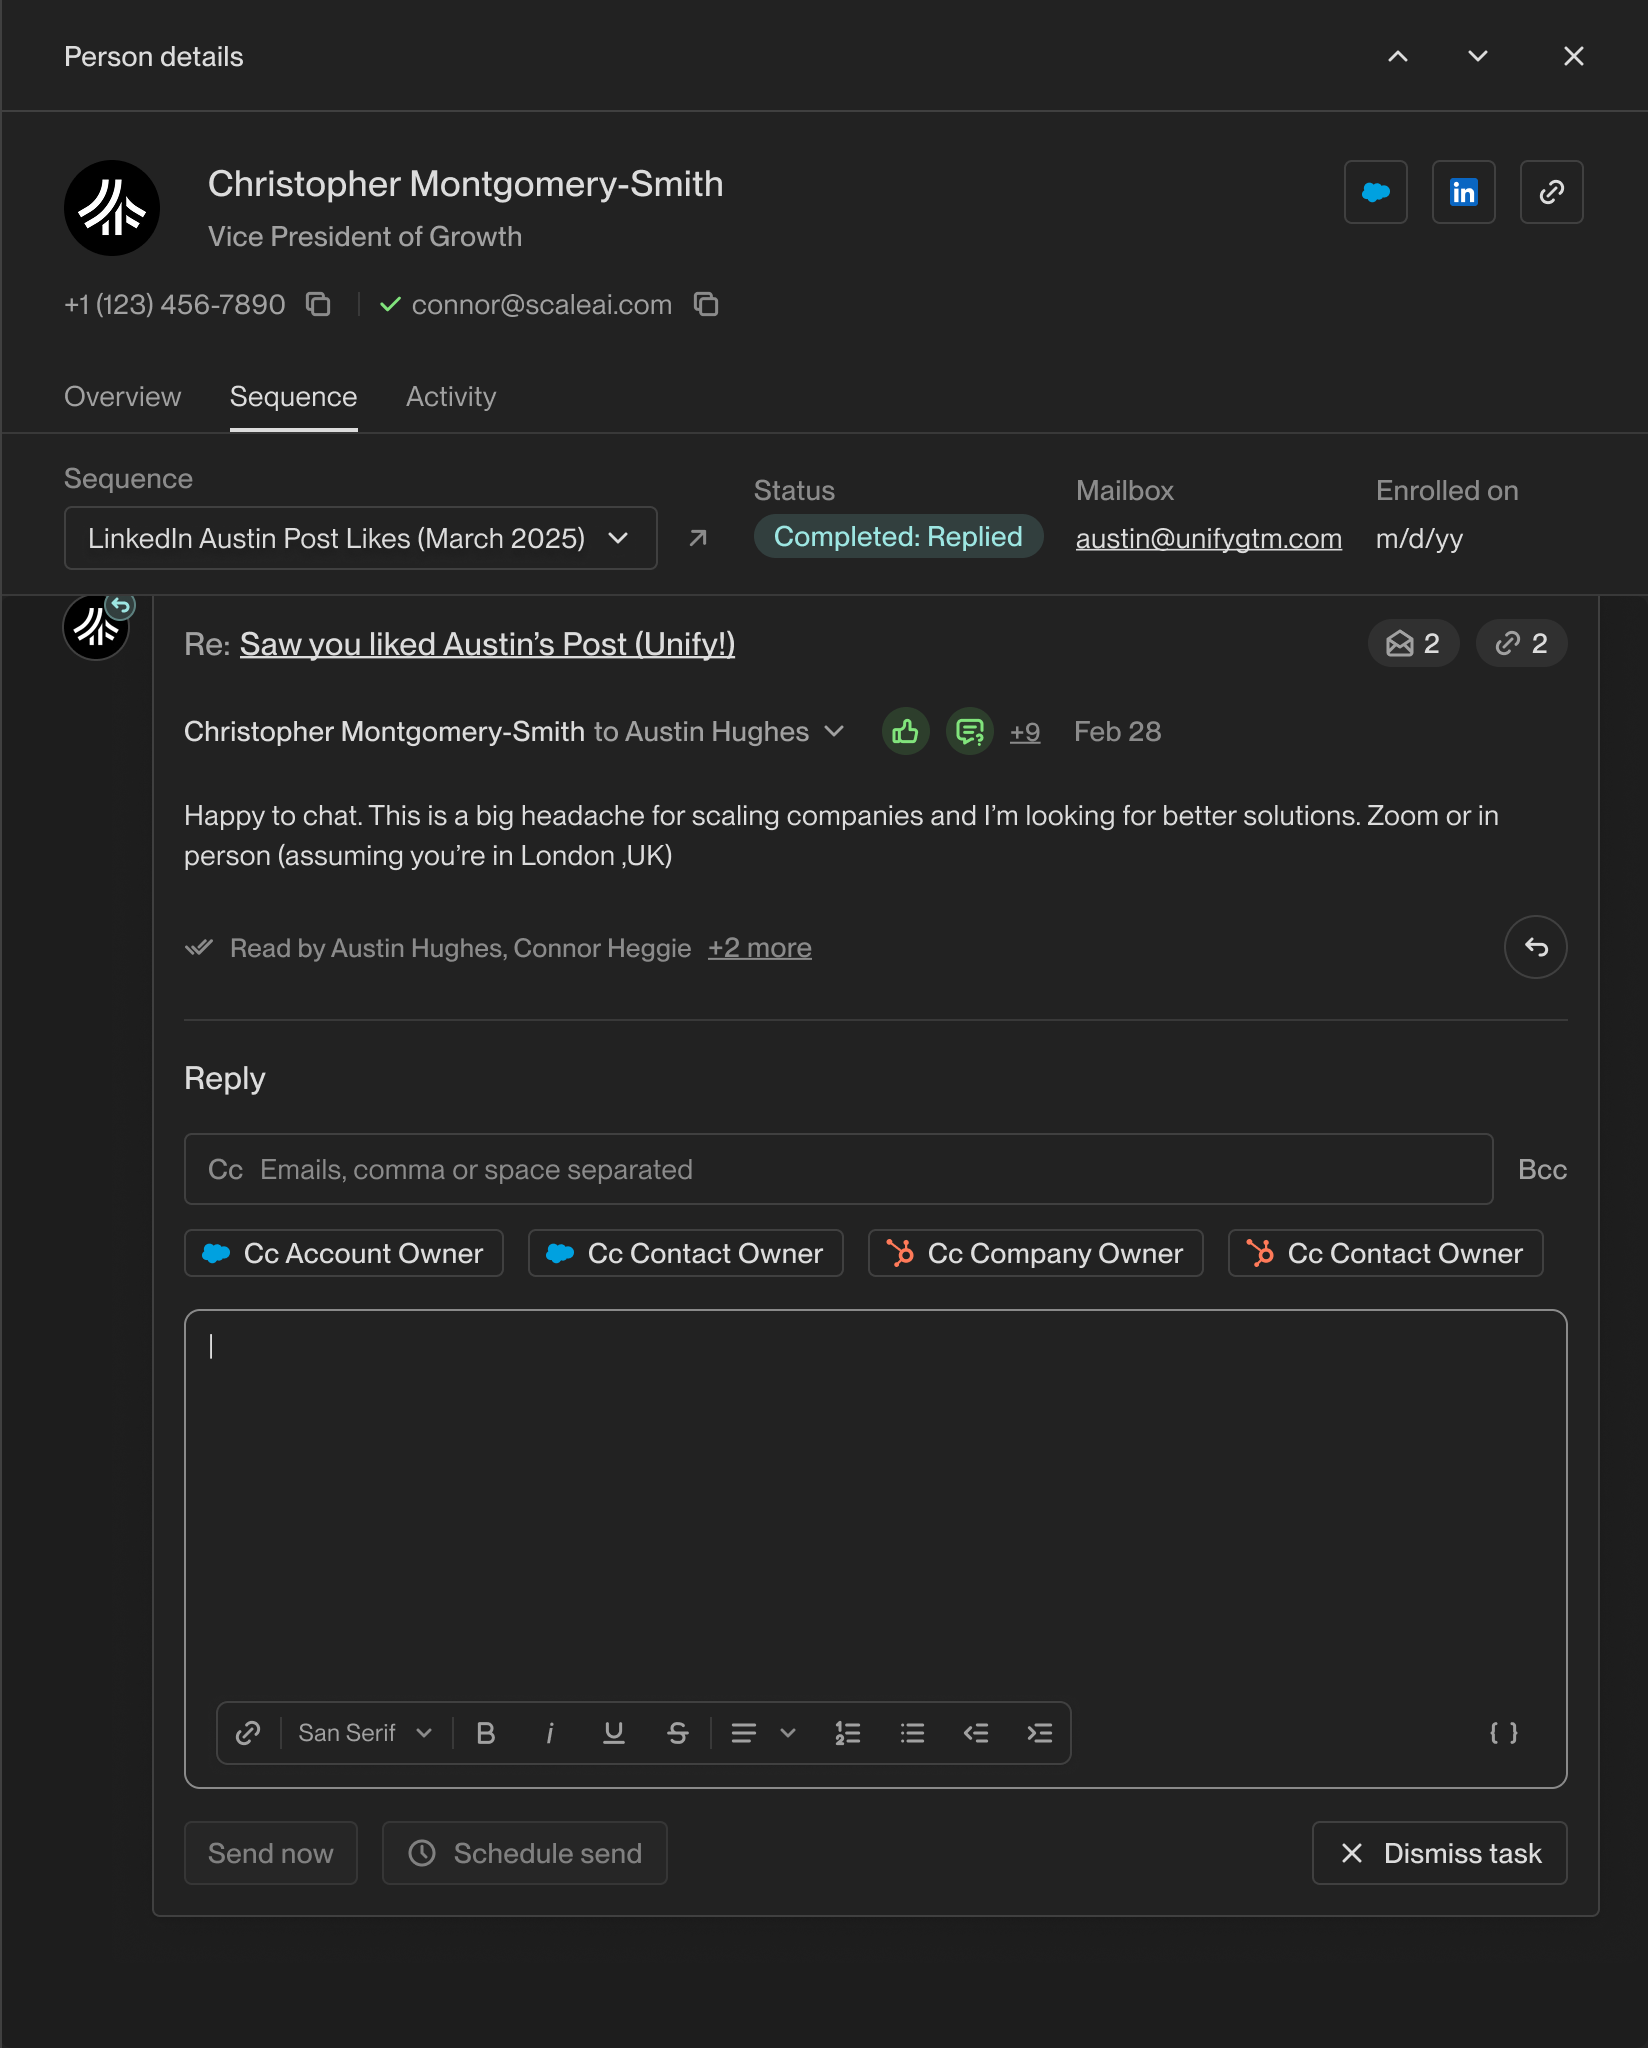 ## Out-of-Thread Replies
In addition to direct replies to Sequence emails, Unify also captures **out-of-thread replies** from your prospects.
An out-of-thread reply is an email from a sequence enrollee that doesn't directly reply to a sequence email. This includes new email threads initiated by the prospect or separate conversations sent to your mailbox while they're engaged with your sequence.
## Reply Classifications
Unify automatically classifies replies using AI to help you prioritize your responses. Each reply receives one or more classification tags that indicate the prospect's intent or sentiment.
*
## Out-of-Thread Replies
In addition to direct replies to Sequence emails, Unify also captures **out-of-thread replies** from your prospects.
An out-of-thread reply is an email from a sequence enrollee that doesn't directly reply to a sequence email. This includes new email threads initiated by the prospect or separate conversations sent to your mailbox while they're engaged with your sequence.
## Reply Classifications
Unify automatically classifies replies using AI to help you prioritize your responses. Each reply receives one or more classification tags that indicate the prospect's intent or sentiment.
* 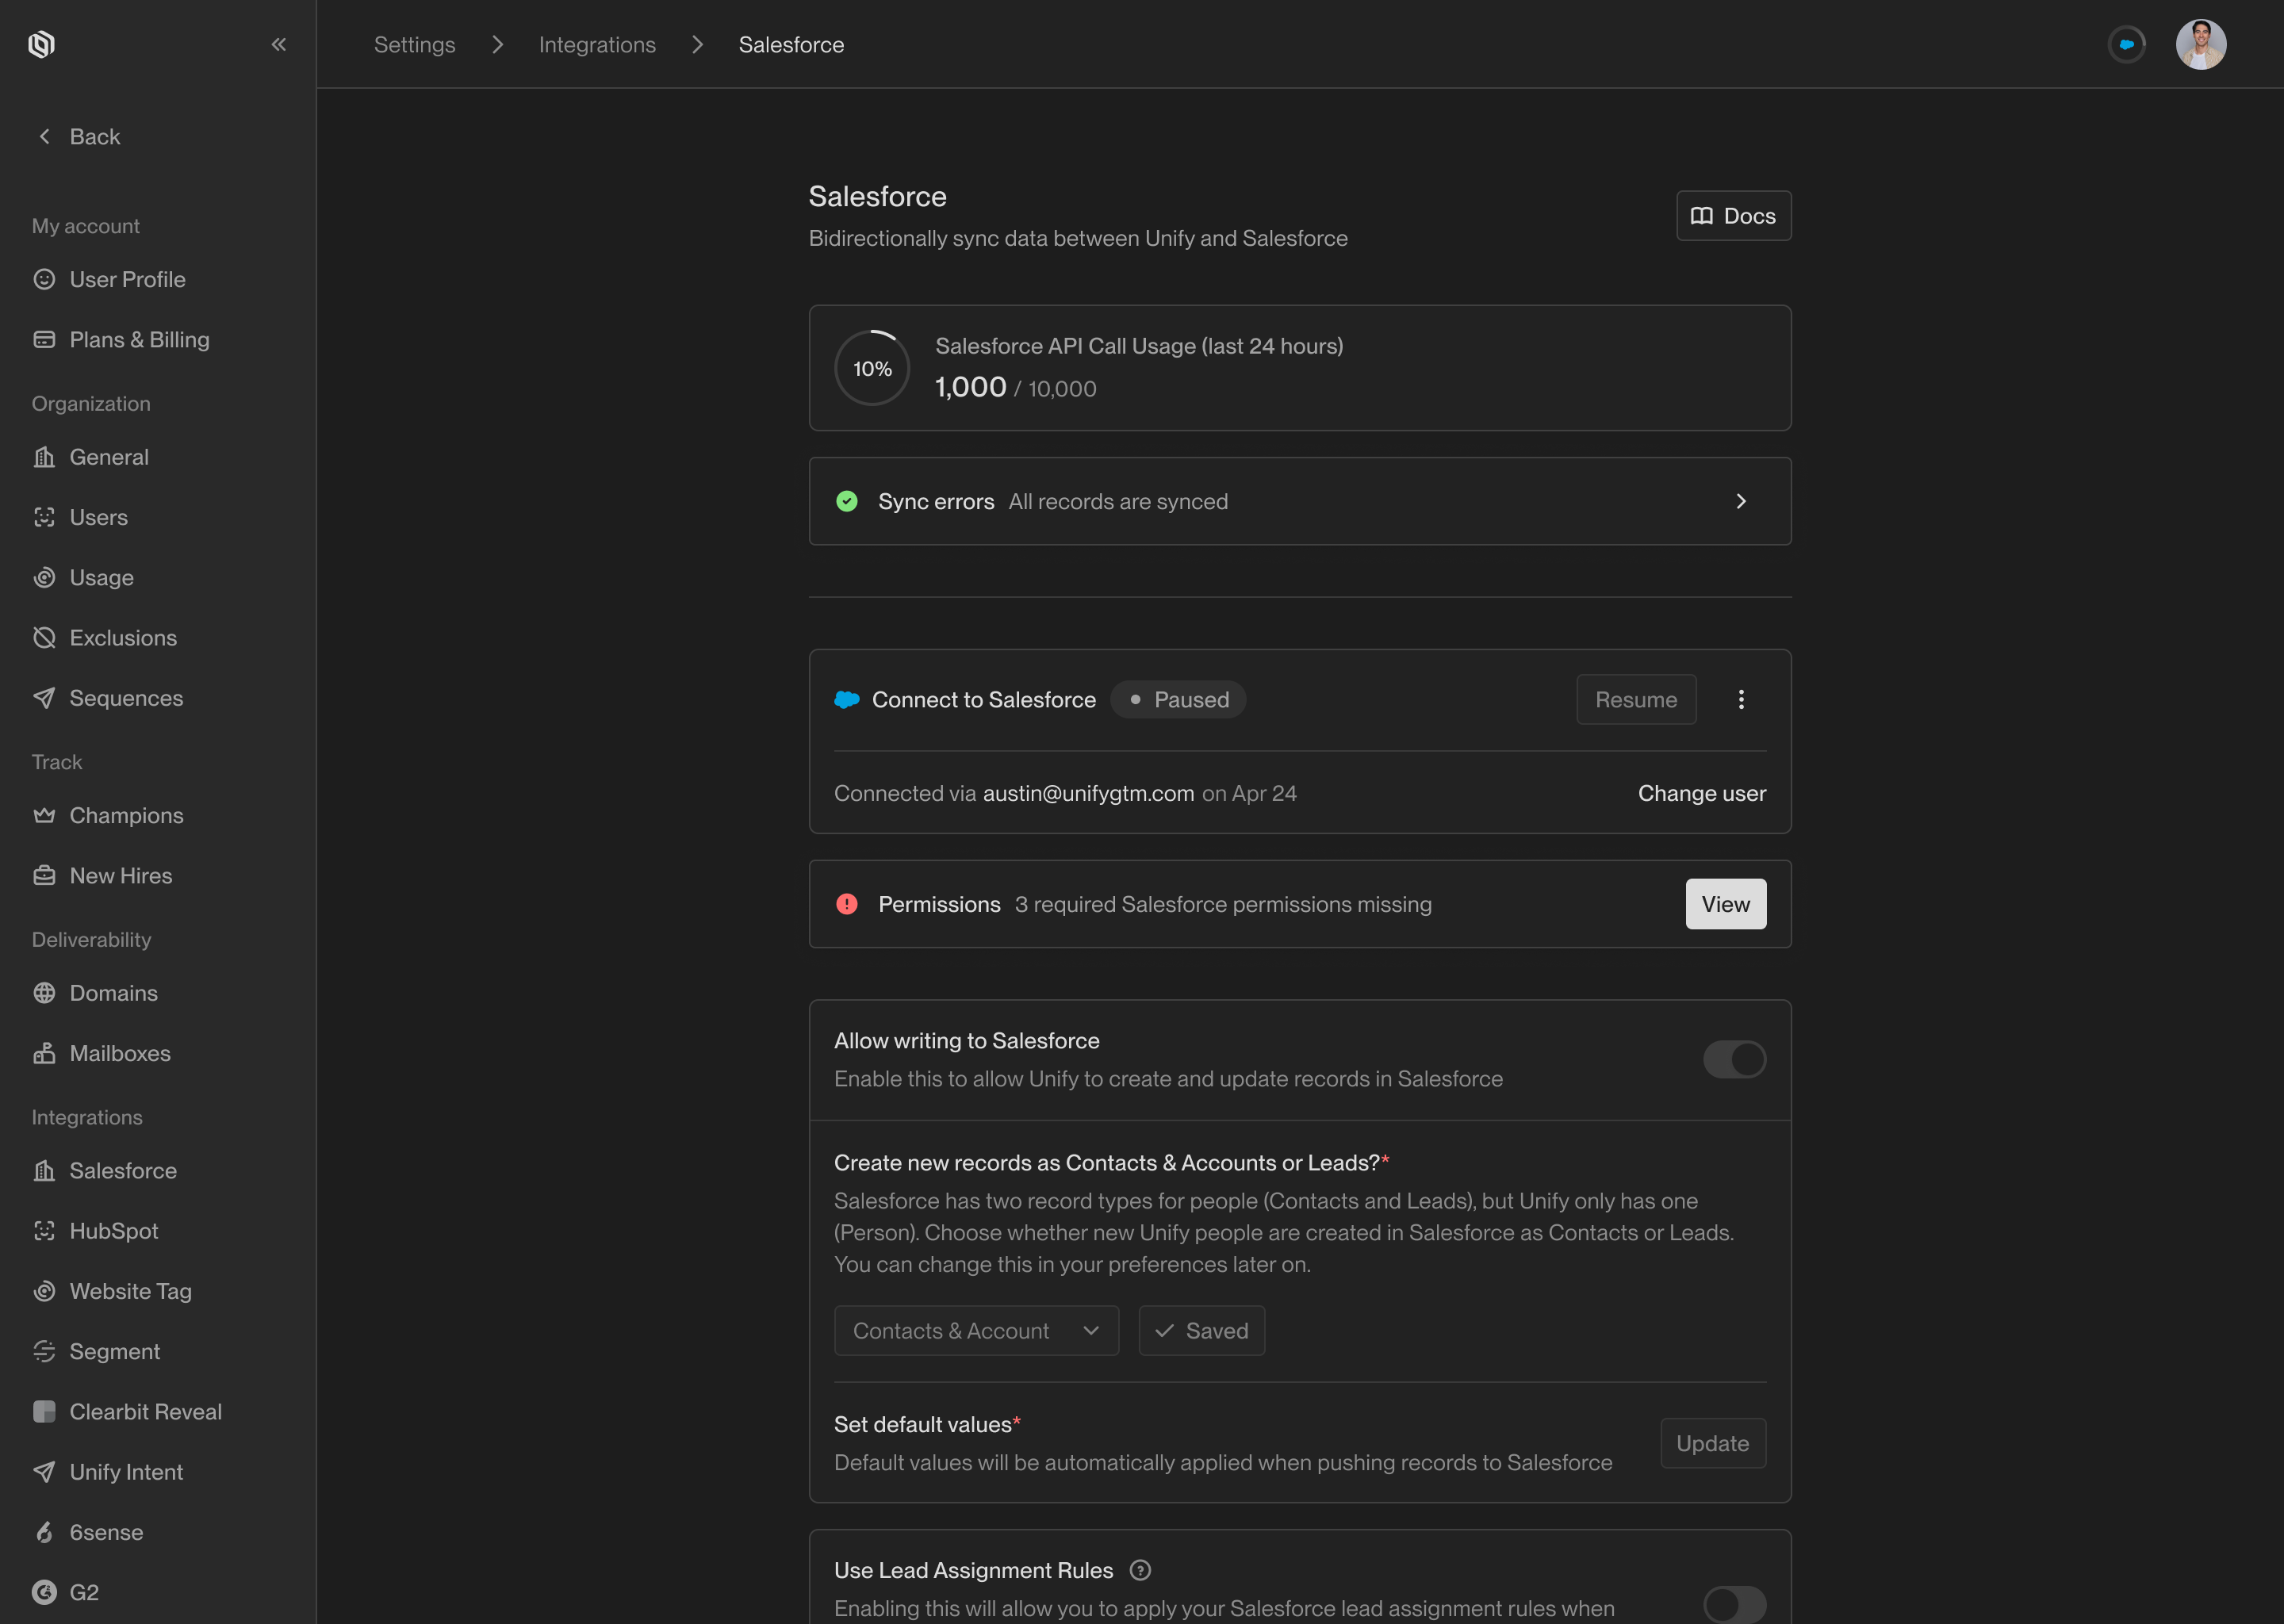
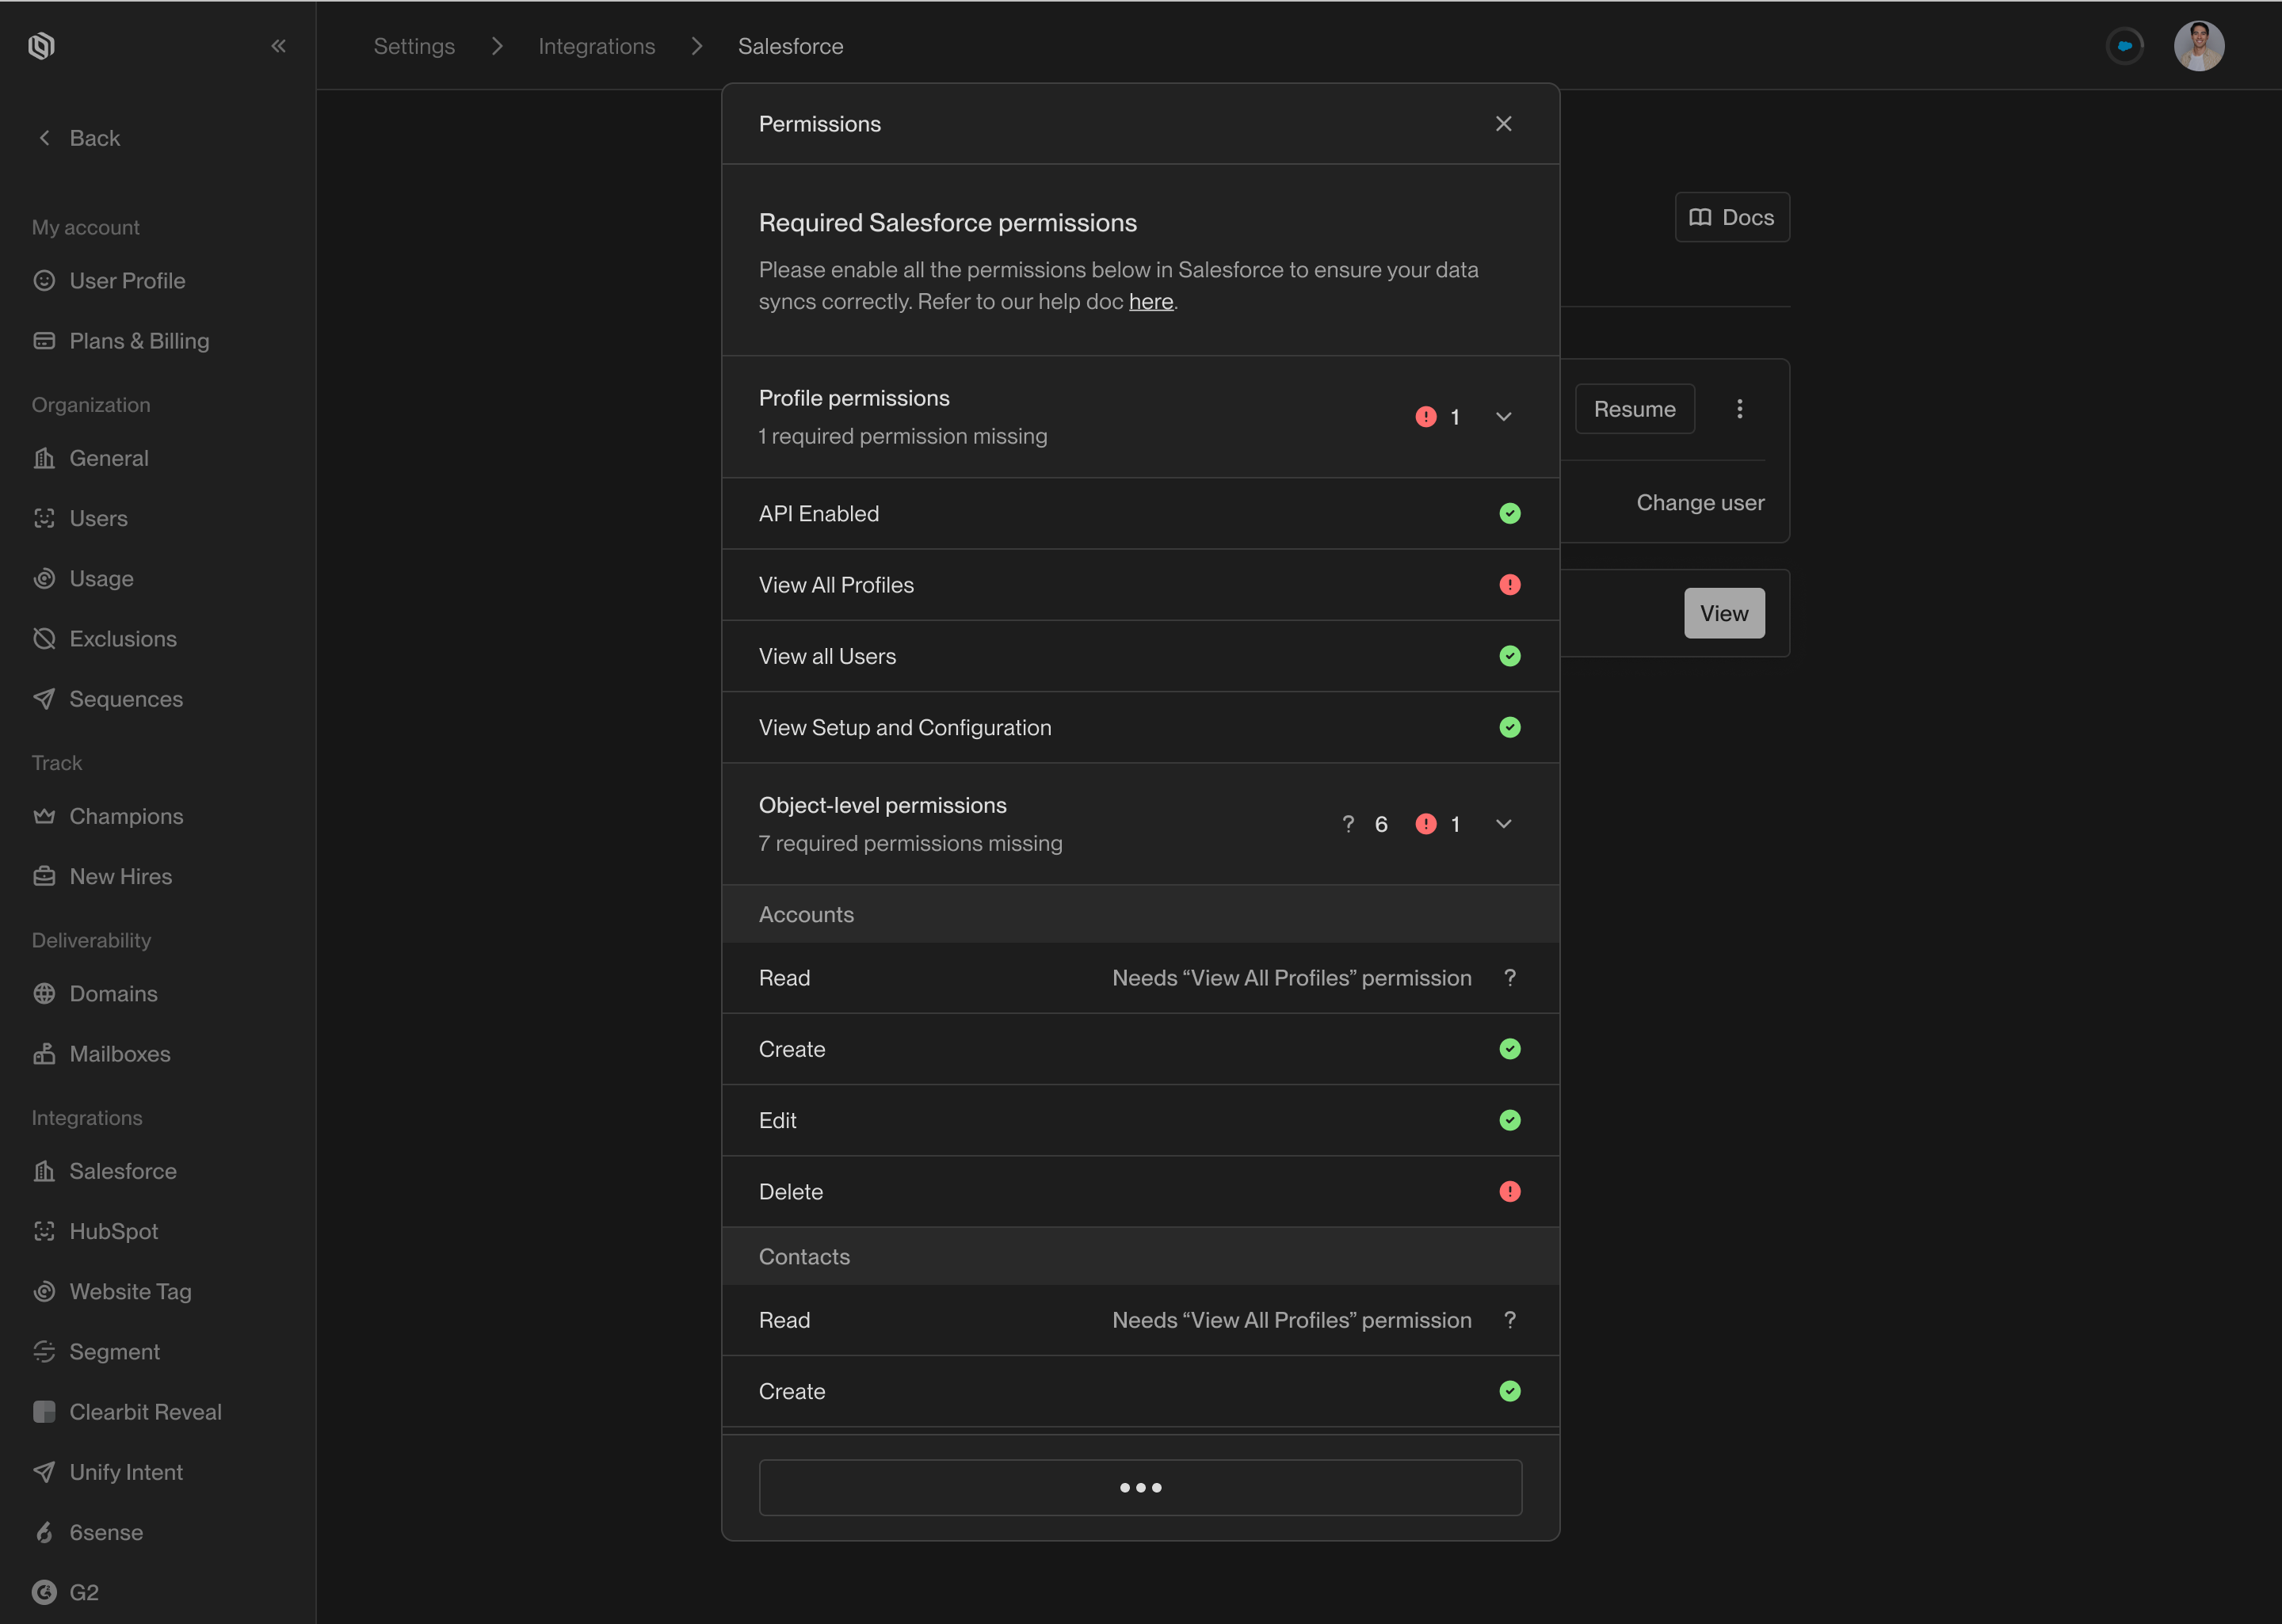 ### Enable Enhanced Emails
To ensure Unify can write emails to Salesforce, the **Enhanced Email** feature
must be enabled. This allows Unify to write sent emails using the **Email Message**
object.
In most orgs, Enhanced Email is enabled by default. If you don’t see the
**Email Message** object, review the following guide to enable it.
### Enable Enhanced Emails
To ensure Unify can write emails to Salesforce, the **Enhanced Email** feature
must be enabled. This allows Unify to write sent emails using the **Email Message**
object.
In most orgs, Enhanced Email is enabled by default. If you don’t see the
**Email Message** object, review the following guide to enable it.
 ## Response types
### True / False
Agents will respond with either `True` or `False` to a question of this type. This is best for simple questions:
* *Does this company have an office in San Francisco?*
* *Is there a pricing page on this company's website?*
### Number
Agents will respond with a number to a question of this type. This is best for questions that require a numerical answer:
* *What was the revenue for this company last year?*
* *How many years of full-time experience does this person have?*
### Select
Agents will respond with a *single* option from a list that you specify.
This is best for multiple-choice questions:
* *Is this company B2B, B2C, or B2G?*
* Options: `B2B`, `B2C`, `B2G`
* Answer: `B2B`
In some cases, you may want the Agent to respond with *multiple* options from the list you provided.
Click the `Allow multiple options` checkbox to enable this.
When enabled, the Agent will respond with zero, one, or multiple options.
* *Which of the following funding rounds has this company completed?*
* Options: `Seed`, `Series A`, `Series B`, `Series C`, `Series D`, `Series E`
* Answer: `Seed`, `Series A`
---
# Source: https://docs.unifygtm.com/reference/integrations/orum/salesforce-setup.md
# Source: https://docs.unifygtm.com/reference/integrations/nooks/salesforce-setup.md
> ## Documentation Index
> Fetch the complete documentation index at: https://docs.unifygtm.com/llms.txt
> Use this file to discover all available pages before exploring further.
# Nooks Salesforce Setup
> Configure Nooks integration with Salesforce for call task synchronization.
# Salesforce Setup for Nooks Integration
This guide walks you through the steps required to set up call tasks in Salesforce and configure the Nooks integration for seamless call campaign management.
## Overview
You can bidirectionally sync your call tasks between Unify and Nooks using a Salesforce report. The instructions below will help you build a report to successfully set up the sync.
## Salesforce Report Setup
### Call Report Setup in Salesforce
To create call tasks in Salesforce, set up a new report with the following criteria:
1. Navigate to your Salesforce Reports tab
2. Click **New Report**
3. Configure the report with these settings:
* **Category**: Activities (Activities with Contacts)
* **Show Me**: All activities
* **Date**: All Time
* **Show**: Open Activities
* **Show**: Tasks
* **Assigned**: equals \$USER
* **Task Subtype**: equals Call
## Response types
### True / False
Agents will respond with either `True` or `False` to a question of this type. This is best for simple questions:
* *Does this company have an office in San Francisco?*
* *Is there a pricing page on this company's website?*
### Number
Agents will respond with a number to a question of this type. This is best for questions that require a numerical answer:
* *What was the revenue for this company last year?*
* *How many years of full-time experience does this person have?*
### Select
Agents will respond with a *single* option from a list that you specify.
This is best for multiple-choice questions:
* *Is this company B2B, B2C, or B2G?*
* Options: `B2B`, `B2C`, `B2G`
* Answer: `B2B`
In some cases, you may want the Agent to respond with *multiple* options from the list you provided.
Click the `Allow multiple options` checkbox to enable this.
When enabled, the Agent will respond with zero, one, or multiple options.
* *Which of the following funding rounds has this company completed?*
* Options: `Seed`, `Series A`, `Series B`, `Series C`, `Series D`, `Series E`
* Answer: `Seed`, `Series A`
---
# Source: https://docs.unifygtm.com/reference/integrations/orum/salesforce-setup.md
# Source: https://docs.unifygtm.com/reference/integrations/nooks/salesforce-setup.md
> ## Documentation Index
> Fetch the complete documentation index at: https://docs.unifygtm.com/llms.txt
> Use this file to discover all available pages before exploring further.
# Nooks Salesforce Setup
> Configure Nooks integration with Salesforce for call task synchronization.
# Salesforce Setup for Nooks Integration
This guide walks you through the steps required to set up call tasks in Salesforce and configure the Nooks integration for seamless call campaign management.
## Overview
You can bidirectionally sync your call tasks between Unify and Nooks using a Salesforce report. The instructions below will help you build a report to successfully set up the sync.
## Salesforce Report Setup
### Call Report Setup in Salesforce
To create call tasks in Salesforce, set up a new report with the following criteria:
1. Navigate to your Salesforce Reports tab
2. Click **New Report**
3. Configure the report with these settings:
* **Category**: Activities (Activities with Contacts)
* **Show Me**: All activities
* **Date**: All Time
* **Show**: Open Activities
* **Show**: Tasks
* **Assigned**: equals \$USER
* **Task Subtype**: equals Call
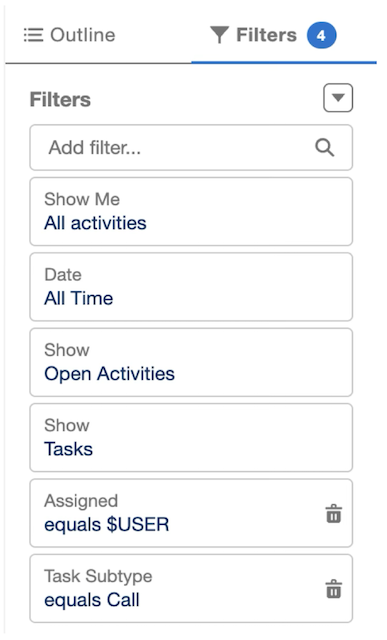 ### Best Practices for Report Columns
We recommend including the following columns in your report for better visibility and alignment with Unify sequences:
1. Click **Customize** on your report
2. Add the following columns:
* Subject
* First Name
* Last Name
* Unify Sequence
### Best Practices for Report Columns
We recommend including the following columns in your report for better visibility and alignment with Unify sequences:
1. Click **Customize** on your report
2. Add the following columns:
* Subject
* First Name
* Last Name
* Unify Sequence
 ## Nooks Integration Setup
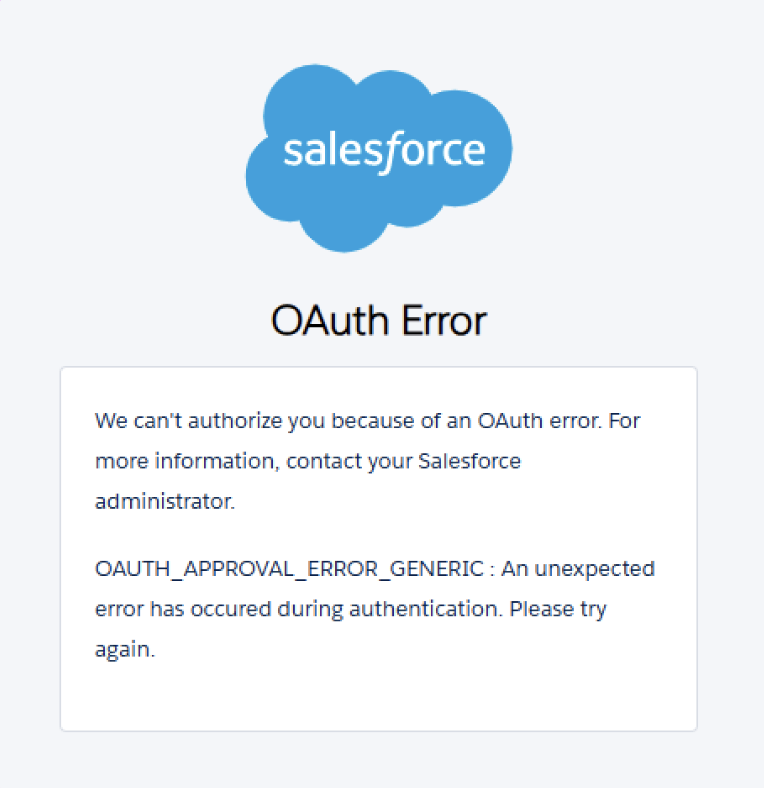 Your Salesforce administrator will need to install Nooks as a trusted app in your Salesforce org. For more information, see: [Installing Nooks as a Trusted App in SFDC](https://support.devrev.ai/nooks/article/ART-115-getting-started-with-salesforce-sfdc#Sep%202025%20Update%3A%20Installing%20Nooks%20as%20a%20Trusted%20App%20in%20SFDC).
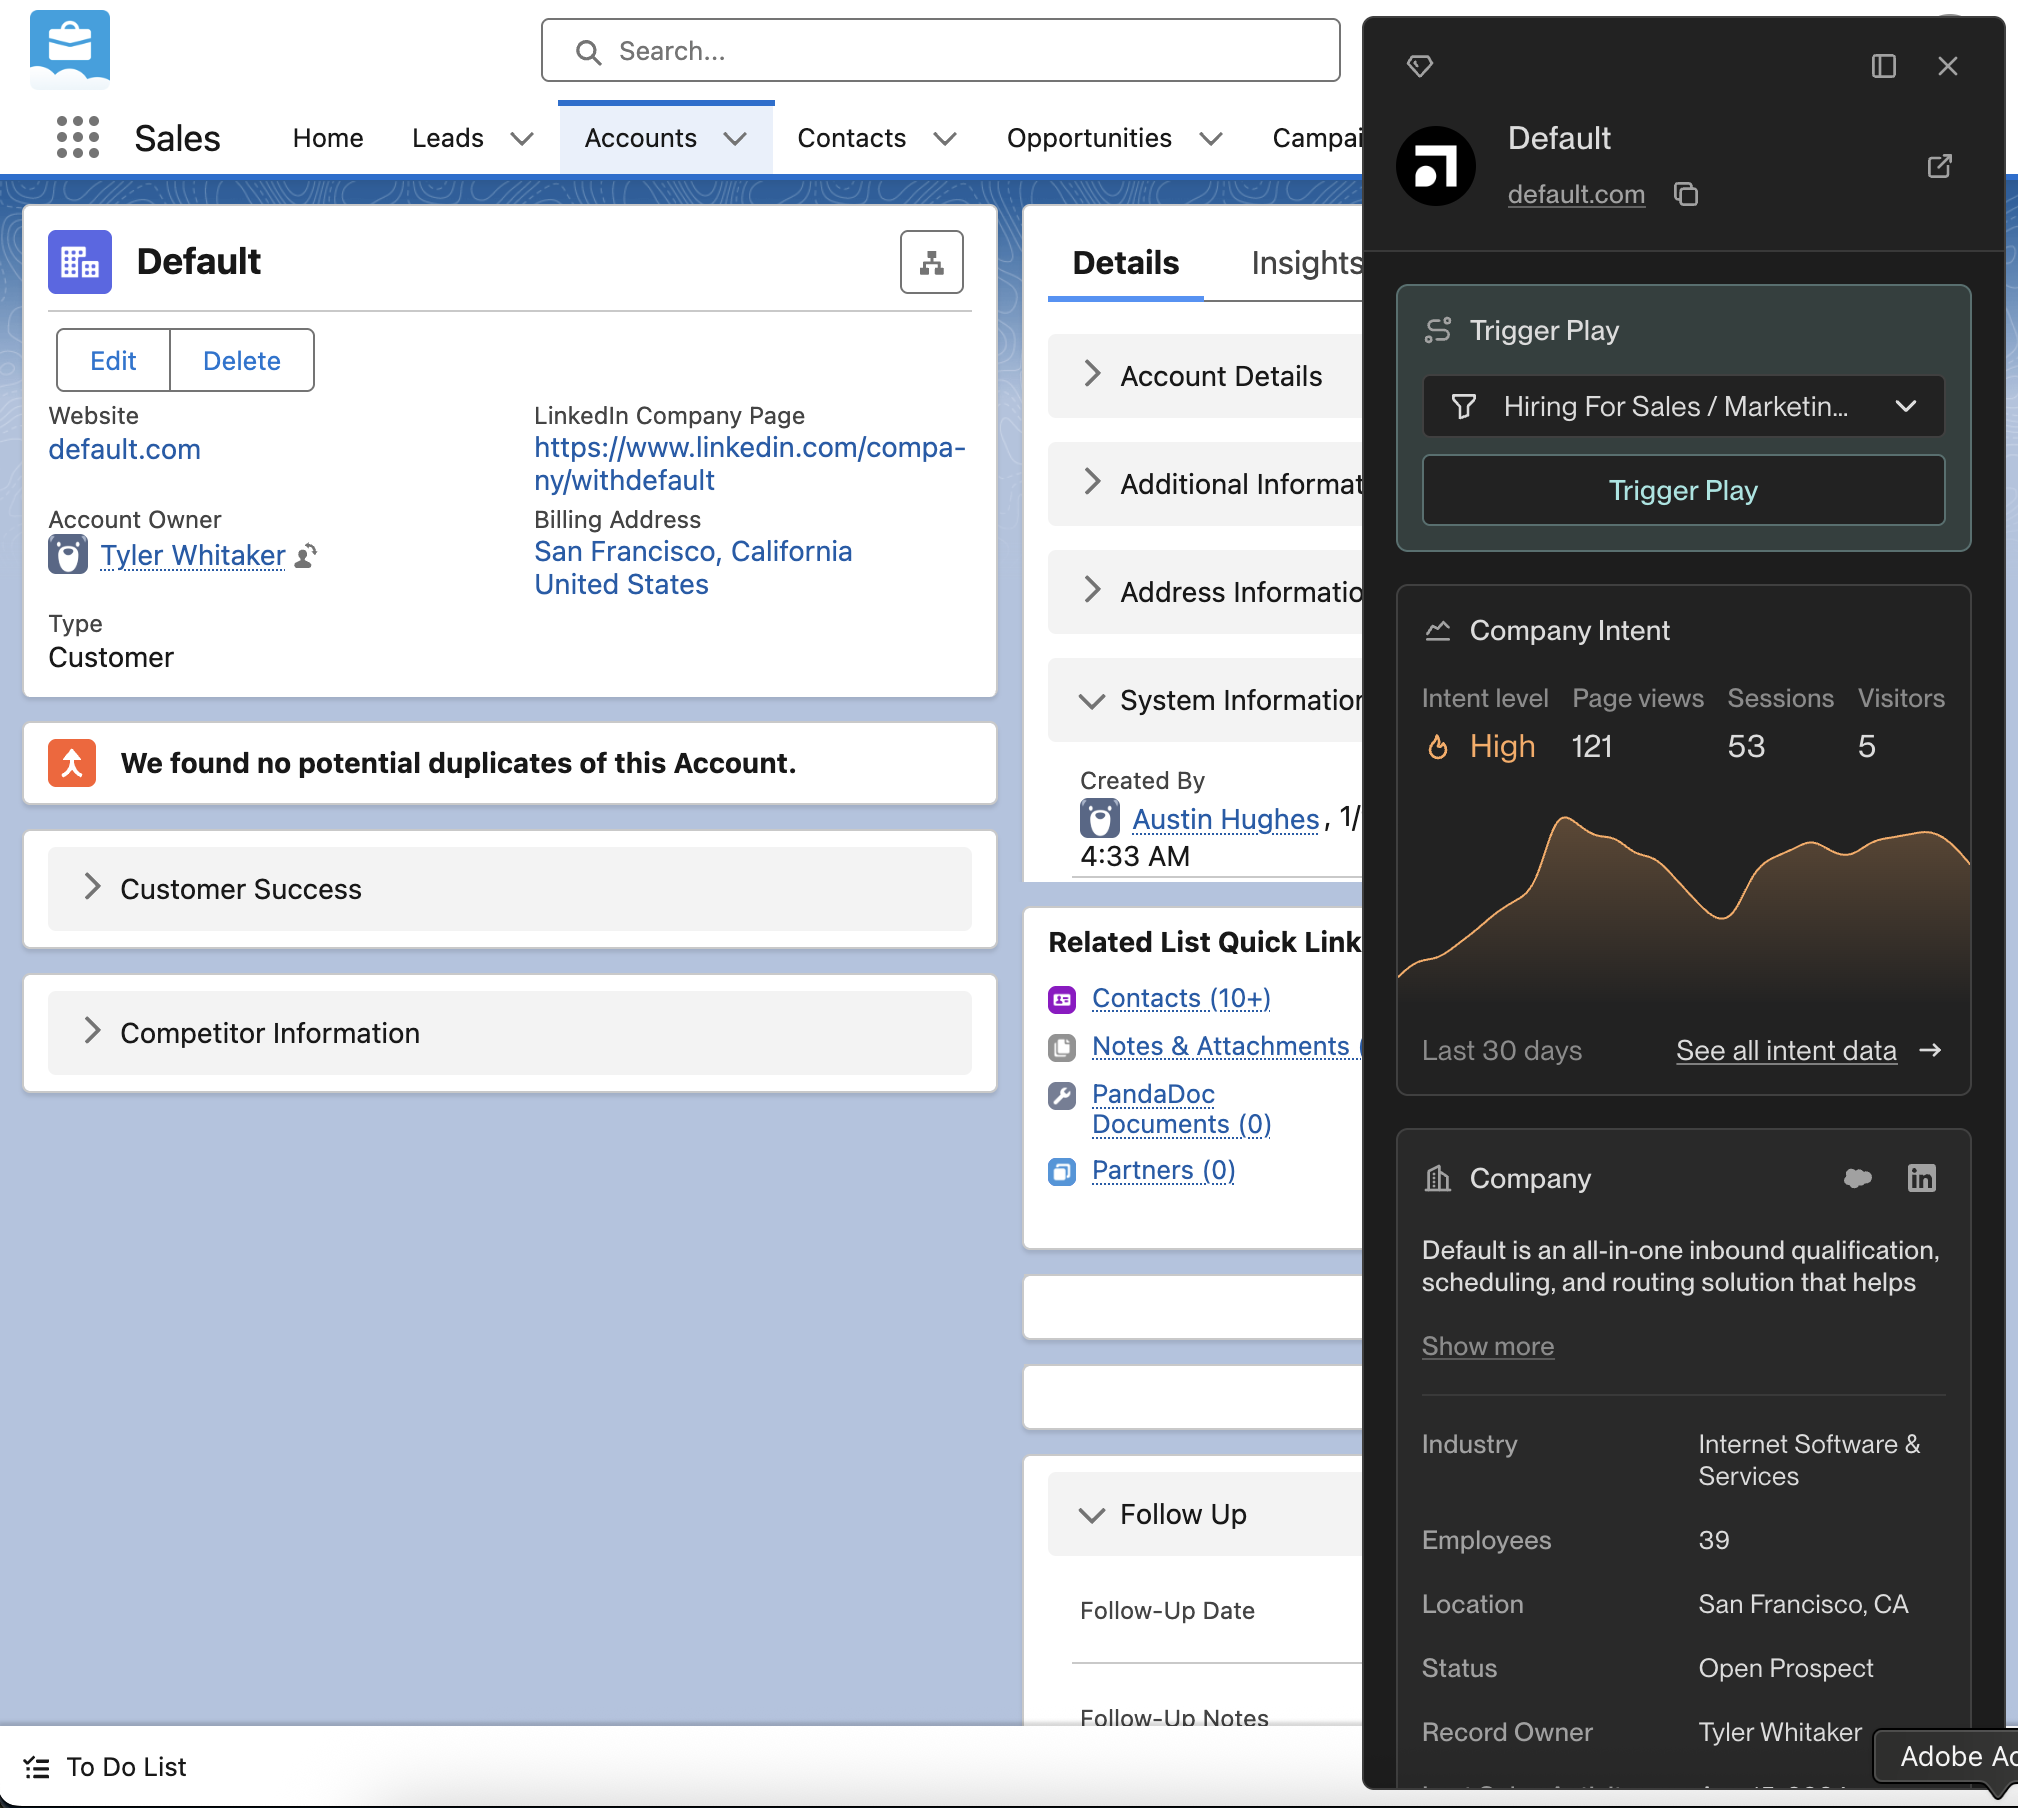 ## Salesforce Contact & Lead Pages
From this view, you can check if this Person is currently enrolled in a Unify Sequence.
If they are not already enrolled, you can enroll them from here using any mailbox or
mailbox group in Unify. Additionally, you can instantly add this Person to any of the
Plays you’ve built. See more info on building Plays in Unify [here](/reference/plays/overview).
## Salesforce Contact & Lead Pages
From this view, you can check if this Person is currently enrolled in a Unify Sequence.
If they are not already enrolled, you can enroll them from here using any mailbox or
mailbox group in Unify. Additionally, you can instantly add this Person to any of the
Plays you’ve built. See more info on building Plays in Unify [here](/reference/plays/overview).
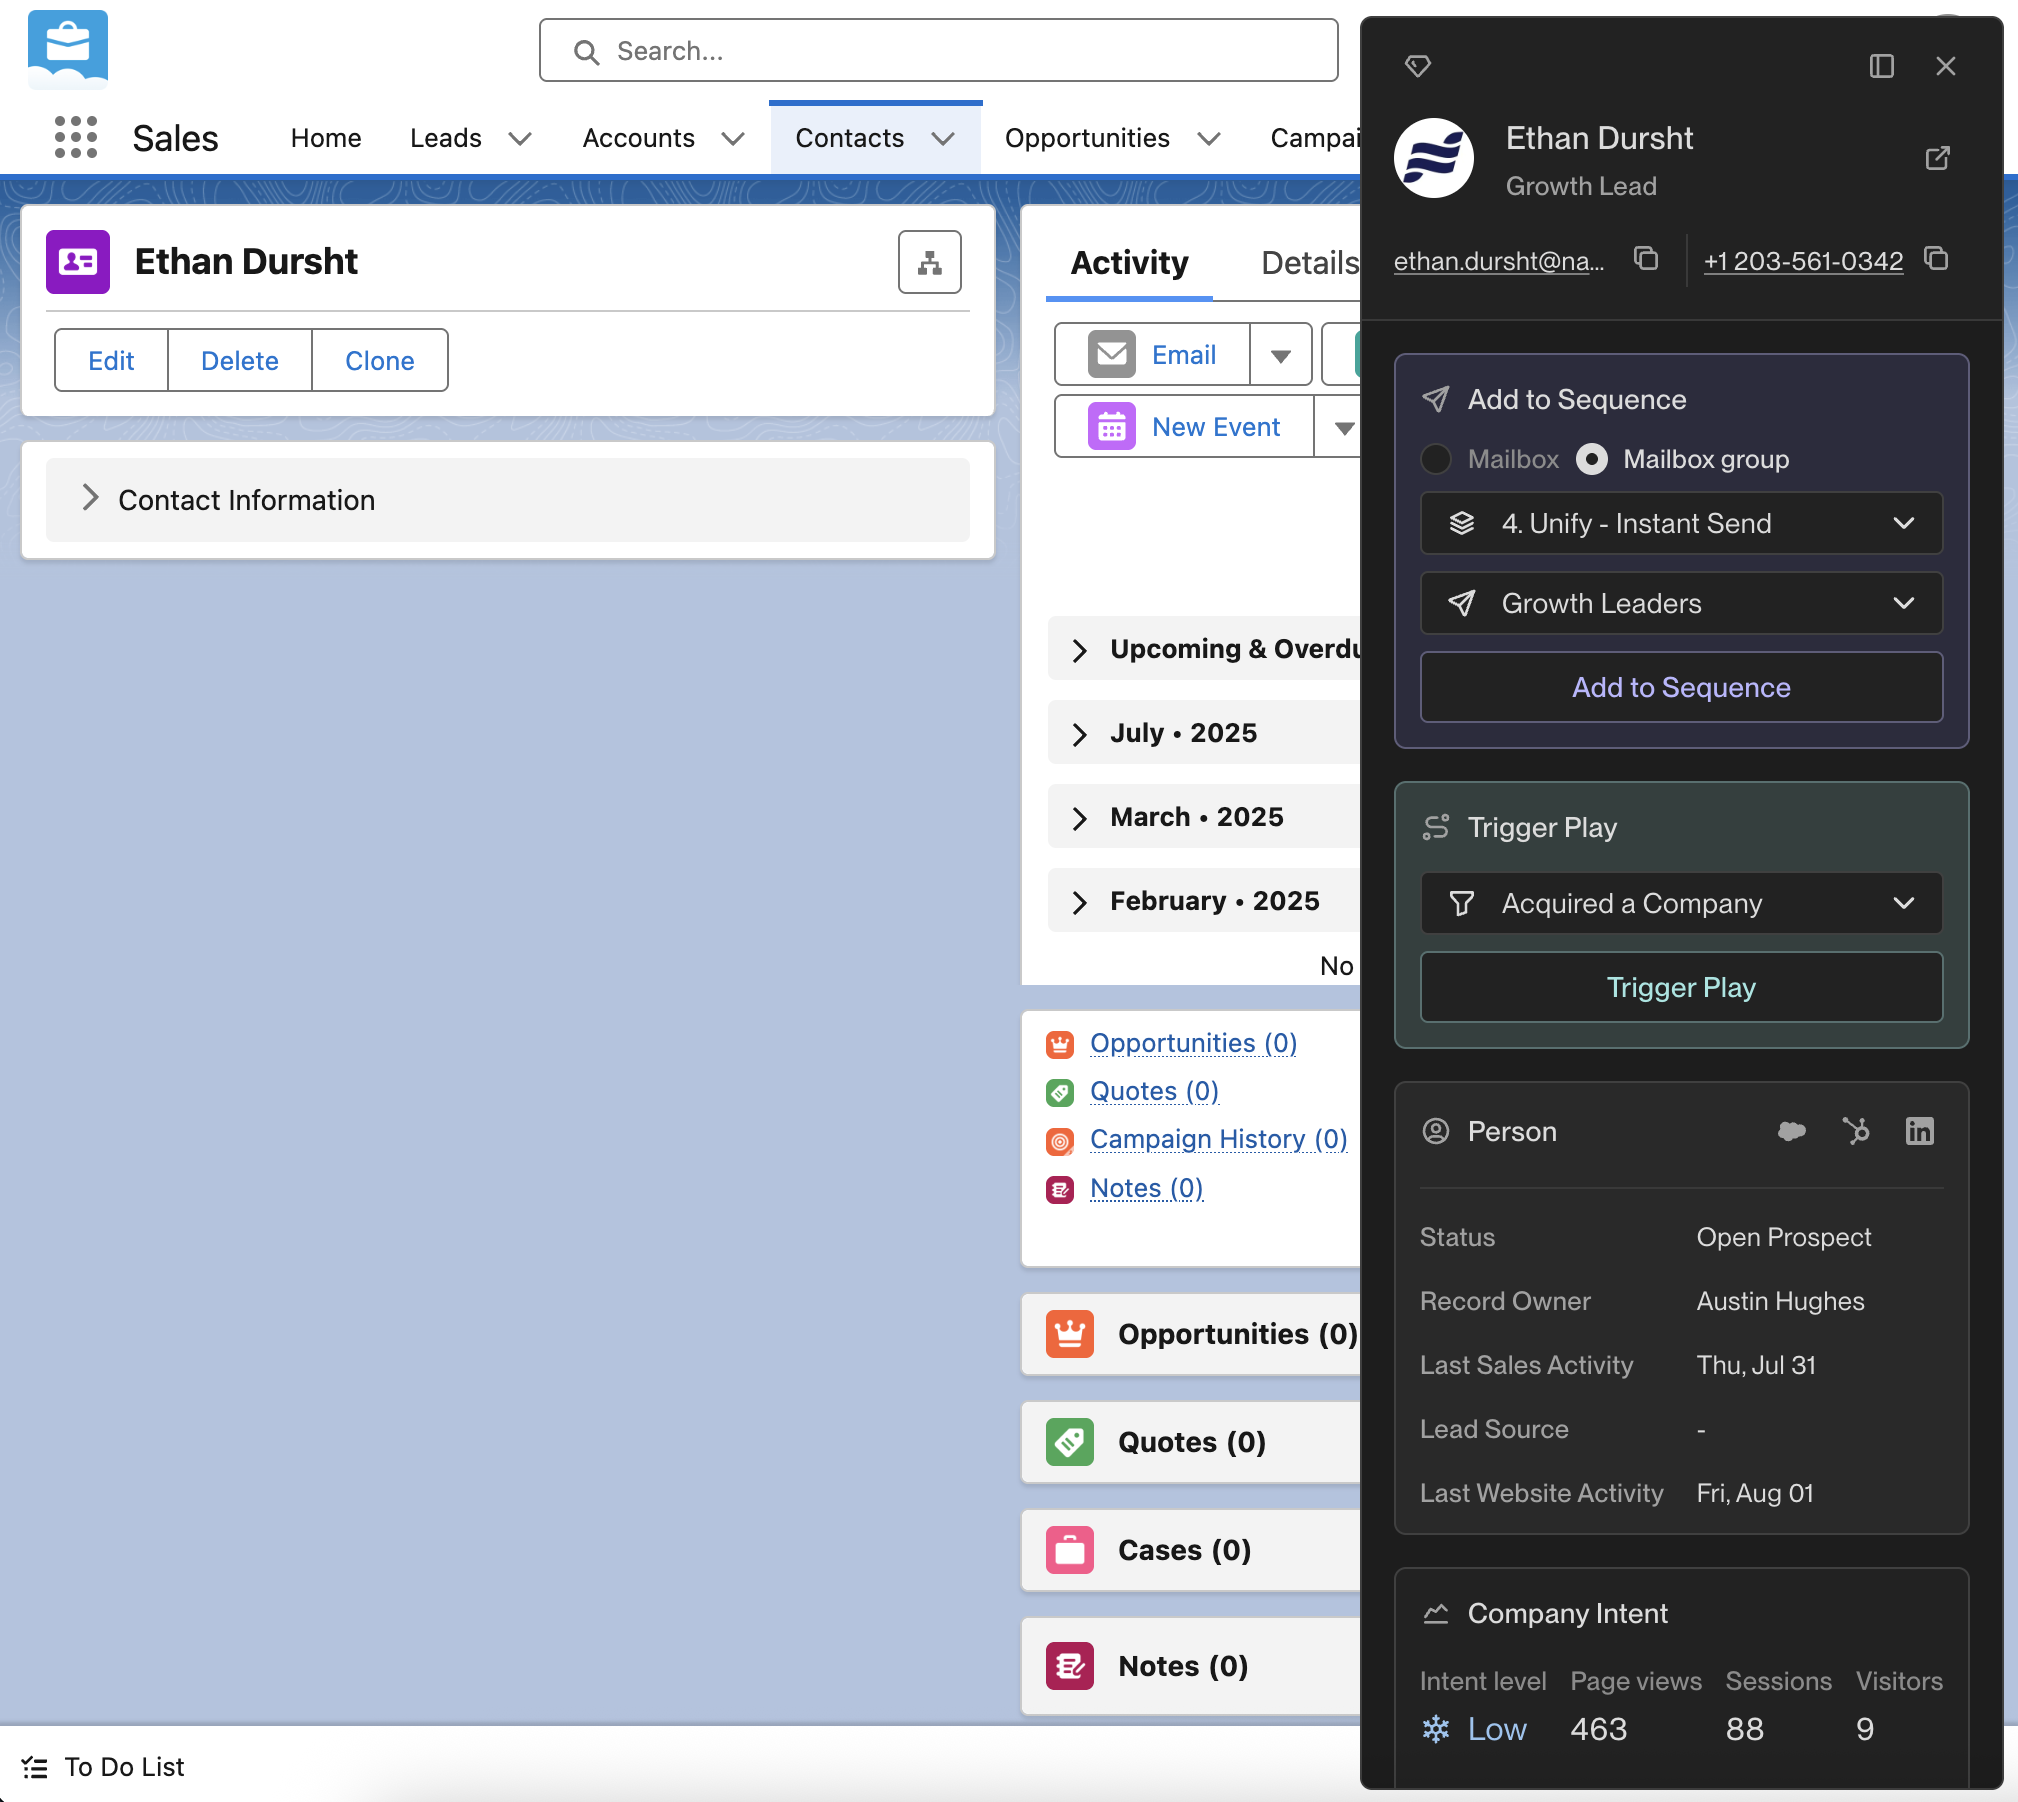 ---
# Source: https://docs.unifygtm.com/reference/integrations/segment.md
> ## Documentation Index
> Fetch the complete documentation index at: https://docs.unifygtm.com/llms.txt
> Use this file to discover all available pages before exploring further.
# Segment Integration Guide
> This guide outlines how to connect your Segment workspace to Unify.
# Overview
If you use Segment to collect website analytics, Unify can be connected to your
Segment workspace as a destination in order to reveal web traffic data. This
will also let you build audiences and Plays using Segment analytics data.
# Steps
---
# Source: https://docs.unifygtm.com/reference/integrations/segment.md
> ## Documentation Index
> Fetch the complete documentation index at: https://docs.unifygtm.com/llms.txt
> Use this file to discover all available pages before exploring further.
# Segment Integration Guide
> This guide outlines how to connect your Segment workspace to Unify.
# Overview
If you use Segment to collect website analytics, Unify can be connected to your
Segment workspace as a destination in order to reveal web traffic data. This
will also let you build audiences and Plays using Segment analytics data.
# Steps
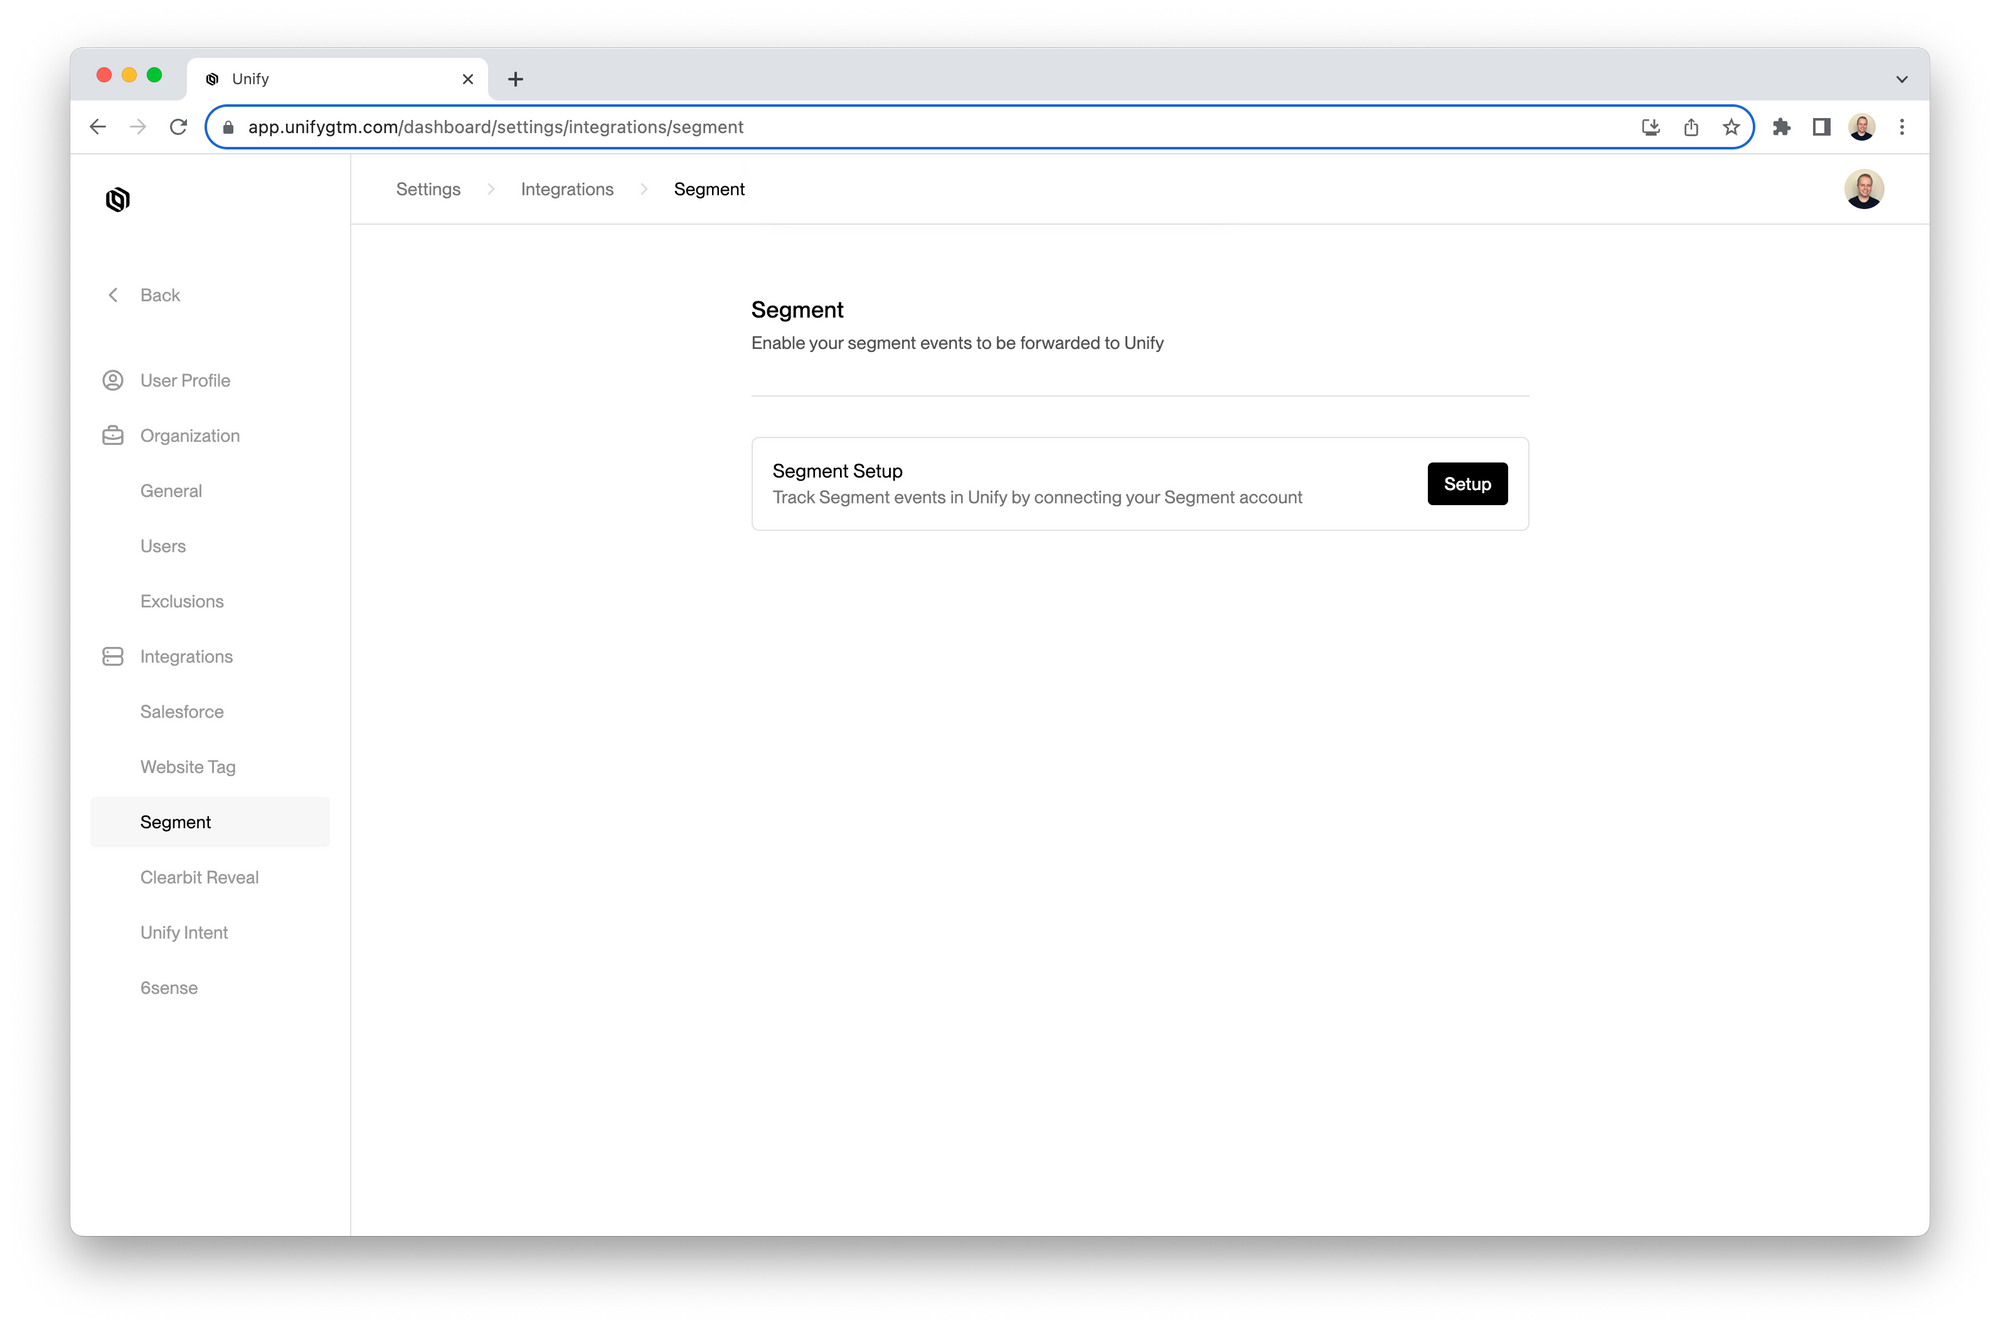 3. Click the **Copy** button to copy the write key to your clipboard
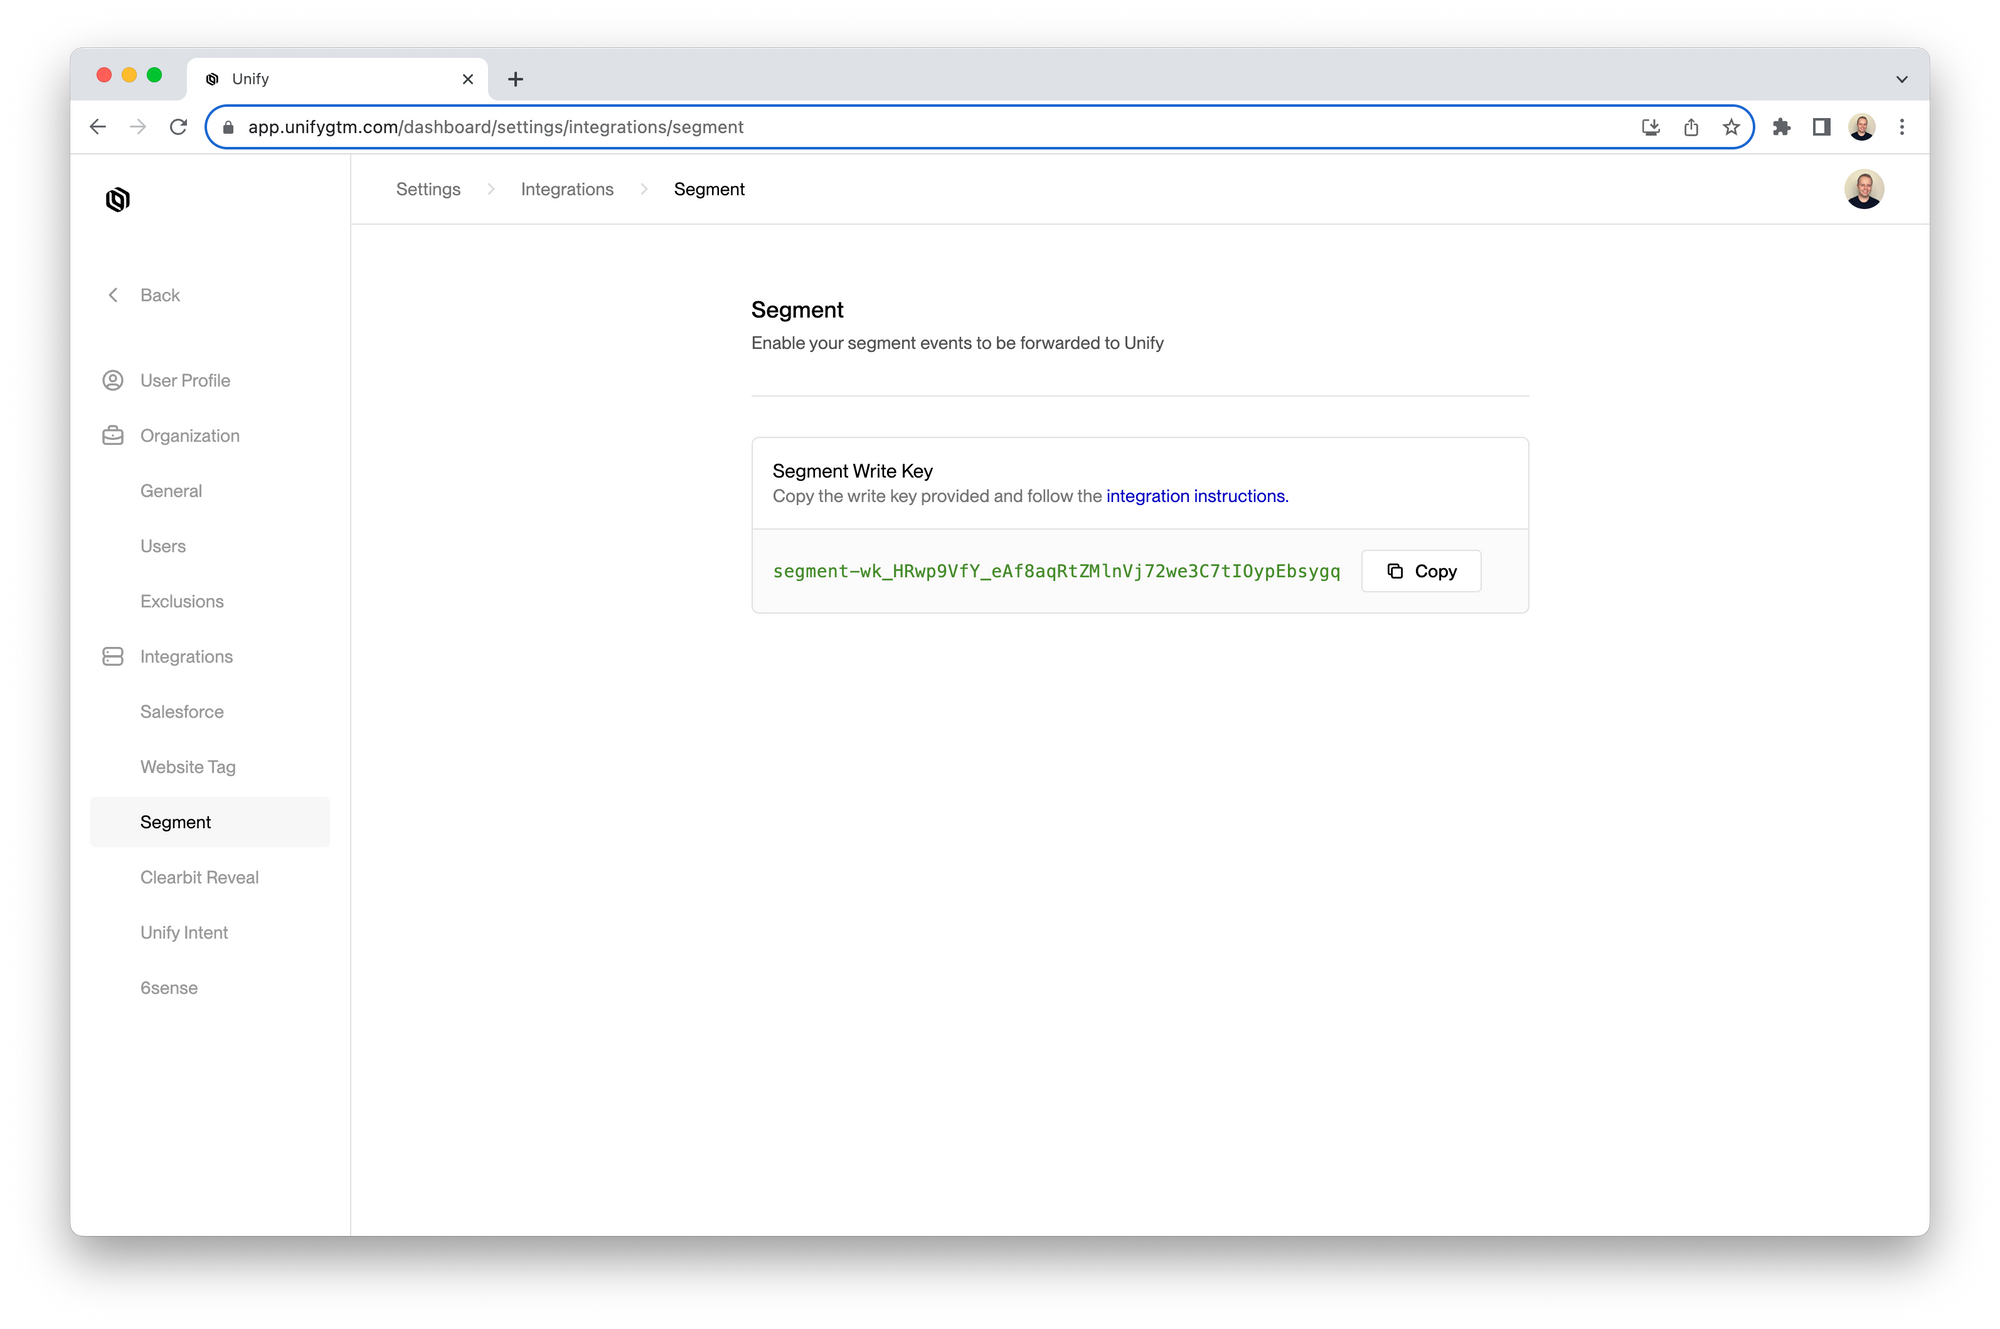 ### Add Segment destination
1. Log in to Segment and click on the **Destinations** tab in the sidebar
### Add Segment destination
1. Log in to Segment and click on the **Destinations** tab in the sidebar
 2. Click **Add destination** in the top right corner
 3. Search for “webhook” and select the **Webhook (actions)** destination
 4. Click **Add destination** again in the top right corner
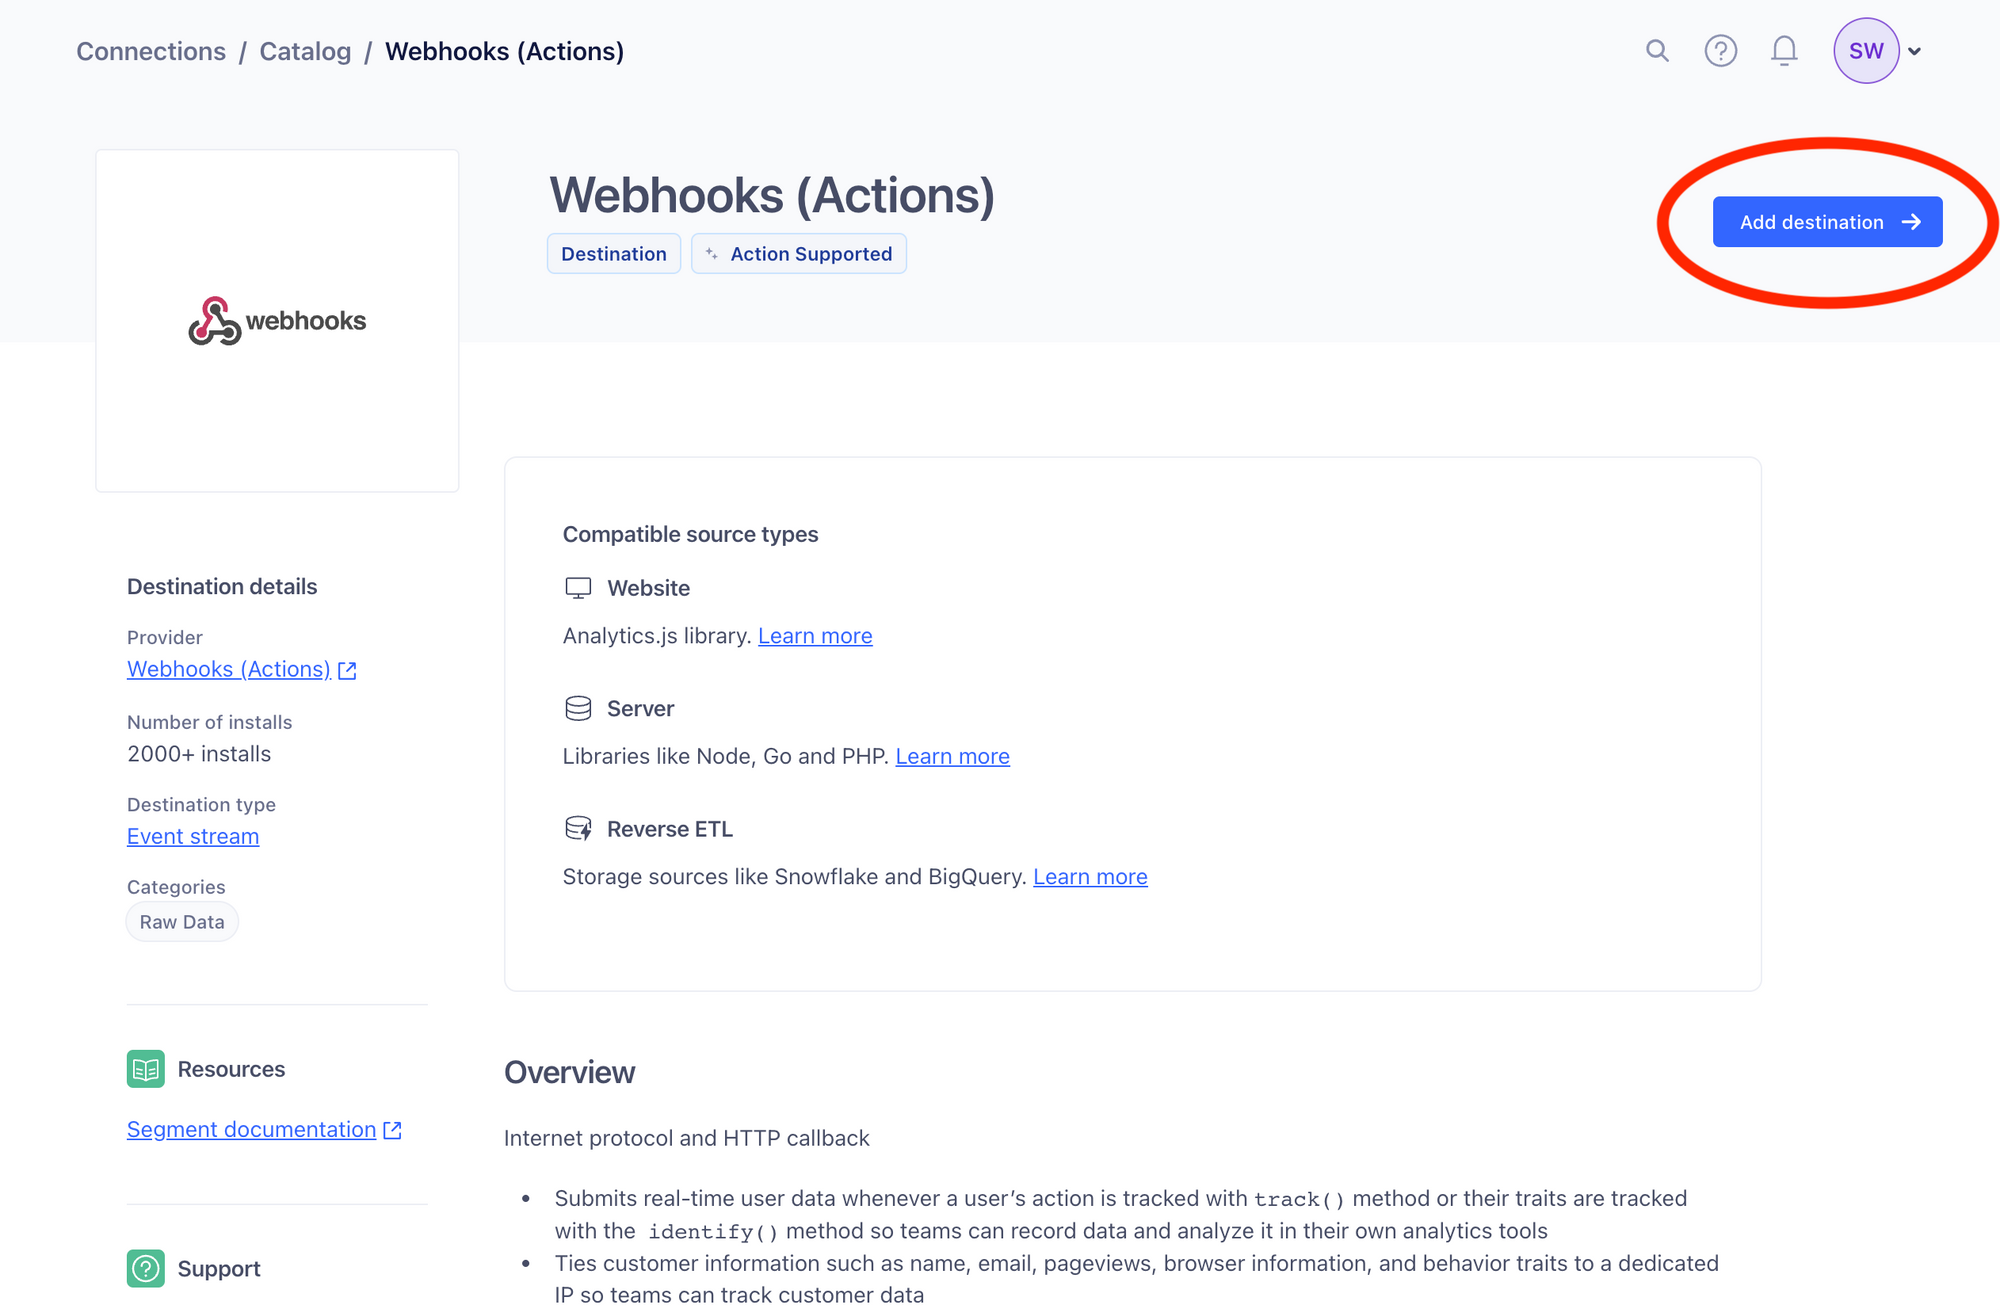 5. Select website source whose data you want to send to Unify and then click **Next**
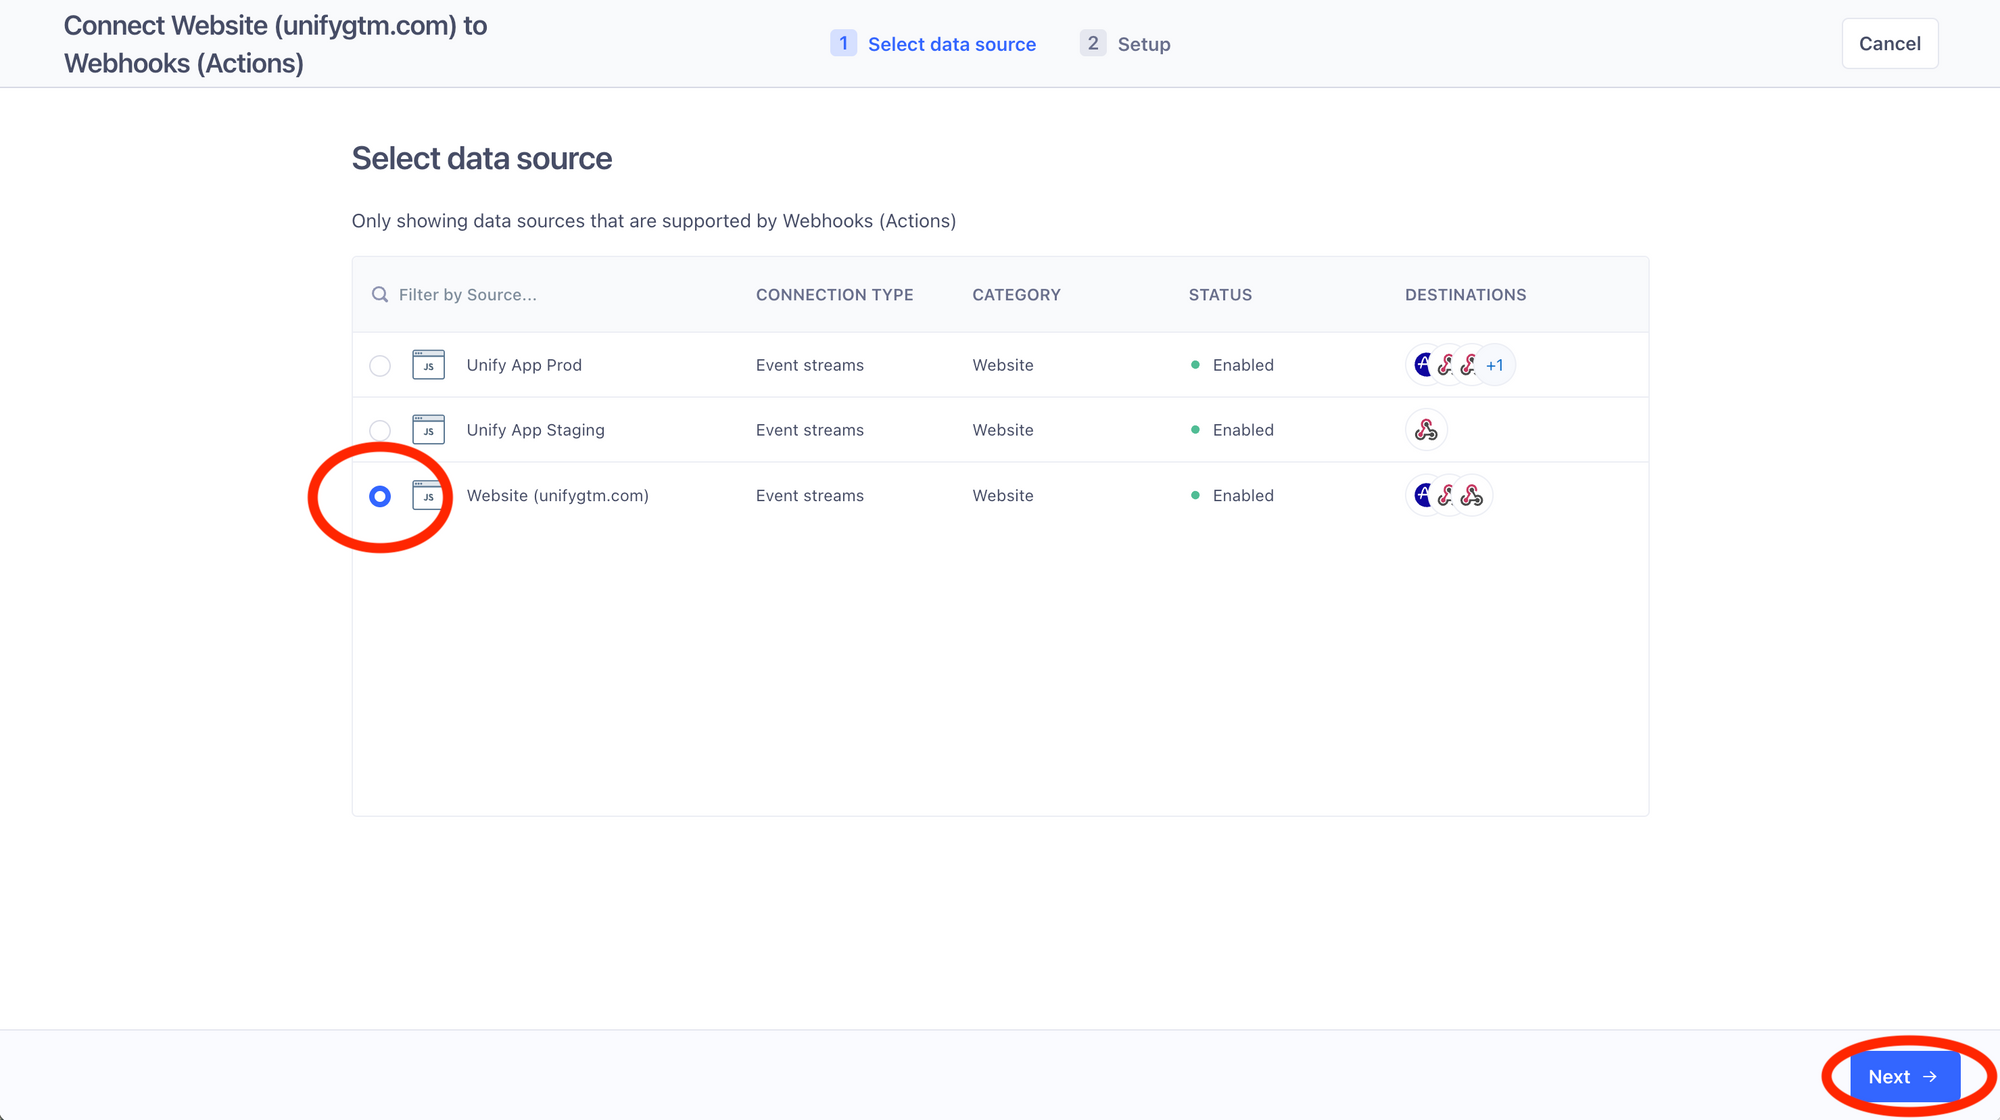 6. Give this destination a name, make sure **Fill in settings manually** is selected, and click **Create destination**
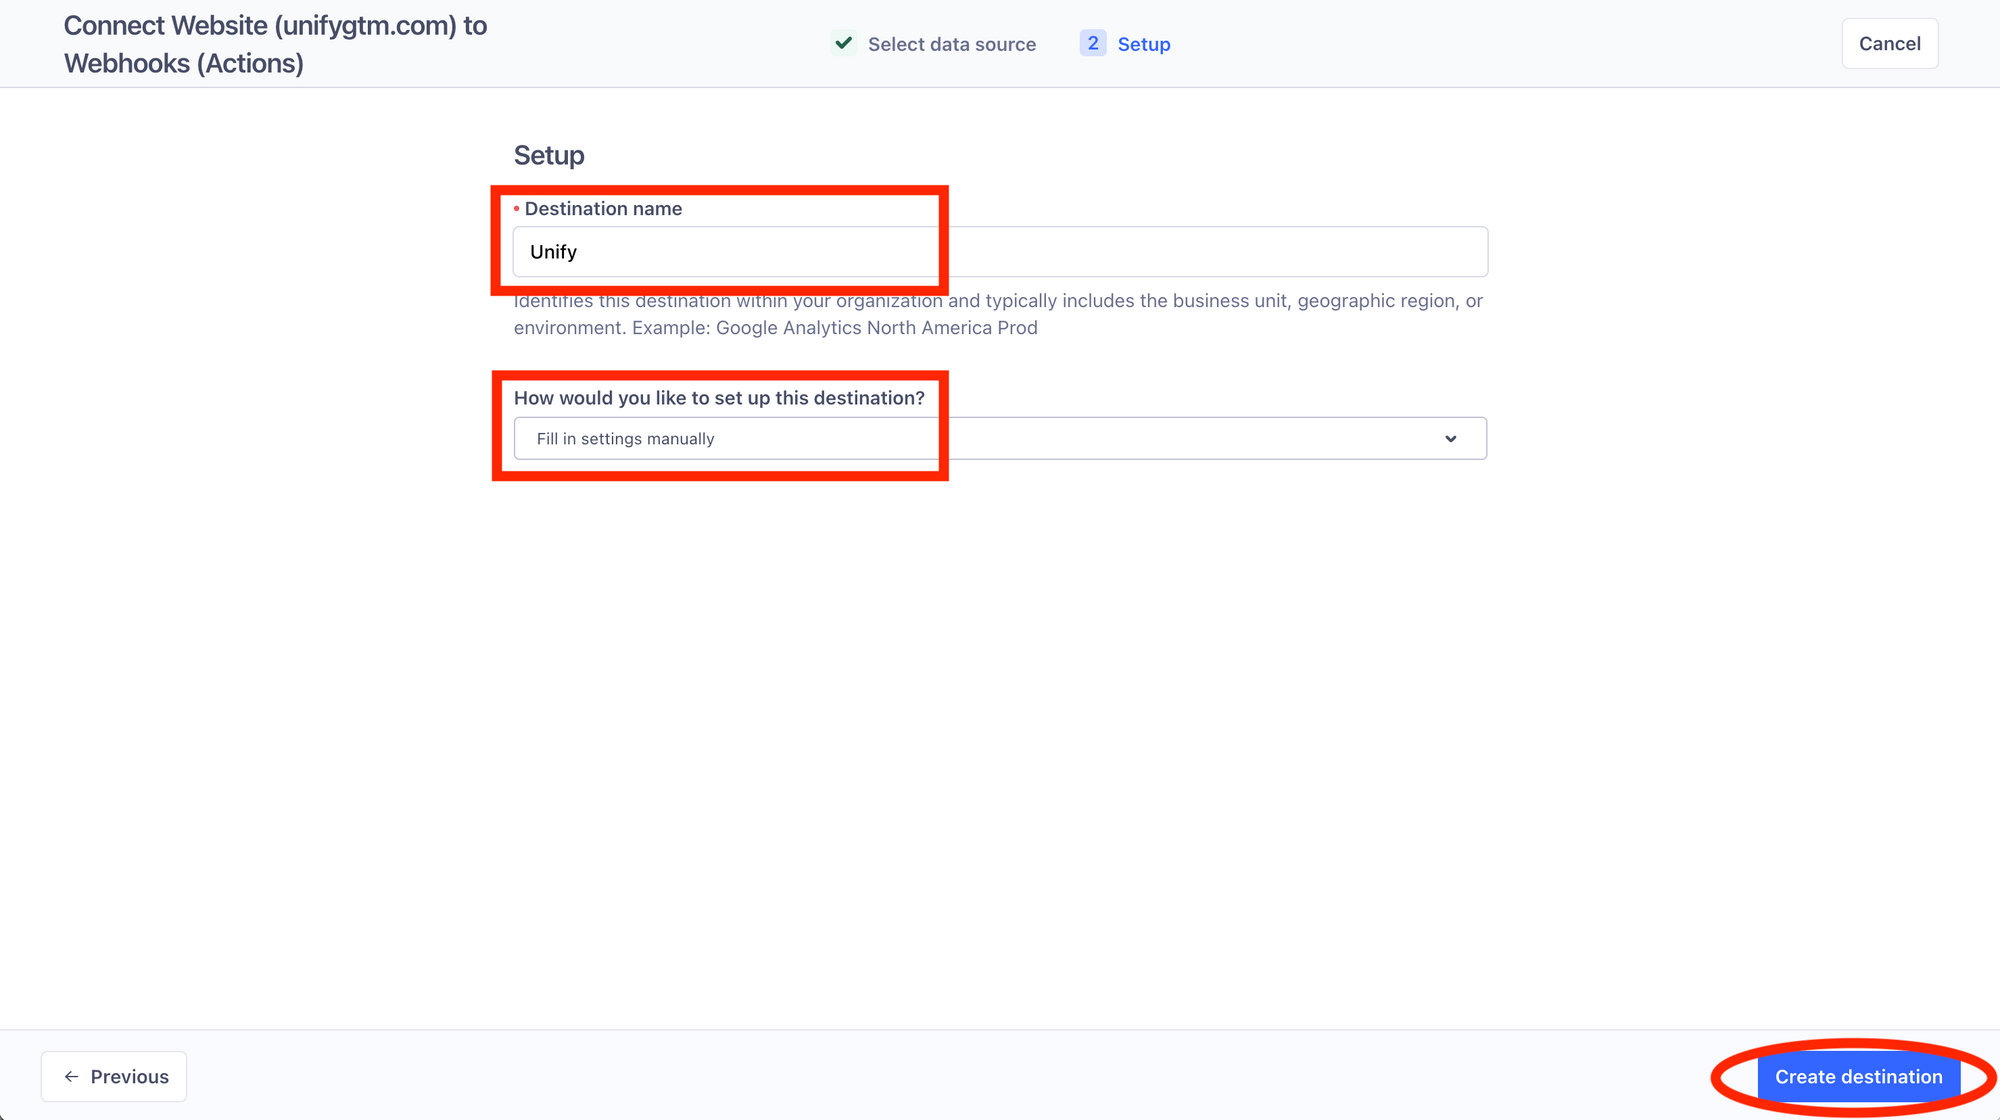 7. Click on the **Mappings** tab on the top and then select **New Mapping**
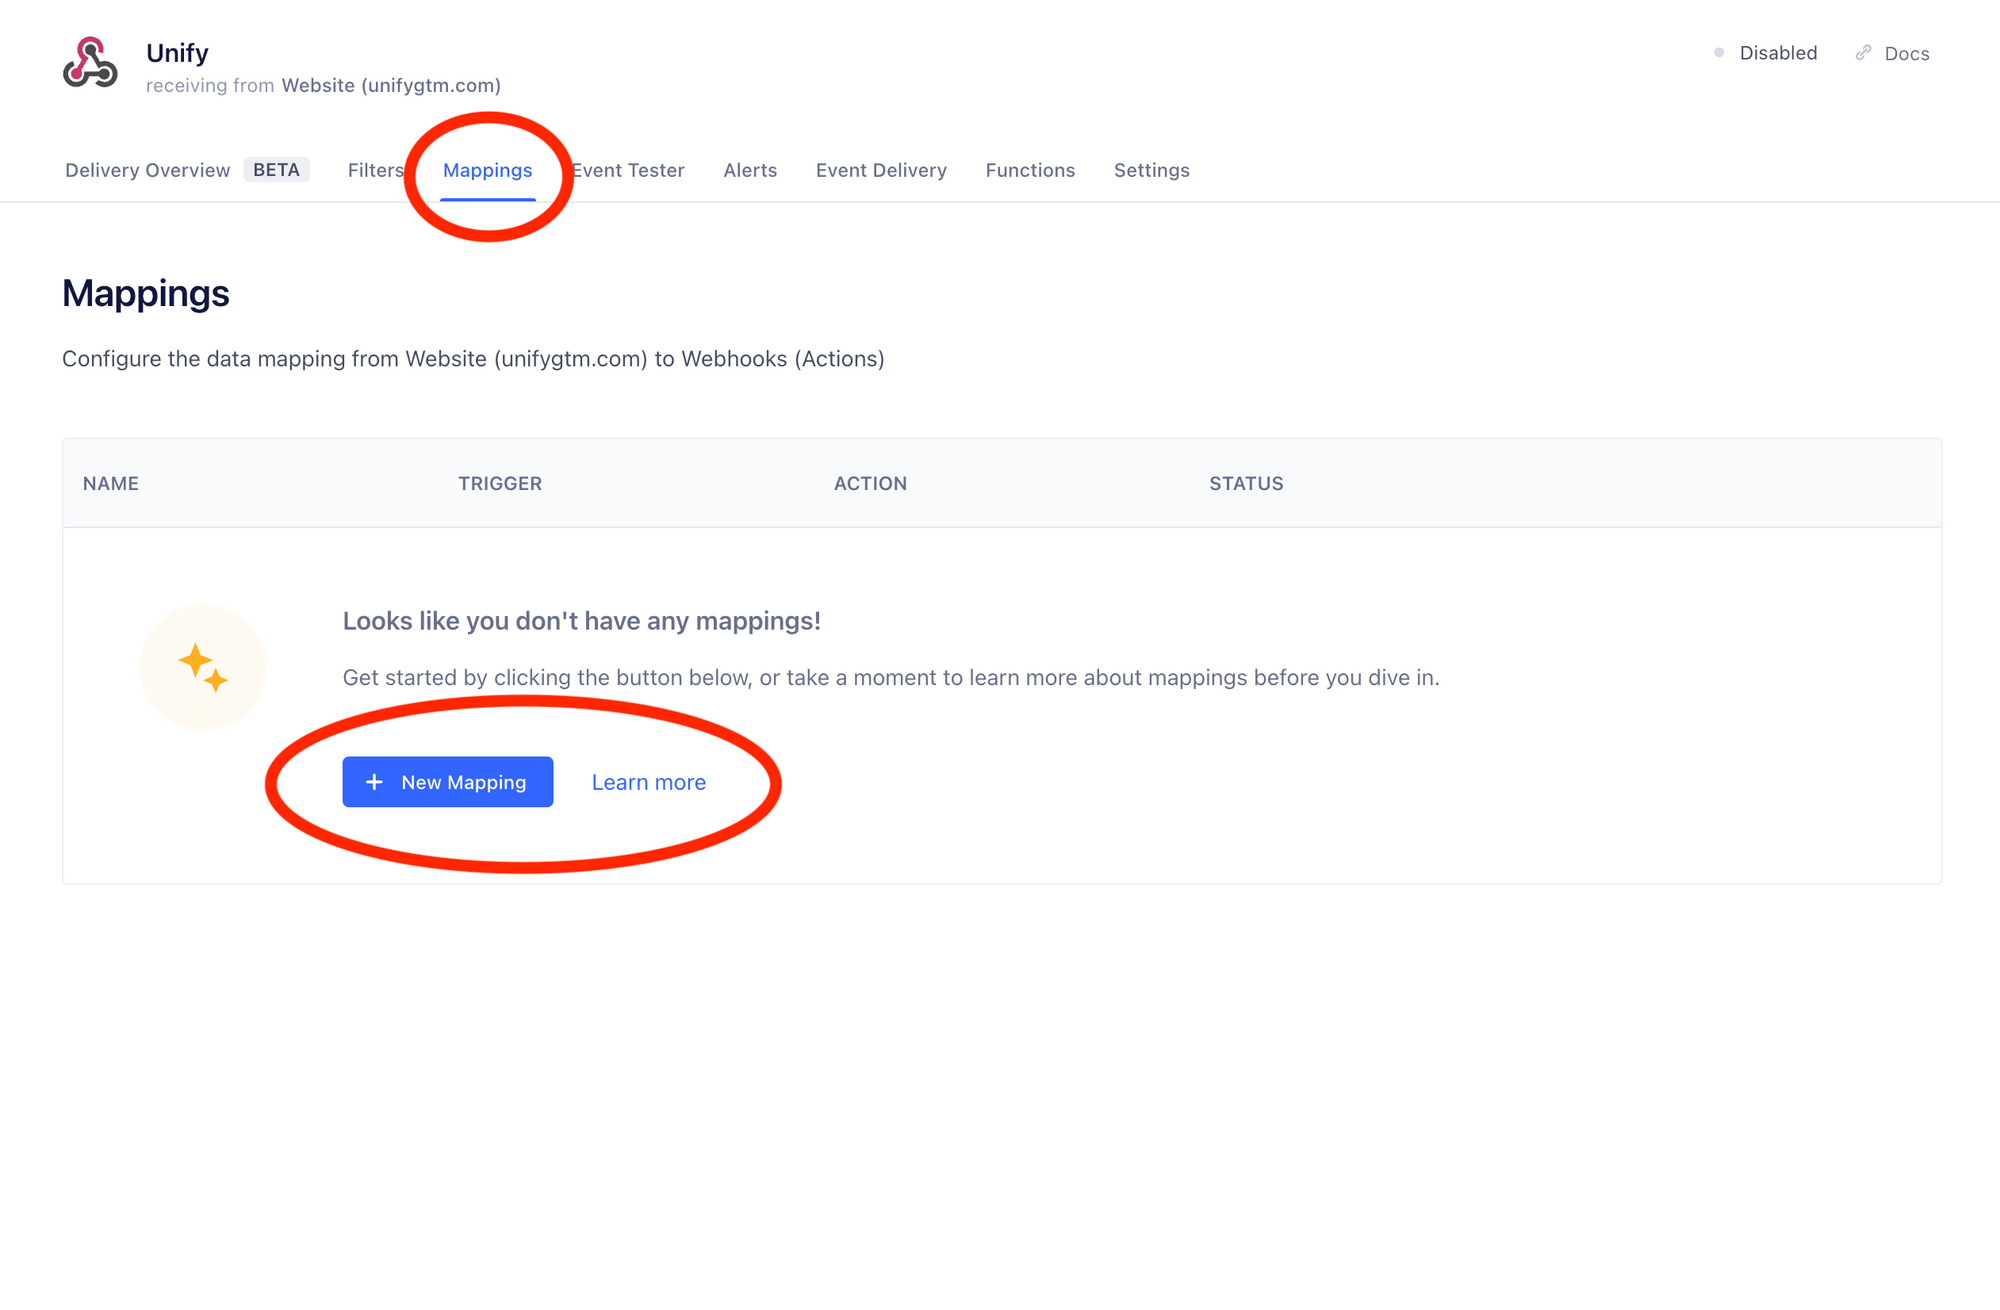 8. Choose the **Send** option
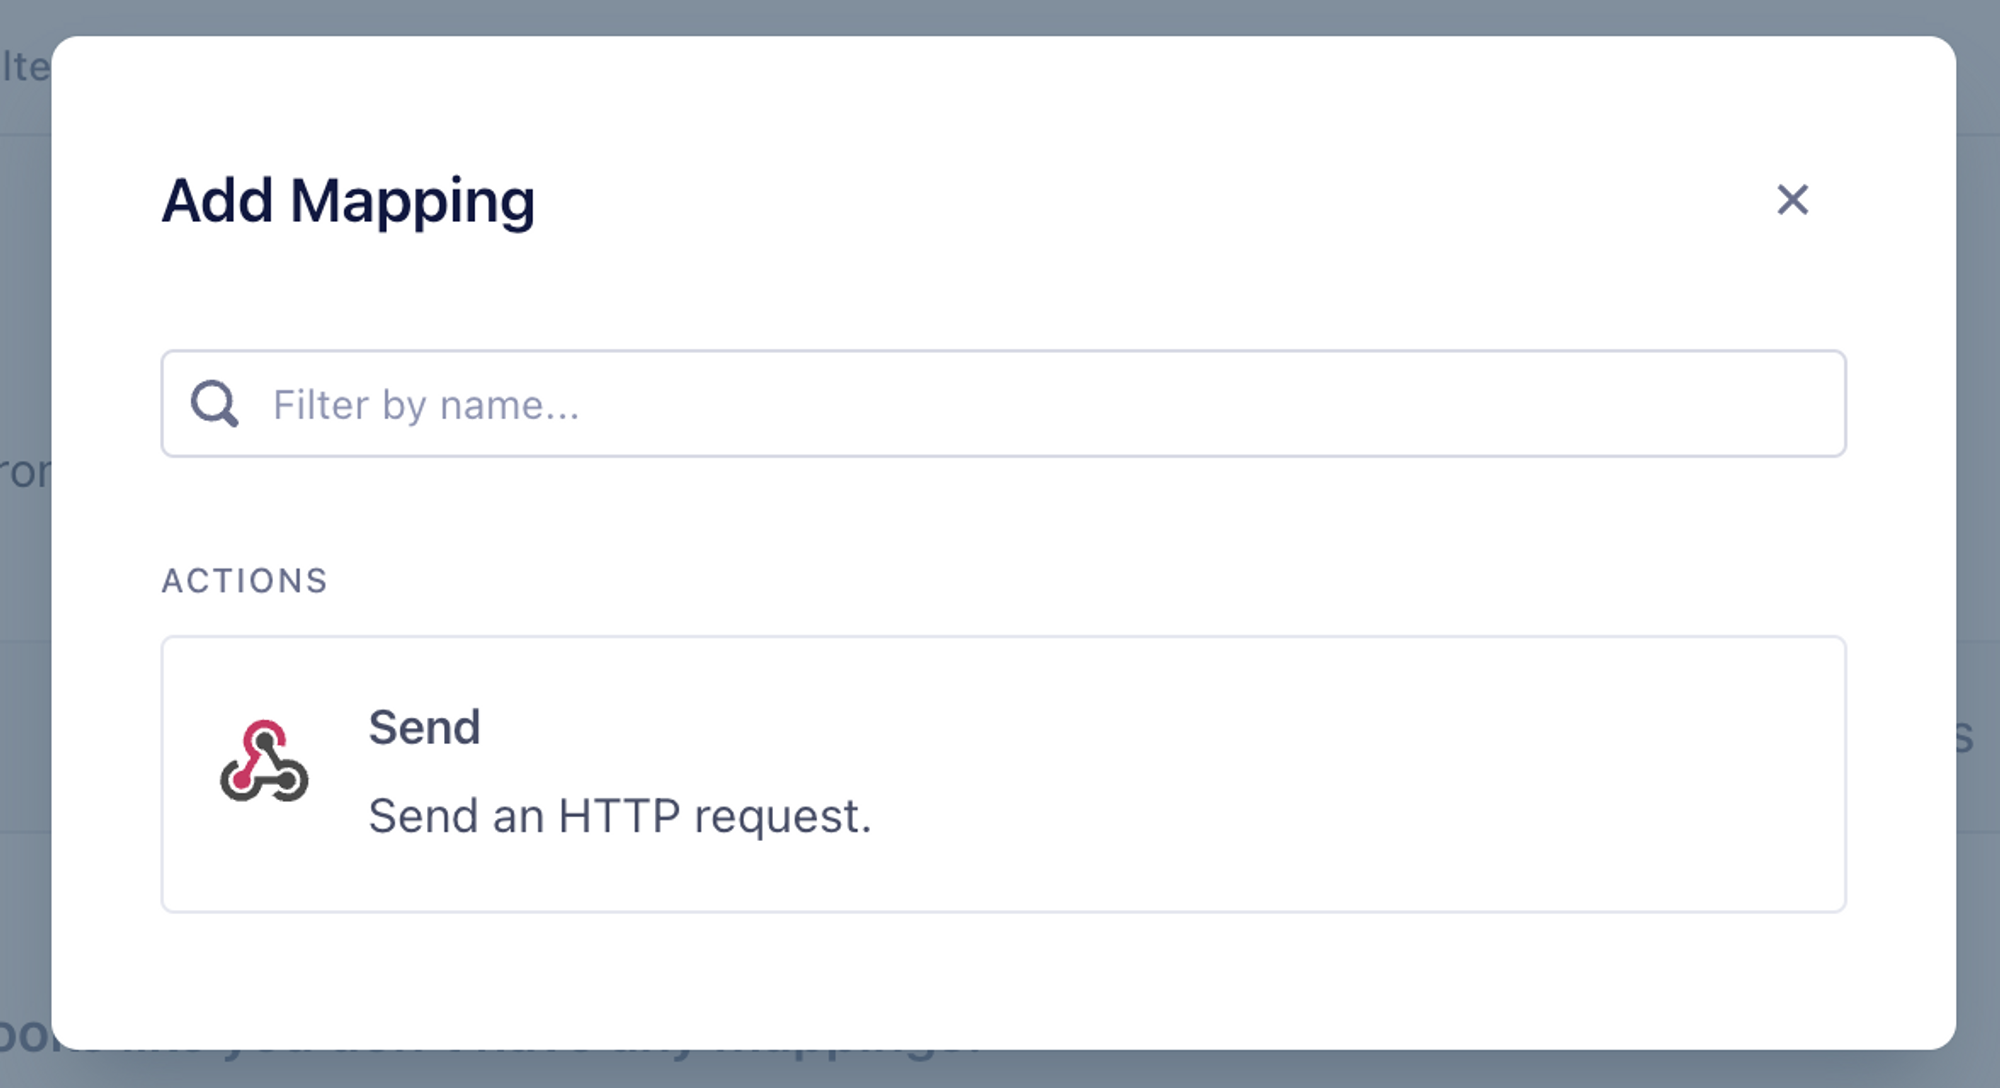 9. Fill in the following mapping values…
1. Under **Section 1**:
1. Unify currently supports Page and Identify event types. Track events will be supported soon. You should select **any** and then list these types.
2. If there are specific event types that you know you do not want to forward to Unify, you can safely omit them.
9. Fill in the following mapping values…
1. Under **Section 1**:
1. Unify currently supports Page and Identify event types. Track events will be supported soon. You should select **any** and then list these types.
2. If there are specific event types that you know you do not want to forward to Unify, you can safely omit them.
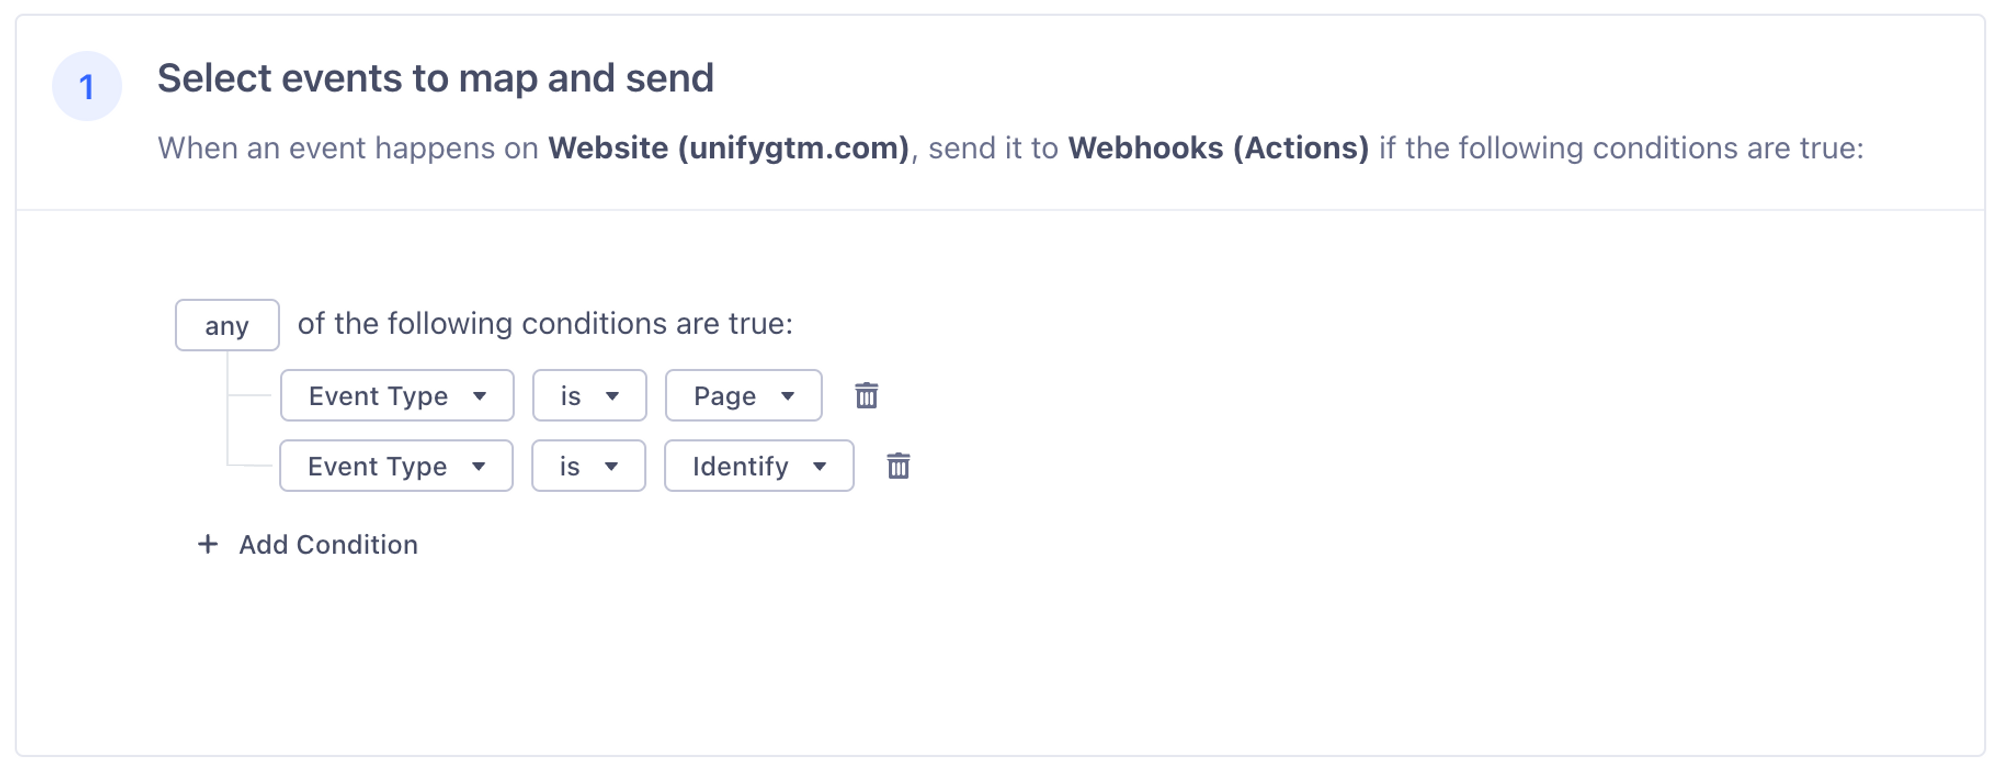 2. Under **Section 2**:
1. Click **Load Sample Event** to populate the box with an example Segment event
2. Under **Section 2**:
1. Click **Load Sample Event** to populate the box with an example Segment event
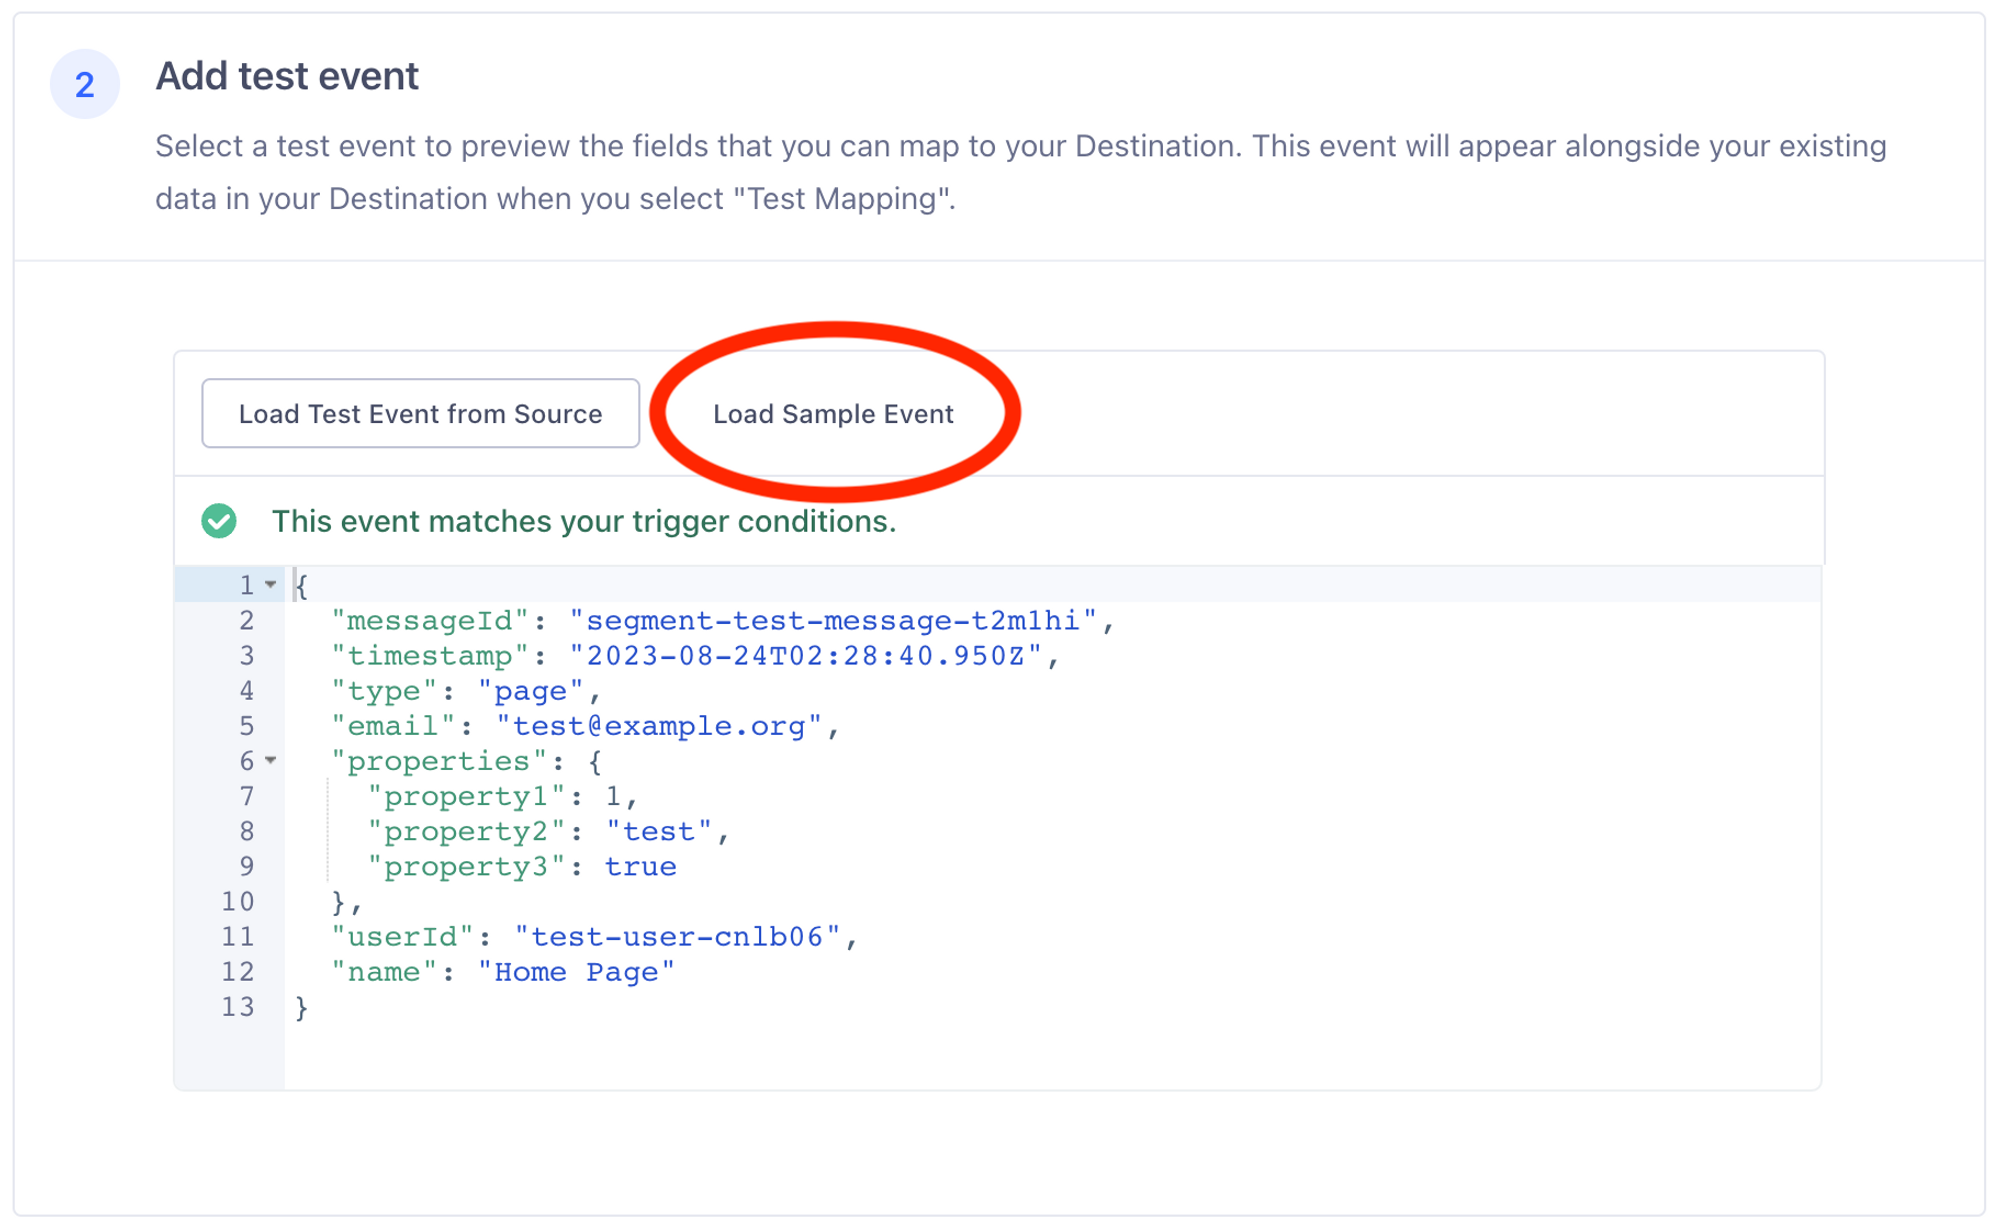 3. Under **Section 3**:
1. Next to **URL**, fill in the following value:
```
https://analytics.unifygtm.com/api/v1/webhooks/segment
```
2. List two values under **Headers** (click **Add Mapping Field** to add more boxes):
1. `
3. Under **Section 3**:
1. Next to **URL**, fill in the following value:
```
https://analytics.unifygtm.com/api/v1/webhooks/segment
```
2. List two values under **Headers** (click **Add Mapping Field** to add more boxes):
1. `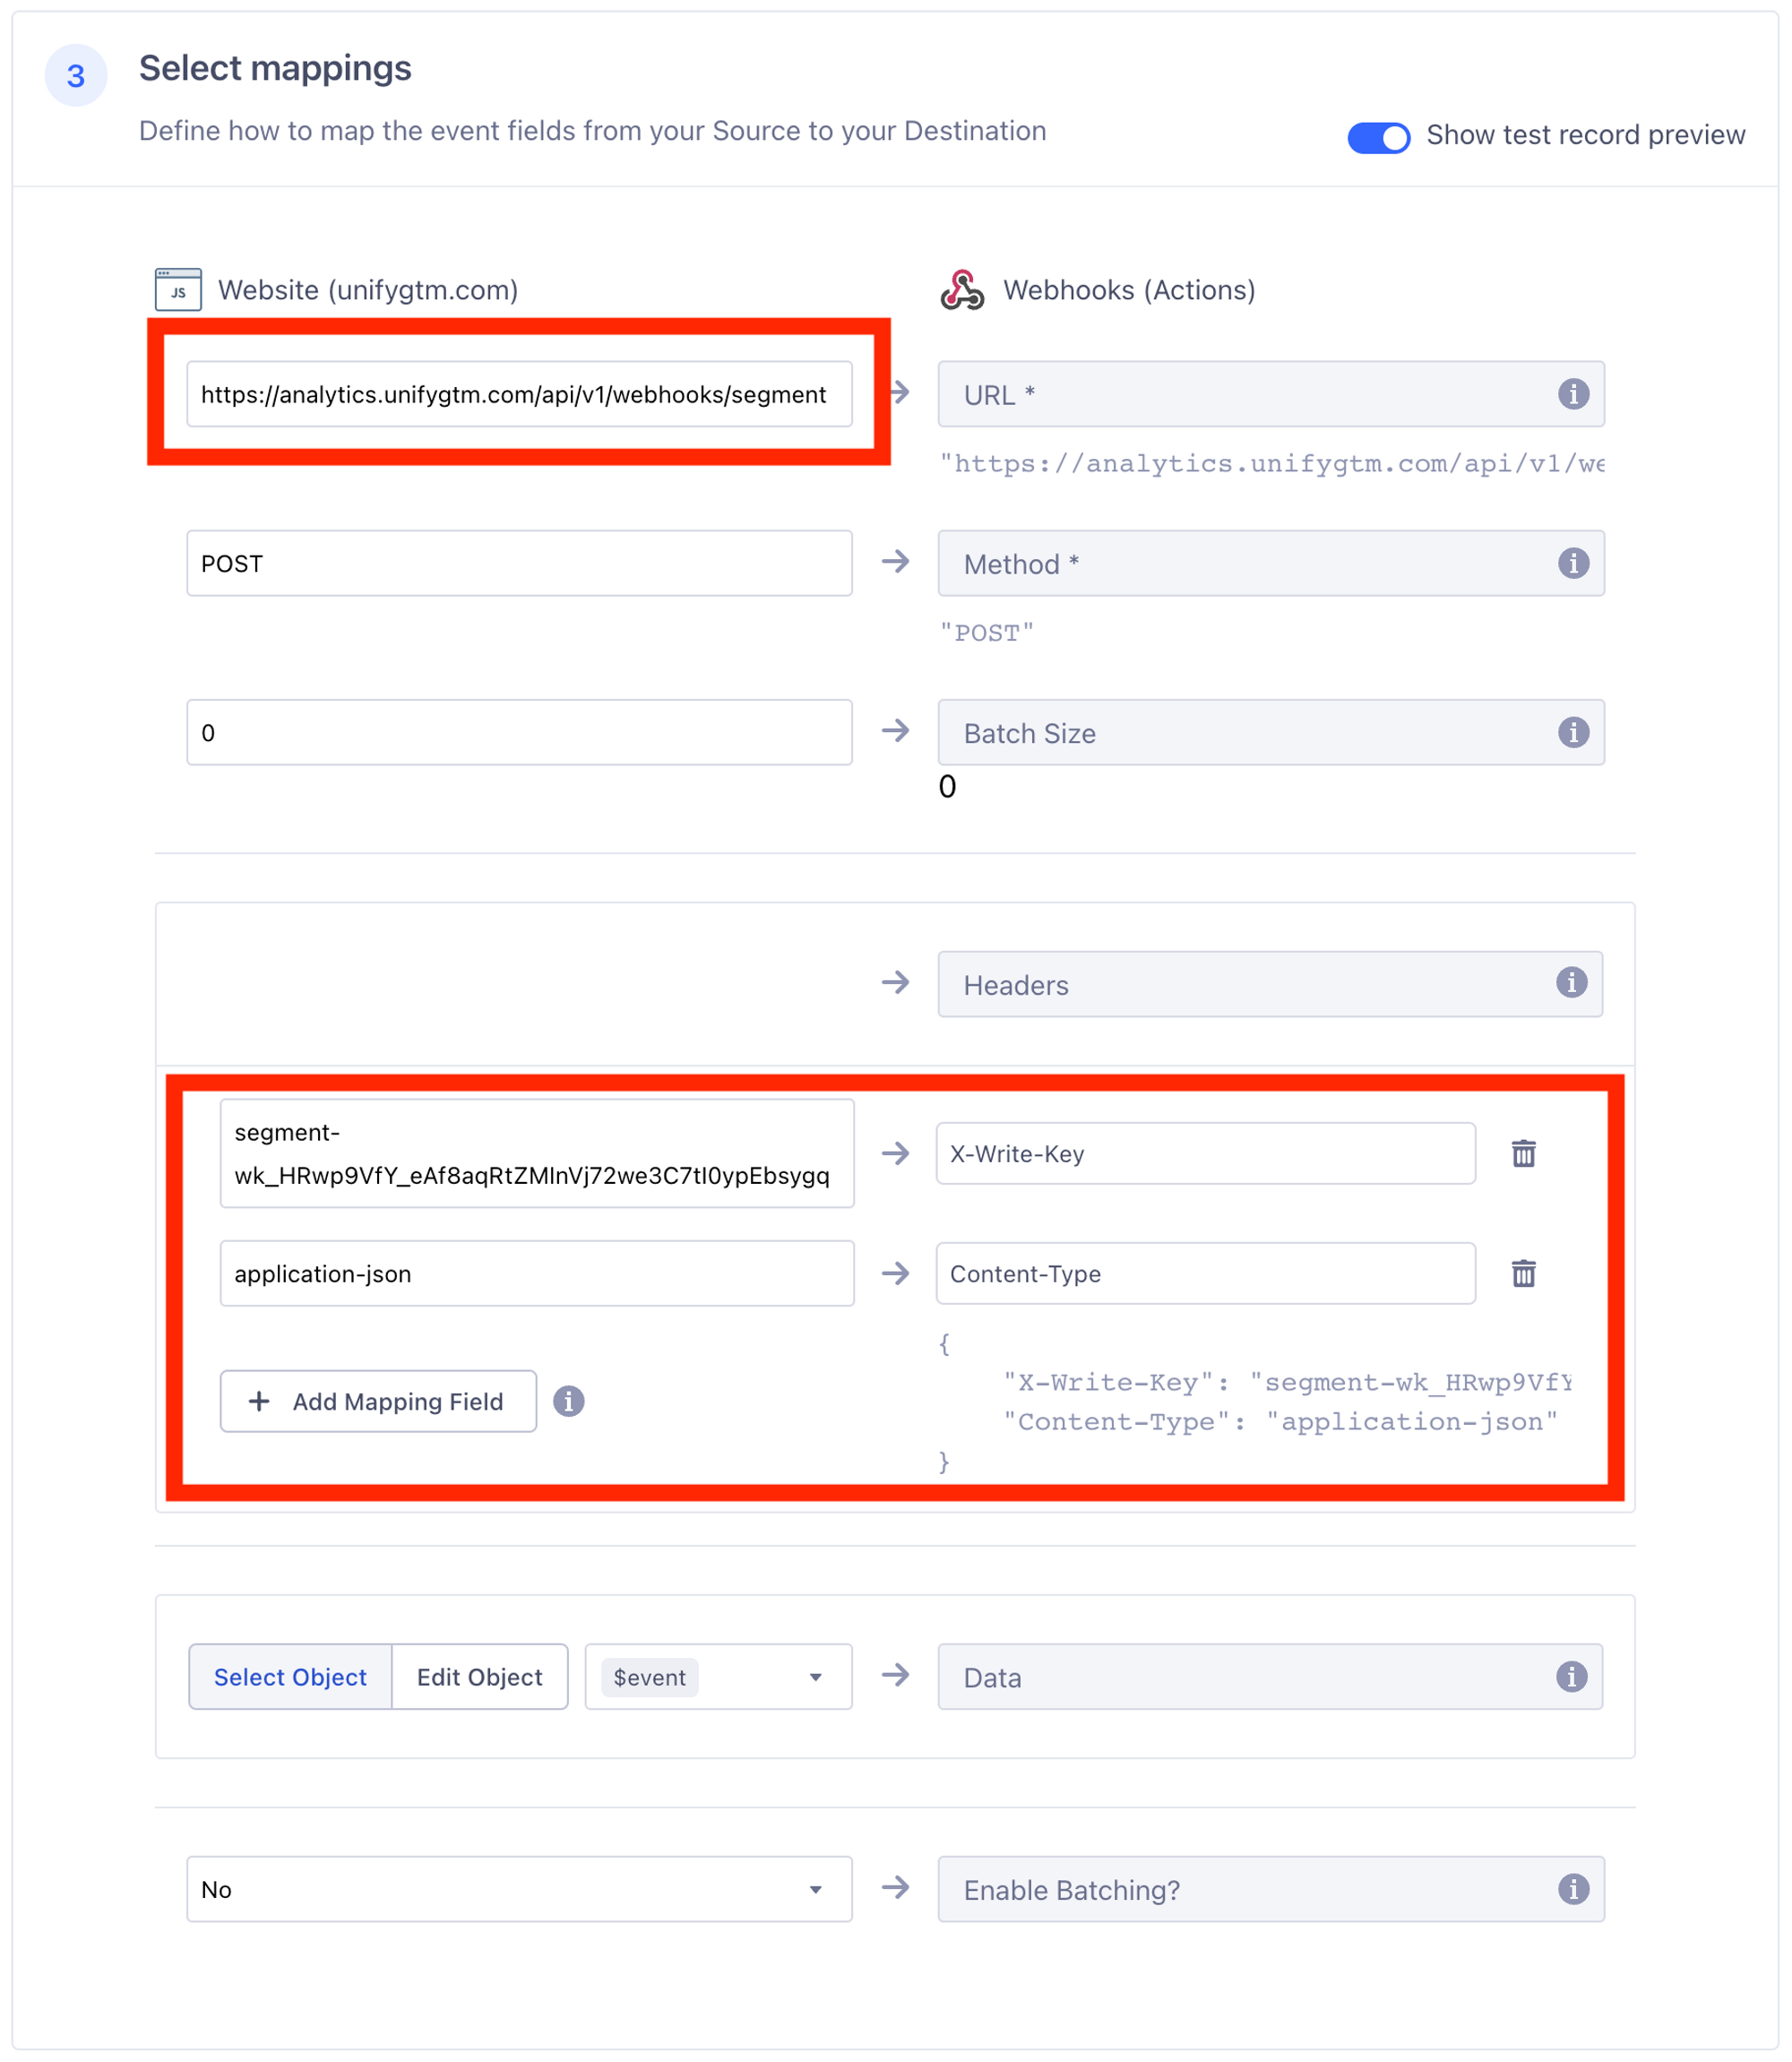 4. Under **Section 4**:
1. Send a test event to verify that it’s working
4. Under **Section 4**:
1. Send a test event to verify that it’s working
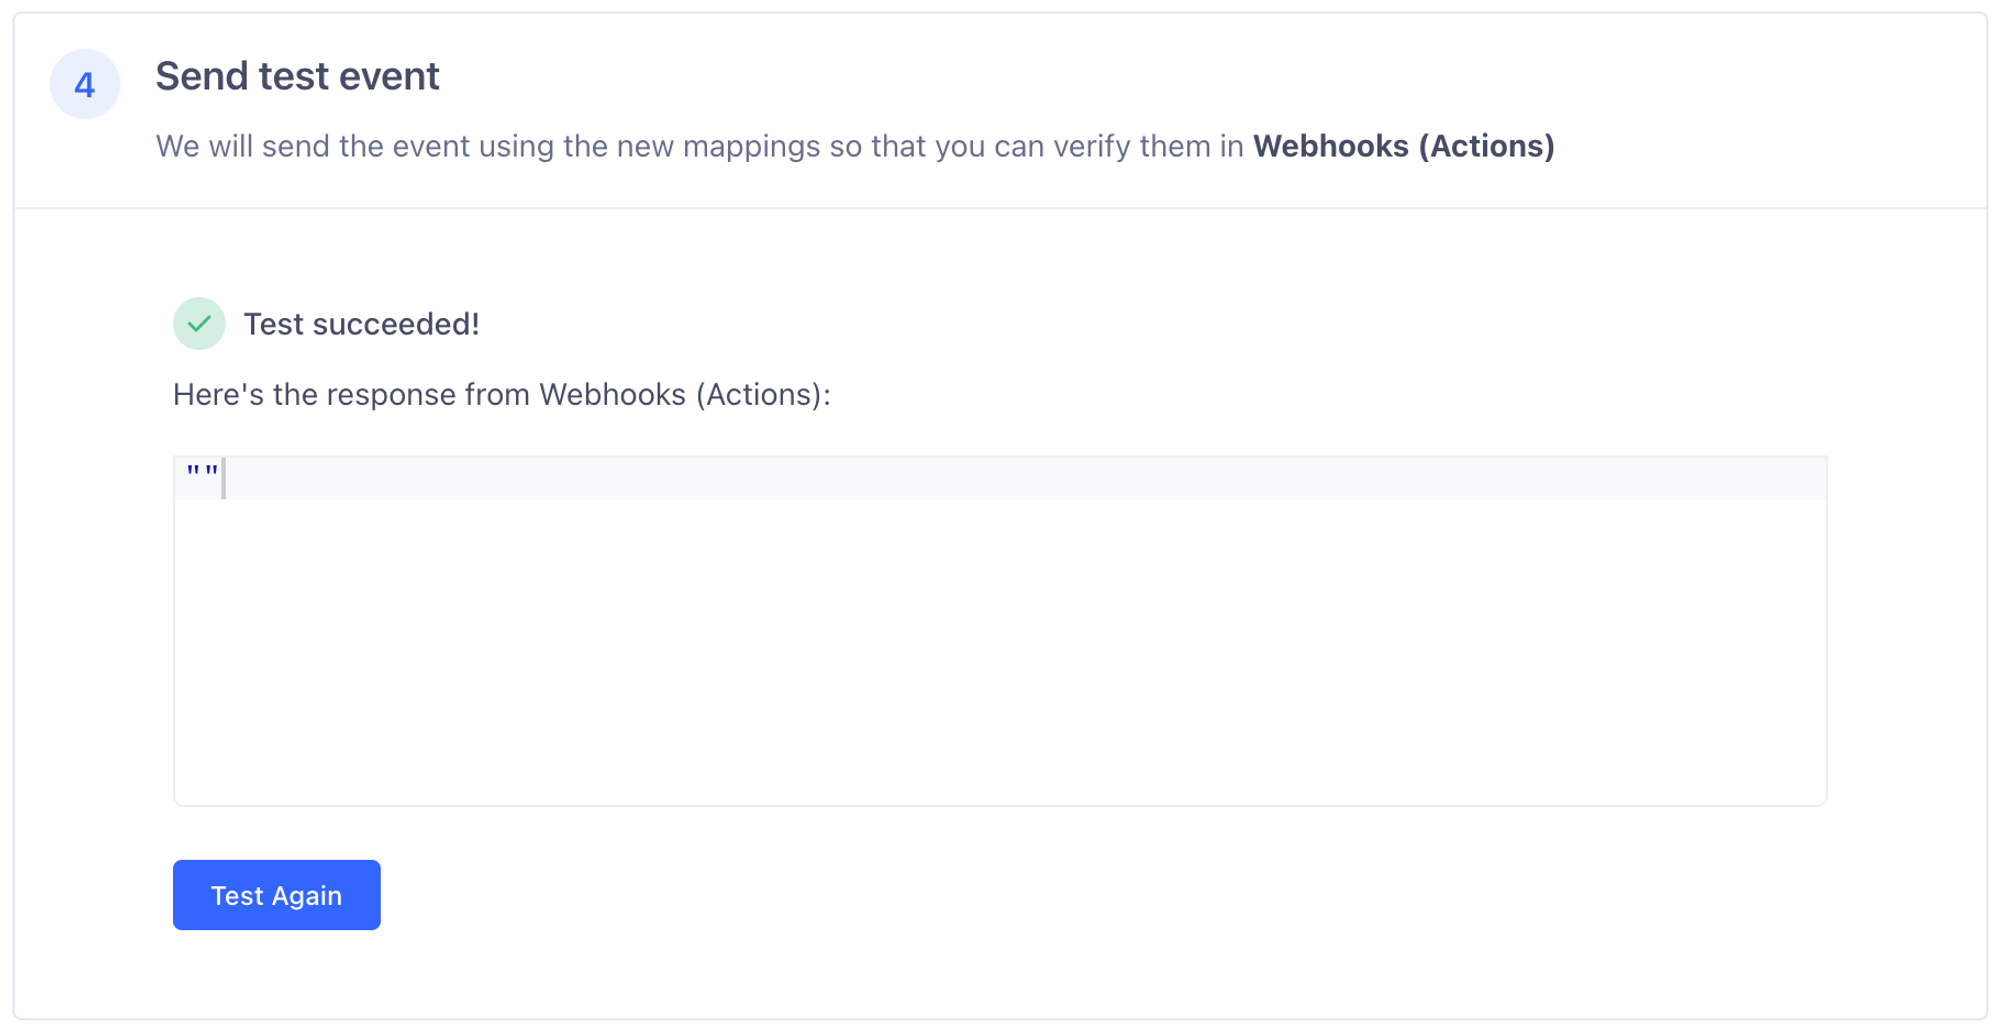 That’s it! If you see **Test succeeded**, you’re all set. Traffic should now be flowing into Unify.
---
# Source: https://docs.unifygtm.com/reference/integrations/slack.md
> ## Documentation Index
> Fetch the complete documentation index at: https://docs.unifygtm.com/llms.txt
> Use this file to discover all available pages before exploring further.
# Slack Integration Guide
> This guide details the process of integrating Unify with your Slack workspace.
That’s it! If you see **Test succeeded**, you’re all set. Traffic should now be flowing into Unify.
---
# Source: https://docs.unifygtm.com/reference/integrations/slack.md
> ## Documentation Index
> Fetch the complete documentation index at: https://docs.unifygtm.com/llms.txt
> Use this file to discover all available pages before exploring further.
# Slack Integration Guide
> This guide details the process of integrating Unify with your Slack workspace.
 You will be redirected to Slack's authorization page. Click **Allow** to proceed.
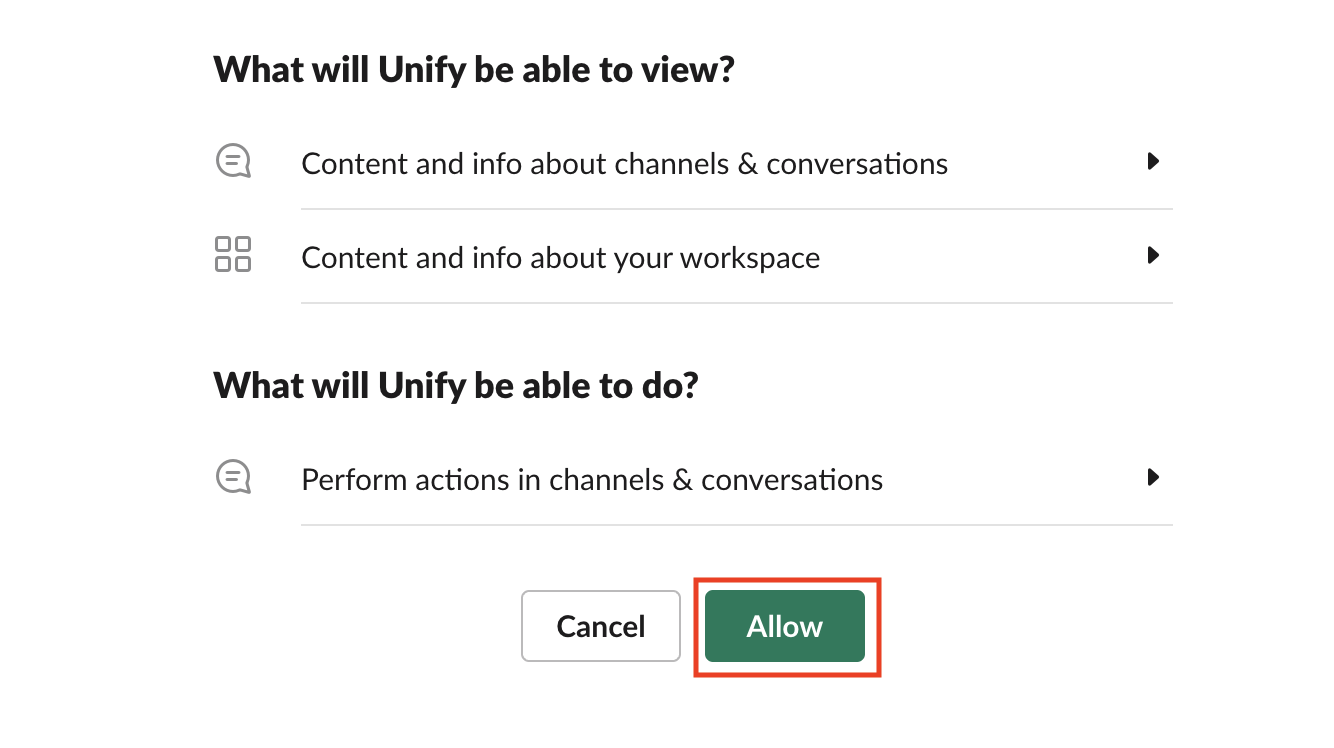 You will be redirected back to the Slack settings page, where you can view the status of your connection.
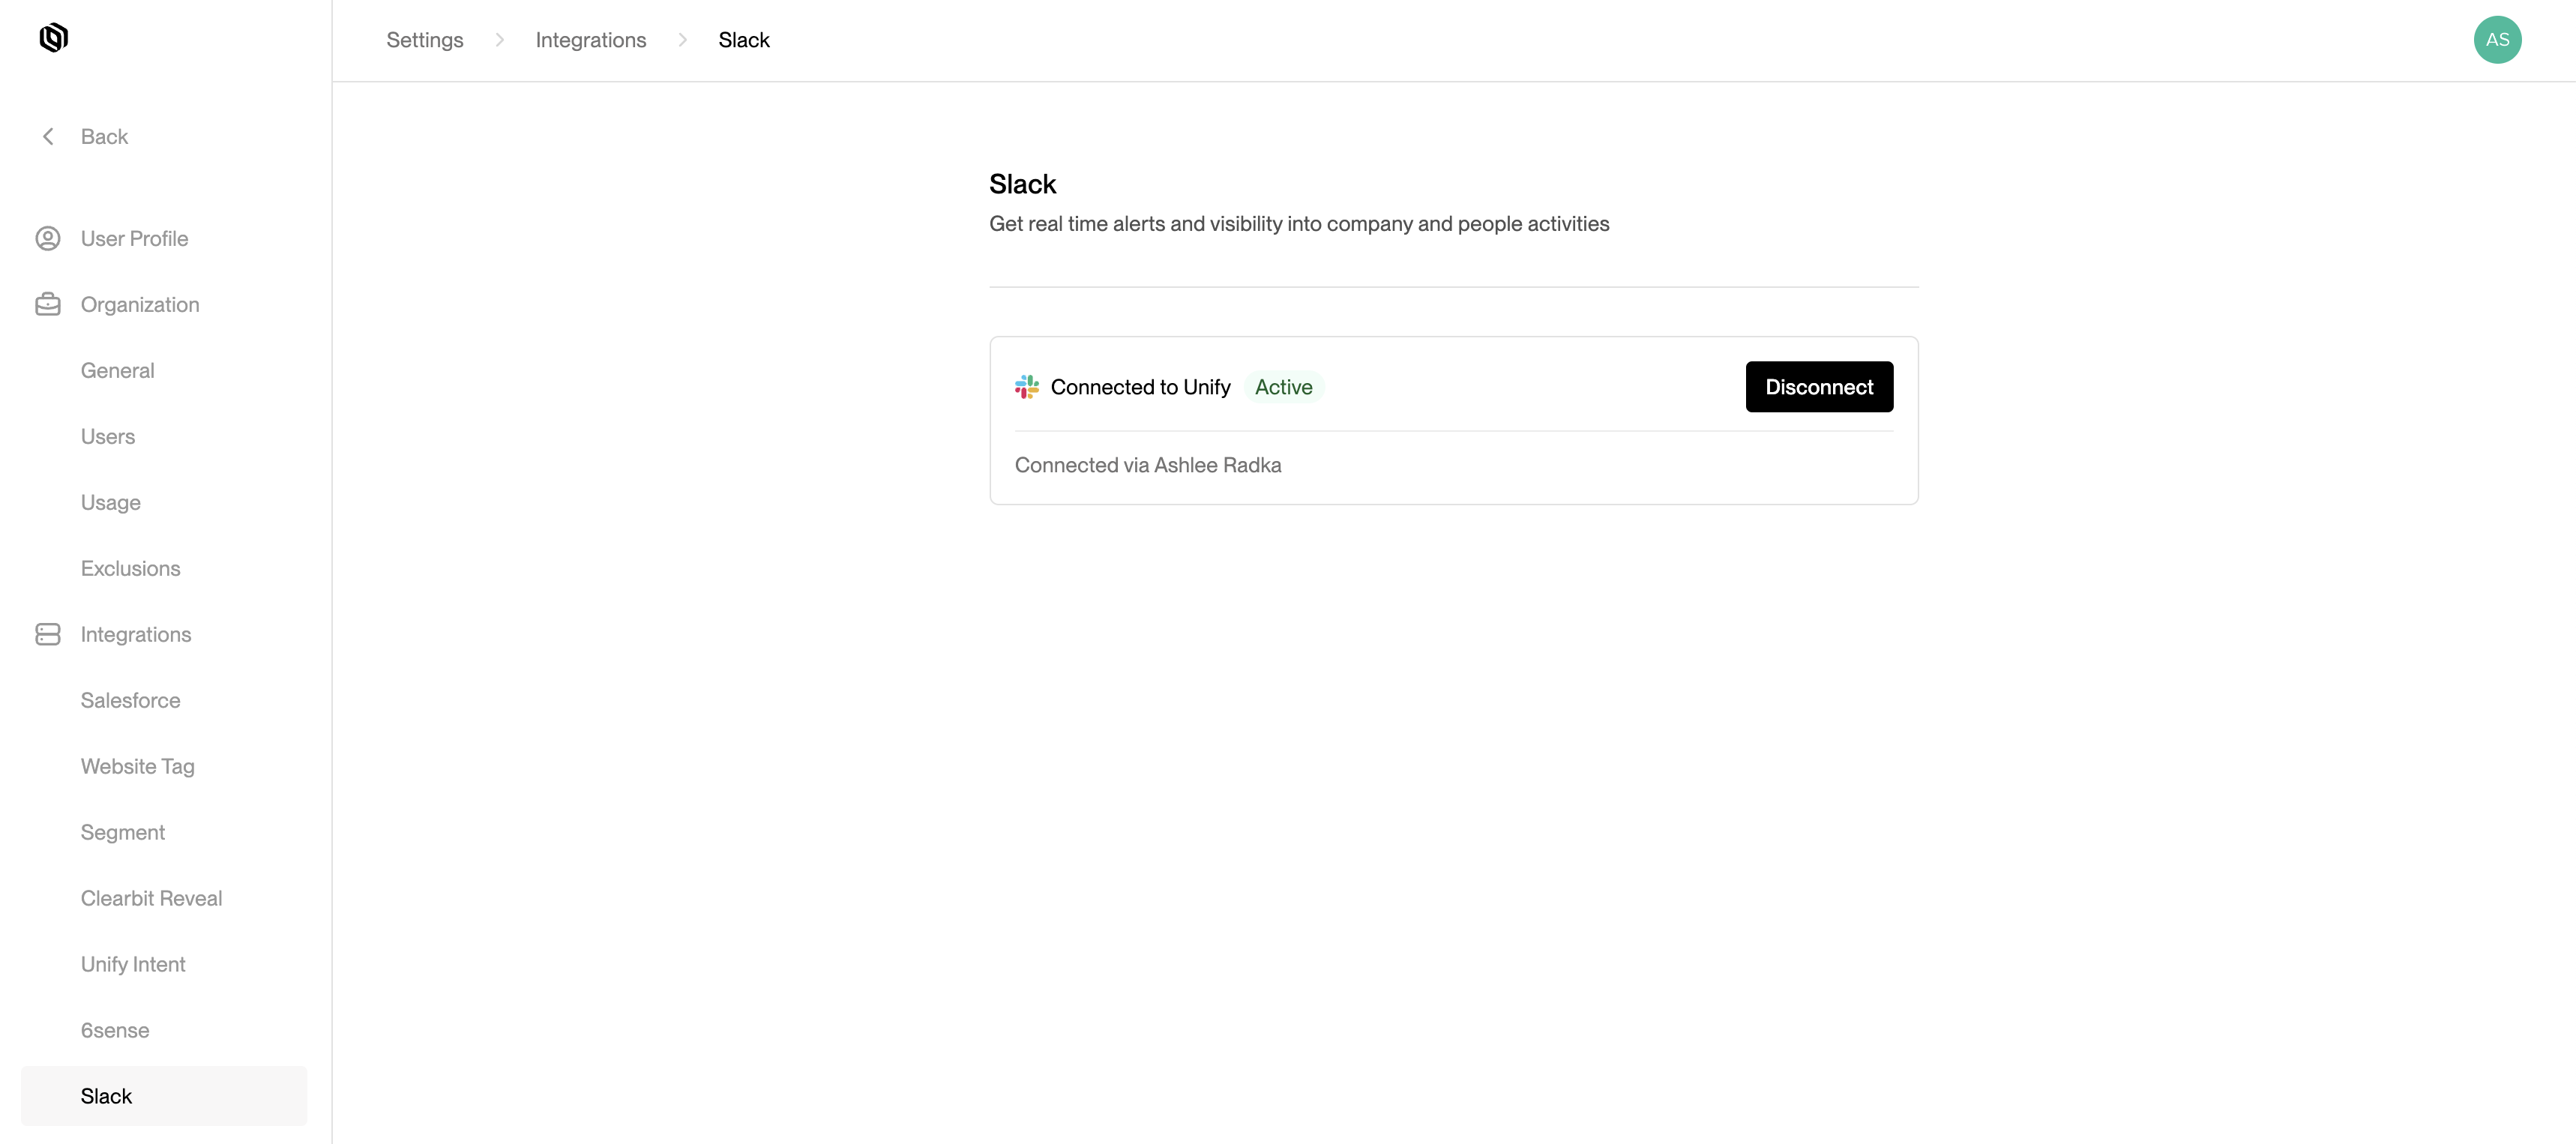 ---
# Source: https://docs.unifygtm.com/reference/sequences/smart-snippets.md
> ## Documentation Index
> Fetch the complete documentation index at: https://docs.unifygtm.com/llms.txt
> Use this file to discover all available pages before exploring further.
# Smart Snippets
> Personalize your outreach with AI-powered email copy generation.
## Overview
Smart snippets allow you to personalize messages with AI-generated copy that's
unique to each recipient. You can use smart snippets to enhance your messaging,
improve deliverability, and increase engagement.
Smart snippets are concise, self-contained pieces of text that serve a clear
communicative purpose. Each snippet should be laser-focused on the parts of your
outbound message that change the most to fit each recipient differently.
## Creating a smart snippet
Navigate to the [Snippets](https://app.unifygtm.com/dashboard/snippets) tab in
the sidebar, select **New Snippet** in the top right corner, and choose
**Smart Snippet**. You will see the smart snippet creation screen.
---
# Source: https://docs.unifygtm.com/reference/sequences/smart-snippets.md
> ## Documentation Index
> Fetch the complete documentation index at: https://docs.unifygtm.com/llms.txt
> Use this file to discover all available pages before exploring further.
# Smart Snippets
> Personalize your outreach with AI-powered email copy generation.
## Overview
Smart snippets allow you to personalize messages with AI-generated copy that's
unique to each recipient. You can use smart snippets to enhance your messaging,
improve deliverability, and increase engagement.
Smart snippets are concise, self-contained pieces of text that serve a clear
communicative purpose. Each snippet should be laser-focused on the parts of your
outbound message that change the most to fit each recipient differently.
## Creating a smart snippet
Navigate to the [Snippets](https://app.unifygtm.com/dashboard/snippets) tab in
the sidebar, select **New Snippet** in the top right corner, and choose
**Smart Snippet**. You will see the smart snippet creation screen.
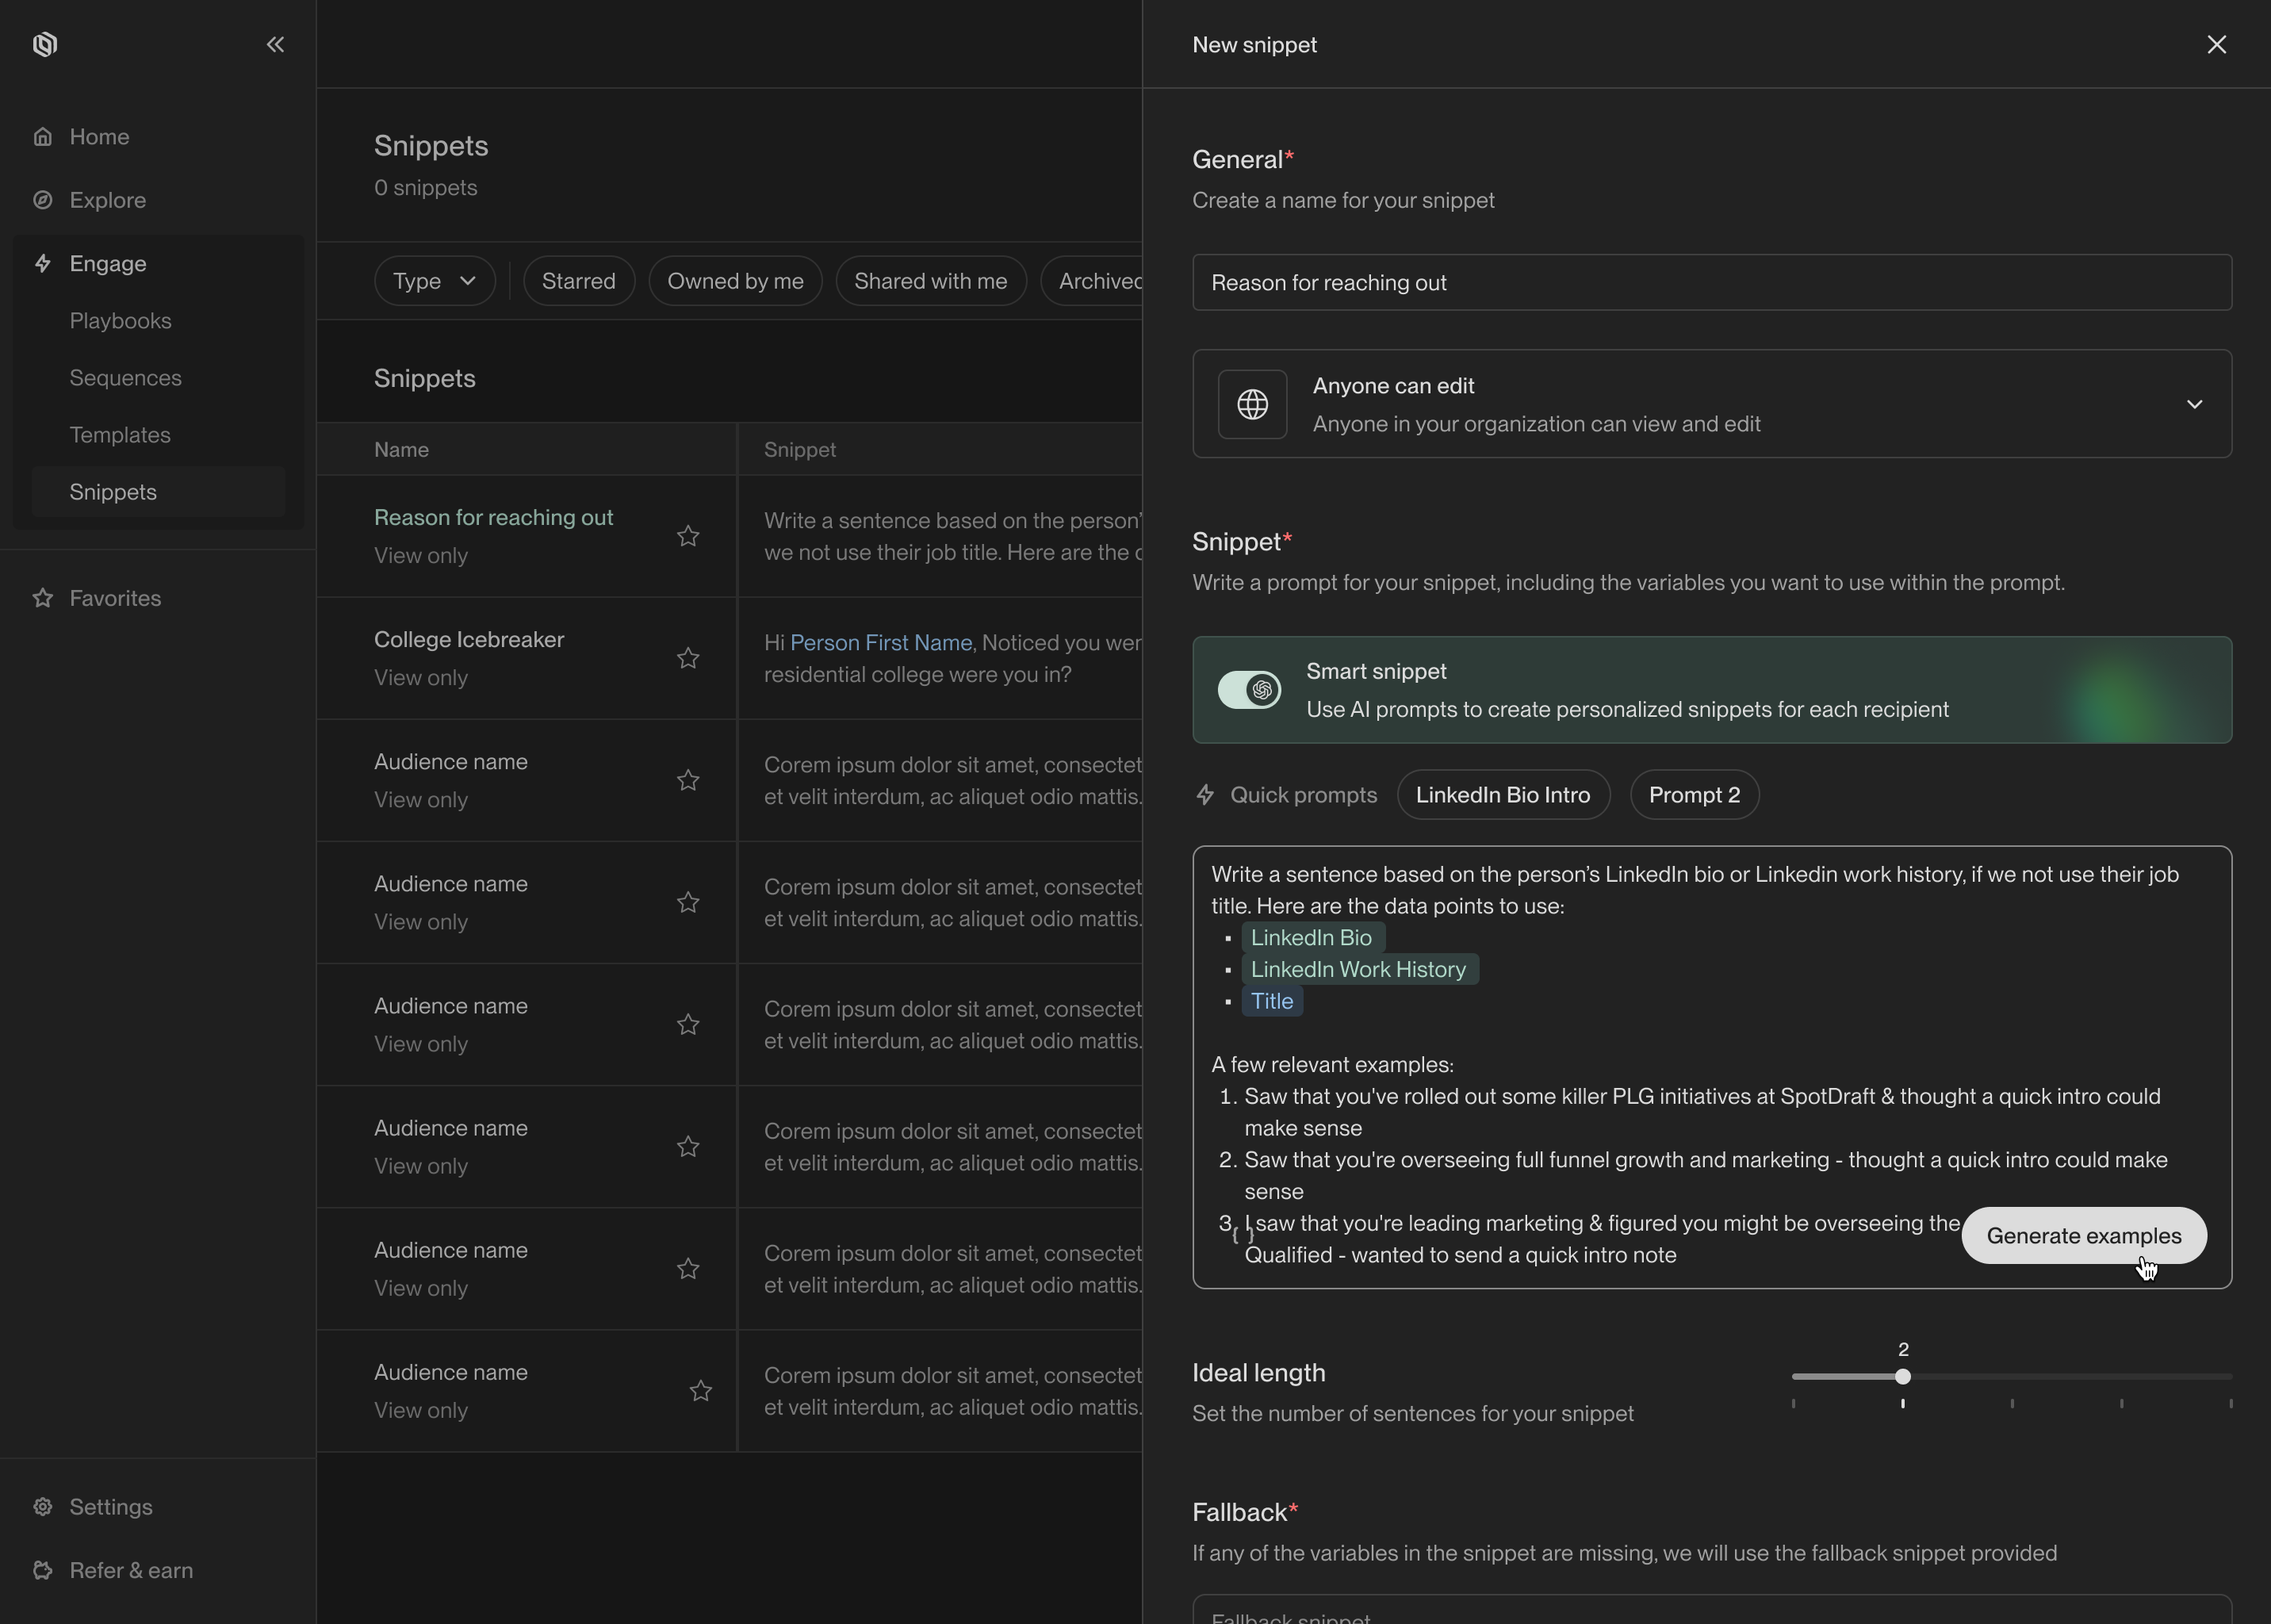 To define a smart snippet, you provide a prompt that describes the content you
want to generate. The prompt should include template variables for any data you
want the model to use when writing the snippet. You can click on the quick
prompts to see example prompts for inspiration.
After you've entered your prompt, click **Generate examples** to see what the
smart snippet will generate for a sample of real people from your data. You can
edit the prompt and regenerate examples to iteratively refine your snippet.
To define a smart snippet, you provide a prompt that describes the content you
want to generate. The prompt should include template variables for any data you
want the model to use when writing the snippet. You can click on the quick
prompts to see example prompts for inspiration.
After you've entered your prompt, click **Generate examples** to see what the
smart snippet will generate for a sample of real people from your data. You can
edit the prompt and regenerate examples to iteratively refine your snippet.
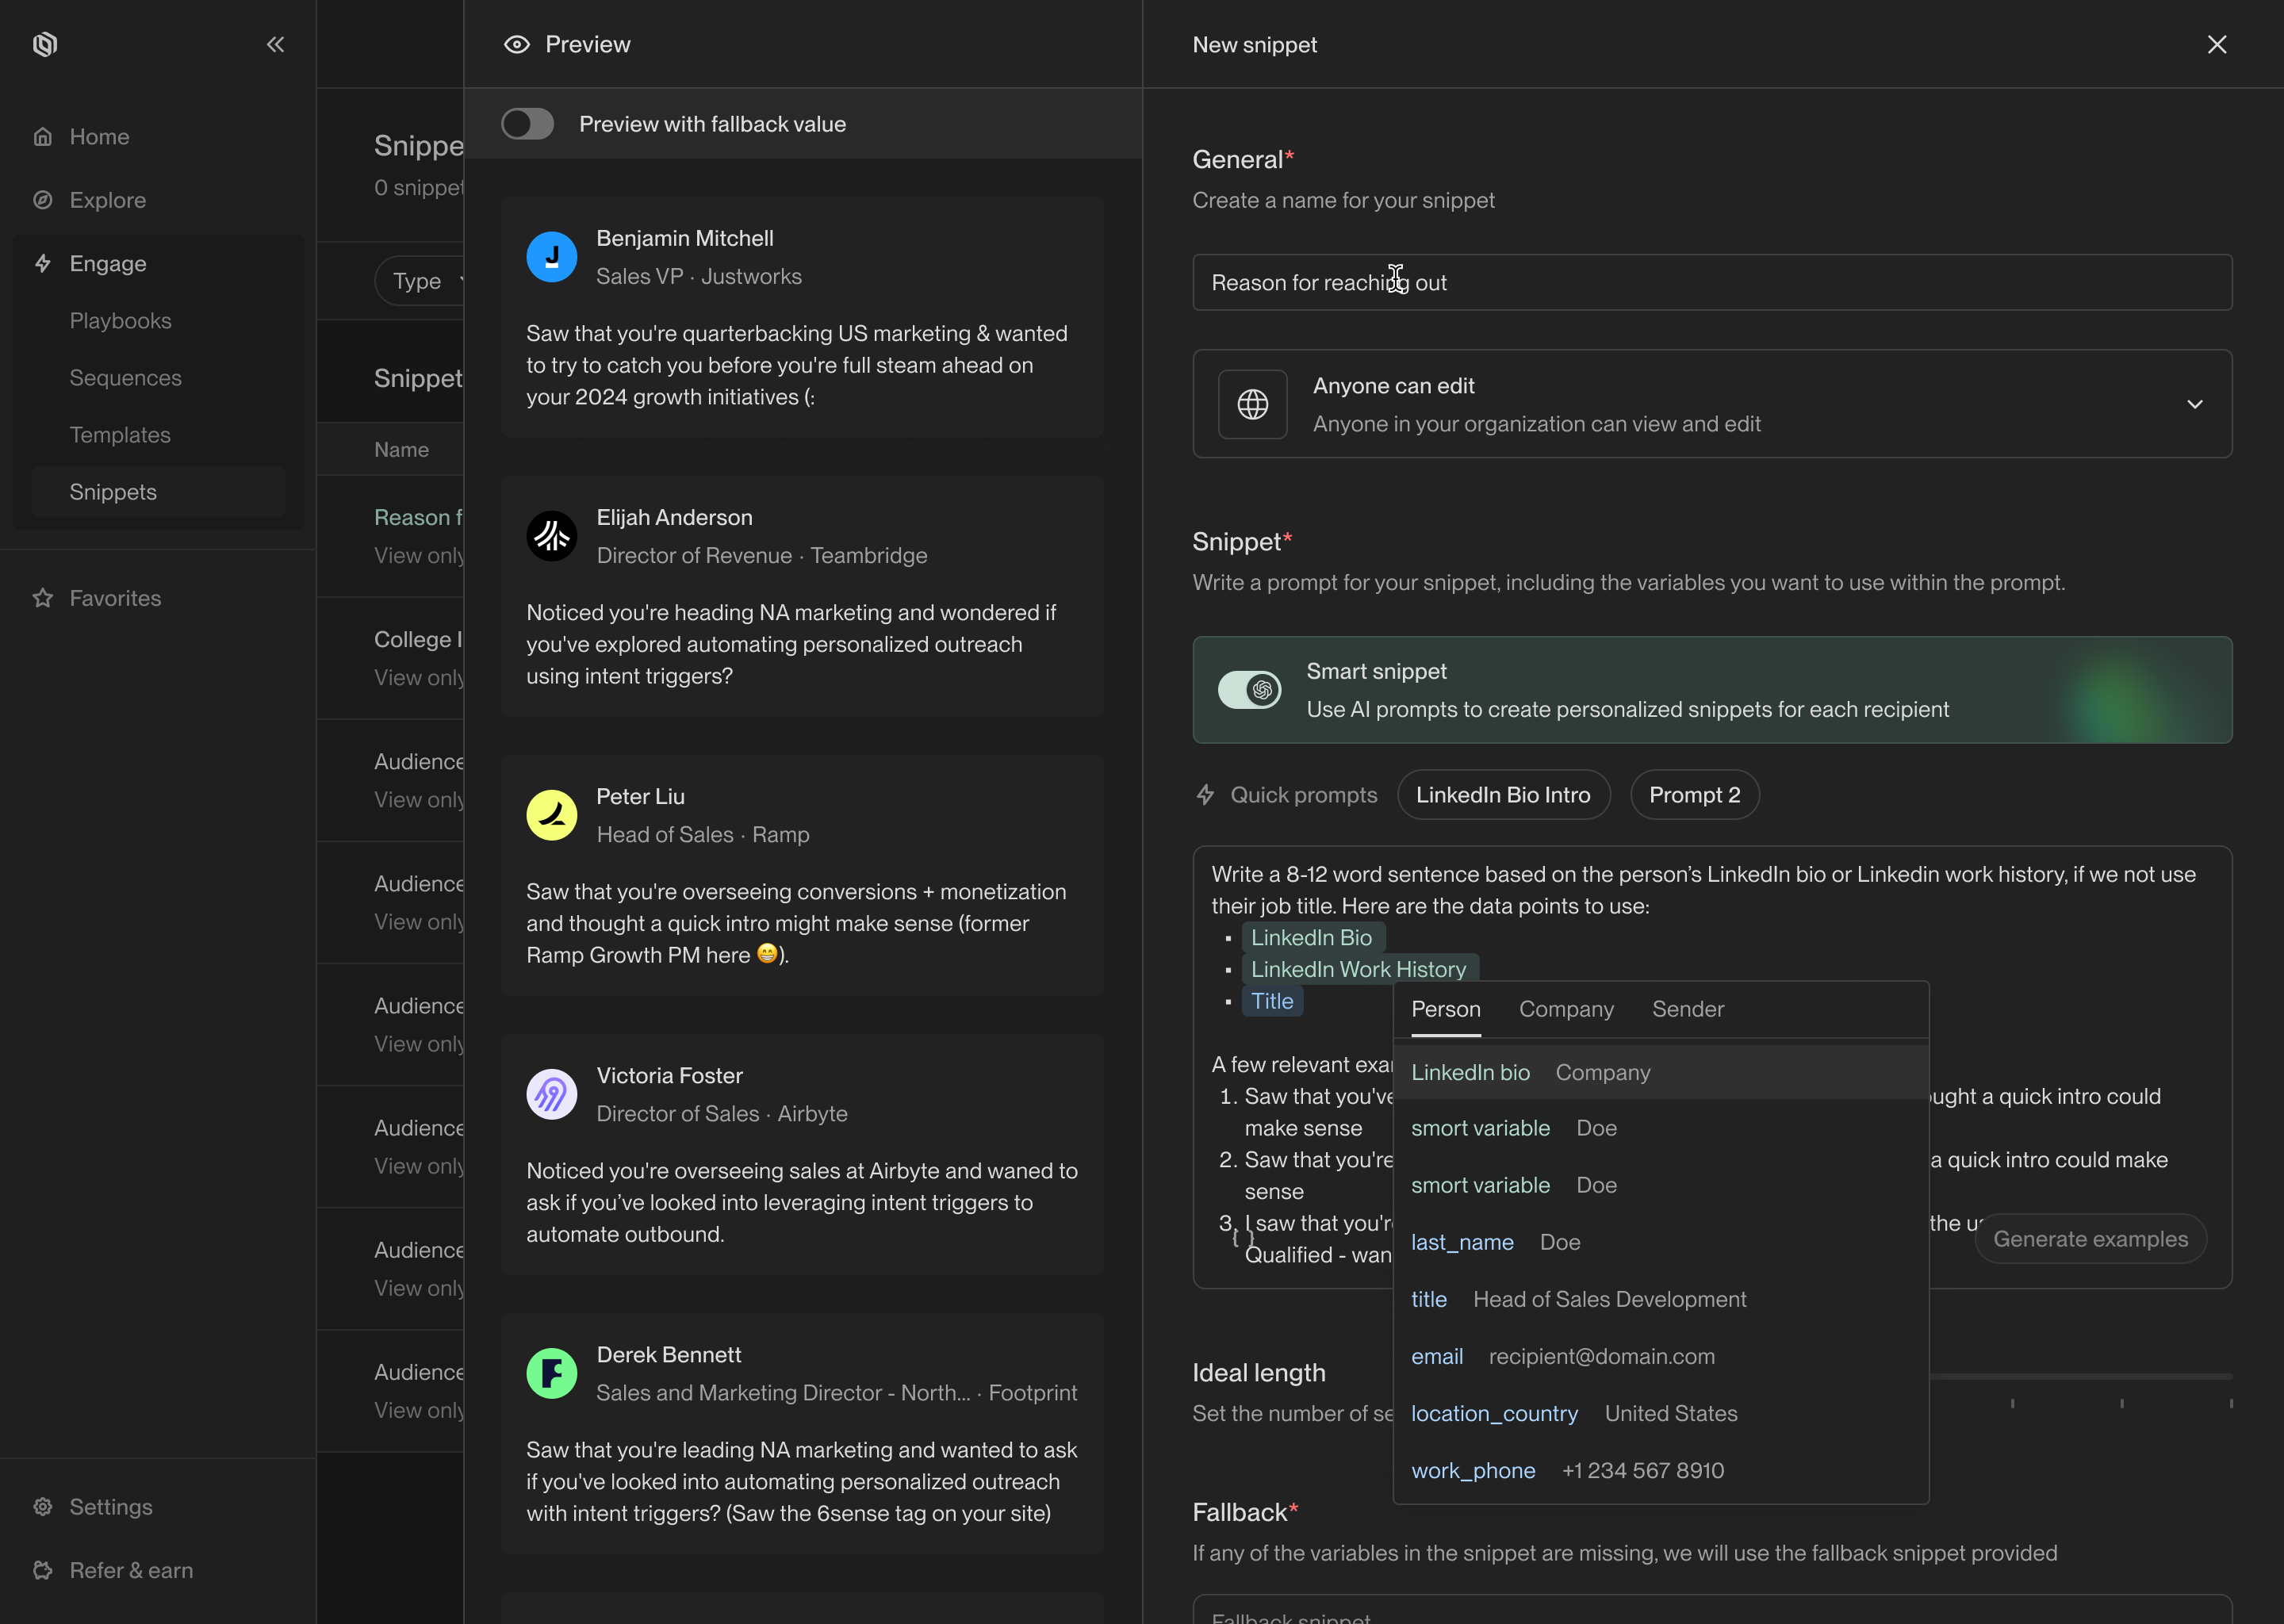 Just like regular snippets, you should also define a fallback value for the case
where some of the template variables in the prompt are missing data. This will
prevent enrollments from being blocked by the missing data.
When you're satisfied with your prompt, click **Create** to save it. You will
now be able to use the snippet in your sequences.
## Recommendations
Here are a few practices we recommend to get the most out of smart snippets:
1. Always include at least one template variable for the model to use to
personalize the snippet. For example, include some details about the sender,
the recipient, or their company. This helps the model write more precise and
personalized copy.
2. Include 2-3 example outputs to guide the model. Examples help the model
understand the tone and structure you're trying to achieve. The model will
often pick up on vocabulary and stylistic choices from your examples.
3. Start small. Pick a specific part of the email—such as the salutation or
hook—and focus on personalizing that part. Smart snippets are most effective
when they're used to personalize small sections of your email. Remember that
you can use as many snippets in an email as you want!
---
# Source: https://docs.unifygtm.com/reference/integrations/snitcher.md
> ## Documentation Index
> Fetch the complete documentation index at: https://docs.unifygtm.com/llms.txt
> Use this file to discover all available pages before exploring further.
# Snitcher Integration Guide
> Identify website visitors with Snitcher and other providers.
# Overview
Unify provides out-of-the-box website visitor identification Snitcher and other
providers. To get started, simply enable [Unify Intent](https://app.unifygtm.com/dashboard/settings/integrations/unify-intent)
in your settings.
Once connected, Unify will automatically begin identifying website visitors
using Snitcher and other data sources for maximum coverage. Be sure to set up
the Unify Intent client on your website to start receiving visitors to identify.
---
# Source: https://docs.unifygtm.com/reference/sequences/template-variables.md
> ## Documentation Index
> Fetch the complete documentation index at: https://docs.unifygtm.com/llms.txt
> Use this file to discover all available pages before exploring further.
# Template Variables
> Use template variables to personalize your emails.
## Overview
Template variables are key to personalizing messages sent through Unify. You can
use template variables to insert dynamic values into your emails, such as a
person's name, company, or job title.
## Inserting variables
You can insert template variables into emails you write when creating sequences in Unify. To open the template variable dropdown, click on the template variable button in the sequence builder.
Just like regular snippets, you should also define a fallback value for the case
where some of the template variables in the prompt are missing data. This will
prevent enrollments from being blocked by the missing data.
When you're satisfied with your prompt, click **Create** to save it. You will
now be able to use the snippet in your sequences.
## Recommendations
Here are a few practices we recommend to get the most out of smart snippets:
1. Always include at least one template variable for the model to use to
personalize the snippet. For example, include some details about the sender,
the recipient, or their company. This helps the model write more precise and
personalized copy.
2. Include 2-3 example outputs to guide the model. Examples help the model
understand the tone and structure you're trying to achieve. The model will
often pick up on vocabulary and stylistic choices from your examples.
3. Start small. Pick a specific part of the email—such as the salutation or
hook—and focus on personalizing that part. Smart snippets are most effective
when they're used to personalize small sections of your email. Remember that
you can use as many snippets in an email as you want!
---
# Source: https://docs.unifygtm.com/reference/integrations/snitcher.md
> ## Documentation Index
> Fetch the complete documentation index at: https://docs.unifygtm.com/llms.txt
> Use this file to discover all available pages before exploring further.
# Snitcher Integration Guide
> Identify website visitors with Snitcher and other providers.
# Overview
Unify provides out-of-the-box website visitor identification Snitcher and other
providers. To get started, simply enable [Unify Intent](https://app.unifygtm.com/dashboard/settings/integrations/unify-intent)
in your settings.
Once connected, Unify will automatically begin identifying website visitors
using Snitcher and other data sources for maximum coverage. Be sure to set up
the Unify Intent client on your website to start receiving visitors to identify.
---
# Source: https://docs.unifygtm.com/reference/sequences/template-variables.md
> ## Documentation Index
> Fetch the complete documentation index at: https://docs.unifygtm.com/llms.txt
> Use this file to discover all available pages before exploring further.
# Template Variables
> Use template variables to personalize your emails.
## Overview
Template variables are key to personalizing messages sent through Unify. You can
use template variables to insert dynamic values into your emails, such as a
person's name, company, or job title.
## Inserting variables
You can insert template variables into emails you write when creating sequences in Unify. To open the template variable dropdown, click on the template variable button in the sequence builder.
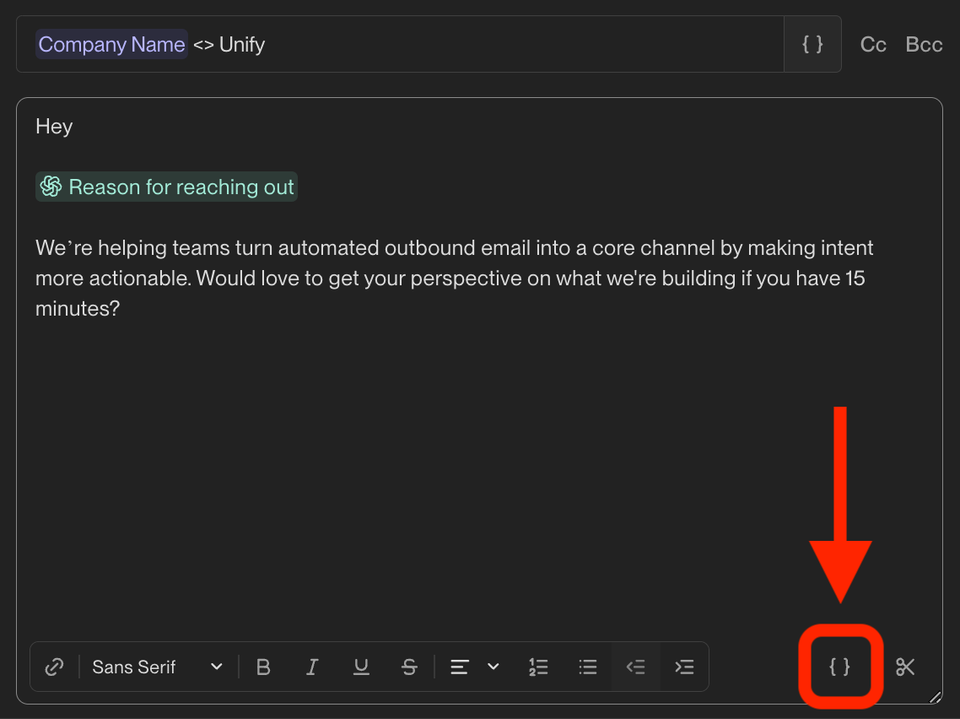 You can also press **`{`** on your keyboard to open the template variable dropdown. Once open, you can select a variable and insert it into your email.
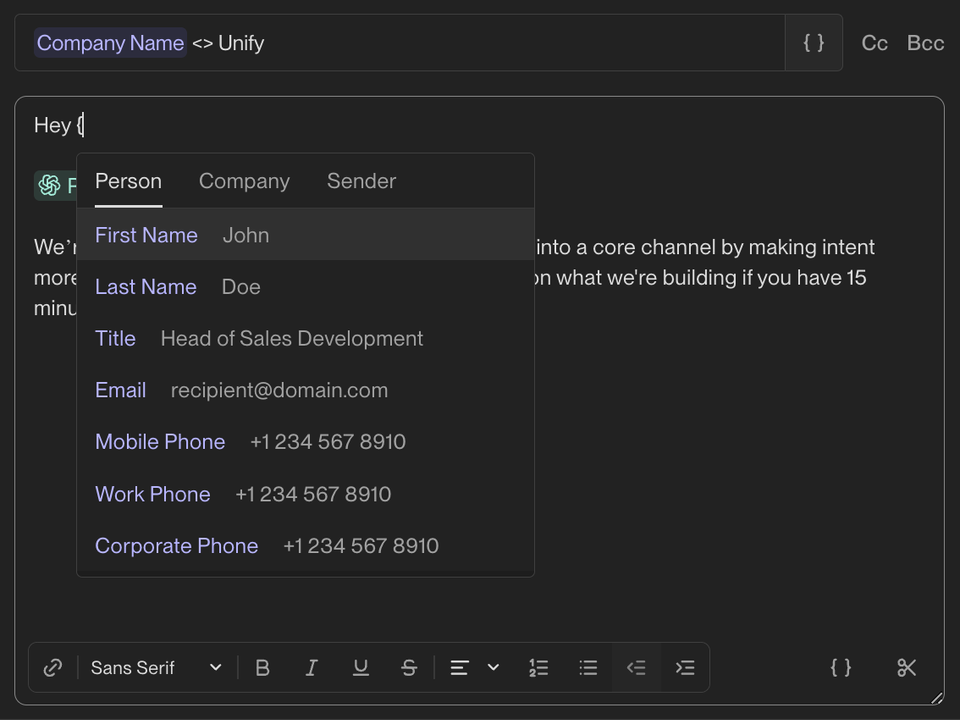
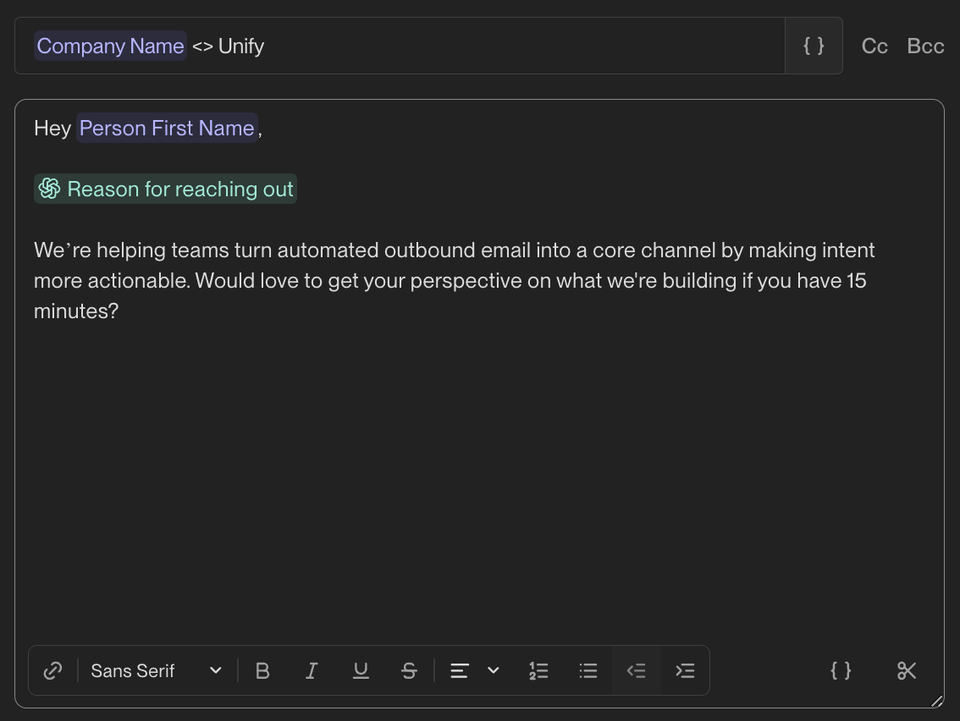 When a person is enrolled in this sequence, this value will be filled in dynamically.
## Handling missing data
### Enrollment blocking
Sometimes, Unify won’t have data to populate variables used in a sequence email. In these cases, Unify will never send an email with a placeholder or missing value. Instead, Unify will *block* the sequence enrollment.
When a person is enrolled in this sequence, this value will be filled in dynamically.
## Handling missing data
### Enrollment blocking
Sometimes, Unify won’t have data to populate variables used in a sequence email. In these cases, Unify will never send an email with a placeholder or missing value. Instead, Unify will *block* the sequence enrollment.
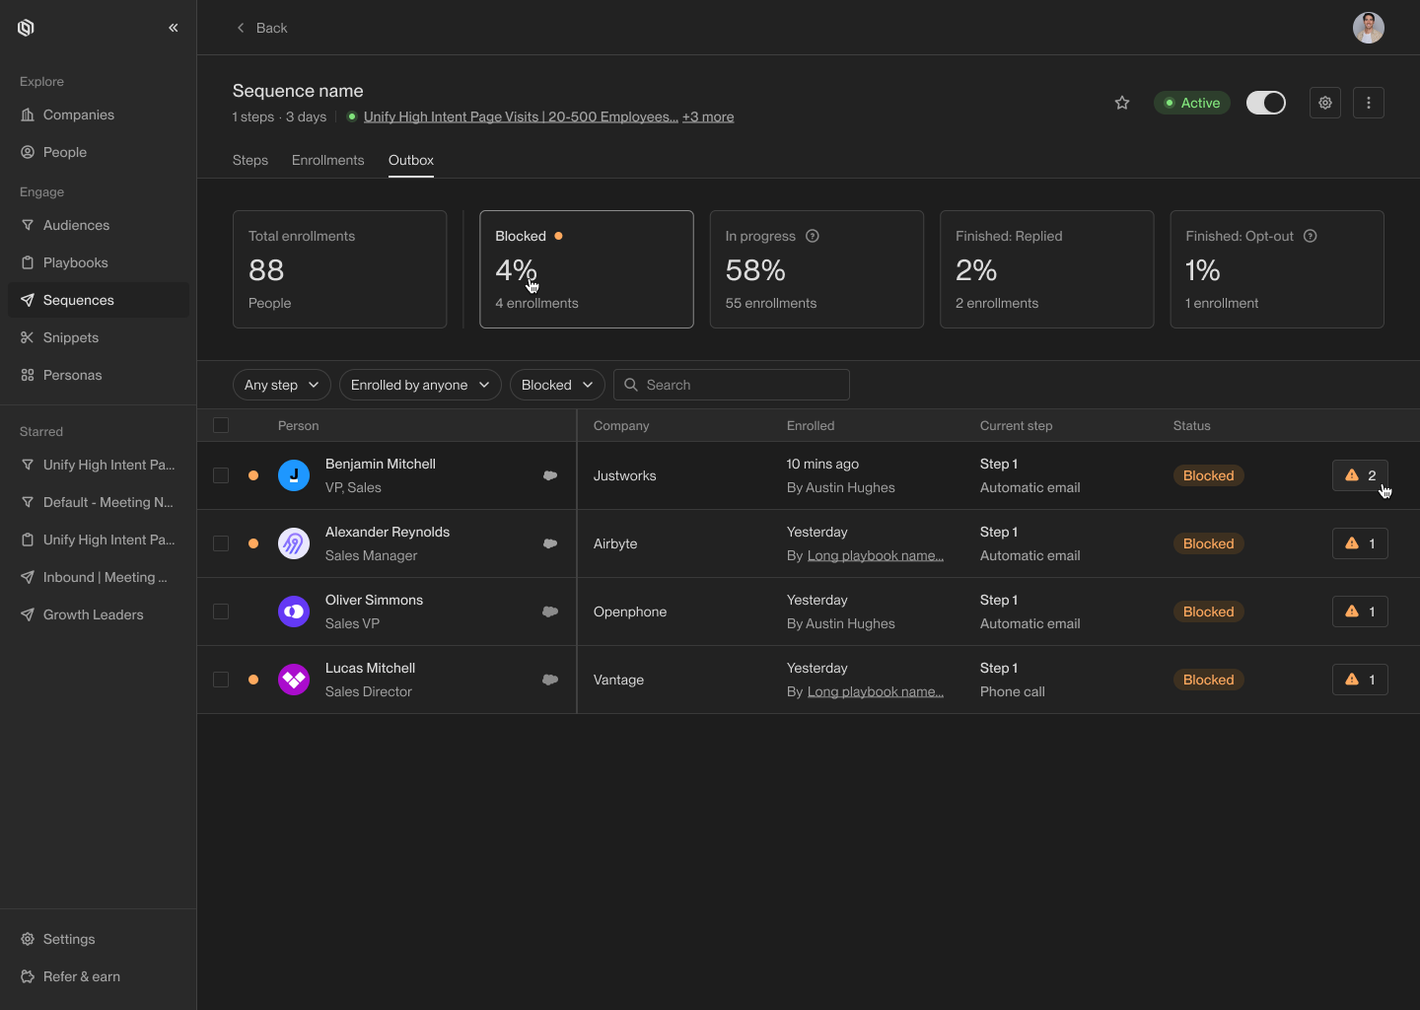 Blocked enrollments can be seen on the sequence details page. You can click on a blocked enrollment to edit the message and manually fill in any missing values.
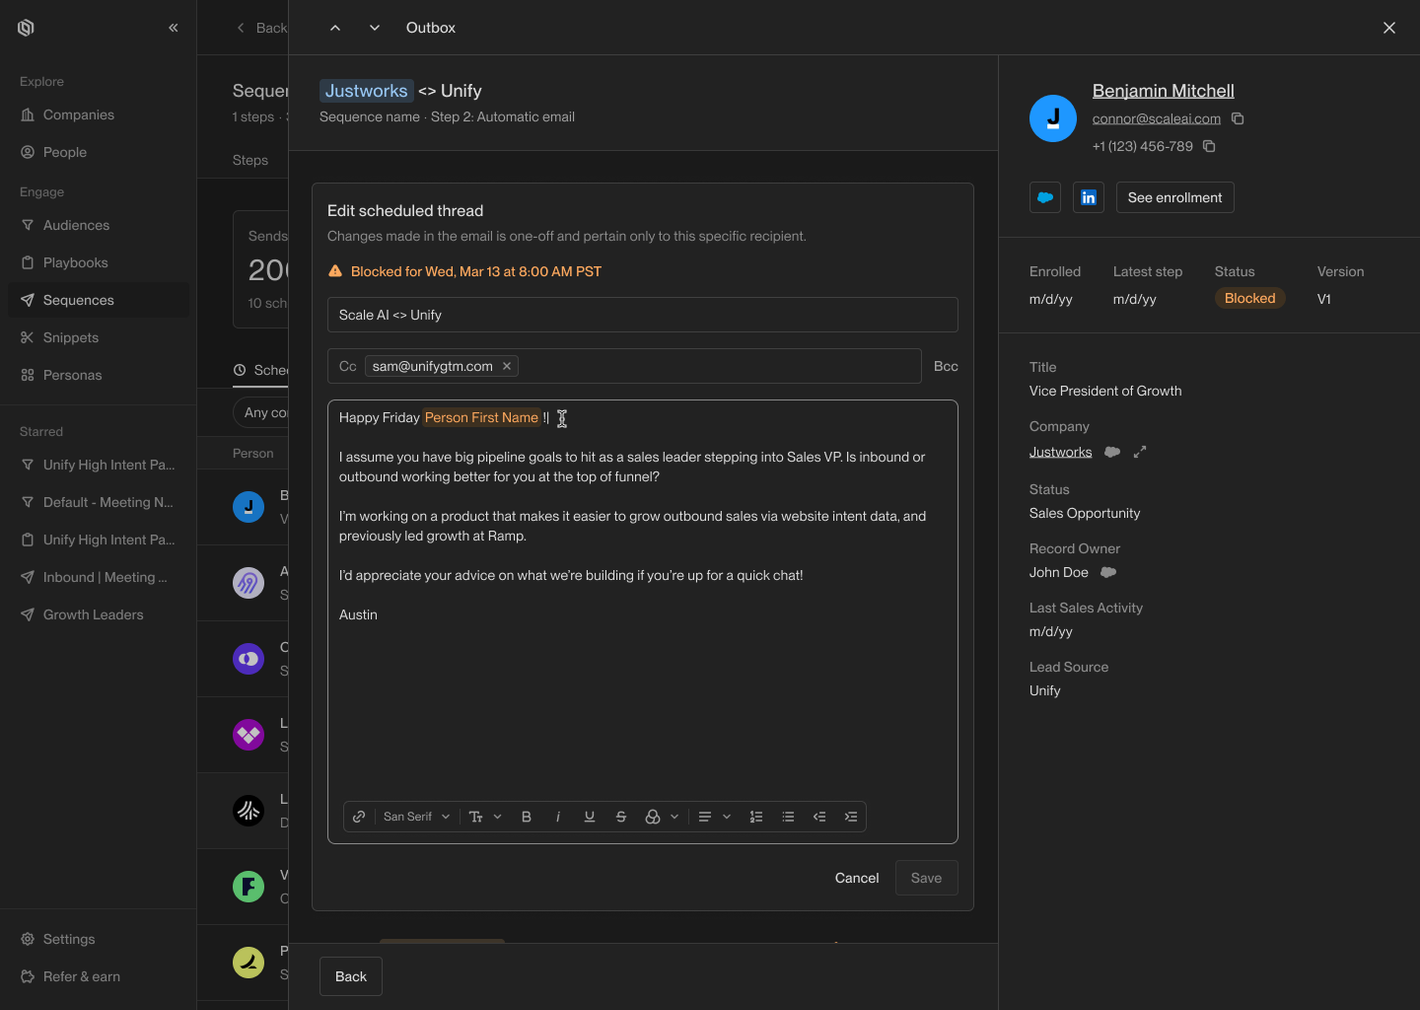 The template variables with missing values will appear highlighted in orange. Once you’ve replaced the missing values, click **Save** and the blocked status will disappear.
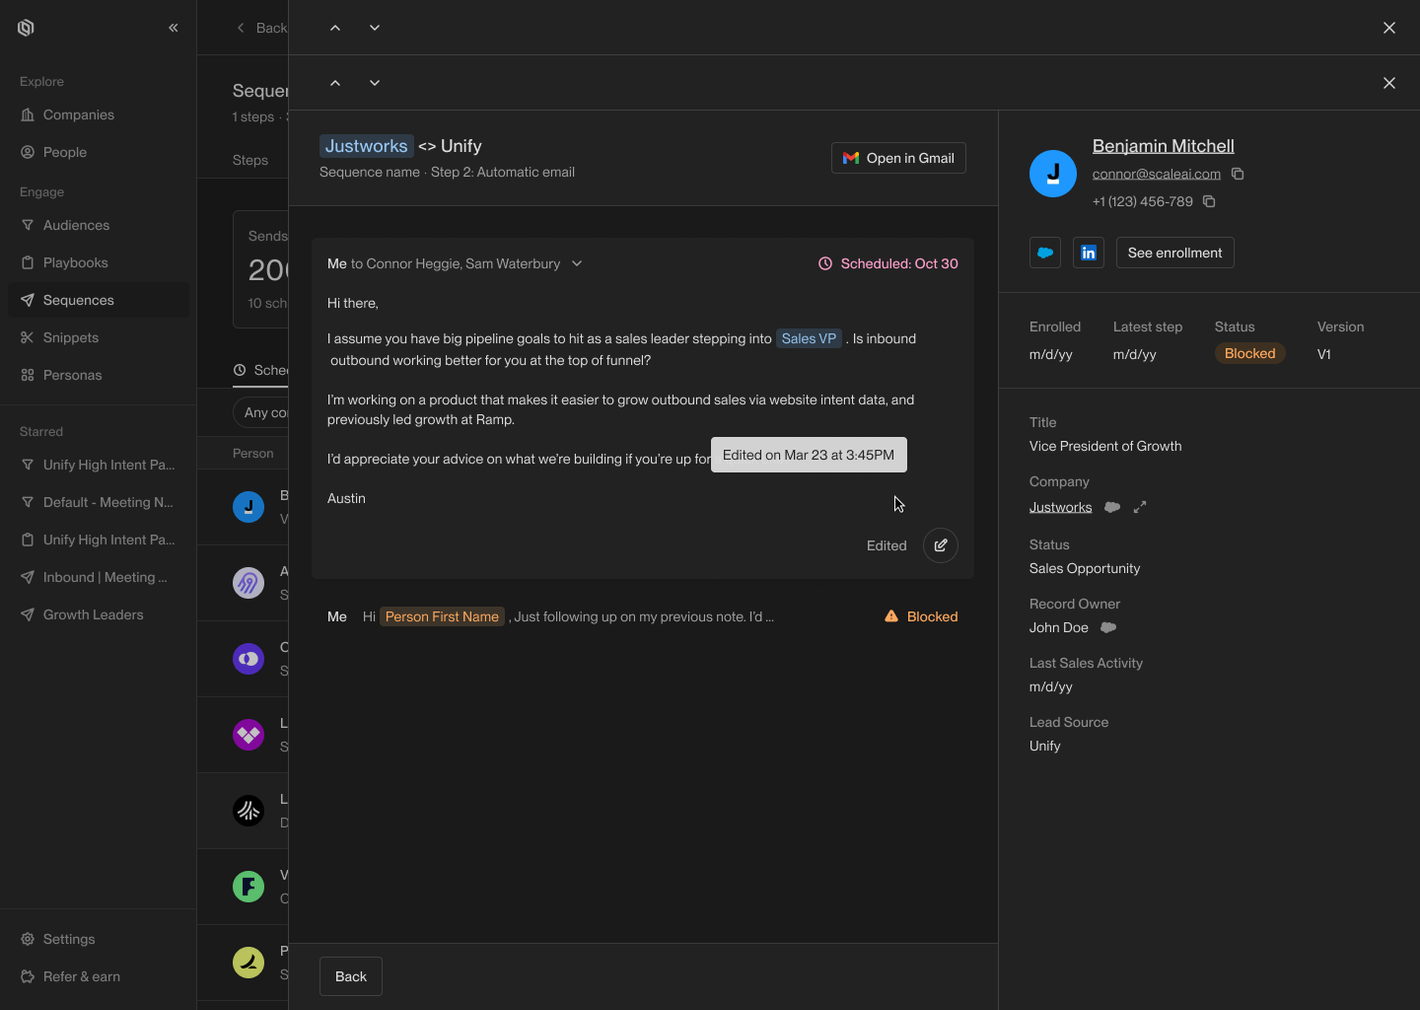 The step will then be rescheduled and sent automatically as part of the sequence.
### Snippets
To avoid having to manually unblock enrollments that are missing a value, it's
highly recommended that you take advantage of *snippets*.
Snippets are reusable blocks of copy that can be inserted into messages the same
as template variables. However, snippets also allow you to define fallback text
which is used if any template variables are missing values.
The step will then be rescheduled and sent automatically as part of the sequence.
### Snippets
To avoid having to manually unblock enrollments that are missing a value, it's
highly recommended that you take advantage of *snippets*.
Snippets are reusable blocks of copy that can be inserted into messages the same
as template variables. However, snippets also allow you to define fallback text
which is used if any template variables are missing values.
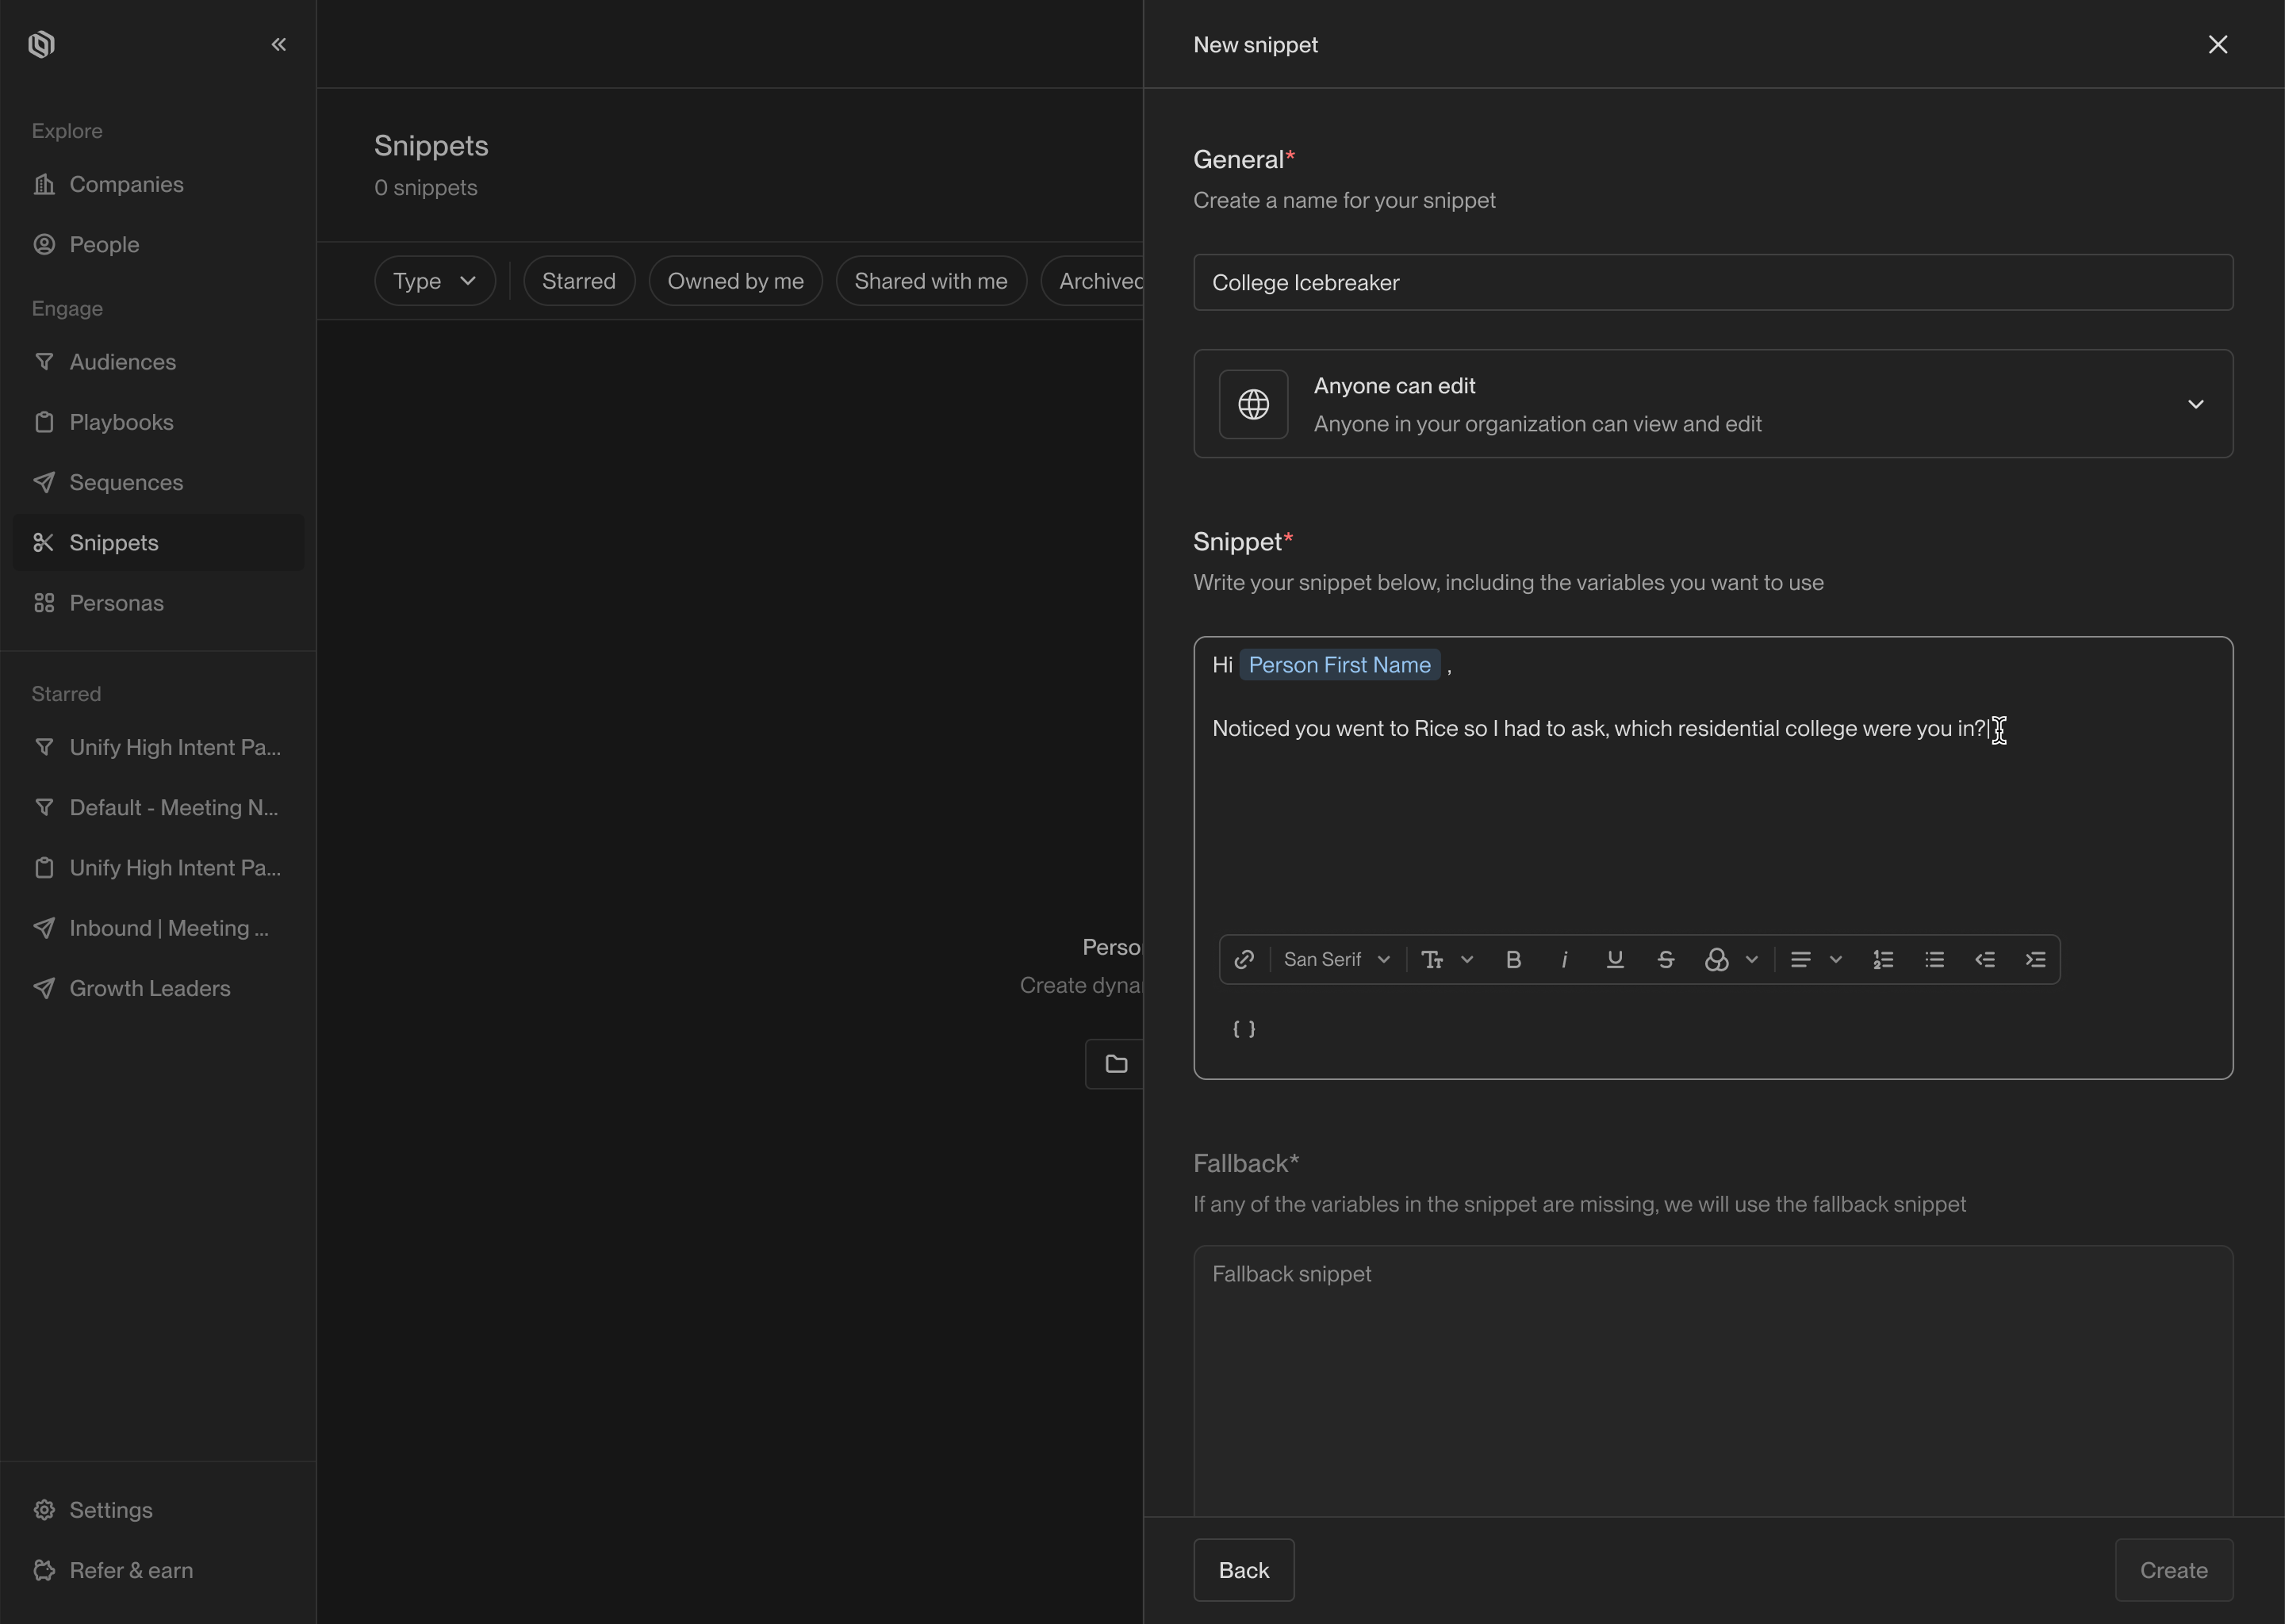 You can access snippets by navigating to the [Snippets](https://app.unifygtm.com/dashboard/snippets)
tab in the sidebar. When defining a snippet, you can use template variables or
even other snippets in the copy. Underneath the snippet text area, there is a
second text area where you can define a fallback.
You can access snippets by navigating to the [Snippets](https://app.unifygtm.com/dashboard/snippets)
tab in the sidebar. When defining a snippet, you can use template variables or
even other snippets in the copy. Underneath the snippet text area, there is a
second text area where you can define a fallback.
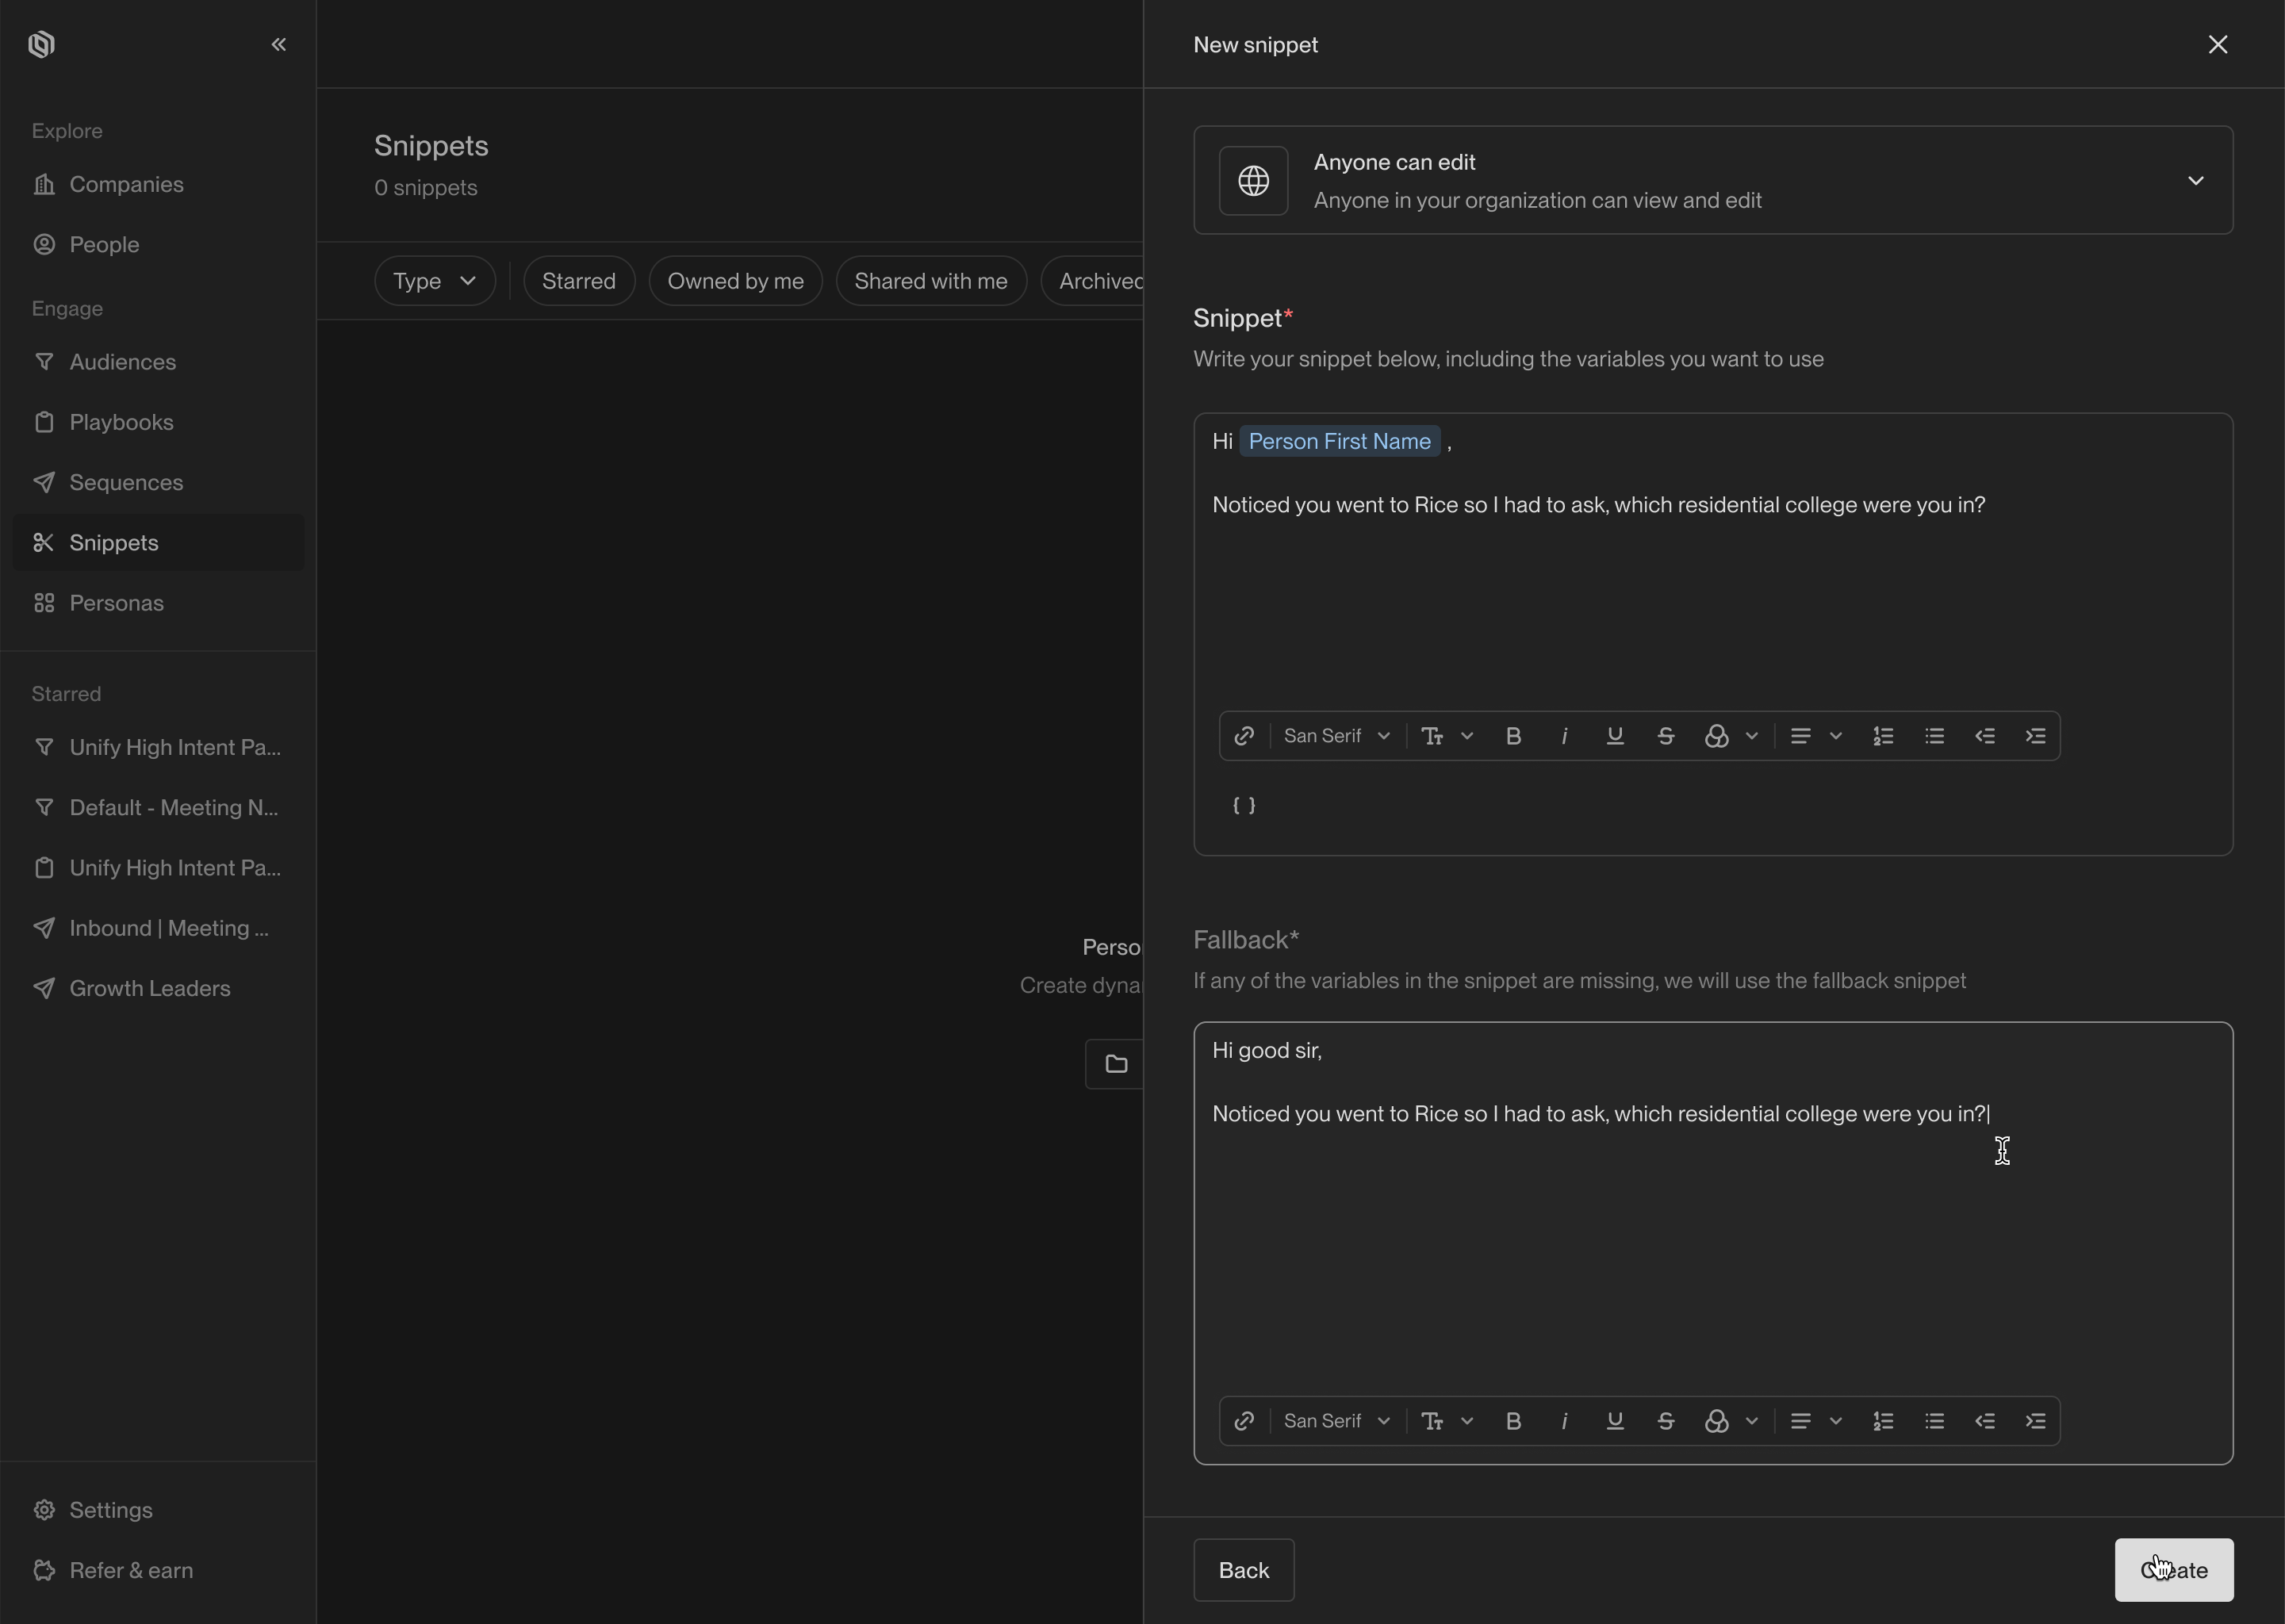 The fallback will be used in the event that any of the variables used in the
copy are missing. If you use snippets within snippets (which is called
*snippet-ception*), the fallback for the nested snippet will be used in the
top-level snippet.
---
# Source: https://docs.unifygtm.com/reference/plays/triggers.md
> ## Documentation Index
> Fetch the complete documentation index at: https://docs.unifygtm.com/llms.txt
> Use this file to discover all available pages before exploring further.
# Play Triggers
> Triggers represent the events and data sources that a Play runs on.
## Overview
Plays run on invidiual records, such as companies or people. Triggers define
when a Play should run and what data should be provided to it. Below are the
triggers you can choose from when creating a Play.
## Available triggers
### Champions
This trigger is a shortcut for running a Play on champions that Unify has
tracked for your business. Once selected, you can customize the matching
criteria similar to the record match trigger. This trigger always returns
People.
The fallback will be used in the event that any of the variables used in the
copy are missing. If you use snippets within snippets (which is called
*snippet-ception*), the fallback for the nested snippet will be used in the
top-level snippet.
---
# Source: https://docs.unifygtm.com/reference/plays/triggers.md
> ## Documentation Index
> Fetch the complete documentation index at: https://docs.unifygtm.com/llms.txt
> Use this file to discover all available pages before exploring further.
# Play Triggers
> Triggers represent the events and data sources that a Play runs on.
## Overview
Plays run on invidiual records, such as companies or people. Triggers define
when a Play should run and what data should be provided to it. Below are the
triggers you can choose from when creating a Play.
## Available triggers
### Champions
This trigger is a shortcut for running a Play on champions that Unify has
tracked for your business. Once selected, you can customize the matching
criteria similar to the record match trigger. This trigger always returns
People.
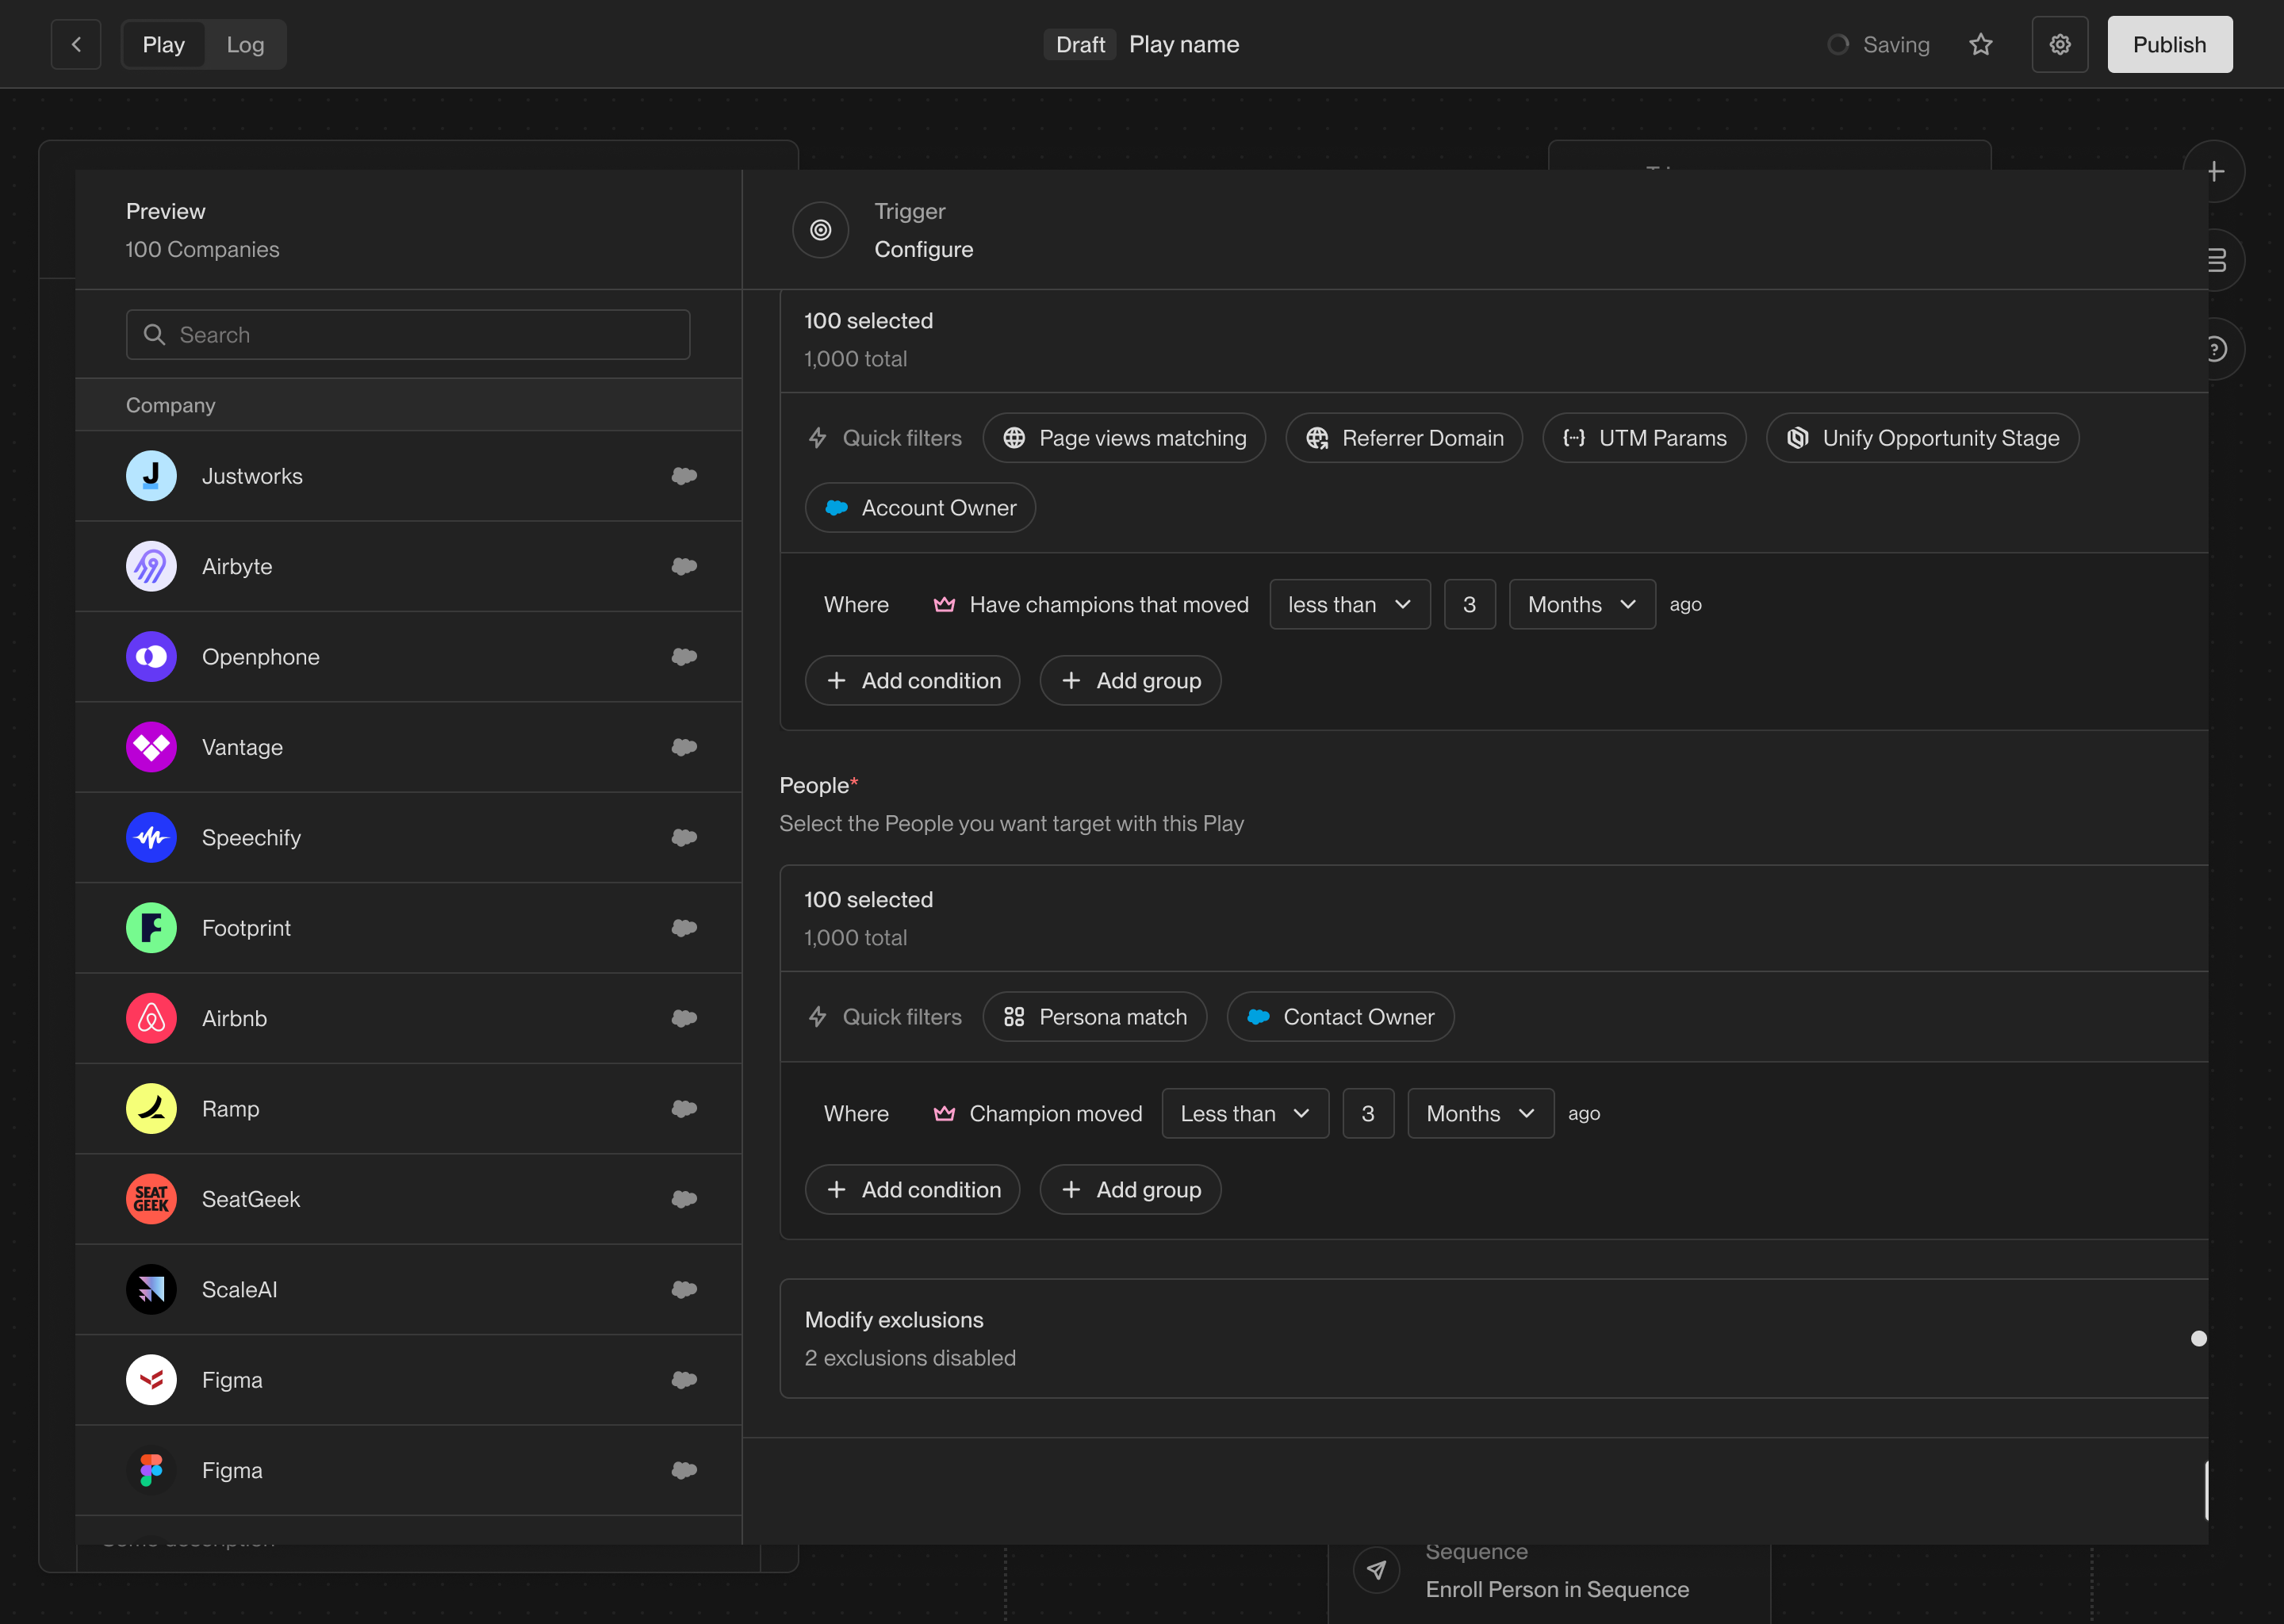 In order to use this trigger, you must have enabled and configured champion
tracking in your settings. For more information, see [Champion Tracking](/reference/signals/champions).
### Find lookalike companies
This trigger runs a Play on companies that are similar to a set of companies
you specify. This is useful for finding new companies that are similar to your
existing customers or ideal customer profile.
In order to use this trigger, you must have enabled and configured champion
tracking in your settings. For more information, see [Champion Tracking](/reference/signals/champions).
### Find lookalike companies
This trigger runs a Play on companies that are similar to a set of companies
you specify. This is useful for finding new companies that are similar to your
existing customers or ideal customer profile.
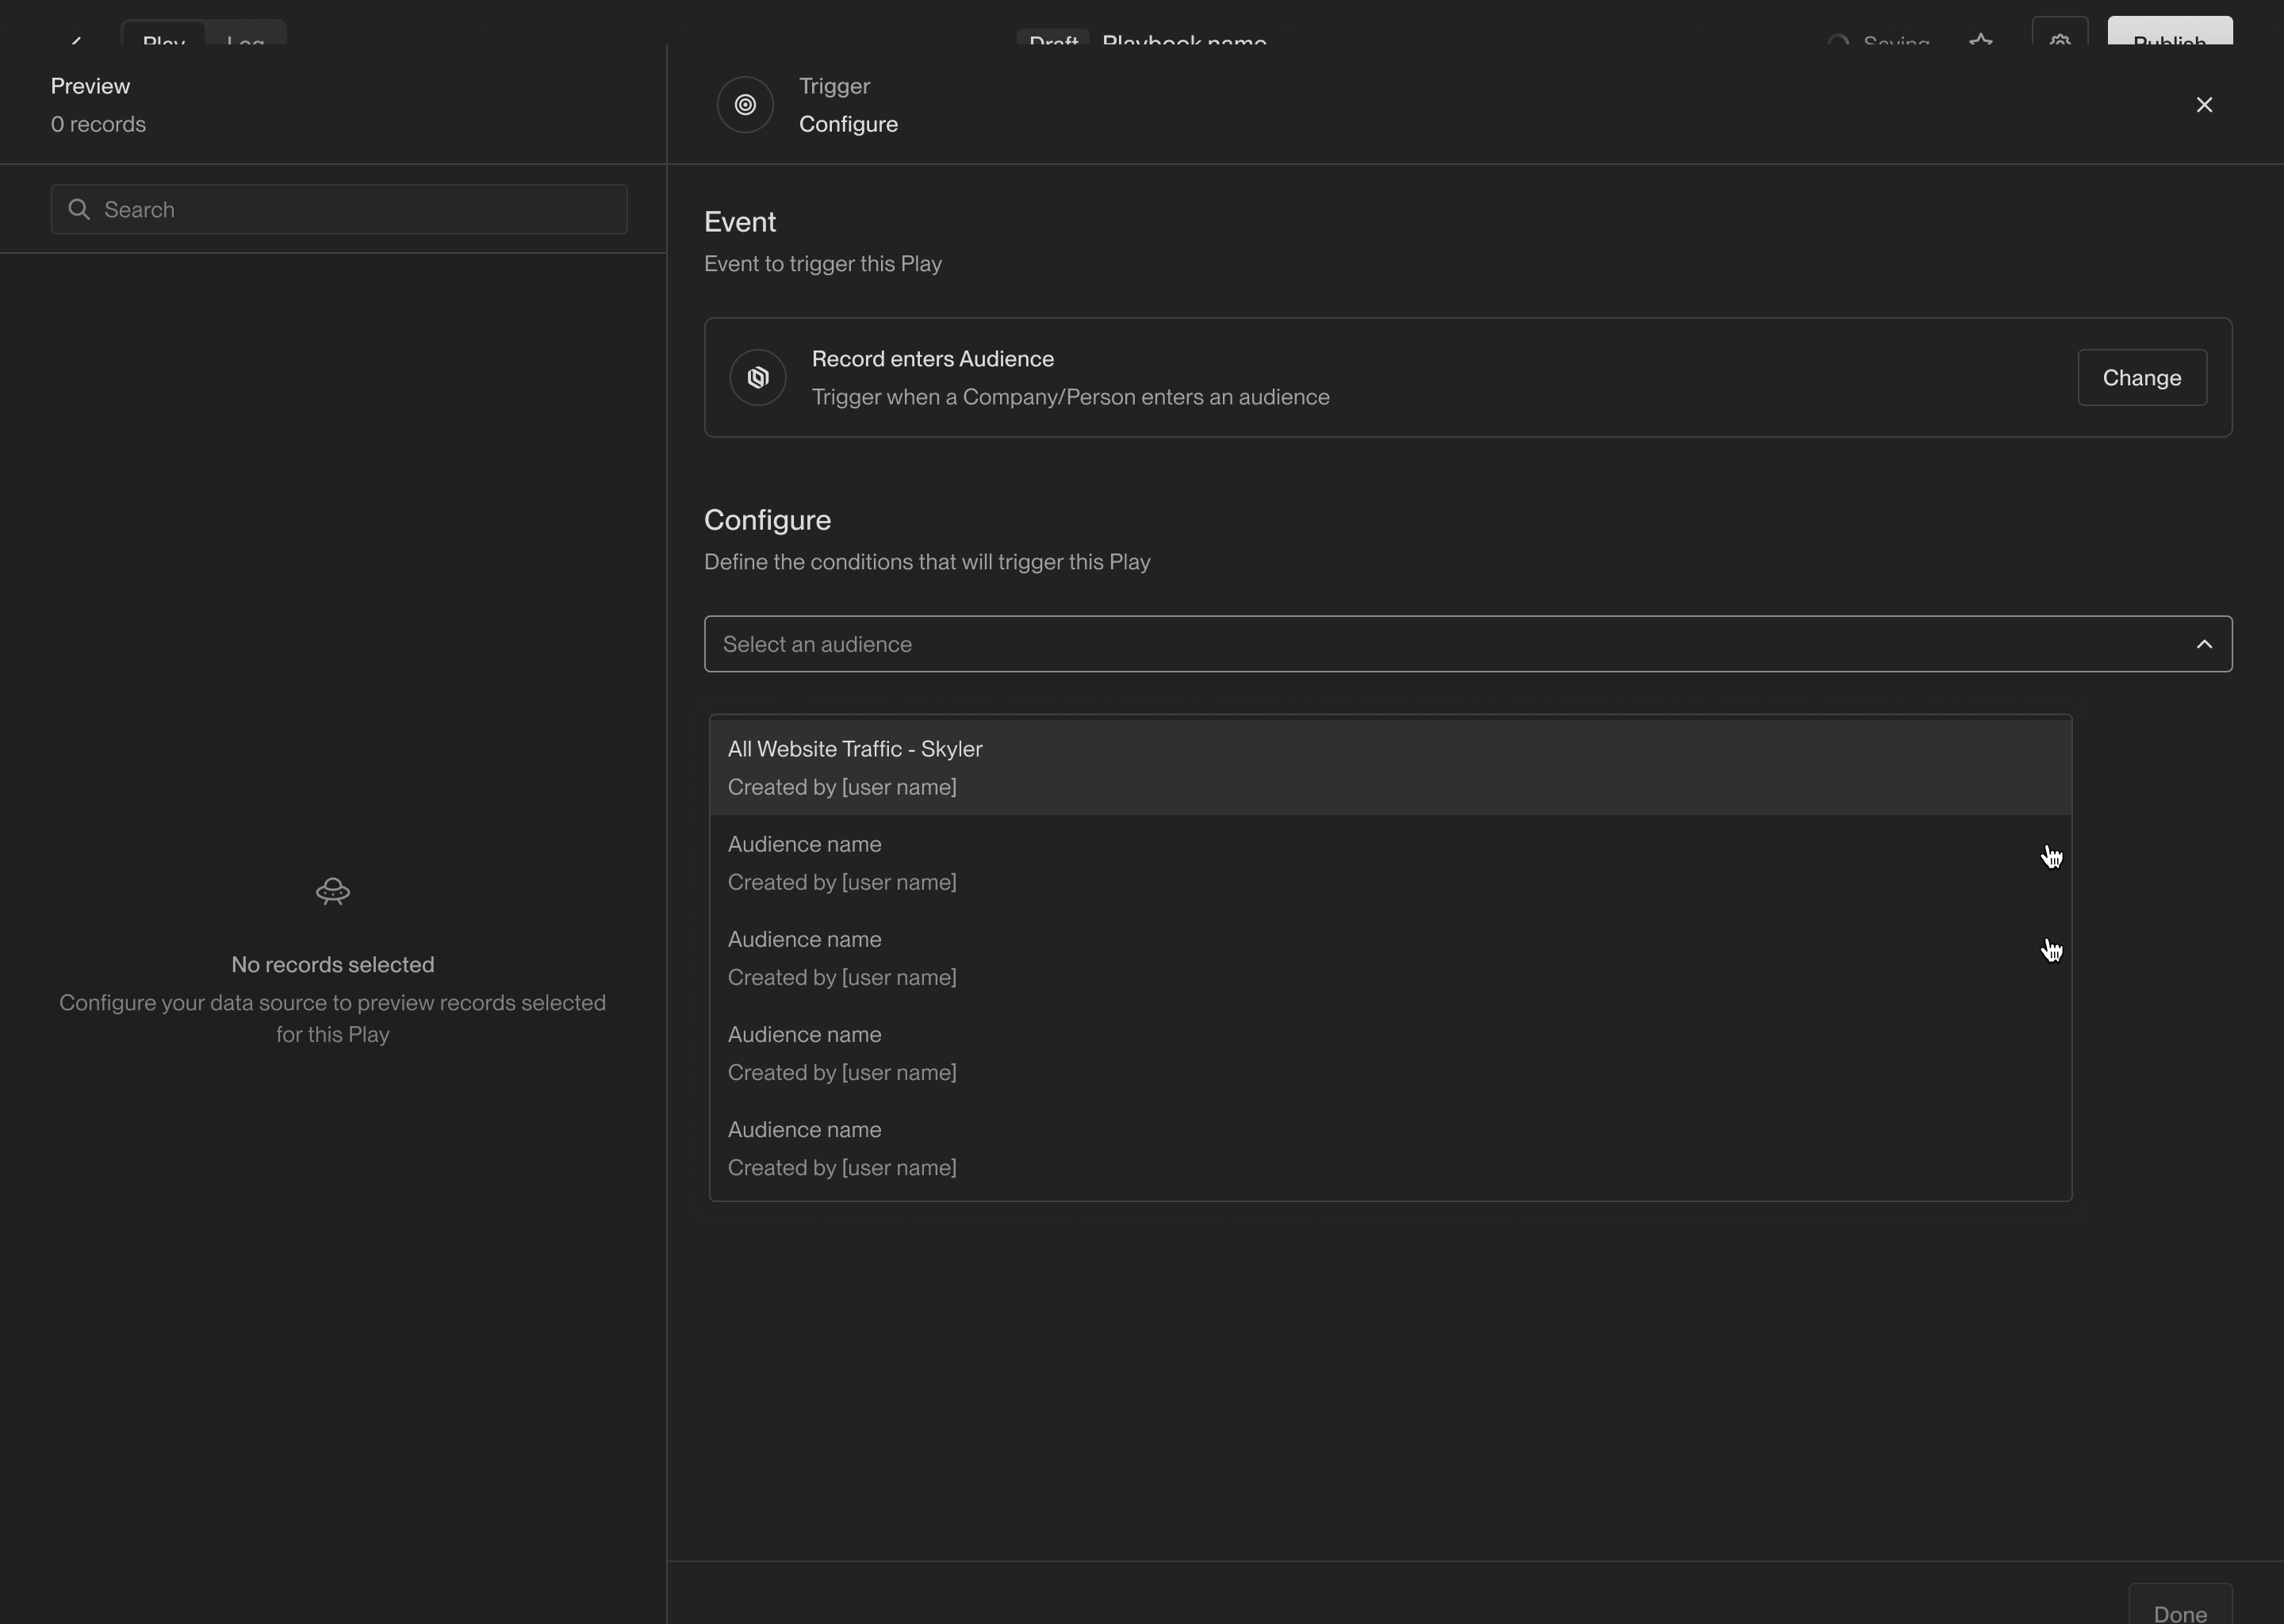 When you select an audience trigger, you will be prompted to select an audience
from the list of audiences you have created. Audiences are reusable in Unify,
which means you can use the same audience in multiple Plays.
You also have the choice to run the Play on either companies that enter the
audience or people that enter the audience. If you select companies, the output
of this trigger will be a company record. Otherwise, the output will be a person
record.
### Record matches criteria
This trigger runs a Play once on every company or person that matches a set of
filters. This trigger behaves the same as the audience trigger, but it doesn't
require that you already have an audience created. Instead, you can define the
filters directly in the Play.
When you select an audience trigger, you will be prompted to select an audience
from the list of audiences you have created. Audiences are reusable in Unify,
which means you can use the same audience in multiple Plays.
You also have the choice to run the Play on either companies that enter the
audience or people that enter the audience. If you select companies, the output
of this trigger will be a company record. Otherwise, the output will be a person
record.
### Record matches criteria
This trigger runs a Play once on every company or person that matches a set of
filters. This trigger behaves the same as the audience trigger, but it doesn't
require that you already have an audience created. Instead, you can define the
filters directly in the Play.
 When you select a criteria trigger, you will be prompted to add filters to
select the companies or people that the Play should run on. Just like building
audiences, you can add as many filters as you like and preview the records that
match the filters before saving the trigger.
As with audience triggers, you can choose to run the Play on either companies or
people. This will determine what type of record the trigger outputs.
### Website visitors
This trigger is a shortcut for running a Play on companies that visit your
website. Once selected, you can customize the matching criteria similar to the
record match trigger. This trigger always returns Companies.
When you select a criteria trigger, you will be prompted to add filters to
select the companies or people that the Play should run on. Just like building
audiences, you can add as many filters as you like and preview the records that
match the filters before saving the trigger.
As with audience triggers, you can choose to run the Play on either companies or
people. This will determine what type of record the trigger outputs.
### Website visitors
This trigger is a shortcut for running a Play on companies that visit your
website. Once selected, you can customize the matching criteria similar to the
record match trigger. This trigger always returns Companies.
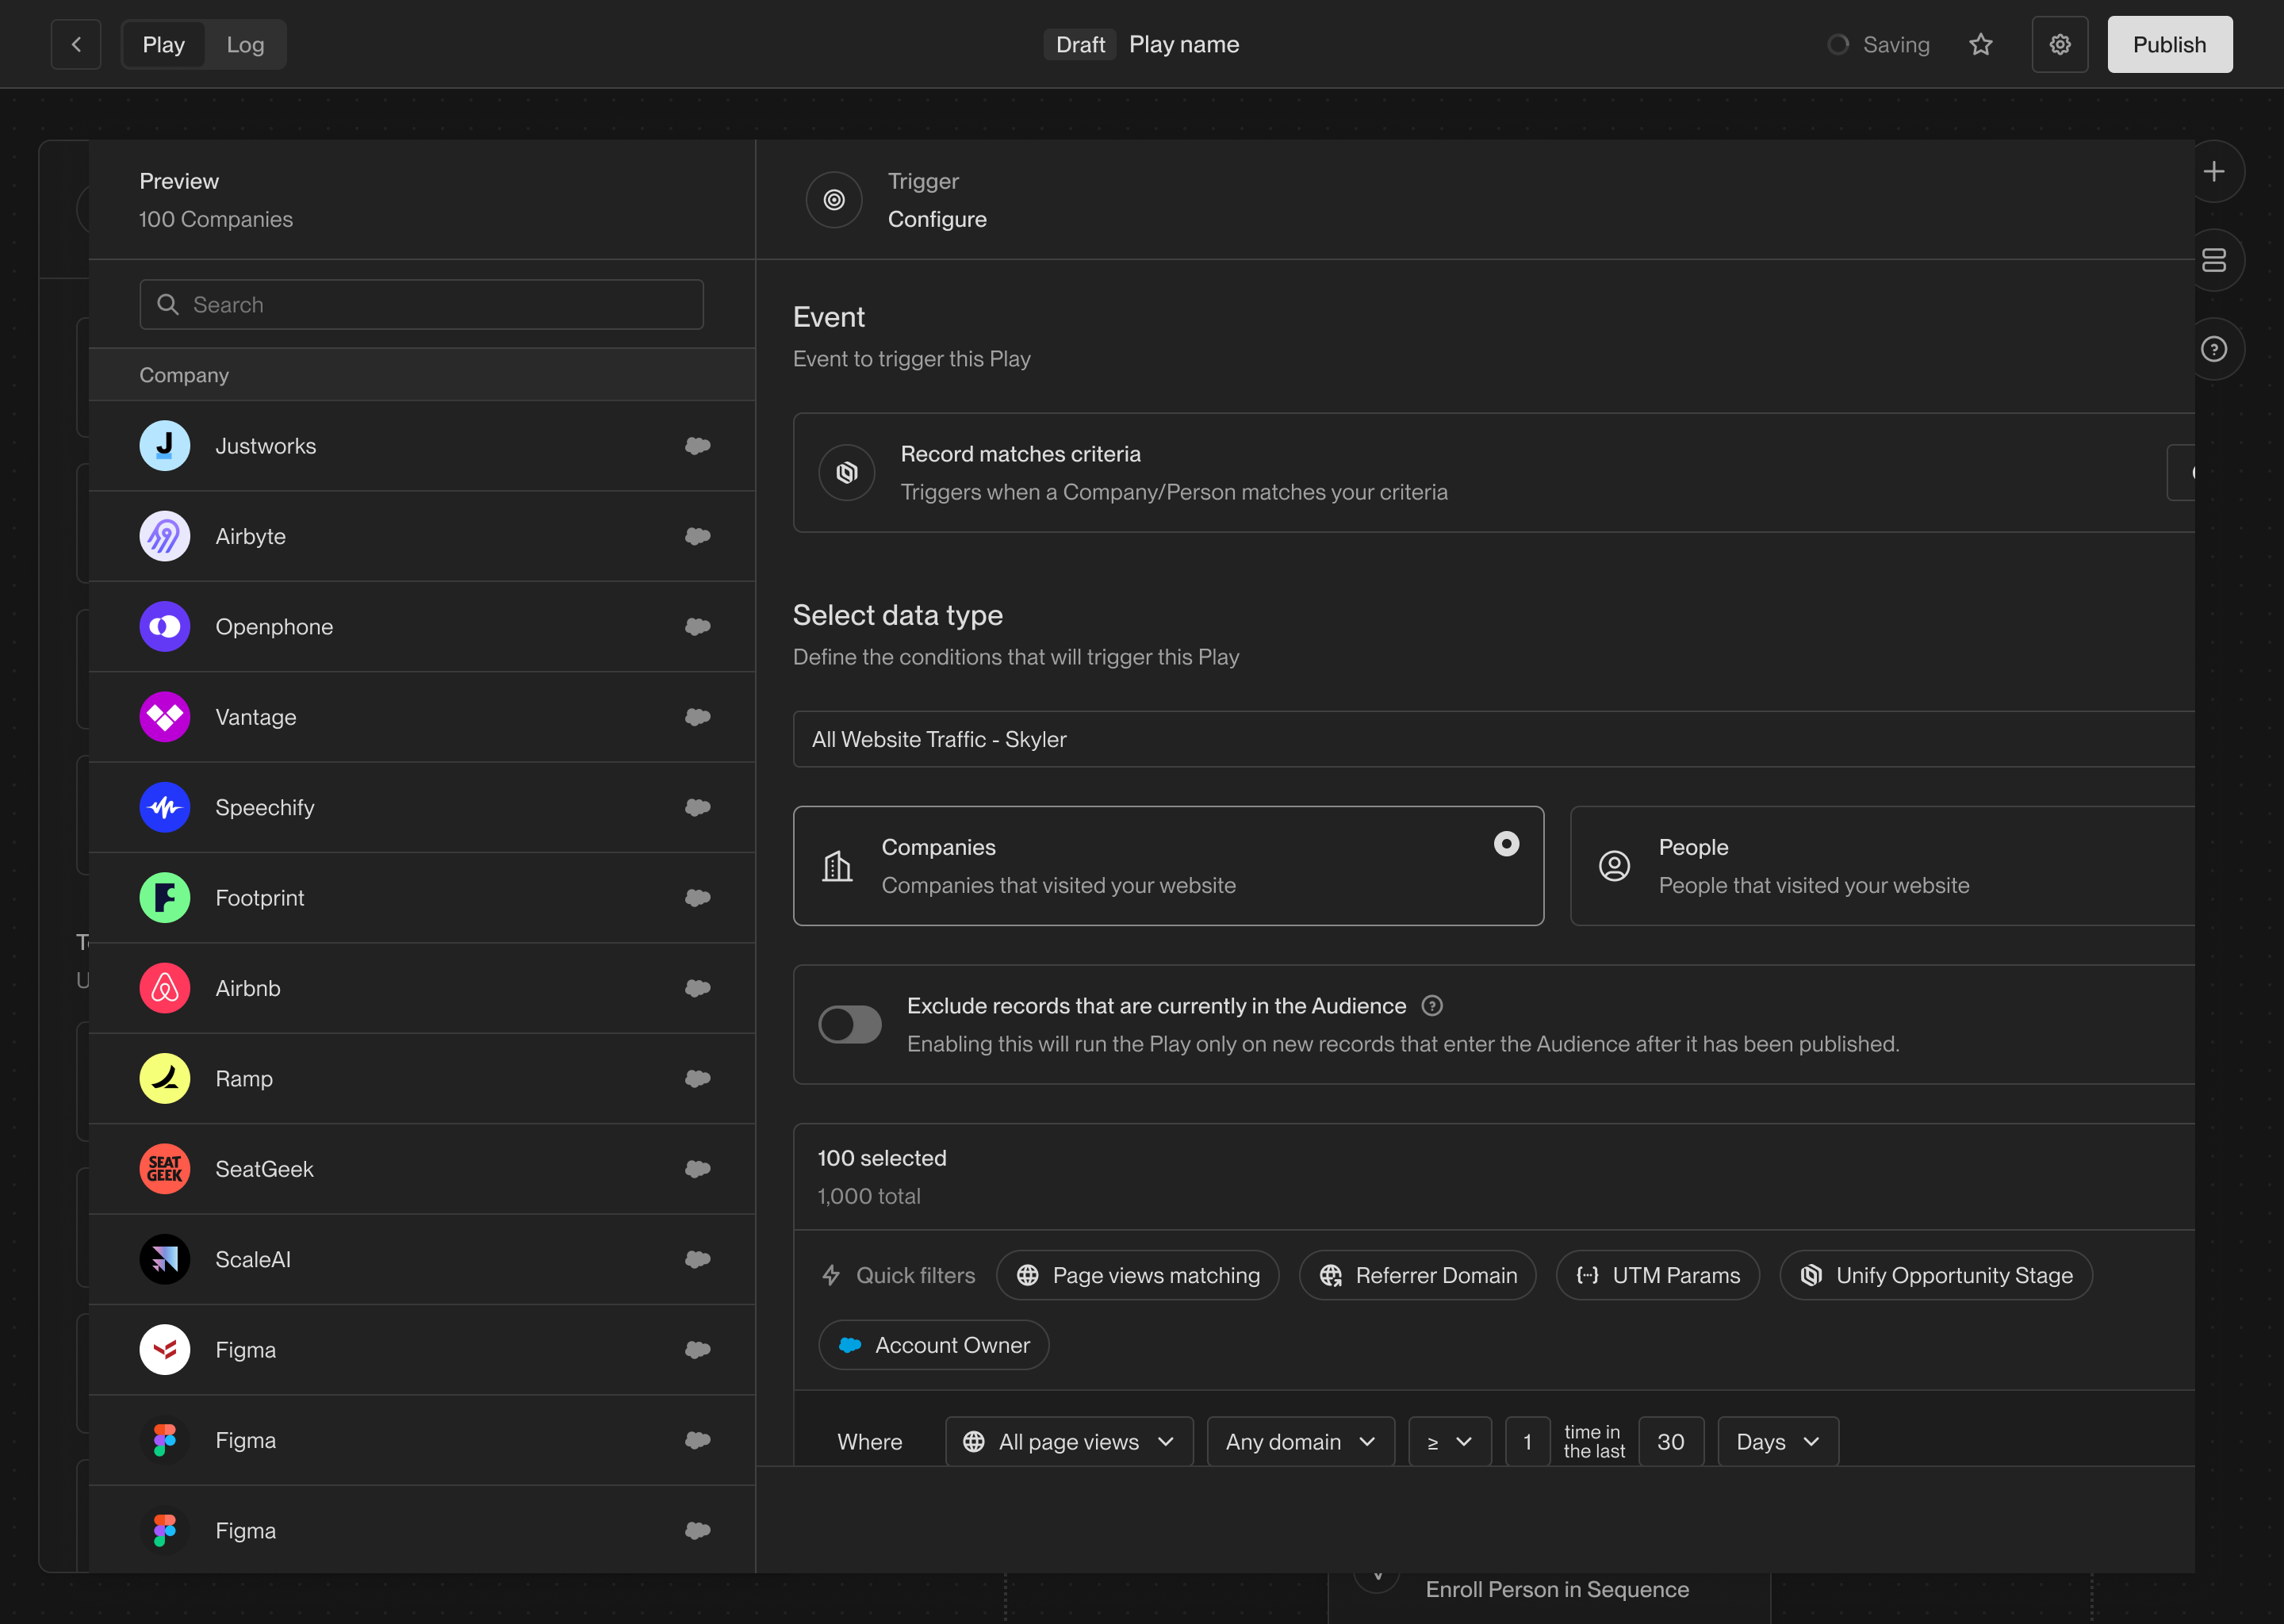 ## Coming soon
There are lots of additional triggers in the works including webhooks, third-party
events, schedules, and more. If you're interested in one that isn't available
yet, [let us know](mailto:support@unifygtm.com)! We'll get you in the beta as
soon as it's ready.
## FAQ
## Coming soon
There are lots of additional triggers in the works including webhooks, third-party
events, schedules, and more. If you're interested in one that isn't available
yet, [let us know](mailto:support@unifygtm.com)! We'll get you in the beta as
soon as it's ready.
## FAQ
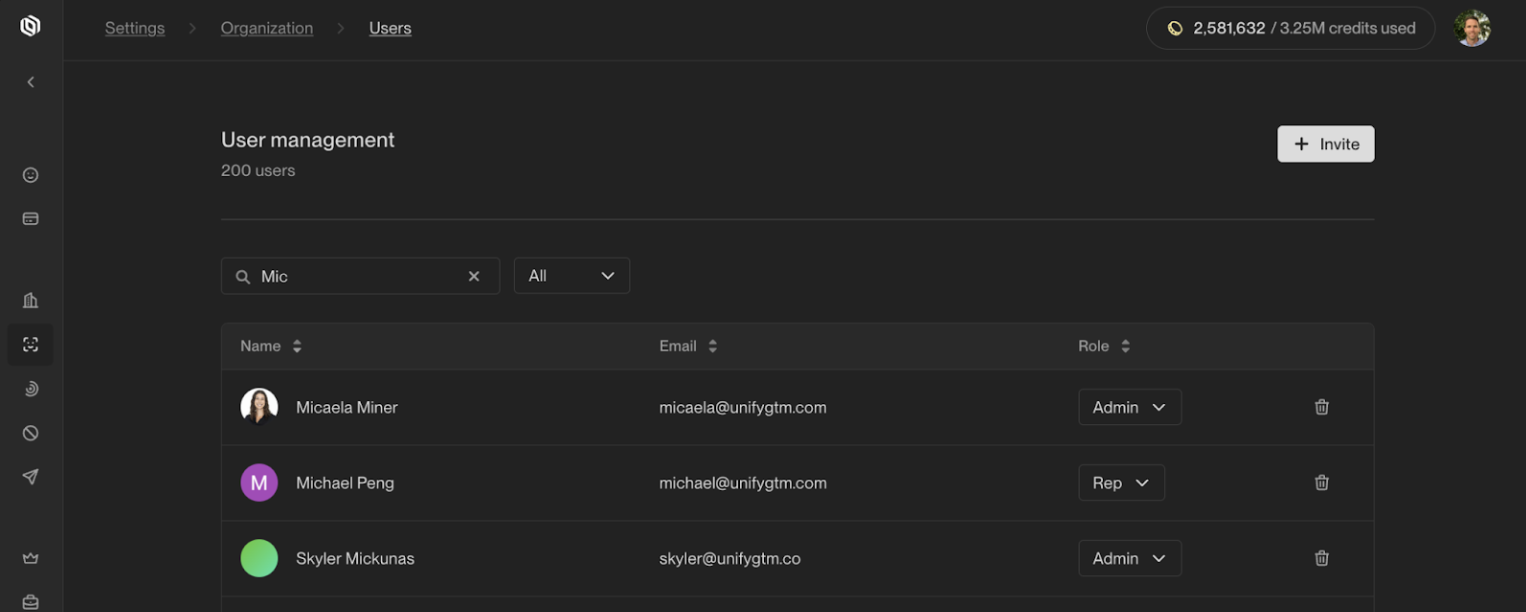 ## Role detail
Each role has a granular set of permissions available to them:
| Permission | Admin | Rep |
| --------------------------------------------- | :---------: | :--------------------: |
| Invite users and set roles | ✅ | ❌ |
| Edit Organization settings, including Billing | ✅ | ❌ |
| Edit Exclusion settings | ✅ | ❌ |
| Create and edit Plays | ✅ | ❌ |
| View Plays | ✅ | ✅ |
| Create and edit Sequences | ✅ | ✅ |
| Create and edit Audiences | ✅ | ✅ |
| Viewable tasks on Tasks dashboard | *All tasks* | *Tasks assigned to me* |
| Edit settings to make task skippable | ✅ | ❌ |
## Inviting a new user
To invite a new user, click the **+ Invite** button, and set their role. You can invite multiple users at one time.
You can always change this role after they accept the invite.
## Role detail
Each role has a granular set of permissions available to them:
| Permission | Admin | Rep |
| --------------------------------------------- | :---------: | :--------------------: |
| Invite users and set roles | ✅ | ❌ |
| Edit Organization settings, including Billing | ✅ | ❌ |
| Edit Exclusion settings | ✅ | ❌ |
| Create and edit Plays | ✅ | ❌ |
| View Plays | ✅ | ✅ |
| Create and edit Sequences | ✅ | ✅ |
| Create and edit Audiences | ✅ | ✅ |
| Viewable tasks on Tasks dashboard | *All tasks* | *Tasks assigned to me* |
| Edit settings to make task skippable | ✅ | ❌ |
## Inviting a new user
To invite a new user, click the **+ Invite** button, and set their role. You can invite multiple users at one time.
You can always change this role after they accept the invite.
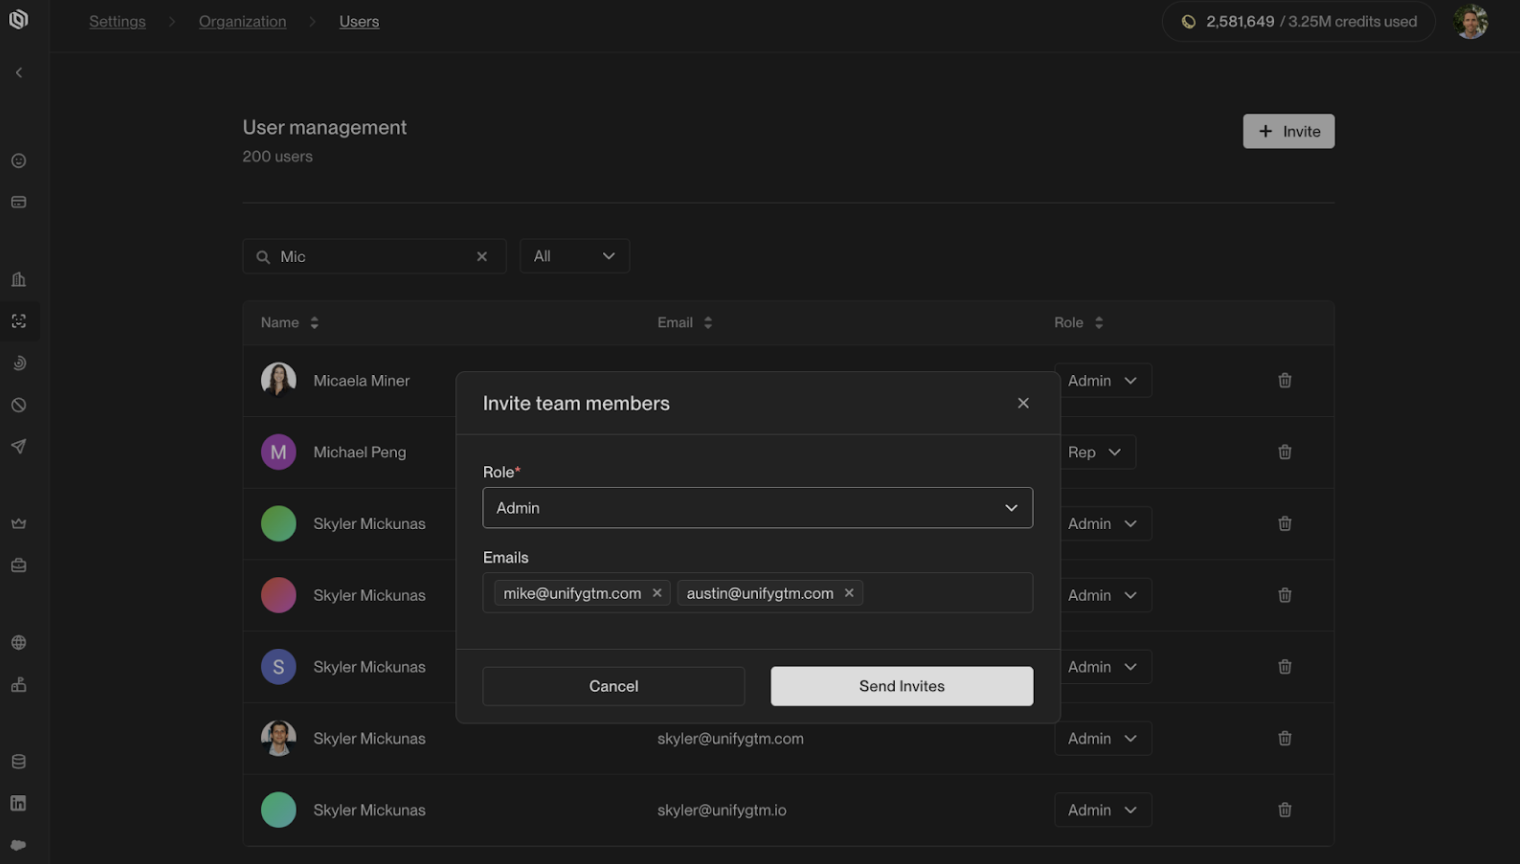 ---
# Source: https://docs.unifygtm.com/reference/sequences/send-schedules/using-send-schedules.md
> ## Documentation Index
> Fetch the complete documentation index at: https://docs.unifygtm.com/llms.txt
> Use this file to discover all available pages before exploring further.
# Using a Custom Send Schedule
> Learn how to view and apply Custom Send Schedules for Sequences.
Custom Send Schedules define when automated emails in a Sequence are allowed to send. Once you’ve configured your Custom Send Schedule, you can assign them to individual Sequences.
***
## Accessing Sequence Settings
To view or edit the Custom Send Schedule assigned to a Sequence:
1. Open any Sequence from your **Sequences** list.
2. Click the **⚙️ cog icon** in the top-right corner to open **Sequence Settings**.
3. In the settings drawer, you’ll see a section labeled **Send schedule**, displaying the currently linked schedule and its details.
---
# Source: https://docs.unifygtm.com/reference/sequences/send-schedules/using-send-schedules.md
> ## Documentation Index
> Fetch the complete documentation index at: https://docs.unifygtm.com/llms.txt
> Use this file to discover all available pages before exploring further.
# Using a Custom Send Schedule
> Learn how to view and apply Custom Send Schedules for Sequences.
Custom Send Schedules define when automated emails in a Sequence are allowed to send. Once you’ve configured your Custom Send Schedule, you can assign them to individual Sequences.
***
## Accessing Sequence Settings
To view or edit the Custom Send Schedule assigned to a Sequence:
1. Open any Sequence from your **Sequences** list.
2. Click the **⚙️ cog icon** in the top-right corner to open **Sequence Settings**.
3. In the settings drawer, you’ll see a section labeled **Send schedule**, displaying the currently linked schedule and its details.
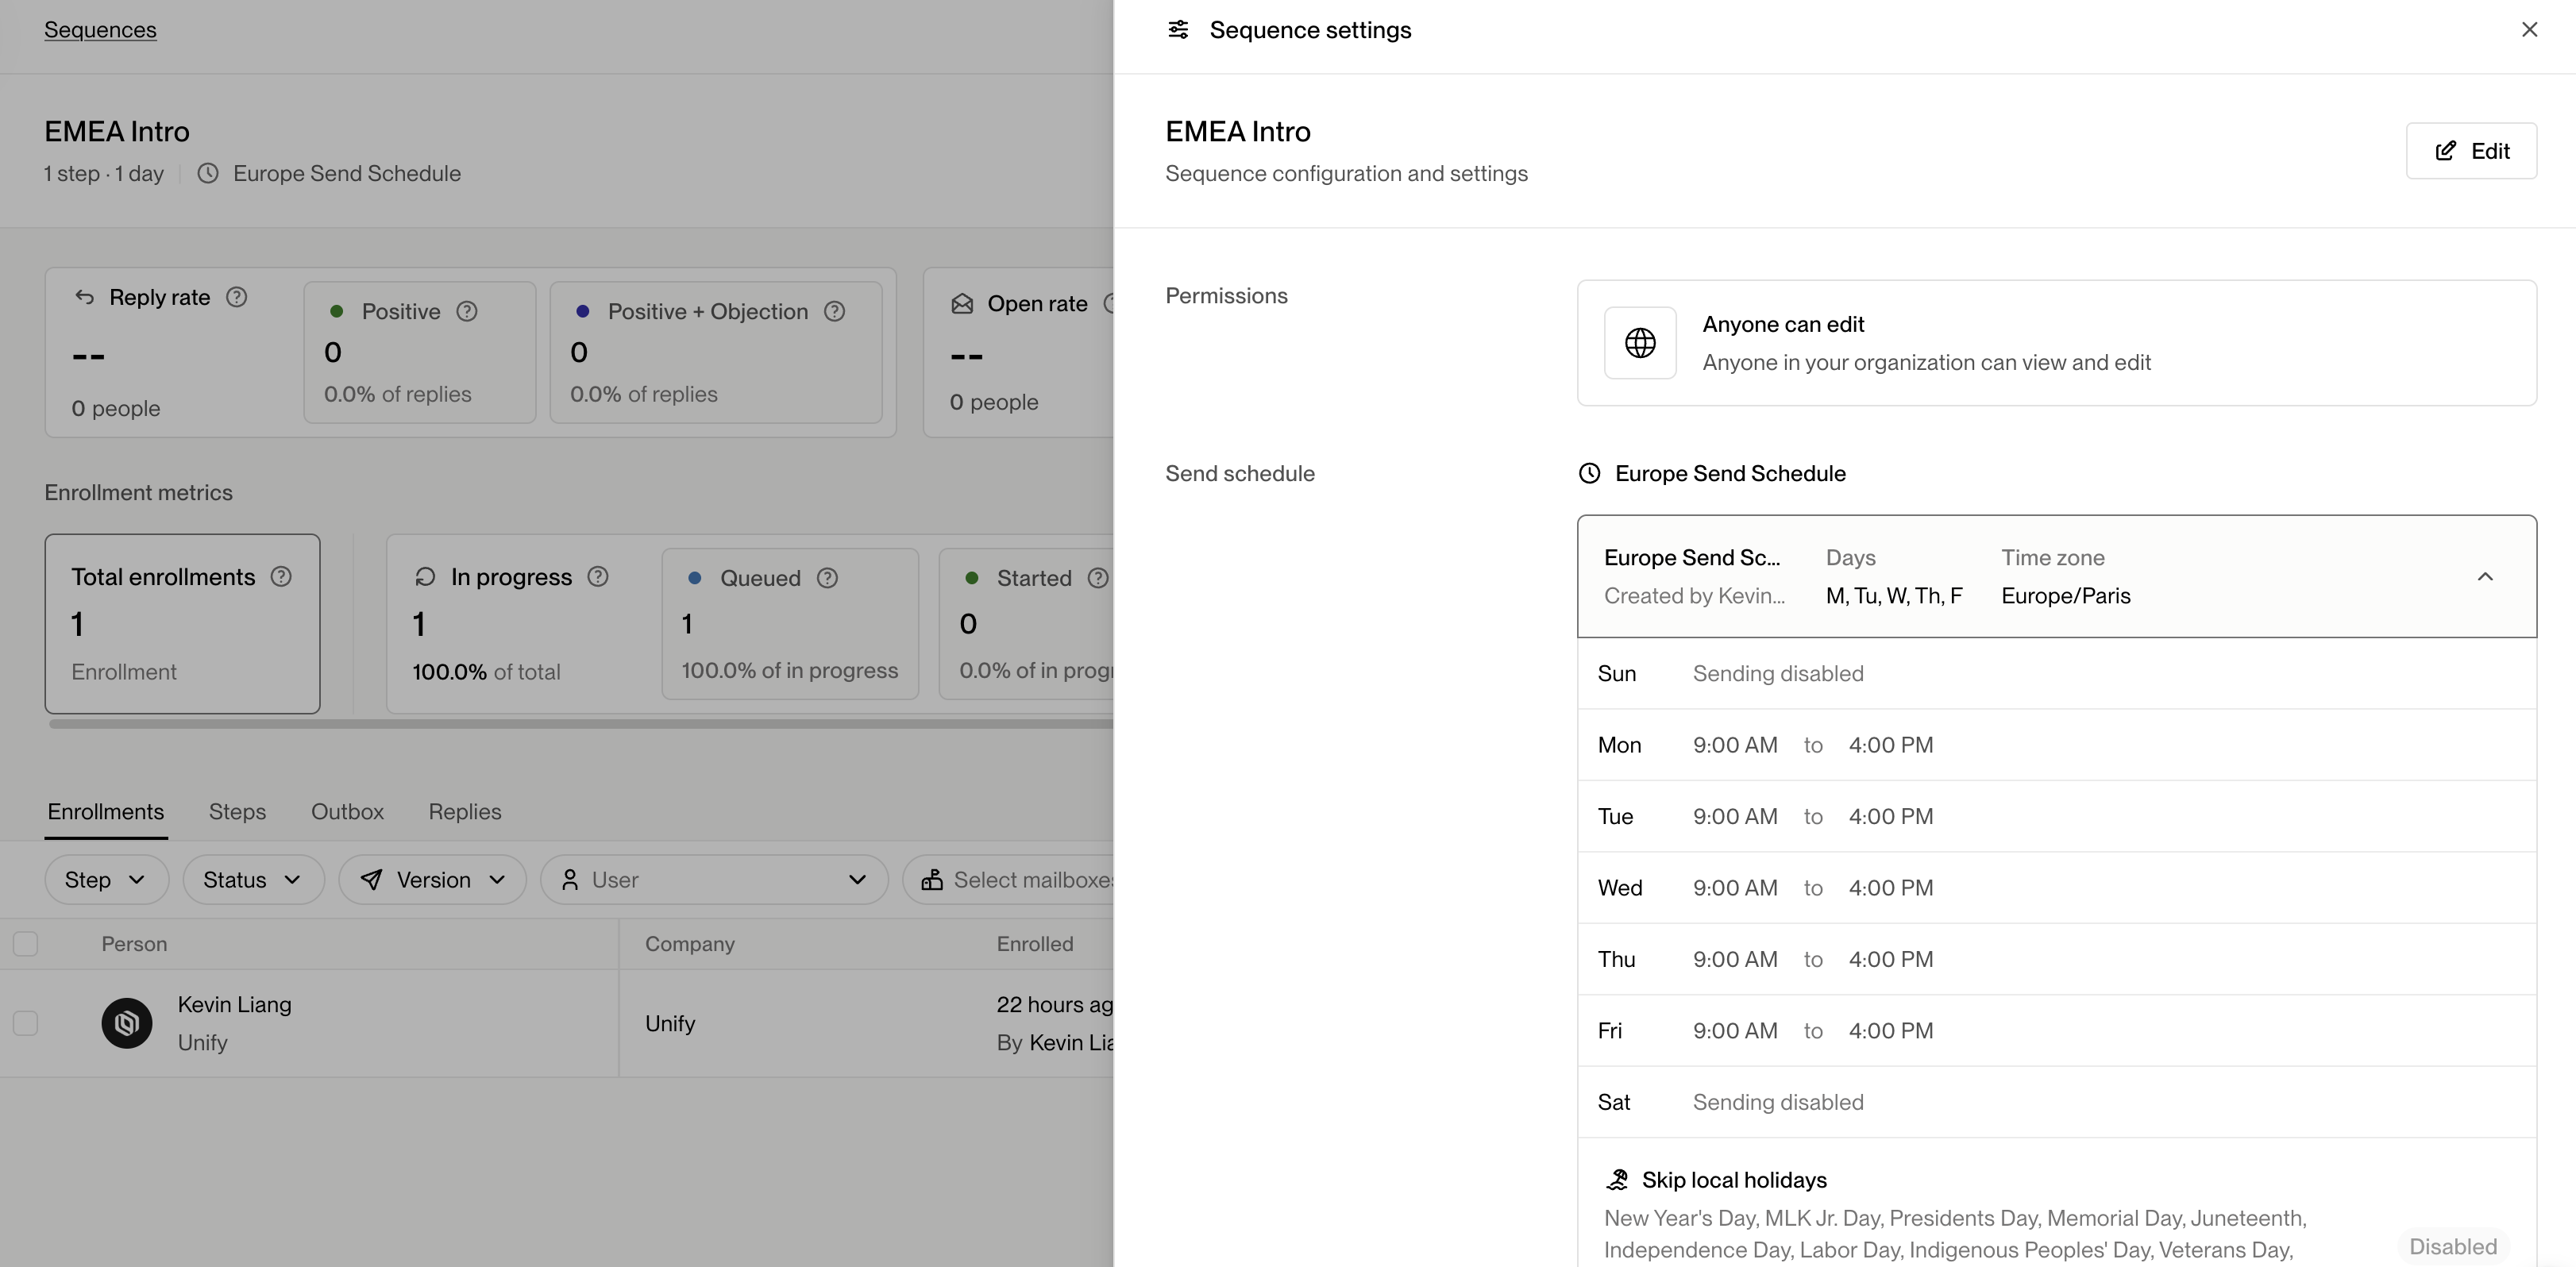 ***
## Selecting a Custom Send Schedule
To change which Custom Send Schedule a Sequence uses:
1. Click **Edit** in the top-right corner of the Sequence Settings drawer.
2. Open the **Send schedule** dropdown.
3. Choose the desired schedule from the list. You’ll see details including:
* Schedule name
* Timezone
* Days enabled for sending
* Sending windows per day
* Skip dates
***
## Selecting a Custom Send Schedule
To change which Custom Send Schedule a Sequence uses:
1. Click **Edit** in the top-right corner of the Sequence Settings drawer.
2. Open the **Send schedule** dropdown.
3. Choose the desired schedule from the list. You’ll see details including:
* Schedule name
* Timezone
* Days enabled for sending
* Sending windows per day
* Skip dates
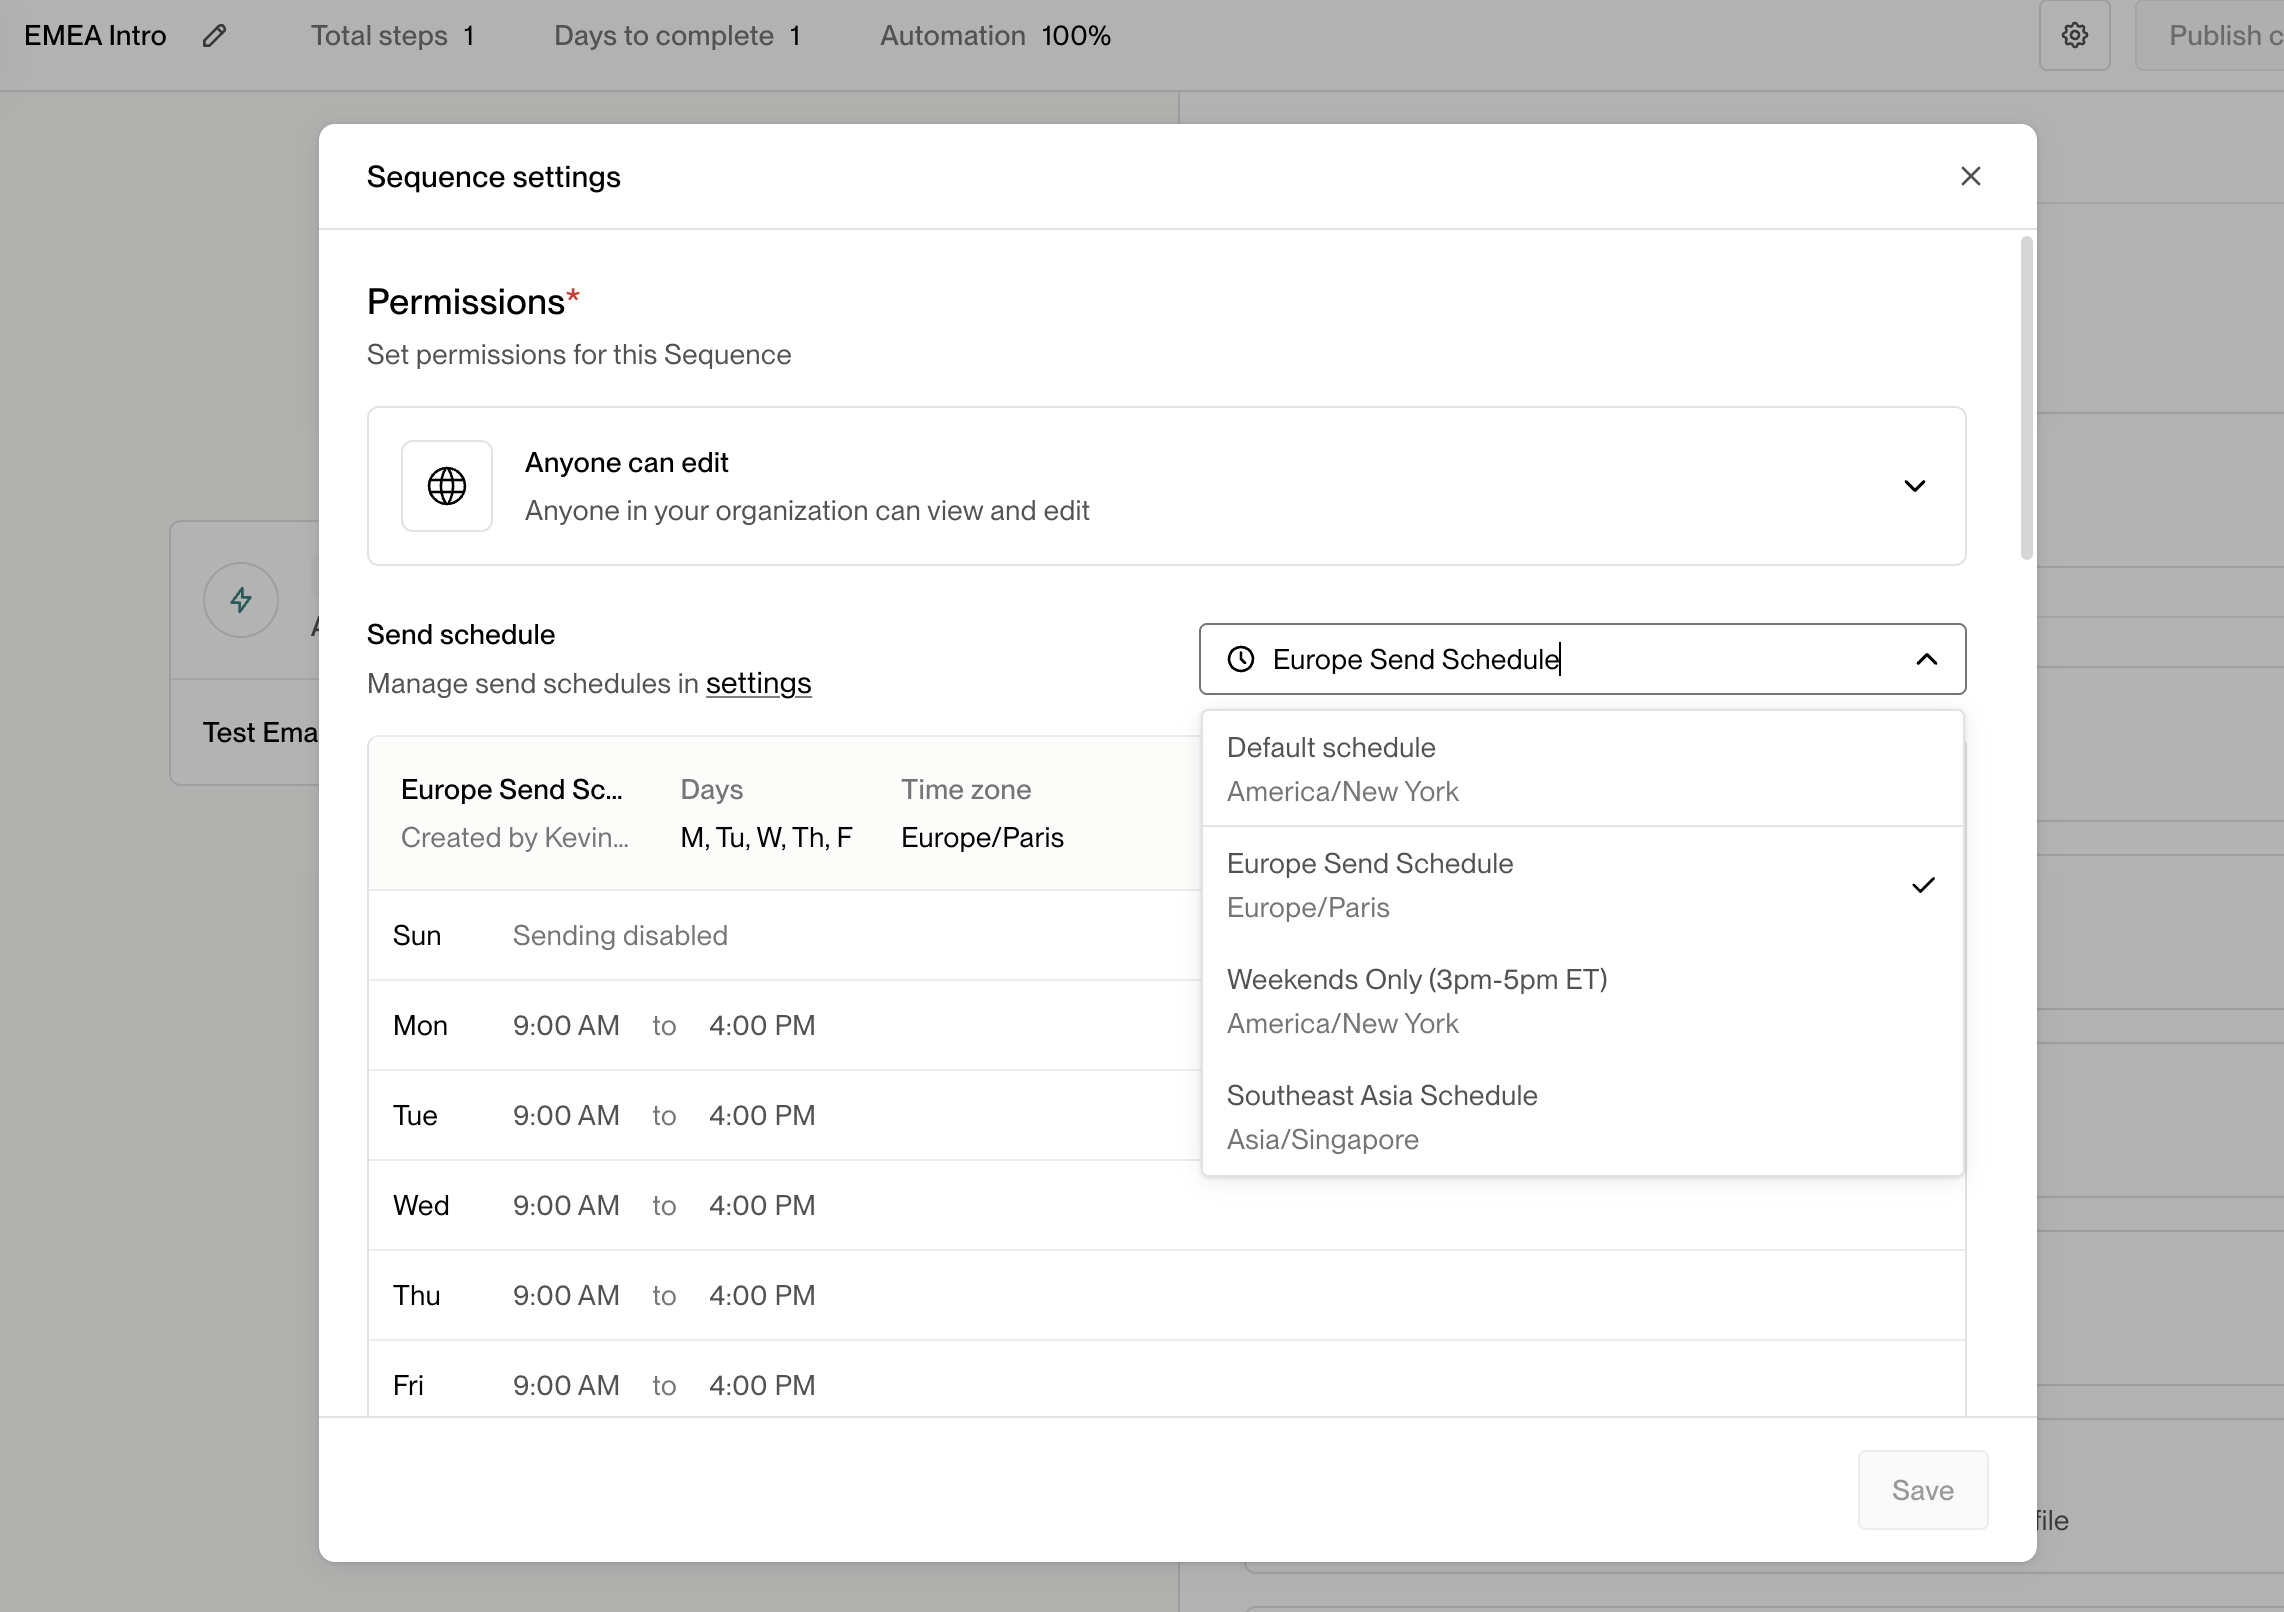 After you’ve selected a schedule, click **Save** to apply it.
***
## Important Notes
After you’ve selected a schedule, click **Save** to apply it.
***
## Important Notes
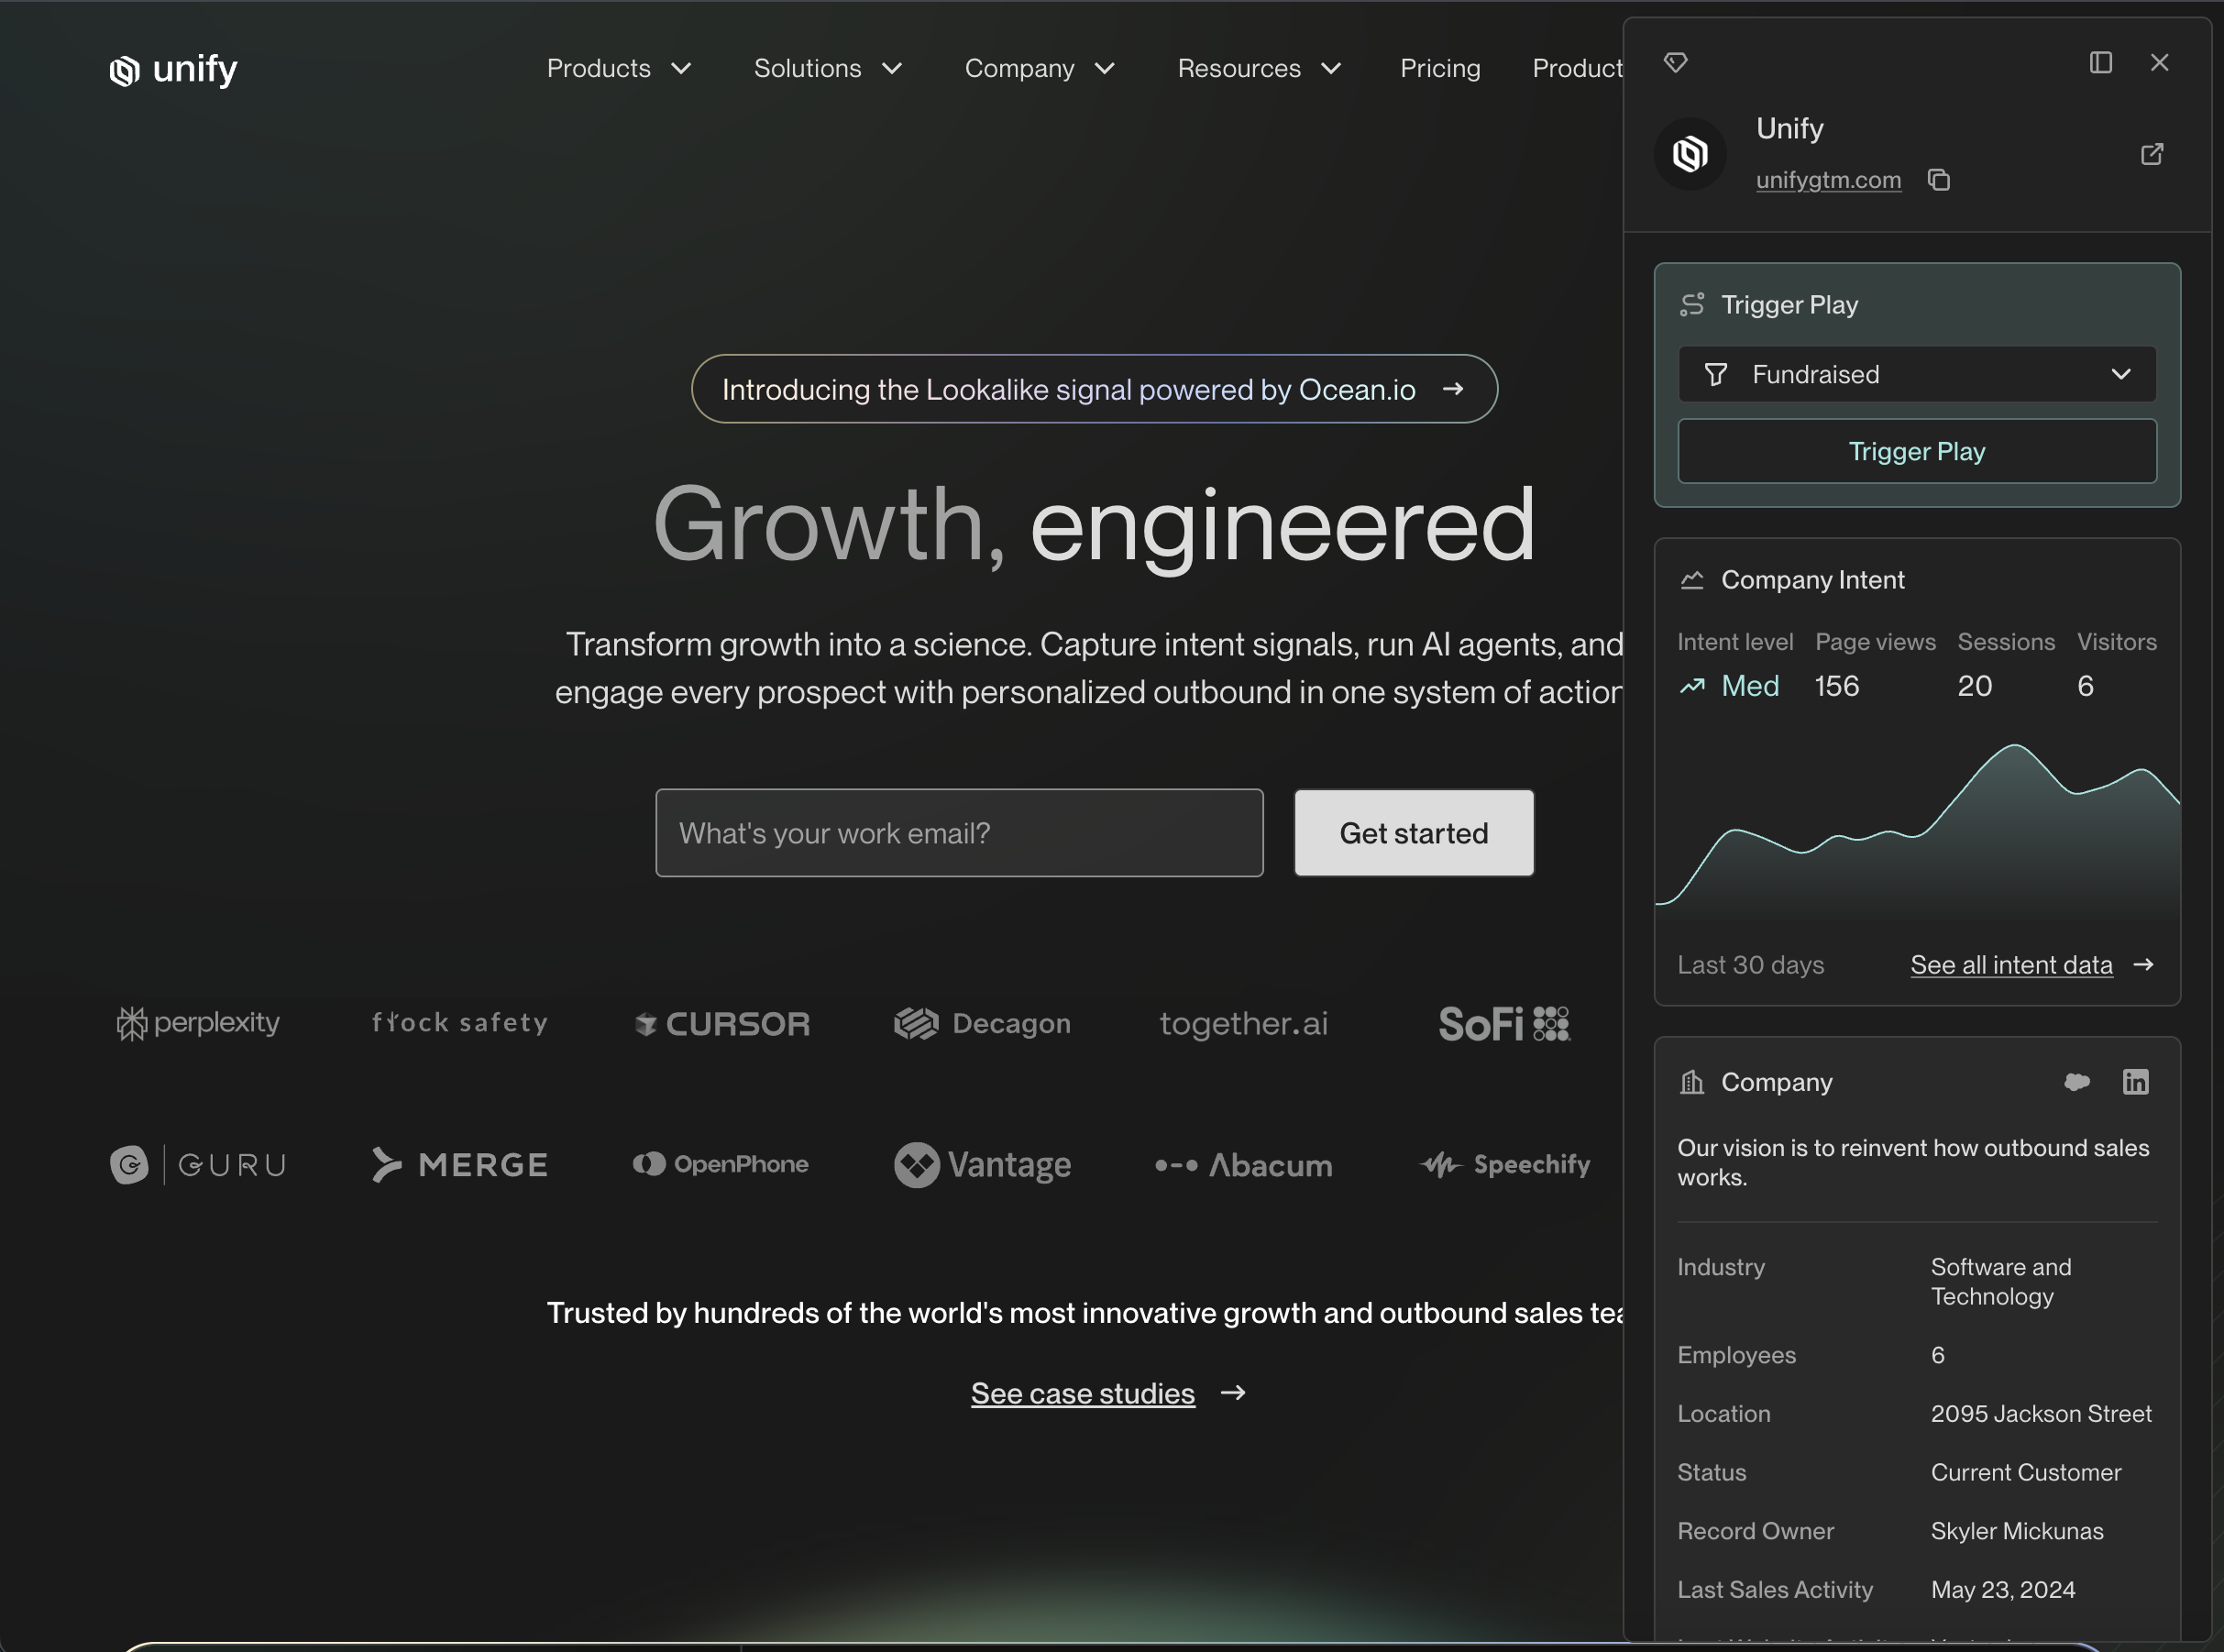
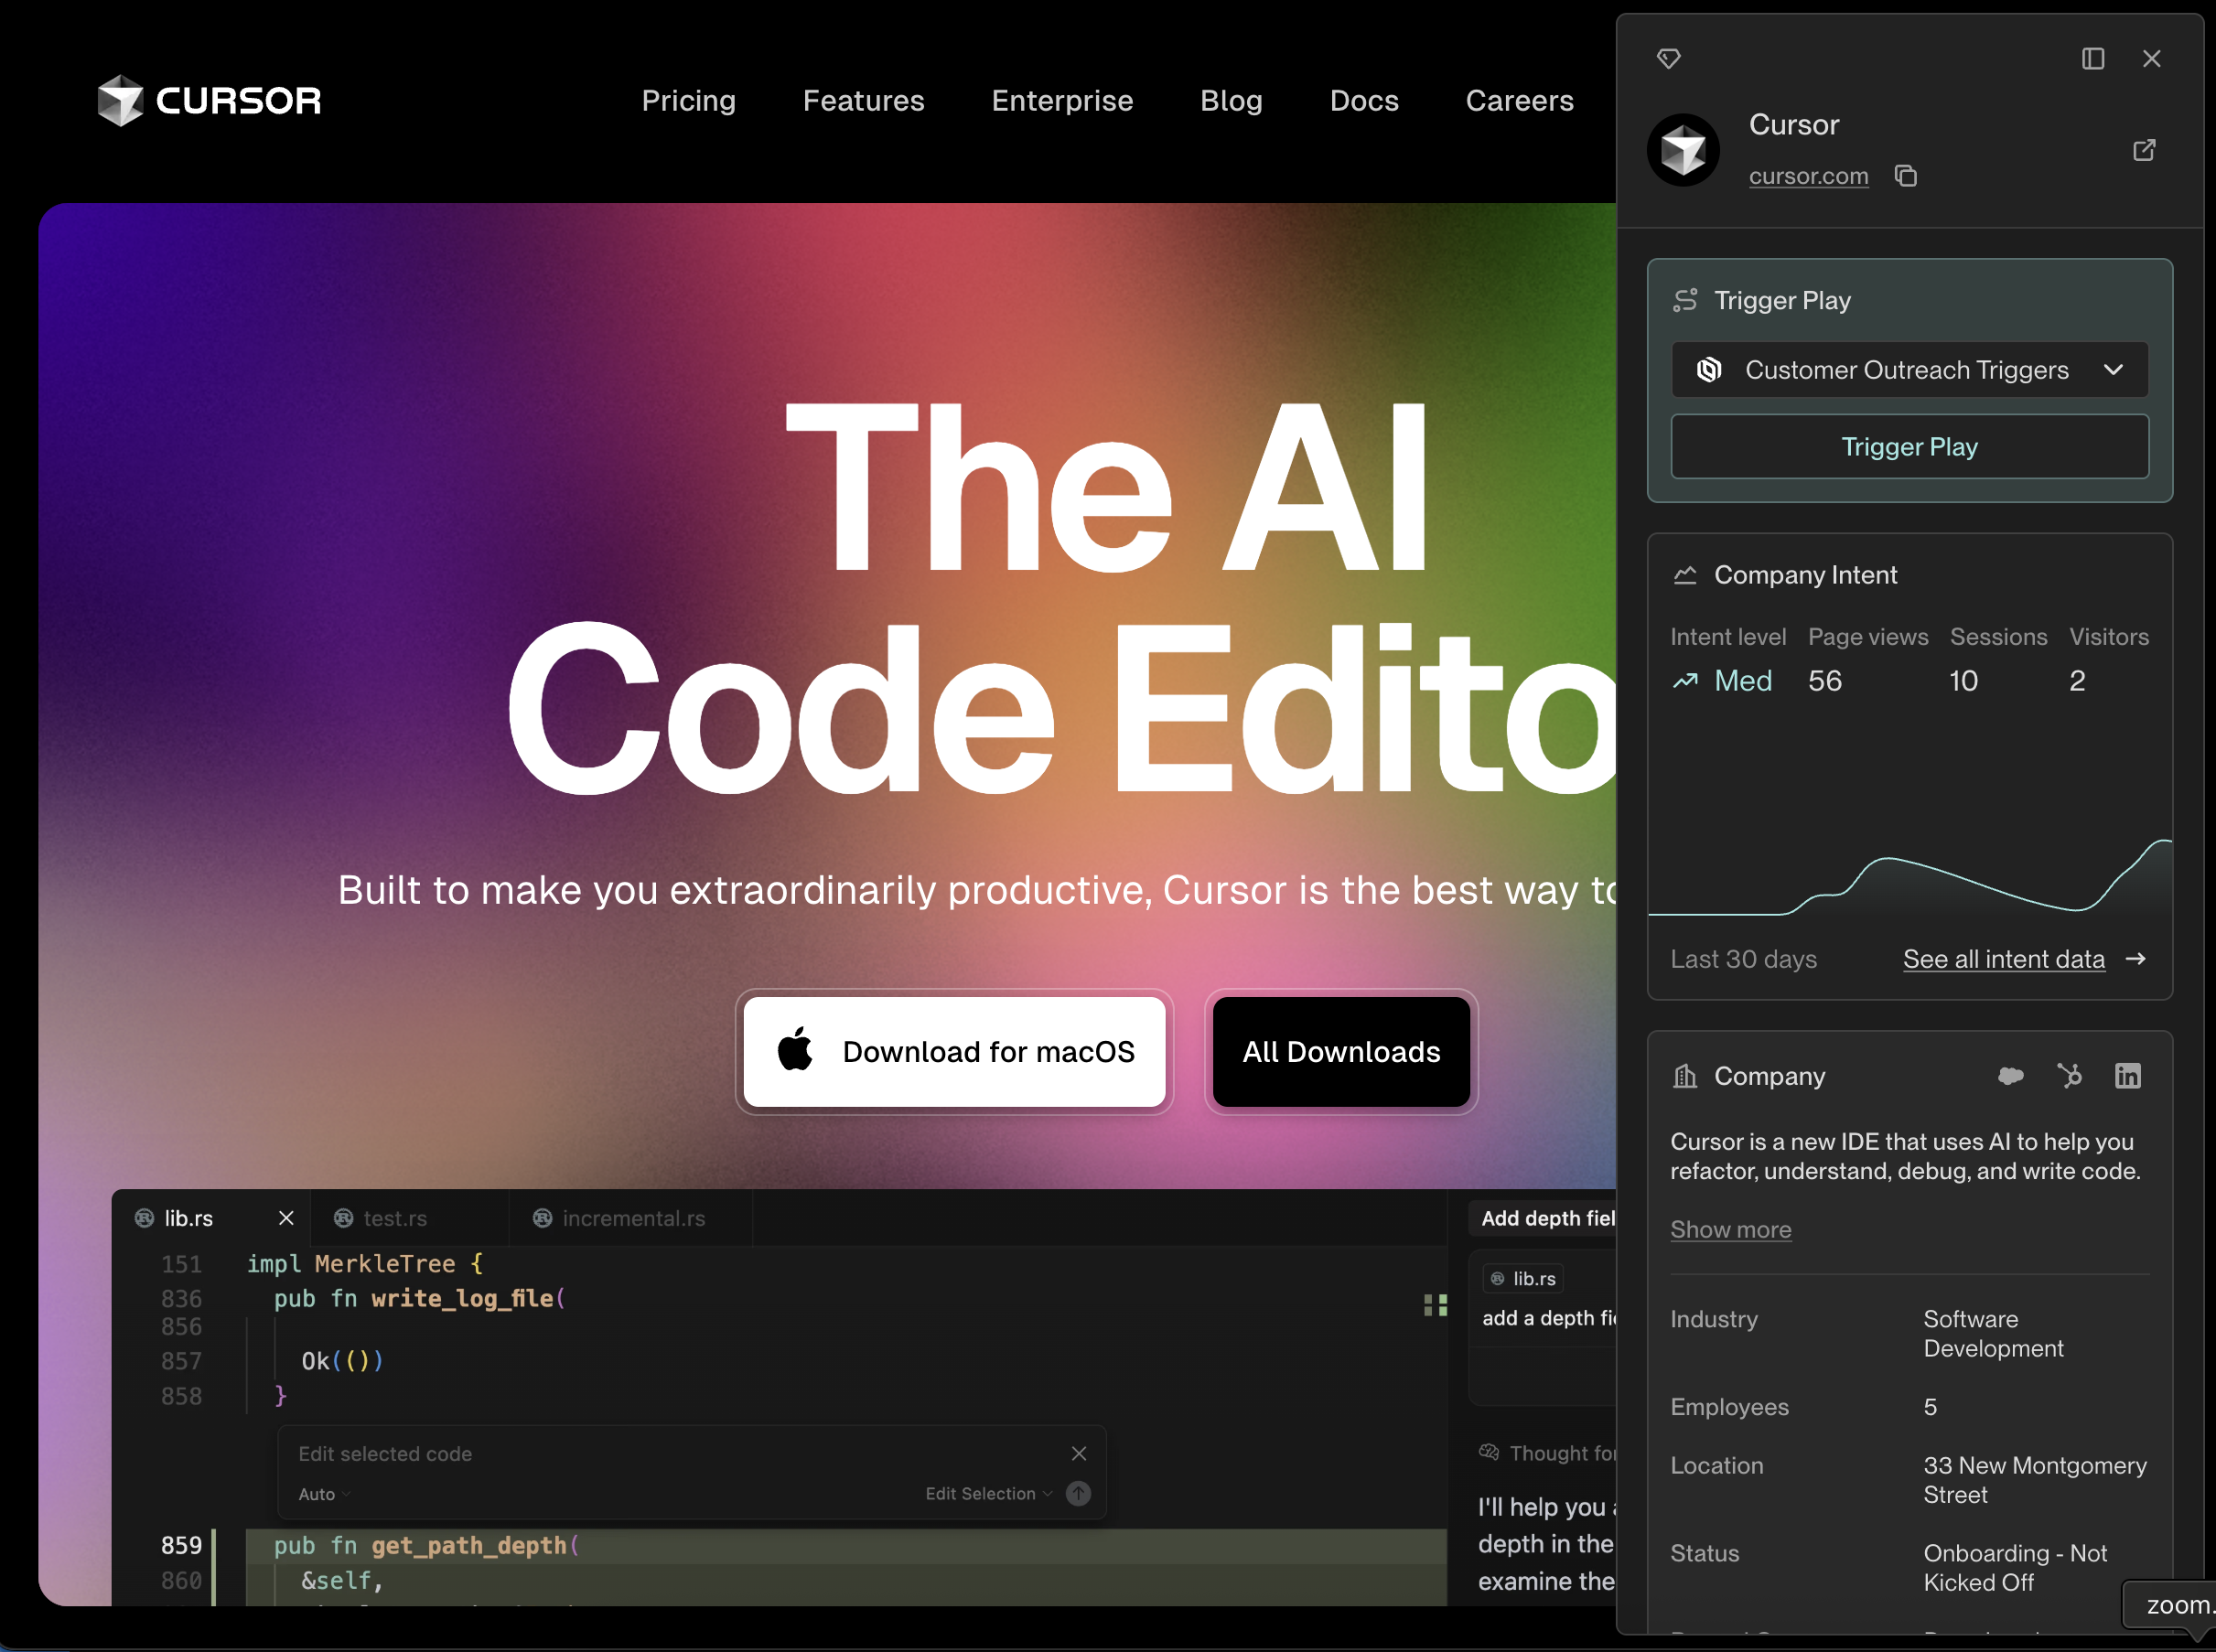 ---
# Source: https://docs.unifygtm.com/reference/signals/website-visitors.md
> ## Documentation Index
> Fetch the complete documentation index at: https://docs.unifygtm.com/llms.txt
> Use this file to discover all available pages before exploring further.
# Website Visitor Intent
> Start revealing the companies and people visiting your website.
## Overview
By integrating with your website, Unify can reveal the companies and people
visiting your website in real-time. Beyond idenifying these visitors, Unify
enables you to take action based on which pages they're clicking on, where
they're visiting from, and how many sessions they've had.
## How to get started
### Step 1: Integrate Unify with your website
The first step is to integrate Unify with your website using either the official
Unify plugin for your website or a third-party analytics provider like Segment.
If you're not already using Segment, we recommend starting with the official
Unify plugin. You can find the installation instructions [here](/developers/intent-client/overview).
For customers already using Segment, you can find the instructions for setting
up the official Segment integration [here](/reference/integrations/segment).
### Step 2: Turn on website intent data
Once that's done, the only thing left to do is to enable the feature in Unify
and start revealing the companies and people visiting your website. Navigate to
[Settings -> Unify Intent](https://app.unifygtm.com/dashboard/settings/integrations/unify-intent)
to turn on this feature.
If you already have a subscription to 6sense or Clearbit Reveal, you can also
bring your own API key. See the [6sense](https://app.unifygtm.com/dashboard/settings/integrations/6sense)
and [Clearbit](https://app.unifygtm.com/dashboard/settings/integrations/clearbit)
integration settings pages to get started.
---
# Source: https://docs.unifygtm.com/tutorials/welcome.md
# Source: https://docs.unifygtm.com/getting-started/welcome.md
> ## Documentation Index
> Fetch the complete documentation index at: https://docs.unifygtm.com/llms.txt
> Use this file to discover all available pages before exploring further.
# Welcome to Unify
> Unify is the all-in-one solution for sales, marketing, and go-to-market teams.
Whether you're new to Unify and looking to get started or an experienced user
aiming to get the most out of the platform, we have the resources you need to
succeed.
---
# Source: https://docs.unifygtm.com/reference/signals/website-visitors.md
> ## Documentation Index
> Fetch the complete documentation index at: https://docs.unifygtm.com/llms.txt
> Use this file to discover all available pages before exploring further.
# Website Visitor Intent
> Start revealing the companies and people visiting your website.
## Overview
By integrating with your website, Unify can reveal the companies and people
visiting your website in real-time. Beyond idenifying these visitors, Unify
enables you to take action based on which pages they're clicking on, where
they're visiting from, and how many sessions they've had.
## How to get started
### Step 1: Integrate Unify with your website
The first step is to integrate Unify with your website using either the official
Unify plugin for your website or a third-party analytics provider like Segment.
If you're not already using Segment, we recommend starting with the official
Unify plugin. You can find the installation instructions [here](/developers/intent-client/overview).
For customers already using Segment, you can find the instructions for setting
up the official Segment integration [here](/reference/integrations/segment).
### Step 2: Turn on website intent data
Once that's done, the only thing left to do is to enable the feature in Unify
and start revealing the companies and people visiting your website. Navigate to
[Settings -> Unify Intent](https://app.unifygtm.com/dashboard/settings/integrations/unify-intent)
to turn on this feature.
If you already have a subscription to 6sense or Clearbit Reveal, you can also
bring your own API key. See the [6sense](https://app.unifygtm.com/dashboard/settings/integrations/6sense)
and [Clearbit](https://app.unifygtm.com/dashboard/settings/integrations/clearbit)
integration settings pages to get started.
---
# Source: https://docs.unifygtm.com/tutorials/welcome.md
# Source: https://docs.unifygtm.com/getting-started/welcome.md
> ## Documentation Index
> Fetch the complete documentation index at: https://docs.unifygtm.com/llms.txt
> Use this file to discover all available pages before exploring further.
# Welcome to Unify
> Unify is the all-in-one solution for sales, marketing, and go-to-market teams.
Whether you're new to Unify and looking to get started or an experienced user
aiming to get the most out of the platform, we have the resources you need to
succeed.