# Ultralytics Yolov8
> description: Transform complex data into insightful heatmaps using Ultralytics YOLO11. Discover patterns, trends, and anomalies with vibrant visualizations.
---
# Source: https://raw.githubusercontent.com/ultralytics/ultralytics/main/docs/en/guides/heatmaps.md
---
comments: true
description: Transform complex data into insightful heatmaps using Ultralytics YOLO11. Discover patterns, trends, and anomalies with vibrant visualizations.
keywords: Ultralytics, YOLO11, heatmaps, data visualization, data analysis, complex data, patterns, trends, anomalies
---
# Advanced [Data Visualization](https://www.ultralytics.com/glossary/data-visualization): Heatmaps using Ultralytics YOLO11 🚀
## Introduction to Heatmaps
A heatmap generated with [Ultralytics YOLO11](https://github.com/ultralytics/ultralytics/) transforms complex data into a vibrant, color-coded matrix. This visual tool employs a spectrum of colors to represent varying data values, where warmer hues indicate higher intensities and cooler tones signify lower values. Heatmaps excel in visualizing intricate data patterns, correlations, and anomalies, offering an accessible and engaging approach to data interpretation across diverse domains.
Watch: Heatmaps using Ultralytics YOLO11
## Why Choose Heatmaps for Data Analysis?
- **Intuitive Data Distribution Visualization:** Heatmaps simplify the comprehension of data concentration and distribution, converting complex datasets into easy-to-understand visual formats.
- **Efficient Pattern Detection:** By visualizing data in heatmap format, it becomes easier to spot trends, clusters, and outliers, facilitating quicker analysis and insights.
- **Enhanced Spatial Analysis and Decision-Making:** Heatmaps are instrumental in illustrating spatial relationships, aiding in decision-making processes in sectors such as business intelligence, environmental studies, and urban planning.
## Real World Applications
| Transportation | Retail |
| :--------------------------------------------------------------------------------------------------------------------------------------------------: | :----------------------------------------------------------------------------------------------------------------------------------: |
|  |  |
| Ultralytics YOLO11 Transportation Heatmap | Ultralytics YOLO11 Retail Heatmap |
!!! example "Heatmaps using Ultralytics YOLO"
=== "CLI"
```bash
# Run a heatmap example
yolo solutions heatmap show=True
# Pass a source video
yolo solutions heatmap source="path/to/video.mp4"
# Pass a custom colormap
yolo solutions heatmap colormap=cv2.COLORMAP_INFERNO
# Heatmaps + object counting
yolo solutions heatmap region="[(20, 400), (1080, 400), (1080, 360), (20, 360)]"
```
=== "Python"
```python
import cv2
from ultralytics import solutions
cap = cv2.VideoCapture("path/to/video.mp4")
assert cap.isOpened(), "Error reading video file"
# Video writer
w, h, fps = (int(cap.get(x)) for x in (cv2.CAP_PROP_FRAME_WIDTH, cv2.CAP_PROP_FRAME_HEIGHT, cv2.CAP_PROP_FPS))
video_writer = cv2.VideoWriter("heatmap_output.avi", cv2.VideoWriter_fourcc(*"mp4v"), fps, (w, h))
# For object counting with heatmap, you can pass region points.
# region_points = [(20, 400), (1080, 400)] # line points
# region_points = [(20, 400), (1080, 400), (1080, 360), (20, 360)] # rectangle region
# region_points = [(20, 400), (1080, 400), (1080, 360), (20, 360), (20, 400)] # polygon points
# Initialize heatmap object
heatmap = solutions.Heatmap(
show=True, # display the output
model="yolo11n.pt", # path to the YOLO11 model file
colormap=cv2.COLORMAP_PARULA, # colormap of heatmap
# region=region_points, # object counting with heatmaps, you can pass region_points
# classes=[0, 2], # generate heatmap for specific classes, e.g., person and car.
)
# Process video
while cap.isOpened():
success, im0 = cap.read()
if not success:
print("Video frame is empty or processing is complete.")
break
results = heatmap(im0)
# print(results) # access the output
video_writer.write(results.plot_im) # write the processed frame.
cap.release()
video_writer.release()
cv2.destroyAllWindows() # destroy all opened windows
```
### `Heatmap()` Arguments
Here's a table with the `Heatmap` arguments:
{% from "macros/solutions-args.md" import param_table %}
{{ param_table(["model", "colormap", "show_in", "show_out", "region"]) }}
You can also apply different `track` arguments in the `Heatmap` solution.
{% from "macros/track-args.md" import param_table %}
{{ param_table(["tracker", "conf", "iou", "classes", "verbose", "device"]) }}
Additionally, the supported visualization arguments are listed below:
{% from "macros/visualization-args.md" import param_table %}
{{ param_table(["show", "line_width", "show_conf", "show_labels"]) }}
#### Heatmap COLORMAPs
| Colormap Name | Description |
| ------------------------------- | -------------------------------------- |
| `cv::COLORMAP_AUTUMN` | Autumn color map |
| `cv::COLORMAP_BONE` | Bone color map |
| `cv::COLORMAP_JET` | Jet color map |
| `cv::COLORMAP_WINTER` | Winter color map |
| `cv::COLORMAP_RAINBOW` | Rainbow color map |
| `cv::COLORMAP_OCEAN` | Ocean color map |
| `cv::COLORMAP_SUMMER` | Summer color map |
| `cv::COLORMAP_SPRING` | Spring color map |
| `cv::COLORMAP_COOL` | Cool color map |
| `cv::COLORMAP_HSV` | HSV (Hue, Saturation, Value) color map |
| `cv::COLORMAP_PINK` | Pink color map |
| `cv::COLORMAP_HOT` | Hot color map |
| `cv::COLORMAP_PARULA` | Parula color map |
| `cv::COLORMAP_MAGMA` | Magma color map |
| `cv::COLORMAP_INFERNO` | Inferno color map |
| `cv::COLORMAP_PLASMA` | Plasma color map |
| `cv::COLORMAP_VIRIDIS` | Viridis color map |
| `cv::COLORMAP_CIVIDIS` | Cividis color map |
| `cv::COLORMAP_TWILIGHT` | Twilight color map |
| `cv::COLORMAP_TWILIGHT_SHIFTED` | Shifted Twilight color map |
| `cv::COLORMAP_TURBO` | Turbo color map |
| `cv::COLORMAP_DEEPGREEN` | Deep Green color map |
These colormaps are commonly used for visualizing data with different color representations.
## How Heatmaps Work in Ultralytics YOLO11
The [Heatmap solution](../reference/solutions/heatmap.md) in Ultralytics YOLO11 extends the [ObjectCounter](../reference/solutions/object_counter.md) class to generate and visualize movement patterns in video streams. When initialized, the solution creates a blank heatmap layer that gets updated as objects move through the frame.
For each detected object, the solution:
1. Tracks the object across frames using YOLO11's tracking capabilities
2. Updates the heatmap intensity at the object's location
3. Applies a selected colormap to visualize the intensity values
4. Overlays the colored heatmap on the original frame
The result is a dynamic visualization that builds up over time, revealing traffic patterns, crowd movements, or other spatial behaviors in your video data.
## FAQ
### How does Ultralytics YOLO11 generate heatmaps and what are their benefits?
Ultralytics YOLO11 generates heatmaps by transforming complex data into a color-coded matrix where different hues represent data intensities. Heatmaps make it easier to visualize patterns, correlations, and anomalies in the data. Warmer hues indicate higher values, while cooler tones represent lower values. The primary benefits include intuitive visualization of data distribution, efficient pattern detection, and enhanced spatial analysis for decision-making. For more details and configuration options, refer to the [Heatmap Configuration](#heatmap-arguments) section.
### Can I use Ultralytics YOLO11 to perform object tracking and generate a heatmap simultaneously?
Yes, Ultralytics YOLO11 supports object tracking and heatmap generation concurrently. This can be achieved through its `Heatmap` solution integrated with object tracking models. To do so, you need to initialize the heatmap object and use YOLO11's tracking capabilities. Here's a simple example:
```python
import cv2
from ultralytics import solutions
cap = cv2.VideoCapture("path/to/video.mp4")
heatmap = solutions.Heatmap(colormap=cv2.COLORMAP_PARULA, show=True, model="yolo11n.pt")
while cap.isOpened():
success, im0 = cap.read()
if not success:
break
results = heatmap(im0)
cap.release()
cv2.destroyAllWindows()
```
For further guidance, check the [Tracking Mode](../modes/track.md) page.
### What makes Ultralytics YOLO11 heatmaps different from other data visualization tools like those from [OpenCV](https://www.ultralytics.com/glossary/opencv) or Matplotlib?
Ultralytics YOLO11 heatmaps are specifically designed for integration with its [object detection](https://www.ultralytics.com/glossary/object-detection) and tracking models, providing an end-to-end solution for real-time data analysis. Unlike generic visualization tools like OpenCV or Matplotlib, YOLO11 heatmaps are optimized for performance and automated processing, supporting features like persistent tracking, decay factor adjustment, and real-time video overlay. For more information on YOLO11's unique features, visit the [Ultralytics YOLO11 Introduction](https://www.ultralytics.com/blog/introducing-ultralytics-yolov8).
### How can I visualize only specific object classes in heatmaps using Ultralytics YOLO11?
You can visualize specific object classes by specifying the desired classes in the `track()` method of the YOLO model. For instance, if you only want to visualize cars and persons (assuming their class indices are 0 and 2), you can set the `classes` parameter accordingly.
```python
import cv2
from ultralytics import solutions
cap = cv2.VideoCapture("path/to/video.mp4")
heatmap = solutions.Heatmap(show=True, model="yolo11n.pt", classes=[0, 2])
while cap.isOpened():
success, im0 = cap.read()
if not success:
break
results = heatmap(im0)
cap.release()
cv2.destroyAllWindows()
```
### Why should businesses choose Ultralytics YOLO11 for heatmap generation in data analysis?
Ultralytics YOLO11 offers seamless integration of advanced object detection and real-time heatmap generation, making it an ideal choice for businesses looking to visualize data more effectively. The key advantages include intuitive data distribution visualization, efficient pattern detection, and enhanced spatial analysis for better decision-making. Additionally, YOLO11's cutting-edge features such as persistent tracking, customizable colormaps, and support for various export formats make it superior to other tools like [TensorFlow](https://www.ultralytics.com/glossary/tensorflow) and OpenCV for comprehensive data analysis. Learn more about business applications at [Ultralytics Plans](https://www.ultralytics.com/plans).
---
# Source: https://raw.githubusercontent.com/ultralytics/ultralytics/main/docs/en/guides/index.md
---
comments: true
description: Master YOLO with Ultralytics tutorials covering training, deployment and optimization. Find solutions, improve metrics, and deploy with ease.
keywords: Ultralytics, YOLO, tutorials, guides, object detection, deep learning, PyTorch, training, deployment, optimization, computer vision
---
# Comprehensive Tutorials for Ultralytics YOLO
Welcome to Ultralytics' YOLO Guides. Our comprehensive tutorials cover various aspects of the YOLO [object detection](https://www.ultralytics.com/glossary/object-detection) model, ranging from training and prediction to deployment. Built on [PyTorch](https://www.ultralytics.com/glossary/pytorch), YOLO stands out for its exceptional speed and [accuracy](https://www.ultralytics.com/glossary/accuracy) in real-time object detection tasks.
Whether you're a beginner or an expert in [deep learning](https://www.ultralytics.com/glossary/deep-learning-dl), our tutorials offer valuable insights into the implementation and optimization of YOLO for your [computer vision](https://www.ultralytics.com/glossary/computer-vision-cv) projects.
Watch: Ultralytics YOLO11 Guides Overview
## Guides
Here's a compilation of in-depth guides to help you master different aspects of Ultralytics YOLO.
- [A Guide on Model Testing](model-testing.md): A thorough guide on testing your computer vision models in realistic settings. Learn how to verify accuracy, reliability, and performance in line with project goals.
- [AzureML Quickstart](azureml-quickstart.md): Get up and running with Ultralytics YOLO models on Microsoft's Azure [Machine Learning](https://www.ultralytics.com/glossary/machine-learning-ml) platform. Learn how to train, deploy, and scale your object detection projects in the cloud.
- [Best Practices for Model Deployment](model-deployment-practices.md): Walk through tips and best practices for efficiently deploying models in computer vision projects, with a focus on optimization, troubleshooting, and security.
- [Conda Quickstart](conda-quickstart.md): Step-by-step guide to setting up a [Conda](https://anaconda.org/conda-forge/ultralytics) environment for Ultralytics. Learn how to install and start using the Ultralytics package efficiently with Conda.
- [Data Collection and Annotation](data-collection-and-annotation.md): Explore the tools, techniques, and best practices for collecting and annotating data to create high-quality inputs for your computer vision models.
- [DeepStream on NVIDIA Jetson](deepstream-nvidia-jetson.md): Quickstart guide for deploying YOLO models on NVIDIA Jetson devices using DeepStream and TensorRT.
- [Defining A Computer Vision Project's Goals](defining-project-goals.md): Walk through how to effectively define clear and measurable goals for your computer vision project. Learn the importance of a well-defined problem statement and how it creates a roadmap for your project.
- [Docker Quickstart](docker-quickstart.md): Complete guide to setting up and using Ultralytics YOLO models with [Docker](https://hub.docker.com/r/ultralytics/ultralytics). Learn how to install Docker, manage GPU support, and run YOLO models in isolated containers for consistent development and deployment.
- [Edge TPU on Raspberry Pi](coral-edge-tpu-on-raspberry-pi.md): [Google Edge TPU](https://developers.google.com/coral) accelerates YOLO inference on [Raspberry Pi](https://www.raspberrypi.com/).
- [Hyperparameter Tuning](hyperparameter-tuning.md): Discover how to optimize your YOLO models by fine-tuning hyperparameters using the Tuner class and genetic evolution algorithms.
- [Insights on Model Evaluation and Fine-Tuning](model-evaluation-insights.md): Gain insights into the strategies and best practices for evaluating and fine-tuning your computer vision models. Learn about the iterative process of refining models to achieve optimal results.
- [Isolating Segmentation Objects](isolating-segmentation-objects.md): Step-by-step recipe and explanation on how to extract and/or isolate objects from images using Ultralytics Segmentation.
- [K-Fold Cross Validation](kfold-cross-validation.md): Learn how to improve model generalization using K-Fold cross-validation technique.
- [Maintaining Your Computer Vision Model](model-monitoring-and-maintenance.md): Understand the key practices for monitoring, maintaining, and documenting computer vision models to guarantee accuracy, spot anomalies, and mitigate data drift.
- [Model Deployment Options](model-deployment-options.md): Overview of YOLO [model deployment](https://www.ultralytics.com/glossary/model-deployment) formats like ONNX, OpenVINO, and TensorRT, with pros and cons for each to inform your deployment strategy.
- [Model YAML Configuration Guide](model-yaml-config.md): A comprehensive deep dive into Ultralytics' model architecture definitions. Explore the YAML format, understand the module resolution system, and learn how to integrate custom modules seamlessly.
- [NVIDIA Jetson](nvidia-jetson.md): Quickstart guide for deploying YOLO models on NVIDIA Jetson devices.
- [OpenVINO Latency vs Throughput Modes](optimizing-openvino-latency-vs-throughput-modes.md): Learn latency and throughput optimization techniques for peak YOLO inference performance.
- [Preprocessing Annotated Data](preprocessing_annotated_data.md): Learn about preprocessing and augmenting image data in computer vision projects using YOLO11, including normalization, dataset augmentation, splitting, and exploratory data analysis (EDA).
- [Raspberry Pi](raspberry-pi.md): Quickstart tutorial to run YOLO models on the latest Raspberry Pi hardware.
- [ROS Quickstart](ros-quickstart.md): Learn how to integrate YOLO with the Robot Operating System (ROS) for real-time object detection in robotics applications, including Point Cloud and Depth images.
- [SAHI Tiled Inference](sahi-tiled-inference.md): Comprehensive guide on leveraging SAHI's sliced inference capabilities with YOLO11 for object detection in high-resolution images.
- [Steps of a Computer Vision Project](steps-of-a-cv-project.md): Learn about the key steps involved in a computer vision project, including defining goals, selecting models, preparing data, and evaluating results.
- [Tips for Model Training](model-training-tips.md): Explore tips on optimizing [batch sizes](https://www.ultralytics.com/glossary/batch-size), using [mixed precision](https://www.ultralytics.com/glossary/mixed-precision), applying pretrained weights, and more to make training your computer vision model a breeze.
- [Triton Inference Server Integration](triton-inference-server.md): Dive into the integration of Ultralytics YOLO11 with NVIDIA's Triton Inference Server for scalable and efficient deep learning inference deployments.
- [Vertex AI Deployment with Docker](vertex-ai-deployment-with-docker.md): Streamlined guide to containerizing YOLO models with Docker and deploying them on Google Cloud Vertex AI—covering build, push, autoscaling, and monitoring.
- [View Inference Images in a Terminal](view-results-in-terminal.md): Use VSCode's integrated terminal to view inference results when using Remote Tunnel or SSH sessions.
- [YOLO Common Issues](yolo-common-issues.md) ⭐ RECOMMENDED: Practical solutions and troubleshooting tips to the most frequently encountered issues when working with Ultralytics YOLO models.
- [YOLO Data Augmentation](yolo-data-augmentation.md): Master the complete range of data augmentation techniques in YOLO, from basic transformations to advanced strategies for improving model robustness and performance.
- [YOLO Performance Metrics](yolo-performance-metrics.md) ⭐ ESSENTIAL: Understand the key metrics like mAP, IoU, and [F1 score](https://www.ultralytics.com/glossary/f1-score) used to evaluate the performance of your YOLO models. Includes practical examples and tips on how to improve detection accuracy and speed.
- [YOLO Thread-Safe Inference](yolo-thread-safe-inference.md): Guidelines for performing inference with YOLO models in a thread-safe manner. Learn the importance of thread safety and best practices to prevent race conditions and ensure consistent predictions.
## Contribute to Our Guides
We welcome contributions from the community! If you've mastered a particular aspect of Ultralytics YOLO that's not yet covered in our guides, we encourage you to share your expertise. Writing a guide is a great way to give back to the community and help us make our documentation more comprehensive and user-friendly.
To get started, please read our [Contributing Guide](../help/contributing.md) for guidelines on how to open a Pull Request (PR). We look forward to your contributions.
## FAQ
### How do I train a custom object detection model using Ultralytics YOLO?
Training a custom object detection model with Ultralytics YOLO is straightforward. Start by preparing your dataset in the correct format and installing the Ultralytics package. Use the following code to initiate training:
!!! example
=== "Python"
```python
from ultralytics import YOLO
model = YOLO("yolo11n.pt") # Load a pretrained YOLO model
model.train(data="path/to/dataset.yaml", epochs=50) # Train on custom dataset
```
=== "CLI"
```bash
yolo task=detect mode=train model=yolo11n.pt data=path/to/dataset.yaml epochs=50
```
For detailed dataset formatting and additional options, refer to our [Tips for Model Training](model-training-tips.md) guide.
### What performance metrics should I use to evaluate my YOLO model?
Evaluating your YOLO model performance is crucial to understanding its efficacy. Key metrics include [Mean Average Precision](https://www.ultralytics.com/glossary/mean-average-precision-map) (mAP), [Intersection over Union](https://www.ultralytics.com/glossary/intersection-over-union-iou) (IoU), and F1 score. These metrics help assess the accuracy and [precision](https://www.ultralytics.com/glossary/precision) of object detection tasks. You can learn more about these metrics and how to improve your model in our [YOLO Performance Metrics](yolo-performance-metrics.md) guide.
### Why should I use Ultralytics HUB for my computer vision projects?
Ultralytics HUB is a no-code platform that simplifies managing, training, and deploying YOLO models. It supports seamless integration, real-time tracking, and cloud training, making it ideal for both beginners and professionals. Discover more about its features and how it can streamline your workflow with our [Ultralytics HUB](https://docs.ultralytics.com/hub/) quickstart guide.
### What are the common issues faced during YOLO model training, and how can I resolve them?
Common issues during YOLO model training include data formatting errors, model architecture mismatches, and insufficient [training data](https://www.ultralytics.com/glossary/training-data). To address these, ensure your dataset is correctly formatted, check for compatible model versions, and augment your training data. For a comprehensive list of solutions, refer to our [YOLO Common Issues](yolo-common-issues.md) guide.
### How can I deploy my YOLO model for real-time object detection on edge devices?
Deploying YOLO models on edge devices like NVIDIA Jetson and Raspberry Pi requires converting the model to a compatible format such as TensorRT or TFLite. Follow our step-by-step guides for [NVIDIA Jetson](nvidia-jetson.md) and [Raspberry Pi](raspberry-pi.md) deployments to get started with real-time object detection on edge hardware. These guides will walk you through installation, configuration, and performance optimization.
---
# Source: https://raw.githubusercontent.com/ultralytics/ultralytics/main/docs/en/guides/object-counting.md
---
comments: true
description: Learn to accurately identify and count objects in real-time using Ultralytics YOLO11 for applications like crowd analysis and surveillance.
keywords: object counting, YOLO11, Ultralytics, real-time object detection, AI, deep learning, object tracking, crowd analysis, surveillance, resource optimization
---
# Object Counting using Ultralytics YOLO11
## What is Object Counting?
Object counting with [Ultralytics YOLO11](https://github.com/ultralytics/ultralytics/) involves accurate identification and counting of specific objects in videos and camera streams. YOLO11 excels in real-time applications, providing efficient and precise object counting for various scenarios like crowd analysis and surveillance, thanks to its state-of-the-art algorithms and [deep learning](https://www.ultralytics.com/glossary/deep-learning-dl) capabilities.
Watch: How to Perform Real-Time Object Counting with Ultralytics YOLO11 🍏
## Advantages of Object Counting
- **Resource Optimization:** Object counting facilitates efficient resource management by providing accurate counts, optimizing resource allocation in applications like [inventory management](https://docs.ultralytics.com/guides/analytics/).
- **Enhanced Security:** Object counting enhances security and surveillance by accurately tracking and counting entities, aiding in proactive [threat detection](https://docs.ultralytics.com/guides/security-alarm-system/).
- **Informed Decision-Making:** Object counting offers valuable insights for decision-making, optimizing processes in retail, [traffic management](https://www.ultralytics.com/blog/ai-in-traffic-management-from-congestion-to-coordination), and various other domains.
## Real World Applications
| Logistics | Aquaculture |
| :-----------------------------------------------------------------------------------------------------------------------------------------------------: | :----------------------------------------------------------------------------------------------------------------------------------------------------------: |
|  |  |
| Conveyor Belt Packets Counting Using Ultralytics YOLO11 | Fish Counting in Sea using Ultralytics YOLO11 |
!!! example "Object Counting using Ultralytics YOLO"
=== "CLI"
```bash
# Run a counting example
yolo solutions count show=True
# Pass a source video
yolo solutions count source="path/to/video.mp4"
# Pass region coordinates
yolo solutions count region="[(20, 400), (1080, 400), (1080, 360), (20, 360)]"
```
The `region` argument accepts either two points (for a line) or a polygon with three or more points. Define the coordinates in the order they should be connected so the counter knows exactly where entries and exits occur.
=== "Python"
```python
import cv2
from ultralytics import solutions
cap = cv2.VideoCapture("path/to/video.mp4")
assert cap.isOpened(), "Error reading video file"
# region_points = [(20, 400), (1080, 400)] # line counting
region_points = [(20, 400), (1080, 400), (1080, 360), (20, 360)] # rectangular region
# region_points = [(20, 400), (1080, 400), (1080, 360), (20, 360), (20, 400)] # polygon region
# Video writer
w, h, fps = (int(cap.get(x)) for x in (cv2.CAP_PROP_FRAME_WIDTH, cv2.CAP_PROP_FRAME_HEIGHT, cv2.CAP_PROP_FPS))
video_writer = cv2.VideoWriter("object_counting_output.avi", cv2.VideoWriter_fourcc(*"mp4v"), fps, (w, h))
# Initialize object counter object
counter = solutions.ObjectCounter(
show=True, # display the output
region=region_points, # pass region points
model="yolo11n.pt", # model="yolo11n-obb.pt" for object counting with OBB model.
# classes=[0, 2], # count specific classes, e.g., person and car with the COCO pretrained model.
# tracker="botsort.yaml", # choose trackers, e.g., "bytetrack.yaml"
)
# Process video
while cap.isOpened():
success, im0 = cap.read()
if not success:
print("Video frame is empty or processing is complete.")
break
results = counter(im0)
# print(results) # access the output
video_writer.write(results.plot_im) # write the processed frame.
cap.release()
video_writer.release()
cv2.destroyAllWindows() # destroy all opened windows
```
### `ObjectCounter` Arguments
Here's a table with the `ObjectCounter` arguments:
{% from "macros/solutions-args.md" import param_table %}
{{ param_table(["model", "show_in", "show_out", "region"]) }}
The `ObjectCounter` solution allows the use of several `track` arguments:
{% from "macros/track-args.md" import param_table %}
{{ param_table(["tracker", "conf", "iou", "classes", "verbose", "device"]) }}
Additionally, the visualization arguments listed below are supported:
{% from "macros/visualization-args.md" import param_table %}
{{ param_table(["show", "line_width", "show_conf", "show_labels"]) }}
## FAQ
### How do I count objects in a video using Ultralytics YOLO11?
To count objects in a video using Ultralytics YOLO11, you can follow these steps:
1. Import the necessary libraries (`cv2`, `ultralytics`).
2. Define the counting region (e.g., a polygon, line, etc.).
3. Set up the video capture and initialize the object counter.
4. Process each frame to track objects and count them within the defined region.
Here's a simple example for counting in a region:
```python
import cv2
from ultralytics import solutions
def count_objects_in_region(video_path, output_video_path, model_path):
"""Count objects in a specific region within a video."""
cap = cv2.VideoCapture(video_path)
assert cap.isOpened(), "Error reading video file"
w, h, fps = (int(cap.get(x)) for x in (cv2.CAP_PROP_FRAME_WIDTH, cv2.CAP_PROP_FRAME_HEIGHT, cv2.CAP_PROP_FPS))
video_writer = cv2.VideoWriter(output_video_path, cv2.VideoWriter_fourcc(*"mp4v"), fps, (w, h))
region_points = [(20, 400), (1080, 400), (1080, 360), (20, 360)]
counter = solutions.ObjectCounter(show=True, region=region_points, model=model_path)
while cap.isOpened():
success, im0 = cap.read()
if not success:
print("Video frame is empty or processing is complete.")
break
results = counter(im0)
video_writer.write(results.plot_im)
cap.release()
video_writer.release()
cv2.destroyAllWindows()
count_objects_in_region("path/to/video.mp4", "output_video.avi", "yolo11n.pt")
```
For more advanced configurations and options, check out the [RegionCounter solution](https://docs.ultralytics.com/guides/region-counting/) for counting objects in multiple regions simultaneously.
### What are the advantages of using Ultralytics YOLO11 for object counting?
Using Ultralytics YOLO11 for object counting offers several advantages:
1. **Resource Optimization:** It facilitates efficient resource management by providing accurate counts, helping optimize resource allocation in industries like [inventory management](https://www.ultralytics.com/blog/ai-for-smarter-retail-inventory-management).
2. **Enhanced Security:** It enhances security and surveillance by accurately tracking and counting entities, aiding in proactive threat detection and [security systems](https://docs.ultralytics.com/guides/security-alarm-system/).
3. **Informed Decision-Making:** It offers valuable insights for decision-making, optimizing processes in domains like retail, traffic management, and more.
4. **Real-time Processing:** YOLO11's architecture enables [real-time inference](https://www.ultralytics.com/glossary/real-time-inference), making it suitable for live video streams and time-sensitive applications.
For implementation examples and practical applications, explore the [TrackZone solution](https://docs.ultralytics.com/guides/trackzone/) for tracking objects in specific zones.
### How can I count specific classes of objects using Ultralytics YOLO11?
To count specific classes of objects using Ultralytics YOLO11, you need to specify the classes you are interested in during the tracking phase. Below is a Python example:
```python
import cv2
from ultralytics import solutions
def count_specific_classes(video_path, output_video_path, model_path, classes_to_count):
"""Count specific classes of objects in a video."""
cap = cv2.VideoCapture(video_path)
assert cap.isOpened(), "Error reading video file"
w, h, fps = (int(cap.get(x)) for x in (cv2.CAP_PROP_FRAME_WIDTH, cv2.CAP_PROP_FRAME_HEIGHT, cv2.CAP_PROP_FPS))
video_writer = cv2.VideoWriter(output_video_path, cv2.VideoWriter_fourcc(*"mp4v"), fps, (w, h))
line_points = [(20, 400), (1080, 400)]
counter = solutions.ObjectCounter(show=True, region=line_points, model=model_path, classes=classes_to_count)
while cap.isOpened():
success, im0 = cap.read()
if not success:
print("Video frame is empty or processing is complete.")
break
results = counter(im0)
video_writer.write(results.plot_im)
cap.release()
video_writer.release()
cv2.destroyAllWindows()
count_specific_classes("path/to/video.mp4", "output_specific_classes.avi", "yolo11n.pt", [0, 2])
```
In this example, `classes_to_count=[0, 2]` means it counts objects of class `0` and `2` (e.g., person and car in the COCO dataset). You can find more information about class indices in the [COCO dataset documentation](https://docs.ultralytics.com/datasets/detect/coco/).
### Why should I use YOLO11 over other [object detection](https://www.ultralytics.com/glossary/object-detection) models for real-time applications?
Ultralytics YOLO11 provides several advantages over other object detection models like [Faster R-CNN](https://docs.ultralytics.com/compare/yolo11-vs-efficientdet/), SSD, and previous YOLO versions:
1. **Speed and Efficiency:** YOLO11 offers real-time processing capabilities, making it ideal for applications requiring high-speed inference, such as surveillance and [autonomous driving](https://www.ultralytics.com/blog/ai-in-self-driving-cars).
2. **[Accuracy](https://www.ultralytics.com/glossary/accuracy):** It provides state-of-the-art accuracy for object detection and tracking tasks, reducing the number of false positives and improving overall system reliability.
3. **Ease of Integration:** YOLO11 offers seamless integration with various platforms and devices, including mobile and [edge devices](https://docs.ultralytics.com/guides/nvidia-jetson/), which is crucial for modern AI applications.
4. **Flexibility:** Supports various tasks like object detection, [segmentation](https://docs.ultralytics.com/tasks/segment/), and tracking with configurable models to meet specific use-case requirements.
Check out Ultralytics [YOLO11 Documentation](https://docs.ultralytics.com/models/yolo11/) for a deeper dive into its features and performance comparisons.
### Can I use YOLO11 for advanced applications like crowd analysis and traffic management?
Yes, Ultralytics YOLO11 is perfectly suited for advanced applications like crowd analysis and traffic management due to its real-time detection capabilities, scalability, and integration flexibility. Its advanced features allow for high-accuracy object tracking, counting, and classification in dynamic environments. Example use cases include:
- **Crowd Analysis:** Monitor and manage large gatherings, ensuring safety and optimizing crowd flow with [region-based counting](https://docs.ultralytics.com/guides/region-counting/).
- **Traffic Management:** Track and count vehicles, analyze traffic patterns, and manage congestion in real-time with [speed estimation](https://docs.ultralytics.com/guides/speed-estimation/) capabilities.
- **Retail Analytics:** Analyze customer movement patterns and product interactions to optimize store layouts and improve customer experience.
- **Industrial Automation:** Count products on conveyor belts and monitor production lines for quality control and efficiency improvements.
For more specialized applications, explore [Ultralytics Solutions](https://docs.ultralytics.com/solutions/) for a comprehensive set of tools designed for real-world computer vision challenges.
---
# Source: https://raw.githubusercontent.com/ultralytics/ultralytics/main/docs/en/guides/steps-of-a-cv-project.md
---
comments: true
description: Discover essential steps for launching a successful computer vision project, from defining goals to model deployment and maintenance.
keywords: Computer Vision, AI, Object Detection, Image Classification, Instance Segmentation, Data Annotation, Model Training, Model Evaluation, Model Deployment
---
# Understanding the Key Steps in a Computer Vision Project
## Introduction
Computer vision is a subfield of [artificial intelligence](https://www.ultralytics.com/glossary/artificial-intelligence-ai) (AI) that helps computers see and understand the world like humans do. It processes and analyzes images or videos to extract information, recognize patterns, and make decisions based on that data.
Watch: How to Do Computer Vision Projects | A Step-by-Step Guide
Computer vision techniques like [object detection](../tasks/detect.md), [image classification](../tasks/classify.md), and [instance segmentation](../tasks/segment.md) can be applied across various industries, from [autonomous driving](https://www.ultralytics.com/solutions/ai-in-automotive) to [medical imaging](https://www.ultralytics.com/solutions/ai-in-healthcare) to gain valuable insights.
Working on your own computer vision projects is a great way to understand and learn more about computer vision. However, a computer vision project can consist of many steps, and it might seem confusing at first. By the end of this guide, you'll be familiar with the steps involved in a computer vision project. We'll walk through everything from the beginning to the end of a project, explaining why each part is important.
## An Overview of a Computer Vision Project
Before discussing the details of each step involved in a computer vision project, let's look at the overall process. If you started a computer vision project today, you'd take the following steps:
- Your first priority would be to understand your project's requirements.
- Then, you'd collect and accurately label the images that will help train your model.
- Next, you'd clean your data and apply augmentation techniques to prepare it for model training.
- After model training, you'd thoroughly test and evaluate your model to make sure it performs consistently under different conditions.
- Finally, you'd deploy your model into the real world and update it based on new insights and feedback.
Now that we know what to expect, let's dive right into the steps and get your project moving forward.
## Step 1: Defining Your Project's Goals
The first step in any computer vision project is clearly defining the problem you're trying to solve. Knowing the end goal helps you start to build a solution. This is especially true when it comes to computer vision because your project's objective will directly affect which computer vision task you need to focus on.
Here are some examples of project objectives and the computer vision tasks that can be used to reach these objectives:
- **Objective:** To develop a system that can monitor and manage the flow of different vehicle types on highways, improving traffic management and safety.
- **Computer Vision Task:** Object detection is ideal for traffic monitoring because it efficiently locates and identifies multiple vehicles. It is less computationally demanding than image segmentation, which provides unnecessary detail for this task, ensuring faster, real-time analysis.
- **Objective:** To develop a tool that assists radiologists by providing precise, pixel-level outlines of tumors in medical imaging scans.
- **Computer Vision Task:** Image segmentation is suitable for medical imaging because it provides accurate and detailed boundaries of tumors that are crucial for assessing size, shape, and treatment planning.
- **Objective:** To create a digital system that categorizes various documents (e.g., invoices, receipts, legal paperwork) to improve organizational efficiency and document retrieval.
- **Computer Vision Task:** [Image classification](https://www.ultralytics.com/glossary/image-classification) is ideal here as it handles one document at a time, without needing to consider the document's position in the image. This approach simplifies and accelerates the sorting process.
### Step 1.5: Selecting the Right Model and Training Approach
After understanding the project objective and suitable computer vision tasks, an essential part of defining the project goal is [selecting the right model](../models/index.md) and training approach.
Depending on the objective, you might choose to select the model first or after seeing what data you are able to collect in Step 2. For example, suppose your project is highly dependent on the availability of specific types of data. In that case, it may be more practical to gather and analyze the data first before selecting a model. On the other hand, if you have a clear understanding of the model requirements, you can choose the model first and then collect data that fits those specifications.
Choosing between training from scratch or using [transfer learning](https://www.ultralytics.com/glossary/transfer-learning) affects how you prepare your data. Training from scratch requires a diverse dataset to build the model's understanding from the ground up. Transfer learning, on the other hand, allows you to use a pretrained model and adapt it with a smaller, more specific dataset. Also, choosing a specific model to train will determine how you need to prepare your data, such as resizing images or adding annotations, according to the model's specific requirements.
Note: When choosing a model, consider its [deployment](./model-deployment-options.md) to ensure compatibility and performance. For example, lightweight models are ideal for [edge computing](https://www.ultralytics.com/glossary/edge-computing) due to their efficiency on resource-constrained devices. To learn more about the key points related to defining your project, read [our guide](./defining-project-goals.md) on defining your project's goals and selecting the right model.
Before getting into the hands-on work of a computer vision project, it's important to have a clear understanding of these details. Double-check that you've considered the following before moving on to Step 2:
- Clearly define the problem you're trying to solve.
- Determine the end goal of your project.
- Identify the specific computer vision task needed (e.g., object detection, image classification, image segmentation).
- Decide whether to train a model from scratch or use transfer learning.
- Select the appropriate model for your task and deployment needs.
## Step 2: Data Collection and Data Annotation
The quality of your computer vision models depends on the quality of your dataset. You can either collect images from the internet, take your own pictures, or use pre-existing datasets. Here are some great resources for downloading high-quality datasets: [Google Dataset Search Engine](https://datasetsearch.research.google.com/), [UC Irvine Machine Learning Repository](https://archive.ics.uci.edu/), and [Kaggle Datasets](https://www.kaggle.com/datasets).
Some libraries, like Ultralytics, provide [built-in support for various datasets](../datasets/index.md), making it easier to get started with high-quality data. These libraries often include utilities for using popular datasets seamlessly, which can save you a lot of time and effort in the initial stages of your project.
However, if you choose to collect images or take your own pictures, you'll need to annotate your data. Data annotation is the process of labeling your data to impart knowledge to your model. The type of data annotation you'll work with depends on your specific computer vision technique. Here are some examples:
- **Image Classification:** You'll label the entire image as a single class.
- **[Object Detection](https://www.ultralytics.com/glossary/object-detection):** You'll draw bounding boxes around each object in the image and label each box.
- **[Image Segmentation](https://www.ultralytics.com/glossary/image-segmentation):** You'll label each pixel in the image according to the object it belongs to, creating detailed object boundaries.
[Data collection and annotation](./data-collection-and-annotation.md) can be a time-consuming manual effort. Annotation tools can help make this process easier. Here are some useful open annotation tools: [LabeI Studio](https://github.com/HumanSignal/label-studio), [CVAT](https://github.com/cvat-ai/cvat), and [Labelme](https://github.com/wkentaro/labelme).
## Step 3: Data Augmentation and Splitting Your Dataset
After collecting and annotating your image data, it's important to first split your dataset into training, validation, and test sets before performing [data augmentation](https://www.ultralytics.com/glossary/data-augmentation). Splitting your dataset before augmentation is crucial to test and validate your model on original, unaltered data. It helps accurately assess how well the model generalizes to new, unseen data.
Here's how to split your data:
- **Training Set:** It is the largest portion of your data, typically 70-80% of the total, used to train your model.
- **Validation Set:** Usually around 10-15% of your data; this set is used to tune hyperparameters and validate the model during training, helping to prevent [overfitting](https://www.ultralytics.com/glossary/overfitting).
- **Test Set:** The remaining 10-15% of your data is set aside as the test set. It is used to evaluate the model's performance on unseen data after training is complete.
After splitting your data, you can perform data augmentation by applying transformations like rotating, scaling, and flipping images to artificially increase the size of your dataset. Data augmentation makes your model more robust to variations and improves its performance on unseen images.
Libraries like [OpenCV](https://www.ultralytics.com/glossary/opencv), [Albumentations](../integrations/albumentations.md), and [TensorFlow](https://www.ultralytics.com/glossary/tensorflow) offer flexible augmentation functions that you can use. Additionally, some libraries, such as Ultralytics, have [built-in augmentation settings](../modes/train.md) directly within its model training function, simplifying the process.
To understand your data better, you can use tools like [Matplotlib](https://matplotlib.org/) or [Seaborn](https://seaborn.pydata.org/) to visualize the images and analyze their distribution and characteristics. Visualizing your data helps identify patterns, anomalies, and the effectiveness of your augmentation techniques. You can also use [Ultralytics Explorer](../datasets/explorer/index.md), a tool for exploring computer vision datasets with semantic search, SQL queries, and vector similarity search.
By properly [understanding, splitting, and augmenting your data](./preprocessing_annotated_data.md), you can develop a well-trained, validated, and tested model that performs well in real-world applications.
## Step 4: Model Training
Once your dataset is ready for training, you can focus on setting up the necessary environment, managing your datasets, and training your model.
First, you'll need to make sure your environment is configured correctly. Typically, this includes the following:
- Installing essential libraries and frameworks like TensorFlow, [PyTorch](https://www.ultralytics.com/glossary/pytorch), or [Ultralytics](../quickstart.md).
- If you are using a GPU, installing libraries like CUDA and cuDNN will help enable GPU acceleration and speed up the training process.
Then, you can load your training and validation datasets into your environment. Normalize and preprocess the data through resizing, format conversion, or augmentation. With your model selected, configure the layers and specify hyperparameters. Compile the model by setting the [loss function](https://www.ultralytics.com/glossary/loss-function), optimizer, and performance metrics.
Libraries like Ultralytics simplify the training process. You can [start training](../modes/train.md) by feeding data into the model with minimal code. These libraries handle weight adjustments, [backpropagation](https://www.ultralytics.com/glossary/backpropagation), and validation automatically. They also offer tools to monitor progress and adjust hyperparameters easily. After training, save the model and its weights with a few commands.
It's important to keep in mind that proper dataset management is vital for efficient training. Use version control for datasets to track changes and ensure reproducibility. Tools like [DVC (Data Version Control)](../integrations/dvc.md) can help manage large datasets.
## Step 5: Model Evaluation and Model Finetuning
It's important to assess your model's performance using various metrics and refine it to improve [accuracy](https://www.ultralytics.com/glossary/accuracy). [Evaluating](../modes/val.md) helps identify areas where the model excels and where it may need improvement. [Fine-tuning](https://www.ultralytics.com/glossary/fine-tuning) ensures the model is optimized for the best possible performance.
- **[Performance Metrics](./yolo-performance-metrics.md):** Use metrics like accuracy, [precision](https://www.ultralytics.com/glossary/precision), [recall](https://www.ultralytics.com/glossary/recall), and F1-score to evaluate your model's performance. These metrics provide insights into how well your model is making predictions.
- **[Hyperparameter Tuning](./hyperparameter-tuning.md):** Adjust hyperparameters to optimize model performance. Techniques like grid search or random search can help find the best hyperparameter values.
- **Fine-Tuning:** Make small adjustments to the model architecture or training process to enhance performance. This might involve tweaking [learning rates](https://www.ultralytics.com/glossary/learning-rate), [batch sizes](https://www.ultralytics.com/glossary/batch-size), or other model parameters.
For a deeper understanding of model evaluation and fine-tuning techniques, check out our [model evaluation insights guide](./model-evaluation-insights.md).
## Step 6: Model Testing
In this step, you can make sure that your model performs well on completely unseen data, confirming its readiness for deployment. The difference between model testing and model evaluation is that it focuses on verifying the final model's performance rather than iteratively improving it.
It's important to thoroughly test and debug any common issues that may arise. Test your model on a separate test dataset that was not used during training or validation. This dataset should represent real-world scenarios to ensure the model's performance is consistent and reliable.
Also, address common problems such as overfitting, [underfitting](https://www.ultralytics.com/glossary/underfitting), and data leakage. Use techniques like [cross-validation](https://www.ultralytics.com/glossary/cross-validation) and [anomaly detection](https://www.ultralytics.com/glossary/anomaly-detection) to identify and fix these issues. For comprehensive testing strategies, refer to our [model testing guide](./model-testing.md).
## Step 7: Model Deployment
Once your model has been thoroughly tested, it's time to deploy it. [Model deployment](https://www.ultralytics.com/glossary/model-deployment) involves making your model available for use in a production environment. Here are the steps to deploy a computer vision model:
- **Setting Up the Environment:** Configure the necessary infrastructure for your chosen deployment option, whether it's cloud-based (AWS, Google Cloud, Azure) or edge-based (local devices, IoT).
- **[Exporting the Model](../modes/export.md):** Export your model to the appropriate format (e.g., ONNX, TensorRT, CoreML for YOLO11) to ensure compatibility with your deployment platform.
- **Deploying the Model:** Deploy the model by setting up APIs or endpoints and integrating it with your application.
- **Ensuring Scalability:** Implement load balancers, auto-scaling groups, and monitoring tools to manage resources and handle increasing data and user requests.
For more detailed guidance on deployment strategies and best practices, check out our [model deployment practices guide](./model-deployment-practices.md).
## Step 8: Monitoring, Maintenance, and Documentation
Once your model is deployed, it's important to continuously monitor its performance, maintain it to handle any issues, and document the entire process for future reference and improvements.
Monitoring tools can help you track key performance indicators (KPIs) and detect anomalies or drops in accuracy. By monitoring the model, you can be aware of model drift, where the model's performance declines over time due to changes in the input data. Periodically retrain the model with updated data to maintain accuracy and relevance.
In addition to monitoring and maintenance, documentation is also key. Thoroughly document the entire process, including model architecture, training procedures, hyperparameters, data preprocessing steps, and any changes made during deployment and maintenance. Good documentation ensures reproducibility and makes future updates or troubleshooting easier. By effectively [monitoring, maintaining, and documenting your model](./model-monitoring-and-maintenance.md), you can ensure it remains accurate, reliable, and easy to manage over its lifecycle.
## Engaging with the Community
Connecting with a community of computer vision enthusiasts can help you tackle any issues you face while working on your computer vision project with confidence. Here are some ways to learn, troubleshoot, and network effectively.
### Community Resources
- **GitHub Issues:** Check out the [YOLO11 GitHub repository](https://github.com/ultralytics/ultralytics/issues) and use the Issues tab to ask questions, report bugs, and suggest new features. The active community and maintainers are there to help with specific issues.
- **Ultralytics Discord Server:** Join the [Ultralytics Discord server](https://discord.com/invite/ultralytics) to interact with other users and developers, get support, and share insights.
### Official Documentation
- **Ultralytics YOLO11 Documentation:** Explore the [official YOLO11 documentation](./index.md) for detailed guides with helpful tips on different computer vision tasks and projects.
Using these resources will help you overcome challenges and stay updated with the latest trends and best practices in the computer vision community.
## Next Steps
Taking on a computer vision project can be exciting and rewarding. By following the steps in this guide, you can build a solid foundation for success. Each step is crucial for developing a solution that meets your objectives and works well in real-world scenarios. As you gain experience, you'll discover advanced techniques and tools to improve your projects.
## FAQ
### How do I choose the right computer vision task for my project?
Choosing the right computer vision task depends on your project's end goal. For instance, if you want to monitor traffic, **object detection** is suitable as it can locate and identify multiple vehicle types in real-time. For medical imaging, **image segmentation** is ideal for providing detailed boundaries of tumors, aiding in diagnosis and treatment planning. Learn more about specific tasks like [object detection](../tasks/detect.md), [image classification](../tasks/classify.md), and [instance segmentation](../tasks/segment.md).
### Why is data annotation crucial in computer vision projects?
Data annotation is vital for teaching your model to recognize patterns. The type of annotation varies with the task:
- **Image Classification**: Entire image labeled as a single class.
- **Object Detection**: Bounding boxes drawn around objects.
- **Image Segmentation**: Each pixel labeled according to the object it belongs to.
Tools like [Label Studio](https://github.com/HumanSignal/label-studio), [CVAT](https://github.com/cvat-ai/cvat), and [Labelme](https://github.com/wkentaro/labelme) can assist in this process. For more details, refer to our [data collection and annotation guide](./data-collection-and-annotation.md).
### What steps should I follow to augment and split my dataset effectively?
Splitting your dataset before augmentation helps validate model performance on original, unaltered data. Follow these steps:
- **Training Set**: 70-80% of your data.
- **Validation Set**: 10-15% for [hyperparameter tuning](https://www.ultralytics.com/glossary/hyperparameter-tuning).
- **Test Set**: Remaining 10-15% for final evaluation.
After splitting, apply data augmentation techniques like rotation, scaling, and flipping to increase dataset diversity. Libraries such as [Albumentations](../integrations/albumentations.md) and OpenCV can help. Ultralytics also offers [built-in augmentation settings](../modes/train.md) for convenience.
### How can I export my trained computer vision model for deployment?
Exporting your model ensures compatibility with different deployment platforms. Ultralytics provides multiple formats, including [ONNX](../integrations/onnx.md), [TensorRT](../integrations/tensorrt.md), and [CoreML](../integrations/coreml.md). To export your YOLO11 model, follow this guide:
- Use the `export` function with the desired format parameter.
- Ensure the exported model fits the specifications of your deployment environment (e.g., edge devices, cloud).
For more information, check out the [model export guide](../modes/export.md).
### What are the best practices for monitoring and maintaining a deployed computer vision model?
Continuous monitoring and maintenance are essential for a model's long-term success. Implement tools for tracking Key Performance Indicators (KPIs) and detecting anomalies. Regularly retrain the model with updated data to counteract model drift. Document the entire process, including model architecture, hyperparameters, and changes, to ensure reproducibility and ease of future updates. Learn more in our [monitoring and maintenance guide](./model-monitoring-and-maintenance.md).
---
# Source: https://raw.githubusercontent.com/ultralytics/ultralytics/main/docs/en/help/index.md
---
comments: true
description: Explore the Ultralytics Help Center with guides, FAQs, CI processes, and policies to support your YOLO model experience and contributions.
keywords: Ultralytics, YOLO, help center, documentation, guides, FAQ, contributing, CI, MRE, CLA, code of conduct, security policy, privacy policy
---
# Help
Welcome to the Ultralytics Help page. This page brings together practical guides, policies, and FAQs to support your work with Ultralytics YOLO models and repositories.
- [Frequently Asked Questions (FAQ)](FAQ.md): Find answers to common questions and issues encountered by the community of Ultralytics YOLO users and contributors.
- [Contributing Guide](contributing.md): Discover the protocols for making contributions, including how to submit pull requests, report bugs, and more.
- [Continuous Integration (CI) Guide](CI.md): Gain insights into the CI processes we employ, complete with status reports for each Ultralytics repository.
- [Contributor License Agreement (CLA)](CLA.md): Review the CLA to understand the rights and responsibilities associated with contributing to Ultralytics projects.
- [Minimum Reproducible Example (MRE) Guide](minimum-reproducible-example.md): Learn the process for creating an MRE, which is crucial for the timely and effective resolution of bug reports.
- [Code of Conduct](code-of-conduct.md): Our community guidelines support a respectful and open atmosphere for all collaborators.
- [Environmental, Health, and Safety (EHS) Policy](environmental-health-safety.md): Delve into our commitment to sustainability and the well-being of all our stakeholders.
- [Security Policy](security.md): Familiarize yourself with our security protocols and the procedure for reporting vulnerabilities.
- [Privacy Policy](privacy.md): Read our privacy policy to understand how we protect your data and respect your privacy in all our services and operations.
We encourage you to review these resources for a smooth and productive experience. If you need additional support, reach out via [GitHub Issues](https://github.com/ultralytics/ultralytics/issues) or the [Ultralytics Community](https://community.ultralytics.com/).
## FAQ
### What is Ultralytics YOLO and how does it benefit my [machine learning](https://www.ultralytics.com/glossary/machine-learning-ml) projects?
Ultralytics YOLO (You Only Look Once) is a state-of-the-art, real-time [object detection](https://www.ultralytics.com/glossary/object-detection) model. Its latest version, YOLO11, enhances speed, [accuracy](https://www.ultralytics.com/glossary/accuracy), and versatility, making it ideal for a wide range of applications, from real-time video analytics to advanced machine learning research. YOLO's efficiency in detecting objects in images and videos has made it the go-to solution for businesses and researchers looking to integrate robust [computer vision](https://www.ultralytics.com/glossary/computer-vision-cv) capabilities into their projects.
For more details on YOLO11, visit the [YOLO11 documentation](../models/yolo11.md).
### How do I contribute to Ultralytics YOLO repositories?
Contributing to Ultralytics YOLO repositories is straightforward. Start by reviewing the [Contributing Guide](contributing.md) to understand the protocols for submitting pull requests, reporting bugs, and more. You'll also need to sign the [Contributor License Agreement (CLA)](CLA.md) to ensure your contributions are legally recognized. For effective bug reporting, refer to the [Minimum Reproducible Example (MRE) Guide](minimum-reproducible-example.md).
### Why should I use Ultralytics HUB for my machine learning projects?
Ultralytics HUB offers a seamless, no-code solution for managing your machine learning projects. It enables you to generate, train, and deploy AI models like YOLO11 effortlessly. Unique features include cloud training, real-time tracking, and intuitive dataset management. Ultralytics HUB simplifies the entire workflow, from data processing to [model deployment](https://www.ultralytics.com/glossary/model-deployment), making it an indispensable tool for both beginners and advanced users.
To get started, visit [Ultralytics HUB Quickstart](../hub/quickstart.md).
### What is Continuous Integration (CI) in Ultralytics, and how does it ensure high-quality code?
Continuous Integration (CI) in Ultralytics involves automated processes that ensure the integrity and quality of the codebase. Our CI setup includes Docker deployment, broken link checks, [CodeQL analysis](https://github.com/github/codeql), and PyPI publishing. These processes help maintain stable and secure repositories by automatically running tests and checks on new code submissions.
Learn more in the [Continuous Integration (CI) Guide](CI.md).
### How is [data privacy](https://www.ultralytics.com/glossary/data-privacy) handled by Ultralytics?
Ultralytics takes data privacy seriously. Our [Privacy Policy](privacy.md) outlines how we collect and use anonymized data to improve the YOLO package while prioritizing user privacy and control. We adhere to strict data protection regulations to ensure your information is secure at all times.
For more information, review our [Privacy Policy](privacy.md).
---
# Source: https://raw.githubusercontent.com/ultralytics/ultralytics/main/docs/en/index.md
---
comments: true
description: Discover Ultralytics YOLO - the latest in real-time object detection and image segmentation. Learn about its features and maximize its potential in your projects.
keywords: Ultralytics, YOLO, YOLO11, object detection, image segmentation, deep learning, computer vision, AI, machine learning, documentation, tutorial
---
# Home
Introducing Ultralytics [YOLO11](models/yolo11.md), the latest version of the acclaimed real-time object detection and image segmentation model. YOLO11 is built on cutting-edge advancements in [deep learning](https://www.ultralytics.com/glossary/deep-learning-dl) and [computer vision](https://www.ultralytics.com/blog/everything-you-need-to-know-about-computer-vision-in-2025), offering unparalleled performance in terms of speed and [accuracy](https://www.ultralytics.com/glossary/accuracy). Its streamlined design makes it suitable for various applications and easily adaptable to different hardware platforms, from edge devices to cloud APIs.
Explore the Ultralytics Docs, a comprehensive resource designed to help you understand and utilize its features and capabilities. Whether you are a seasoned [machine learning](https://www.ultralytics.com/glossary/machine-learning-ml) practitioner or new to the field, this hub aims to maximize YOLO's potential in your projects.
## Where to Start
- :material-clock-fast:{ .lg .middle } **Getting Started**
***
Install `ultralytics` with pip and get up and running in minutes to train a YOLO model
***
[:octicons-arrow-right-24: Quickstart](quickstart.md)
- :material-image:{ .lg .middle } **Predict**
***
Predict on new images, videos and streams with YOLO
***
[:octicons-arrow-right-24: Learn more](modes/predict.md)
- :fontawesome-solid-brain:{ .lg .middle } **Train a Model**
***
Train a new YOLO model on your own custom dataset from scratch or load and train on a pretrained model
***
[:octicons-arrow-right-24: Learn more](modes/train.md)
- :material-magnify-expand:{ .lg .middle } **Explore Computer Vision Tasks**
***
Discover YOLO tasks like detect, segment, classify, pose, OBB and track
***
[:octicons-arrow-right-24: Explore Tasks](tasks/index.md)
- :rocket:{ .lg .middle } **Explore YOLO11 🚀**
***
Discover Ultralytics' latest state-of-the-art YOLO11 models and their capabilities
***
[:octicons-arrow-right-24: YOLO11 Models 🚀](models/yolo11.md)
- :material-select-all:{ .lg .middle } **SAM 3: Segment Anything with Concepts 🚀 NEW**
***
Meta's latest SAM 3 with Promptable Concept Segmentation - segment all instances using text or image exemplars
***
[:octicons-arrow-right-24: SAM 3 Models](models/sam-3.md)
- :material-scale-balance:{ .lg .middle } **Open Source, AGPL-3.0**
***
Ultralytics offers two YOLO licenses: AGPL-3.0 and Enterprise. Explore YOLO on [GitHub](https://github.com/ultralytics/ultralytics).
***
[:octicons-arrow-right-24: YOLO License](https://www.ultralytics.com/license)
Watch: How to Train a YOLO11 model on Your Custom Dataset in Google Colab.
## YOLO: A Brief History
[YOLO](models/index.md) (You Only Look Once), a popular [object detection](https://www.ultralytics.com/glossary/object-detection) and [image segmentation](https://www.ultralytics.com/glossary/image-segmentation) model, was developed by Joseph Redmon and Ali Farhadi at the University of Washington. Launched in 2015, YOLO gained popularity for its high speed and accuracy.
- [YOLOv2](models/index.md), released in 2016, improved the original model by incorporating batch normalization, anchor boxes, and dimension clusters.
- [YOLOv3](models/yolov3.md), launched in 2018, further enhanced the model's performance using a more efficient backbone network, multiple anchors, and spatial pyramid pooling.
- [YOLOv4](models/yolov4.md) was released in 2020, introducing innovations like Mosaic [data augmentation](https://www.ultralytics.com/glossary/data-augmentation), a new anchor-free detection head, and a new [loss function](https://www.ultralytics.com/glossary/loss-function).
- [YOLOv5](models/yolov5.md) further improved the model's performance and added new features such as hyperparameter optimization, integrated experiment tracking, and automatic export to popular export formats.
- [YOLOv6](models/yolov6.md) was open-sourced by [Meituan](https://www.meituan.com/) in 2022 and is used in many of the company's autonomous delivery robots.
- [YOLOv7](models/yolov7.md) added additional tasks such as pose estimation on the COCO keypoints dataset.
- [YOLOv8](models/yolov8.md) released in 2023 by Ultralytics, introduced new features and improvements for enhanced performance, flexibility, and efficiency, supporting a full range of vision AI tasks.
- [YOLOv9](models/yolov9.md) introduces innovative methods like Programmable Gradient Information (PGI) and the Generalized Efficient Layer Aggregation Network (GELAN).
- [YOLOv10](models/yolov10.md) created by researchers from [Tsinghua University](https://www.tsinghua.edu.cn/en/) using the [Ultralytics](https://www.ultralytics.com/) [Python package](https://pypi.org/project/ultralytics/), provides real-time [object detection](tasks/detect.md) advancements by introducing an End-to-End head that eliminates Non-Maximum Suppression (NMS) requirements.
- **[YOLO11](models/yolo11.md) 🚀**: Ultralytics' latest YOLO models deliver state-of-the-art (SOTA) performance across multiple tasks, including [object detection](tasks/detect.md), [segmentation](tasks/segment.md), [pose estimation](tasks/pose.md), [tracking](modes/track.md), and [classification](tasks/classify.md), enabling deployment across diverse AI applications and domains.
- **[YOLO26](models/yolo26.md) ⚠️ Coming Soon**: Ultralytics' next-generation YOLO model optimized for edge deployment with end-to-end NMS-free inference.
## YOLO Licenses: How is Ultralytics YOLO licensed?
Ultralytics offers two licensing options to accommodate diverse use cases:
- **AGPL-3.0 License**: This [OSI-approved](https://opensource.org/license/agpl-v3) open-source license is ideal for students and enthusiasts, promoting open collaboration and knowledge sharing. See the [LICENSE](https://github.com/ultralytics/ultralytics/blob/main/LICENSE) file for more details.
- **Enterprise License**: Designed for commercial use, this license permits seamless integration of Ultralytics software and AI models into commercial goods and services, bypassing the open-source requirements of AGPL-3.0. If your scenario involves embedding our solutions into a commercial offering, reach out through [Ultralytics Licensing](https://www.ultralytics.com/license).
Our licensing strategy is designed to ensure that any improvements to our open-source projects are returned to the community. We believe in open source, and our mission is to ensure that our contributions can be used and expanded in ways that benefit everyone.
## The Evolution of Object Detection
Object detection has evolved significantly over the years, from traditional computer vision techniques to advanced deep learning models. The [YOLO family of models](https://www.ultralytics.com/blog/the-evolution-of-object-detection-and-ultralytics-yolo-models) has been at the forefront of this evolution, consistently pushing the boundaries of what's possible in real-time object detection.
YOLO's unique approach treats object detection as a single regression problem, predicting [bounding boxes](https://www.ultralytics.com/glossary/bounding-box) and class probabilities directly from full images in one evaluation. This revolutionary method has made YOLO models significantly faster than previous two-stage detectors while maintaining high accuracy.
With each new version, YOLO has introduced architectural improvements and innovative techniques that have enhanced performance across various metrics. YOLO11 continues this tradition by incorporating the latest advancements in computer vision research, offering even better speed-accuracy trade-offs for real-world applications.
## FAQ
### What is Ultralytics YOLO and how does it improve object detection?
Ultralytics YOLO is the latest advancement in the acclaimed YOLO (You Only Look Once) series for real-time object detection and image segmentation. It builds on previous versions by introducing new features and improvements for enhanced performance, flexibility, and efficiency. YOLO supports various [vision AI tasks](tasks/index.md) such as detection, segmentation, pose estimation, tracking, and classification. Its state-of-the-art architecture ensures superior speed and accuracy, making it suitable for diverse applications, including edge devices and cloud APIs.
### How can I get started with YOLO installation and setup?
Getting started with YOLO is quick and straightforward. You can install the Ultralytics package using [pip](https://pypi.org/project/ultralytics/) and get up and running in minutes. Here's a basic installation command:
!!! example "Installation using pip"
=== "CLI"
```bash
pip install -U ultralytics
```
For a comprehensive step-by-step guide, visit our [Quickstart](quickstart.md) page. This resource will help you with installation instructions, initial setup, and running your first model.
### How can I train a custom YOLO model on my dataset?
Training a custom YOLO model on your dataset involves a few detailed steps:
1. Prepare your annotated dataset.
2. Configure the training parameters in a YAML file.
3. Use the `yolo TASK train` command to start training. (Each `TASK` has its own argument)
Here's example code for the Object Detection Task:
!!! example "Train Example for Object Detection Task"
=== "Python"
```python
from ultralytics import YOLO
# Load a pretrained YOLO model (you can choose n, s, m, l, or x versions)
model = YOLO("yolo11n.pt")
# Start training on your custom dataset
model.train(data="path/to/dataset.yaml", epochs=100, imgsz=640)
```
=== "CLI"
```bash
# Train a YOLO model from the command line
yolo detect train data=path/to/dataset.yaml epochs=100 imgsz=640
```
For a detailed walkthrough, check out our [Train a Model](modes/train.md) guide, which includes examples and tips for optimizing your training process.
### What are the licensing options available for Ultralytics YOLO?
Ultralytics offers two licensing options for YOLO:
- **AGPL-3.0 License**: This open-source license is ideal for educational and non-commercial use, promoting open collaboration.
- **Enterprise License**: This is designed for commercial applications, allowing seamless integration of Ultralytics software into commercial products without the restrictions of the AGPL-3.0 license.
For more details, visit our [Licensing](https://www.ultralytics.com/license) page.
### How can Ultralytics YOLO be used for real-time object tracking?
Ultralytics YOLO supports efficient and customizable multi-object tracking. To utilize tracking capabilities, you can use the `yolo track` command, as shown below:
!!! example "Example for Object Tracking on a Video"
=== "Python"
```python
from ultralytics import YOLO
# Load a pretrained YOLO model
model = YOLO("yolo11n.pt")
# Start tracking objects in a video
# You can also use live video streams or webcam input
model.track(source="path/to/video.mp4")
```
=== "CLI"
```bash
# Perform object tracking on a video from the command line
# You can specify different sources like webcam (0) or RTSP streams
yolo track source=path/to/video.mp4
```
For a detailed guide on setting up and running object tracking, check our [Track Mode](modes/track.md) documentation, which explains the configuration and practical applications in real-time scenarios.
---
# Source: https://raw.githubusercontent.com/ultralytics/ultralytics/main/docs/en/integrations/amazon-sagemaker.md
---
comments: true
description: Learn step-by-step how to deploy Ultralytics' YOLO11 on Amazon SageMaker Endpoints, from setup to testing, for powerful real-time inference with AWS services.
keywords: YOLO11, Amazon SageMaker, AWS, Ultralytics, machine learning, computer vision, model deployment, AWS CloudFormation, AWS CDK, real-time inference
---
# A Guide to Deploying YOLO11 on Amazon SageMaker Endpoints
Deploying advanced [computer vision](https://www.ultralytics.com/glossary/computer-vision-cv) models like [Ultralytics' YOLO11](https://github.com/ultralytics/ultralytics) on Amazon SageMaker Endpoints opens up a wide range of possibilities for various [machine learning](https://www.ultralytics.com/glossary/machine-learning-ml) applications. The key to effectively using these models lies in understanding their setup, configuration, and deployment processes. YOLO11 becomes even more powerful when integrated seamlessly with Amazon SageMaker, a robust and scalable machine learning service by AWS.
This guide will take you through the process of deploying YOLO11 [PyTorch](https://www.ultralytics.com/glossary/pytorch) models on Amazon SageMaker Endpoints step by step. You'll learn the essentials of preparing your AWS environment, configuring the model appropriately, and using tools like AWS CloudFormation and the AWS Cloud Development Kit (CDK) for deployment.
## Amazon SageMaker
[Amazon SageMaker](https://aws.amazon.com/sagemaker/) is a machine learning service from Amazon Web Services (AWS) that simplifies the process of building, training, and deploying machine learning models. It provides a broad range of tools for handling various aspects of machine learning workflows. This includes automated features for tuning models, options for training models at scale, and straightforward methods for deploying models into production. SageMaker supports popular machine learning frameworks, offering the flexibility needed for diverse projects. Its features also cover data labeling, workflow management, and performance analysis.
## Deploying YOLO11 on Amazon SageMaker Endpoints
Deploying YOLO11 on Amazon SageMaker lets you use its managed environment for real-time inference and take advantage of features like autoscaling. Take a look at the AWS architecture below.
### Step 1: Setup Your AWS Environment
First, ensure you have the following prerequisites in place:
- An AWS Account: If you don't already have one, sign up for an AWS account.
- Configured IAM Roles: You'll need an IAM role with the necessary permissions for Amazon SageMaker, AWS CloudFormation, and Amazon S3. This role should have policies that allow it to access these services.
- AWS CLI: If not already installed, download and install the AWS Command Line Interface (CLI) and configure it with your account details. Follow [the AWS CLI instructions](https://docs.aws.amazon.com/cli/latest/userguide/getting-started-install.html) for installation.
- AWS CDK: If not already installed, install the AWS Cloud Development Kit (CDK), which will be used for scripting the deployment. Follow [the AWS CDK instructions](https://docs.aws.amazon.com/cdk/v2/guide/#getting_started_install) for installation.
- Adequate Service Quota: Confirm that you have sufficient quotas for two separate resources in Amazon SageMaker: one for `ml.m5.4xlarge` for endpoint usage and another for `ml.m5.4xlarge` for notebook instance usage. Each of these requires a minimum of one quota value. If your current quotas are below this requirement, it's important to request an increase for each. You can request a quota increase by following the detailed instructions in the [AWS Service Quotas documentation](https://docs.aws.amazon.com/servicequotas/latest/userguide/request-quota-increase.html#quota-console-increase).
### Step 2: Clone the YOLO11 SageMaker Repository
The next step is to clone the specific AWS repository that contains the resources for deploying YOLO11 on SageMaker. This repository, hosted on GitHub, includes the necessary CDK scripts and configuration files.
- Clone the GitHub Repository: Execute the following command in your terminal to clone the host-yolov8-on-sagemaker-endpoint repository:
```bash
git clone https://github.com/aws-samples/host-yolov8-on-sagemaker-endpoint.git
```
- Navigate to the Cloned Directory: Change your directory to the cloned repository:
```bash
cd host-yolov8-on-sagemaker-endpoint/yolov8-pytorch-cdk
```
### Step 3: Set Up the CDK Environment
Now that you have the necessary code, set up your environment for deploying with AWS CDK.
- Create a Python Virtual Environment: This isolates your Python environment and dependencies. Run:
```bash
python3 -m venv .venv
```
- Activate the Virtual Environment:
```bash
source .venv/bin/activate
```
- Install Dependencies: Install the required Python dependencies for the project:
```bash
pip3 install -r requirements.txt
```
- Upgrade AWS CDK Library: Ensure you have the latest version of the AWS CDK library:
```bash
pip install --upgrade aws-cdk-lib
```
### Step 4: Create the AWS CloudFormation Stack
- Synthesize the CDK Application: Generate the AWS CloudFormation template from your CDK code:
```bash
cdk synth
```
- Bootstrap the CDK Application: Prepare your AWS environment for CDK deployment:
```bash
cdk bootstrap
```
- Deploy the Stack: This will create the necessary AWS resources and deploy your model:
```bash
cdk deploy
```
### Step 5: Deploy the YOLO Model
Before diving into the deployment instructions, be sure to check out the range of [YOLO11 models offered by Ultralytics](../models/index.md). This will help you choose the most appropriate model for your project requirements.
After creating the AWS CloudFormation Stack, the next step is to deploy YOLO11.
- Open the Notebook Instance: Go to the AWS Console and navigate to the Amazon SageMaker service. Select "Notebook Instances" from the dashboard, then locate the notebook instance that was created by your CDK deployment script. Open the notebook instance to access the Jupyter environment.
- Access and Modify inference.py: After opening the SageMaker notebook instance in Jupyter, locate the inference.py file. Edit the output_fn function in inference.py as shown below and save your changes to the script, ensuring that there are no syntax errors.
```python
import json
def output_fn(prediction_output):
"""Formats model outputs as JSON string, extracting attributes like boxes, masks, keypoints."""
print("Executing output_fn from inference.py ...")
infer = {}
for result in prediction_output:
if result.boxes is not None:
infer["boxes"] = result.boxes.numpy().data.tolist()
if result.masks is not None:
infer["masks"] = result.masks.numpy().data.tolist()
if result.keypoints is not None:
infer["keypoints"] = result.keypoints.numpy().data.tolist()
if result.obb is not None:
infer["obb"] = result.obb.numpy().data.tolist()
if result.probs is not None:
infer["probs"] = result.probs.numpy().data.tolist()
return json.dumps(infer)
```
- Deploy the Endpoint Using 1_DeployEndpoint.ipynb: In the Jupyter environment, open the 1_DeployEndpoint.ipynb notebook located in the sm-notebook directory. Follow the instructions in the notebook and run the cells to download the YOLO11 model, package it with the updated inference code, and upload it to an Amazon S3 bucket. The notebook will guide you through creating and deploying a SageMaker endpoint for the YOLO11 model.
### Step 6: Testing Your Deployment
Now that your YOLO11 model is deployed, it's important to test its performance and functionality.
- Open the Test Notebook: In the same Jupyter environment, locate and open the 2_TestEndpoint.ipynb notebook, also in the sm-notebook directory.
- Run the Test Notebook: Follow the instructions within the notebook to test the deployed SageMaker endpoint. This includes sending an image to the endpoint and running inferences. Then, you'll plot the output to visualize the model's performance and [accuracy](https://www.ultralytics.com/glossary/accuracy), as shown below.
- Clean-Up Resources: The test notebook will also guide you through the process of cleaning up the endpoint and the hosted model. This is an important step to manage costs and resources effectively, especially if you do not plan to use the deployed model immediately.
### Step 7: Monitoring and Management
After testing, continuous monitoring and management of your deployed model are essential.
- Monitor with Amazon CloudWatch: Regularly check the performance and health of your SageMaker endpoint using [Amazon CloudWatch](https://aws.amazon.com/cloudwatch/).
- Manage the Endpoint: Use the SageMaker console for ongoing management of the endpoint. This includes scaling, updating, or redeploying the model as required.
By completing these steps, you will have successfully deployed and tested a YOLO11 model on Amazon SageMaker Endpoints. This process not only equips you with practical experience in using AWS services for machine learning deployment but also lays the foundation for deploying other advanced models in the future.
## Summary
This guide took you step by step through deploying YOLO11 on Amazon SageMaker Endpoints using AWS CloudFormation and the AWS Cloud Development Kit (CDK). The process includes cloning the necessary GitHub repository, setting up the CDK environment, deploying the model using AWS services, and testing its performance on SageMaker.
For more technical details, refer to [this article](https://aws.amazon.com/blogs/machine-learning/hosting-yolov8-pytorch-model-on-amazon-sagemaker-endpoints/) on the AWS Machine Learning Blog. You can also check out the official [Amazon SageMaker Documentation](https://docs.aws.amazon.com/sagemaker/latest/dg/realtime-endpoints.html) for more insights into various features and functionalities.
Are you interested in learning more about different YOLO11 integrations? Visit the [Ultralytics integrations guide page](../integrations/index.md) to discover additional tools and capabilities that can enhance your machine-learning projects.
## FAQ
### How do I deploy the Ultralytics YOLO11 model on Amazon SageMaker Endpoints?
To deploy the Ultralytics YOLO11 model on Amazon SageMaker Endpoints, follow these steps:
1. **Set Up Your AWS Environment**: Ensure you have an AWS Account, IAM roles with necessary permissions, and the AWS CLI configured. Install AWS CDK if not already done (refer to the [AWS CDK instructions](https://docs.aws.amazon.com/cdk/v2/guide/#getting_started_install)).
2. **Clone the YOLO11 SageMaker Repository**:
```bash
git clone https://github.com/aws-samples/host-yolov8-on-sagemaker-endpoint.git
cd host-yolov8-on-sagemaker-endpoint/yolov8-pytorch-cdk
```
3. **Set Up the CDK Environment**: Create a Python virtual environment, activate it, install dependencies, and upgrade AWS CDK library.
```bash
python3 -m venv .venv
source .venv/bin/activate
pip3 install -r requirements.txt
pip install --upgrade aws-cdk-lib
```
4. **Deploy using AWS CDK**: Synthesize and deploy the CloudFormation stack, bootstrap the environment.
```bash
cdk synth
cdk bootstrap
cdk deploy
```
For further details, review the [documentation section](#step-5-deploy-the-yolo-model).
### What are the prerequisites for deploying YOLO11 on Amazon SageMaker?
To deploy YOLO11 on Amazon SageMaker, ensure you have the following prerequisites:
1. **AWS Account**: Active AWS account ([sign up here](https://aws.amazon.com/)).
2. **IAM Roles**: Configured IAM roles with permissions for SageMaker, CloudFormation, and Amazon S3.
3. **AWS CLI**: Installed and configured AWS Command Line Interface ([AWS CLI installation guide](https://docs.aws.amazon.com/cli/latest/userguide/getting-started-install.html)).
4. **AWS CDK**: Installed AWS Cloud Development Kit ([CDK setup guide](https://docs.aws.amazon.com/cdk/v2/guide/#getting_started_install)).
5. **Service Quotas**: Sufficient quotas for `ml.m5.4xlarge` instances for both endpoint and notebook usage ([request a quota increase](https://docs.aws.amazon.com/servicequotas/latest/userguide/request-quota-increase.html#quota-console-increase)).
For detailed setup, refer to [this section](#step-1-setup-your-aws-environment).
### Why should I use Ultralytics YOLO11 on Amazon SageMaker?
Using Ultralytics YOLO11 on Amazon SageMaker offers several advantages:
1. **Scalability and Management**: SageMaker provides a managed environment with features like autoscaling, which helps in real-time inference needs.
2. **Integration with AWS Services**: Seamlessly integrate with other AWS services, such as S3 for data storage, CloudFormation for infrastructure as code, and CloudWatch for monitoring.
3. **Ease of Deployment**: Simplified setup using AWS CDK scripts and streamlined deployment processes.
4. **Performance**: Leverage Amazon SageMaker's high-performance infrastructure for running large scale inference tasks efficiently.
Explore more about the advantages of using SageMaker in the [introduction section](#amazon-sagemaker).
### Can I customize the inference logic for YOLO11 on Amazon SageMaker?
Yes, you can customize the inference logic for YOLO11 on Amazon SageMaker:
1. **Modify `inference.py`**: Locate and customize the `output_fn` function in the `inference.py` file to tailor output formats.
```python
import json
def output_fn(prediction_output):
"""Formats model outputs as JSON string, extracting attributes like boxes, masks, keypoints."""
infer = {}
for result in prediction_output:
if result.boxes is not None:
infer["boxes"] = result.boxes.numpy().data.tolist()
# Add more processing logic if necessary
return json.dumps(infer)
```
2. **Deploy Updated Model**: Ensure you redeploy the model using Jupyter notebooks provided (`1_DeployEndpoint.ipynb`) to include these changes.
Refer to the [detailed steps](#step-5-deploy-the-yolo-model) for deploying the modified model.
### How can I test the deployed YOLO11 model on Amazon SageMaker?
To test the deployed YOLO11 model on Amazon SageMaker:
1. **Open the Test Notebook**: Locate the `2_TestEndpoint.ipynb` notebook in the SageMaker Jupyter environment.
2. **Run the Notebook**: Follow the notebook's instructions to send an image to the endpoint, perform inference, and display results.
3. **Visualize Results**: Use built-in plotting functionalities to visualize performance metrics, such as bounding boxes around detected objects.
For comprehensive testing instructions, visit the [testing section](#step-6-testing-your-deployment).
---
# Source: https://raw.githubusercontent.com/ultralytics/ultralytics/main/docs/en/integrations/clearml.md
---
comments: true
description: Discover how to integrate YOLO11 with ClearML to streamline your MLOps workflow, automate experiments, and enhance model management effortlessly.
keywords: YOLO11, ClearML, MLOps, Ultralytics, machine learning, object detection, model training, automation, experiment management
---
# Training YOLO11 with ClearML: Streamlining Your MLOps Workflow
MLOps bridges the gap between creating and deploying [machine learning](https://www.ultralytics.com/glossary/machine-learning-ml) models in real-world settings. It focuses on efficient deployment, scalability, and ongoing management to ensure models perform well in practical applications.
[Ultralytics YOLO11](https://www.ultralytics.com/) effortlessly integrates with ClearML, streamlining and enhancing your [object detection](https://www.ultralytics.com/glossary/object-detection) model's training and management. This guide will walk you through the integration process, detailing how to set up ClearML, manage experiments, automate model management, and collaborate effectively.
## ClearML
[ClearML](https://clear.ml/) is an innovative open-source MLOps platform that is skillfully designed to automate, monitor, and orchestrate machine learning workflows. Its key features include automated logging of all training and inference data for full experiment reproducibility, an intuitive web UI for easy [data visualization](https://www.ultralytics.com/glossary/data-visualization) and analysis, advanced hyperparameter [optimization algorithms](https://www.ultralytics.com/glossary/optimization-algorithm), and robust model management for efficient deployment across various platforms.
## YOLO11 Training with ClearML
You can bring automation and efficiency to your machine learning workflow by integrating YOLO11 with ClearML to improve your training process.
## Installation
To install the required packages, run:
!!! tip "Installation"
=== "CLI"
```bash
# Install the required packages for YOLO11 and ClearML
pip install ultralytics clearml
```
For detailed instructions and best practices related to the installation process, be sure to check our [YOLO11 Installation guide](../quickstart.md). While installing the required packages for YOLO11, if you encounter any difficulties, consult our [Common Issues guide](../guides/yolo-common-issues.md) for solutions and tips.
## Configuring ClearML
Once you have installed the necessary packages, the next step is to initialize and configure your ClearML SDK. This involves setting up your ClearML account and obtaining the necessary credentials for a seamless connection between your development environment and the ClearML server.
Begin by initializing the ClearML SDK in your environment. The `clearml-init` command starts the setup process and prompts you for the necessary credentials.
!!! tip "Initial SDK Setup"
=== "CLI"
```bash
# Initialize your ClearML SDK setup process
clearml-init
```
After executing this command, visit the [ClearML Settings page](https://app.clear.ml/settings/workspace-configuration). Navigate to the top right corner and select "Settings." Go to the "Workspace" section and click on "Create new credentials." Use the credentials provided in the "Create Credentials" pop-up to complete the setup as instructed, depending on whether you are configuring ClearML in a Jupyter Notebook or a local Python environment.
## Usage
Before diving into the usage instructions, be sure to check out the range of [YOLO11 models offered by Ultralytics](../models/index.md). This will help you choose the most appropriate model for your project requirements.
!!! example "Usage"
=== "Python"
```python
from clearml import Task
from ultralytics import YOLO
# Step 1: Creating a ClearML Task
task = Task.init(project_name="my_project", task_name="my_yolo11_task")
# Step 2: Selecting the YOLO11 Model
model_variant = "yolo11n"
task.set_parameter("model_variant", model_variant)
# Step 3: Loading the YOLO11 Model
model = YOLO(f"{model_variant}.pt")
# Step 4: Setting Up Training Arguments
args = dict(data="coco8.yaml", epochs=16)
task.connect(args)
# Step 5: Initiating Model Training
results = model.train(**args)
```
### Understanding the Code
Let's understand the steps showcased in the usage code snippet above.
**Step 1: Creating a ClearML Task**: A new task is initialized in ClearML, specifying your project and task names. This task will track and manage your model's training.
**Step 2: Selecting the YOLO11 Model**: The `model_variant` variable is set to 'yolo11n', one of the YOLO11 models. This variant is then logged in ClearML for tracking.
**Step 3: Loading the YOLO11 Model**: The selected YOLO11 model is loaded using Ultralytics' YOLO class, preparing it for training.
**Step 4: Setting Up Training Arguments**: Key training arguments like the dataset (`coco8.yaml`) and the number of [epochs](https://www.ultralytics.com/glossary/epoch) (`16`) are organized in a dictionary and connected to the ClearML task. This allows for tracking and potential modification via the ClearML UI. For a detailed understanding of the model training process and best practices, refer to our [YOLO11 Model Training guide](../modes/train.md).
**Step 5: Initiating Model Training**: The model training is started with the specified arguments. The results of the training process are captured in the `results` variable.
### Understanding the Output
Upon running the usage code snippet above, you can expect the following output:
- A confirmation message indicating the creation of a new ClearML task, along with its unique ID.
- An informational message about the script code being stored, indicating that the code execution is being tracked by ClearML.
- A URL link to the ClearML results page where you can monitor the training progress and view detailed logs.
- Download progress for the YOLO11 model and the specified dataset, followed by a summary of the model architecture and training configuration.
- Initialization messages for various training components like TensorBoard, Automatic [Mixed Precision](https://www.ultralytics.com/glossary/mixed-precision) (AMP), and dataset preparation.
- Finally, the training process starts, with progress updates as the model trains on the specified dataset. For an in-depth understanding of the performance metrics used during training, read [our guide on performance metrics](../guides/yolo-performance-metrics.md).
### Viewing the ClearML Results Page
By clicking on the URL link to the ClearML results page in the output of the usage code snippet, you can access a comprehensive view of your model's training process.
#### Key Features of the ClearML Results Page
- **Real-Time Metrics Tracking**
- Track critical metrics like loss, [accuracy](https://www.ultralytics.com/glossary/accuracy), and validation scores as they occur.
- Provides immediate feedback for timely model performance adjustments.
- **Experiment Comparison**
- Compare different training runs side-by-side.
- Essential for [hyperparameter tuning](https://www.ultralytics.com/glossary/hyperparameter-tuning) and identifying the most effective models.
- **Detailed Logs and Outputs**
- Access comprehensive logs, graphical representations of metrics, and console outputs.
- Gain a deeper understanding of model behavior and issue resolution.
- **Resource Utilization Monitoring**
- Monitor the utilization of computational resources, including CPU, GPU, and memory.
- Key to optimizing training efficiency and costs.
- **Model Artifacts Management**
- View, download, and share model artifacts like trained models and checkpoints.
- Enhances collaboration and streamlines [model deployment](https://www.ultralytics.com/glossary/model-deployment) and sharing.
For a visual walkthrough of what the ClearML Results Page looks like, watch the video below:
Watch: YOLO11 MLOps Integration using ClearML
### Advanced Features in ClearML
ClearML offers several advanced features to enhance your MLOps experience.
#### Remote Execution
ClearML's remote execution feature facilitates the reproduction and manipulation of experiments on different machines. It logs essential details like installed packages and uncommitted changes. When a task is enqueued, the [ClearML Agent](https://clear.ml/docs/latest/docs/clearml_agent/) pulls it, recreates the environment, and runs the experiment, reporting back with detailed results.
Deploying a ClearML Agent is straightforward and can be done on various machines using the following command:
```bash
clearml-agent daemon --queue QUEUES_TO_LISTEN_TO [--docker]
```
This setup is applicable to cloud VMs, local GPUs, or laptops. [ClearML Autoscalers](https://clear.ml/docs/latest/docs/cloud_autoscaling/autoscaling_overview/) help manage cloud workloads on platforms like AWS, GCP, and Azure, automating the deployment of agents and adjusting resources based on your resource budget.
### Cloning, Editing, and Enqueuing
ClearML's user-friendly interface allows easy cloning, editing, and enqueuing of tasks. Users can clone an existing experiment, adjust parameters or other details through the UI, and enqueue the task for execution. This streamlined process ensures that the ClearML Agent executing the task uses updated configurations, making it ideal for iterative experimentation and model fine-tuning.
## Dataset Version Management
ClearML also offers powerful [dataset version management](https://clear.ml/docs/latest/docs/hyperdatasets/dataset/) capabilities that integrate seamlessly with YOLO11 training workflows. This feature allows you to:
- Version your datasets separately from your code
- Track which dataset version was used for each experiment
- Easily access and download the latest dataset version
To prepare your dataset for ClearML, follow these steps:
1. Organize your dataset with the standard YOLO structure (images, labels, etc.)
2. Copy the corresponding YAML file to the root of your dataset folder
3. Upload your dataset using the ClearML Data tool:
```bash
cd your_dataset_folder
clearml-data sync --project YOLO11 --name your_dataset_name --folder .
```
This command will create a versioned dataset in ClearML that can be referenced in your training scripts, ensuring reproducibility and easy access to your data.
## Summary
This guide has led you through the process of integrating ClearML with Ultralytics' YOLO11. Covering everything from initial setup to advanced model management, you've discovered how to leverage ClearML for efficient training, experiment tracking, and workflow optimization in your machine learning projects.
For further details on usage, visit [ClearML's official YOLOv8 integration guide](https://clear.ml/docs/latest/docs/integrations/yolov8/), which also applies to YOLO11 workflows.
Additionally, explore more integrations and capabilities of Ultralytics by visiting the [Ultralytics integration guide page](../integrations/index.md), which is a treasure trove of resources and insights.
## FAQ
### What is the process for integrating Ultralytics YOLO11 with ClearML?
Integrating Ultralytics YOLO11 with ClearML involves a series of steps to streamline your MLOps workflow. First, install the necessary packages:
```bash
pip install ultralytics clearml
```
Next, initialize the ClearML SDK in your environment using:
```bash
clearml-init
```
You then configure ClearML with your credentials from the [ClearML Settings page](https://app.clear.ml/settings/workspace-configuration). Detailed instructions on the entire setup process, including model selection and training configurations, can be found in our [YOLO11 Model Training guide](../modes/train.md).
### Why should I use ClearML with Ultralytics YOLO11 for my machine learning projects?
Using ClearML with Ultralytics YOLO11 enhances your machine learning projects by automating experiment tracking, streamlining workflows, and enabling robust model management. ClearML offers real-time metrics tracking, resource utilization monitoring, and a user-friendly interface for comparing experiments. These features help optimize your model's performance and make the development process more efficient. Learn more about the benefits and procedures in our [MLOps Integration guide](../modes/train.md).
### How do I troubleshoot common issues during YOLO11 and ClearML integration?
If you encounter issues during the integration of YOLO11 with ClearML, consult our [Common Issues guide](../guides/yolo-common-issues.md) for solutions and tips. Typical problems might involve package installation errors, credential setup, or configuration issues. This guide provides step-by-step troubleshooting instructions to resolve these common issues efficiently.
### How do I set up the ClearML task for YOLO11 model training?
Setting up a ClearML task for YOLO11 training involves initializing a task, selecting the model variant, loading the model, setting up training arguments, and finally, starting the model training. Here's a simplified example:
```python
from clearml import Task
from ultralytics import YOLO
# Step 1: Creating a ClearML Task
task = Task.init(project_name="my_project", task_name="my_yolo11_task")
# Step 2: Selecting the YOLO11 Model
model_variant = "yolo11n"
task.set_parameter("model_variant", model_variant)
# Step 3: Loading the YOLO11 Model
model = YOLO(f"{model_variant}.pt")
# Step 4: Setting Up Training Arguments
args = dict(data="coco8.yaml", epochs=16)
task.connect(args)
# Step 5: Initiating Model Training
results = model.train(**args)
```
Refer to our [Usage guide](#usage) for a detailed breakdown of these steps.
### Where can I view the results of my YOLO11 training in ClearML?
After running your YOLO11 training script with ClearML, you can view the results on the ClearML results page. The output will include a URL link to the ClearML dashboard, where you can track metrics, compare experiments, and monitor resource usage. For more details on how to view and interpret the results, check our section on [Viewing the ClearML Results Page](#viewing-the-clearml-results-page).
---
# Source: https://raw.githubusercontent.com/ultralytics/ultralytics/main/docs/en/integrations/comet.md
---
comments: true
description: Learn to simplify the logging of YOLO11 training with Comet. This guide covers installation, setup, real-time insights, and custom logging.
keywords: YOLO11, Comet, Comet ML, logging, machine learning, training, model checkpoints, metrics, installation, configuration, real-time insights, custom logging
---
# Elevating YOLO11 Training: Simplify Your Logging Process with Comet
Logging key training details such as parameters, metrics, image predictions, and model checkpoints is essential in [machine learning](https://www.ultralytics.com/glossary/machine-learning-ml)—it keeps your project transparent, your progress measurable, and your results repeatable.
Watch: How to Use Comet for Ultralytics YOLO Model Training Logs and Metrics 🚀
[Ultralytics YOLO11](https://www.ultralytics.com/) seamlessly integrates with Comet (formerly Comet ML), efficiently capturing and optimizing every aspect of your YOLO11 [object detection](https://www.ultralytics.com/glossary/object-detection) model's training process. In this guide, we'll cover the installation process, Comet setup, real-time insights, custom logging, and offline usage, ensuring that your YOLO11 training is thoroughly documented and fine-tuned for outstanding results.
## Comet
[Comet](https://www.comet.com/site/) is a platform for tracking, comparing, explaining, and optimizing machine learning models and experiments. It allows you to log metrics, parameters, media, and more during your model training and monitor your experiments through an aesthetically pleasing web interface. Comet helps data scientists iterate more rapidly, enhances transparency and reproducibility, and aids in the development of production models.
## Harnessing the Power of YOLO11 and Comet
By combining Ultralytics YOLO11 with Comet, you unlock a range of benefits. These include simplified experiment management, real-time insights for quick adjustments, flexible and tailored logging options, and the ability to log experiments offline when internet access is limited. This integration empowers you to make data-driven decisions, analyze performance metrics, and achieve exceptional results.
## Installation
To install the required packages, run:
!!! tip "Installation"
=== "CLI"
```bash
# Install the required packages for YOLO11 and Comet
pip install ultralytics comet_ml torch torchvision
```
## Configuring Comet
After installing the required packages, you'll need to sign up, get a [Comet API Key](https://www.comet.com/signup), and configure it.
!!! tip "Configuring Comet"
=== "CLI"
```bash
# Set your Comet API Key
export COMET_API_KEY=YOUR_API_KEY
```
Then, you can initialize your Comet project. Comet will automatically detect the API key and proceed with the setup.
!!! example "Initialize Comet project"
=== "Python"
```python
import comet_ml
comet_ml.login(project_name="comet-example-yolo11-coco128")
```
If you are using a Google Colab notebook, the code above will prompt you to enter your API key for initialization.
## Usage
Before diving into the usage instructions, be sure to check out the range of [YOLO11 models offered by Ultralytics](../models/yolo11.md). This will help you choose the most appropriate model for your project requirements.
!!! example "Usage"
=== "Python"
```python
from ultralytics import YOLO
# Load a model
model = YOLO("yolo11n.pt")
# Train the model
results = model.train(
data="coco8.yaml",
project="comet-example-yolo11-coco128",
batch=32,
save_period=1,
save_json=True,
epochs=3,
)
```
After running the training code, Comet will create an experiment in your Comet workspace to track the run automatically. You will then be provided with a link to view the detailed logging of your [YOLO11 model's training](../modes/train.md) process.
Comet automatically logs the following data with no additional configuration: metrics such as mAP and loss, hyperparameters, model checkpoints, interactive confusion matrix, and image [bounding box](https://www.ultralytics.com/glossary/bounding-box) predictions.
## Understanding Your Model's Performance with Comet Visualizations
Let's dive into what you'll see on the Comet dashboard once your YOLO11 model begins training. The dashboard is where all the action happens, presenting a range of automatically logged information through visuals and statistics. Here's a quick tour:
**Experiment Panels**
The experiment panels section of the Comet dashboard organizes and presents the different runs and their metrics, such as segment mask loss, class loss, precision, and [mean average precision](https://www.ultralytics.com/glossary/mean-average-precision-map).
**Metrics**
In the metrics section, you have the option to examine the metrics in a tabular format as well, which is displayed in a dedicated pane as illustrated here.
**Interactive [Confusion Matrix](https://www.ultralytics.com/glossary/confusion-matrix)**
The confusion matrix, found in the Confusion Matrix tab, provides an interactive way to assess the model's classification [accuracy](https://www.ultralytics.com/glossary/accuracy). It details the correct and incorrect predictions, allowing you to understand the model's strengths and weaknesses.
**System Metrics**
Comet logs system metrics to help identify any bottlenecks in the training process. It includes metrics such as GPU utilization, GPU memory usage, CPU utilization, and RAM usage. These are essential for monitoring the efficiency of resource usage during model training.
## Customizing Comet Logging
Comet offers the flexibility to customize its logging behavior by setting environment variables. These configurations allow you to tailor Comet to your specific needs and preferences. Here are some helpful customization options:
### Logging Image Predictions
You can control the number of image predictions that Comet logs during your experiments. By default, Comet logs 100 image predictions from the validation set. However, you can change this number to better suit your requirements. For example, to log 200 image predictions, use the following code:
```python
import os
os.environ["COMET_MAX_IMAGE_PREDICTIONS"] = "200"
```
### Batch Logging Interval
Comet allows you to specify how often batches of image predictions are logged. The `COMET_EVAL_BATCH_LOGGING_INTERVAL` environment variable controls this frequency. The default setting is 1, which logs predictions from every validation batch. You can adjust this value to log predictions at a different interval. For instance, setting it to 4 will log predictions from every fourth batch.
```python
import os
os.environ["COMET_EVAL_BATCH_LOGGING_INTERVAL"] = "4"
```
### Disabling Confusion Matrix Logging
In some cases, you may not want to log the confusion matrix from your validation set after every [epoch](https://www.ultralytics.com/glossary/epoch). You can disable this feature by setting the `COMET_EVAL_LOG_CONFUSION_MATRIX` environment variable to "false." The confusion matrix will only be logged once, after the training is completed.
```python
import os
os.environ["COMET_EVAL_LOG_CONFUSION_MATRIX"] = "false"
```
### Offline Logging
If you find yourself in a situation where internet access is limited, Comet provides an offline logging option. You can set the `COMET_MODE` environment variable to "offline" to enable this feature. Your experiment data will be saved locally in a directory that you can later upload to Comet when internet connectivity is available.
```python
import os
os.environ["COMET_MODE"] = "offline"
```
## Summary
This guide has walked you through integrating Comet with Ultralytics' YOLO11. From installation to customization, you've learned to streamline experiment management, gain real-time insights, and adapt logging to your project's needs.
Explore [Comet's official YOLOv8 integration documentation](https://www.comet.com/docs/v2/integrations/third-party-tools/yolov8/), which also applies to YOLO11 projects.
Furthermore, if you're looking to dive deeper into the practical applications of YOLO11, specifically for [image segmentation](https://www.ultralytics.com/glossary/image-segmentation) tasks, this detailed guide on [fine-tuning YOLO11 with Comet](https://www.comet.com/site/blog/fine-tuning-yolov8-for-image-segmentation-with-comet/) offers valuable insights and step-by-step instructions to enhance your model's performance.
Additionally, to explore other exciting integrations with Ultralytics, check out the [integration guide page](../integrations/index.md), which offers a wealth of resources and information.
## FAQ
### How do I integrate Comet with Ultralytics YOLO11 for training?
To integrate Comet with Ultralytics YOLO11, follow these steps:
1. **Install the required packages**:
```bash
pip install ultralytics comet_ml torch torchvision
```
2. **Set up your Comet API Key**:
```bash
export COMET_API_KEY=YOUR_API_KEY
```
3. **Initialize your Comet project in your Python code**:
```python
import comet_ml
comet_ml.login(project_name="comet-example-yolo11-coco128")
```
4. **Train your YOLO11 model and log metrics**:
```python
from ultralytics import YOLO
model = YOLO("yolo11n.pt")
results = model.train(
data="coco8.yaml",
project="comet-example-yolo11-coco128",
batch=32,
save_period=1,
save_json=True,
epochs=3,
)
```
For more detailed instructions, refer to the [Comet configuration section](#configuring-comet).
### What are the benefits of using Comet with YOLO11?
By integrating Ultralytics YOLO11 with Comet, you can:
- **Monitor real-time insights**: Get instant feedback on your training results, allowing for quick adjustments.
- **Log extensive metrics**: Automatically capture essential metrics such as mAP, loss, hyperparameters, and model checkpoints.
- **Track experiments offline**: Log your training runs locally when internet access is unavailable.
- **Compare different training runs**: Use the interactive Comet dashboard to analyze and compare multiple experiments.
By leveraging these features, you can optimize your machine learning workflows for better performance and reproducibility. For more information, visit the [Comet integration guide](../integrations/index.md).
### How do I customize the logging behavior of Comet during YOLO11 training?
Comet allows for extensive customization of its logging behavior using environment variables:
- **Change the number of image predictions logged**:
```python
import os
os.environ["COMET_MAX_IMAGE_PREDICTIONS"] = "200"
```
- **Adjust batch logging interval**:
```python
import os
os.environ["COMET_EVAL_BATCH_LOGGING_INTERVAL"] = "4"
```
- **Disable confusion matrix logging**:
```python
import os
os.environ["COMET_EVAL_LOG_CONFUSION_MATRIX"] = "false"
```
Refer to the [Customizing Comet Logging](#customizing-comet-logging) section for more customization options.
### How do I view detailed metrics and visualizations of my YOLO11 training on Comet?
Once your YOLO11 model starts training, you can access a wide range of metrics and visualizations on the Comet dashboard. Key features include:
- **Experiment Panels**: View different runs and their metrics, including segment mask loss, class loss, and mean average [precision](https://www.ultralytics.com/glossary/precision).
- **Metrics**: Examine metrics in tabular format for detailed analysis.
- **Interactive Confusion Matrix**: Assess classification accuracy with an interactive confusion matrix.
- **System Metrics**: Monitor GPU and CPU utilization, memory usage, and other system metrics.
For a detailed overview of these features, visit the [Understanding Your Model's Performance with Comet Visualizations](#understanding-your-models-performance-with-comet-visualizations) section.
### Can I use Comet for offline logging when training YOLO11 models?
Yes, you can enable offline logging in Comet by setting the `COMET_MODE` environment variable to "offline":
```python
import os
os.environ["COMET_MODE"] = "offline"
```
This feature allows you to log your experiment data locally, which can later be uploaded to Comet when internet connectivity is available. This is particularly useful when working in environments with limited internet access. For more details, refer to the [Offline Logging](#offline-logging) section.
---
# Source: https://raw.githubusercontent.com/ultralytics/ultralytics/main/docs/en/integrations/dvc.md
---
comments: true
description: Unlock seamless YOLO11 tracking with DVCLive. Discover how to log, visualize, and analyze experiments for optimized ML model performance.
keywords: YOLO11, DVCLive, experiment tracking, machine learning, model training, data visualization, Git integration
---
# Advanced YOLO11 Experiment Tracking with DVCLive
Experiment tracking in [machine learning](https://www.ultralytics.com/glossary/machine-learning-ml) is critical to model development and evaluation. It involves recording and analyzing various parameters, metrics, and outcomes from numerous training runs. This process is essential for understanding model performance and making data-driven decisions to refine and optimize models.
Integrating DVCLive with [Ultralytics YOLO11](https://www.ultralytics.com/) transforms the way experiments are tracked and managed. This integration offers a seamless solution for automatically logging key experiment details, comparing results across different runs, and visualizing data for in-depth analysis. In this guide, we'll understand how DVCLive can be used to streamline the process.
## DVCLive
[DVCLive](https://doc.dvc.org/dvclive), developed by DVC, is an innovative open-source tool for experiment tracking in machine learning. Integrating seamlessly with Git and DVC, it automates the logging of crucial experiment data like model parameters and training metrics. Designed for simplicity, DVCLive enables effortless comparison and analysis of multiple runs, enhancing the efficiency of machine learning projects with intuitive [data visualization](https://www.ultralytics.com/glossary/data-visualization) and analysis tools.
## YOLO11 Training with DVCLive
YOLO11 training sessions can be effectively monitored with DVCLive. Additionally, DVC provides integral features for visualizing these experiments, including the generation of a report that enables the comparison of metric plots across all tracked experiments, offering a comprehensive view of the training process.
## Installation
To install the required packages, run:
!!! tip "Installation"
=== "CLI"
```bash
# Install the required packages for YOLO11 and DVCLive
pip install ultralytics dvclive
```
For detailed instructions and best practices related to the installation process, be sure to check our [YOLO11 Installation guide](../quickstart.md). While installing the required packages for YOLO11, if you encounter any difficulties, consult our [Common Issues guide](../guides/yolo-common-issues.md) for solutions and tips.
## Configuring DVCLive
Once you have installed the necessary packages, the next step is to set up and configure your environment with the required credentials. This setup ensures a smooth integration of DVCLive into your existing workflow.
Begin by initializing a Git repository, as Git plays a crucial role in version control for both your code and DVCLive configurations.
!!! tip "Initial Environment Setup"
=== "CLI"
```bash
# Initialize a Git repository
git init -q
# Configure Git with your details
git config --local user.email "you@example.com"
git config --local user.name "Your Name"
# Initialize DVCLive in your project
dvc init -q
# Commit the DVCLive setup to your Git repository
git commit -m "DVC init"
```
In these commands, ensure you replace "you@example.com" with the email address associated with your Git account, and "Your Name" with your Git account username.
## Usage
Before diving into the usage instructions, be sure to check out the range of [YOLO11 models offered by Ultralytics](../models/index.md). This will help you choose the most appropriate model for your project requirements.
### Training YOLO11 Models with DVCLive
Start by running your YOLO11 training sessions. You can use different model configurations and training parameters to suit your project needs. For instance:
```bash
# Example training commands for YOLO11 with varying configurations
yolo train model=yolo11n.pt data=coco8.yaml epochs=5 imgsz=512
yolo train model=yolo11n.pt data=coco8.yaml epochs=5 imgsz=640
```
Adjust the model, data, [epochs](https://www.ultralytics.com/glossary/epoch), and imgsz parameters according to your specific requirements. For a detailed understanding of the model training process and best practices, refer to our [YOLO11 Model Training guide](../modes/train.md).
### Monitoring Experiments with DVCLive
DVCLive enhances the training process by enabling the tracking and visualization of key metrics. When installed, Ultralytics YOLO11 automatically integrates with DVCLive for experiment tracking, which you can later analyze for performance insights. For a comprehensive understanding of the specific performance metrics used during training, be sure to explore [our detailed guide on performance metrics](../guides/yolo-performance-metrics.md).
### Analyzing Results
After your YOLO11 training sessions are complete, you can leverage DVCLive's powerful visualization tools for in-depth analysis of the results. DVCLive's integration ensures that all training metrics are systematically logged, facilitating a comprehensive evaluation of your model's performance.
To start the analysis, you can extract the experiment data using DVC's API and process it with Pandas for easier handling and visualization:
```python
import dvc.api
import pandas as pd
# Define the columns of interest
columns = ["Experiment", "epochs", "imgsz", "model", "metrics.mAP50-95(B)"]
# Retrieve experiment data
df = pd.DataFrame(dvc.api.exp_show(), columns=columns)
# Clean the data
df.dropna(inplace=True)
df.reset_index(drop=True, inplace=True)
# Display the DataFrame
print(df)
```
The output of the code snippet above provides a clear tabular view of the different experiments conducted with YOLO11 models. Each row represents a different training run, detailing the experiment's name, the number of epochs, image size (imgsz), the specific model used, and the mAP50-95(B) metric. This metric is crucial for evaluating the model's [accuracy](https://www.ultralytics.com/glossary/accuracy), with higher values indicating better performance.
#### Visualizing Results with Plotly
For a more interactive and visual analysis of your experiment results, you can use Plotly's parallel coordinates plot. This type of plot is particularly useful for understanding the relationships and trade-offs between different parameters and metrics.
```python
from plotly.express import parallel_coordinates
# Create a parallel coordinates plot
fig = parallel_coordinates(df, columns, color="metrics.mAP50-95(B)")
# Display the plot
fig.show()
```
The output of the code snippet above generates a plot that will visually represent the relationships between epochs, image size, model type, and their corresponding mAP50-95(B) scores, enabling you to spot trends and patterns in your experiment data.
#### Generating Comparative Visualizations with DVC
DVC provides a useful command to generate comparative plots for your experiments. This can be especially helpful to compare the performance of different models over various training runs.
```bash
# Generate DVC comparative plots
dvc plots diff $(dvc exp list --names-only)
```
After executing this command, DVC generates plots comparing the metrics across different experiments, which are saved as HTML files. Below is an example image illustrating typical plots generated by this process. The image showcases various graphs, including those representing mAP, [recall](https://www.ultralytics.com/glossary/recall), [precision](https://www.ultralytics.com/glossary/precision), loss values, and more, providing a visual overview of key performance metrics:
### Displaying DVC Plots
If you are using a Jupyter Notebook and you want to display the generated DVC plots, you can use the IPython display functionality.
```python
from IPython.display import HTML
# Display the DVC plots as HTML
HTML(filename="./dvc_plots/index.html")
```
This code will render the HTML file containing the DVC plots directly in your Jupyter Notebook, providing an easy and convenient way to analyze the visualized experiment data.
### Making Data-Driven Decisions
Use the insights gained from these visualizations to make informed decisions about model optimizations, [hyperparameter tuning](https://www.ultralytics.com/glossary/hyperparameter-tuning), and other modifications to enhance your model's performance.
### Iterating on Experiments
Based on your analysis, iterate on your experiments. Adjust model configurations, training parameters, or even the data inputs, and repeat the training and analysis process. This iterative approach is key to refining your model for the best possible performance.
## Summary
This guide has led you through the process of integrating DVCLive with Ultralytics' YOLO11. You have learned how to harness the power of DVCLive for detailed experiment monitoring, effective visualization, and insightful analysis in your machine learning endeavors.
For further details on usage, visit [DVCLive's official documentation](https://doc.dvc.org/dvclive/ml-frameworks/yolo).
Additionally, explore more integrations and capabilities of Ultralytics by visiting the [Ultralytics integration guide page](../integrations/index.md), which is a collection of great resources and insights.
## FAQ
### How do I integrate DVCLive with Ultralytics YOLO11 for experiment tracking?
Integrating DVCLive with Ultralytics YOLO11 is straightforward. Start by installing the necessary packages:
!!! example "Installation"
=== "CLI"
```bash
pip install ultralytics dvclive
```
Next, initialize a Git repository and configure DVCLive in your project:
!!! example "Initial Environment Setup"
=== "CLI"
```bash
git init -q
git config --local user.email "you@example.com"
git config --local user.name "Your Name"
dvc init -q
git commit -m "DVC init"
```
Follow our [YOLO11 Installation guide](../quickstart.md) for detailed setup instructions.
### Why should I use DVCLive for tracking YOLO11 experiments?
Using DVCLive with YOLO11 provides several advantages, such as:
- **Automated Logging**: DVCLive automatically records key experiment details like model parameters and metrics.
- **Easy Comparison**: Facilitates comparison of results across different runs.
- **Visualization Tools**: Leverages DVCLive's robust data visualization capabilities for in-depth analysis.
For further details, refer to our guide on [YOLO11 Model Training](../modes/train.md) and [YOLO Performance Metrics](../guides/yolo-performance-metrics.md) to maximize your experiment tracking efficiency.
### How can DVCLive improve my results analysis for YOLO11 training sessions?
After completing your YOLO11 training sessions, DVCLive helps in visualizing and analyzing the results effectively. Example code for loading and displaying experiment data:
```python
import dvc.api
import pandas as pd
# Define columns of interest
columns = ["Experiment", "epochs", "imgsz", "model", "metrics.mAP50-95(B)"]
# Retrieve experiment data
df = pd.DataFrame(dvc.api.exp_show(), columns=columns)
# Clean data
df.dropna(inplace=True)
df.reset_index(drop=True, inplace=True)
# Display DataFrame
print(df)
```
To visualize results interactively, use Plotly's parallel coordinates plot:
```python
from plotly.express import parallel_coordinates
fig = parallel_coordinates(df, columns, color="metrics.mAP50-95(B)")
fig.show()
```
Refer to our guide on [YOLO11 Training with DVCLive](#yolo11-training-with-dvclive) for more examples and best practices.
### What are the steps to configure my environment for DVCLive and YOLO11 integration?
To configure your environment for a smooth integration of DVCLive and YOLO11, follow these steps:
1. **Install Required Packages**: Use `pip install ultralytics dvclive`.
2. **Initialize Git Repository**: Run `git init -q`.
3. **Setup DVCLive**: Execute `dvc init -q`.
4. **Commit to Git**: Use `git commit -m "DVC init"`.
These steps ensure proper version control and setup for experiment tracking. For in-depth configuration details, visit our [Configuration guide](../quickstart.md).
### How do I visualize YOLO11 experiment results using DVCLive?
DVCLive offers powerful tools to visualize the results of YOLO11 experiments. Here's how you can generate comparative plots:
!!! example "Generate Comparative Plots"
=== "CLI"
```bash
dvc plots diff $(dvc exp list --names-only)
```
To display these plots in a Jupyter Notebook, use:
```python
from IPython.display import HTML
# Display plots as HTML
HTML(filename="./dvc_plots/index.html")
```
These visualizations help identify trends and optimize model performance. Check our detailed guides on [YOLO11 Experiment Analysis](#analyzing-results) for comprehensive steps and examples.
---
# Source: https://raw.githubusercontent.com/ultralytics/ultralytics/main/docs/en/integrations/index.md
---
comments: true
description: Discover Ultralytics integrations for streamlined ML workflows, dataset management, optimized model training, and robust deployment solutions.
keywords: Ultralytics, machine learning, ML workflows, dataset management, model training, model deployment, Roboflow, ClearML, Comet ML, DVC, MLFlow, Ultralytics HUB, Neptune, Ray Tune, TensorBoard, Weights & Biases, Amazon SageMaker, Paperspace Gradient, Google Colab, Neural Magic, Gradio, TorchScript, ONNX, OpenVINO, TensorRT, CoreML, TF SavedModel, TF GraphDef, TFLite, TFLite Edge TPU, TF.js, PaddlePaddle, NCNN
---
# Ultralytics Integrations
Welcome to the Ultralytics Integrations page! This page provides an overview of our partnerships with various tools and platforms, designed to streamline your [machine learning](https://www.ultralytics.com/glossary/machine-learning-ml) workflows, enhance dataset management, simplify model training, and facilitate efficient deployment.
Watch: Ultralytics YOLO11 Deployment and Integrations
## Training Integrations
- [Albumentations](albumentations.md): Enhance your Ultralytics models with powerful image augmentations to improve model robustness and generalization.
- [Amazon SageMaker](amazon-sagemaker.md): Leverage Amazon SageMaker to efficiently build, train, and deploy Ultralytics models, providing an all-in-one platform for the ML lifecycle.
- [ClearML](clearml.md): Automate your Ultralytics ML workflows, monitor experiments, and foster team collaboration.
- [Comet ML](comet.md): Enhance your model development with Ultralytics by tracking, comparing, and optimizing your machine learning experiments.
- [DVC](dvc.md): Implement version control for your Ultralytics machine learning projects, synchronizing data, code, and models effectively.
- [Google Colab](google-colab.md): Use Google Colab to train and evaluate Ultralytics models in a cloud-based environment that supports collaboration and sharing.
- [IBM Watsonx](ibm-watsonx.md): See how IBM Watsonx simplifies the training and evaluation of Ultralytics models with its cutting-edge AI tools, effortless integration, and advanced model management system.
- [JupyterLab](jupyterlab.md): Find out how to use JupyterLab's interactive and customizable environment to train and evaluate Ultralytics models with ease and efficiency.
- [Kaggle](kaggle.md): Explore how you can use Kaggle to train and evaluate Ultralytics models in a cloud-based environment with pre-installed libraries, GPU support, and a vibrant community for collaboration and sharing.
- [MLFlow](mlflow.md): Streamline the entire ML lifecycle of Ultralytics models, from experimentation and reproducibility to deployment.
- [Neptune](neptune.md): Maintain a comprehensive log of your ML experiments with Ultralytics in this metadata store designed for MLOps.
- [Paperspace Gradient](paperspace.md): Paperspace Gradient simplifies working on YOLO11 projects by providing easy-to-use cloud tools for training, testing, and deploying your models quickly.
- [Ray Tune](ray-tune.md): Optimize the hyperparameters of your Ultralytics models at any scale.
- [TensorBoard](tensorboard.md): Visualize your Ultralytics ML workflows, monitor model metrics, and foster team collaboration.
- [Ultralytics HUB](https://hub.ultralytics.com/): Access and contribute to a community of pretrained Ultralytics models.
- [VS Code](vscode.md): An extension for VS Code that provides code snippets to accelerate Ultralytics development workflows and offers examples to help anyone learn or get started.
- [Weights & Biases (W&B)](weights-biases.md): Monitor experiments, visualize metrics, and foster reproducibility and collaboration on Ultralytics projects.
## Deployment Integrations
- [Axelera](axelera.md): Explore Metis accelerators and the Voyager SDK for running Ultralytics models with efficient edge inference.
- [CoreML](coreml.md): CoreML, developed by [Apple](https://www.apple.com/), is a framework designed for efficiently integrating machine learning models into applications across iOS, macOS, watchOS, and tvOS, using Apple's hardware for effective and secure [model deployment](https://www.ultralytics.com/glossary/model-deployment).
- [ExecuTorch](executorch.md): Developed by [Meta](https://about.meta.com/), ExecuTorch is PyTorch's unified solution for deploying Ultralytics YOLO models on edge devices.
- [Gradio](gradio.md): Deploy Ultralytics models with Gradio for real-time, interactive object detection demos.
- [MNN](mnn.md): Developed by [Alibaba](https://www.alibabagroup.com/), MNN is a highly efficient and lightweight deep learning framework. It supports inference and training of deep learning models and has industry-leading performance for inference and training on-device.
- [NCNN](ncnn.md): Developed by [Tencent](http://www.tencent.com/), NCNN is an efficient [neural network](https://www.ultralytics.com/glossary/neural-network-nn) inference framework tailored for mobile devices. It enables direct deployment of AI models into apps, optimizing performance across various mobile platforms.
- [Neural Magic](neural-magic.md): Leverage Quantization Aware Training (QAT) and pruning techniques to optimize Ultralytics models for superior performance and leaner size.
- [ONNX](onnx.md): An open-source format created by [Microsoft](https://www.microsoft.com/) for facilitating the transfer of AI models between various frameworks, enhancing the versatility and deployment flexibility of Ultralytics models.
- [OpenVINO](openvino.md): Intel's toolkit for optimizing and deploying [computer vision](https://www.ultralytics.com/glossary/computer-vision-cv) models efficiently across various Intel CPU and GPU platforms.
- [PaddlePaddle](paddlepaddle.md): An open-source deep learning platform by [Baidu](https://www.baidu.com/), PaddlePaddle enables the efficient deployment of AI models and focuses on the scalability of industrial applications.
- [Rockchip RKNN](rockchip-rknn.md): Developed by [Rockchip](https://www.rock-chips.com/), RKNN is a specialized neural network inference framework optimized for Rockchip's hardware platforms, particularly their NPUs. It facilitates efficient deployment of AI models on edge devices, enabling high-performance inference in real-time applications.
- [Seeed Studio reCamera](seeedstudio-recamera.md): Developed by [Seeed Studio](https://www.seeedstudio.com/), the reCamera is an advanced edge AI device designed for real-time computer vision applications. Powered by the RISC-V-based SG200X processor, it delivers high-performance AI inference with energy efficiency. Its modular design, advanced video processing capabilities, and support for flexible deployment make it an ideal choice for various use cases, including safety monitoring, environmental applications, and manufacturing.
- [SONY IMX500](sony-imx500.md): Optimize and deploy [Ultralytics YOLOv8](https://docs.ultralytics.com/models/yolov8/) models on Raspberry Pi AI Cameras with the IMX500 sensor for fast, low-power performance.
- [TensorRT](tensorrt.md): Developed by [NVIDIA](https://www.nvidia.com/), this high-performance [deep learning](https://www.ultralytics.com/glossary/deep-learning-dl) inference framework and model format optimizes AI models for accelerated speed and efficiency on NVIDIA GPUs, ensuring streamlined deployment.
- [TF GraphDef](tf-graphdef.md): Developed by [Google](https://www.google.com/), GraphDef is TensorFlow's format for representing computation graphs, enabling optimized execution of machine learning models across diverse hardware.
- [TF SavedModel](tf-savedmodel.md): Developed by [Google](https://www.google.com/), TF SavedModel is a universal serialization format for [TensorFlow](https://www.ultralytics.com/glossary/tensorflow) models, enabling easy sharing and deployment across a wide range of platforms, from servers to edge devices.
- [TF.js](tfjs.md): Developed by [Google](https://www.google.com/) to facilitate machine learning in browsers and Node.js, TF.js allows JavaScript-based deployment of ML models.
- [TFLite](tflite.md): Developed by [Google](https://www.google.com/), TFLite is a lightweight framework for deploying machine learning models on mobile and edge devices, ensuring fast, efficient inference with minimal memory footprint.
- [TFLite Edge TPU](edge-tpu.md): Developed by [Google](https://www.google.com/) for optimizing TensorFlow Lite models on Edge TPUs, this model format ensures high-speed, efficient [edge computing](https://www.ultralytics.com/glossary/edge-computing).
- [TorchScript](torchscript.md): Developed as part of the [PyTorch](https://pytorch.org/) framework, TorchScript enables efficient execution and deployment of machine learning models in various production environments without the need for Python dependencies.
## Datasets Integrations
- [Roboflow](roboflow.md): Facilitate dataset labeling and management for Ultralytics models, offering annotation tools to label images.
### Export Formats
We also support a variety of model export formats for deployment in different environments. Here are the available formats:
{% include "macros/export-table.md" %}
Explore the links to learn more about each integration and how to get the most out of them with Ultralytics. See full `export` details in the [Export](../modes/export.md) page.
## Contribute to Our Integrations
We're always excited to see how the community integrates Ultralytics YOLO with other technologies, tools, and platforms! If you have successfully integrated YOLO with a new system or have valuable insights to share, consider [contributing to our Integrations Docs](../help/contributing.md).
By writing a guide or tutorial, you can help expand our documentation and provide real-world examples that benefit the community. It's an excellent way to contribute to the growing ecosystem around Ultralytics YOLO.
To contribute, please check out our [Contributing Guide](../help/contributing.md) for instructions on how to submit a Pull Request (PR) 🛠️. We eagerly await your contributions!
Let's collaborate to make the Ultralytics YOLO ecosystem more expansive and feature-rich 🙏!
## FAQ
### What is Ultralytics HUB, and how does it streamline the ML workflow?
[Ultralytics HUB](https://www.ultralytics.com/hub) is a cloud-based platform designed to make machine learning workflows for Ultralytics models seamless and efficient. By using this tool, you can easily upload datasets, train models, perform real-time tracking, and deploy YOLO models without needing extensive coding skills. The platform serves as a centralized workspace where you can manage your entire ML pipeline from data preparation to deployment. You can explore the key features on the [Ultralytics HUB](https://hub.ultralytics.com/) page and get started quickly with our [Quickstart](https://docs.ultralytics.com/hub/quickstart/) guide.
### Can I track the performance of my Ultralytics models using MLFlow?
Yes, you can. Integrating [MLFlow](https://mlflow.org/) with Ultralytics models allows you to track experiments, improve reproducibility, and streamline the entire ML lifecycle. Detailed instructions for setting up this integration can be found on the [MLFlow](mlflow.md) integration page. This integration is particularly useful for monitoring model metrics, comparing different training runs, and managing the ML workflow efficiently. MLFlow provides a centralized platform to log parameters, metrics, and artifacts, making it easier to understand model behavior and make data-driven improvements.
### What are the benefits of using Neural Magic for YOLO11 model optimization?
[Neural Magic](neural-magic.md) optimizes YOLO11 models by leveraging techniques like Quantization Aware Training (QAT) and pruning, resulting in highly efficient, smaller models that perform better on resource-limited hardware. Check out the [Neural Magic](neural-magic.md) integration page to learn how to implement these optimizations for superior performance and leaner models. This is especially beneficial for deployment on edge devices where computational resources are constrained. Neural Magic's DeepSparse engine can deliver up to 6x faster inference on CPUs, making it possible to run complex models without specialized hardware.
### How do I deploy Ultralytics YOLO models with Gradio for interactive demos?
To deploy Ultralytics YOLO models with [Gradio](https://www.gradio.app/) for interactive [object detection](https://www.ultralytics.com/glossary/object-detection) demos, you can follow the steps outlined on the [Gradio](gradio.md) integration page. Gradio allows you to create easy-to-use web interfaces for real-time model inference, making it an excellent tool for showcasing your YOLO model's capabilities in a user-friendly format suitable for both developers and end-users. With just a few lines of code, you can build interactive applications that demonstrate your model's performance on custom inputs, facilitating better understanding and evaluation of your computer vision solutions.
---
# Source: https://raw.githubusercontent.com/ultralytics/ultralytics/main/docs/en/integrations/mlflow.md
---
comments: true
description: Learn how to set up and use MLflow logging with Ultralytics YOLO for enhanced experiment tracking, model reproducibility, and performance improvements.
keywords: MLflow, Ultralytics YOLO, machine learning, experiment tracking, metrics logging, parameter logging, artifact logging
---
# MLflow Integration for Ultralytics YOLO
## Introduction
Experiment logging is a crucial aspect of [machine learning](https://www.ultralytics.com/glossary/machine-learning-ml) workflows that enables tracking of various metrics, parameters, and artifacts. It helps to enhance model reproducibility, debug issues, and improve model performance. [Ultralytics](https://www.ultralytics.com/) YOLO, known for its real-time [object detection](https://www.ultralytics.com/glossary/object-detection) capabilities, now offers integration with [MLflow](https://mlflow.org/), an open-source platform for complete machine learning lifecycle management.
This documentation page is a comprehensive guide to setting up and utilizing the MLflow logging capabilities for your Ultralytics YOLO project.
## What is MLflow?
[MLflow](https://mlflow.org/) is an open-source platform developed by [Databricks](https://www.databricks.com/) for managing the end-to-end machine learning lifecycle. It includes tools for tracking experiments, packaging code into reproducible runs, and sharing and deploying models. MLflow is designed to work with any machine learning library and programming language.
## Features
- **Metrics Logging**: Logs metrics at the end of each epoch and at the end of the training.
- **Parameter Logging**: Logs all the parameters used in the training.
- **Artifacts Logging**: Logs model artifacts, including weights and configuration files, at the end of the training.
## Setup and Prerequisites
Ensure MLflow is installed. If not, install it using pip:
```bash
pip install mlflow
```
Make sure that MLflow logging is enabled in Ultralytics settings. Usually, this is controlled by the settings `mlflow` key. See the [settings](../quickstart.md#ultralytics-settings) page for more info.
!!! example "Update Ultralytics MLflow Settings"
=== "Python"
Within the Python environment, call the `update` method on the `settings` object to change your settings:
```python
from ultralytics import settings
# Update a setting
settings.update({"mlflow": True})
# Reset settings to default values
settings.reset()
```
=== "CLI"
If you prefer using the command-line interface, the following commands will allow you to modify your settings:
```bash
# Update a setting
yolo settings mlflow=True
# Reset settings to default values
yolo settings reset
```
## How to Use
### Commands
1. **Set a Project Name**: You can set the project name via an environment variable:
```bash
export MLFLOW_EXPERIMENT_NAME=YOUR_EXPERIMENT_NAME
```
Or use the `project=` argument when training a YOLO model, i.e. `yolo train project=my_project`.
2. **Set a Run Name**: Similar to setting a project name, you can set the run name via an environment variable:
```bash
export MLFLOW_RUN=YOUR_RUN_NAME
```
Or use the `name=` argument when training a YOLO model, i.e. `yolo train project=my_project name=my_name`.
3. **Start Local MLflow Server**: To start tracking, use:
```bash
mlflow server --backend-store-uri runs/mlflow
```
This will start a local server at `http://127.0.0.1:5000` by default and save all mlflow logs to the 'runs/mlflow' directory. To specify a different URI, set the `MLFLOW_TRACKING_URI` environment variable.
4. **Kill MLflow Server Instances**: To stop all running MLflow instances, run:
```bash
ps aux | grep 'mlflow' | grep -v 'grep' | awk '{print $2}' | xargs kill -9
```
### Logging
The logging is taken care of by the `on_pretrain_routine_end`, `on_fit_epoch_end`, and `on_train_end` [callback functions](../reference/utils/callbacks/mlflow.md). These functions are automatically called during the respective stages of the training process, and they handle the logging of parameters, metrics, and artifacts.
## Examples
1. **Logging Custom Metrics**: You can add custom metrics to be logged by modifying the `trainer.metrics` dictionary before `on_fit_epoch_end` is called.
2. **View Experiment**: To view your logs, navigate to your MLflow server (usually `http://127.0.0.1:5000`) and select your experiment and run.
3. **View Run**: Runs are individual models inside an experiment. Click on a Run and see the Run details, including uploaded artifacts and model weights.
## Disabling MLflow
To turn off MLflow logging:
```bash
yolo settings mlflow=False
```
## Conclusion
MLflow logging integration with Ultralytics YOLO offers a streamlined way to keep track of your [machine learning experiments](https://www.ultralytics.com/blog/log-ultralytics-yolo-experiments-using-mlflow-integration). It empowers you to monitor performance metrics and manage artifacts effectively, thus aiding in robust model development and deployment. For further details please visit the MLflow [official documentation](https://mlflow.org/docs/latest/index.html).
## FAQ
### How do I set up MLflow logging with Ultralytics YOLO?
To set up MLflow logging with Ultralytics YOLO, you first need to ensure MLflow is installed. You can install it using pip:
```bash
pip install mlflow
```
Next, enable MLflow logging in Ultralytics settings. This can be controlled using the `mlflow` key. For more information, see the [settings guide](../quickstart.md#ultralytics-settings).
!!! example "Update Ultralytics MLflow Settings"
=== "Python"
```python
from ultralytics import settings
# Update a setting
settings.update({"mlflow": True})
# Reset settings to default values
settings.reset()
```
=== "CLI"
```bash
# Update a setting
yolo settings mlflow=True
# Reset settings to default values
yolo settings reset
```
Finally, start a local MLflow server for tracking:
```bash
mlflow server --backend-store-uri runs/mlflow
```
### What metrics and parameters can I log using MLflow with Ultralytics YOLO?
Ultralytics YOLO with MLflow supports logging various metrics, parameters, and artifacts throughout the training process:
- **Metrics Logging**: Tracks metrics at the end of each [epoch](https://www.ultralytics.com/glossary/epoch) and upon training completion.
- **Parameter Logging**: Logs all parameters used in the training process.
- **Artifacts Logging**: Saves model artifacts like weights and configuration files after training.
For more detailed information, visit the [Ultralytics YOLO tracking documentation](#features).
### Can I disable MLflow logging once it is enabled?
Yes, you can disable MLflow logging for Ultralytics YOLO by updating the settings. Here's how you can do it using the CLI:
```bash
yolo settings mlflow=False
```
For further customization and resetting settings, refer to the [settings guide](../quickstart.md#ultralytics-settings).
### How can I start and stop an MLflow server for Ultralytics YOLO tracking?
To start an MLflow server for tracking your experiments in Ultralytics YOLO, use the following command:
```bash
mlflow server --backend-store-uri runs/mlflow
```
This command starts a local server at `http://127.0.0.1:5000` by default. If you need to stop running MLflow server instances, use the following bash command:
```bash
ps aux | grep 'mlflow' | grep -v 'grep' | awk '{print $2}' | xargs kill -9
```
Refer to the [commands section](#commands) for more command options.
### What are the benefits of integrating MLflow with Ultralytics YOLO for experiment tracking?
Integrating MLflow with Ultralytics YOLO offers several benefits for managing your machine learning experiments:
- **Enhanced Experiment Tracking**: Easily track and compare different runs and their outcomes.
- **Improved Model Reproducibility**: Ensure that your experiments are reproducible by logging all parameters and artifacts.
- **Performance Monitoring**: Visualize performance metrics over time to make data-driven decisions for model improvements.
- **Streamlined Workflow**: Automate the logging process to focus more on model development rather than manual tracking.
- **Collaborative Development**: Share experiment results with team members for better collaboration and knowledge sharing.
For an in-depth look at setting up and leveraging MLflow with Ultralytics YOLO, explore the [MLflow Integration for Ultralytics YOLO](#introduction) documentation.
---
# Source: https://raw.githubusercontent.com/ultralytics/ultralytics/main/docs/en/integrations/ray-tune.md
---
comments: true
description: Optimize YOLO11 model performance with Ray Tune. Learn efficient hyperparameter tuning using advanced search strategies, parallelism, and early stopping.
keywords: YOLO11, Ray Tune, hyperparameter tuning, model optimization, machine learning, deep learning, AI, Ultralytics, Weights & Biases
---
# Efficient Hyperparameter Tuning with Ray Tune and YOLO11
Hyperparameter tuning is vital in achieving peak model performance by discovering the optimal set of hyperparameters. This involves running trials with different hyperparameters and evaluating each trial's performance.
## Accelerate Tuning with Ultralytics YOLO11 and Ray Tune
[Ultralytics YOLO11](https://www.ultralytics.com/) incorporates Ray Tune for hyperparameter tuning, streamlining the optimization of YOLO11 model hyperparameters. With Ray Tune, you can utilize advanced search strategies, parallelism, and early stopping to expedite the tuning process.
### Ray Tune
[Ray Tune](https://docs.ray.io/en/latest/tune/index.html) is a hyperparameter tuning library designed for efficiency and flexibility. It supports various search strategies, parallelism, and early stopping strategies, and seamlessly integrates with popular [machine learning](https://www.ultralytics.com/glossary/machine-learning-ml) frameworks, including Ultralytics YOLO11.
### Integration with Weights & Biases
YOLO11 also allows optional integration with [Weights & Biases](https://wandb.ai/site) for monitoring the tuning process.
## Installation
To install the required packages, run:
!!! tip "Installation"
=== "CLI"
```bash
# Install and update Ultralytics and Ray Tune packages
pip install -U ultralytics "ray[tune]"
# Optionally install W&B for logging
pip install wandb
```
## Usage
!!! example "Usage"
=== "Python"
```python
from ultralytics import YOLO
# Load a YOLO11n model
model = YOLO("yolo11n.pt")
# Start tuning hyperparameters for YOLO11n training on the COCO8 dataset
result_grid = model.tune(data="coco8.yaml", use_ray=True)
```
## `tune()` Method Parameters
The `tune()` method in YOLO11 provides an easy-to-use interface for hyperparameter tuning with Ray Tune. It accepts several arguments that allow you to customize the tuning process. Below is a detailed explanation of each parameter:
| Parameter | Type | Description | Default Value |
| --------------- | ---------------- | -------------------------------------------------------------------------------------------------------------------------------------------------------------------------------------------------------------------------------------------------------------------------------------------------------------------------------------------- | ------------- |
| `data` | `str` | The dataset configuration file (in YAML format) to run the tuner on. This file should specify the training and [validation data](https://www.ultralytics.com/glossary/validation-data) paths, as well as other dataset-specific settings. | |
| `space` | `dict, optional` | A dictionary defining the hyperparameter search space for Ray Tune. Each key corresponds to a hyperparameter name, and the value specifies the range of values to explore during tuning. If not provided, YOLO11 uses a default search space with various hyperparameters. | |
| `grace_period` | `int, optional` | The grace period in [epochs](https://www.ultralytics.com/glossary/epoch) for the [ASHA scheduler](https://docs.ray.io/en/latest/tune/api/schedulers.html) in Ray Tune. The scheduler will not terminate any trial before this number of epochs, allowing the model to have some minimum training before making a decision on early stopping. | 10 |
| `gpu_per_trial` | `int, optional` | The number of GPUs to allocate per trial during tuning. This helps manage GPU usage, particularly in multi-GPU environments. If not provided, the tuner will use all available GPUs. | `None` |
| `iterations` | `int, optional` | The maximum number of trials to run during tuning. This parameter helps control the total number of hyperparameter combinations tested, ensuring the tuning process does not run indefinitely. | 10 |
| `**train_args` | `dict, optional` | Additional arguments to pass to the `train()` method during tuning. These arguments can include settings like the number of training epochs, [batch size](https://www.ultralytics.com/glossary/batch-size), and other training-specific configurations. | {} |
By customizing these parameters, you can fine-tune the hyperparameter optimization process to suit your specific needs and available computational resources.
## Default Search Space Description
The following table lists the default search space parameters for hyperparameter tuning in YOLO11 with Ray Tune. Each parameter has a specific value range defined by `tune.uniform()`.
| Parameter | Range | Description |
| ----------------- | -------------------------- | ------------------------------------------------------------------------------------------------------------------------------------------------ |
| `lr0` | `tune.uniform(1e-5, 1e-1)` | Initial learning rate that controls the step size during optimization. Higher values speed up training but may cause instability. |
| `lrf` | `tune.uniform(0.01, 1.0)` | Final learning rate factor that determines how much the learning rate decreases by the end of training. |
| `momentum` | `tune.uniform(0.6, 0.98)` | Momentum factor for the optimizer that helps accelerate training and overcome local minima. |
| `weight_decay` | `tune.uniform(0.0, 0.001)` | Regularization parameter that prevents overfitting by penalizing large weight values. |
| `warmup_epochs` | `tune.uniform(0.0, 5.0)` | Number of epochs with gradually increasing learning rate to stabilize early training. |
| `warmup_momentum` | `tune.uniform(0.0, 0.95)` | Initial momentum value that gradually increases during the warmup period. |
| `box` | `tune.uniform(0.02, 0.2)` | Weight for the bounding box loss component, balancing localization accuracy in the model. |
| `cls` | `tune.uniform(0.2, 4.0)` | Weight for the classification loss component, balancing class prediction accuracy in the model. |
| `hsv_h` | `tune.uniform(0.0, 0.1)` | Hue augmentation range that introduces color variability to help the model generalize. |
| `hsv_s` | `tune.uniform(0.0, 0.9)` | Saturation augmentation range that varies color intensity to improve robustness. |
| `hsv_v` | `tune.uniform(0.0, 0.9)` | Value (brightness) augmentation range that helps the model perform under various lighting conditions. |
| `degrees` | `tune.uniform(0.0, 45.0)` | Rotation augmentation range in degrees, improving recognition of rotated objects. |
| `translate` | `tune.uniform(0.0, 0.9)` | Translation augmentation range that shifts images horizontally and vertically. |
| `scale` | `tune.uniform(0.0, 0.9)` | Scaling augmentation range that simulates objects at different distances. |
| `shear` | `tune.uniform(0.0, 10.0)` | Shear augmentation range in degrees, simulating perspective shifts. |
| `perspective` | `tune.uniform(0.0, 0.001)` | Perspective augmentation range that simulates 3D viewpoint changes. |
| `flipud` | `tune.uniform(0.0, 1.0)` | Vertical flip augmentation probability, increasing dataset diversity. |
| `fliplr` | `tune.uniform(0.0, 1.0)` | Horizontal flip augmentation probability, useful for symmetrical objects. |
| `mosaic` | `tune.uniform(0.0, 1.0)` | Mosaic augmentation probability that combines four images into one training sample. |
| `mixup` | `tune.uniform(0.0, 1.0)` | Mixup augmentation probability that blends two images and their labels together. |
| `cutmix` | `tune.uniform(0.0, 1.0)` | Cutmix augmentation probability that combines image regions while maintaining local features, improving detection of partially occluded objects. |
| `copy_paste` | `tune.uniform(0.0, 1.0)` | Copy-paste augmentation probability that transfers objects between images to increase instance diversity. |
## Custom Search Space Example
In this example, we demonstrate how to use a custom search space for hyperparameter tuning with Ray Tune and YOLO11. By providing a custom search space, you can focus the tuning process on specific hyperparameters of interest.
!!! example "Usage"
```python
from ray import tune
from ultralytics import YOLO
# Define a YOLO model
model = YOLO("yolo11n.pt")
# Run Ray Tune on the model
result_grid = model.tune(
data="coco8.yaml",
space={"lr0": tune.uniform(1e-5, 1e-1)},
epochs=50,
use_ray=True,
)
```
In the code snippet above, we create a YOLO model with the "yolo11n.pt" pretrained weights. Then, we call the `tune()` method, specifying the dataset configuration with "coco8.yaml". We provide a custom search space for the initial learning rate `lr0` using a dictionary with the key "lr0" and the value `tune.uniform(1e-5, 1e-1)`. Finally, we pass additional training arguments, such as the number of epochs directly to the tune method as `epochs=50`.
## Resuming An Interrupted Hyperparameter Tuning Session With Ray Tune
You can resume an interrupted Ray Tune session by passing `resume=True`. You can optionally pass the directory `name` used by Ray Tune under `runs/{task}` to resume. Otherwise, it would resume the last interrupted session. You don't need to provide the `iterations` and `space` again, but you need to provide the rest of the training arguments again including `data` and `epochs`.
!!! example "Using `resume=True` with `model.tune()`"
```python
from ultralytics import YOLO
# Define a YOLO model
model = YOLO("yolo11n.pt")
# Resume previous run
results = model.tune(use_ray=True, data="coco8.yaml", epochs=50, resume=True)
# Resume Ray Tune run with name 'tune_exp_2'
results = model.tune(use_ray=True, data="coco8.yaml", epochs=50, name="tune_exp_2", resume=True)
```
## Processing Ray Tune Results
After running a hyperparameter tuning experiment with Ray Tune, you might want to perform various analyses on the obtained results. This guide will take you through common workflows for processing and analyzing these results.
### Loading Tune Experiment Results from a Directory
After running the tuning experiment with `tuner.fit()`, you can load the results from a directory. This is useful, especially if you're performing the analysis after the initial training script has exited.
```python
experiment_path = f"{storage_path}/{exp_name}"
print(f"Loading results from {experiment_path}...")
restored_tuner = tune.Tuner.restore(experiment_path, trainable=train_mnist)
result_grid = restored_tuner.get_results()
```
### Basic Experiment-Level Analysis
Get an overview of how trials performed. You can quickly check if there were any errors during the trials.
```python
if result_grid.errors:
print("One or more trials failed!")
else:
print("No errors!")
```
### Basic Trial-Level Analysis
Access individual trial hyperparameter configurations and the last reported metrics.
```python
for i, result in enumerate(result_grid):
print(f"Trial #{i}: Configuration: {result.config}, Last Reported Metrics: {result.metrics}")
```
### Plotting the Entire History of Reported Metrics for a Trial
You can plot the history of reported metrics for each trial to see how the metrics evolved over time.
```python
import matplotlib.pyplot as plt
for i, result in enumerate(result_grid):
plt.plot(
result.metrics_dataframe["training_iteration"],
result.metrics_dataframe["mean_accuracy"],
label=f"Trial {i}",
)
plt.xlabel("Training Iterations")
plt.ylabel("Mean Accuracy")
plt.legend()
plt.show()
```
## Summary
In this guide, we covered common workflows to analyze the results of experiments run with Ray Tune using Ultralytics. The key steps include loading the experiment results from a directory, performing basic experiment-level and trial-level analysis, and plotting metrics.
Explore further by looking into Ray Tune's [Analyze Results](https://docs.ray.io/en/latest/tune/examples/tune_analyze_results.html) docs page to get the most out of your hyperparameter tuning experiments.
## FAQ
### How do I tune the hyperparameters of my YOLO11 model using Ray Tune?
To tune the hyperparameters of your Ultralytics YOLO11 model using Ray Tune, follow these steps:
1. **Install the required packages:**
```bash
pip install -U ultralytics "ray[tune]"
pip install wandb # optional for logging
```
2. **Load your YOLO11 model and start tuning:**
```python
from ultralytics import YOLO
# Load a YOLO11 model
model = YOLO("yolo11n.pt")
# Start tuning with the COCO8 dataset
result_grid = model.tune(data="coco8.yaml", use_ray=True)
```
This utilizes Ray Tune's advanced search strategies and parallelism to efficiently optimize your model's hyperparameters. For more information, check out the [Ray Tune documentation](https://docs.ray.io/en/latest/tune/index.html).
### What are the default hyperparameters for YOLO11 tuning with Ray Tune?
Ultralytics YOLO11 uses the following default hyperparameters for tuning with Ray Tune:
| Parameter | Value Range | Description |
| --------------- | -------------------------- | ------------------------------ |
| `lr0` | `tune.uniform(1e-5, 1e-1)` | Initial learning rate |
| `lrf` | `tune.uniform(0.01, 1.0)` | Final learning rate factor |
| `momentum` | `tune.uniform(0.6, 0.98)` | Momentum |
| `weight_decay` | `tune.uniform(0.0, 0.001)` | Weight decay |
| `warmup_epochs` | `tune.uniform(0.0, 5.0)` | Warmup epochs |
| `box` | `tune.uniform(0.02, 0.2)` | Box loss weight |
| `cls` | `tune.uniform(0.2, 4.0)` | Class loss weight |
| `hsv_h` | `tune.uniform(0.0, 0.1)` | Hue augmentation range |
| `translate` | `tune.uniform(0.0, 0.9)` | Translation augmentation range |
These hyperparameters can be customized to suit your specific needs. For a complete list and more details, refer to the [Hyperparameter Tuning](../guides/hyperparameter-tuning.md) guide.
### How can I integrate Weights & Biases with my YOLO11 model tuning?
To integrate Weights & Biases (W&B) with your Ultralytics YOLO11 tuning process:
1. **Install W&B:**
```bash
pip install wandb
```
2. **Modify your tuning script:**
```python
import wandb
from ultralytics import YOLO
wandb.init(project="YOLO-Tuning", entity="your-entity")
# Load YOLO model
model = YOLO("yolo11n.pt")
# Tune hyperparameters
result_grid = model.tune(data="coco8.yaml", use_ray=True)
```
This setup will allow you to monitor the tuning process, track hyperparameter configurations, and visualize results in W&B.
### Why should I use Ray Tune for hyperparameter optimization with YOLO11?
Ray Tune offers numerous advantages for hyperparameter optimization:
- **Advanced Search Strategies:** Utilizes algorithms like [Bayesian Optimization](https://www.ultralytics.com/glossary/bayesian-network) and HyperOpt for efficient parameter search.
- **Parallelism:** Supports parallel execution of multiple trials, significantly speeding up the tuning process.
- **Early Stopping:** Employs strategies like ASHA to terminate under-performing trials early, saving computational resources.
Ray Tune seamlessly integrates with Ultralytics YOLO11, providing an easy-to-use interface for tuning hyperparameters effectively. To get started, check out the [Hyperparameter Tuning](../guides/hyperparameter-tuning.md) guide.
### How can I define a custom search space for YOLO11 hyperparameter tuning?
To define a custom search space for your YOLO11 hyperparameter tuning with Ray Tune:
```python
from ray import tune
from ultralytics import YOLO
model = YOLO("yolo11n.pt")
search_space = {"lr0": tune.uniform(1e-5, 1e-1), "momentum": tune.uniform(0.6, 0.98)}
result_grid = model.tune(data="coco8.yaml", space=search_space, use_ray=True)
```
This customizes the range of hyperparameters like initial learning rate and momentum to be explored during the tuning process. For advanced configurations, refer to the [Custom Search Space Example](#custom-search-space-example) section.
---
# Source: https://raw.githubusercontent.com/ultralytics/ultralytics/main/docs/en/integrations/tensorboard.md
---
comments: true
description: Learn how to integrate YOLO11 with TensorBoard for real-time visual insights into your model's training metrics, performance graphs, and debugging workflows.
keywords: YOLO11, TensorBoard, model training, visualization, machine learning, deep learning, Ultralytics, training metrics, performance analysis
---
# Gain Visual Insights with YOLO11's Integration with TensorBoard
Understanding and fine-tuning [computer vision](https://www.ultralytics.com/glossary/computer-vision-cv) models like [Ultralytics' YOLO11](https://www.ultralytics.com/) becomes more straightforward when you take a closer look at their training processes. Model training visualization helps with getting insights into the model's learning patterns, performance metrics, and overall behavior. YOLO11's integration with TensorBoard makes this process of visualization and analysis easier and enables more efficient and informed adjustments to the model.
This guide covers how to use TensorBoard with YOLO11. You'll learn about various visualizations, from tracking metrics to analyzing model graphs. These tools will help you understand your YOLO11 model's performance better.
## TensorBoard
[TensorBoard](https://www.tensorflow.org/tensorboard), [TensorFlow](https://www.ultralytics.com/glossary/tensorflow)'s visualization toolkit, is essential for [machine learning](https://www.ultralytics.com/glossary/machine-learning-ml) experimentation. TensorBoard features a range of visualization tools, crucial for monitoring machine learning models. These tools include tracking key metrics like loss and accuracy, visualizing model graphs, and viewing histograms of weights and biases over time. It also provides capabilities for projecting [embeddings](https://www.ultralytics.com/glossary/embeddings) to lower-dimensional spaces and displaying multimedia data.
## YOLO11 Training with TensorBoard
Using TensorBoard while training YOLO11 models is straightforward and offers significant benefits.
## Installation
To install the required package, run:
!!! tip "Installation"
=== "CLI"
```bash
# Install the required package for YOLO11 and Tensorboard
pip install ultralytics
```
TensorBoard is conveniently pre-installed with YOLO11, eliminating the need for additional setup for visualization purposes.
For detailed instructions and best practices related to the installation process, be sure to check our [YOLO11 Installation guide](../quickstart.md). While installing the required packages for YOLO11, if you encounter any difficulties, consult our [Common Issues guide](../guides/yolo-common-issues.md) for solutions and tips.
## Configuring TensorBoard for Google Colab
When using Google Colab, it's important to set up TensorBoard before starting your training code:
!!! example "Configure TensorBoard for Google Colab"
=== "Python"
```bash
%load_ext tensorboard
%tensorboard --logdir path/to/runs
```
## Usage
Before diving into the usage instructions, be sure to check out the range of [YOLO11 models offered by Ultralytics](../models/index.md). This will help you choose the most appropriate model for your project requirements.
!!! tip "Enable or Disable TensorBoard"
By default, TensorBoard logging is disabled. You can enable or disable the logging by using the `yolo settings` command.
=== "CLI"
```bash
# Enable TensorBoard logging
yolo settings tensorboard=True
# Disable TensorBoard logging
yolo settings tensorboard=False
```
!!! example "Usage"
=== "Python"
```python
from ultralytics import YOLO
# Load a pretrained model
model = YOLO("yolo11n.pt")
# Train the model
results = model.train(data="coco8.yaml", epochs=100, imgsz=640)
```
Upon running the usage code snippet above, you can expect the following output:
```bash
TensorBoard: Start with 'tensorboard --logdir path_to_your_tensorboard_logs', view at http://localhost:6006/
```
This output indicates that TensorBoard is now actively monitoring your YOLO11 training session. You can access the TensorBoard dashboard by visiting the provided URL (http://localhost:6006/) to view real-time training metrics and model performance. For users working in [Google Colab](../integrations/google-colab.md), the TensorBoard will be displayed in the same cell where you executed the TensorBoard configuration commands.
For more information related to the model training process, be sure to check our [YOLO11 Model Training guide](../modes/train.md). If you are interested in learning more about logging, checkpoints, plotting, and file management, read our [usage guide on configuration](../usage/cfg.md).
## Understanding Your TensorBoard for YOLO11 Training
Now, let's focus on understanding the various features and components of TensorBoard in the context of YOLO11 training. The three key sections of the TensorBoard are Time Series, Scalars, and Graphs.
### Time Series
The Time Series feature in the TensorBoard offers a dynamic and detailed perspective of various training metrics over time for YOLO11 models. It focuses on the progression and trends of metrics across training epochs. Here's an example of what you can expect to see.

#### Key Features of Time Series in TensorBoard
- **Filter Tags and Pinned Cards**: This functionality allows users to filter specific metrics and pin cards for quick comparison and access. It's particularly useful for focusing on specific aspects of the training process.
- **Detailed Metric Cards**: Time Series divides metrics into different categories like [learning rate](https://www.ultralytics.com/glossary/learning-rate) (lr), training (train), and validation (val) metrics, each represented by individual cards.
- **Graphical Display**: Each card in the Time Series section shows a detailed graph of a specific metric over the course of training. This visual representation aids in identifying trends, patterns, or anomalies in the training process.
- **In-Depth Analysis**: Time Series provides an in-depth analysis of each metric. For instance, different learning rate segments are shown, offering insights into how adjustments in learning rate impact the model's learning curve.
#### Importance of Time Series in YOLO11 Training
The Time Series section is essential for a thorough analysis of the YOLO11 model's training progress. It lets you track the metrics in real time to promptly identify and solve issues. It also offers a detailed view of each metric's progression, which is crucial for fine-tuning the model and enhancing its performance.
### Scalars
Scalars in the TensorBoard are crucial for plotting and analyzing simple metrics like loss and accuracy during the training of YOLO11 models. They offer a clear and concise view of how these metrics evolve with each training [epoch](https://www.ultralytics.com/glossary/epoch), providing insights into the model's learning effectiveness and stability. Here's an example of what you can expect to see.

#### Key Features of Scalars in TensorBoard
- **Learning Rate (lr) Tags**: These tags show the variations in the learning rate across different segments (e.g., `pg0`, `pg1`, `pg2`). This helps us understand the impact of learning rate adjustments on the training process.
- **Metrics Tags**: Scalars include performance indicators such as:
- `mAP50 (B)`: Mean Average [Precision](https://www.ultralytics.com/glossary/precision) at 50% [Intersection over Union](https://www.ultralytics.com/glossary/intersection-over-union-iou) (IoU), crucial for assessing object detection accuracy.
- `mAP50-95 (B)`: [Mean Average Precision](https://www.ultralytics.com/glossary/mean-average-precision-map) calculated over a range of IoU thresholds, offering a more comprehensive evaluation of accuracy.
- `Precision (B)`: Indicates the ratio of correctly predicted positive observations, key to understanding prediction [accuracy](https://www.ultralytics.com/glossary/accuracy).
- `Recall (B)`: Important for models where missing a detection is significant, this metric measures the ability to detect all relevant instances.
- To learn more about the different metrics, read our guide on [performance metrics](../guides/yolo-performance-metrics.md).
- **Training and Validation Tags (`train`, `val`)**: These tags display metrics specifically for the training and validation datasets, allowing for a comparative analysis of model performance across different data sets.
#### Importance of Monitoring Scalars
Observing scalar metrics is crucial for fine-tuning the YOLO11 model. Variations in these metrics, such as spikes or irregular patterns in loss graphs, can highlight potential issues such as [overfitting](https://www.ultralytics.com/glossary/overfitting), [underfitting](https://www.ultralytics.com/glossary/underfitting), or inappropriate learning rate settings. By closely monitoring these scalars, you can make informed decisions to optimize the training process, ensuring that the model learns effectively and achieves the desired performance.
### Difference Between Scalars and Time Series
While both Scalars and Time Series in TensorBoard are used for tracking metrics, they serve slightly different purposes. Scalars focus on plotting simple metrics such as loss and accuracy as scalar values. They provide a high-level overview of how these metrics change with each training epoch. Meanwhile, the time-series section of the TensorBoard offers a more detailed timeline view of various metrics. It is particularly useful for monitoring the progression and trends of metrics over time, providing a deeper dive into the specifics of the training process.
### Graphs
The Graphs section of the TensorBoard visualizes the computational graph of the YOLO11 model, showing how operations and data flow within the model. It's a powerful tool for understanding the model's structure, ensuring that all layers are connected correctly, and for identifying any potential bottlenecks in data flow. Here's an example of what you can expect to see.

Graphs are particularly useful for debugging the model, especially in complex architectures typical in [deep learning](https://www.ultralytics.com/glossary/deep-learning-dl) models like YOLO11. They help in verifying layer connections and the overall design of the model.
## Summary
This guide aims to help you use TensorBoard with YOLO11 for visualization and analysis of machine learning model training. It focuses on explaining how key TensorBoard features can provide insights into training metrics and model performance during YOLO11 training sessions.
For a more detailed exploration of these features and effective utilization strategies, you can refer to TensorFlow's official [TensorBoard documentation](https://www.tensorflow.org/tensorboard/get_started) and their [GitHub repository](https://github.com/tensorflow/tensorboard).
Want to learn more about the various integrations of Ultralytics? Check out the [Ultralytics integrations guide page](../integrations/index.md) to see what other exciting capabilities are waiting to be discovered!
## FAQ
### What benefits does using TensorBoard with YOLO11 offer?
Using TensorBoard with YOLO11 provides several visualization tools essential for efficient model training:
- **Real-Time Metrics Tracking:** Track key metrics such as loss, accuracy, precision, and recall live.
- **Model Graph Visualization:** Understand and debug the model architecture by visualizing computational graphs.
- **Embedding Visualization:** Project embeddings to lower-dimensional spaces for better insight.
These tools enable you to make informed adjustments to enhance your YOLO11 model's performance. For more details on TensorBoard features, check out the TensorFlow [TensorBoard guide](https://www.tensorflow.org/tensorboard/get_started).
### How can I monitor training metrics using TensorBoard when training a YOLO11 model?
To monitor training metrics while training a YOLO11 model with TensorBoard, follow these steps:
1. **Install TensorBoard and YOLO11:** Run `pip install ultralytics` which includes TensorBoard.
2. **Configure TensorBoard Logging:** During the training process, YOLO11 logs metrics to a specified log directory.
3. **Start TensorBoard:** Launch TensorBoard using the command `tensorboard --logdir path/to/your/tensorboard/logs`.
The TensorBoard dashboard, accessible via [http://localhost:6006/](http://localhost:6006/), provides real-time insights into various training metrics. For a deeper dive into training configurations, visit our [YOLO11 Configuration guide](../usage/cfg.md).
### What kind of metrics can I visualize with TensorBoard when training YOLO11 models?
When training YOLO11 models, TensorBoard allows you to visualize an array of important metrics including:
- **Loss (Training and Validation):** Indicates how well the model is performing during training and validation.
- **Accuracy/Precision/[Recall](https://www.ultralytics.com/glossary/recall):** Key performance metrics to evaluate detection accuracy.
- **Learning Rate:** Track learning rate changes to understand its impact on training dynamics.
- **mAP (mean Average Precision):** For a comprehensive evaluation of [object detection](https://www.ultralytics.com/glossary/object-detection) accuracy at various IoU thresholds.
These visualizations are essential for tracking model performance and making necessary optimizations. For more information on these metrics, refer to our [Performance Metrics guide](../guides/yolo-performance-metrics.md).
### Can I use TensorBoard in a Google Colab environment for training YOLO11?
Yes, you can use TensorBoard in a Google Colab environment to train YOLO11 models. Here's a quick setup:
!!! example "Configure TensorBoard for Google Colab"
=== "Python"
```bash
%load_ext tensorboard
%tensorboard --logdir path/to/runs
```
Then, run the YOLO11 training script:
```python
from ultralytics import YOLO
# Load a pretrained model
model = YOLO("yolo11n.pt")
# Train the model
results = model.train(data="coco8.yaml", epochs=100, imgsz=640)
```
TensorBoard will visualize the training progress within Colab, providing real-time insights into metrics like loss and accuracy. For additional details on configuring YOLO11 training, see our detailed [YOLO11 Installation guide](../quickstart.md).
---
# Source: https://raw.githubusercontent.com/ultralytics/ultralytics/main/docs/en/models/index.md
---
comments: true
description: Discover a variety of models supported by Ultralytics, including YOLOv3 to YOLO11, NAS, SAM, and RT-DETR for detection, segmentation, and more.
keywords: Ultralytics, supported models, YOLOv3, YOLOv4, YOLOv5, YOLOv6, YOLOv7, YOLOv8, YOLOv9, YOLOv10, YOLO11, SAM, SAM2, SAM3, MobileSAM, FastSAM, YOLO-NAS, RT-DETR, YOLO-World, object detection, image segmentation, classification, pose estimation, multi-object tracking
---
# Models Supported by Ultralytics
Welcome to Ultralytics' model documentation! We offer support for a wide range of models, each tailored to specific tasks like [object detection](../tasks/detect.md), [instance segmentation](../tasks/segment.md), [image classification](../tasks/classify.md), [pose estimation](../tasks/pose.md), and [multi-object tracking](../modes/track.md). If you're interested in contributing your model architecture to Ultralytics, check out our [Contributing Guide](../help/contributing.md).
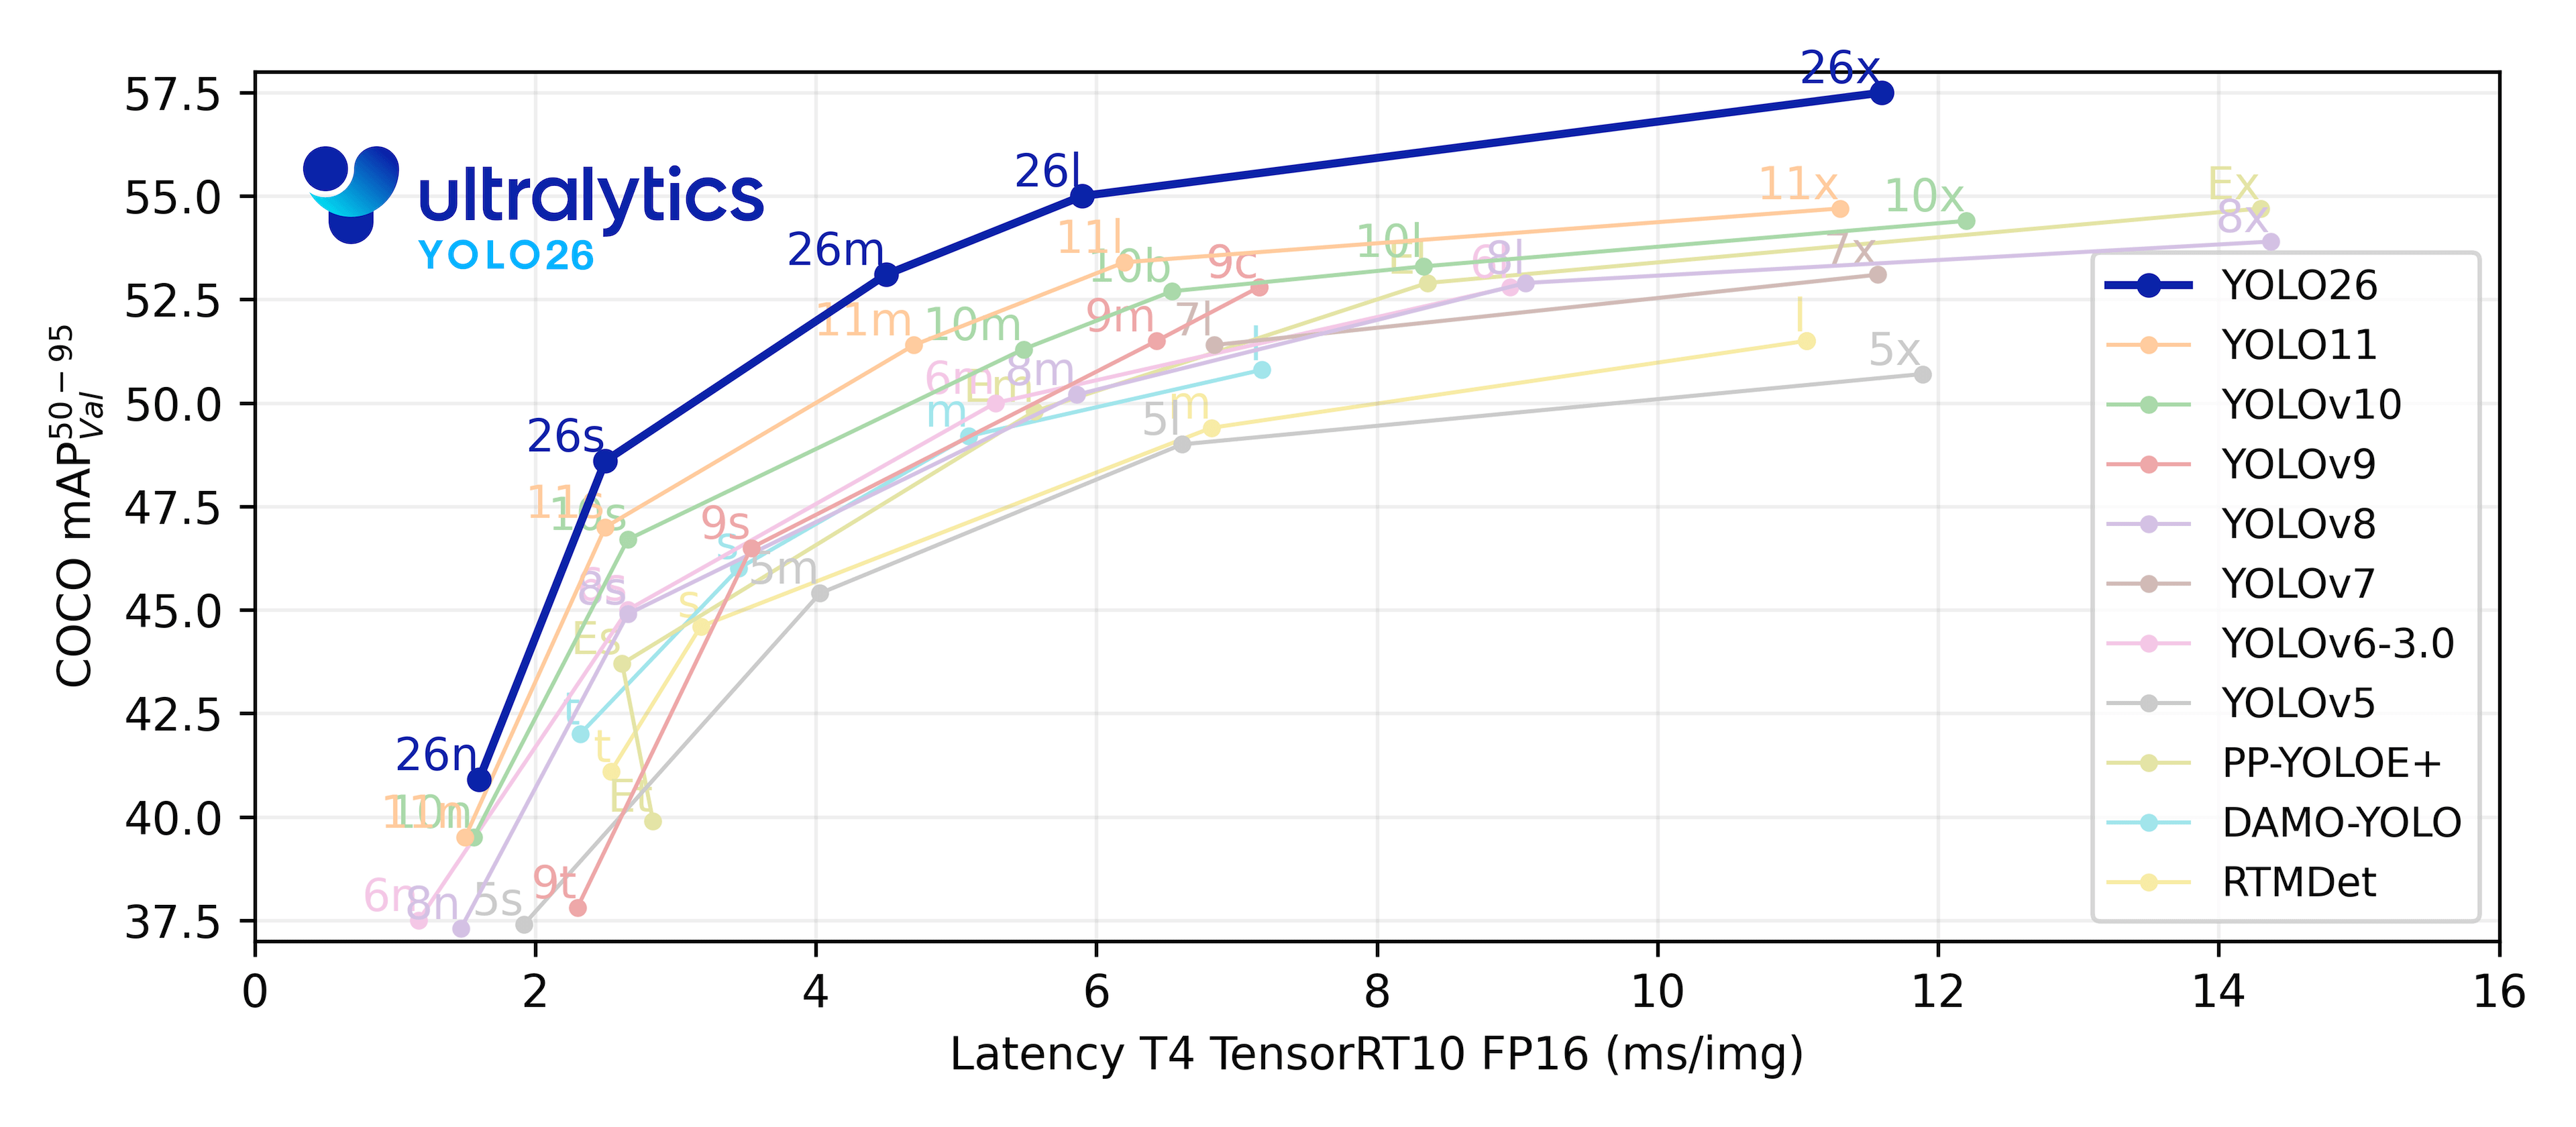
## Featured Models
Here are some of the key models supported:
1. **[YOLOv3](yolov3.md)**: The third iteration of the YOLO model family, originally by Joseph Redmon, known for its efficient real-time object detection capabilities.
2. **[YOLOv4](yolov4.md)**: A darknet-native update to YOLOv3, released by Alexey Bochkovskiy in 2020.
3. **[YOLOv5](yolov5.md)**: An improved version of the YOLO architecture by Ultralytics, offering better performance and speed trade-offs compared to previous versions.
4. **[YOLOv6](yolov6.md)**: Released by [Meituan](https://www.meituan.com/) in 2022, and in use in many of the company's autonomous delivery robots.
5. **[YOLOv7](yolov7.md)**: Updated YOLO models released in 2022 by the authors of YOLOv4. Only inference is supported.
6. **[YOLOv8](yolov8.md)**: A versatile model featuring enhanced capabilities such as [instance segmentation](https://www.ultralytics.com/glossary/instance-segmentation), pose/keypoints estimation, and classification.
7. **[YOLOv9](yolov9.md)**: An experimental model trained on the Ultralytics [YOLOv5](yolov5.md) codebase implementing Programmable Gradient Information (PGI).
8. **[YOLOv10](yolov10.md)**: By Tsinghua University, featuring NMS-free training and efficiency-accuracy driven architecture, delivering state-of-the-art performance and latency.
9. **[YOLO11](yolo11.md) 🚀**: Ultralytics' latest YOLO models delivering state-of-the-art (SOTA) performance across multiple tasks including detection, segmentation, pose estimation, tracking, and classification.
10. **[YOLO26](yolo26.md) ⚠️ Coming Soon**: Ultralytics' next-generation YOLO model optimized for edge deployment with end-to-end NMS-free inference.
11. **[Segment Anything Model (SAM)](sam.md)**: Meta's original Segment Anything Model (SAM).
12. **[Segment Anything Model 2 (SAM2)](sam-2.md)**: The next generation of Meta's Segment Anything Model for videos and images.
13. **[Segment Anything Model 3 (SAM3)](sam-3.md) 🚀 NEW**: Meta's third generation Segment Anything Model with Promptable Concept Segmentation for text and image exemplar-based segmentation.
14. **[Mobile Segment Anything Model (MobileSAM)](mobile-sam.md)**: MobileSAM for mobile applications, by Kyung Hee University.
15. **[Fast Segment Anything Model (FastSAM)](fast-sam.md)**: FastSAM by Image & Video Analysis Group, Institute of Automation, Chinese Academy of Sciences.
16. **[YOLO-NAS](yolo-nas.md)**: YOLO [Neural Architecture Search](https://www.ultralytics.com/glossary/neural-architecture-search-nas) (NAS) Models.
17. **[Real-Time Detection Transformers (RT-DETR)](rtdetr.md)**: Baidu's PaddlePaddle real-time Detection [Transformer](https://www.ultralytics.com/glossary/transformer) (RT-DETR) models.
18. **[YOLO-World](yolo-world.md)**: Real-time Open Vocabulary Object Detection models from Tencent AI Lab.
19. **[YOLOE](yoloe.md)**: An improved open-vocabulary object detector that maintains YOLO's real-time performance while detecting arbitrary classes beyond its training data.
Watch: Run Ultralytics YOLO models in just a few lines of code.
## Getting Started: Usage Examples
This example provides simple YOLO training and inference examples. For full documentation on these and other [modes](../modes/index.md) see the [Predict](../modes/predict.md), [Train](../modes/train.md), [Val](../modes/val.md) and [Export](../modes/export.md) docs pages.
Note the below example spotlights YOLO11 [Detect](../tasks/detect.md) models for [object detection](https://www.ultralytics.com/glossary/object-detection). For additional supported tasks see the [Segment](../tasks/segment.md), [Classify](../tasks/classify.md) and [Pose](../tasks/pose.md) docs.
!!! example
=== "Python"
[PyTorch](https://www.ultralytics.com/glossary/pytorch) pretrained `*.pt` models as well as configuration `*.yaml` files can be passed to the `YOLO()`, `SAM()`, `NAS()` and `RTDETR()` classes to create a model instance in Python:
```python
from ultralytics import YOLO
# Load a COCO-pretrained YOLO11n model
model = YOLO("yolo11n.pt")
# Display model information (optional)
model.info()
# Train the model on the COCO8 example dataset for 100 epochs
results = model.train(data="coco8.yaml", epochs=100, imgsz=640)
# Run inference with the YOLO11n model on the 'bus.jpg' image
results = model("path/to/bus.jpg")
```
=== "CLI"
CLI commands are available to directly run the models:
```bash
# Load a COCO-pretrained YOLO11n model and train it on the COCO8 example dataset for 100 epochs
yolo train model=yolo11n.pt data=coco8.yaml epochs=100 imgsz=640
# Load a COCO-pretrained YOLO11n model and run inference on the 'bus.jpg' image
yolo predict model=yolo11n.pt source=path/to/bus.jpg
```
## Contributing New Models
Interested in contributing your model to Ultralytics? Great! We're always open to expanding our model portfolio.
1. **Fork the Repository**: Start by forking the [Ultralytics GitHub repository](https://github.com/ultralytics/ultralytics).
2. **Clone Your Fork**: Clone your fork to your local machine and create a new branch to work on.
3. **Implement Your Model**: Add your model following the coding standards and guidelines provided in our [Contributing Guide](../help/contributing.md).
4. **Test Thoroughly**: Make sure to test your model rigorously, both in isolation and as part of the pipeline.
5. **Create a Pull Request**: Once you're satisfied with your model, create a pull request to the main repository for review.
6. **Code Review & Merging**: After review, if your model meets our criteria, it will be merged into the main repository.
For detailed steps, consult our [Contributing Guide](../help/contributing.md).
## FAQ
### What are the key advantages of using Ultralytics YOLO11 for object detection?
Ultralytics YOLO11 offers enhanced capabilities such as real-time object detection, instance segmentation, pose estimation, and classification. Its optimized architecture ensures high-speed performance without sacrificing [accuracy](https://www.ultralytics.com/glossary/accuracy), making it ideal for a variety of applications across diverse AI domains. YOLO11 builds on previous versions with improved performance and additional features, as detailed on the [YOLO11 documentation page](../models/yolo11.md).
### How can I train a YOLO model on custom data?
Training a YOLO model on custom data can be easily accomplished using Ultralytics' libraries. Here's a quick example:
!!! example
=== "Python"
```python
from ultralytics import YOLO
# Load a YOLO model
model = YOLO("yolo11n.pt") # or any other YOLO model
# Train the model on custom dataset
results = model.train(data="custom_data.yaml", epochs=100, imgsz=640)
```
=== "CLI"
```bash
yolo train model=yolo11n.pt data='custom_data.yaml' epochs=100 imgsz=640
```
For more detailed instructions, visit the [Train](../modes/train.md) documentation page.
### Which YOLO versions are supported by Ultralytics?
Ultralytics supports a comprehensive range of YOLO (You Only Look Once) versions from YOLOv3 to YOLO11, along with models like YOLO-NAS, SAM, and RT-DETR. Each version is optimized for various tasks such as detection, segmentation, and classification. For detailed information on each model, refer to the [Models Supported by Ultralytics](../models/index.md) documentation.
### Why should I use Ultralytics HUB for [machine learning](https://www.ultralytics.com/glossary/machine-learning-ml) projects?
[Ultralytics HUB](../hub/index.md) provides a no-code, end-to-end platform for training, deploying, and managing YOLO models. It simplifies complex workflows, enabling users to focus on model performance and application. The HUB also offers [cloud training capabilities](../hub/cloud-training.md), comprehensive dataset management, and user-friendly interfaces for both beginners and experienced developers.
### What types of tasks can YOLO11 perform, and how does it compare to other YOLO versions?
YOLO11 is a versatile model capable of performing tasks including object detection, instance segmentation, classification, and pose estimation. Compared to earlier versions, YOLO11 offers significant improvements in speed and accuracy due to its optimized architecture and anchor-free design. For a deeper comparison, refer to the [YOLO11 documentation](../models/yolo11.md) and the [Task pages](../tasks/index.md) for more details on specific tasks.
---
# Source: https://raw.githubusercontent.com/ultralytics/ultralytics/main/docs/en/models/yolo11.md
---
comments: true
description: Discover YOLO11, the latest advancement in state-of-the-art object detection, offering unmatched accuracy and efficiency for diverse computer vision tasks.
keywords: YOLO11, state-of-the-art object detection, YOLO series, Ultralytics, computer vision, AI, machine learning, deep learning
---
# Ultralytics YOLO11
## Overview
YOLO11 is the latest iteration in the [Ultralytics](https://www.ultralytics.com/) YOLO series of real-time object detectors, redefining what's possible with cutting-edge [accuracy](https://www.ultralytics.com/glossary/accuracy), speed, and efficiency. Building upon the impressive advancements of previous YOLO versions, YOLO11 introduces significant improvements in architecture and training methods, making it a versatile choice for a wide range of [computer vision](https://www.ultralytics.com/glossary/computer-vision-cv) tasks.

Ultralytics YOLO11 🚀 Podcast generated by NotebookLM
Watch: How to Use Ultralytics YOLO11 for Object Detection and Tracking | How to Benchmark | YOLO11 RELEASED🚀
## Key Features
- **Enhanced Feature Extraction:** YOLO11 employs an improved [backbone](https://www.ultralytics.com/glossary/backbone) and neck architecture, which enhances [feature extraction](https://www.ultralytics.com/glossary/feature-extraction) capabilities for more precise object detection and complex task performance.
- **Optimized for Efficiency and Speed:** YOLO11 introduces refined architectural designs and optimized training pipelines, delivering faster processing speeds and maintaining an optimal balance between accuracy and performance.
- **Greater Accuracy with Fewer Parameters:** With advancements in model design, YOLO11m achieves a higher [mean Average Precision](https://www.ultralytics.com/glossary/mean-average-precision-map) (mAP) on the COCO dataset while using 22% fewer parameters than YOLOv8m, making it computationally efficient without compromising accuracy.
- **Adaptability Across Environments:** YOLO11 can be seamlessly deployed across various environments, including edge devices, cloud platforms, and systems supporting NVIDIA GPUs, ensuring maximum flexibility.
- **Broad Range of Supported Tasks:** Whether it's object detection, instance segmentation, image classification, pose estimation, or oriented object detection (OBB), YOLO11 is designed to cater to a diverse set of computer vision challenges.
## Supported Tasks and Modes
YOLO11 builds upon the versatile model range established by earlier Ultralytics YOLO releases, offering enhanced support across various computer vision tasks:
| Model | Filenames | Task | Inference | Validation | Training | Export |
| ----------- | ----------------------------------------------------------------------------------------- | -------------------------------------------- | --------- | ---------- | -------- | ------ |
| YOLO11 | `yolo11n.pt` `yolo11s.pt` `yolo11m.pt` `yolo11l.pt` `yolo11x.pt` | [Detection](../tasks/detect.md) | ✅ | ✅ | ✅ | ✅ |
| YOLO11-seg | `yolo11n-seg.pt` `yolo11s-seg.pt` `yolo11m-seg.pt` `yolo11l-seg.pt` `yolo11x-seg.pt` | [Instance Segmentation](../tasks/segment.md) | ✅ | ✅ | ✅ | ✅ |
| YOLO11-pose | `yolo11n-pose.pt` `yolo11s-pose.pt` `yolo11m-pose.pt` `yolo11l-pose.pt` `yolo11x-pose.pt` | [Pose/Keypoints](../tasks/pose.md) | ✅ | ✅ | ✅ | ✅ |
| YOLO11-obb | `yolo11n-obb.pt` `yolo11s-obb.pt` `yolo11m-obb.pt` `yolo11l-obb.pt` `yolo11x-obb.pt` | [Oriented Detection](../tasks/obb.md) | ✅ | ✅ | ✅ | ✅ |
| YOLO11-cls | `yolo11n-cls.pt` `yolo11s-cls.pt` `yolo11m-cls.pt` `yolo11l-cls.pt` `yolo11x-cls.pt` | [Classification](../tasks/classify.md) | ✅ | ✅ | ✅ | ✅ |
This table provides an overview of the YOLO11 model variants, showcasing their applicability in specific tasks and compatibility with operational modes such as Inference, Validation, Training, and Export. This flexibility makes YOLO11 suitable for a wide range of applications in computer vision, from real-time detection to complex segmentation tasks.
## Performance Metrics
!!! tip "Performance"
=== "Detection (COCO)"
See [Detection Docs](../tasks/detect.md) for usage examples with these models trained on [COCO](../datasets/detect/coco.md), which include 80 pretrained classes.
--8<-- "docs/macros/yolo-det-perf.md"
=== "Segmentation (COCO)"
See [Segmentation Docs](../tasks/segment.md) for usage examples with these models trained on [COCO](../datasets/segment/coco.md), which include 80 pretrained classes.
--8<-- "docs/macros/yolo-seg-perf.md"
=== "Classification (ImageNet)"
See [Classification Docs](../tasks/classify.md) for usage examples with these models trained on [ImageNet](../datasets/classify/imagenet.md), which include 1000 pretrained classes.
--8<-- "docs/macros/yolo-cls-perf.md"
=== "Pose (COCO)"
See [Pose Estimation Docs](../tasks/pose.md) for usage examples with these models trained on [COCO](../datasets/pose/coco.md), which include 1 pretrained class, 'person'.
--8<-- "docs/macros/yolo-pose-perf.md"
=== "OBB (DOTAv1)"
See [Oriented Detection Docs](../tasks/obb.md) for usage examples with these models trained on [DOTAv1](../datasets/obb/dota-v2.md#dota-v10), which include 15 pretrained classes.
--8<-- "docs/macros/yolo-obb-perf.md"
## Usage Examples
This section provides simple YOLO11 training and inference examples. For full documentation on these and other [modes](../modes/index.md), see the [Predict](../modes/predict.md), [Train](../modes/train.md), [Val](../modes/val.md), and [Export](../modes/export.md) docs pages.
Note that the example below is for YOLO11 [Detect](../tasks/detect.md) models for [object detection](https://www.ultralytics.com/glossary/object-detection). For additional supported tasks, see the [Segment](../tasks/segment.md), [Classify](../tasks/classify.md), [OBB](../tasks/obb.md), and [Pose](../tasks/pose.md) docs.
!!! example
=== "Python"
[PyTorch](https://www.ultralytics.com/glossary/pytorch) pretrained `*.pt` models as well as configuration `*.yaml` files can be passed to the `YOLO()` class to create a model instance in Python:
```python
from ultralytics import YOLO
# Load a COCO-pretrained YOLO11n model
model = YOLO("yolo11n.pt")
# Train the model on the COCO8 example dataset for 100 epochs
results = model.train(data="coco8.yaml", epochs=100, imgsz=640)
# Run inference with the YOLO11n model on the 'bus.jpg' image
results = model("path/to/bus.jpg")
```
=== "CLI"
CLI commands are available to directly run the models:
```bash
# Load a COCO-pretrained YOLO11n model and train it on the COCO8 example dataset for 100 epochs
yolo train model=yolo11n.pt data=coco8.yaml epochs=100 imgsz=640
# Load a COCO-pretrained YOLO11n model and run inference on the 'bus.jpg' image
yolo predict model=yolo11n.pt source=path/to/bus.jpg
```
## Citations and Acknowledgments
!!! tip "Ultralytics YOLO11 Publication"
Ultralytics has not published a formal research paper for YOLO11 due to the rapidly evolving nature of the models. We focus on advancing the technology and making it easier to use, rather than producing static documentation. For the most up-to-date information on YOLO architecture, features, and usage, please refer to our [GitHub repository](https://github.com/ultralytics/ultralytics) and [documentation](https://docs.ultralytics.com/).
If you use YOLO11 or any other software from this repository in your work, please cite it using the following format:
!!! quote ""
=== "BibTeX"
```bibtex
@software{yolo11_ultralytics,
author = {Glenn Jocher and Jing Qiu},
title = {Ultralytics YOLO11},
version = {11.0.0},
year = {2024},
url = {https://github.com/ultralytics/ultralytics},
orcid = {0000-0001-5950-6979, 0000-0003-3783-7069},
license = {AGPL-3.0}
}
```
Please note that the DOI is pending and will be added to the citation once it is available. YOLO11 models are provided under [AGPL-3.0](https://github.com/ultralytics/ultralytics/blob/main/LICENSE) and [Enterprise](https://www.ultralytics.com/license) licenses.
## FAQ
### What are the key improvements in Ultralytics YOLO11 compared to previous versions?
Ultralytics YOLO11 introduces several significant advancements over its predecessors. Key improvements include:
- **Enhanced Feature Extraction:** YOLO11 employs an improved backbone and neck architecture, enhancing [feature extraction](https://www.ultralytics.com/glossary/feature-extraction) capabilities for more precise object detection.
- **Optimized Efficiency and Speed:** Refined architectural designs and optimized training pipelines deliver faster processing speeds while maintaining a balance between accuracy and performance.
- **Greater Accuracy with Fewer Parameters:** YOLO11m achieves higher mean Average [Precision](https://www.ultralytics.com/glossary/precision) (mAP) on the COCO dataset with 22% fewer parameters than YOLOv8m, making it computationally efficient without compromising accuracy.
- **Adaptability Across Environments:** YOLO11 can be deployed across various environments, including edge devices, cloud platforms, and systems supporting NVIDIA GPUs.
- **Broad Range of Supported Tasks:** YOLO11 supports diverse computer vision tasks such as object detection, [instance segmentation](https://www.ultralytics.com/glossary/instance-segmentation), image classification, pose estimation, and oriented object detection (OBB).
### How do I train a YOLO11 model for object detection?
Training a YOLO11 model for object detection can be done using Python or CLI commands. Below are examples for both methods:
!!! example
=== "Python"
```python
from ultralytics import YOLO
# Load a COCO-pretrained YOLO11n model
model = YOLO("yolo11n.pt")
# Train the model on the COCO8 example dataset for 100 epochs
results = model.train(data="coco8.yaml", epochs=100, imgsz=640)
```
=== "CLI"
```bash
# Load a COCO-pretrained YOLO11n model and train it on the COCO8 example dataset for 100 epochs
yolo train model=yolo11n.pt data=coco8.yaml epochs=100 imgsz=640
```
For more detailed instructions, refer to the [Train](../modes/train.md) documentation.
### What tasks can YOLO11 models perform?
YOLO11 models are versatile and support a wide range of computer vision tasks, including:
- **Object Detection:** Identifying and locating objects within an image.
- **Instance Segmentation:** Detecting objects and delineating their boundaries.
- **[Image Classification](https://www.ultralytics.com/glossary/image-classification):** Categorizing images into predefined classes.
- **Pose Estimation:** Detecting and tracking keypoints on human bodies.
- **Oriented Object Detection (OBB):** Detecting objects with rotation for higher precision.
For more information on each task, see the [Detection](../tasks/detect.md), [Instance Segmentation](../tasks/segment.md), [Classification](../tasks/classify.md), [Pose Estimation](../tasks/pose.md), and [Oriented Detection](../tasks/obb.md) documentation.
### How does YOLO11 achieve greater accuracy with fewer parameters?
YOLO11 achieves greater accuracy with fewer parameters through advancements in model design and optimization techniques. The improved architecture allows for efficient feature extraction and processing, resulting in higher mean Average Precision (mAP) on datasets like COCO while using 22% fewer parameters than YOLOv8m. This makes YOLO11 computationally efficient without compromising on accuracy, making it suitable for deployment on resource-constrained devices.
### Can YOLO11 be deployed on edge devices?
Yes, YOLO11 is designed for adaptability across various environments, including edge devices. Its optimized architecture and efficient processing capabilities make it suitable for deployment on edge devices, cloud platforms, and systems supporting NVIDIA GPUs. This flexibility ensures that YOLO11 can be used in diverse applications, from real-time detection on mobile devices to complex segmentation tasks in cloud environments. For more details on deployment options, refer to the [Export](../modes/export.md) documentation.
---
# Source: https://raw.githubusercontent.com/ultralytics/ultralytics/main/docs/en/models/yolov8.md
---
comments: true
description: Discover Ultralytics YOLOv8, an advancement in real-time object detection, optimizing performance with an array of pretrained models for diverse tasks.
keywords: YOLOv8, real-time object detection, YOLO series, Ultralytics, computer vision, advanced object detection, AI, machine learning, deep learning
---
# Explore Ultralytics YOLOv8
## Overview
YOLOv8 was released by Ultralytics on January 10, 2023, offering cutting-edge performance in terms of accuracy and speed. Building upon the advancements of previous YOLO versions, YOLOv8 introduced new features and optimizations that make it an ideal choice for various [object detection](https://www.ultralytics.com/blog/a-guide-to-deep-dive-into-object-detection-in-2025) tasks in a wide range of applications.

Watch: Ultralytics YOLOv8 Model Overview
## Key Features of YOLOv8
- **Advanced Backbone and Neck Architectures:** YOLOv8 employs state-of-the-art backbone and neck architectures, resulting in improved [feature extraction](https://www.ultralytics.com/glossary/feature-extraction) and [object detection](https://www.ultralytics.com/glossary/object-detection) performance.
- **Anchor-free Split Ultralytics Head:** YOLOv8 adopts an anchor-free split Ultralytics head, which contributes to better accuracy and a more efficient detection process compared to anchor-based approaches.
- **Optimized Accuracy-Speed Tradeoff:** With a focus on maintaining an optimal balance between accuracy and speed, YOLOv8 is suitable for real-time object detection tasks in diverse application areas.
- **Variety of Pretrained Models:** YOLOv8 offers a range of pretrained models to cater to various tasks and performance requirements, making it easier to find the right model for your specific use case.
## Supported Tasks and Modes
The YOLOv8 series offers a diverse range of models, each specialized for specific tasks in computer vision. These models are designed to cater to various requirements, from object detection to more complex tasks like [instance segmentation](https://www.ultralytics.com/glossary/instance-segmentation), pose/keypoints detection, oriented object detection, and classification.
Each variant of the YOLOv8 series is optimized for its respective task, ensuring high performance and accuracy. Additionally, these models are compatible with various operational modes including [Inference](../modes/predict.md), [Validation](../modes/val.md), [Training](../modes/train.md), and [Export](../modes/export.md), facilitating their use in different stages of deployment and development.
| Model | Filenames | Task | Inference | Validation | Training | Export |
| ----------- | -------------------------------------------------------------------------------------------------------------- | -------------------------------------------- | --------- | ---------- | -------- | ------ |
| YOLOv8 | `yolov8n.pt` `yolov8s.pt` `yolov8m.pt` `yolov8l.pt` `yolov8x.pt` | [Detection](../tasks/detect.md) | ✅ | ✅ | ✅ | ✅ |
| YOLOv8-seg | `yolov8n-seg.pt` `yolov8s-seg.pt` `yolov8m-seg.pt` `yolov8l-seg.pt` `yolov8x-seg.pt` | [Instance Segmentation](../tasks/segment.md) | ✅ | ✅ | ✅ | ✅ |
| YOLOv8-pose | `yolov8n-pose.pt` `yolov8s-pose.pt` `yolov8m-pose.pt` `yolov8l-pose.pt` `yolov8x-pose.pt` `yolov8x-pose-p6.pt` | [Pose/Keypoints](../tasks/pose.md) | ✅ | ✅ | ✅ | ✅ |
| YOLOv8-obb | `yolov8n-obb.pt` `yolov8s-obb.pt` `yolov8m-obb.pt` `yolov8l-obb.pt` `yolov8x-obb.pt` | [Oriented Detection](../tasks/obb.md) | ✅ | ✅ | ✅ | ✅ |
| YOLOv8-cls | `yolov8n-cls.pt` `yolov8s-cls.pt` `yolov8m-cls.pt` `yolov8l-cls.pt` `yolov8x-cls.pt` | [Classification](../tasks/classify.md) | ✅ | ✅ | ✅ | ✅ |
This table provides an overview of the YOLOv8 model variants, highlighting their applicability in specific tasks and their compatibility with various operational modes such as Inference, Validation, Training, and Export. It showcases the versatility and robustness of the YOLOv8 series, making them suitable for a variety of applications in [computer vision](https://www.ultralytics.com/glossary/computer-vision-cv).
## Performance Metrics
!!! tip "Performance"
=== "Detection (COCO)"
See [Detection Docs](../tasks/detect.md) for usage examples with these models trained on [COCO](../datasets/detect/coco.md), which include 80 pretrained classes.
| Model | size (pixels) | mAPval 50-95 | Speed CPU ONNX (ms) | Speed A100 TensorRT (ms) | params (M) | FLOPs (B) |
| ------------------------------------------------------------------------------------ | --------------------- | -------------------- | ------------------------------ | ----------------------------------- | ------------------ | ----------------- |
| [YOLOv8n](https://github.com/ultralytics/assets/releases/download/v8.3.0/yolov8n.pt) | 640 | 37.3 | 80.4 | 0.99 | 3.2 | 8.7 |
| [YOLOv8s](https://github.com/ultralytics/assets/releases/download/v8.3.0/yolov8s.pt) | 640 | 44.9 | 128.4 | 1.20 | 11.2 | 28.6 |
| [YOLOv8m](https://github.com/ultralytics/assets/releases/download/v8.3.0/yolov8m.pt) | 640 | 50.2 | 234.7 | 1.83 | 25.9 | 78.9 |
| [YOLOv8l](https://github.com/ultralytics/assets/releases/download/v8.3.0/yolov8l.pt) | 640 | 52.9 | 375.2 | 2.39 | 43.7 | 165.2 |
| [YOLOv8x](https://github.com/ultralytics/assets/releases/download/v8.3.0/yolov8x.pt) | 640 | 53.9 | 479.1 | 3.53 | 68.2 | 257.8 |
=== "Detection (Open Images V7)"
See [Detection Docs](../tasks/detect.md) for usage examples with these models trained on [Open Image V7](../datasets/detect/open-images-v7.md), which include 600 pretrained classes.
| Model | size (pixels) | mAPval 50-95 | Speed CPU ONNX (ms) | Speed A100 TensorRT (ms) | params (M) | FLOPs (B) |
| ----------------------------------------------------------------------------------------- | --------------------- | -------------------- | ------------------------------ | ----------------------------------- | ------------------ | ----------------- |
| [YOLOv8n](https://github.com/ultralytics/assets/releases/download/v8.3.0/yolov8n-oiv7.pt) | 640 | 18.4 | 142.4 | 1.21 | 3.5 | 10.5 |
| [YOLOv8s](https://github.com/ultralytics/assets/releases/download/v8.3.0/yolov8s-oiv7.pt) | 640 | 27.7 | 183.1 | 1.40 | 11.4 | 29.7 |
| [YOLOv8m](https://github.com/ultralytics/assets/releases/download/v8.3.0/yolov8m-oiv7.pt) | 640 | 33.6 | 408.5 | 2.26 | 26.2 | 80.6 |
| [YOLOv8l](https://github.com/ultralytics/assets/releases/download/v8.3.0/yolov8l-oiv7.pt) | 640 | 34.9 | 596.9 | 2.43 | 44.1 | 167.4 |
| [YOLOv8x](https://github.com/ultralytics/assets/releases/download/v8.3.0/yolov8x-oiv7.pt) | 640 | 36.3 | 860.6 | 3.56 | 68.7 | 260.6 |
=== "Segmentation (COCO)"
See [Segmentation Docs](../tasks/segment.md) for usage examples with these models trained on [COCO](../datasets/segment/coco.md), which include 80 pretrained classes.
| Model | size (pixels) | mAPbox 50-95 | mAPmask 50-95 | Speed CPU ONNX (ms) | Speed A100 TensorRT (ms) | params (M) | FLOPs (B) |
| -------------------------------------------------------------------------------------------- | --------------------- | -------------------- | --------------------- | ------------------------------ | ----------------------------------- | ------------------ | ----------------- |
| [YOLOv8n-seg](https://github.com/ultralytics/assets/releases/download/v8.3.0/yolov8n-seg.pt) | 640 | 36.7 | 30.5 | 96.1 | 1.21 | 3.4 | 12.6 |
| [YOLOv8s-seg](https://github.com/ultralytics/assets/releases/download/v8.3.0/yolov8s-seg.pt) | 640 | 44.6 | 36.8 | 155.7 | 1.47 | 11.8 | 42.6 |
| [YOLOv8m-seg](https://github.com/ultralytics/assets/releases/download/v8.3.0/yolov8m-seg.pt) | 640 | 49.9 | 40.8 | 317.0 | 2.18 | 27.3 | 110.2 |
| [YOLOv8l-seg](https://github.com/ultralytics/assets/releases/download/v8.3.0/yolov8l-seg.pt) | 640 | 52.3 | 42.6 | 572.4 | 2.79 | 46.0 | 220.5 |
| [YOLOv8x-seg](https://github.com/ultralytics/assets/releases/download/v8.3.0/yolov8x-seg.pt) | 640 | 53.4 | 43.4 | 712.1 | 4.02 | 71.8 | 344.1 |
=== "Classification (ImageNet)"
See [Classification Docs](../tasks/classify.md) for usage examples with these models trained on [ImageNet](../datasets/classify/imagenet.md), which include 1000 pretrained classes.
| Model | size (pixels) | acc top1 | acc top5 | Speed CPU ONNX (ms) | Speed A100 TensorRT (ms) | params (M) | FLOPs (B) at 224 |
| -------------------------------------------------------------------------------------------- | --------------------- | ---------------- | ---------------- | ------------------------------ | ----------------------------------- | ------------------ | ------------------------ |
| [YOLOv8n-cls](https://github.com/ultralytics/assets/releases/download/v8.3.0/yolov8n-cls.pt) | 224 | 69.0 | 88.3 | 12.9 | 0.31 | 2.7 | 0.5 |
| [YOLOv8s-cls](https://github.com/ultralytics/assets/releases/download/v8.3.0/yolov8s-cls.pt) | 224 | 73.8 | 91.7 | 23.4 | 0.35 | 6.4 | 1.7 |
| [YOLOv8m-cls](https://github.com/ultralytics/assets/releases/download/v8.3.0/yolov8m-cls.pt) | 224 | 76.8 | 93.5 | 85.4 | 0.62 | 17.0 | 5.3 |
| [YOLOv8l-cls](https://github.com/ultralytics/assets/releases/download/v8.3.0/yolov8l-cls.pt) | 224 | 76.8 | 93.5 | 163.0 | 0.87 | 37.5 | 12.3 |
| [YOLOv8x-cls](https://github.com/ultralytics/assets/releases/download/v8.3.0/yolov8x-cls.pt) | 224 | 79.0 | 94.6 | 232.0 | 1.01 | 57.4 | 19.0 |
=== "Pose (COCO)"
See [Pose Estimation Docs](../tasks/pose.md) for usage examples with these models trained on [COCO](../datasets/pose/coco.md), which include 1 pretrained class, 'person'.
| Model | size (pixels) | mAPpose 50-95 | mAPpose 50 | Speed CPU ONNX (ms) | Speed A100 TensorRT (ms) | params (M) | FLOPs (B) |
| ---------------------------------------------------------------------------------------------------- | --------------------- | --------------------- | ------------------ | ------------------------------ | ----------------------------------- | ------------------ | ----------------- |
| [YOLOv8n-pose](https://github.com/ultralytics/assets/releases/download/v8.3.0/yolov8n-pose.pt) | 640 | 50.4 | 80.1 | 131.8 | 1.18 | 3.3 | 9.2 |
| [YOLOv8s-pose](https://github.com/ultralytics/assets/releases/download/v8.3.0/yolov8s-pose.pt) | 640 | 60.0 | 86.2 | 233.2 | 1.42 | 11.6 | 30.2 |
| [YOLOv8m-pose](https://github.com/ultralytics/assets/releases/download/v8.3.0/yolov8m-pose.pt) | 640 | 65.0 | 88.8 | 456.3 | 2.00 | 26.4 | 81.0 |
| [YOLOv8l-pose](https://github.com/ultralytics/assets/releases/download/v8.3.0/yolov8l-pose.pt) | 640 | 67.6 | 90.0 | 784.5 | 2.59 | 44.4 | 168.6 |
| [YOLOv8x-pose](https://github.com/ultralytics/assets/releases/download/v8.3.0/yolov8x-pose.pt) | 640 | 69.2 | 90.2 | 1607.1 | 3.73 | 69.4 | 263.2 |
| [YOLOv8x-pose-p6](https://github.com/ultralytics/assets/releases/download/v8.3.0/yolov8x-pose-p6.pt) | 1280 | 71.6 | 91.2 | 4088.7 | 10.04 | 99.1 | 1066.4 |
=== "OBB (DOTAv1)"
See [Oriented Detection Docs](../tasks/obb.md) for usage examples with these models trained on [DOTAv1](../datasets/obb/dota-v2.md#dota-v10), which include 15 pretrained classes.
| Model | size (pixels) | mAPtest 50 | Speed CPU ONNX (ms) | Speed A100 TensorRT (ms) | params (M) | FLOPs (B) |
|----------------------------------------------------------------------------------------------|-----------------------| -------------------- | -------------------------------- | ------------------------------------- | -------------------- | ----------------- |
| [YOLOv8n-obb](https://github.com/ultralytics/assets/releases/download/v8.3.0/yolov8n-obb.pt) | 1024 | 78.0 | 204.77 | 3.57 | 3.1 | 23.3 |
| [YOLOv8s-obb](https://github.com/ultralytics/assets/releases/download/v8.3.0/yolov8s-obb.pt) | 1024 | 79.5 | 424.88 | 4.07 | 11.4 | 76.3 |
| [YOLOv8m-obb](https://github.com/ultralytics/assets/releases/download/v8.3.0/yolov8m-obb.pt) | 1024 | 80.5 | 763.48 | 7.61 | 26.4 | 208.6 |
| [YOLOv8l-obb](https://github.com/ultralytics/assets/releases/download/v8.3.0/yolov8l-obb.pt) | 1024 | 80.7 | 1278.42 | 11.83 | 44.5 | 433.8 |
| [YOLOv8x-obb](https://github.com/ultralytics/assets/releases/download/v8.3.0/yolov8x-obb.pt) | 1024 | 81.36 | 1759.10 | 13.23 | 69.5 | 676.7 |
## YOLOv8 Usage Examples
This example provides simple YOLOv8 training and inference examples. For full documentation on these and other [modes](../modes/index.md) see the [Predict](../modes/predict.md), [Train](../modes/train.md), [Val](../modes/val.md) and [Export](../modes/export.md) docs pages.
Note the below example is for YOLOv8 [Detect](../tasks/detect.md) models for object detection. For additional supported tasks see the [Segment](../tasks/segment.md), [Classify](../tasks/classify.md), [OBB](../tasks/obb.md) docs and [Pose](../tasks/pose.md) docs.
!!! example
=== "Python"
[PyTorch](https://www.ultralytics.com/glossary/pytorch) pretrained `*.pt` models as well as configuration `*.yaml` files can be passed to the `YOLO()` class to create a model instance in python:
```python
from ultralytics import YOLO
# Load a COCO-pretrained YOLOv8n model
model = YOLO("yolov8n.pt")
# Display model information (optional)
model.info()
# Train the model on the COCO8 example dataset for 100 epochs
results = model.train(data="coco8.yaml", epochs=100, imgsz=640)
# Run inference with the YOLOv8n model on the 'bus.jpg' image
results = model("path/to/bus.jpg")
```
=== "CLI"
CLI commands are available to directly run the models:
```bash
# Load a COCO-pretrained YOLOv8n model and train it on the COCO8 example dataset for 100 epochs
yolo train model=yolov8n.pt data=coco8.yaml epochs=100 imgsz=640
# Load a COCO-pretrained YOLOv8n model and run inference on the 'bus.jpg' image
yolo predict model=yolov8n.pt source=path/to/bus.jpg
```
## Citations and Acknowledgments
!!! tip "Ultralytics YOLOv8 Publication"
Ultralytics has not published a formal research paper for YOLOv8 due to the rapidly evolving nature of the models. We focus on advancing the technology and making it easier to use, rather than producing static documentation. For the most up-to-date information on YOLO architecture, features, and usage, please refer to our [GitHub repository](https://github.com/ultralytics/ultralytics) and [documentation](https://docs.ultralytics.com/).
If you use the YOLOv8 model or any other software from this repository in your work, please cite it using the following format:
!!! quote ""
=== "BibTeX"
```bibtex
@software{yolov8_ultralytics,
author = {Glenn Jocher and Ayush Chaurasia and Jing Qiu},
title = {Ultralytics YOLOv8},
version = {8.0.0},
year = {2023},
url = {https://github.com/ultralytics/ultralytics},
orcid = {0000-0001-5950-6979, 0000-0002-7603-6750, 0000-0003-3783-7069},
license = {AGPL-3.0}
}
```
Please note that the DOI is pending and will be added to the citation once it is available. YOLOv8 models are provided under [AGPL-3.0](https://github.com/ultralytics/ultralytics/blob/main/LICENSE) and [Enterprise](https://www.ultralytics.com/license) licenses.
## FAQ
### What is YOLOv8 and how does it differ from previous YOLO versions?
YOLOv8 is designed to improve real-time object detection performance with advanced features. Unlike earlier versions, YOLOv8 incorporates an **anchor-free split Ultralytics head**, state-of-the-art [backbone](https://www.ultralytics.com/glossary/backbone) and neck architectures, and offers optimized [accuracy](https://www.ultralytics.com/glossary/accuracy)-speed tradeoff, making it ideal for diverse applications. For more details, check the [Overview](#overview) and [Key Features](#key-features-of-yolov8) sections.
### How can I use YOLOv8 for different computer vision tasks?
YOLOv8 supports a wide range of computer vision tasks, including object detection, instance segmentation, pose/keypoints detection, oriented object detection, and classification. Each model variant is optimized for its specific task and compatible with various operational modes like [Inference](../modes/predict.md), [Validation](../modes/val.md), [Training](../modes/train.md), and [Export](../modes/export.md). Refer to the [Supported Tasks and Modes](#supported-tasks-and-modes) section for more information.
### What are the performance metrics for YOLOv8 models?
YOLOv8 models achieve state-of-the-art performance across various benchmarking datasets. For instance, the YOLOv8n model achieves a mAP (mean Average Precision) of 37.3 on the COCO dataset and a speed of 0.99 ms on A100 TensorRT. Detailed performance metrics for each model variant across different tasks and datasets can be found in the [Performance Metrics](#performance-metrics) section.
### How do I train a YOLOv8 model?
Training a YOLOv8 model can be done using either Python or CLI. Below are examples for training a model using a COCO-pretrained YOLOv8 model on the COCO8 dataset for 100 [epochs](https://www.ultralytics.com/glossary/epoch):
!!! example
=== "Python"
```python
from ultralytics import YOLO
# Load a COCO-pretrained YOLOv8n model
model = YOLO("yolov8n.pt")
# Train the model on the COCO8 example dataset for 100 epochs
results = model.train(data="coco8.yaml", epochs=100, imgsz=640)
```
=== "CLI"
```bash
yolo train model=yolov8n.pt data=coco8.yaml epochs=100 imgsz=640
```
For further details, visit the [Training](../modes/train.md) documentation.
### Can I benchmark YOLOv8 models for performance?
Yes, YOLOv8 models can be benchmarked for performance in terms of speed and accuracy across various export formats. You can use PyTorch, ONNX, TensorRT, and more for benchmarking. Below are example commands for benchmarking using Python and CLI:
!!! example
=== "Python"
```python
from ultralytics.utils.benchmarks import benchmark
# Benchmark on GPU
benchmark(model="yolov8n.pt", data="coco8.yaml", imgsz=640, half=False, device=0)
```
=== "CLI"
```bash
yolo benchmark model=yolov8n.pt data='coco8.yaml' imgsz=640 half=False device=0
```
For additional information, check the [Performance Metrics](#performance-metrics) section.
---
# Source: https://raw.githubusercontent.com/ultralytics/ultralytics/main/docs/en/models/yolov9.md
---
comments: true
description: Explore YOLOv9, a leap in real-time object detection, featuring innovations like PGI and GELAN, and achieving new benchmarks in efficiency and accuracy.
keywords: YOLOv9, object detection, real-time, PGI, GELAN, deep learning, MS COCO, AI, neural networks, model efficiency, accuracy, Ultralytics
---
# YOLOv9: A Leap Forward in [Object Detection](https://www.ultralytics.com/glossary/object-detection) Technology
YOLOv9 marks a significant advancement in real-time object detection, introducing groundbreaking techniques such as Programmable Gradient Information (PGI) and the Generalized Efficient Layer Aggregation Network (GELAN). This model demonstrates remarkable improvements in efficiency, accuracy, and adaptability, setting new benchmarks on the MS COCO dataset. The YOLOv9 project, while developed by a separate open-source team, builds upon the robust codebase provided by [Ultralytics](https://www.ultralytics.com/) [YOLOv5](yolov5.md), showcasing the collaborative spirit of the AI research community.
Watch: YOLOv9 Training on Custom Data using Ultralytics | Industrial Package Dataset

## Introduction to YOLOv9
In the quest for optimal real-time object detection, YOLOv9 stands out with its innovative approach to overcoming information loss challenges inherent in deep [neural networks](https://www.ultralytics.com/glossary/neural-network-nn). By integrating PGI and the versatile GELAN architecture, YOLOv9 not only enhances the model's learning capacity but also ensures the retention of crucial information throughout the detection process, thereby achieving exceptional accuracy and performance.
## Core Innovations of YOLOv9
YOLOv9's advancements are deeply rooted in addressing the challenges posed by information loss in deep neural networks. The Information Bottleneck Principle and the innovative use of Reversible Functions are central to its design, ensuring YOLOv9 maintains high efficiency and accuracy.
### Information Bottleneck Principle
The Information Bottleneck Principle reveals a fundamental challenge in deep learning: as data passes through successive layers of a network, the potential for information loss increases. This phenomenon is mathematically represented as:
```python
I(X, X) >= I(X, f_theta(X)) >= I(X, g_phi(f_theta(X)))
```
where `I` denotes mutual information, and `f` and `g` represent transformation functions with parameters `theta` and `phi`, respectively. YOLOv9 counters this challenge by implementing Programmable Gradient Information (PGI), which aids in preserving essential data across the network's depth, ensuring more reliable gradient generation and, consequently, better model convergence and performance.
### Reversible Functions
The concept of Reversible Functions is another cornerstone of YOLOv9's design. A function is deemed reversible if it can be inverted without any loss of information, as expressed by:
```python
X = v_zeta(r_psi(X))
```
with `psi` and `zeta` as parameters for the reversible and its inverse function, respectively. This property is crucial for [deep learning](https://www.ultralytics.com/glossary/deep-learning-dl) architectures, as it allows the network to retain a complete information flow, thereby enabling more accurate updates to the model's parameters. YOLOv9 incorporates reversible functions within its architecture to mitigate the risk of information degradation, especially in deeper layers, ensuring the preservation of critical data for object detection tasks.
### Impact on Lightweight Models
Addressing information loss is particularly vital for lightweight models, which are often under-parameterized and prone to losing significant information during the feedforward process. YOLOv9's architecture, through the use of PGI and reversible functions, ensures that even with a streamlined model, the essential information required for accurate object detection is retained and effectively utilized.
### Programmable Gradient Information (PGI)
PGI is a novel concept introduced in YOLOv9 to combat the information bottleneck problem, ensuring the preservation of essential data across deep network layers. This allows for the generation of reliable gradients, facilitating accurate model updates and improving the overall detection performance.
### Generalized Efficient Layer Aggregation Network (GELAN)
GELAN represents a strategic architectural advancement, enabling YOLOv9 to achieve superior parameter utilization and computational efficiency. Its design allows for flexible integration of various computational blocks, making YOLOv9 adaptable to a wide range of applications without sacrificing speed or accuracy.

## YOLOv9 Benchmarks
Benchmarking in YOLOv9 using [Ultralytics](https://docs.ultralytics.com/modes/benchmark/) involves evaluating the performance of your trained and validated model in real-world scenarios. This process includes:
- **Performance Evaluation:** Assessing the model's speed and accuracy.
- **Export Formats:** Testing the model across different export formats to ensure it meets the necessary standards and performs well in various environments.
- **Framework Support:** Providing a comprehensive framework within Ultralytics YOLOv8 to facilitate these assessments and ensure consistent and reliable results.
By benchmarking, you can ensure that your model not only performs well in controlled testing environments but also maintains high performance in practical, real-world applications.
Watch: How to Benchmark the YOLOv9 Model Using the Ultralytics Python Package
## Performance on MS COCO Dataset
The performance of YOLOv9 on the [COCO dataset](../datasets/detect/coco.md) exemplifies its significant advancements in real-time object detection, setting new benchmarks across various model sizes. Table 1 presents a comprehensive comparison of state-of-the-art real-time object detectors, illustrating YOLOv9's superior efficiency and [accuracy](https://www.ultralytics.com/glossary/accuracy).
!!! tip "Performance"
=== "Detection (COCO)"
| Model | size (pixels) | mAPval 50-95 | mAPval 50 | params (M) | FLOPs (B) |
|---------------------------------------------------------------------------------------|-----------------------|----------------------|-------------------|--------------------|-------------------|
| [YOLOv9t](https://github.com/ultralytics/assets/releases/download/v8.3.0/yolov9t.pt) | 640 | 38.3 | 53.1 | 2.0 | 7.7 |
| [YOLOv9s](https://github.com/ultralytics/assets/releases/download/v8.3.0/yolov9s.pt) | 640 | 46.8 | 63.4 | 7.2 | 26.7 |
| [YOLOv9m](https://github.com/ultralytics/assets/releases/download/v8.3.0/yolov9m.pt) | 640 | 51.4 | 68.1 | 20.1 | 76.8 |
| [YOLOv9c](https://github.com/ultralytics/assets/releases/download/v8.3.0/yolov9c.pt) | 640 | 53.0 | 70.2 | 25.5 | 102.8 |
| [YOLOv9e](https://github.com/ultralytics/assets/releases/download/v8.3.0/yolov9e.pt) | 640 | 55.6 | 72.8 | 58.1 | 192.5 |
=== "Segmentation (COCO)"
| Model | size (pixels) | mAPbox 50-95 | mAPmask 50-95 | params (M) | FLOPs (B) |
|-----------------------------------------------------------------------------------------------|-----------------------|----------------------|-----------------------|--------------------|-------------------|
| [YOLOv9c-seg](https://github.com/ultralytics/assets/releases/download/v8.3.0/yolov9c-seg.pt) | 640 | 52.4 | 42.2 | 27.9 | 159.4 |
| [YOLOv9e-seg](https://github.com/ultralytics/assets/releases/download/v8.3.0/yolov9e-seg.pt) | 640 | 55.1 | 44.3 | 60.5 | 248.4 |
YOLOv9's iterations, ranging from the tiny `t` variant to the extensive `e` model, demonstrate improvements not only in accuracy (mAP metrics) but also in efficiency with a reduced number of parameters and computational needs (FLOPs). This table underscores YOLOv9's ability to deliver high [precision](https://www.ultralytics.com/glossary/precision) while maintaining or reducing the computational overhead compared to prior versions and competing models.
Comparatively, YOLOv9 exhibits remarkable gains:
- **Lightweight Models**: YOLOv9s surpasses the YOLO MS-S in parameter efficiency and computational load while achieving an improvement of 0.4∼0.6% in AP.
- **Medium to Large Models**: YOLOv9m and YOLOv9e show notable advancements in balancing the trade-off between model complexity and detection performance, offering significant reductions in parameters and computations against the backdrop of improved accuracy.
The YOLOv9c model, in particular, highlights the effectiveness of the architecture's optimizations. It operates with 42% fewer parameters and 21% less computational demand than YOLOv7 AF, yet it achieves comparable accuracy, demonstrating YOLOv9's significant efficiency improvements. Furthermore, the YOLOv9e model sets a new standard for large models, with 15% fewer parameters and 25% less computational need than [YOLOv8x](yolov8.md), alongside an incremental 1.7% improvement in AP.
These results showcase YOLOv9's strategic advancements in model design, emphasizing its enhanced efficiency without compromising on the precision essential for real-time object detection tasks. The model not only pushes the boundaries of performance metrics but also emphasizes the importance of computational efficiency, making it a pivotal development in the field of [computer vision](https://www.ultralytics.com/glossary/computer-vision-cv).
## Conclusion
YOLOv9 represents a pivotal development in real-time object detection, offering significant improvements in terms of efficiency, accuracy, and adaptability. By addressing critical challenges through innovative solutions like PGI and GELAN, YOLOv9 sets a new precedent for future research and application in the field. As the AI community continues to evolve, YOLOv9 stands as a testament to the power of collaboration and innovation in driving technological progress.
## Usage Examples
This example provides simple YOLOv9 training and inference examples. For full documentation on these and other [modes](../modes/index.md) see the [Predict](../modes/predict.md), [Train](../modes/train.md), [Val](../modes/val.md) and [Export](../modes/export.md) docs pages.
!!! example
=== "Python"
[PyTorch](https://www.ultralytics.com/glossary/pytorch) pretrained `*.pt` models as well as configuration `*.yaml` files can be passed to the `YOLO()` class to create a model instance in python:
```python
from ultralytics import YOLO
# Build a YOLOv9c model from scratch
model = YOLO("yolov9c.yaml")
# Build a YOLOv9c model from pretrained weight
model = YOLO("yolov9c.pt")
# Display model information (optional)
model.info()
# Train the model on the COCO8 example dataset for 100 epochs
results = model.train(data="coco8.yaml", epochs=100, imgsz=640)
# Run inference with the YOLOv9c model on the 'bus.jpg' image
results = model("path/to/bus.jpg")
```
=== "CLI"
CLI commands are available to directly run the models:
```bash
# Build a YOLOv9c model from scratch and train it on the COCO8 example dataset for 100 epochs
yolo train model=yolov9c.yaml data=coco8.yaml epochs=100 imgsz=640
# Build a YOLOv9c model from scratch and run inference on the 'bus.jpg' image
yolo predict model=yolov9c.yaml source=path/to/bus.jpg
```
## Supported Tasks and Modes
The YOLOv9 series offers a range of models, each optimized for high-performance [Object Detection](../tasks/detect.md). These models cater to varying computational needs and accuracy requirements, making them versatile for a wide array of applications.
| Model | Filenames | Tasks | Inference | Validation | Training | Export |
| ---------- | ---------------------------------------------------------------- | -------------------------------------------- | --------- | ---------- | -------- | ------ |
| YOLOv9 | `yolov9t.pt` `yolov9s.pt` `yolov9m.pt` `yolov9c.pt` `yolov9e.pt` | [Object Detection](../tasks/detect.md) | ✅ | ✅ | ✅ | ✅ |
| YOLOv9-seg | `yolov9c-seg.pt` `yolov9e-seg.pt` | [Instance Segmentation](../tasks/segment.md) | ✅ | ✅ | ✅ | ✅ |
This table provides a detailed overview of the YOLOv9 model variants, highlighting their capabilities in object detection tasks and their compatibility with various operational modes such as [Inference](../modes/predict.md), [Validation](../modes/val.md), [Training](../modes/train.md), and [Export](../modes/export.md). This comprehensive support ensures that users can fully leverage the capabilities of YOLOv9 models in a broad range of object detection scenarios.
!!! note
Training YOLOv9 models will require _more_ resources **and** take longer than the equivalent sized [YOLOv8 model](yolov8.md).
## Citations and Acknowledgments
We would like to acknowledge the YOLOv9 authors for their significant contributions in the field of real-time object detection:
!!! quote ""
=== "BibTeX"
```bibtex
@article{wang2024yolov9,
title={YOLOv9: Learning What You Want to Learn Using Programmable Gradient Information},
author={Wang, Chien-Yao and Liao, Hong-Yuan Mark},
booktitle={arXiv preprint arXiv:2402.13616},
year={2024}
}
```
The original YOLOv9 paper can be found on [arXiv](https://arxiv.org/pdf/2402.13616). The authors have made their work publicly available, and the codebase can be accessed on [GitHub](https://github.com/WongKinYiu/yolov9). We appreciate their efforts in advancing the field and making their work accessible to the broader community.
## FAQ
### What innovations does YOLOv9 introduce for real-time object detection?
YOLOv9 introduces groundbreaking techniques such as Programmable Gradient Information (PGI) and the Generalized Efficient Layer Aggregation Network (GELAN). These innovations address information loss challenges in deep neural networks, ensuring high efficiency, accuracy, and adaptability. PGI preserves essential data across network layers, while GELAN optimizes parameter utilization and computational efficiency. Learn more about [YOLOv9's core innovations](#core-innovations-of-yolov9) that set new benchmarks on the MS COCO dataset.
### How does YOLOv9 perform on the MS COCO dataset compared to other models?
YOLOv9 outperforms state-of-the-art real-time object detectors by achieving higher accuracy and efficiency. On the [COCO dataset](../datasets/detect/coco.md), YOLOv9 models exhibit superior mAP scores across various sizes while maintaining or reducing computational overhead. For instance, YOLOv9c achieves comparable accuracy with 42% fewer parameters and 21% less computational demand than YOLOv7 AF. Explore [performance comparisons](#performance-on-ms-coco-dataset) for detailed metrics.
### How can I train a YOLOv9 model using Python and CLI?
You can train a YOLOv9 model using both Python and CLI commands. For Python, instantiate a model using the `YOLO` class and call the `train` method:
```python
from ultralytics import YOLO
# Build a YOLOv9c model from pretrained weights and train
model = YOLO("yolov9c.pt")
results = model.train(data="coco8.yaml", epochs=100, imgsz=640)
```
For CLI training, execute:
```bash
yolo train model=yolov9c.yaml data=coco8.yaml epochs=100 imgsz=640
```
Learn more about [usage examples](#usage-examples) for training and inference.
### What are the advantages of using Ultralytics YOLOv9 for lightweight models?
YOLOv9 is designed to mitigate information loss, which is particularly important for lightweight models often prone to losing significant information. By integrating Programmable Gradient Information (PGI) and reversible functions, YOLOv9 ensures essential data retention, enhancing the model's accuracy and efficiency. This makes it highly suitable for applications requiring compact models with high performance. For more details, explore the section on [YOLOv9's impact on lightweight models](#impact-on-lightweight-models).
### What tasks and modes does YOLOv9 support?
YOLOv9 supports various tasks including object detection and [instance segmentation](https://www.ultralytics.com/glossary/instance-segmentation). It is compatible with multiple operational modes such as inference, validation, training, and export. This versatility makes YOLOv9 adaptable to diverse real-time computer vision applications. Refer to the [supported tasks and modes](#supported-tasks-and-modes) section for more information.
---
# Source: https://raw.githubusercontent.com/ultralytics/ultralytics/main/docs/en/modes/benchmark.md
---
comments: true
description: Learn how to evaluate your YOLO11 model's performance in real-world scenarios using benchmark mode. Optimize speed, accuracy, and resource allocation across export formats.
keywords: model benchmarking, YOLO11, Ultralytics, performance evaluation, export formats, ONNX, TensorRT, OpenVINO, CoreML, TensorFlow, optimization, mAP50-95, inference time
---
# Model Benchmarking with Ultralytics YOLO
## Benchmark Visualization
!!! tip "Refresh Browser"
You may need to refresh the page to view the graphs correctly due to potential cookie issues.
## Introduction
Once your model is trained and validated, the next logical step is to evaluate its performance in various real-world scenarios. Benchmark mode in Ultralytics YOLO11 serves this purpose by providing a robust framework for assessing the speed and [accuracy](https://www.ultralytics.com/glossary/accuracy) of your model across a range of export formats.
Watch: Benchmark Ultralytics YOLO11 Models | How to Compare Model Performance on Different Hardware?
## Why Is Benchmarking Crucial?
- **Informed Decisions:** Gain insights into the trade-offs between speed and accuracy.
- **Resource Allocation:** Understand how different export formats perform on different hardware.
- **Optimization:** Learn which export format offers the best performance for your specific use case.
- **Cost Efficiency:** Make more efficient use of hardware resources based on benchmark results.
### Key Metrics in Benchmark Mode
- **mAP50-95:** For [object detection](https://www.ultralytics.com/glossary/object-detection), segmentation, and pose estimation.
- **accuracy_top5:** For [image classification](https://www.ultralytics.com/glossary/image-classification).
- **Inference Time:** Time taken for each image in milliseconds.
### Supported Export Formats
- **ONNX:** For optimal CPU performance
- **TensorRT:** For maximal GPU efficiency
- **OpenVINO:** For Intel hardware optimization
- **CoreML, TensorFlow SavedModel, and More:** For diverse deployment needs.
!!! tip
* Export to ONNX or OpenVINO for up to 3x CPU speedup.
* Export to TensorRT for up to 5x GPU speedup.
## Usage Examples
Run YOLO11n benchmarks across all supported export formats (ONNX, TensorRT, etc.). See the Arguments section below for a full list of export options.
!!! example
=== "Python"
```python
from ultralytics.utils.benchmarks import benchmark
# Benchmark on GPU
benchmark(model="yolo11n.pt", data="coco8.yaml", imgsz=640, half=False, device=0)
# Benchmark specific export format
benchmark(model="yolo11n.pt", data="coco8.yaml", imgsz=640, format="onnx")
```
=== "CLI"
```bash
yolo benchmark model=yolo11n.pt data='coco8.yaml' imgsz=640 half=False device=0
# Benchmark specific export format
yolo benchmark model=yolo11n.pt data='coco8.yaml' imgsz=640 format=onnx
```
## Arguments
Arguments such as `model`, `data`, `imgsz`, `half`, `device`, `verbose` and `format` provide users with the flexibility to fine-tune the benchmarks to their specific needs and compare the performance of different export formats with ease.
| Key | Default Value | Description |
| --------- | ------------- | ------------------------------------------------------------------------------------------------------------------------------------------------------------------------------------------------------- |
| `model` | `None` | Specifies the path to the model file. Accepts both `.pt` and `.yaml` formats, e.g., `"yolo11n.pt"` for pretrained models or configuration files. |
| `data` | `None` | Path to a YAML file defining the dataset for benchmarking, typically including paths and settings for [validation data](https://www.ultralytics.com/glossary/validation-data). Example: `"coco8.yaml"`. |
| `imgsz` | `640` | The input image size for the model. Can be a single integer for square images or a tuple `(width, height)` for non-square, e.g., `(640, 480)`. |
| `half` | `False` | Enables FP16 (half-precision) inference, reducing memory usage and possibly increasing speed on compatible hardware. Use `half=True` to enable. |
| `int8` | `False` | Activates INT8 quantization for further optimized performance on supported devices, especially useful for edge devices. Set `int8=True` to use. |
| `device` | `None` | Defines the computation device(s) for benchmarking, such as `"cpu"` or `"cuda:0"`. |
| `verbose` | `False` | Controls the level of detail in logging output. Set `verbose=True` for detailed logs. |
| `format` | `''` | Benchmarks only the specified export format (e.g., `format=onnx`). Leave it blank to test every supported format automatically. |
## Export Formats
Benchmarks will attempt to run automatically on all possible export formats listed below. Alternatively, you can run benchmarks for a specific format by using the `format` argument, which accepts any of the formats mentioned below.
{% include "macros/export-table.md" %}
See full `export` details in the [Export](../modes/export.md) page.
## FAQ
### How do I benchmark my YOLO11 model's performance using Ultralytics?
Ultralytics YOLO11 offers a Benchmark mode to assess your model's performance across different export formats. This mode provides insights into key metrics such as [mean Average Precision](https://www.ultralytics.com/glossary/mean-average-precision-map) (mAP50-95), accuracy, and inference time in milliseconds. To run benchmarks, you can use either Python or CLI commands. For example, to benchmark on a GPU:
!!! example
=== "Python"
```python
from ultralytics.utils.benchmarks import benchmark
# Benchmark on GPU
benchmark(model="yolo11n.pt", data="coco8.yaml", imgsz=640, half=False, device=0)
```
=== "CLI"
```bash
yolo benchmark model=yolo11n.pt data='coco8.yaml' imgsz=640 half=False device=0
```
For more details on benchmark arguments, visit the [Arguments](#arguments) section.
### What are the benefits of exporting YOLO11 models to different formats?
Exporting YOLO11 models to different formats such as [ONNX](https://docs.ultralytics.com/integrations/onnx/), [TensorRT](https://docs.ultralytics.com/integrations/tensorrt/), and [OpenVINO](https://docs.ultralytics.com/integrations/openvino/) allows you to optimize performance based on your deployment environment. For instance:
- **ONNX:** Provides up to 3x CPU speedup.
- **TensorRT:** Offers up to 5x GPU speedup.
- **OpenVINO:** Specifically optimized for Intel hardware.
These formats enhance both the speed and accuracy of your models, making them more efficient for various real-world applications. Visit the [Export](../modes/export.md) page for complete details.
### Why is benchmarking crucial in evaluating YOLO11 models?
Benchmarking your YOLO11 models is essential for several reasons:
- **Informed Decisions:** Understand the trade-offs between speed and accuracy.
- **Resource Allocation:** Gauge the performance across different hardware options.
- **Optimization:** Determine which export format offers the best performance for specific use cases.
- **Cost Efficiency:** Optimize hardware usage based on benchmark results.
Key metrics such as mAP50-95, Top-5 accuracy, and inference time help in making these evaluations. Refer to the [Key Metrics](#key-metrics-in-benchmark-mode) section for more information.
### Which export formats are supported by YOLO11, and what are their advantages?
YOLO11 supports a variety of export formats, each tailored for specific hardware and use cases:
- **ONNX:** Best for CPU performance.
- **TensorRT:** Ideal for GPU efficiency.
- **OpenVINO:** Optimized for Intel hardware.
- **CoreML & [TensorFlow](https://www.ultralytics.com/glossary/tensorflow):** Useful for iOS and general ML applications.
For a complete list of supported formats and their respective advantages, check out the [Supported Export Formats](#supported-export-formats) section.
### What arguments can I use to fine-tune my YOLO11 benchmarks?
When running benchmarks, several arguments can be customized to suit specific needs:
- **model:** Path to the model file (e.g., "yolo11n.pt").
- **data:** Path to a YAML file defining the dataset (e.g., "coco8.yaml").
- **imgsz:** The input image size, either as a single integer or a tuple.
- **half:** Enable FP16 inference for better performance.
- **int8:** Activate INT8 quantization for edge devices.
- **device:** Specify the computation device (e.g., "cpu", "cuda:0").
- **verbose:** Control the level of logging detail.
For a full list of arguments, refer to the [Arguments](#arguments) section.
---
# Source: https://raw.githubusercontent.com/ultralytics/ultralytics/main/docs/en/modes/export.md
---
comments: true
description: Learn how to export your YOLO11 model to various formats like ONNX, TensorRT, and CoreML. Achieve maximum compatibility and performance.
keywords: YOLO11, Model Export, ONNX, TensorRT, CoreML, Ultralytics, AI, Machine Learning, Inference, Deployment
---
# Model Export with Ultralytics YOLO
## Introduction
The ultimate goal of training a model is to deploy it for real-world applications. Export mode in Ultralytics YOLO11 offers a versatile range of options for exporting your trained model to different formats, making it deployable across various platforms and devices. This comprehensive guide aims to walk you through the nuances of model exporting, showcasing how to achieve maximum compatibility and performance.
Watch: How To Export Custom Trained Ultralytics YOLO Model and Run Live Inference on Webcam.
## Why Choose YOLO11's Export Mode?
- **Versatility:** Export to multiple formats including [ONNX](../integrations/onnx.md), [TensorRT](../integrations/tensorrt.md), [CoreML](../integrations/coreml.md), and more.
- **Performance:** Gain up to 5x GPU speedup with TensorRT and 3x CPU speedup with ONNX or [OpenVINO](../integrations/openvino.md).
- **Compatibility:** Make your model universally deployable across numerous hardware and software environments.
- **Ease of Use:** Simple CLI and Python API for quick and straightforward model exporting.
### Key Features of Export Mode
Here are some of the standout functionalities:
- **One-Click Export:** Simple commands for exporting to different formats.
- **Batch Export:** Export batched-inference capable models.
- **Optimized Inference:** Exported models are optimized for quicker inference times.
- **Tutorial Videos:** In-depth guides and tutorials for a smooth exporting experience.
!!! tip
* Export to [ONNX](../integrations/onnx.md) or [OpenVINO](../integrations/openvino.md) for up to 3x CPU speedup.
* Export to [TensorRT](../integrations/tensorrt.md) for up to 5x GPU speedup.
## Usage Examples
Export a YOLO11n model to a different format like ONNX or TensorRT. See the Arguments section below for a full list of export arguments.
!!! example
=== "Python"
```python
from ultralytics import YOLO
# Load a model
model = YOLO("yolo11n.pt") # load an official model
model = YOLO("path/to/best.pt") # load a custom-trained model
# Export the model
model.export(format="onnx")
```
=== "CLI"
```bash
yolo export model=yolo11n.pt format=onnx # export official model
yolo export model=path/to/best.pt format=onnx # export custom-trained model
```
## Arguments
This table details the configurations and options available for exporting YOLO models to different formats. These settings are critical for optimizing the exported model's performance, size, and compatibility across various platforms and environments. Proper configuration ensures that the model is ready for deployment in the intended application with optimal efficiency.
{% include "macros/export-args.md" %}
Adjusting these parameters allows for customization of the export process to fit specific requirements, such as deployment environment, hardware constraints, and performance targets. Selecting the appropriate format and settings is essential for achieving the best balance between model size, speed, and [accuracy](https://www.ultralytics.com/glossary/accuracy).
## Export Formats
Available YOLO11 export formats are in the table below. You can export to any format using the `format` argument, i.e., `format='onnx'` or `format='engine'`. You can predict or validate directly on exported models, i.e., `yolo predict model=yolo11n.onnx`. Usage examples are shown for your model after export completes.
{% include "macros/export-table.md" %}
## FAQ
### How do I export a YOLO11 model to ONNX format?
Exporting a YOLO11 model to ONNX format is straightforward with Ultralytics. It provides both Python and CLI methods for exporting models.
!!! example
=== "Python"
```python
from ultralytics import YOLO
# Load a model
model = YOLO("yolo11n.pt") # load an official model
model = YOLO("path/to/best.pt") # load a custom-trained model
# Export the model
model.export(format="onnx")
```
=== "CLI"
```bash
yolo export model=yolo11n.pt format=onnx # export official model
yolo export model=path/to/best.pt format=onnx # export custom-trained model
```
For more details on the process, including advanced options like handling different input sizes, refer to the [ONNX integration guide](../integrations/onnx.md).
### What are the benefits of using TensorRT for model export?
Using TensorRT for model export offers significant performance improvements. YOLO11 models exported to TensorRT can achieve up to a 5x GPU speedup, making it ideal for real-time inference applications.
- **Versatility:** Optimize models for a specific hardware setup.
- **Speed:** Achieve faster inference through advanced optimizations.
- **Compatibility:** Integrate smoothly with NVIDIA hardware.
To learn more about integrating TensorRT, see the [TensorRT integration guide](../integrations/tensorrt.md).
### How do I enable INT8 quantization when exporting my YOLO11 model?
INT8 quantization is an excellent way to compress the model and speed up inference, especially on edge devices. Here's how you can enable INT8 quantization:
!!! example
=== "Python"
```python
from ultralytics import YOLO
model = YOLO("yolo11n.pt") # Load a model
model.export(format="engine", int8=True)
```
=== "CLI"
```bash
yolo export model=yolo11n.pt format=engine int8=True # export TensorRT model with INT8 quantization
```
INT8 quantization can be applied to various formats, such as [TensorRT](../integrations/tensorrt.md), [OpenVINO](../integrations/openvino.md), and [CoreML](../integrations/coreml.md). For optimal quantization results, provide a representative [dataset](https://docs.ultralytics.com/datasets/) using the `data` parameter.
### Why is dynamic input size important when exporting models?
Dynamic input size allows the exported model to handle varying image dimensions, providing flexibility and optimizing processing efficiency for different use cases. When exporting to formats like [ONNX](../integrations/onnx.md) or [TensorRT](../integrations/tensorrt.md), enabling dynamic input size ensures that the model can adapt to different input shapes seamlessly.
To enable this feature, use the `dynamic=True` flag during export:
!!! example
=== "Python"
```python
from ultralytics import YOLO
model = YOLO("yolo11n.pt")
model.export(format="onnx", dynamic=True)
```
=== "CLI"
```bash
yolo export model=yolo11n.pt format=onnx dynamic=True
```
Dynamic input sizing is particularly useful for applications where input dimensions may vary, such as video processing or when handling images from different sources.
### What are the key export arguments to consider for optimizing model performance?
Understanding and configuring export arguments is crucial for optimizing model performance:
- **`format:`** The target format for the exported model (e.g., `onnx`, `torchscript`, `tensorflow`).
- **`imgsz:`** Desired image size for the model input (e.g., `640` or `(height, width)`).
- **`half:`** Enables FP16 quantization, reducing model size and potentially speeding up inference.
- **`optimize:`** Applies specific optimizations for mobile or constrained environments.
- **`int8:`** Enables INT8 quantization, highly beneficial for [edge AI](https://www.ultralytics.com/blog/deploying-computer-vision-applications-on-edge-ai-devices) deployments.
For deployment on specific hardware platforms, consider using specialized export formats like [TensorRT](../integrations/tensorrt.md) for NVIDIA GPUs, [CoreML](../integrations/coreml.md) for Apple devices, or [Edge TPU](../integrations/edge-tpu.md) for Google Coral devices.
---
# Source: https://raw.githubusercontent.com/ultralytics/ultralytics/main/docs/en/modes/index.md
---
comments: true
description: Discover the diverse modes of Ultralytics YOLO11, including training, validation, prediction, export, tracking, and benchmarking. Maximize model performance and efficiency.
keywords: Ultralytics, YOLO11, machine learning, model training, validation, prediction, export, tracking, benchmarking, object detection
---
# Ultralytics YOLO11 Modes
## Introduction
Ultralytics YOLO11 is not just another object detection model; it's a versatile framework designed to cover the entire lifecycle of [machine learning](https://www.ultralytics.com/glossary/machine-learning-ml) models—from data ingestion and model training to validation, deployment, and real-world tracking. Each mode serves a specific purpose and is engineered to offer you the flexibility and efficiency required for different tasks and use cases.
### Modes at a Glance
Understanding the different **modes** that Ultralytics YOLO11 supports is critical to getting the most out of your models:
- **Train** mode: Fine-tune your model on custom or preloaded datasets.
- **Val** mode: A post-training checkpoint to validate model performance.
- **Predict** mode: Unleash the predictive power of your model on real-world data.
- **Export** mode: Make your [model deployment](https://www.ultralytics.com/glossary/model-deployment)-ready in various formats.
- **Track** mode: Extend your object detection model into real-time tracking applications.
- **Benchmark** mode: Analyze the speed and accuracy of your model in diverse deployment environments.
This comprehensive guide aims to give you an overview and practical insights into each mode, helping you harness the full potential of YOLO11.
## [Train](train.md)
Train mode is used for training a YOLO11 model on a custom dataset. In this mode, the model is trained using the specified dataset and hyperparameters. The training process involves optimizing the model's parameters so that it can accurately predict the classes and locations of objects in an image. Training is essential for creating models that can recognize specific objects relevant to your application.
[Train Examples](train.md){ .md-button }
## [Val](val.md)
Val mode is used for validating a YOLO11 model after it has been trained. In this mode, the model is evaluated on a validation set to measure its accuracy and generalization performance. Validation helps identify potential issues like [overfitting](https://www.ultralytics.com/glossary/overfitting) and provides metrics such as [mean Average Precision](https://www.ultralytics.com/glossary/mean-average-precision-map) (mAP) to quantify model performance. This mode is crucial for tuning hyperparameters and improving overall model effectiveness.
[Val Examples](val.md){ .md-button }
## [Predict](predict.md)
Predict mode is used for making predictions using a trained YOLO11 model on new images or videos. In this mode, the model is loaded from a checkpoint file, and the user can provide images or videos to perform inference. The model identifies and localizes objects in the input media, making it ready for real-world applications. Predict mode is the gateway to applying your trained model to solve practical problems.
[Predict Examples](predict.md){ .md-button }
## [Export](export.md)
Export mode is used for converting a YOLO11 model to formats suitable for deployment across different platforms and devices. This mode transforms your PyTorch model into optimized formats like ONNX, TensorRT, or CoreML, enabling deployment in production environments. Exporting is essential for integrating your model with various software applications or hardware devices, often resulting in significant performance improvements.
[Export Examples](export.md){ .md-button }
## [Track](track.md)
Track mode extends YOLO11's object detection capabilities to track objects across video frames or live streams. This mode is particularly valuable for applications requiring persistent object identification, such as [surveillance systems](https://www.ultralytics.com/blog/shattering-the-surveillance-status-quo-with-vision-ai) or [self-driving cars](https://www.ultralytics.com/solutions/ai-in-automotive). Track mode implements sophisticated algorithms like ByteTrack to maintain object identity across frames, even when objects temporarily disappear from view.
[Track Examples](track.md){ .md-button }
## [Benchmark](benchmark.md)
Benchmark mode profiles the speed and accuracy of various export formats for YOLO11. This mode provides comprehensive metrics on model size, accuracy (mAP50-95 for detection tasks or accuracy_top5 for classification), and inference time across different formats like ONNX, [OpenVINO](https://docs.ultralytics.com/integrations/openvino/), and TensorRT. Benchmarking helps you select the optimal export format based on your specific requirements for speed and accuracy in your deployment environment.
[Benchmark Examples](benchmark.md){ .md-button }
## FAQ
### How do I train a custom [object detection](https://www.ultralytics.com/glossary/object-detection) model with Ultralytics YOLO11?
Training a custom object detection model with Ultralytics YOLO11 involves using the train mode. You need a dataset formatted in YOLO format, containing images and corresponding annotation files. Use the following command to start the training process:
!!! example
=== "Python"
```python
from ultralytics import YOLO
# Load a pretrained YOLO model (you can choose n, s, m, l, or x versions)
model = YOLO("yolo11n.pt")
# Start training on your custom dataset
model.train(data="path/to/dataset.yaml", epochs=100, imgsz=640)
```
=== "CLI"
```bash
# Train a YOLO model from the command line
yolo detect train data=path/to/dataset.yaml model=yolo11n.pt epochs=100 imgsz=640
```
For more detailed instructions, you can refer to the [Ultralytics Train Guide](../modes/train.md).
### What metrics does Ultralytics YOLO11 use to validate the model's performance?
Ultralytics YOLO11 uses various metrics during the validation process to assess model performance. These include:
- **mAP (mean Average Precision)**: This evaluates the accuracy of object detection.
- **IOU (Intersection over Union)**: Measures the overlap between predicted and ground truth bounding boxes.
- **[Precision](https://www.ultralytics.com/glossary/precision) and [Recall](https://www.ultralytics.com/glossary/recall)**: Precision measures the ratio of true positive detections to the total detected positives, while recall measures the ratio of true positive detections to the total actual positives.
You can run the following command to start the validation:
!!! example
=== "Python"
```python
from ultralytics import YOLO
# Load a pretrained or custom YOLO model
model = YOLO("yolo11n.pt")
# Run validation on your dataset
model.val(data="path/to/validation.yaml")
```
=== "CLI"
```bash
# Validate a YOLO model from the command line
yolo val model=yolo11n.pt data=path/to/validation.yaml
```
Refer to the [Validation Guide](../modes/val.md) for further details.
### How can I export my YOLO11 model for deployment?
Ultralytics YOLO11 offers export functionality to convert your trained model into various deployment formats such as ONNX, TensorRT, CoreML, and more. Use the following example to export your model:
!!! example
=== "Python"
```python
from ultralytics import YOLO
# Load your trained YOLO model
model = YOLO("yolo11n.pt")
# Export the model to ONNX format (you can specify other formats as needed)
model.export(format="onnx")
```
=== "CLI"
```bash
# Export a YOLO model to ONNX format from the command line
yolo export model=yolo11n.pt format=onnx
```
Detailed steps for each export format can be found in the [Export Guide](../modes/export.md).
### What is the purpose of the benchmark mode in Ultralytics YOLO11?
Benchmark mode in Ultralytics YOLO11 is used to analyze the speed and [accuracy](https://www.ultralytics.com/glossary/accuracy) of various export formats such as ONNX, TensorRT, and OpenVINO. It provides metrics like model size, `mAP50-95` for object detection, and inference time across different hardware setups, helping you choose the most suitable format for your deployment needs.
!!! example
=== "Python"
```python
from ultralytics.utils.benchmarks import benchmark
# Run benchmark on GPU (device 0)
# You can adjust parameters like model, dataset, image size, and precision as needed
benchmark(model="yolo11n.pt", data="coco8.yaml", imgsz=640, half=False, device=0)
```
=== "CLI"
```bash
# Benchmark a YOLO model from the command line
# Adjust parameters as needed for your specific use case
yolo benchmark model=yolo11n.pt data='coco8.yaml' imgsz=640 half=False device=0
```
For more details, refer to the [Benchmark Guide](../modes/benchmark.md).
### How can I perform real-time object tracking using Ultralytics YOLO11?
Real-time object tracking can be achieved using the track mode in Ultralytics YOLO11. This mode extends object detection capabilities to track objects across video frames or live feeds. Use the following example to enable tracking:
!!! example
=== "Python"
```python
from ultralytics import YOLO
# Load a pretrained YOLO model
model = YOLO("yolo11n.pt")
# Start tracking objects in a video
# You can also use live video streams or webcam input
model.track(source="path/to/video.mp4")
```
=== "CLI"
```bash
# Perform object tracking on a video from the command line
# You can specify different sources like webcam (0) or RTSP streams
yolo track model=yolo11n.pt source=path/to/video.mp4
```
For in-depth instructions, visit the [Track Guide](../modes/track.md).
---
# Source: https://raw.githubusercontent.com/ultralytics/ultralytics/main/docs/en/modes/predict.md
---
comments: true
description: Harness the power of Ultralytics YOLO11 for real-time, high-speed inference on various data sources. Learn about predict mode, key features, and practical applications.
keywords: Ultralytics, YOLO11, model prediction, inference, predict mode, real-time inference, computer vision, machine learning, streaming, high performance
---
# Model Prediction with Ultralytics YOLO
## Introduction
In the world of [machine learning](https://www.ultralytics.com/glossary/machine-learning-ml) and [computer vision](https://www.ultralytics.com/glossary/computer-vision-cv), the process of making sense of visual data is often called inference or prediction. Ultralytics YOLO11 offers a powerful feature known as **predict mode**, tailored for high-performance, real-time inference across a wide range of data sources.
Watch: How to Extract Results from Ultralytics YOLO11 Tasks for Custom Projects 🚀
## Real-world Applications
| Manufacturing | Sports | Safety |
| :-----------------------------------------------: | :--------------------------------------------------: | :-----------------------------------------: |
| ![Vehicle Spare Parts Detection][car spare parts] | ![Football Player Detection][football player detect] | ![People Fall Detection][human fall detect] |
| Vehicle Spare Parts Detection | Football Player Detection | People Fall Detection |
## Why Use Ultralytics YOLO for Inference?
Here's why you should consider YOLO11's predict mode for your various inference needs:
- **Versatility:** Capable of running inference on images, videos, and even live streams.
- **Performance:** Engineered for real-time, high-speed processing without sacrificing [accuracy](https://www.ultralytics.com/glossary/accuracy).
- **Ease of Use:** Intuitive Python and CLI interfaces for rapid deployment and testing.
- **Highly Customizable:** Various settings and parameters to tune the model's inference behavior according to your specific requirements.
### Key Features of Predict Mode
YOLO11's predict mode is designed to be robust and versatile, featuring:
- **Multiple Data Source Compatibility:** Whether your data is in the form of individual images, a collection of images, video files, or real-time video streams, predict mode has you covered.
- **Streaming Mode:** Use the streaming feature to generate a memory-efficient generator of `Results` objects. Enable this by setting `stream=True` in the predictor's call method.
- **Batch Processing:** Process multiple images or video frames in a single batch, further reducing total inference time.
- **Integration Friendly:** Easily integrate with existing data pipelines and other software components, thanks to its flexible API.
Ultralytics YOLO models return either a Python list of `Results` objects or a memory-efficient generator of `Results` objects when `stream=True` is passed to the model during inference:
!!! example "Predict"
=== "Return a list with `stream=False`"
```python
from ultralytics import YOLO
# Load a model
model = YOLO("yolo11n.pt") # pretrained YOLO11n model
# Run batched inference on a list of images
results = model(["image1.jpg", "image2.jpg"]) # return a list of Results objects
# Process results list
for result in results:
boxes = result.boxes # Boxes object for bounding box outputs
masks = result.masks # Masks object for segmentation masks outputs
keypoints = result.keypoints # Keypoints object for pose outputs
probs = result.probs # Probs object for classification outputs
obb = result.obb # Oriented boxes object for OBB outputs
result.show() # display to screen
result.save(filename="result.jpg") # save to disk
```
=== "Return a generator with `stream=True`"
```python
from ultralytics import YOLO
# Load a model
model = YOLO("yolo11n.pt") # pretrained YOLO11n model
# Run batched inference on a list of images
results = model(["image1.jpg", "image2.jpg"], stream=True) # return a generator of Results objects
# Process results generator
for result in results:
boxes = result.boxes # Boxes object for bounding box outputs
masks = result.masks # Masks object for segmentation masks outputs
keypoints = result.keypoints # Keypoints object for pose outputs
probs = result.probs # Probs object for classification outputs
obb = result.obb # Oriented boxes object for OBB outputs
result.show() # display to screen
result.save(filename="result.jpg") # save to disk
```
## Inference Sources
YOLO11 can process different types of input sources for inference, as shown in the table below. The sources include static images, video streams, and various data formats. The table also indicates whether each source can be used in streaming mode with the argument `stream=True` ✅. Streaming mode is beneficial for processing videos or live streams as it creates a generator of results instead of loading all frames into memory.
!!! tip
Use `stream=True` for processing long videos or large datasets to efficiently manage memory. When `stream=False`, the results for all frames or data points are stored in memory, which can quickly add up and cause out-of-memory errors for large inputs. In contrast, `stream=True` utilizes a generator, which only keeps the results of the current frame or data point in memory, significantly reducing memory consumption and preventing out-of-memory issues.
| Source | Example | Type | Notes |
| ----------------------------------------------------- | ------------------------------------------ | --------------- | -------------------------------------------------------------------------------------------- |
| image | `'image.jpg'` | `str` or `Path` | Single image file. |
| URL | `'https://ultralytics.com/images/bus.jpg'` | `str` | URL to an image. |
| screenshot | `'screen'` | `str` | Capture a screenshot. |
| PIL | `Image.open('image.jpg')` | `PIL.Image` | HWC format with RGB channels. |
| [OpenCV](https://www.ultralytics.com/glossary/opencv) | `cv2.imread('image.jpg')` | `np.ndarray` | HWC format with BGR channels `uint8 (0-255)`. |
| numpy | `np.zeros((640,1280,3))` | `np.ndarray` | HWC format with BGR channels `uint8 (0-255)`. |
| torch | `torch.zeros(16,3,320,640)` | `torch.Tensor` | BCHW format with RGB channels `float32 (0.0-1.0)`. |
| CSV | `'sources.csv'` | `str` or `Path` | CSV file containing paths to images, videos, or directories. |
| video ✅ | `'video.mp4'` | `str` or `Path` | Video file in formats like MP4, AVI, etc. |
| directory ✅ | `'path/'` | `str` or `Path` | Path to a directory containing images or videos. |
| glob ✅ | `'path/*.jpg'` | `str` | Glob pattern to match multiple files. Use the `*` character as a wildcard. |
| YouTube ✅ | `'https://youtu.be/LNwODJXcvt4'` | `str` | URL to a YouTube video. |
| stream ✅ | `'rtsp://example.com/media.mp4'` | `str` | URL for streaming protocols such as RTSP, RTMP, TCP, or an IP address. |
| multi-stream ✅ | `'list.streams'` | `str` or `Path` | `*.streams` text file with one stream URL per row, i.e., 8 streams will run at batch-size 8. |
| webcam ✅ | `0` | `int` | Index of the connected camera device to run inference on. |
Below are code examples for using each source type:
!!! example "Prediction sources"
=== "image"
Run inference on an image file.
```python
from ultralytics import YOLO
# Load a pretrained YOLO11n model
model = YOLO("yolo11n.pt")
# Define path to the image file
source = "path/to/image.jpg"
# Run inference on the source
results = model(source) # list of Results objects
```
=== "screenshot"
Run inference on the current screen content as a screenshot.
```python
from ultralytics import YOLO
# Load a pretrained YOLO11n model
model = YOLO("yolo11n.pt")
# Define current screenshot as source
source = "screen"
# Run inference on the source
results = model(source) # list of Results objects
```
=== "URL"
Run inference on an image or video hosted remotely via URL.
```python
from ultralytics import YOLO
# Load a pretrained YOLO11n model
model = YOLO("yolo11n.pt")
# Define remote image or video URL
source = "https://ultralytics.com/images/bus.jpg"
# Run inference on the source
results = model(source) # list of Results objects
```
=== "PIL"
Run inference on an image opened with Python Imaging Library (PIL).
```python
from PIL import Image
from ultralytics import YOLO
# Load a pretrained YOLO11n model
model = YOLO("yolo11n.pt")
# Open an image using PIL
source = Image.open("path/to/image.jpg")
# Run inference on the source
results = model(source) # list of Results objects
```
=== "OpenCV"
Run inference on an image read with OpenCV.
```python
import cv2
from ultralytics import YOLO
# Load a pretrained YOLO11n model
model = YOLO("yolo11n.pt")
# Read an image using OpenCV
source = cv2.imread("path/to/image.jpg")
# Run inference on the source
results = model(source) # list of Results objects
```
=== "numpy"
Run inference on an image represented as a numpy array.
```python
import numpy as np
from ultralytics import YOLO
# Load a pretrained YOLO11n model
model = YOLO("yolo11n.pt")
# Create a random numpy array of HWC shape (640, 640, 3) with values in range [0, 255] and type uint8
source = np.random.randint(low=0, high=255, size=(640, 640, 3), dtype="uint8")
# Run inference on the source
results = model(source) # list of Results objects
```
=== "torch"
Run inference on an image represented as a [PyTorch](https://www.ultralytics.com/glossary/pytorch) tensor.
```python
import torch
from ultralytics import YOLO
# Load a pretrained YOLO11n model
model = YOLO("yolo11n.pt")
# Create a random torch tensor of BCHW shape (1, 3, 640, 640) with values in range [0, 1] and type float32
source = torch.rand(1, 3, 640, 640, dtype=torch.float32)
# Run inference on the source
results = model(source) # list of Results objects
```
=== "CSV"
Run inference on a collection of images, URLs, videos, and directories listed in a CSV file.
```python
from ultralytics import YOLO
# Load a pretrained YOLO11n model
model = YOLO("yolo11n.pt")
# Define a path to a CSV file with images, URLs, videos and directories
source = "path/to/file.csv"
# Run inference on the source
results = model(source) # list of Results objects
```
=== "video"
Run inference on a video file. By using `stream=True`, you can create a generator of Results objects to reduce memory usage.
```python
from ultralytics import YOLO
# Load a pretrained YOLO11n model
model = YOLO("yolo11n.pt")
# Define path to video file
source = "path/to/video.mp4"
# Run inference on the source
results = model(source, stream=True) # generator of Results objects
```
=== "directory"
Run inference on all images and videos in a directory. To include assets in subdirectories, use a glob pattern such as `path/to/dir/**/*`.
```python
from ultralytics import YOLO
# Load a pretrained YOLO11n model
model = YOLO("yolo11n.pt")
# Define path to directory containing images and videos for inference
source = "path/to/dir"
# Run inference on the source
results = model(source, stream=True) # generator of Results objects
```
=== "glob"
Run inference on all images and videos that match a glob expression with `*` characters.
```python
from ultralytics import YOLO
# Load a pretrained YOLO11n model
model = YOLO("yolo11n.pt")
# Define a glob search for all JPG files in a directory
source = "path/to/dir/*.jpg"
# OR define a recursive glob search for all JPG files including subdirectories
source = "path/to/dir/**/*.jpg"
# Run inference on the source
results = model(source, stream=True) # generator of Results objects
```
=== "YouTube"
Run inference on a YouTube video. By using `stream=True`, you can create a generator of Results objects to reduce memory usage for long videos.
```python
from ultralytics import YOLO
# Load a pretrained YOLO11n model
model = YOLO("yolo11n.pt")
# Define source as YouTube video URL
source = "https://youtu.be/LNwODJXcvt4"
# Run inference on the source
results = model(source, stream=True) # generator of Results objects
```
=== "Stream"
Use the stream mode to run inference on live video streams using RTSP, RTMP, TCP, or IP address protocols. If a single stream is provided, the model runs inference with a [batch size](https://www.ultralytics.com/glossary/batch-size) of 1. For multiple streams, a `.streams` text file can be used to perform batched inference, where the batch size is determined by the number of streams provided (e.g., batch-size 8 for 8 streams).
```python
from ultralytics import YOLO
# Load a pretrained YOLO11n model
model = YOLO("yolo11n.pt")
# Single stream with batch-size 1 inference
source = "rtsp://example.com/media.mp4" # RTSP, RTMP, TCP, or IP streaming address
# Run inference on the source
results = model(source, stream=True) # generator of Results objects
```
For single stream usage, the batch size is set to 1 by default, allowing efficient real-time processing of the video feed.
=== "Multi-Stream"
To handle multiple video streams simultaneously, use a `.streams` text file containing one source per line. The model will run batched inference where the batch size equals the number of streams. This setup enables efficient processing of multiple feeds concurrently.
```python
from ultralytics import YOLO
# Load a pretrained YOLO11n model
model = YOLO("yolo11n.pt")
# Multiple streams with batched inference (e.g., batch-size 8 for 8 streams)
source = "path/to/list.streams" # *.streams text file with one streaming address per line
# Run inference on the source
results = model(source, stream=True) # generator of Results objects
```
Example `.streams` text file:
```text
rtsp://example.com/media1.mp4
rtsp://example.com/media2.mp4
rtmp://example2.com/live
tcp://192.168.1.100:554
...
```
Each row in the file represents a streaming source, allowing you to monitor and perform inference on several video streams at once.
=== "Webcam"
You can run inference on a connected camera device by passing the index of that particular camera to `source`.
```python
from ultralytics import YOLO
# Load a pretrained YOLO11n model
model = YOLO("yolo11n.pt")
# Run inference on the source
results = model(source=0, stream=True) # generator of Results objects
```
## Inference Arguments
`model.predict()` accepts multiple arguments that can be passed at inference time to override defaults:
!!! note
Ultralytics uses minimal padding during inference by default (`rect=True`). In this mode, the shorter side of each image is padded only as much as needed to make it divisible by the model's maximum stride, rather than padding it all the way to the full `imgsz`. When running inference on a batch of images, minimal padding only works if all images have identical size. Otherwise, images are uniformly padded to a square shape with both sides equal to `imgsz`.
- `batch=1`, using `rect` padding by default.
- `batch>1`, using `rect` padding only if all the images in one batch have identical size, otherwise using square padding to `imgsz`.
!!! example
=== "Python"
```python
from ultralytics import YOLO
# Load a pretrained YOLO11n model
model = YOLO("yolo11n.pt")
# Run inference on 'bus.jpg' with arguments
model.predict("https://ultralytics.com/images/bus.jpg", save=True, imgsz=320, conf=0.5)
```
=== "CLI"
```bash
# Run inference on 'bus.jpg'
yolo predict model=yolo11n.pt source='https://ultralytics.com/images/bus.jpg'
```
Inference arguments:
{% include "macros/predict-args.md" %}
Visualization arguments:
{% from "macros/visualization-args.md" import param_table %}
{{ param_table() }}
## Image and Video Formats
YOLO11 supports various image and video formats, as specified in [ultralytics/data/utils.py](https://github.com/ultralytics/ultralytics/blob/main/ultralytics/data/utils.py). See the tables below for the valid suffixes and example predict commands.
### Images
The below table contains valid Ultralytics image formats.
!!! note
HEIC images are supported for inference only, not for training.
| Image Suffixes | Example Predict Command | Reference |
| -------------- | -------------------------------- | -------------------------------------------------------------------------- |
| `.bmp` | `yolo predict source=image.bmp` | [Microsoft BMP File Format](https://en.wikipedia.org/wiki/BMP_file_format) |
| `.dng` | `yolo predict source=image.dng` | [Adobe DNG](https://en.wikipedia.org/wiki/Digital_Negative) |
| `.jpeg` | `yolo predict source=image.jpeg` | [JPEG](https://en.wikipedia.org/wiki/JPEG) |
| `.jpg` | `yolo predict source=image.jpg` | [JPEG](https://en.wikipedia.org/wiki/JPEG) |
| `.mpo` | `yolo predict source=image.mpo` | [Multi Picture Object](https://fileinfo.com/extension/mpo) |
| `.png` | `yolo predict source=image.png` | [Portable Network Graphics](https://en.wikipedia.org/wiki/PNG) |
| `.tif` | `yolo predict source=image.tif` | [Tag Image File Format](https://en.wikipedia.org/wiki/TIFF) |
| `.tiff` | `yolo predict source=image.tiff` | [Tag Image File Format](https://en.wikipedia.org/wiki/TIFF) |
| `.webp` | `yolo predict source=image.webp` | [WebP](https://en.wikipedia.org/wiki/WebP) |
| `.pfm` | `yolo predict source=image.pfm` | [Portable FloatMap](https://en.wikipedia.org/wiki/Netpbm#File_formats) |
| `.HEIC` | `yolo predict source=image.HEIC` | [High Efficiency Image Format](https://en.wikipedia.org/wiki/HEIF) |
### Videos
The below table contains valid Ultralytics video formats.
| Video Suffixes | Example Predict Command | Reference |
| -------------- | -------------------------------- | -------------------------------------------------------------------------------- |
| `.asf` | `yolo predict source=video.asf` | [Advanced Systems Format](https://en.wikipedia.org/wiki/Advanced_Systems_Format) |
| `.avi` | `yolo predict source=video.avi` | [Audio Video Interleave](https://en.wikipedia.org/wiki/Audio_Video_Interleave) |
| `.gif` | `yolo predict source=video.gif` | [Graphics Interchange Format](https://en.wikipedia.org/wiki/GIF) |
| `.m4v` | `yolo predict source=video.m4v` | [MPEG-4 Part 14](https://en.wikipedia.org/wiki/M4V) |
| `.mkv` | `yolo predict source=video.mkv` | [Matroska](https://en.wikipedia.org/wiki/Matroska) |
| `.mov` | `yolo predict source=video.mov` | [QuickTime File Format](https://en.wikipedia.org/wiki/QuickTime_File_Format) |
| `.mp4` | `yolo predict source=video.mp4` | [MPEG-4 Part 14 - Wikipedia](https://en.wikipedia.org/wiki/MPEG-4_Part_14) |
| `.mpeg` | `yolo predict source=video.mpeg` | [MPEG-1 Part 2](https://en.wikipedia.org/wiki/MPEG-1) |
| `.mpg` | `yolo predict source=video.mpg` | [MPEG-1 Part 2](https://en.wikipedia.org/wiki/MPEG-1) |
| `.ts` | `yolo predict source=video.ts` | [MPEG Transport Stream](https://en.wikipedia.org/wiki/MPEG_transport_stream) |
| `.wmv` | `yolo predict source=video.wmv` | [Windows Media Video](https://en.wikipedia.org/wiki/Windows_Media_Video) |
| `.webm` | `yolo predict source=video.webm` | [WebM Project](https://en.wikipedia.org/wiki/WebM) |
## Working with Results
All Ultralytics `predict()` calls will return a list of `Results` objects:
!!! example "Results"
```python
from ultralytics import YOLO
# Load a pretrained YOLO11n model
model = YOLO("yolo11n.pt")
# Run inference on an image
results = model("https://ultralytics.com/images/bus.jpg")
results = model(
[
"https://ultralytics.com/images/bus.jpg",
"https://ultralytics.com/images/zidane.jpg",
]
) # batch inference
```
`Results` objects have the following attributes:
| Attribute | Type | Description |
| ------------ | --------------------- | ---------------------------------------------------------------------------------------- |
| `orig_img` | `np.ndarray` | The original image as a numpy array. |
| `orig_shape` | `tuple` | The original image shape in (height, width) format. |
| `boxes` | `Boxes, optional` | A Boxes object containing the detection bounding boxes. |
| `masks` | `Masks, optional` | A Masks object containing the detection masks. |
| `probs` | `Probs, optional` | A Probs object containing probabilities of each class for classification task. |
| `keypoints` | `Keypoints, optional` | A Keypoints object containing detected keypoints for each object. |
| `obb` | `OBB, optional` | An OBB object containing oriented bounding boxes. |
| `speed` | `dict` | A dictionary of preprocess, inference, and postprocess speeds in milliseconds per image. |
| `names` | `dict` | A dictionary mapping class indices to class names. |
| `path` | `str` | The path to the image file. |
| `save_dir` | `str, optional` | Directory to save results. |
`Results` objects have the following methods:
| Method | Return Type | Description |
| ------------- | ---------------------- | ----------------------------------------------------------------------------------------- |
| `update()` | `None` | Updates the Results object with new detection data (boxes, masks, probs, obb, keypoints). |
| `cpu()` | `Results` | Returns a copy of the Results object with all tensors moved to CPU memory. |
| `numpy()` | `Results` | Returns a copy of the Results object with all tensors converted to numpy arrays. |
| `cuda()` | `Results` | Returns a copy of the Results object with all tensors moved to GPU memory. |
| `to()` | `Results` | Returns a copy of the Results object with tensors moved to specified device and dtype. |
| `new()` | `Results` | Creates a new Results object with the same image, path, names, and speed attributes. |
| `plot()` | `np.ndarray` | Plots detection results on an input RGB image and returns the annotated image. |
| `show()` | `None` | Displays the image with annotated inference results. |
| `save()` | `str` | Saves annotated inference results image to file and returns the filename. |
| `verbose()` | `str` | Returns a log string for each task, detailing detection and classification outcomes. |
| `save_txt()` | `str` | Saves detection results to a text file and returns the path to the saved file. |
| `save_crop()` | `None` | Saves cropped detection images to specified directory. |
| `summary()` | `List[Dict[str, Any]]` | Converts inference results to a summarized dictionary with optional normalization. |
| `to_df()` | `DataFrame` | Converts detection results to a Polars DataFrame. |
| `to_csv()` | `str` | Converts detection results to CSV format. |
| `to_json()` | `str` | Converts detection results to JSON format. |
For more details see the [`Results` class documentation](../reference/engine/results.md).
### Boxes
`Boxes` object can be used to index, manipulate, and convert bounding boxes to different formats.
!!! example "Boxes"
```python
from ultralytics import YOLO
# Load a pretrained YOLO11n model
model = YOLO("yolo11n.pt")
# Run inference on an image
results = model("https://ultralytics.com/images/bus.jpg") # results list
# View results
for r in results:
print(r.boxes) # print the Boxes object containing the detection bounding boxes
```
Here is a table for the `Boxes` class methods and properties, including their name, type, and description:
| Name | Type | Description |
| --------- | ------------------------- | ------------------------------------------------------------------ |
| `cpu()` | Method | Move the object to CPU memory. |
| `numpy()` | Method | Convert the object to a numpy array. |
| `cuda()` | Method | Move the object to CUDA memory. |
| `to()` | Method | Move the object to the specified device. |
| `xyxy` | Property (`torch.Tensor`) | Return the boxes in xyxy format. |
| `conf` | Property (`torch.Tensor`) | Return the confidence values of the boxes. |
| `cls` | Property (`torch.Tensor`) | Return the class values of the boxes. |
| `id` | Property (`torch.Tensor`) | Return the track IDs of the boxes (if available). |
| `xywh` | Property (`torch.Tensor`) | Return the boxes in xywh format. |
| `xyxyn` | Property (`torch.Tensor`) | Return the boxes in xyxy format normalized by original image size. |
| `xywhn` | Property (`torch.Tensor`) | Return the boxes in xywh format normalized by original image size. |
For more details see the [`Boxes` class documentation](../reference/engine/results.md#ultralytics.engine.results.Boxes).
### Masks
`Masks` object can be used index, manipulate and convert masks to segments.
!!! example "Masks"
```python
from ultralytics import YOLO
# Load a pretrained YOLO11n-seg Segment model
model = YOLO("yolo11n-seg.pt")
# Run inference on an image
results = model("https://ultralytics.com/images/bus.jpg") # results list
# View results
for r in results:
print(r.masks) # print the Masks object containing the detected instance masks
```
Here is a table for the `Masks` class methods and properties, including their name, type, and description:
| Name | Type | Description |
| --------- | ------------------------- | --------------------------------------------------------------- |
| `cpu()` | Method | Returns the masks tensor on CPU memory. |
| `numpy()` | Method | Returns the masks tensor as a numpy array. |
| `cuda()` | Method | Returns the masks tensor on GPU memory. |
| `to()` | Method | Returns the masks tensor with the specified device and dtype. |
| `xyn` | Property (`torch.Tensor`) | A list of normalized segments represented as tensors. |
| `xy` | Property (`torch.Tensor`) | A list of segments in pixel coordinates represented as tensors. |
For more details see the [`Masks` class documentation](../reference/engine/results.md#ultralytics.engine.results.Masks).
### Keypoints
`Keypoints` object can be used index, manipulate and normalize coordinates.
!!! example "Keypoints"
```python
from ultralytics import YOLO
# Load a pretrained YOLO11n-pose Pose model
model = YOLO("yolo11n-pose.pt")
# Run inference on an image
results = model("https://ultralytics.com/images/bus.jpg") # results list
# View results
for r in results:
print(r.keypoints) # print the Keypoints object containing the detected keypoints
```
Here is a table for the `Keypoints` class methods and properties, including their name, type, and description:
| Name | Type | Description |
| --------- | ------------------------- | ----------------------------------------------------------------- |
| `cpu()` | Method | Returns the keypoints tensor on CPU memory. |
| `numpy()` | Method | Returns the keypoints tensor as a numpy array. |
| `cuda()` | Method | Returns the keypoints tensor on GPU memory. |
| `to()` | Method | Returns the keypoints tensor with the specified device and dtype. |
| `xyn` | Property (`torch.Tensor`) | A list of normalized keypoints represented as tensors. |
| `xy` | Property (`torch.Tensor`) | A list of keypoints in pixel coordinates represented as tensors. |
| `conf` | Property (`torch.Tensor`) | Returns confidence values of keypoints if available, else None. |
For more details see the [`Keypoints` class documentation](../reference/engine/results.md#ultralytics.engine.results.Keypoints).
### Probs
`Probs` object can be used index, get `top1` and `top5` indices and scores of classification.
!!! example "Probs"
```python
from ultralytics import YOLO
# Load a pretrained YOLO11n-cls Classify model
model = YOLO("yolo11n-cls.pt")
# Run inference on an image
results = model("https://ultralytics.com/images/bus.jpg") # results list
# View results
for r in results:
print(r.probs) # print the Probs object containing the detected class probabilities
```
Here's a table summarizing the methods and properties for the `Probs` class:
| Name | Type | Description |
| ---------- | ------------------------- | ----------------------------------------------------------------------- |
| `cpu()` | Method | Returns a copy of the probs tensor on CPU memory. |
| `numpy()` | Method | Returns a copy of the probs tensor as a numpy array. |
| `cuda()` | Method | Returns a copy of the probs tensor on GPU memory. |
| `to()` | Method | Returns a copy of the probs tensor with the specified device and dtype. |
| `top1` | Property (`int`) | Index of the top 1 class. |
| `top5` | Property (`list[int]`) | Indices of the top 5 classes. |
| `top1conf` | Property (`torch.Tensor`) | Confidence of the top 1 class. |
| `top5conf` | Property (`torch.Tensor`) | Confidences of the top 5 classes. |
For more details see the [`Probs` class documentation](../reference/engine/results.md#ultralytics.engine.results.Probs).
### OBB
`OBB` object can be used to index, manipulate, and convert oriented bounding boxes to different formats.
!!! example "OBB"
```python
from ultralytics import YOLO
# Load a pretrained YOLO11n model
model = YOLO("yolo11n-obb.pt")
# Run inference on an image
results = model("https://ultralytics.com/images/boats.jpg") # results list
# View results
for r in results:
print(r.obb) # print the OBB object containing the oriented detection bounding boxes
```
Here is a table for the `OBB` class methods and properties, including their name, type, and description:
| Name | Type | Description |
| ----------- | ------------------------- | --------------------------------------------------------------------- |
| `cpu()` | Method | Move the object to CPU memory. |
| `numpy()` | Method | Convert the object to a numpy array. |
| `cuda()` | Method | Move the object to CUDA memory. |
| `to()` | Method | Move the object to the specified device. |
| `conf` | Property (`torch.Tensor`) | Return the confidence values of the boxes. |
| `cls` | Property (`torch.Tensor`) | Return the class values of the boxes. |
| `id` | Property (`torch.Tensor`) | Return the track IDs of the boxes (if available). |
| `xyxy` | Property (`torch.Tensor`) | Return the horizontal boxes in xyxy format. |
| `xywhr` | Property (`torch.Tensor`) | Return the rotated boxes in xywhr format. |
| `xyxyxyxy` | Property (`torch.Tensor`) | Return the rotated boxes in xyxyxyxy format. |
| `xyxyxyxyn` | Property (`torch.Tensor`) | Return the rotated boxes in xyxyxyxy format normalized by image size. |
For more details see the [`OBB` class documentation](../reference/engine/results.md#ultralytics.engine.results.OBB).
## Plotting Results
The `plot()` method in `Results` objects facilitates visualization of predictions by overlaying detected objects (such as bounding boxes, masks, keypoints, and probabilities) onto the original image. This method returns the annotated image as a NumPy array, allowing for easy display or saving.
!!! example "Plotting"
```python
from PIL import Image
from ultralytics import YOLO
# Load a pretrained YOLO11n model
model = YOLO("yolo11n.pt")
# Run inference on 'bus.jpg'
results = model(["https://ultralytics.com/images/bus.jpg", "https://ultralytics.com/images/zidane.jpg"]) # results list
# Visualize the results
for i, r in enumerate(results):
# Plot results image
im_bgr = r.plot() # BGR-order numpy array
im_rgb = Image.fromarray(im_bgr[..., ::-1]) # RGB-order PIL image
# Show results to screen (in supported environments)
r.show()
# Save results to disk
r.save(filename=f"results{i}.jpg")
```
### `plot()` Method Parameters
The `plot()` method supports various arguments to customize the output:
| Argument | Type | Description | Default |
| ------------ | ---------------------- | -------------------------------------------------------------------------- | ----------------- |
| `conf` | `bool` | Include detection confidence scores. | `True` |
| `line_width` | `float` | Line width of bounding boxes. Scales with image size if `None`. | `None` |
| `font_size` | `float` | Text font size. Scales with image size if `None`. | `None` |
| `font` | `str` | Font name for text annotations. | `'Arial.ttf'` |
| `pil` | `bool` | Return image as a PIL Image object. | `False` |
| `img` | `np.ndarray` | Alternative image for plotting. Uses the original image if `None`. | `None` |
| `im_gpu` | `torch.Tensor` | GPU-accelerated image for faster mask plotting. Shape: (1, 3, 640, 640). | `None` |
| `kpt_radius` | `int` | Radius for drawn keypoints. | `5` |
| `kpt_line` | `bool` | Connect keypoints with lines. | `True` |
| `labels` | `bool` | Include class labels in annotations. | `True` |
| `boxes` | `bool` | Overlay bounding boxes on the image. | `True` |
| `masks` | `bool` | Overlay masks on the image. | `True` |
| `probs` | `bool` | Include classification probabilities. | `True` |
| `show` | `bool` | Display the annotated image directly using the default image viewer. | `False` |
| `save` | `bool` | Save the annotated image to a file specified by `filename`. | `False` |
| `filename` | `str` | Path and name of the file to save the annotated image if `save` is `True`. | `None` |
| `color_mode` | `str` | Specify the color mode, e.g., 'instance' or 'class'. | `'class'` |
| `txt_color` | `tuple[int, int, int]` | RGB text color for bounding box and image classification label. | `(255, 255, 255)` |
## Thread-Safe Inference
Ensuring thread safety during inference is crucial when you are running multiple YOLO models in parallel across different threads. Thread-safe inference guarantees that each thread's predictions are isolated and do not interfere with one another, avoiding race conditions and ensuring consistent and reliable outputs.
When using YOLO models in a multi-threaded application, it's important to instantiate separate model objects for each thread or employ thread-local storage to prevent conflicts:
!!! example "Thread-Safe Inference"
Instantiate a single model inside each thread for thread-safe inference:
```python
from threading import Thread
from ultralytics import YOLO
def thread_safe_predict(model, image_path):
"""Performs thread-safe prediction on an image using a locally instantiated YOLO model."""
model = YOLO(model)
results = model.predict(image_path)
# Process results
# Starting threads that each have their own model instance
Thread(target=thread_safe_predict, args=("yolo11n.pt", "image1.jpg")).start()
Thread(target=thread_safe_predict, args=("yolo11n.pt", "image2.jpg")).start()
```
For an in-depth look at thread-safe inference with YOLO models and step-by-step instructions, please refer to our [YOLO Thread-Safe Inference Guide](../guides/yolo-thread-safe-inference.md). This guide will provide you with all the necessary information to avoid common pitfalls and ensure that your multi-threaded inference runs smoothly.
## Streaming Source `for`-loop
Here's a Python script using OpenCV (`cv2`) and YOLO to run inference on video frames. This script assumes you have already installed the necessary packages (`opencv-python` and `ultralytics`).
!!! example "Streaming for-loop"
```python
import cv2
from ultralytics import YOLO
# Load the YOLO model
model = YOLO("yolo11n.pt")
# Open the video file
video_path = "path/to/your/video/file.mp4"
cap = cv2.VideoCapture(video_path)
# Loop through the video frames
while cap.isOpened():
# Read a frame from the video
success, frame = cap.read()
if success:
# Run YOLO inference on the frame
results = model(frame)
# Visualize the results on the frame
annotated_frame = results[0].plot()
# Display the annotated frame
cv2.imshow("YOLO Inference", annotated_frame)
# Break the loop if 'q' is pressed
if cv2.waitKey(1) & 0xFF == ord("q"):
break
else:
# Break the loop if the end of the video is reached
break
# Release the video capture object and close the display window
cap.release()
cv2.destroyAllWindows()
```
This script will run predictions on each frame of the video, visualize the results, and display them in a window. The loop can be exited by pressing 'q'.
[car spare parts]: https://github.com/ultralytics/docs/releases/download/0/car-parts-detection-for-predict.avif
[football player detect]: https://github.com/ultralytics/docs/releases/download/0/football-players-detection.avif
[human fall detect]: https://github.com/ultralytics/docs/releases/download/0/person-fall-detection.avif
## FAQ
### What is Ultralytics YOLO and its predict mode for real-time inference?
Ultralytics YOLO is a state-of-the-art model for real-time [object detection](https://www.ultralytics.com/glossary/object-detection), segmentation, and classification. Its **predict mode** allows users to perform high-speed inference on various data sources such as images, videos, and live streams. Designed for performance and versatility, it also offers batch processing and streaming modes. For more details on its features, check out the [Ultralytics YOLO predict mode](#key-features-of-predict-mode).
### How can I run inference using Ultralytics YOLO on different data sources?
Ultralytics YOLO can process a wide range of data sources, including individual images, videos, directories, URLs, and streams. You can specify the data source in the `model.predict()` call. For example, use `'image.jpg'` for a local image or `'https://ultralytics.com/images/bus.jpg'` for a URL. Check out the detailed examples for various [inference sources](#inference-sources) in the documentation.
### How do I optimize YOLO inference speed and memory usage?
To optimize inference speed and manage memory efficiently, you can use the streaming mode by setting `stream=True` in the predictor's call method. The streaming mode generates a memory-efficient generator of `Results` objects instead of loading all frames into memory. For processing long videos or large datasets, streaming mode is particularly useful. Learn more about [streaming mode](#key-features-of-predict-mode).
### What inference arguments does Ultralytics YOLO support?
The `model.predict()` method in YOLO supports various arguments such as `conf`, `iou`, `imgsz`, `device`, and more. These arguments allow you to customize the inference process, setting parameters like confidence thresholds, image size, and the device used for computation. Detailed descriptions of these arguments can be found in the [inference arguments](#inference-arguments) section.
### How can I visualize and save the results of YOLO predictions?
After running inference with YOLO, the `Results` objects contain methods for displaying and saving annotated images. You can use methods like `result.show()` and `result.save(filename="result.jpg")` to visualize and save the results. For a comprehensive list of these methods, refer to the [working with results](#working-with-results) section.
---
# Source: https://raw.githubusercontent.com/ultralytics/ultralytics/main/docs/en/modes/track.md
---
comments: true
description: Discover efficient, flexible, and customizable multi-object tracking with Ultralytics YOLO. Learn to track real-time video streams with ease.
keywords: multi-object tracking, Ultralytics YOLO, video analytics, real-time tracking, object detection, AI, machine learning
---
# Multi-Object Tracking with Ultralytics YOLO
Object tracking in the realm of video analytics is a critical task that not only identifies the location and class of objects within the frame but also maintains a unique ID for each detected object as the video progresses. The applications are limitless—ranging from surveillance and security to real-time sports analytics.
## Why Choose Ultralytics YOLO for Object Tracking?
The output from Ultralytics trackers is consistent with standard [object detection](https://www.ultralytics.com/glossary/object-detection) but has the added value of object IDs. This makes it easy to track objects in video streams and perform subsequent analytics. Here's why you should consider using Ultralytics YOLO for your object tracking needs:
- **Efficiency:** Process video streams in real-time without compromising [accuracy](https://www.ultralytics.com/glossary/accuracy).
- **Flexibility:** Supports multiple tracking algorithms and configurations.
- **Ease of Use:** Simple Python API and CLI options for quick integration and deployment.
- **Customizability:** Easy to use with custom-trained YOLO models, allowing integration into domain-specific applications.
Watch: Object Detection and Tracking with Ultralytics YOLO.
## Real-world Applications
| Transportation | Retail | Aquaculture |
| :--------------------------------: | :------------------------------: | :--------------------------: |
| ![Vehicle Tracking][vehicle track] | ![People Tracking][people track] | ![Fish Tracking][fish track] |
| Vehicle Tracking | People Tracking | Fish Tracking |
## Features at a Glance
Ultralytics YOLO extends its object detection features to provide robust and versatile object tracking:
- **Real-Time Tracking:** Seamlessly track objects in high-frame-rate videos.
- **Multiple Tracker Support:** Choose from a variety of established tracking algorithms.
- **Customizable Tracker Configurations:** Tailor the tracking algorithm to meet specific requirements by adjusting various parameters.
## Available Trackers
Ultralytics YOLO supports the following tracking algorithms. They can be enabled by passing the relevant YAML configuration file such as `tracker=tracker_type.yaml`:
- [BoT-SORT](https://github.com/NirAharon/BoT-SORT) - Use `botsort.yaml` to enable this tracker.
- [ByteTrack](https://github.com/FoundationVision/ByteTrack) - Use `bytetrack.yaml` to enable this tracker.
The default tracker is BoT-SORT.
## Tracking
To run the tracker on video streams, use a trained Detect, Segment, or Pose model such as YOLO11n, YOLO11n-seg, or YOLO11n-pose.
!!! example
=== "Python"
```python
from ultralytics import YOLO
# Load an official or custom model
model = YOLO("yolo11n.pt") # Load an official Detect model
model = YOLO("yolo11n-seg.pt") # Load an official Segment model
model = YOLO("yolo11n-pose.pt") # Load an official Pose model
model = YOLO("path/to/best.pt") # Load a custom-trained model
# Perform tracking with the model
results = model.track("https://youtu.be/LNwODJXcvt4", show=True) # Tracking with default tracker
results = model.track("https://youtu.be/LNwODJXcvt4", show=True, tracker="bytetrack.yaml") # with ByteTrack
```
=== "CLI"
```bash
# Perform tracking with various models using the command line interface
yolo track model=yolo11n.pt source="https://youtu.be/LNwODJXcvt4" # Official Detect model
yolo track model=yolo11n-seg.pt source="https://youtu.be/LNwODJXcvt4" # Official Segment model
yolo track model=yolo11n-pose.pt source="https://youtu.be/LNwODJXcvt4" # Official Pose model
yolo track model=path/to/best.pt source="https://youtu.be/LNwODJXcvt4" # Custom trained model
# Track using ByteTrack tracker
yolo track model=path/to/best.pt source="https://youtu.be/LNwODJXcvt4" tracker="bytetrack.yaml"
```
As can be seen in the above usage, tracking is available for all Detect, Segment, and Pose models run on videos or streaming sources.
## Configuration
### Tracking Arguments
Tracking configuration shares properties with Predict mode, such as `conf`, `iou`, and `show`. For further configurations, refer to the [Predict](../modes/predict.md#inference-arguments) model page.
!!! example
=== "Python"
```python
from ultralytics import YOLO
# Configure the tracking parameters and run the tracker
model = YOLO("yolo11n.pt")
results = model.track(source="https://youtu.be/LNwODJXcvt4", conf=0.3, iou=0.5, show=True)
```
=== "CLI"
```bash
# Configure tracking parameters and run the tracker using the command line interface
yolo track model=yolo11n.pt source="https://youtu.be/LNwODJXcvt4" conf=0.3, iou=0.5 show
```
### Tracker Selection
Ultralytics also allows you to use a modified tracker configuration file. To do this, simply make a copy of a tracker config file (for example, `custom_tracker.yaml`) from [ultralytics/cfg/trackers](https://github.com/ultralytics/ultralytics/tree/main/ultralytics/cfg/trackers) and modify any configurations (except the `tracker_type`) as per your needs.
!!! example
=== "Python"
```python
from ultralytics import YOLO
# Load the model and run the tracker with a custom configuration file
model = YOLO("yolo11n.pt")
results = model.track(source="https://youtu.be/LNwODJXcvt4", tracker="custom_tracker.yaml")
```
=== "CLI"
```bash
# Load the model and run the tracker with a custom configuration file using the command line interface
yolo track model=yolo11n.pt source="https://youtu.be/LNwODJXcvt4" tracker='custom_tracker.yaml'
```
Refer to [Tracker Arguments](#tracker-arguments) section for a detailed description of each parameter.
### Tracker Arguments
Some tracking behaviors can be fine-tuned by editing the YAML configuration files specific to each tracking algorithm. These files define parameters like thresholds, buffers, and matching logic:
- [`botsort.yaml`](https://github.com/ultralytics/ultralytics/blob/main/ultralytics/cfg/trackers/botsort.yaml)
- [`bytetrack.yaml`](https://github.com/ultralytics/ultralytics/blob/main/ultralytics/cfg/trackers/bytetrack.yaml)
The following table provides a description of each parameter:
!!! warning "Tracker Threshold Information"
If a detection's confidence score falls below [`track_high_thresh`](https://github.com/ultralytics/ultralytics/blob/main/ultralytics/cfg/trackers/bytetrack.yaml#L5), the tracker will not update that object, resulting in no active tracks.
| **Parameter** | **Valid Values or Ranges** | **Description** |
| ------------------- | --------------------------------------------- | ------------------------------------------------------------------------------------------------------------------------------------------------------ |
| `tracker_type` | `botsort`, `bytetrack` | Specifies the tracker type. Options are `botsort` or `bytetrack`. |
| `track_high_thresh` | `0.0-1.0` | Threshold for the first association during tracking used. Affects how confidently a detection is matched to an existing track. |
| `track_low_thresh` | `0.0-1.0` | Threshold for the second association during tracking. Used when the first association fails, with more lenient criteria. |
| `new_track_thresh` | `0.0-1.0` | Threshold to initialize a new track if the detection does not match any existing tracks. Controls when a new object is considered to appear. |
| `track_buffer` | `>=0` | Buffer used to indicate the number of frames lost tracks should be kept alive before getting removed. Higher value means more tolerance for occlusion. |
| `match_thresh` | `0.0-1.0` | Threshold for matching tracks. Higher values makes the matching more lenient. |
| `fuse_score` | `True`, `False` | Determines whether to fuse confidence scores with IoU distances before matching. Helps balance spatial and confidence information when associating. |
| `gmc_method` | `orb`, `sift`, `ecc`, `sparseOptFlow`, `None` | Method used for global motion compensation. Helps account for camera movement to improve tracking. |
| `proximity_thresh` | `0.0-1.0` | Minimum IoU required for a valid match with ReID (Re-identification). Ensures spatial closeness before using appearance cues. |
| `appearance_thresh` | `0.0-1.0` | Minimum appearance similarity required for ReID. Sets how visually similar two detections must be to be linked. |
| `with_reid` | `True`, `False` | Indicates whether to use ReID. Enables appearance-based matching for better tracking across occlusions. Only supported by BoTSORT. |
| `model` | `auto`, `yolo11[nsmlx]-cls.pt` | Specifies the model to use. Defaults to `auto`, which uses native features if the detector is YOLO, otherwise uses `yolo11n-cls.pt`. |
### Enabling Re-Identification (ReID)
By default, ReID is turned off to minimize performance overhead. Enabling it is simple—just set `with_reid: True` in the [tracker configuration](https://github.com/ultralytics/ultralytics/blob/main/ultralytics/cfg/trackers/botsort.yaml). You can also customize the `model` used for ReID, allowing you to trade off accuracy and speed depending on your use case:
- **Native features (`model: auto`)**: This leverages features directly from the YOLO detector for ReID, adding minimal overhead. It's ideal when you need some level of ReID without significantly impacting performance. If the detector doesn't support native features, it automatically falls back to using `yolo11n-cls.pt`.
- **YOLO classification models**: You can explicitly set a classification model (e.g. `yolo11n-cls.pt`) for ReID feature extraction. This provides more discriminative embeddings, but introduces additional latency due to the extra inference step.
For better performance, especially when using a separate classification model for ReID, you can export it to a faster backend like TensorRT:
!!! example "Exporting a ReID model to TensorRT"
```python
from torch import nn
from ultralytics import YOLO
# Load the classification model
model = YOLO("yolo11n-cls.pt")
# Add average pooling layer
head = model.model.model[-1]
pool = nn.Sequential(nn.AdaptiveAvgPool2d((1, 1)), nn.Flatten(start_dim=1))
pool.f, pool.i = head.f, head.i
model.model.model[-1] = pool
# Export to TensorRT
model.export(format="engine", half=True, dynamic=True, batch=32)
```
Once exported, you can point to the TensorRT model path in your tracker config, and it will be used for ReID during tracking.
## Python Examples
Watch: How to Build Interactive Object Tracking with Ultralytics YOLO | Click to Crop & Display ⚡
### Persisting Tracks Loop
Here is a Python script using [OpenCV](https://www.ultralytics.com/glossary/opencv) (`cv2`) and YOLO11 to run object tracking on video frames. This script assumes the necessary packages (`opencv-python` and `ultralytics`) are already installed. The `persist=True` argument tells the tracker that the current image or frame is the next in a sequence and to expect tracks from the previous image in the current image.
!!! example "Streaming for-loop with tracking"
```python
import cv2
from ultralytics import YOLO
# Load the YOLO11 model
model = YOLO("yolo11n.pt")
# Open the video file
video_path = "path/to/video.mp4"
cap = cv2.VideoCapture(video_path)
# Loop through the video frames
while cap.isOpened():
# Read a frame from the video
success, frame = cap.read()
if success:
# Run YOLO11 tracking on the frame, persisting tracks between frames
results = model.track(frame, persist=True)
# Visualize the results on the frame
annotated_frame = results[0].plot()
# Display the annotated frame
cv2.imshow("YOLO11 Tracking", annotated_frame)
# Break the loop if 'q' is pressed
if cv2.waitKey(1) & 0xFF == ord("q"):
break
else:
# Break the loop if the end of the video is reached
break
# Release the video capture object and close the display window
cap.release()
cv2.destroyAllWindows()
```
Please note the change from `model(frame)` to `model.track(frame)`, which enables object tracking instead of simple detection. This modified script will run the tracker on each frame of the video, visualize the results, and display them in a window. The loop can be exited by pressing 'q'.
### Plotting Tracks Over Time
Visualizing object tracks over consecutive frames can provide valuable insights into the movement patterns and behavior of detected objects within a video. With Ultralytics YOLO11, plotting these tracks is a seamless and efficient process.
In the following example, we demonstrate how to utilize YOLO11's tracking capabilities to plot the movement of detected objects across multiple video frames. This script involves opening a video file, reading it frame by frame, and utilizing the YOLO model to identify and track various objects. By retaining the center points of the detected bounding boxes and connecting them, we can draw lines that represent the paths followed by the tracked objects.
!!! example "Plotting tracks over multiple video frames"
```python
from collections import defaultdict
import cv2
import numpy as np
from ultralytics import YOLO
# Load the YOLO11 model
model = YOLO("yolo11n.pt")
# Open the video file
video_path = "path/to/video.mp4"
cap = cv2.VideoCapture(video_path)
# Store the track history
track_history = defaultdict(lambda: [])
# Loop through the video frames
while cap.isOpened():
# Read a frame from the video
success, frame = cap.read()
if success:
# Run YOLO11 tracking on the frame, persisting tracks between frames
result = model.track(frame, persist=True)[0]
# Get the boxes and track IDs
if result.boxes and result.boxes.is_track:
boxes = result.boxes.xywh.cpu()
track_ids = result.boxes.id.int().cpu().tolist()
# Visualize the result on the frame
frame = result.plot()
# Plot the tracks
for box, track_id in zip(boxes, track_ids):
x, y, w, h = box
track = track_history[track_id]
track.append((float(x), float(y))) # x, y center point
if len(track) > 30: # retain 30 tracks for 30 frames
track.pop(0)
# Draw the tracking lines
points = np.hstack(track).astype(np.int32).reshape((-1, 1, 2))
cv2.polylines(frame, [points], isClosed=False, color=(230, 230, 230), thickness=10)
# Display the annotated frame
cv2.imshow("YOLO11 Tracking", frame)
# Break the loop if 'q' is pressed
if cv2.waitKey(1) & 0xFF == ord("q"):
break
else:
# Break the loop if the end of the video is reached
break
# Release the video capture object and close the display window
cap.release()
cv2.destroyAllWindows()
```
### Multithreaded Tracking
Multithreaded tracking provides the capability to run object tracking on multiple video streams simultaneously. This is particularly useful when handling multiple video inputs, such as from multiple surveillance cameras, where concurrent processing can greatly enhance efficiency and performance.
In the provided Python script, we make use of Python's `threading` module to run multiple instances of the tracker concurrently. Each thread is responsible for running the tracker on one video file, and all the threads run simultaneously in the background.
To ensure that each thread receives the correct parameters (the video file, the model to use and the file index), we define a function `run_tracker_in_thread` that accepts these parameters and contains the main tracking loop. This function reads the video frame by frame, runs the tracker, and displays the results.
Two different models are used in this example: `yolo11n.pt` and `yolo11n-seg.pt`, each tracking objects in a different video file. The video files are specified in `SOURCES`.
The `daemon=True` parameter in `threading.Thread` means that these threads will be closed as soon as the main program finishes. We then start the threads with `start()` and use `join()` to make the main thread wait until both tracker threads have finished.
Finally, after all threads have completed their task, the windows displaying the results are closed using `cv2.destroyAllWindows()`.
!!! example "Multithreaded tracking implementation"
```python
import threading
import cv2
from ultralytics import YOLO
# Define model names and video sources
MODEL_NAMES = ["yolo11n.pt", "yolo11n-seg.pt"]
SOURCES = ["path/to/video.mp4", "0"] # local video, 0 for webcam
def run_tracker_in_thread(model_name, filename):
"""Run YOLO tracker in its own thread for concurrent processing.
Args:
model_name (str): The YOLO11 model object.
filename (str): The path to the video file or the identifier for the webcam/external camera source.
"""
model = YOLO(model_name)
results = model.track(filename, save=True, stream=True)
for r in results:
pass
# Create and start tracker threads using a for loop
tracker_threads = []
for video_file, model_name in zip(SOURCES, MODEL_NAMES):
thread = threading.Thread(target=run_tracker_in_thread, args=(model_name, video_file), daemon=True)
tracker_threads.append(thread)
thread.start()
# Wait for all tracker threads to finish
for thread in tracker_threads:
thread.join()
# Clean up and close windows
cv2.destroyAllWindows()
```
This example can easily be extended to handle more video files and models by creating more threads and applying the same methodology.
## Contribute New Trackers
Are you proficient in multi-object tracking and have successfully implemented or adapted a tracking algorithm with Ultralytics YOLO? We invite you to contribute to our Trackers section in [ultralytics/cfg/trackers](https://github.com/ultralytics/ultralytics/tree/main/ultralytics/cfg/trackers)! Your real-world applications and solutions could be invaluable for users working on tracking tasks.
By contributing to this section, you help expand the scope of tracking solutions available within the Ultralytics YOLO framework, adding another layer of functionality and utility for the community.
To initiate your contribution, please refer to our [Contributing Guide](../help/contributing.md) for comprehensive instructions on submitting a Pull Request (PR) 🛠️. We are excited to see what you bring to the table!
Together, let's enhance the tracking capabilities of the Ultralytics YOLO ecosystem 🙏!
[fish track]: https://github.com/ultralytics/docs/releases/download/0/fish-tracking.avif
[people track]: https://github.com/ultralytics/docs/releases/download/0/people-tracking.avif
[vehicle track]: https://github.com/ultralytics/docs/releases/download/0/vehicle-tracking.avif
## FAQ
### What is Multi-Object Tracking and how does Ultralytics YOLO support it?
Multi-object tracking in video analytics involves both identifying objects and maintaining a unique ID for each detected object across video frames. Ultralytics YOLO supports this by providing real-time tracking along with object IDs, facilitating tasks such as security surveillance and sports analytics. The system uses trackers like [BoT-SORT](https://github.com/NirAharon/BoT-SORT) and [ByteTrack](https://github.com/FoundationVision/ByteTrack), which can be configured via YAML files.
### How do I configure a custom tracker for Ultralytics YOLO?
You can configure a custom tracker by copying an existing tracker configuration file (e.g., `custom_tracker.yaml`) from the [Ultralytics tracker configuration directory](https://github.com/ultralytics/ultralytics/tree/main/ultralytics/cfg/trackers) and modifying parameters as needed, except for the `tracker_type`. Use this file in your tracking model like so:
!!! example
=== "Python"
```python
from ultralytics import YOLO
model = YOLO("yolo11n.pt")
results = model.track(source="https://youtu.be/LNwODJXcvt4", tracker="custom_tracker.yaml")
```
=== "CLI"
```bash
yolo track model=yolo11n.pt source="https://youtu.be/LNwODJXcvt4" tracker='custom_tracker.yaml'
```
### How can I run object tracking on multiple video streams simultaneously?
To run object tracking on multiple video streams simultaneously, you can use Python's `threading` module. Each thread will handle a separate video stream. Here's an example of how you can set this up:
!!! example "Multithreaded Tracking"
```python
import threading
import cv2
from ultralytics import YOLO
# Define model names and video sources
MODEL_NAMES = ["yolo11n.pt", "yolo11n-seg.pt"]
SOURCES = ["path/to/video.mp4", "0"] # local video, 0 for webcam
def run_tracker_in_thread(model_name, filename):
"""Run YOLO tracker in its own thread for concurrent processing.
Args:
model_name (str): The YOLO11 model object.
filename (str): The path to the video file or the identifier for the webcam/external camera source.
"""
model = YOLO(model_name)
results = model.track(filename, save=True, stream=True)
for r in results:
pass
# Create and start tracker threads using a for loop
tracker_threads = []
for video_file, model_name in zip(SOURCES, MODEL_NAMES):
thread = threading.Thread(target=run_tracker_in_thread, args=(model_name, video_file), daemon=True)
tracker_threads.append(thread)
thread.start()
# Wait for all tracker threads to finish
for thread in tracker_threads:
thread.join()
# Clean up and close windows
cv2.destroyAllWindows()
```
### What are the real-world applications of multi-object tracking with Ultralytics YOLO?
Multi-object tracking with Ultralytics YOLO has numerous applications, including:
- **Transportation:** Vehicle tracking for traffic management and [autonomous driving](https://www.ultralytics.com/blog/ai-in-self-driving-cars).
- **Retail:** People tracking for in-store analytics and security.
- **Aquaculture:** Fish tracking for monitoring aquatic environments.
- **Sports Analytics:** Tracking players and equipment for performance analysis.
- **Security Systems:** [Monitoring suspicious activities](https://www.ultralytics.com/blog/security-alarm-system-projects-with-ultralytics-yolov8) and creating [security alarms](https://docs.ultralytics.com/guides/security-alarm-system/).
These applications benefit from Ultralytics YOLO's ability to process high-frame-rate videos in real time with exceptional accuracy.
### How can I visualize object tracks over multiple video frames with Ultralytics YOLO?
To visualize object tracks over multiple video frames, you can use the YOLO model's tracking features along with OpenCV to draw the paths of detected objects. Here's an example script that demonstrates this:
!!! example "Plotting tracks over multiple video frames"
```python
from collections import defaultdict
import cv2
import numpy as np
from ultralytics import YOLO
model = YOLO("yolo11n.pt")
video_path = "path/to/video.mp4"
cap = cv2.VideoCapture(video_path)
track_history = defaultdict(lambda: [])
while cap.isOpened():
success, frame = cap.read()
if success:
results = model.track(frame, persist=True)
boxes = results[0].boxes.xywh.cpu()
track_ids = results[0].boxes.id.int().cpu().tolist()
annotated_frame = results[0].plot()
for box, track_id in zip(boxes, track_ids):
x, y, w, h = box
track = track_history[track_id]
track.append((float(x), float(y)))
if len(track) > 30:
track.pop(0)
points = np.hstack(track).astype(np.int32).reshape((-1, 1, 2))
cv2.polylines(annotated_frame, [points], isClosed=False, color=(230, 230, 230), thickness=10)
cv2.imshow("YOLO11 Tracking", annotated_frame)
if cv2.waitKey(1) & 0xFF == ord("q"):
break
else:
break
cap.release()
cv2.destroyAllWindows()
```
This script will plot the tracking lines showing the movement paths of the tracked objects over time, providing valuable insights into object behavior and patterns.
---
# Source: https://raw.githubusercontent.com/ultralytics/ultralytics/main/docs/en/modes/train.md
---
comments: true
description: Learn how to efficiently train object detection models using YOLO11 with comprehensive instructions on settings, augmentation, and hardware utilization.
keywords: Ultralytics, YOLO11, model training, deep learning, object detection, GPU training, dataset augmentation, hyperparameter tuning, model performance, apple silicon training
---
# Model Training with Ultralytics YOLO
## Introduction
Training a [deep learning](https://www.ultralytics.com/glossary/deep-learning-dl) model involves feeding it data and adjusting its parameters so that it can make accurate predictions. Train mode in Ultralytics YOLO11 is engineered for effective and efficient training of object detection models, fully utilizing modern hardware capabilities. This guide aims to cover all the details you need to get started with training your own models using YOLO11's robust set of features.
Watch: How to Train a YOLO model on Your Custom Dataset in Google Colab.
## Why Choose Ultralytics YOLO for Training?
Here are some compelling reasons to opt for YOLO11's Train mode:
- **Efficiency:** Make the most out of your hardware, whether you're on a single-GPU setup or scaling across multiple GPUs.
- **Versatility:** Train on custom datasets in addition to readily available ones like COCO, VOC, and ImageNet.
- **User-Friendly:** Simple yet powerful CLI and Python interfaces for a straightforward training experience.
- **Hyperparameter Flexibility:** A broad range of customizable hyperparameters to fine-tune model performance.
### Key Features of Train Mode
The following are some notable features of YOLO11's Train mode:
- **Automatic Dataset Download:** Standard datasets like COCO, VOC, and ImageNet are downloaded automatically on first use.
- **Multi-GPU Support:** Scale your training efforts seamlessly across multiple GPUs to expedite the process.
- **Hyperparameter Configuration:** The option to modify hyperparameters through YAML configuration files or CLI arguments.
- **Visualization and Monitoring:** Real-time tracking of training metrics and visualization of the learning process for better insights.
!!! tip
* YOLO11 datasets like COCO, VOC, ImageNet, and many others automatically download on first use, i.e., `yolo train data=coco.yaml`
## Usage Examples
Train YOLO11n on the COCO8 dataset for 100 [epochs](https://www.ultralytics.com/glossary/epoch) at image size 640. The training device can be specified using the `device` argument. If no argument is passed, GPU `device=0` will be used when available; otherwise `device='cpu'` will be used. See the Arguments section below for a full list of training arguments.
!!! warning "Windows Multi-Processing Error"
On Windows, you may receive a `RuntimeError` when launching the training as a script. Add an `if __name__ == "__main__":` block before your training code to resolve it.
!!! example "Single-GPU and CPU Training Example"
Device is determined automatically. If a GPU is available, it will be used (default CUDA device 0); otherwise training will start on CPU.
=== "Python"
```python
from ultralytics import YOLO
# Load a model
model = YOLO("yolo11n.yaml") # build a new model from YAML
model = YOLO("yolo11n.pt") # load a pretrained model (recommended for training)
model = YOLO("yolo11n.yaml").load("yolo11n.pt") # build from YAML and transfer weights
# Train the model
results = model.train(data="coco8.yaml", epochs=100, imgsz=640)
```
=== "CLI"
```bash
# Build a new model from YAML and start training from scratch
yolo detect train data=coco8.yaml model=yolo11n.yaml epochs=100 imgsz=640
# Start training from a pretrained *.pt model
yolo detect train data=coco8.yaml model=yolo11n.pt epochs=100 imgsz=640
# Build a new model from YAML, transfer pretrained weights to it and start training
yolo detect train data=coco8.yaml model=yolo11n.yaml pretrained=yolo11n.pt epochs=100 imgsz=640
```
### Multi-GPU Training
Multi-GPU training allows for more efficient utilization of available hardware resources by distributing the training load across multiple GPUs. This feature is available through both the Python API and the command-line interface. To enable multi-GPU training, specify the GPU device IDs you wish to use.
!!! example "Multi-GPU Training Example"
To train with 2 GPUs, CUDA devices 0 and 1 use the following commands. Expand to additional GPUs as required.
=== "Python"
```python
from ultralytics import YOLO
# Load a model
model = YOLO("yolo11n.pt") # load a pretrained model (recommended for training)
# Train the model with 2 GPUs
results = model.train(data="coco8.yaml", epochs=100, imgsz=640, device=[0, 1])
# Train the model with the two most idle GPUs
results = model.train(data="coco8.yaml", epochs=100, imgsz=640, device=[-1, -1])
```
=== "CLI"
```bash
# Start training from a pretrained *.pt model using GPUs 0 and 1
yolo detect train data=coco8.yaml model=yolo11n.pt epochs=100 imgsz=640 device=0,1
# Use the two most idle GPUs
yolo detect train data=coco8.yaml model=yolo11n.pt epochs=100 imgsz=640 device=-1,-1
```
### Idle GPU Training
Idle GPU Training enables automatic selection of the least utilized GPUs in multi-GPU systems, optimizing resource usage without manual GPU selection. This feature identifies available GPUs based on utilization metrics and VRAM availability.
!!! example "Idle GPU Training Example"
To automatically select and use the most idle GPU(s) for training, use the `-1` device parameter. This is particularly useful in shared computing environments or servers with multiple users.
=== "Python"
```python
from ultralytics import YOLO
# Load a model
model = YOLO("yolo11n.pt") # load a pretrained model (recommended for training)
# Train using the single most idle GPU
results = model.train(data="coco8.yaml", epochs=100, imgsz=640, device=-1)
# Train using the two most idle GPUs
results = model.train(data="coco8.yaml", epochs=100, imgsz=640, device=[-1, -1])
```
=== "CLI"
```bash
# Start training using the single most idle GPU
yolo detect train data=coco8.yaml model=yolo11n.pt epochs=100 imgsz=640 device=-1
# Start training using the two most idle GPUs
yolo detect train data=coco8.yaml model=yolo11n.pt epochs=100 imgsz=640 device=-1,-1
```
The auto-selection algorithm prioritizes GPUs with:
1. Lower current utilization percentages
2. Higher available memory (free VRAM)
3. Lower temperature and power consumption
This feature is especially valuable in shared computing environments or when running multiple training jobs across different models. It automatically adapts to changing system conditions, ensuring optimal resource allocation without manual intervention.
### Apple Silicon MPS Training
With the support for Apple silicon chips integrated in the Ultralytics YOLO models, it's now possible to train your models on devices utilizing the powerful Metal Performance Shaders (MPS) framework. The MPS offers a high-performance way of executing computation and image processing tasks on Apple's custom silicon.
To enable training on Apple silicon chips, you should specify 'mps' as your device when initiating the training process. Below is an example of how you could do this in Python and via the command line:
!!! example "MPS Training Example"
=== "Python"
```python
from ultralytics import YOLO
# Load a model
model = YOLO("yolo11n.pt") # load a pretrained model (recommended for training)
# Train the model with MPS
results = model.train(data="coco8.yaml", epochs=100, imgsz=640, device="mps")
```
=== "CLI"
```bash
# Start training from a pretrained *.pt model using MPS
yolo detect train data=coco8.yaml model=yolo11n.pt epochs=100 imgsz=640 device=mps
```
While leveraging the computational power of the Apple silicon chips, this enables more efficient processing of the training tasks. For more detailed guidance and advanced configuration options, please refer to the [PyTorch MPS documentation](https://docs.pytorch.org/docs/stable/notes/mps.html).
### Resuming Interrupted Trainings
Resuming training from a previously saved state is a crucial feature when working with deep learning models. This can come in handy in various scenarios, like when the training process has been unexpectedly interrupted, or when you wish to continue training a model with new data or for more epochs.
When training is resumed, Ultralytics YOLO loads the weights from the last saved model and also restores the optimizer state, [learning rate](https://www.ultralytics.com/glossary/learning-rate) scheduler, and the epoch number. This allows you to continue the training process seamlessly from where it was left off.
You can easily resume training in Ultralytics YOLO by setting the `resume` argument to `True` when calling the `train` method, and specifying the path to the `.pt` file containing the partially trained model weights.
Below is an example of how to resume an interrupted training using Python and via the command line:
!!! example "Resume Training Example"
=== "Python"
```python
from ultralytics import YOLO
# Load a model
model = YOLO("path/to/last.pt") # load a partially trained model
# Resume training
results = model.train(resume=True)
```
=== "CLI"
```bash
# Resume an interrupted training
yolo train resume model=path/to/last.pt
```
By setting `resume=True`, the `train` function will continue training from where it left off, using the state stored in the 'path/to/last.pt' file. If the `resume` argument is omitted or set to `False`, the `train` function will start a new training session.
Remember that checkpoints are saved at the end of every epoch by default, or at fixed intervals using the `save_period` argument, so you must complete at least 1 epoch to resume a training run.
## Train Settings
The training settings for YOLO models encompass various hyperparameters and configurations used during the training process. These settings influence the model's performance, speed, and [accuracy](https://www.ultralytics.com/glossary/accuracy). Key training settings include batch size, learning rate, momentum, and weight decay. Additionally, the choice of optimizer, [loss function](https://www.ultralytics.com/glossary/loss-function), and training dataset composition can impact the training process. Careful tuning and experimentation with these settings are crucial for optimizing performance.
{% include "macros/train-args.md" %}
!!! info "Note on Batch-size Settings"
The `batch` argument can be configured in three ways:
- **Fixed [Batch Size](https://www.ultralytics.com/glossary/batch-size)**: Set an integer value (e.g., `batch=16`), specifying the number of images per batch directly.
- **Auto Mode (60% GPU Memory)**: Use `batch=-1` to automatically adjust batch size for approximately 60% CUDA memory utilization.
- **Auto Mode with Utilization Fraction**: Set a fraction value (e.g., `batch=0.70`) to adjust batch size based on the specified fraction of GPU memory usage.
## Augmentation Settings and Hyperparameters
Augmentation techniques are essential for improving the robustness and performance of YOLO models by introducing variability into the [training data](https://www.ultralytics.com/glossary/training-data), helping the model generalize better to unseen data. The following table outlines the purpose and effect of each augmentation argument:
{% include "macros/augmentation-args.md" %}
These settings can be adjusted to meet the specific requirements of the dataset and task at hand. Experimenting with different values can help find the optimal augmentation strategy that leads to the best model performance.
!!! info
For more information about training augmentation operations, see the [reference section](../reference/data/augment.md).
## Logging
In training a YOLO11 model, you might find it valuable to keep track of the model's performance over time. This is where logging comes into play. Ultralytics YOLO provides support for three types of loggers - [Comet](../integrations/comet.md), [ClearML](../integrations/clearml.md), and [TensorBoard](../integrations/tensorboard.md).
To use a logger, select it from the dropdown menu in the code snippet above and run it. The chosen logger will be installed and initialized.
### Comet
[Comet](../integrations/comet.md) is a platform that allows data scientists and developers to track, compare, explain and optimize experiments and models. It provides functionalities such as real-time metrics, code diffs, and hyperparameters tracking.
To use Comet:
!!! example
=== "Python"
```python
# pip install comet_ml
import comet_ml
comet_ml.init()
```
Remember to sign in to your Comet account on their website and get your API key. You will need to add this to your environment variables or your script to log your experiments.
### ClearML
[ClearML](https://clear.ml/) is an open-source platform that automates tracking of experiments and helps with efficient sharing of resources. It is designed to help teams manage, execute, and reproduce their ML work more efficiently.
To use ClearML:
!!! example
=== "Python"
```python
# pip install clearml
import clearml
clearml.browser_login()
```
After running this script, you will need to sign in to your ClearML account on the browser and authenticate your session.
### TensorBoard
[TensorBoard](https://www.tensorflow.org/tensorboard) is a visualization toolkit for [TensorFlow](https://www.ultralytics.com/glossary/tensorflow). It allows you to visualize your TensorFlow graph, plot quantitative metrics about the execution of your graph, and show additional data like images that pass through it.
To use TensorBoard in [Google Colab](https://colab.research.google.com/github/ultralytics/ultralytics/blob/main/examples/tutorial.ipynb):
!!! example
=== "CLI"
```bash
load_ext tensorboard
tensorboard --logdir ultralytics/runs # replace with 'runs' directory
```
To use TensorBoard locally run the below command and view results at `http://localhost:6006/`.
!!! example
=== "CLI"
```bash
tensorboard --logdir ultralytics/runs # replace with 'runs' directory
```
This will load TensorBoard and direct it to the directory where your training logs are saved.
After setting up your logger, you can then proceed with your model training. All training metrics will be automatically logged in your chosen platform, and you can access these logs to monitor your model's performance over time, compare different models, and identify areas for improvement.
## FAQ
### How do I train an [object detection](https://www.ultralytics.com/glossary/object-detection) model using Ultralytics YOLO11?
To train an object detection model using Ultralytics YOLO11, you can either use the Python API or the CLI. Below is an example for both:
!!! example "Single-GPU and CPU Training Example"
=== "Python"
```python
from ultralytics import YOLO
# Load a model
model = YOLO("yolo11n.pt") # load a pretrained model (recommended for training)
# Train the model
results = model.train(data="coco8.yaml", epochs=100, imgsz=640)
```
=== "CLI"
```bash
yolo detect train data=coco8.yaml model=yolo11n.pt epochs=100 imgsz=640
```
For more details, refer to the [Train Settings](#train-settings) section.
### What are the key features of Ultralytics YOLO11's Train mode?
The key features of Ultralytics YOLO11's Train mode include:
- **Automatic Dataset Download:** Automatically downloads standard datasets like COCO, VOC, and ImageNet.
- **Multi-GPU Support:** Scale training across multiple GPUs for faster processing.
- **Hyperparameter Configuration:** Customize hyperparameters through YAML files or CLI arguments.
- **Visualization and Monitoring:** Real-time tracking of training metrics for better insights.
These features make training efficient and customizable to your needs. For more details, see the [Key Features of Train Mode](#key-features-of-train-mode) section.
### How do I resume training from an interrupted session in Ultralytics YOLO11?
To resume training from an interrupted session, set the `resume` argument to `True` and specify the path to the last saved checkpoint.
!!! example "Resume Training Example"
=== "Python"
```python
from ultralytics import YOLO
# Load the partially trained model
model = YOLO("path/to/last.pt")
# Resume training
results = model.train(resume=True)
```
=== "CLI"
```bash
yolo train resume model=path/to/last.pt
```
Check the section on [Resuming Interrupted Trainings](#resuming-interrupted-trainings) for more information.
### Can I train YOLO11 models on Apple silicon chips?
Yes, Ultralytics YOLO11 supports training on Apple silicon chips utilizing the Metal Performance Shaders (MPS) framework. Specify 'mps' as your training device.
!!! example "MPS Training Example"
=== "Python"
```python
from ultralytics import YOLO
# Load a pretrained model
model = YOLO("yolo11n.pt")
# Train the model on Apple silicon chip (M1/M2/M3/M4)
results = model.train(data="coco8.yaml", epochs=100, imgsz=640, device="mps")
```
=== "CLI"
```bash
yolo detect train data=coco8.yaml model=yolo11n.pt epochs=100 imgsz=640 device=mps
```
For more details, refer to the [Apple Silicon MPS Training](#apple-silicon-mps-training) section.
### What are the common training settings, and how do I configure them?
Ultralytics YOLO11 allows you to configure a variety of training settings such as batch size, learning rate, epochs, and more through arguments. Here's a brief overview:
| Argument | Default | Description |
| -------- | ------- | ---------------------------------------------------------------------- |
| `model` | `None` | Path to the model file for training. |
| `data` | `None` | Path to the dataset configuration file (e.g., `coco8.yaml`). |
| `epochs` | `100` | Total number of training epochs. |
| `batch` | `16` | Batch size, adjustable as integer or auto mode. |
| `imgsz` | `640` | Target image size for training. |
| `device` | `None` | Computational device(s) for training like `cpu`, `0`, `0,1`, or `mps`. |
| `save` | `True` | Enables saving of training checkpoints and final model weights. |
For an in-depth guide on training settings, check the [Train Settings](#train-settings) section.
---
# Source: https://raw.githubusercontent.com/ultralytics/ultralytics/main/docs/en/modes/val.md
---
comments: true
description: Learn how to validate your YOLO11 model with precise metrics, easy-to-use tools, and custom settings for optimal performance.
keywords: Ultralytics, YOLO11, model validation, machine learning, object detection, mAP metrics, Python API, CLI
---
# Model Validation with Ultralytics YOLO
## Introduction
Validation is a critical step in the [machine learning](https://www.ultralytics.com/glossary/machine-learning-ml) pipeline, allowing you to assess the quality of your trained models. Val mode in Ultralytics YOLO11 provides a robust suite of tools and metrics for evaluating the performance of your [object detection](https://www.ultralytics.com/glossary/object-detection) models. This guide serves as a complete resource for understanding how to effectively use the Val mode to ensure that your models are both accurate and reliable.
Watch: Ultralytics Modes Tutorial: Validation
## Why Validate with Ultralytics YOLO?
Here's why using YOLO11's Val mode is advantageous:
- **Precision:** Get accurate metrics like mAP50, mAP75, and mAP50-95 to comprehensively evaluate your model.
- **Convenience:** Utilize built-in features that remember training settings, simplifying the validation process.
- **Flexibility:** Validate your model with the same or different datasets and image sizes.
- **[Hyperparameter Tuning](https://www.ultralytics.com/glossary/hyperparameter-tuning):** Use validation metrics to fine-tune your model for better performance.
### Key Features of Val Mode
These are the notable functionalities offered by YOLO11's Val mode:
- **Automated Settings:** Models remember their training configurations for straightforward validation.
- **Multi-Metric Support:** Evaluate your model based on a range of accuracy metrics.
- **CLI and Python API:** Choose from command-line interface or Python API based on your preference for validation.
- **Data Compatibility:** Works seamlessly with datasets used during the training phase as well as custom datasets.
!!! tip
* YOLO11 models automatically remember their training settings, so you can validate a model at the same image size and on the original dataset easily with just `yolo val model=yolo11n.pt` or `YOLO("yolo11n.pt").val()`
## Usage Examples
Validate a trained YOLO11n model [accuracy](https://www.ultralytics.com/glossary/accuracy) on the COCO8 dataset. No arguments are needed as the `model` retains its training `data` and arguments as model attributes. See the Arguments section below for a full list of validation arguments.
!!! warning "Windows Multi-Processing Error"
On Windows, you may receive a `RuntimeError` when launching the validation as a script. Add an `if __name__ == "__main__":` block before your validation code to resolve it.
!!! example
=== "Python"
```python
from ultralytics import YOLO
# Load a model
model = YOLO("yolo11n.pt") # load an official model
model = YOLO("path/to/best.pt") # load a custom model
# Validate the model
metrics = model.val() # no arguments needed, dataset and settings remembered
metrics.box.map # map50-95
metrics.box.map50 # map50
metrics.box.map75 # map75
metrics.box.maps # a list containing mAP50-95 for each category
```
=== "CLI"
```bash
yolo detect val model=yolo11n.pt # val official model
yolo detect val model=path/to/best.pt # val custom model
```
## Arguments for YOLO Model Validation
When validating YOLO models, several arguments can be fine-tuned to optimize the evaluation process. These arguments control aspects such as input image size, batch processing, and performance thresholds. Below is a detailed breakdown of each argument to help you customize your validation settings effectively.
{% include "macros/validation-args.md" %}
Each of these settings plays a vital role in the validation process, allowing for a customizable and efficient evaluation of YOLO models. Adjusting these parameters according to your specific needs and resources can help achieve the best balance between accuracy and performance.
### Example Validation with Arguments
Watch: How to Export Model Validation Results in CSV, JSON, SQL, Polars DataFrame & More
The below examples showcase YOLO model validation with custom arguments in Python and CLI.
!!! example
=== "Python"
```python
from ultralytics import YOLO
# Load a model
model = YOLO("yolo11n.pt")
# Customize validation settings
metrics = model.val(data="coco8.yaml", imgsz=640, batch=16, conf=0.25, iou=0.6, device="0")
```
=== "CLI"
```bash
yolo val model=yolo11n.pt data=coco8.yaml imgsz=640 batch=16 conf=0.25 iou=0.6 device=0
```
!!! tip "Export ConfusionMatrix"
You can also save the ConfusionMatrix results in different formats using the provided code.
```python
from ultralytics import YOLO
model = YOLO("yolo11n.pt")
results = model.val(data="coco8.yaml", plots=True)
print(results.confusion_matrix.to_df())
```
| Method | Return Type | Description |
| ----------- | ---------------------- | -------------------------------------------------------------------------- |
| `summary()` | `List[Dict[str, Any]]` | Converts validation results to a summarized dictionary. |
| `to_df()` | `DataFrame` | Returns the validation results as a structured Polars DataFrame. |
| `to_csv()` | `str` | Exports the validation results in CSV format and returns the CSV string. |
| `to_json()` | `str` | Exports the validation results in JSON format and returns the JSON string. |
For more details see the [`DataExportMixin` class documentation](../reference/utils/__init__.md/#ultralytics.utils.DataExportMixin).
## FAQ
### How do I validate my YOLO11 model with Ultralytics?
To validate your YOLO11 model, you can use the Val mode provided by Ultralytics. For example, using the Python API, you can load a model and run validation with:
```python
from ultralytics import YOLO
# Load a model
model = YOLO("yolo11n.pt")
# Validate the model
metrics = model.val()
print(metrics.box.map) # map50-95
```
Alternatively, you can use the command-line interface (CLI):
```bash
yolo val model=yolo11n.pt
```
For further customization, you can adjust various arguments like `imgsz`, `batch`, and `conf` in both Python and CLI modes. Check the [Arguments for YOLO Model Validation](#arguments-for-yolo-model-validation) section for the full list of parameters.
### What metrics can I get from YOLO11 model validation?
YOLO11 model validation provides several key metrics to assess model performance. These include:
- mAP50 (mean Average Precision at IoU threshold 0.5)
- mAP75 (mean Average Precision at IoU threshold 0.75)
- mAP50-95 (mean Average Precision across multiple IoU thresholds from 0.5 to 0.95)
Using the Python API, you can access these metrics as follows:
```python
metrics = model.val() # assumes `model` has been loaded
print(metrics.box.map) # mAP50-95
print(metrics.box.map50) # mAP50
print(metrics.box.map75) # mAP75
print(metrics.box.maps) # list of mAP50-95 for each category
```
For a complete performance evaluation, it's crucial to review all these metrics. For more details, refer to the [Key Features of Val Mode](#key-features-of-val-mode).
### What are the advantages of using Ultralytics YOLO for validation?
Using Ultralytics YOLO for validation provides several advantages:
- **[Precision](https://www.ultralytics.com/glossary/precision):** YOLO11 offers accurate performance metrics including mAP50, mAP75, and mAP50-95.
- **Convenience:** The models remember their training settings, making validation straightforward.
- **Flexibility:** You can validate against the same or different datasets and image sizes.
- **Hyperparameter Tuning:** Validation metrics help in fine-tuning models for better performance.
These benefits ensure that your models are evaluated thoroughly and can be optimized for superior results. Learn more about these advantages in the [Why Validate with Ultralytics YOLO](#why-validate-with-ultralytics-yolo) section.
### Can I validate my YOLO11 model using a custom dataset?
Yes, you can validate your YOLO11 model using a [custom dataset](https://docs.ultralytics.com/datasets/). Specify the `data` argument with the path to your dataset configuration file. This file should include the path to the [validation data](https://www.ultralytics.com/glossary/validation-data).
!!! note
Validation is performed using the model's own class names, which you can view using `model.names`, and which may be different to those specified in the dataset configuration file.
Example in Python:
```python
from ultralytics import YOLO
# Load a model
model = YOLO("yolo11n.pt")
# Validate with a custom dataset
metrics = model.val(data="path/to/your/custom_dataset.yaml")
print(metrics.box.map) # map50-95
```
Example using CLI:
```bash
yolo val model=yolo11n.pt data=path/to/your/custom_dataset.yaml
```
For more customizable options during validation, see the [Example Validation with Arguments](#example-validation-with-arguments) section.
### How do I save validation results to a JSON file in YOLO11?
To save the validation results to a JSON file, you can set the `save_json` argument to `True` when running validation. This can be done in both the Python API and CLI.
Example in Python:
```python
from ultralytics import YOLO
# Load a model
model = YOLO("yolo11n.pt")
# Save validation results to JSON
metrics = model.val(save_json=True)
```
Example using CLI:
```bash
yolo val model=yolo11n.pt save_json=True
```
This functionality is particularly useful for further analysis or integration with other tools. Check the [Arguments for YOLO Model Validation](#arguments-for-yolo-model-validation) for more details.
---
# Source: https://raw.githubusercontent.com/ultralytics/ultralytics/main/docs/en/quickstart.md
---
comments: true
description: Learn how to install Ultralytics using pip, conda, or Docker. Follow our step-by-step guide for a seamless setup of Ultralytics YOLO.
keywords: Ultralytics, YOLO11, Install Ultralytics, pip, conda, Docker, GitHub, machine learning, object detection
---
# Install Ultralytics
Ultralytics offers a variety of installation methods, including pip, conda, and Docker. You can install YOLO via the `ultralytics` pip package for the latest stable release, or by cloning the [Ultralytics GitHub repository](https://github.com/ultralytics/ultralytics) for the most current version. Docker is also an option to run the package in an isolated container, which avoids local installation.
=== "Pip install (recommended)"
Install or update the `ultralytics` package using pip by running `pip install -U ultralytics`. For more details on the `ultralytics` package, visit the [Python Package Index (PyPI)](https://pypi.org/project/ultralytics/).
[](https://pypi.org/project/ultralytics/)
[](https://clickpy.clickhouse.com/dashboard/ultralytics)
```bash
# Install or upgrade the ultralytics package from PyPI
pip install -U ultralytics
```
You can also install `ultralytics` directly from the [Ultralytics GitHub repository](https://github.com/ultralytics/ultralytics). This can be useful if you want the latest development version. Ensure you have the Git command-line tool installed, and then run:
```bash
# Install the ultralytics package from GitHub
pip install git+https://github.com/ultralytics/ultralytics.git@main
```
=== "Conda install"
Conda can be used as an alternative package manager to pip. For more details, visit [Anaconda](https://anaconda.org/conda-forge/ultralytics). The Ultralytics feedstock repository for updating the conda package is available at [GitHub](https://github.com/conda-forge/ultralytics-feedstock/).
[](https://anaconda.org/conda-forge/ultralytics)
[](https://anaconda.org/conda-forge/ultralytics)
[](https://anaconda.org/conda-forge/ultralytics)
[](https://anaconda.org/conda-forge/ultralytics)
```bash
# Install the ultralytics package using conda
conda install -c conda-forge ultralytics
```
!!! note
If you are installing in a CUDA environment, it is best practice to install `ultralytics`, `pytorch`, and `pytorch-cuda` in the same command. This allows the conda package manager to resolve any conflicts. Alternatively, install `pytorch-cuda` last to override the CPU-specific `pytorch` package if necessary.
```bash
# Install all packages together using conda
conda install -c pytorch -c nvidia -c conda-forge pytorch torchvision pytorch-cuda=11.8 ultralytics
```
### Conda Docker Image
Ultralytics Conda Docker images are also available on [Docker Hub](https://hub.docker.com/r/ultralytics/ultralytics). These images are based on [Miniconda3](https://www.anaconda.com/docs/main) and provide a straightforward way to start using `ultralytics` in a Conda environment.
```bash
# Set image name as a variable
t=ultralytics/ultralytics:latest-conda
# Pull the latest ultralytics image from Docker Hub
sudo docker pull $t
# Run the ultralytics image in a container with GPU support
sudo docker run -it --ipc=host --runtime=nvidia --gpus all $t # all GPUs
sudo docker run -it --ipc=host --runtime=nvidia --gpus '"device=2,3"' $t # specify GPUs
```
=== "Git clone"
Clone the [Ultralytics GitHub repository](https://github.com/ultralytics/ultralytics) if you are interested in contributing to development or wish to experiment with the latest source code. After cloning, navigate into the directory and install the package in editable mode `-e` using pip.
[](https://github.com/ultralytics/ultralytics)
[](https://github.com/ultralytics/ultralytics)
```bash
# Clone the ultralytics repository
git clone https://github.com/ultralytics/ultralytics
# Navigate to the cloned directory
cd ultralytics
# Install the package in editable mode for development
pip install -e .
```
=== "Docker"
Use Docker to execute the `ultralytics` package in an isolated container, ensuring consistent performance across various environments. By selecting one of the official `ultralytics` images from [Docker Hub](https://hub.docker.com/r/ultralytics/ultralytics), you avoid the complexity of local installation and gain access to a verified working environment. Ultralytics offers five main supported Docker images, each designed for high compatibility and efficiency:
[](https://hub.docker.com/r/ultralytics/ultralytics)
[](https://hub.docker.com/r/ultralytics/ultralytics)
- **Dockerfile:** GPU image recommended for training.
- **Dockerfile-arm64:** Optimized for ARM64 architecture, suitable for deployment on devices like Raspberry Pi and other ARM64-based platforms.
- **Dockerfile-cpu:** Ubuntu-based CPU-only version, suitable for inference and environments without GPUs.
- **Dockerfile-jetson:** Tailored for [NVIDIA Jetson](https://docs.ultralytics.com/guides/nvidia-jetson/) devices, integrating GPU support optimized for these platforms.
- **Dockerfile-python:** Minimal image with just Python and necessary dependencies, ideal for lightweight applications and development.
- **Dockerfile-conda:** Based on Miniconda3 with a conda installation of the `ultralytics` package.
Here are the commands to get the latest image and execute it:
```bash
# Set image name as a variable
t=ultralytics/ultralytics:latest
# Pull the latest ultralytics image from Docker Hub
sudo docker pull $t
# Run the ultralytics image in a container with GPU support
sudo docker run -it --ipc=host --runtime=nvidia --gpus all $t # all GPUs
sudo docker run -it --ipc=host --runtime=nvidia --gpus '"device=2,3"' $t # specify GPUs
```
The above command initializes a Docker container with the latest `ultralytics` image. The `-it` flags assign a pseudo-TTY and keep stdin open, allowing interaction with the container. The `--ipc=host` flag sets the IPC (Inter-Process Communication) namespace to the host, which is essential for sharing memory between processes. The `--gpus all` flag enables access to all available GPUs inside the container, crucial for tasks requiring GPU computation.
Note: To work with files on your local machine within the container, use Docker volumes to mount a local directory into the container:
```bash
# Mount local directory to a directory inside the container
sudo docker run -it --ipc=host --runtime=nvidia --gpus all -v /path/on/host:/path/in/container $t
```
Replace `/path/on/host` with the directory path on your local machine, and `/path/in/container` with the desired path inside the Docker container.
For advanced Docker usage, explore the [Ultralytics Docker Guide](guides/docker-quickstart.md).
See the `ultralytics` [pyproject.toml](https://github.com/ultralytics/ultralytics/blob/main/pyproject.toml) file for a list of dependencies. Note that all examples above install all required dependencies.
!!! tip
[PyTorch](https://www.ultralytics.com/glossary/pytorch) requirements vary by operating system and CUDA requirements, so install PyTorch first by following the instructions at [PyTorch](https://pytorch.org/get-started/locally/).
## Headless Server Installation
For server environments without a display (e.g., cloud VMs, Docker containers, CI/CD pipelines), use the `ultralytics-opencv-headless` package. This is identical to the standard `ultralytics` package but depends on `opencv-python-headless` instead of `opencv-python`, avoiding unnecessary GUI dependencies and potential `libGL` errors.
!!! example "Headless Install"
```bash
pip install ultralytics-opencv-headless
```
Both packages provide the same functionality and API. The headless variant simply excludes OpenCV's GUI components that require display libraries.
## Advanced Installation
While the standard installation methods cover most use cases, you might need a more tailored setup for development or custom configurations.
!!! example "Advanced Methods"
=== "Install from Fork"
If you need persistent custom modifications, you can fork the Ultralytics repository, make changes to `pyproject.toml` or other code, and install from your fork.
1. **Fork** the [Ultralytics GitHub repository](https://github.com/ultralytics/ultralytics) to your own GitHub account.
2. **Clone** your fork locally:
```bash
git clone https://github.com/YOUR_USERNAME/ultralytics.git
cd ultralytics
```
3. **Create a new branch** for your changes:
```bash
git checkout -b my-custom-branch
```
4. **Make your modifications** to `pyproject.toml` or other files as needed.
5. **Commit and push** your changes:
```bash
git add .
git commit -m "My custom changes"
git push origin my-custom-branch
```
6. **Install** using pip with the `git+https` syntax, pointing to your branch:
```bash
pip install git+https://github.com/YOUR_USERNAME/ultralytics.git@my-custom-branch
```
=== "Local Clone and Install"
Clone the repository locally, modify files as needed, and install in editable mode.
1. **Clone** the Ultralytics repository:
```bash
git clone https://github.com/ultralytics/ultralytics
cd ultralytics
```
2. **Make your modifications** to `pyproject.toml` or other files as needed.
3. **Install** the package in editable mode (`-e`). Pip will use your modified `pyproject.toml` to resolve dependencies:
```bash
pip install -e .
```
This approach is useful for development or testing local changes before committing.
=== "Use requirements.txt"
Specify a custom Ultralytics fork in your `requirements.txt` file to ensure consistent installations across your team.
```text title="requirements.txt"
# Install ultralytics from a specific git branch
git+https://github.com/YOUR_USERNAME/ultralytics.git@my-custom-branch
# Other project dependencies
flask
```
Install dependencies from the file:
```bash
pip install -r requirements.txt
```
## Use Ultralytics with CLI
The Ultralytics command-line interface (CLI) allows for simple single-line commands without needing a Python environment. CLI requires no customization or Python code; run all tasks from the terminal with the `yolo` command. For more on using YOLO from the command line, see the [CLI Guide](usage/cli.md).
!!! example
=== "Syntax"
Ultralytics `yolo` commands use the following syntax:
```bash
yolo TASK MODE ARGS
```
- `TASK` (optional) is one of ([detect](tasks/detect.md), [segment](tasks/segment.md), [classify](tasks/classify.md), [pose](tasks/pose.md), [obb](tasks/obb.md))
- `MODE` (required) is one of ([train](modes/train.md), [val](modes/val.md), [predict](modes/predict.md), [export](modes/export.md), [track](modes/track.md), [benchmark](modes/benchmark.md))
- `ARGS` (optional) are `arg=value` pairs like `imgsz=640` that override defaults.
See all `ARGS` in the full [Configuration Guide](usage/cfg.md) or with the `yolo cfg` CLI command.
=== "Train"
Train a detection model for 10 [epochs](https://www.ultralytics.com/glossary/epoch) with an initial learning rate of 0.01:
```bash
yolo train data=coco8.yaml model=yolo11n.pt epochs=10 lr0=0.01
```
=== "Predict"
Predict a YouTube video using a pretrained segmentation model at image size 320:
```bash
yolo predict model=yolo11n-seg.pt source='https://youtu.be/LNwODJXcvt4' imgsz=320
```
=== "Val"
Validate a pretrained detection model with a batch size of 1 and image size of 640:
```bash
yolo val model=yolo11n.pt data=coco8.yaml batch=1 imgsz=640
```
=== "Export"
Export a YOLO11n classification model to ONNX format with an image size of 224x128 (no TASK required):
```bash
yolo export model=yolo11n-cls.pt format=onnx imgsz=224,128
```
=== "Count"
Count objects in a video or live stream using YOLO11:
```bash
yolo solutions count show=True
yolo solutions count source="path/to/video.mp4" # specify video file path
```
=== "Workout"
Monitor workout exercises using a YOLO11 pose model:
```bash
yolo solutions workout show=True
yolo solutions workout source="path/to/video.mp4" # specify video file path
# Use keypoints for ab-workouts
yolo solutions workout kpts="[5, 11, 13]" # left side
yolo solutions workout kpts="[6, 12, 14]" # right side
```
=== "Queue"
Use YOLO11 to count objects in a designated queue or region:
```bash
yolo solutions queue show=True
yolo solutions queue source="path/to/video.mp4" # specify video file path
yolo solutions queue region="[(20, 400), (1080, 400), (1080, 360), (20, 360)]" # configure queue coordinates
```
=== "Inference with Streamlit"
Perform object detection, instance segmentation, or pose estimation in a web browser using [Streamlit](https://docs.ultralytics.com/reference/solutions/streamlit_inference/):
```bash
yolo solutions inference
yolo solutions inference model="path/to/model.pt" # use model fine-tuned with Ultralytics Python package
```
=== "Special"
Run special commands to see the version, view settings, run checks, and more:
```bash
yolo help
yolo checks
yolo version
yolo settings
yolo copy-cfg
yolo cfg
yolo solutions help
```
!!! warning
Arguments must be passed as `arg=value` pairs, split by an equals `=` sign and delimited by spaces. Do not use `--` argument prefixes or commas `,` between arguments.
- `yolo predict model=yolo11n.pt imgsz=640 conf=0.25` ✅
- `yolo predict model yolo11n.pt imgsz 640 conf 0.25` ❌ (missing `=`)
- `yolo predict model=yolo11n.pt, imgsz=640, conf=0.25` ❌ (do not use `,`)
- `yolo predict --model yolo11n.pt --imgsz 640 --conf 0.25` ❌ (do not use `--`)
- `yolo solution model=yolo11n.pt imgsz=640 conf=0.25` ❌ (use `solutions`, not `solution`)
[CLI Guide](usage/cli.md){ .md-button }
## Use Ultralytics with Python
The Ultralytics YOLO Python interface offers seamless integration into Python projects, making it easy to load, run, and process model outputs. Designed for simplicity, the Python interface allows users to quickly implement [object detection](https://www.ultralytics.com/glossary/object-detection), segmentation, and classification. This makes the YOLO Python interface an invaluable tool for incorporating these functionalities into Python projects.
For instance, users can load a model, train it, evaluate its performance, and export it to ONNX format with just a few lines of code. Explore the [Python Guide](usage/python.md) to learn more about using YOLO within your Python projects.
!!! example
```python
from ultralytics import YOLO
# Create a new YOLO model from scratch
model = YOLO("yolo11n.yaml")
# Load a pretrained YOLO model (recommended for training)
model = YOLO("yolo11n.pt")
# Train the model using the 'coco8.yaml' dataset for 3 epochs
results = model.train(data="coco8.yaml", epochs=3)
# Evaluate the model's performance on the validation set
results = model.val()
# Perform object detection on an image using the model
results = model("https://ultralytics.com/images/bus.jpg")
# Export the model to ONNX format
success = model.export(format="onnx")
```
[Python Guide](usage/python.md){.md-button .md-button--primary}
## Ultralytics Settings
The Ultralytics library includes a `SettingsManager` for fine-grained control over experiments, allowing users to access and modify settings easily. Stored in a JSON file within the environment's user configuration directory, these settings can be viewed or modified in the Python environment or via the Command-Line Interface (CLI).
### Inspecting Settings
To view the current configuration of your settings:
!!! example "View settings"
=== "Python"
Use Python to view your settings by importing the `settings` object from the `ultralytics` module. Print and return settings with these commands:
```python
from ultralytics import settings
# View all settings
print(settings)
# Return a specific setting
value = settings["runs_dir"]
```
=== "CLI"
The command-line interface allows you to check your settings with:
```bash
yolo settings
```
### Modifying Settings
Ultralytics makes it easy to modify settings in the following ways:
!!! example "Update settings"
=== "Python"
In Python, use the `update` method on the `settings` object:
```python
from ultralytics import settings
# Update a setting
settings.update({"runs_dir": "/path/to/runs"})
# Update multiple settings
settings.update({"runs_dir": "/path/to/runs", "tensorboard": False})
# Reset settings to default values
settings.reset()
```
=== "CLI"
To modify settings using the command-line interface:
```bash
# Update a setting
yolo settings runs_dir='/path/to/runs'
# Update multiple settings
yolo settings runs_dir='/path/to/runs' tensorboard=False
# Reset settings to default values
yolo settings reset
```
### Understanding Settings
The table below overviews the adjustable settings within Ultralytics, including example values, data types, and descriptions.
| Name | Example Value | Data Type | Description |
| ------------------ | --------------------- | --------- | ---------------------------------------------------------------------------------------------------------------- |
| `settings_version` | `'0.0.4'` | `str` | Ultralytics _settings_ version (distinct from the Ultralytics [pip] version) |
| `datasets_dir` | `'/path/to/datasets'` | `str` | Directory where datasets are stored |
| `weights_dir` | `'/path/to/weights'` | `str` | Directory where model weights are stored |
| `runs_dir` | `'/path/to/runs'` | `str` | Directory where experiment runs are stored |
| `uuid` | `'a1b2c3d4'` | `str` | Unique identifier for the current settings |
| `sync` | `True` | `bool` | Option to sync analytics and crashes to [Ultralytics HUB] |
| `api_key` | `''` | `str` | [Ultralytics HUB] API Key |
| `clearml` | `True` | `bool` | Option to use [ClearML] logging |
| `comet` | `True` | `bool` | Option to use [Comet ML] for experiment tracking and visualization |
| `dvc` | `True` | `bool` | Option to use [DVC for experiment tracking] and version control |
| `hub` | `True` | `bool` | Option to use [Ultralytics HUB] integration |
| `mlflow` | `True` | `bool` | Option to use [MLFlow] for experiment tracking |
| `neptune` | `True` | `bool` | Option to use [Neptune] for experiment tracking |
| `raytune` | `True` | `bool` | Option to use [Ray Tune] for [hyperparameter tuning](https://www.ultralytics.com/glossary/hyperparameter-tuning) |
| `tensorboard` | `True` | `bool` | Option to use [TensorBoard] for visualization |
| `wandb` | `True` | `bool` | Option to use [Weights & Biases] logging |
| `vscode_msg` | `True` | `bool` | When a VS Code terminal is detected, enables a prompt to download the [Ultralytics-Snippets] extension. |
Revisit these settings as you progress through projects or experiments to ensure optimal configuration.
## FAQ
### How do I install Ultralytics using pip?
Install Ultralytics with pip using:
```bash
pip install -U ultralytics
```
This installs the latest stable release of the `ultralytics` package from [PyPI](https://pypi.org/project/ultralytics/). To install the development version directly from GitHub:
```bash
pip install git+https://github.com/ultralytics/ultralytics.git
```
Ensure the Git command-line tool is installed on your system.
### Can I install Ultralytics YOLO using conda?
Yes, install Ultralytics YOLO using conda with:
```bash
conda install -c conda-forge ultralytics
```
This method is a great alternative to pip, ensuring compatibility with other packages. For CUDA environments, install `ultralytics`, `pytorch`, and `pytorch-cuda` together to resolve conflicts:
```bash
conda install -c pytorch -c nvidia -c conda-forge pytorch torchvision pytorch-cuda=11.8 ultralytics
```
For more instructions, see the [Conda quickstart guide](guides/conda-quickstart.md).
### What are the advantages of using Docker to run Ultralytics YOLO?
Docker provides an isolated, consistent environment for Ultralytics YOLO, ensuring smooth performance across systems and avoiding local installation complexities. Official Docker images are available on [Docker Hub](https://hub.docker.com/r/ultralytics/ultralytics), with variants for GPU, CPU, ARM64, [NVIDIA Jetson](https://docs.ultralytics.com/guides/nvidia-jetson/), and Conda. To pull and run the latest image:
```bash
# Pull the latest ultralytics image from Docker Hub
sudo docker pull ultralytics/ultralytics:latest
# Run the ultralytics image in a container with GPU support
sudo docker run -it --ipc=host --runtime=nvidia --gpus all ultralytics/ultralytics:latest
```
For detailed Docker instructions, see the [Docker quickstart guide](guides/docker-quickstart.md).
### How do I clone the Ultralytics repository for development?
Clone the Ultralytics repository and set up a development environment with:
```bash
# Clone the ultralytics repository
git clone https://github.com/ultralytics/ultralytics
# Navigate to the cloned directory
cd ultralytics
# Install the package in editable mode for development
pip install -e .
```
This allows contributions to the project or experimentation with the latest source code. For details, visit the [Ultralytics GitHub repository](https://github.com/ultralytics/ultralytics).
### Why should I use Ultralytics YOLO CLI?
The Ultralytics YOLO CLI simplifies running object detection tasks without Python code, enabling single-line commands for training, validation, and prediction directly from your terminal. The basic syntax is:
```bash
yolo TASK MODE ARGS
```
For example, to train a detection model:
```bash
yolo train data=coco8.yaml model=yolo11n.pt epochs=10 lr0=0.01
```
Explore more commands and usage examples in the full [CLI Guide](usage/cli.md).
[Ultralytics HUB]: https://hub.ultralytics.com
[API Key]: https://hub.ultralytics.com/settings?tab=api+keys
[pip]: https://pypi.org/project/ultralytics/
[DVC for experiment tracking]: https://dvc.org/doc/dvclive/ml-frameworks/yolo
[Comet ML]: https://bit.ly/yolov8-readme-comet
[Ultralytics HUB]: https://hub.ultralytics.com
[ClearML]: ./integrations/clearml.md
[MLFlow]: ./integrations/mlflow.md
[Neptune]: https://neptune.ai/
[Tensorboard]: ./integrations/tensorboard.md
[Ray Tune]: ./integrations/ray-tune.md
[Weights & Biases]: ./integrations/weights-biases.md
[Ultralytics-Snippets]: ./integrations/vscode.md
---
# Source: https://raw.githubusercontent.com/ultralytics/ultralytics/main/docs/en/tasks/classify.md
---
comments: true
description: Master image classification using YOLO11. Learn to train, validate, predict, and export models efficiently.
keywords: YOLO11, image classification, AI, machine learning, pretrained models, ImageNet, model export, predict, train, validate
model_name: yolo11n-cls
---
# Image Classification
[Image classification](https://www.ultralytics.com/glossary/image-classification) is the simplest of the three tasks and involves classifying an entire image into one of a set of predefined classes.
The output of an image classifier is a single class label and a confidence score. Image classification is useful when you need to know only what class an image belongs to and don't need to know where objects of that class are located or what their exact shape is.
Watch: Explore Ultralytics YOLO Tasks: Image Classification using Ultralytics HUB
!!! tip
YOLO11 Classify models use the `-cls` suffix, i.e., `yolo11n-cls.pt`, and are pretrained on [ImageNet](https://github.com/ultralytics/ultralytics/blob/main/ultralytics/cfg/datasets/ImageNet.yaml).
## [Models](https://github.com/ultralytics/ultralytics/tree/main/ultralytics/cfg/models/11)
YOLO11 pretrained Classify models are shown here. Detect, Segment, and Pose models are pretrained on the [COCO](https://github.com/ultralytics/ultralytics/blob/main/ultralytics/cfg/datasets/coco.yaml) dataset, while Classify models are pretrained on the [ImageNet](https://github.com/ultralytics/ultralytics/blob/main/ultralytics/cfg/datasets/ImageNet.yaml) dataset.
[Models](https://github.com/ultralytics/ultralytics/tree/main/ultralytics/cfg/models) are downloaded automatically from the latest Ultralytics [release](https://github.com/ultralytics/assets/releases) on first use.
{% include "macros/yolo-cls-perf.md" %}
- **acc** values are model accuracies on the [ImageNet](https://www.image-net.org/) dataset validation set. Reproduce by `yolo val classify data=path/to/ImageNet device=0`
- **Speed** averaged over ImageNet val images using an [Amazon EC2 P4d](https://aws.amazon.com/ec2/instance-types/p4/) instance. Reproduce by `yolo val classify data=path/to/ImageNet batch=1 device=0|cpu`
## Train
Train YOLO11n-cls on the MNIST160 dataset for 100 [epochs](https://www.ultralytics.com/glossary/epoch) at image size 64. For a full list of available arguments see the [Configuration](../usage/cfg.md) page.
!!! example
=== "Python"
```python
from ultralytics import YOLO
# Load a model
model = YOLO("yolo11n-cls.yaml") # build a new model from YAML
model = YOLO("yolo11n-cls.pt") # load a pretrained model (recommended for training)
model = YOLO("yolo11n-cls.yaml").load("yolo11n-cls.pt") # build from YAML and transfer weights
# Train the model
results = model.train(data="mnist160", epochs=100, imgsz=64)
```
=== "CLI"
```bash
# Build a new model from YAML and start training from scratch
yolo classify train data=mnist160 model=yolo11n-cls.yaml epochs=100 imgsz=64
# Start training from a pretrained *.pt model
yolo classify train data=mnist160 model=yolo11n-cls.pt epochs=100 imgsz=64
# Build a new model from YAML, transfer pretrained weights to it and start training
yolo classify train data=mnist160 model=yolo11n-cls.yaml pretrained=yolo11n-cls.pt epochs=100 imgsz=64
```
!!! tip
Ultralytics YOLO classification uses [`torchvision.transforms.RandomResizedCrop`](https://docs.pytorch.org/vision/stable/generated/torchvision.transforms.RandomResizedCrop.html) for training and [`torchvision.transforms.CenterCrop`](https://docs.pytorch.org/vision/stable/generated/torchvision.transforms.CenterCrop.html) for validation and inference.
These cropping-based transforms assume square inputs and may inadvertently crop out important regions from images with extreme aspect ratios, potentially causing loss of critical visual information during training.
To preserve the full image while maintaining its proportions, consider using [`torchvision.transforms.Resize`](https://docs.pytorch.org/vision/stable/generated/torchvision.transforms.Resize.html) instead of cropping transforms.
You can implement this by customizing your augmentation pipeline through a custom `ClassificationDataset` and `ClassificationTrainer`.
```python
import torch
import torchvision.transforms as T
from ultralytics import YOLO
from ultralytics.data.dataset import ClassificationDataset
from ultralytics.models.yolo.classify import ClassificationTrainer, ClassificationValidator
class CustomizedDataset(ClassificationDataset):
"""A customized dataset class for image classification with enhanced data augmentation transforms."""
def __init__(self, root: str, args, augment: bool = False, prefix: str = ""):
"""Initialize a customized classification dataset with enhanced data augmentation transforms."""
super().__init__(root, args, augment, prefix)
# Add your custom training transforms here
train_transforms = T.Compose(
[
T.Resize((args.imgsz, args.imgsz)),
T.RandomHorizontalFlip(p=args.fliplr),
T.RandomVerticalFlip(p=args.flipud),
T.RandAugment(interpolation=T.InterpolationMode.BILINEAR),
T.ColorJitter(brightness=args.hsv_v, contrast=args.hsv_v, saturation=args.hsv_s, hue=args.hsv_h),
T.ToTensor(),
T.Normalize(mean=torch.tensor(0), std=torch.tensor(1)),
T.RandomErasing(p=args.erasing, inplace=True),
]
)
# Add your custom validation transforms here
val_transforms = T.Compose(
[
T.Resize((args.imgsz, args.imgsz)),
T.ToTensor(),
T.Normalize(mean=torch.tensor(0), std=torch.tensor(1)),
]
)
self.torch_transforms = train_transforms if augment else val_transforms
class CustomizedTrainer(ClassificationTrainer):
"""A customized trainer class for YOLO classification models with enhanced dataset handling."""
def build_dataset(self, img_path: str, mode: str = "train", batch=None):
"""Build a customized dataset for classification training and the validation during training."""
return CustomizedDataset(root=img_path, args=self.args, augment=mode == "train", prefix=mode)
class CustomizedValidator(ClassificationValidator):
"""A customized validator class for YOLO classification models with enhanced dataset handling."""
def build_dataset(self, img_path: str, mode: str = "train"):
"""Build a customized dataset for classification standalone validation."""
return CustomizedDataset(root=img_path, args=self.args, augment=mode == "train", prefix=self.args.split)
model = YOLO("yolo11n-cls.pt")
model.train(data="imagenet1000", trainer=CustomizedTrainer, epochs=10, imgsz=224, batch=64)
model.val(data="imagenet1000", validator=CustomizedValidator, imgsz=224, batch=64)
```
### Dataset format
YOLO classification dataset format can be found in detail in the [Dataset Guide](../datasets/classify/index.md).
## Val
Validate trained YOLO11n-cls model [accuracy](https://www.ultralytics.com/glossary/accuracy) on the MNIST160 dataset. No arguments are needed as the `model` retains its training `data` and arguments as model attributes.
!!! example
=== "Python"
```python
from ultralytics import YOLO
# Load a model
model = YOLO("yolo11n-cls.pt") # load an official model
model = YOLO("path/to/best.pt") # load a custom model
# Validate the model
metrics = model.val() # no arguments needed, dataset and settings remembered
metrics.top1 # top1 accuracy
metrics.top5 # top5 accuracy
```
=== "CLI"
```bash
yolo classify val model=yolo11n-cls.pt # val official model
yolo classify val model=path/to/best.pt # val custom model
```
!!! tip
As mentioned in the [training section](#train), you can handle extreme aspect ratios during training by using a custom `ClassificationTrainer`. You need to apply the same approach for consistent validation results by implementing a custom `ClassificationValidator` when calling the `val()` method. Refer to the complete code example in the [training section](#train) for implementation details.
## Predict
Use a trained YOLO11n-cls model to run predictions on images.
!!! example
=== "Python"
```python
from ultralytics import YOLO
# Load a model
model = YOLO("yolo11n-cls.pt") # load an official model
model = YOLO("path/to/best.pt") # load a custom model
# Predict with the model
results = model("https://ultralytics.com/images/bus.jpg") # predict on an image
```
=== "CLI"
```bash
yolo classify predict model=yolo11n-cls.pt source='https://ultralytics.com/images/bus.jpg' # predict with official model
yolo classify predict model=path/to/best.pt source='https://ultralytics.com/images/bus.jpg' # predict with custom model
```
See full `predict` mode details in the [Predict](../modes/predict.md) page.
## Export
Export a YOLO11n-cls model to a different format like ONNX, CoreML, etc.
!!! example
=== "Python"
```python
from ultralytics import YOLO
# Load a model
model = YOLO("yolo11n-cls.pt") # load an official model
model = YOLO("path/to/best.pt") # load a custom-trained model
# Export the model
model.export(format="onnx")
```
=== "CLI"
```bash
yolo export model=yolo11n-cls.pt format=onnx # export official model
yolo export model=path/to/best.pt format=onnx # export custom-trained model
```
Available YOLO11-cls export formats are in the table below. You can export to any format using the `format` argument, i.e., `format='onnx'` or `format='engine'`. You can predict or validate directly on exported models, i.e., `yolo predict model=yolo11n-cls.onnx`. Usage examples are shown for your model after export completes.
{% include "macros/export-table.md" %}
See full `export` details in the [Export](../modes/export.md) page.
## FAQ
### What is the purpose of YOLO11 in image classification?
YOLO11 models, such as `yolo11n-cls.pt`, are designed for efficient image classification. They assign a single class label to an entire image along with a confidence score. This is particularly useful for applications where knowing the specific class of an image is sufficient, rather than identifying the location or shape of objects within the image.
### How do I train a YOLO11 model for image classification?
To train a YOLO11 model, you can use either Python or CLI commands. For example, to train a `yolo11n-cls` model on the MNIST160 dataset for 100 epochs at an image size of 64:
!!! example
=== "Python"
```python
from ultralytics import YOLO
# Load a model
model = YOLO("yolo11n-cls.pt") # load a pretrained model (recommended for training)
# Train the model
results = model.train(data="mnist160", epochs=100, imgsz=64)
```
=== "CLI"
```bash
yolo classify train data=mnist160 model=yolo11n-cls.pt epochs=100 imgsz=64
```
For more configuration options, visit the [Configuration](../usage/cfg.md) page.
### Where can I find pretrained YOLO11 classification models?
Pretrained YOLO11 classification models can be found in the [Models](https://github.com/ultralytics/ultralytics/tree/main/ultralytics/cfg/models/11) section. Models like `yolo11n-cls.pt`, `yolo11s-cls.pt`, `yolo11m-cls.pt`, etc., are pretrained on the [ImageNet](https://github.com/ultralytics/ultralytics/blob/main/ultralytics/cfg/datasets/ImageNet.yaml) dataset and can be easily downloaded and used for various image classification tasks.
### How can I export a trained YOLO11 model to different formats?
You can export a trained YOLO11 model to various formats using Python or CLI commands. For instance, to export a model to ONNX format:
!!! example
=== "Python"
```python
from ultralytics import YOLO
# Load a model
model = YOLO("yolo11n-cls.pt") # load the trained model
# Export the model to ONNX
model.export(format="onnx")
```
=== "CLI"
```bash
yolo export model=yolo11n-cls.pt format=onnx # export the trained model to ONNX format
```
For detailed export options, refer to the [Export](../modes/export.md) page.
### How do I validate a trained YOLO11 classification model?
To validate a trained model's accuracy on a dataset like MNIST160, you can use the following Python or CLI commands:
!!! example
=== "Python"
```python
from ultralytics import YOLO
# Load a model
model = YOLO("yolo11n-cls.pt") # load the trained model
# Validate the model
metrics = model.val() # no arguments needed, uses the dataset and settings from training
metrics.top1 # top1 accuracy
metrics.top5 # top5 accuracy
```
=== "CLI"
```bash
yolo classify val model=yolo11n-cls.pt # validate the trained model
```
For more information, visit the [Validate](#val) section.
---
# Source: https://raw.githubusercontent.com/ultralytics/ultralytics/main/docs/en/tasks/detect.md
---
comments: true
description: Learn about object detection with YOLO11. Explore pretrained models, training, validation, prediction, and export details for efficient object recognition.
keywords: object detection, YOLO11, pretrained models, training, validation, prediction, export, machine learning, computer vision
---
# Object Detection
[Object detection](https://www.ultralytics.com/glossary/object-detection) is a task that involves identifying the location and class of objects in an image or video stream.
The output of an object detector is a set of bounding boxes that enclose the objects in the image, along with class labels and confidence scores for each box. Object detection is a good choice when you need to identify objects of interest in a scene, but don't need to know exactly where the object is or its exact shape.
Watch: Object Detection with Pretrained Ultralytics YOLO Model.
!!! tip
YOLO11 Detect models are the default YOLO11 models, i.e., `yolo11n.pt`, and are pretrained on [COCO](https://github.com/ultralytics/ultralytics/blob/main/ultralytics/cfg/datasets/coco.yaml).
## [Models](https://github.com/ultralytics/ultralytics/tree/main/ultralytics/cfg/models/11)
YOLO11 pretrained Detect models are shown here. Detect, Segment, and Pose models are pretrained on the [COCO](https://github.com/ultralytics/ultralytics/blob/main/ultralytics/cfg/datasets/coco.yaml) dataset, while Classify models are pretrained on the [ImageNet](https://github.com/ultralytics/ultralytics/blob/main/ultralytics/cfg/datasets/ImageNet.yaml) dataset.
[Models](https://github.com/ultralytics/ultralytics/tree/main/ultralytics/cfg/models) are downloaded automatically from the latest Ultralytics [release](https://github.com/ultralytics/assets/releases) on first use.
{% include "macros/yolo-det-perf.md" %}
- **mAPval** values are for single-model single-scale on [COCO val2017](https://cocodataset.org/) dataset. Reproduce by `yolo val detect data=coco.yaml device=0`
- **Speed** averaged over COCO val images using an [Amazon EC2 P4d](https://aws.amazon.com/ec2/instance-types/p4/) instance. Reproduce by `yolo val detect data=coco.yaml batch=1 device=0|cpu`
## Train
Train YOLO11n on the COCO8 dataset for 100 [epochs](https://www.ultralytics.com/glossary/epoch) at image size 640. For a full list of available arguments see the [Configuration](../usage/cfg.md) page.
!!! example
=== "Python"
```python
from ultralytics import YOLO
# Load a model
model = YOLO("yolo11n.yaml") # build a new model from YAML
model = YOLO("yolo11n.pt") # load a pretrained model (recommended for training)
model = YOLO("yolo11n.yaml").load("yolo11n.pt") # build from YAML and transfer weights
# Train the model
results = model.train(data="coco8.yaml", epochs=100, imgsz=640)
```
=== "CLI"
```bash
# Build a new model from YAML and start training from scratch
yolo detect train data=coco8.yaml model=yolo11n.yaml epochs=100 imgsz=640
# Start training from a pretrained *.pt model
yolo detect train data=coco8.yaml model=yolo11n.pt epochs=100 imgsz=640
# Build a new model from YAML, transfer pretrained weights to it and start training
yolo detect train data=coco8.yaml model=yolo11n.yaml pretrained=yolo11n.pt epochs=100 imgsz=640
```
### Dataset format
YOLO detection dataset format can be found in detail in the [Dataset Guide](../datasets/detect/index.md). To convert your existing dataset from other formats (like COCO etc.) to YOLO format, please use [JSON2YOLO](https://github.com/ultralytics/JSON2YOLO) tool by Ultralytics.
## Val
Validate trained YOLO11n model [accuracy](https://www.ultralytics.com/glossary/accuracy) on the COCO8 dataset. No arguments are needed as the `model` retains its training `data` and arguments as model attributes.
!!! example
=== "Python"
```python
from ultralytics import YOLO
# Load a model
model = YOLO("yolo11n.pt") # load an official model
model = YOLO("path/to/best.pt") # load a custom model
# Validate the model
metrics = model.val() # no arguments needed, dataset and settings remembered
metrics.box.map # map50-95
metrics.box.map50 # map50
metrics.box.map75 # map75
metrics.box.maps # a list containing mAP50-95 for each category
```
=== "CLI"
```bash
yolo detect val model=yolo11n.pt # val official model
yolo detect val model=path/to/best.pt # val custom model
```
## Predict
Use a trained YOLO11n model to run predictions on images.
!!! example
=== "Python"
```python
from ultralytics import YOLO
# Load a model
model = YOLO("yolo11n.pt") # load an official model
model = YOLO("path/to/best.pt") # load a custom model
# Predict with the model
results = model("https://ultralytics.com/images/bus.jpg") # predict on an image
# Access the results
for result in results:
xywh = result.boxes.xywh # center-x, center-y, width, height
xywhn = result.boxes.xywhn # normalized
xyxy = result.boxes.xyxy # top-left-x, top-left-y, bottom-right-x, bottom-right-y
xyxyn = result.boxes.xyxyn # normalized
names = [result.names[cls.item()] for cls in result.boxes.cls.int()] # class name of each box
confs = result.boxes.conf # confidence score of each box
```
=== "CLI"
```bash
yolo detect predict model=yolo11n.pt source='https://ultralytics.com/images/bus.jpg' # predict with official model
yolo detect predict model=path/to/best.pt source='https://ultralytics.com/images/bus.jpg' # predict with custom model
```
See full `predict` mode details in the [Predict](../modes/predict.md) page.
## Export
Export a YOLO11n model to a different format like ONNX, CoreML, etc.
!!! example
=== "Python"
```python
from ultralytics import YOLO
# Load a model
model = YOLO("yolo11n.pt") # load an official model
model = YOLO("path/to/best.pt") # load a custom-trained model
# Export the model
model.export(format="onnx")
```
=== "CLI"
```bash
yolo export model=yolo11n.pt format=onnx # export official model
yolo export model=path/to/best.pt format=onnx # export custom-trained model
```
Available YOLO11 export formats are in the table below. You can export to any format using the `format` argument, i.e., `format='onnx'` or `format='engine'`. You can predict or validate directly on exported models, i.e., `yolo predict model=yolo11n.onnx`. Usage examples are shown for your model after export completes.
{% include "macros/export-table.md" %}
See full `export` details in the [Export](../modes/export.md) page.
## FAQ
### How do I train a YOLO11 model on my custom dataset?
Training a YOLO11 model on a custom dataset involves a few steps:
1. **Prepare the Dataset**: Ensure your dataset is in the YOLO format. For guidance, refer to our [Dataset Guide](../datasets/detect/index.md).
2. **Load the Model**: Use the Ultralytics YOLO library to load a pretrained model or create a new model from a YAML file.
3. **Train the Model**: Execute the `train` method in Python or the `yolo detect train` command in CLI.
!!! example
=== "Python"
```python
from ultralytics import YOLO
# Load a pretrained model
model = YOLO("yolo11n.pt")
# Train the model on your custom dataset
model.train(data="my_custom_dataset.yaml", epochs=100, imgsz=640)
```
=== "CLI"
```bash
yolo detect train data=my_custom_dataset.yaml model=yolo11n.pt epochs=100 imgsz=640
```
For detailed configuration options, visit the [Configuration](../usage/cfg.md) page.
### What pretrained models are available in YOLO11?
Ultralytics YOLO11 offers various pretrained models for object detection, segmentation, and pose estimation. These models are pretrained on the COCO dataset or ImageNet for classification tasks. Here are some of the available models:
- [YOLO11n](https://github.com/ultralytics/assets/releases/download/v8.3.0/yolo11n.pt)
- [YOLO11s](https://github.com/ultralytics/assets/releases/download/v8.3.0/yolo11s.pt)
- [YOLO11m](https://github.com/ultralytics/assets/releases/download/v8.3.0/yolo11m.pt)
- [YOLO11l](https://github.com/ultralytics/assets/releases/download/v8.3.0/yolo11l.pt)
- [YOLO11x](https://github.com/ultralytics/assets/releases/download/v8.3.0/yolo11x.pt)
For a detailed list and performance metrics, refer to the [Models](https://github.com/ultralytics/ultralytics/tree/main/ultralytics/cfg/models/11) section.
### How can I validate the accuracy of my trained YOLO model?
To validate the accuracy of your trained YOLO11 model, you can use the `.val()` method in Python or the `yolo detect val` command in CLI. This will provide metrics like mAP50-95, mAP50, and more.
!!! example
=== "Python"
```python
from ultralytics import YOLO
# Load the model
model = YOLO("path/to/best.pt")
# Validate the model
metrics = model.val()
print(metrics.box.map) # mAP50-95
```
=== "CLI"
```bash
yolo detect val model=path/to/best.pt
```
For more validation details, visit the [Val](../modes/val.md) page.
### What formats can I export a YOLO11 model to?
Ultralytics YOLO11 allows exporting models to various formats such as [ONNX](https://www.ultralytics.com/glossary/onnx-open-neural-network-exchange), [TensorRT](https://www.ultralytics.com/glossary/tensorrt), [CoreML](https://docs.ultralytics.com/integrations/coreml/), and more to ensure compatibility across different platforms and devices.
!!! example
=== "Python"
```python
from ultralytics import YOLO
# Load the model
model = YOLO("yolo11n.pt")
# Export the model to ONNX format
model.export(format="onnx")
```
=== "CLI"
```bash
yolo export model=yolo11n.pt format=onnx
```
Check the full list of supported formats and instructions on the [Export](../modes/export.md) page.
### Why should I use Ultralytics YOLO11 for object detection?
Ultralytics YOLO11 is designed to offer state-of-the-art performance for object detection, segmentation, and pose estimation. Here are some key advantages:
1. **Pretrained Models**: Utilize models pretrained on popular datasets like [COCO](https://docs.ultralytics.com/datasets/detect/coco/) and [ImageNet](https://docs.ultralytics.com/datasets/classify/imagenet/) for faster development.
2. **High Accuracy**: Achieves impressive mAP scores, ensuring reliable object detection.
3. **Speed**: Optimized for [real-time inference](https://www.ultralytics.com/glossary/real-time-inference), making it ideal for applications requiring swift processing.
4. **Flexibility**: Export models to various formats like ONNX and TensorRT for deployment across multiple platforms.
Explore our [Blog](https://www.ultralytics.com/blog) for use cases and success stories showcasing YOLO11 in action.
---
# Source: https://raw.githubusercontent.com/ultralytics/ultralytics/main/docs/en/tasks/index.md
---
comments: true
description: Explore Ultralytics YOLO11 for detection, segmentation, classification, OBB, and pose estimation with high accuracy and speed. Learn how to apply each task.
keywords: Ultralytics YOLO11, detection, segmentation, classification, oriented object detection, pose estimation, computer vision, AI framework
---
# Computer Vision Tasks Supported by Ultralytics YOLO11
Ultralytics YOLO11 is a versatile AI framework that supports multiple [computer vision](https://www.ultralytics.com/blog/everything-you-need-to-know-about-computer-vision-in-2025) **tasks**. The framework can be used to perform [detection](detect.md), [segmentation](segment.md), [OBB](obb.md), [classification](classify.md), and [pose](pose.md) estimation. Each of these tasks has a different objective and use case, allowing you to address various computer vision challenges with a single framework.
## [Detection](detect.md)
Detection is the primary task supported by YOLO11. It involves identifying objects in an image or video frame and drawing bounding boxes around them. The detected objects are classified into different categories based on their features. YOLO11 can detect multiple objects in a single image or video frame with high [accuracy](https://www.ultralytics.com/glossary/accuracy) and speed, making it ideal for real-time applications like [surveillance systems](https://www.ultralytics.com/blog/shattering-the-surveillance-status-quo-with-vision-ai) and [autonomous vehicles](https://www.ultralytics.com/solutions/ai-in-automotive).
[Detection Examples](detect.md){ .md-button }
## [Image segmentation](segment.md)
Segmentation takes object detection further by producing pixel-level masks for each object. This precision is useful for applications such as [medical imaging](https://www.ultralytics.com/blog/ai-and-radiology-a-new-era-of-precision-and-efficiency), [agricultural analysis](https://www.ultralytics.com/blog/from-farm-to-table-how-ai-drives-innovation-in-agriculture), and [manufacturing quality control](https://www.ultralytics.com/blog/improving-manufacturing-with-computer-vision).
[Segmentation Examples](segment.md){ .md-button }
## [Classification](classify.md)
Classification involves categorizing entire images based on their content. This task is essential for applications like [product categorization](https://www.ultralytics.com/blog/understanding-vision-language-models-and-their-applications) in e-commerce, [content moderation](https://www.ultralytics.com/blog/ai-in-document-authentication-with-image-segmentation), and [wildlife monitoring](https://www.ultralytics.com/blog/monitoring-animal-behavior-using-ultralytics-yolov8).
[Classification Examples](classify.md){ .md-button }
## [Pose estimation](pose.md)
Pose estimation detects specific keypoints in images or video frames to track movements or estimate poses. These keypoints can represent human joints, facial features, or other significant points of interest. YOLO11 excels at keypoint detection with high accuracy and speed, making it valuable for [fitness applications](https://www.ultralytics.com/blog/ai-in-our-day-to-day-health-and-fitness), [sports analytics](https://www.ultralytics.com/blog/exploring-the-applications-of-computer-vision-in-sports), and [human-computer interaction](https://www.ultralytics.com/blog/custom-training-ultralytics-yolo11-for-dog-pose-estimation).
[Pose Examples](pose.md){ .md-button }
## [OBB](obb.md)
Oriented Bounding Box (OBB) detection enhances traditional object detection by adding an orientation angle to better locate rotated objects. This capability is particularly valuable for [aerial imagery analysis](https://www.ultralytics.com/blog/using-computer-vision-to-analyze-satellite-imagery), [document processing](https://www.ultralytics.com/blog/using-ultralytics-yolo11-for-smart-document-analysis), and [industrial applications](https://www.ultralytics.com/blog/yolo11-enhancing-efficiency-conveyor-automation) where objects appear at various angles. YOLO11 delivers high accuracy and speed for detecting rotated objects in diverse scenarios.
[Oriented Detection](obb.md){ .md-button }
## Conclusion
Ultralytics YOLO11 supports multiple computer vision tasks, including detection, segmentation, classification, oriented object detection, and keypoint detection. Each task addresses specific needs in the computer vision landscape, from basic object identification to detailed pose analysis. By understanding the capabilities and applications of each task, you can select the most appropriate approach for your specific computer vision challenges and leverage YOLO11's powerful features to build effective solutions.
## FAQ
### What computer vision tasks can Ultralytics YOLO11 perform?
Ultralytics YOLO11 is a versatile AI framework capable of performing various computer vision tasks with high accuracy and speed. These tasks include:
- **[Object Detection](detect.md):** Identifying and localizing objects in images or video frames by drawing bounding boxes around them.
- **[Image segmentation](segment.md):** Segmenting images into different regions based on their content, useful for applications like medical imaging.
- **[Classification](classify.md):** Categorizing entire images based on their content.
- **[Pose estimation](pose.md):** Detecting specific keypoints in an image or video frame to track movements or poses.
- **[Oriented Object Detection (OBB)](obb.md):** Detecting rotated objects with an added orientation angle for enhanced accuracy.
### How do I use Ultralytics YOLO11 for object detection?
To use Ultralytics YOLO11 for object detection, follow these steps:
1. Prepare your dataset in the appropriate format.
2. Train the YOLO11 model using the detection task.
3. Use the model to make predictions by feeding in new images or video frames.
!!! example
=== "Python"
```python
from ultralytics import YOLO
# Load a pretrained YOLO model (adjust model type as needed)
model = YOLO("yolo11n.pt") # n, s, m, l, x versions available
# Perform object detection on an image
results = model.predict(source="image.jpg") # Can also use video, directory, URL, etc.
# Display the results
results[0].show() # Show the first image results
```
=== "CLI"
```bash
# Run YOLO detection from the command line
yolo detect model=yolo11n.pt source="image.jpg" # Adjust model and source as needed
```
For more detailed instructions, check out our [detection examples](detect.md).
### What are the benefits of using YOLO11 for segmentation tasks?
Using YOLO11 for segmentation tasks provides several advantages:
1. **High Accuracy:** The segmentation task provides precise, pixel-level masks.
2. **Speed:** YOLO11 is optimized for real-time applications, offering quick processing even for high-resolution images.
3. **Multiple Applications:** It is ideal for medical imaging, autonomous driving, and other applications requiring detailed image segmentation.
Learn more about the benefits and use cases of YOLO11 for segmentation in the [image segmentation section](segment.md).
### Can Ultralytics YOLO11 handle pose estimation and keypoint detection?
Yes, Ultralytics YOLO11 can effectively perform pose estimation and keypoint detection with high accuracy and speed. This feature is particularly useful for tracking movements in sports analytics, healthcare, and human-computer interaction applications. YOLO11 detects keypoints in an image or video frame, allowing for precise pose estimation.
For more details and implementation tips, visit our [pose estimation examples](pose.md).
### Why should I choose Ultralytics YOLO11 for oriented object detection (OBB)?
Oriented Object Detection (OBB) with YOLO11 provides enhanced [precision](https://www.ultralytics.com/glossary/precision) by detecting objects with an additional angle parameter. This feature is beneficial for applications requiring accurate localization of rotated objects, such as aerial imagery analysis and warehouse automation.
- **Increased Precision:** The angle component reduces false positives for rotated objects.
- **Versatile Applications:** Useful for tasks in geospatial analysis, robotics, etc.
Check out the [Oriented Object Detection section](obb.md) for more details and examples.
---
# Source: https://raw.githubusercontent.com/ultralytics/ultralytics/main/docs/en/tasks/obb.md
---
comments: true
description: Discover how to detect objects with rotation for higher precision using YOLO11 OBB models. Learn, train, validate, and export OBB models effortlessly.
keywords: Oriented Bounding Boxes, OBB, Object Detection, YOLO11, Ultralytics, DOTAv1, Model Training, Model Export, AI, Machine Learning
model_name: yolo11n-obb
---
# Oriented Bounding Boxes [Object Detection](https://www.ultralytics.com/glossary/object-detection)
Oriented object detection goes a step further than standard object detection by introducing an extra angle to locate objects more accurately in an image.
The output of an oriented object detector is a set of rotated bounding boxes that precisely enclose the objects in the image, along with class labels and confidence scores for each box. Oriented bounding boxes are particularly useful when objects appear at various angles, such as in aerial imagery, where traditional axis-aligned bounding boxes may include unnecessary background.
!!! tip
YOLO11 OBB models use the `-obb` suffix, i.e., `yolo11n-obb.pt`, and are pretrained on [DOTAv1](https://github.com/ultralytics/ultralytics/blob/main/ultralytics/cfg/datasets/DOTAv1.yaml).
Watch: Object Detection using Ultralytics YOLO Oriented Bounding Boxes (YOLO-OBB)
## Visual Samples
| Ships Detection using OBB | Vehicle Detection using OBB |
| :------------------------------------------------------------------------------------------------------------------: | :----------------------------------------------------------------------------------------------------------------------: |
|  |  |
## [Models](https://github.com/ultralytics/ultralytics/tree/main/ultralytics/cfg/models/11)
YOLO11 pretrained OBB models are shown here, which are pretrained on the [DOTAv1](https://github.com/ultralytics/ultralytics/blob/main/ultralytics/cfg/datasets/DOTAv1.yaml) dataset.
[Models](https://github.com/ultralytics/ultralytics/tree/main/ultralytics/cfg/models) download automatically from the latest Ultralytics [release](https://github.com/ultralytics/assets/releases) on first use.
{% include "macros/yolo-obb-perf.md" %}
- **mAPtest** values are for single-model multiscale on [DOTAv1](https://captain-whu.github.io/DOTA/index.html) dataset. Reproduce by `yolo val obb data=DOTAv1.yaml device=0 split=test` and submit merged results to [DOTA evaluation](https://captain-whu.github.io/DOTA/evaluation.html).
- **Speed** averaged over DOTAv1 val images using an [Amazon EC2 P4d](https://aws.amazon.com/ec2/instance-types/p4/) instance. Reproduce by `yolo val obb data=DOTAv1.yaml batch=1 device=0|cpu`
## Train
Train YOLO11n-obb on the DOTA8 dataset for 100 [epochs](https://www.ultralytics.com/glossary/epoch) at image size 640. For a full list of available arguments see the [Configuration](../usage/cfg.md) page.
!!! note
OBB angles are constrained to the range **0–90 degrees** (exclusive of 90). Angles of 90 degrees or greater are not supported.
!!! example
=== "Python"
```python
from ultralytics import YOLO
# Load a model
model = YOLO("yolo11n-obb.yaml") # build a new model from YAML
model = YOLO("yolo11n-obb.pt") # load a pretrained model (recommended for training)
model = YOLO("yolo11n-obb.yaml").load("yolo11n.pt") # build from YAML and transfer weights
# Train the model
results = model.train(data="dota8.yaml", epochs=100, imgsz=640)
```
=== "CLI"
```bash
# Build a new model from YAML and start training from scratch
yolo obb train data=dota8.yaml model=yolo11n-obb.yaml epochs=100 imgsz=640
# Start training from a pretrained *.pt model
yolo obb train data=dota8.yaml model=yolo11n-obb.pt epochs=100 imgsz=640
# Build a new model from YAML, transfer pretrained weights to it and start training
yolo obb train data=dota8.yaml model=yolo11n-obb.yaml pretrained=yolo11n-obb.pt epochs=100 imgsz=640
```
Watch: How to Train Ultralytics YOLO-OBB (Oriented Bounding Boxes) Models on DOTA Dataset using Ultralytics HUB
### Dataset format
OBB dataset format can be found in detail in the [Dataset Guide](../datasets/obb/index.md). The YOLO OBB format designates bounding boxes by their four corner points with coordinates normalized between 0 and 1, following this structure:
```
class_index x1 y1 x2 y2 x3 y3 x4 y4
```
Internally, YOLO processes losses and outputs in the `xywhr` format, which represents the [bounding box](https://www.ultralytics.com/glossary/bounding-box)'s center point (xy), width, height, and rotation.
## Val
Validate trained YOLO11n-obb model [accuracy](https://www.ultralytics.com/glossary/accuracy) on the DOTA8 dataset. No arguments are needed as the `model` retains its training `data` and arguments as model attributes.
!!! example
=== "Python"
```python
from ultralytics import YOLO
# Load a model
model = YOLO("yolo11n-obb.pt") # load an official model
model = YOLO("path/to/best.pt") # load a custom model
# Validate the model
metrics = model.val(data="dota8.yaml") # no arguments needed, dataset and settings remembered
metrics.box.map # map50-95(B)
metrics.box.map50 # map50(B)
metrics.box.map75 # map75(B)
metrics.box.maps # a list containing mAP50-95(B) for each category
```
=== "CLI"
```bash
yolo obb val model=yolo11n-obb.pt data=dota8.yaml # val official model
yolo obb val model=path/to/best.pt data=path/to/data.yaml # val custom model
```
## Predict
Use a trained YOLO11n-obb model to run predictions on images.
!!! example
=== "Python"
```python
from ultralytics import YOLO
# Load a model
model = YOLO("yolo11n-obb.pt") # load an official model
model = YOLO("path/to/best.pt") # load a custom model
# Predict with the model
results = model("https://ultralytics.com/images/boats.jpg") # predict on an image
# Access the results
for result in results:
xywhr = result.obb.xywhr # center-x, center-y, width, height, angle (radians)
xyxyxyxy = result.obb.xyxyxyxy # polygon format with 4-points
names = [result.names[cls.item()] for cls in result.obb.cls.int()] # class name of each box
confs = result.obb.conf # confidence score of each box
```
=== "CLI"
```bash
yolo obb predict model=yolo11n-obb.pt source='https://ultralytics.com/images/boats.jpg' # predict with official model
yolo obb predict model=path/to/best.pt source='https://ultralytics.com/images/boats.jpg' # predict with custom model
```
Watch: How to Detect and Track Storage Tanks using Ultralytics YOLO-OBB | Oriented Bounding Boxes | DOTA
See full `predict` mode details in the [Predict](../modes/predict.md) page.
## Export
Export a YOLO11n-obb model to a different format like ONNX, CoreML, etc.
!!! example
=== "Python"
```python
from ultralytics import YOLO
# Load a model
model = YOLO("yolo11n-obb.pt") # load an official model
model = YOLO("path/to/best.pt") # load a custom-trained model
# Export the model
model.export(format="onnx")
```
=== "CLI"
```bash
yolo export model=yolo11n-obb.pt format=onnx # export official model
yolo export model=path/to/best.pt format=onnx # export custom-trained model
```
Available YOLO11-obb export formats are in the table below. You can export to any format using the `format` argument, i.e., `format='onnx'` or `format='engine'`. You can predict or validate directly on exported models, i.e., `yolo predict model=yolo11n-obb.onnx`. Usage examples are shown for your model after export completes.
{% include "macros/export-table.md" %}
See full `export` details in the [Export](../modes/export.md) page.
## Real-World Applications
OBB detection with YOLO11 has numerous practical applications across various industries:
- **Maritime and Port Management**: Detecting ships and vessels at various angles for [fleet management](https://www.ultralytics.com/blog/how-to-use-ultralytics-yolo11-for-obb-object-detection) and monitoring.
- **Urban Planning**: Analyzing buildings and infrastructure from aerial imagery.
- **Agriculture**: Monitoring crops and agricultural equipment from drone footage.
- **Energy Sector**: Inspecting solar panels and wind turbines at different orientations.
- **Transportation**: Tracking vehicles on roads and in parking lots from various perspectives.
These applications benefit from OBB's ability to precisely fit objects at any angle, providing more accurate detection than traditional bounding boxes.
## FAQ
### What are Oriented Bounding Boxes (OBB) and how do they differ from regular bounding boxes?
Oriented Bounding Boxes (OBB) include an additional angle to enhance object localization accuracy in images. Unlike regular bounding boxes, which are axis-aligned rectangles, OBBs can rotate to fit the orientation of the object better. This is particularly useful for applications requiring precise object placement, such as aerial or satellite imagery ([Dataset Guide](../datasets/obb/index.md)).
### How do I train a YOLO11n-obb model using a custom dataset?
To train a YOLO11n-obb model with a custom dataset, follow the example below using Python or CLI:
!!! example
=== "Python"
```python
from ultralytics import YOLO
# Load a pretrained model
model = YOLO("yolo11n-obb.pt")
# Train the model
results = model.train(data="path/to/custom_dataset.yaml", epochs=100, imgsz=640)
```
=== "CLI"
```bash
yolo obb train data=path/to/custom_dataset.yaml model=yolo11n-obb.pt epochs=100 imgsz=640
```
For more training arguments, check the [Configuration](../usage/cfg.md) section.
### What datasets can I use for training YOLO11-OBB models?
YOLO11-OBB models are pretrained on datasets like [DOTAv1](https://github.com/ultralytics/ultralytics/blob/main/ultralytics/cfg/datasets/DOTAv1.yaml) but you can use any dataset formatted for OBB. Detailed information on OBB dataset formats can be found in the [Dataset Guide](../datasets/obb/index.md).
### How can I export a YOLO11-OBB model to ONNX format?
Exporting a YOLO11-OBB model to ONNX format is straightforward using either Python or CLI:
!!! example
=== "Python"
```python
from ultralytics import YOLO
# Load a model
model = YOLO("yolo11n-obb.pt")
# Export the model
model.export(format="onnx")
```
=== "CLI"
```bash
yolo export model=yolo11n-obb.pt format=onnx
```
For more export formats and details, refer to the [Export](../modes/export.md) page.
### How do I validate the accuracy of a YOLO11n-obb model?
To validate a YOLO11n-obb model, you can use Python or CLI commands as shown below:
!!! example
=== "Python"
```python
from ultralytics import YOLO
# Load a model
model = YOLO("yolo11n-obb.pt")
# Validate the model
metrics = model.val(data="dota8.yaml")
```
=== "CLI"
```bash
yolo obb val model=yolo11n-obb.pt data=dota8.yaml
```
See full validation details in the [Val](../modes/val.md) section.
---
# Source: https://raw.githubusercontent.com/ultralytics/ultralytics/main/docs/en/tasks/pose.md
---
comments: true
description: Discover how to use YOLO11 for pose estimation tasks. Learn about model training, validation, prediction, and exporting in various formats.
keywords: pose estimation, YOLO11, Ultralytics, keypoints, model training, image recognition, deep learning, human pose detection, computer vision, real-time tracking
model_name: yolo11n-pose
---
# Pose Estimation
Pose estimation is a task that involves identifying the location of specific points in an image, usually referred to as keypoints. The keypoints can represent various parts of the object such as joints, landmarks, or other distinctive features. The locations of the keypoints are usually represented as a set of 2D `[x, y]` or 3D `[x, y, visible]` coordinates.
The output of a pose estimation model is a set of points that represent the keypoints on an object in the image, usually along with the confidence scores for each point. Pose estimation is a good choice when you need to identify specific parts of an object in a scene, and their location in relation to each other.
Watch: Ultralytics YOLO11 Pose Estimation Tutorial | Real-Time Object Tracking and Human Pose Detection
!!! tip
YOLO11 _pose_ models use the `-pose` suffix, i.e., `yolo11n-pose.pt`. These models are trained on the [COCO keypoints](https://github.com/ultralytics/ultralytics/blob/main/ultralytics/cfg/datasets/coco-pose.yaml) dataset and are suitable for a variety of pose estimation tasks.
In the default YOLO11 pose model, there are 17 keypoints, each representing a different part of the human body. Here is the mapping of each index to its respective body joint:
0. Nose
1. Left Eye
2. Right Eye
3. Left Ear
4. Right Ear
5. Left Shoulder
6. Right Shoulder
7. Left Elbow
8. Right Elbow
9. Left Wrist
10. Right Wrist
11. Left Hip
12. Right Hip
13. Left Knee
14. Right Knee
15. Left Ankle
16. Right Ankle
## [Models](https://github.com/ultralytics/ultralytics/tree/main/ultralytics/cfg/models/11)
Ultralytics YOLO11 pretrained Pose models are shown here. Detect, Segment and Pose models are pretrained on the [COCO](https://github.com/ultralytics/ultralytics/blob/main/ultralytics/cfg/datasets/coco.yaml) dataset, while Classify models are pretrained on the [ImageNet](https://github.com/ultralytics/ultralytics/blob/main/ultralytics/cfg/datasets/ImageNet.yaml) dataset.
[Models](https://github.com/ultralytics/ultralytics/tree/main/ultralytics/cfg/models) download automatically from the latest Ultralytics [release](https://github.com/ultralytics/assets/releases) on first use.
{% include "macros/yolo-pose-perf.md" %}
- **mAPval** values are for single-model single-scale on [COCO Keypoints val2017](https://cocodataset.org/) dataset. Reproduce by `yolo val pose data=coco-pose.yaml device=0`
- **Speed** averaged over COCO val images using an [Amazon EC2 P4d](https://aws.amazon.com/ec2/instance-types/p4/) instance. Reproduce by `yolo val pose data=coco-pose.yaml batch=1 device=0|cpu`
## Train
Train a YOLO11-pose model on the COCO8-pose dataset. The [COCO8-pose dataset](https://docs.ultralytics.com/datasets/pose/coco8-pose/) is a small sample dataset that's perfect for testing and debugging your pose estimation models.
!!! example
=== "Python"
```python
from ultralytics import YOLO
# Load a model
model = YOLO("yolo11n-pose.yaml") # build a new model from YAML
model = YOLO("yolo11n-pose.pt") # load a pretrained model (recommended for training)
model = YOLO("yolo11n-pose.yaml").load("yolo11n-pose.pt") # build from YAML and transfer weights
# Train the model
results = model.train(data="coco8-pose.yaml", epochs=100, imgsz=640)
```
=== "CLI"
```bash
# Build a new model from YAML and start training from scratch
yolo pose train data=coco8-pose.yaml model=yolo11n-pose.yaml epochs=100 imgsz=640
# Start training from a pretrained *.pt model
yolo pose train data=coco8-pose.yaml model=yolo11n-pose.pt epochs=100 imgsz=640
# Build a new model from YAML, transfer pretrained weights to it and start training
yolo pose train data=coco8-pose.yaml model=yolo11n-pose.yaml pretrained=yolo11n-pose.pt epochs=100 imgsz=640
```
### Dataset format
YOLO pose dataset format can be found in detail in the [Dataset Guide](../datasets/pose/index.md). To convert your existing dataset from other formats (like [COCO](https://docs.ultralytics.com/datasets/pose/coco/) etc.) to YOLO format, please use the [JSON2YOLO](https://github.com/ultralytics/JSON2YOLO) tool by Ultralytics.
For custom pose estimation tasks, you can also explore specialized datasets like [Tiger-Pose](https://docs.ultralytics.com/datasets/pose/tiger-pose/) for animal pose estimation, [Hand Keypoints](https://docs.ultralytics.com/datasets/pose/hand-keypoints/) for hand tracking, or [Dog-Pose](https://docs.ultralytics.com/datasets/pose/dog-pose/) for canine pose analysis.
## Val
Validate trained YOLO11n-pose model [accuracy](https://www.ultralytics.com/glossary/accuracy) on the COCO8-pose dataset. No arguments are needed as the `model` retains its training `data` and arguments as model attributes.
!!! example
=== "Python"
```python
from ultralytics import YOLO
# Load a model
model = YOLO("yolo11n-pose.pt") # load an official model
model = YOLO("path/to/best.pt") # load a custom model
# Validate the model
metrics = model.val() # no arguments needed, dataset and settings remembered
metrics.box.map # map50-95
metrics.box.map50 # map50
metrics.box.map75 # map75
metrics.box.maps # a list containing mAP50-95 for each category
metrics.pose.map # map50-95(P)
metrics.pose.map50 # map50(P)
metrics.pose.map75 # map75(P)
metrics.pose.maps # a list containing mAP50-95(P) for each category
```
=== "CLI"
```bash
yolo pose val model=yolo11n-pose.pt # val official model
yolo pose val model=path/to/best.pt # val custom model
```
## Predict
Use a trained YOLO11n-pose model to run predictions on images. The [predict mode](https://docs.ultralytics.com/modes/predict/) allows you to perform inference on images, videos, or real-time streams.
!!! example
=== "Python"
```python
from ultralytics import YOLO
# Load a model
model = YOLO("yolo11n-pose.pt") # load an official model
model = YOLO("path/to/best.pt") # load a custom model
# Predict with the model
results = model("https://ultralytics.com/images/bus.jpg") # predict on an image
# Access the results
for result in results:
xy = result.keypoints.xy # x and y coordinates
xyn = result.keypoints.xyn # normalized
kpts = result.keypoints.data # x, y, visibility (if available)
```
=== "CLI"
```bash
yolo pose predict model=yolo11n-pose.pt source='https://ultralytics.com/images/bus.jpg' # predict with official model
yolo pose predict model=path/to/best.pt source='https://ultralytics.com/images/bus.jpg' # predict with custom model
```
See full `predict` mode details in the [Predict](../modes/predict.md) page.
## Export
Export a YOLO11n Pose model to a different format like ONNX, CoreML, etc. This allows you to deploy your model on various platforms and devices for [real-time inference](https://www.ultralytics.com/glossary/real-time-inference).
!!! example
=== "Python"
```python
from ultralytics import YOLO
# Load a model
model = YOLO("yolo11n-pose.pt") # load an official model
model = YOLO("path/to/best.pt") # load a custom-trained model
# Export the model
model.export(format="onnx")
```
=== "CLI"
```bash
yolo export model=yolo11n-pose.pt format=onnx # export official model
yolo export model=path/to/best.pt format=onnx # export custom-trained model
```
Available YOLO11-pose export formats are in the table below. You can export to any format using the `format` argument, i.e., `format='onnx'` or `format='engine'`. You can predict or validate directly on exported models, i.e., `yolo predict model=yolo11n-pose.onnx`. Usage examples are shown for your model after export completes.
{% include "macros/export-table.md" %}
See full `export` details in the [Export](../modes/export.md) page.
## FAQ
### What is Pose Estimation with Ultralytics YOLO11 and how does it work?
Pose estimation with Ultralytics YOLO11 involves identifying specific points, known as keypoints, in an image. These keypoints typically represent joints or other important features of the object. The output includes the `[x, y]` coordinates and confidence scores for each point. YOLO11-pose models are specifically designed for this task and use the `-pose` suffix, such as `yolo11n-pose.pt`. These models are pretrained on datasets like [COCO keypoints](https://github.com/ultralytics/ultralytics/blob/main/ultralytics/cfg/datasets/coco-pose.yaml) and can be used for various pose estimation tasks. For more information, visit the [Pose Estimation Page](#pose-estimation).
### How can I train a YOLO11-pose model on a custom dataset?
Training a YOLO11-pose model on a custom dataset involves loading a model, either a new model defined by a YAML file or a pretrained model. You can then start the training process using your specified dataset and parameters.
```python
from ultralytics import YOLO
# Load a model
model = YOLO("yolo11n-pose.yaml") # build a new model from YAML
model = YOLO("yolo11n-pose.pt") # load a pretrained model (recommended for training)
# Train the model
results = model.train(data="your-dataset.yaml", epochs=100, imgsz=640)
```
For comprehensive details on training, refer to the [Train Section](#train). You can also use [Ultralytics HUB](https://www.ultralytics.com/hub) for a no-code approach to training custom pose estimation models.
### How do I validate a trained YOLO11-pose model?
Validation of a YOLO11-pose model involves assessing its accuracy using the same dataset parameters retained during training. Here's an example:
```python
from ultralytics import YOLO
# Load a model
model = YOLO("yolo11n-pose.pt") # load an official model
model = YOLO("path/to/best.pt") # load a custom model
# Validate the model
metrics = model.val() # no arguments needed, dataset and settings remembered
```
For more information, visit the [Val Section](#val).
### Can I export a YOLO11-pose model to other formats, and how?
Yes, you can export a YOLO11-pose model to various formats like ONNX, CoreML, TensorRT, and more. This can be done using either Python or the Command Line Interface (CLI).
```python
from ultralytics import YOLO
# Load a model
model = YOLO("yolo11n-pose.pt") # load an official model
model = YOLO("path/to/best.pt") # load a custom-trained model
# Export the model
model.export(format="onnx")
```
Refer to the [Export Section](#export) for more details. Exported models can be deployed on edge devices for [real-time applications](https://www.ultralytics.com/blog/real-time-inferences-in-vision-ai-solutions-are-making-an-impact) like fitness tracking, sports analysis, or [robotics](https://www.ultralytics.com/blog/from-algorithms-to-automation-ais-role-in-robotics).
### What are the available Ultralytics YOLO11-pose models and their performance metrics?
Ultralytics YOLO11 offers various pretrained pose models such as YOLO11n-pose, YOLO11s-pose, YOLO11m-pose, among others. These models differ in size, accuracy (mAP), and speed. For instance, the YOLO11n-pose model achieves a mAPpose50-95 of 50.0 and an mAPpose50 of 81.0. For a complete list and performance details, visit the [Models Section](#models).
---
# Source: https://raw.githubusercontent.com/ultralytics/ultralytics/main/docs/en/tasks/segment.md
---
comments: true
description: Master instance segmentation using YOLO11. Learn how to detect, segment and outline objects in images with detailed guides and examples.
keywords: instance segmentation, YOLO11, object detection, image segmentation, machine learning, deep learning, computer vision, COCO dataset, Ultralytics
model_name: yolo11n-seg
---
# Instance Segmentation
[Instance segmentation](https://www.ultralytics.com/glossary/instance-segmentation) goes a step further than object detection and involves identifying individual objects in an image and segmenting them from the rest of the image.
The output of an instance segmentation model is a set of masks or contours that outline each object in the image, along with class labels and confidence scores for each object. Instance segmentation is useful when you need to know not only where objects are in an image, but also what their exact shape is.
Watch: Run Segmentation with Pretrained Ultralytics YOLO Model in Python.
!!! tip
YOLO11 Segment models use the `-seg` suffix, i.e., `yolo11n-seg.pt`, and are pretrained on [COCO](https://github.com/ultralytics/ultralytics/blob/main/ultralytics/cfg/datasets/coco.yaml).
## [Models](https://github.com/ultralytics/ultralytics/tree/main/ultralytics/cfg/models/11)
YOLO11 pretrained Segment models are shown here. Detect, Segment and Pose models are pretrained on the [COCO](https://github.com/ultralytics/ultralytics/blob/main/ultralytics/cfg/datasets/coco.yaml) dataset, while Classify models are pretrained on the [ImageNet](https://github.com/ultralytics/ultralytics/blob/main/ultralytics/cfg/datasets/ImageNet.yaml) dataset.
[Models](https://github.com/ultralytics/ultralytics/tree/main/ultralytics/cfg/models) download automatically from the latest Ultralytics [release](https://github.com/ultralytics/assets/releases) on first use.
{% include "macros/yolo-seg-perf.md" %}
- **mAPval** values are for single-model single-scale on [COCO val2017](https://cocodataset.org/) dataset. Reproduce by `yolo val segment data=coco.yaml device=0`
- **Speed** averaged over COCO val images using an [Amazon EC2 P4d](https://aws.amazon.com/ec2/instance-types/p4/) instance. Reproduce by `yolo val segment data=coco.yaml batch=1 device=0|cpu`
## Train
Train YOLO11n-seg on the COCO8-seg dataset for 100 [epochs](https://www.ultralytics.com/glossary/epoch) at image size 640. For a full list of available arguments see the [Configuration](../usage/cfg.md) page.
!!! example
=== "Python"
```python
from ultralytics import YOLO
# Load a model
model = YOLO("yolo11n-seg.yaml") # build a new model from YAML
model = YOLO("yolo11n-seg.pt") # load a pretrained model (recommended for training)
model = YOLO("yolo11n-seg.yaml").load("yolo11n.pt") # build from YAML and transfer weights
# Train the model
results = model.train(data="coco8-seg.yaml", epochs=100, imgsz=640)
```
=== "CLI"
```bash
# Build a new model from YAML and start training from scratch
yolo segment train data=coco8-seg.yaml model=yolo11n-seg.yaml epochs=100 imgsz=640
# Start training from a pretrained *.pt model
yolo segment train data=coco8-seg.yaml model=yolo11n-seg.pt epochs=100 imgsz=640
# Build a new model from YAML, transfer pretrained weights to it and start training
yolo segment train data=coco8-seg.yaml model=yolo11n-seg.yaml pretrained=yolo11n-seg.pt epochs=100 imgsz=640
```
### Dataset format
YOLO segmentation dataset format can be found in detail in the [Dataset Guide](../datasets/segment/index.md). To convert your existing dataset from other formats (like COCO etc.) to YOLO format, please use [JSON2YOLO](https://github.com/ultralytics/JSON2YOLO) tool by Ultralytics.
## Val
Validate trained YOLO11n-seg model [accuracy](https://www.ultralytics.com/glossary/accuracy) on the COCO8-seg dataset. No arguments are needed as the `model` retains its training `data` and arguments as model attributes.
!!! example
=== "Python"
```python
from ultralytics import YOLO
# Load a model
model = YOLO("yolo11n-seg.pt") # load an official model
model = YOLO("path/to/best.pt") # load a custom model
# Validate the model
metrics = model.val() # no arguments needed, dataset and settings remembered
metrics.box.map # map50-95(B)
metrics.box.map50 # map50(B)
metrics.box.map75 # map75(B)
metrics.box.maps # a list containing mAP50-95(B) for each category
metrics.seg.map # map50-95(M)
metrics.seg.map50 # map50(M)
metrics.seg.map75 # map75(M)
metrics.seg.maps # a list containing mAP50-95(M) for each category
```
=== "CLI"
```bash
yolo segment val model=yolo11n-seg.pt # val official model
yolo segment val model=path/to/best.pt # val custom model
```
## Predict
Use a trained YOLO11n-seg model to run predictions on images.
!!! example
=== "Python"
```python
from ultralytics import YOLO
# Load a model
model = YOLO("yolo11n-seg.pt") # load an official model
model = YOLO("path/to/best.pt") # load a custom model
# Predict with the model
results = model("https://ultralytics.com/images/bus.jpg") # predict on an image
# Access the results
for result in results:
xy = result.masks.xy # mask in polygon format
xyn = result.masks.xyn # normalized
masks = result.masks.data # mask in matrix format (num_objects x H x W)
```
=== "CLI"
```bash
yolo segment predict model=yolo11n-seg.pt source='https://ultralytics.com/images/bus.jpg' # predict with official model
yolo segment predict model=path/to/best.pt source='https://ultralytics.com/images/bus.jpg' # predict with custom model
```
See full `predict` mode details in the [Predict](../modes/predict.md) page.
## Export
Export a YOLO11n-seg model to a different format like ONNX, CoreML, etc.
!!! example
=== "Python"
```python
from ultralytics import YOLO
# Load a model
model = YOLO("yolo11n-seg.pt") # load an official model
model = YOLO("path/to/best.pt") # load a custom-trained model
# Export the model
model.export(format="onnx")
```
=== "CLI"
```bash
yolo export model=yolo11n-seg.pt format=onnx # export official model
yolo export model=path/to/best.pt format=onnx # export custom-trained model
```
Available YOLO11-seg export formats are in the table below. You can export to any format using the `format` argument, i.e., `format='onnx'` or `format='engine'`. You can predict or validate directly on exported models, i.e., `yolo predict model=yolo11n-seg.onnx`. Usage examples are shown for your model after export completes.
{% include "macros/export-table.md" %}
See full `export` details in the [Export](../modes/export.md) page.
## FAQ
### How do I train a YOLO11 segmentation model on a custom dataset?
To train a YOLO11 segmentation model on a custom dataset, you first need to prepare your dataset in the YOLO segmentation format. You can use tools like [JSON2YOLO](https://github.com/ultralytics/JSON2YOLO) to convert datasets from other formats. Once your dataset is ready, you can train the model using Python or CLI commands:
!!! example
=== "Python"
```python
from ultralytics import YOLO
# Load a pretrained YOLO11 segment model
model = YOLO("yolo11n-seg.pt")
# Train the model
results = model.train(data="path/to/your_dataset.yaml", epochs=100, imgsz=640)
```
=== "CLI"
```bash
yolo segment train data=path/to/your_dataset.yaml model=yolo11n-seg.pt epochs=100 imgsz=640
```
Check the [Configuration](../usage/cfg.md) page for more available arguments.
### What is the difference between [object detection](https://www.ultralytics.com/glossary/object-detection) and instance segmentation in YOLO11?
Object detection identifies and localizes objects within an image by drawing bounding boxes around them, whereas instance segmentation not only identifies the bounding boxes but also delineates the exact shape of each object. YOLO11 instance segmentation models provide masks or contours that outline each detected object, which is particularly useful for tasks where knowing the precise shape of objects is important, such as medical imaging or autonomous driving.
### Why use YOLO11 for instance segmentation?
Ultralytics YOLO11 is a state-of-the-art model recognized for its high accuracy and real-time performance, making it ideal for instance segmentation tasks. YOLO11 Segment models come pretrained on the [COCO dataset](https://github.com/ultralytics/ultralytics/blob/main/ultralytics/cfg/datasets/coco.yaml), ensuring robust performance across a variety of objects. Additionally, YOLO supports training, validation, prediction, and export functionalities with seamless integration, making it highly versatile for both research and industry applications.
### How do I load and validate a pretrained YOLO segmentation model?
Loading and validating a pretrained YOLO segmentation model is straightforward. Here's how you can do it using both Python and CLI:
!!! example
=== "Python"
```python
from ultralytics import YOLO
# Load a pretrained model
model = YOLO("yolo11n-seg.pt")
# Validate the model
metrics = model.val()
print("Mean Average Precision for boxes:", metrics.box.map)
print("Mean Average Precision for masks:", metrics.seg.map)
```
=== "CLI"
```bash
yolo segment val model=yolo11n-seg.pt
```
These steps will provide you with validation metrics like [Mean Average Precision](https://www.ultralytics.com/glossary/mean-average-precision-map) (mAP), crucial for assessing model performance.
### How can I export a YOLO segmentation model to ONNX format?
Exporting a YOLO segmentation model to ONNX format is simple and can be done using Python or CLI commands:
!!! example
=== "Python"
```python
from ultralytics import YOLO
# Load a pretrained model
model = YOLO("yolo11n-seg.pt")
# Export the model to ONNX format
model.export(format="onnx")
```
=== "CLI"
```bash
yolo export model=yolo11n-seg.pt format=onnx
```
For more details on exporting to various formats, refer to the [Export](../modes/export.md) page.
---
# Source: https://raw.githubusercontent.com/ultralytics/ultralytics/main/docs/en/usage/callbacks.md
---
comments: true
description: Explore Ultralytics callbacks for training, validation, exporting, and prediction. Learn how to use and customize them for your ML models.
keywords: Ultralytics, callbacks, training, validation, export, prediction, ML models, YOLO, Python, machine learning
---
# Callbacks
Ultralytics framework supports callbacks, which serve as entry points at strategic stages during the `train`, `val`, `export`, and `predict` modes. Each callback accepts a `Trainer`, `Validator`, or `Predictor` object, depending on the operation type. All properties of these objects are detailed in the [Reference section](../reference/cfg/__init__.md) of the documentation.
Watch: How to use Ultralytics Callbacks | Predict, Train, Validate and Export Callbacks | Ultralytics YOLO🚀
## Examples
### Returning Additional Information with Prediction
In this example, we demonstrate how to return the original frame along with each result object:
```python
from ultralytics import YOLO
def on_predict_batch_end(predictor):
"""Combine prediction results with corresponding frames."""
_, image, _, _ = predictor.batch
# Ensure that image is a list
image = image if isinstance(image, list) else [image]
# Combine the prediction results with the corresponding frames
predictor.results = zip(predictor.results, image)
# Create a YOLO model instance
model = YOLO("yolo11n.pt")
# Add the custom callback to the model
model.add_callback("on_predict_batch_end", on_predict_batch_end)
# Iterate through the results and frames
for result, frame in model.predict(): # or model.track()
pass
```
### Access Model metrics using the `on_model_save` callback
This example shows how to retrieve training details, such as the best_fitness score, total_loss, and other metrics after a checkpoint is saved using the `on_model_save` callback.
```python
from ultralytics import YOLO
# Load a YOLO model
model = YOLO("yolo11n.pt")
def print_checkpoint_metrics(trainer):
"""Print trainer metrics and loss details after each checkpoint is saved."""
print(
f"Model details\n"
f"Best fitness: {trainer.best_fitness}, "
f"Loss names: {trainer.loss_names}, " # List of loss names
f"Metrics: {trainer.metrics}, "
f"Total loss: {trainer.tloss}" # Total loss value
)
if __name__ == "__main__":
# Add on_model_save callback.
model.add_callback("on_model_save", print_checkpoint_metrics)
# Run model training on custom dataset.
results = model.train(data="coco8.yaml", epochs=3)
```
## All Callbacks
Below are all the supported callbacks. For more details, refer to the callbacks [source code](https://github.com/ultralytics/ultralytics/blob/main/ultralytics/utils/callbacks/base.py).
### Trainer Callbacks
| Callback | Description |
| --------------------------- | -------------------------------------------------------------------------------------------- |
| `on_pretrain_routine_start` | Triggered at the beginning of the pre-training routine. |
| `on_pretrain_routine_end` | Triggered at the end of the pre-training routine. |
| `on_train_start` | Triggered when the training starts. |
| `on_train_epoch_start` | Triggered at the start of each training [epoch](https://www.ultralytics.com/glossary/epoch). |
| `on_train_batch_start` | Triggered at the start of each training batch. |
| `optimizer_step` | Triggered during the optimizer step. |
| `on_before_zero_grad` | Triggered before gradients are zeroed. |
| `on_train_batch_end` | Triggered at the end of each training batch. |
| `on_train_epoch_end` | Triggered at the end of each training epoch. |
| `on_fit_epoch_end` | Triggered at the end of each fit epoch. |
| `on_model_save` | Triggered when the model is saved. |
| `on_train_end` | Triggered when the training process ends. |
| `on_params_update` | Triggered when model parameters are updated. |
| `teardown` | Triggered when the training process is being cleaned up. |
### Validator Callbacks
| Callback | Description |
| -------------------- | ------------------------------------------------ |
| `on_val_start` | Triggered when validation starts. |
| `on_val_batch_start` | Triggered at the start of each validation batch. |
| `on_val_batch_end` | Triggered at the end of each validation batch. |
| `on_val_end` | Triggered when validation ends. |
### Predictor Callbacks
| Callback | Description |
| ---------------------------- | --------------------------------------------------- |
| `on_predict_start` | Triggered when the prediction process starts. |
| `on_predict_batch_start` | Triggered at the start of each prediction batch. |
| `on_predict_postprocess_end` | Triggered at the end of prediction post-processing. |
| `on_predict_batch_end` | Triggered at the end of each prediction batch. |
| `on_predict_end` | Triggered when the prediction process ends. |
### Exporter Callbacks
| Callback | Description |
| ----------------- | ----------------------------------------- |
| `on_export_start` | Triggered when the export process starts. |
| `on_export_end` | Triggered when the export process ends. |
## FAQ
### What are Ultralytics callbacks and how can I use them?
Ultralytics callbacks are specialized entry points that are triggered during key stages of model operations such as training, validation, exporting, and prediction. These callbacks enable custom functionality at specific points in the process, allowing for enhancements and modifications to the workflow. Each callback accepts a `Trainer`, `Validator`, or `Predictor` object, depending on the operation type. For detailed properties of these objects, refer to the [Reference section](../reference/cfg/__init__.md).
To use a callback, define a function and add it to the model using the [`model.add_callback()`](../reference/engine/model.md#ultralytics.engine.model.Model.add_callback) method. Here is an example of returning additional information during prediction:
```python
from ultralytics import YOLO
def on_predict_batch_end(predictor):
"""Handle prediction batch end by combining results with corresponding frames; modifies predictor results."""
_, image, _, _ = predictor.batch
image = image if isinstance(image, list) else [image]
predictor.results = zip(predictor.results, image)
model = YOLO("yolo11n.pt")
model.add_callback("on_predict_batch_end", on_predict_batch_end)
for result, frame in model.predict():
pass
```
### How can I customize the Ultralytics training routine using callbacks?
Customize your Ultralytics training routine by injecting logic at specific stages of the training process. Ultralytics YOLO provides a variety of training callbacks, such as `on_train_start`, `on_train_end`, and `on_train_batch_end`, which allow you to add custom metrics, processing, or logging.
Here's how to freeze BatchNorm statistics when freezing layers with callbacks:
```python
from ultralytics import YOLO
# Add a callback to put the frozen layers in eval mode to prevent BN values from changing
def put_in_eval_mode(trainer):
n_layers = trainer.args.freeze
if not isinstance(n_layers, int):
return
for i, (name, module) in enumerate(trainer.model.named_modules()):
if name.endswith("bn") and int(name.split(".")[1]) < n_layers:
module.eval()
module.track_running_stats = False
model = YOLO("yolo11n.pt")
model.add_callback("on_train_epoch_start", put_in_eval_mode)
model.train(data="coco.yaml", epochs=10)
```
For more details on effectively using training callbacks, see the [Training Guide](../modes/train.md).
### Why should I use callbacks during validation in Ultralytics YOLO?
Using callbacks during validation in Ultralytics YOLO enhances model evaluation by enabling custom processing, logging, or metrics calculation. Callbacks like `on_val_start`, `on_val_batch_end`, and `on_val_end` provide entry points to inject custom logic, ensuring detailed and comprehensive validation processes.
For example, to plot all validation batches instead of just the first three:
```python
import inspect
from ultralytics import YOLO
def plot_samples(validator):
frame = inspect.currentframe().f_back.f_back
v = frame.f_locals
validator.plot_val_samples(v["batch"], v["batch_i"])
validator.plot_predictions(v["batch"], v["preds"], v["batch_i"])
model = YOLO("yolo11n.pt")
model.add_callback("on_val_batch_end", plot_samples)
model.val(data="coco.yaml")
```
For more insights on incorporating callbacks into your validation process, see the [Validation Guide](../modes/val.md).
### How do I attach a custom callback for the prediction mode in Ultralytics YOLO?
To attach a custom callback for prediction mode in Ultralytics YOLO, define a callback function and register it with the prediction process. Common prediction callbacks include `on_predict_start`, `on_predict_batch_end`, and `on_predict_end`. These allow for the modification of prediction outputs and the integration of additional functionalities, like data logging or result transformation.
Here is an example where a custom callback saves predictions based on whether an object of a particular class is present:
```python
from ultralytics import YOLO
model = YOLO("yolo11n.pt")
class_id = 2
def save_on_object(predictor):
r = predictor.results[0]
if class_id in r.boxes.cls:
predictor.args.save = True
else:
predictor.args.save = False
model.add_callback("on_predict_postprocess_end", save_on_object)
results = model("pedestrians.mp4", stream=True, save=True)
for results in results:
pass
```
For more comprehensive usage, refer to the [Prediction Guide](../modes/predict.md), which includes detailed instructions and additional customization options.
### What are some practical examples of using callbacks in Ultralytics YOLO?
Ultralytics YOLO supports various practical implementations of callbacks to enhance and customize different phases like training, validation, and prediction. Some practical examples include:
- **Logging Custom Metrics**: Log additional metrics at different stages, such as at the end of training or validation [epochs](https://www.ultralytics.com/glossary/epoch).
- **[Data Augmentation](https://www.ultralytics.com/glossary/data-augmentation)**: Implement custom data transformations or augmentations during prediction or training batches.
- **Intermediate Results**: Save intermediate results, such as predictions or frames, for further analysis or visualization.
Example: Combining frames with prediction results during prediction using `on_predict_batch_end`:
```python
from ultralytics import YOLO
def on_predict_batch_end(predictor):
"""Combine prediction results with frames."""
_, image, _, _ = predictor.batch
image = image if isinstance(image, list) else [image]
predictor.results = zip(predictor.results, image)
model = YOLO("yolo11n.pt")
model.add_callback("on_predict_batch_end", on_predict_batch_end)
for result, frame in model.predict():
pass
```
Explore the [callback source code](https://github.com/ultralytics/ultralytics/blob/main/ultralytics/utils/callbacks/base.py) for more options and examples.
---
# Source: https://raw.githubusercontent.com/ultralytics/ultralytics/main/docs/en/usage/cfg.md
---
comments: true
description: Optimize your Ultralytics YOLO model's performance with the right settings and hyperparameters. Learn about training, validation, and prediction configurations.
keywords: YOLO, hyperparameters, configuration, training, validation, prediction, model settings, Ultralytics, performance optimization, machine learning
---
# Configuration
YOLO settings and hyperparameters play a critical role in the model's performance, speed, and [accuracy](https://www.ultralytics.com/glossary/accuracy). These settings can affect the model's behavior at various stages, including training, validation, and prediction.
**Watch:** Mastering Ultralytics YOLO: Configuration
Watch: Mastering Ultralytics YOLO: Configuration
Ultralytics commands use the following syntax:
!!! example
=== "CLI"
```bash
yolo TASK MODE ARGS
```
=== "Python"
```python
from ultralytics import YOLO
# Load a YOLO model from a pretrained weights file
model = YOLO("yolo11n.pt")
# Run the model in MODE using custom ARGS
MODE = "predict"
ARGS = {"source": "image.jpg", "imgsz": 640}
getattr(model, MODE)(**ARGS)
```
Where:
- `TASK` (optional) is one of ([detect](../tasks/detect.md), [segment](../tasks/segment.md), [classify](../tasks/classify.md), [pose](../tasks/pose.md), [obb](../tasks/obb.md))
- `MODE` (required) is one of ([train](../modes/train.md), [val](../modes/val.md), [predict](../modes/predict.md), [export](../modes/export.md), [track](../modes/track.md), [benchmark](../modes/benchmark.md))
- `ARGS` (optional) are `arg=value` pairs like `imgsz=640` that override defaults.
Default `ARG` values are defined on this page and come from the `cfg/default.yaml` [file](https://github.com/ultralytics/ultralytics/blob/main/ultralytics/cfg/default.yaml).
## Tasks
Ultralytics YOLO models can perform a variety of computer vision tasks, including:
- **Detect**: [Object detection](https://docs.ultralytics.com/tasks/detect/) identifies and localizes objects within an image or video.
- **Segment**: [Instance segmentation](https://docs.ultralytics.com/tasks/segment/) divides an image or video into regions corresponding to different objects or classes.
- **Classify**: [Image classification](https://docs.ultralytics.com/tasks/classify/) predicts the class label of an input image.
- **Pose**: [Pose estimation](https://docs.ultralytics.com/tasks/pose/) identifies objects and estimates their keypoints in an image or video.
- **OBB**: [Oriented Bounding Boxes](https://docs.ultralytics.com/tasks/obb/) uses rotated bounding boxes, suitable for satellite or medical imagery.
| Argument | Default | Description |
| -------- | ---------- | ---------------------------------------------------------------------------------------------------------------------------------------------------------------------------------------------------------------------------------------------------------------------------------------------------------------------------------- |
| `task` | `'detect'` | Specifies the YOLO task: `detect` for [object detection](https://www.ultralytics.com/glossary/object-detection), `segment` for segmentation, `classify` for classification, `pose` for pose estimation, and `obb` for oriented bounding boxes. Each task is tailored to specific outputs and problems in image and video analysis. |
[Tasks Guide](../tasks/index.md){ .md-button }
## Modes
Ultralytics YOLO models operate in different modes, each designed for a specific stage of the model lifecycle:
- **Train**: Train a YOLO model on a custom dataset.
- **Val**: Validate a trained YOLO model.
- **Predict**: Use a trained YOLO model to make predictions on new images or videos.
- **Export**: Export a YOLO model for deployment.
- **Track**: Track objects in real-time using a YOLO model.
- **Benchmark**: Benchmark the speed and accuracy of YOLO exports (ONNX, TensorRT, etc.).
| Argument | Default | Description |
| -------- | --------- | ------------------------------------------------------------------------------------------------------------------------------------------------------------------------------------------------------------------------------------------------------------------------------------------------------------------ |
| `mode` | `'train'` | Specifies the YOLO model's operating mode: `train` for model training, `val` for validation, `predict` for inference, `export` for converting to deployment formats, `track` for object tracking, and `benchmark` for performance evaluation. Each mode supports different stages, from development to deployment. |
[Modes Guide](../modes/index.md){ .md-button }
## Train Settings
Training settings for YOLO models include hyperparameters and configurations that affect the model's performance, speed, and [accuracy](https://www.ultralytics.com/glossary/accuracy). Key settings include [batch size](https://www.ultralytics.com/glossary/batch-size), [learning rate](https://www.ultralytics.com/glossary/learning-rate), momentum, and weight decay. The choice of optimizer, [loss function](https://www.ultralytics.com/glossary/loss-function), and dataset composition also impact training. Tuning and experimentation are crucial for optimal performance. For more details, see the [Ultralytics entrypoint function](../reference/cfg/__init__.md).
{% include "macros/train-args.md" %}
!!! info "Note on Batch-size Settings"
The `batch` argument offers three configuration options:
- **Fixed Batch Size**: Specify the number of images per batch with an integer (e.g., `batch=16`).
- **Auto Mode (60% GPU Memory)**: Use `batch=-1` for automatic adjustment to approximately 60% CUDA memory utilization.
- **Auto Mode with Utilization Fraction**: Set a fraction (e.g., `batch=0.70`) to adjust based on a specified GPU memory usage.
[Train Guide](../modes/train.md){ .md-button }
## Predict Settings
Prediction settings for YOLO models include hyperparameters and configurations that influence performance, speed, and [accuracy](https://www.ultralytics.com/glossary/accuracy) during inference. Key settings include the confidence threshold, [Non-Maximum Suppression (NMS)](https://www.ultralytics.com/glossary/non-maximum-suppression-nms) threshold, and the number of classes. Input data size, format, and supplementary features like masks also affect predictions. Tuning these settings is essential for optimal performance.
Inference arguments:
{% include "macros/predict-args.md" %}
Visualization arguments:
{% from "macros/visualization-args.md" import param_table %} {{ param_table() }}
[Predict Guide](../modes/predict.md){ .md-button }
## Validation Settings
Validation settings for YOLO models involve hyperparameters and configurations to evaluate performance on a [validation dataset](https://www.ultralytics.com/glossary/validation-data). These settings influence performance, speed, and [accuracy](https://www.ultralytics.com/glossary/accuracy). Common settings include batch size, validation frequency, and performance metrics. The validation dataset's size and composition, along with the specific task, also affect the process.
{% include "macros/validation-args.md" %}
Careful tuning and experimentation are crucial to ensure optimal performance and to detect and prevent [overfitting](https://www.ultralytics.com/glossary/overfitting).
[Val Guide](../modes/val.md){ .md-button }
## Export Settings
Export settings for YOLO models include configurations for saving or exporting the model for use in different environments. These settings impact performance, size, and compatibility. Key settings include the exported file format (e.g., ONNX, TensorFlow SavedModel), the target device (e.g., CPU, GPU), and features like masks. The model's task and the destination environment's constraints also affect the export process.
{% include "macros/export-args.md" %}
Thoughtful configuration ensures the exported model is optimized for its use case and functions effectively in the target environment.
[Export Guide](../modes/export.md){ .md-button }
## Solutions Settings
Ultralytics Solutions configuration settings offer flexibility to customize models for tasks like object counting, heatmap creation, workout tracking, data analysis, zone tracking, queue management, and region-based counting. These options allow easy adjustments for accurate and useful results tailored to specific needs.
{% from "macros/solutions-args.md" import param_table %} {{ param_table() }}
[Solutions Guide](../solutions/index.md){ .md-button }
## Augmentation Settings
[Data augmentation](https://www.ultralytics.com/glossary/data-augmentation) techniques are essential for improving YOLO model robustness and performance by introducing variability into the [training data](https://www.ultralytics.com/glossary/training-data), helping the model generalize better to unseen data. The following table outlines each augmentation argument's purpose and effect:
{% include "macros/augmentation-args.md" %}
Adjust these settings to meet dataset and task requirements. Experimenting with different values can help find the optimal augmentation strategy for the best model performance.
[Augmentation Guide](../guides/yolo-data-augmentation.md){ .md-button }
## Logging, Checkpoints and Plotting Settings
Logging, checkpoints, plotting, and file management are important when training a YOLO model:
- **Logging**: Track the model's progress and diagnose issues using libraries like [TensorBoard](https://docs.ultralytics.com/integrations/tensorboard/) or by writing to a file.
- **Checkpoints**: Save the model at regular intervals to resume training or experiment with different configurations.
- **Plotting**: Visualize performance and training progress using libraries like matplotlib or TensorBoard.
- **File management**: Organize files generated during training, such as checkpoints, log files, and plots, for easy access and analysis.
Effective management of these aspects helps track progress and makes debugging and optimization easier.
| Argument | Default | Description |
| ---------- | -------- | --------------------------------------------------------------------------------------------------------------------------------------------------------------------------------------------------------------------------------------------------------------------------------------------------------- |
| `project` | `'runs'` | Specifies the root directory for saving training runs. Each run is saved in a separate subdirectory. |
| `name` | `'exp'` | Defines the experiment name. If unspecified, YOLO increments this name for each run (e.g., `exp`, `exp2`) to avoid overwriting. |
| `exist_ok` | `False` | Determines whether to overwrite an existing experiment directory. `True` allows overwriting; `False` prevents it. |
| `plots` | `False` | Controls the generation and saving of training and validation plots. Set to `True` to create plots like loss curves, [precision](https://www.ultralytics.com/glossary/precision)-[recall](https://www.ultralytics.com/glossary/recall) curves, and sample predictions for visual tracking of performance. |
| `save` | `False` | Enables saving training checkpoints and final model weights. Set to `True` to save model states periodically, allowing training resumption or model deployment. |
## FAQ
### How do I improve my YOLO model's performance during training?
Improve performance by tuning hyperparameters like [batch size](https://www.ultralytics.com/glossary/batch-size), [learning rate](https://www.ultralytics.com/glossary/learning-rate), momentum, and weight decay. Adjust [data augmentation](https://www.ultralytics.com/glossary/data-augmentation) settings, select the right optimizer, and use techniques like early stopping or [mixed precision](https://www.ultralytics.com/glossary/mixed-precision). For details, see the [Train Guide](../modes/train.md).
### What are the key hyperparameters for YOLO model accuracy?
Key hyperparameters affecting accuracy include:
- **Batch Size (`batch`)**: Larger sizes can stabilize training but need more memory.
- **Learning Rate (`lr0`)**: Smaller rates offer fine adjustments but slower convergence.
- **Momentum (`momentum`)**: Accelerates gradient vectors, dampening oscillations.
- **Image Size (`imgsz`)**: Larger sizes improve accuracy but increase computational load.
Adjust these based on your dataset and hardware. Learn more in [Train Settings](#train-settings).
### How do I set the learning rate for training a YOLO model?
The learning rate (`lr0`) is crucial; start with `0.01` for SGD or `0.001` for [Adam optimizer](https://www.ultralytics.com/glossary/adam-optimizer). Monitor metrics and adjust as needed. Use cosine learning rate schedulers (`cos_lr`) or warmup (`warmup_epochs`, `warmup_momentum`). Details are in the [Train Guide](../modes/train.md).
### What are the default inference settings for YOLO models?
Default settings include:
- **Confidence Threshold (`conf=0.25`)**: Minimum confidence for detections.
- **IoU Threshold (`iou=0.7`)**: For [Non-Maximum Suppression (NMS)](https://www.ultralytics.com/glossary/non-maximum-suppression-nms).
- **Image Size (`imgsz=640`)**: Resizes input images.
- **Device (`device=None`)**: Selects CPU or GPU.
For a full overview, see [Predict Settings](#predict-settings) and the [Predict Guide](../modes/predict.md).
### Why use mixed precision training with YOLO models?
[Mixed precision](https://www.ultralytics.com/glossary/mixed-precision) training (`amp=True`) reduces memory usage and speeds up training using FP16 and FP32. It's beneficial for modern GPUs, allowing larger models and faster computations without significant accuracy loss. Learn more in the [Train Guide](../modes/train.md).


 ## Introduction
Experiment logging is a crucial aspect of [machine learning](https://www.ultralytics.com/glossary/machine-learning-ml) workflows that enables tracking of various metrics, parameters, and artifacts. It helps to enhance model reproducibility, debug issues, and improve model performance. [Ultralytics](https://www.ultralytics.com/) YOLO, known for its real-time [object detection](https://www.ultralytics.com/glossary/object-detection) capabilities, now offers integration with [MLflow](https://mlflow.org/), an open-source platform for complete machine learning lifecycle management.
This documentation page is a comprehensive guide to setting up and utilizing the MLflow logging capabilities for your Ultralytics YOLO project.
## What is MLflow?
[MLflow](https://mlflow.org/) is an open-source platform developed by [Databricks](https://www.databricks.com/) for managing the end-to-end machine learning lifecycle. It includes tools for tracking experiments, packaging code into reproducible runs, and sharing and deploying models. MLflow is designed to work with any machine learning library and programming language.
## Features
- **Metrics Logging**: Logs metrics at the end of each epoch and at the end of the training.
- **Parameter Logging**: Logs all the parameters used in the training.
- **Artifacts Logging**: Logs model artifacts, including weights and configuration files, at the end of the training.
## Setup and Prerequisites
Ensure MLflow is installed. If not, install it using pip:
```bash
pip install mlflow
```
Make sure that MLflow logging is enabled in Ultralytics settings. Usually, this is controlled by the settings `mlflow` key. See the [settings](../quickstart.md#ultralytics-settings) page for more info.
!!! example "Update Ultralytics MLflow Settings"
=== "Python"
Within the Python environment, call the `update` method on the `settings` object to change your settings:
```python
from ultralytics import settings
# Update a setting
settings.update({"mlflow": True})
# Reset settings to default values
settings.reset()
```
=== "CLI"
If you prefer using the command-line interface, the following commands will allow you to modify your settings:
```bash
# Update a setting
yolo settings mlflow=True
# Reset settings to default values
yolo settings reset
```
## How to Use
### Commands
1. **Set a Project Name**: You can set the project name via an environment variable:
```bash
export MLFLOW_EXPERIMENT_NAME=YOUR_EXPERIMENT_NAME
```
Or use the `project=
## Introduction
Experiment logging is a crucial aspect of [machine learning](https://www.ultralytics.com/glossary/machine-learning-ml) workflows that enables tracking of various metrics, parameters, and artifacts. It helps to enhance model reproducibility, debug issues, and improve model performance. [Ultralytics](https://www.ultralytics.com/) YOLO, known for its real-time [object detection](https://www.ultralytics.com/glossary/object-detection) capabilities, now offers integration with [MLflow](https://mlflow.org/), an open-source platform for complete machine learning lifecycle management.
This documentation page is a comprehensive guide to setting up and utilizing the MLflow logging capabilities for your Ultralytics YOLO project.
## What is MLflow?
[MLflow](https://mlflow.org/) is an open-source platform developed by [Databricks](https://www.databricks.com/) for managing the end-to-end machine learning lifecycle. It includes tools for tracking experiments, packaging code into reproducible runs, and sharing and deploying models. MLflow is designed to work with any machine learning library and programming language.
## Features
- **Metrics Logging**: Logs metrics at the end of each epoch and at the end of the training.
- **Parameter Logging**: Logs all the parameters used in the training.
- **Artifacts Logging**: Logs model artifacts, including weights and configuration files, at the end of the training.
## Setup and Prerequisites
Ensure MLflow is installed. If not, install it using pip:
```bash
pip install mlflow
```
Make sure that MLflow logging is enabled in Ultralytics settings. Usually, this is controlled by the settings `mlflow` key. See the [settings](../quickstart.md#ultralytics-settings) page for more info.
!!! example "Update Ultralytics MLflow Settings"
=== "Python"
Within the Python environment, call the `update` method on the `settings` object to change your settings:
```python
from ultralytics import settings
# Update a setting
settings.update({"mlflow": True})
# Reset settings to default values
settings.reset()
```
=== "CLI"
If you prefer using the command-line interface, the following commands will allow you to modify your settings:
```bash
# Update a setting
yolo settings mlflow=True
# Reset settings to default values
yolo settings reset
```
## How to Use
### Commands
1. **Set a Project Name**: You can set the project name via an environment variable:
```bash
export MLFLOW_EXPERIMENT_NAME=YOUR_EXPERIMENT_NAME
```
Or use the `project= 3. **View Run**: Runs are individual models inside an experiment. Click on a Run and see the Run details, including uploaded artifacts and model weights.
  ## Disabling MLflow
To turn off MLflow logging:
```bash
yolo settings mlflow=False
```
## Conclusion
MLflow logging integration with Ultralytics YOLO offers a streamlined way to keep track of your [machine learning experiments](https://www.ultralytics.com/blog/log-ultralytics-yolo-experiments-using-mlflow-integration). It empowers you to monitor performance metrics and manage artifacts effectively, thus aiding in robust model development and deployment. For further details please visit the MLflow [official documentation](https://mlflow.org/docs/latest/index.html).
## FAQ
### How do I set up MLflow logging with Ultralytics YOLO?
To set up MLflow logging with Ultralytics YOLO, you first need to ensure MLflow is installed. You can install it using pip:
```bash
pip install mlflow
```
Next, enable MLflow logging in Ultralytics settings. This can be controlled using the `mlflow` key. For more information, see the [settings guide](../quickstart.md#ultralytics-settings).
!!! example "Update Ultralytics MLflow Settings"
=== "Python"
```python
from ultralytics import settings
# Update a setting
settings.update({"mlflow": True})
# Reset settings to default values
settings.reset()
```
=== "CLI"
```bash
# Update a setting
yolo settings mlflow=True
# Reset settings to default values
yolo settings reset
```
Finally, start a local MLflow server for tracking:
```bash
mlflow server --backend-store-uri runs/mlflow
```
### What metrics and parameters can I log using MLflow with Ultralytics YOLO?
Ultralytics YOLO with MLflow supports logging various metrics, parameters, and artifacts throughout the training process:
- **Metrics Logging**: Tracks metrics at the end of each [epoch](https://www.ultralytics.com/glossary/epoch) and upon training completion.
- **Parameter Logging**: Logs all parameters used in the training process.
- **Artifacts Logging**: Saves model artifacts like weights and configuration files after training.
For more detailed information, visit the [Ultralytics YOLO tracking documentation](#features).
### Can I disable MLflow logging once it is enabled?
Yes, you can disable MLflow logging for Ultralytics YOLO by updating the settings. Here's how you can do it using the CLI:
```bash
yolo settings mlflow=False
```
For further customization and resetting settings, refer to the [settings guide](../quickstart.md#ultralytics-settings).
### How can I start and stop an MLflow server for Ultralytics YOLO tracking?
To start an MLflow server for tracking your experiments in Ultralytics YOLO, use the following command:
```bash
mlflow server --backend-store-uri runs/mlflow
```
This command starts a local server at `http://127.0.0.1:5000` by default. If you need to stop running MLflow server instances, use the following bash command:
```bash
ps aux | grep 'mlflow' | grep -v 'grep' | awk '{print $2}' | xargs kill -9
```
Refer to the [commands section](#commands) for more command options.
### What are the benefits of integrating MLflow with Ultralytics YOLO for experiment tracking?
Integrating MLflow with Ultralytics YOLO offers several benefits for managing your machine learning experiments:
- **Enhanced Experiment Tracking**: Easily track and compare different runs and their outcomes.
- **Improved Model Reproducibility**: Ensure that your experiments are reproducible by logging all parameters and artifacts.
- **Performance Monitoring**: Visualize performance metrics over time to make data-driven decisions for model improvements.
- **Streamlined Workflow**: Automate the logging process to focus more on model development rather than manual tracking.
- **Collaborative Development**: Share experiment results with team members for better collaboration and knowledge sharing.
For an in-depth look at setting up and leveraging MLflow with Ultralytics YOLO, explore the [MLflow Integration for Ultralytics YOLO](#introduction) documentation.
---
# Source: https://raw.githubusercontent.com/ultralytics/ultralytics/main/docs/en/integrations/ray-tune.md
---
comments: true
description: Optimize YOLO11 model performance with Ray Tune. Learn efficient hyperparameter tuning using advanced search strategies, parallelism, and early stopping.
keywords: YOLO11, Ray Tune, hyperparameter tuning, model optimization, machine learning, deep learning, AI, Ultralytics, Weights & Biases
---
# Efficient Hyperparameter Tuning with Ray Tune and YOLO11
Hyperparameter tuning is vital in achieving peak model performance by discovering the optimal set of hyperparameters. This involves running trials with different hyperparameters and evaluating each trial's performance.
## Accelerate Tuning with Ultralytics YOLO11 and Ray Tune
[Ultralytics YOLO11](https://www.ultralytics.com/) incorporates Ray Tune for hyperparameter tuning, streamlining the optimization of YOLO11 model hyperparameters. With Ray Tune, you can utilize advanced search strategies, parallelism, and early stopping to expedite the tuning process.
### Ray Tune
## Disabling MLflow
To turn off MLflow logging:
```bash
yolo settings mlflow=False
```
## Conclusion
MLflow logging integration with Ultralytics YOLO offers a streamlined way to keep track of your [machine learning experiments](https://www.ultralytics.com/blog/log-ultralytics-yolo-experiments-using-mlflow-integration). It empowers you to monitor performance metrics and manage artifacts effectively, thus aiding in robust model development and deployment. For further details please visit the MLflow [official documentation](https://mlflow.org/docs/latest/index.html).
## FAQ
### How do I set up MLflow logging with Ultralytics YOLO?
To set up MLflow logging with Ultralytics YOLO, you first need to ensure MLflow is installed. You can install it using pip:
```bash
pip install mlflow
```
Next, enable MLflow logging in Ultralytics settings. This can be controlled using the `mlflow` key. For more information, see the [settings guide](../quickstart.md#ultralytics-settings).
!!! example "Update Ultralytics MLflow Settings"
=== "Python"
```python
from ultralytics import settings
# Update a setting
settings.update({"mlflow": True})
# Reset settings to default values
settings.reset()
```
=== "CLI"
```bash
# Update a setting
yolo settings mlflow=True
# Reset settings to default values
yolo settings reset
```
Finally, start a local MLflow server for tracking:
```bash
mlflow server --backend-store-uri runs/mlflow
```
### What metrics and parameters can I log using MLflow with Ultralytics YOLO?
Ultralytics YOLO with MLflow supports logging various metrics, parameters, and artifacts throughout the training process:
- **Metrics Logging**: Tracks metrics at the end of each [epoch](https://www.ultralytics.com/glossary/epoch) and upon training completion.
- **Parameter Logging**: Logs all parameters used in the training process.
- **Artifacts Logging**: Saves model artifacts like weights and configuration files after training.
For more detailed information, visit the [Ultralytics YOLO tracking documentation](#features).
### Can I disable MLflow logging once it is enabled?
Yes, you can disable MLflow logging for Ultralytics YOLO by updating the settings. Here's how you can do it using the CLI:
```bash
yolo settings mlflow=False
```
For further customization and resetting settings, refer to the [settings guide](../quickstart.md#ultralytics-settings).
### How can I start and stop an MLflow server for Ultralytics YOLO tracking?
To start an MLflow server for tracking your experiments in Ultralytics YOLO, use the following command:
```bash
mlflow server --backend-store-uri runs/mlflow
```
This command starts a local server at `http://127.0.0.1:5000` by default. If you need to stop running MLflow server instances, use the following bash command:
```bash
ps aux | grep 'mlflow' | grep -v 'grep' | awk '{print $2}' | xargs kill -9
```
Refer to the [commands section](#commands) for more command options.
### What are the benefits of integrating MLflow with Ultralytics YOLO for experiment tracking?
Integrating MLflow with Ultralytics YOLO offers several benefits for managing your machine learning experiments:
- **Enhanced Experiment Tracking**: Easily track and compare different runs and their outcomes.
- **Improved Model Reproducibility**: Ensure that your experiments are reproducible by logging all parameters and artifacts.
- **Performance Monitoring**: Visualize performance metrics over time to make data-driven decisions for model improvements.
- **Streamlined Workflow**: Automate the logging process to focus more on model development rather than manual tracking.
- **Collaborative Development**: Share experiment results with team members for better collaboration and knowledge sharing.
For an in-depth look at setting up and leveraging MLflow with Ultralytics YOLO, explore the [MLflow Integration for Ultralytics YOLO](#introduction) documentation.
---
# Source: https://raw.githubusercontent.com/ultralytics/ultralytics/main/docs/en/integrations/ray-tune.md
---
comments: true
description: Optimize YOLO11 model performance with Ray Tune. Learn efficient hyperparameter tuning using advanced search strategies, parallelism, and early stopping.
keywords: YOLO11, Ray Tune, hyperparameter tuning, model optimization, machine learning, deep learning, AI, Ultralytics, Weights & Biases
---
# Efficient Hyperparameter Tuning with Ray Tune and YOLO11
Hyperparameter tuning is vital in achieving peak model performance by discovering the optimal set of hyperparameters. This involves running trials with different hyperparameters and evaluating each trial's performance.
## Accelerate Tuning with Ultralytics YOLO11 and Ray Tune
[Ultralytics YOLO11](https://www.ultralytics.com/) incorporates Ray Tune for hyperparameter tuning, streamlining the optimization of YOLO11 model hyperparameters. With Ray Tune, you can utilize advanced search strategies, parallelism, and early stopping to expedite the tuning process.
### Ray Tune


 ## Headless Server Installation
For server environments without a display (e.g., cloud VMs, Docker containers, CI/CD pipelines), use the `ultralytics-opencv-headless` package. This is identical to the standard `ultralytics` package but depends on `opencv-python-headless` instead of `opencv-python`, avoiding unnecessary GUI dependencies and potential `libGL` errors.
!!! example "Headless Install"
```bash
pip install ultralytics-opencv-headless
```
Both packages provide the same functionality and API. The headless variant simply excludes OpenCV's GUI components that require display libraries.
## Advanced Installation
While the standard installation methods cover most use cases, you might need a more tailored setup for development or custom configurations.
!!! example "Advanced Methods"
=== "Install from Fork"
If you need persistent custom modifications, you can fork the Ultralytics repository, make changes to `pyproject.toml` or other code, and install from your fork.
1. **Fork** the [Ultralytics GitHub repository](https://github.com/ultralytics/ultralytics) to your own GitHub account.
2. **Clone** your fork locally:
```bash
git clone https://github.com/YOUR_USERNAME/ultralytics.git
cd ultralytics
```
3. **Create a new branch** for your changes:
```bash
git checkout -b my-custom-branch
```
4. **Make your modifications** to `pyproject.toml` or other files as needed.
5. **Commit and push** your changes:
```bash
git add .
git commit -m "My custom changes"
git push origin my-custom-branch
```
6. **Install** using pip with the `git+https` syntax, pointing to your branch:
```bash
pip install git+https://github.com/YOUR_USERNAME/ultralytics.git@my-custom-branch
```
=== "Local Clone and Install"
Clone the repository locally, modify files as needed, and install in editable mode.
1. **Clone** the Ultralytics repository:
```bash
git clone https://github.com/ultralytics/ultralytics
cd ultralytics
```
2. **Make your modifications** to `pyproject.toml` or other files as needed.
3. **Install** the package in editable mode (`-e`). Pip will use your modified `pyproject.toml` to resolve dependencies:
```bash
pip install -e .
```
This approach is useful for development or testing local changes before committing.
=== "Use requirements.txt"
Specify a custom Ultralytics fork in your `requirements.txt` file to ensure consistent installations across your team.
```text title="requirements.txt"
# Install ultralytics from a specific git branch
git+https://github.com/YOUR_USERNAME/ultralytics.git@my-custom-branch
# Other project dependencies
flask
```
Install dependencies from the file:
```bash
pip install -r requirements.txt
```
## Use Ultralytics with CLI
The Ultralytics command-line interface (CLI) allows for simple single-line commands without needing a Python environment. CLI requires no customization or Python code; run all tasks from the terminal with the `yolo` command. For more on using YOLO from the command line, see the [CLI Guide](usage/cli.md).
!!! example
=== "Syntax"
Ultralytics `yolo` commands use the following syntax:
```bash
yolo TASK MODE ARGS
```
- `TASK` (optional) is one of ([detect](tasks/detect.md), [segment](tasks/segment.md), [classify](tasks/classify.md), [pose](tasks/pose.md), [obb](tasks/obb.md))
- `MODE` (required) is one of ([train](modes/train.md), [val](modes/val.md), [predict](modes/predict.md), [export](modes/export.md), [track](modes/track.md), [benchmark](modes/benchmark.md))
- `ARGS` (optional) are `arg=value` pairs like `imgsz=640` that override defaults.
See all `ARGS` in the full [Configuration Guide](usage/cfg.md) or with the `yolo cfg` CLI command.
=== "Train"
Train a detection model for 10 [epochs](https://www.ultralytics.com/glossary/epoch) with an initial learning rate of 0.01:
```bash
yolo train data=coco8.yaml model=yolo11n.pt epochs=10 lr0=0.01
```
=== "Predict"
Predict a YouTube video using a pretrained segmentation model at image size 320:
```bash
yolo predict model=yolo11n-seg.pt source='https://youtu.be/LNwODJXcvt4' imgsz=320
```
=== "Val"
Validate a pretrained detection model with a batch size of 1 and image size of 640:
```bash
yolo val model=yolo11n.pt data=coco8.yaml batch=1 imgsz=640
```
=== "Export"
Export a YOLO11n classification model to ONNX format with an image size of 224x128 (no TASK required):
```bash
yolo export model=yolo11n-cls.pt format=onnx imgsz=224,128
```
=== "Count"
Count objects in a video or live stream using YOLO11:
```bash
yolo solutions count show=True
yolo solutions count source="path/to/video.mp4" # specify video file path
```
=== "Workout"
Monitor workout exercises using a YOLO11 pose model:
```bash
yolo solutions workout show=True
yolo solutions workout source="path/to/video.mp4" # specify video file path
# Use keypoints for ab-workouts
yolo solutions workout kpts="[5, 11, 13]" # left side
yolo solutions workout kpts="[6, 12, 14]" # right side
```
=== "Queue"
Use YOLO11 to count objects in a designated queue or region:
```bash
yolo solutions queue show=True
yolo solutions queue source="path/to/video.mp4" # specify video file path
yolo solutions queue region="[(20, 400), (1080, 400), (1080, 360), (20, 360)]" # configure queue coordinates
```
=== "Inference with Streamlit"
Perform object detection, instance segmentation, or pose estimation in a web browser using [Streamlit](https://docs.ultralytics.com/reference/solutions/streamlit_inference/):
```bash
yolo solutions inference
yolo solutions inference model="path/to/model.pt" # use model fine-tuned with Ultralytics Python package
```
=== "Special"
Run special commands to see the version, view settings, run checks, and more:
```bash
yolo help
yolo checks
yolo version
yolo settings
yolo copy-cfg
yolo cfg
yolo solutions help
```
!!! warning
Arguments must be passed as `arg=value` pairs, split by an equals `=` sign and delimited by spaces. Do not use `--` argument prefixes or commas `,` between arguments.
- `yolo predict model=yolo11n.pt imgsz=640 conf=0.25` ✅
- `yolo predict model yolo11n.pt imgsz 640 conf 0.25` ❌ (missing `=`)
- `yolo predict model=yolo11n.pt, imgsz=640, conf=0.25` ❌ (do not use `,`)
- `yolo predict --model yolo11n.pt --imgsz 640 --conf 0.25` ❌ (do not use `--`)
- `yolo solution model=yolo11n.pt imgsz=640 conf=0.25` ❌ (use `solutions`, not `solution`)
[CLI Guide](usage/cli.md){ .md-button }
## Use Ultralytics with Python
The Ultralytics YOLO Python interface offers seamless integration into Python projects, making it easy to load, run, and process model outputs. Designed for simplicity, the Python interface allows users to quickly implement [object detection](https://www.ultralytics.com/glossary/object-detection), segmentation, and classification. This makes the YOLO Python interface an invaluable tool for incorporating these functionalities into Python projects.
For instance, users can load a model, train it, evaluate its performance, and export it to ONNX format with just a few lines of code. Explore the [Python Guide](usage/python.md) to learn more about using YOLO within your Python projects.
!!! example
```python
from ultralytics import YOLO
# Create a new YOLO model from scratch
model = YOLO("yolo11n.yaml")
# Load a pretrained YOLO model (recommended for training)
model = YOLO("yolo11n.pt")
# Train the model using the 'coco8.yaml' dataset for 3 epochs
results = model.train(data="coco8.yaml", epochs=3)
# Evaluate the model's performance on the validation set
results = model.val()
# Perform object detection on an image using the model
results = model("https://ultralytics.com/images/bus.jpg")
# Export the model to ONNX format
success = model.export(format="onnx")
```
[Python Guide](usage/python.md){.md-button .md-button--primary}
## Ultralytics Settings
The Ultralytics library includes a `SettingsManager` for fine-grained control over experiments, allowing users to access and modify settings easily. Stored in a JSON file within the environment's user configuration directory, these settings can be viewed or modified in the Python environment or via the Command-Line Interface (CLI).
### Inspecting Settings
To view the current configuration of your settings:
!!! example "View settings"
=== "Python"
Use Python to view your settings by importing the `settings` object from the `ultralytics` module. Print and return settings with these commands:
```python
from ultralytics import settings
# View all settings
print(settings)
# Return a specific setting
value = settings["runs_dir"]
```
=== "CLI"
The command-line interface allows you to check your settings with:
```bash
yolo settings
```
### Modifying Settings
Ultralytics makes it easy to modify settings in the following ways:
!!! example "Update settings"
=== "Python"
In Python, use the `update` method on the `settings` object:
```python
from ultralytics import settings
# Update a setting
settings.update({"runs_dir": "/path/to/runs"})
# Update multiple settings
settings.update({"runs_dir": "/path/to/runs", "tensorboard": False})
# Reset settings to default values
settings.reset()
```
=== "CLI"
To modify settings using the command-line interface:
```bash
# Update a setting
yolo settings runs_dir='/path/to/runs'
# Update multiple settings
yolo settings runs_dir='/path/to/runs' tensorboard=False
# Reset settings to default values
yolo settings reset
```
### Understanding Settings
The table below overviews the adjustable settings within Ultralytics, including example values, data types, and descriptions.
| Name | Example Value | Data Type | Description |
| ------------------ | --------------------- | --------- | ---------------------------------------------------------------------------------------------------------------- |
| `settings_version` | `'0.0.4'` | `str` | Ultralytics _settings_ version (distinct from the Ultralytics [pip] version) |
| `datasets_dir` | `'/path/to/datasets'` | `str` | Directory where datasets are stored |
| `weights_dir` | `'/path/to/weights'` | `str` | Directory where model weights are stored |
| `runs_dir` | `'/path/to/runs'` | `str` | Directory where experiment runs are stored |
| `uuid` | `'a1b2c3d4'` | `str` | Unique identifier for the current settings |
| `sync` | `True` | `bool` | Option to sync analytics and crashes to [Ultralytics HUB] |
| `api_key` | `''` | `str` | [Ultralytics HUB] API Key |
| `clearml` | `True` | `bool` | Option to use [ClearML] logging |
| `comet` | `True` | `bool` | Option to use [Comet ML] for experiment tracking and visualization |
| `dvc` | `True` | `bool` | Option to use [DVC for experiment tracking] and version control |
| `hub` | `True` | `bool` | Option to use [Ultralytics HUB] integration |
| `mlflow` | `True` | `bool` | Option to use [MLFlow] for experiment tracking |
| `neptune` | `True` | `bool` | Option to use [Neptune] for experiment tracking |
| `raytune` | `True` | `bool` | Option to use [Ray Tune] for [hyperparameter tuning](https://www.ultralytics.com/glossary/hyperparameter-tuning) |
| `tensorboard` | `True` | `bool` | Option to use [TensorBoard] for visualization |
| `wandb` | `True` | `bool` | Option to use [Weights & Biases] logging |
| `vscode_msg` | `True` | `bool` | When a VS Code terminal is detected, enables a prompt to download the [Ultralytics-Snippets] extension. |
Revisit these settings as you progress through projects or experiments to ensure optimal configuration.
## FAQ
### How do I install Ultralytics using pip?
Install Ultralytics with pip using:
```bash
pip install -U ultralytics
```
This installs the latest stable release of the `ultralytics` package from [PyPI](https://pypi.org/project/ultralytics/). To install the development version directly from GitHub:
```bash
pip install git+https://github.com/ultralytics/ultralytics.git
```
Ensure the Git command-line tool is installed on your system.
### Can I install Ultralytics YOLO using conda?
Yes, install Ultralytics YOLO using conda with:
```bash
conda install -c conda-forge ultralytics
```
This method is a great alternative to pip, ensuring compatibility with other packages. For CUDA environments, install `ultralytics`, `pytorch`, and `pytorch-cuda` together to resolve conflicts:
```bash
conda install -c pytorch -c nvidia -c conda-forge pytorch torchvision pytorch-cuda=11.8 ultralytics
```
For more instructions, see the [Conda quickstart guide](guides/conda-quickstart.md).
### What are the advantages of using Docker to run Ultralytics YOLO?
Docker provides an isolated, consistent environment for Ultralytics YOLO, ensuring smooth performance across systems and avoiding local installation complexities. Official Docker images are available on [Docker Hub](https://hub.docker.com/r/ultralytics/ultralytics), with variants for GPU, CPU, ARM64, [NVIDIA Jetson](https://docs.ultralytics.com/guides/nvidia-jetson/), and Conda. To pull and run the latest image:
```bash
# Pull the latest ultralytics image from Docker Hub
sudo docker pull ultralytics/ultralytics:latest
# Run the ultralytics image in a container with GPU support
sudo docker run -it --ipc=host --runtime=nvidia --gpus all ultralytics/ultralytics:latest
```
For detailed Docker instructions, see the [Docker quickstart guide](guides/docker-quickstart.md).
### How do I clone the Ultralytics repository for development?
Clone the Ultralytics repository and set up a development environment with:
```bash
# Clone the ultralytics repository
git clone https://github.com/ultralytics/ultralytics
# Navigate to the cloned directory
cd ultralytics
# Install the package in editable mode for development
pip install -e .
```
This allows contributions to the project or experimentation with the latest source code. For details, visit the [Ultralytics GitHub repository](https://github.com/ultralytics/ultralytics).
### Why should I use Ultralytics YOLO CLI?
The Ultralytics YOLO CLI simplifies running object detection tasks without Python code, enabling single-line commands for training, validation, and prediction directly from your terminal. The basic syntax is:
```bash
yolo TASK MODE ARGS
```
For example, to train a detection model:
```bash
yolo train data=coco8.yaml model=yolo11n.pt epochs=10 lr0=0.01
```
Explore more commands and usage examples in the full [CLI Guide](usage/cli.md).
[Ultralytics HUB]: https://hub.ultralytics.com
[API Key]: https://hub.ultralytics.com/settings?tab=api+keys
[pip]: https://pypi.org/project/ultralytics/
[DVC for experiment tracking]: https://dvc.org/doc/dvclive/ml-frameworks/yolo
[Comet ML]: https://bit.ly/yolov8-readme-comet
[Ultralytics HUB]: https://hub.ultralytics.com
[ClearML]: ./integrations/clearml.md
[MLFlow]: ./integrations/mlflow.md
[Neptune]: https://neptune.ai/
[Tensorboard]: ./integrations/tensorboard.md
[Ray Tune]: ./integrations/ray-tune.md
[Weights & Biases]: ./integrations/weights-biases.md
[Ultralytics-Snippets]: ./integrations/vscode.md
---
# Source: https://raw.githubusercontent.com/ultralytics/ultralytics/main/docs/en/tasks/classify.md
---
comments: true
description: Master image classification using YOLO11. Learn to train, validate, predict, and export models efficiently.
keywords: YOLO11, image classification, AI, machine learning, pretrained models, ImageNet, model export, predict, train, validate
model_name: yolo11n-cls
---
# Image Classification
## Headless Server Installation
For server environments without a display (e.g., cloud VMs, Docker containers, CI/CD pipelines), use the `ultralytics-opencv-headless` package. This is identical to the standard `ultralytics` package but depends on `opencv-python-headless` instead of `opencv-python`, avoiding unnecessary GUI dependencies and potential `libGL` errors.
!!! example "Headless Install"
```bash
pip install ultralytics-opencv-headless
```
Both packages provide the same functionality and API. The headless variant simply excludes OpenCV's GUI components that require display libraries.
## Advanced Installation
While the standard installation methods cover most use cases, you might need a more tailored setup for development or custom configurations.
!!! example "Advanced Methods"
=== "Install from Fork"
If you need persistent custom modifications, you can fork the Ultralytics repository, make changes to `pyproject.toml` or other code, and install from your fork.
1. **Fork** the [Ultralytics GitHub repository](https://github.com/ultralytics/ultralytics) to your own GitHub account.
2. **Clone** your fork locally:
```bash
git clone https://github.com/YOUR_USERNAME/ultralytics.git
cd ultralytics
```
3. **Create a new branch** for your changes:
```bash
git checkout -b my-custom-branch
```
4. **Make your modifications** to `pyproject.toml` or other files as needed.
5. **Commit and push** your changes:
```bash
git add .
git commit -m "My custom changes"
git push origin my-custom-branch
```
6. **Install** using pip with the `git+https` syntax, pointing to your branch:
```bash
pip install git+https://github.com/YOUR_USERNAME/ultralytics.git@my-custom-branch
```
=== "Local Clone and Install"
Clone the repository locally, modify files as needed, and install in editable mode.
1. **Clone** the Ultralytics repository:
```bash
git clone https://github.com/ultralytics/ultralytics
cd ultralytics
```
2. **Make your modifications** to `pyproject.toml` or other files as needed.
3. **Install** the package in editable mode (`-e`). Pip will use your modified `pyproject.toml` to resolve dependencies:
```bash
pip install -e .
```
This approach is useful for development or testing local changes before committing.
=== "Use requirements.txt"
Specify a custom Ultralytics fork in your `requirements.txt` file to ensure consistent installations across your team.
```text title="requirements.txt"
# Install ultralytics from a specific git branch
git+https://github.com/YOUR_USERNAME/ultralytics.git@my-custom-branch
# Other project dependencies
flask
```
Install dependencies from the file:
```bash
pip install -r requirements.txt
```
## Use Ultralytics with CLI
The Ultralytics command-line interface (CLI) allows for simple single-line commands without needing a Python environment. CLI requires no customization or Python code; run all tasks from the terminal with the `yolo` command. For more on using YOLO from the command line, see the [CLI Guide](usage/cli.md).
!!! example
=== "Syntax"
Ultralytics `yolo` commands use the following syntax:
```bash
yolo TASK MODE ARGS
```
- `TASK` (optional) is one of ([detect](tasks/detect.md), [segment](tasks/segment.md), [classify](tasks/classify.md), [pose](tasks/pose.md), [obb](tasks/obb.md))
- `MODE` (required) is one of ([train](modes/train.md), [val](modes/val.md), [predict](modes/predict.md), [export](modes/export.md), [track](modes/track.md), [benchmark](modes/benchmark.md))
- `ARGS` (optional) are `arg=value` pairs like `imgsz=640` that override defaults.
See all `ARGS` in the full [Configuration Guide](usage/cfg.md) or with the `yolo cfg` CLI command.
=== "Train"
Train a detection model for 10 [epochs](https://www.ultralytics.com/glossary/epoch) with an initial learning rate of 0.01:
```bash
yolo train data=coco8.yaml model=yolo11n.pt epochs=10 lr0=0.01
```
=== "Predict"
Predict a YouTube video using a pretrained segmentation model at image size 320:
```bash
yolo predict model=yolo11n-seg.pt source='https://youtu.be/LNwODJXcvt4' imgsz=320
```
=== "Val"
Validate a pretrained detection model with a batch size of 1 and image size of 640:
```bash
yolo val model=yolo11n.pt data=coco8.yaml batch=1 imgsz=640
```
=== "Export"
Export a YOLO11n classification model to ONNX format with an image size of 224x128 (no TASK required):
```bash
yolo export model=yolo11n-cls.pt format=onnx imgsz=224,128
```
=== "Count"
Count objects in a video or live stream using YOLO11:
```bash
yolo solutions count show=True
yolo solutions count source="path/to/video.mp4" # specify video file path
```
=== "Workout"
Monitor workout exercises using a YOLO11 pose model:
```bash
yolo solutions workout show=True
yolo solutions workout source="path/to/video.mp4" # specify video file path
# Use keypoints for ab-workouts
yolo solutions workout kpts="[5, 11, 13]" # left side
yolo solutions workout kpts="[6, 12, 14]" # right side
```
=== "Queue"
Use YOLO11 to count objects in a designated queue or region:
```bash
yolo solutions queue show=True
yolo solutions queue source="path/to/video.mp4" # specify video file path
yolo solutions queue region="[(20, 400), (1080, 400), (1080, 360), (20, 360)]" # configure queue coordinates
```
=== "Inference with Streamlit"
Perform object detection, instance segmentation, or pose estimation in a web browser using [Streamlit](https://docs.ultralytics.com/reference/solutions/streamlit_inference/):
```bash
yolo solutions inference
yolo solutions inference model="path/to/model.pt" # use model fine-tuned with Ultralytics Python package
```
=== "Special"
Run special commands to see the version, view settings, run checks, and more:
```bash
yolo help
yolo checks
yolo version
yolo settings
yolo copy-cfg
yolo cfg
yolo solutions help
```
!!! warning
Arguments must be passed as `arg=value` pairs, split by an equals `=` sign and delimited by spaces. Do not use `--` argument prefixes or commas `,` between arguments.
- `yolo predict model=yolo11n.pt imgsz=640 conf=0.25` ✅
- `yolo predict model yolo11n.pt imgsz 640 conf 0.25` ❌ (missing `=`)
- `yolo predict model=yolo11n.pt, imgsz=640, conf=0.25` ❌ (do not use `,`)
- `yolo predict --model yolo11n.pt --imgsz 640 --conf 0.25` ❌ (do not use `--`)
- `yolo solution model=yolo11n.pt imgsz=640 conf=0.25` ❌ (use `solutions`, not `solution`)
[CLI Guide](usage/cli.md){ .md-button }
## Use Ultralytics with Python
The Ultralytics YOLO Python interface offers seamless integration into Python projects, making it easy to load, run, and process model outputs. Designed for simplicity, the Python interface allows users to quickly implement [object detection](https://www.ultralytics.com/glossary/object-detection), segmentation, and classification. This makes the YOLO Python interface an invaluable tool for incorporating these functionalities into Python projects.
For instance, users can load a model, train it, evaluate its performance, and export it to ONNX format with just a few lines of code. Explore the [Python Guide](usage/python.md) to learn more about using YOLO within your Python projects.
!!! example
```python
from ultralytics import YOLO
# Create a new YOLO model from scratch
model = YOLO("yolo11n.yaml")
# Load a pretrained YOLO model (recommended for training)
model = YOLO("yolo11n.pt")
# Train the model using the 'coco8.yaml' dataset for 3 epochs
results = model.train(data="coco8.yaml", epochs=3)
# Evaluate the model's performance on the validation set
results = model.val()
# Perform object detection on an image using the model
results = model("https://ultralytics.com/images/bus.jpg")
# Export the model to ONNX format
success = model.export(format="onnx")
```
[Python Guide](usage/python.md){.md-button .md-button--primary}
## Ultralytics Settings
The Ultralytics library includes a `SettingsManager` for fine-grained control over experiments, allowing users to access and modify settings easily. Stored in a JSON file within the environment's user configuration directory, these settings can be viewed or modified in the Python environment or via the Command-Line Interface (CLI).
### Inspecting Settings
To view the current configuration of your settings:
!!! example "View settings"
=== "Python"
Use Python to view your settings by importing the `settings` object from the `ultralytics` module. Print and return settings with these commands:
```python
from ultralytics import settings
# View all settings
print(settings)
# Return a specific setting
value = settings["runs_dir"]
```
=== "CLI"
The command-line interface allows you to check your settings with:
```bash
yolo settings
```
### Modifying Settings
Ultralytics makes it easy to modify settings in the following ways:
!!! example "Update settings"
=== "Python"
In Python, use the `update` method on the `settings` object:
```python
from ultralytics import settings
# Update a setting
settings.update({"runs_dir": "/path/to/runs"})
# Update multiple settings
settings.update({"runs_dir": "/path/to/runs", "tensorboard": False})
# Reset settings to default values
settings.reset()
```
=== "CLI"
To modify settings using the command-line interface:
```bash
# Update a setting
yolo settings runs_dir='/path/to/runs'
# Update multiple settings
yolo settings runs_dir='/path/to/runs' tensorboard=False
# Reset settings to default values
yolo settings reset
```
### Understanding Settings
The table below overviews the adjustable settings within Ultralytics, including example values, data types, and descriptions.
| Name | Example Value | Data Type | Description |
| ------------------ | --------------------- | --------- | ---------------------------------------------------------------------------------------------------------------- |
| `settings_version` | `'0.0.4'` | `str` | Ultralytics _settings_ version (distinct from the Ultralytics [pip] version) |
| `datasets_dir` | `'/path/to/datasets'` | `str` | Directory where datasets are stored |
| `weights_dir` | `'/path/to/weights'` | `str` | Directory where model weights are stored |
| `runs_dir` | `'/path/to/runs'` | `str` | Directory where experiment runs are stored |
| `uuid` | `'a1b2c3d4'` | `str` | Unique identifier for the current settings |
| `sync` | `True` | `bool` | Option to sync analytics and crashes to [Ultralytics HUB] |
| `api_key` | `''` | `str` | [Ultralytics HUB] API Key |
| `clearml` | `True` | `bool` | Option to use [ClearML] logging |
| `comet` | `True` | `bool` | Option to use [Comet ML] for experiment tracking and visualization |
| `dvc` | `True` | `bool` | Option to use [DVC for experiment tracking] and version control |
| `hub` | `True` | `bool` | Option to use [Ultralytics HUB] integration |
| `mlflow` | `True` | `bool` | Option to use [MLFlow] for experiment tracking |
| `neptune` | `True` | `bool` | Option to use [Neptune] for experiment tracking |
| `raytune` | `True` | `bool` | Option to use [Ray Tune] for [hyperparameter tuning](https://www.ultralytics.com/glossary/hyperparameter-tuning) |
| `tensorboard` | `True` | `bool` | Option to use [TensorBoard] for visualization |
| `wandb` | `True` | `bool` | Option to use [Weights & Biases] logging |
| `vscode_msg` | `True` | `bool` | When a VS Code terminal is detected, enables a prompt to download the [Ultralytics-Snippets] extension. |
Revisit these settings as you progress through projects or experiments to ensure optimal configuration.
## FAQ
### How do I install Ultralytics using pip?
Install Ultralytics with pip using:
```bash
pip install -U ultralytics
```
This installs the latest stable release of the `ultralytics` package from [PyPI](https://pypi.org/project/ultralytics/). To install the development version directly from GitHub:
```bash
pip install git+https://github.com/ultralytics/ultralytics.git
```
Ensure the Git command-line tool is installed on your system.
### Can I install Ultralytics YOLO using conda?
Yes, install Ultralytics YOLO using conda with:
```bash
conda install -c conda-forge ultralytics
```
This method is a great alternative to pip, ensuring compatibility with other packages. For CUDA environments, install `ultralytics`, `pytorch`, and `pytorch-cuda` together to resolve conflicts:
```bash
conda install -c pytorch -c nvidia -c conda-forge pytorch torchvision pytorch-cuda=11.8 ultralytics
```
For more instructions, see the [Conda quickstart guide](guides/conda-quickstart.md).
### What are the advantages of using Docker to run Ultralytics YOLO?
Docker provides an isolated, consistent environment for Ultralytics YOLO, ensuring smooth performance across systems and avoiding local installation complexities. Official Docker images are available on [Docker Hub](https://hub.docker.com/r/ultralytics/ultralytics), with variants for GPU, CPU, ARM64, [NVIDIA Jetson](https://docs.ultralytics.com/guides/nvidia-jetson/), and Conda. To pull and run the latest image:
```bash
# Pull the latest ultralytics image from Docker Hub
sudo docker pull ultralytics/ultralytics:latest
# Run the ultralytics image in a container with GPU support
sudo docker run -it --ipc=host --runtime=nvidia --gpus all ultralytics/ultralytics:latest
```
For detailed Docker instructions, see the [Docker quickstart guide](guides/docker-quickstart.md).
### How do I clone the Ultralytics repository for development?
Clone the Ultralytics repository and set up a development environment with:
```bash
# Clone the ultralytics repository
git clone https://github.com/ultralytics/ultralytics
# Navigate to the cloned directory
cd ultralytics
# Install the package in editable mode for development
pip install -e .
```
This allows contributions to the project or experimentation with the latest source code. For details, visit the [Ultralytics GitHub repository](https://github.com/ultralytics/ultralytics).
### Why should I use Ultralytics YOLO CLI?
The Ultralytics YOLO CLI simplifies running object detection tasks without Python code, enabling single-line commands for training, validation, and prediction directly from your terminal. The basic syntax is:
```bash
yolo TASK MODE ARGS
```
For example, to train a detection model:
```bash
yolo train data=coco8.yaml model=yolo11n.pt epochs=10 lr0=0.01
```
Explore more commands and usage examples in the full [CLI Guide](usage/cli.md).
[Ultralytics HUB]: https://hub.ultralytics.com
[API Key]: https://hub.ultralytics.com/settings?tab=api+keys
[pip]: https://pypi.org/project/ultralytics/
[DVC for experiment tracking]: https://dvc.org/doc/dvclive/ml-frameworks/yolo
[Comet ML]: https://bit.ly/yolov8-readme-comet
[Ultralytics HUB]: https://hub.ultralytics.com
[ClearML]: ./integrations/clearml.md
[MLFlow]: ./integrations/mlflow.md
[Neptune]: https://neptune.ai/
[Tensorboard]: ./integrations/tensorboard.md
[Ray Tune]: ./integrations/ray-tune.md
[Weights & Biases]: ./integrations/weights-biases.md
[Ultralytics-Snippets]: ./integrations/vscode.md
---
# Source: https://raw.githubusercontent.com/ultralytics/ultralytics/main/docs/en/tasks/classify.md
---
comments: true
description: Master image classification using YOLO11. Learn to train, validate, predict, and export models efficiently.
keywords: YOLO11, image classification, AI, machine learning, pretrained models, ImageNet, model export, predict, train, validate
model_name: yolo11n-cls
---
# Image Classification
 [Image classification](https://www.ultralytics.com/glossary/image-classification) is the simplest of the three tasks and involves classifying an entire image into one of a set of predefined classes.
The output of an image classifier is a single class label and a confidence score. Image classification is useful when you need to know only what class an image belongs to and don't need to know where objects of that class are located or what their exact shape is.
[Image classification](https://www.ultralytics.com/glossary/image-classification) is the simplest of the three tasks and involves classifying an entire image into one of a set of predefined classes.
The output of an image classifier is a single class label and a confidence score. Image classification is useful when you need to know only what class an image belongs to and don't need to know where objects of that class are located or what their exact shape is.
 [Object detection](https://www.ultralytics.com/glossary/object-detection) is a task that involves identifying the location and class of objects in an image or video stream.
The output of an object detector is a set of bounding boxes that enclose the objects in the image, along with class labels and confidence scores for each box. Object detection is a good choice when you need to identify objects of interest in a scene, but don't need to know exactly where the object is or its exact shape.
[Object detection](https://www.ultralytics.com/glossary/object-detection) is a task that involves identifying the location and class of objects in an image or video stream.
The output of an object detector is a set of bounding boxes that enclose the objects in the image, along with class labels and confidence scores for each box. Object detection is a good choice when you need to identify objects of interest in a scene, but don't need to know exactly where the object is or its exact shape.
 Ultralytics YOLO11 is a versatile AI framework that supports multiple [computer vision](https://www.ultralytics.com/blog/everything-you-need-to-know-about-computer-vision-in-2025) **tasks**. The framework can be used to perform [detection](detect.md), [segmentation](segment.md), [OBB](obb.md), [classification](classify.md), and [pose](pose.md) estimation. Each of these tasks has a different objective and use case, allowing you to address various computer vision challenges with a single framework.
 Pose estimation is a task that involves identifying the location of specific points in an image, usually referred to as keypoints. The keypoints can represent various parts of the object such as joints, landmarks, or other distinctive features. The locations of the keypoints are usually represented as a set of 2D `[x, y]` or 3D `[x, y, visible]` coordinates.
The output of a pose estimation model is a set of points that represent the keypoints on an object in the image, usually along with the confidence scores for each point. Pose estimation is a good choice when you need to identify specific parts of an object in a scene, and their location in relation to each other.
Pose estimation is a task that involves identifying the location of specific points in an image, usually referred to as keypoints. The keypoints can represent various parts of the object such as joints, landmarks, or other distinctive features. The locations of the keypoints are usually represented as a set of 2D `[x, y]` or 3D `[x, y, visible]` coordinates.
The output of a pose estimation model is a set of points that represent the keypoints on an object in the image, usually along with the confidence scores for each point. Pose estimation is a good choice when you need to identify specific parts of an object in a scene, and their location in relation to each other.
 [Instance segmentation](https://www.ultralytics.com/glossary/instance-segmentation) goes a step further than object detection and involves identifying individual objects in an image and segmenting them from the rest of the image.
The output of an instance segmentation model is a set of masks or contours that outline each object in the image, along with class labels and confidence scores for each object. Instance segmentation is useful when you need to know not only where objects are in an image, but also what their exact shape is.
[Instance segmentation](https://www.ultralytics.com/glossary/instance-segmentation) goes a step further than object detection and involves identifying individual objects in an image and segmenting them from the rest of the image.
The output of an instance segmentation model is a set of masks or contours that outline each object in the image, along with class labels and confidence scores for each object. Instance segmentation is useful when you need to know not only where objects are in an image, but also what their exact shape is.