 ## RAG Explanation
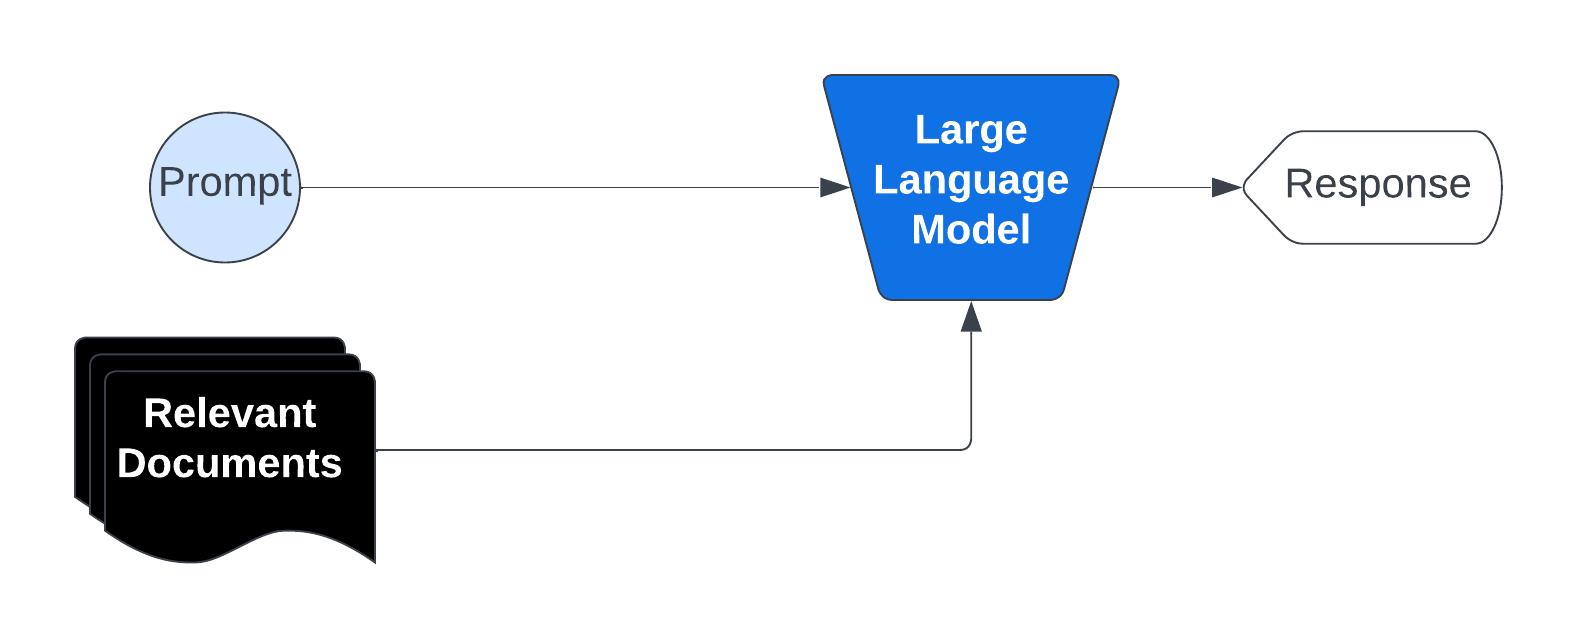
RAG operates by preprocessing a large knowledge base and dynamically retrieving relevant information at runtime.
Here's a breakdown of the process:
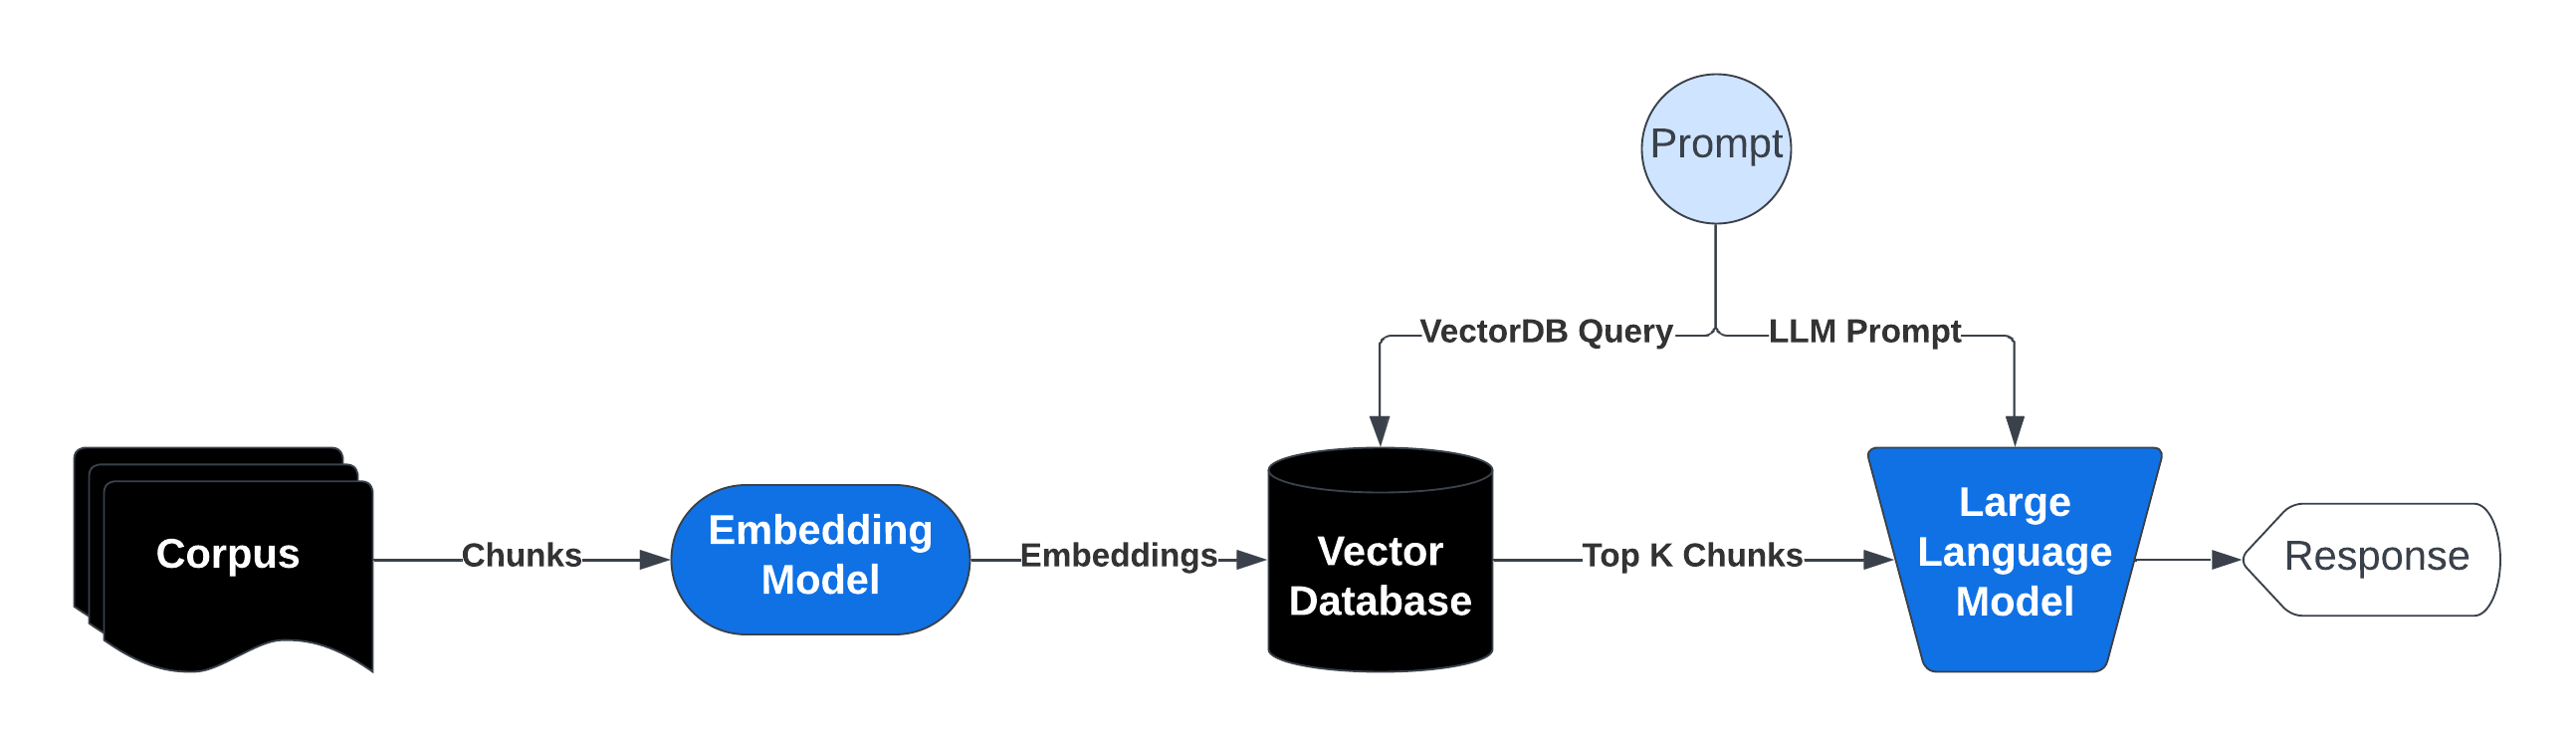
1. Indexing the Knowledge Base: The corpus (collection of documents) is divided into smaller, manageable chunks of text. Each chunk is converted into a vector embedding using an embedding model. These embeddings are stored in a vector database optimized for similarity searches.
2. Query Processing and Retrieval: When a user submits a prompt that would initially go directly to a LLM we process that and extract a query, the system searches the vector database for chunks semantically similar to the query. The most relevant chunks are retrieved and injected into the prompt sent to the generative AI model.
3. Response Generation: The AI model then uses the retrieved information along with its pre-trained knowledge to generate a response. Not only does this reduce the likelihood of hallucination since relevant context is provided directly in the prompt but it also allows us to cite to source material as well.
## RAG Explanation
RAG operates by preprocessing a large knowledge base and dynamically retrieving relevant information at runtime.
Here's a breakdown of the process:
1. Indexing the Knowledge Base: The corpus (collection of documents) is divided into smaller, manageable chunks of text. Each chunk is converted into a vector embedding using an embedding model. These embeddings are stored in a vector database optimized for similarity searches.
2. Query Processing and Retrieval: When a user submits a prompt that would initially go directly to a LLM we process that and extract a query, the system searches the vector database for chunks semantically similar to the query. The most relevant chunks are retrieved and injected into the prompt sent to the generative AI model.
3. Response Generation: The AI model then uses the retrieved information along with its pre-trained knowledge to generate a response. Not only does this reduce the likelihood of hallucination since relevant context is provided directly in the prompt but it also allows us to cite to source material as well.
 ## Download and View the Dataset
```bash Shell theme={null}
wget https://raw.githubusercontent.com/togethercomputer/together-cookbook/refs/heads/main/datasets/movies.json
mkdir datasets
mv movies.json datasets/movies.json
```
```py Python theme={null}
import together, os
from together import Together
# Paste in your Together AI API Key or load it
TOGETHER_API_KEY = os.environ.get("TOGETHER_API_KEY")
import json
with open("./datasets/movies.json", "r") as file:
movies_data = json.load(file)
movies_data[:1]
```
This dataset consists of movie information as below:
```py Python theme={null}
[
{
"title": "Minions",
"overview": "Minions Stuart, Kevin and Bob are recruited by Scarlet Overkill, a super-villain who, alongside her inventor husband Herb, hatches a plot to take over the world.",
"director": "Kyle Balda",
"genres": "Family Animation Adventure Comedy",
"tagline": "Before Gru, they had a history of bad bosses",
},
{
"title": "Interstellar",
"overview": "Interstellar chronicles the adventures of a group of explorers who make use of a newly discovered wormhole to surpass the limitations on human space travel and conquer the vast distances involved in an interstellar voyage.",
"director": "Christopher Nolan",
"genres": "Adventure Drama Science Fiction",
"tagline": "Mankind was born on Earth. It was never meant to die here.",
},
{
"title": "Deadpool",
"overview": "Deadpool tells the origin story of former Special Forces operative turned mercenary Wade Wilson, who after being subjected to a rogue experiment that leaves him with accelerated healing powers, adopts the alter ego Deadpool. Armed with his new abilities and a dark, twisted sense of humor, Deadpool hunts down the man who nearly destroyed his life.",
"director": "Tim Miller",
"genres": "Action Adventure Comedy",
"tagline": "Witness the beginning of a happy ending",
},
]
```
## Implement Retrieval Pipeline - "R" part of RAG
Below we implement a simple retrieval pipeline:
1. Embed movie documents and query
2. Obtain top k movies ranked based on cosine similarities between the query and movie vectors.
```py Python theme={null}
# This function will be used to access the Together API to generate embeddings for the movie plots
from typing import List
import numpy as np
def generate_embeddings(
input_texts: List[str],
model_api_string: str,
) -> List[List[float]]:
"""Generate embeddings from Together python library.
Args:
input_texts: a list of string input texts.
model_api_string: str. An API string for a specific embedding model of your choice.
Returns:
embeddings_list: a list of embeddings. Each element corresponds to the each input text.
"""
together_client = together.Together(api_key=TOGETHER_API_KEY)
outputs = together_client.embeddings.create(
input=input_texts,
model=model_api_string,
)
return np.array([x.embedding for x in outputs.data])
# We will concatenate fields in the dataset in prep for embedding
to_embed = []
for movie in movies_data:
text = ""
for field in ["title", "overview", "tagline"]:
value = movie.get(field, "")
text += str(value) + " "
to_embed.append(text.strip())
# Use bge-base-en-v1.5 model to generate embeddings
embeddings = generate_embeddings(to_embed, "BAAI/bge-base-en-v1.5")
```
This will generate embeddings of the movies which we can use later to retrieve similar movies.
When a use makes a query we can embed the query using the same model and perform a vector similarity search as shown below:
```py Python theme={null}
from sklearn.metrics.pairwise import cosine_similarity
# Generate the vector embeddings for the query
query = "super hero action movie with a timeline twist"
query_embedding = generate_embeddings([query], "BAAI/bge-base-en-v1.5")[0]
# Calculate cosine similarity between the query embedding and each movie embedding
similarity_scores = cosine_similarity([query_embedding], embeddings)
```
We get a similarity score for each of our 1000 movies - the higher the score, the more similar the movie is to the query.
We can sort this similarity score to get the movies most similar to our query = `super hero action movie with a timeline twist`
```py Python theme={null}
# Get the indices of the highest to lowest values
indices = np.argsort(-similarity_scores)
top_10_sorted_titles = [movies_data[index]["title"] for index in indices[0]][
:10
]
top_10_sorted_titles
```
This produces the top ten most similar movie titles below:
```
['The Incredibles',
'Watchmen',
'Mr. Peabody & Sherman',
'Due Date',
'The Next Three Days',
'Super 8',
'Iron Man',
'After Earth',
'Men in Black 3',
'Despicable Me 2']
```
## We can encapsulate the above in a function
```py Python theme={null}
def retrieve(
query: str,
top_k: int = 5,
index: np.ndarray = None,
) -> List[int]:
"""
Retrieve the top-k most similar items from an index based on a query.
Args:
query (str): The query string to search for.
top_k (int, optional): The number of top similar items to retrieve. Defaults to 5.
index (np.ndarray, optional): The index array containing embeddings to search against. Defaults to None.
Returns:
List[int]: A list of indices corresponding to the top-k most similar items in the index.
"""
query_embedding = generate_embeddings([query], "BAAI/bge-base-en-v1.5")[0]
similarity_scores = cosine_similarity([query_embedding], index)
return np.argsort(-similarity_scores)[0][:top_k]
```
Which can be used as follows:
```py Python theme={null}
retrieve(
"super hero action movie with a timeline twist",
top_k=5,
index=embeddings,
)
```
Which returns an array of indices for movies that best match the query.
```
array([172, 265, 768, 621, 929])
```
## Generation Step - "G" part of RAG
Below we will inject/augment the information the retrieval pipeline extracts into the prompt to the Llama3 8b Model.
This will help guide the generation by grounding it from facts in our knowledge base!
```py Python theme={null}
# Extract out the titles and overviews of the top 10 most similar movies
titles = [movies_data[index]["title"] for index in indices[0]][:10]
overviews = [movies_data[index]["overview"] for index in indices[0]][:10]
client = Together(api_key=TOGETHER_API_KEY)
# Generate a story based on the top 10 most similar movies
response = client.chat.completions.create(
model="meta-llama/Llama-3-8b-chat-hf",
messages=[
{
"role": "system",
"content": "You are a pulitzer award winning craftful story teller. Given only the overview of different plots you can weave together an interesting storyline.",
},
{
"role": "user",
"content": f"Tell me a story about {titles}. Here is some information about them {overviews}",
},
],
)
print(response.choices[0].message.content)
```
Which produces the grounded output below:
```txt Text theme={null}
What a delightful mix of plots! Here's a story that weaves them together:
In a world where superheroes are a thing of the past, Bob Parr, aka Mr. Incredible, has given up his life of saving the world to become an insurance adjuster in the suburbs. His wife, Helen, aka Elastigirl, has also hung up her superhero suit to raise their three children. However, when Bob receives a mysterious assignment from a secret organization, he's forced to don his old costume once again.
As Bob delves deeper into the assignment, he discovers that it's connected to a sinister plot to destroy the world. The plot is masterminded by a group of rogue superheroes, who were once part of the Watchmen, a group of vigilantes that were disbanded by the government in the 1980s.
The Watchmen, led by the enigmatic Rorschach, have been secretly rebuilding their team and are now determined to take revenge on the world that wronged them. Bob must team up with his old friends, including the brilliant scientist, Dr. Manhattan, to stop the Watchmen and prevent their destruction.
Meanwhile, in a different part of the world, a young boy named Sherman, who has a genius-level IQ, has built a time-travel machine with his dog, Penny. When the machine is stolen, Sherman and Penny must travel through time to prevent a series of catastrophic events from occurring.
As they travel through time, they encounter a group of friends who are making a zombie movie with a Super-8 camera. The friends, including a young boy named Charles, witness a train derailment and soon discover that it was no accident. They team up with Sherman and Penny to uncover the truth behind the crash and prevent a series of unexplained events and disappearances.
As the story unfolds, Bob and his friends must navigate a complex web of time travel and alternate realities to stop the Watchmen and prevent the destruction of the world. Along the way, they encounter a group of agents from the Men in Black, who are trying to prevent a catastrophic event from occurring.
The agents, led by Agents J and K, are on a mission to stop a powerful new super criminal, who is threatening to destroy the world. They team up with Bob and his friends to prevent the destruction and save the world.
In the end, Bob and his friends succeed in stopping the Watchmen and preventing the destruction of the world. However, the journey is not without its challenges, and Bob must confront his own demons and learn to balance his life as a superhero with his life as a husband and father.
The story concludes with Bob and his family returning to their normal lives, but with a newfound appreciation for the importance of family and the power of teamwork. The movie ends with a shot of the Parr family, including their three children, who are all wearing superhero costumes, ready to take on the next adventure that comes their way.
```
Here we can see a simple RAG pipeline where we use semantic search to perform retrieval and pass relevant information into the prompt of a LLM to condition its generation.
To learn more about the Together AI API please refer to the [docs here](/intro) !
---
> To find navigation and other pages in this documentation, fetch the llms.txt file at: https://docs.together.ai/llms.txt
---
# Source: https://docs.together.ai/docs/changelog.md
# Changelog
## December, 2025
## Download and View the Dataset
```bash Shell theme={null}
wget https://raw.githubusercontent.com/togethercomputer/together-cookbook/refs/heads/main/datasets/movies.json
mkdir datasets
mv movies.json datasets/movies.json
```
```py Python theme={null}
import together, os
from together import Together
# Paste in your Together AI API Key or load it
TOGETHER_API_KEY = os.environ.get("TOGETHER_API_KEY")
import json
with open("./datasets/movies.json", "r") as file:
movies_data = json.load(file)
movies_data[:1]
```
This dataset consists of movie information as below:
```py Python theme={null}
[
{
"title": "Minions",
"overview": "Minions Stuart, Kevin and Bob are recruited by Scarlet Overkill, a super-villain who, alongside her inventor husband Herb, hatches a plot to take over the world.",
"director": "Kyle Balda",
"genres": "Family Animation Adventure Comedy",
"tagline": "Before Gru, they had a history of bad bosses",
},
{
"title": "Interstellar",
"overview": "Interstellar chronicles the adventures of a group of explorers who make use of a newly discovered wormhole to surpass the limitations on human space travel and conquer the vast distances involved in an interstellar voyage.",
"director": "Christopher Nolan",
"genres": "Adventure Drama Science Fiction",
"tagline": "Mankind was born on Earth. It was never meant to die here.",
},
{
"title": "Deadpool",
"overview": "Deadpool tells the origin story of former Special Forces operative turned mercenary Wade Wilson, who after being subjected to a rogue experiment that leaves him with accelerated healing powers, adopts the alter ego Deadpool. Armed with his new abilities and a dark, twisted sense of humor, Deadpool hunts down the man who nearly destroyed his life.",
"director": "Tim Miller",
"genres": "Action Adventure Comedy",
"tagline": "Witness the beginning of a happy ending",
},
]
```
## Implement Retrieval Pipeline - "R" part of RAG
Below we implement a simple retrieval pipeline:
1. Embed movie documents and query
2. Obtain top k movies ranked based on cosine similarities between the query and movie vectors.
```py Python theme={null}
# This function will be used to access the Together API to generate embeddings for the movie plots
from typing import List
import numpy as np
def generate_embeddings(
input_texts: List[str],
model_api_string: str,
) -> List[List[float]]:
"""Generate embeddings from Together python library.
Args:
input_texts: a list of string input texts.
model_api_string: str. An API string for a specific embedding model of your choice.
Returns:
embeddings_list: a list of embeddings. Each element corresponds to the each input text.
"""
together_client = together.Together(api_key=TOGETHER_API_KEY)
outputs = together_client.embeddings.create(
input=input_texts,
model=model_api_string,
)
return np.array([x.embedding for x in outputs.data])
# We will concatenate fields in the dataset in prep for embedding
to_embed = []
for movie in movies_data:
text = ""
for field in ["title", "overview", "tagline"]:
value = movie.get(field, "")
text += str(value) + " "
to_embed.append(text.strip())
# Use bge-base-en-v1.5 model to generate embeddings
embeddings = generate_embeddings(to_embed, "BAAI/bge-base-en-v1.5")
```
This will generate embeddings of the movies which we can use later to retrieve similar movies.
When a use makes a query we can embed the query using the same model and perform a vector similarity search as shown below:
```py Python theme={null}
from sklearn.metrics.pairwise import cosine_similarity
# Generate the vector embeddings for the query
query = "super hero action movie with a timeline twist"
query_embedding = generate_embeddings([query], "BAAI/bge-base-en-v1.5")[0]
# Calculate cosine similarity between the query embedding and each movie embedding
similarity_scores = cosine_similarity([query_embedding], embeddings)
```
We get a similarity score for each of our 1000 movies - the higher the score, the more similar the movie is to the query.
We can sort this similarity score to get the movies most similar to our query = `super hero action movie with a timeline twist`
```py Python theme={null}
# Get the indices of the highest to lowest values
indices = np.argsort(-similarity_scores)
top_10_sorted_titles = [movies_data[index]["title"] for index in indices[0]][
:10
]
top_10_sorted_titles
```
This produces the top ten most similar movie titles below:
```
['The Incredibles',
'Watchmen',
'Mr. Peabody & Sherman',
'Due Date',
'The Next Three Days',
'Super 8',
'Iron Man',
'After Earth',
'Men in Black 3',
'Despicable Me 2']
```
## We can encapsulate the above in a function
```py Python theme={null}
def retrieve(
query: str,
top_k: int = 5,
index: np.ndarray = None,
) -> List[int]:
"""
Retrieve the top-k most similar items from an index based on a query.
Args:
query (str): The query string to search for.
top_k (int, optional): The number of top similar items to retrieve. Defaults to 5.
index (np.ndarray, optional): The index array containing embeddings to search against. Defaults to None.
Returns:
List[int]: A list of indices corresponding to the top-k most similar items in the index.
"""
query_embedding = generate_embeddings([query], "BAAI/bge-base-en-v1.5")[0]
similarity_scores = cosine_similarity([query_embedding], index)
return np.argsort(-similarity_scores)[0][:top_k]
```
Which can be used as follows:
```py Python theme={null}
retrieve(
"super hero action movie with a timeline twist",
top_k=5,
index=embeddings,
)
```
Which returns an array of indices for movies that best match the query.
```
array([172, 265, 768, 621, 929])
```
## Generation Step - "G" part of RAG
Below we will inject/augment the information the retrieval pipeline extracts into the prompt to the Llama3 8b Model.
This will help guide the generation by grounding it from facts in our knowledge base!
```py Python theme={null}
# Extract out the titles and overviews of the top 10 most similar movies
titles = [movies_data[index]["title"] for index in indices[0]][:10]
overviews = [movies_data[index]["overview"] for index in indices[0]][:10]
client = Together(api_key=TOGETHER_API_KEY)
# Generate a story based on the top 10 most similar movies
response = client.chat.completions.create(
model="meta-llama/Llama-3-8b-chat-hf",
messages=[
{
"role": "system",
"content": "You are a pulitzer award winning craftful story teller. Given only the overview of different plots you can weave together an interesting storyline.",
},
{
"role": "user",
"content": f"Tell me a story about {titles}. Here is some information about them {overviews}",
},
],
)
print(response.choices[0].message.content)
```
Which produces the grounded output below:
```txt Text theme={null}
What a delightful mix of plots! Here's a story that weaves them together:
In a world where superheroes are a thing of the past, Bob Parr, aka Mr. Incredible, has given up his life of saving the world to become an insurance adjuster in the suburbs. His wife, Helen, aka Elastigirl, has also hung up her superhero suit to raise their three children. However, when Bob receives a mysterious assignment from a secret organization, he's forced to don his old costume once again.
As Bob delves deeper into the assignment, he discovers that it's connected to a sinister plot to destroy the world. The plot is masterminded by a group of rogue superheroes, who were once part of the Watchmen, a group of vigilantes that were disbanded by the government in the 1980s.
The Watchmen, led by the enigmatic Rorschach, have been secretly rebuilding their team and are now determined to take revenge on the world that wronged them. Bob must team up with his old friends, including the brilliant scientist, Dr. Manhattan, to stop the Watchmen and prevent their destruction.
Meanwhile, in a different part of the world, a young boy named Sherman, who has a genius-level IQ, has built a time-travel machine with his dog, Penny. When the machine is stolen, Sherman and Penny must travel through time to prevent a series of catastrophic events from occurring.
As they travel through time, they encounter a group of friends who are making a zombie movie with a Super-8 camera. The friends, including a young boy named Charles, witness a train derailment and soon discover that it was no accident. They team up with Sherman and Penny to uncover the truth behind the crash and prevent a series of unexplained events and disappearances.
As the story unfolds, Bob and his friends must navigate a complex web of time travel and alternate realities to stop the Watchmen and prevent the destruction of the world. Along the way, they encounter a group of agents from the Men in Black, who are trying to prevent a catastrophic event from occurring.
The agents, led by Agents J and K, are on a mission to stop a powerful new super criminal, who is threatening to destroy the world. They team up with Bob and his friends to prevent the destruction and save the world.
In the end, Bob and his friends succeed in stopping the Watchmen and preventing the destruction of the world. However, the journey is not without its challenges, and Bob must confront his own demons and learn to balance his life as a superhero with his life as a husband and father.
The story concludes with Bob and his family returning to their normal lives, but with a newfound appreciation for the importance of family and the power of teamwork. The movie ends with a shot of the Parr family, including their three children, who are all wearing superhero costumes, ready to take on the next adventure that comes their way.
```
Here we can see a simple RAG pipeline where we use semantic search to perform retrieval and pass relevant information into the prompt of a LLM to condition its generation.
To learn more about the Together AI API please refer to the [docs here](/intro) !
---
> To find navigation and other pages in this documentation, fetch the llms.txt file at: https://docs.together.ai/llms.txt
---
# Source: https://docs.together.ai/docs/changelog.md
# Changelog
## December, 2025
 On the left hand side, select Members.
 At the top of Members, select “Add User”.
 A popup will appear. In this popup, please enter the email of the user.
 If the user does not have an Playground account or SSH key, you will see an error indicating that the user cannot be added.
 Once you click add user, the user will appear in the grid.
 To remove this user, press the 3 dots on the right side and select “Remove user”.
 ---
> To find navigation and other pages in this documentation, fetch the llms.txt file at: https://docs.together.ai/llms.txt
---
# Source: https://docs.together.ai/reference/completions-1.md
# Create Completion
> Query a language, code, or image model.
## OpenAPI
````yaml POST /completions
openapi: 3.1.0
info:
title: Together APIs
description: The Together REST API. Please see https://docs.together.ai for more details.
version: 2.0.0
termsOfService: https://www.together.ai/terms-of-service
contact:
name: Together Support
url: https://www.together.ai/contact
license:
name: MIT
url: https://github.com/togethercomputer/openapi/blob/main/LICENSE
servers:
- url: https://api.together.xyz/v1
security:
- bearerAuth: []
paths:
/completions:
post:
tags:
- Completion
summary: Create completion
description: Query a language, code, or image model.
operationId: completions
requestBody:
content:
application/json:
schema:
$ref: '#/components/schemas/CompletionRequest'
responses:
'200':
description: '200'
content:
application/json:
schema:
$ref: '#/components/schemas/CompletionResponse'
text/event-stream:
schema:
$ref: '#/components/schemas/CompletionStream'
'400':
description: BadRequest
content:
application/json:
schema:
$ref: '#/components/schemas/ErrorData'
'401':
description: Unauthorized
content:
application/json:
schema:
$ref: '#/components/schemas/ErrorData'
'404':
description: NotFound
content:
application/json:
schema:
$ref: '#/components/schemas/ErrorData'
'429':
description: RateLimit
content:
application/json:
schema:
$ref: '#/components/schemas/ErrorData'
'503':
description: Overloaded
content:
application/json:
schema:
$ref: '#/components/schemas/ErrorData'
'504':
description: Timeout
content:
application/json:
schema:
$ref: '#/components/schemas/ErrorData'
deprecated: false
components:
schemas:
CompletionRequest:
type: object
required:
- model
- prompt
properties:
prompt:
type: string
description: A string providing context for the model to complete.
example:
---
> To find navigation and other pages in this documentation, fetch the llms.txt file at: https://docs.together.ai/llms.txt
---
# Source: https://docs.together.ai/reference/completions-1.md
# Create Completion
> Query a language, code, or image model.
## OpenAPI
````yaml POST /completions
openapi: 3.1.0
info:
title: Together APIs
description: The Together REST API. Please see https://docs.together.ai for more details.
version: 2.0.0
termsOfService: https://www.together.ai/terms-of-service
contact:
name: Together Support
url: https://www.together.ai/contact
license:
name: MIT
url: https://github.com/togethercomputer/openapi/blob/main/LICENSE
servers:
- url: https://api.together.xyz/v1
security:
- bearerAuth: []
paths:
/completions:
post:
tags:
- Completion
summary: Create completion
description: Query a language, code, or image model.
operationId: completions
requestBody:
content:
application/json:
schema:
$ref: '#/components/schemas/CompletionRequest'
responses:
'200':
description: '200'
content:
application/json:
schema:
$ref: '#/components/schemas/CompletionResponse'
text/event-stream:
schema:
$ref: '#/components/schemas/CompletionStream'
'400':
description: BadRequest
content:
application/json:
schema:
$ref: '#/components/schemas/ErrorData'
'401':
description: Unauthorized
content:
application/json:
schema:
$ref: '#/components/schemas/ErrorData'
'404':
description: NotFound
content:
application/json:
schema:
$ref: '#/components/schemas/ErrorData'
'429':
description: RateLimit
content:
application/json:
schema:
$ref: '#/components/schemas/ErrorData'
'503':
description: Overloaded
content:
application/json:
schema:
$ref: '#/components/schemas/ErrorData'
'504':
description: Timeout
content:
application/json:
schema:
$ref: '#/components/schemas/ErrorData'
deprecated: false
components:
schemas:
CompletionRequest:
type: object
required:
- model
- prompt
properties:
prompt:
type: string
description: A string providing context for the model to complete.
example:  ## Setup Client & Helper Functions
```py Python theme={null}
import json
from pydantic import ValidationError
from together import Together
client = Together()
def run_llm(user_prompt: str, model: str, system_prompt: str = None):
messages = []
if system_prompt:
messages.append({"role": "system", "content": system_prompt})
messages.append({"role": "user", "content": user_prompt})
response = client.chat.completions.create(
model=model,
messages=messages,
temperature=0.7,
max_tokens=4000,
)
return response.choices[0].message.content
def JSON_llm(user_prompt: str, schema, system_prompt: str = None):
try:
messages = []
if system_prompt:
messages.append({"role": "system", "content": system_prompt})
messages.append({"role": "user", "content": user_prompt})
extract = client.chat.completions.create(
messages=messages,
model="meta-llama/Meta-Llama-3.1-70B-Instruct-Turbo",
response_format={
"type": "json_object",
"schema": schema.model_json_schema(),
},
)
return json.loads(extract.choices[0].message.content)
except ValidationError as e:
error_message = f"Failed to parse JSON: {e}"
print(error_message)
```
## Implement Workflow
## Setup Client & Helper Functions
```py Python theme={null}
import json
from pydantic import ValidationError
from together import Together
client = Together()
def run_llm(user_prompt: str, model: str, system_prompt: str = None):
messages = []
if system_prompt:
messages.append({"role": "system", "content": system_prompt})
messages.append({"role": "user", "content": user_prompt})
response = client.chat.completions.create(
model=model,
messages=messages,
temperature=0.7,
max_tokens=4000,
)
return response.choices[0].message.content
def JSON_llm(user_prompt: str, schema, system_prompt: str = None):
try:
messages = []
if system_prompt:
messages.append({"role": "system", "content": system_prompt})
messages.append({"role": "user", "content": user_prompt})
extract = client.chat.completions.create(
messages=messages,
model="meta-llama/Meta-Llama-3.1-70B-Instruct-Turbo",
response_format={
"type": "json_object",
"schema": schema.model_json_schema(),
},
)
return json.loads(extract.choices[0].message.content)
except ValidationError as e:
error_message = f"Failed to parse JSON: {e}"
print(error_message)
```
## Implement Workflow
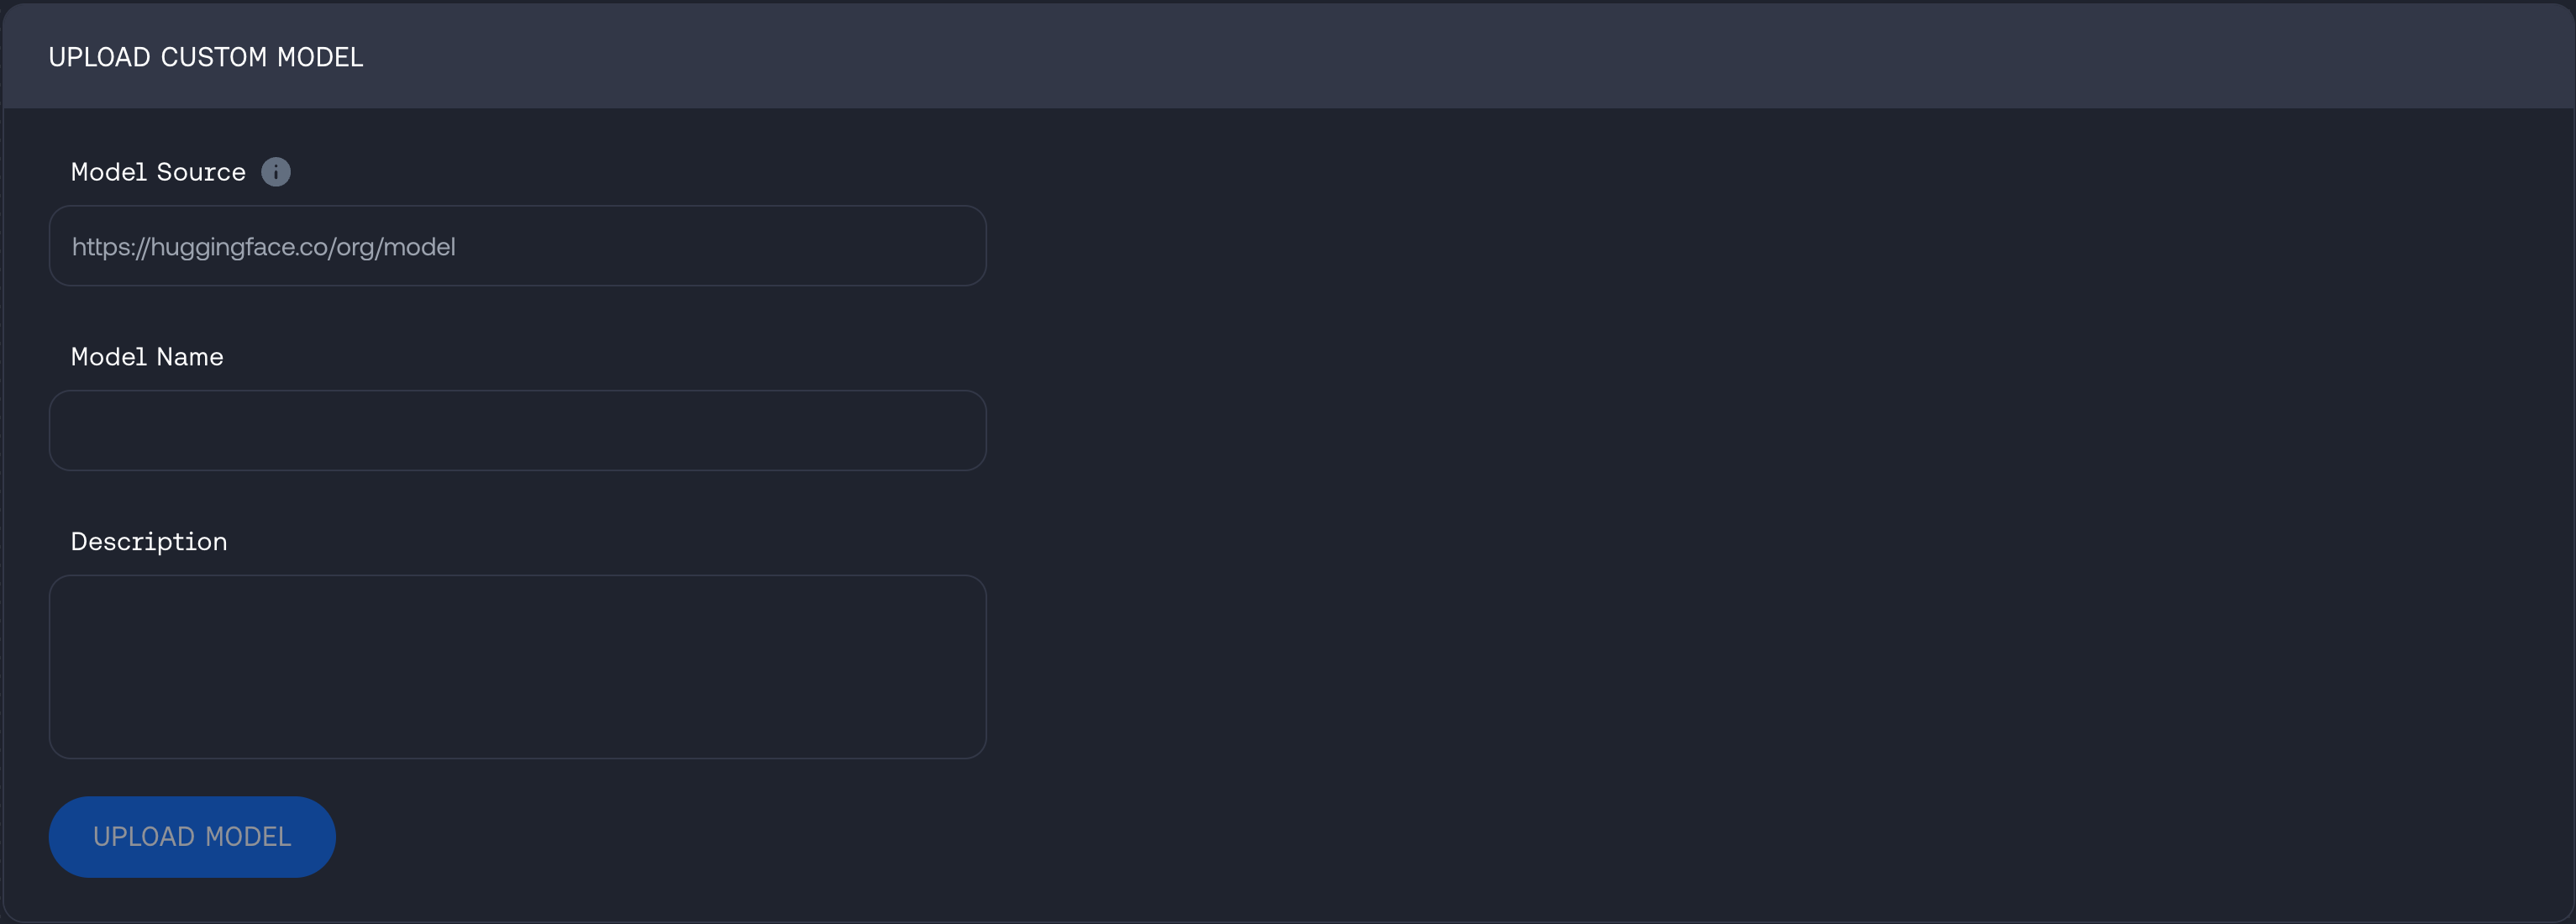 Then fill in the source URL (S3 or Hugging Face), the model name and how you would like it described in your Together account once uploaded.
#### CLI
Upload a model from Hugging Face or S3:
Then fill in the source URL (S3 or Hugging Face), the model name and how you would like it described in your Together account once uploaded.
#### CLI
Upload a model from Hugging Face or S3:
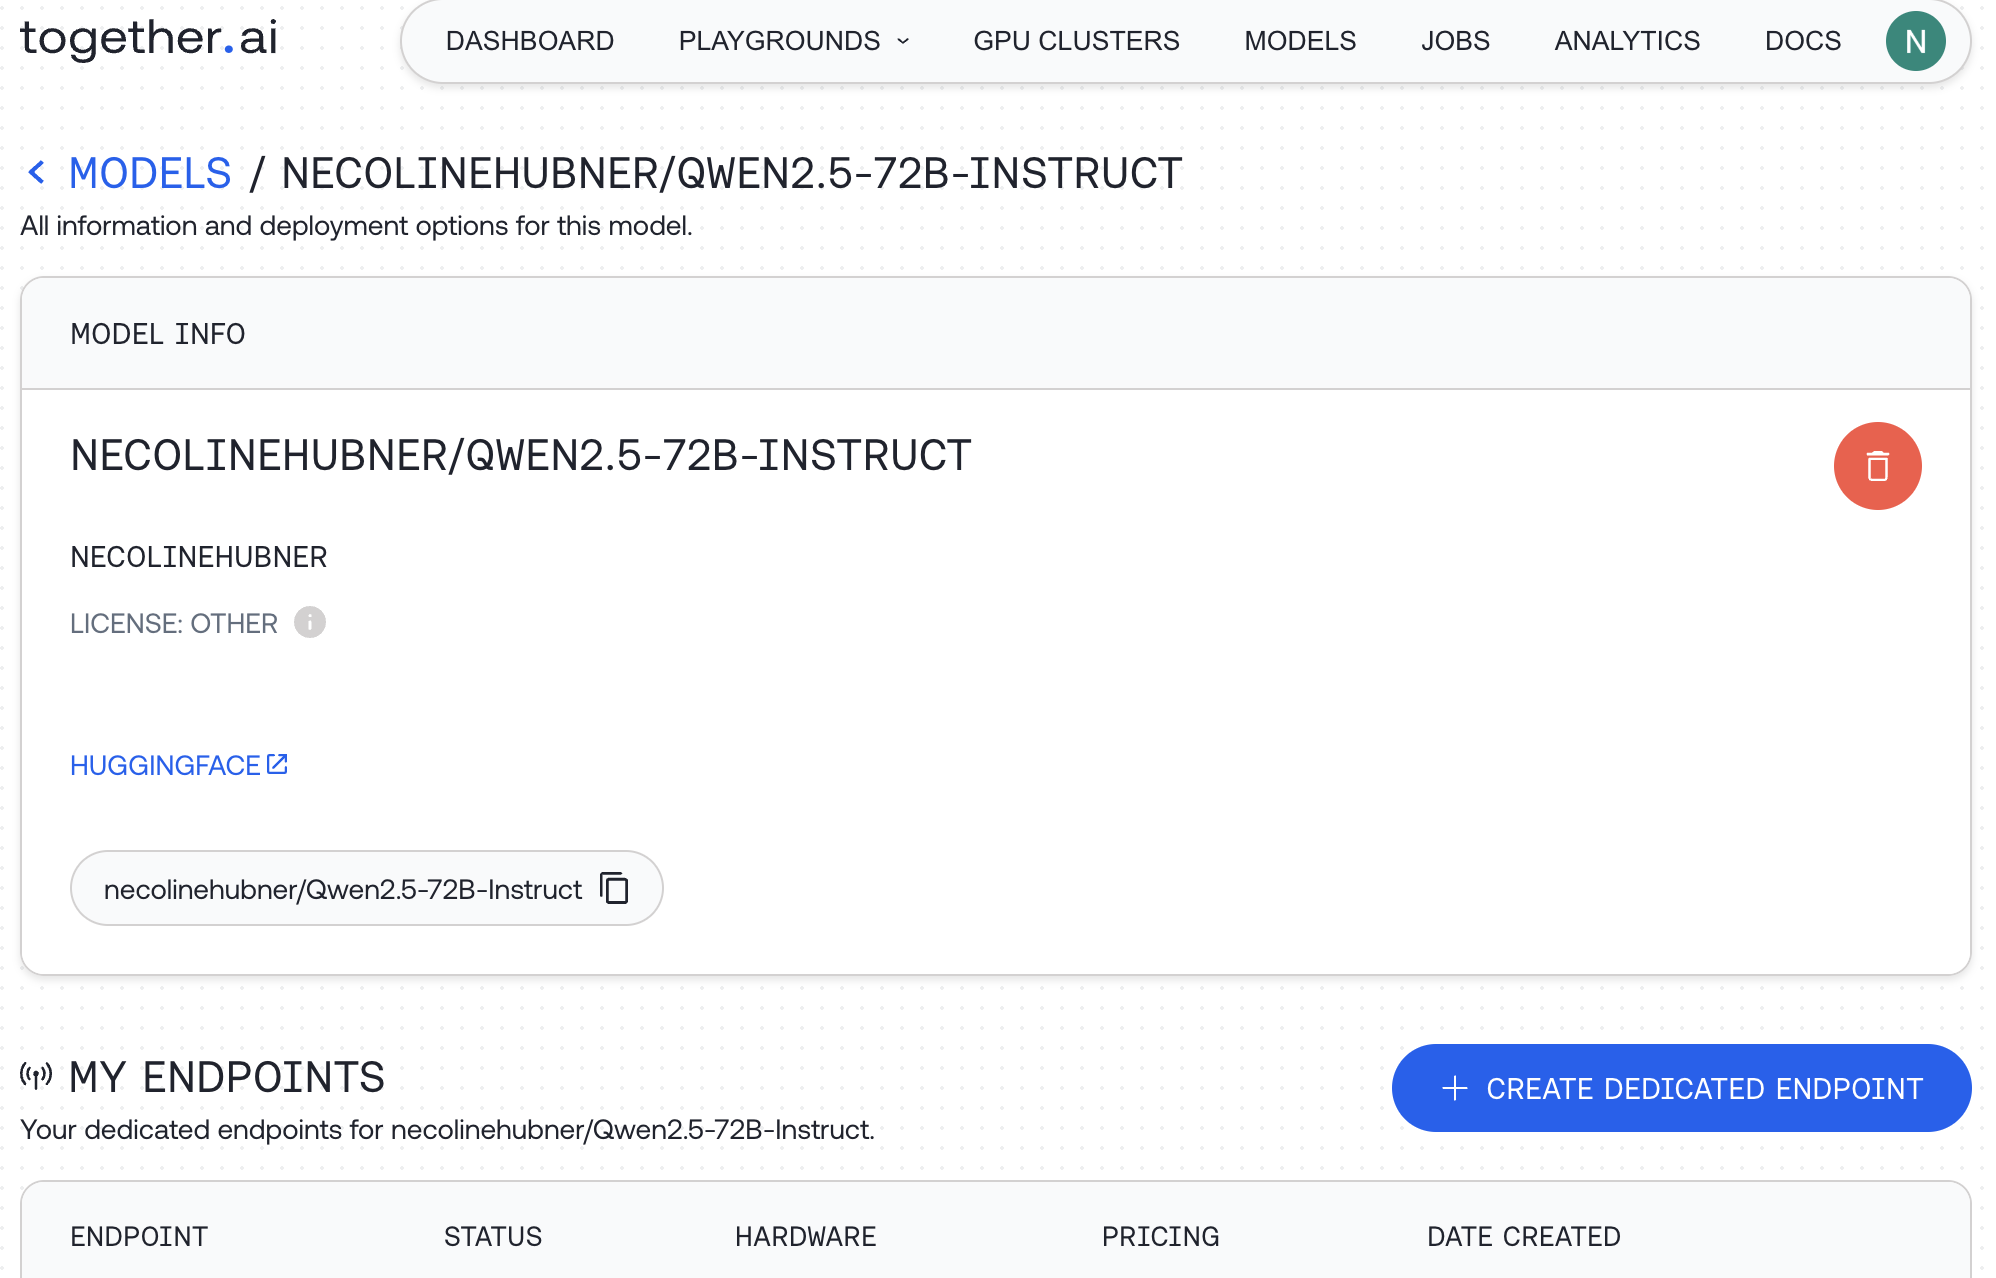
 The model page will display details from your uploaded model with an option to create a dedicated endpoint.
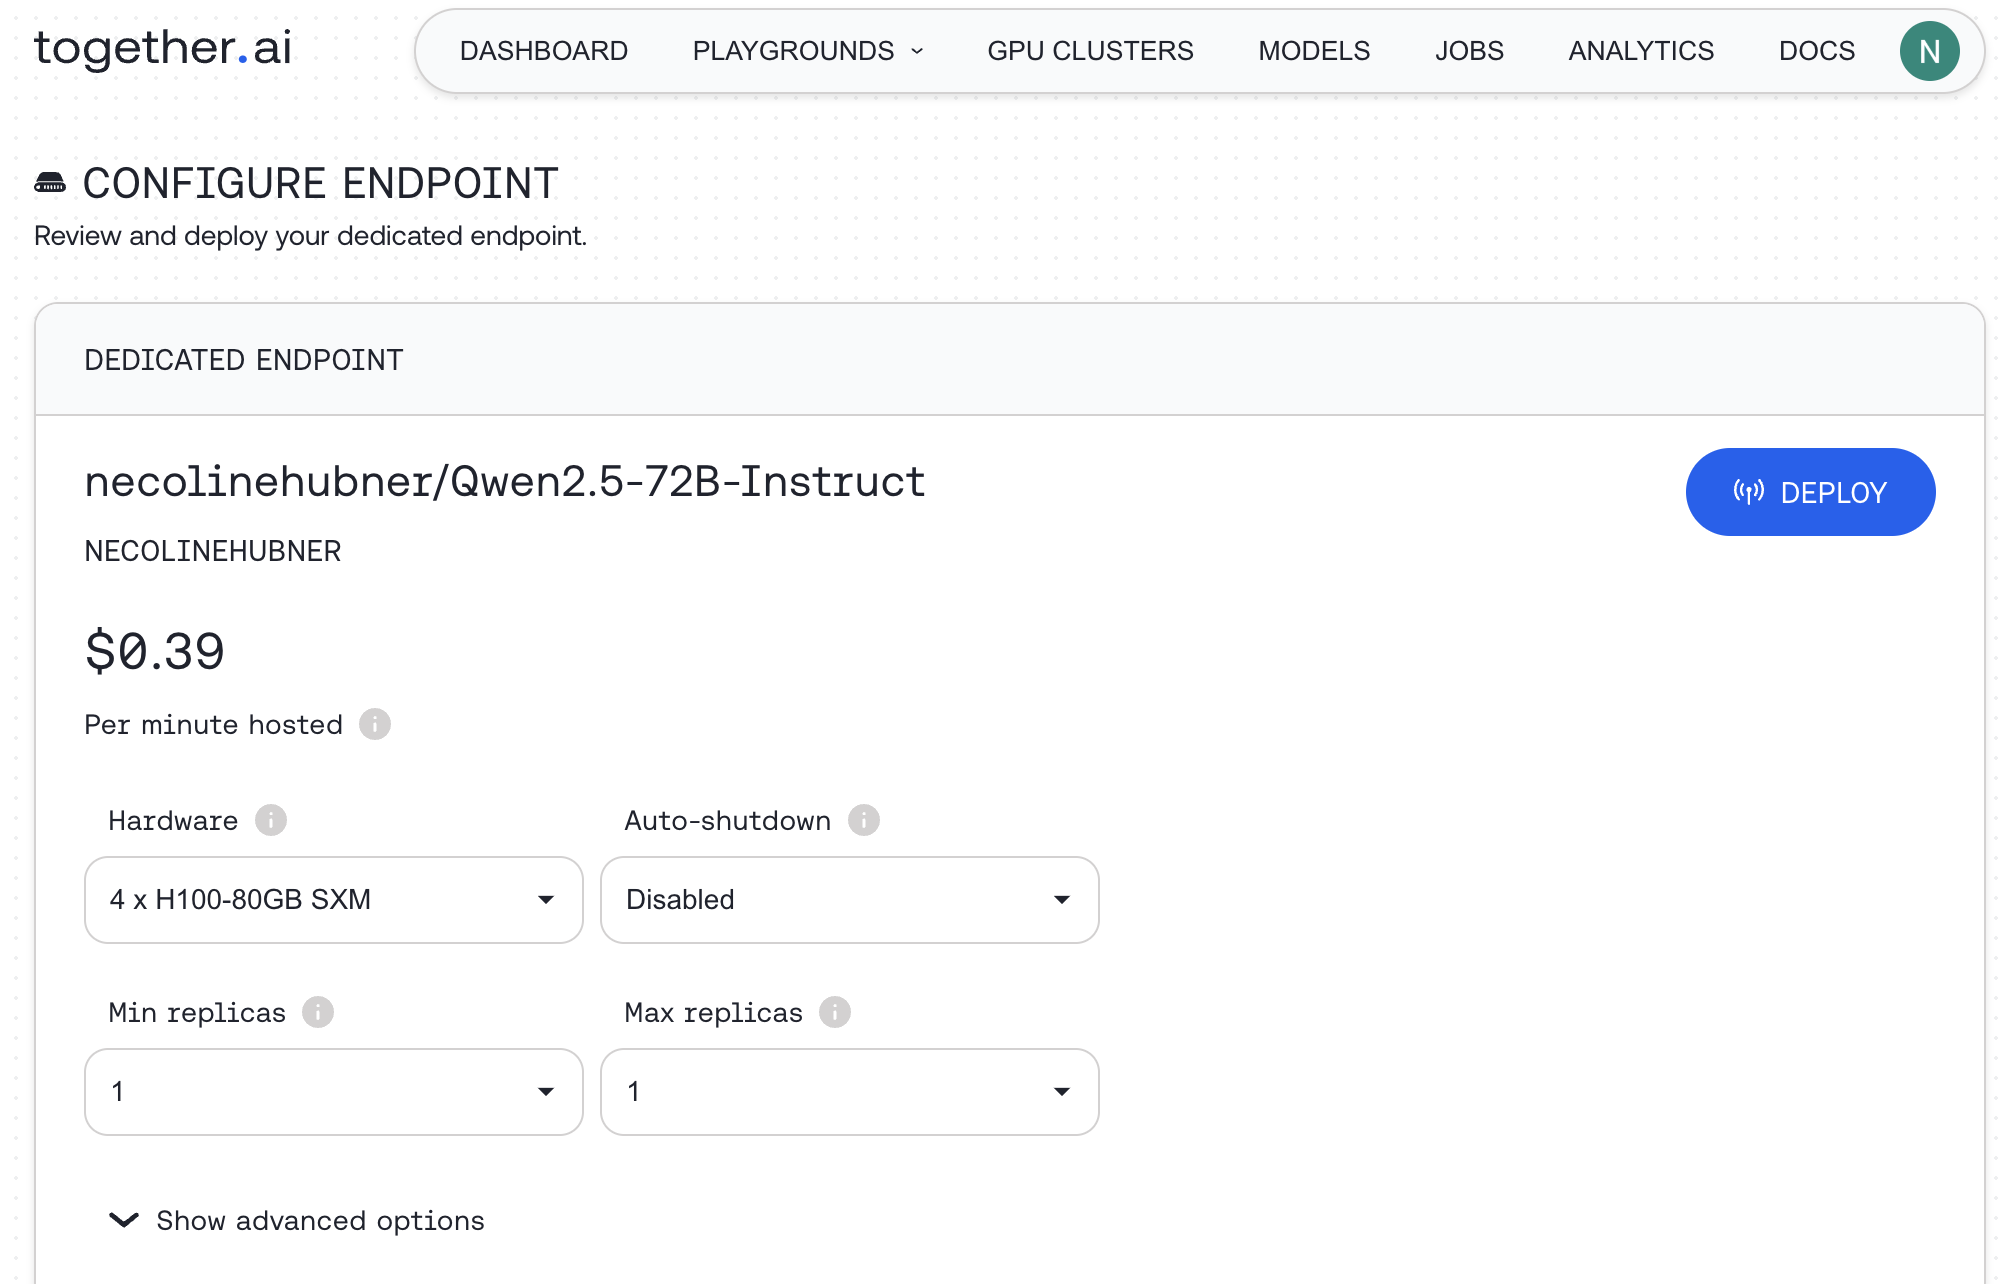
 When you select 'Create Dedicated Endpoint' you will see an option to configure the deployment.
 Once an endpoint has been deployed, you can interact with it on the playground or via the API.
#### CLI
After uploading your model, you can verify its registration and check available hardware options.
**List your uploaded models:**
Once an endpoint has been deployed, you can interact with it on the playground or via the API.
#### CLI
After uploading your model, you can verify its registration and check available hardware options.
**List your uploaded models:**
 ## Resources
* [More guides: Mixture of Agents](/docs/mixture-of-agents)
* [E2B docs](https://e2b.dev/docs)
* [E2B Cookbook](https://github.com/e2b-dev/e2b-cookbook/tree/main)
---
> To find navigation and other pages in this documentation, fetch the llms.txt file at: https://docs.together.ai/llms.txt
---
# Source: https://docs.together.ai/docs/dedicated-endpoints-1.md
# Dedicated Endpoints FAQs
## How does the system scale?
Dedicated endpoints support horizontal scaling. This means that it scales linearly with the additional replicas specified during endpoint configuration.
## How does auto-scaling affect my costs?
Billing for dedicated endpoints is proportional to the number of replicas. For example, scaling from 1 to 2 replicas will double your GPU costs.
## Is my endpoint guaranteed to scale to the max replica set?
We will scale to the max possible replica available at the time. This may be short of the max replicas that were set in the configuration if availability is limited.
## When to use vertical vs horizontal scale?
In other words, when to add GPUs per replica or add more replicas?
### Vertical scaling
Multiple GPUs, or vertical scaling, increases the generation speed, time to first token and max QPS. You should increase GPUs if your workload meets the following conditions:
**Compute-bound** If your workload is compute-intensive and bottlenecked by GPU processing power, adding more GPUs to a single endpoint can significantly improve performance.
**Memory-intensive** If your workload requires large amounts of memory, adding more GPUs to a single endpoint can provide more memory and improve performance.
**Single-node scalability** If your workload can scale well within a single node (e.g., using data parallelism or model parallelism), adding more GPUs to a single endpoint can be an effective way to increase throughput.
**Low-latency requirements** If your application requires low latency, increasing the number of GPUs on a single endpoint can help reduce latency by processing requests in parallel.
### Horizontal scaling
The number of replicas (horizontal scaling) increases the max number of QPS. You should increase the number of replicas if your workload meets the following conditions:
**I/O-bound workloads** If your workload is I/O-bound (e.g., waiting for data to be loaded or written), increasing the number of replicas can help spread the I/O load across multiple nodes.
**Request concurrency** If your application receives a high volume of concurrent requests, increasing the number of replicas can help distribute the load and improve responsiveness.
**Fault tolerance**: Increasing the number of replicas can improve fault tolerance by ensuring that if one node fails, others can continue to process requests.
**Scalability across multiple nodes** If your workload can scale well across multiple nodes (e.g., using data parallelism or distributed training), increasing the number of replicas can be an effective way to increase throughput.
## Troubleshooting dedicated endpoints configuration
There are a number of reasons that an endpoint isn't immediately created successfully.
**Lack of availability**: If we are short on available hardware, the endpoint will still be created but rather than automatically starting the endpoint, it will be queued for the next available hardware.
**Low availability**: We may have hardware available but only enough for a small amount of replicas. If this is the case, the endpoint may start but only scale to the amount of replicas available. If the min replica is set higher than we have capacity for, we may queue the endpoint until there is enough availability. To avoid the wait, you can reduce the minimum replica count.
**Hardware unavailable error**: If you see "Hardware for endpoint not available now. please try again later", the required resources are currently unavailable. Try using a different comparable model (see [whichllm.together.ai](https://whichllm.together.ai/)) or attempt deployment at a different time when more resources may be available.
**Model not supported**: Not all models are supported on dedicated endpoints. Check the list of supported models in your [account dashboard](https://api.together.xyz/models?filter=dedicated) under Models > All Models > Dedicated toggle. Your fine-tuned model must be based on a supported base model to deploy on an endpoint.
## Stopping an Endpoint
### Auto-shutdown
When you create an endpoint you can select an auto-shutdown timeframe during the configuration step. We offer various timeframes.
If you need to shut down your endpoint before the auto-shutdown period has elapsed, you can do this in a couple of ways.
### Web Interface
#### Shutdown during deployment
When your model is being deployed, you can click the red stop button to stop the deployment.
#### Shutdown when the endpoint is running
If the dedicated endpoint has started, you can shut down the endpoint by going to your models page. Click on the Model to expand the drop down, click the three dots and then **Stop endpoint**, then confirm in the pop-up prompt.
Once the endpoint has stopped, you will see it is offline on the models page. You can use the same three dots menu to start the endpoint again if you did this by mistake.
### API
You can also use the Together AI CLI to send a stop command, as covered in our documentation. To do this you will need your endpoint ID.
**Minimal availability**: We may have hardware available but only enough for a small amount of replicas. If this is the case, the endpoint may start but only scale to the amount of replicas available. If the min replica is set higher than we have capacity for, we may queue the endpoint until there is enough availability. To avoid the wait, you can reduce the min replica count.
## Will I be billed for the time spent spinning up the endpoint or looking for resources?
Billing events start only when a dedicated endpoint is successfully up and running. If there is a lag in time or a failure to deploy the endpoint, you will not be billed for that time.
## How much will I be charged to deploy a model?
Deployed models incur continuous per-minute hosting charges even when not actively processing requests. This applies to both fine-tuned models and dedicated endpoints. When you deploy a model, you should see a pricing prediction. This will change based on the hardware you select, as dedicated endpoints are charged based on the hardware used rather than the model being hosted.
You can find full details of our hardware pricing on our [pricing page](https://www.together.ai/pricing).
To avoid unexpected charges, make sure to set an auto-shutdown value, and regularly review your active deployments in the [models dashboard](https://api.together.xyz/models) to stop any unused endpoints. Remember that serverless endpoints are only charged based on actual token usage, while dedicated endpoints and fine-tuned models have ongoing hosting costs.
---
> To find navigation and other pages in this documentation, fetch the llms.txt file at: https://docs.together.ai/llms.txt
---
# Source: https://docs.together.ai/docs/dedicated-endpoints-ui.md
# Deploying Dedicated Endpoints
> Guide to creating dedicated endpoints via the web UI.
With Together AI, you can create on-demand dedicated endpoints with the following advantages:
* Consistent, predictable performance, unaffected by other users' load in our serverless environment
* No rate limits, with a high maximum load capacity
* More cost-effective under high utilization
* Access to a broader selection of models
## Creating an on demand dedicated endpoint
Navigate to the [Models page](https://api.together.xyz/models) in our playground. Under "All models" click "Dedicated." Search across 179 available models.
## Resources
* [More guides: Mixture of Agents](/docs/mixture-of-agents)
* [E2B docs](https://e2b.dev/docs)
* [E2B Cookbook](https://github.com/e2b-dev/e2b-cookbook/tree/main)
---
> To find navigation and other pages in this documentation, fetch the llms.txt file at: https://docs.together.ai/llms.txt
---
# Source: https://docs.together.ai/docs/dedicated-endpoints-1.md
# Dedicated Endpoints FAQs
## How does the system scale?
Dedicated endpoints support horizontal scaling. This means that it scales linearly with the additional replicas specified during endpoint configuration.
## How does auto-scaling affect my costs?
Billing for dedicated endpoints is proportional to the number of replicas. For example, scaling from 1 to 2 replicas will double your GPU costs.
## Is my endpoint guaranteed to scale to the max replica set?
We will scale to the max possible replica available at the time. This may be short of the max replicas that were set in the configuration if availability is limited.
## When to use vertical vs horizontal scale?
In other words, when to add GPUs per replica or add more replicas?
### Vertical scaling
Multiple GPUs, or vertical scaling, increases the generation speed, time to first token and max QPS. You should increase GPUs if your workload meets the following conditions:
**Compute-bound** If your workload is compute-intensive and bottlenecked by GPU processing power, adding more GPUs to a single endpoint can significantly improve performance.
**Memory-intensive** If your workload requires large amounts of memory, adding more GPUs to a single endpoint can provide more memory and improve performance.
**Single-node scalability** If your workload can scale well within a single node (e.g., using data parallelism or model parallelism), adding more GPUs to a single endpoint can be an effective way to increase throughput.
**Low-latency requirements** If your application requires low latency, increasing the number of GPUs on a single endpoint can help reduce latency by processing requests in parallel.
### Horizontal scaling
The number of replicas (horizontal scaling) increases the max number of QPS. You should increase the number of replicas if your workload meets the following conditions:
**I/O-bound workloads** If your workload is I/O-bound (e.g., waiting for data to be loaded or written), increasing the number of replicas can help spread the I/O load across multiple nodes.
**Request concurrency** If your application receives a high volume of concurrent requests, increasing the number of replicas can help distribute the load and improve responsiveness.
**Fault tolerance**: Increasing the number of replicas can improve fault tolerance by ensuring that if one node fails, others can continue to process requests.
**Scalability across multiple nodes** If your workload can scale well across multiple nodes (e.g., using data parallelism or distributed training), increasing the number of replicas can be an effective way to increase throughput.
## Troubleshooting dedicated endpoints configuration
There are a number of reasons that an endpoint isn't immediately created successfully.
**Lack of availability**: If we are short on available hardware, the endpoint will still be created but rather than automatically starting the endpoint, it will be queued for the next available hardware.
**Low availability**: We may have hardware available but only enough for a small amount of replicas. If this is the case, the endpoint may start but only scale to the amount of replicas available. If the min replica is set higher than we have capacity for, we may queue the endpoint until there is enough availability. To avoid the wait, you can reduce the minimum replica count.
**Hardware unavailable error**: If you see "Hardware for endpoint not available now. please try again later", the required resources are currently unavailable. Try using a different comparable model (see [whichllm.together.ai](https://whichllm.together.ai/)) or attempt deployment at a different time when more resources may be available.
**Model not supported**: Not all models are supported on dedicated endpoints. Check the list of supported models in your [account dashboard](https://api.together.xyz/models?filter=dedicated) under Models > All Models > Dedicated toggle. Your fine-tuned model must be based on a supported base model to deploy on an endpoint.
## Stopping an Endpoint
### Auto-shutdown
When you create an endpoint you can select an auto-shutdown timeframe during the configuration step. We offer various timeframes.
If you need to shut down your endpoint before the auto-shutdown period has elapsed, you can do this in a couple of ways.
### Web Interface
#### Shutdown during deployment
When your model is being deployed, you can click the red stop button to stop the deployment.
#### Shutdown when the endpoint is running
If the dedicated endpoint has started, you can shut down the endpoint by going to your models page. Click on the Model to expand the drop down, click the three dots and then **Stop endpoint**, then confirm in the pop-up prompt.
Once the endpoint has stopped, you will see it is offline on the models page. You can use the same three dots menu to start the endpoint again if you did this by mistake.
### API
You can also use the Together AI CLI to send a stop command, as covered in our documentation. To do this you will need your endpoint ID.
**Minimal availability**: We may have hardware available but only enough for a small amount of replicas. If this is the case, the endpoint may start but only scale to the amount of replicas available. If the min replica is set higher than we have capacity for, we may queue the endpoint until there is enough availability. To avoid the wait, you can reduce the min replica count.
## Will I be billed for the time spent spinning up the endpoint or looking for resources?
Billing events start only when a dedicated endpoint is successfully up and running. If there is a lag in time or a failure to deploy the endpoint, you will not be billed for that time.
## How much will I be charged to deploy a model?
Deployed models incur continuous per-minute hosting charges even when not actively processing requests. This applies to both fine-tuned models and dedicated endpoints. When you deploy a model, you should see a pricing prediction. This will change based on the hardware you select, as dedicated endpoints are charged based on the hardware used rather than the model being hosted.
You can find full details of our hardware pricing on our [pricing page](https://www.together.ai/pricing).
To avoid unexpected charges, make sure to set an auto-shutdown value, and regularly review your active deployments in the [models dashboard](https://api.together.xyz/models) to stop any unused endpoints. Remember that serverless endpoints are only charged based on actual token usage, while dedicated endpoints and fine-tuned models have ongoing hosting costs.
---
> To find navigation and other pages in this documentation, fetch the llms.txt file at: https://docs.together.ai/llms.txt
---
# Source: https://docs.together.ai/docs/dedicated-endpoints-ui.md
# Deploying Dedicated Endpoints
> Guide to creating dedicated endpoints via the web UI.
With Together AI, you can create on-demand dedicated endpoints with the following advantages:
* Consistent, predictable performance, unaffected by other users' load in our serverless environment
* No rate limits, with a high maximum load capacity
* More cost-effective under high utilization
* Access to a broader selection of models
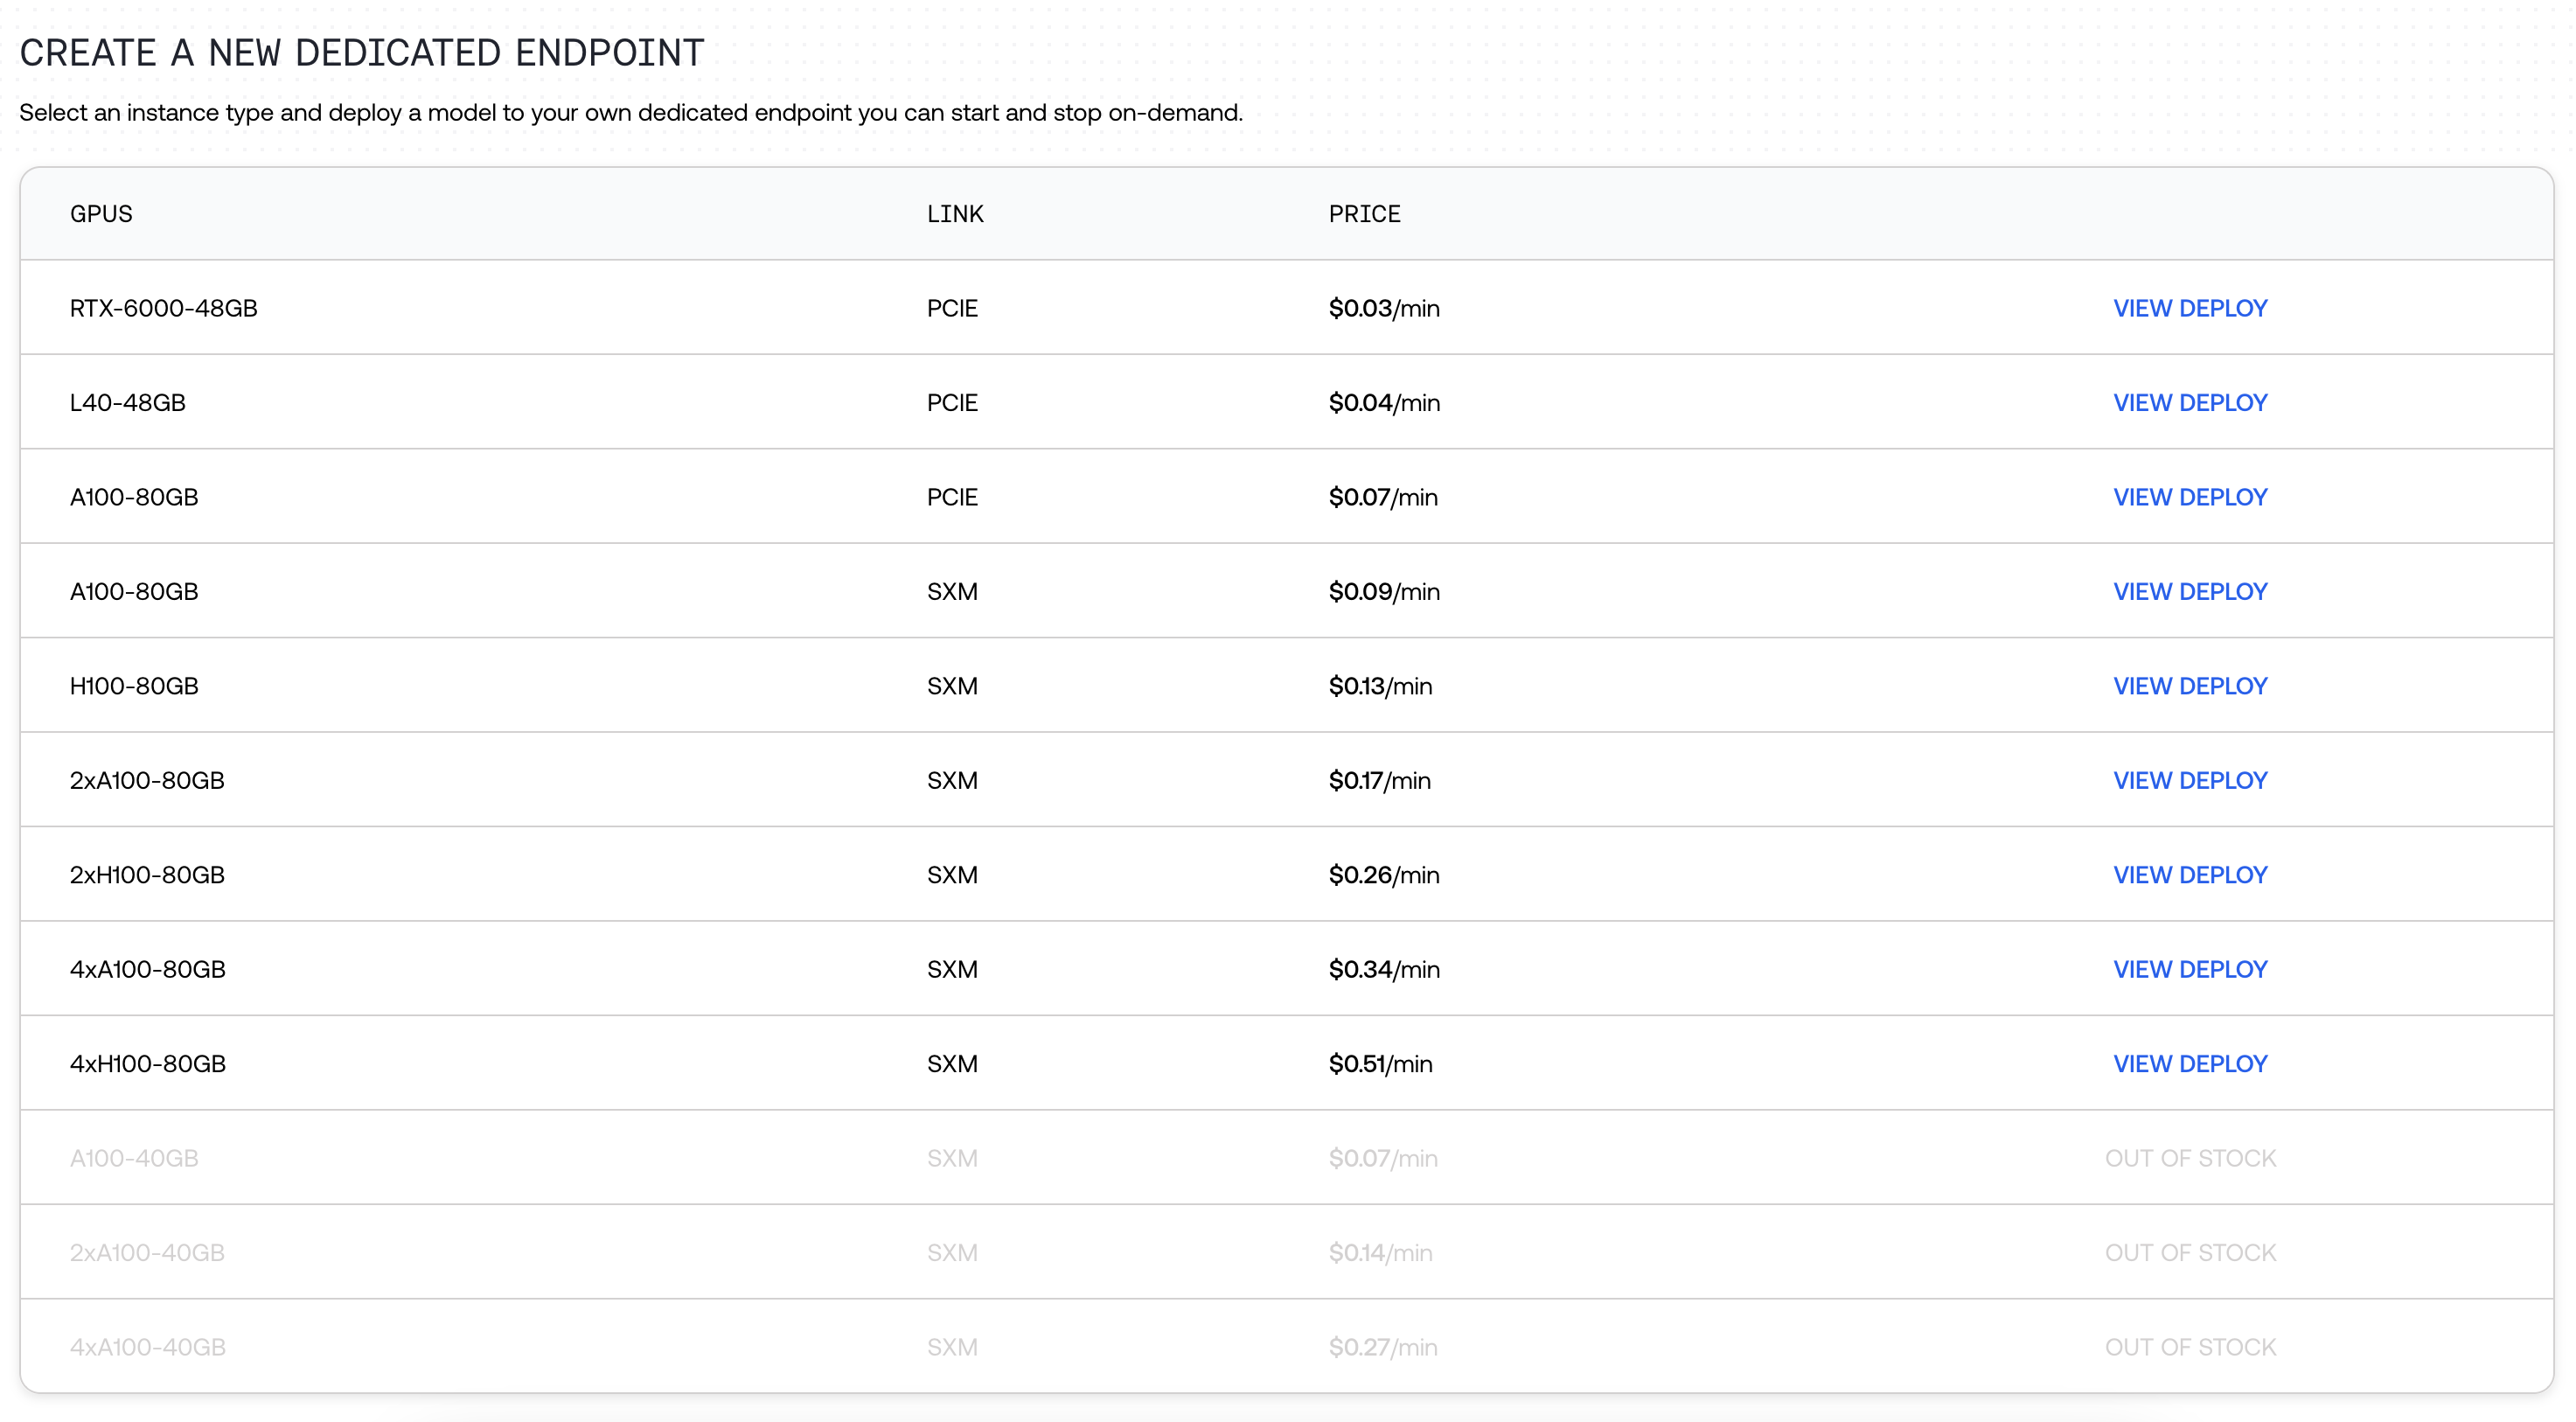
## Creating an on demand dedicated endpoint
Navigate to the [Models page](https://api.together.xyz/models) in our playground. Under "All models" click "Dedicated." Search across 179 available models.
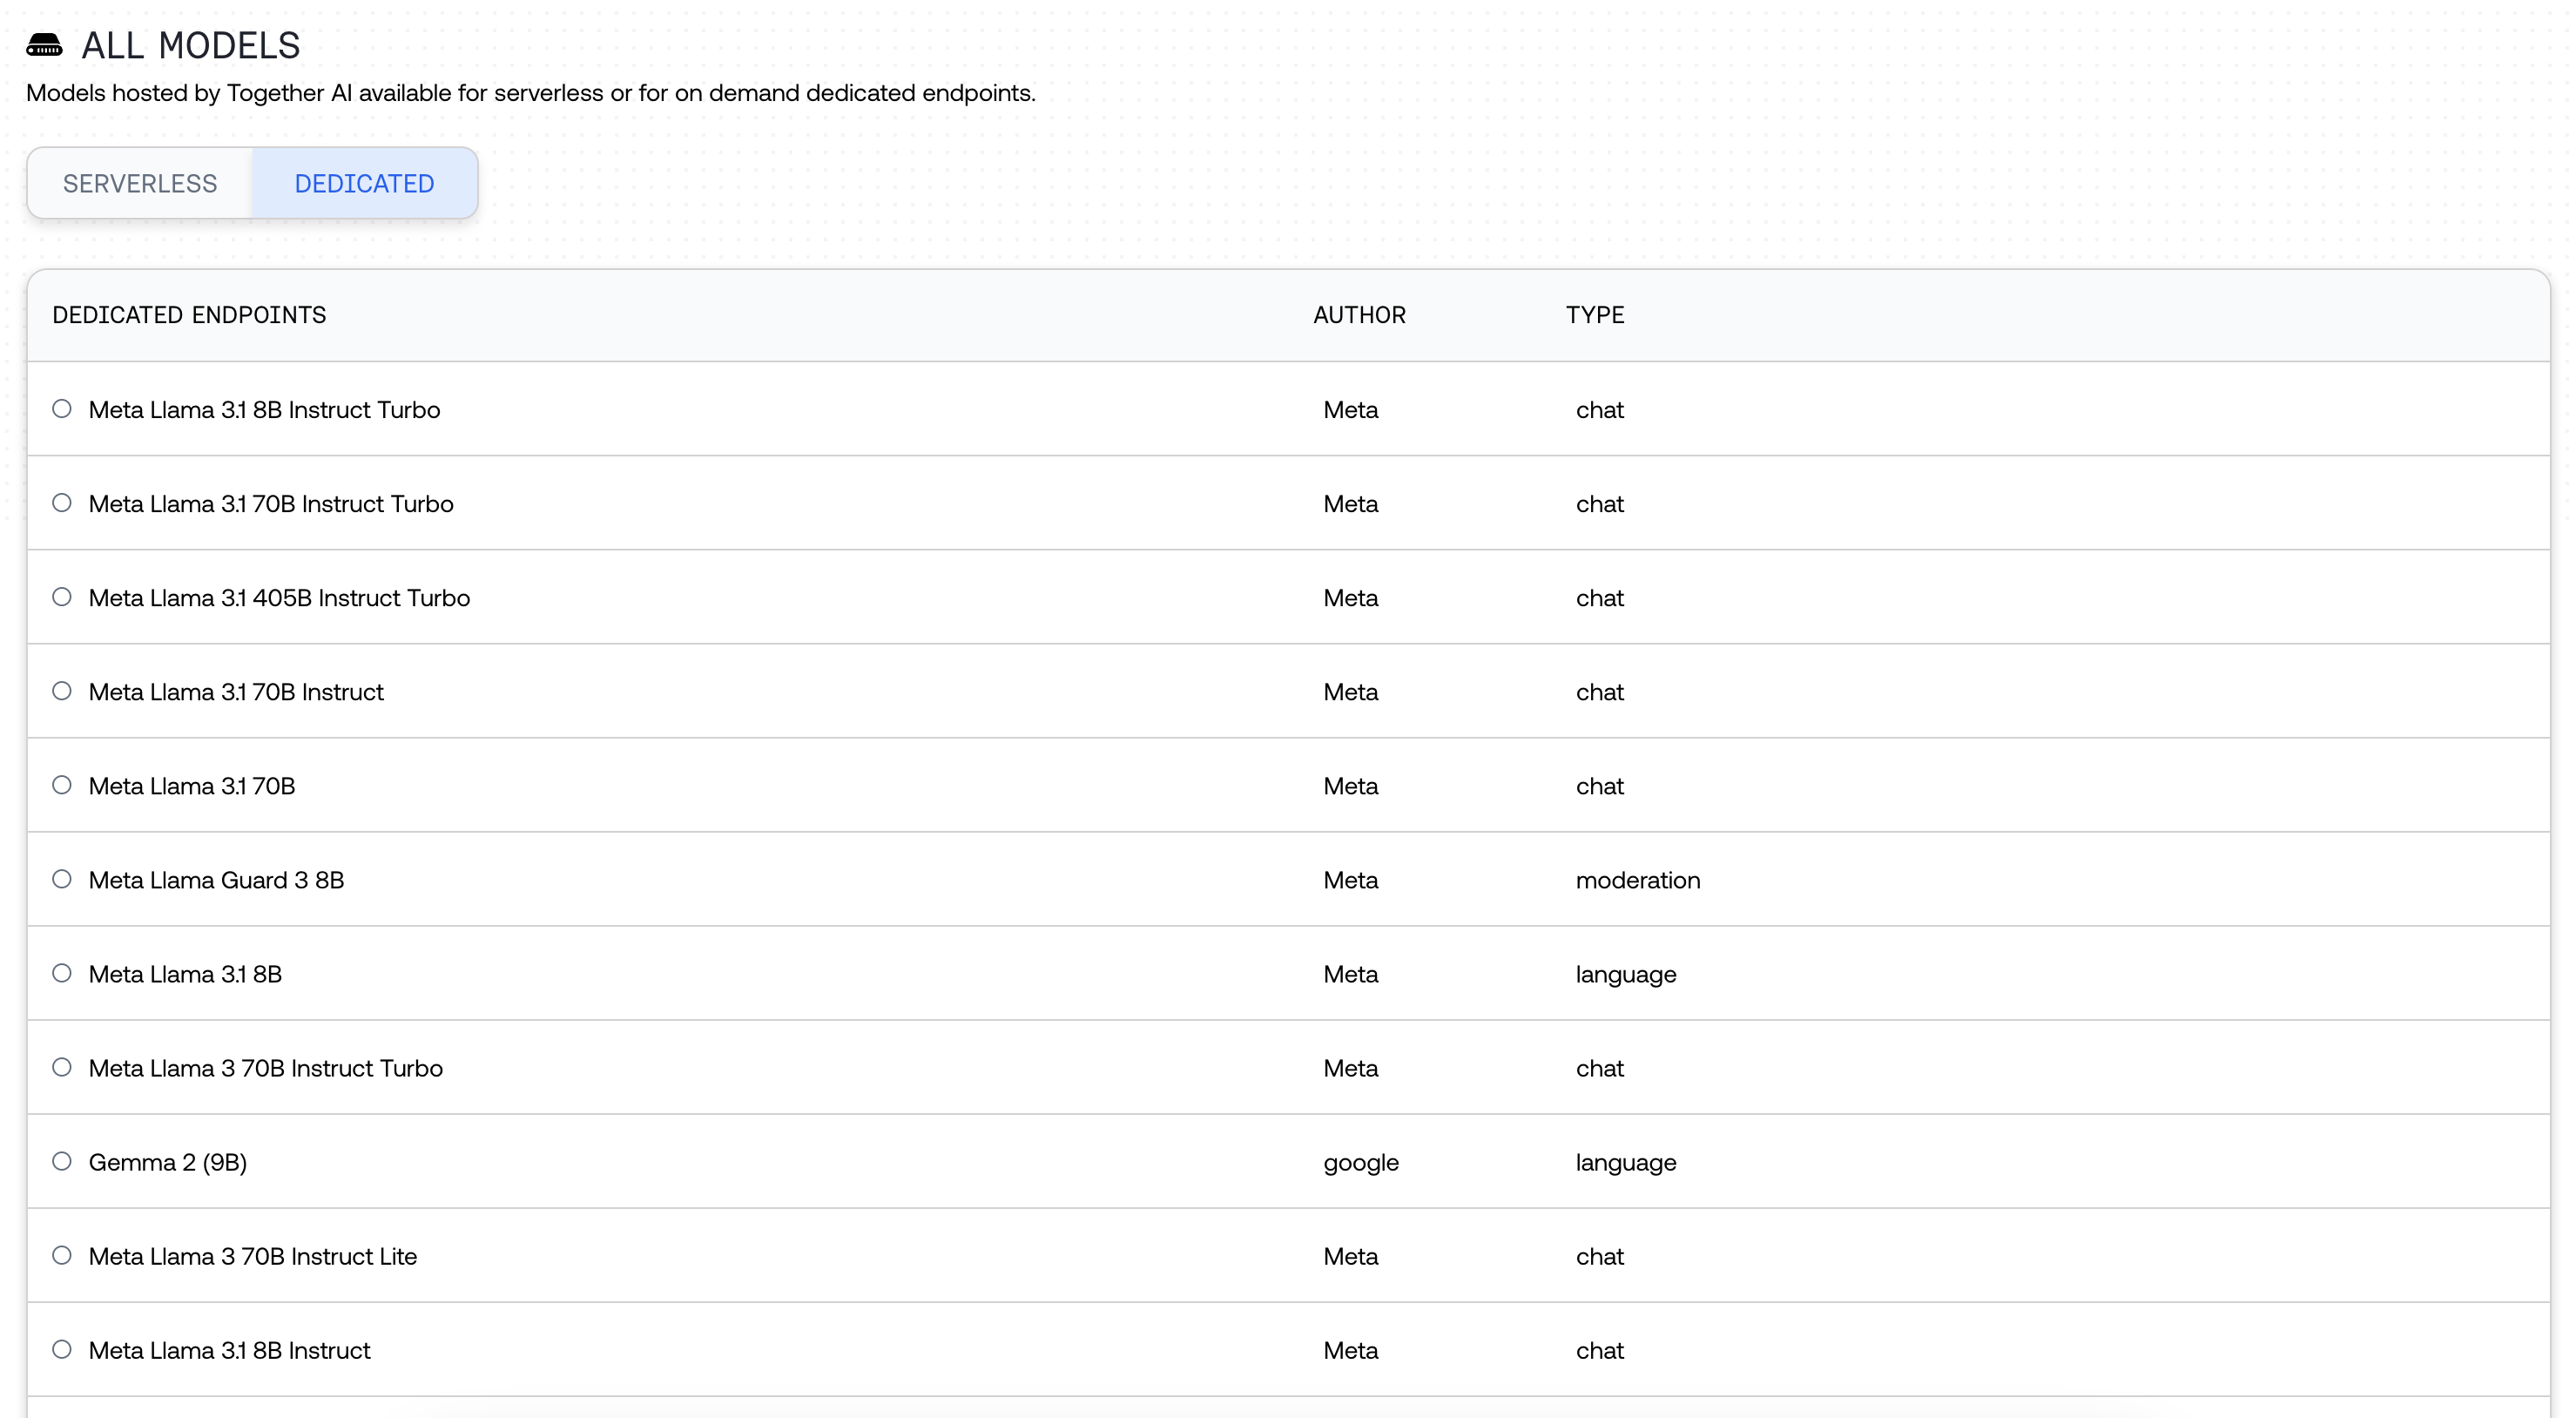 Select your hardware. We have multiple hardware options available, all with varying prices (e.g. RTX-6000, L40, A100 SXM, A100 PCIe, and H100).
 Click the Play button, and wait up to 10 minutes for the endpoint to be deployed.
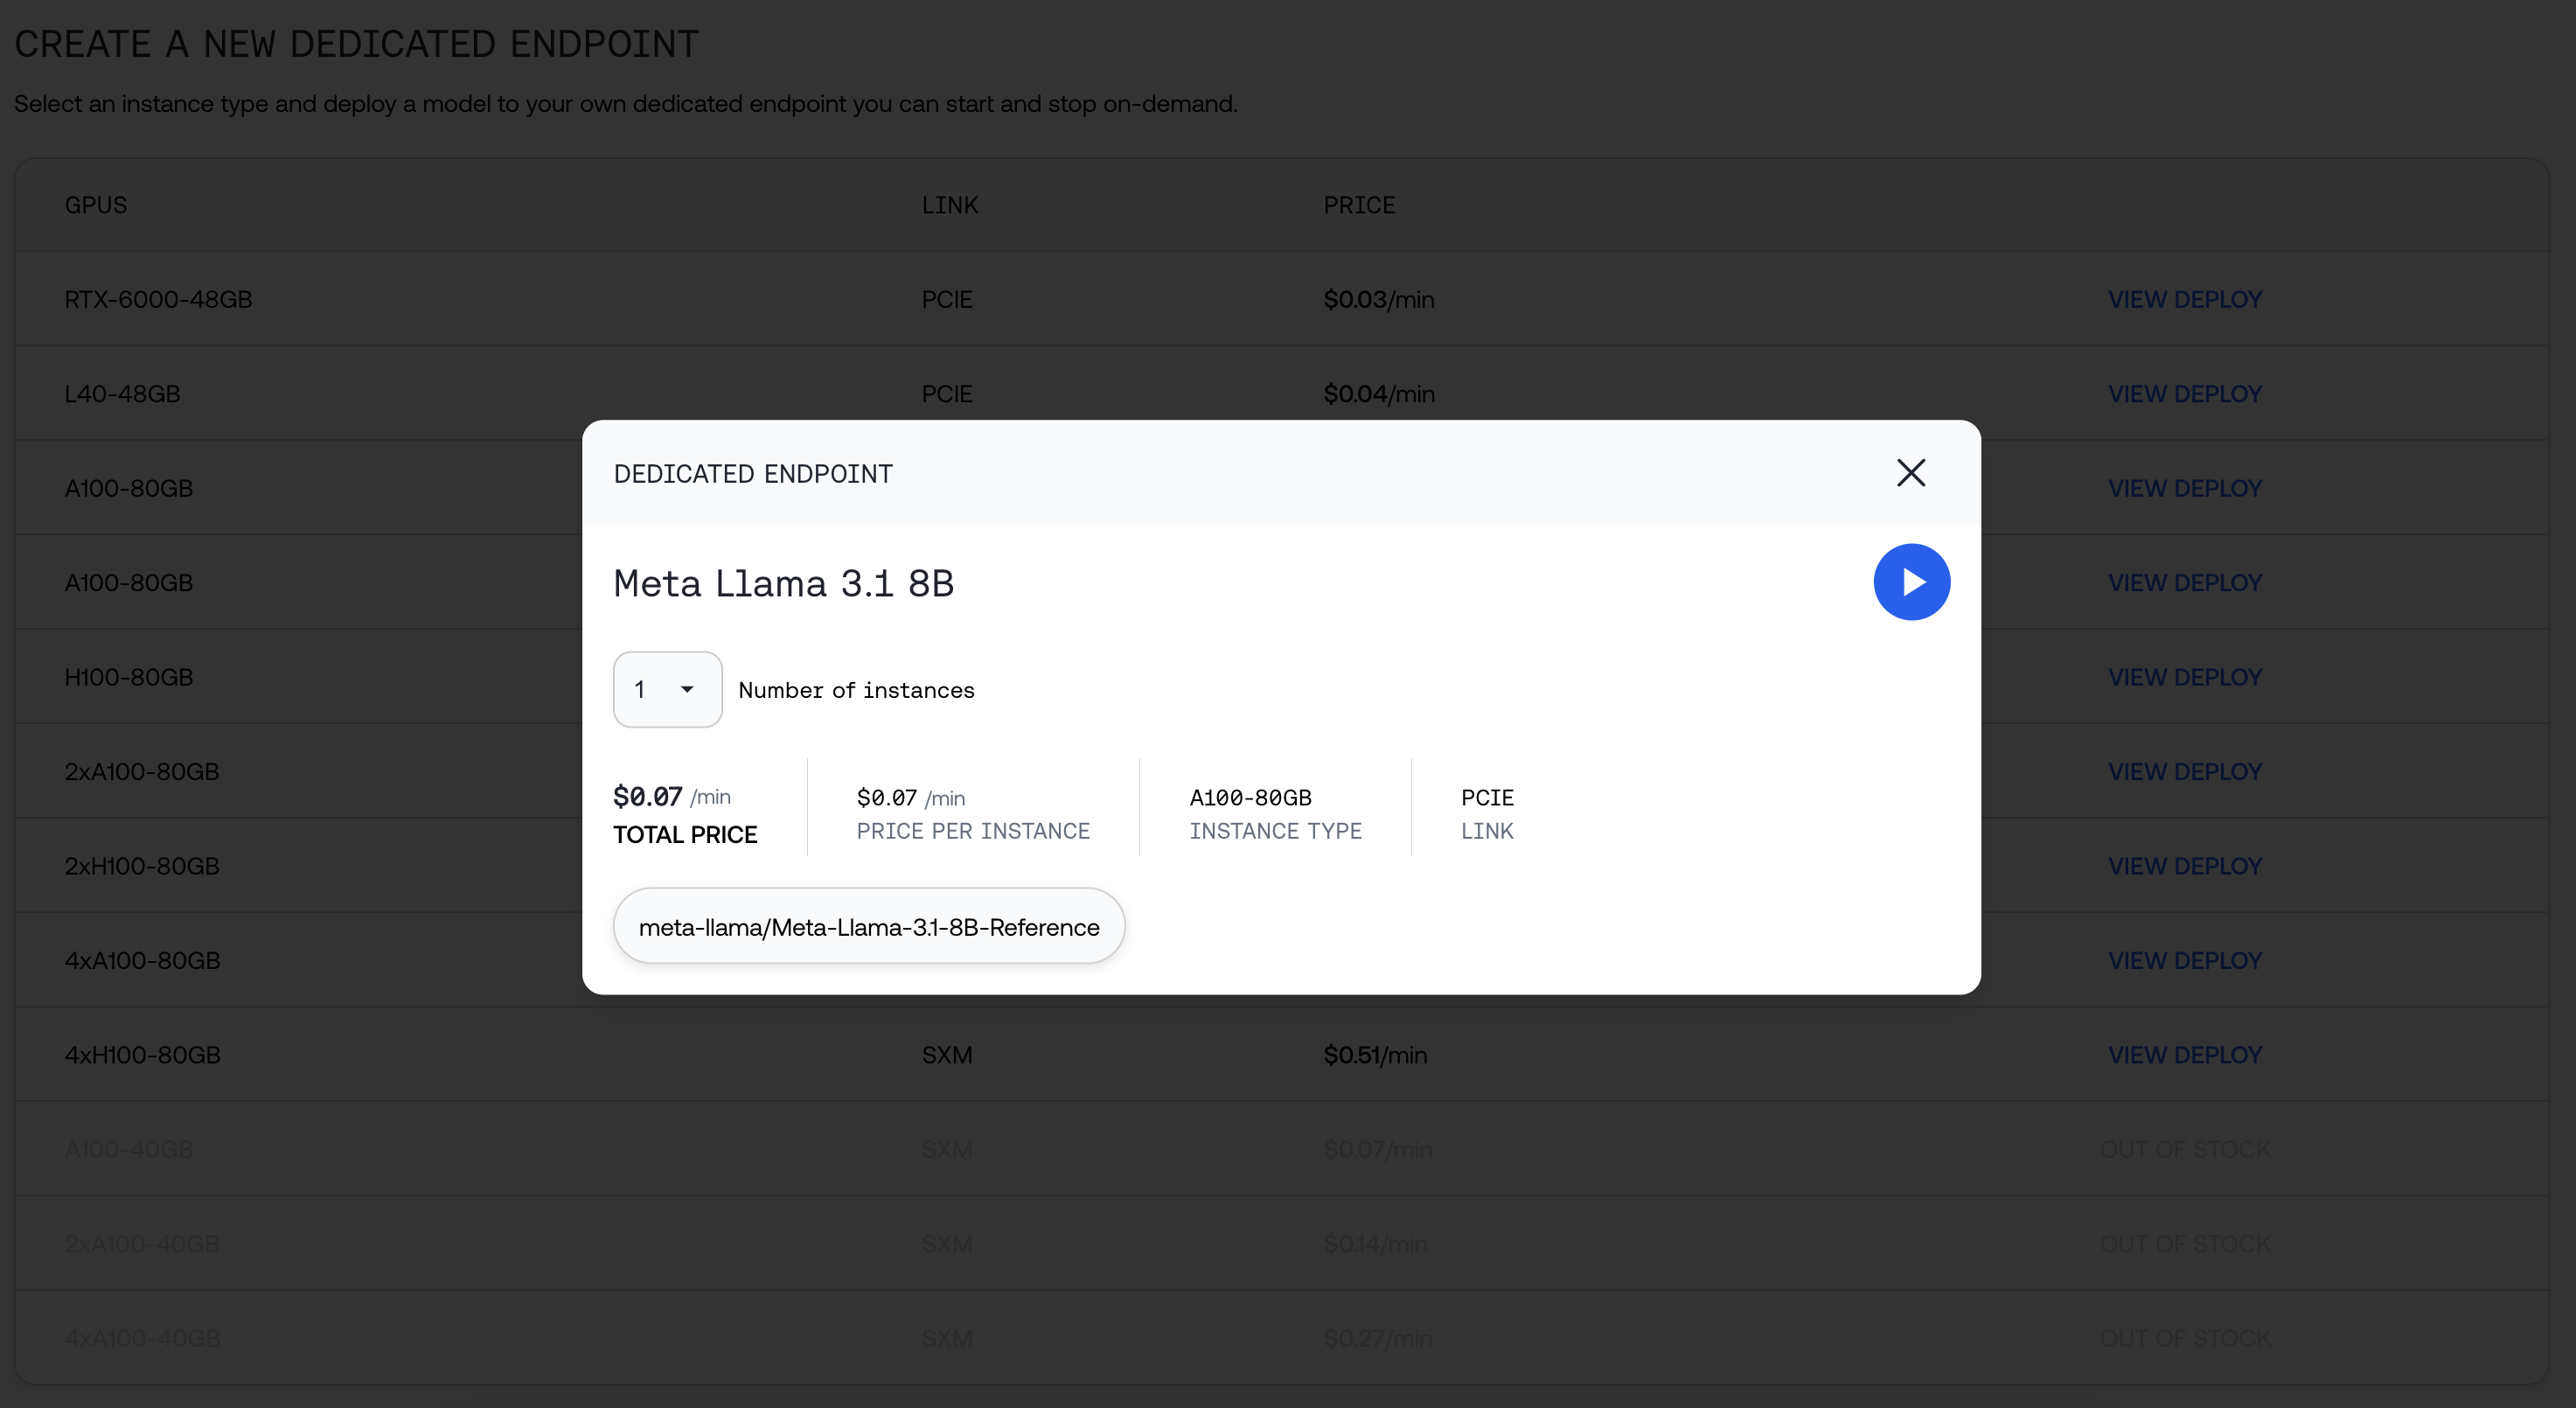 We will provide you the string you can use to call the model, as well as additional information about your deployment.
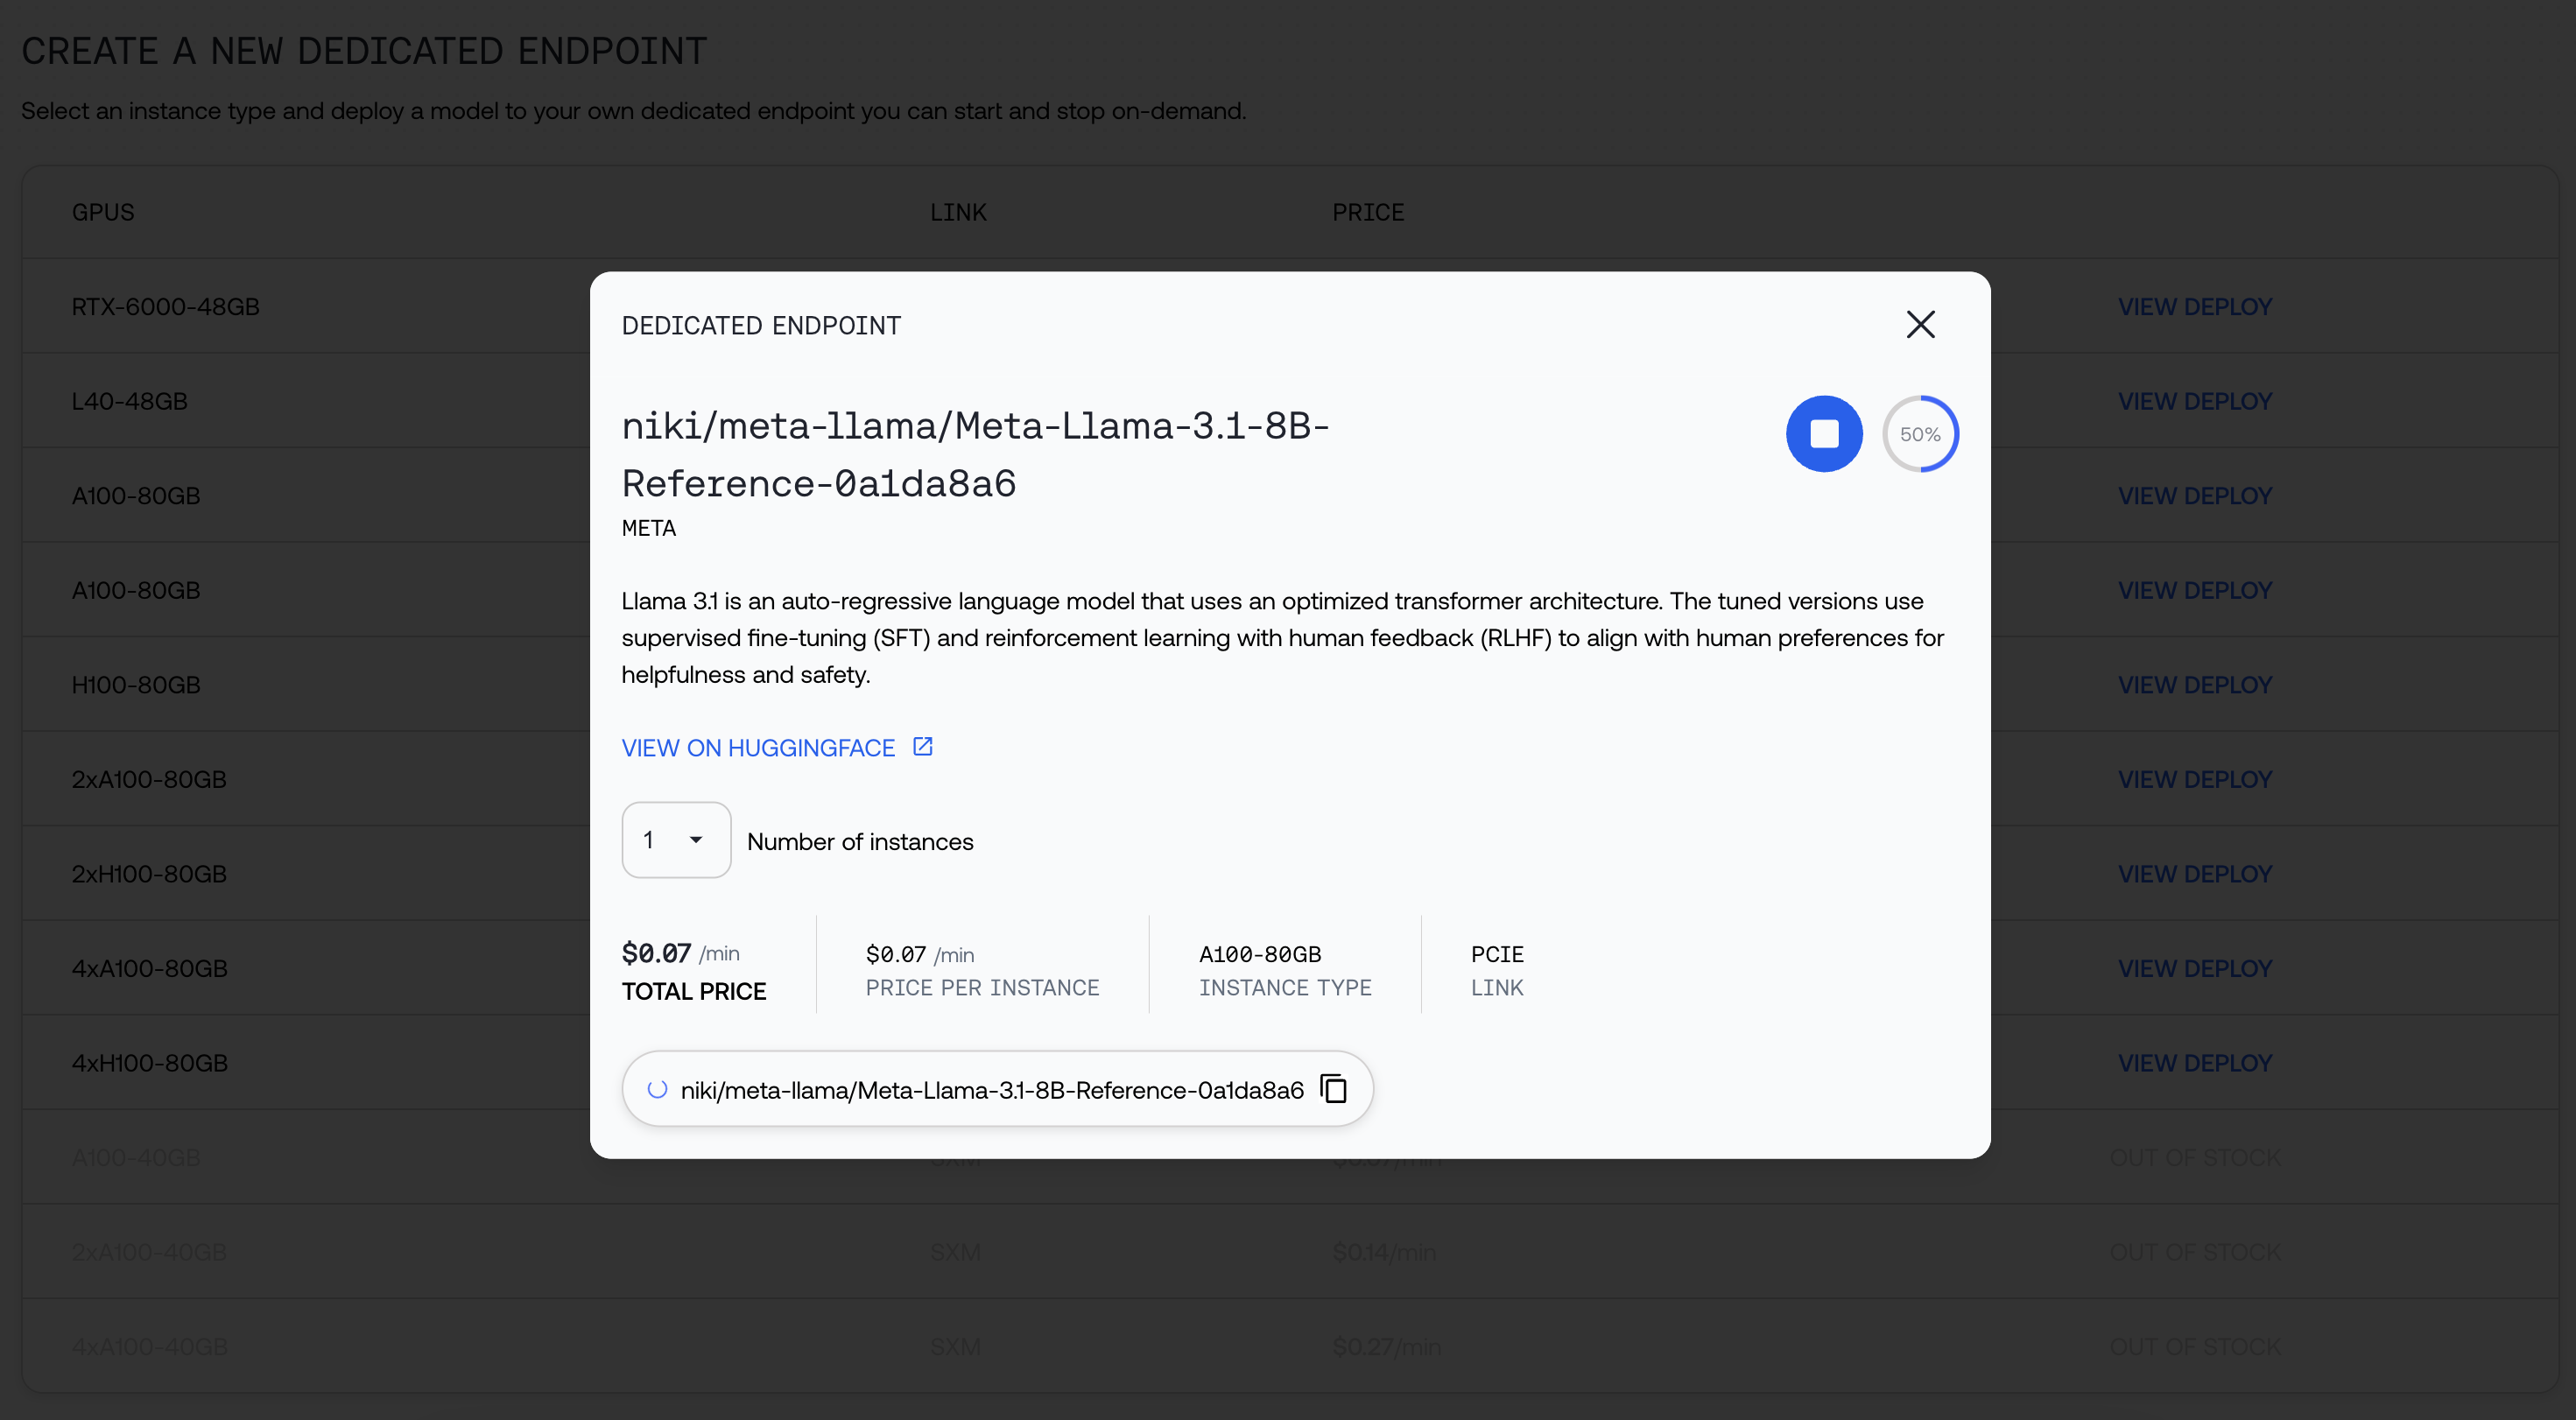 You can navigate away while your model is being deployed. Click open when it's ready:
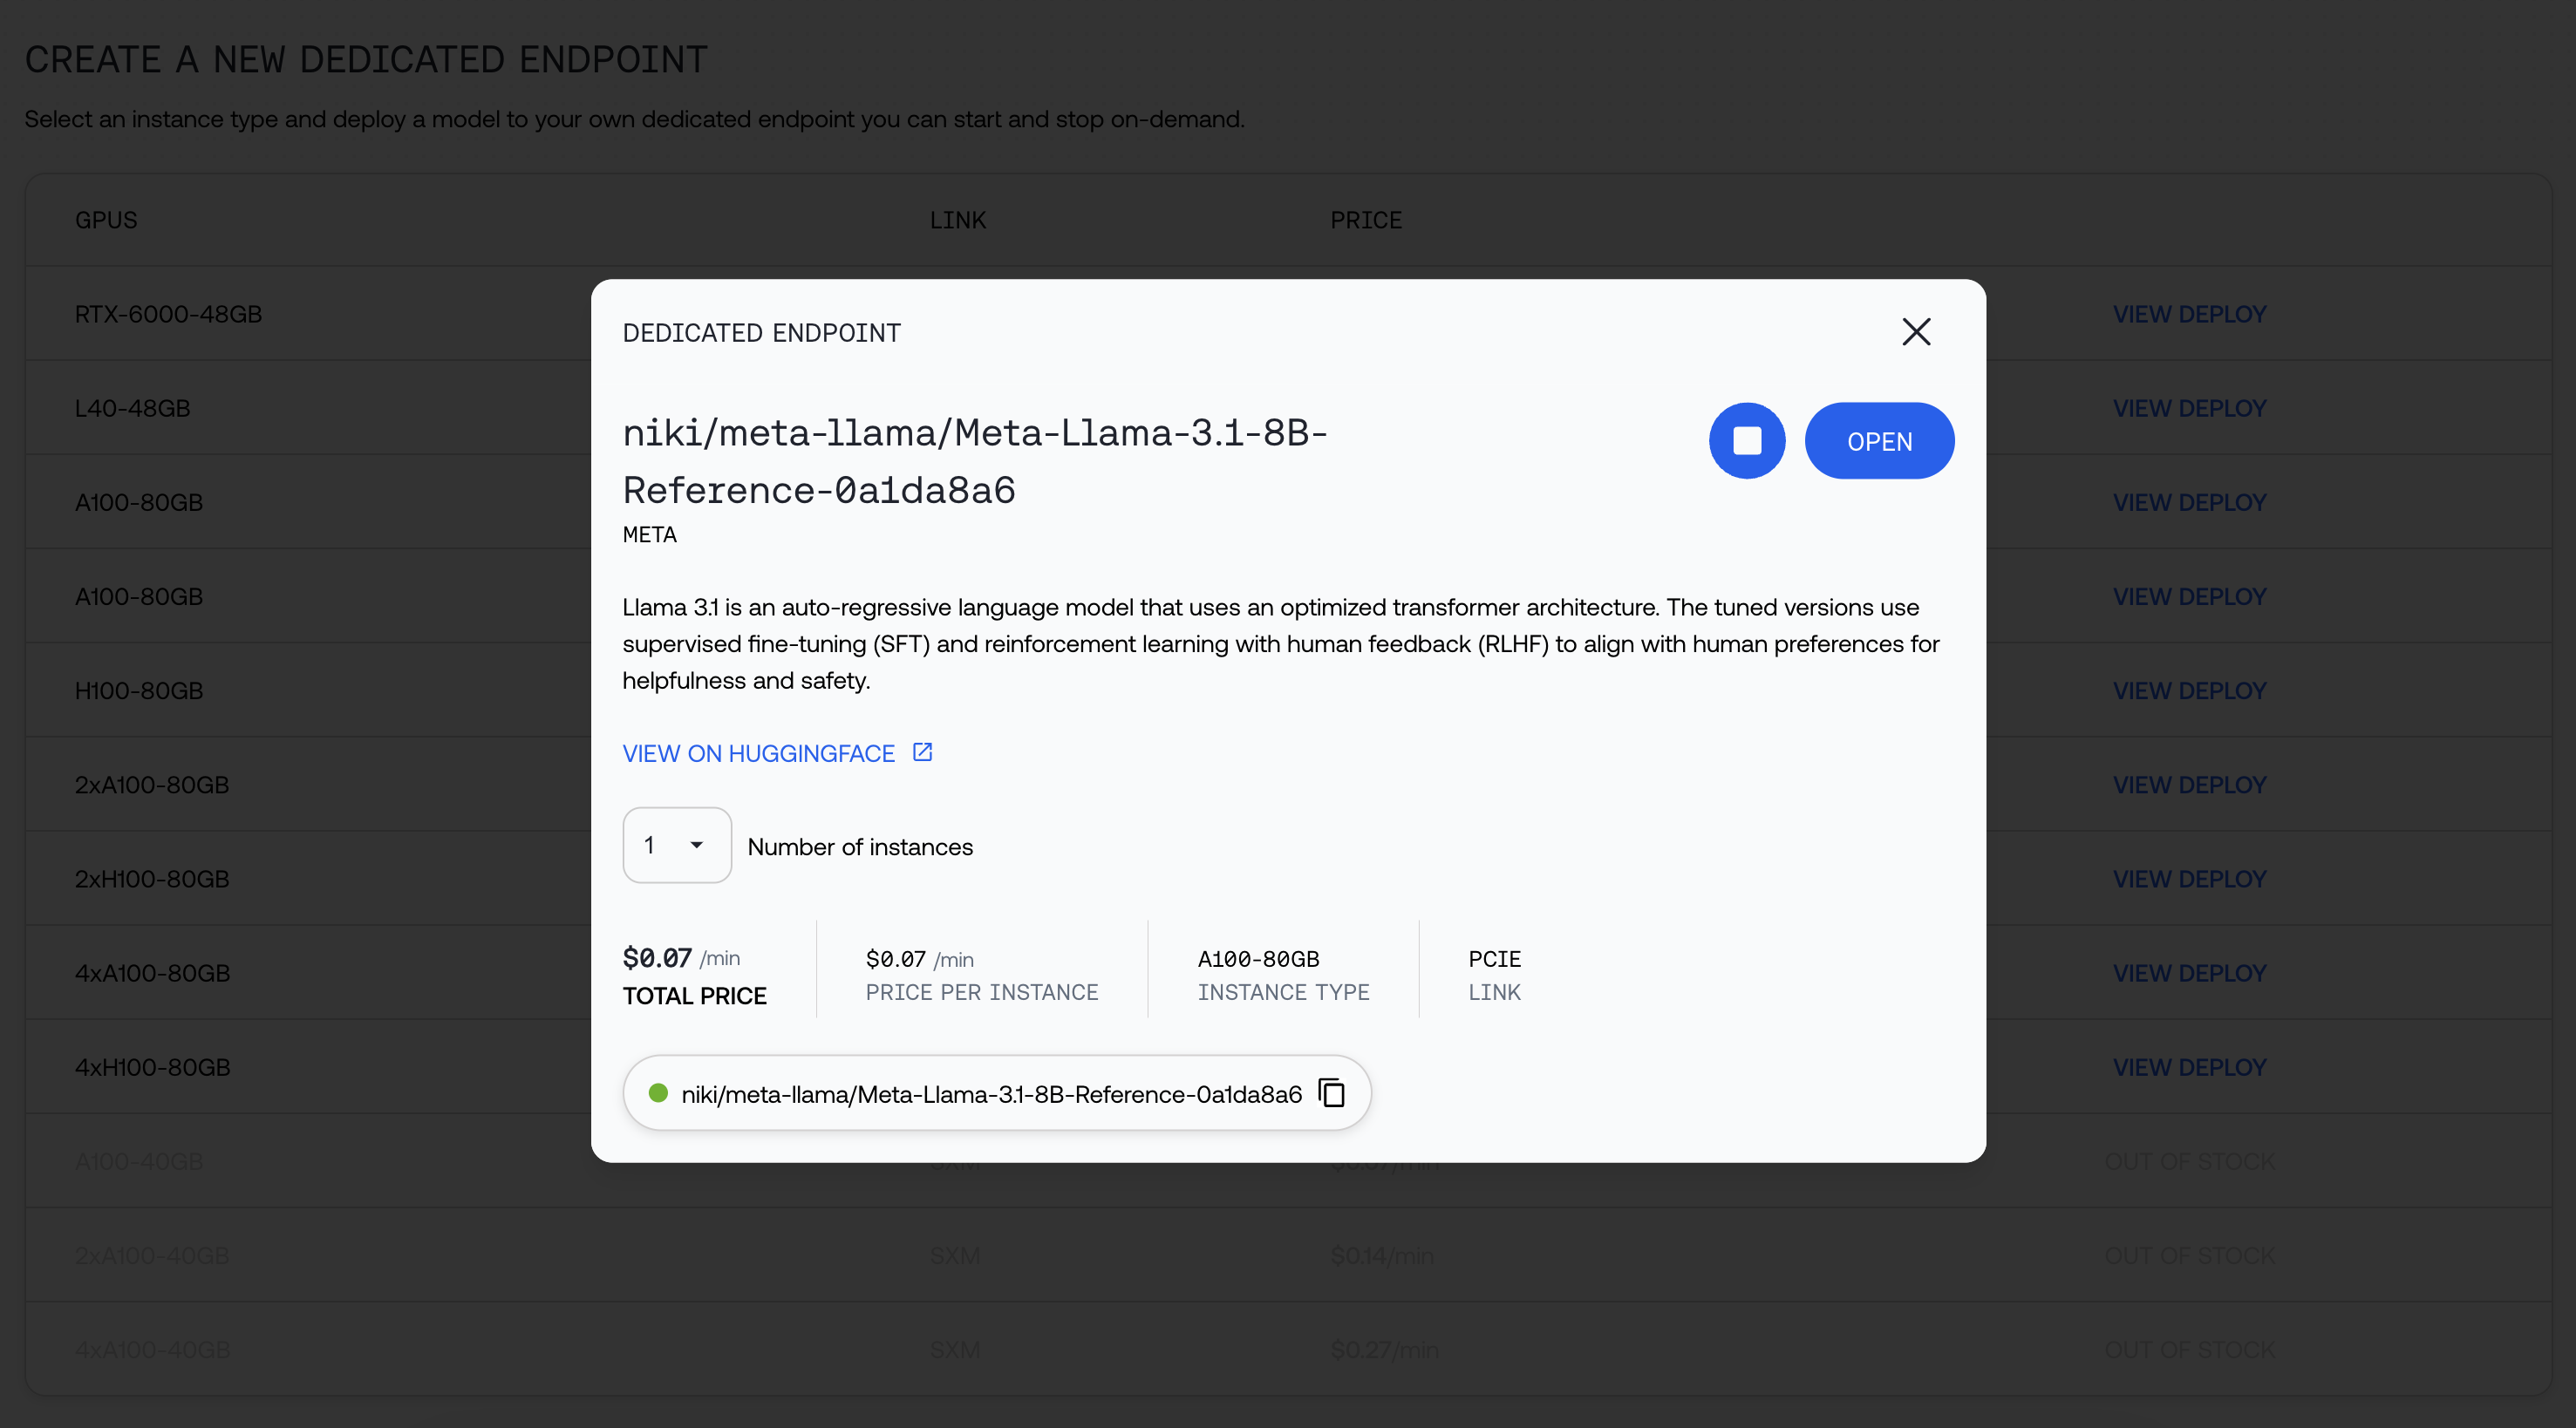 Start using your endpoint!
 You can now find your endpoint in the My Models Page, and upon clicking the Model, under "Endpoints"

 **Looking for custom configurations?** [Contact us.](https://www.together.ai/forms/monthly-reserved)
---
> To find navigation and other pages in this documentation, fetch the llms.txt file at: https://docs.together.ai/llms.txt
---
# Source: https://docs.together.ai/docs/dedicated-inference.md
# Dedicated Inference
> Deploy models on your own custom endpoints for improved reliability at scale
Dedicated Endpoints allows you to deploy models as dedicated endpoints with custom hardware and scaling configurations. Benefits of dedicated endpoints include:
* Predictable performance unaffected by serverless traffic.
* Reliable capacity to respond to spiky traffic.
* Customization to suit the unique usage of the model.
## Getting Started
Jump straight into the API with these [docs](/reference/listendpoints) or create an endpoint with this guide below.
### 1. Select a model
Explore the list of supported models for dedicated endpoints on our [models list](https://api.together.ai/models?filter=dedicated).
You can also upload your own [model](/docs/custom-models) .
### 2. Create a dedicated endpoint
To create a dedicated endpoint, first identify the hardware options for your specific model.
To do this, run:
**Looking for custom configurations?** [Contact us.](https://www.together.ai/forms/monthly-reserved)
---
> To find navigation and other pages in this documentation, fetch the llms.txt file at: https://docs.together.ai/llms.txt
---
# Source: https://docs.together.ai/docs/dedicated-inference.md
# Dedicated Inference
> Deploy models on your own custom endpoints for improved reliability at scale
Dedicated Endpoints allows you to deploy models as dedicated endpoints with custom hardware and scaling configurations. Benefits of dedicated endpoints include:
* Predictable performance unaffected by serverless traffic.
* Reliable capacity to respond to spiky traffic.
* Customization to suit the unique usage of the model.
## Getting Started
Jump straight into the API with these [docs](/reference/listendpoints) or create an endpoint with this guide below.
### 1. Select a model
Explore the list of supported models for dedicated endpoints on our [models list](https://api.together.ai/models?filter=dedicated).
You can also upload your own [model](/docs/custom-models) .
### 2. Create a dedicated endpoint
To create a dedicated endpoint, first identify the hardware options for your specific model.
To do this, run:
| Organization | Model name | API model name | Context length | {listedModels.map(model =>
|---|---|---|---|
| {model.organization} | {model.name} | {model.apiName} | {model.contextLength > 0 ? model.contextLength : "-"} |
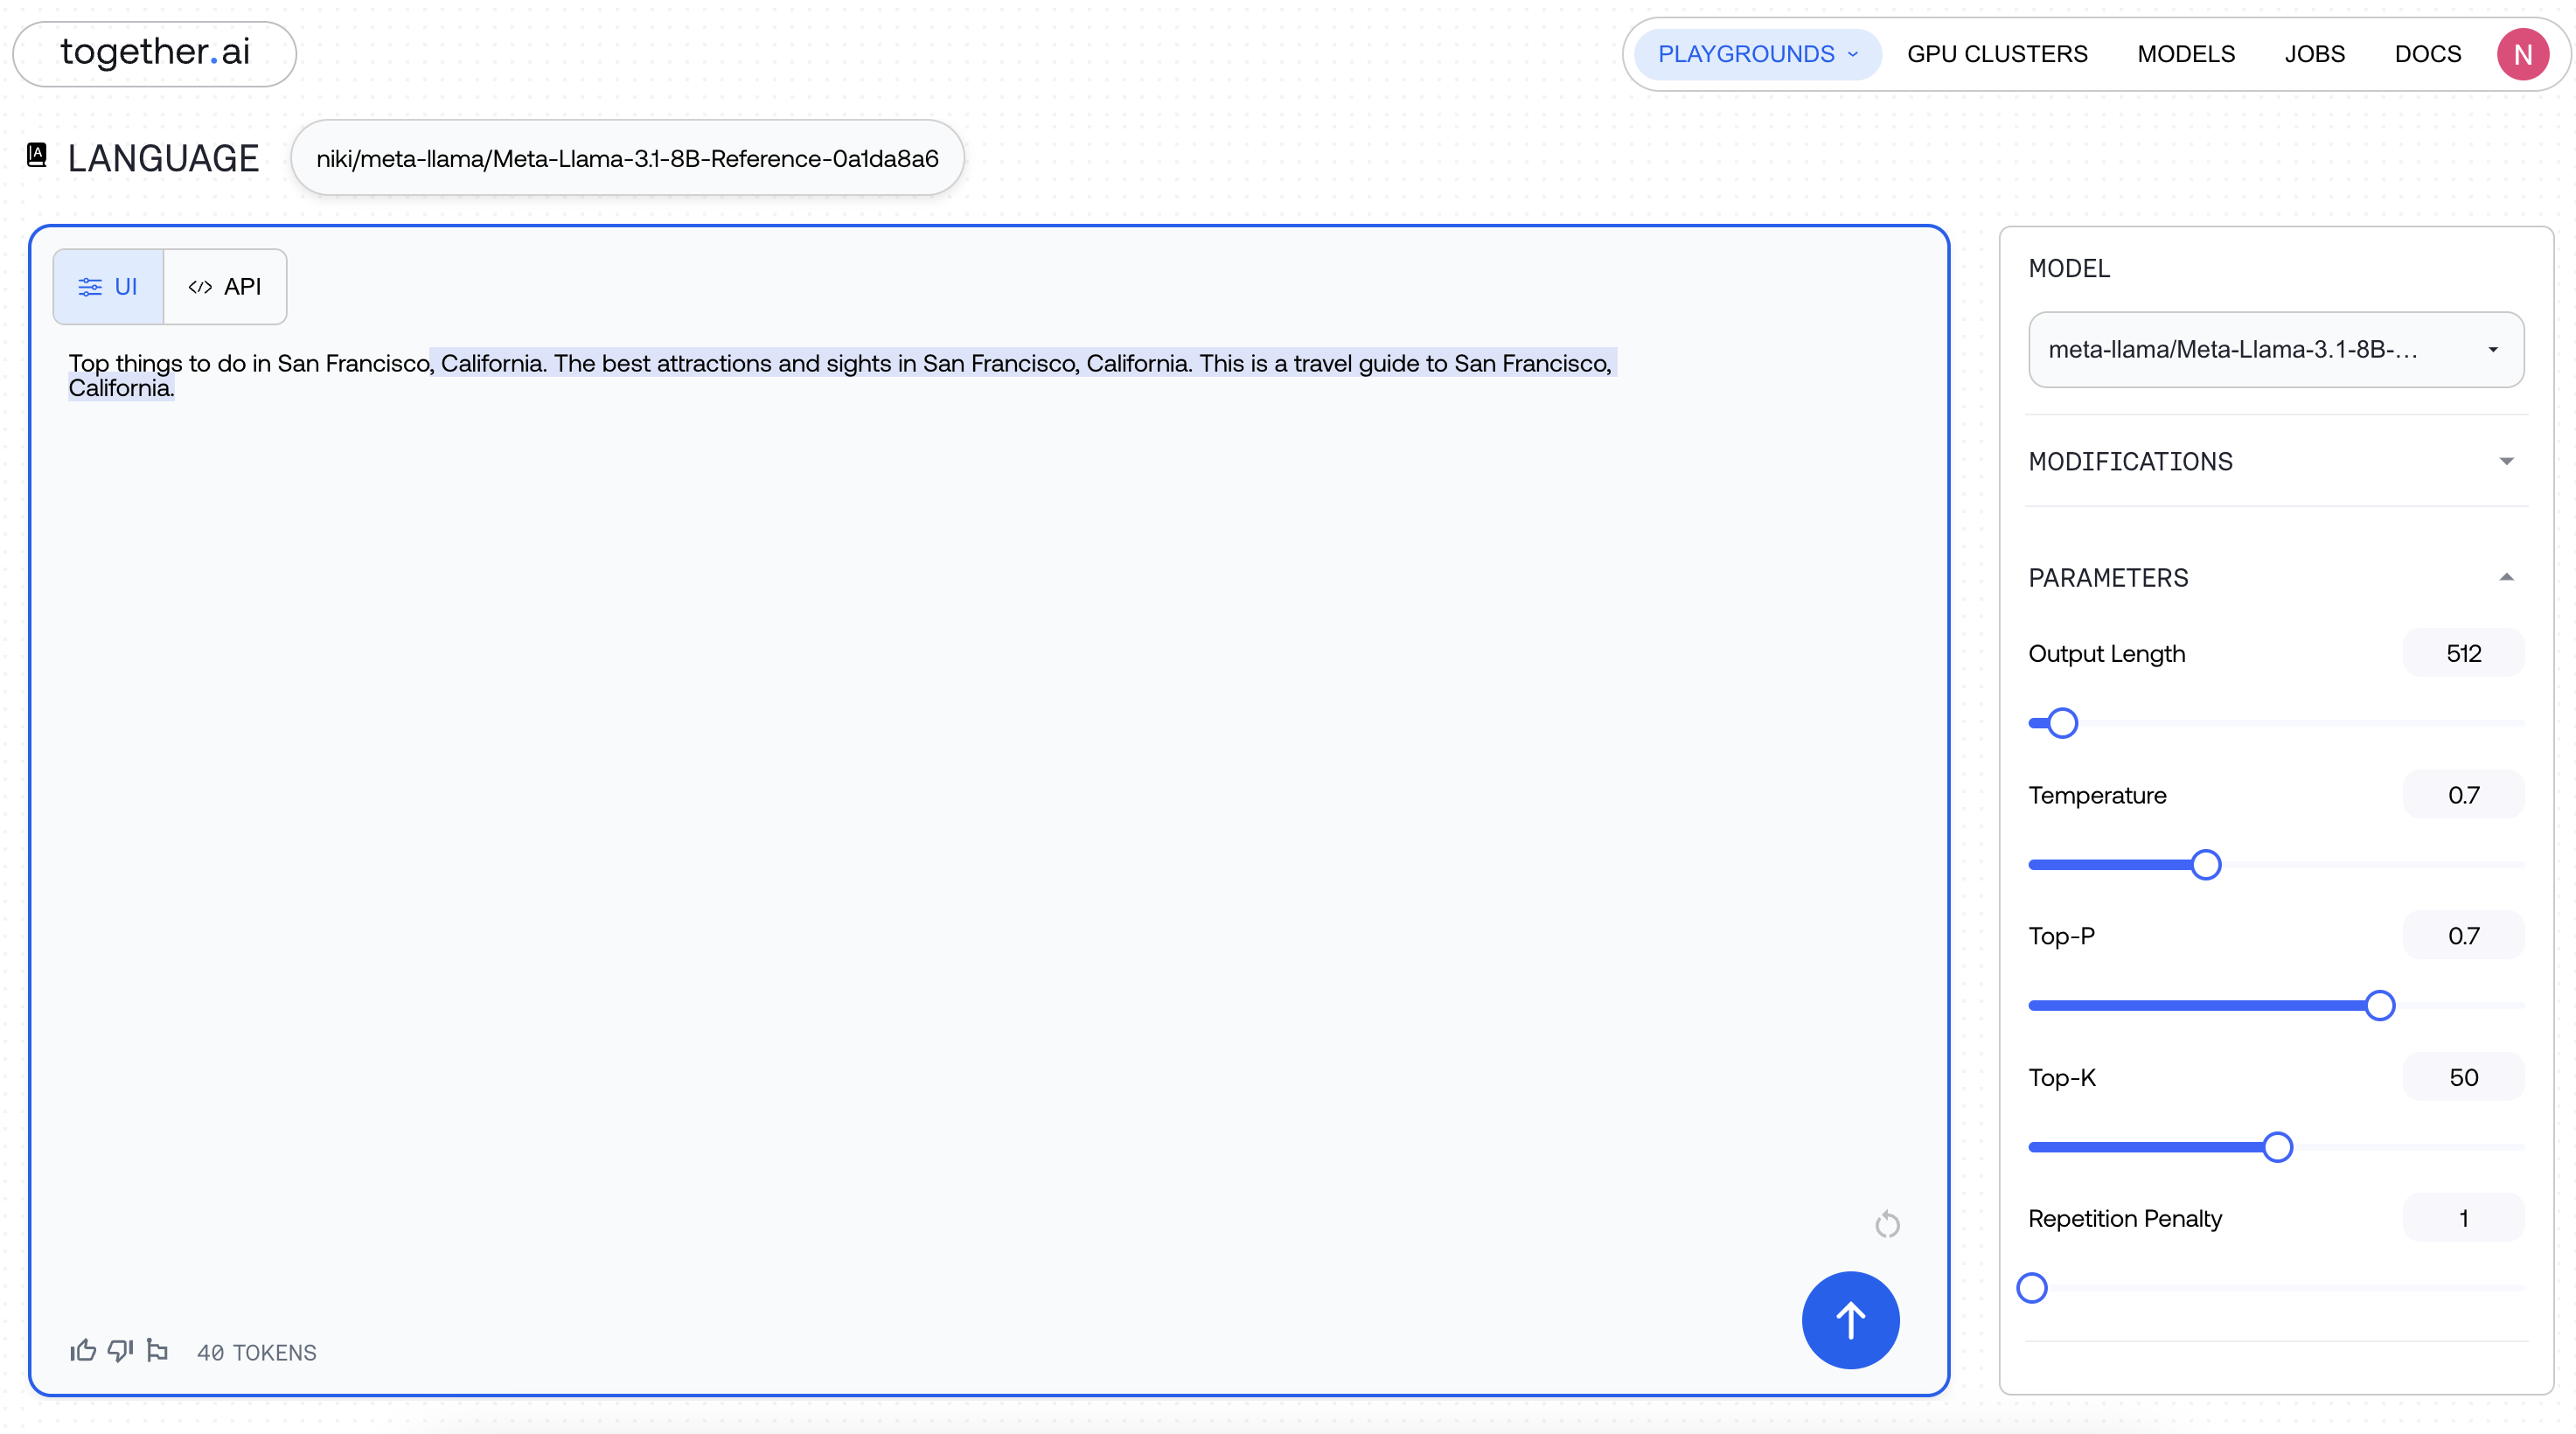
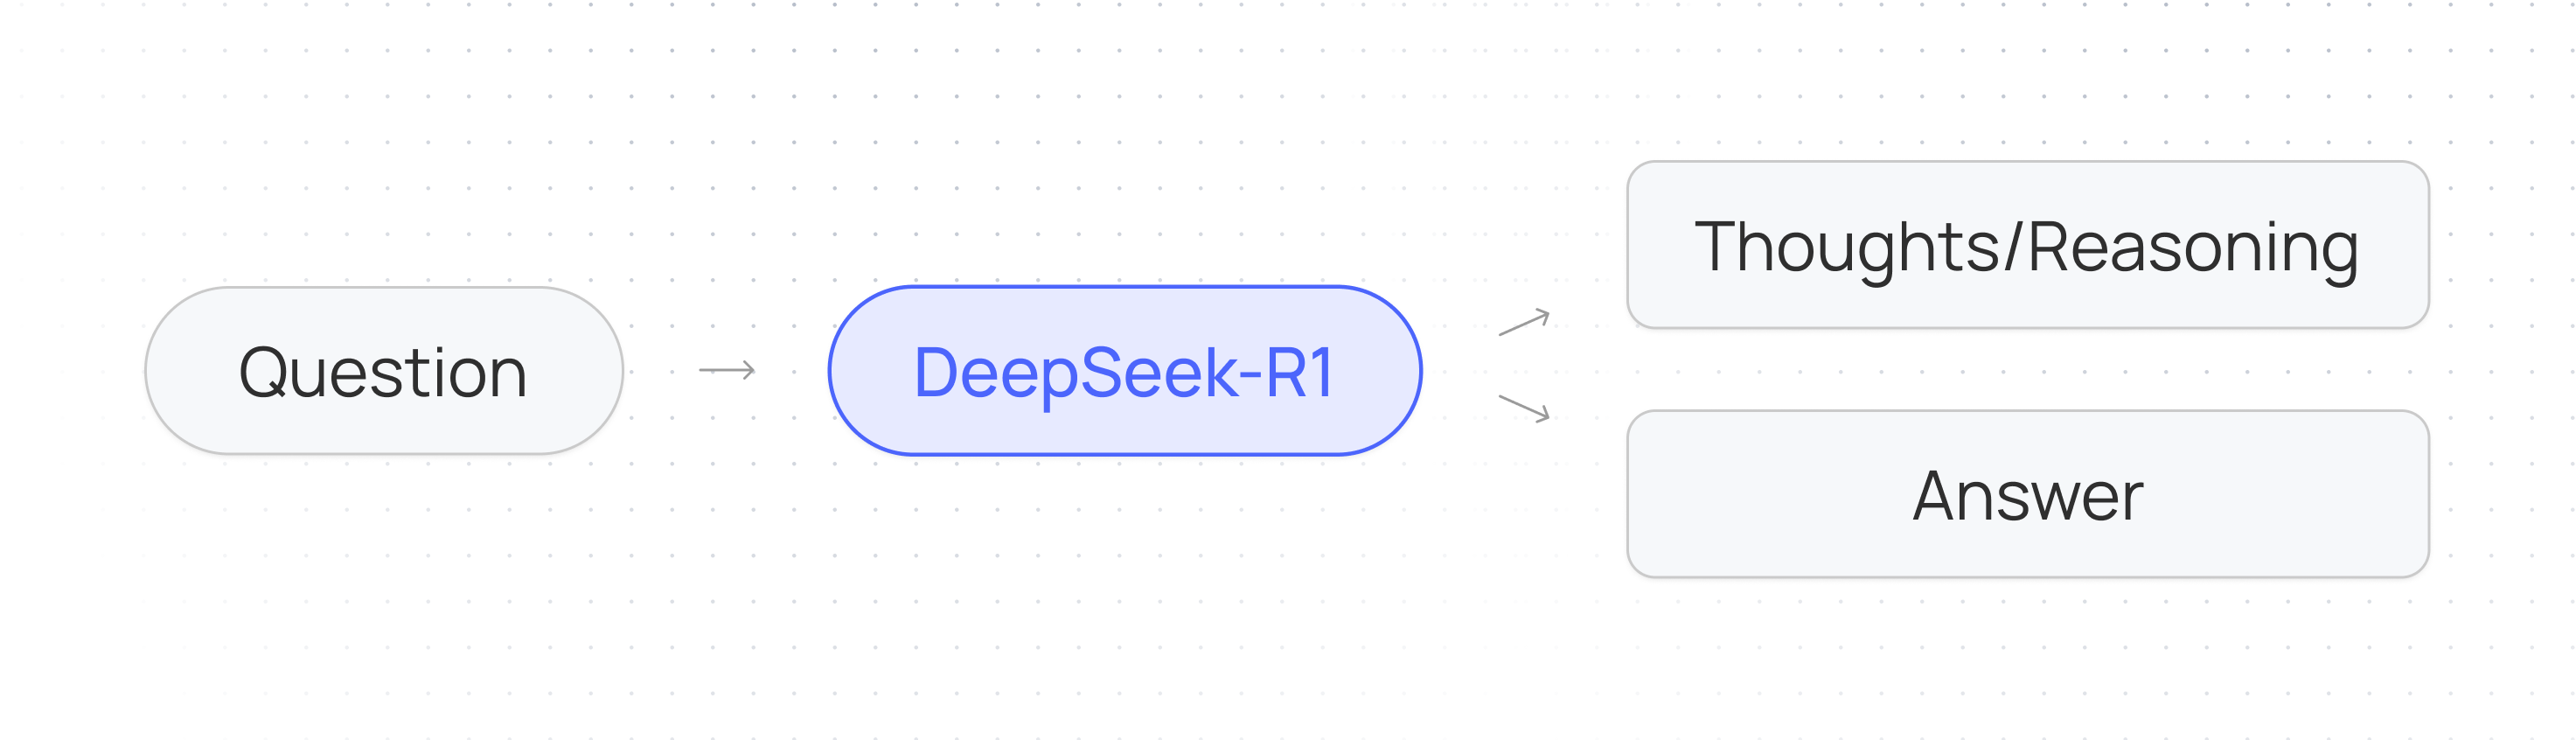 ## How to use DeepSeek-R1 API
Since these models produce longer responses we'll stream in tokens instead of waiting for the whole response to complete.
## How to use DeepSeek-R1 API
Since these models produce longer responses we'll stream in tokens instead of waiting for the whole response to complete.
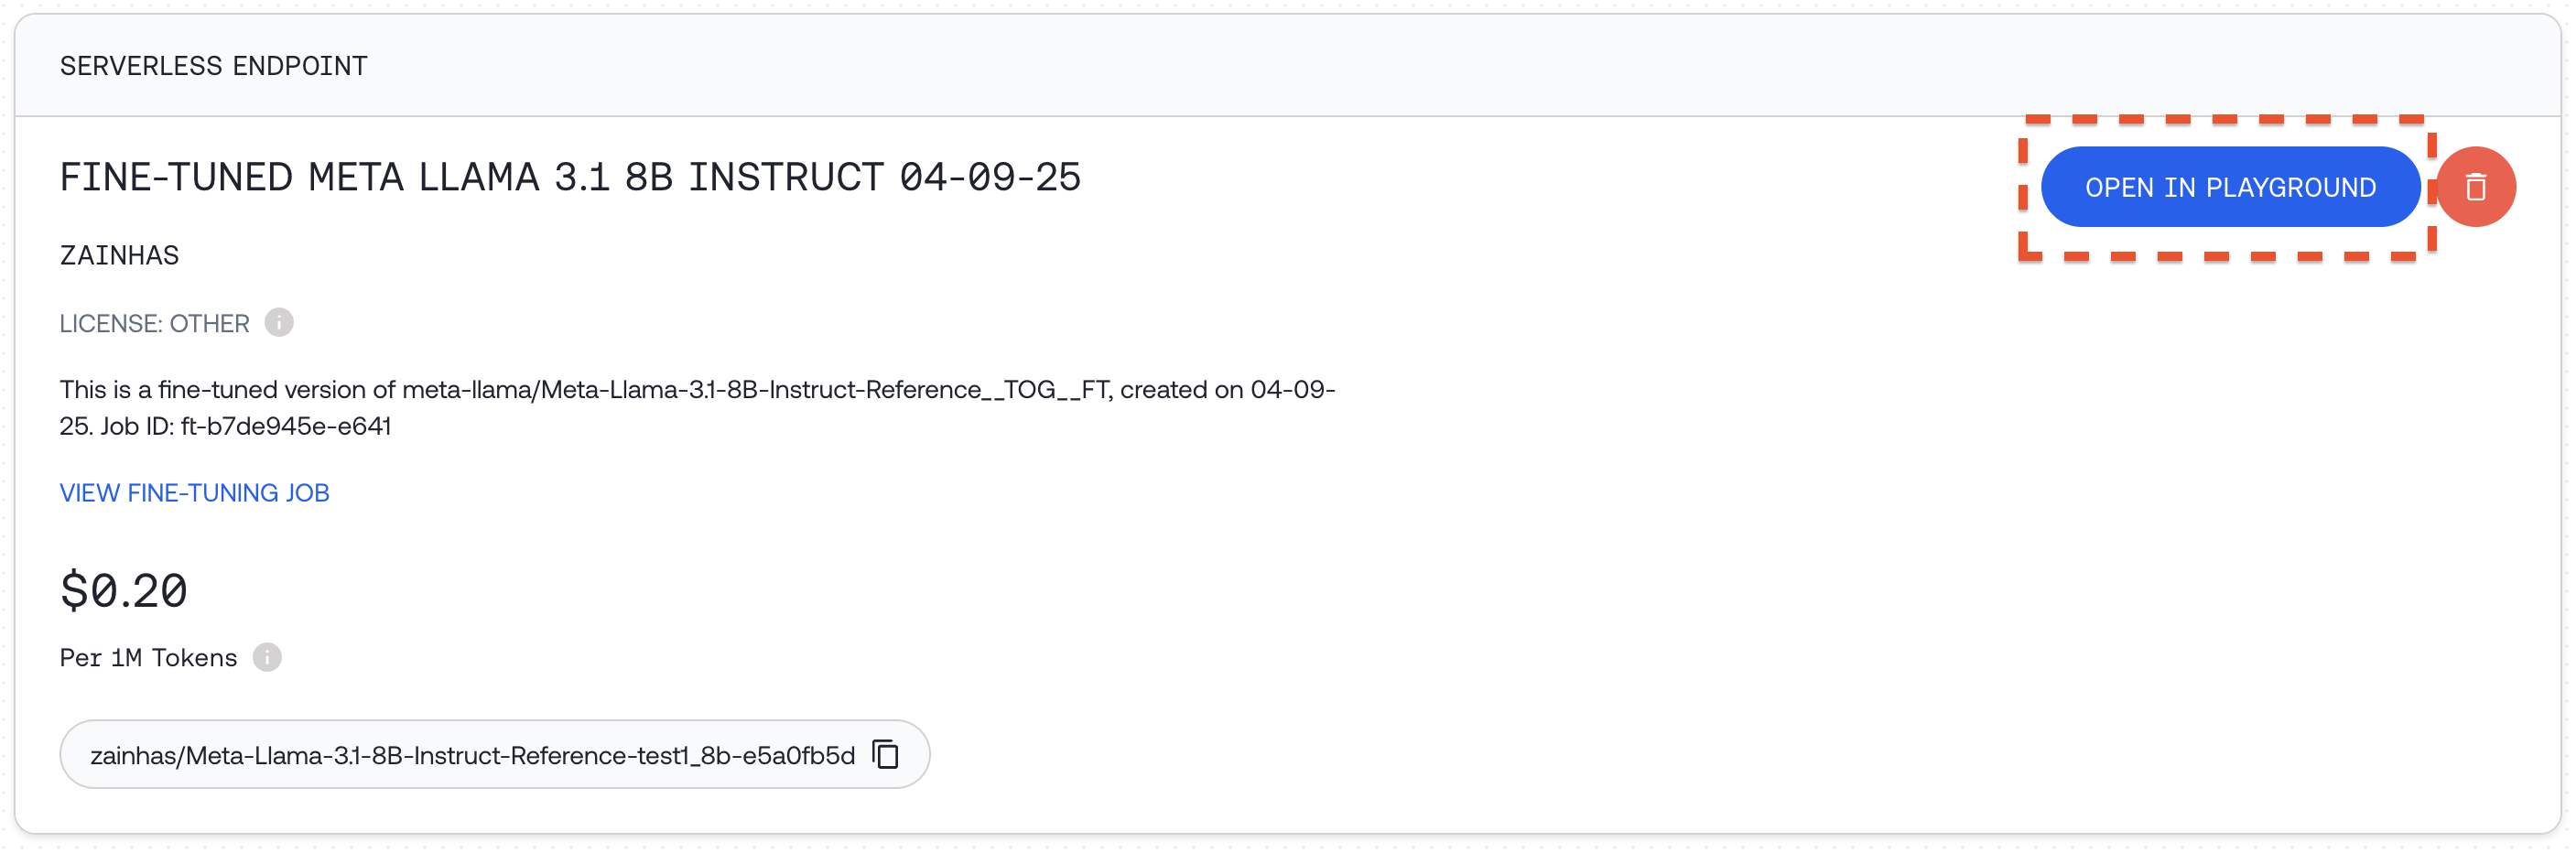
 To use your model, you can either:
1. Host it on Together AI as a [dedicated endpoint(DE)](/docs/dedicated-inference) for an hourly usage fee
2. Run it immediately if the model supports [Serverless LoRA Inference](/docs/lora-training-and-inference)
3. Download your model and run it locally
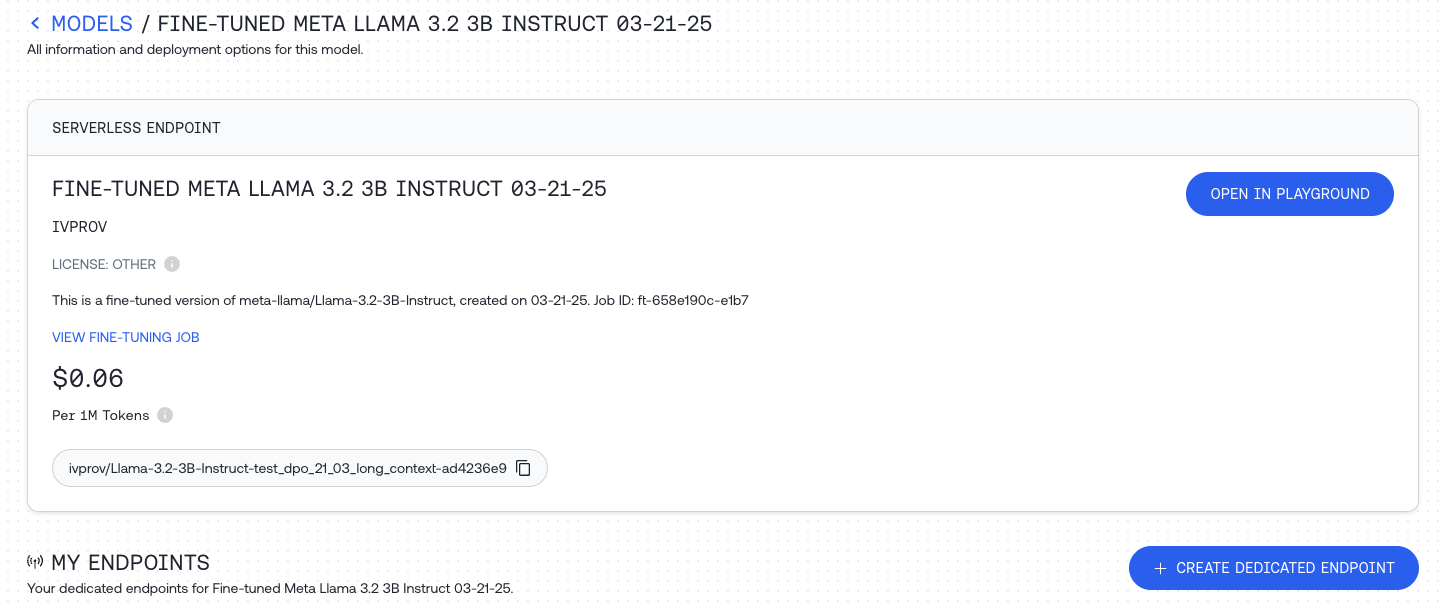
## Hosting your model on Together AI
If you select your model in [the models dashboard](https://api.together.xyz/models) you can click `CREATE DEDICATED ENDPOINT` to create a [dedicated endpoint](/docs/dedicated-endpoints-ui) for the fine-tuned model.
To use your model, you can either:
1. Host it on Together AI as a [dedicated endpoint(DE)](/docs/dedicated-inference) for an hourly usage fee
2. Run it immediately if the model supports [Serverless LoRA Inference](/docs/lora-training-and-inference)
3. Download your model and run it locally
## Hosting your model on Together AI
If you select your model in [the models dashboard](https://api.together.xyz/models) you can click `CREATE DEDICATED ENDPOINT` to create a [dedicated endpoint](/docs/dedicated-endpoints-ui) for the fine-tuned model.
 Once it's deployed, you can use the ID to query your new model using any of our APIs:
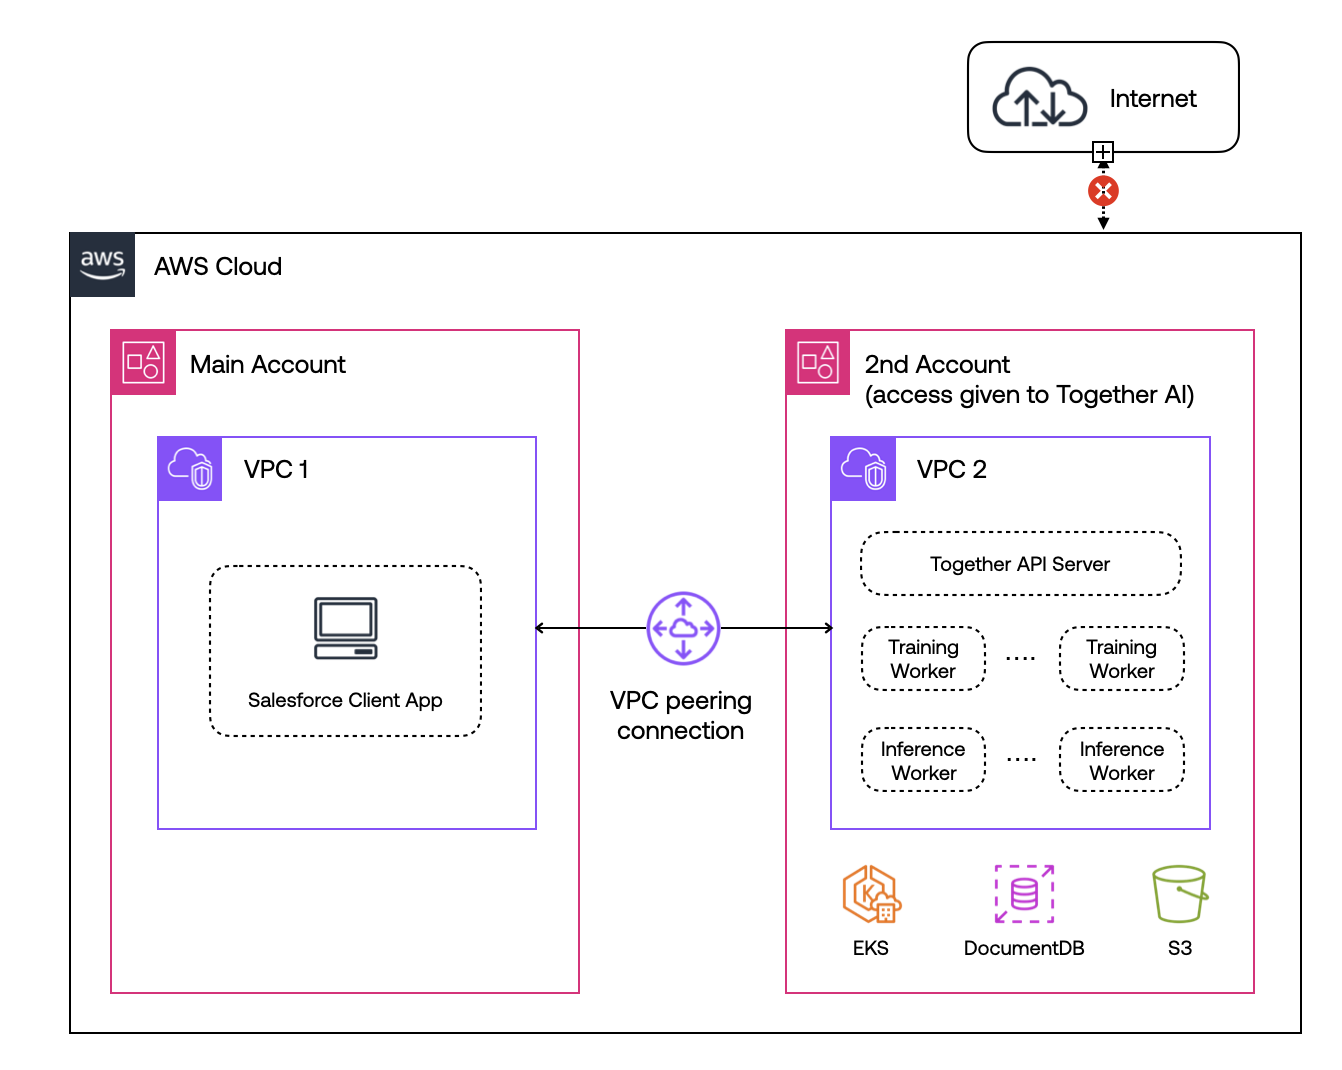 1. **Secure VPC Peering**: Together AI connects to your AWS environment via secure VPC peering, ensuring data remains entirely within your AWS account.
2. **Private Subnets**: All data processing and model inference happens within private subnets, isolating resources from the internet.
3. **Control of Ingress/Egress Traffic**: You have full control over all traffic entering and leaving your VPC, including restrictions on external network access.
4. **Data Sovereignty**: Since all computations are performed within your VPC, data never leaves your controlled environment.
5. **Custom Scaling**: Leverage AWS autoscaling groups to ensure that your AI workloads scale seamlessly with demand, while maintaining complete control over resources.
Although this example uses AWS, the architecture can be adapted to other cloud providers such as Azure or Google Cloud with similar capabilities.
For more information on VPC deployment, [get in touch with us](/docs/support-ticket-portal).
## Comparison of Deployment Options
| Feature | Together AI Cloud | Together AI VPC Deployment |
| --------------------------- | -------------------------------------------------------------------------------------------------------------------------------------------------------------- | --------------------------------------------------------------------------------------------------------- |
| **How It Works** | Fully-managed, serverless API endpoints. On-demand and reserved dedicated endpoints for production workloads - with consistent performance and no rate limits. | Deploy Together's Platform and inference stack in your VPC on any cloud platform. |
| **Performance** | Optimal performance with Together inference stack and Together Turbo Endpoints. | Better performance on your infrastructure: Up to 2x better speed on existing infrastructure |
| **Cost** | Pay-as-you-go, or discounts for reserved endpoints. | Lower TCO through faster performance and optimized GPU usage. |
| **Management** | Fully-managed service, no infrastructure to manage. | You manage your VPC, with Together AI’s support. Managed service offering also available. |
| **Scaling** | Automatic scaling to meet demand. | Intelligent scaling based on your infrastructure. Fully customizable. |
| **Data Privacy & Security** | Data ownership with SOC 2 and HIPAA compliance. | Data never leaves your environment. |
| **Compliance** | SOC 2 and HIPAA compliant. | Implement security and compliance controls to match internal standards. |
| **Support** | 24/7 support with guaranteed SLAs. | Dedicated support with engineers on call. |
| **Ideal For** | Startups and companies that want quick, easy access to AI infrastructure without managing it. | Enterprises with stringent security and privacy needs, or those leveraging existing cloud infrastructure. |
## Next Steps
To get started with Together AI’s platform, **we recommend [trying the Together AI Cloud](https://api.together.ai/signin)** for quick deployment and experimentation. If your organization has specific security, infrastructure, or compliance needs, consider Together AI VPC.
For more information, or to find the best deployment option for your business, [contact our team](https://www.together.ai/forms/contact-sales).
---
> To find navigation and other pages in this documentation, fetch the llms.txt file at: https://docs.together.ai/llms.txt
---
# Source: https://docs.together.ai/docs/deprecations.md
# Deprecations
## Overview
We regularly update our platform with the latest and most powerful open-source models. This document outlines our model lifecycle policy, including how we handle model upgrades, redirects, and deprecations.
## Model Lifecycle Policy
To ensure customers get predictable behavior while we maintain a high-quality model catalog, we follow a structured approach to introducing new models, upgrading existing models, and deprecating older versions.
### Model Upgrades (Redirects)
An **upgrade** is a model release that is materially the same model lineage with targeted improvements and no fundamental changes to how developers use or reason about it.
A model qualifies as an upgrade when **one or more** of the following are true (and none of the "New Model" criteria apply):
* Same modality and task profile (e.g., instruct → instruct, reasoning → reasoning)
* Same architecture family (e.g., DeepSeek-V3 → DeepSeek-V3-0324)
* Post-training/fine-tuning improvements, bug fixes, safety tuning, or small data refresh
* Behavior is strongly compatible (prompting patterns and evals are similar)
* Pricing change is none or small (≤10% increase)
**Outcome:** The current endpoint redirects to the upgraded version after a **3-day notice**. The old version remains available via Dedicated Endpoints.
### New Models (No Redirect)
A **new model** is a release with materially different capabilities, costs, or operating characteristics—such that a silent redirect would be misleading.
Any of the following triggers classification as a new model:
* Modality shift (e.g., reasoning-only ↔ instruct/hybrid, text → multimodal)
* Architecture shift (e.g., Qwen3 → Qwen3-Next, Llama 3 → Llama 4)
* Large behavior shift (prompting patterns, output style/verbosity materially different)
* Experimental flag by provider (e.g., DeepSeek-V3-Exp)
* Large price change (>10% increase or pricing structure change)
* Benchmark deltas that meaningfully change task positioning
* Safety policy or system prompt changes that noticeably affect outputs
**Outcome:** No automatic redirect. We announce the new model and deprecate the old one on a **2-week timeline** (both are available during this window). Customers must explicitly switch model IDs.
## Active Model Redirects
The following models are currently being redirected to newer versions. Requests to the original model ID are automatically routed to the upgraded version:
| Original Model | Redirects To | Notes |
| :------------- | :----------------- | :---------------------------------------- |
| `Kimi-K2` | `Kimi-K2-0905` | Same architecture, improved post-training |
| `DeepSeek-V3` | `DeepSeek-V3-0324` | Same architecture, targeted improvements |
| `DeepSeek-R1` | `DeepSeek-R1-0528` | Same architecture, targeted improvements |
1. **Secure VPC Peering**: Together AI connects to your AWS environment via secure VPC peering, ensuring data remains entirely within your AWS account.
2. **Private Subnets**: All data processing and model inference happens within private subnets, isolating resources from the internet.
3. **Control of Ingress/Egress Traffic**: You have full control over all traffic entering and leaving your VPC, including restrictions on external network access.
4. **Data Sovereignty**: Since all computations are performed within your VPC, data never leaves your controlled environment.
5. **Custom Scaling**: Leverage AWS autoscaling groups to ensure that your AI workloads scale seamlessly with demand, while maintaining complete control over resources.
Although this example uses AWS, the architecture can be adapted to other cloud providers such as Azure or Google Cloud with similar capabilities.
For more information on VPC deployment, [get in touch with us](/docs/support-ticket-portal).
## Comparison of Deployment Options
| Feature | Together AI Cloud | Together AI VPC Deployment |
| --------------------------- | -------------------------------------------------------------------------------------------------------------------------------------------------------------- | --------------------------------------------------------------------------------------------------------- |
| **How It Works** | Fully-managed, serverless API endpoints. On-demand and reserved dedicated endpoints for production workloads - with consistent performance and no rate limits. | Deploy Together's Platform and inference stack in your VPC on any cloud platform. |
| **Performance** | Optimal performance with Together inference stack and Together Turbo Endpoints. | Better performance on your infrastructure: Up to 2x better speed on existing infrastructure |
| **Cost** | Pay-as-you-go, or discounts for reserved endpoints. | Lower TCO through faster performance and optimized GPU usage. |
| **Management** | Fully-managed service, no infrastructure to manage. | You manage your VPC, with Together AI’s support. Managed service offering also available. |
| **Scaling** | Automatic scaling to meet demand. | Intelligent scaling based on your infrastructure. Fully customizable. |
| **Data Privacy & Security** | Data ownership with SOC 2 and HIPAA compliance. | Data never leaves your environment. |
| **Compliance** | SOC 2 and HIPAA compliant. | Implement security and compliance controls to match internal standards. |
| **Support** | 24/7 support with guaranteed SLAs. | Dedicated support with engineers on call. |
| **Ideal For** | Startups and companies that want quick, easy access to AI infrastructure without managing it. | Enterprises with stringent security and privacy needs, or those leveraging existing cloud infrastructure. |
## Next Steps
To get started with Together AI’s platform, **we recommend [trying the Together AI Cloud](https://api.together.ai/signin)** for quick deployment and experimentation. If your organization has specific security, infrastructure, or compliance needs, consider Together AI VPC.
For more information, or to find the best deployment option for your business, [contact our team](https://www.together.ai/forms/contact-sales).
---
> To find navigation and other pages in this documentation, fetch the llms.txt file at: https://docs.together.ai/llms.txt
---
# Source: https://docs.together.ai/docs/deprecations.md
# Deprecations
## Overview
We regularly update our platform with the latest and most powerful open-source models. This document outlines our model lifecycle policy, including how we handle model upgrades, redirects, and deprecations.
## Model Lifecycle Policy
To ensure customers get predictable behavior while we maintain a high-quality model catalog, we follow a structured approach to introducing new models, upgrading existing models, and deprecating older versions.
### Model Upgrades (Redirects)
An **upgrade** is a model release that is materially the same model lineage with targeted improvements and no fundamental changes to how developers use or reason about it.
A model qualifies as an upgrade when **one or more** of the following are true (and none of the "New Model" criteria apply):
* Same modality and task profile (e.g., instruct → instruct, reasoning → reasoning)
* Same architecture family (e.g., DeepSeek-V3 → DeepSeek-V3-0324)
* Post-training/fine-tuning improvements, bug fixes, safety tuning, or small data refresh
* Behavior is strongly compatible (prompting patterns and evals are similar)
* Pricing change is none or small (≤10% increase)
**Outcome:** The current endpoint redirects to the upgraded version after a **3-day notice**. The old version remains available via Dedicated Endpoints.
### New Models (No Redirect)
A **new model** is a release with materially different capabilities, costs, or operating characteristics—such that a silent redirect would be misleading.
Any of the following triggers classification as a new model:
* Modality shift (e.g., reasoning-only ↔ instruct/hybrid, text → multimodal)
* Architecture shift (e.g., Qwen3 → Qwen3-Next, Llama 3 → Llama 4)
* Large behavior shift (prompting patterns, output style/verbosity materially different)
* Experimental flag by provider (e.g., DeepSeek-V3-Exp)
* Large price change (>10% increase or pricing structure change)
* Benchmark deltas that meaningfully change task positioning
* Safety policy or system prompt changes that noticeably affect outputs
**Outcome:** No automatic redirect. We announce the new model and deprecate the old one on a **2-week timeline** (both are available during this window). Customers must explicitly switch model IDs.
## Active Model Redirects
The following models are currently being redirected to newer versions. Requests to the original model ID are automatically routed to the upgraded version:
| Original Model | Redirects To | Notes |
| :------------- | :----------------- | :---------------------------------------- |
| `Kimi-K2` | `Kimi-K2-0905` | Same architecture, improved post-training |
| `DeepSeek-V3` | `DeepSeek-V3-0324` | Same architecture, targeted improvements |
| `DeepSeek-R1` | `DeepSeek-R1-0528` | Same architecture, targeted improvements |
[See all of Together AI's embedding models](https://docs.together.ai/docs/serverless-models#embedding-models) example: togethercomputer/m2-bert-80M-8k-retrieval anyOf: - type: string enum: - WhereIsAI/UAE-Large-V1 - BAAI/bge-large-en-v1.5 - BAAI/bge-base-en-v1.5 - togethercomputer/m2-bert-80M-8k-retrieval - type: string input: oneOf: - type: string description: A string providing the text for the model to embed. example: >- Our solar system orbits the Milky Way galaxy at about 515,000 mph - type: array items: type: string description: A string providing the text for the model to embed. example: >- Our solar system orbits the Milky Way galaxy at about 515,000 mph example: Our solar system orbits the Milky Way galaxy at about 515,000 mph EmbeddingsResponse: type: object required: - object - model - data properties: object: type: string enum: - list model: type: string data: type: array items: type: object required: - index - object - embedding properties: object: type: string enum: - embedding embedding: type: array items: type: number index: type: integer ErrorData: type: object required: - error properties: error: type: object properties: message: type: string nullable: false type: type: string nullable: false param: type: string nullable: true default: null code: type: string nullable: true default: null required: - type - message securitySchemes: bearerAuth: type: http scheme: bearer x-bearer-format: bearer x-default: default ```` --- > To find navigation and other pages in this documentation, fetch the llms.txt file at: https://docs.together.ai/llms.txt --- # Source: https://docs.together.ai/docs/embeddings-overview.md # Embeddings > Learn how to get an embedding vector for a given text input. Together's Embeddings API lets you turn some input text (the *input*) into an array of numbers (the *embedding*). The resulting embedding can be compared against other embeddings to determine how closely related the two input strings are. Embeddings from large datasets can be stored in vector databases for later retrieval or comparison. Common use cases for embeddings are search, classification, and recommendations. They're also used for building Retrieval Augmented Generation (RAG) applications. ## Generating a single embedding Use `client.embeddings.create` to generate an embedding for some input text, passing in a model name and input string:
{title}
{title}
{description}
 GitHub
{label}
{title}
{description}
GitHub
Together cookbooks & example apps
Explore our vast library of open-source cookbooks & example apps.
Featured cookbooks
Featured example app
Example apps
Explore all of our open source TypeScript example apps.
View all example apps
Cookbooks
Explore all of our open source Python cookbooks.
View all cookbooks
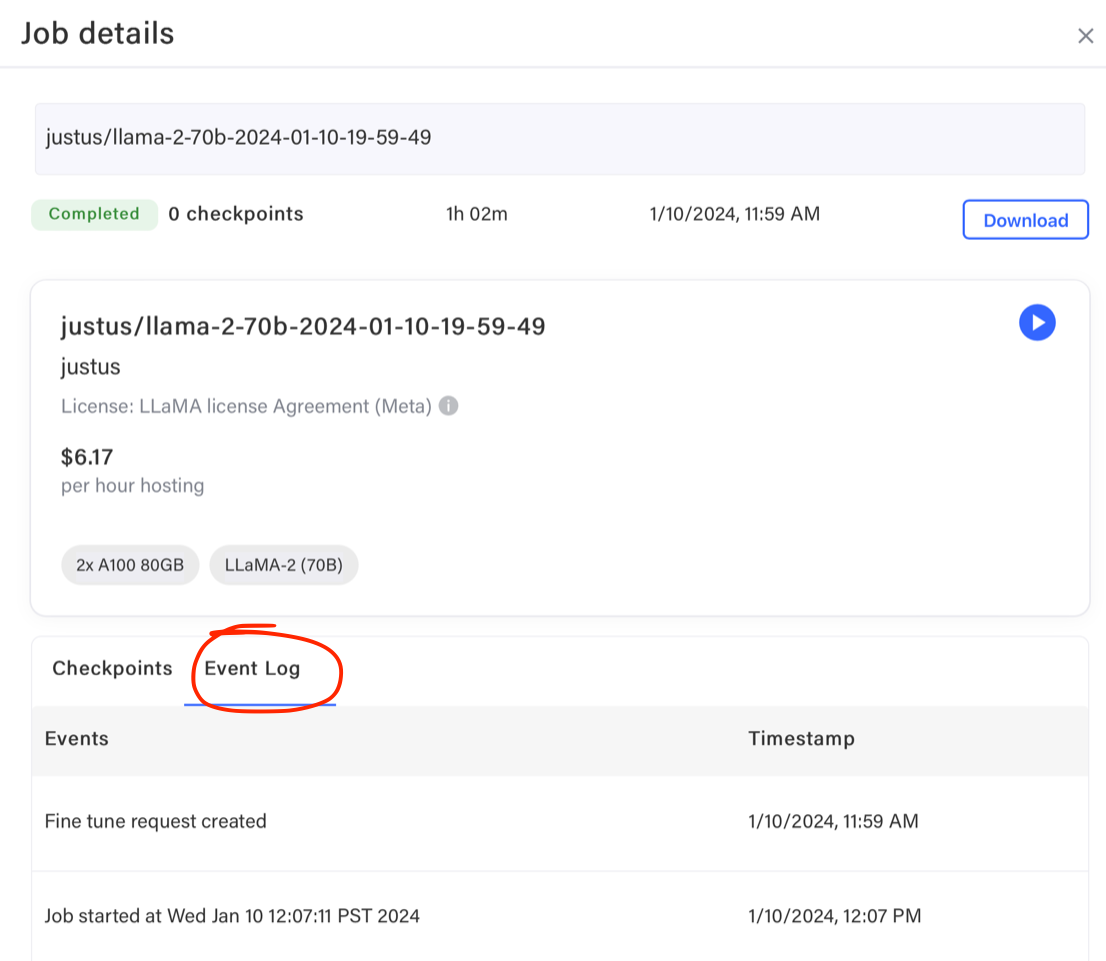 Example event log for billing limit:
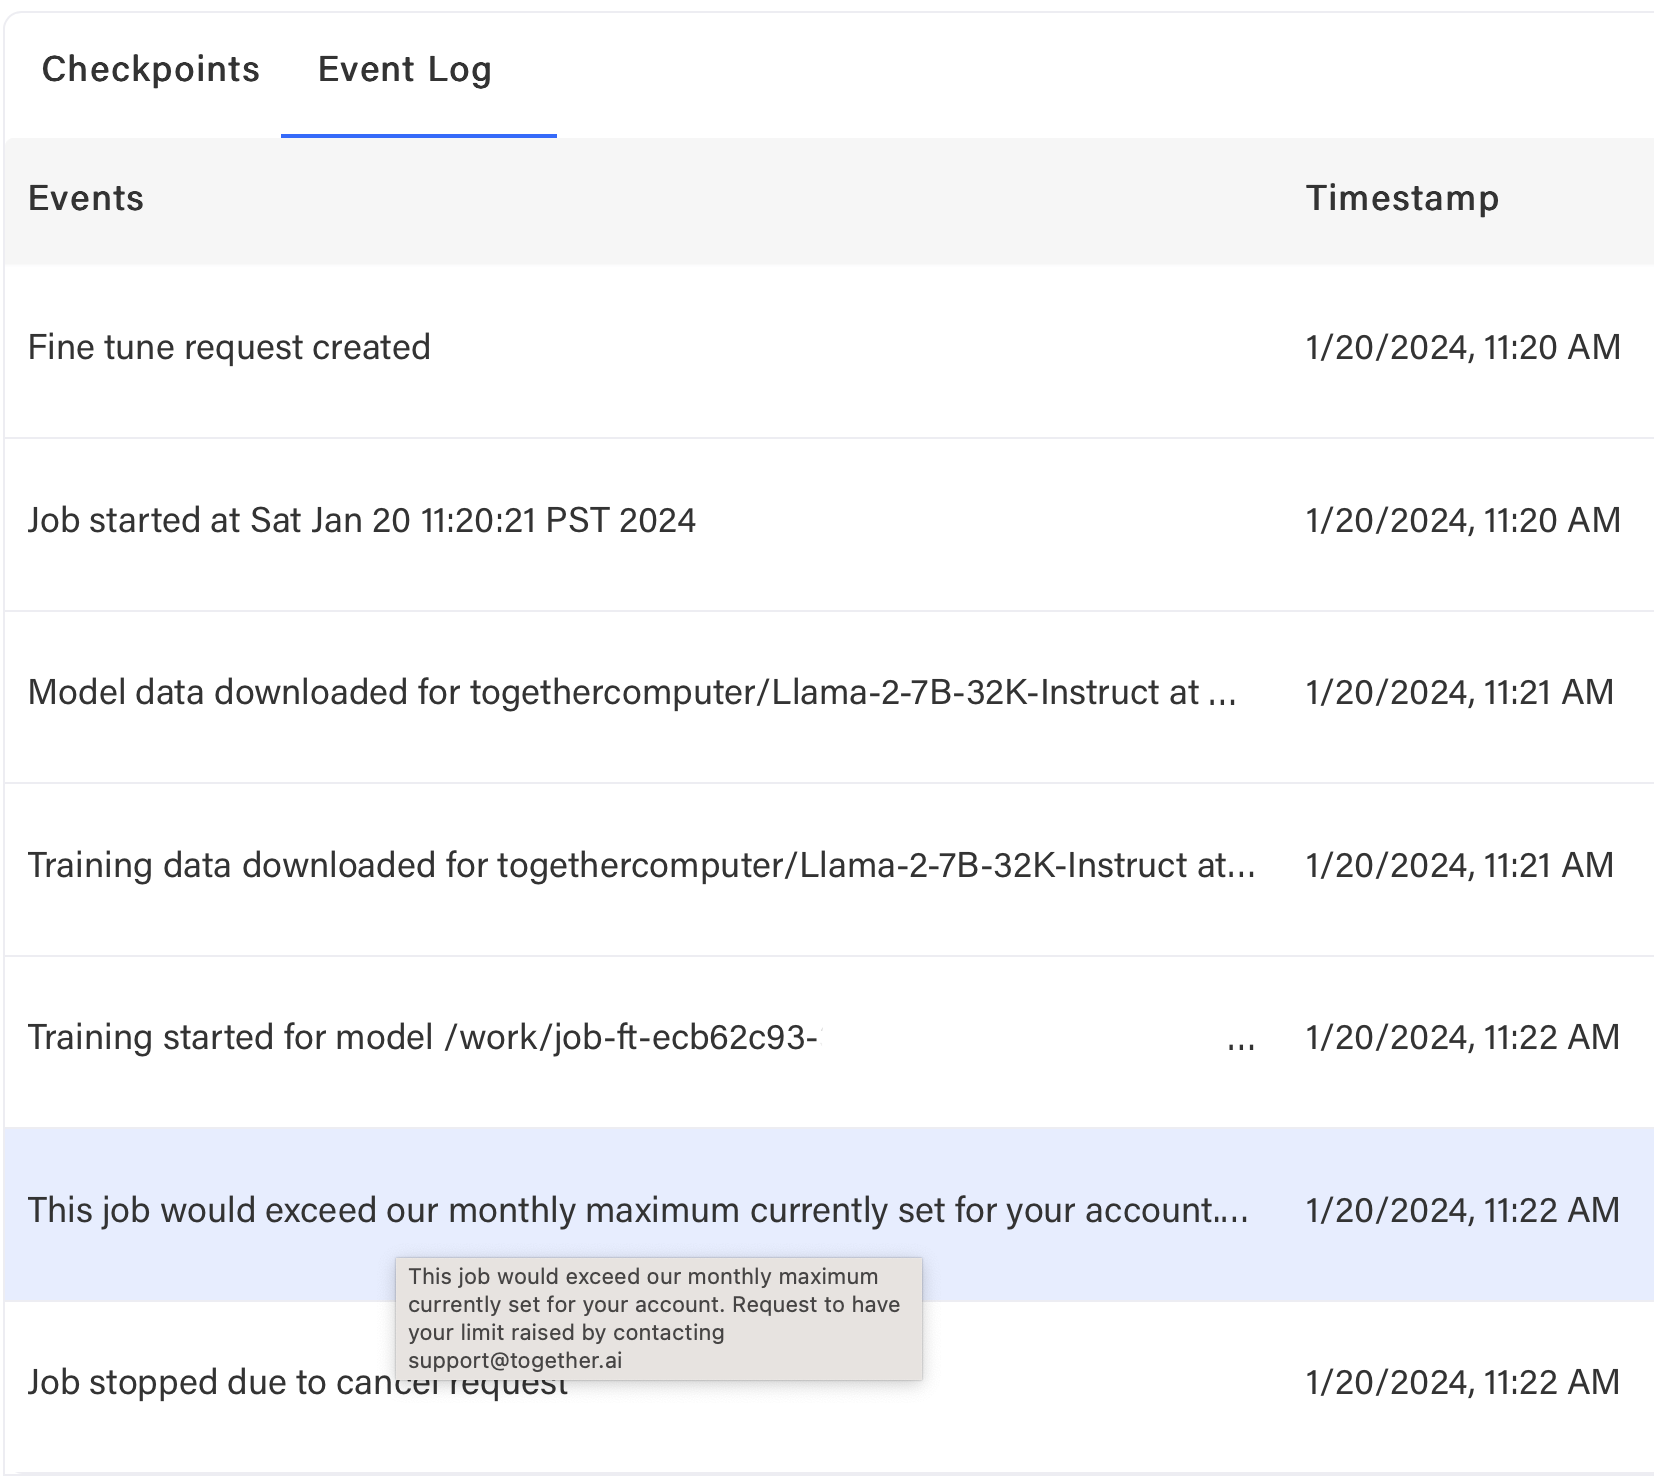 ### What should I do if my job is cancelled due to billing limits?
Add a credit card to increase your spending limit, make a payment, or adjust limits. Contact support if needed.
### Why was there an error while running my job?
If failing after download but before training, likely training data issue. Check event log:
### What should I do if my job is cancelled due to billing limits?
Add a credit card to increase your spending limit, make a payment, or adjust limits. Contact support if needed.
### Why was there an error while running my job?
If failing after download but before training, likely training data issue. Check event log:
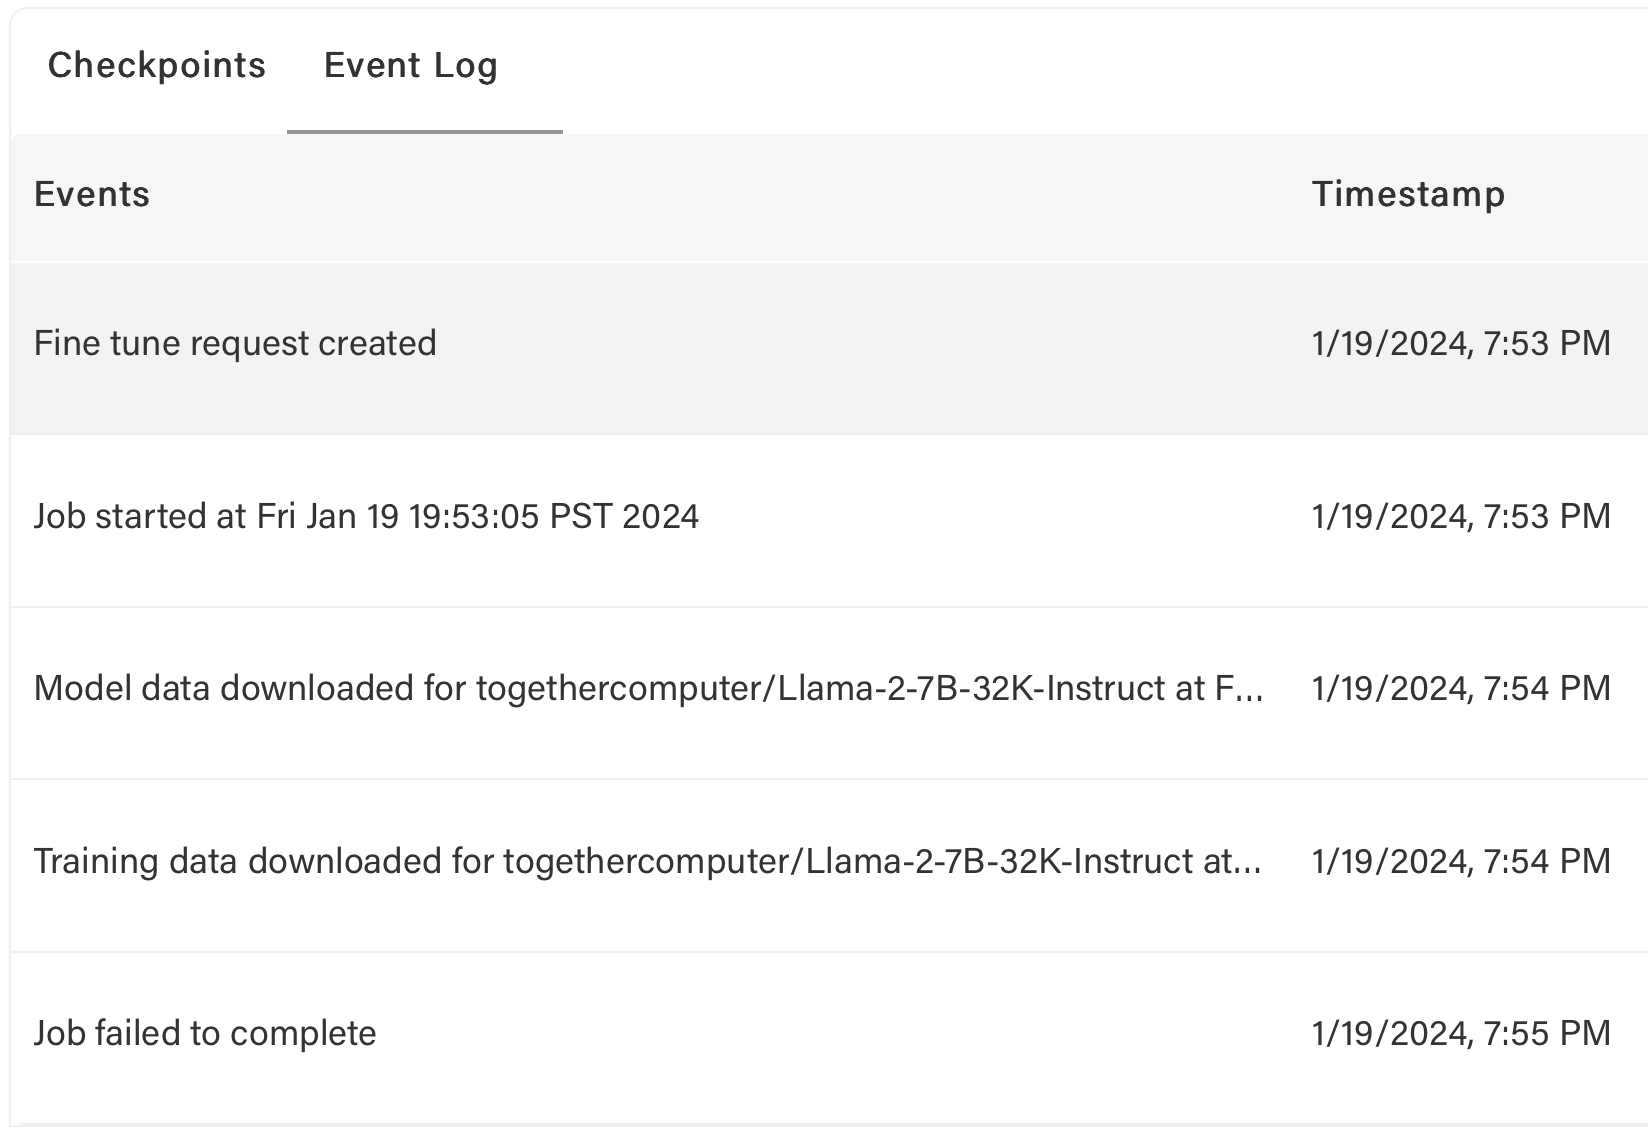 Verify file with: `$ together files check ~/Downloads/unified_joke_explanations.jsonl`
If data passes checks but errors persist, contact support.
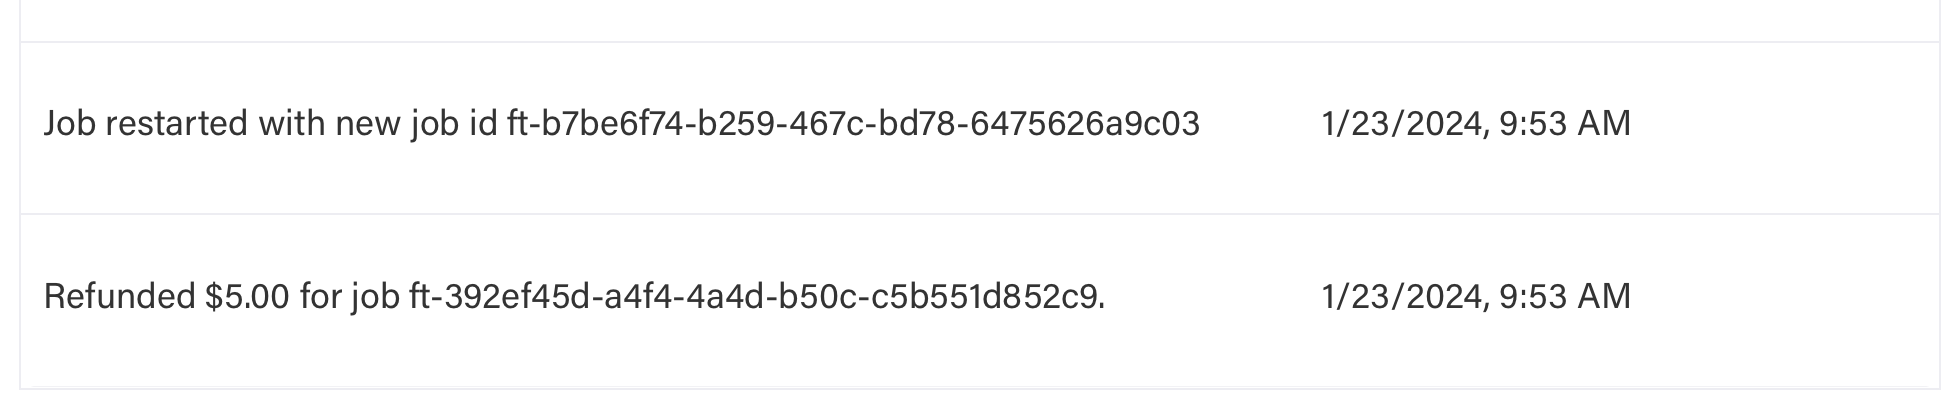
For other errors (e.g., hardware failures), jobs may restart automatically with refunds.
### How do I know if my job was restarted?
Jobs restart automatically on internal errors. Check event log for restarts, new job ID, and refunds.
Example:
Verify file with: `$ together files check ~/Downloads/unified_joke_explanations.jsonl`
If data passes checks but errors persist, contact support.
For other errors (e.g., hardware failures), jobs may restart automatically with refunds.
### How do I know if my job was restarted?
Jobs restart automatically on internal errors. Check event log for restarts, new job ID, and refunds.
Example:
 ## Common Error Codes During Fine-Tuning
| Code | Cause | Solution |
| ---- | ----------------------------------------------------------------------- | ----------------------------------------------------------------------------------------------------------------- |
| 401 | Missing or Invalid API Key | Ensure you are using the correct [API Key](https://api.together.xyz/settings/api-keys) and supplying it correctly |
| 403 | Input token count + `max_tokens` parameter exceeds model context length | Set `max_tokens` to a lower number. For chat models, you may set `max_tokens` to `null` |
| 404 | Invalid Endpoint URL or model name | Check your request is made to the correct endpoint and the model is available |
| 429 | Rate limit exceeded | Throttle request rate (see [rate limits](https://docs.together.ai/docs/rate-limits)) |
| 500 | Invalid Request | Ensure valid JSON, correct API key, and proper prompt format for the model type |
| 503 | Engine Overloaded | Try again after a brief wait. Contact support if persistent |
| 504 | Timeout | Try again after a brief wait. Contact support if persistent |
| 524 | Cloudflare Timeout | Try again after a brief wait. Contact support if persistent |
| 529 | Server Error | Try again after a wait. Contact support if persistent |
If you encounter other errors or these solutions don't work, [contact support](https://www.together.ai/contact).
## Model Management
### Can I download the weights of my model?
Yes, to use your fine-tuned model outside our platform:
Run: `together fine-tuning download
## Common Error Codes During Fine-Tuning
| Code | Cause | Solution |
| ---- | ----------------------------------------------------------------------- | ----------------------------------------------------------------------------------------------------------------- |
| 401 | Missing or Invalid API Key | Ensure you are using the correct [API Key](https://api.together.xyz/settings/api-keys) and supplying it correctly |
| 403 | Input token count + `max_tokens` parameter exceeds model context length | Set `max_tokens` to a lower number. For chat models, you may set `max_tokens` to `null` |
| 404 | Invalid Endpoint URL or model name | Check your request is made to the correct endpoint and the model is available |
| 429 | Rate limit exceeded | Throttle request rate (see [rate limits](https://docs.together.ai/docs/rate-limits)) |
| 500 | Invalid Request | Ensure valid JSON, correct API key, and proper prompt format for the model type |
| 503 | Engine Overloaded | Try again after a brief wait. Contact support if persistent |
| 504 | Timeout | Try again after a brief wait. Contact support if persistent |
| 524 | Cloudflare Timeout | Try again after a brief wait. Contact support if persistent |
| 529 | Server Error | Try again after a wait. Contact support if persistent |
If you encounter other errors or these solutions don't work, [contact support](https://www.together.ai/contact).
## Model Management
### Can I download the weights of my model?
Yes, to use your fine-tuned model outside our platform:
Run: `together fine-tuning download  ## Deleting a fine-tuning job
You can also delete your fine-tuning job. This action can not be undone. This will destroy all files produced by your job including intermediate and final checkpoints.
## Deleting a fine-tuning job
You can also delete your fine-tuning job. This action can not be undone. This will destroy all files produced by your job including intermediate and final checkpoints.
 **Option 2: Deploy a Dedicated Endpoint**
Another way to run your fine-tuned model is to deploy it on a custom dedicated endpoint:
1. Visit [your models dashboard](https://api.together.xyz/models)
2. Click `"+ CREATE DEDICATED ENDPOINT"` for your fine-tuned model
3.
**Option 2: Deploy a Dedicated Endpoint**
Another way to run your fine-tuned model is to deploy it on a custom dedicated endpoint:
1. Visit [your models dashboard](https://api.together.xyz/models)
2. Click `"+ CREATE DEDICATED ENDPOINT"` for your fine-tuned model
3. 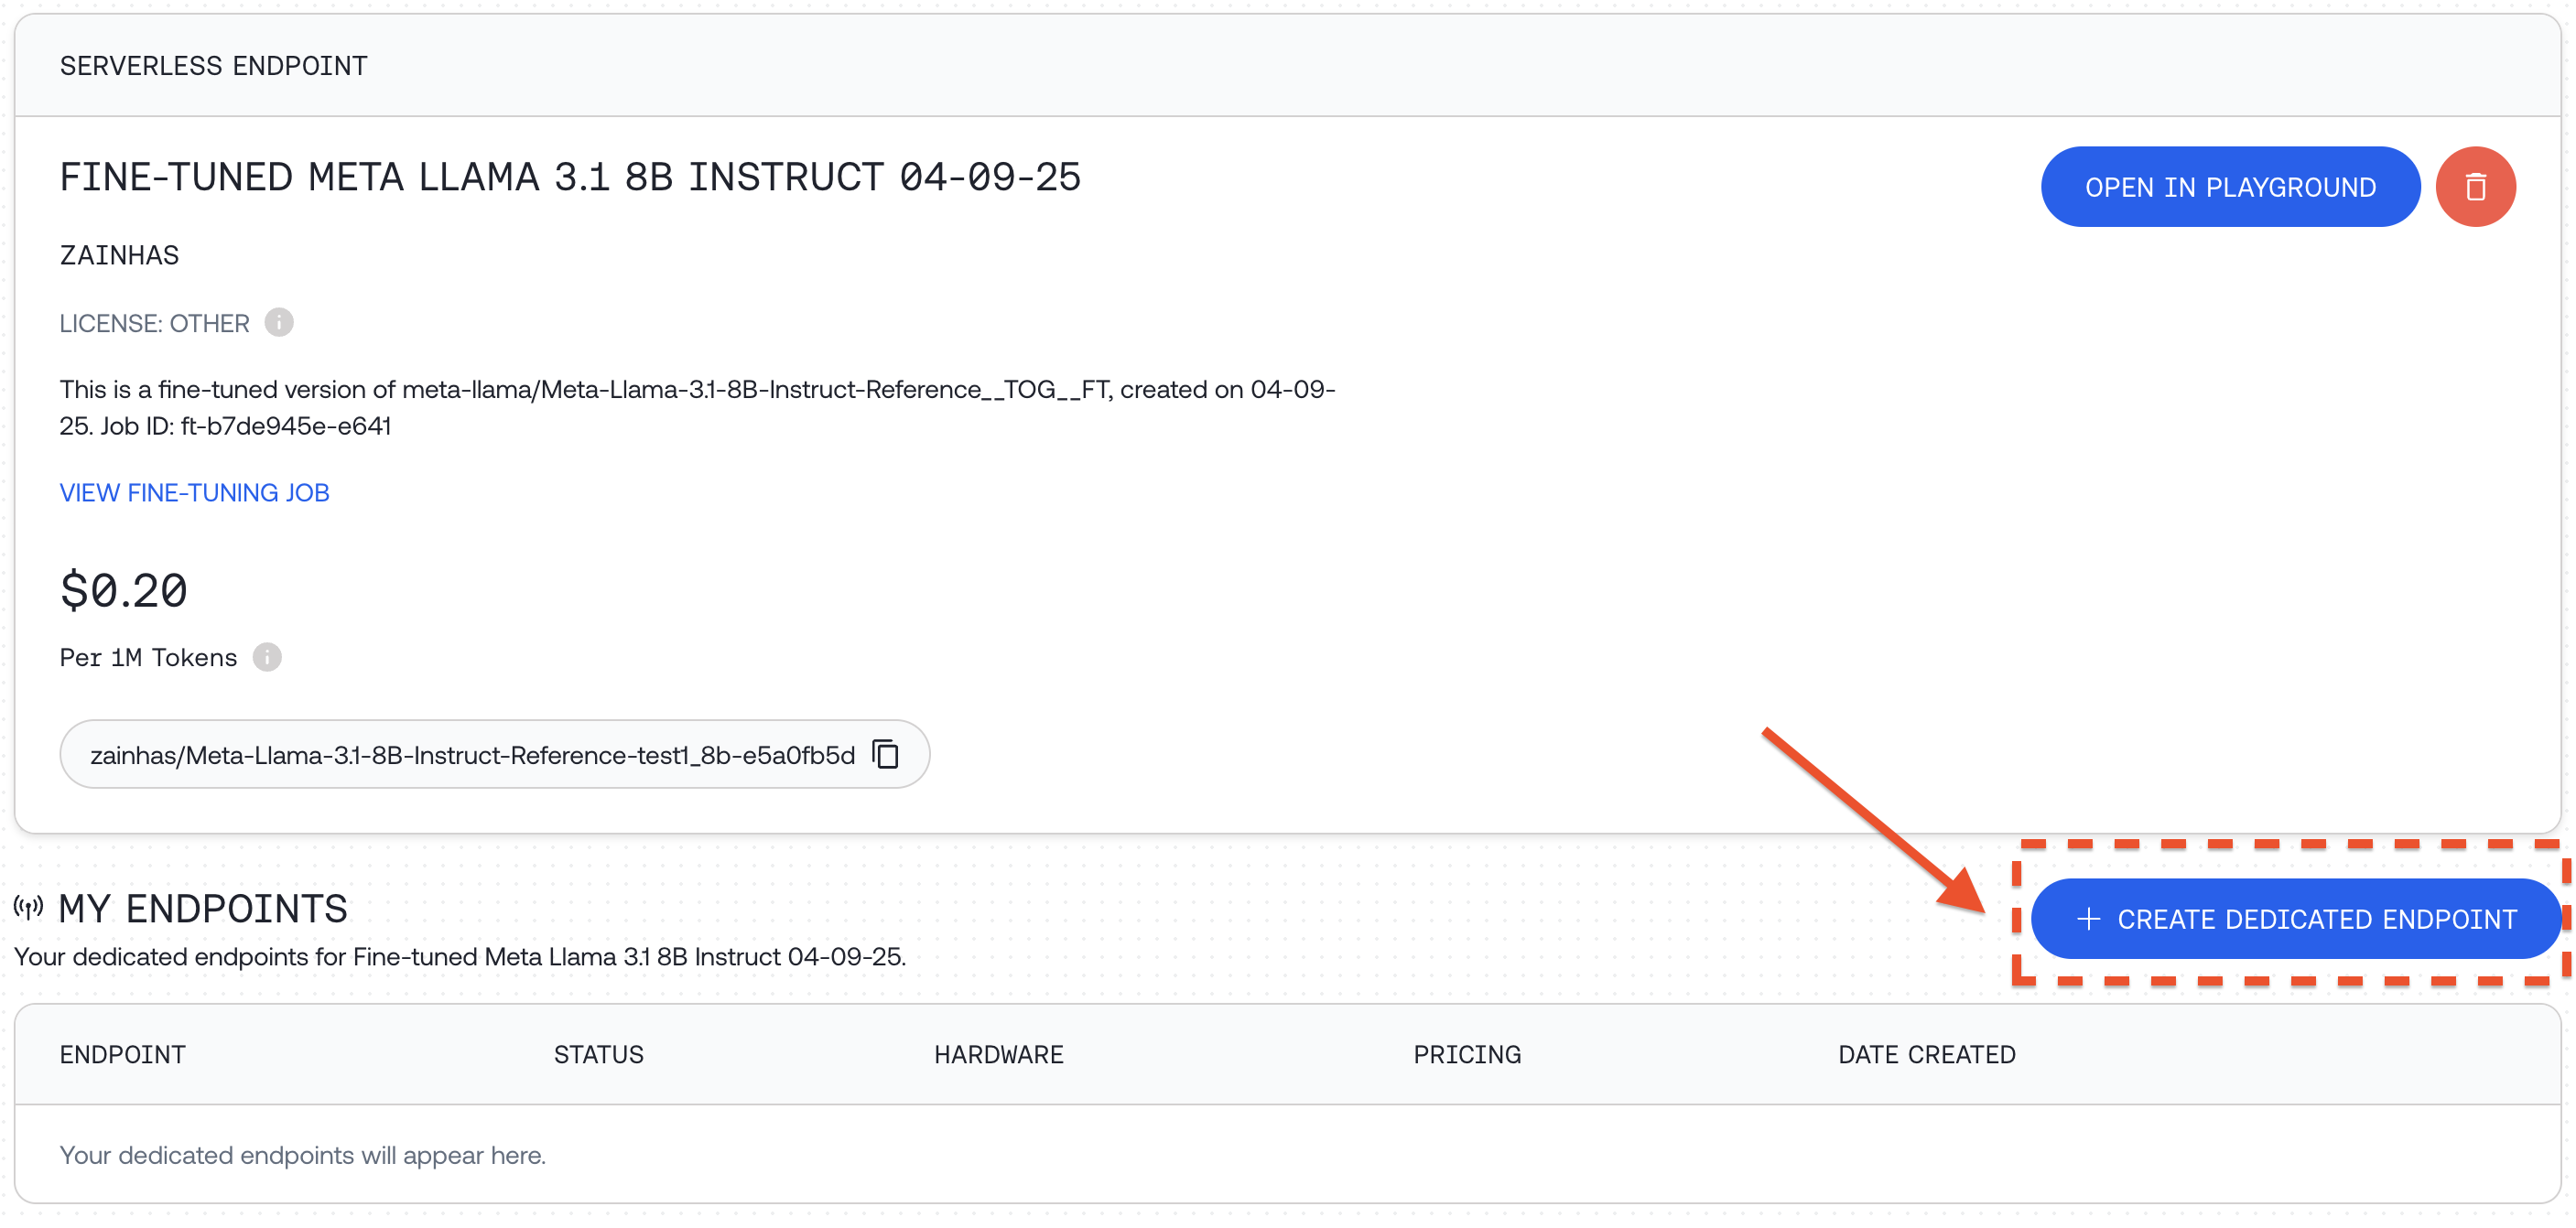 Select hardware configuration and scaling options, including min and max replicas which affects the maximum QPS the deployment can support and then click `"DEPLOY"`
You can also deploy programmatically:
```python Python theme={null}
response = client.endpoints.create(
display_name="Fine-tuned Meta Llama 3.1 8B Instruct 04-09-25",
model="zainhas/Meta-Llama-3.1-8B-Instruct-Reference-test1_8b-e5a0fb5d",
hardware="4x_nvidia_h100_80gb_sxm",
autoscaling={"min_replicas": 1, "max_replicas": 1},
)
print(response)
```
⚠️ If you run this code it will deploy a dedicated endpoint for you. For detailed documentation around how to deploy, delete and modify endpoints see the [Endpoints API Reference](/reference/createendpoint).
Select hardware configuration and scaling options, including min and max replicas which affects the maximum QPS the deployment can support and then click `"DEPLOY"`
You can also deploy programmatically:
```python Python theme={null}
response = client.endpoints.create(
display_name="Fine-tuned Meta Llama 3.1 8B Instruct 04-09-25",
model="zainhas/Meta-Llama-3.1-8B-Instruct-Reference-test1_8b-e5a0fb5d",
hardware="4x_nvidia_h100_80gb_sxm",
autoscaling={"min_replicas": 1, "max_replicas": 1},
)
print(response)
```
⚠️ If you run this code it will deploy a dedicated endpoint for you. For detailed documentation around how to deploy, delete and modify endpoints see the [Endpoints API Reference](/reference/createendpoint).
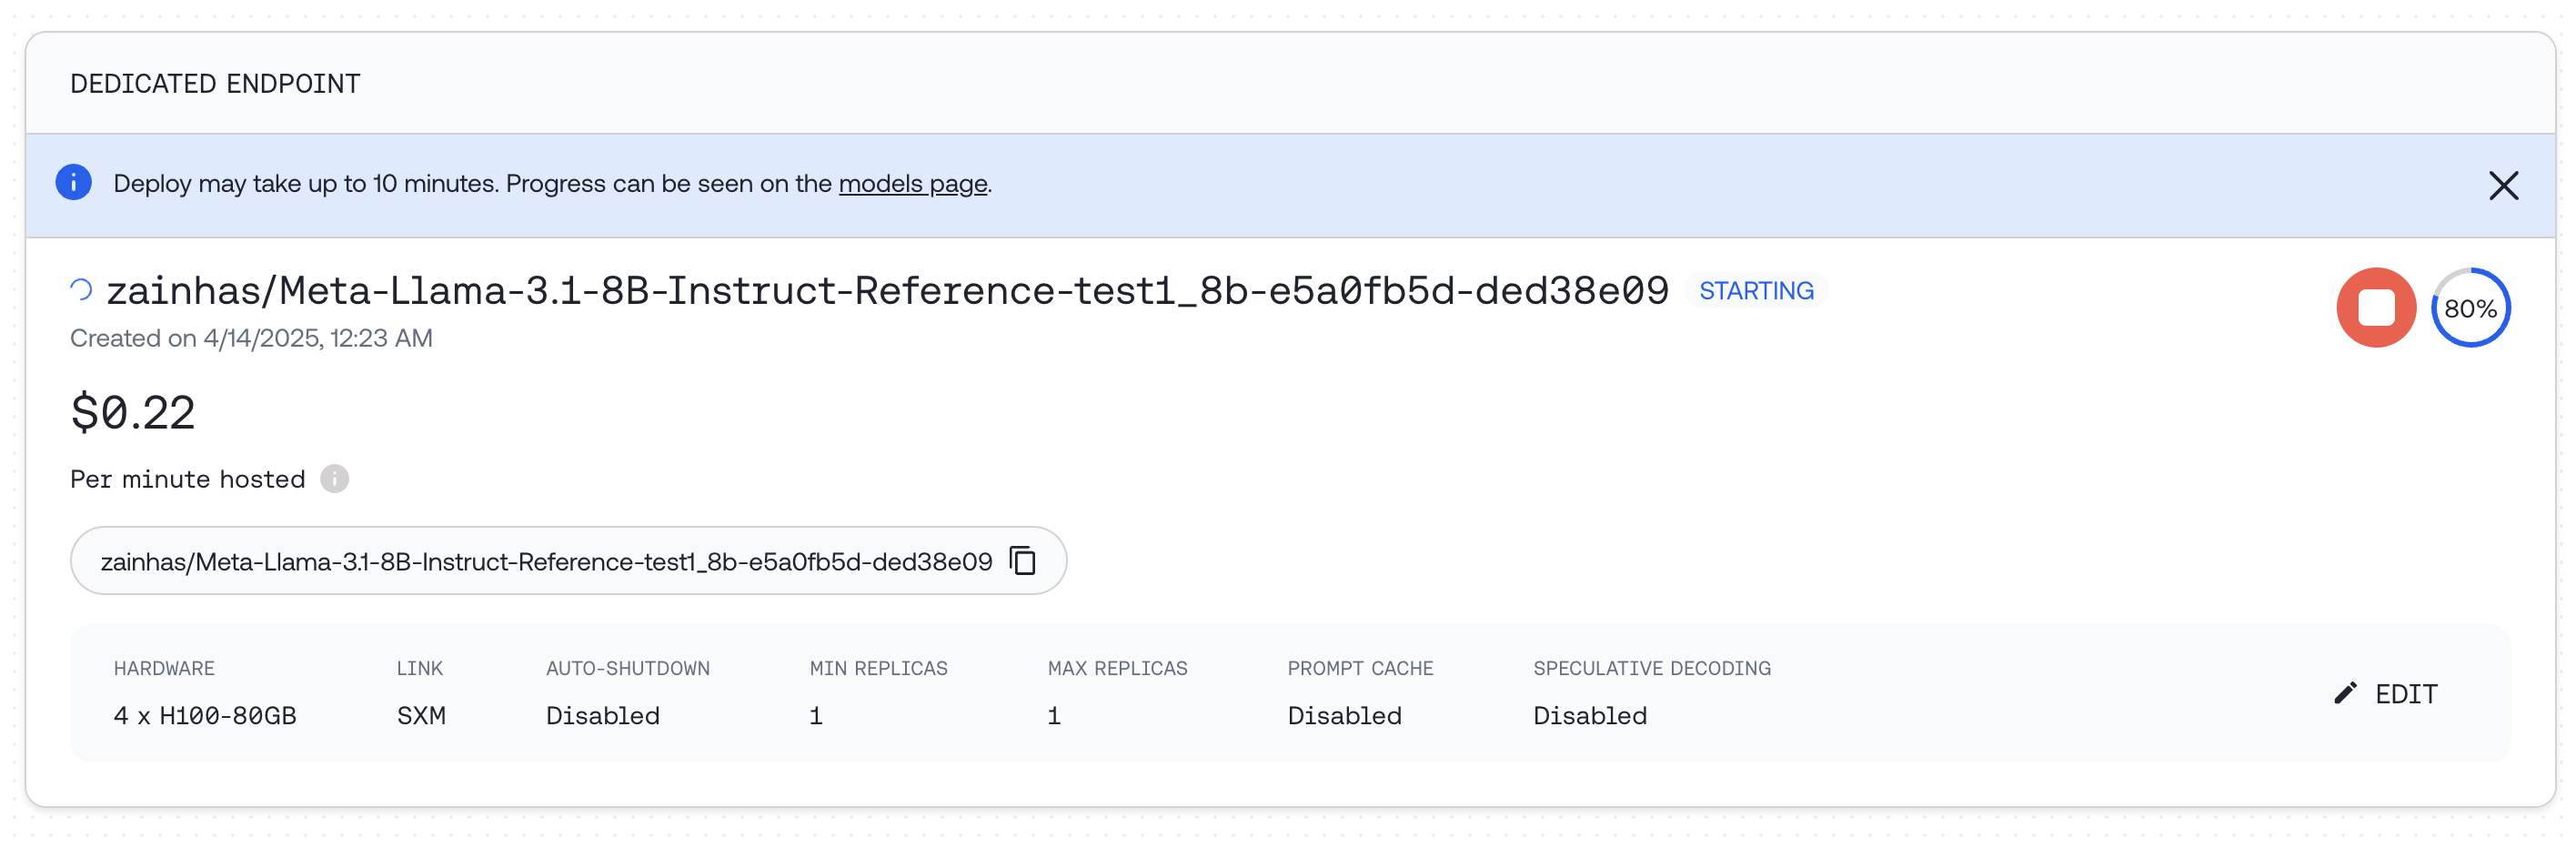 Once deployed, you can query the endpoint:
```python Python theme={null}
response = client.chat.completions.create(
model="zainhas/Meta-Llama-3.1-8B-Instruct-Reference-test1_8b-e5a0fb5d-ded38e09",
messages=[{"role": "user", "content": "What is the capital of France?"}],
max_tokens=128,
)
print(response.choices[0].message.content)
```
## Evaluating a Fine-tuned Model
To assess the impact of fine-tuning, we can compare the responses of our fine-tuned model with the original base model on the same prompts in our test set. This provides a way to measure improvements after fine-tuning.
**Using a Validation Set During Training**
You can provide a validation set when starting your fine-tuning job:
```python Python theme={null}
response = client.fine_tuning.create(
training_file="your-training-file-id",
validation_file="your-validation-file-id",
n_evals=10, # Number of times to evaluate on validation set
model="meta-llama/Meta-Llama-3.1-8B-Instruct-Reference",
)
```
**Post-Training Evaluation Example**
Here's a comprehensive example of evaluating models after fine-tuning, using the CoQA dataset:
1. First, load a portion of the validation dataset:
```python Python theme={null}
coqa_dataset_validation = load_dataset(
"stanfordnlp/coqa",
split="validation[:50]",
)
```
2. Define a function to generate answers from both models:
```python Python theme={null}
from tqdm.auto import tqdm
from multiprocessing.pool import ThreadPool
base_model = "meta-llama/Meta-Llama-3.1-8B-Instruct-Turbo" # Original model
finetuned_model = ft_resp.output_name # Fine-tuned model
def get_model_answers(model_name):
"""
Generate model answers for a given model name using a dataset of questions and answers.
Args:
model_name (str): The name of the model to use for generating answers.
Returns:
list: A list of lists, where each inner list contains the answers generated by the model.
"""
model_answers = []
system_prompt = (
"Read the story and extract answers for the questions.\nStory: {}"
)
def get_answers(data):
answers = []
messages = [
{
"role": "system",
"content": system_prompt.format(data["story"]),
}
]
for q, true_answer in zip(
data["questions"],
data["answers"]["input_text"],
):
try:
messages.append({"role": "user", "content": q})
response = client.chat.completions.create(
messages=messages,
model=model_name,
max_tokens=64,
)
answer = response.choices[0].message.content
answers.append(answer)
except Exception:
answers.append("Invalid Response")
return answers
# We'll use 8 threads to generate answers faster in parallel
with ThreadPool(8) as pool:
for answers in tqdm(
pool.imap(get_answers, coqa_dataset_validation),
total=len(coqa_dataset_validation),
):
model_answers.append(answers)
return model_answers
```
3. Generate answers from both models:
```python Python theme={null}
base_answers = get_model_answers(base_model)
finetuned_answers = get_model_answers(finetuned_model)
```
4. Define a function to calculate evaluation metrics:
```python Python theme={null}
import transformers.data.metrics.squad_metrics as squad_metrics
def get_metrics(pred_answers):
"""
Calculate the Exact Match (EM) and F1 metrics for predicted answers.
Args:
pred_answers (list): A list of predicted answers.
Returns:
tuple: A tuple containing EM score and F1 score.
"""
em_metrics = []
f1_metrics = []
for pred, data in tqdm(
zip(pred_answers, coqa_dataset_validation),
total=len(pred_answers),
):
for pred_answer, true_answer in zip(
pred, data["answers"]["input_text"]
):
em_metrics.append(
squad_metrics.compute_exact(true_answer, pred_answer)
)
f1_metrics.append(
squad_metrics.compute_f1(true_answer, pred_answer)
)
return sum(em_metrics) / len(em_metrics), sum(f1_metrics) / len(f1_metrics)
```
5. Calculate and compare metrics:
```python Python theme={null}
## Calculate metrics for both models
em_base, f1_base = get_metrics(base_answers)
em_ft, f1_ft = get_metrics(finetuned_answers)
print(f"Base Model - EM: {em_base:.2f}, F1: {f1_base:.2f}")
print(f"Fine-tuned Model - EM: {em_ft:.2f}, F1: {f1_ft:.2f}")
```
You should get figures similar to the table below:
| Llama 3.1 8B | EM | F1 |
| ------------ | ---- | ---- |
| Original | 0.01 | 0.18 |
| Fine-tuned | 0.32 | 0.41 |
We can see that the fine-tuned model performs significantly better on the test set, with a large improvement in both Exact Match and F1 scores.
## Advanced Topics
**Continuing a Fine-tuning Job**
You can continue training from a previous fine-tuning job:
Once deployed, you can query the endpoint:
```python Python theme={null}
response = client.chat.completions.create(
model="zainhas/Meta-Llama-3.1-8B-Instruct-Reference-test1_8b-e5a0fb5d-ded38e09",
messages=[{"role": "user", "content": "What is the capital of France?"}],
max_tokens=128,
)
print(response.choices[0].message.content)
```
## Evaluating a Fine-tuned Model
To assess the impact of fine-tuning, we can compare the responses of our fine-tuned model with the original base model on the same prompts in our test set. This provides a way to measure improvements after fine-tuning.
**Using a Validation Set During Training**
You can provide a validation set when starting your fine-tuning job:
```python Python theme={null}
response = client.fine_tuning.create(
training_file="your-training-file-id",
validation_file="your-validation-file-id",
n_evals=10, # Number of times to evaluate on validation set
model="meta-llama/Meta-Llama-3.1-8B-Instruct-Reference",
)
```
**Post-Training Evaluation Example**
Here's a comprehensive example of evaluating models after fine-tuning, using the CoQA dataset:
1. First, load a portion of the validation dataset:
```python Python theme={null}
coqa_dataset_validation = load_dataset(
"stanfordnlp/coqa",
split="validation[:50]",
)
```
2. Define a function to generate answers from both models:
```python Python theme={null}
from tqdm.auto import tqdm
from multiprocessing.pool import ThreadPool
base_model = "meta-llama/Meta-Llama-3.1-8B-Instruct-Turbo" # Original model
finetuned_model = ft_resp.output_name # Fine-tuned model
def get_model_answers(model_name):
"""
Generate model answers for a given model name using a dataset of questions and answers.
Args:
model_name (str): The name of the model to use for generating answers.
Returns:
list: A list of lists, where each inner list contains the answers generated by the model.
"""
model_answers = []
system_prompt = (
"Read the story and extract answers for the questions.\nStory: {}"
)
def get_answers(data):
answers = []
messages = [
{
"role": "system",
"content": system_prompt.format(data["story"]),
}
]
for q, true_answer in zip(
data["questions"],
data["answers"]["input_text"],
):
try:
messages.append({"role": "user", "content": q})
response = client.chat.completions.create(
messages=messages,
model=model_name,
max_tokens=64,
)
answer = response.choices[0].message.content
answers.append(answer)
except Exception:
answers.append("Invalid Response")
return answers
# We'll use 8 threads to generate answers faster in parallel
with ThreadPool(8) as pool:
for answers in tqdm(
pool.imap(get_answers, coqa_dataset_validation),
total=len(coqa_dataset_validation),
):
model_answers.append(answers)
return model_answers
```
3. Generate answers from both models:
```python Python theme={null}
base_answers = get_model_answers(base_model)
finetuned_answers = get_model_answers(finetuned_model)
```
4. Define a function to calculate evaluation metrics:
```python Python theme={null}
import transformers.data.metrics.squad_metrics as squad_metrics
def get_metrics(pred_answers):
"""
Calculate the Exact Match (EM) and F1 metrics for predicted answers.
Args:
pred_answers (list): A list of predicted answers.
Returns:
tuple: A tuple containing EM score and F1 score.
"""
em_metrics = []
f1_metrics = []
for pred, data in tqdm(
zip(pred_answers, coqa_dataset_validation),
total=len(pred_answers),
):
for pred_answer, true_answer in zip(
pred, data["answers"]["input_text"]
):
em_metrics.append(
squad_metrics.compute_exact(true_answer, pred_answer)
)
f1_metrics.append(
squad_metrics.compute_f1(true_answer, pred_answer)
)
return sum(em_metrics) / len(em_metrics), sum(f1_metrics) / len(f1_metrics)
```
5. Calculate and compare metrics:
```python Python theme={null}
## Calculate metrics for both models
em_base, f1_base = get_metrics(base_answers)
em_ft, f1_ft = get_metrics(finetuned_answers)
print(f"Base Model - EM: {em_base:.2f}, F1: {f1_base:.2f}")
print(f"Fine-tuned Model - EM: {em_ft:.2f}, F1: {f1_ft:.2f}")
```
You should get figures similar to the table below:
| Llama 3.1 8B | EM | F1 |
| ------------ | ---- | ---- |
| Original | 0.01 | 0.18 |
| Fine-tuned | 0.32 | 0.41 |
We can see that the fine-tuned model performs significantly better on the test set, with a large improvement in both Exact Match and F1 scores.
## Advanced Topics
**Continuing a Fine-tuning Job**
You can continue training from a previous fine-tuning job:
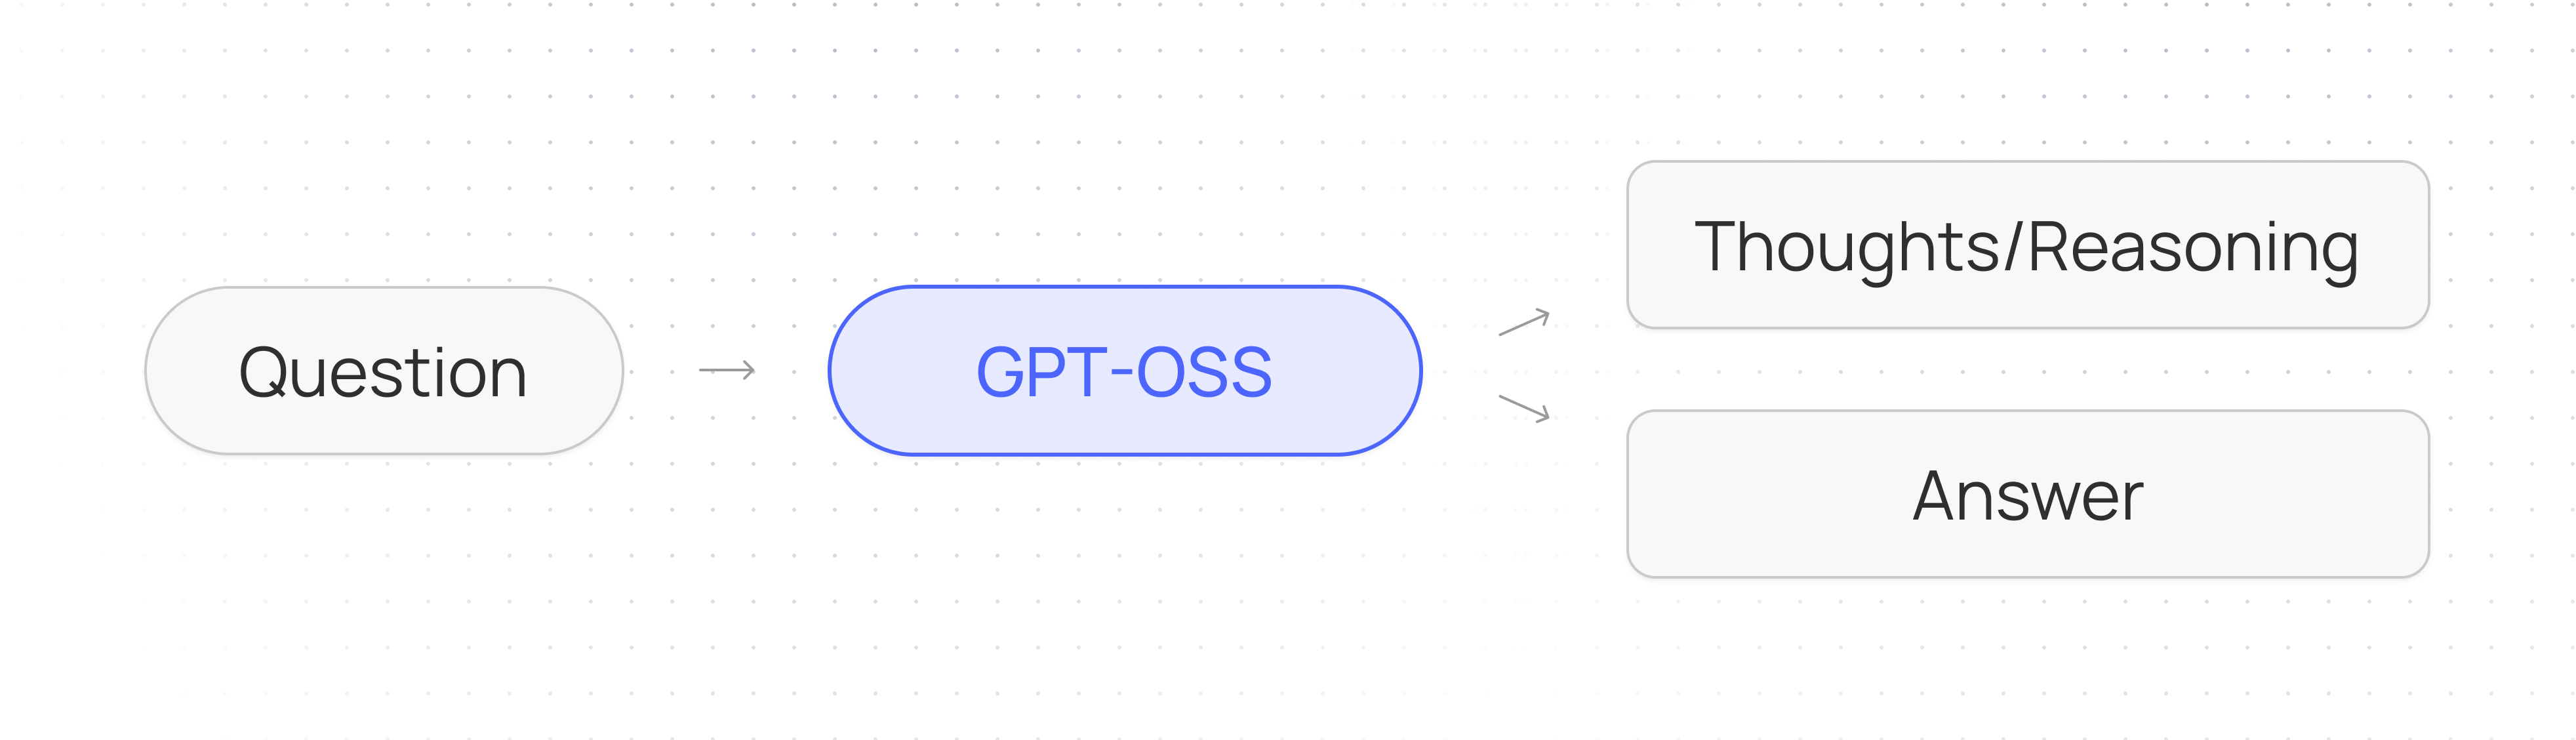 ## How to use GPT-OSS API
These models are only available to Build Tier 1 or higher users. Since reasoning models produce longer responses with chain-of-thought processing, we recommend streaming tokens for better user experience:
## How to use GPT-OSS API
These models are only available to Build Tier 1 or higher users. Since reasoning models produce longer responses with chain-of-thought processing, we recommend streaming tokens for better user experience:
{badge}
{title}
{description}
{heading}
{description}
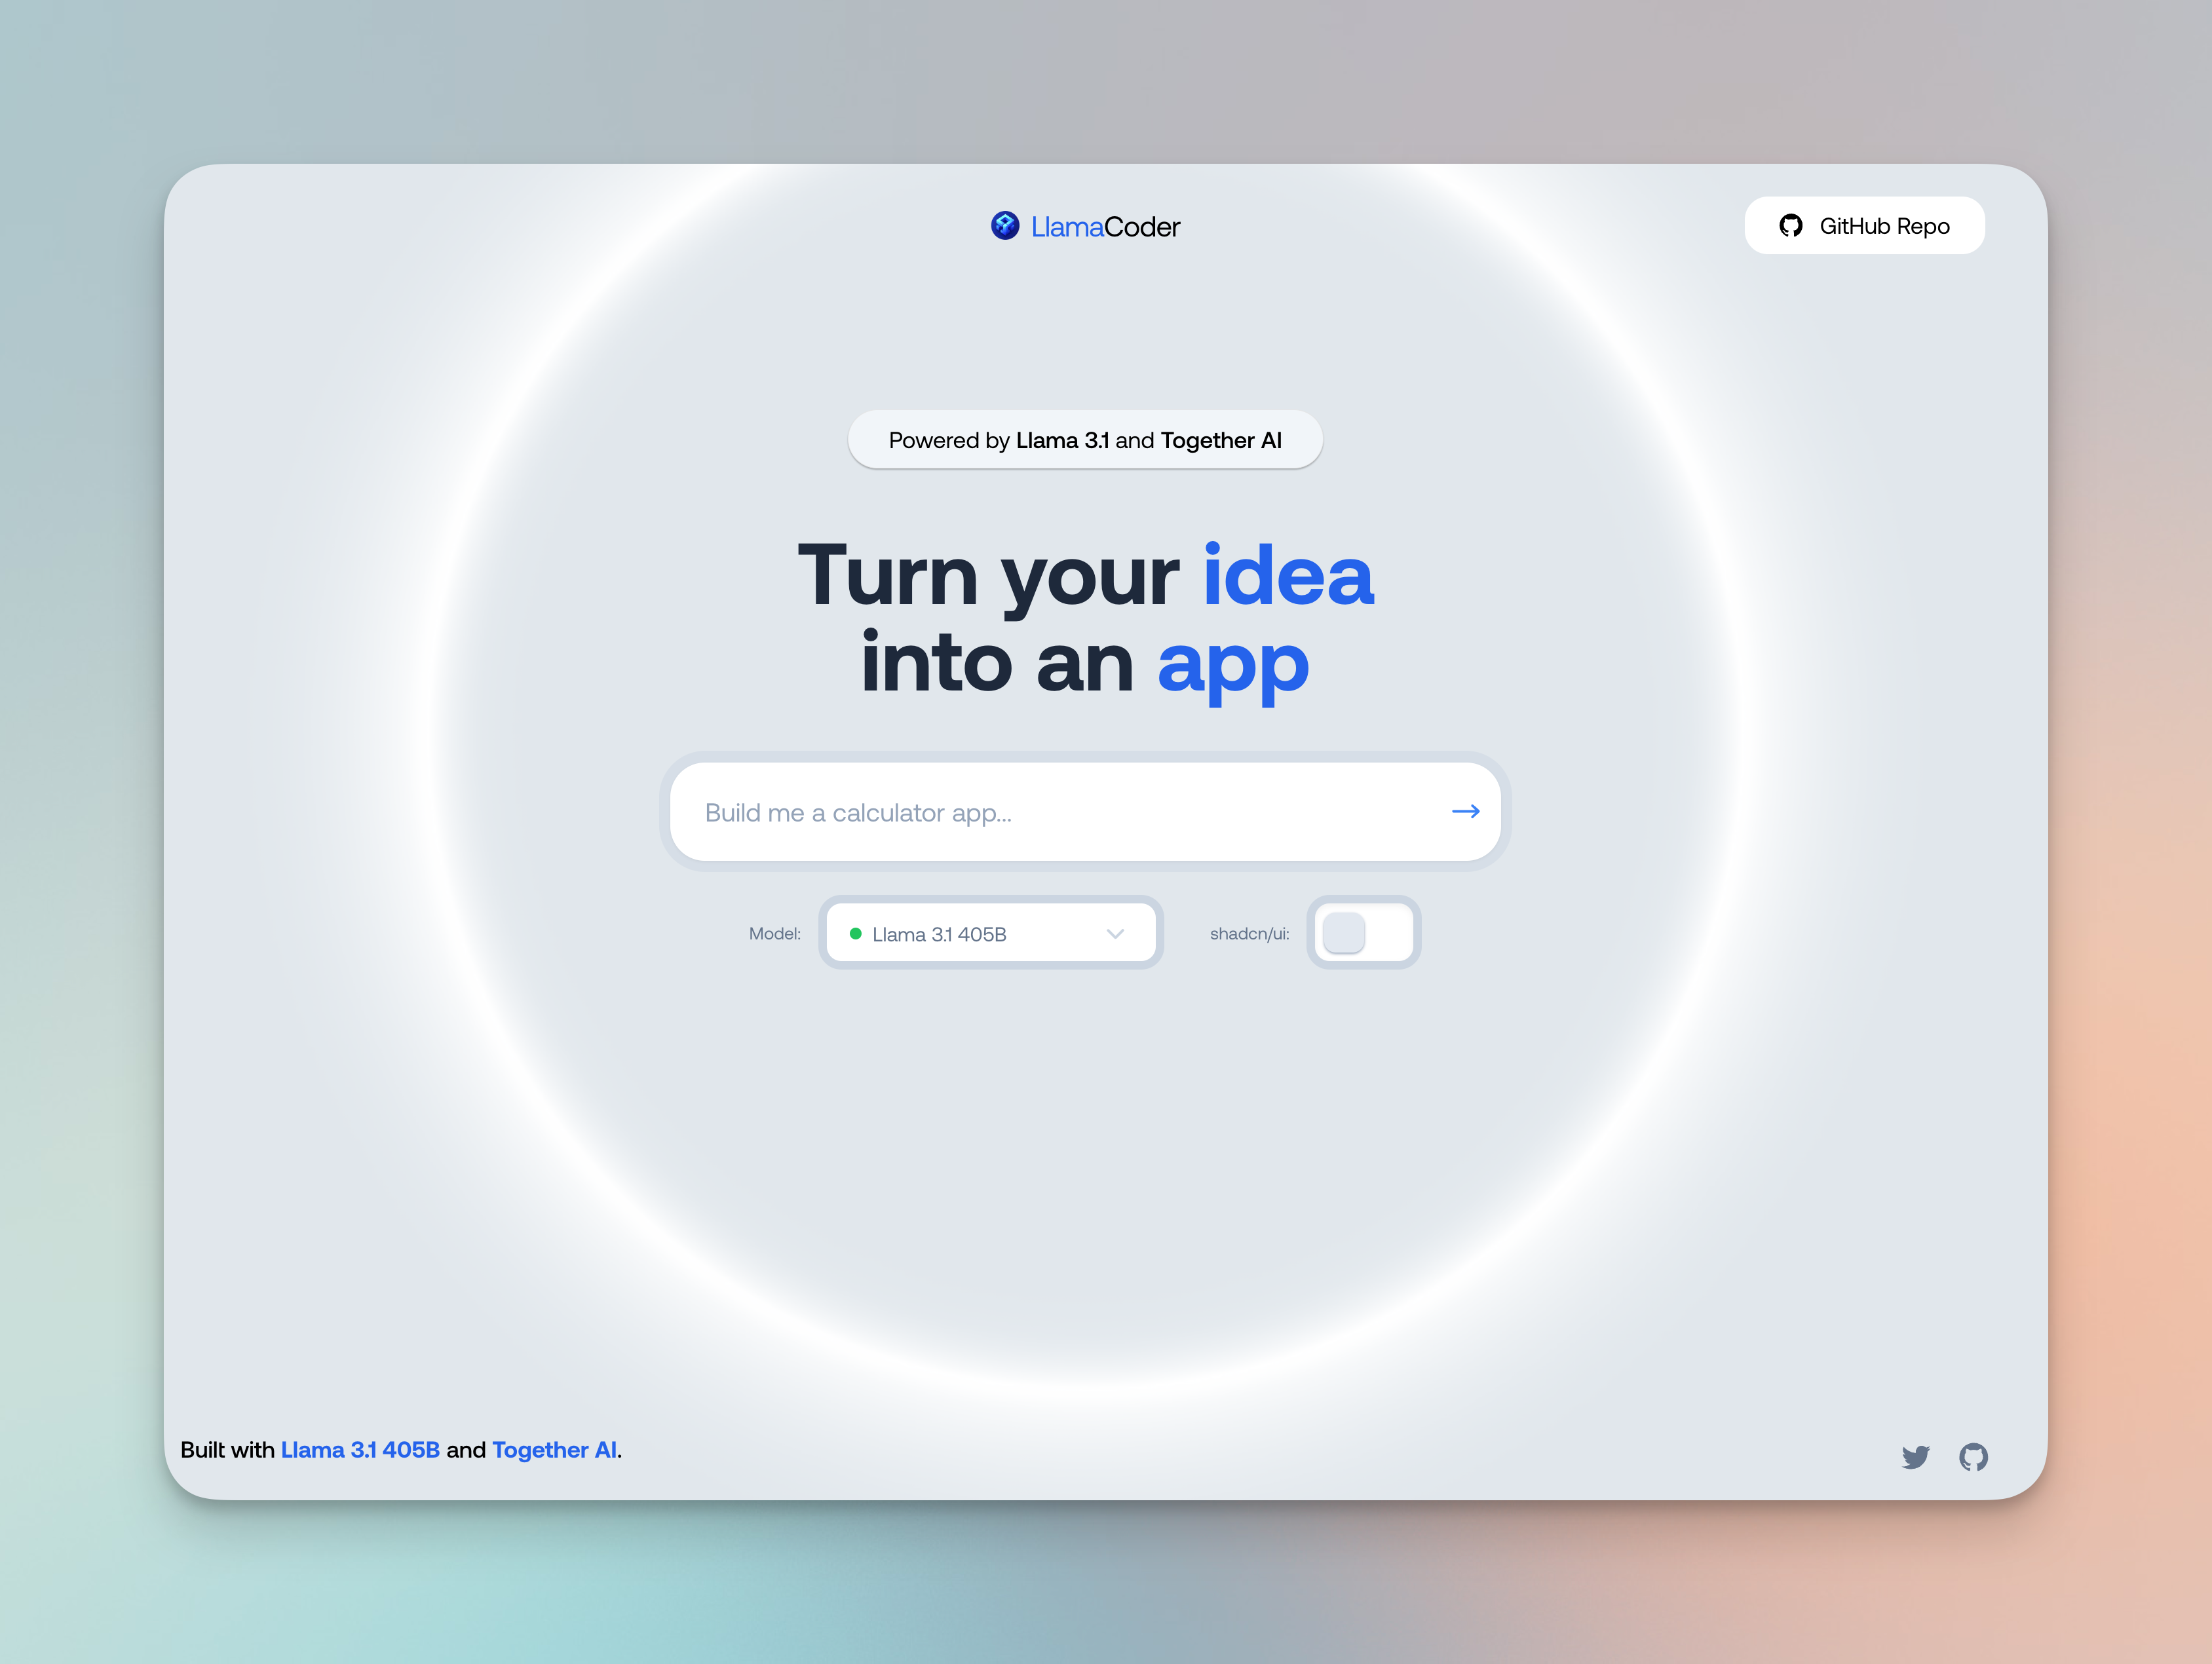 In this post, we’re going to learn how to build the core parts of the app. LlamaCoder is a Next.js app, but Together’s APIs can be used with any web framework or language!
## Scaffolding the initial UI
The core interaction of LlamaCoder is a text field where the user can enter a prompt for an app they’d like to build. So to start, we need that text field:
In this post, we’re going to learn how to build the core parts of the app. LlamaCoder is a Next.js app, but Together’s APIs can be used with any web framework or language!
## Scaffolding the initial UI
The core interaction of LlamaCoder is a text field where the user can enter a prompt for an app they’d like to build. So to start, we need that text field:
 We’ll render a text input inside of a form, and use some new React state to control the input’s value:
```jsx JSX theme={null}
function Page() {
let [prompt, setPrompt] = useState('');
return (
);
}
```
Next, let’s wire up a submit handler to the form. We’ll call it `createApp`, since it’s going to take the user’s prompt and generate the corresponding app code:
```jsx JSX theme={null}
function Page() {
let [prompt, setPrompt] = useState('');
function createApp(e) {
e.preventDefault();
// TODO:
// 1. Generate the code
// 2. Render the app
}
return ;
}
```
To generate the code, we’ll have our React app query a new API endpoint. Let’s put it at `/api/generateCode` , and we’ll make it a POST endpoint so we can send along the `prompt` in the request body:
```jsx JSX theme={null}
async function createApp(e) {
e.preventDefault();
// TODO:
// 1. Generate the code
await fetch('/api/generateCode', {
method: 'POST',
headers: { 'Content-Type': 'application/json' },
body: JSON.stringify({ prompt }),
});
// 2. Render the app
}
```
Looks good – let’s go implement it!
## Generating code in an API route
To create an API route in the Next.js 14 app directory, we can make a new `route.js` file:
```jsx JSX theme={null}
// app/api/generateCode/route.js
export async function POST(req) {
let json = await req.json();
console.log(json.prompt);
}
```
If we submit the form, we’ll see the user’s prompt logged to the console. Now we’re ready to send it off to our LLM and ask it to generate our user’s app! We tested many open source LLMs and found that Kimi K2 was the only one that did a good job at generating small apps, so that’s what we decided to use for the app.
We’ll install Together’s node SDK:
```bash Shell theme={null}
npm i together-ai
```
and use it to kick off a chat with Kimi K2.
Here’s what it looks like:
```jsx JSX theme={null}
// app/api/generateCode/route.js
import Together from 'together-ai';
let together = new Together();
export async function POST(req) {
let json = await req.json();
let completion = await together.chat.completions.create({
model: 'moonshotai/Kimi-K2-Instruct-0905',
messages: [
{
role: 'system',
content: 'You are an expert frontend React engineer.',
},
{
role: 'user',
content: json.prompt,
},
],
});
return Response.json(completion);
}
```
We call `together.chat.completions.create` to get a new response from the LLM. We’ve supplied it with a “system” message telling the LLM that it should behave as if it’s an expert React engineer. Finally, we provide it with the user’s prompt as the second message.
Since we return a JSON object, let’s update our React code to read the JSON from the response:
```jsx JSX theme={null}
async function createApp(e) {
e.preventDefault();
// 1. Generate the code
let res = await fetch('/api/generateCode', {
method: 'POST',
headers: { 'Content-Type': 'application/json' },
body: JSON.stringify({ prompt }),
});
let json = await res.json();
console.log(json);
// 2. Render the app
}
```
And now let’s give it a shot!
We’ll use something simple for our prompt like “Build me a counter”:
We’ll render a text input inside of a form, and use some new React state to control the input’s value:
```jsx JSX theme={null}
function Page() {
let [prompt, setPrompt] = useState('');
return (
);
}
```
Next, let’s wire up a submit handler to the form. We’ll call it `createApp`, since it’s going to take the user’s prompt and generate the corresponding app code:
```jsx JSX theme={null}
function Page() {
let [prompt, setPrompt] = useState('');
function createApp(e) {
e.preventDefault();
// TODO:
// 1. Generate the code
// 2. Render the app
}
return ;
}
```
To generate the code, we’ll have our React app query a new API endpoint. Let’s put it at `/api/generateCode` , and we’ll make it a POST endpoint so we can send along the `prompt` in the request body:
```jsx JSX theme={null}
async function createApp(e) {
e.preventDefault();
// TODO:
// 1. Generate the code
await fetch('/api/generateCode', {
method: 'POST',
headers: { 'Content-Type': 'application/json' },
body: JSON.stringify({ prompt }),
});
// 2. Render the app
}
```
Looks good – let’s go implement it!
## Generating code in an API route
To create an API route in the Next.js 14 app directory, we can make a new `route.js` file:
```jsx JSX theme={null}
// app/api/generateCode/route.js
export async function POST(req) {
let json = await req.json();
console.log(json.prompt);
}
```
If we submit the form, we’ll see the user’s prompt logged to the console. Now we’re ready to send it off to our LLM and ask it to generate our user’s app! We tested many open source LLMs and found that Kimi K2 was the only one that did a good job at generating small apps, so that’s what we decided to use for the app.
We’ll install Together’s node SDK:
```bash Shell theme={null}
npm i together-ai
```
and use it to kick off a chat with Kimi K2.
Here’s what it looks like:
```jsx JSX theme={null}
// app/api/generateCode/route.js
import Together from 'together-ai';
let together = new Together();
export async function POST(req) {
let json = await req.json();
let completion = await together.chat.completions.create({
model: 'moonshotai/Kimi-K2-Instruct-0905',
messages: [
{
role: 'system',
content: 'You are an expert frontend React engineer.',
},
{
role: 'user',
content: json.prompt,
},
],
});
return Response.json(completion);
}
```
We call `together.chat.completions.create` to get a new response from the LLM. We’ve supplied it with a “system” message telling the LLM that it should behave as if it’s an expert React engineer. Finally, we provide it with the user’s prompt as the second message.
Since we return a JSON object, let’s update our React code to read the JSON from the response:
```jsx JSX theme={null}
async function createApp(e) {
e.preventDefault();
// 1. Generate the code
let res = await fetch('/api/generateCode', {
method: 'POST',
headers: { 'Content-Type': 'application/json' },
body: JSON.stringify({ prompt }),
});
let json = await res.json();
console.log(json);
// 2. Render the app
}
```
And now let’s give it a shot!
We’ll use something simple for our prompt like “Build me a counter”:
 When we submit the form, our API response takes several seconds, but then sends our React app the response.
If you take a look at your logs, you should see something like this:
When we submit the form, our API response takes several seconds, but then sends our React app the response.
If you take a look at your logs, you should see something like this:
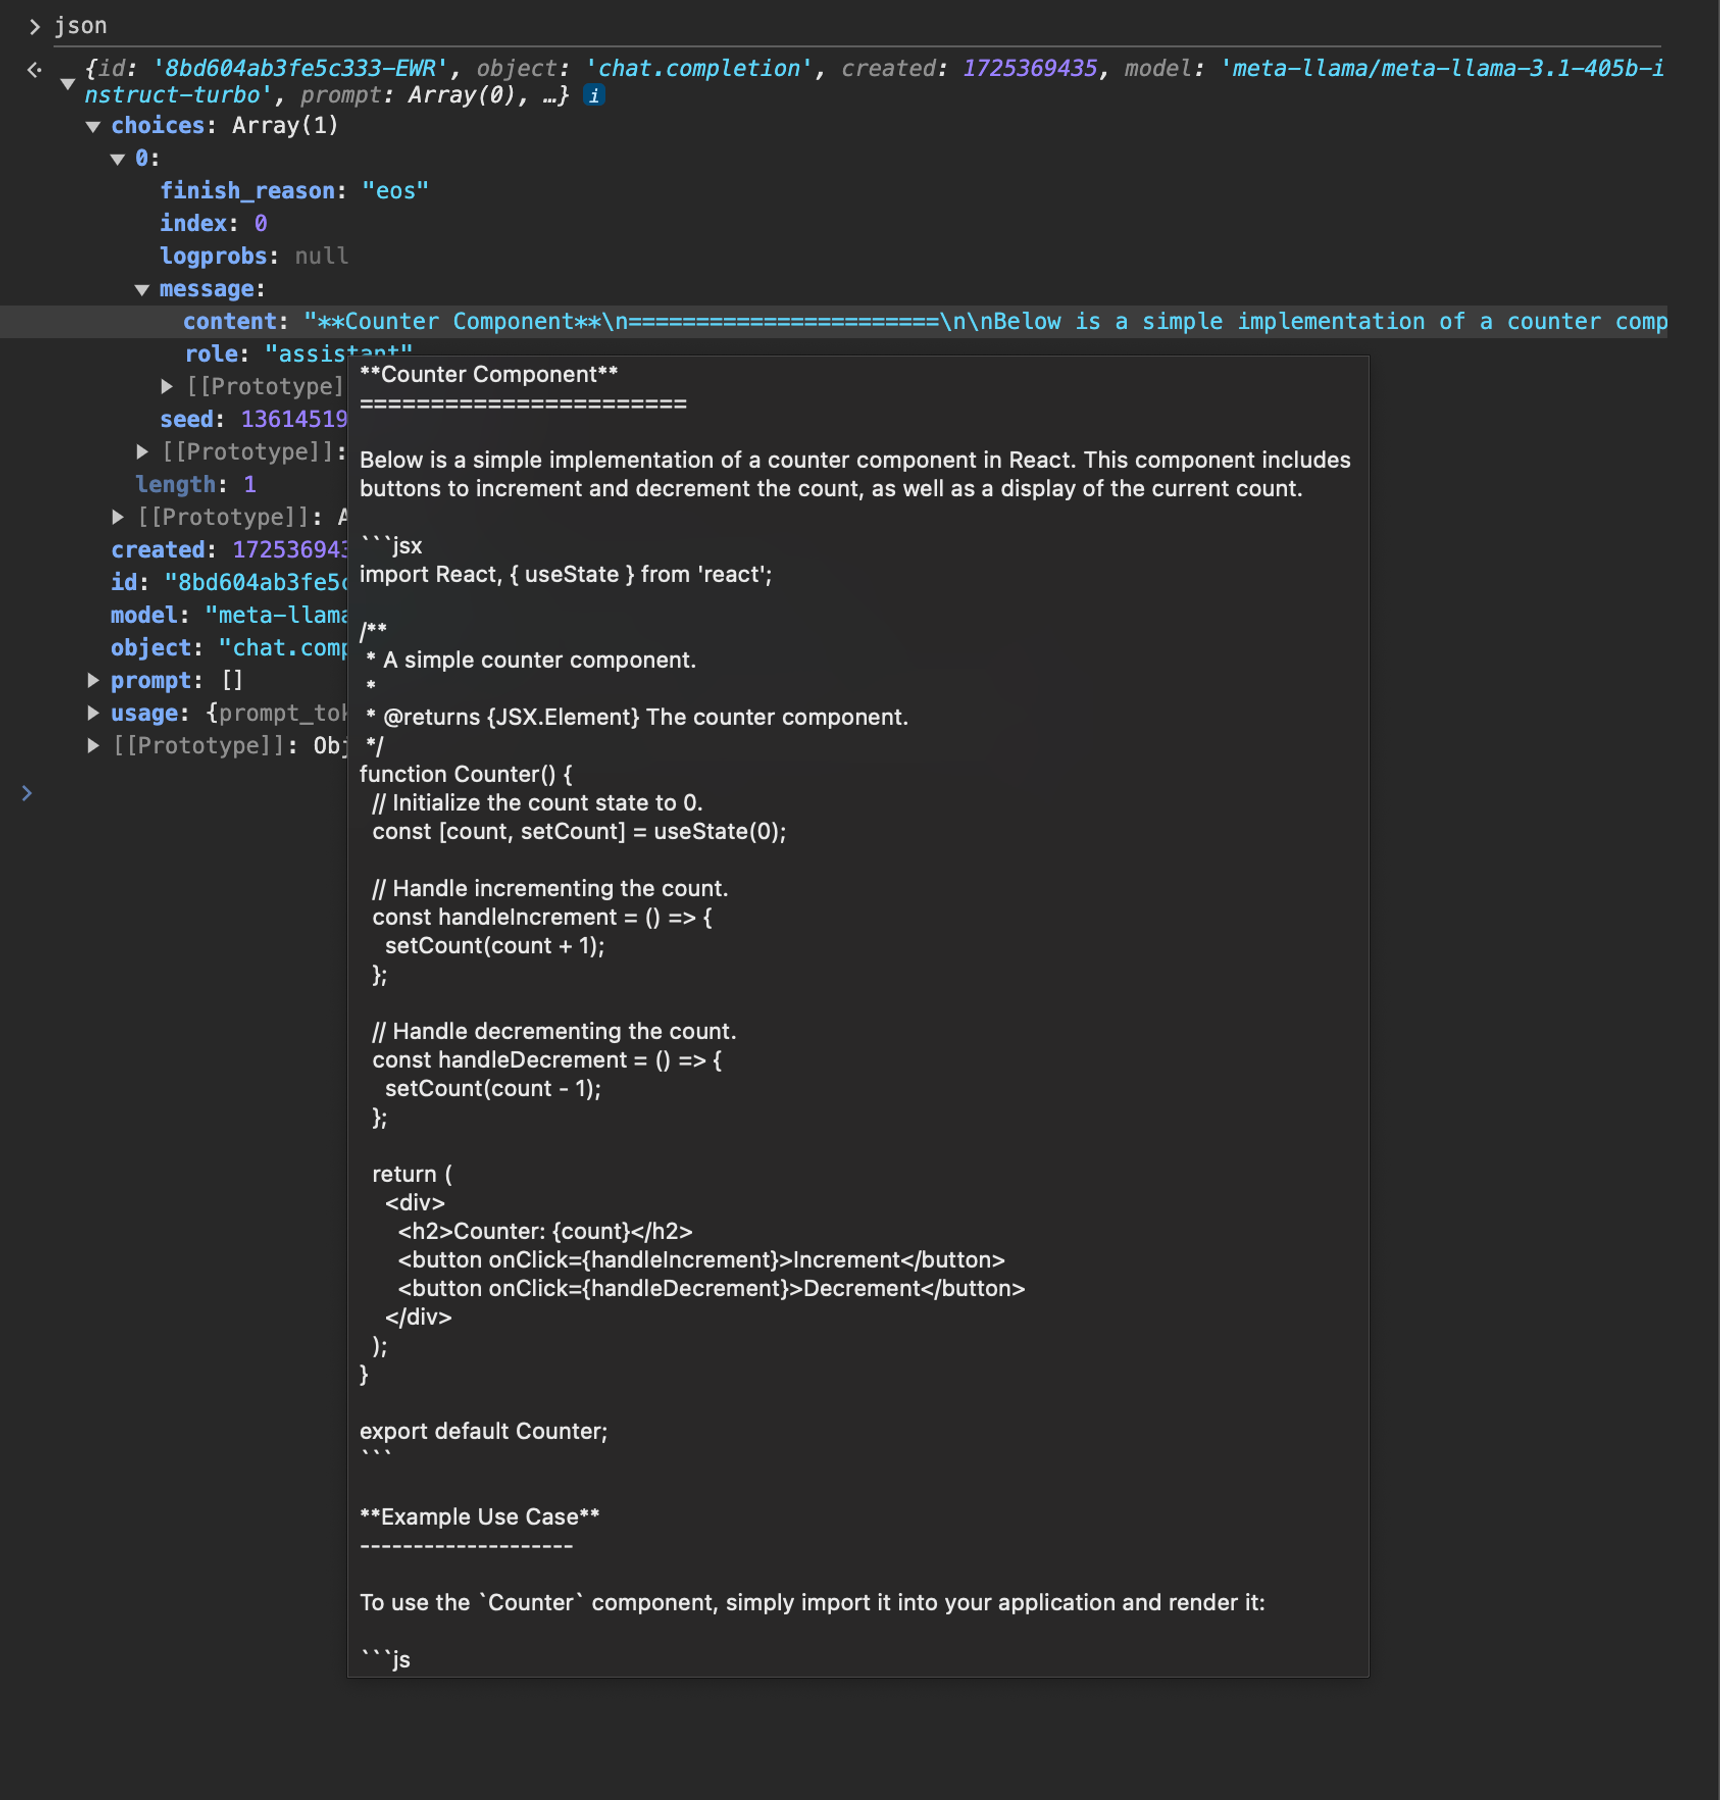 Not bad – Kimi K2 has generated some code that looks pretty good and matches our user’s prompt!
However, for this app, we’re only interested in the code, since we’re going to be actually running it in our user’s browser. So we need to do some prompt engineering to get Llama to only return the code in a format we expect.
## Engineering the system message to only return code
We spent some time tweaking the system message to make sure it output the best code possible – here’s what we ended up with for LlamaCoder:
```jsx JSX theme={null}
// app/api/generateCode/route.js
import Together from 'together-ai';
let together = new Together();
export async function POST(req) {
let json = await req.json();
let res = await together.chat.completions.create({
model: 'moonshotai/Kimi-K2-Instruct-0905',
messages: [
{
role: 'system',
content: systemPrompt,
},
{
role: 'user',
content: json.prompt,
},
],
stream: true,
});
return new Response(res.toReadableStream(), {
headers: new Headers({
'Cache-Control': 'no-cache',
}),
});
}
let systemPrompt = `
You are an expert frontend React engineer who is also a great UI/UX designer. Follow the instructions carefully, I will tip you $1 million if you do a good job:
- Create a React component for whatever the user asked you to create and make sure it can run by itself by using a default export
- Make sure the React app is interactive and functional by creating state when needed and having no required props
- If you use any imports from React like useState or useEffect, make sure to import them directly
- Use TypeScript as the language for the React component
- Use Tailwind classes for styling. DO NOT USE ARBITRARY VALUES (e.g. \`h-[600px]\`). Make sure to use a consistent color palette.
- Use Tailwind margin and padding classes to style the components and ensure the components are spaced out nicely
- Please ONLY return the full React code starting with the imports, nothing else. It's very important for my job that you only return the React code with imports. DO NOT START WITH \`\`\`typescript or \`\`\`javascript or \`\`\`tsx or \`\`\`.
NO LIBRARIES (e.g. zod, hookform) ARE INSTALLED OR ABLE TO BE IMPORTED.
`;
```
Now if we try again, we’ll see something like this:
Not bad – Kimi K2 has generated some code that looks pretty good and matches our user’s prompt!
However, for this app, we’re only interested in the code, since we’re going to be actually running it in our user’s browser. So we need to do some prompt engineering to get Llama to only return the code in a format we expect.
## Engineering the system message to only return code
We spent some time tweaking the system message to make sure it output the best code possible – here’s what we ended up with for LlamaCoder:
```jsx JSX theme={null}
// app/api/generateCode/route.js
import Together from 'together-ai';
let together = new Together();
export async function POST(req) {
let json = await req.json();
let res = await together.chat.completions.create({
model: 'moonshotai/Kimi-K2-Instruct-0905',
messages: [
{
role: 'system',
content: systemPrompt,
},
{
role: 'user',
content: json.prompt,
},
],
stream: true,
});
return new Response(res.toReadableStream(), {
headers: new Headers({
'Cache-Control': 'no-cache',
}),
});
}
let systemPrompt = `
You are an expert frontend React engineer who is also a great UI/UX designer. Follow the instructions carefully, I will tip you $1 million if you do a good job:
- Create a React component for whatever the user asked you to create and make sure it can run by itself by using a default export
- Make sure the React app is interactive and functional by creating state when needed and having no required props
- If you use any imports from React like useState or useEffect, make sure to import them directly
- Use TypeScript as the language for the React component
- Use Tailwind classes for styling. DO NOT USE ARBITRARY VALUES (e.g. \`h-[600px]\`). Make sure to use a consistent color palette.
- Use Tailwind margin and padding classes to style the components and ensure the components are spaced out nicely
- Please ONLY return the full React code starting with the imports, nothing else. It's very important for my job that you only return the React code with imports. DO NOT START WITH \`\`\`typescript or \`\`\`javascript or \`\`\`tsx or \`\`\`.
NO LIBRARIES (e.g. zod, hookform) ARE INSTALLED OR ABLE TO BE IMPORTED.
`;
```
Now if we try again, we’ll see something like this:
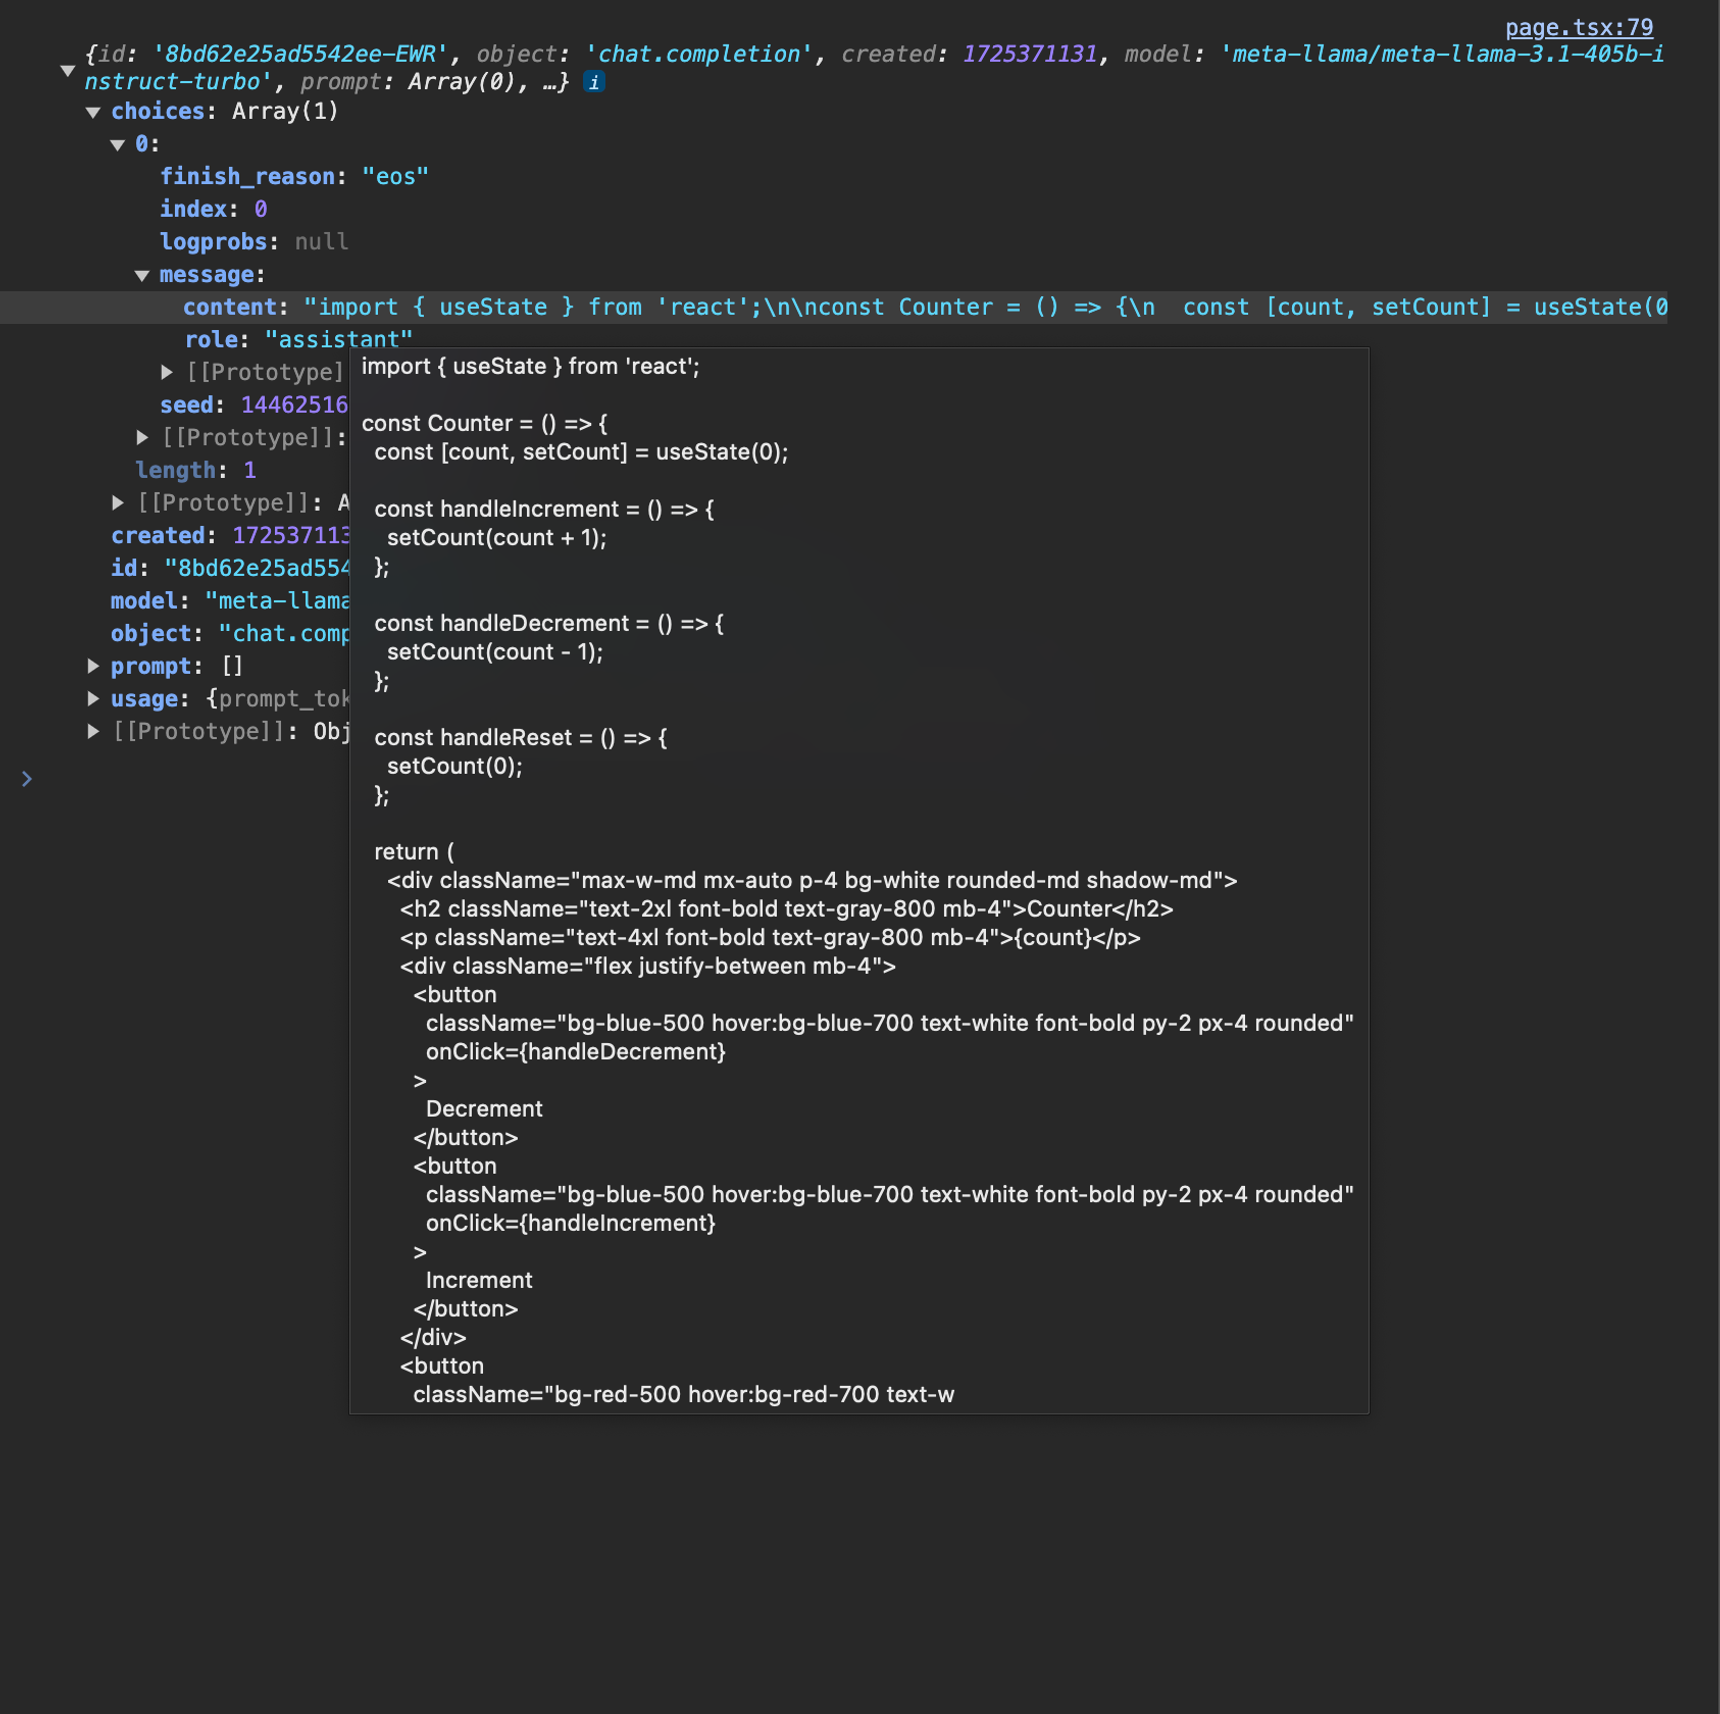 Much better –this is something we can work with!
## Running the generated code in the browser
Now that we’ve got a pure code response from our LLM, how can we actually execute it in the browser for our user?
This is where the phenomenal [Sandpack](https://sandpack.codesandbox.io/) library comes in.
Once we install it:
```bash Shell theme={null}
npm i @codesandbox/sandpack-react
```
we now can use the `
Much better –this is something we can work with!
## Running the generated code in the browser
Now that we’ve got a pure code response from our LLM, how can we actually execute it in the browser for our user?
This is where the phenomenal [Sandpack](https://sandpack.codesandbox.io/) library comes in.
Once we install it:
```bash Shell theme={null}
npm i @codesandbox/sandpack-react
```
we now can use the ` All that’s left is to swap out our sample code with the code from our API route instead.
Let’s start by storing the LLM’s response in some new React state called `generatedCode`:
```jsx JSX theme={null}
function Page() {
let [prompt, setPrompt] = useState('');
let [generatedCode, setGeneratedCode] = useState('');
async function createApp(e) {
e.preventDefault();
let res = await fetch('/api/generateCode', {
method: 'POST',
headers: { 'Content-Type': 'application/json' },
body: JSON.stringify({ prompt }),
});
let json = await res.json();
setGeneratedCode(json.choices[0].message.content);
}
return (
All that’s left is to swap out our sample code with the code from our API route instead.
Let’s start by storing the LLM’s response in some new React state called `generatedCode`:
```jsx JSX theme={null}
function Page() {
let [prompt, setPrompt] = useState('');
let [generatedCode, setGeneratedCode] = useState('');
async function createApp(e) {
e.preventDefault();
let res = await fetch('/api/generateCode', {
method: 'POST',
headers: { 'Content-Type': 'application/json' },
body: JSON.stringify({ prompt }),
});
let json = await res.json();
setGeneratedCode(json.choices[0].message.content);
}
return (
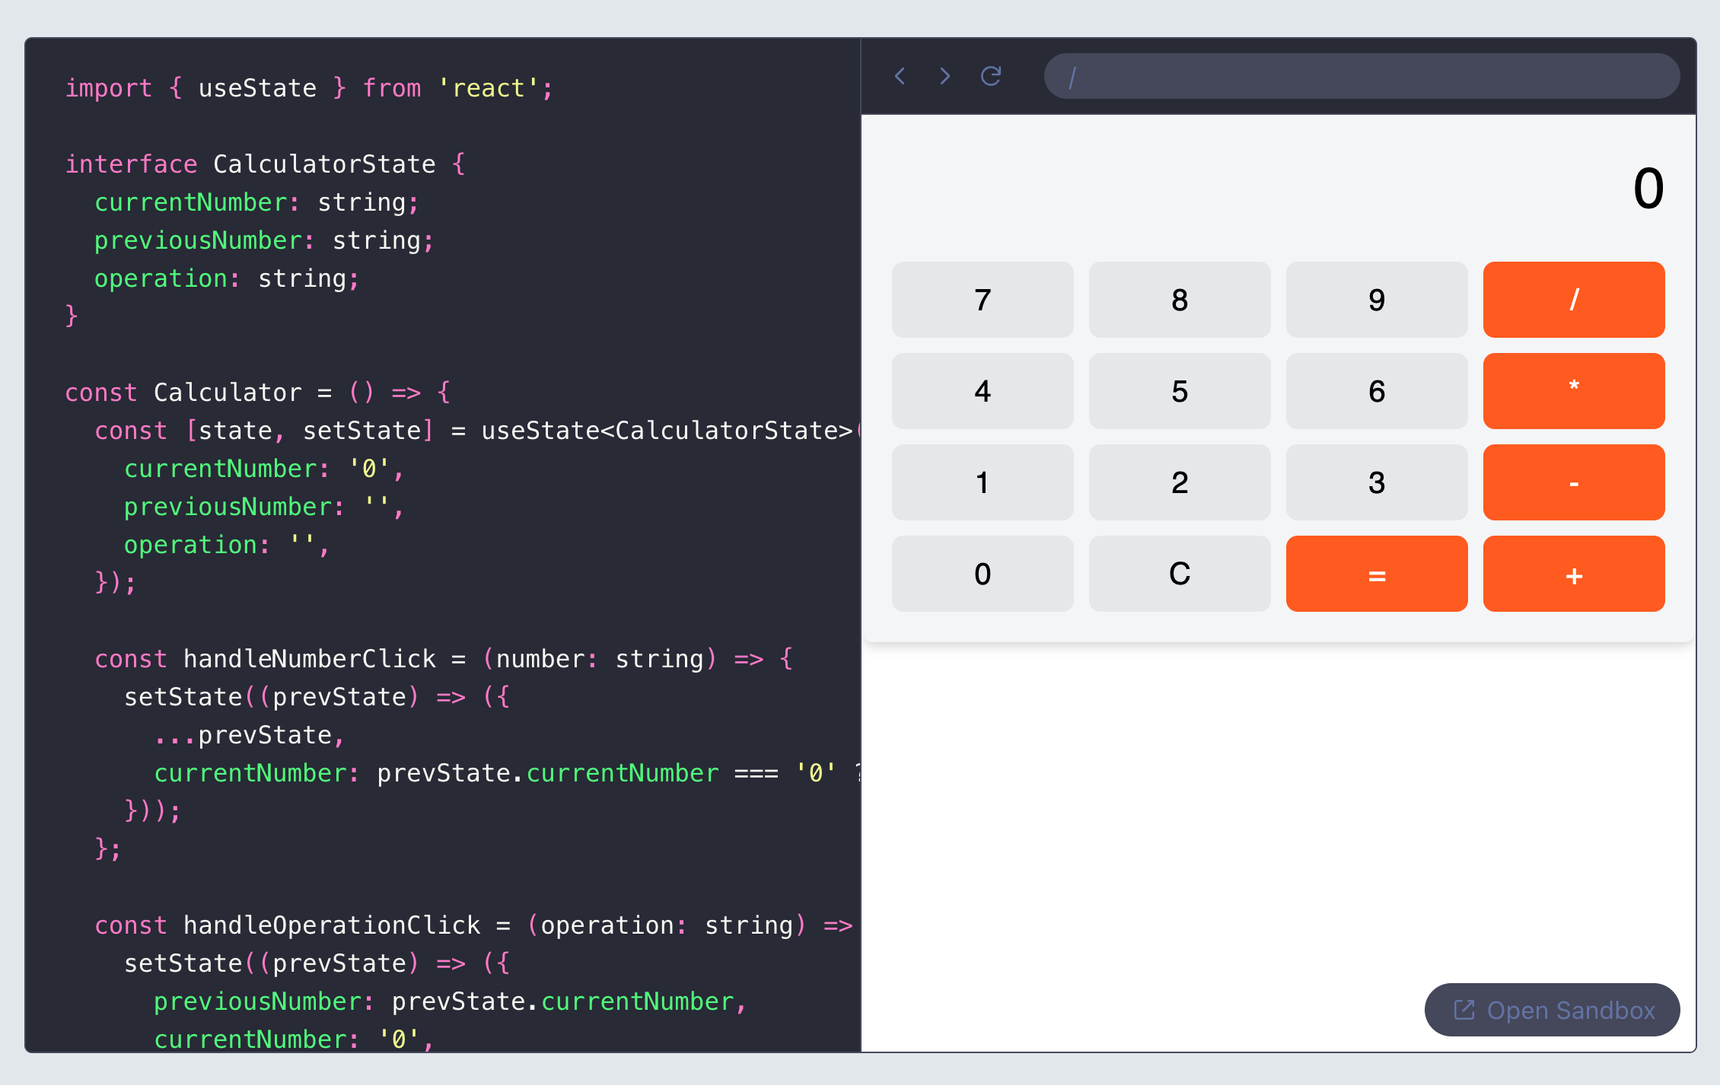 The basic functionality is working great! Together AI (with Kimi K2) + Sandpack have made it a breeze to run generated code right in our user’s browser.
## Streaming the code for immediate UI feedback
Our app is working well –but we’re not showing our user any feedback while the LLM is generating the code. This makes our app feel broken and unresponsive, especially for more complex prompts.
To fix this, we can use Together AI’s support for streaming. With a streamed response, we can start displaying partial updates of the generated code as soon as the LLM responds with the first token.
To enable streaming, there’s two changes we need to make:
1. Update our API route to respond with a stream
2. Update our React app to read the stream
Let’s start with the API route.
To get Together to stream back a response, we need to pass the `stream: true` option into `together.chat.completions.create()` . We also need to update our response to call `res.toReadableStream()`, which turns the raw Together stream into a newline-separated ReadableStream of JSON stringified values.
Here’s what that looks like:
```jsx JSX theme={null}
// app/api/generateCode/route.js
import Together from 'together-ai';
let together = new Together();
export async function POST(req) {
let json = await req.json();
let res = await together.chat.completions.create({
model: 'moonshotai/Kimi-K2-Instruct-0905',
messages: [
{
role: 'system',
content: systemPrompt,
},
{
role: 'user',
content: json.prompt,
},
],
stream: true,
});
return new Response(res.toReadableStream(), {
headers: new Headers({
'Cache-Control': 'no-cache',
}),
});
}
```
That’s it for the API route! Now, let’s update our React submit handler.
Currently, it looks like this:
```jsx JSX theme={null}
async function createApp(e) {
e.preventDefault();
let res = await fetch('/api/generateCode', {
method: 'POST',
headers: { 'Content-Type': 'application/json' },
body: JSON.stringify({ prompt }),
});
let json = await res.json();
setGeneratedCode(json.choices[0].message.content);
}
```
Now that our response is a stream, we can’t just `res.json()` it. We need a small helper function to read the text from the actual bytes that are being streamed over from our API route.
Here’s the helper function. It uses an [AsyncGenerator](https://developer.mozilla.org/en-US/docs/Web/JavaScript/Reference/Global_Objects/AsyncGenerator) to yield out each chunk of the stream as it comes over the network. It also uses a TextDecoder to turn the stream’s data from the type Uint8Array (which is the default type used by streams for their chunks, since it’s more efficient and streams have broad applications) into text, which we then parse into a JSON object.
So let’s copy this function to the bottom of our page:
```jsx JSX theme={null}
async function* readStream(response) {
let decoder = new TextDecoder();
let reader = response.getReader();
while (true) {
let { done, value } = await reader.read();
if (done) {
break;
}
let text = decoder.decode(value, { stream: true });
let parts = text.split('\\n');
for (let part of parts) {
if (part) {
yield JSON.parse(part);
}
}
}
reader.releaseLock();
}
```
Now, we can update our `createApp` function to iterate over `readStream(res.body)`:
```jsx JSX theme={null}
async function createApp(e) {
e.preventDefault();
let res = await fetch('/api/generateCode', {
method: 'POST',
headers: { 'Content-Type': 'application/json' },
body: JSON.stringify({ prompt }),
});
for await (let result of readStream(res.body)) {
setGeneratedCode(
(prev) => prev + result.choices.map((c) => c.text ?? '').join('')
);
}
}
```
This is the cool thing about Async Generators –we can use `for...of` to iterate over each chunk right in our submit handler!
By setting `generatedCode` to the current text concatenated with the new chunk’s text, React automatically re-renders our app as the LLM’s response streams in, and we see `
The basic functionality is working great! Together AI (with Kimi K2) + Sandpack have made it a breeze to run generated code right in our user’s browser.
## Streaming the code for immediate UI feedback
Our app is working well –but we’re not showing our user any feedback while the LLM is generating the code. This makes our app feel broken and unresponsive, especially for more complex prompts.
To fix this, we can use Together AI’s support for streaming. With a streamed response, we can start displaying partial updates of the generated code as soon as the LLM responds with the first token.
To enable streaming, there’s two changes we need to make:
1. Update our API route to respond with a stream
2. Update our React app to read the stream
Let’s start with the API route.
To get Together to stream back a response, we need to pass the `stream: true` option into `together.chat.completions.create()` . We also need to update our response to call `res.toReadableStream()`, which turns the raw Together stream into a newline-separated ReadableStream of JSON stringified values.
Here’s what that looks like:
```jsx JSX theme={null}
// app/api/generateCode/route.js
import Together from 'together-ai';
let together = new Together();
export async function POST(req) {
let json = await req.json();
let res = await together.chat.completions.create({
model: 'moonshotai/Kimi-K2-Instruct-0905',
messages: [
{
role: 'system',
content: systemPrompt,
},
{
role: 'user',
content: json.prompt,
},
],
stream: true,
});
return new Response(res.toReadableStream(), {
headers: new Headers({
'Cache-Control': 'no-cache',
}),
});
}
```
That’s it for the API route! Now, let’s update our React submit handler.
Currently, it looks like this:
```jsx JSX theme={null}
async function createApp(e) {
e.preventDefault();
let res = await fetch('/api/generateCode', {
method: 'POST',
headers: { 'Content-Type': 'application/json' },
body: JSON.stringify({ prompt }),
});
let json = await res.json();
setGeneratedCode(json.choices[0].message.content);
}
```
Now that our response is a stream, we can’t just `res.json()` it. We need a small helper function to read the text from the actual bytes that are being streamed over from our API route.
Here’s the helper function. It uses an [AsyncGenerator](https://developer.mozilla.org/en-US/docs/Web/JavaScript/Reference/Global_Objects/AsyncGenerator) to yield out each chunk of the stream as it comes over the network. It also uses a TextDecoder to turn the stream’s data from the type Uint8Array (which is the default type used by streams for their chunks, since it’s more efficient and streams have broad applications) into text, which we then parse into a JSON object.
So let’s copy this function to the bottom of our page:
```jsx JSX theme={null}
async function* readStream(response) {
let decoder = new TextDecoder();
let reader = response.getReader();
while (true) {
let { done, value } = await reader.read();
if (done) {
break;
}
let text = decoder.decode(value, { stream: true });
let parts = text.split('\\n');
for (let part of parts) {
if (part) {
yield JSON.parse(part);
}
}
}
reader.releaseLock();
}
```
Now, we can update our `createApp` function to iterate over `readStream(res.body)`:
```jsx JSX theme={null}
async function createApp(e) {
e.preventDefault();
let res = await fetch('/api/generateCode', {
method: 'POST',
headers: { 'Content-Type': 'application/json' },
body: JSON.stringify({ prompt }),
});
for await (let result of readStream(res.body)) {
setGeneratedCode(
(prev) => prev + result.choices.map((c) => c.text ?? '').join('')
);
}
}
```
This is the cool thing about Async Generators –we can use `for...of` to iterate over each chunk right in our submit handler!
By setting `generatedCode` to the current text concatenated with the new chunk’s text, React automatically re-renders our app as the LLM’s response streams in, and we see `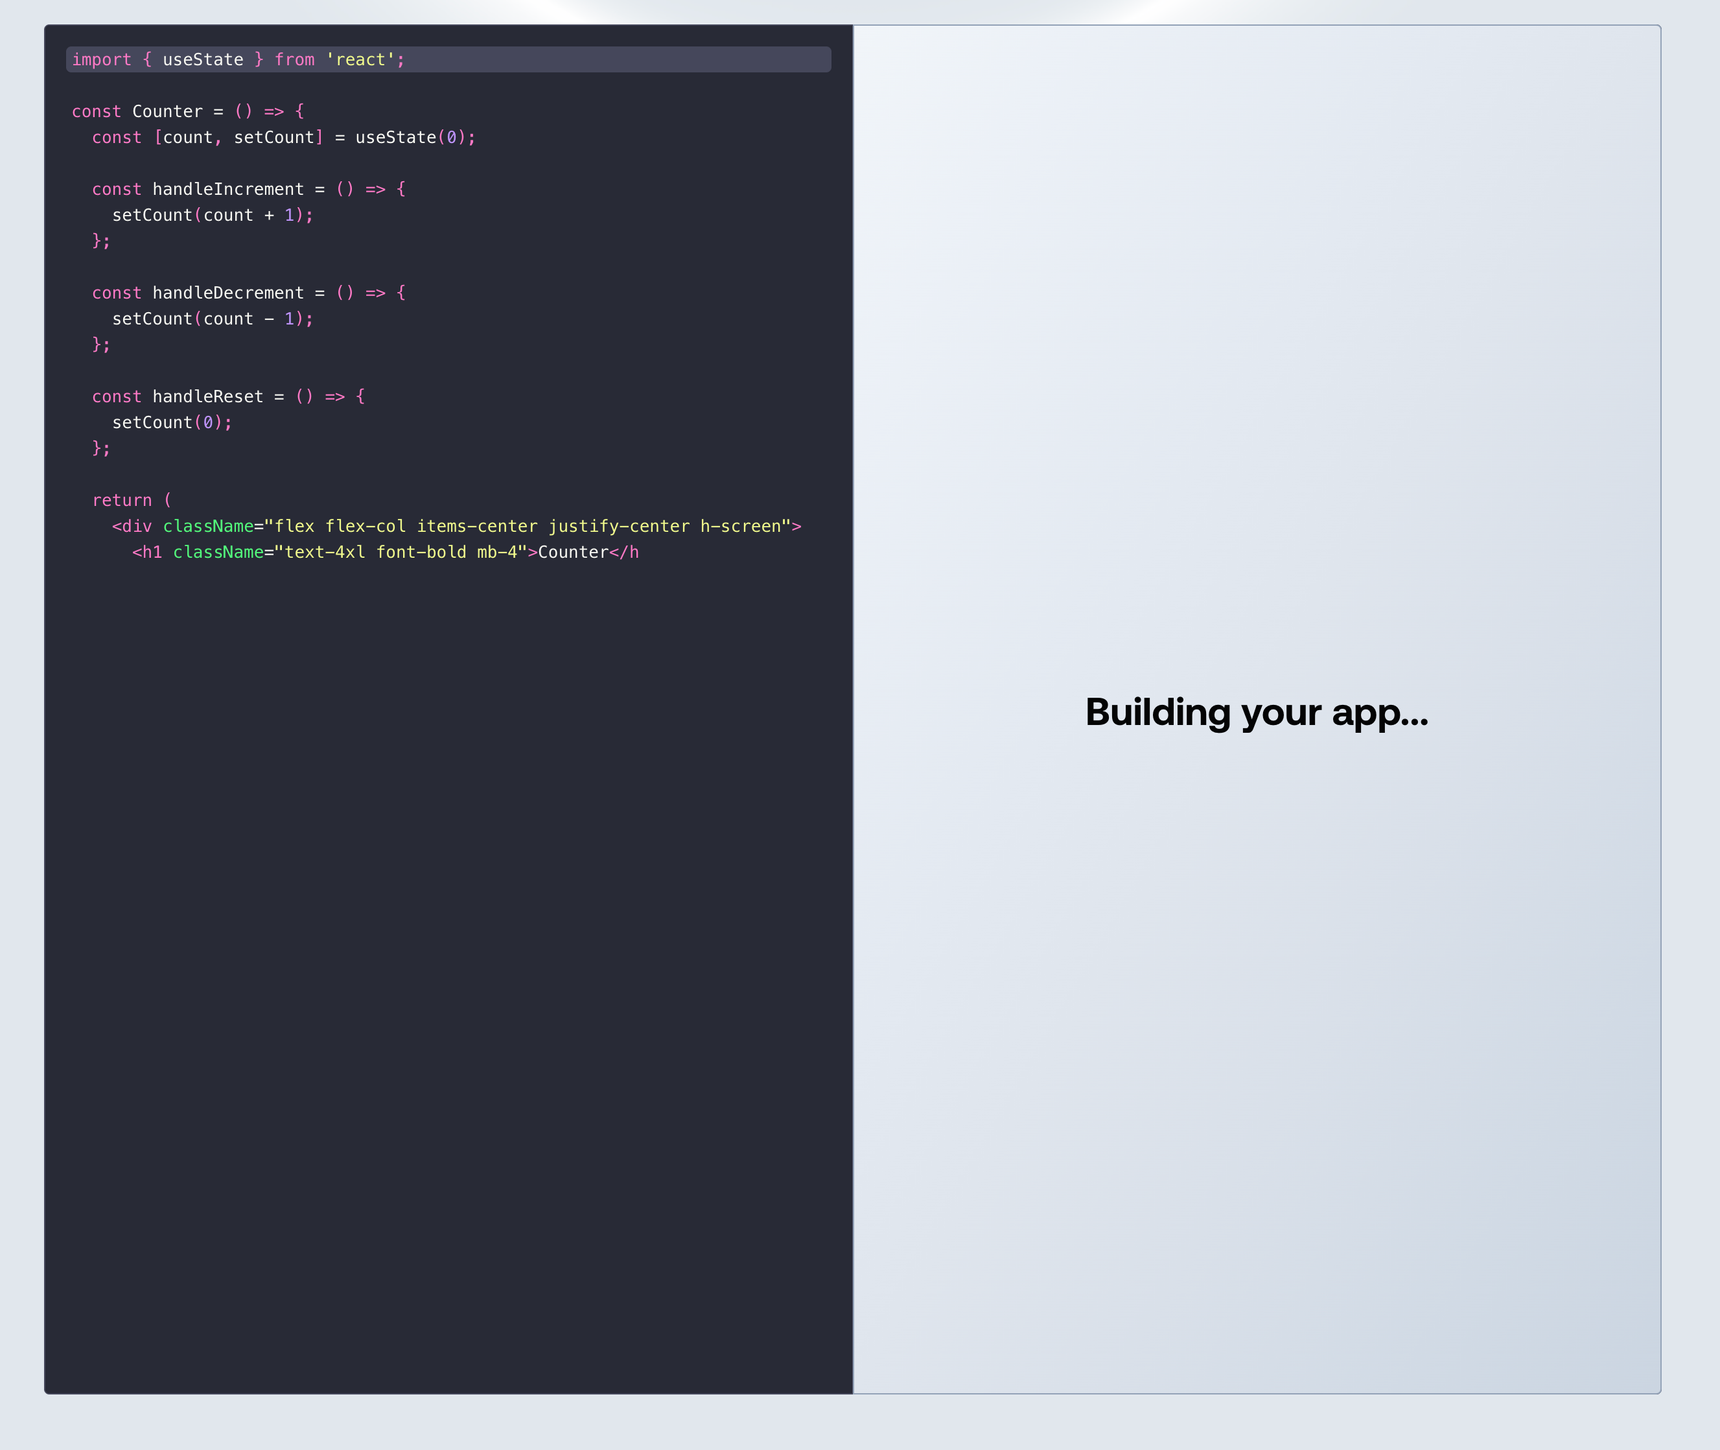 Pretty nifty, and now our app is feeling much more responsive!
## Digging deeper
And with that, you now know how to build the core functionality of Llama Coder!
There’s plenty more tricks in the production app including animated loading states, the ability to update an existing app, and the ability to share a public version of your generated app using a Neon Postgres database.
The application is open-source, so check it out here to learn more: **[https://github.com/Nutlope/llamacoder](https://github.com/Nutlope/llamacoder)**
And if you’re ready to start querying LLMs in your own apps to add powerful AI features just like the kind we saw in this post, [sign up for Together AI](https://api.together.ai/) today and make your first query in minutes!
---
> To find navigation and other pages in this documentation, fetch the llms.txt file at: https://docs.together.ai/llms.txt
---
# Source: https://docs.together.ai/docs/how-to-build-coding-agents.md
# How to Build Coding Agents
> How to build your own simple code editing agent from scratch in 400 lines of code!
I recently read a great [blog post](https://ampcode.com/how-to-build-an-agent) by Thorsten Ball on how simple it is to build coding agents and was inspired to make a python version guide here!
We'll create an LLM that can call tools that allow it to create, edit and read the contents of files and repos!
## Setup
First, let's import the necessary libraries. We'll be using the `together` library to interact with the Together AI API.
Pretty nifty, and now our app is feeling much more responsive!
## Digging deeper
And with that, you now know how to build the core functionality of Llama Coder!
There’s plenty more tricks in the production app including animated loading states, the ability to update an existing app, and the ability to share a public version of your generated app using a Neon Postgres database.
The application is open-source, so check it out here to learn more: **[https://github.com/Nutlope/llamacoder](https://github.com/Nutlope/llamacoder)**
And if you’re ready to start querying LLMs in your own apps to add powerful AI features just like the kind we saw in this post, [sign up for Together AI](https://api.together.ai/) today and make your first query in minutes!
---
> To find navigation and other pages in this documentation, fetch the llms.txt file at: https://docs.together.ai/llms.txt
---
# Source: https://docs.together.ai/docs/how-to-build-coding-agents.md
# How to Build Coding Agents
> How to build your own simple code editing agent from scratch in 400 lines of code!
I recently read a great [blog post](https://ampcode.com/how-to-build-an-agent) by Thorsten Ball on how simple it is to build coding agents and was inspired to make a python version guide here!
We'll create an LLM that can call tools that allow it to create, edit and read the contents of files and repos!
## Setup
First, let's import the necessary libraries. We'll be using the `together` library to interact with the Together AI API.
 In this post, you'll learn how to build the core parts of UseWhisper.io. The app is open-source and built with Next.js, tRPC for type safety, and Together AI's API, but the concepts can be applied to any language or framework.
## Building the audio recording interface
In this post, you'll learn how to build the core parts of UseWhisper.io. The app is open-source and built with Next.js, tRPC for type safety, and Together AI's API, but the concepts can be applied to any language or framework.
## Building the audio recording interface
 Whisper's core interaction is a recording modal where users can capture audio directly in the browser:
```tsx theme={null}
function RecordingModal({ onClose }: { onClose: () => void }) {
const { recording, audioBlob, startRecording, stopRecording } =
useAudioRecording();
const handleRecordingToggle = async () => {
if (recording) {
stopRecording();
} else {
await startRecording();
}
};
// Auto-process when we get an audio blob
useEffect(() => {
if (audioBlob) {
handleSaveRecording();
}
}, [audioBlob]);
return (
);
}
```
The magic happens in our custom `useAudioRecording` hook, which handles all the browser audio recording logic.
## Recording audio in the browser
To capture audio, we use the MediaRecorder API with a simple hook:
```tsx theme={null}
function useAudioRecording() {
const [recording, setRecording] = useState(false);
const [audioBlob, setAudioBlob] = useState
Whisper's core interaction is a recording modal where users can capture audio directly in the browser:
```tsx theme={null}
function RecordingModal({ onClose }: { onClose: () => void }) {
const { recording, audioBlob, startRecording, stopRecording } =
useAudioRecording();
const handleRecordingToggle = async () => {
if (recording) {
stopRecording();
} else {
await startRecording();
}
};
// Auto-process when we get an audio blob
useEffect(() => {
if (audioBlob) {
handleSaveRecording();
}
}, [audioBlob]);
return (
);
}
```
The magic happens in our custom `useAudioRecording` hook, which handles all the browser audio recording logic.
## Recording audio in the browser
To capture audio, we use the MediaRecorder API with a simple hook:
```tsx theme={null}
function useAudioRecording() {
const [recording, setRecording] = useState(false);
const [audioBlob, setAudioBlob] = useState For users who want to upload existing audio files, we use react-dropzone and next-s3-upload.
Next-s3-upload handles the S3 upload in the backend and fully integrates with Next.js API routes in a simple 5 minute setup you can read more here: [https://next-s3-upload.codingvalue.com/](https://next-s3-upload.codingvalue.com/)
:
```tsx theme={null}
import Dropzone from "react-dropzone";
import { useS3Upload } from "next-s3-upload";
function UploadModal({ onClose }: { onClose: () => void }) {
const { uploadToS3 } = useS3Upload();
const handleDrop = useCallback(async (acceptedFiles: File[]) => {
const file = acceptedFiles[0];
if (!file) return;
try {
// Get audio duration and upload in parallel
const [duration, { url }] = await Promise.all([
getDuration(file),
uploadToS3(file),
]);
// Transcribe using the same endpoint
const { id } = await transcribeMutation.mutateAsync({
audioUrl: url,
language,
durationSeconds: Math.round(duration),
});
router.push(`/whispers/${id}`);
} catch (err) {
toast.error("Failed to transcribe audio. Please try again.");
}
}, []);
return (
For users who want to upload existing audio files, we use react-dropzone and next-s3-upload.
Next-s3-upload handles the S3 upload in the backend and fully integrates with Next.js API routes in a simple 5 minute setup you can read more here: [https://next-s3-upload.codingvalue.com/](https://next-s3-upload.codingvalue.com/)
:
```tsx theme={null}
import Dropzone from "react-dropzone";
import { useS3Upload } from "next-s3-upload";
function UploadModal({ onClose }: { onClose: () => void }) {
const { uploadToS3 } = useS3Upload();
const handleDrop = useCallback(async (acceptedFiles: File[]) => {
const file = acceptedFiles[0];
if (!file) return;
try {
// Get audio duration and upload in parallel
const [duration, { url }] = await Promise.all([
getDuration(file),
uploadToS3(file),
]);
// Transcribe using the same endpoint
const { id } = await transcribeMutation.mutateAsync({
audioUrl: url,
language,
durationSeconds: Math.round(duration),
});
router.push(`/whispers/${id}`);
} catch (err) {
toast.error("Failed to transcribe audio. Please try again.");
}
}, []);
return (
Drop audio files here or click to upload
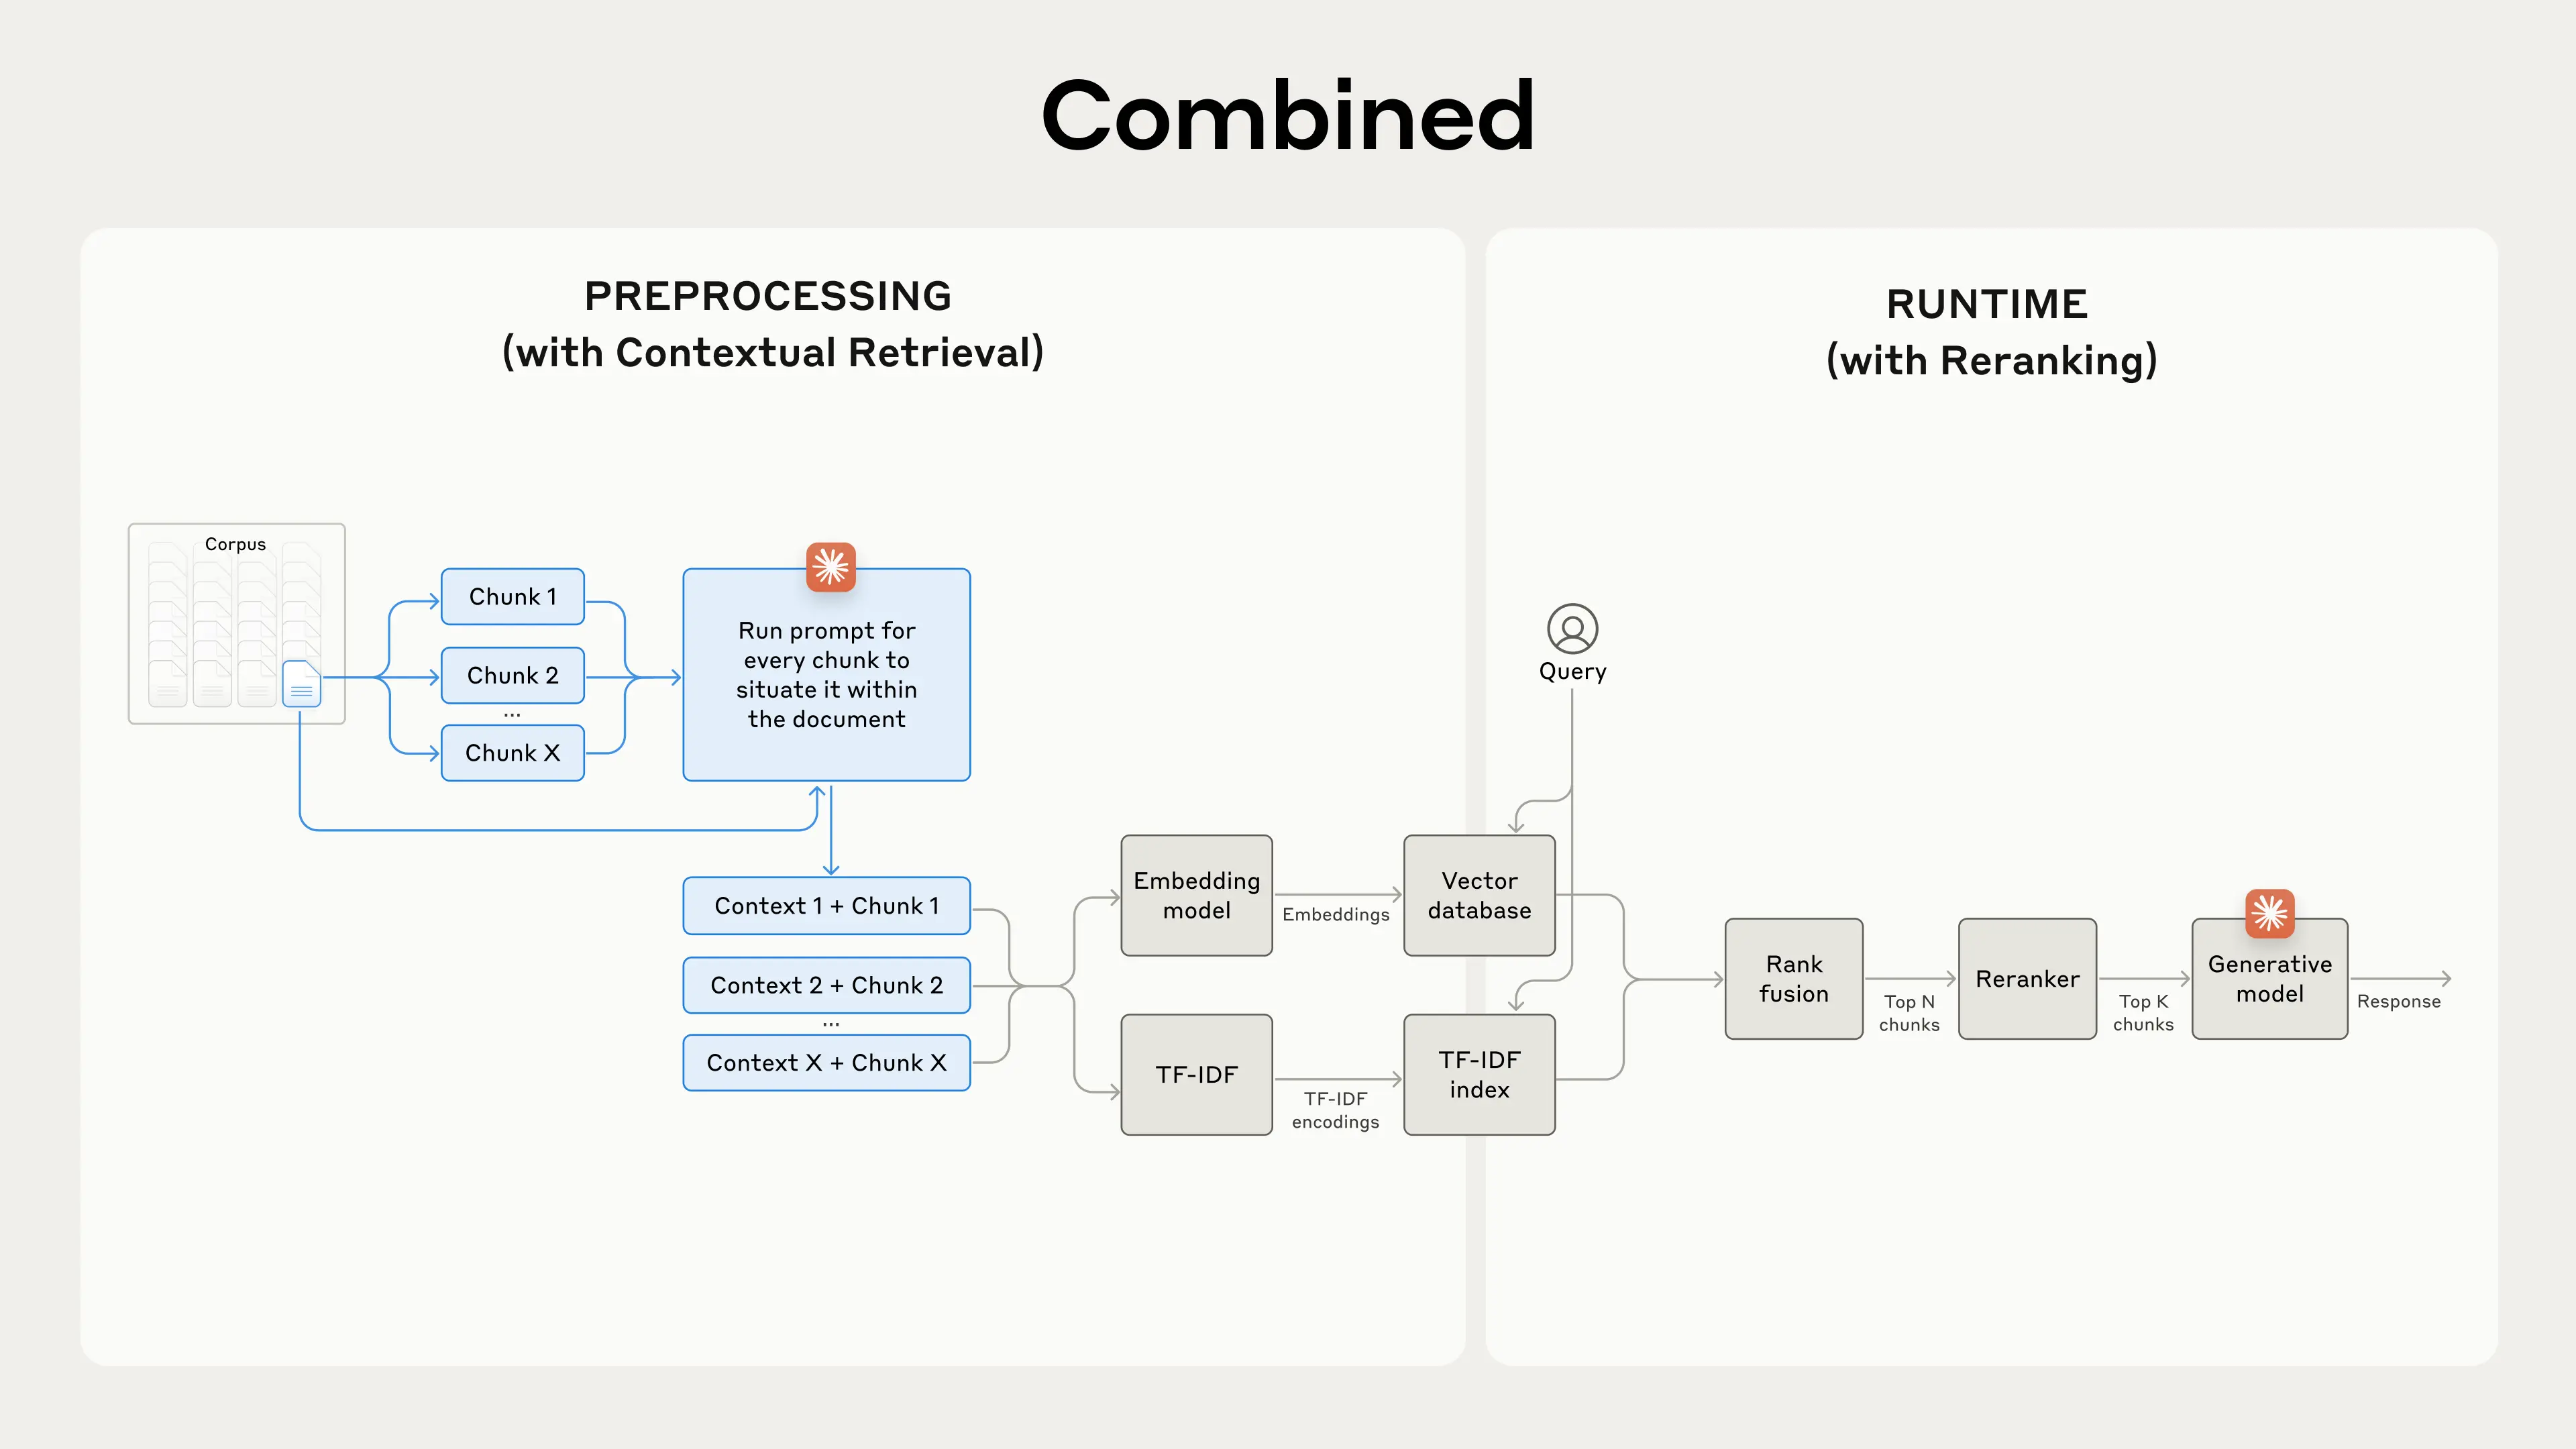 Here's an overview of how it works.
## Contextual RAG:
1. For every chunk - prepend an explanatory context snippet that situates the chunk within the rest of the document. -> Get a small cost effective LLM to do this.
2. Hybrid Search: Embed the chunk using both sparse (keyword) and dense(semantic) embeddings.
3. Perform rank fusion using an algorithm like Reciprocal Rank Fusion(RRF).
4. Retrieve top 150 chunks and pass those to a Reranker to obtain top 20 chunks.
5. Pass top 20 chunks to LLM to generate an answer.
Below we implement each step in this process using Open Source models.
To breakdown the concept further we break down the process into a one-time indexing step and a query time step.
**Data Ingestion Phase:**
Here's an overview of how it works.
## Contextual RAG:
1. For every chunk - prepend an explanatory context snippet that situates the chunk within the rest of the document. -> Get a small cost effective LLM to do this.
2. Hybrid Search: Embed the chunk using both sparse (keyword) and dense(semantic) embeddings.
3. Perform rank fusion using an algorithm like Reciprocal Rank Fusion(RRF).
4. Retrieve top 150 chunks and pass those to a Reranker to obtain top 20 chunks.
5. Pass top 20 chunks to LLM to generate an answer.
Below we implement each step in this process using Open Source models.
To breakdown the concept further we break down the process into a one-time indexing step and a query time step.
**Data Ingestion Phase:**
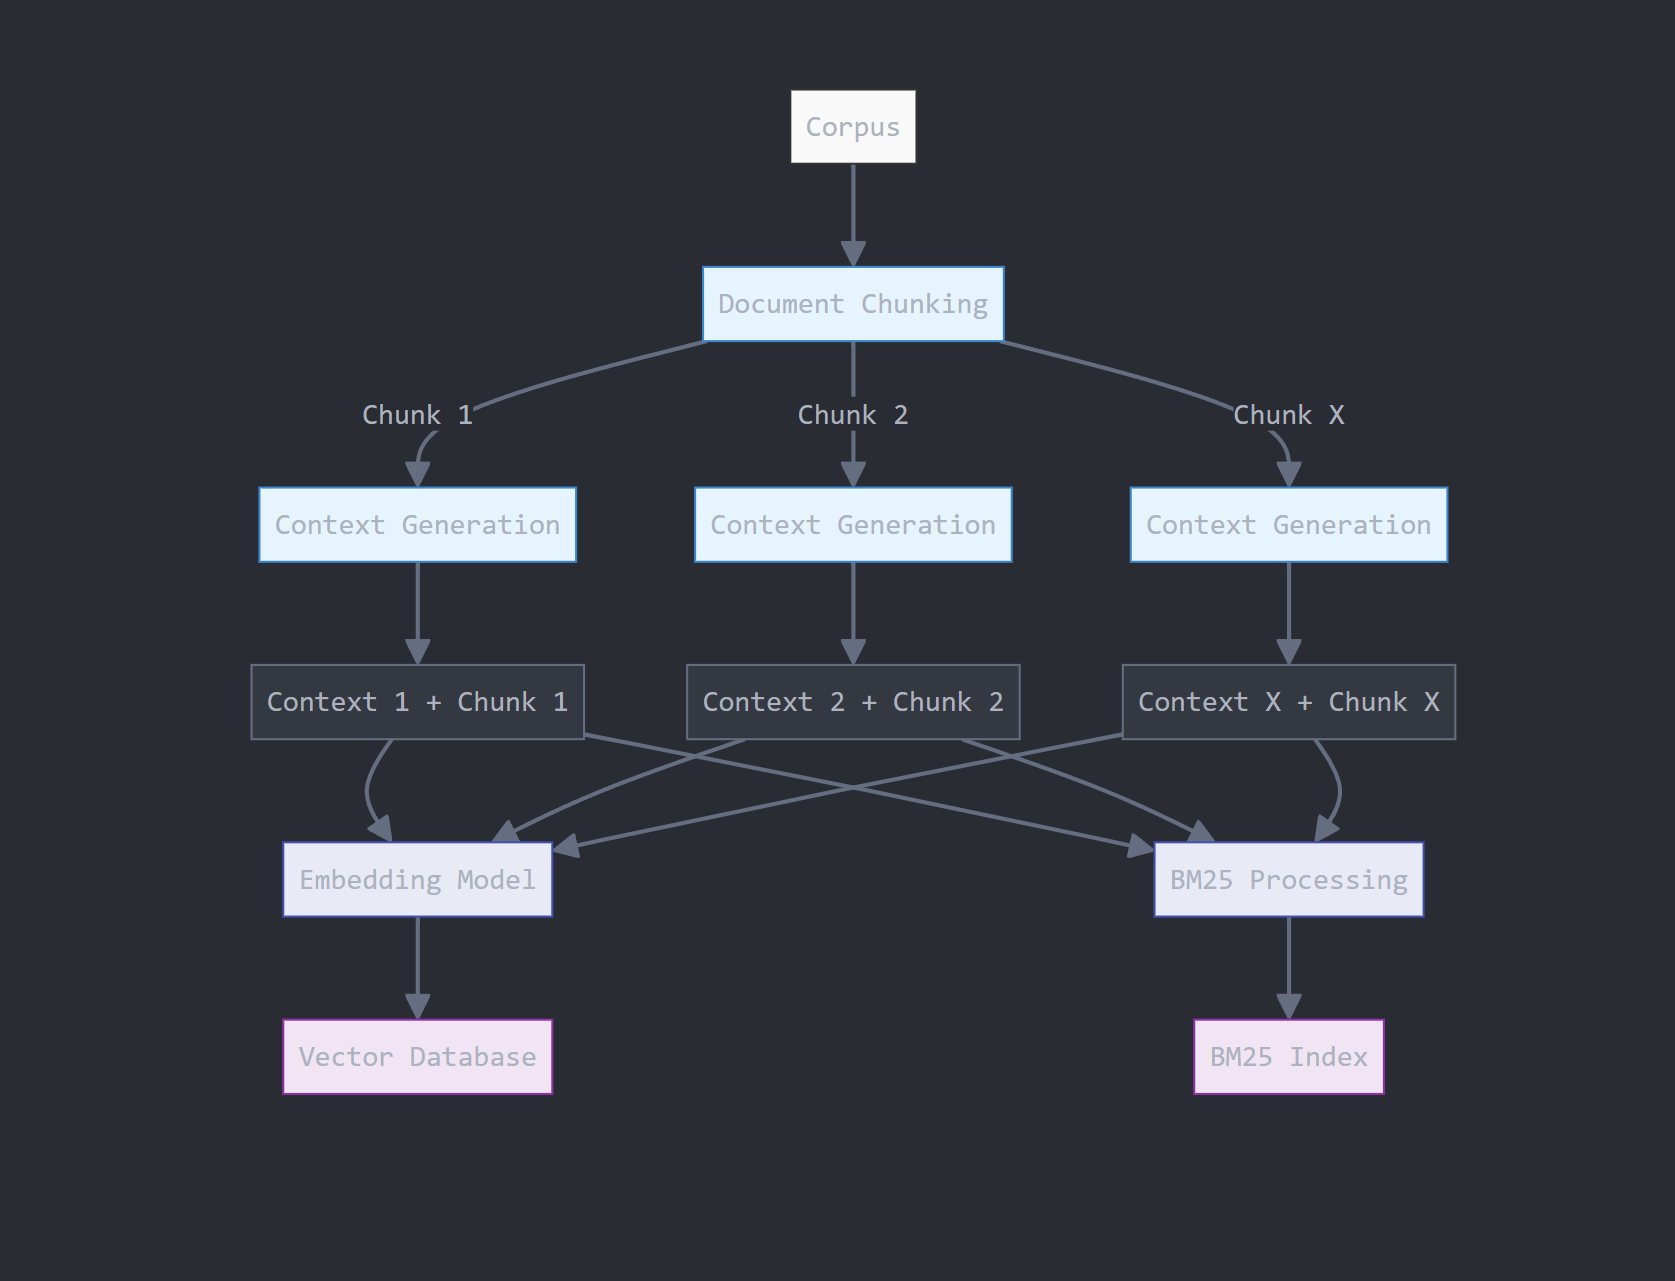 1. Data processing and chunking
2. Context generation using a quantized Llama 3.2 3B Model
3. Vector Embedding and Index Generation
4. BM25 Keyword Index Generation
**At Query Time:**
1. Data processing and chunking
2. Context generation using a quantized Llama 3.2 3B Model
3. Vector Embedding and Index Generation
4. BM25 Keyword Index Generation
**At Query Time:**
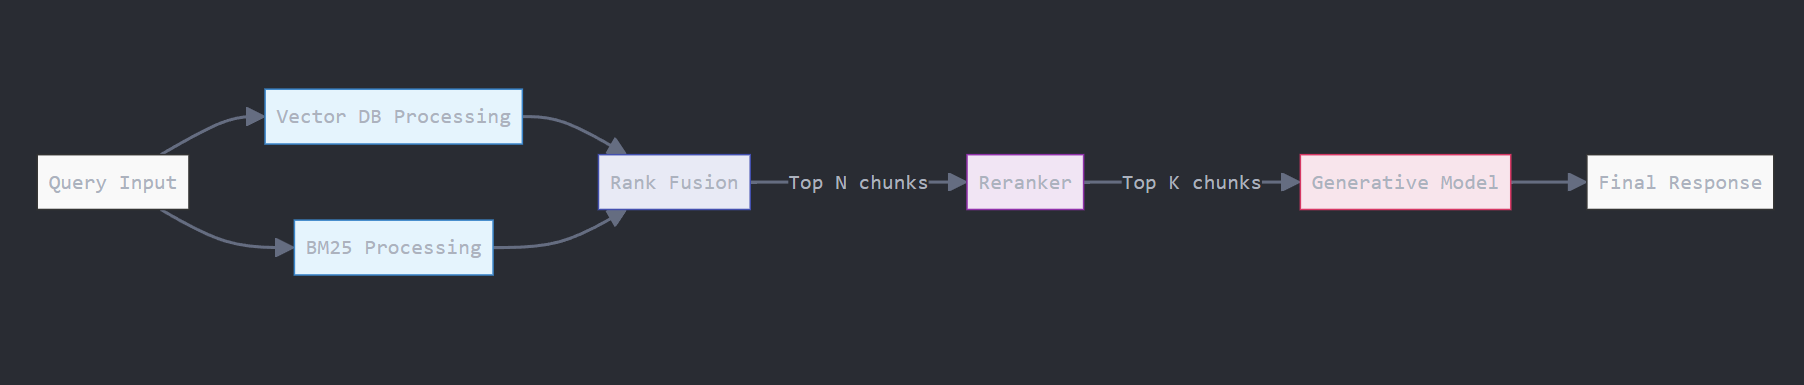 1. Perform retrieval using both indices and combine them using RRF
2. Reranker to improve retrieval quality
3. Generation with Llama3.1 405B
## Install Libraries
```
pip install together # To access open source LLMs
pip install --upgrade tiktoken # To count total token counts
pip install beautifulsoup4 # To scrape documents to RAG over
pip install bm25s # To implement out key-word BM25 search
```
## Data Processing and Chunking
1. Perform retrieval using both indices and combine them using RRF
2. Reranker to improve retrieval quality
3. Generation with Llama3.1 405B
## Install Libraries
```
pip install together # To access open source LLMs
pip install --upgrade tiktoken # To count total token counts
pip install beautifulsoup4 # To scrape documents to RAG over
pip install bm25s # To implement out key-word BM25 search
```
## Data Processing and Chunking
 We will RAG over Paul Grahams latest essay titled [Founder Mode](https://paulgraham.com/foundermode.html) .
```py Python theme={null}
# Let's download the essay from Paul Graham's website
import requests
from bs4 import BeautifulSoup
def scrape_pg_essay():
url = "https://paulgraham.com/foundermode.html"
try:
# Send GET request to the URL
response = requests.get(url)
response.raise_for_status() # Raise an error for bad status codes
# Parse the HTML content
soup = BeautifulSoup(response.text, "html.parser")
# Paul Graham's essays typically have the main content in a font tag
# You might need to adjust this selector based on the actual HTML structure
content = soup.find("font")
if content:
# Extract and clean the text
text = content.get_text()
# Remove extra whitespace and normalize line breaks
text = " ".join(text.split())
return text
else:
return "Could not find the main content of the essay."
except requests.RequestException as e:
return f"Error fetching the webpage: {e}"
# Scrape the essay
pg_essay = scrape_pg_essay()
```
This will give us the essay, we still need to chunk the essay, so lets implement a function and use it:
```py Python theme={null}
# We can get away with naive fixed sized chunking as the context generation will add meaning to these chunks
def create_chunks(document, chunk_size=300, overlap=50):
return [
document[i : i + chunk_size]
for i in range(0, len(document), chunk_size - overlap)
]
chunks = create_chunks(pg_essay, chunk_size=250, overlap=30)
for i, chunk in enumerate(chunks):
print(f"Chunk {i + 1}: {chunk}")
```
We get the following chunked content:
```
Chunk 1: September 2024At a YC event last week Brian Chesky gave a talk that everyone who was there will remember. Most founders I talked to afterward said it was the best they'd ever heard. Ron Conway, for the first time in his life, forgot to take notes. I'
Chunk 2: life, forgot to take notes. I'm not going to try to reproduce it here. Instead I want to talk about a question it raised.The theme of Brian's talk was that the conventional wisdom about how to run larger companies is mistaken. As Airbnb grew, well-me
...
```
## Generating Contextual Chunks
This part contains the main intuition behind `Contextual Retrieval`. We will make an LLM call for each chunk to add much needed relevant context to the chunk. In order to do this we pass in the ENTIRE document per LLM call.
It may seem that passing in the entire document per chunk and making an LLM call per chunk is quite inefficient, this is true and there very well might be more efficient techniques to accomplish the same end goal. But in keeping with implementing the current technique at hand lets do it.
Additionally using quantized small 1-3B models (here we will use Llama 3.2 3B) along with prompt caching does make this more feasible.
Prompt caching allows key and value matrices corresponding to the document to be cached for future LLM calls.
We will use the following prompt to generate context for each chunk:
```py Python theme={null}
# We want to generate a snippet explaining the relevance/importance of the chunk with
# full document in mind.
CONTEXTUAL_RAG_PROMPT = """
Given the document below, we want to explain what the chunk captures in the document.
{WHOLE_DOCUMENT}
Here is the chunk we want to explain:
{CHUNK_CONTENT}
Answer ONLY with a succinct explaination of the meaning of the chunk in the context of the whole document above.
"""
```
Now we can prep each chunk into these prompt template and generate the context:
```py Python theme={null}
from typing import List
import together, os
from together import Together
# Paste in your Together AI API Key or load it
TOGETHER_API_KEY = os.environ.get("TOGETHER_API_KEY")
client = Together(api_key=TOGETHER_API_KEY)
# First we will just generate the prompts and examine them
def generate_prompts(document: str, chunks: List[str]) -> List[str]:
prompts = []
for chunk in chunks:
prompt = CONTEXTUAL_RAG_PROMPT.format(
WHOLE_DOCUMENT=document,
CHUNK_CONTENT=chunk,
)
prompts.append(prompt)
return prompts
prompts = generate_prompts(pg_essay, chunks)
def generate_context(prompt: str):
"""
Generates a contextual response based on the given prompt using the specified language model.
Args:
prompt (str): The input prompt to generate a response for.
Returns:
str: The generated response content from the language model.
"""
response = client.chat.completions.create(
model="meta-llama/Llama-3.2-3B-Instruct-Turbo",
messages=[{"role": "user", "content": prompt}],
temperature=1,
)
return response.choices[0].message.content
```
We can now use the functions above to generate context for each chunk and append it to the chunk itself:
```py Python theme={null}
# Let's generate the entire list of contextual chunks and concatenate to the original chunk
contextual_chunks = [
generate_context(prompts[i]) + " " + chunks[i] for i in range(len(chunks))
]
```
Now we can embed each chunk into a vector index.
## Vector Index
We will now use `bge-large-en-v1.5` to embed the augmented chunks above into a vector index.
```py Python theme={null}
from typing import List
import together
import numpy as np
def generate_embeddings(
input_texts: List[str],
model_api_string: str,
) -> List[List[float]]:
"""Generate embeddings from Together python library.
Args:
input_texts: a list of string input texts.
model_api_string: str. An API string for a specific embedding model of your choice.
Returns:
embeddings_list: a list of embeddings. Each element corresponds to the each input text.
"""
outputs = client.embeddings.create(
input=input_texts,
model=model_api_string,
)
return [x.embedding for x in outputs.data]
contextual_embeddings = generate_embeddings(
contextual_chunks,
"BAAI/bge-large-en-v1.5",
)
```
Next we need to write a function that can retrieve the top matching chunks from this index given a query:
```py Python theme={null}
def vector_retrieval(
query: str,
top_k: int = 5,
vector_index: np.ndarray = None,
) -> List[int]:
"""
Retrieve the top-k most similar items from an index based on a query.
Args:
query (str): The query string to search for.
top_k (int, optional): The number of top similar items to retrieve. Defaults to 5.
index (np.ndarray, optional): The index array containing embeddings to search against. Defaults to None.
Returns:
List[int]: A list of indices corresponding to the top-k most similar items in the index.
"""
query_embedding = generate_embeddings([query], "BAAI/bge-large-en-v1.5")[0]
similarity_scores = cosine_similarity([query_embedding], vector_index)
return list(np.argsort(-similarity_scores)[0][:top_k])
vector_retreival(
query="What are 'skip-level' meetings?",
top_k=5,
vector_index=contextual_embeddings,
)
```
We now have a way to retrieve from the vector index given a query.
## BM25 Index
Lets build a keyword index that allows us to use BM25 to perform lexical search based on the words present in the query and the contextual chunks. For this we will use the `bm25s` python library:
```py Python theme={null}
import bm25s
# Create the BM25 model and index the corpus
retriever = bm25s.BM25(corpus=contextual_chunks)
retriever.index(bm25s.tokenize(contextual_chunks))
```
Which can be queried as follows:
```py Python theme={null}
# Query the corpus and get top-k results
query = "What are 'skip-level' meetings?"
results, scores = retriever.retrieve(
bm25s.tokenize(query),
k=5,
)
```
Similar to the function above which produces vector results from the vector index we can write a function that produces keyword search results from the BM25 index:
```py Python theme={null}
def bm25_retrieval(query: str, k: int, bm25_index) -> List[int]:
"""
Retrieve the top-k document indices based on the BM25 algorithm for a given query.
Args:
query (str): The search query string.
k (int): The number of top documents to retrieve.
bm25_index: The BM25 index object used for retrieval.
Returns:
List[int]: A list of indices of the top-k documents that match the query.
"""
results, scores = bm25_index.retrieve(bm25s.tokenize(query), k=k)
return [contextual_chunks.index(doc) for doc in results[0]]
```
## Everything below this point will happen at query time!
Once a user submits a query we are going to use both functions above to perform Vector and BM25 retrieval and then fuse the ranks using the RRF algorithm implemented below.
```py Python theme={null}
# Example ranked lists from different sources
vector_top_k = vector_retreival(
query="What are 'skip-level' meetings?",
top_k=5,
vector_index=contextual_embeddings,
)
bm25_top_k = bm25_retreival(
query="What are 'skip-level' meetings?",
k=5,
bm25_index=retriever,
)
```
The Reciprocal Rank Fusion algorithm takes two ranked list of objects and combines them:
```py Python theme={null}
from collections import defaultdict
def reciprocal_rank_fusion(*list_of_list_ranks_system, K=60):
"""
Fuse rank from multiple IR systems using Reciprocal Rank Fusion.
Args:
* list_of_list_ranks_system: Ranked results from different IR system.
K (int): A constant used in the RRF formula (default is 60).
Returns:
Tuple of list of sorted documents by score and sorted documents
"""
# Dictionary to store RRF mapping
rrf_map = defaultdict(float)
# Calculate RRF score for each result in each list
for rank_list in list_of_list_ranks_system:
for rank, item in enumerate(rank_list, 1):
rrf_map[item] += 1 / (rank + K)
# Sort items based on their RRF scores in descending order
sorted_items = sorted(rrf_map.items(), key=lambda x: x[1], reverse=True)
# Return tuple of list of sorted documents by score and sorted documents
return sorted_items, [item for item, score in sorted_items]
```
We can use the RRF function above as follows:
```py Python theme={null}
# Combine the lists using RRF
hybrid_top_k = reciprocal_rank_fusion(vector_top_k, bm25_top_k)
hybrid_top_k[1]
hybrid_top_k_docs = [contextual_chunks[index] for index in hybrid_top_k[1]]
```
## Reranker To improve Quality
Now we add a retrieval quality improvement step here to make sure only the highest and most semantically similar chunks get sent to our LLM.
```py Python theme={null}
query = "What are 'skip-level' meetings?" # we keep the same query - can change if we want
response = client.rerank.create(
model="Salesforce/Llama-Rank-V1",
query=query,
documents=hybrid_top_k_docs,
top_n=3, # we only want the top 3 results but this can be alot higher
)
for result in response.results:
retreived_chunks += hybrid_top_k_docs[result.index] + "\n\n"
print(retreived_chunks)
```
This will produce the following three chunks from our essay:
```
This chunk refers to "skip-level" meetings, which are a key characteristic of founder mode, where the CEO engages directly with the company beyond their direct reports. This contrasts with the "manager mode" of addressing company issues, where decisions are made perfunctorily via a hierarchical system, to which founders instinctively rebel. that there's a name for it. And once you abandon that constraint there are a huge number of permutations to choose from.For example, Steve Jobs used to run an annual retreat for what he considered the 100 most important people at Apple, and these wer
This chunk discusses the shift in company management away from the "manager mode" that most companies follow, where CEOs engage with the company only through their direct reports, to "founder mode", where CEOs engage more directly with even higher-level employees and potentially skip over direct reports, potentially leading to "skip-level" meetings. ts of, it's pretty clear that it's going to break the principle that the CEO should engage with the company only via his or her direct reports. "Skip-level" meetings will become the norm instead of a practice so unusual that there's a name for it. An
This chunk explains that founder mode, a hypothetical approach to running a company by its founders, will differ from manager mode in that founders will engage directly with the company, rather than just their direct reports, through "skip-level" meetings, disregarding the traditional principle that CEOs should only interact with their direct reports, as managers do. can already guess at some of the ways it will differ.The way managers are taught to run companies seems to be like modular design in the sense that you treat subtrees of the org chart as black boxes. You tell your direct reports what to do, and it's
```
## Call Generative Model - Llama 3.1 405B
We will pass the finalized 3 chunks into an LLM to get our final answer.
```py Python theme={null}
# Generate a story based on the top 10 most similar movies
query = "What are 'skip-level' meetings?"
response = client.chat.completions.create(
model="meta-llama/Meta-Llama-3.1-405B-Instruct-Turbo",
messages=[
{"role": "system", "content": "You are a helpful chatbot."},
{
"role": "user",
"content": f"Answer the question: {query}. Here is relevant information: {retreived_chunks}",
},
],
)
```
Which produces the following response:
```
'"Skip-level" meetings refer to a management practice where a CEO or high-level executive engages directly with employees who are not their direct reports, bypassing the traditional hierarchical structure of the organization. This approach is characteristic of "founder mode," where the CEO seeks to have a more direct connection with the company beyond their immediate team. In contrast to the traditional "manager mode," where decisions are made through a hierarchical system, skip-level meetings allow for more open communication and collaboration between the CEO and various levels of employees. This approach is often used by founders who want to stay connected to the company\'s operations and culture, and to foster a more flat and collaborative organizational structure.'
```
Above we implemented Contextual Retrieval as discussed in Anthropic's blog using fully open source models!
If you want to learn more about how to best use open models refer to our [docs here](/docs) !
***
---
> To find navigation and other pages in this documentation, fetch the llms.txt file at: https://docs.together.ai/llms.txt
---
# Source: https://docs.together.ai/docs/how-to-improve-search-with-rerankers.md
# How To Improve Search With Rerankers
> Learn how you can improve semantic search quality with reranker models!
In this guide we will use a reranker model to improve the results produced from a simple semantic search workflow. To get a better understanding of how semantic search works please refer to the [Cookbook here](https://github.com/togethercomputer/together-cookbook/blob/main/Semantic_Search.ipynb) .
A reranker model operates by looking at the query and the retrieved results from the semantic search pipeline one by one and assesses how relevant the returned result is to the query. Because the reranker model can spend compute assessing the query with the returned result at the same time it can better judge how relevant the words and meanings in the query are to individual documents. This also means that rerankers are computationally expensive and slower - thus they cannot be used to rank every document in our database.
We run a semantic search process to obtain a list of 15-25 candidate objects that are similar "enough" to the query and then use the reranker as a fine-toothed comb to pick the top 5-10 objects that are actually closest to our query.
We will be using the [Salesforce Llama Rank](/docs/rerank-overview) reranker model.
We will RAG over Paul Grahams latest essay titled [Founder Mode](https://paulgraham.com/foundermode.html) .
```py Python theme={null}
# Let's download the essay from Paul Graham's website
import requests
from bs4 import BeautifulSoup
def scrape_pg_essay():
url = "https://paulgraham.com/foundermode.html"
try:
# Send GET request to the URL
response = requests.get(url)
response.raise_for_status() # Raise an error for bad status codes
# Parse the HTML content
soup = BeautifulSoup(response.text, "html.parser")
# Paul Graham's essays typically have the main content in a font tag
# You might need to adjust this selector based on the actual HTML structure
content = soup.find("font")
if content:
# Extract and clean the text
text = content.get_text()
# Remove extra whitespace and normalize line breaks
text = " ".join(text.split())
return text
else:
return "Could not find the main content of the essay."
except requests.RequestException as e:
return f"Error fetching the webpage: {e}"
# Scrape the essay
pg_essay = scrape_pg_essay()
```
This will give us the essay, we still need to chunk the essay, so lets implement a function and use it:
```py Python theme={null}
# We can get away with naive fixed sized chunking as the context generation will add meaning to these chunks
def create_chunks(document, chunk_size=300, overlap=50):
return [
document[i : i + chunk_size]
for i in range(0, len(document), chunk_size - overlap)
]
chunks = create_chunks(pg_essay, chunk_size=250, overlap=30)
for i, chunk in enumerate(chunks):
print(f"Chunk {i + 1}: {chunk}")
```
We get the following chunked content:
```
Chunk 1: September 2024At a YC event last week Brian Chesky gave a talk that everyone who was there will remember. Most founders I talked to afterward said it was the best they'd ever heard. Ron Conway, for the first time in his life, forgot to take notes. I'
Chunk 2: life, forgot to take notes. I'm not going to try to reproduce it here. Instead I want to talk about a question it raised.The theme of Brian's talk was that the conventional wisdom about how to run larger companies is mistaken. As Airbnb grew, well-me
...
```
## Generating Contextual Chunks
This part contains the main intuition behind `Contextual Retrieval`. We will make an LLM call for each chunk to add much needed relevant context to the chunk. In order to do this we pass in the ENTIRE document per LLM call.
It may seem that passing in the entire document per chunk and making an LLM call per chunk is quite inefficient, this is true and there very well might be more efficient techniques to accomplish the same end goal. But in keeping with implementing the current technique at hand lets do it.
Additionally using quantized small 1-3B models (here we will use Llama 3.2 3B) along with prompt caching does make this more feasible.
Prompt caching allows key and value matrices corresponding to the document to be cached for future LLM calls.
We will use the following prompt to generate context for each chunk:
```py Python theme={null}
# We want to generate a snippet explaining the relevance/importance of the chunk with
# full document in mind.
CONTEXTUAL_RAG_PROMPT = """
Given the document below, we want to explain what the chunk captures in the document.
{WHOLE_DOCUMENT}
Here is the chunk we want to explain:
{CHUNK_CONTENT}
Answer ONLY with a succinct explaination of the meaning of the chunk in the context of the whole document above.
"""
```
Now we can prep each chunk into these prompt template and generate the context:
```py Python theme={null}
from typing import List
import together, os
from together import Together
# Paste in your Together AI API Key or load it
TOGETHER_API_KEY = os.environ.get("TOGETHER_API_KEY")
client = Together(api_key=TOGETHER_API_KEY)
# First we will just generate the prompts and examine them
def generate_prompts(document: str, chunks: List[str]) -> List[str]:
prompts = []
for chunk in chunks:
prompt = CONTEXTUAL_RAG_PROMPT.format(
WHOLE_DOCUMENT=document,
CHUNK_CONTENT=chunk,
)
prompts.append(prompt)
return prompts
prompts = generate_prompts(pg_essay, chunks)
def generate_context(prompt: str):
"""
Generates a contextual response based on the given prompt using the specified language model.
Args:
prompt (str): The input prompt to generate a response for.
Returns:
str: The generated response content from the language model.
"""
response = client.chat.completions.create(
model="meta-llama/Llama-3.2-3B-Instruct-Turbo",
messages=[{"role": "user", "content": prompt}],
temperature=1,
)
return response.choices[0].message.content
```
We can now use the functions above to generate context for each chunk and append it to the chunk itself:
```py Python theme={null}
# Let's generate the entire list of contextual chunks and concatenate to the original chunk
contextual_chunks = [
generate_context(prompts[i]) + " " + chunks[i] for i in range(len(chunks))
]
```
Now we can embed each chunk into a vector index.
## Vector Index
We will now use `bge-large-en-v1.5` to embed the augmented chunks above into a vector index.
```py Python theme={null}
from typing import List
import together
import numpy as np
def generate_embeddings(
input_texts: List[str],
model_api_string: str,
) -> List[List[float]]:
"""Generate embeddings from Together python library.
Args:
input_texts: a list of string input texts.
model_api_string: str. An API string for a specific embedding model of your choice.
Returns:
embeddings_list: a list of embeddings. Each element corresponds to the each input text.
"""
outputs = client.embeddings.create(
input=input_texts,
model=model_api_string,
)
return [x.embedding for x in outputs.data]
contextual_embeddings = generate_embeddings(
contextual_chunks,
"BAAI/bge-large-en-v1.5",
)
```
Next we need to write a function that can retrieve the top matching chunks from this index given a query:
```py Python theme={null}
def vector_retrieval(
query: str,
top_k: int = 5,
vector_index: np.ndarray = None,
) -> List[int]:
"""
Retrieve the top-k most similar items from an index based on a query.
Args:
query (str): The query string to search for.
top_k (int, optional): The number of top similar items to retrieve. Defaults to 5.
index (np.ndarray, optional): The index array containing embeddings to search against. Defaults to None.
Returns:
List[int]: A list of indices corresponding to the top-k most similar items in the index.
"""
query_embedding = generate_embeddings([query], "BAAI/bge-large-en-v1.5")[0]
similarity_scores = cosine_similarity([query_embedding], vector_index)
return list(np.argsort(-similarity_scores)[0][:top_k])
vector_retreival(
query="What are 'skip-level' meetings?",
top_k=5,
vector_index=contextual_embeddings,
)
```
We now have a way to retrieve from the vector index given a query.
## BM25 Index
Lets build a keyword index that allows us to use BM25 to perform lexical search based on the words present in the query and the contextual chunks. For this we will use the `bm25s` python library:
```py Python theme={null}
import bm25s
# Create the BM25 model and index the corpus
retriever = bm25s.BM25(corpus=contextual_chunks)
retriever.index(bm25s.tokenize(contextual_chunks))
```
Which can be queried as follows:
```py Python theme={null}
# Query the corpus and get top-k results
query = "What are 'skip-level' meetings?"
results, scores = retriever.retrieve(
bm25s.tokenize(query),
k=5,
)
```
Similar to the function above which produces vector results from the vector index we can write a function that produces keyword search results from the BM25 index:
```py Python theme={null}
def bm25_retrieval(query: str, k: int, bm25_index) -> List[int]:
"""
Retrieve the top-k document indices based on the BM25 algorithm for a given query.
Args:
query (str): The search query string.
k (int): The number of top documents to retrieve.
bm25_index: The BM25 index object used for retrieval.
Returns:
List[int]: A list of indices of the top-k documents that match the query.
"""
results, scores = bm25_index.retrieve(bm25s.tokenize(query), k=k)
return [contextual_chunks.index(doc) for doc in results[0]]
```
## Everything below this point will happen at query time!
Once a user submits a query we are going to use both functions above to perform Vector and BM25 retrieval and then fuse the ranks using the RRF algorithm implemented below.
```py Python theme={null}
# Example ranked lists from different sources
vector_top_k = vector_retreival(
query="What are 'skip-level' meetings?",
top_k=5,
vector_index=contextual_embeddings,
)
bm25_top_k = bm25_retreival(
query="What are 'skip-level' meetings?",
k=5,
bm25_index=retriever,
)
```
The Reciprocal Rank Fusion algorithm takes two ranked list of objects and combines them:
```py Python theme={null}
from collections import defaultdict
def reciprocal_rank_fusion(*list_of_list_ranks_system, K=60):
"""
Fuse rank from multiple IR systems using Reciprocal Rank Fusion.
Args:
* list_of_list_ranks_system: Ranked results from different IR system.
K (int): A constant used in the RRF formula (default is 60).
Returns:
Tuple of list of sorted documents by score and sorted documents
"""
# Dictionary to store RRF mapping
rrf_map = defaultdict(float)
# Calculate RRF score for each result in each list
for rank_list in list_of_list_ranks_system:
for rank, item in enumerate(rank_list, 1):
rrf_map[item] += 1 / (rank + K)
# Sort items based on their RRF scores in descending order
sorted_items = sorted(rrf_map.items(), key=lambda x: x[1], reverse=True)
# Return tuple of list of sorted documents by score and sorted documents
return sorted_items, [item for item, score in sorted_items]
```
We can use the RRF function above as follows:
```py Python theme={null}
# Combine the lists using RRF
hybrid_top_k = reciprocal_rank_fusion(vector_top_k, bm25_top_k)
hybrid_top_k[1]
hybrid_top_k_docs = [contextual_chunks[index] for index in hybrid_top_k[1]]
```
## Reranker To improve Quality
Now we add a retrieval quality improvement step here to make sure only the highest and most semantically similar chunks get sent to our LLM.
```py Python theme={null}
query = "What are 'skip-level' meetings?" # we keep the same query - can change if we want
response = client.rerank.create(
model="Salesforce/Llama-Rank-V1",
query=query,
documents=hybrid_top_k_docs,
top_n=3, # we only want the top 3 results but this can be alot higher
)
for result in response.results:
retreived_chunks += hybrid_top_k_docs[result.index] + "\n\n"
print(retreived_chunks)
```
This will produce the following three chunks from our essay:
```
This chunk refers to "skip-level" meetings, which are a key characteristic of founder mode, where the CEO engages directly with the company beyond their direct reports. This contrasts with the "manager mode" of addressing company issues, where decisions are made perfunctorily via a hierarchical system, to which founders instinctively rebel. that there's a name for it. And once you abandon that constraint there are a huge number of permutations to choose from.For example, Steve Jobs used to run an annual retreat for what he considered the 100 most important people at Apple, and these wer
This chunk discusses the shift in company management away from the "manager mode" that most companies follow, where CEOs engage with the company only through their direct reports, to "founder mode", where CEOs engage more directly with even higher-level employees and potentially skip over direct reports, potentially leading to "skip-level" meetings. ts of, it's pretty clear that it's going to break the principle that the CEO should engage with the company only via his or her direct reports. "Skip-level" meetings will become the norm instead of a practice so unusual that there's a name for it. An
This chunk explains that founder mode, a hypothetical approach to running a company by its founders, will differ from manager mode in that founders will engage directly with the company, rather than just their direct reports, through "skip-level" meetings, disregarding the traditional principle that CEOs should only interact with their direct reports, as managers do. can already guess at some of the ways it will differ.The way managers are taught to run companies seems to be like modular design in the sense that you treat subtrees of the org chart as black boxes. You tell your direct reports what to do, and it's
```
## Call Generative Model - Llama 3.1 405B
We will pass the finalized 3 chunks into an LLM to get our final answer.
```py Python theme={null}
# Generate a story based on the top 10 most similar movies
query = "What are 'skip-level' meetings?"
response = client.chat.completions.create(
model="meta-llama/Meta-Llama-3.1-405B-Instruct-Turbo",
messages=[
{"role": "system", "content": "You are a helpful chatbot."},
{
"role": "user",
"content": f"Answer the question: {query}. Here is relevant information: {retreived_chunks}",
},
],
)
```
Which produces the following response:
```
'"Skip-level" meetings refer to a management practice where a CEO or high-level executive engages directly with employees who are not their direct reports, bypassing the traditional hierarchical structure of the organization. This approach is characteristic of "founder mode," where the CEO seeks to have a more direct connection with the company beyond their immediate team. In contrast to the traditional "manager mode," where decisions are made through a hierarchical system, skip-level meetings allow for more open communication and collaboration between the CEO and various levels of employees. This approach is often used by founders who want to stay connected to the company\'s operations and culture, and to foster a more flat and collaborative organizational structure.'
```
Above we implemented Contextual Retrieval as discussed in Anthropic's blog using fully open source models!
If you want to learn more about how to best use open models refer to our [docs here](/docs) !
***
---
> To find navigation and other pages in this documentation, fetch the llms.txt file at: https://docs.together.ai/llms.txt
---
# Source: https://docs.together.ai/docs/how-to-improve-search-with-rerankers.md
# How To Improve Search With Rerankers
> Learn how you can improve semantic search quality with reranker models!
In this guide we will use a reranker model to improve the results produced from a simple semantic search workflow. To get a better understanding of how semantic search works please refer to the [Cookbook here](https://github.com/togethercomputer/together-cookbook/blob/main/Semantic_Search.ipynb) .
A reranker model operates by looking at the query and the retrieved results from the semantic search pipeline one by one and assesses how relevant the returned result is to the query. Because the reranker model can spend compute assessing the query with the returned result at the same time it can better judge how relevant the words and meanings in the query are to individual documents. This also means that rerankers are computationally expensive and slower - thus they cannot be used to rank every document in our database.
We run a semantic search process to obtain a list of 15-25 candidate objects that are similar "enough" to the query and then use the reranker as a fine-toothed comb to pick the top 5-10 objects that are actually closest to our query.
We will be using the [Salesforce Llama Rank](/docs/rerank-overview) reranker model.
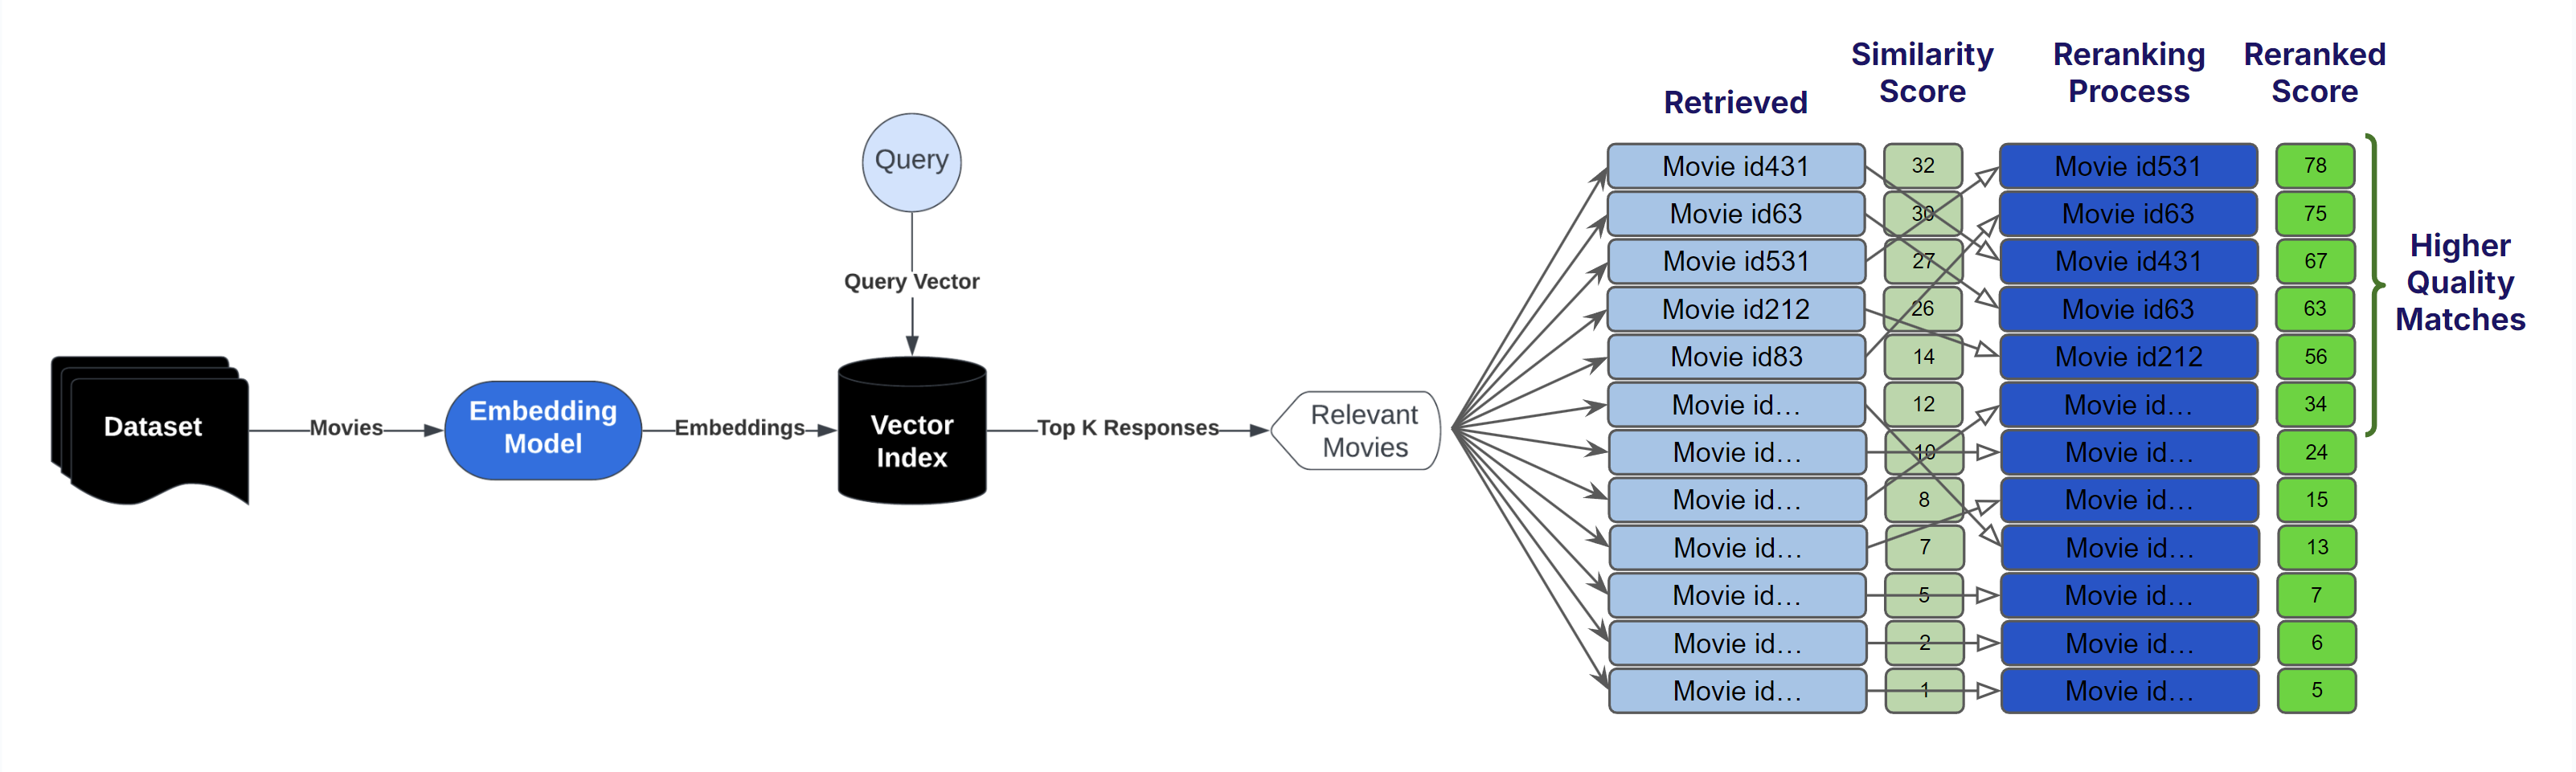 ## Download and View the Dataset
```bash Shell theme={null}
wget https://raw.githubusercontent.com/togethercomputer/together-cookbook/refs/heads/main/datasets/movies.json
mkdir datasets
mv movies.json datasets/movies.json
```
```py Python theme={null}
import json
import together, os
from together import Together
# Paste in your Together AI API Key or load it
TOGETHER_API_KEY = os.environ.get("TOGETHER_API_KEY")
client = Together(api_key=TOGETHER_API_KEY)
with open("./datasets/movies.json", "r") as file:
movies_data = json.load(file)
movies_data[10:13]
```
Our dataset contains information about popular movies:
```
[{'title': 'Terminator Genisys',
'overview': "The year is 2029. John Connor, leader of the resistance continues the war against the machines. At the Los Angeles offensive, John's fears of the unknown future begin to emerge when TECOM spies reveal a new plot by SkyNet that will attack him from both fronts; past and future, and will ultimately change warfare forever.",
'director': 'Alan Taylor',
'genres': 'Science Fiction Action Thriller Adventure',
'tagline': 'Reset the future'},
{'title': 'Captain America: Civil War',
'overview': 'Following the events of Age of Ultron, the collective governments of the world pass an act designed to regulate all superhuman activity. This polarizes opinion amongst the Avengers, causing two factions to side with Iron Man or Captain America, which causes an epic battle between former allies.',
'director': 'Anthony Russo',
'genres': 'Adventure Action Science Fiction',
'tagline': 'Divided We Fall'},
{'title': 'Whiplash',
'overview': 'Under the direction of a ruthless instructor, a talented young drummer begins to pursue perfection at any cost, even his humanity.',
'director': 'Damien Chazelle',
'genres': 'Drama',
'tagline': 'The road to greatness can take you to the edge.'}]
```
## Implement Semantic Search Pipeline
Below we implement a simple semantic search pipeline:
1. Embed movie documents + query
2. Obtain a list of movies ranked based on cosine similarities between the query and movie vectors.
```py Python theme={null}
# This function will be used to access the Together API to generate embeddings for the movie plots
from typing import List
def generate_embeddings(
input_texts: List[str],
model_api_string: str,
) -> List[List[float]]:
"""Generate embeddings from Together python library.
Args:
input_texts: a list of string input texts.
model_api_string: str. An API string for a specific embedding model of your choice.
Returns:
embeddings_list: a list of embeddings. Each element corresponds to the each input text.
"""
together_client = together.Together(api_key=TOGETHER_API_KEY)
outputs = together_client.embeddings.create(
input=input_texts,
model=model_api_string,
)
return [x.embedding for x in outputs.data]
to_embed = []
for movie in movies_data[:1000]:
text = ""
for field in ["title", "overview", "tagline"]:
value = movie.get(field, "")
text += str(value) + " "
to_embed.append(text.strip())
# Use bge-base-en-v1.5 model to generate embeddings
embeddings = generate_embeddings(to_embed, "BAAI/bge-base-en-v1.5")
```
Next we implement a function that when given the above embeddings and a test query will return indices of most semantically similar data objects:
```py Python theme={null}
def retrieve(
query: str,
top_k: int = 5,
index: np.ndarray = None,
) -> List[int]:
"""
Retrieve the top-k most similar items from an index based on a query.
Args:
query (str): The query string to search for.
top_k (int, optional): The number of top similar items to retrieve. Defaults to 5.
index (np.ndarray, optional): The index array containing embeddings to search against. Defaults to None.
Returns:
List[int]: A list of indices corresponding to the top-k most similar items in the index.
"""
query_embedding = generate_embeddings([query], "BAAI/bge-base-en-v1.5")[0]
similarity_scores = cosine_similarity([query_embedding], index)
return np.argsort(-similarity_scores)[0][:top_k]
```
We will use the above function to retrieve 25 movies most similar to our query:
```py Python theme={null}
indices = retrieve(
query="super hero mystery action movie about bats",
top_k=25,
index=embeddings,
)
```
This will give us the following movie indices and movie titles:
```
array([ 13, 265, 451, 33, 56, 17, 140, 450, 58, 828, 227, 62, 337,
172, 724, 424, 585, 696, 933, 996, 932, 433, 883, 420, 744])
```
```py Python theme={null}
# Get the top 25 movie titles that are most similar to the query - these will be passed to the reranker
top_25_sorted_titles = [movies_data[index]["title"] for index in indices[0]][
:25
]
```
```
['The Dark Knight',
'Watchmen',
'Predator',
'Despicable Me 2',
'Night at the Museum: Secret of the Tomb',
'Batman v Superman: Dawn of Justice',
'Penguins of Madagascar',
'Batman & Robin',
'Batman Begins',
'Super 8',
'Megamind',
'The Dark Knight Rises',
'Batman Returns',
'The Incredibles',
'The Raid',
'Die Hard: With a Vengeance',
'Kick-Ass',
'Fantastic Mr. Fox',
'Commando',
'Tremors',
'The Peanuts Movie',
'Kung Fu Panda 2',
'Crank: High Voltage',
'Men in Black 3',
'ParaNorman']
```
Notice here that not all movies in our top 25 have to do with our query - super hero mystery action movie about bats. This is because semantic search capture the "approximate" meaning of the query and movies.
The reranker can more closely determine the similarity between these 25 candidates and rerank which ones deserve to be atop our list.
## Use Llama Rank to Rerank Top 25 Movies
Treating the top 25 matching movies as good candidate matches, potentially with irrelevant false positives, that might have snuck in we want to have the reranker model look and rerank each based on similarity to the query.
```py Python theme={null}
query = "super hero mystery action movie about bats" # we keep the same query - can change if we want
response = client.rerank.create(
model="Salesforce/Llama-Rank-V1",
query=query,
documents=top_25_sorted_titles,
top_n=5, # we only want the top 5 results
)
for result in response.results:
print(f"Document Index: {result.index}")
print(f"Document: {top_25_sorted_titles[result.index]}")
print(f"Relevance Score: {result.relevance_score}")
```
This will give us a reranked list of movies as shown below:
```
Document Index: 12
Document: Batman Returns
Relevance Score: 0.35380946383813044
Document Index: 8
Document: Batman Begins
Relevance Score: 0.339339115127178
Document Index: 7
Document: Batman & Robin
Relevance Score: 0.33013392395016167
Document Index: 5
Document: Batman v Superman: Dawn of Justice
Relevance Score: 0.3289763252445171
Document Index: 9
Document: Super 8
Relevance Score: 0.258483721657576
```
Here we can see that that reranker was able to improve the list by demoting irrelevant movies like Watchmen, Predator, Despicable Me 2, Night at the Museum: Secret of the Tomb, Penguins of Madagascar, further down the list and promoting Batman Returns, Batman Begins, Batman & Robin, Batman v Superman: Dawn of Justice to the top of the list!
The `bge-base-en-v1.5` embedding model gives us a fuzzy match to concepts mentioned in the query, the Llama-Rank-V1 reranker then imrpoves the quality of our list further by spending more compute to resort the list of movies.
Learn more about how to use reranker models in the [docs here](/docs/rerank-overview) !
***
---
> To find navigation and other pages in this documentation, fetch the llms.txt file at: https://docs.together.ai/llms.txt
---
# Source: https://docs.together.ai/docs/how-to-use-cline.md
> Use Cline (an AI coding agent) with DeepSeek V3 (a powerful open source model) to code faster.
# How to use Cline with DeepSeek V3 to build faster
Cline is a popular open source AI coding agent with nearly 2 million installs that is installable through any IDE including VS Code, Cursor, and Windsurf. In this quick guide, we want to take you through how you can combine Cline with powerful open source models on Together AI like DeepSeek V3 to supercharge your development process.
With Cline's agent, you can ask it to build features, fix bugs, or start new projects for you – and it's fully transparent in terms of the cost and tokens used as you use it. Here's how you can start using it with DeepSeek V3 on Together AI:
### 1. Install Cline
Navigate to [https://cline.bot/](https://cline.bot/) to install Cline in your preferred IDE.
## Download and View the Dataset
```bash Shell theme={null}
wget https://raw.githubusercontent.com/togethercomputer/together-cookbook/refs/heads/main/datasets/movies.json
mkdir datasets
mv movies.json datasets/movies.json
```
```py Python theme={null}
import json
import together, os
from together import Together
# Paste in your Together AI API Key or load it
TOGETHER_API_KEY = os.environ.get("TOGETHER_API_KEY")
client = Together(api_key=TOGETHER_API_KEY)
with open("./datasets/movies.json", "r") as file:
movies_data = json.load(file)
movies_data[10:13]
```
Our dataset contains information about popular movies:
```
[{'title': 'Terminator Genisys',
'overview': "The year is 2029. John Connor, leader of the resistance continues the war against the machines. At the Los Angeles offensive, John's fears of the unknown future begin to emerge when TECOM spies reveal a new plot by SkyNet that will attack him from both fronts; past and future, and will ultimately change warfare forever.",
'director': 'Alan Taylor',
'genres': 'Science Fiction Action Thriller Adventure',
'tagline': 'Reset the future'},
{'title': 'Captain America: Civil War',
'overview': 'Following the events of Age of Ultron, the collective governments of the world pass an act designed to regulate all superhuman activity. This polarizes opinion amongst the Avengers, causing two factions to side with Iron Man or Captain America, which causes an epic battle between former allies.',
'director': 'Anthony Russo',
'genres': 'Adventure Action Science Fiction',
'tagline': 'Divided We Fall'},
{'title': 'Whiplash',
'overview': 'Under the direction of a ruthless instructor, a talented young drummer begins to pursue perfection at any cost, even his humanity.',
'director': 'Damien Chazelle',
'genres': 'Drama',
'tagline': 'The road to greatness can take you to the edge.'}]
```
## Implement Semantic Search Pipeline
Below we implement a simple semantic search pipeline:
1. Embed movie documents + query
2. Obtain a list of movies ranked based on cosine similarities between the query and movie vectors.
```py Python theme={null}
# This function will be used to access the Together API to generate embeddings for the movie plots
from typing import List
def generate_embeddings(
input_texts: List[str],
model_api_string: str,
) -> List[List[float]]:
"""Generate embeddings from Together python library.
Args:
input_texts: a list of string input texts.
model_api_string: str. An API string for a specific embedding model of your choice.
Returns:
embeddings_list: a list of embeddings. Each element corresponds to the each input text.
"""
together_client = together.Together(api_key=TOGETHER_API_KEY)
outputs = together_client.embeddings.create(
input=input_texts,
model=model_api_string,
)
return [x.embedding for x in outputs.data]
to_embed = []
for movie in movies_data[:1000]:
text = ""
for field in ["title", "overview", "tagline"]:
value = movie.get(field, "")
text += str(value) + " "
to_embed.append(text.strip())
# Use bge-base-en-v1.5 model to generate embeddings
embeddings = generate_embeddings(to_embed, "BAAI/bge-base-en-v1.5")
```
Next we implement a function that when given the above embeddings and a test query will return indices of most semantically similar data objects:
```py Python theme={null}
def retrieve(
query: str,
top_k: int = 5,
index: np.ndarray = None,
) -> List[int]:
"""
Retrieve the top-k most similar items from an index based on a query.
Args:
query (str): The query string to search for.
top_k (int, optional): The number of top similar items to retrieve. Defaults to 5.
index (np.ndarray, optional): The index array containing embeddings to search against. Defaults to None.
Returns:
List[int]: A list of indices corresponding to the top-k most similar items in the index.
"""
query_embedding = generate_embeddings([query], "BAAI/bge-base-en-v1.5")[0]
similarity_scores = cosine_similarity([query_embedding], index)
return np.argsort(-similarity_scores)[0][:top_k]
```
We will use the above function to retrieve 25 movies most similar to our query:
```py Python theme={null}
indices = retrieve(
query="super hero mystery action movie about bats",
top_k=25,
index=embeddings,
)
```
This will give us the following movie indices and movie titles:
```
array([ 13, 265, 451, 33, 56, 17, 140, 450, 58, 828, 227, 62, 337,
172, 724, 424, 585, 696, 933, 996, 932, 433, 883, 420, 744])
```
```py Python theme={null}
# Get the top 25 movie titles that are most similar to the query - these will be passed to the reranker
top_25_sorted_titles = [movies_data[index]["title"] for index in indices[0]][
:25
]
```
```
['The Dark Knight',
'Watchmen',
'Predator',
'Despicable Me 2',
'Night at the Museum: Secret of the Tomb',
'Batman v Superman: Dawn of Justice',
'Penguins of Madagascar',
'Batman & Robin',
'Batman Begins',
'Super 8',
'Megamind',
'The Dark Knight Rises',
'Batman Returns',
'The Incredibles',
'The Raid',
'Die Hard: With a Vengeance',
'Kick-Ass',
'Fantastic Mr. Fox',
'Commando',
'Tremors',
'The Peanuts Movie',
'Kung Fu Panda 2',
'Crank: High Voltage',
'Men in Black 3',
'ParaNorman']
```
Notice here that not all movies in our top 25 have to do with our query - super hero mystery action movie about bats. This is because semantic search capture the "approximate" meaning of the query and movies.
The reranker can more closely determine the similarity between these 25 candidates and rerank which ones deserve to be atop our list.
## Use Llama Rank to Rerank Top 25 Movies
Treating the top 25 matching movies as good candidate matches, potentially with irrelevant false positives, that might have snuck in we want to have the reranker model look and rerank each based on similarity to the query.
```py Python theme={null}
query = "super hero mystery action movie about bats" # we keep the same query - can change if we want
response = client.rerank.create(
model="Salesforce/Llama-Rank-V1",
query=query,
documents=top_25_sorted_titles,
top_n=5, # we only want the top 5 results
)
for result in response.results:
print(f"Document Index: {result.index}")
print(f"Document: {top_25_sorted_titles[result.index]}")
print(f"Relevance Score: {result.relevance_score}")
```
This will give us a reranked list of movies as shown below:
```
Document Index: 12
Document: Batman Returns
Relevance Score: 0.35380946383813044
Document Index: 8
Document: Batman Begins
Relevance Score: 0.339339115127178
Document Index: 7
Document: Batman & Robin
Relevance Score: 0.33013392395016167
Document Index: 5
Document: Batman v Superman: Dawn of Justice
Relevance Score: 0.3289763252445171
Document Index: 9
Document: Super 8
Relevance Score: 0.258483721657576
```
Here we can see that that reranker was able to improve the list by demoting irrelevant movies like Watchmen, Predator, Despicable Me 2, Night at the Museum: Secret of the Tomb, Penguins of Madagascar, further down the list and promoting Batman Returns, Batman Begins, Batman & Robin, Batman v Superman: Dawn of Justice to the top of the list!
The `bge-base-en-v1.5` embedding model gives us a fuzzy match to concepts mentioned in the query, the Llama-Rank-V1 reranker then imrpoves the quality of our list further by spending more compute to resort the list of movies.
Learn more about how to use reranker models in the [docs here](/docs/rerank-overview) !
***
---
> To find navigation and other pages in this documentation, fetch the llms.txt file at: https://docs.together.ai/llms.txt
---
# Source: https://docs.together.ai/docs/how-to-use-cline.md
> Use Cline (an AI coding agent) with DeepSeek V3 (a powerful open source model) to code faster.
# How to use Cline with DeepSeek V3 to build faster
Cline is a popular open source AI coding agent with nearly 2 million installs that is installable through any IDE including VS Code, Cursor, and Windsurf. In this quick guide, we want to take you through how you can combine Cline with powerful open source models on Together AI like DeepSeek V3 to supercharge your development process.
With Cline's agent, you can ask it to build features, fix bugs, or start new projects for you – and it's fully transparent in terms of the cost and tokens used as you use it. Here's how you can start using it with DeepSeek V3 on Together AI:
### 1. Install Cline
Navigate to [https://cline.bot/](https://cline.bot/) to install Cline in your preferred IDE.
 ### 2. Select Cline
After it's installed, select Cline from the menu of your IDE to configure it.
### 2. Select Cline
After it's installed, select Cline from the menu of your IDE to configure it.
 ### 3. Configure Together AI & DeepSeek V3
Click "Use your own API key". After this, select Together as the API Provider, paste in your [Together API key](https://api.together.xyz/settings/api-keys), and type in any of our models to use. We recommend using `deepseek-ai/DeepSeek-V3` as its a powerful coding model.
### 3. Configure Together AI & DeepSeek V3
Click "Use your own API key". After this, select Together as the API Provider, paste in your [Together API key](https://api.together.xyz/settings/api-keys), and type in any of our models to use. We recommend using `deepseek-ai/DeepSeek-V3` as its a powerful coding model.
 That's it! You can now build faster with one of the most popular coding agents running a fast, secure, and private open source model hosted on Together AI.
---
> To find navigation and other pages in this documentation, fetch the llms.txt file at: https://docs.together.ai/llms.txt
---
# Source: https://docs.together.ai/docs/how-to-use-opencode.md
# How to use OpenCode with Together AI to build faster
> Learn how to combine OpenCode, a powerful terminal-based AI coding agent, with Together AI models like DeepSeek V3 to supercharge your development workflow.
# How to use OpenCode with Together AI to build faster
OpenCode is a powerful AI coding agent built specifically for the terminal, offering a native TUI experience with LSP support and multi-session capabilities. In this guide, we'll show you how to combine OpenCode with powerful open source models on Together AI like DeepSeek V3 and DeepSeek R1 to supercharge your development workflow directly from your terminal.
With OpenCode's agent, you can ask it to build features, fix bugs, explain codebases, and start new projects – all while maintaining full transparency in terms of cost and token usage. Here's how you can start using it with Together AI's models:
## 1. Install OpenCode
Install OpenCode directly from your terminal with a single command:
```bash theme={null}
curl -fsSL https://opencode.ai/install | bash
```
This will install OpenCode and make it available system-wide.
## 2. Launch OpenCode
Navigate to your project directory and launch OpenCode:
```bash theme={null}
cd your-project
opencode
```
OpenCode will start with its native terminal UI interface, automatically detecting and loading the appropriate Language Server Protocol (LSP) for your project.
## 3. Configure Together AI
When you first run OpenCode, you'll need to configure it to use Together AI as your model provider. Follow these steps:
* **Set up your API provider**: Configure OpenCode to use Together AI
* **opencode auth login**
That's it! You can now build faster with one of the most popular coding agents running a fast, secure, and private open source model hosted on Together AI.
---
> To find navigation and other pages in this documentation, fetch the llms.txt file at: https://docs.together.ai/llms.txt
---
# Source: https://docs.together.ai/docs/how-to-use-opencode.md
# How to use OpenCode with Together AI to build faster
> Learn how to combine OpenCode, a powerful terminal-based AI coding agent, with Together AI models like DeepSeek V3 to supercharge your development workflow.
# How to use OpenCode with Together AI to build faster
OpenCode is a powerful AI coding agent built specifically for the terminal, offering a native TUI experience with LSP support and multi-session capabilities. In this guide, we'll show you how to combine OpenCode with powerful open source models on Together AI like DeepSeek V3 and DeepSeek R1 to supercharge your development workflow directly from your terminal.
With OpenCode's agent, you can ask it to build features, fix bugs, explain codebases, and start new projects – all while maintaining full transparency in terms of cost and token usage. Here's how you can start using it with Together AI's models:
## 1. Install OpenCode
Install OpenCode directly from your terminal with a single command:
```bash theme={null}
curl -fsSL https://opencode.ai/install | bash
```
This will install OpenCode and make it available system-wide.
## 2. Launch OpenCode
Navigate to your project directory and launch OpenCode:
```bash theme={null}
cd your-project
opencode
```
OpenCode will start with its native terminal UI interface, automatically detecting and loading the appropriate Language Server Protocol (LSP) for your project.
## 3. Configure Together AI
When you first run OpenCode, you'll need to configure it to use Together AI as your model provider. Follow these steps:
* **Set up your API provider**: Configure OpenCode to use Together AI
* **opencode auth login**
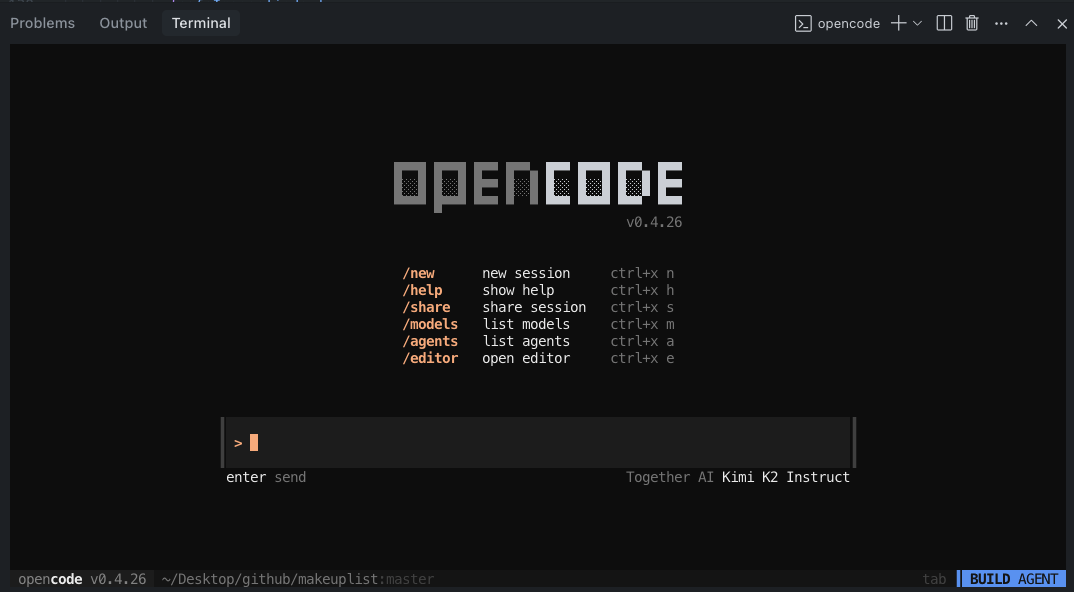 > To find the Together AI provider you will need to scroll the provider list of simply type together
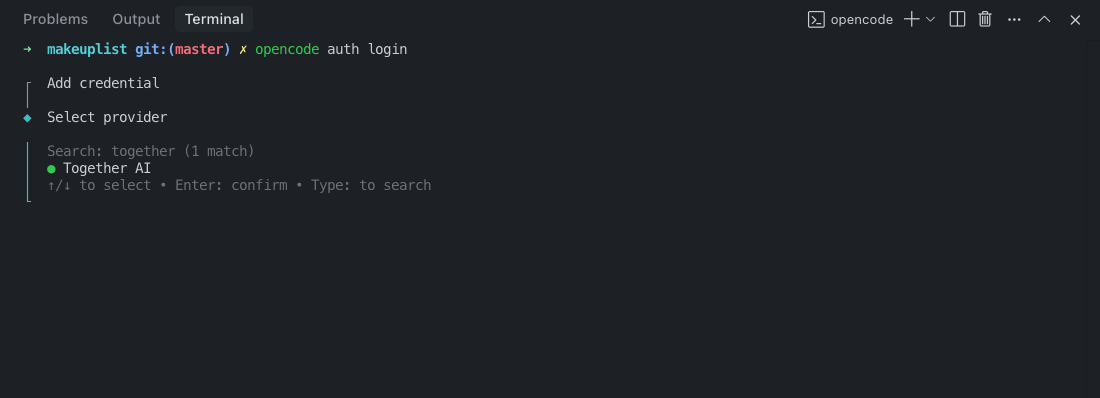 * **Add your API key**: Get your [Together AI API key](https://api.together.xyz/settings/api-keys) and paste it into the opencode terminal
* **Select a model**: Choose from powerful models like:
* `deepseek-ai/DeepSeek-V3` - Excellent for general coding tasks
* `deepseek-ai/DeepSeek-R1` - Advanced reasoning capabilities
* `meta-llama/Llama-3.3-70B-Instruct-Turbo` - Fast and efficient
* `Qwen/Qwen3-Coder-480B-A35B-Instruct-FP8` - Specialized coding model
## 4. Bonus: install the opencode vs-code extension
For developers who prefer working within VS Code, OpenCode offers a dedicated extension that integrates seamlessly into your IDE workflow while still leveraging the power of the terminal-based agent.
Install the extension: Search for "opencode" in the VS Code Extensions Marketplace or directly use this link:
* [https://open-vsx.org/extension/sst-dev/opencode](https://open-vsx.org/extension/sst-dev/opencode)
## Key Features & Usage
### Native Terminal Experience
OpenCode provides a responsive, native terminal UI that's fully themeable and integrated into your command-line workflow.
### Plan Mode vs Build Mode
Switch between modes using the **Tab** key:
* **Plan Mode**: Ask OpenCode to create implementation plans without making changes
* **Build Mode**: Let OpenCode directly implement features and make code changes
### File References with Fuzzy Search
Use the `@` key to fuzzy search and reference files in your project:
```
How is authentication handled in @packages/functions/src/api/index.ts
```
## Best Practices
### Give Detailed Context
Talk to OpenCode like you're talking to a junior developer:
```
When a user deletes a note, flag it as deleted in the database instead of removing it.
Then create a "Recently Deleted" screen where users can restore or permanently delete notes.
Use the same design patterns as our existing settings page.
```
### Use Examples and References
Provide plenty of context and examples:
```
Add error handling to the API similar to how it's done in @src/utils/errorHandler.js
```
### Iterate on Plans
In Plan Mode, review and refine the approach before implementation:
```
That looks good, but let's also add input validation and rate limiting
```
## Model Recommendations
* **DeepSeek V3** (`deepseek-ai/DeepSeek-V3`): \$1.25 per million tokens, excellent balance of performance and cost
* **DeepSeek R1** (`deepseek-ai/DeepSeek-R1`): $3.00-$7.00 per million tokens, advanced reasoning for complex problems
* **Llama 3.3 70B** (`meta-llama/Llama-3.3-70B-Instruct-Turbo`): \$0.88 per million tokens, fast and cost-effective
## Getting Started
1. Install OpenCode: `curl -fsSL https://opencode.ai/install | bash`
2. Navigate to your project: `cd your-project`
3. Launch OpenCode: `opencode`
4. Configure Together AI with your API key
5. Start building faster with AI assistance!
That's it! You now have one of the most powerful terminal-based AI coding agents running with fast, secure, and private open source models hosted on Together AI. OpenCode's native terminal interface combined with Together AI's powerful models will transform your development workflow.
---
> To find navigation and other pages in this documentation, fetch the llms.txt file at: https://docs.together.ai/llms.txt
---
# Source: https://docs.together.ai/docs/how-to-use-qwen-code.md
# How to use Qwen Code with Together AI for enhanced development workflow
> Learn how to configure Qwen Code, a powerful AI-powered command-line workflow tool, with Together AI models to supercharge your coding workflow with advanced code understanding and automation.
# How to use Qwen Code with Together AI for enhanced development workflow
Qwen Code is a powerful command-line AI workflow tool specifically optimized for code understanding, automated tasks, and intelligent development assistance. While it comes with built-in Qwen OAuth support, you can also configure it to use Together AI's extensive model selection for even more flexibility and control over your AI coding experience.
In this guide, we'll show you how to set up Qwen Code with Together AI's powerful models like DeepSeek V3, Llama 3.3 70B, and specialized coding models to enhance your development workflow beyond traditional context window limits.
## Why Use Qwen Code with Together AI?
* **Model Choice**: Access to a wide variety of models beyond just Qwen models
* **Transparent Pricing**: Clear token-based pricing with no surprises
* **Enterprise Control**: Use your own API keys and have full control over usage
* **Specialized Models**: Access to coding-specific models like Qwen3-Coder and DeepSeek variants
## 1. Install Qwen Code
Install Qwen Code globally via npm:
```bash theme={null}
npm install -g @qwen-code/qwen-code@latest
```
Verify the installation:
```bash theme={null}
qwen --version
```
**Prerequisites**: Ensure you have Node.js version 20 or higher installed.
## 2. Configure Together AI
Instead of using the default Qwen OAuth, you'll configure Qwen Code to use Together AI's OpenAI-compatible API.
### Method 1: Environment Variables (Recommended)
Set up your environment variables:
```bash theme={null}
export OPENAI_API_KEY="your_together_api_key_here"
export OPENAI_BASE_URL="https://api.together.xyz/v1"
export OPENAI_MODEL="your_chosen_model"
```
### Method 2: Project .env File
Create a `.env` file in your project root:
```env theme={null}
OPENAI_API_KEY=your_together_api_key_here
OPENAI_BASE_URL=https://api.together.xyz/v1
OPENAI_MODEL=your_chosen_model
```
### Get Your Together AI Credentials
1. **API Key**: Get your [Together AI API key](https://api.together.xyz/settings/api-keys)
2. **Base URL**: Use `https://api.together.xyz/v1` for Together AI
3. **Model**: Choose from [Together AI's model catalog](https://www.together.ai/models)
## 3. Choose Your Model
Select from Together AI's powerful model selection:
### Recommended Models for Coding
**For General Development:**
* `deepseek-ai/DeepSeek-V3` - Excellent balance of performance and cost (\$1.25/M tokens)
* `meta-llama/Llama-3.3-70B-Instruct-Turbo` - Fast and cost-effective (\$0.88/M tokens)
**For Advanced Coding Tasks:**
* `Qwen/Qwen3-Coder-480B-A35B-Instruct-FP8` - Specialized for complex coding (\$2.00/M tokens)
* `deepseek-ai/DeepSeek-R1` - Advanced reasoning capabilities ($3.00-$7.00/M tokens)
### Example Configuration
```bash theme={null}
export OPENAI_API_KEY="your_together_api_key"
export OPENAI_BASE_URL="https://api.together.xyz/v1"
export OPENAI_MODEL="deepseek-ai/DeepSeek-V3"
```
## 4. Launch and Use Qwen Code
Navigate to your project and start Qwen Code:
```bash theme={null}
cd your-project/
qwen
```
You're now ready to use Qwen Code with Together AI models!
## Advanced Tips
### Token Optimization
* Use `/compress` to maintain context while reducing token usage
* Set appropriate session limits based on your Together AI plan
* Monitor usage with `/stats` command
### Model Selection Strategy
* Use **DeepSeek V3** for general coding tasks
* Switch to **Qwen3-Coder** for complex code generation
* Use **Llama 3.3 70B** for faster, cost-effective operations
### Context Window Management
Qwen Code is designed to handle large codebases beyond traditional context limits:
* Automatically chunks and processes large files
* Maintains conversation context across multiple API calls
* Optimizes token usage through intelligent compression
## Troubleshooting
### Common Issues
**Authentication Errors:**
* Verify your Together AI API key is correct
* Ensure `OPENAI_BASE_URL` is set to `https://api.together.xyz/v1`
* Check that your API key has sufficient credits
**Model Not Found:**
* Verify the model name exists in [Together AI's catalog](https://www.together.ai/models)
* Ensure the model name is exactly as listed (case-sensitive)
## Getting Started Checklist
1. ✅ Install Node.js 20+ and Qwen Code
2. ✅ Get your Together AI API key
3. ✅ Set environment variables or create `.env` file
4. ✅ Choose your preferred model from Together AI
5. ✅ Launch Qwen Code in your project directory
6. ✅ Start coding with AI assistance!
That's it! You now have Qwen Code powered by Together AI's advanced models, giving you unprecedented control over your AI-assisted development workflow with transparent pricing and model flexibility.
---
> To find navigation and other pages in this documentation, fetch the llms.txt file at: https://docs.together.ai/llms.txt
---
# Source: https://docs.together.ai/docs/images-overview.md
# Images
> Generate high-quality images from text + image prompts.
## Generating an image
To query an image model, use the `.images` method and specify the image model you want to use.
* **Add your API key**: Get your [Together AI API key](https://api.together.xyz/settings/api-keys) and paste it into the opencode terminal
* **Select a model**: Choose from powerful models like:
* `deepseek-ai/DeepSeek-V3` - Excellent for general coding tasks
* `deepseek-ai/DeepSeek-R1` - Advanced reasoning capabilities
* `meta-llama/Llama-3.3-70B-Instruct-Turbo` - Fast and efficient
* `Qwen/Qwen3-Coder-480B-A35B-Instruct-FP8` - Specialized coding model
## 4. Bonus: install the opencode vs-code extension
For developers who prefer working within VS Code, OpenCode offers a dedicated extension that integrates seamlessly into your IDE workflow while still leveraging the power of the terminal-based agent.
Install the extension: Search for "opencode" in the VS Code Extensions Marketplace or directly use this link:
* [https://open-vsx.org/extension/sst-dev/opencode](https://open-vsx.org/extension/sst-dev/opencode)
## Key Features & Usage
### Native Terminal Experience
OpenCode provides a responsive, native terminal UI that's fully themeable and integrated into your command-line workflow.
### Plan Mode vs Build Mode
Switch between modes using the **Tab** key:
* **Plan Mode**: Ask OpenCode to create implementation plans without making changes
* **Build Mode**: Let OpenCode directly implement features and make code changes
### File References with Fuzzy Search
Use the `@` key to fuzzy search and reference files in your project:
```
How is authentication handled in @packages/functions/src/api/index.ts
```
## Best Practices
### Give Detailed Context
Talk to OpenCode like you're talking to a junior developer:
```
When a user deletes a note, flag it as deleted in the database instead of removing it.
Then create a "Recently Deleted" screen where users can restore or permanently delete notes.
Use the same design patterns as our existing settings page.
```
### Use Examples and References
Provide plenty of context and examples:
```
Add error handling to the API similar to how it's done in @src/utils/errorHandler.js
```
### Iterate on Plans
In Plan Mode, review and refine the approach before implementation:
```
That looks good, but let's also add input validation and rate limiting
```
## Model Recommendations
* **DeepSeek V3** (`deepseek-ai/DeepSeek-V3`): \$1.25 per million tokens, excellent balance of performance and cost
* **DeepSeek R1** (`deepseek-ai/DeepSeek-R1`): $3.00-$7.00 per million tokens, advanced reasoning for complex problems
* **Llama 3.3 70B** (`meta-llama/Llama-3.3-70B-Instruct-Turbo`): \$0.88 per million tokens, fast and cost-effective
## Getting Started
1. Install OpenCode: `curl -fsSL https://opencode.ai/install | bash`
2. Navigate to your project: `cd your-project`
3. Launch OpenCode: `opencode`
4. Configure Together AI with your API key
5. Start building faster with AI assistance!
That's it! You now have one of the most powerful terminal-based AI coding agents running with fast, secure, and private open source models hosted on Together AI. OpenCode's native terminal interface combined with Together AI's powerful models will transform your development workflow.
---
> To find navigation and other pages in this documentation, fetch the llms.txt file at: https://docs.together.ai/llms.txt
---
# Source: https://docs.together.ai/docs/how-to-use-qwen-code.md
# How to use Qwen Code with Together AI for enhanced development workflow
> Learn how to configure Qwen Code, a powerful AI-powered command-line workflow tool, with Together AI models to supercharge your coding workflow with advanced code understanding and automation.
# How to use Qwen Code with Together AI for enhanced development workflow
Qwen Code is a powerful command-line AI workflow tool specifically optimized for code understanding, automated tasks, and intelligent development assistance. While it comes with built-in Qwen OAuth support, you can also configure it to use Together AI's extensive model selection for even more flexibility and control over your AI coding experience.
In this guide, we'll show you how to set up Qwen Code with Together AI's powerful models like DeepSeek V3, Llama 3.3 70B, and specialized coding models to enhance your development workflow beyond traditional context window limits.
## Why Use Qwen Code with Together AI?
* **Model Choice**: Access to a wide variety of models beyond just Qwen models
* **Transparent Pricing**: Clear token-based pricing with no surprises
* **Enterprise Control**: Use your own API keys and have full control over usage
* **Specialized Models**: Access to coding-specific models like Qwen3-Coder and DeepSeek variants
## 1. Install Qwen Code
Install Qwen Code globally via npm:
```bash theme={null}
npm install -g @qwen-code/qwen-code@latest
```
Verify the installation:
```bash theme={null}
qwen --version
```
**Prerequisites**: Ensure you have Node.js version 20 or higher installed.
## 2. Configure Together AI
Instead of using the default Qwen OAuth, you'll configure Qwen Code to use Together AI's OpenAI-compatible API.
### Method 1: Environment Variables (Recommended)
Set up your environment variables:
```bash theme={null}
export OPENAI_API_KEY="your_together_api_key_here"
export OPENAI_BASE_URL="https://api.together.xyz/v1"
export OPENAI_MODEL="your_chosen_model"
```
### Method 2: Project .env File
Create a `.env` file in your project root:
```env theme={null}
OPENAI_API_KEY=your_together_api_key_here
OPENAI_BASE_URL=https://api.together.xyz/v1
OPENAI_MODEL=your_chosen_model
```
### Get Your Together AI Credentials
1. **API Key**: Get your [Together AI API key](https://api.together.xyz/settings/api-keys)
2. **Base URL**: Use `https://api.together.xyz/v1` for Together AI
3. **Model**: Choose from [Together AI's model catalog](https://www.together.ai/models)
## 3. Choose Your Model
Select from Together AI's powerful model selection:
### Recommended Models for Coding
**For General Development:**
* `deepseek-ai/DeepSeek-V3` - Excellent balance of performance and cost (\$1.25/M tokens)
* `meta-llama/Llama-3.3-70B-Instruct-Turbo` - Fast and cost-effective (\$0.88/M tokens)
**For Advanced Coding Tasks:**
* `Qwen/Qwen3-Coder-480B-A35B-Instruct-FP8` - Specialized for complex coding (\$2.00/M tokens)
* `deepseek-ai/DeepSeek-R1` - Advanced reasoning capabilities ($3.00-$7.00/M tokens)
### Example Configuration
```bash theme={null}
export OPENAI_API_KEY="your_together_api_key"
export OPENAI_BASE_URL="https://api.together.xyz/v1"
export OPENAI_MODEL="deepseek-ai/DeepSeek-V3"
```
## 4. Launch and Use Qwen Code
Navigate to your project and start Qwen Code:
```bash theme={null}
cd your-project/
qwen
```
You're now ready to use Qwen Code with Together AI models!
## Advanced Tips
### Token Optimization
* Use `/compress` to maintain context while reducing token usage
* Set appropriate session limits based on your Together AI plan
* Monitor usage with `/stats` command
### Model Selection Strategy
* Use **DeepSeek V3** for general coding tasks
* Switch to **Qwen3-Coder** for complex code generation
* Use **Llama 3.3 70B** for faster, cost-effective operations
### Context Window Management
Qwen Code is designed to handle large codebases beyond traditional context limits:
* Automatically chunks and processes large files
* Maintains conversation context across multiple API calls
* Optimizes token usage through intelligent compression
## Troubleshooting
### Common Issues
**Authentication Errors:**
* Verify your Together AI API key is correct
* Ensure `OPENAI_BASE_URL` is set to `https://api.together.xyz/v1`
* Check that your API key has sufficient credits
**Model Not Found:**
* Verify the model name exists in [Together AI's catalog](https://www.together.ai/models)
* Ensure the model name is exactly as listed (case-sensitive)
## Getting Started Checklist
1. ✅ Install Node.js 20+ and Qwen Code
2. ✅ Get your Together AI API key
3. ✅ Set environment variables or create `.env` file
4. ✅ Choose your preferred model from Together AI
5. ✅ Launch Qwen Code in your project directory
6. ✅ Start coding with AI assistance!
That's it! You now have Qwen Code powered by Together AI's advanced models, giving you unprecedented control over your AI-assisted development workflow with transparent pricing and model flexibility.
---
> To find navigation and other pages in this documentation, fetch the llms.txt file at: https://docs.together.ai/llms.txt
---
# Source: https://docs.together.ai/docs/images-overview.md
# Images
> Generate high-quality images from text + image prompts.
## Generating an image
To query an image model, use the `.images` method and specify the image model you want to use.
 ## Provide reference image
Use a reference image to guide the generation:
## Provide reference image
Use a reference image to guide the generation:
 ## Supported Models
See our [models page](/docs/serverless-models#image-models) for supported image models.
## Parameters
| Parameter | Type | Description | Default |
| ----------------- | ------- | ---------------------------------------------------------------------------------------- | ------------ |
| `prompt` | string | Text description of the image to generate | **Required** |
| `model` | string | Model identifier | **Required** |
| `width` | integer | Image width in pixels | 1024 |
| `height` | integer | Image height in pixels | 1024 |
| `n` | integer | Number of images to generate (1-4) | 1 |
| `steps` | integer | Diffusion steps (higher = better quality, slower) | 1-50 |
| `seed` | integer | Random seed for reproducibility | any |
| `negative_prompt` | string | What to avoid in generation | - |
| `frame_images` | array | **Required for Kling model.** Array of images to guide video generation, like keyframes. | - |
* `prompt` is required for all models except Kling
* `width` and `height` will rely on defaults unless otherwise specified - options for dimensions differ by model
* Flux Schnell and Kontext \[Pro/Max/Dev] models use the `aspect_ratio` parameter to set the output image size whereas Flux.1 Pro, Flux 1.1 Pro, and Flux.1 Dev use `width` and `height` parameters.
## Generating Multiple Variations
Generate multiple variations of the same prompt to choose from:
## Supported Models
See our [models page](/docs/serverless-models#image-models) for supported image models.
## Parameters
| Parameter | Type | Description | Default |
| ----------------- | ------- | ---------------------------------------------------------------------------------------- | ------------ |
| `prompt` | string | Text description of the image to generate | **Required** |
| `model` | string | Model identifier | **Required** |
| `width` | integer | Image width in pixels | 1024 |
| `height` | integer | Image height in pixels | 1024 |
| `n` | integer | Number of images to generate (1-4) | 1 |
| `steps` | integer | Diffusion steps (higher = better quality, slower) | 1-50 |
| `seed` | integer | Random seed for reproducibility | any |
| `negative_prompt` | string | What to avoid in generation | - |
| `frame_images` | array | **Required for Kling model.** Array of images to guide video generation, like keyframes. | - |
* `prompt` is required for all models except Kling
* `width` and `height` will rely on defaults unless otherwise specified - options for dimensions differ by model
* Flux Schnell and Kontext \[Pro/Max/Dev] models use the `aspect_ratio` parameter to set the output image size whereas Flux.1 Pro, Flux 1.1 Pro, and Flux.1 Dev use `width` and `height` parameters.
## Generating Multiple Variations
Generate multiple variations of the same prompt to choose from:
 ## Custom Dimensions & Aspect Ratios
Different aspect ratios for different use cases:
## Custom Dimensions & Aspect Ratios
Different aspect ratios for different use cases:
 ## Quality Control with Steps
Compare different step counts for quality vs. speed:
```python theme={null}
import time
prompt = "A majestic mountain landscape"
step_counts = [1, 6, 12]
for steps in step_counts:
start = time.time()
response = client.images.generate(
prompt=prompt,
model="black-forest-labs/FLUX.1-schnell",
steps=steps,
seed=42, # Same seed for fair comparison
)
elapsed = time.time() - start
print(f"Steps: {steps} - Generated in {elapsed:.2f}s")
```
## Quality Control with Steps
Compare different step counts for quality vs. speed:
```python theme={null}
import time
prompt = "A majestic mountain landscape"
step_counts = [1, 6, 12]
for steps in step_counts:
start = time.time()
response = client.images.generate(
prompt=prompt,
model="black-forest-labs/FLUX.1-schnell",
steps=steps,
seed=42, # Same seed for fair comparison
)
elapsed = time.time() - start
print(f"Steps: {steps} - Generated in {elapsed:.2f}s")
```
 ## Base64 Images
If you prefer the image data to be embedded directly in the response, set `response_format` to "base64".
## Base64 Images
If you prefer the image data to be embedded directly in the response, set `response_format` to "base64".
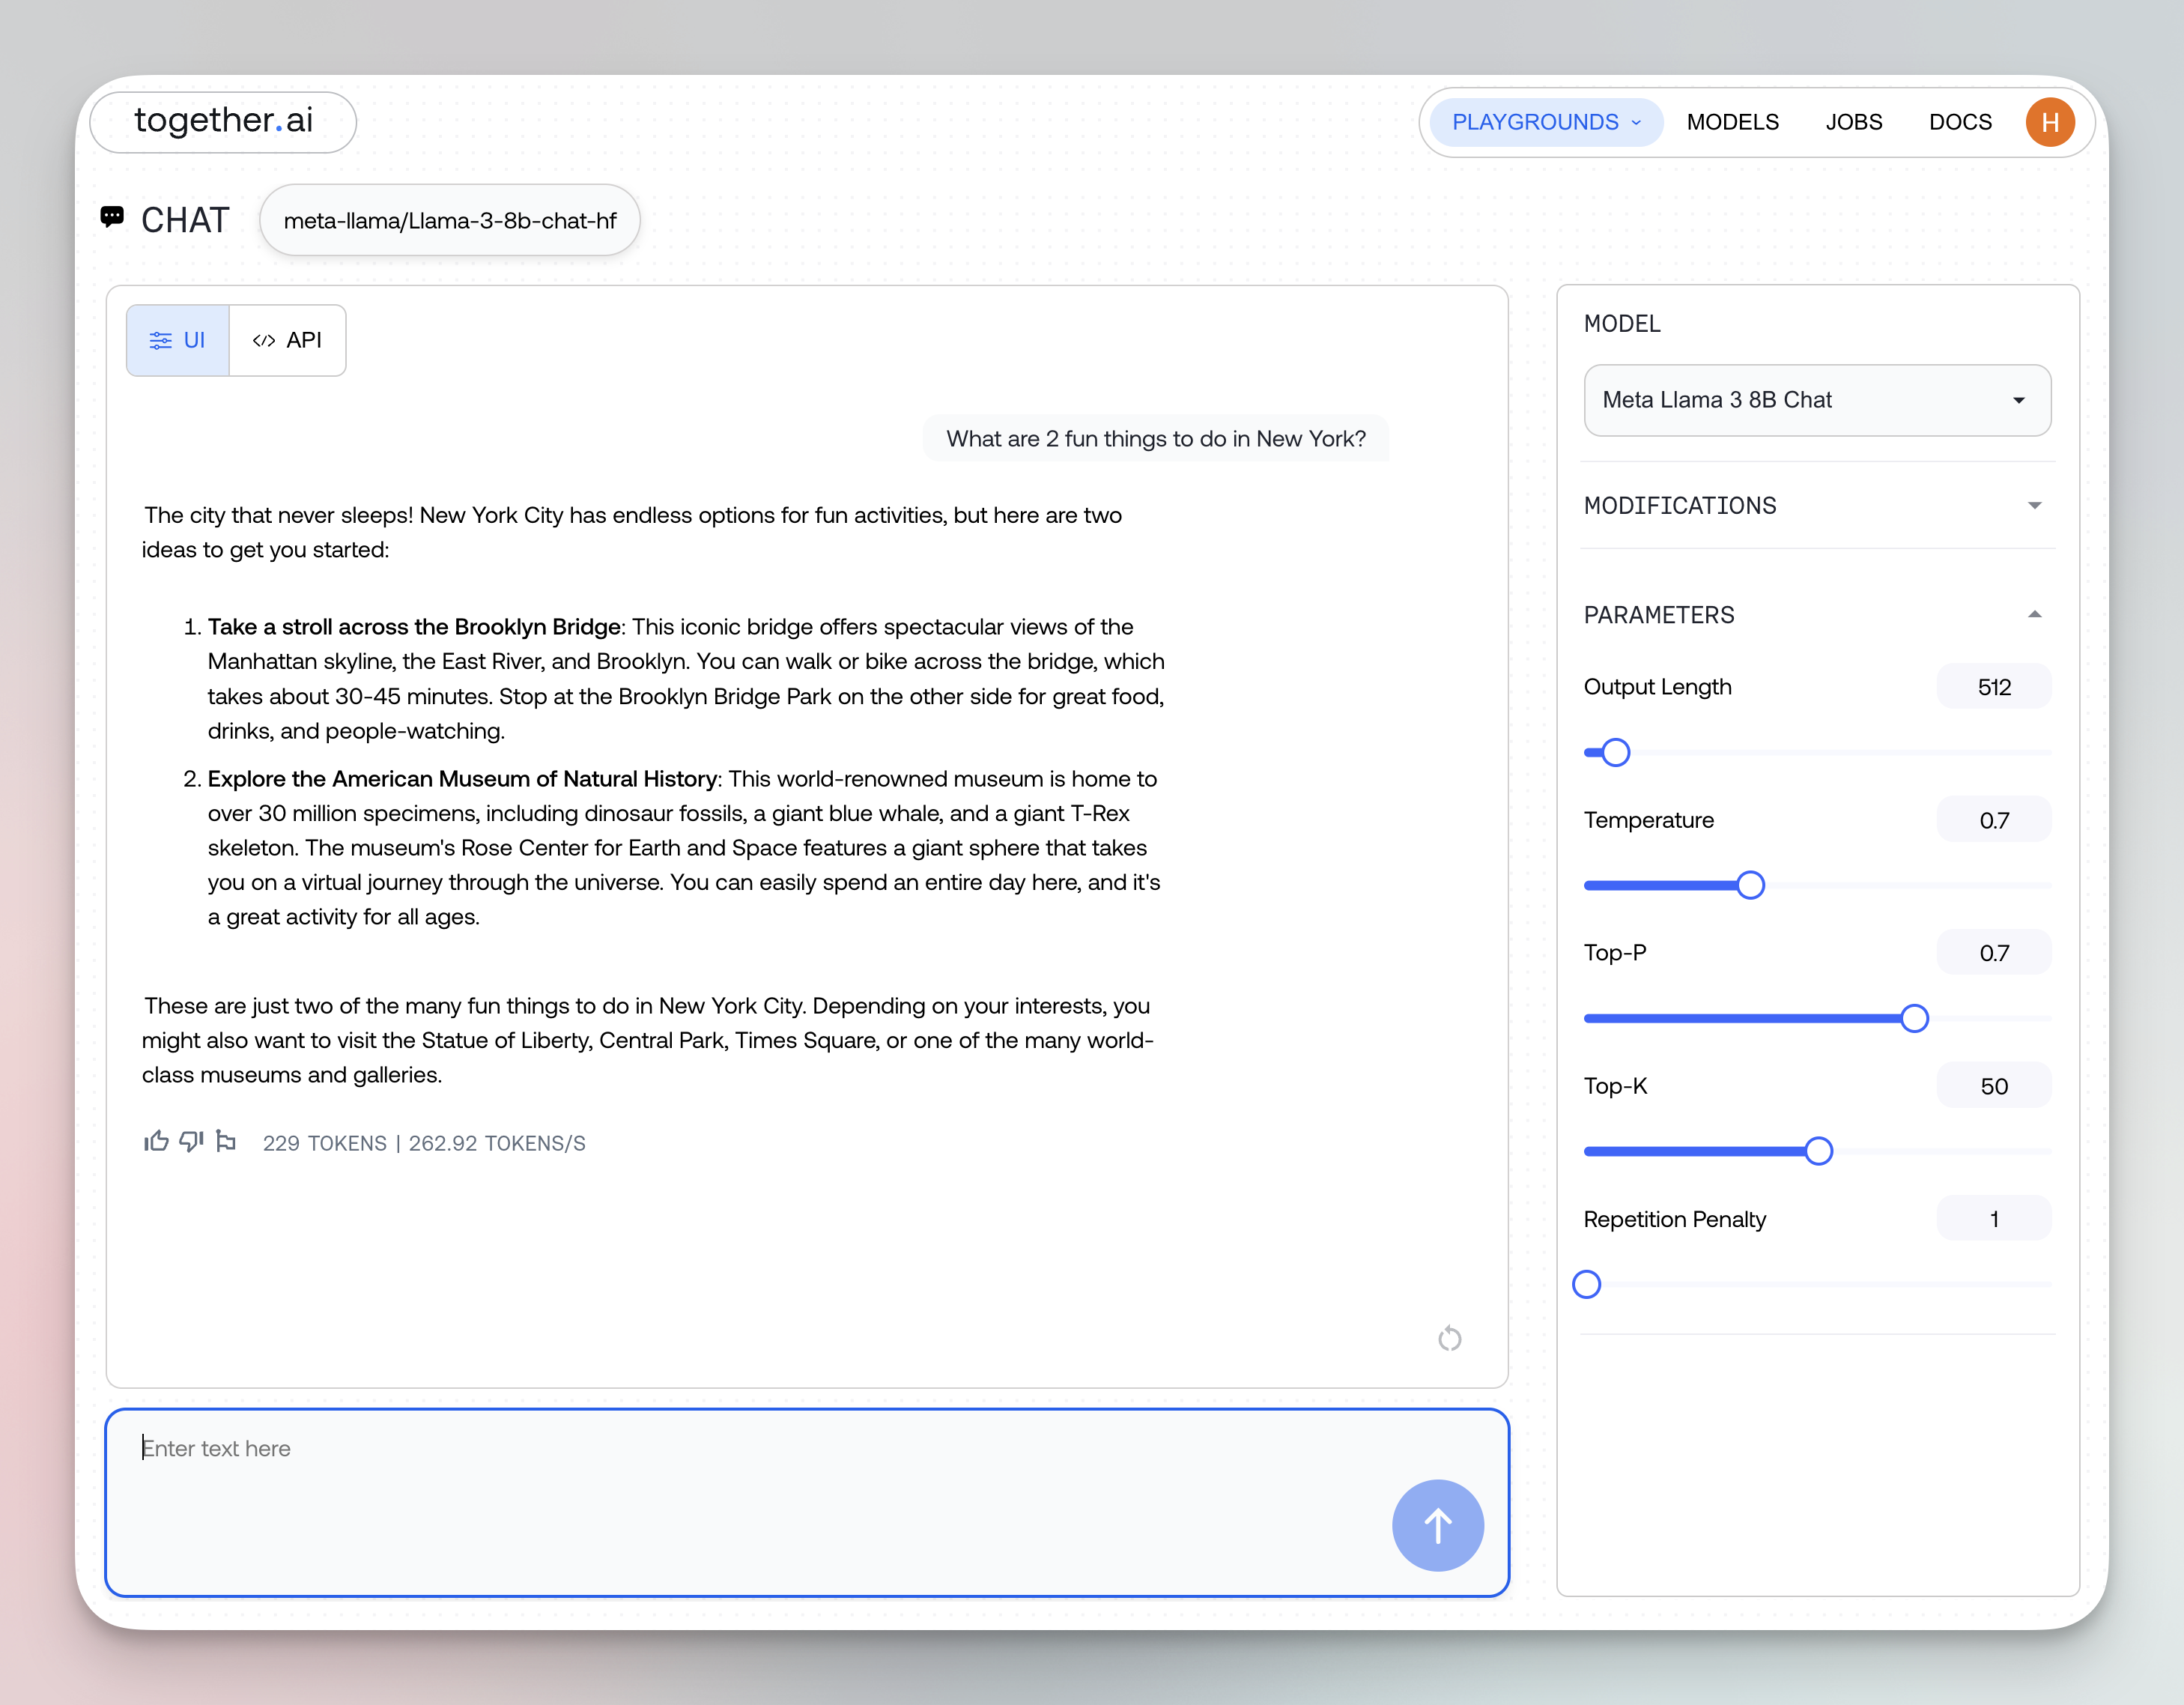 There are five playgrounds for interacting with different types of models:
1. **Chat Playground**
Chat with models like DeepSeek R1-0528 in a conversational interface. Adjust model behavior with system prompts.
2. **Image Playground**
Create stunning images from text or from existing images using FLUX.1 \[schnell] or other image generations models. This playground can also be useful for using instruction-tuned models and providing few-shot prompts.
3. **Video Playground**
Produce engaging videos with Kling 1.6 Standard and other advanced models from text prompts.
4. **Audio Playground**
Generate lifelike audio for synthesis or editing from text using models like Cartesia Sonic 2.
5. **Transcribe Playground**
Turn audio into text with Whisper large-v3 or other transcription models.
## Instructions
1. Log in to [api.together.xyz](https://api.together.xyz/playground) with your username and password
2. Navigate through the different playgrounds we offer using the left sidebar
3. Select a model (either one that we offer, or one you have fine-tuned yourself)
4. Adjust the modifications and parameters (more details below)
### Modifications
From the right side panel you can access **modifications** to control the stop sequence or system prompt. The stop sequence controls when the model will stop outputting more text. The system prompt instructs the model how to behave. There are several default system prompts provided and you can add your own. To edit a system prompt you added, hover over the prompt in the menu and click the pencil icon.
### Parameters
Edit inference parameter settings from the right side panel. For more information on how to set these settings see [inference parameters](/docs/inference-parameters).
---
> To find navigation and other pages in this documentation, fetch the llms.txt file at: https://docs.together.ai/llms.txt
---
# Source: https://docs.together.ai/reference/installation.md
# Installation
The Together Python library comes with a command-line interface you can use to query Together's open-source models, upload new data files to your account, or manage your account's fine-tune jobs.
## Prerequisites
* Make sure your local machine has [Python](https://www.python.org/) installed.
* If you haven't already, [register for a Together account](https://api.together.xyz/settings/api-keys) to get an API key.
## Install the library
Launch your terminal and install or update the Together CLI with the following command:
```sh Shell theme={null}
pip install --upgrade together
```
## Authenticate your shell
The CLI relies on the `TOGETHER_API_KEY` environment variable being set to your account's API token to authenticate requests. You can find your API token in your [account settings](https://api.together.xyz/settings/api-keys).
Tocreate an environment variable in the current shell, run:
```sh Shell theme={null}
export TOGETHER_API_KEY=xxxxx
```
You can also add it to your shell's global configuration so all new sessions can access it. Different shells have different semantics for setting global environment variables, so see your preferred shell's documentation to learn more.
## Next steps
If you know what you're looking for, find your use case in the sidebar to learn more! The CLI is primarily used for fine-tuning so we recommend visiting **[Files](/reference/files)** or **[Fine-tuning](/reference/finetune)**.
To see all commands available in the CLI, run:
```sh Shell theme={null}
together --help
```
---
> To find navigation and other pages in this documentation, fetch the llms.txt file at: https://docs.together.ai/llms.txt
---
# Source: https://docs.together.ai/docs/instant-clusters.md
> Create, scale, and manage Instant Clusters in Together Cloud
# Instant Clusters
## Overview
Instant Clusters allows you to create high-performance GPU clusters in minutes. With features like on-demand scaling, long-lived resizable high-bandwidth shared DC-local storage, Kubernetes and Slurm cluster flavors, a REST API, and Terraform support, you can run workloads flexibly without complex infrastructure management.
## Quickstart: Create an Instant Cluster
1. Log into api.together.ai.
2. Click **GPU Clusters** in the top navigation menu.
3. Click **Create Cluster**.
4. Choose whether you want **Reserved** capacity or **On-demand**, based on your needs.
5. Select the **cluster size**, for example `8xH100`.
6. Enter a **cluster name**.
7. Choose a **cluster type** either Kubernetes or Slurm.
8. Select a **region**.
9. Choose the reservation **duration** for your cluster.
10. Create and name your **shared volume** (minimum size 1 TiB).
11. Optional: Select your **NVIDIA driver** and **CUDA** versions.
12. Click **Proceed**.
Your cluster will now be ready for you to use.
### Capacity Types
* **Reserved**: You pay upfront to reserve GPU capacity for a duration between 1-90 days.
* **On-demand**: You pay as you go for GPU capacity on an hourly basis. No pre-payment or reservation needed, and you can terminate your cluster at any time.
### Node Types
We have the following node types available in Instant Clusters.
* NVIDIA HGX B200
* NVIDIA HGX H200
* NVIDIA HGX H100 SXM
* NVIDIA HGX H100 SXM - Inference (lower Infiniband multi-node GPU-to-GPU bandwidth, suitable for single-node inference)
If you don't see an available node type, select the "Notify Me" option to get notified when capacity is online. You can also contact us with your request via [support@together.ai](mailto:support@together.ai).
### Pricing
Pricing information for different GPU node types can be found [here](https://www.together.ai/instant-gpu-clusters).
### Cluster Status
* From the UI, verify that your cluster transitions to Ready.
* Monitor progress and health indicators directly from the cluster list.
### Start Training with Kubernetes
#### Install kubectl
Install `kubectl` in your environment, for example on [MacOS](https://kubernetes.io/docs/tasks/tools/install-kubectl-macos/).
#### Download kubeconfig
From the Instant Clusters UI, download the kubeconfig and copy it to your local machine:
```bash theme={null}
~/.kube/together_instant.kubeconfig
export KUBECONFIG=$HOME/.kube/together_instant.kubeconfig
kubectl get nodes
```
> You can rename the file to `config`, but back up your existing config first.
#### Verify Connectivity
```bash theme={null}
kubectl get nodes
```
You should see all worker and control plane nodes listed.
#### Deploy a Pod with Storage
* Create a PersistentVolumeClaim for shared storage. We provide a static PersistentVolume with the same name as your shared volume. As long as you use the static PV, your data would persist.
```yaml theme={null}
apiVersion: v1
kind: PersistentVolumeClaim
metadata:
name: shared-pvc
spec:
accessModes:
- ReadWriteMany # Multiple pods can read/write
resources:
requests:
storage: 10Gi # Requested size
volumeName:
There are five playgrounds for interacting with different types of models:
1. **Chat Playground**
Chat with models like DeepSeek R1-0528 in a conversational interface. Adjust model behavior with system prompts.
2. **Image Playground**
Create stunning images from text or from existing images using FLUX.1 \[schnell] or other image generations models. This playground can also be useful for using instruction-tuned models and providing few-shot prompts.
3. **Video Playground**
Produce engaging videos with Kling 1.6 Standard and other advanced models from text prompts.
4. **Audio Playground**
Generate lifelike audio for synthesis or editing from text using models like Cartesia Sonic 2.
5. **Transcribe Playground**
Turn audio into text with Whisper large-v3 or other transcription models.
## Instructions
1. Log in to [api.together.xyz](https://api.together.xyz/playground) with your username and password
2. Navigate through the different playgrounds we offer using the left sidebar
3. Select a model (either one that we offer, or one you have fine-tuned yourself)
4. Adjust the modifications and parameters (more details below)
### Modifications
From the right side panel you can access **modifications** to control the stop sequence or system prompt. The stop sequence controls when the model will stop outputting more text. The system prompt instructs the model how to behave. There are several default system prompts provided and you can add your own. To edit a system prompt you added, hover over the prompt in the menu and click the pencil icon.
### Parameters
Edit inference parameter settings from the right side panel. For more information on how to set these settings see [inference parameters](/docs/inference-parameters).
---
> To find navigation and other pages in this documentation, fetch the llms.txt file at: https://docs.together.ai/llms.txt
---
# Source: https://docs.together.ai/reference/installation.md
# Installation
The Together Python library comes with a command-line interface you can use to query Together's open-source models, upload new data files to your account, or manage your account's fine-tune jobs.
## Prerequisites
* Make sure your local machine has [Python](https://www.python.org/) installed.
* If you haven't already, [register for a Together account](https://api.together.xyz/settings/api-keys) to get an API key.
## Install the library
Launch your terminal and install or update the Together CLI with the following command:
```sh Shell theme={null}
pip install --upgrade together
```
## Authenticate your shell
The CLI relies on the `TOGETHER_API_KEY` environment variable being set to your account's API token to authenticate requests. You can find your API token in your [account settings](https://api.together.xyz/settings/api-keys).
Tocreate an environment variable in the current shell, run:
```sh Shell theme={null}
export TOGETHER_API_KEY=xxxxx
```
You can also add it to your shell's global configuration so all new sessions can access it. Different shells have different semantics for setting global environment variables, so see your preferred shell's documentation to learn more.
## Next steps
If you know what you're looking for, find your use case in the sidebar to learn more! The CLI is primarily used for fine-tuning so we recommend visiting **[Files](/reference/files)** or **[Fine-tuning](/reference/finetune)**.
To see all commands available in the CLI, run:
```sh Shell theme={null}
together --help
```
---
> To find navigation and other pages in this documentation, fetch the llms.txt file at: https://docs.together.ai/llms.txt
---
# Source: https://docs.together.ai/docs/instant-clusters.md
> Create, scale, and manage Instant Clusters in Together Cloud
# Instant Clusters
## Overview
Instant Clusters allows you to create high-performance GPU clusters in minutes. With features like on-demand scaling, long-lived resizable high-bandwidth shared DC-local storage, Kubernetes and Slurm cluster flavors, a REST API, and Terraform support, you can run workloads flexibly without complex infrastructure management.
## Quickstart: Create an Instant Cluster
1. Log into api.together.ai.
2. Click **GPU Clusters** in the top navigation menu.
3. Click **Create Cluster**.
4. Choose whether you want **Reserved** capacity or **On-demand**, based on your needs.
5. Select the **cluster size**, for example `8xH100`.
6. Enter a **cluster name**.
7. Choose a **cluster type** either Kubernetes or Slurm.
8. Select a **region**.
9. Choose the reservation **duration** for your cluster.
10. Create and name your **shared volume** (minimum size 1 TiB).
11. Optional: Select your **NVIDIA driver** and **CUDA** versions.
12. Click **Proceed**.
Your cluster will now be ready for you to use.
### Capacity Types
* **Reserved**: You pay upfront to reserve GPU capacity for a duration between 1-90 days.
* **On-demand**: You pay as you go for GPU capacity on an hourly basis. No pre-payment or reservation needed, and you can terminate your cluster at any time.
### Node Types
We have the following node types available in Instant Clusters.
* NVIDIA HGX B200
* NVIDIA HGX H200
* NVIDIA HGX H100 SXM
* NVIDIA HGX H100 SXM - Inference (lower Infiniband multi-node GPU-to-GPU bandwidth, suitable for single-node inference)
If you don't see an available node type, select the "Notify Me" option to get notified when capacity is online. You can also contact us with your request via [support@together.ai](mailto:support@together.ai).
### Pricing
Pricing information for different GPU node types can be found [here](https://www.together.ai/instant-gpu-clusters).
### Cluster Status
* From the UI, verify that your cluster transitions to Ready.
* Monitor progress and health indicators directly from the cluster list.
### Start Training with Kubernetes
#### Install kubectl
Install `kubectl` in your environment, for example on [MacOS](https://kubernetes.io/docs/tasks/tools/install-kubectl-macos/).
#### Download kubeconfig
From the Instant Clusters UI, download the kubeconfig and copy it to your local machine:
```bash theme={null}
~/.kube/together_instant.kubeconfig
export KUBECONFIG=$HOME/.kube/together_instant.kubeconfig
kubectl get nodes
```
> You can rename the file to `config`, but back up your existing config first.
#### Verify Connectivity
```bash theme={null}
kubectl get nodes
```
You should see all worker and control plane nodes listed.
#### Deploy a Pod with Storage
* Create a PersistentVolumeClaim for shared storage. We provide a static PersistentVolume with the same name as your shared volume. As long as you use the static PV, your data would persist.
```yaml theme={null}
apiVersion: v1
kind: PersistentVolumeClaim
metadata:
name: shared-pvc
spec:
accessModes:
- ReadWriteMany # Multiple pods can read/write
resources:
requests:
storage: 10Gi # Requested size
volumeName: {group.title}
{group.hasViewAll &&View all models
{item.name}
} )}{title}
{description}
{title}
{description}
python
typescript
curL
from
{" "}
together{" "}
import
{" "}
Together
client{" "}
=
{" "}
Together()
completion{" "}
=
{" "}
client.chat.completions.create(
{" "}
model
=
"meta-llama/Meta-Llama-3.1-8B-Instruct-Turbo"
,
{" "}
messages
=
[{"{"}
"role"
:{" "}
"user"
,{" "}
"content"
:{" "}
"What are the top 3 things to do in New York?"
{"}"}],)
print (completion.choices[ 0 ].message.content)
123456789
Developer Quickstart
Copy this snippet to get started with our inference API. See our{" "} full quickstart for more details.
{heading}
{description}
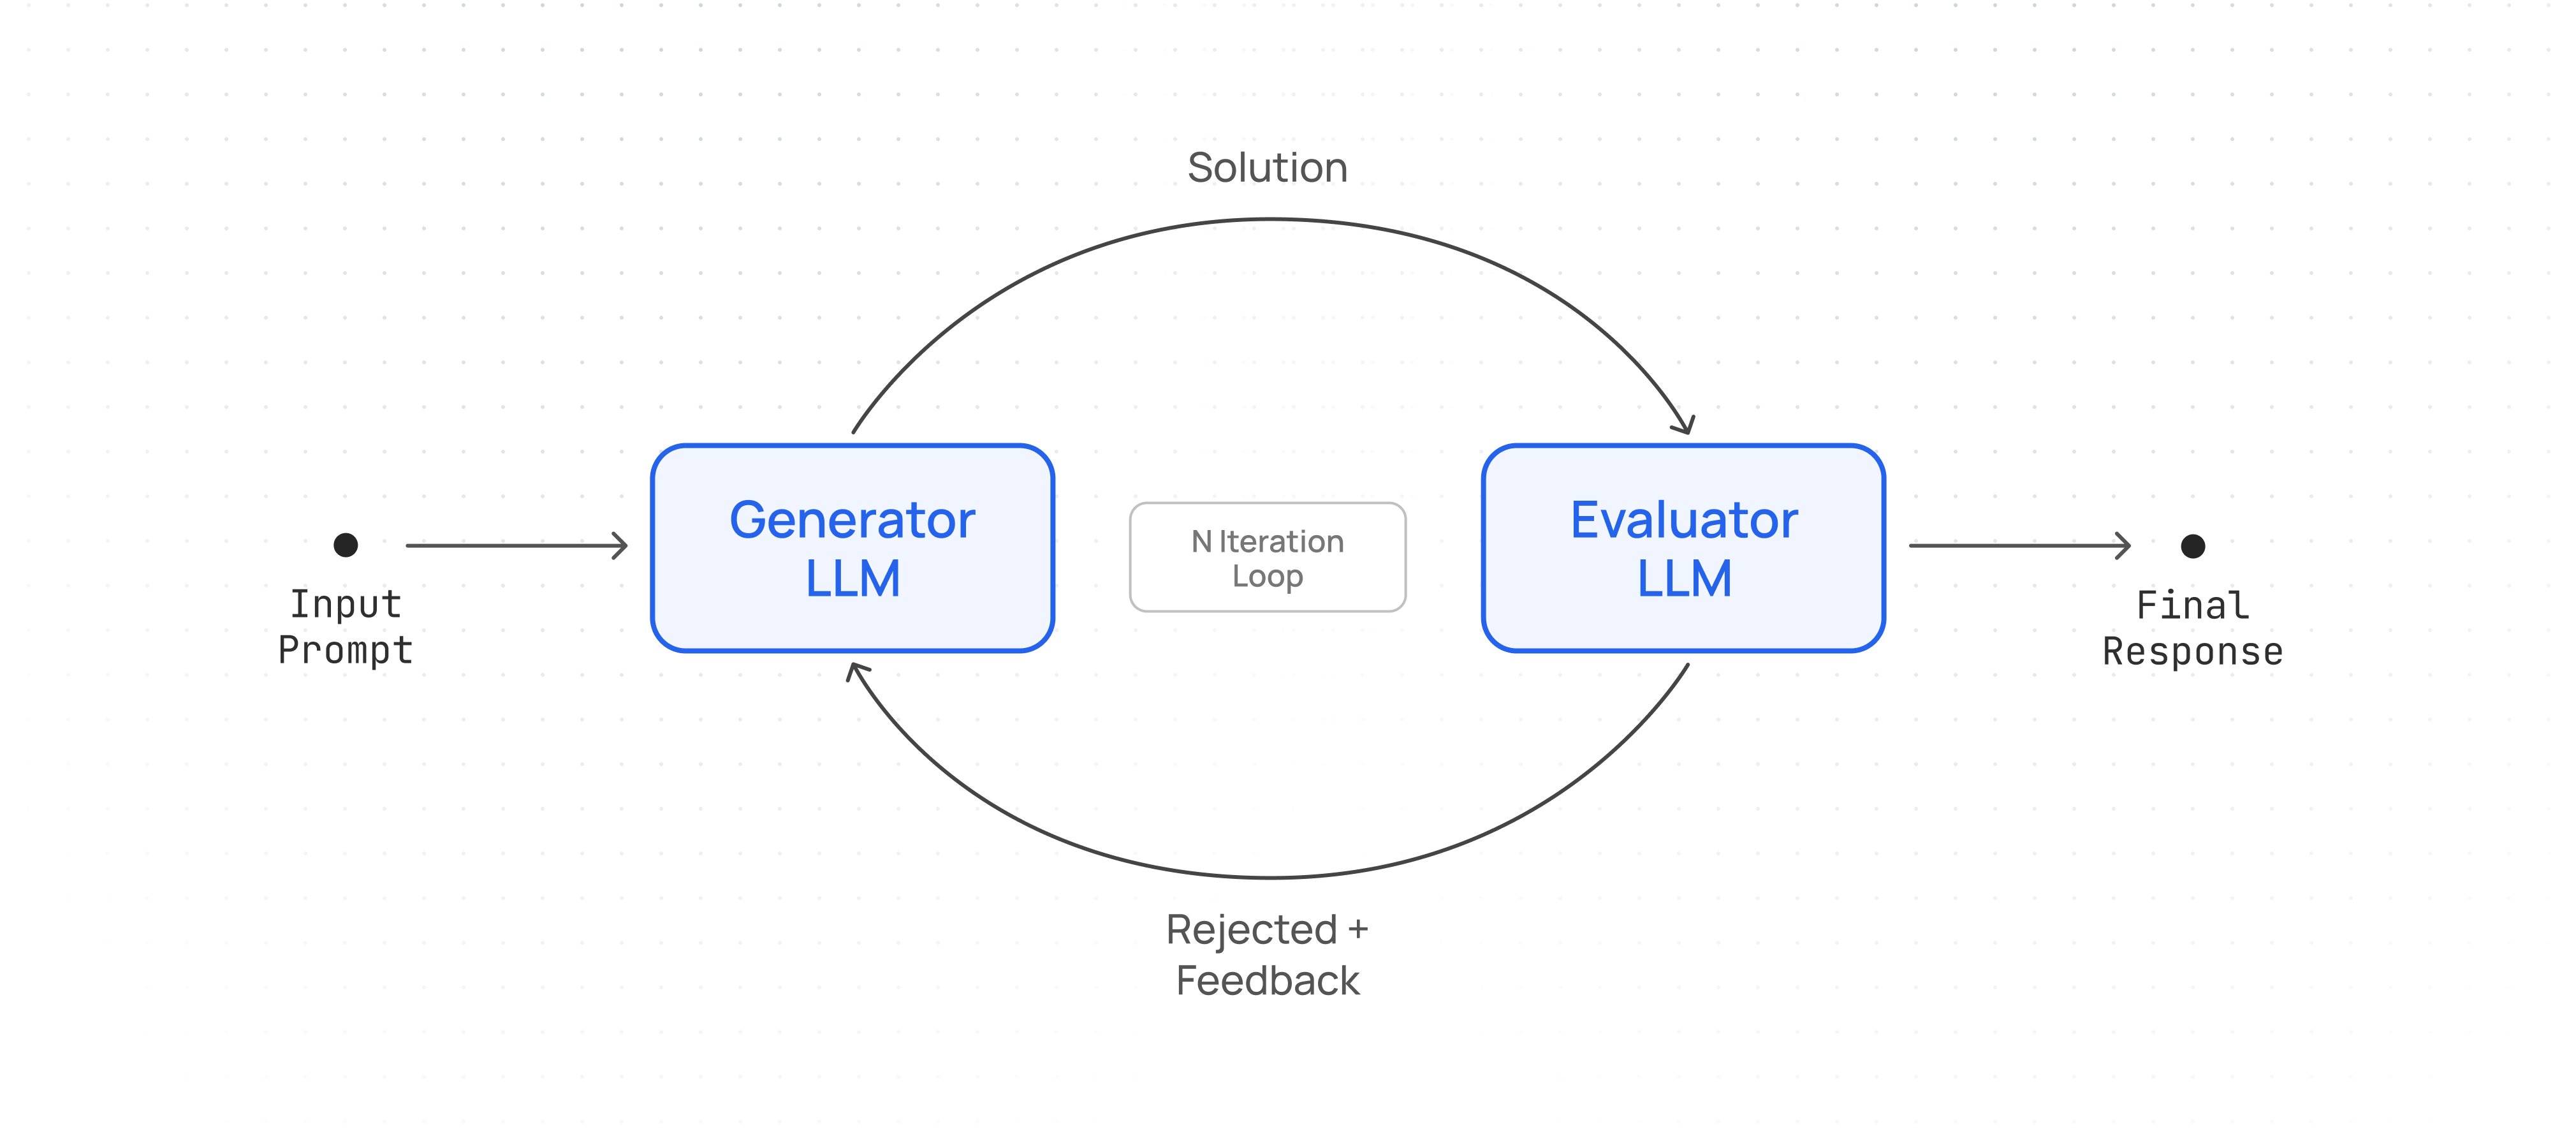 ## Setup Client & Helper Functions
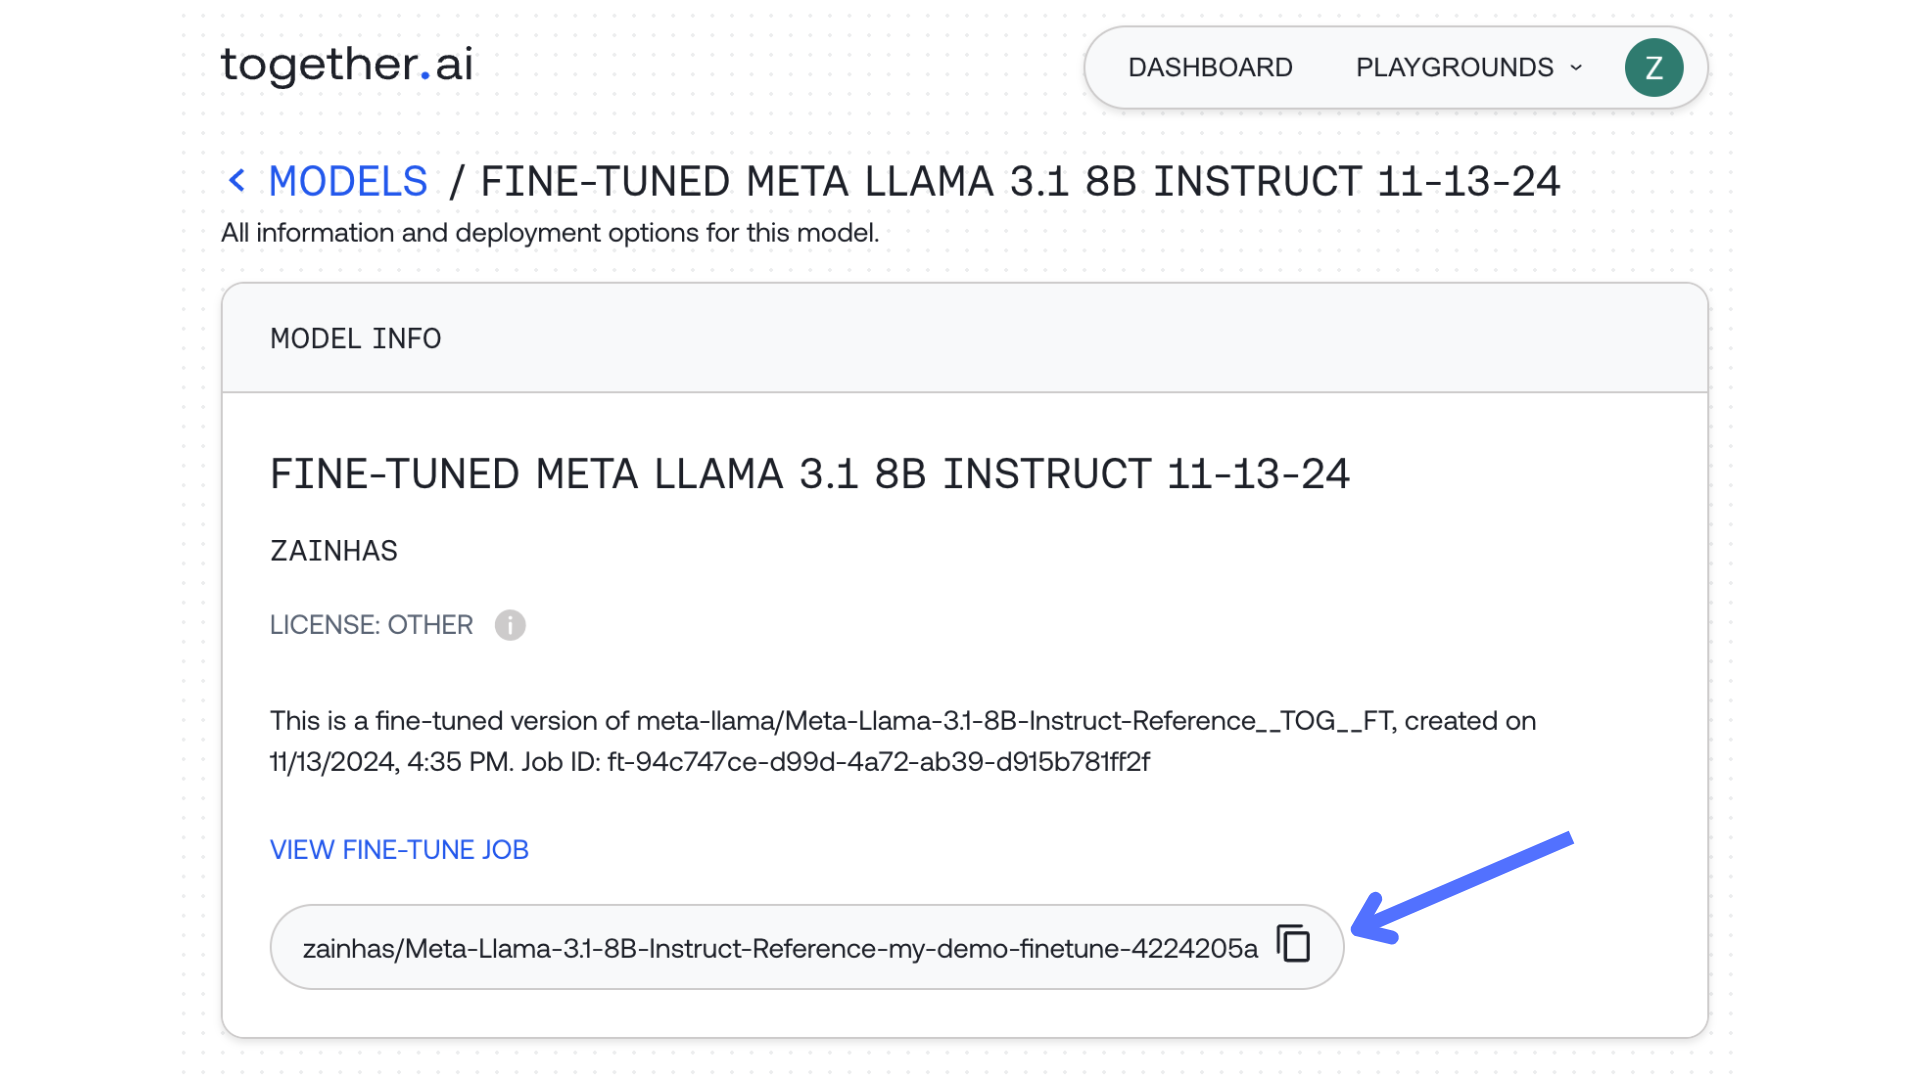 ### Step 4: Running LoRA inference
Once the fine-tuning job is completed, your model is immediately available for inference.
### Step 4: Running LoRA inference
Once the fine-tuning job is completed, your model is immediately available for inference.
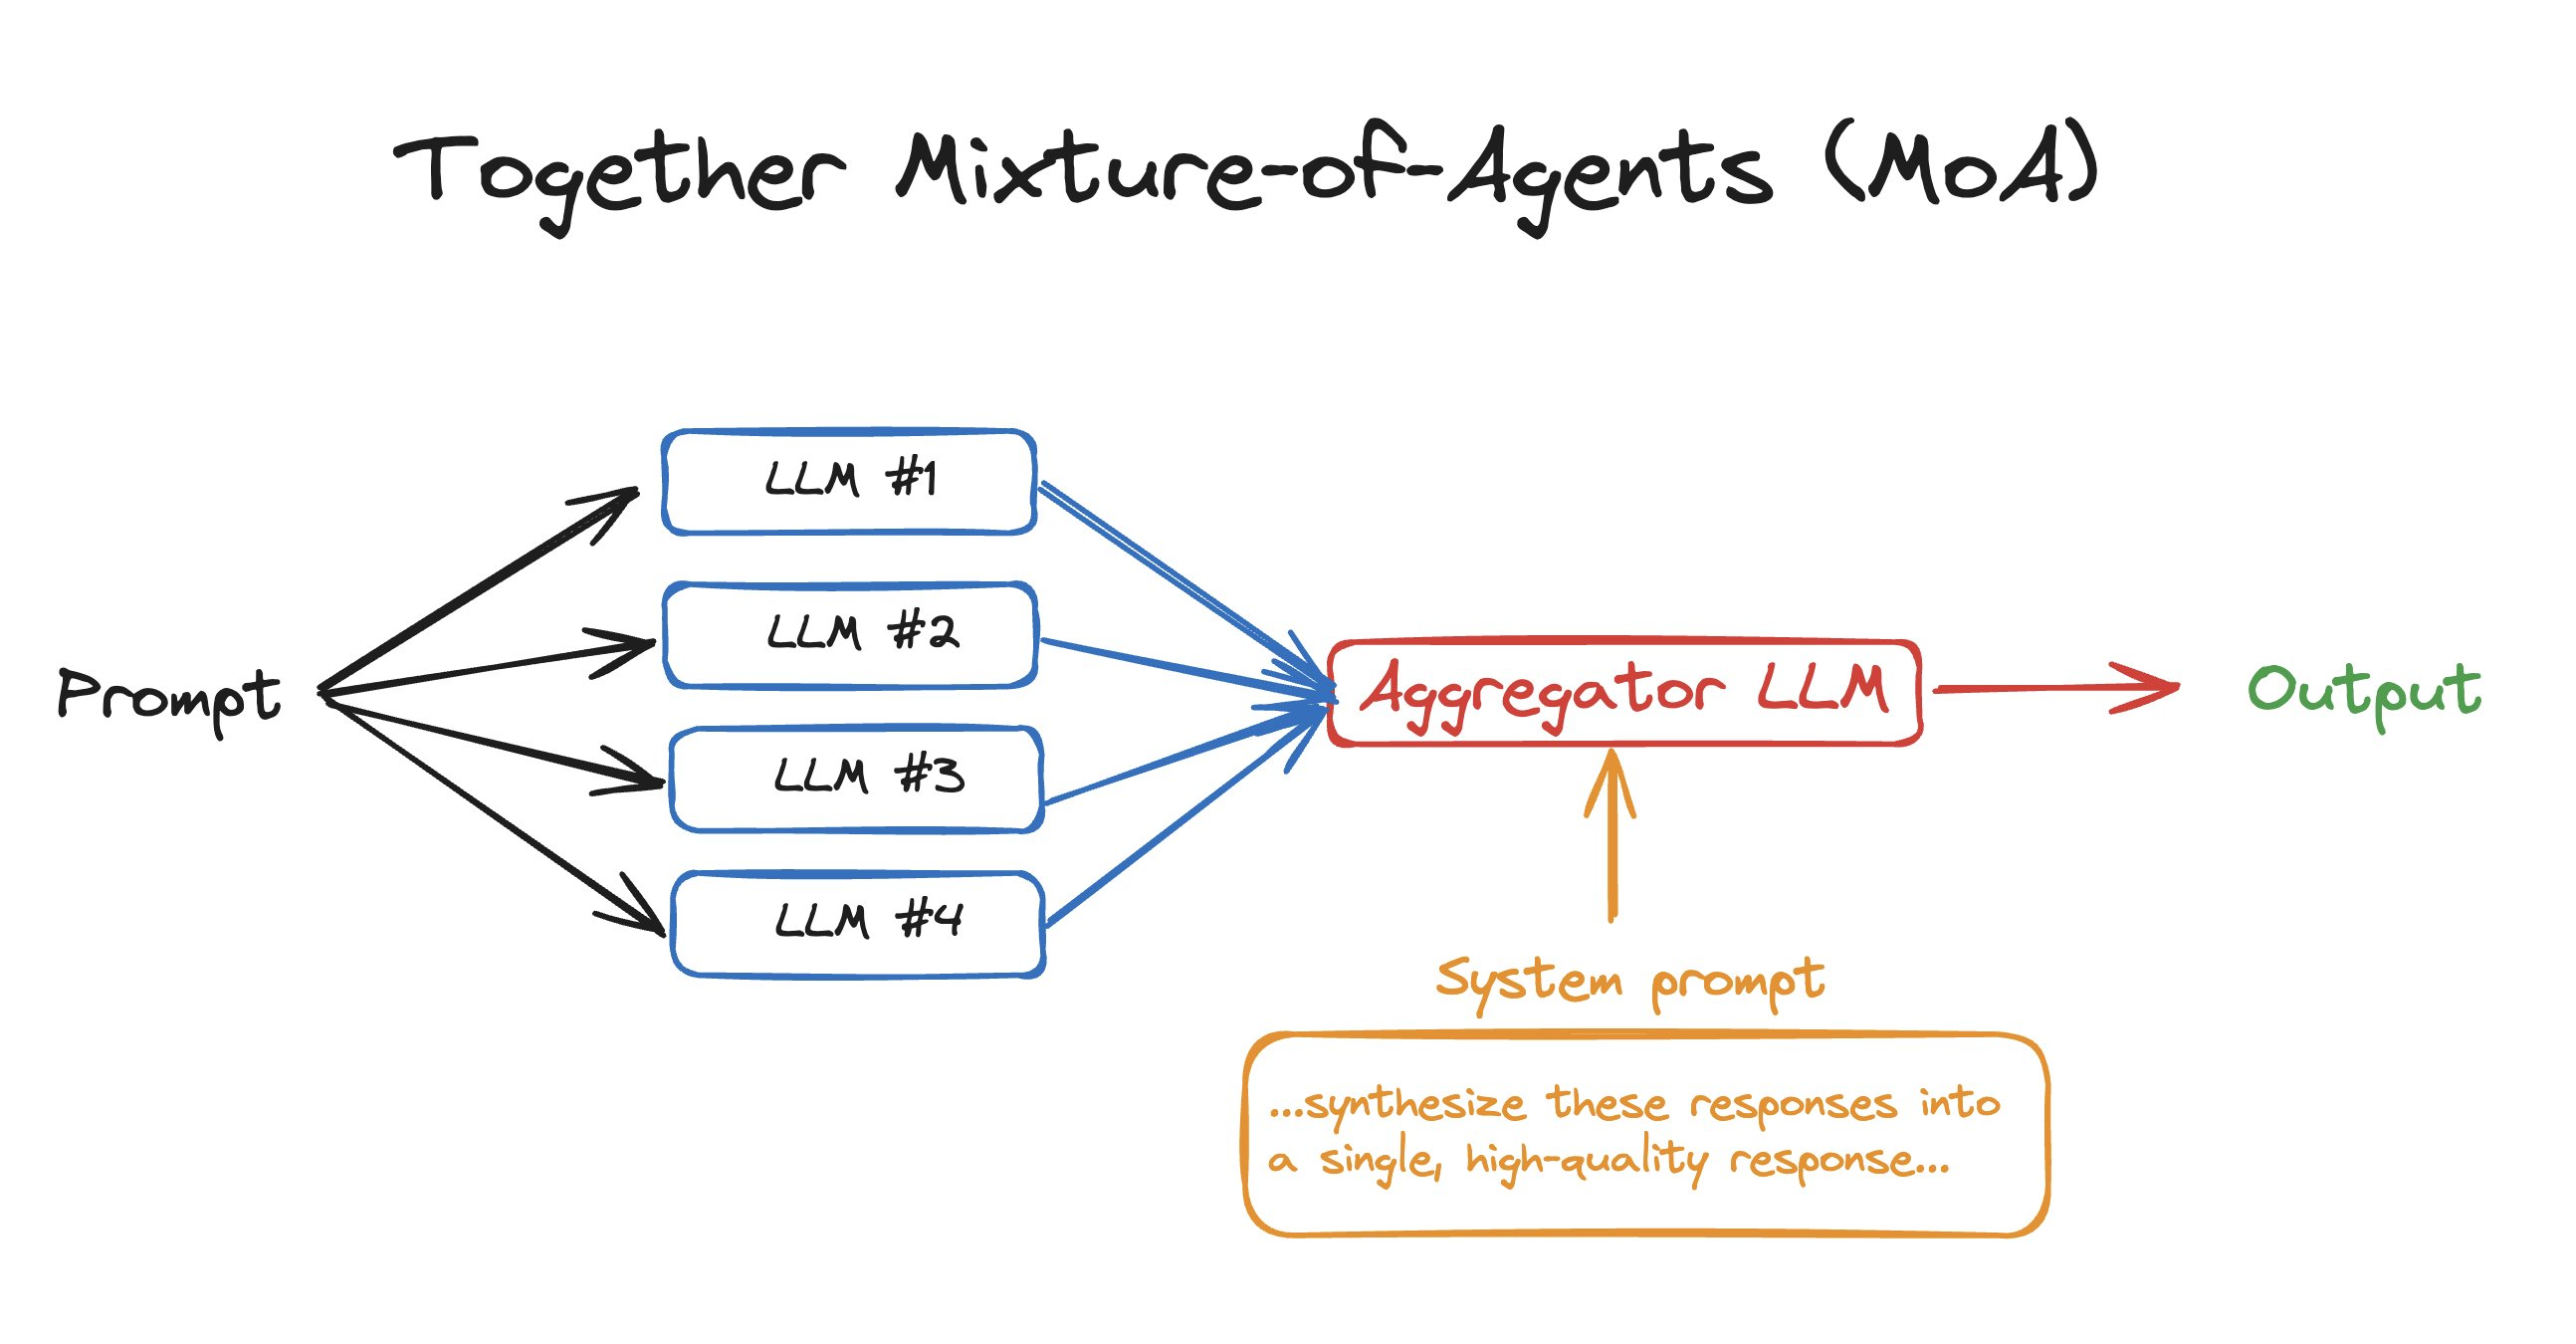 ## What is Together MoA?
Mixture of Agents (MoA) is a novel approach that leverages the collective strengths of multiple LLMs to enhance performance, achieving state-of-the-art results. By employing a layered architecture where each layer comprises several LLM agents, **MoA significantly outperforms** GPT-4 Omni’s 57.5% on AlpacaEval 2.0 with a score of 65.1%, using only open-source models!
The way Together MoA works is that given a prompt, like `tell me the best things to do in SF`, it sends it to 4 different OSS LLMs. It then combines results from all 4, sends it to a final LLM, and asks it to combine all 4 responses into an ideal response. That’s it! It’s just the idea of combining the results of 4 different LLMs to produce a better final output. It’s obviously slower than using a single LLM but it can be great for use cases where latency doesn't matter as much like synthetic data generation.
For a quick summary and 3-minute demo on how to implement MoA with code, watch the video below:
## Together MoA in 50 lines of code
To get to get started with using MoA in your own apps, you'll need to install the Together python library, get your Together API key, and run the code below which uses our chat completions API to interact with OSS models.
1. Install the Together Python library
```bash Shell theme={null}
pip install together
```
2. Get your [Together API key](https://api.together.xyz/settings/api-keys) & export it
```bash Shell theme={null}
export TOGETHER_API_KEY='xxxx'
```
3. Run the code below, which interacts with our chat completions API.
This implementation of MoA uses 2 layers and 4 LLMs. We’ll define our 4 initial LLMs and our aggregator LLM, along with our prompt. We’ll also add in a prompt to send to the aggregator to combine responses effectively. Now that we have this, we’ll simply send the prompt to the 4 LLMs and compute all results simultaneously. Finally, we'll send the results from the four LLMs to our final LLM, along with a system prompt instructing it to combine them into a final answer, and we’ll stream results back.
```py Python theme={null}
# Mixture-of-Agents in 50 lines of code
import asyncio
import os
from together import AsyncTogether, Together
client = Together()
async_client = AsyncTogether()
user_prompt = "What are some fun things to do in SF?"
reference_models = [
"Qwen/Qwen2-72B-Instruct",
"meta-llama/Llama-3.3-70B-Instruct-Turbo",
"mistralai/Mixtral-8x22B-Instruct-v0.1",
"databricks/dbrx-instruct",
]
aggregator_model = "mistralai/Mixtral-8x22B-Instruct-v0.1"
aggreagator_system_prompt = """You have been provided with a set of responses from various open-source models to the latest user query. Your task is to synthesize these responses into a single, high-quality response. It is crucial to critically evaluate the information provided in these responses, recognizing that some of it may be biased or incorrect. Your response should not simply replicate the given answers but should offer a refined, accurate, and comprehensive reply to the instruction. Ensure your response is well-structured, coherent, and adheres to the highest standards of accuracy and reliability.
Responses from models:"""
async def run_llm(model):
"""Run a single LLM call with a reference model."""
response = await async_client.chat.completions.create(
model=model,
messages=[{"role": "user", "content": user_prompt}],
temperature=0.7,
max_tokens=512,
)
print(model)
return response.choices[0].message.content
async def main():
results = await asyncio.gather(
*[run_llm(model) for model in reference_models]
)
finalStream = client.chat.completions.create(
model=aggregator_model,
messages=[
{"role": "system", "content": aggreagator_system_prompt},
{
"role": "user",
"content": ",".join(str(element) for element in results),
},
],
stream=True,
)
for chunk in finalStream:
print(chunk.choices[0].delta.content or "", end="", flush=True)
asyncio.run(main())
```
## Advanced MoA example
In the previous example, we went over how to implement MoA with 2 layers (4 LLMs answering and one LLM aggregating). However, one strength of MoA is being able to go through several layers to get an even better response. In this example, we'll go through how to run MoA with 3+ layers.
## What is Together MoA?
Mixture of Agents (MoA) is a novel approach that leverages the collective strengths of multiple LLMs to enhance performance, achieving state-of-the-art results. By employing a layered architecture where each layer comprises several LLM agents, **MoA significantly outperforms** GPT-4 Omni’s 57.5% on AlpacaEval 2.0 with a score of 65.1%, using only open-source models!
The way Together MoA works is that given a prompt, like `tell me the best things to do in SF`, it sends it to 4 different OSS LLMs. It then combines results from all 4, sends it to a final LLM, and asks it to combine all 4 responses into an ideal response. That’s it! It’s just the idea of combining the results of 4 different LLMs to produce a better final output. It’s obviously slower than using a single LLM but it can be great for use cases where latency doesn't matter as much like synthetic data generation.
For a quick summary and 3-minute demo on how to implement MoA with code, watch the video below:
## Together MoA in 50 lines of code
To get to get started with using MoA in your own apps, you'll need to install the Together python library, get your Together API key, and run the code below which uses our chat completions API to interact with OSS models.
1. Install the Together Python library
```bash Shell theme={null}
pip install together
```
2. Get your [Together API key](https://api.together.xyz/settings/api-keys) & export it
```bash Shell theme={null}
export TOGETHER_API_KEY='xxxx'
```
3. Run the code below, which interacts with our chat completions API.
This implementation of MoA uses 2 layers and 4 LLMs. We’ll define our 4 initial LLMs and our aggregator LLM, along with our prompt. We’ll also add in a prompt to send to the aggregator to combine responses effectively. Now that we have this, we’ll simply send the prompt to the 4 LLMs and compute all results simultaneously. Finally, we'll send the results from the four LLMs to our final LLM, along with a system prompt instructing it to combine them into a final answer, and we’ll stream results back.
```py Python theme={null}
# Mixture-of-Agents in 50 lines of code
import asyncio
import os
from together import AsyncTogether, Together
client = Together()
async_client = AsyncTogether()
user_prompt = "What are some fun things to do in SF?"
reference_models = [
"Qwen/Qwen2-72B-Instruct",
"meta-llama/Llama-3.3-70B-Instruct-Turbo",
"mistralai/Mixtral-8x22B-Instruct-v0.1",
"databricks/dbrx-instruct",
]
aggregator_model = "mistralai/Mixtral-8x22B-Instruct-v0.1"
aggreagator_system_prompt = """You have been provided with a set of responses from various open-source models to the latest user query. Your task is to synthesize these responses into a single, high-quality response. It is crucial to critically evaluate the information provided in these responses, recognizing that some of it may be biased or incorrect. Your response should not simply replicate the given answers but should offer a refined, accurate, and comprehensive reply to the instruction. Ensure your response is well-structured, coherent, and adheres to the highest standards of accuracy and reliability.
Responses from models:"""
async def run_llm(model):
"""Run a single LLM call with a reference model."""
response = await async_client.chat.completions.create(
model=model,
messages=[{"role": "user", "content": user_prompt}],
temperature=0.7,
max_tokens=512,
)
print(model)
return response.choices[0].message.content
async def main():
results = await asyncio.gather(
*[run_llm(model) for model in reference_models]
)
finalStream = client.chat.completions.create(
model=aggregator_model,
messages=[
{"role": "system", "content": aggreagator_system_prompt},
{
"role": "user",
"content": ",".join(str(element) for element in results),
},
],
stream=True,
)
for chunk in finalStream:
print(chunk.choices[0].delta.content or "", end="", flush=True)
asyncio.run(main())
```
## Advanced MoA example
In the previous example, we went over how to implement MoA with 2 layers (4 LLMs answering and one LLM aggregating). However, one strength of MoA is being able to go through several layers to get an even better response. In this example, we'll go through how to run MoA with 3+ layers.
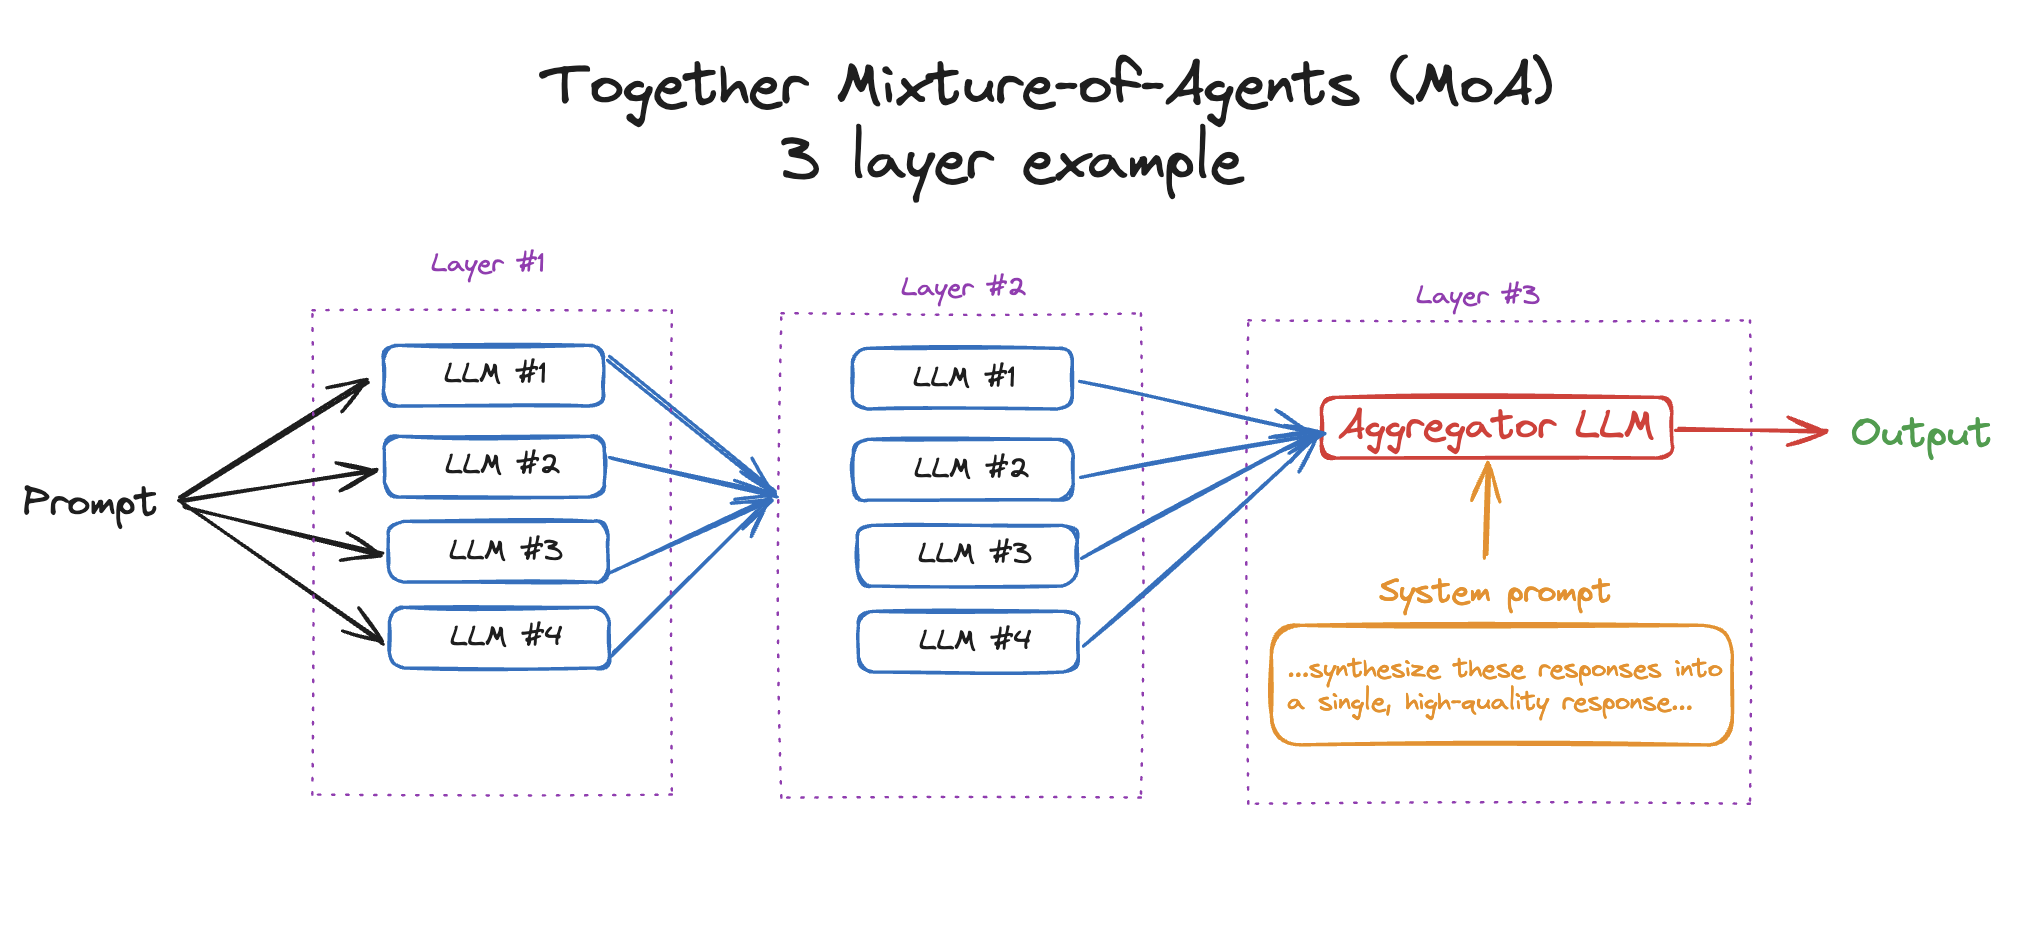 ```py Python theme={null}
# Advanced Mixture-of-Agents example – 3 layers
import asyncio
import os
import together
from together import AsyncTogether, Together
client = Together()
async_client = AsyncTogether()
user_prompt = "What are 3 fun things to do in SF?"
reference_models = [
"Qwen/Qwen2-72B-Instruct",
"meta-llama/Llama-3.3-70B-Instruct-Turbo",
"mistralai/Mixtral-8x22B-Instruct-v0.1",
"databricks/dbrx-instruct",
]
aggregator_model = "mistralai/Mixtral-8x22B-Instruct-v0.1"
aggreagator_system_prompt = """You have been provided with a set of responses from various open-source models to the latest user query. Your task is to synthesize these responses into a single, high-quality response. It is crucial to critically evaluate the information provided in these responses, recognizing that some of it may be biased or incorrect. Your response should not simply replicate the given answers but should offer a refined, accurate, and comprehensive reply to the instruction. Ensure your response is well-structured, coherent, and adheres to the highest standards of accuracy and reliability.
Responses from models:"""
layers = 3
def getFinalSystemPrompt(system_prompt, results):
"""Construct a system prompt for layers 2+ that includes the previous responses to synthesize."""
return (
system_prompt
+ "\n"
+ "\n".join(
[f"{i+1}. {str(element)}" for i, element in enumerate(results)]
)
)
async def run_llm(model, prev_response=None):
"""Run a single LLM call with a model while accounting for previous responses + rate limits."""
for sleep_time in [1, 2, 4]:
try:
messages = (
[
{
"role": "system",
"content": getFinalSystemPrompt(
aggreagator_system_prompt, prev_response
),
},
{"role": "user", "content": user_prompt},
]
if prev_response
else [{"role": "user", "content": user_prompt}]
)
response = await async_client.chat.completions.create(
model=model,
messages=messages,
temperature=0.7,
max_tokens=512,
)
print("Model: ", model)
break
except together.error.RateLimitError as e:
print(e)
await asyncio.sleep(sleep_time)
return response.choices[0].message.content
async def main():
"""Run the main loop of the MOA process."""
results = await asyncio.gather(
*[run_llm(model) for model in reference_models]
)
for _ in range(1, layers - 1):
results = await asyncio.gather(
*[
run_llm(model, prev_response=results)
for model in reference_models
]
)
finalStream = client.chat.completions.create(
model=aggregator_model,
messages=[
{
"role": "system",
"content": getFinalSystemPrompt(
aggreagator_system_prompt, results
),
},
{"role": "user", "content": user_prompt},
],
stream=True,
)
for chunk in finalStream:
print(chunk.choices[0].delta.content or "", end="", flush=True)
asyncio.run(main())
```
## Resources
* [Together MoA GitHub Repo](https://github.com/togethercomputer/MoA) (includes an interactive demo)
* [Together MoA blog post](https://www.together.ai/blog/together-moa)
* [MoA Technical Paper](https://arxiv.org/abs/2406.04692)
---
> To find navigation and other pages in this documentation, fetch the llms.txt file at: https://docs.together.ai/llms.txt
---
# Source: https://docs.together.ai/reference/models-1.md
# List All Models
> Lists all of Together's open-source models
## OpenAPI
````yaml GET /models
openapi: 3.1.0
info:
title: Together APIs
description: The Together REST API. Please see https://docs.together.ai for more details.
version: 2.0.0
termsOfService: https://www.together.ai/terms-of-service
contact:
name: Together Support
url: https://www.together.ai/contact
license:
name: MIT
url: https://github.com/togethercomputer/openapi/blob/main/LICENSE
servers:
- url: https://api.together.xyz/v1
security:
- bearerAuth: []
paths:
/models:
get:
tags:
- Models
summary: List all models
description: Lists all of Together's open-source models
operationId: models
parameters:
- name: dedicated
in: query
description: Filter models to only return dedicated models
schema:
type: boolean
responses:
'200':
description: '200'
content:
application/json:
schema:
$ref: '#/components/schemas/ModelInfoList'
'400':
description: BadRequest
content:
application/json:
schema:
$ref: '#/components/schemas/ErrorData'
'401':
description: Unauthorized
content:
application/json:
schema:
$ref: '#/components/schemas/ErrorData'
'404':
description: NotFound
content:
application/json:
schema:
$ref: '#/components/schemas/ErrorData'
'429':
description: RateLimit
content:
application/json:
schema:
$ref: '#/components/schemas/ErrorData'
'504':
description: Timeout
content:
application/json:
schema:
$ref: '#/components/schemas/ErrorData'
deprecated: false
components:
schemas:
ModelInfoList:
type: array
items:
$ref: '#/components/schemas/ModelInfo'
ErrorData:
type: object
required:
- error
properties:
error:
type: object
properties:
message:
type: string
nullable: false
type:
type: string
nullable: false
param:
type: string
nullable: true
default: null
code:
type: string
nullable: true
default: null
required:
- type
- message
ModelInfo:
type: object
required:
- id
- object
- created
- type
properties:
id:
type: string
example: Austism/chronos-hermes-13b
object:
type: string
example: model
created:
type: integer
example: 1692896905
type:
enum:
- chat
- language
- code
- image
- embedding
- moderation
- rerank
example: chat
display_name:
type: string
example: Chronos Hermes (13B)
organization:
type: string
example: Austism
link:
type: string
license:
type: string
example: other
context_length:
type: integer
example: 2048
pricing:
$ref: '#/components/schemas/Pricing'
Pricing:
type: object
required:
- hourly
- input
- output
- base
- finetune
properties:
hourly:
type: number
example: 0
input:
type: number
example: 0.3
output:
type: number
example: 0.3
base:
type: number
example: 0
finetune:
type: number
example: 0
securitySchemes:
bearerAuth:
type: http
scheme: bearer
x-bearer-format: bearer
x-default: default
````
---
> To find navigation and other pages in this documentation, fetch the llms.txt file at: https://docs.together.ai/llms.txt
---
# Source: https://docs.together.ai/reference/models-5.md
# Models
## List all models
To list all the available models, run `together models list`:
```sh Bash theme={null}
# List models
together models list
```
## View all commands
To see all the available chat commands, run:
```sh Shell theme={null}
together models --help
```
---
> To find navigation and other pages in this documentation, fetch the llms.txt file at: https://docs.together.ai/llms.txt
---
# Source: https://docs.together.ai/docs/multiple-api-keys.md
# Multiple API Keys
## Can I create multiple API keys?
Under [Settings](https://api.together.ai/settings/api-keys) you will find a list of all the API keys associated with the account. Here, you can create a new API key, set an API key name and optionally set an expiration date.
```py Python theme={null}
# Advanced Mixture-of-Agents example – 3 layers
import asyncio
import os
import together
from together import AsyncTogether, Together
client = Together()
async_client = AsyncTogether()
user_prompt = "What are 3 fun things to do in SF?"
reference_models = [
"Qwen/Qwen2-72B-Instruct",
"meta-llama/Llama-3.3-70B-Instruct-Turbo",
"mistralai/Mixtral-8x22B-Instruct-v0.1",
"databricks/dbrx-instruct",
]
aggregator_model = "mistralai/Mixtral-8x22B-Instruct-v0.1"
aggreagator_system_prompt = """You have been provided with a set of responses from various open-source models to the latest user query. Your task is to synthesize these responses into a single, high-quality response. It is crucial to critically evaluate the information provided in these responses, recognizing that some of it may be biased or incorrect. Your response should not simply replicate the given answers but should offer a refined, accurate, and comprehensive reply to the instruction. Ensure your response is well-structured, coherent, and adheres to the highest standards of accuracy and reliability.
Responses from models:"""
layers = 3
def getFinalSystemPrompt(system_prompt, results):
"""Construct a system prompt for layers 2+ that includes the previous responses to synthesize."""
return (
system_prompt
+ "\n"
+ "\n".join(
[f"{i+1}. {str(element)}" for i, element in enumerate(results)]
)
)
async def run_llm(model, prev_response=None):
"""Run a single LLM call with a model while accounting for previous responses + rate limits."""
for sleep_time in [1, 2, 4]:
try:
messages = (
[
{
"role": "system",
"content": getFinalSystemPrompt(
aggreagator_system_prompt, prev_response
),
},
{"role": "user", "content": user_prompt},
]
if prev_response
else [{"role": "user", "content": user_prompt}]
)
response = await async_client.chat.completions.create(
model=model,
messages=messages,
temperature=0.7,
max_tokens=512,
)
print("Model: ", model)
break
except together.error.RateLimitError as e:
print(e)
await asyncio.sleep(sleep_time)
return response.choices[0].message.content
async def main():
"""Run the main loop of the MOA process."""
results = await asyncio.gather(
*[run_llm(model) for model in reference_models]
)
for _ in range(1, layers - 1):
results = await asyncio.gather(
*[
run_llm(model, prev_response=results)
for model in reference_models
]
)
finalStream = client.chat.completions.create(
model=aggregator_model,
messages=[
{
"role": "system",
"content": getFinalSystemPrompt(
aggreagator_system_prompt, results
),
},
{"role": "user", "content": user_prompt},
],
stream=True,
)
for chunk in finalStream:
print(chunk.choices[0].delta.content or "", end="", flush=True)
asyncio.run(main())
```
## Resources
* [Together MoA GitHub Repo](https://github.com/togethercomputer/MoA) (includes an interactive demo)
* [Together MoA blog post](https://www.together.ai/blog/together-moa)
* [MoA Technical Paper](https://arxiv.org/abs/2406.04692)
---
> To find navigation and other pages in this documentation, fetch the llms.txt file at: https://docs.together.ai/llms.txt
---
# Source: https://docs.together.ai/reference/models-1.md
# List All Models
> Lists all of Together's open-source models
## OpenAPI
````yaml GET /models
openapi: 3.1.0
info:
title: Together APIs
description: The Together REST API. Please see https://docs.together.ai for more details.
version: 2.0.0
termsOfService: https://www.together.ai/terms-of-service
contact:
name: Together Support
url: https://www.together.ai/contact
license:
name: MIT
url: https://github.com/togethercomputer/openapi/blob/main/LICENSE
servers:
- url: https://api.together.xyz/v1
security:
- bearerAuth: []
paths:
/models:
get:
tags:
- Models
summary: List all models
description: Lists all of Together's open-source models
operationId: models
parameters:
- name: dedicated
in: query
description: Filter models to only return dedicated models
schema:
type: boolean
responses:
'200':
description: '200'
content:
application/json:
schema:
$ref: '#/components/schemas/ModelInfoList'
'400':
description: BadRequest
content:
application/json:
schema:
$ref: '#/components/schemas/ErrorData'
'401':
description: Unauthorized
content:
application/json:
schema:
$ref: '#/components/schemas/ErrorData'
'404':
description: NotFound
content:
application/json:
schema:
$ref: '#/components/schemas/ErrorData'
'429':
description: RateLimit
content:
application/json:
schema:
$ref: '#/components/schemas/ErrorData'
'504':
description: Timeout
content:
application/json:
schema:
$ref: '#/components/schemas/ErrorData'
deprecated: false
components:
schemas:
ModelInfoList:
type: array
items:
$ref: '#/components/schemas/ModelInfo'
ErrorData:
type: object
required:
- error
properties:
error:
type: object
properties:
message:
type: string
nullable: false
type:
type: string
nullable: false
param:
type: string
nullable: true
default: null
code:
type: string
nullable: true
default: null
required:
- type
- message
ModelInfo:
type: object
required:
- id
- object
- created
- type
properties:
id:
type: string
example: Austism/chronos-hermes-13b
object:
type: string
example: model
created:
type: integer
example: 1692896905
type:
enum:
- chat
- language
- code
- image
- embedding
- moderation
- rerank
example: chat
display_name:
type: string
example: Chronos Hermes (13B)
organization:
type: string
example: Austism
link:
type: string
license:
type: string
example: other
context_length:
type: integer
example: 2048
pricing:
$ref: '#/components/schemas/Pricing'
Pricing:
type: object
required:
- hourly
- input
- output
- base
- finetune
properties:
hourly:
type: number
example: 0
input:
type: number
example: 0.3
output:
type: number
example: 0.3
base:
type: number
example: 0
finetune:
type: number
example: 0
securitySchemes:
bearerAuth:
type: http
scheme: bearer
x-bearer-format: bearer
x-default: default
````
---
> To find navigation and other pages in this documentation, fetch the llms.txt file at: https://docs.together.ai/llms.txt
---
# Source: https://docs.together.ai/reference/models-5.md
# Models
## List all models
To list all the available models, run `together models list`:
```sh Bash theme={null}
# List models
together models list
```
## View all commands
To see all the available chat commands, run:
```sh Shell theme={null}
together models --help
```
---
> To find navigation and other pages in this documentation, fetch the llms.txt file at: https://docs.together.ai/llms.txt
---
# Source: https://docs.together.ai/docs/multiple-api-keys.md
# Multiple API Keys
## Can I create multiple API keys?
Under [Settings](https://api.together.ai/settings/api-keys) you will find a list of all the API keys associated with the account. Here, you can create a new API key, set an API key name and optionally set an expiration date.
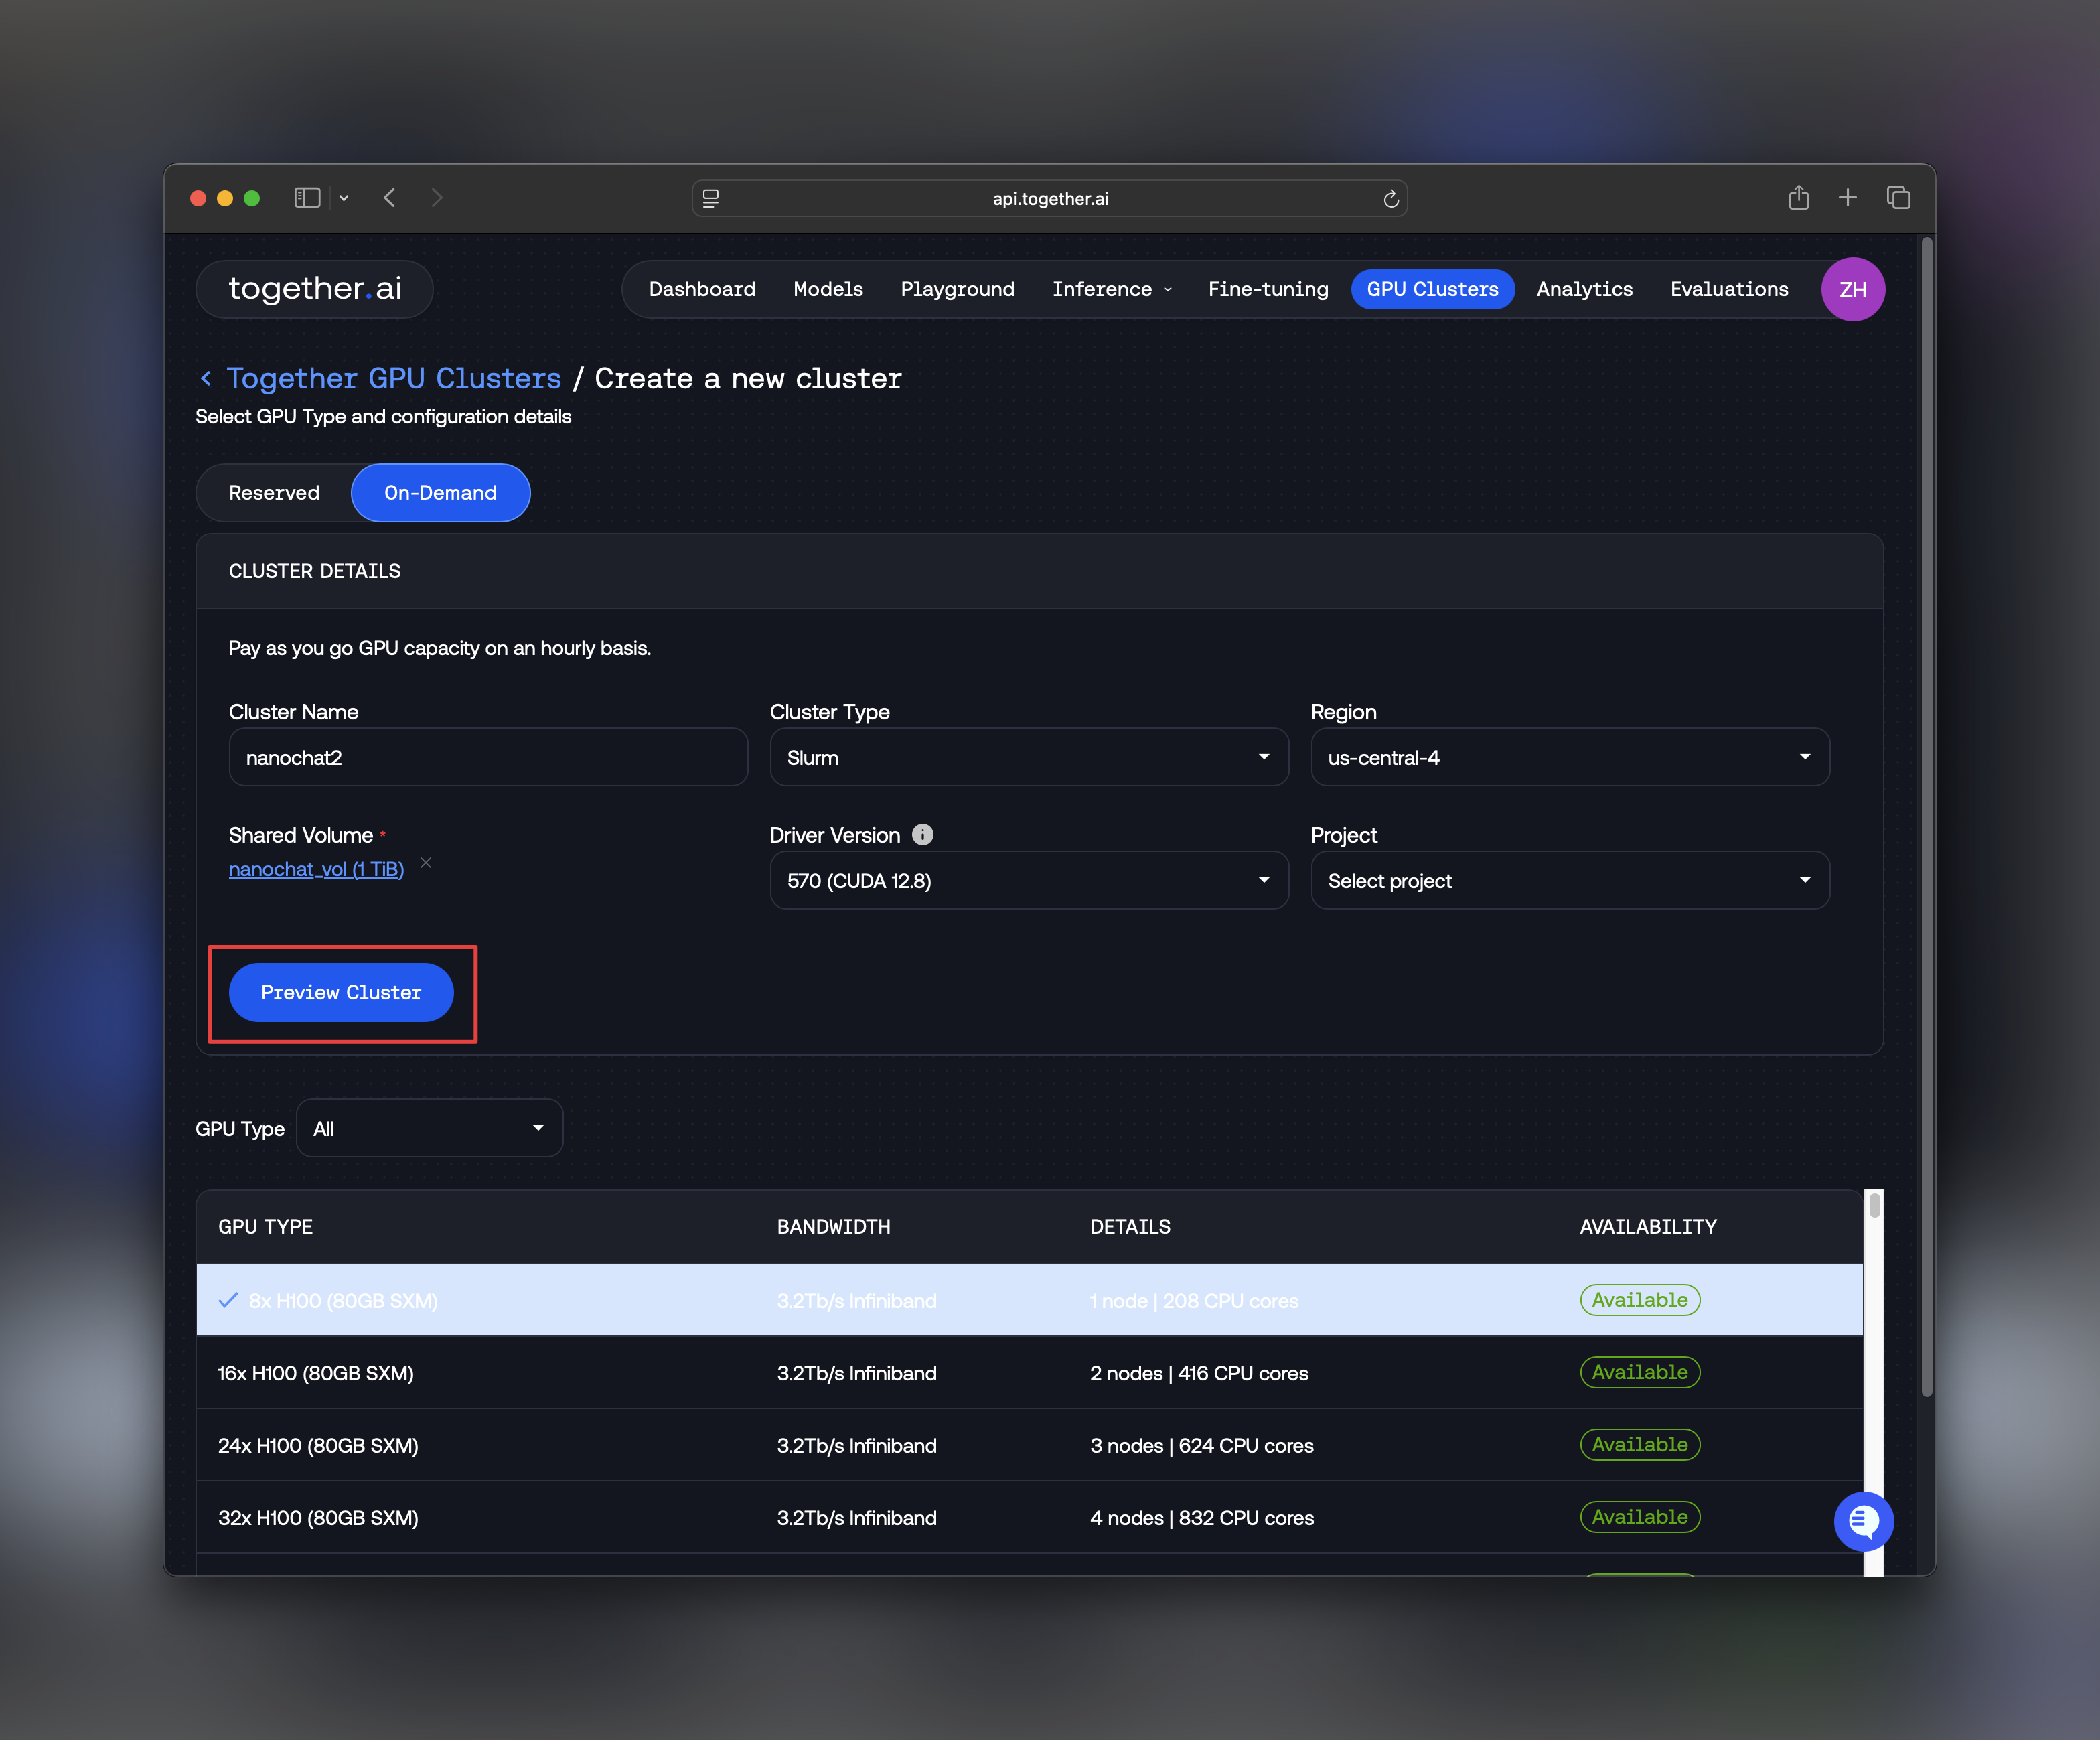 Your cluster will be ready in a few minutes. Once the status shows **Ready**, you can proceed to the next step.

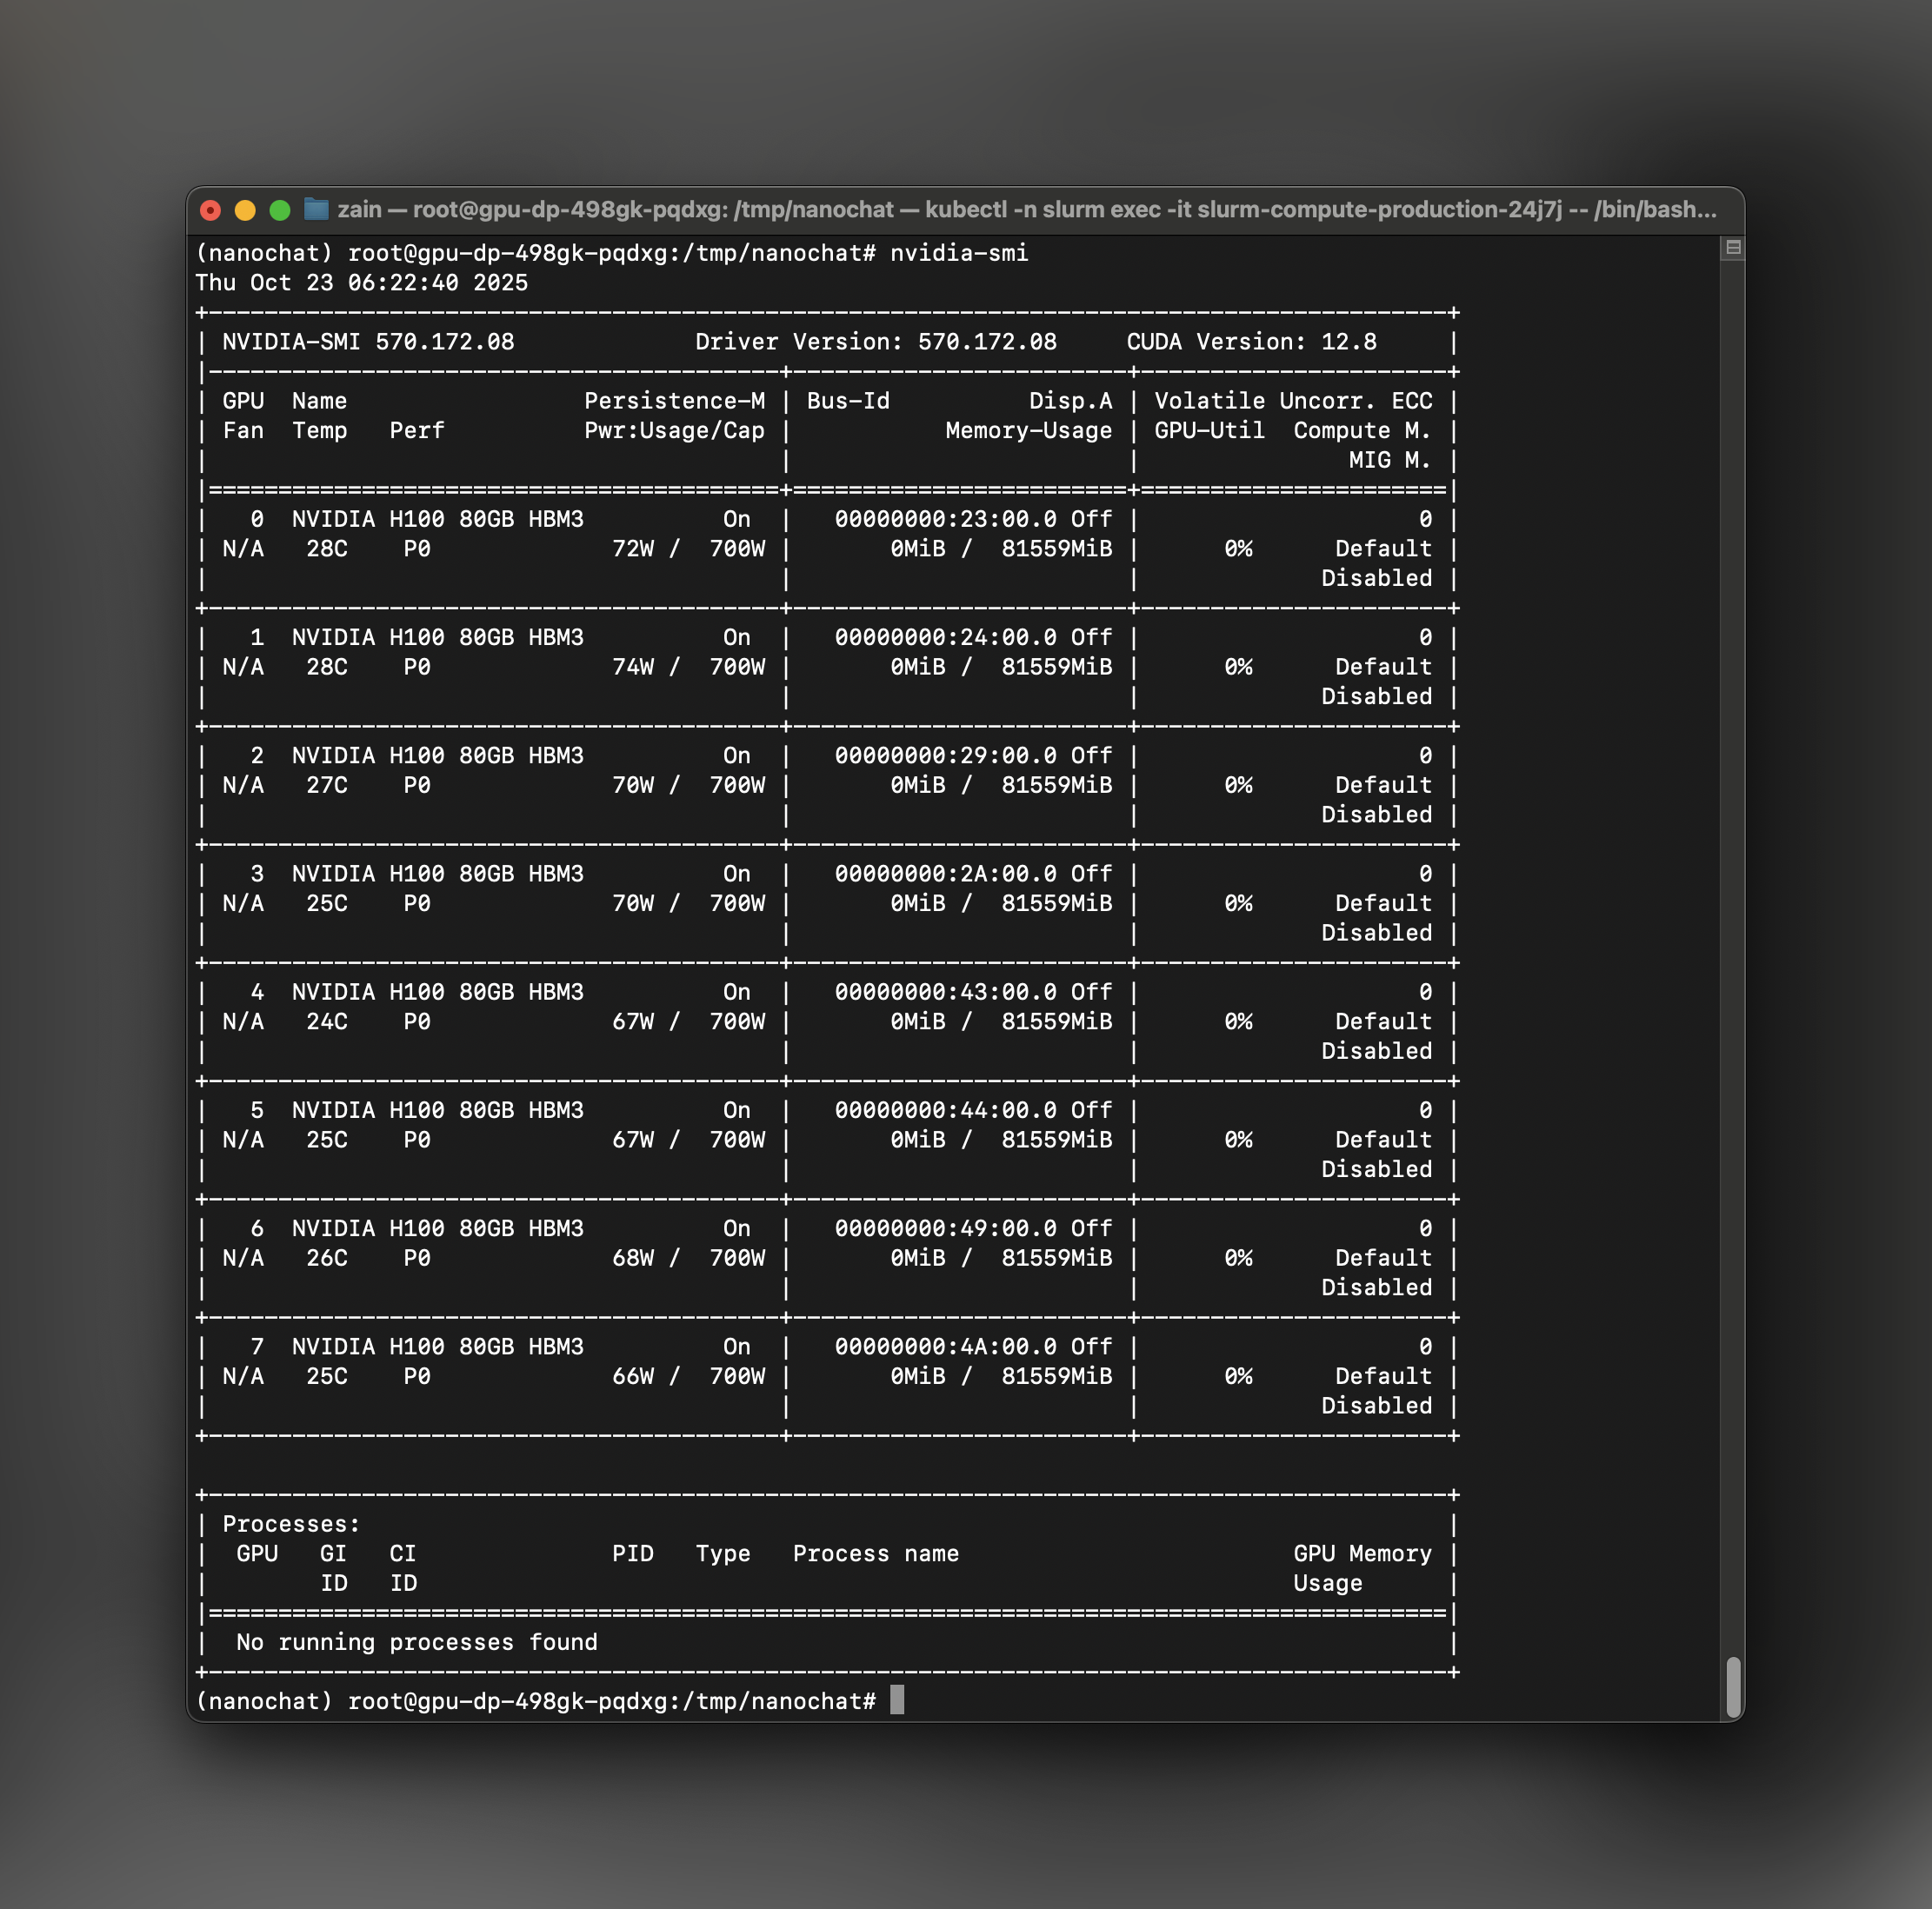 ## Step 5: Configure Cache Directory
To optimize data loading performance, set the nanochat cache directory to the `/scratch` volume, which is optimized for high-throughput I/O:
## Step 5: Configure Cache Directory
To optimize data loading performance, set the nanochat cache directory to the `/scratch` volume, which is optimized for high-throughput I/O:
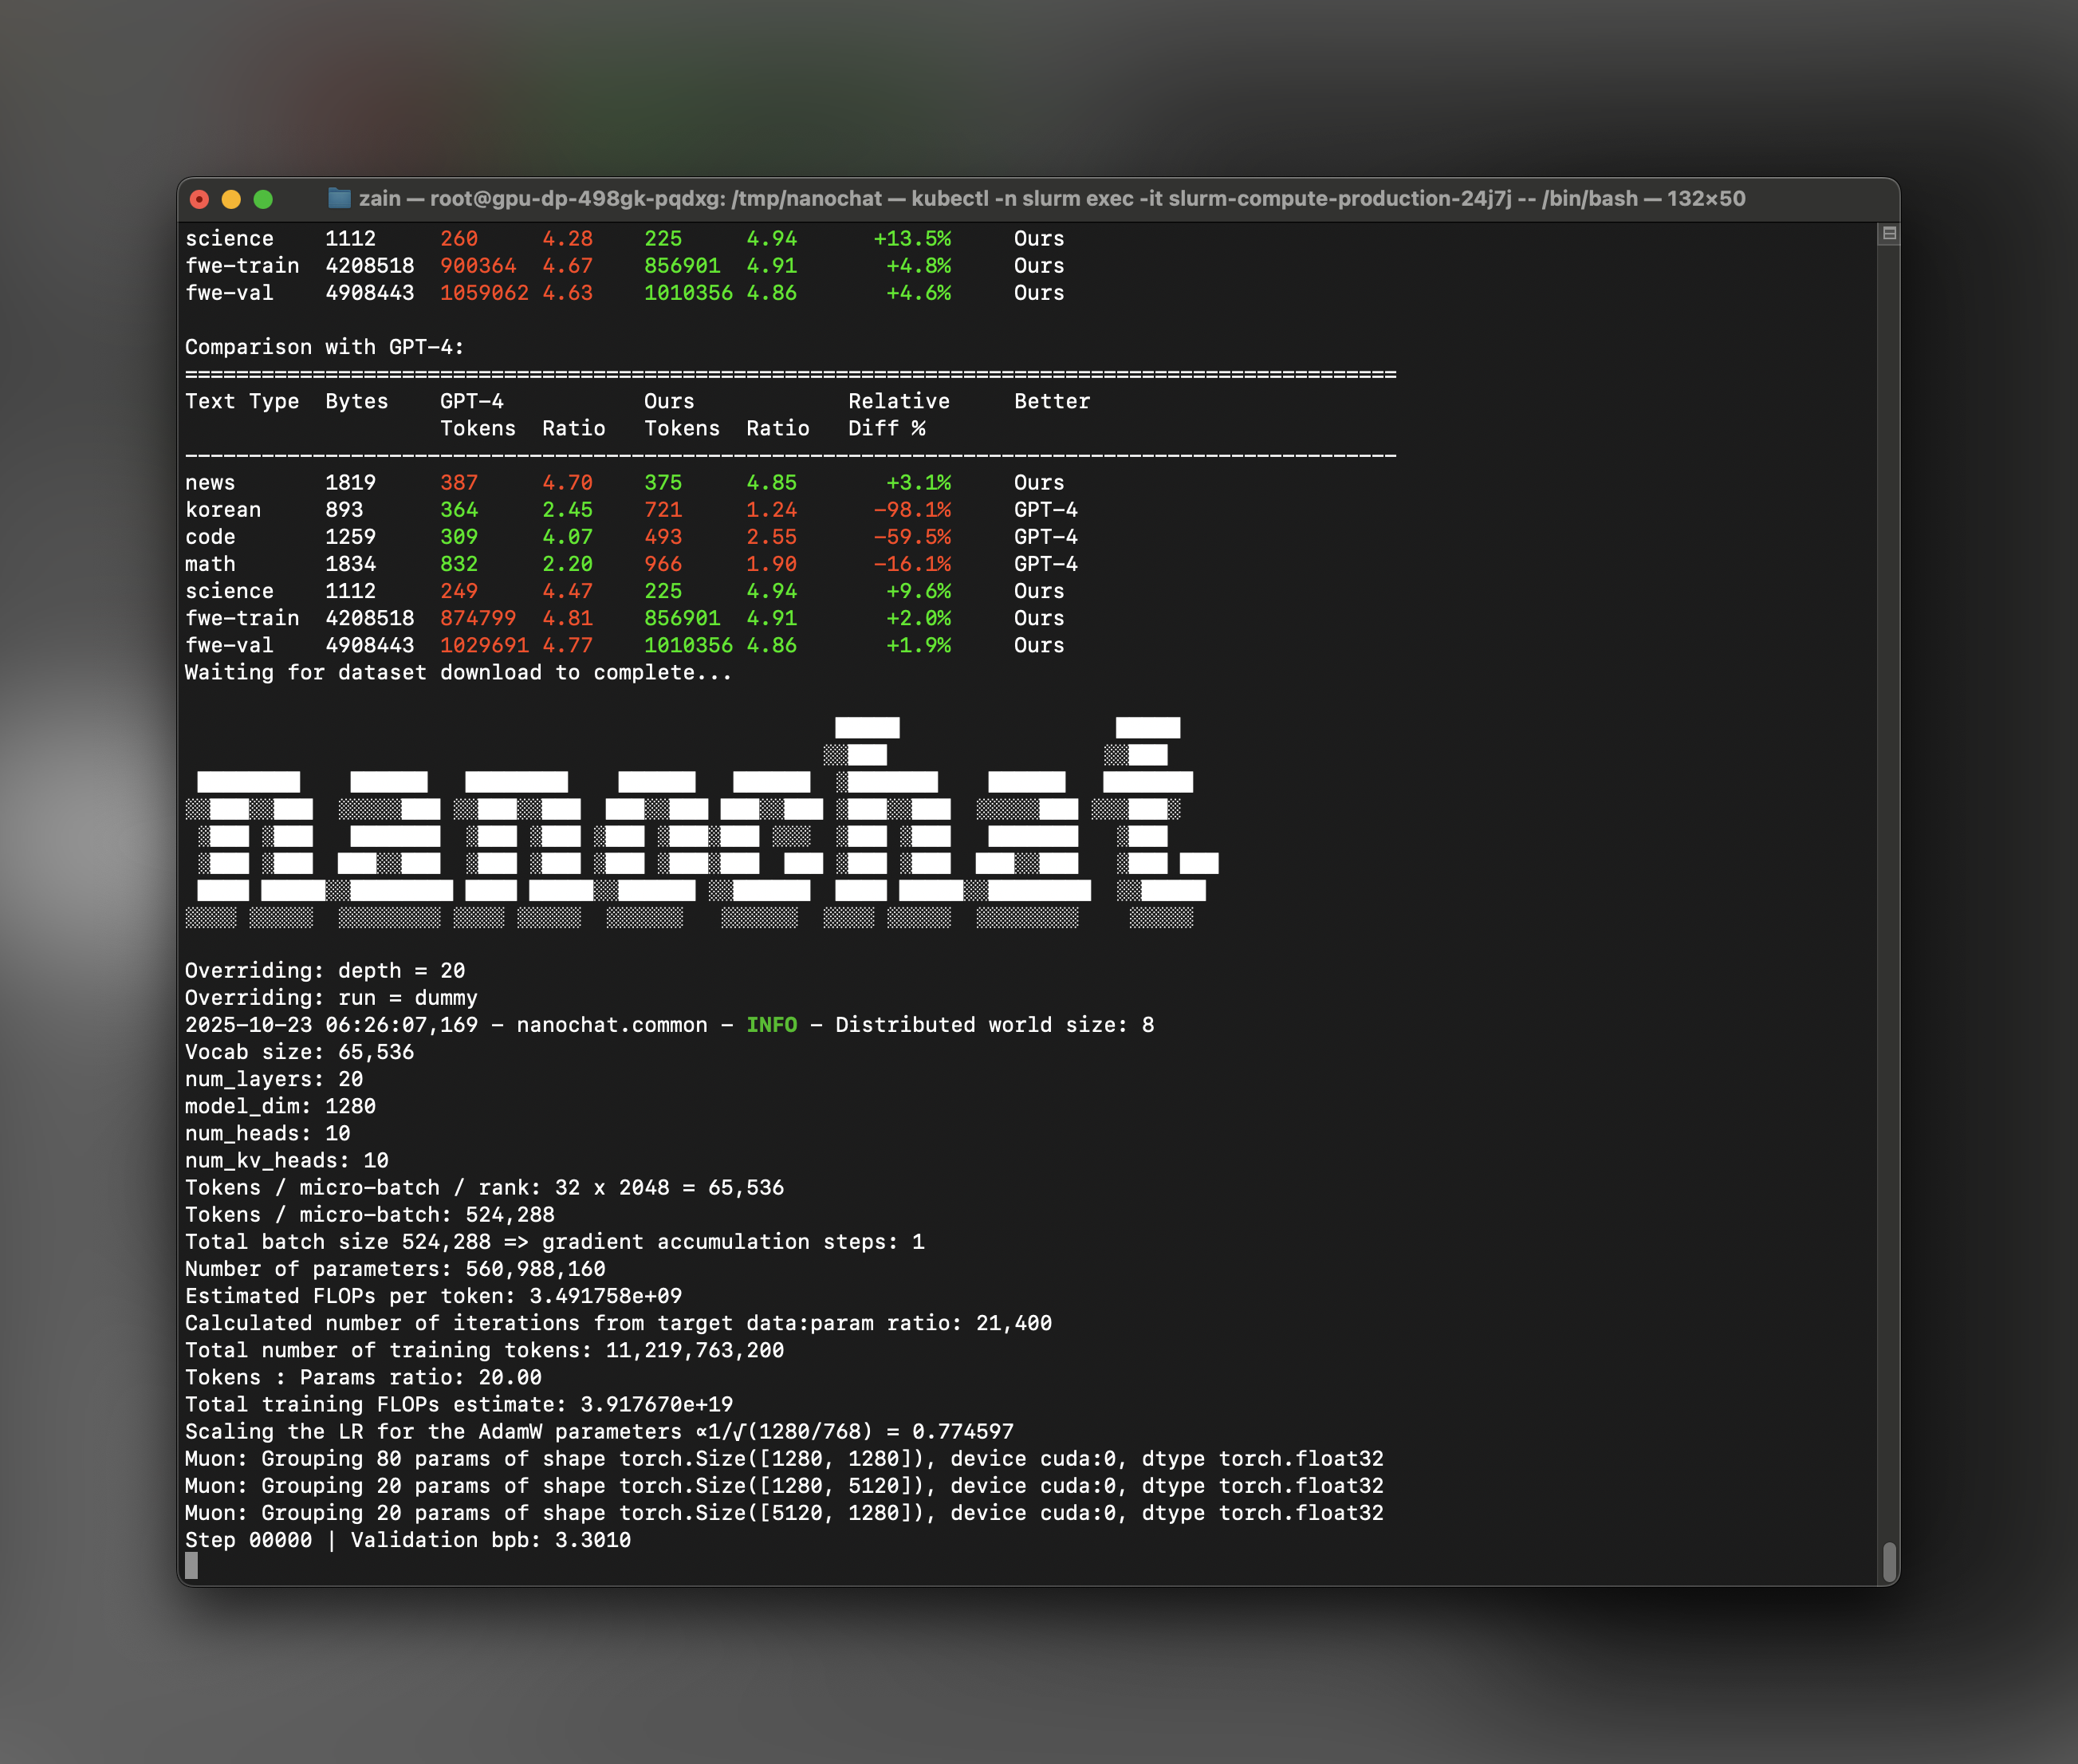 **Monitor Training Progress**
During training, you can monitor several key metrics:
* **Model Flops Utilization (MFU)**: Should be around 50% for optimal performance
* **tok/sec**: Tracks tokens processed per second of training
* **Step timing**: Each step should complete in a few seconds
The scripts automatically log progress and save checkpoints under `$NANOCHAT_BASE_DIR`.
**Monitor Training Progress**
During training, you can monitor several key metrics:
* **Model Flops Utilization (MFU)**: Should be around 50% for optimal performance
* **tok/sec**: Tracks tokens processed per second of training
* **Step timing**: Each step should complete in a few seconds
The scripts automatically log progress and save checkpoints under `$NANOCHAT_BASE_DIR`.
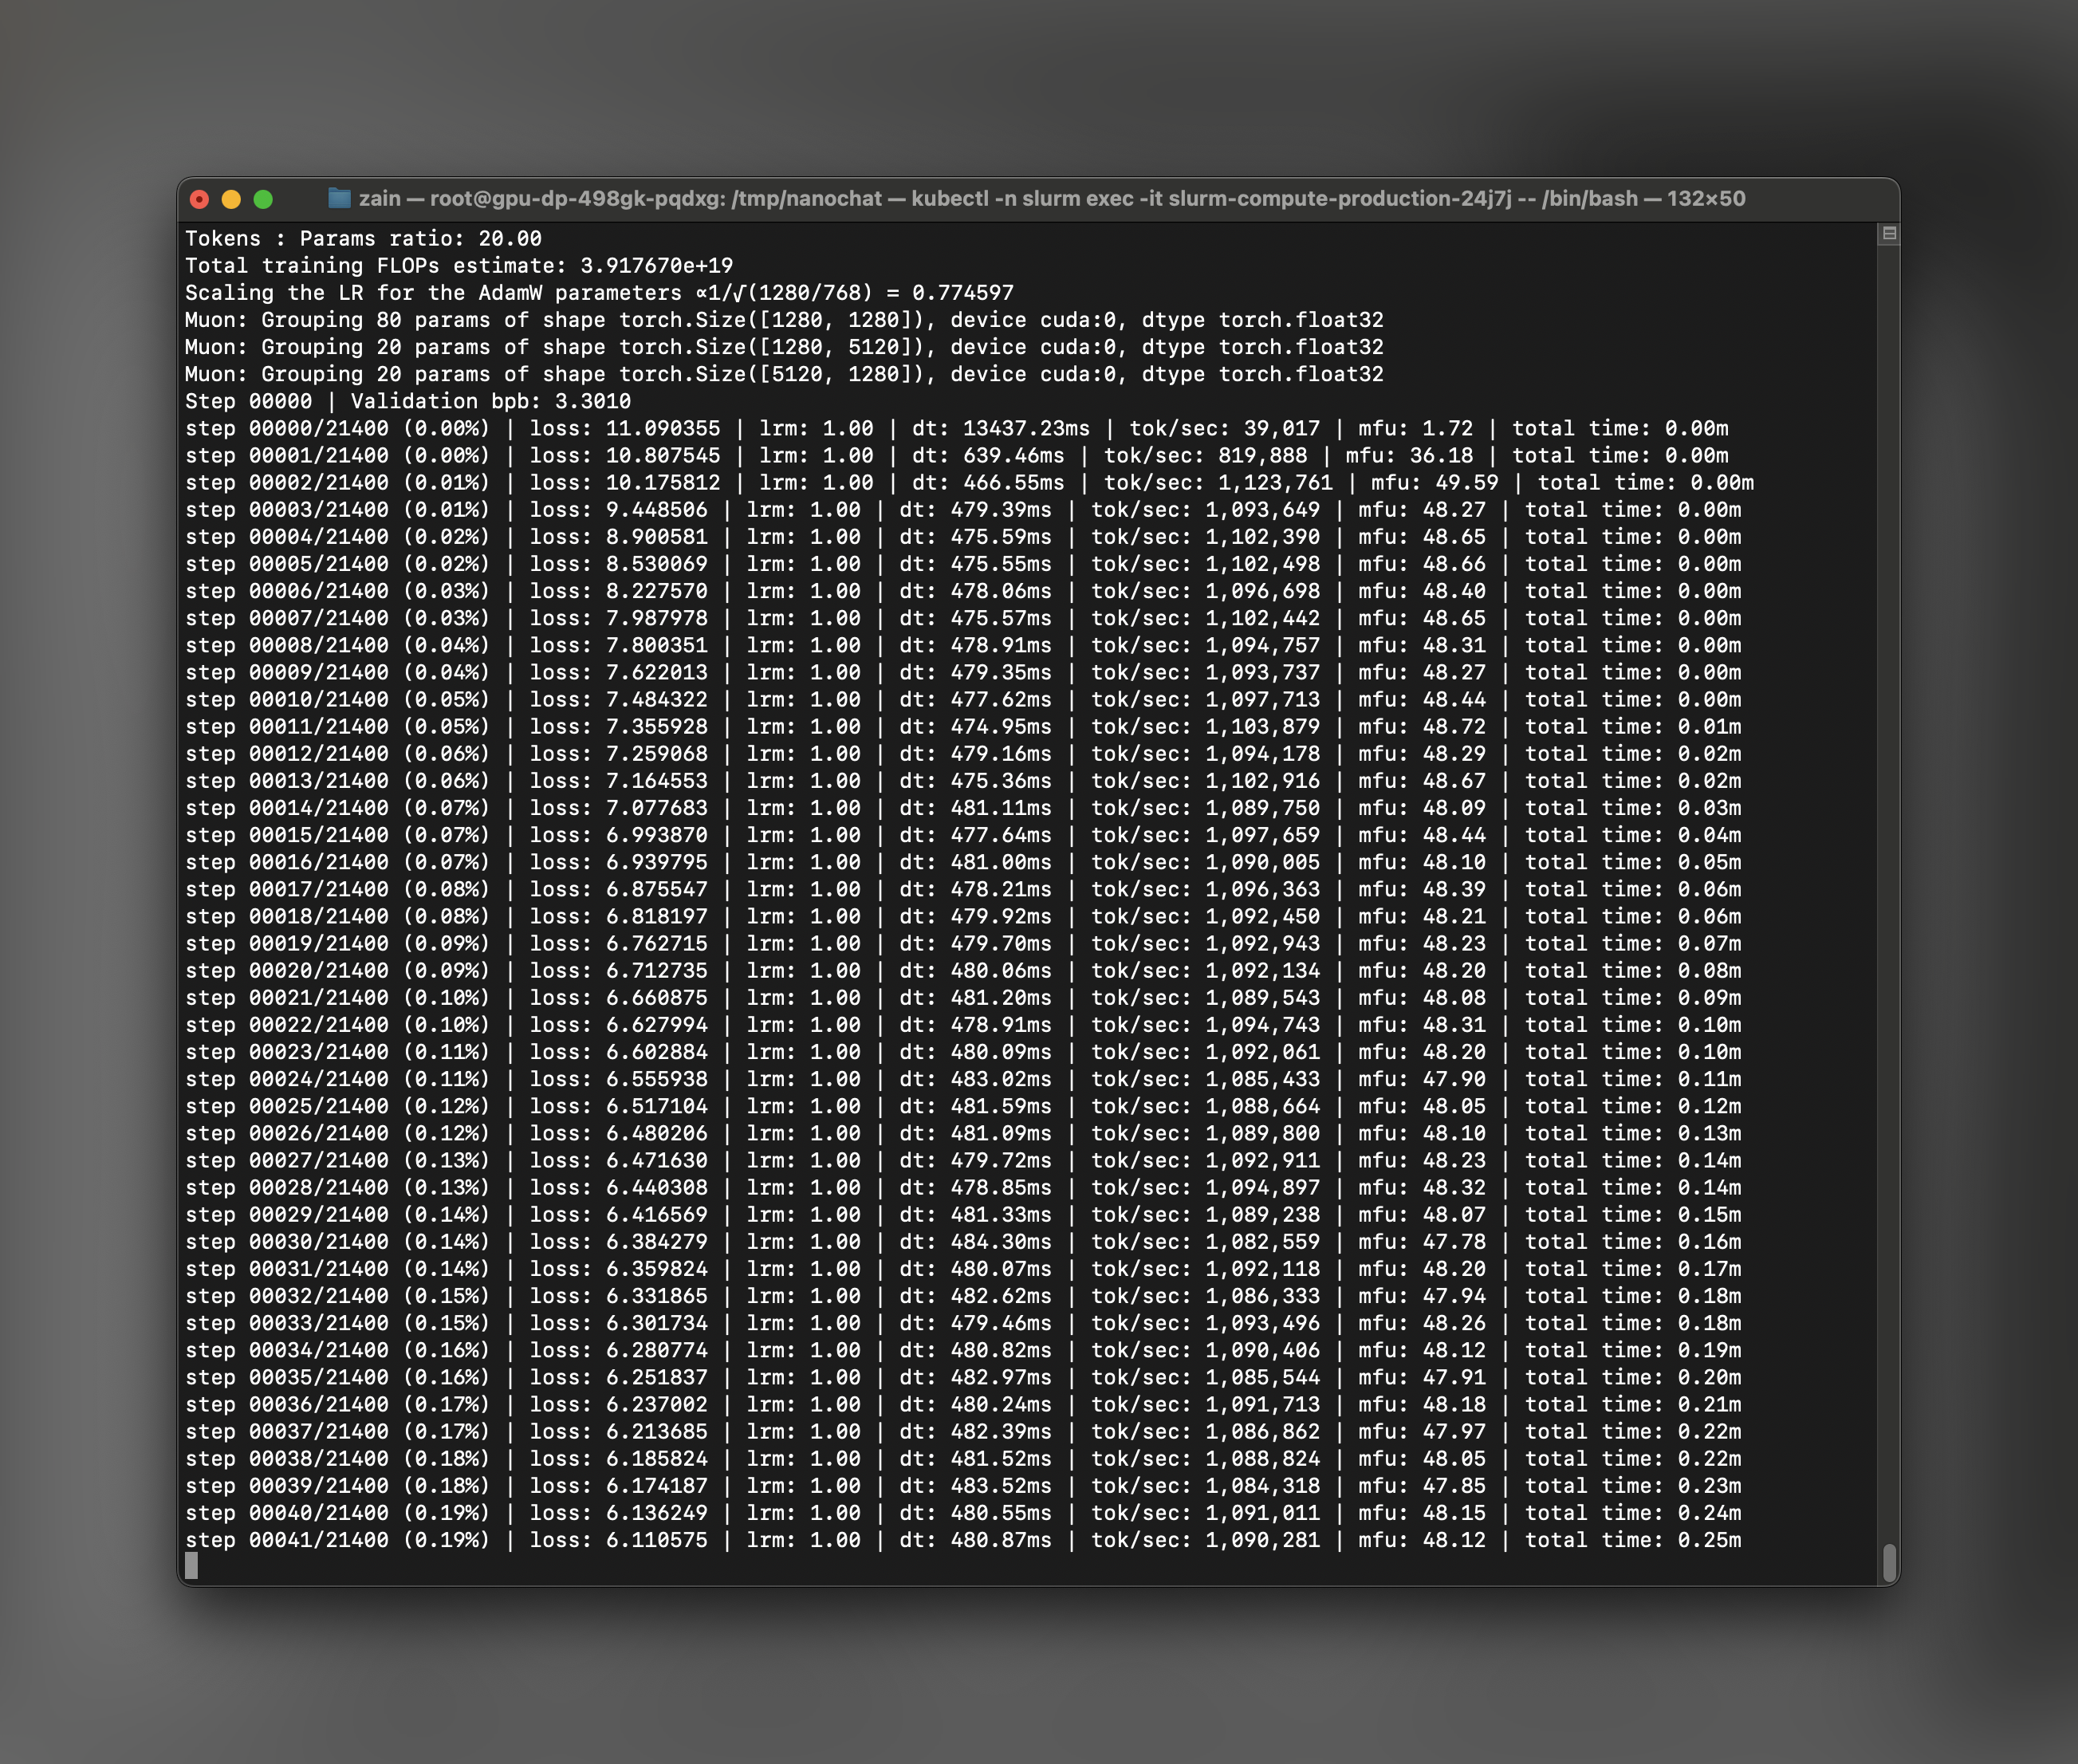 # nanochat Inference
## Step 1: Download Your Cluster's Kubeconfig
While training is running (or after it completes), download your cluster's kubeconfig from the Together AI dashboard. This will allow you to access the cluster using kubectl.
1. Go to your cluster in the Together AI dashboard
2. Click on the **View Kubeconfig** button
3. Copy and save the kubeconfig file to your local machine (e.g., `~/.kube/nanochat-cluster-config`)
# nanochat Inference
## Step 1: Download Your Cluster's Kubeconfig
While training is running (or after it completes), download your cluster's kubeconfig from the Together AI dashboard. This will allow you to access the cluster using kubectl.
1. Go to your cluster in the Together AI dashboard
2. Click on the **View Kubeconfig** button
3. Copy and save the kubeconfig file to your local machine (e.g., `~/.kube/nanochat-cluster-config`)
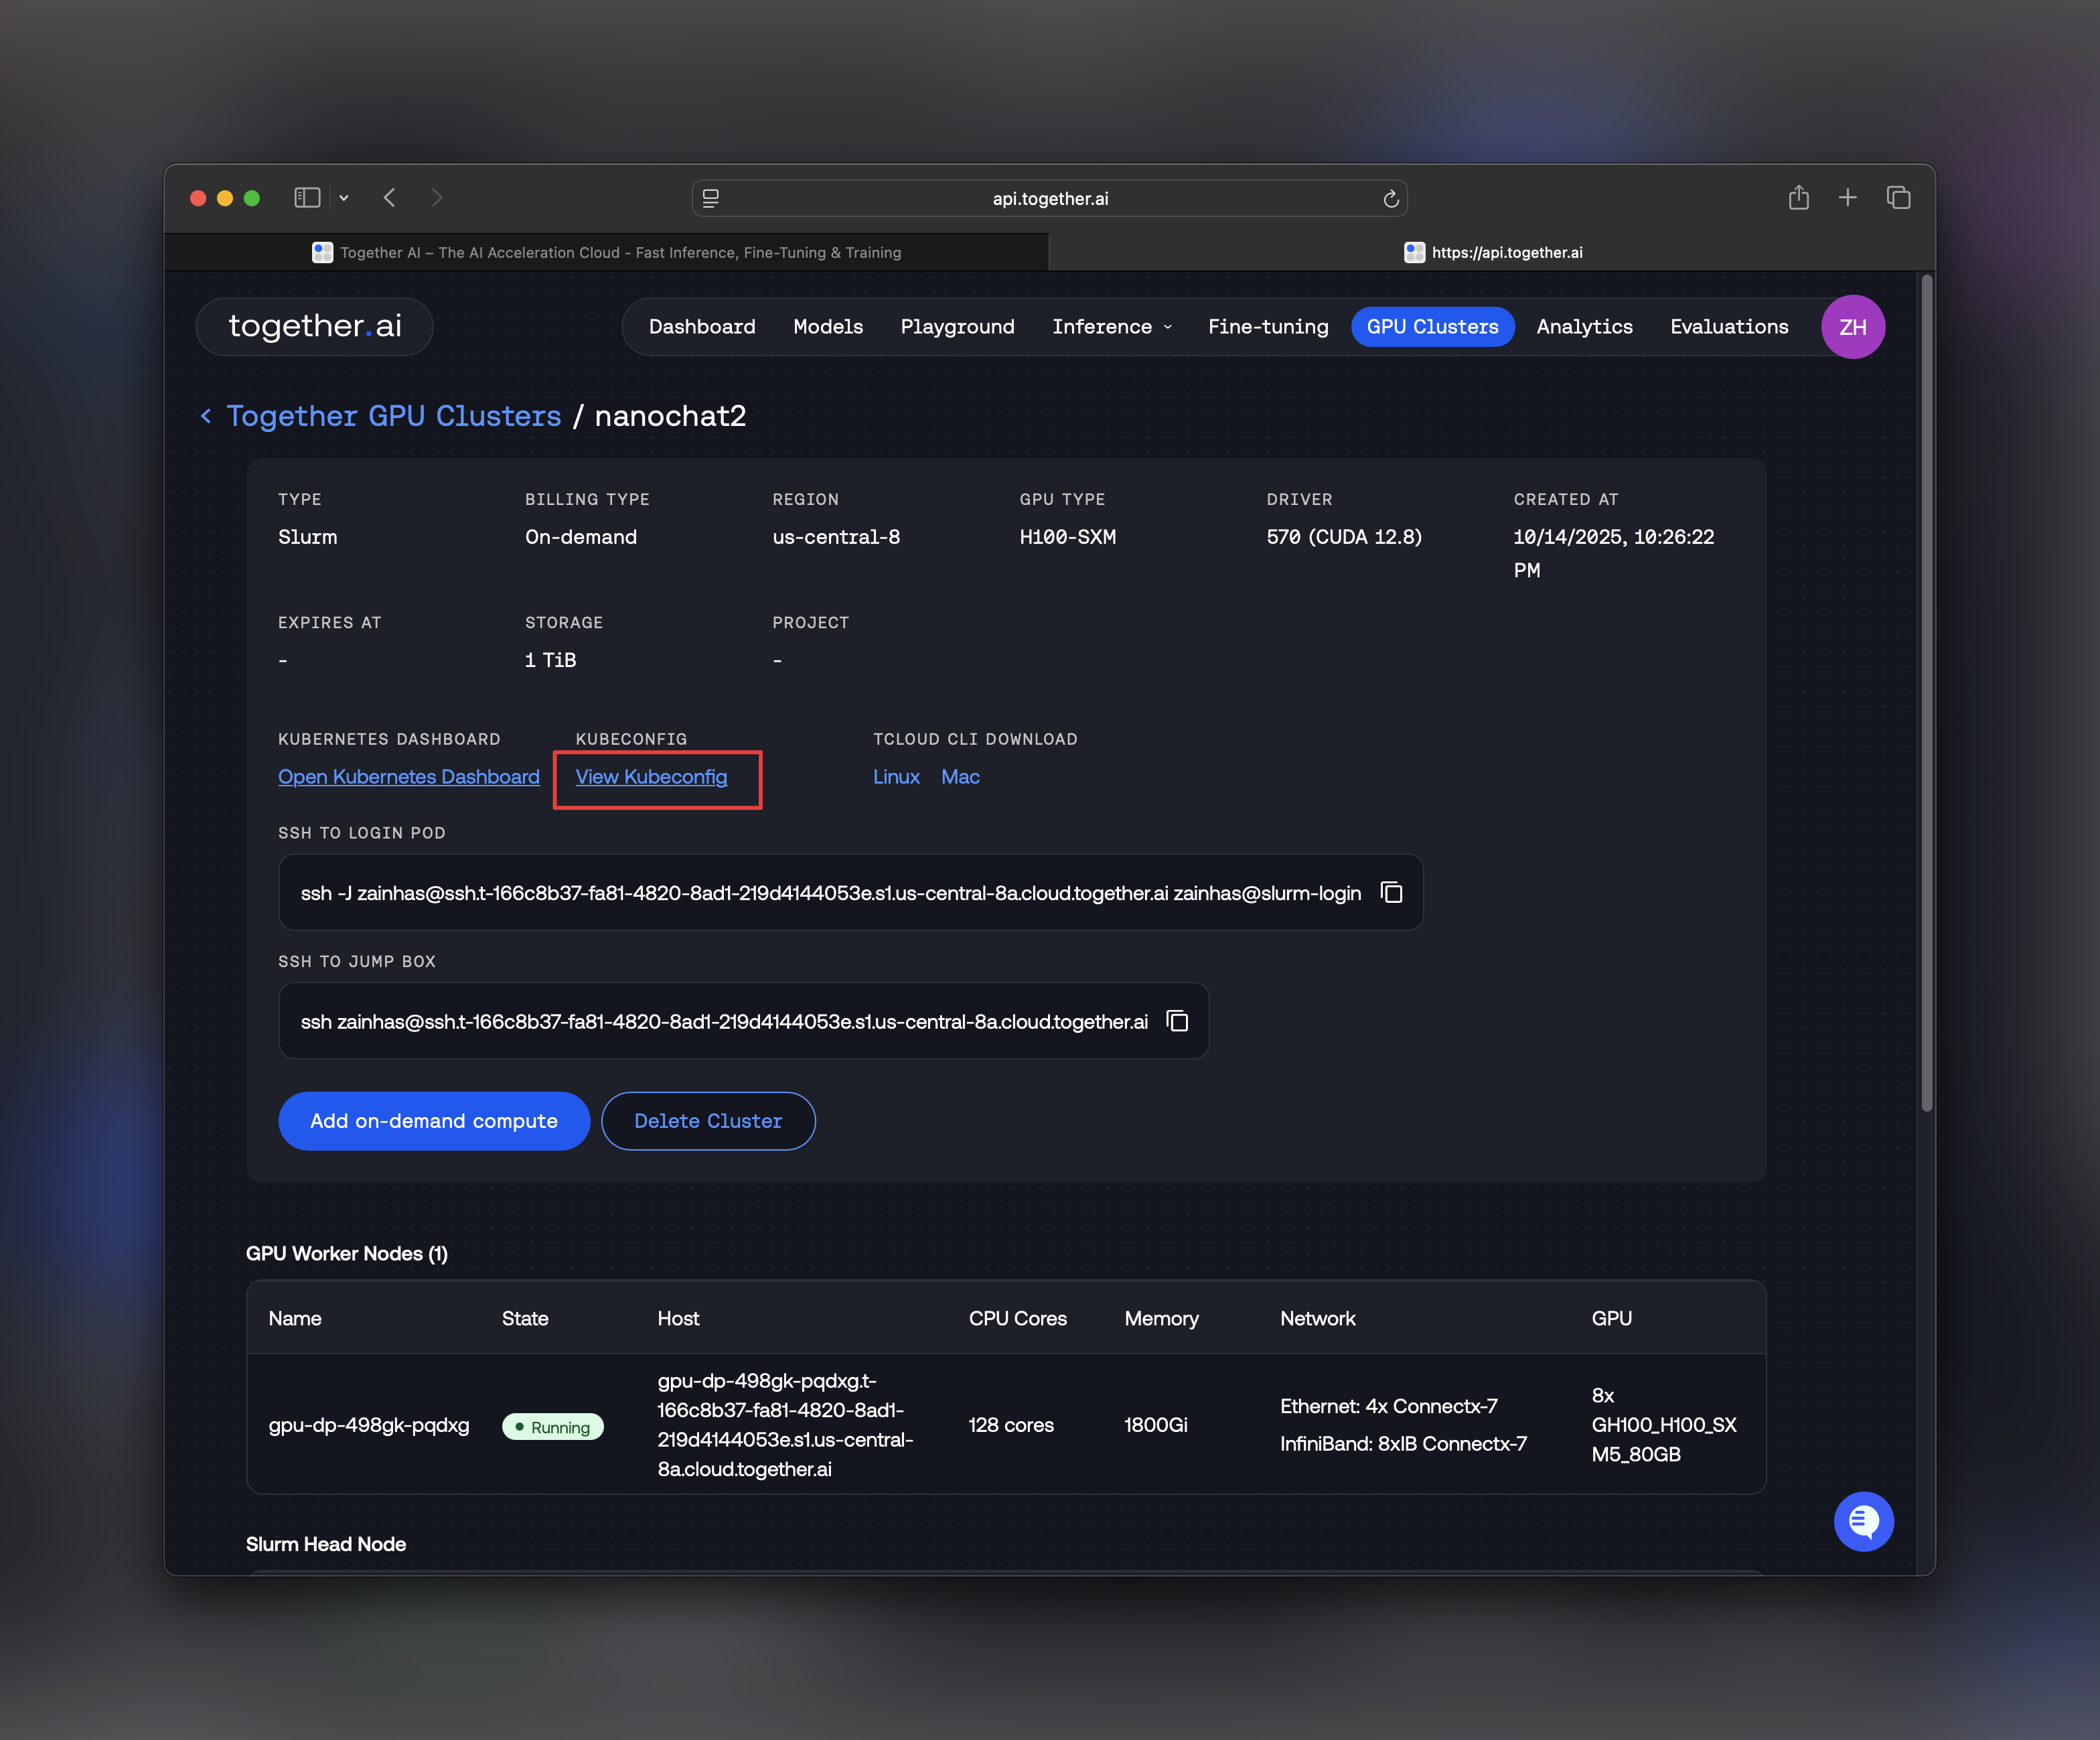 ## Step 2: Access the Compute Pod via kubectl
From your **local machine**, set up kubectl access to your cluster:
## Step 2: Access the Compute Pod via kubectl
From your **local machine**, set up kubectl access to your cluster:
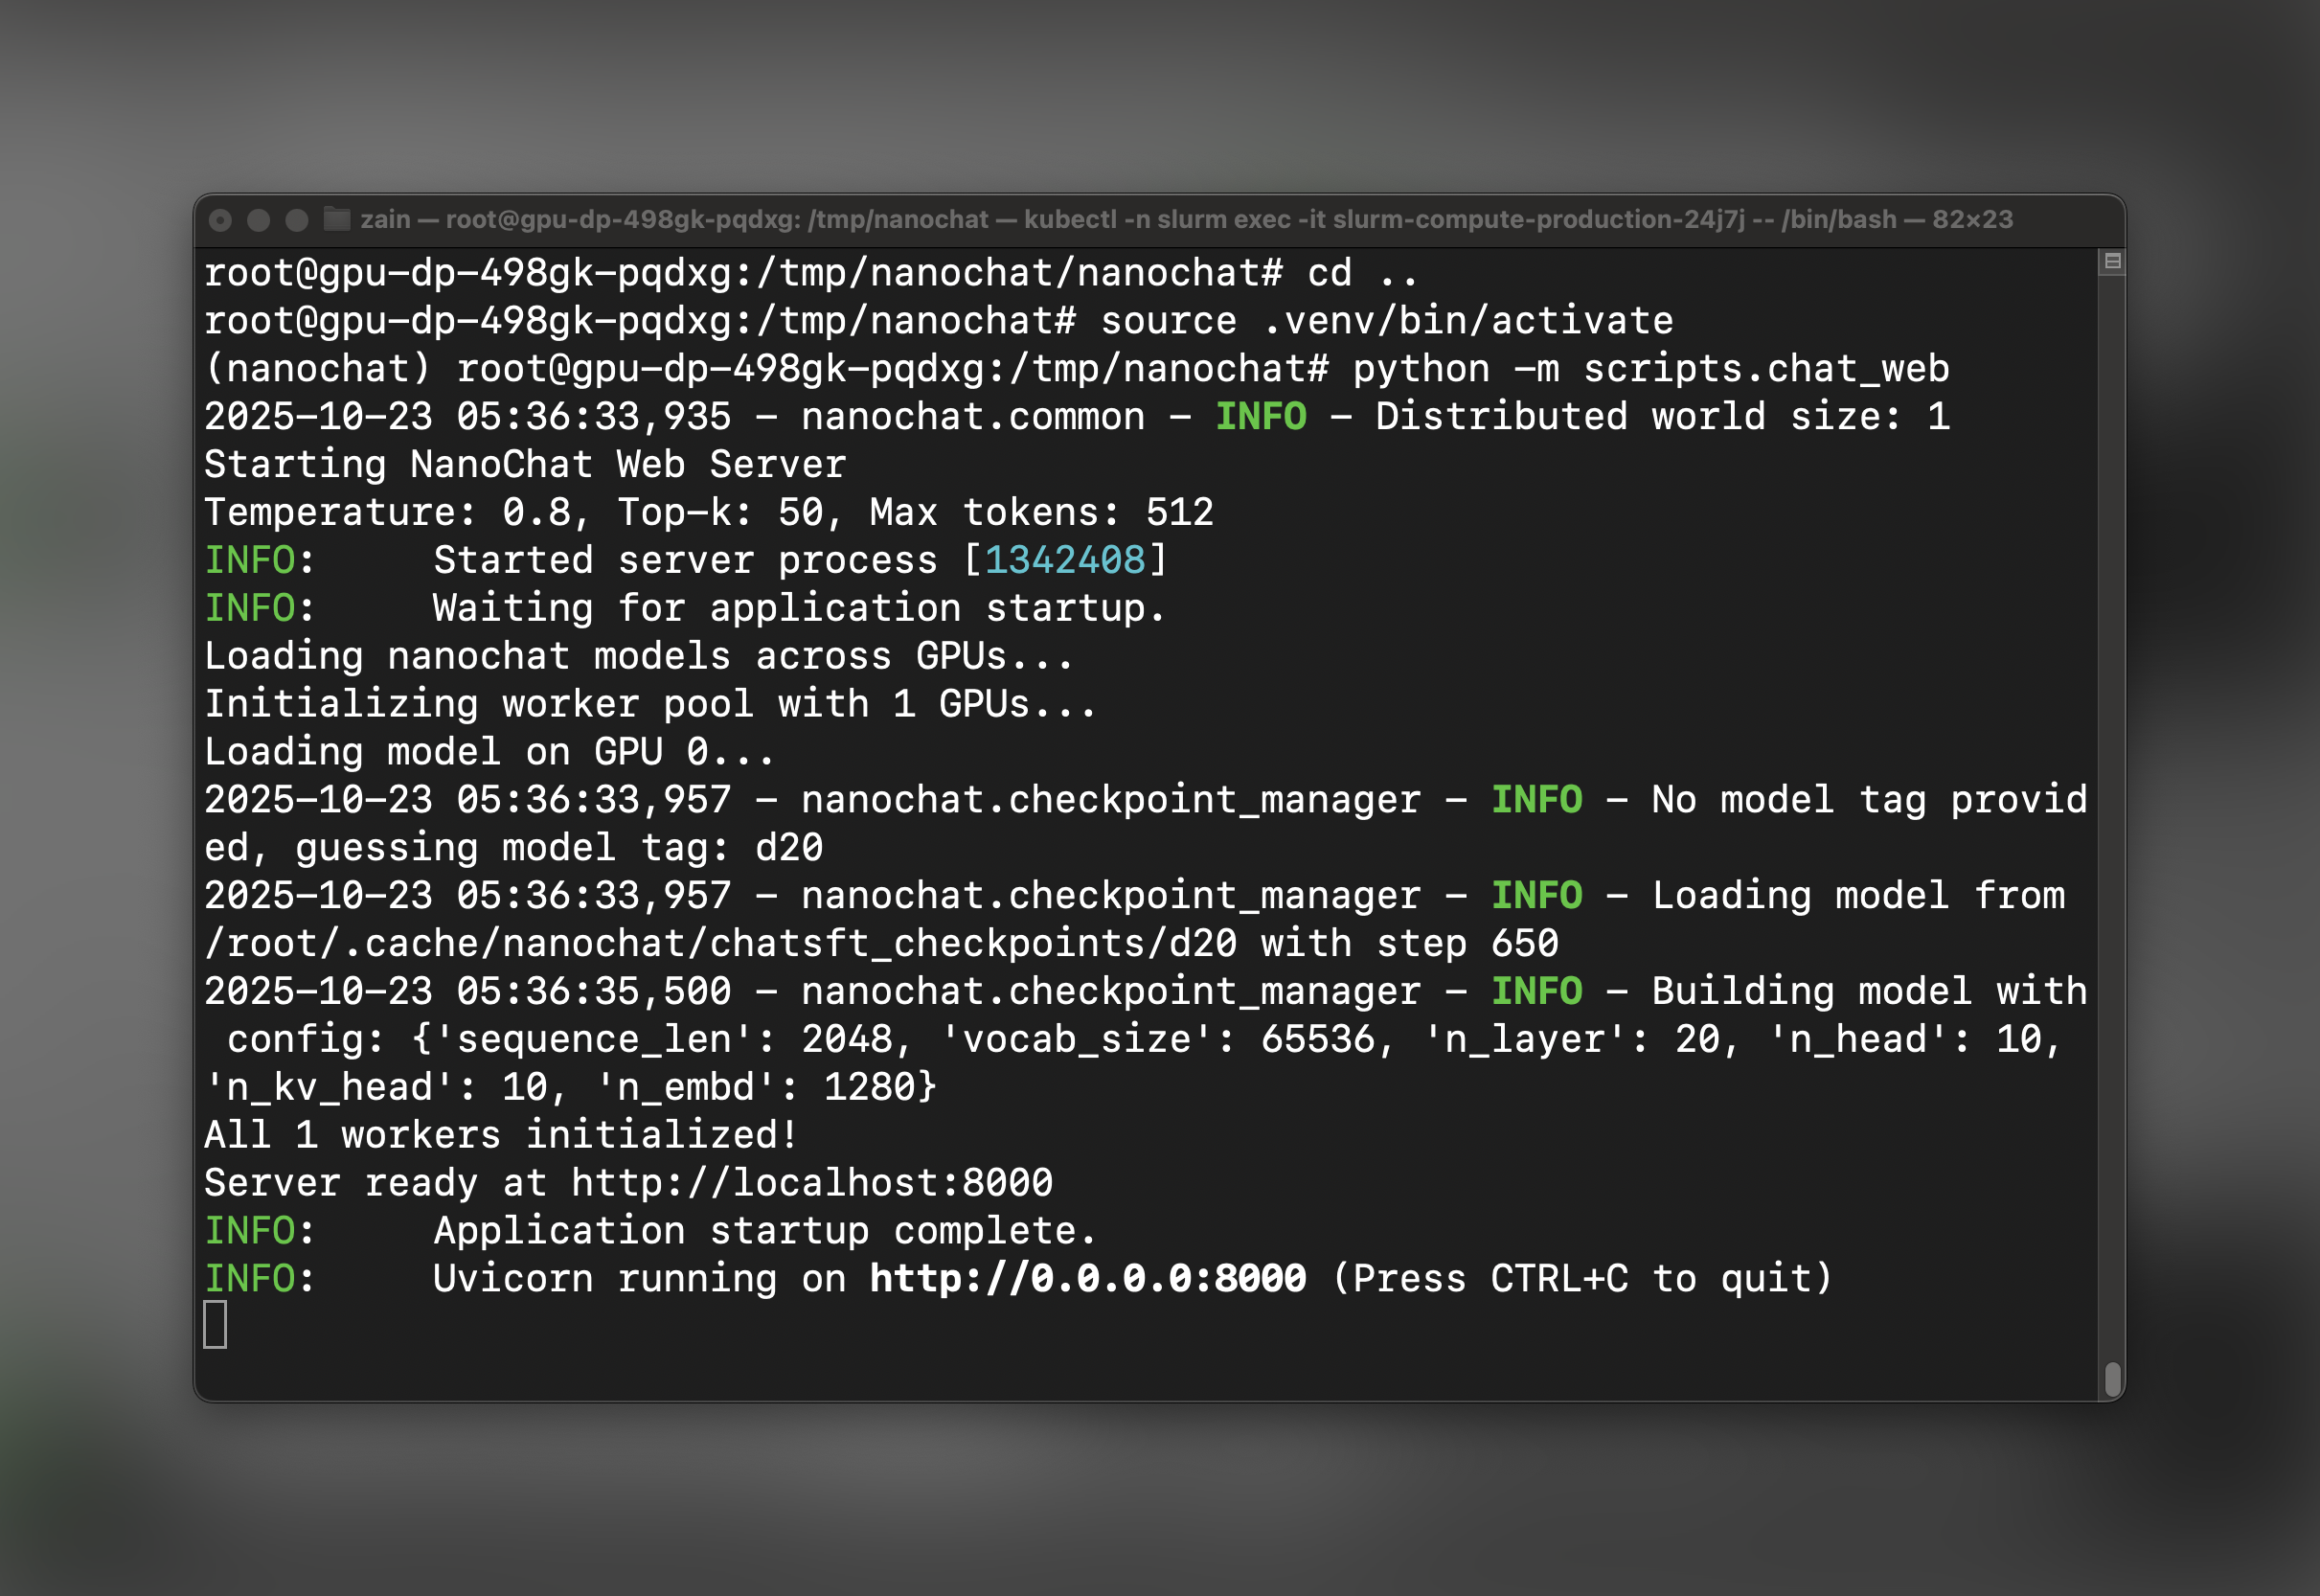 ## Step 4: Port Forward to Access the UI
In a **new terminal window on your local machine**, set up port forwarding to access the web UI:
## Step 4: Port Forward to Access the UI
In a **new terminal window on your local machine**, set up port forwarding to access the web UI:
 ## Understanding Training Costs and Performance
The nanochat training pipeline on 8×H100 Instant Clusters typically:
* **Training time**: \~4 hours for the full speedrun pipeline
* **Model Flops Utilization**: \~50% (indicating efficient GPU utilization)
* **Cost**: Approximately \$100 depending on your selected hardware and duration
* **Final model**: A fully functional conversational AI
After training completes, check the generated report `report.md` for detailed metrics.
## Troubleshooting
**GPU Not Available**
If `nvidia-smi` doesn't show GPUs after `srun`:
## Understanding Training Costs and Performance
The nanochat training pipeline on 8×H100 Instant Clusters typically:
* **Training time**: \~4 hours for the full speedrun pipeline
* **Model Flops Utilization**: \~50% (indicating efficient GPU utilization)
* **Cost**: Approximately \$100 depending on your selected hardware and duration
* **Final model**: A fully functional conversational AI
After training completes, check the generated report `report.md` for detailed metrics.
## Troubleshooting
**GPU Not Available**
If `nvidia-smi` doesn't show GPUs after `srun`:
{answer}
{message.role}: {message.content}
))}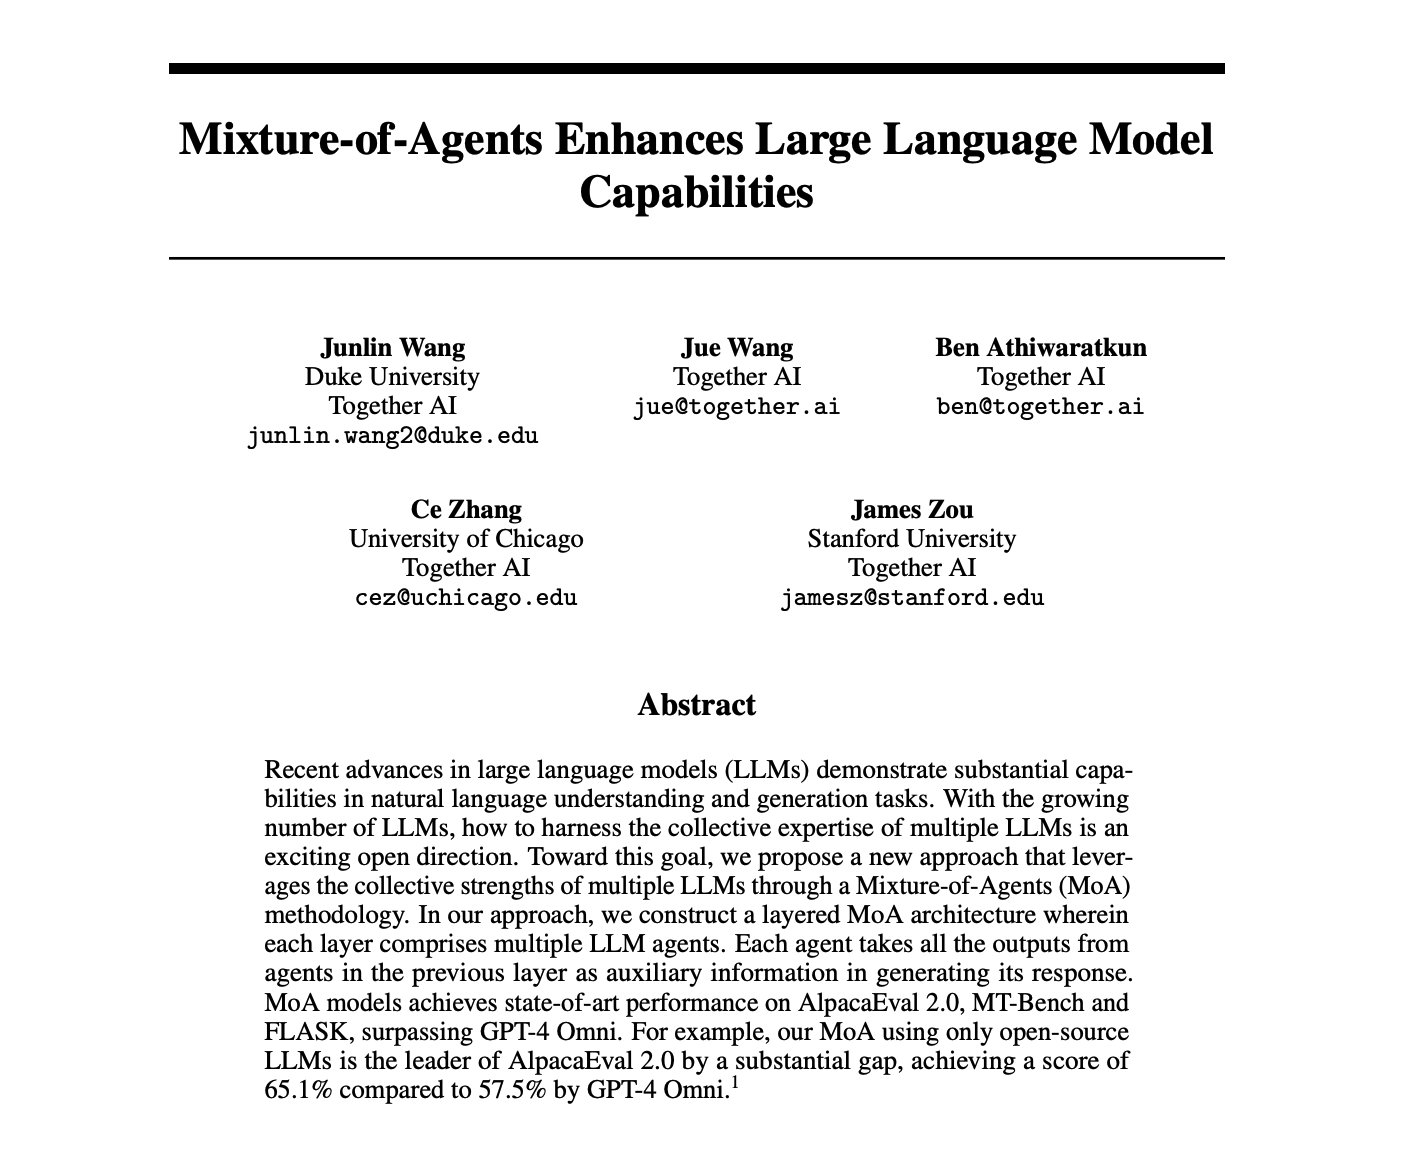 Download the PDF file and then extract text contents using the function below.
```bash Shell theme={null}
!wget https://arxiv.org/pdf/2406.04692
!mv 2406.04692 MoA.pdf
```
```py Python theme={null}
from pypdf import PdfReader
def get_PDF_text(file: str):
text = ""
# Read the PDF file and extract text
try:
with Path(file).open("rb") as f:
reader = PdfReader(f)
text = "\n\n".join([page.extract_text() for page in reader.pages])
except Exception as e:
raise f"Error reading the PDF file: {str(e)}"
# Check if the PDF has more than ~400,000 characters
# The context lenght limit of the model is 131,072 tokens and thus the text should be less than this limit
# Assumes that 1 token is approximately 4 characters
if len(text) > 400000:
raise "The PDF is too long. Please upload a PDF with fewer than ~131072 tokens."
return text
text = get_PDF_text("MoA.pdf")
```
## Generate Podcast Script using JSON Mode
Below we call Llama3.1 70B with JSON mode to generate a script for our podcast. JSON mode makes it so that the LLM will only generate responses in the format specified by the `Script` class. We will also be able to read it's scratchpad and see how it structured the overall conversation.
```py Python theme={null}
from together import Together
from pydantic import ValidationError
client_together = Together(api_key="TOGETHER_API_KEY")
def call_llm(system_prompt: str, text: str, dialogue_format):
"""Call the LLM with the given prompt and dialogue format."""
response = client_together.chat.completions.create(
messages=[
{"role": "system", "content": system_prompt},
{"role": "user", "content": text},
],
model="meta-llama/Meta-Llama-3.1-70B-Instruct-Turbo",
response_format={
"type": "json_object",
"schema": dialogue_format.model_json_schema(),
},
)
return response
def generate_script(system_prompt: str, input_text: str, output_model):
"""Get the script from the LLM."""
# Load as python object
try:
response = call_llm(system_prompt, input_text, output_model)
dialogue = output_model.model_validate_json(
response.choices[0].message.content
)
except ValidationError as e:
error_message = f"Failed to parse dialogue JSON: {e}"
system_prompt_with_error = f"{system_prompt}\n\nPlease return a VALID JSON object. This was the earlier error: {error_message}"
response = call_llm(system_prompt_with_error, input_text, output_model)
dialogue = output_model.model_validate_json(
response.choices[0].message.content
)
return dialogue
# Generate the podcast script
script = generate_script(SYSTEM_PROMPT, text, Script)
```
Above we are also handling the erroneous case which will let us know if the script was not generated following the `Script` class.
Now we can have a look at the script that is generated:
```
[DialogueItem(speaker='Host (Jane)', text='Welcome to today’s podcast. I’m your host, Jane. Joining me is Junlin Wang, a researcher from Duke University and Together AI. Junlin, welcome to the show!'),
DialogueItem(speaker='Guest', text='Thanks for having me, Jane. I’m excited to be here.'),
DialogueItem(speaker='Host (Jane)', text='Junlin, your recent paper proposes a new approach to enhancing large language models (LLMs) by leveraging the collective strengths of multiple models. Can you tell us more about this?'),
DialogueItem(speaker='Guest', text='Our approach is called Mixture-of-Agents (MoA). We found that LLMs exhibit a phenomenon we call collaborativeness, where they generate better responses when presented with outputs from other models, even if those outputs are of lower quality.'),
DialogueItem(speaker='Host (Jane)', text='That’s fascinating. Can you walk us through how MoA works?'),
DialogueItem(speaker='Guest', text='MoA consists of multiple layers, each comprising multiple LLM agents. Each agent takes all the outputs from agents in the previous layer as auxiliary information in generating its response. This process is repeated for several cycles until a more robust and comprehensive response is obtained.'),
DialogueItem(speaker='Host (Jane)', text='I see. And what kind of results have you seen with MoA?'),
DialogueItem(speaker='Guest', text='We evaluated MoA on several benchmarks, including AlpacaEval 2.0, MT-Bench, and FLASK. Our results show substantial improvements in response quality, with MoA achieving state-of-the-art performance on these benchmarks.'),
DialogueItem(speaker='Host (Jane)', text='Wow, that’s impressive. What about the cost-effectiveness of MoA?'),
DialogueItem(speaker='Guest', text='We found that MoA can deliver performance comparable to GPT-4 Turbo while being 2x more cost-effective. This is because MoA can leverage the strengths of multiple models, reducing the need for expensive and computationally intensive training.'),
DialogueItem(speaker='Host (Jane)', text='That’s great to hear. Junlin, what do you think is the potential impact of MoA on the field of natural language processing?'),
DialogueItem(speaker='Guest', text='I believe MoA has the potential to significantly enhance the effectiveness of LLM-driven chat assistants, making AI more accessible to a wider range of people. Additionally, MoA can improve the interpretability of models, facilitating better alignment with human reasoning.'),
DialogueItem(speaker='Host (Jane)', text='That’s a great point. Junlin, thank you for sharing your insights with us today.'),
DialogueItem(speaker='Guest', text='Thanks for having me, Jane. It was a pleasure discussing MoA with you.')]
```
## Generate Podcast Using TTS
Below we read through the script and parse choose the TTS voice depending on the speaker. We define a speaker and guest voice id.
```py Python theme={null}
import subprocess
import ffmpeg
from cartesia import Cartesia
client_cartesia = Cartesia(api_key="CARTESIA_API_KEY")
host_id = "694f9389-aac1-45b6-b726-9d9369183238" # Jane - host voice
guest_id = "a0e99841-438c-4a64-b679-ae501e7d6091" # Guest voice
model_id = "sonic-english" # The Sonic Cartesia model for English TTS
output_format = {
"container": "raw",
"encoding": "pcm_f32le",
"sample_rate": 44100,
}
# Set up a WebSocket connection.
ws = client_cartesia.tts.websocket()
```
We can loop through the lines in the script and generate them by a call to the TTS model with specific voice and lines configurations. The lines all appended to the same buffer and once the script finishes we write this out to a wav file, ready to be played.
```py Python theme={null}
# Open a file to write the raw PCM audio bytes to.
f = open("podcast.pcm", "wb")
# Generate and stream audio.
for line in script.dialogue:
if line.speaker == "Guest":
voice_id = guest_id
else:
voice_id = host_id
for output in ws.send(
model_id=model_id,
transcript="-"
+ line.text, # the "-"" is to add a pause between speakers
voice_id=voice_id,
stream=True,
output_format=output_format,
):
buffer = output["audio"] # buffer contains raw PCM audio bytes
f.write(buffer)
# Close the connection to release resources
ws.close()
f.close()
# Convert the raw PCM bytes to a WAV file.
ffmpeg.input("podcast.pcm", format="f32le").output("podcast.wav").run()
# Play the file
subprocess.run(["ffplay", "-autoexit", "-nodisp", "podcast.wav"])
```
Once this code executes you will have a `podcast.wav` file saved on disk that can be played!
If you're ready to create your own PDF to podcast app like above [sign up for Together AI today](https://www.together.ai/) and make your first query in minutes!
---
> To find navigation and other pages in this documentation, fetch the llms.txt file at: https://docs.together.ai/llms.txt
---
# Source: https://docs.together.ai/docs/openai-api-compatibility.md
> Together's API is compatible with OpenAI's libraries, making it easy to try out our open-source models on existing applications.
# OpenAI Compatibility
Together's API endpoints for chat, vision, images, embeddings, speech are fully compatible with OpenAI's API.
If you have an application that uses one of OpenAI's client libraries, you can easily configure it to point to Together's API servers, and start running your existing applications using our open-source models.
## Configuring OpenAI to use Together's API
To start using Together with OpenAI's client libraries, pass in your Together API key to the `api_key` option, and change the `base_url` to `https://api.together.xyz/v1`:
Download the PDF file and then extract text contents using the function below.
```bash Shell theme={null}
!wget https://arxiv.org/pdf/2406.04692
!mv 2406.04692 MoA.pdf
```
```py Python theme={null}
from pypdf import PdfReader
def get_PDF_text(file: str):
text = ""
# Read the PDF file and extract text
try:
with Path(file).open("rb") as f:
reader = PdfReader(f)
text = "\n\n".join([page.extract_text() for page in reader.pages])
except Exception as e:
raise f"Error reading the PDF file: {str(e)}"
# Check if the PDF has more than ~400,000 characters
# The context lenght limit of the model is 131,072 tokens and thus the text should be less than this limit
# Assumes that 1 token is approximately 4 characters
if len(text) > 400000:
raise "The PDF is too long. Please upload a PDF with fewer than ~131072 tokens."
return text
text = get_PDF_text("MoA.pdf")
```
## Generate Podcast Script using JSON Mode
Below we call Llama3.1 70B with JSON mode to generate a script for our podcast. JSON mode makes it so that the LLM will only generate responses in the format specified by the `Script` class. We will also be able to read it's scratchpad and see how it structured the overall conversation.
```py Python theme={null}
from together import Together
from pydantic import ValidationError
client_together = Together(api_key="TOGETHER_API_KEY")
def call_llm(system_prompt: str, text: str, dialogue_format):
"""Call the LLM with the given prompt and dialogue format."""
response = client_together.chat.completions.create(
messages=[
{"role": "system", "content": system_prompt},
{"role": "user", "content": text},
],
model="meta-llama/Meta-Llama-3.1-70B-Instruct-Turbo",
response_format={
"type": "json_object",
"schema": dialogue_format.model_json_schema(),
},
)
return response
def generate_script(system_prompt: str, input_text: str, output_model):
"""Get the script from the LLM."""
# Load as python object
try:
response = call_llm(system_prompt, input_text, output_model)
dialogue = output_model.model_validate_json(
response.choices[0].message.content
)
except ValidationError as e:
error_message = f"Failed to parse dialogue JSON: {e}"
system_prompt_with_error = f"{system_prompt}\n\nPlease return a VALID JSON object. This was the earlier error: {error_message}"
response = call_llm(system_prompt_with_error, input_text, output_model)
dialogue = output_model.model_validate_json(
response.choices[0].message.content
)
return dialogue
# Generate the podcast script
script = generate_script(SYSTEM_PROMPT, text, Script)
```
Above we are also handling the erroneous case which will let us know if the script was not generated following the `Script` class.
Now we can have a look at the script that is generated:
```
[DialogueItem(speaker='Host (Jane)', text='Welcome to today’s podcast. I’m your host, Jane. Joining me is Junlin Wang, a researcher from Duke University and Together AI. Junlin, welcome to the show!'),
DialogueItem(speaker='Guest', text='Thanks for having me, Jane. I’m excited to be here.'),
DialogueItem(speaker='Host (Jane)', text='Junlin, your recent paper proposes a new approach to enhancing large language models (LLMs) by leveraging the collective strengths of multiple models. Can you tell us more about this?'),
DialogueItem(speaker='Guest', text='Our approach is called Mixture-of-Agents (MoA). We found that LLMs exhibit a phenomenon we call collaborativeness, where they generate better responses when presented with outputs from other models, even if those outputs are of lower quality.'),
DialogueItem(speaker='Host (Jane)', text='That’s fascinating. Can you walk us through how MoA works?'),
DialogueItem(speaker='Guest', text='MoA consists of multiple layers, each comprising multiple LLM agents. Each agent takes all the outputs from agents in the previous layer as auxiliary information in generating its response. This process is repeated for several cycles until a more robust and comprehensive response is obtained.'),
DialogueItem(speaker='Host (Jane)', text='I see. And what kind of results have you seen with MoA?'),
DialogueItem(speaker='Guest', text='We evaluated MoA on several benchmarks, including AlpacaEval 2.0, MT-Bench, and FLASK. Our results show substantial improvements in response quality, with MoA achieving state-of-the-art performance on these benchmarks.'),
DialogueItem(speaker='Host (Jane)', text='Wow, that’s impressive. What about the cost-effectiveness of MoA?'),
DialogueItem(speaker='Guest', text='We found that MoA can deliver performance comparable to GPT-4 Turbo while being 2x more cost-effective. This is because MoA can leverage the strengths of multiple models, reducing the need for expensive and computationally intensive training.'),
DialogueItem(speaker='Host (Jane)', text='That’s great to hear. Junlin, what do you think is the potential impact of MoA on the field of natural language processing?'),
DialogueItem(speaker='Guest', text='I believe MoA has the potential to significantly enhance the effectiveness of LLM-driven chat assistants, making AI more accessible to a wider range of people. Additionally, MoA can improve the interpretability of models, facilitating better alignment with human reasoning.'),
DialogueItem(speaker='Host (Jane)', text='That’s a great point. Junlin, thank you for sharing your insights with us today.'),
DialogueItem(speaker='Guest', text='Thanks for having me, Jane. It was a pleasure discussing MoA with you.')]
```
## Generate Podcast Using TTS
Below we read through the script and parse choose the TTS voice depending on the speaker. We define a speaker and guest voice id.
```py Python theme={null}
import subprocess
import ffmpeg
from cartesia import Cartesia
client_cartesia = Cartesia(api_key="CARTESIA_API_KEY")
host_id = "694f9389-aac1-45b6-b726-9d9369183238" # Jane - host voice
guest_id = "a0e99841-438c-4a64-b679-ae501e7d6091" # Guest voice
model_id = "sonic-english" # The Sonic Cartesia model for English TTS
output_format = {
"container": "raw",
"encoding": "pcm_f32le",
"sample_rate": 44100,
}
# Set up a WebSocket connection.
ws = client_cartesia.tts.websocket()
```
We can loop through the lines in the script and generate them by a call to the TTS model with specific voice and lines configurations. The lines all appended to the same buffer and once the script finishes we write this out to a wav file, ready to be played.
```py Python theme={null}
# Open a file to write the raw PCM audio bytes to.
f = open("podcast.pcm", "wb")
# Generate and stream audio.
for line in script.dialogue:
if line.speaker == "Guest":
voice_id = guest_id
else:
voice_id = host_id
for output in ws.send(
model_id=model_id,
transcript="-"
+ line.text, # the "-"" is to add a pause between speakers
voice_id=voice_id,
stream=True,
output_format=output_format,
):
buffer = output["audio"] # buffer contains raw PCM audio bytes
f.write(buffer)
# Close the connection to release resources
ws.close()
f.close()
# Convert the raw PCM bytes to a WAV file.
ffmpeg.input("podcast.pcm", format="f32le").output("podcast.wav").run()
# Play the file
subprocess.run(["ffplay", "-autoexit", "-nodisp", "podcast.wav"])
```
Once this code executes you will have a `podcast.wav` file saved on disk that can be played!
If you're ready to create your own PDF to podcast app like above [sign up for Together AI today](https://www.together.ai/) and make your first query in minutes!
---
> To find navigation and other pages in this documentation, fetch the llms.txt file at: https://docs.together.ai/llms.txt
---
# Source: https://docs.together.ai/docs/openai-api-compatibility.md
> Together's API is compatible with OpenAI's libraries, making it easy to try out our open-source models on existing applications.
# OpenAI Compatibility
Together's API endpoints for chat, vision, images, embeddings, speech are fully compatible with OpenAI's API.
If you have an application that uses one of OpenAI's client libraries, you can easily configure it to point to Together's API servers, and start running your existing applications using our open-source models.
## Configuring OpenAI to use Together's API
To start using Together with OpenAI's client libraries, pass in your Together API key to the `api_key` option, and change the `base_url` to `https://api.together.xyz/v1`:

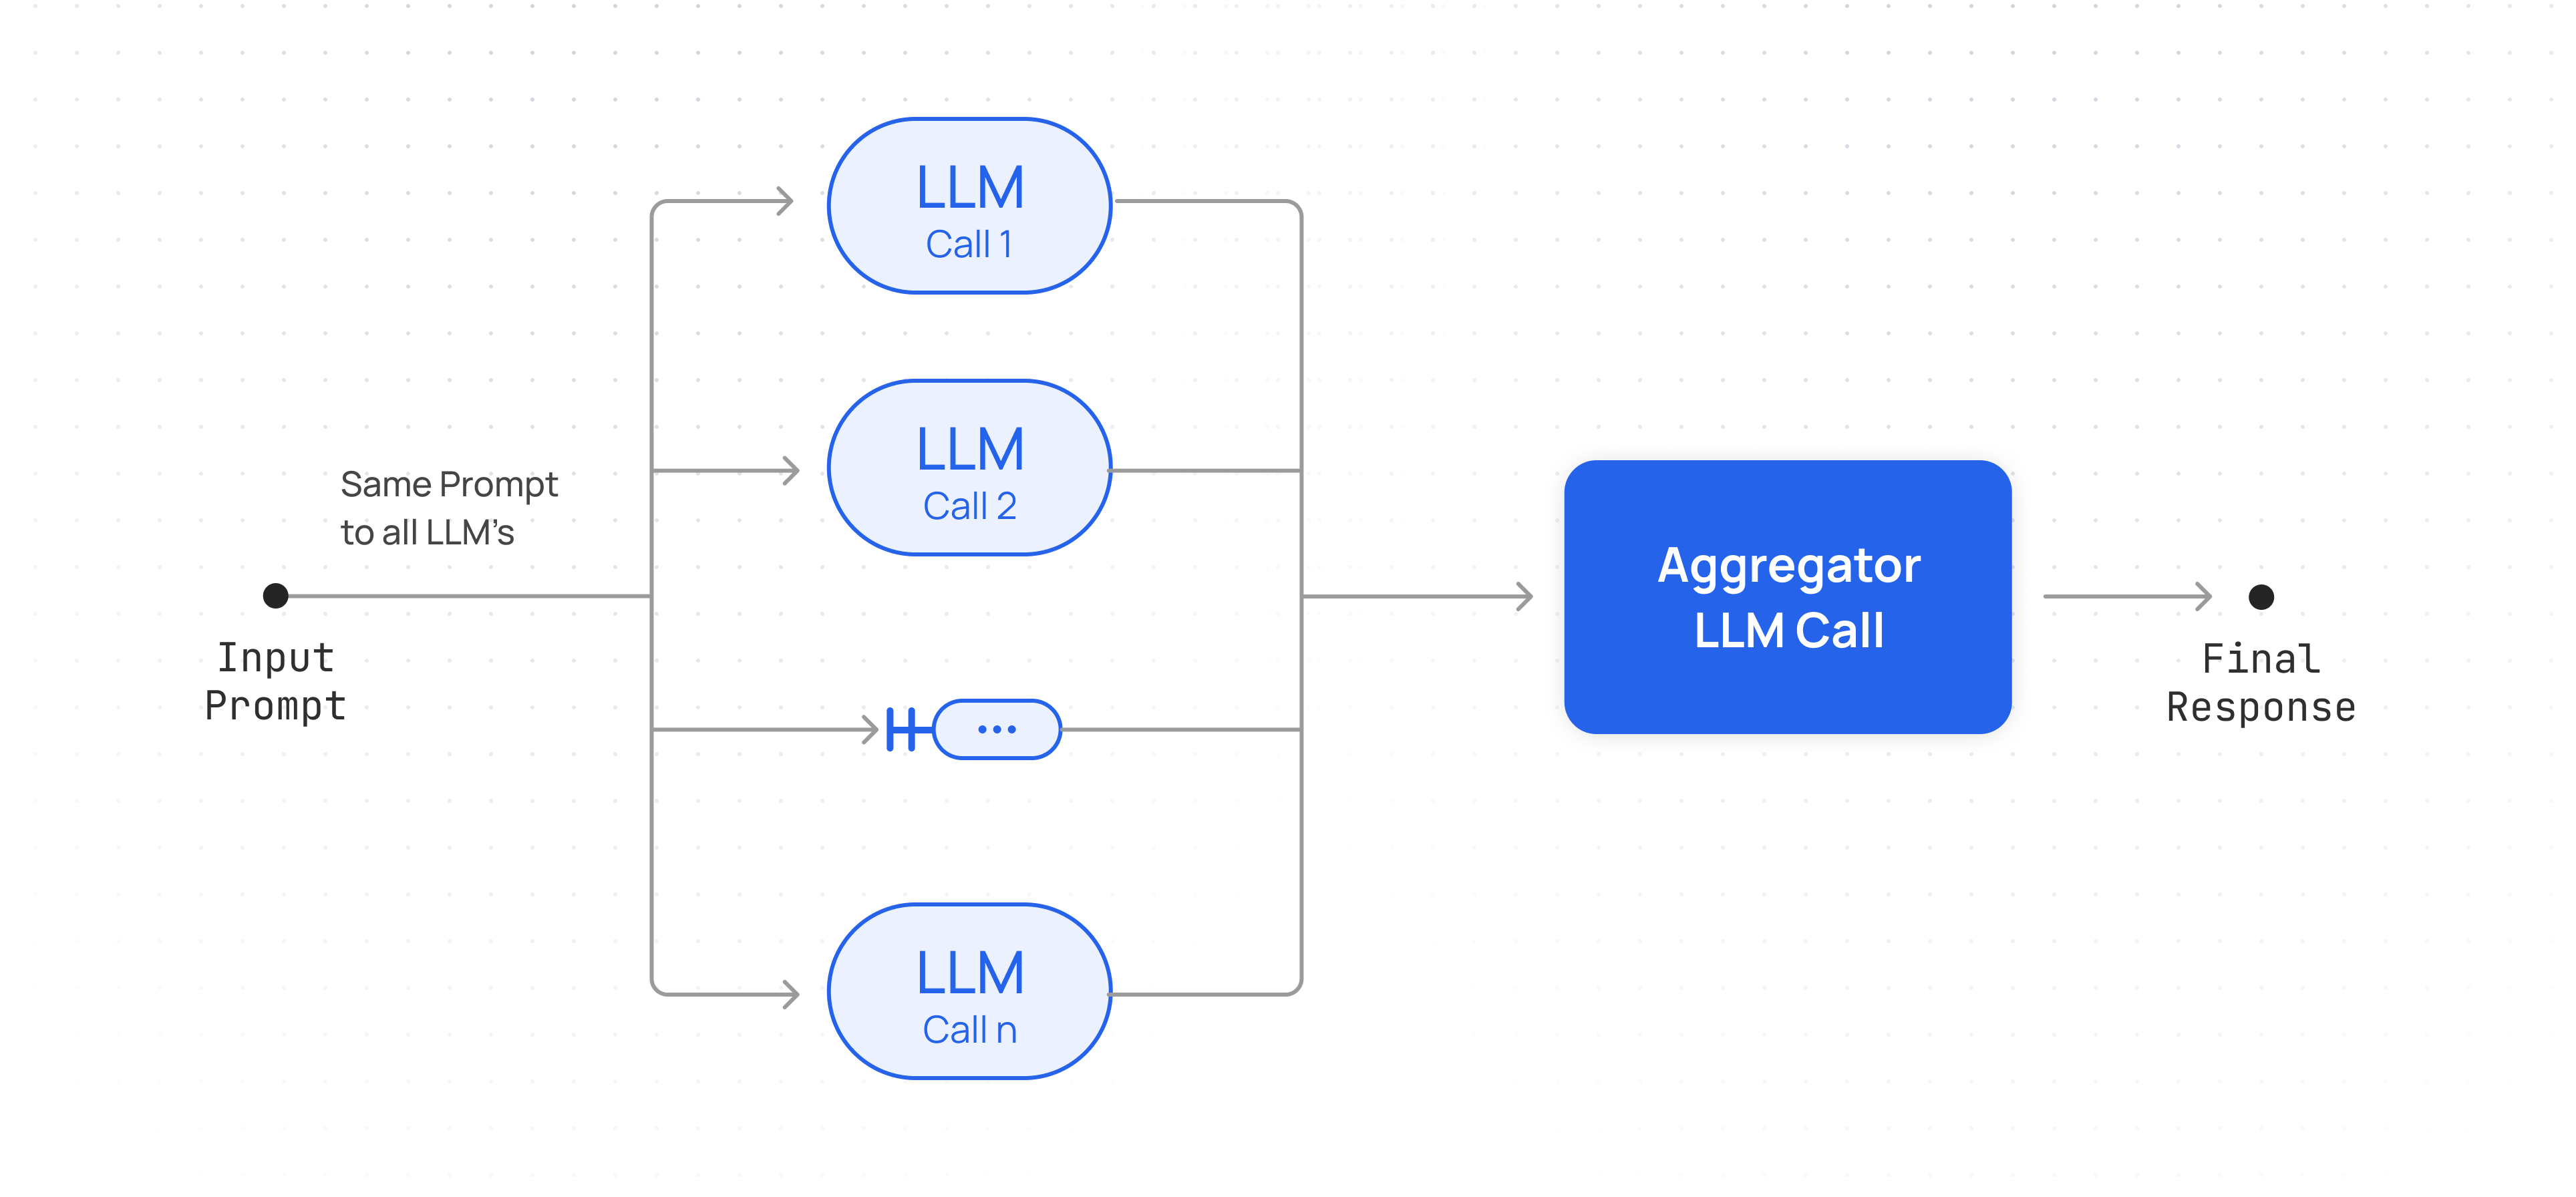
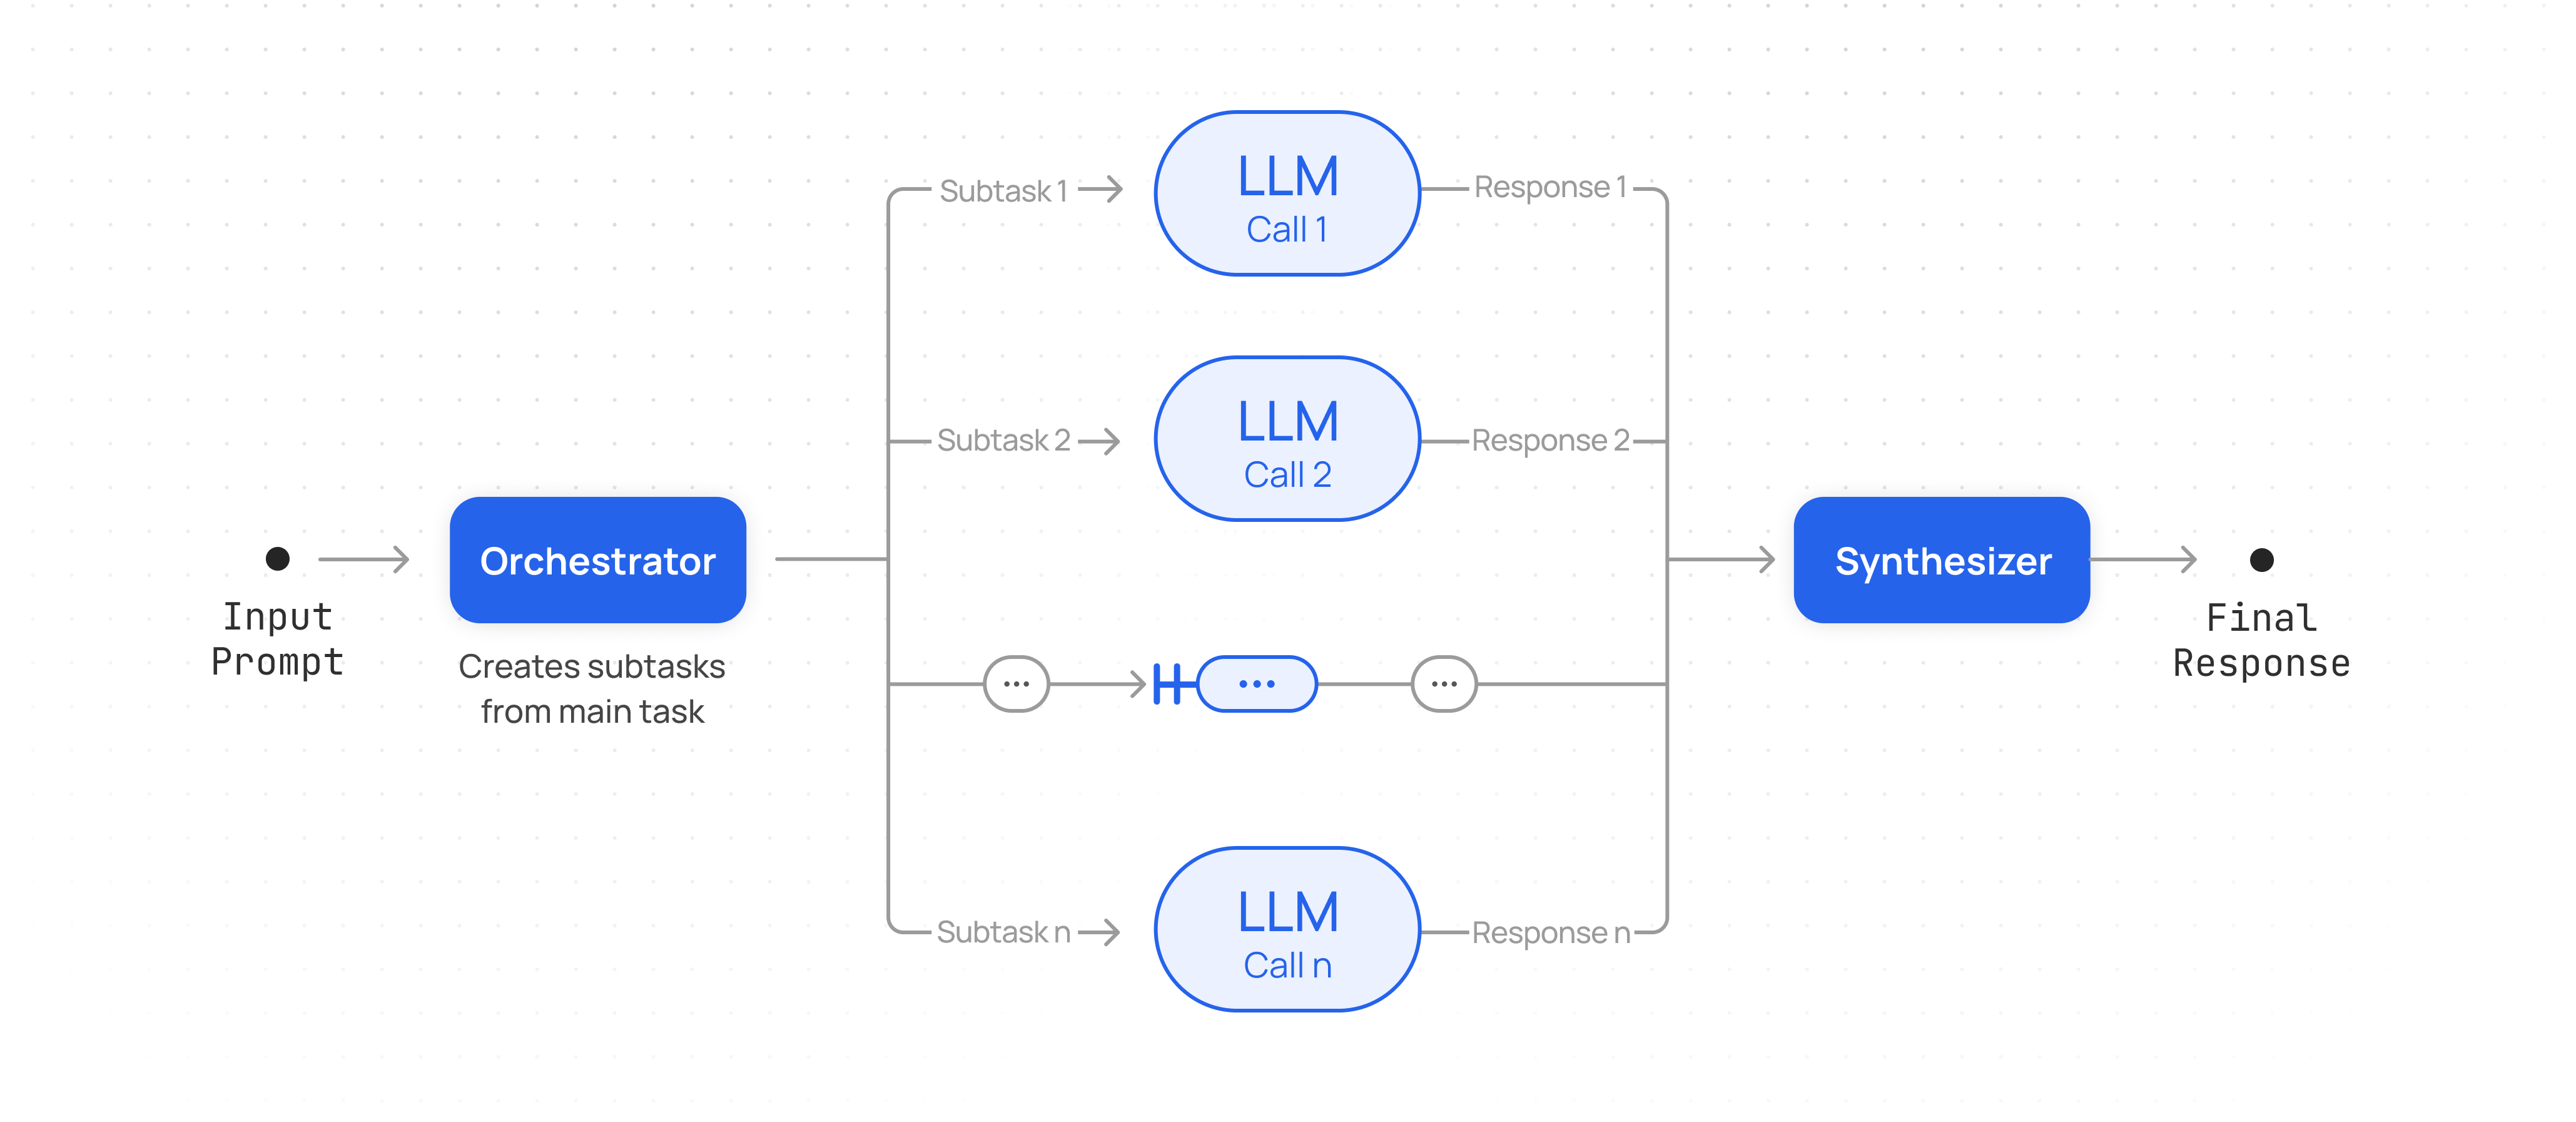
[See all of Together AI's image models](https://docs.together.ai/docs/serverless-models#image-models) example: black-forest-labs/FLUX.1-schnell anyOf: - type: string enum: - black-forest-labs/FLUX.1-schnell-Free - black-forest-labs/FLUX.1-schnell - black-forest-labs/FLUX.1.1-pro - type: string steps: type: integer default: 20 description: Number of generation steps. image_url: type: string description: URL of an image to use for image models that support it. seed: type: integer description: >- Seed used for generation. Can be used to reproduce image generations. 'n': type: integer default: 1 description: Number of image results to generate. height: type: integer default: 1024 description: Height of the image to generate in number of pixels. width: type: integer default: 1024 description: Width of the image to generate in number of pixels. negative_prompt: type: string description: The prompt or prompts not to guide the image generation. response_format: type: string description: >- Format of the image response. Can be either a base64 string or a URL. enum: - base64 - url guidance_scale: type: number description: >- Adjusts the alignment of the generated image with the input prompt. Higher values (e.g., 8-10) make the output more faithful to the prompt, while lower values (e.g., 1-5) encourage more creative freedom. default: 3.5 output_format: type: string description: >- The format of the image response. Can be either be `jpeg` or `png`. Defaults to `jpeg`. default: jpeg enum: - jpeg - png image_loras: description: >- An array of objects that define LoRAs (Low-Rank Adaptations) to influence the generated image. type: array items: type: object required: - path - scale properties: path: type: string description: >- The URL of the LoRA to apply (e.g. https://huggingface.co/strangerzonehf/Flux-Midjourney-Mix2-LoRA). scale: type: number description: >- The strength of the LoRA's influence. Most LoRA's recommend a value of 1. reference_images: description: >- An array of image URLs that guide the overall appearance and style of the generated image. These reference images influence the visual characteristics consistently across the generation. type: array items: type: string description: URL of a reference image to guide the image generation. disable_safety_checker: type: boolean description: If true, disables the safety checker for image generation. responses: '200': description: Image generated successfully content: application/json: schema: $ref: '#/components/schemas/ImageResponse' components: schemas: ImageResponse: type: object properties: id: type: string model: type: string object: enum: - list example: list data: type: array items: oneOf: - $ref: '#/components/schemas/ImageResponseDataB64' - $ref: '#/components/schemas/ImageResponseDataUrl' discriminator: propertyName: type required: - id - model - object - data ImageResponseDataB64: type: object required: - index - b64_json - type properties: index: type: integer b64_json: type: string type: type: string enum: - b64_json ImageResponseDataUrl: type: object required: - index - url - type properties: index: type: integer url: type: string type: type: string enum: - url securitySchemes: bearerAuth: type: http scheme: bearer x-bearer-format: bearer x-default: default ```` --- > To find navigation and other pages in this documentation, fetch the llms.txt file at: https://docs.together.ai/llms.txt --- # Source: https://docs.together.ai/docs/preference-fine-tuning.md # Preference Fine-Tuning > Learn how to use preference fine-tuning on Together Fine-Tuning Platform Preference fine-tuning allows you to train models using pairs of preferred and non-preferred examples. This approach is more effective than standard fine-tuning when you have paired examples that show which responses your model should generate and which it should avoid. We use [Direct Preference Optimization (DPO)](https://arxiv.org/abs/2305.18290) for this type of fine-tuning. Before proceeding: Review our [How-to: Fine-tuning](/docs/fine-tuning-quickstart) guide for an overview of the fine-tuning process. ## Data Preparation Your dataset should contain examples with: * An `input` field with messages in in the [conversational format](/docs/fine-tuning-data-preparation#conversational-data). * A `preferred_output` field with the ideal assistant response * A `non_preferred_output` field with a suboptimal assistant response Both outputs must contain exactly one message from the assistant role. Format your data in `JSONL`, with each line structured as:
 ## Combining methods: supervised fine-tuning & preference fine-tuning
Supervised fine-tuning (SFT) is the default method on our platform. The recommended approach is to first perform SFT followed up by preference tuning as follows:
1. First perform [supervised fine-tuning (SFT)](/docs/finetuning) on your data.
2. Then refine with preference fine-tuning using [continued fine-tuning](/docs/finetuning#continue-a-fine-tuning-job) on your SFT checkpoint.
Performing SFT on your dataset prior to DPO can significantly increase the resulting model quality, especially if your training data differs significantly from the data the base model observed during pretraining. To perform SFT, you can concatenate the context with the preferred output and use one of our [SFT data formats](/docs/fine-tuning-data-preparation#data-formats) .
---
> To find navigation and other pages in this documentation, fetch the llms.txt file at: https://docs.together.ai/llms.txt
---
# Source: https://docs.together.ai/docs/prompting-deepseek-r1.md
# Prompting DeepSeek R1
> Prompt engineering for DeepSeek-R1.
Prompting DeepSeek-R1, and other reasoning models in general, is quite different from working with non-reasoning models.
Below we provide guidance on how to get the most out of DeepSeek-R1:
* **Clear and specific prompts**: Write your instructions in plain language, clearly stating what you want. Complex, lengthy prompts often lead to less effective results.
* **Sampling parameters**: Set the `temperature` within the range of 0.5-0.7 (0.6 is recommended) to prevent endless repetitions or incoherent outputs. Also, a `top-p` of 0.95 is recommended.
* **No system prompt**: Avoid adding a system prompt; all instructions should be contained within the user prompt.
* **No few-shot prompting**: Do not provide examples in the prompt, as this consistently degrades model performance. Rather, describe in detail the problem, task, and output format you want the model to accomplish. If you do want to provide examples, ensure that they align very closely with your prompt instructions.
* **Structure your prompt**: Break up different parts of your prompt using clear markers like XML tags, markdown formatting, or labeled sections. This organization helps ensure the model correctly interprets and addresses each component of your request.
* **Set clear requirements**: When your request has specific limitations or criteria, state them explicitly (like "Each line should take no more than 5 seconds to say..."). Whether it's budget constraints, time limits, or particular formats, clearly outline these parameters to guide the model's response.
* **Clearly describe output**: Paint a clear picture of your desired outcome. Describe the specific characteristics or qualities that would make the response exactly what you need, allowing the model to work toward meeting those criteria.
* **Majority voting for responses**: When evaluating model performance, it is recommended to generate multiple solutions and then use the most frequent results.
* **No chain-of-thought prompting**: Since these models always reason prior to answering the question, it is not necessary to tell them to "Reason step by step..."
* **Math tasks**: For mathematical problems, it is advisable to include a directive in your prompt such as: "Please reason step by step, and put your final answer within `\boxed{}`."
* **Forcing `
## Combining methods: supervised fine-tuning & preference fine-tuning
Supervised fine-tuning (SFT) is the default method on our platform. The recommended approach is to first perform SFT followed up by preference tuning as follows:
1. First perform [supervised fine-tuning (SFT)](/docs/finetuning) on your data.
2. Then refine with preference fine-tuning using [continued fine-tuning](/docs/finetuning#continue-a-fine-tuning-job) on your SFT checkpoint.
Performing SFT on your dataset prior to DPO can significantly increase the resulting model quality, especially if your training data differs significantly from the data the base model observed during pretraining. To perform SFT, you can concatenate the context with the preferred output and use one of our [SFT data formats](/docs/fine-tuning-data-preparation#data-formats) .
---
> To find navigation and other pages in this documentation, fetch the llms.txt file at: https://docs.together.ai/llms.txt
---
# Source: https://docs.together.ai/docs/prompting-deepseek-r1.md
# Prompting DeepSeek R1
> Prompt engineering for DeepSeek-R1.
Prompting DeepSeek-R1, and other reasoning models in general, is quite different from working with non-reasoning models.
Below we provide guidance on how to get the most out of DeepSeek-R1:
* **Clear and specific prompts**: Write your instructions in plain language, clearly stating what you want. Complex, lengthy prompts often lead to less effective results.
* **Sampling parameters**: Set the `temperature` within the range of 0.5-0.7 (0.6 is recommended) to prevent endless repetitions or incoherent outputs. Also, a `top-p` of 0.95 is recommended.
* **No system prompt**: Avoid adding a system prompt; all instructions should be contained within the user prompt.
* **No few-shot prompting**: Do not provide examples in the prompt, as this consistently degrades model performance. Rather, describe in detail the problem, task, and output format you want the model to accomplish. If you do want to provide examples, ensure that they align very closely with your prompt instructions.
* **Structure your prompt**: Break up different parts of your prompt using clear markers like XML tags, markdown formatting, or labeled sections. This organization helps ensure the model correctly interprets and addresses each component of your request.
* **Set clear requirements**: When your request has specific limitations or criteria, state them explicitly (like "Each line should take no more than 5 seconds to say..."). Whether it's budget constraints, time limits, or particular formats, clearly outline these parameters to guide the model's response.
* **Clearly describe output**: Paint a clear picture of your desired outcome. Describe the specific characteristics or qualities that would make the response exactly what you need, allowing the model to work toward meeting those criteria.
* **Majority voting for responses**: When evaluating model performance, it is recommended to generate multiple solutions and then use the most frequent results.
* **No chain-of-thought prompting**: Since these models always reason prior to answering the question, it is not necessary to tell them to "Reason step by step..."
* **Math tasks**: For mathematical problems, it is advisable to include a directive in your prompt such as: "Please reason step by step, and put your final answer within `\boxed{}`."
* **Forcing ` **Using FLUX.2 \[dev]**
The dev variant offers a great balance for development and iteration:
**Using FLUX.2 \[dev]**
The dev variant offers a great balance for development and iteration:
 **Using FLUX.2 \[flex]**
The flex variant provides maximum customization with `steps` and `guidance` parameters. It also excels at typography and text rendering.
**Using FLUX.2 \[flex]**
The flex variant provides maximum customization with `steps` and `guidance` parameters. It also excels at typography and text rendering.
 ## Parameters
**Common Parameters (All Models)**
| Parameter | Type | Description | Default |
| ------------------- | ------- | -------------------------------------------------- | ------------ |
| `prompt` | string | Text description of the image to generate | **Required** |
| `width` | integer | Image width in pixels (256-1920) | 1024 |
| `height` | integer | Image height in pixels (256-1920) | 768 |
| `seed` | integer | Seed for reproducibility | Random |
| `prompt_upsampling` | boolean | Automatically enhance prompt for better generation | true |
| `output_format` | string | Output format: `jpeg` or `png` | jpeg |
| `reference_images` | array | Reference image URL(s) for image-to-image editing | - |
**Additional Parameters for \[dev] and \[flex]**
FLUX.2 \[dev] and FLUX.2 \[flex] support additional parameters:
| Parameter | Type | Description | Default |
| ---------- | ------- | ----------------------------------------------------------- | ------------- |
| `steps` | integer | Number of inference steps (higher = better quality, slower) | Model default |
| `guidance` | float | Guidance scale (higher values follow prompt more closely) | Model default |
## Image-to-Image with Reference Images
FLUX.2 supports powerful image-to-image editing using the `reference_images` parameter. Pass one or more image URLs to guide generation.
**Core Capabilities:**
| Capability | Description |
| --------------------------- | -------------------------------------------------------------- |
| **Multi-reference editing** | Use multiple images in a single edit |
| **Sequential edits** | Edit images iteratively |
| **Color control** | Specify exact colors using hex values or reference images |
| **Image indexing** | Reference specific images by number: "the jacket from image 2" |
| **Natural language** | Describe elements naturally: "the woman in the blue dress" |
**Single Reference Image**
Edit or transform a single input image:
```python theme={null}
from together import Together
client = Together()
response = client.images.generate(
model="black-forest-labs/FLUX.2-pro",
prompt="Replace the color of the car to blue",
width=1024,
height=768,
reference_images=[
"https://images.pexels.com/photos/3729464/pexels-photo-3729464.jpeg"
],
)
print(response.data[0].url)
```
## Parameters
**Common Parameters (All Models)**
| Parameter | Type | Description | Default |
| ------------------- | ------- | -------------------------------------------------- | ------------ |
| `prompt` | string | Text description of the image to generate | **Required** |
| `width` | integer | Image width in pixels (256-1920) | 1024 |
| `height` | integer | Image height in pixels (256-1920) | 768 |
| `seed` | integer | Seed for reproducibility | Random |
| `prompt_upsampling` | boolean | Automatically enhance prompt for better generation | true |
| `output_format` | string | Output format: `jpeg` or `png` | jpeg |
| `reference_images` | array | Reference image URL(s) for image-to-image editing | - |
**Additional Parameters for \[dev] and \[flex]**
FLUX.2 \[dev] and FLUX.2 \[flex] support additional parameters:
| Parameter | Type | Description | Default |
| ---------- | ------- | ----------------------------------------------------------- | ------------- |
| `steps` | integer | Number of inference steps (higher = better quality, slower) | Model default |
| `guidance` | float | Guidance scale (higher values follow prompt more closely) | Model default |
## Image-to-Image with Reference Images
FLUX.2 supports powerful image-to-image editing using the `reference_images` parameter. Pass one or more image URLs to guide generation.
**Core Capabilities:**
| Capability | Description |
| --------------------------- | -------------------------------------------------------------- |
| **Multi-reference editing** | Use multiple images in a single edit |
| **Sequential edits** | Edit images iteratively |
| **Color control** | Specify exact colors using hex values or reference images |
| **Image indexing** | Reference specific images by number: "the jacket from image 2" |
| **Natural language** | Describe elements naturally: "the woman in the blue dress" |
**Single Reference Image**
Edit or transform a single input image:
```python theme={null}
from together import Together
client = Together()
response = client.images.generate(
model="black-forest-labs/FLUX.2-pro",
prompt="Replace the color of the car to blue",
width=1024,
height=768,
reference_images=[
"https://images.pexels.com/photos/3729464/pexels-photo-3729464.jpeg"
],
)
print(response.data[0].url)
```
 →
→


 **JSON Schema Reference**
Here's the recommended schema for structured prompts:
```json theme={null}
{
"scene": "Overall scene setting or location",
"subjects": [
{
"type": "Type of subject (e.g., person, object)",
"description": "Physical attributes, clothing, accessories",
"pose": "Action or stance",
"position": "foreground | midground | background"
}
],
"style": "Artistic rendering style",
"color_palette": ["color 1", "color 2", "color 3"],
"lighting": "Lighting condition and direction",
"mood": "Emotional atmosphere",
"background": "Background environment details",
"composition": "rule of thirds | golden spiral | minimalist negative space | ...",
"camera": {
"angle": "eye level | low angle | bird's-eye | ...",
"distance": "close-up | medium shot | wide shot | ...",
"focus": "deep focus | selective focus | sharp on subject",
"lens": "35mm | 50mm | 85mm | ...",
"f-number": "f/2.8 | f/5.6 | ...",
"ISO": 200
},
"effects": ["lens flare", "film grain", "soft bloom"]
}
```
**Composition Options**
| Option | Description |
| --------------------------- | ---------------------------- |
| `rule of thirds` | Classic balanced composition |
| `golden spiral` | Fibonacci-based natural flow |
| `minimalist negative space` | Clean, spacious design |
| `diagonal energy` | Dynamic, action-oriented |
| `vanishing point center` | Depth and perspective focus |
| `triangular arrangement` | Stable, hierarchical layout |
**Camera Angle Options**
| Angle | Use Case |
| ------------------- | ------------------------------ |
| `eye level` | Natural, relatable perspective |
| `low angle` | Heroic, powerful subjects |
| `bird's-eye` | Overview, patterns |
| `worm's-eye` | Dramatic, imposing |
| `over-the-shoulder` | Intimate, narrative |
## HEX Color Code Prompting
FLUX.2 supports precise color control using HEX codes. Include the keyword "color" or "hex" followed by the code:
```python theme={null}
from together import Together
client = Together()
response = client.images.generate(
model="black-forest-labs/FLUX.2-pro",
prompt="A modern living room with a velvet sofa in color #2E4057 and accent pillows in hex #E8AA14, minimalist design with warm lighting",
width=1024,
height=768,
)
print(response.data[0].url)
```
**JSON Schema Reference**
Here's the recommended schema for structured prompts:
```json theme={null}
{
"scene": "Overall scene setting or location",
"subjects": [
{
"type": "Type of subject (e.g., person, object)",
"description": "Physical attributes, clothing, accessories",
"pose": "Action or stance",
"position": "foreground | midground | background"
}
],
"style": "Artistic rendering style",
"color_palette": ["color 1", "color 2", "color 3"],
"lighting": "Lighting condition and direction",
"mood": "Emotional atmosphere",
"background": "Background environment details",
"composition": "rule of thirds | golden spiral | minimalist negative space | ...",
"camera": {
"angle": "eye level | low angle | bird's-eye | ...",
"distance": "close-up | medium shot | wide shot | ...",
"focus": "deep focus | selective focus | sharp on subject",
"lens": "35mm | 50mm | 85mm | ...",
"f-number": "f/2.8 | f/5.6 | ...",
"ISO": 200
},
"effects": ["lens flare", "film grain", "soft bloom"]
}
```
**Composition Options**
| Option | Description |
| --------------------------- | ---------------------------- |
| `rule of thirds` | Classic balanced composition |
| `golden spiral` | Fibonacci-based natural flow |
| `minimalist negative space` | Clean, spacious design |
| `diagonal energy` | Dynamic, action-oriented |
| `vanishing point center` | Depth and perspective focus |
| `triangular arrangement` | Stable, hierarchical layout |
**Camera Angle Options**
| Angle | Use Case |
| ------------------- | ------------------------------ |
| `eye level` | Natural, relatable perspective |
| `low angle` | Heroic, powerful subjects |
| `bird's-eye` | Overview, patterns |
| `worm's-eye` | Dramatic, imposing |
| `over-the-shoulder` | Intimate, narrative |
## HEX Color Code Prompting
FLUX.2 supports precise color control using HEX codes. Include the keyword "color" or "hex" followed by the code:
```python theme={null}
from together import Together
client = Together()
response = client.images.generate(
model="black-forest-labs/FLUX.2-pro",
prompt="A modern living room with a velvet sofa in color #2E4057 and accent pillows in hex #E8AA14, minimalist design with warm lighting",
width=1024,
height=768,
)
print(response.data[0].url)
```
 **Gradient Example**
```python theme={null}
response = client.images.generate(
model="black-forest-labs/FLUX.2-pro",
prompt="A ceramic vase on a table, the color is a gradient starting with #02eb3c and finishing with #edfa3c, modern minimalist interior",
width=1024,
height=768,
)
```
**Gradient Example**
```python theme={null}
response = client.images.generate(
model="black-forest-labs/FLUX.2-pro",
prompt="A ceramic vase on a table, the color is a gradient starting with #02eb3c and finishing with #edfa3c, modern minimalist interior",
width=1024,
height=768,
)
```
 ## Advanced Use Cases
**Infographics**
FLUX.2 can create complex, visually appealing infographics. Specify all data and content explicitly:
```python theme={null}
prompt = """Educational weather infographic titled 'WHY FREIBURG IS SO SUNNY' in bold navy letters at top on cream background, illustrated geographic cross-section showing sunny valley between two mountain ranges, left side blue-grey mountains labeled 'VOSGES', right side dark green mountains labeled 'BLACK FOREST', central golden sunshine rays creating 'SUNSHINE POCKET' text over valley, orange sun icon with '1,800 HOURS' text in top right corner, bottom beige panel with three facts in clean sans-serif text: First fact: 'Protected by two mountain ranges', Second fact: 'Creates Germany's sunniest microclimate', Third fact: 'Perfect for wine and solar energy', flat illustration style with soft gradients"""
response = client.images.generate(
model="black-forest-labs/FLUX.2-pro",
prompt=prompt,
width=1024,
height=1344,
)
```
## Advanced Use Cases
**Infographics**
FLUX.2 can create complex, visually appealing infographics. Specify all data and content explicitly:
```python theme={null}
prompt = """Educational weather infographic titled 'WHY FREIBURG IS SO SUNNY' in bold navy letters at top on cream background, illustrated geographic cross-section showing sunny valley between two mountain ranges, left side blue-grey mountains labeled 'VOSGES', right side dark green mountains labeled 'BLACK FOREST', central golden sunshine rays creating 'SUNSHINE POCKET' text over valley, orange sun icon with '1,800 HOURS' text in top right corner, bottom beige panel with three facts in clean sans-serif text: First fact: 'Protected by two mountain ranges', Second fact: 'Creates Germany's sunniest microclimate', Third fact: 'Perfect for wine and solar energy', flat illustration style with soft gradients"""
response = client.images.generate(
model="black-forest-labs/FLUX.2-pro",
prompt=prompt,
width=1024,
height=1344,
)
```
 **Website & App Design Mocks**
Generate full web design mockups for prototyping:
```python theme={null}
prompt = """Full-page modern meal-kit delivery homepage, professional web design layout. Top navigation bar with text links 'Plans', 'Recipes', 'How it works', 'Login' in clean sans-serif. Large hero headline 'Dinner, simplified.' in bold readable font, below it subheadline 'Fresh ingredients. Easy recipes. Delivered weekly.' Two CTA buttons: primary green rounded button with 'Get started' text, secondary outlined button with 'See plans' text. Right side features large professional food photography showing colorful fresh vegetables. Three value prop cards with icons and text 'Save time', 'Reduce waste', 'Cook better'. Bold green (#2ECC71) accent color, rounded buttons, crisp sans-serif typography, warm natural lighting, modern DTC aesthetic"""
response = client.images.generate(
model="black-forest-labs/FLUX.2-pro",
prompt=prompt,
width=1024,
height=1344,
)
```
**Website & App Design Mocks**
Generate full web design mockups for prototyping:
```python theme={null}
prompt = """Full-page modern meal-kit delivery homepage, professional web design layout. Top navigation bar with text links 'Plans', 'Recipes', 'How it works', 'Login' in clean sans-serif. Large hero headline 'Dinner, simplified.' in bold readable font, below it subheadline 'Fresh ingredients. Easy recipes. Delivered weekly.' Two CTA buttons: primary green rounded button with 'Get started' text, secondary outlined button with 'See plans' text. Right side features large professional food photography showing colorful fresh vegetables. Three value prop cards with icons and text 'Save time', 'Reduce waste', 'Cook better'. Bold green (#2ECC71) accent color, rounded buttons, crisp sans-serif typography, warm natural lighting, modern DTC aesthetic"""
response = client.images.generate(
model="black-forest-labs/FLUX.2-pro",
prompt=prompt,
width=1024,
height=1344,
)
```
 **Comic Strips**
Create consistent comic-style illustrations:
```python theme={null}
prompt = """Style: Classic superhero comic with dynamic action lines
Character: Diffusion Man (athletic 30-year-old with brown skin tone and short natural fade haircut, wearing sleek gradient bodysuit from deep purple to electric blue, glowing neural network emblem on chest, confident expression) extends both hands forward shooting beams of energy
Setting: Digital cyberspace environment with floating data cubes
Text: "Time to DENOISE this chaos!"
Mood: Intense, action-packed with bright energy flashes"""
response = client.images.generate(
model="black-forest-labs/FLUX.2-pro",
prompt=prompt,
width=1024,
height=768,
)
```
**Comic Strips**
Create consistent comic-style illustrations:
```python theme={null}
prompt = """Style: Classic superhero comic with dynamic action lines
Character: Diffusion Man (athletic 30-year-old with brown skin tone and short natural fade haircut, wearing sleek gradient bodysuit from deep purple to electric blue, glowing neural network emblem on chest, confident expression) extends both hands forward shooting beams of energy
Setting: Digital cyberspace environment with floating data cubes
Text: "Time to DENOISE this chaos!"
Mood: Intense, action-packed with bright energy flashes"""
response = client.images.generate(
model="black-forest-labs/FLUX.2-pro",
prompt=prompt,
width=1024,
height=768,
)
```
 **Stickers**
Generate die-cut sticker designs:
```python theme={null}
prompt = """A kawaii die-cut sticker of a chubby orange cat, featuring big sparkly eyes and a happy smile with paws raised in greeting and a heart-shaped pink nose. The design should have smooth rounded lines with black outlines and soft gradient shading with pink cheeks."""
response = client.images.generate(
model="black-forest-labs/FLUX.2-pro",
prompt=prompt,
width=768,
height=768,
)
```
**Stickers**
Generate die-cut sticker designs:
```python theme={null}
prompt = """A kawaii die-cut sticker of a chubby orange cat, featuring big sparkly eyes and a happy smile with paws raised in greeting and a heart-shaped pink nose. The design should have smooth rounded lines with black outlines and soft gradient shading with pink cheeks."""
response = client.images.generate(
model="black-forest-labs/FLUX.2-pro",
prompt=prompt,
width=768,
height=768,
)
```
 ## Photography Styles
FLUX.2 excels at various photography aesthetics. Add style keywords to your prompts:
| Style | Prompt Suffix |
| ------------------- | ------------------------------------------------------ |
| Modern Photorealism | `close up photo, photorealistic` |
| 2000s Digicam | `2000s digicam style` |
| 80s Vintage | `80s vintage photo` |
| Analogue Film | `shot on 35mm film, f/2.8, film grain` |
| Vintage Cellphone | `picture taken from a vintage cellphone, selfie style` |
```python theme={null}
# Example: 80s vintage style
response = client.images.generate(
model="black-forest-labs/FLUX.2-pro",
prompt="A group of friends at an arcade, neon lights, having fun playing games, 80s vintage photo",
width=1024,
height=768,
)
```
## Photography Styles
FLUX.2 excels at various photography aesthetics. Add style keywords to your prompts:
| Style | Prompt Suffix |
| ------------------- | ------------------------------------------------------ |
| Modern Photorealism | `close up photo, photorealistic` |
| 2000s Digicam | `2000s digicam style` |
| 80s Vintage | `80s vintage photo` |
| Analogue Film | `shot on 35mm film, f/2.8, film grain` |
| Vintage Cellphone | `picture taken from a vintage cellphone, selfie style` |
```python theme={null}
# Example: 80s vintage style
response = client.images.generate(
model="black-forest-labs/FLUX.2-pro",
prompt="A group of friends at an arcade, neon lights, having fun playing games, 80s vintage photo",
width=1024,
height=768,
)
```
 ## Multi-Language Support
FLUX.2 supports prompting in many languages without translation:
```python theme={null}
# French
response = client.images.generate(
model="black-forest-labs/FLUX.2-pro",
prompt="Un marché alimentaire dans la campagne normande, des marchands vendent divers légumes, fruits. Lever de soleil, temps un peu brumeux",
width=1024,
height=768,
)
```
## Multi-Language Support
FLUX.2 supports prompting in many languages without translation:
```python theme={null}
# French
response = client.images.generate(
model="black-forest-labs/FLUX.2-pro",
prompt="Un marché alimentaire dans la campagne normande, des marchands vendent divers légumes, fruits. Lever de soleil, temps un peu brumeux",
width=1024,
height=768,
)
```
 ```python theme={null}
# Korean
response = client.images.generate(
model="black-forest-labs/FLUX.2-pro",
prompt="서울 도심의 옥상 정원, 저녁 노을이 지는 하늘 아래에서 사람들이 작은 등불을 켜고 있다",
width=1024,
height=768,
)
```
```python theme={null}
# Korean
response = client.images.generate(
model="black-forest-labs/FLUX.2-pro",
prompt="서울 도심의 옥상 정원, 저녁 노을이 지는 하늘 아래에서 사람들이 작은 등불을 켜고 있다",
width=1024,
height=768,
)
```
 ## Prompting Best Practices
**Golden Rules**
1. **Order by importance** — List the most important elements first in your prompt
2. **Be specific** — The more detailed, the more controlled the output
**Prompt Framework**
Follow this structure: **Subject + Action + Style + Context**
* **Subject**: The main focus (person, object, character)
* **Action**: What the subject is doing or their pose
* **Style**: Artistic approach, medium, or aesthetic
* **Context**: Setting, lighting, time, mood
**Avoid Negative Prompting**
FLUX.2 does **not** support negative prompts. Instead of saying what you don't want, describe what you do want:
| ❌ Don't | ✅ Do |
| ----------------------------------------- | ----------------------------------------------------------------------------------------- |
| `portrait, --no text, --no extra fingers` | `tight head-and-shoulders portrait, clean background, natural hands at rest out of frame` |
| `landscape, --no people` | `serene mountain landscape, untouched wilderness, pristine nature` |
## Troubleshooting
**Text not rendering correctly**
* Use FLUX.2 \[flex] for better typography
* Put exact text in quotes within the prompt
* Keep text short and clear
**Colors not matching**
* Use HEX codes with "color" or "hex" keyword
* Be explicit about which element should have which color
**Composition not as expected**
* Use JSON structured prompts for precise control
* Specify camera angle, distance, and composition type
* Use position descriptors (foreground, midground, background)
Check out all available Flux models [here](/docs/serverless-models#image-models)
---
> To find navigation and other pages in this documentation, fetch the llms.txt file at: https://docs.together.ai/llms.txt
---
# Source: https://docs.together.ai/docs/quickstart-flux-kontext.md
> Learn how to use Flux's new in-context image generation models
# Quickstart: Flux Kontext
## Flux Kontext
Black Forest Labs has released FLUX Kontext with support on Together AI. These models allow you to generate and edit images through in-context image generation.
Unlike existing text-to-image models, FLUX.1 Kontext allows you to prompt with both text and images, and seamlessly extract and modify visual concepts to produce new, coherent renderings.
The Kontext family includes three models optimized for different use cases: Pro for balanced speed and quality, Max for maximum image fidelity, and Dev for development and experimentation.
## Generating an image
Here's how to use the new Kontext models:
## Prompting Best Practices
**Golden Rules**
1. **Order by importance** — List the most important elements first in your prompt
2. **Be specific** — The more detailed, the more controlled the output
**Prompt Framework**
Follow this structure: **Subject + Action + Style + Context**
* **Subject**: The main focus (person, object, character)
* **Action**: What the subject is doing or their pose
* **Style**: Artistic approach, medium, or aesthetic
* **Context**: Setting, lighting, time, mood
**Avoid Negative Prompting**
FLUX.2 does **not** support negative prompts. Instead of saying what you don't want, describe what you do want:
| ❌ Don't | ✅ Do |
| ----------------------------------------- | ----------------------------------------------------------------------------------------- |
| `portrait, --no text, --no extra fingers` | `tight head-and-shoulders portrait, clean background, natural hands at rest out of frame` |
| `landscape, --no people` | `serene mountain landscape, untouched wilderness, pristine nature` |
## Troubleshooting
**Text not rendering correctly**
* Use FLUX.2 \[flex] for better typography
* Put exact text in quotes within the prompt
* Keep text short and clear
**Colors not matching**
* Use HEX codes with "color" or "hex" keyword
* Be explicit about which element should have which color
**Composition not as expected**
* Use JSON structured prompts for precise control
* Specify camera angle, distance, and composition type
* Use position descriptors (foreground, midground, background)
Check out all available Flux models [here](/docs/serverless-models#image-models)
---
> To find navigation and other pages in this documentation, fetch the llms.txt file at: https://docs.together.ai/llms.txt
---
# Source: https://docs.together.ai/docs/quickstart-flux-kontext.md
> Learn how to use Flux's new in-context image generation models
# Quickstart: Flux Kontext
## Flux Kontext
Black Forest Labs has released FLUX Kontext with support on Together AI. These models allow you to generate and edit images through in-context image generation.
Unlike existing text-to-image models, FLUX.1 Kontext allows you to prompt with both text and images, and seamlessly extract and modify visual concepts to produce new, coherent renderings.
The Kontext family includes three models optimized for different use cases: Pro for balanced speed and quality, Max for maximum image fidelity, and Dev for development and experimentation.
## Generating an image
Here's how to use the new Kontext models:
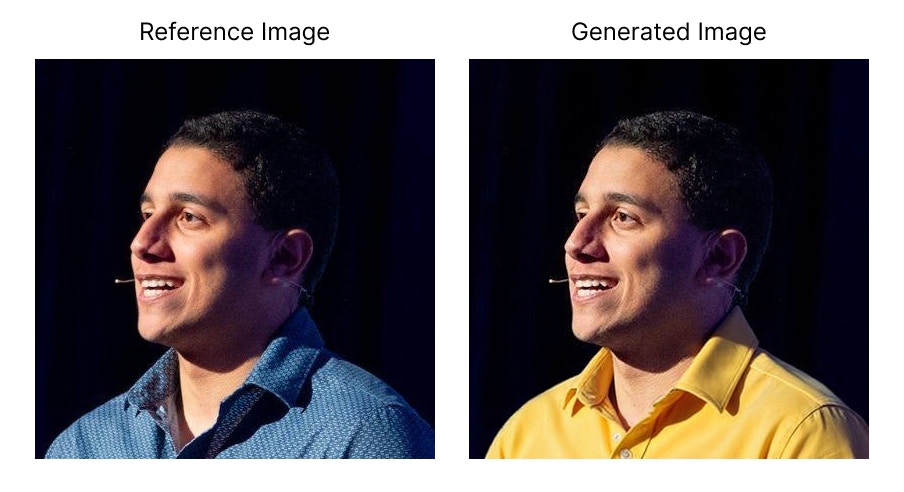 ## Available Models
Flux Kontext offers different models for various needs:
* **FLUX.1-kontext-pro**: Best balance of speed and quality (recommended)
* **FLUX.1-kontext-max**: Maximum image quality for production use
* **FLUX.1-kontext-dev**: Development model for testing
## Common Use Cases
* **Style Transfer**: Transform photos into different art styles (watercolor, oil painting, etc.)
* **Object Modification**: Change colors, add elements, or modify specific parts of an image
* **Scene Transformation**: Convert daytime to nighttime, change seasons, or alter environments
* **Character Creation**: Transform portraits into different styles or characters
## Key Parameters
Flux Kontext models support the following key parameters:
* `model`: Choose from `black-forest-labs/FLUX.1-kontext-pro`, `black-forest-labs/FLUX.1-kontext-max`, or `black-forest-labs/FLUX.1-kontext-dev`
* `prompt`: Text description of the transformation you want to apply
* `image_url`: URL of the reference image to transform
* `aspect_ratio`: Output aspect ratio (e.g., "1:1", "16:9", "9:16", "4:3", "3:2") - alternatively, you can use `width` and `height` for precise pixel dimensions
* `steps`: Number of diffusion steps (default: 28, higher values may improve quality)
* `seed`: Random seed for reproducible results
For complete parameter documentation, see the [Images Overview](/docs/images-overview#parameters).
See all available image models: [Image Models](/docs/serverless-models#image-models)
---
> To find navigation and other pages in this documentation, fetch the llms.txt file at: https://docs.together.ai/llms.txt
---
# Source: https://docs.together.ai/docs/quickstart-flux-lora.md
# Quickstart: Flux LoRA Inference
Together AI now provides a high-speed endpoint for the FLUX.1 \[dev] model with integrated LoRA support. This enables swift and high-quality image generation using pre-trained LoRA adaptations for personalized outputs, unique styles, brand identities, and product-specific visualizations.
**Fine-tuning for FLUX LoRA is not yet available.**
## Generating an image using Flux LoRAs
Some Flux LoRA fine-tunes need to be activated using a trigger phrases that can be used in the prompt and can typically be found in the model cards. For example with: [https://huggingface.co/multimodalart/flux-tarot-v1](https://huggingface.co/multimodalart/flux-tarot-v1), you should use `in the style of TOK a trtcrd tarot style` to trigger the image generation.
You can add up to 2 LoRAs per image to combine the style from the different fine-tunes. The `scale` parameter allows you to specify the strength of each LoRA. Typically values of `0.3-1.2` will produce good results.
## Available Models
Flux Kontext offers different models for various needs:
* **FLUX.1-kontext-pro**: Best balance of speed and quality (recommended)
* **FLUX.1-kontext-max**: Maximum image quality for production use
* **FLUX.1-kontext-dev**: Development model for testing
## Common Use Cases
* **Style Transfer**: Transform photos into different art styles (watercolor, oil painting, etc.)
* **Object Modification**: Change colors, add elements, or modify specific parts of an image
* **Scene Transformation**: Convert daytime to nighttime, change seasons, or alter environments
* **Character Creation**: Transform portraits into different styles or characters
## Key Parameters
Flux Kontext models support the following key parameters:
* `model`: Choose from `black-forest-labs/FLUX.1-kontext-pro`, `black-forest-labs/FLUX.1-kontext-max`, or `black-forest-labs/FLUX.1-kontext-dev`
* `prompt`: Text description of the transformation you want to apply
* `image_url`: URL of the reference image to transform
* `aspect_ratio`: Output aspect ratio (e.g., "1:1", "16:9", "9:16", "4:3", "3:2") - alternatively, you can use `width` and `height` for precise pixel dimensions
* `steps`: Number of diffusion steps (default: 28, higher values may improve quality)
* `seed`: Random seed for reproducible results
For complete parameter documentation, see the [Images Overview](/docs/images-overview#parameters).
See all available image models: [Image Models](/docs/serverless-models#image-models)
---
> To find navigation and other pages in this documentation, fetch the llms.txt file at: https://docs.together.ai/llms.txt
---
# Source: https://docs.together.ai/docs/quickstart-flux-lora.md
# Quickstart: Flux LoRA Inference
Together AI now provides a high-speed endpoint for the FLUX.1 \[dev] model with integrated LoRA support. This enables swift and high-quality image generation using pre-trained LoRA adaptations for personalized outputs, unique styles, brand identities, and product-specific visualizations.
**Fine-tuning for FLUX LoRA is not yet available.**
## Generating an image using Flux LoRAs
Some Flux LoRA fine-tunes need to be activated using a trigger phrases that can be used in the prompt and can typically be found in the model cards. For example with: [https://huggingface.co/multimodalart/flux-tarot-v1](https://huggingface.co/multimodalart/flux-tarot-v1), you should use `in the style of TOK a trtcrd tarot style` to trigger the image generation.
You can add up to 2 LoRAs per image to combine the style from the different fine-tunes. The `scale` parameter allows you to specify the strength of each LoRA. Typically values of `0.3-1.2` will produce good results.
 ## Pricing
Your request costs \$0.035 per megapixel. For \$1, you can run this model approximately 29 times. Image charges are calculated by rounding up to the nearest megapixel.
Note: Due to high demand, FLUX.1 \[schnell] Free has a model specific rate limit of 10 img/min.
---
> To find navigation and other pages in this documentation, fetch the llms.txt file at: https://docs.together.ai/llms.txt
---
# Source: https://docs.together.ai/docs/quickstart-how-to-do-ocr.md
> A step by step guide on how to do OCR with Together AI's vision models with structured outputs
# Quickstart: How to do OCR
## Understanding OCR and Its Importance
Optical Character Recognition (OCR) has become a crucial tool for many applications as it enables computers to read & understand text within images. With the advent of advanced AI vision models, OCR can now understand context, structure, and relationships within documents, making it particularly valuable for processing receipts, invoices, and other structured documents while reasoning on the content output format.
In this guide, we're going to look at how you can take documents and images and extract text out of them in markdown (unstructured) or JSON (structured) formats.
## How to do standard OCR with Together SDK
Together AI provides powerful vision models that can process images and extract text with high accuracy.
The basic approach involves sending an image to a vision model and receiving extracted text in return.\
A great example of this implementation can be found at [llamaOCR.com](https://llamaocr.com/).
Here's a basic Typescript/Python implementation for standard OCR:
## Pricing
Your request costs \$0.035 per megapixel. For \$1, you can run this model approximately 29 times. Image charges are calculated by rounding up to the nearest megapixel.
Note: Due to high demand, FLUX.1 \[schnell] Free has a model specific rate limit of 10 img/min.
---
> To find navigation and other pages in this documentation, fetch the llms.txt file at: https://docs.together.ai/llms.txt
---
# Source: https://docs.together.ai/docs/quickstart-how-to-do-ocr.md
> A step by step guide on how to do OCR with Together AI's vision models with structured outputs
# Quickstart: How to do OCR
## Understanding OCR and Its Importance
Optical Character Recognition (OCR) has become a crucial tool for many applications as it enables computers to read & understand text within images. With the advent of advanced AI vision models, OCR can now understand context, structure, and relationships within documents, making it particularly valuable for processing receipts, invoices, and other structured documents while reasoning on the content output format.
In this guide, we're going to look at how you can take documents and images and extract text out of them in markdown (unstructured) or JSON (structured) formats.
## How to do standard OCR with Together SDK
Together AI provides powerful vision models that can process images and extract text with high accuracy.
The basic approach involves sending an image to a vision model and receiving extracted text in return.\
A great example of this implementation can be found at [llamaOCR.com](https://llamaocr.com/).
Here's a basic Typescript/Python implementation for standard OCR:
[See all of Together AI's rerank models](https://docs.together.ai/docs/serverless-models#rerank-models) example: Salesforce/Llama-Rank-V1 anyOf: - type: string enum: - Salesforce/Llama-Rank-v1 - type: string query: type: string description: The search query to be used for ranking. example: What animals can I find near Peru? documents: description: List of documents, which can be either strings or objects. oneOf: - type: array items: type: object additionalProperties: true - type: array items: type: string example: >- Our solar system orbits the Milky Way galaxy at about 515,000 mph example: - title: Llama text: >- The llama is a domesticated South American camelid, widely used as a meat and pack animal by Andean cultures since the pre-Columbian era. - title: Panda text: >- The giant panda (Ailuropoda melanoleuca), also known as the panda bear or simply panda, is a bear species endemic to China. - title: Guanaco text: >- The guanaco is a camelid native to South America, closely related to the llama. Guanacos are one of two wild South American camelids; the other species is the vicuña, which lives at higher elevations. - title: Wild Bactrian camel text: >- The wild Bactrian camel (Camelus ferus) is an endangered species of camel endemic to Northwest China and southwestern Mongolia. top_n: type: integer description: The number of top results to return. example: 2 return_documents: type: boolean description: Whether to return supplied documents with the response. example: true rank_fields: type: array items: type: string description: >- List of keys in the JSON Object document to rank by. Defaults to use all supplied keys for ranking. example: - title - text required: - model - query - documents additionalProperties: false RerankResponse: type: object required: - object - model - results properties: object: type: string description: Object type enum: - rerank example: rerank id: type: string description: Request ID example: 9dfa1a09-5ebc-4a40-970f-586cb8f4ae47 model: type: string description: The model to be used for the rerank request. example: salesforce/turboranker-0.8-3778-6328 results: type: array items: type: object required: - index - relevance_score - document properties: index: type: integer relevance_score: type: number document: type: object properties: text: type: string nullable: true example: - index: 0 relevance_score: 0.29980177813003117 document: text: >- {"title":"Llama","text":"The llama is a domesticated South American camelid, widely used as a meat and pack animal by Andean cultures since the pre-Columbian era."} - index: 2 relevance_score: 0.2752447527354349 document: text: >- {"title":"Guanaco","text":"The guanaco is a camelid native to South America, closely related to the llama. Guanacos are one of two wild South American camelids; the other species is the vicuña, which lives at higher elevations."} usage: $ref: '#/components/schemas/UsageData' example: prompt_tokens: 1837 completion_tokens: 0 total_tokens: 1837 ErrorData: type: object required: - error properties: error: type: object properties: message: type: string nullable: false type: type: string nullable: false param: type: string nullable: true default: null code: type: string nullable: true default: null required: - type - message UsageData: type: object properties: prompt_tokens: type: integer completion_tokens: type: integer total_tokens: type: integer required: - prompt_tokens - completion_tokens - total_tokens nullable: true securitySchemes: bearerAuth: type: http scheme: bearer x-bearer-format: bearer x-default: default ```` --- > To find navigation and other pages in this documentation, fetch the llms.txt file at: https://docs.together.ai/llms.txt --- # Source: https://docs.together.ai/docs/rerank-overview.md # Rerank > Learn how to improve the relevance of your search and RAG systems with reranking. ## What is a reranker? A reranker is a specialized model that improves search relevancy by reassessing and reordering a set of retrieved documents based on their relevance to a given query. It takes a query and a set of text inputs (called 'documents'), and returns a relevancy score for each document relative to the given query. This process helps filter and prioritize the most pertinent information, enhancing the quality of search results. In Retrieval Augmented Generation (RAG) pipelines, the reranking step sits between the initial retrieval step and the final generation phase. It acts as a quality filter, refining the selection of documents that will be used as context for language models. By ensuring that only the most relevant information is passed to the generation phase, rerankers play a crucial role in improving the accuracy of generated responses while potentially reducing processing costs. ## How does Together's Rerank API work? Together's serverless Rerank API allows you to seamlessly integrate supported rerank models into your enterprise applications. It takes in a `query` and a number of `documents`, and outputs a relevancy score and ordering index for each document. It can also filter its response to the n most relevant documents. Together's Rerank API is also compatible with Cohere Rerank, making it easy to try out our reranker models on your existing applications. Key features of Together's Rerank API include: * Flagship support for [LlamaRank](/docs/together-and-llamarank), Salesforce’s reranker model * Support for JSON and tabular data * Long 8K context per document * Low latency for fast search queries * Full compatibility with Cohere's Rerank API [Get started building with Together Rerank today →](/docs/together-and-llamarank) ## Cohere Rerank compatibility The Together Rerank endpoint is compatible with Cohere Rerank, making it easy to test out models like [LlamaRank](/docs/together-and-llamarank) for your existing applications. Simply switch it out by updating the `URL`, `API key` and `model`.
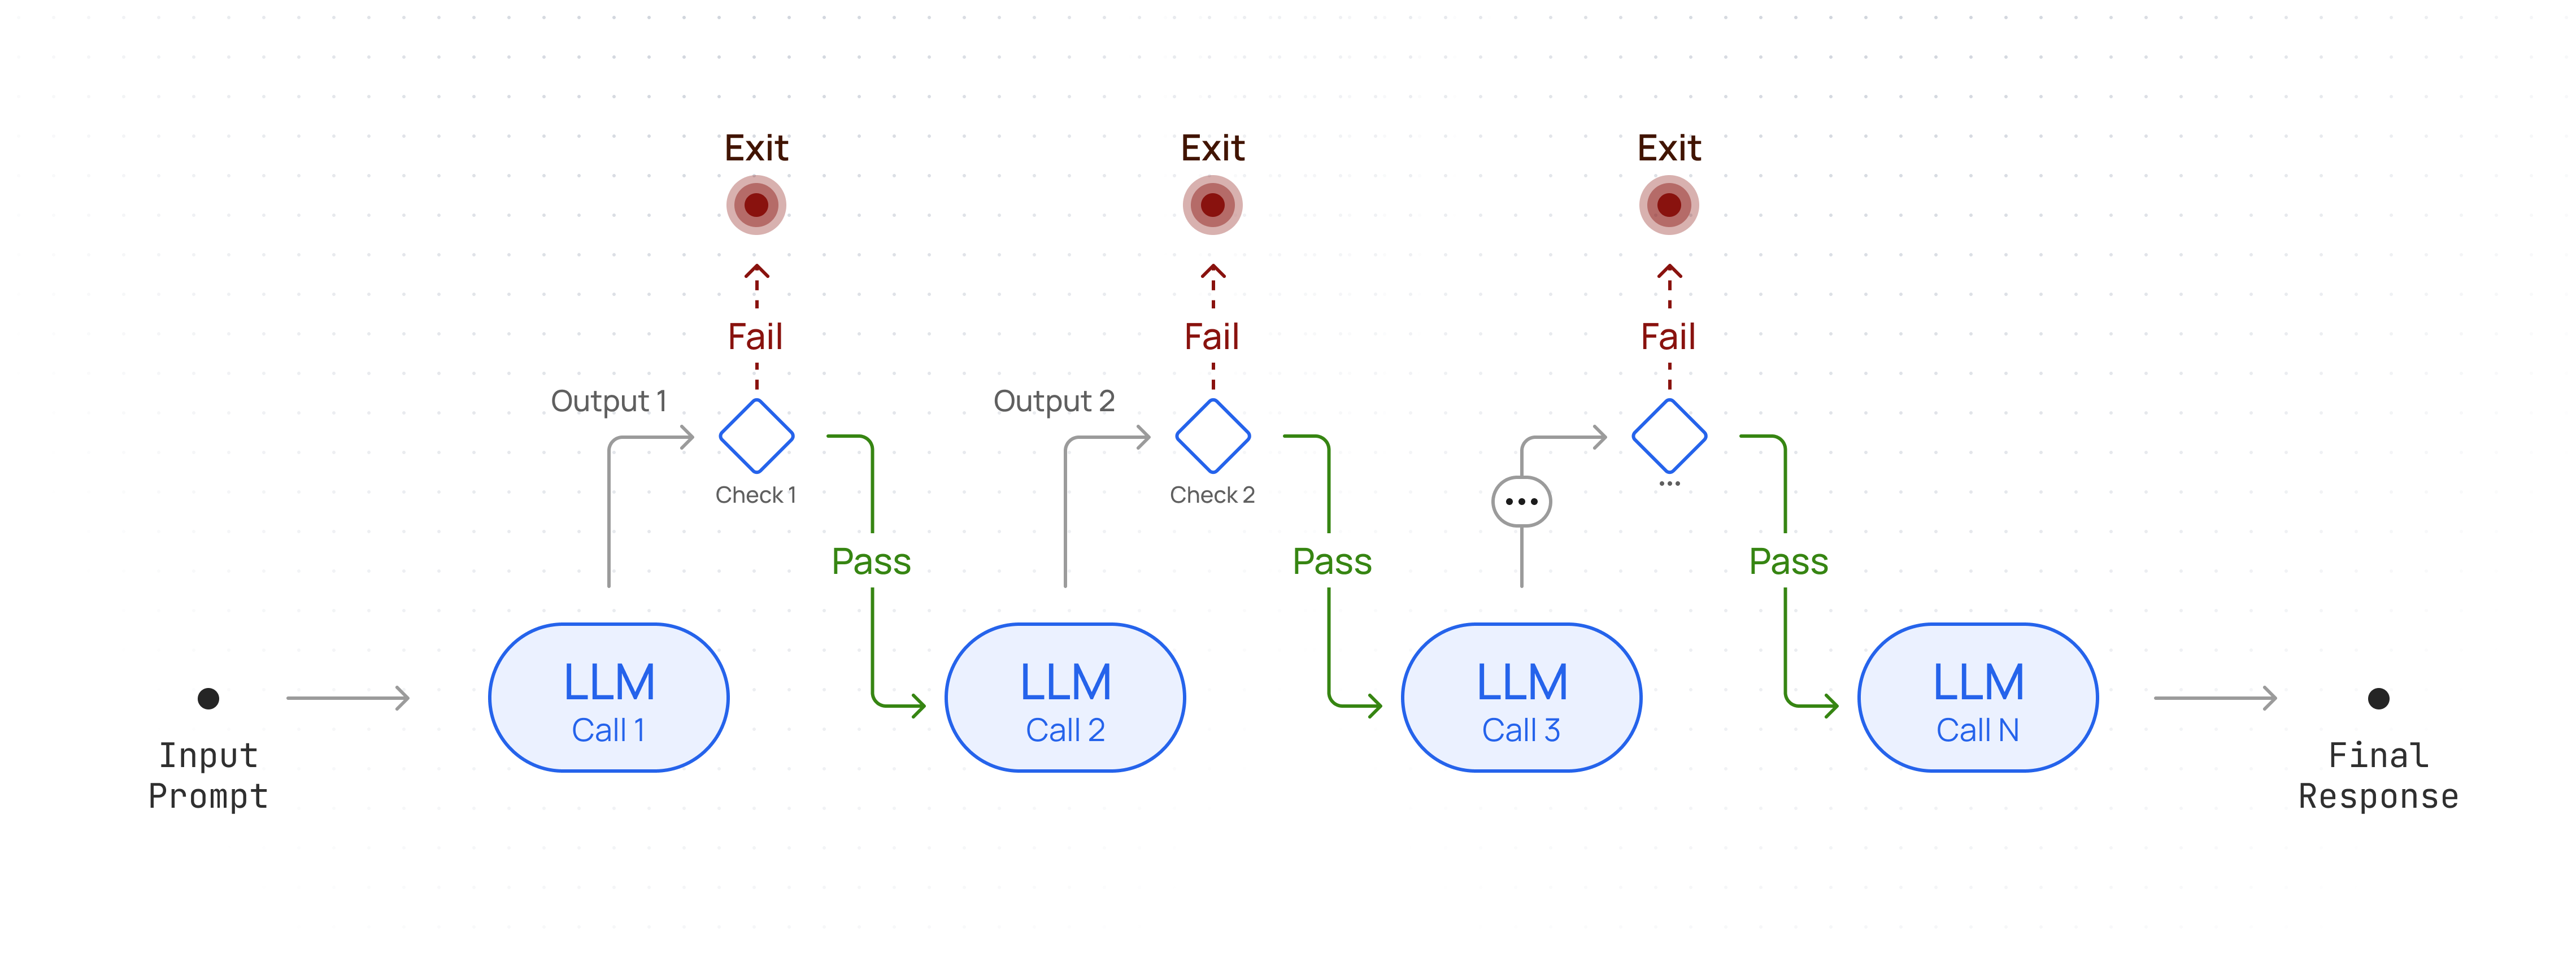
(17Bx128E) | meta-llama/Llama-4-Maverick-17B-128E-Instruct-FP8 | 1048576 | FP8 | | Meta | Llama 4 Scout
(17Bx16E) | meta-llama/Llama-4-Scout-17B-16E-Instruct | 1048576 | FP16 | | Meta | Llama 3.3 70B Instruct Turbo | meta-llama/Llama-3.3-70B-Instruct-Turbo | 131072 | FP8 | | Deep Cogito | Cogito v2 Preview 70B | deepcogito/cogito-v2-preview-llama-70B | 32768 | BF16 | | Deep Cogito | Cogito v2 Preview 109B MoE | deepcogito/cogito-v2-preview-llama-109B-MoE | 32768 | BF16 | | Deep Cogito | Cogito v2 Preview 405B | deepcogito/cogito-v2-preview-llama-405B | 32768 | BF16 | | Deep Cogito | Cogito v2.1 671B | deepcogito/cogito-v2-1-671b | 32768 | FP8 | | Mistral AI | Magistral Small 2506 API | mistralai/Magistral-Small-2506 | 40960 | BF16 | | Mistral AI | Ministral 3 14B Instruct 2512 | mistralai/Ministral-3-14B-Instruct-2512 | 262144 | BF16 | | Marin Community | Marin 8B Instruct | marin-community/marin-8b-instruct | 4096 | FP16 | | Essential AI | Rnj-1 Instruct | essentialai/rnj-1-instruct | 32768 | BF16 | | Mistral AI | Mistral Small 3 Instruct (24B) | mistralai/Mistral-Small-24B-Instruct-2501 | 32768 | FP16 | | Meta | Llama 3.1 8B Instruct Turbo | meta-llama/Meta-Llama-3.1-8B-Instruct-Turbo | 131072 | FP8 | | Qwen | Qwen 2.5 7B Instruct Turbo | Qwen/Qwen2.5-7B-Instruct-Turbo | 32768 | FP8 | | Qwen | Qwen 2.5 72B Instruct Turbo | Qwen/Qwen2.5-72B-Instruct-Turbo | 32768 | FP8 | | Qwen | Qwen2.5 Vision Language 72B Instruct | Qwen/Qwen2.5-VL-72B-Instruct | 32768 | FP8 | | Qwen | Qwen3 235B A22B Throughput | Qwen/Qwen3-235B-A22B-fp8-tput | 40960 | FP8 | | Arcee | Arcee AI Trinity Mini | arcee-ai/trinity-mini | 32768 | - | | Meta | Llama 3.1 405B Instruct Turbo | meta-llama/Meta-Llama-3.1-405B-Instruct-Turbo | 130815 | FP8 | | Meta | Llama 3.2 3B Instruct Turbo | meta-llama/Llama-3.2-3B-Instruct-Turbo | 131072 | FP16 | | Meta | Llama 3 8B Instruct Lite | meta-llama/Meta-Llama-3-8B-Instruct-Lite | 8192 | INT4 | | Meta | Llama 3 70B Instruct Reference | meta-llama/Llama-3-70b-chat-hf | 8192 | FP16 | | Google | Gemma Instruct (2B) | google/gemma-2b-it\* | 8192 | FP16 | | Google | Gemma 3N E4B Instruct | google/gemma-3n-E4B-it | 32768 | FP8 | | Gryphe | MythoMax-L2 (13B) | Gryphe/MythoMax-L2-13b\* | 4096 | FP16 | | Mistral AI | Mistral (7B) Instruct v0.2 | mistralai/Mistral-7B-Instruct-v0.2 | 32768 | FP16 | | Mistral AI | Mistral (7B) Instruct v0.3 | mistralai/Mistral-7B-Instruct-v0.3 | 32768 | FP16 | | NVIDIA | Nemotron Nano 9B v2 | nvidia/NVIDIA-Nemotron-Nano-9B-v2 | 131072 | BF16 | \* The Free version of Llama 3.3 70B Instruct Turbo has a reduced rate limit of .6 requests/minute (36/hour) for users on the free tier and 3 requests/minute for any user who has added a credit card on file. \*Deprecated model, see [Deprecations](/docs/deprecations) for more details **Chat Model Examples** * [PDF to Chat App](https://www.pdftochat.com/) - Chat with your PDFs (blogs, textbooks, papers) * [Open Deep Research Notebook](https://github.com/togethercomputer/together-cookbook/blob/main/Agents/Together_Open_Deep_Research_CookBook.ipynb) - Generate long form reports using a single prompt * [RAG with Reasoning Models Notebook](https://github.com/togethercomputer/together-cookbook/blob/main/RAG_with_Reasoning_Models.ipynb) - RAG with DeepSeek-R1 * [Fine-tuning Chat Models Notebook](https://github.com/togethercomputer/together-cookbook/blob/main/Finetuning/Finetuning_Guide.ipynb) - Tune Language models for conversation * [Building Agents](https://github.com/togethercomputer/together-cookbook/tree/main/Agents) - Agent workflows with language models ## Image models Use our [Images](/reference/post-images-generations) endpoint for Image Models. | Organization | Model Name | Model String for API | Default steps | | :---------------- | :--------------------------------- | :--------------------------------------- | :------------ | | Google | Imagen 4.0 Preview | google/imagen-4.0-preview | - | | Google | Imagen 4.0 Fast | google/imagen-4.0-fast | - | | Google | Imagen 4.0 Ultra | google/imagen-4.0-ultra | - | | Google | Flash Image 2.5 (Nano Banana) | google/flash-image-2.5 | - | | Google | Gemini 3 Pro Image (Nano Banana 2) | google/gemini-3-pro-image | - | | Black Forest Labs | Flux.1 \[schnell] **(free)\*** | black-forest-labs/FLUX.1-schnell-Free | N/A | | Black Forest Labs | Flux.1 \[schnell] (Turbo) | black-forest-labs/FLUX.1-schnell | 4 | | Black Forest Labs | Flux.1 Dev | black-forest-labs/FLUX.1-dev | 28 | | Black Forest Labs | Flux1.1 \[pro] | black-forest-labs/FLUX.1.1-pro | - | | Black Forest Labs | Flux.1 Kontext \[pro] | black-forest-labs/FLUX.1-kontext-pro | 28 | | Black Forest Labs | Flux.1 Kontext \[max] | black-forest-labs/FLUX.1-kontext-max | 28 | | Black Forest Labs | Flux.1 Kontext \[dev] | black-forest-labs/FLUX.1-kontext-dev | 28 | | Black Forest Labs | FLUX.1 Krea \[dev] | black-forest-labs/FLUX.1-krea-dev | 28 | | Black Forest Labs | FLUX.2 \[pro] | black-forest-labs/FLUX.2-pro | - | | Black Forest Labs | FLUX.2 \[dev] | black-forest-labs/FLUX.2-dev | - | | Black Forest Labs | FLUX.2 \[flex] | black-forest-labs/FLUX.2-flex | - | | ByteDance | Seedream 3.0 | ByteDance-Seed/Seedream-3.0 | - | | ByteDance | Seedream 4.0 | ByteDance-Seed/Seedream-4.0 | - | | Qwen | Qwen Image | Qwen/Qwen-Image | - | | RunDiffusion | Juggernaut Pro Flux | RunDiffusion/Juggernaut-pro-flux | - | | RunDiffusion | Juggernaut Lightning Flux | Rundiffusion/Juggernaut-Lightning-Flux | - | | HiDream | HiDream-I1-Full | HiDream-ai/HiDream-I1-Full | - | | HiDream | HiDream-I1-Dev | HiDream-ai/HiDream-I1-Dev | - | | HiDream | HiDream-I1-Fast | HiDream-ai/HiDream-I1-Fast | - | | Ideogram | Ideogram 3.0 | ideogram/ideogram-3.0 | - | | Lykon | Dreamshaper | Lykon/DreamShaper | - | | Stability AI | SD XL | stabilityai/stable-diffusion-xl-base-1.0 | - | | Stability AI | Stable Diffusion 3 | stabilityai/stable-diffusion-3-medium | - | Note: Due to high demand, FLUX.1 \[schnell] Free has a model specific rate limit of 10 img/min. Image models can also only be used with credits. Users are unable to call Image models with a zero or negative balance. \*Free model has reduced rate limits and performance compared to our paid Turbo endpoint for Flux Shnell named `black-forest-labs/FLUX.1-schnell` **Image Model Examples** * [Blinkshot.io](https://www.blinkshot.io/) - A realtime AI image playground built with Flux Schnell * [Logo Creator](https://www.logo-creator.io/) - An logo generator that creates professional logos in seconds using Flux Pro 1.1 * [PicMenu](https://www.picmenu.co/) - A menu visualizer that takes a restaurant menu and generates nice images for each dish. * [Flux LoRA Inference Notebook](https://github.com/togethercomputer/together-cookbook/blob/main/Flux_LoRA_Inference.ipynb) - Using LoRA fine-tuned image generations models **How FLUX pricing works** For FLUX models (except for pro) pricing is based on the size of generated images (in megapixels) and the number of steps used (if the number of steps exceed the default steps). * **Default pricing:** The listed per megapixel prices are for the default number of steps. * **Using more or fewer steps:** Costs are adjusted based on the number of steps used **only if you go above the default steps**. If you use more steps, the cost increases proportionally using the formula below. If you use fewer steps, the cost *does not* decrease and is based on the default rate. Here’s a formula to calculate cost: Cost = MP × Price per MP × (Steps ÷ Default Steps) Where: * MP = (Width × Height ÷ 1,000,000) * Price per MP = Cost for generating one megapixel at the default steps * Steps = The number of steps used for the image generation. This is only factored in if going above default steps. **How Pricing works for Gemini 3 Pro Image** Gemini 3 Pro Image offers pricing based on the resolution of the image. * 1080p and 2K: \$0.134/image * 4K resolution: \$0.24 /image Supported dimensions: 1K: 1024×1024 (1:1), 1248×832 (3:2), 832×1248 (2:3), 1184×864 (4:3), 864×1184 (3:4), 896×1152 (4:5), 1152×896 (5:4), 768×1344 (9:16), 1344×768 (16:9), 1536×672 (21:9). 2K: 2048×2048 (1:1), 2496×1664 (3:2), 1664×2496 (2:3), 2368×1728 (4:3), 1728×2368 (3:4), 1792×2304 (4:5), 2304×1792 (5:4), 1536×2688 (9:16), 2688×1536 (16:9), 3072×1344 (21:9). 4K: 4096×4096 (1:1), 4992×3328 (3:2), 3328×4992 (2:3), 4736×3456 (4:3), 3456×4736 (3:4), 3584×4608 (4:5), 4608×3584 (5:4), 3072×5376 (9:16), 5376×3072 (16:9), 6144×2688 (21:9). ## Vision models If you're not sure which vision model to use, we currently recommend **Llama 4 Scout** (`meta-llama/Llama-4-Scout-17B-16E-Instruct`) to get started. For model specific rate limits, navigate [here](/docs/rate-limits). | Organization | Model Name | API Model String | Context length | | :----------- | :----------------------------------- | :------------------------------------------------ | :------------- | | Meta | Llama 4 Maverick
(17Bx128E) | meta-llama/Llama-4-Maverick-17B-128E-Instruct-FP8 | 524288 | | Meta | Llama 4 Scout
(17Bx16E) | meta-llama/Llama-4-Scout-17B-16E-Instruct | 327680 | | Qwen | Qwen2.5 Vision Language 72B Instruct | Qwen/Qwen2.5-VL-72B-Instruct | 32768 | | Qwen | Qwen3-VL-32B-Instruct | Qwen/Qwen3-VL-32B-Instruct | 256000 | | Qwen | Qwen3-VL-8B-Instruct | Qwen/Qwen3-VL-8B-Instruct | 262100 | **Vision Model Examples** * [LlamaOCR](https://llamaocr.com/) - A tool that takes documents (like receipts) and outputs markdown * [Wireframe to Code](https://www.napkins.dev/) - A wireframe to app tool that takes in a UI mockup of a site and give you React code. * [Extracting Structured Data from Images](https://github.com/togethercomputer/together-cookbook/blob/main/Structured_Text_Extraction_from_Images.ipynb) - Extract information from images as JSON ## Video models | Organization | Model Name | Model String for API | Resolution / Duration | | :----------- | :------------------- | :-------------------------- | :-------------------- | | MiniMax | MiniMax 01 Director | minimax/video-01-director | 720p / 5s | | MiniMax | MiniMax Hailuo 02 | minimax/hailuo-02 | 768p / 10s | | Google | Veo 2.0 | google/veo-2.0 | 720p / 5s | | Google | Veo 3.0 | google/veo-3.0 | 720p / 8s | | Google | Veo 3.0 + Audio | google/veo-3.0-audio | 720p / 8s | | Google | Veo 3.0 Fast | google/veo-3.0-fast | 1080p / 8s | | Google | Veo 3.0 Fast + Audio | google/veo-3.0-fast-audio | 1080p / 8s | | ByteDance | Seedance 1.0 Lite | ByteDance/Seedance-1.0-lite | 720p / 5s | | ByteDance | Seedance 1.0 Pro | ByteDance/Seedance-1.0-pro | 1080p / 5s | | PixVerse | PixVerse v5 | pixverse/pixverse-v5 | 1080p / 5s | | Kuaishou | Kling 2.1 Master | kwaivgI/kling-2.1-master | 1080p / 5s | | Kuaishou | Kling 2.1 Standard | kwaivgI/kling-2.1-standard | 720p / 5s | | Kuaishou | Kling 2.1 Pro | kwaivgI/kling-2.1-pro | 1080p / 5s | | Kuaishou | Kling 2.0 Master | kwaivgI/kling-2.0-master | 1080p / 5s | | Kuaishou | Kling 1.6 Standard | kwaivgI/kling-1.6-standard | 720p / 5s | | Kuaishou | Kling 1.6 Pro | kwaivgI/kling-1.6-pro | 1080p / 5s | | Wan-AI | Wan 2.2 I2V | Wan-AI/Wan2.2-I2V-A14B | - | | Wan-AI | Wan 2.2 T2V | Wan-AI/Wan2.2-T2V-A14B | - | | Vidu | Vidu 2.0 | vidu/vidu-2.0 | 720p / 8s | | Vidu | Vidu Q1 | vidu/vidu-q1 | 1080p / 5s | | OpenAI | Sora 2 | openai/sora-2 | 720p / 8s | | OpenAI | Sora 2 Pro | openai/sora-2-pro | 1080p / 8s | ## Audio models Use our [Audio](/reference/audio-speech) endpoint for text-to-speech models. For speech-to-text models see [Transcription](/reference/audio-transcriptions) and [Translations](/reference/audio-translations) | Organization | Modality | Model Name | Model String for API | | :----------- | :------------- | :--------------- | :----------------------------- | | Canopy Labs | Text-to-Speech | Orpheus 3B | canopylabs/orpheus-3b-0.1-ft | | Kokoro | Text-to-Speech | Kokoro | hexgrad/Kokoro-82M | | Cartesia | Text-to-Speech | Cartesia Sonic 2 | cartesia/sonic-2 | | Cartesia | Text-to-Speech | Cartesia Sonic | cartesia/sonic | | OpenAI | Speech-to-Text | Whisper Large v3 | openai/whisper-large-v3 | | Mistral AI | Speech-to-Text | Voxtral Mini 3B | mistralai/Voxtral-Mini-3B-2507 | **Audio Model Examples** * [PDF to Podcast Notebook](https://github.com/togethercomputer/together-cookbook/blob/main/PDF_to_Podcast.ipynb) - Generate a NotebookLM style podcast given a PDF * [Audio Podcast Agent Workflow](https://github.com/togethercomputer/together-cookbook/blob/main/Agents/Serial_Chain_Agent_Workflow.ipynb) - Agent workflow to generate audio files given input content ## Embedding models | Model Name | Model String for API | Model Size | Embedding Dimension | Context Window | | :----------------------------- | ------------------------------------------ | :--------- | :------------------ | :------------- | | M2-BERT-80M-32K-Retrieval | togethercomputer/m2-bert-80M-32k-retrieval | 80M | 768 | 32768 | | BGE-Large-EN-v1.5 | BAAI/bge-large-en-v1.5 | 326M | 1024 | 512 | | BGE-Base-EN-v1.5 | BAAI/bge-base-en-v1.5 | 102M | 768 | 512 | | GTE-Modernbert-base | Alibaba-NLP/gte-modernbert-base | 149M | 768 | 8192 | | Multilingual-e5-large-instruct | intfloat/multilingual-e5-large-instruct | 560M | 1024 | 514 | **Embedding Model Examples** * [Contextual RAG](https://docs.together.ai/docs/how-to-implement-contextual-rag-from-anthropic) - An open source implementation of contextual RAG by Anthropic * [Code Generation Agent](https://github.com/togethercomputer/together-cookbook/blob/main/Agents/Looping_Agent_Workflow.ipynb) - An agent workflow to generate and iteratively improve code * [Multimodal Search and Image Generation](https://github.com/togethercomputer/together-cookbook/blob/main/Multimodal_Search_and_Conditional_Image_Generation.ipynb) - Search for images and generate more similar ones * [Visualizing Embeddings](https://github.com/togethercomputer/together-cookbook/blob/main/Embedding_Visualization.ipynb) - Visualizing and clustering vector embeddings ## Rerank models Our [Rerank API](/docs/rerank-overview) has built-in support for the following models, that we host via our serverless endpoints. | Organization | Model Name | Model Size | Model String for API | Max Doc Size (tokens) | Max Docs | | ------------ | ------------ | :--------- | ----------------------------------- | --------------------- | -------- | | Salesforce | LlamaRank | 8B | Salesforce/Llama-Rank-v1 | 8192 | 1024 | | MixedBread | Rerank Large | 1.6B | mixedbread-ai/Mxbai-Rerank-Large-V2 | 32768 | - | **Rerank Model Examples** * [Search and Reranking](https://github.com/togethercomputer/together-cookbook/blob/main/Search_with_Reranking.ipynb) - Simple semantic search pipeline improved using a reranker * [Implementing Hybrid Search Notebook](https://github.com/togethercomputer/together-cookbook/blob/main/Open_Contextual_RAG.ipynb) - Implementing semantic + lexical search along with reranking ## Moderation models Use our [Completions](/reference/completions-1) endpoint to run a moderation model as a standalone classifier, or use it alongside any of the other models above as a filter to safeguard responses from 100+ models, by specifying the parameter `"safety_model": "MODEL_API_STRING"` | Organization | Model Name | Model String for API | Context length | | :----------- | :------------------ | :------------------------------- | :------------- | | Meta | Llama Guard (8B) | meta-llama/Meta-Llama-Guard-3-8B | 8192 | | Meta | Llama Guard 4 (12B) | meta-llama/Llama-Guard-4-12B | 1048576 | | Virtue AI | Virtue Guard | VirtueAI/VirtueGuard-Text-Lite | 32768 | --- > To find navigation and other pages in this documentation, fetch the llms.txt file at: https://docs.together.ai/llms.txt --- # Source: https://docs.together.ai/docs/slurm.md # Slurm Management System ## Slurm Slurm is a cluster management system that allows users to manage and schedule jobs on a cluster of computers. A Together GPU Cluster provides Slurm configured out-of-the-box for distributed training and the option to use your own scheduler. Users can submit computing jobs to the Slurm head node where the scheduler will assign the tasks to available GPU nodes based on resource availability. For more information on Slurm, see the [Slurm Quick Start User Guide](https://slurm.schedmd.com/quickstart.html). ### **Slurm Basic Concepts** 1. **Jobs**: A job is a unit of work that is submitted to the cluster. Jobs can be scripts, programs, or other types of tasks. 2. **Nodes**: A node is a computer in the cluster that can run jobs. Nodes can be physical machines or virtual machines. 3. **Head Node**: Each Together GPU Cluster cluster is configured with head node. A user will login to the head node to write jobs, submit jobs to the GPU cluster, and retrieve the results. 4. **Partitions**: A partition is a group of nodes that can be used to run jobs. Partitions can be configured to have different properties, such as the number of nodes and the amount of memory available. 5. **Priorities**: Priorities are used to determine which jobs should be run first. Jobs with higher priorities are given preference over jobs with lower priorities. ### **Using Slurm** 1. **Job Submission**: Jobs can be submitted to the cluster using the **`sbatch`** command. Jobs can be submitted in batch mode or interactively using the **`srun`** command. 2. **Job Monitoring**: Jobs can be monitored using the **`squeue`** command, which displays information about the jobs that are currently running or waiting to run. 3. **Job Control**: Jobs can be controlled using the **`scancel`** command, which allows users to cancel or interrupt jobs that are running. ### Slurm Job Arrays You can use Slurm job arrays to partition input files into k chunks and distribute the chunks across the nodes. See this example on processing RPv1 which will need to be adapted to your processing: [arxiv-clean-slurm.batch](https://github.com/togethercomputer/RedPajama-Data/blob/rp_v1/data_prep/arxiv/scripts/arxiv-clean-slurm.sbatch) ### **Troubleshooting Slurm** 1. **Error Messages**: Slurm provides error messages that can help users diagnose and troubleshoot problems. 2. **Log Files**: Slurm provides log files that can be used to monitor the status of the cluster and diagnose problems. --- > To find navigation and other pages in this documentation, fetch the llms.txt file at: https://docs.together.ai/llms.txt --- # Source: https://docs.together.ai/docs/speech-to-text.md > Learn how to transcribe and translate audio into text! # Speech-to-Text Together AI provides comprehensive audio transcription and translation capabilities powered by state-of-the-art speech recognition models including OpenAI's Whisper and Voxtral. This guide covers everything from batch transcription to real-time streaming for low-latency applications. ## Quick Start Here's how to get started with basic transcription and translation:
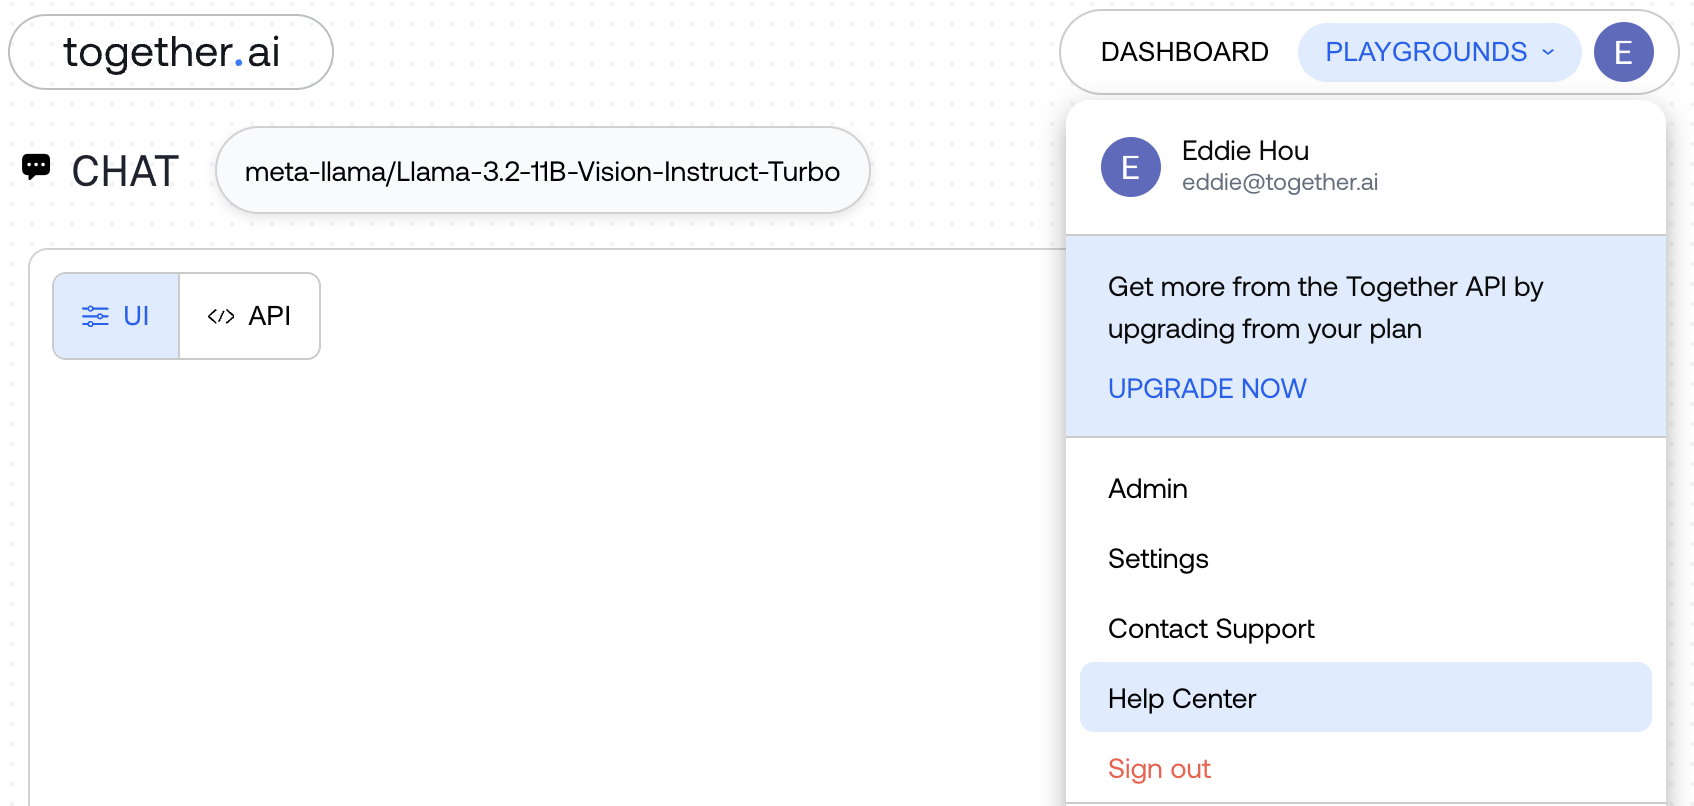 After being redirected, you will land in our help center:
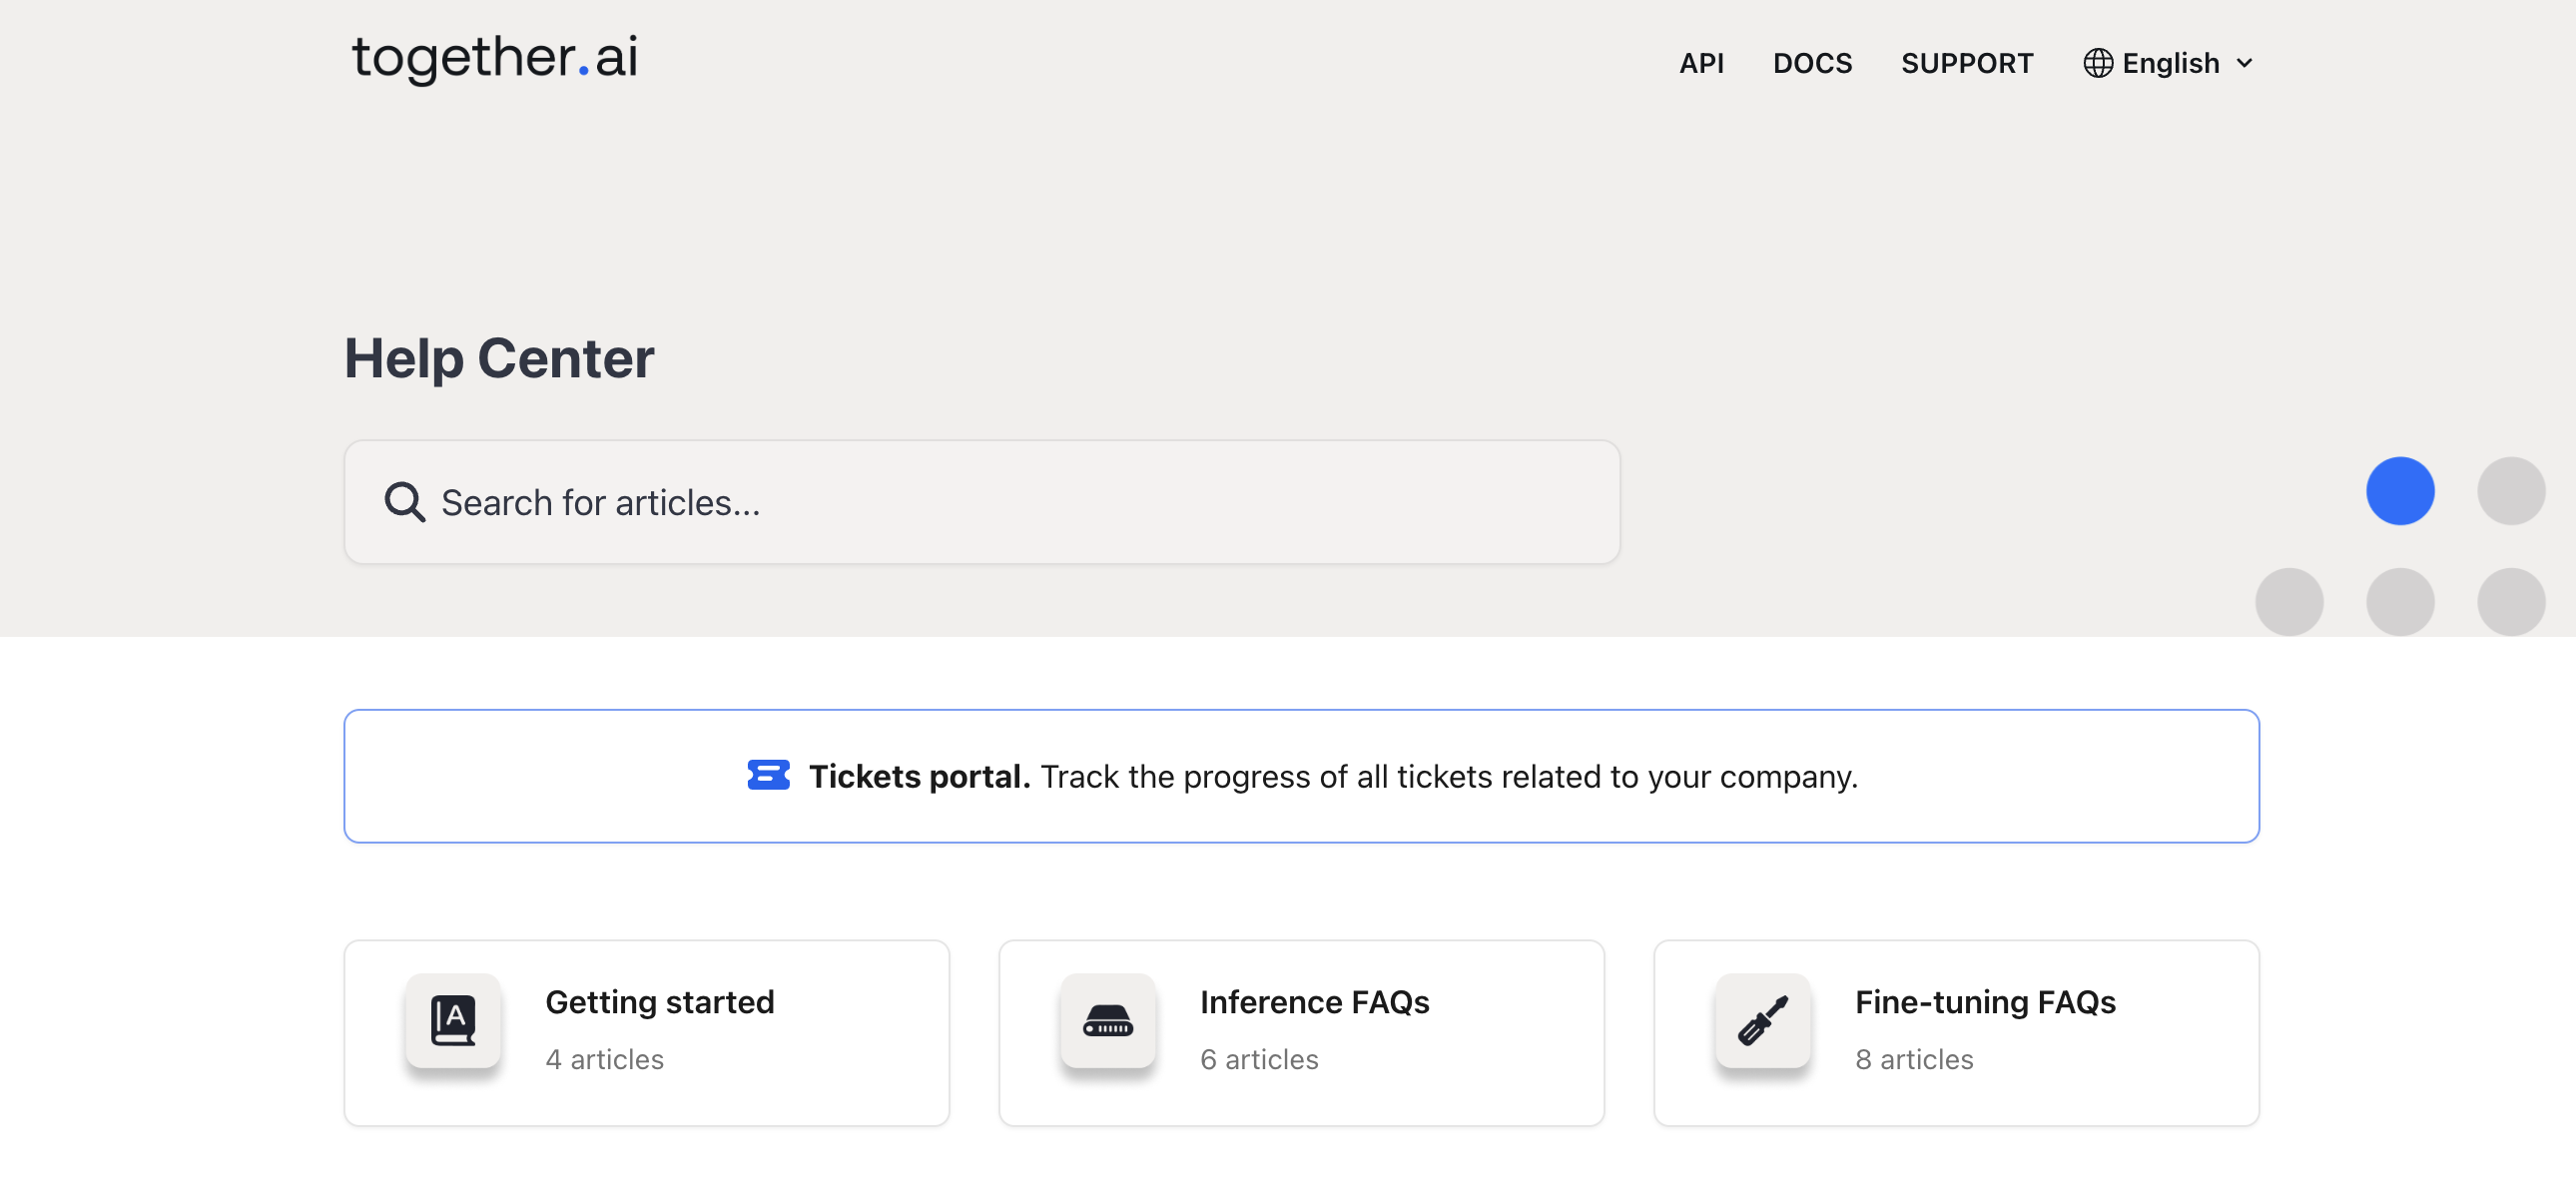 Clicking on "Tickets portal" will show you all tickets related to or logged by your company. You can check the status of any ticket, and message us directly if you have further questions.
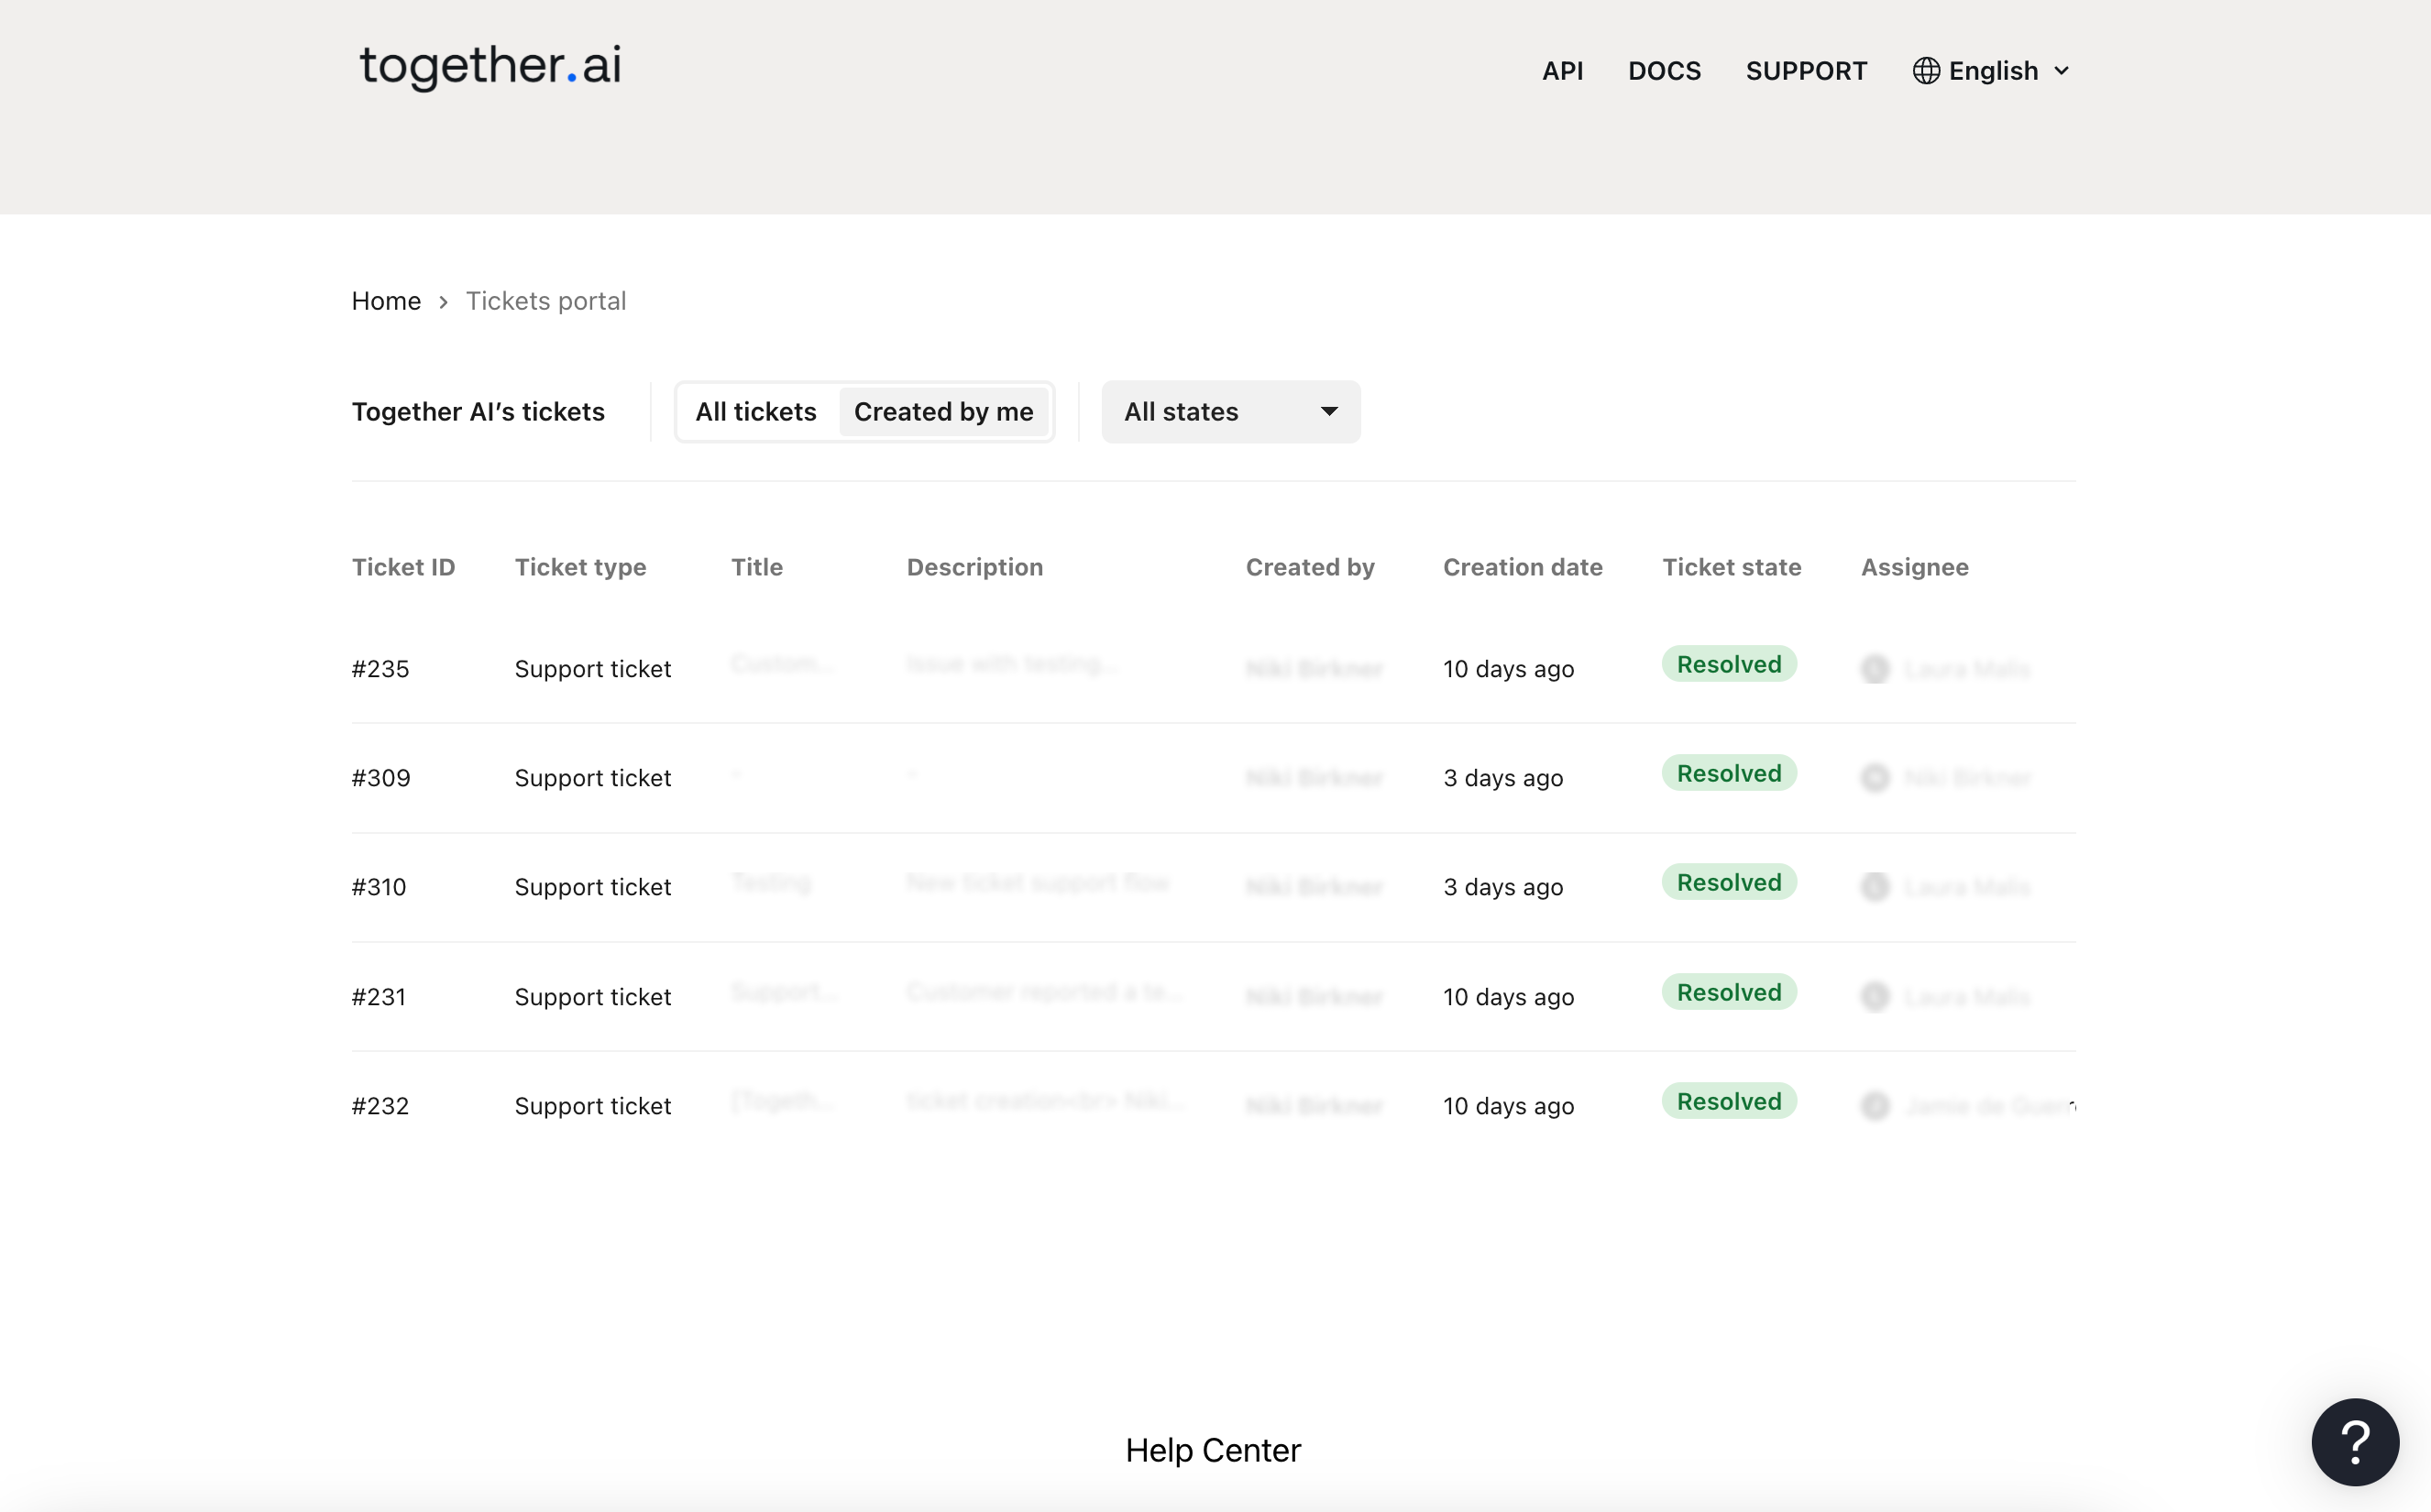
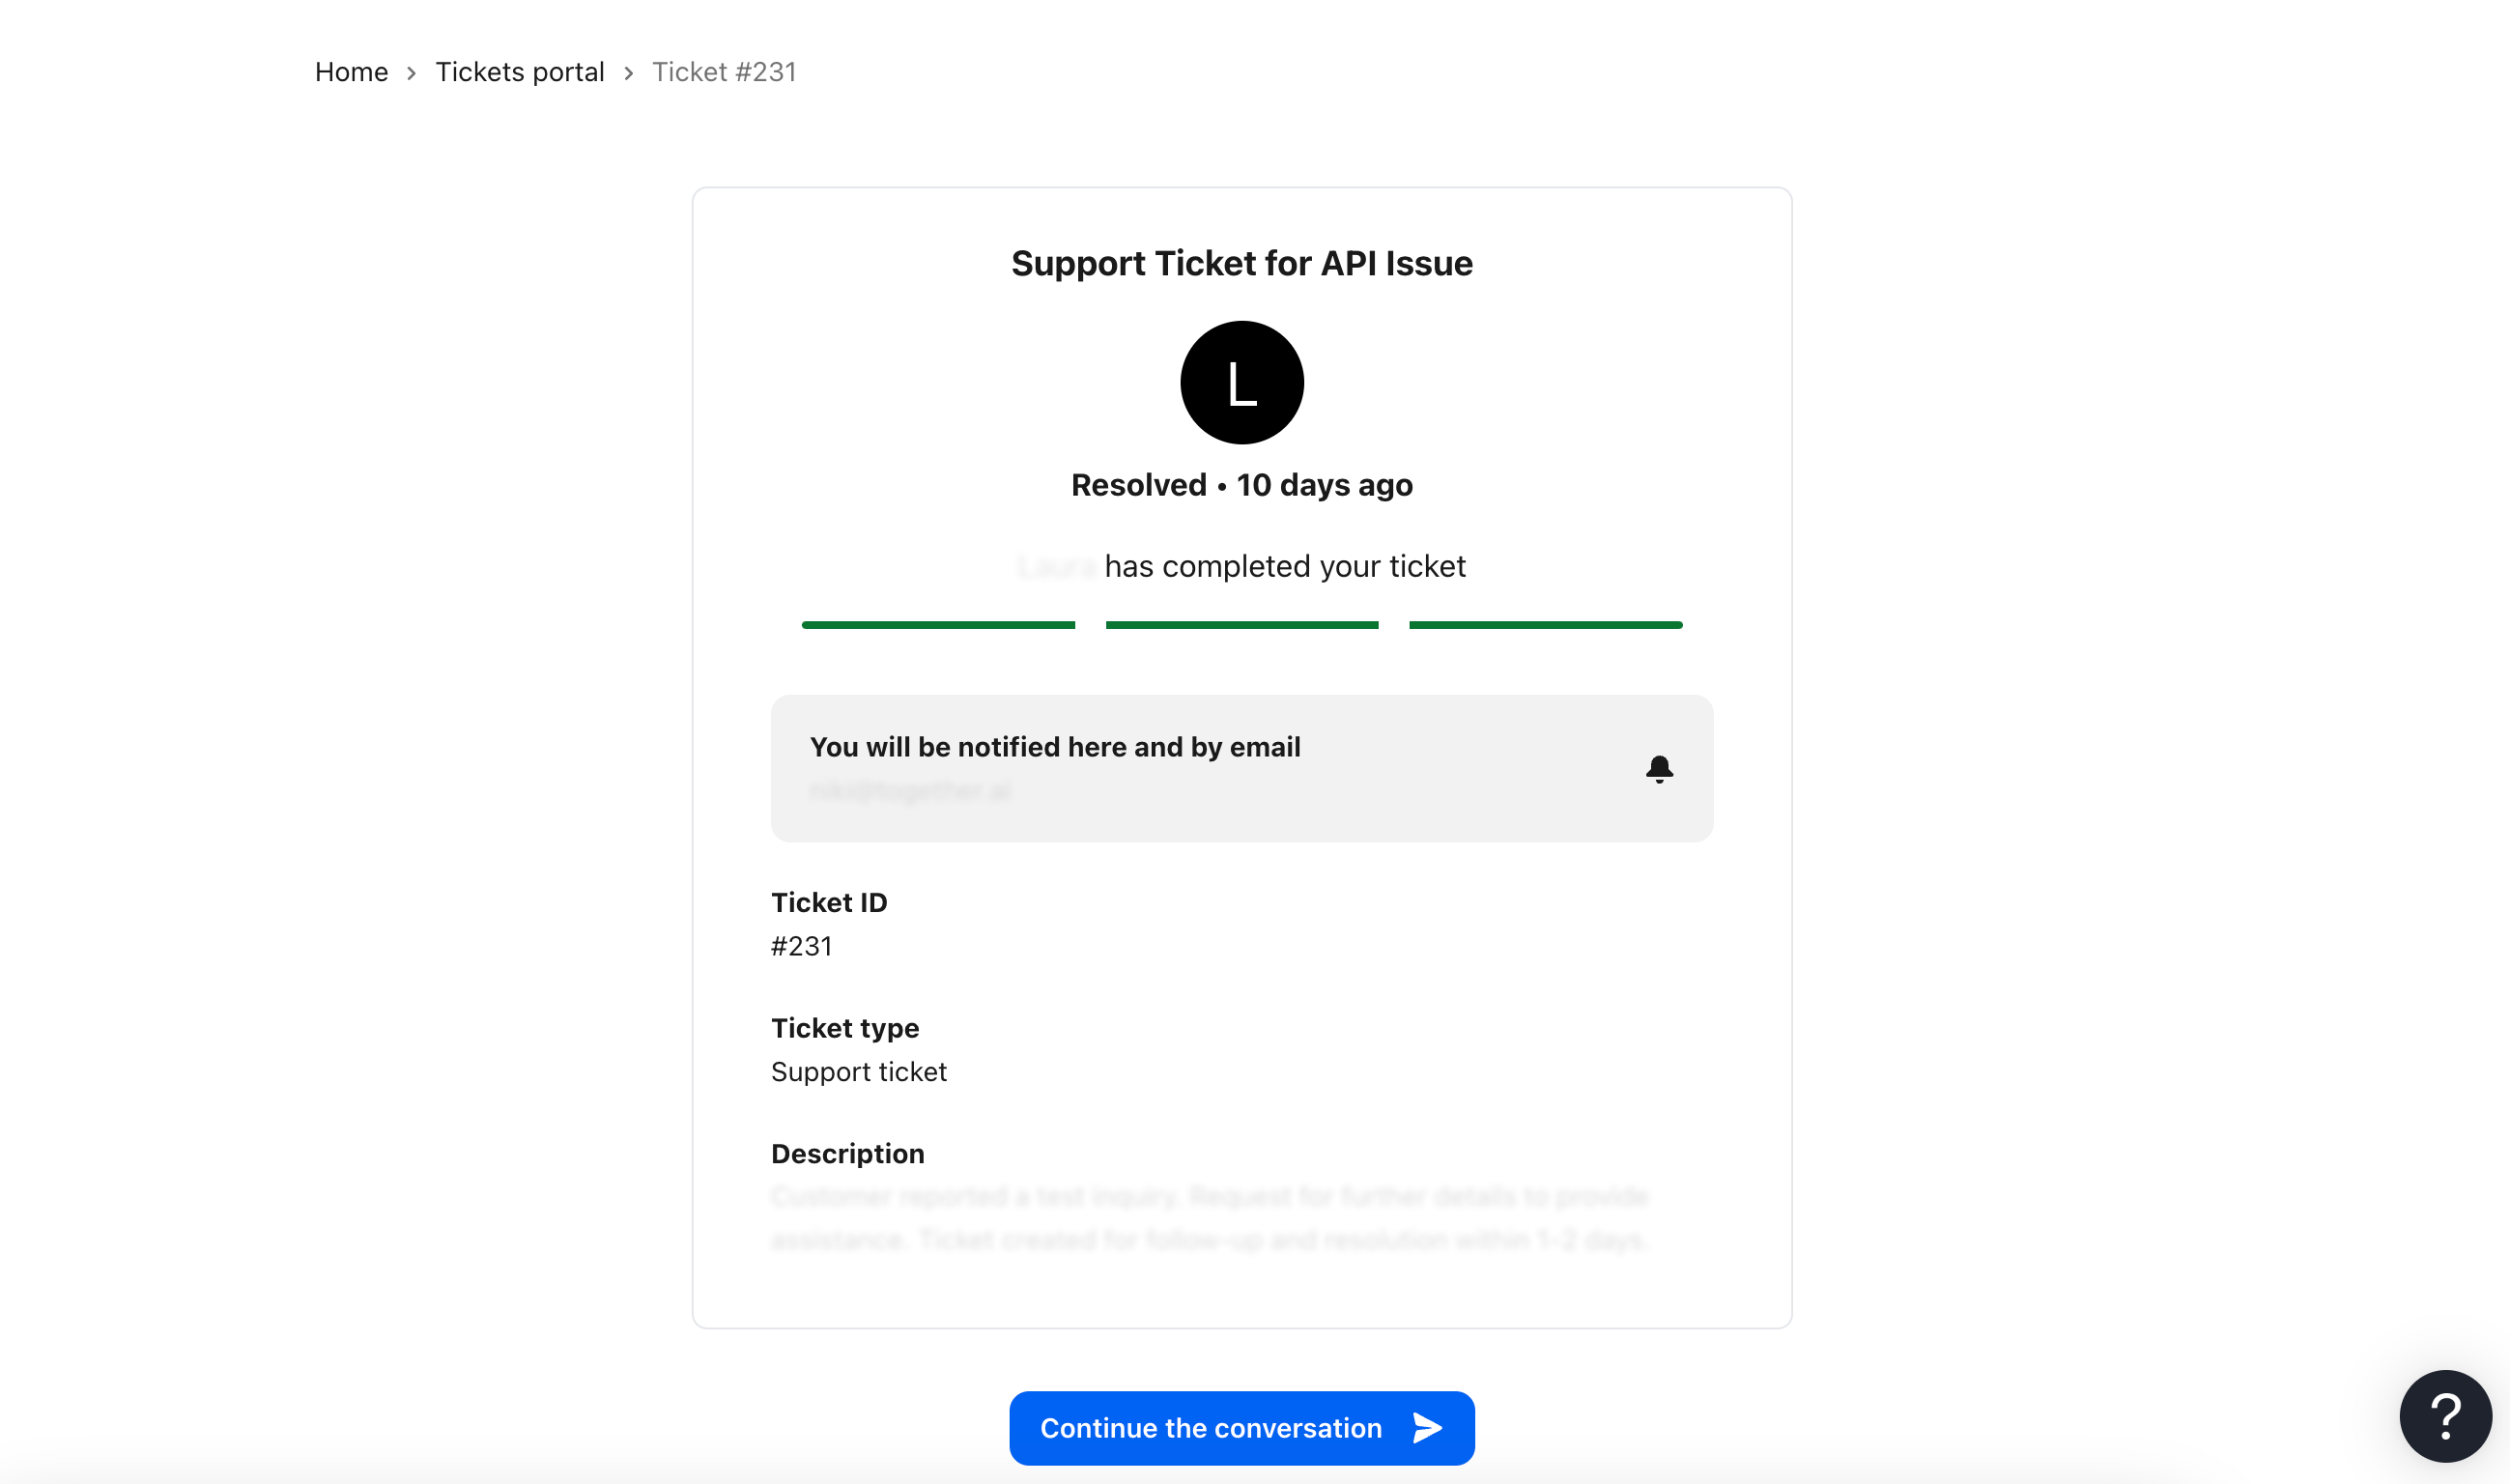 ## FAQs
### I can't find the ticket portal in the help center, what should I do?
1. Ensure you are authenticated by visiting api.together.ai before navigating to the help center.
2. If the portal is still not visible, it might not be set up for you yet. Please contact us at [support@together.ai](mailto:support@together.ai). Please note that the portal is only available to customers of GPU clusters or monthly reserved dedicated endpoints.
### The ticket I filed is not showing up in the portal, what should I do?
1. It may take up to 5 minutes for your ticket to appear in the portal.
2. If the ticket is still not visible after 5 minutes, please contact us at [support@together.ai](mailto:support@together.ai), and we will investigate.
---
> To find navigation and other pages in this documentation, fetch the llms.txt file at: https://docs.together.ai/llms.txt
---
# Source: https://docs.together.ai/reference/tci-execute.md
# /tci/execute
> Executes the given code snippet and returns the output. Without a session_id, a new session will be created to run the code. If you do pass in a valid session_id, the code will be run in that session. This is useful for running multiple code snippets in the same environment, because dependencies and similar things are persisted
between calls to the same session.
## OpenAPI
````yaml POST /tci/execute
openapi: 3.1.0
info:
title: Together APIs
description: The Together REST API. Please see https://docs.together.ai for more details.
version: 2.0.0
termsOfService: https://www.together.ai/terms-of-service
contact:
name: Together Support
url: https://www.together.ai/contact
license:
name: MIT
url: https://github.com/togethercomputer/openapi/blob/main/LICENSE
servers:
- url: https://api.together.xyz/v1
security:
- bearerAuth: []
paths:
/tci/execute:
post:
tags:
- Code Interpreter
description: >
Executes the given code snippet and returns the output. Without a
session_id, a new session will be created to run the code. If you do
pass in a valid session_id, the code will be run in that session. This
is useful for running multiple code snippets in the same environment,
because dependencies and similar things are persisted
between calls to the same session.
operationId: tci/execute
parameters: []
requestBody:
content:
application/json:
schema:
$ref: '#/components/schemas/ExecuteRequest'
description: Execute Request
required: false
responses:
'200':
content:
application/json:
schema:
$ref: '#/components/schemas/ExecuteResponse'
description: Execute Response
callbacks: {}
components:
schemas:
ExecuteRequest:
title: ExecuteRequest
required:
- language
- code
properties:
code:
description: Code snippet to execute.
example: print('Hello, world!')
type: string
files:
description: >-
Files to upload to the session. If present, files will be uploaded
before executing the given code.
items:
properties:
content:
type: string
encoding:
description: >-
Encoding of the file content. Use `string` for text files such
as code, and `base64` for binary files, such as images.
enum:
- string
- base64
type: string
name:
type: string
required:
- name
- encoding
- content
type: object
type: array
language:
default: python
description: >-
Programming language for the code to execute. Currently only
supports Python, but more will be added.
enum:
- python
session_id:
description: >-
Identifier of the current session. Used to make follow-up calls.
Requests will return an error if the session does not belong to the
caller or has expired.
example: ses_abcDEF123
nullable: false
type: string
ExecuteResponse:
title: ExecuteResponse
type: object
description: >-
The result of the execution. If successful, `data` contains the result
and `errors` will be null. If unsuccessful, `data` will be null and
`errors` will contain the errors.
oneOf:
- title: SuccessfulExecution
type: object
required:
- data
- errors
properties:
errors:
type: 'null'
data:
type: object
nullable: false
required:
- session_id
- outputs
properties:
outputs:
type: array
items:
discriminator:
propertyName: type
oneOf:
- title: StreamOutput
description: Outputs that were printed to stdout or stderr
type: object
required:
- type
- data
properties:
type:
enum:
- stdout
- stderr
type: string
data:
type: string
- title: ErrorOutput
description: >-
Errors and exceptions that occurred. If this output
type is present, your code did not execute
successfully.
properties:
data:
type: string
type:
enum:
- error
type: string
required:
- type
- data
- properties:
data:
properties:
application/geo+json:
type: object
additionalProperties: true
application/javascript:
type: string
application/json:
type: object
additionalProperties: true
application/pdf:
format: byte
type: string
application/vnd.vega.v5+json:
type: object
additionalProperties: true
application/vnd.vegalite.v4+json:
type: object
additionalProperties: true
image/gif:
format: byte
type: string
image/jpeg:
format: byte
type: string
image/png:
format: byte
type: string
image/svg+xml:
type: string
text/html:
type: string
text/latex:
type: string
text/markdown:
type: string
text/plain:
type: string
type: object
type:
enum:
- display_data
- execute_result
type: string
required:
- type
- data
title: DisplayorExecuteOutput
title: InterpreterOutput
session_id:
type: string
description: >-
Identifier of the current session. Used to make follow-up
calls.
example: ses_abcDEF123
nullable: false
status:
type: string
enum:
- success
description: Status of the execution. Currently only supports success.
- title: FailedExecution
type: object
required:
- data
- errors
properties:
data:
type: 'null'
errors:
type: array
items:
oneOf:
- type: string
- type: object
additionalProperties: true
title: Error
securitySchemes:
bearerAuth:
type: http
scheme: bearer
x-bearer-format: bearer
x-default: default
````
---
> To find navigation and other pages in this documentation, fetch the llms.txt file at: https://docs.together.ai/llms.txt
---
# Source: https://docs.together.ai/reference/tci-sessions.md
# /tci/sessions
> Lists all your currently active sessions.
## OpenAPI
````yaml GET /tci/sessions
openapi: 3.1.0
info:
title: Together APIs
description: The Together REST API. Please see https://docs.together.ai for more details.
version: 2.0.0
termsOfService: https://www.together.ai/terms-of-service
contact:
name: Together Support
url: https://www.together.ai/contact
license:
name: MIT
url: https://github.com/togethercomputer/openapi/blob/main/LICENSE
servers:
- url: https://api.together.xyz/v1
security:
- bearerAuth: []
paths:
/tci/sessions:
get:
tags:
- Code Interpreter
description: |
Lists all your currently active sessions.
operationId: sessions/list
parameters: []
responses:
'200':
content:
application/json:
schema:
$ref: '#/components/schemas/SessionListResponse'
description: List Response
callbacks: {}
components:
schemas:
SessionListResponse:
allOf:
- properties:
errors:
type: array
items:
oneOf:
- type: string
- type: object
additionalProperties: true
title: Error
title: Response
type: object
- properties:
data:
properties:
sessions:
items:
properties:
execute_count:
type: integer
expires_at:
type: string
format: date-time
id:
description: Session Identifier. Used to make follow-up calls.
example: ses_abcDEF123
type: string
last_execute_at:
type: string
format: date-time
started_at:
type: string
format: date-time
required:
- execute_count
- expires_at
- id
- last_execute_at
- started_at
type: object
type: array
required:
- sessions
type: object
title: SessionListResponse
type: object
securitySchemes:
bearerAuth:
type: http
scheme: bearer
x-bearer-format: bearer
x-default: default
````
---
> To find navigation and other pages in this documentation, fetch the llms.txt file at: https://docs.together.ai/llms.txt
---
# Source: https://docs.together.ai/docs/text-to-speech.md
> Learn how to use the text-to-speech functionality supported by Together AI.
# Text-to-Speech
Together AI provides comprehensive text-to-speech capabilities with multiple models and delivery methods. This guide covers everything from basic audio generation to real-time streaming via WebSockets.
## Quick Start
Here's how to get started with basic text-to-speech:
## FAQs
### I can't find the ticket portal in the help center, what should I do?
1. Ensure you are authenticated by visiting api.together.ai before navigating to the help center.
2. If the portal is still not visible, it might not be set up for you yet. Please contact us at [support@together.ai](mailto:support@together.ai). Please note that the portal is only available to customers of GPU clusters or monthly reserved dedicated endpoints.
### The ticket I filed is not showing up in the portal, what should I do?
1. It may take up to 5 minutes for your ticket to appear in the portal.
2. If the ticket is still not visible after 5 minutes, please contact us at [support@together.ai](mailto:support@together.ai), and we will investigate.
---
> To find navigation and other pages in this documentation, fetch the llms.txt file at: https://docs.together.ai/llms.txt
---
# Source: https://docs.together.ai/reference/tci-execute.md
# /tci/execute
> Executes the given code snippet and returns the output. Without a session_id, a new session will be created to run the code. If you do pass in a valid session_id, the code will be run in that session. This is useful for running multiple code snippets in the same environment, because dependencies and similar things are persisted
between calls to the same session.
## OpenAPI
````yaml POST /tci/execute
openapi: 3.1.0
info:
title: Together APIs
description: The Together REST API. Please see https://docs.together.ai for more details.
version: 2.0.0
termsOfService: https://www.together.ai/terms-of-service
contact:
name: Together Support
url: https://www.together.ai/contact
license:
name: MIT
url: https://github.com/togethercomputer/openapi/blob/main/LICENSE
servers:
- url: https://api.together.xyz/v1
security:
- bearerAuth: []
paths:
/tci/execute:
post:
tags:
- Code Interpreter
description: >
Executes the given code snippet and returns the output. Without a
session_id, a new session will be created to run the code. If you do
pass in a valid session_id, the code will be run in that session. This
is useful for running multiple code snippets in the same environment,
because dependencies and similar things are persisted
between calls to the same session.
operationId: tci/execute
parameters: []
requestBody:
content:
application/json:
schema:
$ref: '#/components/schemas/ExecuteRequest'
description: Execute Request
required: false
responses:
'200':
content:
application/json:
schema:
$ref: '#/components/schemas/ExecuteResponse'
description: Execute Response
callbacks: {}
components:
schemas:
ExecuteRequest:
title: ExecuteRequest
required:
- language
- code
properties:
code:
description: Code snippet to execute.
example: print('Hello, world!')
type: string
files:
description: >-
Files to upload to the session. If present, files will be uploaded
before executing the given code.
items:
properties:
content:
type: string
encoding:
description: >-
Encoding of the file content. Use `string` for text files such
as code, and `base64` for binary files, such as images.
enum:
- string
- base64
type: string
name:
type: string
required:
- name
- encoding
- content
type: object
type: array
language:
default: python
description: >-
Programming language for the code to execute. Currently only
supports Python, but more will be added.
enum:
- python
session_id:
description: >-
Identifier of the current session. Used to make follow-up calls.
Requests will return an error if the session does not belong to the
caller or has expired.
example: ses_abcDEF123
nullable: false
type: string
ExecuteResponse:
title: ExecuteResponse
type: object
description: >-
The result of the execution. If successful, `data` contains the result
and `errors` will be null. If unsuccessful, `data` will be null and
`errors` will contain the errors.
oneOf:
- title: SuccessfulExecution
type: object
required:
- data
- errors
properties:
errors:
type: 'null'
data:
type: object
nullable: false
required:
- session_id
- outputs
properties:
outputs:
type: array
items:
discriminator:
propertyName: type
oneOf:
- title: StreamOutput
description: Outputs that were printed to stdout or stderr
type: object
required:
- type
- data
properties:
type:
enum:
- stdout
- stderr
type: string
data:
type: string
- title: ErrorOutput
description: >-
Errors and exceptions that occurred. If this output
type is present, your code did not execute
successfully.
properties:
data:
type: string
type:
enum:
- error
type: string
required:
- type
- data
- properties:
data:
properties:
application/geo+json:
type: object
additionalProperties: true
application/javascript:
type: string
application/json:
type: object
additionalProperties: true
application/pdf:
format: byte
type: string
application/vnd.vega.v5+json:
type: object
additionalProperties: true
application/vnd.vegalite.v4+json:
type: object
additionalProperties: true
image/gif:
format: byte
type: string
image/jpeg:
format: byte
type: string
image/png:
format: byte
type: string
image/svg+xml:
type: string
text/html:
type: string
text/latex:
type: string
text/markdown:
type: string
text/plain:
type: string
type: object
type:
enum:
- display_data
- execute_result
type: string
required:
- type
- data
title: DisplayorExecuteOutput
title: InterpreterOutput
session_id:
type: string
description: >-
Identifier of the current session. Used to make follow-up
calls.
example: ses_abcDEF123
nullable: false
status:
type: string
enum:
- success
description: Status of the execution. Currently only supports success.
- title: FailedExecution
type: object
required:
- data
- errors
properties:
data:
type: 'null'
errors:
type: array
items:
oneOf:
- type: string
- type: object
additionalProperties: true
title: Error
securitySchemes:
bearerAuth:
type: http
scheme: bearer
x-bearer-format: bearer
x-default: default
````
---
> To find navigation and other pages in this documentation, fetch the llms.txt file at: https://docs.together.ai/llms.txt
---
# Source: https://docs.together.ai/reference/tci-sessions.md
# /tci/sessions
> Lists all your currently active sessions.
## OpenAPI
````yaml GET /tci/sessions
openapi: 3.1.0
info:
title: Together APIs
description: The Together REST API. Please see https://docs.together.ai for more details.
version: 2.0.0
termsOfService: https://www.together.ai/terms-of-service
contact:
name: Together Support
url: https://www.together.ai/contact
license:
name: MIT
url: https://github.com/togethercomputer/openapi/blob/main/LICENSE
servers:
- url: https://api.together.xyz/v1
security:
- bearerAuth: []
paths:
/tci/sessions:
get:
tags:
- Code Interpreter
description: |
Lists all your currently active sessions.
operationId: sessions/list
parameters: []
responses:
'200':
content:
application/json:
schema:
$ref: '#/components/schemas/SessionListResponse'
description: List Response
callbacks: {}
components:
schemas:
SessionListResponse:
allOf:
- properties:
errors:
type: array
items:
oneOf:
- type: string
- type: object
additionalProperties: true
title: Error
title: Response
type: object
- properties:
data:
properties:
sessions:
items:
properties:
execute_count:
type: integer
expires_at:
type: string
format: date-time
id:
description: Session Identifier. Used to make follow-up calls.
example: ses_abcDEF123
type: string
last_execute_at:
type: string
format: date-time
started_at:
type: string
format: date-time
required:
- execute_count
- expires_at
- id
- last_execute_at
- started_at
type: object
type: array
required:
- sessions
type: object
title: SessionListResponse
type: object
securitySchemes:
bearerAuth:
type: http
scheme: bearer
x-bearer-format: bearer
x-default: default
````
---
> To find navigation and other pages in this documentation, fetch the llms.txt file at: https://docs.together.ai/llms.txt
---
# Source: https://docs.together.ai/docs/text-to-speech.md
> Learn how to use the text-to-speech functionality supported by Together AI.
# Text-to-Speech
Together AI provides comprehensive text-to-speech capabilities with multiple models and delivery methods. This guide covers everything from basic audio generation to real-time streaming via WebSockets.
## Quick Start
Here's how to get started with basic text-to-speech:
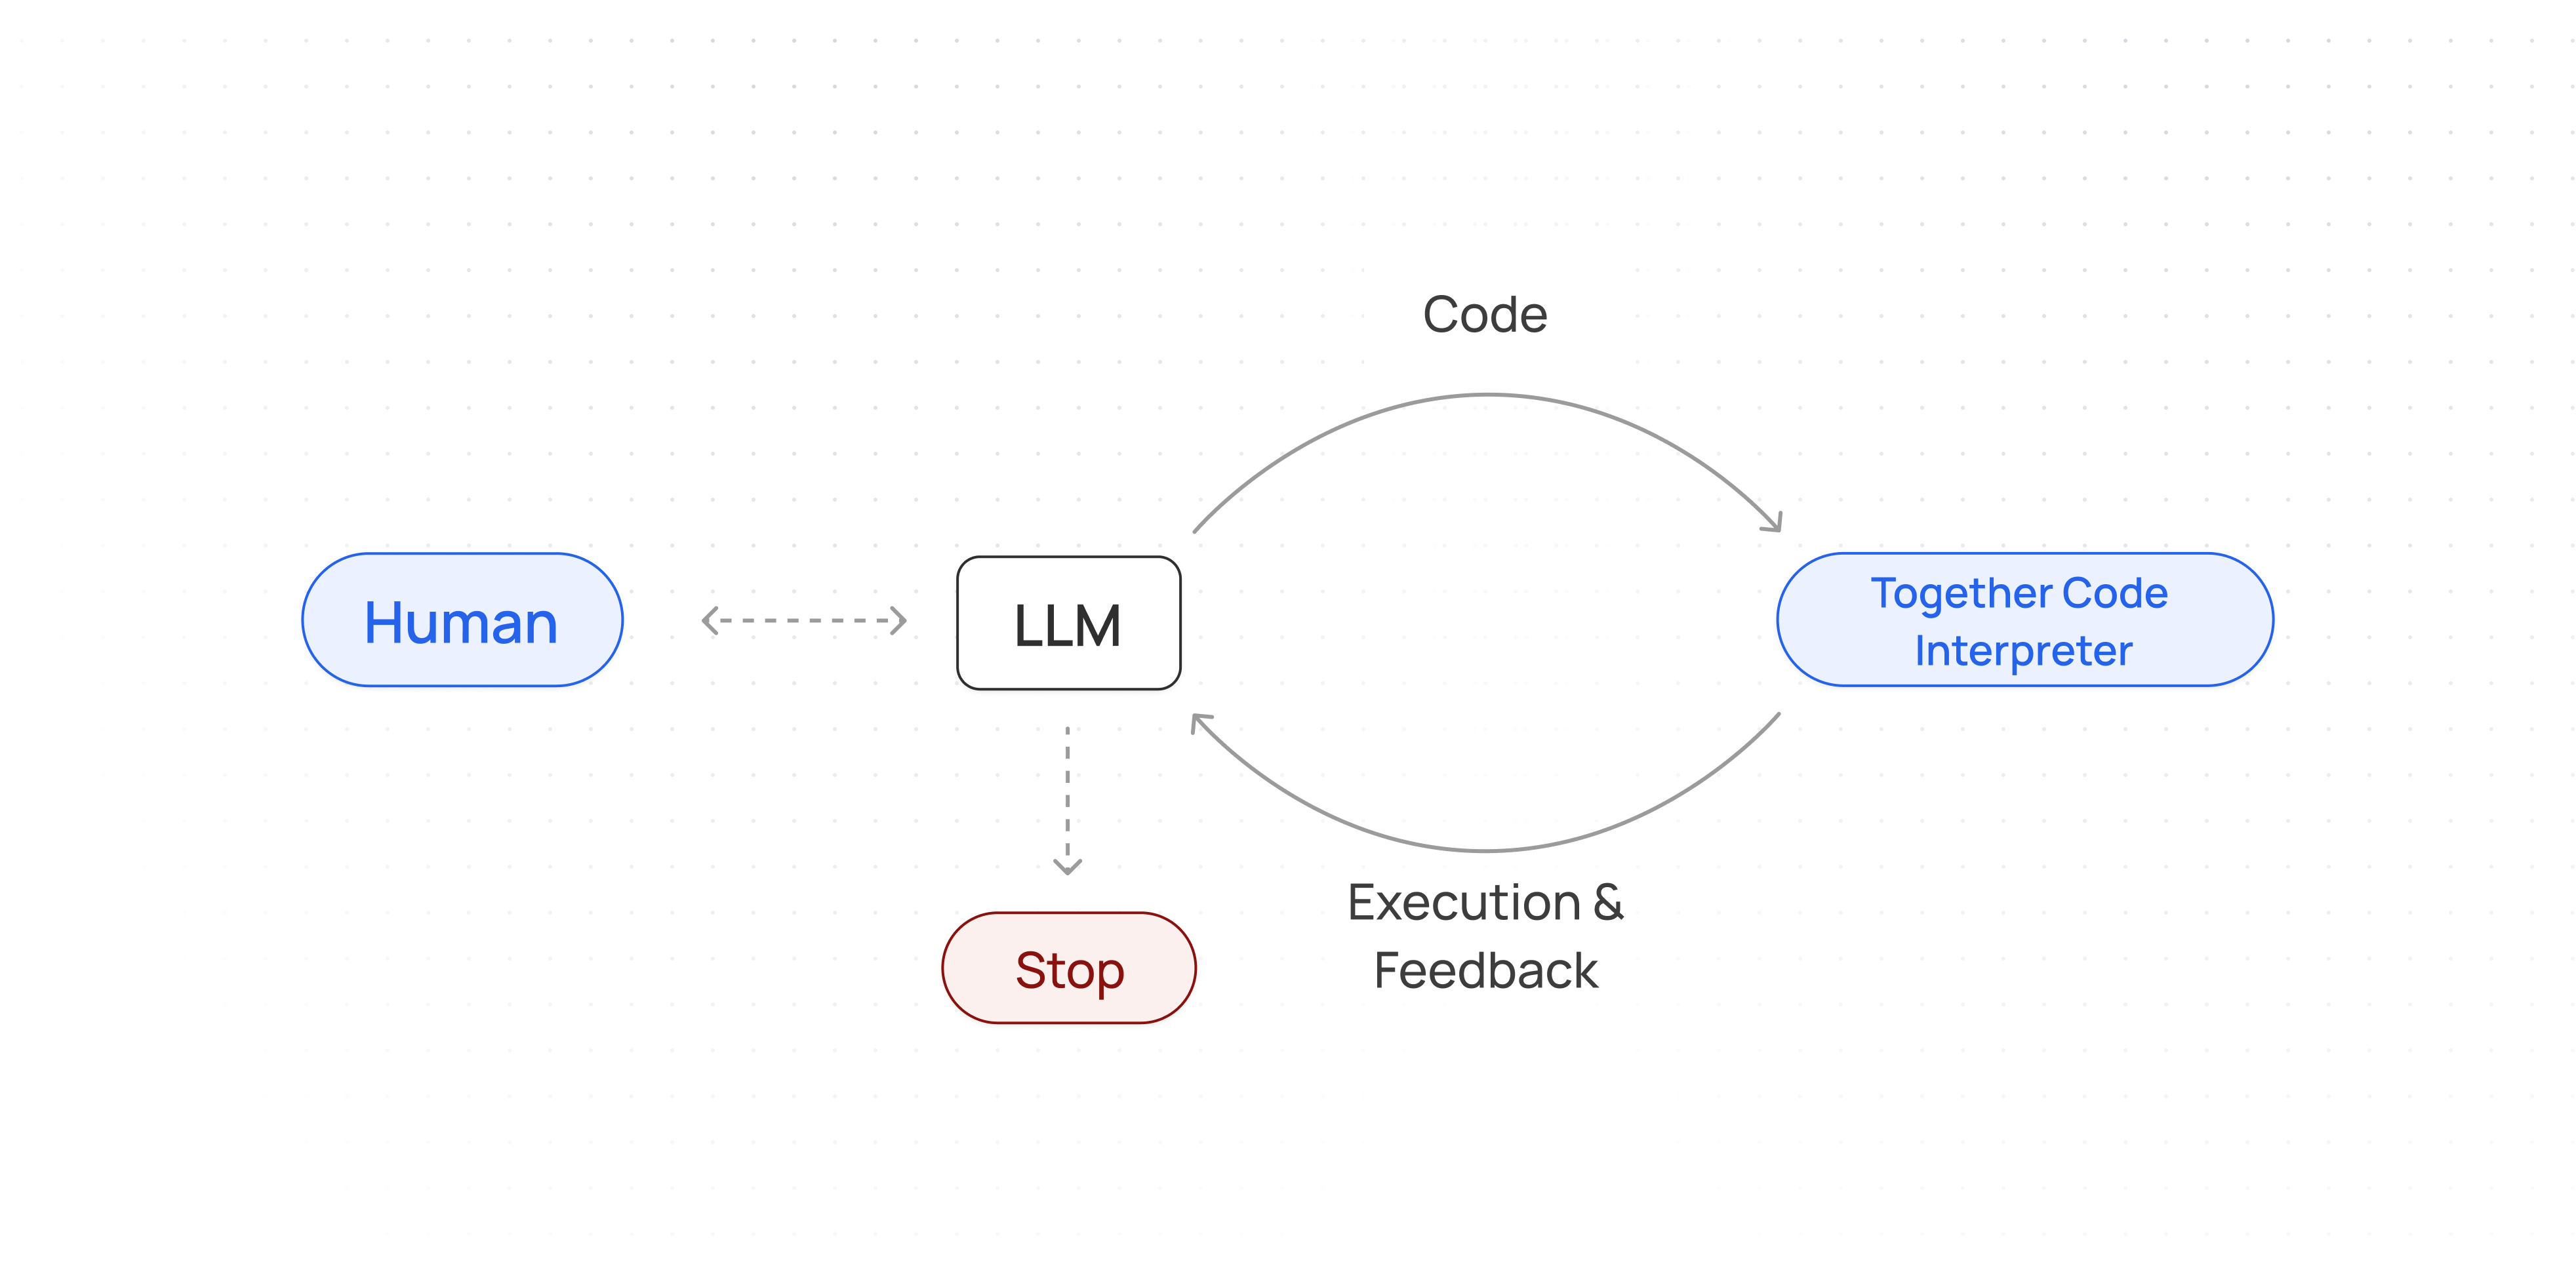 * **Reinforcement learning (RL) training**: TCI transforms code execution into an interactive RL environment where generated code is run and evaluated in real time, providing reward signals from successes or failures, integrating automated pass/fail tests, and scaling easily across parallel workers—thus creating a powerful feedback loop that refines coding models over many trials.
* **Developing agentic workflows**: TCI allows AI agents to seamlessly write and execute Python code, enabling robust, iterative, and secure computations within a closed-loop system.
## Response Format
The API returns:
* `session_id`: Identifier for the current session
* `outputs`: Array of execution outputs, which can include:
* Execution output (the return value of your snippet)
* Standard output (`stdout`)
* Standard error (`stderr`)
* Error messages
* Rich display data (images, HTML, etc.)
Example
```json JSON theme={null}
{
"data": {
"outputs": [
{
"data": "Hello, world!\n",
"type": "stdout"
},
{
"data": {
"image/png": "iVBORw0KGgoAAAANSUhEUgAAA...",
"text/plain": "
* **Reinforcement learning (RL) training**: TCI transforms code execution into an interactive RL environment where generated code is run and evaluated in real time, providing reward signals from successes or failures, integrating automated pass/fail tests, and scaling easily across parallel workers—thus creating a powerful feedback loop that refines coding models over many trials.
* **Developing agentic workflows**: TCI allows AI agents to seamlessly write and execute Python code, enabling robust, iterative, and secure computations within a closed-loop system.
## Response Format
The API returns:
* `session_id`: Identifier for the current session
* `outputs`: Array of execution outputs, which can include:
* Execution output (the return value of your snippet)
* Standard output (`stdout`)
* Standard error (`stderr`)
* Error messages
* Rich display data (images, HTML, etc.)
Example
```json JSON theme={null}
{
"data": {
"outputs": [
{
"data": "Hello, world!\n",
"type": "stdout"
},
{
"data": {
"image/png": "iVBORw0KGgoAAAANSUhEUgAAA...",
"text/plain": "## Sandbox life-cycle By default a Sandbox will be created from a template. A template is a memory/fs snapshot of a Sandbox, meaning it will be a direct continuation of the template. If the template was running a dev server, that dev server is running when the Sandbox is created. When you create, resume or restart a Sandbox you can access its `bootupType`. This value indicates how the Sandbox was started. **FORK**: The Sandbox was created from a template. This happens when you call `create` successfully.\ **RUNNING**: The Sandbox was already running. This happens when you call `resume` and the Sandbox was already running.\ **RESUME**: The Sandbox was resumed from hibernation. This happens when you call `resume` and the Sandbox was hibernated.\ **CLEAN**: The Sandbox was created or resumed from scratch. This happens when you call `create` or `resume` and the Sandbox was not running and was missing a snapshot. This can happen if the Sandbox was shut down, restarted, the snapshot was expired (old snapshot) or if something went wrong. ## Managing CLEAN bootups Whenever we boot a sandbox from scratch, we'll: 1. Start the Firecracker VM 2. Create a default user (called pitcher-host) 3. (optional) Build the Docker image specified in the .devcontainer/devcontainer.json file 4. Start the Docker container 5. Mount the /project/sandbox directory as a volume inside the Docker container You will be able to connect to the Sandbox during this process and track its progress. ```javascript JavaScript theme={null} const sandbox = await sdk.sandboxes.create() const setupSteps = sandbox.setup.getSteps() for (const step of setupSteps) { console.log(`Step: ${step.name}`); console.log(`Command: ${step.command}`); console.log(`Status: ${step.status}`); const output = await step.open() output.onOutput((output) => { console.log(output) }) await step.waitUntilComplete() } ```
## Using templates Code Sandbox has default templates that you can use to create sandboxes. These templates are available in the Template Library and by default we use the "Universal" template. To create your own template you will need to use our CLI. ## Creating the template Create a new folder in your project and add the files you want to have available inside your Sandbox. For example set up a Vite project: ```text Text theme={null} npx create-vite@latest my-template ``` Now we need to configure the template with tasks so that it will install dependencies and start the dev server. Create a my-template/.codesandbox/tasks.json file with the following content: ```json JSON theme={null} { "setupTasks": [ "npm install" ], "tasks": { "dev-server": { "name": "Dev Server", "command": "npm run dev", "runAtStart": true } } } ``` The `setupTasks` will run after the Sandbox has started, before any other tasks. Now we are ready to deploy the template to our clusters, run: ```text Text theme={null} $ CSB_API_KEY=your-api-key npx @codesandbox/sdk build ./my-template --ports 5173 ```
## Connecting Sandboxes in the browser In addition to running your Sandbox in the server, you can also connect it to the browser. This requires some collaboration with the server. ```javascript JavaScript theme={null} app.post('/api/sandboxes', async (req, res) => { const sandbox = await sdk.sandboxes.create(); const session = await sandbox.createBrowserSession({ // Create isolated sessions by using a unique reference to the user id: req.session.username, }); res.json(session) }) app.get('/api/sandboxes/:sandboxId', async (req, res) => { const sandbox = await sdk.sandboxes.resume(req.params.sandboxId); const session = await sandbox.createBrowserSession({ // Resume any existing session by using the same user reference id: req.session.username, }); res.json(session) }) ``` Then in the browser: ```javascript JavaScript theme={null} import { connectToSandbox } from '@codesandbox/sdk/browser'; const sandbox = await connectToSandbox({ // The session object you either passed on page load or fetched from the server session: initialSessionFromServer, // When reconnecting to the sandbox, fetch the session from the server getSession: (id) => fetchJson(`/api/sandboxes/${id}`) }); await sandbox.fs.writeTextFile('test.txt', 'Hello World'); ``` The browser session automatically manages the connection and will reconnect if the connection is lost. This is controlled by an option called `onFocusChange` and by default it will reconnect when the page is visible. ```javascript JavaScript theme={null} const sandbox = await connectToSandbox({ session: initialSessionFromServer, getSession: (id) => fetchJson(`/api/sandboxes/${id}`), onFocusChange: (notify) => { const onVisibilityChange = () => { notify(document.visibilityState === 'visible'); } document.addEventListener('visibilitychange', onVisibilityChange); return () => { document.removeEventListener('visibilitychange', onVisibilityChange); } } }); ``` If you tell the browser session when it is in focus it will automatically reconnect when hibernated. Unless you explicitly disconnect the session. While the `connectToSandbox` promise is resolving you can also listen to initialization events to show a loading state: ```javascript JavaScript theme={null} const sandbox = await connectToSandbox({ session: initialSessionFromServer, getSession: (id) => fetchJson(`/api/sandboxes/${id}`), onInitCb: (event) => {} }); ``` ## Disconnecting the Sandbox Disconnecting the session will end the session and automatically hibernate the sandbox after a timeout. You can also hibernate the sandbox explicitly from the server. ```javascript JavaScript theme={null} import { connectToSandbox } from '@codesandbox/sdk/browser' const sandbox = await connectToSandbox({ session: initialSessionFromServer, getSession: (id) => fetchJson(`/api/sandboxes/${id}`), }) // Disconnect returns a promise that resolves when the session is disconnected sandbox.disconnect(); // Optionally hibernate the sandbox explicitly by creating an endpoint on your server fetch('/api/sandboxes/' + sandbox.id + '/hibernate', { method: 'POST' }) // You can reconnect explicitly from the browser by sandbox.reconnect() ```
## Pricing The self-serve option for running Code Sandbox is priced according to the CodeSandbox SDK plans which follows two main pricing components: VM credits: Credits serve as the unit of measurement for VM runtime. One credit equates to a specific amount of resources used per hour, depending on the specs of the VM you are using. VM credits follow a pay-as-you-go approach and are priced at \$0.01486 per credit. Learn more about credits here. VM concurrency: This defines the maximum number of VMs you can run simultaneously with the SDK. As explored below, each CodeSandbox plan has a different VM concurrency limit.
## VM credit prices by VM size Below is a summary of how many VM credits are used per hour of runtime in each of our available VM sizes. Note that, by default, we recommend using the Nano VM size, as it should provide enough resources for most simple workflows (Pico is mostly suitable for very simple code execution jobs) . | VM size | Credits / hour | Cost / hour | CPU | RAM | | :------ | :------------- | :---------- | :------- | :----- | | Pico | 5 credits | \$0.0743 | 2 cores | 1 GB | | Nano | 10 credits | \$0.1486 | 2 cores | 4 GB | | Micro | 20 credits | \$0.2972 | 4 cores | 8 GB | | Small | 40 credits | \$0.5944 | 8 cores | 16 GB | | Medium | 80 credits | \$1.1888 | 16 cores | 32 GB | | Large | 160 credits | \$2.3776 | 32 cores | 64 GB | | XLarge | 320 credits | \$4.7552 | 64 cores | 128 GB |
### Concurrent VMs To pick the most suitable plan for your use case, consider how many concurrent VMs you require and pick the corresponding plan: * Build (free) plan: 10 concurrent VMs * Scale plan: 250 concurrent VMs * Enterprise plan: custom concurrent VMs In case you expect a a high volume of VM runtime, our Enterprise plan also provides special discounts on VM credits.
## Further reading Learn more about Sandbox configurations and features on the [CodeSandbox SDK documentation page](https://codesandbox.io/docs/sdk/sandboxes) --- > To find navigation and other pages in this documentation, fetch the llms.txt file at: https://docs.together.ai/llms.txt --- # Source: https://docs.together.ai/reference/updateendpoint.md # Update, Start or Stop Endpoint > Updates an existing endpoint's configuration. You can modify the display name, autoscaling settings, or change the endpoint's state (start/stop). ## OpenAPI ````yaml PATCH /endpoints/{endpointId} openapi: 3.1.0 info: title: Together APIs description: The Together REST API. Please see https://docs.together.ai for more details. version: 2.0.0 termsOfService: https://www.together.ai/terms-of-service contact: name: Together Support url: https://www.together.ai/contact license: name: MIT url: https://github.com/togethercomputer/openapi/blob/main/LICENSE servers: - url: https://api.together.xyz/v1 security: - bearerAuth: [] paths: /endpoints/{endpointId}: patch: tags: - Endpoints summary: >- Update endpoint, this can also be used to start or stop a dedicated endpoint description: >- Updates an existing endpoint's configuration. You can modify the display name, autoscaling settings, or change the endpoint's state (start/stop). operationId: updateEndpoint parameters: - name: endpointId in: path required: true schema: type: string description: The ID of the endpoint to update example: endpoint-d23901de-ef8f-44bf-b3e7-de9c1ca8f2d7 requestBody: required: true content: application/json: schema: type: object properties: display_name: type: string description: A human-readable name for the endpoint example: My Llama3 70b endpoint state: type: string description: The desired state of the endpoint enum: - STARTED - STOPPED example: STARTED autoscaling: $ref: '#/components/schemas/Autoscaling' description: New autoscaling configuration for the endpoint inactive_timeout: type: integer description: >- The number of minutes of inactivity after which the endpoint will be automatically stopped. Set to 0 to disable automatic timeout. nullable: true example: 60 responses: '200': description: '200' content: application/json: schema: $ref: '#/components/schemas/DedicatedEndpoint' '403': description: Unauthorized content: application/json: schema: $ref: '#/components/schemas/ErrorData' '404': description: Not Found content: application/json: schema: $ref: '#/components/schemas/ErrorData' '500': description: Internal error content: application/json: schema: $ref: '#/components/schemas/ErrorData' components: schemas: Autoscaling: type: object description: Configuration for automatic scaling of replicas based on demand. required: - min_replicas - max_replicas properties: min_replicas: type: integer format: int32 description: >- The minimum number of replicas to maintain, even when there is no load examples: - 2 max_replicas: type: integer format: int32 description: The maximum number of replicas to scale up to under load examples: - 5 DedicatedEndpoint: type: object description: Details about a dedicated endpoint deployment required: - object - id - name - display_name - model - hardware - type - owner - state - autoscaling - created_at properties: object: type: string enum: - endpoint description: The type of object example: endpoint id: type: string description: Unique identifier for the endpoint example: endpoint-d23901de-ef8f-44bf-b3e7-de9c1ca8f2d7 name: type: string description: System name for the endpoint example: devuser/meta-llama/Llama-3-8b-chat-hf-a32b82a1 display_name: type: string description: Human-readable name for the endpoint example: My Llama3 70b endpoint model: type: string description: The model deployed on this endpoint example: meta-llama/Llama-3-8b-chat-hf hardware: type: string description: The hardware configuration used for this endpoint example: 1x_nvidia_a100_80gb_sxm type: type: string enum: - dedicated description: The type of endpoint example: dedicated owner: type: string description: The owner of this endpoint example: devuser state: type: string enum: - PENDING - STARTING - STARTED - STOPPING - STOPPED - ERROR description: Current state of the endpoint example: STARTED autoscaling: $ref: '#/components/schemas/Autoscaling' description: Configuration for automatic scaling of the endpoint created_at: type: string format: date-time description: Timestamp when the endpoint was created example: '2025-02-04T10:43:55.405Z' ErrorData: type: object required: - error properties: error: type: object properties: message: type: string nullable: false type: type: string nullable: false param: type: string nullable: true default: null code: type: string nullable: true default: null required: - type - message securitySchemes: bearerAuth: type: http scheme: bearer x-bearer-format: bearer x-default: default ```` --- > To find navigation and other pages in this documentation, fetch the llms.txt file at: https://docs.together.ai/llms.txt --- # Source: https://docs.together.ai/reference/upload-file.md # Upload a file > Upload a file with specified purpose, file name, and file type. ## OpenAPI ````yaml POST /files/upload openapi: 3.1.0 info: title: Together APIs description: The Together REST API. Please see https://docs.together.ai for more details. version: 2.0.0 termsOfService: https://www.together.ai/terms-of-service contact: name: Together Support url: https://www.together.ai/contact license: name: MIT url: https://github.com/togethercomputer/openapi/blob/main/LICENSE servers: - url: https://api.together.xyz/v1 security: - bearerAuth: [] paths: /files/upload: post: tags: - Files summary: Upload a file description: Upload a file with specified purpose, file name, and file type. requestBody: required: true content: multipart/form-data: schema: type: object required: - purpose - file_name - file properties: purpose: $ref: '#/components/schemas/FilePurpose' file_name: type: string description: The name of the file being uploaded example: dataset.csv file_type: $ref: '#/components/schemas/FileType' file: type: string format: binary description: The content of the file being uploaded responses: '200': description: File uploaded successfully content: application/json: schema: $ref: '#/components/schemas/FileResponse' '400': description: Bad Request content: application/json: schema: $ref: '#/components/schemas/ErrorData' '401': description: Unauthorized content: application/json: schema: $ref: '#/components/schemas/ErrorData' '500': description: Internal Server Error content: application/json: schema: $ref: '#/components/schemas/ErrorData' components: schemas: FilePurpose: type: string description: The purpose of the file example: fine-tune enum: - fine-tune - eval - eval-sample - eval-output - eval-summary - batch-generated - batch-api FileType: type: string description: The type of the file default: jsonl example: jsonl enum: - csv - jsonl - parquet FileResponse: type: object required: - id - object - created_at - filename - bytes - purpose - FileType - Processed - LineCount properties: id: type: string object: type: string example: file created_at: type: integer example: 1715021438 filename: type: string example: my_file.jsonl bytes: type: integer example: 2664 purpose: $ref: '#/components/schemas/FilePurpose' Processed: type: boolean FileType: $ref: '#/components/schemas/FileType' LineCount: type: integer ErrorData: type: object required: - error properties: error: type: object properties: message: type: string nullable: false type: type: string nullable: false param: type: string nullable: true default: null code: type: string nullable: true default: null required: - type - message securitySchemes: bearerAuth: type: http scheme: bearer x-bearer-format: bearer x-default: default ```` --- > To find navigation and other pages in this documentation, fetch the llms.txt file at: https://docs.together.ai/llms.txt --- # Source: https://docs.together.ai/reference/upload-model.md # Upload a custom model or adapter > Upload a custom model or adapter from Hugging Face or S3 ## OpenAPI ````yaml POST /models openapi: 3.1.0 info: title: Together APIs description: The Together REST API. Please see https://docs.together.ai for more details. version: 2.0.0 termsOfService: https://www.together.ai/terms-of-service contact: name: Together Support url: https://www.together.ai/contact license: name: MIT url: https://github.com/togethercomputer/openapi/blob/main/LICENSE servers: - url: https://api.together.xyz/v1 security: - bearerAuth: [] paths: /models: post: tags: - Models summary: Upload a custom model or adapter description: Upload a custom model or adapter from Hugging Face or S3 operationId: uploadModel requestBody: required: true content: application/json: schema: $ref: '#/components/schemas/ModelUploadRequest' responses: '200': description: Model / adapter upload job created successfully content: application/json: schema: $ref: '#/components/schemas/ModelUploadSuccessResponse' components: schemas: ModelUploadRequest: type: object required: - model_name - model_source properties: model_name: type: string description: The name to give to your uploaded model example: Qwen2.5-72B-Instruct model_source: type: string description: The source location of the model (Hugging Face repo or S3 path) example: unsloth/Qwen2.5-72B-Instruct model_type: type: string description: Whether the model is a full model or an adapter default: model enum: - model - adapter example: model hf_token: type: string description: Hugging Face token (if uploading from Hugging Face) example: hf_examplehuggingfacetoken description: type: string description: A description of your model example: Finetuned Qwen2.5-72B-Instruct by Unsloth base_model: type: string description: >- The base model to use for an adapter if setting it to run against a serverless pool. Only used for model_type `adapter`. example: Qwen/Qwen2.5-72B-Instruct lora_model: type: string description: >- The lora pool to use for an adapter if setting it to run against, say, a dedicated pool. Only used for model_type `adapter`. example: my_username/Qwen2.5-72B-Instruct-lora ModelUploadSuccessResponse: type: object required: - data - message properties: data: type: object required: - job_id - model_name - model_id - model_source properties: job_id: type: string example: job-a15dad11-8d8e-4007-97c5-a211304de284 model_name: type: string example: necolinehubner/Qwen2.5-72B-Instruct model_id: type: string example: model-c0e32dfc-637e-47b2-bf4e-e9b2e58c9da7 model_source: type: string example: huggingface message: type: string example: Processing model weights. Job created. securitySchemes: bearerAuth: type: http scheme: bearer x-bearer-format: bearer x-default: default ```` --- > To find navigation and other pages in this documentation, fetch the llms.txt file at: https://docs.together.ai/llms.txt --- # Source: https://docs.together.ai/docs/using-together-with-mastra.md # Quickstart: Using Mastra with Together AI > This guide will walk you through how to use Together models with Mastra. [Mastra](https://mastra.ai) is a framework for building and deploying AI-powered features using a modern JavaScript stack powered by the [Vercel AI SDK](/docs/ai-sdk). Integrating with Together AI provides access to a wide range of models for building intelligent agents. ## Getting started 1. ### Create a new Mastra project First, create a new Mastra project using the CLI: ```bash theme={null} pnpm dlx create-mastra@latest ``` During the setup, the system prompts you to name your project, choose a default provider, and more. Feel free to use the default settings. 2. ### Install dependencies To use Together AI with Mastra, install the required packages: