# Sonarcloud
> This language is available only in the Enterprise plan. See the [subscription-plans](https://docs.sonarsource.com/sonarqube-cloud/administering-sonarcloud/managing-subscription/subscription-plans "men
---
# Source: https://docs.sonarsource.com/sonarqube-server/8.9/analyzing-source-code/languages/abap.md
# Source: https://docs.sonarsource.com/sonarqube-server/9.8/analyzing-source-code/languages/abap.md
# Source: https://docs.sonarsource.com/sonarqube-server/9.9/analyzing-source-code/languages/abap.md
# Source: https://docs.sonarsource.com/sonarqube-server/10.0/analyzing-source-code/languages/abap.md
# Source: https://docs.sonarsource.com/sonarqube-server/10.1/analyzing-source-code/languages/abap.md
# Source: https://docs.sonarsource.com/sonarqube-server/10.2/analyzing-source-code/languages/abap.md
# Source: https://docs.sonarsource.com/sonarqube-server/10.3/analyzing-source-code/languages/abap.md
# Source: https://docs.sonarsource.com/sonarqube-server/10.4/analyzing-source-code/languages/abap.md
# Source: https://docs.sonarsource.com/sonarqube-server/10.5/analyzing-source-code/languages/abap.md
# Source: https://docs.sonarsource.com/sonarqube-server/10.6/analyzing-source-code/languages/abap.md
# Source: https://docs.sonarsource.com/sonarqube-server/10.7/analyzing-source-code/languages/abap.md
# Source: https://docs.sonarsource.com/sonarqube-server/10.8/analyzing-source-code/languages/abap.md
# Source: https://docs.sonarsource.com/sonarqube-server/2025.2/analyzing-source-code/languages/abap.md
# Source: https://docs.sonarsource.com/sonarqube-server/2025.3/analyzing-source-code/languages/abap.md
# Source: https://docs.sonarsource.com/sonarqube-server/2025.5/analyzing-source-code/languages/abap.md
# Source: https://docs.sonarsource.com/sonarqube-server/2025.1/analyzing-source-code/languages/abap.md
# Source: https://docs.sonarsource.com/sonarqube-server/2025.4/analyzing-source-code/languages/abap.md
# Source: https://docs.sonarsource.com/sonarqube-server/2025.6/analyzing-source-code/languages/abap.md
# Source: https://docs.sonarsource.com/sonarqube-server/analyzing-source-code/languages/abap.md
# Source: https://docs.sonarsource.com/sonarqube-cloud/advanced-setup/languages/abap.md
# ABAP
This language is available only in the Enterprise plan. See the [subscription-plans](https://docs.sonarsource.com/sonarqube-cloud/administering-sonarcloud/managing-subscription/subscription-plans "mention") page for details.
### Language specific properties
To discover and update the ABAP-specific properties, navigate in SonarQube Cloud to *Your Project* > **Administration** > **General Settings** > **Languages** > **ABAP**. See the [analysis-parameters](https://docs.sonarsource.com/sonarqube-cloud/advanced-setup/analysis-parameters "mention") page for more information about specific properties.
### Source code extraction
In order to analyze your source code with SonarQube Cloud you need to first extract it from SAP onto a file system. You can use your own tool or an open source tool; Sonar does not provide any connectors or source code extraction tools.
You can also use [abapGit](https://github.com/abapGit/abapGit) client to manage your project in a Git repository and analyze it directly from your ALM system.
---
# Source: https://docs.sonarsource.com/sonarqube-community-build/analyzing-source-code/importing-external-issues/about-external-issues.md
# Source: https://docs.sonarsource.com/sonarqube-server/2025.5/analyzing-source-code/importing-external-issues/about-external-issues.md
# Source: https://docs.sonarsource.com/sonarqube-server/2025.6/analyzing-source-code/importing-external-issues/about-external-issues.md
# Source: https://docs.sonarsource.com/sonarqube-server/analyzing-source-code/importing-external-issues/about-external-issues.md
# About external issues
Many languages have dedicated analyzers (also known as linters) that are commonly used to spot problems in code. SonarQube can integrate the results from many of these external analyzers. This lets you see this information alongside the other SonarQube metrics and allows the external results to be taken into account when calculating quality gate status.
If your analyzer doesn't integrate with SonarQube Server, you can import the external issues either in the generic SonarQube format or in the SARIF format.
### List of supported analyzers
The table below lists the third-party analyzers that integrate with SonarQube Server.
Language
External analyzers
Ansible
ansible-lint
Apex
PMD
Cloudformation
AWS CloudFormation Linter
C/C++/Objective-C
Valgrind Memcheck, Valgrind Helgrind
C#/VB.NET
Roslyn (inc. Roslyn analyzers provided by Microsoft)
CSS
StyleLint.io
Docker
Hadolint
Go
GoVet, GoLint, GoMetaLinter, golanci-lint, gosec
Java
SpotBugs, FindSecBugs, FindBugs, PMD, Checkstyle
JavaScript/TypeScript
ESLint
Kotlin
AndroidLint, Detekt, Ktlint
PHP
Psalm, PHPStan
Python
Pylint, Bandit, Flake8, Mypy, Ruff
Ruby
Rubocop
Scala
Scalastyle, Scapegoat
Swift
SwiftLint
Terraform
TFLint
### Limitations
The external issues will be taken into account by SonarQube in the analysis report and users will be able to resolve an external issue the same way as an internal issue.
But external issues have an important limitation. The activation of the rules that raise these issues cannot be managed within SonarQube. External rules are not visible on the Rules page or reflected in any quality profile.
{% hint style="info" %}
Managing an external issue within SonarQube has no impact on its state in the external tool. For example, when you mark an issue as false positive in SonarQube, it is not reflected in the external tool.
{% endhint %}
### Related pages
[external-analyzer-reports](https://docs.sonarsource.com/sonarqube-server/analyzing-source-code/importing-external-issues/external-analyzer-reports "mention")\
[generic-issue-import-format](https://docs.sonarsource.com/sonarqube-server/analyzing-source-code/importing-external-issues/generic-issue-import-format "mention")\
[importing-issues-from-sarif-reports](https://docs.sonarsource.com/sonarqube-server/analyzing-source-code/importing-external-issues/importing-issues-from-sarif-reports "mention")\
[integration-with-external-analyzers](https://docs.sonarsource.com/sonarqube-server/instance-administration/analysis-functions/integration-with-external-analyzers "mention")
---
# Source: https://docs.sonarsource.com/sonarqube-community-build/user-guide/about-new-code.md
# Source: https://docs.sonarsource.com/sonarqube-server/10.7/core-concepts/clean-as-you-code/about-new-code.md
# Source: https://docs.sonarsource.com/sonarqube-server/10.8/core-concepts/clean-as-you-code/about-new-code.md
# Source: https://docs.sonarsource.com/sonarqube-server/2025.2/user-guide/about-new-code.md
# Source: https://docs.sonarsource.com/sonarqube-server/2025.3/user-guide/about-new-code.md
# Source: https://docs.sonarsource.com/sonarqube-server/2025.5/user-guide/about-new-code.md
# Source: https://docs.sonarsource.com/sonarqube-server/2025.1/user-guide/about-new-code.md
# Source: https://docs.sonarsource.com/sonarqube-server/2025.4/user-guide/about-new-code.md
# Source: https://docs.sonarsource.com/sonarqube-server/2025.6/user-guide/about-new-code.md
# Source: https://docs.sonarsource.com/sonarqube-server/user-guide/about-new-code.md
# Source: https://docs.sonarsource.com/sonarqube-cloud/standards/about-new-code.md
# Quality standards and new code
SonarQube Cloud warns you whenever issues are detected in your new code. When you add new code to your projects, you usually touch a portion of the old code in the process. As a consequence, analyzing and cleaning new code allows you to fix issues in your old code and gradually improve the overall quality of your codebase.
### Defining a quality standard
First, you define the code quality standard for your project:
* With a quality profile, you define the set of rules to be applied during analysis. We recommend using the built-in quality profile, called Sonar way. See [understanding-quality-profiles](https://docs.sonarsource.com/sonarqube-cloud/standards/managing-quality-profiles/understanding-quality-profiles "mention").
* With a quality gate, you define a set of conditions that the code must meet. By default, SonarQube implements a recommended quality gate called the Sonar way. See [introduction-to-quality-gates](https://docs.sonarsource.com/sonarqube-cloud/standards/managing-quality-gates/introduction-to-quality-gates "mention").
Then, you define what is considered new code in your project, adapting your configuration to the nature of your project: versioned, continuous delivery, etc.
Finally, you ensure your code is analyzed frequently and at different stages of its journey, in your IDE and your DevOps platforms. See *SonarQube for IDE* documentation.
### Focus on new code
New code is code that you’ve recently added or modified. Different options can be used to define new code on a branch, project, or at global level. The new code definition tells SonarQube which part of the code is considered new during analysis.
SonarQube Cloud differentiates the analysis results on new code from overall code (overall code includes new and old code). To ensure you focus your efforts on new code, SonarQube highlights the status of new code in the UI.
Likewise, the built-in [quality-gates](https://docs.sonarsource.com/sonarqube-cloud/improving/quality-gates "mention") Sonar Way defines conditions applying to new code only.
### New code definitions
SonarQube Cloud supports the following options for new code definition: Previous version, Number of days, Specific version, and Specific date.
SonarQube Cloud calculates a new code period *with a start and end date*. All the code that falls between the date of your last analysis and the start date is considered new code. The way the start date is calculated depends on the applying new code definition option (for information about the issue date calculation, see the [solution-overview](https://docs.sonarsource.com/sonarqube-cloud/managing-your-projects/issues/solution-overview "mention") overview page).
#### Previous version
Any code that has changed since the most recent version increment of the project is considered new code.
With this option, the new code period’s start date is the date of the first analysis performed for the current project version.
#### Number of days
Any code that has changed in the last X days is considered new code.
With this option, the new code period’s start date is the current date minus X days.
For example, setting the Number of days to 30 creates a new code period beginning 30 days before the current date. If no action is taken on a new code issue after 30 days, this issue becomes part of the overall code. The default value is 30 days, 7 or 14 days are other common values. The maximum possible value is 90 days.
#### Specific version
{% hint style="info" %}
Specific version can only be configured as the new code definition via the [web-api](https://docs.sonarsource.com/sonarqube-cloud/advanced-setup/web-api "mention").
{% endhint %}
Any code that has changed since a specific, defined version of the project is considered new code.
With this option, the new code period’s start date is the date of the first analysis performed for the specific project version.
This option gives you more control over your new code than the **Number of days** option. For example, for a project that follows a continuous delivery model, it allows you to mark the start of a new cycle, where a number of days would not be accurate enough.
#### Specific date
{% hint style="info" %}
Specific date can only be configured as the new code definition via the [web-api](https://docs.sonarsource.com/sonarqube-cloud/advanced-setup/web-api "mention").
{% endhint %}
Any code that has changed since a specific, defined date is considered new code.
With this option, the new code period’s start date is the specific date.
### Recommended option depending on project type
Depending on the type of project you’re working on, the best option to use will vary. Here are general use cases for various types of projects:
### Configuration levels
The new code definition can be set at the organization and project levels with the following restriction:
* Only the Previous version and Number of days options can be set at the organization level.
The following applies:
* The new code option defined at the organization level (if any) is applied by default to all *new* projects.
* The project-level definition has precedence over the organization-level definition.
* By default, no organization-level new code definition is set.
### Focus on new code in the IDE
Focusing on new code can be a helpful strategy to avoid introducing new issues into your code base. SonarQube for IDE allows you to focus on *new code* by filtering issues shown in the IDE, as determined by your new code definition.
The **Focus on new code** feature highlights only new code and works when SonarQube for IDE is running in either [connected-mode](https://docs.sonarsource.com/sonarqube-cloud/improving/connected-mode "mention") or standalone mode and must be enabled manually. Please see these instructions according to the IDE you’re using:
* See [Investigating issues #Focusing on new code](https://app.gitbook.com/s/6LPRABg3ubAJhpfR5K0Y/using/investigating-issues#focusing-on-new-code "mention") in SonarQube for VS Code
* See [Investigating issues #Focusing on new code](https://app.gitbook.com/s/NvI4wotPmITyM0mnsmtp/using/investigating-issues#focusing-on-new-code "mention") in SonarQube for IntelliJ
* See [Investigating issues #Focusing on new code](https://app.gitbook.com/s/kadXEH8HkykK7lKaDvVq/using/investigating-issues#focusing-on-new-code "mention") in SonarQube for Eclipse
### Three stages of SonarQube code review and analysis
1. The first base layer is code analysis in your SonarQube for IDE. This allows issues to be fixed as soon as they are introduced.
2. The pull request analysis layer ensures that all code to be merged is clean.
3. The branch analysis layer guarantees that the main branch or another branch is ready for release or deployment.
Each layer has advantages in terms of speed and depth of analysis. We recommend implementing all three for the most comprehensive experience.
### Related pages
* [setting-new-code-definition-at-organization-level](https://docs.sonarsource.com/sonarqube-cloud/administering-sonarcloud/managing-organization/setting-config-at-org-level/setting-new-code-definition-at-organization-level "mention")
* [configuring-new-code-calculation](https://docs.sonarsource.com/sonarqube-cloud/managing-your-projects/project-analysis/configuring-new-code-calculation "mention")
---
# Source: https://docs.sonarsource.com/sonarqube-server/10.7/core-concepts/clean-as-you-code/about-quality-standards.md
# Source: https://docs.sonarsource.com/sonarqube-server/10.8/core-concepts/clean-as-you-code/about-quality-standards.md
# About quality standards
In the Sonar solution, each of your projects has a set quality standard, made up of a quality profile and a quality gate:
* A quality profile determines the set of [overview](https://docs.sonarsource.com/sonarqube-server/10.8/user-guide/rules/overview "mention") that apply during analysis.
* A quality gate consists of a set of conditions against which the code is measured during analysis. Depending on the result, the code will pass or fail the quality gate, giving developers indications on whether to fix issues or merge the code.
#### Quality profile
We recommend using the built-in quality profile, called Sonar way. For details, see the [quality-profiles](https://docs.sonarsource.com/sonarqube-server/10.8/instance-administration/analysis-functions/quality-profiles "mention") page.
#### Quality gate
By default, SonarQube Server and SonarQube Cloud implement a recommended quality gate called the Sonar way. For details, see the section about Sonar Way and Clean as You code on the [quality-gates](https://docs.sonarsource.com/sonarqube-server/10.8/instance-administration/analysis-functions/quality-gates "mention") page.
---
# Source: https://docs.sonarsource.com/sonarqube-cloud/administering-sonarcloud/about-sonarqube-cloud-solution.md
# About SonarQube Cloud solution
- [Ressources structure](/sonarqube-cloud/administering-sonarcloud/about-sonarqube-cloud-solution/ressources-structure.md): Your SonarQube Cloud projects, organization, and enterprise structure is organized in methodical way. These pages help you understand where dependencies and connections lay.
- [Organization](/sonarqube-cloud/administering-sonarcloud/about-sonarqube-cloud-solution/ressources-structure/organization.md): SonarQube Cloud mirrors the organization-based structure of your DevOps platform. Projects are grouped together for collaborative work and permission management.
- [Organization's projects](/sonarqube-cloud/administering-sonarcloud/about-sonarqube-cloud-solution/ressources-structure/projects.md): SonarQube Cloud projects represent DevOps platform repos and can be public or private, with binding to the repository determining visibility. Project permissions are managed through user groups.
- [Enterprise](/sonarqube-cloud/administering-sonarcloud/about-sonarqube-cloud-solution/ressources-structure/enterprise.md): SonarQube Cloud's Enterprise plan allows the centralized administration of multiple Organizations which may or may not be linked to multiple DevOps platforms.
- [Binding with the DevOps platform](/sonarqube-cloud/administering-sonarcloud/about-sonarqube-cloud-solution/ressources-structure/binding-with-dop.md): Your organizations and projects in SonarQube Cloud are bound to their respective organization or repository on GitHub, Bitbucket Cloud, GitLab, or Azure DevOps.
- [User management](/sonarqube-cloud/administering-sonarcloud/about-sonarqube-cloud-solution/user-management.md): This section groups together a few basic concepts that should be understood when managing your SonarQube Cloud user accounts.
- [User group concept](/sonarqube-cloud/administering-sonarcloud/about-sonarqube-cloud-solution/user-management/user-group-concept.md): To manage user permissions more easily in SonarQube Cloud, the members of your organization are managed through groups.
- [Associated SCM accounts](/sonarqube-cloud/administering-sonarcloud/about-sonarqube-cloud-solution/user-management/associated-scm-accounts.md): SonarQube Cloud uses the association of users with Source Control Management (SCM) accounts to automatically assign issues to users.
- [Default authentication through DevOps platform](/sonarqube-cloud/administering-sonarcloud/about-sonarqube-cloud-solution/user-management/devops-platform-authentication.md): By default, users can authenticate to SonarQube Cloud with their existing credentials on their DevOps platform service (DOP). No additional setup is required.
- [GitHub member synchronization](/sonarqube-cloud/administering-sonarcloud/about-sonarqube-cloud-solution/user-management/github-member-synchronization.md): The GitHub member synchronization allows the automatic synchronization of organization members between GitHub and SonarQube Cloud.
---
# Source: https://docs.sonarsource.com/sonarqube-server/10.7/core-concepts/clean-as-you-code/about-the-analysis-setup.md
# Source: https://docs.sonarsource.com/sonarqube-server/10.8/core-concepts/clean-as-you-code/about-the-analysis-setup.md
# About the analysis setup
To successfully practice the Clean as You Code methodology, we recommend deploying the analysis at three different levels:
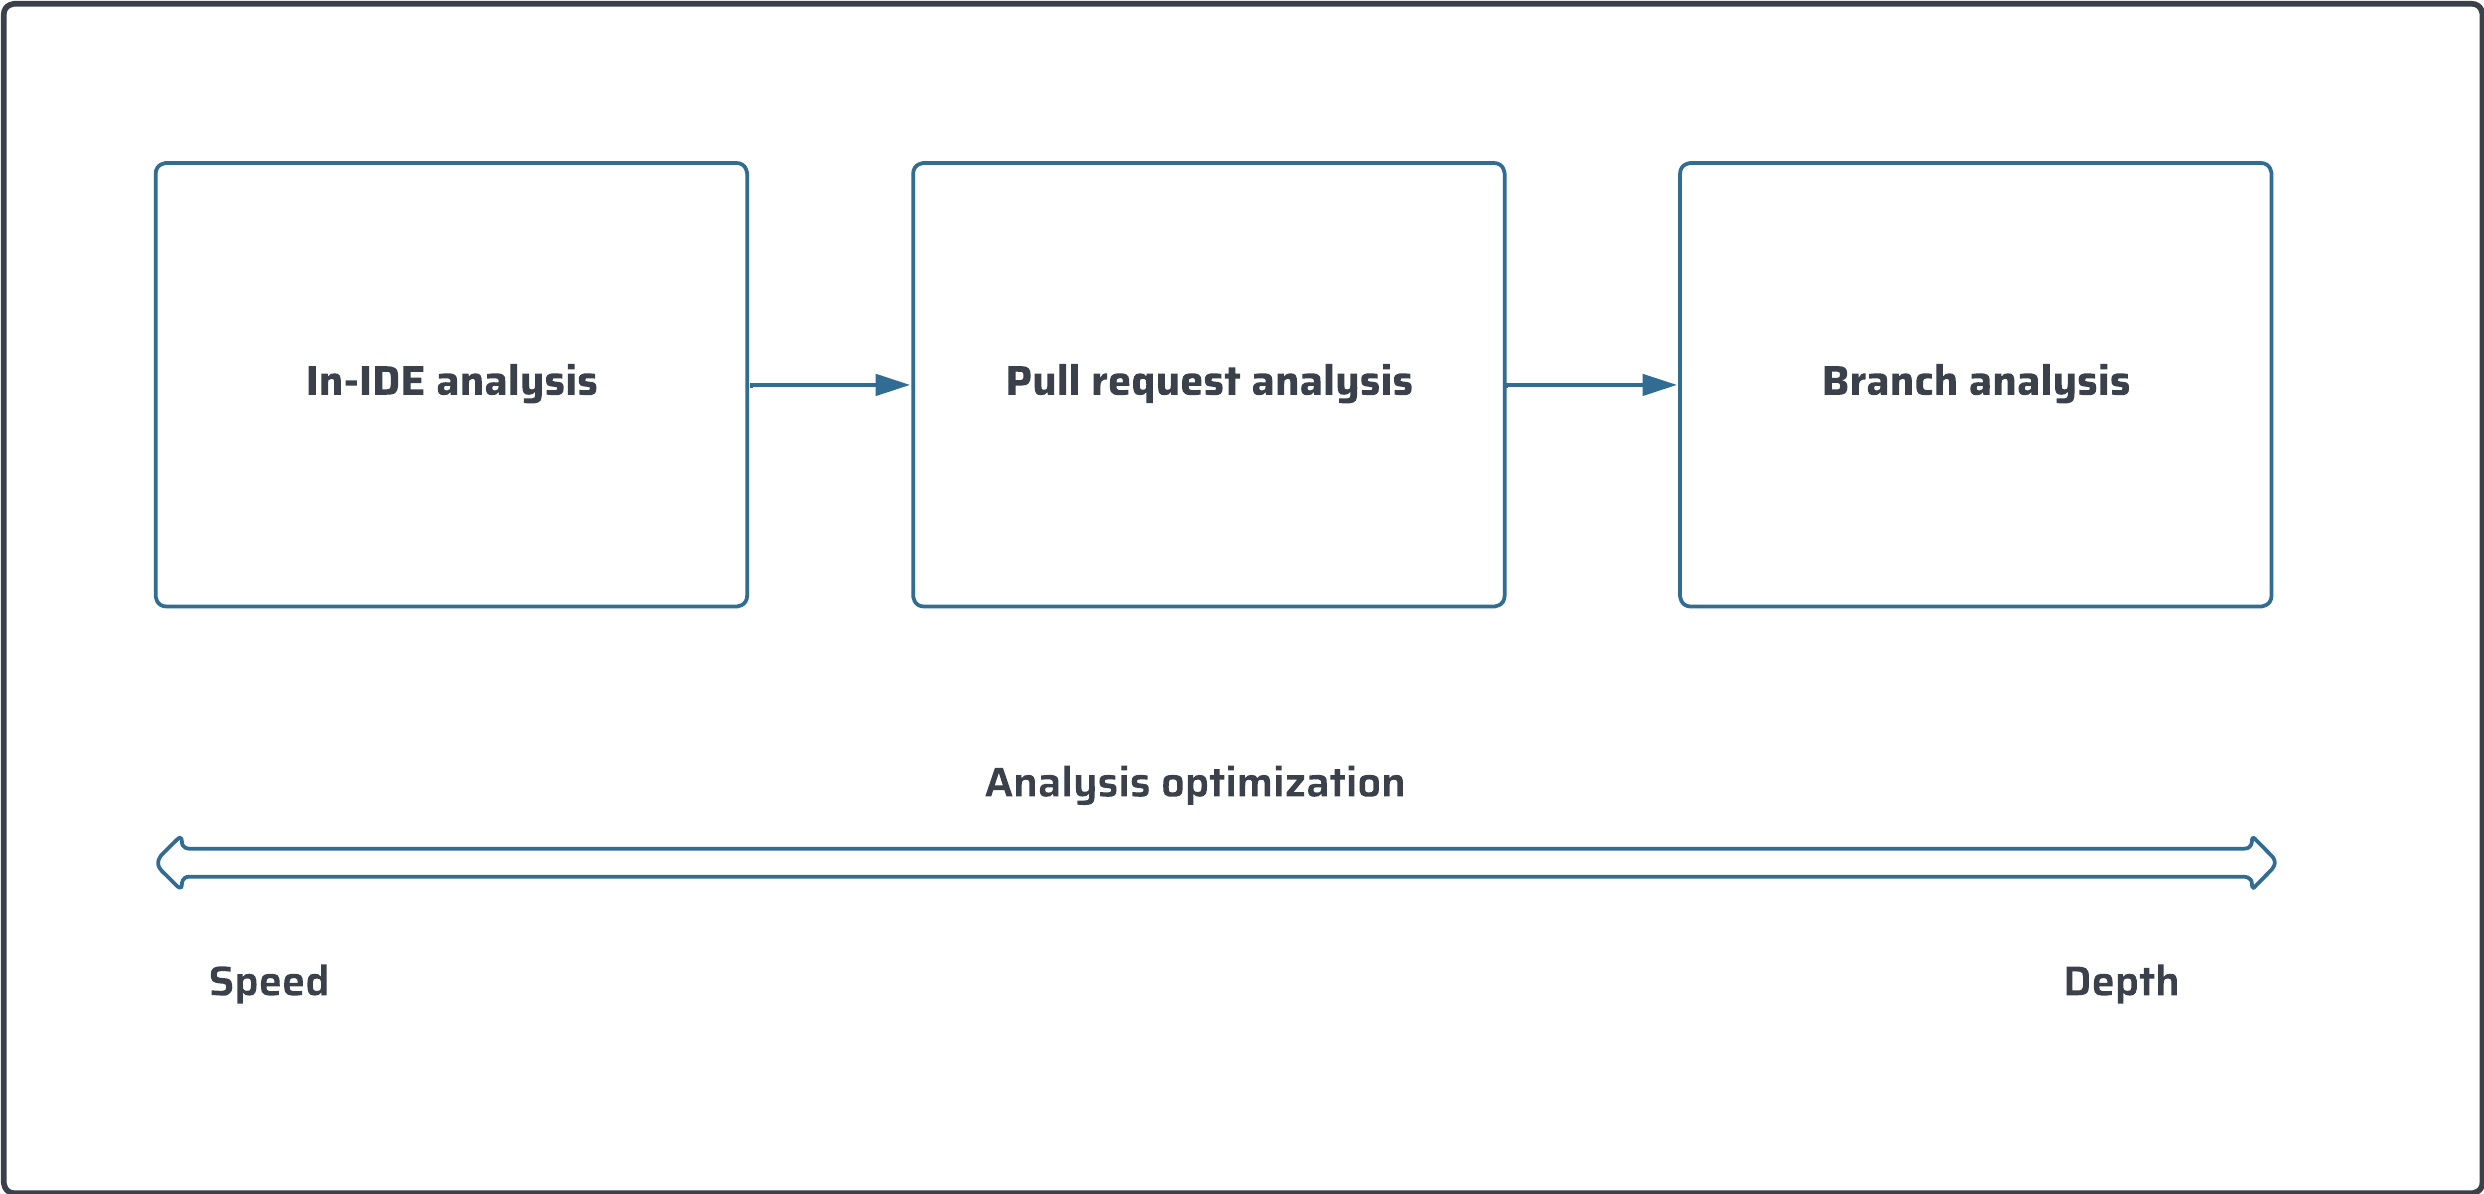
* The first base layer is code analysis in your [Intellij](https://app.gitbook.com/o/2ibCvzwZt86Nlk2zloB7/s/NvI4wotPmITyM0mnsmtp/ "mention"). This allows issues to be fixed as soon as they are introduced.
* The pull request analysis layer ensures that all code to be merged is clean.
* The branch analysis layer guarantees that the main branch or another branch is ready for release or deployment.
Each layer has advantages in terms of speed and depth of analysis. We recommend implementing all three for the most comprehensive experience.
For setup instructions, see [setting-up-clean-as-you-code](https://docs.sonarsource.com/sonarqube-server/10.8/project-administration/setting-up-clean-as-you-code "mention").
---
# Source: https://docs.sonarsource.com/sonarqube-server/2025.6/instance-administration/system-functions/notifications/slack/about.md
# Source: https://docs.sonarsource.com/sonarqube-server/instance-administration/system-functions/notifications/slack/about.md
# Source: https://docs.sonarsource.com/sonarqube-cloud/administering-sonarcloud/managing-enterprise/enterprise-security/sso/about.md
# About SSO authentication solution
The SonarQube Cloud Enterprise plan supports a transition from the DevOps platform authentication mode to Single Sign On (SSO) with any identity provider (IdP) that supports SAML. SonarQube Cloud uses the Service Provider (SP) initiated SSO. See the [introduction](https://docs.sonarsource.com/sonarqube-cloud/getting-started-with-enterprise/introduction "mention") to Enterprise plans for more information about these and other supported features.
With SSO you benefit from:
* Increased security and a single source of truth for user authentication.
* [automatic-group-synchronization](https://docs.sonarsource.com/sonarqube-cloud/administering-sonarcloud/managing-enterprise/enterprise-security/sso/about/automatic-group-synchronization "mention").
* Just-in-Time user provisioning; when a users sign up with SonarQube Cloud with SSO for the first time, their SSO user account is automatically created in SonarQube Cloud.
SSO is set up for a given enterprise, see [setting-up-your-enterprise](https://docs.sonarsource.com/sonarqube-cloud/getting-started-with-enterprise/setting-up-your-enterprise "mention") for more details. At SSO login time, users select the enterprise they want to access.
### SAML SSO authentication flow
Users log directly into SonarQube Cloud with their SAML SSO credentials which are transmitted to an Auth0 server for authentication. Auth0 functions as the SAML service provider, bridging SonarQube Cloud and the identity provider.
The authentication flow is as follows:
1. The user enters their login for SAML SSO via SonarQube Cloud.
2. SonarQube Cloud redirects the authentication request to Auth0.
3. Auth0 forwards the SAML request to the SAML identity provider.
4. The SAML identity provider authenticates the user and generates a signed token containing the user’s information and privileges (SAML assertion). It sends the SAML assertion to Auth0. Optionally, the identity provider can encrypt this assertion with SonarQube Server’s certificate. Note that in that case, the SAML response, which contains the encrypted assertion, must be signed.
5. Auth0 sends the token to SonarQube Cloud.
6. SonarQube Cloud receives the token, verifies its signature and performs extra-authentication checks. If successful, the user is authenticated in SonarQube Cloud.
{% hint style="info" %}
Auth0 may connect to the identity provider from one of the IP addresses listed [here](https://auth0.com/docs/secure/security-guidance/data-security/allowlist).
{% endhint %}
### User login format
When creating a new user login, SonarQube Cloud systematically adds a random suffix to the login name to manage user misidentification risk.
{% hint style="info" %}
When setting up API-based automations related to users, don’t use the `login` field to retrieve a user. Use the `email` field instead.
{% endhint %}
### Limitations
In an SSO-enabled enterprise:
* SSO users cannot be added to organizations outside of their enterprise.
* The GitHub member synchronization is disabled on any organization of the enterprise.
* Currently, an SSO user cannot bind a SonarQube Cloud organization to its corresponding Bitbucket Cloud workspace. They must use their DevOps platform (DOP) account to perform the binding.
* Both DevOps platform and SSO authentications are supported but only one SSO configuration can be managed.
### Related pages
[automatic-group-synchronization](https://docs.sonarsource.com/sonarqube-cloud/administering-sonarcloud/managing-enterprise/enterprise-security/sso/about/automatic-group-synchronization "mention")\
[setting-up-sso](https://docs.sonarsource.com/sonarqube-cloud/getting-started-with-enterprise/setting-up-sso "mention")\
[editing-sso-configuration](https://docs.sonarsource.com/sonarqube-cloud/administering-sonarcloud/managing-enterprise/enterprise-security/sso/editing-sso-configuration "mention")\
[deleting-sso-configuration](https://docs.sonarsource.com/sonarqube-cloud/administering-sonarcloud/managing-enterprise/enterprise-security/sso/deleting-sso-configuration "mention")\
[troubleshooting](https://docs.sonarsource.com/sonarqube-cloud/administering-sonarcloud/managing-enterprise/enterprise-security/sso/troubleshooting "mention")\
[#deleting-sso-account](https://docs.sonarsource.com/sonarqube-cloud/managing-organization/users-and-permissions/user-on-and-offboarding#deleting-sso-account "mention")
---
# Source: https://docs.sonarsource.com/sonarqube-server/9.9/setup-and-upgrade/upgrade-the-server/active-versions.md
# Source: https://docs.sonarsource.com/sonarqube-server/10.5/setup-and-upgrade/upgrade-the-server/active-versions.md
# Source: https://docs.sonarsource.com/sonarqube-server/10.6/setup-and-upgrade/upgrade-the-server/active-versions.md
# Source: https://docs.sonarsource.com/sonarqube-server/10.7/server-upgrade-and-maintenance/upgrade/upgrade-the-server/active-versions.md
# Source: https://docs.sonarsource.com/sonarqube-server/10.8/server-upgrade-and-maintenance/upgrade/upgrade-the-server/active-versions.md
# Active versions
In order to ensure that you continue to avail of the best user experience, you need to make sure that you are on an *active version*. An active version of SonarQube Server is a version that is deemed suitable for use and support and will provide you with the best user experience, given how often you upgrade. Ensuring you are on an active version allows you to benefit from different levels of support from Sonar:
* New features - your organizations gain immediate access to all new capabilities released, as well as to continuous product improvements. This leads to a better user experience and improved developer productivity (LTA and latest versions only).
* Patch releases - users on the LTA and latest versions have immediate access to bug fixes and security patches from Sonar. Users on non-active versions don’t receive these patches so are at increased risk of operational issues.
* Technical support - all organizations receive [troubleshooting](https://docs.sonarsource.com/sonarqube-server/10.8/server-upgrade-and-maintenance/troubleshooting "mention") support and technical assistance from Sonar, addressing problems quickly and minimizing downtime.
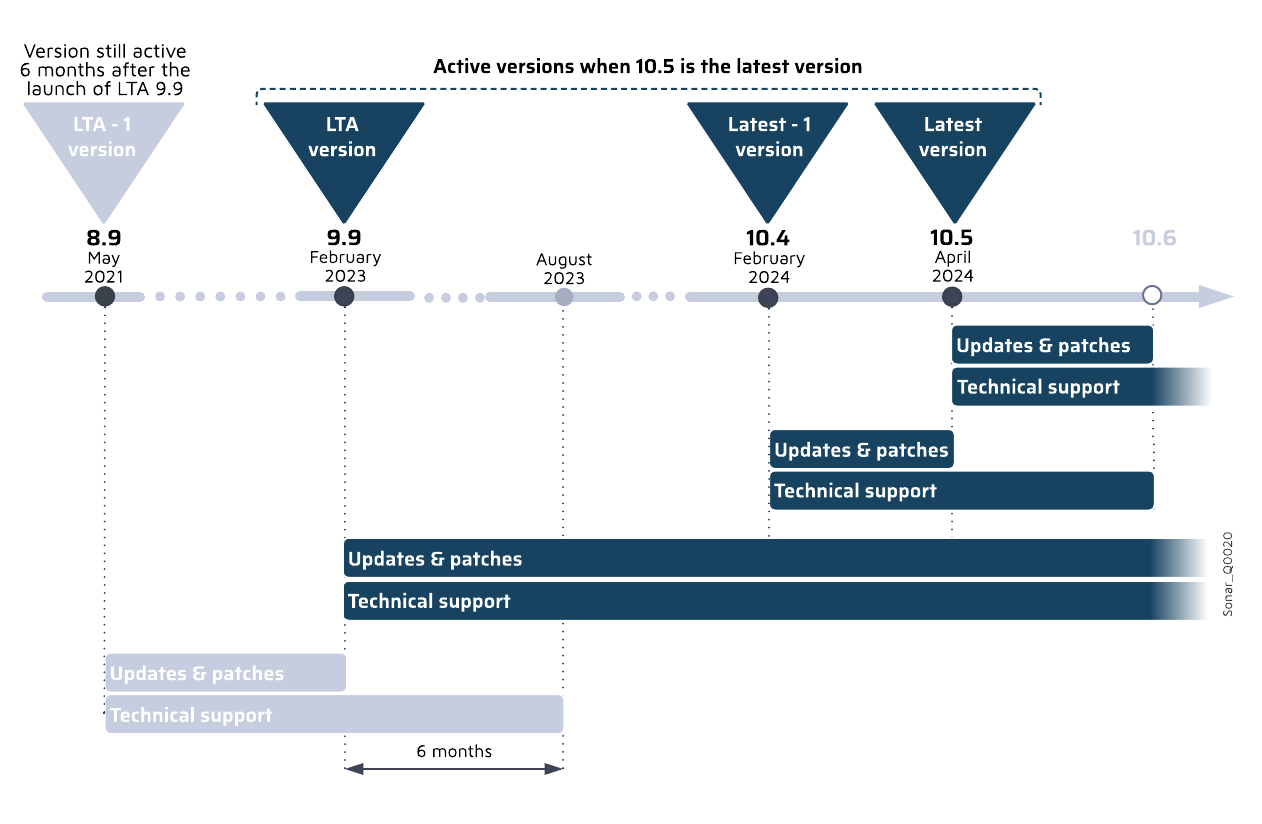
### Examples of active versions
LTA (Long-Term Active) refers to the version of SonarQube Server that is released approximately every 18 to 24 months (previously known as LTS). It is a version of the product that is functionally complete and will stay active for a longer period of time.
The following count as active versions:
* Latest version of SonarQube Server, for example, 10.4
* Latest -1, for example, 10.3
* LTA, for example, 9.9
* LTA -1, for example, 8.9. This is only supported for a period of six months after the LTA is launched to allow you sufficient time to transition and upgrade.
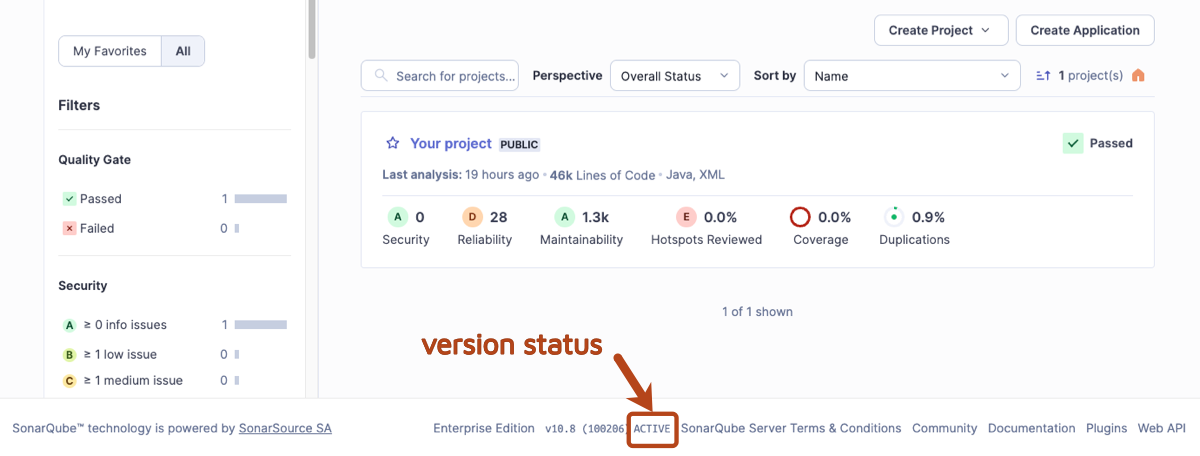
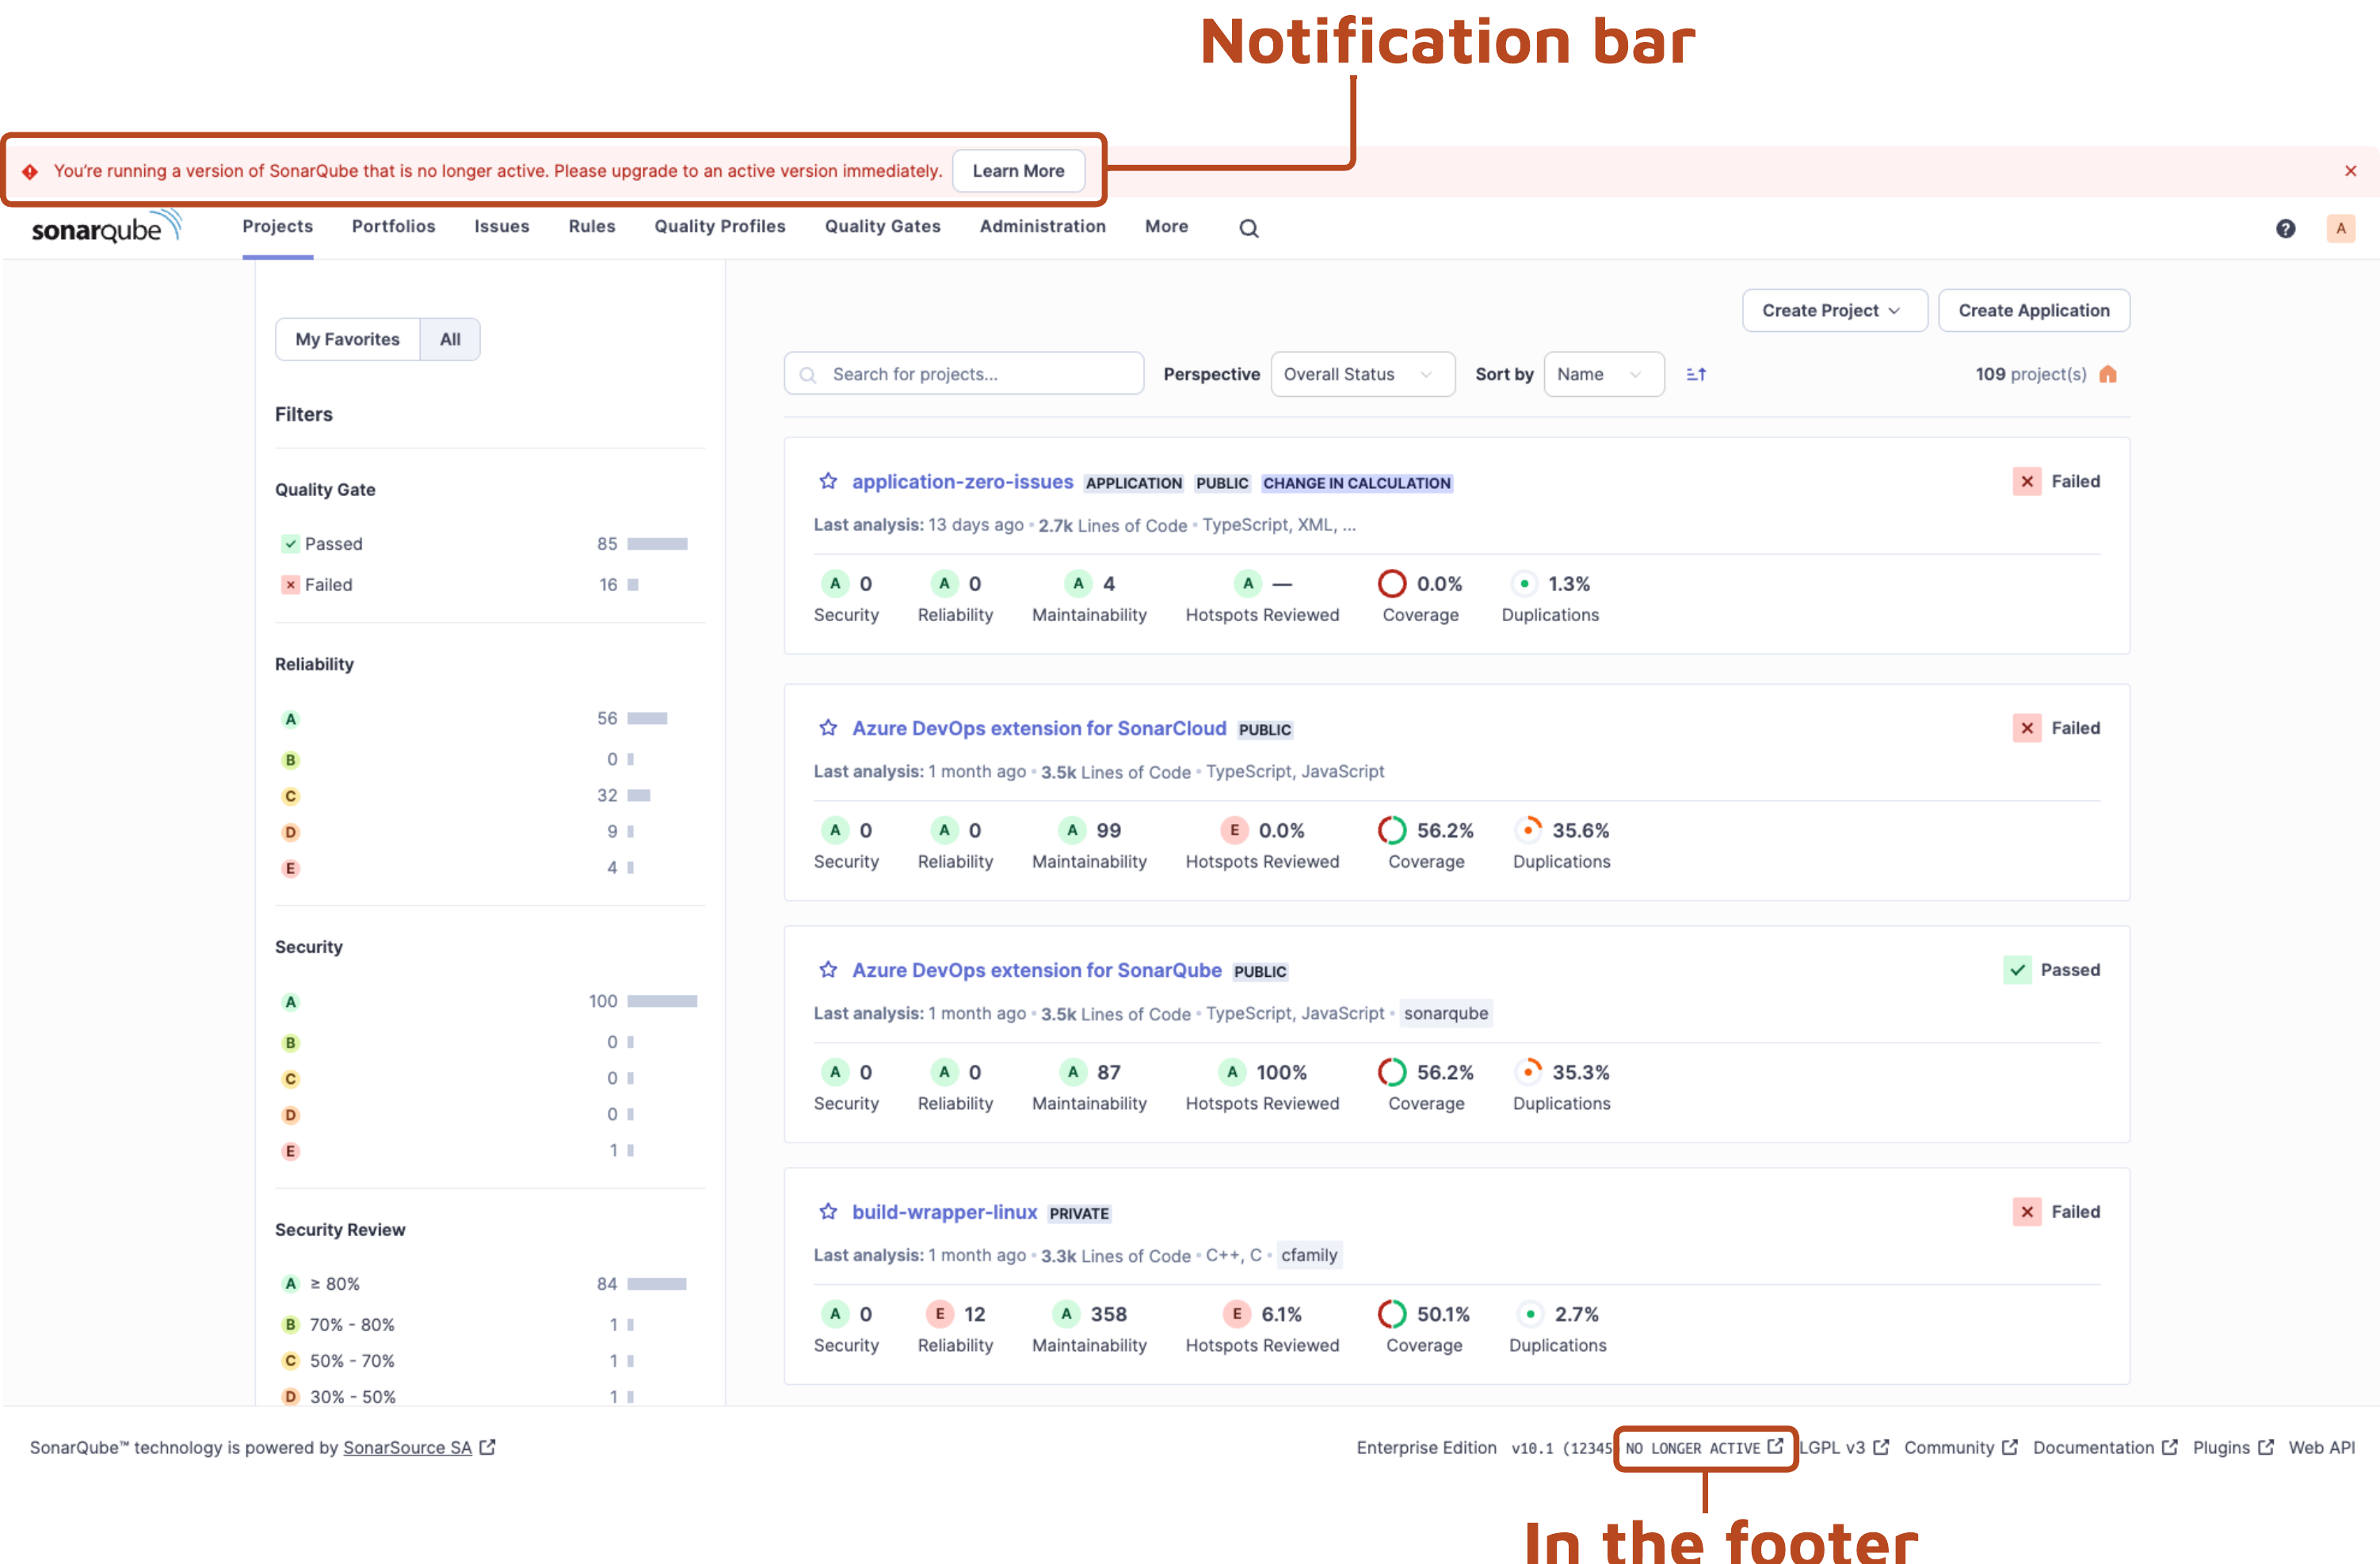
### Checking if your version is active
There are two main ways to check if you are using an active version of SonarQube Server:
1. In SonarQube Server, in the footer next to the version number, you can immediately see if your version is *active* or *no longer active.*
2\. Administrators can go to the **Administration** > **System.** As per above, you can see in the footer if you are on an active version.
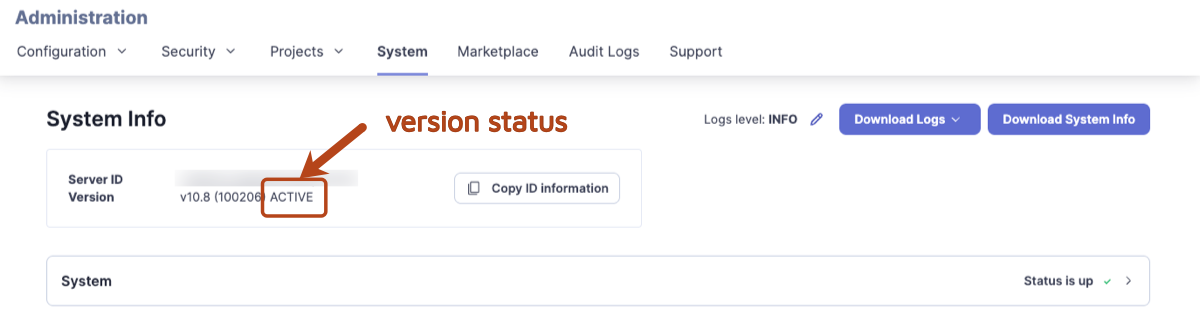
If there is a new version available, administrators will see a message at the top of the screen prompting you to upgrade to the latest version:
### Reasons to upgrade immediately
In SonarQube Server, you need to perform an upgrade in the following situations:
1. If you are on a version of SonarQube Server that is no longer active.
2. If you are on the latest version of SonarQube Server and there is a new upgrade available.
3. If you are on the latest version or LTA for which there is a new patch version available (security and bug fixes).
### Learn more
For information on how to upgrade to and from an LTA, see [determine-path](https://docs.sonarsource.com/sonarqube-server/10.8/server-upgrade-and-maintenance/upgrade/upgrade-the-server/determine-path "mention").
---
# Source: https://docs.sonarsource.com/sonarqube-community-build/user-guide/viewing-projects/activity-and-history.md
# Source: https://docs.sonarsource.com/sonarqube-server/8.9/user-guide/activity-and-history.md
# Source: https://docs.sonarsource.com/sonarqube-server/9.8/user-guide/activity-and-history.md
# Source: https://docs.sonarsource.com/sonarqube-server/9.9/user-guide/activity-and-history.md
# Source: https://docs.sonarsource.com/sonarqube-server/10.0/user-guide/activity-and-history.md
# Source: https://docs.sonarsource.com/sonarqube-server/10.1/user-guide/activity-and-history.md
# Source: https://docs.sonarsource.com/sonarqube-server/10.2/user-guide/activity-and-history.md
# Source: https://docs.sonarsource.com/sonarqube-server/10.3/user-guide/activity-and-history.md
# Source: https://docs.sonarsource.com/sonarqube-server/10.4/user-guide/activity-and-history.md
# Source: https://docs.sonarsource.com/sonarqube-server/10.5/user-guide/activity-and-history.md
# Source: https://docs.sonarsource.com/sonarqube-server/10.6/user-guide/activity-and-history.md
# Source: https://docs.sonarsource.com/sonarqube-server/10.7/user-guide/viewing-projects/activity-and-history.md
# Source: https://docs.sonarsource.com/sonarqube-server/10.8/user-guide/viewing-projects/activity-and-history.md
# Source: https://docs.sonarsource.com/sonarqube-server/2025.2/user-guide/viewing-projects/activity-and-history.md
# Source: https://docs.sonarsource.com/sonarqube-server/2025.3/user-guide/viewing-projects/activity-and-history.md
# Source: https://docs.sonarsource.com/sonarqube-server/2025.5/user-guide/viewing-projects/activity-and-history.md
# Source: https://docs.sonarsource.com/sonarqube-server/2025.1/user-guide/viewing-projects/activity-and-history.md
# Source: https://docs.sonarsource.com/sonarqube-server/2025.4/user-guide/viewing-projects/activity-and-history.md
# Source: https://docs.sonarsource.com/sonarqube-server/2025.6/user-guide/viewing-projects/activity-and-history.md
# Source: https://docs.sonarsource.com/sonarqube-server/user-guide/viewing-projects/activity-and-history.md
# Source: https://docs.sonarsource.com/sonarqube-cloud/digging-deeper/activity-and-history.md
# Activity and history
The project **Activity** page shows a list of the analyses that have been performed on your project. This covers all historical data except for that which has been cleaned up by the [housekeeping](https://docs.sonarsource.com/sonarqube-cloud/digging-deeper/housekeeping "mention") process.
Graphs on the activity page help you understand the evolution of up to three measures of your choice against each other. Graph mouseovers show the measure values and events associated with particular analyses.
### Events
There are four types of events:
* **Quality Gate**: the status of your quality gate has changed. See the [introduction-to-quality-gates](https://docs.sonarsource.com/sonarqube-cloud/standards/managing-quality-gates/introduction-to-quality-gates "mention") page for details.
* **Profile**: the quality profile used to analyze your project has changed - either the profile was edited, or a different profile was used to analyze the project. See the [understanding-quality-profiles](https://docs.sonarsource.com/sonarqube-cloud/standards/managing-quality-profiles/understanding-quality-profiles "mention") page for details.
* **Version**: the project’s version changed.
* **Other**: an event was manually created on a snapshot. See the page about [managing-project-history](https://docs.sonarsource.com/sonarqube-cloud/digging-deeper/managing-project-history "mention").
Events are shown on the project **Overview** page; scroll down to see the **Latest Activity** section. See the[main-branch-analysis](https://docs.sonarsource.com/sonarqube-cloud/improving/main-branch-analysis "mention") and [first-analysis](https://docs.sonarsource.com/sonarqube-cloud/getting-started/first-analysis "mention") pages to for explanations about what information is available.
---
# Source: https://docs.sonarsource.com/sonarqube-community-build/analyzing-source-code/ci-integration/jenkins-integration/add-analysis-to-job.md
# Source: https://docs.sonarsource.com/sonarqube-server/10.5/analyzing-source-code/ci-integration/jenkins-integration/add-analysis-to-job.md
# Source: https://docs.sonarsource.com/sonarqube-server/10.6/analyzing-source-code/ci-integration/jenkins-integration/add-analysis-to-job.md
# Source: https://docs.sonarsource.com/sonarqube-server/10.7/analyzing-source-code/ci-integration/jenkins-integration/add-analysis-to-job.md
# Source: https://docs.sonarsource.com/sonarqube-server/10.8/analyzing-source-code/ci-integration/jenkins-integration/add-analysis-to-job.md
# Source: https://docs.sonarsource.com/sonarqube-server/2025.2/analyzing-source-code/ci-integration/jenkins-integration/add-analysis-to-job.md
# Source: https://docs.sonarsource.com/sonarqube-server/2025.3/analyzing-source-code/ci-integration/jenkins-integration/add-analysis-to-job.md
# Source: https://docs.sonarsource.com/sonarqube-server/2025.5/analyzing-source-code/ci-integration/jenkins-integration/add-analysis-to-job.md
# Source: https://docs.sonarsource.com/sonarqube-server/2025.1/analyzing-source-code/ci-integration/jenkins-integration/add-analysis-to-job.md
# Source: https://docs.sonarsource.com/sonarqube-server/2025.4/analyzing-source-code/ci-integration/jenkins-integration/add-analysis-to-job.md
# Source: https://docs.sonarsource.com/sonarqube-server/2025.6/analyzing-source-code/ci-integration/jenkins-integration/add-analysis-to-job.md
# Source: https://docs.sonarsource.com/sonarqube-server/analyzing-source-code/ci-integration/jenkins-integration/add-analysis-to-job.md
# Source: https://docs.sonarsource.com/sonarqube-cloud/advanced-setup/ci-based-analysis/jenkins/add-analysis-to-job.md
# Adding analysis to a Jenkins job
You can add the SonarQube Cloud analysis to your Jenkins Freestyle or Pipeline jobs and easily configure your project analysis with Jenkins through the in-product tutorial.
To be able to add a SonarQube Cloud analysis to a Jenkins job, Jenkins must have been set up for SonarQube Cloud integration. See the [global-setup](https://docs.sonarsource.com/sonarqube-cloud/advanced-setup/ci-based-analysis/jenkins/global-setup "mention") page to learn more.
### Adding analysis to a Freestyle job
The procedure depends on the project type.
{% tabs %}
{% tab title="MAVEN OR GRADLE" %}
1. Create and configure your Jenkins job, and go to the **Build Environment** section.
2. Enable **Prepare SonarScanner environment** to allow the injection of SonarQube Cloud values into this particular job. Once the environment variables are available, use them in a standard Maven build step (**Invoke top-level Maven targets**) by setting the **Goals** to include, or a standard Gradle build step (**Invoke Gradle script**) by setting the **Tasks** to execute.
Maven goal:
```bash
SONAR_MAVEN_GOAL
```
Gradle task:
```bash
sonar
```
{% hint style="info" %}
In both cases, launching your analysis may require authentication. In that case, make sure that the global configuration in Jenkins of SonarQube Cloud defines a valid SonarQube Cloud token (see the [global-setup](https://docs.sonarsource.com/sonarqube-cloud/advanced-setup/ci-based-analysis/jenkins/global-setup "mention") page).
{% endhint %}
{% endtab %}
{% tab title=".NET" %}
1. Create and configure your Jenkins job, and go to the **Build** section.
2. Add the **SonarQube for MSBuild - Begin Analysis** to your build.
3. Configure the SonarQube Cloud Project Key, Name, and Version in the **SonarScanner for MSBuild - Begin Analysis** build step.
4. Add the compatible **MSBuild build step** or the **Execute Windows batch command** to execute the build.
5. Add the **SonarQube for MSBuild - End Analysis** build steps to your build.
{% hint style="info" %}
In version 5.0 of the SonarScanner, we changed the name of the *SonarScanner for MSBuild* to *SonarScanner for .NET*.
The documentation is updated with the new name and we will call the scanner *SonarScanner for .NET* moving forward.
{% endhint %}
{% endtab %}
{% tab title="OTHER" %}
1. Create and configure your Jenkins job, and go to the **Build** section.
2. Add the SonarScanner CLI build step to your build.
3. Configure the analysis properties. You can either point to an existing `sonar-project.properties` file or set the analysis properties directly in the **Analysis properties** field.
{% endtab %}
{% endtabs %}
### Adding analysis to a Pipeline job
1. In Jenkins, create your Pipeline job.
2. Add the SonarQube Cloud analysis stage to the Jenkins file: see below.
3. [pipeline-pause](https://docs.sonarsource.com/sonarqube-cloud/advanced-setup/ci-based-analysis/jenkins/pipeline-pause "mention") until the quality gate is computed.
### Adding analysis to a Multibranch Pipeline job
1. In Jenkins, create your Multibranch Pipeline job.
2. From your Jenkins job, go to **Configure** > **Branch Sources > Behaviors** and:
1. Under **Discover branches**, make sure \*\*Exclude branches that are also filed as PRs (\*\*or **MRs)** is selected.
2. Under \*\*Discover pull (\*\*or **merge) requests from origin**, make sure \*\*The current pull (\*\*or **merge) request revision** is selected.
3. Under **Specify ref specs,** make sure the **Ref Spec value** will include any target branches (the default value should be enough).\
If the **Specify ref specs** behavior is not active, click on **Add** and select **Specify ref specs.**
3. Add the SonarQube Cloud analysis stage to the Jenkins file: see below.
4. Set up a pipeline pause until the quality gate is computed. The [pipeline-pause](https://docs.sonarsource.com/sonarqube-cloud/advanced-setup/ci-based-analysis/jenkins/pipeline-pause "mention") page has instructions.
### Adding an analysis stage to the Jenkins file
You must use the `withSonarQubeEnv` step in the SonarQube Cloud analysis stage of your pipeline job. This step is used to set the environment variables necessary to connect to SonarQube Cloud. The connection details are retrieved from the Jenkins global configuration.
The `withSonarQubeEnv`() method can take the following optional parameters:
* `installationName`(string): name of the SonarQube Cloud installation as configured in Jenkins.
* `credentialsId`(string): if you want to overwrite the credentials configured in the Jenkins global configuration.
* `envOnly`(boolean): set it to true if you only want the SonarQube Cloud environment variables to be expanded in the build context
#### Examples
Note that you don’t need to specify an SCM stage in your Jenkins Pipeline or Multibranch Pipeline job.
{% tabs %}
{% tab title="GRADLE" %}
Scripted pipeline example:
```groovy
node {
stage('SonarCloud analysis') {
withSonarQubeEnv() { // Will pick the global server connection you have configured
sh './gradlew sonar'
}
}
}
```
{% endtab %}
{% tab title="MAVEN" %}
Scripted pipeline example:
```groovy
node {
stage('SonarCloud analysis') {
withSonarQubeEnv(credentialsId: 'f225455e-ea59-40fa-8af7-08176e86507a', installationName: 'SonarCloud') { // You can override the credential to be used
sh 'mvn org.sonarsource.scanner.maven:sonar-maven-plugin:3.11.0.3922:sonar'
}
}
}
```
{% endtab %}
{% tab title=".NET" %}
Scripted pipeline example:
```groovy
node {
stage('Build + SonarCloud analysis') {
def sqScannerMsBuildHome = tool 'Scanner for .Net Framework'
withSonarQubeEnv('SonarCloud') {
bat "${sqScannerMsBuildHome}\\SonarScanner.MSBuild.exe begin /k:myKey"
bat 'MSBuild.exe /t:Rebuild'
bat "${sqScannerMsBuildHome}\\SonarScanner.MSBuild.exe end"
}
}
}
```
{% endtab %}
{% tab title="OTHER" %}
Scripted pipeline example:
```groovy
node {
stage('SonarQube analysis') {
def scannerHome = tool ''; // must match the name of an actual scanner installation directory on your Jenkins build agent
withSonarQubeEnv('SonarCloud') {
sh "${scannerHome}/bin/sonar-scanner"
}
}
}
```
Declarative pipeline example:
```groovy
pipeline {
agent any
stages {
stage('SonarQube analysis') {
steps {
script {
scannerHome = tool ''// must match the name of an actual scanner installation directory on your Jenkins build agent
}
withSonarQubeEnv('SonarCloud') {
sh "${scannerHome}/bin/sonar-scanner"
}
}
}
}
}
```
{% endtab %}
{% endtabs %}
---
# Source: https://docs.sonarsource.com/sonarqube-cloud/advanced-setup/ci-based-analysis/azure-pipelines/adding-analysis-to-build-pipeline.md
# Adding analysis to build pipeline
{% content-ref url="adding-analysis-to-build-pipeline/gradle-or-maven-project" %}
[gradle-or-maven-project](https://docs.sonarsource.com/sonarqube-cloud/advanced-setup/ci-based-analysis/azure-pipelines/adding-analysis-to-build-pipeline/gradle-or-maven-project)
{% endcontent-ref %}
{% content-ref url="adding-analysis-to-build-pipeline/dotnet-project" %}
[dotnet-project](https://docs.sonarsource.com/sonarqube-cloud/advanced-setup/ci-based-analysis/azure-pipelines/adding-analysis-to-build-pipeline/dotnet-project)
{% endcontent-ref %}
{% content-ref url="adding-analysis-to-build-pipeline/c-family-project" %}
[c-family-project](https://docs.sonarsource.com/sonarqube-cloud/advanced-setup/ci-based-analysis/azure-pipelines/adding-analysis-to-build-pipeline/c-family-project)
{% endcontent-ref %}
{% content-ref url="adding-analysis-to-build-pipeline/js-ts-go-python-php" %}
[js-ts-go-python-php](https://docs.sonarsource.com/sonarqube-cloud/advanced-setup/ci-based-analysis/azure-pipelines/adding-analysis-to-build-pipeline/js-ts-go-python-php)
{% endcontent-ref %}
{% content-ref url="adding-analysis-to-build-pipeline/monorepo-projects" %}
[monorepo-projects](https://docs.sonarsource.com/sonarqube-cloud/advanced-setup/ci-based-analysis/azure-pipelines/adding-analysis-to-build-pipeline/monorepo-projects)
{% endcontent-ref %}
{% content-ref url="adding-analysis-to-build-pipeline/various-features" %}
[various-features](https://docs.sonarsource.com/sonarqube-cloud/advanced-setup/ci-based-analysis/azure-pipelines/adding-analysis-to-build-pipeline/various-features)
{% endcontent-ref %}
---
# Source: https://docs.sonarsource.com/sonarqube-community-build/devops-platform-integration/github-integration/adding-analysis-to-github-actions-workflow.md
# Source: https://docs.sonarsource.com/sonarqube-server/10.6/devops-platform-integration/github-integration/adding-analysis-to-github-actions-workflow.md
# Source: https://docs.sonarsource.com/sonarqube-server/10.7/devops-platform-integration/github-integration/adding-analysis-to-github-actions-workflow.md
# Source: https://docs.sonarsource.com/sonarqube-server/10.8/devops-platform-integration/github-integration/adding-analysis-to-github-actions-workflow.md
# Source: https://docs.sonarsource.com/sonarqube-server/2025.2/devops-platform-integration/github-integration/adding-analysis-to-github-actions-workflow.md
# Source: https://docs.sonarsource.com/sonarqube-server/2025.3/devops-platform-integration/github-integration/adding-analysis-to-github-actions-workflow.md
# Source: https://docs.sonarsource.com/sonarqube-server/2025.5/devops-platform-integration/github-integration/adding-analysis-to-github-actions-workflow.md
# Source: https://docs.sonarsource.com/sonarqube-server/2025.1/devops-platform-integration/github-integration/adding-analysis-to-github-actions-workflow.md
# Source: https://docs.sonarsource.com/sonarqube-server/2025.4/devops-platform-integration/github-integration/adding-analysis-to-github-actions-workflow.md
# Source: https://docs.sonarsource.com/sonarqube-server/2025.6/devops-platform-integration/github-integration/adding-analysis-to-github-actions-workflow.md
# Source: https://docs.sonarsource.com/sonarqube-server/devops-platform-integration/github-integration/adding-analysis-to-github-actions-workflow.md
# Adding analysis to GitHub Actions workflow
Once you have create your project in SonarQube Server, you can add the SonarQube Server analysis to your GitHub Actions workflow:
1. Configure the project analysis parameters.
2. Add the analysis to your GitHub Actions workflows.
3. Commit and push your code to start the analysis.
If you use a monorepo, see the section [#monorepo](#monorepo "mention"), below.
Considerations about upgrading to GitHub Action v7
The SonarQube Scan GitHub Action version 7 uses the Scanner CLI v8. Please see this [release note for the SonarQube Scan GitHub Action](https://github.com/SonarSource/sonarqube-scan-action/releases/tag/v7.0.0).
* The main change on Scanner CLI v8 is related to the embedded JRE version which is now Java 21. Please see [this release note for the SonarScanner CLI](https://github.com/SonarSource/sonar-scanner-cli/releases/tag/8.0.0.6341).
Considerations about upgrading to GitHub Action v6
When updating to SonarQube Scan GitHub action `v6`, you might have to update your workflow to change how arguments are quoted because the `args` input is parsed differently. See [this release note](https://github.com/SonarSource/sonarqube-scan-action/releases/tag/v6.0.0) for more information.
Considerations about upgrading to GitHub Action v5
`v3.1.0` and below of the GitHub Action are based on Docker: at every execution of the action, a dedicated docker container is spawned.
The advantage of using container are primarily:
* **Isolation**, since the SonarScanner gets only access to the directory where the project is checked out.
* **Full control of the environment** where the SonarScanner is executed, in terms of required utilities such as `wget` and `keytool`.
The use of Docker comes, however, with multiple disadvantages regarding SonarQube analysis:
* Issues with analyzers requiring access to a system-level directory, such as cache of dependencies in Java or Dart.
* Issues with DockerHub rate limit on peak workload scenarios.
* Requirement by GitHub to run as root user.
* Support for Docker-based actions limited to Linux - no support of Windows nor MacOS.
`v5` doesn't have the Docker dependency, making the action [composite](https://docs.github.com/en/actions/sharing-automations/creating-actions/creating-a-composite-action). The action now runs in the environment of the runner executing the GitHub workflow.
### Prerequisites From GitHub Action version v5
* If your runner is [GitHub-hosted](https://docs.github.com/en/actions/using-github-hosted-runners/using-github-hosted-runners/about-github-hosted-runners), all required utilities should be already provided by default.
* If your runner is [self-hosted](https://docs.github.com/en/actions/hosting-your-own-runners/managing-self-hosted-runners/about-self-hosted-runners), ensure that the following utilities are installed and available in the `PATH`: `unzip`, `wget` or `curl`.
If your SonarQube uses certificates
If you use the [sonarqube-scan-action](https://github.com/SonarSource/sonarqube-scan-action) for your GitHub Action and your SonarQube Server has certificates that need to be recognized by the GitHub runner, you’ll need to set the `SONAR_ROOT_CERT` environment variable in GitHub , see [manage-tls-certificates](https://docs.sonarsource.com/sonarqube-server/analyzing-source-code/scanners/scanner-environment/manage-tls-certificates "mention") for more information.
### Configuring the project analysis parameters
For general information, see [analysis-parameters](https://docs.sonarsource.com/sonarqube-server/analyzing-source-code/analysis-parameters "mention") and the respective SonarScanner section: [sonarscanner-for-maven](https://docs.sonarsource.com/sonarqube-server/analyzing-source-code/scanners/sonarscanner-for-maven "mention"), [sonarscanner-for-gradle](https://docs.sonarsource.com/sonarqube-server/analyzing-source-code/scanners/sonarscanner-for-gradle "mention"), [using](https://docs.sonarsource.com/sonarqube-server/analyzing-source-code/scanners/dotnet/using "mention") for .NET, the [sonarscanner](https://docs.sonarsource.com/sonarqube-server/analyzing-source-code/scanners/sonarscanner "mention"), or the [configuring](https://docs.sonarsource.com/sonarqube-server/analyzing-source-code/scanners/npm/configuring "mention") for NPM pages.
Specific to GitHub Actions is the setting of `sonar.token` and `sonar.host.url`: With GitHub Actions, you can configure these parameters in GitHub. This may be done at the global level by the system administrator, or at the project level by the Project Administrator as explained below . It makes sense to store the server URL at the global level.
In addition, starting from the [Developer edition](https://www.sonarsource.com/plans-and-pricing/developer/), SonarScanners running in GitHub Actions can automatically detect branches and pull requests being built so you don’t need to specifically pass them as parameters to the scanner. See [introduction](https://docs.sonarsource.com/sonarqube-server/analyzing-source-code/branch-analysis/introduction "mention") to branch analysis and [introduction](https://docs.sonarsource.com/sonarqube-server/analyzing-source-code/pull-request-analysis/introduction "mention") to pull request analysis for more information.
#### Storing the authentication token in GitHub for your project
The authentication token used in GitHub Actions workflows should be securely stored in a GitHub secret: see GitHub’s documentation on [Encrypted secrets](https://docs.github.com/en/actions/reference/encrypted-secrets) for more information.
Proceed as follows
1. In the SonarQube Community Build UI, generate a SonarQube Community Build token for your project.
2. Create a repository secret in GitHub with:
* Name: SONAR\_TOKEN
* Value: the token you generated in the previous step.
#### Storing the SonarQube Server URL in GitHub for your project
Create an [organization variable](https://docs.github.com/en/actions/writing-workflows/choosing-what-your-workflow-does/store-information-in-variables) in GitHub with:
* Name: SONAR\_HOST\_URL
* Value: SonarQube Server URL
### Configuring the build.yml file
This section shows you how to configure your `.github/workflows/build.yml` file.
GitHub Actions can build specific branches and pull requests if you use `on.push.branches` and `on.pull-requests` configurations as shown in the examples below.
Click the scanner you’re using below to expand the example configuration:
{% hint style="warning" %}
The errors "*Missing blame information…*" and "*Could not find ref…*" can be caused by checking out with a partial or shallow clone, or when using Git submodules. You should disable git shallow clone to make sure the scanner has access to all of your history when running analysis with GitHub Actions.
For more information, see the [GitHub Actions Checkout README](https://github.com/actions/checkout).
{% endhint %}
SonarScanner for Gradle
**Note:** A project key might have to be provided through a `build.gradle` file, or through the command line parameter. For more information, see the [sonarscanner-for-gradle](https://docs.sonarsource.com/sonarqube-server/analyzing-source-code/scanners/sonarscanner-for-gradle "mention") documentation.
Add the following to your `build.gradle` file:
```yaml
plugins {
id "org.sonarqube" version ""
}
```
We recommend using the latest version of [SonarScanner for Gradle](https://docs.sonarsource.com/sonarqube-server/analyzing-source-code/scanners/sonarscanner-for-gradle).
Write the following in your workflow YAML file:
```yaml
name: Build
on:
push:
branches:
- main # the name of your main branch
pull_request:
types: [opened, synchronize, reopened]
jobs:
build:
name: Build
runs-on: ubuntu-latest
steps:
- uses: actions/checkout@v6
with:
fetch-depth: 0 # Shallow clones should be disabled for a better relevancy of analysis
- name: Set up JDK 17
uses: actions/setup-java@v1
with:
java-version: 17
- name: Cache SonarQube packages
uses: actions/cache@v4
with:
path: ~/.sonar/cache
key: ${{ runner.os }}-sonar
restore-keys: ${{ runner.os }}-sonar
- name: Cache Gradle packages
uses: actions/cache@v4
with:
path: ~/.gradle/caches
key: ${{ runner.os }}-gradle-${{ hashFiles('**/*.gradle') }}
restore-keys: ${{ runner.os }}-gradle
- name: Build and analyze
env:
SONAR_TOKEN: ${{ secrets.SONAR_TOKEN }}
SONAR_HOST_URL: ${{ vars.SONAR_HOST_URL }}
run: ./gradlew build sonar --info
```
SonarScanner for Maven
**Note:** A project key might have to be provided through the command line parameter. For more information, see the [sonarscanner-for-maven](https://docs.sonarsource.com/sonarqube-server/analyzing-source-code/scanners/sonarscanner-for-maven "mention") documentation.
Write the following in your workflow YAML file:
```yaml
name: Build
on:
push:
branches:
- main # the name of your main branch
pull_request:
types: [opened, synchronize, reopened]
jobs:
build:
name: Build
runs-on: ubuntu-latest
steps:
- uses: actions/checkout@v6
with:
fetch-depth: 0 # Shallow clones should be disabled for a better relevancy of analysis
- name: Set up JDK 17
uses: actions/setup-java@v1
with:
java-version: 17
- name: Cache SonarQube packages
uses: actions/cache@v4
with:
path: ~/.sonar/cache
key: ${{ runner.os }}-sonar
restore-keys: ${{ runner.os }}-sonar
- name: Cache Maven packages
uses: actions/cache@v4
with:
path: ~/.m2
key: ${{ runner.os }}-m2-${{ hashFiles('**/pom.xml') }}
restore-keys: ${{ runner.os }}-m2
- name: Build and analyze
env:
SONAR_TOKEN: ${{ secrets.SONAR_TOKEN }}
SONAR_HOST_URL: ${{ vars.SONAR_HOST_URL }}
run: mvn -B verify org.sonarsource.scanner.maven:sonar-maven-plugin:sonar
```
SonarScanner for .NET
Write the following in your workflow YAML file:
```yaml
name: Build
on:
push:
branches:
- main # the name of your main branch
pull_request:
types: [opened, synchronize, reopened]
jobs:
build:
name: Build
runs-on: windows-latest
steps:
- name: Set up JDK 17
uses: actions/setup-java@v1
with:
java-version: 1.17
- uses: actions/checkout@v6
with:
fetch-depth: 0 # Shallow clones should be disabled for a better relevancy of analysis
- name: Cache SonarQube packages
uses: actions/cache@v4
with:
path: ~\.sonar\cache
key: ${{ runner.os }}-sonar
restore-keys: ${{ runner.os }}-sonar
- name: Cache SonarQube scanner
id: cache-sonar-scanner
uses: actions/cache@v4
with:
path: .\.sonar\scanner
key: ${{ runner.os }}-sonar-scanner
restore-keys: ${{ runner.os }}-sonar-scanner
- name: Install SonarQube scanner
if: steps.cache-sonar-scanner.outputs.cache-hit != 'true'
shell: powershell
run: |
New-Item -Path .\.sonar\scanner -ItemType Directory
dotnet tool update dotnet-sonarscanner --tool-path .\.sonar\scanner
- name: Build and analyze
shell: pwsh
run: |
# Fail fast and propagate errors to the runner
# https://learn.microsoft.com/en-us/powershell/module/microsoft.powershell.core/about/about_preference_variables?view=powershell-7.5
$ErrorActionPreference = "Stop"
$PSNativeCommandUseErrorActionPreference = $true
.\.sonar\scanner\dotnet-sonarscanner begin /k:"example" /d:sonar.token="${{ secrets.SONAR_TOKEN }}" /d:sonar.host.url="${{ vars.SONAR_HOST_URL }}"
dotnet build
.\.sonar\scanner\dotnet-sonarscanner end /d:sonar.token="${{ secrets.SONAR_TOKEN }}"
```
SonarScanner CLI
You can easily set up a basic configuration using the [SonarQube Scan](https://github.com/marketplace/actions/official-sonarqube-scan) GitHub action, for all languages, including C, C++, Objective-C, and Dart.
You’ll find the GitHub Actions and configuration instructions page on the GitHub Marketplace.
### Preventing pull request merges when the quality gate fails
In GitHub, you can block pull requests from being merged if it is failing the quality gate. To do this:
1. In GitHub, go to your repository **Settings** > **Branches** > **Branch protection rules** and select either the **Add rule** or **Edit** button if you already have a rule on the branch you wish to protect.
2. Complete the **Branch protection rule** form:
* Define the **Branch name pattern** (the name of the branch you wish to protect)
* Select **Require status checks to pass before merging** to open supplementary form fields.
* In the **Search for status checks in the last week** for this repository field, select **Require branches to be up to date before merging**, then find `SonarQube Code Analysis` and add it to the list of required checks.
### Failing the workflow when the quality gate fails
You can use the [SonarQube Server quality gate check GitHub Action](https://github.com/marketplace/actions/sonarqube-quality-gate-check) to ensure your code meets your quality standards by failing your workflow when your quality gate fails.
If you do not want to use the SonarQube Server quality gate Check Action, you can instruct the scanner to wait for the SonarQube Server quality gate status at the end of the analysis. To enable this, pass the `-Dsonar.qualitygate.wait=true` parameter to the scanner in the workflow YAML file.
This will make the analysis step poll SonarQube Server regularly until the quality gate is computed. This will increase your workflow duration. Note that, if the quality gate is red, this will make the analysis step fail, even if the actual analysis itself is successful. We advise only using this parameter when necessary (for example, to block a deployment workflow if the quality gate is red). It should not be used to report the quality gate status in a pull request, as this is already done with pull request decoration.
You can set the `sonar.qualitygate.timeout` property to an amount of time (in seconds) that the scanner should wait for a report to be processed. The default is 300 seconds.
### If you use a monorepo
The monorepo feature is supported starting in the [Enterprise edition](https://www.sonarsource.com/plans-and-pricing/enterprise/) provided the GitHub integration with SonarQube Server has been properly set up. See [global-setup](https://docs.sonarsource.com/sonarqube-server/devops-platform-integration/gitlab-integration/global-setup "mention") for more details.
To add the SonarQube Server analysis to your monorepo workflow:
#### Step 1: Configure the analysis parameters for each project
For each project in the monorepo, set the analysis parameters: See **Configuring the project analysis parameters** above. Specific to the monorepo set up is the setting of the `sonar.token` property explained below.
You must create the Sonar tokens used to authenticate to the SonarQube Server during the analysis of the monorepo projects and store them securely in GitHub secrets. You can either use one single global-level token for the monorepo or a project-level token for each project in the monorepo.
Proceed as follows:
1. Generate the token in SonarQube Server:
* For project tokens, create a token for each project you need the Administer permission on the project. Go to the **Security** page of your SonarQube Server account and create a **Project analysis token**.
* For a global token, ask your administrator. The procedure is similar but you need the global Administer system permission.
2. In your GitHub repository, go to **Settings** > **Secrets**.
3. Select **New repository secret**.
4. In the **Name** field:
* If you use a global token: enter `SONAR_TOKEN`.
* Otherwise: enter `SONAR_TOKEN_1` (or another unique identifier within the monorepo) for the token of your first project in the monorepo.
5. In the **Value** field, enter the corresponding token value.
6. Select **Add secret**.
7. If you use project-level tokens, repeat steps 3 to 6 for each additional project in the monorepo.
#### Step 2: Configure the build.yml file of the monorepo
In the `build.yml` file of your monorepo:
* Define the paths to the projects.
* Add a job for each project in the monorepo.
See the file example below.
{% hint style="info" %}
You can fail a job inside the monorepo workflow when the quality gate fails and/or prevent pull request merges when the quality gate fails: see **Failing the workflow when the quality gate fails** above.
{% endhint %}
{% tabs %}
{% tab title="MAVEN" %}
```yaml
name: Build
on:
push:
branches:
- main # or another name representing the main branch
paths:
- 'PROJECT1_PATH/**' # monorepo projects paths from the monorepo root directory
- 'PROJECT2_PATH/**'
pull_request:
types: [opened, synchronize, reopened]
jobs:
sonarQubeScan1:
name: sonarQubeScan1
runs-on: ubuntu-latest
steps:
- uses: actions/checkout@v6
with:
fetch-depth: 0 # Shallow clones should be disabled for a better relevancy of analysis
- name: Set up JDK 17
uses: actions/setup-java@v1
with:
java-version: 17
- name: Cache SonarQube packages
uses: actions/cache@v4
with:
path: ~/.sonar/cache
key: ${{ runner.os }}-sonar
restore-keys: ${{ runner.os }}-sonar
- name: Cache Maven packages
uses: actions/cache@v4
with:
path: ~/.m2
key: ${{ runner.os }}-m2-${{ hashFiles('**/pom.xml') }}
restore-keys: ${{ runner.os }}-m2
- name: SonarQube Scan 1
env:
SONAR_TOKEN: ${{ secrets.SONAR_TOKEN_1 }} # analysis token associated to your project
SONAR_HOST_URL: ${{ vars.SONAR_HOST_URL }}
run: |
cd PROJECT1_PATH/
mvn -B verify org.sonarsource.scanner.maven:sonar-maven-plugin:sonar -Dsonar.projectKey=SONAR_PROJECT1_KEY -Dsonar.projectName='SONAR_PROJECT1_NAME'
# Replace variables with project path, key and name
sonarQubeScan2:
name: sonarQubeScan2
runs-on: ubuntu-latest
steps:
- uses: actions/checkout@v6
with:
fetch-depth: 0 # Shallow clones should be disabled for a better relevancy of analysis
- name: Set up JDK 17
uses: actions/setup-java@v1
with:
java-version: 17
- name: Cache SonarQube packages
uses: actions/cache@v4
with:
path: ~/.sonar/cache
key: ${{ runner.os }}-sonar
restore-keys: ${{ runner.os }}-sonar
- name: Cache Maven packages
uses: actions/cache@v4
with:
path: ~/.m2
key: ${{ runner.os }}-m2-${{ hashFiles('**/pom.xml') }}
restore-keys: ${{ runner.os }}-m2
- name: SonarQube Scan 2
env:
SONAR_TOKEN: ${{ secrets.SONAR_TOKEN_2 }} # analysis token associated to your project
SONAR_HOST_URL: ${{ vars.SONAR_HOST_URL }}
run: |
cd PROJECT2_PATH/
mvn -B verify org.sonarsource.scanner.maven:sonar-maven-plugin:sonar -Dsonar.projectKey=SONAR_PROJECT2_KEY -Dsonar.projectName='SONAR_PROJECT2_NAME'
# Replace variables with project path, key and name
# Add other scan jobs if you wish to scan more projects in the monorepo
```
{% endtab %}
{% tab title="GRADLE" %}
```yaml
name: Build
on:
push:
branches:
- main # or another name representing the main branch
paths:
- 'PROJECT1_PATH/**' # monorepo projects paths from the monorepo root directory
- 'PROJECT2_PATH/**'
pull_request:
types: [opened, synchronize, reopened]
jobs:
sonarQubeScan1:
name: sonarQube Scan 1
runs-on: ubuntu-latest
steps:
- uses: actions/checkout@v6
with:
fetch-depth: 0 # Shallow clones should be disabled for a better relevancy of analysis
- name: Set up JDK 17
uses: actions/setup-java@v1
with:
java-version: 17
- name: Cache SonarQube packages
uses: actions/cache@v4
with:
path: ~/.sonar/cache
key: ${{ runner.os }}-sonar
restore-keys: ${{ runner.os }}-sonar
- name: Cache Gradle packages
uses: actions/cache@v4
with:
path: ~/.gradle/caches
key: ${{ runner.os }}-gradle-${{ hashFiles('**/*.gradle') }}
restore-keys: ${{ runner.os }}-gradle
- name: sonarQube Scan 1
env:
SONAR_TOKEN: ${{ secrets.SONAR_TOKEN_1 }} # analysis token associated to your project
SONAR_HOST_URL: ${{ vars.SONAR_HOST_URL }}
run: |
cd PROJECT1_PATH/
./gradlew build sonar --info
#Replace variable with the project path
sonarQubeScan2:
name: sonarQubeScan2
runs-on: ubuntu-latest
steps:
- uses: actions/checkout@v6
with:
fetch-depth: 0 # Shallow clones should be disabled for a better relevancy of analysis
- name: Set up JDK 17
uses: actions/setup-java@v1
with:
java-version: 17
- name: Cache SonarQube packages
uses: actions/cache@v4
with:
path: ~/.sonar/cache
key: ${{ runner.os }}-sonar
restore-keys: ${{ runner.os }}-sonar
- name: Cache Gradle packages
uses: actions/cache@v4
with:
path: ~/.gradle/caches
key: ${{ runner.os }}-gradle-${{ hashFiles('**/*.gradle') }}
restore-keys: ${{ runner.os }}-gradle
- name: sonarQube Scan 2
env:
SONAR_TOKEN: ${{ secrets.SONAR_TOKEN_2 }} # analysis token associated to your project
SONAR_HOST_URL: ${{ vars.SONAR_HOST_URL }}
run: |
cd PROJECT2_PATH/
./gradlew build sonar --info
#Replace variable with the project path
# Add other scan jobs if you wish to scan more projects in the monorepo
```
{% endtab %}
{% tab title=".NET" %}
```yaml
name: Build
on:
push:
branches:
- main # or another name representing the main branch
paths:
- 'PROJECT1_PATH/**' # monorepo projects paths from the monorepo root directory
- 'PROJECT2_PATH/**'
pull_request:
types: [opened, synchronize, reopened]
jobs:
sonarQubeScan1:
name: sonarQube Scan 1
runs-on: windows-latest
steps:
- uses: actions/checkout@v6
with:
fetch-depth: 0 # Shallow clones should be disabled for a better relevancy of analysis
- name: Set up JDK 17
uses: actions/setup-java@v1
with:
java-version: 17
- name: Cache SonarQube packages
uses: actions/cache@v4
with:
path: ~\.sonar\cache
key: ${{ runner.os }}-sonar
restore-keys: ${{ runner.os }}-sonar
- name: Cache SonarQube scanner
id: cache-sonar-scanner
uses: actions/cache@v4
with:
path: .\.sonar\scanner
key: ${{ runner.os }}-sonar-scanner
restore-keys: ${{ runner.os }}-sonar-scanner
- name: Install SonarQube scanner
if: steps.cache-sonar-scanner.outputs.cache-hit != 'true'
shell: powershell
run: |
New-Item -Path .\.sonar\scanner -ItemType Directory
dotnet tool update dotnet-sonarscanner --tool-path .\.sonar\scanner
- name: sonarQube Scan 1
shell: powershell
run: |
.\.sonar\scanner\dotnet-sonarscanner begin /k:"SONAR_PROJECT1_KEY" /d:sonar.token="${{ secrets.SONAR_TOKEN_1 }}" /d:sonar.host.url="${{ vars.SONAR_HOST_URL }}"
dotnet build PROJECT1_PATH\SLN_FILE.SLN
.\.sonar\scanner\dotnet-sonarscanner end /d:sonar.token="${{ secrets.SONAR_TOKEN_1 }}"
# Replace variables with the project key and the path to the project solution file
sonarQubeScan2:
name: sonarQube Scan 2
runs-on: windows-latest
steps:
- uses: actions/checkout@v6
with:
fetch-depth: 0 # Shallow clones should be disabled for a better relevancy of analysis
- name: Set up JDK 17
uses: actions/setup-java@v1
with:
java-version: 17
- name: Cache SonarQube packages
uses: actions/cache@v4
with:
path: ~\.sonar\cache
key: ${{ runner.os }}-sonar
restore-keys: ${{ runner.os }}-sonar
- name: Cache SonarQube scanner
id: cache-sonar-scanner
uses: actions/cache@v4
with:
path: .\.sonar\scanner
key: ${{ runner.os }}-sonar-scanner
restore-keys: ${{ runner.os }}-sonar-scanner
- name: Install SonarQube scanner
if: steps.cache-sonar-scanner.outputs.cache-hit != 'true'
shell: powershell
run: |
New-Item -Path .\.sonar\scanner -ItemType Directory
dotnet tool update dotnet-sonarscanner --tool-path .\.sonar\scanner
- name: sonarQube Scan 2
shell: pwsh
run: |
# Fail fast and propagate errors to the runner
# https://learn.microsoft.com/en-us/powershell/module/microsoft.powershell.core/about/about_preference_variables?view=powershell-7.5
$ErrorActionPreference = "Stop"
$PSNativeCommandUseErrorActionPreference = $true
.\.sonar\scanner\dotnet-sonarscanner begin /k:"SONAR_PROJECT2_KEY" /d:sonar.token="${{ secrets.SONAR_TOKEN_2 }}" /d:sonar.host.url="${{ vars.SONAR_HOST_URL }}"
dotnet build PROJECT2_PATH\SLN_FILE.SLN
.\.sonar\scanner\dotnet-sonarscanner end /d:sonar.token="${{ secrets.SONAR_TOKEN_2 }}"
# Replace variables with the project key and the path to the project solution file
# Add other scan jobs if you wish to scan more projects in the monorepo
```
{% endtab %}
{% tab title="C, C++, OBJECTIVE-C" %}
```yaml
name: Build
on:
push:
branches:
- main # or another name representing the main branch
paths:
- 'PROJECT1_PATH/**' # monorepo projects paths from the monorepo root directory
- 'PROJECT2_PATH/**'
pull_request:
types: [opened, synchronize, reopened]
jobs:
sonarQubeScan1:
name: SonarQube Scan 1
runs-on: ubuntu-latest
env:
BUILD_WRAPPER_OUT_DIR: build_wrapper_output_directory # Directory where Build Wrapper output will be placed
steps:
- uses: actions/checkout@v6
with:
fetch-depth: 0 # Shallow clones should be disabled for a better relevancy of analysis
- name: Install Build Wrapper
uses: SonarSource/sonarqube-scan-action/install-build-wrapper@v4
env:
SONAR_HOST_URL: ${{vars.SONAR_HOST_URL}}
- name: Run Build Wrapper for project 1
run: |
build-wrapper-linux-x86-64 --out-dir ${{ env.BUILD_WRAPPER_OUT_DIR }}
- name: SonarQube Scan for project 1
uses: SonarSource/sonarqube-scan-action@v7
env:
SONAR_TOKEN: ${{ secrets.SONAR_TOKEN_1 }}
SONAR_HOST_URL: ${{vars.SONAR_HOST_URL}}
with:
args: >
--define sonar.cfamily.compile-commands="${{ env.BUILD_WRAPPER_OUT_DIR }}/compile_commands.json" -Dsonar.projectBaseDir="PROJECT1_PATH/"
#Replace variable with project path
sonarQubeScan2:
name: SonarQube Scan 2
runs-on: ubuntu-latest
env:
BUILD_WRAPPER_OUT_DIR: build_wrapper_output_directory # Directory where build-wrapper output will be placed
steps:
- uses: actions/checkout@v6
with:
fetch-depth: 0 # Shallow clones should be disabled for a better relevancy of analysis
- name: Install Build Wrapper
uses: SonarSource/sonarqube-scan-action/install-build-wrapper@v4
env:
SONAR_HOST_URL: ${{vars.SONAR_HOST_URL}}
- name: Run Build Wrapper for project 2
run: |
build-wrapper-linux-x86-64 --out-dir ${{ env.BUILD_WRAPPER_OUT_DIR }}
- name: SonarQube Scan for project 2
env:
SONAR_TOKEN: ${{ secrets.SONAR_TOKEN_2 }}
SONAR_HOST_URL: ${{vars.SONAR_HOST_URL}}
with:
args: >
--define sonar.cfamily.build-wrapper-output="${{ env.BUILD_WRAPPER_OUT_DIR }}" -Dsonar.projectBaseDir="PROJECT2_PATH/"4
#Replace variable with project path
# Add other scan jobs if you wish to scan more projects in the monorepo
```
{% endtab %}
{% tab title="OTHER" %}
The `projectBaseDir` parameter below retrieves a `sonar-project.properties` configuration file used to define the project’s analysis parameters (particularly the project key). For more information about this file, see **Configuring your project** in [SonarScanner CLI](https://app.gitbook.com/s/69lEOGGgOhCpumODGD9v/analyzing-source-code/scanners/sonarscanner "mention").
```yaml
name: Build
on:
push:
branches:
- main # or another name representing the main branch
paths:
- 'PROJECT1_PATH/**' # monorepo projects paths from the monorepo root directory
- 'PROJECT2_PATH/**'
pull_request:
types: [opened, synchronize, reopened]
jobs:
sonarQubeScan1:
name: sonarQubeScan1
runs-on: ubuntu-latest
steps:
- uses: actions/checkout@v6
with:
fetch-depth: 0 # Shallow clones should be disabled for a better relevancy of analysis
- name: SonarQube Scan 1
uses: SonarSource/sonarqube-scan-action@v7
env:
SONAR_TOKEN: ${{ secrets.SONAR_TOKEN_1 }} # analysis token associated to your project
SONAR_HOST_URL: ${{ vars.SONAR_HOST_URL }}
with:
projectBaseDir: PROJECT1_PATH/ # the path to your project from the monorepo root directory
# If you wish to fail your job when the Quality Gate is red, uncomment the
# following lines. This would typically be used to fail a deployment.
# We do not recommend to use this in a pull request. Prefer using pull request
# decoration instead.
# - uses: SonarSource/sonarqube-quality-gate-action@v1
# timeout-minutes: 5
# env:
# SONAR_TOKEN: ${{ secrets.SONAR_TOKEN_1 }}
sonarQubeScan2:
name: sonarQubeScan2
runs-on: ubuntu-latest
steps:
- uses: actions/checkout@v6
with:
fetch-depth: 0 # Shallow clones should be disabled for a better relevancy of analysis
- name: SonarQube Scan 2
uses: SonarSource/sonarqube-scan-action@v7
env:
SONAR_TOKEN: ${{ secrets.SONAR_TOKEN_2 }} # analysis token associated to your project
SONAR_HOST_URL: ${{ vars.SONAR_HOST_URL }}
with:
projectBaseDir: PROJECT2_PATH/ # project path from the monorepo root directory
# If you wish to fail your job when the Quality Gate is red, uncomment the
# following lines. This would typically be used to fail a deployment.
# We do not recommend to use this in a pull request. Prefer using pull request
# decoration instead.
# - uses: SonarSource/sonarqube-quality-gate-action@v1
# timeout-minutes: 5
# env:
# SONAR_TOKEN: ${{ secrets.SONAR_TOKEN_2 }}
# Add other scan jobs if you wish to scan more projects in the monorepo
```
{% endtab %}
{% endtabs %}
---
# Source: https://docs.sonarsource.com/sonarqube-community-build/devops-platform-integration/gitlab-integration/adding-analysis-to-gitlab-ci-cd.md
# Source: https://docs.sonarsource.com/sonarqube-server/10.6/devops-platform-integration/gitlab-integration/adding-analysis-to-gitlab-ci-cd.md
# Source: https://docs.sonarsource.com/sonarqube-server/10.7/devops-platform-integration/gitlab-integration/adding-analysis-to-gitlab-ci-cd.md
# Source: https://docs.sonarsource.com/sonarqube-server/10.8/devops-platform-integration/gitlab-integration/adding-analysis-to-gitlab-ci-cd.md
# Source: https://docs.sonarsource.com/sonarqube-server/2025.2/devops-platform-integration/gitlab-integration/adding-analysis-to-gitlab-ci-cd.md
# Source: https://docs.sonarsource.com/sonarqube-server/2025.3/devops-platform-integration/gitlab-integration/adding-analysis-to-gitlab-ci-cd.md
# Source: https://docs.sonarsource.com/sonarqube-server/2025.5/devops-platform-integration/gitlab-integration/adding-analysis-to-gitlab-ci-cd.md
# Source: https://docs.sonarsource.com/sonarqube-server/2025.1/devops-platform-integration/gitlab-integration/adding-analysis-to-gitlab-ci-cd.md
# Source: https://docs.sonarsource.com/sonarqube-server/2025.4/devops-platform-integration/gitlab-integration/adding-analysis-to-gitlab-ci-cd.md
# Source: https://docs.sonarsource.com/sonarqube-server/2025.6/devops-platform-integration/gitlab-integration/adding-analysis-to-gitlab-ci-cd.md
# Source: https://docs.sonarsource.com/sonarqube-server/devops-platform-integration/gitlab-integration/adding-analysis-to-gitlab-ci-cd.md
# Adding analysis to GitLab CI/CD pipeline
Once you have created your project in SonarQube, you can add the SonarQube analysis to your GitLab CI/CD pipeline:
1. Configure the project analysis parameters.
2. Add the analysis to your GitLab CI/CD pipeline.
3. Commit and push your code to start the analysis.
You can fail the pipeline when the quality gate fails (see below). If you use a monorepo, see [#monorepo](#monorepo "mention"). To manage other project-level features, see [setting-up-at-project-level](https://docs.sonarsource.com/sonarqube-server/devops-platform-integration/gitlab-integration/setting-up-at-project-level "mention").
For more information on configuring your build with GitLab CI/CD, see the [GitLab CI/CD configuration reference](https://docs.gitlab.com/ee/administration/cicd/).
{% hint style="info" %}
A GitLab runner with a [Docker executor](https://docs.gitlab.com/runner/executors/#docker-executor) is required.
{% endhint %}
### Configuring the project analysis parameters
For general information, see [analysis-parameters](https://docs.sonarsource.com/sonarqube-server/analyzing-source-code/analysis-parameters "mention") and the respective SonarScanner section: [sonarscanner-for-maven](https://docs.sonarsource.com/sonarqube-server/analyzing-source-code/scanners/sonarscanner-for-maven "mention"), [sonarscanner-for-gradle](https://docs.sonarsource.com/sonarqube-server/analyzing-source-code/scanners/sonarscanner-for-gradle "mention"), [using](https://docs.sonarsource.com/sonarqube-server/analyzing-source-code/scanners/dotnet/using "mention"), [sonarscanner](https://docs.sonarsource.com/sonarqube-server/analyzing-source-code/scanners/sonarscanner "mention"), and [configuring](https://docs.sonarsource.com/sonarqube-server/analyzing-source-code/scanners/npm/configuring "mention").
With GitLab CI/CD, you can securely set `sonar.token` and `sonar.host.url` properties through [CI/CD variables](https://docs.gitlab.com/ee/ci/variables/#creating-a-custom-environment-variable): see **Setting the authentication to the SonarQube Server** below.
In addition, starting from the [Developer edition](https://www.sonarsource.com/plans-and-pricing/developer/), SonarScanners running in GitLab CI/CD can automatically detect branches and merge requests being built so you don’t need to specifically pass them as parameters to the scanner. See [introduction](https://docs.sonarsource.com/sonarqube-server/analyzing-source-code/branch-analysis/introduction "mention") to branch analysis and [introduction](https://docs.sonarsource.com/sonarqube-server/analyzing-source-code/pull-request-analysis/introduction "mention") to pull request analysis for more information.
### Configuring your .gitlab-ci-yml file
This section shows you how to configure your GitLab CI/CD .gitlab-ci.yml file. The `allow_failure` parameter in the examples allows a job to fail without impacting the rest of the CI suite.
By default, GitLab will build all branches but not merge requests. To build merge requests, you need to use rules in your .gitlab-ci.yml. See the example configurations below for more information.
Select the scanner you’re using below to expand an example configuration:
SonarScanner for Gradle
```yaml
sonarqube-check:
image: gradle:8.10.0-jdk17-jammy
variables:
SONAR_USER_HOME: "${CI_PROJECT_DIR}/.sonar" # Defines the location of the analysis task cache
GIT_DEPTH: "0" # Tells git to fetch all the branches of the project, required by the analysis task
cache:
key: "${CI_JOB_NAME}"
paths:
- .sonar/cache
script: gradle sonarqube -Dsonar.qualitygate.wait=true
allow_failure: false
rules:
- if: $CI_COMMIT_REF_NAME == 'main' || $CI_PIPELINE_SOURCE == 'merge_request_event'
```
SonarScanner for Maven
```yaml
sonarqube-check:
image: maven:3.9.3-eclipse-temurin-17
variables:
SONAR_USER_HOME: "${CI_PROJECT_DIR}/.sonar" # Defines the location of the analysis task cache
GIT_DEPTH: "0" # Tells git to fetch all the branches of the project, required by the analysis task
cache:
key: "${CI_JOB_NAME}"
paths:
- .sonar/cache
script:
- mvn org.sonarsource.scanner.maven:sonar-maven-plugin:sonar-Dsonar.qualitygate.wait=true
allow_failure: false
rules:
- if: $CI_COMMIT_REF_NAME == 'main' || $CI_PIPELINE_SOURCE == 'merge_request_event'
```
SonarScanner CLI
```yaml
sonarqube-check:
image:
name: sonarsource/sonar-scanner-cli:latest
entrypoint: [""]
variables:
SONAR_USER_HOME: "${CI_PROJECT_DIR}/.sonar" # Defines the location of the analysis task cache
GIT_DEPTH: "0" # Tells git to fetch all the branches of the project, required by the analysis task
cache:
key: "${CI_JOB_NAME}"
paths:
- .sonar/cache
script:
- sonar-scanner -Dsonar.qualitygate.wait=true
allow_failure: false
rules:
- if: $CI_COMMIT_REF_NAME == 'main' || $CI_PIPELINE_SOURCE == 'merge_request_event'
```
**Project key**\
A project key has to be provided through `sonar-project.properties` or through the command line parameter. For more information, see the [sonarscanner](https://docs.sonarsource.com/sonarqube-server/analyzing-source-code/scanners/sonarscanner "mention") documentation.
**Self-signed certificates**\
If you secure your SonarQube Server instance with a self-signed certificate, you may need to build a custom image based on `sonarsource/sonar-scanner-cli`. See the section **Advanced docker configuration** within the [sonarscanner](https://docs.sonarsource.com/sonarqube-server/analyzing-source-code/scanners/sonarscanner "mention") documentation.
SonarScanner for .NET
Configure your .gitlab-ci.yml file for .NET.
```yaml
sonarqube-check:
image: mcr.microsoft.com/dotnet/sdk:latest
variables:
SONAR_USER_HOME: "${CI_PROJECT_DIR}/.sonar" # Defines the location of the analysis task cache
GIT_DEPTH: "0" # Tells git to fetch all the branches of the project, required by the analysis task
cache:
key: "${CI_JOB_NAME}"
paths:
- .sonar/cache
script:
- "dotnet tool install --global dotnet-sonarscanner"
- "export PATH=\"$PATH:$HOME/.dotnet/tools\""
- "dotnet sonarscanner begin /k:\"projectKey" /d:sonar.token=\"$SONAR_TOKEN\" /d:\"sonar.host.url=$SONAR_HOST_URL\" " #Replace "projectKey" with your project key
- "dotnet build"
- "dotnet sonarscanner end /d:sonar.token=\"$SONAR_TOKEN\""
allow_failure: false
only:
- merge_requests
- main
- develop
```
{% hint style="info" %}
For C/C++/Objective-C configuration examples, you can refer to the [sonarsource-cfamily-examples](https://github.com/orgs/sonarsource-cfamily-examples/repositories?q=sq+gitlab) repository.
{% endhint %}
{% hint style="warning" %}
The errors "*Missing blame information…*" and "*Could not find ref…*" can be caused by checking out with a partial or shallow clone, or when using Git submodules. You should disable git shallow clone to make sure the scanner has access to all of your history when running analysis with GitLab CI/CD.
For more information, see [Git shallow clone](https://docs.gitlab.com/ee/user/project/repository/monorepos/#shallow-cloning).
{% endhint %}
### Failing the pipeline when the quality gate fails
You can configure the SonarScanner to wait for the quality gate result. This setting will force the pipeline to fail if the quality gate fails.
To do so:
1. Set the `sonar.qualitygate.wait` analysis parameter to `true`.
2. You can set the `sonar.qualitygate.timeout` analysis parameters to the number of seconds that the scanner should wait for a report to be processed. The default is 300 seconds.
See the configuration examples in [#configuring-yml-file](#configuring-yml-file "mention")file above.
### If you use a monorepo
The monorepo feature is supported starting in the [Enterprise edition](https://www.sonarsource.com/plans-and-pricing/enterprise/) provided the GitLab integration with SonarQube Server has been properly set up, see [global-setup](https://docs.sonarsource.com/sonarqube-server/devops-platform-integration/gitlab-integration/global-setup "mention") for more details.
To add the SonarQube Server analysis to your GitLab’s monorepo CI/CD pipeline:
1. If not already done, create the SonarQube Server projects related to your monorepo: see [monorepos](https://docs.sonarsource.com/sonarqube-server/project-administration/monorepos "mention").
2. For each project, set up integration features: see [setting-up-at-project-level](https://docs.sonarsource.com/sonarqube-server/devops-platform-integration/gitlab-integration/setting-up-at-project-level "mention").
3. For each project in the monorepo:
* Set up the authentication to SonarQube Server (`sonar.token` and `sonar.host.url` properties). See the [#setting-up-the-authentication-to-the-sonarqube-server](#setting-up-the-authentication-to-the-sonarqube-server "mention") expandable below, for instructions.
* Set the other necessary analysis parameters; see the [#configuring-analysis-parameters](#configuring-analysis-parameters "mention") article above for details. The mandatory parameter is: `sonar.projectKey` property.
4. Add a CI/CD YAML syntax reference ( .gitlab-ci.yml) in the home directory of the monorepo: Define a job for each monorepo project in .gitlab-ci.yml.
5. You can fail the pipeline when the quality gate fails: see above.
Setting up the authentication to the SonarQube Server
You have to create the Sonar tokens used to authenticate to the SonarQube Server during the analysis of the monorepo projects and store them securely in the pipeline environment. You can either use one single global-level token for the monorepo or use a project-level token for each project in the monorepo. Note that the user account used to generate the token must have the Execute analysis permission.
Proceed as follows:
1. Generate your tokens in SonarQube Server, see [managing-tokens](https://docs.sonarsource.com/sonarqube-server/user-guide/managing-tokens "mention"):
* For project tokens, create a token for each project (you need the Administer permission on the project): Go to the Security page of your SonarQube Server account and create a Project analysis token.
* For a global token, ask your administrator (The procedure is similar but you need the global Administer system permission.).
2. Create a [custom environment variable](https://docs.gitlab.com/ee/ci/variables/) in GitLab and set the Key as follows:
* If you use a global token: enter `SONAR_TOKEN`.
* Otherwise: enter `SONAR_TOKEN_1` (or another unique identifier within the monorepo) for the token of your first project in the monorepo
3. In the Value field, enter the corresponding token value.
4. If you use project-level tokens, repeat steps 2 to 3 for each additional project in the monorepo.
5. Create a custom environment variable in GitLab with:
* Key: `SONAR_HOST_URL`
* Value: `SonarQube Server URL`
---
# Source: https://docs.sonarsource.com/sonarqube-community-build/devops-platform-integration/azure-devops-integration/adding-analysis-to-pipeline.md
# Source: https://docs.sonarsource.com/sonarqube-server/2025.2/devops-platform-integration/azure-devops-integration/adding-analysis-to-pipeline.md
# Source: https://docs.sonarsource.com/sonarqube-server/2025.3/devops-platform-integration/azure-devops-integration/adding-analysis-to-pipeline.md
# Source: https://docs.sonarsource.com/sonarqube-server/2025.5/devops-platform-integration/azure-devops-integration/adding-analysis-to-pipeline.md
# Source: https://docs.sonarsource.com/sonarqube-server/2025.1/devops-platform-integration/azure-devops-integration/adding-analysis-to-pipeline.md
# Source: https://docs.sonarsource.com/sonarqube-server/2025.4/devops-platform-integration/azure-devops-integration/adding-analysis-to-pipeline.md
# Source: https://docs.sonarsource.com/sonarqube-server/2025.6/devops-platform-integration/azure-devops-integration/adding-analysis-to-pipeline.md
# Source: https://docs.sonarsource.com/sonarqube-server/devops-platform-integration/azure-devops-integration/adding-analysis-to-pipeline.md
# Adding analysis to Azure pipeline
- [Introduction](/sonarqube-server/devops-platform-integration/azure-devops-integration/adding-analysis-to-pipeline/introduction.md): Adding SonarQube Server analysis to your Azure pipeline.
- [Gradle or Maven project](/sonarqube-server/devops-platform-integration/azure-devops-integration/adding-analysis-to-pipeline/gradle-or-maven-project.md): Using YAML or the Azure Classic editor to create the Azure build pipeline with new Gradle or Maven tasks.
- [.NET project](/sonarqube-server/devops-platform-integration/azure-devops-integration/adding-analysis-to-pipeline/dotnet-project.md): Using YAML or the Azure Classic editor to create the Azure build pipeline for .Net projects.
- [C family project](/sonarqube-server/devops-platform-integration/azure-devops-integration/adding-analysis-to-pipeline/c-family-project.md): Using YAML or the Azure Classic editor to create the Azure build pipeline for C family projects.
- [JS, TS, Go, Python, PHP, etc. project](/sonarqube-server/devops-platform-integration/azure-devops-integration/adding-analysis-to-pipeline/js-ts-go-python-php.md): Using YAML or the Azure Classic editor to create the Azure build pipeline for JavaScript, TypeScript, Go, Python, PHP, and other projects.
- [Monorepo projects](/sonarqube-server/devops-platform-integration/azure-devops-integration/adding-analysis-to-pipeline/monorepo-projects.md): Adding analysis to your Azure build pipeline for a monorepo.
- [Using various features](/sonarqube-server/devops-platform-integration/azure-devops-integration/adding-analysis-to-pipeline/various-features.md): Adding more SonarQube Server features to the analysis for your Azure build pipeline.
- [Quality gate status in release pipeline](/sonarqube-server/devops-platform-integration/azure-devops-integration/adding-analysis-to-pipeline/quality-gate-status-in-release-pipeline.md): Adding SonarQube Quality Gate status check to your Azure release pipeline.
- [SonarQube tasks for Azure Pipelines](/sonarqube-server/devops-platform-integration/azure-devops-integration/adding-analysis-to-pipeline/sonarqube-tasks.md): Tasks supported by the Azure DevOps Extension for SonarQube Server you can use in your Azure build pipeline.
---
# Source: https://docs.sonarsource.com/sonarqube-community-build/extension-guide/adding-coding-rules.md
# Source: https://docs.sonarsource.com/sonarqube-server/8.9/extension-guide/adding-coding-rules.md
# Source: https://docs.sonarsource.com/sonarqube-server/9.8/extension-guide/adding-coding-rules.md
# Source: https://docs.sonarsource.com/sonarqube-server/9.9/extension-guide/adding-coding-rules.md
# Source: https://docs.sonarsource.com/sonarqube-server/10.0/extension-guide/adding-coding-rules.md
# Source: https://docs.sonarsource.com/sonarqube-server/10.1/extension-guide/adding-coding-rules.md
# Source: https://docs.sonarsource.com/sonarqube-server/10.2/extension-guide/adding-coding-rules.md
# Source: https://docs.sonarsource.com/sonarqube-server/10.3/extension-guide/adding-coding-rules.md
# Source: https://docs.sonarsource.com/sonarqube-server/10.4/extension-guide/adding-coding-rules.md
# Source: https://docs.sonarsource.com/sonarqube-server/10.5/extension-guide/adding-coding-rules.md
# Source: https://docs.sonarsource.com/sonarqube-server/10.6/extension-guide/adding-coding-rules.md
# Source: https://docs.sonarsource.com/sonarqube-server/10.7/extension-guide/adding-coding-rules.md
# Source: https://docs.sonarsource.com/sonarqube-server/10.8/extension-guide/adding-coding-rules.md
# Source: https://docs.sonarsource.com/sonarqube-server/2025.2/extension-guide/adding-coding-rules.md
# Source: https://docs.sonarsource.com/sonarqube-server/2025.3/extension-guide/adding-coding-rules.md
# Source: https://docs.sonarsource.com/sonarqube-server/2025.5/extension-guide/adding-coding-rules.md
# Source: https://docs.sonarsource.com/sonarqube-server/2025.1/extension-guide/adding-coding-rules.md
# Source: https://docs.sonarsource.com/sonarqube-server/2025.4/extension-guide/adding-coding-rules.md
# Source: https://docs.sonarsource.com/sonarqube-server/2025.6/extension-guide/adding-coding-rules.md
# Source: https://docs.sonarsource.com/sonarqube-server/extension-guide/adding-coding-rules.md
# Adding coding rules
There are three ways to add coding rules to SonarQube Server:
* Writing a SonarQube Server plugin in Java that uses SonarQube Server APIs to add new rules
* Adding XPath rules directly through the SonarQube Server web interface
* Importing [generic-issue-import-format](https://docs.sonarsource.com/sonarqube-server/analyzing-source-code/importing-external-issues/generic-issue-import-format "mention") generated by an independently run tool
The Java API will be more fully-featured than what’s available for XPath, and is generally preferable. However, this comes with the overhead of maintaining a SonarQube Server plugin (including keeping it up-to-date as APIs change, upgrading the plugin after releasing a new version).
Importing [generic-issue-import-format](https://docs.sonarsource.com/sonarqube-server/analyzing-source-code/importing-external-issues/generic-issue-import-format "mention") is a good solution when there’s a very specific need for a subset of projects on your SonarQube Server instance. They are the most flexible option but lack some features (such as being able to control their execution by inclusion in a quality profile).
{% hint style="info" %}
Before implementing a new coding rule, you should consider whether it is specific to your own context or might benefit others. If it might benefit others, you can propose it on the [community forum](https://community.sonarsource.com/). If there is a shared interest, then it might be implemented for you directly in the related language plugin. It means less maintenance for you and benefit to others.
{% endhint %}
### Custom rule support by language
| | **XPath 1.0** | **Java** | **Generic Issue Reports** | **Other** |
| ----------------------- | ---------------------------------------------------------------------------------------------------------------------- | ---------------------------------------------------------------------------------------------------------------------- | ---------------------------------------------------------------------------------------------------------------------- | ----------------------------------------------------------------------------------------------------------------------------------------------------------------------------------------------------------------------------------------------------------------------------------------------------------- |
| ABAP | - | - |  |
|
### Adding coding rules using Java
Writing coding rules in Java is a six-step process:
1. Create a SonarQube Server plugin.
2. Put a dependency on the API of the language plugin for which you are writing coding rules.
3. Create as many custom rules as required.
4. Generate the SonarQube Server plugin (jar file).
5. Place this jar file in the `/extensions/plugins` directory.
6. Restart SonarQube Server.
See the following pages to see samples and details about how to create coding rules
* [COBOL](https://docs.sonarsource.com/sonarqube-server/analyzing-source-code/languages/cobol#custom-rules)
* [Java](https://docs.sonarsource.com/sonarqube-server/analyzing-source-code/languages/java#custom-rules)
* [PHP](https://docs.sonarsource.com/sonarqube-server/analyzing-source-code/languages/php#custom-rules)
* [Python](https://docs.sonarsource.com/sonarqube-server/analyzing-source-code/languages/python#custom-rules)
* [RPG](https://docs.sonarsource.com/sonarqube-server/analyzing-source-code/languages/rpg#custom-rules-for-rpg)
**Notes**:
* Custom rules written in Java will run in SonarQube for IDE if SonarQube for IDE compatibility is properly notated in the custom plugin manifest, see [this example](https://github.com/SonarSource/sonar-java/blob/d6c878a2494365fe55eaa58873a226e2d3285263/docs/java-custom-rules-example/pom.xml#L80) for the syntax.
* When writing custom Java rules, you can only use classes from [org.sonar.plugins.java.api](https://github.com/SonarSource/sonar-java/tree/7.16.0.30901/java-frontend/src/main/java/org/sonar/plugins/java/api) package. For more information see the [What you can use, and what you can’t](https://github.com/SonarSource/sonar-java/blob/master/docs/CUSTOM_RULES_101.md#what-you-can-use-and-what-you-cant) article.
### Adding coding rules using XPath
SonarQube Server provides a quick and easy way to add new coding rules directly via the web interface for certain languages using XPath 1.0 expressions. For XML, which is already immediately accessible to XPath, you can simply write your rules and check them using any of the [freely available tools](http://codebeautify.org/Xpath-Tester) for examining XPath on XML. If you’re writing rules for XML, skip down to the Adding your rule to the server section once you’ve got your rules written.
For other languages how to access a variable, for example, in XPath is less obvious, so we’ve provided tools.
#### Writing an XPath rule using SSLR toolkit
The rules must be written in XPath (version 1.0) to navigate the language’s [abstract syntax tree](http://en.wikipedia.org/wiki/Abstract_syntax_tree) (AST). For most languages, an SSLR Toolkit is provided to help you navigate the AST. You need to download the `sslr-{language}-toolkit-{version}.jar` file corresponding to the version of your language plugin you have on your SonarQube Server instance.
Each language’s SSLR Toolkit is a standalone application that displays the AST for a piece of code source that you feed into it, allowing you to read the node names and attributes from your code sample and write your XPath expression. Knowing the XPath language is the only prerequisite, and there are a lot of tutorials on XPath online.
The latest version of SSLR Toolkit can be downloaded from the following locations:
* [Flex](https://binaries.sonarsource.com/?prefix=Distribution/sslr-flex-toolkit/)
* [PL/SQL](https://binaries.sonarsource.com/?prefix=CommercialDistribution/sslr-plsql-toolkit/)
* [PL/I](https://binaries.sonarsource.com/?prefix=CommercialDistribution/sslr-pli-toolkit/)
For an SSLR preview, consider the following source code sample:
```css-79elbk
function HelloWorld(hour) {
if (hour) {
this.hour = hour;
} else {
var date = new Date();
this.hour = date.getHours();
}
this.displayGreeting = function() {
if (this.hour >= 22 || this.hour <= 5)
document.write("Good night, World!");
else
document.write("Hello, World!");
}
}
```
While parsing source code, SonarQube Server builds an abstract syntax tree (AST) for it, and the SSLR toolkit provided for each language will show you SonarQube Server’s AST for a given piece of code. Here’s the AST for our sample:
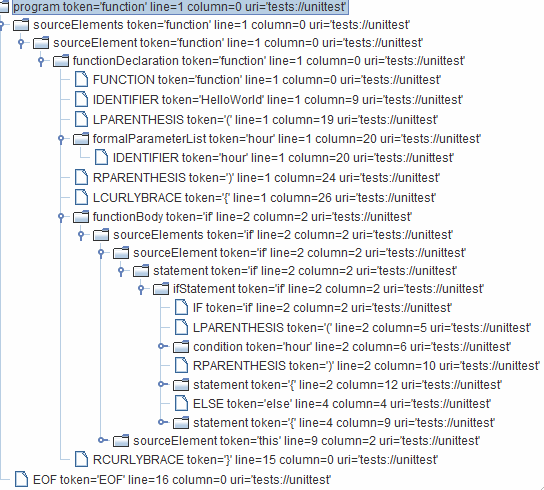
Asset sample
The [XPath](http://en.wikipedia.org/wiki/XPath) language provides a way to write coding rules by navigating this AST, and the SSLR toolkit for the language will give you the ability to test your new rules against your sample code.
#### Adding your Rule to SonarQube Server
Once your new rule is written, you can add it to SonarQube Server:
1. Log in as a quality profile administrator.
2. Go to the **Rules** page.
3. Select the language for which you want to create the XPath rule.
4. Tick the **Template** criterion and select **Show Templates Only**.
5. Look for the XPath rule template.
6. Click on it to select it, then use the interface controls to create a new instance.
7. Fill in the form that pops up.
8. Once you’ve created your rule, you’ll need to add it to a quality profile and run an analysis to see it in action.
### Coding rule guidelines
These are the guidelines that Sonar uses internally to specify new rules. Rules in community plugins are not required to adhere to these guidelines. They are provided here only in case they are useful.
Note that fields "title", "description" and "message" have a different format when the rule type is "hotspot".
#### Guidelines applicable to all rules
**Code examples**
Do not give examples that make references to real companies or organizations:
```css-79elbk
$fp = file_get_contents("https://www.real-company.com");
```
Should be replaced by a neutral website:
```css-79elbk
$fp = file_get_contents("https//www.example.com");
// or even better:
$fp = file_get_contents("https://localhost");
```
**See/References**
When a reference is made to the specification of a standard, e.g. MISRA, the following steps must also be taken:
* add any related tags such as security, bug, etc.
* add the relevant standard-related tag/label such as cwe, misra, etc. (If you forget, the overnight automation will remember for you.)
* update the appropriate field on the **References** tab with the cited id. (If you forget, the overnight automation will remember for you.)
If needed, references to other rules should be listed under a "see also" heading. If a "see" heading exists in the rule, then the "see also" title should be at the h3 level. Otherwise, use an h2 for it.
Other rules should be linked to only if they are related or contradictory (such as a pair of rules about where `{` should go).
Why list references to other rules under "see also" instead of "see"? The "see" section is used to support the current rule, and one rule cannot be used as justification for another rule.
**Classifying your rules**
{% tabs %}
{% tab title="CLASSIFYING-RULES-MQR-MODE" %}
Now that you’ve fleshed out the description, you should have a fairly clear idea of what software qualities this rule impacts, but to be explicit:
**Reliability**: Something that’s wrong or potentially wrong.
**Maintainability**: Something that will confuse a maintainer or cause them to stumble in their reading of the code.
**Security**: Something that’s wrong which impacts the application’s security and therefore needs a fix.
**Hotspot**: An optional protection is missing and the developer needs to do a review before deciding whether to apply a fix.
Sometimes the line between reliability and maintainability is fuzzy. When in doubt, ask yourself: "Is code that breaks this rule doing what the programmer probably intended?" If the answer is "probably not" then it’s a reliability issue. Everything else is a maintainability issue.
The main differences between a security impact and hotspots are explained on the [security-hotspots](https://docs.sonarsource.com/sonarqube-server/user-guide/security-hotspots "mention") page. During the specification of a rule, the following guidelines might also help:
The difficulty of exploiting a weakness should not be a criterion for specifying a hotspot or a security impact.
Security impacts and hotspots should not overlap but can be related to the same subject. For example, with the hotspot RSPEC-2077, formatted SQL queries are highlighted and we recommend the use of *prepare statements* as additional protection to prevent SQL-injection vulnerabilities (RSPEC-3649).
{% endtab %}
{% tab title="CLASSIFYING RULES IN STANDARD EXPERIENCE MODE" %}
Now that you’ve fleshed out the description, you should have a fairly clear idea of what type of rule this is, but to be explicit:
**Bug**: Something that’s wrong or potentially wrong.
**Code Smell**: Something that will confuse a maintainer or cause them to stumble in their reading of the code.
**Vulnerability**: Something that’s wrong which impacts the application’s security and therefore needs a fix.
**Hotspot**: An optional protection is missing and the developer needs to do a review before deciding whether to apply a fix.
Sometimes the line between bug and code smell is fuzzy. When in doubt, ask yourself: "Is code that breaks this rule doing what the programmer probably intended?" If the answer is "probably not" then it’s a bug. Everything else is a code smell.
The main differences between vulnerabilities and hotspots are explained on the [security-hotspots](https://docs.sonarsource.com/sonarqube-server/user-guide/security-hotspots "mention") page. During the specification of a rule, the following guidelines might also help:
* The difficulty of exploiting a weakness should not be a criterion for specifying a hotspot or a vulnerability.
* Vulnerabilities and hotspots should not overlap but can be related to the same subject. For example, with the hotspot [RSPEC-2077](https://jira.sonarsource.com/browse/RSPEC-2077), formatted SQL queries are highlighted and we recommend the use of *prepare statements* as additional protection to prevent SQL-injection vulnerabilities ([RSPEC-3649](https://jira.sonarsource.com/browse/RSPEC-3649)).
{% endtab %}
{% endtabs %}
**Default severities**
When assessing the default severity of a rule, the first thing to do is ask yourself "what’s the worst thing that could happen?" In answering, you should factor in Murphy’s Law without predicting Armageddon.
Once you have your answer, it’s time to assess the impact and likelihood of the worst thing happening using these specific questions:
{% tabs %}
{% tab title="SETTING SEVERITIES IN MQR MODE" %}
Security
* Impact: Could the exploitation of this issue result in significant damage to your assets or your users?
* Likelihood: Is it very likely that a hacker will be able to exploit it? What is the time to fix the issue?
Reliability
* Impact: Could this cause the application to crash or corrupt stored data?
* Likelihood: Is it very likely that the worst will happen?
Maintainability
* Impact: Could this lead a maintainer to introduce a bug?
* Likelihood: Is it very likely that the worst will happen?
Once you have your impact and likelihood assessments, you can put them in a truth table to assess the default severity of the rule:
| Rule severity | Impact | Likelihood |
| ------------- | ------ | ---------- |
| Blocker | Yes | Yes |
| High | Yes | No |
| Medium | No | Yes |
| Low | No | No |
| {% endtab %} | | |
{% tab title="SETTING SEVERITIES IN STANDARD EXPERIENCE" %}
Vulnerability
* Impact: Could the exploitation of the vulnerability result in significant damage to your assets or your users?
* Likelihood: Is it very likely that a hacker will be able to exploit it? What is the time to fix the issue?
Bug
* Impact: Could the bug cause the application to crash or corrupt stored data?
* Likelihood: Is it very likely that the worst will happen?
Code Smell
* Impact: Could the Code Smell lead a maintainer to introduce a bug?
* Likelihood: Is it very likely that the worst will happen?
Once you have your impact and likelihood assessments, you can put them in a truth table to assess the default severity of the rule:
| Rule severity | Impact | Likelihood |
| ------------- | ------ | ---------- |
| Blocker | Yes | Yes |
| Critical | Yes | No |
| Major | No | Yes |
| Minor | No | No |
| {% endtab %} | | |
| {% endtabs %} | | |
**Tags**
Rules can have 0-n tags, although most rules should have at least one. Many of the common-across-languages tags are described in [built-in-rule-tags](https://docs.sonarsource.com/sonarqube-server/user-guide/rules/built-in-rule-tags "mention").
**Evaluation of the remediation cost**
For most rules, the SQALE remediation cost is constant per issue. The goal of this section is to help define the value of this constant and to unify the way those estimations are done to prevent having some big discrepancies among language plugins.
First, classify the effort to do the remediation:
* **TRIVIAL**: No need to understand the logic and no potential impact. Examples:
* Remove unused imports.
* Replace tabulations by spaces.
* Remove call to `System.out.println()` used for debugging purposes.
* **EASY**: : No need to understand the logic but potential impacts. Examples:
* Rename a method.
* Rename a parameter.
* Remove unused private method.
* **MEDIUM**: Understanding the logic of a piece of code is required before doing a little and easy refactoring (1 or 2 lines of code), but understanding the big picture is not required. Examples:
* CURSORs should not be declared inside a loop.
* EXAMINE statement should not be used.
* `IF` should be closed with `END-IF`.
* **MAJOR**: Understanding the logic of a piece of code is required and it’s up to the developer to define the remediation action. Examples:
* Too many nested IF statements.
* Methods should not have too many parameters.
* UNION should not be used in SQL SELECT statements.
* Public Java method should have a javadoc.
* Avoid using deprecated methods.
* **HIGH**: The remediation action might lead to a local impact on the design of the application. Examples:
* Classes should not have too many responsibilities.
* Cobol programs should not have too many lines of code.
* Architectural constraint.
* **COMPLEX**: The remediation action might lead to an impact on the overall design of the application. Examples:
* Avoid cycles between packages.
Then use the following table to get the remediation cost according to the required remediation effort and to the language:
| | | | | | | |
| --------------- | ----------- | -------- | ---------- | --------- | -------- | ----------- |
| | **Trivial** | **Easy** | **Medium** | **Major** | **High** | **Complex** |
| ABAP, COBOL, … | 10min | 20min | 30min | 1h | 3h | 1d |
| Other languages | 5min | 10min | 20min | 1h | 3h | 1d |
For rules using either the "linear" or "linear with offset" remediation functions, the "Effort To Fix" field must be fed on each issue and this field is used to compute the remediation cost.
**Issue location(s) and highlighting**
For any given rule, highlighting behavior should be consistent across languages within the bounds of what’s relevant for each language.
When possible, each issue should be raised on the line of code that needs correction, with highlighting limited to the portion of the line to be corrected. For example:
* An issue for a misnamed method should be raised on the line with the method name, and the method name itself should be highlighted.
When correcting an issue requires action across multiple lines, the issue should be raised on the lowest block that encloses all relevant lines. For example an issue for:
* Method complexity should be raised on the method signature.
* Method count in a class should be raised on the class declaration.
When an issue could be made clearer by highlighting multiple code segments, such as a method complexity issue, additional issue locations may be highlighted, and additional messages may optionally be logged for those locations. In general, these guidelines should be followed for secondary issue locations:
* Highlight the minimum code to show the line’s contribution to the issue.
* Avoid using an additional message if the secondary location is likely to be on the same issue as the issue itself. For example, the rule "Parameters should be final" will raise an issue on the method name, and highlight each non-final parameter. Since all locations are likely to be on the same line, additional messages would only confuse the issue.
* Don’t write a novel. The message for a secondary location is meant to be a hint to push the user in the right direction. Don’t take over the interface with a narrative.
#### Guidelines when writing rules for issues
**Titles**
* The title of the rule should match the pattern "X should \[ not ] Y" for most rules. Note that the "should \[ not ]" pattern is too strong for Finding rules, which are about observations on the code. Finding titles should be neutral, such as "Track x".
* All other things being equal, the positive form is preferred. For example:
* "X should Y" is preferred to
* "X should not Z"
* Titles should be written in the plural form if at all possible. For example:
* Flibbers should gibbet is preferred to
* A Flibber should gibbet
* Any piece of code in the rule title should be double-quoted (and not single-quoted).
* There should be no category/tag prefixed to the rule title, such as "Accessibility - Image tags should have an alternate text attribute"
* Titles should be as concise as possible. Somewhere around 70 or 80 characters is an ideal maximum, although this is not always achievable.
Noncompliant title examples:
* A file should not have too many lines of code // Noncompliant; singular form used
* Avoid files with too many lines of code // Noncompliant; doesn’t follow "x should \[not] y" pattern
* Too many lines of code // Noncompliant
* Don’t use "System.(out/err)" // Noncompliant
* Parameters in an overriding virtual function should either use the same default arguments as the function they override, or not specify any default arguments // Noncompliant; much too long
Compliant solutions:
* Files should not have too many lines of code
* "System.(out/err)" should not be used to log messages
* Overriding virtual functions should not change parameter defaults
Starting with the subject, such as "Files", will ensure that all rules applying to files will be grouped together.
**Descriptions**
Rule descriptions should contain the following sections in the listed order:
* **Introduction:** (optional) Short summary of the topic that is no longer than a few sentences to add clarity if the title is does not provide enough clarity of the issue.
* **Why is this an issue**: Explains why this rule and the concepts behind these types of issues.
* This section includes the following subsections
* **What is the potential impact?:** (optional) What are the risks associated with this rule including examples.
* **How can I fix it?:** Explain one or multiple ways to fix this issue.
* **Noncompliant Code Example**: Providing some examples of issues
* Ideally, the examples should depend upon the default values of any parameters the rule has, and these default values should be mentioned before the code block. This is for the benefit of users whose rule parameters are tuned to something other than the default values. E.G. With a parameter of: *`:.`*`log4j.*`
* The lines in these code samples where issues are expected should be marked with a "Noncompliant" comment
* "Compliant" comments may be used to help demonstrate the difference between what is and is not allowed by the rule
* It is acceptable to omit this section when demonstrating noncompliance would take too long, e.g. "Classes should not have too many lines of code"
* **Compliant Solution**: Demonstrating how to fix the previous issues. Good to have but not required for rules that detect bugs.
* There is no need to mark anything "Compliant" in the Compliant Solution; everything here is compliant by definition
* It is acceptable to omit this section when there are too many equally viable solutions.
* This section includes the following subsections
* **How does it work?:** (optional) Explain why this fixes the problem. There can be multiple ways of fixing the issue.
* **Pitfalls:** (optional) One or multiple pitfalls to take into account when working on fixing this issue.
* **Going the extra mile:** (optional) Even though the issue might be fixed, most of the time there can be way/s to further improve on this issue or to harden your project.
* **Exceptions**: (optional) Listing and explaining some specific use cases where no issues are logged even though some might be expected.
* **More info**: (optional) Listing references and/or links to external standards like MISRA, SEI, CERT, etc.
Code samples for COBOL should be in upper case.
When displayed in SonarQube Server, any code or keywords in the description should be enclosed in `` tags. For descriptions written in JIRA, this means using double curly braces (`{{` and `}}`) to enclose such text. They will be translated in the final output.
**Messages**
Issue messages should contain the remediation message for bug and quality rules. For potential-bug rules, it should make it explicit that a manual review is required. It should be in the imperative mood ("Do x"), and therefore start with a verb.
An issue message should always end with a period (‘.’) since it is an actual sentence unless it ends with a regular expression, in which case the regular expression should be preceded by a colon and should end the message.
Any piece of code in the rule message should be double-quoted (and not single-quoted). Moreover, if an issue is triggered because a number was above a threshold value, then both the number and the threshold value should be mentioned in the issue message.
Sample messages:
* Remove or refactor this useless "switch" statement. // Compliant
* This "switch" statement is useless and should be refactored or removed. // Noncompliant
* Every "switch" statement shall have at least one case clause. // Noncompliant
* Rename this variable to comply with the regular expression: \[a-z]+ // Compliant
Sample Specification
**Generic exceptions should not be thrown**
Using generic exceptions such as `Error`, `RuntimeException`, `Throwable`, and `Exception` prevents calling methods from handling true, system-generated exceptions differently than application-generated errors.
**Noncompliant Code Example**
```css-79elbk
With the default regular expression [a-z][a-zA-Z0-9]+:
try { /* ... */ } catch (Exception e) { LOGGER.info("context"); } // Noncompliant; exception is lost
try { /* ... */ } catch (Exception e) { LOGGER.info(e); } // Noncompliant; context is required
try { /* ... */ } catch (Exception e) { LOGGER.info(e.getMessage()); } // Noncompliant; exception is lost (only message is preserved)
try {
/* ... */
} catch (Exception e) { // Noncompliant - exception is lost
throw new RuntimeException("context");
}
```
**Compliant Solution**
```css-79elbk
try { /* ... */ } catch (Exception e) { LOGGER.info("context", e); }
try {
/* ... */
} catch (Exception e) {
throw new RuntimeException("context", e);
}
```
**Exceptions**\
Generic exceptions in the signatures of overriding methods are ignored.
```css-79elbk
@Override
public void myMethod() throws Exception {...}
```
**See**
* MISRA C:2004, 4.5.2
* MITRE, [CWE-580](http://cwe.mitre.org/data/definitions/580.html) - clone() Method Without super.clone()
**See also**\
S4567 - Rule title here
**Guidelines for Hotspot rules**
See [RSPEC-6502](https://rules.sonarsource.com/docker/RSPEC-6502/) for an example of a Hotspot rule.
Titles
* The title should start with a verb in the present participle form (-ing)
* The title should end with "is security-sensitive"
Noncompliant Title Examples:
* Avoid the creation of cookies without the "secure" flag
Compliant Solution:
* Creating cookies without the "secure" flag is security-sensitive
**Descriptions**
Rule descriptions should contain the following sections in the listed order:
* **Rationale**: (unlabeled) Explains why this rule makes sense.
* It starts with a copy of the title. The "is security sensitive" part can be replaced with "can lead to …" when there is one risk and it is easy to describe in a short manner.
* **Ask Yourself**: A set of questions that the developer should ask herself/himself.
* Those questions should help the developer to decide whether or not a missing protection has to be implemented based on the context of the application. For example, if the highlighted missing protection (such as a secure cookie flag) helps protect a bit against MITM attacks, list all mandatory protections that, on the contrary, greatly lower this risk (such as encryption). At the end of the review, the developer should be sure that in its context the implementation of this protection improves the overall application’s security.
* The hotspot-review should be done by developers by themselves without external help:
* It is not recommended to drive the review with **data sensitivity** (eg: "*if this data/feature/component is sensitive there is a risk*") because this concept is too generic and the use of the application (with or without sensitive data) may vary over time and cannot be controlled by developers.
* It is not recommended to highlight a widely-used technology (weak in some contexts) when its replacement can only be done with such significant changes (eg: a new authentication system or a different database engine) that it would block developers who may not be responsible for the architecture of the application.
* This section ends with "There is a risk if you answered yes to any of those questions."
* **Recommended Secure Coding Practices**: describing all the ways to mitigate the risk.
* This part can be easily translated by a developer into examples of implementation/source code, if the recommendations are too abstract the developer will not be able to imagine the fix and decide whether to implement it.
* The following parts are mandatory in RSPEC language-specification:
* **Sensitive Code Example**: same as "Noncompliant code example" for Bug, Vulnerability, and Code Smell rules.
* **Compliant Solution**: same as for Bug, Vulnerability, and Code Smell rules.
* **See**: (optional) same as for Bug, Vulnerability, and Code Smell rules.
* **Deprecated**: (optional) listing replacement rules with links.
Guidelines regarding COBOL, keywords, and code are the same as for other rules.
**Messages**
Most of the time you can paraphrase the title:
* Start the sentence with "Make sure that"
* Replace "is security-sensitive" with "is safe here"
Examples:
* Make sure creating this cookie without the "secure" flag is safe.
---
# Source: https://docs.sonarsource.com/sonarqube-cloud/administering-sonarcloud/managing-enterprise/adding-organizations-to-your-enterprise.md
# Adding organizations to your enterprise
You can add an organization to an existing enterprise provided you are an admin of both the enterprise and the organization.
{% hint style="warning" %}
If you add a Team plan organization to your enterprise, the organization’s Team plan subscription will be automatically cancelled and the organization will be moved to the Enterprise plan without a refund. Therefore, we recommend adding your organizations before their next billing date to avoid double charges.
{% endhint %}
{% hint style="info" %}
Currently, Sonar restricts each enterprise to a maximum of 200 organizations.
{% endhint %}
To add an organization to an existing enterprise:
1. Log in to SonarQube Cloud with your enterprise admin account.
2. Retrieve your enterprise.
3. In the **Organizations** tab, select the **Add organization** button. The **Add an organization** dialog opens.
4. Select the organization to be added and select the **Add** button.\
If you cannot see your organization, it probably means that your enterprise admin account is not admin of the organization. It may be the case if you imported your organization by using another user account (typically, from another DevOps platform’s account). In that case, see *Adding organizations belonging to multiple DevOps platforms* below.
### Adding organizations belonging to multiple DevOps platforms
You can add to your enterprise organizations belonging to multiple DevOps platforms (The prerequisites described above in *Adding an organization to an enterprise* apply.).
When possible, use the same admin account to create your enterprise and import the organizations you want to add to your enterprise.
Currently, the following apply (The limitations on Bitbucket organization import will be removed in a future SonarQube Cloud release.):
* To import a Bitbucket workspace, you must log in to SonarQube Cloud with your Bitbucket account.
* To import a GitHub organization, a GitLab group, or an Azure DevOps organization, you can use any account, including your SSO account.
If you use different admin accounts (e.g., if your enterprise should contain GitHub organizations and Bitbucket workspaces), your enterprise admin account may not be an admin of the new organization you want to add to your enterprise. For example, your enterprise admin account is a GitHub account; you have imported a Bitbucket workspace to SonarQube Cloud with your Bitbucket account, and you want to add the so-created organization to your enterprise. In that case, additional steps are necessary as described below:
1. Log in to SonarQube Cloud with your Bitbucket account (the account you used to import your workspace).
2. Add your GitHub account (enterprise admin account) as a member of the organization to be added. See [organization-members](https://docs.sonarsource.com/sonarqube-cloud/administering-sonarcloud/managing-organization/users-and-permissions/organization-members "mention") for more information.
3. Give this account the Administer Organization permission. See [organization-permissions](https://docs.sonarsource.com/sonarqube-cloud/administering-sonarcloud/managing-organization/users-and-permissions/organization-permissions "mention") for more information.
4. Log in to SonarQube Cloud with your GitHub account and add the new organization to the enterprise as described above in *Adding an organization to an enterprise*.
{% hint style="warning" %}
In the example above, if the Bitbucket account and the enterprise admin account use the same email address, the procedure will not work. To solve the problem, let another user perform steps 1 and 2 with their Bitbucket account.
{% endhint %}
### Removing an organization from your enterprise
You can remove an organization from an existing enterprise provided:
* You are an admin of both the enterprise and the organization through a SonarQube Cloud account that is not an SSO account.
* The organization to be removed is not the only member of your enterprise (you currently cannot downgrade an entire enterprise).
When you remove an organization, you have to choose the organization’s new subscription plan (Free or Team). Be aware that you’ll loose features. For more information, see [#reviewing-the-plan-changes](https://docs.sonarsource.com/sonarqube-cloud/managing-subscription/changing-plan#reviewing-the-plan-changes "mention").
Proceed as follows:
1. Retrieve the enterprise.
2. In the **Organizations** tab, select the **Remove and downgrade** button at the far right of the organization to be removed. The **Select an alternate plan to downgrade** dialog opens.
3. Select the plan
4. Select the **Confirm removal and downgrade** button and follow the instructions to complete your subscription. Note that you will not be able to analyze your organization’s private projects as long as you haven’t completed your new subscription.
### Related pages
[retrieving-and-viewing-your-enterprise](https://docs.sonarsource.com/sonarqube-cloud/administering-sonarcloud/managing-enterprise/retrieving-and-viewing-your-enterprise "mention")\
[creating-your-enterprise](https://docs.sonarsource.com/sonarqube-cloud/administering-sonarcloud/managing-enterprise/creating-your-enterprise "mention")\
[enterprise-security](https://docs.sonarsource.com/sonarqube-cloud/administering-sonarcloud/managing-enterprise/enterprise-security "mention")\
[managing-the-enterprise-related-permissions](https://docs.sonarsource.com/sonarqube-cloud/administering-sonarcloud/managing-enterprise/managing-the-enterprise-related-permissions "mention")\
[managing-the-lines-of-code-within-your-enterprise](https://docs.sonarsource.com/sonarqube-cloud/administering-sonarcloud/managing-enterprise/managing-the-lines-of-code-within-your-enterprise "mention")\
[changing-enterprise-settings](https://docs.sonarsource.com/sonarqube-cloud/administering-sonarcloud/managing-enterprise/changing-enterprise-settings "mention")\
[downgrading-your-enterprise](https://docs.sonarsource.com/sonarqube-cloud/administering-sonarcloud/managing-enterprise/downgrading-your-enterprise "mention")
---
# Source: https://docs.sonarsource.com/sonarqube-community-build/extension-guide/developing-a-plugin/adding-pages-to-the-webapp.md
# Source: https://docs.sonarsource.com/sonarqube-server/8.9/extension-guide/developing-a-plugin/adding-pages-to-the-webapp.md
# Source: https://docs.sonarsource.com/sonarqube-server/9.8/extension-guide/developing-a-plugin/adding-pages-to-the-webapp.md
# Source: https://docs.sonarsource.com/sonarqube-server/9.9/extension-guide/developing-a-plugin/adding-pages-to-the-webapp.md
# Source: https://docs.sonarsource.com/sonarqube-server/10.0/extension-guide/developing-a-plugin/adding-pages-to-the-webapp.md
# Source: https://docs.sonarsource.com/sonarqube-server/10.1/extension-guide/developing-a-plugin/adding-pages-to-the-webapp.md
# Source: https://docs.sonarsource.com/sonarqube-server/10.2/extension-guide/developing-a-plugin/adding-pages-to-the-webapp.md
# Source: https://docs.sonarsource.com/sonarqube-server/10.3/extension-guide/developing-a-plugin/adding-pages-to-the-webapp.md
# Source: https://docs.sonarsource.com/sonarqube-server/10.4/extension-guide/developing-a-plugin/adding-pages-to-the-webapp.md
# Source: https://docs.sonarsource.com/sonarqube-server/10.5/extension-guide/developing-a-plugin/adding-pages-to-the-webapp.md
# Source: https://docs.sonarsource.com/sonarqube-server/10.6/extension-guide/developing-a-plugin/adding-pages-to-the-webapp.md
# Source: https://docs.sonarsource.com/sonarqube-server/10.7/extension-guide/developing-a-plugin/adding-pages-to-the-webapp.md
# Source: https://docs.sonarsource.com/sonarqube-server/10.8/extension-guide/developing-a-plugin/adding-pages-to-the-webapp.md
# Source: https://docs.sonarsource.com/sonarqube-server/2025.2/extension-guide/developing-a-plugin/adding-pages-to-the-webapp.md
# Source: https://docs.sonarsource.com/sonarqube-server/2025.3/extension-guide/developing-a-plugin/adding-pages-to-the-webapp.md
# Source: https://docs.sonarsource.com/sonarqube-server/2025.5/extension-guide/developing-a-plugin/adding-pages-to-the-webapp.md
# Source: https://docs.sonarsource.com/sonarqube-server/2025.1/extension-guide/developing-a-plugin/adding-pages-to-the-webapp.md
# Source: https://docs.sonarsource.com/sonarqube-server/2025.4/extension-guide/developing-a-plugin/adding-pages-to-the-webapp.md
# Source: https://docs.sonarsource.com/sonarqube-server/2025.6/extension-guide/developing-a-plugin/adding-pages-to-the-webapp.md
# Source: https://docs.sonarsource.com/sonarqube-server/extension-guide/developing-a-plugin/adding-pages-to-the-webapp.md
# Adding pages to the webapp
SonarQube Server’s UI is built as a Single Page Application using [React](https://reactjs.org/). It provides the ability to add new pages to the UI using JavaScript. A page (or page extension) is a self-contained JavaScript application that runs in the SonarQube Server environment. You can find the example of page extensions in the [SonarQube](https://github.com/SonarSource/sonarqube) or [sonar-custom-plugin-example](https://github.com/SonarSource/sonar-custom-plugin-example/tree/7.x/) repositories on GitHub.
Note that for security reasons, pages added to the UI cannot include [inline scripts](https://developer.mozilla.org/en-US/docs/Web/HTTP/Headers/Content-Security-Policy/script-src#unsafe_inline_script) and [unsafe eval](https://developer.mozilla.org/en-US/docs/Web/HTTP/Headers/Content-Security-Policy/script-src#unsafe_eval_expressions) expressions.
### Prerequisites
Before reading this guide, make sure you know the [plugin-basics](https://docs.sonarsource.com/sonarqube-server/extension-guide/developing-a-plugin/plugin-basics "mention").
### Create a Java class implementing PageDefinition
For each page, you’ll need to set a key and a name. The page key should have the format `plugin_key/page_id` (e.g.: `governance/project_dump`). The `plugin_key` is computed from the `` in your `pom.xml`, or can be set explicitly in the pom using the `` parameter in the `sonar-packaging-maven-plugin` configuration. All the pages should be declared in this class. Here is an example.
```css-79elbk
import org.sonar.api.web.page.Page;
import org.sonar.api.web.page.PageDefinition;
import org.sonar.api.web.page.Context;
import static org.sonar.api.web.page.Page.Scope.COMPONENT;
import static org.sonar.api.web.page.Page.Qualifier.VIEW;
import static org.sonar.api.web.page.Page.Qualifier.SUB_VIEW;
public class MyPluginPageDefinition implements PageDefinition {
@Override
public void define(Context context) {
context
.addPage(Page.builder("my_plugin/global_page")
.setName("Global Page")
.build())
.addPage(Page.builder("my_plugin/project_page")
.setName("Project Page")
.setScope(COMPONENT)
.build())
.addPage(Page.builder("my_plugin/portfolio_page")
.setName("Portfolio Page")
.setScope(COMPONENT)
.setComponentQualifiers(VIEW, SUB_VIEW)
.build())
.addPage(Page.builder("my_plugin/admin_page")
.setName("Admin Page")
.setAdmin(true)
.build());
}
}
```
#### Configuring each page
There are 3 settings available when you define the page extensions using the `PageDefinition` class:
* `setAdmin(boolean admin)`: flag this page as restricted to users with "administer" permission. Defaults to `false`.
* `setScope(org.sonar.api.web.page.Page.Scope scope)`: set the scope of this page. Available scopes are `GLOBAL` (default), which will add this page to the main menu, and `COMPONENT`, which will add the page to a project, application, or portfolio menu (applications and portfolios only apply to Enterprise Edition and above).
* `setComponentQualifiers(org.sonar.api.web.page.Qualifier... qualifiers)`: if `setScope()` is set to `COMPONENT`, this sets to what kind of component the page applies to. Available qualifiers are `PROJECT`, `APP`, `VIEW` (portfolio), and `SUB_VIEW` (`APP`, `VIEW`, and `SUB_VIEW` only apply to Enterprise Edition and above). You can pass multiple qualifiers. If no qualifier is set, it will apply to all types.
### Create a JavaScript file per page
The `PageDefinition` will register each key as an available route in SonarQube Server. Whenever this route is visited, SonarQube Server will asynchronously fetch a single JavaScript file from your plugin’s `/static/` directory, and boot up your page’s application. This file should have the same name as the `page_id` you defined in your `PageDefinition` class. In the example in Step 1, you would need 4 different JavaScript files:
* `/static/global_page.js`
* `/static/project_page.js`
* `/static/portfolio_page.js`
* `/static/admin_page.js`
Each file *must* call the global `window.registerExtension()` function, and pass its *full key* as a first argument (`plugin_key/page_id`, e.g.: `governance/project_dump`). The second argument is the *start* callback. This function will be called once your page is started, and receive information about the current page as an argument (see below). The return value of the start callback depends on how you want to implement your page:
If you want to use [React](https://reactjs.org/), you should return a React Component:
```css-79elbk
// static/global_page.js
import React from "react";
import App from "./components/App";
window.registerExtension('my_plugin/global_page', function (options) {
return
});
```
If you want to use any other framework, you should perform any start logic directly inside the start function body, and **return a shutdown callback**:
```css-79elbk
// static/global_page.js
const init = require("./my-app/init");
window.registerExtension('my_plugin/global_page', function (options) {
// Start up my custom application, passing the DOM element which will serve as
// the container.
init.boot(options.el, options.currentUser, options.component);
// Whenever the user leaves the page, cleanly shut everything down
// (i.e., remove event listeners, stop running timers, etc).
return function () {
init.removeEventListeners();
init.clearState();
init.shutdown();
};
});
```
The `options` object will contain the following:
* `options.el`: A DOM node you must use to inject your content.
* `options.currentUser`: Information about the current user.
* (optional) `options.component`: Contains the information of the current project, application, or portfolio.
* (optional) `options.branchLike`: Contains the information of the current branch or pull request.
SonarQube Server doesn’t guarantee any JavaScript library availability at runtime (except React). If you need a library, include it in the final file.
#### CSS files
If you want a static CSS file to be loaded when your extension is bootstrapped, rather than using run-time inclusion of styles, you can pass `true` as a third parameter to the `window.registerExtension()` function. This will trigger the loading of a CSS file that *must* have the same basename as the registering JS file. I.e., if your extension JS file is `/static/global_page.js`, the CSS file must be called `/static/global_page.css`. The bootstrap will wait for the CSS file to be fully loaded before calling the `start` callback.
### Examples
We recommend checking out the [sonar-custom-plugin-example](https://github.com/SonarSource/sonar-custom-plugin-example/) repository. It contains detailed examples using several front-end frameworks, and its code is thoroughly documented. It also describes how to run a local development server to speed up the front-end development, without requiring a full rebuild and re-deploy to test your changes.
---
# Source: https://docs.sonarsource.com/sonarqube-server/10.5/devops-platform-integration/github-integration/adding-sonarqube-analysis-to-your-workflow.md
# Adding analysis to GitHub Actions workflow
SonarScanners running in GitHub Actions can automatically detect branches and pull requests being built so you don’t need to specifically pass them as parameters to the scanner.
To analyze your projects with GitHub Actions, you need to:
1. Create your GitHub Secrets.
2. Configure your workflow YAML file.
3. Commit and push your code to start the analysis.
### Creating your GitHub secrets
You can create repository secrets from your GitHub repository. See GitHub’s documentation on [Encrypted secrets](https://docs.github.com/en/actions/reference/encrypted-secrets) for more information.
You need to set the following GitHub repository secrets to analyze your projects with GitHub Actions:
* **Sonar Token**: Generate a SonarQube [generating-and-using-tokens](https://docs.sonarsource.com/sonarqube-server/10.5/user-guide/user-account/generating-and-using-tokens "mention") and, in GitHub, create a new repository secret in GitHub with `SONAR_TOKEN` as the **Name** and the token you generated as the **Value**.
* **Sonar Host URL**: In GitHub, create a new repository secret with `SONAR_HOST_URL` as the **Name** and your SonarQube server URL as the **Value**.
### Configuring your .github/workflows/build.yml file
This section shows you how to configure your `.github/workflows/build.yml` file.
You’ll set up your build according to your SonarQube edition:
* **Community Edition**: Community Edition doesn’t support multiple branches, so you should only analyze your main branch. You can restrict analysis to your main branch by setting it as the only branch in your `on.push.branches` configuration in your workflow YAML file, and not using `on.pull_request`.
* **Developer Edition and above**: GitHub Actions can build specific branches and pull requests if you use `on.push.branches` and `on.pull-requests` configurations as shown in the examples below.
Click the scanner you’re using below to expand the example configuration:
SonarScanner for Gradle
**Note:** A project key might have to be provided through a `build.gradle` file, or through the command line parameter. For more information, see the [sonarscanner-for-gradle](https://docs.sonarsource.com/sonarqube-server/10.5/analyzing-source-code/scanners/sonarscanner-for-gradle "mention") documentation.
Add the following to your `build.gradle` file:
```css-79elbk
plugins {
id "org.sonarqube" version "3.5.0.2730"
}
```
Write the following in your workflow YAML file:
```css-79elbk
name: Build
on:
push:
branches:
- main # the name of your main branch
pull_request:
types: [opened, synchronize, reopened]
jobs:
build:
name: Build
runs-on: ubuntu-latest
steps:
- uses: actions/checkout@v2
with:
fetch-depth: 0 # Shallow clones should be disabled for a better relevancy of analysis
- name: Set up JDK 17
uses: actions/setup-java@v1
with:
java-version: 17
- name: Cache SonarQube packages
uses: actions/cache@v1
with:
path: ~/.sonar/cache
key: ${{ runner.os }}-sonar
restore-keys: ${{ runner.os }}-sonar
- name: Cache Gradle packages
uses: actions/cache@v1
with:
path: ~/.gradle/caches
key: ${{ runner.os }}-gradle-${{ hashFiles('**/*.gradle') }}
restore-keys: ${{ runner.os }}-gradle
- name: Build and analyze
env:
SONAR_TOKEN: ${{ secrets.SONAR_TOKEN }}
SONAR_HOST_URL: ${{ secrets.SONAR_HOST_URL }}
run: ./gradlew build sonar --info
```
SonarScanner for Maven
**Note:** A project key might have to be provided through the command line parameter. For more information, see the [sonarscanner-for-maven](https://docs.sonarsource.com/sonarqube-server/10.5/analyzing-source-code/scanners/sonarscanner-for-maven "mention") documentation.
Write the following in your workflow YAML file:
```css-79elbk
name: Build
on:
push:
branches:
- main # the name of your main branch
pull_request:
types: [opened, synchronize, reopened]
jobs:
build:
name: Build
runs-on: ubuntu-latest
steps:
- uses: actions/checkout@v2
with:
fetch-depth: 0 # Shallow clones should be disabled for a better relevancy of analysis
- name: Set up JDK 17
uses: actions/setup-java@v1
with:
java-version: 17
- name: Cache SonarQube packages
uses: actions/cache@v1
with:
path: ~/.sonar/cache
key: ${{ runner.os }}-sonar
restore-keys: ${{ runner.os }}-sonar
- name: Cache Maven packages
uses: actions/cache@v1
with:
path: ~/.m2
key: ${{ runner.os }}-m2-${{ hashFiles('**/pom.xml') }}
restore-keys: ${{ runner.os }}-m2
- name: Build and analyze
env:
SONAR_TOKEN: ${{ secrets.SONAR_TOKEN }}
SONAR_HOST_URL: ${{ secrets.SONAR_HOST_URL }}
run: mvn -B verify org.sonarsource.scanner.maven:sonar-maven-plugin:sonar
```
SonarScanner for .NET
Write the following in your workflow YAML file:
```css-79elbk
name: Build
on:
push:
branches:
- main # the name of your main branch
pull_request:
types: [opened, synchronize, reopened]
jobs:
build:
name: Build
runs-on: windows-latest
steps:
- name: Set up JDK 17
uses: actions/setup-java@v1
with:
java-version: 1.17
- uses: actions/checkout@v2
with:
fetch-depth: 0 # Shallow clones should be disabled for a better relevancy of analysis
- name: Cache SonarQube packages
uses: actions/cache@v1
with:
path: ~\.sonar\cache
key: ${{ runner.os }}-sonar
restore-keys: ${{ runner.os }}-sonar
- name: Cache SonarQube scanner
id: cache-sonar-scanner
uses: actions/cache@v1
with:
path: .\.sonar\scanner
key: ${{ runner.os }}-sonar-scanner
restore-keys: ${{ runner.os }}-sonar-scanner
- name: Install SonarQube scanner
if: steps.cache-sonar-scanner.outputs.cache-hit != 'true'
shell: powershell
run: |
New-Item -Path .\.sonar\scanner -ItemType Directory
dotnet tool update dotnet-sonarscanner --tool-path .\.sonar\scanner
- name: Build and analyze
shell: powershell
run: |
.\.sonar\scanner\dotnet-sonarscanner begin /k:"example" /d:sonar.token="${{ secrets.SONAR_TOKEN }}" /d:sonar.host.url="${{ secrets.SONAR_HOST_URL }}"
dotnet build
.\.sonar\scanner\dotnet-sonarscanner end /d:sonar.token="${{ secrets.SONAR_TOKEN }}"
```
SonarScanner CLI
You can easily set up a basic configuration using the SonarQube Scan GitHub Actions:
* To analyze C and C++ code, use the [SonarQube Scan for C and C++](https://github.com/marketplace/actions/sonarqube-scan-for-c-and-c) GitHub Action. It contains steps required for [c-family](https://docs.sonarsource.com/sonarqube-server/10.5/analyzing-source-code/languages/c-family "mention"), making the workflow simpler.
* To analyze other languages, use the [SonarQube Scan](https://github.com/marketplace/actions/official-sonarqube-scan) GitHub action
You’ll find the GitHub Actions and configuration instructions page on the GitHub Marketplace.
{% hint style="warning" %}
The errors "*Missing blame information…*" and "*Could not find ref…*" can be caused by checking out with a partial or shallow clone, or when using Git submodules. You should disable git shallow clone to make sure the scanner has access to all of your history when running analysis with GitHub Actions.
For more information, see the [GitHub Actions Checkout README](https://github.com/actions/checkout).
{% endhint %}
### Failing the workflow when the quality gate fails
You can use the [SonarQube quality gate check GitHub Action](https://github.com/marketplace/actions/sonarqube-quality-gate-check) to ensure your code meets your quality standards by failing your workflow when your [quality-gates](https://docs.sonarsource.com/sonarqube-server/10.5/user-guide/quality-gates "mention") fails.
If you do not want to use the SonarQube quality gate Check Action, you can instruct the scanner to wait for the SonarQube quality gate status at the end of the analysis. To enable this, pass the `-Dsonar.qualitygate.wait=true` parameter to the scanner in the workflow YAML file.
This will make the analysis step poll SonarQube regularly until the quality gate is computed. This will increase your workflow duration. Note that, if the quality gate is red, this will make the analysis step fail, even if the actual analysis itself is successful. We advise only using this parameter when necessary (for example, to block a deployment workflow if the quality gate is red). It should not be used to report the quality gate status in a pull request, as this is already done with pull request decoration.
You can set the `sonar.qualitygate.timeout` property to an amount of time (in seconds) that the scanner should wait for a report to be processed. The default is 300 seconds.
### Preventing pull request merges when the quality gate fails
In GitHub, you can block pull requests from being merged if it is failing the quality gate. To do this:
1. In GitHub, go to your repository **Settings** > **Branches** > **Branch** protection rules and select either the **Add rule** or **Edit** button if you already have a rule on the branch you wish to protect.
2. Complete the **Branch protection rule** form:
* Define the **Branch name pattern** (the name of the branch you wish to protect)
* Select **Require status checks to pass before merging** to open supplementary form fields.
* In the **Search for status checks in the last week for this repository** field, select **Require branches to be up to date before merging**, then find `SonarQube Code Analysis` and add it to the list of required checks.
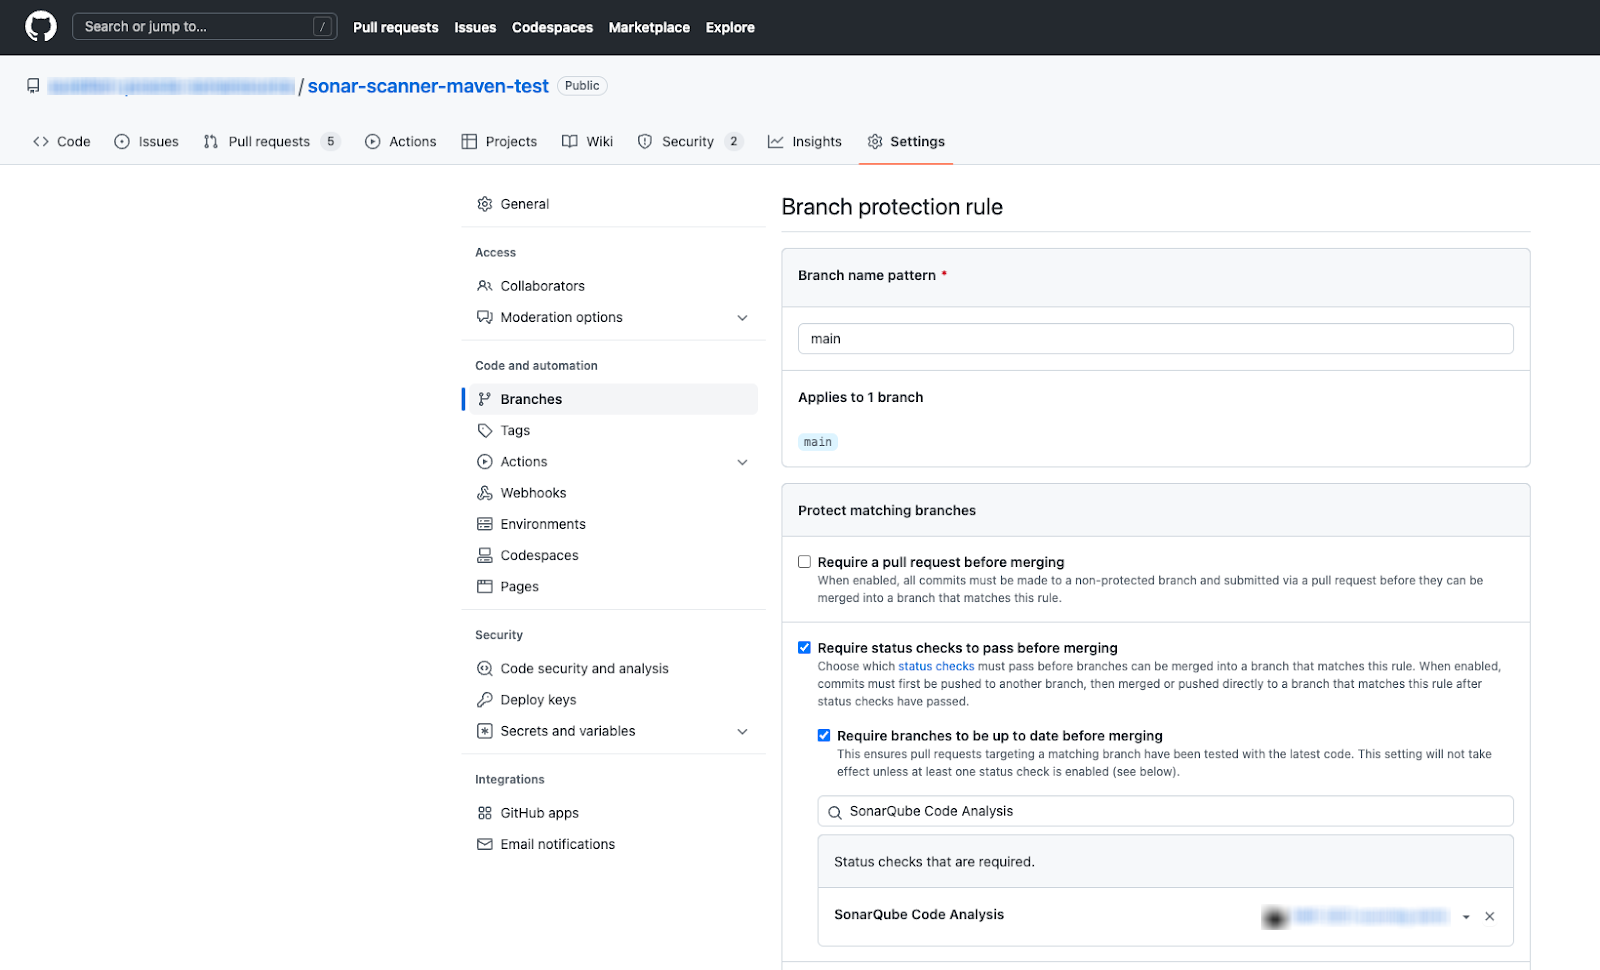
Define the ’SonarQube Code\` value as the status check to perform before permitting a PR merge.
---
# Source: https://docs.sonarsource.com/sonarqube-server/quality-standards-administration/managing-quality-profiles/adding-tags-to-rule.md
# Adding tags to a rule
Most rules have some tags out of the box. Issues inherit the tags of the rules that raised them. With the Administer Quality Profiles permission, you can add tags to the rules. You have the option to apply your own custom tags to rules or use the tags that are built-in to SonarQube.
{% hint style="info" %}
End users can manage the tags assigned to issues within their project. They can add tags using either built-in rule tags or their own custom tags, and they can remove inherited tags.
{% endhint %}
To add a tag to a rule:
1. In SonarQube, go to **Rules** and retrieve the rule you want to tag.
2. In the **Tags** section of the rule, select the plus sign. The **Edit Tags** dialog opens.
3. In the search field, enter the name of the tag to be added. The list of existing tags is filtered. If the tag doesn't exist, its name is displayed in the search results with a plus sign as illustrated below.
4. In the search results, select the tag you want to add. The tag is created (if it did not exist) and added to the rule.
### Related pages
* [built-in-rule-tags](https://docs.sonarsource.com/sonarqube-server/user-guide/rules/built-in-rule-tags "mention")
* [#tagging](https://docs.sonarsource.com/sonarqube-server/user-guide/issues/managing#tagging "mention")
---
# Source: https://docs.sonarsource.com/sonarqube-cloud/administering-sonarcloud/managing-organization/setting-config-at-org-level/adjusting-analysis-scope.md
# Adjusting analysis scope
{% content-ref url="adjusting-analysis-scope/introduction" %}
[introduction](https://docs.sonarsource.com/sonarqube-cloud/administering-sonarcloud/managing-organization/setting-config-at-org-level/adjusting-analysis-scope/introduction)
{% endcontent-ref %}
{% content-ref url="adjusting-analysis-scope/exclude-from-coverage-duplication" %}
[exclude-from-coverage-duplication](https://docs.sonarsource.com/sonarqube-cloud/administering-sonarcloud/managing-organization/setting-config-at-org-level/adjusting-analysis-scope/exclude-from-coverage-duplication)
{% endcontent-ref %}
{% content-ref url="adjusting-analysis-scope/excluding-files-based-on-file-paths" %}
[excluding-files-based-on-file-paths](https://docs.sonarsource.com/sonarqube-cloud/administering-sonarcloud/managing-organization/setting-config-at-org-level/adjusting-analysis-scope/excluding-files-based-on-file-paths)
{% endcontent-ref %}
{% content-ref url="adjusting-analysis-scope/advanced-exclusion-features" %}
[advanced-exclusion-features](https://docs.sonarsource.com/sonarqube-cloud/administering-sonarcloud/managing-organization/setting-config-at-org-level/adjusting-analysis-scope/advanced-exclusion-features)
{% endcontent-ref %}
---
# Source: https://docs.sonarsource.com/sonarqube-community-build/project-administration/adjusting-analysis.md
# Source: https://docs.sonarsource.com/sonarqube-server/2025.6/project-administration/adjusting-analysis.md
# Source: https://docs.sonarsource.com/sonarqube-server/project-administration/adjusting-analysis.md
# Adjusting project analysis
- [Setting analysis scope](/sonarqube-server/project-administration/adjusting-analysis/setting-analysis-scope.md): Setting and managing your analysis scope.
- [Introduction](/sonarqube-server/project-administration/adjusting-analysis/setting-analysis-scope/introduction.md): Main steps for setting the project's analysis scope.
- [Setting initial scope](/sonarqube-server/project-administration/adjusting-analysis/setting-analysis-scope/setting-initial-scope.md): Setting the initial scope of analysis for your project's source and test files.
- [Excluding based on path-matching patterns](/sonarqube-server/project-administration/adjusting-analysis/setting-analysis-scope/excluding-files-based-on-patterns.md): Adjust your project’s initial analysis scope by excluding files based on path-matching patterns.
- [Excluding based on file extension](/sonarqube-server/project-administration/adjusting-analysis/setting-analysis-scope/excluding-based-on-file-extension.md): For each programming language, define the file extensions to be analyzed.
- [Excluding from coverage or duplication](/sonarqube-server/project-administration/adjusting-analysis/setting-analysis-scope/exclude-from-coverage-duplication.md): Exclude specific files from your project's code coverage analysis or duplication checks.
- [Applying advanced exclusions](/sonarqube-server/project-administration/adjusting-analysis/setting-analysis-scope/advanced-exclusions.md): Tailor your project's analysis by applying advanced exclusions based on file content, specific code blocks, and defined coding rules.
- [Other adjustments](/sonarqube-server/project-administration/adjusting-analysis/setting-analysis-scope/other-adjustments.md): Adjust your project's analysis based on secret detection scope, file size, and SCM file ignore patterns.
- [Verifying analysis scope](/sonarqube-server/project-administration/adjusting-analysis/setting-analysis-scope/verifying-analysis-scope.md): Review configured properties and properties identified by the SonarScanner to determine your SonarQube project's analysis scope.
- [Defining matching patterns](/sonarqube-server/project-administration/adjusting-analysis/setting-analysis-scope/defining-matching-patterns.md): Define matching patterns for files and coding rules.
- [Managing your project's quality gate](/sonarqube-server/project-administration/adjusting-analysis/changing-quality-gate-and-fudge-factor.md): Changing your project's default quality gate and other parameters or features impacting your quality gate.
- [Changing your project's quality profiles](/sonarqube-server/project-administration/adjusting-analysis/changing-quality-gate.md): Changing the project's default quality profile.
- [Configuring new code calculation](/sonarqube-server/project-administration/adjusting-analysis/configuring-new-code-calculation.md): Configuring your project’s new code definition.
---
# Source: https://docs.sonarsource.com/sonarqube-cloud/getting-started-with-enterprise/administering-portfolios.md
# Administering portfolios
This feature is only available in the [Enterprise plan](https://www.sonarsource.com/plans-and-pricing/#sonarqube-cloud-features).
A portfolio is a set of projects within an enterprise that enables an aggregate view of its state through various lenses, including releasability, security, reliability, and maintainability.
{% hint style="info" %}
Before you can view the Enterprise-level reports, your organization must be added to an enterprise. For more information, see [managing-enterprise](https://docs.sonarsource.com/sonarqube-cloud/administering-sonarcloud/managing-enterprise "mention").
{% endhint %}
### Permissions
To create a portfolio or a portfolio permission template, you must first be granted access by an Enterprise administrator. The permissions to administer, edit, or view a portfolio are granted by the portfolio administrator in the portfolio settings.
#### Create Portfolios permission
The Enterprise administrator permission is required to grant the **Create Portfolios** permission to users.
1. Retrieve your enterprise. See [retrieving-and-viewing-your-enterprise](https://docs.sonarsource.com/sonarqube-cloud/administering-sonarcloud/managing-enterprise/retrieving-and-viewing-your-enterprise "mention").
2. Go to **Administration** > **Enterprise Permissions** to access a list of members in all of your organizations.
3. Use the toggle switch to add the **Create Portfolios** permission for the enterprise **Admins** and **Creators**.
#### Administer, edit, and view permissions
As an administrator of a portfolio, you can assign users and groups permission to **Administer**, **Edit**, and **View** portfolios to selected users and groups.
* **View**: Users can view the portfolio’s **Overview**, **Portfolio** **Breakdown**, and **Measures** tabs. On the **Portfolio** **Breakdown** page, users can only view the projects they have access to (Browse permission).
* **Edit**: Users can change the portfolio definition (add or remove projects) and delete a portfolio. However, they can only add or remove projects they have access to (Browse permission).
* **Administer**: Users can change the portfolio’s permissions.
1. Go to **My Portfolios** in the top navigation and select your enterprise from the drop-down menu.
2. Select the portfolio you want to add the permissions to from the Portfolios home page
3. Go to **Settings** > **Permissions**
4. Assign users and groups the **Administer**, **Edit**, and **View** permissions or select **Apply Permission Template**. The Filters sidebar allows you to find users by **Type**, **Role**, and **Organization**.
### Portfolio permission templates
Portfolio permission template defines the portfolio-related permissions granted to groups and members of your enterprise. Enterprise administrators can define several permission templates in your organization including a default template. Using permission templates allows you to:
* Grant or revoke different sets of permissions to users or groups.
* Set a default template for new portfolios.
#### Creating portfolio permission templates
The Enterprise administrator permission is required to create permission templates:
1. Retrieve your enterprise. See [retrieving-and-viewing-your-enterprise](https://docs.sonarsource.com/sonarqube-cloud/administering-sonarcloud/managing-enterprise/retrieving-and-viewing-your-enterprise "mention").
2. Select **Administration** > **Portfolio Permission Templates**.
3. Select **Create new template** at the top right of the page.
4. Enter the **Template Name** and **Description** in the modal.
5. Assign users and groups the **Administer**, **Edit,** and **View** permissions. The Filters sidebar allows you to find users by **Type**, **Role**, and **Organization**.
#### Editing portfolio permission templates
To edit an existing permission template:
1. Go to **My Portfolios** in the top navigation and select your enterprise from the drop-down menu.
2. Select **Administration** > **Portfolio Permission Templates**.
3. From your permission template’s **Actions** menu you can set the template as default for new portfolios, edit permissions, update name and description or delete the template.
{% hint style="info" %}
If you update a portfolio permission template, the changes are not reflected in any previously created or updated portfolios using that template.
{% endhint %}
### Related pages
* [](https://docs.sonarsource.com/sonarqube-cloud/getting-started-with-enterprise "mention")
* [viewing-portfolios](https://docs.sonarsource.com/sonarqube-cloud/getting-started-with-enterprise/viewing-enterprise-reports/viewing-portfolios "mention")
* [managing-portfolios](https://docs.sonarsource.com/sonarqube-cloud/managing-portfolios "mention")
---
# Source: https://docs.sonarsource.com/sonarqube-cloud/administering-sonarcloud.md
# Administering SonarQube Cloud
- [About SonarQube Cloud solution](/sonarqube-cloud/administering-sonarcloud/about-sonarqube-cloud-solution.md): This section explains solution concepts you require to administer SonarQube Cloud.
- [Ressources structure](/sonarqube-cloud/administering-sonarcloud/about-sonarqube-cloud-solution/ressources-structure.md): Your SonarQube Cloud projects, organization, and enterprise structure is organized in methodical way. These pages help you understand where dependencies and connections lay.
- [Organization](/sonarqube-cloud/administering-sonarcloud/about-sonarqube-cloud-solution/ressources-structure/organization.md): SonarQube Cloud mirrors the organization-based structure of your DevOps platform. Projects are grouped together for collaborative work and permission management.
- [Organization's projects](/sonarqube-cloud/administering-sonarcloud/about-sonarqube-cloud-solution/ressources-structure/projects.md): SonarQube Cloud projects represent DevOps platform repos and can be public or private, with binding to the repository determining visibility. Project permissions are managed through user groups.
- [Enterprise](/sonarqube-cloud/administering-sonarcloud/about-sonarqube-cloud-solution/ressources-structure/enterprise.md): SonarQube Cloud's Enterprise plan allows the centralized administration of multiple Organizations which may or may not be linked to multiple DevOps platforms.
- [Binding with the DevOps platform](/sonarqube-cloud/administering-sonarcloud/about-sonarqube-cloud-solution/ressources-structure/binding-with-dop.md): Your organizations and projects in SonarQube Cloud are bound to their respective organization or repository on GitHub, Bitbucket Cloud, GitLab, or Azure DevOps.
- [User management](/sonarqube-cloud/administering-sonarcloud/about-sonarqube-cloud-solution/user-management.md): This section groups together a few basic concepts that should be understood when managing your SonarQube Cloud user accounts.
- [User group concept](/sonarqube-cloud/administering-sonarcloud/about-sonarqube-cloud-solution/user-management/user-group-concept.md): To manage user permissions more easily in SonarQube Cloud, the members of your organization are managed through groups.
- [Associated SCM accounts](/sonarqube-cloud/administering-sonarcloud/about-sonarqube-cloud-solution/user-management/associated-scm-accounts.md): SonarQube Cloud uses the association of users with Source Control Management (SCM) accounts to automatically assign issues to users.
- [Default authentication through DevOps platform](/sonarqube-cloud/administering-sonarcloud/about-sonarqube-cloud-solution/user-management/devops-platform-authentication.md): By default, users can authenticate to SonarQube Cloud with their existing credentials on their DevOps platform service (DOP). No additional setup is required.
- [GitHub member synchronization](/sonarqube-cloud/administering-sonarcloud/about-sonarqube-cloud-solution/user-management/github-member-synchronization.md): The GitHub member synchronization allows the automatic synchronization of organization members between GitHub and SonarQube Cloud.
- [Managing your subscription](/sonarqube-cloud/administering-sonarcloud/managing-subscription.md): Understanding how to manage your SonarQube Cloud subscription plan, billing, and any changes you might need to make, can be found here.
- [Introduction](/sonarqube-cloud/administering-sonarcloud/managing-subscription/introduction.md): The SonarQube Cloud subscription plans are: free, Team, or Enterprise.
- [Subscription plans](/sonarqube-cloud/administering-sonarcloud/managing-subscription/subscription-plans.md): SonarQube Cloud offers three subscription-based plans: Free, Team, and Enterprise, each with varying features and suitable for different team sizes.
- [Billing model](/sonarqube-cloud/administering-sonarcloud/managing-subscription/billing-model.md): In SonarQube Cloud each Team or Enterprise plan organization is billed separately. You can be billed monthly or yearly.
- [Signing up for a plan](/sonarqube-cloud/administering-sonarcloud/managing-subscription/signing-up-for-plan.md): Signing up for a SonarQube Cloud subscription happens at the organization level.
- [Changing your subscription plan](/sonarqube-cloud/administering-sonarcloud/managing-subscription/changing-plan.md): Changing your SonarQube Cloud plan is straight forward however, it depends on the move you're making (upgrade/downgrade) and if your on a monthly or yearly subscription billing schedule.
- [Updating billing or payment details](/sonarqube-cloud/administering-sonarcloud/managing-subscription/updating-billing-payment-details.md): SonarQube Cloud's monthly subscribers can directly update the billing and payment details of their organization. Read this page to learn about how to add, remove, or change your payment method.
- [Viewing billing or usage information](/sonarqube-cloud/administering-sonarcloud/managing-subscription/viewing-billing-and-usage.md): This page provides instructions on how to view billing and usage information for both SonarQube Cloud organizations and enterprises.
- [Viewing taxes and invoices](/sonarqube-cloud/administering-sonarcloud/managing-subscription/viewing-taxes-and-invoices.md): This page explains how to access monthly invoices for your SonarQube Cloud subscriptions, detailing the steps to view and download them from the customer portal.
- [Managing your organization](/sonarqube-cloud/administering-sonarcloud/managing-organization.md): How to create your organization, manage their members, and set up analysis features at the organization level.
- [Organization setup overview](/sonarqube-cloud/administering-sonarcloud/managing-organization/setup-overview.md): The procedure below explains how to set up your organization in SonarQube Cloud when your system uses DevOps platform (DOP) authentication.
- [Creating and editing your organization](/sonarqube-cloud/administering-sonarcloud/managing-organization/creating-organization.md): Creating and editing your SonarQube Cloud organization differs slightly depending on your DevOps platform or if you're creating it manually. These pages help you understand each step along the way.
- [Importing GitHub organization](/sonarqube-cloud/administering-sonarcloud/managing-organization/creating-organization/importing-github-organization.md): This page helps you understand how to import your GitHub organization into SonarQube Cloud and explains key details about modifying the necessary repository access rights.
- [Importing Bitbucket workspace](/sonarqube-cloud/administering-sonarcloud/managing-organization/creating-organization/importing-bitbucket-workspace.md): This page helps you understand how to import your Bitbucket workspace into SonarQube Cloud and explains prerequisites and key procedures.
- [Importing GitLab group](/sonarqube-cloud/administering-sonarcloud/managing-organization/creating-organization/importing-gitlab-group.md): This page helps you understand how to import your GitLab group into SonarQube Cloud and explains prerequisites and key procedures.
- [Importing Azure DevOps organization](/sonarqube-cloud/administering-sonarcloud/managing-organization/creating-organization/importing-azure-devops-organization.md): This page helps you understand how to import your Azure DevOps organization into SonarQube Cloud and explains prerequisites and key procedures.
- [Creating organization manually](/sonarqube-cloud/administering-sonarcloud/managing-organization/creating-organization/creating-organization-manually.md): You can manually create your SonarQube Cloud organization manually however, you will not benefit from the advantages of binding your projects to a DevOps organization.
- [Changing organization binding](/sonarqube-cloud/administering-sonarcloud/managing-organization/creating-organization/changing-organization-binding.md): You can use the workaround described on this page to change the binding of a SonarQube Cloud organization bound to a GitHub or Bitbucket organization.
- [Binding an unbound organization](/sonarqube-cloud/administering-sonarcloud/managing-organization/creating-organization/binding-unbound-organization.md): Binding your unbound SonarQube Cloud organization is slightly different depending on your DevOps platform.
- [Security contact](/sonarqube-cloud/administering-sonarcloud/managing-organization/creating-organization/security-contact.md): As an administrator of your organization you can set up a dedicated contact for urgent, security-related communications.
- [Changing organization settings](/sonarqube-cloud/administering-sonarcloud/managing-organization/creating-organization/changing-organization-settings.md): SonarQube Cloud allows to change your organization key, requiring private-only projects, and change the token used to connect to GitLab or Azure DevOps organization.
- [Deleting organization](/sonarqube-cloud/administering-sonarcloud/managing-organization/creating-organization/deleting-organization.md): Organization administrators can delete an organization in SonarQube Cloud either from the "My Organizations" page or directly from the organization's administration settings.
- [Using multiple accounts](/sonarqube-cloud/administering-sonarcloud/managing-organization/creating-organization/importing-from-multiple-platforms.md): This page explains that when importing an organization into SonarQube Cloud, the importing account automatically becomes an administrator; other accounts must be added manually.
- [Managing users and permissions](/sonarqube-cloud/administering-sonarcloud/managing-organization/users-and-permissions.md): This section contains instructions to manage your organization's members, including user groups and permissions, and user account deletion.
- [Adding organization members](/sonarqube-cloud/administering-sonarcloud/managing-organization/users-and-permissions/organization-members.md): This section explains how to add and remove members to and from a SonarQube Cloud organization.
- [Managing user groups](/sonarqube-cloud/administering-sonarcloud/managing-organization/users-and-permissions/user-groups.md): SonarQube Cloud's user groups can be used to manage organization members and their permissions. This section explains how to manage user groups.
- [Managing organization permissions](/sonarqube-cloud/administering-sonarcloud/managing-organization/users-and-permissions/organization-permissions.md): This section explains how to manage the permissions related to your SonarQube Cloud organization.
- [Disabling GitHub member synchronization](/sonarqube-cloud/administering-sonarcloud/managing-organization/users-and-permissions/github-member-sync.md): When you import a GitHub organization to SonarQube Cloud, GitHub member synchronization is enabled by default provided Single Sign-On (SSO) authentication is not enabled.
- [User onboarding and offboarding](/sonarqube-cloud/administering-sonarcloud/managing-organization/users-and-permissions/user-on-and-offboarding.md): User onboarding is automatic. You can only delete your own user account.
- [Performing global analysis setup](/sonarqube-cloud/administering-sonarcloud/managing-organization/setting-config-at-org-level.md): When performing a global analysis in SonarQube Cloud, you can manage new code definition, long-lived branch pattern, analysis scope, and control your quality standards to apply to all new projects.
- [Introduction](/sonarqube-cloud/administering-sonarcloud/managing-organization/setting-config-at-org-level/introduction.md): With SonarQube Cloud Enterprise, your can define default settings for long-lived branch patterns, automatic analysis, and set your analysis scope, all of which can be overridden at the project level.
- [Setting new code definition](/sonarqube-cloud/administering-sonarcloud/managing-organization/setting-config-at-org-level/setting-new-code-definition-at-organization-level.md): SonarQube Cloud Project administrators can set the default the new code definition.
- [Setting long-lived branch pattern](/sonarqube-cloud/administering-sonarcloud/managing-organization/setting-config-at-org-level/setting-long-lived-branch-pattern.md): This section explains how to define a long-lived branches name pattern in SonarQube Cloud at your organization level.
- [Adjusting analysis scope](/sonarqube-cloud/administering-sonarcloud/managing-organization/setting-config-at-org-level/adjusting-analysis-scope.md): With the SonarQube Cloud Enterprise plan, you can set and adjust your analysis scope at the organization level.
- [Introduction](/sonarqube-cloud/administering-sonarcloud/managing-organization/setting-config-at-org-level/adjusting-analysis-scope/introduction.md): As an organization admin, you can define in the UI an analysis scope adjustment at the organization level.
- [Excluding from coverage or duplication](/sonarqube-cloud/administering-sonarcloud/managing-organization/setting-config-at-org-level/adjusting-analysis-scope/exclude-from-coverage-duplication.md): Excluding specific files from code coverage or duplication check can be defined at the organization level for your SonarQube Cloud organization.
- [Excluding files based on file paths](/sonarqube-cloud/administering-sonarcloud/managing-organization/setting-config-at-org-level/adjusting-analysis-scope/excluding-files-based-on-file-paths.md): To exclude files from your SonarQube Cloud project’s analysis scope based on file paths, you can define file exclusion parameters based on directory and file name patterns.
- [Using advanced exclusion features](/sonarqube-cloud/administering-sonarcloud/managing-organization/setting-config-at-org-level/adjusting-analysis-scope/advanced-exclusion-features.md): In very specific situations, you may have to define, at the organization level, the exclusion of code from the analysis using SonarQube Cloud's advanced exclusion features.
- [Disabling automatic analysis](/sonarqube-cloud/administering-sonarcloud/managing-organization/setting-config-at-org-level/disabling-automatic-analysis.md): This page explains how to disable the automatic analysis in SonarQube Cloud at the organization level.
- [Managing quality standards](/sonarqube-cloud/administering-sonarcloud/managing-organization/setting-config-at-org-level/quality-standards.md): This page outlines how to manage organization-level quality standards in SonarQube Cloud, specifically focusing on the "quality gate fudge factor."
- [Managing organization's projects](/sonarqube-cloud/administering-sonarcloud/managing-organization/manage-org-projects.md): Managing your SonarQube Cloud organization's projects involves using the Project Management page and understanding project permissions. This section also contains information about migrating projects.
- [Using Projects Management page](/sonarqube-cloud/administering-sonarcloud/managing-organization/manage-org-projects/projects-management-page.md): As the organization admin, you can manage your organization’s SonarQube Cloud projects on a centralized page called the Projects management page.
- [Managing project permissions](/sonarqube-cloud/administering-sonarcloud/managing-organization/manage-org-projects/manage-project-permissions.md): Managing project permissions in SonarQube Cloud involves using permission templates and restoring administrator access.
- [Using permission templates](/sonarqube-cloud/administering-sonarcloud/managing-organization/manage-org-projects/manage-project-permissions/templates.md): As the organization admin in SonarQube Cloud, using permission templates allows you to define permissions granted by default on new projects and various sets of permissions.
- [Restoring administrator access](/sonarqube-cloud/administering-sonarcloud/managing-organization/manage-org-projects/manage-project-permissions/recovering-admin-access.md): This page explains how to recover administrator access to a project of your SonarQube Cloud organization.
- [Migrating projects](/sonarqube-cloud/administering-sonarcloud/managing-organization/manage-org-projects/migrate-projects-to-another-org.md): A SonarQube Cloud organization cannot be re-bound to another organization however, you can move projects if needed. This page explains how to migrate projects between organizations.
- [Managing Scoped Organization Tokens](/sonarqube-cloud/administering-sonarcloud/managing-organization/scoped-organization-tokens.md): Scoped Organization Tokens provide a secure way to manage non-user-specific authentication.
- [Connecting to Slack](/sonarqube-cloud/administering-sonarcloud/managing-organization/connecting-to-slack.md): With the SonarQube Cloud integration with Slack, users can receive real-time notifications on analysis results directly in Slack.
- [About SonarQube Cloud integration with Slack](/sonarqube-cloud/administering-sonarcloud/managing-organization/connecting-to-slack/integration-overview.md): Understanding how the SonarQube Cloud integration with Slack works.
- [Setting up the connection to Slack](/sonarqube-cloud/administering-sonarcloud/managing-organization/connecting-to-slack/setup.md): How to install the SonarQube app for Slack in your workspace.
- [Managing your enterprise](/sonarqube-cloud/administering-sonarcloud/managing-enterprise.md): How to set up & update your enterprise, set up the enterprise security features, and manage the permissions set at the enterprise level.
- [Retrieving and viewing your enterprise](/sonarqube-cloud/administering-sonarcloud/managing-enterprise/retrieving-and-viewing-your-enterprise.md): You can view the enterprises you’re an admin or a member of.
- [Creating your enterprise](/sonarqube-cloud/administering-sonarcloud/managing-enterprise/creating-your-enterprise.md): With the Enterprise license, you can group together SonarQube Cloud organizations from different DevOps platforms into an enterprise and benefit from many features.
- [Enterprise security](/sonarqube-cloud/administering-sonarcloud/managing-enterprise/enterprise-security.md): How to enhance your enterprise security with various security features.
- [IP allow lists](/sonarqube-cloud/administering-sonarcloud/managing-enterprise/enterprise-security/ip-allow-lists.md): How to restrict the IP allow list for SonarQube Cloud
- [Audit logs](/sonarqube-cloud/administering-sonarcloud/managing-enterprise/enterprise-security/audit-logs.md): The initial release of SonarQube Cloud's audit logs provides you with the essential data you need to meet your immediate compliance and security needs.
- [Single Sign-On](/sonarqube-cloud/administering-sonarcloud/managing-enterprise/enterprise-security/sso.md): This section explains the Single Sign-On (SSO) authentication solution in SonarQube Cloud and how to set it up.
- [About SSO authentication solution](/sonarqube-cloud/administering-sonarcloud/managing-enterprise/enterprise-security/sso/about.md): This page provides an overview of the SSO authentication solution in SonarQube Cloud.
- [Automatic group synchronization](/sonarqube-cloud/administering-sonarcloud/managing-enterprise/enterprise-security/sso/about/automatic-group-synchronization.md): This page describes the automatic group synchronization solution in SonarQube Cloud.
- [Setting up SSO](/sonarqube-cloud/administering-sonarcloud/managing-enterprise/enterprise-security/sso/setup.md): With the Enterprise plan, you can transition your SonarQube Cloud enterprise to Single Sign-On.
- [Step 1: Verify the user groups](/sonarqube-cloud/administering-sonarcloud/managing-enterprise/enterprise-security/sso/setup/verify-user-groups.md): Before configuring SSO for your SonarQube Cloud enterprise, you must ensure that the automatic group synchronization can take place properly.
- [Step 2: Configure SSO](/sonarqube-cloud/administering-sonarcloud/managing-enterprise/enterprise-security/sso/setup/configure-sso.md): The second step in configuring SSO for your SonarQube Cloud enterprise varies slightly, depending on your identity provider. If you use Okta or Microsoft Entra ID, go directly to the respective page.
- [Using the setup assistant (generic operation)](/sonarqube-cloud/administering-sonarcloud/managing-enterprise/enterprise-security/sso/setup/configure-sso/generic-operation.md): This page explains how to configure SSO with SonarQube Cloud’s setup assistant if you use another identity provider than Okta or Microsoft Entra ID.
- [SAML SSO with Okta](/sonarqube-cloud/administering-sonarcloud/managing-enterprise/enterprise-security/sso/setup/configure-sso/okta.md): This page explains how to setup SAML SSO with Okta and SonarQube Cloud's SSO setup assistant.
- [SAML SSO with Entra ID](/sonarqube-cloud/administering-sonarcloud/managing-enterprise/enterprise-security/sso/setup/configure-sso/microsoft-entra-id.md): This page explains how to configure SAML SSO in your enterprise with Microsoft Entra ID while using SonarQube Cloud's setup assistant.
- [Step 3: Invite users to sign in](/sonarqube-cloud/administering-sonarcloud/managing-enterprise/enterprise-security/sso/setup/inviting-users-to-sign-in.md): Once the SSO connection has been established, you can invite users to sign in to SonarQube Cloud with SSO by sending them the enterprise’s login URL.
- [Step 4: Terminate SSO setup](/sonarqube-cloud/administering-sonarcloud/managing-enterprise/enterprise-security/sso/setup/terminate-setup.md): This page describes how to terminate your Single Sign-On (SSO) setup in SonarQube Cloud.
- [Editing SSO configuration](/sonarqube-cloud/administering-sonarcloud/managing-enterprise/enterprise-security/sso/editing-sso-configuration.md): After setup, editing your SSO configuration in SonarQube Cloud is straight-forward.
- [Editing SSO configuration (old method)](/sonarqube-cloud/administering-sonarcloud/managing-enterprise/enterprise-security/sso/editing-configuration-old-method.md): Editing your SSO configuration in SonarQube Cloud was recently improved using the SSO setup assistant. These pages outline the previous editing procedures (without the SSO setup assistant).
- [Introduction](/sonarqube-cloud/administering-sonarcloud/managing-enterprise/enterprise-security/sso/editing-configuration-old-method/introduction.md): This page explains the generic steps necessary to edit the SAML SSO configuration you established in SonarQube Cloud using the older method (without the SSO setup assistant).
- [With Okta](/sonarqube-cloud/administering-sonarcloud/managing-enterprise/enterprise-security/sso/editing-configuration-old-method/okta.md): This page explains how to edit the SAML SSO configuration you established in SonarQube Cloud with Okta and using the old method (without the SSO setup assistant).
- [With Microsoft Entra ID](/sonarqube-cloud/administering-sonarcloud/managing-enterprise/enterprise-security/sso/editing-configuration-old-method/microsoft-entra-id.md): This page explains how to edit the SAML SSO configuration you established in SonarQube Cloud with Microsoft Entra ID while using the old method (without the SSO setup assistant).
- [Deleting SSO configuration](/sonarqube-cloud/administering-sonarcloud/managing-enterprise/enterprise-security/sso/deleting-sso-configuration.md): As an enterprise admin, you can delete your enterprise’s SSO configuration in SonarQube Cloud either in the UI or via the Web API.
- [Troubleshooting SSO connection](/sonarqube-cloud/administering-sonarcloud/managing-enterprise/enterprise-security/sso/troubleshooting.md): Troubleshooting your SSO connection can be tricky. Here's a list of items to check in SonarQube Cloud and with your identity provider.
- [Adding organizations to your enterprise](/sonarqube-cloud/administering-sonarcloud/managing-enterprise/adding-organizations-to-your-enterprise.md): Adding or removing organizations to / from your enterprise.
- [Managing the enterprise-related permissions](/sonarqube-cloud/administering-sonarcloud/managing-enterprise/managing-the-enterprise-related-permissions.md): You must be an admin of the enterprise to be able to manage the permissions.
- [Managing the lines of code within your enterprise](/sonarqube-cloud/administering-sonarcloud/managing-enterprise/managing-the-lines-of-code-within-your-enterprise.md): You must be an enterprise admin to be able to manage the lines of code (LOC) limits within your enterprise.
- [Changing enterprise settings](/sonarqube-cloud/administering-sonarcloud/managing-enterprise/changing-enterprise-settings.md): You can rename your enterprise provided you're an enterprise admin.
- [Downgrading your enterprise](/sonarqube-cloud/administering-sonarcloud/managing-enterprise/downgrading-your-enterprise.md): How to downgrade an enterprise.
- [AI features](/sonarqube-cloud/administering-sonarcloud/ai-features.md): SonarQube Cloud offers a series of AI features that are managed at the organization and enterprise levels to help you produce secure and maintainable code.
- [Autodetect AI code](/sonarqube-cloud/administering-sonarcloud/ai-features/autodetect-ai-code.md): Autodetect AI-Generated Code is turned on by default in SonarQube Cloud, but your DevOps provider must give the appropriate permissions to allow communication with SonarQube.
- [Permissions for AI Autodetect](/sonarqube-cloud/administering-sonarcloud/ai-features/permissions-for-ai-autodetect.md): Setting up AI autodetection in SonarQube Cloud requires that a DevOps platform administrator set the correct permission level in your AI-powered web service.
- [Enable AI CodeFix](/sonarqube-cloud/administering-sonarcloud/ai-features/enable-ai-codefix.md): Enabling AI CodeFix for your SonarQube Cloud organization is a straight-forward process. Simply enable AI CodeFix in the UI, choose your LLM provider, and allow project access.
- [SonarQube Remediation Agent](/sonarqube-cloud/administering-sonarcloud/ai-features/sonarqube-remediation-agent.md): The SonarQube Remediation Agent will suggest fixes for issues found during your pull request analysis.
- [Advanced administration](/sonarqube-cloud/administering-sonarcloud/advanced-administration.md): How to manage advanced administration tasks.
---
# Source: https://docs.sonarsource.com/sonarqube-community-build/instance-administration/security/administering-tokens.md
# Source: https://docs.sonarsource.com/sonarqube-server/10.7/instance-administration/user-management/administering-tokens.md
# Source: https://docs.sonarsource.com/sonarqube-server/10.8/instance-administration/user-management/administering-tokens.md
# Source: https://docs.sonarsource.com/sonarqube-server/2025.2/instance-administration/user-management/administering-tokens.md
# Source: https://docs.sonarsource.com/sonarqube-server/2025.3/instance-administration/security/administering-tokens.md
# Source: https://docs.sonarsource.com/sonarqube-server/2025.5/instance-administration/security/administering-tokens.md
# Source: https://docs.sonarsource.com/sonarqube-server/2025.1/instance-administration/user-management/administering-tokens.md
# Source: https://docs.sonarsource.com/sonarqube-server/2025.4/instance-administration/security/administering-tokens.md
# Source: https://docs.sonarsource.com/sonarqube-server/2025.6/instance-administration/security/administering-tokens.md
# Source: https://docs.sonarsource.com/sonarqube-server/instance-administration/security/administering-tokens.md
# Tokens
As a System Administrator, you can generate tokens of type **User** on behalf of another user and you can revoke any token. For more information about tokens and how to manage your own tokens, see [managing-tokens](https://docs.sonarsource.com/sonarqube-server/user-guide/managing-tokens "mention").
### Generating a token on behalf of another user
1. In **Administration** > **Security** > **Users**, retrieve the user (see [viewing-users](https://docs.sonarsource.com/sonarqube-server/instance-administration/user-management/viewing-users "mention")).
2. In the user’s **Tokens** column, select the three-dot menu. The **Tokens** dialog opens.
3. Enter the token name, check the expiration date, and select **Generate**.
### Revoking a token
1. In **Administration** > **Security** > **Users**, retrieve the user (see [viewing-users](https://docs.sonarsource.com/sonarqube-server/instance-administration/user-management/viewing-users "mention")).
2. In the user’s **Tokens** column, select the three-dot menu. The **Tokens** dialog opens with the list of tokens.
3. In the **Actions** column of the token, select **Revoke**.
### Enforcing a maximum lifetime for tokens (from Enterprise Edition)
The ability to configure a maximum lifetime for tokens is available starting in [Enterprise Edition](https://www.sonarsource.com/plans-and-pricing/enterprise/).
As a System Administrator, you can define a maximum lifetime for any *newly* generated token. Non-administrator users can also set a time-to-live as long as it is less than or equal to the maximum lifetime configured at the system level. Tokens generated after updating this setting will expire either at the configured maximum lifetime or at the time set by the user, whichever comes first.
{% hint style="info" %}
Updating this setting does *not* affect any existing tokens. It will only impact newly generated tokens.
{% endhint %}
To enforce a maximum lifetime for tokens at the system level:
1. Go to **Administration** > **Configuration** > **General Settings** > **Security**.
2. In **Maximum allowed lifetime for token**, select the lifetime you want to set.
---
# Source: https://docs.sonarsource.com/sonarqube-cloud/managing-your-projects/administering-your-projects.md
# Administering your project
{% content-ref url="administering-your-projects/introduction" %}
[introduction](https://docs.sonarsource.com/sonarqube-cloud/managing-your-projects/administering-your-projects/introduction)
{% endcontent-ref %}
{% content-ref url="administering-your-projects/setting-up-project" %}
[setting-up-project](https://docs.sonarsource.com/sonarqube-cloud/managing-your-projects/administering-your-projects/setting-up-project)
{% endcontent-ref %}
{% content-ref url="administering-your-projects/devops-platform-integration" %}
[devops-platform-integration](https://docs.sonarsource.com/sonarqube-cloud/managing-your-projects/administering-your-projects/devops-platform-integration)
{% endcontent-ref %}
{% content-ref url="administering-your-projects/setting-permissions" %}
[setting-permissions](https://docs.sonarsource.com/sonarqube-cloud/managing-your-projects/administering-your-projects/setting-permissions)
{% endcontent-ref %}
{% content-ref url="administering-your-projects/changing-binding" %}
[changing-binding](https://docs.sonarsource.com/sonarqube-cloud/managing-your-projects/administering-your-projects/changing-binding)
{% endcontent-ref %}
{% content-ref url="administering-your-projects/ai-features" %}
[ai-features](https://docs.sonarsource.com/sonarqube-cloud/managing-your-projects/administering-your-projects/ai-features)
{% endcontent-ref %}
{% content-ref url="administering-your-projects/customizing-info-page" %}
[customizing-info-page](https://docs.sonarsource.com/sonarqube-cloud/managing-your-projects/administering-your-projects/customizing-info-page)
{% endcontent-ref %}
{% content-ref url="administering-your-projects/jira-integration" %}
[jira-integration](https://docs.sonarsource.com/sonarqube-cloud/managing-your-projects/administering-your-projects/jira-integration)
{% endcontent-ref %}
{% content-ref url="administering-your-projects/advanced-administration" %}
[advanced-administration](https://docs.sonarsource.com/sonarqube-cloud/managing-your-projects/administering-your-projects/advanced-administration)
{% endcontent-ref %}
{% content-ref url="administering-your-projects/deleting-project" %}
[deleting-project](https://docs.sonarsource.com/sonarqube-cloud/managing-your-projects/administering-your-projects/deleting-project)
{% endcontent-ref %}
---
# Source: https://docs.sonarsource.com/sonarqube-cloud/administering-sonarcloud/advanced-administration.md
# Source: https://docs.sonarsource.com/sonarqube-cloud/managing-your-projects/administering-your-projects/advanced-administration.md
# Advanced administration
{% content-ref url="advanced-administration/setting-up-run-tasks-in-tfc" %}
[setting-up-run-tasks-in-tfc](https://docs.sonarsource.com/sonarqube-cloud/managing-your-projects/administering-your-projects/advanced-administration/setting-up-run-tasks-in-tfc)
{% endcontent-ref %}
{% content-ref url="advanced-administration/integrating-projects-with-compass" %}
[integrating-projects-with-compass](https://docs.sonarsource.com/sonarqube-cloud/managing-your-projects/administering-your-projects/advanced-administration/integrating-projects-with-compass)
{% endcontent-ref %}
{% content-ref url="advanced-administration/other-advanced-procedures" %}
[other-advanced-procedures](https://docs.sonarsource.com/sonarqube-cloud/managing-your-projects/administering-your-projects/advanced-administration/other-advanced-procedures)
{% endcontent-ref %}
---
# Source: https://docs.sonarsource.com/sonarqube-for-eclipse/connect-your-ide/advanced-configuration.md
# Source: https://docs.sonarsource.com/sonarqube-for-visual-studio/connect-your-ide/advanced-configuration.md
# Source: https://docs.sonarsource.com/sonarqube-for-intellij/connect-your-ide/advanced-configuration.md
# Source: https://docs.sonarsource.com/sonarqube-for-vs-code/connect-your-ide/advanced-configuration.md
# Advanced configuration
### HTTP configuration
To operate, SonarQube for VS Code needs to perform HTTP requests, especially in [Connected mode](https://app.gitbook.com/s/NvI4wotPmITyM0mnsmtp/connect-your-ide/connected-mode "mention"). While SonarQube for VS Code will work out-of-the-box in most situations, some network infrastructure may require a custom configuration.
### Passing SonarQube for IDE properties
In SonarQube for VS Code, open the SonarLint extension settings, and add your properties to the **Settings** > **Extensions** > **Sonarlint** > **Ls: Vmargs** JVM arguments.
### Proxy configuration
To use connected mode with a SonarQube instance running behind a proxy, pass your settings using the JVM arguments as referenced above in [#passing-sonarlint-properties](#passing-sonarlint-properties "mention").
For example, you might add these arguments:
```
{ "sonarlint.ls.vmargs": "-Dhttps.proxyHost= -Dhttps.proxyPort=8080 -Dhttps.nonProxyHosts=localhost|127.0.0.1|" }
```
### Manage your configuration
#### HTTP Client timeouts
SonarQube for IDE supports various timeouts. Below you will find the properties added to control them:
`sonarlint.http.connectTimeout`
* Determines the timeout, in minutes, until a new connection is fully established.
* **Default**: 1 min
`sonarlint.http.socketTimeout`
* Determines the default socket timeout value, in minutes, for I/O operations.
* **Default**: infinite
`sonarlint.http.connectionRequestTimeout`
* The connection lease request timeout, in minutes, is used when requesting a connection from the connection manager.
* **Default**: 1 min
`sonarlint.http.responseTimeout`
* Determines the timeout, in minutes, until the arrival of a response from the opposite endpoint.
* **Default**: 10 min
#### Server SSL certificates
SonarQube for IDE manages its own TrustStore in addition to the OS and Java TrustStores. When encountering an untrusted certificate, SonarQube for IDE will ask the user if the certificate should be trusted. If the answer is yes, the certificate will be added to the TrustStore.
SonarQube for IDE depends on you to provide server certificates when required by your environment. Here’s a generalization of a few basic steps you can use to help make that easier. Note that these instructions are for *server SSL certificates*. If you're dealing with a *client SSL certificate*, you'll need to create and configure a "key store" instead.
Install a server SSL certificate
**To install a server SSL certificate**
**Step 1:** Import your certificate into SonarQube for IDE. Here is a common command to import your certificate (`.cer`) into a TrustStore (`C:/`):
```bash
keytool -import -keystore C:/ -storepass password -noprompt -alias sonarqube-ssl -file .cer
```
* Replace `C:/` with your desired path and `password` with your chosen TrustStore password.
**Step 2:** Now that you’ve created the file, tell VS Code where to find it by adding these lines to your JVM arguments. See the [#passing-sonarlint-properties](#passing-sonarlint-properties "mention") instructions for more details.
```bash
-Dsonarlint.ssl.trustStorePath=C:/
-Dsonarlint.ssl.trustStorePassword=
-Dsonarlint.ssl.trustStoreType=PKCS12
```
* Check that your path and password match what you used for your TrustStore.
**Step 3:** Restart your IDE.
**TrustStore**
**sonarlint.ssl.trustStorePath**
* Path to the keystore used by SonarLint to store custom trusted server certificates
* **default**: `~/.sonarlint/ssl/truststore.p12`
**sonarlint.ssl.trustStorePassword**
* Password of the truststore.
* **default**: `sonarlint`
**sonarlint.ssl.trustStoreType**
* The format of the keystore file is found in the [Oracle documentation](https://docs.oracle.com/en/java/javase/17/docs/specs/security/standard-names.html#keystore-types).
* **default**: `PKCS12`
#### Client SSL certificates
Some servers or proxies may also require SonarQube for IDE to authenticate using client-side SSL certificates. This is a rare use case, and at for the moment, there is no UI to configure client-side SSL certificates. To properly authenticate client-side SSL certificates, you must manually create a keystore at the default location, or use the following properties:
**KeyStore**
**sonarlint.ssl.keyStorePath**
* Path to the keystore used by SonarQube for IDE to store client certificates.
* **default**: `~/.sonarlint/ssl/keystore.p12`
**sonarlint.ssl.keyStorePassword**
* Password of the keystore.
* **default**: `sonarlint`
**sonarlint.ssl.keyStoreType**
* The format of the keystore file is found in the [Oracle documentation](https://docs.oracle.com/en/java/javase/17/docs/specs/security/standard-names.html#keystore-types).
* **default**: `PKCS12`
---
# Source: https://docs.sonarsource.com/sonarqube-community-build/instance-administration/analysis-functions/analysis-scope/advanced-exclusion-features.md
# Source: https://docs.sonarsource.com/sonarqube-server/2025.2/instance-administration/analysis-functions/analysis-scope/advanced-exclusion-features.md
# Source: https://docs.sonarsource.com/sonarqube-server/2025.3/instance-administration/analysis-functions/analysis-scope/advanced-exclusion-features.md
# Source: https://docs.sonarsource.com/sonarqube-server/2025.5/instance-administration/analysis-functions/analysis-scope/advanced-exclusion-features.md
# Source: https://docs.sonarsource.com/sonarqube-server/2025.4/instance-administration/analysis-functions/analysis-scope/advanced-exclusion-features.md
# Source: https://docs.sonarsource.com/sonarqube-server/2025.6/instance-administration/analysis-functions/analysis-scope/advanced-exclusion-features.md
# Source: https://docs.sonarsource.com/sonarqube-server/instance-administration/analysis-functions/analysis-scope/advanced-exclusion-features.md
# Source: https://docs.sonarsource.com/sonarqube-cloud/administering-sonarcloud/managing-organization/setting-config-at-org-level/adjusting-analysis-scope/advanced-exclusion-features.md
# Using advanced exclusion features
This feature is only available in the [Enterprise plan](https://www.sonarsource.com/plans-and-pricing/#sonarqube-cloud-features).
In very specific situations, you may have to define at the organization level the exclusion of code from the analysis:
* File exclusion based on the file content.
* Exclusion of blocks within files.
* Exclusion of specific files from specific coding rules.
Such an analysis scope adjustment applies to all projects in the organization. However, it can be overridden at the project level in the UI or through [analysis-parameters](https://docs.sonarsource.com/sonarqube-cloud/advanced-setup/analysis-parameters "mention") set on the CI/CD host. For more information about setting your scope at the project level, see the [introduction](https://docs.sonarsource.com/sonarqube-cloud/managing-your-projects/project-analysis/setting-analysis-scope/introduction "mention") page in the [setting-analysis-scope](https://docs.sonarsource.com/sonarqube-cloud/managing-your-projects/project-analysis/setting-analysis-scope "mention") section.
This feature requires the Administer organization permission.
### Excluding files based on file content
You can exclude from the analysis files that contain a block of code matching a given regular expression. You can enter one or more regular expression patterns. Any file containing at least one of the specified patterns will be ignored.
The parameter to be configured is **Ignore Issues on Files**.
To define the **Ignore Issues on Files** parameter:
1. Retrieve your organization. See [viewing-organizations](https://docs.sonarsource.com/sonarqube-cloud/getting-started/viewing-organizations "mention") for more details.
2. Go to **Administration** > **Analysis scope**.
3. In **Ignore Issues on Files**, enter and save a regular expression pattern.
4. You can enter a second regular expression pattern and so on.
Example of Ignore Issues on Files parameter configuration
Let’s say you have generated class files in your Java project that you wish to exclude. The files look something like this:
```java
@Generated("com.example.generated")
public class GeneratedClass extends AnotherClass {
// Some generated code
}
```
To exclude all such files, you might set the **Ignore Issues on Files** parameter to the following regular expression: `@Generated\(".*"\)`
### Excluding blocks within files
You can exclude from the analysis specific blocks contained in any source file (The rest of the file will be analyzed.). The parameter to be configured is **Ignore Issues in Blocks**.
Principles governing the use of the Ignore Issues in Blocks parameter
Blocks to be ignored are delimited within the file by start and end strings specified by regular expression patterns:
* If the first regular expression is found but not the second one, the end of the file is considered to be the end of the block.
* Regular expressions are not matched across multiple lines.
Any block - within any file - containing at least one of the specified patterns will be ignored.
Defining the Ignore Issues in Blocks parameter
1. Retrieve your organization. See [viewing-organizations](https://docs.sonarsource.com/sonarqube-cloud/getting-started/viewing-organizations "mention") for more details.
2. Go to **Administration** > **Analysis scope**.
3. In **Ignore Issues in Blocks**, enter and save a block definition.
4. You can enter a second block definition and so on.
Example of Ignore Issues in Blocks parameter configuration
You can use block delimiters to specify the block to be excluded as illustrated below. In this example, you want to ignore the code in the method `doSomethingElse` below delimited by `// BEGIN-NOSCAN` and `// END-NOSCAN`.
```c
public class MyClass {
public MyClass() {
...
}
public void doSomething() {
...
}
// BEGIN-NOSCAN
public void doSomethingElse()
{
...
}
// END-NOSCAN
}
```
You could define the block to be excluded with the following regular expressions:
* Start of block: `\s*//\s*START-NOSCAN`
* End of block: `\s*//\s*END-NOSCAN`
These regular expressions ensure that the start and end block delimiters will be recognized regardless of the number of spaces around the line comment characters (`//`).
### Excluding specific files from specific coding rules
This section explains how to exclude specific files from specific coding rules in your project analysis.
Introduction to coding rules exclusion
To exclude specific files from specific coding rules, you can:
* Exclude specific files from the check against specific coding rules.\
To do so, you define exclusion criteria. An exclusion criterion is a combination of:
* A coding rule key pattern: specifies the coding rules to be excluded.
* A file path pattern: specifies the files to which the specified coding rules will not be applied.
* Apply the check against specific coding rules to specific files. It means that the other files are excluded from this check.\
To do so, you define inclusion criteria. An inclusion criterion is a combination of:
* A coding rule key pattern: specifies the coding rules to be applied.
* A file path pattern: specifies the files to which the specified rules will be applied. The specified rules will not be applied to the other files.
Defining coding rule inclusion or exclusion criteria
1. Retrieve your organization. See [viewing-organizations](https://docs.sonarsource.com/sonarqube-cloud/getting-started/viewing-organizations "mention") for more details.
2. Go to **Administration** > **Analysis scope**.
3. In the **Ignore Issues on Multiple Criteria** parameter (to define an exclusion criterion), or in the **Restrict Scope of Coding Rules** (to define an inclusion criteria), enter and save a pair consisting of:
* A pattern for coding rule keys.
* A pattern for file paths. See [defining-matching-patterns](https://docs.sonarsource.com/sonarqube-cloud/appendices/defining-matching-patterns "mention") for more details.
4. You can add a second criterion, and so on.
Examples of Ignore Issues on Multiple Criteria parameter configuration (inclusion criterion)
| **Example** | **Inclusion criterion** |
| --------------------------------------------------------------------------------------------------------------------------------------------------------------------------------------- | ------------------------------------------------------------------------------------------------------------------------------------------------------------------------------------------------------------------------------------------------------------------------------------------------------------------------------------------ |
|
Check:
• The coding rule "compareTo" should not be overloaded"
• Only on "Bean" objects and on nothing else.
|
• Rule key pattern: java:s4351
• File path pattern: \*\*/\*Bean.java
|
|
Check:
• The coding rule "GO TO DEPENDING ON should not be used" in COBOL.
• Only on files in the directories bank/creditcard and bank/bankcard and on nothing else.
• In files located directly in the Java package com.foo, but not in its sub-packages.
|
• Rule key pattern:
• File path pattern: com/foo/
|
|
Ignore:
• The C++ coding rules where the word "union" appears in the name.
• In files in the directory object and its sub-directories.
|
• Rule key pattern: cpp:Union
• File path pattern: object/\*\*/\*
|
---
# Source: https://docs.sonarsource.com/sonarqube-community-build/project-administration/adjusting-analysis/setting-analysis-scope/advanced-exclusions.md
# Source: https://docs.sonarsource.com/sonarqube-server/2025.2/project-administration/setting-analysis-scope/advanced-exclusions.md
# Source: https://docs.sonarsource.com/sonarqube-server/2025.3/project-administration/setting-analysis-scope/advanced-exclusions.md
# Source: https://docs.sonarsource.com/sonarqube-server/2025.5/project-administration/setting-analysis-scope/advanced-exclusions.md
# Source: https://docs.sonarsource.com/sonarqube-server/2025.4/project-administration/setting-analysis-scope/advanced-exclusions.md
# Source: https://docs.sonarsource.com/sonarqube-server/2025.6/project-administration/adjusting-analysis/setting-analysis-scope/advanced-exclusions.md
# Source: https://docs.sonarsource.com/sonarqube-server/project-administration/adjusting-analysis/setting-analysis-scope/advanced-exclusions.md
# Source: https://docs.sonarsource.com/sonarqube-cloud/managing-your-projects/project-analysis/setting-analysis-scope/advanced-exclusions.md
# Advanced exclusions
In very specific situations, you may have to:
* Exclude files based on the file content.
* Exclude blocks within files.
* Exlude specific files from specific coding rules.
{% hint style="info" %}
It is strongly advised to configure these features in SonarQube UI. The configuration on the CI/CD host which is very tedious and implies using a set of properties is not documented in this guide.
{% endhint %}
{% hint style="info" %}
As the admin of an Enterprise plan organization, you can perform these settings as the default settings for all projects of your organization. See [advanced-exclusion-features](https://docs.sonarsource.com/sonarqube-cloud/administering-sonarcloud/managing-organization/setting-config-at-org-level/adjusting-analysis-scope/advanced-exclusion-features "mention").
{% endhint %}
### Excluding files based on file content
You can exclude from the analysis files that contain a block of code matching a given regular expression. You can enter one or more regular expression patterns. Any file containing at least one of the specified patterns will be ignored.
The parameter to be configured is **Ignore Issues on Files**. For a configuration example of this parameter, see below.
To define the **Ignore Issues on Files** parameter:
1. Retrieve your project. See [retrieving-projects](https://docs.sonarsource.com/sonarqube-cloud/managing-your-projects/retrieving-projects "mention") for more details.
2. Go to **Administration** > **General Settings** > **Analysis scope**.
3. In **Issues > Ignore Issues on Files**, enter and save a regular expression pattern.
4. You can enter a second regular expression pattern and so on.
Example of Ignore Issues on Files parameter configuration
Let’s say you have generated class files in your Java project that you wish to exclude. The files look something like this:
```java
@Generated("com.example.generated")
public class GeneratedClass extends AnotherClass {
// Some generated code
}
```
To exclude all such files, you might set the **Ignore Issues on Files** parameter to the following regular expression: `@Generated\(".*"\)`
### Excluding blocks within files
You can exclude from the analysis specific blocks contained in any source file (The rest of the file will be analyzed.). The parameter to be configured is **Ignore Issues in Blocks**.
Principles governing the use of the Ignore Issues in Blocks parameter
Blocks to be ignored are delimited within the file by start and end strings specified by regular expression patterns:
* If the first regular expression is found but not the second one, the end of the file is considered to be the end of the block.
* Regular expressions are not matched across multiple lines.
Any block - within any file - containing at least one of the specified patterns will be ignored.
Defining the Ignore Issues in Blocks parameter
1. Retrieve your project. See [retrieving-projects](https://docs.sonarsource.com/sonarqube-cloud/managing-your-projects/retrieving-projects "mention") for more details.
2. Go to **Administration** > **General Settings** > **Analysis scope**.
3. In **Issues** > **Ignore Issues in Blocks**, enter and save a block definition.
4. You can enter a second block definition and so on.
Example of Ignore Issues in Blocks parameter configuration
You can use block delimiters to specify the block to be excluded as illustrated below. In this example, you want to ignore the code in the method `doSomethingElse` below delimited by `// BEGIN-NOSCAN` and `// END-NOSCAN`.
```c
public class MyClass {
public MyClass() {
...
}
public void doSomething() {
...
}
// BEGIN-NOSCAN
public void doSomethingElse()
{
...
}
// END-NOSCAN
}
```
You could define the block to be excluded with the following regular expressions:
* Start of block: `\s*//\s*START-NOSCAN`
* End of block: `\s*//\s*END-NOSCAN`
These regular expressions ensure that the start and end block delimiters will be recognized regardless of the number of spaces around the line comment characters (`//`).
### Excluding specific files from specific coding rules
This section explains how to exclude specific files from specific coding rules in your project analysis.
Introduction to coding rules exclusion
To exclude specific files from specific coding rules, you can:
* Exclude specific files from the check against specific coding rules.\
To do so, you define exclusion criteria. An exclusion criterion is a combination of:
* A coding rule key pattern: specifies the coding rules to be excluded.
* A file path pattern: specifies the files to which the specified coding rules will not be applied.
* Apply the check against specific coding rules to specific files. It means that the other files are excluded from this check.\
To do so, you define inclusion criteria. An inclusion criterion is a combination of:
* A coding rule key pattern: specifies the coding rules to be applied.
* A file path pattern: specifies the files to which the specified rules will be applied. The specified rules will not be applied to the other files.
Defining coding rule inclusion or exclusion criteria
1. Retrieve your project. See [retrieving-projects](https://docs.sonarsource.com/sonarqube-cloud/managing-your-projects/retrieving-projects "mention") for details.
2. Go to **Administration** > **General Settings** > **Analysis scope**.
3. In the **Issues** > **Ignore Issues on Multiple Criteria** parameter (to define an exclusion criterion), or in the **Issues** > **Restrict Scope of Coding Rules** (to define an inclusion criteria), enter and save a pair consisting of, see [defining-matching-patterns](https://docs.sonarsource.com/sonarqube-cloud/appendices/defining-matching-patterns "mention"):
* A pattern for coding rule keys.
* A pattern for file paths.
4. You can add a second criterion, and so on.
Examples of Ignore Issues on Multiple Criteria parameter configuration (inclusion criterion)
| **Example** | **Inclusion criterion** |
| --------------------------------------------------------------------------------------------------------------------------------------------------------------------------------------- | ------------------------------------------------------------------------------------------------------------------------------------------------------------------------------------------------------------------------------------------------------------------------------------------------------------------------------------------ |
|
Check:
• The coding rule "compareTo" should not be overloaded"
• Only on "Bean" objects and on nothing else.
|
• Rule key pattern: java:s4351
• File path pattern: \*\*/\*Bean.java
|
|
Check:
• The coding rule "GO TO DEPENDING ON should not be used" in COBOL.
• Only on files in the directories bank/creditcard and bank/bankcard and on nothing else.
|
Two criteria must be used.
Criterion 1:
• Rule key pattern: cobol:S4883
• File path pattern: bank/creditcard//
Criterion 2:
• Rule key pattern: cobol:S4883
• File path pattern: bank/bankcard//
|
Examples of Restrict Scope of Coding Rules parameter configuration (exclusion criterion)
| Example | Exclusion criterion |
| --------------------------------------------------------------------------------------------------------------------------------------------------------- | ------------------------------------------------------------------------------ |
|
Ignore:
• All coding rules.
• In all files.
|
• Rule key pattern:
• File path pattern: \*\*/
|
|
Ignore:
• All coding rules.
• In the file bank/ZTR00021.cbl.
|
• Rule key pattern: \*
• File path pattern: bank/ZTR00021.cbl
|
|
Ignore:
• All coding rules.
• In files located directly in the Java package com.foo, but not in its sub-packages.
|
• Rule key pattern:
• File path pattern: com/foo/
|
|
Ignore:
• The C++ coding rules where the word "union" appears in the name.
• In files in the directory object and its sub-directories.
|
• Rule key pattern: cpp:Union
• File path pattern: object/\*\*/\*
|
### Related pages
* [setting-initial-scope](https://docs.sonarsource.com/sonarqube-cloud/managing-your-projects/project-analysis/setting-analysis-scope/setting-initial-scope "mention")
* [exclude-from-coverage-duplication](https://docs.sonarsource.com/sonarqube-cloud/managing-your-projects/project-analysis/setting-analysis-scope/exclude-from-coverage-duplication "mention")
* [excluding-files-based-on-patterns](https://docs.sonarsource.com/sonarqube-cloud/managing-your-projects/project-analysis/setting-analysis-scope/excluding-files-based-on-patterns "mention")
* [excluding-based-on-file-extension](https://docs.sonarsource.com/sonarqube-cloud/managing-your-projects/project-analysis/setting-analysis-scope/excluding-based-on-file-extension "mention")
* [other-adjustments](https://docs.sonarsource.com/sonarqube-cloud/managing-your-projects/project-analysis/setting-analysis-scope/other-adjustments "mention")
* [verifying-analysis-scope](https://docs.sonarsource.com/sonarqube-cloud/managing-your-projects/project-analysis/setting-analysis-scope/verifying-analysis-scope "mention")
* [introduction](https://docs.sonarsource.com/sonarqube-cloud/administering-sonarcloud/managing-organization/setting-config-at-org-level/adjusting-analysis-scope/introduction "mention") to Adjusting analysis scope
---
# Source: https://docs.sonarsource.com/sonarqube-server/10.3/setup-and-upgrade/install-the-server/advanced-installation-features.md
# Source: https://docs.sonarsource.com/sonarqube-server/10.4/setup-and-upgrade/install-the-server/advanced-installation-features.md
# Source: https://docs.sonarsource.com/sonarqube-server/10.5/setup-and-upgrade/install-the-server/advanced-installation-features.md
# Source: https://docs.sonarsource.com/sonarqube-server/10.6/setup-and-upgrade/install-the-server/advanced-installation-features.md
# Source: https://docs.sonarsource.com/sonarqube-server/10.7/setup-and-upgrade/install-the-server/advanced-installation-features.md
# Source: https://docs.sonarsource.com/sonarqube-server/10.8/setup-and-upgrade/install-the-server/advanced-installation-features.md
# Source: https://docs.sonarsource.com/sonarqube-server/2025.2/setup-and-update/install-the-server/advanced-installation-features.md
# Source: https://docs.sonarsource.com/sonarqube-server/2025.1/setup-and-upgrade/install-the-server/advanced-installation-features.md
# Advanced installation
This section explains how to:
* Change the web server connection parameters
* Modify the default configuration of the server installation
You can also:
* In case of a ZIP installation: run SonarQube Server as a service on Windows or Linux. See [#running-sonarqube-as-a-service-on-windows](https://docs.sonarsource.com/sonarqube-server/2025.1/operating-the-server#running-sonarqube-as-a-service-on-windows "mention").
* Run SonarQube Server behind a proxy. See [#securing-the-server-behind-a-proxy](https://docs.sonarsource.com/sonarqube-server/2025.1/operating-the-server#securing-the-server-behind-a-proxy "mention") [operating-the-server](https://docs.sonarsource.com/sonarqube-server/2025.1/setup-and-upgrade/operating-the-server "mention")
* Monitor and adjust Java process memory. See [#java-process-memory](https://docs.sonarsource.com/sonarqube-server/2025.1/server-update-and-maintenance/monitoring/instance#java-process-memory "mention").
* Install a plugin. See [install-a-plugin](https://docs.sonarsource.com/sonarqube-server/2025.1/setup-and-upgrade/plugins/install-a-plugin "mention").
### Changing the web server connection parameters
To set up the web server connection:
* For a server installation from the ZIP file: Verify and change if necessary the following properties in the SonarQube Server configuration file (`/conf/sonar.properties`).
* For a server installation from the Docker image: Verify and change if necessary the following environment variables.
Property (ZIP installation)
Environment variable (Docker installation)
Description
sonar.web.host
SONAR_WEB_HOST
For servers with more than one IP address, this property specifies which address will be used for listening on the specified ports.
Default value: 0.0.0.0 (ports will be used on all IP addresses associated with the server)
sonar.web.port
SONAR_WEB_PORT
TCP port for incoming HTTP connections.
Default value: 9000
sonar.web.context
SONAR_WEB_CONTEXT
Web context specifying the path at which to serve SonarQube Server. For example, with sonar.web.port=9000 and sonar.web.context=/sonarqube, you will access the web interface at http://localhost:9000/sonarqube.
Example: /sonarqube (must start with a forward slash)
Default value: empty (root context)
### Modifying the default configuration of a server installation
To modify the default configuration:
* For a server installation from the ZIP file: Change the sonar properties in the SonarQube Server configuration file (`/conf/sonar.properties`).
* For a server installation from the Docker image: Change the sonar environment variables. See [environment-variables](https://docs.sonarsource.com/sonarqube-server/2025.1/setup-and-upgrade/environment-variables "mention").
### Self Signed Certificates of DevOps platforms
When running in an environment where the DevOps platform or other related tooling is secured by self-signed certificates, the CA needs to be added to the Java truststore of SonarQube Server.
In a zip installation, the systems truststore can be found in `$JAVA_HOME/lib/security/cacerts`. In order to add a new certificate to the truststore you can use the following command as an example:
```css-79elbk
keytool -importcert -file $PATH_TO_CERTIFICATE -alias $CERTIFICATE_NAME -keystore /$JAVA_HOME/lib/security/cacerts -storepass changeit -trustcacerts -noprompt
```
In our official Docker images, you can find the systems truststore in `/lib/security/cacerts`. In order to add new certificates here as well you can:
* Bind mount an existing truststore containing your certificates to `/lib/security/cacerts`.
Example
```css-79elbk
docker run -d --name sonarqube -v /path/to/your/cacerts.truststore:/opt/java/openjdk/lib/security/cacerts:ro -p 9000:9000 sonarqube
```
* Import your CA certificate the same way as in the zip installation but inside the container.
If you deploy SonarQube Server on Kubernetes using the official Helm Chart, you can create a new secret containing your required certificates and reference this via:
```css-79elbk
caCerts:
enabled: true
image: adoptopenjdk/openjdk17:alpine
secret: your-secret
```
### SonarQube Server DNS cache
When reporting Quality Gate status to DevOps platforms, SonarQube Server uses a DNS cache time to live policy of 30 seconds. If necessary, you can change this setting in your JVM:
```css-79elbk
echo "networkaddress.cache.ttl=5" >> "${JAVA_HOME}/conf/security/java.security"
```
Please be aware that low values increase the risk of DNS spoofing attacks.
---
# Source: https://docs.sonarsource.com/sonarqube-server/2025.3/advanced-security.md
# Source: https://docs.sonarsource.com/sonarqube-server/2025.5/advanced-security.md
# Source: https://docs.sonarsource.com/sonarqube-server/2025.4/advanced-security.md
# Source: https://docs.sonarsource.com/sonarqube-server/2025.6/advanced-security.md
# Source: https://docs.sonarsource.com/sonarqube-server/advanced-security.md
# Source: https://docs.sonarsource.com/sonarqube-cloud/advanced-security.md
# Advanced Security
*Advanced Security is an add-on that requires a separate subscription to your SonarQube Cloud's* [*Enterprise license*](https://www.sonarsource.com/plans-and-pricing/#sonarqube-cloud-features)*.*
{% content-ref url="advanced-security/introduction" %}
[introduction](https://docs.sonarsource.com/sonarqube-cloud/advanced-security/introduction)
{% endcontent-ref %}
{% content-ref url="advanced-security/analyzing-projects-for-dependencies-sca" %}
[analyzing-projects-for-dependencies-sca](https://docs.sonarsource.com/sonarqube-cloud/advanced-security/analyzing-projects-for-dependencies-sca)
{% endcontent-ref %}
{% content-ref url="advanced-security/viewing-dependencies" %}
[viewing-dependencies](https://docs.sonarsource.com/sonarqube-cloud/advanced-security/viewing-dependencies)
{% endcontent-ref %}
{% content-ref url="advanced-security/reviewing-and-fixing-dependency-risks" %}
[reviewing-and-fixing-dependency-risks](https://docs.sonarsource.com/sonarqube-cloud/advanced-security/reviewing-and-fixing-dependency-risks)
{% endcontent-ref %}
{% content-ref url="advanced-security/managing-license-profiles-and-policies" %}
[managing-license-profiles-and-policies](https://docs.sonarsource.com/sonarqube-cloud/advanced-security/managing-license-profiles-and-policies)
{% endcontent-ref %}
{% content-ref url="advanced-security/troubleshooting-the-dependency-analysis" %}
[troubleshooting-the-dependency-analysis](https://docs.sonarsource.com/sonarqube-cloud/advanced-security/troubleshooting-the-dependency-analysis)
{% endcontent-ref %}
{% content-ref url="advanced-security/best-practices-for-managing-dependency-risks" %}
[best-practices-for-managing-dependency-risks](https://docs.sonarsource.com/sonarqube-cloud/advanced-security/best-practices-for-managing-dependency-risks)
{% endcontent-ref %}
---
# Source: https://docs.sonarsource.com/sonarqube-community-build/server-installation/from-docker-image/advanced-setup.md
# Source: https://docs.sonarsource.com/sonarqube-community-build/server-installation/from-zip-file/advanced-setup.md
# Source: https://docs.sonarsource.com/sonarqube-server/2025.3/server-installation/from-docker-image/advanced-setup.md
# Source: https://docs.sonarsource.com/sonarqube-server/2025.3/server-installation/from-zip-file/advanced-setup.md
# Source: https://docs.sonarsource.com/sonarqube-server/2025.5/server-installation/from-docker-image/advanced-setup.md
# Source: https://docs.sonarsource.com/sonarqube-server/2025.5/server-installation/from-zip-file/advanced-setup.md
# Source: https://docs.sonarsource.com/sonarqube-server/2025.4/server-installation/from-docker-image/advanced-setup.md
# Source: https://docs.sonarsource.com/sonarqube-server/2025.4/server-installation/from-zip-file/advanced-setup.md
# Source: https://docs.sonarsource.com/sonarqube-server/2025.6/server-installation/from-docker-image/advanced-setup.md
# Source: https://docs.sonarsource.com/sonarqube-server/2025.6/server-installation/from-zip-file/advanced-setup.md
# Source: https://docs.sonarsource.com/sonarqube-server/server-installation/from-docker-image/advanced-setup.md
# Source: https://docs.sonarsource.com/sonarqube-server/server-installation/from-zip-file/advanced-setup.md
# Source: https://docs.sonarsource.com/sonarqube-cloud/advanced-setup.md
# Advanced setup
{% content-ref url="advanced-setup/overview" %}
[overview](https://docs.sonarsource.com/sonarqube-cloud/advanced-setup/overview)
{% endcontent-ref %}
{% content-ref url="advanced-setup/automatic-analysis" %}
[automatic-analysis](https://docs.sonarsource.com/sonarqube-cloud/advanced-setup/automatic-analysis)
{% endcontent-ref %}
{% content-ref url="advanced-setup/ci-based-analysis" %}
[ci-based-analysis](https://docs.sonarsource.com/sonarqube-cloud/advanced-setup/ci-based-analysis)
{% endcontent-ref %}
{% content-ref url="advanced-setup/scanner-environment" %}
[scanner-environment](https://docs.sonarsource.com/sonarqube-cloud/advanced-setup/scanner-environment)
{% endcontent-ref %}
{% content-ref url="advanced-setup/languages" %}
[languages](https://docs.sonarsource.com/sonarqube-cloud/advanced-setup/languages)
{% endcontent-ref %}
{% content-ref url="advanced-setup/analysis-parameters" %}
[analysis-parameters](https://docs.sonarsource.com/sonarqube-cloud/advanced-setup/analysis-parameters)
{% endcontent-ref %}
{% content-ref url="advanced-setup/monorepo-support" %}
[monorepo-support](https://docs.sonarsource.com/sonarqube-cloud/advanced-setup/monorepo-support)
{% endcontent-ref %}
{% content-ref url="advanced-setup/web-api" %}
[web-api](https://docs.sonarsource.com/sonarqube-cloud/advanced-setup/web-api)
{% endcontent-ref %}
{% content-ref url="advanced-setup/webhooks" %}
[webhooks](https://docs.sonarsource.com/sonarqube-cloud/advanced-setup/webhooks)
{% endcontent-ref %}
{% content-ref url="advanced-setup/incremental-analysis-mechanisms" %}
[incremental-analysis-mechanisms](https://docs.sonarsource.com/sonarqube-cloud/advanced-setup/incremental-analysis-mechanisms)
{% endcontent-ref %}
---
# Source: https://docs.sonarsource.com/sonarqube-cloud/managing-your-projects/issues/with-ai-features/agents-in-your-github-pull-request.md
# Agents in your GitHub pull request
### The SonarQube Remediation Agent
{% hint style="success" %}
The SonarQube Remediation Agent is a [Beta](https://docs.sonarsource.com/sonarqube-cloud/appendices/product-release-lifecycle#beta) feature available with Enterprise plan accounts. It is free during the beta phase and will be a paid feature when it moves to [General Availability](https://docs.sonarsource.com/sonarqube-cloud/appendices/product-release-lifecycle#general-availability). To learn more about the terms & conditions, please see our legal page about features in [Early Access](https://www.sonarsource.com/legal/early-access/).
If your SonarQube Cloud organization is not on an Enterprise plan, please see the [getting-started-with-enterprise](https://docs.sonarsource.com/sonarqube-cloud/getting-started-with-enterprise "mention") pages to get the process started.
{% endhint %}
Once the SonarQube Remediation Agent is activated as described on the [sonarqube-remediation-agent](https://docs.sonarsource.com/sonarqube-cloud/administering-sonarcloud/ai-features/sonarqube-remediation-agent "mention") page, it's activity can be reviewed in SonarQube Cloud and the agent can be engaged in GitHub on your open PR.
The agent is triggered when your quality gate fails during the pull request (PR) analysis. If you have additional commits on the PR that cause your quality gate to fail, you will trigger a new agent and only engage with the most recent agent called.
Once active, the SonarQube Remediation Agent automatically generates commit suggestions for new issues introduced in the PR. It only offers fix suggestions for issues in the PR within which the agent is was triggered.
### Agent behavior
After your SonarQube Cloud administrator has completed the steps laid out in the [#enable-your-agent](https://docs.sonarsource.com/sonarqube-cloud/administering-sonarcloud/ai-features/sonarqube-remediation-agent#enable-your-agent "mention") article, navigate to *Your SonarQube Cloud Project* > **Agent activity** to view your remediation agent’s activity. The **Agent activity** page provides basic information and hyperlinks to:
1. The GitHub PR where the agent exists.
2. The PR summary for the relevant pull request. See the *Pull request analysis* page for information about [#understanding-your-pull-request-analysis](https://docs.sonarsource.com/sonarqube-cloud/improving/pull-request-analysis#understanding-your-pull-request-analysis "mention").
3. A timestamp for the recorded activity.
### Engage with the agent
A single **Remediation Agent Summary** will be created on your pull request explaining the agent’s suggestions, and a unique **Agent Fix (Issue X of Y)** commit suggestion for each issue will be created for review by a developer. The summary provides an explanation about each fix suggestion, including links to the issue description, type, severity, and estimated effort required to fix (where applicable). See the diagram below for a more detailed explaination:
1. The status of your quality gate will be shown on the activity history of our PR. The next action item in your history should be the Remediation Agent summary; if it doesn't show up or isn't updating its status, try refreshing your page.
2. Select the **Suggested fixes** collapsible to reveal the list of fixes provided by the agent. The summary page provides information about:
* **Quality:** each issue's [software-qualities](https://docs.sonarsource.com/sonarqube-cloud/digging-deeper/software-qualities "mention")
* **Issue:** the issues's rule description and a link to the issue as found in the SonarQube Cloud Pull request analysis
* **Status**: the state of each issue's resolution in relation to the agent's activity
3. Each fix suggestion provides the issue's rule description and the accompanying information as found with every SonarQube rule. The generation of fix suggestions takes place in the background and the new code does not introduce new issues.
4. Select **View fix** to jump to a unique comment in your PR history. There, you can review the fix in more detail and if approved, commit the fix as a change. See [#review-agent-fix-suggestions](#review-agent-fix-suggestions "mention") for more information.
5. If the agent can't provide a fix suggestion, the issue will be listed here. Depending on the number of issues and the parameters of your quality gate, you may need to fix these issues in the IDE before being able to merge your PR. See the page about using [connected-mode](https://docs.sonarsource.com/sonarqube-cloud/improving/connected-mode "mention") and connected mode, if needed.
### Review agent fix suggestions
If in point 4 above, you selected **View fix**, you'll arrive at a unique comment designed for reviewing your specific issue.
Each issue has its own comment that includes a dif view of the suggested change along with an explanation about the fix suggestion. Additional information includes links to the issue description, type, severity, and an estimated effort required to fix the issue (where applicable).
1. Use this information to find your issue's location in your code.
2. A dif view is provided so you can see what will be changed if you choose to **Select fix** (see number 4 below).
3. The suggestion details include an AI-generated explanation of what the code change is accomplishing.
4. Choosing **Select fix** means that you have reviewed the content and have marked the agent's fix suggestion to be commited to your PR. The fix suggestion will be added to a list that must be confirmed in the next step.
5. *IMPORTANT*: Select **Commit changes** only when you are ready to accept *all of your selected fixes*. Selecting the **Commit changes** checkbox applies all of the reviewed changes you accepted in point 4. Once selected, all of the changes will be applied to your code in a new commit. The new code does not introduce new issues.
### The agent's commit
The SonarQube Remediation Agent will contain important information that you may want to reference later. Here's a list of the information that it includes:
* The fixes you reviewed and approved (when selecting **Select fix**) will be kept as hidden items in your PR history. The fix comment, as described in [#review-agent-fix-suggestions](#review-agent-fix-suggestions "mention"), will be updated to confirm that the fix suggestion was commited to your PR.
* All of the fixes that you select will be in the single commit with a unique reference number, and marked as co-authored by *you* and the *sonarqube-agent \[bot]*.
* The new commit will trigger another pull request analysis on SonarQube Cloud. The results of the analysis will determine what happens next in your PR:
* If your quality gate passes, you can proceed with merging in accordance with your Branch protection rules.
* If your quality gate fails, the SonarQube Remediation Agent will be retriggered, and you can restart the review process of its fix suggestion. The agent may take a few minutes to run depending on the complexity of your project. Refreshing the page in GitHub can help show the agent's most recent activity.
---
# Source: https://docs.sonarsource.com/sonarqube-for-vs-code/ai-capabilities/agents.md
# AI agents
SonarQube for IDE’s code analysis workflow is enhanced by a set of tools designed to integrate with AI agents. These tools allow you to interact with AI agents in natural language to perform specific SonarQube-related tasks directly within your IDE. This integration streamlines your development process by bringing the power of SonarQube analysis into your AI-assisted conversations, helping you focus on and resolve code quality and security issues more efficiently.
### SonarQube MCP Server
The SonarQube MCP Server is a Model Context Protocol (MCP) server that runs locally and enables a seamless connection between your AI agents and your SonarQube platform. The tools are designed to bridge the divide between productivity and quality. Please see the full details in the [SonarQube MCP Server](https://app.gitbook.com/o/2ibCvzwZt86Nlk2zloB7/s/xNksbUaDXyfRoTpHP0vQ/ "mention") documentation.
Using SonarQube MCP Server together with the SonarQube for IDE plugin allows the MCP server to trigger analyses directly in the editor, just like regular on-the-fly analysis by SonarQube for IDE. This powerful combination helps AI agents deliver more reliable, maintainable, and secure code.
When you're using an AI-enabled IDE such as Cursor, Windsurf, or VS Code with Copilot enabled, and have already completed your [setup](https://docs.sonarsource.com/sonarqube-for-vs-code/connect-your-ide/setup "mention") in SonarQube for IDE with SonarQube Server or SonarQube Cloud, a quick select button is available.
* Select the icon, **Configure MCP Server** from the **CONNECTED MODE** view window to use your connected mode credentials to start using the SonarQube MCP Server. The same workflow is available in the **AI AGENTS CONFIGURATION** view.
Once SonarQube MCP Server is configured in your AI Assisted IDE, select the **Create Instructions for AI** **agents** action (Cursor only) to generate a rules file in your workspace folder for the agent to use.
This rule file contains instructions for the agent on how to effectively utilize SonarQube MCP Server. As an example, it instructs the agent to disable SonarQube automatic analysis before starting code generation, and to enable it after the generation is complete. It also asks the agent to analyze changed files in batches, once the changes are done.
### GitHub Copilot extension
SonarQube for VS Code includes tools for the GitHub Copilot extension in VS Code. The interactive tools come automatically with your [installation](https://docs.sonarsource.com/sonarqube-for-vs-code/getting-started/installation "mention") and are best accessed with the Copilot **Agent** mode enabled.
You can easily use SonarQube for VS Code’s tools within the GitHub Copilot extension. Simply call the SonarQube for IDE tools by name or ask Copilot to perform a SonarQube-related action using natural language. Either way, Copilot will recognize what you need and guide you by opening the right window or asking for any extra details.
#### SonarQube for IDE tools
* Security Hotspots
* `#sonarqube_getSecurityHotspots`
* Checks for security hotspots in your file. The tool takes a single file path as an argument.
* Exclude File or Folder from Analysis
* `#sonarqube_excludeFiles`
* Updates the SonarQube for IDE analysis settings to exclude files and folders using known [file-exclusions](https://docs.sonarsource.com/sonarqube-for-vs-code/using/file-exclusions "mention").
* Set up Connected Mode
* `#sonarqube_setUpConnectedMode`
* Copilot will walk you through the [setup](https://docs.sonarsource.com/sonarqube-for-vs-code/connect-your-ide/setup "mention") with SonarQube Server or Cloud. If you already have a shared setup, Copilot will open the UI to complete the process, or prompt you to choose Server or Cloud before beginning a new connection setup.
* Analyze File
* `#sonarqube_analyzeFile`
* Use this tool to analyze a file, including those you might have previously excluded.
---
# Source: https://docs.sonarsource.com/sonarqube-cloud/ai-capabilities/ai-agents.md
# SonarQube Remediation Agent
### The SonarQube Remediation Agent
{% hint style="success" %}
The SonarQube Remediation Agent is a [Beta](https://docs.sonarsource.com/sonarqube-cloud/appendices/product-release-lifecycle#beta) feature available with Enterprise plan accounts. It is free during the beta phase and will be a paid feature when it moves to [General Availability](https://docs.sonarsource.com/sonarqube-cloud/appendices/product-release-lifecycle#general-availability). To learn more about the terms & conditions, please see our legal page about features in [Early Access](https://www.sonarsource.com/legal/early-access/).
If your SonarQube Cloud organization is not on an Enterprise plan, please see the [getting-started-with-enterprise](https://docs.sonarsource.com/sonarqube-cloud/getting-started-with-enterprise "mention") pages to get the process started.
{% endhint %}
The SonarQube Remediation Agent runs an independent review and analysis to help you fix reliability and maintainability issues found in your latest code. It focuses on new issues discovered in your latest GitHub pull request (PR). These issues, picked up by the agent, would otherwise break the new code conditions of your quality gate and block the merge of your PR.
The agent uses space.vars.SQC\_Remediation\_agent\_LLM to generate fix suggestions in the background and checks that the new code does not introduce new issues before offering the suggestion.
The agent reviews issues found during your pull request analysis, proposes fixes, and adds a commit to the PR when the fix suggestion is accepted. Users maintain full control of the agent at all times from enabling it on a per-project basis, to reviewing and approving code suggestions on an issue-by-issue basis.
It works with your most common languages (Java, JavaScript/TypeScript, and Python) by providing feedback on maintainability, reliability, and select security issues. In addition, it also offers fix suggestions for [secrets](https://docs.sonarsource.com/sonarqube-cloud/advanced-setup/languages/secrets "mention"); see the [#requirements-and-limitations](https://docs.sonarsource.com/sonarqube-cloud/administering-sonarcloud/ai-features/sonarqube-remediation-agent#requirements-and-limitations "mention") for complete details.
To enable and install the agent, see the [sonarqube-remediation-agent](https://docs.sonarsource.com/sonarqube-cloud/administering-sonarcloud/ai-features/sonarqube-remediation-agent "mention") page. To understand the agent's behavior and learn how to engage with the agent in your pull request, see the [agents-in-your-github-pull-request](https://docs.sonarsource.com/sonarqube-cloud/managing-your-projects/issues/with-ai-features/agents-in-your-github-pull-request "mention") page.
### Sharing your code with Sonar
If you use the SonarQube Remediation Agent, the affected code snippet will be sent by the agent to an LLM to generate a fix suggestion. These suggestions are verified by Sonar before being offered as an issue fix. Service agreements with Sonar’s LLMs prevent your code from being used to train those models and it is not stored by the LLM provider nor by any third party.
For details about terms and conditions, please refer to the [Early Access terms](https://www.sonarsource.com/legal/early-access/) in our [Legal Documentation](https://www.sonarsource.com/legal/).
---
# Source: https://docs.sonarsource.com/sonarqube-for-intellij/ai-capabilities.md
# Source: https://docs.sonarsource.com/sonarqube-for-vs-code/ai-capabilities.md
# Source: https://docs.sonarsource.com/sonarqube-server/2025.2/ai-capabilities.md
# Source: https://docs.sonarsource.com/sonarqube-server/2025.3/ai-capabilities.md
# Source: https://docs.sonarsource.com/sonarqube-server/2025.5/ai-capabilities.md
# Source: https://docs.sonarsource.com/sonarqube-server/2025.1/ai-capabilities.md
# Source: https://docs.sonarsource.com/sonarqube-server/2025.4/ai-capabilities.md
# Source: https://docs.sonarsource.com/sonarqube-server/2025.6/ai-capabilities.md
# Source: https://docs.sonarsource.com/sonarqube-server/ai-capabilities.md
# Source: https://docs.sonarsource.com/sonarqube-cloud/ai-capabilities.md
# AI capabilities
Available features include [autodetect-ai-code](https://docs.sonarsource.com/sonarqube-cloud/ai-capabilities/autodetect-ai-code "mention") and [ai-code-assurance](https://docs.sonarsource.com/sonarqube-cloud/ai-capabilities/ai-code-assurance "mention") to help you identify and highlight projects containing AI code.
The [sonarqube-mcp-server](https://docs.sonarsource.com/sonarqube-cloud/ai-capabilities/sonarqube-mcp-server "mention") facilitates a seamless integration between your AI-enabled IDE and SonarQube Cloud.
In addition, Sonar's [ai-codefix](https://docs.sonarsource.com/sonarqube-cloud/ai-capabilities/ai-codefix "mention") provides fix suggestions to developers in their IDEs and [ai-agents](https://docs.sonarsource.com/sonarqube-cloud/ai-capabilities/ai-agents "mention") are available to remediate issues in your GitHub PRs. /
{% columns %}
{% column %}
{% content-ref url="ai-capabilities/sonarqube-mcp-server" %}
[sonarqube-mcp-server](https://docs.sonarsource.com/sonarqube-cloud/ai-capabilities/sonarqube-mcp-server)
{% endcontent-ref %}
{% content-ref url="ai-capabilities/ai-codefix" %}
[ai-codefix](https://docs.sonarsource.com/sonarqube-cloud/ai-capabilities/ai-codefix)
{% endcontent-ref %}
{% content-ref url="ai-capabilities/ai-agents" %}
[ai-agents](https://docs.sonarsource.com/sonarqube-cloud/ai-capabilities/ai-agents)
{% endcontent-ref %}
{% endcolumn %}
{% column %}
{% content-ref url="ai-capabilities/autodetect-ai-code" %}
[autodetect-ai-code](https://docs.sonarsource.com/sonarqube-cloud/ai-capabilities/autodetect-ai-code)
{% endcontent-ref %}
{% content-ref url="ai-capabilities/ai-code-assurance" %}
[ai-code-assurance](https://docs.sonarsource.com/sonarqube-cloud/ai-capabilities/ai-code-assurance)
{% endcontent-ref %}
{% endcolumn %}
{% endcolumns %}
---
# Source: https://docs.sonarsource.com/sonarqube-server/2025.3/quality-standards-administration/ai-code-assurance.md
# Source: https://docs.sonarsource.com/sonarqube-server/2025.3/ai-capabilities/ai-code-assurance.md
# Source: https://docs.sonarsource.com/sonarqube-server/2025.5/quality-standards-administration/ai-code-assurance.md
# Source: https://docs.sonarsource.com/sonarqube-server/2025.5/ai-capabilities/ai-code-assurance.md
# Source: https://docs.sonarsource.com/sonarqube-server/2025.1/instance-administration/analysis-functions/ai-code-assurance.md
# Source: https://docs.sonarsource.com/sonarqube-server/2025.4/quality-standards-administration/ai-code-assurance.md
# Source: https://docs.sonarsource.com/sonarqube-server/2025.4/ai-capabilities/ai-code-assurance.md
# Source: https://docs.sonarsource.com/sonarqube-server/2025.6/quality-standards-administration/ai-code-assurance.md
# Source: https://docs.sonarsource.com/sonarqube-server/2025.6/ai-capabilities/ai-code-assurance.md
# Source: https://docs.sonarsource.com/sonarqube-server/quality-standards-administration/ai-code-assurance.md
# Source: https://docs.sonarsource.com/sonarqube-server/ai-capabilities/ai-code-assurance.md
# Source: https://docs.sonarsource.com/sonarqube-cloud/standards/ai-code-assurance.md
# Source: https://docs.sonarsource.com/sonarqube-cloud/ai-capabilities/ai-code-assurance.md
# AI Code Assurance
SonarQube Cloud’s AI Code Assurance features help you set appropriate standards for projects containing AI-generated code. A combination of tools, including project labels, a default quality gate, and the availability of externally published project badges, lets you ensure that your AI projects are protected for security and code quality.
### Assuring your AI code
Sonar recognizes that AI-generated code should be monitored with additional quality standards. Recommended checks include high standards to reduce code complexity, remove bugs, and eliminate injection vulnerabilities. SonarQube’s AI Code Assurance features bring confidence that your AI-generated code is being reviewed to avoid any accountability crisis.
These objectives are achieved with three features that allow Quality Standard administrators to qualify projects as AI Code Assured:
1. [#label-projects-with-ai-code](https://docs.sonarsource.com/sonarqube-cloud/standards/ai-code-assurance/overview#label-projects-with-ai-code "mention")
2. [#apply-a-quality-gate-for-ai-code-assurance](https://docs.sonarsource.com/sonarqube-cloud/standards/ai-code-assurance/overview#apply-a-quality-gate-for-ai-code-assurance "mention")
3. Publish an AI Code Assurance badge externally to your websites. See the [#monitor-projects-containing-ai-code](https://docs.sonarsource.com/sonarqube-cloud/standards/ai-code-assurance/overview#monitor-projects-containing-ai-code "mention") page for instructions.
The full details to setting up AI Code Assurance are outlined on the [overview](https://docs.sonarsource.com/sonarqube-cloud/standards/ai-code-assurance/overview "mention") page.
### Quality gates for AI code
Quality gates designed for projects containing AI-generated code are an important part of the quality control and review process. The [quality-gates-for-ai-code](https://docs.sonarsource.com/sonarqube-cloud/standards/ai-code-assurance/quality-gates-for-ai-code "mention") page outlines the important control measures that help protect against the buildup of new issues as you leverage AI assistance in your coding process, and adds an extra layer of protection helps catch vulnerabilities and critical reliability issues that could be lurking in your project.
### Quality profiles for AI code
When AI Code Assurance is enabled on a project, it should protect the AI-generated code by applying a suitable quality standard for developers to follow. Therefore, it’s important to define a set of rules that will offer the necessary protection to AI-generated code. To ensure protection of a project with AI code, the project should not only have a strict quality gate, but also a strict quality profile. The [quality-profiles-for-ai-code](https://docs.sonarsource.com/sonarqube-cloud/standards/ai-code-assurance/quality-profiles-for-ai-code "mention") page helps you define, for a given language, the set of coding rules to be applied during analysis.
### Autodetecting AI code
Knowing if your project contains AI-generated code helps raise awareness of code ownership and code security. To help build this awareness, SonarQube Cloud can autodetect AI-generated code in projects on GitHub using GitHub Copilot. See the page about [autodetect-ai-code](https://docs.sonarsource.com/sonarqube-cloud/ai-capabilities/autodetect-ai-code "mention") for an overview.
If your SonarCloud Organization is integrated with GitHub and you’re using GitHub Copilot, your project is eligible for automatically detecting AI-generated code. For more information, see [autodetect-ai-code](https://docs.sonarsource.com/sonarqube-cloud/administering-sonarcloud/ai-features/autodetect-ai-code "mention").
### Monitoring your projects
If you’ve completed the steps above to apply AI Code Assured quality gates to your projects, a series of external badges are available to publish on your websites. For more details, please see the [monitor-projects-with-ai-code](https://docs.sonarsource.com/sonarqube-cloud/standards/ai-code-assurance/monitor-projects-with-ai-code "mention") page.
### Related pages
* Administering your [ai-features](https://docs.sonarsource.com/sonarqube-cloud/administering-sonarcloud/ai-features "mention") as an Organization Admin
* Learn about [ai-codefix](https://docs.sonarsource.com/sonarqube-cloud/ai-capabilities/ai-codefix "mention") to get AI-generated fix suggestions
---
# Source: https://docs.sonarsource.com/sonarqube-for-intellij/ai-capabilities/ai-codefix.md
# Source: https://docs.sonarsource.com/sonarqube-for-vs-code/ai-capabilities/ai-codefix.md
# Source: https://docs.sonarsource.com/sonarqube-server/2025.3/ai-capabilities/ai-codefix.md
# Source: https://docs.sonarsource.com/sonarqube-server/2025.5/ai-capabilities/ai-codefix.md
# Source: https://docs.sonarsource.com/sonarqube-server/2025.4/ai-capabilities/ai-codefix.md
# Source: https://docs.sonarsource.com/sonarqube-server/2025.6/ai-capabilities/ai-codefix.md
# Source: https://docs.sonarsource.com/sonarqube-server/ai-capabilities/ai-codefix.md
# Source: https://docs.sonarsource.com/sonarqube-cloud/ai-capabilities/ai-codefix.md
# AI CodeFix
*AI features are only available in SonarQube Cloud Team and Enterprise plans*. See the [subscription-plans](https://docs.sonarsource.com/sonarqube-cloud/administering-sonarcloud/managing-subscription/subscription-plans "mention") page for more details*.*
Sonar’s AI CodeFix uses a large language model (LLM) to automatically generate AI-driven code fixes for the issues discovered by SonarQube Cloud. The feature is available with SonarQube Cloud Team and Enterprise plans.
Using AI CodeFix is simple. When you request a fix, the affected code and issue description are sent to an LLM. AI CodeFix then proposes an edit that resolves the problem without changing the code’s functionality.
### Enabling AI-generated fix suggestions
SonarQube Cloud’s AI CodeFix is a feature that uses space.vars.SQC\_Supported\_LLM\_version to suggest fixes for a select set of rules in Java, JavaScript, TypeScript, Python, C#, and C++. See the [Sonar AI CodeFix terms](https://www.sonarsource.com/legal/ai-codefix-terms/) for details about the terms of access.
To learn more about which rules are eligible for AI CodeFix, please see the list of [#ai-codefix-rules](https://docs.sonarsource.com/sonarqube-cloud/digging-deeper/rules-for-ai-codefix#ai-codefix-rules "mention").
As an Organization Admin, you can activate or deactivate AI CodeFix for your organization at the global and project levels; see the [enable-ai-codefix](https://docs.sonarsource.com/sonarqube-cloud/administering-sonarcloud/ai-features/enable-ai-codefix "mention") page for the full details.
### Sharing your code with Sonar
If you use Sonar’s AI CodeFix LLM, the affected code snippet will be sent by the AI CodeFix service to the selected LLM. Service agreements with Sonar’s LLMs prevent your code from being used to train those models.
For details about terms and conditions, please refer to the [AI CodeFix terms](https://www.sonarsource.com/legal/ai-codefix-terms/) in our [Legal Documentation](https://www.sonarsource.com/legal/).
### Getting AI-generated fix suggestions
Once AI CodeFix is enabled, users will be able to select **Generate AI Fix** on eligible issues and copy/paste the fix into their IDE with the **Open in IDE** feature when using [connected-mode](https://docs.sonarsource.com/sonarqube-cloud/improving/connected-mode "mention"). If your Engineers are using SonarQube for [VS Code](https://app.gitbook.com/o/2ibCvzwZt86Nlk2zloB7/s/6LPRABg3ubAJhpfR5K0Y/ "mention") or SonarQube for [Intellij](https://app.gitbook.com/o/2ibCvzwZt86Nlk2zloB7/s/NvI4wotPmITyM0mnsmtp/ "mention"), AI CodeFix is available in the IDE and follows the settings you defined in your quality profile.
* See the IntelliJ page for [AI CodeFix #AI CodeFix in your IDE](https://app.gitbook.com/s/NvI4wotPmITyM0mnsmtp/ai-capabilities/ai-codefix#ai-codefix "mention")
* See the VS Code page for [AI CodeFix #AI CodeFix in your IDE](https://app.gitbook.com/s/6LPRABg3ubAJhpfR5K0Y/ai-capabilities/ai-codefix#ai-codefix "mention")
To use AI CodeFix in SonarQube, please see the article about [#getting-ai-generated-fix-suggestions](https://docs.sonarsource.com/sonarqube-cloud/managing-your-projects/issues/fixing#getting-ai-generated-fix-suggestions "mention")*.*
### Usage limits
Limits are placed on the AI CodeFix feature to manage abuse. Developers will be notified directly when the monthly allocation is reached for your organization. If the instance is blocked due to reaching the allowance, users attempting to generate a fix will see an error message. Usage quotas are reset on the first day of each month.
### AI Code Assurance
Sonar recognizes that AI-generated code should be monitored with additional quality standards and offers administrators a series of tools described on the [ai-code-assurance](https://docs.sonarsource.com/sonarqube-cloud/ai-capabilities/ai-code-assurance "mention") page. The feature includes labels to mark projects with AI-generated code, custom quality gates that help protect your projects, and a set of external badges to monitor projects containing AI code.
If you’ve already set up AI Code Assurance and are ready to use the badges, it works just like any other. For instructions, please see the [#using-project-badge](https://docs.sonarsource.com/sonarqube-cloud/managing-your-projects/managing-your-project-as-developer#using-project-badge "mention") article. You do not need to enable the AI CodeFix feature to use AI Code Assurance.
### Related pages
* Administering your [ai-features](https://docs.sonarsource.com/sonarqube-cloud/administering-sonarcloud/ai-features "mention") as an Organization Admin
* [#ai-codefix-rules](https://docs.sonarsource.com/sonarqube-cloud/digging-deeper/rules-for-ai-codefix#ai-codefix-rules "mention")
* [ai-code-assurance](https://docs.sonarsource.com/sonarqube-cloud/ai-capabilities/ai-code-assurance "mention")
* [enable-ai-codefix](https://docs.sonarsource.com/sonarqube-cloud/administering-sonarcloud/ai-features/enable-ai-codefix "mention") to get AI-generated fix suggestions
---
# Source: https://docs.sonarsource.com/sonarqube-server/10.7/user-guide/ai-features.md
# Source: https://docs.sonarsource.com/sonarqube-server/10.8/user-guide/ai-features.md
# Source: https://docs.sonarsource.com/sonarqube-server/2025.3/instance-administration/ai-features.md
# Source: https://docs.sonarsource.com/sonarqube-server/2025.3/project-administration/ai-features.md
# Source: https://docs.sonarsource.com/sonarqube-server/2025.5/instance-administration/ai-features.md
# Source: https://docs.sonarsource.com/sonarqube-server/2025.5/project-administration/ai-features.md
# Source: https://docs.sonarsource.com/sonarqube-server/2025.1/instance-administration/ai-features.md
# Source: https://docs.sonarsource.com/sonarqube-server/2025.1/project-administration/ai-features.md
# Source: https://docs.sonarsource.com/sonarqube-server/2025.4/instance-administration/ai-features.md
# Source: https://docs.sonarsource.com/sonarqube-server/2025.4/project-administration/ai-features.md
# Source: https://docs.sonarsource.com/sonarqube-server/2025.6/instance-administration/ai-features.md
# Source: https://docs.sonarsource.com/sonarqube-server/2025.6/project-administration/ai-features.md
# Source: https://docs.sonarsource.com/sonarqube-server/instance-administration/ai-features.md
# Source: https://docs.sonarsource.com/sonarqube-server/project-administration/ai-features.md
# Source: https://docs.sonarsource.com/sonarqube-cloud/administering-sonarcloud/ai-features.md
# Source: https://docs.sonarsource.com/sonarqube-cloud/managing-your-projects/administering-your-projects/ai-features.md
# AI features
SonarQube Cloud provides a series of tools to help you identify, manage, and use AI-generated code in your projects.
### AI Code Assurance
Setting up AI Code Assurance is a three-step process to manage and apply specific labels and quality gates to your projects that contain AI code. The [set-up-ai-code-assurance](https://docs.sonarsource.com/sonarqube-cloud/managing-your-projects/administering-your-projects/ai-features/set-up-ai-code-assurance "mention") page has more information about this process.
{% content-ref url="ai-features/set-up-ai-code-assurance" %}
[set-up-ai-code-assurance](https://docs.sonarsource.com/sonarqube-cloud/managing-your-projects/administering-your-projects/ai-features/set-up-ai-code-assurance)
{% endcontent-ref %}
### AI CodeFix
AI CodeFix allows your developers to get AI-generated fix suggestions from SonarQube Cloud and apply the fixes on their next pull request. AI CodeFix must be activated by an Organization Admin and can be applied to selected projects as needed.
See the [enable-ai-codefix](https://docs.sonarsource.com/sonarqube-cloud/managing-your-projects/administering-your-projects/ai-features/enable-ai-codefix "mention") page for more details, including information about [#opening-issues-in-your-ide](https://docs.sonarsource.com/sonarqube-cloud/issues/fixing#opening-issues-in-your-ide "mention").
{% content-ref url="ai-features/enable-ai-codefix" %}
[enable-ai-codefix](https://docs.sonarsource.com/sonarqube-cloud/managing-your-projects/administering-your-projects/ai-features/enable-ai-codefix)
{% endcontent-ref %}
---
# Source: https://docs.sonarsource.com/sonarqube-server/2025.2/ai-capabilities/ai-fix-suggestions.md
# Source: https://docs.sonarsource.com/sonarqube-server/2025.1/ai-capabilities/ai-fix-suggestions.md
# AI CodeFix
*AI CodeFix is only available in SonarQube Server* [*Enterprise and Data Center editions*](https://www.sonarsource.com/plans-and-pricing/sonarqube/) to provide AI-generated fixes for your issues.
Sonar AI CodeFix uses a large language model (LLM) to automatically generate AI-driven code fixes for the issues discovered by SonarQube Server. The process is simple. When you request a fix, the affected code and issue description are sent to an LLM. AI CodeFix then proposes an edit that resolves the problem without changing the code’s functionality.
AI CodeFix currently uses space.vars.SQS\_20251\_Supported\_LLM\_version to suggest fixes for a select set of rules in Java, JavaScript, TypeScript, Python, C#, and C++. To learn more about which rules are eligible for AI CodeFix, please see the list of [#ai-codefix-rules](https://docs.sonarsource.com/sonarqube-server/2025.1/user-guide/rules/rules-for-ai-codefix#ai-codefix-rules "mention").
### Enabling AI-generated fix suggestions
As an Instance Admin, you can activate or deactivate AI CodeFix for your organization at the global and project levels; see the [enable-ai-codefix](https://docs.sonarsource.com/sonarqube-server/2025.1/instance-administration/ai-features/enable-ai-codefix "mention") page for the full details.
### Sharing your code with Sonar
If you use Sonar’s AI CodeFix LLM, the affected code snippet will be sent by the AI CodeFix service to the selected LLM. Service agreements with Sonar’s LLMs prevent your code from being used to train those models.
For details about terms and conditions, please refer to the [AI CodeFix terms](https://www.sonarsource.com/legal/ai-codefix-terms/) in our [Legal Documentation](https://www.sonarsource.com/legal/).
### Getting AI-generated fix suggestions
Once AI CodeFix is enabled, users will be able to select **Generate AI Fix** on eligible issues and copy/paste the fix into their IDE with the **Open in IDE** feature when using [connected-mode](https://docs.sonarsource.com/sonarqube-server/2025.1/user-guide/connected-mode "mention").
For complete details about using AI CodeFix to fix your issues in SonarQube Server, see the article on [#getting-ai-generated-fix-suggestions](https://docs.sonarsource.com/sonarqube-server/2025.1/user-guide/issues/fixing#getting-ai-generated-fix-suggestions "mention").
### Usage limits
Limits are placed on the AI CodeFix feature to manage abuse. Developers will be notified directly when the monthly allocation is reached for your organization. If the instance is blocked due to reaching the allowance, users attempting to generate a fix will see an error message. Usage quotas are reset on the first day of each month.
### AI Code Assurance
Sonar recognizes that AI-generated code should be monitored with additional quality standards and offers administrators a series of tools described on the [ai-standards](https://docs.sonarsource.com/sonarqube-server/2025.1/ai-capabilities/ai-standards "mention") page.
It’s possible to view ratings for projects with AI Code Assurance in your portfolios beginning in the [Enterprise edition](https://www.sonarsource.com/plans-and-pricing/enterprise/). There, you will see a breakdown of projects, applications, and nested portfolios that include the standards you’ve set for AI-generated code. See the [#portfolio-breakdown](https://docs.sonarsource.com/sonarqube-server/2025.1/user-guide/viewing-reports/portfolios#portfolio-breakdown "mention") article for more information.
### Related pages
* [overview](https://docs.sonarsource.com/sonarqube-server/2025.1/ai-capabilities/overview "mention") of AI capabilities
* [#ai-codefix-rules](https://docs.sonarsource.com/sonarqube-server/2025.1/user-guide/rules/rules-for-ai-codefix#ai-codefix-rules "mention")
* [autodetect-ai-code](https://docs.sonarsource.com/sonarqube-server/2025.1/ai-capabilities/autodetect-ai-code "mention")
* learn about [#getting-ai-generated-fix-suggestions](https://docs.sonarsource.com/sonarqube-server/2025.1/user-guide/issues/fixing#getting-ai-generated-fix-suggestions "mention")
* see [#label-projects-with-ai-code](https://docs.sonarsource.com/sonarqube-server/2025.1/instance-administration/analysis-functions/ai-code-assurance/overview#label-projects-with-ai-code "mention")
---
# Source: https://docs.sonarsource.com/sonarqube-server/10.8/instance-administration/analysis-functions/ai-standards.md
# Source: https://docs.sonarsource.com/sonarqube-server/2025.2/ai-capabilities/ai-standards.md
# Source: https://docs.sonarsource.com/sonarqube-server/2025.1/ai-capabilities/ai-standards.md
# AI Code Assurance
Sonar’s AI Code Assurance helps you ensure security and code quality within projects containing AI-generated code. By utilizing project labels, custom quality gate certification and marking, and dynamic project badge publishing, you can maintain high standards and confidently assure the quality of your AI projects.
### Assuring your AI code
Sonar recognizes that AI-generated code should be monitored with additional quality standards. Recommended checks include high standards to reduce code complexity, remove bugs, and eliminate injection vulnerabilities. SonarQube’s AI Code Assurance features bring confidence that your AI-generated code is being reviewed to avoid any accountability crisis.
These objectives are achieved with three features that allow Quality Standard administrators to qualify projects as AI Code Assured:
1. [#label-projects-with-ai-code](https://docs.sonarsource.com/sonarqube-server/2025.1/instance-administration/analysis-functions/ai-code-assurance/overview#label-projects-with-ai-code "mention")
2. [#apply-qualified-quality-gate](https://docs.sonarsource.com/sonarqube-server/2025.1/instance-administration/analysis-functions/ai-code-assurance/overview#apply-qualified-quality-gate "mention")
3. Publish an [#using-the-ai-code-assurance-badge](https://docs.sonarsource.com/sonarqube-server/2025.1/instance-administration/analysis-functions/ai-code-assurance/monitor-projects-with-ai-code#using-the-ai-code-assurance-badge "mention") externally to your websites (optional)
The full details are outlined on the [overview](https://docs.sonarsource.com/sonarqube-server/2025.1/instance-administration/analysis-functions/ai-code-assurance/overview "mention") page.
### Quality gates for AI code
Quality gates designed for projects containing AI-generated code are an important part of the quality control and review process. The [quality-gates-for-ai-code](https://docs.sonarsource.com/sonarqube-server/2025.1/instance-administration/analysis-functions/ai-code-assurance/quality-gates-for-ai-code "mention") page outlines the important control measures that help protect against the buildup of new issues as you leverage AI assistance in your coding process, and adds an extra layer of protection helps catch vulnerabilities and critical reliability issues that could be lurking in your project.
{% hint style="warning" %}
In SonarQube Server version 10.7, the Sonar way quality gate was enforced on projects marked as containing AI Code. If you’re migrating from this version, projects using this quality gate will lose their AI Code Assurance status until a new, AI-qualified quality gate is applied.
{% endhint %}
### Monitoring your projects
If you’ve completed the steps above to apply AI Code Assured quality gates to your projects, a series of external badges are available to publish on your websites. For more details, please see the [monitor-projects-with-ai-code](https://docs.sonarsource.com/sonarqube-server/2025.1/instance-administration/analysis-functions/ai-code-assurance/monitor-projects-with-ai-code "mention") page.
### Related pages
* [overview](https://docs.sonarsource.com/sonarqube-server/2025.1/ai-capabilities/overview "mention") of AI capabilities
* [autodetect-ai-code](https://docs.sonarsource.com/sonarqube-server/2025.1/ai-capabilities/autodetect-ai-code "mention")
* Learn about [#getting-ai-generated-fix-suggestions](https://docs.sonarsource.com/sonarqube-server/2025.1/user-guide/issues/fixing#getting-ai-generated-fix-suggestions "mention") to use AI CodeFix
---
# Source: https://docs.sonarsource.com/sonarqube-server/8.9/alm-integration.md
# ALM integration
{% content-ref url="alm-integration/github-integration" %}
[github-integration](https://docs.sonarsource.com/sonarqube-server/8.9/alm-integration/github-integration)
{% endcontent-ref %}
{% content-ref url="alm-integration/gitlab-integration" %}
[gitlab-integration](https://docs.sonarsource.com/sonarqube-server/8.9/alm-integration/gitlab-integration)
{% endcontent-ref %}
{% content-ref url="alm-integration/bitbucket-server-integration" %}
[bitbucket-server-integration](https://docs.sonarsource.com/sonarqube-server/8.9/alm-integration/bitbucket-server-integration)
{% endcontent-ref %}
{% content-ref url="alm-integration/bitbucket-cloud-integration" %}
[bitbucket-cloud-integration](https://docs.sonarsource.com/sonarqube-server/8.9/alm-integration/bitbucket-cloud-integration)
{% endcontent-ref %}
{% content-ref url="alm-integration/azure-devops-integration" %}
[azure-devops-integration](https://docs.sonarsource.com/sonarqube-server/8.9/alm-integration/azure-devops-integration)
{% endcontent-ref %}
---
# Source: https://docs.sonarsource.com/sonarqube-cloud/advanced-setup/ci-based-analysis/amazon-codecatalyst.md
# Amazon CodeCatalyst
{% hint style="warning" %}
**Deprecation notice**
On October 7th, 2025, AWS announced the retirement of CodeCatalyst. Starting November 7th, 2025, no new spaces can be created, and access is limited to existing customers. As a consequence, this tool won't be maintained anymore starting December 16th, 2025.
* Your code is built with Maven: run `org.sonarsource.scanner.maven:sonar-maven-plugin:3.11.0.3922:sonar` during the build (more info in the [sonarscanner-for-maven](https://docs.sonarsource.com/sonarqube-cloud/advanced-setup/ci-based-analysis/sonarscanner-for-maven "mention") documentation)
* Your code is built with Gradle: use the [sonarscanner-for-gradle](https://docs.sonarsource.com/sonarqube-cloud/advanced-setup/ci-based-analysis/sonarscanner-for-gradle "mention") during the build
* You want to analyze a .NET solution: follow our interactive tutorial for other CI's
* You want to analyze C and C++ code: rely on our [SonarQube Cloud Scan for C and C++](https://github.com/marketplace/actions/sonarcloud-scan-for-c-and-c) and look at [our sample C and C++ project](https://github.com/sonarsource-cfamily-examples?q=gh-actions-sc\&type=all\&language=\&sort=)
* Your code uses another language or ecosystem: use [sonarscanner-cli](https://docs.sonarsource.com/sonarqube-cloud/advanced-setup/ci-based-analysis/sonarscanner-cli "mention")
{% endhint %}
To configure an analysis of your project in Amazon CodeCatalyst CI/CD, follow the SonarQube Cloud in-product tutorial when creating a new project. The tutorial will walk you through the precise steps to set up the analysis. Meanwhile, here's a summary of the basic steps you will follow:
* Define the `SONAR_TOKEN` environment variable in your repository by setting up a CodeCatalyst Secret. The `SONAR_TOKEN` identifies and authenticates you to SonarQube Cloud
* Define your main branch on SonarQube Cloud to match the one in your repository (for unbound projects only; see the [binding-with-dop](https://docs.sonarsource.com/sonarqube-cloud/administering-sonarcloud/about-sonarqube-cloud-solution/ressources-structure/binding-with-dop "mention") page)
* Set the essential analysis parameters, `sonar.projectKey`, `sonar.organization`, and `sonar.host.url`.The tutorial will be populated with the correct values for your specific account. These parameters are set differently depending on your project type:
* In the `pom.xml` for Java Maven projects
* In the `build.gradle` file for Java Gradle projects
* In the SonarScanner command line for .NET projects
* In the `sonar-project.properties` file for other types of projects. You can also add additional analysis parameters to further specify your analysis details (See the [analysis-parameters](https://docs.sonarsource.com/sonarqube-cloud/advanced-setup/analysis-parameters "mention") page)
* Create the `.codecatalyst/workflows/build.yml` file that defines the steps of your build. In addition to the usual steps that build your project, you need to invoke the SonarScanner to perform the analysis of your code. This is done differently depending on your project type (detailed below)
### Creating a CodeCatalyst Secret
First of all, you need to go to your CodeCatalyst project, navigate to CI/CD → Secrets and create a new secret with the following details:
* In the Name field, enter `SONAR_TOKEN`
* In the Value field, enter the token you generated on SonarQube Cloud
### Defining your main branch
{% hint style="info" %}
This step is relevant to manual projects that are *not bound* to a repository on one of the supported DevOps platforms.
{% endhint %}
You then need to define your main branch on SonarQube Cloud to match the one in your repository.
To do this, go to the Branches page within your SonarQube Cloud project, and rename it to match the main branch of your repository.
### Analyzing a project
Create or update your `.codecatalyst/workflows/build.yaml` file.
The following example shows a base configuration to run a SonarQube Cloud analysis on all your branches. If you already have existing workflows, you can simply add some of these new steps to an existing one.
```yaml
Name: SonarCloudAnalysis
SchemaVersion: "1.0"
# Optional - Set automatic triggers.
Triggers:
- Type: Push
# Required - Define action configurations.
Actions:
SonarCloudScanAction:
# Identifies the SonarCloud Scan Action. Do not modify this value, just the version if needed.
Identifier: sonar/sonarcloud-scan@v1.0.7
# Specifies the source and/or artifacts to pass to the action as input.
Inputs:
# Required
Sources:
- WorkflowSource # This specifies that the action requires this Workflow as a source
Compute:
Type: EC2
# Defines the action's properties.
Configuration:
SonarToken: ${Secrets.SONAR_TOKEN}
```
Create a configuration file in the root directory of the project and name it `sonar-project.properties`.
```properties
sonar.projectKey=your-project-key
sonar.organization=your-organization-key
# This is the name and version displayed in the SonarCloud UI.
#sonar.projectName=csharp-my-app
#sonar.projectVersion=1.0
# Path is relative to the sonar-project.properties file. Replace "\" by "/" on Windows.
#sonar.sources=.
sonar.exclusions=venv/**
# Encoding of the source code. Default is default system encoding
#sonar.sourceEncoding=UTF-8
```
### Analyzing a Java project with Maven
Update your pom.xml file with the following properties:
```xml
your-project-keyyour-organization-keyhttps://sonarcloud.io
```
Create or update your `.codecatalyst/workflows/build.yaml` file.
The following is a base configuration to run a SonarQube Cloud analysis on all your branches. If you already have existing workflows, you can simply add some of these new steps to an existing one.
```yaml
Name: SonarCloudAnalysis
SchemaVersion: "1.0"
Triggers:
- Type: PUSH
Actions:
Analysis:
Identifier: aws/build@v1.0.0
Inputs:
Sources:
- WorkflowSource
Variables:
- Name: SONAR_TOKEN
Value: ${Secrets.SONAR_TOKEN}
Compute:
Type: EC2
Configuration:
Steps:
- Run: mvn verify org.sonarsource.scanner.maven:sonar-maven-plugin:sonar -Dsonar.branch.name=${WorkflowSource.BranchName}
```
### Analyzing a Java project with Gradle
Update your `build.gradle` file with the `org.sonarqube` plugin and its configuration:
```properties
plugins {
id "org.sonarqube" version "4.2.1.3168"
}
sonar {
properties {
property "sonar.projectKey", "your-project-key"
property "sonar.organization", "your-organization-key"
property "sonar.host.url", "https://sonarcloud.io"
}
}
```
Create or update your .`codecatalyst/workflows/build.yaml` file.
Here is a base configuration to run a SonarQube Cloud analysis on all your branches. If you already have existing workflows, you might want to just add some of these new steps to an existing one.
```yaml
Name: SonarCloudAnalysis
SchemaVersion: "1.0"
Triggers:
- Type: PUSH
Actions:
Analysis:
Identifier: aws/build@v1.0.0
Inputs:
Sources:
- WorkflowSource
Variables:
- Name: SONAR_TOKEN
Value: ${Secrets.SONAR_TOKEN}
Compute:
Type: EC2
Configuration:
Steps:
- Run: ./gradlew build sonar -Dsonar.branch.name=${WorkflowSource.BranchName}
```
### Analyzing a .NET solution
Create or update your `.codecatalyst/workflows/build.yaml` file.
The following is a base configuration to run a SonarQube Cloud analysis on all your branches. If you already have existing workflows, you might want to just add some of these new steps to an existing one.
```yaml
Name: SonarCloudAnalysis
SchemaVersion: "1.0"
Triggers:
- Type: PUSH
Actions:
Analysis:
Identifier: aws/build@v1.0.0
Inputs:
Sources:
- WorkflowSource
Compute:
Type: EC2
Configuration:
Steps:
- Name: Install SonarCloud scanner
Run: dotnet tool install --global dotnet-sonarscanner
- Name: Build and analyze
Run: |
dotnet sonarscanner begin /k:"manualorgcc_dotnetcc" /o:"manualorgcc" /d:sonar.token="${Secrets.SONAR_TOKEN}" /d:sonar.host.url="https://sonarcloud.io"
dotnet sonarscanner end /d:sonar.token="${Secrets.SONAR_TOKEN}"
```
Replace <*insert\_your\_clean\_build\_command*> with the actual one.
### Failing the workflow when the SonarQube Cloud Quality Gate fails
In order for the workflow to fail in CodeCatalyst when the Quality Gate fails on the SonarQube Cloud side, the SonarScanner needs to wait for the report and Quality Gate status to be processed by SonarQube Cloud. To enable this feature, set the `sonar.qualitygate.wait=true` parameter in your workflow definition.
```groovy
(...)
Configuration:
Steps:
- Run: mvn verify org.sonarsource.scanner.maven:sonar-maven-plugin:sonar -Dsonar.branch.name=${WorkflowSource.BranchName} -Dsonar.qualitygate.wait=true
```
You can also set the `sonar.qualitygate.timeout` property to a maximum amount of time (in seconds) that the SonarScanner should wait for a report to be processed. The default is 300 seconds. Reaching this timeout will count as a failure and stop the CodeCatalyst workflow.
---
# Source: https://docs.sonarsource.com/sonarqube-community-build/instance-administration/analysis-functions.md
# Source: https://docs.sonarsource.com/sonarqube-server/10.7/instance-administration/analysis-functions.md
# Source: https://docs.sonarsource.com/sonarqube-server/10.8/instance-administration/analysis-functions.md
# Source: https://docs.sonarsource.com/sonarqube-server/2025.2/instance-administration/analysis-functions.md
# Source: https://docs.sonarsource.com/sonarqube-server/2025.3/instance-administration/analysis-functions.md
# Source: https://docs.sonarsource.com/sonarqube-server/2025.5/instance-administration/analysis-functions.md
# Source: https://docs.sonarsource.com/sonarqube-server/2025.1/instance-administration/analysis-functions.md
# Source: https://docs.sonarsource.com/sonarqube-server/2025.4/instance-administration/analysis-functions.md
# Source: https://docs.sonarsource.com/sonarqube-server/2025.6/instance-administration/analysis-functions.md
# Source: https://docs.sonarsource.com/sonarqube-server/instance-administration/analysis-functions.md
# Global analysis setup
{% content-ref url="analysis-functions/instance-mode" %}
[instance-mode](https://docs.sonarsource.com/sonarqube-server/instance-administration/analysis-functions/instance-mode)
{% endcontent-ref %}
{% content-ref url="analysis-functions/setting-new-code-definition-at-global-level" %}
[setting-new-code-definition-at-global-level](https://docs.sonarsource.com/sonarqube-server/instance-administration/analysis-functions/setting-new-code-definition-at-global-level)
{% endcontent-ref %}
{% content-ref url="analysis-functions/quality-standards" %}
[quality-standards](https://docs.sonarsource.com/sonarqube-server/instance-administration/analysis-functions/quality-standards)
{% endcontent-ref %}
{% content-ref url="analysis-functions/analysis-scope" %}
[analysis-scope](https://docs.sonarsource.com/sonarqube-server/instance-administration/analysis-functions/analysis-scope)
{% endcontent-ref %}
{% content-ref url="analysis-functions/metrics-parameters" %}
[metrics-parameters](https://docs.sonarsource.com/sonarqube-server/instance-administration/analysis-functions/metrics-parameters)
{% endcontent-ref %}
{% content-ref url="analysis-functions/integration-with-external-analyzers" %}
[integration-with-external-analyzers](https://docs.sonarsource.com/sonarqube-server/instance-administration/analysis-functions/integration-with-external-analyzers)
{% endcontent-ref %}
{% content-ref url="analysis-functions/various-settings-at-the-instance-level" %}
[various-settings-at-the-instance-level](https://docs.sonarsource.com/sonarqube-server/instance-administration/analysis-functions/various-settings-at-the-instance-level)
{% endcontent-ref %}
---
# Source: https://docs.sonarsource.com/sonarqube-server/10.6/analyzing-source-code/languages/c-family/analysis-modes.md
# Source: https://docs.sonarsource.com/sonarqube-server/10.7/analyzing-source-code/languages/c-family/analysis-modes.md
# Source: https://docs.sonarsource.com/sonarqube-server/10.8/analyzing-source-code/languages/c-family/analysis-modes.md
# Source: https://docs.sonarsource.com/sonarqube-server/2025.2/analyzing-source-code/languages/c-family/analysis-modes.md
# Source: https://docs.sonarsource.com/sonarqube-server/2025.3/analyzing-source-code/languages/c-family/analysis-modes.md
# Source: https://docs.sonarsource.com/sonarqube-server/2025.5/analyzing-source-code/languages/c-family/analysis-modes.md
# Source: https://docs.sonarsource.com/sonarqube-server/2025.1/analyzing-source-code/languages/c-family/analysis-modes.md
# Source: https://docs.sonarsource.com/sonarqube-server/2025.4/analyzing-source-code/languages/c-family/analysis-modes.md
# Source: https://docs.sonarsource.com/sonarqube-server/2025.6/analyzing-source-code/languages/c-family/analysis-modes.md
# Source: https://docs.sonarsource.com/sonarqube-server/analyzing-source-code/languages/c-family/analysis-modes.md
# Source: https://docs.sonarsource.com/sonarqube-cloud/advanced-setup/languages/c-family/analysis-modes.md
# Analysis modes
The analysis can operate in *Automatic Analysis* or *Manual configuration* (Compilation Database) modes.
* [automatic-analysis](https://docs.sonarsource.com/sonarqube-cloud/advanced-setup/automatic-analysis "mention") automatically analyzes your code simply by reading it from your GitHub repository, without the need to configure a CI-based analysis.
* Compilation Database mode gives you more control over the configuration and requires a CI-based analysis configuration. You can activate this mode by deactivating Automatic Analysis and supplying a `compile_commands.json` to the SonarScanner.
The analyzer must understand the code’s intended compilation options to ensure an accurate static analysis of the CFamily code.
* In Compilation Database mode, these options are provided to the analyzer through [Compilation Database](https://clang.llvm.org/docs/JSONCompilationDatabase.html): a JSON file introduced by the LLVM project.
* In Automatic Analysis mode, the analyzer attempts to deduce these options automatically. A set of high-level Automatic Analysis properties can tune the automatic deduction process. For details, see the [#automatic-analysis-specific-properties](https://docs.sonarsource.com/sonarqube-cloud/advanced-setup/languages/customizing-the-analysis#automatic-analysis-specific-properties "mention") article on the [customizing-the-analysis](https://docs.sonarsource.com/sonarqube-cloud/advanced-setup/languages/c-family/customizing-the-analysis "mention") page.
### Choosing the right analysis mode
Compilation Database mode is recommended if:
* Your projects aren’t hosted on GitHub. Automatic Analysis is only available for GitHub repositories.
* You’re seeking the highest CFamily analysis quality SonarQube Cloud can provide. Please note that in rare instances, Automatic Analysis may result in some issues being overlooked.
* You want to have finer control over the analysis configuration, such as analyzing a specific build variant.
* You require faster analysis. In Compilation Database mode, you can control the hardware capacity on the CI where the analysis runs.
* Your projects have Objective-C code: Objective-C analysis is not supported in Automatic Analysis mode.
Automatic Analysis mode is recommended if:
* Your projects use compilers that don’t meet the supported compiler prerequisite of Compilation Database mode (see the [prerequisites](https://docs.sonarsource.com/sonarqube-cloud/advanced-setup/languages/c-family/prerequisites "mention") page).
* Your projects use compilation environments where generating a compilation database is not feasible (see the [prerequisites](https://docs.sonarsource.com/sonarqube-cloud/advanced-setup/languages/c-family/prerequisites "mention") page).
* You desire a swift analysis setup without the need to allocate human resources for the maintenance of a CI pipeline and the generation of a Compilation Database.
* Your projects have a low CFamily code percentage.
---
# Source: https://docs.sonarsource.com/sonarqube-community-build/analyzing-source-code/analysis-overview.md
# Source: https://docs.sonarsource.com/sonarqube-server/10.6/analyzing-source-code/analysis-overview.md
# Source: https://docs.sonarsource.com/sonarqube-server/10.7/analyzing-source-code/analysis-overview.md
# Source: https://docs.sonarsource.com/sonarqube-server/10.8/analyzing-source-code/analysis-overview.md
# Source: https://docs.sonarsource.com/sonarqube-server/2025.2/analyzing-source-code/analysis-overview.md
# Source: https://docs.sonarsource.com/sonarqube-server/2025.3/analyzing-source-code/analysis-overview.md
# Source: https://docs.sonarsource.com/sonarqube-server/2025.5/analyzing-source-code/analysis-overview.md
# Source: https://docs.sonarsource.com/sonarqube-server/2025.1/analyzing-source-code/analysis-overview.md
# Source: https://docs.sonarsource.com/sonarqube-server/2025.4/analyzing-source-code/analysis-overview.md
# Source: https://docs.sonarsource.com/sonarqube-server/2025.6/analyzing-source-code/analysis-overview.md
# Source: https://docs.sonarsource.com/sonarqube-server/analyzing-source-code/analysis-overview.md
# SonarQube Server analysis overview
With SonarQube Server, you can perform automated code review and analysis of your project’s main branch, as well as multiple branches and pull requests.
### What is automated code review?
An automated code review is a software development process in which static code analysis tools are used to automatically review and analyze the source code for potential issues and coding standard violations. Automated code review accelerates the identification and resolution of code issues and improves code quality (reliability, security, maintainability).
### Code analysis with the SonarScanner
The SonarScanner performs the automated source code analysis as part of your code review process. This stand-alone program runs on the CI/CD host and sends the analysis results to SonarQube Server, which computes them, calculates the quality gate, and generates reports.
To perform the analysis, the SonarScanner uses the [supported languages](https://docs.sonarsource.com/sonarqube-server/analyzing-source-code/languages/overview) that it downloads from SonarQube Server at installation.
The Sonar Solution offers SonarScanners that integrate with the following build systems: Gradle, Maven, .NET, NPM, and Python. For other project types, the SonarScanner CLI which requires more manual configuration is used.
### Analysis process
Essentially, the main steps of the analysis process are:
1. Your build or CI pipeline starts the SonarScanner.
2. The SonarScanner scans the local repository and determines the files to be analyzed according to the configured analysis scope.
3. The scanner sends an analysis request to the respective language analyzer which retrieves the files to be analyzed from the file system and analyzes them according to the configured [quality profiles](https://docs.sonarsource.com/sonarqube-server/quality-standards-administration/managing-quality-profiles/understanding-quality-profiles).
4. The analyzer sends the analysis results ([metrics](https://docs.sonarsource.com/sonarqube-server/user-guide/code-metrics/metrics-definition) and [issues](https://docs.sonarsource.com/sonarqube-server/user-guide/issues/solution-overview)) to the scanner which forwards them to SonarQube Server in the form of a report.
5. SonarQube Server computes the analysis results asynchronously to perform the following:
* It identifies the new issues according to the configured [quality standards](https://docs.sonarsource.com/sonarqube-server/user-guide/about-new-code) and raises them in both the new code and the overall code (It uploads the code as part of the analysis and shows users the code that it raised issues on. Unanalyzed changes in the code are not visible.).
* It computes the [quality gate](https://docs.sonarsource.com/sonarqube-server/quality-standards-administration/managing-quality-gates/introduction-to-quality-gates).
* It generates reports.
{% hint style="info" %}
By default, only files that are recognized by your edition of SonarQube Server are loaded into the project during analysis.
{% endhint %}
### Integration into your CI pipeline
Integrating SonarQube Server into your CI pipeline brings powerful code review capabilities to your projects. Key features include main branch analysis, pull request analysis, and multiple branch analysis, ensuring comprehensive code quality checks at every stage of development.
The relevant CI pipeline steps with SonarQube Server integration are:
1. A developer pushes changes on a branch to the remote repository.
2. A CI pipeline is triggered for the specific branch. For this purpose, webhooks may be used when events occur in the Source Control Management (SCM) system or the repository may be monitored by a CI/CD tool like Jenkins.
3. The pipeline clones the remote repository and checks out the relevant branch to the local repository on the CI/CD host (The code and SCM metadata are copied.).
4. In the case of a compiled programming language, the pipeline builds the code.
5. The pipeline executes the appropriate Sonar Scanner to analyze the code.
6. The scanner sends the analysis results to SonarQube Server, which computes them.
7. The Server sends the Quality Gate computation result to the CI pipeline (This step is optional.).
8. The pipeline continues (if the Quality Gate succeeds) or stops (otherwise).
### Scanner engine and analyzers download at analysis time
A SonarScanner is a scanner bootstrapper that downloads the scanner engine and language analyzers from SonarQube Server at analysis time. This way:
* It ensures that the scanner engine and analyzer versions are compatible with SonarQube Server.
* Only the analyzers necessary to analyze the detected languages are downloaded.
The figure below shows a simplified view of the download process of the scanner engine and language analyzers. For each analysis run:
1. The CI or build pipeline starts the SonarScanner.
2. The SonarScanner connects to SonarQube Server to retrieve the scanner engine version to be used. It checks the scanner cache for the scanner engine version. If it doesn’t find it, it downloads it from SonarQube Server and stores it in the cache.
3. The scanner engine scans the code to identify the different languages used in the project to be analyzed.
4. The scanner engine checks the scanner cache for the required language analyzers. If it doesn’t find them, it downloads them from SonarQube Server and stores them in the cache.
### Related pages
* [overview](https://docs.sonarsource.com/sonarqube-server/analyzing-source-code/overview "mention")
* [troubleshooting-the-analysis](https://docs.sonarsource.com/sonarqube-server/analyzing-source-code/troubleshooting-the-analysis "mention")
---
# Source: https://docs.sonarsource.com/sonarqube-community-build/analyzing-source-code/analysis-parameters.md
# Source: https://docs.sonarsource.com/sonarqube-server/8.9/analyzing-source-code/analysis-parameters.md
# Source: https://docs.sonarsource.com/sonarqube-server/9.8/analyzing-source-code/analysis-parameters.md
# Source: https://docs.sonarsource.com/sonarqube-server/9.9/analyzing-source-code/analysis-parameters.md
# Source: https://docs.sonarsource.com/sonarqube-server/10.0/analyzing-source-code/analysis-parameters.md
# Source: https://docs.sonarsource.com/sonarqube-server/10.1/analyzing-source-code/analysis-parameters.md
# Source: https://docs.sonarsource.com/sonarqube-server/10.2/analyzing-source-code/analysis-parameters.md
# Source: https://docs.sonarsource.com/sonarqube-server/10.3/analyzing-source-code/analysis-parameters.md
# Source: https://docs.sonarsource.com/sonarqube-server/10.4/analyzing-source-code/analysis-parameters.md
# Source: https://docs.sonarsource.com/sonarqube-server/10.5/analyzing-source-code/analysis-parameters.md
# Source: https://docs.sonarsource.com/sonarqube-server/10.6/analyzing-source-code/analysis-parameters.md
# Source: https://docs.sonarsource.com/sonarqube-server/10.7/analyzing-source-code/analysis-parameters.md
# Source: https://docs.sonarsource.com/sonarqube-server/10.8/analyzing-source-code/analysis-parameters.md
# Source: https://docs.sonarsource.com/sonarqube-server/2025.2/analyzing-source-code/analysis-parameters.md
# Source: https://docs.sonarsource.com/sonarqube-server/2025.3/analyzing-source-code/analysis-parameters.md
# Source: https://docs.sonarsource.com/sonarqube-server/2025.5/analyzing-source-code/analysis-parameters.md
# Source: https://docs.sonarsource.com/sonarqube-server/2025.1/analyzing-source-code/analysis-parameters.md
# Source: https://docs.sonarsource.com/sonarqube-server/2025.4/analyzing-source-code/analysis-parameters.md
# Source: https://docs.sonarsource.com/sonarqube-server/2025.6/analyzing-source-code/analysis-parameters.md
# Source: https://docs.sonarsource.com/sonarqube-server/analyzing-source-code/analysis-parameters.md
# Source: https://docs.sonarsource.com/sonarqube-cloud/advanced-setup/analysis-parameters.md
# Analysis parameters
This section provides general guidelines to configure the analysis parameters, and lists the analysis parameters you cannot set in the UI.
{% content-ref url="analysis-parameters/configuration-overview" %}
[configuration-overview](https://docs.sonarsource.com/sonarqube-cloud/advanced-setup/analysis-parameters/configuration-overview)
{% endcontent-ref %}
{% content-ref url="analysis-parameters/parameters-not-settable-in-ui" %}
[parameters-not-settable-in-ui](https://docs.sonarsource.com/sonarqube-cloud/advanced-setup/analysis-parameters/parameters-not-settable-in-ui)
{% endcontent-ref %}
---
# Source: https://docs.sonarsource.com/sonarqube-community-build/instance-administration/analysis-functions/analysis-scope.md
# Source: https://docs.sonarsource.com/sonarqube-server/10.1/project-administration/analysis-scope.md
# Source: https://docs.sonarsource.com/sonarqube-server/10.2/project-administration/analysis-scope.md
# Source: https://docs.sonarsource.com/sonarqube-server/10.3/project-administration/analysis-scope.md
# Source: https://docs.sonarsource.com/sonarqube-server/10.4/project-administration/analysis-scope.md
# Source: https://docs.sonarsource.com/sonarqube-server/10.5/project-administration/analysis-scope.md
# Source: https://docs.sonarsource.com/sonarqube-server/10.6/project-administration/analysis-scope.md
# Source: https://docs.sonarsource.com/sonarqube-server/10.7/project-administration/analysis-scope.md
# Source: https://docs.sonarsource.com/sonarqube-server/10.8/project-administration/analysis-scope.md
# Source: https://docs.sonarsource.com/sonarqube-server/2025.2/instance-administration/analysis-functions/analysis-scope.md
# Source: https://docs.sonarsource.com/sonarqube-server/2025.3/instance-administration/analysis-functions/analysis-scope.md
# Source: https://docs.sonarsource.com/sonarqube-server/2025.5/instance-administration/analysis-functions/analysis-scope.md
# Source: https://docs.sonarsource.com/sonarqube-server/2025.1/project-administration/analysis-scope.md
# Source: https://docs.sonarsource.com/sonarqube-server/2025.4/instance-administration/analysis-functions/analysis-scope.md
# Source: https://docs.sonarsource.com/sonarqube-server/2025.6/instance-administration/analysis-functions/analysis-scope.md
# Source: https://docs.sonarsource.com/sonarqube-server/instance-administration/analysis-functions/analysis-scope.md
# Analysis scope
{% content-ref url="analysis-scope/introduction" %}
[introduction](https://docs.sonarsource.com/sonarqube-server/instance-administration/analysis-functions/analysis-scope/introduction)
{% endcontent-ref %}
{% content-ref url="analysis-scope/excluding-files-based-on-file-paths" %}
[excluding-files-based-on-file-paths](https://docs.sonarsource.com/sonarqube-server/instance-administration/analysis-functions/analysis-scope/excluding-files-based-on-file-paths)
{% endcontent-ref %}
{% content-ref url="analysis-scope/exclude-from-coverage-duplication" %}
[exclude-from-coverage-duplication](https://docs.sonarsource.com/sonarqube-server/instance-administration/analysis-functions/analysis-scope/exclude-from-coverage-duplication)
{% endcontent-ref %}
{% content-ref url="analysis-scope/advanced-exclusion-features" %}
[advanced-exclusion-features](https://docs.sonarsource.com/sonarqube-server/instance-administration/analysis-functions/analysis-scope/advanced-exclusion-features)
{% endcontent-ref %}
---
# Source: https://docs.sonarsource.com/sonarqube-cloud/advanced-security/analyzing-projects-for-dependencies-sca.md
# Analyzing projects for dependencies (SCA)
Advanced Security is an add-on that requires a separate subscription to your [SonarQube Cloud's Enterprise plan](https://www.sonarsource.com/plans-and-pricing/#sonarqube-cloud-features).
## Enabling the SCA service
By default, SCA is enabled for your organization when SonarQube [Advanced Security](https://docs.sonarsource.com/sonarqube-cloud/advanced-security/introduction) is active.
You can choose whether all projects will be scanned using SCA by default. To do this, go to your organization and choose **Administration** > **Organization Settings** > **Advanced Security**, where you can adjust the **Enable SCA** checkbox. If you disable dependency analysis by default, you will need to enable analysis on a project-by-project basis at the scanner level by passing `sonar.sca.enabled=true` as an analysis parameter.
## Supported languages and package managers
SonarQube evaluates your third-party open source code usage by matching dependencies defined in your project’s dependency files to known open source code on upstream package managers. It currently supports the following languages, package managers, and package manager files:
| Language |
| N/A |
## Ensure the analysis is run in an appropriate environment
To correctly analyze both your direct and transitive dependencies on projects where there is not a lockfile that contains all dependencies, SonarQube executes commands using your build tools to get a full dependency list.
#### Note on security
To run a dependency analysis, the SonarQube scanner might install the dependencies required to build your application. This could pull in untrusted artifacts, similar to while you're building the application. Ensure the analysis will run in a secure environment before proceeding.
#### Notes on specific build tools and language ecosystems
**Maven**
The Maven binary (`mvn`) or maven wrapper (`mvnw`) must be located in the project directory, the manifest file’s directory, or in the execution path.
**Gradle**
The Gradle binary (`gradle`) or Gradle wrapper (`gradlew`) must be in the project directory, the manifest file’s directory, or in the execution path.
**pip**
The analysis must be run with the same Python runtime that your application is built on. The SonarQube analysis will create a virtual environment to resolve dependencies, and a C compiler and development libraries may be required, based on your python dependencies.
**Go**
The go runtime that matches the version in `go.mod` must be present.
**Internal artifact repositories**
If your application build configuration includes internal or private artifacts, the analysis process must have network access to your artifact server.
If the analysis is not run in the proper environment, it will cause degraded analysis results and potential analysis failures. You can see more information in analysis warnings in the UI and in the scanner log. See [Troubleshooting](https://github.com/SonarSource/sonarqube-documentation/blob/main/content-output/advanced-security/.gitbook/includes/troubleshooting-the-dependency-analysis.md) for some common scenarios.
#### Note on pull request analysis
To get valuable results when performing a pull request analysis, the target branch should be analyzed first.
## Ensure the analysis includes the appropriate files
The SCA analysis recursively searches for appropriate package files for your project. In some cases, this may analyze more files than what your project actually uses. Common cases to look out for include:
* Package manager files in test code and data directories
If you have package manager files present in test directories, ensure these locations are properly excluded from analysis. This can be done in multiple ways:
* Add paths to the common `sonar.exclusions` configuration option. Example: `sonar.exclusions="tests/**"`
* Use the specific `sonar.sca.exclusions` configuration option. Example `sonar.sca.exclusions="tests/**"`
* As long as SonarQube's SCM support is enabled (the default), add the paths to a source control ignore file, such as `.gitignore`
## Automatic analysis projects are not supported
Dependency analysis is not performed on projects that use [automatic analysis](https://docs.sonarsource.com/sonarqube-cloud/advanced-setup/automatic-analysis).
## Customizing the dependency analysis
The following parameters influence the results of the dependency analysis.
| `sonar.sca.enabled` | Boolean | true | Indicates whether to perform Software Composition Analysis (SCA) on this project. Set it to false to disable SCA for this project. |
| -------------------------------------- | ------- | --------------- | ----------------------------------------------------------------------------------------------------------------------------------------------------------------------------------------------------------------------------------------------------------------------------------------------------------------------------------------------- |
| `sonar.sca.exclusions` | String |
|
A comma-separated list of global patterns of paths to exclude as part of analysis.
For example, to ignore all manifests under the tests/ and fixtures/ directories, set:
When performing analysis, SonarQube attempts to run your build tools (such as Maven or Gradle) to create a full dependency graph.
By default, SonarQube does not fail the analysis if these tools fail, and returns information on a limited set of dependencies. Set this parameter to false to force a failure in this scenario.
|
| `sonar.sca.goNoResolve` | Boolean | false | Disables automatic generation of a Go lock file. This results in degraded dependency information. |
| `sonar.sca.mavenNoResolve` | Boolean | false |
Disables automatic generation of a Maven lock file and dependency graph file.
This results in degraded dependency information.
|
| `sonar.sca.mavenForceDepPlugin` | Boolean | true | Ensures Maven Dependency Plugin is installed even when it’s not available in the environment. |
| `sonar.sca.mavenIgnoreWrapper` | Boolean | false | Disables a search for a Maven wrapper script `mvnw.` Set this to true if the default Maven wrapper in your `PATH` is not functioning. |
| `sonar.sca.mavenOptions` | String |
| Sends additional options to any Maven commands used to generate the lock file and dependency graph file. |
| `sonar.sca.gradleNoResolve` | Boolean | false | Disables automatic generation of a Gradle dependencies lock file. This results in degraded dependency information. |
| `sonar.sca.gradleConfigurationPattern` | String |
| Java regex of configurations to include. This is passed to gradle via `-PconfigurationPattern`. When unset, all configurations will be resolved. |
| `sonar.sca.pythonBinary` | String | /usr/bin/python | Path to a specific Python binary that should be used if lock files need to be generated. |
| `sonar.sca.pythonNoResolve` | Boolean | false | Disables automatic generation of a Python lock file. This results in degraded dependency information. |
| `sonar.sca.pythonResolveLocal` | Boolean | false | When generating a python lockfile, dependency resolution is done in a temporary virtual environment. Set this to true to skip creation of the virtual environment and resolve against the local python environment. |
| `sonar.sca.npmNoResolve` | Boolean | false | Disables automatic generation of a lock file for an NPM project when a supported lockfile (`yarn.lock`, `package-lock.json`, `pnpm-lock.yaml`, `bun.lock`) is not present. |
| `sonar.sca.npmEnableScripts` | Boolean | false | By default, when generating a lockfile, the `--ignore-scripts NPM/Yarn` option is passed to ignore any lifecycle scripts. If lifecycle scripts are needed to properly generate dependencies, enable this option. |
| `sonar.sca.nugetNoResolve` | Boolean | false | Disables automatic generation of a lock file for a Nuget project. |
| `sonar.scanner.keepReport` | Boolean | false | Not specific to SCA. Keeps the scanner work directory after analysis, including the `dependency-files.tar.xz` that contains dependency files to analyze. Useful if you have access to [commercial support](https://www.sonarsource.com/support/), as the Sonar support team may ask for this file to assist with resolving issues. |
| `sonar.sca.cfamily` | Boolean | false | When set to true, enables support for C/C++ dependency analysis (beta) |
| `sonar.sca.sbomImportPaths` | String | | Comma-separated list of SBOM files to import and analyze. See “Supported languages and package managers” for supported file types and required file naming. |
## Troubleshooting the dependency analysis
See [Advanced security troubleshooting](https://docs.sonarsource.com/sonarqube-cloud/advanced-security/troubleshooting/) for guidance on how to troubleshoot the dependency analysis.
## Continual analysis
Once SCA analysis has been performed on a branch, Sonar automatically re-analyzes your branch for new dependency risks. This analysis runs once per day. Any newly discovered vulnerability or license risks will be added to the list of dependency risks for your project, any changes to risk factors and scoring will cause any needed severity updates, and any quality gate will be recomputed.
You can configure the branch rescan frequency by going to **Administration** > **Advanced Security** > **Configure branch rescanning**.
From there, you can set the following:
* **Branch rescan frequency**: Daily, weekly, or never
* **Target branch types**: Main branch only, kept branches only, or all branches. When set to **Kept branches only**, continual analysis targets [long-lived branches](https://docs.sonarsource.com/sonarqube-cloud/enriching/branch-analysis-setup#longlived-branches).
## What data is collected
Whenever you run an analysis, data is sent to a Sonar cloud service for analysis. The Sonar scanner collects the manifests of your projects. Manifests are language-specific files that define your projects’ dependencies, such as `pom.xml` for Java, or `requirements.txt` for Python. The scanner also collects any relevant lockfiles that describe the fully-resolved set of dependencies, such as `package-lock.json` for a JavaScript project.
These manifests and lockfiles are assembled into an archive file and sent to a Sonar cloud service for analysis. All data is sent over a secure HTTPS connection. Information on your dependencies and their issues is returned to your SonarQube Server instance. No source code is sent to Sonar.
Manifests and lockfiles are not stored persistently in Sonar. Sonar may collect aggregate data, and other service telemetry on open source package usage in an anonymized way.
The manifest and lockfiles that are processed contain a list of all dependencies of your project, which could include internally-developed library names. The Sonar service compares dependency names against a set of known open source components; any internally-developed library name would not match, and therefore would not have any license or vulnerability data returned for that library.
## Related pages
* [Viewing dependencies](https://docs.sonarsource.com/sonarqube-cloud/advanced-security/viewing-dependencies)
* [Reviewing and fixing dependency risks](https://docs.sonarsource.com/sonarqube-cloud/advanced-security/reviewing-and-fixing-dependency-risks)
* [Managing license profiles and policies](https://docs.sonarsource.com/sonarqube-cloud/advanced-security/managing-license-profiles-and-policies)
* [Troubleshooting](https://docs.sonarsource.com/sonarqube-cloud/appendices/troubleshooting)
* [Best practices for managing dependency risks](https://docs.sonarsource.com/sonarqube-cloud/advanced-security/best-practices-for-managing-dependency-risks)
---
# Source: https://docs.sonarsource.com/sonarqube-server/2025.3/advanced-security/analyzing-projects-for-dependencies.md
# Source: https://docs.sonarsource.com/sonarqube-server/2025.5/advanced-security/analyzing-projects-for-dependencies.md
# Source: https://docs.sonarsource.com/sonarqube-server/2025.4/advanced-security/analyzing-projects-for-dependencies.md
# Source: https://docs.sonarsource.com/sonarqube-server/2025.6/advanced-security/analyzing-projects-for-dependencies.md
# Source: https://docs.sonarsource.com/sonarqube-server/advanced-security/analyzing-projects-for-dependencies.md
# Analyzing projects for dependencies (SCA)
*Advanced Security is only available in SonarQube Server, as an add-on starting in* [*Enterprise edition*](https://www.sonarsource.com/plans-and-pricing/sonarqube/)*.*
With Software Composition Analysis (SCA), SonarQube analyzes your built project and returns information on:
* vulnerabilities in your third-party open source dependencies
* where your open source dependencies may conflict with your organization’s license policies
Here are things to check out for to ensure that you get fast and accurate dependency analysis.
### Enabling the SCA service
By default, SCA is not enabled on your instance. To turn on the Sonar SCA service as an admin:
1. Make sure your SonarQube Server license includes Advanced Security.
2. Go to **Administration** > **Configuration** > **General Settings** > **Advanced Security** and activate the **Software Composition analysis (SCA)** option.
You can choose whether all projects will be scanned using SCA by default, by adjusting the **Analyze all projects checkbox**. If you disable dependency analysis by default, you will need to enable analysis on a project-by-project basis at the scanner level by passing `sonar.sca.enabled=true` as a scanner parameter.
A connectivity test is available after SCA is enabled to test your Internet access.
### Internet connection
Detecting and remediating third-party vulnerabilities requires a constantly updated source of data. New vulnerabilities are discovered every day, and new releases of software that fix them soon follow. Sonar’s researchers are constantly checking to ensure that our license data is accurate, and for details on how reported vulnerabilities may actually affect your code.
As a result, an internet connection is required to always provide the most up-to-date information on your third-party dependencies, including:
* what licenses you have
* what issues you are affected by
* what workarounds maintainers have published as being available
Your SonarQube Server instance must be able to reach the following servers:
* [api.sonarcloud.io](http://api.sonarcloud.io/)
* [scanner.sonarcloud.io](http://scanner.sonarcloud.io/)
See [#marketplace](https://docs.sonarsource.com/sonarqube-server/server-installation/system-properties/common-properties#marketplace "mention") for more information about configuring system properties and environment variables.
You can use the connectivity check under **Administration** > **Configuration** > **General Settings** > **Advanced Security** to test your network access.
#### What data is collected
Whenever you run an analysis, data is sent to a Sonar cloud service for analysis. The Sonar scanner collects the *manifests* of your projects. Manifests are language-specific files that define your projects’ dependencies, such as `pom.xml` for Java, or `requirements.txt` for Python. The scanner also collects any relevant lockfiles that describe the fully-resolved set of dependencies, such as `package-lock.json` for a JavaScript project.
These manifests and lockfiles are assembled into an archive file and sent to a Sonar cloud service for analysis. All data is sent over a secure HTTPS connection. Information on your dependencies and their issues is returned to your SonarQube Server instance. No source code is sent to Sonar.
Manifests and lockfiles are not stored persistently in Sonar. Sonar may collect aggregate data, and other service telemetry on open source package usage in an anonymized way.
The manifest and lockfiles that are processed contain a list of all dependencies of your project, which could include internally-developed library names. The Sonar service compares dependency names against a set of known open source components; any internally-developed library name would not match, and therefore would not have any license or vulnerability data returned for that library.
### Supported languages and package managers
SonarQube evaluates your third-party open source code usage by matching dependencies defined in your project’s dependency files to known open source code on upstream package managers. It currently supports the following languages, package managers, and package manager files:
| Language |
| N/A |
### Ensure the analysis is run in an appropriate environment
To correctly analyze both your direct and transitive dependencies on projects where there is not a lockfile that contains all dependencies, SonarQube executes commands using your build tools to get a full dependency list.
#### Note on security
To run a dependency analysis, the SonarQube scanner might install the dependencies required to build your application. This could pull in untrusted artifacts, similar to while you’re building the application. Ensure the analysis will run in a secure environment before proceeding.
#### Notes on specific build tools and language ecosystems
**Maven**
The Maven binary (`mvn`) or maven wrapper (`mvnw`) must be located in the project directory, the manifest file’s directory, or in the execution path.
**Gradle**
The Gradle binary (`gradle`) or Gradle wrapper (`gradlew`) must be in the project directory, the manifest file’s directory, or in the execution path.
**pip**
The analysis must be run with the same Python runtime that your application is built on. The SonarQube analysis will create a virtual environment to resolve dependencies, and a C compiler and development libraries may be required, based on your python dependencies.
**Go**
The go runtime that matches the version in `go.mod` must be present.
**Internal artifact repositories**
If your application build configuration includes internal or private artifacts, the analysis process must have network access to your artifact server.
If the analysis is not run in the proper environment, it will cause degraded analysis results and potential analysis failures. You can see more information in analysis warnings in the UI and in the scanner log. See the [Troubleshooting](https://docs.sonarsource.com/sonarqube-server/advanced-security/troubleshooting) section for some common scenarios.
#### Note on pull request analysis
To get valuable results when performing a pull request analysis, the target branch should have been analyzed first.
### Ensure the analysis includes the appropriate files
The SCA analysis recursively searches for appropriate package files for your project. In some cases, this may analyze more files than what your project actually uses. Common cases to look out for include:
* Package manager files in test code and data directories
If you have package manager files present in test directories, ensure these locations are properly excluded from analysis. This can be done in multiple ways:
* Add paths to the common `sonar.exclusions` configuration option. Example: `sonar.exclusions="tests/**"`
* Use the specific `sonar.sca.exclusions` configuration option. Example `sonar.sca.exclusions="tests/**"`
* As long as SonarQube's SCM support is enabled (the default), add the paths to a source control ignore file, such as `.gitignore`
### Customizing the dependency analysis
The following parameters influence the results of the dependency analysis.
| `sonar.sca.enabled` | Boolean | true | Indicates whether to perform Software Composition Analysis (SCA) on this project. Set it to false to disable SCA for this project. |
| -------------------------------------- | ------- | --------------- | ----------------------------------------------------------------------------------------------------------------------------------------------------------------------------------------------------------------------------------------------------------------------------------------------------------------------------------------------- |
| `sonar.sca.exclusions` | String |
|
A comma-separated list of global patterns of paths to exclude as part of analysis.
For example, to ignore all manifests under the tests/ and fixtures/ directories, set:
When performing analysis, SonarQube attempts to run your build tools (such as Maven or Gradle) to create a full dependency graph.
By default, SonarQube does not fail the analysis if these tools fail, and returns information on a limited set of dependencies. Set this parameter to false to force a failure in this scenario.
|
| `sonar.sca.goNoResolve` | Boolean | false | Disables automatic generation of a Go lock file. This results in degraded dependency information. |
| `sonar.sca.mavenNoResolve` | Boolean | false |
Disables automatic generation of a Maven lock file and dependency graph file.
This results in degraded dependency information.
|
| `sonar.sca.mavenForceDepPlugin` | Boolean | true | Ensures Maven Dependency Plugin is installed even when it’s not available in the environment. |
| `sonar.sca.mavenIgnoreWrapper` | Boolean | false | Disables a search for a Maven wrapper script `mvnw.` Set this to true if the default Maven wrapper in your `PATH` is not functioning. |
| `sonar.sca.mavenOptions` | String |
| Sends additional options to any Maven commands used to generate the lock file and dependency graph file. |
| `sonar.sca.gradleNoResolve` | Boolean | false | Disables automatic generation of a Gradle dependencies lock file. This results in degraded dependency information. |
| `sonar.sca.gradleConfigurationPattern` | String |
| Java regex of configurations to include. This is passed to gradle via `-PconfigurationPattern`. When unset, all configurations will be resolved. |
| `sonar.sca.pythonBinary` | String | /usr/bin/python | Path to a specific Python binary that should be used if lock files need to be generated. |
| `sonar.sca.pythonNoResolve` | Boolean | false | Disables automatic generation of a Python lock file. This results in degraded dependency information. |
| `sonar.sca.pythonResolveLocal` | Boolean | false | When generating a python lockfile, dependency resolution is done in a temporary virtual environment. Set this to true to skip creation of the virtual environment and resolve against the local python environment. |
| `sonar.sca.npmNoResolve` | Boolean | false | Disables automatic generation of a lock file for an NPM project when a supported lockfile (`yarn.lock`, `package-lock.json`, `pnpm-lock.yaml`, `bun.lock`) is not present. |
| `sonar.sca.npmEnableScripts` | Boolean | false | By default, when generating a lockfile, the `--ignore-scripts NPM/Yarn` option is passed to ignore any lifecycle scripts. If lifecycle scripts are needed to properly generate dependencies, enable this option. |
| `sonar.sca.nugetNoResolve` | Boolean | false | Disables automatic generation of a lock file for a Nuget project. |
| `sonar.scanner.keepReport` | Boolean | false | Not specific to SCA. Keeps the scanner work directory after analysis, including the `dependency-files.tar.xz` that contains dependency files to analyze. Useful if you have access to [commercial support](https://www.sonarsource.com/support/), as the Sonar support team may ask for this file to assist with resolving issues. |
| `sonar.sca.cfamily` | Boolean | false | When set to true, enables support for C/C++ dependency analysis (beta) |
| `sonar.sca.sbomImportPaths` | String | | Comma-separated list of SBOM files to import and analyze. See “Supported languages and package managers” for supported file types and required file naming. |
### Troubleshooting the dependency analysis
See [troubleshooting](https://docs.sonarsource.com/sonarqube-server/advanced-security/troubleshooting "mention") for guidance on how to troubleshoot the dependency analysis.
### Continual analysis
Once SCA analysis has been performed on a permanent branch, Sonar automatically re-analyzes your branch for new dependency risks. This analysis runs once per day. Any newly discovered vulnerability or license risks will be added to the list of dependency risks for your project, any changes to risk factors and scoring will cause any needed severity updates, and any quality gate will be recomputed. For more information on project branches, see [maintaining-the-branches-of-your-project](https://docs.sonarsource.com/sonarqube-server/project-administration/maintaining-project/maintaining-the-branches-of-your-project "mention").
You can change how often your branches are re-analyzed and disable re-analysis from the SonarQube Server UI. To do this, go to **Administration** > **Configuration** > **Advanced Security** > **Configure Branch Rescanning.**
From there, you can set the following:
* **Branch rescan frequency**: Daily, weekly, or never
* **Target branch types**: Main branch only, kept branches only, or all branches
### Related pages
* [viewing-dependencies](https://docs.sonarsource.com/sonarqube-server/advanced-security/viewing-dependencies "mention")
* [reviewing-and-fixing-dependency-risks](https://docs.sonarsource.com/sonarqube-server/advanced-security/reviewing-and-fixing-dependency-risks "mention")
* [managing-license-profiles-and-policies](https://docs.sonarsource.com/sonarqube-server/advanced-security/managing-license-profiles-and-policies "mention")
* [troubleshooting](https://docs.sonarsource.com/sonarqube-server/advanced-security/troubleshooting "mention")
* [best-practices-for-managing-dependency-risks](https://docs.sonarsource.com/sonarqube-server/advanced-security/best-practices-for-managing-dependency-risks "mention")
---
# Source: https://docs.sonarsource.com/sonarqube-community-build/analyzing-source-code.md
# Source: https://docs.sonarsource.com/sonarqube-server/8.9/analyzing-source-code.md
# Source: https://docs.sonarsource.com/sonarqube-server/9.8/analyzing-source-code.md
# Source: https://docs.sonarsource.com/sonarqube-server/9.9/analyzing-source-code.md
# Source: https://docs.sonarsource.com/sonarqube-server/10.0/analyzing-source-code.md
# Source: https://docs.sonarsource.com/sonarqube-server/10.1/analyzing-source-code.md
# Source: https://docs.sonarsource.com/sonarqube-server/10.2/analyzing-source-code.md
# Source: https://docs.sonarsource.com/sonarqube-server/10.3/analyzing-source-code.md
# Source: https://docs.sonarsource.com/sonarqube-server/10.4/analyzing-source-code.md
# Source: https://docs.sonarsource.com/sonarqube-server/10.5/analyzing-source-code.md
# Source: https://docs.sonarsource.com/sonarqube-server/10.6/analyzing-source-code.md
# Source: https://docs.sonarsource.com/sonarqube-server/10.7/analyzing-source-code.md
# Source: https://docs.sonarsource.com/sonarqube-server/10.8/analyzing-source-code.md
# Source: https://docs.sonarsource.com/sonarqube-server/2025.2/analyzing-source-code.md
# Source: https://docs.sonarsource.com/sonarqube-server/2025.3/analyzing-source-code.md
# Source: https://docs.sonarsource.com/sonarqube-server/2025.5/analyzing-source-code.md
# Source: https://docs.sonarsource.com/sonarqube-server/2025.1/analyzing-source-code.md
# Source: https://docs.sonarsource.com/sonarqube-server/2025.4/analyzing-source-code.md
# Source: https://docs.sonarsource.com/sonarqube-server/2025.6/analyzing-source-code.md
# Source: https://docs.sonarsource.com/sonarqube-server/analyzing-source-code.md
# Analyzing source code
- [SonarQube Server analysis overview](/sonarqube-server/analyzing-source-code/analysis-overview.md): This page explains SonarQube Server’s main analysis steps and how SonarQube Server integrates with your CI pipeline.
- [Project analysis setup](/sonarqube-server/analyzing-source-code/overview.md): This page introduces briefly the prerequisites and the setup steps necessary for a project analysis with SonarQube Server.
- [Scanners](/sonarqube-server/analyzing-source-code/scanners.md): Information about various SonarScanners.
- [Scanner environment](/sonarqube-server/analyzing-source-code/scanners/scanner-environment.md): Information on scanner environment requirements, TLS certificates, and checked out code.
- [General requirements](/sonarqube-server/analyzing-source-code/scanners/scanner-environment/general-requirements.md): General requirements for setting up your SonarScanner for SonarQube Server.
- [TLS certificates on client side](/sonarqube-server/analyzing-source-code/scanners/scanner-environment/manage-tls-certificates.md): If your SonarQube Server instance is secured, add the self-signed certificate to the CI/CD host. If mutual TLS is used, an additional setup is required.
- [Checked-out code](/sonarqube-server/analyzing-source-code/scanners/scanner-environment/verifying-code-checkout-step.md): During the checkout of a working copy (clone) of the code from the project repository, we recommend using the full depth.
- [Managing JRE auto-provisioning](/sonarqube-server/analyzing-source-code/scanners/scanner-environment/managing-jre-auto-provisioning.md): How to disable or adjust JRE auto-provisioning for scanners.
- [SonarScanner CLI](/sonarqube-server/analyzing-source-code/scanners/sonarscanner.md): The SonarScanner CLI is the scanner to use when there is no specific scanner for your build system.
- [Azure DevOps Extension](/sonarqube-server/analyzing-source-code/scanners/sonarqube-extension-for-azure-devops.md): The Azure DevOps Extension for SonarQube Server makes it easy to integrate analysis into your build pipeline, allowing you to analyze all supported languages.
- [Jenkins extension](/sonarqube-server/analyzing-source-code/scanners/jenkins-extension-sonarqube.md): This extension lets you centralize the configuration of your SonarQube Server connection details in your Jenkins global configuration.
- [SonarScanner for Maven](/sonarqube-server/analyzing-source-code/scanners/sonarscanner-for-maven.md): The SonarScanner for Maven is recommended as the default scanner for Maven projects.
- [SonarScanner for Gradle](/sonarqube-server/analyzing-source-code/scanners/sonarscanner-for-gradle.md): The SonarScanner for Gradle provides an easy way to start the analysis of a Gradle project with SonarQube Server.
- [SonarScanner for .NET](/sonarqube-server/analyzing-source-code/scanners/dotnet.md): Information on installing, using, and configuring the SonarScanner for .NET.
- [Introduction](/sonarqube-server/analyzing-source-code/scanners/dotnet/introduction.md): Your entry point to understanding how the SonarScanner for .NET works with SonarQube Server.
- [Installing the scanner](/sonarqube-server/analyzing-source-code/scanners/dotnet/installing.md): Installing the SonarScanner for .NET to run with SonarQube Server is easy. Everything you need to know is on this page.
- [Using the scanner](/sonarqube-server/analyzing-source-code/scanners/dotnet/using.md): Check this page to learn how to invoke the SonarScanner for .NET and understand which parameters to use in your SonarQube Server analysis.
- [Configuring the scanner](/sonarqube-server/analyzing-source-code/scanners/dotnet/configuring.md): Configuring the SonarScanner for .NET in SonarQube Server can be tricky. Here is everything you need to know.
- [SonarScanner for NPM](/sonarqube-server/analyzing-source-code/scanners/npm.md): This section describes how to install, use, and configure the sonarScanner for NPM.
- [Introduction](/sonarqube-server/analyzing-source-code/scanners/npm/introduction.md): The SonarScanner for NPM makes it very easy to trigger a SonarQube Server analysis on your JavaScript code base, without needing additional tools or resources.
- [Installing the scanner](/sonarqube-server/analyzing-source-code/scanners/npm/installing.md): Depending on how you want to start the SonarScanner for NPM, you will use a different method to install the scanner.
- [Using the scanner](/sonarqube-server/analyzing-source-code/scanners/npm/using.md): To start the SonarScanner for NPM, you can either add the analysis to your build files or use the scanner start command line (with or without npx).
- [Configuring the scanner](/sonarqube-server/analyzing-source-code/scanners/npm/configuring.md): This section explains how to configure the parameters used for an analysis with the SonarScanner for NPM when running it with SonarQube Server.
- [SonarScanner for Python](/sonarqube-server/analyzing-source-code/scanners/sonarscanner-for-python.md): The SonarScanner for Python provides an easy way to start the analysis of a Python project with SonarQube Server.
- [Analysis parameters](/sonarqube-server/analyzing-source-code/analysis-parameters.md): Analysis parameters are used to set up your analysis.
- [Configuration overview](/sonarqube-server/analyzing-source-code/analysis-parameters/configuration-overview.md): This page explains the hierarchy and provides general configuration guidelines regarding the analysis parameters.
- [Parameters not settable in the UI](/sonarqube-server/analyzing-source-code/analysis-parameters/parameters-not-settable-in-ui.md): This section lists the analysis parameters (sonar properties) that must be configured on the CI/CD host, as they cannot be set within the user interface.
- [Languages](/sonarqube-server/analyzing-source-code/languages.md)
- [Supported languages](/sonarqube-server/analyzing-source-code/languages/overview.md): SonarQube Server provides analysis of different languages depending on the edition you’re running.
- [ABAP](/sonarqube-server/analyzing-source-code/languages/abap.md): ABAP analysis is available starting in commercial editions of SonarQube Server.
- [Ansible](/sonarqube-server/analyzing-source-code/languages/ansible.md): Language-specific information about the way SonarQube Server supports the analysis of Ansible.
- [Apex](/sonarqube-server/analyzing-source-code/languages/apex.md): Apex analysis is available starting in SonarQube Server Enterprise Edition.
- [Azure Resource Manager](/sonarqube-server/analyzing-source-code/languages/azure-resource-manager.md): SonarQube analysis supports Azure Resource Manager templates in the JSON & Bicep formats, and is available starting in Community Edition.
- [C/C++/Objective-C](/sonarqube-server/analyzing-source-code/languages/c-family.md): Information on how to set up, run, and customize analysis for C, C++ and Objective-C.
- [C/C++/Objective-C analysis overview](/sonarqube-server/analyzing-source-code/languages/c-family/overview.md): An overview of the configuration required to analyze CFamily code in SonarQube Server.
- [Analysis modes](/sonarqube-server/analyzing-source-code/languages/c-family/analysis-modes.md): Presentation of the several analysis modes.
- [Prerequisites](/sonarqube-server/analyzing-source-code/languages/c-family/prerequisites.md): Prerequisites for CFamily analysis in SonarQube Server.
- [Running the analysis](/sonarqube-server/analyzing-source-code/languages/c-family/running-the-analysis.md): How to run a CFamily code analysis in SonarQube Server.
- [Customizing the analysis](/sonarqube-server/analyzing-source-code/languages/c-family/customizing-the-analysis.md): How to customize your CFamily code analysis.
- [Understanding the analysis](/sonarqube-server/analyzing-source-code/languages/c-family/understanding-the-analysis.md): Details on the CFamily analysis and the way it works with SonarQube Server.
- [Related pages](/sonarqube-server/analyzing-source-code/languages/c-family/related-pages.md): Pages related to CFamily analysis in SonarQube Server
- [CloudFormation](/sonarqube-server/analyzing-source-code/languages/cloudformation.md): SonarQube Server can analyze Infrastructure-as-Code (IaC) languages such as CloudFormation, Kubernetes, and Terraform.
- [COBOL](/sonarqube-server/analyzing-source-code/languages/cobol.md): Cobol analysis is available starting in Enterprise Edition.
- [C#](/sonarqube-server/analyzing-source-code/languages/csharp.md): C# analysis is available in all editions of SonarQube Server and SonarQube Community Build.
- [Dart](/sonarqube-server/analyzing-source-code/languages/dart.md): SonarQube Server can analyze the Dart language.
- [Docker](/sonarqube-server/analyzing-source-code/languages/docker.md): SonarQube Server can analyze Infrastructure-as-Code (IaC) languages such as CloudFormation, Kubernetes, and Terraform.
- [Flex](/sonarqube-server/analyzing-source-code/languages/flex.md): Flex analysis is available starting in all editions of SonarQube Server and SonarQube Community Build.
- [GitHub Actions](/sonarqube-server/analyzing-source-code/languages/github-actions.md): SonarQube supports analysis of YAML files detected as GitHub Actions.
- [Go](/sonarqube-server/analyzing-source-code/languages/go.md): Go analysis is available in all editions of SonarQube.
- [HTML](/sonarqube-server/analyzing-source-code/languages/html.md): HTML analysis is available in all editions of SonarQube and SonarQube Community Build.
- [Java](/sonarqube-server/analyzing-source-code/languages/java.md): Java analysis is available in all editions of SonarQube Server and SonarQube Community Build.
- [JavaScript/TypeScript/CSS](/sonarqube-server/analyzing-source-code/languages/javascript-typescript-css.md): JavaScript, TypeScript, and CSS analysis is available in all editions of SonarQube Server and SonarQube Community Build.
- [JCL](/sonarqube-server/analyzing-source-code/languages/jcl.md): JCL analysis is available starting in SonarQube Server Enterprise Edition and supported by SonarQube for Eclipse when running in Connected Mode.
- [JSON](/sonarqube-server/analyzing-source-code/languages/json.md)
- [Kotlin](/sonarqube-server/analyzing-source-code/languages/kotlin.md): Kotlin analysis is available in all editions of SonarQube Server and SonarQube Community Build.
- [Kubernetes/Helm](/sonarqube-server/analyzing-source-code/languages/kubernetes.md): SonarQube Server can analyze Infrastructure-as-Code (IaC) languages such as CloudFormation, Kubernetes, and Terraform.
- [PHP](/sonarqube-server/analyzing-source-code/languages/php.md): PHP analysis is available in all editions of SonarQube Server and SonarQube Community Build.
- [PLI](/sonarqube-server/analyzing-source-code/languages/pli.md): PLI analysis is available starting in SonarQube Server Enterprise Edition.
- [PL/SQL](/sonarqube-server/analyzing-source-code/languages/pl-sql.md): PL/SQL analysis is available starting in SonarQube Server Developer Edition.
- [Python](/sonarqube-server/analyzing-source-code/languages/python.md): Python analysis is available in all editions of SonarQube Server and SonarQube Community Build.
- [RPG](/sonarqube-server/analyzing-source-code/languages/rpg.md): RPG is available starting in SonarQube Server Enterprise Edition.
- [Ruby](/sonarqube-server/analyzing-source-code/languages/ruby.md): Ruby analysis is available in all editions of SonarQube Server and Community Build.
- [Rust](/sonarqube-server/analyzing-source-code/languages/rust.md)
- [Scala](/sonarqube-server/analyzing-source-code/languages/scala.md): Scala analysis is available in all editions of SonarQube Server and SonarQube Community Build.
- [Shell](/sonarqube-server/analyzing-source-code/languages/shell.md): The Shell analyzer for SonarQube Server is designed to perform static code analysis on Bash and POSIX Shell scripts.
- [Swift](/sonarqube-server/analyzing-source-code/languages/swift.md): Swift analysis is available starting in SonarQube Server Developer Edition.
- [Secrets](/sonarqube-server/analyzing-source-code/languages/secrets.md): SonarQube Server detects exposed Secrets in your source code and language-agnostic config files, starting in the SonarQube Community Build.
- [Terraform](/sonarqube-server/analyzing-source-code/languages/terraform.md): SonarQube Server can analyze Infrastructure-as-Code (IaC) languages such as CloudFormation, Kubernetes, and Terraform.
- [T-SQL](/sonarqube-server/analyzing-source-code/languages/t-sql.md): T-SQL analysis is available starting in SonarQube Server Developer Edition.
- [VB.NET](/sonarqube-server/analyzing-source-code/languages/vb-dotnet.md): VB.NET analysis is available in all editions of SonarQube Server and SonarQube Community Build.
- [VB6](/sonarqube-server/analyzing-source-code/languages/vb6.md): VB6 analysis is available starting in the SonarQube Server Enterprise Edition.
- [XML](/sonarqube-server/analyzing-source-code/languages/xml.md): XML analysis is available in all editions of SonarQube Server and SonarQube Community Build.
- [YAML](/sonarqube-server/analyzing-source-code/languages/yaml.md)
- [.NET environments](/sonarqube-server/analyzing-source-code/dotnet-environments.md): This section contains information on how to work with .NET environments when using SonarQube Server.
- [Overview](/sonarqube-server/analyzing-source-code/dotnet-environments/overview.md): Running .NET analysis on SonarQube Server can be tricky to set up. This page gives you an overview of what’s required depending on your .NET framework.
- [Getting started with .NET](/sonarqube-server/analyzing-source-code/dotnet-environments/getting-started-with-net.md): Your page to get started setting up a .NET analysis in any edition of SonarQube Server.
- [SonarScanner for .NET](/sonarqube-server/analyzing-source-code/dotnet-environments/sonarscanner-for-dotnet.md): Understanding how to analyze .NET projects in SonarQube Server can be difficult. This user guide helps make the setup process easy.
- [.NET test coverage](/sonarqube-server/analyzing-source-code/dotnet-environments/dotnet-test-coverage.md): SonarQube Server supports the reporting of test coverage information as part of the analysis of your .NET project.
- [Specifying test projects](/sonarqube-server/analyzing-source-code/dotnet-environments/specify-test-project-analysis.md): The SonarScanner for .NET analyzes test projects in a different way than main projects. Metrics sent to SonarQube Server provide more insight into your project.
- [VB.NET](/sonarqube-server/analyzing-source-code/dotnet-environments/vb-dotnet.md): VB.NET analysis is available in all editions of SonarQube Server.
- [Troubleshooting](/sonarqube-server/analyzing-source-code/dotnet-environments/troubleshooting.md): Sometimes problems occur when dialing in your .NET analysis in SonarQube Server. Here are some guides created to explain use cases and potential problems.
- [Test coverage](/sonarqube-server/analyzing-source-code/test-coverage.md): Information on the reporting of test coverage information as part of your project analysis.
- [Overview](/sonarqube-server/analyzing-source-code/test-coverage/overview.md): SonarQube's test coverage reports and test execution reports are important metrics in assessing the quality of your code.
- [C / C++ / Objective-C test coverage](/sonarqube-server/analyzing-source-code/test-coverage/c-family-test-coverage.md): Information on reporting test coverage information in SonarQube Server for the CFamily languages.
- [Dart test coverage](/sonarqube-server/analyzing-source-code/test-coverage/dart-test-coverage.md): Information on reporting test coverage information in SonarQube Server for Dart.
- [Go test coverage](/sonarqube-server/analyzing-source-code/test-coverage/go-test-coverage.md): SonarQube Server supports the reporting of test coverage information as part of the analysis of your Go project.
- [Java test coverage](/sonarqube-server/analyzing-source-code/test-coverage/java-test-coverage.md): Information on reporting test coverage information in SonarQube Server for Java.
- [JavaScript / TypeScript test coverage](/sonarqube-server/analyzing-source-code/test-coverage/javascript-typescript-test-coverage.md): Information on reporting test coverage information in SonarQube Server for Javascript and Typescript.
- [.NET test coverage](/sonarqube-server/analyzing-source-code/test-coverage/dotnet-test-coverage.md): Information on reporting test coverage information in SonarQube Server for .NET projects.
- [PHP test coverage](/sonarqube-server/analyzing-source-code/test-coverage/php-test-coverage.md): Information on reporting test coverage information in SonarQube Server for PHP projects.
- [Python test coverage](/sonarqube-server/analyzing-source-code/test-coverage/python-test-coverage.md): Information on reporting test coverage information in SonarQube Server for Python projects.
- [Generic test data](/sonarqube-server/analyzing-source-code/test-coverage/generic-test-data.md): SonarQube supports generic formats for test coverage and test execution import.
- [Test coverage parameters](/sonarqube-server/analyzing-source-code/test-coverage/test-coverage-parameters.md): SonarQube's test coverage reports describe the percentage of your code that has been tested by your test suite during a build.
- [Test execution parameters](/sonarqube-server/analyzing-source-code/test-coverage/test-execution-parameters.md): This page describes what analysis parameters are needed to import test execution reports into SonarQube.
- [Importing external issues](/sonarqube-server/analyzing-source-code/importing-external-issues.md): How to import issues generated by third-party analyzers into your project analysis.
- [About external issues](/sonarqube-server/analyzing-source-code/importing-external-issues/about-external-issues.md): Issues generated by third-party analyzers can be imported into SonarQube Server.
- [External analyzer reports](/sonarqube-server/analyzing-source-code/importing-external-issues/external-analyzer-reports.md): How to set up the import for your project of issues generated by third-party analyzers that integrate with SonarQube.
- [Generic formatted reports](/sonarqube-server/analyzing-source-code/importing-external-issues/generic-issue-import-format.md): SonarQube Server supports a generic import format for raising external issues in code.
- [SARIF reports](/sonarqube-server/analyzing-source-code/importing-external-issues/importing-issues-from-sarif-reports.md): SonarQube Server supports the standard Static Analysis Results Interchange Format (SARIF) for raising external issues in code.
- [Background tasks](/sonarqube-server/analyzing-source-code/background-tasks.md): Information on background tasks in SonarQube Server.
- [Pull request analysis](/sonarqube-server/analyzing-source-code/pull-request-analysis.md): Information on setting up pull request analysis for your projects.
- [Introduction](/sonarqube-server/analyzing-source-code/pull-request-analysis/introduction.md): SonarQube Server supports pull request analysis: analysis results only include issues that have been introduced by the pull request itself.
- [Setting up the pull request analysis](/sonarqube-server/analyzing-source-code/pull-request-analysis/setting-up-the-pull-request-analysis.md): With SonarQube Server, a pull request analysis occurs when a pull request is opened and every time a change is pushed to the pull request branch.
- [Branch analysis](/sonarqube-server/analyzing-source-code/branch-analysis.md): Information on setting up Branch analysis for your projects.
- [Introduction](/sonarqube-server/analyzing-source-code/branch-analysis/introduction.md): Branch analysis allows you to trigger an analysis on a push to any long-living branch or to short-lived branches without involving pull requests.
- [Setting up the branch analysis](/sonarqube-server/analyzing-source-code/branch-analysis/setting-up-the-branch-analysis.md): In SonarQube Server, branch analysis allows you to trigger an analysis on a push to any specified branch without involving pull requests.
- [CI integration](/sonarqube-server/analyzing-source-code/ci-integration.md): Information on integrating SonarQube Server with your CI pipelines.
- [Overview](/sonarqube-server/analyzing-source-code/ci-integration/overview.md): SonarQube Server supports integration on multiple platforms allowing you to maintain code quality and security in your projects.
- [Jenkins integration](/sonarqube-server/analyzing-source-code/ci-integration/jenkins-integration.md): Information on integrating SonarQube Server with Jenkins.
- [Key features](/sonarqube-server/analyzing-source-code/ci-integration/jenkins-integration/key-features.md): Sonar provides an extension for Jenkins to enable smooth integration with Jenkins. This section explains the key features of this integration.
- [Setting up Jenkins](/sonarqube-server/analyzing-source-code/ci-integration/jenkins-integration/global-setup.md): This page explains how to set up Jenkins globally for the integration with SonarQube Server by using SonarQube extension for Jenkins.
- [Adding analysis to a Jenkins job](/sonarqube-server/analyzing-source-code/ci-integration/jenkins-integration/add-analysis-to-job.md): This section explains how to add the SonarQube Server analysis to your Jenkins Freestyle or Pipeline jobs.
- [Setting up a pipeline pause](/sonarqube-server/analyzing-source-code/ci-integration/jenkins-integration/pipeline-pause.md): To configure an automatic failing of your Jenkins pipeline in case the quality gate computed by SonarQube Server fails, you must set up a pipeline pause.
- [Codemagic integration](/sonarqube-server/analyzing-source-code/ci-integration/codemagic-integration.md): Information on setting up Codemagic with SonarQube Server.
- [SCM integration](/sonarqube-server/analyzing-source-code/scm-integration.md): Collecting SCM data during code analysis can unlock a number of SonarQube Server features.
- [Security engine custom configuration](/sonarqube-server/analyzing-source-code/security-engine-custom-configuration.md): Security Engine Custom Configuration is available as part of the Enterprise Edition. The security engine tracks the path that data follows through your code.
- [Troubleshooting the analysis](/sonarqube-server/analyzing-source-code/troubleshooting-the-analysis.md): If your SonarQube Server analysis errors out.
- [Incremental analysis](/sonarqube-server/analyzing-source-code/incremental-analysis.md): Information on SonarQube incremental analysis and how to disable or change the mechanisms.
- [About the incremental analysis](/sonarqube-server/analyzing-source-code/incremental-analysis/introduction.md): This page explains the mechanisms used to perform incremental branch and pull request analysis in SonarQube Server.
- [Disabling or changing the mechanisms](/sonarqube-server/analyzing-source-code/incremental-analysis/disabling-or-changing.md): In very specific cases, you may have to disable or change the incremental analysis mechanism.
- [JFrog Evidence Collection integration](/sonarqube-server/analyzing-source-code/jfrog-evidence-collection-integration.md): SonarQube Server integrates with JFrog Evidence Collection to provide trusted auditing for software packages.
---
# Source: https://docs.sonarsource.com/sonarqube-cloud/appendices/announcements.md
# Announcements
{% hint style="info" %}
Deprecations are now announced on the [deprecations-and-removals](https://docs.sonarsource.com/sonarqube-cloud/deprecations-and-removals "mention") page.
{% endhint %}
### January 15, 2024 - End of support for Java 11
Java 11 is no longer supported as scanner runtime environment. The minimum required version of Java is now Java 17.
The installation of Java discussed here refers specifically to the JDK or JRE installed and used in the context where your SonarQube Cloud scanner analysis tool is running. This may be your local build environment or your CI service.
This does not have any impact on the Java version targeted by your project code. You can still analyze Java projects that target versions earlier than 17.
### December 2023 - Node.js 14 and 16 end of service
If you are using a deprecated version of Node.js, versions 14 or 16, in the analysis environment, you must upgrade to Node.js 20, [the active LTS](https://nodejs.org/en/about/previous-releases#release-schedule), to avoid disruption.
* *Node.js 14 is no longer supported*. Your analysis will stop working unless you upgrade your environment. This change is now effective in SonarQube Cloud and will soon be effective in the coming SonarQube Server and SonarQube for IDE versions.
* *Node.js 16 support ends in mid-January 2024*. SonarQube Server 10.4 will be the last version supporting Node.js 16.
From now on, analysis failures will occur immediately for misconfigurations or unsupported versions. This will prevent failed analysis from going unnoticed for long periods of time, which could happen before.
Note that this will only affect your analysis environment, likely part of your CI/CD. Please ensure your analysis environment is using the latest Node.js LTS version, currently Node.js 20. If you are using Automatic Analysis in SonarQube Cloud, no action is needed.
See the [Sonar Community announcement](https://community.sonarsource.com/t/node-js-v14-no-longer-supported-v16-stops-early-next-year/105428) to get more information and help if needed.
### July 2023 - Deprecated support for SonarScanner for Ant
The SonarScanner for Ant provides a `task` that is a wrapper of SonarScanner to allow integration of SonarQube Cloud analysis into an Apache Ant build script. It is now deprecated and will be removed in the future. We recommend adjusting your configuration to use the [sonarscanner-cli](https://docs.sonarsource.com/sonarqube-cloud/advanced-setup/ci-based-analysis/sonarscanner-cli "mention") directly.
### July 2023 - Deprecated support for Java 11
We recommend updating the version of Java installed in the scanner environment to at least Java 17. Java 11 is now deprecated and scanners using this version will stop functioning in the future.
The installation of Java discussed here refers specifically to the JDK or JRE installed and used in the context where your SonarQube Cloud scanner analysis tool is running. This may be your local build environment or your CI service.
This does *not* have any impact on the Java version targeted by your project code. You can still analyze Java projects that target versions earlier than 17.
### September 15, 2022 - Deprecated support for Node.js 12
A Node.js runtime is required to run CI-based analysis of JavaScript, TypeScript or CSS. The minimum version requirement for this runtime will change soon:
We would like to inform you that, as of September 15, 2022, the use of Node.js 12 will no longer be supported by analyses targeting SonarQube Cloud. It has been considered EOL by OpenJS Foundation since March 2022 and has been deprecated since then. This means that support will also be removed in the latest version of SonarQube for IDE. Support for Node.js 12 will end today.
* This means that starting today, analysis of JS/TS/CSS will stop working in Node.js 12 environments. You will no longer be able to create new projects within these environments.
* This will make the minimum supported version of Node.Js 14, but we recommend using the latest LTS version 16.
To continue to enjoy the latest rule updates, you should move your Node.js environment to a supported version as soon as possible:
* The minimum supported version will be Node.js 14.
* The recommended supported version is the latest LTS, which is currently Node.js 16.
The change applies specifically to the version of Node.js installed and used by the SonarQube Cloud scanner analysis tool, either in your local build environment or in your cloud CI service. Please note that this change does not have any impact outside of your analysis runtime.
For more information on how payment and billing work, see [updating-billing-payment-details](https://docs.sonarsource.com/sonarqube-cloud/administering-sonarcloud/managing-subscription/updating-billing-payment-details "mention").
---
# Source: https://docs.sonarsource.com/sonarqube-server/10.8/analyzing-source-code/languages/ansible.md
# Source: https://docs.sonarsource.com/sonarqube-server/2025.2/analyzing-source-code/languages/ansible.md
# Source: https://docs.sonarsource.com/sonarqube-server/2025.3/analyzing-source-code/languages/ansible.md
# Source: https://docs.sonarsource.com/sonarqube-server/2025.5/analyzing-source-code/languages/ansible.md
# Source: https://docs.sonarsource.com/sonarqube-server/2025.1/analyzing-source-code/languages/ansible.md
# Source: https://docs.sonarsource.com/sonarqube-server/2025.4/analyzing-source-code/languages/ansible.md
# Source: https://docs.sonarsource.com/sonarqube-server/2025.6/analyzing-source-code/languages/ansible.md
# Source: https://docs.sonarsource.com/sonarqube-server/analyzing-source-code/languages/ansible.md
# Source: https://docs.sonarsource.com/sonarqube-cloud/advanced-setup/languages/ansible.md
# Ansible
### Supported versions
The level of support for a language is defined as follows:
* Fully supported: Analysis will complete. All the language features are understood and examined.
* Supported: Most language features are understood and examined but the version includes unsupported features. Analysis might break or provide incomplete results.
Versions 10.x and 11.x are supported.
### Language specific properties
To discover and update the Ansible-specific properties, navigate in SonarQube Cloud to *Your Project* > **Administration** > **General Settings** > **Languages** > **Ansible**. See the [analysis-parameters](https://docs.sonarsource.com/sonarqube-cloud/advanced-setup/analysis-parameters "mention") page for more information about specific properties.
### Related Pages
You can import `ansible-lint` reports for Ansible. For more information, go to *Your Project >* **Administration** > **Configuration** > **General Settings** > **External Analyzers** on SonarQube Cloud.
---
# Source: https://docs.sonarsource.com/sonarqube-server/8.9/analyzing-source-code/languages/apex.md
# Source: https://docs.sonarsource.com/sonarqube-server/9.8/analyzing-source-code/languages/apex.md
# Source: https://docs.sonarsource.com/sonarqube-server/9.9/analyzing-source-code/languages/apex.md
# Source: https://docs.sonarsource.com/sonarqube-server/10.0/analyzing-source-code/languages/apex.md
# Source: https://docs.sonarsource.com/sonarqube-server/10.1/analyzing-source-code/languages/apex.md
# Source: https://docs.sonarsource.com/sonarqube-server/10.2/analyzing-source-code/languages/apex.md
# Source: https://docs.sonarsource.com/sonarqube-server/10.3/analyzing-source-code/languages/apex.md
# Source: https://docs.sonarsource.com/sonarqube-server/10.4/analyzing-source-code/languages/apex.md
# Source: https://docs.sonarsource.com/sonarqube-server/10.5/analyzing-source-code/languages/apex.md
# Source: https://docs.sonarsource.com/sonarqube-server/10.6/analyzing-source-code/languages/apex.md
# Source: https://docs.sonarsource.com/sonarqube-server/10.7/analyzing-source-code/languages/apex.md
# Source: https://docs.sonarsource.com/sonarqube-server/10.8/analyzing-source-code/languages/apex.md
# Source: https://docs.sonarsource.com/sonarqube-server/2025.2/analyzing-source-code/languages/apex.md
# Source: https://docs.sonarsource.com/sonarqube-server/2025.3/analyzing-source-code/languages/apex.md
# Source: https://docs.sonarsource.com/sonarqube-server/2025.5/analyzing-source-code/languages/apex.md
# Source: https://docs.sonarsource.com/sonarqube-server/2025.1/analyzing-source-code/languages/apex.md
# Source: https://docs.sonarsource.com/sonarqube-server/2025.4/analyzing-source-code/languages/apex.md
# Source: https://docs.sonarsource.com/sonarqube-server/2025.6/analyzing-source-code/languages/apex.md
# Source: https://docs.sonarsource.com/sonarqube-server/analyzing-source-code/languages/apex.md
# Source: https://docs.sonarsource.com/sonarqube-cloud/advanced-setup/languages/apex.md
# Apex
This language is available only in the [subscription-plans](https://docs.sonarsource.com/sonarqube-cloud/administering-sonarcloud/managing-subscription/subscription-plans "mention").
### Supported tools and frameworks
SalesForce Lightning Components (Aura Components or Web Components)
### Language-Specific Properties
To discover and update the Apex-specific properties, navigate in SonarQube Cloud to *Your Project* > **Administration** > **General Settings** > **Languages** > **Apex**. See the [analysis-parameters](https://docs.sonarsource.com/sonarqube-cloud/advanced-setup/analysis-parameters "mention") page for more information about specific properties.
### Related Pages
* [external-analyzer-reports](https://docs.sonarsource.com/sonarqube-cloud/enriching/external-analyzer-reports "mention") (PMD Apex)
* [test-coverage-parameters](https://docs.sonarsource.com/sonarqube-cloud/enriching/test-coverage/test-coverage-parameters "mention") (For Salesforce DX project)
---
# Source: https://docs.sonarsource.com/sonarqube-community-build/server-update-and-maintenance/maintenance/deprecations/api-deprecation.md
# Source: https://docs.sonarsource.com/sonarqube-server/10.4/instance-administration/monitoring/api-deprecation.md
# Source: https://docs.sonarsource.com/sonarqube-server/10.5/instance-administration/monitoring/api-deprecation.md
# Source: https://docs.sonarsource.com/sonarqube-server/10.6/instance-administration/monitoring/api-deprecation.md
# Source: https://docs.sonarsource.com/sonarqube-server/10.7/server-upgrade-and-maintenance/monitoring/api-deprecation.md
# Source: https://docs.sonarsource.com/sonarqube-server/10.8/server-upgrade-and-maintenance/monitoring/api-deprecation.md
# Source: https://docs.sonarsource.com/sonarqube-server/2025.1/server-update-and-maintenance/monitoring/api-deprecation.md
# API deprecation
If you use custom plugins based on the plugin API or consume SonarQube Server services through the [web-api](https://docs.sonarsource.com/sonarqube-server/2025.1/extension-guide/web-api "mention") then you will have to manage the possible API deprecations. See also the [web-api](https://docs.sonarsource.com/sonarqube-server/2025.1/extension-guide/web-api "mention") and the [plugin-basics](https://docs.sonarsource.com/sonarqube-server/2025.1/extension-guide/developing-a-plugin/plugin-basics "mention") pages.
### Monitoring the deprecated Web API components
After an upgrade, you can check if an authenticated client of your SonarQube Server instance uses deprecated Web API endpoints and parameters in order to anticipate their drop. To do so, browse the deprecation log as illustrated below.
To download the deprecation log from the UI (with the **Administer System** permission):
1. In the top navigation bar of the SonarQube Server UI, select **Administration > System**.
2. In the top right corner of the **System Info** page, click **Download Logs > Deprecation Logs**.
{% hint style="info" %}
You can automate the retrieval of the deprecation log information by calling the Web API endpoint [`api/system/logs`](https://next.sonarqube.com/sonarqube/web_api/api/system/logs) with `deprecation` as the value of the `name` parameter.
{% endhint %}
### Monitoring the deprecated Plugin API components
Check the [Plugin API release notes](https://github.com/SonarSource/sonar-plugin-api/releases) for deprecation notes.
---
# Source: https://docs.sonarsource.com/sonarqube-cloud/appendices.md
# Appendices
{% content-ref url="appendices/frequently-asked-questions" %}
[frequently-asked-questions](https://docs.sonarsource.com/sonarqube-cloud/appendices/frequently-asked-questions)
{% endcontent-ref %}
{% content-ref url="appendices/troubleshooting" %}
[troubleshooting](https://docs.sonarsource.com/sonarqube-cloud/appendices/troubleshooting)
{% endcontent-ref %}
{% content-ref url="appendices/keyboard-shortcuts" %}
[keyboard-shortcuts](https://docs.sonarsource.com/sonarqube-cloud/appendices/keyboard-shortcuts)
{% endcontent-ref %}
{% content-ref url="appendices/announcements" %}
[announcements](https://docs.sonarsource.com/sonarqube-cloud/appendices/announcements)
{% endcontent-ref %}
{% content-ref url="appendices/security" %}
[security](https://docs.sonarsource.com/sonarqube-cloud/appendices/security)
{% endcontent-ref %}
{% content-ref url="appendices/glossary" %}
[glossary](https://docs.sonarsource.com/sonarqube-cloud/appendices/glossary)
{% endcontent-ref %}
{% content-ref url="appendices/defining-matching-patterns" %}
[defining-matching-patterns](https://docs.sonarsource.com/sonarqube-cloud/appendices/defining-matching-patterns)
{% endcontent-ref %}
{% content-ref url="appendices/product-release-lifecycle" %}
[product-release-lifecycle](https://docs.sonarsource.com/sonarqube-cloud/appendices/product-release-lifecycle)
{% endcontent-ref %}
---
# Source: https://docs.sonarsource.com/sonarqube-server/8.9/user-guide/applications.md
# Source: https://docs.sonarsource.com/sonarqube-server/9.8/user-guide/applications.md
# Source: https://docs.sonarsource.com/sonarqube-server/9.9/user-guide/applications.md
# Source: https://docs.sonarsource.com/sonarqube-server/10.0/user-guide/applications.md
# Source: https://docs.sonarsource.com/sonarqube-server/10.1/user-guide/applications.md
# Source: https://docs.sonarsource.com/sonarqube-server/10.2/user-guide/applications.md
# Source: https://docs.sonarsource.com/sonarqube-server/10.3/user-guide/applications.md
# Source: https://docs.sonarsource.com/sonarqube-server/10.4/user-guide/applications.md
# Source: https://docs.sonarsource.com/sonarqube-server/10.5/user-guide/applications.md
# Source: https://docs.sonarsource.com/sonarqube-server/10.6/user-guide/applications.md
# Source: https://docs.sonarsource.com/sonarqube-server/10.7/user-guide/applications.md
# Source: https://docs.sonarsource.com/sonarqube-server/10.8/user-guide/applications.md
# Source: https://docs.sonarsource.com/sonarqube-server/2025.2/user-guide/applications.md
# Source: https://docs.sonarsource.com/sonarqube-server/2025.3/user-guide/applications.md
# Source: https://docs.sonarsource.com/sonarqube-server/2025.5/user-guide/applications.md
# Source: https://docs.sonarsource.com/sonarqube-server/2025.1/user-guide/applications.md
# Source: https://docs.sonarsource.com/sonarqube-server/2025.4/user-guide/applications.md
# Source: https://docs.sonarsource.com/sonarqube-server/2025.6/user-guide/applications.md
# Source: https://docs.sonarsource.com/sonarqube-server/user-guide/applications.md
# Using applications
### Using applications
Assume that you have a set of projects which have been split for technical reasons, but which share a life cycle; they interact directly in production and are always released together. With an application, they can be treated as a single entity in SonarQube Server with a unified project homepage, issues list, measures space, and most importantly, pass through the same quality gate.
#### Applications vs. portfolios
Applications and portfolios are both aggregations of projects but have different goals and, therefore, different presentations. A portfolio is designed to provide a very high-level, executive overview that gives a perspective on quality between what may be only tangentially related projects. Applications allow you to see your set of projects as a larger, overall meta-project. For instance, because all the projects in an application ship together, if one of them isn’t releasable, then none of them are, and an Application’s consolidated quality gate gives you an immediate summary of what must be fixed across all projects in order to allow you to release the set.
### Application setup
You can create an application by selecting **Create Application** in the upper-right corner of the **Projects** homepage.
Starting in [Enterprise Edition](https://www.sonarsource.com/plans-and-pricing/enterprise/), you can also create and edit applications in the global portfolio administration interface at **Administration** > **Configuration** > **Portfolios**.
For more information on setting up applications, see [managing-applications](https://docs.sonarsource.com/sonarqube-server/project-administration/managing-applications "mention").
#### Populating application data
An application is automatically re-calculated after each analysis of one of its projects. If you want immediate (re)calculation, anyone with **Administration** user rights on the application can use the **Recompute** button in the application-level **Application Settings** > **Edit Definition** interface.
Starting in [Enterprise Edition](https://www.sonarsource.com/plans-and-pricing/enterprise/), the global Portfolio administration interface, **Administration** > **Configuration** > **Portfolios**, offers the ability to queue the analysis of all Applications and Portfolios at once.
### Applications and branch analysis
Branches are available for applications. They allow you to aggregate branches from the projects in an Application.
**Note:** To prevent issues with your Application status, avoid adding branches to your application that will be deleted.
Once an Application has been set up, anyone with **Administration** user rights on the application can manually create a new branch in the **Application Settings** > **Edit Definition** interface. In Enterprise Edition and above, you can also manage branches from the global **Administration** > **Configuration** > **Portfolios** interface. For each application branch, you can choose which project branch should be included or decide whether the project should be represented in the branch at all.
### Using application badges to promote application health
You can promote your application’s status in third-party tools and external websites using application badges. You can find the application badges by opening the **Application Information** menu in the upper-right corner of the application home page and clicking **Get application badges**. From here, you can choose and fine-tune your badge then copy the markdown text or image URL. Each application badge has a unique security token, which is required to make it accessible from third-party tools.
Using application badges can expose sensitive information like your security rating and other metrics. Because of this, you should only use them in trusted environments. If an application badge URL is accessed by someone who should not have access to it, a project administrator can renew the application badge’s unique token by clicking the **Renew token** button. This invalidates any existing application badge URLs, and you’ll have to update all locations where the badge is being used.
---
# Source: https://docs.sonarsource.com/sonarqube-server/2025.3/server-installation/data-center-edition/on-kubernetes-or-openshift/setting-up-disaster-recovery/architecture-example.md
# Source: https://docs.sonarsource.com/sonarqube-server/2025.5/server-installation/data-center-edition/on-kubernetes-or-openshift/setting-up-disaster-recovery/architecture-example.md
# Source: https://docs.sonarsource.com/sonarqube-server/2025.4/server-installation/data-center-edition/on-kubernetes-or-openshift/setting-up-disaster-recovery/architecture-example.md
# Source: https://docs.sonarsource.com/sonarqube-server/2025.6/server-installation/data-center-edition/on-kubernetes-or-openshift/setting-up-disaster-recovery/architecture-example.md
# Source: https://docs.sonarsource.com/sonarqube-server/server-installation/data-center-edition/on-kubernetes-or-openshift/setting-up-disaster-recovery/architecture-example.md
# Disaster recovery architecture example with Azure resources
In the disaster recovery architecture example described below, Azure Kubernetes Service (AKS) is used, but the overall concept can be adapted to Google Cloud Platform (GCP) or Amazon Web Services (AWS) with a few modifications.
For this architecture example, you need the Azure subscription.
### Architecture overview
In our setup example, the disaster architecture consists of:
* Azure Front Door.
* Two AKS clusters (with two ingresses): your SonarQube primary and replica clusters.
* Azure Database for PostgreSQL flexible server with geo-replication and a writer endpoint.
{% hint style="warning" %}
The architecture presented here represents an Active-Cold Standby configuration as SonarQube Server currently does not support access to a database in read-only format for Active/Standby or Active/Active configurations.
{% endhint %}
### Disaster recovery mechanism
Azure Front Door provides a mechanism for global traffic routing and failover, which can be used in conjunction with DNS to ensure high availability:
* An endpoint is used for an origin group consisting of the two ingresses from your SonarQube primary and replica clusters.
* Priority routing is used to ensure high availability by directing traffic to your primary cluster (highest priority). If the primary cluster is unavailable, traffic automatically fails over to the replica cluster.
* An alert can be set up for your origin group that triggers whenever your primary cluster health goes under a specific threshold. The alert can optionally send an email to the SonarQube Server Administrator or start an automation runbook to perform additional actions. For example, the runbook powers on the replica cluster site in case of an outage of the primary cluster site.
The database failover process is entirely automated by the Azure Database for PostgreSQL flexible server.
### Related pages
* [deploy-databases](https://docs.sonarsource.com/sonarqube-server/server-installation/data-center-edition/on-kubernetes-or-openshift/setting-up-disaster-recovery/deploy-databases "mention")
* [set-up-clusters-on-aks](https://docs.sonarsource.com/sonarqube-server/server-installation/data-center-edition/on-kubernetes-or-openshift/setting-up-disaster-recovery/set-up-clusters-on-aks "mention")
* [configure-azure-front-door](https://docs.sonarsource.com/sonarqube-server/server-installation/data-center-edition/on-kubernetes-or-openshift/setting-up-disaster-recovery/configure-azure-front-door "mention")
* [test-failover-scenarios](https://docs.sonarsource.com/sonarqube-server/server-installation/data-center-edition/on-kubernetes-or-openshift/setting-up-disaster-recovery/test-failover-scenarios "mention")
---
# Source: https://docs.sonarsource.com/sonarqube-cloud/architecture.md
# Architecture (Beta)
{% hint style="warning" %}
The features described on this page are in Beta stage, with support currently available for C#, Java, JavaScript, Python and TypeScript. See the [Product release lifecycle](https://docs.sonarsource.com/sonarqube-cloud/appendices/product-release-lifecycle) page for more information.
{% endhint %}
### Overview
Software Architecture is in most cases not managed in organizations/teams, and when it is managed, this is done manually. Teams tend to, consciously or unconsciously, leave their software architecture unattended, and this results in what is called architecture erosion, or structural technical debt.
Architecture erosion has 3 major impacts:
* It requires more work to make changes.
* It makes it harder to keep the impact of changes under control.
* It eventually leads to making the application impossible to change due to accumulated structural technical debt.
The increasing use of AI coding has accelerated this phenomenon.
To help prevent and reduce architecture erosion, SonarQube Cloud provides tools that allow you to:
* Visualize your current codebase architecture.
* Create an intended architecture.
* Raise architecture issues when flaws or deviation from the intended architecture are detected.
* Raise code issues for underlying architecture issues, as part of existing workflows (quality gate for example).
The Sonar Architecture features are located in the **Architecture** tab of the SonarQube Cloud UI.
### Concepts and terminology
#### Architecture
The architecture of an application is about how its physical and logical containers are organized and interconnected.
When dealing with architecture, there are 3 parts that need to be managed, in this order:
* Structure: How code is organized into a hierarchy of containers.
* Relationships: How containers depend on each other.
* Design: How containers interact with each other.
#### Current architecture
How code is *currently* organized into containers, and how these containers actually interact. Current architecture is automatically derived from the code.
#### Intended architecture
How code *should* be organized into containers, and how these containers should interact. Intended architecture is defined by tech leads.
#### Tangles
A tangle is a set of classes/files which are cyclically-dependent - that is, there is a path from every item to every other item in the tangle’s dependency graph. Tangles make code more complex and harder to understand and maintain.
#### Containers
In the context of code architecture, containers are units of code. Their relationships with other containers forms the architecture of your software.
### Roles, approach and workflow
Sonar Architecture provides a solution for documenting, maintaining, improving, transforming and evolving software architectures. It aims to engage not only technical leads, but also developers, and reduce structural technical debt by becoming part of the development process.
#### Roles
The Sonar solution recognizes that there are 2 distinct activities or roles involved in the definition and evolution of a software architecture. These are often (but not always) performed by different team members:
**Tech lead**
Person in the team who has the skills and legitimacy to make architectural decisions. A tech lead:
* Defines the [intended architecture](#intended-architecture).
* Sees the deviation between intended architecture and current architecture.
* Reviews flaws in the current architecture and suggests solutions for fixing them.
**Developer**
Person who makes code changes to the project on a daily basis. A developer:
* Has access to the intended architecture defined by tech leads.
* Makes sure no deviations are introduced in the code.
* Follows architectural recommendations.
#### Approach
Sonar has a divide to conquer approach, decoupling the multiple dimensions of architecture:
1. **Comprehend current architecture:** Enable human and AI stakeholders to understand the current architecture, with a live reference point.
2. **Formalize intended architecture**: Enable tech leads to define the intended architecture, to be enforced, easily and incrementally. The model is usable by AI, for example by providing it as context in a request.
3. **Prioritize architectural problems**: Enable tech leads to get a clear view of architectural issues, with clear priorities.
4. **Make structural problems actionable**: Leverage SonarQube to stop human or AI from further eroding the architecture, and divide the remediation of existing problems into smaller actionable actions for developers and/or AI.
#### Workflow
Sonar provides a complete workflow which ensures that:
* The whole team understands the current architecture, and the evolving intended architecture.
* Tech leads can incrementally formalize architectural decisions.
Architectural decisions that imply code changes raise [SonarQube issues](https://docs.sonarsource.com/sonarqube-cloud/managing-your-projects/issues/introduction) that can be resolved by developers.
Without action from tech leads, no SonarQube issues are raised.
### How to use Sonar Architecture
The process is driven by the tech leads who:
1. Understand the [current architecture](#current-architecture).
2. Define the [intended architecture](#intended-architecture) to constrain the most important structure and relationships, by starting at the top-level and working down into the structure. The intended architecture will be compared to the current architecture to raise architecture deviation issues during analysis.
3. Review flaws in the current structure automatically identified by SonarQuble, and make suggestions for repairs.
4. Iteratively evolve and extend the intended architecture as the code and priorities change.
As a developer, your role is to:
1. Fix the [code issues](https://docs.sonarsource.com/sonarqube-cloud/managing-your-projects/issues) that are raised by SonarQube following tech lead input.
2. Explore the evolving intended architecture to ensure compliance as you add or modify code, and when addressing raised SonarQube issues.
3. Explore the current architecture to refresh your understanding of the project topology, and to gain insights for specific tasks.
#### Viewing the current architecture
SonarQube Cloud provides an interactive visual map to explore the structure and relationships within your codebase.
The map allows you to:
* Understand the current topology of the project.
* Navigate to understand the map in more or less detail.
* Focus on the relationships of a specific container.
There is no special setup or input needed to view and use the map. It is automatically updated after each analysis so it is always up to date.
**How to read the map**
To access the current architecture map, go to **Architecture** > **Open structure map**.
Classes/files are recursively grouped within their packages/folders/modules. The size of containers generally reflects the number of underlying containers, but the white space inside a container also characterizes it.
In every container (also true for top level containers), sub-containers are levelized, which means they are organized as follows:
* Containers that have no outgoing relationships are located on the right.
* Every container in a column has at least one dependency on the next column on the right.
* Containers in a column have no dependencies between themselves.
This means that relationships will generally flow from left to right. This conveys the flow of relationships without showing all the specific relationships.
To display direct relationships to/from selected containers, click on the container.
**How to use the map**
To explore the map, just pan, zoom and click:
* Zoom to see more or less detail.
* Select any item at any level to see its relationships.
* Pan across the map or zoom out to see regions or relationships that are off-screen.
#### Creating an intended architecture
You can create and update a visual model that expresses the intended structure and relationships within your codebase. This intended architecture will serve as the reference: during analysis, deviation issues are raised when the intended architecture and current architecture don’t match.
The intended architecture editor lets you:
* Formalize the structure and relationships in a way that is straightforward and incremental: you can stop at any point in time.
* Decide which containers should be inspected, as SonarQube inspects them only once they are added to the intended architecture.
* Define a structure using a top-down approach.
Note that to create the intended architecture, you only define allowed relationships between sibling containers. Relationships are inherited by sub-containers.
All the above tasks require the **Administer project** permissions. See [Setting user permissions](https://docs.sonarsource.com/sonarqube-cloud/managing-your-projects/administering-your-projects/setting-permissions) for more information.
#### How to use the intended architecture editor
To access the intended architecture editor, go to **Architecture** > **Intended architecture**.
Your goal is to define the structure and relationships in your code.
* Structure: Which containers you care about, and where they should be located.
* Relationships: How should the containers in the model depend on any of their peers in the model.
Starting at the top-level of your structure, add the containers and sub-containers that you most care about. Additionally, containers may:
* Be placeholders for for code that does not exist.
and/or
* Map to code currently at a location that is different to the model location, that should be moved to the model location.
Every time you add a container to the model, you should immediately define the allowed relationships to its siblings to keep the model complete. Indeed, any non-defined dependency between siblings will be considered as forbidden.
You can follow your progress by looking at the treeview on the left. Every time you add a container to the map, the corresponding containers in the treeview are grayed out.
You can stop at any time, and start again. You should expect to regularly modify the intended architecture as the codebase evolves.
{% hint style="success" %}
Remember to click **Save** so that your updated model is picked up and used by the next analysis.
{% endhint %}
### Architecture issues
Issues in the current architecture are detected automatically during the project analysis. The scope of issues will depend upon the intended architecture provided, issues are made of a mix of flaws and deviations.
#### Understanding architecture issues
* If you have not defined an intended architecture, only architectural flaws will be detected. At this stage, flaws are made only of tangles.
* If you have defined an intended architecture, analysis will also raise issues from architectural deviations, i.e. differences between current and intended architecture. At this stage, SonarQube can detect 2 types of deviations: wrong dependencies and wrong locations.
* For each type of issue, you will get a list of issues, ordered by priority.
* For tangles, you will get a visual representation of the issue and be able to instruct developers how to solve the issue.
#### Fixing architecture issues
When you review the list of issues:
* For deviations, make sure that they are in line with your intention.
* For flaws (tangles at this stage), pick the ones you wish to solve, review them and provide instructions to developers by selecting the undesirable relationships. The next analysis will raise code issues when these relationships are detected.
---
# Source: https://docs.sonarsource.com/sonarqube-cloud/administering-sonarcloud/about-sonarqube-cloud-solution/user-management/associated-scm-accounts.md
# Associated SCM accounts
SonarQube Cloud performs the association with a Source Control Management (SCM) account automatically, based on the user’s email address. You cannot explicitly add an SCM account association. See [solution-overview](https://docs.sonarsource.com/sonarqube-cloud/managing-your-projects/issues/solution-overview "mention") for more information about automatic issue assignment.
The associated SCM accounts are displayed in the UI on the user's **Profile** page (accessed from the Account menu in the top right corner) as illustrated below.
---
# Source: https://docs.sonarsource.com/sonarqube-community-build/quality-standards-administration/managing-quality-profiles/associating-a-quality-profile-with-projects.md
# Source: https://docs.sonarsource.com/sonarqube-server/2025.3/quality-standards-administration/managing-quality-profiles/associating-a-quality-profile-with-projects.md
# Source: https://docs.sonarsource.com/sonarqube-server/2025.5/quality-standards-administration/managing-quality-profiles/associating-a-quality-profile-with-projects.md
# Source: https://docs.sonarsource.com/sonarqube-server/2025.4/quality-standards-administration/managing-quality-profiles/associating-a-quality-profile-with-projects.md
# Source: https://docs.sonarsource.com/sonarqube-server/2025.6/quality-standards-administration/managing-quality-profiles/associating-a-quality-profile-with-projects.md
# Source: https://docs.sonarsource.com/sonarqube-server/quality-standards-administration/managing-quality-profiles/associating-a-quality-profile-with-projects.md
# Source: https://docs.sonarsource.com/sonarqube-cloud/standards/managing-quality-profiles/associating-a-quality-profile-with-projects.md
# Associating with projects
As a Quality Profile Administrator, you can explicitly associate a quality profile with projects.
As a project administrator, you can associate your project with quality profiles. See the [quality-profile-association](https://docs.sonarsource.com/sonarqube-cloud/managing-your-projects/project-analysis/quality-profile-association "mention") page.
To explicitly associate a quality profile with projects, or change the projects associated with a quality profile:
1. Go to your Organization. See the[viewing-organizations](https://docs.sonarsource.com/sonarqube-cloud/getting-started/viewing-organizations "mention") page for instructions.
2. Go to the **Quality Profiles** page and retrieve your quality profile.
3. In the **Projects** section of the quality profile, select **Change projects**. The **Projects** dialog opens.
4. Select the tab you want to use to filter the list of projects:
* The **With** tab shows the projects associated with this quality profile. Use this tab to remove associations.
* The **Without** tab shows the projects not associated with this quality profile. Use this tab to associate projects.
* The **All** tab shows all projects. Use this tab to associate all projects or remove all associations.
5. Use the Search field to filter the list of projects.
6. Select or unselect a project to associate the project or remove the association, respectively. In the **All** tab, select **Bulk Change** to select or unselect all projects.
7. If you’re in the **With** or **Without** tabs, select **Reload** to refresh the dialog with your changes.
8. Select **Close**.
### Related pages
* [understanding-quality-profiles](https://docs.sonarsource.com/sonarqube-cloud/standards/managing-quality-profiles/understanding-quality-profiles "mention")
* [viewing-quality-profiles](https://docs.sonarsource.com/sonarqube-cloud/standards/managing-quality-profiles/viewing-quality-profiles "mention")
* [creating-a-quality-profile](https://docs.sonarsource.com/sonarqube-cloud/standards/managing-quality-profiles/creating-a-quality-profile "mention")
* [editing-a-custom-quality-profile](https://docs.sonarsource.com/sonarqube-cloud/standards/managing-quality-profiles/editing-a-custom-quality-profile "mention")
* [changing-default-quality-profile](https://docs.sonarsource.com/sonarqube-cloud/standards/managing-quality-profiles/changing-default-quality-profile "mention")
* [maintaining-your-custom-quality-profiles](https://docs.sonarsource.com/sonarqube-cloud/standards/managing-quality-profiles/maintaining-your-custom-quality-profiles "mention")
* [authorizing-other-users-to-manage-quality-profile](https://docs.sonarsource.com/sonarqube-cloud/standards/managing-quality-profiles/authorizing-other-users-to-manage-quality-profile "mention")
* [quality-profile-association](https://docs.sonarsource.com/sonarqube-cloud/managing-your-projects/project-analysis/quality-profile-association "mention")
---
# Source: https://docs.sonarsource.com/sonarqube-community-build/quality-standards-administration/managing-quality-gates/associating-projects-with-quality-gate.md
# Source: https://docs.sonarsource.com/sonarqube-server/2025.2/quality-standards-administration/managing-quality-gates/associating-projects-with-quality-gate.md
# Source: https://docs.sonarsource.com/sonarqube-server/2025.3/quality-standards-administration/managing-quality-gates/associating-projects-with-quality-gate.md
# Source: https://docs.sonarsource.com/sonarqube-server/2025.5/quality-standards-administration/managing-quality-gates/associating-projects-with-quality-gate.md
# Source: https://docs.sonarsource.com/sonarqube-server/2025.4/quality-standards-administration/managing-quality-gates/associating-projects-with-quality-gate.md
# Source: https://docs.sonarsource.com/sonarqube-server/2025.6/quality-standards-administration/managing-quality-gates/associating-projects-with-quality-gate.md
# Source: https://docs.sonarsource.com/sonarqube-server/quality-standards-administration/managing-quality-gates/associating-projects-with-quality-gate.md
# Source: https://docs.sonarsource.com/sonarqube-cloud/standards/managing-quality-gates/associating-projects-with-quality-gate.md
# Associating a quality gate with projects
The default quality gate is associated with all projects in the organization that are not explicitly associated with a quality gate. You can explicitly associate a project with a quality gate:
* At the quality gate level with the Administer Quality Gates permission. The procedure is explained below.
* At the project level with the Administer Quality Gates permission or the Administer Project permission. See the [changing-quality-gate](https://docs.sonarsource.com/sonarqube-cloud/managing-your-projects/project-analysis/changing-quality-gate "mention") page.
### Last setting overrides principle without a hierarchy
The "last setting overrides" principle applies without a hierarchy: the most recently configured setting will take precedence over all previous settings. For example:
1. From the **Quality Gates** page, you first associate quality gate 1 with project 1.
2. Still from the **Quality Gates** page, you associate quality gate 2 with project 1. Project 1 is now associated with quality gate 2.
3. From project 1’s settings, you associate project 1 with quality gate 3. Project 1 is now associated with quality gate 3 (the setting is updated in the **Quality Gates** page).
4. From the **Quality Gates** page, you associate quality gate 1 with project 1. Project 1 is now associated with quality gate 1 (the setting is updated in project 1’s settings).
{% hint style="warning" %}
To avoid misconfigurations, we recommend that in your instance, you perform explicit associations either from the **Quality Gates** page or from the project settings, but not from both.
{% endhint %}
### Associating (or disassociating) a quality gate with (from) projects
1. In the top navigation bar, select **Quality Gates**.
2. In the left panel, select the quality gate you want to manage.
3. In the right panel’s **Projects** section, select the **With** (to view only the associated projects), **Without** (to view only the not associated projects) or **All** tab.
4. Select or unselect the projects you want to associate or disassociate with / from the quality gate.
### Related pages
* [introduction-to-quality-gates](https://docs.sonarsource.com/sonarqube-cloud/standards/managing-quality-gates/introduction-to-quality-gates "mention")
* [viewing-quality-gate](https://docs.sonarsource.com/sonarqube-cloud/standards/managing-quality-gates/viewing-quality-gate "mention")
* [managing-custom-quality-gates](https://docs.sonarsource.com/sonarqube-cloud/standards/managing-quality-gates/managing-custom-quality-gates "mention")
* [changing-default-quality-gate](https://docs.sonarsource.com/sonarqube-cloud/standards/managing-quality-gates/changing-default-quality-gate "mention")
* [notifications](https://docs.sonarsource.com/sonarqube-cloud/managing-your-account/notifications "mention")
* [quality-gates-for-ai-code](https://docs.sonarsource.com/sonarqube-cloud/standards/ai-code-assurance/quality-gates-for-ai-code "mention")
* [changing-quality-gate](https://docs.sonarsource.com/sonarqube-cloud/managing-your-projects/project-analysis/changing-quality-gate "mention")
---
# Source: https://docs.sonarsource.com/sonarqube-server/2025.2/project-administration/assuring-ai-code.md
# Assuring your AI code
Recommended checks include high standards to reduce code complexity, remove bugs, and eliminate injection vulnerabilities. SonarQube’s AI Code Assurance features bring confidence that your AI-generated code is being reviewed to avoid any accountability crisis.
These objectives are achieved with three features that allow Quality Standard administrators to qualify projects as AI Code Assured:
1. [#label-projects-with-ai-code](https://docs.sonarsource.com/sonarqube-server/2025.2/ai-capabilities/ai-standards#label-projects-with-ai-code "mention")
2. [#apply-qualified-quality-gate](https://docs.sonarsource.com/sonarqube-server/2025.2/ai-capabilities/ai-standards#apply-qualified-quality-gate "mention")
3. Publish an [#using-the-ai-code-assurance-badge](https://docs.sonarsource.com/sonarqube-server/2025.2/ai-capabilities/ai-standards#using-the-ai-code-assurance-badge "mention") externally to your websites (optional)
---
# Source: https://docs.sonarsource.com/sonarqube-server/9.8/instance-administration/audit-logs.md
# Source: https://docs.sonarsource.com/sonarqube-server/9.9/instance-administration/audit-logs.md
# Source: https://docs.sonarsource.com/sonarqube-server/10.0/instance-administration/audit-logs.md
# Source: https://docs.sonarsource.com/sonarqube-server/10.1/instance-administration/audit-logs.md
# Source: https://docs.sonarsource.com/sonarqube-server/10.2/instance-administration/audit-logs.md
# Source: https://docs.sonarsource.com/sonarqube-server/10.3/instance-administration/audit-logs.md
# Source: https://docs.sonarsource.com/sonarqube-server/10.4/instance-administration/monitoring/audit-logs.md
# Source: https://docs.sonarsource.com/sonarqube-server/10.5/instance-administration/monitoring/audit-logs.md
# Source: https://docs.sonarsource.com/sonarqube-server/10.6/instance-administration/monitoring/audit-logs.md
# Source: https://docs.sonarsource.com/sonarqube-server/10.7/server-upgrade-and-maintenance/monitoring/audit-logs.md
# Source: https://docs.sonarsource.com/sonarqube-server/10.8/server-upgrade-and-maintenance/monitoring/audit-logs.md
# Source: https://docs.sonarsource.com/sonarqube-server/2025.2/server-update-and-maintenance/monitoring/audit-logs.md
# Source: https://docs.sonarsource.com/sonarqube-server/2025.3/server-update-and-maintenance/monitoring/audit-logs.md
# Source: https://docs.sonarsource.com/sonarqube-server/2025.5/server-update-and-maintenance/monitoring/audit-logs.md
# Source: https://docs.sonarsource.com/sonarqube-server/2025.1/server-update-and-maintenance/monitoring/audit-logs.md
# Source: https://docs.sonarsource.com/sonarqube-server/2025.4/server-update-and-maintenance/monitoring/audit-logs.md
# Source: https://docs.sonarsource.com/sonarqube-server/2025.6/instance-administration/security/audit-logs.md
# Source: https://docs.sonarsource.com/sonarqube-server/instance-administration/security/audit-logs.md
# Source: https://docs.sonarsource.com/sonarqube-cloud/administering-sonarcloud/managing-enterprise/enterprise-security/audit-logs.md
# Audit logs
*This feature is available with the Enterprise plan.*
As an Enterprise admin, you can access audit logs through the [Audit logs API](https://api-docs.sonarsource.com/sonarqube-cloud/default/public-audit-logs-1-0-1). To authenticate to the Web API, see [web-api](https://docs.sonarsource.com/sonarqube-cloud/advanced-setup/web-api "mention").
{% hint style="info" %}
Audit logs are retained for 180 days.
{% endhint %}
### List of logged events
| Event type | Description | For more details |
| ----------------------------------- | ------------------------------------------------------------------------------ | ------------------------------------------------------------------------------------------------------------------------------------------------------------------------------------------------------- |
| authentication.user\_login | An SSO user logs in to SonarQube Cloud. | |
| authentication.user\_logout | An SSO user logs out of SonarQube Cloud. | |
| user.create | An SSO user account is created. | |
| user.remove | An SSO user account is removed. | |
| permission\_template.create | An organization admin creates a permission template. | [templates](https://docs.sonarsource.com/sonarqube-cloud/administering-sonarcloud/managing-organization/manage-org-projects/manage-project-permissions/templates "mention") |
| permission\_template.delete | An organization admin deletes a permission template. | [templates](https://docs.sonarsource.com/sonarqube-cloud/administering-sonarcloud/managing-organization/manage-org-projects/manage-project-permissions/templates "mention") |
| org.add\_user | A user is added to an organization. | |
| org.remove\_user | A user is removed from an organization. | |
| org.add\_group | A group is created in the organization. | [user-group-concept](https://docs.sonarsource.com/sonarqube-cloud/administering-sonarcloud/about-sonarqube-cloud-solution/user-management/user-group-concept "mention") |
| org.remove\_group | A group is removed from the organization. | [user-group-concept](https://docs.sonarsource.com/sonarqube-cloud/administering-sonarcloud/about-sonarqube-cloud-solution/user-management/user-group-concept "mention") |
| org.add\_permission | An organization-related permission is added to a user or group. | [#permissions-related-to-organization](https://docs.sonarsource.com/sonarqube-cloud/managing-organization/users-and-permissions/organization-permissions#permissions-related-to-organization "mention") |
| org.remove\_permission | An organization-related permission is removed from a user or group. | [#permissions-related-to-organization](https://docs.sonarsource.com/sonarqube-cloud/managing-organization/users-and-permissions/organization-permissions#permissions-related-to-organization "mention") |
| org.membersync\_enabled | An organization admin enables the GitHub member synchronization. | [github-member-synchronization](https://docs.sonarsource.com/sonarqube-cloud/administering-sonarcloud/about-sonarqube-cloud-solution/user-management/github-member-synchronization "mention") |
| org.membersync\_disabled | An organization admin disables the GitHub member synchronization. | [github-member-synchronization](https://docs.sonarsource.com/sonarqube-cloud/administering-sonarcloud/about-sonarqube-cloud-solution/user-management/github-member-synchronization "mention") |
| portfolio.add\_permission | A portfolio admin adds a portfolio-related permission to a user or group. | [#permissions](https://docs.sonarsource.com/sonarqube-cloud/getting-started-with-enterprise/administering-portfolios#permissions "mention") |
| portfolio.remove\_permission | A portfolio admin removes a portfolio-related permission from a user or group. | [#permissions](https://docs.sonarsource.com/sonarqube-cloud/getting-started-with-enterprise/administering-portfolios#permissions "mention") |
| project.apply\_permission\_template | A project admin applies a permission template to their project. | [#updating-resetting-permissions](https://docs.sonarsource.com/sonarqube-cloud/managing-your-projects/administering-your-projects/setting-permissions#updating-resetting-permissions "mention") |
| project.add\_permission | A project admin adds a project-related permission to a user or group. | [#project-level-permissions](https://docs.sonarsource.com/sonarqube-cloud/managing-your-projects/administering-your-projects/setting-permissions#project-level-permissions "mention") |
| project.remove\_permission | A project admin removes a project-related permission from a user or group. | [#project-level-permissions](https://docs.sonarsource.com/sonarqube-cloud/managing-your-projects/administering-your-projects/setting-permissions#project-level-permissions "mention") |
| group.create | A group is created in an organization. | [user-group-concept](https://docs.sonarsource.com/sonarqube-cloud/administering-sonarcloud/about-sonarqube-cloud-solution/user-management/user-group-concept "mention") |
| group.remove | A group is removed from an organization. | [user-group-concept](https://docs.sonarsource.com/sonarqube-cloud/administering-sonarcloud/about-sonarqube-cloud-solution/user-management/user-group-concept "mention") |
### Related pages
[ip-allow-lists](https://docs.sonarsource.com/sonarqube-cloud/administering-sonarcloud/managing-enterprise/enterprise-security/ip-allow-lists "mention")\
[sso](https://docs.sonarsource.com/sonarqube-cloud/administering-sonarcloud/managing-enterprise/enterprise-security/sso "mention")
---
# Source: https://docs.sonarsource.com/sonarqube-community-build/instance-administration/authentication.md
# Source: https://docs.sonarsource.com/sonarqube-server/9.8/instance-administration/authentication.md
# Source: https://docs.sonarsource.com/sonarqube-server/9.9/instance-administration/authentication.md
# Source: https://docs.sonarsource.com/sonarqube-server/10.0/instance-administration/authentication.md
# Source: https://docs.sonarsource.com/sonarqube-server/10.1/instance-administration/authentication.md
# Source: https://docs.sonarsource.com/sonarqube-server/10.2/instance-administration/authentication.md
# Source: https://docs.sonarsource.com/sonarqube-server/10.3/instance-administration/authentication.md
# Source: https://docs.sonarsource.com/sonarqube-server/10.4/instance-administration/authentication.md
# Source: https://docs.sonarsource.com/sonarqube-server/10.5/instance-administration/authentication.md
# Source: https://docs.sonarsource.com/sonarqube-server/10.6/instance-administration/authentication.md
# Source: https://docs.sonarsource.com/sonarqube-server/10.7/instance-administration/authentication.md
# Source: https://docs.sonarsource.com/sonarqube-server/10.8/instance-administration/authentication.md
# Source: https://docs.sonarsource.com/sonarqube-server/2025.2/instance-administration/authentication.md
# Source: https://docs.sonarsource.com/sonarqube-server/2025.3/instance-administration/authentication.md
# Source: https://docs.sonarsource.com/sonarqube-server/2025.5/instance-administration/authentication.md
# Source: https://docs.sonarsource.com/sonarqube-server/2025.1/instance-administration/authentication.md
# Source: https://docs.sonarsource.com/sonarqube-server/2025.4/instance-administration/authentication.md
# Source: https://docs.sonarsource.com/sonarqube-server/2025.6/instance-administration/authentication.md
# Source: https://docs.sonarsource.com/sonarqube-server/instance-administration/authentication.md
# Authentication and provisioning
- [Overview of authentication and provisioning](/sonarqube-server/instance-administration/authentication/overview.md): SonarQube Server can delegate authentication via HTTP Headers, GitHub Authentication, GitLab Authentication, Bitbucket Cloud Authentication, SAML, or LDAP.
- [HTTP header](/sonarqube-server/instance-administration/authentication/http-header.md): Setting up the HTTP header authentication in your SonarQube Server instance.
- [LDAP](/sonarqube-server/instance-administration/authentication/ldap.md): Setting up the LDAP authentication in your SonarQube Server instance.
- [SAML](/sonarqube-server/instance-administration/authentication/saml.md): Setting up SAML authentication in your SonarQube Server instance.
- [Overview of SAML support](/sonarqube-server/instance-administration/authentication/saml/overview.md): You can delegate authentication to a SAML 2.0 identity provider using SAML authentication. SonarQube Server uses the Service Provider (SP) initiated SAML.
- [With Microsoft Entra ID](/sonarqube-server/instance-administration/authentication/saml/ms-entra-id.md): Setting up SAML authentication with Microsoft Entra ID in your SonarQube Server instance.
- [Introduction to SAML with Microsoft Entra ID](/sonarqube-server/instance-administration/authentication/saml/ms-entra-id/introduction.md): Main steps of SAML authentication setup with Microsoft Entra ID.
- [Setup in Microsoft Entra ID](/sonarqube-server/instance-administration/authentication/saml/ms-entra-id/setup-in-entra-id.md): This page describes how to register SonarQube Server in Microsoft Entra ID.
- [Setup in SonarQube Server](/sonarqube-server/instance-administration/authentication/saml/ms-entra-id/setup-in-sq.md): This page describes how to setup in SonarQube Server SAML with Microsoft Entra ID.
- [Setup of security features](/sonarqube-server/instance-administration/authentication/saml/ms-entra-id/optional-security-features.md): To improve security, you can set up the encryption of SAML assertions sent by Microsoft Entra ID and the signing of SAML requests sent by SonarQube Server.
- [With Keycloak](/sonarqube-server/instance-administration/authentication/saml/how-to-set-up-keycloak.md): Setting up SAML authentication with Keycloak in your SonarQube Server instance.
- [With Okta](/sonarqube-server/instance-administration/authentication/saml/how-to-set-up-okta.md): Setting up SAML authentication with Okta in your SonarQube Server instance.
- [With Ping Identity](/sonarqube-server/instance-administration/authentication/saml/ping-identity.md): Setting up SAML authentication with Ping Identity in your SonarQube Server instance.
- [Introduction to SAML with Ping Identity](/sonarqube-server/instance-administration/authentication/saml/ping-identity/introduction.md): Main steps of SAML setup with Ping Identity.
- [Setup in Ping Identity](/sonarqube-server/instance-administration/authentication/saml/ping-identity/setup-in-ping-identity.md): This page explains how to register SonarQube Server in PingOne or PingFederate.
- [Setup in SonarQube Server](/sonarqube-server/instance-administration/authentication/saml/ping-identity/setup-in-sq.md): This page describes how to set up SAML with Ping Identity in SonarQube Server.
- [Setup of security features](/sonarqube-server/instance-administration/authentication/saml/ping-identity/optional-security-features.md): To improve security, you can set up the encryption of SAML assertions sent by Ping Identity and the signing of SAML requests sent by SonarQube Server.
- [With SCIM provisioning](/sonarqube-server/instance-administration/authentication/saml/scim.md): Setting up automatic provisioning between SonarQube Server and Microsoft Entra ID or Okta using SCIM.
- [SCIM overview](/sonarqube-server/instance-administration/authentication/saml/scim/overview.md): SCIM helps you automatically provision user and groups to SonarQube Server.
- [SCIM with Microsoft Entra ID](/sonarqube-server/instance-administration/authentication/saml/scim/scim-provisioning-with-azure-ad.md): Enable SCIM to automate user and group provisioning from Microsoft Entra ID to SonarQube Server.
- [SCIM with Okta](/sonarqube-server/instance-administration/authentication/saml/scim/scim-provisioning-with-okta.md): Enable SCIM to automate user and group provisioning from Okta to SonarQube Server.
- [GitHub](/sonarqube-server/instance-administration/authentication/github.md): Setting up the GitHub authentication in your SonarQube Server instance.
- [Bitbucket Cloud](/sonarqube-server/instance-administration/authentication/bitbucket-cloud.md): Setting up the Bitbucket Cloud authentication in your SonarQube Server instance.
- [GitLab](/sonarqube-server/instance-administration/authentication/gitlab.md): Setting up the GitLab authentication in your SonarQube Server instance.
- [Provisioning modes](/sonarqube-server/instance-administration/authentication/gitlab/provisioning-modes.md): This section describes GitLab provisioning modes
- [Introduction to GitLab provisioning modes](/sonarqube-server/instance-administration/authentication/gitlab/provisioning-modes/introduction.md): Overview of the GitLab authentication's provisioning modes.
- [Just-in-Time provisioning](/sonarqube-server/instance-administration/authentication/gitlab/provisioning-modes/just-in-time.md): With the Just-in-Time (JIT) provisioning mode, user accounts are automatically created in SonarQube Server when GitLab users log in for the first time.
- [Automatic provisioning](/sonarqube-server/instance-administration/authentication/gitlab/provisioning-modes/automatic.md): With GitLab automatic provisioning mode, you can benefit from automatic user provisioning, deprovisioning and synchronization of groups and permissions in SonarQube Server.
- [Setting up authentication](/sonarqube-server/instance-administration/authentication/gitlab/setting-up.md): Setting up the GitLab authentication and provisioning in SonarQube Server.
- [Managing JIT provisioning](/sonarqube-server/instance-administration/authentication/gitlab/managing-jit-mode.md): Once you’ve set up GitLab authentication and provisioning with the Just-in-Time (JIT) provisioning mode, you can set or change JIT provisioning mode options.
- [Managing automatic provisioning](/sonarqube-server/instance-administration/authentication/gitlab/managing-automatic-provisioning.md): Starting from the Developer Edition, you can enable the automatic user and group provisioning in SonarQube Server.
- [Disabling authentication](/sonarqube-server/instance-administration/authentication/gitlab/disabling.md): To disable GitLab authentication and provisioning in SonarQube Server, you must disable the GitLab authentication configuration.
- [Troubleshooting](/sonarqube-server/instance-administration/authentication/troubleshooting.md): Troubleshooting authentication and provisioning.
---
# Source: https://docs.sonarsource.com/sonarqube-community-build/quality-standards-administration/managing-quality-profiles/authorizing-other-users-to-manage-quality-profile.md
# Source: https://docs.sonarsource.com/sonarqube-server/2025.3/quality-standards-administration/managing-quality-profiles/authorizing-other-users-to-manage-quality-profile.md
# Source: https://docs.sonarsource.com/sonarqube-server/2025.5/quality-standards-administration/managing-quality-profiles/authorizing-other-users-to-manage-quality-profile.md
# Source: https://docs.sonarsource.com/sonarqube-server/2025.4/quality-standards-administration/managing-quality-profiles/authorizing-other-users-to-manage-quality-profile.md
# Source: https://docs.sonarsource.com/sonarqube-server/2025.6/quality-standards-administration/managing-quality-profiles/authorizing-other-users-to-manage-quality-profile.md
# Source: https://docs.sonarsource.com/sonarqube-server/quality-standards-administration/managing-quality-profiles/authorizing-other-users-to-manage-quality-profile.md
# Source: https://docs.sonarsource.com/sonarqube-cloud/standards/managing-quality-profiles/authorizing-other-users-to-manage-quality-profile.md
# Granting permissions to users
With the Administer Quality Profiles permission, you can authorize users or groups to manage a specific custom quality profile, it means to:
* Activate or deactivate rules.
* Associate the profile with projects.
* Change the profile’s parent.
* Rename the profile.
* Authorize other users to manage the profile.
To authorize other users to manage a custom quality profile:
1. See [viewing-organizations](https://docs.sonarsource.com/sonarqube-cloud/getting-started/viewing-organizations "mention") to access your organization, then go to **Quality Profiles** and retrieve the quality profile.
2. In the **Permissions** section, select **Grant permissions to more users**. The **Grant permissions to a user or a group** dialog opens.
3. Select the user or group.
4. Select **Add**.
### Related pages
* [understanding-quality-profiles](https://docs.sonarsource.com/sonarqube-cloud/standards/managing-quality-profiles/understanding-quality-profiles "mention")
* [viewing-quality-profiles](https://docs.sonarsource.com/sonarqube-cloud/standards/managing-quality-profiles/viewing-quality-profiles "mention")
* [creating-a-quality-profile](https://docs.sonarsource.com/sonarqube-cloud/standards/managing-quality-profiles/creating-a-quality-profile "mention")
* [editing-a-custom-quality-profile](https://docs.sonarsource.com/sonarqube-cloud/standards/managing-quality-profiles/editing-a-custom-quality-profile "mention")
* [associating-a-quality-profile-with-projects](https://docs.sonarsource.com/sonarqube-cloud/standards/managing-quality-profiles/associating-a-quality-profile-with-projects "mention")
* [changing-default-quality-profile](https://docs.sonarsource.com/sonarqube-cloud/standards/managing-quality-profiles/changing-default-quality-profile "mention")
* [maintaining-your-custom-quality-profiles](https://docs.sonarsource.com/sonarqube-cloud/standards/managing-quality-profiles/maintaining-your-custom-quality-profiles "mention")
* [quality-profile-association](https://docs.sonarsource.com/sonarqube-cloud/managing-your-projects/project-analysis/quality-profile-association "mention")
---
# Source: https://docs.sonarsource.com/sonarqube-server/2025.2/ai-capabilities/autodetect-ai-code.md
# Source: https://docs.sonarsource.com/sonarqube-server/2025.3/instance-administration/ai-features/autodetect-ai-code.md
# Source: https://docs.sonarsource.com/sonarqube-server/2025.3/ai-capabilities/autodetect-ai-code.md
# Source: https://docs.sonarsource.com/sonarqube-server/2025.5/instance-administration/ai-features/autodetect-ai-code.md
# Source: https://docs.sonarsource.com/sonarqube-server/2025.5/ai-capabilities/autodetect-ai-code.md
# Source: https://docs.sonarsource.com/sonarqube-server/2025.1/instance-administration/ai-features/autodetect-ai-code.md
# Source: https://docs.sonarsource.com/sonarqube-server/2025.1/ai-capabilities/autodetect-ai-code.md
# Source: https://docs.sonarsource.com/sonarqube-server/2025.4/instance-administration/ai-features/autodetect-ai-code.md
# Source: https://docs.sonarsource.com/sonarqube-server/2025.4/ai-capabilities/autodetect-ai-code.md
# Source: https://docs.sonarsource.com/sonarqube-server/2025.6/instance-administration/ai-features/autodetect-ai-code.md
# Source: https://docs.sonarsource.com/sonarqube-server/2025.6/ai-capabilities/autodetect-ai-code.md
# Source: https://docs.sonarsource.com/sonarqube-server/instance-administration/ai-features/autodetect-ai-code.md
# Source: https://docs.sonarsource.com/sonarqube-server/ai-capabilities/autodetect-ai-code.md
# Source: https://docs.sonarsource.com/sonarqube-cloud/administering-sonarcloud/ai-features/autodetect-ai-code.md
# Source: https://docs.sonarsource.com/sonarqube-cloud/ai-capabilities/autodetect-ai-code.md
# Autodetect AI code
Knowing if your project contains AI-generated code helps raise awareness of code ownership and code security. To help build this awareness, SonarQube Cloud can autodetect AI-generated code in projects using GitHub Copilot.
* If turned on, the feature alerts Project Admins when project contributors recently used GitHub Copilot.
* If Copilot usage is detected, Project Admins can implement the tags and quality gates associated with your team’s *AI Code Assurance profile* to better call out projects that contain AI code.
**Autodetect AI-Generated Code** is turned on by default in SonarQube Cloud, but your GitHub App must have the appropriate permissions in order to allow communication with SonarQube Cloud.
For full details about the feature including instructions and requirements, see [autodetect-ai-code](https://docs.sonarsource.com/sonarqube-cloud/administering-sonarcloud/ai-features/autodetect-ai-code "mention") page.
If you’re a GitHub Admin and want more information about the required permission levels in GitHub, see [permissions-for-ai-autodetect](https://docs.sonarsource.com/sonarqube-cloud/administering-sonarcloud/ai-features/permissions-for-ai-autodetect "mention").
### Related pages
* [ai-code-assurance](https://docs.sonarsource.com/sonarqube-cloud/ai-capabilities/ai-code-assurance "mention")
* Administering your [ai-features](https://docs.sonarsource.com/sonarqube-cloud/administering-sonarcloud/ai-features "mention") as an Organization Admin
---
# Source: https://docs.sonarsource.com/sonarqube-cloud/advanced-setup/automatic-analysis.md
# Automatic analysis
When you first import a project that is compatible with automatic analysis, the initial analysis behaves differently from subsequent analyses. During this first analysis, not only is the default branch (typically *main* branch) analyzed, but also the five most recently active pull requests. Subsequently, automatic analysis will trigger a new analysis on each push to the default branch and on each push to any pull request branch.
### Considerations
Currently, automatic analysis has the following limitations:
* It is only available for GitHub repositories.
* [branch-analysis](https://docs.sonarsource.com/sonarqube-cloud/enriching/branch-analysis "mention") (analysis of non-pull request branches other than *main* branch) is not supported.
* Automatic analysis does not support monorepos (the *monorepo* strategy). See the [monorepo-support](https://docs.sonarsource.com/sonarqube-cloud/advanced-setup/monorepo-support "mention") page for more details.
* Code coverage information is not supported.
* Import of external rule engine reports is not supported.
* SCA in SonarQube Advanced Security is not supported.
* Automatic analysis logs are not available.
If you experience prolonged analysis times or need to review the analysis logs, consider onboarding your project using a CI-based analysis. See the [overview-of-integrated-cis](https://docs.sonarsource.com/sonarqube-cloud/advanced-setup/ci-based-analysis/overview-of-integrated-cis "mention") page for more information.
{% hint style="warning" %}
**Analyzing Gradle files**
If you are analyzing Gradle files, your Gradle build file must be located in the root of your repository in order to be detected by the scanner because SonarScanner checks for the presence of a \`pom.xml\`, \`build.gradle\`, or \`build.gradle.kts\` file.
If your Gradle build file is located in sub-directory, you have to use CI-based analysis instead. For more information, see [Analyzing multi-project builds](https://docs.sonarsource.com/sonarqube-cloud/enriching/external-analyzer-reports).
{% endhint %}
### Supported languages
Automatic analysis is available for nearly all of SonarQube Cloud's [overview](https://docs.sonarsource.com/sonarqube-cloud/advanced-setup/languages/overview "mention"). However, the Objective-C, Dart, and Rust languages are not eligible for automatic analysis at this time.
For Java, there are some known limitations. See the dedicated sections below for the details.
{% hint style="info" %}
Automatic analysis now also supports Azure Resource Manager and its two formats, JSON and Bicep.
{% endhint %}
### Activating automatic analysis
For new projects:
* After importing a project from GitHub, SonarQube Cloud will automatically check whether your project is eligible for automatic analysis. This should take a few seconds.
* SonarQube Cloud will deem a project *eligible* for automatic analysis only if *at least 20%* of the lines of code in the project are in a *supported language*.
* For a Java project to be eligible, the amount of Java code cannot exceed 10MB.
* If your project is eligible, SonarQube Cloud will automatically trigger the first analysis. On this first analysis, the system will analyze the default branch of the project and the five most recently active pull requests. All you have to do is wait for the analysis to finish.
* If your project is not compatible, SonarQube Cloud will suggest other analysis methods such as using a CI tool.
* You can force automatic analysis on an initially non-eligible project. *However, doing this is not recommended as it will typically not provide useful information*. To force automatic analysis, do one of the following:
* From your project’s homepage, click the *Force Automatic Analysis* button.
* From your project’s **Administration** > **Analysis Method** page, turn on **Automatic Analysis**.
For existing projects:
* Go to your project’s **Administration** > **Analysis Method** page and turn on **Automatic Analysis**.
* The **Analysis Method** page will display a compatibility check, so you are aware of our recommendations for your specific project.
### Presence of a properties file
If you import a project that already contains a `sonar-project.properties` file, SonarQube Cloud will ignore the parameters in your `sonar-project.properties` file. To analyze your code with the settings defined in this file, you can disable Autoscan and configure a CI/CD analysis. See the [#deactivating-automatic-analysis](#deactivating-automatic-analysis "mention") article for instructions.
### Analysis method indicator
If a project uses automatic analysis, then in the project **Overview** > **Information** under **Last analysis method** the system will display *Analyzed by SonarQube Cloud*:
### Conflict with CI-based analysis
Automatic analysis is not intended to be used in conjunction with CI-based analysis.
If you enable automatic analysis, you must ensure that you do not have any CI-based analyses configured. If you do then these CI-based analyses will fail and *cause a failure in your build process*.
Similarly, if you wish to use a CI-based analysis on a project, you must ensure that automatic analysis is disabled for that project.
This is done to prevent duplicate analyses from being sent to SonarQube Cloud that would cause problems in your project activity reports.
### Deactivating automatic analysis
Go to your project’s **Administration** > **Analysis Method** page and unselect **Enabled for this project**.
From the same page, you can then follow one of our tutorials for configuring SonarQube Cloud analyses with another method.
{% hint style="info" %}
As an organization admin, you can disable automatic analyses in your Enterprise plan organization. See the [disabling-automatic-analysis](https://docs.sonarsource.com/sonarqube-cloud/administering-sonarcloud/managing-organization/setting-config-at-org-level/disabling-automatic-analysis "mention") page for details.
{% endhint %}
### Additional analysis configuration
You can refine the configuration of your analyses by adding a `.sonarcloud.properties` file to your repository’s default branch. *Note that this is different from the `sonar-project.properties` file used for CI-based analysis*.
Below are the supported optional settings for the `.sonarcloud.properties` file. Wildcard patterns are not allowed. Read more on the [analysis-parameters](https://docs.sonarsource.com/sonarqube-cloud/advanced-setup/analysis-parameters "mention") page.
```properties
# Path to sources
# sonar.sources=
# sonar.exclusions=
# sonar.inclusions=
# Path to tests
# sonar.tests=
# sonar.test.exclusions=
# sonar.test.inclusions=
# Source encoding
# sonar.sourceEncoding=
# Exclusions for copy-paste detection
# sonar.cpd.exclusions=
# Python version (for python projects only)
# sonar.python.version=
# C++ standard version (for C++ projects only)
# If not specified, it defaults to the latest supported standard
# sonar.cfamily.reportingCppStandardOverride=c++98|c++11|c++14|c++17|c++20
```
Not all properties work with all scanner versions. Be sure to review the [#analysis-scope](https://docs.sonarsource.com/sonarqube-cloud/analysis-parameters#analysis-scope "mention") and check which are available for your scanner and scanner version.
Some of these settings can also be configured from the SonarQube Cloud UI. In your project’s **Administration** > **General Settings** > **Analysis Scope** > **Files** section, you can define source and test file exclusions and inclusions. If you have different options set in the UI than are defined in your `.sonarcloud.properties` file, SonarQube Cloud will only take into account the value from the `.sonarcloud.properties` file.
{% hint style="info" %}
* This feature works for any project, public or private.
* It can be activated at no extra cost.
* If you were previously using the *Automatic Analysis Beta*, removing the `.sonarcloud.properties` file will no longer disable automatic analysis. It will only disable the additional configuration settings you might have defined in it. You will still have to disable automatic analysis from the SonarQube Cloud UI, in the **Administration** > **Analysis Method** page.
{% endhint %}
### Automatic analysis for Java, Kotlin, and Scala
Automatic analysis provides the quickest way to get your Java, Kotlin, and Scala projects up and running on SonarQube Cloud and see code analysis results fast.
To be eligible for automatic analysis, your Java project must:
* Use either Maven or Gradle
* Have less than 10MB in total amount of code
Automatic analysis for Java has the following limitations:
* XSS (Cross-Site Scripting) issues can’t be detected: to get the full power of Sonar analyzers, it’s required to switch to CI-based analysis.
* For Gradle-based projects, there are less security issues detected: to get the full power of Sonar analyzers, it’s required to switch to CI-based analysis.
* Rules that belong to [this list](https://github.com/SonarSource/sonar-java/blob/3c8b11346c6cc84e3bc936a2b1a5487dd1c0ee1e/check-list/src/main/java/org/sonar/java/CheckListGenerator.java#L177C64-L177C100) are not supported because the results that they currently produce are not accurate enough (see the line with `JAVA_CHECKS_NOT_WORKING_FOR_AUTOSCAN`)
* Not all properties are supported (see below).
{% hint style="warning" %}
Java automatic analysis does not support the following properties:
* sonar.sources
* sonar.tests
* sonar.inclusions
* sonar.test.inclusions
This is because we assume that your files will follow the standard directory layout that is expected by Maven and Gradle (`**/src/main/**/*` and `**/src/test/**/*`) for Java projects.
{% endhint %}
With these limitations in mind, the next step in your Java project onboarding is to set up CI-based analysis to get the most out of SonarQube Cloud analysis. See the [overview-of-integrated-cis](https://docs.sonarsource.com/sonarqube-cloud/advanced-setup/ci-based-analysis/overview-of-integrated-cis "mention") page for more information.
### Automatic analysis for .NET projects
SonarQube Cloud automatic analysis now also supports .NET projects. .NET Framework, .NET Core, .NET 5 and .NET 6 projects can be analyzed but are subject to some limitations:
* Projects must contain at least 20% code in a supported language. The amount of .NET code for automatic analysis is calculated by adding the sum of \*.cs and \*.vb files together.
* Projects must contain at least one XML file - \*.csproj or \*.vbproj. A combination of both file types is acceptable.
With these limitations in mind, the next step in your .NET project onboarding is to set up CI-based analysis to get the most out of SonarQube Cloud analysis. See the [overview-of-integrated-cis](https://docs.sonarsource.com/sonarqube-cloud/advanced-setup/ci-based-analysis/overview-of-integrated-cis "mention") page for more information.
### Automatic analysis for C and C++ projects
There are no additional requirements for [C and C++ projects](https://www.sonarsource.com/products/sonarcloud/features/auto-analysis-for-c-and-cpp/), apart from the standard [#considerations](#considerations "mention") for automatic analysis.
* C & C++ automatic analysis does not have any toolchain or project structural requirements.
* C & C++ can be analyzed in combination with all other supported languages (including Java and .NET.)
SonarQube Cloud automatic analysis for C and C++ is already available and ready to analyze. The quality of analysis is very similar to a CI-based analysis and, for most users, it is the only analysis you really need.
For other users, there are a few cases where a CI-based analysis remains a better option.
* If your project is so big that the analysis cannot be completed before the analysis times out, automatic analysis will fail.
* If you require faster analysis. You should run the analysis using self-hosted resources with an increased hardware capacity. It would also allow you to keep full control of the analysis cache if needed.
* If your project uses generated code that you want to analyze. For example, this can happen in some custom build systems.
* If you need control over the configuration of your code. For example, with automatic analysis, you cannot analyze a specific build variant. Automatic analysis uses a configuration that maximizes the amount of code analyzed and the OS and architecture used for this can differ from your own configuration.
* If your project is experiencing missing issues. In rare cases, automatic analysis can lead to such limitations.
See [overview-of-integrated-cis](https://docs.sonarsource.com/sonarqube-cloud/advanced-setup/ci-based-analysis/overview-of-integrated-cis "mention") page for more information.
---
# Source: https://docs.sonarsource.com/sonarqube-cloud/administering-sonarcloud/managing-enterprise/enterprise-security/sso/about/automatic-group-synchronization.md
# Automatic group synchronization
The automatic synchronization of user groups is used with the Single Sign-On (SSO) authentication. See the [user-group-concept](https://docs.sonarsource.com/sonarqube-cloud/administering-sonarcloud/about-sonarqube-cloud-solution/user-management/user-group-concept "mention") page for more information about user groups in SonarQube Cloud.
With the automatic group synchronization:
* A user in SonarQube Cloud is automatically added to an organization’s group within the enterprise if the user is a member of a group with the same name in the IdP. (The check is case-sensitive and excludes the organization’s default **Members** group.)
* The users added to a SonarQube Cloud group become members of the respective organization.
{% hint style="info" %}
If a group with the same name is assigned to several organizations, the user account is added to all these groups and thus, is a member of all these organizations.
{% endhint %}
{% hint style="warning" %}
If a user cannot be added to any group in SonarQube Cloud, they will land on an empty organization page.
{% endhint %}
### Related pages
* [..](https://docs.sonarsource.com/sonarqube-cloud/administering-sonarcloud/managing-enterprise/enterprise-security/sso "mention")
* [user-groups](https://docs.sonarsource.com/sonarqube-cloud/administering-sonarcloud/managing-organization/users-and-permissions/user-groups "mention")
---
# Source: https://docs.sonarsource.com/sonarqube-server/10.7/instance-administration/authentication/gitlab/provisioning-modes/automatic.md
# Source: https://docs.sonarsource.com/sonarqube-server/10.8/instance-administration/authentication/gitlab/provisioning-modes/automatic.md
# Source: https://docs.sonarsource.com/sonarqube-server/2025.2/instance-administration/authentication/gitlab/provisioning-modes/automatic.md
# Source: https://docs.sonarsource.com/sonarqube-server/2025.3/instance-administration/authentication/gitlab/provisioning-modes/automatic.md
# Source: https://docs.sonarsource.com/sonarqube-server/2025.5/instance-administration/authentication/gitlab/provisioning-modes/automatic.md
# Source: https://docs.sonarsource.com/sonarqube-server/2025.1/instance-administration/authentication/gitlab/provisioning-modes/automatic.md
# Source: https://docs.sonarsource.com/sonarqube-server/2025.4/instance-administration/authentication/gitlab/provisioning-modes/automatic.md
# Source: https://docs.sonarsource.com/sonarqube-server/2025.6/instance-administration/authentication/gitlab/provisioning-modes/automatic.md
# Source: https://docs.sonarsource.com/sonarqube-server/instance-administration/authentication/gitlab/provisioning-modes/automatic.md
# Automatic provisioning
You can enable the GitLab automatic provisioning mode in SonarQube Server and benefit from:
* Automatic user and group provisioning and de-provisioning.
* Automatic synchronization of users’ group memberships.
* Automatic synchronization of user permissions on projects.
* Automatic project visibility synchronization.
### Limitations
The permission synchronization concerns only the project-level permissions. It means that you must still configure the global permissions manually.
Automatic provisioning can only be enabled with a single identity provider. When enabled, this mechanism becomes the sole method for creating new users in your instance. For more information, see [#automatic-provisioning](https://docs.sonarsource.com/sonarqube-server/instance-administration/overview#automatic-provisioning "mention").
### User and group provisioning
The user and group provisioning is restricted to predefined GitLab root groups (groups with no parent): only members of these groups and all their subgroups are provisioned. These groups and subgroups are called *Allowed* groups.
On an hourly basis:
* SonarQube Server provisions and de-provisions the groups as follows:
* For each Allowed group that doesn’t exist yet in SonarQube Server, it creates the corresponding group: see **Group creation** below.
* It removes any existing group in SonarQube Server that doesn’t belong to the Allowed groups.
* SonarQube Server provisions and de-provisions the users as follows:
* It creates a user account for any member of an Allowed group who doesn’t have yet an account in SonarQube Server.
* It removes any user account that doesn’t belong to any Allowed groups.
* SonarQube Server synchronizes the users with GitLab regarding:
* Group memberships.
* Project permissions: see **Project permissions synchronization** below.
* SonarQube Server synchronizes the visibility (public/private) of each project with its bound repository’s associated project in GitLab.
In addition, if enabled, SonarQube Server synchronizes the group memberships of any existing auto-provisioned user at authentication time (Just-in-Time (JIT) synchronization).
{% hint style="info" %}
Automatic synchronization won’t set or update emails (This is done at each user login.).
{% endhint %}
### Group creation
Since SonarQube Server doesn’t support the group hierarchy (there is no subgroup concept), the corresponding groups and subgroups are all created in SonarQube Server as groups.
The following naming convention is used for a group:\
`//`\
where:
* `rootGroup`: is the name of the root group (group without parent) in GitLab.
* `subgroup_i`: is the level\_i’s subgroup name in GitLab.
For example, if the GitLab group URL is `https://gitlab.com/my-gitlab-group/my-subgroup`, the group name in SonarQube Server will be `my-gitlab-group/my-subgroup`.
### Project permissions synchronization
With the automatic provisioning mode, the user permissions on projects are also synchronized: for each project, the permissions of auto-provisioned users are synchronized in SonarQube Server based on the highest GitLab user role applying to the repository in GitLab and according to the configured role permission mapping. A default mapping is provided but you can change it to adapt it to your needs. In addition, if you manage [GitLab custom roles](https://docs.gitlab.com/ee/user/custom_roles.html) (with GitLab Ultimate), you can configure the permission mapping of the custom rules in SonarQube Server.
{% hint style="info" %}
With this feature:
* Project permissions are set at the user level only (not at the group level).
* Project permissions cannot be edited in SonarQube Server (Manually edited project permissions of existing auto-provisioned accounts get reset in SonarQube Server.).
* The application of default permissions for new projects through permission templates is not supported.
{% endhint %}
Default role permission mapping
The table below shows how a GitLab role is mapped by default to a SonarQube Server permission at the project level. For more information about project permissions, see [#permissions-related-to-a-project](https://docs.sonarsource.com/sonarqube-server/user-management/user-permissions#permissions-related-to-a-project "mention").
| GitLab role | Browse Project | See source Code | Administer Issues | Administer Security Hotspots | Execute Analysis | Administer Project |
| ----------- | -------------- | --------------- | ----------------- | ---------------------------- | ---------------- | ------------------ |
| Guest | x |
|
|
|
|
|
| Reporter | x | x |
|
|
|
|
| Developer | x | x | x | x | x |
|
| Maintainer | x | x | x | x | x | x |
| Owner | x | x | x | x | x | x |
Custom GitLab roles
You can define the mapping of your custom GitLab roles to SonarQube Server permissions. If no mapping is defined for a custom role, SonarQube Server will perform the permission mapping based on the custom role’s inherited base role.
### Project visibility synchronization
With the automatic provisioning mode, the SonarQube Server project visibility is synchronized with the visibility of the project associated with the corresponding repository in GitLab according to the mapping table below.
GitLab project visibility
SonarQube Server project visibility
Private
Private
Internal
Private
Public
Public
### Related pages
* [#group-concept](https://docs.sonarsource.com/sonarqube-server/user-management/user-groups#group-concept "mention")
* [setting-up](https://docs.sonarsource.com/sonarqube-server/instance-administration/authentication/gitlab/setting-up "mention")
* [managing-automatic-provisioning](https://docs.sonarsource.com/sonarqube-server/instance-administration/authentication/gitlab/managing-automatic-provisioning "mention")
* [#permission-templates](https://docs.sonarsource.com/sonarqube-server/user-management/user-permissions#permission-templates "mention")
---
# Source: https://docs.sonarsource.com/sonarqube-community-build/project-administration/creating-project/automating-creation.md
# Automating project creation and import
If you’re getting started with Web APIs, see [web-api](https://docs.sonarsource.com/sonarqube-community-build/extension-guide/web-api "mention").
### Automating the local project creation
Only using the Web API `POST /api/projects/create` endpoint is enough to create a local project. A name and a project key are the only necessary parameters.
### Automating the import of projects hosted on a DevOps platform
You can create a project in SonarQube and automatically bind it with a project in your DevOps platform using the Web API.
* As an instance administrator, you must first configure your SonarQube instance with your DevOps platform. You can use the `POST api/alm_settings/create_` endpoint to create the integration or set it up in the SonarQube UI by going to **Administration** > **Configuration** > **General Settings** > **DevOps Platform Integrations**.
* As a user, create a SonarQube project with the information from your DevOps platform project using the `POST api/v2/dop-translation/bound-projects` [endpoint](https://next.sonarqube.com/sonarqube/web_api_v2#/dop-translation/bound-projects--post). Requirements:
* Make sure you have the Create Project permissions.
* Set a Personal Access Token using the `POST api/alm_integrations/set_pat` [endpoint](https://next.sonarqube.com/sonarqube/web_api/api/alm_integrations/set_pat).
* List all DevOps platform integrations to retrieve the information needed for the project creation endpoint parameters using the `GET /api/v2/dop-translation/dop-settings` [endpoint](https://www.google.com/search?q=https://next.sonarqube.com/sonarqube/web_api_v2#/dop-translation/dop-settings--get).
---
# Source: https://docs.sonarsource.com/sonarqube-server/2025.6/project-administration/creating-your-project/automating-project-creation-and-import.md
# Source: https://docs.sonarsource.com/sonarqube-server/project-administration/creating-your-project/automating-project-creation-and-import.md
# Automating project creation and import
If you’re getting started with Web APIs, see [web-api](https://docs.sonarsource.com/sonarqube-server/extension-guide/web-api "mention").
### Automating the local project creation
Only using the Web API `POST /api/projects/create` endpoint is enough to create a local project. A name and a project key are the only necessary parameters.
### Automating the import of projects hosted on a DevOps platform
You can create a project in SonarQube and automatically bind it with a project in your DevOps platform using the Web API.
* As an instance administrator, you must first configure your SonarQube instance with your DevOps platform. You can use the `POST api/alm_settings/create_` endpoint to create the integration or set it up in the SonarQube UI by going to **Administration** > **Configuration** > **General Settings** > **DevOps Platform Integrations**.
* As a user, create a SonarQube project with the information from your DevOps platform project using the `POST api/v2/dop-translation/bound-projects` [endpoint](https://next.sonarqube.com/sonarqube/web_api_v2#/dop-translation/bound-projects--post). Requirements:
* Make sure you have the Create Project permissions.
* Set a Personal Access Token using the `POST api/alm_integrations/set_pat` [endpoint](https://next.sonarqube.com/sonarqube/web_api/api/alm_integrations/set_pat).
* List all DevOps platform integrations to retrieve the information needed for the project creation endpoint parameters using the `GET /api/v2/dop-translation/dop-settings` [endpoint](https://www.google.com/search?q=https://next.sonarqube.com/sonarqube/web_api_v2#/dop-translation/dop-settings--get).
---
# Source: https://docs.sonarsource.com/sonarqube-community-build/devops-platform-integration/azure-devops-integration.md
# Source: https://docs.sonarsource.com/sonarqube-server/8.9/alm-integration/azure-devops-integration.md
# Source: https://docs.sonarsource.com/sonarqube-server/9.8/devops-platform-integration/azure-devops-integration.md
# Source: https://docs.sonarsource.com/sonarqube-server/9.9/devops-platform-integration/azure-devops-integration.md
# Source: https://docs.sonarsource.com/sonarqube-server/10.0/devops-platform-integration/azure-devops-integration.md
# Source: https://docs.sonarsource.com/sonarqube-server/10.1/devops-platform-integration/azure-devops-integration.md
# Source: https://docs.sonarsource.com/sonarqube-server/10.2/devops-platform-integration/azure-devops-integration.md
# Source: https://docs.sonarsource.com/sonarqube-server/10.3/devops-platform-integration/azure-devops-integration.md
# Source: https://docs.sonarsource.com/sonarqube-server/10.4/devops-platform-integration/azure-devops-integration.md
# Source: https://docs.sonarsource.com/sonarqube-server/10.5/devops-platform-integration/azure-devops-integration.md
# Source: https://docs.sonarsource.com/sonarqube-server/10.6/devops-platform-integration/azure-devops-integration.md
# Source: https://docs.sonarsource.com/sonarqube-server/10.7/devops-platform-integration/azure-devops-integration.md
# Source: https://docs.sonarsource.com/sonarqube-server/10.8/devops-platform-integration/azure-devops-integration.md
# Source: https://docs.sonarsource.com/sonarqube-server/2025.2/devops-platform-integration/azure-devops-integration.md
# Source: https://docs.sonarsource.com/sonarqube-server/2025.3/devops-platform-integration/azure-devops-integration.md
# Source: https://docs.sonarsource.com/sonarqube-server/2025.5/devops-platform-integration/azure-devops-integration.md
# Source: https://docs.sonarsource.com/sonarqube-server/2025.1/devops-platform-integration/azure-devops-integration.md
# Source: https://docs.sonarsource.com/sonarqube-server/2025.4/devops-platform-integration/azure-devops-integration.md
# Source: https://docs.sonarsource.com/sonarqube-server/2025.6/devops-platform-integration/azure-devops-integration.md
# Source: https://docs.sonarsource.com/sonarqube-server/devops-platform-integration/azure-devops-integration.md
# Azure DevOps integration
- [Introduction to Azure DevOps integration](/sonarqube-server/devops-platform-integration/azure-devops-integration/introduction.md): SonarQube Server’s integration with Azure DevOps allows you to maintain code quality and security in your Azure DevOps repositories.
- [Azure Pipelines integration overview](/sonarqube-server/devops-platform-integration/azure-devops-integration/azure-pipelines-integration-overview.md): The Azure DevOps Extension for SonarQube Server is used to manage the integration of SonarQube Server with Azure Pipelines.
- [Setting up Azure DevOps integration at global level](/sonarqube-server/devops-platform-integration/azure-devops-integration/setting-up-integration-at-global-level.md): Setting up integration of Azure DevOps with SonarQube Server at the global level.
- [Creating and configuring your Azure DevOps project](/sonarqube-server/devops-platform-integration/azure-devops-integration/creating-your-project.md): Creating your project by importing an Azure DevOps repository.
- [Setting up Azure integration for your project](/sonarqube-server/devops-platform-integration/azure-devops-integration/setting-up-project-integration.md): This helps you define the project-level settings required for Azure DevOps or Azure Pipelines when setting up a SonarQube project analysis.
- [Adding analysis to Azure pipeline](/sonarqube-server/devops-platform-integration/azure-devops-integration/adding-analysis-to-pipeline.md): Choose your configuration from the list below for detailed instructions when constructing your Azure DevOps pipeline.
- [Introduction](/sonarqube-server/devops-platform-integration/azure-devops-integration/adding-analysis-to-pipeline/introduction.md): Adding SonarQube Server analysis to your Azure pipeline.
- [Gradle or Maven project](/sonarqube-server/devops-platform-integration/azure-devops-integration/adding-analysis-to-pipeline/gradle-or-maven-project.md): Using YAML or the Azure Classic editor to create the Azure build pipeline with new Gradle or Maven tasks.
- [.NET project](/sonarqube-server/devops-platform-integration/azure-devops-integration/adding-analysis-to-pipeline/dotnet-project.md): Using YAML or the Azure Classic editor to create the Azure build pipeline for .Net projects.
- [C family project](/sonarqube-server/devops-platform-integration/azure-devops-integration/adding-analysis-to-pipeline/c-family-project.md): Using YAML or the Azure Classic editor to create the Azure build pipeline for C family projects.
- [JS, TS, Go, Python, PHP, etc. project](/sonarqube-server/devops-platform-integration/azure-devops-integration/adding-analysis-to-pipeline/js-ts-go-python-php.md): Using YAML or the Azure Classic editor to create the Azure build pipeline for JavaScript, TypeScript, Go, Python, PHP, and other projects.
- [Monorepo projects](/sonarqube-server/devops-platform-integration/azure-devops-integration/adding-analysis-to-pipeline/monorepo-projects.md): Adding analysis to your Azure build pipeline for a monorepo.
- [Using various features](/sonarqube-server/devops-platform-integration/azure-devops-integration/adding-analysis-to-pipeline/various-features.md): Adding more SonarQube Server features to the analysis for your Azure build pipeline.
- [Quality gate status in release pipeline](/sonarqube-server/devops-platform-integration/azure-devops-integration/adding-analysis-to-pipeline/quality-gate-status-in-release-pipeline.md): Adding SonarQube Quality Gate status check to your Azure release pipeline.
- [SonarQube tasks for Azure Pipelines](/sonarqube-server/devops-platform-integration/azure-devops-integration/adding-analysis-to-pipeline/sonarqube-tasks.md): Tasks supported by the Azure DevOps Extension for SonarQube Server you can use in your Azure build pipeline.
- [Troubleshooting analysis](/sonarqube-server/devops-platform-integration/azure-devops-integration/troubleshooting-analysis.md): Troubleshooting various Azure pipeline and integration issues.
---
# Source: https://docs.sonarsource.com/sonarqube-server/2025.5/user-guide/issues/in-devops-platform/azure-devops.md
# Source: https://docs.sonarsource.com/sonarqube-server/2025.6/user-guide/issues/in-devops-platform/azure-devops.md
# Source: https://docs.sonarsource.com/sonarqube-server/user-guide/issues/in-devops-platform/azure-devops.md
# Source: https://docs.sonarsource.com/sonarqube-cloud/managing-your-projects/administering-your-projects/devops-platform-integration/azure-devops.md
# Source: https://docs.sonarsource.com/sonarqube-cloud/managing-your-projects/issues/in-devops-platform/azure-devops.md
# Source: https://docs.sonarsource.com/sonarqube-cloud/getting-started/azure-devops.md
# Analyzing Azure DevOps projects
If your code is on Azure DevOps, you can benefit from SonarQube Cloud’s integration with Azure DevOps.
### Key features of Azure DevOps integration
SonarQube Cloud’s integration with Azure DevOps allows you to maintain code quality and security in your Azure DevOps repositories. It is compatible with Azure DevOps Services.
With this integration, you’ll be able to:
* Sign in to SonarQube Cloud with your Azure DevOps credentials.
* Import your Azure DevOps repositories into SonarQube Cloud to easily set up SonarQube Cloud projects.
* Integrate smoothly SonarQube Cloud analysis into your Azure build pipeline with the Azure DevOps extension for SonarQube. This includes multi-branch analysis features.
* Report the analysis’ quality gate status right in Azure Pipeline’s Build Summary page.
* Prevent pull request merges when the quality gate fails.
* View issues detected on a pull request in Azure DevOps.\
Each issue will be a comment on the Azure DevOps pull request. If you change the status of an issue in SonarQube Cloud, that status change is immediately reflected in the Azure DevOps interface.
### Sign up to SonarQube Cloud
Go to the [SonarQube Cloud](https://www.sonarsource.com/products/sonarcloud/) product page and choose **Set up** or **Login**, then select **Azure DevOps** from the list of DevOps cloud platforms.
You will be taken to the Microsoft login page. Sign in using your Microsoft credentials.
Setting up a new SonarQube Cloud account with your Azure DevOps service requires that you be logged into both instances because there is some back-and-forth involved between the two platforms.
With an existing Azure DevOps service, you will start by opening a new SonarQube Cloud account, creating a SonarQube Cloud Organization, and connecting it to Azure with an Azure Personal Access Token. With your PAT in place, importing your repositories and configuring the analysis are the next steps to get things going.
Once you have successfully logged in, you will see the SonarQube Cloud welcome screen. See below for full, step-by-step instructions.
### Set up your organization
In this step, you will create a SonarQube Cloud organization by importing your Azure DevOps organization (you must be an admin of the Azure DevOps organization). For more information, see [importing-azure-devops-organization](https://docs.sonarsource.com/sonarqube-cloud/administering-sonarcloud/managing-organization/creating-organization/importing-azure-devops-organization "mention").
SonarQube Cloud is set up to mirror the way that code is organized in Azure DevOps (and other repository providers):
* Each *SonarQube Cloud project* corresponds one-to-one with an *Azure DevOps project*, which resides in its own Git repository.
* *Azure DevOps projects* are grouped into *Azure DevOps organizations*.
* Each *SonarQube Cloud organization* corresponds one-to-one with an *Azure DevOps organization*.
You will be presented with a screen like this:
#### Check the organization name and key
SonarQube Cloud will suggest a *key* for your SonarQube Cloud organization. This is a name unique across all organizations within SonarQube Cloud. You can accept the suggestion or change it manually. The interface will prevent you from changing it to an already existing key.
#### Create and enter the Azure PAT
1. Create the Personal Access Token (PAT) on the Azure DevOps organization as described in **Step 1** of [importing-azure-devops-organization](https://docs.sonarsource.com/sonarqube-cloud/administering-sonarcloud/managing-organization/creating-organization/importing-azure-devops-organization "mention").
2. Copy-paste the PAT to **Personal Access Token**.
#### Choose a plan
Next, you will be asked to choose a SonarQube Cloud subscription plan. See [subscription-plans](https://docs.sonarsource.com/sonarqube-cloud/administering-sonarcloud/managing-subscription/subscription-plans "mention") for a comparison between the different plans.
If you want to analyze more than 50k lines of private code, then you need to select the Team or Enterprise plan. Monthly plans offer a 14-day free trial period. Once the 14 days have elapsed, the cost is based on the number of lines of code analyzed. For more information, see [#loc-based-pricing](https://docs.sonarsource.com/sonarqube-cloud/administering-sonarcloud/managing-subscription/subscription-plans#loc-based-pricing "mention").
Once you have chosen a plan and clicked **Create Organization,** your SonarQube Cloud organization will be created!
### Set up your analysis
#### Import repositories
The next step is to import the projects (that is, individual git repositories) that you want to analyze (from your Azure DevOps organization) into your newly created SonarQube Cloud organization. A corresponding SonarQube Cloud project will be created for each git repository.
SonarQube Cloud will present a list of the repositories in your Azure DevOps organization. Choose those that you want to import and analyze, then select **Set Up** to continue.
The selected projects will be imported.
### Choose your new code definition
The next step is to set the new code definition (NCD) for your projects. The NCD is a mandatory step and it defines which part of your code is considered new code. This helps you to focus your attention on the most recent changes to your code.
{% hint style="info" %}
Note that the new code definition you apply at this stage will apply to all of the projects you have selected for analysis. You can change your new code definition later on a per-project basis.
To do this, go to *Your Organization* > *Your Project* > **Administration** > **New Code**.
{% endhint %}
For more information, see [about-new-code](https://docs.sonarsource.com/sonarqube-cloud/standards/about-new-code "mention").
#### Configure analysis
With Azure DevOps projects the actual analysis is performed in your build environment (cloud CI, local machine, etc.). This means that you must configure your build process to perform the analysis on each build and communicate the results to SonarQube Cloud.
{% hint style="info" %}
We refer to this analysis method as *CI-based analysis* (though it may take place in a cloud CI or a manually configured build environment) to contrast it with *automatic analysis* which works by SonarQube Cloud directly accessing your repository and performing the analysis itself.
However, automatic analysis is currently available only for GitHub projects and only for a subset of languages. It is currently not available for Azure DevOps projects.
{% endhint %}
SonarQube Cloud will guide you through a tutorial on how to set up your build environment to perform analysis.
The first step is to select your build environment. SonarQube Cloud will present this page:
If you have no particular preference and are setting up a new project on Azure DevOps, we recommend using Azure DevOps Pipelines as your CI.
SonarQube Cloud’s in-product tutorial assumes that the user has experience setting up pipelines in Azure DevOps and will walk you through most of the process. You can check Azure pipelines [introduction](https://docs.sonarsource.com/sonarqube-cloud/advanced-setup/ci-based-analysis/azure-pipelines/introduction "mention") documentation if more information is needed to set up your YAML file.
### See your analysis results
Your next steps are to check the results of your first analysis. Your next steps are to check the results of your first analysis and set your new code definition, See [about-new-code](https://docs.sonarsource.com/sonarqube-cloud/standards/about-new-code "mention") for details.
{% hint style="info" %}
If you log into SonarQube Cloud using an email address that you previously used to log into another DevOps platform, you need to be aware that SonarQube Cloud will automatically associate your email address with the new DevOps platform.
For example, if you log in through Azure DevOps and previously used GitHub, GitHub issues will no longer be assigned to your email address and you will stop receiving GitHub email notifications (via your SonarQube Cloud organization). If you then decide to switch back to GitHub, the Azure DevOps email notifications will be discontinued.
{% endhint %}
### Related pages
* [importing-azure-devops-organization](https://docs.sonarsource.com/sonarqube-cloud/administering-sonarcloud/managing-organization/creating-organization/importing-azure-devops-organization "mention")
* [setting-up-project](https://docs.sonarsource.com/sonarqube-cloud/managing-your-projects/administering-your-projects/setting-up-project "mention")
* [azure-devops](https://docs.sonarsource.com/sonarqube-cloud/managing-your-projects/administering-your-projects/devops-platform-integration/azure-devops "mention")
* [azure-pipelines](https://docs.sonarsource.com/sonarqube-cloud/advanced-setup/ci-based-analysis/azure-pipelines "mention")
---
# Source: https://docs.sonarsource.com/sonarqube-community-build/devops-platform-integration/azure-devops-integration/azure-pipelines-integration-overview.md
# Source: https://docs.sonarsource.com/sonarqube-server/2025.2/devops-platform-integration/azure-devops-integration/azure-pipelines-integration-overview.md
# Source: https://docs.sonarsource.com/sonarqube-server/2025.3/devops-platform-integration/azure-devops-integration/azure-pipelines-integration-overview.md
# Source: https://docs.sonarsource.com/sonarqube-server/2025.5/devops-platform-integration/azure-devops-integration/azure-pipelines-integration-overview.md
# Source: https://docs.sonarsource.com/sonarqube-server/2025.1/devops-platform-integration/azure-devops-integration/azure-pipelines-integration-overview.md
# Source: https://docs.sonarsource.com/sonarqube-server/2025.4/devops-platform-integration/azure-devops-integration/azure-pipelines-integration-overview.md
# Source: https://docs.sonarsource.com/sonarqube-server/2025.6/devops-platform-integration/azure-devops-integration/azure-pipelines-integration-overview.md
# Source: https://docs.sonarsource.com/sonarqube-server/devops-platform-integration/azure-devops-integration/azure-pipelines-integration-overview.md
# Source: https://docs.sonarsource.com/sonarqube-cloud/advanced-setup/ci-based-analysis/azure-pipelines/azure-pipelines-integration-overview.md
# Azure Pipelines integration overview
The Azure DevOps extension for SonarQube Cloud is used to manage the integration of SonarQube Cloud with Azure Pipelines. It allows:
* Integrating smoothly SonarQube analysis into your Azure build pipeline. This includes multi-branch analysis features.
* Reporting the analysis’ quality gate status right in Azure Pipeline’s Build Summary page.
* Checking the SonarQube quality gate status in your Azure release pipeline.
* Monitoring the quality gate status of your projects directly in your Azure DevOps dashboard with the quality gate status widget.
### Extension modes
The Azure DevOps extension for SonarQube Cloud can run in one of the following modes depending on your project type:
* **.NET**: for .NET projects. The [sonarscanner-for-dotnet](https://docs.sonarsource.com/sonarqube-cloud/advanced-setup/ci-based-analysis/sonarscanner-for-dotnet "mention") is used.
* **Maven or Gradle**: for Maven and Gradle projects. The [sonarscanner-for-maven](https://docs.sonarsource.com/sonarqube-cloud/advanced-setup/ci-based-analysis/sonarscanner-for-maven "mention") or [sonarscanner-for-gradle](https://docs.sonarsource.com/sonarqube-cloud/advanced-setup/ci-based-analysis/sonarscanner-for-gradle "mention") is used, respectively.
* **CLI**: for the other project types (C family, JavaScript, TypeScript, Go, Python, PHP, etc.). The [sonarscanner-cli](https://docs.sonarsource.com/sonarqube-cloud/advanced-setup/ci-based-analysis/sonarscanner-cli "mention") is used.
The Azure DevOps extension for SonarQube Cloud embeds the last compatible version of the SonarScanner for .NET and SonarScanner CLI, which is used by default.
In Maven/Gradle mode, your build task downloads the SonarScanner for Maven or Gradle from the Sonar binaries site.
{% hint style="info" %}
In very particular situations, you may not want to use the extension’s default version but a specific previous version of the SonarScanner for .NET or CLI. In such a case, you can configure your Azure build pipeline to download this specific version from the Sonar binaries site (see [various-features](https://docs.sonarsource.com/sonarqube-cloud/advanced-setup/ci-based-analysis/azure-pipelines/adding-analysis-to-build-pipeline/various-features "mention")).
{% endhint %}
### SonarQube tasks used in the pipeline definition
The SonarQube Cloud analysis is integrated into your Azure build pipeline by adding the following SonarQube tasks to your build pipeline definition:
* Prepare Analysis Configuration
* Run Code Analysis\
This task starts the SonarScanner for .NET or CLI. In the Maven/Gradle mode, it is replaced by a Maven or Gradle task that downloads the SonarScanner for Maven or Gradle, respectively.
* Publish Quality Gate Result\
With this task, the quality gate status and a link to SonarQube Cloud are shown in the Azure Pipeline’s Build Summary page.
### Analysis process overview
The figure below shows the analysis’s main steps with the example of a .NET project :
1. The **Prepare Analysis Configuration** task starts the Begin step: the SonarScanner for .NET prepares the analysis by gathering all of the parameters and resources needed to analyze your project.
2. The rules configured in your SonarQube quality profile are run during the build step. The SonarScanner for .NET collects the analysis data while your project is being built.
3. The **Run Code Analysis** task starts the End step: the SonarScanner for .NET collects and prepares the analysis results which will be sent to SonarQube.
4. The SonarScanner for .NET sends the analysis results to SonarQube for further processing.
5. SonarQube sends the quality gate status to Azure DevOps where it can be used in your pipeline through the **Publish Quality Gate Result** task.
### Related pages
* [gradle-or-maven-project](https://docs.sonarsource.com/sonarqube-cloud/advanced-setup/ci-based-analysis/azure-pipelines/adding-analysis-to-build-pipeline/gradle-or-maven-project "mention")
* [dotnet-project](https://docs.sonarsource.com/sonarqube-cloud/advanced-setup/ci-based-analysis/azure-pipelines/adding-analysis-to-build-pipeline/dotnet-project "mention")
* [c-family-project](https://docs.sonarsource.com/sonarqube-cloud/advanced-setup/ci-based-analysis/azure-pipelines/adding-analysis-to-build-pipeline/c-family-project "mention")
* [js-ts-go-python-php](https://docs.sonarsource.com/sonarqube-cloud/advanced-setup/ci-based-analysis/azure-pipelines/adding-analysis-to-build-pipeline/js-ts-go-python-php "mention")
* [monorepo-projects](https://docs.sonarsource.com/sonarqube-cloud/advanced-setup/ci-based-analysis/azure-pipelines/adding-analysis-to-build-pipeline/monorepo-projects "mention")
* [sonarqube-tasks](https://docs.sonarsource.com/sonarqube-cloud/advanced-setup/ci-based-analysis/azure-pipelines/sonarqube-tasks "mention")
---
# Source: https://docs.sonarsource.com/sonarqube-cloud/advanced-setup/ci-based-analysis/azure-pipelines.md
# Azure pipelines
{% content-ref url="azure-pipelines/introduction" %}
[introduction](https://docs.sonarsource.com/sonarqube-cloud/advanced-setup/ci-based-analysis/azure-pipelines/introduction)
{% endcontent-ref %}
{% content-ref url="azure-pipelines/azure-pipelines-integration-overview" %}
[azure-pipelines-integration-overview](https://docs.sonarsource.com/sonarqube-cloud/advanced-setup/ci-based-analysis/azure-pipelines/azure-pipelines-integration-overview)
{% endcontent-ref %}
{% content-ref url="azure-pipelines/setting-up-project-integration" %}
[setting-up-project-integration](https://docs.sonarsource.com/sonarqube-cloud/advanced-setup/ci-based-analysis/azure-pipelines/setting-up-project-integration)
{% endcontent-ref %}
{% content-ref url="azure-pipelines/adding-analysis-to-build-pipeline" %}
[adding-analysis-to-build-pipeline](https://docs.sonarsource.com/sonarqube-cloud/advanced-setup/ci-based-analysis/azure-pipelines/adding-analysis-to-build-pipeline)
{% endcontent-ref %}
{% content-ref url="azure-pipelines/quality-gate-status-in-release-pipeline" %}
[quality-gate-status-in-release-pipeline](https://docs.sonarsource.com/sonarqube-cloud/advanced-setup/ci-based-analysis/azure-pipelines/quality-gate-status-in-release-pipeline)
{% endcontent-ref %}
{% content-ref url="azure-pipelines/sonarqube-tasks" %}
[sonarqube-tasks](https://docs.sonarsource.com/sonarqube-cloud/advanced-setup/ci-based-analysis/azure-pipelines/sonarqube-tasks)
{% endcontent-ref %}
---
# Source: https://docs.sonarsource.com/sonarqube-community-build/analyzing-source-code/languages/azure-resource-manager.md
# Source: https://docs.sonarsource.com/sonarqube-server/10.2/analyzing-source-code/languages/azure-resource-manager.md
# Source: https://docs.sonarsource.com/sonarqube-server/10.3/analyzing-source-code/languages/azure-resource-manager.md
# Source: https://docs.sonarsource.com/sonarqube-server/10.4/analyzing-source-code/languages/azure-resource-manager.md
# Source: https://docs.sonarsource.com/sonarqube-server/10.5/analyzing-source-code/languages/azure-resource-manager.md
# Source: https://docs.sonarsource.com/sonarqube-server/10.6/analyzing-source-code/languages/azure-resource-manager.md
# Source: https://docs.sonarsource.com/sonarqube-server/10.7/analyzing-source-code/languages/azure-resource-manager.md
# Source: https://docs.sonarsource.com/sonarqube-server/10.8/analyzing-source-code/languages/azure-resource-manager.md
# Source: https://docs.sonarsource.com/sonarqube-server/2025.2/analyzing-source-code/languages/azure-resource-manager.md
# Source: https://docs.sonarsource.com/sonarqube-server/2025.3/analyzing-source-code/languages/azure-resource-manager.md
# Source: https://docs.sonarsource.com/sonarqube-server/2025.5/analyzing-source-code/languages/azure-resource-manager.md
# Source: https://docs.sonarsource.com/sonarqube-server/2025.1/analyzing-source-code/languages/azure-resource-manager.md
# Source: https://docs.sonarsource.com/sonarqube-server/2025.4/analyzing-source-code/languages/azure-resource-manager.md
# Source: https://docs.sonarsource.com/sonarqube-server/2025.6/analyzing-source-code/languages/azure-resource-manager.md
# Source: https://docs.sonarsource.com/sonarqube-server/analyzing-source-code/languages/azure-resource-manager.md
# Source: https://docs.sonarsource.com/sonarqube-cloud/advanced-setup/languages/azure-resource-manager.md
# Azure Resource Manager
SonarQube Cloud analysis supports [Azure Resource Manager templates](https://learn.microsoft.com/en-us/azure/azure-resource-manager/templates/overview) and its two formats, JSON and Bicep.
### Supported versions
The level of support for a language is defined as follows:
* Fully supported: Analysis will complete. All the language features are understood and examined.
* Supported: Most language features are understood and examined but the version includes unsupported features. Analysis might break or provide incomplete results.
#### JSON
The 2019-04-01 deployment template JSON schema is supported.
#### Bicep
All versions up to 0.32.4 are supported.
### Language-specific properties
To discover and update the Azure Resource Manger-specific properties, navigate in SonarQube Cloud to *Your Project* > **Administration** > **General Settings** > **Languages** > **Azure Resource Manger**. See the [analysis-parameters](https://docs.sonarsource.com/sonarqube-cloud/advanced-setup/analysis-parameters "mention") page for more information about specific properties.
### Related pages
* [AzureResourceManager rules](https://rules.sonarsource.com/azureresourcemanager/) for static code analysis
---
# Source: https://docs.sonarsource.com/sonarqube-community-build/analyzing-source-code/background-tasks.md
# Source: https://docs.sonarsource.com/sonarqube-server/8.9/analyzing-source-code/background-tasks.md
# Source: https://docs.sonarsource.com/sonarqube-server/9.8/analyzing-source-code/background-tasks.md
# Source: https://docs.sonarsource.com/sonarqube-server/9.9/analyzing-source-code/background-tasks.md
# Source: https://docs.sonarsource.com/sonarqube-server/10.0/analyzing-source-code/background-tasks.md
# Source: https://docs.sonarsource.com/sonarqube-server/10.1/analyzing-source-code/background-tasks.md
# Source: https://docs.sonarsource.com/sonarqube-server/10.2/analyzing-source-code/background-tasks.md
# Source: https://docs.sonarsource.com/sonarqube-server/10.3/analyzing-source-code/background-tasks.md
# Source: https://docs.sonarsource.com/sonarqube-server/10.4/analyzing-source-code/background-tasks.md
# Source: https://docs.sonarsource.com/sonarqube-server/10.5/analyzing-source-code/background-tasks.md
# Source: https://docs.sonarsource.com/sonarqube-server/10.6/analyzing-source-code/background-tasks.md
# Source: https://docs.sonarsource.com/sonarqube-server/10.7/analyzing-source-code/background-tasks.md
# Source: https://docs.sonarsource.com/sonarqube-server/10.8/analyzing-source-code/background-tasks.md
# Source: https://docs.sonarsource.com/sonarqube-server/2025.2/analyzing-source-code/background-tasks.md
# Source: https://docs.sonarsource.com/sonarqube-server/2025.3/analyzing-source-code/background-tasks.md
# Source: https://docs.sonarsource.com/sonarqube-server/2025.5/analyzing-source-code/background-tasks.md
# Source: https://docs.sonarsource.com/sonarqube-server/2025.1/analyzing-source-code/background-tasks.md
# Source: https://docs.sonarsource.com/sonarqube-server/2025.4/analyzing-source-code/background-tasks.md
# Source: https://docs.sonarsource.com/sonarqube-server/2025.6/analyzing-source-code/background-tasks.md
# Source: https://docs.sonarsource.com/sonarqube-server/analyzing-source-code/background-tasks.md
# Source: https://docs.sonarsource.com/sonarqube-cloud/digging-deeper/background-tasks.md
# Background tasks
The processing of the scanner results is called a background task. Analysis is not complete until the relevant background task has been completed.
### What happens after the scanner is done analyzing?
Analysis is not complete until the relevant background task has been completed. Even though the SonarScanner’s log shows `EXECUTION SUCCESS`, the analysis results will not be visible in the SonarQube Cloud project until the background task has been completed. After a SonarScanner has finished analyzing your code, the result of the analysis (sources, issues, metrics) - the analysis report - is sent to SonarQube Cloud server for final processing by the compute engine. Analysis reports are queued and processed serially.
At the project level, when there is a pending analysis report waiting to be consumed, you can see a "pending" notification in the header, next to the date of the most recently completed analysis.
Project administrators can see the tasks for a project at **Administration** > **Background Tasks**.
### How do I know when analysis report processing fails?
Background tasks usually succeed, but sometimes unusual circumstances cause processing to fail. Examples include:
* Running out of memory while processing a report from a very large project
* Hitting a clash between the key of an existing module or project and one in the report
If that happens, the failed status displays on the project homepage, but that requires someone to notice it. You can also choose to be notified by email when background tasks fail - either on a project by project basis, or globally, on all projects where you have administration rights in the **Notifications** section of your profile.
### How do I diagnose a failing background task?
For each analysis report, there is a dropdown menu allowing you to access the scanner context that shows you the Scanner’s configuration at the moment when the code scan was run.
If processing failed for the task, an additional option is available: "Show Error Details", to get the technical details of why the background task processing failed.
### How do I cancel a pending analysis report?
Administrators can cancel the processing of a pending task by clicking:
* on the red ‘x’ available on each line of a `pending` task
* on the red "bulk cancel" option next to the pending jobs count. This button cancels all pending tasks.
Once processing has begun on a report, it’s too late to cancel it.
### How long is the history kept for background tasks?
The history for background tasks is retained for 6 months.
---
# Source: https://docs.sonarsource.com/sonarqube-community-build/server-update-and-maintenance/maintenance/backup-and-restore.md
# Source: https://docs.sonarsource.com/sonarqube-server/8.9/instance-administration/backup-and-restore.md
# Source: https://docs.sonarsource.com/sonarqube-server/9.8/instance-administration/backup-and-restore.md
# Source: https://docs.sonarsource.com/sonarqube-server/9.9/instance-administration/backup-and-restore.md
# Source: https://docs.sonarsource.com/sonarqube-server/10.0/instance-administration/backup-and-restore.md
# Source: https://docs.sonarsource.com/sonarqube-server/10.1/instance-administration/backup-and-restore.md
# Source: https://docs.sonarsource.com/sonarqube-server/10.2/instance-administration/backup-and-restore.md
# Source: https://docs.sonarsource.com/sonarqube-server/10.3/instance-administration/backup-and-restore.md
# Source: https://docs.sonarsource.com/sonarqube-server/10.4/instance-administration/backup-and-restore.md
# Source: https://docs.sonarsource.com/sonarqube-server/10.5/instance-administration/backup-and-restore.md
# Source: https://docs.sonarsource.com/sonarqube-server/10.6/instance-administration/backup-and-restore.md
# Source: https://docs.sonarsource.com/sonarqube-server/10.7/server-upgrade-and-maintenance/maintenance/backup-and-restore.md
# Source: https://docs.sonarsource.com/sonarqube-server/10.8/server-upgrade-and-maintenance/maintenance/backup-and-restore.md
# Source: https://docs.sonarsource.com/sonarqube-server/2025.2/server-update-and-maintenance/maintenance/backup-and-restore.md
# Source: https://docs.sonarsource.com/sonarqube-server/2025.3/server-update-and-maintenance/maintenance/backup-and-restore.md
# Source: https://docs.sonarsource.com/sonarqube-server/2025.5/server-update-and-maintenance/maintenance/backup-and-restore.md
# Source: https://docs.sonarsource.com/sonarqube-server/2025.1/server-update-and-maintenance/maintenance/backup-and-restore.md
# Source: https://docs.sonarsource.com/sonarqube-server/2025.4/server-update-and-maintenance/maintenance/backup-and-restore.md
# Source: https://docs.sonarsource.com/sonarqube-server/2025.6/server-update-and-maintenance/maintenance/backup-and-restore.md
# Source: https://docs.sonarsource.com/sonarqube-server/server-update-and-maintenance/maintenance/backup-and-restore.md
# Backup and restore
### Backing up data
Most databases come with backup tools. We recommend using these tools to back up your data.
Hot database backups are supported.
### Restoring data
To restore data from the backup and or trigger a full [reindexing](https://docs.sonarsource.com/sonarqube-server/server-update-and-maintenance/maintenance/reindexing "mention"), follow these steps:
1. Stop the server.
2. Restore the backup.
3. Drop the Elasticsearch indexes by deleting the contents of `/data/es8` directory.
4. Restart the server.
---
# Source: https://docs.sonarsource.com/sonarqube-community-build/server-installation/from-zip-file/basic-installation.md
# Source: https://docs.sonarsource.com/sonarqube-server/2025.3/server-installation/from-docker-image/basic-installation.md
# Source: https://docs.sonarsource.com/sonarqube-server/2025.3/server-installation/from-zip-file/basic-installation.md
# Source: https://docs.sonarsource.com/sonarqube-server/2025.5/server-installation/from-zip-file/basic-installation.md
# Source: https://docs.sonarsource.com/sonarqube-server/2025.4/server-installation/from-zip-file/basic-installation.md
# Source: https://docs.sonarsource.com/sonarqube-server/2025.6/server-installation/from-zip-file/basic-installation.md
# Source: https://docs.sonarsource.com/sonarqube-server/server-installation/from-zip-file/basic-installation.md
# Basic installation
### Prerequisites
You have:
* Checked the host requirements. See [server-host-requirements](https://docs.sonarsource.com/sonarqube-server/server-installation/server-host-requirements "mention").\
In particular, make sure the correct Java version is installed. To check the Java version on your computer, you can use the command line. In Windows, open the Command Prompt and type `java -version`. In macOS, open Terminal and type the same command. This will display the Java version installed on your system.
* Performed the pre-installation checks:
* [linux](https://docs.sonarsource.com/sonarqube-server/server-installation/pre-installation/linux "mention")
* [unix](https://docs.sonarsource.com/sonarqube-server/server-installation/pre-installation/unix "mention")
* [macos](https://docs.sonarsource.com/sonarqube-server/server-installation/pre-installation/macos "mention")
* Installed your database (except if you want to install SonarQube for test purposes and want to use the embedded database H2). See [installing-the-database](https://docs.sonarsource.com/sonarqube-server/server-installation/installing-the-database "mention").
### Download the distribution
1. Download the [distribution](https://www.sonarsource.com/products/sonarqube/downloads/).
2. Unzip the downloaded ZIP file into the directory you want to use to install your SonarQube (except a directory starting with a digit). The figure below shows this directory. It is called `` in this documentation.
### Set access to the database
You must configure the access to your database (except if you want to use SonarQube for test purposes and want to use the embedded database H2):
1. Open `/conf/sonar.properties`.
2. Set the user credentials required to connect to your database. To do so, uncomment and configure the lines related to:
* `sonar.jdbc.username` (JDBC user name)
* `sonar.jdbc.password` (JDBC user password)
3. Specify how to connect to your database. To do so, uncomment and configure the line related to `sonar.jdbc.url` and corresponding to your database type. For more information, see [#general](https://docs.sonarsource.com/sonarqube-server/system-properties/common-properties#general "mention").
4. Comment out the lines dedicated to the embedded database H2.
Example for a PostgreSQL database
```css-79elbk
sonar.jdbc.username=sonarqube
sonar.jdbc.password=mypassword
sonar.jdbc.url=jdbc:postgresql://localhost/sonarqube
```
### Oracle database: add the JDBC driver
If you use an Oracle database, copy the JDBC driver into `/extensions/jdbc-driver/oracle`.
Drivers for the other supported databases are already provided. Do not replace the provided drivers; they are the only ones supported.
### Configure the Elasticsearch storage path
By default, Elasticsearch data is stored in `/data`, but this is not recommended for production instances. Instead, you should store this data elsewhere, ideally in a dedicated volume with fast I/O. In addition to maintaining performance, upgrading your instance of SonarQube will be easier.
To configure the path to the `data` and `temp` directories:
1\. Edit `/conf/sonar.properties` to configure the following settings:
Linux
```css-79elbk
sonar.path.data=/var/sonarqube/data
sonar.path.temp=/var/sonarqube/temp
```
Windows
```css-79elbk
sonar.path.data=H:\sonarqube\data
sonar.path.temp=H:\sonarqube\temp
```
2\. Make sure the user launching SonarQube has read and write access to those directories.
### Check the web server connection parameters
Check the default values of the web server connection parameters in [#web-server-connection](https://docs.sonarsource.com/sonarqube-server/system-properties/common-properties#web-server-connection "mention"). Change the parameter values in `/conf/sonar.properties` if necessary.
### Start the web server
To start SonarQube Server from the console, see [from-zip-file](https://docs.sonarsource.com/sonarqube-server/server-installation/from-zip-file/starting-stopping-server/from-zip-file "mention").
To install and start SonarQube Server as a service, see [running-as-a-service](https://docs.sonarsource.com/sonarqube-server/server-installation/from-zip-file/starting-stopping-server/running-as-a-service "mention").
The message "SonarQube is operational" appears in the console output or in the server logs after a successful installation and startup. You can now open SonarQube Server at the configured address (by default `http://localhost:9000`). The default system administrator credentials are **admin**/**admin**.
{% hint style="info" %}
Once SonarQube Server UI is up, you can encrypt sensitive properties stored in `/conf/sonar.properties`. See [encrypting-settings](https://docs.sonarsource.com/sonarqube-server/instance-administration/security/encrypting-settings "mention").
{% endhint %}
### Related pages
* [overview](https://docs.sonarsource.com/sonarqube-server/server-installation/from-zip-file/overview "mention")
* [advanced-setup](https://docs.sonarsource.com/sonarqube-server/server-installation/from-zip-file/advanced-setup "mention")
* **Configuring network security features:**
* [securing-behind-proxy](https://docs.sonarsource.com/sonarqube-server/server-installation/network-security/securing-behind-proxy "mention")
* [network-rules](https://docs.sonarsource.com/sonarqube-server/server-installation/network-security/network-rules "mention")
* [starting-stopping-server](https://docs.sonarsource.com/sonarqube-server/server-installation/from-zip-file/starting-stopping-server "mention")
* [running-as-a-service](https://docs.sonarsource.com/sonarqube-server/server-installation/from-zip-file/starting-stopping-server/running-as-a-service "mention")
* Installing the Data Center Edition from the ZIP file:[from-zip-file](https://docs.sonarsource.com/sonarqube-server/server-installation/data-center-edition/from-zip-file "mention")
---
# Source: https://docs.sonarsource.com/sonarqube-community-build/server-installation/on-kubernetes-or-openshift/before-you-start.md
# Source: https://docs.sonarsource.com/sonarqube-server/10.7/setup-and-upgrade/deploy-on-kubernetes/server/before-you-start.md
# Source: https://docs.sonarsource.com/sonarqube-server/10.8/setup-and-upgrade/deploy-on-kubernetes/dce/before-you-start.md
# Source: https://docs.sonarsource.com/sonarqube-server/10.8/setup-and-upgrade/deploy-on-kubernetes/server/before-you-start.md
# Source: https://docs.sonarsource.com/sonarqube-server/2025.2/setup-and-update/deploy-on-kubernetes/dce/before-you-start.md
# Source: https://docs.sonarsource.com/sonarqube-server/2025.2/setup-and-update/deploy-on-kubernetes/server/before-you-start.md
# Source: https://docs.sonarsource.com/sonarqube-server/2025.3/server-installation/data-center-edition/on-kubernetes-or-openshift/before-you-start.md
# Source: https://docs.sonarsource.com/sonarqube-server/2025.3/server-installation/on-kubernetes-or-openshift/before-you-start.md
# Source: https://docs.sonarsource.com/sonarqube-server/2025.5/server-installation/data-center-edition/on-kubernetes-or-openshift/before-you-start.md
# Source: https://docs.sonarsource.com/sonarqube-server/2025.5/server-installation/on-kubernetes-or-openshift/before-you-start.md
# Source: https://docs.sonarsource.com/sonarqube-server/2025.1/setup-and-upgrade/deploy-on-kubernetes/dce/before-you-start.md
# Source: https://docs.sonarsource.com/sonarqube-server/2025.1/setup-and-upgrade/deploy-on-kubernetes/server/before-you-start.md
# Source: https://docs.sonarsource.com/sonarqube-server/2025.4/server-installation/data-center-edition/on-kubernetes-or-openshift/before-you-start.md
# Source: https://docs.sonarsource.com/sonarqube-server/2025.4/server-installation/on-kubernetes-or-openshift/before-you-start.md
# Source: https://docs.sonarsource.com/sonarqube-server/2025.6/server-installation/data-center-edition/on-kubernetes-or-openshift/before-you-start.md
# Source: https://docs.sonarsource.com/sonarqube-server/2025.6/server-installation/on-kubernetes-or-openshift/before-you-start.md
# Source: https://docs.sonarsource.com/sonarqube-server/server-installation/data-center-edition/on-kubernetes-or-openshift/before-you-start.md
# Source: https://docs.sonarsource.com/sonarqube-server/server-installation/on-kubernetes-or-openshift/before-you-start.md
# Before you start
### Installation requirements
* The SonarQube Server Helm chart comes with default values for [CPU and memory requests and limits](https://artifacthub.io/packages/helm/sonarqube/sonarqube#cpu-and-memory-settings). Depending on your system, you may have to adjust them.
* See the [Helm chart documentation](https://artifacthub.io/packages/helm/sonarqube/sonarqube) for information about the supported Kubernetes and OpenShift versions.
### Production use case
In a production use case:
* Ensure that the SonarQube Server Helm chart runs in a full restricted namespace (see [#ensuring-restricted-level](https://docs.sonarsource.com/sonarqube-server/server-installation/customizing-helm-chart#ensuring-restricted-level "mention")).
* Use your own Ingress controllers.\
Ingress controllers are critical Kubernetes components, we advise users to install their own.
* Use your own database.
For more information, see the [production use case guidelines](https://artifacthub.io/packages/helm/sonarqube/sonarqube#production-use-case) in the Helm chart documentation, which we strongly recommend following.
{% hint style="danger" %}
The PostgreSQL data dependency was removed in SonarQube Server 2026.1. If you used PostgreSQL for testing purposes, you can rely on the H2 database by default. For production, migrate your data to a standalone database prior to the SonarQube Server 2026.1 update. See the[ Helm chart](https://artifacthub.io/packages/helm/sonarqube/sonarqube#upgrade) documentation for more details.
{% endhint %}
### Known limitations
As SonarQube Server is intended to be run anywhere, there are some drawbacks that are currently known when operating in Kubernetes. This list is not comprehensive, but something to keep in mind and points for us to improve on.
#### Readiness and startup delays
When persistence is disabled, SonarQube Server startup takes significantly longer as the Elasticsearch indexes need to be rebuilt. As this delay depends on the amount of data in your SonarQube Server instance, the values for the startup/readiness and liveness probes need to be adjusted to your environment. We also recommend looking at the default limits for the SonarQube Server deployment, as the amount of CPU available to SonarQube Server also impacts the startup time.
#### Problems with Azure Fileshare PVC
Currently, there is a known limitation when working with AKS due to the way Azure Fileshare uses NTFS, which cannot handle the file system permissions and properties that SonarQube Server relies on. We recommend using another storage class for persistence on AKS.
### Related pages
* [installation-overview](https://docs.sonarsource.com/sonarqube-server/server-installation/on-kubernetes-or-openshift/installation-overview "mention")
* [customizing-helm-chart](https://docs.sonarsource.com/sonarqube-server/server-installation/on-kubernetes-or-openshift/customizing-helm-chart "mention")
* [installing-helm-chart](https://docs.sonarsource.com/sonarqube-server/server-installation/on-kubernetes-or-openshift/installing-helm-chart "mention")
* [set-up-monitoring](https://docs.sonarsource.com/sonarqube-server/server-installation/on-kubernetes-or-openshift/set-up-monitoring "mention")
* Installing Data Center Edition on Kubernetes: [on-kubernetes-or-openshift](https://docs.sonarsource.com/sonarqube-server/server-installation/data-center-edition/on-kubernetes-or-openshift "mention")
---
# Source: https://docs.sonarsource.com/sonarqube-server/9.8/setup-and-upgrade/upgrade-the-server/before-you-upgrade.md
# Source: https://docs.sonarsource.com/sonarqube-server/9.9/setup-and-upgrade/upgrade-the-server/before-you-upgrade.md
# Source: https://docs.sonarsource.com/sonarqube-server/10.0/setup-and-upgrade/upgrade-the-server/before-you-upgrade.md
# Source: https://docs.sonarsource.com/sonarqube-server/10.1/setup-and-upgrade/upgrade-the-server/before-you-upgrade.md
# Source: https://docs.sonarsource.com/sonarqube-server/10.2/setup-and-upgrade/upgrade-the-server/before-you-upgrade.md
# Source: https://docs.sonarsource.com/sonarqube-server/10.3/setup-and-upgrade/upgrade-the-server/before-you-upgrade.md
# Before you upgrade
This page contains some concepts and recommendations that you should familiarize yourself with before upgrading. See the [upgrade-guide](https://docs.sonarsource.com/sonarqube-server/10.3/setup-and-upgrade/upgrade-the-server/upgrade-guide "mention") for information on the actual upgrade process.
### SonarQube version number format
Version numbers have up to three digits with each digit representing part of the release cycle:
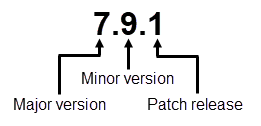
Picture explaining how to read the SonarQube version number format
**Major version number**
The major version number represents a series of releases with high-level objectives for the release cycle. It’s incremented with the release following an LTS version (for example, the release following 7.9 LTS was 8.0).
**Minor version number**
The minor version number corresponds to incremental functional changes within a major release cycle. At the time of an LTS release, the release cycle is closed and the minor version number is frozen.
**Patch release number**
The patch release number represents patches that fix blockers and critical problems.
### Migration path
Upgrading across multiple non-LTS versions is handled automatically. However, if there are one or multiple LTS versions in your migration path, you must first migrate to each intermediate LTS and then to your target version, as shown in the example below.
When upgrading to an LTS version, you should directly upgrade to its latest patch. This allows you to make sure everything runs well (see Practice your upgrade section below) with that patch.
You can upgrade from the latest LTS version to the latest non-LTS version directly. See the example below.
{% hint style="info" %}
If you’re migrating from an earlier patch version of an LTS, you can upgrade directly to the next LTS. You don’t need to install any intermediate patch versions.
{% endhint %}
**Migration path examples**:
**LTS > LTS (1)** – From 8.9 LTS > 9.9 LTS, the migration path is 8.9 LTS > 9.9 LTS\
**LTS > LTS** **(2)** – From 7.9 LTS > 9.9 LTS, the migration path is 7.9 LTS > 8.9 LTS > 9.9 LTS\
**LTS > non-LTS** – From 9.9 LTS > 10.1, the migration path is 9.9 LTS > 10.1\
**Non-LTS > LTS** – From 9.6 > 9.9 LTS, the migration path is 9.6 > 9.9 LTS\*\*\
Non-LTS > LTS > non-LTS\*\* – From 9.6 > 10.1, the migration path is 9.6 > 9.9 LTS > 10.1
### Release upgrade notes
SonarQube releases come with some specific recommendations for upgrading from the previous version. You should read the [release-upgrade-notes](https://docs.sonarsource.com/sonarqube-server/10.3/setup-and-upgrade/release-upgrade-notes "mention") for each version between your current version and the target version.
### Practice your upgrade
We recommend practicing your upgrade to:
* make sure your infrastructure can run the upgrade.
* get an idea of how long the upgrade will take.
* gain a better understanding of the upgrade process and anticipate what you’ll need to do when performing the actual upgrade.
* address any issues you encounter during the practice upgrade on the [Sonar community](https://community.sonarsource.com/).
To practice your upgrade, create a staging environment using a recent backup of your production database. You want your staging environment to be as similar to your production instance as possible because the resources and time needed to upgrade depends on what’s stored in your database. Use this staging environment to test the upgrade, observing how long it takes to back up and restore systems and complete the process.
You can use our calculator to help determine your update path.
{% @sonar-embeds/upgrade-calculator fullWidth="true" %}
---
# Source: https://docs.sonarsource.com/sonarqube-server/2025.3/advanced-security/best-practices-for-managing-dependency-risks.md
# Source: https://docs.sonarsource.com/sonarqube-server/2025.5/advanced-security/best-practices-for-managing-dependency-risks.md
# Source: https://docs.sonarsource.com/sonarqube-server/2025.4/advanced-security/best-practices-for-managing-dependency-risks.md
# Source: https://docs.sonarsource.com/sonarqube-server/2025.6/advanced-security/best-practices-for-managing-dependency-risks.md
# Source: https://docs.sonarsource.com/sonarqube-server/advanced-security/best-practices-for-managing-dependency-risks.md
# Source: https://docs.sonarsource.com/sonarqube-cloud/advanced-security/best-practices-for-managing-dependency-risks.md
# Best practices for managing dependency risks
Advanced Security is an add-on that requires a separate subscription to your SonarQube Cloud's [Enterprise plan](https://www.sonarsource.com/plans-and-pricing/#sonarqube-cloud-features).
Managing dependency risks from SCA is differs from fixing issues in first-party code in a number of ways. Here are some recommendations.
### How dependency risks differ from issues
First-party code issues can be fixed entirely by your developers. Even where they may require some internal refactoring, 95% of the time a developer can fix a first-party Sonar code without leaving their codebase, and without having to adjust other code in their application.
That isn’t the case with dependency risks. Dependency risks require updating your open source dependencies to new versions. Moving to a new version of a dependency could require any or all of the following larger changes:
* Adjusting code throughout your application to call new or changed APIs.
* Data migration to new file formats if the new dependency version requires it.
* Moving to entirely an entirely new version of your language runtime (such as Java 21) if the new version of the dependency requires it.
Because of this, the typical dependency risk takes significantly longer to fix than a typical Sonar code issue. Oftentimes development teams will need to schedule explicit technical debt work to perform needed dependency upgrades.
#### Some risks require replacing the entire package
Open source packages do not change licenses often. If a risk is found where you are using a third-party dependency with a license that is unfit for your organization, in the overwhelming majority of cases, the only available fix is to move to a different dependency entirely. This can be an effort of hours, weeks, or even months in the case of major framework migrations.
#### The initial work can be large
If you have not previously had good dependency management practices, you may be surprised by the number of direct and transitive issues that are discovered for your projects. The scope of burning down this initial backlog of risk is usually larger than can be added to your developers’ plates to be handled in an ad-hoc manner while they do their normal day-to-day work.
Because of the differences in how dependency risks are resolved by developers, Sonar recommends the following practices for successful onboarding of the SCA features of Advanced Security in a large organization.
### Best practices
#### Start small
The initial [SCA analyses](https://docs.sonarsource.com/sonarqube-cloud/advanced-security/analyzing-projects-for-dependencies-sca) will likely create a backlog of issues that need to be triaged and addressed, especially if you had no prior SCA process in place.
* Start with one developer team to refine rollout processes.
* Choose a team committed to refining the process and willing to be a reference.
* The team should have time to spend working through a backlog of initially discovered risks.
#### Determine how you want to handle license compliance
The appropriate [license policy](https://docs.sonarsource.com/sonarqube-cloud/advanced-security/managing-license-profiles-and-policies) for a piece of software in your organization can depend on:
* what the license of your own code is
* where and how the application is deployed (internal only, network facing, delivered as an artifact to customers)
* how it uses and invokes those dependencies
* your own organization’s level of risk tolerance
There is no one-size-fits-all approach to license compliance. Work with your legal contact to create an appropriate license profile for the applications produced by your first developer team. Create multiple profiles as necessary based on the characteristics of your applications.
#### Only enforce a quality gate on new code
To avoid shutting down ongoing development due to a tightly configured [quality gate](https://docs.sonarsource.com/sonarqube-cloud/improving/quality-gates) when tackling dependency risks, start enforcement by only enforcing quality on [newly added code](https://docs.sonarsource.com/sonarqube-cloud/standards/about-new-code) / on pull requests.
To ensures no new, real, risk is added to your codebase, a good first start is by adding the “Severity of a dependency risk is greater than Info” condition for new code.
#### Begin reducing existing risk outside of a quality gate
Once you are no longer bringing in new risks into your codebase, you can then address the backlog of initial risks.
Start by addressing the most severe (any Blocker or High risks). Work with your development team to:
* evaluate how the risk applies to your code. You may be able to mark them as safe as you research how it affects your environment.
* perform any necessary dependency upgrades or implement any workarounds.
Once you have worked with your development team to understand how quickly they can remediate these risks and perform these upgrades, you can then determine how strict of a quality gate is appropriate for overall code.
#### When ready, enforce a quality gate on overall code
A quality gate on overall code means that *merging of new code will be broken for any new publicly disclosed vulnerability*. Before you enable such a quality gate, you need to ensure that your development team is able to handle these risks when they arise.
Once you are comfortable that your development team is able to quickly remediate new public issues, you can add a quality gate condition such as “Severity of a dependency risk is greater than Medium”
This ensures that production code drops will stop whenever a newly discovered High or Blocker issue, forcing the development team to address it.
#### Track your work
You can measure your success in dependency risk management by tracking the risk over time in your applications.
Track how over time the number of risks, and their severity, drops across your applications. This shows you how your developers are reducing risk in your organization, and how fast they are eliminating risks as they appear.
#### Expand the circle
Once you have gone through these steps with one development team in your organization, you can expand the circle. Take your notes and processes that you have developed, and repeat the steps with another team. Use your first team as a reference to help onboard subsequent teams. As you expand, you will be able to build a culture of dependency management practices throughout your organization.
---
# Source: https://docs.sonarsource.com/sonarqube-cloud/administering-sonarcloud/managing-subscription/billing-model.md
# Billing model
### Billing methods
The billing method is different depending on the plan.
Team
In SonarQube Cloud each Team plan organization is billed separately. Payment information is always specific to a particular organization, it is not tied to the DevOps platform account that you signed in with.
You can use the following billing methods:
* Monthly with credit card: You have to provide your credit card details and your credit card will be automatically charged every month. With the new billing customer portal, the currency used (EUR, GBP, JPY, or USD) will depend on your billing country.\
This method is supported only for the Team plan.
* Custom with coupon: You must [contact our team](https://www.sonarsource.com/company/contact/) to purchase a coupon, which is usually valid for one year.\
This method is supported for the Team and Enterprise plans.
{% hint style="warning" %}
We recently introduced a new billing customer portal that is currently only available to new customers.
{% endhint %}
Enterprise
The Enterprise plan is now based on an enterprise-level subscription. You must [contact our team](https://www.sonarsource.com/company/contact/) to purchase a one-year or multi-year license, billed annually.
{% hint style="info" %}
Indirect taxes may be added to your subscription fee. See [viewing-taxes-and-invoices](https://docs.sonarsource.com/sonarqube-cloud/administering-sonarcloud/managing-subscription/viewing-taxes-and-invoices "mention") for more information.
{% endhint %}
### Free trial
When you sign up for a monthly paid plan (with credit card payment), a 14-days free trial is offered.
If you sign up with a coupon, a custom trial may be associated with the coupon.
### Automatic renewal of monthly subscriptions
Paid plan subscriptions automatically renew every month by automatically charging your credit card.
### If the renewal payment fails or your coupon or license expires
If your credit card is rejected multiple times or if your coupon or license expires, your private projects will be suspended. New analyses will no longer be possible on those projects but all your data will be preserved. The private projects will remain private, nothing will be deleted, and organization members will still be able to access all the data of these projects.
You can re-activate these projects simply by correcting your credit card problem and re-entering the credit card information (even if it is the same as your previous one), or entering a new coupon or license. You may also downgrade to the Free plan in which you can benefit from the analysis of up to 50k lines of private code. See [changing-plan](https://docs.sonarsource.com/sonarqube-cloud/administering-sonarcloud/managing-subscription/changing-plan "mention") for more information.
If you abandon your account by failing to renew or update payment information for a long period of time, your private projects will eventually be deleted. However, we will always attempt to reach out and warn you to remedy the situation before this happens.
{% hint style="info" %}
Two months prior to the enterprise license expiration, a banner warning of upcoming license expiration will be displayed to all users. In that case, please have your admin [contact our team](https://www.sonarsource.com/company/contact/) to renew your license.
{% endhint %}
### Related pages
* [subscription-plans](https://docs.sonarsource.com/sonarqube-cloud/administering-sonarcloud/managing-subscription/subscription-plans "mention")
* [signing-up-for-plan](https://docs.sonarsource.com/sonarqube-cloud/administering-sonarcloud/managing-subscription/signing-up-for-plan "mention")
* [changing-plan](https://docs.sonarsource.com/sonarqube-cloud/administering-sonarcloud/managing-subscription/changing-plan "mention")
* [updating-billing-payment-details](https://docs.sonarsource.com/sonarqube-cloud/administering-sonarcloud/managing-subscription/updating-billing-payment-details "mention")
* [viewing-billing-and-usage](https://docs.sonarsource.com/sonarqube-cloud/administering-sonarcloud/managing-subscription/viewing-billing-and-usage "mention")
* [viewing-taxes-and-invoices](https://docs.sonarsource.com/sonarqube-cloud/administering-sonarcloud/managing-subscription/viewing-taxes-and-invoices "mention")
---
# Source: https://docs.sonarsource.com/sonarqube-cloud/administering-sonarcloud/managing-organization/creating-organization/binding-unbound-organization.md
# Binding an unbound organization
If you created your organization manually, then it’s not bound to its corresponding DevOps platform organization and you don’t benefit from many advantages. This procedure explains how to bind your unbound organization. See [binding-with-dop](https://docs.sonarsource.com/sonarqube-cloud/administering-sonarcloud/about-sonarqube-cloud-solution/ressources-structure/binding-with-dop "mention") for more information. To do so, you need the corresponding permissions on your DevOps platform.
{% hint style="warning" %}
* You cannot unbind nor change the binding of an organization bound to a GitLab group or an Azure organization.
* If the binding fails because the organization already exists in SonarQube Cloud and you’ve lost administrator access to this organization, send a request to with all the necessary details.
{% endhint %}
### Binding to a GitHub organization
You must be an owner of the GitHub organization.
To bind your unbound organization to a GitHub organization:
1. Log in to SonarQube Cloud with your GitHub account.\
If you’re a member of an enterprise, you may use any of your DevOps Platform accounts or your SSO account. In that case, see [importing-from-multiple-platforms](https://docs.sonarsource.com/sonarqube-cloud/administering-sonarcloud/managing-organization/creating-organization/importing-from-multiple-platforms "mention") for important insights.
2. Retrieve your organization. See [viewing-organizations](https://docs.sonarsource.com/sonarqube-cloud/getting-started/viewing-organizations "mention") for more information.
3. Go to **Administration** > **Organization settings** > **Organization binding**.
4. Select the **GitHub** button. The **Install SonarQube Cloud** page opens. The SonarQube Cloud app is required to allow SonarQube Cloud to access your GitHub organization.
5. Select the GitHub organization you want to import.
6. In **Repository access**, you can restrict access to the Git repositories that can be imported to SonarQube Cloud for analysis. You can always change this setting later, see [importing-github-organization](https://docs.sonarsource.com/sonarqube-cloud/administering-sonarcloud/managing-organization/creating-organization/importing-github-organization "mention") for more details.
7. Select **Save**. Your SonarQube Cloud organization is bound.
### Binding to a Bitbucket Cloud workspace
You must be an administrator of the Bitbucket workspace:
* You will already be an administrator of your default workspace.
* For any other workspace, you have to add your Bitbucket account to a user group with the **Administer workspace** user right enabled.
To bind your unbound organization to a Bitbucket workspace:
1. Log in to SonarQube Cloud with your Bitbucket account.
2. Retrieve your organization. See [viewing-organizations](https://docs.sonarsource.com/sonarqube-cloud/getting-started/viewing-organizations "mention") for more information.
3. Go to **Administration** > **Organization settings** > **Organization binding**.
4. Select the **Bitbucket** button.
5. When prompted, grant access to the SonarQube Cloud application to read your Bitbucket Cloud workspace. SonarQube Cloud requests access for:
* Reading your account information.
* Reading your repositories and their pull requests.
* Reading your team membership information.
### Binding to a GitLab group
You can bind your SonarQube Cloud organization to:
* Any GitLab parent group of which you’re the owner.
* Your personal GitLab group. This group refers to the repositories that are under your personal namespace.
To bind your unbound organization to a GitLab group:
1. In GitLab, create the personal access token required by SonarQube Cloud to access the GitLab group. See [#create-personal-access-token](https://docs.sonarsource.com/sonarqube-cloud/administering-sonarcloud/managing-organization/importing-gitlab-group#create-personal-access-token "mention") for more details.
2. Log in to SonarQube Cloud with your GitLab account.\
If you’re a member of an enterprise, you may use any of your DevOps Platform accounts or your SSO account. In that case, see [importing-from-multiple-platforms](https://docs.sonarsource.com/sonarqube-cloud/administering-sonarcloud/managing-organization/creating-organization/importing-from-multiple-platforms "mention") for important insights.
3. Retrieve your organization. See [viewing-organizations](https://docs.sonarsource.com/sonarqube-cloud/getting-started/viewing-organizations "mention") for more information.
4. Go to **Administration** > **Organization settings** > **Organization binding**.
5. Select the **GitLab** button.
6. Select either
* **Import any GitLab group**, if you want to import a GitLab group other than your personal one, or
* **Import my personal GitLab group**, if you want to import only the repositories that are under your personal namespace.
7. **In GitLab group key** (if you don’t import your personal GitLab group), enter the group key. To retrieve the key, see [#retrieve-group-key](https://docs.sonarsource.com/sonarqube-cloud/administering-sonarcloud/managing-organization/importing-gitlab-group#retrieve-group-key "mention") for more information.
8. In **Personal Access Token**, paste the personal access token you created in the first step.
### Binding to an Azure DevOps organization
You must be an administrator of the Azure DevOps organization.
To bind your unbound organization to an Azure DevOps organization:
1. In Azure DevOps, create the Personal Access Token (PAT) required by SonarQube Cloud to access the Azure DevOps organization. See [#create-pat](https://docs.sonarsource.com/sonarqube-cloud/administering-sonarcloud/managing-organization/importing-azure-devops-organization#create-pat "mention") for more information.
2. Log in to SonarQube Cloud with your Azure DevOps account.\
If you’re a member of an enterprise, you may use any of your DevOps Platform accounts or your SSO account. In that case, see [importing-from-multiple-platforms](https://docs.sonarsource.com/sonarqube-cloud/administering-sonarcloud/managing-organization/creating-organization/importing-from-multiple-platforms "mention") for important insights.
3. Retrieve your organization. See [viewing-organizations](https://docs.sonarsource.com/sonarqube-cloud/getting-started/viewing-organizations "mention") for more information.
4. Go to **Administration** > **Organization settings** > **Organization binding**.
5. Select the **Azure DevOps** button.
6. Follow the instructions.
7. In **Personal Access Token**, paste the PAT you created in the first step.
### Related pages
* [importing-github-organization](https://docs.sonarsource.com/sonarqube-cloud/administering-sonarcloud/managing-organization/creating-organization/importing-github-organization "mention")
* [importing-bitbucket-workspace](https://docs.sonarsource.com/sonarqube-cloud/administering-sonarcloud/managing-organization/creating-organization/importing-bitbucket-workspace "mention")
* [importing-gitlab-group](https://docs.sonarsource.com/sonarqube-cloud/administering-sonarcloud/managing-organization/creating-organization/importing-gitlab-group "mention")
* [importing-azure-devops-organization](https://docs.sonarsource.com/sonarqube-cloud/administering-sonarcloud/managing-organization/creating-organization/importing-azure-devops-organization "mention")
* [creating-organization-manually](https://docs.sonarsource.com/sonarqube-cloud/administering-sonarcloud/managing-organization/creating-organization/creating-organization-manually "mention")
* [changing-organization-binding](https://docs.sonarsource.com/sonarqube-cloud/administering-sonarcloud/managing-organization/creating-organization/changing-organization-binding "mention")
* [changing-organization-settings](https://docs.sonarsource.com/sonarqube-cloud/administering-sonarcloud/managing-organization/creating-organization/changing-organization-settings "mention")
* [deleting-organization](https://docs.sonarsource.com/sonarqube-cloud/administering-sonarcloud/managing-organization/creating-organization/deleting-organization "mention")
* [importing-from-multiple-platforms](https://docs.sonarsource.com/sonarqube-cloud/administering-sonarcloud/managing-organization/creating-organization/importing-from-multiple-platforms "mention")
---
# Source: https://docs.sonarsource.com/sonarqube-cloud/administering-sonarcloud/about-sonarqube-cloud-solution/ressources-structure/binding-with-dop.md
# Binding with the DevOps platform
Through the integration of SonarQube Cloud with your DevOps platform (GitHub, Bitbucket Cloud, GitLab, or Azure DevOps), your organizations and projects in SonarQube Cloud are bound to their respective organization or repository on the DevOps platform.
The following applies:
* The binding is performed automatically by importing the DevOps organization and its repositories into SonarQube Cloud. Note that you cannot import repositories into SonarQube Cloud if the respective DevOps organization has not been imported into SonarQube Cloud.
* If you create organizations or projects manually (i.e., without importing the DevOps organizations or projects), they are not bound with any peers on the DevOps platform. Manual organizations and projects are like empty containers identified solely by their keys, which you choose when you create them. They are only linked to your code by you explicitly setting the analysis parameters sonar.projectKey and `sonar.organization` to those keys in your CI-based analysis setup. [automatic-analysis](https://docs.sonarsource.com/sonarqube-cloud/advanced-setup/automatic-analysis "mention") is not supported for manual projects.
{% hint style="info" %}
* You can bind an unbound project and you can bind a bound project to another repository.
* You can bind an unbound organization but you cannot change the binding of a bound organization.
{% endhint %}
The binding presents many advantages as described below.
### Advantages of bound organizations
The advantages of bound SonarQube Cloud organizations over unbound ones are:
* Bound organizations enable the easy selection and import of projects into SonarQube Cloud, as mentioned above.
* Bound organizations support automatic member synchronization. This feature is only supported with GitHub, see [devops-platform-authentication](https://docs.sonarsource.com/sonarqube-cloud/administering-sonarcloud/about-sonarqube-cloud-solution/user-management/devops-platform-authentication "mention") for more details.
* Importing a project via a bound organization is the only way to create a bound project, and bound projects have their own set of advantages.
### Advantages of bound projects
The advantages of bound SonarQube Cloud projects over unbound ones are:
* [automatic-analysis](https://docs.sonarsource.com/sonarqube-cloud/advanced-setup/automatic-analysis "mention") is only available for bound projects. This feature is only supported with GitHub.
* The pull request decoration is automatically configured on bound projects if your CI tool is integrated with SonarQube Cloud.
* Upon import, bound projects on the SonarQube Cloud side automatically adopt the privacy setting of their DevOps platform peer. Projects that are private on the DevOps platform remain private on SonarQube Cloud. With manually created projects, you must make sure to explicitly set the privacy status of your SonarQube Cloud project. This opens up the possibility of inadvertently exposing the code of a private project to the public through SonarQube Cloud.
### Related pages
* [binding-unbound-organization](https://docs.sonarsource.com/sonarqube-cloud/administering-sonarcloud/managing-organization/creating-organization/binding-unbound-organization "mention")
* [changing-binding](https://docs.sonarsource.com/sonarqube-cloud/managing-your-projects/administering-your-projects/changing-binding "mention")
---
# Source: https://docs.sonarsource.com/sonarqube-community-build/devops-platform-integration/bitbucket-integration/bitbucket-cloud-integration.md
# Source: https://docs.sonarsource.com/sonarqube-server/8.9/alm-integration/bitbucket-cloud-integration.md
# Source: https://docs.sonarsource.com/sonarqube-server/9.8/devops-platform-integration/bitbucket-integration/bitbucket-cloud-integration.md
# Source: https://docs.sonarsource.com/sonarqube-server/9.9/devops-platform-integration/bitbucket-integration/bitbucket-cloud-integration.md
# Source: https://docs.sonarsource.com/sonarqube-server/10.0/devops-platform-integration/bitbucket-integration/bitbucket-cloud-integration.md
# Source: https://docs.sonarsource.com/sonarqube-server/10.1/devops-platform-integration/bitbucket-integration/bitbucket-cloud-integration.md
# Source: https://docs.sonarsource.com/sonarqube-server/10.2/devops-platform-integration/bitbucket-integration/bitbucket-cloud-integration.md
# Source: https://docs.sonarsource.com/sonarqube-server/10.3/devops-platform-integration/bitbucket-integration/bitbucket-cloud-integration.md
# Source: https://docs.sonarsource.com/sonarqube-server/10.4/devops-platform-integration/bitbucket-integration/bitbucket-cloud-integration.md
# Source: https://docs.sonarsource.com/sonarqube-server/10.5/devops-platform-integration/bitbucket-integration/bitbucket-cloud-integration.md
# Source: https://docs.sonarsource.com/sonarqube-server/10.6/devops-platform-integration/bitbucket-integration/bitbucket-cloud-integration.md
# Source: https://docs.sonarsource.com/sonarqube-server/10.7/devops-platform-integration/bitbucket-integration/bitbucket-cloud-integration.md
# Source: https://docs.sonarsource.com/sonarqube-server/10.8/devops-platform-integration/bitbucket-integration/bitbucket-cloud-integration.md
# Source: https://docs.sonarsource.com/sonarqube-server/2025.2/devops-platform-integration/bitbucket-integration/bitbucket-cloud-integration.md
# Source: https://docs.sonarsource.com/sonarqube-server/2025.3/devops-platform-integration/bitbucket-integration/bitbucket-cloud-integration.md
# Source: https://docs.sonarsource.com/sonarqube-server/2025.5/devops-platform-integration/bitbucket-integration/bitbucket-cloud-integration.md
# Source: https://docs.sonarsource.com/sonarqube-server/2025.1/devops-platform-integration/bitbucket-integration/bitbucket-cloud-integration.md
# Source: https://docs.sonarsource.com/sonarqube-server/2025.4/devops-platform-integration/bitbucket-integration/bitbucket-cloud-integration.md
# Source: https://docs.sonarsource.com/sonarqube-server/2025.6/devops-platform-integration/bitbucket-integration/bitbucket-cloud-integration.md
# Source: https://docs.sonarsource.com/sonarqube-server/devops-platform-integration/bitbucket-integration/bitbucket-cloud-integration.md
# Bitbucket Cloud integration
- [Introduction to Bitbucket Cloud integration](/sonarqube-server/devops-platform-integration/bitbucket-integration/bitbucket-cloud-integration/introduction.md): SonarQube Server’s integration with Bitbucket Cloud allows you to maintain code quality and security in your Bitbucket Cloud repositories.
- [Setting up Bitbucket Cloud integration at global level](/sonarqube-server/devops-platform-integration/bitbucket-integration/bitbucket-cloud-integration/global.md): How to set up Bitbucket Cloud and SonarQube Server for integration at the global level.
- [Importing Bitbucket Cloud repositories](/sonarqube-server/devops-platform-integration/bitbucket-integration/bitbucket-cloud-integration/import-repos.md): How to import your Bitbucket Cloud repositories into SonarQube Server.
- [Setting up Bitbucket Cloud integration for your project](/sonarqube-server/devops-platform-integration/bitbucket-integration/bitbucket-cloud-integration/project.md): How to set up Bibucket Cloud integration features for your SonarQube Server project.
- [Adding analysis to Bitbucket pipeline](/sonarqube-server/devops-platform-integration/bitbucket-integration/bitbucket-cloud-integration/bitbucket-pipelines.md): How to add SonarQube Server analysis to Bitbucket Pipelines.
- [Troubleshooting](/sonarqube-server/devops-platform-integration/bitbucket-integration/bitbucket-cloud-integration/troubleshooting.md): Troubleshooting issues when integrating SonarQube Server with Bitbucket Cloud.
---
# Source: https://docs.sonarsource.com/sonarqube-community-build/instance-administration/authentication/bitbucket-cloud.md
# Source: https://docs.sonarsource.com/sonarqube-server/9.8/instance-administration/authentication/bitbucket-cloud.md
# Source: https://docs.sonarsource.com/sonarqube-server/9.9/instance-administration/authentication/bitbucket-cloud.md
# Source: https://docs.sonarsource.com/sonarqube-server/10.0/instance-administration/authentication/bitbucket-cloud.md
# Source: https://docs.sonarsource.com/sonarqube-server/10.1/instance-administration/authentication/bitbucket-cloud.md
# Source: https://docs.sonarsource.com/sonarqube-server/10.2/instance-administration/authentication/bitbucket-cloud.md
# Source: https://docs.sonarsource.com/sonarqube-server/10.3/instance-administration/authentication/bitbucket-cloud.md
# Source: https://docs.sonarsource.com/sonarqube-server/10.4/instance-administration/authentication/bitbucket-cloud.md
# Source: https://docs.sonarsource.com/sonarqube-server/10.5/instance-administration/authentication/bitbucket-cloud.md
# Source: https://docs.sonarsource.com/sonarqube-server/10.6/instance-administration/authentication/bitbucket-cloud.md
# Source: https://docs.sonarsource.com/sonarqube-server/10.7/instance-administration/authentication/bitbucket-cloud.md
# Source: https://docs.sonarsource.com/sonarqube-server/10.8/instance-administration/authentication/bitbucket-cloud.md
# Source: https://docs.sonarsource.com/sonarqube-server/2025.2/instance-administration/authentication/bitbucket-cloud.md
# Source: https://docs.sonarsource.com/sonarqube-server/2025.3/instance-administration/authentication/bitbucket-cloud.md
# Source: https://docs.sonarsource.com/sonarqube-server/2025.5/instance-administration/authentication/bitbucket-cloud.md
# Source: https://docs.sonarsource.com/sonarqube-server/2025.1/instance-administration/authentication/bitbucket-cloud.md
# Source: https://docs.sonarsource.com/sonarqube-server/2025.4/instance-administration/authentication/bitbucket-cloud.md
# Source: https://docs.sonarsource.com/sonarqube-server/2025.6/instance-administration/authentication/bitbucket-cloud.md
# Source: https://docs.sonarsource.com/sonarqube-server/instance-administration/authentication/bitbucket-cloud.md
# Source: https://docs.sonarsource.com/sonarqube-cloud/managing-your-projects/administering-your-projects/devops-platform-integration/bitbucket-cloud.md
# Source: https://docs.sonarsource.com/sonarqube-cloud/managing-your-projects/issues/in-devops-platform/bitbucket-cloud.md
# Source: https://docs.sonarsource.com/sonarqube-cloud/getting-started/bitbucket-cloud.md
# Analyzing Bitbucket Cloud projects
If your code is on Bitbucket Cloud, go to the [SonarQube Cloud](https://www.sonarsource.com/products/sonarcloud/) product page and choose **Set up** or **Login**, then select **Bitbucket** from the list of DevOps cloud platforms.
You will be taken to the Bitbucket login page. Sign in using your Bitbucket credentials.
### Welcome to SonarQube Cloud
Once you have successfully logged in, you will see the SonarQube Cloud welcome screen.
Select **Import projects from Bitbucket**.
### Set up your organization
You must be an administrator of the Bitbucket workspace.
For a complete setup overview, see [setup-overview](https://docs.sonarsource.com/sonarqube-cloud/administering-sonarcloud/managing-organization/setup-overview "mention").
#### Connect your Bitbucket Cloud workspace to SonarQube Cloud
When prompted, grant access to the SonarQube Cloud application to read your Bitbucket Cloud workspace. SonarQube Cloud requests access for:
* reading your account information.
* reading your repositories and their pull requests.
* reading your team membership information.
{% hint style="info" %}
You must be an administrator of the workspace that contains the repository you want to analyze. You will already be an administrator of your default workspace. For any other workspace, you have to add your Bitbucket account to a user group with the **Administer workspace** user right enabled.
{% endhint %}
{% hint style="info" %}
To avoid exceeding [Bitbucket Cloud API rate limits](https://support.atlassian.com/bitbucket-cloud/docs/api-request-limits/), it is recommended to use a dedicated Bitbucket user for SonarQube Cloud integration.
{% endhint %}
#### Create your SonarQube Cloud organization
SonarQube Cloud is set up to mirror the way that code is organized in Bitbucket Cloud (and other repository providers):
* Each *SonarQube Cloud project* corresponds one-to-one with a *Bitbucket Git repository*.
* *Bitbucket projects* are grouped into *Bitbucket workspaces*.
* Each *SonarQube Cloud organization* corresponds one-to-one with a *Bitbucket workspace*.
{% hint style="info" %}
Bitbucket Git repositories are grouped into Bitbucket projects. Bitbucket projects cannot be linked to SonarQube projects; instead the link is on the Git repository level.
{% endhint %}
In this step, you will create a SonarQube Cloud organization that corresponds to your Bitbucket workspace.
SonarQube Cloud will suggest a *key* for your SonarQube Cloud organization. This is a name unique across all organizations within SonarQube Cloud. You can accept the suggestion or change it manually. The interface will prevent you from changing it to an already existing key.
{% hint style="warning" %}
SonarQube Cloud does not support linking an organization to more than one DevOps platform. If you want to link to more than one, you will need to create a separate organization to link to each DevOps service.
{% endhint %}
For more information, see [importing-bitbucket-workspace](https://docs.sonarsource.com/sonarqube-cloud/administering-sonarcloud/managing-organization/creating-organization/importing-bitbucket-workspace "mention").
#### Choose a plan
Next, you will be asked to choose a SonarQube Cloud subscription plan. See [subscription-plans](https://docs.sonarsource.com/sonarqube-cloud/administering-sonarcloud/managing-subscription/subscription-plans "mention") for a comparison between the different plans.
If you want to analyze more than 50k lines of private code, then you need to select the Team or Enterprise plan. Monthly plans offer a 14-day free trial period. Once the 14 days have elapsed, the cost is based on the number of lines of code analyzed. For more information, see [#loc-based-pricing](https://docs.sonarsource.com/sonarqube-cloud/administering-sonarcloud/managing-subscription/subscription-plans#loc-based-pricing "mention").
Once you have chosen a plan and clicked **Create Organization**, your SonarQube Cloud organization will be created!
### Set up your analysis
#### Import repositories
The next step is to import the projects (that is, individual Git repositories) that you want to analyze from your Bitbucket workspace into your newly created SonarQube Cloud organization. A corresponding SonarQube Cloud project will be created for each.
SonarQube Cloud will present a list of the repositories in your Bitbucket workspace. The selected projects will be imported.
### Choose your new code definition
The next step is to set the **New Code Definition** (NCD) for your project(s). The NCD is a mandatory step and it defines which part of your code is considered *new code*. This helps you to focus your attention on the most recent changes to your code.
{% hint style="info" %}
Note that the new code definition you apply at this stage will apply to all of the projects you have selected for analysis. You can change your new code definition later on a per-project basis.
To do this, go to *Your Project* > **Administration** > **New Code.**
{% endhint %}
For more information, check out the [about-new-code](https://docs.sonarsource.com/sonarqube-cloud/standards/about-new-code "mention") page.
#### Configure analysis
With Bitbucket Cloud projects, the actual analysis is performed in your build environment (cloud CI, local machine, etc.). This means you have to configure your build process to perform the analysis on each build and communicate the results up to SonarQube Cloud.
{% hint style="info" %}
We refer to this analysis method as *CI-based analysis* (though it may take place in a cloud CI or a manually configured build environment) to contrast it with *automatic analysis* which works by SonarQube Cloud directly accessing your repository and performing the analysis itself. However, [automatic-analysis](https://docs.sonarsource.com/sonarqube-cloud/advanced-setup/automatic-analysis "mention") is currently available only for GitHub projects; it is currently not available for Bitbucket Cloud projects.
{% endhint %}
SonarQube Cloud will guide you through a tutorial on how to set up your build environment to perform analysis.
The first step is to select your build environment. SonarQube Cloud will present this page:
If you have no particular preference and are setting up a new project on Bitbucket Cloud, we recommend using Bitbucket Pipelines as your CI.
Follow the in-product tutorial to correctly set up your analysis.
### See your analysis results
Once it is complete, you can view the results of your first analysis. SonarQube Cloud also displays some result data directly in the Bitbucket cloud interface itself.
In addition, please see the page on [bitbucket-pipelines-for-sonarcloud](https://docs.sonarsource.com/sonarqube-cloud/advanced-setup/ci-based-analysis/bitbucket-pipelines-for-sonarcloud "mention") to integrate SonarQube Cloud into your Bitbucket pipeline.
{% hint style="warning" %}
If you log into SonarQube Cloud using an email address that you previously used to log into another DevOps platform, you need to be aware that SonarQube Cloud will automatically associate your email address with the new DevOps platform.
For example, if you log in through Bitbucket Cloud and previously used GitHub, GitHub issues will no longer be assigned to your email address and you will stop receiving GitHub email notifications. If you then decide to switch back to GitHub, the Bitbucket Cloud email notifications will be discontinued.
{% endhint %}
### Sample projects
You can take a look at these various projects: [Sample projects analyzed on SonarQube Cloud](https://bitbucket.org/account/user/sonarsource/projects/SAMPLES).
### Related pages
* [importing-bitbucket-workspace](https://docs.sonarsource.com/sonarqube-cloud/administering-sonarcloud/managing-organization/creating-organization/importing-bitbucket-workspace "mention")
* [setting-up-project](https://docs.sonarsource.com/sonarqube-cloud/managing-your-projects/administering-your-projects/setting-up-project "mention")
* [bitbucket-cloud](https://docs.sonarsource.com/sonarqube-cloud/managing-your-projects/administering-your-projects/devops-platform-integration/bitbucket-cloud "mention")
* [bitbucket-pipelines-for-sonarcloud](https://docs.sonarsource.com/sonarqube-cloud/advanced-setup/ci-based-analysis/bitbucket-pipelines-for-sonarcloud "mention")
---
# Source: https://docs.sonarsource.com/sonarqube-community-build/devops-platform-integration/bitbucket-integration.md
# Source: https://docs.sonarsource.com/sonarqube-server/9.8/devops-platform-integration/bitbucket-integration.md
# Source: https://docs.sonarsource.com/sonarqube-server/9.9/devops-platform-integration/bitbucket-integration.md
# Source: https://docs.sonarsource.com/sonarqube-server/10.0/devops-platform-integration/bitbucket-integration.md
# Source: https://docs.sonarsource.com/sonarqube-server/10.1/devops-platform-integration/bitbucket-integration.md
# Source: https://docs.sonarsource.com/sonarqube-server/10.2/devops-platform-integration/bitbucket-integration.md
# Source: https://docs.sonarsource.com/sonarqube-server/10.3/devops-platform-integration/bitbucket-integration.md
# Source: https://docs.sonarsource.com/sonarqube-server/10.4/devops-platform-integration/bitbucket-integration.md
# Source: https://docs.sonarsource.com/sonarqube-server/10.5/devops-platform-integration/bitbucket-integration.md
# Source: https://docs.sonarsource.com/sonarqube-server/10.6/devops-platform-integration/bitbucket-integration.md
# Source: https://docs.sonarsource.com/sonarqube-server/10.7/devops-platform-integration/bitbucket-integration.md
# Source: https://docs.sonarsource.com/sonarqube-server/10.8/devops-platform-integration/bitbucket-integration.md
# Source: https://docs.sonarsource.com/sonarqube-server/2025.2/devops-platform-integration/bitbucket-integration.md
# Source: https://docs.sonarsource.com/sonarqube-server/2025.3/devops-platform-integration/bitbucket-integration.md
# Source: https://docs.sonarsource.com/sonarqube-server/2025.5/devops-platform-integration/bitbucket-integration.md
# Source: https://docs.sonarsource.com/sonarqube-server/2025.1/devops-platform-integration/bitbucket-integration.md
# Source: https://docs.sonarsource.com/sonarqube-server/2025.4/devops-platform-integration/bitbucket-integration.md
# Source: https://docs.sonarsource.com/sonarqube-server/2025.6/devops-platform-integration/bitbucket-integration.md
# Source: https://docs.sonarsource.com/sonarqube-server/devops-platform-integration/bitbucket-integration.md
# Bitbucket integration
- [Bitbucket Data Center](/sonarqube-server/devops-platform-integration/bitbucket-integration/bitbucket-server-integration.md): SonarQube Server’s integration with Bitbucket Data Center allows you to maintain code quality and security in your Bitbucket repositories.
- [Setting up Bitbucket Data Center integration at global level](/sonarqube-server/devops-platform-integration/bitbucket-integration/bitbucket-server-integration/global.md): How to set up Bitbucket Data Center and SonarQube Server for integration at the global level.
- [Importing your Bitbucket Data Center repositories](/sonarqube-server/devops-platform-integration/bitbucket-integration/bitbucket-server-integration/import-repos.md): How to import your Bitbucket Data Center repositories into SonarQube Server.
- [Setting up Bitbucket Data Center integration for your project](/sonarqube-server/devops-platform-integration/bitbucket-integration/bitbucket-server-integration/project.md): How to set up Bibucket Data Center integration features for your SonarQube Server project.
- [Bitbucket Cloud integration](/sonarqube-server/devops-platform-integration/bitbucket-integration/bitbucket-cloud-integration.md): SonarQube Server’s integration with Bitbucket Cloud.
- [Introduction to Bitbucket Cloud integration](/sonarqube-server/devops-platform-integration/bitbucket-integration/bitbucket-cloud-integration/introduction.md): SonarQube Server’s integration with Bitbucket Cloud allows you to maintain code quality and security in your Bitbucket Cloud repositories.
- [Setting up Bitbucket Cloud integration at global level](/sonarqube-server/devops-platform-integration/bitbucket-integration/bitbucket-cloud-integration/global.md): How to set up Bitbucket Cloud and SonarQube Server for integration at the global level.
- [Importing Bitbucket Cloud repositories](/sonarqube-server/devops-platform-integration/bitbucket-integration/bitbucket-cloud-integration/import-repos.md): How to import your Bitbucket Cloud repositories into SonarQube Server.
- [Setting up Bitbucket Cloud integration for your project](/sonarqube-server/devops-platform-integration/bitbucket-integration/bitbucket-cloud-integration/project.md): How to set up Bibucket Cloud integration features for your SonarQube Server project.
- [Adding analysis to Bitbucket pipeline](/sonarqube-server/devops-platform-integration/bitbucket-integration/bitbucket-cloud-integration/bitbucket-pipelines.md): How to add SonarQube Server analysis to Bitbucket Pipelines.
- [Troubleshooting](/sonarqube-server/devops-platform-integration/bitbucket-integration/bitbucket-cloud-integration/troubleshooting.md): Troubleshooting issues when integrating SonarQube Server with Bitbucket Cloud.
---
# Source: https://docs.sonarsource.com/sonarqube-cloud/advanced-setup/ci-based-analysis/bitbucket-pipelines-for-sonarcloud.md
# Bitbucket Pipelines
Once your project is created and initiated from the repository you selected, you can follow the tutorial to configure your analysis with Bitbucket Pipelines.
### Launch your analysis and check your Quality Gate
Launch analyses with the [SonarQube Cloud Scan](https://bitbucket.org/sonarsource/sonarcloud-scan/) pipe and check the [quality-gates](https://docs.sonarsource.com/sonarqube-cloud/improving/quality-gates "mention") with the [SonarQube Cloud Quality Gate check](https://bitbucket.org/sonarsource/sonarcloud-quality-gate/) pipe.
{% hint style="info" %}
**Unsupported build technologies**:
These pipes cannot be used for projects built with Maven, Gradle, .NET, and C/C++.
{% endhint %}
More information:
* [SonarQube Cloud Scan](https://bitbucket.org/sonarsource/sonarcloud-scan/)
* [SonarQube Cloud Quality Gate check](https://bitbucket.org/sonarsource/sonarcloud-quality-gate/)
* [Get started with Bitbucket Pipelines](https://confluence.atlassian.com/bitbucket/get-started-with-bitbucket-pipelines-792298921.html)
### Analyzing branches
In order to trigger a SonarQube Cloud analysis on each push on a branch, you have to supply the same command in the `branches` section of `bitbucket-pipelines.yml` (check the [bitbucket-pipelines.yml configuration reference](https://confluence.atlassian.com/bitbucket/configure-bitbucket-pipelines-yml-792298910.html#Configurebitbucket-pipelines.yml-ci_branchesbranches) for more details about that section). Here is a sample configuration:
```yaml
pipelines:
...
branches:
main:
- step:
script:
- mvn org.sonarsource.scanner.maven:sonar-maven-plugin:sonar
...
```
Make sure that your `bitbucket-pipelines.yml` is up to date in the branch you want to analyze.
### Analyzing pull requests
In order to trigger a SonarQube Cloud analysis on each pull request update, you have to supply the same command in the `pull-requests` section of `bitbucket-pipelines.yml` (check the [bitbucket-pipelines.yml configuration reference](https://confluence.atlassian.com/bitbucket/configure-bitbucket-pipelines-yml-792298910.html#Configurebitbucket-pipelines.yml-ci_branchesbranches) for more details about that section). Here is a sample configuration:
```yaml
pipelines:
...
pull-requests:
feature/*:
- step:
script:
- mvn org.sonarsource.scanner.maven:sonar-maven-plugin:sonar
...
```
Make sure that your `bitbucket-pipelines.yml` is up to date in the pull request you want to analyze.
### Analyzing Monorepo Projects with Bitbucket Cloud: Pipeline Configuration
If you want to analyze a monorepo that contains more than one project, you need to ensure that you *specify the paths to each project for analysis* in your `bitbucket-pipelines.yml` file.
A typical yml file for a monorepo analysis should look something like this.
```yaml
definitions:
caches:
sonar: ~/.sonar/cache # Caching SonarQube Cloud artifacts will speed up your build
steps:
- step: &build-test-sonarcloud
name: Build, test and analyze on SonarQube Cloud
caches:
- sonar
script:
- pipe: sonarsource/sonarcloud-scan:2.0.0
variables:
SONAR_TOKEN: ${SONAR_TOKEN}
EXTRA_ARGS: '-Dsonar.projectKey=neil.hannonbbc4_monorepotest_proj1 -Dsonar.organization=neil.hannonbbc4 -Dsonar.projectBaseDir=proj1'
- pipe: sonarsource/sonarcloud-scan:2.0.0
variables:
SONAR_TOKEN: ${SONAR_TOKEN}
EXTRA_ARGS: '-Dsonar.projectKey=neil.hannonbbc4_monorepotest_proj2 -Dsonar.organization=neil.hannonbbc4 -Dsonar.projectBaseDir=proj2'
```
We recommend checking that you’re using the sonarcloud-scan pipe version mentioned [on this page](https://bitbucket.org/sonarsource/sonarcloud-scan/src/master/).
{% hint style="info" %}
Note that you need to build each project in the monorepo separately with a unique project key for each one.
{% endhint %}
### Failing the pipeline job when the quality gate fails
You can use the [SonarQube Cloud quality gate check Bitbucket Pipe](https://bitbucket.org/sonarsource/sonarcloud-quality-gate/src/master/) to ensure your code meets your quality standards by failing your pipeline job when your [quality-gates](https://docs.sonarsource.com/sonarqube-cloud/improving/quality-gates "mention") fail.
If you do not want to use the SonarQube Cloud quality gate check Pipe, you can instruct the scanner to wait for the SonarQube Cloud quality gate status at the end of the analysis by passing the `-Dsonar.qualitygate.wait=true` parameter in the `bitbucket-pipelines.yml` file.
This will make the analysis step poll SonarQube Cloud regularly until the quality gate is computed, increasing your pipeline duration. Note that if the quality gate is red, the analysis step will fail, even if the actual analysis itself is successful. We advise only using this parameter when necessary, for example, to block a deployment pipeline if the quality gate is red. It should not be used to report the quality gate status in a pull request.
You can set the `sonar.qualitygate.timeout` property to the amount of time (in seconds) that the SonarQube Cloud scan should wait for a report to be processed. The default is 300 seconds.
### Preventing pull request merges when the quality gate fails
After setting up a pull request analysis, you can block pull requests from being merged if it is failing the quality gate.
1. You must be using Bitbucket Pipelines with a Premium Bitbucket Cloud plan.
2. Make sure that the Bitbucket Pipeline fails when the quality gate fails (refer to **Failing the pipeline job when the quality gate fails** above)
3. In Bitbucket, go to **Repository settings** > **Branch restrictions** to either **Add a branch restriction** or edit your existing one:
* In the **Merge settings** tab, select:
* **Minimum number of successful builds for the last commit with no failed builds and no in progress builds**,
* and **Prevent a merge with unresolved merge checks**.
### Sample projects
You can see our multiple sample projects to see how it works :
* [Built with Gradle](https://bitbucket.org/sonarsource/sample-gradle-project)
* [Built with Maven](https://bitbucket.org/sonarsource/sample-maven-project)
* [JavaScript project](https://bitbucket.org/sonarsource/sample-nodejs-project)
If you target a .NET application, see a [sample .NET project](https://bitbucket.org/sonarsource/sample-dotnet-project-azuredevops) built with Azure Pipelines.
### Troubleshooting
**Docker memory limit:**
If your Pipelines fail with the error `Container ‘docker' exceeded memory limit`, you’ll need to increase the memory limit for the docker process in your `bitbucket-pipelines.yml` file:
```yaml
...
definitions:
services:
docker:
memory: 2048
pipelines:
...
```
### Related pages
* [bitbucket-cloud](https://docs.sonarsource.com/sonarqube-cloud/getting-started/bitbucket-cloud "mention")
* [bitbucket-cloud](https://docs.sonarsource.com/sonarqube-cloud/managing-your-projects/administering-your-projects/devops-platform-integration/bitbucket-cloud "mention")
* [importing-bitbucket-workspace](https://docs.sonarsource.com/sonarqube-cloud/administering-sonarcloud/managing-organization/creating-organization/importing-bitbucket-workspace "mention")
---
# Source: https://docs.sonarsource.com/sonarqube-community-build/devops-platform-integration/bitbucket-integration/bitbucket-cloud-integration/bitbucket-pipelines.md
# Source: https://docs.sonarsource.com/sonarqube-server/2025.5/devops-platform-integration/bitbucket-integration/bitbucket-cloud-integration/bitbucket-pipelines.md
# Source: https://docs.sonarsource.com/sonarqube-server/2025.6/devops-platform-integration/bitbucket-integration/bitbucket-cloud-integration/bitbucket-pipelines.md
# Source: https://docs.sonarsource.com/sonarqube-server/devops-platform-integration/bitbucket-integration/bitbucket-cloud-integration/bitbucket-pipelines.md
# Adding analysis to Bitbucket pipeline
Once you have created your project in SonarQube, you can add the SonarQube analysis to your Bitbucket pipeline. To do so, you need to:
* Configure your project analysis parameters.
* Configure your `bitbucket-pipelines.yml` file.
{% hint style="info" %}
SonarScanners running in Bitbucket Pipelines can automatically detect branches or pull requests being built so you don’t need to specifically pass them as parameters to the scanner.
{% endhint %}
### Prerequisites
You should clone the full depth to make sure the scanner has access to all of your history when running analysis. For more information, see the documentation about[ Git clone behavior in Bitbucket](https://support.atlassian.com/bitbucket-cloud/docs/git-clone-behavior/).
### Configuring your project analysis parameters
For general information about the configuration of project analysis parameters, see [configuration-overview](https://docs.sonarsource.com/sonarqube-server/analyzing-source-code/analysis-parameters/configuration-overview "mention").
You can set environment variables securely for all pipelines in Bitbucket Cloud’s settings. See[ User-defined variables](https://support.atlassian.com/bitbucket-cloud/docs/variables-and-secrets/#User-defined-variables) for more information.
{% hint style="info" %}
You may need to commit your bitbucket-pipelines.yml before being able to set environment variables for pipelines.
{% endhint %}
You need to set the following environment variables in Bitbucket Cloud for analysis:
* `SONAR_TOKEN`: Generate a SonarQube token for Bitbucket Cloud and create a custom, secure environment variable in Bitbucket Cloud with `SONAR_TOKEN` as the **Name** and the token you generated as the **Value**.
* `SONAR_HOST_URL`: Create a custom environment variable with `SONAR_HOST_URL` as the **Name** and your SonarQube URL as the **Value**.
See [managing-tokens](https://docs.sonarsource.com/sonarqube-server/user-guide/managing-tokens "mention") for more information.
### Configuring your bitbucket-pipelines.yml file
This section shows you how to configure your `bitbucket-pipelines.yml` file. Bitbucket Pipelines can build specific branches and pull requests if you use the branches and pull-requests pipelines as shown in the example configurations below.
{% hint style="info" %}
* This setup assumes a typical gitflow workflow. See[ Use glob patterns on the Pipelines YAML file](https://support.atlassian.com/bitbucket-cloud/docs/use-glob-patterns-on-the-pipelines-yaml-file/) provided by Atlassian for more information on customizing which branches or pull requests trigger an analysis.
* For more information on configuring your build with Bitbucket Pipelines, see the[ Configure bitbucket-pipelines.yml](https://support.atlassian.com/bitbucket-cloud/docs/configure-bitbucket-pipelinesyml/) documentation provided by Atlassian.
{% endhint %}
SonarScanner for Gradle
In SonarQube, after you select a project imported from Bitbucket, you’ll need to select an analysis method. Select **With Bitbucket Pipelines** and follow the in-product tutorial to create environment variables and configure your `bitbucket-pipelines.yml` for analysis.
{% hint style="info" %}
A project key might have to be provided through a `build.gradle` file, or through the command line parameter. For more information, see [sonarscanner-for-gradle](https://docs.sonarsource.com/sonarqube-server/analyzing-source-code/scanners/sonarscanner-for-gradle "mention").
{% endhint %}
SonarScanner for Maven
In SonarQube, after you select a project imported from Bitbucket, you’ll need to select an analysis method. Select **With Bitbucket Pipelines** and follow the in-product tutorial to create environment variables and configure your `bitbucket-pipelines.yml` for analysis.
{% hint style="info" %}
A project key might have to be provided through the command line parameter. For more information, see [sonarscanner-for-maven](https://docs.sonarsource.com/sonarqube-server/analyzing-source-code/scanners/sonarscanner-for-maven "mention").
{% endhint %}
SonarScanner for .NET
In SonarQube, after you select a project imported from Bitbucket, you’ll need to select an analysis method. Select **With Bitbucket Pipelines** and follow the in-product tutorial to create environment variables and configure your `bitbucket-pipelines.yml` for analysis.
SonarScanner CLI
{% hint style="info" %}
The Advanced Configuration below is an alternative to the SonarQube Scan Bitbucket Pipe. If you do not need a setup that allows for scanner caching, we recommend using the Bitbucket Pipe configuration.
{% endhint %}
You can set up the SonarScanner CLI configuration the following ways:
* **SonarQube Scan Bitbucket Pipe**: Using the SonarQube Scan Bitbucket Pipe is an easy way to set up a basic configuration. You’ll find the Bitbucket Pipe and configuration instructions on the [SonarQube Scan Bitbucket Pipe](https://bitbucket.org/sonarsource/sonarqube-scan/) page.
* **Advanced Configuration**: If you need an advanced setup that allows for scanner caching, you can add the following to your `bitbucket-pipelines.yml` file:
```yaml
image:
definitions:
steps: &build-step
- step:
name: SonarQube analysis
image: sonarsource/sonar-scanner-cli:latest
caches:
- sonar
script:
- sonar-scanner
caches:
sonar: /opt/sonar-scanner/.sonar
clone:
depth: full
pipelines:
branches:
'{master,main,develop}':
- step: *build-step
pull-requests:
'**':
- step: *build-step
```
{% hint style="info" %}
A project key has to be provided through a `sonar-project.properties` file, or through the command line parameter. For more information, see [sonarscanner](https://docs.sonarsource.com/sonarqube-server/analyzing-source-code/scanners/sonarscanner "mention").
{% endhint %}
### Failing the pipeline job when the quality gate fails
You can use the [SonarQube quality gate check Bitbucket Pipe](https://bitbucket.org/sonarsource/sonarqube-quality-gate) to ensure your code meets your quality standards by failing your pipeline job when your quality gate fails.
If you do not want to use the SonarQube quality gate Check Pipe, you can instruct the scanner to wait for the SonarQube quality gate status at the end of the analysis. To enable this, pass the `-Dsonar.qualitygate.wait=true` parameter to the scanner in the `bitbucket-pipelines.yml` file.
This will make the analysis step poll SonarQube regularly until the quality gate is computed. This will increase your pipeline duration. Note that, if the quality gate is red, this will make the analysis step fail, even if the actual analysis itself is successful. We advise only using this parameter when necessary (for example, to block a deployment pipeline if the quality gate is red). It should not be used to report the quality gate status in a pull request.
You can set the `sonar.qualitygate.timeout` property to an amount of time (in seconds) that the scanner should wait for a report to be processed. The default is 300 seconds.
### If you use a monorepo
The monorepo feature is supported starting in the [Enterprise Edition](https://www.sonarsource.com/plans-and-pricing/enterprise/) provided the Bitbucket Cloud integration with SonarQube Server has been properly set up.
To add the SonarQube Server analysis to your Bitbucket pipeline:
1. If not already done, create the SonarQube Server projects related to your monorepo: see [monorepos](https://docs.sonarsource.com/sonarqube-server/project-administration/monorepos "mention").
2. For each project, set up integration features: see [project](https://docs.sonarsource.com/sonarqube-server/devops-platform-integration/bitbucket-integration/bitbucket-server-integration/project "mention").
3. For each project in the monorepo, configure the project analysis parameters. See [#configuring-the-project-analysis-parameters](#configuring-the-project-analysis-parameters "mention").
4. Configure the `bitbucket-pipelines.yml` file of your monorepo. You need to ensure that you specify the path to each project for analysis in your `bitbucket-pipelines.yml` file.
### Related pages
[global](https://docs.sonarsource.com/sonarqube-server/devops-platform-integration/bitbucket-integration/bitbucket-cloud-integration/global "mention")\
[import-repos](https://docs.sonarsource.com/sonarqube-server/devops-platform-integration/bitbucket-integration/bitbucket-cloud-integration/import-repos "mention")\
[project](https://docs.sonarsource.com/sonarqube-server/devops-platform-integration/bitbucket-integration/bitbucket-cloud-integration/project "mention")\\
---
# Source: https://docs.sonarsource.com/sonarqube-community-build/devops-platform-integration/bitbucket-integration/bitbucket-server-integration.md
# Source: https://docs.sonarsource.com/sonarqube-server/8.9/alm-integration/bitbucket-server-integration.md
# Source: https://docs.sonarsource.com/sonarqube-server/9.8/devops-platform-integration/bitbucket-integration/bitbucket-server-integration.md
# Source: https://docs.sonarsource.com/sonarqube-server/9.9/devops-platform-integration/bitbucket-integration/bitbucket-server-integration.md
# Source: https://docs.sonarsource.com/sonarqube-server/10.0/devops-platform-integration/bitbucket-integration/bitbucket-server-integration.md
# Source: https://docs.sonarsource.com/sonarqube-server/10.1/devops-platform-integration/bitbucket-integration/bitbucket-server-integration.md
# Source: https://docs.sonarsource.com/sonarqube-server/10.2/devops-platform-integration/bitbucket-integration/bitbucket-server-integration.md
# Source: https://docs.sonarsource.com/sonarqube-server/10.3/devops-platform-integration/bitbucket-integration/bitbucket-server-integration.md
# Source: https://docs.sonarsource.com/sonarqube-server/10.4/devops-platform-integration/bitbucket-integration/bitbucket-server-integration.md
# Source: https://docs.sonarsource.com/sonarqube-server/10.5/devops-platform-integration/bitbucket-integration/bitbucket-server-integration.md
# Source: https://docs.sonarsource.com/sonarqube-server/10.6/devops-platform-integration/bitbucket-integration/bitbucket-server-integration.md
# Source: https://docs.sonarsource.com/sonarqube-server/10.7/devops-platform-integration/bitbucket-integration/bitbucket-server-integration.md
# Source: https://docs.sonarsource.com/sonarqube-server/10.8/devops-platform-integration/bitbucket-integration/bitbucket-server-integration.md
# Source: https://docs.sonarsource.com/sonarqube-server/2025.2/devops-platform-integration/bitbucket-integration/bitbucket-server-integration.md
# Source: https://docs.sonarsource.com/sonarqube-server/2025.3/devops-platform-integration/bitbucket-integration/bitbucket-server-integration.md
# Source: https://docs.sonarsource.com/sonarqube-server/2025.1/devops-platform-integration/bitbucket-integration/bitbucket-server-integration.md
# Source: https://docs.sonarsource.com/sonarqube-server/2025.4/devops-platform-integration/bitbucket-integration/bitbucket-server-integration.md
# Source: https://docs.sonarsource.com/sonarqube-server/2025.6/devops-platform-integration/bitbucket-integration/bitbucket-server-integration.md
# Source: https://docs.sonarsource.com/sonarqube-server/devops-platform-integration/bitbucket-integration/bitbucket-server-integration.md
# Bitbucket Data Center
With this integration, you’ll be able to:
* **Import your BitBucket repositories**: Import your Bitbucket repositories into SonarQube Server to easily set up SonarQube Server projects.
* **Report your Quality Gate status to your pull requests**: See your Quality Gate and code metric results right in Bitbucket so you know if it’s safe to merge your changes.
Once the SonarQube Server instance admin has set up the integration at the global level, Bitbucket repositories can be imported into SonarQube Server to create the corresponding SonarQube projects. The project admin can then set up integration features for their project.
{% content-ref url="bitbucket-server-integration/global" %}
[global](https://docs.sonarsource.com/sonarqube-server/devops-platform-integration/bitbucket-integration/bitbucket-server-integration/global)
{% endcontent-ref %}
{% content-ref url="bitbucket-server-integration/import-repos" %}
[import-repos](https://docs.sonarsource.com/sonarqube-server/devops-platform-integration/bitbucket-integration/bitbucket-server-integration/import-repos)
{% endcontent-ref %}
{% content-ref url="bitbucket-server-integration/project" %}
[project](https://docs.sonarsource.com/sonarqube-server/devops-platform-integration/bitbucket-integration/bitbucket-server-integration/project)
{% endcontent-ref %}
---
# Source: https://docs.sonarsource.com/sonarqube-server/2025.5/user-guide/issues/in-devops-platform/bitbucket.md
# Source: https://docs.sonarsource.com/sonarqube-server/2025.6/user-guide/issues/in-devops-platform/bitbucket.md
# Source: https://docs.sonarsource.com/sonarqube-server/user-guide/issues/in-devops-platform/bitbucket.md
# Issues reported in Bitbucket
### Pull request decoration
SonarQube Server sets up the report of your quality gate status and analysis metrics directly to your pull requests in Bitbucket Data Center and Bitbucket Cloud. Inline annotations are not supported.
{% hint style="info" %}
Pull request decoration requires that pull request integration be correctly configured for your project. See [project](https://docs.sonarsource.com/sonarqube-server/devops-platform-integration/bitbucket-integration/bitbucket-server-integration/project "mention") and [project](https://docs.sonarsource.com/sonarqube-server/devops-platform-integration/bitbucket-integration/bitbucket-cloud-integration/project "mention").
{% endhint %}
---
# Source: https://docs.sonarsource.com/sonarqube-cloud/enriching/branch-analysis-setup.md
# Branch analysis setup
Setting up branch analysis enables SonarQube Cloud to analyze branches in your project *other than the main branch and pull request branches*. To enable branch analysis, your project must be set up for build-based analysis, not automatic analysis. Branch analysis is not available with automatic analysis.
As with all build-based analyses, the code analysis is performed by the SonarScanner software installed in your build environment and the results are sent to the SonarQube Cloud server for processing and display.
Using a SonarQube Cloud-integrated CI for your builds will make configuration simpler, though setting up branch analysis with a local build environment or a non-integrated CI is also possible. Both options are covered below.
### Setup with a SonarQube Cloud-integrated CI
Using a SonarQube Cloud-integrated CI simplifies the setup of branch analysis. The integrated CIs are:
* GitHub Actions
* Bitbucket Pipelines
* Azure Pipelines
* GitLab CI
* CircleCI
* Travis CI
Here we use GitHub Actions as an example. Other CIs have different configuration details, so you will need to adapt this example accordingly.
If you followed the in-product tutorial, then you should already have configured your build definition (for example, `.github/workflows/build.yml` in GitHub Actions) for main branch analysis.
For our purposes, the most important section is the part that triggers the workflow on every push to the main branch. In GitHub Actions it looks like this:
```yaml
on:
push:
branches:
- main # The default branch
```
This is the section that you need to change to enable branch analysis. You simply need to add a directive so that the workflow is triggered not just on each push to the main branch, but also on each push to the other branch (or branches) that you want to analyze.
For example, to enable analysis on all branches with the pattern `branch-*`, you would change this section of `build.yml` to
```yaml
on:
push:
branches:
- main # The default branch
- branch-* # The other branches to be analyzed
```
You should make sure that this newly altered `build.yml` file is checked-in to all the `branch-*` branches. It is good practice to check it into *all* branches, including the main branch, in identical form.
Now, whenever you push a commit to the main branch, the analysis will run and the results will appear on SonarQube Cloud on the main branch page of your project.
Similarly, whenever you push a commit to any branch matching the pattern `branch-*`, the analysis will also run and the result will appear on SonarQube Cloud on the page for that branch.
#### Under the hood
Internally, when the SonarScanner performs a branch analysis in an integrated CI, it automatically sets two *analysis parameters*:
* `sonar.branch.name`: The name of the branch that was analyzed.
* `sonar.branch.target`: The name of the target branch of the branch that was analyzed.
This data is sent up to SonarQube Cloud alongside the analysis results and allows SonarQube Cloud to display the results correctly.
In a non-integrated CI, these parameters must be set manually as part of the configuration of branch analysis. See *Setup with non-integrated CI*, below, for details.
Additionally, in some special cases, even with an integrated CI, you may need to manually set the `sonar.branch.target` parameter. See *Target branch*, below, for details.
### Setup with a non-integrated build environment
A non-integrated build environment is any build environment (cloud-based CI, local, etc) for which SonarQube Cloud does not provide integration and therefore cannot automatically determine the `sonar.branch.*` analysis parameters. In this case, you need to manually configure these parameters.
Let’s say you want to set up analysis for a branch called `branch-1`. First of all, you would follow the same steps as for the integrated CI:
* Set up your project as described in the in-product tutorial (this sets up main branch analysis)
* Set up your build script so that, in addition to building on each push to the main branch, a build is also triggered on each push to `branch-1`
At this point, you would be done if you were using an integrated CI. For a non-integrated environment you must, additionally, manually set the analysis parameters. For example:
* `sonar.branch.name = branch-1`
* `sonar.branch.target = main`
Where you make this configuration depends on the language you are analyzing and the build tools you are using. The in-product tutorial will indicate where you configure the parameters for your specific case.
### Long-lived and short-lived branches
In most development processes there are effectively two types of branches, used for two different purposes: long-lived branches and short-lived branches. SonarQube Cloud allows you to indicate the type of a branch using a naming convention (see *Branch name pattern*, below). This lets the system adjust how it analyzes a branch and how it displays the results.
#### Long-lived branches
A *long-lived branch* is a branch that plays a continuous role within the development process of a software project. The main branch of a repository is always considered a long-lived branch, usually representing the next release of the project.
Branches representing previous versions of a project are typically also considered long-lived. In addition, some development workflows use a long-running `develop` or `next` branch (the naming may differ) that runs parallel to the main branch. Such branches are also considered long-lived.
In general, long-lived branches are those that exist side-by-side with the main branch for a relatively long time.
#### Short-lived branches
Short-lived branches are those that are intended to exist only temporarily. They are typically a child branch of a long-lived branch and are intended to be merged back into that parent branch within a relatively short period. They include feature branches and bug-fix branches.
#### Pull requests and short-lived branches
Short-lived branch analysis and pull request analysis are two separate features of SonarQube Cloud that can sometimes be confused.
Creating a pull request involves the creation of a branch. This is usually called a "feature" or "bug-fix" branch and it is indeed typically "short-lived". This is the branch that holds the changes that will be merged into the main branch (or another long-lived branch) on approval. SonarQube Cloud pull request analysis is part of that approval process and ensures that only high-quality code is merged.
For more detailed information, see [pull-request-analysis](https://docs.sonarsource.com/sonarqube-cloud/improving/pull-request-analysis "mention").
*However, short-lived branch analysis in SonarQube Cloud does not refer to the analysis of these pull request branches*.
Instead, short-lived branch analysis is about analyzing feature and bug-fix branches that are *not part of a pull request*. These usually occur in projects that, for whatever reason, do not use pull requests at all, but want to achieve the same objective as pull request analysis, namely, ensuring only high-quality code is merged.
In short, if you already use PRs in your project, then you don’t need short-lived branch analysis. Pull request analysis offers more features (pull request decoration, for example) and requires no configuration. Short-lived branch analysis is only useful in the special case where you want to have (some of) the functionality of pull request analysis, but you do not use PRs in your project workflow.
For more detailed information, see [#short-lived-branch-analysis](https://docs.sonarsource.com/sonarqube-cloud/branch-analysis#short-lived-branch-analysis "mention").
#### Branch name pattern
You can set a long-lived branches name pattern at the project level and, only with the Enterprise plan, at the organization level. The project-level configuration overrides the organization-level configuration.
### New code with long- and short-lived branches
The distinction between new code and overall code is a key part of the SonarQube Cloud methodology. See [about-new-code](https://docs.sonarsource.com/sonarqube-cloud/standards/about-new-code "mention") fore more details.
The new code definition for all long-lived branches, including the main branch, is the project-level new code definition.
For short-lived branches, the new code consists of all those files which have been modified or added relative to the target branch. Modified files are determined by comparing checksums between the `sonar.branch.target` branch and the short-lived branch to be analyzed.
### Quality gates with long- and short-lived branches
For long-lived branches, including the main branch:
* The quality gate defined at the project level is used.
* Both the conditions defined on overall code and conditions defined on new code are applied.
* And, what counts as new code is determined by the prevailing new code definition setting for the branch, as described above.
For short-lived branches:
* The quality gate defined at the project level is used.
* But, only conditions defined on new code are applied.
* And, new code is defined as whatever has changed relative to the parent branch, as described above.
### Target branch
The parameter `sonar.branch.target` specifies the target branch of the branch indicated by `sonar.branch.name`.
If `sonar.branch.name` is a *long-lived branch* **B**, then `sonar.branch.target` **T** is the *reference branch* of **B**. This means that issues from **T** will be copied to **B** on the first analysis of **B**. See **Issue synchronization,** below.
If `sonar.branch.name` is a *short-lived branch* **S**, then `sonar.branch.target` **T** is the *intended merge target* of **S**. This means that when analyzing **S**, SonarQube Cloud will only consider code that differs from that in **T**.
### Issue synchronization
For any long-lived branch **B** with target branch **T**, during the first analysis only, issues (including their type, severity, status, assignee, changelog, and comments) are copied from **T** to **B**. A comment is added to the changelog of each such issue in **B**:
*This issue has been copied from branch **T** to branch **B**.*
Then, at each subsequent analysis of the long-lived branch, any new issue in **B** that comes from merging a short-lived branch **S** into **B** automatically inherits the attributes (type, severity, etc.) that the issue had in **S**. A comment is added to the changelog of the issue in **B**:
*This issue had been copied from branch **S** to branch **B**.*
For short-lived branches, the issues visible upon analysis are the new issues corresponding to files added or modified in that branch. Modified files are determined by comparing the `sonar.branch.target` branch and the short-lived branch to be analyzed.
Note that the target branch of any branch (short- or long-lived) must itself always be a long-lived branch.
### SonarQube for IDE
In all SonarQube for IDE products, only issues from a project’s main branch and long-lived branches will be synchronized.
This means that when using Connected Mode with SonarQube for IntelliJ, Visual Studio, VS Code, and Eclipse, issues on short-lived branches are not synchronized. When an issue is marked in SonarQube Cloud as accepted or false positive on a short-lived branch, SonarQube for IDE will still show that issue in the IDE.
### Other settings
Other settings, including those for quality profiles, are set at the organization and/or project level. These settings do not differ between long- and short-lived branches and cannot be configured on a per-branch basis.
### Changing the name of a branch
The name of a branch, including the main branch, can be changed on the SonarQube Cloud side, on the **Branches** page of the SonarQube Cloud UI.
If you change the name of a branch in the SonarQube Cloud UI you must make sure that the same change is made in the repository itself (in Git, when a branch is renamed, a new branch is created with the same content as the old one, and the old one is deleted). Additionally, in the case of changing the name of a non-main branch, you must also make sure that the same change is made in the analysis parameters (the `sonar.branch.*` properties).
Note that the type of branch (long- vs short-lived) in SonarQube Cloud cannot be changed, even if the name is changed in such a way that it now matches the naming pattern of a different type. For example, if the name of a branch initially matches the long-lived name pattern then it will be a long-lived branch for as long as it exists, even if its name is changed to something that no longer matches the pattern.
### Branch lifetimes
Long-lived branches are retained until you delete them manually (Administration > Branches). Short-lived branches are deleted automatically after 30 days with no analysis. For more details, see [housekeeping](https://docs.sonarsource.com/sonarqube-cloud/digging-deeper/housekeeping "mention").
### Effect of branches on LOC consumption
For purposes of paid or Enterprise SonarQube Cloud plans, the number of lines of code that your organization is considered to have is calculated by adding together the LOC of the single largest branch within each project in that organization. All smaller branches within each project are ignored.
{% hint style="info" %}
Code that has already been analyzed does not count toward the LOC limit determined by your license. You cannot use up your LOC limit by analyzing the same code repeatedly.
{% endhint %}
---
# Source: https://docs.sonarsource.com/sonarqube-server/8.9/analyzing-source-code/branches/branch-analysis.md
# Source: https://docs.sonarsource.com/sonarqube-server/9.8/analyzing-source-code/branches/branch-analysis.md
# Source: https://docs.sonarsource.com/sonarqube-server/9.9/analyzing-source-code/branches/branch-analysis.md
# Source: https://docs.sonarsource.com/sonarqube-server/10.0/analyzing-source-code/branches/branch-analysis.md
# Source: https://docs.sonarsource.com/sonarqube-server/10.1/analyzing-source-code/branches/branch-analysis.md
# Source: https://docs.sonarsource.com/sonarqube-server/10.2/analyzing-source-code/branches/branch-analysis.md
# Source: https://docs.sonarsource.com/sonarqube-server/10.3/analyzing-source-code/branches/branch-analysis.md
# Source: https://docs.sonarsource.com/sonarqube-server/10.4/analyzing-source-code/branches/branch-analysis.md
# Source: https://docs.sonarsource.com/sonarqube-server/10.5/analyzing-source-code/branches/branch-analysis.md
# Source: https://docs.sonarsource.com/sonarqube-server/10.6/analyzing-source-code/branch-analysis.md
# Source: https://docs.sonarsource.com/sonarqube-server/10.7/analyzing-source-code/branch-analysis.md
# Source: https://docs.sonarsource.com/sonarqube-server/10.8/analyzing-source-code/branch-analysis.md
# Source: https://docs.sonarsource.com/sonarqube-server/2025.2/analyzing-source-code/branch-analysis.md
# Source: https://docs.sonarsource.com/sonarqube-server/2025.3/analyzing-source-code/branch-analysis.md
# Source: https://docs.sonarsource.com/sonarqube-server/2025.5/analyzing-source-code/branch-analysis.md
# Source: https://docs.sonarsource.com/sonarqube-server/2025.1/analyzing-source-code/branch-analysis.md
# Source: https://docs.sonarsource.com/sonarqube-server/2025.4/analyzing-source-code/branch-analysis.md
# Source: https://docs.sonarsource.com/sonarqube-server/2025.6/analyzing-source-code/branch-analysis.md
# Source: https://docs.sonarsource.com/sonarqube-server/analyzing-source-code/branch-analysis.md
# Source: https://docs.sonarsource.com/sonarqube-cloud/enriching/branch-analysis.md
# Branch analysis
*This feature is only available in the Team and Enterprise plans. Only the main branch analysis is available in the Free plan. See* [subscription-plans](https://docs.sonarsource.com/sonarqube-cloud/administering-sonarcloud/managing-subscription/subscription-plans "mention") *for more information.*
Branch analysis in SonarQube Cloud lets you analyze branches of your project other than pull request branches and the main branch.
### What is branch analysis for?
In most projects, SonarQube Cloud is configured to do two kinds of analyses:
* [main-branch-analysis](https://docs.sonarsource.com/sonarqube-cloud/improving/main-branch-analysis "mention"): This occurs every time a change is pushed to the main branch. The analysis is done on the current state of the main branch, that is, the state recorded in the `HEAD` commit of the main branch, with a special focus on new code. The results of this analysis track the quality of the whole project and are used (via the quality gate) to ensure that the project is always in a releasable state.
* [pull-request-analysis](https://docs.sonarsource.com/sonarqube-cloud/improving/pull-request-analysis "mention"): This occurs when a pull request is opened and every time a change is pushed to the pull request branch. Analysis results only include issues that have been introduced by the pull request itself. A quality gate on the pull request uses these results to ensure that the code changes introduced are always clean.
**Branch analysis**, in contrast, allows you to trigger an analysis on a push to *any specified branch* (not just the main branch) *without involving pull requests*. This capability can be useful in the following situations:
* If your project has **long-living branches** other than the main branch that you want to analyze. One use-case is having branches for older versions of your software that you still periodically update with critical fixes. Another is having separate branches for *development* and *production* in your project.
* If you use **short-lived branches** (for example, "feature" branches) to introduce changes to your main branch but do not use them with a pull request mechanism in a supported CI.
To support these use-cases, SonarQube Cloud lets you specify whether a branch is short- or long-lived using a naming convention. Based on this distinction, it will then analyze the two types of branches differently. For full details on setting up branch analysis and how it works, see [branch-analysis-setup](https://docs.sonarsource.com/sonarqube-cloud/enriching/branch-analysis-setup "mention"). But first, an understanding of the results of the branch analysis will help.
In the SonarQube Cloud Free plan, branch analysis is available only on the main branch. Please see the *Comparison table* on the [subscription-plans](https://docs.sonarsource.com/sonarqube-cloud/administering-sonarcloud/managing-subscription/subscription-plans "mention") for plan details.
### Branch analysis results
Assuming that you have set up your branch analysis properly, every time you push to the branch in question, SonarQube Cloud will analyze and report the result in the SonarQube Cloud interface. To see the analysis result, go to the project and select **Branches** from the left menu sidebar.
This view displays the main branch, as well as any other long-lived or short-lived branches that have been analyzed. It does not include branches that have been used for pull requests.
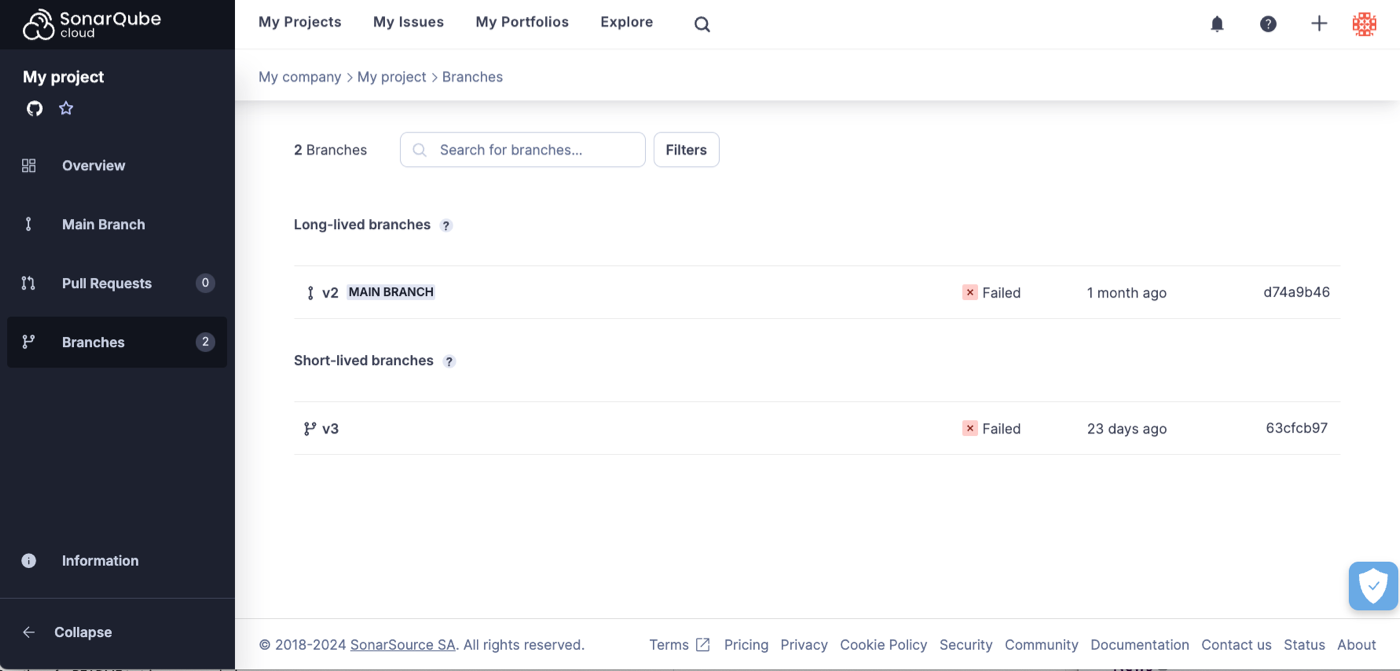
As we can see here, the view is organized into *long-lived branches* and *short-lived branches.*
SonarQube Cloud knows which is which based on the naming convention mentioned above. In this case, `branch-a` is considered a long-lived branch because its name matches the pattern `(branch|release)-.*` and the short branch is considered a short-lived branch because its name does not. The *main branch* is always considered a long-lived branch.
### Short-lived branch analysis
If you click on a short-lived branch, you will be taken to the short-lived branch analysis page:
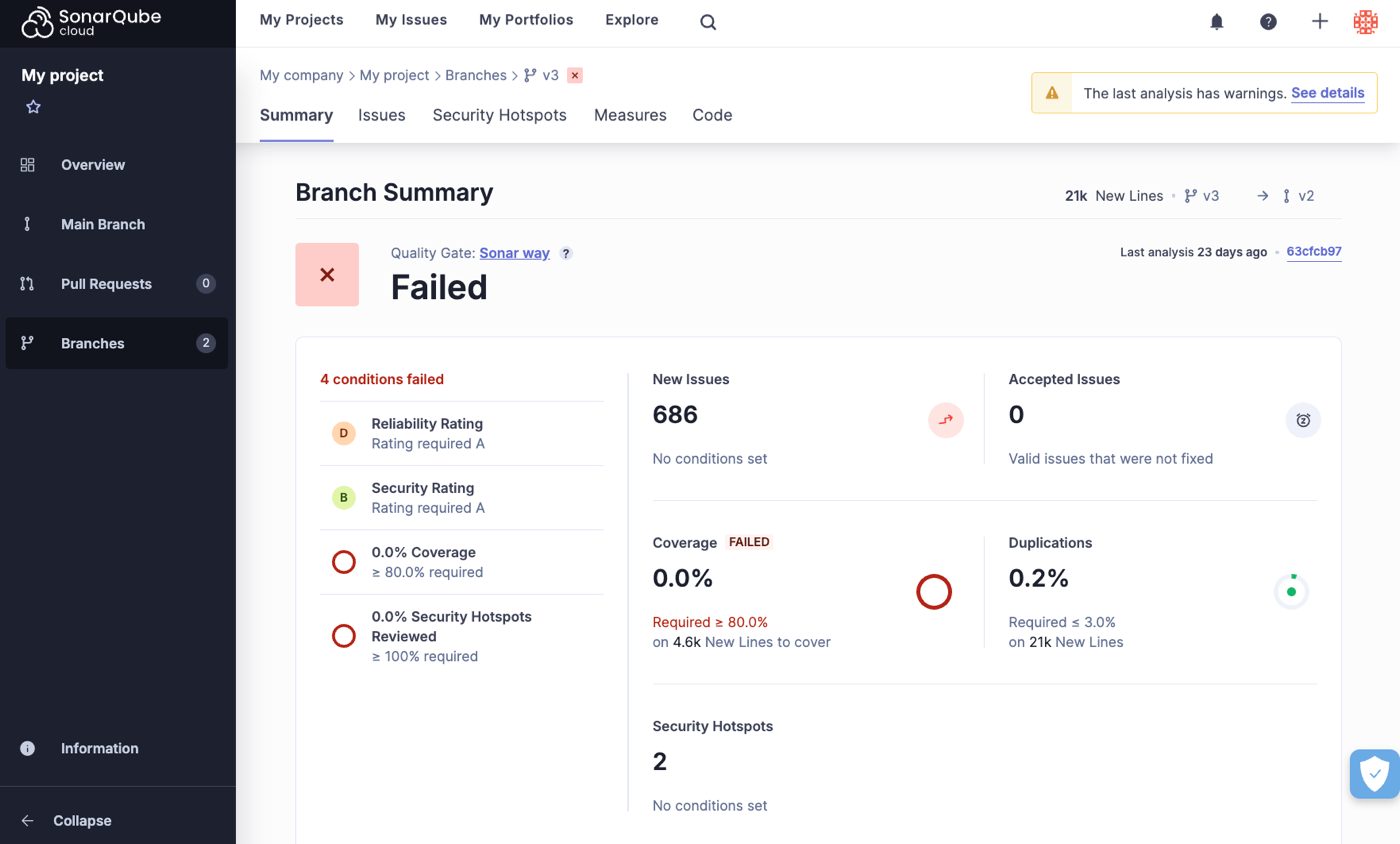
You will notice that it is very similar to the **Pull Requests** analysis page. This is because it is based on the same principles. Like pull request analysis, short-lived branch analysis has two significant features:
* *Short-lived branch analysis only reports issues that were introduced by the branch itself*. When SonarQube Cloud analyzes a short-lived branch **B** with target branch **T** it scans the HEAD commit of **B** and compares the result with the most recent scan of **T**. Only issues that appear in **B** but not in **T** are reported in the analysis results. In cases where **T** includes new issues added since the most recent scan (in other words, the scan is outdated) those additional issues will appear as part of the short-lived branch analysis, even though they were not introduced by that branch. To understand how the target branch is determined see the [branch-analysis-setup](https://docs.sonarsource.com/sonarqube-cloud/enriching/branch-analysis-setup "mention") page.
* The quality gate for the short-lived branch is computed based on this analysis. The quality gate used is the one set at the project level, however, *only the conditions on new code within the quality gate are applied*.
When selecting a **Short-lived branch** from the list of branches, you can see that on the **Summary** tab, the quality gate and the six quality metrics are displayed. In addition, the other tabs, **Issues**, **Security Hotspots**, **Measures**, and **Code** let you see more details about the analysis.
### Long-lived branch analysis
If you select a branch from the **Long-lived branches** list you will be taken to the **Summary** page for that branch, much like we described above for the **Short-lived branches**:
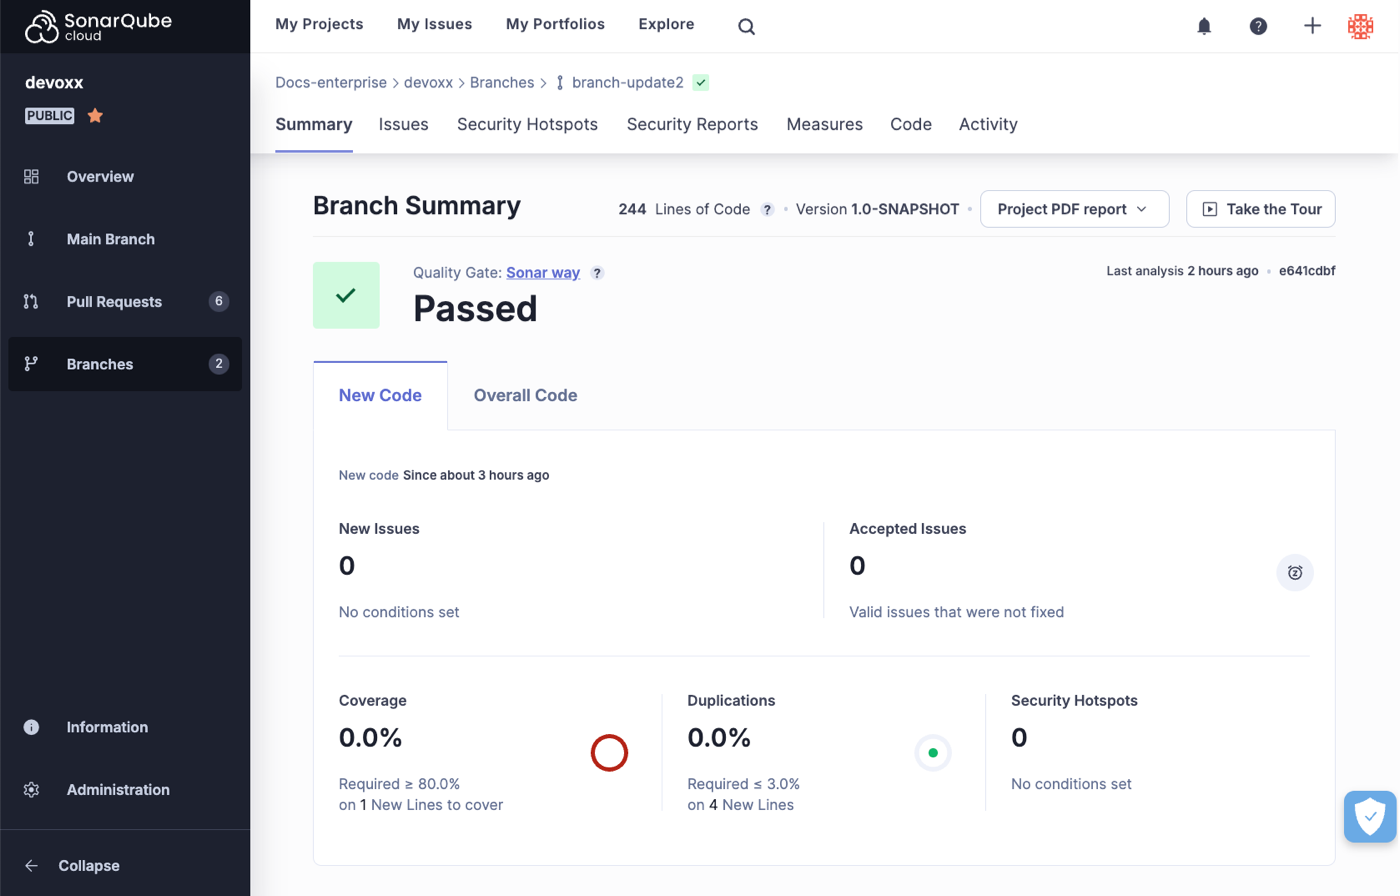
As you can see, this page is very similar to the **Main Branch** analysis page. Again, this is because it is based on the same principles:
* At the top of the branches page, the [quality-gates](https://docs.sonarsource.com/sonarqube-cloud/improving/quality-gates "mention") shows the "releasability" status of the long-lived branch. It answers the question "Can I release this branch today?"
* There are two tabs: One for **New Code** and one for **Overall Code**, just as in the **Main Branch** view.
* The metrics displayed and the tabs available are identical to those found on the main branch analysis page, except that they apply to this long-lived branch.
* You can download regulatory reports for a long-lived branch by clicking on **Downloadable reports** and selecting **Download Regulatory report (.zip)** from the drop down menu. See [viewing-project-regulatory-reports](https://docs.sonarsource.com/sonarqube-cloud/getting-started-with-enterprise/viewing-enterprise-reports/viewing-project-regulatory-reports "mention") for more details.
See the [main-branch-analysis](https://docs.sonarsource.com/sonarqube-cloud/improving/main-branch-analysis "mention") page for details about working with the **Main Branch**.
### Incremental analysis
Some analyzers use the [incremental-analysis-mechanisms](https://docs.sonarsource.com/sonarqube-cloud/advanced-setup/incremental-analysis-mechanisms "mention") to shorten the branch analysis.
---
# Source: https://docs.sonarsource.com/sonarqube-server/8.9/analyzing-source-code/branches/branch-faq.md
# Source: https://docs.sonarsource.com/sonarqube-server/9.8/analyzing-source-code/branches/branch-faq.md
# Source: https://docs.sonarsource.com/sonarqube-server/9.9/analyzing-source-code/branches/branch-faq.md
# Source: https://docs.sonarsource.com/sonarqube-server/10.0/analyzing-source-code/branches/branch-faq.md
# Source: https://docs.sonarsource.com/sonarqube-server/10.1/analyzing-source-code/branches/branch-faq.md
# Source: https://docs.sonarsource.com/sonarqube-server/10.2/analyzing-source-code/branches/branch-faq.md
# Source: https://docs.sonarsource.com/sonarqube-server/10.3/analyzing-source-code/branches/branch-faq.md
# Source: https://docs.sonarsource.com/sonarqube-server/10.4/analyzing-source-code/branches/branch-faq.md
# Source: https://docs.sonarsource.com/sonarqube-server/10.5/analyzing-source-code/branches/branch-faq.md
# Branch FAQ
*Branch analysis is available starting in* [*Developer Edition*](https://www.sonarsource.com/plans-and-pricing/developer/)*.*
### How long are branches retained?
Branches will be deleted automatically when they are inactive according to your settings at **Administration** > **Configuration** > **General Settings** > **Housekeeping** > **Number of days** before deleting inactive branches except for branches you have set to be kept when inactive. These branches are kept until you delete them manually at the project level at **Project Settings > Branches and Pull Requests**. See [branch-analysis](https://docs.sonarsource.com/sonarqube-server/10.5/analyzing-source-code/branches/branch-analysis "mention") for more information on keeping inactive branches.
### Does my project need to be stored in an SCM like Git or SVN?
No, you don’t need to be connected to an SCM. However, SCM data still enhances the SonarQube experience (including issue auto-assignment and issue backdating), and you will be well prepared to take advantage of [pull-request-analysis](https://docs.sonarsource.com/sonarqube-server/10.5/analyzing-source-code/pull-request-analysis "mention")!
### What if I mark an issue "Accept" or "False-Positive" in a branch?
If you have configured the **Reference Branch** [defining-new-code](https://docs.sonarsource.com/sonarqube-server/10.5/project-administration/clean-as-you-code-settings/defining-new-code "mention") for a branch, issues in the reference branch automatically inherit their attributes from this original branch (including the **Accept** and **False Positive** resolutions) after the merge.
### Can I manually delete a branch?
You can delete a branch in the **Branches** tab at **Project Settings** > **Branches and Pull Requests**.
### Does the payload of the Webhook include branch information?
Yes, an extra node called `branch` is added to the payload.
### When are Webhooks called?
When the computation of the background task is done for a given branch.
### What is the impact on my LOCs consumption vs my license?
The [license-administration](https://docs.sonarsource.com/sonarqube-server/10.5/instance-administration/license-administration "mention") of your largest branch is counted toward your license limit. All other branches are ignored.
---
# Source: https://docs.sonarsource.com/sonarqube-server/8.9/analyzing-source-code/branches.md
# Source: https://docs.sonarsource.com/sonarqube-server/9.8/analyzing-source-code/branches.md
# Source: https://docs.sonarsource.com/sonarqube-server/9.9/analyzing-source-code/branches.md
# Source: https://docs.sonarsource.com/sonarqube-server/10.0/analyzing-source-code/branches.md
# Source: https://docs.sonarsource.com/sonarqube-server/10.1/analyzing-source-code/branches.md
# Source: https://docs.sonarsource.com/sonarqube-server/10.2/analyzing-source-code/branches.md
# Source: https://docs.sonarsource.com/sonarqube-server/10.3/analyzing-source-code/branches.md
# Source: https://docs.sonarsource.com/sonarqube-server/10.4/analyzing-source-code/branches.md
# Source: https://docs.sonarsource.com/sonarqube-server/10.5/analyzing-source-code/branches.md
# Branches
{% content-ref url="branches/branch-analysis" %}
[branch-analysis](https://docs.sonarsource.com/sonarqube-server/10.5/analyzing-source-code/branches/branch-analysis)
{% endcontent-ref %}
{% content-ref url="branches/branch-faq" %}
[branch-faq](https://docs.sonarsource.com/sonarqube-server/10.5/analyzing-source-code/branches/branch-faq)
{% endcontent-ref %}
---
# Source: https://docs.sonarsource.com/sonarqube-mcp-server/build-and-configure.md
# Build and configure
Depending on your setup requirements, you may need to set up your server using more specific details to get the SonarQube MCP up and running in your environment. The pages listed below contain those details.
{% content-ref url="build-and-configure/build" %}
[build](https://docs.sonarsource.com/sonarqube-mcp-server/build-and-configure/build)
{% endcontent-ref %}
{% content-ref url="build-and-configure/environment-variables" %}
[environment-variables](https://docs.sonarsource.com/sonarqube-mcp-server/build-and-configure/environment-variables)
{% endcontent-ref %}
{% content-ref url="build-and-configure/configure" %}
[configure](https://docs.sonarsource.com/sonarqube-mcp-server/build-and-configure/configure)
{% endcontent-ref %}
---
# Source: https://docs.sonarsource.com/sonarqube-mcp-server/build-and-configure/build.md
# Build your SonarQube MCP Server
As described in the [#mcp-server-setup-in-your-ide](https://docs.sonarsource.com/sonarqube-mcp-server/quickstart-guide#mcp-server-setup-in-your-ide "mention"), launching the SonarQube MCP server is most easily done using the container image. However, you do have other options.
### Build locally
We recommend setting up the SonarQube MCP Server with the container image as explained in the [#launch-the-server-from-the-container-image](https://docs.sonarsource.com/sonarqube-mcp-server/quickstart-guide#launch-the-server-from-the-container-image "mention") article, but if you want to build it locally, check out the [#prerequisites](https://docs.sonarsource.com/sonarqube-mcp-server/readme#prerequisites "mention"), then follow these steps:
1. Clone the SonarQube MCP Server project from the [sonarqube-mcp-server](https://github.com/SonarSource/sonarqube-mcp-server) repository.
2. Run the following Gradle command to clean the project and build the application:\
./gradlew clean build -x test. The JAR file will be created in `build/libs/`.
3. Perform the manual installation as explained below.
If you prefer, the JAR file is downloadable as an **Asset** on the [MCP server Releases page](https://github.com/SonarSource/sonarqube-mcp-server/releases).
### Manual installation
After you’ve built the SonarQube MCP Server locally, you’ll need to manually install it in your MCP client. Add the following to your MCP configuration’s JSON file.
The main difference between the server setup of SonarQube Cloud and SonarQube server is:
* SonarQube Cloud requires a User token and an organization name.
* SonarQube Server and SonarQube Community Build require a User token and server URL.
{% tabs %}
{% tab title="SONARQUBE CLOUD" %}
```json
{
"sonarqube": {
"command": "java",
"args": [
"-jar",
""
],
"env": {
"STORAGE_PATH": "",
"SONARQUBE_TOKEN": "",
"SONARQUBE_ORG": ""
}
}
}
```
{% hint style="warning" %}
*User tokens* are required when setting up connected mode or an MCP Server between SonarQube (Server, Cloud) and SonarQube for IDE. Note that the binding will not function properly if *project tokens*, *global tokens*, or *scoped organization tokens* are used during the setup process.
{% endhint %}
{% endtab %}
{% tab title="SONARQUBE SERVER" %}
```json
{
"sonarqube": {
"command": "java",
"args": [
"-jar",
""
],
"env": {
"STORAGE_PATH": "",
"SONARQUBE_TOKEN": "",
"SONARQUBE_URL": ""
}
}
}
```
{% hint style="warning" %}
*User tokens* are required when setting up connected mode or an MCP Server between SonarQube (Server, Cloud) and SonarQube for IDE. Note that the binding will not function properly if *project tokens*, *global tokens*, or *scoped organization tokens* are used during the setup process.
{% endhint %}
{% endtab %}
{% endtabs %}
### Deployment options.
Depending on your user environment, you may want to deploy your MCP server in different ways. Check out the page about configuring your server and pick the right [#transport-mode](https://docs.sonarsource.com/sonarqube-mcp-server/configure#transport-mode "mention") for you.
---
# Source: https://docs.sonarsource.com/sonarqube-community-build/user-guide/rules/built-in-rule-tags.md
# Source: https://docs.sonarsource.com/sonarqube-server/8.9/user-guide/rules/built-in-rule-tags.md
# Source: https://docs.sonarsource.com/sonarqube-server/9.8/user-guide/rules/built-in-rule-tags.md
# Source: https://docs.sonarsource.com/sonarqube-server/9.9/user-guide/rules/built-in-rule-tags.md
# Source: https://docs.sonarsource.com/sonarqube-server/10.0/user-guide/rules/built-in-rule-tags.md
# Source: https://docs.sonarsource.com/sonarqube-server/10.1/user-guide/rules/built-in-rule-tags.md
# Source: https://docs.sonarsource.com/sonarqube-server/10.2/user-guide/rules/built-in-rule-tags.md
# Source: https://docs.sonarsource.com/sonarqube-server/10.3/user-guide/rules/built-in-rule-tags.md
# Source: https://docs.sonarsource.com/sonarqube-server/10.4/user-guide/rules/built-in-rule-tags.md
# Source: https://docs.sonarsource.com/sonarqube-server/10.5/user-guide/rules/built-in-rule-tags.md
# Source: https://docs.sonarsource.com/sonarqube-server/10.6/user-guide/rules/built-in-rule-tags.md
# Source: https://docs.sonarsource.com/sonarqube-server/10.7/user-guide/rules/built-in-rule-tags.md
# Source: https://docs.sonarsource.com/sonarqube-server/10.8/user-guide/rules/built-in-rule-tags.md
# Source: https://docs.sonarsource.com/sonarqube-server/2025.2/user-guide/rules/built-in-rule-tags.md
# Source: https://docs.sonarsource.com/sonarqube-server/2025.3/user-guide/rules/built-in-rule-tags.md
# Source: https://docs.sonarsource.com/sonarqube-server/2025.5/user-guide/rules/built-in-rule-tags.md
# Source: https://docs.sonarsource.com/sonarqube-server/2025.1/user-guide/rules/built-in-rule-tags.md
# Source: https://docs.sonarsource.com/sonarqube-server/2025.4/user-guide/rules/built-in-rule-tags.md
# Source: https://docs.sonarsource.com/sonarqube-server/2025.6/user-guide/rules/built-in-rule-tags.md
# Source: https://docs.sonarsource.com/sonarqube-server/user-guide/rules/built-in-rule-tags.md
# Source: https://docs.sonarsource.com/sonarqube-cloud/digging-deeper/built-in-rule-tags.md
# Built-in rule tags
Tags are a way to categorize rules and issues. Issues inherit the tags on the rules that raised them. Some tags are language-specific, but many more appear across languages. Users can add tags to rules and issues, but most rules have some tags out of the box. Here is a non-comprehensive list of what some of those built-in tags mean:
{% hint style="info" %}
*Most of the links below to* [*rules.sonarsource.com*](https://rules.sonarsource.com/) *will be initially filtered for Java language rules*
{% endhint %}
* [architecture](https://rules.sonarsource.com/java/tag/architecture): there is something questionable about the architecture of the code.
* [brain-overload](https://rules.sonarsource.com/java/tag/brain-overload) - there is too much to keep in your head at one time
* [bad-practice](https://rules.sonarsource.com/java/tag/bad-practice) - the code likely works as designed, but the way it was designed is widely recognized as being a bad idea.
* [cert](https://rules.sonarsource.com/java/tag/cert) - relates to a rule in a [CERT](https://wiki.sei.cmu.edu/confluence/display/seccode/SEI+CERT+Coding+Standards) standard. There are currently three CERT standards: [C](https://wiki.sei.cmu.edu/confluence/display/c/SEI+CERT+C+Coding+Standard), [C++](https://wiki.sei.cmu.edu/confluence/pages/viewpage.action?pageId=88046682), and [Java](https://wiki.sei.cmu.edu/confluence/display/java/SEI+CERT+Oracle+Coding+Standard+for+Java). Many of these rules are not language-specific, but are good programming practices. That’s why you’ll see this tag on non-C/C++, Java rules.
* [clumsy](https://rules.sonarsource.com/java/tag/clumsy) - extra steps are used to accomplish something that could be done more clearly and concisely. (E.G. calling .toString() on a String).
* [confusing](https://rules.sonarsource.com/java/tag/confusing) - will take maintainers longer to understand than is really justified by what the code actually does
* [convention](https://rules.sonarsource.com/java/tag/convention) - coding convention - typically formatting, naming, whitespace…
* [cwe](https://rules.sonarsource.com/java/tag/cwe) - relates to a rule in the [Common Weakness Enumeration](http://cwe.mitre.org/). For more on CWE and on security-related rules in general, see the [security-related-rules](https://docs.sonarsource.com/sonarqube-cloud/digging-deeper/security-related-rules "mention") page.
* [lock-in](https://rules.sonarsource.com/java/tag/lock-in) - environment-specific features are used
* [misra](https://rules.sonarsource.com/cpp/tag/misra-c2012) - relates to a rule in one of the [MISRA](http://www.misra.org.uk/) standards. While the MISRA rules are primarily about C and C++, many of them are not language-specific (E.G. don’t use a float as a loop counter) but are simply good programming practices. That’s why you’ll see these tags on non-C/C++ rules.
* [pitfall](https://rules.sonarsource.com/java/tag/pitfall) - nothing is wrong yet, but something could go wrong in the future; a trap has been set for the next guy and he’ll probably fall into it and screw up the code.
* [suspicious](https://rules.sonarsource.com/java/tag/suspicious) - it’s not guaranteed that this is a **bug**, but it looks suspiciously like one. At the very least, the code should be re-examined & likely refactored for clarity.
* [unpredictable](https://rules.sonarsource.com/java/tag/unpredictable) - the code may work fine under current conditions, but may fail erratically if conditions change.
* [unused](https://rules.sonarsource.com/java/tag/unused) - unused code, E.G. a private variable that is never used.
* [user-experience](https://rules.sonarsource.com/java/tag/user-experience) - there’s nothing technically wrong with your code, but it may make some or all of your users hate you.
---
# Source: https://docs.sonarsource.com/sonarqube-cloud/enriching/test-coverage/c-c-objective-c-test-coverage.md
# C / C++ / Objective-C test coverage
SonarQube Cloud supports the reporting of test coverage information as part of the analysis of your C/C++/Objective-C project.
However, SonarQube Cloud does not produce the coverage report itself. Instead, you must set up a third-party tool to produce the report as part of your build process. You then need to configure your analysis to tell the SonarScanner where the report is located so that it can pick it up and send it to SonarQube Cloud, where it will be displayed on your project dashboard along with the other analysis metrics.
### Follow the tutorial
After you import your repository SonarQube Cloud will direct you to the onboarding tutorial specific to your CI. Follow the tutorial and when it asks, **What option best describes your build?**, choose **C/C++/Objective-C**. When you are done with the tutorial, you should have a functioning CI-based analysis setup for your project. The next step is to adjust it to get coverage working.
### Adjust your setup
To enable coverage you need to:
* Adjust your build process so that the coverage tool generates the report(s) just after your unit as part of the clean build required to run analysis.
* Make sure that the coverage tool writes its report file to a defined path in the build environment.
* Configure the scanning step of your build so that the scanner picks up the report file from that defined path.
### Add coverage to your build process
For C/C++/Objective-C projects SonarQube Cloud supports a number of coverage tools. Each has an associated analysis parameter that must be set to the location of the coverage report that is produced by the tool. The parameters are:
* `sonar.cfamily.llvm-cov.reportPath`
* `sonar.cfamily.vscoveragexml.reportsPath`
* `sonar.cfamily.gcov.reportsPath`
* `sonar.cfamily.bullseye.reportPath`
* `sonar.coverageReportPaths`
Assuming that you have already set up your project, you will have seen the example projects (*without coverage*) referenced in the in-product tutorials: [sonarsource-cfamily-examples](https://github.com/orgs/sonarsource-cfamily-examples/).
To help you add coverage to your project, we also provide, in the same GitHub organization, a few example repositories *with coverage*.
Note that these examples do not include every possible combination of tooling and platform, so you may need to adapt them slightly to your situation:
* [windows-msbuild-vscoverage-gh-actions-sc](https://github.com/sonarsource-cfamily-examples/windows-msbuild-vscoverage-gh-actions-sc)
* [windows-msbuild-vscoverage-azure-sc](https://github.com/sonarsource-cfamily-examples/windows-msbuild-vscoverage-azure-sc)
* [windows-msbuild-opencppcoverage-actions-sc](https://github.com/sonarsource-cfamily-examples/windows-msbuild-vscoverage-azure-sc)
* [macos-xcode-coverage-gh-actions-sc](https://github.com/sonarsource-cfamily-examples/macos-xcode-coverage-gh-actions-sc)
* [linux-cmake-llvm-cov-gh-actions-sc](https://github.com/sonarsource-cfamily-examples/linux-cmake-llvm-cov-gh-actions-sc)
* [linux-cmake-gcovr-gh-actions-sc](https://github.com/sonarsource-cfamily-examples/linux-cmake-gcovr-gh-actions-sc)
* [linux-autotools-gcov-travis-sc](https://github.com/sonarsource-cfamily-examples/linux-autotools-gcov-travis-sc)
These examples include the major free-to-use coverage tools for C/C++/Objective-C (VS Coverage, XCode Coverage, LLVM-COV, GCOVR, GCOV and OpenCppCoverage). For information on the popular commercial Bullseye product, see [BullseyeCoverage - C++ Code Coverage Tool](https://www.bullseye.com/).
---
# Source: https://docs.sonarsource.com/sonarqube-server/2025.2/devops-platform-integration/azure-devops-integration/adding-analysis-to-pipeline/c-family-project.md
# Source: https://docs.sonarsource.com/sonarqube-server/2025.3/devops-platform-integration/azure-devops-integration/adding-analysis-to-pipeline/c-family-project.md
# Source: https://docs.sonarsource.com/sonarqube-server/2025.5/devops-platform-integration/azure-devops-integration/adding-analysis-to-pipeline/c-family-project.md
# Source: https://docs.sonarsource.com/sonarqube-server/2025.1/devops-platform-integration/azure-devops-integration/adding-analysis-to-pipeline/c-family-project.md
# Source: https://docs.sonarsource.com/sonarqube-server/2025.4/devops-platform-integration/azure-devops-integration/adding-analysis-to-pipeline/c-family-project.md
# Source: https://docs.sonarsource.com/sonarqube-server/2025.6/devops-platform-integration/azure-devops-integration/adding-analysis-to-pipeline/c-family-project.md
# Source: https://docs.sonarsource.com/sonarqube-server/devops-platform-integration/azure-devops-integration/adding-analysis-to-pipeline/c-family-project.md
# Source: https://docs.sonarsource.com/sonarqube-cloud/advanced-setup/ci-based-analysis/azure-pipelines/adding-analysis-to-build-pipeline/c-family-project.md
# C family project
Before starting, read the [Azure Pipelines integration overview](https://app.gitbook.com/s/4FzELVjsPO4ijRo3jtBV/devops-platform-integration/azure-devops-integration/azure-pipelines-integration-overview "mention") page.
Once you have [Creating and configuring your project](https://app.gitbook.com/s/4FzELVjsPO4ijRo3jtBV/devops-platform-integration/azure-devops-integration/creating-your-project "mention") in SonarQube Cloud, and set up feature integration for your project (see the [setting-up-project-integration](https://docs.sonarsource.com/sonarqube-cloud/advanced-setup/ci-based-analysis/azure-pipelines/setting-up-project-integration "mention") page), you can add the SonarQube Cloud analysis to your Azure build pipeline.
In your build pipeline, insert the following steps in the order they appear here. These steps can be interweaved with other steps of your build as long as the following order is followed. All steps have to be executed on the same agent.
To create your Azure build pipeline, you can use either YAML or the Azure Classic interface.
{% hint style="info" %}
* The use of the Classic interface is not always possible (e.g. if your code is stored on GitHub).
* If you use YAML, Sonar can provide you with YAML templates or code examples.
{% endhint %}
{% hint style="info" %}
Make sure to enable the pull request and branch analysis in your pipeline. See the [setting-up-project-integration](https://docs.sonarsource.com/sonarqube-cloud/advanced-setup/ci-based-analysis/azure-pipelines/setting-up-project-integration "mention") page.
{% endhint %}
### Step 1: Make the Build Wrapper available on the build agent.
Download and unzip the Build Wrapper on the build agent, as explained below, according to your build agent type. See also the CFamily [Prerequisites](https://app.gitbook.com/s/4FzELVjsPO4ijRo3jtBV/analyzing-source-code/languages/c-family/prerequisites "mention") page. The archive to download and unzip depends on the host’s platform.
Microsoft-hosted build agent
You will need to make the Build Wrapper available on the build agent every time (as part of the build pipeline). To accomplish this, you can add a PowerShell script task (on Windows) or a Bash task (on Linux and macOS) by inserting a Command Line task. See the examples below.
**PowerShell commands on a Windows host**\
`Invoke-WebRequest -Uri 'https://sonarcloud.io/static/cpp/build-wrapper-win-x86.zip' -OutFile 'build-wrapper.zip'`\
`Expand-Archive -Path 'build-wrapper.zip' -DestinationPath '.'`
**Bash commands on a Linux host**\
`curl 'https://sonarcloud.io/static/cpp/build-wrapper-linux-x86.zip' --output build-wrapper.zip`\
`unzip build-wrapper.zip`
**Bash commands on a Linux ARM64 host**\
`curl 'https://sonarcloud.io/static/cpp/build-wrapper-linux-aarch64.zip' --output build-wrapper.zip`\
`unzip build-wrapper.zip`
**Bash commands on a macos host**\
`curl 'https://sonarcloud.io/static/cpp/build-wrapper-macosx-x86.zip' --output build-wrapper.zip`\
`unzip build-wrapper.zip`
Self-hosted build agent
You can either download it every time (using the same scripts) or only once (as part of the manual setup of your build agent).
### Step 2: Add a Prepare Analysis Configuration task
If you want to use a specific scanner version, see the [#specific-scanner-version](https://docs.sonarsource.com/sonarqube-cloud/advanced-setup/ci-based-analysis/azure-pipelines/various-features#specific-scanner-version "mention") article.
Using YAML
Add a SonarQube’s Prepare Analysis Configuration task before your build task. See the YAML file example below.
Using the Classic interface
In the procedure below, the manual configuration mode is used to define analysis parameters at the pipeline level. You may use the `sonar-project.properties` file instead (or another specified configuration file). For more information, see the [#configuration-mode](https://docs.sonarsource.com/sonarqube-cloud/advanced-setup/ci-based-analysis/azure-pipelines/various-features#configuration-mode "mention") article.
Add a SonarQube’s **Prepare analysis configuration** task and configure it as follows:
1. In SonarQube Cloud Service Endpoint, select the SonarQube Cloud service connection you created in **Adding the SonarQube service connection to your AzDO project**. More information is available on the[azure-devops](https://docs.sonarsource.com/sonarqube-cloud/managing-your-projects/administering-your-projects/devops-platform-integration/azure-devops "mention") page.
2. In **Choose the way to run the analysis**, select **Use SonarScanner CLI** (even if you build with *Visual Studio*/*MSBuild*).
3. Select the **Manually provide configuration** mode.
4. In the **Project Key** field, enter your project key.
5. In **Advanced section > Additional properties**, add the following property:
* key: `sonar.cfamily.compile-commands`
* Value: the path to the `compile_commands.json` file inside the Build Wrapper output directory: `sonar.cfamily.compile-commands=
### Step 3: Add a Command Line task to run your build
For the analysis to happen, your build has to be run through a command line so that it can be wrapped-up by the build-wrapper.
To do so, run **Build wrapper** executable and pass in as the arguments:
1. The output directory configured in the previous task.
2. The command that runs a clean build of your project (not an incremental build): see the command examples below.
**PowerShell commands on a Windows host with an MSBuild build** `build-wrapper-win-x86/build-wrapper-win-x86-64.exe --out-dir MSBuild.exe /t:Rebuild`
**Bash commands on a Linux host with a make build** `build-wrapper-linux-x86/build-wrapper-linux-x86-64 --out-dir make clean all`
**Bash commands on a Linux ARM64 host with a make build** `build-wrapper-linux-aarch64/build-wrapper-linux-aarch64 --out-dir make clean all`
**Example of bash commands on a macos host with a xcodebuild build** `build-wrapper-macosx-x86/build-wrapper-macos-x86 --out-dir xcodebuild -project myproject.xcodeproj -configuration Release clean build`
### Step 4: Add a Run code analysis task
Add a SonarQube’s **Run code analysis** task to run the code analysis and make the results available to SonarQube. Consider running this task right after step 3’s Command line task as the build environment should not be significantly altered before running the analysis.
### Step 5: Add a Publish quality gate result task.
Add a new SonarQube’s **Publish quality gate result** task.
### YAML file example
If you use YAML to create your Azure build pipeline, see the example below and also our [YAML pipeline templates](https://github.com/SonarSource/sonar-scanner-azdo/tree/master/its/fixtures). For information about the SonarQube task inputs, see the [SonarQube tasks for Azure Pipelines](https://app.gitbook.com/s/4FzELVjsPO4ijRo3jtBV/devops-platform-integration/azure-devops-integration/adding-analysis-to-pipeline/sonarqube-tasks "mention") page.
{% hint style="info" %}
Make sure the SonarQube task version used in your YAML file is the correct one.\
For example, in `SonarCloudPrepare@3`, `@3` should correspond to the version of the [sonarcloud-extension-for-azure-devops](https://docs.sonarsource.com/sonarqube-cloud/advanced-setup/ci-based-analysis/sonarcloud-extension-for-azure-devops "mention") you’re using.
{% endhint %}
```yaml
trigger:
- main # or another name representing your main branch
- feature/*
steps:
- checkout: self
# disable shallow fetch
fetchDepth: 0
# Make Build Wrapper available
- task: Bash@3
displayName: Download Build Wrapper
inputs:
targetType: inline
script: |
curl 'https://sonarcloud.io/static/cpp/build-wrapper-linux-x86.zip' --output build-wrapper.zip
unzip build-wrapper.zip
# Prepare Analysis Configuration task
- task: SonarCloudPrepare@4
inputs:
SonarCloud: ''
organization: ''
scannerMode: 'cli'
configMode: 'manual'
cliProjectKey: ''
extraProperties: |
"sonar.cfamily.compile-commands=bw_output/compile_commands.json"
# Command Line task to run your build.
- task: Bash@3
displayName: Bash Script
inputs:
targetType: inline
script: |
./build-wrapper-linux-x86/build-wrapper-linux-x86-64 --out-dir bw_output
# Run Code Analysis task
- task: SonarCloudAnalyze@4
# Publish Quality Gate Result task
- task: SonarCloudPublish@4
inputs:
pollingTimeoutSec: '300'
```
### Related pages
* [gradle-or-maven-project](https://docs.sonarsource.com/sonarqube-cloud/advanced-setup/ci-based-analysis/azure-pipelines/adding-analysis-to-build-pipeline/gradle-or-maven-project "mention")
* [dotnet-project](https://docs.sonarsource.com/sonarqube-cloud/advanced-setup/ci-based-analysis/azure-pipelines/adding-analysis-to-build-pipeline/dotnet-project "mention")
* [js-ts-go-python-php](https://docs.sonarsource.com/sonarqube-cloud/advanced-setup/ci-based-analysis/azure-pipelines/adding-analysis-to-build-pipeline/js-ts-go-python-php "mention")
* [monorepo-projects](https://docs.sonarsource.com/sonarqube-cloud/advanced-setup/ci-based-analysis/azure-pipelines/adding-analysis-to-build-pipeline/monorepo-projects "mention")
* [sonarqube-tasks](https://docs.sonarsource.com/sonarqube-cloud/advanced-setup/ci-based-analysis/azure-pipelines/sonarqube-tasks "mention")
* [sonarcloud-extension-for-azure-devops](https://docs.sonarsource.com/sonarqube-cloud/advanced-setup/ci-based-analysis/sonarcloud-extension-for-azure-devops "mention")
---
# Source: https://docs.sonarsource.com/sonarqube-server/9.8/analyzing-source-code/test-coverage/c-family-test-coverage.md
# Source: https://docs.sonarsource.com/sonarqube-server/9.9/analyzing-source-code/test-coverage/c-family-test-coverage.md
# Source: https://docs.sonarsource.com/sonarqube-server/10.0/analyzing-source-code/test-coverage/c-family-test-coverage.md
# Source: https://docs.sonarsource.com/sonarqube-server/10.1/analyzing-source-code/test-coverage/c-family-test-coverage.md
# Source: https://docs.sonarsource.com/sonarqube-server/10.2/analyzing-source-code/test-coverage/c-family-test-coverage.md
# Source: https://docs.sonarsource.com/sonarqube-server/10.3/analyzing-source-code/test-coverage/c-family-test-coverage.md
# Source: https://docs.sonarsource.com/sonarqube-server/10.4/analyzing-source-code/test-coverage/c-family-test-coverage.md
# Source: https://docs.sonarsource.com/sonarqube-server/10.5/analyzing-source-code/test-coverage/c-family-test-coverage.md
# Source: https://docs.sonarsource.com/sonarqube-server/10.6/analyzing-source-code/test-coverage/c-family-test-coverage.md
# Source: https://docs.sonarsource.com/sonarqube-server/10.7/analyzing-source-code/test-coverage/c-family-test-coverage.md
# Source: https://docs.sonarsource.com/sonarqube-server/10.8/analyzing-source-code/test-coverage/c-family-test-coverage.md
# Source: https://docs.sonarsource.com/sonarqube-server/2025.2/analyzing-source-code/test-coverage/c-family-test-coverage.md
# Source: https://docs.sonarsource.com/sonarqube-server/2025.3/analyzing-source-code/test-coverage/c-family-test-coverage.md
# Source: https://docs.sonarsource.com/sonarqube-server/2025.5/analyzing-source-code/test-coverage/c-family-test-coverage.md
# Source: https://docs.sonarsource.com/sonarqube-server/2025.1/analyzing-source-code/test-coverage/c-family-test-coverage.md
# Source: https://docs.sonarsource.com/sonarqube-server/2025.4/analyzing-source-code/test-coverage/c-family-test-coverage.md
# Source: https://docs.sonarsource.com/sonarqube-server/2025.6/analyzing-source-code/test-coverage/c-family-test-coverage.md
# Source: https://docs.sonarsource.com/sonarqube-server/analyzing-source-code/test-coverage/c-family-test-coverage.md
# C / C++ / Objective-C test coverage
SonarQube Server supports the reporting of test coverage information as part of the analysis of your C/C++/Objective-C project.
However, SonarQube Server does not generate the coverage report itself. Instead, you must set up a third-party tool to produce the report as part of your build process. You then need to configure your analysis to tell the SonarScanner where the report is located so that it can pick it up and send it to SonarQube Server, where it will be displayed on your project dashboard along with the other analysis metrics.
### Adjust your setup
To enable coverage, you need to:
* Adjust your build process so that the coverage tool generates the report(s). This is done just after your unit tests as part of the clean build required to run analysis.
* Make sure that the coverage tool writes its report file to a defined path in the build environment.
* Configure the scanning step of your build so that the scanner picks up the report file from that defined path.
### Add coverage to your build process
For C/C++/Objective-C projects, SonarQube Server supports a number of coverage tools. Each has an associated analysis parameter that must be set to the location of the coverage report that is produced by the tool. The parameters are:
* `sonar.cfamily.llvm-cov.reportPath`
* `sonar.cfamily.vscoveragexml.reportsPath`
* `sonar.cfamily.gcov.reportsPath`
* `sonar.cfamily.bullseye.reportPath`
* `sonar.cfamily.cobertura.reportPaths`
* `sonar.coverageReportPaths`
Assuming that you have already set up your project, you will have seen the example projects (*without coverage*) referenced in the in-product tutorials: [sonarsource-cfamily-examples](https://github.com/orgs/sonarsource-cfamily-examples/).
In the same GitHub organization, you will also find example repositories that provide guidance on how to *add coverage* to an already-configured project. These examples do not explicitly describe every possible combination of tooling and platform but do cover the most significant variants. You may need to adapt them slightly:
* [Visual Studio Coverage example on GitHub Actions](https://github.com/sonarsource-cfamily-examples/windows-msbuild-vscoverage-gh-actions-sc)
* [Visual Studio Coverage example on Azure DevOps](https://github.com/sonarsource-cfamily-examples/windows-msbuild-vscoverage-azure-sc)
* [XCode Coverage example](https://github.com/sonarsource-cfamily-examples/macos-xcode-coverage-gh-actions-sc)
* [llvm-cov example](https://github.com/sonarsource-cfamily-examples/linux-cmake-llvm-cov-gh-actions-sc)
* [gcovr example](https://github.com/sonarsource-cfamily-examples/linux-cmake-gcovr-gh-actions-sc)
* [gcov example](https://github.com/sonarsource-cfamily-examples/linux-autotools-gcov-travis-sc)
Note that these examples do not include every possible combination of tooling and platform, so you may need to adapt them slightly to your situation:
* [windows-msbuild-vscoverage-gh-actions-sc](https://github.com/sonarsource-cfamily-examples/windows-msbuild-vscoverage-gh-actions-sc)
* [windows-msbuild-vscoverage-azure-sc](https://github.com/sonarsource-cfamily-examples/windows-msbuild-vscoverage-azure-sc)
* [windows-msbuild-opencppcoverage-actions-sc](https://github.com/sonarsource-cfamily-examples/windows-msbuild-vscoverage-azure-sc)
* [macos-xcode-coverage-gh-actions-sc](https://github.com/sonarsource-cfamily-examples/macos-xcode-coverage-gh-actions-sc)
* [linux-cmake-llvm-cov-gh-actions-sc](https://github.com/sonarsource-cfamily-examples/linux-cmake-llvm-cov-gh-actions-sc)
* [linux-cmake-gcovr-gh-actions-sc](https://github.com/sonarsource-cfamily-examples/linux-cmake-gcovr-gh-actions-sc)
* [linux-autotools-gcov-travis-sc](https://github.com/sonarsource-cfamily-examples/linux-autotools-gcov-travis-sc)
These examples include the major free-to-use coverage tools for C/C++/Objective-C (VS Coverage, XCode Coverage, LLVM-COV, GCOVR, GCOV and OpenCppCoverage). For information on the popular commercial Bullseye product, see [BullseyeCoverage - C++ Code Coverage Tool](https://www.bullseye.com/).
### Coverage parameters can be set in multiple places
As with other analysis parameters, the coverage-related parameters for C/C++/Objective-C projects can be set in multiple places:
* On the command line of the scanner invocation use the `-D` or `--define` switch. This is what is done in the examples above, inside the `build.yml` files of each example.
* In the `sonar-project.properties` file.
* In the SonarQube Server interface under *Your Project* > **Project Settings** > **General Settings** > **Languages** > **C/C++/Objective-C** > **Coverage** for project-level settings, and **Administration** > **Configuration** > **General Settings** > **Languages** > **C/C++/Objective-C** > **Coverage** for global settings (applying to all projects).
### Related pages
[test-coverage-parameters](https://docs.sonarsource.com/sonarqube-server/analyzing-source-code/test-coverage/test-coverage-parameters "mention").
---
# Source: https://docs.sonarsource.com/sonarqube-server/8.9/analyzing-source-code/languages/c-family.md
# Source: https://docs.sonarsource.com/sonarqube-server/9.8/analyzing-source-code/languages/c-family.md
# Source: https://docs.sonarsource.com/sonarqube-server/9.9/analyzing-source-code/languages/c-family.md
# Source: https://docs.sonarsource.com/sonarqube-server/10.0/analyzing-source-code/languages/c-family.md
# Source: https://docs.sonarsource.com/sonarqube-server/10.1/analyzing-source-code/languages/c-family.md
# Source: https://docs.sonarsource.com/sonarqube-server/10.2/analyzing-source-code/languages/c-family.md
# Source: https://docs.sonarsource.com/sonarqube-server/10.3/analyzing-source-code/languages/c-family.md
# Source: https://docs.sonarsource.com/sonarqube-server/10.4/analyzing-source-code/languages/c-family.md
# Source: https://docs.sonarsource.com/sonarqube-server/10.5/analyzing-source-code/languages/c-family.md
# Source: https://docs.sonarsource.com/sonarqube-server/10.6/analyzing-source-code/languages/c-family.md
# Source: https://docs.sonarsource.com/sonarqube-server/10.7/analyzing-source-code/languages/c-family.md
# Source: https://docs.sonarsource.com/sonarqube-server/10.8/analyzing-source-code/languages/c-family.md
# Source: https://docs.sonarsource.com/sonarqube-server/2025.2/analyzing-source-code/languages/c-family.md
# Source: https://docs.sonarsource.com/sonarqube-server/2025.3/analyzing-source-code/languages/c-family.md
# Source: https://docs.sonarsource.com/sonarqube-server/2025.5/analyzing-source-code/languages/c-family.md
# Source: https://docs.sonarsource.com/sonarqube-server/2025.1/analyzing-source-code/languages/c-family.md
# Source: https://docs.sonarsource.com/sonarqube-server/2025.4/analyzing-source-code/languages/c-family.md
# Source: https://docs.sonarsource.com/sonarqube-server/2025.6/analyzing-source-code/languages/c-family.md
# Source: https://docs.sonarsource.com/sonarqube-server/analyzing-source-code/languages/c-family.md
# Source: https://docs.sonarsource.com/sonarqube-cloud/advanced-setup/languages/c-family.md
# C/C++/Objective C
{% content-ref url="c-family/overview" %}
[overview](https://docs.sonarsource.com/sonarqube-cloud/advanced-setup/languages/c-family/overview)
{% endcontent-ref %}
{% content-ref url="c-family/analysis-modes" %}
[analysis-modes](https://docs.sonarsource.com/sonarqube-cloud/advanced-setup/languages/c-family/analysis-modes)
{% endcontent-ref %}
{% content-ref url="c-family/prerequisites" %}
[prerequisites](https://docs.sonarsource.com/sonarqube-cloud/advanced-setup/languages/c-family/prerequisites)
{% endcontent-ref %}
{% content-ref url="c-family/running-the-analysis" %}
[running-the-analysis](https://docs.sonarsource.com/sonarqube-cloud/advanced-setup/languages/c-family/running-the-analysis)
{% endcontent-ref %}
{% content-ref url="c-family/customizing-the-analysis" %}
[customizing-the-analysis](https://docs.sonarsource.com/sonarqube-cloud/advanced-setup/languages/c-family/customizing-the-analysis)
{% endcontent-ref %}
{% content-ref url="c-family/understanding-the-analysis" %}
[understanding-the-analysis](https://docs.sonarsource.com/sonarqube-cloud/advanced-setup/languages/c-family/understanding-the-analysis)
{% endcontent-ref %}
{% content-ref url="c-family/related-pages" %}
[related-pages](https://docs.sonarsource.com/sonarqube-cloud/advanced-setup/languages/c-family/related-pages)
{% endcontent-ref %}
---
# Source: https://docs.sonarsource.com/sonarqube-cloud/managing-your-projects/administering-your-projects/changing-binding.md
# Changing project binding
### Changing the binding of your project
You can bind a project to another repository or you can bind an unbound project to a repository. See [binding-with-dop](https://docs.sonarsource.com/sonarqube-cloud/administering-sonarcloud/about-sonarqube-cloud-solution/ressources-structure/binding-with-dop "mention") for more information.
Binding a project to another repository
You can change the repository binding of a project provided you have Administer permission on that project and Create projects permission. The following limitations apply:
* The source and target repositories must be in the same organization.
* A public project cannot be bound to a private repository.
{% hint style="info" %}
The repository change will not impact the automatic analysis activation status of your project except if the target repository is a monorepo and automatic analysis was enabled for your project. In that case, the automatic analysis will be disabled since it’s not supported for monorepos and you will need to manually configure a CI-based analysis for your project. See [overview-of-integrated-cis](https://docs.sonarsource.com/sonarqube-cloud/advanced-setup/ci-based-analysis/overview-of-integrated-cis "mention") for more details.
{% endhint %}
{% hint style="warning" %}
Changing the binding of a project configured with a CI-based analysis may require that you change the CI/CD process configuration for this project.
{% endhint %}
To bind a project to another repository:
1. Retrieve your project. See [retrieving-projects](https://docs.sonarsource.com/sonarqube-cloud/managing-your-projects/retrieving-projects "mention") for more details.
2. Go to **Administration** > **General Settings** > **Repository binding**.
3. In the list of repositories, select the target repository and select **Save**.
Binding an unbound project to a repository
You can bind an unbound project to a repository provided you have Administer permission on that project and Create project permission. Note that a public project cannot be bound to a private repository.
{% hint style="info" %}
In case you had manually linked your project to a repository, you should remove this manual setup.
{% endhint %}
To bind an unbound project to a repository:
1. Retrieve your project. See [retrieving-projects](https://docs.sonarsource.com/sonarqube-cloud/managing-your-projects/retrieving-projects "mention") for more details.
2. Go to **Administration** > **General Settings** > **Repository binding**.
3. In the list of repositories, select the repository and select **Save**.
{% hint style="info" %}
You may want to enable the automatic analysis on your newly bound project. To do so, see [#activating-automatic-analysis](https://docs.sonarsource.com/sonarqube-cloud/advanced-setup/automatic-analysis#activating-automatic-analysis "mention").
{% endhint %}
Updating the project binding on repository URL change
In case you renamed your repository or moved it within the same organization, you can update the repository binding to your SonarQube Cloud project as follows:
1. Retrieve your project. See [retrieving-projects](https://docs.sonarsource.com/sonarqube-cloud/managing-your-projects/retrieving-projects "mention") for more details.
2. Go to **Administration** > **General Settings** > **Repository binding**.
3. In the list of repositories, re-select the target repository and select **Save**.
### Changing the project key
1. Retrieve your project. See [retrieving-projects](https://docs.sonarsource.com/sonarqube-cloud/managing-your-projects/retrieving-projects "mention") for more information.
2. In the left sidebar, select **Administration** > **Update Key**. The **Update Key** page opens.
3. Enter the new key and select **Update**.
### Related pages
* [setting-up-project](https://docs.sonarsource.com/sonarqube-cloud/managing-your-projects/administering-your-projects/setting-up-project "mention")
* [introduction](https://docs.sonarsource.com/sonarqube-cloud/managing-your-projects/administering-your-projects/devops-platform-integration/introduction "mention") to Setting up the integration of your project with your DevOps platform
* [setting-permissions](https://docs.sonarsource.com/sonarqube-cloud/managing-your-projects/administering-your-projects/setting-permissions "mention")
* [customizing-info-page](https://docs.sonarsource.com/sonarqube-cloud/managing-your-projects/administering-your-projects/customizing-info-page "mention")
* [deleting-project](https://docs.sonarsource.com/sonarqube-cloud/managing-your-projects/administering-your-projects/deleting-project "mention")
---
# Source: https://docs.sonarsource.com/sonarqube-community-build/quality-standards-administration/managing-quality-gates/changing-default-quality-gate.md
# Source: https://docs.sonarsource.com/sonarqube-server/2025.2/quality-standards-administration/managing-quality-gates/changing-default-quality-gate.md
# Source: https://docs.sonarsource.com/sonarqube-server/2025.3/quality-standards-administration/managing-quality-gates/changing-default-quality-gate.md
# Source: https://docs.sonarsource.com/sonarqube-server/2025.5/quality-standards-administration/managing-quality-gates/changing-default-quality-gate.md
# Source: https://docs.sonarsource.com/sonarqube-server/2025.4/quality-standards-administration/managing-quality-gates/changing-default-quality-gate.md
# Source: https://docs.sonarsource.com/sonarqube-server/2025.6/quality-standards-administration/managing-quality-gates/changing-default-quality-gate.md
# Source: https://docs.sonarsource.com/sonarqube-server/quality-standards-administration/managing-quality-gates/changing-default-quality-gate.md
# Source: https://docs.sonarsource.com/sonarqube-cloud/standards/managing-quality-gates/changing-default-quality-gate.md
# Changing default quality gate
A default quality gate is defined in your organization: any project that is not explicitly associated with a quality gate, is associated with its organization’s default quality gate. The default quality gate is indicated in the UI with the `DEFAULT` tag.
By default, the default quality gate is the built-in quality gate **Sonar way**. You can set any built-in or custom quality gate as the default quality gate. Check the [introduction-to-quality-gates](https://docs.sonarsource.com/sonarqube-cloud/standards/managing-quality-gates/introduction-to-quality-gates "mention") page for instructions.
{% hint style="info" %}
If you set as default a quality gate that is explicitly associated with projects, the explicit association is not shown anymore in the UI but is not removed: if you change again the default quality gate, the explicit association will show up again.
{% endhint %}
To change the default quality gate:
1. See [viewing-organizations](https://docs.sonarsource.com/sonarqube-cloud/getting-started/viewing-organizations "mention") to access your organization.
2. In the organization’s navigation bar, select **Quality Gates**.
3. In the left panel, select the quality gate you want to set as default.
4. In the top right corner of the quality gate, select the Actions button, then select **Set as default**.
### Related pages
* [introduction-to-quality-gates](https://docs.sonarsource.com/sonarqube-cloud/standards/managing-quality-gates/introduction-to-quality-gates "mention")
* [viewing-quality-gate](https://docs.sonarsource.com/sonarqube-cloud/standards/managing-quality-gates/viewing-quality-gate "mention")
* [managing-custom-quality-gates](https://docs.sonarsource.com/sonarqube-cloud/standards/managing-quality-gates/managing-custom-quality-gates "mention")
* [associating-projects-with-quality-gate](https://docs.sonarsource.com/sonarqube-cloud/standards/managing-quality-gates/associating-projects-with-quality-gate "mention")
* [notifications](https://docs.sonarsource.com/sonarqube-cloud/managing-your-account/notifications "mention")
* [quality-gates-for-ai-code](https://docs.sonarsource.com/sonarqube-cloud/standards/ai-code-assurance/quality-gates-for-ai-code "mention")
* [changing-quality-gate](https://docs.sonarsource.com/sonarqube-cloud/managing-your-projects/project-analysis/changing-quality-gate "mention")
---
# Source: https://docs.sonarsource.com/sonarqube-community-build/quality-standards-administration/managing-quality-profiles/changing-default-quality-profile.md
# Source: https://docs.sonarsource.com/sonarqube-server/2025.3/quality-standards-administration/managing-quality-profiles/changing-default-quality-profile.md
# Source: https://docs.sonarsource.com/sonarqube-server/2025.5/quality-standards-administration/managing-quality-profiles/changing-default-quality-profile.md
# Source: https://docs.sonarsource.com/sonarqube-server/2025.4/quality-standards-administration/managing-quality-profiles/changing-default-quality-profile.md
# Source: https://docs.sonarsource.com/sonarqube-server/2025.6/quality-standards-administration/managing-quality-profiles/changing-default-quality-profile.md
# Source: https://docs.sonarsource.com/sonarqube-server/quality-standards-administration/managing-quality-profiles/changing-default-quality-profile.md
# Source: https://docs.sonarsource.com/sonarqube-cloud/standards/managing-quality-profiles/changing-default-quality-profile.md
# Changing default quality profile
With the Administer Quality Profiles permission, you can change a language’s default quality profile in your organization
To change the default quality profile assigned to a language in your organization:
1. See [viewing-organizations](https://docs.sonarsource.com/sonarqube-cloud/getting-started/viewing-organizations "mention") to access your organization.
2. Go to the **Quality Profiles** page and locate the language that you want to change (the default quality profile on).
3. In the far right of the row, behind the three-dot button, select **Set as Default** from the menu.
* If there's only one quality profile or you've selected the existing DEFAULT profile for that language, select either **Copy** or **Extend** first, then select **Set as Default**.
### Related pages
* [understanding-quality-profiles](https://docs.sonarsource.com/sonarqube-cloud/standards/managing-quality-profiles/understanding-quality-profiles "mention")
* [viewing-quality-profiles](https://docs.sonarsource.com/sonarqube-cloud/standards/managing-quality-profiles/viewing-quality-profiles "mention")
* [creating-a-quality-profile](https://docs.sonarsource.com/sonarqube-cloud/standards/managing-quality-profiles/creating-a-quality-profile "mention")
* [editing-a-custom-quality-profile](https://docs.sonarsource.com/sonarqube-cloud/standards/managing-quality-profiles/editing-a-custom-quality-profile "mention")
* [associating-a-quality-profile-with-projects](https://docs.sonarsource.com/sonarqube-cloud/standards/managing-quality-profiles/associating-a-quality-profile-with-projects "mention")
* [maintaining-your-custom-quality-profiles](https://docs.sonarsource.com/sonarqube-cloud/standards/managing-quality-profiles/maintaining-your-custom-quality-profiles "mention")
* [authorizing-other-users-to-manage-quality-profile](https://docs.sonarsource.com/sonarqube-cloud/standards/managing-quality-profiles/authorizing-other-users-to-manage-quality-profile "mention")
* [quality-profile-association](https://docs.sonarsource.com/sonarqube-cloud/managing-your-projects/project-analysis/quality-profile-association "mention")
---
# Source: https://docs.sonarsource.com/sonarqube-cloud/administering-sonarcloud/managing-enterprise/changing-enterprise-settings.md
# Changing enterprise settings
### Renaming your enterprise
You must be an admin of the enterprise to be able to perform this procedure.
To rename an enterprise:
1. Retrieve your enterprise
2. Go to **Administration** > **Enterprise Settings** tab.
3. In the **Enterprise details** section, change the enterprise name and select **Save**.
### Related pages
[retrieving-and-viewing-your-enterprise](https://docs.sonarsource.com/sonarqube-cloud/administering-sonarcloud/managing-enterprise/retrieving-and-viewing-your-enterprise "mention")\
[creating-your-enterprise](https://docs.sonarsource.com/sonarqube-cloud/administering-sonarcloud/managing-enterprise/creating-your-enterprise "mention")\
[enterprise-security](https://docs.sonarsource.com/sonarqube-cloud/administering-sonarcloud/managing-enterprise/enterprise-security "mention")\
[adding-organizations-to-your-enterprise](https://docs.sonarsource.com/sonarqube-cloud/administering-sonarcloud/managing-enterprise/adding-organizations-to-your-enterprise "mention")\
[managing-the-enterprise-related-permissions](https://docs.sonarsource.com/sonarqube-cloud/administering-sonarcloud/managing-enterprise/managing-the-enterprise-related-permissions "mention")\
[managing-the-lines-of-code-within-your-enterprise](https://docs.sonarsource.com/sonarqube-cloud/administering-sonarcloud/managing-enterprise/managing-the-lines-of-code-within-your-enterprise "mention")\
[downgrading-your-enterprise](https://docs.sonarsource.com/sonarqube-cloud/administering-sonarcloud/managing-enterprise/downgrading-your-enterprise "mention")
---
# Source: https://docs.sonarsource.com/sonarqube-community-build/user-guide/code-metrics/changing-modes.md
# Source: https://docs.sonarsource.com/sonarqube-server/10.8/user-guide/code-metrics/changing-modes.md
# Source: https://docs.sonarsource.com/sonarqube-server/2025.2/user-guide/code-metrics/changing-modes.md
# Source: https://docs.sonarsource.com/sonarqube-server/2025.3/user-guide/code-metrics/changing-modes.md
# Source: https://docs.sonarsource.com/sonarqube-server/2025.5/user-guide/code-metrics/changing-modes.md
# Source: https://docs.sonarsource.com/sonarqube-server/2025.1/user-guide/code-metrics/changing-modes.md
# Source: https://docs.sonarsource.com/sonarqube-server/2025.4/user-guide/code-metrics/changing-modes.md
# Source: https://docs.sonarsource.com/sonarqube-server/2025.6/user-guide/code-metrics/changing-modes.md
# Source: https://docs.sonarsource.com/sonarqube-server/user-guide/code-metrics/changing-modes.md
# Changing instance modes
### The concept of two modes
Starting with SonarQube Server 10.8 we are introducing the concept of two modes: [standard-experience](https://docs.sonarsource.com/sonarqube-server/instance-administration/analysis-functions/instance-mode/standard-experience "mention") and [mqr-mode](https://docs.sonarsource.com/sonarqube-server/instance-administration/analysis-functions/instance-mode/mqr-mode "mention").
In Standard Experience, you can use familiar workflows and categorization for issues such as bugs, vulnerabilities, and code smells without impacting your way of working.
### Standard Experience metrics
The Standard Experience encompasses the use of rule types such as bugs, code smells, and vulnerabilities, with a single type and severity level for each rule. This approach focuses on assigning severity to a rule based on the single software quality (security, reliability, or maintainability) it has the largest impact on.
Severities in Standard Experience (Blocker, Critical, Major, Minor, and Info) are applied at the overall rule level.
### Multi-Quality Rule Mode metrics
The new MQR Mode aims to more accurately represent the impact an issue has on all [software-qualities](https://docs.sonarsource.com/sonarqube-server/user-guide/rules/software-qualities "mention"). It does this by assigning a separate severity to a rule for each software quality it might impact. This approach focuses on ensuring the impact on all affected software qualities is clear, not just the one most severely impacted.
Severities in MQR Mode (Blocker, High, Medium, Low, and Info) are applied at the software quality level.
### Example and comparison
To illustrate the difference between Standard Experience and MQR Mode, let’s examine the [Arguments in long RUN instructions should be sorted](https://rules.sonarsource.com/docker/RSPEC-7018/) rule in Docker:
* When your code breaks this rule in Standard Experience an issue is raised with a Code Smell type and Minor severity level.
* In MQR Mode, however, an issue is raised that impacts all three software qualities at different severity levels: Maintainability (Medium), Reliability (Low), and Security (Low). This provides you with a more comprehensive picture of the issue’s impact on your project.
### Switching modes
#### Permissions
To change from Standard Experience to MQR Mode and vice versa, you need instance admin permissions.
To switch the mode in your SonarQube Server instance go to **Administration** > **Configuration** > **General Settings** > **Mode** and select either **Standard Experience** or **Multi-Quality Rule Mode**.
#### From Standard Experience to MQR Mode
After switching to MQR Mode you will notice some changes in your SonarQube Server instance:
* The severities levels for rules, issues and ratings are now Blocker, High, Medium, Low, and Info.
* Bugs, Vulnerabilities, and Code Smells are replaced with software qualities: Reliability, Security, and Maintainability. Security vulnerabilities are replaced with Security in Portfolios and Security Reports.
* Since issues might impact multiple software qualities, the number of issues may increase. This might also impact the outcome of your quality profiles and quality gates.
* You might have to update the conditions of custom Quality Gates to use them with the MQR metrics as some metrics might impact more than one software quality.
* Check if your API calls to the Sonar solution use the correct MQR Mode metrics. See the [metrics-definition](https://docs.sonarsource.com/sonarqube-server/user-guide/code-metrics/metrics-definition "mention") page for more details.
* If you are using the generic issue format for the analysis report, you must use the latest format version as outlined on the [generic-issue-import-format](https://docs.sonarsource.com/sonarqube-server/analyzing-source-code/importing-external-issues/generic-issue-import-format "mention") page. Otherwise, all issues will appear with Maintainability set to Medium when you switch to MQR Mode.
#### From MQR Mode to Standard Experience
After switching to Standard Experience you will notice some changes in your SonarQube Server instance:
* The severities levels for rules, issues and ratings are now Blocker, Critical, Major, Minor, and Info.
* Reliability, Security, and Maintainability are replaced with Bugs, Vulnerabilities, and Code Smells types. Security is replaced with Security Vulnerabilities in Portfolios and Security Reports.
* Since issues impact only one type you might see different outcomes in your quality profiles and quality gates.
* You might have to update the conditions of custom Quality Gates to use them with the Standard Experience metrics.
* Check if your API calls to the Sonar solution use the correct Standard Experience metrics. See the Metric definitions page for more details.
* If you are using the generic issue format for the analysis report, you must use the latest format version as outlined on the [generic-issue-import-format](https://docs.sonarsource.com/sonarqube-server/analyzing-source-code/importing-external-issues/generic-issue-import-format "mention") page.
---
# Source: https://docs.sonarsource.com/sonarqube-cloud/administering-sonarcloud/managing-organization/creating-organization/changing-organization-binding.md
# Changing organization binding
Sonar is planning to change the organization binding feature in order to allow a simplified change of organization binding. In the meantime, you can use the workaround described below for a SonarQube Cloud organization bound to a GitHub organization or a Bitbucket workspace.
You will first unbind the SonarQube Cloud organization and then rebind it to the new DevOps platform organization. The new organization may be on any DevOps platform (GitHub, Bitbucket, GitLab or Azure DevOps).
{% hint style="warning" %}
* The workaround applies only to a SonarQube Cloud organization bound to a GitHub organization or a Bitbucket workspace.
* You must manually change the binding of the projects within the SonarQube Cloud organization.
{% endhint %}
The operation is different if the new binding is on a different DevOps platform.
### Prerequisites
To be able to change the binding of a SonarQube Cloud organization, you must:
* Be an admin of the organization.
* Have the required permissions on the new DevOps platform organization. It means, depending on the DevOps platform:
* GitHub: be an owner of the GitHub organization.
* Bitbucket workspace: be an administrator of the Bitbucket workspace. You will already be an administrator of your default workspace. For any other workspace, you have to add your Bitbucket account to a user group with the Administer workspace user right enabled.
* GitLab: be an owner of the GitLab group.
* Azure DevOps: be an administrator of the Azure DevOps organization.
### On the same DevOps platform
1. Remove the SonarQube Cloud app from the GitHub organization or a Bitbucket workspace (this will unbind the organization in SonarQube Cloud). See:
* [Deleting a GitHub App](https://docs.github.com/en/apps/maintaining-github-apps/deleting-a-github-app) in the GitHub documentation.
* [Removing an app](https://support.atlassian.com/bitbucket-cloud/docs/bitbucket-cloud-apps-overview/) in the Altassian documentation.
2. Sign in to SonarQube Cloud.
3. Bind the unbound organization to the new DevOps platform organization. See [binding-unbound-organization](https://docs.sonarsource.com/sonarqube-cloud/administering-sonarcloud/managing-organization/creating-organization/binding-unbound-organization "mention") for more information.
4. Change the binding of each project in the SonarQube Cloud organization. See [changing-binding](https://docs.sonarsource.com/sonarqube-cloud/managing-your-projects/administering-your-projects/changing-binding "mention") for more information.
### On a different DevOps platform
This section explains the operation in case you want to change the binding of the organization to a different DevOps platform. DevOps platform1 refers to your GitHub organization or Bitbucket workspace that you want to unbind. DevOps platform2 refers to your GitHub organization, Bitbucket workspace, GitLab group, or Azure DevOps organization that you want to bind to.
If you’re a member of an enterprise and DevOps platform2 is not Bitbucket, you may use any of your DevOps Platform accounts or your SSO account to perform the new binding. It means that you can log in to SonarQube Cloud with your account that is an admin of the SonarQube Cloud organization and follow the steps above in *On the same DevOps platform*.
Otherwise, you must use your DevOps platform2’s account (`Account2`) to perform the new binding. You must make sure that `Account2` is also an admin of the SonarQube Cloud organization to be changed. If it’s not the case, you must add it to the organization by using your DevOps platform1’s account (`Account1`) that is an admin of the organization. To do so:
1. Sign in to SonarQube Cloud with `Account1`.
2. Add `Account2` as a member of the SonarQube Cloud organization, see [organization-members](https://docs.sonarsource.com/sonarqube-cloud/administering-sonarcloud/managing-organization/users-and-permissions/organization-members "mention") for more details. This operation is not possible if `Account1` and `Account2` have different email addresses, since SonarQube Cloud doesn’t simultaneously support two accounts with the same email address. In that case, another user must perform the procedure and you must first set this user as an admin of the organization.
3. Grant the Administer organization permission to `Account2`, see [organization-permissions](https://docs.sonarsource.com/sonarqube-cloud/administering-sonarcloud/managing-organization/users-and-permissions/organization-permissions "mention") for more details.
4. You can now follow the steps above in *On the same DevOps platform* by signing in to SonarQube Cloud with `Account2`*.*
---
# Source: https://docs.sonarsource.com/sonarqube-cloud/administering-sonarcloud/managing-organization/creating-organization/changing-organization-settings.md
# Changing organization settings
You must be an organization admin to perform the procedures described below.
### Changing organization details
You can:
* Change the organization name displayed on SonarQube Cloud UI.
* Add or change the avatar. The avatar is a small image representing the organization and displayed on the UI near the organization’s name.
* Add or change the organization description.
* Add or change the URL of the homepage of the organization displayed on the UI.
Proceed as follows:
1. Retrieve your organization. See [viewing-organizations](https://docs.sonarsource.com/sonarqube-cloud/getting-started/viewing-organizations "mention") for more information.
2. Go to **Administration** > **Organization settings** > **General** > **Organization details**.
3. Edit the field value(s).
4. Select **Save**.
### Changing the organization key
The organization key is set when you import the organization into SonarQube Cloud. At that point, you can choose your own key or accept the suggested key. In some cases, you may later wish to change this key (for example, if a new naming convention is adopted at your company, or if you initially chose a bad key by accident).
{% hint style="info" %}
The organization key is used in CI-based analysis setups to link the analysis produced by the scanner in your local or cloud-based build environment with the correct organization in SonarQube Cloud. It appears as the value of the `sonar.organization` parameter in your analysis configuration.
{% endhint %}
To change the key of your organization:
1. Retrieve your organization. See [viewing-organizations](https://docs.sonarsource.com/sonarqube-cloud/getting-started/viewing-organizations "mention") for more information.
2. Go to **Administration** > **Organization settings** > **General** > **Edit organization key**.
3. In **Key**, enter your new key, and select **Save**.
4. Make the same change to the `sonar.organization` setting of every project in the organization that is configured for CI-based analysis, or inform the respective project administrators.
### Allowing only private projects in an organization
By default, the visibility of newly created projects is set to private on Free, Team and Enterprise plans. However, In a Team or Enterprise plan organization, you can restrict project creation to private projects only. If public projects belong to the organization, you must make them private first, see [setting-permissions](https://docs.sonarsource.com/sonarqube-cloud/managing-your-projects/administering-your-projects/setting-permissions "mention").
To allow only private projects in your organization:
1. Retrieve your organization. See [viewing-organizations](https://docs.sonarsource.com/sonarqube-cloud/getting-started/viewing-organizations "mention") for more information.
2. Go to **Administration** > **Organization settings** > **General** > **Only allow private projects**.
3. Select the **Only allow private projects** checkbox.
4. Select **Save**.
### Changing the token used to connect to GitLab or Azure DevOps organization
To change the personal access token used to connect to your GitLab or Azure DevOps organization:
1. Retrieve your organization. See [viewing-organizations](https://docs.sonarsource.com/sonarqube-cloud/getting-started/viewing-organizations "mention") for more information.
2. Go to **Administration** > **Organization settings** > **Organization binding**.
3. In **Current binding**, select the **Edit token** button.
### Related pages
* [binding-unbound-organization](https://docs.sonarsource.com/sonarqube-cloud/administering-sonarcloud/managing-organization/creating-organization/binding-unbound-organization "mention")
* [importing-github-organization](https://docs.sonarsource.com/sonarqube-cloud/administering-sonarcloud/managing-organization/creating-organization/importing-github-organization "mention")
* [importing-bitbucket-workspace](https://docs.sonarsource.com/sonarqube-cloud/administering-sonarcloud/managing-organization/creating-organization/importing-bitbucket-workspace "mention")
* [importing-gitlab-group](https://docs.sonarsource.com/sonarqube-cloud/administering-sonarcloud/managing-organization/creating-organization/importing-gitlab-group "mention")
* [importing-azure-devops-organization](https://docs.sonarsource.com/sonarqube-cloud/administering-sonarcloud/managing-organization/creating-organization/importing-azure-devops-organization "mention")
* [creating-organization-manually](https://docs.sonarsource.com/sonarqube-cloud/administering-sonarcloud/managing-organization/creating-organization/creating-organization-manually "mention")
* [changing-organization-binding](https://docs.sonarsource.com/sonarqube-cloud/administering-sonarcloud/managing-organization/creating-organization/changing-organization-binding "mention")
* [deleting-organization](https://docs.sonarsource.com/sonarqube-cloud/administering-sonarcloud/managing-organization/creating-organization/deleting-organization "mention")
* [importing-from-multiple-platforms](https://docs.sonarsource.com/sonarqube-cloud/administering-sonarcloud/managing-organization/creating-organization/importing-from-multiple-platforms "mention")
---
# Source: https://docs.sonarsource.com/sonarqube-community-build/user-guide/managing-your-account/changing-password.md
# Source: https://docs.sonarsource.com/sonarqube-server/10.7/user-guide/managing-your-account/changing-password.md
# Source: https://docs.sonarsource.com/sonarqube-server/10.8/user-guide/managing-your-account/changing-password.md
# Source: https://docs.sonarsource.com/sonarqube-server/2025.2/user-guide/managing-your-account/changing-password.md
# Source: https://docs.sonarsource.com/sonarqube-server/2025.3/user-guide/managing-your-account/changing-password.md
# Source: https://docs.sonarsource.com/sonarqube-server/2025.5/user-guide/managing-your-account/changing-password.md
# Source: https://docs.sonarsource.com/sonarqube-server/2025.1/user-guide/managing-your-account/changing-password.md
# Source: https://docs.sonarsource.com/sonarqube-server/2025.4/user-guide/managing-your-account/changing-password.md
# Source: https://docs.sonarsource.com/sonarqube-server/2025.6/user-guide/managing-your-account/changing-password.md
# Source: https://docs.sonarsource.com/sonarqube-server/user-guide/managing-your-account/changing-password.md
# Changing password
If your SonarQube Server instance is not using a 3rd party authentication mechanism such as LDAP or an OAuth provider (GitHub, Google Account, etc.), you can change your SonarQube Server password.
To change your password:
1. Select your account menu in the top right corner of the SonarQube Server interface.
2. In the menu, select **My Account**.
3. Select the **Security** tab.
4. In the **Enter a new password** section, enter your old and new password.
5. Select **Update**.
---
# Source: https://docs.sonarsource.com/sonarqube-cloud/administering-sonarcloud/managing-subscription/changing-plan.md
# Changing your subscription plan
This page explains how to upgrade to or downgrade from a subscription plan, and how to change the Lines of Code (LOC) limit of your organization or enterprise.
### Changing the LOC limit of your subscription
If you have a monthly subscription, you can change your LOC (Lines of Code) limit in the UI. Otherwise, [contact our team](https://www.sonarsource.com/company/contact/). For more information about the LOC, see [#loc-based-pricing](https://docs.sonarsource.com/sonarqube-cloud/administering-sonarcloud/subscription-plans#loc-based-pricing "mention").
{% hint style="info" %}
You cannot change the LOC of a legacy paid plan. You can only migrate your legacy paid plan organization to Free or upgrade it to Team or Enterprise. See above.
{% endhint %}
To change the LOC limit of your monthly subscription:
Yearly or custom subscription
[Contact our team](https://www.sonarsource.com/company/contact/).
Monthly subscription
1. Retrieve your organization. See [viewing-organizations](https://docs.sonarsource.com/sonarqube-cloud/getting-started/viewing-organizations "mention") for more details.
2. Select the **Billing & Upgrade** tab.
3. In the **Current plan** section, select **Modify plan**.
4. In **Plan Details** > **How many lines of code?**, change the LOC.
5. Select **Update**.
Note that:
* If you increase the LOC limit, the change takes effect immediately and you will be charged on the next billing date with the pro-rated amount for the rest of the current billing period.
* If you decrease the LOC limit, the change will take effect on the next billing cycle.
### Upgrading from Free to Team Monthly subscription
1. Retrieve your organization. See [viewing-organizations](https://docs.sonarsource.com/sonarqube-cloud/getting-started/viewing-organizations "mention") for more details.
2. Select the **Billing & Upgrade** tab.
3. In **Current plan**, select **Modify plan**. The **Upgrade to the Team plan** page opens.
4. In **Plan details**, select the Lines of Code (LOC threshold) you want to purchase for the organization. See **LOC-based pricing** in [subscription-plans](https://docs.sonarsource.com/sonarqube-cloud/administering-sonarcloud/managing-subscription/subscription-plans "mention") for more information.
5. Select **Continue to billing information**.
6. Enter your billing information.
7. Select **Continue to payment information**.
8. Enter your credit card information.
9. Select **Upgrade**.
Yearly or custom subscription
1. Select the Lines of Code (LOC threshold) you want to purchase for the organization. See **LOC-based pricing** in [subscription-plans](https://docs.sonarsource.com/sonarqube-cloud/administering-sonarcloud/managing-subscription/subscription-plans "mention") for more details.
2. [Contact our team](https://www.sonarsource.com/company/contact/) to purchase a yearly or custom coupon for the selected LOC.
3. Once you have your coupon, retrieve your organization. See [viewing-organizations](https://docs.sonarsource.com/sonarqube-cloud/getting-started/viewing-organizations "mention") for more information.
4. Select the **Billing & Upgrade** tab.
5. In **Already have a coupon?**, select the **apply it directly here** link.
6. Enter the coupon and select **Apply coupon**.
### Upgrading to the Enterprise plan
See [setting-up-your-enterprise](https://docs.sonarsource.com/sonarqube-cloud/getting-started-with-enterprise/setting-up-your-enterprise "mention") for more information.
### Downgrading from Enterprise
When you downgrade an organization, the downgrade will take effect on the next billing cycle.
Before downgrading, see [#feature-loss-on-downgrade](#feature-loss-on-downgrade "mention").
When you remove an organization from your enterprise, the organization is automatically downgraded to the plan of your choice. See [#removing-org-from-enterprise](https://docs.sonarsource.com/sonarqube-cloud/managing-enterprise/adding-organizations-to-your-enterprise#removing-org-from-enterprise "mention").
### Downgrading from Team
When you downgrade an organization, the downgrade will take effect on the next billing cycle.
Before downgrading, see [#feature-loss-on-downgrade](#feature-loss-on-downgrade "mention").
To downgrade from Team:
1. Retrieve your organization. See [viewing-organizations](https://docs.sonarsource.com/sonarqube-cloud/getting-started/viewing-organizations "mention") for more details.
2. Select the **Billing & Upgrade** tab.
3. In the **Current plan** section, select **Modify plan**.
4. On the new page, click the **visit our compare plan page** link. A new page displays a summary of the different plans.
5. In the **Free** column, select **Downgrade to Free**.\
SonarQube Cloud checks if your organization complies with the Free plan’s limit (maximum number of members). If not, a warning is displayed, and you are guided through the steps necessary to make your organization comply with this limit. Once this is done, you will be able to proceed to the next step.
6. Select **Next step**.
7. You can now review the plan changes: what you will gain and what you will lose. Select **Next step**.
8. If you agree to downgrade, enter your organization name and select **Downgrade organization**. Otherwise, select **Cancel download**.
### Moving from OSS to Free
If you want to change your OSS plan organization, you can only move it to Free. In that case, you will be able to analyze private projects but you will loose access to the advanced features listed in [#oss-plan](https://docs.sonarsource.com/sonarqube-cloud/administering-sonarcloud/subscription-plans#oss-plan "mention").
To move your organization from OSS to Free:
1. Retrieve your organization. See [viewing-organizations](https://docs.sonarsource.com/sonarqube-cloud/getting-started/viewing-organizations "mention") for more details.
2. Select the **Billing & Upgrade** tab.
3. In **Current plan**, select **Modify plan**.
4. Select the Free plan.
### Changing your legacy paid plan
The legacy paid plan has been replaced by the new Team plan. It will soon no longer be supported.
Before migrating, determine the number of private lines (LOC) your organization needs and check the features of each plan. For more information, see [subscription-plans](https://docs.sonarsource.com/sonarqube-cloud/administering-sonarcloud/managing-subscription/subscription-plans "mention").
To migrate your organization to another plan:
1. Retrieve your organization. See [viewing-organizations](https://docs.sonarsource.com/sonarqube-cloud/getting-started/viewing-organizations "mention") for more details.
2. Select the **Billing & Upgrade** tab.
3. In **Current plan**, select **Modify plan** and follow the instructions to select your new plan.
If your organization doesn’t comply with the new plan’s limits (maximum number of members and maximum LOC), a warning is displayed, and you are guided through the steps necessary to make your organization comply with these limits.
### Terminating a monthly subscription
A monthly subscription is automatically renewed. To terminate it, you can delete it (see [deleting-organization](https://docs.sonarsource.com/sonarqube-cloud/administering-sonarcloud/managing-organization/creating-organization/deleting-organization "mention")) or downgrade it to Free (see [#downgrading-from-team](#downgrading-from-team "mention")).
### Reviewing the feature loss before a downgrade
When you downgrade:
* The maximum number of LOC you can analyze in your private projects will decrease if you downgrade from Team to Free. If your currently LOC used is over the maximum LOC of the target plan, you won’t be able to analyze all your current private projects anymore. This means also automatic project provisioning through your CI/CD pipeline will create public projects.
* You may lose access to features: see the table below. In particular, be aware of the downgrade impacts explained in the **If you lose it during the downgrade** column.
Feature
Available from
If you lose it during a downgrade
AI CodeFix
Team
As a developer, you can’t use the AI CodeFix feature to resolve your code issues anymore. See ai-codefix overview page for details about the feature.
Custom quality profiles
Team
You can’t manage custom quality profiles anymore. Only the built-in quality profile (Sonar way) can be used. Your existing custom quality profiles are not deleted, but they are removed from your project settings, and you can’t use them anymore. If you upgrade your plan, you regain access to them. See understanding-quality-profiles for more details.
Custom quality gates
Team
You can’t manage custom quality gates anymore. Only the built-in quality gate (Sonar way) can be used. Your existing custom quality gates are not deleted, but they are removed from your project settings, and you can’t use them anymore. If you upgrade your plan, you regain access to them. See introduction-to-quality-gates for more details.
Enterprise languages
Enterprise
The following languages can no longer be analyzed: APEX, ABAP, COBOL, JCL, PL/I, and RPG.
Feedback on all branches
Team
The branch-analysis is now limited to the main branch, and the pull request analysis is now limited to pull requests where the target branch is the main branch.
Note that it’s still possible to analyze any branch and any pull request. SonarQube Cloud stores the analysis results in its database but you can’t access them. If you upgrade your plan, you (re)gain access to all your previous analyses.
GitHub advanced security integration
Enterprise
The report of the security issues inside the github interface as code scanning alerts is not supported anymore.
GitHub member sync
Team
You cannot access the GitHub member synchronization feature anymore. See devops-platform-authentication for more details.
Groups (member management)
Team
You can’t manage custom groups anymore. This means that only the built-in groups are used (Owners and Members). The permissions of the built-in groups are set back to their default values and you cannot change them. See #built-in-groups for more details.
Warning: Your existing custom groups are deleted. The Owners group is recreated by adding all users with administration permissions who belonged to the Owners group or a deleted custom group.
Management reporting
Enterprise
You have no access to the Enterprise reporting features anymore (portfolios, security and project reports). See introduction to Viewing the enterprise reports for details.
Permission templates
Team
You can’t manage permission templates anymore.
Warning: Your existing permission templates are deleted.
Projects Management
Enterprise
As an organization admin, you lose access to:
• The Projects Management page, which allows you to manage projects in a centralized manner.
You’ll have to delete all SSO accounts before the downgrade. See about for more details.
Quality profile admin delegation
Enterprise
As a user with the Quality Profiles Administration permission, you can no longer authorize users or groups to manage a specific custom quality profile. See authorizing-other-users-to-manage-quality-profile for more details.
Unlimited team members
Team
The number of members in your organization is now limited to 5.
Webhooks
Team
You can’t manage webhooks anymore. Your existing webhooks are not deleted but SonarQube Cloud will not invoke them anymore (you can still delete them). If you upgrade your organization, you regain access to them.
### Related pages
* [subscription-plans](https://docs.sonarsource.com/sonarqube-cloud/administering-sonarcloud/managing-subscription/subscription-plans "mention")
* [billing-model](https://docs.sonarsource.com/sonarqube-cloud/administering-sonarcloud/managing-subscription/billing-model "mention")
* [signing-up-for-plan](https://docs.sonarsource.com/sonarqube-cloud/administering-sonarcloud/managing-subscription/signing-up-for-plan "mention")
* [updating-billing-payment-details](https://docs.sonarsource.com/sonarqube-cloud/administering-sonarcloud/managing-subscription/updating-billing-payment-details "mention")
* [viewing-billing-and-usage](https://docs.sonarsource.com/sonarqube-cloud/administering-sonarcloud/managing-subscription/viewing-billing-and-usage "mention")
* [viewing-taxes-and-invoices](https://docs.sonarsource.com/sonarqube-cloud/administering-sonarcloud/managing-subscription/viewing-taxes-and-invoices "mention")
---
# Source: https://docs.sonarsource.com/sonarqube-community-build/project-administration/maintaining-project/changing-project-binding.md
# Source: https://docs.sonarsource.com/sonarqube-server/2025.5/project-administration/changing-project-binding.md
# Source: https://docs.sonarsource.com/sonarqube-server/2025.6/project-administration/maintaining-project/changing-project-binding.md
# Source: https://docs.sonarsource.com/sonarqube-server/project-administration/maintaining-project/changing-project-binding.md
# Changing your project binding
You must be an administrator of your project.
### Unbinding or changing the binding of a bound project
1. Retrieve your project. For more information, see [retrieving-projects](https://docs.sonarsource.com/sonarqube-server/user-guide/viewing-projects/retrieving-projects "mention").
2. Go to **Project Settings** > **General Settings** > **DevOps Platform Integration**.
3. In the bottom of the page, select **Reset**. The project is unbound.
4. To bind the project to another repository, see [#binding-an-unbound-project](#binding-an-unbound-project "mention") below.
### **Binding an unbound project**
If you created your project manually and want to bind it to its DevOps platform repository to benefit the features of a bound project, proceed as follows:
1. Retrieve your project in SonarQube Server. For more information, see [retrieving-projects](https://docs.sonarsource.com/sonarqube-server/user-guide/viewing-projects/retrieving-projects "mention")..
2. In front of the project name, select **Bind project**. The DevOps Platform Integration page opens.
3. In **Configuration name**, enter the Configuration record used to manage your DevOps platform integration at the global level. Ask your system administrator.
4. This step depends on your DevOps platform:
* GitHub: In **Repository name**, enter the name of the GitHub repository you want to bind.\
You can enable the [analysis summary under the GitHub Conversation tab](https://docs.sonarsource.com/sonarqube-server/user-guide/issues/in-devops-platform/github#pull-request-decoration).
* Bitbucket Cloud: In **Repository slug**, enter the URL of the Bitbucket Cloud repository you want to bind.
* GitLab: In **Project ID**, enter the unique identifier of your GitLab project you want to bind.
* Azure DevOps:
* In **Project name**, enter the name of the Azure DevOps project containing your repository.
* In **Repository name**, enter the name of the Azure DevOps repository you want to bind.
* By default, [pull request annotations](https://docs.sonarsource.com/sonarqube-server/user-guide/issues/in-devops-platform/azure-devops#pull-request-decoration) are enabled. You can disable them.
5. Select **Save**. The new binding is saved.
6. Select **Check configuration**. SonarQube Server checks if the entered DevOps platform repository exists and you have access to it.
{% hint style="info" %}
The project binding (incl. the configuration check) is logged in the [audit logs](https://docs.sonarsource.com/sonarqube-server/instance-administration/security/audit-logs).
{% endhint %}
---
# Source: https://docs.sonarsource.com/sonarqube-community-build/project-administration/maintaining-project/changing-project-key.md
# Source: https://docs.sonarsource.com/sonarqube-server/2025.2/project-administration/changing-project-key.md
# Source: https://docs.sonarsource.com/sonarqube-server/2025.3/project-administration/changing-project-key.md
# Source: https://docs.sonarsource.com/sonarqube-server/2025.5/project-administration/changing-project-key.md
# Source: https://docs.sonarsource.com/sonarqube-server/2025.4/project-administration/changing-project-key.md
# Source: https://docs.sonarsource.com/sonarqube-server/2025.6/project-administration/maintaining-project/changing-project-key.md
# Source: https://docs.sonarsource.com/sonarqube-server/project-administration/maintaining-project/changing-project-key.md
# Changing the project key
The project key can be updated as follows:
1. Retrieve your project. See [retrieving-projects](https://docs.sonarsource.com/sonarqube-server/user-guide/viewing-projects/retrieving-projects "mention") for more details.
2. In the top right corner, select **Project Settings** > **Update Key**.
The new key must contain at least one non-digit character. Allowed characters are: `a` through `z`, `A` through `Z`, `-` (dash), `_` (underscore), `.` (dot), `:` (colon) and the digits `0` through `9`. This value is case-sensitive.
---
# Source: https://docs.sonarsource.com/sonarqube-community-build/project-administration/adjusting-analysis/changing-quality-gate-and-fudge-factor.md
# Source: https://docs.sonarsource.com/sonarqube-server/2025.2/project-administration/changing-quality-gate-and-fudge-factor.md
# Source: https://docs.sonarsource.com/sonarqube-server/2025.3/project-administration/changing-quality-gate-and-fudge-factor.md
# Source: https://docs.sonarsource.com/sonarqube-server/2025.5/project-administration/changing-quality-gate-and-fudge-factor.md
# Source: https://docs.sonarsource.com/sonarqube-server/2025.4/project-administration/changing-quality-gate-and-fudge-factor.md
# Source: https://docs.sonarsource.com/sonarqube-server/2025.6/project-administration/adjusting-analysis/changing-quality-gate-and-fudge-factor.md
# Source: https://docs.sonarsource.com/sonarqube-server/project-administration/adjusting-analysis/changing-quality-gate-and-fudge-factor.md
# Managing your project's quality gate
### Changing the quality gate applied to your project
The instance’s default quality gate is applied by default to your project. As a project administrator, you can apply other standards to your project. To do so:
1. Retrieve your project. See [retrieving-projects](https://docs.sonarsource.com/sonarqube-server/user-guide/viewing-projects/retrieving-projects "mention") for more details.
2. Select **Project Settings > Quality Gate**.
3. Select **Always use a specific Quality Gate**, and select the quality gate in the list.
4. Select **Save**.
### Setting up the Sandbox feature for your project
If your instance admin has enabled the Sandbox feature in your instance, you can switch it on or off for your project, and, if allowed by the instance admin, you can change the sandbox conditions. For more information about this feature, see [#sandboxing-of-issues-coming-from-sonarqube-update](https://docs.sonarsource.com/sonarqube-server/user-guide/issues/solution-overview#sandboxing-of-issues-coming-from-sonarqube-update "mention").
{% hint style="info" %}
If you switch off the Sandbox feature for your project, any existing sandboxed issues will remain in the Sandbox and can still be triaged by users.
{% endhint %}
#### Switching Sandbox on or off
1. Retrieve your project. See [retrieving-projects](https://docs.sonarsource.com/sonarqube-server/user-guide/viewing-projects/retrieving-projects "mention") for more details.
2. In the top right corner, select **Project Settings > General Settings > General**.
3. In **Sandbox specific issue categories after SonarQube update**, enable the Sandbox feature.
4. Select Save.
#### Changing the Sandbox conditions
If allowed by your instance admin, you can change the software quality and/or severity of issues moved to the Sandbox.
Proceed as follows:
1. Retrieve your project.
2. In the top right corner, select **Project Settings > General Settings > General**.
3. In **Sandbox specific issue categories after SonarQube update**, make sure the sandbox feature is enabled.
4. In **Choose software quality and severity of issues automatically moved to sandbox after SonarQube update**, change the software quality(ies) and/or severity(ies).
5. Select **Save**.
6. To reset the sandbox conditions to their default values, select **Reset To Default**.
### Configuring the quality gate fudge factor
The quality gate fudge factor refers to a mechanism where conditions on duplication and coverage are ignored until the number of new lines is at least 20. This is used to avoid overly strict enforcement when dealing with small changes, as minor issues might disproportionately impact the overall quality gate status.
The fudge factor is enabled by default in your instance. This global setting is applied to all new projects. Project administrators can override it for their project.
You can enable the fudge factor in the UI as explained below, or by setting the `sonar.qualitygate.ignoreSmallChanges` property to `false` or `true` on the CI/CD host (see [analysis-parameters](https://docs.sonarsource.com/sonarqube-server/analyzing-source-code/analysis-parameters "mention")).
To enable or disable the quality gate fudge factor in the UI for your project:
1. Retrieve your project. See [retrieving-projects](https://docs.sonarsource.com/sonarqube-server/user-guide/viewing-projects/retrieving-projects "mention") for more details.
2. Select **Project Settings > General Settings > General**.
3. In the **Quality gate** section, unselect or select **Ignore duplication and coverage on small changes**.
### Related pages
* [introduction-to-quality-gates](https://docs.sonarsource.com/sonarqube-server/quality-standards-administration/managing-quality-gates/introduction-to-quality-gates "mention")
* [viewing-quality-gate](https://docs.sonarsource.com/sonarqube-server/quality-standards-administration/managing-quality-gates/viewing-quality-gate "mention")
* [managing-custom-quality-gates](https://docs.sonarsource.com/sonarqube-server/quality-standards-administration/managing-quality-gates/managing-custom-quality-gates "mention")
* [changing-default-quality-gate](https://docs.sonarsource.com/sonarqube-server/quality-standards-administration/managing-quality-gates/changing-default-quality-gate "mention")
* [associating-projects-with-quality-gate](https://docs.sonarsource.com/sonarqube-server/quality-standards-administration/managing-quality-gates/associating-projects-with-quality-gate "mention")
* [subscribing-to-notifications](https://docs.sonarsource.com/sonarqube-server/user-guide/managing-your-account/subscribing-to-notifications "mention")
* [#sandboxing-of-issues-coming-from-sonarqube-update](https://docs.sonarsource.com/sonarqube-server/user-guide/issues/solution-overview#sandboxing-of-issues-coming-from-sonarqube-update "mention")
---
# Source: https://docs.sonarsource.com/sonarqube-server/2025.2/project-administration/changing-quality-gate.md
# Source: https://docs.sonarsource.com/sonarqube-server/2025.3/project-administration/changing-quality-gate.md
# Source: https://docs.sonarsource.com/sonarqube-server/2025.5/project-administration/changing-quality-gate.md
# Source: https://docs.sonarsource.com/sonarqube-server/2025.4/project-administration/changing-quality-gate.md
# Source: https://docs.sonarsource.com/sonarqube-server/2025.6/project-administration/adjusting-analysis/changing-quality-gate.md
# Source: https://docs.sonarsource.com/sonarqube-server/project-administration/adjusting-analysis/changing-quality-gate.md
# Source: https://docs.sonarsource.com/sonarqube-cloud/managing-your-projects/project-analysis/changing-quality-gate.md
# Quality gate
The organization’s default quality gate is applied by default to your project. As a project administrator, you can apply other standards to your project. In addition, you can change the fudge factor used for quality gate computation for your project.
### Changing the quality gate applied to your project
1. Retrieve your project. See [retrieving-projects](https://docs.sonarsource.com/sonarqube-cloud/managing-your-projects/retrieving-projects "mention") for more details.
2. In the left navigation bar, select **Administration** > **Quality Gate**.
3. Select **Use a specific quality gate**, and select the quality gate in the list.
4. Select **Save**.
### Changing the quality gate fudge factor of your project
The quality gate fudge factor refers to a mechanism where conditions on duplication and coverage are ignored until the number of new lines is at least 20. This is used to avoid overly strict enforcement when dealing with small changes, as minor issues might disproportionately impact the overall quality gate status.
The fudge factor is enabled by default in your organization. This organization’s setting is applied to all new projects. Project administrators can override it for their project.
To enable or disable the fudge factor for your project:
1. Retrieve your project. See [retrieving-projects](https://docs.sonarsource.com/sonarqube-cloud/managing-your-projects/retrieving-projects "mention") for more details.
2. In the left navigation bar, select **Administration** > **Quality Gate**.
3. Unselect or select **Ignore duplication and coverage on small changes**.
4. Select **Save**.
### Related pages
* [introduction-to-quality-gates](https://docs.sonarsource.com/sonarqube-cloud/standards/managing-quality-gates/introduction-to-quality-gates "mention")
* [viewing-quality-gate](https://docs.sonarsource.com/sonarqube-cloud/standards/managing-quality-gates/viewing-quality-gate "mention")
* [managing-custom-quality-gates](https://docs.sonarsource.com/sonarqube-cloud/standards/managing-quality-gates/managing-custom-quality-gates "mention")
* [changing-default-quality-gate](https://docs.sonarsource.com/sonarqube-cloud/standards/managing-quality-gates/changing-default-quality-gate "mention")
* [associating-projects-with-quality-gate](https://docs.sonarsource.com/sonarqube-cloud/standards/managing-quality-gates/associating-projects-with-quality-gate "mention")
* [notifications](https://docs.sonarsource.com/sonarqube-cloud/managing-your-account/notifications "mention")
* [quality-gates-for-ai-code](https://docs.sonarsource.com/sonarqube-cloud/standards/ai-code-assurance/quality-gates-for-ai-code "mention")
* [quality-standards](https://docs.sonarsource.com/sonarqube-cloud/administering-sonarcloud/managing-organization/setting-config-at-org-level/quality-standards "mention")
---
# Source: https://docs.sonarsource.com/sonarqube-community-build/project-administration/adjusting-analysis/changing-quality-profiles.md
# Changing quality profiles
The instance’s default quality profiles for each language is applied by default to your project. As a project administrator, you can apply other standards to your project.
Proceed as follows:
1. Retrieve your project. See [retrieving-projects](https://docs.sonarsource.com/sonarqube-community-build/user-guide/viewing-projects/retrieving-projects "mention") for more details.
2. Select **Project Settings > Quality Profiles**.
3. In the **Actions** column of the language you want to configure, select the pen icon. If the language is not listed, select **Add language**.
4. Select **Always use a specific Quality Profile**, and select the quality profile in the list.
5. Select **Save**.
---
# Source: https://docs.sonarsource.com/sonarqube-community-build/instance-administration/user-management/changing-user-password.md
# Source: https://docs.sonarsource.com/sonarqube-server/10.7/instance-administration/user-management/changing-user-password.md
# Source: https://docs.sonarsource.com/sonarqube-server/10.8/instance-administration/user-management/changing-user-password.md
# Source: https://docs.sonarsource.com/sonarqube-server/2025.2/instance-administration/user-management/changing-user-password.md
# Source: https://docs.sonarsource.com/sonarqube-server/2025.3/instance-administration/user-management/changing-user-password.md
# Source: https://docs.sonarsource.com/sonarqube-server/2025.5/instance-administration/user-management/changing-user-password.md
# Source: https://docs.sonarsource.com/sonarqube-server/2025.1/instance-administration/user-management/changing-user-password.md
# Source: https://docs.sonarsource.com/sonarqube-server/2025.4/instance-administration/user-management/changing-user-password.md
# Source: https://docs.sonarsource.com/sonarqube-server/2025.6/instance-administration/user-management/changing-user-password.md
# Source: https://docs.sonarsource.com/sonarqube-server/instance-administration/user-management/changing-user-password.md
# Changing user password
### Changing the password in the UI
1. In **Administration > Security > Users**, retrieve the user (see [viewing-users](https://docs.sonarsource.com/sonarqube-server/instance-administration/user-management/viewing-users "mention")).
2. In the user’s **Actions** column, select the three-dot menu.
3. Select **Enter a new password**.
{% hint style="info" %}
You cannot change any user password in the UI (even of user accounts not tied to a third-party provider) if your system has enabled automatic provisioning mode.
{% endhint %}
### Changing the password through the API
Use the web service [`api/users/change_password`](https://next.sonarqube.com/sonarqube/web_api/api/users/change_password).
### Related pages
* [creating-users](https://docs.sonarsource.com/sonarqube-server/instance-administration/user-management/creating-users "mention")
* [deactivating-users](https://docs.sonarsource.com/sonarqube-server/instance-administration/user-management/deactivating-users "mention")
* [changing-password](https://docs.sonarsource.com/sonarqube-server/user-guide/managing-your-account/changing-password "mention")
---
# Source: https://docs.sonarsource.com/sonarqube-server/10.8/server-upgrade-and-maintenance/troubleshooting/checking-server-logs.md
# Source: https://docs.sonarsource.com/sonarqube-server/2025.1/server-update-and-maintenance/troubleshooting/checking-server-logs.md
# Checking the server logs
If you’re having trouble starting your server for the first time (or any subsequent time!) the first thing to do is check your server logs.
The following log files are created (log files rotate on a regular basis):
* One per SonarQube Server process (main process, compute engine, search engine, and web server).
* The access log.
* The deprecation logs which stores the Web API requests that use deprecated Web API endpoints or parameters. See [api-deprecation](https://docs.sonarsource.com/sonarqube-server/2025.1/server-update-and-maintenance/monitoring/api-deprecation "mention") for more details.
If you have a support contract, you can download your instance’s current log files from the UI. To do so:
* Go to **Administration > System** and click **Download logs** in the top right corner.
Otherwise, you’ll find them in `/logs`:
* `sonar.log`: Log for the main process. Holds general information about startup and shutdown. You’ll get overall status here but not details. Look to the other logs for that.
* `web.log`: Information about initial connection to the database, database migration and reindexing, and the processing of HTTP requests. This includes database and search engine logs related to those requests.
* `ce.log`: Information about background task processing and the database and search engine logs related to those tasks.
* `es.log`: Ops information from the search engine, such as Elasticsearch startup, health status changes, cluster-, node- and index-level operations, etc.
* `access.log`: access log.
### Understanding the logs
When there’s an error, you’ll very often find a stacktrace in the logs. If you’re not familiar stacktraces, they can be intimidatingly tall walls of incomprehensible text. As a sample, here’s a fairly short one:
```css-79elbk
java.lang.IllegalStateException: Unable to blame file **/**/foo.java
at org.sonarsource.scm.git.JGitBlameCommand.blame(JGitBlameCommand.java:128)
at org.sonarsource.scm.git.JGitBlameCommand.access$000(JGitBlameCommand.java:44)
at org.sonarsource.scm.git.JGitBlameCommand$1.call(JGitBlameCommand.java:112)
at org.sonarsource.scm.git.JGitBlameCommand$1.call(JGitBlameCommand.java:109)
at java.util.concurrent.FutureTask.run(Unknown Source)
at java.util.concurrent.ThreadPoolExecutor.runWorker(Unknown Source)
at java.util.concurrent.ThreadPoolExecutor$Worker.run(Unknown Source)
at java.lang.Thread.run(Unknown Source)
Caused by: java.lang.NullPointerException
at org.eclipse.jgit.treewalk.filter.PathFilter.create(PathFilter.java:77)
at org.eclipse.jgit.blame.BlameGenerator.(BlameGenerator.java:161)
at org.eclipse.jgit.api.BlameCommand.call(BlameCommand.java:203)
at org.sonarsource.scm.git.JGitBlameCommand.blame(JGitBlameCommand.java:126)
... 7 more
```
Unless you wrote the code that produced this error, you really only care about:
* the first line, which ought to have a human-readable message after the colon. In this case, it’s Unable to blame file `**/**/foo.java`
* and any line that starts with `Caused by`. There are often several `Caused by` lines, and indentation makes them easy to find as you scroll through the error. Be sure to read each of these lines. Very often one of them - the last one or next-to-last one - contains the real problem.
### Related pages
* [server-logs-and-system-info](https://docs.sonarsource.com/sonarqube-server/2025.1/instance-administration/system-functions/server-logs-and-system-info "mention")
* [performance-issues](https://docs.sonarsource.com/sonarqube-server/2025.1/server-update-and-maintenance/troubleshooting/performance-issues "mention")
* [database-related-issues](https://docs.sonarsource.com/sonarqube-server/2025.1/server-update-and-maintenance/troubleshooting/database-related-issues "mention")
* [elasticsearch](https://docs.sonarsource.com/sonarqube-server/2025.1/server-update-and-maintenance/troubleshooting/elasticsearch "mention")
* [other-issues](https://docs.sonarsource.com/sonarqube-server/2025.1/server-update-and-maintenance/troubleshooting/other-issues "mention")
---
# Source: https://docs.sonarsource.com/sonarqube-cloud/advanced-setup/ci-based-analysis.md
# CI-based analysis
{% content-ref url="ci-based-analysis/overview-of-integrated-cis" %}
[overview-of-integrated-cis](https://docs.sonarsource.com/sonarqube-cloud/advanced-setup/ci-based-analysis/overview-of-integrated-cis)
{% endcontent-ref %}
{% content-ref url="ci-based-analysis/github-actions-for-sonarcloud" %}
[github-actions-for-sonarcloud](https://docs.sonarsource.com/sonarqube-cloud/advanced-setup/ci-based-analysis/github-actions-for-sonarcloud)
{% endcontent-ref %}
{% content-ref url="ci-based-analysis/bitbucket-pipelines-for-sonarcloud" %}
[bitbucket-pipelines-for-sonarcloud](https://docs.sonarsource.com/sonarqube-cloud/advanced-setup/ci-based-analysis/bitbucket-pipelines-for-sonarcloud)
{% endcontent-ref %}
{% content-ref url="ci-based-analysis/azure-pipelines" %}
[azure-pipelines](https://docs.sonarsource.com/sonarqube-cloud/advanced-setup/ci-based-analysis/azure-pipelines)
{% endcontent-ref %}
{% content-ref url="ci-based-analysis/gitlab-ci" %}
[gitlab-ci](https://docs.sonarsource.com/sonarqube-cloud/advanced-setup/ci-based-analysis/gitlab-ci)
{% endcontent-ref %}
{% content-ref url="ci-based-analysis/jenkins" %}
[jenkins](https://docs.sonarsource.com/sonarqube-cloud/advanced-setup/ci-based-analysis/jenkins)
{% endcontent-ref %}
{% content-ref url="ci-based-analysis/amazon-codecatalyst" %}
[amazon-codecatalyst](https://docs.sonarsource.com/sonarqube-cloud/advanced-setup/ci-based-analysis/amazon-codecatalyst)
{% endcontent-ref %}
{% content-ref url="ci-based-analysis/circleci" %}
[circleci](https://docs.sonarsource.com/sonarqube-cloud/advanced-setup/ci-based-analysis/circleci)
{% endcontent-ref %}
{% content-ref url="ci-based-analysis/codemagic" %}
[codemagic](https://docs.sonarsource.com/sonarqube-cloud/advanced-setup/ci-based-analysis/codemagic)
{% endcontent-ref %}
{% content-ref url="ci-based-analysis/other-cis" %}
[other-cis](https://docs.sonarsource.com/sonarqube-cloud/advanced-setup/ci-based-analysis/other-cis)
{% endcontent-ref %}
{% content-ref url="ci-based-analysis/sonarscanner-cli" %}
[sonarscanner-cli](https://docs.sonarsource.com/sonarqube-cloud/advanced-setup/ci-based-analysis/sonarscanner-cli)
{% endcontent-ref %}
{% content-ref url="ci-based-analysis/sonarcloud-extension-for-azure-devops" %}
[sonarcloud-extension-for-azure-devops](https://docs.sonarsource.com/sonarqube-cloud/advanced-setup/ci-based-analysis/sonarcloud-extension-for-azure-devops)
{% endcontent-ref %}
{% content-ref url="ci-based-analysis/sonarcloud-extension-for-jenkins" %}
[sonarcloud-extension-for-jenkins](https://docs.sonarsource.com/sonarqube-cloud/advanced-setup/ci-based-analysis/sonarcloud-extension-for-jenkins)
{% endcontent-ref %}
{% content-ref url="ci-based-analysis/sonarscanner-for-maven" %}
[sonarscanner-for-maven](https://docs.sonarsource.com/sonarqube-cloud/advanced-setup/ci-based-analysis/sonarscanner-for-maven)
{% endcontent-ref %}
{% content-ref url="ci-based-analysis/sonarscanner-for-gradle" %}
[sonarscanner-for-gradle](https://docs.sonarsource.com/sonarqube-cloud/advanced-setup/ci-based-analysis/sonarscanner-for-gradle)
{% endcontent-ref %}
{% content-ref url="ci-based-analysis/sonarscanner-for-dotnet" %}
[sonarscanner-for-dotnet](https://docs.sonarsource.com/sonarqube-cloud/advanced-setup/ci-based-analysis/sonarscanner-for-dotnet)
{% endcontent-ref %}
{% content-ref url="ci-based-analysis/sonarscanner-for-npm" %}
[sonarscanner-for-npm](https://docs.sonarsource.com/sonarqube-cloud/advanced-setup/ci-based-analysis/sonarscanner-for-npm)
{% endcontent-ref %}
{% content-ref url="ci-based-analysis/sonarscanner-for-python" %}
[sonarscanner-for-python](https://docs.sonarsource.com/sonarqube-cloud/advanced-setup/ci-based-analysis/sonarscanner-for-python)
{% endcontent-ref %}
{% content-ref url="ci-based-analysis/jfrog-evidence-collection" %}
[jfrog-evidence-collection](https://docs.sonarsource.com/sonarqube-cloud/advanced-setup/ci-based-analysis/jfrog-evidence-collection)
{% endcontent-ref %}
---
# Source: https://docs.sonarsource.com/sonarqube-community-build/analyzing-source-code/ci-integration.md
# Source: https://docs.sonarsource.com/sonarqube-server/8.9/analyzing-source-code/ci-integration.md
# Source: https://docs.sonarsource.com/sonarqube-server/9.8/analyzing-source-code/ci-integration.md
# Source: https://docs.sonarsource.com/sonarqube-server/9.9/analyzing-source-code/ci-integration.md
# Source: https://docs.sonarsource.com/sonarqube-server/10.0/analyzing-source-code/ci-integration.md
# Source: https://docs.sonarsource.com/sonarqube-server/10.1/analyzing-source-code/ci-integration.md
# Source: https://docs.sonarsource.com/sonarqube-server/10.2/analyzing-source-code/ci-integration.md
# Source: https://docs.sonarsource.com/sonarqube-server/10.3/analyzing-source-code/ci-integration.md
# Source: https://docs.sonarsource.com/sonarqube-server/10.4/analyzing-source-code/ci-integration.md
# Source: https://docs.sonarsource.com/sonarqube-server/10.5/analyzing-source-code/ci-integration.md
# Source: https://docs.sonarsource.com/sonarqube-server/10.6/analyzing-source-code/ci-integration.md
# Source: https://docs.sonarsource.com/sonarqube-server/10.7/analyzing-source-code/ci-integration.md
# Source: https://docs.sonarsource.com/sonarqube-server/10.8/analyzing-source-code/ci-integration.md
# Source: https://docs.sonarsource.com/sonarqube-server/2025.2/analyzing-source-code/ci-integration.md
# Source: https://docs.sonarsource.com/sonarqube-server/2025.3/analyzing-source-code/ci-integration.md
# Source: https://docs.sonarsource.com/sonarqube-server/2025.5/analyzing-source-code/ci-integration.md
# Source: https://docs.sonarsource.com/sonarqube-server/2025.1/analyzing-source-code/ci-integration.md
# Source: https://docs.sonarsource.com/sonarqube-server/2025.4/analyzing-source-code/ci-integration.md
# Source: https://docs.sonarsource.com/sonarqube-server/2025.6/analyzing-source-code/ci-integration.md
# Source: https://docs.sonarsource.com/sonarqube-server/analyzing-source-code/ci-integration.md
# CI integration
{% content-ref url="ci-integration/overview" %}
[overview](https://docs.sonarsource.com/sonarqube-server/analyzing-source-code/ci-integration/overview)
{% endcontent-ref %}
{% content-ref url="ci-integration/jenkins-integration" %}
[jenkins-integration](https://docs.sonarsource.com/sonarqube-server/analyzing-source-code/ci-integration/jenkins-integration)
{% endcontent-ref %}
{% content-ref url="ci-integration/codemagic-integration" %}
[codemagic-integration](https://docs.sonarsource.com/sonarqube-server/analyzing-source-code/ci-integration/codemagic-integration)
{% endcontent-ref %}
---
# Source: https://docs.sonarsource.com/sonarqube-cloud/advanced-setup/ci-based-analysis/circleci.md
# CircleCI
Once your project is created and initiated from the repository you selected, follow our [official Orb Quick Start Guide](https://circleci.com/orbs/registry/orb/sonarsource/sonarcloud) to set up your project using Maven, Gradle, and other build technologies. Check also [our Orb’s readme](https://github.com/SonarSource/sonarcloud-circleci-orb/blob/master/README.md).
Limitations:
* Make (for C/C++ projects) and MSBuild are not yet supported.
* The Orb is currently available only for Linux and x64 architecture.
---
# Source: https://docs.sonarsource.com/sonarqube-server/10.1/project-administration/clean-as-you-code-settings.md
# Source: https://docs.sonarsource.com/sonarqube-server/10.2/project-administration/clean-as-you-code-settings.md
# Source: https://docs.sonarsource.com/sonarqube-server/10.3/project-administration/clean-as-you-code-settings.md
# Source: https://docs.sonarsource.com/sonarqube-server/10.4/project-administration/clean-as-you-code-settings.md
# Source: https://docs.sonarsource.com/sonarqube-server/10.5/project-administration/clean-as-you-code-settings.md
# Source: https://docs.sonarsource.com/sonarqube-server/10.6/project-administration/clean-as-you-code-settings.md
# Clean as You Code settings
{% content-ref url="clean-as-you-code-settings/defining-new-code" %}
[defining-new-code](https://docs.sonarsource.com/sonarqube-server/10.6/project-administration/clean-as-you-code-settings/defining-new-code)
{% endcontent-ref %}
---
# Source: https://docs.sonarsource.com/sonarqube-server/8.9/user-guide/clean-as-you-code.md
# Source: https://docs.sonarsource.com/sonarqube-server/9.8/user-guide/clean-as-you-code.md
# Source: https://docs.sonarsource.com/sonarqube-server/9.9/user-guide/clean-as-you-code.md
# Source: https://docs.sonarsource.com/sonarqube-server/10.0/user-guide/clean-as-you-code.md
# Source: https://docs.sonarsource.com/sonarqube-server/10.1/user-guide/clean-as-you-code.md
# Source: https://docs.sonarsource.com/sonarqube-server/10.2/user-guide/clean-as-you-code.md
# Source: https://docs.sonarsource.com/sonarqube-server/10.3/user-guide/clean-as-you-code.md
# Source: https://docs.sonarsource.com/sonarqube-server/10.4/user-guide/clean-as-you-code.md
# Source: https://docs.sonarsource.com/sonarqube-server/10.5/user-guide/clean-as-you-code.md
# Source: https://docs.sonarsource.com/sonarqube-server/10.6/user-guide/clean-as-you-code.md
# Source: https://docs.sonarsource.com/sonarqube-server/10.7/core-concepts/clean-as-you-code.md
# Source: https://docs.sonarsource.com/sonarqube-server/10.8/core-concepts/clean-as-you-code.md
# Clean as You Code
{% content-ref url="clean-as-you-code/introduction" %}
[introduction](https://docs.sonarsource.com/sonarqube-server/10.8/core-concepts/clean-as-you-code/introduction)
{% endcontent-ref %}
{% content-ref url="clean-as-you-code/implementation" %}
[implementation](https://docs.sonarsource.com/sonarqube-server/10.8/core-concepts/clean-as-you-code/implementation)
{% endcontent-ref %}
{% content-ref url="clean-as-you-code/about-quality-standards" %}
[about-quality-standards](https://docs.sonarsource.com/sonarqube-server/10.8/core-concepts/clean-as-you-code/about-quality-standards)
{% endcontent-ref %}
{% content-ref url="clean-as-you-code/about-new-code" %}
[about-new-code](https://docs.sonarsource.com/sonarqube-server/10.8/core-concepts/clean-as-you-code/about-new-code)
{% endcontent-ref %}
{% content-ref url="clean-as-you-code/about-the-analysis-setup" %}
[about-the-analysis-setup](https://docs.sonarsource.com/sonarqube-server/10.8/core-concepts/clean-as-you-code/about-the-analysis-setup)
{% endcontent-ref %}
---
# Source: https://docs.sonarsource.com/sonarqube-server/10.2/user-guide/clean-code.md
# Source: https://docs.sonarsource.com/sonarqube-server/10.3/user-guide/clean-code.md
# Source: https://docs.sonarsource.com/sonarqube-server/10.4/user-guide/clean-code.md
# Source: https://docs.sonarsource.com/sonarqube-server/10.5/user-guide/clean-code.md
# Source: https://docs.sonarsource.com/sonarqube-server/10.6/user-guide/clean-code.md
# Source: https://docs.sonarsource.com/sonarqube-server/10.7/core-concepts/clean-code.md
# Source: https://docs.sonarsource.com/sonarqube-server/10.8/core-concepts/clean-code.md
# Clean Code
{% content-ref url="clean-code/introduction" %}
[introduction](https://docs.sonarsource.com/sonarqube-server/10.8/core-concepts/clean-code/introduction)
{% endcontent-ref %}
{% content-ref url="clean-code/definition" %}
[definition](https://docs.sonarsource.com/sonarqube-server/10.8/core-concepts/clean-code/definition)
{% endcontent-ref %}
{% content-ref url="clean-code/software-qualities" %}
[software-qualities](https://docs.sonarsource.com/sonarqube-server/10.8/core-concepts/clean-code/software-qualities)
{% endcontent-ref %}
{% content-ref url="clean-code/code-analysis" %}
[code-analysis](https://docs.sonarsource.com/sonarqube-server/10.8/core-concepts/clean-code/code-analysis)
{% endcontent-ref %}
---
# Source: https://docs.sonarsource.com/sonarqube-community-build/analyzing-source-code/languages/cloudformation.md
# Source: https://docs.sonarsource.com/sonarqube-server/10.1/analyzing-source-code/languages/cloudformation.md
# Source: https://docs.sonarsource.com/sonarqube-server/10.2/analyzing-source-code/languages/cloudformation.md
# Source: https://docs.sonarsource.com/sonarqube-server/10.3/analyzing-source-code/languages/cloudformation.md
# Source: https://docs.sonarsource.com/sonarqube-server/10.4/analyzing-source-code/languages/cloudformation.md
# Source: https://docs.sonarsource.com/sonarqube-server/10.5/analyzing-source-code/languages/cloudformation.md
# Source: https://docs.sonarsource.com/sonarqube-server/10.6/analyzing-source-code/languages/cloudformation.md
# Source: https://docs.sonarsource.com/sonarqube-server/10.7/analyzing-source-code/languages/cloudformation.md
# Source: https://docs.sonarsource.com/sonarqube-server/10.8/analyzing-source-code/languages/cloudformation.md
# Source: https://docs.sonarsource.com/sonarqube-server/2025.2/analyzing-source-code/languages/cloudformation.md
# Source: https://docs.sonarsource.com/sonarqube-server/2025.3/analyzing-source-code/languages/cloudformation.md
# Source: https://docs.sonarsource.com/sonarqube-server/2025.5/analyzing-source-code/languages/cloudformation.md
# Source: https://docs.sonarsource.com/sonarqube-server/2025.1/analyzing-source-code/languages/cloudformation.md
# Source: https://docs.sonarsource.com/sonarqube-server/2025.4/analyzing-source-code/languages/cloudformation.md
# Source: https://docs.sonarsource.com/sonarqube-server/2025.6/analyzing-source-code/languages/cloudformation.md
# Source: https://docs.sonarsource.com/sonarqube-server/analyzing-source-code/languages/cloudformation.md
# Source: https://docs.sonarsource.com/sonarqube-cloud/advanced-setup/languages/cloudformation.md
# CloudFormation
### Language-specific properties
To discover and update the CloudFormation-specific properties, navigate in SonarQube Cloud to *Your Project* > **Administration** > **General Settings** > **Languages** > **CloudFormation**. See the [analysis-parameters](https://docs.sonarsource.com/sonarqube-cloud/advanced-setup/analysis-parameters "mention") page for more information about specific properties.
### Supported versions, formats and providers
* CloudFormation with AWSTemplateFormatVersion 2010-09-09 (YAML and JSON)
### Related pages
For CloudFormation you can import `cfn-lint` reports. See *Your Project* > **Administration** > **General Settings** > **External Analyzers** > **CloudFormation** to specify the file path.
---
# Source: https://docs.sonarsource.com/sonarqube-server/10.4/setup-and-upgrade/deploy-on-kubernetes/cluster.md
# Source: https://docs.sonarsource.com/sonarqube-server/10.5/setup-and-upgrade/deploy-on-kubernetes/cluster.md
# Source: https://docs.sonarsource.com/sonarqube-server/10.6/setup-and-upgrade/deploy-on-kubernetes/cluster.md
# Source: https://docs.sonarsource.com/sonarqube-server/10.7/setup-and-upgrade/deploy-on-kubernetes/cluster.md
# Deploying SonarQube cluster
This page applies to deploying SonarQube Data Center Edition on Kubernetes. For information on deploying Community, Developer, and Enterprise editions of SonarQube on Kubernetes, see [introduction](https://docs.sonarsource.com/sonarqube-server/10.7/setup-and-upgrade/deploy-on-kubernetes/server/introduction "mention") documentation.
### Overview
You can find the SonarQube DCE Helm chart on [GitHub](https://github.com/SonarSource/helm-chart-sonarqube/tree/master/charts/sonarqube-dce).
Your feedback is welcome at [our community forum](https://community.sonarsource.com/).
### Kubernetes environment recommendations
When you want to operate SonarQube on Kubernetes, consider the following recommendations.
#### Supported versions
The SonarQube helm chart should only be used with the latest version of SonarQube and a supported version of Kubernetes. There is a dedicated helm chart for the LTA ([active-versions](https://docs.sonarsource.com/sonarqube-server/10.7/server-upgrade-and-maintenance/upgrade/upgrade-the-server/active-versions "mention")) version of SonarQube that follows the same patch policy as the application, while also being compatible with the supported versions of Kubernetes.
#### Pod Security Standards
Here is the list of containers that are compatible with the [Pod Security levels](https://kubernetes.io/docs/concepts/security/pod-security-admission/#pod-security-levels):
* privileged:
* `init-sysctl`
* baseline:
* `init-fs`
* restricted:
* SQ application containers
* SQ init containers.
* PostgreSQL containers.
This is achieved by setting this `SecurityContext` as default on most containers:
```css-79elbk
allowPrivilegeEscalation: false
runAsNonRoot: true
runAsUser: 1000
runAsGroup: 1000
seccompProfile:
type: RuntimeDefault
capabilities:
drop: ["ALL"]
```
Based on that, one can run the SQ helm chart in a full restricted namespace, by deactivating the `initSysctl.enabled` and `initFs.enabled` parameters, which require root access.
For more information, see the [production-use-case](https://github.com/SonarSource/helm-chart-sonarqube/tree/master/charts/sonarqube-dce#production-use-case) or take a look at the `values.yaml` file.
### Helm chart specifics
We try to provide a good default with the Helm chart, but there are some points to consider while working with SonarQube on Kubernetes. Please read the following sections carefully to make the correct decisions for your environment.
#### Persistency
SonarQube comes with a bundled Elasticsearch and, as Elasticsearch is stateful, so is SonarQube. For Data Center Edition (DCE) clusters, it makes sense to persist the Elasticsearch data because the cluster will survive the loss of any single search node without index corruption. By default, persistency is *enabled* for the DCE, and managed with the Helm chart.
Enabling persistency decreases the project reload time so that accessing project data is much faster. Although there is no need to change the default value in DCE, you can manage persistency with the following parameter in the `values.yaml`:
```css-79elbk
persistence:
enabled: true
```
Disabling persistency would result in a longer startup time until SonarQube is fully available which can be a very large factor considering the downtime for the index rebuild on DCE clusters.
#### Ingress Creation
To make the SonarQube service accessible from outside of your cluster, you most likely need an ingress. Creating a new ingress is also covered by the Helm chart. See the following section for help with creating one.
**Ingress Class**
The Sonar Helm chart has an optional dependency to the [NGINX-ingress helm chart](https://kubernetes.github.io/ingress-nginx). If you already have NGINX-ingress present in your cluster, you can use it.
If you want to install NGINX as well, add the following to your `values.yaml`.
```css-79elbk
nginx:
enabled: true
```
We recommend using the `ingress-class` NGINX with a body size of at least 8MB. This can be achieved with the following changes to your `values.yaml`:
```css-79elbk
ingress:
enabled: true
# Used to create an Ingress record.
hosts:
- name:
# Different clouds or configurations might need /* as the default path
path: /
# For additional control over serviceName and servicePort
# serviceName: someService
# servicePort: somePort
annotations:
kubernetes.io/ingress.class: nginx
nginx.ingress.kubernetes.io/proxy-body-size: "8m"
```
#### Monitoring
See [introduction](https://docs.sonarsource.com/sonarqube-server/10.7/setup-and-upgrade/deploy-on-kubernetes/set-up-monitoring/introduction "mention")
#### Log Format
SonarQube prints all logs in plain-text to stdout/stderr. It can print logs as JSON-String if the variable `logging.jsonOutput` is set to `true`. This will enable log collection tools like [Loki](https://grafana.com/oss/loki/) to do post processing on the information that are provided by the application.
**LogQL Example**
With JSON Logging enabled, you can define a LogQL Query like this to filter only logs with the severity "ERROR" and display the Name of the Pod as well as the Message:
```css-79elbk
{namespace="sonarqube-dce", app="sonarqube-dce"}| json | severity="ERROR" | line_format "{{.nodename}} {{.message}}"
```
#### ES Cluster Authentication
Since SonarQube 8.9, you can enable basic security for the Search Cluster in SonarQube. To benefit from this additional layer of security on Kubernetes as well, you need to provide a PKCS#11 Container with the required certificates to our Helm chart. The required secret can be created like this:
```css-79elbk
kubectl create secret generic --from-file=/PATH/TO/YOUR/PKCS12.container=elastic-stack-ca.p12 -n
```
#### Other Configuration Options
This documentation only contains the most important Helm chart customizations. See the [Customize the chart before installing](https://helm.sh/docs/intro/using_helm/#customizing-the-chart-before-installing) documentation and the Helm chart [README](https://github.com/SonarSource/helm-chart-sonarqube/tree/master/charts/sonarqube-dce) for more possibilities on customizing the Helm chart.
### Known limitations
#### Problems with Azure Fileshare PVC
Currently, there is a known limitation when working on AKS that resonates around the use of Azure Fileshare. We recommend using another storage class for persistency on AKS.
### Installing from the Helm repository
Currently only Helm 3 is supported.
To install the Helm chart from Helm repository, you can use the following commands:
```css-79elbk
helm repo add sonarqube https://SonarSource.github.io/helm-chart-sonarqube
helm repo update
kubectl create namespace sonarqube-dce
export JWT_SECRET=$(echo -n "your_secret" | openssl dgst -sha256 -hmac "your_key" -binary | base64)
helm upgrade --install -n sonarqube-dce sonarqube-dce --set ApplicationNodes.jwtSecret=$JWT_SECRET sonarqube/sonarqube-dce
```
The `helm upgrade --install -n sonarqube-dce sonarqube-dce --set` line allows you to customize the [Helm chart values](https://helm.sh/docs/chart_template_guide/values_files/).
The `echo`command allows you to set the value of your Application authentication JWT token. This value must be an HS256 key encoded with base64.
### Installing from the Google Cloud Platform
SonarQube DCE can be deployed on Kubernetes through the Google Marketplace, using its "Click to Deploy" feature with the following current limitations:
* SonarQube DCE can’t be deployed into "Autopilot" clusters.
* SonarQube DCE is not compatible with Istio.
#### Prerequisites
Make sure that you have kubectl configured in your environment and that your cluster has Google’s Application CustomResourceDefinition installed. That definition can be obtained from [this file](https://raw.githubusercontent.com/GoogleCloudPlatform/marketplace-k8s-app-tools/master/crd/app-crd.yaml).
#### Pre-installation steps
* Set the value of your Application authentication JWT Token. This value is an HS256 key encoded with base64. To do so, you may use the `echo` command below:
```css-79elbk
echo -n "your_secret" | openssl dgst -sha256 -hmac "your_key" -binary | base64
```
* If necessary, create the target namespace you want to install SonarQube DCE into.
#### Installing using Click to Deploy
1. Go to the [SonarQube DCE page](https://console.cloud.google.com/marketplace/product/sonarsource-public/sonarqube-data-center-edition) on the Google Cloud Platform.
2. Click **Get started** and follow the instructions.
3. In the **Deploy** page, fill in the fields in the **Click to Deploy on GKE** tab: see **Installation parameters** below.
4. At the bottom of the tab, click **Deploy**.
#### Installing manually
For manual installation or development purposes, SonarQube can be configured using the [mpdev CLI tool](https://github.com/GoogleCloudPlatform/marketplace-k8s-app-tools) provided by Google. See Installation parameters below for the supported parameters with key.
#### Deleting the installation
To delete the installation of SonarQube from your cluster:
1. Delete the created Application resource.
2. Delete the PersistentVolumeClaims related to the search nodes and database (if applicable).
#### Installation parameters
| **Name** | **Description** | **Key** | **Type** |
| ---------------------------------------------------------------------------------- | --------------------------------------------------------------------------------------------------------------------------------------------------------------------------------------------------------------------------------------------- | ----------------------------- | ----------- |
| Existing Kubernetes cluster | Kubernetes cluster in which the application will be deployed. |
|
|
| Namespace | Target namespace to install SonarQube DCE into (The namespace must exist already, it will not be created automatically.). | namespace | string |
| App instance name | Name of the application in your Kubernetes cluster | name | string |
| Application authentication JWT Token | The HS256 key encoded with base64: see **Pre-installation steps** above. | ApplicationNode.jwtSecret | string |
| Connection to a database - Recommended | If enabled, SonarQube will be connected to your PostgreSQL database. The connection parameters **JDBC URL**, **username**, and **password** will be used. Make sure that the **Embedded database** option is disabled. | jdbcOverwrite.enable | boolean |
| JDBC URL | The JDBC URL used to connect to the database. | jdbcOverwrite.jdbcUrl | string |
| JDB Username | The username used to connect to the database. | jdbcOverwrite.jdbcUsername | string |
| JDBC Password | The password used to connect to the database. | jdbcOverwrite.jdbcPassword | string |
| Application nodes replicas | The number of replicas for the Application Nodes | ApplicationNodes.replicaCount | integer |
| Search nodes replicas | The number of replicas for the Search Nodes | searchNodes.replicaCount | integer |
| Enable initSysctl privileged initContainer to setup elasticearch kernel parameters | This should be disabled and set up by your cluster administrator. Refer to this [documentation](https://github.com/SonarSource/helm-chart-sonarqube/blob/master/charts/sonarqube-dce/README.md#elasticsearch-prerequisites) for more details. | initSysctl.enabled | boolean |
| Enable initFs root initContainer to setup filesystem parameters | This is generally not required on a Google Kubernetes cluster. Refer to [this documentation](https://github.com/SonarSource/helm-chart-sonarqube/blob/master/charts/sonarqube-dce/README.md#production-use-case) for more details. | initFs.enabled | boolean |
| GCP Marketplace application | This flag must be enabled in the context of the installation from GCP. | gcp\_marketplace | boolean |
| Embedded database - For testing purposes only | Not recommended for production: a test PostgreSQL database will be installed. | postgresql.enabled | boolean |
---
# Source: https://docs.sonarsource.com/sonarqube-server/8.9/analyzing-source-code/languages/cobol.md
# Source: https://docs.sonarsource.com/sonarqube-server/9.8/analyzing-source-code/languages/cobol.md
# Source: https://docs.sonarsource.com/sonarqube-server/9.9/analyzing-source-code/languages/cobol.md
# Source: https://docs.sonarsource.com/sonarqube-server/10.0/analyzing-source-code/languages/cobol.md
# Source: https://docs.sonarsource.com/sonarqube-server/10.1/analyzing-source-code/languages/cobol.md
# Source: https://docs.sonarsource.com/sonarqube-server/10.2/analyzing-source-code/languages/cobol.md
# Source: https://docs.sonarsource.com/sonarqube-server/10.3/analyzing-source-code/languages/cobol.md
# Source: https://docs.sonarsource.com/sonarqube-server/10.4/analyzing-source-code/languages/cobol.md
# Source: https://docs.sonarsource.com/sonarqube-server/10.5/analyzing-source-code/languages/cobol.md
# Source: https://docs.sonarsource.com/sonarqube-server/10.6/analyzing-source-code/languages/cobol.md
# Source: https://docs.sonarsource.com/sonarqube-server/10.7/analyzing-source-code/languages/cobol.md
# Source: https://docs.sonarsource.com/sonarqube-server/10.8/analyzing-source-code/languages/cobol.md
# Source: https://docs.sonarsource.com/sonarqube-server/2025.2/analyzing-source-code/languages/cobol.md
# Source: https://docs.sonarsource.com/sonarqube-server/2025.3/analyzing-source-code/languages/cobol.md
# Source: https://docs.sonarsource.com/sonarqube-server/2025.5/analyzing-source-code/languages/cobol.md
# Source: https://docs.sonarsource.com/sonarqube-server/2025.1/analyzing-source-code/languages/cobol.md
# Source: https://docs.sonarsource.com/sonarqube-server/2025.4/analyzing-source-code/languages/cobol.md
# Source: https://docs.sonarsource.com/sonarqube-server/2025.6/analyzing-source-code/languages/cobol.md
# Source: https://docs.sonarsource.com/sonarqube-server/analyzing-source-code/languages/cobol.md
# Source: https://docs.sonarsource.com/sonarqube-cloud/advanced-setup/languages/cobol.md
# COBOL
This language is available only in the [subscription-plans](https://docs.sonarsource.com/sonarqube-cloud/administering-sonarcloud/managing-subscription/subscription-plans "mention").
### Language-Specific Properties
To discover and update the COBOL-specific properties, navigate in SonarQube Cloud to *Your Project* > **Administration** > **General Settings** > **Languages** > **Cobol**. See the [analysis-parameters](https://docs.sonarsource.com/sonarqube-cloud/advanced-setup/analysis-parameters "mention") page for more information about specific properties.
### Source code extraction
In order to analyze your source code with SonarQube Cloud, you need to first extract it onto a filesystem. You can use your own tool or an open-source tool; Sonar does not provide any connectors or source code extraction tools.
### Advanced Configuration
#### Defining Source Code Format
The supported source code formats are:
* Fixed format
* Free format
* Variable format
To set the format, go to Project **Administration** > **General Settings** > **Languages** > **Cobol** and set the **Source format** property.
The fixed format has three main areas:
```cobol
Area1 | Area2 | Area3
000100* MY COMMENT
000100 IDENTIFICATION DIVISION.
000200 PROGRAM-ID. HELLOWORLD. *xxx
100000 PROCEDURE DIVISION. *yyy
100100
100200 START.
100400 DISPLAY "HELLO COBOL !" LINE 42 POSITION 12.
100500 STOP RUN.
```
Areas #1 and #3 contain non-significant characters. Area #2 contains the source code. The first character of Area #2 is the Indicator Area, which has a special meaning (for example, `*` means that the line is a comment line, `D` means that the line is only taken into account in debug mode, etc.).
The free format:
```cobol
Area1 | Area2
* MY COMMENT
IDENTIFICATION DIVISION.
PROGRAM-ID. HELLOWORLD.
PROCEDURE DIVISION.
DISPLAY "HELLO COBOL !" LINE 42 POSITION 12.
STOP RUN.
```
The Indicator Area that has a special meaning (for instance `*` means that the line is a comment line, `D` means that the line in only taken into account in debug mode, etc.) is located at column 0. The size of the source code area is not limited.
The variable format is also supported: it’s similar to the fixed format but without Area #3.
#### Defining COBOL Dialect
Go to Project **Administration** > **General Settings** > **Languages** > **Cobol** and set the **Dialect** property.
COBOL analysis supports the following dialects:
* `bull-gcos-cobol`
* `hp-tandem-cobol`
* `ibm-os/vs-cobol`
* `ibm-ile-cobol`
* `ibm-cobol/ii`
* `ibm-cobol/400`
* `ibm-enterprise-cobol`
* `microfocus-cobol`
* `microfocus-acucobol-gt-cobol`
* `opencobol/cobol-it`
#### Making Copybooks Available to the Analysis
Copybooks are, by definition, COBOL files that are not syntactically valid by themselves. However, copybooks are usually needed to properly parse COBOL programs. Thus, paths to the copybooks must be listed through the `sonar.cobol.copy.directories` property.
#### Raising Issues Against Copybooks
To have copybooks imported into a project, and issues logged against them, the copybook directories must be added to `sonar.sources` AND the copybook file suffixes must be added to `sonar.cobol.file.suffixes`. E.G.:
```properties
sonar.sources=cobol,copy1,commonCopy
sonar.cobol.file.suffixes=cbl,cpy
sonar.cobol.copy.suffixes=cpy
sonar.cobol.copy.directories=copy1,commonCopy
```
In the case where a number of projects share a common set of copybooks, it may not be desirable to increment each project’s technical debt with the issues from the common copybooks. In such cases, the directory holding the common copybooks should be listed in `sonar.cobol.copy.directories` (as before) but left out of `sonar.sources`, for example:
```properties
sonar.sources=cobol,copy1
sonar.cobol.file.suffixes=cbl,cpy
sonar.cobol.copy.suffixes=cpy
sonar.cobol.copy.directories=copy1,commonCopy
```
#### Analyzing without file suffixes
Note that it is possible to analyze a COBOL project without file suffixes. To do this, remove the two suffix-related properties from your configuration and substitute the following setting:
`sonar.lang.patterns.cobol=**/*`
#### Switching Off Issues
There are three ways to switch off issues:
* See [#false-positive](https://docs.sonarsource.com/sonarqube-cloud/managing-your-projects/issues/editing#false-positive "mention")
* Using [advanced-exclusions](https://docs.sonarsource.com/sonarqube-cloud/managing-your-projects/project-analysis/setting-analysis-scope/advanced-exclusions "mention") to ignore issues.
* Using the `NOSONAR` tag. To switch off an issue, place the `NOSONAR` tag in a comment line located right before the line containing the issue. Example:
`* NOSONAR, in such case call to GO TO is tolerated, blabla...`\
`GO TO MY_PARAGRAPH.`
#### ACUCOBOL-GT Source Code Control Directives
COBOL analysis supports the ACUCOBOL-GT’s Source Code Control directives. This mechanism allows you to conditionally modify the program at compile time by excluding or including lines. This can be used to maintain different versions of the program, perhaps to support different machine environments.
The `-Si` (include) flag controls the actions of the source code control system. It must be followed by an argument that specifies a pattern that the compiler will search for in the Identification Area of each source line. If the pattern is found, then the line will be included in the source program, even if it is a comment line. However, if the pattern is immediately preceded by an exclamation point, then the line will be excluded from the source (i.e., commented out).
The `-Sx` (exclude) flag works the same way, except that its meaning is reversed (lines with the pattern will be commented out and lines with a preceding exclamation point will be included).
For example, suppose a program is being maintained for both the UNIX and VMS environments. The following piece of code is in the program:
```cobol
MOVE "SYS$HELP:HELPFILE" TO FILE-NAME. VMS
*MOVE "/etc/helpfile" TO FILE-NAME. UNX
OPEN INPUT HELP-FILE.
```
This program fragment is ready to be compiled for the VMS system. If a UNIX version is desired, then the following flags will correct the source during compilation:
```bash
-Si UNX -Sx VMS
```
Please consult the ACUCOBOL-GT documentation for more on the mechanism.
There are two ways in SonarQube Cloud to specify the list of ACUCOBOL-GT flags to be used in order to preprocess the source code. The first option is to define a list of global flags which will be used to preprocess all source files. This can be done in the **Administration** > **General Settings** > **Languages** > **Cobol** > **Preprocessor**.
The second option is to provide a list of relative paths (with help of the `sonar.cobol.acucobol.preprocessor.directives.directories` property) which contain the list of flags to be used for each COBOL source file. Let’s take a simple example. If a file `MY_PROGRAM.CBL` is going to be processed, the SonarQube ACUCOBOL-GT preprocessor will try to find a file `MY_PROGRAM.CMD`. If this file is found, then the flags contained in this file are used to preprocess the program `MY_PROGRAM.CBL`. If the file `MY_PROGRAM.CMD` doesn’t exist, then the preprocessor will use the content of the file `DEFAULT.CMD`, if it exists.
#### Microfocus Compiler Constants
If your code takes advantage of conditional compilation features provided by Microfocus, you may have to configure compiler constants for your analysis.
For example, if your COBOL code looks like this:
```cobol
IDENTIFICATION DIVISION.
$IF myconstant DEFINED
PROGRAM-ID. x.
$END
$IF otherconstant DEFINED
PROGRAM-ID. y.
$END
```
Go to Project **Administration** > **General Settings** > **Languages** > **Cobol** and declare each constant by name with an associated value.
Defining the constant via `sonar.cobol.compilationConstant.[constant name here]` in `sonar-project.properties` is deprecated since version 4.5 of the COBOL analyzer.
### Database Catalog (DB2)
COBOL analysis offers rules which target embedded SQL statements and require the analyzer to have knowledge of the database catalog (for example, the primary key column(s) of a given table). These rules will raise issues only if the database catalog is provided for the analysis. For the moment, this is available only for IBM DB2 (z/OS) catalogs, and the catalog must be provided via a set of CSV ("Comma Separated Values") files.
These rules rely on two analysis properties:
| **Key** | **Description** |
| --------------------------------------- | -------------------------------------------------------------------------------- |
| `sonar.cobol.sql.catalog.csv.path` | relative path of the directory containing CSV files for the database catalog |
| `sonar.cobol.sql.catalog.defaultSchema` | comma-separated list of default database schemas used in embedded SQL statements |
`sonar.cobol.sql.catalog.csv.path` should define a directory that contains 8 CSV files. Each of these CSV files contains data for a specific DB2 catalog table and is named after it. The following table lists the required files and their respective mandatory columns. Additional columns may be listed, but will be ignored:
| **Table** | **File name** | **Required Columns** |
| ---------------------- | ------------------- | -------------------------------------------------------------------------------------- |
| `SYSIBM.SYSCOLUMNS` | `SYSCOLUMNS.csv` | `TBNAME`,`TBCREATOR`,`NAME`,`PARTKEY_COLSEQ`,`DEFAULT`,`NULLS`,`DEFAULTVALUE` |
| `SYSIBM.SYSINDEXES` | `SYSINDEXES.csv` | `NAME`,`CREATOR`,`TBNAME`,`TBCREATOR`,`UNIQUERULE`,`INDEXTYPE` |
| `SYSIBM.SYSINDEXPART` | `SYSINDEXPART.csv` | `IXNAME`,`IXCREATOR`,`PARTITION` |
| `SYSIBM.SYSKEYS` | `SYSKEYS.csv` | `IXNAME`,`IXCREATOR`,`COLNAME`,`COLSEQ` |
| `SYSIBM.SYSSYNONYMS` | `SYSSYNONYMS.csv` | `NAME`,`CREATOR`,`TBNAME`,`TBCREATOR` |
| `SYSIBM.SYSTABLES` | `SYSTABLES.csv` | `NAME`,`CREATOR`,`TYPE`,`PARTKEYCOLNUM`,`TSNAME`,`DBNAME`,`TBNAME`,`TBCREATOR`,`CARDF` |
| `SYSIBM.SYSTABLESPACE` | `SYSTABLESPACE.csv` | `NAME`,`DBNAME`,`PARTITIONS` |
| `SYSIBM.SYSVIEWS` | `SYSVIEWS.csv` | `NAME`,`CREATOR`,`STATEMENT` |
The CSV format is the following:
* Each file must be named for the table it represents.
* The first line must contain the names of the columns.
* The order of the columns is not meaningful.
* Fields are comma-delimited.
* If a field contains a comma, then its value must be surrounded by double quotes (").
* If a field that is surrounded by double quotes contains a double quote character ("), then this character must be doubled ("").
Example for `SYSVIEWS.csv`:
```csv
CREATOR,NAME,STATEMENT
USER1,VIEW1,select x from table1
USER1,VIEW2,"select x, y from table1"
USER1,VIEW3,"select x, ""y"" from table1"
```
The `UNLOAD` DB2 utility with the `DELIMITED` option should produce the required files except for the column names on the first line.
---
# Source: https://docs.sonarsource.com/sonarqube-server/10.4/user-guide/clean-code/code-analysis.md
# Source: https://docs.sonarsource.com/sonarqube-server/10.5/user-guide/clean-code/code-analysis.md
# Source: https://docs.sonarsource.com/sonarqube-server/10.6/user-guide/clean-code/code-analysis.md
# Source: https://docs.sonarsource.com/sonarqube-server/10.7/core-concepts/clean-code/code-analysis.md
# Source: https://docs.sonarsource.com/sonarqube-server/10.8/core-concepts/clean-code/code-analysis.md
# Code analysis based on Clean Code
The Sonar automated code review aims to identify any issue in your code that prevents it from being Clean Code.
Each Clean Code attribute is evaluated, for a given language, based on a series of rules:
* Each rule:
* Is associated with the Clean Code attribute it evaluates.
* Is associated with the software quality(ies) to which this Clean Code attribute contributes.\
Each associated software quality (security, reliability, or maintainability) is assigned a severity (critical, high, medium, low, or info). This severity determines how much that software quality is impacted when the rule is broken.
* When a rule is broken, an issue is raised. The issue affects one or more software qualities with varying severity as inherited from the rule.
The figure below shows the Clean-Code-based analysis principles of the Sonar solution.
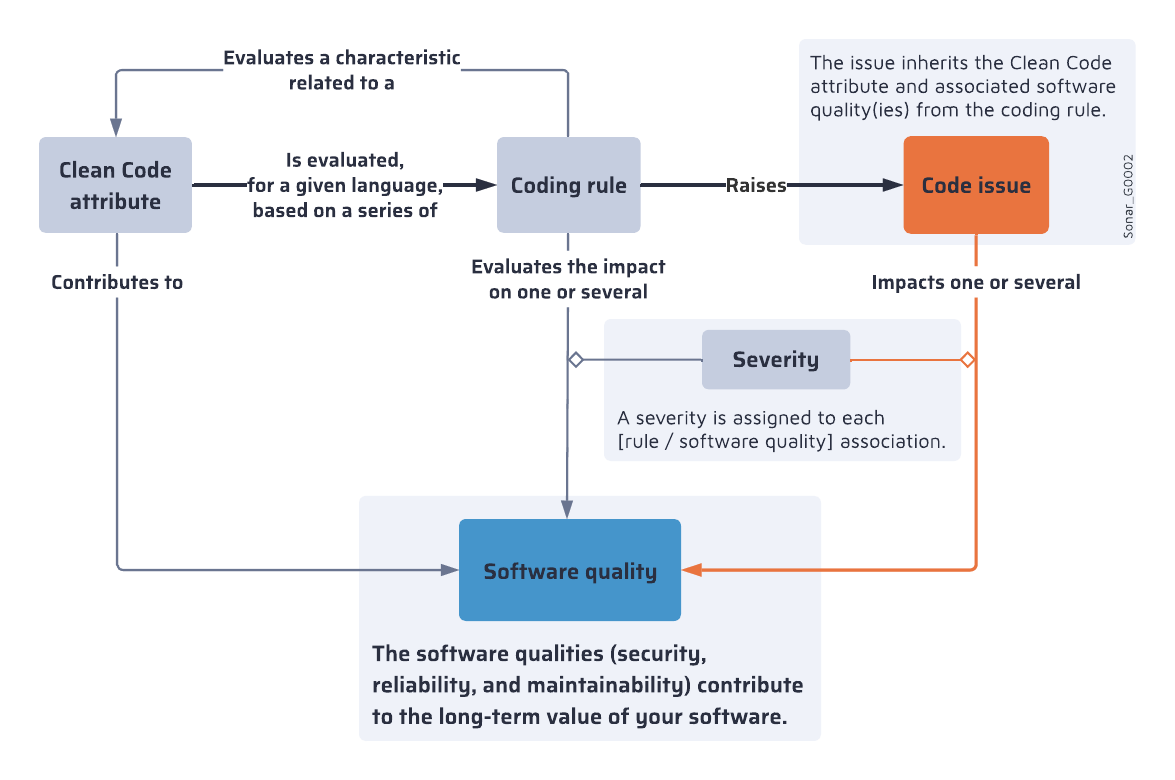
Check the [definition](https://docs.sonarsource.com/sonarqube-server/10.8/core-concepts/clean-code/definition "mention") page for details about Clean Code attributes, and the [software-qualities](https://docs.sonarsource.com/sonarqube-server/10.8/core-concepts/clean-code/software-qualities "mention") page to better understand software qualities.
---
# Source: https://docs.sonarsource.com/sonarqube-community-build/user-guide/code-metrics.md
# Source: https://docs.sonarsource.com/sonarqube-server/10.6/user-guide/code-metrics.md
# Source: https://docs.sonarsource.com/sonarqube-server/10.7/user-guide/code-metrics.md
# Source: https://docs.sonarsource.com/sonarqube-server/10.8/user-guide/code-metrics.md
# Source: https://docs.sonarsource.com/sonarqube-server/2025.2/user-guide/code-metrics.md
# Source: https://docs.sonarsource.com/sonarqube-server/2025.3/user-guide/code-metrics.md
# Source: https://docs.sonarsource.com/sonarqube-server/2025.5/user-guide/code-metrics.md
# Source: https://docs.sonarsource.com/sonarqube-server/2025.1/user-guide/code-metrics.md
# Source: https://docs.sonarsource.com/sonarqube-server/2025.4/user-guide/code-metrics.md
# Source: https://docs.sonarsource.com/sonarqube-server/2025.6/user-guide/code-metrics.md
# Source: https://docs.sonarsource.com/sonarqube-server/user-guide/code-metrics.md
# Monitoring code metrics
{% content-ref url="code-metrics/introduction" %}
[introduction](https://docs.sonarsource.com/sonarqube-server/user-guide/code-metrics/introduction)
{% endcontent-ref %}
{% content-ref url="code-metrics/metrics-definition" %}
[metrics-definition](https://docs.sonarsource.com/sonarqube-server/user-guide/code-metrics/metrics-definition)
{% endcontent-ref %}
{% content-ref url="code-metrics/monitoring-project-metrics" %}
[monitoring-project-metrics](https://docs.sonarsource.com/sonarqube-server/user-guide/code-metrics/monitoring-project-metrics)
{% endcontent-ref %}
{% content-ref url="code-metrics/monitoring-portfolio-metrics" %}
[monitoring-portfolio-metrics](https://docs.sonarsource.com/sonarqube-server/user-guide/code-metrics/monitoring-portfolio-metrics)
{% endcontent-ref %}
{% content-ref url="code-metrics/changing-modes" %}
[changing-modes](https://docs.sonarsource.com/sonarqube-server/user-guide/code-metrics/changing-modes)
{% endcontent-ref %}
---
# Source: https://docs.sonarsource.com/sonarqube-community-build/analyzing-source-code/ci-integration/codemagic-integration.md
# Source: https://docs.sonarsource.com/sonarqube-server/9.8/analyzing-source-code/ci-integration/codemagic-integration.md
# Source: https://docs.sonarsource.com/sonarqube-server/9.9/analyzing-source-code/ci-integration/codemagic-integration.md
# Source: https://docs.sonarsource.com/sonarqube-server/10.0/analyzing-source-code/ci-integration/codemagic-integration.md
# Source: https://docs.sonarsource.com/sonarqube-server/10.1/analyzing-source-code/ci-integration/codemagic-integration.md
# Source: https://docs.sonarsource.com/sonarqube-server/10.2/analyzing-source-code/ci-integration/codemagic-integration.md
# Source: https://docs.sonarsource.com/sonarqube-server/10.3/analyzing-source-code/ci-integration/codemagic-integration.md
# Source: https://docs.sonarsource.com/sonarqube-server/10.4/analyzing-source-code/ci-integration/codemagic-integration.md
# Source: https://docs.sonarsource.com/sonarqube-server/10.5/analyzing-source-code/ci-integration/codemagic-integration.md
# Source: https://docs.sonarsource.com/sonarqube-server/10.6/analyzing-source-code/ci-integration/codemagic-integration.md
# Source: https://docs.sonarsource.com/sonarqube-server/10.7/analyzing-source-code/ci-integration/codemagic-integration.md
# Source: https://docs.sonarsource.com/sonarqube-server/10.8/analyzing-source-code/ci-integration/codemagic-integration.md
# Source: https://docs.sonarsource.com/sonarqube-server/2025.2/analyzing-source-code/ci-integration/codemagic-integration.md
# Source: https://docs.sonarsource.com/sonarqube-server/2025.3/analyzing-source-code/ci-integration/codemagic-integration.md
# Source: https://docs.sonarsource.com/sonarqube-server/2025.5/analyzing-source-code/ci-integration/codemagic-integration.md
# Source: https://docs.sonarsource.com/sonarqube-server/2025.1/analyzing-source-code/ci-integration/codemagic-integration.md
# Source: https://docs.sonarsource.com/sonarqube-server/2025.4/analyzing-source-code/ci-integration/codemagic-integration.md
# Source: https://docs.sonarsource.com/sonarqube-server/2025.6/analyzing-source-code/ci-integration/codemagic-integration.md
# Source: https://docs.sonarsource.com/sonarqube-server/analyzing-source-code/ci-integration/codemagic-integration.md
# Codemagic integration
SonarScanners running in Codemagic can automatically detect branches and merge or pull requests in certain jobs. You don’t need to explicitly pass the branch or pull request details.
### Adding SonarQube Server scripts to your Codemagic .yml file
To analyze your code when using Codemagic:
* Add the following scripts to your existing `codemagic.yaml` file:
```yaml
scripts:
- |
# download and install the SonarScanner
wget -O $FCI_BUILD_DIR/sonar-scanner.zip https://binaries.sonarsource.com/Distribution/sonar-scanner-cli/sonar-scanner-cli-4.4.0.2170-macosx.zip
# If running in a Linux environment, download https://binaries.sonarsource.com/Distribution/sonar-scanner-cli/sonar-scanner-cli-4.4.0.2170-linux.zip
unzip $FCI_BUILD_DIR/sonar-scanner.zip
mv sonar-scanner-* sonar-scanner
- |
# Generate and upload code analysis report
export PATH=$PATH:$FCI_BUILD_DIR/sonar-scanner/bin
sonar-scanner \
-Dsonar.projectKey=YOUR_PROJECT_KEY \
-Dsonar.host.url=SONARQUBE_URL \
```
* Define `SONAR_TOKEN` as a Codemagic environment variable.
### Automatically detecting pull requests
For SonarQube Server to automatically detect pull requests when using Codemagic, you need to add an event in the triggering section of your `codemagic.yaml` file as shown in the following snippet:
```yaml
triggering:
events:
- pull_request
```
For triggering to work, you also need to set up a link between Codemagic and your DevOps platform (Bitbucket, Github, etc.). See the [Codemagic documentation](https://docs.codemagic.io/configuration/webhooks/) for more information.
### Caching the .sonar folder
Caching the `.sonar` folder saves time on subsequent analyses. To do this, add the following snippet to your `codemagic.yaml` file:
```yaml
cache:
cache_paths:
- ~/.sonar
```
---
# Source: https://docs.sonarsource.com/sonarqube-cloud/advanced-setup/ci-based-analysis/codemagic.md
# Codemagic
Once your project is created and initiated from the repository you selected, follow [this tutorial](https://blog.codemagic.io/sonarqube-integration-with-codemagic/#connecting-with-sonarcloud) to set up your project.
SonarQube Cloud is integrated with Codemagic to automatically configure pull-request and branch information. All you have to do is configure the `sonar.host.url`, `sonar.organization`, and `sonar.projectKey` parameters.
---
# Source: https://docs.sonarsource.com/sonarqube-server/2025.3/server-installation/system-properties/common-properties.md
# Source: https://docs.sonarsource.com/sonarqube-server/2025.5/server-installation/system-properties/common-properties.md
# Source: https://docs.sonarsource.com/sonarqube-server/2025.4/server-installation/system-properties/common-properties.md
# Source: https://docs.sonarsource.com/sonarqube-server/2025.6/server-installation/system-properties/common-properties.md
# Source: https://docs.sonarsource.com/sonarqube-server/server-installation/system-properties/common-properties.md
# List of properties common to all editions
During startup, SonarQube loads system properties that are not stored in the database. This page lists the configurable system properties common to all SonarQube Server editions (if not otherwise indicated). Properties specific to the Data Center Edition are listed in [dce-specific](https://docs.sonarsource.com/sonarqube-server/server-installation/system-properties/dce-specific "mention").
### General Properties
| System property (sonar property and ENVIRONMENT\_VARIABLE) | Description |
| ---------------------------------------------------------------------------------- | ------------------------------------------------------------------------------------------------------------------------------------------------------------------------------------------------------------------------------------------------------------------------------------------------------------------------------------------------------------------------------------------------------------------------------------------------------------------------------------------------------------------------------------------------------------------------------------------------------------------------------------------------------------------------------------------------------------------------------------------------------------------------------------------------- |
|
sonar.multi-quality-mode.enabled
SONAR\_MULTI\_QUALITY\_MODE\_ENABLED
|
Enables the Multi-Quality Rule (MQR) Mode¹⁾ in your instance.
Possible values:true or false.
|
|
sonar.path.data
SONAR\_PATH\_DATA
| Path to the directory used by SonarQube to store persistent data file. The path can be absolute or relative to the SonarQube home directory²⁾. |
|
sonar.path.temp
SONAR\_PATH\_TEMP
| Path to the directory used by SonarQube to store temporary files. The path can be absolute or relative to the SonarQube home directory²⁾. |
|
sonar.notifications.delay
SONAR\_NOTIFICATIONS\_DELAY
|
Delay in seconds between processing of notification queue.
Default value:60
|
|
sonar.telemetry.enable
SONAR\_TELEMETRY\_ENABLE
|
Enables Telemetry³⁾. By sharing anonymous SonarQube statistics, you help us understand how SonarQube is used so we can improve the product to work even better for you. We don’t collect source code or IP addresses. And we don’t share the data with anyone else.
Default value:true
|
| sonar.secretKeyPath |
Path to the file containing the key used to encrypt4⁾ sensitive system properties in the UI or in sonar.properties.
Warning: The slashes have to be escaped.
Default value: ${user.home}/.sonar/sonar-secret.txt where user.home refers to the user directory. For example, if using the default value, sonar-secret.text may be stored in C:\Users\User1.sonar or, if the service is registered and runs as the local system, in C:\Windows\System32\Config\systemprofile.sonar
|
1\) See [mqr-mode](https://docs.sonarsource.com/sonarqube-server/instance-administration/analysis-functions/instance-mode/mqr-mode "mention").\
2\) The SonarQube home directory is: the location where the SonarQbue distribution has been unzipped (for a ZIP installation); the installation directory of SonarQube within your container (for a Docker installation).\
3\) See [telemetry](https://docs.sonarsource.com/sonarqube-server/instance-administration/system-functions/telemetry "mention").\
4\) See [encrypting-settings](https://docs.sonarsource.com/sonarqube-server/instance-administration/security/encrypting-settings "mention").
### Database General
System property (sonar property and ENVIRONMENT_VARIABLE)
• By default the schema named public is used. It can be overridden with the parameter currentSchema: jdbc:postgresql://localhost/sonarqube?currentSchema=my_schema
• If you’re using the Integrated Security, don’t use the sonar.jdbc.username and sonar.jdbc.password properties.
• If you want to use SQL Auth while connecting to MS SQL Server, use the value jdbc:sqlserver://localhost;databaseName=sonar and set the SONAR_JDBC_USERNAME and SONAR_JDBC_PASSWORD appropriately.
sonar.embeddeddatabase.port
SONAR_EMBEDDEDDATABASE_PORT
H2 embedded database server listening port.
Default value: 9092
Connection pool
| System property (sonar property and ENVIRONMENT\_VARIABLE) | Description |
| ---------------------------------------------------------- | -------------------------------------------------------------------------------------------------------------------------------------------------------------------------------------------------------------------------------------------------------------------------------------------------------------------------------------------------------------------------------------------------------- |
|
sonar.jdbc.maxActive
SONAR\_JDBC\_MAXACTIVE
|
The maximum number of active connections that can be allocated at the same time, or negative for no limit. The recommended value is 1.2 \* max sizes of HTTP pools. For example, if HTTP ports are enabled with default sizes (50, see property sonar.web.http.maxThreads) then sonar.jdbc.maxActive should be 1.2 \* 50 = 60.
Default value: 60
|
|
sonar.jdbc.maxIdle
SONAR\_JDBC\_MAXIDLE
|
The maximum number of connections that can remain idle in the pool, without extra ones being released, or negative for no limit.
Default value: 5
|
|
sonar.jdbc.minIdle
SONAR\_JDBC\_MINIDLE
|
The minimum number of connections that can remain idle in the pool, without extra ones being created, or zero to create none.
Default value: 2
|
|
sonar.jdbc.maxWait
SONAR\_JDBC\_MAXWAIT
|
The maximum number of milliseconds that the pool will wait (when there are no available connections) for a connection to be returned before throwing an exception, or <= 0 to wait indefinitely.
Default value: 5000
|
### Web server JVM options
| System property (sonar property and ENVIRONMENT\_VARIABLE) | Description |
| ------------------------------------------------------------------------ | -------------------------------------------------------------------------------------------------------------------------------------------------------------------------------------------------------------------------------------------- |
|
sonar.web.javaOpts
SONAR\_WEB\_JAVAOPTS
| Is used to customize JVM options for the Web server process by overriding all the existing options. |
|
sonar.web.javaAdditionalOpts
SONAR\_WEB\_JAVAADDITIONALOPTS
|
Is used to customize JVM options for the Web server process by adding them to the existing options.
Note: If this variable is used with SONAR\_WEB\_JAVAOPTS, its content is appended to SONAR\_WEB\_JAVAOPTS.
|
Web server connection
| System property (sonar property and ENVIRONMENT\_VARIABLE) | Description |
| ---------------------------------------------------------- | --------------------------------------------------------------------------------------------------------------------------------------------------------------------------------------------------------------------------------------------------------------------------------------------------------------------------------------------------------------------------------------------------------------- |
|
sonar.web.host
SONAR\_WEB\_HOST
|
For servers with more than one IP address, this property specifies which address will be used for listening on the specified ports.
Default value: 0.0.0.0 (ports will be used on all IP addresses associated with the server)
|
|
sonar.web.port
SONAR\_WEB\_PORT
|
TCP port for incoming HTTP connections.
Default value: 9000
|
|
sonar.web.context
SONAR\_WEB\_CONTEXT
|
Web context specifying the path at which to serve SonarQube. For example, with sonar.web.port=9000 and sonar.web.context=/sonarqube, you will access the web interface at .
Example: /sonarqube (must start with a forward slash)
Default value: empty (root context)
|
HTTP connections
| System property (sonar property and ENVIRONMENT\_VARIABLE) | Description |
| ------------------------------------------------------------------------------- | --------------------------------------------------------------------------------------------------------------------------------------------------------------------------------------------------------------------------------------------------------------------------------------------------------------------------------------------------------------------------------------------------------------- |
|
sonar.web.http.maxThreads
SONAR\_WEB\_HTTP\_MAXTHREADS
|
The maximum number of connections that the server will accept and process at any given time. When this number has been reached, the server will not accept any more connections until the number of connections falls below this value. The operating system may still accept connections based on the sonar.web.connections.acceptCount property.
Default value: 50
|
|
sonar.web.http.minThreads
SONAR\_WEB\_HTTP\_MINTHREADS
|
The minimum number of threads always kept running.
Default value: 5
|
|
sonar.web.http.acceptCount
SONAR\_WEB\_HTTP\_ACCEPTCOUNT
|
The maximum queue length for incoming connection requests when all possible request processing threads are in use. Any requests received when the queue is full will be refused.
Default value: 25
|
|
sonar.web.http.keepAliveTimeout
SONAR\_WEB\_HTTP\_KEEPALIVETIMEOUT
|
The number of milliseconds this Connector will wait for another HTTP request before closing the connection. Use a value of -1 to indicate no (i.e. infinite) timeout.
Default value: 60000 (ms)
|
User sessions
| System property (sonar property and ENVIRONMENT\_VARIABLE) | Description |
| ---------------------------------------------------------------------------------- | -------------------------------------------------------------------------------------------------------------------------------------------------------------------------------------------------------------------------------------------------------------------------------------------------------------------------------------------------------------------------------------------------------------------------------------------------------------------------------------------------------------------------------------------------------------------------- |
|
sonar.auth.jwtBase64hs256secret
SONAR\_AUTH\_JWTBASE64HS256SECRET
| By default, users are logged out and sessions closed when server is restarted. If you prefer keeping user sessions open, a secret should be defined. Value is HS256 key encoded with base64¹⁾. It must be unique for each installation of SonarQube. |
|
sonar.web.sessionTimeoutInMinutes
SONAR\_WEB\_SESSIONTIMEOUTINMINUTES
|
Inactive session timeout (in minutes). The maximum time a user can remain idle (no activity) before the session ends. If the user does not interact with the system within this time, they are logged out.
Default value: 4320 (3 days)
Minimum value: 6
Maximum value: 129 600 (90 days)
|
|
sonar.web.activeSessionTimeoutInMinutes
|
This property is supported starting in SonarQube Server’s Enterprise dition.
Active session timeout (in minutes). The maximum time a user can remain logged in, regardless of activity. After this time, the session ends automatically even if the user is actively using the system.
Default value: 129 600 (90 days)
Minimum value:15
Maximum value: 129 600 (90 days)
|
1\) See [jwt-token](https://docs.sonarsource.com/sonarqube-server/server-installation/pre-installation/jwt-token "mention").
Authentication to web services
| System property (sonar property and ENVIRONMENT\_VARIABLE) | Description |
| ---------------------------------------------------------------- | ---------------------------------------------------------------------------------------------------------------------------------------------------------------------------------------------------------------------------------------------------------------------------------------------------------------------------------------------------------------------------------- |
|
sonar.web.systemPassCode
SONAR\_WEB\_SYSTEMPASSCODE
|
A passcode can be defined to access some web services from monitoring tools without having to use the credentials of a system administrator. Check the Web API documentation to know which web services are supporting this authentication mode. The passcode should be provided in HTTP requests with the header "X-Sonar-Passcode"¹⁾. By default, feature is disabled.
|
1\) See [#authenticate-to-api](https://docs.sonarsource.com/sonarqube-server/extension-guide/web-api#authenticate-to-api "mention").
### SSO authentication Properties
| System property (sonar property and ENVIRONMENT\_VARIABLE) | Description |
| --------------------------------------------------------------------------------------------- | ------------------------------------------------------------------------------------------------------------------------------------------------------------------------------------------------------------------------------------------------------------------------------------------------------------------------------------------------------------------------------------------------------------------ |
|
sonar.web.sso.enable
SONAR\_WEB\_SSO\_ENABLE
|
Enable authentication using HTTP headers.
Default value: false
|
|
sonar.web.sso.loginheader
SONAR\_WEB\_SSO\_LOGINHEADER
|
The name of the header to get the user login. Only alphanumeric, ‘.’ and ‘@’ characters are allowed.
Default value:X-Forwarded-Login
|
|
sonar.web.sso.nameheader
SONAR\_WEB\_SSO\_NAMEHEADER
|
The name of the header to get the user name. Default value:X-Forwarded-Name
|
|
sonar.web.sso.emailheader
SONAR\_WEB\_SSO\_EMAILHEADER
|
The name of the header to get the user email (optional)
Default value:X-Forwarded-Email
|
|
sonar.web.sso.groupsheader
SONAR\_WEB\_SSO\_GROUPSHEADER
|
The name of the header to get the list of user groups, separated by comma (optional). If this property is set, the user will belong to those groups if groups exist in SonarQube. If none of the provided groups exists in SonarQube, the user will only belong to the default group. Note that the default group will always be set.
Default value:X-Forwarded-Groups
|
|
sonar.web.sso.refreshintervalinminutes
SONAR\_WEB\_SSO\_REFRESHINTERVALINMINUTES
|
The interval used to know when to refresh name, email, and groups. During this interval, if for instance the name of the user is changed in the header, it will only be updated after X minutes.
Default value:5
|
### LDAP authentication
See also [ldap](https://docs.sonarsource.com/sonarqube-server/instance-administration/authentication/ldap "mention").
General
System property (sonar property and ENVIRONMENT_VARIABLE)
Description
Required
sonar.security.realm
SONAR_SECURITY_REALM
Enables the LDAP feature. If set to LDAP, authentication against the external sytem is performed. If the external system is not reachable or if the user is not defined in the external system, authentication will be performed against SonarQube’s internal database.
Possible value:LDAP
Yes
sonar.authenticator.downcase
SONAR_AUTHENTICATOR_DOWNCASE
Is intended to be set to true when the backend LDAP system is configured for case-insensitivity (user’s input is transformed to lowercase and this value is used as the SonarQube user name).
Default value:false
No
ldap.url
LDAP_URL
URL of the LDAP server. If you are using ldaps, you should install the server certificate into the Java truststore.
Example:ldap://localhost:10389
Yes
ldap.bindDn
LDAP_BINDDN
The username of an LDAP user to connect (or bind) with. Leave this blank for anonymous access to the LDAP directory.
Example:cn=sonar,ou=users,o=mycompany
No
ldap.bindPassword
LDAP_BINDPASSWORD
The password of the user to connect with. Leave this blank for anonymous access to the LDAP directory.
Example for Active Directory:(&(objectClass=group)(member={dn}))
No
ldap.group.idAttribute
LDAP_GROUP_IDATTRIBUTE
Property used to specifiy the attribute to be used for returning the list of user groups in the compatibility mode.
Default value:cn
No
### Compute engine Properties
System property (sonar property and ENVIRONMENT_VARIABLE)
Description
sonar.ce.javaOpts
SONAR_CE_JAVAOPTS
Is used to customize JVM options for the Compute Engine process by overriding all the existing options.
sonar.ce.javaAdditionalOpts
SONAR_CE_JAVAADDITIONALOPTS
Is used to customize JVM options for the Compute Engine process by adding them to the existing options.
Note: If this variable is used with SONAR_CE_JAVAOPTS, its content is appended to SONAR_CE_JAVAOPTS.
### Elasticsearch Properties
System property (sonar property and ENVIRONMENT_VARIABLE)
Description
sonar.search.javaOpts
SONAR_SEARCH_JAVAOPTS
Is used to customize JVM options for the Elasticsearch process by overriding all the existing options.
sonar.search.javaAdditionalOpts
SONAR_SEARCH_JAVAADDITIONALOPTS
Is used to customize JVM options for the Elasticsearch process by adding them to the existing options.
Note: If this variable is used with SONAR_SEARCH_JAVAOPTS, its content is appended to SONAR_SEARCH_JAVAOPTS.
sonar.search.port
SONAR_SEARCH_PORT
Elasticsearch port. Use 0 to get a free port. As a security precaution, should be blocked by a firewall and not exposed to the Internet.
Default value: 9001
sonar.search.host
SONAR_SEARCH_HOST
Elasticsearch host. The search server will bind this address and the search client will connect to it. Default is loopback address. As a security precaution, should NOT be set to a publicly available address.
### Proxy configuration
If your SonarQube is located behind a proxy, you must configure the proxy parameters listed below
Properties
System property (sonar property and ENVIRONMENT_VARIABLE)
Description
sonar.updatecenter.activate
SONAR_UPDATECENTER_ACTIVATE
Specifies whether the SonarQube’s Marketplace automatically searches for plugin updates.
Default value:true
http.proxyHost
HTTP_PROXYHOST
HTTP proxy host.
http.proxyPort
HTTP_PROXYPORT
HTTP proxy port number.
https.proxyHost
HTTPS_PROXYHOST
HTTPS proxy host.
Default value: sonar.http.proxyhost or HTTP_PROXYHOST value, respectively.
https.proxyPport
HTTPS_PROXYPORT
HTTPS proxy port number.
Default value: sonar.http.proxyport or HTTP_PROXYPORT value, respectively.
http.auth.ntlm.domain
HTTP_AUTH_NTLM_DOMAIN
NT domain name if NTLM proxy is used.
socksProxyHost
SOCKSPROXYHOST
SOCKS proxy port number.
socksProxyPort
SOCKSPROXYPORT
SOCKS proxy host.
sonar.http.proxyUser
HTTP_PROXYUSER
Proxy authentication (used for HTTP, HTTPS and SOCKS proxies).
sonar.http.proxyPassword
HTTP_PROXYPASSWORD
Proxy authentication (used for HTTP, HTTPS and SOCKS proxies).
sonar.http.nonProxyHosts
HTTP_NONPROXYHOSTS
List of hosts that can be accessed without going through the proxy.
The list items are separated by the ‘|’ character. The wildcard character ‘*’ can be used for pattern matching used for HTTP and HTTPS.
Note: Localhost and its literal notations (e.g. 127.0.0.1) are always excluded.
### Logging Properties
See also [server-logs](https://docs.sonarsource.com/sonarqube-server/server-update-and-maintenance/troubleshooting/server-logs "mention").
| SQSCB-table-common system properties > elasticsearch | Description |
| ----------------------------------------------------------------------------------------------------------------------------------------------------------------------------------------------------------------------------------- | ------------------------------------------------------------------------------------------------------------------------------------------------------------------------------------------------------------------------------------------------------------------------------------------------------------------------------------------------------------------------------------------------------------------------------------------------------------------------------------------------------------------------------------------------------------------------------------------------------------------------------------------------------------------------------------------------------------------------------------------------------------------------------------------------------------------------------------------------------------------------- |
|
sonar.log.level
SONAR\_LOG\_LEVEL
|
Global level of logs (applies to all 4 processes).
Possible values:INFO (default), DEBUG, and TRACE.
|
|
sonar.log.level.\
SONAR\_LOG\_LEVEL\_\
where \ can be:
• app: main process
• web: Web server process
• ce: Compute Engine process
• es: Elasticsearch process
|
Level of logs for each process. When specified, they overwrite the level defined at the global level.
Possible values:INFO, DEBUG, and TRACE
|
|
sonar.path.logs
SONAR\_PATH\_LOGS
|
Path to log files. Can be absolute or relative to the SonarQube home directory¹⁾.
Default value:/logs
|
|
sonar.log.rollingPolicy
SONAR\_LOG\_ROLLINGPOLICY
|
Rolling policy of log files (including the access log).
Possible values:
• time:\: the rolling policy is based on time. Example: by day (time:yyyy-MM-dd) or by month (time:yyyy-MM).
• size:\: the rolling policy is based on size. Example: size:10MB
• none: the rolling policy is disabled. Typically this would be used when logs are handled by an external system like logrotate.
Default value:time:yyyy-MM-dd
|
|
sonar.log.maxFiles
SONAR\_LOG\_MAXFILES
|
Maximum number of files to keep if a rolling policy is enabled.
The maximum value is:
• For a size rolling policy: 20.
• For a time rolling poilicy: unlimited.
Set to zero to disable old file purging.
|
|
sonar.log.jsonOutput
SONAR\_LOG\_JSONOUTPUT
|
Converts the log output to JSON.
Possible values:true or false.
|
|
sonar.web.accessLogs.enable
SONAR\_WEB\_ACCESSLOGS\_ENABLE
| Specifies whether the access log is enabled, i.e. whether HTTP requests received by the server are logged. If enabled, the list of requests is stored in the `access.log` file. |
|
sonar.web.accessLogs.pattern
SONAR\_WEB\_ACCESSLOGS\_PATTERN
|
If the access log is enabled, format of the access log.
Possible values:
• common : The Common Log Format, shortcut to: %h %l %u %user %date "%r" %s %b
• combined : Another format widely recognized, shortcut to: %h %l %u \[%t] "%r" %s %b "%i{Referer}" "%i{User-Agent}"
• The login of an authenticated user is implemented with %reqAttribute{LOGIN}.
• The token name used for requests will be added to the access log if the %reqAttribute{TOKEN\_NAME} is added.
• The SonarQube’s HTTP request ID is implemented with %reqAttribute{ID}.
|
1\) The SonarQube home directory is: the location where the SonarQbue distribution has been unzipped (for a ZIP installation); the installation directory of SonarQube within your container (for a Docker installation).
### AI features Properties
System property (sonar property and ENVIRONMENT_VARIABLE)
Description
sonar.ai.codefix.hidden
SONAR_AI_CODEFIX_HIDDEN
Disables the AI CodeFix feature¹ completely in SonarQube Server and hides the feature from all users, including System Adminstrators.
Default value: false
sonar.enforceAzureOpenAiDomainValidation
SONAR_ENFORCEAZUREOPENAIDOMAINVALIDATION
Ensures that configured Azure OpenAI endpoints strictly end with .openai.azure.com for enhanced security and authenticity.
Disabling this setting can expose the instance to security risks by allowing connections to potentially unauthorized services.
1. See [ai-codefix](https://docs.sonarsource.com/sonarqube-server/ai-capabilities/ai-codefix "mention")
### Sandbox
For information about the Sandbox feature, see [#from-sonarqube-update](https://docs.sonarsource.com/sonarqube-server/user-guide/issues/solution-overview#from-sonarqube-update "mention").
{% hint style="info" %}
The Sandbox properties, unlike the other system properties, are stored in the database. They can be set in the UI at the instance level (see [#setting-up-the-sandbox-feature-at-the-instance-level](https://docs.sonarsource.com/sonarqube-server/instance-administration/analysis-functions/quality-standards#setting-up-the-sandbox-feature-at-the-instance-level "mention")). Doing the setup through system properties may be useful in case you're updating your SonarQube Server from a version not supporting this feature since this ensures that the feature is enabled before any project analysis.
{% endhint %}
Properties
| System property (sonar property and ENVIRONMENT\_VARIABLE) | Description |
| --------------------------------------------------------------------------------------------- | --------------------------------------------------------------------------------------------------------------------------------------------------------------------------------------------------------------------------------------------------------------------------------------------------------------------------------------------------------------------------------------------------------------------------------------------------------------------------------------------------------------------- |
|
Note: You must use the parameter's MQR mode format even if your instance is in the Standard Experience mode (SonarQube Server will automatically transpose the value). For more details about the instance modes, see instance-mode.
Sets the default status (On or Off) of the Sandbox feature for projects (the project admins can change it):
On: The Sandbox feature will be On by default for all new and existing projects.
Off: The Sandbox feature will be Off by default for all new and existing projects.
|
### Related pages
* [configuration-methods](https://docs.sonarsource.com/sonarqube-server/server-installation/system-properties/configuration-methods "mention")
* [dce-specific](https://docs.sonarsource.com/sonarqube-server/server-installation/system-properties/dce-specific "mention")
---
# Source: https://docs.sonarsource.com/sonarqube-server/8.9/instance-administration/compute-engine-performance.md
# Source: https://docs.sonarsource.com/sonarqube-server/9.8/instance-administration/compute-engine-performance.md
# Source: https://docs.sonarsource.com/sonarqube-server/9.9/instance-administration/compute-engine-performance.md
# Source: https://docs.sonarsource.com/sonarqube-server/10.0/instance-administration/compute-engine-performance.md
# Source: https://docs.sonarsource.com/sonarqube-server/10.1/instance-administration/compute-engine-performance.md
# Source: https://docs.sonarsource.com/sonarqube-server/10.2/instance-administration/compute-engine-performance.md
# Source: https://docs.sonarsource.com/sonarqube-server/10.3/instance-administration/compute-engine-performance.md
# Compute engine performance
{% hint style="info" %}
The ability to manage Compute Engine performance is available as part of [Enterprise Edition](https://www.sonarsource.com/plans-and-pricing/enterprise/) and above.
{% endhint %}
### Increasing the number of Compute Engine workers
If analyses are taking too long to process, it may be that you need to increase the number of Compute Engine (CE) workers (**Administration** > **Projects** > **Background Tasks** > **Number of Workers**).
There are two cases to consider:
1. Slowness comes from the fact that the queue is often full of pending tasks.
2. Individual tasks take a long time to process.
In the first case, increasing the number of workers could help. The second case should be carefully evaluated. In either case, when considering increasing the number of CE workers, two questions should be answered.
* Does my infrastructure allow me to increase the number of workers?
* To what extent should I increase the number of workers? What number should I configure?
Increasing the number of workers will increase the stress on the resources consumed by the CE. Those resources are:
* the DB.
* disk I/O.
* the network.
* heap.
* CPU.
Of those, only the last two are internal to the CE.
If slowness comes from any of the external resources (DB, disk I/O, network), then increasing the number of workers could actually slow the processing of individual reports (think of two people trying to go through a door at the same time). However, if your slow speed is caused by large individual analysis reports hogging the CE worker for extended periods of time, then enabling parallel processing by adding another worker could help. If parallel processing is enabled, you will need to take a look at the internal resources.
CE workers are not CPU-intensive and memory use depends entirely on the project that was analyzed. Some workers need a lot of memory, while others don’t. With multiple CE workers, you should increase CE heap size by a multiple of the number of workers. The same logic applies to CPU: if running with one worker consumes up to Y% of CPU, then you should plan for Z workers requiring Y\*Z% of CPU.
To accurately diagnose your situation, monitor network latency, the I/O of the SonarQube instance, the database CPU, and memory usage to evaluate whether slowness is mainly/mostly/only related to external resources.
### Parallel processing of pull request and branch analyses
{% hint style="info" %}
This feature is available as part of [Enterprise Edition](https://www.sonarsource.com/plans-and-pricing/enterprise/) and above.
{% endhint %}
By default, SonarQube only processes one analysis at a time for each project, even if there are multiple CE workers available. Pull request analyses and branch analyses are put in the same queue and processed in their order of insertion.
To speed up the process, you can configure the CE to enable parallel processing of pull request analyses and branch analyses for each project. Once enabled, SonarQube can analyze one branch and several pull requests together at any given time.
To activate this option, go to **Administration > General Settings > General > Compute Engine** and check the **Enable running project analysis tasks in parallel** option.
This feature requires multiple CE workers to be configured. Note that enabling this feature may impact the accuracy of issue tracking between branches.
---
# Source: https://docs.sonarsource.com/sonarqube-server/8.9/user-guide/concepts.md
# Source: https://docs.sonarsource.com/sonarqube-server/9.8/user-guide/concepts.md
# Source: https://docs.sonarsource.com/sonarqube-server/9.9/user-guide/concepts.md
# Source: https://docs.sonarsource.com/sonarqube-server/10.0/user-guide/concepts.md
# Source: https://docs.sonarsource.com/sonarqube-server/10.1/user-guide/concepts.md
# Source: https://docs.sonarsource.com/sonarqube-server/10.2/user-guide/concepts.md
# Source: https://docs.sonarsource.com/sonarqube-server/10.3/user-guide/concepts.md
# Source: https://docs.sonarsource.com/sonarqube-server/10.4/user-guide/concepts.md
# Source: https://docs.sonarsource.com/sonarqube-server/10.5/user-guide/concepts.md
# Source: https://docs.sonarsource.com/sonarqube-server/10.6/user-guide/concepts.md
# Source: https://docs.sonarsource.com/sonarqube-server/10.7/user-guide/concepts.md
# Concepts
### Architecture
| **Concept** | **Definition** |
| ----------- | -------------------------------------------------------------------------------------- |
| Analyzer | A client application that analyzes the source code to compute **snapshots**. |
| Database | Stores configuration and **snapshots.** |
| Server | Web interface that is used to browse **snapshot** data and make configuration changes. |
### Quality
| **Concept** | **Definition** |
| ------------------- | ----------------------------------------------------------------------------------------------------------------------------------------------------------------------------------------------------------------------------------------------------------------------------------------------------------------------------------------------------------------------------------------------------------------------------------------------------------------------------- |
| Clean Code | Code whose attributes make your software reliable, secure, and maintainable. See [introduction](https://docs.sonarsource.com/sonarqube-server/10.7/core-concepts/clean-code/introduction "mention") for more details. |
| Bug | An issue that represents something wrong in the code. If this has not broken yet, it will, and will probably break at the worst possible moment. This needs to be fixed as soon as possible. |
| Code smell | A maintainability-related issue in the code. Leaving it as-is means that at best, developers maintaining the code will have a harder time than they should when making changes. At worst, they’ll be so confused by the state of the code that they’ll introduce additional errors as they make changes. |
| Cost | See Remediation cost. |
| Debt | See Technical debt. |
| Issue | When a piece of code does not comply with a rule, an issue is logged on the snapshot. An issue can be logged on a source file or a unit test file. |
| Measure | The value of a metric for a given file or project at a given time. For example, 125 lines of code on class MyClass or, the density of duplicated lines = 30.5% on project myProject, can be considered a measure. |
| Metric |
A type of measurement. Metrics can have varying values, or measures, over time. Examples: number of lines of code, complexity, etc.
A metric may be either qualitative (for example, the density of duplicated lines, line coverage by tests, etc.) or quantitative (for example, the number of lines of code, the complexity, etc.)
|
| New code definition | A changeset or period that you’re keeping a close watch on for the introduction of new problems in the code. Ideally, this is since the `previous_version`, but if you don’t use a Maven-like versioning scheme, you may need to set a time period such as *21 days since a specific analysis* or use a reference branch. See [about-new-code](https://docs.sonarsource.com/sonarqube-server/10.7/core-concepts/clean-as-you-code/about-new-code "mention") for more details. |
| Quality profile | A set of rules. Each snapshot is based on a single quality profile. See also [quality-profiles](https://docs.sonarsource.com/sonarqube-server/10.7/instance-administration/analysis-functions/quality-profiles "mention"). |
| Rule | A coding standard or practice that should be followed. Not complying with coding rules can lead to issues and hotspots. Adherence to rules can be used to measure the quality of code files or unit tests. |
| Remediation cost | The estimated time required to fix vulnerability and reliability Issues. |
| Snapshot | A set of **measures** and **issues** on a given project at a given time. A snapshot is generated for each analysis. |
| Security hotspot | Security-sensitive pieces of code that need to be manually reviewed. Upon review, you’ll either find that there is no threat or that there is vulnerable code that needs to be fixed. |
| Technical debt | The estimated time required to fix all maintainability issues and code smells. |
| Vulnerability | A security-related issue that represents a backdoor for attackers. See also [security-related-rules](https://docs.sonarsource.com/sonarqube-server/10.7/user-guide/rules/security-related-rules "mention") |
---
# Source: https://docs.sonarsource.com/sonarqube-community-build/server-installation/system-properties/configuration-methods.md
# Source: https://docs.sonarsource.com/sonarqube-server/2025.3/server-installation/system-properties/configuration-methods.md
# Source: https://docs.sonarsource.com/sonarqube-server/2025.5/server-installation/system-properties/configuration-methods.md
# Source: https://docs.sonarsource.com/sonarqube-server/2025.4/server-installation/system-properties/configuration-methods.md
# Source: https://docs.sonarsource.com/sonarqube-server/2025.6/server-installation/system-properties/configuration-methods.md
# Source: https://docs.sonarsource.com/sonarqube-server/server-installation/system-properties/configuration-methods.md
# Configuration methods
SonarQube utilizes system properties during startup, which are not stored in the database. These properties can be configured through:
* `sonar.properties` configuration file\
You can define system properties through sonar properties (`sonar.*`) stored in the `sonar.properties` file.
* Environment variables\
You can define system properties through environment variables.
* Command line\
You can define system properties in the command line used to start SonarQube.
The properties set through the command line have precedence over the environment variables which have precedence over the `sonar.properties` file.
See the list of sonar properties considered as system properties, along with the corresponding environment variables:
* [common-properties](https://docs.sonarsource.com/sonarqube-server/server-installation/system-properties/common-properties "mention")
* [dce-specific](https://docs.sonarsource.com/sonarqube-server/server-installation/system-properties/dce-specific "mention")
{% hint style="info" %}
Once you have set or changed system properties, you must restart SonarQube to apply the changes.
{% endhint %}
### In a ZIP installation
The preferred method to manage system properties in a ZIP installation is to edit the `sonar.properties` file which is stored in `/conf/sonar.properties` where `` is the location where the SonarQube Server distribution has been unzipped.
To encrypt sensitive system properties stored in `sonar.properties`, see [encrypting-settings](https://docs.sonarsource.com/sonarqube-server/instance-administration/security/encrypting-settings "mention").
{% hint style="info" %}
The `sonar.properties` file also accepts a restricted list of non-system properties. Currently, if you use a non-supported property, SonarQube will ignore it and no error or warning will be raised. As a principle, use only properties documented in the `sonar.properties` file or explicitly authorized in the SonarQube documentation.
{% endhint %}
### In a Docker installation
The preferred method to manage system properties in a Docker installation is to use the environment variables.
System properties can also be edited in the `sonar.properties` file which is stored in `/conf/sonar.properties` where `` is the installation directory of SonarQube Server within your container. This path is stored in the `SONARQUBE_HOME` environment variable.
### In a Kubernetes installation
In a Kubernetes installation, a few system properties are set through Helm chart parameters. For example, the Helm chart’s parameter `jdbcOverwrite.jdbcUrl` corresponds to the sonar property `sonar.jdbc.url`.
If you need to set additional system properties, you can set them in the Helm chart through:
* Sonar properties
* Environment variables
In addition, system properties stored in external Secrets or ConfigMaps can be injected into the Helm chart.
#### Defining sonar properties
In the SonarQube Helm chart (`values.yaml` file), use the `sonarProperties` parameter as illustrated below. This creates a custom `sonar.properties` file within the Kubernetes cluster.
```yaml
sonarProperties:
sonar.log.level: DEBUG
sonar.security.realm: LDAP
ldap.url: ldaps://organization.com
```
To encrypt sensitive properties stored in the Helm chart, see [encrypting-helm-chart-sensitive-data](https://docs.sonarsource.com/sonarqube-server/server-installation/on-kubernetes-or-openshift/encrypting-helm-chart-sensitive-data "mention").
{% hint style="info" %}
Only system properties can be defined through `sonarProperties` in the Helm chart. Non-system properties will be ignored.
{% endhint %}
#### Using environment variables
In the Helm chart, you can define system properties through environment variables by using `env:`.
#### Injecting external Secrets or ConfigMaps
In environments where another tool, such as terraform or ansible, is used to provision infrastructure or passwords, configuration may be read, via environment variables, from existing Secrets and ConfigMaps.
To do so, proceed as follows:
1\. Create a `ConfigMap` (or `Secret`) containing key/value pairs, as expected by SonarQube.
```yaml
apiVersion: v1
kind: ConfigMap
metadata:
name: external-sonarqube-opts
data:
SONAR_JDBC_USERNAME: foo
SONAR_JDBC_URL: jdbc:postgresql://db.example.com:5432/sonar
```
2\. Set the following in your `values.yaml` (using the key `extraConfig.secrets` to reference Secrets)
```yaml
extraConfig:
configmaps:
- external-sonarqube-opts
```
### Related pages
* [common-properties](https://docs.sonarsource.com/sonarqube-server/server-installation/system-properties/common-properties "mention")
* [dce-specific](https://docs.sonarsource.com/sonarqube-server/server-installation/system-properties/dce-specific "mention")
---
# Source: https://docs.sonarsource.com/sonarqube-community-build/analyzing-source-code/analysis-parameters/configuration-overview.md
# Source: https://docs.sonarsource.com/sonarqube-server/2025.5/analyzing-source-code/analysis-parameters/configuration-overview.md
# Source: https://docs.sonarsource.com/sonarqube-server/2025.6/analyzing-source-code/analysis-parameters/configuration-overview.md
# Source: https://docs.sonarsource.com/sonarqube-server/analyzing-source-code/analysis-parameters/configuration-overview.md
# Source: https://docs.sonarsource.com/sonarqube-cloud/advanced-setup/analysis-parameters/configuration-overview.md
# Configuration overview
### Settings hierarchy
You can configure project analysis settings mainly in the UI, in scanner configuration files, and as scanner arguments on the command line. Here is the hierarchy in order of precedence:
1. **Organization properties** (Enterprise only): As an organization admin, you can define analysis scope adjustments at the organization level in the SonarQube UI by going to *Your Organization* > **Administration** > **Analysis Scope**.
2. **Project properties:** As a project admin, you can change these properties in the SonarQube UI and apply them to your project by going to *Your Organization* > *Your Project* > **Administration** > **General Settings**.
3. **Scanner configuration files**: You can configure scanner parameters in a configuration file within your project or a build framework. Values set in the configuration file will override organization and project properties set in the UI. See the individual scanner pages for more information.
4. **Scanner arguments**: For CI-based analysis, you can also set parameters on the command line. This can be done with the standalone command-line tool sonar-scanner or with any of the build-tool-specific variants such as SonarScanner for Maven and SonarScanner for Gradle. Scanner arguments override the scanner configuration files.
If you use environment variables, which are available for some properties, they will be overridden by scanner arguments.
### General configuration guidelines
Consider the following:
* Most of the analysis parameters you can set in the UI can also be set in scanner configuration files or as scanner arguments by using the corresponding sonar properties (a sonar property is a key/value pair in which the key has the `sonar.` syntax) .
* Sonar property keys are case-sensitive.
* Some analysis parameters cannot be set in the UI; they are listed in [parameters-not-settable-in-ui](https://docs.sonarsource.com/sonarqube-cloud/advanced-setup/analysis-parameters/parameters-not-settable-in-ui "mention").
* Only parameters you set through the UI are stored in the SonarQube Cloud database. Parameters set in the command line or in the scanner configuration files will only be effective for the current analysis and *not* for subsequent analyses or analyses in SonarQube for IDE with connected mode. For example, if you override the `sonar.exclusions` parameter via the command line for a specific project, it will not be stored in the database. Subsequent analyses without the `sonar.exclusions` parameter in the command line or scanner configuration file, or analyses in SonarQube for IDE, will be executed with the exclusions stored in the database.
* See the corresponding SonarScanner section in this documentation for general information about the configuration of analysis parameters in scanner configuration files or as scanner arguments:
* [sonarscanner-for-maven](https://docs.sonarsource.com/sonarqube-cloud/advanced-setup/ci-based-analysis/sonarscanner-for-maven "mention")
* [sonarscanner-for-gradle](https://docs.sonarsource.com/sonarqube-cloud/advanced-setup/ci-based-analysis/sonarscanner-for-gradle "mention")
* SonarScanner for NPM: [configuring](https://docs.sonarsource.com/sonarqube-cloud/advanced-setup/ci-based-analysis/sonarscanner-for-npm/configuring "mention")
* SonarScanner for .NET: [using](https://docs.sonarsource.com/sonarqube-cloud/advanced-setup/ci-based-analysis/sonarscanner-for-dotnet/using "mention")
* [sonarscanner-for-python](https://docs.sonarsource.com/sonarqube-cloud/advanced-setup/ci-based-analysis/sonarscanner-for-python "mention")
* [sonarscanner-cli](https://docs.sonarsource.com/sonarqube-cloud/advanced-setup/ci-based-analysis/sonarscanner-cli "mention")
* If you use PowerShell, you need to wrap any parameter value that includes a dot (`.`) in either single or double quotes to prevent misinterpretation.
* To adjust the analysis scope of your project, see [setting-analysis-scope](https://docs.sonarsource.com/sonarqube-cloud/managing-your-projects/project-analysis/setting-analysis-scope "mention").
* To include test coverage in your project analysis, see the [test-coverage](https://docs.sonarsource.com/sonarqube-cloud/enriching/test-coverage "mention") pages.
* To import issues generated by third-party analyzers, see the [external-analyzer-reports](https://docs.sonarsource.com/sonarqube-cloud/enriching/external-analyzer-reports "mention") page.
---
# Source: https://docs.sonarsource.com/sonarqube-server/8.9/setup-and-upgrade/configure-and-operate-a-cluster.md
# Source: https://docs.sonarsource.com/sonarqube-server/9.8/setup-and-upgrade/configure-and-operate-a-cluster.md
# Source: https://docs.sonarsource.com/sonarqube-server/9.9/setup-and-upgrade/configure-and-operate-a-cluster.md
# Source: https://docs.sonarsource.com/sonarqube-server/10.0/setup-and-upgrade/configure-and-operate-a-cluster.md
# Source: https://docs.sonarsource.com/sonarqube-server/10.1/setup-and-upgrade/configure-and-operate-a-cluster.md
# Source: https://docs.sonarsource.com/sonarqube-server/10.2/setup-and-upgrade/configure-and-operate-a-cluster.md
# Source: https://docs.sonarsource.com/sonarqube-server/10.3/setup-and-upgrade/configure-and-operate-a-cluster.md
# Source: https://docs.sonarsource.com/sonarqube-server/10.4/setup-and-upgrade/configure-and-operate-a-cluster.md
# Source: https://docs.sonarsource.com/sonarqube-server/10.5/setup-and-upgrade/configure-and-operate-a-cluster.md
# Source: https://docs.sonarsource.com/sonarqube-server/10.6/setup-and-upgrade/configure-and-operate-a-cluster.md
# Source: https://docs.sonarsource.com/sonarqube-server/10.7/setup-and-upgrade/configure-and-operate-a-cluster.md
# Source: https://docs.sonarsource.com/sonarqube-server/10.8/setup-and-upgrade/configure-and-operate-a-cluster.md
# Source: https://docs.sonarsource.com/sonarqube-server/2025.2/setup-and-update/configure-and-operate-a-cluster.md
# Source: https://docs.sonarsource.com/sonarqube-server/2025.1/setup-and-upgrade/configure-and-operate-a-cluster.md
# Operating the DCE cluster
*High availability and cluster scalability are features of the* [*Data Center Edition*](https://redirect.sonarsource.com/editions/datacenter.html)*.*
Once the SonarQube Server cluster is installed, you have a high availability configuration that allows your SonarQube Server instance to stay up and running even if there is a crash or failure in one of the cluster’s nodes. Your SonarQube Server cluster is also scalable, and you can add application nodes to increase your computing capabilities.
### Start, stop, or update the cluster
#### Start the Cluster
To start a cluster, you need to follow these steps in order:
1. Start the search nodes
2. Start the application nodes
#### Stop the Cluster
To stop a cluster, you need to follow these steps in order:
1. Stop the application nodes
2. Stop the search nodes
#### Update SonarQube Server
1. Stop the cluster.
2. Update SonarQube Server on all nodes (application part, plugins, JDBC driver if required) following the usual update procedure but without triggering the setup phase. See [update](https://docs.sonarsource.com/sonarqube-server/2025.1/server-update-and-maintenance/update "mention").
3. Once all nodes have the same binaries: restart the cluster.
4. At this point, only one of the application nodes is up. Try to access `node_ip:port/setup` on each application node, and trigger the setup operation on the one that responds.
### Start or stop a node
You can start or stop a single node in the same way as starting and stopping an instance using a single server. By default, it’s a graceful shutdown where no new analysis report processing can start, but the tasks in progress are allowed to finish.
### Install or upgrade a plugin
1. Stop the application nodes.
2. Install or upgrade the plugin on the application nodes.
* If upgrading, remove the old version.
* You don’t need to install plugins on search nodes.
3. Restart the application nodes.
### Scalability
You have the option of adding application nodes (up to 10 total application nodes) to your cluster to increase computing capabilities.
#### Scaling in a Traditional Environment
**Adding an Application Node**
To add an application node:
1. Configure your new application node in sonar.properties. The following is an example of the configuration to be added to `sonar.properties` for a sixth application node (server6, ip6) in a cluster with the default five servers. For information about the system properties used, see [#traditional-environment-configuration](#traditional-environment-configuration "mention").
**Server6:**
```css-79elbk
...
sonar.cluster.enabled=true
sonar.cluster.node.type=application
sonar.cluster.node.host=ip6
sonar.cluster.node.port=9003
sonar.cluster.node.web.port=4023
sonar.cluster.node.ce.port=4024
sonar.cluster.hosts=ip1,ip2,ip6
sonar.cluster.search.hosts=ip3:9001,ip4:9001,ip5:9001
sonar.auth.jwtBase64Hs256Secret=YOURGENERATEDSECRET
...
```
{% hint style="info" %}
The `sonar.cluster.node.web.port` and `sonar.cluster.node.ce.port` system properties are optional. If not used, a dynamic port will be chosen.
{% endhint %}
2. Update the configuration of the preexisting nodes to include your new node. While you don’t need to restart the cluster after adding a node, you should ensure the configuration is up to date on all of your nodes to avoid issues when you eventually do need to restart.
**Removing an Application Node**
When you remove an application node, make sure to update the configuration of the remaining nodes. Much like adding a node, while you don’t need to restart the cluster after removing a node, you should ensure the configuration is up to date on all of your nodes to avoid issues when you eventually do need to restart.
#### Scaling in a Docker Environment
**Adding Application Nodes**
If you’re using docker-compose, you can scale the application nodes using the following command:
`docker-compose up -d --scale sonarqube=3`
**Removing Application Nodes**
You can reduce the number of application nodes with the same command used to add application nodes by lowering the number.
### Monitoring
CPU and RAM usage on each node have to be monitored separately with an APM.
In addition, we provide a Web API `api/system/health` you can use to validate that all of the nodes in your cluster are operational.
* GREEN: SonarQube Server is fully operational
* YELLOW: SonarQube Server is usable, but it needs attention in order to be fully operational
* RED: SonarQube Server is not operational
To call it from a monitoring system without having to give admin credentials, it is possible to setup a system passcode. You can configure this through the `sonar.web.systemPasscode` property in `/conf/sonar.properties` if you’re using a traditional environment or through the corresponding environment variable if you’re using a Docker environment.
#### Cluster Status
On the System Info page at **Administration > System**, you can check whether your cluster is running safely (green) or has some nodes with problems (orange or red).
#### Maximum Pending Time for Tasks
On the global Background Tasks page at **Administration > Projects > Background Tasks**, you can see the number of **pending** tasks as well as the maximum **pending time** for the tasks in the queue. This shows the pending time of the oldest background task waiting to be processed. You can use this to evaluate if it might be worth configuring additional Compute Engine workers (Enterprise Edition) or additional nodes (Data Center Edition) to improve SonarQube Server performance.
### Compute engine workers
If you change the number of compute engine workers in the Sonar Qube Server UI, *you must restart each application node for the change to take effect*; more details about is on the [improving-performance](https://docs.sonarsource.com/sonarqube-server/2025.1/server-update-and-maintenance/maintenance/improving-performance "mention") page. You can configure up to 10 workers replicated across each application node. The number of workers is global and cannot be configured at the application node level.
For example, if you set 4 workers in the SonarQube Server UI and you have 2 application nodes, you have configured 8 workers total after you finish restarting all the application nodes (4 workers \* 2 nodes = 8 workers total).
### Project move
When the [project-move](https://docs.sonarsource.com/sonarqube-server/2025.1/project-administration/project-move "mention") feature is used in a DC installation:
* Projects are exported on only one of the application nodes
* The archive of the exported projects must be copied to all the applications nodes in the target server
### Configuration details
There are three TCP networks to configure:
* the network of application nodes that relies on Hazelcast.
* the network used for Elasticsearch internal communication between search nodes (`es` properties).
* the network between application nodes and search nodes (`search` properties).
[Hazelcast](https://hazelcast.org/) is used to manage the communication between the cluster’s application nodes. You don’t need to install it yourself, it’s provided out of the box.
### Docker environment configuration
In a Docker environment, your properties are configured using [environment-variables](https://docs.sonarsource.com/sonarqube-server/2025.1/setup-and-upgrade/environment-variables "mention").
### Traditional environment configuration
The following properties may be defined in the `/conf/sonar.properties` file of each node in a cluster. When defining a property that contains a list of hosts (`*.hosts`) the port is not required if the default port was not overridden in the configuration.
{% hint style="warning" %}
Ports can be unintentionally exposed. We recommend only giving external access to the application nodes and to main port (`sonar.web.port`).
{% endhint %}
**All nodes**
| | | | |
| ------------------------- | ---------------------------------------------------------------------------------------------------------------------------------------------------------------------------------------------------------------------------------------------------------------------------- | ------------------ | ----------- |
| Property | Description | Default | Required |
| `sonar.cluster.enabled` | Set to `true` in each node to activate the cluster mode | `false` | yes |
| `sonar.cluster.name` | The name of the cluster. **Required if multiple clusters are present on the same network.** For example this prevents mixing Production and Preproduction clusters. This will be the name stored in the Hazelcast cluster and used as the name of the Elasticsearch cluster. | `sonarqube` | no |
| `sonar.cluster.node.name` | The name of the node that is used on Elasticsearch and stored in Hazelcast member attribute (NODE\_NAME) for sonar-application | `sonarqube-{UUID}` |
|
| `sonar.cluster.node.type` | Type of node: either `application` or `search` |
|
|
**Application nodes**
Property
Description
sonar.cluster.hosts
Comma-delimited list of all application hosts in the cluster. This value must contain only application hosts. Each item in the list must contain the port if the default sonar.cluster.node.port value is not used. Item format is sonar.cluster.node.host or sonar.cluster.node.host:sonar.cluster.node.po
sonar.cluster.node.host
IP address of the network card that will be used by Hazelcast to communicate with the members of the cluster.
sonar.cluster.node.port
The Hazelcast port for communication with each application member of the cluster. Default: 9003
sonar.cluster.node.web.port
The Hazelcast port for communication with the WebServer process. Port must be accessible to all other application nodes. If not specified, a dynamic port will be chosen and all ports must be open among the nodes.
sonar.cluster.node.ce.port
The Hazelcast port for communication with the ComputeEngine process. Port must be accessible to all other application nodes. If not specified, a dynamic port will be chosen and all ports must be open among the nodes.
sonar.cluster.search.hosts
Comma-delimited list of search hosts in the cluster. The list can contain either the host or the host and port, but not both. The item format is sonar.cluster.node.search.host for host only orsonar.cluster.node.search.host:sonar.cluster.node.search.port for host and port.
sonar.auth.jwtBase64Hs256Secret
Required for authentication with multiple web servers. It is used to keep user sessions opened when they are redirected from one web server to another by the load balancer. See $SONARQUBE-HOME/conf/sonar.properties) for details about how to generate this secret key.
**Search nodes**
Property
Description
sonar.cluster.node.search.host
Elasticsearch host of the current node used for HTTP communication between search and application nodes. IP must be accessible to all application nodes.
sonar.cluster.node.search.port
Elasticsearch port of the current node used for HTTP communication between search and application nodes. Port must be accessible to all application nodes.
sonar.cluster.es.hosts
Comma-delimited list of search hosts in the cluster. The list can contain either the host or the host and port but not both. The item format is sonar.cluster.node.es.host for host only orsonar.cluster.node.es.host:sonar.cluster.node.es.port for host and port.
sonar.cluster.node.es.host
Elasticsearch host of the current node used by Elasticsearch internal communication to form a cluster (TCP transport).
sonar.cluster.node.es.port
Elasticsearch port of the current node used by Elasticsearch internal communication to form a cluster (TCP transport). Port must be accessible to all other search nodes
sonar.search.initialStateTimeout
The timeout for the Elasticsearch nodes to elect a primary node. The default value will be fine in most cases, but in a situation where startup is failing because of a timeout, this may need to be adjusted. The value must be set in the format: {integer}{timeunit}. Valid {timeunit} values are: ms (milliseconds); s (seconds); m (minutes); h (hours); d (days); w (weeks)
#### Elasticsearch authentication
{% hint style="info" %}
This configuration is optional. To secure access to your setup, you may want to first limit access to the nodes in your network. Elasticsearch authentication just adds another layer of security.
{% endhint %}
{% hint style="warning" %}
When creating the PKCS#12 container, make sure it is created with an algorithm that is readable by Java 17.
{% endhint %}
For Elasticsearch authentication, the following properties need to be configured on specific nodes:
**Application nodes**
| | | | |
| ------------------------------- | ---------------------------------------------------------------------------------------------------------------------------------------------------------------------------------------------------------------------------------------------------- | ----------- | -------- |
| Property | Description | Default | Required |
| `sonar.cluster.search.password` | Password for Elasticsearch built-in user (elastic) which will be used on the client site. If provided, it enables authentication. If this property is set, `sonar.cluster.search.password` on the search nodes must also be set to exact same value. |
| no |
**Search nodes**
| | | | |
| ----------------------------------------- | ---------------------------------------------------------------------------------------------------------------------------------------------------------------------------------------------------------------------------------------------------------------------------------------------------------- | ----------- | -------- |
| Property | Description | Default | Required |
| `sonar.cluster.search.password` | Password for Elasticsearch built-in user (elastic) which will be set in ES. If provided, it enables authentication, and the instance will require additional properties to be set. If this property is set, `sonar.cluster.search.password` on the application nodes must also be set to exact same value. |
| no |
| `sonar.cluster.es.ssl.keystore` | File path to a keystore in PKCS#12 format. The user running SonarQube Server must have READ permission to that file. Required if password provided. |
| no |
| `sonar.cluster.es.ssl.truststore` | File path to a truststore in PKCS#12 format. The user running SonarQube Server must have READ permission to that file. Required if password provided. |
| no |
| `sonar.cluster.es.ssl.keystorePassword` | Password to the keystore. |
| no |
| `sonar.cluster.es.ssl.truststorePassword` | Password to the truststore. |
| no |
When you’re using the SonarSource Docker images, the truststore/keystore should be provided as volumes. On Kubernetes, you need to create a new Secret from the truststore/keystore and provide the name to the Helm chart.
#### Elasticsearch TLS encryption over HTTP
**Prerequisite:** Elasticsearch authentication is enabled.
This configuration is optional. Enabling TLS on the HTTP layer provides additional security to ensure that all communications between application nodes and search nodes are encrypted.
The following properties need to be configured on both application nodes and search nodes:
| | | | |
| -------------------------------------------- | ------------------------------------------------------------------------------------------------------------------------------------------------------------ | ----------- | -------- |
| Property | Description | Default | Required |
| `sonar.cluster.es.http.ssl.keystore` | File path to a keystore in PKCS#12 format. The user running SonarQube Server must have READ permission to that file. If provided, it enables TLS encryption. |
| no |
| `sonar.cluster.es.http.ssl.keystorePassword` | Password to the keystore. |
| no |
### Secure your network
To further lock down the communication in between the nodes in your SonarQube Server Cluster, you can define the following network rules:
| | | | | |
| -------- | ------------- | ----------- | -------------------------------- | ------- |
| Protocol | Source | Destination | Port | Default |
| TCP | Reverse Proxy | App Node | `sonar.web.port` | 9000 |
| TCP | App Node | Search Node | `sonar.cluster.node.search.port` | 9001 |
| TCP | Search Node | Search Node | `sonar.cluster.node.es.port` | 9002 |
| TCP | App Node | App Node | `sonar.cluster.node.port` | 9003 |
You can further segment your network configuration if you specify a frontend, a backend and a search network.
Network
Parameter
Description
Frontend
sonar.web.host
Frontend HTTP Network
Backend
sonar.cluster.node.host
Backend App to App Network
Backend
sonar.cluster.search.hosts
Backend App to Search Network
Search
sonar.cluster.node.search.host
Backend Search to Search Network
### Limitations
* Cluster downtime is required for SonarQube Server upgrades or plugin installations.
* All application nodes must be stopped when installing, uninstalling, or upgrading a plugin.
* Plugins are not shared, meaning if you install/uninstall/upgrade a given plugin on one application node, you need to perform the same actions on the other application node.
* There is no way to perform actions on the cluster from a central app - all operations must be done manually on each node of the cluster.
### Frequently asked questions
**Does Elasticsearch discover automatically other ES nodes?**
No. Multicast is disabled. All hosts (IP+port) must be listed.
**Can different nodes run on the same machine?**
Yes, but it’s best to have one machine for each node to be resilient to failures. To maintain an even higher level of availability, each of your three search nodes can be located in a separate availability zone *within the same region*.
**Can the members of a cluster be discovered automatically?**
No, all nodes must be configured in `/conf/sonar.properties`*.*
**My keystore/truststore cannot be read by SonarQube Server**
Make sure that the keystore/truststore in question was generated with an algorithm that is known to Java 17. See [JDK-8267599](https://bugs.openjdk.java.net/browse/JDK-8267599) for reference
---
# Source: https://docs.sonarsource.com/sonarqube-server/8.9/setup-and-upgrade/configure-and-operate-a-server.md
# Source: https://docs.sonarsource.com/sonarqube-server/9.8/setup-and-upgrade/configure-and-operate-a-server.md
# Source: https://docs.sonarsource.com/sonarqube-server/9.9/setup-and-upgrade/configure-and-operate-a-server.md
# Source: https://docs.sonarsource.com/sonarqube-server/10.0/setup-and-upgrade/configure-and-operate-a-server.md
# Source: https://docs.sonarsource.com/sonarqube-server/10.1/setup-and-upgrade/configure-and-operate-a-server.md
# Source: https://docs.sonarsource.com/sonarqube-server/10.2/setup-and-upgrade/configure-and-operate-a-server.md
# Source: https://docs.sonarsource.com/sonarqube-server/10.3/setup-and-upgrade/configure-and-operate-a-server.md
# Source: https://docs.sonarsource.com/sonarqube-server/10.4/setup-and-upgrade/configure-and-operate-a-server.md
# Source: https://docs.sonarsource.com/sonarqube-server/10.5/setup-and-upgrade/configure-and-operate-a-server.md
# Source: https://docs.sonarsource.com/sonarqube-server/10.6/setup-and-upgrade/configure-and-operate-a-server.md
# Configure and operate a server
{% content-ref url="configure-and-operate-a-server/operating-the-server" %}
[operating-the-server](https://docs.sonarsource.com/sonarqube-server/10.6/setup-and-upgrade/configure-and-operate-a-server/operating-the-server)
{% endcontent-ref %}
{% content-ref url="configure-and-operate-a-server/environment-variables" %}
[environment-variables](https://docs.sonarsource.com/sonarqube-server/10.6/setup-and-upgrade/configure-and-operate-a-server/environment-variables)
{% endcontent-ref %}
---
# Source: https://docs.sonarsource.com/sonarqube-server/2025.3/server-installation/data-center-edition/on-kubernetes-or-openshift/setting-up-disaster-recovery/configure-azure-front-door.md
# Source: https://docs.sonarsource.com/sonarqube-server/2025.5/server-installation/data-center-edition/on-kubernetes-or-openshift/setting-up-disaster-recovery/configure-azure-front-door.md
# Source: https://docs.sonarsource.com/sonarqube-server/2025.4/server-installation/data-center-edition/on-kubernetes-or-openshift/setting-up-disaster-recovery/configure-azure-front-door.md
# Source: https://docs.sonarsource.com/sonarqube-server/2025.6/server-installation/data-center-edition/on-kubernetes-or-openshift/setting-up-disaster-recovery/configure-azure-front-door.md
# Source: https://docs.sonarsource.com/sonarqube-server/server-installation/data-center-edition/on-kubernetes-or-openshift/setting-up-disaster-recovery/configure-azure-front-door.md
# Step 3: Configure the Azure Front Door
The setup instructions are based on a [architecture-example](https://docs.sonarsource.com/sonarqube-server/server-installation/data-center-edition/on-kubernetes-or-openshift/setting-up-disaster-recovery/architecture-example "mention").
### Step 1: Create an Azure Front Door
Create an Azure Front Door as follows (see also the [Azure documentation](https://learn.microsoft.com/en-us/azure/frontdoor/create-front-door-portal?tabs=quick)):
1\. In the Azure portal, create a new Azure Front Door by using the **Quick create** option. The **Create a Front Door** **profile** page opens.
2\. In **Project details**, select your subscription and resource group.
3\. In **Profile details**, enter your profile name
4\. In **Endpoint settings:**
* In **Endpoint name**, enter a name for your endpoint. This is the domain where users will access your SonarQube Server instance. Azure creates a \*.[azurefd.net](http://azurefd.net/) domain for your endpoint by default. You can modify this setting to use your own domain on the Front Door settings.
* In **Origin type**, select **Custom**.
* In **Origin host name**, enter the FQDN of your primary cluster Ingress. You’ll add the Replica origin once the Front Door is created along with the origin group.
* Leave **Caching** and **WAF policy** with the default settings.
5. Select the **Review + create** button.
6. Go back to the overview page and select the newly created Front Door.
7. Go to **Origin Groups** > **Origin group name**
8. Select your origin group from the list (the origin group is automatically created with default name `default-origin-group`). The **Update origin group** page opens.
9. Select **Add an origin**.
10. Set the parameters of the new origin:
* In **Name**, enter a name for the replica origin.
* In **Origin type**, select **Custom**.
* In **Host name**, enter the DNS name of your replica cluster Ingress.
* Leave **Origin host header** blank.
* In **Certificate subject name validation**, select **Enable the validation**.
* Leave **HTTP port** and **HTTPS port** with the default values.
* In **Priority**, enter **2**.
* Leave **Weight** and **Status** with the default values.
### Step 2: Configure an alert rule for the origin group
You can set up an alert for your origin group that triggers whenever your origin health goes under a specific threshold. The alert can optionally send an email to the SonarQube Server Administrator or start an automation runbook to perform additional actions, if required.
To configure an alert rule for the origin group:
1. Select your Front Door.
2. In **Monitoring**, select **Alerts**.
3. Select **Create Alert rule**.
4. In **Signal name**, select **Origin Health Percentage**.
5. In **Aggregation type**, select **Average**.
6. In **Threshold**, select **99%**.
7. In **Split by dimensions :**
1. In **Dimension name**, select **Origin.**
2. In **Operator**, select **=**.
3. Select your primary SonarQube **Origin Group** as **Dimension values**.
8. In **When to evaluate**, select the values based on your requirements.
9. Select the **Next:Actions** button.
10. In **Select actions**, select **Use action groups**.
11. In **Action groups**, select **Select action groups** and then **Create action group**.
12. Select the correct subscription and resource group and give a name of your choice for the action group name and display name.
13. Select the **Next:Notifications** button.
14. Select a notification type. At a minimum, select **Email/SMS message/Push/Voice** to receive an email whenever the alert is triggered.
15. Optionally, select **Actions** and select an automation runbook with a script to power on the replica cluster. To create an automation runbook, see below.
### Creating an automation runbook
This section explains how to create an automation runbook triggered by an alert rule created for the Front Door origin containing your primary cluster. This runbook powers on the replica cluster in case of an outage of the primary cluster.
{% hint style="warning" %}
The following steps are listed in this guide as a reference only. Sonar recommends a manual power-on of the replica cluster in the event of a disaster, as this is a sensitive operation that could impact your RTO goals.
{% endhint %}
Step 1: Create an automation account
Proceed as follows (see also the [Azure documentation](https://learn.microsoft.com/en-us/azure/automation/quickstarts/create-azure-automation-account-portal)):
1. In your Azure portal, navigate to **Automation Accounts** and select **Create**.
2. Select your subscription and resource group.
3. In **Instance Details**, enter a name and select a region for your Automation Account.
4. Select the **Advanced** tab to select the managed identity option. This identity is needed for the Runbooks associated with this account to connect and run operations on your clusters. You can either use a System-assigned or a User-assigned identity.\
If using an identity option, make sure you set the correct Azure role permissions to your SonarQube clusters.
5. Select the **Review + Create** button.
Step 2: Create a runbook
1. Go to your automation account.
2. In **Process Automation**, select **Runbooks** and **Create a runbook**.
3. Enter the runbook name.
4. In **Runbook type**, select **PowerShell**.
5. In **Runtime version**, select **7.2**.
6. Use the sample PowerShell script below to power on the replica cluster.
```powershell
# This script starts an Azure Kubernetes Service (AKS) cluster using the Azure PowerShell module.
#variables
param(
[Parameter(Mandatory = $true)]
[string]$PrimaryClusterName,
[Parameter(Mandatory = $true)]
[string]$ReplicaClusterName,
[Parameter(Mandatory = $true)]
[string]$SubscriptionId,
[Parameter(Mandatory = $true)]
[string]$ManagedIdentityClientId,
[Parameter(Mandatory = $true)]
[string]$ResourceGroupName
)
#connect to Azure using managed identity
Connect-AzAccount -Identity -AccountId $ManagedIdentityClientId
#check the status of the AKS Primary cluster
$primaryCluster = Get-AzAksCluster -ResourceGroupName $ResourceGroupName -Name $PrimaryClusterName -SubscriptionId $SubscriptionId
if ($primaryCluster.ProvisioningState -ne "Succeeded" -or $primaryCluster.PowerState.Code -ne "Running") {
Start-AzAksCluster -ResourceGroupName $ResourceGroupName -Name $ReplicaClusterName -SubscriptionId $SubscriptionId
}
else {
Write-Output "Primary AKS cluster is still running. No action taken."
}
```
### Related pages
* [architecture-example](https://docs.sonarsource.com/sonarqube-server/server-installation/data-center-edition/on-kubernetes-or-openshift/setting-up-disaster-recovery/architecture-example "mention")
* [deploy-databases](https://docs.sonarsource.com/sonarqube-server/server-installation/data-center-edition/on-kubernetes-or-openshift/setting-up-disaster-recovery/deploy-databases "mention")
* [set-up-clusters-on-aks](https://docs.sonarsource.com/sonarqube-server/server-installation/data-center-edition/on-kubernetes-or-openshift/setting-up-disaster-recovery/set-up-clusters-on-aks "mention")
* [test-failover-scenarios](https://docs.sonarsource.com/sonarqube-server/server-installation/data-center-edition/on-kubernetes-or-openshift/setting-up-disaster-recovery/test-failover-scenarios "mention")
---
# Source: https://docs.sonarsource.com/sonarqube-cloud/administering-sonarcloud/managing-enterprise/enterprise-security/sso/setup/configure-sso.md
# Step 2: Configure SSO
- [Using the setup assistant (generic operation)](/sonarqube-cloud/administering-sonarcloud/managing-enterprise/enterprise-security/sso/setup/configure-sso/generic-operation.md): This page explains how to configure SSO with SonarQube Cloud’s setup assistant if you use another identity provider than Okta or Microsoft Entra ID.
- [SAML SSO with Okta](/sonarqube-cloud/administering-sonarcloud/managing-enterprise/enterprise-security/sso/setup/configure-sso/okta.md): This page explains how to setup SAML SSO with Okta and SonarQube Cloud's SSO setup assistant.
- [SAML SSO with Entra ID](/sonarqube-cloud/administering-sonarcloud/managing-enterprise/enterprise-security/sso/setup/configure-sso/microsoft-entra-id.md): This page explains how to configure SAML SSO in your enterprise with Microsoft Entra ID while using SonarQube Cloud's setup assistant.
---
# Source: https://docs.sonarsource.com/sonarqube-mcp-server/build-and-configure/configure.md
# Configure your SonarQube MCP server
No matter if you're looking for a configuration for single-users ([#stdio](#stdio "mention")), multi-user ([#http](#http "mention")), or secure multi-client ([#https](#https "mention")) configurations, the SonarQube MCP Server has you covered. On this page, you'll find container image examples for setup with SonarQube Cloud and SonarQube Server, including requirements for user tokens and handling of custom certificates and proxies.
If you're unable to use a container image to deploy your MCP server, please see the [build](https://docs.sonarsource.com/sonarqube-mcp-server/build-and-configure/build "mention") page for alternatives.
### Overview
The SonarQube MCP Server uses [#stdio](#stdio "mention") when running a local configuration. This configuration is designed for single-user access however, it's possible to manage your MCP server using a [#transport-mode](#transport-mode "mention") configuration, designed for shared access across a network using [#http](#http "mention") or [#https](#https "mention") connection protocols.
### Transport mode
Once configured, your MCP server is hosted on a local network and can handle connections from multiple users; all of your team's developers can access the same MCP server and reduces the need for multiple unique configurations. For more information about how HTTP transport works, please see the [Model Context Protocol documentation on Transports](https://modelcontextprotocol.io/specification/2025-06-18/basic/transports).
The SonarQube MCP Server supports three transport modes:
1. [#stdio](#stdio "mention") is the default mode. This is the default mode, designed for single-user setups using command line tools or MCP clients.
2. [#http](#http "mention") is an unencrypted transport mode that can enable multiple client connections to a remote HTTP server. Each client provides its own user token. This transport mode is not recommended. Use [#stdio](#stdio "mention") for local development or [#https](#https "mention") for multi-user production deployments.
3. [#https](#https "mention") is also for multi-user production environments and uses a security protocol. This mode is the same as HTTP plus TLS encryption. The use of SSL certificates is required.
#### Stdio
Stdio is the default mode for local development and single-user set ups used by all MCP clients. The [#common-variables](https://docs.sonarsource.com/sonarqube-mcp-server/environment-variables#common-variables "mention") are required to initialize any transport mode you choose.
{% hint style="info" %}
Although the examples below use `docker`, any OCI-compatible container runtime works (for example, Podman, nerdctl, etc). Simply replace `docker` with commands specific to your preferred tool.
{% endhint %}
**Docker example**
{% tabs %}
{% tab title="SONARQUBE CLOUD" %}
Use this code sample when using the container image to configure your MCP HTTP server for integrating with SonarQube Cloud.
```bash
{
"mcpServers": {
"sonarqube": {
"command": "docker",
"args": ["run", "-i", "--rm", "-e", "SONARQUBE_TOKEN", "-e", "SONARQUBE_ORG", "mcp/sonarqube"],
"env": {
"SONARQUBE_TOKEN": "",
"SONARQUBE_ORG": ""
}
}
}
}
```
{% hint style="warning" %}
*User tokens* are required when setting up connected mode or an MCP Server between SonarQube (Server, Cloud) and SonarQube for IDE. Note that the binding will not function properly if *project tokens*, *global tokens*, or *scoped organization tokens* are used during the setup process.
{% endhint %}
{% endtab %}
{% tab title="SONARQUBE SERVER" %}
Use this code sample when using Docker to configure your MCP server for integrating with SonarQube Server or SonarQube Community Build.
```bash
{
"mcpServers": {
"sonarqube": {
"command": "docker",
"args": ["run", "-i", "--rm", "-e", "SONARQUBE_TOKEN", "-e", "SONARQUBE_URL", "mcp/sonarqube"],
"env": {
"SONARQUBE_TOKEN": "",
"SONARQUBE_URL": ""
}
}
}
}
```
{% hint style="warning" %}
*User tokens* are required when setting up connected mode or an MCP Server between SonarQube (Server, Cloud) and SonarQube for IDE. Note that the binding will not function properly if *project tokens*, *global tokens*, or *scoped organization tokens* are used during the setup process.
{% endhint %}
{% endtab %}
{% endtabs %}
#### HTTP
{% hint style="danger" %}
The HTTP [#transport-mode](#transport-mode "mention") is not recommended. Use [#stdio](#stdio "mention") for local development or [#https](#https "mention") for multi-user production deployments.
{% endhint %}
Enable HTTP transport for unencrypted multi-user scenarios where more than one client will connect to a shared server. The [#common-variables](https://docs.sonarsource.com/sonarqube-mcp-server/environment-variables#common-variables "mention") are required for initialization, in addition to the listed [#http-variables](https://docs.sonarsource.com/sonarqube-mcp-server/environment-variables#http-variables "mention") that clients will need to access the server.
Once set up, each client must provide its own user token for access.
#### HTTPS
HTTPS configurations are very similar to [#http](#http "mention") but require SSL certificates.
* For local development, use HTTP instead of HTTPS to avoid [#ssl-certificate](https://docs.sonarsource.com/sonarqube-mcp-server/environment-variables#ssl-certificate "mention") issues.
* For production deployments with proper SSL certificates from a trusted CA, use HTTPS.
**Docker example**
{% tabs %}
{% tab title="SONARQUBE CLOUD" %}
Use this code sample when using the container image to configure your MCP HTTPS server for integrating with SonarQube Cloud. The server uses the `SONARQUBE_TOKEN` one time, only for initialization.
{% hint style="info" %}
Although the examples below use `docker`, any OCI-compatible container runtime works (for example, Podman, nerdctl, etc). Simply replace `docker` with commands specific to your preferred tool.
{% endhint %}
```bash
# Start server (requires token for initialization)
docker run -p 8443:8443 \
-v $(pwd)/keystore.p12:/etc/ssl/mcp/keystore.p12:ro \
-e SONARQUBE_TRANSPORT=https \
-e SONARQUBE_HTTP_HOST=0.0.0.0 \
-e SONARQUBE_HTTP_PORT=8443 \
-e SONARQUBE_TOKEN="" \
-e SONARQUBE_ORG="" \
mcp/sonarqube
```
{% hint style="warning" %}
*User tokens* are required when setting up connected mode or an MCP Server between SonarQube (Server, Cloud) and SonarQube for IDE. Note that the binding will not function properly if *project tokens*, *global tokens*, or *scoped organization tokens* are used during the setup process.
{% endhint %}
{% endtab %}
{% tab title="SONARQUBE SERVER" %}
Use this code sample when using the container image to configure your MCP HTTP server for integrating with SonarQube Server or SonarQube Community Build. The server uses the `SONARQUBE_TOKEN` one time, only for initialization.
{% hint style="info" %}
Although the examples below use `docker`, any OCI-compatible container runtime works (for example, Podman, nerdctl, etc). Simply replace `docker` with commands specific to your preferred tool.
{% endhint %}
```bash
# Start server (requires token for initialization)
docker run -p 8080:8080 \
-e SONARQUBE_HTTP_ENABLED=true \
-e SONARQUBE_HTTP_PORT= \
-e SONARQUBE_TOKEN="" \
-e SONARQUBE_URL="" \
mcp/sonarqube
```
{% hint style="warning" %}
*User tokens* are required when setting up connected mode or an MCP Server between SonarQube (Server, Cloud) and SonarQube for IDE. Note that the binding will not function properly if *project tokens*, *global tokens*, or *scoped organization tokens* are used during the setup process.
{% endhint %}
{% endtab %}
{% endtabs %}
**Client configuration**
When connecting to the HTTP or HTTPS transport server, clients must include the `SONARQUBE_TOKEN` header in all requests. The server uses the `SONARQUBE_TOKEN` only for initialization.
```json
{
"mcpServers": {
"sonarqube-https": {
"url": "https://:8443/mcp",
"headers": {
"SONARQUBE_TOKEN": ""
}
}
}
}
```
{% hint style="warning" %}
*User tokens* are required when setting up connected mode or an MCP Server between SonarQube (Server, Cloud) and SonarQube for IDE. Note that the binding will not function properly if *project tokens*, *global tokens*, or *scoped organization tokens* are used during the setup process.
{% endhint %}
### Custom certificates
If your instance of SonarQube Server uses a self-signed certificate or a certificate from a private Certificate Authority (CA), you can add custom certificates to the container.
#### Supported certificate formats
The container supports the following certificate formats:
* `.crt` files (PEM or DER encoded)
* `.pem` files (PEM encoded)
{% hint style="info" %}
Although the examples below use `docker`, any OCI-compatible container runtime works (for example, Podman, nerdctl, etc). Simply replace `docker` with commands specific to your preferred tool.
{% endhint %}
Using a Volume Mount
Mount a directory containing your certificates when running the container:
```bash
docker run -i --rm \
-v /path/to/your/certificates/:/usr/local/share/ca-certificates/:ro \
-e SONARQUBE_TOKEN="" \
-e SONARQUBE_URL="" \
mcp/sonarqube
```
{% hint style="warning" %}
*User tokens* are required when setting up connected mode or an MCP Server between SonarQube (Server, Cloud) and SonarQube for IDE. Note that the binding will not function properly if *project tokens*, *global tokens*, or *scoped organization tokens* are used during the setup process.
{% endhint %}
Custom certificates
When using custom certificates, you can modify your MCP configuration to mount the certificates. Here an example when connecting to SonarQube Server or SonarQube Community Build:
```json
{
"sonarqube": {
"command": "docker",
"args": [
"run",
"-i",
"--rm",
"-v",
"/path/to/your/certificates/:/usr/local/share/ca-certificates/:ro",
"-e",
"SONARQUBE_TOKEN",
"-e",
"SONARQUBE_URL",
"mcp/sonarqube"
],
"env": {
"SONARQUBE_TOKEN": "",
"SONARQUBE_URL": ""
}
}
}
```
{% hint style="warning" %}
*User tokens* are required when setting up connected mode or an MCP Server between SonarQube (Server, Cloud) and SonarQube for IDE. Note that the binding will not function properly if *project tokens*, *global tokens*, or *scoped organization tokens* are used during the setup process.
{% endhint %}
### Proxy
The SonarQube MCP Server supports HTTP proxies through standard Java proxy system properties.
Configure proxy settings
You can configure proxy settings using Java system properties. These can be set as environment variables or passed as JVM arguments.
#### **Common proxy properties**
| Property | Description | Example |
| -------------------- | -------------------------------------------- | -------------------------------------- |
| `http.proxyHost` | HTTP proxy hostname | `proxy.example.com` |
| `http.proxyPort` | HTTP proxy port | `8080` |
| `https.proxyHost` | HTTPS proxy hostname | `proxy.example.com` |
| `https.proxyPort` | HTTPS proxy port | `8443` |
| `http.nonProxyHosts` | Hosts that bypass the proxy (pipe-separated) | `localhost\|127.0.0.1\|*.internal.com` |
#### **Proxy authentication**
If your proxy requires authentication, the SonarQube MCP Server uses Java's standard authentication mechanism. You can set up proxy credentials using Java system properties:
| Property | Description | Example |
| --------------------- | -------------------- | -------------- |
| `http.proxyPassword` | HTTP proxy password | `yourpassword` |
| `http.proxyUser` | HTTP proxy username | `yourusername` |
| `https.proxyPassword` | HTTPS proxy password | `yourpassword` |
| `https.proxyUser` | HTTPS proxy username | `yourusername` |
---
# Source: https://docs.sonarsource.com/sonarqube-community-build/project-administration/adjusting-analysis/configuring-new-code-calculation.md
# Source: https://docs.sonarsource.com/sonarqube-server/2025.2/project-administration/configuring-new-code-calculation.md
# Source: https://docs.sonarsource.com/sonarqube-server/2025.3/project-administration/configuring-new-code-calculation.md
# Source: https://docs.sonarsource.com/sonarqube-server/2025.5/project-administration/configuring-new-code-calculation.md
# Source: https://docs.sonarsource.com/sonarqube-server/2025.4/project-administration/configuring-new-code-calculation.md
# Source: https://docs.sonarsource.com/sonarqube-server/2025.6/project-administration/adjusting-analysis/configuring-new-code-calculation.md
# Source: https://docs.sonarsource.com/sonarqube-server/project-administration/adjusting-analysis/configuring-new-code-calculation.md
# Source: https://docs.sonarsource.com/sonarqube-cloud/managing-your-projects/project-analysis/configuring-new-code-calculation.md
# New code definition
When your project is created, the new code definition set at the organization level is applied to your project by default. However, you can select another new code definition for your project. See [about-new-code](https://docs.sonarsource.com/sonarqube-cloud/standards/about-new-code "mention") for additional information.
### Setting the new code definition for your project
As a project admin, you can set the new code definition for your project in the UI (except the Specific version and Specific date options) or using the Web API, at creation time or anytime later as explained below.
{% hint style="info" %}
For more compliance with the Clean as You Code methodology, the Specific version and Specific date options can only be set using the Web API, as it would require frequent user action to be kept up to date.
{% endhint %}
#### In the UI
To set or change the new code definition for your project in the UI:
1. Retrieve your project. See [retrieving-projects](https://docs.sonarsource.com/sonarqube-cloud/managing-your-projects/retrieving-projects "mention") for more details.
2. Go to **Administration > New Code**.
3. Select the option you want to apply to your project.
4. Select **Save**.
#### Via the Web API
To use the [web-api](https://docs.sonarsource.com/sonarqube-cloud/advanced-setup/web-api "mention") to set your new code definition, you need to use an alternative endpoint, POST [api/settings/set](https://sonarcloud.io/web_api/api/settings?query=settings\&deprecated=false).
You need to make two separate API calls as explained below depending on the selected new code option.
Previous version
| **Previous version** | |
| -------------------- | ------------------------------------------------------------------------------------------------------------------------------------------ |
| **First call** |
|
Number of days
| **Number of days** | |
| ------------------ | -------------------------------------------------------------------------------------------------------------------------------------- |
| **First call** |
|
{% hint style="info" %}
It’s not necessary to pass the organization key since the project key is unique across all the organizations (The `component` parameter accepts only a single value).
{% endhint %}
### Additional setup and recommendations
Make sure to follow the recommendations about the [verifying-code-checkout-step](https://docs.sonarsource.com/sonarqube-cloud/advanced-setup/scanner-environment/verifying-code-checkout-step "mention").
We also recommend completing your merges using the fast-forward option without a merge commit; examples include GitHub’s squash and merge or rebase and merge options. That way, blame for merged commits will always have a more recent commit date.
#### If using Previous version option
The current version of a project is determined in different ways depending on the build system:
* If the analysis is done using the [sonarscanner-for-maven](https://docs.sonarsource.com/sonarqube-cloud/advanced-setup/ci-based-analysis/sonarscanner-for-maven "mention"), then SonarQube Server reads the version from the `pom.xml` file.
* If the analysis is done with the [sonarscanner-for-gradle](https://docs.sonarsource.com/sonarqube-cloud/advanced-setup/ci-based-analysis/sonarscanner-for-gradle "mention") then SonarQube Server reads the version from the `build.gradle` file.
* In all other cases, you must explicitly specify the version by setting the analysis parameter `sonar.projectVersion`.
### Related pages
* [about-new-code](https://docs.sonarsource.com/sonarqube-cloud/standards/about-new-code "mention")
* [setting-new-code-definition-at-organization-level](https://docs.sonarsource.com/sonarqube-cloud/administering-sonarcloud/managing-organization/setting-config-at-org-level/setting-new-code-definition-at-organization-level "mention")
---
# Source: https://docs.sonarsource.com/sonarqube-server/10.6/user-guide/issues/configuring-notifications.md
# Configuring issue-related notifications
You can receive an email notification for issue-related events. You can enable the notifications at global level (for all your projects) and at project level.
To configure the notifications for issue-related events:
1. In the top right corner of the SonarQube UI, click your account icon and select **My account** in the account menu.
2. In the Account’s navigation bar, select **Notifications**.
3. In **Overall notifications**, check the option to enable notifications at the global level as illustrated below.
4. To configure notifications for a given project, select **Add a project**.
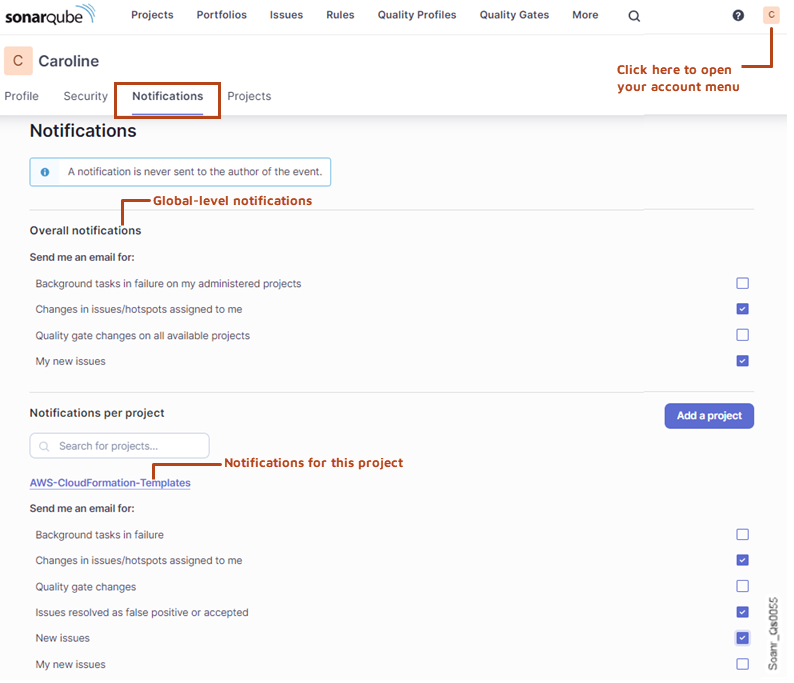
---
# Source: https://docs.sonarsource.com/sonarqube-server/10.6/analyzing-source-code/scanners/sonarscanner-for-npm/configuring-the-analysis-parameters.md
# Configuring the analysis parameters
The analysis parameters are various parameters used to set up the project analysis. The following applies:
* A few analysis parameters are mandatory.
* Many analysis parameters, such as those defining the analysis scope, have a default value and can be adjusted.
* Other parameters allow you to include the code and test coverage in your analysis, or to import issues generated by a third-party analyzer, etc.
{% hint style="info" %}
SonarQube manages the analysis parameters through sonar properties (The sonar property key has the following syntax: `sonar..`).
{% endhint %}
### Introduction to the analysis parameters setup
The [introduction](https://docs.sonarsource.com/sonarqube-server/10.6/analyzing-source-code/scanners/sonarscanner-for-npm/introduction "mention") reads or receives parameters from different sources:
* It gets analysis parameters through its APIs.
* It reads analysis parameters from `package.json`.
* It reads analysis parameters from environment variables.
* It reads parameters from the `sonar-project.properties`file.
* It gets the parameters that were set in the SonarQube UI.
* Some parameters are assigned a default value.
{% hint style="info" %}
It is recommended to set the analysis parameters in the SonarQube UI when possible because it allows a centralized, reliable, and user-friendly configuration. However, nearly all analysis parameters can be configured on the CI/CD host.
{% endhint %}
The table below lists the different configuration methods in the order of priority in which the SonarScanner for NPM processes the corresponding parameters. It also shows whether the parameters apply to all projects (global level) or to a given project.
| **Priority (higher to lower)** | **Method** | **Description** | **Global level** | **Project level** |
| ------------------------------ | -------------------------- | ----------------------------------------------------------------------------------------------------------------------------------------------------------------------------------------------- | ---------------- | ----------------- |
| 1 | API parameters | Parameters can be provided to the scanner either [introduction](https://docs.sonarsource.com/sonarqube-server/10.6/analyzing-source-code/scanners/sonarscanner-for-npm/introduction "mention"). |
| x |
| 2 | Environment variables | Some parameters can be stored in environment variables on the CI/CD host. | x |
|
| 4 | Project configuration file | Parameters can be defined in the `sonar-project.properties` file stored in the project root directory. |
| x |
| 3 | `package.json` | The scanner reads some analysis parameters from fields of the package.json file. |
| x |
| 5 | Default values | Some parameters are assigned a default value. The parameters considered here are parameters that cannot be set in the UI. | (1) | (1) |
| 6 | UI (project level) | Parameters can be set in the UI for a given project. |
| x |
| 7 | UI (global level) | Parameters can be set in the UI for all projects. | x |
|
(1) Depends on the parameter.
#### Analysis parameters read from package.json
The SonarScanner for NPM parses the NPM `package.json` file of the project to be analyzed and reads the value of the parameters below from the corresponding package.json field. For information about the listed analysis parameters, see Analysis parameters.
| **Analysis parameter** | **package.json field** |
| ------------------------ | ---------------------- |
| sonar.projectName | name |
| sonar.projectVersion | version |
| sonar.projectDescription | description |
| sonar.links.homepage | homepage |
| sonar.links.issue | bugs.url |
| sonar.links.scm | repository.url |
In addition, specific values may be added to the parameters listed below if particular conditions are fulfilled.
| **Analysis parameter** | **Value(s) added to** | **Conditions** |
| ------------------------------------------------------------------------------------------------------------------------------------------------------------------------------------------------------- | ---------------------------------------------------------- | -------------------------------------------------------------------------------------------------------------------------------------- |
|
sonar.exclusions (see analysis-scope) sonar.javascript.lcov.reportPaths (see Test coverage parameters)
| `nyc.report-dir` and `jest.converageDirectory` directories | If an `lcov.info` file is specified in the `package.json` fields `nyc.report-dir` and `jest.converageDirectory` |
| `sonar.testExecutionReportPaths` (see [test-execution-parameters](https://docs.sonarsource.com/sonarqube-server/10.6/analyzing-source-code/test-coverage/test-execution-parameters "mention")) | `Xunit.xml` file | If the `package.json` has declared the dependency `mocha-sonarqube-reporter` and the file `xunit.xml` exists in the project directory. |
### Preparing the analysis parameters setup
Depending on your tool environment and strategy, and on the analysis parameter (global or not, must be securely passed or not), you may choose one or the other setup method.
All mandatory analysis parameters and some optional analysis parameters can only be set on the CI/CD host (i.e. they cannot be set in the UI). The [analysis-parameters](https://docs.sonarsource.com/sonarqube-server/10.6/analyzing-source-code/analysis-parameters "mention") page lists these parameters and provides relevant information about each one.
{% hint style="info" %}
To retrieve the sonar property key of a parameter set in the UI, go to the UI page where this parameter is set. The property key is displayed near the analysis parameter field. Note that it’s strongly advised **not** to define multiple-value and multiple-criteria parameters through sonar properties on the CI/CD host.
{% endhint %}
### Providing analysis parameters through the scanner API
See **Adding the analysis step to your build files** or **Starting the scanner from the command line** in [using-the-sonarscanner-for-npm](https://docs.sonarsource.com/sonarqube-server/10.6/analyzing-source-code/scanners/sonarscanner-for-npm/using-the-sonarscanner-for-npm "mention").
### Setting analysis parameters in environment variables
You can use environment variables on the CI/CD host to define analysis parameters:
* Some parameters can be defined through a dedicated environment variable. For example, the `sonar.host.url` property value can be defined through the `SONAR_HOST_URL` environment variable. See the parameter lists in [analysis-parameters](https://docs.sonarsource.com/sonarqube-server/10.6/analyzing-source-code/analysis-parameters "mention") to know which parameters can be set in an environment variable.
* The `SONAR_SCANNER_JSON_PARAMS` environment variable allows you to pass multiple analysis parameters in a single variable, encoded as JSON.
Example:
```css-79elbk
SONAR_SCANNER_JSON_PARAMS = { "sonar.host.url":"http://my.server", "sonar.verbose:"true"}
```
{% hint style="info" %}
Parameters set through their respective environment variable (e.g. `SONAR_HOST_URL`) have precedence over parameters set through `SONAR_SCANNER_JSON_PARAMS`.
{% endhint %}
### Setting analysis parameters in sonar-project.properties
See **Configuring your project** in [sonarscanner](https://docs.sonarsource.com/sonarqube-server/10.6/analyzing-source-code/scanners/sonarscanner "mention").
### Setting analysis parameters in the SonarQube UI
You can set analysis parameters in the SonarQube UI at the global level (provided you have the global Administer permission) or for a given project (provided you have the Administer permission for this project). The project level has precedence over the global level, and parameters set on the CI/CD host have precedence over parameters set in the UI.
To set analysis parameters at the global level:
* In the top navigation bar of the SonarQube UI, select **Administration > Configuration > General settings**.
To set analysis parameters at the project level:
1. Open the project in the SonarQube UI.
2. In the top right corner of the project page, select **Project Settings > General Settings**.
---
# Source: https://docs.sonarsource.com/sonarqube-server/2025.2/design-and-architecture/configuring-the-architecture-analysis.md
# Source: https://docs.sonarsource.com/sonarqube-server/2025.3/design-and-architecture/configuring-the-architecture-analysis.md
# Source: https://docs.sonarsource.com/sonarqube-server/2025.5/design-and-architecture/configuring-the-architecture-analysis.md
# Source: https://docs.sonarsource.com/sonarqube-server/2025.4/design-and-architecture/configuring-the-architecture-analysis.md
# Source: https://docs.sonarsource.com/sonarqube-server/2025.6/design-and-architecture/configuring-the-architecture-analysis.md
# Configuring the architecture analysis
{% hint style="warning" %}
The cycle detection and architecture as code are deprecated, pending removal in January 2026. They will be replaced by improved architecture capabilities. See the [Sonar newsroom](https://www.sonarsource.com/company/newsroom/) page for more information.
{% endhint %}
### The configuration file
#### How it models the architecture
The architecture analysis in Sonar is configured via a YAML or JSON file. It has two functions:
1. To declare the formal architecture of the codebase using *Groups* and *Perspectives*
2. To declare architectural *Constraints* that enforce the formal architecture
A Perspective is a structured view of your codebase, defining how parts of your code are organized into architectural elements, called Groups. Groups can be nested, forming a hierarchy that reflects your domain concepts. A project can have multiple Perspectives, each offering a different view of the architecture. For example, one Perspective might illustrate architectural layers, while another maps features to the relevant parts of the code. See "Groups and Perspectives" below for more information.
A Constraint is a rule your team defines and enforces through Sonar. Constraints are declared in the architecture file, and Sonar verifies them in CI/CD, raising issues when divergences occur.
There are two types of constraints:
* Group constraints - They are defined within a Perspective and apply to hierarchical groups.
* Top-Level constraints - They apply to the entire codebase and use raw code patterns like globs and wildcards
See the "Constraints" section below for more information.
#### Using a configuration file and format
The configuration file path can be specified via the`sonar.architecture.configpath` property. The following example runs the analysis in a maven project using the configuration file `myArchitecture.json` in the project root directory:
```css-79elbk
mvn clean verify sonar:sonar -Dsonar.architecture.configpath=./myArchitecture.json
```
It must be provided either in JSON or YAML format; `.json`, `.yaml` and `.yml` are valid file name extensions.
If no configuration file is being specified, the analyzer looks for a file `architecture.json`, `architecture.yaml` or `architecture.yml` in the project root directory by default. If you want no configuration file to be used at all, you can set the following property for the analysis:
```css-79elbk
mvn clean verify sonar:sonar -Dsonar.architecture.noconfig
```
Note that this does not disable the architecture analysis. It just makes features unavailable that need configuration, but features that don’t need configuration (e.g., cycle detection) will still work.
#### All configuration properties
This section lists all properties available in the architecture configuration file. Refer to the ongoing sections for more information and configuration examples.
**Configuration file:**
* `perspectives` (optional) – An array of `PERSPECTIVE`. These are the perspective declarations that describe the formal architecture of the codebase. See "Groups and Perspectives" below.
* `constraints` (optional) – An array of `TOP-LEVEL-CONSTRAINT`. These are the top-level constraints not tied to an individual perspective. See "Top-Level Constraints Declaration" below.
**PERSPECTIVE**
* `label` (required) – Unique identifier for the perspective, which can contain any character except `/`.
* `description` (optional) – Provides more information about the perspective in human-readable form.
* `groups` (optional) – An array of `GROUP`. A perspective can declare one or many groups. These are the structural elements that make up the perspective. While the property is optional, a perspective without groups would usually be useless.
* `constraints` (optional) – An array of `PERSPECTIVE-CONSTRAINT`. These are the constraints declared for this perspective. See "Perspective Constraints Declaration" below.
**GROUP**
* `label` (required) – Unique identifier for the group within its parent group or perspective. It can contain any character except `/`.
* `description` (optional) – Provides more information about the group in human-readable form.
* `patterns` (required) – Specifies the code elements that are contained in the group in the same way as patterns are used in Constraints. See the "Constraints" section below for more information.
* `groups` (optional) – An array of `GROUP`. A group can declare one or many subgroups, allowing for the nested declaration of groups.
**PERSPECTIVE-CONSTRAINT**
* `from` (required) – Patterns for the elements that use the `to` elements in this constraint. This is an array of strings, each one representing a group path. The pattern can contain globs or regular expressions. See "Perspective Constraints Declaration" and "Wildcards" below.
* `to` (required) – Patterns for the elements used by the `from` elements in this constraint. This is an array of strings, each one representing a file path pattern. The pattern can contain globs or regular expressions. See "Perspective Constraints Declaration" and "Wildcards" below.
* `message` (optional, or stand-alone) – Issue message specific for this constraint if used together with `from` and `to`, or global issue message if used stand-alone. See "Custom Issue Messages" below.
* `relation` (optional) – Indicates whether this is a constraint that allows or denies the access from `from` to `to` elements. Possible values are `deny` and `exclusive-allow`. The constraint type defaults to `deny` if this property is not specified. See "Constraint Types" below.
**TOP-LEVEL-CONSTRAINT**
* `from` (required) – Patterns for the elements that use the `to` elements in this constraint. This is an array of strings, each one representing a file path pattern. The pattern can contain globs or regular expressions. See "File path and name pattern" and "Wildcards" below.
* `to` (required) – Patterns for the elements used by the `from` elements in this constraint. This is an array of strings, each one representing a file path pattern. The pattern can contain globs or regular expressions. See "File path and name pattern" and "Wildcards" below.
* `message` (optional, or stand-alone) – Issue message specific for this constraint if used together with `from` and `to`, or global issue message if used stand-alone. See "Custom issue messages" below.
* `relation` (optional) – Indicates whether this is a constraint that allows or denies the access from `from` to `to` elements. Possible values are `deny` and `exclusive-allow`. The constraint type defaults to `deny` if this property is not specified. See "Constraint Types" below.
#### JSON schema
When working on an architecture configuration file in the IDE or text editor of your choice, we recommend using the following JSON Schema. It provides validation and autocompletion features, thereby reducing the risk of errors in your configuration.
{% file src="" %}
### Groups and Perspectives
#### Declaration
The architecture configuration file can model the different views on the codebase using *Groups* and *Perspectives*. While a perspective represents a specific view, it consists of several groups that represent structural units within that perspective. Perspectives can overlap, include the entire codebase, or comprise just a subset of it. This means that an individual code element can be covered by one or many perspectives, or by no perspective at all.
Under the array property `perspectives`, you can specify one or many perspectives. A perspective has the following properties:
* `label` (required) – Unique identifier for the perspective, which can contain any character except `/`.
* `description` (optional) – Provides more information about the perspective in human-readable form.
* `groups` (optional) – A perspective can declare one or many groups. These are the structural elements that make up the perspective. While the property is optional, a perspective without groups would usually be useless.
Within the `groups` property of a perspective or group, you can specify one or many groups. A group has the following properties:
* `label` (required) – Unique identifier for the group within its parent group or perspective. It can contain any character except `/`.
* `description` (optional) – Provides more information about the group in human-readable form.
* `patterns` (required) – Specifies the code elements that are contained in the group in the same way as patterns are used in Constraints. See the "Constraints" section below for more information.
* `groups` (optional) – A group can declare one or many subgroups, allowing for the nested declaration of groups.
The following example models the architectural layers of a codebase:
```css-79elbk
{
"perspectives": [
{
"label": "Layers",
"description": "Application Layers",
"groups": [
{
"label": "UI Layer",
"patterns": ["src/*/com/example/ui/**"]
},
{
"label": "Service Layer",
"patterns": ["src/*/com/example/services/**"]
},
{
"label": "Data Layer",
"patterns": [
"src/*/com/example/repos/**",
"src/*/com/example/dtos/**"
]
}
]
}
]
}
```
#### Multiple perspectives
The following example adds a *Modules* perspective (which is an orthogonal view to the layers perspective) and a *Main/Test* perspective to the previous example. Each of the perspectives covers the entire codebase.
```css-79elbk
{
"perspectives": [
{
"label": "Layers",
"description": "Application Layers",
"groups": [
{
"label": "UI Layer",
"patterns": ["src/*/com/example/ui/**"]
},
{
"label": "Service Layer",
"patterns": ["src/*/com/example/services/**"]
},
{
"label": "Data Layer",
"patterns": [
"src/*/com/example/repos/**",
"src/*/com/example/dtos/**"
]
}
]
},
{
"label": "Modules",
"description": "Application Functional Units",
"groups": [
{
"label": "Customers",
"patterns": ["src/*/com/example/*/customers/**"]
},
{
"label": "Products",
"patterns": ["src/*/com/example/*/products/**"]
},
{
"label": "Events",
"patterns": ["src/*/com/example/*/events/**"]
}
]
},
{
"label": "Main/Test",
"description": "Main and Test Code",
"groups": [
{
"label": "Main",
"description": "Main Code",
"patterns": ["src/main/**"]
},
{
"label": "Test",
"description": "Test Code",
"patterns": ["src/test/**"]
}
]
}
]
```
### Nested groups
#### Declaration
Groups can declare subgroups, which have the same features as top-level groups. This allows for defining architectures with multiple structural levels, rather than just flat architectures. The following example declares a perspective that distinguishes between modules on the first level and main/test code on the second.
```css-79elbk
{
"perspectives": [
{
"label": "Modules",
"groups": [
{
"label": "Customers",
"patterns": ["src/*/com/example/*/customers/**"],
"groups": [
{
"label": "Main",
"patterns": ["src/main/**"]
},
{
"label": "Test",
"patterns": ["src/test/**"]
}
]
},
{
"label": "Products",
"patterns": ["src/*/com/example/*/products/**"],
"groups": [
{
"label": "Main",
"patterns": ["src/main/**"]
},
{
"label": "Test",
"patterns": ["src/test/**"]
}
]
},
{
"label": "Events",
"patterns": ["src/*/com/example/*/events/**"],
"groups": [
{
"label": "Main",
"patterns": ["src/main/**"]
},
{
"label": "Test",
"patterns": ["src/test/**"]
}
]
}
]
}
]
}
```
#### Label reuse
A group label must be unique within its parent group or perspective. Outside the enclosing declaration, it can be reused. This is demonstrated in the above example, where the labels `Main` and `Test` are being reused multiple times.
#### Patterns intersection
For an element to be covered by a subgroup, it must not only match the patterns of that group, but the patterns of its parent groups as well. Formally, the matcher algorithm traverses up the path from a subgroup through all its parent groups, and a code element is considered a path of the subgroup only if it matches all the patterns along that path.
This simplifies the usage of subgroup patterns, because you do not need to specify the intersection pattern explicitly. Take this excerpt from the above example:
```css-79elbk
{
"perspectives": [
{
"label": "Modules",
"groups": [
{
"label": "Customers",
"patterns": ["src/*/com/example/*/customers/**"],
...
"groups": [
{
"label": "Main",
"patterns": ["src/main/**"]
}
]
},
...
]
}
]
}
```
An element will only be part of the subgroup `Main` in group `Modules` if it is located under `src/main/com/example/customers/"`. However, we don’t need to be that specific. To declare the pattern `src/main/*`is sufficient to achieve the same effect. This is a trivial example, but note that patterns can become arbitrarily complex.
### Constraints
#### Top-Level Constraints Declaration
Top-level constraints define which files and folders are allowed or denied access to each other. A constraint is made up of two required properties `from` and `to` that declare from which file or name pattern to which file or name pattern the constraint is applied. By default, constraints are *deny constraints*, which means that elements matching the `from` pattern are not allowed to use elements matching the `to` pattern in any way, such as importing them, or using classes or members from them.
The example configuration file in JSON format below shows the declaration of a simple top-level constraint:
```css-79elbk
{
"constraints": [
{
"from": ["com/example/ui/**"],
"to": [
"com/example/repos/**",
"com/example/dtos/**"
]
}
]
}
```
The YAML equivalent looks like this:
```css-79elbk
constraints:
- from:
- "com/example/ui/**"
to:
- "com/example/repos/**"
- "com/example/dtos/**"
```
The declared constraint prevents any source code element located under the path:
```css-79elbk
com/example/ui
```
from using any source code element located under the paths:
```css-79elbk
com/example/repos
com/example/dtos
```
The following example declares two top-level constraints:
```css-79elbk
{
"constraints": [
{
"from": ["com/example/ui/**"],
"to": [
"com/example/repos/**",
"com/example/dtos/**"
]
},
{
"from": ["com/example/services/**"],
"to": ["com/example/dtos/**"]
}
]
}
```
#### Perspective Constraints Declaration
Perspective constraints work like top-level constraints in all aspects, except for the patterns used in the `from` and `to` properties. Instead of locating source code elements by file path or fully qualified name (see the "File path and name pattern" section below for more information), perspective constraints use paths to groups or subgroups within the declared groups. For example, if a top-level group `Customer` contains a subgroup `UI`, which contains a subgroup `Test`, then `Customer/UI/Test` is the path to that subgroup.
Perspective constraints are applied between groups and subgroups, not individual files. Wildcards are still supported in perspective constraints, allowing for flexible pattern matching. For instance, the pattern `*/UI/Test` selects the subgroup `Test` in the subgroup `UI` contained in any top-level group.
The following example adds a constraint to the example from the "Declaration" section below that forbids access from main code to test code for the top level group `Customers`:
```css-79elbk
{
"perspectives": [
{
...
"constraints": [
{
"from": ["Customers/Main"],
"to": ["Customers/Test"]
}
]
}
]
}
```
The following example adds a constraint that forbids access from main code to test code for all top level groups:
```css-79elbk
{
"perspectives": [
{
...
"constraints": [
{
"from": ["*/Main"],
"to": ["*/Test"]
}
]
}
]
}
```
#### Constraint Types
The constraint type can be specified with the `relation` property. There are two types of constraints:
* `deny` - Access to the `to` elements by any of the `from` elements is denied.
* `exclusive-allow` - Access to the `to` elements is allowed only by the `from` elements, by the `to` elements themselves, and no others.
If not declared, the constraint type defaults to `deny`.
The following example states that elements in `com/example/dtos` can only be used by themselves and by elements in and `com/example/repos`.
```css-79elbk
{
"constraints": [
{
"from": ["com/example/repos/**"],
"to": ["com/example/dtos/**"],
"relation": "exclusive-allow"
}
]
}
```
#### Custom Issue Messages
By default, constraint violations are reported in a generic form:
*$from should not reference $to due to architectural constraints.*
Here, `$from` and `$to` represent the patterns of the constraint being violated.
To provide more context, architects can define custom issue messages. These messages help developers understand which constraint was violated and the rationale behind it, thereby enhancing their comprehension of the architecture and design principles of the codebase.
**Global issue messages**
Custom issue messages can be declared *globally*, applying to a group of constraints, or *locally* for a specific constraint. A global issue message is declared in place of a constraint, like in the following example:
```css-79elbk
{
"constraints": [
{
"message": "Lower application layers should not depend on higher ones"
}, {
"from": ["com/example/dtos/**"],
"to": ["com/example/repos/**"]
}, {
"from": ["com/example/repos/**"],
"to": ["com/example/services/**"]
}
]
}
```
This message applies to all subsequent constraints – unless overridden by a constraint-specific message – until the next message is declared. In the following example shows two different messages applied to subsequent constraints:
```css-79elbk
{
"constraints": [
{
"message": "Lower application layers should not depend on higher ones"
}, {
"from": ["com/example/dtos/**"],
"to": ["com/example/repos/**"]
}, {
"from": ["com/example/repos/**"],
"to": ["com/example/services/**"]
}, {
"message": "These modules should not depend on each other"
}, {
"from": ["com/example/*/Customers"],
"to": ["com/example/*/Products"]
},
...
]
}
```
**Resetting the global message**
To reset the global issue message and revert to the default format:
*$from should not reference $to due to architectural constraints.*
Specify an empty message string. In this example, the custom message applies only to the first two constraints, while the ongoing constraints revert to the default message:
```css-79elbk
{
"constraints": [
{
"message": "Lower application layers should not depend on higher ones"
}, {
"from": ["com/example/dtos/**"],
"to": ["com/example/repos/**"]
}, {
"from": ["com/example/repos/**"],
"to": ["com/example/services/**"]
}, {
"message": ""
}, {
"from": ["com/example/*/Customers"],
"to": ["com/example/*/Products"]
},
...
]
}
```
**Using "from" and "to" pattern in custom issue messages**
Custom issue messages can incorporate the `$from` and `$to` pattern, similar to the default message:
*$from should not reference $to due to architectural constraints.*
This allows for dynamic insertion of the constraints pattern being violated, as demonstrated in the following example:
```css-79elbk
{
"constraints": [
{
"message": "$from module should not depend on $to module"
}, {
"from": ["com/example/*/Customers"],
"to": ["com/example/*/Products"]
},
...
]
}
```
**Constraint-specific issue messages**
Constraint-specific issue messages override global ones. They are declared as a property of the respective constraint, such as in the following example:
```css-79elbk
{
"constraints": [
{
"message": "Lower application layers should not depend on higher ones"
}, {
"message": "DTOs must not depend on data repositories",
"from": ["com/example/dtos/**"],
"to": ["com/example/repos/**"]
}, {
"from": ["com/example/repos/**"],
"to": ["com/example/services/**"]
}
]
}
```
#### Exceptions from Constraints
If not regulated by a constraint, which means that there is no constraint whose `from` and `to` pattern matches the elements, then the access between two elements is allowed. If multiple constraints match, they are applied in the order in which they appear in the configuration file to determine the accessibility between elements. This allows to specify an exception for a deny-constraint or allow-constraint.
In the following example, elements from `com/example/ui` cannot access elements from `com/example/repos`, except if they are located in `com/example/ui/internal`.
```css-79elbk
{
"constraints": [
{
"from": ["com/example/ui/**"],
"to": ["com/example/repos/**"],
"relation": "deny"
},
{
"from": ["com/example/ui/internal/**"],
"to": ["com/example/repos/**"],
"relation": "exclusive-allow"
}
]
}
```
#### File path and name pattern
Currently, constraints can only use file-path patterns. They provide a language-agnostic method to locate source code elements in the file system.
Future versions of the configuration schema will also support fully qualified name patterns. These are more natural to the developer of a language, but they are not language agnostic, as different languages have different concepts for their visibility scopes. For example, in Java, the scope of the package `foo.bar` is not a subscope of the package `foo`, whereas in C#, the namespace `foo.bar` is a subscope of `foo`.
Consider the following example of a constraints declaration for a Java project. This is an invalid example as the constraint patterns use fully qualified names, not file paths. The resulting constraint would never match.
```css-79elbk
{
"constraints": [
{
"from": ["com.example.ui.*"],
"to": ["com.example.repos.*"]
}
]
}
```
#### Wildcards
Constraint patterns can contain wildcards. Both glob patterns and regular expressions are supported.
**Globs**
[Globs](https://en.wikipedia.org/wiki/Glob_\(programming\)) are less powerful than regular expressions but are sufficient for most scenarios and are easier to use. By default, all patterns in the architecture configuration file are globs, while regular expressions are identified by a special marker.
Glob patterns in the architecture configuration file support the following features:
* `?` - Any single character
* `*` - Any sequence of zero or more characters that does not cross path separator boundaries
* `**` - Any sequence of zero or more characters that can cross path separator boundaries
* `[abc]` - Any of the characters `a`, `b`, `c`
* `[^abc]` - Any character except `a`, `b`, `c`
The path separator depends on the path type. For file paths, the separator is `/`, meaning that `foo/*/baz` matches `foo/bar/baz` but not `foo/baz` or `foo/bar/bas/baz`. For Java namespace paths, the separator is `.`, although currently only file paths are supported (see "File path and name pattern" above).
The following example prevents any `.java` file that doesn’t start with letter `X`, located under any `ui` folder from using any element located under any `repos` folder:
```css-79elbk
{
"constraints": [
{
"from": ["**/ui/**/[^X]*.java"],
"to": ["**/repos/**"]
}
]
}
```
**Regular Expressions**
Patterns that start with `^` and end with `$` are interpreted as regular expressions. They support all features of [Java Regular Expressions](https://docs.oracle.com/en/java/javase/21/docs/api/java.base/java/util/regex/Pattern.html). The following example is equivalent to the above, but used regular expression patterns instead of globs:
```css-79elbk
{
"constraints": [
{
"from": ["^.*/ui/.*/[^X][^/]*.java$"],
"to": ["^.*/repos/.*$"]
}
]
}
```
### Disabling the architecture analysis
To disable architecture analysis, set the `-Dsonar.architecture.enable` property to `false` .
---
# Source: https://docs.sonarsource.com/sonarqube-community-build/analyzing-source-code/scanners/npm/configuring.md
# Source: https://docs.sonarsource.com/sonarqube-community-build/analyzing-source-code/scanners/dotnet/configuring.md
# Source: https://docs.sonarsource.com/sonarqube-server/10.7/analyzing-source-code/scanners/npm/configuring.md
# Source: https://docs.sonarsource.com/sonarqube-server/10.7/analyzing-source-code/scanners/dotnet/configuring.md
# Source: https://docs.sonarsource.com/sonarqube-server/10.8/analyzing-source-code/scanners/npm/configuring.md
# Source: https://docs.sonarsource.com/sonarqube-server/10.8/analyzing-source-code/scanners/dotnet/configuring.md
# Source: https://docs.sonarsource.com/sonarqube-server/2025.2/analyzing-source-code/scanners/npm/configuring.md
# Source: https://docs.sonarsource.com/sonarqube-server/2025.2/analyzing-source-code/scanners/dotnet/configuring.md
# Source: https://docs.sonarsource.com/sonarqube-server/2025.3/analyzing-source-code/scanners/npm/configuring.md
# Source: https://docs.sonarsource.com/sonarqube-server/2025.3/analyzing-source-code/scanners/dotnet/configuring.md
# Source: https://docs.sonarsource.com/sonarqube-server/2025.5/analyzing-source-code/scanners/npm/configuring.md
# Source: https://docs.sonarsource.com/sonarqube-server/2025.5/analyzing-source-code/scanners/dotnet/configuring.md
# Source: https://docs.sonarsource.com/sonarqube-server/2025.1/analyzing-source-code/scanners/npm/configuring.md
# Source: https://docs.sonarsource.com/sonarqube-server/2025.1/analyzing-source-code/scanners/dotnet/configuring.md
# Source: https://docs.sonarsource.com/sonarqube-server/2025.4/analyzing-source-code/scanners/npm/configuring.md
# Source: https://docs.sonarsource.com/sonarqube-server/2025.4/analyzing-source-code/scanners/dotnet/configuring.md
# Source: https://docs.sonarsource.com/sonarqube-server/2025.6/analyzing-source-code/scanners/npm/configuring.md
# Source: https://docs.sonarsource.com/sonarqube-server/2025.6/analyzing-source-code/scanners/dotnet/configuring.md
# Source: https://docs.sonarsource.com/sonarqube-server/analyzing-source-code/scanners/npm/configuring.md
# Source: https://docs.sonarsource.com/sonarqube-server/analyzing-source-code/scanners/dotnet/configuring.md
# Source: https://docs.sonarsource.com/sonarqube-cloud/advanced-setup/ci-based-analysis/sonarscanner-for-npm/configuring.md
# Source: https://docs.sonarsource.com/sonarqube-cloud/advanced-setup/ci-based-analysis/sonarscanner-for-dotnet/configuring.md
# Configuring the scanner
### Code Coverage
In an Azure DevOps / TFS environment, test files are automatically retrieved as follows:
* A search is done for *.trx* files in any `TestResults` folder located under `$Build.SourcesDirectory`.
* If no .trx files are found there, then a fallback search is performed under `$Agent.TempDirectory`.
Once the *.trx* files have been found, their *.coverage* counterparts are retrieved and converted to *.coveragexml* files for upload to SonarQube Cloud.
As stated above, this will work only with the .NET Framework version of the scanner.
See the[dotnet-test-coverage](https://docs.sonarsource.com/sonarqube-cloud/enriching/test-coverage/dotnet-test-coverage "mention") page for more information.
### Excluding projects from analysis
Some project types, such as [Microsoft Fakes](https://msdn.microsoft.com/en-us/library/hh549175.aspx), are automatically excluded from the analysis. To manually exclude a different type of project from the analysis, place the following in its *.csproj* / *.vbproj* file.
```xml
true
```
### Advanced topics
**Analyzing MSBuild 12, 14, and 15 projects with MSBuild 16**
The Sonar Scanner for .NET requires your project to be built with MSBuild 16. We recommend installing Visual Studio 2017 or later on the analysis machine in order to benefit from the integration and features provided with the Visual Studio ecosystem (VSTest, MSTest unit tests, etc.).
Projects targeting older versions of the .NET Framework can be built using MSBuild 16 by setting the "TargetFrameworkVersion" MSBuild property as documented by Microsoft:
* [How to: Target a Version of the .NET Framework](https://msdn.microsoft.com/en-us/library/bb398202.aspx)
* [MSBuild Target Framework and Target Platform](https://msdn.microsoft.com/en-us/library/hh264221.aspx)
For example, if you want to build a .NET 3.5 project, but you are using a newer MSBuild version:
```bash
MSBuild.exe /t:Rebuild /p:TargetFramework=net35
```
If you do not want to switch your production build to MSBuild 16, you can set up a separate build dedicated to the SonarQube Cloud analysis.
**Detection of test projects**
You can read a full description of that subject on our wiki [here](https://github.com/SonarSource/sonar-scanner-msbuild/wiki/Analysis-of-product-projects-vs.-test-projects).
**Per-project analysis parameters**
Some analysis parameters can be set for a single MSBuild project by adding them to its *.csproj* file.
```xml
$(MSBuildProjectFullPath)
```
#### Analyzing languages other than C# and VB
For newer SDK-style projects (used by .NET Core, .NET 5, and later), the SonarScanner for .NET will analyze all file types supported by the available language plugins unless explicitly excluded.
If you have an `esproj` project type, make sure to use [Microsoft.VisualStudio.JavaScript.SDK](https://www.nuget.org/packages/Microsoft.VisualStudio.JavaScript.SDK) version 0.5.74-alpha or later to ensure the SonarScanner for .NET recognizes the esproj contents for scanning.
For older-style projects, the scanner will only analyze files listed in the *.csproj* or *.vbproj* project file. Usually, this means that only C# and VB files will be analyzed. To enable the analysis of other types of files, include them in the project file.
Even if you disable multi-file analysis (see below), any files included by an element of the `ItemTypes` in [this list](https://github.com/SonarSource/sonar-scanner-msbuild/blob/5.14.0.78575/src/SonarScanner.MSBuild.Tasks/Targets/SonarQube.Integration.targets#L109) will be analyzed automatically. For example, the following line in your *.csproj* or *.vbproj* file will enable the analysis of all JavaScript files in the directory foobecause the content is one of the `ItemTypes` that are automatically analyzed.
```xml
```
Additionally, `` and `` attributes in .NET project files (either .csproj or .vbproj) work differently depending on the file type and if the `sonar.scanner.scanAll` property (the multi-language analysis feature) is enabled or not.
* C# and VB.NET files will not be analyzed since they are not part of the compilation, and therefore the Roslyn analyzers will not run on them.
* When the multi-language analysis feature is enabled, additional language file types (such as JavaScript, TypeScript, SQL, etc.) are added to the scope and will be analyzed. To ignore specific language file types, we recommend that you use the `sonar.exclusions` property. See the [#multi-language-analysis](#multi-language-analysis "mention") article (below) for a list of file types automatically picked up by the scanner.
You can also add `ItemTypes` to the default list by following [these directions](https://github.com/SonarSource/sonar-scanner-msbuild/blob/5.14.0.78575/src/SonarScanner.MSBuild.Tasks/Targets/SonarQube.Integration.targets#L70).
You can check which files the scanner will analyze by looking in the file *.sonarqube-project.properties* after MSBuild has finished.
File type extensions can be manually excluded from the analysis using `sonar.exclusions`. See the [introduction](https://docs.sonarsource.com/sonarqube-cloud/managing-your-projects/project-analysis/setting-analysis-scope/introduction "mention") to setting the analysis scope of your project for guidance.
#### Using SonarScanner for .NET with a proxy
On build machines that connect to the Internet through a proxy server you might experience difficulties connecting to SonarQube Server. To instruct the Java VM to use specific proxy settings use the following value:
```bash
SONAR_SCANNER_OPTS = "-Dhttp.proxyHost=yourProxyHost -Dhttp.proxyPort=yourProxyPort"
```
Where *yourProxyHost* and *yourProxyPort* are the hostname and the port of your proxy server. There are additional proxy settings for HTTPS, authentication, and exclusions that could be passed to the Java VM. For more information, see the following article: .
You also need to set the appropriate proxy environment variables used by .NET. `HTTP_PROXY`, `HTTPS_PROXY`, `ALL_PROXY`, and `NO_PROXY` are all supported. You can find more details [here](https://docs.microsoft.com/en-us/dotnet/api/system.net.http.httpclient.defaultproxy?view=net-5.0).
{% hint style="info" %}
Proxy environment variables do not work with the .NET Framework variant of SonarScanner for .NET at this time.
{% endhint %}
#### **Multi-language analysis**
The SonarScanner for .NET (starting from v8.0) automatically analyzes file types for select languages when the `sonar.scanner.scanAll` parameter is enabled. These file types are automatically picked up by the scanner:
Introduced in the SonarScanner for .NET v8.0:
* Ansible (.yaml)
* CloudFormation (.yaml)
* CSS (.css, .less, .scss, .sass)
* Helm (.yaml)
* HTML (.html, .xhtml, .cshtml, .vbhtml, .aspx, .ascx, .rhtml, .erb,.shtm, .shtml,.cmp, .twig)
* Javascript (.js, .jsx, .cjs, .mjs, .vue). See the [javascript-typescript-test-coverage](https://docs.sonarsource.com/sonarqube-cloud/enriching/test-coverage/javascript-typescript-test-coverage "mention") page for details to adjust your setup.
* JSON (.json)
* Kubernetes (.yaml)
* PLSQL (.sql, .pks, .pkb)
* SQL (.tsql)
* TypeScript (.ts, .tsx, .cts, .mts). See the [javascript-typescript-test-coverage](https://docs.sonarsource.com/sonarqube-cloud/enriching/test-coverage/javascript-typescript-test-coverage "mention") page for details to adjust your setup.
Introduced in the SonarScanner for .NET v10.0:
* AzureResourceManager (.bicep)
* Docker (Dockerfile, \*.dockerfile, \*.Dockerfile, Dockerfile.\*)
* Go (.go)
* Java Config files (\*app\*.properties, \*app\*.yaml, \*app\*.yml)
* PHP (.php, .php3, .php4, .php5, .phtml, .inc)
* Python (.py, .ipynb), including Jupyter Notebooks
* Secrets (\*.sh, \*.bash, \*.zsh, \*.ksh, \*.ps1, \*.properties, \*.conf, \*.pem, \*.config, .env, config)
* Terraform (.tf)
File type extensions can be found and configured in the SonarQube Cloud UI; see the [excluding-based-on-file-extension](https://docs.sonarsource.com/sonarqube-cloud/managing-your-projects/project-analysis/setting-analysis-scope/excluding-based-on-file-extension "mention") page for more details. Additionally, you can also use path-matching patterns; see the [excluding-files-based-on-patterns](https://docs.sonarsource.com/sonarqube-cloud/managing-your-projects/project-analysis/setting-analysis-scope/excluding-files-based-on-patterns "mention") page for this information.
Unless manually excluded, the files linked by the *.csproj* project file will be analyzed even if the value is false.
{% hint style="info" %}
Multi-Language analysis is enabled by default. If this was not intended and you have issues such as hitting your LOC limit or analyzing unwanted files, you can set `/d:sonar.scanner.scanAll=false` in the Begin step to *turn off multi-language analysis*.
If you're using an Azure pipeline, you can add `sonar.scanner.scanAll=false` to the `extraProperties` in your [#prepare-analysis-configuration](https://docs.sonarsource.com/sonarqube-cloud/advanced-setup/azure-pipelines/sonarqube-tasks#prepare-analysis-configuration "mention").
{% endhint %}
### Known issues
**I have multiple builds in the same pipeline, each of them getting analyzed even if the Run Code Analysis has already been executed:**
The scanner doesn’t uninstall the global `ImportBefore` targets to support concurrent analyses on the same machine. The main effect is that if you build a solution where a .sonarqube folder is located nearby, then the `sonar-dotnet` analyzer will be executed along with your build task.
To avoid that, you can disable the targets file by adding a build parameter:
```bash
msbuild /p:SonarQubeTargetsImported=true
dotnet build -p:SonarQubeTargetsImported=true
```
**Excluding files in certain directories**
[It is known](https://github.com/SonarSource/sonar-dotnet/issues/6328) that the SonarScanner for .NET can’t filter the excluded files/folders from the analysis, which happens during the build. The `sonar.exclusions` property is only used to filter issues sent to SonarQube Cloud during the final step.
As a workaround, you can try to add an *.editorconfig* file in the folder to override the severity of the Sonar rules:
```ini
[*.cs]
dotnet_diagnostic.S1118.severity = none
```
Unfortunately, you may have to manually do this for every rule.
### Related pages
* [introduction](https://docs.sonarsource.com/sonarqube-cloud/advanced-setup/ci-based-analysis/sonarscanner-for-dotnet/introduction "mention")
* [installing](https://docs.sonarsource.com/sonarqube-cloud/advanced-setup/ci-based-analysis/sonarscanner-for-dotnet/installing "mention")
* [using](https://docs.sonarsource.com/sonarqube-cloud/advanced-setup/ci-based-analysis/sonarscanner-for-dotnet/using "mention")
---
# Source: https://docs.sonarsource.com/sonarqube-for-eclipse/connect-your-ide.md
# Source: https://docs.sonarsource.com/sonarqube-for-visual-studio/connect-your-ide.md
# Source: https://docs.sonarsource.com/sonarqube-for-intellij/connect-your-ide.md
# Source: https://docs.sonarsource.com/sonarqube-for-vs-code/connect-your-ide.md
# Connect your IDE
{% content-ref url="connect-your-ide/connected-mode" %}
[connected-mode](https://docs.sonarsource.com/sonarqube-for-vs-code/connect-your-ide/connected-mode)
{% endcontent-ref %}
{% content-ref url="connect-your-ide/setup" %}
[setup](https://docs.sonarsource.com/sonarqube-for-vs-code/connect-your-ide/setup)
{% endcontent-ref %}
{% content-ref url="connect-your-ide/advanced-configuration" %}
[advanced-configuration](https://docs.sonarsource.com/sonarqube-for-vs-code/connect-your-ide/advanced-configuration)
{% endcontent-ref %}
---
# Source: https://docs.sonarsource.com/sonarqube-community-build/user-guide/connected-mode.md
# Source: https://docs.sonarsource.com/sonarqube-for-eclipse/connect-your-ide/connected-mode.md
# Source: https://docs.sonarsource.com/sonarqube-for-visual-studio/connect-your-ide/connected-mode.md
# Source: https://docs.sonarsource.com/sonarqube-for-intellij/connect-your-ide/connected-mode.md
# Source: https://docs.sonarsource.com/sonarqube-for-vs-code/connect-your-ide/connected-mode.md
# Source: https://docs.sonarsource.com/sonarqube-server/2025.2/user-guide/connected-mode.md
# Source: https://docs.sonarsource.com/sonarqube-server/2025.3/user-guide/connected-mode.md
# Source: https://docs.sonarsource.com/sonarqube-server/2025.5/user-guide/connected-mode.md
# Source: https://docs.sonarsource.com/sonarqube-server/2025.1/user-guide/connected-mode.md
# Source: https://docs.sonarsource.com/sonarqube-server/2025.4/user-guide/connected-mode.md
# Source: https://docs.sonarsource.com/sonarqube-server/2025.6/user-guide/connected-mode.md
# Source: https://docs.sonarsource.com/sonarqube-server/user-guide/connected-mode.md
# Source: https://docs.sonarsource.com/sonarqube-cloud/improving/connected-mode.md
# SonarQube for IDE
Connected mode binds your SonarQube Cloud project to a local project so that automated code review can catch issues immediately, right in the IDE, before you even commit them.
[SonarQube for IDE](https://www.sonarsource.com/products/sonarlint/) is a free IDE extension that integrates with SonarQube (Server, Cloud) using connected mode. Like a spell checker, automated code review highlights issues as you type. When an issue is identified, SonarQube for IDE provides you with clear remediation guidance so you can fix it before the code is even committed. In many cases, it also provides a *quick fix* that can automatically fix the issue for you.
### Supported IDEs
{% tabs %}
{% tab title="VS CODE" %}
SonarQube for VS Code will automatically identify and fix quality and security issues as you code with enhanced linting capabilities directly in your VS Code IDE. SonarQube for VS Code works with most VS Code forks including Cursor, Windsurf, Trae, and more.
* [Feature overview](https://www.sonarsource.com/products/sonarlint/features/vs-code/)
* [Installation](https://app.gitbook.com/s/6LPRABg3ubAJhpfR5K0Y/getting-started/installation "mention") instructions
* Supported [Rules and languages](https://app.gitbook.com/s/6LPRABg3ubAJhpfR5K0Y/using/rules "mention")
* [Connected mode setup](https://docs.sonarsource.com/sonarqube-for-vs-code/connect-your-ide/setup) and list of [Connected mode](https://docs.sonarsource.com/sonarqube-for-vs-code/connect-your-ide/connected-mode) benefits.
* [Download](https://marketplace.visualstudio.com/items?itemName=SonarSource.sonarlint-vscode)
{% endtab %}
{% tab title="INTELLIJ" %}
SonarQube for IDE integrates with most JetBrains IDEs including IntelliJ IDEA, CLion, GoLand, WebStorm, PHPStorm, PyCharm, Rider, Android Studio & RubyMine.
* [Feature overview](https://www.sonarsource.com/products/sonarlint/features/jetbrains/)
* [Installation](https://app.gitbook.com/s/NvI4wotPmITyM0mnsmtp/getting-started/installation "mention") instructions
* Supported [Rules and languages](https://app.gitbook.com/s/NvI4wotPmITyM0mnsmtp/using/rules "mention")
* [Connected mode setup](https://docs.sonarsource.com/sonarqube-for-intellij/connect-your-ide/setup) and list of [Connected mode](https://docs.sonarsource.com/sonarqube-for-intellij/connect-your-ide/connected-mode) benefits.
* [Download](https://plugins.jetbrains.com/plugin/7973-sonarlint)
{% endtab %}
{% tab title="VISUAL STUDIO" %}
SonarQube for IDE provides Visual Studio developers with a comprehensive in-IDE solution for improving the quality and security of the code they deliver.
* [Feature overview](https://www.sonarsource.com/products/sonarlint/features/visual-studio/)
* [Installation](https://app.gitbook.com/s/5CSDwdOaYoOAGYNiRqgl/getting-started/installation "mention") instructions
* Supported [Rules and languages](https://app.gitbook.com/s/5CSDwdOaYoOAGYNiRqgl/using/rules "mention")
* [Connected mode setup](https://docs.sonarsource.com/sonarqube-for-visual-studio/connect-your-ide/setup) and list of [Connected mode](https://docs.sonarsource.com/sonarqube-for-visual-studio/connect-your-ide/connected-mode) benefits.
* Downloads for:
* [VS-2022](https://marketplace.visualstudio.com/items?itemName=SonarSource.SonarLintforVisualStudio2022)
* [VS-2019](https://marketplace.visualstudio.com/items?itemName=SonarSource.SonarLintforVisualStudio2019) (no longer suppoerted)
* [VS-2017](https://marketplace.visualstudio.com/items?itemName=SonarSource.SonarLintforVisualStudio2017) (no longer suppoerted)
{% endtab %}
{% tab title="ECLIPSE" %}
SonarQube for Eclipse will automatically identify and fix quality and security issues as you code with enhanced linting capabilities right in your Eclipse IDE.
* [Feature overview](https://www.sonarsource.com/products/sonarlint/features/eclipse/)
* [Installation](https://app.gitbook.com/s/kadXEH8HkykK7lKaDvVq/getting-started/installation "mention") instructions
* Supported [Rules and languages](https://app.gitbook.com/s/kadXEH8HkykK7lKaDvVq/using/rules "mention")
* [Connected mode setup](https://docs.sonarsource.com/sonarqube-for-eclipse/connect-your-ide/setup) and list of [Connected mode](https://docs.sonarsource.com/sonarqube-for-eclipse/connect-your-ide/connected-mode) benefits.
* [Download](https://marketplace.eclipse.org/content/sonarlint)
{% endtab %}
{% endtabs %}
The supported languages vary by IDE. Check the Rules page for your IDE to learn which languages are supported out-of-the-box and which require the use of connected mode.
Though SonarQube for IDE can run local analyses in standalone mode, we highly recommend that you set up connected mode with SonarQube (Server, Cloud) or SonarQube Community Build. Running SonarQube Cloud and SonarQube for IDE in connected mode provides additional [valuable features](https://www.sonarsource.com/products/sonarlint/features/connected-mode/).
### Connected mode benefits
* When combining SonarQube for IDE-supported rules with Sonar Cloud's [overview](https://docs.sonarsource.com/sonarqube-cloud/advanced-setup/languages/overview "mention"), you can analyze more languages and detect more issues.
* Highlight advanced issues (in the IDE) like injection vulnerabilities, detected by SonarQube Cloud. See [security-related-rules](https://docs.sonarsource.com/sonarqube-cloud/digging-deeper/security-related-rules "mention") for more information.
* Use the same quality profile locally as is defined on SonarQube Cloud. See the [managing-quality-profiles](https://docs.sonarsource.com/sonarqube-cloud/standards/managing-quality-profiles "mention") pages for more details.
* Apply settings, such as [rules](https://docs.sonarsource.com/sonarqube-cloud/digging-deeper/rules "mention") and file exclusion defined on SonarQube Cloud, to your local analysis. See [introduction](https://docs.sonarsource.com/sonarqube-cloud/managing-your-projects/project-analysis/setting-analysis-scope/introduction "mention") to analysis scope for more information.
* Define specific [analysis-parameters](https://docs.sonarsource.com/sonarqube-cloud/advanced-setup/analysis-parameters "mention") on SonarQube Cloud, and have those parameters applied locally.
* Automatically suppress issues that are marked as Accepted or False Positive on SonarQube Cloud so that locally reported issues match those found on the server. See [introduction](https://docs.sonarsource.com/sonarqube-cloud/managing-your-projects/issues/introduction "mention") to managing code issues for more details.
* Use the SonarQube for IDE focus on new code features to concentrate detection of issues only in new code. See [about-new-code](https://docs.sonarsource.com/sonarqube-cloud/standards/about-new-code "mention") for more information.
* Changes in your SonarQube Cloud [quality-gates](https://docs.sonarsource.com/sonarqube-cloud/improving/quality-gates "mention") will arrive in your IDE when you accept Smart notifications.
#### Using the Open in IDE feature
If you’re using SonarQube for IntelliJ, Visual Studio, VS Code, or Eclipse, the **Open in IDE** button can be used to open most all issues in the code editor, speeding up the time it takes to find and fix your issue. Simply click the **Open in IDE** button from SonarQube Cloud to view it in your IDE; you’ll be prompted to set up connected mode if the project is not already bound.
Opening Security hotspots using the **Open in IDE** feature is available for all of the SonarQube IDEs. See [fixing](https://docs.sonarsource.com/sonarqube-cloud/managing-your-projects/issues/fixing "mention") for more details.
### Reviewing issues in your IDE
Seeing an issue directly in the IDE can help you better understand its context. This is the purpose of the **Open in IDE** button that you’ll see as an authenticated user.
This feature is available if you’re using a compatible version and flavor of SonarQube for IDE. The project must be open in the appropriate IDE and bound to the server through connected mode. To learn more about managing issues locally, please check the SonarQube for IDE documentation for your IDE:
* [Investigating issues](https://app.gitbook.com/s/6LPRABg3ubAJhpfR5K0Y/using/investigating-issues "mention") in SonarQube for VS Code
* [Investigating issues](https://app.gitbook.com/s/NvI4wotPmITyM0mnsmtp/using/investigating-issues "mention") in SonarQube for IntelliJ
* [Investigating issues](https://app.gitbook.com/s/5CSDwdOaYoOAGYNiRqgl/using/investigating-issues "mention") in SonarQube for Visual Studio
* [Investigating issues](https://app.gitbook.com/s/kadXEH8HkykK7lKaDvVq/using/investigating-issues "mention") in SonarQube for Eclipse
Simply open a file of a supported language and start coding, and you will start seeing issues highlighted in your code. For example, here is SonarQube for VSCode:
Keep in mind that the revision or branch analyzed by SonarQube (Server, Cloud) may not be the same as what you have opened in the IDE. In this case, SonarQube for IDE will do its best to locate the issue in your local code.
### Commercial-level rules
There are commercial-level rules available in SonarQube Cloud for all plans. However, these rules will not appear in your IDE unless your SonarQube for IDE is in connected mode.
### Injection vulnerabilities
*Injection vulnerabilities* are also known as *injection flaws* or *taint vulnerabilities*; the names are often used interchangeably (ie: injection flaws, injection vulnerabilities, and taint vulnerabilities). They are issues raised by specific security-related rules in SonarQube Server and SonarQube Cloud and remain a top concern. Common types include [SQL Injection](https://rules.sonarsource.com/java/type/Vulnerability/RSPEC-3649/), [Deserialization](https://rules.sonarsource.com/java/type/Vulnerability/RSPEC-5135/), and [Command Injection](https://rules.sonarsource.com/java/type/Vulnerability/RSPEC-2076/) vulnerabilities.
Injection vulnerabilities are unique issues because of how data and information flow within your application. This flow becomes a problem when a user controls the data input into the application (source), and that data is not validated or sanitized before it is used by sensitive functions (sink). This lack of validation or sanitization is what allows a potential attacker to manipulate the data flow for malicious purposes.
Because injection vulnerabilities (i.e., taint vulnerabilities) often involve code in multiple files and functions, SonarQube for IDE can only raise them after a full project analysis. This is why taint vulnerabilities are pulled from SonarQube Server or SonarQube Cloud after a project analysis.
You can find the definition of injection vulnerabilities in the [glossary](https://docs.sonarsource.com/sonarqube-cloud/appendices/glossary "mention")
Currently, as analyzed by SonarQube Cloud, injection vulnerabilities are only pulled from the project’s main branch.
### Smart notifications
Connected mode allows SonarQube (Server, Cloud) to send smart alerts to individuals or teams when new issues are discovered. With everyone in the loop, issues can be addressed promptly, improving the overall software quality and delivery. You’ll receive smart notifications in your IDE when:
* the [quality-gates](https://docs.sonarsource.com/sonarqube-cloud/improving/quality-gates "mention") status of a project *open in your IDE* changes
* a SonarQube analysis raises new issues that you’ve introduced in a project open in your IDE
Each developer must individually activate or deactivate SonarQube for IDE smart notifications directly in SonarQube for IDE on the IDE side. When setting up connected mode for the first time, there’s a box to check to decide whether or not you want to receive Smart Notifications from SonarQube Cloud in your IDE.
For all the details about managing notifications, check the SonarQube for IDE documentation that matches your IDE:
* [Notifications](https://docs.sonarsource.com/sonarqube-for-vs-code/connect-your-ide/connected-mode#notifications) in SonarQube for VS Code
* [Notifications](https://docs.sonarsource.com/sonarqube-for-intellij/connect-your-ide/connected-mode#notifications) in SonarQube for IntelliJ
* [Notifications](https://docs.sonarsource.com/sonarqube-for-visual-studio/connect-your-ide/connected-mode#notifications) in SonarQube for Visual Studio
* [Notifications](https://docs.sonarsource.com/sonarqube-for-eclipse/connect-your-ide/connect-your-ide/connected-mode#notifications) in SonarQube for Eclipse
### Troubleshooting unexpected analysis results Unexpected analysis results
Observing different analysis results between SonarQube (Server, Cloud) and SonarQube for IDE can have different causes.
**Some issues might be detected by a third-party**
Due to extensive resource requirements, injection vulnerability and some advanced bug detection rules are ignored by SonarQube for IDE. Please check the analyzer (PMD, Checkstyle, ESLint, PyLint, …). SonarQube for IDE will only run [rules from Sonar analyzers](https://rules.sonarsource.com/) including custom rules extending Sonar analyzers. Third-party analyzers usually have their own IDE integration, so we have no plan to run them in SonarQube for IDE.
**Your test files might be mistaken as source files**
Test files can be defined on the server or in the IDE, and when running in connected mode, these test sources will be used by SonarQube for IDE. Each SonarQube for IDE flavor has its own way of detecting which file is considered a test file; in SonarQube for IntelliJ, you must define your test files as a [Test Sources Root](https://www.jetbrains.com/help/idea/testing.html#add-test-root). To define test files on the server, please see the [introduction](https://docs.sonarsource.com/sonarqube-cloud/managing-your-projects/project-analysis/setting-analysis-scope/introduction "mention") page to set the scope of your analysis.
**Some complex rules are not run in SonarQube for IDE**
Due to extensive resource requirements, injection vulnerabilities and some advanced bug detection rules are ignored by SonarQube for IDE. Please check the [SonarQube for IDE roadmap](https://www.sonarsource.com/products/sonarlint/roadmap/) for a list of features and enhancements on the horizon.
**Only line-level issues are reported**
Some rules are able to report issues at the project level. Such issues are not displayed in SonarQube Server for IDE, only in SonarQube Server; see the [security-related-rules](https://docs.sonarsource.com/sonarqube-cloud/digging-deeper/security-related-rules "mention") page for more details.
**When analyzing Java files, the analyzer might need some context for some issues to be found**
In IntelliJ, there is no incremental compilation of the .class files found in the compiler output folder; these are only produced or refreshed when the project is built. The workaround is to simply build your project with the green hammer (when using SonarQube for IntelliJ) in the top-right toolbar. The project should be built on a regular basis to keep the compiled files up-to-date and overcome this [known limitation](https://sonarsource.atlassian.net/browse/SLI-488).
---
# Source: https://docs.sonarsource.com/sonarqube-cloud/administering-sonarcloud/managing-organization/connecting-to-slack.md
# Connecting to Slack
To enable real-time notifications about analysis results in Slack, a Slack workspace administrator must first connect SonarQube Cloud to the workspace: see [setup](https://docs.sonarsource.com/sonarqube-cloud/administering-sonarcloud/managing-organization/connecting-to-slack/setup "mention"). Once this initial setup is complete, users can subscribe to SonarQube Cloud notifications directly within their Slack account: see [subscribing-to-slack-notifications](https://docs.sonarsource.com/sonarqube-cloud/managing-your-account/subscribing-to-slack-notifications "mention").
You may also read the [integration-overview](https://docs.sonarsource.com/sonarqube-cloud/administering-sonarcloud/managing-organization/connecting-to-slack/integration-overview "mention") article for a technical overview of the Slack integration.
---
# Source: https://docs.sonarsource.com/sonarqube-community-build/extension-guide/contributing.md
# Source: https://docs.sonarsource.com/sonarqube-server/8.9/extension-guide/contributing.md
# Source: https://docs.sonarsource.com/sonarqube-server/9.8/extension-guide/contributing.md
# Source: https://docs.sonarsource.com/sonarqube-server/9.9/extension-guide/contributing.md
# Source: https://docs.sonarsource.com/sonarqube-server/10.0/extension-guide/contributing.md
# Source: https://docs.sonarsource.com/sonarqube-server/10.1/extension-guide/contributing.md
# Source: https://docs.sonarsource.com/sonarqube-server/10.2/extension-guide/contributing.md
# Source: https://docs.sonarsource.com/sonarqube-server/10.3/extension-guide/contributing.md
# Source: https://docs.sonarsource.com/sonarqube-server/10.4/extension-guide/contributing.md
# Source: https://docs.sonarsource.com/sonarqube-server/10.5/extension-guide/contributing.md
# Source: https://docs.sonarsource.com/sonarqube-server/10.6/extension-guide/contributing.md
# Source: https://docs.sonarsource.com/sonarqube-server/10.7/extension-guide/contributing.md
# Source: https://docs.sonarsource.com/sonarqube-server/10.8/extension-guide/contributing.md
# Contributing
Please be aware that we are not actively looking for feature contributions to SonarQube Community Build itself because it’s extremely difficult for someone outside Sonar to comply with our roadmap and expectations. Therefore, we typically only accept minor cosmetic changes and typo fixes for SonarQube Community Build, but we do happily welcome contributions to the other open-source projects under the Sonar umbrella.
### General guidelines
* Choose an open ticket in [JIRA](https://jira.sonarsource.com/secure/Dashboard.jspa) or propose your change on the [SonarQube community forum](https://community.sonarsource.com/); the discussion there is likely to result in the opening of a JIRA ticket. ;-)
* Use the Sonar conventions, which you’ll find neatly packaged here: .
* Use pull requests to submit your work.
### New rule implementations in existing plugins
* Start from an existing [RSpec](https://jira.sonarsource.com/browse/RSPEC-1973?filter=10375) (Rule Specification) that lists your language of interest in the **Targeted languages** field.
* If the RSpec you’re interested in doesn’t target the language where you want to implement it, raise the question on the community forums.
* If no RSpec exists for the rule you want to implement, raise the question on the [Community forum](https://community.sonarsource.com/).
* Put your rule implementation class in the \[language]-checks (for example: java-checks, or javascript-checks) module, in the checks sub-package.
* The naming convention for implementation classes is `[A-Z][a-za-z]+Check.java`. (Yes, put `Check` in the name too.) The class name should be descriptive and not reflect the rule key. For example, `FindBadCodeCheck.java`, not `S007.java`.
* A good way to get started on a rule implementation is to look at the implementations of rules that do similar things.
* During development, there’s no need to load the plugin in a server to test your implementation, use the rule’s unit test for that.
* For a complete implementation, make sure all of the following are done:
* create HTML description file and metadata file.
* write test class.
* register the rule in `CheckList.java`.
* add the rule to the profile used for the integration test in `profile.xml`.
* run the integration test and add any new issues to the set of expected issues.
---
# Source: https://docs.sonarsource.com/sonarqube-server/10.7/core-concepts.md
# Source: https://docs.sonarsource.com/sonarqube-server/10.8/core-concepts.md
# Core concepts
{% content-ref url="core-concepts/clean-code" %}
[clean-code](https://docs.sonarsource.com/sonarqube-server/10.8/core-concepts/clean-code)
{% endcontent-ref %}
{% content-ref url="core-concepts/clean-as-you-code" %}
[clean-as-you-code](https://docs.sonarsource.com/sonarqube-server/10.8/core-concepts/clean-as-you-code)
{% endcontent-ref %}
---
# Source: https://docs.sonarsource.com/sonarqube-community-build/quality-standards-administration/managing-quality-profiles/creating-a-quality-profile.md
# Source: https://docs.sonarsource.com/sonarqube-server/2025.3/quality-standards-administration/managing-quality-profiles/creating-a-quality-profile.md
# Source: https://docs.sonarsource.com/sonarqube-server/2025.5/quality-standards-administration/managing-quality-profiles/creating-a-quality-profile.md
# Source: https://docs.sonarsource.com/sonarqube-server/2025.4/quality-standards-administration/managing-quality-profiles/creating-a-quality-profile.md
# Source: https://docs.sonarsource.com/sonarqube-server/2025.6/quality-standards-administration/managing-quality-profiles/creating-a-quality-profile.md
# Source: https://docs.sonarsource.com/sonarqube-server/quality-standards-administration/managing-quality-profiles/creating-a-quality-profile.md
# Source: https://docs.sonarsource.com/sonarqube-cloud/standards/managing-quality-profiles/creating-a-quality-profile.md
# Creating a quality profile
*This feature is only available in the Team and Enterprise plans. See* [subscription-plans](https://docs.sonarsource.com/sonarqube-cloud/administering-sonarcloud/managing-subscription/subscription-plans "mention") *for more information.*
The Sonar way profile is intended as a starting point. In many cases, you will want to adjust your quality profile later.
If you have multiple projects, you might also need to have different profiles for each. You might run into the following situations:
* You have different technical requirements from one project to another.
* You want to ensure stronger requirements for some of your projects than for others.
To create a quality profile, you need the Administer Quality Profiles permission. You can:
* Extend an existing quality profile (duplicate an existing profile with inheritance).
* Copy an existing quality profile (duplicate an existing profile without inheritance).
* Create a quality profile from scratch.
* Import a quality profile from another SonarQube instance.
We highly recommend that you customize your profiles by extending the Sonar way profile. This allows you to manage most use cases. Indeed, if your profiles inherit from the Sonar way profile, you will automatically benefit from:
* Newly implemented rules.
* Changes in a rule’s configuration.
* The deactivation of deprecated rules.
### Extending a quality profile
When you extend a profile, you create a child profile that inherits all the *activated* rules in the parent profile. You can then activate additional rules in the child, beyond those that are inherited. You can also deactivate rules that are activated in the parent.
For more information about inheritance, check out the [understanding-quality-profiles](https://docs.sonarsource.com/sonarqube-cloud/standards/managing-quality-profiles/understanding-quality-profiles "mention") page.
#### By using the Create button
1. See [viewing-organizations](https://docs.sonarsource.com/sonarqube-cloud/getting-started/viewing-organizations "mention") to access your organization, then go to the **Quality Profiles** page.
2. In the top right corner of the page, select **Create**. The **New Quality Profile** page opens.
3. In **Name**, enter the name of the new quality profile.
4. In **Language**, select the language of the new quality profile.
5. In **Parent**, select the quality profile you want to extend.
6. Select **Create**.
To change the created profile, see [editing-a-custom-quality-profile](https://docs.sonarsource.com/sonarqube-cloud/standards/managing-quality-profiles/editing-a-custom-quality-profile "mention").
#### From the parent profile’s menu
1. See the [viewing-quality-profiles](https://docs.sonarsource.com/sonarqube-cloud/standards/managing-quality-profiles/viewing-quality-profiles "mention") page to learn how to select the quality profile that you want to extend.
2. Select the three-dot button and select **Extend** in the menu. The **Extend Profile** dialog opens.
3. In **New name**, enter the name of the new quality profile.
4. Select **Extend**.
To change the created profile, see [editing-a-custom-quality-profile](https://docs.sonarsource.com/sonarqube-cloud/standards/managing-quality-profiles/editing-a-custom-quality-profile "mention").
### Copying a quality profile
1. See the [viewing-quality-profiles](https://docs.sonarsource.com/sonarqube-cloud/standards/managing-quality-profiles/viewing-quality-profiles "mention") page to learn how to select the quality profile that you want to copy.
2. Select the three-dot button and select **Copy** in the menu. The **Copy Profile** dialog opens.
3. In **Name**, enter the name of the new quality profile.
4. Select **Copy**.
To change the created profile, see the instructions on the [editing-a-custom-quality-profile](https://docs.sonarsource.com/sonarqube-cloud/standards/managing-quality-profiles/editing-a-custom-quality-profile "mention") page.
### Creating a quality profile from scratch
1. See [viewing-organizations](https://docs.sonarsource.com/sonarqube-cloud/getting-started/viewing-organizations "mention") to access your organization, the go to the **Quality Profiles** page.
2. In the top right corner of the page, select **Create**. The **New Quality Profile** page opens.
3. In **Name**, enter the name of the new quality profile.
4. In **Language**, select the language of the new quality profile.
5. In **Parent**, select **None**.
6. Select **Create**.
To change the created profile, see the instructions on the [editing-a-custom-quality-profile](https://docs.sonarsource.com/sonarqube-cloud/standards/managing-quality-profiles/editing-a-custom-quality-profile "mention") page.
### Importing a quality profile from another SonarQube instance
You can export a custom quality profile to an XML file and import it from another SonarQube instance. SonarQube Server, Cloud, and SonarQube Community Build support this feature.
When you import the quality profile:
* If a quality profile with an identical name already exists, it will be updated. The update process involves adding any active rules from the backup that were not active in the existing profile. Existing active rules will not be updated.
* Otherwise, a new profile is created.
Any user can export a quality profile.You need the Administer Quality Profiles permission to import a quality profile.
To export a custom quality profile:
1. Go to **Quality Profiles**.
2. Locate the quality profile’s row and select the three-dot button in the far right of the row.
3. Select **Back up** in the menu.
To import a backed up quality profile:
1. Go to **Quality Profiles**.
2. In the top right corner of the page, select **Restore**. The **Restore File** dialog opens.
3. Select **Choose File** and find your XML file.
4. Select **Restore**.
### Related pages
* [understanding-quality-profiles](https://docs.sonarsource.com/sonarqube-cloud/standards/managing-quality-profiles/understanding-quality-profiles "mention")
* [viewing-quality-profiles](https://docs.sonarsource.com/sonarqube-cloud/standards/managing-quality-profiles/viewing-quality-profiles "mention")
* [editing-a-custom-quality-profile](https://docs.sonarsource.com/sonarqube-cloud/standards/managing-quality-profiles/editing-a-custom-quality-profile "mention")
* [associating-a-quality-profile-with-projects](https://docs.sonarsource.com/sonarqube-cloud/standards/managing-quality-profiles/associating-a-quality-profile-with-projects "mention")
* [changing-default-quality-profile](https://docs.sonarsource.com/sonarqube-cloud/standards/managing-quality-profiles/changing-default-quality-profile "mention")
* [maintaining-your-custom-quality-profiles](https://docs.sonarsource.com/sonarqube-cloud/standards/managing-quality-profiles/maintaining-your-custom-quality-profiles "mention")
* [authorizing-other-users-to-manage-quality-profile](https://docs.sonarsource.com/sonarqube-cloud/standards/managing-quality-profiles/authorizing-other-users-to-manage-quality-profile "mention")
* [quality-profile-association](https://docs.sonarsource.com/sonarqube-cloud/managing-your-projects/project-analysis/quality-profile-association "mention")
---
# Source: https://docs.sonarsource.com/sonarqube-server/10.3/project-administration/creating-and-importing-projects.md
# Source: https://docs.sonarsource.com/sonarqube-server/10.4/project-administration/creating-and-importing-projects.md
# Source: https://docs.sonarsource.com/sonarqube-server/10.5/project-administration/creating-and-importing-projects.md
# Source: https://docs.sonarsource.com/sonarqube-server/10.6/project-administration/creating-and-importing-projects.md
# Source: https://docs.sonarsource.com/sonarqube-server/10.7/project-administration/creating-and-importing-projects.md
# Source: https://docs.sonarsource.com/sonarqube-server/10.8/project-administration/creating-and-importing-projects.md
# Source: https://docs.sonarsource.com/sonarqube-server/2025.2/project-administration/creating-and-importing-projects.md
# Source: https://docs.sonarsource.com/sonarqube-server/2025.3/project-administration/creating-and-importing-projects.md
# Source: https://docs.sonarsource.com/sonarqube-server/2025.5/project-administration/creating-and-importing-projects.md
# Source: https://docs.sonarsource.com/sonarqube-server/2025.1/project-administration/creating-and-importing-projects.md
# Source: https://docs.sonarsource.com/sonarqube-server/2025.4/project-administration/creating-and-importing-projects.md
# Creating and importing projects
### Overview
There are several ways to create a project in SonarQube Server:
* **Import from DevOps Platforms**: If your project is bound to a DevOps platform and you want to benefit from the integration features out of the box.
* **Local project**: For a project not linked to a DevOps platform, you can create your SonarQube project manually.
* **Automate through the API**: Both methods mentioned above can be automated using the Web API.
* **First scan**: If none of the above is relevant, you can create a project by scanning it for the first time.
All the above methods require the Create Projects permission. See [user-permissions](https://docs.sonarsource.com/sonarqube-server/2025.4/instance-administration/user-management/user-permissions "mention") for more information.
### Choosing a method for project creation
When a project is created in SonarQube Server through a first scan, the default configuration applies: default quality profile for each language, default quality gate, default visibility, a permissions template is applied if applicable, etc.
While this is handy, this method is not always desirable as it doesn’t allow a proper configuration upfront. If you want to configure your project before you run a first analysis, use one of the following options:
* **Import from DevOps Platforms**: If your project is hosted on GitHub, GitLab, Azure DevOps, or BitBucket.
* **Local project:** If your project is not hosted on a DevOps platform (in rare cases).
### Importing a DevOps platform repository
Once the global-level integration with your DevOps platform is complete, you can create your SonarQube Server project by importing your DevOps platform repository. The so-created SonarQube Server project is "bound" to its Azure DevOps repository. With a bound project, you benefit from integration features, such as pull request decoration, code scanning alerts, permission synchronization, etc.
To import your repository, you need the Create Projects permission in SonarQube Server and the corresponding access rights on the repository.
To import a DevOps platform repository into SonarQube Server:
1. In the top navigation bar of SonarQube Server, select the **Projects** tab.
2. In the top right corner, select the **Create Project > From \** button.
3. If your instance has multiple DevOps platform Integrations, select the configuration from which you want to import your project.
4. Select the repository to be imported.
{% hint style="info" %}
Starting in [Enterprise Edition](https://www.sonarsource.com/plans-and-pricing/enterprise/), you can import a monorepo. See [monorepos](https://docs.sonarsource.com/sonarqube-server/2025.4/project-administration/monorepos "mention").
{% endhint %}
### Creating your SonarQube Server project manually (local project)
You need the Create Projects permission in SonarQube Server.
Proceed as follows:
1. In the top navigation bar of SonarQube Server, select the **Projects** tab.
2. In the top right corner, select the **Create Project > Local Project** button.
### Automating project creation and import
When you have a large project base, it can be beneficial to automate project creation and import using the Web API. If you’re getting started with Web APIs, check out the [web-api](https://docs.sonarsource.com/sonarqube-server/2025.4/extension-guide/web-api "mention") documentation.
#### Automate local project creation
Only using the Web API `POST /api/projects/create` endpoint is enough to create a local project. A name and a project key are the only necessary parameters.
#### Automate the import of projects hosted on a DevOps platform
You can create a project in SonarQube Server and automatically bind it with a project in your DevOps platform using the Web API.
1. As an instance administrator, you must first configure your SonarQube Server instance with your DevOps platform. You can use the `POST api/alm_settings/create_` endpoint to create the integration or set it up in the SonarQube Server UI by going to **Administration** > **Configuration** > **General Settings** > **DevOps Platform Integrations**.
2. As a user, create a SonarQube project with the information from your DevOps platform project using the `POST api/v2/dop-translation/bound-projects` [endpoint](https://next.sonarqube.com/sonarqube/web_api_v2#/dop-translation/bound-projects--post). Requirements:
* Make sure you have the Create Project permissions. See [user-permissions](https://docs.sonarsource.com/sonarqube-server/2025.4/instance-administration/user-management/user-permissions "mention") for more information.
* Set a Personal Access Token using the `POST api/alm_integrations/set_pat` [endpoint](https://next.sonarqube.com/sonarqube/web_api/api/alm_integrations/set_pat).
* List all DevOps platform integrations to retrieve the information needed for the project creation endpoint parameters using the `GET /api/v2/dop-translation/dop-settings` [endpoint](https://www.google.com/search?q=https://next.sonarqube.com/sonarqube/web_api_v2#/dop-translation/dop-settings--get).
---
# Source: https://docs.sonarsource.com/sonarqube-cloud/managing-your-projects/dashboards/creating-dashboards.md
# Creating dashboards
This feature is available in the [Enterprise](https://www.sonarsource.com/plans-and-pricing/sonarcloud/) plan.
There are two ways to create a custom dashboard, by duplicating an existing dashboard or by creating one from scratch.
{% embed url="" %}
### Duplicating an existing dashboard
You can duplicate an existing dashboard and use it as a starting point. Sometimes, this is the fastest way to get started.
1. Retrieve your project. See [retrieving-projects](https://docs.sonarsource.com/sonarqube-cloud/managing-your-projects/retrieving-projects "mention") for more information.
2. Select the **Main Branch** from the left side menu.
3. Click **Dashboards** from the top menu and select **All dashboards**.
4. Click on the action menu next to the existing dashboard and select **Duplicate**. You can only duplicate custom dashboards.
5. In the **Duplicate dashboard** modal enter the dashboard name, description and click **Create duplicate**. The new dashboard appears on the All dashboards page.
6. Click on the action menu next to the duplicated dashboard and select **Edit** to customize it.
### Creating a custom dashboard from scratch
To create a custom dashboard from scratch:
1. Retrieve your project. See [retrieving-projects](https://docs.sonarsource.com/sonarqube-cloud/managing-your-projects/retrieving-projects "mention") for more information.
2. Select the **Main Branch** from the left side menu.
3. Click **Dashboards** from the top menu and select either **All dashboards**.
4. Click **Create custom dashboard** button in the top right corner.
5. In the **Create custom dashboard** modal enter the dashboard name, description and click **Create**. The new dashboard appears on the **All dashboards** page.
6. Click on the action menu next to the new dashboard and select **Edit** to customize it.
Once you are in the edit mode you can select the following option at the top of the page:
* **Add widget**: Opens a modal where you can configure the widget. See [#adding-a-widget](#adding-a-widget "mention").
* **Add section**: Sections group a set of widgets together and are collapsible. See [#adding-sections](#adding-sections "mention")
* **Cancel and exit**: Exits the edit mode without saving the changes.
* **Save changes**: Saves the current changes.
### Adding a widget
In the dashboard’s edit mode, click **Add widget** to open a modal. In the **Add new widget** modal follow these steps:
{% stepper %}
{% step %}
**Define your widget**
* **Visualization**: Choose the visualization that will represent the data. The options are: **Count**, **Rating badge**, **Line chart**, **Donut chart**, and **Pie chart**. See [#viewing-dashboards](https://docs.sonarsource.com/sonarqube-cloud/managing-your-projects/viewing-and-managing-dashboards#viewing-dashboards "mention") for more information about the chart options.
* **Metric**: Choose the metric you want to visualize. The metric drop-down list is filtered by metrics available for the visualization you have selected. See [#metrics](#metrics "mention") for a list of available metrics and associated visualizations.
* **Slice by**: This option appears only for pie and donut charts. Available options depend on the metric you have chosen.
{% endstep %}
{% step %}
**Apply filters**
Depending on the metric you have selected in the previous step, appropriate filters are displayed. Feel free to explore the filters and combine them with various metrics to find the desired results.
* **Scope**: For the count, rating badge, pie, and donut chart visualizations, you can choose between **Overall code** or **New code**. For the line chart, **Overall code** is the only option and is applied by default.
* **Time range**: This option appears only for the line chart because it is a time-based chart. The options are: **All**, **Last 3 months**, and **Last month**.
* Additional filters appear that are relevant to the visualization and metric you selected in the previous step.
{% endstep %}
{% step %}
**Customize visualization**
* **Show legend**: Select this option to display a legend for a visualization. This applies to the line, donut and pie charts.
* **Show trend indicator**: Available only to the count visualization.
{% endstep %}
{% endstepper %}
Once you are done configuring the widget:
* Click **Add to dashboard** at the bottom of the modal.
* Click **Save changes** at the top of the dashboard page, if you are done editing.
### Adding a section
Sections help you organize and group your widgets on a dashboard.
To create a section:
* Enter the edit mode and click **Add section** to open a modal.
* Enter the section name and description in the modal.
* Click **Create section** to add it to the dashboard.
1. Once the section appears on a dashboard, you can move it by clicking the handle located in the upper-left corner and dragging it to another location.
2. Click **Add widget** to add a new widget directly from within the section.
3. Click the action menu located in the upper right corner of the section to edit or delete the section.
4. **Collapse** or **Expand** the section to change its visibility. This feature works even after you save the changes and exit edit mode.
5. Click **Save changes** at the top of the page when you are done.
### Metrics
The following table shows a list of metrics and associated visualizations.
| Metrics | Visualization | Additional information |
| ---------------------------------------- | ----------------------------------------- | -------------------------------------------------------------------------------------------------------------------------------- |
| **Issues** | | |
| Issue count | Count, line chart, donut chart, pie chart | See [#issues](https://docs.sonarsource.com/sonarqube-cloud/digging-deeper/metric-definitions#issues "mention") |
| **Security** | | |
| Security remediation effort | Count, line chart | See [#security](https://docs.sonarsource.com/sonarqube-cloud/digging-deeper/metric-definitions#security "mention") |
| Security hotspots | Count, line chart | See [#security-review](https://docs.sonarsource.com/sonarqube-cloud/digging-deeper/metric-definitions#security-review "mention") |
| Security hotspots reviewed | Count, line chart | See [#security-review](https://docs.sonarsource.com/sonarqube-cloud/digging-deeper/metric-definitions#security-review "mention") |
| Security hotspot count | Donut chart, pie chart | See [#security-review](https://docs.sonarsource.com/sonarqube-cloud/digging-deeper/metric-definitions#security-review "mention") |
| Security rating | Rating badge | See [#security](https://docs.sonarsource.com/sonarqube-cloud/digging-deeper/metric-definitions#security "mention") |
| Security review rating | Rating badge | See [#security-review](https://docs.sonarsource.com/sonarqube-cloud/digging-deeper/metric-definitions#security-review "mention") |
| **Reliability** | | |
| Reliability remediation effort | Count, line chart | See [#reliability](https://docs.sonarsource.com/sonarqube-cloud/digging-deeper/metric-definitions#reliability "mention") |
| Reliability rating | Rating badge | See [#reliability](https://docs.sonarsource.com/sonarqube-cloud/digging-deeper/metric-definitions#reliability "mention") |
| **Maintainability** | | |
| Effort to reach maintainability rating A | Count, line chart | See [#maintainability](https://docs.sonarsource.com/sonarqube-cloud/digging-deeper/metric-definitions#maintainability "mention") |
| Technical debt ratio | Count, line chart | See [#maintainability](https://docs.sonarsource.com/sonarqube-cloud/digging-deeper/metric-definitions#maintainability "mention") |
| Technical dept ratio of new/changed code | Count, line chart | See [#maintainability](https://docs.sonarsource.com/sonarqube-cloud/digging-deeper/metric-definitions#maintainability "mention") |
| Maintainability rating | Rating badge | See [#maintainability](https://docs.sonarsource.com/sonarqube-cloud/digging-deeper/metric-definitions#maintainability "mention") |
| **Coverage** | | |
| Conditions to cover | Count, line chart | See [#coverage](https://docs.sonarsource.com/sonarqube-cloud/digging-deeper/metric-definitions#coverage "mention") |
| Coverage by tests | Count, line chart | See [#coverage](https://docs.sonarsource.com/sonarqube-cloud/digging-deeper/metric-definitions#coverage "mention") |
| Line coverage | Count, line chart | See [#coverage](https://docs.sonarsource.com/sonarqube-cloud/digging-deeper/metric-definitions#coverage "mention") |
| Lines to cover | Count, line chart | See [#coverage](https://docs.sonarsource.com/sonarqube-cloud/digging-deeper/metric-definitions#coverage "mention") |
| Uncovered conditions | Count, line chart | See [#coverage](https://docs.sonarsource.com/sonarqube-cloud/digging-deeper/metric-definitions#coverage "mention") |
| Uncovered lines | Count, line chart | See [#coverage](https://docs.sonarsource.com/sonarqube-cloud/digging-deeper/metric-definitions#coverage "mention") |
| **Duplications** | | |
| Duplicated blocks | Count, line chart | See [#duplications](https://docs.sonarsource.com/sonarqube-cloud/digging-deeper/metric-definitions#duplications "mention") |
| Duplicated files | Count, line chart | See [#duplications](https://docs.sonarsource.com/sonarqube-cloud/digging-deeper/metric-definitions#duplications "mention") |
| Duplicated lines | Count, line chart | See [#duplications](https://docs.sonarsource.com/sonarqube-cloud/digging-deeper/metric-definitions#duplications "mention") |
| Duplicated lines density | Count, line chart | See [#duplications](https://docs.sonarsource.com/sonarqube-cloud/digging-deeper/metric-definitions#duplications "mention") |
| **Size** | | |
| Comment lines | Count, line chart | See [#size](https://docs.sonarsource.com/sonarqube-cloud/digging-deeper/metric-definitions#size "mention") |
| Comment lines density | Count, line chart | See [#size](https://docs.sonarsource.com/sonarqube-cloud/digging-deeper/metric-definitions#size "mention") |
| Lines | Count, line chart | See [#size](https://docs.sonarsource.com/sonarqube-cloud/digging-deeper/metric-definitions#size "mention") |
| Line count | Donut chart, pie chart | See [#size](https://docs.sonarsource.com/sonarqube-cloud/digging-deeper/metric-definitions#size "mention") |
### Related pages
* [](https://docs.sonarsource.com/sonarqube-cloud/managing-your-projects/dashboards "mention")
* [viewing-and-managing-dashboards](https://docs.sonarsource.com/sonarqube-cloud/managing-your-projects/dashboards/viewing-and-managing-dashboards "mention")
---
# Source: https://docs.sonarsource.com/sonarqube-community-build/project-administration/creating-project/creating-manually.md
# Creating your project manually
You need the Create Projects permission in SonarQube Community Build.
Proceed as follows:
1. In the top navigation bar of SonarQube Community Build, select the **Projects** tab.
2. In the top right corner, select the **Create Project > Local Project** button.
---
# Source: https://docs.sonarsource.com/sonarqube-cloud/administering-sonarcloud/managing-organization/creating-organization/creating-organization-manually.md
# Creating organization manually
To understand more about the advantages of binding your SonarQube Cloud organization with a DevOps platform, see [binding-with-dop](https://docs.sonarsource.com/sonarqube-cloud/administering-sonarcloud/about-sonarqube-cloud-solution/ressources-structure/binding-with-dop "mention").
{% hint style="info" %}
In SonarQube Cloud, each organization is assigned a subscription plan. Before creating your organization, choose the subscription plan suited to your needs, see [subscription-plans](https://docs.sonarsource.com/sonarqube-cloud/administering-sonarcloud/managing-subscription/subscription-plans "mention") for more information. If you want a paid plan, select the number of Lines of Code (LOC) you need. See [#loc-based-pricing](https://docs.sonarsource.com/sonarqube-cloud/managing-subscription/subscription-plans#loc-based-pricing "mention") for more details.
{% endhint %}
To create an organization manually:
1. On the top right of the SonarQube Cloud interface, select the ✚ (plus) menu and select **Create new organization**. The **Create an organization** page opens.
2. Select the **create one manually** hyperlink below the **Import** buttons.
3. Enter the organization name and key.
4. Select **Add additional info** to add:
* An avatar: a small image representing the organization and displayed on the UI near the organization name.
* A description of the organization.
* A URL: the URL of the homepage of the organization displayed on the UI.
5. Select the subscription plan for your organization. See [subscription-plans](https://docs.sonarsource.com/sonarqube-cloud/administering-sonarcloud/managing-subscription/subscription-plans "mention") for more details.
6. If you selected a paid plan, select the number of Lines of Code (LOC) for your plan and follow the instructions to enter your billing and payment information.
7. Select **Create Organization**. The organization is created and opened in SonarQube Cloud.
### Related pages
* [binding-unbound-organization](https://docs.sonarsource.com/sonarqube-cloud/administering-sonarcloud/managing-organization/creating-organization/binding-unbound-organization "mention")
* [importing-github-organization](https://docs.sonarsource.com/sonarqube-cloud/administering-sonarcloud/managing-organization/creating-organization/importing-github-organization "mention")
* [importing-bitbucket-workspace](https://docs.sonarsource.com/sonarqube-cloud/administering-sonarcloud/managing-organization/creating-organization/importing-bitbucket-workspace "mention")
* [importing-gitlab-group](https://docs.sonarsource.com/sonarqube-cloud/administering-sonarcloud/managing-organization/creating-organization/importing-gitlab-group "mention")
* [importing-azure-devops-organization](https://docs.sonarsource.com/sonarqube-cloud/administering-sonarcloud/managing-organization/creating-organization/importing-azure-devops-organization "mention")
* [changing-organization-settings](https://docs.sonarsource.com/sonarqube-cloud/administering-sonarcloud/managing-organization/creating-organization/changing-organization-settings "mention")
* [deleting-organization](https://docs.sonarsource.com/sonarqube-cloud/administering-sonarcloud/managing-organization/creating-organization/deleting-organization "mention")
* [importing-from-multiple-platforms](https://docs.sonarsource.com/sonarqube-cloud/administering-sonarcloud/managing-organization/creating-organization/importing-from-multiple-platforms "mention")
---
# Source: https://docs.sonarsource.com/sonarqube-cloud/administering-sonarcloud/managing-organization/creating-organization.md
# Creating and editing your organization
{% content-ref url="creating-organization/importing-github-organization" %}
[importing-github-organization](https://docs.sonarsource.com/sonarqube-cloud/administering-sonarcloud/managing-organization/creating-organization/importing-github-organization)
{% endcontent-ref %}
{% content-ref url="creating-organization/importing-bitbucket-workspace" %}
[importing-bitbucket-workspace](https://docs.sonarsource.com/sonarqube-cloud/administering-sonarcloud/managing-organization/creating-organization/importing-bitbucket-workspace)
{% endcontent-ref %}
{% content-ref url="creating-organization/importing-gitlab-group" %}
[importing-gitlab-group](https://docs.sonarsource.com/sonarqube-cloud/administering-sonarcloud/managing-organization/creating-organization/importing-gitlab-group)
{% endcontent-ref %}
{% content-ref url="creating-organization/importing-azure-devops-organization" %}
[importing-azure-devops-organization](https://docs.sonarsource.com/sonarqube-cloud/administering-sonarcloud/managing-organization/creating-organization/importing-azure-devops-organization)
{% endcontent-ref %}
{% content-ref url="creating-organization/creating-organization-manually" %}
[creating-organization-manually](https://docs.sonarsource.com/sonarqube-cloud/administering-sonarcloud/managing-organization/creating-organization/creating-organization-manually)
{% endcontent-ref %}
{% content-ref url="creating-organization/changing-organization-binding" %}
[changing-organization-binding](https://docs.sonarsource.com/sonarqube-cloud/administering-sonarcloud/managing-organization/creating-organization/changing-organization-binding)
{% endcontent-ref %}
{% content-ref url="creating-organization/binding-unbound-organization" %}
[binding-unbound-organization](https://docs.sonarsource.com/sonarqube-cloud/administering-sonarcloud/managing-organization/creating-organization/binding-unbound-organization)
{% endcontent-ref %}
{% content-ref url="creating-organization/security-contact" %}
[security-contact](https://docs.sonarsource.com/sonarqube-cloud/administering-sonarcloud/managing-organization/creating-organization/security-contact)
{% endcontent-ref %}
{% content-ref url="creating-organization/changing-organization-settings" %}
[changing-organization-settings](https://docs.sonarsource.com/sonarqube-cloud/administering-sonarcloud/managing-organization/creating-organization/changing-organization-settings)
{% endcontent-ref %}
{% content-ref url="creating-organization/deleting-organization" %}
[deleting-organization](https://docs.sonarsource.com/sonarqube-cloud/administering-sonarcloud/managing-organization/creating-organization/deleting-organization)
{% endcontent-ref %}
{% content-ref url="creating-organization/importing-from-multiple-platforms" %}
[importing-from-multiple-platforms](https://docs.sonarsource.com/sonarqube-cloud/administering-sonarcloud/managing-organization/creating-organization/importing-from-multiple-platforms)
{% endcontent-ref %}
---
# Source: https://docs.sonarsource.com/sonarqube-server/2025.6/project-administration/creating-your-project/creating-project-manually.md
# Source: https://docs.sonarsource.com/sonarqube-server/project-administration/creating-your-project/creating-project-manually.md
# Creating your project manually
You need the Create Projects permission in SonarQube Server.
Proceed as follows:
1. In the top navigation bar of SonarQube Server, select the **Projects** tab.
2. In the top right corner, select the **Create Project > Local Project** button.
---
# Source: https://docs.sonarsource.com/sonarqube-community-build/project-administration/creating-project.md
# Creating your project
There are several ways to create a project in SonarQube Server:
* **Import from DevOps Platforms**: If your repository is hosted on GitHub, GitLab, Azure DevOps, or BitBucket, you can import it to create your corresponding project in SonarQube Server (The so created project is *bound* to the DevOps platform repository). This way, you can benefit from the integration features out of the box.
* **Local project**: For a project not linked to a DevOps platform, you can create your SonarQube project manually.
* **Automate through the API**: Both methods mentioned above can be automated using the Web API.
* **First scan**: If none of the above is relevant, you can create a project by scanning it for the first time.\
In this case, the default configuration applies: default quality profile for each language, default quality gate, default visibility, a permissions template is applied if applicable, etc.
All the above methods require the Create Projects permission.
{% content-ref url="creating-project/importing-repo" %}
[importing-repo](https://docs.sonarsource.com/sonarqube-community-build/project-administration/creating-project/importing-repo)
{% endcontent-ref %}
{% content-ref url="creating-project/creating-manually" %}
[creating-manually](https://docs.sonarsource.com/sonarqube-community-build/project-administration/creating-project/creating-manually)
{% endcontent-ref %}
{% content-ref url="creating-project/automating-creation" %}
[automating-creation](https://docs.sonarsource.com/sonarqube-community-build/project-administration/creating-project/automating-creation)
{% endcontent-ref %}
---
# Source: https://docs.sonarsource.com/sonarqube-server/2025.2/server-update-and-maintenance/troubleshooting/creating-support-ticket.md
# Source: https://docs.sonarsource.com/sonarqube-server/2025.3/server-update-and-maintenance/troubleshooting/creating-support-ticket.md
# Source: https://docs.sonarsource.com/sonarqube-server/2025.5/server-update-and-maintenance/troubleshooting/creating-support-ticket.md
# Source: https://docs.sonarsource.com/sonarqube-server/2025.1/server-update-and-maintenance/troubleshooting/creating-support-ticket.md
# Source: https://docs.sonarsource.com/sonarqube-server/2025.4/server-update-and-maintenance/troubleshooting/creating-support-ticket.md
# Source: https://docs.sonarsource.com/sonarqube-server/2025.6/server-update-and-maintenance/troubleshooting/creating-support-ticket.md
# Source: https://docs.sonarsource.com/sonarqube-server/server-update-and-maintenance/troubleshooting/creating-support-ticket.md
# Creating support ticket
If your license includes Sonar support, a **Support** tab will be visible on the **Administration** > **Support** page, providing guidance for interacting with the support team.
Click **Download** to collect the support information file of your instance. Make sure to provide this file for any interaction with Sonar Support.
---
# Source: https://docs.sonarsource.com/sonarqube-community-build/instance-administration/user-management/creating-users.md
# Source: https://docs.sonarsource.com/sonarqube-server/10.7/instance-administration/user-management/creating-users.md
# Source: https://docs.sonarsource.com/sonarqube-server/10.8/instance-administration/user-management/creating-users.md
# Source: https://docs.sonarsource.com/sonarqube-server/2025.2/instance-administration/user-management/creating-users.md
# Source: https://docs.sonarsource.com/sonarqube-server/2025.3/instance-administration/user-management/creating-users.md
# Source: https://docs.sonarsource.com/sonarqube-server/2025.5/instance-administration/user-management/creating-users.md
# Source: https://docs.sonarsource.com/sonarqube-server/2025.1/instance-administration/user-management/creating-users.md
# Source: https://docs.sonarsource.com/sonarqube-server/2025.4/instance-administration/user-management/creating-users.md
# Source: https://docs.sonarsource.com/sonarqube-server/2025.6/instance-administration/user-management/creating-users.md
# Source: https://docs.sonarsource.com/sonarqube-server/instance-administration/user-management/creating-users.md
# Creating users manually
You can create a user account manually in SonarQube Server. Manually created users are authenticated against SonarQube Server’s own user/group database. In contrast, users can be provisioned and authenticated through an external tool such as GitHub, GitLab, SAML Identity Provider, LDAP service, etc. (For more information, see [overview](https://docs.sonarsource.com/sonarqube-server/instance-administration/authentication/overview "mention").).
You need the global Administer System permission to create user accounts.
{% hint style="info" %}
If you enable the automatic provision mode in SonarQube with an identity provider, you cannot manually create users and the existing manually created users become *local users*. For more information, see [#local-user-concept](https://docs.sonarsource.com/sonarqube-server/authentication/overview#local-user-concept "mention").
{% endhint %}
To create a user account:
1. In the top navigation bar, go to **Administration > Security > Users**.
2. Select the **Create User** button. The **Create User** dialog opens.
3. In the dialog, enter the **Login** (user identifier), **Name** (account’s screen name), **Email** (optional), and **Password**.
4. If the entered login or email address does not match the user’s SCM account login, you can explicitly associate the SCM account with the manual account: see [updating-scm-details](https://docs.sonarsource.com/sonarqube-server/instance-administration/user-management/updating-scm-details "mention").
5. Select **Create**.
### Related pages
* [changing-user-password](https://docs.sonarsource.com/sonarqube-server/instance-administration/user-management/changing-user-password "mention")
* [deactivating-users](https://docs.sonarsource.com/sonarqube-server/instance-administration/user-management/deactivating-users "mention")
---
# Source: https://docs.sonarsource.com/sonarqube-cloud/administering-sonarcloud/managing-enterprise/creating-your-enterprise.md
# Creating your enterprise
To set up your enterprise from scratch, see [setting-up-your-enterprise](https://docs.sonarsource.com/sonarqube-cloud/getting-started-with-enterprise/setting-up-your-enterprise "mention") for more information.
{% hint style="info" %}
Currently, Sonar restricts each enterprise to a maximum of 200 organizations.
{% endhint %}
### Related pages
[retrieving-and-viewing-your-enterprise](https://docs.sonarsource.com/sonarqube-cloud/administering-sonarcloud/managing-enterprise/retrieving-and-viewing-your-enterprise "mention")\
[enterprise-security](https://docs.sonarsource.com/sonarqube-cloud/administering-sonarcloud/managing-enterprise/enterprise-security "mention")\
[adding-organizations-to-your-enterprise](https://docs.sonarsource.com/sonarqube-cloud/administering-sonarcloud/managing-enterprise/adding-organizations-to-your-enterprise "mention")\
[managing-the-enterprise-related-permissions](https://docs.sonarsource.com/sonarqube-cloud/administering-sonarcloud/managing-enterprise/managing-the-enterprise-related-permissions "mention")\
[managing-the-lines-of-code-within-your-enterprise](https://docs.sonarsource.com/sonarqube-cloud/administering-sonarcloud/managing-enterprise/managing-the-lines-of-code-within-your-enterprise "mention")\
[changing-enterprise-settings](https://docs.sonarsource.com/sonarqube-cloud/administering-sonarcloud/managing-enterprise/changing-enterprise-settings "mention")\
[downgrading-your-enterprise](https://docs.sonarsource.com/sonarqube-cloud/administering-sonarcloud/managing-enterprise/downgrading-your-enterprise "mention")
---
# Source: https://docs.sonarsource.com/sonarqube-community-build/devops-platform-integration/azure-devops-integration/creating-your-project.md
# Source: https://docs.sonarsource.com/sonarqube-server/2025.2/devops-platform-integration/azure-devops-integration/creating-your-project.md
# Source: https://docs.sonarsource.com/sonarqube-server/2025.3/devops-platform-integration/azure-devops-integration/creating-your-project.md
# Source: https://docs.sonarsource.com/sonarqube-server/2025.5/devops-platform-integration/azure-devops-integration/creating-your-project.md
# Source: https://docs.sonarsource.com/sonarqube-server/2025.1/devops-platform-integration/azure-devops-integration/creating-your-project.md
# Source: https://docs.sonarsource.com/sonarqube-server/2025.4/devops-platform-integration/azure-devops-integration/creating-your-project.md
# Source: https://docs.sonarsource.com/sonarqube-server/2025.6/project-administration/creating-your-project.md
# Source: https://docs.sonarsource.com/sonarqube-server/2025.6/devops-platform-integration/azure-devops-integration/creating-your-project.md
# Source: https://docs.sonarsource.com/sonarqube-server/project-administration/creating-your-project.md
# Source: https://docs.sonarsource.com/sonarqube-server/devops-platform-integration/azure-devops-integration/creating-your-project.md
# Creating and configuring your Azure DevOps project
Once the [setting-up-integration-at-global-level](https://docs.sonarsource.com/sonarqube-server/devops-platform-integration/azure-devops-integration/setting-up-integration-at-global-level "mention") with Azure DevOps is complete, you can create your SonarQube Server project by importing your Azure DevOps repository. You can also create it manually but you won’t benefit from the integration features.
{% hint style="warning" %}
It’s highly recommended to create your SonarQube Server project before running your first analysis. Creating the project from the first analysis has side-effects (e.g., you can’t choose the main branch name).
{% endhint %}
### Before your first repository import
On your first repository import, you will have to insert an Azure Personal Authentication Token (PAT) so that you are able to list the repositories you have access to in Azure DevOps.
Proceed as follows to create your Azure PAT:
1\. Log in to Azure DevOps.
2\. Go to your Azure DevOps organization **User settings** > **Personal access tokens** and select **+ New token**.
3\. On the next page, under **Scopes**, make sure that you specify at least the scope **Code** > **Read**.
4\. Click **Create** to generate the token.
5\. When the personal access token is displayed, copy it (you will have to paste it during your first repository import as described below).\
You may ask your administrator to encrypt this token. See [encrypting-settings](https://docs.sonarsource.com/sonarqube-server/instance-administration/security/encrypting-settings "mention") for more details.
### Importing your Azure DevOps repository
To import your repository, you need the Create Projects permission in SonarQube Server.
The so-created SonarQube Server project is "bound" to its Azure DevOps repository. With a bound project:
* You can see in the SonarQube Server UI with which repository the project is associated.
* You benefit from pull request integration features.
To import an Azure DevOps repository into SonarQube Server:
1. In the top navigation bar of SonarQube Server, select the **Projects** tab.
2. In the top right corner, select the **Create Project > From Azure DevOps** button.
3. If it’s your first repository import, you’ll be prompted to enter the Azure PAT you created as described in *Before your first repository import* above. Enter your PAT and select **Save**.
4\. If your instance has multiple Azure DevOps Integrations, select the **Azure** **DevOps configuration** from which you want to import your project.
5\. Select the repository to be imported.
### Importing a monorepo
Starting in [Enterprise edition](https://www.sonarsource.com/plans-and-pricing/enterprise/), you can import an Azure DevOps monorepo. See [monorepos](https://docs.sonarsource.com/sonarqube-server/project-administration/monorepos "mention").
### Creating your SonarQube Server project manually
You need the Create Projects permission in SonarQube Server.
Proceed as follows:
1. In the top navigation bar of SonarQube Server, select the **Projects** tab.
2. In the top right corner, select the **Create Project > Local Project** button.
### Configuring the project analysis parameters
You can configure analysis parameters at different levels:
* In your build environment.
* In the `sonar-project.properties` file.
* In SonarQube Server UI.
* At the Azure pipeline level.\
Parameters set at the pipeline level have precedence over parameters set at other levels.
For general information on setting up analysis parameters at the global and project levels, see [analysis-parameters](https://docs.sonarsource.com/sonarqube-server/analyzing-source-code/analysis-parameters "mention") and the respective SonarScanner section: [sonarscanner-for-maven](https://docs.sonarsource.com/sonarqube-server/analyzing-source-code/scanners/sonarscanner-for-maven "mention"), [sonarscanner-for-gradle](https://docs.sonarsource.com/sonarqube-server/analyzing-source-code/scanners/sonarscanner-for-gradle "mention"), [configuring](https://docs.sonarsource.com/sonarqube-server/analyzing-source-code/scanners/dotnet/configuring "mention"), or [sonarscanner](https://docs.sonarsource.com/sonarqube-server/analyzing-source-code/scanners/sonarscanner "mention").
### Related pages
* [azure-pipelines-integration-overview](https://docs.sonarsource.com/sonarqube-server/devops-platform-integration/azure-devops-integration/azure-pipelines-integration-overview "mention")
* [setting-up-integration-at-global-level](https://docs.sonarsource.com/sonarqube-server/devops-platform-integration/azure-devops-integration/setting-up-integration-at-global-level "mention")
* [setting-up-project-integration](https://docs.sonarsource.com/sonarqube-server/devops-platform-integration/azure-devops-integration/setting-up-project-integration "mention") at the project level
* [introduction](https://docs.sonarsource.com/sonarqube-server/devops-platform-integration/azure-devops-integration/adding-analysis-to-pipeline/introduction "mention") to adding analysis to your Azure build pipeline
* [troubleshooting-analysis](https://docs.sonarsource.com/sonarqube-server/devops-platform-integration/azure-devops-integration/troubleshooting-analysis "mention")
---
# Source: https://docs.sonarsource.com/sonarqube-community-build/analyzing-source-code/languages/csharp.md
# Source: https://docs.sonarsource.com/sonarqube-server/8.9/analyzing-source-code/languages/csharp.md
# Source: https://docs.sonarsource.com/sonarqube-server/9.8/analyzing-source-code/languages/csharp.md
# Source: https://docs.sonarsource.com/sonarqube-server/9.9/analyzing-source-code/languages/csharp.md
# Source: https://docs.sonarsource.com/sonarqube-server/10.0/analyzing-source-code/languages/csharp.md
# Source: https://docs.sonarsource.com/sonarqube-server/10.1/analyzing-source-code/languages/csharp.md
# Source: https://docs.sonarsource.com/sonarqube-server/10.2/analyzing-source-code/languages/csharp.md
# Source: https://docs.sonarsource.com/sonarqube-server/10.3/analyzing-source-code/languages/csharp.md
# Source: https://docs.sonarsource.com/sonarqube-server/10.4/analyzing-source-code/languages/csharp.md
# Source: https://docs.sonarsource.com/sonarqube-server/10.5/analyzing-source-code/languages/csharp.md
# Source: https://docs.sonarsource.com/sonarqube-server/10.6/analyzing-source-code/languages/csharp.md
# Source: https://docs.sonarsource.com/sonarqube-server/10.7/analyzing-source-code/languages/csharp.md
# Source: https://docs.sonarsource.com/sonarqube-server/10.8/analyzing-source-code/languages/csharp.md
# Source: https://docs.sonarsource.com/sonarqube-server/2025.2/analyzing-source-code/languages/csharp.md
# Source: https://docs.sonarsource.com/sonarqube-server/2025.3/analyzing-source-code/languages/csharp.md
# Source: https://docs.sonarsource.com/sonarqube-server/2025.5/analyzing-source-code/languages/csharp.md
# Source: https://docs.sonarsource.com/sonarqube-server/2025.1/analyzing-source-code/languages/csharp.md
# Source: https://docs.sonarsource.com/sonarqube-server/2025.4/analyzing-source-code/languages/csharp.md
# Source: https://docs.sonarsource.com/sonarqube-server/2025.6/analyzing-source-code/languages/csharp.md
# Source: https://docs.sonarsource.com/sonarqube-server/analyzing-source-code/languages/csharp.md
# Source: https://docs.sonarsource.com/sonarqube-cloud/advanced-setup/languages/csharp.md
# C\#
### Supported versions
The level of support for a language is defined as follows:
* Fully supported: Analysis will complete. All the language features are understood and examined.
* Supported: Most language features are understood and examined but the version includes unsupported features. Analysis might break or provide incomplete results.
C#1 to C#14: Fully supported
### Supported frameworks and tools
ASP.NET MVC, ASP.NET Core MVC
### Language-specific properties
To discover and update the C#-specific properties, navigate in SonarQube Cloud to *Your Project* > **Administration** > **General Settings** > **Languages** > **C#**. See the [analysis-parameters](https://docs.sonarsource.com/sonarqube-cloud/advanced-setup/analysis-parameters "mention") page for more information about specific properties.
#### Analyze generated code
To analyze tool-generated code (e.g. WCF code generated by `SvcUtil.exe`, protobuf code generated by `protoc`, Swagger client code generated by `NSwag`) for a specific C# project, enable the "Analyze generated code" setting inside **Project > Administration > General Settings > C#**. By default, tool-generated code files are skipped during analysis.
The detection of generated code is based on the file name, special comments, and attributes. The currently recognized values are in [GeneratedCodeRecognizer.cs](https://github.com/SonarSource/sonar-dotnet/blob/master/analyzers/src/SonarAnalyzer.Core/Syntax/Utilities/GeneratedCodeRecognizer.cs).
{% hint style="info" %}
When a `Generated` comment is present in the file, SonarQube ignores the *entire* \*\* *file*, even if only parts of it were generated. It’s possible to enable or disable analysis of *files containing generated code* at the project level in *Your project* > **Administration** > **General Settings** > **Languages** > *Your language* > **Analyze generated code**.
{% endhint %}
### Scanner compatibility
To analyze C# code, you need to use the [sonarscanner-for-dotnet](https://docs.sonarsource.com/sonarqube-cloud/advanced-setup/ci-based-analysis/sonarscanner-for-dotnet "mention"), version 4.x or newer.
### Exclusions
Files to be excluded should be set in the project configuration. Excluded files are still going to be analyzed during the compilation and the results will be filtered according to the exclusion settings. Details about inclusions and exclusions can be found on the [setting-analysis-scope](https://docs.sonarsource.com/sonarqube-cloud/managing-your-projects/project-analysis/setting-analysis-scope "mention") pages.
As an alternative, a `.editorconfig` file can be used to disable the analysis for a specific rule on a file or directory. This can solve performance problems on large files.
`[Path/File.cs]`\
`dotnet_diagnostic.Sxxx.severity = none`
### Related pages
* [Investigating the performance of .NET Analysis](https://community.sonarsource.com/t/the-sonarsource-guide-for-investigating-the-performance-of-net-analysis/47279)
* Importing external issues: [external-analyzer-reports](https://docs.sonarsource.com/sonarqube-cloud/enriching/external-analyzer-reports "mention") (NUnit, MSTest, xUnit)
* For excluding external Roslyn issues: [external-analyzer-reports](https://docs.sonarsource.com/sonarqube-cloud/enriching/external-analyzer-reports "mention"). See also [#notes-on-external-.net-c-or-vb.net-issues](https://docs.sonarsource.com/sonarqube-cloud/enriching/external-analyzer-reports#notes-on-external-.net-c-or-vb.net-issues "mention")
* [c-c-objective-c-test-coverage](https://docs.sonarsource.com/sonarqube-cloud/enriching/test-coverage/c-c-objective-c-test-coverage "mention") (Visual Studio Code Coverage, dotCover, OpenCover, Coverlet, Altcover, VSTest)
* The [sonarscanner-for-dotnet](https://docs.sonarsource.com/sonarqube-cloud/advanced-setup/ci-based-analysis/sonarscanner-for-dotnet "mention")
* The [sonarcloud-extension-for-azure-devops](https://docs.sonarsource.com/sonarqube-cloud/advanced-setup/ci-based-analysis/sonarcloud-extension-for-azure-devops "mention") for SonarQube Cloud
* [Specifying test projects](https://app.gitbook.com/s/yDv2XwTC1xoOKBYeCK45/analyzing-source-code/dotnet-environments/specify-test-project-analysis "mention") (the page is in the SonarQube Server docs, but also applies when setting up SonarQube Cloud .NET projects)
* [dotnet-test-coverage](https://docs.sonarsource.com/sonarqube-cloud/enriching/test-coverage/dotnet-test-coverage "mention")
---
# Source: https://docs.sonarsource.com/sonarqube-server/8.9/analyzing-source-code/languages/css.md
# CSS
### Prerequisites
In order to analyze CSS code, you need to have Node.js >= 8 installed on the machine running the scan. Set property `sonar.nodejs.executable` to an absolute path to Node.js executable, if standard `node` is not available.
If you have a community plugin that handles CSS installed on your SonarQube instance it will conflict with analysis of CSS, so it should be removed.
### Language-Specific Properties
Discover and update the CSS-specific [properties](https://docs.sonarsource.com/sonarqube-server/8.9/analyzing-source-code/analysis-parameters) in: **Administration > General Settings > CSS**
### Supported languages
* CSS, SCSS, Less
* Also ‘style’ inside PHP, HTML and VueJS files
### Related pages
* [importing-third-party-issues](https://docs.sonarsource.com/sonarqube-server/8.9/analyzing-source-code/importing-external-issues/importing-third-party-issues "mention") (StyleLint.io)
### Issue tracker
Check the [issue tracker](https://github.com/SonarSource/sonar-css/issues) for this language.
---
# Source: https://docs.sonarsource.com/sonarqube-for-vs-code/ai-capabilities/ides/cursor.md
# SonarQube for VS Code in Cursor
### Installation
The SonarQube for VS Code extension can easily be installed in Cursor from either the [Open VSX registry](https://open-vsx.org/extension/SonarSource/sonarlint-vscode) or by using Cursor’s [VS Code Migration](https://cursor.com/docs/configuration/migrations/vscode) tools.
To install the SonarQube for VS Code extension in Cursor:
1. Open the **Extensions** view by pressing `Ctrl + Shift + X` (or `Cmd + Shift + X` on Mac).
2. Search for `sonarqube`.
3. Finish the installation by selecting the **Install** button
Once installed, we recommended using [connected mode](https://docs.sonarsource.com/sonarqube-for-vs-code/connect-your-ide/setup) and setting up the [#sonarqube-mcp-server](#sonarqube-mcp-server "mention") with SonarQube Server or SonarQube Cloud to strengthen your AI integration with SonarQube.
#### Migrate extensions from VS Code
Cursor provides a workflow to [import your VS Code settings](https://cursor.com/docs/configuration/migrations/vscode), including your extensions.
If you were using connected mode or the [#sonarqube-mcp-server](#sonarqube-mcp-server "mention"), your SonarQube token will not be migrated but you will be prompted to reauthenticate any connections you created in VS Code.
{% hint style="info" %}
Cursor subscribers on their Enterprise plan should add SonarQube for VS Code to the list of allowed extensions. Please see the Cursor documentation to [Configure (your) allowed extensions](https://docs.cursor.com/en/account/teams/enterprise-settings#configure-allowed-extensions).
{% endhint %}
### SonarQube MCP Server
The SonarQube MCP Server is a Model Context Protocol (MCP) server that runs locally and enables a seamless connection between your AI agents and your SonarQube platform. The tools are designed to bridge the divide between productivity and quality. Please see the full details in the [SonarQube MCP Server](https://app.gitbook.com/o/2ibCvzwZt86Nlk2zloB7/s/xNksbUaDXyfRoTpHP0vQ/ "mention") documentation.
See the [Quickstart guide #Setup in Cursor](https://app.gitbook.com/s/xNksbUaDXyfRoTpHP0vQ/quickstart-guide#setup-in-cursor "mention") instructions in our SonarQube MCP Server documentation for full details.
#### Setup the SonarQube MCP Server
When you're using an AI-enabled IDE such as Cursor, Windsurf, or VS Code with Copilot enabled, and have already completed your [setup](https://docs.sonarsource.com/sonarqube-for-vs-code/connect-your-ide/setup "mention") in SonarQube for IDE with SonarQube Server or SonarQube Cloud, a quick select button is available.
* Select the icon, **Configure MCP Server** from the **CONNECTED MODE** view window to use your connected mode credentials to start using the SonarQube MCP Server. The same workflow is available in the **AI AGENTS CONFIGURATION** view.
If you prefer to set up your MCP server manually, a detailed quickstart guide is available for [Quickstart guide #Setup in Cursor](https://app.gitbook.com/s/xNksbUaDXyfRoTpHP0vQ/quickstart-guide#setup-in-cursor "mention"). More information about the available tools can be found in the SonarQube MCP Server documentation, on the [Tools](https://app.gitbook.com/s/xNksbUaDXyfRoTpHP0vQ/tools "mention") page.
#### Configure your AI agent
The **AI AGENTS CONFIGURATION** view is only available when running an AI-enabled agent and offers two tools to help your AI agent engage with SonarQube (Server, Cloud).
* Select **Configure SonarQube MCP Server** to use your connected mode credentials to install the SonarQube MCP Server. You will be prompted to complete your [setup](https://docs.sonarsource.com/sonarqube-for-vs-code/connect-your-ide/setup "mention") if none exists.
* Available in Cursor, Kiro, and Windsurf: Select **Introduce SonarQube Rules File** to create explicit instructions for your AI-powered IDE to produce secure, reliable, and maintainable code.
* The file provides SonarQube MCP Server instructions to your AI agent. As an example, it instructs the agent to disable SonarQube automatic analysis before starting code generation, and to enable it after the generation is complete. It also asks the agent to analyze changed files in batches, once the changes are done.
### Related pages
* [ai-codefix](https://docs.sonarsource.com/sonarqube-for-vs-code/ai-capabilities/ai-codefix "mention")
* SonarQube and [agents](https://docs.sonarsource.com/sonarqube-for-vs-code/ai-capabilities/agents "mention") in your IDE
* Getting started with other [ides](https://docs.sonarsource.com/sonarqube-for-vs-code/getting-started/ides "mention")
* [setup](https://docs.sonarsource.com/sonarqube-for-vs-code/connect-your-ide/setup "mention")
---
# Source: https://docs.sonarsource.com/sonarqube-server/8.9/instance-administration/custom-measures.md
# Custom measures
SonarQube collects a maximum of measures in an automated manner but there are some measures for which this is not possible, such as when: the information is not available for collection, the measure is computed by a human, and so on. Whatever the reason, SonarQube provides a service to inject those measures manually and allows you to benefit from other services: the Manual Measures service. The manual measures entered will be picked during the next analysis of the project and thereafter treated as "normal" measures.
### Managing custom metrics
As with measures that are collected automatically, manual measures are the values collected in each analysis for manual metrics. Therefore, the first thing to do is create the metric you want to save your measure against. In order to do so, log in as a system administrator and go to **Administration** > **Configuration** > **Custom Metrics**, where the interface will guide you in creating the metric you need.
### Managing custom measures
Custom measures can be entered at the project level. To add a measure, sign in as a project administrator, navigate to the desired project and choose **Project Settings** > **Custom Measures**, where you will find a table with the latest measure value entered for each metric.
Values entered in this interface are **Pending**, and will not be visible outside this administrative interface until the next analysis.
---
# Source: https://docs.sonarsource.com/sonarqube-server/9.8/instance-administration/custom-messages.md
# Source: https://docs.sonarsource.com/sonarqube-server/9.9/instance-administration/custom-messages.md
# Source: https://docs.sonarsource.com/sonarqube-server/10.0/instance-administration/custom-messages.md
# Source: https://docs.sonarsource.com/sonarqube-server/10.1/instance-administration/custom-messages.md
# Source: https://docs.sonarsource.com/sonarqube-server/10.2/instance-administration/custom-messages.md
# Source: https://docs.sonarsource.com/sonarqube-server/10.3/instance-administration/custom-messages.md
# Source: https://docs.sonarsource.com/sonarqube-server/10.4/instance-administration/custom-messages.md
# Source: https://docs.sonarsource.com/sonarqube-server/10.5/instance-administration/custom-messages.md
# Source: https://docs.sonarsource.com/sonarqube-server/10.6/instance-administration/custom-messages.md
# Source: https://docs.sonarsource.com/sonarqube-server/10.7/instance-administration/ui-customization/custom-messages.md
# Source: https://docs.sonarsource.com/sonarqube-server/10.8/instance-administration/ui-customization/custom-messages.md
# Source: https://docs.sonarsource.com/sonarqube-server/2025.2/instance-administration/ui-customization/custom-messages.md
# Source: https://docs.sonarsource.com/sonarqube-server/2025.3/instance-administration/ui-customization/custom-messages.md
# Source: https://docs.sonarsource.com/sonarqube-server/2025.5/instance-administration/ui-customization/custom-messages.md
# Source: https://docs.sonarsource.com/sonarqube-server/2025.1/instance-administration/ui-customization/custom-messages.md
# Source: https://docs.sonarsource.com/sonarqube-server/2025.4/instance-administration/ui-customization/custom-messages.md
# Source: https://docs.sonarsource.com/sonarqube-server/2025.6/instance-administration/ui-customization/custom-messages.md
# Source: https://docs.sonarsource.com/sonarqube-server/instance-administration/ui-customization/custom-messages.md
# Custom messages
*This feature is available to customers with* [*Enterprise Edition*](https://www.sonarsource.com/plans-and-pricing/enterprise/)*.*
### Log-in message
As an admin, you can display a custom login message that all users will see on their login screen.
An administrator can:
* Define or edit a message using text or markdown.
* Remove the message at any time.
The use of links is supported.
You can adjust the login message setting by navigating to **Administration** > **Configuration** > **General Settings** > **General** > **Log-in message**
Switch on/off the option to display a message, type in your text, and save.
{% hint style="info" %}
If the message is turned on but the text field is empty, nothing will be displayed to users.
{% endhint %}
### Announcements
You can create announcements that will be displayed as a banner after users have logged in to SonarQube Server. To adjust the announcement message go to **Administration** > **Configuration** > **General Settings** > **General** > **Announcement message.**
As an admin, you can:
* Define or edit a message using text or markdown.
* Remove the message at any time.
The use of links is supported.
---
# Source: https://docs.sonarsource.com/sonarqube-community-build/server-installation/on-kubernetes-or-openshift/customizing-helm-chart.md
# Source: https://docs.sonarsource.com/sonarqube-server/10.7/setup-and-upgrade/deploy-on-kubernetes/server/customizing-helm-chart.md
# Source: https://docs.sonarsource.com/sonarqube-server/10.8/setup-and-upgrade/deploy-on-kubernetes/dce/customizing-helm-chart.md
# Source: https://docs.sonarsource.com/sonarqube-server/10.8/setup-and-upgrade/deploy-on-kubernetes/server/customizing-helm-chart.md
# Source: https://docs.sonarsource.com/sonarqube-server/2025.2/setup-and-update/deploy-on-kubernetes/dce/customizing-helm-chart.md
# Source: https://docs.sonarsource.com/sonarqube-server/2025.2/setup-and-update/deploy-on-kubernetes/server/customizing-helm-chart.md
# Source: https://docs.sonarsource.com/sonarqube-server/2025.3/server-installation/data-center-edition/on-kubernetes-or-openshift/customizing-helm-chart.md
# Source: https://docs.sonarsource.com/sonarqube-server/2025.3/server-installation/on-kubernetes-or-openshift/customizing-helm-chart.md
# Source: https://docs.sonarsource.com/sonarqube-server/2025.5/server-installation/data-center-edition/on-kubernetes-or-openshift/customizing-helm-chart.md
# Source: https://docs.sonarsource.com/sonarqube-server/2025.5/server-installation/on-kubernetes-or-openshift/customizing-helm-chart.md
# Source: https://docs.sonarsource.com/sonarqube-server/2025.1/setup-and-upgrade/deploy-on-kubernetes/dce/customizing-helm-chart.md
# Source: https://docs.sonarsource.com/sonarqube-server/2025.1/setup-and-upgrade/deploy-on-kubernetes/server/customizing-helm-chart.md
# Source: https://docs.sonarsource.com/sonarqube-server/2025.4/server-installation/data-center-edition/on-kubernetes-or-openshift/customizing-helm-chart.md
# Source: https://docs.sonarsource.com/sonarqube-server/2025.4/server-installation/on-kubernetes-or-openshift/customizing-helm-chart.md
# Source: https://docs.sonarsource.com/sonarqube-server/2025.6/server-installation/data-center-edition/on-kubernetes-or-openshift/customizing-helm-chart.md
# Source: https://docs.sonarsource.com/sonarqube-server/2025.6/server-installation/on-kubernetes-or-openshift/customizing-helm-chart.md
# Source: https://docs.sonarsource.com/sonarqube-server/server-installation/data-center-edition/on-kubernetes-or-openshift/customizing-helm-chart.md
# Source: https://docs.sonarsource.com/sonarqube-server/server-installation/on-kubernetes-or-openshift/customizing-helm-chart.md
# Customizing Helm chart
While we only document the most pressing SonarQube Server Helm chart customizations in this documentation, there are other possibilities for you to choose to customize the chart before installing. Please see the [Helm chart README file](https://artifacthub.io/packages/helm/sonarqube/sonarqube) for more information on these. In particular, see the recommended production use case values.
You can customize the SonarQube Server Helm chart:
* By editing the default values in the `values.yaml` file.
* Or directly in the Helm chart installation command line, see [installing-helm-chart](https://docs.sonarsource.com/sonarqube-server/server-installation/on-kubernetes-or-openshift/installing-helm-chart "mention").
Parameters passed in the command line have precedence over parameters set in `values.yaml`.
{% hint style="info" %}
To set up SonarQube Server monitoring, see [set-up-monitoring](https://docs.sonarsource.com/sonarqube-server/server-installation/on-kubernetes-or-openshift/set-up-monitoring "mention").
{% endhint %}
### Enabling OpenShift
If you want to install SonarQube Server on OpenShift, you must enable OpenShift in the Helm chart. In that case:
* The Helm chart will auto-configure itself to comply with the default OpenShift [SCCs](https://docs.openshift.com/container-platform/3.11/admin_guide/manage_scc.html) (Security Context Constraints).
* Not using a default SCC in your OpenShift cluster may cause problems.
To enable OpenShift in the Helm chart:
1. Set `OpenShift.enabled` to `true`.
2. Set `OpenShift.createSCC` to `false`.
3. If you want to make your application publicly visible with Routes, you can set `route.enabled` to `true`. Please check the [configuration details](https://artifacthub.io/packages/helm/sonarqube/sonarqube#openshift) in the Helm chart documentation to customize the Route based on your needs.
### Ensuring a restricted security level About the Pod security level
Below is the [Pod security level](https://kubernetes.io/docs/concepts/security/pod-security-admission/#pod-security-levels) applied by default to each container. To apply a security level, a default `SecurityContext` is set on the container through the SonarQube Server Helm chart.
| **Container** | **Pod security level** | **Note** |
| --------------------------------------- | ---------------------- | ------------------------------------------------------------------------------------------------------------------------ |
| SonarQube Server application containers | restricted |
|
| SonarQube Server init containers | restricted |
|
| init-sysctl | privileged |
Utility software that requires root access.
|
| init-fs | baseline | Utility software that requires root access. To disable the container, set `initFs.enabled` in the Helm chart to `false`. |
The `SecurityContext` below is set as default on all restricted containers.
```css-79elbk
allowPrivilegeEscalation: false
runAsNonRoot: true
runAsUser: 1000
runAsGroup: 1000
seccompProfile:
type: RuntimeDefault
capabilities:
drop: ["ALL"]
```
In a Kubernetes installation
To run the SonarQube Server Helm chart in a full restricted namespace, you must disable the `init-sysctl` and `init-fs` containers by setting in the Helm chart:
* `initSysctl.enabled` to `false`.
* `initFs.enabled` to `false`.
Since these containers are used to perform some settings at the host/kernel level, disabling them may require additional configuration steps. For more information, see [Elasticsearch prerequisites](https://artifacthub.io/packages/helm/sonarqube/sonarqube#elasticsearch-prerequisites) in the Helm chart documentation.
In an OpenShift installation
The configuration described in [#enabling-openshift](#enabling-openshift "mention") above forces the disabling of the `init-sysctl` and `init-fs` containers. These containers should not be required in the vast majority of cases for an Openshift installation. Therefore, an Openshift installation is compatible with restricted SCCv2 (Security Context Constraints).
### Setting access to your external database
You must configure the access to your database (except if you want to use SonarQube for test purposes and want to use the embedded database H2).
To do so:
1. Set `jdbcOverwrite.enabled` to `true`.
2. Set `jdbcOverwrite.jdbcUrl` to the database URL and `jdbcOverwrite.jdbcUsername` to the database username.
3. Store the database password in a Kubernetes secret and set `jdbcOverwrite.jdbcSecretName` to the secret’s name.
4. If you use an Oracle database:
* Let the Helm chart download and inject the corresponding JDBC driver in SonarQube by setting `jdbcOverwrite.oracleJdbcDriver.url` to the URL of the Oracle JDBC driver to be downloaded.
* In case the download requires it, set `jdbcOverwrite.oracleJdbcDriver.netrcCreds` to the name of the Kubernetes secret containing the `.netrc` file that stores the credentials.
For more information, see this [section](https://artifacthub.io/packages/helm/sonarqube/sonarqube#jdbc-overwrite) in the ArtifactHub page of the Helm Chart.
### Enabling persistency in Elasticsearch
SonarQube Server comes with a bundled Elasticsearch, and as Elasticsearch is stateful, so is SonarQube Server. There is an option to persist the Elasticsearch indexes in a Persistent Volume, but with regular stoppage operations by the Kubernetes Cluster, these indexes can be corrupted. By default, persistency is disabled in the Helm chart.
Enabling persistency decreases the startup time of the SonarQube Server Pod significantly, but you are risking corrupting your Elasticsearch index. You can enable persistency by adding the following to the `values.yaml`:
```css-79elbk
persistence:
enabled: true
```
Leaving persistency disabled results in a longer startup time until SonarQube Server is fully available, but you won’t lose any data as SonarQube Server will persist all data in the database.
### Using custom certificates for your code repository
When you are working with your own Certificate Authority or in an environment that uses self-signed certificates for your code repository platform, you can create a secret containing this certificate and add this certificate to the Java truststore inside the SonarQube deployment.
To add a certificate to the Javatrustore inside the SonarQube deployment:
1. Ask the relevant team to provide you with a PEM format certificate or certificate chain. We will assume it to be called `cert.pem` on the following commands.
2. Generate the kubernetes secret, e.g. with this command:
```bash
kubectl create secret generic --from-file cert.pem -n
```
The generated secret should then appear in this format and the certificate should contain the full chain:
```
apiVersion: v1
data:
sonar.crt:
kind: Secret
metadata:
name:
namespace: sq
type: Opaque
```
3\. In SonarQube’s `value.yaml` file, add:
```yaml
caCerts:
enabled: true
secret:
```
### Creating an Ingress to make SonarQube Server service accessible from outside
To make the SonarQube Server service accessible from outside of your cluster, you most likely need an Ingress.
{% hint style="info" %}
The Sonar Helm chart has an optional dependency on the [NGINX Ingress Helm chart](https://kubernetes.github.io/ingress-nginx) which installs the NGINX Ingress controller (To install the NGINX Ingress Helm chart through SonarQube Server Helm chart, set `ingress-nginx.enabled` to `true` in SonarQube Server’s `values.yaml`.) You should use it only in a test environment. In a production environment, it’s highly recommended that you use your own Ingress controller since the controller is a critical part of the software chain.
{% endhint %}
To create an Ingress resource through the Helm chart:
* Add the following to your SonarQube Server’s `values.yaml`. In this configuration, we use the Ingress class NGINX with a body size of at least 64MB since this is what we recommend.
```yaml
ingress:
enabled: true
# Used to create an Ingress record.
hosts:
- name:
# Different clouds or configurations might need /* as the default path
path: /
# For additional control over serviceName and servicePort
# serviceName: someService
# servicePort: somePort
annotations:
nginx.ingress.kubernetes.io/proxy-body-size: "64m"
```
#### Deprecation of Ingress NGINX
Due to the retirement of the ingress-nginx controller in November 2025 (with best-effort support ceasing in March 2026), the dependency on this chart is now deprecated.
We advise migrating to the [Gateway API](https://gateway-api.sigs.k8s.io/guides/), which is the modern successor to Ingress. Should you need to continue using Ingress, consult the [Kubernetes documentation](https://kubernetes.io/docs/concepts/services-networking/ingress-controllers/) for a list of suitable alternative controllers. A replacement dependency will be provided in a future release.
### Related pages
* [installation-overview](https://docs.sonarsource.com/sonarqube-server/server-installation/on-kubernetes-or-openshift/installation-overview "mention")
* [before-you-start](https://docs.sonarsource.com/sonarqube-server/server-installation/on-kubernetes-or-openshift/before-you-start "mention")
* [installing-helm-chart](https://docs.sonarsource.com/sonarqube-server/server-installation/on-kubernetes-or-openshift/installing-helm-chart "mention")
* [set-up-monitoring](https://docs.sonarsource.com/sonarqube-server/server-installation/on-kubernetes-or-openshift/set-up-monitoring "mention")
* Installing Data Center Edition on Kubernetes: [on-kubernetes-or-openshift](https://docs.sonarsource.com/sonarqube-server/server-installation/data-center-edition/on-kubernetes-or-openshift "mention")
---
# Source: https://docs.sonarsource.com/sonarqube-cloud/managing-your-projects/administering-your-projects/customizing-info-page.md
# Customizing Information page
This page explains how to add custom links to the Information page of a SonarQube Cloud project.
### Adding links on the project Information page
You can add URLs associated with your project visible on your project’s **Information** page in the **External Links** section.
Creating a project link
1. Retrieve your project. See [retrieving-projects](https://docs.sonarsource.com/sonarqube-cloud/managing-your-projects/retrieving-projects "mention") for more information.
2. In the left sidebar, select **Administration** > **Links**. The **Links** page opens.
3. In the top right corner, select **Create**. The **Create New Project Link** dialog opens.
4. Enter the name and URL, and select **Create**.
Deleting a project link
1. Retrieve your project. See [retrieving-projects](https://docs.sonarsource.com/sonarqube-cloud/managing-your-projects/retrieving-projects "mention") for more information.
2. In the left sidebar, select **Administration** > **Links**. The **Links** page opens with the list of configured links.
3. Select the dustbin icon in the row of the link to delete.
### Related pages
* [setting-up-project](https://docs.sonarsource.com/sonarqube-cloud/managing-your-projects/administering-your-projects/setting-up-project "mention")
* [introduction](https://docs.sonarsource.com/sonarqube-cloud/managing-your-projects/administering-your-projects/devops-platform-integration/introduction "mention") to Setting up the integration of your project with your DevOps platform
* [setting-permissions](https://docs.sonarsource.com/sonarqube-cloud/managing-your-projects/administering-your-projects/setting-permissions "mention")
* [changing-binding](https://docs.sonarsource.com/sonarqube-cloud/managing-your-projects/administering-your-projects/changing-binding "mention")
---
# Source: https://docs.sonarsource.com/sonarqube-community-build/project-administration/setting-up-features/customizing-project-information-page.md
# Source: https://docs.sonarsource.com/sonarqube-server/2025.2/project-administration/customizing-project-information-page.md
# Source: https://docs.sonarsource.com/sonarqube-server/2025.3/project-administration/customizing-project-information-page.md
# Source: https://docs.sonarsource.com/sonarqube-server/2025.5/project-administration/customizing-project-information-page.md
# Source: https://docs.sonarsource.com/sonarqube-server/2025.4/project-administration/customizing-project-information-page.md
# Source: https://docs.sonarsource.com/sonarqube-server/2025.6/project-administration/setting-up-features/customizing-project-information-page.md
# Source: https://docs.sonarsource.com/sonarqube-server/project-administration/setting-up-features/customizing-project-information-page.md
# Customizing Project Information page
You can add URLs associated with your project visible on your project’s information page in the **External Links** section.
### Creating a project link
1. Retrieve your project. See [retrieving-projects](https://docs.sonarsource.com/sonarqube-server/user-guide/viewing-projects/retrieving-projects "mention") for more details.
2. In the top right corner, select **Project Settings >** **Links**. The **Links** page opens.
3. In the top right corner, select **Create**. The **Create New Project Link** dialog opens.
4. Enter the name and URL, and select **Create**.
### Deleting a project link
1. Retrieve your project. See [retrieving-projects](https://docs.sonarsource.com/sonarqube-server/user-guide/viewing-projects/retrieving-projects "mention") for more details.
2. In the top right corner, select **Project Settings >** **Links**. The **Links** page opens.
3. Select the dustbin icon in the row of the link to delete.
---
# Source: https://docs.sonarsource.com/sonarqube-server/10.6/analyzing-source-code/languages/c-family/customizing-the-analysis.md
# Source: https://docs.sonarsource.com/sonarqube-server/10.7/analyzing-source-code/languages/c-family/customizing-the-analysis.md
# Source: https://docs.sonarsource.com/sonarqube-server/10.8/analyzing-source-code/languages/c-family/customizing-the-analysis.md
# Source: https://docs.sonarsource.com/sonarqube-server/2025.2/analyzing-source-code/languages/c-family/customizing-the-analysis.md
# Source: https://docs.sonarsource.com/sonarqube-server/2025.3/analyzing-source-code/languages/c-family/customizing-the-analysis.md
# Source: https://docs.sonarsource.com/sonarqube-server/2025.5/analyzing-source-code/languages/c-family/customizing-the-analysis.md
# Source: https://docs.sonarsource.com/sonarqube-server/2025.1/analyzing-source-code/languages/c-family/customizing-the-analysis.md
# Source: https://docs.sonarsource.com/sonarqube-server/2025.4/analyzing-source-code/languages/c-family/customizing-the-analysis.md
# Source: https://docs.sonarsource.com/sonarqube-server/2025.6/analyzing-source-code/languages/c-family/customizing-the-analysis.md
# Source: https://docs.sonarsource.com/sonarqube-server/analyzing-source-code/languages/c-family/customizing-the-analysis.md
# Source: https://docs.sonarsource.com/sonarqube-cloud/advanced-setup/languages/c-family/customizing-the-analysis.md
# Customizing the analysis
### Language-specific properties
Discover and update the C/C++/Objective-C specific properties in the project settings. From the project homepage, go to **Administration** > **General Settings** > **Languages** > **C/C++/Objective-C** > **Automatic Analysis Settings**.
### Analyzing test files
The scanner property `sonar.tests` is used to pinpoint the directories that contain test source files. Recognizing these test files aids the analyzers in adjusting their rules accordingly. For instance, analyzers can activate rules specific to tests and deactivate those not applicable in a testing context.
Currently, the CFamily analyzer treats main and test source files identically. As a result, the `sonar.tests` scanner property is not supported at this time and is disregarded by the analyzer.
To analyze test source files, they should be incorporated into the `sonar.sources` scanner property. In that case, please note that the test code is considered part of the overall code and counts toward the license usage.
### Quality profiles
* Like all other languages supported by SonarQube Cloud, C, C++, and Objective-C come with the "Sonar way" profile. This is Sonar’s recommended quality profile, designed to fit most projects. To learn more, see the [understanding-quality-profiles](https://docs.sonarsource.com/sonarqube-cloud/standards/managing-quality-profiles/understanding-quality-profiles "mention") page.
* We also provide the "Mission critical" quality profile for C++. It is our recommendation for modern C++ development (C++17 and beyond) for mission-critical software. It is based on MISRA C++ 2023 and trades more constraints on your code for more code safety.
### Targeted C++ standard
The analyzer targets a specific version of the C++ language to tune the rules in the activated quality profile. This reporting standard is used to:
* Suppress rules that cannot be applied, such as rules that suggest using C++20 features while compiling the code with C++17.
* Adjust rules’ messages to suggest the proper fix according to the used standard. For example, a rule that suggests using `std::ranges::any_of` with C++20 will be tuned to suggest using `std::any_of` with an older standard.
In Compilation Database mode, the reporting standard defaults to the version used to compile the code. This is ideal for most projects. However, there are some edge cases where there is a need to use a reporting standard different from the compilation standard. For this reason, we provide the following scanner property to adjust the reporting standard:
```properties
sonar.cfamily.reportingCppStandardOverride=c++98|c++11|c++14|c++17|c++20|c++23
```
This property is only recommended for use in cases where a project has to comply with a standard older than the one it is compiled with. This can happen if:
* The compiler doesn’t allow setting a specific standard. For example, MSVC doesn’t allow specifying a standard older than C++14.
* The project wants to be compiled with the latest standard while still complying with an older one.
In Automatic Analysis mode, the reporting standard defaults to the latest version. In this case, we recommend setting the property if the project needs to comply with an older standard.
### C++20 Modules
Support for C++20 modules is currently experimental and not enabled by default.
* Since the analyzer is based on Clang 20, not all features of C++20 modules are supported. For more information, see the [official documentation for Clang](https://releases.llvm.org/20.1.0/tools/clang/docs/StandardCPlusPlusModules.html).
* Header units are not currently supported.
* The CFamily analyzer needs to know where to find the module units and how to build their corresponding Binary Module Interfaces (BMI). Hence, the Compilation Database must contain the necessary compiler calls for a complete clean build. This is also true for import std. Module units do not need to be indexed by Sonar unless you want them to be analyzed.
* Support for this feature is only available through the Sonar Community; commercial support is not currently available.
* When modules are involved, there may be some False Positives or Negatives. If you find any, [please report them via the Sonar Community](https://community.sonarsource.com/t/how-to-report-a-false-positive-false-negative/37022/1) or mark "*Share* *comment with Sonar to help improve our analyzers*" when flagging an issue as a False Positive in SonarQube Cloud.
Use the following scanner property to enable C++20 module support:
```properties
sonar.cfamily.enableModules=true
```
There are some aspects to keep in mind when analyzing code with C++20 modules:
* The property above will enable module support only for source files compiled with C++20 or later.
* Using modules requires building intermediate *BMIs*, which, by default, will be put under the directory configured by **`sonar.working.directory`** (usually, `.sonarscanner` under the project root directory). You must account for some extra space to store these files, which SonarScanner will remove at the end of the analysis.
* Analysis results and module dependencies are cached, but the intermediate BMIs are not. Hence, when re-analyzing a file, the analyzer will have to build its full tree of dependencies.
### Automatic Analysis specific properties
While Automatic Analysis mode automatically deduces the low-level configurations, optionally tuning some high-level configurations can be beneficial to force the analysis of specific project variants and improve its analysis quality. Those high-level configurations can be tuned through settings Automatic Analysis specific properties that fall into three categories: custom preprocessor, custom analysis target, and forcing a C++ language standard.
* Set a custom preprocessor to tune which parts of the code are analyzed and which features macros are enabled or disabled.
* Set custom targets to tune the size of types and inform the analyzer about the environment the project aims to run on. This can be especially useful for embedded projects with custom architecture.
* Override the default C++ language standard if the project needs to comply with a standard other than the latest.
You can find more on those settings and how to set them in the project administration settings. From the project homepage, go to **Project Settings** > **General Settings** > **Languages** > **C/C++/Objective-C** > **Automatic Analysis**.
While it is recommended and easier to set these properties from the UI, they can be set in `.sonarcloud.properties`, for example:
```properties
# Set a multiline custom preprocessor to disable C++ exceptions and define a `custom_macro` to 1
sonar.cfamily.customPreprocessor=#undef __cpp_exceptions\n#define custom_macro 1\n
# Set custom targets, possible values are listed in the UI
# This is equivalent to Clang command line argument: "-target aarch64-pc-linux-gnu"
sonar.cfamily.customTargetArch=aarch64
sonar.cfamily.customTargetVendor=pc
sonar.cfamily.customTargetSystem=linux
sonar.cfamily.customTargetEnv=gnu
# Override the default C++ language standard with c++14
sonar.cfamily.reportingCppStandardOverride=c++14
```
Note that you don’t need to worry about these properties by default. Different UI warnings are raised when the analysis quality is considered too low, suggesting providing the Automatic Analysis-specific properties or moving from Automatic Analysis to Compilation Database mode.
### Analysis cache
The C/C++/Objective-C analyzer uses the [#analysis-cache](https://docs.sonarsource.com/sonarqube-cloud/incremental-analysis-mechanisms#analysis-cache "mention") to perform incremental analysis.
Incremental analysis is activated by default and uses server cache storage. It’s possible to change the cache storage to the local file system.
You should consider changing the cache storage to the local filesystem when:
* The server cache size becomes a concern.
* You want to optimize the cache lifecycle based on your project workflow.\
In particular, if you have long-living pull request branches, you may want to persist the cache for each pull request analysis.
With the filesystem cache, you define a path to the cache. The analyzer loads the cache provided in this directory at the beginning of the analysis and overwrites it at the end. Persisting this directory at the end of the analysis, and loading the cache of the most relevant analysis at the beginning becomes the responsibility of the CI configuration. For example, for the first analysis of a pull request branch, a good option is usually to load the target branch cache to the location of the pull request branch analysis cache.
{% hint style="warning" %}
Be aware that the setup of a filesystem cache is complicated since you must implement the cache lifecycle management logic in your CI configuration.
{% endhint %}
To configure the filesystem cache:
1. Set the `sonar.cfamily.analysisCache.mode` property to `fs` (filesystem) on your CI/CD host (the default value is `server` for server-side cache). See the corresponding SonarScanner section for more information about the setup methods.
2. To set the path to the cache, use the `sonar.cfamily.analysisCache.path` property in your CI process configuration.
### Incremental symbolic execution
The analyzer provides an incremental symbolic execution mode that incrementally updates the analysis results computed for the rules with a symbolic-execution tag (see the [#implementationrelated-rule-tags](https://docs.sonarsource.com/sonarqube-cloud/advanced-setup/languages/understanding-the-analysis#implementationrelated-rule-tags "mention") article*)*. It may be used to shorten the analysis.
Incremental symbolic execution is enabled by default. It acts as an additional layer on top of the analysis cache and uses the same storage to maintain the required information as selected for the analysis cache (server cache or local file system). For more information on the analysis cache, see the corresponding section above.
In contrast to the analysis cache, incremental symbolic execution detects code changes on an intra-file level rather than treating a file and its dependencies as a whole. This allows it to skip parts of the analysis or to reuse parts of the previous analysis results that are still valid even in cases where a file or its dependencies did undergo edits.
To toggle the incremental symbolic execution mode, set the property `sonar.cfamily.symbolicExecution.useIncrementalMode` to `true` or `false` at the scanner level.
### Parallel code scan
By default, the analyzer tries to parallelize the analysis of compilation units; it spawns as many jobs as the machine’s logical CPUs allow.
If required, in **Compilation Database mode**, the number of scheduled parallel jobs can be customized by configuring the property `sonar.cfamily.threads=n` at the scanner level, where `n` is an integer indicating the maximum number of parallel jobs.
You should consider setting the `sonar.cfamily.threads` property only when the desired number of logical CPUs cannot be detected automatically. A typical example is when the analysis should not consume all the available computing resources to leave room for other tasks running in parallel on the same machine.
When setting the `sonar.cfamily.threads` property, you should set it to a value less or equal to the number of logical CPUs available. Over-committing doesn’t accelerate the analysis and can even slow it down.
### Automatic Shallow Mode for Advanced Bug Detection
For large files that take a long time to analyze, you can activate Automatic Shallow Mode, which trades a potentially lower bug detection rate for a faster analysis time.
To activate shallow mode on files with more than `N` entry points set the property `sonar.cfamily.symbolicExecution.automaticShallowModeThreshold=N`. An entry point is essentially a (member-) function declaration with a body. The analyzer begins its work at every function declared with a body, so a file containing many entry points will require a longer analysis time.
By default `sonar.cfamily.symbolicExecution.automaticShallowModeThreshold=0` which means this feature is disabled.
If you are willing to reduce the bug detection rate in order to reduce analysis time, we recommend setting it to 70 entry points. Choosing a lower, non-zero value for `N` will reduce analysis depth on more files and will make the analysis even faster. Choosing a higher value for `N` restricts shallow mode only to the largest files, minimizing the impact on small and medium files.
---
# Source: https://docs.sonarsource.com/sonarqube-server/2025.2/design-and-architecture/cycle-detection.md
# Source: https://docs.sonarsource.com/sonarqube-server/2025.3/design-and-architecture/cycle-detection.md
# Source: https://docs.sonarsource.com/sonarqube-server/2025.5/design-and-architecture/cycle-detection.md
# Source: https://docs.sonarsource.com/sonarqube-server/2025.4/design-and-architecture/cycle-detection.md
# Source: https://docs.sonarsource.com/sonarqube-server/2025.6/design-and-architecture/cycle-detection.md
# Cycle detection
{% hint style="warning" %}
The cycle detection and architecture as code are deprecated, pending removal in January 2026. They will be replaced by improved architecture capabilities. See the [Sonar newsroom](https://www.sonarsource.com/company/newsroom/) page for more information.
{% endhint %}
No additional configuration is needed beyond ensuring that the rule is included in your Quality Profile. Depending on the language, Sonar enables the rules by default in the Sonar Way profile.
Circular dependencies occur when two or more classes, modules, or elements reference each other, either directly or indirectly. This creates a cyclic dependency graph, preventing a clear and intuitive hierarchy in the codebase, and typically indicates a divergence from the intended abstraction. As a result, understanding, maintaining, and refactoring the code becomes significantly more challenging.
#### Why Circular Dependencies are problematic
Circular dependencies increase architectural complexity, making it harder for teams to modify and extend the code. They introduce tight coupling, reducing modularity and reusability while increasing the risk of unintended side effects when making changes. Additionally, they can cause issues such as:
* Compilation and runtime errors: Some languages struggle to resolve circular dependencies at compile time, leading to build failures or unexpected runtime behavior.
* Code fragility: Changes to one part of the code can have unintended consequences elsewhere, increasing the risk of regressions.
* Performance issues: In dynamically loaded environments, circular dependencies can lead to memory leaks or inefficient initialization sequences.
As a project grows, circular dependencies often lead to even more circular dependencies, further entangling the architecture and increasing technical debt. Over time, resolving these issues becomes significantly more difficult, requiring major refactoring efforts.
By automatically identifying circular dependencies, Sonar helps developers maintain a clean and scalable architecture, improving the maintainability and long-term health of the codebase.
---
# Source: https://docs.sonarsource.com/sonarqube-server/10.7/analyzing-source-code/test-coverage/dart-test-coverage.md
# Source: https://docs.sonarsource.com/sonarqube-server/10.8/analyzing-source-code/test-coverage/dart-test-coverage.md
# Source: https://docs.sonarsource.com/sonarqube-server/2025.2/analyzing-source-code/test-coverage/dart-test-coverage.md
# Source: https://docs.sonarsource.com/sonarqube-server/2025.3/analyzing-source-code/test-coverage/dart-test-coverage.md
# Source: https://docs.sonarsource.com/sonarqube-server/2025.5/analyzing-source-code/test-coverage/dart-test-coverage.md
# Source: https://docs.sonarsource.com/sonarqube-server/2025.1/analyzing-source-code/test-coverage/dart-test-coverage.md
# Source: https://docs.sonarsource.com/sonarqube-server/2025.4/analyzing-source-code/test-coverage/dart-test-coverage.md
# Source: https://docs.sonarsource.com/sonarqube-server/2025.6/analyzing-source-code/test-coverage/dart-test-coverage.md
# Source: https://docs.sonarsource.com/sonarqube-server/analyzing-source-code/test-coverage/dart-test-coverage.md
# Source: https://docs.sonarsource.com/sonarqube-cloud/enriching/test-coverage/dart-test-coverage.md
# Dart test coverage
SonarQube Cloud supports the reporting of test coverage information as part of the analysis of your Flutter or Dart project.
However, SonarQube Cloud does not produce the coverage report itself. Instead, you’ll need to set up a coverage tool to produce an [LCOV report](https://github.com/linux-test-project/lcov) as part of your build process, then configure your analysis to tell the SonarScanner where the report is located so that it can pick it up and send it to SonarQube Cloud. The report will be displayed on your project dashboard along with the other analysis metrics.
### Follow the in-product tutorial
After you import your repository, SonarQube Cloud directs you to the onboarding tutorial specific to your CI. Follow the tutorial, and when asked **What option best describes your build?**, choose **Flutter or Dart**. When you’re done with the tutorial, you should have a functioning CI-based analysis setup for your project. The next step is to adjust it to get coverage working.
### Adjust your setup
To enable coverage for Dart, you need to:
* Adjust your build process so that the coverage tool generates the report(s) just after your unit as part of the clean build required to run analysis.
* Make sure that the coverage tool writes its report file to a defined path in the build environment.
* Configure the scanning step of your build so that the scanner picks up the report file from that defined path.
### Adding coverage to your build process
For Flutter or Dart projects, SonarQube Cloud supports [LCOV reports](https://github.com/linux-test-project/lcov). The location of the coverage report produced by the tool must be set in the associated analysis parameter `sonar.dart.lcov.reportPaths`.
Multiple options are available to generate coverage reports, depending on the type of project and the tools used to run test. For example:
* the [Flutter command-line tool](https://docs.flutter.dev/reference/flutter-cli), when dealing with Flutter projects
* the [Dart coverage package](https://pub.dev/documentation/coverage/latest/), when dealing with generic Dart projects
```dart
# example for a Flutter project
flutter test --coverage
# example for a Dart project
dart pub global activate coverage
dart pub global run coverage:test_with_coverage
```
To produce data for branch coverage when using the Dart coverage package, you can provide the `--branch-coverage` parameter to the `coverage:test_with_coverage` target. You’ll find more information and options in the [Dart coverage package documentation](https://pub.dev/documentation/coverage/latest/).
### Related pages
* [dart](https://docs.sonarsource.com/sonarqube-cloud/advanced-setup/languages/dart "mention")
* [test-coverage-parameters](https://docs.sonarsource.com/sonarqube-cloud/enriching/test-coverage/test-coverage-parameters "mention")
---
# Source: https://docs.sonarsource.com/sonarqube-server/10.7/analyzing-source-code/languages/dart.md
# Source: https://docs.sonarsource.com/sonarqube-server/10.8/analyzing-source-code/languages/dart.md
# Source: https://docs.sonarsource.com/sonarqube-server/2025.2/analyzing-source-code/languages/dart.md
# Source: https://docs.sonarsource.com/sonarqube-server/2025.3/analyzing-source-code/languages/dart.md
# Source: https://docs.sonarsource.com/sonarqube-server/2025.5/analyzing-source-code/languages/dart.md
# Source: https://docs.sonarsource.com/sonarqube-server/2025.1/analyzing-source-code/languages/dart.md
# Source: https://docs.sonarsource.com/sonarqube-server/2025.4/analyzing-source-code/languages/dart.md
# Source: https://docs.sonarsource.com/sonarqube-server/2025.6/analyzing-source-code/languages/dart.md
# Source: https://docs.sonarsource.com/sonarqube-server/analyzing-source-code/languages/dart.md
# Source: https://docs.sonarsource.com/sonarqube-cloud/advanced-setup/languages/dart.md
# Dart
### Supported versions
The level of support for a language is defined as follows:
* Fully supported: Analysis will complete. All the language features are understood and examined.
* Supported: Most language features are understood and examined but the version includes unsupported features. Analysis might break or provide incomplete results.
Version 2 is supported.
Versions 3 to 3.8 are fully supported.
### Language-specific properties
To discover and update the Dart-specific properties, navigate in SonarQube Cloud to *Your Project* > **Administration** > **General Settings** > **Languages** > **Dart**. See the [analysis-parameters](https://docs.sonarsource.com/sonarqube-cloud/advanced-setup/analysis-parameters "mention") page for more information about specific properties.
### Preparing the analysis
Before performing the analysis, we highly recommend:
* retrieving all project dependencies declared in `pubspec.yaml`, for example, by running `flutter pub get` for Flutter projects, `dart pub get` for Dart projects, etc.
* performing a full and successful build of your Flutter or Dart project
Otherwise, you might get incomplete and potentially incorrect analysis results. Running `flutter pub get` or `dart pub get` alone may not be enough to produce a correct analysis, for example, when you analyze generated code.
### Analyzing generated code
When code generation is done via [automated source code generation](https://github.com/dart-lang/source_gen), the analysis of generated code can only happen after the execution of `source_gen`, which requires a full build of the Flutter or Dart project containing the builders.
When code generation is done via lower-level packages such as [build](https://pub.dev/packages/build), the analysis should only happen once the source has been generated and persisted on disk.
{% hint style="info" %}
When a `Generated` comment is present in the file, SonarQube ignores the *entire* \*\* *file*, even if only parts of it were generated. It’s possible to enable or disable analysis of *files containing generated code* at the project level in *Your project* > **Administration** > **General Settings** > **Languages** > *Your language* > **Analyze generated code**.
{% endhint %}
{% hint style="warning" %}
Sonar provides the [`sonarcloud-github-action` action](https://github.com/marketplace/actions/sonarcloud-scan) and the [`sonarqube-scan-action` action](https://github.com/marketplace/actions/official-sonarqube-scan) to ease the configuration of the analysis in GitHub.
However, up to `v3`, the two GitHub Actions run the analysis in a Docker container, which has only access to the directory where the project is checked out.
That means that the action doesn’t have access to the directory where dependencies have been retrieved, after running `flutter pub get`, `dart pub get`, or a similar command, which may result in an incomplete and potentially incorrect analysis.
Therefore, we suggest:
* either using `sonarqube-scan-action@v6` or above, which includes a unique entrypoint for both SonarQube Server and Cloud and is based on a [composite action](https://docs.github.com/en/actions/sharing-automations/creating-actions/creating-a-composite-action)
* or [sonarscanner-cli](https://docs.sonarsource.com/sonarqube-cloud/advanced-setup/ci-based-analysis/sonarscanner-cli "mention") directly (see the "Running SonarScanner CLI from the zip file" section).
{% endhint %}
### Related pages
* [dart-test-coverage](https://docs.sonarsource.com/sonarqube-cloud/enriching/test-coverage/dart-test-coverage "mention")
---
# Source: https://docs.sonarsource.com/sonarqube-cloud/managing-your-projects/dashboards.md
# Dashboards
This feature is available in the [Enterprise](https://www.sonarsource.com/plans-and-pricing/sonarcloud/) plan.
{% embed url="" %}
You can use the Project health dashboard, a built-in dashboard provided by Sonar, or create your own dashboards from scratch. Duplicating existing dashboards provides a good starting point for creating custom dashboards that fit your organization’s needs. Dashboards use interactive widgets that visualize data based on various types of measures. You can then sort and filter the data and click on values displayed in a dashboard to investigate further.
{% content-ref url="dashboards/viewing-and-managing-dashboards" %}
[viewing-and-managing-dashboards](https://docs.sonarsource.com/sonarqube-cloud/managing-your-projects/dashboards/viewing-and-managing-dashboards)
{% endcontent-ref %}
{% content-ref url="dashboards/creating-dashboards" %}
[creating-dashboards](https://docs.sonarsource.com/sonarqube-cloud/managing-your-projects/dashboards/creating-dashboards)
{% endcontent-ref %}
---
# Source: https://docs.sonarsource.com/sonarqube-server/2025.3/server-update-and-maintenance/data-center-edition.md
# Source: https://docs.sonarsource.com/sonarqube-server/2025.3/server-installation/data-center-edition.md
# Source: https://docs.sonarsource.com/sonarqube-server/2025.5/server-update-and-maintenance/data-center-edition.md
# Source: https://docs.sonarsource.com/sonarqube-server/2025.5/server-installation/data-center-edition.md
# Source: https://docs.sonarsource.com/sonarqube-server/2025.4/server-update-and-maintenance/data-center-edition.md
# Source: https://docs.sonarsource.com/sonarqube-server/2025.4/server-installation/data-center-edition.md
# Source: https://docs.sonarsource.com/sonarqube-server/2025.6/server-update-and-maintenance/data-center-edition.md
# Source: https://docs.sonarsource.com/sonarqube-server/2025.6/server-installation/data-center-edition.md
# Source: https://docs.sonarsource.com/sonarqube-server/server-update-and-maintenance/data-center-edition.md
# Source: https://docs.sonarsource.com/sonarqube-server/server-installation/data-center-edition.md
# Data Center Edition
- [Introduction](/sonarqube-server/server-installation/data-center-edition/introduction.md): Content of the Data Center Edition (DCE) installation section.
- [DCE topology](/sonarqube-server/server-installation/data-center-edition/dce-topology.md): The Data Center Edition (DCE) allows SonarQube Server to run in a clustered configuration to make it resilient to failures.
- [Installation requirements](/sonarqube-server/server-installation/data-center-edition/installation-requirements.md): General requirements, recommendations, and limitations for SonarQube Server’s cluster. Additional requirements specific to an installation type may be mentioned in the respective installation section.
- [Pre-installation steps](/sonarqube-server/server-installation/data-center-edition/pre-installation.md): Steps to perform before installing Data Center Edition (DCE).
- [Installing from ZIP file](/sonarqube-server/server-installation/data-center-edition/from-zip-file.md): Installing SonarQube Server's Data Center Edition (DCE) form the ZIP file.
- [Installing on Kubernetes or Openshift](/sonarqube-server/server-installation/data-center-edition/on-kubernetes-or-openshift.md): Installating SonarQube Server's Data Center Edition on Kubernetes or Openshift.
- [Installation overview](/sonarqube-server/server-installation/data-center-edition/on-kubernetes-or-openshift/overview.md): Your entry point to deploy the Data Center Edition (DCE) on Kubernetes or OpenShift.
- [Before you start](/sonarqube-server/server-installation/data-center-edition/on-kubernetes-or-openshift/before-you-start.md): This page describes the requirements and known limitations of a SonarQube Server’s Data Center Edition (DCE) deployment on Kubernetes or Openshift.
- [Customizing the DCE Helm chart](/sonarqube-server/server-installation/data-center-edition/on-kubernetes-or-openshift/customizing-helm-chart.md): How to perform the most important customization of the Helm chart for SonarQube Server’s Data Center Edition (DCE).
- [Setting up autoscaling](/sonarqube-server/server-installation/data-center-edition/on-kubernetes-or-openshift/setting-up-autoscaling.md): With Kubernetes’ Horizontal Pod Autoscaling (HPA), you can automatically scale your SonarQube Server out and in, resolving any performance issues you may have.
- [Setting up disaster recovery](/sonarqube-server/server-installation/data-center-edition/on-kubernetes-or-openshift/setting-up-disaster-recovery.md): How to set up a disaster recovery for SonarQube Server’s Data Center Edition (DCE) deployed on Kubernetes.
- [Disaster recovery architecture example with Azure resources](/sonarqube-server/server-installation/data-center-edition/on-kubernetes-or-openshift/setting-up-disaster-recovery/architecture-example.md): Example of disaster recovery architecture used for SonarQube Server’s Data Center Edition (DCE) deployed on Kubernetes.
- [Step 1: Deploy the primary and replica databases](/sonarqube-server/server-installation/data-center-edition/on-kubernetes-or-openshift/setting-up-disaster-recovery/deploy-databases.md): The first step of the disaster recovery setup for the Data Center Edition (DCE) deployed on Kubernetes consists in deploying the primary and replica databases.
- [Step 2: Set up the primary and replica clusters on AKS](/sonarqube-server/server-installation/data-center-edition/on-kubernetes-or-openshift/setting-up-disaster-recovery/set-up-clusters-on-aks.md): The second step of the disaster recovery setup for the Data Center Edition (DCE) on Kubernetes consists in setting up the primary and replica clusters.
- [Step 3: Configure the Azure Front Door](/sonarqube-server/server-installation/data-center-edition/on-kubernetes-or-openshift/setting-up-disaster-recovery/configure-azure-front-door.md): The third step of the disaster recovery setup for the Data Center Edition (DCE) deployed on Kubernetes consists in configuring the Azure Front Door.
- [Step 4: Test failover scenarios](/sonarqube-server/server-installation/data-center-edition/on-kubernetes-or-openshift/setting-up-disaster-recovery/test-failover-scenarios.md): How to test the failover of the Data Center Edition (DCE) deployed on Kubernetes.
- [Installing the DCE Helm chart](/sonarqube-server/server-installation/data-center-edition/on-kubernetes-or-openshift/installing-from-helm-repo.md): SonarQube Data Center Edition (DCE) can be installed from a customized SonarQube Server Helm chart.
- [Installing from Google Cloud Platform](/sonarqube-server/server-installation/data-center-edition/on-kubernetes-or-openshift/installing-from-gcp.md): SonarQube Data Center Edition (DCE) can be deployed on Kubernetes through the Google Marketplace.
- [Network security](/sonarqube-server/server-installation/data-center-edition/network-security.md): Enhancing network security for your Data Center Edition.
- [Securing behind a proxy](/sonarqube-server/server-installation/data-center-edition/network-security/securing-behind-proxy.md): It is recommended to run SonarQube behind a proxy, if it should be accessible from outside.
- [Elasticsearch security features](/sonarqube-server/server-installation/data-center-edition/network-security/elasticsearch-security-features.md): How to to set up Elasticsearch security features.
- [Network rules](/sonarqube-server/server-installation/data-center-edition/network-security/network-rules.md): Defining network rules to enhance the security.
- [Starting and stopping cluster](/sonarqube-server/server-installation/data-center-edition/starting-stopping-cluster.md): How to start and stop your Data Center Edition's cluster.
---
# Source: https://docs.sonarsource.com/sonarqube-server/2025.5/devops-platform-integration/bitbucket-integration/data-center.md
# Bitbucket Data Center integration
With this integration, you’ll be able to:
* **Import your BitBucket Data Center repositories**: Import your Bitbucket Server or Data Center repositories into SonarQube Server to easily set up SonarQube Server projects.
* **Report your Quality Gate status to your pull requests**: See your Quality Gate and code metric results right in Bitbucket Server or Data Center so you know if it’s safe to merge your changes.
Once the SonarQube Server instance admin has set up the integration at the global level, Bitbucket repositories can be imported into SonarQube Server to create the corresponding SonarQube projects. The project admin can then set up integration features for their project.
{% content-ref url="data-center/global" %}
[global](https://docs.sonarsource.com/sonarqube-server/2025.5/devops-platform-integration/bitbucket-integration/data-center/global)
{% endcontent-ref %}
{% content-ref url="data-center/import-repos" %}
[import-repos](https://docs.sonarsource.com/sonarqube-server/2025.5/devops-platform-integration/bitbucket-integration/data-center/import-repos)
{% endcontent-ref %}
{% content-ref url="data-center/project" %}
[project](https://docs.sonarsource.com/sonarqube-server/2025.5/devops-platform-integration/bitbucket-integration/data-center/project)
{% endcontent-ref %}
---
# Source: https://docs.sonarsource.com/sonarqube-community-build/server-update-and-maintenance/troubleshooting/database-related-issues.md
# Source: https://docs.sonarsource.com/sonarqube-server/10.8/server-upgrade-and-maintenance/troubleshooting/database-related-issues.md
# Source: https://docs.sonarsource.com/sonarqube-server/2025.2/server-update-and-maintenance/troubleshooting/database-related-issues.md
# Source: https://docs.sonarsource.com/sonarqube-server/2025.3/server-update-and-maintenance/troubleshooting/database-related-issues.md
# Source: https://docs.sonarsource.com/sonarqube-server/2025.5/server-update-and-maintenance/troubleshooting/database-related-issues.md
# Source: https://docs.sonarsource.com/sonarqube-server/2025.1/server-update-and-maintenance/troubleshooting/database-related-issues.md
# Source: https://docs.sonarsource.com/sonarqube-server/2025.4/server-update-and-maintenance/troubleshooting/database-related-issues.md
# Source: https://docs.sonarsource.com/sonarqube-server/2025.6/server-update-and-maintenance/troubleshooting/database-related-issues.md
# Source: https://docs.sonarsource.com/sonarqube-server/server-update-and-maintenance/troubleshooting/database-related-issues.md
# Database-related issues
We recommend reading the [server-logs](https://docs.sonarsource.com/sonarqube-server/server-update-and-maintenance/troubleshooting/server-logs "mention") first.
### Timeout issues when setting up Database Connection Pool
In some configurations when there is a firewall between SonarQube Server and the data you may experience timeout issues. The firewall may interrupt idle DB connections after a specific timeout which can lead to resetting connections. See also **Issues with MS SQL Server connection** below.
You can customize the [HikariCP](https://github.com/brettwooldridge/HikariCP#gear-configuration-knobs-baby) settings to the defaults listed below to avoid timeout isssues.
```css-79elbk
sonar.jdbc.idleTimeout=600000
sonar.jdbc.keepaliveTime=300000
sonar.jdbc.maxLifetime=1800000
sonar.jdbc.validationTimeout=5000
```
Additionally, it is now possible to configure HikariCP properties described [here](https://github.com/brettwooldridge/HikariCP#frequently-used) using the following naming convention: `sonar.jdbc.{HikariCP property name}`.
### Issues with MS SQL Server connection
HikariCP may get exhausted from connections causing SonarQube Server to be unresponsive. In this case, the error may display something like `HikariPool-1 - Connection is not available` or `HikariPool-1 - Cannot acquire connection from data source`.
In this case, customize the [HikariCP](https://github.com/brettwooldridge/HikariCP#gear-configuration-knobs-baby) settings as follows:
```css-79elbk
sonar.jdbc.minIdle=25
sonar.jdbc.maxActive=25
sonar.jdbc.maxLifetime=0
sonar.jdbc.maxWait=30000
```
### Oracle JDBC driver blocked
See [#if-oracle](https://docs.sonarsource.com/sonarqube-server/server-installation/pre-installation/linux#if-oracle "mention") for more information.
### Connectivity issue between SonarQube Server and MS SQL Server
If the TCP/IP connection is refused, make sure that Named Pipes and TCP/IP connections are enabled on your SQL Server.
### Duplicate keys during background task processing after upgrading to RHEL 8
If you performed an in-place OS upgrade to RHEL 8 or [with any similar operating systems](https://wiki.postgresql.org/wiki/Locale_data_changes#What_Linux_distributions_are_affected) and you use PostgreSQL, the new version of glibc may affect locale data changes.
To prevent this, avoid in-place OS upgrades and perform dump-and-restore of the database to an already-upgraded OS.
To correct the issue, restore from a known good backup copy of the database and perform the maintenance steps:
```css-79elbk
VACUUM FULL;
REINDEX DATABASE ;
ANALYZE;
```
### Related pages
* [server-logs](https://docs.sonarsource.com/sonarqube-server/server-update-and-maintenance/troubleshooting/server-logs "mention")
* [performance-issues](https://docs.sonarsource.com/sonarqube-server/server-update-and-maintenance/troubleshooting/performance-issues "mention")
* [elasticsearch](https://docs.sonarsource.com/sonarqube-server/server-update-and-maintenance/troubleshooting/elasticsearch "mention")
* [other-issues](https://docs.sonarsource.com/sonarqube-server/server-update-and-maintenance/troubleshooting/other-issues "mention")
---
# Source: https://docs.sonarsource.com/sonarqube-server/10.5/setup-and-upgrade/installation-requirements/database-requirements.md
# Source: https://docs.sonarsource.com/sonarqube-server/10.6/setup-and-upgrade/installation-requirements/database-requirements.md
# Source: https://docs.sonarsource.com/sonarqube-server/10.7/setup-and-upgrade/installation-requirements/database-requirements.md
# Source: https://docs.sonarsource.com/sonarqube-server/10.8/setup-and-upgrade/installation-requirements/database-requirements.md
# Source: https://docs.sonarsource.com/sonarqube-server/2025.2/setup-and-update/installation-requirements/database-requirements.md
# Source: https://docs.sonarsource.com/sonarqube-server/2025.1/setup-and-upgrade/installation-requirements/database-requirements.md
# Database
Supported database engines:
Database engine
Requirement
PostgreSQL
Version: 13 to 17
Microsoft SQL server
Version:
• 2022 (MSSQL Server 16.0); 2019 (MSSQL Server 15.0); 2017 (MSSQL Server 14.0); 2016 (MSSQL Server 13.0).
• With bundled Microsoft JDBC driver.
Notes:
• Express Edition is supported.
• Windows and SQL Server authentication are both supported.
Oracle
Version: 23ai, 21C, 19C, XE Editions.
Recommendation: Use the latest Oracle JDBC driver.
Notes:
• The driver ojdbc14.jar is not supported.
• Only the thin mode is supported, not OCI.
• Only MAX_STRING_SIZE=STANDARD parameter is supported, not EXTENDED.
• Must be configured to use a UTF8-family charset (see the NLS_CHARACTERSET).
• The Oracle JDBC driver versions 12.1.0.1 and 12.1.0.2 have major bugs, and are not recommended for use with SonarQube Server (see more details).
H2
Recommendation: Use the H2 embedded database for non-production use cases:
• Development/Testing: H2 is ideal for quick prototypes, unit or integration tests, or CI/CD pipelines due to its lightweight setup.
• Trials: H2 allows users to try SonarQube without configuring a full database setup like PostgreSQL, Oracle, or MS SQL.
Why avoid H2 in production:
• Scalability Limits: H2 cannot handle high transaction volumes or concurrent users.
• Data Risks: In-memory mode risks data loss; file-based mode lacks robust durability.
• Concurrency Issues: H2 struggles with heavy concurrent access, which could cause slowdowns or deadlocks.
• Limited Features: H2 lacks replication, high availability, advanced security, or robust backups.
• SQL Compatibility: H2 may differ from production databases, risking transition issues.
Use PostgreSQL, Oracle, or MS SQL for production to ensure reliability and scalability. Limit H2 to development, testing, or trials.
{% hint style="info" %}
We recommend that for production installation, the database used by SonarQube Server is hosted on a machine that is physically separate from the SonarQube Server host, with low latency between both hosts.
{% endhint %}
---
# Source: https://docs.sonarsource.com/sonarqube-community-build/server-installation/on-kubernetes-or-openshift/set-up-monitoring/datadog.md
# Source: https://docs.sonarsource.com/sonarqube-server/10.4/setup-and-upgrade/deploy-on-kubernetes/set-up-monitoring/datadog.md
# Source: https://docs.sonarsource.com/sonarqube-server/10.5/setup-and-upgrade/deploy-on-kubernetes/set-up-monitoring/datadog.md
# Source: https://docs.sonarsource.com/sonarqube-server/10.6/setup-and-upgrade/deploy-on-kubernetes/set-up-monitoring/datadog.md
# Source: https://docs.sonarsource.com/sonarqube-server/10.7/setup-and-upgrade/deploy-on-kubernetes/set-up-monitoring/datadog.md
# Source: https://docs.sonarsource.com/sonarqube-server/10.8/setup-and-upgrade/deploy-on-kubernetes/set-up-monitoring/datadog.md
# Source: https://docs.sonarsource.com/sonarqube-server/2025.2/setup-and-update/deploy-on-kubernetes/set-up-monitoring/datadog.md
# Source: https://docs.sonarsource.com/sonarqube-server/2025.3/server-installation/on-kubernetes-or-openshift/set-up-monitoring/datadog.md
# Source: https://docs.sonarsource.com/sonarqube-server/2025.5/server-installation/on-kubernetes-or-openshift/set-up-monitoring/datadog.md
# Source: https://docs.sonarsource.com/sonarqube-server/2025.1/setup-and-upgrade/deploy-on-kubernetes/set-up-monitoring/datadog.md
# Source: https://docs.sonarsource.com/sonarqube-server/2025.4/server-installation/on-kubernetes-or-openshift/set-up-monitoring/datadog.md
# Source: https://docs.sonarsource.com/sonarqube-server/2025.6/server-installation/on-kubernetes-or-openshift/set-up-monitoring/datadog.md
# Source: https://docs.sonarsource.com/sonarqube-server/server-installation/on-kubernetes-or-openshift/set-up-monitoring/datadog.md
# Setting up with Datadog
In the following, we assume that you are installing both SonarQube Server and Datadog to a Kubernetes cluster via the corresponding Helm charts.
### Introduction
To set up Datadog to monitor SonarQube Server, you have to specify an annotation in SonarQube Server’s Helm chart related to Datadog. Since Datadog doesn’t understand the Prometheus’ Bearer authentication annotation, you cannot use it. Instead, you can specify an annotation that will manage a Datadog configuration file.
The illustration below shows the setup and monitoring process:
* When you install the SonarQube Server’s Helm chart in the Kubernetes cluster, the chart deploys the Datadog configuration file on the Pod.
* The Datadog agent then:
1. Reads the Datadog configuration file.
2. Authenticates to the SonarQube Server’s Web API endpoint and pulls the Prometheus metrics from the endpoint.
3. Pushes the metrics to the Datadog dashboard.
### Setting up the Datadog authentication to the Web API endpoint
You need to create a secret containing the monitoring passcode and then mount that secret in the Datadog agent. To do so, add the code below to the `values.yaml` file of the Datadog’s Helm chart. In this example, we mount the subkey `passcode` from the `datadog-api-secret` secret into `/etc/secret-volume`.
```css-79elbk
agents:
volumes:
- name: secret-volume
secret:
secretName: datadog-api-secret
items:
- key: passcode
path: passcode
volumeMounts:
- name: secret-volume
mountPath: /etc/secret-volume
```
### Specifying the annotation for the Datadog agent
Add the code below to the `values.yaml` file of the SonarQube Server’s Helm chart. Note that:
* This example corresponds to the example shown shown in **Setting up the Datadog authentication to the Web API endpoint** above: you must adapt the `reader` and `writer` sections to your values.
* If a webcontext is used in the path at which to serve SonarQube Server then you must add it to the `openmetrics_endpoint`. For example, if the`/sonarqube` web context were used here then we would have:\
`"openmetrics_endpoint": "http://%%host%%:9000/sonarqube/api/monitoring/metrics"`
```yaml
# Set annotations for pods
annotations:
#ad.datadoghq.com/.checks
ad.datadoghq.com/sonarqube-dce.checks: |
{
"openmetrics": {
"init_config": {},
"instances": [
{
"openmetrics_endpoint": "http://%%host%%:9000/api/monitoring/metrics",
"metrics": [".*"],
"auth_token":
{
"reader":
{
"type": "file",
"path": "/etc/secret-volume/passcode"
},
"writer":
{
"type": "header",
"name": "Authorization",
"value": "Bearer "
}
}
}
]
}
}
```
---
# Source: https://docs.sonarsource.com/sonarqube-server/2025.3/server-installation/system-properties/dce-specific.md
# Source: https://docs.sonarsource.com/sonarqube-server/2025.5/server-installation/system-properties/dce-specific.md
# Source: https://docs.sonarsource.com/sonarqube-server/2025.4/server-installation/system-properties/dce-specific.md
# Source: https://docs.sonarsource.com/sonarqube-server/2025.6/server-installation/system-properties/dce-specific.md
# Source: https://docs.sonarsource.com/sonarqube-server/server-installation/system-properties/dce-specific.md
# List of DCE-specific properties
SonarQube utilizes system properties during startup, which are not stored in the database. This page lists the configurable system properties that are specific to the Data Center Edition.
### General All nodes
System property (sonar property and ENVIRONMENT_VARIABLE)
Description
Required
sonar.cluster.enabled
Enables the cluster mode. Must be set to true in each node.
Default value: false
yes
sonar.cluster.name
SONAR_CLUSTER_NAME
The name of the cluster. Required if multiple clusters are present on the same network. For example, this prevents mixing Production and Preproduction clusters.
Will be the name stored in the Hazelcast cluster and used as the name of the Elasticsearch cluster.
Default value: sonarqube
Where appropriate
sonar.cluster.node.name
SONAR_CLUSTER_NODE_NAME
The name of the node that is used on Elasticsearch and stored in Hazelcast member attribute (NODE_NAME) for sonar-application.
Default value: sonarqube-<UUID>
yes
sonar.cluster.node.type
SONAR_CLUSTER_NODE_TYPE
Type of node.
Possible values:
• application: node hosting the WebServer process.
• search: node hosting the Elasticsearch process.
yes
Application nodes only
System property (sonar property and ENVIRONMENT_VARIABLE)
Description
Required
sonar.cluster.hosts
SONAR_CLUSTER_HOSTS
Comma-delimited list of all application nodes in the cluster.
List item format (the same format for all items):
• Either <nodeIpAddress> (if all ports have the sonar.cluster.node.port default value)
• Or <nodeIpAddress>:<ApplicationPortNumber>
yes
sonar.cluster.node.host
IP address of the current node used by Hazelcast to communicate with the node.
yes
sonar.cluster.node.port
SONAR_CLUSTER_NODE_PORT
Port of the current node used by Hazelcast to communicate with the node.
Default value: 9003
yes
sonar.cluster.node.web.port
Port of the current node used by Hazelcast to communicate with the WebServer process on the current node. Port must be accessible to all other application nodes.
If not specified, a dynamic port will be chosen. In that case, all ports must be open among the nodes to ensure inter-node communication.
no
sonar.cluster.node.ce.port
Port of the current node used by Hazelcast to communicate with the Compute Engine process on the current node. Port must be accessible to all other application nodes.
If not specified, a dynamic port will be chosen. In that case, all ports must be open among the nodes to ensure inter-node communication.
no
sonar.cluster.search.hosts
SONAR_CLUSTER_SEARCH_HOSTS
Comma-delimited list of search nodes in the cluster. A search node is described through the IP address and port used for search requests.
List item format (the same format for all items):
• Either <nodeIpAddress> (if all ports have the sonar.cluster.node.port default value and this value has not been overridden in the current node’s configuration file)
• Or <nodeIpAddress>:<searchPortNumber>
<nodeIpAddress> can also be set to the service name of the search containers.
yes
sonar.auth.jwtBase64Hs256Secret
SONAR_AUTH_JWTBASE64HS256SECRET
Required for authentication with multiple web servers. It is used to keep user sessions opened when they are redirected from one web server to another by the load balancer. You must generate a secret for the application nodes (it will be the same for all application nodes).¹
yes
1\) See [#jwt-token](https://docs.sonarsource.com/sonarqube-server/data-center-edition/pre-installation#jwt-token "mention").
Search nodes only
System property (sonar property and ENVIRONMENT_VARIABLE)
Description
Required
sonar.cluster.node.search.host
Elasticsearch host of the current node used for HTTP communication between search and application nodes. IP must be accessible to all application nodes.
yes
sonar.cluster.node.search.port
Elasticsearch port of the current node used for HTTP communication between search and application nodes. Port must be accessible to all application nodes.
yes
sonar.cluster.es.hosts
SONAR_CLUSTER_ES_HOSTS
Comma-delimited list of nodes in the Elasticsearch cluster. A node is described through the IP address and port used for internal communication within the Elasticsearch cluster.
List item format (the same format for all items):
• Either <nodeIpAddress> (if all ports have the sonar.cluster.node.port default value and this value has not been overridden in the current node’s configuration file)
• Or <nodeIpAddress>:<esPortNumber>
yes
sonar.cluster.node.es.host
IP address of the current search node used for internal communication within the Elasticsearch cluster. The IP address must be accessible to all other search nodes.
yes
sonar.cluster.node.es.port
Port of the current search node used for internal communication within the Elasticsearch cluster. The port must be accessible to all other search nodes
yes
sonar.search.initialStateTimeout
The timeout for the Elasticsearch nodes to elect a primary node. The default value will be fine in most cases, but in a situation where startup is failing because of a timeout, this may need to be adjusted.
Value format: <integer><timeunit> where<timeunit> possible values are:
• ms: milliseconds
• s: seconds
• m: minutes
• h: hours
• d: days
• w: weeks
no
### Elasticsearch authentication
See also [elasticsearch-security-features](https://docs.sonarsource.com/sonarqube-server/server-installation/data-center-edition/network-security/elasticsearch-security-features "mention").
All nodes
System property (sonar property and ENVIRONMENT_VARIABLE)
Description
sonar.cluster.search.password
SONAR_CLUSTER_SEARCH_PASSWORD
Password for Elasticsearch built-in user (elastic) which will be used on client side (for an application node) or set in Elasticsearch (for a search node). If provided, it enables authentication, and for a search node, the instance will require additional properties to be set. If this property is set, the same value must be used on all nodes of the cluster (application and search nodes).
Search nodes
System property (sonar property and ENVIRONMENT_VARIABLE)
Description
sonar.cluster.es.ssl.keystore
SONAR_CLUSTER_ES_SSL_KEYSTORE
File path to a keystore in PKCS#12 format¹. The user running SonarQube must have READ permission to that file. Required if password provided.
Can be the same PKCS#12 container as the SONAR_CLUSTER_ES_SSL_TRUSTSTORE.
sonar.cluster.es.ssl.truststore
SONAR_CLUSTER_ES_SSL_TRUSTSTORE
File path to a truststore in PKCS#12 format¹. The user running SonarQube must have READ permission to that file. Required if password provided.
Can be the same PKCS#12 container as the SONAR_CLUSTER_ES_SSL_KEYSTORE.
sonar.cluster.es.ssl.keystorePassword
SONAR_CLUSTER_ES_SSL_KEYSTOREPASSWORD
Password to the keystore.
sonar.cluster.es.ssl.truststorePassword
SONAR_CLUSTER_ES_SSL_TRUSTSTOREPASSWORD
Password to the truststore.
1\) When creating the PKCS#12 container, make sure it is created with an algorithm that is readable by Java 17.
### TLS encryption
See also [#tls-encryption](https://docs.sonarsource.com/sonarqube-server/data-center-edition/network-security/elasticsearch-security-features#tls-encryption "mention").
All nodes
System property (sonar property and ENVIRONMENT_VARIABLE)
Description
sonar.cluster.es.http.ssl.keystore
SONAR_CLUSTER_ES_HTTP_SSL_KEYSTORE
File path to a keystore in PKCS#12 format¹. The user running SonarQube must have READ permission to that file. If provided, it enables TLS encryption.
sonar.cluster.es.http.ssl.keystorePassword
SONAR_CLUSTER_ES_HTTP_SSL_KEYSTOREPASSWORD
Password to the keystore.
1\) When creating the PKCS#12 container, make sure it is created with an algorithm that is readable by Java 17.
### Related pages
* [configuration-methods](https://docs.sonarsource.com/sonarqube-server/server-installation/system-properties/configuration-methods "mention")
* [common-properties](https://docs.sonarsource.com/sonarqube-server/server-installation/system-properties/common-properties "mention")
---
# Source: https://docs.sonarsource.com/sonarqube-server/2025.3/server-installation/data-center-edition/dce-topology.md
# Source: https://docs.sonarsource.com/sonarqube-server/2025.5/server-installation/data-center-edition/dce-topology.md
# Source: https://docs.sonarsource.com/sonarqube-server/2025.4/server-installation/data-center-edition/dce-topology.md
# Source: https://docs.sonarsource.com/sonarqube-server/2025.6/server-installation/data-center-edition/dce-topology.md
# Source: https://docs.sonarsource.com/sonarqube-server/server-installation/data-center-edition/dce-topology.md
# DCE topology
As a DCE subscriber, Sonar will assist with the setup and configuration of your cluster. Get in touch with your account manager to receive appropriate onboarding resources.
The DCE consists of:
* Application nodes responsible for handling web requests from users (Web process) and handling analysis reports (Compute Engine process). You can add application nodes to increase computing capabilities.
* Search nodes that host the Elasticsearch process that will store data indices. The search nodes build an Elasticsearch cluster. Unicast discovery is used in this cluster.
* A reverse proxy / load balancer to load balance traffic between the two application nodes. The installing organization must supply this hardware or software component.
* PostgreSQL, Oracle, or Microsoft SQL Server database server. This software must be supplied by the installing organization.
We recommend having one machine for each node to be resilient to failures. To maintain an even higher level of availability, each of your three search nodes can be located in a separate availability zone *within the same region*.
For more information about the SonarQube Server processes (Sonar, Web, Compute Engine, and Elasticsearch), see [server-components-overview](https://docs.sonarsource.com/sonarqube-server/server-installation/server-components-overview "mention").
### Default topology
The default topology of the Data Center Edition corresponds to the minimum topology and comprises:
* Two application nodes.
* Three search nodes.
With this topology, one application node and one search node can be lost without impacting users. Below is a diagram of the default topology.
### Related pages
* [installation-requirements](https://docs.sonarsource.com/sonarqube-server/server-installation/data-center-edition/installation-requirements "mention")
* [pre-installation](https://docs.sonarsource.com/sonarqube-server/server-installation/data-center-edition/pre-installation "mention")
* [from-zip-file](https://docs.sonarsource.com/sonarqube-server/server-installation/data-center-edition/from-zip-file "mention")
* [on-kubernetes-or-openshift](https://docs.sonarsource.com/sonarqube-server/server-installation/data-center-edition/on-kubernetes-or-openshift "mention")
* **Configuring network security features:**
* [securing-behind-proxy](https://docs.sonarsource.com/sonarqube-server/server-installation/data-center-edition/network-security/securing-behind-proxy "mention")
* [elasticsearch-security-features](https://docs.sonarsource.com/sonarqube-server/server-installation/data-center-edition/network-security/elasticsearch-security-features "mention")
* [network-rules](https://docs.sonarsource.com/sonarqube-server/server-installation/data-center-edition/network-security/network-rules "mention")
* [starting-stopping-cluster](https://docs.sonarsource.com/sonarqube-server/server-installation/data-center-edition/starting-stopping-cluster "mention")
---
# Source: https://docs.sonarsource.com/sonarqube-server/10.8/setup-and-upgrade/deploy-on-kubernetes/dce.md
# Source: https://docs.sonarsource.com/sonarqube-server/2025.2/setup-and-update/deploy-on-kubernetes/dce.md
# Source: https://docs.sonarsource.com/sonarqube-server/2025.1/setup-and-upgrade/deploy-on-kubernetes/dce.md
# Data Center Edition
{% content-ref url="dce/introduction" %}
[introduction](https://docs.sonarsource.com/sonarqube-server/2025.1/setup-and-upgrade/deploy-on-kubernetes/dce/introduction)
{% endcontent-ref %}
{% content-ref url="dce/before-you-start" %}
[before-you-start](https://docs.sonarsource.com/sonarqube-server/2025.1/setup-and-upgrade/deploy-on-kubernetes/dce/before-you-start)
{% endcontent-ref %}
{% content-ref url="dce/customizing-helm-chart" %}
[customizing-helm-chart](https://docs.sonarsource.com/sonarqube-server/2025.1/setup-and-upgrade/deploy-on-kubernetes/dce/customizing-helm-chart)
{% endcontent-ref %}
{% content-ref url="dce/installing-from-helm-repo" %}
[installing-from-helm-repo](https://docs.sonarsource.com/sonarqube-server/2025.1/setup-and-upgrade/deploy-on-kubernetes/dce/installing-from-helm-repo)
{% endcontent-ref %}
{% content-ref url="dce/installing-from-gcp" %}
[installing-from-gcp](https://docs.sonarsource.com/sonarqube-server/2025.1/setup-and-upgrade/deploy-on-kubernetes/dce/installing-from-gcp)
{% endcontent-ref %}
---
# Source: https://docs.sonarsource.com/sonarqube-community-build/instance-administration/user-management/deactivating-users.md
# Source: https://docs.sonarsource.com/sonarqube-server/10.7/instance-administration/user-management/deactivating-users.md
# Source: https://docs.sonarsource.com/sonarqube-server/10.8/instance-administration/user-management/deactivating-users.md
# Source: https://docs.sonarsource.com/sonarqube-server/2025.2/instance-administration/user-management/deactivating-users.md
# Source: https://docs.sonarsource.com/sonarqube-server/2025.3/instance-administration/user-management/deactivating-users.md
# Source: https://docs.sonarsource.com/sonarqube-server/2025.5/instance-administration/user-management/deactivating-users.md
# Source: https://docs.sonarsource.com/sonarqube-server/2025.1/instance-administration/user-management/deactivating-users.md
# Source: https://docs.sonarsource.com/sonarqube-server/2025.4/instance-administration/user-management/deactivating-users.md
# Source: https://docs.sonarsource.com/sonarqube-server/2025.6/instance-administration/user-management/deactivating-users.md
# Source: https://docs.sonarsource.com/sonarqube-server/instance-administration/user-management/deactivating-users.md
# Deactivating users
When you deactivate a user in SonarQube Server:
* Any SonarQube Server tokens associated with the user are revoked.
* You have the possibility to delete the user’s personal data at the same time.
{% hint style="warning" %}
When SonarQube Server authentication is delegated to an external identity provider, deactivating a user on the identity provider side does not remove any tokens associated with the user on the SonarQube Server side. To revoke a token, see [#revoking-token](https://docs.sonarsource.com/sonarqube-server/security/administering-tokens#revoking-token "mention").
{% endhint %}
### Introduction to personal data deletion
For legal compliance, you may want to ensure that the personal data of deactivated users is not retained.
SonarQube Server deletes a user’s personal data by anonymizing their data. This feature has the following limitations:
* The user login is changed, making it impossible to reactivate the user by recreating a user with the old login.
* The user’s login may still be stored in issue changelogs and the user’s login, name, and email address may still be stored in audit entries (Audit entries are purged by default after 30 days.).
* The user may still appear in the list of authors and other locations due to SCM (Source Control Management) data.
* Some columns in the database may contain parts of the user’s login if the user was created before the instance was upgraded to SonarQube Server 8.3.
### Deactivating a user in SonarQube Server
You need the global Administer System permission to be able to deactivate users in SonarQube Server.
To deactivate a user:
1. In **Administration > Security > Users**, retrieve the user (see[viewing-users](https://docs.sonarsource.com/sonarqube-server/instance-administration/user-management/viewing-users "mention")).
2. In the user’s **Actions** column, select the three-dot menu.
3. Select **Deactivate**. The **Deactivate User** dialog opens.
4. Select the **Delete user’s personal information** option if you want to anonymize the user’s personal data.
5. Select **Deactivate**.
### Deleting users’ personal data using the API (deprecated)
This feature is deprecated.
You can delete personal data using the API. First, the user needs to be deactivated, then an admin can use the web service `/api/users/anonymize` and pass to it the login of a deactivated user to replace all personal data of the user with anonymized data. Note that the admin is able to retrieve the logins of deactivated users by using `/api/users/search` endpoint with the appropriate parameter.
---
# Source: https://docs.sonarsource.com/sonarqube-community-build/project-administration/adjusting-analysis/setting-analysis-scope/defining-matching-patterns.md
# Source: https://docs.sonarsource.com/sonarqube-server/2025.2/project-administration/setting-analysis-scope/defining-matching-patterns.md
# Source: https://docs.sonarsource.com/sonarqube-server/2025.3/project-administration/setting-analysis-scope/defining-matching-patterns.md
# Source: https://docs.sonarsource.com/sonarqube-server/2025.5/project-administration/setting-analysis-scope/defining-matching-patterns.md
# Source: https://docs.sonarsource.com/sonarqube-server/2025.4/project-administration/setting-analysis-scope/defining-matching-patterns.md
# Source: https://docs.sonarsource.com/sonarqube-server/2025.6/project-administration/adjusting-analysis/setting-analysis-scope/defining-matching-patterns.md
# Source: https://docs.sonarsource.com/sonarqube-server/project-administration/adjusting-analysis/setting-analysis-scope/defining-matching-patterns.md
# Source: https://docs.sonarsource.com/sonarqube-cloud/appendices/defining-matching-patterns.md
# Defining matching patterns
### Defining matching patterns for files
To define path-matching patterns, you can use the following wildcards:
* `*` matches zero or more characters (not including the directory delimiter, `/`).
* `**` matches zero or more directory segments within the path.
* `?` matches a single character (not including the directory delimiter, `/`).
A file path definition is either relative to the sonar.projectBaseDir property, which is by default the directory from which the analysis was started, or absolute. See [analysis-parameters](https://docs.sonarsource.com/sonarqube-cloud/advanced-setup/analysis-parameters "mention") for more information.
The table below shows path-matching pattern examples.
| **Matching pattern** | **Definition** |
| ---------------------------------- | ---------------------------------------------------------------------------------------------------------------------------------- |
| `**/*.css` | `/.css` |
| `**/*Bean.java` |
|
### Defining matching patterns for coding rules
To define matching patterns for coding rules, use the following syntax:
`:`
Where:
* ruleRepository: is the identifier of the rule repository\
Examples: SonarQube java (identifier: java) or Security SonarAnalyzer PHP (identifier: phpsecurity), etc.\
You can use the wildcard pattern \* (any string) to define the rule repository.
* searchString: is any search string present in the rule key or in the rule name
The matching pattern means that any rule:
* of the specified repository
* whose name or key contains the specified search string
is a match.
Rule-matching pattern examples
| **Rule-matching pattern** | **Description** |
| ------------------------- | ------------------------------------ |
| `css:S4655` | Rule ID s4655 in the repository css. |
| `*:S4655` | Rule ID s4655 in any repository. |
| `*` | All rules. |
Identifying the repository, name, and key of a rule
1. Retrieve your organization. See [viewing-organizations](https://docs.sonarsource.com/sonarqube-cloud/getting-started/viewing-organizations "mention") for more details.
2. Go to **Rules**.
3. Use the filter on the left to search for a rule. The search results are displayed in the right panel.
4. In the search results, click the rule you want to view. The rule opens and you can see the rule parameters.
---
# Source: https://docs.sonarsource.com/sonarqube-server/8.9/project-administration/defining-new-code.md
# Source: https://docs.sonarsource.com/sonarqube-server/9.8/project-administration/defining-new-code.md
# Source: https://docs.sonarsource.com/sonarqube-server/9.9/project-administration/defining-new-code.md
# Source: https://docs.sonarsource.com/sonarqube-server/10.0/project-administration/defining-new-code.md
# Source: https://docs.sonarsource.com/sonarqube-server/10.1/project-administration/clean-as-you-code-settings/defining-new-code.md
# Source: https://docs.sonarsource.com/sonarqube-server/10.2/project-administration/clean-as-you-code-settings/defining-new-code.md
# Source: https://docs.sonarsource.com/sonarqube-server/10.3/project-administration/clean-as-you-code-settings/defining-new-code.md
# Source: https://docs.sonarsource.com/sonarqube-server/10.4/project-administration/clean-as-you-code-settings/defining-new-code.md
# Source: https://docs.sonarsource.com/sonarqube-server/10.5/project-administration/clean-as-you-code-settings/defining-new-code.md
# Source: https://docs.sonarsource.com/sonarqube-server/10.6/project-administration/clean-as-you-code-settings/defining-new-code.md
# Defining new code
Each SonarQube project has a *new code definition* (NCD), that is, a setting that tells SonarQube which part of the code is considered *new code*. When you run an analysis, SonarQube uses the new code definition to identify new code, then highlights issues in the new code.
This helps you focus attention on the most recent changes to your codebase, helping you follow the [Clean as You Code](https://docs.sonarsource.com/sonarqube-server/10.6/user-guide/clean-as-you-code) methodology.
### Setting your new code definition
You can define new code at the global, project, or branch level.
* **Global level**: Set a global new code definition at **Administration** > **Configuration** > **General Settings** > **New Code**. What you define as new code at the global level will be the default for your projects.
* **Project level**: Set a new code definition for your project at **Project Settings** > **New Code**. What you define as new code at the project level will be the default for the project’s branches if you’re using an edition that supports multiple branches (starting in [Developer Edition](https://www.sonarsource.com/plans-and-pricing/developer/)).
* **Branch level**: You can define new code for each branch from the **Actions** column of the branches table on the project’s **New Code** settings page if you’re using an edition that supports multiple branches (starting in [Developer Edition](https://www.sonarsource.com/plans-and-pricing/developer/)).
Both project and branch-specific new code definitions can be reset to use the default setting (only if the default complies with the Clean as You Code methodology).
### New code definition options
Setting up the relevant new code definition for your project is an important step in getting the most out of SonarQube. You can choose from the following options:
* **Previous version**: Available at the global, project, and branch levels. Recommended for projects with regular versions or releases. Defines *new code* as any code that has changed since the most recent version increment of the project. The current version of a project is determined in different ways depending on the build system:
* If the analysis is done using the [sonarscanner-for-maven](https://docs.sonarsource.com/sonarqube-server/10.6/analyzing-source-code/scanners/sonarscanner-for-maven "mention"), then SonarQube reads the version from the `pom.xml` file.
* If the analysis is done with the [sonarscanner-for-gradle](https://docs.sonarsource.com/sonarqube-server/10.6/analyzing-source-code/scanners/sonarscanner-for-gradle "mention") then SonarQube reads the version from the `build.gradle` file.
* In all other cases, the version must be explicitly specified by setting the analysis parameter `sonar.projectVersion`.
* **Number of days**: Available at the global, project, and branch levels. Recommended for projects following continuous delivery. Defines new code as any code that has changed in the last X days (max 90). For example, setting the Number of Days to 30 creates a new code period beginning 30 days before the current date. If no action is taken on a new issue after 30 days, this issue becomes part of the overall code.
{% hint style="info" %}
Code that is older than 90 days cannot be considered new, and old issues should not be a priority. If this option is set to a higher value than 90 before upgrading to SonarQube 10.2 or later, it is automatically changed to 90. Some issues may move out of the new code as a consequence.
{% endhint %}
* **Specific analysis** (Web API only): Choose a previous analysis as your new code definition. Any changes made since that analysis are considered new code. For more compliance with the Clean as You Code methodology, this option cannot be set in the UI, as it would require frequent user action to be kept up to date. Available:
* at the branch level in [Developer Edition](https://www.sonarsource.com/plans-and-pricing/developer/) and above
* at the project level in Community Edition, as the edition doesn’t support multiple branches
* **Reference branch**: Available at the project and branch levels. Recommended for projects using feature branches. Choose a specific branch to define your new code. Any differences between your branch and the reference branch in the clone the scanner has access to at analysis time are considered new code. To avoid reference errors when cloning a repository, we recommend cloning all its branches.
You can use on the scanner side the `sonar.newCode.referenceBranch` property to apply the Reference branch option to the analysis of a branch, overriding the global new code definition set in the UI (See the [analysis-parameters](https://docs.sonarsource.com/sonarqube-server/10.6/analyzing-source-code/analysis-parameters "mention") page for more information about setting hierarchies). This setting is particularly useful during the first analysis when the branch to be analyzed does not exist yet in SonarQube. The `sonar.newCode.referenceBranch` property specifies the reference branch value.
{% hint style="info" %}
The Reference branch new code definition is useful for short-lived branch analysis before a pull request is created, or for short-lived branch analysis where pull requests are not in use (e.g. trunk-based developments). For the latest, the setting will also allow issues on the reference branch to inherit their status from your short-lived branch after its merge (see [solution-overview](https://docs.sonarsource.com/sonarqube-server/10.6/user-guide/issues/solution-overview "mention")).
{% endhint %}
When using any new code period type other than **Reference Branch**, we recommend completing your merges using the *fast-forward* option without a merge commit; examples include GitHub’s *squash and merge* or *rebase and merge* options. In this way, the blame for the merged commits will always have a more recent commit date.
### How the new code definition affects your analysis results
During analysis of the main branch, what counts as a *new code issue* is determined by the following:
1. SonarQube determines how your code is compared:
* For the *Reference branch* option, the analyzed branch is compared to the current state of the reference branch based on [scm-integration](https://docs.sonarsource.com/sonarqube-server/10.6/analyzing-source-code/scm-integration "mention"). If the SCM is not available, the two branches are compared based on their current state in SonarQube.
* For the other options, SonarQube uses the *start date of the new code period,* calculated as follows:
* Previous version: Date when the project was first incremented to the version in question
* Number of days: Current date minus the specified number of days
* Specific analysis: Date of the past analysis
2. All lines of code in all files under analysis that are not in the reference branch or have changed since the start date of the new code period are marked (and displayed in yellow in the SonarQube interface).
3. All issues with one or more of the marked lines as primary or secondary locations are categorized as *new code issues*.
{% hint style="info" %}
For analysis of [introduction](https://docs.sonarsource.com/sonarqube-server/10.6/analyzing-source-code/pull-request-analysis/introduction "mention"), the new code definition is not used. Instead, the *new code issues* are those introduced by the pull request itself.
{% endhint %}
The set of new code issues, in turn, affects many aspects of your results:
* The default [quality-gates](https://docs.sonarsource.com/sonarqube-server/10.6/user-guide/quality-gates "mention") applies conditions only to new code issues.
* New code metrics are separated from overall code metrics in the main branch overview and the overviews of the other branches.
* The **Measures** panel separates new code data vs overall code data.
* Selecting the **Issues in new code** filter found on the *Your Project* > **Issues** page allows you to quickly switch between issues in *new code* or issues in *overall code*.
The activity graphs separate activity in the *new code* from activity in the *overall code*.
### About new code definition and the WEB API
While choosing an option, you should take into account your development context. If you’re importing several projects at once (bulk project import) using the [WEB API](https://next.sonarqube.com/sonarqube/web_api/api/alm_integrations), knowing how the NCD options affect your analysis results can be helpful.
---
# Source: https://docs.sonarsource.com/sonarqube-server/10.4/user-guide/clean-code/definition.md
# Source: https://docs.sonarsource.com/sonarqube-server/10.5/user-guide/clean-code/definition.md
# Source: https://docs.sonarsource.com/sonarqube-server/10.6/user-guide/clean-code/definition.md
# Source: https://docs.sonarsource.com/sonarqube-server/10.7/core-concepts/clean-code/definition.md
# Source: https://docs.sonarsource.com/sonarqube-server/10.8/core-concepts/clean-code/definition.md
# Clean Code definition
We define Clean Code as code that has the following attributes: consistency, intentionality, adaptability, and responsibility.
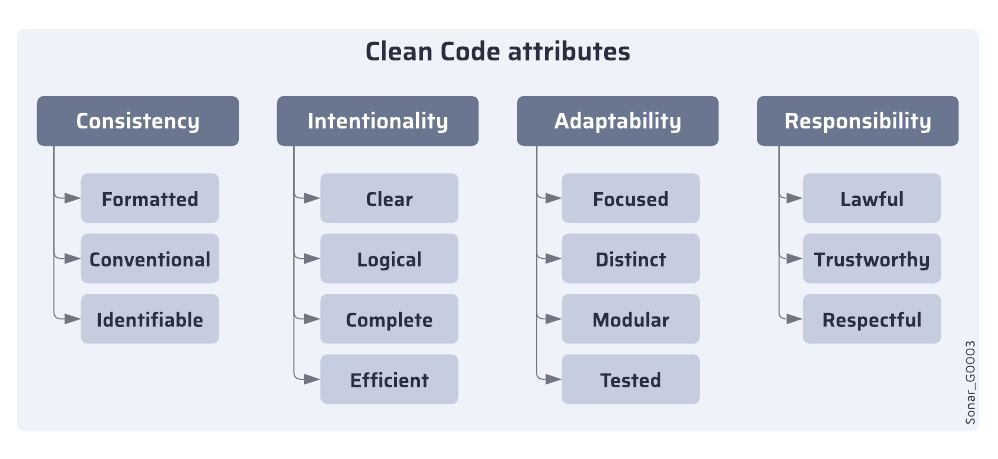
### Consistency
The code is written in a uniform and conventional way. All the code looks similar and follows a regular pattern, even with multiple contributors at different times.
Consistent code is formatted, conventional, and identifiable.
#### Formatted
The code presentation is systematic and regular. Non-semantic choices, such as spacing, indentation, and character placement, remain consistent throughout the codebase, maintaining uniformity across files and authors.
Example
The example below shows inconsistent indentation in Java code. It’s not about tabs versus spaces, it’s about consistency.
**Non-compliant code**
```css-79elbk
class Foo {
public int a;
public int b;
public void doSomething() {
if(something) {
doSomethingElse();
}
}
}
```
**Compliant code**
```css-79elbk
class Foo {
public int a;
public int b;
public void doSomething() {
if(something) {
doSomethingElse();
}
}
}
```
For more information, see the corresponding [Sonar rule](https://rules.sonarsource.com/java/RSPEC-1120).
#### Conventional
The code performs tasks with expected instructions. Faced with equally good options, the code adheres to a single choice across all instances, preferring language conventions. This includes using the appropriate programming interfaces and language features.
Example
In C++ from version 11, type aliases can be declared via either **`typedef`** or **`using`**, however, you should prefer the latter for modern code.
**Non-compliant code**
```css-79elbk
typedef void (*FunctionPointerType)(int);
```
**Compliant code**
```css-79elbk
using FunctionPointerType = void (*)(int);
```
For more information, see the corresponding [Sonar rule](https://rules.sonarsource.com/cpp/RSPEC-5416/).
#### Identifiable
The names follow a regular structure based on language conventions. The casing, word separators, suffixes, and prefixes used in the identifiers have purpose, without arbitrary differences.
Example
Consider code written in C#, where PascalCase is used for all identifiers except parameter names. In this context, using underscores or other casing styles to differentiate words in an identifier is unacceptable.
**Non-compliant code**
```css-79elbk
class my_class {...}
class SOMEName {...}
```
**Compliant code**
```css-79elbk
class MyClass {...}
class SomeName {...}
```
For more information, see the corresponding [Sonar rule](https://rules.sonarsource.com/csharp/RSPEC-101/).
### Intentionality
The code is precise and purposeful. Every instruction makes sense, is adequately formed, and clearly communicates its behavior.
Intentional code is clear, logical, complete, and efficient.
#### Clear
The code is self-explanatory, transparently communicating its functionality. It is written in a straightforward way that minimizes ambiguity, avoiding unnecessary clever or intricate solutions.
Example
In the non-compliant example of Python code below, and you’ll notice that variables **`message`** and **`i`** are defined but never used. When readers encounter such cases, they might wonder if it’s a coding error that was supposed to do something else or if it’s just leftover code that can be safely deleted.
**Non-compliant code**
```css-79elbk
def hello(name):
message = "Hello " + name
print(name)
for i in range(10):
foo()
```
**Compliant code**
```css-79elbk
def hello(name):
message = "Hello " + name
print(message)
for _ in range(10):
foo()
```
For more information, see the corresponding [Sonar rule](https://rules.sonarsource.com/python/RSPEC-1481/).
#### Logical
The code has well-formed and sound instructions that work together. It is free of explicit errors, contradictions, and commands that could be unpredictable or objectionable.
Example
In JavaScript, there’s **`NaN`**, which stands for Not-a-Number. It represents a numeric data type that isn’t a valid number. **`NaN`** is not equal to any value, even itself, and this behavior can lead to unexpected results.
**Non-compliant code**
```css-79elbk
if (a !== NaN) {
console.log("this is always logged");
}
```
**Compliant code**
```css-79elbk
if (!isNaN(a)) {
console.log("a is not NaN");
}
```
For more information, see the corresponding [Sonar rule](https://rules.sonarsource.com/javascript/RSPEC-2688/).
#### Complete
The code constructs are comprehensive and used adequately and thoroughly. The code is functional and achieves its implied goals. There are no obviously incomplete or lacking solutions.
Example
An example in PHP is the use of secure cookies. The method **`setcookie`** allows you to create cookies that can be transmitted via HTTP by default, making their contents readable. Since cookies often carry sensitive data, it’s important to ensure they are transferred securely to fulfill their intended purpose. You need to pass a last argument to enable HTTPS only.
**Non-compliant code**
```css-79elbk
$value = "sensitive data";
setcookie($name, $value, $expire, $path, $domain);
```
**Compliant code**
```css-79elbk
$value = "sensitive data";
setcookie($name, $value, $expire, $path, $domain, true);
```
For more information, see the corresponding [Sonar rule](https://rules.sonarsource.com/php/RSPEC-2092).
#### Efficient
The code uses resources without needless waste. It prioritizes economical options when available, avoiding unnecessary consumption of memory, processor, disk, or network resources.
Example
Most Linux package managers create a cache by default when working with Docker. Unless you remember to remove these files in your Dockerfile, they will increase the size of your image without providing any additional value.
**Non-compliant code**
```css-79elbk
RUN apt-get update \
&& apt-get install nginx
```
**Compliant code**
```css-79elbk
RUN apt-get update \
&& apt-get install nginx \
&& apt-get clean
```
### Adaptability
The code is structured to be easy to evolve and develop with confidence. It makes extending or repurposing its parts easy and promotes localized changes without undesirable side-effects.
Adaptable code is focused, distinct, modular, and tested.
#### Focused
The code has a single, narrow, and specific scope. Each unit should have only one concise purpose, without an overwhelming accumulation of instructions or excessive amounts of complexity.
Example
In Swift, it’s best practice to keep types, such as classes, in separate files. This helps prevent an excessive accumulation of instructions or an overwhelming amount of complexity within a single file.
**Non-compliant code**
```css-79elbk
class MyViewController: UIViewController {
// …
}
extension MyViewController: UIScrollViewDelegate {
// …
}
class UnrelatedController: UIViewController {
// …
}
```
**Compliant code**
```css-79elbk
class MyViewController: UIViewController {
// …
}
extension MyViewController: UIScrollViewDelegate {
// …
}
```
For more information, see the corresponding [Sonar rule](https://rules.sonarsource.com/swift/RSPEC-1996).
#### Distinct
The code procedures and data are unique and distinctive, without undue duplication. The codebase has no significant repetition where it could be decomposed into smaller shared segments.
Example
Duplicating string literals raises the risk of errors when making updates since each occurrence must be changed separately. A better approach is to use constants that can be referenced from multiple places, allowing updates to be made in a single location. Here’s an example using Ruby.
**Non-compliant code**
```css-79elbk
def foo()
prepare('action random1')
execute('action random1')
release('action random1')
end
```
**Compliant code**
```css-79elbk
def foo()
action1 = 'action random1'
prepare(action1)
execute(action1)
release(action1)
end
```
For more information, see the corresponding [Sonar rule](https://rules.sonarsource.com/ruby/RSPEC-1192).
#### Modular
The code has been organized and distributed to emphasize the separation between its parts. The relationships within the code are carefully managed, ensuring they are minimal and clearly defined.
Example
A key aspect of this is encapsulation. In Object-Oriented languages, encapsulation often involves making fields private. This way, the class retains control over the details of its internal representation and prevents other parts of the code from having too much knowledge about its inner workings.
However, there are multiple levels of encapsulation, and even minor improvements can make a difference. For example, if you’re working with VB.Net, which allows publicly accessible fields, it’s better to avoid using them and instead use properties. Properties work similarly to fields but are part of the interface and can be overridden by getters and setters.
**Non-compliant code**
```css-79elbk
Class Foo
Public Bar = 42
End Class
```
**Compliant code**
```css-79elbk
Class Foo
Public Property Bar = 42
End Class
```
For more information, see the corresponding [Sonar rule](https://rules.sonarsource.com/vbnet/RSPEC-2357).
#### Tested
The code has automated checks that provide confidence in the functionality. It has enough test coverage which enables changes in implementation without the risk of functional regressions.
Examples
There are odd examples, where you have a test folder or test files, without actual test cases inside, which can mislead other developers. See the corresponding [Sonar rule](https://rules.sonarsource.com/csharp/RSPEC-2187/).
There are also cases where tests are skipped and accidentally committed like that, which might go unnoticed if not tracked in any way. See the corresponding [Sonar rule](https://rules.sonarsource.com/csharp/RSPEC-1607).
### Responsibility
The code takes into account its ethical obligations on data, as well as societal norms.
Responsible code is lawful, trustworthy, and respectful.
#### Lawful
The code respects licensing and copyright regulation. It exercises the creator’s rights and honors other’s rights to license their own code.
Example
One common example is companies enforcing copyright headers in their code files:
```css-79elbk
/*
* SonarQube, open source software for clean code.
* Copyright (C) 2008-2024 SonarSource
* mailto:contact AT sonarsource DOT com
*
* SonarQube is free software; you can redistribute it and/or
* modify it under the terms of the GNU Lesser General Public
* License as published by the Free Software Foundation; either
* version 3 of the License, or (at your option) any later version.
*
* SonarQube is distributed in the hope that it will be useful,
* but WITHOUT ANY WARRANTY; without even the implied warranty of
* MERCHANTABILITY or FITNESS FOR A PARTICULAR PURPOSE. See the GNU
* Lesser General Public License for more details.
*
* You should have received a copy of the GNU Lesser General Public License
* along with this program; if not, write to the Free Software Foundation,
* Inc., 51 Franklin Street, Fifth Floor, Boston, MA 02110-1301, USA.
*/
```
For more information, see the corresponding [Sonar rule](https://rules.sonarsource.com/csharp/RSPEC-1451).
#### Trustworthy
The code abstains from revealing or hard-coding private information. It preserves sensitive private information such as credentials and personally identifying information.
Example
Below is a simplified example using Go.
**Non-compliant code**
```css-79elbk
func connect() {
user := "root"
password:= "supersecret"
url := "login=" + user + "&passwd=" + password
}
```
**Compliant code**
```css-79elbk
func connect() {
user := getEncryptedUser()
password:= getEncryptedPass()
url := "login=" + user + "&passwd=" + password
}
```
For more information, see the corresponding [Sonar rule](https://rules.sonarsource.com/go/RSPEC-2068).
#### Respectful
The code refrains from using discriminatory and offensive language. It chooses to prioritize inclusive terminology whenever an alternative exists that conveys the same meaning.
Example
**Non-compliant code**
```css-79elbk
Master / Slave
Blacklist / Whitelist
```
**Compliant code**
```css-79elbk
Primary / Secondary
Denylist / Allowlist
```
### Learn more
Check the [software-qualities](https://docs.sonarsource.com/sonarqube-server/10.8/core-concepts/clean-code/software-qualities "mention") page to better understand software qualities. On the [code-analysis](https://docs.sonarsource.com/sonarqube-server/10.8/core-concepts/clean-code/code-analysis "mention") page you can learn how Clean Code attributes and software qualities are impacted by your code issue.
---
# Source: https://docs.sonarsource.com/sonarqube-server/8.9/instance-administration/delegating-authentication.md
# Delegating authentication
SonarQube comes with an onboard user database, as well as the ability to delegate authentication via HTTP Headers, GitHub Authentication, GitLab Authentication, SAML, or LDAP. Each method offers user identity management, group synchronization/mapping, and authentication.
### Group mapping
When using group mapping, the following caveats apply regardless of which delegated authentication method is used:
* Membership in synchronized groups will override any membership locally configured in SonarQube *at each login*
* Membership in a group is synched only if a group with the same name exists in SonarQube
* Membership in the default group `sonar-users` remains (this is a built-in group) even if the group does not exist in the identity provider
{% hint style="warning" %}
When group mapping is configured, the delegated authentication source becomes the only place to manage group membership, and the user’s groups are re-fetched with each log-in.
{% endhint %}
### HTTP header authentication
You can delegate user authentication to third-party systems (proxies/servers) using HTTP Header Authentication.
When this feature is activated, SonarQube expects that the authentication is handled prior to any query reaching the server. The tool that handles the authentication should:
* Intercept calls to the SonarQube server
* Take care of the authentication
* Update the HTTP request header with the relevant SonarQube user information
* Re-route the request to SonarQube with the appropriate header information

All the parameters required to activate and configure this feature are available in SonarQube server configuration file (in `/conf/sonar.properties`).
Using HTTP header authentication is an easy way to integrate your SonarQube deployment with an in-house SSO implementation.
### GitHub and GitLab authentication
You can delegate authentication to GitHub or GitLab. See the corresponding DevOps platform integration page for more information:
* [github-integration](https://docs.sonarsource.com/sonarqube-server/8.9/alm-integration/github-integration "mention")
* [gitlab-integration](https://docs.sonarsource.com/sonarqube-server/8.9/alm-integration/gitlab-integration "mention")
### SAML authentication
You can delegate authentication to a SAML 2.0 Identity Provider using SAML Authentication.
#### Limitations
* SAML requests are not signed. Client signature validation should be disabled in the identity provider.
* SAML encrypted responses are not supported. SAML encryption should be disabled in the identity provider.
#### Example: Using Keycloak as a SAML identity provider
The following example may be useful if you’re using Keycloak as a SAML identity provider. If you’re not using Keycloak, your settings are likely to be different.
In the Keycloak server, create a new SAML client
Create a new client
1. **Client ID**: Something like "sonarqube", it must not contain whitespace.
2. **Client Protocol**: *saml*
3. **Client SAML Endpoint**: Can be left empty.
Configure the new client
1. Under *Settings*
1. **Client Signature Required:** OFF.
2. **Valid Redirect URIs**: `/oauth2/callback/saml` (for example, ).
2. In **Client Scopes > Default Client Scopes**, remove `role_list` from **Assigned Default Client Scopes** (to prevent the error `com.onelogin.saml2.exception.ValidationError: Found an Attribute element with duplicated Name` during authentication).
3. Under **Mappers**, create a mapper for each user attribute:
1. Create a mapper for the login:
1. **Name**: `Login`
2. **Mapper Type**: *User Property*
3. **Property**: `` (Substitute the actual user login. This value should not contain any special characters other than `.-_@` to meet SonarQube restrictions)
4. **SAML Attribute Name**: *login*
2. Create a mapper for the name:
1. **Name**: `Name`
2. **Mapper Type**: *User Property*
3. **Property**: `` (Substitute the actual user name)
4. **SAML Attribute Name**: *name*
3. (Optional) Create a mapper for the email:
1. **Name**: `Email`
2. **Mapper Type**: *User Property*
3. **Property**: `` (Substitute the actual user email)
4. **SAML Attribute Name**: "email"
4. (Optional) Create a mapper for the groups (if you rely on a list of roles defined in **Roles** of the realm , not in **Roles** of the client):
1. **Name**: `Groups`
2. **Mapper Type**: *Role list*
3. **Role Attribute Name**: `groups`
4. **Single Role Attribute**: *ON*
5. If you rely on a list of groups defined in "Groups":
1. **Name**: `Groups`
2. **Mapper Type**: *Group list*
3. **Role Attribute Name**: `groups`
4. **Single Role Attribute**: *ON*
5. **Full Group Path**: *OFF*
4. In **Realm Settings > General > Endpoints**, click on **SAML 2.0 Identify Provider Metadata** to obtain the XML configuration file from Keycloak.
In SonarQube, configure SAML authentication
Go to **Administration > Configuration > General Settings > Security > SAML**
* **Enabled**: *true.*
* **Application ID**: The value of the **Client ID** you set in Keycloak (for example `sonarqube`).
* **Provider ID**: The value of the `EntityDescriptor > entityID` attribute in the XML configuration file (e.g., ").
* **SAML login url**: The value of `SingleSignOnService > Location` attribute in the XML configuration file (e.g., ").
* **Identity provider certificate**: The value you get from **Realm Settings > Keys**. Click on the *Certificate* button.
* **SAML user login attribute**: The value set in the login mapper in **SAML Attribute Name** (`login`, in the above example).
* **SAML user name attribute**: The value set in the name mapper in **SAML Attribute Name** (`name`, in the above example).
* (Optional) **SAML user email attribute**: The value set in the email mapper in **SAML Attribute Name** (`email`, in the above example).
* (Optional) **SAML group attribute**: the value set in the groups mapper in **Role/Group Attribute Name** (`groups`, in the above example).
In the login form, the new button **Log in with SAML** allows users to connect with their SAML account.
#### SAML and reverse proxy configuration
When using SAML, make sure your reverse proxy is properly configured. See [operating-the-server](https://docs.sonarsource.com/sonarqube-server/8.9/setup-and-upgrade/configure-and-operate-a-server/operating-the-server "mention") for more information.
### LDAP Authentication
You can configure SonarQube authentication and authorization to an LDAP server (including LDAP Service of Active Directory) by configuring the correct values in `/conf/sonar.properties`.
The main features are:
* Password checking against the external authentication engine.
* Automatic synchronization of usernames and emails.
* Automatic synchronization of relationships between users and groups (authorization).
* Ability to authenticate against both the external and the internal authentication systems. There is an automatic fallback on SonarQube internal system if the LDAP server is down.
* During the first authentication trial, if the user’s password is correct, the SonarQube database is automatically populated with the new user. Each time a user logs into SonarQube, the username, the email and the groups this user belongs to that are refreshed in the SonarQube database. You can choose to have group membership synchronized as well, but this is not the default.
| | | | | |
| ---------- | ------------- | ------------ | ----------- | -------------------- |
| | **Apache DS** | **OpenLDAP** | **Open DS** | **Active Directory** |
| Anonymous | **Y** | **Y** | **Y** | |
| Simple | **Y** | **Y** | **Y** | **Y** |
| LDAPS | **Y** | **Y** |
| **Y** |
| DIGEST-MD5 | **Y** |
| **Y** | **Y** |
| CRAM-MD5 | **Y** |
| **Y** | **Y** |
| GSSAPI | **Y** |
|
|
|
**Y** = successfully tested
#### Setup
* Configure LDAP by editing `/conf/sonar.properties` (see table below).
* Restart the SonarQube server and check the log file for:
```css-79elbk
INFO org.sonar.INFO Security realm: LDAP ...
INFO o.s.p.l.LdapContextFactory Test LDAP connection: OK
```
* Log into SonarQube
* On logout users will be presented a login page (`/sessions/login`), where they can choose to login as technical user or a domain user by passing appropriate credentials
From SonarScanners, we recommend using [security](https://docs.sonarsource.com/sonarqube-server/8.9/instance-administration/security "mention") for authentication against SonarQube Server.
**General configuration**
| | | | | |
| ------------------------------ | --------------------------------------------------------------------------------------------------------------------------------------------------------------------------------------------------------------------------------------- | ---------------------------------- | ------------ | ------------------------------- |
| **Property** | **Description** | **Default value** | **Required** | **Example** |
| `sonar.security.realm` | Set this to `LDAP` authenticate first against the external sytem. If the external system is not reachable or if the user is not defined in the external system, authentication will be performed against SonarQube’s internal database. | none | Yes | `LDAP` (only possible value) |
| `sonar.authenticator.downcase` | Set to true when connecting to a LDAP server using a case-insensitive setup. | `false` | No |
|
| `ldap.url` | URL of the LDAP server. If you are using ldaps, you should install the server certificate into the Java truststore. | none | Yes | `ldap://localhost:10389` |
| `ldap.bindDn` | The username of an LDAP user to connect (or bind) with. Leave this blank for anonymous access to the LDAP directory. | none | No | `cn=sonar,ou=users,o=mycompany` |
| `ldap.bindPassword` | The password of the user to connect with. Leave this blank for anonymous access to the LDAP directory. | none | No | `secret` |
| `ldap.authentication` | Possible values: `simple`, `CRAM-MD5`, `DIGEST-MD5`, `GSSAPI`. See [the tutorial on authentication mechanisms](http://java.sun.com/products/jndi/tutorial/ldap/security/auth.html) | `simple` | No |
|
| `ldap.realm` | See [Digest-MD5 Authentication](http://java.sun.com/products/jndi/tutorial/ldap/security/digest.html), [CRAM-MD5 Authentication](http://java.sun.com/products/jndi/tutorial/ldap/security/crammd5.html) | none | No | example.org |
| `ldap.contextFactoryClass` | Context factory class. | `com.sun.jndi.ldap.LdapCtxFactory` | No |
|
| `ldap.StartTLS` | Enable use of `StartTLS` | `false` | No |
|
| `ldap.followReferrals` | Follow referrals or not. See [Referrals in the JNDI](http://docs.oracle.com/javase/jndi/tutorial/ldap/referral/jndi.html) | `true` |
|
|
**User mapping**
| | | | | |
| ----------------------------- | -------------------------------------------------------------------------------- | --------------------------------------------- | ------------ | ----------------------------------------------- |
| **Property** | **Description** | **Default value** | **Required** | **Example for Active Directory** |
| `ldap.user.baseDn` | Distinguished Name (DN) of the root node in LDAP from which to search for users. | None | Yes | `cn=users,dc=example,dc=org` |
| `ldap.user.request` | LDAP user request. | `(&(objectClass=inetOrgPerson)(uid={login}))` | No | `(&(objectClass=user)(sAMAccountName={login}))` |
| `ldap.user.realNameAttribute` | Attribute in LDAP defining the user’s real name. | `cn` | No |
|
| `ldap.user.emailAttribute` | Attribute in LDAP defining the user’s email. | `mail` | No |
|
**Group Mapping** Only groups (not roles) and static groups (not dynamic groups) are supported. Click [here](http://identitycontrol.blogspot.fr/2007/07/static-vs-dynamic-ldap-groups.html) for more information.
For the delegation of authorization, [security](https://docs.sonarsource.com/sonarqube-server/8.9/instance-administration/security "mention"). Then, the following properties must be defined to allow SonarQube to automatically synchronize the relationships between users and groups.
| | | | | |
| ------------------------ | ------------------------------------------------------------------------------------------------------------------- | -------------------------------------------------------- | ------------ | ------------------------------------- |
| **Property** | **Description** | **Default value** | **Required** | **Example for Active Directory** |
| `ldap.group.baseDn` | Distinguished Name (DN) of the root node in LDAP from which to search for groups. | none | No | `cn=groups,dc=example,dc=org` |
| `ldap.group.request` | LDAP group request. | `(&(objectClass=groupOfUniqueNames)(uniqueMember={dn}))` | No | `(&(objectClass=group)(member={dn}))` |
| `ldap.group.idAttribute` | Property used to specifiy the attribute to be used for returning the list of user groups in the compatibility mode. | `cn` | No | `sAMAccountName` |
#### Sample configuration
```css-79elbk
# LDAP configuration
# General Configuration
sonar.security.realm=LDAP
ldap.url=ldap://myserver.mycompany.com
ldap.bindDn=my_bind_dn
ldap.bindPassword=my_bind_password
# User Configuration
ldap.user.baseDn=ou=Users,dc=mycompany,dc=com
ldap.user.request=(&(objectClass=inetOrgPerson)(uid={login}))
ldap.user.realNameAttribute=cn
ldap.user.emailAttribute=mail
# Group Configuration
ldap.group.baseDn=ou=Groups,dc=sonarsource,dc=com
ldap.group.request=(&(objectClass=posixGroup)(memberUid={uid}))
```
### Advanced LDAP Topics
#### Authentication methods
* **`Anonymous`** - Used when only read-only access to non-protected entries and attributes is needed when binding to the LDAP server.
* **`Simple`** Simple authentication is not recommended for production deployments not using the ldaps secure protocol since it sends a cleartext password over the network.
* **`CRAM-MD5`** - The Challenge-Response Authentication Method (CRAM) based on the HMAC-MD5 MAC algorithm ([RFC 2195](http://tools.ietf.org/html/rfc2195)).
* **`DIGEST-MD5`** - This is an improvement on the CRAM-MD5 authentication method ([RFC 2831](http://www.ietf.org/rfc/rfc2831.txt)).
* **`GSSAPI`** - GSS-API is Generic Security Service API ([RFC 2744](http://www.ietf.org/rfc/rfc2744.txt)). One of the most popular security services available for GSS-API is the Kerberos v5, used in Microsoft’s Windows 2000 platform.
For a full discussion of LDAP authentication approaches, see [RFC 2829](http://www.ietf.org/rfc/rfc2829.txt) and [RFC 2251](http://www.ietf.org/rfc/rfc2251.txt).
#### Multiple servers
To configure multiple servers:
```css-79elbk
# List the different servers
ldap.servers=server1,server2
# Configure server1
ldap.server1.url=ldap://server1:1389
ldap.server1.user.baseDn=dc=dept1,dc=com
...
# Configure server2
ldap.server2.url=ldap://server2:1389
ldap.server2.user.baseDn=dc=dept2,dc=com
...
```
Authentication will be tried on each server, in the order that they are listed in the configuration until one succeeds. User/group mapping will be performed against the first server on which the user is found.
Note that all the LDAP servers must be available while (re)starting the SonarQube server.
#### Migrate users to a new authentication method
If you are changing your delegated authentication method and migrating existing users from your previous authentication method, you can use the `api/users/update_identity_provider` web API to update your users’ identity provider.
#### Troubleshooting
* Detailed connection logs (and potential error codes received from LDAP server) are output to SonarQube’s `/logs/web.log` when logging is in `DEBUG` mode.
* Time out when running SonarQube analysis using LDAP Java parameters are documented here: . Such parameters can be set in `sonar.web.javaAdditionalOpts` in `/conf/sonar.properties`.
---
# Source: https://docs.sonarsource.com/sonarqube-cloud/administering-sonarcloud/managing-organization/creating-organization/deleting-organization.md
# Deleting organization
You can delete an organization provided you’re an organization admin.
### From your account’s Organizations page
1. Select your account menu in the top right corner of the SonarQube Cloud interface.
2. In the menu, select **My Organizations**. Your account’s **Organizations** page opens.
3. Select **Delete** on the row of the organization you want to delete.
### From the organization record
1. Go to **Administration** > **Organization settings**.
2. In the **Delete Organization** section, select the **Delete** button. The **Delete organization** dialog opens.
3. Enter your organization name and select **Delete**.
### Related pages
* [importing-github-organization](https://docs.sonarsource.com/sonarqube-cloud/administering-sonarcloud/managing-organization/creating-organization/importing-github-organization "mention")
* [importing-bitbucket-workspace](https://docs.sonarsource.com/sonarqube-cloud/administering-sonarcloud/managing-organization/creating-organization/importing-bitbucket-workspace "mention")
* [importing-gitlab-group](https://docs.sonarsource.com/sonarqube-cloud/administering-sonarcloud/managing-organization/creating-organization/importing-gitlab-group "mention")
* [importing-azure-devops-organization](https://docs.sonarsource.com/sonarqube-cloud/administering-sonarcloud/managing-organization/creating-organization/importing-azure-devops-organization "mention")
* [creating-organization-manually](https://docs.sonarsource.com/sonarqube-cloud/administering-sonarcloud/managing-organization/creating-organization/creating-organization-manually "mention")
* [binding-unbound-organization](https://docs.sonarsource.com/sonarqube-cloud/administering-sonarcloud/managing-organization/creating-organization/binding-unbound-organization "mention")
* [changing-organization-settings](https://docs.sonarsource.com/sonarqube-cloud/administering-sonarcloud/managing-organization/creating-organization/changing-organization-settings "mention")
* [importing-from-multiple-platforms](https://docs.sonarsource.com/sonarqube-cloud/administering-sonarcloud/managing-organization/creating-organization/importing-from-multiple-platforms "mention")
---
# Source: https://docs.sonarsource.com/sonarqube-community-build/project-administration/maintaining-project/deleting-project.md
# Source: https://docs.sonarsource.com/sonarqube-server/2025.2/project-administration/deleting-project.md
# Source: https://docs.sonarsource.com/sonarqube-server/2025.3/project-administration/deleting-project.md
# Source: https://docs.sonarsource.com/sonarqube-server/2025.5/project-administration/deleting-project.md
# Source: https://docs.sonarsource.com/sonarqube-server/2025.4/project-administration/deleting-project.md
# Source: https://docs.sonarsource.com/sonarqube-server/2025.6/project-administration/maintaining-project/deleting-project.md
# Source: https://docs.sonarsource.com/sonarqube-server/project-administration/maintaining-project/deleting-project.md
# Source: https://docs.sonarsource.com/sonarqube-cloud/managing-your-projects/administering-your-projects/deleting-project.md
# Deleting project
You can delete your project provided you’re a project admin.
{% hint style="info" %}
As an organization administrator, you can delete several projects from your organization at a time. See [projects-management-page](https://docs.sonarsource.com/sonarqube-cloud/administering-sonarcloud/managing-organization/manage-org-projects/projects-management-page "mention") for more information.
{% endhint %}
Proceed as follows:
1. Retrieve your project. See [retrieving-projects](https://docs.sonarsource.com/sonarqube-cloud/managing-your-projects/retrieving-projects "mention") for more details.
2. In the left sidebar, select **Administration** > **Deletion** and confirm. The **Delete project** dialog opens.
3. Enter the project name and select **Delete**.
---
# Source: https://docs.sonarsource.com/sonarqube-cloud/administering-sonarcloud/managing-enterprise/enterprise-security/sso/deleting-sso-configuration.md
# Deleting SSO configuration
{% hint style="warning" %}
The SSO users will no longer be able to login after the deletion. Before proceeding with the deletion, ensure the following:
* For each organization in the enterprise, there is at least one organization admin account that doesn’t use the SSO authentication.
* There is at least one enterprise admin account that doesn’t use the SSO authentication.
{% endhint %}
### In the UI
To delete your SSO configuration in the UI:
1. Retrieve your enterprise. See [..](https://docs.sonarsource.com/sonarqube-cloud/administering-sonarcloud/managing-enterprise "mention") for more details.
2. Select **Administration** > **Single Sign-On**. The **Single Sign-On** page opens.
3. Select **Delete**. The **Delete SSO configuration** dialog opens.
4. In the dialog, confirm the deletion.
### Via the Web API
To delete your SSO configuration via the [web-api](https://docs.sonarsource.com/sonarqube-cloud/advanced-setup/web-api "mention"):
* Use the `api/authentication/connections/delete` endpoint.
### Related pages
[about](https://docs.sonarsource.com/sonarqube-cloud/administering-sonarcloud/managing-enterprise/enterprise-security/sso/about "mention")\
[setting-up-sso](https://docs.sonarsource.com/sonarqube-cloud/getting-started-with-enterprise/setting-up-sso "mention")\
[editing-sso-configuration](https://docs.sonarsource.com/sonarqube-cloud/administering-sonarcloud/managing-enterprise/enterprise-security/sso/editing-sso-configuration "mention")\
[troubleshooting](https://docs.sonarsource.com/sonarqube-cloud/administering-sonarcloud/managing-enterprise/enterprise-security/sso/troubleshooting "mention")\
[#deleting-sso-account](https://docs.sonarsource.com/sonarqube-cloud/managing-organization/users-and-permissions/user-on-and-offboarding#deleting-sso-account "mention")
---
# Source: https://docs.sonarsource.com/sonarqube-cloud/managing-your-account/deleting.md
# Deleting your account
Before you can delete your user account, you must first manually unassign yourself from all your issues and remove your issue comment. See [#assigning](https://docs.sonarsource.com/sonarqube-cloud/managing-your-projects/issues/editing#assigning "mention") for more details.
{% hint style="info" %}
If you are the only administrator for an organization of which you are a member, the administrator permissions must be transferred before you can delete your SonarQube Cloud account. See [#transferring-ownership-of-organization](https://docs.sonarsource.com/sonarqube-cloud/administering-sonarcloud/managing-organization/users-and-permissions/organization-permissions#transferring-ownership-of-organization "mention") for more information.
{% endhint %}
To delete your user account:
1. Select your account menu in the top right corner of the SonarQube Cloud interface.
2. In the menu, select **My account**. The **Profile** page opens.
3. In the **Delete your SonarQube Cloud account** section, select **Delete account**.
---
# Source: https://docs.sonarsource.com/sonarqube-for-visual-studio/using/dependency-risks.md
# Source: https://docs.sonarsource.com/sonarqube-for-intellij/using/dependency-risks.md
# Source: https://docs.sonarsource.com/sonarqube-for-vs-code/using/dependency-risks.md
# Dependency risks
In connected mode, you can see the results from SonarQube (Server, Cloud) [Advanced Security ](https://app.gitbook.com/s/B4UT2GNiZKjtxFtcFAL7/advanced-security)tools for Software composition analysis (SCA), directly in the VS Code UI. This includes:
* vulnerabilities in your third-party open source dependencies.
* seeing where your open source dependencies may be in conflict with your organization’s license policies.
### Prerequisites
* Using SonarQube Server Enterprise edition version 2025.4 or later or SonarQube Cloud with the Enterprise Plan.
* Having the Advanced Security add-on with SCA enabled. SCA is enabled by default in SonarQube Cloud and must be manually activated in SonarQube Server.
* Running SonarQube for VS Code in connected mode with SonarQube (Server, Cloud). See the pages on [connected-mode](https://docs.sonarsource.com/sonarqube-for-vs-code/connect-your-ide/connected-mode "mention") and [setup](https://docs.sonarsource.com/sonarqube-for-vs-code/connect-your-ide/setup "mention") for more details.
### How to view your dependency risks
In SonarQube for VS Code, dependency risks are displayed in the **SONARQUBE** Panel.
For each dependency risk, the following information is displayed:
* **Risk type**: Vulnerability and Prohibited license
* **Risk severity**: Blocker, High, Medium, Low, or Info
* **Package name**
* **Package version**
You can select a risk to open it in SonarQube Server to get more details.
### Fixing dependency risks
Because dependency risk analysis requires that you run in connected mode, any changes you make to the code must be analyzed by your instance of SonarQube (Server, Cloud). Here are two options to resolve dependency risks displayed by SonarQube for VS Code:
* After you fix the dependency risk in your IDE, commit your code and rerun the analysis on SonarQube Server or SonarQube Cloud. The new status of the risk will be reflected in your IDE.
* Mark the dependency risk as **Confirmed**, **Accepted**, or **Safe** directly from the VS Code UI or SonarQube (Server, Cloud). You can also add comments. The status update is then reflected in VS Code or SonarQube (Server, Cloud).
---
# Source: https://docs.sonarsource.com/sonarqube-server/9.8/setup-and-upgrade/deploy-on-kubernetes/deploy-a-sonarqube-cluster-on-kubernetes.md
# Source: https://docs.sonarsource.com/sonarqube-server/9.9/setup-and-upgrade/deploy-on-kubernetes/deploy-a-sonarqube-cluster-on-kubernetes.md
# Source: https://docs.sonarsource.com/sonarqube-server/10.0/setup-and-upgrade/deploy-on-kubernetes/deploy-a-sonarqube-cluster-on-kubernetes.md
# Source: https://docs.sonarsource.com/sonarqube-server/10.1/setup-and-upgrade/deploy-on-kubernetes/deploy-a-sonarqube-cluster-on-kubernetes.md
# Source: https://docs.sonarsource.com/sonarqube-server/10.2/setup-and-upgrade/deploy-on-kubernetes/deploy-a-sonarqube-cluster-on-kubernetes.md
# Source: https://docs.sonarsource.com/sonarqube-server/10.3/setup-and-upgrade/deploy-on-kubernetes/deploy-a-sonarqube-cluster-on-kubernetes.md
# Deploy a SonarQube cluster on Kubernetes
*This page applies to deploying SonarQube Data Center Edition on Kubernetes. For information on deploying Community, Developer, and Enterprise editions of SonarQube on Kubernetes,* see [deploy-sonarqube-on-kubernetes](https://docs.sonarsource.com/sonarqube-server/10.3/setup-and-upgrade/deploy-on-kubernetes/deploy-sonarqube-on-kubernetes "mention") documentation.
### Overview
You can find the SonarQube DCE Helm chart on [GitHub](https://github.com/SonarSource/helm-chart-sonarqube/tree/master/charts/sonarqube-dce).
Your feedback is welcome at [our community forum](https://community.sonarsource.com/).
### Kubernetes environment recommendations
When you want to operate SonarQube on Kubernetes, consider the following recommendations.
#### Supported versions
The SonarQube helm chart should only be used with the latest version of SonarQube and a supported version of Kubernetes. There is a dedicated helm chart for the LTS version of SonarQube that follows the same patch policy as the application, while also being compatible with the supported versions of Kubernetes.
#### Pod Security Standards
Here is the list of containers that are compatible with the [Pod Security levels](https://kubernetes.io/docs/concepts/security/pod-security-admission/#pod-security-levels):
* privileged:
* `init-sysctl`
* baseline:
* `init-fs`
* restricted:
* SQ application containers
* SQ init containers.
* PostgreSQL containers.
This is achieved by setting this `SecurityContext` as default on most containers:
```css-79elbk
allowPrivilegeEscalation: false
runAsNonRoot: true
runAsUser: 1000
runAsGroup: 1000
seccompProfile:
type: RuntimeDefault
capabilities:
drop: ["ALL"]
```
Based on that, one can run the SQ helm chart in a full restricted namespace, by deactivating the `initSysctl.enabled` and `initFs.enabled` parameters, which require root access.
For more information, see the [production-use-case](https://github.com/SonarSource/helm-chart-sonarqube/tree/master/charts/sonarqube-dce#production-use-case) or take a look at the `values.yaml` file.
### Helm chart specifics
We try to provide a good default with the Helm chart, but there are some points to consider while working with SonarQube on Kubernetes. Please read the following sections carefully to make the correct decisions for your environment.
#### Installation
Currently only Helm 3 is supported.
To install the Helm chart from Helm repository, you can use the following commands:
```css-79elbk
helm repo add sonarqube https://SonarSource.github.io/helm-chart-sonarqube
helm repo update
kubectl create namespace sonarqube-dce
export JWT_SECRET=$(echo -n "your_secret" | openssl dgst -sha256 -hmac "your_key" -binary | base64)
helm upgrade --install -n sonarqube-dce sonarqube-dce --set ApplicationNodes.jwtSecret=$JWT_SECRET sonarqube/sonarqube-dce
```
The `helm upgrade --install -n sonarqube-dce sonarqube-dce --set` line allows you to customize the [Helm chart values](https://helm.sh/docs/chart_template_guide/values_files/).
#### Persistency
SonarQube comes with a bundled Elasticsearch and, as Elasticsearch is stateful, so is SonarQube. For Data Center Edition (DCE) clusters, it makes sense to persist the Elasticsearch data because the cluster will survive the loss of any single search node without index corruption. By default, persistency is *enabled* for the DCE, and managed with the Helm chart.
Enabling persistency decreases the project reload time so that accessing project data is much faster. Although there is no need to change the default value in DCE, you can manage persistency with the following parameter in the `values.yaml`:
```css-79elbk
persistence:
enabled: true
```
Disabling persistency would result in a longer startup time until SonarQube is fully available which can be a very large factor considering the downtime for the index rebuild on DCE clusters.
#### Ingress Creation
To make the SonarQube service accessible from outside of your cluster, you most likely need an ingress. Creating a new ingress is also covered by the Helm chart. See the following section for help with creating one.
**Ingress Class**
The SonarSource Helm chart has an optional dependency to the [NGINX-ingress helm chart](https://kubernetes.github.io/ingress-nginx). If you already have NGINX-ingress present in your cluster, you can use it.
If you want to install NGINX as well, add the following to your `values.yaml`.
```css-79elbk
nginx:
enabled: true
```
We recommend using the `ingress-class` NGINX with a body size of at least 8MB. This can be achieved with the following changes to your `values.yaml`:
```css-79elbk
ingress:
enabled: true
# Used to create an Ingress record.
hosts:
- name:
# Different clouds or configurations might need /* as the default path
path: /
# For additional control over serviceName and servicePort
# serviceName: someService
# servicePort: somePort
annotations:
kubernetes.io/ingress.class: nginx
nginx.ingress.kubernetes.io/proxy-body-size: "8m"
```
#### Monitoring
You can monitor your SonarQube cluster using SonarQube’s native integration with Prometheus. Through this integration, you can ensure your cluster is running properly and know if you need to take action to prevent future issues.
Prometheus monitors your SonarQube cluster by collecting metrics from the `/api/monitoring/metrics` endpoint. Results are returned in OpenMetrics text format. See Prometheus’ documentation on [Exposition formats](https://prometheus.io/docs/instrumenting/exposition_formats/) for more information on the OpenMetrics text format.
Monitoring through this endpoint requires authentication. You can access the endpoint following ways:
* **`Authorization:Bearer xxxx`** **header:** You can use a bearer token during database upgrade and when SonarQube is fully operational. Define the bearer token in the `sonar.properties` file using the `sonar.web.systemPasscode property`.
* **`X-Sonar-Passcode: xxxxx`** **header:** You can use `X-Sonar-passcode` during database upgrade and when SonarQube is fully operational. Define `X-Sonar-passcode` in the `sonar.properties` file using the `sonar.web.systemPasscode property`.
* **username:password and JWT token:** When SonarQube is fully operational, system admins logged in with local or delegated authentication can access the endpoint.
**JMX Exporter**
You can also expose the JMX metrics to Prometheus with the help of the Prometheus JMX exporter.
To use this option, set the following values in your `values.yaml` file:
```css-79elbk
prometheusExporter:
enabled: true
config:
rules:
- pattern: ".*"
```
This downloads the Prometheus JMX exporter agent and adds it to the startup options of SonarQube. With this default configuration, the JMX metrics will be exposed on /metrics for Prometheus to scrape.
The config scope here defines a configuration that is understandable by the Prometheus JMX exporter. For more information, please Prometheus’ documentation on the [JMX exporter](https://github.com/prometheus/jmx_exporter).
**PodMonitor**
You can collect metrics on application nodes using PodMonitor for Prometheus. Search node monitoring is not currently supported. To monitor applications nodes, define PodMonitor as follows:
```css-79elbk
apiVersion: monitoring.coreos.com/v1
kind: PodMonitor
metadata:
name: sonarqube
namespace: monitoring
spec:
namespaceSelector:
matchNames:
- sonarqube-dce
podMetricsEndpoints:
- interval: 30s
path: /
scheme: http
targetPort: monitoring-ce
- interval: 30s
path: /
scheme: http
targetPort: monitoring-web
selector:
matchLabels:
app: sonarqube-dce
```
#### Log Format
SonarQube prints all logs in plain-text to stdout/stderr. It can print logs as JSON-String if the variable `logging.jsonOutput` is set to `true`. This will enable log collection tools like [Loki](https://grafana.com/oss/loki/) to do post processing on the information that are provided by the application.
**LogQL Example**
With JSON Logging enabled, you can define a LogQL Query like this to filter only logs with the severity "ERROR" and display the Name of the Pod as well as the Message:
```css-79elbk
{namespace="sonarqube-dce", app="sonarqube-dce"}| json | severity="ERROR" | line_format "{{.nodename}} {{.message}}"
```
#### ES Cluster Authentication
Since SonarQube 8.9, you can enable basic security for the Search Cluster in SonarQube. To benefit from this additional layer of security on Kubernetes as well, you need to provide a PKCS#11 Container with the required certificates to our Helm chart. The required secret can be created like this:
```css-79elbk
kubectl create secret generic --from-file=/PATH/TO/YOUR/PKCS12.container=elastic-stack-ca.p12 -n
```
#### Other Configuration Options
This documentation only contains the most important Helm chart customizations. See the [Customize the chart before installing](https://helm.sh/docs/intro/using_helm/#customizing-the-chart-before-installing) documentation and the Helm chart [README](https://github.com/SonarSource/helm-chart-sonarqube/tree/master/charts/sonarqube-dce) for more possibilities on customizing the Helm chart.
### Known limitations
#### Problems with Azure Fileshare PVC
Currently, there is a known limitation when working on AKS that resonates around the use of Azure Fileshare. We recommend using another storage class for persistency on AKS.
### Upgrade
See **Upgrading instructions > Upgrading from the Helm chart** in [upgrade-guide](https://docs.sonarsource.com/sonarqube-server/10.3/setup-and-upgrade/upgrade-the-server/upgrade-guide "mention").
---
# Source: https://docs.sonarsource.com/sonarqube-server/2025.3/server-installation/data-center-edition/on-kubernetes-or-openshift/setting-up-disaster-recovery/deploy-databases.md
# Source: https://docs.sonarsource.com/sonarqube-server/2025.5/server-installation/data-center-edition/on-kubernetes-or-openshift/setting-up-disaster-recovery/deploy-databases.md
# Source: https://docs.sonarsource.com/sonarqube-server/2025.4/server-installation/data-center-edition/on-kubernetes-or-openshift/setting-up-disaster-recovery/deploy-databases.md
# Source: https://docs.sonarsource.com/sonarqube-server/2025.6/server-installation/data-center-edition/on-kubernetes-or-openshift/setting-up-disaster-recovery/deploy-databases.md
# Source: https://docs.sonarsource.com/sonarqube-server/server-installation/data-center-edition/on-kubernetes-or-openshift/setting-up-disaster-recovery/deploy-databases.md
# Step 1: Deploy the primary and replica databases
The setup instructions are based on a [architecture-example](https://docs.sonarsource.com/sonarqube-server/server-installation/data-center-edition/on-kubernetes-or-openshift/setting-up-disaster-recovery/architecture-example "mention").
Deploy the primary and replica PostgreSQL databases on Azure as follows:
1. On the Azure Database for PostgreSQL flexible server creation page of your primary database, select your subscription and resource group.
2. In **Server details** > **Compute + storage**, select **Configure server**. A new pane opens.
3. In **Backups**, enable the **Geo-redundancy**.
4. Once the primary database has been deployed, create the replica database. To do so, go to the primary database resource page > **Settings >** **Replication >** **Create replica**. Ensure that you select a different **Availability zone** than for the primary database.
5. Create virtual endpoints: go to **Database Settings** > **Replication** > **Virtual endpoints**.
The following pane is displayed.
### Related pages
* [architecture-example](https://docs.sonarsource.com/sonarqube-server/server-installation/data-center-edition/on-kubernetes-or-openshift/setting-up-disaster-recovery/architecture-example "mention")
* [set-up-clusters-on-aks](https://docs.sonarsource.com/sonarqube-server/server-installation/data-center-edition/on-kubernetes-or-openshift/setting-up-disaster-recovery/set-up-clusters-on-aks "mention")
* [configure-azure-front-door](https://docs.sonarsource.com/sonarqube-server/server-installation/data-center-edition/on-kubernetes-or-openshift/setting-up-disaster-recovery/configure-azure-front-door "mention")
* [test-failover-scenarios](https://docs.sonarsource.com/sonarqube-server/server-installation/data-center-edition/on-kubernetes-or-openshift/setting-up-disaster-recovery/test-failover-scenarios "mention")
---
# Source: https://docs.sonarsource.com/sonarqube-server/9.8/setup-and-upgrade/deploy-on-kubernetes.md
# Source: https://docs.sonarsource.com/sonarqube-server/9.9/setup-and-upgrade/deploy-on-kubernetes.md
# Source: https://docs.sonarsource.com/sonarqube-server/10.0/setup-and-upgrade/deploy-on-kubernetes.md
# Source: https://docs.sonarsource.com/sonarqube-server/10.1/setup-and-upgrade/deploy-on-kubernetes.md
# Source: https://docs.sonarsource.com/sonarqube-server/10.2/setup-and-upgrade/deploy-on-kubernetes.md
# Source: https://docs.sonarsource.com/sonarqube-server/10.3/setup-and-upgrade/deploy-on-kubernetes.md
# Source: https://docs.sonarsource.com/sonarqube-server/10.4/setup-and-upgrade/deploy-on-kubernetes.md
# Source: https://docs.sonarsource.com/sonarqube-server/10.5/setup-and-upgrade/deploy-on-kubernetes.md
# Source: https://docs.sonarsource.com/sonarqube-server/10.6/setup-and-upgrade/deploy-on-kubernetes.md
# Source: https://docs.sonarsource.com/sonarqube-server/10.7/setup-and-upgrade/deploy-on-kubernetes.md
# Source: https://docs.sonarsource.com/sonarqube-server/10.8/setup-and-upgrade/deploy-on-kubernetes.md
# Source: https://docs.sonarsource.com/sonarqube-server/2025.2/setup-and-update/deploy-on-kubernetes.md
# Source: https://docs.sonarsource.com/sonarqube-server/2025.1/setup-and-upgrade/deploy-on-kubernetes.md
# Deploying on Kubernetes
{% content-ref url="deploy-on-kubernetes/server" %}
[server](https://docs.sonarsource.com/sonarqube-server/2025.1/setup-and-upgrade/deploy-on-kubernetes/server)
{% endcontent-ref %}
{% content-ref url="deploy-on-kubernetes/dce" %}
[dce](https://docs.sonarsource.com/sonarqube-server/2025.1/setup-and-upgrade/deploy-on-kubernetes/dce)
{% endcontent-ref %}
{% content-ref url="deploy-on-kubernetes/set-up-monitoring" %}
[set-up-monitoring](https://docs.sonarsource.com/sonarqube-server/2025.1/setup-and-upgrade/deploy-on-kubernetes/set-up-monitoring)
{% endcontent-ref %}
{% content-ref url="deploy-on-kubernetes/setting-up-autoscaling" %}
[setting-up-autoscaling](https://docs.sonarsource.com/sonarqube-server/2025.1/setup-and-upgrade/deploy-on-kubernetes/setting-up-autoscaling)
{% endcontent-ref %}
{% content-ref url="deploy-on-kubernetes/encrypting-helm-chart-sensitive-data" %}
[encrypting-helm-chart-sensitive-data](https://docs.sonarsource.com/sonarqube-server/2025.1/setup-and-upgrade/deploy-on-kubernetes/encrypting-helm-chart-sensitive-data)
{% endcontent-ref %}
---
# Source: https://docs.sonarsource.com/sonarqube-server/8.9/setup-and-upgrade/deploy-sonarqube-on-kubernetes.md
# Source: https://docs.sonarsource.com/sonarqube-server/9.8/setup-and-upgrade/deploy-on-kubernetes/deploy-sonarqube-on-kubernetes.md
# Source: https://docs.sonarsource.com/sonarqube-server/9.9/setup-and-upgrade/deploy-on-kubernetes/deploy-sonarqube-on-kubernetes.md
# Source: https://docs.sonarsource.com/sonarqube-server/10.0/setup-and-upgrade/deploy-on-kubernetes/deploy-sonarqube-on-kubernetes.md
# Source: https://docs.sonarsource.com/sonarqube-server/10.1/setup-and-upgrade/deploy-on-kubernetes/deploy-sonarqube-on-kubernetes.md
# Source: https://docs.sonarsource.com/sonarqube-server/10.2/setup-and-upgrade/deploy-on-kubernetes/deploy-sonarqube-on-kubernetes.md
# Source: https://docs.sonarsource.com/sonarqube-server/10.3/setup-and-upgrade/deploy-on-kubernetes/deploy-sonarqube-on-kubernetes.md
# Deploy SonarQube on Kubernetes
*This part of the Documentation is only valid for Community, Developer, and Enterprise Editions. For information on deploying the Data Center Edition of SonarQube on Kubernetes,* see [deploy-a-sonarqube-cluster-on-kubernetes](https://docs.sonarsource.com/sonarqube-server/10.3/setup-and-upgrade/deploy-on-kubernetes/deploy-a-sonarqube-cluster-on-kubernetes "mention") documentation\*.\*
### Overview
You can find the SonarQube Helm chart on [GitHub](https://github.com/SonarSource/helm-chart-sonarqube/tree/master/charts/sonarqube).
Your feedback is welcome at [our community forum](https://community.sonarsource.com/).
### Kubernetes environment recommendations
When you want to operate SonarQube on Kubernetes, consider the following recommendations.
#### Prerequisites
**Supported versions**
The SonarQube helm chart should only be used with the latest version of SonarQube and a supported version of Kubernetes. There is a dedicated helm chart for the LTS version of SonarQube that follows the same patch policy as the application, while also being compatible with the supported versions of Kubernetes.
#### Pod Security Standards
Here is the list of containers that are compatible with the [Pod Security levels](https://kubernetes.io/docs/concepts/security/pod-security-admission/#pod-security-levels):
* privileged:
* `init-sysctl`
* baseline:
* `init-fs`
* restricted:
* SQ application containers
* SQ init containers.
* postgresql containers.
This is achieved by setting this `SecurityContext` as default on most containers:
```css-79elbk
allowPrivilegeEscalation: false
runAsNonRoot: true
runAsUser: 1000
runAsGroup: 1000
seccompProfile:
type: RuntimeDefault
capabilities:
drop: ["ALL"]
```
Based on that, one can run the SQ helm chart in a full restricted namespace, by deactivating the `initSysctl.enabled` and `initFs.enabled` parameters, which require root access.
For more information, see the [production-use-case](https://github.com/SonarSource/helm-chart-sonarqube/blob/master/charts/sonarqube/README.md#production-use-case) or take a look at the `values.yaml` file.
#### Installation
Currently, only Helm 3 is supported.
To install the Helm Chart from our Helm Repository, you can use the following commands:
```css-79elbk
helm repo add sonarqube https://SonarSource.github.io/helm-chart-sonarqube
helm repo update
kubectl create namespace sonarqube
helm upgrade --install -n sonarqube sonarqube sonarqube/sonarqube
```
#### Persistency
SonarQube comes with a bundled Elasticsearch and, as Elasticsearch is stateful, so is SonarQube. There is an option to persist the Elasticsearch indexes in a Persistent Volume, but with regular killing operations by the Kubernetes Cluster, these indexes can be corrupted. By default, persistency is disabled in the Helm chart.
Enabling persistency decreases the startup time of the SonarQube Pod significantly, but you are risking corrupting your Elasticsearch index. You can enable persistency by adding the following to the `values.yaml`:
```css-79elbk
persistence:
enabled: true
```
Leaving persistency disabled results in a longer startup time until SonarQube is fully available, but you won’t lose any data as SonarQube will persist all data in the database.
#### Custom certificate
When you’re working with your own CA or in an environment that uses self-signed certificates for your code repository platform, you can create a secret containing this certificate and add this certificate to the Java truststore inside the SonarQube deployment directly during the deployment.
To enable this behavior, add the following to your `value.yaml` file:
```css-79elbk
caCerts:
secret:
```
**Get Certificate via openssl**
If you already have a running installation of your code repository platform, you can extract the certificate with the following snippet using `openssl`
```css-79elbk
echo -n | openssl s_client -connect :443 | sed -ne '/-BEGIN CERTIFICATE-/,/-END CERTIFICATE-/p' > cert.pem
```
This certificate needs to be Base64 encoded in order to be added as secret data.
```css-79elbk
Create base64 string
cat cert.pem | base64 | tr -d "\n"
```
Note that you can also use `string-data` here if you don’t want to encode your certificate.
**Create secret**
The Base64 encoded certificate can be added to the secret’s data:
```css-79elbk
apiVersion: v1
kind: Secret
metadata:
name:
namespace:
data:
cert:
```
Then, create the secret in your Kubernetes cluster with the following command:
```css-79elbk
kubectl apply -f secret.yaml
```
#### Ingress creation
To make the SonarQube service accessible from outside of your cluster, you most likely need an ingress. Creating a new ingress is also covered by the Helm chart. See the following section for help with creating one.
**Ingress Class**
The Sonar Helm chart has an optional dependency on the [NGINX-ingress helm chart](https://kubernetes.github.io/ingress-nginx). If you already have NGINX-ingress present in your cluster, you can use it.
If you want to install NGINX as well, add the following to your `values.yaml`.
```css-79elbk
nginx:
enabled: true
```
We recommend using the ingress-class NGINX with a body size of at least 64MB. This can be achieved with the following changes to your values.yaml:
```css-79elbk
ingress:
enabled: true
# Used to create an Ingress record.
hosts:
- name:
# Different clouds or configurations might need /* as the default path
path: /
# For additional control over serviceName and servicePort
# serviceName: someService
# servicePort: somePort
annotations:
nginx.ingress.kubernetes.io/proxy-body-size: "64m"
```
#### Monitoring
You can monitor your SonarQube instance using SonarQube’s native integration with Prometheus. Through this integration, you can ensure your instance is running properly and know if you need to take action to prevent future issues.
Prometheus monitors your SonarQube instance by collecting metrics from the `/api/monitoring/metrics` endpoint. Results are returned in OpenMetrics text format. See Prometheus’ documentation on [exposition formats](https://prometheus.io/docs/instrumenting/exposition_formats/) for more information on the OpenMetrics text format.
Monitoring through this endpoint requires authentication. You can access the endpoint following ways:
* **`Authorization:Bearer xxxx`** **header:** You can use a bearer token during database upgrade and when SonarQube is fully operational. Define the bearer token in the `sonar.properties` file using the `sonar.web.systemPasscode property`.
* **`X-Sonar-Passcode: xxxxx`** **header:** You can use `X-Sonar-passcode` during database upgrade and when SonarQube is fully operational. Define `X-Sonar-passcode` in the `sonar.properties` file using the `sonar.web.systemPasscode property`.
* **username:password and JWT token:** When SonarQube is fully operational, system admins logged in with local or delegated authentication can access the endpoint.
**JMX Exporter**
You can also expose the JMX metrics to Prometheus using the Prometheus JMX exporter.
To use this option, set the following values in your `values.yaml` file:
```css-79elbk
prometheusExporter:
enabled: true
config:
rules:
- pattern: ".*"
```
This downloads the Prometheus JMX exporter agent and adds it to the startup options of SonarQube. With this default configuration, the JMX metrics will be exposed on /metrics for Prometheus to scrape.
The config scope here defines a configuration that is understandable by the Prometheus JMX exporter. For more information, please Prometheus’ documentation on the [JMX exporter](https://github.com/prometheus/jmx_exporter).
**PodMonitor**
You can collect metrics on using PodMonitor for Prometheus by defining PodMonitor as follows:
```css-79elbk
apiVersion: monitoring.coreos.com/v1
kind: PodMonitor
metadata:
name: sonarqube
namespace: monitoring
spec:
namespaceSelector:
matchNames:
- sonarqube
podMetricsEndpoints:
- interval: 30s
path: /
scheme: http
targetPort: monitoring-ce
- interval: 30s
path: /
scheme: http
targetPort: monitoring-web
selector:
matchLabels:
app: sonarqube
```
#### Customizing Helm chart values
You can customize the [Helm chart values](https://helm.sh/docs/chart_template_guide/values_files/) with various methods. One example is directly at the command line:
```css-79elbk
helm upgrade --install --set edition=enterprise sonarqube sonarqube/sonarqube
```
#### Other configuration options
While we only document the most pressing Helm chart customizations in this documentation, there are other possibilities for you to choose to [customize the chart before installing](https://helm.sh/docs/intro/using_helm/#customizing-the-chart-before-installing). Please see the Helm chart [README](https://github.com/SonarSource/helm-chart-sonarqube/tree/master/charts/sonarqube) file for more information on these.
### Known limitations
As SonarQube is intended to be run anywhere, there are some drawbacks that are currently known when operating in Kubernetes. This list is not comprehensive, but something to keep in mind and points for us to improve on.
#### Readiness and startup delays
When persistence is disabled, SonarQube startup takes significantly longer as the Elasticsearch indexes need to be rebuilt. As this delay depends on the amount of data in your SonarQube instance, the values for the startup/readiness and liveness probes need to be adjusted to your environment. We also recommend taking a look at the default limits for the SonarQube deployment as the amount of CPU available to SonarQube also impacts the startup time.
#### Problems with Azure Fileshare PVC
Currently, there is a known limitation when working on AKS that resonates around the use of Azure Fileshare. We recommend using another storage class for persistency on AKS.
### Upgrade
See **Upgrading instructions > Upgrading from the Helm chart** in [upgrade-guide](https://docs.sonarsource.com/sonarqube-server/10.3/setup-and-upgrade/upgrade-the-server/upgrade-guide "mention").
---
# Source: https://docs.sonarsource.com/sonarqube-community-build/server-update-and-maintenance/maintenance/deprecations/deprecation-policy.md
# Source: https://docs.sonarsource.com/sonarqube-server/2025.2/server-update-and-maintenance/maintenance/deprecations/deprecation-policy.md
# Source: https://docs.sonarsource.com/sonarqube-server/2025.3/server-update-and-maintenance/maintenance/deprecations/deprecation-policy.md
# Source: https://docs.sonarsource.com/sonarqube-server/2025.5/server-update-and-maintenance/maintenance/deprecations/deprecation-policy.md
# Source: https://docs.sonarsource.com/sonarqube-server/2025.4/server-update-and-maintenance/maintenance/deprecations/deprecation-policy.md
# Source: https://docs.sonarsource.com/sonarqube-server/2025.6/server-update-and-maintenance/maintenance/deprecations/deprecation-policy.md
# Source: https://docs.sonarsource.com/sonarqube-server/server-update-and-maintenance/maintenance/deprecations/deprecation-policy.md
# Deprecation policy
### General principles
A backward-incompatible change or dropping of a public API endpoint, a workflow, or a feature is subject to the deprecation. Once deprecated, they will be removed in a future version:
* A deprecated feature can be dropped in the year following the year it was deprecated, after the new LTA, with a minimum of 6 months after deprecation.\
For example, a feature deprecated in the 2025.2 version is kept until the 2026.1 LTA (Long-Term Active) version and dropped in the 2026.2 version or later. See [release-cycle-model](https://docs.sonarsource.com/sonarqube-server/server-update-and-maintenance/update/release-cycle-model "mention") for more information.
* See below for deprecated Web API or Plugin API components.
### Web API deprecation policy
The Web API deprecation policy states that:
* An API component must be deprecated before being dropped. Furthermore, if the underlying feature is not being dropped, a replacement component must immediately be provided.
* A deprecated API component must be fully supported until its drop (For instance the implementation of a deprecated method can’t be replaced by throwing a new UnsupportedOperationException()).
* The API release cycle is tied to the [release-cycle-model](https://docs.sonarsource.com/sonarqube-server/server-update-and-maintenance/update/release-cycle-model "mention").
* A deprecated API endpoint can be dropped in January of the year following the year it was deprecated, but not before 6 months after deprecation.
{% hint style="info" %}
Under special circumstances, for example, when there are security vulnerabilities that need to be addressed, we might make an exception and drop the deprecated API component earlier.
{% endhint %}
### Plugin API deprecation policy
The Plugin API deprecation policy states that:
* An API component must be deprecated before being dropped. Furthermore, if the underlying feature is not being dropped, a replacement component must immediately be provided.
* A deprecated API component must be fully supported until its drop (For instance the implementation of a deprecated method can’t be replaced by throwing a new UnsupportedOperationException()).
* The API is released independently of SonarQube Server (see the [version compatibility matrix](https://github.com/SonarSource/sonar-plugin-api?tab=readme-ov-file#sonarqube)).
* All breaking changes in the Plugin API must be preceded by a deprecation period of at least 2 years after the deprecation.
{% hint style="info" %}
Under special circumstances, for example, when there are security vulnerabilities that need to be addressed, we might make an exception and drop the deprecated API component earlier.
{% endhint %}
Deprecation mark
A Plugin API component is marked as deprecated with both:
* The annotation `@Deprecated`.
* The Javadoc tag `@deprecated` whose message must start with "in x.y", for example:
```css-79elbk
* /**
* @deprecated in 4.2. Replaced by {@link #newMethod()}.
*/
@Deprecated
public void foo() {
...
}
```
### Policy recommendations for API users
* Regularly monitor the deprecation of API components and check if you’re currently using them. See [monitoring-api-deprecation](https://docs.sonarsource.com/sonarqube-server/server-update-and-maintenance/maintenance/deprecations/monitoring-api-deprecation "mention").
* If you’re currently using deprecated API components:
* Don’t add new uses of it.
* Make the necessary updates in your next few releases so you’re ready for any breaking changes after the next LTA (Long-Term Active) release. See [release-cycle-model](https://docs.sonarsource.com/sonarqube-server/server-update-and-maintenance/update/release-cycle-model "mention") for more information.
### Deprecation notice
Feature removals and deprecations are announced in the [release-notes](https://docs.sonarsource.com/sonarqube-server/server-update-and-maintenance/release-notes "mention").
Plugin API deprecations are announced in the [sonar-plugi-api GitHub repository](https://github.com/SonarSource/sonar-plugin-api/releases).
### Related pages
* [web-api](https://docs.sonarsource.com/sonarqube-server/extension-guide/web-api "mention")
* [plugin-basics](https://docs.sonarsource.com/sonarqube-server/extension-guide/developing-a-plugin/plugin-basics "mention")
---
# Source: https://docs.sonarsource.com/sonarqube-server/10.6/setup-and-upgrade/deprecations-and-removals-by-version.md
# Source: https://docs.sonarsource.com/sonarqube-server/10.7/server-upgrade-and-maintenance/release-notes-and-notices/deprecations-and-removals-by-version.md
# Deprecations and removals
This page contains information on the deprecation and removal of SonarQube features and API endpoints.
* Each deprecated feature or API endpoint will be removed in a future release. We recommend to start using its replacement (if any) as soon as possible.
* To check for breaking changes before you upgrade, read the [release-upgrade-notes](https://docs.sonarsource.com/sonarqube-server/10.7/server-upgrade-and-maintenance/release-notes-and-notices/release-upgrade-notes "mention") for all the versions between your current version and the target version.
* [plugin-basics](https://docs.sonarsource.com/sonarqube-server/10.7/extension-guide/developing-a-plugin/plugin-basics "mention") deprecations are announced in the [sonar-plugi-api GitHub repository](https://github.com/SonarSource/sonar-plugin-api/releases).
**Deprecation time frame**
If a feature or API endpoint is deprecated in version X.Y, it is planned to be dropped in version (X+1).0. For example, a feature deprecated in the 10.x version is kept until the 10.x LTA (Long-Term Active) version and dropped in the 11.0 version or later.
A backward-incompatible change or dropping of a public API endpoint, a workflow, or a feature can be considered deprecation. Once deprecated, they will be removed in a future version.
### SonarQube 10.6
#### Deprecated build wrapper output property
* Announced in SonarQube 10.6 (June 2024)
* Removal in SonarQube 11.0 or later
Build Wrapper collects information from the build in two separate JSON formats: `compile_commands.json` and `build-wrapper-dump.json`. Both these files are generated in the specified output directory. The `build-wrapper-dump.json` format and its associated property `sonar.cfamily.build-wrapper-output` are deprecated. The `sonar.cfamily.compile-commands` property should be used instead to specify the path to the `compile_commands.json` file.
---
# Source: https://docs.sonarsource.com/sonarqube-server/10.8/server-upgrade-and-maintenance/release-notes-and-notices/deprecations-and-removals.md
# Source: https://docs.sonarsource.com/sonarqube-server/2025.1/server-update-and-maintenance/release-notes-and-notices/deprecations-and-removals.md
# Source: https://docs.sonarsource.com/sonarqube-cloud/deprecations-and-removals.md
# Deprecations and removals
### Deprecation policy
A backward-incompatible change or dropping of a public API endpoint, a workflow, or a feature can be considered deprecation. Once deprecated, they will be removed after a defined period of time.
Before making a backward-incompatible change or dropping a public API endpoint, it is marked as obsolete or deprecated. Once deprecated, they will be removed after a defined period of time.
#### Deprecation timeframe
* When a public API endpoint is to be dropped, Sonar will announce this at least **180 days** before to the users.
* When a feature is to be dropped, Sonar will announce this at least **90 days** before to the users.
* The feature or API endpoint will be removed on the expiry of the deprecation period.
#### Deprecation communication
1. Deprecation notices will be published in SonarCloud documentation under the dedicated *Deprecation announcements* section below.
2. Users will be notified about an API endpoint deprecation in the [Sonar community](https://community.sonarsource.com/c/announce/20) (future deprecation announcements will be available at this link).
3. Users (organization owner and token owner if the endpoint is used by the organization) will be notified about the deprecation of an API endpoint via email. If you have used the API endpoint that is about to be deprecated within the last 30 days prior to deprecation, you will receive an email announcing the deprecation.
4. A reminder of the deprecation will be delivered through email 90, 60, and 30 days prior to the removal of the endpoint.
5. Deprecation of a feature or workflow will be communicated to existing users within the product UI.
6. Notification will include the scope of deprecation, timeframe of deprecation, and alternative solution (if available).
### Deprecation announcements
#### Deprecated SonarCloud with Travis CI add-on
Support for the Travis CI add-on will end on March 9th, 2026. Please see [this page](https://docs.sonarsource.com/sonarqube-cloud/advanced-setup/ci-based-analysis/other-cis) for information on alternative options.
#### Deprecated Amazon CodeCatalyst
On October 7th, 2025, AWS announced the retirement of CodeCatalyst. Starting November 7th, 2025, no new spaces can be created, and access is limited to existing customers. As a consequence, [this tool](https://docs.sonarsource.com/sonarqube-cloud/advanced-setup/ci-based-analysis/amazon-codecatalyst) won't be maintained anymore starting December 16th, 2025.
* Your code is built with Maven: run `org.sonarsource.scanner.maven:sonar-maven-plugin:3.11.0.3922:sonar` during the build (more info in the [sonarscanner-for-maven](https://docs.sonarsource.com/sonarqube-cloud/advanced-setup/ci-based-analysis/sonarscanner-for-maven "mention") documentation)
* Your code is built with Gradle: use the [sonarscanner-for-gradle](https://docs.sonarsource.com/sonarqube-cloud/advanced-setup/ci-based-analysis/sonarscanner-for-gradle "mention") during the build
* You want to analyze a .NET solution: follow our interactive tutorial for other CI's
* You want to analyze C and C++ code: rely on our [SonarQube Cloud Scan for C and C++](https://github.com/marketplace/actions/sonarcloud-scan-for-c-and-c) and look at [our sample C and C++ project](https://github.com/sonarsource-cfamily-examples?q=gh-actions-sc\&type=all\&language=\&sort=)
* Your code uses another language or ecosystem: use [sonarscanner-cli](https://docs.sonarsource.com/sonarqube-cloud/advanced-setup/ci-based-analysis/sonarscanner-cli "mention")
#### Deprecated Design and Architecture features
* Announced in October 2025
* Removal after January 17 2026
The Design and Architecture features are deprecated and will be removed in the future.
#### Deprecated build wrapper output property
* Announced in May 2024
* Removal after July 10 2024
Build Wrapper collects information from the build in two separate JSON formats: `compile_commands.json` and `build-wrapper-dump.json`. Both these files are generated in the specified output directory. The `build-wrapper-dump.json` format and its associated property `sonar.cfamily.build-wrapper-output` are deprecated. The `sonar.cfamily.compile-commands` property should be used instead to specify the path to the `compile_commands.json` file.
### Additional API updates
When querying rules or issues, INFO and BLOCKER may appear as statuses at the quality level (i.e. a rule might have a reliability severity of BLOCKER). It is also possible to create rules/issues with these additional severities.
The affected APIs:
* api/issues/\*
* api/rules/\*
* api/projects/export\_findings
* api/qualityprofiles/compare
* api/qualityprofiles/changelog
---
# Source: https://docs.sonarsource.com/sonarqube-community-build/server-update-and-maintenance/maintenance/deprecations.md
# Source: https://docs.sonarsource.com/sonarqube-server/2025.2/server-update-and-maintenance/maintenance/deprecations.md
# Source: https://docs.sonarsource.com/sonarqube-server/2025.3/server-update-and-maintenance/maintenance/deprecations.md
# Source: https://docs.sonarsource.com/sonarqube-server/2025.5/server-update-and-maintenance/maintenance/deprecations.md
# Source: https://docs.sonarsource.com/sonarqube-server/2025.4/server-update-and-maintenance/maintenance/deprecations.md
# Source: https://docs.sonarsource.com/sonarqube-server/2025.6/server-update-and-maintenance/maintenance/deprecations.md
# Source: https://docs.sonarsource.com/sonarqube-server/server-update-and-maintenance/maintenance/deprecations.md
# Deprecations
- [Deprecation policy](/sonarqube-server/server-update-and-maintenance/maintenance/deprecations/deprecation-policy.md): The goal of the deprecation policy is to ensure that users are aware of what is changing and have time to adjust before a feature or an API component is dropped on a planned date.
- [Monitoring API deprecation](/sonarqube-server/server-update-and-maintenance/maintenance/deprecations/monitoring-api-deprecation.md): Monitoring deprecated Web API components is an important part of checking that your SonarQube instance is using deprecated endpoints.
---
# Source: https://docs.sonarsource.com/sonarqube-server/2025.2/design-and-architecture.md
# Source: https://docs.sonarsource.com/sonarqube-server/2025.3/design-and-architecture.md
# Source: https://docs.sonarsource.com/sonarqube-server/2025.5/design-and-architecture.md
# Source: https://docs.sonarsource.com/sonarqube-server/2025.4/design-and-architecture.md
# Source: https://docs.sonarsource.com/sonarqube-server/2025.6/design-and-architecture.md
# Design and Architecture
{% hint style="warning" %}
The Design and Architecture features described in these pages are deprecated and will be removed in the future.
{% endhint %}
{% content-ref url="design-and-architecture/overview" %}
[overview](https://docs.sonarsource.com/sonarqube-server/2025.6/design-and-architecture/overview)
{% endcontent-ref %}
{% content-ref url="design-and-architecture/cycle-detection" %}
[cycle-detection](https://docs.sonarsource.com/sonarqube-server/2025.6/design-and-architecture/cycle-detection)
{% endcontent-ref %}
{% content-ref url="design-and-architecture/configuring-the-architecture-analysis" %}
[configuring-the-architecture-analysis](https://docs.sonarsource.com/sonarqube-server/2025.6/design-and-architecture/configuring-the-architecture-analysis)
{% endcontent-ref %}
---
# Source: https://docs.sonarsource.com/sonarqube-community-build/server-update-and-maintenance/update/determine-path.md
# Source: https://docs.sonarsource.com/sonarqube-server/10.4/setup-and-upgrade/upgrade-the-server/determine-path.md
# Source: https://docs.sonarsource.com/sonarqube-server/10.5/setup-and-upgrade/upgrade-the-server/determine-path.md
# Source: https://docs.sonarsource.com/sonarqube-server/10.6/setup-and-upgrade/upgrade-the-server/determine-path.md
# Source: https://docs.sonarsource.com/sonarqube-server/10.7/server-upgrade-and-maintenance/upgrade/upgrade-the-server/determine-path.md
# Source: https://docs.sonarsource.com/sonarqube-server/10.8/server-upgrade-and-maintenance/upgrade/upgrade-the-server/determine-path.md
# Source: https://docs.sonarsource.com/sonarqube-server/2025.2/server-update-and-maintenance/upgrade/determine-path.md
# Source: https://docs.sonarsource.com/sonarqube-server/2025.3/server-update-and-maintenance/upgrade/determine-path.md
# Source: https://docs.sonarsource.com/sonarqube-server/2025.5/server-update-and-maintenance/update/determine-path.md
# Source: https://docs.sonarsource.com/sonarqube-server/2025.1/server-update-and-maintenance/update/determine-path.md
# Source: https://docs.sonarsource.com/sonarqube-server/2025.4/server-update-and-maintenance/update/determine-path.md
# Source: https://docs.sonarsource.com/sonarqube-server/2025.6/server-update-and-maintenance/update/determine-path.md
# Source: https://docs.sonarsource.com/sonarqube-server/server-update-and-maintenance/update/determine-path.md
# Determining the update path
This section explains the principles to follow to determine whether you can perform the update directly or must update first to an intermediate version(s). To understand the principles, you must first understand the [release-cycle-model](https://docs.sonarsource.com/sonarqube-server/server-update-and-maintenance/update/release-cycle-model "mention").
To determine your update path, consider the following principles:
* You can update directly from a non-LTA version to another if there is no LTA version in your update path.
* If there is at least one LTA version in your update path, you must first update to each intermediate LTA and then to your target version.
* When upgrading to an LTA version, you should directly update to its latest patch.
* You can update from the latest LTA version to the latest non-LTA version directly.
* If you’re migrating from an earlier patch version of an LTA, you can update directly to the next LTA. You don’t need to install any intermediate patch versions.
* There is no LTA concept for SonarQube Community Build.
### Update path examples
| From version | To version | Update path |
| ------------ | ---------- | --------------------------------------------------------- |
| 2025.1 LTA | 2026.1 LTA | 2025.1 LTA > 2026.1 LTA (direct) |
| 9.9 LTA | 2026.1 LTA | 9.9 LTA > 2025.1 LTA > 2026.1 LTA (one intermediate step) |
| 9.9 LTA | 2025.4 LTA | 9.9 LTA > 2025.1 LTA > 2025.4 LTA (one intermediate step) |
| 9.9 LTA | 2025.1 LTA | 9.9 LTA > 2025.1 LTA (direct) |
| 8.9 | 2025.1 LTA | 8.9 LTA > 9.9 LTA > 2025.1 LTA (one intermediate step) |
| 2025.1 LTA | 2025.3 | 2025.1 LTA > 2025.3 (direct) |
| 10.6 | 2025.1 LTA | 10.6 > 2025.1 LTA (direct) |
| 10.6 | 2025.3 | 10.6 > 2025.1 LTA > 2025.3 (one intermediate step) |
### Update path calculator
You can use our calculator to help determine your update path.
{% @sonar-embeds/upgrade-calculator %}
---
# Source: https://docs.sonarsource.com/sonarqube-community-build/extension-guide/developing-a-plugin.md
# Source: https://docs.sonarsource.com/sonarqube-server/8.9/extension-guide/developing-a-plugin.md
# Source: https://docs.sonarsource.com/sonarqube-server/9.8/extension-guide/developing-a-plugin.md
# Source: https://docs.sonarsource.com/sonarqube-server/9.9/extension-guide/developing-a-plugin.md
# Source: https://docs.sonarsource.com/sonarqube-server/10.0/extension-guide/developing-a-plugin.md
# Source: https://docs.sonarsource.com/sonarqube-server/10.1/extension-guide/developing-a-plugin.md
# Source: https://docs.sonarsource.com/sonarqube-server/10.2/extension-guide/developing-a-plugin.md
# Source: https://docs.sonarsource.com/sonarqube-server/10.3/extension-guide/developing-a-plugin.md
# Source: https://docs.sonarsource.com/sonarqube-server/10.4/extension-guide/developing-a-plugin.md
# Source: https://docs.sonarsource.com/sonarqube-server/10.5/extension-guide/developing-a-plugin.md
# Source: https://docs.sonarsource.com/sonarqube-server/10.6/extension-guide/developing-a-plugin.md
# Source: https://docs.sonarsource.com/sonarqube-server/10.7/extension-guide/developing-a-plugin.md
# Source: https://docs.sonarsource.com/sonarqube-server/10.8/extension-guide/developing-a-plugin.md
# Source: https://docs.sonarsource.com/sonarqube-server/2025.2/extension-guide/developing-a-plugin.md
# Source: https://docs.sonarsource.com/sonarqube-server/2025.3/extension-guide/developing-a-plugin.md
# Source: https://docs.sonarsource.com/sonarqube-server/2025.5/extension-guide/developing-a-plugin.md
# Source: https://docs.sonarsource.com/sonarqube-server/2025.1/extension-guide/developing-a-plugin.md
# Source: https://docs.sonarsource.com/sonarqube-server/2025.4/extension-guide/developing-a-plugin.md
# Source: https://docs.sonarsource.com/sonarqube-server/2025.6/extension-guide/developing-a-plugin.md
# Source: https://docs.sonarsource.com/sonarqube-server/extension-guide/developing-a-plugin.md
# Developing a plugin
{% content-ref url="developing-a-plugin/plugin-basics" %}
[plugin-basics](https://docs.sonarsource.com/sonarqube-server/extension-guide/developing-a-plugin/plugin-basics)
{% endcontent-ref %}
{% content-ref url="developing-a-plugin/supporting-new-languages" %}
[supporting-new-languages](https://docs.sonarsource.com/sonarqube-server/extension-guide/developing-a-plugin/supporting-new-languages)
{% endcontent-ref %}
{% content-ref url="developing-a-plugin/executable-lines" %}
[executable-lines](https://docs.sonarsource.com/sonarqube-server/extension-guide/developing-a-plugin/executable-lines)
{% endcontent-ref %}
{% content-ref url="developing-a-plugin/adding-pages-to-the-webapp" %}
[adding-pages-to-the-webapp](https://docs.sonarsource.com/sonarqube-server/extension-guide/developing-a-plugin/adding-pages-to-the-webapp)
{% endcontent-ref %}
{% content-ref url="developing-a-plugin/supporting-scm-providers" %}
[supporting-scm-providers](https://docs.sonarsource.com/sonarqube-server/extension-guide/developing-a-plugin/supporting-scm-providers)
{% endcontent-ref %}
---
# Source: https://docs.sonarsource.com/sonarqube-cloud/discovering-sonarcloud/developing-with-sonar.md
# Developing with Sonar
The SonarQube solution helps developers perform automated code analysis and reviews at every stage of the development process:
* SonarQube for IDE provides immediate feedback in your IDE as you write code so you can find, focus on, and fix anticipated issues before a commit.
* SonarQube Cloud’s PR analysis fits into your cloud-based CI/CD workflows so that you merge high-quality code every time.
* Quality gates keep code with issues from being released to production. See [about-new-code](https://docs.sonarsource.com/sonarqube-cloud/standards/about-new-code "mention") for more details.
Organizations start with a set of default rules called the Sonar Way Quality Profile. Quality profiles define the set of [rules](https://docs.sonarsource.com/sonarqube-cloud/digging-deeper/rules "mention") to be applied during code review and analysis. The Sonar Way can be customized per project to satisfy different technical requirements. See [understanding-quality-profiles](https://docs.sonarsource.com/sonarqube-cloud/standards/managing-quality-profiles/understanding-quality-profiles "mention") for more information.
A quality gate is an indicator of code quality that can be configured to give a green or red light on the current release-worthiness of your code. It indicates whether your code complies with the quality standards and can move forward. See [introduction-to-quality-gates](https://docs.sonarsource.com/sonarqube-cloud/standards/managing-quality-gates/introduction-to-quality-gates "mention") for more information.
* A **Passed** (green) quality gate means the code meets your standard and is ready to be merged.
* A **Failed** (red) quality gate means there are issues to address.
SonarQube Cloud provides feedback through its UI, email, and in decorations on pull or merge requests to notify your team that there are issues to address. SonarQube Cloud also provides in-depth guidance on the issues telling you why each issue is a problem and how to fix it, adding a valuable layer of education for developers of all experience levels.
Feedback can also be obtained during automated code review in [connected-mode](https://docs.sonarsource.com/sonarqube-cloud/improving/connected-mode "mention") when running in Connected Mode. SonarQube for IDE helps developers find, focus on, and fix anticipated issues before a commit. Together, SonarQube for IDE and SonarQube Cloud help developers address issues effectively, so only high-quality code that passes the quality gate is promoted.
Explore [featured public projects](https://sonarcloud.io/explore/projects) on SonarQube Cloud and experience how other organizations leverage the platform to improve their code.
---
# Source: https://docs.sonarsource.com/sonarqube-cloud/administering-sonarcloud/about-sonarqube-cloud-solution/user-management/devops-platform-authentication.md
# Default authentication through DevOps platform
With the DevOps platform service authentication:
* Just-in-Time user provisioning is used. When a user signs up with SonarQube Cloud for the first time through their DevOps platform (DOP), their DOP user account is automatically created in SonarQube Cloud.
* The automatic member synchronization is supported with GitHub. See [github-member-synchronization](https://docs.sonarsource.com/sonarqube-cloud/administering-sonarcloud/about-sonarqube-cloud-solution/user-management/github-member-synchronization "mention") for more information.
### Authentication flow
Users log directly into SonarQube Cloud with their DevOps platform (DOP) credentials which are transmitted to an Auth0 server for authentication. Auth0 bridges SonarQube Cloud and the DOP service.
The authentication flow is as follows:
1. The user enters their login for their DOP via SonarQube Cloud.
2. SonarQube Cloud redirects the authentication request to Auth0.
3. Auth0 forwards the request to the DOP service.
4. The DOP authenticates the user and sends the authentication response to Auth0.
5. Auth0 forwards the authentication response to SonarQube Cloud.
6. SonarQube Cloud performs extra-authentication checks. If successful, the user is authenticated in SonarQube Cloud.
{% hint style="info" %}
Auth0 may connect to the DOP service from one of the IP addresses listed [here](https://auth0.com/docs/secure/security-guidance/data-security/allowlist).
{% endhint %}
### User login format
When creating a new user login, SonarQube Cloud systematically adds a random suffix to the login name to manage user misidentification risk.
{% hint style="info" %}
When setting up API-based automations related to users, don’t use the `login` field to retrieve a user. Use the `email` field instead.
{% endhint %}
### Azure DevOps service authentication
The following applies for Azure DevOps service authentication in SonarQube Cloud:
* ID tokens are used.
* Both personal and organizations accounts are supported (the multi-tenant endpoint is used).
* The following scopes are required: `User.Read`, `openid`, `profile`, and `email`.
### Related page
[user-on-and-offboarding](https://docs.sonarsource.com/sonarqube-cloud/administering-sonarcloud/managing-organization/users-and-permissions/user-on-and-offboarding "mention")\
[github-member-synchronization](https://docs.sonarsource.com/sonarqube-cloud/administering-sonarcloud/about-sonarqube-cloud-solution/user-management/github-member-synchronization "mention")\
[sso](https://docs.sonarsource.com/sonarqube-cloud/administering-sonarcloud/managing-enterprise/enterprise-security/sso "mention")
---
# Source: https://docs.sonarsource.com/sonarqube-community-build/devops-platform-integration.md
# Source: https://docs.sonarsource.com/sonarqube-server/9.8/devops-platform-integration.md
# Source: https://docs.sonarsource.com/sonarqube-server/9.9/devops-platform-integration.md
# Source: https://docs.sonarsource.com/sonarqube-server/10.0/devops-platform-integration.md
# Source: https://docs.sonarsource.com/sonarqube-server/10.1/devops-platform-integration.md
# Source: https://docs.sonarsource.com/sonarqube-server/10.2/devops-platform-integration.md
# Source: https://docs.sonarsource.com/sonarqube-server/10.3/devops-platform-integration.md
# Source: https://docs.sonarsource.com/sonarqube-server/10.4/devops-platform-integration.md
# Source: https://docs.sonarsource.com/sonarqube-server/10.5/devops-platform-integration.md
# Source: https://docs.sonarsource.com/sonarqube-server/10.6/devops-platform-integration.md
# Source: https://docs.sonarsource.com/sonarqube-server/10.7/devops-platform-integration.md
# Source: https://docs.sonarsource.com/sonarqube-server/10.8/devops-platform-integration.md
# Source: https://docs.sonarsource.com/sonarqube-server/2025.2/devops-platform-integration.md
# Source: https://docs.sonarsource.com/sonarqube-server/2025.3/devops-platform-integration.md
# Source: https://docs.sonarsource.com/sonarqube-server/2025.5/devops-platform-integration.md
# Source: https://docs.sonarsource.com/sonarqube-server/2025.1/devops-platform-integration.md
# Source: https://docs.sonarsource.com/sonarqube-server/2025.4/devops-platform-integration.md
# Source: https://docs.sonarsource.com/sonarqube-server/2025.6/project-administration/setting-up-features/devops-platform-integration.md
# Source: https://docs.sonarsource.com/sonarqube-server/2025.6/devops-platform-integration.md
# Source: https://docs.sonarsource.com/sonarqube-server/project-administration/setting-up-features/devops-platform-integration.md
# Source: https://docs.sonarsource.com/sonarqube-server/devops-platform-integration.md
# Source: https://docs.sonarsource.com/sonarqube-cloud/managing-your-projects/administering-your-projects/devops-platform-integration.md
# DevOps platform integration
{% content-ref url="devops-platform-integration/introduction" %}
[introduction](https://docs.sonarsource.com/sonarqube-cloud/managing-your-projects/administering-your-projects/devops-platform-integration/introduction)
{% endcontent-ref %}
{% content-ref url="devops-platform-integration/github" %}
[github](https://docs.sonarsource.com/sonarqube-cloud/managing-your-projects/administering-your-projects/devops-platform-integration/github)
{% endcontent-ref %}
{% content-ref url="devops-platform-integration/bitbucket-cloud" %}
[bitbucket-cloud](https://docs.sonarsource.com/sonarqube-cloud/managing-your-projects/administering-your-projects/devops-platform-integration/bitbucket-cloud)
{% endcontent-ref %}
{% content-ref url="devops-platform-integration/gitlab" %}
[gitlab](https://docs.sonarsource.com/sonarqube-cloud/managing-your-projects/administering-your-projects/devops-platform-integration/gitlab)
{% endcontent-ref %}
{% content-ref url="devops-platform-integration/azure-devops" %}
[azure-devops](https://docs.sonarsource.com/sonarqube-cloud/managing-your-projects/administering-your-projects/devops-platform-integration/azure-devops)
{% endcontent-ref %}
---
# Source: https://docs.sonarsource.com/sonarqube-cloud/digging-deeper.md
# Digging deeper
Dive deeper into your code review and analysis with SonarQube Cloud. These pages contain a wealth of detailed articles, unlocking advanced features, and providing new insights into your development process.
{% content-ref url="digging-deeper/security-hotspots" %}
[security-hotspots](https://docs.sonarsource.com/sonarqube-cloud/digging-deeper/security-hotspots)
{% endcontent-ref %}
{% content-ref url="digging-deeper/security-reports" %}
[security-reports](https://docs.sonarsource.com/sonarqube-cloud/digging-deeper/security-reports)
{% endcontent-ref %}
{% content-ref url="digging-deeper/activity-and-history" %}
[activity-and-history](https://docs.sonarsource.com/sonarqube-cloud/digging-deeper/activity-and-history)
{% endcontent-ref %}
{% content-ref url="digging-deeper/filters-and-perspective" %}
[filters-and-perspective](https://docs.sonarsource.com/sonarqube-cloud/digging-deeper/filters-and-perspective)
{% endcontent-ref %}
{% content-ref url="digging-deeper/metric-definitions" %}
[metric-definitions](https://docs.sonarsource.com/sonarqube-cloud/digging-deeper/metric-definitions)
{% endcontent-ref %}
{% content-ref url="digging-deeper/background-tasks" %}
[background-tasks](https://docs.sonarsource.com/sonarqube-cloud/digging-deeper/background-tasks)
{% endcontent-ref %}
{% content-ref url="digging-deeper/managing-project-history" %}
[managing-project-history](https://docs.sonarsource.com/sonarqube-cloud/digging-deeper/managing-project-history)
{% endcontent-ref %}
{% content-ref url="digging-deeper/housekeeping" %}
[housekeeping](https://docs.sonarsource.com/sonarqube-cloud/digging-deeper/housekeeping)
{% endcontent-ref %}
{% content-ref url="digging-deeper/rules" %}
[rules](https://docs.sonarsource.com/sonarqube-cloud/digging-deeper/rules)
{% endcontent-ref %}
{% content-ref url="digging-deeper/software-qualities" %}
[software-qualities](https://docs.sonarsource.com/sonarqube-cloud/digging-deeper/software-qualities)
{% endcontent-ref %}
{% content-ref url="digging-deeper/security-related-rules" %}
[security-related-rules](https://docs.sonarsource.com/sonarqube-cloud/digging-deeper/security-related-rules)
{% endcontent-ref %}
{% content-ref url="digging-deeper/rules-for-ai-codefix" %}
[rules-for-ai-codefix](https://docs.sonarsource.com/sonarqube-cloud/digging-deeper/rules-for-ai-codefix)
{% endcontent-ref %}
{% content-ref url="digging-deeper/built-in-rule-tags" %}
[built-in-rule-tags](https://docs.sonarsource.com/sonarqube-cloud/digging-deeper/built-in-rule-tags)
{% endcontent-ref %}
---
# Source: https://docs.sonarsource.com/sonarqube-cloud/administering-sonarcloud/managing-organization/setting-config-at-org-level/disabling-automatic-analysis.md
# Disabling automatic analysis
This feature is only available in the [Enterprise plan](https://www.sonarsource.com/plans-and-pricing/#sonarqube-cloud-features).
As an organization admin, you can disable the [automatic-analysis](https://docs.sonarsource.com/sonarqube-cloud/advanced-setup/automatic-analysis "mention") for all new projects in your organization. This setting can be overridden at the project level.
To disable the automatic analysis for your Enterprise plan organization:
1. Retrieve your organization. See [viewing-organizations](https://docs.sonarsource.com/sonarqube-cloud/getting-started/viewing-organizations "mention") for more details.
2. Go to **Adminstration** > **Organization Settings** > **Analysis**.
3. In **Analysis method** > **Automatic Analysis**, unselect **Enabled for new projects**.
---
# Source: https://docs.sonarsource.com/sonarqube-community-build/analyzing-source-code/incremental-analysis/disabling-or-changing.md
# Source: https://docs.sonarsource.com/sonarqube-server/10.6/analyzing-source-code/incremental-analysis/disabling-or-changing.md
# Source: https://docs.sonarsource.com/sonarqube-server/10.7/analyzing-source-code/incremental-analysis/disabling-or-changing.md
# Source: https://docs.sonarsource.com/sonarqube-server/10.8/analyzing-source-code/incremental-analysis/disabling-or-changing.md
# Source: https://docs.sonarsource.com/sonarqube-server/2025.2/analyzing-source-code/incremental-analysis/disabling-or-changing.md
# Source: https://docs.sonarsource.com/sonarqube-server/2025.3/analyzing-source-code/incremental-analysis/disabling-or-changing.md
# Source: https://docs.sonarsource.com/sonarqube-server/2025.5/analyzing-source-code/incremental-analysis/disabling-or-changing.md
# Source: https://docs.sonarsource.com/sonarqube-server/2025.1/analyzing-source-code/incremental-analysis/disabling-or-changing.md
# Source: https://docs.sonarsource.com/sonarqube-server/2025.4/analyzing-source-code/incremental-analysis/disabling-or-changing.md
# Source: https://docs.sonarsource.com/sonarqube-server/2025.6/analyzing-source-code/incremental-analysis/disabling-or-changing.md
# Source: https://docs.sonarsource.com/sonarqube-server/analyzing-source-code/incremental-analysis/disabling-or-changing.md
# Disabling or changing the mechanisms
In very particular cases, you may need to disable or change the incremental analysis mechanisms.
### Disabling the Skip unchanged files mechanism
You can disable the Skip unchanged files mechanisms used by the Kotlin and Java analyzers by setting the `sonar.kotlin.skipUnchanged` or the `sonar.java.skipUnchanged` to `false`.
### Disabling the analysis cache mechanism
In particular cases, you may need to disable the analysis cache mechanism.
The analysis cache mechanism is enabled by default. If you disable it, the analyzer will analyze all files from scratch.
To disable the analysis cache mechanism, add the following parameter to your analysis (See [analysis-parameters](https://docs.sonarsource.com/sonarqube-server/analyzing-source-code/analysis-parameters "mention") for information about the setup of analysis parameters for the scanner.):
`sonar.analysisCache.enabled=false`
{% hint style="info" %}
The parameter `sonar.analysisCache.enabled` is not compatible with SonarScanner for .NET.
{% endhint %}
### Using the local filesystem for analysis caching
With the C/C++/Objective-C analyzer, you can configure the filesystem cache instead of using the analysis cache on the server. See also [customizing-the-analysis](https://docs.sonarsource.com/sonarqube-server/analyzing-source-code/languages/c-family/customizing-the-analysis "mention") and [Analysis cache mechanism](https://docs.sonarsource.com/sonarqube-server/analyzing-source-code/introduction#analysis-cache).
### Related pages
* [introduction](https://docs.sonarsource.com/sonarqube-server/analyzing-source-code/incremental-analysis/introduction "mention")
---
# Source: https://docs.sonarsource.com/sonarqube-community-build/instance-administration/authentication/gitlab/disabling.md
# Source: https://docs.sonarsource.com/sonarqube-server/10.7/instance-administration/authentication/gitlab/disabling.md
# Source: https://docs.sonarsource.com/sonarqube-server/10.8/instance-administration/authentication/gitlab/disabling.md
# Source: https://docs.sonarsource.com/sonarqube-server/2025.2/instance-administration/authentication/gitlab/disabling.md
# Source: https://docs.sonarsource.com/sonarqube-server/2025.3/instance-administration/authentication/gitlab/disabling.md
# Source: https://docs.sonarsource.com/sonarqube-server/2025.5/instance-administration/authentication/gitlab/disabling.md
# Source: https://docs.sonarsource.com/sonarqube-server/2025.1/instance-administration/authentication/gitlab/disabling.md
# Source: https://docs.sonarsource.com/sonarqube-server/2025.4/instance-administration/authentication/gitlab/disabling.md
# Source: https://docs.sonarsource.com/sonarqube-server/2025.6/instance-administration/authentication/gitlab/disabling.md
# Source: https://docs.sonarsource.com/sonarqube-server/instance-administration/authentication/gitlab/disabling.md
# Disabling authentication
### Disabling the GitLab configuration
1. Go to **Administration** > **Configuration** > **General Settings** > **Authentication** > **GitLab**.
2. If the automatic provisioning mode is enabled, disable it as follows:
3. In the **Provisioning** section, select the **Just-in-time user provisioning** option.
4. Select the **Save** button.
5. Select **Disable configuration**.
6. You can delete the configuration by selecting the **Delete** button. In that case, you won’t be able to re-enable this configuration.
### Re-enabling the GitLab configuration
1. Go to **Administration** > **Configuration** > **General Settings** > **Authentication** > **GitLab**.
2. Select **Enable configuration**.
3. If you had configured the automatic provisioning mode, select the **Automatic user, group, and permission provisioning** option. Your previous settings are kept.
### Related pages
* [just-in-time](https://docs.sonarsource.com/sonarqube-server/instance-administration/authentication/gitlab/provisioning-modes/just-in-time "mention")
* [automatic](https://docs.sonarsource.com/sonarqube-server/instance-administration/authentication/gitlab/provisioning-modes/automatic "mention")
* [setting-up](https://docs.sonarsource.com/sonarqube-server/instance-administration/authentication/gitlab/setting-up "mention")
---
# Source: https://docs.sonarsource.com/sonarqube-cloud/discovering-sonarcloud.md
# Discovering SonarQube Cloud
{% content-ref url="discovering-sonarcloud/developing-with-sonar" %}
[developing-with-sonar](https://docs.sonarsource.com/sonarqube-cloud/discovering-sonarcloud/developing-with-sonar)
{% endcontent-ref %}
{% content-ref url="discovering-sonarcloud/what-sonarcloud-can-do" %}
[what-sonarcloud-can-do](https://docs.sonarsource.com/sonarqube-cloud/discovering-sonarcloud/what-sonarcloud-can-do)
{% endcontent-ref %}
{% content-ref url="discovering-sonarcloud/integration-with-devops-platforms" %}
[integration-with-devops-platforms](https://docs.sonarsource.com/sonarqube-cloud/discovering-sonarcloud/integration-with-devops-platforms)
{% endcontent-ref %}
---
# Source: https://docs.sonarsource.com/sonarqube-community-build/analyzing-source-code/languages/docker.md
# Source: https://docs.sonarsource.com/sonarqube-server/10.1/analyzing-source-code/languages/docker.md
# Source: https://docs.sonarsource.com/sonarqube-server/10.2/analyzing-source-code/languages/docker.md
# Source: https://docs.sonarsource.com/sonarqube-server/10.3/analyzing-source-code/languages/docker.md
# Source: https://docs.sonarsource.com/sonarqube-server/10.4/analyzing-source-code/languages/docker.md
# Source: https://docs.sonarsource.com/sonarqube-server/10.5/analyzing-source-code/languages/docker.md
# Source: https://docs.sonarsource.com/sonarqube-server/10.6/analyzing-source-code/languages/docker.md
# Source: https://docs.sonarsource.com/sonarqube-server/10.7/analyzing-source-code/languages/docker.md
# Source: https://docs.sonarsource.com/sonarqube-server/10.8/analyzing-source-code/languages/docker.md
# Source: https://docs.sonarsource.com/sonarqube-server/2025.2/analyzing-source-code/languages/docker.md
# Source: https://docs.sonarsource.com/sonarqube-server/2025.3/analyzing-source-code/languages/docker.md
# Source: https://docs.sonarsource.com/sonarqube-server/2025.5/analyzing-source-code/languages/docker.md
# Source: https://docs.sonarsource.com/sonarqube-server/2025.1/analyzing-source-code/languages/docker.md
# Source: https://docs.sonarsource.com/sonarqube-server/2025.4/analyzing-source-code/languages/docker.md
# Source: https://docs.sonarsource.com/sonarqube-server/2025.6/analyzing-source-code/languages/docker.md
# Source: https://docs.sonarsource.com/sonarqube-server/analyzing-source-code/languages/docker.md
# Source: https://docs.sonarsource.com/sonarqube-cloud/advanced-setup/languages/docker.md
# Docker
### Supported versions
The level of support for a language is defined as follows:
* Fully supported: Analysis will complete. All the language features are understood and examined.
* Supported: Most language features are understood and examined but the version includes unsupported features. Analysis might break or provide incomplete results.
Dockerfile versions 1.0 to 1.6 are supported.
### Language-specific properties
To discover and update the Docker-specific properties, navigate in SonarQube Cloud to *Your Project* > **Administration** > **General Settings** > **Languages** > **Docker**. See the [analysis-parameters](https://docs.sonarsource.com/sonarqube-cloud/advanced-setup/analysis-parameters "mention") page for more information about specific properties.
### Dockerfiles
**No NoSonar Support:**
Trailing comments are not permitted in Dockerfiles. For this reason, our Dockerfile parser does not support NOSONAR comments to suppress issues. Issues and hotspots must be reviewed in the UI.
**Missing Uniform Filename Convention:**
Dockerfiles can have all kinds of names and do not need a file extension. For this reason, it is difficult for the scanner and the analyzer to recognize all Dockerfiles. By default, all files named Dockerfile, Dockerfile.\*, or \*.dockerfile are considered Dockerfiles. If other conventions apply, these can be specified via the scanner property sonar.lang.patterns.docker.
---
# Source: https://docs.sonarsource.com/sonarqube-community-build/analyzing-source-code/dotnet-environments.md
# Source: https://docs.sonarsource.com/sonarqube-server/10.7/analyzing-source-code/dotnet-environments.md
# Source: https://docs.sonarsource.com/sonarqube-server/10.8/analyzing-source-code/dotnet-environments.md
# Source: https://docs.sonarsource.com/sonarqube-server/2025.2/analyzing-source-code/dotnet-environments.md
# Source: https://docs.sonarsource.com/sonarqube-server/2025.3/analyzing-source-code/dotnet-environments.md
# Source: https://docs.sonarsource.com/sonarqube-server/2025.5/analyzing-source-code/dotnet-environments.md
# Source: https://docs.sonarsource.com/sonarqube-server/2025.1/analyzing-source-code/dotnet-environments.md
# Source: https://docs.sonarsource.com/sonarqube-server/2025.4/analyzing-source-code/dotnet-environments.md
# Source: https://docs.sonarsource.com/sonarqube-server/2025.6/analyzing-source-code/dotnet-environments.md
# Source: https://docs.sonarsource.com/sonarqube-server/analyzing-source-code/dotnet-environments.md
# .NET environments
{% content-ref url="dotnet-environments/overview" %}
[overview](https://docs.sonarsource.com/sonarqube-server/analyzing-source-code/dotnet-environments/overview)
{% endcontent-ref %}
{% content-ref url="dotnet-environments/getting-started-with-net" %}
[getting-started-with-net](https://docs.sonarsource.com/sonarqube-server/analyzing-source-code/dotnet-environments/getting-started-with-net)
{% endcontent-ref %}
{% content-ref url="dotnet-environments/sonarscanner-for-dotnet" %}
[sonarscanner-for-dotnet](https://docs.sonarsource.com/sonarqube-server/analyzing-source-code/dotnet-environments/sonarscanner-for-dotnet)
{% endcontent-ref %}
{% content-ref url="dotnet-environments/dotnet-test-coverage" %}
[dotnet-test-coverage](https://docs.sonarsource.com/sonarqube-server/analyzing-source-code/dotnet-environments/dotnet-test-coverage)
{% endcontent-ref %}
{% content-ref url="dotnet-environments/specify-test-project-analysis" %}
[specify-test-project-analysis](https://docs.sonarsource.com/sonarqube-server/analyzing-source-code/dotnet-environments/specify-test-project-analysis)
{% endcontent-ref %}
{% content-ref url="dotnet-environments/vb-dotnet" %}
[vb-dotnet](https://docs.sonarsource.com/sonarqube-server/analyzing-source-code/dotnet-environments/vb-dotnet)
{% endcontent-ref %}
{% content-ref url="dotnet-environments/troubleshooting" %}
[troubleshooting](https://docs.sonarsource.com/sonarqube-server/analyzing-source-code/dotnet-environments/troubleshooting)
{% endcontent-ref %}
---
# Source: https://docs.sonarsource.com/sonarqube-community-build/devops-platform-integration/azure-devops-integration/adding-analysis-to-pipeline/dotnet-project.md
# Source: https://docs.sonarsource.com/sonarqube-server/2025.2/devops-platform-integration/azure-devops-integration/adding-analysis-to-pipeline/dotnet-project.md
# Source: https://docs.sonarsource.com/sonarqube-server/2025.3/devops-platform-integration/azure-devops-integration/adding-analysis-to-pipeline/dotnet-project.md
# Source: https://docs.sonarsource.com/sonarqube-server/2025.5/devops-platform-integration/azure-devops-integration/adding-analysis-to-pipeline/dotnet-project.md
# Source: https://docs.sonarsource.com/sonarqube-server/2025.1/devops-platform-integration/azure-devops-integration/adding-analysis-to-pipeline/dotnet-project.md
# Source: https://docs.sonarsource.com/sonarqube-server/2025.4/devops-platform-integration/azure-devops-integration/adding-analysis-to-pipeline/dotnet-project.md
# Source: https://docs.sonarsource.com/sonarqube-server/2025.6/devops-platform-integration/azure-devops-integration/adding-analysis-to-pipeline/dotnet-project.md
# Source: https://docs.sonarsource.com/sonarqube-server/devops-platform-integration/azure-devops-integration/adding-analysis-to-pipeline/dotnet-project.md
# Source: https://docs.sonarsource.com/sonarqube-cloud/advanced-setup/ci-based-analysis/azure-pipelines/adding-analysis-to-build-pipeline/dotnet-project.md
# .NET project
Before starting, read [azure-pipelines-integration-overview](https://docs.sonarsource.com/sonarqube-cloud/advanced-setup/ci-based-analysis/azure-pipelines/azure-pipelines-integration-overview "mention").
Once you have created your project in SonarQube Cloud, set up the project integration with your DevOps platform (see the [devops-platform-integration](https://docs.sonarsource.com/sonarqube-cloud/managing-your-projects/administering-your-projects/devops-platform-integration "mention") pages) and with Azure pipelines (see the [setting-up-project-integration](https://docs.sonarsource.com/sonarqube-cloud/advanced-setup/ci-based-analysis/azure-pipelines/setting-up-project-integration "mention") page), you can add the SonarQube Cloud analysis to your Azure build pipeline.
To create your Azure build pipeline, you can use either YAML or the Azure Classic interface.
{% hint style="info" %}
* The use of the Classic interface is not always possible (e.g. if your code is stored on GitHub).
* If you use YAML, Sonar can provide you with YAML templates or code examples.
{% endhint %}
If you need to use a specific scanner version, see the [various-features](https://docs.sonarsource.com/sonarqube-cloud/advanced-setup/ci-based-analysis/azure-pipelines/adding-analysis-to-build-pipeline/various-features "mention") page.
{% hint style="info" %}
Make sure to enable the pull request and branch analysis in your pipeline. See the [setting-up-project-integration](https://docs.sonarsource.com/sonarqube-cloud/advanced-setup/ci-based-analysis/azure-pipelines/setting-up-project-integration "mention") page.
{% endhint %}
### About the analysis parameter setup
[analysis-parameters](https://docs.sonarsource.com/sonarqube-cloud/advanced-setup/analysis-parameters "mention") can be set at different levels. When creating your pipeline, you will have to enter the project key and you may also enter the project version and name. For more information about these task inputs, see the [#task-inputs-specific-to-the-.net-mode](https://docs.sonarsource.com/sonarqube-cloud/advanced-setup/ci-based-analysis/sonarqube-tasks#task-inputs-specific-to-the-.net-mode "mention") article. You may define additional parameters in this task. In that case, these parameters have precedence over parameters defined at the project or global level.
### Using YAML
Add the following SonarQube tasks to your YAML pipeline:
1. Before your build task, add a Prepare Analysis Configuration task.
2. After your build task, add a Run Code Analysis task.
3. After the Run Code Analysis task, add a Publish Quality Gate Result task.
See the YAML file example below. See also our [YAML pipeline templates](https://github.com/SonarSource/sonar-scanner-azdo/tree/master/its/fixtures). For information about the SonarQube task inputs, see the [sonarqube-tasks](https://docs.sonarsource.com/sonarqube-cloud/advanced-setup/ci-based-analysis/azure-pipelines/sonarqube-tasks "mention") page.
{% hint style="info" %}
Make sure the SonarQube task version used in your YAML file is the correct one.\
For example, in `SonarCloudPrepare@3`, `@3` should correspond to the version of the [sonarcloud-extension-for-azure-devops](https://docs.sonarsource.com/sonarqube-cloud/advanced-setup/ci-based-analysis/sonarcloud-extension-for-azure-devops "mention") you’re using.
{% endhint %}
YAML file example
```yaml
trigger:
- main # or another name representing your main branch
- feature/*
steps:
# Checkout the repository
- checkout: self
# Disable shallow fetch
fetchDepth: 0
# Prepare Analysis Configuration task
- task: SonarCloudPrepare@4
inputs:
SonarCloud: ''
organization: ''
scannerMode: 'dotnet'
projectKey: ''
# Dotnet build task
- task: DotNetCoreCLI@2
displayName: 'dotnet build'
# Run Code Analysis task
- task: SonarCloudAnalyze@4
# Publish Quality Gate Result task
- task: SonarCloudPublish@4
inputs:
pollingTimeoutSec: '300'
```
### Using the Classic interface
To add the analysis to your classic build pipeline:
1. In Azure DevOps Classic interface editor, create or update your build pipeline.
2. Add a **Prepare Analysis Configuration** task before your build task:
* In **SonarQube Server Service Endpoint**, select the SonarQube service connection you created during setup. See the [setting-up-project-integration](https://docs.sonarsource.com/sonarqube-cloud/advanced-setup/ci-based-analysis/azure-pipelines/setting-up-project-integration "mention") page for more information about adding a connection.
* Under **Choose a way to run the analysis**, select **Integrate with .NET**.
* In the **Project key** field, enter your project key.
* Optionally, enter the project name and version.
3. Add a new **Run Code Analysis** task after your build task.
4. Add a new **Publish quality gate Result** on your build pipeline summary.
5. Ensure that the pipeline runs automatically for all the branches you want:
* Under the **Triggers** tab of your pipeline, select **Enable continuous integration** and select all the branches for which you want SonarQube Cloud analysis to run automatically.
6. Save your pipeline.
### Configuring your scanner
If you're using the .NET scanner to complete the analysis, see the [configuring](https://docs.sonarsource.com/sonarqube-cloud/advanced-setup/ci-based-analysis/sonarscanner-for-dotnet/configuring "mention") for NET page for language-specific details.
There's also an article about running [#multi-language-analysis](https://docs.sonarsource.com/sonarqube-cloud/advanced-setup/sonarscanner-for-dotnet/configuring#multi-language-analysis "mention") for select languages when the `sonar.scanner.scanAll` parameter is enabled via the `extraProperties` listed in your [#prepare-analysis-configuration](https://docs.sonarsource.com/sonarqube-cloud/advanced-setup/ci-based-analysis/sonarqube-tasks#prepare-analysis-configuration "mention").
### .Net guides on the Sonar Community forum
We’ve prepared some guides on the Community Forum to help you with your .NET project.
#### .NET Configuration
* [Configuration of WarningAsErrors for .NET build](https://community.sonarsource.com/t/configuration-of-warningsaserrors-for-net-build/32393)
* [Investigating the performance of .NET analysis](https://community.sonarsource.com/t/the-sonar-guide-for-investigating-the-performance-of-net-analysis/47279)
#### .NET and Code coverage
* [Generate reports for C# and VB.net](https://community.sonarsource.com/t/coverage-test-data-generate-reports-for-c-vb-net/9871)
* [How to find logs about importing code coverage](https://community.sonarsource.com/t/how-to-find-logs-about-importing-code-coverage/73317)
* [Troubleshooting guide for .NET Code coverage import](https://community.sonarsource.com/t/coverage-troubleshooting-guide-for-net-code-coverage-import/37151)
### Related pages
* [gradle-or-maven-project](https://docs.sonarsource.com/sonarqube-cloud/advanced-setup/ci-based-analysis/azure-pipelines/adding-analysis-to-build-pipeline/gradle-or-maven-project "mention")
* [c-family-project](https://docs.sonarsource.com/sonarqube-cloud/advanced-setup/ci-based-analysis/azure-pipelines/adding-analysis-to-build-pipeline/c-family-project "mention")
* [js-ts-go-python-php](https://docs.sonarsource.com/sonarqube-cloud/advanced-setup/ci-based-analysis/azure-pipelines/adding-analysis-to-build-pipeline/js-ts-go-python-php "mention")
* [monorepo-projects](https://docs.sonarsource.com/sonarqube-cloud/advanced-setup/ci-based-analysis/azure-pipelines/adding-analysis-to-build-pipeline/monorepo-projects "mention")
* [sonarqube-tasks](https://docs.sonarsource.com/sonarqube-cloud/advanced-setup/ci-based-analysis/azure-pipelines/sonarqube-tasks "mention")
---
# Source: https://docs.sonarsource.com/sonarqube-community-build/analyzing-source-code/test-coverage/dotnet-test-coverage.md
# Source: https://docs.sonarsource.com/sonarqube-community-build/analyzing-source-code/dotnet-environments/dotnet-test-coverage.md
# Source: https://docs.sonarsource.com/sonarqube-server/9.8/analyzing-source-code/test-coverage/dotnet-test-coverage.md
# Source: https://docs.sonarsource.com/sonarqube-server/9.9/analyzing-source-code/test-coverage/dotnet-test-coverage.md
# Source: https://docs.sonarsource.com/sonarqube-server/10.0/analyzing-source-code/test-coverage/dotnet-test-coverage.md
# Source: https://docs.sonarsource.com/sonarqube-server/10.1/analyzing-source-code/test-coverage/dotnet-test-coverage.md
# Source: https://docs.sonarsource.com/sonarqube-server/10.2/analyzing-source-code/test-coverage/dotnet-test-coverage.md
# Source: https://docs.sonarsource.com/sonarqube-server/10.3/analyzing-source-code/test-coverage/dotnet-test-coverage.md
# Source: https://docs.sonarsource.com/sonarqube-server/10.4/analyzing-source-code/test-coverage/dotnet-test-coverage.md
# Source: https://docs.sonarsource.com/sonarqube-server/10.5/analyzing-source-code/test-coverage/dotnet-test-coverage.md
# Source: https://docs.sonarsource.com/sonarqube-server/10.6/analyzing-source-code/test-coverage/dotnet-test-coverage.md
# Source: https://docs.sonarsource.com/sonarqube-server/10.7/analyzing-source-code/test-coverage/dotnet-test-coverage.md
# Source: https://docs.sonarsource.com/sonarqube-server/10.7/analyzing-source-code/dotnet-environments/dotnet-test-coverage.md
# Source: https://docs.sonarsource.com/sonarqube-server/10.8/analyzing-source-code/test-coverage/dotnet-test-coverage.md
# Source: https://docs.sonarsource.com/sonarqube-server/10.8/analyzing-source-code/dotnet-environments/dotnet-test-coverage.md
# Source: https://docs.sonarsource.com/sonarqube-server/2025.2/analyzing-source-code/test-coverage/dotnet-test-coverage.md
# Source: https://docs.sonarsource.com/sonarqube-server/2025.2/analyzing-source-code/dotnet-environments/dotnet-test-coverage.md
# Source: https://docs.sonarsource.com/sonarqube-server/2025.3/analyzing-source-code/test-coverage/dotnet-test-coverage.md
# Source: https://docs.sonarsource.com/sonarqube-server/2025.3/analyzing-source-code/dotnet-environments/dotnet-test-coverage.md
# Source: https://docs.sonarsource.com/sonarqube-server/2025.5/analyzing-source-code/test-coverage/dotnet-test-coverage.md
# Source: https://docs.sonarsource.com/sonarqube-server/2025.5/analyzing-source-code/dotnet-environments/dotnet-test-coverage.md
# Source: https://docs.sonarsource.com/sonarqube-server/2025.1/analyzing-source-code/test-coverage/dotnet-test-coverage.md
# Source: https://docs.sonarsource.com/sonarqube-server/2025.1/analyzing-source-code/dotnet-environments/dotnet-test-coverage.md
# Source: https://docs.sonarsource.com/sonarqube-server/2025.4/analyzing-source-code/test-coverage/dotnet-test-coverage.md
# Source: https://docs.sonarsource.com/sonarqube-server/2025.4/analyzing-source-code/dotnet-environments/dotnet-test-coverage.md
# Source: https://docs.sonarsource.com/sonarqube-server/2025.6/analyzing-source-code/test-coverage/dotnet-test-coverage.md
# Source: https://docs.sonarsource.com/sonarqube-server/2025.6/analyzing-source-code/dotnet-environments/dotnet-test-coverage.md
# Source: https://docs.sonarsource.com/sonarqube-server/analyzing-source-code/test-coverage/dotnet-test-coverage.md
# Source: https://docs.sonarsource.com/sonarqube-server/analyzing-source-code/dotnet-environments/dotnet-test-coverage.md
# Source: https://docs.sonarsource.com/sonarqube-cloud/enriching/test-coverage/dotnet-test-coverage.md
# .NET test coverage
SonarQube Cloud supports the reporting of test coverage information as part of the analysis of your .NET project.
However, SonarQube Cloud does not produce the coverage report itself. Instead, you must set up a third-party tool to produce the report as part of your build process. You then need to configure your analysis to tell the SonarScanner where the report is located so that it can pick it up and send it to SonarQube Cloud, where it will be displayed on your project dashboard along with the other analysis metrics.
SonarQube Cloud supports the following .NET test coverage tools:
* [#visual-studio-code-coverage](#visual-studio-code-coverage "mention")
* [#dotnetcoverage](#dotnetcoverage "mention") Code Coverage
* [#dotcover](#dotcover "mention")
* [#opencover](#opencover "mention")
* [#coverlet](#coverlet "mention")
{% hint style="info" %}
If you wish to use an unsupported tool, SonarQube Server supports generic format coverage for test coverage and test execution imports. However, note that it you are responsible for converting its output to the generic format. For information on the generic format including examples, see the [generic-test-data](https://docs.sonarsource.com/sonarqube-cloud/enriching/test-coverage/generic-test-data "mention") page.
This page, *.NET test coverage*, focuses on the directly supported coverage tools.
{% endhint %}
### Follow the tutorial
When you import your .NET project into SonarQube Cloud, you will be guided through the setup process by an in-product tutorial. Once you have completed the tutorial, you should have a working analysis setup. The next step is to adjust that setup to enable coverage reporting.
The .NET scanner comes in four variants depending on which version of .NET and which CI you are using (*.NET Framework*, *.NET Core*, *.NET Global Tool*, and the *Azure DevOps Extension*). The setup is slightly different for each variant (see the [introduction](https://docs.sonarsource.com/sonarqube-cloud/advanced-setup/ci-based-analysis/sonarscanner-for-dotnet/introduction "mention") to SonarScanner for .NET and [sonarcloud-extension-for-azure-devops](https://docs.sonarsource.com/sonarqube-cloud/advanced-setup/ci-based-analysis/sonarcloud-extension-for-azure-devops "mention") sections for more details), but the essential steps are the same.
The analysis is always split into two parts in your build process; the `begin` step and the `end` step. In between, you perform the actual build and your tests. To enable coverage reporting, you need to make the following changes:
* In the scanner `begin` step, add the appropriate parameter to specify the location of the coverage report file that will be produced.
* Just after the `build` step but before the scanner `end` step, ensure that your `test` step produces the coverage report file.
### Examples using the .NET tool scanner variant
The SonarScanner for .NET comes in four major variants: *.NET Framework*, *.NET Core*, *.NET Global Tool*, and the *Azure Pipelines extension*.
#### dotnet-coverage
This is a modern alternative to the Visual Studio Code Coverage provided by Microsoft (see above) that outputs results in the same format, is cross-platform and not dependent on having Visual Studio installed. It requires .NET Core 3.1 or later.
To use [dotnet-coverage](https://docs.microsoft.com/en-us/dotnet/core/additional-tools/dotnet-coverage), you can install it as a local or global dotnet tool:
```bash
dotnet tool install --global dotnet-coverage
```
Using this tool, your build script would look like something like this:
```bash
dotnet sonarscanner begin /k:""
/d:sonar.token=""
/d:sonar.cs.vscoveragexml.reportsPaths=coverage.xml
dotnet build --no-incremental
dotnet-coverage collect "dotnet test" -f xml -o "coverage.xml"
dotnet sonarscanner end /d:sonar.token=""
```
Note that we specify the path to the reports using `sonar.cs.vscoveragexml.reportsPaths` because this tool’s output format is the same as the Visual Studio Code Coverage tool. See the [test-coverage-parameters](https://docs.sonarsource.com/sonarqube-cloud/enriching/test-coverage/test-coverage-parameters "mention") page for information about this parameter. The code sample above uses the `-f xml` parameter to specify that the output format is in XML.
#### Visual Studio Code Coverage
We only recommend the use of this tool when the build agent has Visual Studio Enterprise installed or when you are using an Azure DevOps Windows image for your build. In these cases, the *.NET Framework* scanner will automatically find the coverage output generated by the `--collect "Code Coverage"` parameter without requiring an explicit report path setting. It will also automatically convert the generated report to XML. No further configuration is required. Here is an example:
```bash
SonarScanner.MSBuild.exe begin /k:"" /d:sonar.token=""
dotnet build --no-incremental
dotnet test --collect "Code Coverage"
SonarScanner.MSBuild.exe end /d:sonar.token=""
```
#### dotCover
To use [dotCover](https://www.jetbrains.com/help/dotcover/dotCover__Coverage_Analysis_on_Third-Party_Server.html) you must install it as a global dotnet tool:
```bash
dotnet tool install --global JetBrains.dotCover.CommandLineTools
```
Using this tool, your build script would look like something like this:
```bash
dotnet sonarscanner begin /k:""
/d:sonar.token=""
/d:sonar.cs.dotcover.reportsPaths=dotCover.Output.html
dotnet build --no-incremental
dotnet dotcover test --dcReportType=HTML
dotnet sonarscanner end /d:sonar.token=""
```
Note that the code sample above specifies the path to the reports using **`sonar.cs.dotcover.reportsPaths`** because it is using dotCover; see the [test-coverage-parameters](https://docs.sonarsource.com/sonarqube-cloud/enriching/test-coverage/test-coverage-parameters "mention") page for information about this parameter.
#### OpenCover
To use [OpenCover](https://github.com/OpenCover/opencover/wiki/Usage) you must download it from [OpenCover releases page](https://github.com/OpenCover/opencover/releases) and unzip it in an appropriate directory, for example: `C:\tools\opencover`
When using OpenCover, your build script would look like something like this:
```bash
dotnet sonarscanner begin /k:""
/d:sonar.token=""
/d:sonar.cs.opencover.reportsPaths=coverage.xml
dotnet build --no-incremental
& C:\tools\opencover\OpenCover.Console.exe -target:"dotnet.exe"
-targetargs:"test --no-build"
-returntargetcode
-output:coverage.xml
-register:user
dotnet sonarscanner end /d:sonar.token=""
```
Note that the code sample specifies the path to the reports using `sonar.cs.opencover.reportsPaths` because it is using OpenCover. See the [test-coverage-parameters](https://docs.sonarsource.com/sonarqube-cloud/enriching/test-coverage/test-coverage-parameters "mention") page for information about this parameter.
#### Coverlet
To use [Coverlet](https://github.com/coverlet-coverage/coverlet), you must install it as a global dotnet tool:
```bash
dotnet tool install --global coverlet.console
```
You also have to install [the coverlet collector NuGet package](https://www.nuget.org/packages/coverlet.collector/) on your test project.
When using Coverlet, your build script would look like something like this:
```bash
dotnet sonarscanner begin /k:""
/d:sonar.token=""
/d:sonar.cs.opencover.reportsPaths=coverage.xml
dotnet build --no-incremental
coverlet .\CovExample.Tests\bin\Debug\net6.0\CovExample.Tests.dll
--target "dotnet"
--targetargs "test --no-build"
-f=opencover
-o="coverage.xml"
dotnet sonarscanner end /d:sonar.token=""
```
Note that the code sample specifies the path to the reports in `sonar.cs.opencover.reportsPaths` because Coverlet produces output in the same format as OpenCover. See the [test-coverage-parameters](https://docs.sonarsource.com/sonarqube-cloud/enriching/test-coverage/test-coverage-parameters "mention") page for information about this parameter.
### .NET Framework and .NET Core scanners
In most of the examples above, we use the .NET tool scanner variant. If you use the *.NET Framework* or *.NET Core* scanner, the commands will be a bit different but the pattern will be the same. See the [installing](https://docs.sonarsource.com/sonarqube-cloud/advanced-setup/ci-based-analysis/sonarscanner-for-dotnet/installing "mention") page for details.
### Azure DevOps extension for SonarQube
Using the Azure DevOps extension for SonarQube and Visual Studio Code Coverage with a C# project, your azure-pipelines.yml would look something like the example below.
Note that with the Azure DevOps extension for SonarQube, the scanner `begin` step is handled by the `SonarCloudPrepare` task and the scanner `end` step is handled by the `SonarCloudAnalyze` task. Details about these properties are found on the [Azure DevOps Extension for SonarQube Cloud](https://marketplace.visualstudio.com/items?itemName=SonarSource.sonarcloud) page.
Also note in the code sample below, that because the build is running on Windows (`vmImage: windows-latest`), the pipeline does not need to explicitly define the path to the coverage report; this is evident because `sonar.cs.vscoveragexml.reportsPaths` is not included.
Additionally, you need to run `codecoverage.exe` to convert the report to XML. Here is a code sample, to be named azure-pipelines.yml in your files:
```yaml
trigger:
- main # or another name representing your main branch
variables:
- name: system.debug
value: true
pool:
vmImage: windows-latest
steps:
- task: DotNetCoreCLI@2
inputs:
command: 'restore'
projects: ''
feedsToUse: 'select'
- task: SonarCloudPrepare@4
inputs:
SonarCloud: ''
organization: ''
scannerMode: 'dotnet'
projectKey: ''
projectName: ''
- task: DotNetCoreCLI@2
inputs:
command: 'build'
projects: ''
- task: DotNetCoreCLI@2
inputs:
command: 'test'
projects: 'tests/**/*.csproj'
arguments: '--collect "Code Coverage"'
- task: SonarCloudAnalyze@4
```
{% hint style="info" %}
The parameter `sonar.cs.ncover3.reportsPaths` was formerly used for or NCover3 . This parameter has been deprecated.
{% endhint %}
### VB.NET
The examples above are all for C# projects. The setup is identical for VB.NET projects except that you would use these parameters:
* `sonar.vbnet.vscoveragexml.reportsPaths` for Visual Studio Code Coverage
* `sonar.vbnet.dotcover.reportsPaths` for dotCover
* `sonar.vbnet.opencover.reportsPaths` for OpenCover or Coverlet
See the [test-coverage-parameters](https://docs.sonarsource.com/sonarqube-cloud/enriching/test-coverage/test-coverage-parameters "mention") section for information about these parameters.
{% hint style="warning" %}
The parameter `sonar.vbnet.ncover3.reportsPaths` was formerly used for or NCover3 . This parameter has been deprecated.
{% endhint %}
### Troubleshooting the import of the coverage report
#### Troubleshooting guide
See the [Troubleshooting guide for .NET code coverage import](https://community.sonarsource.com/t/coverage-troubleshooting-guide-for-net-code-coverage-import/37151).
#### Additional notes
**Invalid file path**
When using the `UserSourceLink` option of your tool, the coverage report is generates with source link URIs instead of system paths. You may need to turn off this option to use system paths as the source input for file coverage.
---
# Source: https://docs.sonarsource.com/sonarqube-community-build/analyzing-source-code/scanners/dotnet.md
# Source: https://docs.sonarsource.com/sonarqube-server/10.7/analyzing-source-code/scanners/dotnet.md
# Source: https://docs.sonarsource.com/sonarqube-server/10.8/analyzing-source-code/scanners/dotnet.md
# Source: https://docs.sonarsource.com/sonarqube-server/2025.2/analyzing-source-code/scanners/dotnet.md
# Source: https://docs.sonarsource.com/sonarqube-server/2025.3/analyzing-source-code/scanners/dotnet.md
# Source: https://docs.sonarsource.com/sonarqube-server/2025.5/analyzing-source-code/scanners/dotnet.md
# Source: https://docs.sonarsource.com/sonarqube-server/2025.1/analyzing-source-code/scanners/dotnet.md
# Source: https://docs.sonarsource.com/sonarqube-server/2025.4/analyzing-source-code/scanners/dotnet.md
# Source: https://docs.sonarsource.com/sonarqube-server/2025.6/analyzing-source-code/scanners/dotnet.md
# Source: https://docs.sonarsource.com/sonarqube-server/analyzing-source-code/scanners/dotnet.md
# SonarScanner for .NET
{% content-ref url="dotnet/introduction" %}
[introduction](https://docs.sonarsource.com/sonarqube-server/analyzing-source-code/scanners/dotnet/introduction)
{% endcontent-ref %}
{% content-ref url="dotnet/installing" %}
[installing](https://docs.sonarsource.com/sonarqube-server/analyzing-source-code/scanners/dotnet/installing)
{% endcontent-ref %}
{% content-ref url="dotnet/using" %}
[using](https://docs.sonarsource.com/sonarqube-server/analyzing-source-code/scanners/dotnet/using)
{% endcontent-ref %}
{% content-ref url="dotnet/configuring" %}
[configuring](https://docs.sonarsource.com/sonarqube-server/analyzing-source-code/scanners/dotnet/configuring)
{% endcontent-ref %}
---
# Source: https://docs.sonarsource.com/sonarqube-cloud/administering-sonarcloud/managing-enterprise/downgrading-your-enterprise.md
# Downgrading your enterprise
You currently cannot downgrade an enterprise. However, you can downgrade each organization in the enterprise, except one. See [#removing-org-from-enterprise](https://docs.sonarsource.com/sonarqube-cloud/administering-sonarcloud/adding-organizations-to-your-enterprise#removing-org-from-enterprise "mention").
### Related pages
[retrieving-and-viewing-your-enterprise](https://docs.sonarsource.com/sonarqube-cloud/administering-sonarcloud/managing-enterprise/retrieving-and-viewing-your-enterprise "mention")\
[creating-your-enterprise](https://docs.sonarsource.com/sonarqube-cloud/administering-sonarcloud/managing-enterprise/creating-your-enterprise "mention")\
[enterprise-security](https://docs.sonarsource.com/sonarqube-cloud/administering-sonarcloud/managing-enterprise/enterprise-security "mention")\
[adding-organizations-to-your-enterprise](https://docs.sonarsource.com/sonarqube-cloud/administering-sonarcloud/managing-enterprise/adding-organizations-to-your-enterprise "mention")\
[managing-the-enterprise-related-permissions](https://docs.sonarsource.com/sonarqube-cloud/administering-sonarcloud/managing-enterprise/managing-the-enterprise-related-permissions "mention")\
[managing-the-lines-of-code-within-your-enterprise](https://docs.sonarsource.com/sonarqube-cloud/administering-sonarcloud/managing-enterprise/managing-the-lines-of-code-within-your-enterprise "mention")\
[changing-enterprise-settings](https://docs.sonarsource.com/sonarqube-cloud/administering-sonarcloud/managing-enterprise/changing-enterprise-settings "mention")
---
# Source: https://docs.sonarsource.com/sonarqube-community-build/quality-standards-administration/managing-quality-profiles/editing-a-custom-quality-profile.md
# Source: https://docs.sonarsource.com/sonarqube-server/2025.3/quality-standards-administration/managing-quality-profiles/editing-a-custom-quality-profile.md
# Source: https://docs.sonarsource.com/sonarqube-server/2025.5/quality-standards-administration/managing-quality-profiles/editing-a-custom-quality-profile.md
# Source: https://docs.sonarsource.com/sonarqube-server/2025.4/quality-standards-administration/managing-quality-profiles/editing-a-custom-quality-profile.md
# Source: https://docs.sonarsource.com/sonarqube-server/2025.6/quality-standards-administration/managing-quality-profiles/editing-a-custom-quality-profile.md
# Source: https://docs.sonarsource.com/sonarqube-server/quality-standards-administration/managing-quality-profiles/editing-a-custom-quality-profile.md
# Source: https://docs.sonarsource.com/sonarqube-cloud/standards/managing-quality-profiles/editing-a-custom-quality-profile.md
# Editing a quality profile
*This feature is only available in the Team and Enterprise plans. See* [subscription-plans](https://docs.sonarsource.com/sonarqube-cloud/administering-sonarcloud/managing-subscription/subscription-plans "mention") *for more information.*
Those with the Administer Quality Profiles permission and Users authorized to manage a particular profile have full control of the quality profile's definition. These users can rename a profile, change its parent, activate and deactivate rules, as well as customize a rule's parameters within that quality profile.
### Activating rules in a quality profile
You can activate rules in any custom quality profile.
#### Activating a single rule
When you activate a single rule, you can customize the rule configurable parameters (if any) in the quality profile.
To activate a single rule in a custom quality profile (from the quality profile’s page):
1. See [viewing-organizations](https://docs.sonarsource.com/sonarqube-cloud/getting-started/viewing-organizations "mention") to access your organization, then go to the **Quality Profiles** page.
2. Locate the quality profile’s row and display the list of available rules as follows:
* Either select the three-dot button in the far right of the row, and select **Activate more rules** in the menu.
* Or select the profile and, in the profile page, select the **Activate more** button at the bottom of the **Rule breakdown** section.
3. To activate a single rule, select **Activate** at the far right of the rule row. The **Activate in Quality Profile** dialog opens.
4. If necessary, customize the rule parameters.
5. Select **Activate**.
To activate a single rule in a custom quality profile (from the rule’s page):
1. See [viewing-organizations](https://docs.sonarsource.com/sonarqube-cloud/getting-started/viewing-organizations "mention") to access your organization, then go to the **Rules** page and retrieve your rule.
2. On the **Rules** page, navigate to the bottom to the **Quality Profiles** section.
3. In front of **Quality Profiles**, select **Activate**. The **Activate rule in Quality Profile** dialog opens.
4. In **Quality Profile**, select the quality profile. Note that if the rule is active in all profiles except one, this profile will be automatically selected in the dialog.
5. Customize the rule parameters if applicable and necessary.
6. Select **Activate**.
#### Activating all inactive rules
To activate all inactive rules in a custom quality profile:
1. See [viewing-organizations](https://docs.sonarsource.com/sonarqube-cloud/getting-started/viewing-organizations "mention") to access your organization, then go to the **Quality Profiles** page and retrieve your quality profile.
2. At the bottom of the **Rule breakdown** section, select **Activate more**. The list of inactive rules is displayed.
3. In the top tool bar, select **Bulk Change** > **Activate in <**YOUR PROFILE**>**. A confirmation dialog opens.
4. Confirm.
#### Activating rules from a profile comparison
When you compare two profiles, you can activate a rule from the comparison results. See the [viewing-quality-profiles](https://docs.sonarsource.com/sonarqube-cloud/standards/managing-quality-profiles/viewing-quality-profiles "mention") to learn about comparing profiles.
### Deactivating rules in a quality profile
You can deactivate rules in any custom quality profile.
To deactivate rules in a custom quality profile (from the quality profile’s page):
1. See [viewing-organizations](https://docs.sonarsource.com/sonarqube-cloud/getting-started/viewing-organizations "mention") to access your organization, then go to the **Quality Profiles** page and retrieve your quality profile.
2. In the **Inheritance** section, select the **X active rules** hyperlink. The list of active rules displayed.
3. To deactivate a single rule, select **Deactivate** at the far right of the rule row.
4. To deactivate all active rules, select **Bulk Change** > **Deactivate in <**YOUR PROFILE**>** in the top tool bar.
To deactivate a single rule in a custom quality profile (from the rule’s page):
1. See [viewing-organizations](https://docs.sonarsource.com/sonarqube-cloud/getting-started/viewing-organizations "mention") to access your organization, then go to the **Rules** page and retrieve your rule.
2. On the rule page, navigate to the bottom, in the **Quality Profiles** section.
3. In front of the custom quality profile, select **Deactivate**.
### Customizing a rule’s parameters in a quality profile
In a custom quality profile, you can customize the rule’s configurable parameters (if any). If the quality profile inherits from a parent profile, the rule is considered *overridden*.
You can perform this operation during the rule activation in the quality profile or later as explained below:
1. See [viewing-organizations](https://docs.sonarsource.com/sonarqube-cloud/getting-started/viewing-organizations "mention") to access your organization, then go to the **Rules** page and retrieve your rule.
2. On the **Rules** page, navigate to the bottom to the **Quality Profiles** section.
3. In front of the custom quality profile, select **Change**. The Change details of quality profile dialog opens.
4. Change the parameter value(s).
5. Select **Save**.
### Renaming a quality profile
You can rename any custom quality profile.
To rename a quality profile:
1. See [viewing-organizations](https://docs.sonarsource.com/sonarqube-cloud/getting-started/viewing-organizations "mention") to access your organization, then go to the **Quality Profiles** page and retrieve your quality profile.
2. Select the three-dot button.
3. Select **Rename**. the **Rename Profile** dialog opens.
4. Enter the new name and select **Rename**.
### Changing the parent of a quality profile
You can change or remove the existing parent, or you can add a parent to a custom quality profile. To do so:
1. See [viewing-organizations](https://docs.sonarsource.com/sonarqube-cloud/getting-started/viewing-organizations "mention") to access your organization, then go to the **Quality Profiles** page and retrieve your quality profile.
2. In the **Inheritance** section of the quality profile, select **Change parent**. The **Change Parent** dialog opens.
3. In the dialog, select the new parent or **None** to remove the inheritance.
4. Select **Change**.
### Related pages
* [understanding-quality-profiles](https://docs.sonarsource.com/sonarqube-cloud/standards/managing-quality-profiles/understanding-quality-profiles "mention")
* [viewing-quality-profiles](https://docs.sonarsource.com/sonarqube-cloud/standards/managing-quality-profiles/viewing-quality-profiles "mention")
* [creating-a-quality-profile](https://docs.sonarsource.com/sonarqube-cloud/standards/managing-quality-profiles/creating-a-quality-profile "mention")
* [associating-a-quality-profile-with-projects](https://docs.sonarsource.com/sonarqube-cloud/standards/managing-quality-profiles/associating-a-quality-profile-with-projects "mention")
* [changing-default-quality-profile](https://docs.sonarsource.com/sonarqube-cloud/standards/managing-quality-profiles/changing-default-quality-profile "mention")
* [maintaining-your-custom-quality-profiles](https://docs.sonarsource.com/sonarqube-cloud/standards/managing-quality-profiles/maintaining-your-custom-quality-profiles "mention")
* [authorizing-other-users-to-manage-quality-profile](https://docs.sonarsource.com/sonarqube-cloud/standards/managing-quality-profiles/authorizing-other-users-to-manage-quality-profile "mention")
* [quality-profile-association](https://docs.sonarsource.com/sonarqube-cloud/managing-your-projects/project-analysis/quality-profile-association "mention")
---
# Source: https://docs.sonarsource.com/sonarqube-cloud/administering-sonarcloud/managing-enterprise/enterprise-security/sso/editing-configuration-old-method.md
# Editing SSO configuration (old method)
- [Introduction](/sonarqube-cloud/administering-sonarcloud/managing-enterprise/enterprise-security/sso/editing-configuration-old-method/introduction.md): This page explains the generic steps necessary to edit the SAML SSO configuration you established in SonarQube Cloud using the older method (without the SSO setup assistant).
- [With Okta](/sonarqube-cloud/administering-sonarcloud/managing-enterprise/enterprise-security/sso/editing-configuration-old-method/okta.md): This page explains how to edit the SAML SSO configuration you established in SonarQube Cloud with Okta and using the old method (without the SSO setup assistant).
- [With Microsoft Entra ID](/sonarqube-cloud/administering-sonarcloud/managing-enterprise/enterprise-security/sso/editing-configuration-old-method/microsoft-entra-id.md): This page explains how to edit the SAML SSO configuration you established in SonarQube Cloud with Microsoft Entra ID while using the old method (without the SSO setup assistant).
---
# Source: https://docs.sonarsource.com/sonarqube-cloud/administering-sonarcloud/managing-enterprise/enterprise-security/sso/editing-sso-configuration.md
# Editing SSO configuration
You must be the administrator of the enterprise in SonarQube Cloud.
To edit your SSO configuration:
1. Retrieve your enterprise. See [..](https://docs.sonarsource.com/sonarqube-cloud/administering-sonarcloud/managing-enterprise "mention") for more details.
2. Select **Administration** > **Single Sign-On**. The **Single Sign-On** page opens.
3. Select **Edit Configuration**. The SSO setup assistant opens. Follow the instructions.
If you didn’t create your SSO configuration with the SSO setup assistant and used the older method, the Edit button is in front of SAML configuration. See [okta](https://docs.sonarsource.com/sonarqube-cloud/administering-sonarcloud/managing-enterprise/enterprise-security/sso/editing-configuration-old-method/okta "mention") for additional information.
### Related pages
[about](https://docs.sonarsource.com/sonarqube-cloud/administering-sonarcloud/managing-enterprise/enterprise-security/sso/about "mention")\
[setting-up-sso](https://docs.sonarsource.com/sonarqube-cloud/getting-started-with-enterprise/setting-up-sso "mention")\
[deleting-sso-configuration](https://docs.sonarsource.com/sonarqube-cloud/administering-sonarcloud/managing-enterprise/enterprise-security/sso/deleting-sso-configuration "mention")\
[troubleshooting](https://docs.sonarsource.com/sonarqube-cloud/administering-sonarcloud/managing-enterprise/enterprise-security/sso/troubleshooting "mention")\
[#deleting-sso-account](https://docs.sonarsource.com/sonarqube-cloud/managing-organization/users-and-permissions/user-on-and-offboarding#deleting-sso-account "mention")
---
# Source: https://docs.sonarsource.com/sonarqube-cloud/managing-your-projects/issues/editing.md
# Editing issues
In SonarQube Cloud, you can change the status of an issue in the following cases:
* If you want to fix the issue later, you can accept an issue. The issue status is then marked as **Accepted**.
* If you think the analysis is mistaken, you can mark it as **False positive**, provided you have the corresponding permission.
In addition, you can reassign an issue, tag an issue, and comment on an issue. See [solution-overview](https://docs.sonarsource.com/sonarqube-cloud/managing-your-projects/issues/solution-overview "mention") for more information.
{% hint style="info" %}
* You can receive an email notification for issue-related events: see [notifications](https://docs.sonarsource.com/sonarqube-cloud/managing-your-account/notifications "mention").
* You can manage external issues (issues detected by an external tool and imported into SonarQube Cloud) in the same way as internal issues. Be aware that managing an external issue within SonarQube Cloud has no impact on its state in the external tool. For example, when you mark an issue as **False positive** in SonarQube Cloud, it is not reflected in the external tool.
* As you edit issues, the related metrics, for example, number of issues taken into account, will update automatically; as will the quality gate status if it’s relevant. See [metric-definitions](https://docs.sonarsource.com/sonarqube-cloud/digging-deeper/metric-definitions "mention") for more information.
{% endhint %}
### Accepting an issue
You may accept an issue if you decide to fix the issue later. Note that SonarQube Cloud ignores accepted issues in the quality reports and ratings of the code.
{% hint style="info" %}
You can add a comment to your issue change action. See **Commenting on an issue** below for more information about issue comments.
{% endhint %}
To accept an issue:
1. Retrieve the issue. See [retrieving](https://docs.sonarsource.com/sonarqube-cloud/managing-your-projects/issues/retrieving "mention") for more information.
2. In the issue card, select the **Open** issue status and select **Accept** in the contextual menu as illustrated below. A **Status change comment** box appears.
3. Enter your change comment (optional) and select **Change status**. The issue status is changed to **Accepted**.
### Marking an issue as False positive
If the analysis is mistaken, you can mark an issue as False positive provided you have the Administer Issues permission on the project. Note that SonarQube Cloud ignores False positive issues in the quality reports and ratings of the code.
{% hint style="info" %}
You can add a comment to your issue change action. See **Commenting on an issue** below for more information about issue comments.
{% endhint %}
To mark an issue as False positive:
1. Retrieve the issue. See [retrieving](https://docs.sonarsource.com/sonarqube-cloud/managing-your-projects/issues/retrieving "mention") for more information.
2. In the issue card, select the **Open** issue status and select **False positive** in the contextual menu. A **Status change comment** box appears.
3. Enter your change comment (optional) and select **Change status**. The issue status is changed to **False positive**.
### Reopening an issue
You can reopen an Accepted issue when it’s time to fix it or reopen a False positive issue if it turns out to be a true positive.
To reopen one or several issues:
1. Retrieve the issue. See [retrieving](https://docs.sonarsource.com/sonarqube-cloud/managing-your-projects/issues/retrieving "mention") for more information.
2. In the issue card, select the **Accepted** or **False positive** issue status and select **Reopen** in the contextual menu. The issue status is reset to **Open**.
### Marking an issue as reviewed
To mark issues as reviewed, you may use the tagging feature: create the Reviewed tag and assign it to reviewed issues: see **Tagging an issue** below. This way, you can filter the reviewed issues by using the Tag filter.
### Assigning an issue
When possible, SonarQube Cloud assigns a default assignee at issue creation time, see [solution-overview](https://docs.sonarsource.com/sonarqube-cloud/managing-your-projects/issues/solution-overview "mention") for more information. You can assign an unassigned issue to a user, reassign an issue to another user, or unassign an issue.
To assign an issue:
1. Retrieve the issue. See [retrieving](https://docs.sonarsource.com/sonarqube-cloud/managing-your-projects/issues/retrieving "mention") for more information.
2. In the issue card, click the assignee name or the **Not assigned** mention. The list of users to whom you can assign the issue appears.
3. In the list, select the new assignee or select **Not assigned** in the list to unassign the issue.
### Tagging an issue
You can create tags and assign them to issues to retrieve them more easily or to indicate a workflow step. For example, you can use a tag to mark an issue as reviewed.
{% hint style="info" %}
Rules can also be tagged (In particular, [built-in-rule-tags](https://docs.sonarsource.com/sonarqube-cloud/digging-deeper/built-in-rule-tags "mention") may be assigned to some rules.). An issue inherits the tags assigned to the rule that raised the issue. You can remove the inherited tags.
{% endhint %}
To manage the tags assigned to an issue:
1. Retrieve the issue. See [retrieving](https://docs.sonarsource.com/sonarqube-cloud/managing-your-projects/issues/retrieving "mention") for more information.
2. In the search results list or in the detail view, select in the **Tags** section if the issue. A dialog opens with the list of existing tags.
3. In the dialog, you can use the search field to search for an existing tag. To create a new tag, enter the new tag in the search field: the new tag will appear in the list of tags with a plus sign in front of it .
4. To assign or unassign a tag, select or clear the tag’s checkbox in the list.
5. Click anywhere outside the dialog to close the dialog.
### Commenting on an issue
When accepting an issue or marking an issue as **False positive**, you can add a comment. You can also add a comment to an issue anytime. These comments are visible from the **Activity** tab of the issue: see **Viewing the issue management history and comments** in [reviewing](https://docs.sonarsource.com/sonarqube-cloud/managing-your-projects/issues/reviewing "mention").
By default, comments are shared between all users. They can be disabled at the global level.
To add a comment to an issue:
1. Retrieve the issue and open its detail view. See [retrieving](https://docs.sonarsource.com/sonarqube-cloud/managing-your-projects/issues/retrieving "mention") for more information.
2. Open the **Activity** tab.
3. Select **Add a comment**. The "Add a comment" dialog box opens.
4. Enter your comment and select **Comment**.
5. Your comment is added to the **Activity** tab.
### Suppressing the issues on a given line
In most languages, you can use the `//NOSONAR` comment at the end of a line to suppress all issues on the line. This will suppress all issues - now and in the future - that might be raised on the line.
### Editing several issue in bulk
To edit several issues at once:
1. Select issues individually, or select all issues by clicking the bulk change checkbox at the top of the page. You can deselect the issues you do not want to include.
2. Click on the **Bulk change** button to open a modal.
3. In the modal, select the actions to perform:
* **Assign**: Assign the issues to a user.
* **Add tags**: Add tags to the issues.
* **Remove tags**: Remove tags from the issues.
* **Change status**: To accept, confirm, fix, reopen or mark the issues as a false positive.
* **Status change comment**: Add a comment about the changes you are applying. Additionally, you can share the comment with Sonar to help improve the analysis.
4. Click **Apply**.
### Creating Jira Cloud work items from SonarQube issues
You can create a Jira Cloud work item from a single or multiple SonarQube issues. See [jira-integration](https://docs.sonarsource.com/sonarqube-cloud/managing-your-projects/administering-your-projects/jira-integration "mention") for more information.
---
# Source: https://docs.sonarsource.com/sonarqube-server/2025.3/server-installation/data-center-edition/network-security/elasticsearch-security-features.md
# Source: https://docs.sonarsource.com/sonarqube-server/2025.5/server-installation/data-center-edition/network-security/elasticsearch-security-features.md
# Source: https://docs.sonarsource.com/sonarqube-server/2025.4/server-installation/data-center-edition/network-security/elasticsearch-security-features.md
# Source: https://docs.sonarsource.com/sonarqube-server/2025.6/server-installation/data-center-edition/network-security/elasticsearch-security-features.md
# Source: https://docs.sonarsource.com/sonarqube-server/server-installation/data-center-edition/network-security/elasticsearch-security-features.md
# Elasticsearch security features
### Setting up Elasticsearch authentication
Elasticsearch authentication involves verifying the identity of users and systems before granting access to Elasticsearch. You can use TLS for Elasticsearch authentication.To do so, you need to configure both the search nodes (Elasticsearch nodes) and the application nodes (clients) to use TLS/SSL for communication and ensure they have valid certificates. This involves setting up a Certificate Authority (CA), generating a certificate and configuring Elasticsearch to use this certificate for authentication.
#### Step 1: Generate the CA and certificate
You must generate a Certificate Authority together with a certificate and private key. Generate only one certificate for all nodes.
You can use the elasticsearch-certutil tool to generate both the [Certificate Authority](https://www.elastic.co/guide/en/elasticsearch/reference/current/security-basic-setup.html#generate-certificates) and the [certificate](https://www.elastic.co/guide/en/elasticsearch/reference/current/security-basic-setup-https.html#encrypt-http-communication) (see [the Elastic documentation](https://www.elastic.co/guide/en/elasticsearch/reference/current/security-basic-setup-https.html)):
* Make sure you include all the search nodes’ hostnames. They will be then added as DNS names in the Subject Alternative Name. See the example below.
* Choose the password that will be assigned to `searchNodes.searchAuthentication.userPassword`. This is optional in a Kubernetes installation unless you are not using `searchAuthentication`. If you are using `searchAuthentication` and do not define a password in your helm chart, the system will fail.
* As a result of the certificate creation process, you should get a file called `http.p12`. Rename it to `elastic-stack-ca.p12`
{% hint style="warning" %}
When creating the PKCS#12 container, make sure it is created with an algorithm that is readable by Java 17.
{% endhint %}
DNS names list example
As an example, let’s assume that your cluster has three search nodes with the release’s name set to "sq", the chart’s name set to "sonarqube-dce", and the namespace set to "sonar". You will need to add the following DNS names in the SAN.
`sq-sonarqube-dce-search-0.sq-sonarqube-dce-search.sonar.svc.cluster.local`
`sq-sonarqube-dce-search-1.sq-sonarqube-dce-search.sonar.svc.cluster.local`
`sq-sonarqube-dce-search-2.sq-sonarqube-dce-search.sonar.svc.cluster.local`
`sq-sonarqube-dce-search`
Remember to add the service name in the list (in this case, sq-sonarqube-dce-search).
Note that you can retrieve the search nodes’ FQDN running hostname -f within one of the node.
#### Step 2: Configure the authentication in SonarQube
You must restart the cluster to apply the changes.
{% tabs %}
{% tab title="ZIP OR DOCKER INSTALLATION" %}
1. On each application node and on each search node, enable the authentication to the Elasticsearch cluster by setting the Elasticsearch password in the system property `sonar.cluster.search.password` or the corresponding environment variable `SONAR_CLUSTER_SEARCH_PASSWORD`. It must have the exact same value on all nodes.
2. On each search node, set the path to `elastic-stack-ca.p12` in the following system properties:
* `sonar.cluster.es.ssl.keystore` / `SONAR_CLUSTER_ES_SSL_KEYSTORE`
* `sonar.cluster.es.ssl.truststore` / `SONAR_CLUSTER_ES_SSL_TRUSTSTORE`
3. On each search node, set the keystore / truststore password in the following system properties:
* `sonar.cluster.es.ssl.keystorePassword` / `SONAR_CLUSTER_ES_SSL_KEYSTOREPASSWORD`
* `sonar.cluster.es.ssl.truststorePassword` / `SONAR_CLUSTER_ES_SSL_TRUSTSTOREPASSWORD`
For information about the system properties, see [#elasticsearch-authentication](https://docs.sonarsource.com/sonarqube-server/system-properties/dce-specific#elasticsearch-authentication "mention").
{% endtab %}
{% tab title="KUBERNETES INSTALLATION" %}
In the Helm chart:
1. Set `searchNodes.searchAuthentication.enabled` to `true`.
2. Create the secret that will contain the certificate and assign its name to the `searchNodes.searchAuthentication.keyStoreSecret` parameter.
3. If you chose a password in the certificate generation process, set the `keyStorePassword` or `keyStorePasswordSecret` values with that password value.
{% endtab %}
{% endtabs %}
### Setting up TLS encryption
TLS encryption is used to secure the HTTP traffic between clients (application nodes) and Elasticsearch (search nodes). If Elasticsearch authentication is enabled, you can set up TLS encryption.
You must restart the cluster to apply the changes.
{% tabs %}
{% tab title="ZIP OR DOCKER INSTALLATION" %}
On each application node and each search node, set the path to `elastic-stack-ca.p12` in the following system properties:
* `sonar.cluster.es.http.ssl.keystore` / `SONAR_CLUSTER_ES_HTTP_SSL_KEYSTORE`
* `sonar.cluster.es.http.ssl.keystorePassword` / `SONAR_CLUSTER_ES_HTTP_SSL_KEYSTOREPASSWORD`
For information about the properties, see [#tls-encryption](https://docs.sonarsource.com/sonarqube-server/system-properties/dce-specific#tls-encryption "mention").
{% endtab %}
{% tab title="KUBERNETES INSTALLATION" %}
* Set `nodeEncryption.enabled` to `true`.
{% endtab %}
{% endtabs %}
### Related pages
* [securing-behind-proxy](https://docs.sonarsource.com/sonarqube-server/server-installation/data-center-edition/network-security/securing-behind-proxy "mention")
* [network-rules](https://docs.sonarsource.com/sonarqube-server/server-installation/data-center-edition/network-security/network-rules "mention")
---
# Source: https://docs.sonarsource.com/sonarqube-community-build/server-update-and-maintenance/troubleshooting/elasticsearch.md
# Source: https://docs.sonarsource.com/sonarqube-server/10.8/server-upgrade-and-maintenance/troubleshooting/elasticsearch.md
# Source: https://docs.sonarsource.com/sonarqube-server/2025.2/server-update-and-maintenance/troubleshooting/elasticsearch.md
# Source: https://docs.sonarsource.com/sonarqube-server/2025.3/server-update-and-maintenance/troubleshooting/elasticsearch.md
# Source: https://docs.sonarsource.com/sonarqube-server/2025.5/server-update-and-maintenance/troubleshooting/elasticsearch.md
# Source: https://docs.sonarsource.com/sonarqube-server/2025.1/server-update-and-maintenance/troubleshooting/elasticsearch.md
# Source: https://docs.sonarsource.com/sonarqube-server/2025.4/server-update-and-maintenance/troubleshooting/elasticsearch.md
# Source: https://docs.sonarsource.com/sonarqube-server/2025.6/server-update-and-maintenance/troubleshooting/elasticsearch.md
# Source: https://docs.sonarsource.com/sonarqube-server/server-update-and-maintenance/troubleshooting/elasticsearch.md
# Elasticsearch-related issues
### Recovering from Elasticsearch read-only indices
You may encounter issues with Elasticsearch (ES) indices becoming locked in read-only mode. ES requires free disk space available and implements a safety mechanism to prevent the disk from being flooded with index data that:
* **For non-DCE** – locks all indices in read-only mode when the 95% used disk usage watermark is reached.
* **For DCE** – locks all or some indices in read-only mode when one or more node reaches the 95% used disk usage watermark.
ES shows warnings in the logs as soon as disk usage reaches 85% and 90%. At 95% usage and above, indices turning read-only causes errors in the web and compute engine.
Freeing disk space will *not* automatically make the indices return to read-write. To make indices read-write, you also need to:
* **For non-DCE** – restart SonarQube Server.
* **For DCE** – restart *ALL* application nodes (the first application node restarted after all have been stopped will make the indices read-write).
SonarQube Server’s built-in resilience mechanism allows SonarQube Server to eventually recover from the indices being behind data in the DB (this process can take a while).
If you still have inconsistencies, you’ll need to rebuild the indices (this operation can take a long time depending on the number of issues and components):
**non-DCE:**
1. Stop SonarQube Server.
2. Delete the `data/es8` directory.
3. Restart SonarQube Server.
**DCE:**
1. Stop the whole cluster (ES and application nodes).
2. Delete the `data/es8` directory on each ES node.
3. Restart the whole cluster.
See [starting-stopping-cluster](https://docs.sonarsource.com/sonarqube-server/server-installation/data-center-edition/starting-stopping-cluster "mention") for more information.
### Failed background tasks during reindexing
During Elasticsearch reindexing, you may have failed tasks in your branches or pull requests:
* If you only have a few failed tasks, you can reanalyze your branch or pull request. You may want to use web services to remove branches and pull requests that can’t be reanalyzed because they have been removed from version control.
* If you have many failed tasks, you may want to delete your Elasticsearch directory and reindex again. To do so, see [#forcing-es-reindex](https://docs.sonarsource.com/sonarqube-server/maintenance/reindexing#forcing-es-reindex "mention") for more information.
If background tasks of type **Project Data Reload** fail for a particular project, see the [#reindexing-single-project](https://docs.sonarsource.com/sonarqube-server/maintenance/reindexing#reindexing-single-project "mention") page.
### Exception java.lang.RuntimeException: cannot run elasticsearch as root
SonarQube Server starts an Elasticsearch process, and the same account that is running SonarQube Server itself will be used for the Elasticsearch process. Since Elasticsearch cannot be run as root, that means SonarQube Server can’t be either. You must choose some other, non-root account with which to run SonarQube Server, preferably an account dedicated to the purpose.
### Exception: Failed to allocate closure
This issue is only relevant to Linux. See [Ensure JNA temporary directory permits executables](https://www.elastic.co/docs/deploy-manage/deploy/self-managed/executable-jna-tmpdir) for detailed information. There are two options to ensure the JNA temp directory matches Elasticsearch’s requirements:
1. Remove `noexec` flag on the `/tmp` or wherever `sonar.path.temp` is set to, e.g. `mount -o remount,rw,exec /tmp`
2. Change ES temp directory to a different location that is not so restrictive via `sonar.path.temp`, which will define `-Djna.tmpdir`
### SonarQube cannot read PKCS12 keystore / truststore
Make sure that the keystore/truststore in question was generated with an algorithm that is known to Java 17. See [JDK-8267599](https://bugs.openjdk.java.net/browse/JDK-8267599) for reference.
### Error: `Unable to open socket file /tmp/.java_pid`
SonarQube Server 2026.1 LTA and later includes Elasticsearch 8.x, which requires read and write access to the `/tmp` directory. This is a requirement from Elasticsearch itself and cannot be disabled. For more information and a solution, see [#fonts](https://docs.sonarsource.com/sonarqube-server/server-installation/pre-installation/linux#fonts "mention").
### Related pages
* [server-logs](https://docs.sonarsource.com/sonarqube-server/server-update-and-maintenance/troubleshooting/server-logs "mention")
* [performance-issues](https://docs.sonarsource.com/sonarqube-server/server-update-and-maintenance/troubleshooting/performance-issues "mention")
* [database-related-issues](https://docs.sonarsource.com/sonarqube-server/server-update-and-maintenance/troubleshooting/database-related-issues "mention")
* [other-issues](https://docs.sonarsource.com/sonarqube-server/server-update-and-maintenance/troubleshooting/other-issues "mention")
---
# Source: https://docs.sonarsource.com/sonarqube-server/2025.6/instance-administration/system-functions/notifications/email.md
# Source: https://docs.sonarsource.com/sonarqube-server/2025.6/user-guide/managing-your-account/subscribing-to-notifications/email.md
# Source: https://docs.sonarsource.com/sonarqube-server/instance-administration/system-functions/notifications/email.md
# Source: https://docs.sonarsource.com/sonarqube-server/user-guide/managing-your-account/subscribing-to-notifications/email.md
# Subscribing to email notifications
{% hint style="info" %}
You’re automatically notified in the following cases:
* When one of your tokens is about to expire.
* As a Quality Profile Administrator, when a built-in quality profile is modified (after a SonarQube Server or analyzer update).
{% endhint %}
### List of notifications subject to subscription
The notifications you can subscribe to are listed below.
Overall notifications (for any project)
| **Notification** | **Description** |
| ------------------------------------------------------- | ---------------------------------------------------------------------------------------------------------------- |
| Background tasks in failure on my administered projects | You are notified of any background task failure for any project you’re an admin of. |
| Changes in issues/hotspots assigned to me | You are notified of any change performed by another user on any issue or hotspot assigned to you on any project. |
| Quality gate changes on all available projects | You are notified of any status change for any project you have access. |
| My new issues | You are notified if new issues are assigned to you for the specific project. |
Notifications per project
| **Notification** | **Description** |
| --------------------------------------------- | -------------------------------------------------------------------------------------------------------------------------- |
| Background tasks in failure | You are notified of any background task failure on the specific project. |
| Changes in issues/hotspots assigned to me | You are notified of any change performed by another user on any issue or hotspot assigned to you for the specific project. |
| Quality gate changes | You are notified of any quality gate status change for the specific project. |
| Issues resolved as false positive or accepted | You are notified if issues have been marked as False Positive or Accepted in an analysis of the specific project. |
| New issues | You are notified of any new issues introduced by your code for the specific project. |
| My new issues | You are notified if new issues are assigned to you for the specific project. |
### Subscribing to overall notifications
1. In the upper right corner, select your account menu icon.
2. In the menu, select **My Account**.
3. In the account page’s navigation bar, select **Notifications**.
4. In the **Email** column, select or unselect the check box to enable or disable a notification.
### Subscribing to notifications for a project
1. In the upper right corner, select your account menu icon.
2. In the menu, select **My Account**.
3. In the account page’s navigation bar, select **Notifications**.
4. If the project is not listed in the **Notifications per project** section, then add it as follows:
1. Select **Add project** to add the project you want to configure. The Add a project dialog opens.
2. Enter the first letters of the project, select the project, and select **Add**.
5. In the list of projects, extend the project.
6. In the **Email** column, select or unselect the check box to enable or disable a notification.
### Related pages
[email](https://docs.sonarsource.com/sonarqube-server/instance-administration/system-functions/notifications/email "mention")
---
# Source: https://docs.sonarsource.com/sonarqube-server/2025.3/instance-administration/ai-features/enable-ai-codefix.md
# Source: https://docs.sonarsource.com/sonarqube-server/2025.3/project-administration/ai-features/enable-ai-codefix.md
# Source: https://docs.sonarsource.com/sonarqube-server/2025.5/instance-administration/ai-features/enable-ai-codefix.md
# Source: https://docs.sonarsource.com/sonarqube-server/2025.5/project-administration/ai-features/enable-ai-codefix.md
# Source: https://docs.sonarsource.com/sonarqube-server/2025.1/instance-administration/ai-features/enable-ai-codefix.md
# Source: https://docs.sonarsource.com/sonarqube-server/2025.1/project-administration/ai-features/enable-ai-codefix.md
# Source: https://docs.sonarsource.com/sonarqube-server/2025.4/instance-administration/ai-features/enable-ai-codefix.md
# Source: https://docs.sonarsource.com/sonarqube-server/2025.4/project-administration/ai-features/enable-ai-codefix.md
# Source: https://docs.sonarsource.com/sonarqube-server/2025.6/instance-administration/ai-features/enable-ai-codefix.md
# Source: https://docs.sonarsource.com/sonarqube-server/2025.6/project-administration/ai-features/enable-ai-codefix.md
# Source: https://docs.sonarsource.com/sonarqube-server/instance-administration/ai-features/enable-ai-codefix.md
# Source: https://docs.sonarsource.com/sonarqube-server/project-administration/ai-features/enable-ai-codefix.md
# Source: https://docs.sonarsource.com/sonarqube-cloud/administering-sonarcloud/ai-features/enable-ai-codefix.md
# Source: https://docs.sonarsource.com/sonarqube-cloud/managing-your-projects/administering-your-projects/ai-features/enable-ai-codefix.md
# AI CodeFix
Sonar’s AI CodeFix uses a large language model (LLM) to automatically generate AI-driven code fixes for the issues discovered by SonarQube Cloud AI CodeFix must be enabled by an Instance Admin and is defined for **All projects** or for **Only selected projects**.
See the [enable-ai-codefix](https://docs.sonarsource.com/sonarqube-cloud/administering-sonarcloud/ai-features/enable-ai-codefix "mention") page for the full details.
### Getting AI-generated fix suggestions
SonarQube Cloud’s AI CodeFix is a feature that uses space.vars.SQC\_Supported\_LLM\_version to suggest fixes for a select set of rules in Java, JavaScript, TypeScript, Python, C#, and C++. To learn more about which rules are eligible for AI CodeFix, check the list of [#ai-codefix-rules](https://docs.sonarsource.com/sonarqube-cloud/digging-deeper/rules-for-ai-codefix#ai-codefix-rules "mention").
When an Instance Admin enables AI CodeFix for your project, you can get an AI-generated fix suggestion for eligible issues. See the [Sonar AI CodeFix terms](https://www.sonarsource.com/legal/ai-codefix-terms/) for details about the terms of access.
If you’re using connected mode with SonarQube for VS Code or SonarQube for IntelliJ, it's possible to get AI-generated fix suggestions directly in your IDE. See the relevant SonarQube for IDE pages to see how it works:
* In SonarQube for VS Code: [AI CodeFix #AI CodeFix in your IDE](https://app.gitbook.com/s/6LPRABg3ubAJhpfR5K0Y/ai-capabilities/ai-codefix#ai-codefix "mention")
* In SonarQube for IntelliJ: [AI CodeFix #AI CodeFix in your IDE](https://app.gitbook.com/s/NvI4wotPmITyM0mnsmtp/ai-capabilities/ai-codefix#ai-codefix "mention")
If you're not using connected mode with SonarQube for IDE, see the [#getting-ai-generated-fix-suggestions](https://docs.sonarsource.com/sonarqube-cloud/issues/fixing#getting-ai-generated-fix-suggestions "mention") article for alternative instructions. Then use the [#opening-issues-in-your-ide](https://docs.sonarsource.com/sonarqube-cloud/issues/fixing#opening-issues-in-your-ide "mention") feature to apply the fix.
### Related pages
* Administering your [ai-features](https://docs.sonarsource.com/sonarqube-cloud/administering-sonarcloud/ai-features "mention") as an Organization Admin
* [set-up-ai-code-assurance](https://docs.sonarsource.com/sonarqube-cloud/managing-your-projects/administering-your-projects/ai-features/set-up-ai-code-assurance "mention")
---
# Source: https://docs.sonarsource.com/sonarqube-server/10.7/instance-administration/system-functions/enabling-ai-generated-fix-suggestions.md
# AI-generated fix suggestions
*This feature is available in* [*Early Access*](https://www.sonarsource.com/legal/early-access/?_gl=1*1cnxd7l*_gcl_aw*R0NMLjE3MjYwNjEzMzYuQ2p3S0NBandfNFMzQmhBQUVpd0FfNjRZaHRaajloc0NiVllqSDlWQnBFNThseVJNU3AwRGZJXzFxVUlpVEM5OGNzeWdZTG9lenF1ZU1ob0NyMGtRQXZEX0J3RQ..*_gcl_au*NzgzMTE3MTA4LjE3MjQwNjY1Mjc.*_ga*MjA1OTIwMzU4OS4xNzI0MDY2NTI3*_ga_9JZ0GZ5TC6*MTcyNjA5MzA2Ni4zNy4xLjE3MjYwOTMwNzMuNTMuMC4w)*, in Enterprise Edition and above.*
As an instance administrator, you can enable or disable AI-generated fix suggestions on your instance. SonarQube uses OpenAI’s GPT-4 to generate the suggestions.
To do this, go to **Administration** > **Configuration** > **General Settings** > **AI CodeFix** > and select **Enable AI CodeFix**.
{% hint style="info" %}
You’ll need a a connection to the internet to connect to Sonar’s AI fix suggestions service.
The service is provided via api.sonarqube.io and has these static IP addresses:
99.83.135.55 (CIDR: 99.83.135.55/32)
15.197.164.24 (CIDR: 15.197.164.24/32)
{% endhint %}
Once enabled, developers can get AI-generated fix suggestions from the **Issues** page in their projects. See [fixing](https://docs.sonarsource.com/sonarqube-server/10.7/user-guide/issues/fixing "mention") for more details.
### Related pages
* [ai-features](https://docs.sonarsource.com/sonarqube-server/10.7/user-guide/ai-features "mention")
* [fixing](https://docs.sonarsource.com/sonarqube-server/10.7/user-guide/issues/fixing "mention")
* [project-settings](https://docs.sonarsource.com/sonarqube-server/10.7/project-administration/project-settings "mention") ("Marking a project as containing AI-generated code" section).
---
# Source: https://docs.sonarsource.com/sonarqube-community-build/server-installation/on-kubernetes-or-openshift/encrypting-helm-chart-sensitive-data.md
# Source: https://docs.sonarsource.com/sonarqube-server/10.8/setup-and-upgrade/deploy-on-kubernetes/encrypting-helm-chart-sensitive-data.md
# Source: https://docs.sonarsource.com/sonarqube-server/2025.2/setup-and-update/deploy-on-kubernetes/encrypting-helm-chart-sensitive-data.md
# Source: https://docs.sonarsource.com/sonarqube-server/2025.3/server-installation/on-kubernetes-or-openshift/encrypting-helm-chart-sensitive-data.md
# Source: https://docs.sonarsource.com/sonarqube-server/2025.5/server-installation/on-kubernetes-or-openshift/encrypting-helm-chart-sensitive-data.md
# Source: https://docs.sonarsource.com/sonarqube-server/2025.1/setup-and-upgrade/deploy-on-kubernetes/encrypting-helm-chart-sensitive-data.md
# Source: https://docs.sonarsource.com/sonarqube-server/2025.4/server-installation/on-kubernetes-or-openshift/encrypting-helm-chart-sensitive-data.md
# Source: https://docs.sonarsource.com/sonarqube-server/2025.6/server-installation/on-kubernetes-or-openshift/encrypting-helm-chart-sensitive-data.md
# Source: https://docs.sonarsource.com/sonarqube-server/server-installation/on-kubernetes-or-openshift/encrypting-helm-chart-sensitive-data.md
# Encrypting sensitive data
You can encrypt any Sonar property stored in the `values.yaml` file and some Helm parameters, such as `jdbcPassword`, that will be managed as sonar properties. The encryption algorithm used is AES with 256-bit keys.
You must have the Administer System permission in SonarQube Server to perform this procedure.
### Prerequisites
SonarQube Server must be up and running.
### Step 1: Create the encryption key
1. In SonarQube Server UI, go to **Administration > Configuration > Encryption**.
2. Select **Generate Secret Key**. An encryption key is generated.
3. Store the generated key in a safe location.
### Step 2: Create a Kubernetes secret to store the encryption key
Use the command below:
```sh
kubectl create secret generic --from-literal sonar-secret.txt=
```
Example:
```sh
kubectl create secret generic --from-literal sonar-secret.txt=EgycYJc4Ek4uj2pH39e3+bnnk15IrVu4dxtfjDyN1y8= myEncryptionKeySecret
```
### Step 3: Enable the encryption in the Helm chart
Install the encryption key secret as follows:
1\. Add the following to the `values.yaml` file:
```yaml
sonarSecretKey:
```
2\. Use the helm upgrade command.
### Step 4: Encrypt the sensitive data
To encrypt a sensitive property in `values.yaml`:
1\. In SonarQube Server UI, go to **Administration > Configuration > Encryption**.
2\. Enter the value of the property.
3\. Select the **Encrypt** button. The encrypted value of the property is generated.
4\. Select the copy tool.
5\. In the `values.yaml` file, replace the value of the property with the copied encrypted value.
6\. Use the helm upgrade command.
---
# Source: https://docs.sonarsource.com/sonarqube-community-build/instance-administration/security/encrypting-settings.md
# Source: https://docs.sonarsource.com/sonarqube-server/10.8/instance-administration/encrypting-settings.md
# Source: https://docs.sonarsource.com/sonarqube-server/2025.2/instance-administration/encrypting-settings.md
# Source: https://docs.sonarsource.com/sonarqube-server/2025.3/instance-administration/security/encrypting-settings.md
# Source: https://docs.sonarsource.com/sonarqube-server/2025.5/instance-administration/security/encrypting-settings.md
# Source: https://docs.sonarsource.com/sonarqube-server/2025.1/instance-administration/encrypting-settings.md
# Source: https://docs.sonarsource.com/sonarqube-server/2025.4/instance-administration/security/encrypting-settings.md
# Source: https://docs.sonarsource.com/sonarqube-server/2025.6/instance-administration/security/encrypting-settings.md
# Source: https://docs.sonarsource.com/sonarqube-server/instance-administration/security/encrypting-settings.md
# Sensitive settings
You can encrypt any system property stored in `/conf/sonar.properties` or defined in SonarQube Server UI. The encryption algorithm used is AES with 256-bit keys.
In case of a Kubernetes deployment, see also [encrypting-helm-chart-sensitive-data](https://docs.sonarsource.com/sonarqube-server/server-installation/on-kubernetes-or-openshift/encrypting-helm-chart-sensitive-data "mention").
You must have the Administer System permission in SonarQube Server.
### Prerequisites
SonarQube Server must be up and running.
### Step 1: Create the encryption key
1. In SonarQube Server UI, go to **Administration > Configuration > Encryption**.
2. Select **Generate Secret Key**. An encryption key is generated.
You can use any other tool to generate the encryption key. It should be a Base64 Encoded AES-256 Key.
### Step 2: Store the encryption key in a secured file on disk
1. Copy the generated encryption key to a file on the machine hosting the SonarQube Server. The default location is `~/.sonar/sonar-secret.txt` .\
If you want to store it somewhere else, set its path through the `sonar.secretKeyPath` system property. For more details about this setup, see [configuration-methods](https://docs.sonarsource.com/sonarqube-server/server-installation/system-properties/configuration-methods "mention"). For more details about this system property, see [#general-properties](https://docs.sonarsource.com/sonarqube-server/server-installation/system-properties/common-properties#general-properties "mention").
2. Restrict file permissions to the account running the SonarQube Server (ownership and read-access only).
3. Restart your SonarQube Server.
### Step 3: Encrypt the sensitive settings
To encrypt a property or setting:
1. In SonarQube Server UI, go to **Administration > Configuration > Encryption**.
2. Enter the value of the property in the form.
2. Select the **Encrypt** button. The encrypted value of the property is generated.
3. Select the copy tool to copy this value.
4. You can now:
* In `/conf/sonar.properties`, replace the value of the property with the copied encrypted value.
```properties
sonar.jdbc.password={aes-gcm}CCGCFg4Xpm6r+PiJb1Swfg== # Encrypted DB password
...
sonar.secretKeyPath=C:/path/to/my/secure/location/my_encryption_key.txt
```
* Or set the encrypted value in the corresponding SonarQuber Server UI’s field.
---
# Source: https://docs.sonarsource.com/sonarqube-cloud/enriching.md
# Enriching your analysis
{% content-ref url="enriching/overview" %}
[overview](https://docs.sonarsource.com/sonarqube-cloud/enriching/overview)
{% endcontent-ref %}
{% content-ref url="enriching/test-coverage" %}
[test-coverage](https://docs.sonarsource.com/sonarqube-cloud/enriching/test-coverage)
{% endcontent-ref %}
{% content-ref url="enriching/external-analyzer-reports" %}
[external-analyzer-reports](https://docs.sonarsource.com/sonarqube-cloud/enriching/external-analyzer-reports)
{% endcontent-ref %}
{% content-ref url="enriching/generic-issue-data" %}
[generic-issue-data](https://docs.sonarsource.com/sonarqube-cloud/enriching/generic-issue-data)
{% endcontent-ref %}
{% content-ref url="enriching/importing-issues-from-sarif-reports" %}
[importing-issues-from-sarif-reports](https://docs.sonarsource.com/sonarqube-cloud/enriching/importing-issues-from-sarif-reports)
{% endcontent-ref %}
{% content-ref url="enriching/branch-analysis" %}
[branch-analysis](https://docs.sonarsource.com/sonarqube-cloud/enriching/branch-analysis)
{% endcontent-ref %}
{% content-ref url="enriching/branch-analysis-setup" %}
[branch-analysis-setup](https://docs.sonarsource.com/sonarqube-cloud/enriching/branch-analysis-setup)
{% endcontent-ref %}
---
# Source: https://docs.sonarsource.com/sonarqube-cloud/administering-sonarcloud/managing-enterprise/enterprise-security.md
# Enterprise security
- [IP allow lists](/sonarqube-cloud/administering-sonarcloud/managing-enterprise/enterprise-security/ip-allow-lists.md): How to restrict the IP allow list for SonarQube Cloud
- [Audit logs](/sonarqube-cloud/administering-sonarcloud/managing-enterprise/enterprise-security/audit-logs.md): The initial release of SonarQube Cloud's audit logs provides you with the essential data you need to meet your immediate compliance and security needs.
- [Single Sign-On](/sonarqube-cloud/administering-sonarcloud/managing-enterprise/enterprise-security/sso.md): This section explains the Single Sign-On (SSO) authentication solution in SonarQube Cloud and how to set it up.
- [About SSO authentication solution](/sonarqube-cloud/administering-sonarcloud/managing-enterprise/enterprise-security/sso/about.md): This page provides an overview of the SSO authentication solution in SonarQube Cloud.
- [Automatic group synchronization](/sonarqube-cloud/administering-sonarcloud/managing-enterprise/enterprise-security/sso/about/automatic-group-synchronization.md): This page describes the automatic group synchronization solution in SonarQube Cloud.
- [Setting up SSO](/sonarqube-cloud/administering-sonarcloud/managing-enterprise/enterprise-security/sso/setup.md): With the Enterprise plan, you can transition your SonarQube Cloud enterprise to Single Sign-On.
- [Step 1: Verify the user groups](/sonarqube-cloud/administering-sonarcloud/managing-enterprise/enterprise-security/sso/setup/verify-user-groups.md): Before configuring SSO for your SonarQube Cloud enterprise, you must ensure that the automatic group synchronization can take place properly.
- [Step 2: Configure SSO](/sonarqube-cloud/administering-sonarcloud/managing-enterprise/enterprise-security/sso/setup/configure-sso.md): The second step in configuring SSO for your SonarQube Cloud enterprise varies slightly, depending on your identity provider. If you use Okta or Microsoft Entra ID, go directly to the respective page.
- [Using the setup assistant (generic operation)](/sonarqube-cloud/administering-sonarcloud/managing-enterprise/enterprise-security/sso/setup/configure-sso/generic-operation.md): This page explains how to configure SSO with SonarQube Cloud’s setup assistant if you use another identity provider than Okta or Microsoft Entra ID.
- [SAML SSO with Okta](/sonarqube-cloud/administering-sonarcloud/managing-enterprise/enterprise-security/sso/setup/configure-sso/okta.md): This page explains how to setup SAML SSO with Okta and SonarQube Cloud's SSO setup assistant.
- [SAML SSO with Entra ID](/sonarqube-cloud/administering-sonarcloud/managing-enterprise/enterprise-security/sso/setup/configure-sso/microsoft-entra-id.md): This page explains how to configure SAML SSO in your enterprise with Microsoft Entra ID while using SonarQube Cloud's setup assistant.
- [Step 3: Invite users to sign in](/sonarqube-cloud/administering-sonarcloud/managing-enterprise/enterprise-security/sso/setup/inviting-users-to-sign-in.md): Once the SSO connection has been established, you can invite users to sign in to SonarQube Cloud with SSO by sending them the enterprise’s login URL.
- [Step 4: Terminate SSO setup](/sonarqube-cloud/administering-sonarcloud/managing-enterprise/enterprise-security/sso/setup/terminate-setup.md): This page describes how to terminate your Single Sign-On (SSO) setup in SonarQube Cloud.
- [Editing SSO configuration](/sonarqube-cloud/administering-sonarcloud/managing-enterprise/enterprise-security/sso/editing-sso-configuration.md): After setup, editing your SSO configuration in SonarQube Cloud is straight-forward.
- [Editing SSO configuration (old method)](/sonarqube-cloud/administering-sonarcloud/managing-enterprise/enterprise-security/sso/editing-configuration-old-method.md): Editing your SSO configuration in SonarQube Cloud was recently improved using the SSO setup assistant. These pages outline the previous editing procedures (without the SSO setup assistant).
- [Introduction](/sonarqube-cloud/administering-sonarcloud/managing-enterprise/enterprise-security/sso/editing-configuration-old-method/introduction.md): This page explains the generic steps necessary to edit the SAML SSO configuration you established in SonarQube Cloud using the older method (without the SSO setup assistant).
- [With Okta](/sonarqube-cloud/administering-sonarcloud/managing-enterprise/enterprise-security/sso/editing-configuration-old-method/okta.md): This page explains how to edit the SAML SSO configuration you established in SonarQube Cloud with Okta and using the old method (without the SSO setup assistant).
- [With Microsoft Entra ID](/sonarqube-cloud/administering-sonarcloud/managing-enterprise/enterprise-security/sso/editing-configuration-old-method/microsoft-entra-id.md): This page explains how to edit the SAML SSO configuration you established in SonarQube Cloud with Microsoft Entra ID while using the old method (without the SSO setup assistant).
- [Deleting SSO configuration](/sonarqube-cloud/administering-sonarcloud/managing-enterprise/enterprise-security/sso/deleting-sso-configuration.md): As an enterprise admin, you can delete your enterprise’s SSO configuration in SonarQube Cloud either in the UI or via the Web API.
- [Troubleshooting SSO connection](/sonarqube-cloud/administering-sonarcloud/managing-enterprise/enterprise-security/sso/troubleshooting.md): Troubleshooting your SSO connection can be tricky. Here's a list of items to check in SonarQube Cloud and with your identity provider.
---
# Source: https://docs.sonarsource.com/sonarqube-cloud/administering-sonarcloud/about-sonarqube-cloud-solution/ressources-structure/enterprise.md
# Enterprise
Several organizations can be grouped together into an enterprise in SonarQube Cloud. To do so, the organizations must belong to an enterprise. The following applies:
* The enterprise’s organizations may belong to different DevOps platforms.
* At least one user is defined as the enterprise admin.
* The members of the enterprise are the users who are members of an enterprise’s organization.
### Related pages
* [introduction](https://docs.sonarsource.com/sonarqube-cloud/getting-started-with-enterprise/introduction "mention") to Getting started with enterprise
* [managing-enterprise](https://docs.sonarsource.com/sonarqube-cloud/administering-sonarcloud/managing-enterprise "mention")
* [setup](https://docs.sonarsource.com/sonarqube-cloud/administering-sonarcloud/managing-enterprise/enterprise-security/sso/setup "mention") to Setting up Single Sign-On
---
# Source: https://docs.sonarsource.com/sonarqube-mcp-server/build-and-configure/environment-variables.md
# Source: https://docs.sonarsource.com/sonarqube-server/8.9/setup-and-upgrade/configure-and-operate-a-server/environment-variables.md
# Source: https://docs.sonarsource.com/sonarqube-server/9.8/setup-and-upgrade/configure-and-operate-a-server/environment-variables.md
# Source: https://docs.sonarsource.com/sonarqube-server/9.9/setup-and-upgrade/configure-and-operate-a-server/environment-variables.md
# Source: https://docs.sonarsource.com/sonarqube-server/10.0/setup-and-upgrade/configure-and-operate-a-server/environment-variables.md
# Source: https://docs.sonarsource.com/sonarqube-server/10.1/setup-and-upgrade/configure-and-operate-a-server/environment-variables.md
# Source: https://docs.sonarsource.com/sonarqube-server/10.2/setup-and-upgrade/configure-and-operate-a-server/environment-variables.md
# Source: https://docs.sonarsource.com/sonarqube-server/10.3/setup-and-upgrade/configure-and-operate-a-server/environment-variables.md
# Source: https://docs.sonarsource.com/sonarqube-server/10.4/setup-and-upgrade/configure-and-operate-a-server/environment-variables.md
# Source: https://docs.sonarsource.com/sonarqube-server/10.5/setup-and-upgrade/configure-and-operate-a-server/environment-variables.md
# Source: https://docs.sonarsource.com/sonarqube-server/10.6/setup-and-upgrade/configure-and-operate-a-server/environment-variables.md
# Source: https://docs.sonarsource.com/sonarqube-server/10.7/setup-and-upgrade/environment-variables.md
# Source: https://docs.sonarsource.com/sonarqube-server/10.8/setup-and-upgrade/environment-variables.md
# Source: https://docs.sonarsource.com/sonarqube-server/2025.2/setup-and-update/environment-variables.md
# Source: https://docs.sonarsource.com/sonarqube-server/2025.1/setup-and-upgrade/environment-variables.md
# Environment variables
This page provides environment variables used for configuring SonarQube Server with Docker. The values provided in the following environment variables are the default values.
### Database
{% hint style="info" %}
* The embedded H2 database is used by default. It is recommended for tests but not for production use. Supported databases are Oracle, PostgreSQL, and Microsoft SQLServer.
* Changes to the database connection URL (`sonar.jdbc.url`) can affect Sonar licensed products.
* Unless you intend to delete the database and start new when running your image, be careful not to use `-v` to `docker-compose down` and, be careful when running commands like `docker system prune` or `docker volume prune`; regardless if you use an `external: true` parameter, your database volumes will not persist beyond the initial startup and shutdown of SonarQube Server.
{% endhint %}
#### User credentials
**`SONAR_JDBC_USERNAME=`**\
\&#xNAN;**`SONAR_JDBC_PASSWORD=`** Permissions to create tables, indices, and triggers must be granted to JDBC user. The schema must be created first.
#### Embedded database
**`SONAR_EMBEDDEDDATABASE_PORT=9092`** H2 embedded database server listening port, defaults to 9092.
#### Oracle 19c/21c/23ai
**`SONAR_JDBC_URL=jdbc:oracle:thin:@localhost:1521/XE`** The Oracle JDBC driver must be copied into the directory extensions/jdbc-driver/oracle/. Only the thin client is supported, and we recommend using the latest Oracle JDBC driver. See for more details. If you need to set the schema, please refer to .
#### PostgreSQL 13 or greater
**`SONAR_JDBC_URL=jdbc:postgresql://localhost/sonarqube?currentSchema=my_schema`** By default the schema named "public" is used. It can be overridden with the parameter "currentSchema".
#### Microsoft SQLServer 2016/2017/2019/2022 and SQL Azure
**`SONAR_JDBC_URL=jdbc:sqlserver://localhost;databaseName=sonar;integratedSecurity=true`** A database named sonar must exist and its collation must be case-sensitive (CS) and accent-sensitive (AS). Use this connection string if you want to use integrated security with Microsoft SQL Server. Do not set the `SONAR_JDBC_USERNAME` or `SONAR_JDBC_PASSWORD` property if you are using Integrated Security.
For Integrated Security to work, you have to download the [Microsoft SQL JDBC Auth 12.10.0 package](https://github.com/microsoft/mssql-jdbc/releases/download/v12.10.0/mssql-jdbc_auth.zip) and copy `mssql-jdbc_auth-12.10.0.x64.dll` to the path of the SonarQube Server host.
**`SONAR_JDBC_URL=jdbc:sqlserver://localhost;databaseName=sonar`** Use this connection string if you want to use SQL Auth while connecting to MS SQL Server. Set the `SONAR_JDBC_USERNAME` and `SONAR_JDBC_PASSWORD` appropriately.
#### Connection pool settings
**`SONAR_JDBC_MAXACTIVE=60`** The maximum number of active connections that can be allocated at the same time, or negative for no limit. The recommended value is 1.2 \* max sizes of HTTP pools. For example, if HTTP ports are enabled with default sizes (50, see property `sonar.web.http.maxThreads`) then `SONAR_JDBC_MAXACTIVE` should be 1.2 \* 50 = 60.
**`SONAR_JDBC_MAXIDLE=5`** The maximum number of connections that can remain idle in the pool, without extra ones being released, or negative for no limit.
**`SONAR_JDBC_MINIDLE=2`** The minimum number of connections that can remain idle in the pool, without extra ones being created, or zero to create none.
**`SONAR_JDBC_MAXWAIT=5000`** The maximum number of milliseconds that the pool will wait (when there are no available connections) for a connection to be returned before throwing an exception, or <= 0 to wait indefinitely.
### Web server
**`SONAR_WEB_JAVAOPTS=`** The web server is executed in a dedicated Java process. Use this property to customize JVM options.
{% hint style="info" %}
The HotSpot Server VM is recommended. The property -server should be added if server mode is not enabled by default on your environment. See [**here**](http://docs.oracle.com/javase/8/docs/technotes/guides/vm/server-class.html).
Startup can be long if the entropy source is short of entropy. Adding -Djava.security.egd=file:/dev/./urandom is an option to resolve the problem. See [**here**](https://cwiki.apache.org/confluence/display/TOMCAT/HowTo+FasterStartUp#HowToFasterStartUp-EntropySource)
{% endhint %}
**`SONAR_WEB_JAVAADDITIONALOPTS=`** Same as previous property, but allows to not repeat all other settings like `-Xmx`
**`SONAR_WEB_HOST=0.0.0.0`** Binding IP address. For servers with more than one IP address, this property specifies which address will be used for listening on the specified ports. By default, ports will be used on all IP addresses associated with the server.
**`SONAR_WEB_CONTEXT=`**\
Web context. When set, it must start with a forward slash (for example /sonarqube). The default value is root context (empty value).
**`SONAR_WEB_PORT=9000`** TCP port for incoming HTTP connections. Default value is 9000.
**`SONAR_WEB_HTTP_MAXTHREADS=50`** The maximum number of connections that the server will accept and process at any given time. When this number has been reached, the server will not accept any more connections until the number of connections falls below this value. The operating system may still accept connections based on the `SONAR_WEB_CONNECTIONS_ACCEPTCOUNT` property. The default value is 50.
**`SONAR_WEB_HTTP_MINTHREADS=5`** The minimum number of threads always kept running. The default value is 5.
**`SONAR_WEB_HTTP_ACCEPTCOUNT=25`** The maximum queue length for incoming connection requests when all possible request processing threads are in use. Any requests received when the queue is full will be refused. The default value is 25.
**`SONAR_WEB_HTTP_KEEPALIVETIMEOUT=60000`** The number of milliseconds this Connector will wait for another HTTP request before closing the connection. Use a value of -1 to indicate no (i.e. infinite) timeout. The default value is 60000 (ms).
**`SONAR_AUTH_JWTBASE64HS256SECRET=`**\
By default, users are logged out and sessions closed when server is restarted. If you prefer keeping user sessions open, a secret should be defined. Value is HS256 key encoded with base64. It must be unique for each installation of SonarQube Server. Example of command-line:\
`echo -n "type`*`what`*`you_want" | openssl dgst -sha256 -hmac "key" -binary | base64`
**`SONAR_WEB_SESSIONTIMEOUTINMINUTES=4320`**\
The inactivity timeout duration of user sessions, in minutes. After the configured period of time, the user is logged out. The default value is 3 days (4320 minutes). The value cannot be less than 6 minutes or greater than 3 months (129600 minutes). Value must be strictly positive.
**`SONAR_WEB_SYSTEMPASSCODE=`**\
A passcode can be defined to access some web services from monitoring tools without having to use the credentials of a system administrator. Check the Web API documentation to know which web services are supporting this authentication mode. The passcode should be provided in HTTP requests with the header "X-Sonar-Passcode". By default feature is disabled.
### SSO authentication
**`SONAR_WEB_SSO_ENABLE=false`**\
Enable authentication using HTTP headers
**`SONAR_WEB_SSO_LOGINHEADER=X-Forwarded-Login`**\
Name of the header to get the user login. Only alphanumeric, ‘`.`’ and ‘`@`’ characters are allowed
**`SONAR_WEB_SSO_NAMEHEADER=X-Forwarded-Name`**\
Name of the header to get the user name
**`SONAR_WEB_SSO_EMAILHEADER=X-Forwarded-Email`**\
Name of the header to get the user email (optional)
**`SONAR_WEB_SSO_GROUPSHEADER=X-Forwarded-Groups`**\
Name of the header to get the list of user groups, separated by comma (optional). If the SONAR*SSO*GROUPSHEADER is set, the user will belong to those groups if groups exist in SonarQube Server. If none of the provided groups exists in SonarQube Server, the user will only belong to the default group. Note that the default group will always be set.
**`SONAR_WEB_SSO_REFRESHINTERVALINMINUTES=5`**\
Interval used to know when to refresh name, email, and groups. During this interval, if for instance the name of the user is changed in the header, it will only be updated after X minutes.
### LDAP configuration
**`SONAR_SECURITY_REALM=LDAP`**\
Enable the LDAP feature
**`SONAR_AUTHENTICATOR_DOWNCASE=true`**\
Set to true when connecting to an LDAP server using a case-insensitive setup.
**`LDAP_URL=ldap://localhost:10389`**\
URL of the LDAP server. Note that if you are using LDAPS, then you should install the server certificate into the Java truststore.
**`LDAP_BINDDN=cn=sonar,ou=users,o=mycompany`**\
Bind DN is the username of an LDAP user to connect (or bind) with. Leave this blank for anonymous access to the LDAP directory (optional)
**`LDAP_BINDPASSWORD=secret`**\
Bind Password is the password of the user to connect with. Leave this blank for anonymous access to the LDAP directory (optional)
**`LDAP_AUTHENTICATION=simple`**\
Possible values: `simple | CRAM-MD5 | DIGEST-MD5 | GSSAPI`\
See (default: `simple`)
**`LDAP_REALM=example.org`**\
See :
*
* (optional)
**`LDAP_CONTEXTFACTORYCLASS=com.sun.jndi.ldap.LdapCtxFactory`**\
Context factory class (optional)
**`LDAP_STARTTLS=true`**\
Enable usage of StartTLS (default : `false`)
**`LDAP_FOLLOWREFERRALS=false`** Follow or not referrals. See (default: `true`)
#### Anchor mapping
**`LDAP_USER_BASEDN=cn=users,dc=example,dc=org`**\
Distinguished Name (DN) of the root node in LDAP from which to search for users (mandatory)
**`LDAP_USER_REQUEST=(&(objectClass=user)(sAMAccountName={login}))`**\
LDAP user request. (default: `(&(objectClass=inetOrgPerson)(uid={login}))` )
**`LDAP_USER_REALNAMEATTRIBUTE=name`** Attribute in LDAP defining the user’s real name. (default: `cn`)
**`LDAP_USER_EMAILATTRIBUTE=email`**\
Attribute in LDAP defining the user’s email. (default: `mail`)
#### Group mapping
**`LDAP_GROUP_BASEDN=cn=groups,dc=example,dc=org`**\
Distinguished Name (DN) of the root node in LDAP from which to search for groups. (optional, default: empty)
**`LDAP_GROUP_REQUEST=(&(objectClass=group)(member={dn}))`**\
LDAP group request (default: `(&(objectClass=groupOfUniqueNames)(uniqueMember={dn}))` )
**`LDAP_GROUP_IDATTRIBUTE=sAMAccountName`**\
Property used to specifiy the attribute to be used for returning the list of user groups in the compatibility mode. (default: `cn`)
### Compute engine
**`SONAR_CE_JAVAOPTS=`** The Compute Engine is responsible for processing background tasks.\
Compute Engine is executed in a dedicated Java process.\
Use the following property to customize JVM options.
{% hint style="info" %}
The HotSpot Server VM is recommended. The property -server should be added if server mode is not enabled by default on your environment:
{% endhint %}
**`SONAR_CE_JAVAADDITIONALOPTS=`** Same as previous property, but allows to not repeat all other settings like -Xmx
### Elasticsearch
Elasticsearch is used to facilitate fast and accurate information retrieval. It is executed in a dedicated Java process.
{% hint style="warning" %}
Linux users on 64-bit systems, ensure Virtual Memory on your system is correctly configured for Elasticsearch to run properly (see [here](https://www.elastic.co/guide/en/elasticsearch/reference/5.5/vm-max-map-count.html) for details).
When SonarQube Server runs standalone, a warning such as the following may appear in `logs/es.log`: "`max virtual memory areas vm.maxmapcount [65530] is too low, increase to at least [262144]`"
When SonarQube Server runs as a cluster, however, Elasticsearch will refuse to start.
{% endhint %}
**`SONAR_SEARCH_JAVAOPTS=`**\
JVM options of Elasticsearch process
**`SONAR_SEARCH_JAVAADDITIONALOPTS=`**\
Same as previous property, but allows to not repeat all other settings like -Xmx
**`SONAR_SEARCH_PORT=9001`**\
Elasticsearch port. Default is 9001. Use 0 to get a free port. As a security precaution, should be blocked by a firewall and not exposed to the Internet.
**`SONAR_SEARCH_HOST=`**\
Elasticsearch host. The search server will bind this address and the search client will connect to it. Default is loopback address. As a security precaution, should NOT be set to a publicly available address.
### Update center
**`SONAR_UPDATECENTER_ACTIVATE=true`**\
Update Center requires an internet connection to request It is enabled by default.
**`HTTP_PROXYHOST=`**\
\&#xNAN;**`HTTP_PROXYPORT=`**\
HTTP proxy (default none)
**`HTTPS_PROXYHOST=`**\
\&#xNAN;**`HTTPS_PROXYPORT=`**\
HTTPS proxy (defaults are values of HTTP*PROXYHOST and HTTP*PROXYPORT)
**`HTTP_AUTH_NTLM_DOMAIN=`**\
NT domain name if NTLM proxy is used
**`SOCKSPROXYHOST=`**\
\&#xNAN;**`SOCKSPROXYPORT=`**\
SOCKS proxy (default none)
**`HTTP_PROXYUSER=`**\
\&#xNAN;**`HTTP_PROXYPASSWORD=`**\
Proxy authentication (used for HTTP, HTTPS and SOCKS proxies)
**`HTTP_NONPROXYHOSTS=`**\
Proxy exceptions: list of hosts that can be accessed without going through the proxy separated by the ‘|’ character, wildcard character ‘\*’ can be used for pattern matching used for HTTP and HTTPS (default none) (note: localhost and its literal notations (127.0.0.1, …) are always excluded).
#### Logging
SonarQube Server produces logs in four logs files located in the same directory (see property `SONAR_PATH_LOGS` below), one per process:
* Main process (aka. App) logs in sonar.log
* Web Server (aka. Web) logs in web.log
* Compute Engine (aka. CE) logs in ce.log
* Elasticsearch (aka. ES) logs in es.log
All four files follow the same rolling policy (see `SONAR_LOG_ROLLINGPOLICY` and `SONAR_LOG_MAXFILES`) but it applies individually (eg. if `SONAR_LOG_MAXFILES=4`, there can be at most 4 of each files, ie. 16 files in total).
All four files have logs in the same format:
| | | |
| ------------------------------------------------------------------------------------------------- | ---------------------------------------- | ----------- |
| **1** | **2** | **3** |
| 2016.11.16 16:47:00 INFO ce\[AVht0dNXFcyiYejytc3m]\[o.s.s.c.t.ceworkercallableimpl] Executed task | project=org.sonarqube:example-java-maven | type=REPORT |
| **4** | **5** | **6** |
| id=AVht0dNXFcyiYejytc3m | submitter=admin | time=1699ms |
**1**: timestamp. Format is YYYY.MM.DD HH:MM:SS\
YYYY: year on 4 digits\
MM: month on 2 digits\
DD: day on 2 digits\
HH: hour of day on 2 digits in 24 hours format\
MM: minutes on 2 digits\
SS: seconds on 2 digits
**2**: log level. Possible values (in order of descending criticality): ERROR, WARN, INFO, DEBUG and TRACE
**3**: process identifier. Possible values: app (main), web (Web Server), ce (Compute Engine) and es (Elasticsearch)
**4**: SonarQube thread identifier. Can be empty. In the Web Server, if present, it will be the HTTP request ID. In the Compute Engine, if present, it will be the task ID.
**5**: logger name. Usually a class canonical name. Package names are truncated to keep the whole field to 20 characters max
**6**: log payload. Content of this field does not follow any specific format, can vary in length and include line returns. Some logs, however, will follow the convention to provide data in payload in the format "| key=value" Especially, log of profiled pieces of code will end with "| time=XXXXms".
**`SONAR_LOG_LEVEL=INFO`**\
Global level of logs (applies to all 4 processes). Supported values are INFO (default), DEBUG and TRACE
**`SONAR_LOG_LEVEL_APP=INFO`**\
\&#xNAN;**`SONAR_LOG_LEVEL_WEB=INFO`**\
\&#xNAN;**`SONAR_LOG_LEVEL_CE=INFO`**\
\&#xNAN;**`SONAR_LOG_LEVEL_ES=INFO`**\
Level of logs of each process can be controlled individually with their respective properties. When specified, they overwrite the level defined at global level. Supported values are INFO, DEBUG and TRACE
**`SONAR_PATH_LOGS=logs`**\
Path to log files. Can be absolute or relative to installation directory. Default is /logs
**`SONAR_LOG_ROLLINGPOLICY=time:yyyy-MM-dd`**\
Rolling policy of log files:
* Based on time if value starts with "time:", for example by day ("time:yyyy-MM-dd") or by month ("time:yyyy-MM")
* Based on size if value starts with "size:", for example "size:10MB"
* Disabled if value is "none". That needs logs to be managed by an external system like logrotate.
**`SONAR_LOG_MAXFILES=7`**\
Maximum number of files to keep if a rolling policy is enabled.
* maximum value is 20 on size rolling policy
* unlimited on time rolling policy. Set to zero to disable old file purging.
**`SONAR_WEB_ACCESSLOGS_ENABLE=true`** Access log is the list of all the HTTP requests received by server. If enabled, it is stored in the file {`SONAR_PATH_LOGS`}/access.log. This file follows the same rolling policy as other log file (see `SONAR_LOG_ROLLINGPOLICY` and `SONAR_LOG_MAXFILES`).
**`SONAR_WEB_ACCESSLOGS_PATTERN=%i{X-Forwarded-For} %l %u [%t] "%r" %s %b "%i{Referer}" "%i{User-Agent}" "%reqAttribute{ID}"`**\
Format of access log. It is ignored if `SONAR_WEB_ACCESSLOGS_ENABLE=false`.
Possible values are:
* `common`: The Common Log Format, shortcut to: `%h %l %u %user %date "%r" %s %b`
* `combined`: Another format widely recognized, shortcut to: `%h %l %u [%t] "%r" %s %b "%i{Referer}" "%i{User-Agent}"`
* Otherwise, a custom pattern: see .
The login of an authenticated user is not implemented with `"%u"` but with `"%reqAttribute{LOGIN}"` (since version 6.1).\
The value displayed for anonymous users is "`-`".
The token name used for requests will be added to the access log if the `"%reqAttribute{TOKEN_NAME}"` is added (since version 9.5).
The SonarQube Server’s HTTP request ID can be added to the pattern with `"%reqAttribute{ID}"` (since version 6.2).
If SonarQube Server is behind a reverse proxy, then the following value allows to display the correct remote IP address:
Default value (which was "combined" before version 6.2) is equivalent to "combined + SonarQube HTTP request ID":
`SONAR_WEB_ACCESSLOGS_PATTERN=%h %l %u [%t] "%r" %s %b "%i{Referer}" "%i{User-Agent}" "%reqAttribute{ID}"`
### DataCenter Edition
**`SONAR_CLUSTER_NAME=sonarqube`** The name of the cluster. Required if multiple clusters are present on the same network. For example, this prevents mixing Production and Preproduction clusters. This will be the name stored in the Hazelcast cluster and used as the name of the Elasticsearch cluster.
**`SONAR_CLUSTER_SEARCH_HOSTS`** Comma-delimited list of search hosts in the cluster. The list can contain either the host or the host and port, but not both. The item format is `ip/hostname` for host only or`ip/hostname:port` for host and port. `ip/hostname` can also be set to the service name of the search containers .
**`SONAR_CLUSTER_SEARCH_PASSWORD`** Password for Elasticsearch built-in user (elastic) which will be used on the client site. If provided, it enables authentication. This property needs to be set to the same value throughout the cluster.
#### Search nodes only
**`SONAR_CLUSTER_ES_HOSTS`** Comma-delimited list of search hosts in the cluster. The list can contain either the host or the host and port but not both. The item format is `ip/hostname` for host only or`ip/hostname:port` for host and port, while `ip/hostname` can also be set to the service name of the search containers.
**`SONAR_CLUSTER_NODE_NAME`** The name of the node that is used on Elasticsearch and stored in Hazelcast member attribute (NODE\_NAME)
**`SONAR_CLUSTER_ES_SSL_KEYSTORE`** File path to a keystore in PKCS#12 format. Can be the same PKCS#12 container as the `SONAR_CLUSTER_ES_SSL_TRUSTSTORE`. The user running SonarQube Server must have READ permission to that file. Required if password provided.
**`SONAR_CLUSTER_ES_SSL_KEYSTOREPASSWORD`** Password to the keystore.
**`SONAR_CLUSTER_ES_SSL_TRUSTSTORE`** File path to a truststore in PKCS#12 format. Can be the same PKCS#12 container as the `SONAR_CLUSTER_ES_SSL_KEYSTORE`. The user running SonarQube Server must have READ permission to that file. Required if password provided.
**`SONAR_CLUSTER_ES_SSL_TRUSTSTOREPASSWORD`** Password to the truststore.
#### Application nodes only
**`SONAR_CLUSTER_HOSTS`**
Comma-delimited list of all **application** hosts in the cluster. This value must contain **only application hosts**. Each item in the list must contain the port if the default `SONAR_CLUSTER_NODE_PORT` value is not used. Item format is `ip/hostname`, `ip/hostname:port`. `ip/hostname` can also be set to the service name of the application containers.
**`SONAR_CLUSTER_NODE_PORT`**
The Hazelcast port for communication with each application member of the cluster. Default: `9003`
### Others
**`SONAR_MULTI_QUALITY_MODE_ENABLED=true`**
Enables the MQR mode in your instance. See [changing-modes](https://docs.sonarsource.com/sonarqube-server/2025.1/user-guide/code-metrics/changing-modes "mention").
**`SONAR_NOTIFICATIONS_DELAY=60`**\
Delay in seconds between processing of notification queue. Default is 60 seconds.
**`SONAR_PATH_DATA=data`**\
\&#xNAN;**`SONAR_PATH_TEMP=temp`**\
Paths to persistent data files (embedded database and search index) and temporary files. Can be absolute or relative to installation directory. Defaults are respectively /data and /temp
**`SONAR_TELEMETRY_ENABLE=true`** Telemetry - Share anonymous SonarQube Server statistics. By sharing anonymous SonarQube Server statistics, you help us understand how SonarQube Server is used so we can improve the product to work even better for you. We don’t collect source code or IP addresses. And we don’t share the data with anyone else. For more information, see [telemetry](https://docs.sonarsource.com/sonarqube-server/2025.1/instance-administration/system-functions/telemetry "mention").
### Development - only for developers
{% hint style="warning" %}
The following properties must not be used in production environments.
{% endhint %}
**`SONAR_SEARCH_HTTPPORT=-1`** Elasticsearch HTTP connector
---
# Source: https://docs.sonarsource.com/sonarqube-community-build/instance-administration/analysis-functions/analysis-scope/exclude-from-coverage-duplication.md
# Source: https://docs.sonarsource.com/sonarqube-community-build/project-administration/adjusting-analysis/setting-analysis-scope/exclude-from-coverage-duplication.md
# Source: https://docs.sonarsource.com/sonarqube-server/2025.2/instance-administration/analysis-functions/analysis-scope/exclude-from-coverage-duplication.md
# Source: https://docs.sonarsource.com/sonarqube-server/2025.2/project-administration/setting-analysis-scope/exclude-from-coverage-duplication.md
# Source: https://docs.sonarsource.com/sonarqube-server/2025.3/instance-administration/analysis-functions/analysis-scope/exclude-from-coverage-duplication.md
# Source: https://docs.sonarsource.com/sonarqube-server/2025.3/project-administration/setting-analysis-scope/exclude-from-coverage-duplication.md
# Source: https://docs.sonarsource.com/sonarqube-server/2025.5/instance-administration/analysis-functions/analysis-scope/exclude-from-coverage-duplication.md
# Source: https://docs.sonarsource.com/sonarqube-server/2025.5/project-administration/setting-analysis-scope/exclude-from-coverage-duplication.md
# Source: https://docs.sonarsource.com/sonarqube-server/2025.4/instance-administration/analysis-functions/analysis-scope/exclude-from-coverage-duplication.md
# Source: https://docs.sonarsource.com/sonarqube-server/2025.4/project-administration/setting-analysis-scope/exclude-from-coverage-duplication.md
# Source: https://docs.sonarsource.com/sonarqube-server/2025.6/instance-administration/analysis-functions/analysis-scope/exclude-from-coverage-duplication.md
# Source: https://docs.sonarsource.com/sonarqube-server/2025.6/project-administration/adjusting-analysis/setting-analysis-scope/exclude-from-coverage-duplication.md
# Source: https://docs.sonarsource.com/sonarqube-server/instance-administration/analysis-functions/analysis-scope/exclude-from-coverage-duplication.md
# Source: https://docs.sonarsource.com/sonarqube-server/project-administration/adjusting-analysis/setting-analysis-scope/exclude-from-coverage-duplication.md
# Source: https://docs.sonarsource.com/sonarqube-cloud/administering-sonarcloud/managing-organization/setting-config-at-org-level/adjusting-analysis-scope/exclude-from-coverage-duplication.md
# Source: https://docs.sonarsource.com/sonarqube-cloud/managing-your-projects/project-analysis/setting-analysis-scope/exclude-from-coverage-duplication.md
# Excluding from coverage or duplication
You can exclude specific files from your project’s code coverage analysis or duplication check analysis (detection of identical lines of code).
{% hint style="info" %}
As the admin an Enterprise plan organization, you can perform this setting as the default setting for all projects of your organization. See [exclude-from-coverage-duplication](https://docs.sonarsource.com/sonarqube-cloud/administering-sonarcloud/managing-organization/setting-config-at-org-level/adjusting-analysis-scope/exclude-from-coverage-duplication "mention").
{% endhint %}
### Excluding specific files from the code coverage analysis
You can perform the setup in SonarQube UI (this requires that you have the project’s Administer permission) or on the CI/CD host. A parameter set on the CI/CD host has precedence over any UI setting of the same parameter.
In the UI
1. Retrieve your project. See [retrieving-projects](https://docs.sonarsource.com/sonarqube-cloud/managing-your-projects/retrieving-projects "mention") for more details.
2. Go to **Administration** > **General Settings** > **Analysis scope**.
3. In **Code coverage** > **Coverage Exclusions**, enter and save a path-matching pattern to define files to be excluded from the code coverage analysis. See [defining-matching-patterns](https://docs.sonarsource.com/sonarqube-cloud/appendices/defining-matching-patterns "mention") for details.
On the CI/CD host
The table below lists the sonar properties you can use to exclude specific files from the code coverage analysis. For more information, see [analysis-parameters](https://docs.sonarsource.com/sonarqube-cloud/advanced-setup/analysis-parameters "mention").
| **Property** | **Description** |
| ------------------------- | --------------------------------------------------------------------------------------------------------------------------------------------------------------------------------------------------------------------------------------------------------------------------------------------- |
| sonar.coverage.exclusions |
Defines the source files to be excluded from the code coverage analysis.
Possible values: comma-separated list of path-matching patterns. See defining-matching-patterns for details.
|
### Excluding specific files from the duplication check
You can perform the setup in SonarQube UI (this requires that you have the project’s Administer permission) or on the CI/CD host. A parameter set on the CI/CD host has precedence over any UI setting of the same parameter.
In the UI
1. Retrieve your project. See [retrieving-projects](https://docs.sonarsource.com/sonarqube-cloud/managing-your-projects/retrieving-projects "mention") for more details.
2. Go to **Administration** > **General Settings** > **Analysis scope**.
3. In **Duplication > Duplication Exclusions**, enter and save a path-matching pattern to define files to be excluded from the duplication check. See [defining-matching-patterns](https://docs.sonarsource.com/sonarqube-cloud/appendices/defining-matching-patterns "mention") for details.
On the CI/CD host
The table below lists the sonar properties you can use to exclude specific files from the duplication check. For more information, see [analysis-parameters](https://docs.sonarsource.com/sonarqube-cloud/advanced-setup/analysis-parameters "mention").
| | |
| -------------------- | --------------------------------------------------------------------------------------------------------------------------------------------------------------------------------------------------------------------------------------------------------------------------------------- |
| **Property** | **Description** |
| sonar.cpd.exclusions |
Defines the source files to be excluded from the duplication check.
Possible values: comma-separated list of path-matching patterns. Seedefining-matching-patterns for details.
|
### Related pages
* [setting-initial-scope](https://docs.sonarsource.com/sonarqube-cloud/managing-your-projects/project-analysis/setting-analysis-scope/setting-initial-scope "mention")
* [excluding-files-based-on-patterns](https://docs.sonarsource.com/sonarqube-cloud/managing-your-projects/project-analysis/setting-analysis-scope/excluding-files-based-on-patterns "mention")
* [excluding-based-on-file-extension](https://docs.sonarsource.com/sonarqube-cloud/managing-your-projects/project-analysis/setting-analysis-scope/excluding-based-on-file-extension "mention")
* [advanced-exclusions](https://docs.sonarsource.com/sonarqube-cloud/managing-your-projects/project-analysis/setting-analysis-scope/advanced-exclusions "mention")
* [other-adjustments](https://docs.sonarsource.com/sonarqube-cloud/managing-your-projects/project-analysis/setting-analysis-scope/other-adjustments "mention")
* [verifying-analysis-scope](https://docs.sonarsource.com/sonarqube-cloud/managing-your-projects/project-analysis/setting-analysis-scope/verifying-analysis-scope "mention")
* [introduction](https://docs.sonarsource.com/sonarqube-cloud/administering-sonarcloud/managing-organization/setting-config-at-org-level/adjusting-analysis-scope/introduction "mention") to Adjusting analysis scope
---
# Source: https://docs.sonarsource.com/sonarqube-community-build/project-administration/adjusting-analysis/setting-analysis-scope/excluding-based-on-file-extension.md
# Source: https://docs.sonarsource.com/sonarqube-server/2025.2/project-administration/setting-analysis-scope/excluding-based-on-file-extension.md
# Source: https://docs.sonarsource.com/sonarqube-server/2025.3/project-administration/setting-analysis-scope/excluding-based-on-file-extension.md
# Source: https://docs.sonarsource.com/sonarqube-server/2025.5/project-administration/setting-analysis-scope/excluding-based-on-file-extension.md
# Source: https://docs.sonarsource.com/sonarqube-server/2025.4/project-administration/setting-analysis-scope/excluding-based-on-file-extension.md
# Source: https://docs.sonarsource.com/sonarqube-server/2025.6/project-administration/adjusting-analysis/setting-analysis-scope/excluding-based-on-file-extension.md
# Source: https://docs.sonarsource.com/sonarqube-server/project-administration/adjusting-analysis/setting-analysis-scope/excluding-based-on-file-extension.md
# Source: https://docs.sonarsource.com/sonarqube-cloud/managing-your-projects/project-analysis/setting-analysis-scope/excluding-based-on-file-extension.md
# Excluding based on file extension
You can define for each programming language a set of extensions (file suffixes) to be analyzed. The other extensions will be ignored.
You can perform the setup in SonarQube UI (this requires that you have the project’s Administer permission) or on the CI/CD host. A parameter set on the CI/CD host has precedence over any UI setting of the same parameter.
### Defining file suffix parameters in the UI
1. Retrieve your project. See [retrieving-projects](https://docs.sonarsource.com/sonarqube-cloud/managing-your-projects/retrieving-projects "mention") for more details.
2. Go to **Administration** > **General Settings** > **Languages**.
3. In the drop-down list, select the language you want to configure.
4. In the **General** > **File suffixes** parameter, define the extensions to be analyzed (default values are provided).
### Defining file suffix parameters on the CI/CD host
The table below lists the properties you can use to define on the CI/CD host file suffixes to be analyzed for a given language. For more information, see [analysis-parameters](https://docs.sonarsource.com/sonarqube-cloud/advanced-setup/analysis-parameters "mention").
| **Property** | **Description** |
| ------------------------------- | ------------------------------------------------------------------------------------------------------------------------------------------------------------------------------------------------------------------------------------------------------------------------------------------------------------------------------------------------------------------------------------ |
| sonar.\.file.suffixes |
Defines for a given programming language a set of extensions (file suffixes) to be analyzed (The other extensions will be ignored.).
Possible values: Comma-separated list of file extensions.
Note: You can see the exact property key syntax on the UI: see Defining file suffix parameters in the UI above.
|
### Related pages
* [setting-initial-scope](https://docs.sonarsource.com/sonarqube-cloud/managing-your-projects/project-analysis/setting-analysis-scope/setting-initial-scope "mention")
* [exclude-from-coverage-duplication](https://docs.sonarsource.com/sonarqube-cloud/managing-your-projects/project-analysis/setting-analysis-scope/exclude-from-coverage-duplication "mention")
* [excluding-files-based-on-patterns](https://docs.sonarsource.com/sonarqube-cloud/managing-your-projects/project-analysis/setting-analysis-scope/excluding-files-based-on-patterns "mention")
* [excluding-based-on-file-extension](https://docs.sonarsource.com/sonarqube-cloud/managing-your-projects/project-analysis/setting-analysis-scope/excluding-based-on-file-extension "mention")
* [advanced-exclusions](https://docs.sonarsource.com/sonarqube-cloud/managing-your-projects/project-analysis/setting-analysis-scope/advanced-exclusions "mention")
* [other-adjustments](https://docs.sonarsource.com/sonarqube-cloud/managing-your-projects/project-analysis/setting-analysis-scope/other-adjustments "mention")
* [verifying-analysis-scope](https://docs.sonarsource.com/sonarqube-cloud/managing-your-projects/project-analysis/setting-analysis-scope/verifying-analysis-scope "mention")
* [introduction](https://docs.sonarsource.com/sonarqube-cloud/administering-sonarcloud/managing-organization/setting-config-at-org-level/adjusting-analysis-scope/introduction "mention") to Adjusting analysis scope
---
# Source: https://docs.sonarsource.com/sonarqube-community-build/instance-administration/analysis-functions/analysis-scope/excluding-files-based-on-file-paths.md
# Source: https://docs.sonarsource.com/sonarqube-server/2025.2/instance-administration/analysis-functions/analysis-scope/excluding-files-based-on-file-paths.md
# Source: https://docs.sonarsource.com/sonarqube-server/2025.3/instance-administration/analysis-functions/analysis-scope/excluding-files-based-on-file-paths.md
# Source: https://docs.sonarsource.com/sonarqube-server/2025.5/instance-administration/analysis-functions/analysis-scope/excluding-files-based-on-file-paths.md
# Source: https://docs.sonarsource.com/sonarqube-server/2025.4/instance-administration/analysis-functions/analysis-scope/excluding-files-based-on-file-paths.md
# Source: https://docs.sonarsource.com/sonarqube-server/2025.6/instance-administration/analysis-functions/analysis-scope/excluding-files-based-on-file-paths.md
# Source: https://docs.sonarsource.com/sonarqube-server/instance-administration/analysis-functions/analysis-scope/excluding-files-based-on-file-paths.md
# Source: https://docs.sonarsource.com/sonarqube-cloud/administering-sonarcloud/managing-organization/setting-config-at-org-level/adjusting-analysis-scope/excluding-files-based-on-file-paths.md
# Excluding files based on file paths
This feature is only available in the [Enterprise plan](https://www.sonarsource.com/plans-and-pricing/#sonarqube-cloud-features).
As an organization admin, you can exclude, at the organization level, files from the project’s analysis scope based on file paths. It means that this analysis scope adjustment applies to all projects in the organization. However, they can be overridden at the project level in the UI or through [analysis-parameters](https://docs.sonarsource.com/sonarqube-cloud/advanced-setup/analysis-parameters "mention") set on the CI/CD host. For more information about setting your scope at the project level, see the [introduction](https://docs.sonarsource.com/sonarqube-cloud/managing-your-projects/project-analysis/setting-analysis-scope/introduction "mention") page in the [setting-analysis-scope](https://docs.sonarsource.com/sonarqube-cloud/managing-your-projects/project-analysis/setting-analysis-scope "mention") section.
To exclude the files, you define file exclusion parameters based on directory and file name patterns.
### Example of an initial scope adjustment
We consider the following repository example where test files are contained in both `test/` directories. Source and test code files are contained in the same ancestor directory: `src/` which is chosen as the initial analysis scope for both source and test code. Therefore, a scope adjustment is necessary.
We adjust the initial scope as follows:
* For source files: by defining an exclusion parameter with the pattern `src/**/test/**/*`
* For test files: by defining an inclusion parameter with the pattern `src/**/test/**/*`
### Principles governing the use of file exclusion parameters
A file exclusion parameter:
* Applies either to source code (also called main code) or to test code files.\
The SonarScanner must identify the source code as well as the test code since they are processed differently by SonarQube. A code file is either a source or a test code; it cannot be both (If this is the case, the scanner will fail the analysis with an error message.).
* Contains:
* Either exclusion patterns: to define files to be excluded from the analysis scope.
* Or inclusion patterns: to define files to be included in the scope.\
It means that the rest of the files is excluded from the analysis scope.
For a given code category (source or test), we strongly recommend that you use either exclusion-pattern or inclusion-pattern parameters, depending on what is simpler in your situation (If you do not and there is an overlapping, then exclusion patterns have precedence over inclusion patterns.).
The following applies:
* The parameter defined at the project level will override the same parameter defined at the organization level.\
For example, if the organization administrator defines the exclusion pattern for source code `src/**/test1/**/*` at the organization level, then, if the project administrator sets the exclusion pattern for source code `src/**/test2/**/*` for their project, the scanner will consider only the pattern `src/**/test2/**/*` to compute source file exclusion.
* If *test file inclusion* patterns are used, the scanner will automatically set these patterns as *source file exclusion* patterns during project analysis. These source file exclusion patterns will apply in addition to the other configured source file exclusion patterns.\
For example:
* If the exclusion pattern for source code is `src/**/test5/**/*` and the inclusion pattern for test code is `src/**/test6/**/*`
* Then the scanner will consider both patterns to compute the *source file exclusion*:\
`src/**/test5/**/*` and `src/**/test6/**/*`.
{% hint style="info" %}
A file path definition is either relative to the `sonar.projectBaseDir` property (which is by default the directory from which the analysis was started, for more information see [analysis-parameters](https://docs.sonarsource.com/sonarqube-cloud/advanced-setup/analysis-parameters "mention")) or absolute.
{% endhint %}
### Defining a file exclusion parameter
1. Retrieve your organization. See [viewing-organizations](https://docs.sonarsource.com/sonarqube-cloud/getting-started/viewing-organizations "mention") for more details.
2. Go to **Administration** > **Analysis scope**.
3. In **Files**, choose the parameter to configure (source or test code; exclusion or inclusion patterns), and enter and save the first pattern. See [defining-matching-patterns](https://docs.sonarsource.com/sonarqube-cloud/appendices/defining-matching-patterns "mention") for more details.
4. Add additional patterns to the parameter if necessary.
5. Define other parameters if necessary. Make sure you use either **Source File Exclusions** or **Source File Inclusions**, and either **Test File Exclusions** or **Test File Inclusions**.
---
# Source: https://docs.sonarsource.com/sonarqube-community-build/project-administration/adjusting-analysis/setting-analysis-scope/excluding-files-based-on-patterns.md
# Source: https://docs.sonarsource.com/sonarqube-server/2025.2/project-administration/setting-analysis-scope/excluding-files-based-on-patterns.md
# Source: https://docs.sonarsource.com/sonarqube-server/2025.3/project-administration/setting-analysis-scope/excluding-files-based-on-patterns.md
# Source: https://docs.sonarsource.com/sonarqube-server/2025.5/project-administration/setting-analysis-scope/excluding-files-based-on-patterns.md
# Source: https://docs.sonarsource.com/sonarqube-server/2025.4/project-administration/setting-analysis-scope/excluding-files-based-on-patterns.md
# Source: https://docs.sonarsource.com/sonarqube-server/2025.6/project-administration/adjusting-analysis/setting-analysis-scope/excluding-files-based-on-patterns.md
# Source: https://docs.sonarsource.com/sonarqube-server/project-administration/adjusting-analysis/setting-analysis-scope/excluding-files-based-on-patterns.md
# Source: https://docs.sonarsource.com/sonarqube-cloud/managing-your-projects/project-analysis/setting-analysis-scope/excluding-files-based-on-patterns.md
# Excluding based on path-matching patterns
You can adjust your project’s initial analysis scope by excluding files based on path-matching patterns. To exclude the files, you define file exclusion parameters based on directory and file name patterns.
{% hint style="info" %}
As the admin an Enterprise plan organization, you can perform these settings as the default settings for all projects of your organization. See [excluding-files-based-on-file-paths](https://docs.sonarsource.com/sonarqube-cloud/administering-sonarcloud/managing-organization/setting-config-at-org-level/adjusting-analysis-scope/excluding-files-based-on-file-paths "mention").
{% endhint %}
You can perform the setup in SonarQube UI (this requires that you have the project’s Administer permission) or on the CI/CD host. A parameter set on the CI/CD host has precedence over any UI setting of the same parameter.
### Example of an initial scope adjustment
We consider the following repository example where test files are contained in both `test/` directories. Source and test code files are contained in the same ancestor directory: `src/` which is chosen as the initial analysis scope for both source and test code. Therefore, a scope adjustment is necessary.
We adjust the initial scope as follows:
* For source files: by defining an exclusion parameter with the pattern `src/**/test/**/*`
* For test files: by defining an inclusion parameter with the pattern `src/**/test/**/*`
### Principles governing the use of file exclusion parameters
A file exclusion parameter:
* Applies either to source code (also called main code) or to test code files.\
The SonarScanner must identify the source code as well as the test code since they are processed differently by SonarQube. A code file is either a source or a test code; it cannot be both (If this is the case, the scanner will fail the analysis with an error message.).
* Contains:
* Either exclusion patterns: to define files to be excluded from the analysis scope.
* Or inclusion patterns: to define files to be included in the scope.\
It means that the rest of the files is excluded from the analysis scope.
For a given code category (source or test), we strongly recommend that you use either exclusion-pattern or inclusion-pattern parameters, depending on what is simpler in your situation (If you do not and there is an overlapping, then exclusion patterns have precedence over inclusion patterns.).
The following applies:
* The parameter defined at the project level will override the same parameter defined at the organization level.\
For example, if the organization administrator defines the exclusion pattern for source code `src/**/test1/**/*` at the organization level, then, if the project administrator sets the exclusion pattern for source code `src/**/test2/**/*` for their project, the scanner will consider only the pattern `src/**/test2/**/*` to compute source file exclusion.
* If *test file inclusion* patterns are used, the scanner will automatically set these patterns as *source file exclusion* patterns during project analysis. These source file exclusion patterns will apply in addition to the other configured source file exclusion patterns.\
For example:
* If the exclusion pattern for source code is `src/**/test5/**/*` and the inclusion pattern for test code is `src/**/test6/**/*`
* Then the scanner will consider both patterns to compute the *source file exclusion*:\
`src/**/test5/**/*` and `src/**/test6/**/*`.
{% hint style="info" %}
A file path definition is either relative to the `sonar.projectBaseDir` property, which is by default the directory from which the analysis was started, or absolute. For more information see [analysis-parameters](https://docs.sonarsource.com/sonarqube-cloud/advanced-setup/analysis-parameters "mention").
{% endhint %}
### Defining a file exclusion parameter in the UI
1. Retrieve the project you wish to configure. See [retrieving-projects](https://docs.sonarsource.com/sonarqube-cloud/managing-your-projects/retrieving-projects "mention") for more information.
2. Go to **Administration** > **General Settings** > **Analysis Scope**.
3. In **Files**, choose the parameter to configure (source or test code, exclusion or inclusion patterns), and enter and save the first pattern. See [defining-matching-patterns](https://docs.sonarsource.com/sonarqube-cloud/appendices/defining-matching-patterns "mention") for more information.
4. Add additional patterns to the parameter if necessary.
5. Define other parameters if necessary. Make sure you use either **Source File Exclusions** or **Source File Inclusions**, and either **Test File Exclusions** or **Test File Inclusions**.
{% hint style="info" %}
If a parameter is defined at the organization level, it will appear at the project level as "(default)". You can edit it for your project. Click **Reset** to reset the value to its default value.
{% endhint %}
### Defining a file exclusion parameter on the CI/CD host
The table below lists the properties you can use to define a file exclusion parameter by setting sonar properties on CI/CD host. For more information, see [analysis-parameters](https://docs.sonarsource.com/sonarqube-cloud/advanced-setup/analysis-parameters "mention").
| **Property** | **Description** |
| --------------------- | --------------------------------------------------------------------------------------------------------------------------------------------------------------------------------------------------------------------------------------------------------------------------------------------------------------------------------------------------------------------------------------------------------------------------------------------------------- |
| sonar.exclusions |
Defines the source files (non-test files) to be excluded from the analysis.
Note: In this property key, the test string is in singular, unlike the sonar.tests property defining the analysis initial scope.
|
### Related pages
* [setting-initial-scope](https://docs.sonarsource.com/sonarqube-cloud/managing-your-projects/project-analysis/setting-analysis-scope/setting-initial-scope "mention")
* [exclude-from-coverage-duplication](https://docs.sonarsource.com/sonarqube-cloud/managing-your-projects/project-analysis/setting-analysis-scope/exclude-from-coverage-duplication "mention")
* [excluding-files-based-on-patterns](https://docs.sonarsource.com/sonarqube-cloud/managing-your-projects/project-analysis/setting-analysis-scope/excluding-files-based-on-patterns "mention")
* [excluding-based-on-file-extension](https://docs.sonarsource.com/sonarqube-cloud/managing-your-projects/project-analysis/setting-analysis-scope/excluding-based-on-file-extension "mention")
* [advanced-exclusions](https://docs.sonarsource.com/sonarqube-cloud/managing-your-projects/project-analysis/setting-analysis-scope/advanced-exclusions "mention")
* [other-adjustments](https://docs.sonarsource.com/sonarqube-cloud/managing-your-projects/project-analysis/setting-analysis-scope/other-adjustments "mention")
* [verifying-analysis-scope](https://docs.sonarsource.com/sonarqube-cloud/managing-your-projects/project-analysis/setting-analysis-scope/verifying-analysis-scope "mention")
* [introduction](https://docs.sonarsource.com/sonarqube-cloud/administering-sonarcloud/managing-organization/setting-config-at-org-level/adjusting-analysis-scope/introduction "mention") to Adjusting analysis scope
---
# Source: https://docs.sonarsource.com/sonarqube-community-build/extension-guide/developing-a-plugin/executable-lines.md
# Source: https://docs.sonarsource.com/sonarqube-server/8.9/extension-guide/developing-a-plugin/executable-lines.md
# Source: https://docs.sonarsource.com/sonarqube-server/9.8/extension-guide/developing-a-plugin/executable-lines.md
# Source: https://docs.sonarsource.com/sonarqube-server/9.9/extension-guide/developing-a-plugin/executable-lines.md
# Source: https://docs.sonarsource.com/sonarqube-server/10.0/extension-guide/developing-a-plugin/executable-lines.md
# Source: https://docs.sonarsource.com/sonarqube-server/10.1/extension-guide/developing-a-plugin/executable-lines.md
# Source: https://docs.sonarsource.com/sonarqube-server/10.2/extension-guide/developing-a-plugin/executable-lines.md
# Source: https://docs.sonarsource.com/sonarqube-server/10.3/extension-guide/developing-a-plugin/executable-lines.md
# Source: https://docs.sonarsource.com/sonarqube-server/10.4/extension-guide/developing-a-plugin/executable-lines.md
# Source: https://docs.sonarsource.com/sonarqube-server/10.5/extension-guide/developing-a-plugin/executable-lines.md
# Source: https://docs.sonarsource.com/sonarqube-server/10.6/extension-guide/developing-a-plugin/executable-lines.md
# Source: https://docs.sonarsource.com/sonarqube-server/10.7/extension-guide/developing-a-plugin/executable-lines.md
# Source: https://docs.sonarsource.com/sonarqube-server/10.8/extension-guide/developing-a-plugin/executable-lines.md
# Source: https://docs.sonarsource.com/sonarqube-server/2025.2/extension-guide/developing-a-plugin/executable-lines.md
# Source: https://docs.sonarsource.com/sonarqube-server/2025.3/extension-guide/developing-a-plugin/executable-lines.md
# Source: https://docs.sonarsource.com/sonarqube-server/2025.5/extension-guide/developing-a-plugin/executable-lines.md
# Source: https://docs.sonarsource.com/sonarqube-server/2025.1/extension-guide/developing-a-plugin/executable-lines.md
# Source: https://docs.sonarsource.com/sonarqube-server/2025.4/extension-guide/developing-a-plugin/executable-lines.md
# Source: https://docs.sonarsource.com/sonarqube-server/2025.6/extension-guide/developing-a-plugin/executable-lines.md
# Source: https://docs.sonarsource.com/sonarqube-server/extension-guide/developing-a-plugin/executable-lines.md
# Executable lines
These are the guidelines that Sonar uses internally when defining executable lines for a language. Community plugins are not required to adhere to these guidelines. They are provided here only in case they are useful.
### Things that are executable
Executable lines data is used to calculate missing test coverage for files that are not included in coverage reports. Ideally, executable line counts will be at or just under what coverage engines would calculate.
Generally, each line containing a statement should count as an executable line, with the exception that compound statements ({}) are ignored, although their contents are not. So, for example:
```css-79elbk
void doTheThing () // +0
{ // +0
String fname="Finn"; // +1
etc(); // +1
} // +0
```
### Things that are ignored
#### !Statement: +0
Since some coverage engines mark these things as executable, it’s worth stating explicitly that we will ignore them:
* lines containing only punctuation.
* the method signature of a method definition.
#### Imports, Declarations: +0
Imports, package and namespace statements, declarations, and a few other things demonstrated below are ignored.
```css-79elbk
package foo; // +0
namespace bar { // +0
...
}
import java.util.ArrayList; // +0
#include // +0
public interface FooFace { // +0
void doFoo(); // +0
}
public class Foo1 implements FooFace { // +0
private String name; // +0
}
struct PairWithOperator { // +0
int x; // +0
int y; // +0
bool operator==(PairWithOperator rhs) const { // +0
return x == rhs.x && y == rhs.y; // +1
}
}
class C {
C(const C&) =default; // +0 (explicit inheritance of parent method)
}
using Vec = std::vector>; // +0
static { // +0
...
}
01 ERROR-MESSAGE. *> +0
02 ERROR-TEXT PIC X(132) OCCURS 10 TIMES *> +0
INDEXED BY ERROR-INDEX.
77 ERROR-TEXT-LEN PIC S9(9) COMP VALUE +132. *> +0
```
#### Location
The presence of executable code on a line makes the entire line executable. If a statement is split over multiple lines, the line to be marked executable is the first one with executable code. Given that, a `for` loop is considered executable:
```css-79elbk
for // +1
( // +0
int i=0; // +0
i < 10; // +0
i++ // +0
) // +0
{ // +0
}
```
Regardless of the number of lines across which nested statements are spread, the executable line count should only be incremented by one, since typically the execution of one naturally follows from the other.
```css-79elbk
foo(1, bar()); // +1
foo(1, // +1
bar()); // +0
```
We ignore here the possibility that `bar()` could throw an exception, preventing `foo` from being executed.
### Exceptions
#### Python
`# pragma: no cover` exempts a block from coverage. For example:
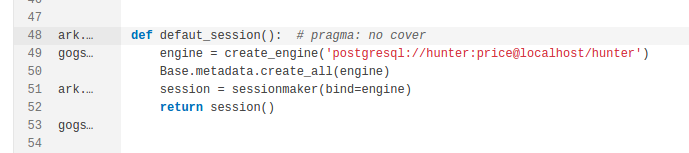
Exempt a block of Python code from coverage
#### JavaScript
We mark variable declarations as executable. For example:
```css-79elbk
var a; // +1
```
---
# Source: https://docs.sonarsource.com/sonarqube-community-build/extension-guide.md
# Source: https://docs.sonarsource.com/sonarqube-server/8.9/extension-guide.md
# Source: https://docs.sonarsource.com/sonarqube-server/9.8/extension-guide.md
# Source: https://docs.sonarsource.com/sonarqube-server/9.9/extension-guide.md
# Source: https://docs.sonarsource.com/sonarqube-server/10.0/extension-guide.md
# Source: https://docs.sonarsource.com/sonarqube-server/10.1/extension-guide.md
# Source: https://docs.sonarsource.com/sonarqube-server/10.2/extension-guide.md
# Source: https://docs.sonarsource.com/sonarqube-server/10.3/extension-guide.md
# Source: https://docs.sonarsource.com/sonarqube-server/10.4/extension-guide.md
# Source: https://docs.sonarsource.com/sonarqube-server/10.5/extension-guide.md
# Source: https://docs.sonarsource.com/sonarqube-server/10.6/extension-guide.md
# Source: https://docs.sonarsource.com/sonarqube-server/10.7/extension-guide.md
# Source: https://docs.sonarsource.com/sonarqube-server/10.8/extension-guide.md
# Source: https://docs.sonarsource.com/sonarqube-server/2025.2/extension-guide.md
# Source: https://docs.sonarsource.com/sonarqube-server/2025.3/extension-guide.md
# Source: https://docs.sonarsource.com/sonarqube-server/2025.5/extension-guide.md
# Source: https://docs.sonarsource.com/sonarqube-server/2025.1/extension-guide.md
# Source: https://docs.sonarsource.com/sonarqube-server/2025.4/extension-guide.md
# Source: https://docs.sonarsource.com/sonarqube-server/2025.6/extension-guide.md
# Source: https://docs.sonarsource.com/sonarqube-server/extension-guide.md
# Extension guide
- [Web API](/sonarqube-server/extension-guide/web-api.md): SonarQube provides the Web API to access its functionalities from applications.
- [Adding coding rules](/sonarqube-server/extension-guide/adding-coding-rules.md): Adding custom coding rules to your SonarQube Server instance.
- [Developing a plugin](/sonarqube-server/extension-guide/developing-a-plugin.md): Developing a plugin for SonarQube Server.
- [Plugin basics](/sonarqube-server/extension-guide/developing-a-plugin/plugin-basics.md): The sonar-plugin-api is a Java API used to develop plugins for SonarQube.
- [Supporting new languages](/sonarqube-server/extension-guide/developing-a-plugin/supporting-new-languages.md): Supporting a new language in SonarQube involves six steps.
- [Executable lines](/sonarqube-server/extension-guide/developing-a-plugin/executable-lines.md): Internal guidelines to define executable lines for a language.
- [Adding pages to the webapp](/sonarqube-server/extension-guide/developing-a-plugin/adding-pages-to-the-webapp.md): Creating page extensions to run in your SonarQube environment.
- [Supporting SCM providers](/sonarqube-server/extension-guide/developing-a-plugin/supporting-scm-providers.md): Information from the Source Code Management (SCM) provider is used by a SonarScanner.
- [Internationalization](/sonarqube-server/extension-guide/internationalization.md): Guidelines to apply the i18n mechanism and how to help the Community.
---
# Source: https://docs.sonarsource.com/sonarqube-community-build/analyzing-source-code/importing-external-issues/external-analyzer-reports.md
# Source: https://docs.sonarsource.com/sonarqube-server/10.3/analyzing-source-code/importing-external-issues/external-analyzer-reports.md
# Source: https://docs.sonarsource.com/sonarqube-server/10.4/analyzing-source-code/importing-external-issues/external-analyzer-reports.md
# Source: https://docs.sonarsource.com/sonarqube-server/10.5/analyzing-source-code/importing-external-issues/external-analyzer-reports.md
# Source: https://docs.sonarsource.com/sonarqube-server/10.6/analyzing-source-code/importing-external-issues/external-analyzer-reports.md
# Source: https://docs.sonarsource.com/sonarqube-server/10.7/analyzing-source-code/importing-external-issues/external-analyzer-reports.md
# Source: https://docs.sonarsource.com/sonarqube-server/10.8/analyzing-source-code/importing-external-issues/external-analyzer-reports.md
# Source: https://docs.sonarsource.com/sonarqube-server/2025.2/analyzing-source-code/importing-external-issues/external-analyzer-reports.md
# Source: https://docs.sonarsource.com/sonarqube-server/2025.3/analyzing-source-code/importing-external-issues/external-analyzer-reports.md
# Source: https://docs.sonarsource.com/sonarqube-server/2025.5/analyzing-source-code/importing-external-issues/external-analyzer-reports.md
# Source: https://docs.sonarsource.com/sonarqube-server/2025.1/analyzing-source-code/importing-external-issues/external-analyzer-reports.md
# Source: https://docs.sonarsource.com/sonarqube-server/2025.4/analyzing-source-code/importing-external-issues/external-analyzer-reports.md
# Source: https://docs.sonarsource.com/sonarqube-server/2025.6/analyzing-source-code/importing-external-issues/external-analyzer-reports.md
# Source: https://docs.sonarsource.com/sonarqube-server/analyzing-source-code/importing-external-issues/external-analyzer-reports.md
# Source: https://docs.sonarsource.com/sonarqube-cloud/enriching/external-analyzer-reports.md
# External analyzer reports
Many languages have dedicated analyzers (also known as linters) that are commonly used to spot problems in code. SonarQube can integrate the results from many of these external analyzers. This lets you see this information alongside the other SonarQube metrics and allows the external results to be taken into account when calculating quality gate status.
The sections below explain, for each language, how to set up, for your project, the import of issue reports generated by external analyzers that integrate with SonarQube. To do so, you must define in SonarQube the paths to the import files. This can be done in the UI (except for the C family and Go analyzers) or by defining an analysis parameter on the CI/CD host.
See also [analysis-parameters](https://docs.sonarsource.com/sonarqube-cloud/advanced-setup/analysis-parameters "mention").
{% hint style="info" %}
If your analyzer doesn't integrate with SonarQube Cloud, you can import the external issues either in the generic SonarQube format or in the SARIF format. See [generic-issue-data](https://docs.sonarsource.com/sonarqube-cloud/enriching/generic-issue-data "mention") or [importing-issues-from-sarif-reports](https://docs.sonarsource.com/sonarqube-cloud/enriching/importing-issues-from-sarif-reports "mention").
{% endhint %}
### Limitations
External analyzer report integration is only available for CI-based analysis. It is not available for automatic analysis.
The external issues will be taken into account by SonarQube in the analysis report and users will be able to resolve an external issue the same way as an internal issue.
But external issues have an important limitation. The activation of the rules that raise these issues cannot be managed within SonarQube. External rules are not visible on the Rules page or reflected in any quality profile.
{% hint style="info" %}
Managing an external issue within SonarQube has no impact on its state in the external tool. For example, when you mark an issue as false positive in SonarQube, it is not reflected in the external tool.
{% endhint %}
### List of supported analyzers
The table below lists the third-party analyzers that integrate with SonarQube Cloud.
Language
External analyzers
Ansible
ansible-lint
Apex
PMD
Cloudformation
AWS CloudFormation Linter
C/C++/Objective-C
Valgrind Memcheck, Valgrind Helgrind
C#/VB.NET
Roslyn (inc. Roslyn analyzers provided by Microsoft)
CSS
StyleLint.io
Docker
Hadolint
Go
GoVet, GoLint, GoMetaLinter, golanci-lint, gosec
Java
SpotBugs, FindSecBugs, FindBugs, PMD, Checkstyle
JavaScript/TypeScript
ESLint
Kotlin
AndroidLint, Detekt, Ktlint
PHP
Psalm, PHPStan
Python
Pylint, Bandit, Flake8, Mypy, Ruff
Ruby
Rubocop
Scala
Scalastyle, Scapegoat
Swift
SwiftLint
Terraform
TFLint
### Ansible
You can integrate the following Ansible analyzer with SonarQube: ansible-lint.
To setup the import of issues generated by ansible-lint:
1. Set up the generation of the reports by ansible-lint in SARIF format and their storing in dedicated import directory(ies). To do so, use the `--sarif-file` ansible-lint option.
2. Set up the import of the generated report files by SonarQube Cloud:
1. Retrieve your SonarQube Cloud project. For more details, see [retrieving-projects](https://docs.sonarsource.com/sonarqube-cloud/managing-your-projects/retrieving-projects "mention").
2. Go to **Administration > General Settings > External Analyzers > Ansible**.
3. In **Android Lint Report Files**, enter the list of import directories or files. This parameter accepts a comma-delimited list of paths. A path definition is either relative to the `sonar.projectBaseDir` analysis parameter (which is by default the directory from which the analysis was started) or absolute. You can use path-matching patterns (see [#for-files](https://docs.sonarsource.com/sonarqube-cloud/appendices/defining-matching-patterns#for-files "mention")).
4. Save.
Alternatively, define on the CI/CD host the analysis parameter `sonar.ansible.ansible-lint.reportPaths` .
### Apex
You can integrate the following Apex analyzer with SonarQube: PMD. Note that the format of PMD reports generated by [sfdx-scanner](https://github.com/forcedotcom/sfdx-scanner) does not seem to perfectly match the format used by PMD.
To setup the import of issues generated by PMD:
1. Set up the generation of the reports by PMD and their storing in dedicated import directory(ies).
2. Set up the import of the generated report files by SonarQube Cloud:
1. Retrieve your SonarQube Cloud project. For more details, see [retrieving-projects](https://docs.sonarsource.com/sonarqube-cloud/managing-your-projects/retrieving-projects "mention").
2. Go to **Administration > General Settings > External Analyzers > Apex**.
3. In **PMD Report Files**, enter the list of import directories or files. This parameter accepts a comma-delimited list of paths. A path definition is either relative to the `sonar.projectBaseDir` analysis parameter (which is by default the directory from which the analysis was started) or absolute.
4. Save.
Alternatively, define on the CI/CD host the analysis parameter `sonar.apex.pmd.reportPaths` .
### CloudFormation
You can integrate the following Cloudformation analyzer with SonarQube: AWS CloudFormation Linter.
To setup the import of issues generated by AWS CloudFormation Linter:
1. Set up the generation of the reports by AWS CloudFormation Linter in JSON format and their storing in a dedicated import directory(ies).
2. Set up the import of the generated report files by SonarQube Cloud:
1. Retrieve your SonarQube Cloud project. For more details, see [retrieving-projects](https://docs.sonarsource.com/sonarqube-cloud/managing-your-projects/retrieving-projects "mention").
2. Go to **Administration > General Settings > External Analyzers > CloudFormation**.
3. In **Cfn-Lint Report Files**, enter the list of import directories or files. This parameter accepts a comma-delimited list of paths. A path definition is either relative to the `sonar.projectBaseDir` analysis parameter (which is by default the directory from which the analysis was started) or absolute.
4. Save.
Alternatively, define on the CI/CD host the analysis parameter `sonar.cloudformation.cfn-lint.reportPaths` .
### C/C++/Objective-C
You can integrate the following C/C++/Objective-C analyzers with SonarQube: Valgrind Memcheck and Valgrind Helgrind.
To setup the import of issues generated by Valgrind Memcheck or Helgrind:
1. Set up the generation of the reports by Valgrind Memcheck or Helgrind in XML format and their storing in dedicated import directory(ies). To do so, use the Valgrind's XML output facility (`--xml=yes`).
2. Set up the import of the generated report files by SonarQube by defining on the CI/CD host the analysis parameter `sonar.cfamily.valgrind.reportsPaths` with the list of import directories or files. This parameter accepts a comma-delimited list of paths. A path definition is either relative to the `sonar.projectBaseDir` analysis parameter (which is by default the directory from which the analysis was started) or absolute.
### C\#
Issues from third-party Roslyn analyzers (including Roslyn analyzers provided by Microsoft) are included in the MSBuild output and imported by default into SonarQube so no properties exist to enable that behavior. Instead, properties are available to adjust the import and to *stop* importing those issues.
To disable the import
1. Retrieve your SonarQube Cloud project. For more details, see [retrieving-projects](https://docs.sonarsource.com/sonarqube-cloud/managing-your-projects/retrieving-projects "mention").
2. Go to Go to **Administration > General Settings > External Analyzers > C#**.
3. Select the **Ignore issues from external Roslyn analyzers** option.
4. Save.
Alternatively, set the `sonar.cs.roslyn.ignoreIssues` analysis parameter to `true` on the CI/CD host.
To adjust the import
1. Retrieve your SonarQube Cloud project. For more details, see [retrieving-projects](https://docs.sonarsource.com/sonarqube-cloud/managing-your-projects/retrieving-projects "mention").
2. Go to Go to **Administration > General Settings > External Analyzers > C#**.
3. Adjust the parameters listed in the table below.
4. Save.
Alternatively, set the corresponding sonar properties on the CI/CD host.
| Parameter | Sonar property | Description |
| --------------------------------------------------- | ----------------------------------------- | ---------------------------------------------------------------------------------------- |
| **Rule categories associated with Bugs** | `sonar.cs.roslyn.bugCategories` | Comma-delimited list of categories whose issues should be classified as Bugs. |
| **Rule categories associated with Vulnerabilities** | `sonar.cs.roslyn.vulnerabilityCategories` | Comma-delimited list of categories whose issues should be classified as Vulnerabilities. |
| **Rule categories associated with Code Smells** | `sonar.cs.roslyn.codeSmellCategories` | Comma-delimited list of categories whose issues should be classified as Code Smells. |
### CSS
You can integrate the following CSS analyzer with SonarQube: Stylelint.
To setup the import of issues generated by Stylelint:
1. Set up the generation of the reports by Stylelint and their storing in dedicated import directory(ies).\
Command example:
```
stylelint src/*.css --config stylelintconfig.json -f json > stylelint-report.json
```
2. Set up the import of the generated report files by SonarQube Cloud:
1. Retrieve your SonarQube Cloud project. For more details, see [retrieving-projects](https://docs.sonarsource.com/sonarqube-cloud/managing-your-projects/retrieving-projects "mention").
2. Go to **Administration > General Settings > External Analyzers > CSS**.
3. In **Stylelint Report Files**, enter the list of import directories or files. This parameter accepts a comma-delimited list of paths. A path definition is either relative to the `sonar.projectBaseDir` analysis parameter (which is by default the directory from which the analysis was started) or absolute.
4. Save.
Alternatively, define on the CI/CD host the analysis parameter `sonar.css.stylelint.reportPaths`.
### Docker
You can integrate the following Docker analyzers with SonarQube: Hadolint.
To setup the import of issues generated by Hadolint:
1. Set up the generation of the reports by Hadolint in JSON or SonarQube format, and their storing in dedicated import directory(ies).
2. Set up the import of the generated report files by SonarQube Cloud:
1. Retrieve your SonarQube Cloud project. For more details, see [retrieving-projects](https://docs.sonarsource.com/sonarqube-cloud/managing-your-projects/retrieving-projects "mention").
2. Go to **Administration > General Settings > External Analyzers > Docker**.
3. In **Hadolint Report Files**, enter the list of import directories or files. This parameter accepts a comma-delimited list of paths. A path definition is either relative to the `sonar.projectBaseDir` analysis parameter (which is by default the directory from which the analysis was started) or absolute.
4. Save.
Alternatively, define on the CI/CD host the analysis parameter `sonar.docker.hadolint.reportPaths` .
### Go
You can integrate the following Go analyzers with SonarQube: Govet, GoLint, GoMetaLinter, golanci-lint, and gosec.
{% tabs %}
{% tab title="Govet" %}
To setup the import of issues generated by Govet:
1. Set up the generation of the reports by Govet and their storing in dedicated import directory(ies).\
Command example:
```
go vet 2> govet-report.out
```
2. Set up the import of the generated report files by SonarQube by defining on the CI/CD host the analysis parameter `sonar.go.govet.reportPaths` with the list of import directories or files. This parameter accepts a comma-delimited list of paths. A path definition is either relative to the `sonar.projectBaseDir` analysis parameter (which is by default the directory from which the analysis was started) or absolute.
{% endtab %}
{% tab title="GoLint" %}
To setup the import of issues generated by GoLint:
1. Set up the generation of the reports by Govet and their storing in dedicated import directory(ies).\
Command example:
```
golint > golint-report.out
```
2. Set up the import of the generated report files by SonarQube by defining on the CI/CD host the analysis parameter `sonar.go.golint.reportPaths` with the list of import directories or files. This parameter accepts a comma-delimited list of paths. A path definition is either relative to the `sonar.projectBaseDir` analysis parameter (which is by default the directory from which the analysis was started) or absolute.
{% endtab %}
{% tab title="GoMetaLinter" %}
To setup the import of issues generated by GoMetaLinter:
1. Set up the generation of the reports by GoMetaLinterand their storing in dedicated import directory(ies).\
Command example:
```
gometalinter > gometalinter-report.out
```
2. Set up the import of the generated report files by SonarQube by defining on the CI/CD host the analysis parameter `sonar.go.gometalinter.reportPaths` with the list of import directories or files. This parameter accepts a comma-delimited list of paths. A path definition is either relative to the `sonar.projectBaseDir` analysis parameter (which is by default the directory from which the analysis was started) or absolute.
{% endtab %}
{% tab title="golanci-lint" %}
To setup the import of issues generated by golangci-lint:
1. Set up the generation of the reports by golangci-lint in checkstyle format and their storing in dedicated import directory(ies).\
For the report generation, use the `--out-format checkstyle golangci-lint` option.
2. Set up the import of the generated report files by SonarQube by defining on the CI/CD host the analysis parameter `sonar.go.golangci-lint.reportPaths` with the list of import directories or files. This parameter accepts a comma-delimited list of paths. A path definition is either relative to the `sonar.projectBaseDir` analysis parameter (which is by default the directory from which the analysis was started) or absolute.
{% endtab %}
{% tab title="gosec" %}
To setup the import of issues generated by gosec:
1. Set up the generation of the reports by gosec in SonarQube format and their storing in dedicated import directory(ies).
For the report generation, use the `-fmt=sonarqube gosec` option.
2. Set up the import of the generated report files by SonarQube by defining on the CI/CD host the analysis parameter `sonar.externalIssuesReportPaths` with the list of import directories or files. This parameter accepts a comma-delimited list of paths. A path definition is either relative to the `sonar.projectBaseDir` analysis parameter (which is by default the directory from which the analysis was started) or absolute.
{% endtab %}
{% endtabs %}
### Java
You can integrate the following Java analyzers with SonarQube: SpotBugs, FindSecBugs, FindBugs, PMD, and Checkstyle. The setup differs depending on whether you use Maven or not.
{% tabs %}
{% tab title="With Maven" %}
To setup the import of issues generated by SpotBugs, FindSecBugs, FindBugs, PMD, and Checkstyle if you use Maven:
1. Open your `pom.xml` and in the section add the following plugins:
```
org.apache.maven.pluginsmaven-pmd-plugin 3.10 . 0 com.github.spotbugsspotbugs-maven-plugin 3.1 . 1 MaxLow true ${session.executionRootDirectory}/spotbugs-include.xmlcom.h3xstream.findsecbugsfindsecbugs-pluginLATEST
```
2. Add or update the section with:
```
./target/spotbugsXml.xml./target/pmd.xml`
./target/checkstyle-result.xml
```
3. Execute the command below:
```
mvn clean package spotbugs:spotbugs pmd:pmd checkstyle:checkstyle sonar:sonar
```
{% endtab %}
{% tab title="Without Maven" %}
To setup the import of issues generated by SpotBugs, FindSecBugs, FindBugs, PMD, and Checkstyle if you don't use Maven:
1. Set up the generation of the reports by your third-party tool, and their storing in dedicated import directory(ies).
2. Set up the import of the generated report files by SonarQube Cloud:
1. Retrieve your SonarQube Cloud project. For more details, see [retrieving-projects](https://docs.sonarsource.com/sonarqube-cloud/managing-your-projects/retrieving-projects "mention").
2. Go to **Administration > General Settings > External Analyzers > Java**.
3. In **Checkstyle Report Files** (for Checkstyle reports), **PMD Report Files** (for PMD reports), or in **SpotBugs Report Files** (For SpotBugs, FindSecBugs and FindBugs reports), enter the list of import directories or files. This parameter accepts a comma-delimited list of paths. A path definition is either relative to the `sonar.projectBaseDir` analysis parameter (which is by default the directory from which the analysis was started) or absolute.
4. Save.
Alternatively, define on the CI/CD host the corresponding analysis parameter:
* For SpotBugs, FindSecBugs and FindBugs: `sonar.java.spotbugs.reportPaths`
* For PMD: `sonar.java.pmd.reportPaths`
* For Checkstyle: `sonar.java.checkstyle.reportPaths`
{% endtab %}
{% endtabs %}
### JavaScript/TypeScript
ou can integrate the following JavaScript/TypeScript analyzer with SonarQube: ESLint.
To setup the import of issues generated by ESLint:
1. Set up the generation of the reports by ESLint in JSON format, and their storing in dedicated import directory(ies).\
Command example:
```
eslint ./ -f json > eslint-report.json
```
2. Set up the import of the generated report files by SonarQube Cloud:
1. Retrieve your SonarQube Cloud project. For more details, see [retrieving-projects](https://docs.sonarsource.com/sonarqube-cloud/managing-your-projects/retrieving-projects "mention").
2. Go to **Administration > General Settings > External Analyzers > JavaScript/TypeScript**.
3. In **ESLint Report Files**, enter the list of import directories or files. This parameter accepts a comma-delimited list of paths. A path definition is either relative to the `sonar.projectBaseDir` analysis parameter (which is by default the directory from which the analysis was started) or absolute.
4. Save.
Alternatively, define on the CI/CD host the analysis parameter `sonar.eslint.reportPaths`.
### Kotlin
You can integrate the following Kotlin analyzers with SonarQube: AndroidLint, Detekt, and Ktlint.
{% tabs %}
{% tab title="AndroidLint" %}
To setup the import of issues generated by AndroidLint:
1. Set up the generation of the reports by AndroidLint, and their storing in dedicated import directory(ies).\
Command example:
```
gradle lint or $ANDROID_HOME/tools/bin/lint --xml lint-results.xml path/to/project
```
2. Set up the import of the generated report files by SonarQube Cloud:
1. Retrieve your SonarQube Cloud project. For more details, see [retrieving-projects](https://docs.sonarsource.com/sonarqube-cloud/managing-your-projects/retrieving-projects "mention").
2. Go to **Administration > General Settings > External Analyzers > Android**.
3. In **Android Lint Report Files**, enter the list of import directories or files. This parameter accepts a comma-delimited list of paths. A path definition is either relative to the `sonar.projectBaseDir` analysis parameter (which is by default the directory from which the analysis was started) or absolute.
4. Save.
Alternatively, define on the CI/CD host the analysis parameter `sonar.androidLint.reportPaths`.
{% endtab %}
{% tab title="Detekt" %}
To setup the import of issues generated by Detekt:
1. Set up the generation of the reports by Detekt, and their storing in dedicated import directory(ies).\
Command example:
```
java -jar path/to/detekt-cli-1.0.0.RC7-3-all.jar -i path/to/project -o path/to/report-directory
```
2. Set up the import of the generated report files by SonarQube Cloud:
1. Retrieve your SonarQube Cloud project. For more details, see [retrieving-projects](https://docs.sonarsource.com/sonarqube-cloud/managing-your-projects/retrieving-projects "mention").
2. Go to **Administration > General Settings > External Analyzers > Kotlin**.
3. In **Detekt Report Files**, enter the list of import directories or files. This parameter accepts a comma-delimited list of paths. A path definition is either relative to the `sonar.projectBaseDir` analysis parameter (which is by default the directory from which the analysis was started) or absolute.
4. Save.
Alternatively, define on the CI/CD host the analysis parameter `sonar.kotlin.detekt.reportPaths`.
{% endtab %}
{% tab title="Ktlint" %}
To setup the import of issues generated by Ktlint:
1. Set up the generation of the reports by Ktlint, and their storing in dedicated import directory(ies).
2. Set up the import of the generated report files by SonarQube Cloud:
1. Retrieve your SonarQube Cloud project. For more details, see [retrieving-projects](https://docs.sonarsource.com/sonarqube-cloud/managing-your-projects/retrieving-projects "mention").
2. Go to **Administration > General Settings > External Analyzers > Kotlin**.
3. In **Ktlint Report Files**, enter the list of import directories or files. This parameter accepts a comma-delimited list of paths. A path definition is either relative to the `sonar.projectBaseDir` analysis parameter (which is by default the directory from which the analysis was started) or absolute.
4. Save.
Alternatively, define on the CI/CD host the analysis parameter `sonar.kotlin.ktlint.reportPaths`.
{% endtab %}
{% endtabs %}
### PHP
You can integrate the following PHP analyzers with SonarQube: Psalm and PHPStan.
{% tabs %}
{% tab title="Psalm" %}
To setup the import of issues generated by Psalm:
1. Set up the generation of the reports by Psalm in the SonarQube format, and their storing in dedicated import directory(ies). To do so, use the `--output-format sonarqube` Psalm option.
2. Set up the import of the generated report files by SonarQube Cloud:
1. Retrieve your SonarQube Cloud project. For more details, see [retrieving-projects](https://docs.sonarsource.com/sonarqube-cloud/managing-your-projects/retrieving-projects "mention").
2. Go to **Administration > General Settings > External Analyzers > PHP**.
3. In **Psalm Report Files**, enter the list of import directories or files. This parameter accepts a comma-delimited list of paths. A path definition is either relative to the `sonar.projectBaseDir` analysis parameter (which is by default the directory from which the analysis was started) or absolute.
4. Save.
Alternatively, define on the CI/CD host the analysis parameter `sonar.php.psalm.reportPaths`.
{% endtab %}
{% tab title="PHPStan" %}
To setup the import of issues generated by PHPStan:
1. Set up the generation of the reports by PHPStan in [JSON format](https://phpstan.org/user-guide/output-format), and their storing in dedicated import directory(ies). To do so, use the PHPStan `analyse` command with the option `--error-format=json`.
2. Set up the import of the generated report files by SonarQube Cloud:
1. Retrieve your SonarQube Cloud project. For more details, see [retrieving-projects](https://docs.sonarsource.com/sonarqube-cloud/managing-your-projects/retrieving-projects "mention").
2. Go to **Administration > General Settings > External Analyzers > PHP**.
3. In **PHPStan Report Files**, enter the list of import directories or files. This parameter accepts a comma-delimited list of paths. A path definition is either relative to the `sonar.projectBaseDir` analysis parameter (which is by default the directory from which the analysis was started) or absolute.
4. Save.
Alternatively, define on the CI/CD host the analysis parameter `sonar.php.phpstan.reportPaths`.
{% endtab %}
{% endtabs %}
### Python
You can integrate the following Python analyzers with SonarQube: Pylint, Bandit, Flake8, Mypy, and Ruff.
{% tabs %}
{% tab title="Pylint" %}
To setup the import of issues generated by Pylint:
1. Set up the generation of the reports by Pylint, and their storing in dedicated import directory(ies). Use the use `--output-format=parseable` [Pylint option](https://docs.pylint.org/en/1.6.0/output.html)\
Command example:
```
pylint -r n --output-format=parseable --msg-template="{path}:{line}: [{msg_id}({symbol}), {obj}] {msg}" >
```
2. Set up the import of the generated report files by SonarQube Cloud:
1. Retrieve your SonarQube Cloud project. For more details, see [retrieving-projects](https://docs.sonarsource.com/sonarqube-cloud/managing-your-projects/retrieving-projects "mention").
2. Go to **Administration > General Settings > External Analyzers > Python**.
3. In **Pylint Report Files**, enter the list of import directories or files. This parameter accepts a comma-delimited list of paths. A path definition is either relative to the `sonar.projectBaseDir` analysis parameter (which is by default the directory from which the analysis was started) or absolute.
4. Save.
Alternatively, define on the CI/CD host the analysis parameter `sonar.python.pylint.reportPaths`.
{% endtab %}
{% tab title="Bandit" %}
To setup the import of issues generated by Bandit:
1. Set up the generation of the reports by Bandit, and their storing in dedicated import directory(ies).\
Command example:
```
bandit --format json --output bandit-report.json --recursive /path/to/your/python/project
```
2. Set up the import of the generated report files by SonarQube Cloud:
1. Retrieve your SonarQube Cloud project. For more details, see [retrieving-projects](https://docs.sonarsource.com/sonarqube-cloud/managing-your-projects/retrieving-projects "mention").
2. Go to **Administration > General Settings > External Analyzers > Python**.
3. In **Bandit Report Files**, enter the list of import directories or files. This parameter accepts a comma-delimited list of paths. A path definition is either relative to the `sonar.projectBaseDir` analysis parameter (which is by default the directory from which the analysis was started) or absolute.
4. Save.
Alternatively, define on the CI/CD host the analysis parameter `sonar.python.bandit.reportPaths` .
{% endtab %}
{% tab title="Flake8, Mypy, Ruff" %}
To setup the import of issues generated by Flake8, Mypy or Ruff:
1. Set up the generation of the reports by your third-party tool, and their storing in dedicated import directory(ies).
2. Set up the import of the generated report files by SonarQube Cloud:
1. Retrieve your SonarQube Cloud project. For more details, see [retrieving-projects](https://docs.sonarsource.com/sonarqube-cloud/managing-your-projects/retrieving-projects "mention").
2. Go to **Administration > General Settings > External Analyzers > Python.**
3. In the respective field (**Flake8 Report Files,** **Mypy Report Files**, or **Ruff Report Files**), enter the list of import directories or files. This parameter accepts a comma-delimited list of paths. A path definition is either relative to the `sonar.projectBaseDir` analysis parameter (which is by default the directory from which the analysis was started) or absolute.
4. Save.
Alternatively, define on the CI/CD host the corresponding analysis parameter:
* For Flake8: `sonar.python.flake8.reportPaths`
* For Mypy: `sonar.python.mypy.reportPaths`
* For Ruff: `sonar.python.ruff.reportPaths`
{% endtab %}
{% endtabs %}
### Ruby
You can integrate the following Ruby analyzer with SonarQube: Rubocop.
To setup the import of issues generated by Rubocop:
1. Set up the generation of the reports by Rubocop, and their storing in dedicated import directory(ies).\
Command example:
```
rubocop --format json --out rubocop-report.json
```
2. Set up the import of the generated report files by SonarQube Cloud:
1. Retrieve your SonarQube Cloud project. For more details, see [retrieving-projects](https://docs.sonarsource.com/sonarqube-cloud/managing-your-projects/retrieving-projects "mention").
2. Go to **Administration > General Settings > External Analyzers > Ruby**.
3. In **RuboCop Report Files**, enter the list of import directories or files. This parameter accepts a comma-delimited list of paths. A path definition is either relative to the `sonar.projectBaseDir` analysis parameter (which is by default the directory from which the analysis was started) or absolute.
4. Save.
Alternatively, define on the CI/CD host the analysis parameter `sonar.ruby.rubocop.reportPaths`.
### Scala
You can integrate the following Scala analyzers with SonarQube: Scalastyle and Scapegoat.
To setup the import of issues generated by Scalastyle or Scapegoat:
1. Set up the generation of the reports in the Scalastyle format for both Scalastyle and Scapegoat. Setup also the storing of the generated report files in dedicated import directory(ies).
2. Set up the import of the generated report files by SonarQube Cloud:
1. Retrieve your SonarQube Cloud project. For more details, see [retrieving-projects](https://docs.sonarsource.com/sonarqube-cloud/managing-your-projects/retrieving-projects "mention").
2. Go to **Administration > General Settings > External Analyzers > Scala**.
3. In the corresponding field (**Scalastyle Report Files** or **Scapegoat Report Files**), enter the list of import directories or files. This parameter accepts a comma-delimited list of paths. A path definition is either relative to the `sonar.projectBaseDir` analysis parameter (which is by default the directory from which the analysis was started) or absolute.
4. Save.
Alternatively, define on the CI/CD host the corresponding analysis parameter:
* For Scalastyle : `sonar.scala.scalastyle.reportPaths`.
* For Scapegoat: `sonar.scala.scapegoat.reportPaths`.
### Swift
You can integrate the following Swift analyzer with SonarQube: Swiftlint.
To setup the import of issues generated by Swiftlint:
1. Set up the generation of the reports by Swiftlint in JSON format, and their storing in dedicated import directory(ies).\
Command example:
```
swiftlint lint --reporter json > swiftlint.json
```
2. Set up the import of the generated report files by SonarQube Cloud:
1. Retrieve your SonarQube Cloud project. For more details, see [retrieving-projects](https://docs.sonarsource.com/sonarqube-cloud/managing-your-projects/retrieving-projects "mention").
2. Go to **Administration > General Settings > External Analyzers > Swift**.
3. In **SwiftLint Report Files**, enter the list of import directories or files. This parameter accepts a comma-delimited list of paths. A path definition is either relative to the `sonar.projectBaseDir` analysis parameter (which is by default the directory from which the analysis was started) or absolute.
4. Save.
Alternatively, define on the CI/CD host the analysis parameter `sonar.swift.swiftLint.reportPaths`.
### Terraform
You can integrate the following Terraform analyzer with SonarQube: TFLint.
To setup the import of issues generated by TFLint:
1. Set up the generation of the reports by TFLint, and their storing in dedicated import directory(ies).
2. Set up the import of the generated report files by SonarQube Cloud:
1. Retrieve your SonarQube Cloud project. For more details, see [retrieving-projects](https://docs.sonarsource.com/sonarqube-cloud/managing-your-projects/retrieving-projects "mention").
2. Go to **Administration > General Settings > External Analyzers > Terraform**.
3. In **TFLint Report Files**, enter the list of import directories or files. This parameter accepts a comma-delimited list of paths. A path definition is either relative to the `sonar.projectBaseDir` analysis parameter (which is by default the directory from which the analysis was started) or absolute.
4. Save.
Alternatively, define on the CI/CD host the analysis parameter `sonar.terraform.tflint.reportPaths`.
### VB.NET
Issues from third-party Roslyn analyzers (including Roslyn analyzers provided by Microsoft) are included in the MSBuild output and imported by default into SonarQube so no properties exist to enable that behavior. Instead, properties are available to adjust the import and to *stop* importing those issues.
{% hint style="warning" %}
Roslyn issues with an *error* severity automatically fail the build, and it is not recommended to run the SonarScanner for .NET’s end step if the MSBuild step fails for any reason because it will result in an essentially empty analysis, which will close all outstanding issues in the project. See Configuring the scanner for .NET for more information.
{% endhint %}
To disable the import
1. Retrieve your SonarQube Cloud project. For more details, see [retrieving-projects](https://docs.sonarsource.com/sonarqube-cloud/managing-your-projects/retrieving-projects "mention").
2. Go to Go to **Administration > General Settings > External Analyzers > VB.NET**.
3. Select the **Ignore issues from external Roslyn analyzers** option.
4. Save.
Alternatively, set the `sonar.vbnet.roslyn.ignoreIssues` analysis parameter to `true` on the CI/CD host.
To adjust the import
1. Retrieve your SonarQube Cloud project. For more details, see [retrieving-projects](https://docs.sonarsource.com/sonarqube-cloud/managing-your-projects/retrieving-projects "mention").
2. Go to Go to **Administration > General Settings > External Analyzers > VB.NET**.
3. Adjust the parameters listed in the table below.
4. Save.
Alternatively, set the corresponding sonar properties on the CI/CD host.
| Parameter | Sonar property | Description |
| --------------------------------------------------- | -------------------------------------------- | ---------------------------------------------------------------------------------------- |
| **Rule categories associated with Bugs** | `sonar.vbnet.roslyn.bugCategories` | Comma-delimited list of categories whose issues should be classified as Bugs. |
| **Rule categories associated with Vulnerabilities** | `sonar.vbnet.roslyn.vulnerabilityCategories` | Comma-delimited list of categories whose issues should be classified as Vulnerabilities. |
| **Rule categories associated with Code Smells** | `sonar.vbnet.roslyn.codeSmellCategories` | Comma-delimited list of categories whose issues should be classified as Code Smells. |
---
# Source: https://docs.sonarsource.com/sonarqube-community-build/feature-comparison-table.md
# Feature comparison table
The table below lists features relevant to comparing support in the different SonarQube deployments. For more information about the features supported in the SonarQube Cloud, see [Subscription plans](https://app.gitbook.com/s/B4UT2GNiZKjtxFtcFAL7/administering-sonarcloud/managing-subscription/subscription-plans "mention"). For more information about features supported in SonarQube Server, see the [SonarQube Server documentation](https://docs.sonarsource.com/sonarqube-server).
| Feature | SonarQube Community Build | SonarQube Cloud Free plan | SonarQube Server | SonarQube Cloud Team and Enterprise plans |
| ----------------------------------------------------------------------------------------------------- | -------------------------------------------------------------------------------------------------------------------------------------------------------------------------------------------------------------------------------------------------------- | ------------------------------------------------------------------------------------------------------------------------------------------------------------------------------------------------------------------------ | ------------------------------------------------------------------------------------------------------------------------------------------------------------------------------------------------------------------------ | ------------------------------------------------------------------------------------------------------------------------------------------------------------------------------------------------------------------------ |
| **Analysis** |
|
|
|
|
| Branch analysis | Only main branch analysis | Only main branch analysis |  |  |
| Pull request analysis |
| Only if the target branch is the main branch |  |  |
|
| From Enterprise (with SCIM; Microsoft Entra ID and Okta): Users and groups |
|
---
# Source: https://docs.sonarsource.com/sonarqube-for-eclipse/using/file-exclusions.md
# Source: https://docs.sonarsource.com/sonarqube-for-visual-studio/using/file-exclusions.md
# Source: https://docs.sonarsource.com/sonarqube-for-intellij/using/file-exclusions.md
# Source: https://docs.sonarsource.com/sonarqube-for-vs-code/using/file-exclusions.md
# File exclusions
All versions of SonarQube for IDE will fetch file exclusions from SonarQube (Server, Cloud) or SonarQube Community Build when you bind a project while running in connected mode. Locally defined file exclusions will be ignored when running in connected mode. For more information about how SonarQube for Visual Studio settings are handled by the server, look at the server documentation on setting your analysis scope:
* See the [Setting analysis scope](https://app.gitbook.com/s/yDv2XwTC1xoOKBYeCK45/project-administration/setting-analysis-scope "mention") pages in SonarQube Server.
* See the [Analysis scope](https://app.gitbook.com/s/B4UT2GNiZKjtxFtcFAL7/managing-your-projects/project-analysis/setting-analysis-scope "mention") pages in SonarQube Cloud.
* See the [Setting analysis scope](https://app.gitbook.com/s/bqrfLGeD0Y9vE5l9Le42/project-administration/adjusting-analysis/setting-analysis-scope "mention") pages in SonarQube Community Build.
### File exclusions in the IDE
When running in [connected-mode](https://docs.sonarsource.com/sonarqube-for-vs-code/connect-your-ide/connected-mode "mention") with SonarQube (Server, Cloud) or SonarQube Community Build, SonarQube for IDE will ignore local exclusions and fetch file exclusions from the SonarQube (Server, Cloud) server.
Defining file exclusions locally in SonarQube for VS Code is possible in versions 3.22 and newer.
### Defining file exclusions
The `sonarlint.analysisExcludesStandalone` property is a simple way to locally exclude files from your analysis and can be used to configure wildcard patterns for files that *only SonarQube for IDE* will exclude. For example:
* The glob pattern `**/file[1-3].py`
* will exclude `file1.py`, `file2.py` and `file3.py`
Go to VS Code **Manage** > **Settings** > **Workspace** (or **Code** > **Settings…** > **Settings \[⌘,]** in macOS) and search `sonarlint.analysisExcludesStandalone` to add your exclusion patterns.
A second exclusion method configures VS Code to exclude files from your workspace; however, this may have unintended consequences such as *files disappearing from the VS Code* ***Explorer*** *view*.
To use VS Code’s file exclusions, go to VS Code **Manage** > **Settings** > **Workspace** (or **Code** > **Settings…** > **Settings \[⌘,]** in macOS), search `Files: Exclude` and select **Add Pattern**. The **Workspace** setting has information about how VS Code uses wildcard patterns to manage exclusions in the editor.
{% hint style="info" %}
Note that when running in connected mode, only the file exclusions defined on the server are respected.
When running a local analysis for security hotspots, which requires using connected mode, it is possible to omit some files and folders from the project analysis. Because you are in [connected-mode](https://docs.sonarsource.com/sonarqube-for-vs-code/connect-your-ide/connected-mode "mention"), a requirement to detect security hotspots in SonarQube for IDE, exclusions defined in VS Code will be ignored.
Check the documentation on [#reporting-security-hotspots-in-the-whole-folder](https://docs.sonarsource.com/sonarqube-for-vs-code/security-hotspots#reporting-security-hotspots-in-the-whole-folder "mention") for those details.
{% endhint %}
### Wildcard patterns
The recognized path-matching patterns are case-sensitive and defined using the following wildcards:
* `*` Match zero or more characters (not including the directory delimiter, `/` ).
* `**` Match zero or more directory segments or files within the path.
* `?` Match a single character (not including the directory delimiter, `/` ).
**Wildcard examples**
* The pattern `**/*.css`
* matches `anyDirectory/anyFile.css`
* doesn’t match `org/sonar.api/MyBean.java`
* The pattern `**/*Bean.java`
* matches `org/sonar.api/MyBean.java`
* doesn’t match `org/sonar.api/mybean.java` or `org/sonar/util/MyDTO.java`
* The pattern `**/*Bean?.java`
* matches `org/sonar/util/MyOtherBean1.java`
* doesn’t match `org/sonar/util/MyOtherBean.java`
* The pattern `org/sonar/*`
* matches `org/sonar/MyClass.java`
* doesn’t match `org/sonar/util/MyClassUtil.java`
* The pattern `org/sonar/**/*` is equivalent to `org/sonar/**` and
* matches `org/sonar/anyDirectory/anyFile`
* matches `org/sonar/MyClass.java`
* doesn’t match `org/radar/MyClass.java`
The use of `?` to match a single character is available in SonarQube for VS Code v4.0+.
---
# Source: https://docs.sonarsource.com/sonarqube-cloud/digging-deeper/filters-and-perspective.md
# Filters and perspective
Visualizations are available to help you gain deeper insights into your projects’ current statuses and histories.
### How do I compare current state for multiple projects or project components?
The Projects space allows you to filter the projects in your instance by multiple, measure-based criteria. Once you’ve chosen your set, you don’t have to stare at the raw numbers to identify the risks its projects face. Instead, several visualizations (**Projects** > **Perspective**) are available to help you understand each project’s relative position in terms of each of the major axes:
* Risk - reliability and security ratings, test coverage, technical debt, and lines of code
* Reliability - reliability rating, reliability remediation effort, lines of code, and bug count
* Security - security rating, security remediation effort, lines of code, and vulnerability count
* Maintainability - maintainability rating, technical debt, lines of code, and code smell count
* Coverage - coverage, complexity, and uncovered lines
* Duplications - duplicated lines %, lines of code, and duplicated blocks
* At the project level these same visualizations are available in the **Measures** tab to help you compare project components. The **Project Overview** corresponds to the **Risk** visualization in the **Projects** space, For the other five graphs, choose the **Overview** option under the relevant domain.
Additionally, tree maps are also available for percentage and rating metrics at the project level. Navigate to them in the **Measures** tab using the perspective selector in the right pane.
### How do I visualize metric history?
At the project level, the **Activity** tab offers several canned line graphs of selected metrics across time, with convenient mouseovers to show graph details and the ability to easily narrow the graph to a slice of the project’s history. Beyond the canned graphs, you also have the ability to map the metrics of your choice against each other in a custom graph.
---
# Source: https://docs.sonarsource.com/sonarqube-cloud/getting-started/first-analysis.md
# Viewing your first analysis' results
If you have successfully followed the in-product tutorial, SonarQube Cloud will run its first analysis on your project.
The first analysis is always a *main branch analysis,* an analysis of the default branch of your repository.
From now on, a new analysis will be triggered every time you make a change to the main branch by direct push, pull request merge, or branch merge.
### Main Branch Status
The **Main Branch Status** is the quality gate of your main branch, indicating whether it meets your quality requirements and is ready to be released.
{% hint style="info" %}
**The quality gate displays Not Computed because it needs to be configured.**
We strongly recommend that you set up your main branch quality gate. To do so, you must set a *new code definition*. Select **Set New Code Definition** to get started.
See the [quality-gates](https://docs.sonarsource.com/sonarqube-cloud/improving/quality-gates "mention") and [about-new-code](https://docs.sonarsource.com/sonarqube-cloud/standards/about-new-code "mention") pagesfor more details. Once you set it up, push a change to the main branch. A new analysis will run, and the quality gate status will display either **Passed** or **Failed**.
{% endhint %}
### Main Branch Evolution
The **Main Branch Evolution** displays a summary of the code quality results from the main branch analysis. In this section, you will find tabs that display different metrics:
* **Issues** displays the number of issues found in the main branch.
* **Coverage** displays the percentage of testable code in the main branch that is covered by your test cases.
* **Duplications** displays the percentage of main branch code that is duplicated.
{% hint style="info" %}
**Coverage displays zero percent because it needs to be configured.**
Initially, your coverage will display zero percent because it requires configuration. To set it up, see the [overview](https://docs.sonarsource.com/sonarqube-cloud/enriching/test-coverage/overview "mention") section.
Once it’s configured, push a change to the main branch to update the analysis. After the a new analysis is run, the coverage percentage will be displayed.
{% endhint %}
The **historical data** chart shows the progress of your code quality.
{% hint style="info" %}
**To see historical data, you must have run at least two analyses.**
Push a change to your main branch. A new analysis will run, and the historical data will be displayed. In the **Main Branch Evolution** section, select **See full history** to the project’s **Activity** page.
{% endhint %}
### Latest Activity
Scroll down to find the **Latest Activity** section; it displays a feed of all analyses that have been run, including all main branch analyses, pull request analyses, and branch analyses.
### Project navigation
The project navigation on the left lets you move between the four views: **Overview**, **Main Branch**, **Pull Requests**, and **Branches**.
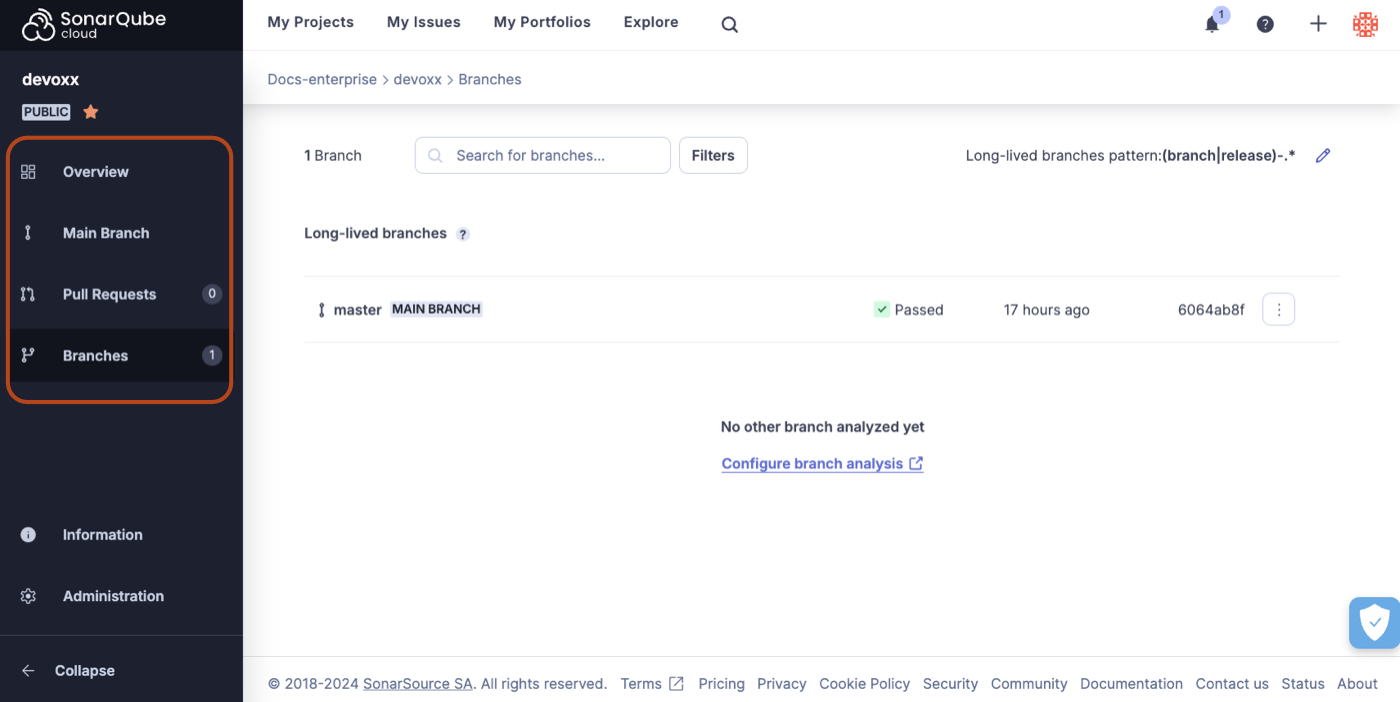
### Main Branch
Select **Branches** > **MAIN BRANCH** to see a more fine-grained view of your most recent [main-branch-analysis](https://docs.sonarsource.com/sonarqube-cloud/improving/main-branch-analysis "mention")
### Pull Requests
In addition to analyzing your main branch every time it changes, SonarQube Cloud also analyzes individual pull requests. These analyses run when a pull request is opened and on each change to the pull request branch. This all happens *before* you merge, letting you catch problems before they even get to the main branch. The results of pull request analysis are displayed in the **Pull Requests** view of your SonarQube Cloud project and the pull request view of your DevOps Platform (GitHub, Bitbucket Cloud, Azure DevOps, or GitLab).
See the [pull-request-analysis](https://docs.sonarsource.com/sonarqube-cloud/improving/pull-request-analysis "mention") page for more details.
### Branches
The **Branches** view displays all the non-pull request branches for which you have set up analysis. Initially, only the main branch is listed here. But, you can configure other branches to be analyzed. Once a branch is configured, an analysis is run on every change to that branch.
See [branch-analysis](https://docs.sonarsource.com/sonarqube-cloud/enriching/branch-analysis "mention") and [branch-analysis-setup](https://docs.sonarsource.com/sonarqube-cloud/enriching/branch-analysis-setup "mention").
---
# Source: https://docs.sonarsource.com/sonarqube-for-eclipse/using/fixing-issues.md
# Source: https://docs.sonarsource.com/sonarqube-for-visual-studio/using/fixing-issues.md
# Source: https://docs.sonarsource.com/sonarqube-for-intellij/using/fixing-issues.md
# Source: https://docs.sonarsource.com/sonarqube-for-vs-code/using/fixing-issues.md
# Fixing issues
Whether your issue is about *a potential security problem*, considered to be *a bad coding practice*, or *a more serious logic error*, fixing issues usually involves changes to the code. SonarQube for IDE’s issue messages contain useful information about how to fix the potential problem and include a rule description so that you can learn more about why the issue is reported.
SonarQube for VS Code offers multiple ways to investigate and fix problems in your code. Issues are usually presented in multiple locations and you can typically hover and/or click or right-click over these markers to open a tooltip that reveals your options. See the [investigating-issues](https://docs.sonarsource.com/sonarqube-for-vs-code/using/investigating-issues "mention") page for more information about finding and identifying your issues.
Double-click an issue in the SonarQube for IDE view window to jump to and highlight the code in the explorer. Once the code is highlighted, you have more than one way to expose solutions and suggested quick fixes.
#### Rule selection
Issues are reported when your code violates one or more of Sonar's rules. When running SonarQube for VS Code in standalone mode (ie: when you're *not in connected mode*), it's possible to locally manage which rules are used to find issues in your code. See the [#using-sonar-rules](https://docs.sonarsource.com/sonarqube-for-vs-code/rules#using-sonar-rules "mention") articles to learn what's possible.
If you simply want to toggle a rule, jump straight to the [#edit-rules](https://docs.sonarsource.com/sonarqube-for-vs-code/rules#edit-rules "mention") article to learn how to turn Sonar rules on or off in your IDE.
{% hint style="info" %}
When a project is bound to a SonarQube (Server, Cloud) or SonarQube Community Build, the **RULES** view is not visible in the UI. In this case, the rules configuration from the server applies. For more information, see the server documentation about quality profiles to edit rules:
* [Managing quality profiles](https://app.gitbook.com/s/B4UT2GNiZKjtxFtcFAL7/standards/managing-quality-profiles "mention") in SonarQube Cloud
* [Managing quality profiles](https://app.gitbook.com/s/yDv2XwTC1xoOKBYeCK45/quality-standards-administration/managing-quality-profiles "mention") in SonarQube Server
{% endhint %}
### Quick fixes
Some issues have Sonar Quick Fixes which means that with a single click, SonarQube for IDE will automatically edit your source code to comply with the rule description and fix the issue. Even when a Sonar Quick Fix is not available, SonarQube for IDE provides options in the tooltip to help you fix your code.
While in the explorer window, select the issue in the PROBLEMS view panel or click the lightbulb in the left margin of the VS Code editor to reveal the tooltip exposing one or more of these options:
* **✧˖° Fix with AI CodeFix**: AI CodeFix suggestions are available when running in connected mode with SonarQube (Server, Cloud). See the article about [#ai-codefix](https://docs.sonarsource.com/sonarqube-for-vs-code/ai-capabilities/ai-codefix#ai-codefix "mention") for details.
* **Open description of rule**: opens a new view panel with the detailed rule description, which usually explains why the issue is raised and explains how to fix it.
* **Deactivate rule ‘yyy:XXX’**: This action disables the rule in the user’s VSCode settings and is only available when you are *not using Connected Mode*.
* To reactivate a rule, go to the **SONARQUBE SETUP** > **RULES** view in VS Code and click the 3-dots to select **Find Rule By Key**.
{% hint style="info" %}
If your code violates more than one rule, a set of options will be presented for each instance. An example is shown in the image below.
* SonarQube for VS Code calls out that your container is missing both CPU *and* memory limits with rules [kubernetes:S6869](https://rules.sonarsource.com/kubernetes/RSPEC-6869/) and [kubernetes:S6864](https://rules.sonarsource.com/kubernetes/rspec-6864/); the Maintainability and Security of your code is potentially affected.
{% endhint %}
### AI CodeFix in your IDE
If you’re running in connected mode with SonarQube Server or SonarQube Cloud, you might see the **✧˖°** icon which means that there is an AI-generated fix suggestion available. Please check the requirements for using [ai-codefix](https://docs.sonarsource.com/sonarqube-for-vs-code/ai-capabilities/ai-codefix "mention").
### Fixing injection vulnerabilities
**Injection vulnerabilities** (also called taint vulnerabilities) are [Security-related rules](https://app.gitbook.com/s/B4UT2GNiZKjtxFtcFAL7/digging-deeper/security-related-rules "mention") issues that are only raised by SonarQube Server and SonarQube Cloud. Due to technical limitations, SonarQube for VS Code can not raise such issues on local analysis and must be running in [connected-mode](https://docs.sonarsource.com/sonarqube-for-vs-code/connect-your-ide/connected-mode "mention") to sync injection vulnerabilities from the server.
Injection vulnerabilities are distinguished in the **SONARQUBE** panel as shown in the following image. Learn how to fix your injection vulnerability by using the tooltip options:
1. Note that your issue list might be collapsed depending on the new code period that is activated when selecting **Focus on New Code**. See the [#setting-your-focus-on-new-code](https://docs.sonarsource.com/sonarqube-for-vs-code/new-code#setting-your-focus-on-new-code "mention") article for more information.
2. In the **SONARQUBE** panel, your taint vulnerabilities are easily identifiable by looking at the  identifying badge. You will also see how many locations this vulnerability occupies.
3. Select one of your taint vulnerabilities to focus the code editor and open the **SONARQUBE ISSUE LOCATIONS** view.
4. Selecting an issue will also open the **SonarQube Rule Description** view.
5. Find more information under the **How can I fix it?** tab.
Please see the documentation about [taint-vulnerabilities](https://docs.sonarsource.com/sonarqube-for-vs-code/using/taint-vulnerabilities "mention") for more information about working with these particular security issues\*.\*
### Marking issues
When running SonarQube for VS Code in connected mode with SonarQube Server 10.2 and newer, it is possible to mark issues before submitting your code for PR analysis.
To mark an issue, go to your issue in the code editor or the **PROBLEMS** panel and select the lightbulb to find the **Quick Fix** menu. Then select **SonarQube: Resolve issue violating rule \`**<*your rule>***\` as…** and choose either **Accepted** or **False positive** to resolve the new issue. Note that the **Quick Fix** menu is only available in the lightbulb next to your issue in the code editor.
{% hint style="info" %}
When running in connected mode with SonarQube Server 10.4 or newer, **Won’t Fix** becomes **Accept**.
{% endhint %}
Marking an issue can be applied to both *new issues* and *known issues*. Marks made on known issues will be reflected on the SonarQube Server server within a few minutes; marks made on new issues will be reflected on the server when a new analysis is run. The option to mark an issue as resolved will not appear if you are connected to an unsupported version of SonarQube Server.
To unmark *all issues not yet known in SonarQube Server*, open the **VS Code Command Palette** and run the command `SonarQube: Reopen Local Issues for current file`. This command will only affect new issues that were marked before an analysis was run on the server.
#### Requirements for marking issues
* SonarQube for VS Code 3.21 or newer.
* Running in connected mode with SonarQube Server 10.2 or newer.
* In SonarQube Server, the **Administer Issues** permission must be granted to the user(s).
{% hint style="info" %}
[security-hotspots](https://docs.sonarsource.com/sonarqube-for-vs-code/using/security-hotspots "mention") and [taint-vulnerabilities](https://docs.sonarsource.com/sonarqube-for-vs-code/using/taint-vulnerabilities "mention") found also on SonarQube Server, Cloud, or on SonarQube Community Build can be marked using different terminology regarding the issue’s status. Please see the dedicated documentation for fixing each of those issue types.
{% endhint %}
---
# Source: https://docs.sonarsource.com/sonarqube-community-build/user-guide/issues/fixing.md
# Source: https://docs.sonarsource.com/sonarqube-server/10.7/user-guide/issues/fixing.md
# Source: https://docs.sonarsource.com/sonarqube-server/10.8/user-guide/issues/fixing.md
# Source: https://docs.sonarsource.com/sonarqube-server/2025.2/user-guide/issues/fixing.md
# Source: https://docs.sonarsource.com/sonarqube-server/2025.3/user-guide/issues/fixing.md
# Source: https://docs.sonarsource.com/sonarqube-server/2025.5/user-guide/issues/fixing.md
# Source: https://docs.sonarsource.com/sonarqube-server/2025.1/user-guide/issues/fixing.md
# Source: https://docs.sonarsource.com/sonarqube-server/2025.4/user-guide/issues/fixing.md
# Source: https://docs.sonarsource.com/sonarqube-server/2025.6/user-guide/issues/fixing.md
# Source: https://docs.sonarsource.com/sonarqube-server/user-guide/issues/fixing.md
# Source: https://docs.sonarsource.com/sonarqube-cloud/managing-your-projects/issues/fixing.md
# Fixing issues
Depending on the issue, you may get fix suggestions:
* In the **How can I fix it?** tab of the issue's detail view. See [reviewing](https://docs.sonarsource.com/sonarqube-cloud/managing-your-projects/issues/reviewing "mention") for more details.
* Available in the Team plan, generated through AI: see [#getting-ai-generated-fix-suggestions](#getting-ai-generated-fix-suggestions "mention") below.
### Opening issues in your IDE
To speed up the time it takes to find and fix the issue, use connected mode to connect SonarQube Cloud with [connected-mode](https://docs.sonarsource.com/sonarqube-cloud/improving/connected-mode "mention") and use the **Open in IDE** feature.
{% hint style="info" %}
If you’ve already fixed the issue in your code, SonarQube for IDE will not be able to find it in the IDE; only matching code will be highlighted.
Keep in mind that the revision or branch analyzed by SonarQube Cloud may not be the same as what you have opened in the IDE. When setting up connected mode, SonarQube for IDE considers the branch currently checked out in the IDE and tries to synchronize it with the most appropriate branch from the server. This is called branch matching in SonarQube for IDE.
{% endhint %}
To open an issue in your IDE, it’s easier if you are already running in connected mode:
1. Follow the [retrieving](https://docs.sonarsource.com/sonarqube-cloud/managing-your-projects/issues/retrieving "mention") instructions and open an issue's detail view.
2. Select the **Open in IDE** button.
Check the individual instructions for your IDE for more details or to troubleshoot failed connections:
* [Opening issues in SonarQube for VS Code](https://docs.sonarsource.com/sonarqube-for-vs-code/using/investigating-issues#opening-issues-in-the-ide)
* [Opening issues in SonarQube for IntelliJ](https://docs.sonarsource.com/sonarqube-for-intellij/using/investigating-issues#opening-issues-in-the-ide)
* [Opening issues in SonarQube for Visual Studio](https://docs.sonarsource.com/sonarqube-for-visual-studio/using/investigating-issues#opening-issues-in-the-ide)
* [Opening issues in SonarQube for Eclipse](https://docs.sonarsource.com/sonarqube-for-eclipse/using/investigating-issues#opening-issues-in-the-ide)
{% hint style="warning" %}
**Open in IDE** is not supported in Safari. Safari has strict security policies regarding custom protocol links which are required to open files directly in your IDE. When using SonraQube (Server, Cloud) or SonarQube Community Build, please use Chrome or Firefox for this functionality.
{% endhint %}
### Getting AI-generated fix suggestions
*AI features are only available in SonarQube Cloud Team and Enterprise plans*. See the [subscription-plans](https://docs.sonarsource.com/sonarqube-cloud/administering-sonarcloud/managing-subscription/subscription-plans "mention") page for more details*.*
Sonar's AI CodeFix is available to provide AI-generated fix suggestions for a select set of issues. See the [subscription-plans](https://docs.sonarsource.com/sonarqube-cloud/administering-sonarcloud/managing-subscription/subscription-plans "mention") and [rules-for-ai-codefix](https://docs.sonarsource.com/sonarqube-cloud/digging-deeper/rules-for-ai-codefix "mention") pages for more details. If needed, the [enable-ai-codefix](https://docs.sonarsource.com/sonarqube-cloud/administering-sonarcloud/ai-features/enable-ai-codefix "mention") page has more information for SonarQube Cloud administrators to activate the feature for your organization.
The suggestions are generated for select rules and languages using space.vars.SQC\_Supported\_LLM\_version.
To generate a fix suggestion in your IDE:
* Simply open your project in SonarQube for SonarQube for VS Code or SonarQube for IntelliJ using connected mode with SonarQube Cloud.
* In your IDE, select an issue marked with the  icon, open the **Rule description** > **AI CodeFix** tab, and select **Generate Fix**. A fix will be generated in the code editor and you’ll have a chance to **Apply** or **Decline** the suggestion.
* See the VS Code page for [AI CodeFix in your IDE](https://docs.sonarsource.com/sonarqube-for-vs-code/ai-capabilities/ai-codefix)
* See the IntelliJ page for [AI CodeFix in your IDE](https://docs.sonarsource.com/sonarqube-for-intellij/ai-capabilities/ai-codefix)
To generate a fix suggestion in SonarQube Cloud:
* Follow the [retrieving](https://docs.sonarsource.com/sonarqube-cloud/managing-your-projects/issues/retrieving "mention") instructions in SonarQube Cloud and open an issue's detail view. If an AI CodeFix is an option for that particular issue, you will see the **Generate AI Fix** button.
* From either the **Where is the Issue** or the **AI CodeFix** tabs, select the **Generate Fix** button.
An AI CodeFix will be generated, and you’ll see a diff view in the **AI CodeFix** tab. Simply copy and paste the generated fix into your IDE; If you’re using SonarQube for IDE and have connected mode set up for [connected-mode](https://docs.sonarsource.com/sonarqube-cloud/improving/connected-mode "mention"), feel free to use the **Open in IDE** feature to streamline the process.
* If you are running SonarQube for Visual Studio, selecting **View fix in IDE** will offer you a diff view in the IDE which provides an opportunity to accept or reject the suggestion before committing the change.
An AI Code Assurance badge is available to any SonarQube Cloud plan to mark your AI projects as reviewed by SonarQube Cloud. Any user with project access can use the badge. For more detailed instructions, see the [#marking-a-project-as-containing-ai-generated-code](https://docs.sonarsource.com/sonarqube-cloud/ai-capabilities/ai-code-assurance#marking-a-project-as-containing-ai-generated-code "mention") article on the *AI settings* page.
Note that for some issues, an AI CodeFix suggestion is not available. To learn more about which rules are eligible for AI CodeFix, please see the list of [#ai-codefix-rules](https://docs.sonarsource.com/sonarqube-cloud/digging-deeper/rules-for-ai-codefix#ai-codefix-rules "mention").
#### Usage limits
Limits are placed on the AI CodeFix feature to manage abuse. Developers will be notified directly when the monthly allocation is reached for your organization. If the instance is blocked due to reaching the allowance, users attempting to generate a fix will see an error message. Usage quotas are reset on the first day of each month.
### SonarQube Remediation agent
{% hint style="success" %}
The SonarQube Remediation Agent is a [Beta](https://docs.sonarsource.com/sonarqube-cloud/appendices/product-release-lifecycle#beta) feature available with Enterprise plan accounts. It is free during the beta phase and will be a paid feature when it moves to [General Availability](https://docs.sonarsource.com/sonarqube-cloud/appendices/product-release-lifecycle#general-availability). To learn more about the terms & conditions, please see our legal page about features in [Early Access](https://www.sonarsource.com/legal/early-access/).
If your SonarQube Cloud organization is not on an Enterprise plan, please see the [getting-started-with-enterprise](https://docs.sonarsource.com/sonarqube-cloud/getting-started-with-enterprise "mention") pages to get the process started.
{% endhint %}
The SonarQube Remediation Agent runs an independent review and analysis to help you fix reliability and maintainability issues found in your latest code. It focuses on new issues discovered in your latest GitHub pull request (PR). These issues, picked up by the agent, would otherwise break the new code conditions of your quality gate and block the merge of your PR.
The agent uses space.vars.SQC\_Remediation\_agent\_LLM to generate fix suggestions in the background and checks that the new code does not introduce new issues before offering the suggestion.
To enable and install the agent, see the [sonarqube-remediation-agent](https://docs.sonarsource.com/sonarqube-cloud/administering-sonarcloud/ai-features/sonarqube-remediation-agent "mention") page. To understand the agent's behavior and learn how to engage with the agent in your pull request, see the [agents-in-your-github-pull-request](https://docs.sonarsource.com/sonarqube-cloud/managing-your-projects/issues/with-ai-features/agents-in-your-github-pull-request "mention") page.
### Creating Jira Cloud work items from SonarQube issues
You can create a Jira Cloud work item from a single or multiple SonarQube issues. See [jira-integration](https://docs.sonarsource.com/sonarqube-cloud/managing-your-projects/administering-your-projects/jira-integration "mention") for more information.
---
# Source: https://docs.sonarsource.com/sonarqube-community-build/analyzing-source-code/languages/flex.md
# Source: https://docs.sonarsource.com/sonarqube-server/8.9/analyzing-source-code/languages/flex.md
# Source: https://docs.sonarsource.com/sonarqube-server/9.8/analyzing-source-code/languages/flex.md
# Source: https://docs.sonarsource.com/sonarqube-server/9.9/analyzing-source-code/languages/flex.md
# Source: https://docs.sonarsource.com/sonarqube-server/10.0/analyzing-source-code/languages/flex.md
# Source: https://docs.sonarsource.com/sonarqube-server/10.1/analyzing-source-code/languages/flex.md
# Source: https://docs.sonarsource.com/sonarqube-server/10.2/analyzing-source-code/languages/flex.md
# Source: https://docs.sonarsource.com/sonarqube-server/10.3/analyzing-source-code/languages/flex.md
# Source: https://docs.sonarsource.com/sonarqube-server/10.4/analyzing-source-code/languages/flex.md
# Source: https://docs.sonarsource.com/sonarqube-server/10.5/analyzing-source-code/languages/flex.md
# Source: https://docs.sonarsource.com/sonarqube-server/10.6/analyzing-source-code/languages/flex.md
# Source: https://docs.sonarsource.com/sonarqube-server/10.7/analyzing-source-code/languages/flex.md
# Source: https://docs.sonarsource.com/sonarqube-server/10.8/analyzing-source-code/languages/flex.md
# Source: https://docs.sonarsource.com/sonarqube-server/2025.2/analyzing-source-code/languages/flex.md
# Source: https://docs.sonarsource.com/sonarqube-server/2025.3/analyzing-source-code/languages/flex.md
# Source: https://docs.sonarsource.com/sonarqube-server/2025.5/analyzing-source-code/languages/flex.md
# Source: https://docs.sonarsource.com/sonarqube-server/2025.1/analyzing-source-code/languages/flex.md
# Source: https://docs.sonarsource.com/sonarqube-server/2025.4/analyzing-source-code/languages/flex.md
# Source: https://docs.sonarsource.com/sonarqube-server/2025.6/analyzing-source-code/languages/flex.md
# Source: https://docs.sonarsource.com/sonarqube-server/analyzing-source-code/languages/flex.md
# Source: https://docs.sonarsource.com/sonarqube-cloud/advanced-setup/languages/flex.md
# Flex
### Supported versions
The level of support for a language is defined as follows:
* Fully supported: Analysis will complete. All the language features are understood and examined.
* Supported: Most language features are understood and examined but the version includes unsupported features. Analysis might break or provide incomplete results.
Actionscript 2 and 3: Fully supported
### Language-specific properties
To discover and update the Flex-specific properties, navigate in SonarQube Cloud to *Your Project* > **Administration** > **General Settings** > **Languages** > **Flex**. See the [analysis-parameters](https://docs.sonarsource.com/sonarqube-cloud/advanced-setup/analysis-parameters "mention") page for more information about specific properties.
### Related pages
* [test-coverage](https://docs.sonarsource.com/sonarqube-cloud/enriching/test-coverage "mention")
---
# Source: https://docs.sonarsource.com/sonarqube-cloud/appendices/frequently-asked-questions.md
# Frequently asked questions
### Does SonarQube Cloud require single sign on - SSO?
SonarQube Cloud does not require single sign-on (SSO), as authentication is performed on the DevOps platform side.
### Which identity providers does SonarQube Cloud support?
The following code repository platforms are supported as identity providers:
* * GitHub
* Bitbucket Cloud
* Azure DevOps Services
* GitLab
You must have an account on one of these code repository platforms to log in to SonarQube Cloud.
### How do I get rid of issues that are false-positives?
#### False Positive and Accept
* You can mark individual issues as *false positive* or \*accepted \*through the issues interface. If you’re using short-lived branch and pull request analysis, issues marked as false positive or accepted will retain that status after merge. This is the preferred approach.
**Help us improve our detection of security issues**
When you mark a vulnerability as false positive or accepted, explain why in the comment box. This feedback and the vulnerability context (current file content, issue and rule details) are reviewed by our teams to make SonarQube Cloud better.
**//NOSONAR**
* Most language analyzers support the use of the generic mechanism: `//NOSONAR` at the end of the line of the issue. This will suppress all issues - now and in the future - that might be raised on the line.
### How do I find and remove projects that haven’t been analyzed in a while?
* In your organization: **Administration** > **Projects Management** you can search for **Last analysis before** to filter projects not analyzed since a specific date, and then use bulk **Delete** to remove the projects that match your filter.
* This can be automated using the corresponding Web API: `api/projects/bulk_delete?organization=ORG-KEY&analyzedBefore=YYYY-MM-DD`.
### What are the browsers supported by SonarQube Cloud?
* SonarQube Cloud supports the following browsers:
* the last 3 Chrome versions
* the last 3 Firefox versions
* the last 3 Safari versions
* the last 3 Edge versions
### What Java versions are supported by SonarQube Cloud?
#### Java Version of Scanner Environment
* If you are performing analysis in your local build environment through an installed scanner tool, then the Java runtime environment of the scanner (that is, the Java installed on your build machine) should be at least Java 17.
* Similarly, if you are analyzing in a CI service, you should configure the Java environment to at least Java 17.
* If you are exclusively using automatic analysis, that is, where the SonarQube Cloud service itself does the analysis, you do not have to do anything.
#### Java Version of Targeted Code
* Pre-Java-17 code (for example, Java 11 code) will continue to be analyzable. The version bump applies only to the environment within which the scanner is running, not the code that is being analyzed. See the [general-requirements](https://docs.sonarsource.com/sonarqube-cloud/advanced-setup/scanner-environment/general-requirements "mention") page for more details.
---
# Source: https://docs.sonarsource.com/sonarqube-community-build/server-installation/from-docker-image.md
# Source: https://docs.sonarsource.com/sonarqube-server/2025.3/server-installation/from-docker-image.md
# Source: https://docs.sonarsource.com/sonarqube-server/2025.5/server-installation/from-docker-image.md
# Source: https://docs.sonarsource.com/sonarqube-server/2025.4/server-installation/from-docker-image.md
# Source: https://docs.sonarsource.com/sonarqube-server/2025.6/server-installation/from-docker-image.md
# Source: https://docs.sonarsource.com/sonarqube-server/server-installation/from-docker-image.md
# From Docker image
- [Installation overview](/sonarqube-server/server-installation/from-docker-image/installation-overview.md): Main steps for installing SonarQube Server from the Docker image.
- [Prepare the Docker installation](/sonarqube-server/server-installation/from-docker-image/prepare-installation.md): How to prepare the installation of SonarQube Server Developer or Enterprise edition from the Docker image.
- [Set up and start your container](/sonarqube-server/server-installation/from-docker-image/set-up-and-start-container.md): How to set up and start your SonarQube Server container with the Developer or Enterprise edition.
- [Advanced setup](/sonarqube-server/server-installation/from-docker-image/advanced-setup.md): Advanced setup when installing SonarQube Server from the Docker image.
---
# Source: https://docs.sonarsource.com/sonarqube-community-build/server-installation/from-zip-file/starting-stopping-server/from-zip-file.md
# Source: https://docs.sonarsource.com/sonarqube-community-build/server-installation/from-zip-file.md
# Source: https://docs.sonarsource.com/sonarqube-server/2025.3/server-installation/data-center-edition/from-zip-file.md
# Source: https://docs.sonarsource.com/sonarqube-server/2025.3/server-installation/from-zip-file/starting-stopping-server/from-zip-file.md
# Source: https://docs.sonarsource.com/sonarqube-server/2025.3/server-installation/from-zip-file.md
# Source: https://docs.sonarsource.com/sonarqube-server/2025.5/server-installation/data-center-edition/from-zip-file.md
# Source: https://docs.sonarsource.com/sonarqube-server/2025.5/server-installation/from-zip-file/starting-stopping-server/from-zip-file.md
# Source: https://docs.sonarsource.com/sonarqube-server/2025.5/server-installation/from-zip-file.md
# Source: https://docs.sonarsource.com/sonarqube-server/2025.4/server-installation/data-center-edition/from-zip-file.md
# Source: https://docs.sonarsource.com/sonarqube-server/2025.4/server-installation/from-zip-file/starting-stopping-server/from-zip-file.md
# Source: https://docs.sonarsource.com/sonarqube-server/2025.4/server-installation/from-zip-file.md
# Source: https://docs.sonarsource.com/sonarqube-server/2025.6/server-installation/data-center-edition/from-zip-file.md
# Source: https://docs.sonarsource.com/sonarqube-server/2025.6/server-installation/from-zip-file/starting-stopping-server/from-zip-file.md
# Source: https://docs.sonarsource.com/sonarqube-server/2025.6/server-installation/from-zip-file.md
# Source: https://docs.sonarsource.com/sonarqube-server/server-installation/data-center-edition/from-zip-file.md
# Source: https://docs.sonarsource.com/sonarqube-server/server-installation/from-zip-file/starting-stopping-server/from-zip-file.md
# Source: https://docs.sonarsource.com/sonarqube-server/server-installation/from-zip-file.md
# From ZIP file
- [Installation overview](/sonarqube-server/server-installation/from-zip-file/overview.md): Main steps for installing SonarQube Server from the ZIP file.
- [Basic installation](/sonarqube-server/server-installation/from-zip-file/basic-installation.md): How to install SonarQube Server Developer or Enterprise edition from the ZIP file and perform the basic setup.
- [Advanced setup](/sonarqube-server/server-installation/from-zip-file/advanced-setup.md): Advanced setup when installing SonarQube Server from the ZIP file.
- [Starting / stopping server](/sonarqube-server/server-installation/from-zip-file/starting-stopping-server.md): How to start or stop the server in case of a ZIP installation
- [From the ZIP file](/sonarqube-server/server-installation/from-zip-file/starting-stopping-server/from-zip-file.md): Starting SonarQube Server from the ZIP file
- [Running as a service](/sonarqube-server/server-installation/from-zip-file/starting-stopping-server/running-as-a-service.md): How to install and start SonarQube Server as a service in case of a ZIP installation. The operation depends on your operating system.
---
# Source: https://docs.sonarsource.com/sonarqube-community-build/analyzing-source-code/scanners/scanner-environment/general-requirements.md
# Source: https://docs.sonarsource.com/sonarqube-server/10.4/analyzing-source-code/scanner-environment/general-requirements.md
# Source: https://docs.sonarsource.com/sonarqube-server/10.5/analyzing-source-code/scanner-environment/general-requirements.md
# Source: https://docs.sonarsource.com/sonarqube-server/10.6/analyzing-source-code/scanners/general-requirements.md
# Source: https://docs.sonarsource.com/sonarqube-server/10.7/analyzing-source-code/scanners/scanner-environment/general-requirements.md
# Source: https://docs.sonarsource.com/sonarqube-server/10.8/analyzing-source-code/scanners/scanner-environment/general-requirements.md
# Source: https://docs.sonarsource.com/sonarqube-server/2025.2/analyzing-source-code/scanners/scanner-environment/general-requirements.md
# Source: https://docs.sonarsource.com/sonarqube-server/2025.3/analyzing-source-code/scanners/scanner-environment/general-requirements.md
# Source: https://docs.sonarsource.com/sonarqube-server/2025.5/analyzing-source-code/scanners/scanner-environment/general-requirements.md
# Source: https://docs.sonarsource.com/sonarqube-server/2025.1/analyzing-source-code/scanners/scanner-environment/general-requirements.md
# Source: https://docs.sonarsource.com/sonarqube-server/2025.4/analyzing-source-code/scanners/scanner-environment/general-requirements.md
# Source: https://docs.sonarsource.com/sonarqube-server/2025.6/analyzing-source-code/scanners/scanner-environment/general-requirements.md
# Source: https://docs.sonarsource.com/sonarqube-server/analyzing-source-code/scanners/scanner-environment/general-requirements.md
# Source: https://docs.sonarsource.com/sonarqube-cloud/advanced-setup/scanner-environment/general-requirements.md
# General requirements
### Operating system
The supported operating systems are:
* Linux (x64, AArch64)
* Windows (x64)
* macOS (x64, AArch64)
* IBM z/OS (see the[ requirements](#requirements-for-analysis-on-z-os) for more information)
### Java runtime environment (JRE)
A JRE (Open JRE or Open JDK) is required for the scanner engine used by all SonarScanners.
The required JRE can be auto-provisioned by a scanner at analysis time. Depending on your SonarScanner, JRE may be auto-provisioned. JRE auto-provisioning is currently supported by:
* SonarScanner CLI, from version 6.0.
* SonarScanner for .NET, from version 7.0.
* SonarScanner for NPM, from version 4.0.
* SonarScanner for Maven, from version 5.0
* SonarScanner for Gradle, from version 6.0
See [#if-jre-auto-provisioning-is-not-supported](#if-jre-auto-provisioning-is-not-supported "mention") for actions you may need to take if JRE auto-provisioning is not supported.
#### Required Java versions
Following are the minimum Java versions required on your CI/CD host depending on your context.
| Scanner | Enabled JRE auto-provisioning | Disabled JRE auto-provisioning |
| ----------------------- | ----------------------------------------------------------------- | ------------------------------------- |
| SonarScanner for Maven | Java 11 | Java 21, Java 17 has been deprecated. |
| SonarScanner for Gradle | Java 11 | Java 21, Java 17 has been deprecated. |
| SonarScaner CLI |
Java 11 (from version 7.2) Java 17 (before version 7.2)
| Java 21, Java 17 has been deprecated. |
| SonarScanner for .NET | None | Java 21, Java 17 has been deprecated. |
| SonarScanner for NPM | None | Java 21, Java 17 has been deprecated. |
| SonarScanner for Python | None | Java 21, Java 17 has been deprecated. |
{% hint style="warning" %}
**Deprecation note**: Java 17 is deprecated as a supported scanner runtime environment and its support ends with SonarQube Server 2026.3 (July 2026), SonarQube Community Build and SonarQube Cloud in July 2026. There is no impact for this change if you use JRE auto-provisioning, enabled by default on scanners that support it, because it keeps Java version requirements always up to date. If you disabled JRE auto-provisioning or your scanner doesn’t support it, you need to update to Java 21 or newer.
{% endhint %}
Additional requirements may exist for specific scanners or languages. Check the respective SonarScanner and language pages for more details. In particular, to analyze JavaScript, TypeScript, or CSS, additional requirements exist, see [javascript-typescript-css](https://docs.sonarsource.com/sonarqube-cloud/advanced-setup/languages/javascript-typescript-css "mention").
{% hint style="info" %}
* The requirement on the JRE refers only to the version of Java used by the scanner itself to run. It does not restrict the versions of Java that can be analyzed by the scanner. In addition, the required version changes with successive versions of the scanner.
* In rare cases, you may want to disable the auto-provisioning. To do so, set the `sonar.scanner.skipJreProvisioning` to `true`. See [#jre-autoprovisioning](https://docs.sonarsource.com/sonarqube-cloud/analysis-parameters#jre-autoprovisioning "mention") for more information.
{% endhint %}
### If JRE auto-provisioning is not supported
This section describes the actions you may need to take depending on your environment in order to make sure the required Java version is used for the analysis.
#### GitHub Actions
The GitHub Action for SonarQube Cloud can be configured for different target build technologies. You can find samples for .NET, Gradle, Maven and a generic one, all running with JDK11, in this Sonar GitHub repository:[ sonarcloud-github-action.samples](https://github.com/SonarSource/sonarcloud-github-action-samples)
{% hint style="info" %}
If you follow these examples, we recommend using the minimum recommended version mentioned at the top of this page.
{% endhint %}
#### Maven / Gradle
If your whole Maven or Gradle build doesn’t run on Java 17 or later, we suggest first to try to base the whole build on this version of Java. If it’s not compatible, then you can override the `JAVA_HOME` environment variable just before the analysis step, as shown here:
```java
# Maven
mvn verify ...
export JAVA_HOME=/path/to/java17
mvn org.sonarsource.scanner.maven:sonar-maven-plugin:sonar ...
```
```java
# Gradle
gradle build ...
export JAVA_HOME=/path/to/java17
gradle sonarqube ...
```
#### Azure DevOps
All VM images available in Azure Pipelines for Microsoft-hosted agents already contain Java 17. There is no further action required. For self-hosted agents, you must ensure that you are using Java 17. You can either modify your build pipeline to ensure that it runs with Java 17 by default, or override the `JAVA_HOME` environment variable just before running the analysis.
**Xamarin**
For the specific case of Xamarin, which only allows Java 8, you will need to specify a Java 8 path separately when invoking MSBuild (using, for example, `XAMARIN_JAVA_HOME`), and then leave the `JAVA_HOME` environment variable for the scanner only.
```java
env:JAVA_HOME=/path/to/java17
env:XAMARIN_JAVA_HOME=/path/to/java8
msbuild.exe /p:JavaSdkDirectory=$env:XAMARIN_JAVA_HOME
```
#### Dockerfile
Multiple base images can be used to run your build with Java 17, here are some examples:
* `openjdk:17-jdk-slim`
* `gradle:8.10.0-jdk17-jammy`
If your build is not compatible with Java 17, then you can override the `JAVA_HOME` environment variable to point to Java 17 immediately before running the scanners.
#### Jenkins
You can easily define a new JDK version by navigating to **Manage Jenkins** > **Global Tool Configuration** if you have the JDK Tool Plugin installed.
**Declarative pipelines**
If you are using a declarative pipeline with different stages, you can add a ‘tools’ section to the stage in which the code scan occurs. This will make the scanner use the JDK version that is specified.
```java
stage('SonarCloud analysis') {
tools {
jdk "jdk17" // the name you have given the JDK installation in Global Tool Configuration
}
environment {
scannerHome = tool 'SonarCloud Scanner' // the name you have given the Sonar Scanner (in Global Tool Configuration)
}
steps {
withSonarQubeEnv(installationName: 'SonarCloud') {
sh "${scannerHome}/bin/sonar-scanner -X"
}
}
}
```
If you are analyzing a Java 11 project, you probably want to continue using Java 11 to build your project. The following example allows you to continue building in Java 11, but will use Java 17 to scan the code:
```java
stage('Build') {
tools {
jdk "jdk11" // the name you have given the JDK installation using the JDK manager (Global Tool Configuration)
}
steps {
sh 'mvn compile'
}
}
stage('SonarCloud analysis') {
tools {
jdk "jdk17" // the name you have given the JDK installation using the JDK manager (Global Tool Configuration)
}
environment {
scannerHome = tool 'SonarCloud Scanner' // the name you have given the Sonar Scanner (Global Tool Configuration)
}
steps {
withSonarQubeEnv(installationName: 'SonarCloud') {
sh 'mvn org.sonarsource.scanner.maven:sonar-maven-plugin:sonar'
}
}
}
```
This example is for Maven but it can be easily modified to use Gradle.
**Classical pipelines**
**Set Job JDK version**
* Set the JDK version to be used by jobs in the **General** section of your configuration. This option is only visible if you have configured multiple JDK versions under **Manage Jenkins** > **Global Tool Configuration**.
**Set ‘Execute SonarQube Scanner’ JDK version**
* If you are using the "Execute SonarQube Scanner" step in your configuration, you can set the JDK for this step in the configuration dialog. By using this approach, you can use JDK 17 only for the code scanning performed by SonarQube Cloud. All the other steps in the job will use the globally configured JDK.
**Java 11 projects**
* Jenkins does not offer functionality to switch JDKs when using a **Freestyle project** or **Maven project** configuration. To build your project using Java 11, you will have to manually set the `JAVA_HOME` variable to Java 17 when running the analysis.
* This can be done by using the **Tool Environment Plugin**. This plugin lets you expose the location of the JDK you added under **Manage Jenkins** > **Global Tool Configuration**.
* The location of the JDK can then be used to set the `JAVA_HOME` variable in a post step command, like this:
```java
export JAVA_HOME=$OPENJDK_17_HOME/Contents/Home
mvn $SONAR_MAVEN_GOAL
```
### Requirements for analysis on z/OS
Analysis is available on z/OS with the SonarScanner CLI.
This guide lists the minimum requirements for running the SonarScanner CLI on an IBM z/OS environment.
* Use sonar-scanner-cli 7.3+ in its generic package form, labeled **Any (Requires a pre-installed JVM)** on the [SonarScanner CLI](https://docs.sonarsource.com/sonarqube-cloud/advanced-setup/ci-based-analysis/sonarscanner-cli) page.
* Bash must be installed and used for execution. Use of other shells (e.g., ksh, zsh) is not guaranteed to work.
* The [minimum required](#required-java-versions) Java version.
{% hint style="info" %}
COBOL is the only officially supported language for analysis on z/OS.
{% endhint %}
---
# Source: https://docs.sonarsource.com/sonarqube-server/8.9/user-guide/user-account/generating-and-using-tokens.md
# Source: https://docs.sonarsource.com/sonarqube-server/9.8/user-guide/user-account/generating-and-using-tokens.md
# Source: https://docs.sonarsource.com/sonarqube-server/9.9/user-guide/user-account/generating-and-using-tokens.md
# Source: https://docs.sonarsource.com/sonarqube-server/10.0/user-guide/user-account/generating-and-using-tokens.md
# Source: https://docs.sonarsource.com/sonarqube-server/10.1/user-guide/user-account/generating-and-using-tokens.md
# Source: https://docs.sonarsource.com/sonarqube-server/10.2/user-guide/user-account/generating-and-using-tokens.md
# Source: https://docs.sonarsource.com/sonarqube-server/10.3/user-guide/user-account/generating-and-using-tokens.md
# Source: https://docs.sonarsource.com/sonarqube-server/10.4/user-guide/user-account/generating-and-using-tokens.md
# Source: https://docs.sonarsource.com/sonarqube-server/10.5/user-guide/user-account/generating-and-using-tokens.md
# Source: https://docs.sonarsource.com/sonarqube-server/10.6/user-guide/user-account/generating-and-using-tokens.md
# Generating and using tokens
SonarQube users can generate tokens that can be used to run analyses or invoke web services without access to the user’s actual credentials. You can generate new tokens at **User** > **My Account** > **Security.**
### Types of tokens
#### User tokens
These tokens can be used to invoke web services, based on the token author’s permissions, and are the preferred authentication method used by SonarLint when setting up [SonarLint Connected Mode](https://app.gitbook.com/s/Bmptmznn7RpPe5u7vdup/user-guide/sonarlint-connected-mode "mention"). A user token gives you all the permissions of the user who issued it. For example, a global admin’s user token gives you full rights to the instance.
User tokens allow you to perform, via the [web-api](https://docs.sonarsource.com/sonarqube-server/10.6/extension-guide/web-api "mention"), any action the user can do via the UI.
{% hint style="info" %}
When using tokens to set up [sonarlint-connected-mode](https://docs.sonarsource.com/sonarqube-server/10.6/user-guide/sonarlint-connected-mode "mention") in SonarLint, *user tokens are required*. Note that the binding will not function properly if *project tokens* or *global tokens* are used during the setup process. Check the SonarLint documentation for more details:
* [Connected mode](https://docs.sonarsource.com/sonarqube-for-intellij/connect-your-ide/connected-mode)
* [Connected mode](https://docs.sonarsource.com/sonarqube-for-visual-studio/connect-your-ide/connected-mode)
* [Connected mode](https://docs.sonarsource.com/sonarqube-for-vs-code/connect-your-ide/connected-mode)
* [Connected mode](https://docs.sonarsource.com/sonarqube-for-eclipse/connect-your-ide/connected-mode)
{% endhint %}
#### Project analysis tokens
A project analysis token allows you to run analyses on the specific project it was generated for.
To create a project analysis token, the user should have Global Execute Analysis permission or Execute Analysis permission on the token’s associated project.
If the token’s author loses Execute Analysis permissions for the associated project, the token will no longer be valid for performing an analysis.
{% hint style="info" %}
The usage of project analysis tokens is encouraged for security reasons. If such a token were to leak, an attacker would only gain access to analyze a single project or to interact with the related web services requiring Execute Analysis permissions.
{% endhint %}
#### Global analysis tokens
These tokens can be used to run analyses on every project.
To create global analysis tokens, the user should have Global Execute Analysis Permission.
If the token’s author loses the Global Execute Analysis permission, the token will no longer be valid for performing an analysis.
### Generating a token
You can generate new tokens at **User** > **My Account** > **Security**.
The form at the top of the page allows you to generate new tokens, specifying their token type. You can select an expiration for your token or choose "no expiration". If you select an expiration date, and your system administrator has configured SonarQube to send email notifications, you will receive an email 7 days prior to your token’s expiry date to remind you to rotate your token. If the token is not revoked before expiring, you will receive another email once the token has expired to notify you the token is no longer usable.
If an Administrator has enforced a maximum lifetime for tokens, then the "no expiration" option will not be available and the maximum allowed expiration will correspond to the maximum token lifetime allowed by your organization. Enforcing a maximum lifetime for all newly generated tokens is available as part of the [Enterprise Edition](https://www.sonarsource.com/plans-and-pricing/enterprise/) and above; for more information, please see [security](https://docs.sonarsource.com/sonarqube-server/10.6/instance-administration/security "mention").
Once you select **Generate**, you will see the token value. Copy it immediately; when you dismiss the notification, you will not be able to retrieve it.
### Revoking a token
You can revoke an existing token at **User** > **My Account** > **Security** by selecting **Revoke** next to the token.
### Expired tokens
If a token has an expiration date and is past the expiration, it will no longer be usable. The token will still be visible under **User** > **My Account** > **Security**, where you can revoke it like any other token.
### Using a token
User tokens are used in the following scenarios:
* when running analyses on your code, use the token as value of the `sonar.token` property, or create the SONAR\_TOKEN environment variable and set the token as its value.
* when invoking web services, pass the token using the bearer or basic HTTP authentication scheme (see [web-api](https://docs.sonarsource.com/sonarqube-server/10.6/extension-guide/web-api "mention")).
In both cases, you don’t need to provide a password. Using a token is the preferred method over using a login and password.
#### Expiration date in HTTP response
When using a token to interact with web services, a `SonarQube-Authentication-Token-Expiration` HTTP header will be added to the response. This header contains the token expiration date and can help third-party tools track upcoming expirations; this method allows the token to be rotated in time.
---
# Source: https://docs.sonarsource.com/sonarqube-cloud/enriching/generic-issue-data.md
# Generic issue data
SonarQube Cloud supports a generic format for importing issues generated by external analysis tools, like linters. This feature can help you integrate a tool that is not directly supported by SonarQube Cloud by having your custom CI task convert the output of the unsupported tool to this generic format, which can then be imported into SonarQube Cloud.
External issues have the limitation that the activation of the rules that raise these issues cannot be managed within SonarQube Cloud. External rules are not visible on the Rules page or reflected in any Quality Profile.
External issues and the rules that raise them must be managed in the configuration of your external tool.
### Import
You can set up the import of the report files by defining the [analysis-parameters](https://docs.sonarsource.com/sonarqube-cloud/advanced-setup/analysis-parameters "mention") `sonar.externalIssuesReportPaths` on the CI/CD host with the list of import directories or files. This parameter accepts a comma-delimited list of paths (a file path definition is either relative to the `sonar.projectBaseDir` property, which is by default the directory from which the analysis was started, or absolute).
The issues report must contain, an array of rule objects (`rules`) and an array of issue objects (`issues`).
#### List of objects and properties in the report
The following objects and properties comprise the generic issues report.
**Rules object**
`rules` (array of rule objects)
**Objects and properties included in rules:**
`id` (string, required): Rule identifier
`name` (string, required): Rule name
`description` (string, required): Rule description
`engineId` (string, required): Identifier of the third-party analyzer that provides the rule.
`cleanCodeAttribute` (string, required): Coding attribute associated with the rule, possible values for:
* Consistency: FORMATTED, CONVENTIONAL, IDENTIFIABLE
* Intentionality: CLEAR, LOGICAL, COMPLETE, EFFICIENT
* Adaptibility: FOCUSED, DISTINCT, MODULAR, TESTED
* Responsibility: LAWFUL, TRUSTWORTHY, RESPECTFUL
`type` (string, deprecated): Rule type, possible values: BUG, VULNERABILITY, CODE\_SMELL.
`severity` (string, deprecated): Rule severity, possible values: BLOCKER, CRITICAL, MAJOR, MINOR, INFO.
`impacts` (array of impact objects, required): `impacts` object replaces deprecated `types` and `severity` properties.
* `softwareQuality` (string)\
Possible values: SECURITY, RELIABILITY, MAINTAINABILITY
* `severity` (string)\
Possible values: BLOCKER, HIGH, MEDIUM, LOW, INFO
Example of a `rules` object containing one rule:
```json
"rules": [
{
"id": "rule1",
"name": "Name of rule 1",
"description": "Description of rule 1",
"engineId": "third-party analyzer 1",
"cleanCodeAttribute": "FORMATTED",
"type": "CODE_SMELL",
"severity": "CRITICAL",
"impacts": [
{
"softwareQuality": "MAINTAINABILITY",
"severity": "HIGH"
},
{
"softwareQuality": "SECURITY",
"severity": "LOW"
}
]
}
]
```
**Issues object**
`issues` (array of issue objects)
**Objects and properties included in issues:**
`ruleID` (string, required): Identifier of the rule that raised the issue.
`effortMinutes` (integer): Effort in minutes to solve the issue. The default value is 0.
`primaryLocation` (object, required): Primary location of the issue in code.
* `message` (string, required): Description of the issue.
* `filePath` (string, required): Path to the code file that raised the issue.
* `textRange` (object): Object used to locate the code that raised the issue.
* `startLine` (integer, required): Start line of the code that raised the issue.
* `endLine` (integer): End line of the code that raised the issue.
* `startColumn` (integer): Start column of the code that raised the issue. **Do not specify** for empty lines.
* `endColumn` (integer): End column of the code that raised the issue.
`secondaryLocations` (array of locations): Secondary locations of the issue if there are several places of concern in the code. See `primaryLocation` on how to structure the location object.
Example of an `issues` object containing one issue:
```json
"issues": [
{
"ruleId": "rule1",
"effortMinutes": 40,
"primaryLocation": {
"message": "fix issue 1",
"filePath": "file1.js",
"textRange": {
"startLine": 1,
"startColumn": 2,
"endLine": 3,
"endColumn": 4
}
},
"secondaryLocations": [
{
"message": "fix issue 2",
"filePath": "file2.js",
"textRange": {
"startLine": 1
}
},
{
"message": "fix issue 3",
"filePath": "file3.js",
"textRange": {
"startLine": 2
}
}
]
}
]
```
#### Report file example
```json
{
"rules": [
{
"id": "rule1",
"name": "Name of rule 1",
"description": "Description of rule 1",
"engineId": "third-party analyzer 1",
"cleanCodeAttribute": "FORMATTED",
"type": "CODE_SMELL",
"severity": "CRITICAL",
"impacts": [
{
"softwareQuality": "MAINTAINABILITY",
"severity": "HIGH"
},
{
"softwareQuality": "SECURITY",
"severity": "LOW"
}
]
},
{
"id": "rule2",
"name": "Name of rule 2",
"description": "Description of rule 2",
"engineId": "third-party analyzer 2",
"cleanCodeAttribute": "IDENTIFIABLE",
"type": "BUG",
"severity": "MINOR",
"impacts": [
{
"softwareQuality": "RELIABILITY",
"severity": "LOW"
}
]
}
],
"issues": [
{
"ruleId": "rule1",
"effortMinutes": 40,
"primaryLocation": {
"message": "fix issue 1",
"filePath": "file1.js",
"textRange": {
"startLine": 1,
"startColumn": 2,
"endLine": 3,
"endColumn": 4
}
},
"secondaryLocations": [
{
"message": "fix issue 2",
"filePath": "file2.js",
"textRange": {
"startLine": 1
}
},
{
"message": "fix issue 3",
"filePath": "file3.js",
"textRange": {
"startLine": 2
}
}
]
},
{
"ruleId": "rule2",
"primaryLocation": {
"message": "fix issue 4",
"filePath": "file4.js",
"textRange": {
"startLine": 3
}
}
}
]
}
```
---
# Source: https://docs.sonarsource.com/sonarqube-community-build/analyzing-source-code/importing-external-issues/generic-issue-import-format.md
# Source: https://docs.sonarsource.com/sonarqube-server/8.9/analyzing-source-code/importing-external-issues/generic-issue-import-format.md
# Source: https://docs.sonarsource.com/sonarqube-server/9.8/analyzing-source-code/importing-external-issues/generic-issue-import-format.md
# Source: https://docs.sonarsource.com/sonarqube-server/9.9/analyzing-source-code/importing-external-issues/generic-issue-import-format.md
# Source: https://docs.sonarsource.com/sonarqube-server/10.0/analyzing-source-code/importing-external-issues/generic-issue-import-format.md
# Source: https://docs.sonarsource.com/sonarqube-server/10.1/analyzing-source-code/importing-external-issues/generic-issue-import-format.md
# Source: https://docs.sonarsource.com/sonarqube-server/10.2/analyzing-source-code/importing-external-issues/generic-issue-import-format.md
# Source: https://docs.sonarsource.com/sonarqube-server/10.3/analyzing-source-code/importing-external-issues/generic-issue-import-format.md
# Source: https://docs.sonarsource.com/sonarqube-server/10.4/analyzing-source-code/importing-external-issues/generic-issue-import-format.md
# Source: https://docs.sonarsource.com/sonarqube-server/10.5/analyzing-source-code/importing-external-issues/generic-issue-import-format.md
# Source: https://docs.sonarsource.com/sonarqube-server/10.6/analyzing-source-code/importing-external-issues/generic-issue-import-format.md
# Source: https://docs.sonarsource.com/sonarqube-server/10.7/analyzing-source-code/importing-external-issues/generic-issue-import-format.md
# Source: https://docs.sonarsource.com/sonarqube-server/10.8/analyzing-source-code/importing-external-issues/generic-issue-import-format.md
# Source: https://docs.sonarsource.com/sonarqube-server/2025.2/analyzing-source-code/importing-external-issues/generic-issue-import-format.md
# Source: https://docs.sonarsource.com/sonarqube-server/2025.3/analyzing-source-code/importing-external-issues/generic-issue-import-format.md
# Source: https://docs.sonarsource.com/sonarqube-server/2025.5/analyzing-source-code/importing-external-issues/generic-issue-import-format.md
# Source: https://docs.sonarsource.com/sonarqube-server/2025.1/analyzing-source-code/importing-external-issues/generic-issue-import-format.md
# Source: https://docs.sonarsource.com/sonarqube-server/2025.4/analyzing-source-code/importing-external-issues/generic-issue-import-format.md
# Source: https://docs.sonarsource.com/sonarqube-server/2025.6/analyzing-source-code/importing-external-issues/generic-issue-import-format.md
# Source: https://docs.sonarsource.com/sonarqube-server/analyzing-source-code/importing-external-issues/generic-issue-import-format.md
# Generic formatted reports
If your third-party analyzer is not supported by SonarQube Server then you can import the reports by using the SonarQube Server generic issue format. No plugin is required.
The external issues will be taken into account by SonarQube Server in the analysis report, but the rules corresponding to these issues will not be visible on the **Rules** page nor reflected in quality profiles. This means that the rules that raise external issues must be managed in your third-party tool.
### Setting up the import
1. Set up the generation of the third-party reports in the generic issue format according to the specifications below.
2. Set up the import of the report files by defining the [analysis-parameters](https://docs.sonarsource.com/sonarqube-server/analyzing-source-code/analysis-parameters "mention") `sonar.externalIssuesReportPaths` on the CI/CD host with the list of import directories or files. to define the list of report files to be imported during your project analysis. This parameter accepts a comma-delimited list of paths (A file path definition is either relative to the `sonar.projectBaseDir` property, which is by default the directory from which the analysis was started, or absolute.).
### Generic issue format specifications
The issues report must contain, an array of rule objects (`rules`) and an array of issue objects (`issues`).
{% hint style="info" %}
The generic issue format has changed with SonarQube Server 10.3. The previous format is deprecated. If you use it, SonarQube Server will apply the following default values:
* For the `cleanCodeAttribute` field: CONVENTIONAL
* For the `softwareQuality` field: MAINTAINABILITY
* For the `severity` field: MEDIUM
If you use SonarQube Server 10.8 or. later, you must use the latest generic issue format as outlined below. Otherwise, all issues will appear with Maintainability set to Medium in MQR Mode.
If you are switching between Standard Experience and MQR Mode, see [changing-modes](https://docs.sonarsource.com/sonarqube-server/user-guide/code-metrics/changing-modes "mention") for more information about how it might affect your metrics and workflow.
{% endhint %}
#### List of objects and properties in the report
The following objects and properties comprise the generic issues report.
**Rules object**
`rules` (array of rule objects)
**Objects and properties included in rules:**
`id` (string, required): Rule identifier
`name` (string, required): Rule name
`description` (string, required): Rule description
`engineId` (string, required): Identifier of the third-party analyzer that provides the rule.
`cleanCodeAttribute` (string, required): Coding attribute associated with the rule, possible values for:
* Consistency: FORMATTED, CONVENTIONAL, IDENTIFIABLE
* Intentionality: CLEAR, LOGICAL, COMPLETE, EFFICIENT
* Adaptibility: FOCUSED, DISTINCT, MODULAR, TESTED
* Responsibility: LAWFUL, TRUSTWORTHY, RESPECTFUL
`type` (string, optional if `impacts` is provided): Rule type, possible values: BUG, VULNERABILITY, CODE\_SMELL. We recommend incluing `type` if your instance is set to [Standard Experience mode](https://docs.sonarsource.com/sonarqube-server/instance-administration/analysis-functions/instance-mode/standard-experience).
`severity` (string, optional if `impacts` is provided): Rule severity, possible values: BLOCKER, CRITICAL, MAJOR, MINOR, INFO. We recommend including `severity` if your instance is set to Standard Experience mode.
`impacts` (array of impact objects, optional if `type` and `severity` are provided). We recommend including `impacts` if your instance is set to [MQR Mode](https://docs.sonarsource.com/sonarqube-server/instance-administration/analysis-functions/instance-mode/mqr-mode).
* `softwareQuality` (string)\
Possible values: SECURITY, RELIABILITY, MAINTAINABILITY
* `severity` (string)\
Possible values: BLOCKER, HIGH, MEDIUM, LOW, INFO
Example of a `rules` object containing one rule:
```json
"rules": [
{
"id": "rule1",
"name": "Name of rule 1",
"description": "Description of rule 1",
"engineId": "third-party analyzer 1",
"cleanCodeAttribute": "FORMATTED",
"type": "CODE_SMELL",
"severity": "CRITICAL",
"impacts": [
{
"softwareQuality": "MAINTAINABILITY",
"severity": "HIGH"
},
{
"softwareQuality": "SECURITY",
"severity": "LOW"
}
]
}
]
```
**Issues object**
`issues` (array of issue objects)
**Objects and properties included in issues:**
`ruleID` (string, required): Identifier of the rule that raised the issue.
`effortMinutes` (integer): Effort in minutes to solve the issue. The default value is 0.
`primaryLocation` (object, required): Primary location of the issue in code.
* `message` (string, required): Description of the issue.
* `filePath` (string, required): Path to the code file that raised the issue.
* `textRange` (object): Object used to locate the code that raised the issue.
* `startLine` (integer, required): Start line of the code that raised the issue.
* `endLine` (integer): End line of the code that raised the issue.
* `startColumn` (integer): Start column of the code that raised the issue. **Do not specify** for empty lines.
* `endColumn` (integer): End column of the code that raised the issue.
`secondaryLocations` (array of locations): Secondary locations of the issue if there are several places of concern in the code. See `primaryLocation` on how to structure the location object.
Example of an `issues` object containing one issue:
```json
"issues": [
{
"ruleId": "rule1",
"effortMinutes": 40,
"primaryLocation": {
"message": "fix issue 1",
"filePath": "file1.js",
"textRange": {
"startLine": 1,
"startColumn": 2,
"endLine": 3,
"endColumn": 4
}
},
"secondaryLocations": [
{
"message": "fix issue 2",
"filePath": "file2.js",
"textRange": {
"startLine": 1
}
},
{
"message": "fix issue 3",
"filePath": "file3.js",
"textRange": {
"startLine": 2
}
}
]
}
]
```
#### Report file example
```json
{
"rules": [
{
"id": "rule1",
"name": "Name of rule 1",
"description": "Description of rule 1",
"engineId": "third-party analyzer 1",
"cleanCodeAttribute": "FORMATTED",
"type": "CODE_SMELL",
"severity": "CRITICAL",
"impacts": [
{
"softwareQuality": "MAINTAINABILITY",
"severity": "HIGH"
},
{
"softwareQuality": "SECURITY",
"severity": "LOW"
}
]
},
{
"id": "rule2",
"name": "Name of rule 2",
"description": "Description of rule 2",
"engineId": "third-party analyzer 2",
"cleanCodeAttribute": "IDENTIFIABLE",
"type": "BUG",
"severity": "MINOR",
"impacts": [
{
"softwareQuality": "RELIABILITY",
"severity": "LOW"
}
]
}
],
"issues": [
{
"ruleId": "rule1",
"effortMinutes": 40,
"primaryLocation": {
"message": "fix issue 1",
"filePath": "file1.js",
"textRange": {
"startLine": 1,
"startColumn": 2,
"endLine": 3,
"endColumn": 4
}
},
"secondaryLocations": [
{
"message": "fix issue 2",
"filePath": "file2.js",
"textRange": {
"startLine": 1
}
},
{
"message": "fix issue 3",
"filePath": "file3.js",
"textRange": {
"startLine": 2
}
}
]
},
{
"ruleId": "rule2",
"primaryLocation": {
"message": "fix issue 4",
"filePath": "file4.js",
"textRange": {
"startLine": 3
}
}
}
]
}
```
### Related pages
[about-external-issues](https://docs.sonarsource.com/sonarqube-server/analyzing-source-code/importing-external-issues/about-external-issues "mention")
[external-analyzer-reports](https://docs.sonarsource.com/sonarqube-server/analyzing-source-code/importing-external-issues/external-analyzer-reports "mention")
[importing-issues-from-sarif-reports](https://docs.sonarsource.com/sonarqube-server/analyzing-source-code/importing-external-issues/importing-issues-from-sarif-reports "mention")
---
# Source: https://docs.sonarsource.com/sonarqube-cloud/administering-sonarcloud/managing-enterprise/enterprise-security/sso/setup/configure-sso/generic-operation.md
# Using the setup assistant (generic operation)
The generic operation to configure SSO with SonarQube Cloud's setup assistant is as follows:
1. In SonarQube Cloud, retrieve your enterprise. See [..](https://docs.sonarsource.com/sonarqube-cloud/administering-sonarcloud/managing-enterprise "mention") for more details.
2. Select **Administration** > **Single Sign-On**. The **Single Sign-On** page opens.
3. Select **Open Configuration** and then **Get Started**. The setup assistant opens.
4. Select **Custom SAML** and select **Next**.
5. Follow the steps described below.
{% hint style="info" %}
* If you use Okta, see [okta](https://docs.sonarsource.com/sonarqube-cloud/administering-sonarcloud/managing-enterprise/enterprise-security/sso/setup/configure-sso/okta "mention").
* If you use Microsoft Entra ID, see [microsoft-entra-id](https://docs.sonarsource.com/sonarqube-cloud/administering-sonarcloud/managing-enterprise/enterprise-security/sso/setup/configure-sso/microsoft-entra-id "mention").
* The SSO setup assistant is a recent addition. If you previously configured SSO using the older method, your setup remains unaffected. However, to leverage the benefits of the new SSO setup assistant, you may delete your existing configuration and create a new one.
{% endhint %}
### Step 1: Create the SonarQube Cloud application in your identity provider
1. Create the SonarQube Cloud application in your identity provider.
2. Copy the **Service Provider Identity ID** field value from the setup assistant and paste it into the corresponding field in your identity provider.
3. Copy the **Single Sign-On URL** field value from the setup assistant and paste it into the corresponding field in your identity provider.
4. In the setup assistant, select **Next** to go to the step **2. Configure Connection**.
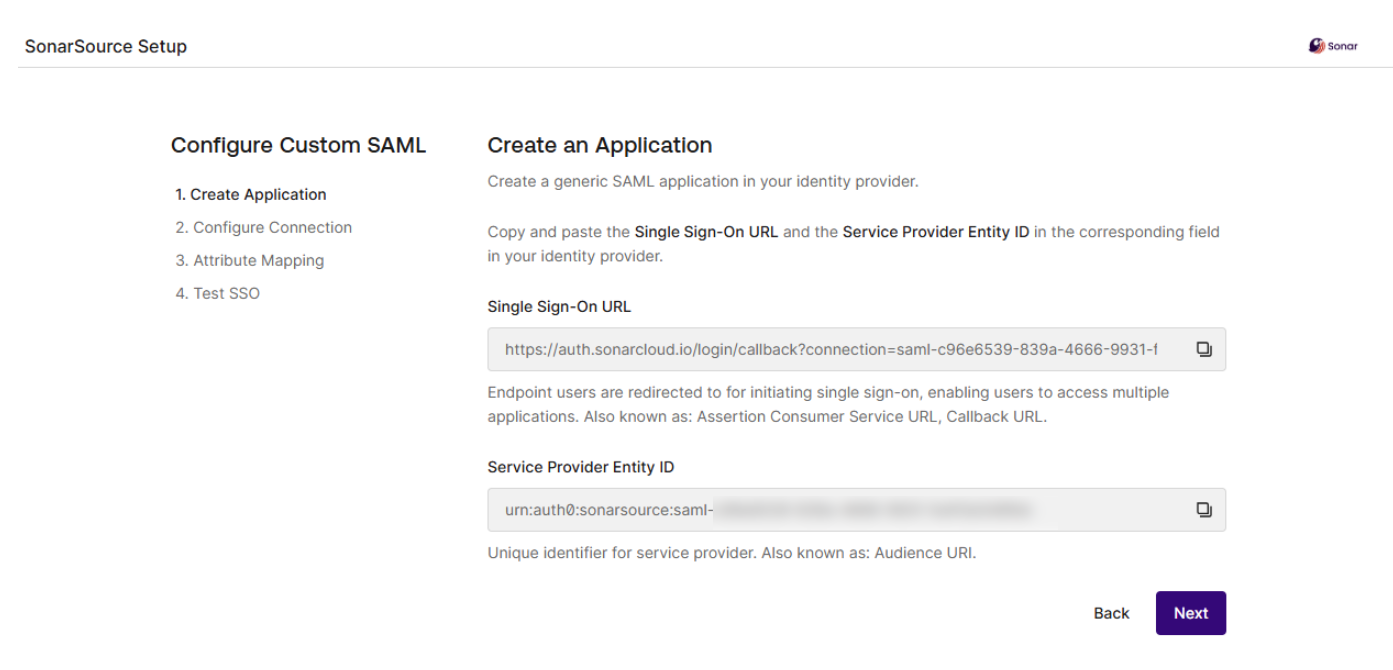
### Step 2: Configure the connection
The operation is different depending on whether your identity provider supports the SAML metadata URL field (URL used by SonarQube Cloud to access metadata information) or not.
Metadata URL supported
1. In your SonarQube Cloud application in your identity provider, copy the value of the field corresponding to the SAML metadata URL .
2. Paste it into the **Metadata URL** field in the **Automatic** tab of the setup assistant page.
3. In the assistant, select **Create Connection** and **Proceed.** SonarQube Cloud is trying to connect to your Identity Provider. If the connection is established, the assistant moves to step **3. Attribute Mapping**.
Metadata URL not supported
1. In the assistant, select the **Manual** tab.
2. In your identity provider, copy the value of the SSO login URL field and paste it into **Single Sign-On Login URL** in the assistant.
3. In your identity provider, download the certificate and upload it to the assistant.
4. In the assistant, select **Create Connection** and **Proceed.** SonarQube Cloud is trying to connect to your Identity Provider. If the connection is established, the assistant moves to step **3. Attribute Mapping**.
### Step 3: Set up the attributes
1. In your identity provider, create the attributes for name, login, email, and groups (the group attribute is used for automatic group synchronization. To do so, for each attribute, copy the attribute name from the assistant and paste it into the attribute’s name field in your identity provider.
2. In the assistant, select **Next** to go to step **4. Test SSO**.
### Step 4: Test SSO
1. Select the **Test Connection** button. The test is started and the results are displayed on the page as illustrated below.
2. If the test was successful, select **Done**.
### Related pages
[verify-user-groups](https://docs.sonarsource.com/sonarqube-cloud/administering-sonarcloud/managing-enterprise/enterprise-security/sso/setup/verify-user-groups "mention")\
[inviting-users-to-sign-in](https://docs.sonarsource.com/sonarqube-cloud/administering-sonarcloud/managing-enterprise/enterprise-security/sso/setup/inviting-users-to-sign-in "mention")\
[terminate-setup](https://docs.sonarsource.com/sonarqube-cloud/administering-sonarcloud/managing-enterprise/enterprise-security/sso/setup/terminate-setup "mention")\
[editing-sso-configuration](https://docs.sonarsource.com/sonarqube-cloud/administering-sonarcloud/managing-enterprise/enterprise-security/sso/editing-sso-configuration "mention")\
[deleting-sso-configuration](https://docs.sonarsource.com/sonarqube-cloud/administering-sonarcloud/managing-enterprise/enterprise-security/sso/deleting-sso-configuration "mention")
---
# Source: https://docs.sonarsource.com/sonarqube-community-build/analyzing-source-code/test-coverage/generic-test-data.md
# Source: https://docs.sonarsource.com/sonarqube-server/8.9/analyzing-source-code/generic-test-data.md
# Source: https://docs.sonarsource.com/sonarqube-server/9.8/analyzing-source-code/test-coverage/generic-test-data.md
# Source: https://docs.sonarsource.com/sonarqube-server/9.9/analyzing-source-code/test-coverage/generic-test-data.md
# Source: https://docs.sonarsource.com/sonarqube-server/10.0/analyzing-source-code/test-coverage/generic-test-data.md
# Source: https://docs.sonarsource.com/sonarqube-server/10.1/analyzing-source-code/test-coverage/generic-test-data.md
# Source: https://docs.sonarsource.com/sonarqube-server/10.2/analyzing-source-code/test-coverage/generic-test-data.md
# Source: https://docs.sonarsource.com/sonarqube-server/10.3/analyzing-source-code/test-coverage/generic-test-data.md
# Source: https://docs.sonarsource.com/sonarqube-server/10.4/analyzing-source-code/test-coverage/generic-test-data.md
# Source: https://docs.sonarsource.com/sonarqube-server/10.5/analyzing-source-code/test-coverage/generic-test-data.md
# Source: https://docs.sonarsource.com/sonarqube-server/10.6/analyzing-source-code/test-coverage/generic-test-data.md
# Source: https://docs.sonarsource.com/sonarqube-server/10.7/analyzing-source-code/test-coverage/generic-test-data.md
# Source: https://docs.sonarsource.com/sonarqube-server/10.8/analyzing-source-code/test-coverage/generic-test-data.md
# Source: https://docs.sonarsource.com/sonarqube-server/2025.2/analyzing-source-code/test-coverage/generic-test-data.md
# Source: https://docs.sonarsource.com/sonarqube-server/2025.3/analyzing-source-code/test-coverage/generic-test-data.md
# Source: https://docs.sonarsource.com/sonarqube-server/2025.5/analyzing-source-code/test-coverage/generic-test-data.md
# Source: https://docs.sonarsource.com/sonarqube-server/2025.1/analyzing-source-code/test-coverage/generic-test-data.md
# Source: https://docs.sonarsource.com/sonarqube-server/2025.4/analyzing-source-code/test-coverage/generic-test-data.md
# Source: https://docs.sonarsource.com/sonarqube-server/2025.6/analyzing-source-code/test-coverage/generic-test-data.md
# Source: https://docs.sonarsource.com/sonarqube-server/analyzing-source-code/test-coverage/generic-test-data.md
# Source: https://docs.sonarsource.com/sonarqube-cloud/enriching/test-coverage/generic-test-data.md
# Generic test data
SonarQube Cloud supports a generic format for importing test coverage and test execution reports. This feature can help you integrate a tool that is not directly supported by SonarQube Cloud by having your custom CI task convert the output of the unsupported tool to this generic format, which can then be imported into SonarQube Cloud.
### Generic coverage
Report paths should be passed in a comma-delimited list to:
* `sonar.coverageReportPaths`
The supported format is described by the `sonar-generic-coverage.xsd`:
```xml
```
and looks like this:
```xml
```
The root node should be named `coverage`. Its version attribute should be set to `1`.
Insert a `file` element for each file which can be covered by tests. Its `path` attribute can be either absolute or relative to the root of the module. Inside a `file` element, insert a `lineToCover` for each line which can be covered by unit tests. It can have the following attributes:
* `lineNumber` (mandatory)
* `covered` (mandatory): boolean value indicating whether a test hits that line
* `branchesToCover` (optional): number of branches that can be covered
* `coveredBranches` (optional): number of branches that are covered by tests
### Generic execution
Report paths should be passed in a comma-delimited list to:
* `sonar.testExecutionReportPaths`
The supported format looks like this:
```xml
otherstacktracestacktrace
```
The root node should be named `testExecutions`. Its version attribute should be set to `1`.
Insert a `file` element for each test file. Its `path` attribute can be either absolute or relative to the root of the module.
**Note** unlike for coverage reports, the files present in the report must be test file names, not source code files covered by tests.
Inside a `file` element, insert a `testCase` for each test run by unit tests. It can have the following attributes/children:
* `testCase` (mandatory)
* `name` (mandatory): name of the test case
* `duration` (mandatory): long value in milliseconds
* `failure|error|skipped` (optional): if the test is not OK, report the cause with a message and a long description
* `message` (mandatory): short message describing the cause
* `stacktrace` (optional): long message containing details about `failure|error|skipped` status
---
# Source: https://docs.sonarsource.com/sonarqube-cloud/getting-started-with-enterprise.md
# Getting started with Enterprise
{% content-ref url="getting-started-with-enterprise/introduction" %}
[introduction](https://docs.sonarsource.com/sonarqube-cloud/getting-started-with-enterprise/introduction)
{% endcontent-ref %}
{% content-ref url="getting-started-with-enterprise/setting-up-your-enterprise" %}
[setting-up-your-enterprise](https://docs.sonarsource.com/sonarqube-cloud/getting-started-with-enterprise/setting-up-your-enterprise)
{% endcontent-ref %}
{% content-ref url="getting-started-with-enterprise/setting-up-sso" %}
[setting-up-sso](https://docs.sonarsource.com/sonarqube-cloud/getting-started-with-enterprise/setting-up-sso)
{% endcontent-ref %}
{% content-ref url="getting-started-with-enterprise/onboarding-new-org" %}
[onboarding-new-org](https://docs.sonarsource.com/sonarqube-cloud/getting-started-with-enterprise/onboarding-new-org)
{% endcontent-ref %}
{% content-ref url="getting-started-with-enterprise/administering-portfolios" %}
[administering-portfolios](https://docs.sonarsource.com/sonarqube-cloud/getting-started-with-enterprise/administering-portfolios)
{% endcontent-ref %}
{% content-ref url="getting-started-with-enterprise/viewing-enterprise-reports" %}
[viewing-enterprise-reports](https://docs.sonarsource.com/sonarqube-cloud/getting-started-with-enterprise/viewing-enterprise-reports)
{% endcontent-ref %}
{% content-ref url="getting-started-with-enterprise/viewing-billing-usage-info" %}
[viewing-billing-usage-info](https://docs.sonarsource.com/sonarqube-cloud/getting-started-with-enterprise/viewing-billing-usage-info)
{% endcontent-ref %}
---
# Source: https://docs.sonarsource.com/sonarqube-community-build/analyzing-source-code/dotnet-environments/getting-started-with-net.md
# Source: https://docs.sonarsource.com/sonarqube-server/10.7/analyzing-source-code/dotnet-environments/getting-started-with-net.md
# Source: https://docs.sonarsource.com/sonarqube-server/10.8/analyzing-source-code/dotnet-environments/getting-started-with-net.md
# Source: https://docs.sonarsource.com/sonarqube-server/2025.2/analyzing-source-code/dotnet-environments/getting-started-with-net.md
# Source: https://docs.sonarsource.com/sonarqube-server/2025.3/analyzing-source-code/dotnet-environments/getting-started-with-net.md
# Source: https://docs.sonarsource.com/sonarqube-server/2025.5/analyzing-source-code/dotnet-environments/getting-started-with-net.md
# Source: https://docs.sonarsource.com/sonarqube-server/2025.1/analyzing-source-code/dotnet-environments/getting-started-with-net.md
# Source: https://docs.sonarsource.com/sonarqube-server/2025.4/analyzing-source-code/dotnet-environments/getting-started-with-net.md
# Source: https://docs.sonarsource.com/sonarqube-server/2025.6/analyzing-source-code/dotnet-environments/getting-started-with-net.md
# Source: https://docs.sonarsource.com/sonarqube-server/analyzing-source-code/dotnet-environments/getting-started-with-net.md
# Getting started with .NET
Setting up a .NET analysis with Sonar involves different configurations depending on your .NET environment and the CI integration used for your workflow. This page helps you get started by looking at the prerequisites, provides information to identify the version of the .NET scanner you should use, followed by links to setting up your CI environment and concluding with an overview of establishing code coverage to generate reports.
### Prerequisites
Knowing which .NET version you are running is important; check this [Microsoft documentation](https://learn.microsoft.com/en-us/dotnet/framework/migration-guide/how-to-determine-which-versions-are-installed) to learn which versions you have installed.
The SonarScanner for .NET must be installed in the same environment where you build your application. For example, if you’re building projects locally, the scanner must be installed locally; similarly, if you’re working with Azure Pipelines, you must add SonarScanner tasks to the pipeline.
The SonarScanner is working during the build process therefore, don’t be worried if everything takes a little longer because as mentioned above, the build is now also running an analysis *during the build*.
#### Your environment
**SonarQube Server**
The SonarScanner for .NET works with supported versions of SonarQube Server and with SonarQube Cloud.
* SonarQube 10.4 and newer requires the SonarScanner for .NET 5.14 or newer.
* SonarQube 8.9 is deprecated in the SonarScanner for .NET 9.0. The SonarScanner will fail to start if SonarQube 8.8 or older is detected.
**Java**
Depending on the version of the SonarScanner for .NET and SonarQube Server combination you are using, you might need to install Java. When running SonarQube 10.6 or newer with the scanner version 7.0 or newer, installing a JRE is not required because it will be automatically obtained from the server.
* You can disable JRE auto-provisioning and specify your own version of Java; please check the scanner’s page [general-requirements](https://docs.sonarsource.com/sonarqube-server/analyzing-source-code/scanners/scanner-environment/general-requirements "mention") when using JRE auto-provisioning.
Otherwise, you must have at least the minimal version of Java supported by your version of SonarQube Server.
* Before scanner version 6.0, Java 11 or newer is required.
* From and including scanner version 6.0, Java 17 or newer is required.
Open the **SonarScanner for .NET** version Update Center expandable box (next, below); then find the scanner version that fits with your version of SonarQube Server and your runtime to download the correct version. We recommend that you choose the latest version of the scanner.
SonarScanner for .NET — 11.0.0.126294 | Issue Tracker
**11.0.0.126294** **2025-10-15**\ The Scanner for .NET does not embed the SonarScanner CLI anymore and downloads it when needed. Adds support for MSTest 4.\
Download scanner for: [.NET Global Tool](https://www.nuget.org/packages/dotnet-sonarscanner) [.NET Core 3.1+](https://github.com/SonarSource/sonar-scanner-msbuild/releases/download/11.0.0.126294/sonar-scanner-11.0.0.126294-net.zip) [.NET Framework 4.6.2+](https://github.com/SonarSource/sonar-scanner-msbuild/releases/download/11.0.0.126294/sonar-scanner-11.0.0.126294-net-framework.zip)\
\
[Release notes](https://github.com/SonarSource/sonar-scanner-msbuild/releases/tag/11.0.0.126294)
***
**10.4.1.124928** **2025-09-23**\ Fix a bug that erroneously warns that Community Build is not supported.\
Download scanner for: [.NET Global Tool](https://www.nuget.org/packages/dotnet-sonarscanner) [.NET Core 3.1+](https://github.com/SonarSource/sonar-scanner-msbuild/releases/download/10.4.1.124928/sonar-scanner-10.4.1.124928-net.zip) [.NET Framework 4.6.2+](https://github.com/SonarSource/sonar-scanner-msbuild/releases/download/10.4.1.124928/sonar-scanner-10.4.1.124928-net-framework.zip)\
\
[Release notes](https://github.com/SonarSource/sonar-scanner-msbuild/releases/tag/10.4.1.124928)
***
**10.4.0.124828** **2025-09-22**\ New communication system with SonarQube.\
Download scanner for: [.NET Global Tool](https://www.nuget.org/packages/dotnet-sonarscanner) [.NET Core 3.1+](https://github.com/SonarSource/sonar-scanner-msbuild/releases/download/10.4.0.124828/sonar-scanner-10.4.0.124828-net.zip) [.NET Framework 4.6.2+](https://github.com/SonarSource/sonar-scanner-msbuild/releases/download/10.4.0.124828/sonar-scanner-10.4.0.124828-net-framework.zip)\
\
[Release notes](https://github.com/SonarSource/sonar-scanner-msbuild/releases/tag/10.4.0.124828)
***
**10.3.0.120579** **2025-07-16**\ Support xUnit v3, fix RunDeploymentRoot in trx files, remove sonar.scanner.scanAll analysis warning.\
Download scanner for: [.NET Global Tool](https://www.nuget.org/packages/dotnet-sonarscanner) [.NET Core 3.1+](https://github.com/SonarSource/sonar-scanner-msbuild/releases/download/10.3.0.120579/sonar-scanner-10.3.0.120579-net.zip) [.NET Framework 4.6.2+](https://github.com/SonarSource/sonar-scanner-msbuild/releases/download/10.3.0.120579/sonar-scanner-10.3.0.120579-net-framework.zip)\
\
[Release notes](https://github.com/SonarSource/sonar-scanner-msbuild/releases/tag/10.3.0.120579)
***
**10.2.0.117568** **2025-06-03**\ Fix a vulnerability from embedded scanner-cli.\
Download scanner for: [.NET Global Tool](https://www.nuget.org/packages/dotnet-sonarscanner) [.NET Core 3.1+](https://github.com/SonarSource/sonar-scanner-msbuild/releases/download/10.2.0.117568/sonar-scanner-10.2.0.117568-net.zip) [.NET Framework 4.6.2+](https://github.com/SonarSource/sonar-scanner-msbuild/releases/download/10.2.0.117568/sonar-scanner-10.2.0.117568-net-framework.zip)\
\
[Release notes](https://github.com/SonarSource/sonar-scanner-msbuild/releases/tag/10.2.0.117568)
***
**10.1.2.114627** **2025-04-16**\ Add 'sonar' default truststore passord fallback.\
Download scanner for: [.NET Global Tool](https://www.nuget.org/packages/dotnet-sonarscanner) [.NET Core 3.1+](https://github.com/SonarSource/sonar-scanner-msbuild/releases/download/10.1.2.114627/sonar-scanner-10.1.2.114627-net.zip) [.NET Framework 4.6.2+](https://github.com/SonarSource/sonar-scanner-msbuild/releases/download/10.1.2.114627/sonar-scanner-10.1.2.114627-net-framework.zip)\
\
[Release notes](https://github.com/SonarSource/sonar-scanner-msbuild/releases/tag/10.1.2.114627)
***
**10.1.1.111189** **2025-03-25**\ Maintenance and dependencies updates.\
Download scanner for: [.NET Global Tool](https://www.nuget.org/packages/dotnet-sonarscanner) [.NET Core 3.1+](https://github.com/SonarSource/sonar-scanner-msbuild/releases/download/10.1.1.111189/sonar-scanner-10.1.1.111189-net.zip) [.NET Framework 4.6.2+](https://github.com/SonarSource/sonar-scanner-msbuild/releases/download/10.1.1.111189/sonar-scanner-10.1.1.111189-net-framework.zip)\
\
[Release notes](https://github.com/SonarSource/sonar-scanner-msbuild/releases/tag/10.1.1.111189)
***
**10.1.0** **2025-03-19**\ Maintenance and dependencies updates.\
Download scanner for: [.NET Global Tool](https://www.nuget.org/packages/dotnet-sonarscanner) [.NET Core 3.1+](https://github.com/SonarSource/sonar-scanner-msbuild/releases/download/10.1.0.110937/sonar-scanner-10.1.0.110937-net.zip) [.NET Framework 4.6.2+](https://github.com/SonarSource/sonar-scanner-msbuild/releases/download/10.1.0.110937/sonar-scanner-10.1.0.110937-net-framework.zip)\
\
[Release notes](https://github.com/SonarSource/sonar-scanner-msbuild/releases/tag/10.1.0.110937)
***
**10.0.0** **2025-03-13**\ Fix a vulnerability. Mandate that the truststore password is passed in the end step if used in the begin step. Added support for 7 new languages.\
Download scanner for: [.NET Global Tool](https://www.nuget.org/packages/dotnet-sonarscanner) [.NET Core 3.1+](https://github.com/SonarSource/sonar-scanner-msbuild/releases/download/10.0.0.110776/sonar-scanner-10.0.0.110776-net.zip) [.NET Framework 4.6.2+](https://github.com/SonarSource/sonar-scanner-msbuild/releases/download/10.0.0.110776/sonar-scanner-10.0.0.110776-net-framework.zip)\
\
[Release notes](https://github.com/SonarSource/sonar-scanner-msbuild/releases/tag/10.0.0.110776)
***
**9.2.1** **2025-02-25**\ DEPRECATED. Use system trusted certificate or JVM certificate store.\
Download scanner for: [.NET Global Tool](https://www.nuget.org/packages/dotnet-sonarscanner) [.NET Core 3.1+](https://github.com/SonarSource/sonar-scanner-msbuild/releases/download/9.2.1.110358/sonar-scanner-9.2.1.110358-net.zip) [.NET Framework 4.6.2+](https://github.com/SonarSource/sonar-scanner-msbuild/releases/download/9.2.1.110358/sonar-scanner-9.2.1.110358-net-framework.zip)\
\
[Release notes](https://github.com/SonarSource/sonar-scanner-msbuild/releases/tag/9.2.1.110358)
***
**9.2.0** **2025-02-19**\ DEPRECATED. Support for local trust store for private and self-signed certificates.\
Download scanner for: [.NET Global Tool](https://www.nuget.org/packages/dotnet-sonarscanner) [.NET Core 3.1+](https://github.com/SonarSource/sonar-scanner-msbuild/releases/download/9.2.0.110275/sonar-scanner-9.2.0.110275-net.zip) [.NET Framework 4.6.2+](https://github.com/SonarSource/sonar-scanner-msbuild/releases/download/9.2.0.110275/sonar-scanner-9.2.0.110275-net-framework.zip)\
\
[Release notes](https://github.com/SonarSource/sonar-scanner-msbuild/releases/tag/9.2.0.110275)
***
**9.1.0** **2025-02-06**\ Read new properties for downloading plugins\
Download scanner for: [.NET Global Tool](https://www.nuget.org/packages/dotnet-sonarscanner) [.NET Core 3.1+](https://github.com/SonarSource/sonar-scanner-msbuild/releases/download/9.1.0.109947/sonar-scanner-9.1.0.109947-net.zip) [.NET Framework 4.6.2+](https://github.com/SonarSource/sonar-scanner-msbuild/releases/download/9.1.0.109947/sonar-scanner-9.1.0.109947-net-framework.zip)\
\
[Release notes](https://github.com/SonarSource/sonar-scanner-msbuild/releases/tag/9.1.0.109947)
***
**9.0.2** **2024-11-12**\ sonar.projectBaseDir passed through extraProperties is respected with Azure DevOps extensions. Do not fail during file indexing when a directory cannot be accessed.\
Download scanner for: [.NET Global Tool](https://www.nuget.org/packages/dotnet-sonarscanner) [.NET Core 3.1+](https://github.com/SonarSource/sonar-scanner-msbuild/releases/download/9.0.2.104486/sonar-scanner-9.0.2.104486-net.zip) [.NET Framework 4.6.2+](https://github.com/SonarSource/sonar-scanner-msbuild/releases/download/9.0.2.104486/sonar-scanner-9.0.2.104486-net-framework.zip)\
\
[Release notes](https://github.com/SonarSource/sonar-scanner-msbuild/releases/tag/9.0.2.104486)
***
**9.0.1** **2024-10-25**\ Fix projectBaseDir path detection on Azure DevOps Linux agents.\
Download scanner for: [.NET Global Tool](https://www.nuget.org/packages/dotnet-sonarscanner) [.NET Core 3.1+](https://github.com/SonarSource/sonar-scanner-msbuild/releases/download/9.0.1.102776/sonar-scanner-9.0.1.102776-net.zip) [.NET Framework 4.6.2+](https://github.com/SonarSource/sonar-scanner-msbuild/releases/download/9.0.1.102776/sonar-scanner-9.0.1.102776-net-framework.zip)\
\
[Release notes](https://github.com/SonarSource/sonar-scanner-msbuild/releases/tag/9.0.1.102776)
***
**9.0.0** **2024-09-27**\ Ignore sonar.sources and sonar.tests properties.\
Download scanner for: [.NET Global Tool](https://www.nuget.org/packages/dotnet-sonarscanner) [.NET Core 3.1+](https://github.com/SonarSource/sonar-scanner-msbuild/releases/download/9.0.0.100868/sonar-scanner-9.0.0.100868-net.zip) [.NET Framework 4.6.2+](https://github.com/SonarSource/sonar-scanner-msbuild/releases/download/9.0.0.100868/sonar-scanner-9.0.0.100868-net-framework.zip)\
\
[Release notes](https://github.com/SonarSource/sonar-scanner-msbuild/releases/tag/9.0.0.100868)
***
**8.0.3** **2024-09-13**\ Exclude XML files from the new automatic analysis. Do not crash on mlaformed paths. Make sure server-side exclusions are not overridden.\
Download scanner for: [.NET Global Tool](https://www.nuget.org/packages/dotnet-sonarscanner) [.NET Core 3.1+](https://github.com/SonarSource/sonar-scanner-msbuild/releases/download/8.0.3.99785/sonar-scanner-8.0.3.99785-net.zip) [.NET Framework 4.6.2+](https://github.com/SonarSource/sonar-scanner-msbuild/releases/download/8.0.3.99785/sonar-scanner-8.0.3.99785-net-framework.zip)\
\
[Release notes](https://github.com/SonarSource/sonar-scanner-msbuild/releases/tag/8.0.3.99785)
***
**8.0.2** **2024-09-02**\ Re-enabled sonar.exclusions support. Automatically exclude files passed-in as coverage. Skip transient projects that do not exist after the build.\
Download scanner for: [.NET Global Tool](https://www.nuget.org/packages/dotnet-sonarscanner) [.NET Core 3.1+](https://github.com/SonarSource/sonar-scanner-msbuild/releases/download/8.0.2.98917/sonar-scanner-8.0.2.98917-net.zip) [.NET Framework 4.6.2+](https://github.com/SonarSource/sonar-scanner-msbuild/releases/download/8.0.2.98917/sonar-scanner-8.0.2.98917-net-framework.zip)\
\
[Release notes](https://github.com/SonarSource/sonar-scanner-msbuild/releases/tag/8.0.2.98917)
***
**8.0.1** **2024-08-21**\ Bug fix release which addresses two issues, improvements on messages emmitted during the analysis.\
Download scanner for: [.NET Global Tool](https://www.nuget.org/packages/dotnet-sonarscanner) [.NET Core 3.1+](https://github.com/SonarSource/sonar-scanner-msbuild/releases/download/8.0.1.97834/sonar-scanner-8.0.1.97834-net.zip) [.NET Framework 4.6.2+](https://github.com/SonarSource/sonar-scanner-msbuild/releases/download/8.0.1.97834/sonar-scanner-8.0.1.97834-net-framework.zip)\
\
[Release notes](https://github.com/SonarSource/sonar-scanner-msbuild/releases/tag/8.0.1.97834)
***
**8.0** **2024-08-12**\ The scanner is now supporting multi-language analysis. Files for other languages are automatically picked up (SQL, YAML, XML, JSON, CSS, HTML, JS, TS)\
Download scanner for: [.NET Global Tool](https://www.nuget.org/packages/dotnet-sonarscanner) [.NET Core 3.1+](https://github.com/SonarSource/sonar-scanner-msbuild/releases/download/8.0.0.97025/sonar-scanner-8.0.0.97025-net.zip) [.NET Framework 4.6.2+](https://github.com/SonarSource/sonar-scanner-msbuild/releases/download/8.0.0.97025/sonar-scanner-8.0.0.97025-net-framework.zip)\
\
[Release notes](https://github.com/SonarSource/sonar-scanner-msbuild/releases/tag/8.0.0.97025)
***
**7.1.1** **2024-07-24**\ Fixed a small issue when not specifying sonar.host.url (defaults to )\
Download scanner for: [.NET Global Tool](https://www.nuget.org/packages/dotnet-sonarscanner) [.NET Core 3.1+](https://github.com/SonarSource/sonar-scanner-msbuild/releases/download/7.1.1.96069/sonar-scanner-7.1.1.96069-net.zip) [.NET Framework 4.6.2+](https://github.com/SonarSource/sonar-scanner-msbuild/releases/download/7.1.1.96069/sonar-scanner-7.1.1.96069-net-framework.zip)\
\
[Release notes](https://github.com/SonarSource/sonar-scanner-msbuild/releases/tag/7.1.1.96069)
***
**7.1** **2024-07-19**\ Fixed a small issue when not specifying sonar.host.url (defaults to )\
Download scanner for: [.NET Global Tool](https://www.nuget.org/packages/dotnet-sonarscanner) [.NET Core 3.1+](https://github.com/SonarSource/sonar-scanner-msbuild/releases/download/7.1.0.95705/sonar-scanner-7.1.0.95705-net.zip) [.NET Framework 4.6.2+](https://github.com/SonarSource/sonar-scanner-msbuild/releases/download/7.1.0.95705/sonar-scanner-7.1.0.95705-net-framework.zip)\
\
[Release notes](https://github.com/SonarSource/sonar-scanner-msbuild/releases/tag/7.1.0.95705)
***
**7.0** **2024-07-18**\ This version does not require a JRE to be present on the machine anymore\
Download scanner for: [.NET Global Tool](https://www.nuget.org/packages/dotnet-sonarscanner) [.NET Core 3.1+](https://github.com/SonarSource/sonar-scanner-msbuild/releases/download/7.0.0.95646/sonar-scanner-7.0.0.95646-net.zip) [.NET Framework 4.6.2+](https://github.com/SonarSource/sonar-scanner-msbuild/releases/download/7.0.0.95646/sonar-scanner-7.0.0.95646-net-framework.zip)\
\
[Release notes](https://github.com/SonarSource/sonar-scanner-msbuild/releases/tag/7.0.0.95646)
***
**6.2** **2024-02-16**\ Fixes the failing analysis on macOS with .NET 8.0. New optional sonar.http.timeout command line parameter\
Download scanner for: [.NET Global Tool](https://www.nuget.org/packages/dotnet-sonarscanner) [.NET Core 3.1+](https://github.com/SonarSource/sonar-scanner-msbuild/releases/download/6.2.0.85879/sonar-scanner-6.2.0.85879-net.zip) [.NET Framework 4.6.2+](https://github.com/SonarSource/sonar-scanner-msbuild/releases/download/6.2.0.85879/sonar-scanner-6.2.0.85879-net-framework.zip)\
\
[Release notes](https://github.com/SonarSource/sonar-scanner-msbuild/releases/tag/6.2.0.85879)
***
**6.1** **2024-01-29**\ Drop support for MSBuild 14, deprecate MSBuild 15\
Download scanner for: [.NET Global Tool](https://www.nuget.org/packages/dotnet-sonarscanner) [.NET Core 3.1+](https://github.com/SonarSource/sonar-scanner-msbuild/releases/download/6.1.0.83647/sonar-scanner-6.1.0.83647-net.zip) [.NET Framework 4.6.2+](https://github.com/SonarSource/sonar-scanner-msbuild/releases/download/6.1.0.83647/sonar-scanner-6.1.0.83647-net-framework.zip)\
\
[Release notes](https://github.com/SonarSource/sonar-scanner-msbuild/releases/tag/6.1.0.83647)
***
**6.0** **2023-12-04**\ Packaging change, drop support for .Net Framework 4.6, Net 2.1, and .Net 3.0. Drop Java 11 support. Drop support of SonarQube versions prior to 8.9\
Download scanner for: [.NET Global Tool](https://www.nuget.org/packages/dotnet-sonarscanner) [.NET Core 3.1+](https://github.com/SonarSource/sonar-scanner-msbuild/releases/download/6.0.0.81631/sonar-scanner-6.0.0.81631-net.zip) [.NET Framework 4.6.2+](https://github.com/SonarSource/sonar-scanner-msbuild/releases/download/6.0.0.81631/sonar-scanner-6.0.0.81631-net-framework.zip)\
\
[Release notes](https://github.com/SonarSource/sonar-scanner-msbuild/releases/tag/6.0.0.81631)
***
**5.15.1** **2024-03-26**\ Fix analysis on MacOSX with .NET 8 when begin runtime doesn't match with build runtime\
Download scanner for: [.NET 5+](https://github.com/SonarSource/sonar-scanner-msbuild/releases/download/5.15.1.88158/sonar-scanner-msbuild-5.15.1.88158-net5.0.zip) [.NET Global Tool](https://www.nuget.org/packages/dotnet-sonarscanner) [.NET Core 3.1](https://github.com/SonarSource/sonar-scanner-msbuild/releases/download/5.15.1.88158/sonar-scanner-msbuild-5.15.1.88158-netcoreapp3.0.zip) [.NET Core 2.1](https://github.com/SonarSource/sonar-scanner-msbuild/releases/download/5.15.1.88158/sonar-scanner-msbuild-5.15.1.88158-netcoreapp2.0.zip) [.NET Framework 4.6](https://github.com/SonarSource/sonar-scanner-msbuild/releases/download/5.15.1.88158/sonar-scanner-msbuild-5.15.1.88158-net46.zip)\
\
[Release notes](https://github.com/SonarSource/sonar-scanner-msbuild/releases/tag/5.15.1.88158)
***
**5.15** **2023-11-20**\ Add an option to specify the scanner's temporary working directory\
Download scanner for: [.NET 5+](https://github.com/SonarSource/sonar-scanner-msbuild/releases/download/5.15.0.80890/sonar-scanner-msbuild-5.15.0.80890-net5.0.zip) [.NET Global Tool](https://www.nuget.org/packages/dotnet-sonarscanner) [.NET Core 3.1](https://github.com/SonarSource/sonar-scanner-msbuild/releases/download/5.15.0.80890/sonar-scanner-msbuild-5.15.0.80890-netcoreapp3.0.zip) [.NET Core 2.1](https://github.com/SonarSource/sonar-scanner-msbuild/releases/download/5.15.0.80890/sonar-scanner-msbuild-5.15.0.80890-netcoreapp2.0.zip) [.NET Framework 4.6](https://github.com/SonarSource/sonar-scanner-msbuild/releases/download/5.15.0.80890/sonar-scanner-msbuild-5.15.0.80890-net46.zip)\
\
[Release notes](https://github.com/SonarSource/sonar-scanner-msbuild/releases/tag/5.15.0.80890)
***
**5.14** **2023-10-02**\ Support upcoming SonarQube 10.4 API changes\
Download scanner for: [.NET 5+](https://github.com/SonarSource/sonar-scanner-msbuild/releases/download/5.14.0.78575/sonar-scanner-msbuild-5.14.0.78575-net5.0.zip) [.NET Global Tool](https://www.nuget.org/packages/dotnet-sonarscanner) [.NET Core 3.1](https://github.com/SonarSource/sonar-scanner-msbuild/releases/download/5.14.0.78575/sonar-scanner-msbuild-5.14.0.78575-netcoreapp3.0.zip) [.NET Core 2.1](https://github.com/SonarSource/sonar-scanner-msbuild/releases/download/5.14.0.78575/sonar-scanner-msbuild-5.14.0.78575-netcoreapp2.0.zip) [.NET Framework 4.6](https://github.com/SonarSource/sonar-scanner-msbuild/releases/download/5.14.0.78575/sonar-scanner-msbuild-5.14.0.78575-net46.zip)\
\
[Release notes](https://github.com/SonarSource/sonar-scanner-msbuild/releases/tag/5.14.0.78575)
***
**5.13.1** **2023-08-14**\ SonarScanner CLI update\
Download scanner for: [.NET 5+](https://github.com/SonarSource/sonar-scanner-msbuild/releases/download/5.13.1.76110/sonar-scanner-msbuild-5.13.1.76110-net5.0.zip) [.NET Global Tool](https://www.nuget.org/packages/dotnet-sonarscanner) [.NET Core 3.1](https://github.com/SonarSource/sonar-scanner-msbuild/releases/download/5.13.1.76110/sonar-scanner-msbuild-5.13.1.76110-netcoreapp3.0.zip) [.NET Core 2.1](https://github.com/SonarSource/sonar-scanner-msbuild/releases/download/5.13.1.76110/sonar-scanner-msbuild-5.13.1.76110-netcoreapp2.0.zip) [.NET Framework 4.6](https://github.com/SonarSource/sonar-scanner-msbuild/releases/download/5.13.1.76110/sonar-scanner-msbuild-5.13.1.76110-net46.zip)\
\
[Release notes](https://github.com/SonarSource/sonar-scanner-msbuild/releases/tag/5.13.1.76110)
***
**5.13** **2023-04-05**\ Support for sonar.token parameter and improved error messages\
Download scanner for: [.NET 5+](https://github.com/SonarSource/sonar-scanner-msbuild/releases/download/5.13.0.66756/sonar-scanner-msbuild-5.13.0.66756-net5.0.zip) [.NET Global Tool](https://www.nuget.org/packages/dotnet-sonarscanner) [.NET Core 3.1](https://github.com/SonarSource/sonar-scanner-msbuild/releases/download/5.13.0.66756/sonar-scanner-msbuild-5.13.0.66756-netcoreapp3.0.zip) [.NET Core 2.1](https://github.com/SonarSource/sonar-scanner-msbuild/releases/download/5.13.0.66756/sonar-scanner-msbuild-5.13.0.66756-netcoreapp2.0.zip) [.NET Framework 4.6](https://github.com/SonarSource/sonar-scanner-msbuild/releases/download/5.13.0.66756/sonar-scanner-msbuild-5.13.0.66756-net46.zip)\
\
[Release notes](https://github.com/SonarSource/sonar-scanner-msbuild/releases/tag/5.13.0.66756)
***
**5.12** **2023-03-17**\ Fast PR Analysis Support For Azure Devops\
Download scanner for: [.NET 5+](https://github.com/SonarSource/sonar-scanner-msbuild/releases/download/5.12.0.64969/sonar-scanner-msbuild-5.12.0.64969-net5.0.zip) [.NET Global Tool](https://www.nuget.org/packages/dotnet-sonarscanner) [.NET Core 3.1](https://github.com/SonarSource/sonar-scanner-msbuild/releases/download/5.12.0.64969/sonar-scanner-msbuild-5.12.0.64969-netcoreapp3.0.zip) [.NET Core 2.1](https://github.com/SonarSource/sonar-scanner-msbuild/releases/download/5.12.0.64969/sonar-scanner-msbuild-5.12.0.64969-netcoreapp2.0.zip) [.NET Framework 4.6](https://github.com/SonarSource/sonar-scanner-msbuild/releases/download/5.12.0.64969/sonar-scanner-msbuild-5.12.0.64969-net46.zip)\
\
[Release notes](https://github.com/SonarSource/sonar-scanner-msbuild/releases/tag/5.12.0.64969)
***
**5.11** **2023-01-27**\ Fast PR Analysis Compatibility Fix\
Download scanner for: [.NET 5+](https://github.com/SonarSource/sonar-scanner-msbuild/releases/download/5.11.0.60783/sonar-scanner-msbuild-5.11.0.60783-net5.0.zip) [.NET Global Tool](https://www.nuget.org/packages/dotnet-sonarscanner) [.NET Core 3.1](https://github.com/SonarSource/sonar-scanner-msbuild/releases/download/5.11.0.60783/sonar-scanner-msbuild-5.11.0.60783-netcoreapp3.0.zip) [.NET Core 2.1](https://github.com/SonarSource/sonar-scanner-msbuild/releases/download/5.11.0.60783/sonar-scanner-msbuild-5.11.0.60783-netcoreapp2.0.zip) [.NET Framework 4.6](https://github.com/SonarSource/sonar-scanner-msbuild/releases/download/5.11.0.60783/sonar-scanner-msbuild-5.11.0.60783-net46.zip)\
\
[Release notes](https://github.com/SonarSource/sonar-scanner-msbuild/releases/tag/5.11.0.60783)
***
**5.10** **2023-01-13**\ Improved FIPS Compliance\
Download scanner for: [.NET 5+](https://github.com/SonarSource/sonar-scanner-msbuild/releases/download/5.10.0.59947/sonar-scanner-msbuild-5.10.0.59947-net5.0.zip) [.NET Global Tool](https://www.nuget.org/packages/dotnet-sonarscanner) [.NET Core 3.1](https://github.com/SonarSource/sonar-scanner-msbuild/releases/download/5.10.0.59947/sonar-scanner-msbuild-5.10.0.59947-netcoreapp3.0.zip) [.NET Core 2.1](https://github.com/SonarSource/sonar-scanner-msbuild/releases/download/5.10.0.59947/sonar-scanner-msbuild-5.10.0.59947-netcoreapp2.0.zip) [.NET Framework 4.6](https://github.com/SonarSource/sonar-scanner-msbuild/releases/download/5.10.0.59947/sonar-scanner-msbuild-5.10.0.59947-net46.zip)\
\
[Release notes](https://github.com/SonarSource/sonar-scanner-msbuild/releases/tag/5.10.0.59947)
***
**5.9.2** **2022-12-14**\ Bug Fix Release related to PR analysis\
Download scanner for: [.NET 5+](https://github.com/SonarSource/sonar-scanner-msbuild/releases/download/5.9.2.58699/sonar-scanner-msbuild-5.9.2.58699-net5.0.zip) [.NET Global Tool](https://www.nuget.org/packages/dotnet-sonarscanner) [.NET Core 3.1](https://github.com/SonarSource/sonar-scanner-msbuild/releases/download/5.9.2.58699/sonar-scanner-msbuild-5.9.2.58699-netcoreapp3.0.zip) [.NET Core 2.1](https://github.com/SonarSource/sonar-scanner-msbuild/releases/download/5.9.2.58699/sonar-scanner-msbuild-5.9.2.58699-netcoreapp2.0.zip) [.NET Framework 4.6](https://github.com/SonarSource/sonar-scanner-msbuild/releases/download/5.9.2.58699/sonar-scanner-msbuild-5.9.2.58699-net46.zip)\
\
[Release notes](https://github.com/SonarSource/sonar-scanner-msbuild/releases/tag/5.9.2.58699)
***
**5.9.1** **2022-12-06**\ Bug Fix Release\
Download scanner for: [.NET 5+](https://github.com/SonarSource/sonar-scanner-msbuild/releases/download/5.9.1.58166/sonar-scanner-msbuild-5.9.1.58166-net5.0.zip) [.NET Global Tool](https://www.nuget.org/packages/dotnet-sonarscanner) [.NET Core 3.1](https://github.com/SonarSource/sonar-scanner-msbuild/releases/download/5.9.1.58166/sonar-scanner-msbuild-5.9.1.58166-netcoreapp3.0.zip) [.NET Core 2.1](https://github.com/SonarSource/sonar-scanner-msbuild/releases/download/5.9.1.58166/sonar-scanner-msbuild-5.9.1.58166-netcoreapp2.0.zip) [.NET Framework 4.6](https://github.com/SonarSource/sonar-scanner-msbuild/releases/download/5.9.1.58166/sonar-scanner-msbuild-5.9.1.58166-net46.zip)\
\
[Release notes](https://github.com/SonarSource/sonar-scanner-msbuild/releases/tag/5.9.1.58166)
***
**5.9.0** **2022-12-01**\ .NET 7 bug fixes and preparation for fast PR analysis\
Download scanner for: [.NET 5+](https://github.com/SonarSource/sonar-scanner-msbuild/releases/download/5.9.0.57893/sonar-scanner-msbuild-5.9.0.57893-net5.0.zip) [.NET Global Tool](https://www.nuget.org/packages/dotnet-sonarscanner) [.NET Core 3.1](https://github.com/SonarSource/sonar-scanner-msbuild/releases/download/5.9.0.57893/sonar-scanner-msbuild-5.9.0.57893-netcoreapp3.0.zip) [.NET Core 2.1](https://github.com/SonarSource/sonar-scanner-msbuild/releases/download/5.9.0.57893/sonar-scanner-msbuild-5.9.0.57893-netcoreapp2.0.zip) [.NET Framework 4.6](https://github.com/SonarSource/sonar-scanner-msbuild/releases/download/5.9.0.57893/sonar-scanner-msbuild-5.9.0.57893-net46.zip)\
\
[Release notes](https://github.com/SonarSource/sonar-scanner-msbuild/releases/tag/5.9.0.57893)
***
**5.8.0** **2022-08-24**\ Analysis of Azure Functions on Github Actions no longer hard fails with default behavior. See release notes for details.\
Download scanner for: [.NET 5+](https://github.com/SonarSource/sonar-scanner-msbuild/releases/download/5.8.0.52797/sonar-scanner-msbuild-5.8.0.52797-net5.0.zip) [.NET Global Tool](https://www.nuget.org/packages/dotnet-sonarscanner) [.NET Core 3.1](https://github.com/SonarSource/sonar-scanner-msbuild/releases/download/5.8.0.52797/sonar-scanner-msbuild-5.8.0.52797-netcoreapp3.0.zip) [.NET Core 2.1](https://github.com/SonarSource/sonar-scanner-msbuild/releases/download/5.8.0.52797/sonar-scanner-msbuild-5.8.0.52797-netcoreapp2.0.zip) [.NET Framework 4.6](https://github.com/SonarSource/sonar-scanner-msbuild/releases/download/5.8.0.52797/sonar-scanner-msbuild-5.8.0.52797-net46.zip)\
\
[Release notes](https://github.com/SonarSource/sonar-scanner-msbuild/releases/tag/5.8.0.52797)
***
**5.7.2** **2022-07-12**\ Log warning instead of error when not parsing environment variables to avoid hard failure when Newtonsoft does not get resolved\
Download scanner for: [.NET 5+](https://github.com/SonarSource/sonar-scanner-msbuild/releases/download/5.7.2.50892/sonar-scanner-msbuild-5.7.2.50892-net5.0.zip) [.NET Global Tool](https://www.nuget.org/packages/dotnet-sonarscanner) [.NET Core 3.1](https://github.com/SonarSource/sonar-scanner-msbuild/releases/download/5.7.2.50892/sonar-scanner-msbuild-5.7.2.50892-netcoreapp3.0.zip) [.NET Core 2.1](https://github.com/SonarSource/sonar-scanner-msbuild/releases/download/5.7.2.50892/sonar-scanner-msbuild-5.7.2.50892-netcoreapp2.0.zip) [.NET Framework 4.6](https://github.com/SonarSource/sonar-scanner-msbuild/releases/download/5.7.2.50892/sonar-scanner-msbuild-5.7.2.50892-net46.zip)\
\
[Release notes](https://github.com/SonarSource/sonar-scanner-msbuild/releases/tag/5.7.2.50892)
***
**5.7.1** **2022-06-21**\ Bug Fix Release\
Download scanner for: [.NET 5+](https://github.com/SonarSource/sonar-scanner-msbuild/releases/download/5.7.1.49528/sonar-scanner-msbuild-5.7.1.49528-net5.0.zip) [.NET Global Tool](https://www.nuget.org/packages/dotnet-sonarscanner) [.NET Core 3.1](https://github.com/SonarSource/sonar-scanner-msbuild/releases/download/5.7.1.49528/sonar-scanner-msbuild-5.7.1.49528-netcoreapp3.0.zip) [.NET Core 2.1](https://github.com/SonarSource/sonar-scanner-msbuild/releases/download/5.7.1.49528/sonar-scanner-msbuild-5.7.1.49528-netcoreapp2.0.zip) [.NET Framework 4.6](https://github.com/SonarSource/sonar-scanner-msbuild/releases/download/5.7.1.49528/sonar-scanner-msbuild-5.7.1.49528-net46.zip)\
\
[Release notes](https://github.com/SonarSource/sonar-scanner-msbuild/releases/tag/5.7.1.49528)
***
**5.7.0** **2022-06-20**\ Bug Fix Release\
Download scanner for: [.NET 5+](https://github.com/SonarSource/sonar-scanner-msbuild/releases/download/5.7.0.49456/sonar-scanner-msbuild-5.7.0.49456-net5.0.zip) [.NET Global Tool](https://www.nuget.org/packages/dotnet-sonarscanner) [.NET Core 3.1](https://github.com/SonarSource/sonar-scanner-msbuild/releases/download/5.7.0.49456/sonar-scanner-msbuild-5.7.0.49456-netcoreapp3.0.zip) [.NET Core 2.1](https://github.com/SonarSource/sonar-scanner-msbuild/releases/download/5.7.0.49456/sonar-scanner-msbuild-5.7.0.49456-netcoreapp2.0.zip) [.NET Framework 4.6](https://github.com/SonarSource/sonar-scanner-msbuild/releases/download/5.7.0.49456/sonar-scanner-msbuild-5.7.0.49456-net46.zip)\
\
[Release notes](https://github.com/SonarSource/sonar-scanner-msbuild/releases/tag/5.7.0.49456)
***
**5.6.0** **2022-05-30**\ Send warnings to users of versions where support will change\
Download scanner for: [.NET 5+](https://github.com/SonarSource/sonar-scanner-msbuild/releases/download/5.6.0.48455/sonar-scanner-msbuild-5.6.0.48455-net5.0.zip) [.NET Global Tool](https://www.nuget.org/packages/dotnet-sonarscanner) [.NET Core 3.1](https://github.com/SonarSource/sonar-scanner-msbuild/releases/download/5.6.0.48455/sonar-scanner-msbuild-5.6.0.48455-netcoreapp3.0.zip) [.NET Core 2.1](https://github.com/SonarSource/sonar-scanner-msbuild/releases/download/5.6.0.48455/sonar-scanner-msbuild-5.6.0.48455-netcoreapp2.0.zip) [.NET Framework 4.6](https://github.com/SonarSource/sonar-scanner-msbuild/releases/download/5.6.0.48455/sonar-scanner-msbuild-5.6.0.48455-net46.zip)\
\
[Release notes](https://github.com/SonarSource/sonar-scanner-msbuild/releases/tag/5.6.0.48455)
***
**5.5.3** **2022-02-14**\ Support for .NET 6 Web Projects, TLS Version selection logic removed - now responsibility of OS, Fix "MSB3677 Unable to move file" regression\
Download scanner for: [.NET 5+](https://github.com/SonarSource/sonar-scanner-msbuild/releases/download/5.5.3.43281/sonar-scanner-msbuild-5.5.3.43281-net5.0.zip) [.NET Global Tool](https://www.nuget.org/packages/dotnet-sonarscanner) [.NET Core 2.1](https://github.com/SonarSource/sonar-scanner-msbuild/releases/download/5.5.3.43281/sonar-scanner-msbuild-5.5.3.43281-netcoreapp2.0.zip) [.NET Framework 4.6](https://github.com/SonarSource/sonar-scanner-msbuild/releases/download/5.5.3.43281/sonar-scanner-msbuild-5.5.3.43281-net46.zip)\
\
[Release notes](https://github.com/SonarSource/sonar-scanner-msbuild/releases/tag/5.5.3.43281)
***
**5.5.2** **2022-02-10**\ Support for .NET 6 Web Projects, TLS Version selection logic removed, now responsibility of OS\
Download scanner for: [.NET 5+](https://github.com/SonarSource/sonar-scanner-msbuild/releases/download/5.5.2.43124/sonar-scanner-msbuild-5.5.2.43124-net5.0.zip) [.NET Global Tool](https://www.nuget.org/packages/dotnet-sonarscanner) [.NET Core 2.1](https://github.com/SonarSource/sonar-scanner-msbuild/releases/download/5.5.2.43124/sonar-scanner-msbuild-5.5.2.43124-netcoreapp2.0.zip) [.NET Framework 4.6](https://github.com/SonarSource/sonar-scanner-msbuild/releases/download/5.5.2.43124/sonar-scanner-msbuild-5.5.2.43124-net46.zip)\
\
[Release notes](https://github.com/SonarSource/sonar-scanner-msbuild/releases/tag/5.5.2.43124)
***
**5.5.1** **2022-02-08**\ Support for .NET 6 Web Projects, support TLS 1.3 where supported by environment\
Download scanner for: [.NET 5+](https://github.com/SonarSource/sonar-scanner-msbuild/releases/download/5.5.1.42999/sonar-scanner-msbuild-5.5.1.42999-net5.0.zip) [.NET Global Tool](https://www.nuget.org/packages/dotnet-sonarscanner) [.NET Core 2.1](https://github.com/SonarSource/sonar-scanner-msbuild/releases/download/5.5.1.42999/sonar-scanner-msbuild-5.5.1.42999-netcoreapp2.0.zip) [.NET Framework 4.6](https://github.com/SonarSource/sonar-scanner-msbuild/releases/download/5.5.1.42999/sonar-scanner-msbuild-5.5.1.42999-net46.zip)\
\
[Release notes](https://github.com/SonarSource/sonar-scanner-msbuild/releases/tag/5.5.1.42999)
***
**5.5.0** **2022-02-07**\ Support for .NET 6 Web Projects, support TLS 1.3\
Download scanner for: [.NET 5+](https://github.com/SonarSource/sonar-scanner-msbuild/releases/download/5.5.0.42949/sonar-scanner-msbuild-5.5.0.42949-net5.0.zip) [.NET Global Tool](https://www.nuget.org/packages/dotnet-sonarscanner) [.NET Core 2.1](https://github.com/SonarSource/sonar-scanner-msbuild/releases/download/5.5.0.42949/sonar-scanner-msbuild-5.5.0.42949-netcoreapp2.0.zip) [.NET Framework 4.6](https://github.com/SonarSource/sonar-scanner-msbuild/releases/download/5.5.0.42949/sonar-scanner-msbuild-5.5.0.42949-net46.zip)\
\
[Release notes](https://github.com/SonarSource/sonar-scanner-msbuild/releases/tag/5.5.0.42949)
***
**5.4.1** **2021-12-23**\ Updated Newtonsoft.Json to latest\
Download scanner for: [.NET 5+](https://github.com/SonarSource/sonar-scanner-msbuild/releases/download/5.4.1.41282/sonar-scanner-msbuild-5.4.1.41282-net5.0.zip) [.NET Global Tool](https://www.nuget.org/packages/dotnet-sonarscanner) [.NET Core 2.1](https://github.com/SonarSource/sonar-scanner-msbuild/releases/download/5.4.1.41282/sonar-scanner-msbuild-5.4.1.41282-netcoreapp2.0.zip) [.NET Framework 4.6](https://github.com/SonarSource/sonar-scanner-msbuild/releases/download/5.4.1.41282/sonar-scanner-msbuild-5.4.1.41282-net46.zip)\
\
[Release notes](https://github.com/SonarSource/sonar-scanner-msbuild/releases/tag/5.4.1.41282)
***
**5.4** **2021-11-26**\ Updated .NET 5 Version to be forward compatible and support .NET 6 environments\
Download scanner for: [.NET 5+](https://github.com/SonarSource/sonar-scanner-msbuild/releases/download/5.4.0.40033/sonar-scanner-msbuild-5.4.0.40033-net5.0.zip) [.NET Global Tool](https://www.nuget.org/packages/dotnet-sonarscanner) [.NET Core 2.1](https://github.com/SonarSource/sonar-scanner-msbuild/releases/download/5.4.0.40033/sonar-scanner-msbuild-5.4.0.40033-netcoreapp2.0.zip) [.NET Framework 4.6](https://github.com/SonarSource/sonar-scanner-msbuild/releases/download/5.4.0.40033/sonar-scanner-msbuild-5.4.0.40033-net46.zip)\
\
[Release notes](https://github.com/SonarSource/sonar-scanner-msbuild/releases/tag/5.4.0.40033)
***
**5.3.2** **2021-10-28**\ Added parameters sonar.clientcert.path and sonar.clientcert.password for securing connections to SonarQube\
Download scanner for: [.NET 5+](https://github.com/SonarSource/sonar-scanner-msbuild/releases/download/5.3.2.38712/sonar-scanner-msbuild-5.3.2.38712-net5.0.zip) [.NET Global Tool](https://www.nuget.org/packages/dotnet-sonarscanner) [.NET Core 2.1](https://github.com/SonarSource/sonar-scanner-msbuild/releases/download/5.3.2.38712/sonar-scanner-msbuild-5.3.2.38712-netcoreapp2.0.zip) [.NET Framework 4.6](https://github.com/SonarSource/sonar-scanner-msbuild/releases/download/5.3.2.38712/sonar-scanner-msbuild-5.3.2.38712-net46.zip)\
\
[Release notes](https://github.com/SonarSource/sonar-scanner-msbuild/releases/tag/5.3.2.38712)
***
**5.3.1** **2021-09-01**\ Update scanner-cli, Compile with .NET Core 2.1 and 3.1, Improve uninstall of targets if multiple builds in the same pipeline\
Download scanner for: [.NET 5+](https://github.com/SonarSource/sonar-scanner-msbuild/releases/download/5.3.1.36242/sonar-scanner-msbuild-5.3.1.36242-net5.0.zip) [.NET Global Tool](https://www.nuget.org/packages/dotnet-sonarscanner) [.NET Core 2.1](https://github.com/SonarSource/sonar-scanner-msbuild/releases/download/5.3.1.36242/sonar-scanner-msbuild-5.3.1.36242-netcoreapp2.0.zip) [.NET Framework 4.6](https://github.com/SonarSource/sonar-scanner-msbuild/releases/download/5.3.1.36242/sonar-scanner-msbuild-5.3.1.36242-net46.zip)\
\
[Release notes](https://github.com/SonarSource/sonar-scanner-msbuild/releases/tag/5.3.1.36242)
***
**5.2.2** **2021-06-24**\ Fix test assembly detection + mTLS certificate with password\
Download scanner for: [.NET 5+](https://github.com/SonarSource/sonar-scanner-msbuild/releases/download/5.2.2.33595/sonar-scanner-msbuild-5.2.2.33595-net5.0.zip) [.NET Global Tool](https://www.nuget.org/packages/dotnet-sonarscanner) [.NET Core 2.1](https://github.com/SonarSource/sonar-scanner-msbuild/releases/download/5.2.2.33595/sonar-scanner-msbuild-5.2.2.33595-netcoreapp2.0.zip) [.NET Framework 4.6](https://github.com/SonarSource/sonar-scanner-msbuild/releases/download/5.2.2.33595/sonar-scanner-msbuild-5.2.2.33595-net46.zip)\
\
[Release notes](https://github.com/SonarSource/sonar-scanner-msbuild/releases/tag/5.2.2.33595)
***
**5.2.1** **2021-04-30**\ Update embedded SonarScanner CLI\
Download scanner for: [.NET 5+](https://github.com/SonarSource/sonar-scanner-msbuild/releases/download/5.2.1.31210/sonar-scanner-msbuild-5.2.1.31210-net5.0.zip) [.NET Global Tool](https://www.nuget.org/packages/dotnet-sonarscanner) [.NET Core 2.1](https://github.com/SonarSource/sonar-scanner-msbuild/releases/download/5.2.1.31210/sonar-scanner-msbuild-5.2.1.31210-netcoreapp2.0.zip) [.NET Framework 4.6](https://github.com/SonarSource/sonar-scanner-msbuild/releases/download/5.2.1.31210/sonar-scanner-msbuild-5.2.1.31210-net46.zip)\
\
[Release notes](https://github.com/SonarSource/sonar-scanner-msbuild/releases/tag/5.2.1.31210)
***
**5.2** **2021-04-09**\ Support for test code analysis\
Download scanner for: [.NET 5+](https://github.com/SonarSource/sonar-scanner-msbuild/releases/download/5.2.0.29862/sonar-scanner-msbuild-5.2.0.29862-net5.0.zip) [.NET Global Tool](https://www.nuget.org/packages/dotnet-sonarscanner) [.NET Core 2.1](https://github.com/SonarSource/sonar-scanner-msbuild/releases/download/5.2.0.29862/sonar-scanner-msbuild-5.2.0.29862-netcoreapp2.0.zip) [.NET Framework 4.6](https://github.com/SonarSource/sonar-scanner-msbuild/releases/download/5.2.0.29862/sonar-scanner-msbuild-5.2.0.29862-net46.zip)\
\
[Release notes](https://github.com/SonarSource/sonar-scanner-msbuild/releases/tag/5.2.0.29862)
***
**5.1** **2021-03-09**\ Support for .NET 5, support for solo .NET Core project (without .sln)\
Download scanner for: [.NET 5+](https://github.com/SonarSource/sonar-scanner-msbuild/releases/download/5.1.0.28487/sonar-scanner-msbuild-5.1.0.28487-net5.0.zip) [.NET Global Tool](https://www.nuget.org/packages/dotnet-sonarscanner) [.NET Core 2.1](https://github.com/SonarSource/sonar-scanner-msbuild/releases/download/5.1.0.28487/sonar-scanner-msbuild-5.1.0.28487-netcoreapp2.0.zip) [.NET Framework 4.6](https://github.com/SonarSource/sonar-scanner-msbuild/releases/download/5.1.0.28487/sonar-scanner-msbuild-5.1.0.28487-net46.zip)\
\
[Release notes](https://github.com/SonarSource/sonar-scanner-msbuild/releases/tag/5.1.0.28487)
***
**5.0.4** **2020-11-11**\ Support for .NET 5, support for solo .NET Core project (without .sln)\
Download scanner for: [.NET 5+](https://github.com/SonarSource/sonar-scanner-msbuild/releases/download/5.0.4.24009/sonar-scanner-msbuild-5.0.4.24009-net5.0.zip) [.NET Global Tool](https://www.nuget.org/packages/dotnet-sonarscanner) [.NET Core 2.1](https://github.com/SonarSource/sonar-scanner-msbuild/releases/download/5.0.4.24009/sonar-scanner-msbuild-5.0.4.24009-netcoreapp2.0.zip) [.NET Framework 4.6](https://github.com/SonarSource/sonar-scanner-msbuild/releases/download/5.0.4.24009/sonar-scanner-msbuild-5.0.4.24009-net46.zip)\
\
[Release notes](https://github.com/SonarSource/sonar-scanner-msbuild/releases/tag/5.0.4.24009)
***
**5.0.3** **2020-11-10**\ Support for .NET 5, support for solo .NET Core project (without .sln)\
Download scanner for: [.NET 5+](https://github.com/SonarSource/sonar-scanner-msbuild/releases/download/5.0.3.23901/sonar-scanner-msbuild-5.0.3.23901-net5.0.zip) [.NET Global Tool](https://www.nuget.org/packages/dotnet-sonarscanner) [.NET Core 2.1](https://github.com/SonarSource/sonar-scanner-msbuild/releases/download/5.0.3.23901/sonar-scanner-msbuild-5.0.3.23901-netcoreapp2.0.zip) [.NET Framework 4.6](https://github.com/SonarSource/sonar-scanner-msbuild/releases/download/5.0.3.23901/sonar-scanner-msbuild-5.0.3.23901-net46.zip)\
\
[Release notes](https://github.com/SonarSource/sonar-scanner-msbuild/releases/tag/5.0.3.23901)
***
**5.0** **2020-11-05**\ Support for .NET 5, support for solo .NET Core project (without .sln)\
Download scanner for: [.NET 5+](https://github.com/SonarSource/sonar-scanner-msbuild/releases/download/5.0.0.23533/sonar-scanner-msbuild-5.0.0.23533-net5.0.zip) [.NET Global Tool](https://www.nuget.org/packages/dotnet-sonarscanner) [.NET Core 2.1](https://github.com/SonarSource/sonar-scanner-msbuild/releases/download/5.0.0.23533/sonar-scanner-msbuild-5.0.0.23533-netcoreapp2.0.zip) [.NET Framework 4.6](https://github.com/SonarSource/sonar-scanner-msbuild/releases/download/5.0.0.23533/sonar-scanner-msbuild-5.0.0.23533-net46.zip)\
\
[Release notes](https://github.com/SonarSource/sonar-scanner-msbuild/releases/tag/5.0.0.23533)
***
**4.10** **2020-06-29**\ Support FIPS compliant cryptographic algorithm\
Download scanner for: [.NET Global Tool](https://www.nuget.org/packages/dotnet-sonarscanner) [.NET Core 2.1](https://github.com/SonarSource/sonar-scanner-msbuild/releases/download/4.10.0.19059/sonar-scanner-msbuild-4.10.0.19059-netcoreapp2.0.zip) [.NET Framework 4.6](https://github.com/SonarSource/sonar-scanner-msbuild/releases/download/4.10.0.19059/sonar-scanner-msbuild-4.10.0.19059-net46.zip)\
\
[Release notes](https://github.com/SonarSource/sonar-scanner-msbuild/releases/tag/4.10.0.19059)
***
**4.9** **2020-05-05**\ Improve detection of duplicated coverage reports, fix categorization of fakes projects\
Download scanner for: [.NET Global Tool](https://www.nuget.org/packages/dotnet-sonarscanner) [.NET Core 2.1](https://github.com/SonarSource/sonar-scanner-msbuild/releases/download/4.9.0.17385/sonar-scanner-msbuild-4.9.0.17385-netcoreapp2.0.zip) [.NET Framework 4.6](https://github.com/SonarSource/sonar-scanner-msbuild/releases/download/4.9.0.17385/sonar-scanner-msbuild-4.9.0.17385-net46.zip)\
\
[Release notes](https://github.com/SonarSource/sonar-scanner-msbuild/releases/tag/4.9.0.17385)
***
**4.8** **2019-11-06**\ Enable scanner execution when only .NET Core 3 is installed\
Download scanner for: [.NET Global Tool](https://www.nuget.org/packages/dotnet-sonarscanner) [.NET Core 2.1](https://github.com/SonarSource/sonar-scanner-msbuild/releases/download/4.8.0.12008/sonar-scanner-msbuild-4.8.0.12008-netcoreapp2.0.zip) [.NET Framework 4.6](https://github.com/SonarSource/sonar-scanner-msbuild/releases/download/4.8.0.12008/sonar-scanner-msbuild-4.8.0.12008-net46.zip)\
\
[Release notes](https://github.com/SonarSource/sonar-scanner-msbuild/releases/tag/4.8.0.12008)
***
**4.7.1** **2019-09-10**\ Update SonarScanner to version 4.1\
Download scanner for: [.NET Global Tool](https://www.nuget.org/packages/dotnet-sonarscanner) [.NET Core 2.1](https://github.com/SonarSource/sonar-scanner-msbuild/releases/download/4.7.1.2311/sonar-scanner-msbuild-4.7.1.2311-netcoreapp2.0.zip) [.NET Framework 4.6](https://github.com/SonarSource/sonar-scanner-msbuild/releases/download/4.7.1.2311/sonar-scanner-msbuild-4.7.1.2311-net46.zip)\
\
[Release notes](https://github.com/SonarSource/sonar-scanner-msbuild/releases/tag/4.7.1.2311)
***
**4.7** **2019-09-03**\ Support dash and forward-slash in dotnet command line arguments, analyze XAML files, add analyzed targets in logs\
Download scanner for: [.NET Global Tool](https://www.nuget.org/packages/dotnet-sonarscanner) [.NET Core 2.1](https://github.com/SonarSource/sonar-scanner-msbuild/releases/download/4.7.0.2295/sonar-scanner-msbuild-4.7.0.2295-netcoreapp2.0.zip) [.NET Framework 4.6](https://github.com/SonarSource/sonar-scanner-msbuild/releases/download/4.7.0.2295/sonar-scanner-msbuild-4.7.0.2295-net46.zip)\
\
[Release notes](https://github.com/SonarSource/sonar-scanner-msbuild/releases/tag/4.7.0.2295)
### Identify your SonarScanner version
Each .NET environment is slightly different. Check the appropriate tab for requirements and notes about the installation.
{% tabs %}
{% tab title=".NET" %}
**Install your .NET environment**
If you are using the .NET version of the scanner or the [.NET Global Tool](https://www.nuget.org/packages/dotnet-sonarscanner) you will need [.NET Core SDK 3.1 or above](https://dotnet.microsoft.com/en-us/download/dotnet). See this [Microsoft page](https://dotnet.microsoft.com/en-us/download) to download .NET.
The SonarScanner for .NET works with .NET environments including .NET Core 3.1 and newer.
{% endtab %}
{% tab title=".NET FRAMEWORK" %}
**Install your .NET Framework environment**
If you are using the .NET Framework version of the scanner you will need .NET Framework v4.6.2 or above. For commercial versions of SonarQube Server to benefit from security analysis you will need .NET Framework v4.7.2 or above. See this [Microsoft page](https://dotnet.microsoft.com/en-us/download/dotnet-framework) to download supported versions of .NET Framework.
{% endtab %}
{% endtabs %}
#### Installing the scanner
SonarQube Server knows which analyzer plugins you need for a given version however, choosing the correct SonarScanner version is up to you according to your .NET environment. You can use any version of the SonarScanner that supports your .NET runtime. For full details, check the [installing](https://docs.sonarsource.com/sonarqube-server/analyzing-source-code/scanners/dotnet/installing "mention") page for the prerequisites and install instructions.
Below, choose the SDK corresponding to your build system for a getting started overview:
{% tabs %}
{% tab title=".NET" %}
### **Install scanner for .NET**
You can install the SonarScanner for .NET from Nuget using the .NET global tool, or download a standalone file to execute.
#### **.NET global tool**
If you are using .NET on an already installed instance of SonarQube Server, the simplest way to install the scanner is to use the dotnet install tool from the command line. The [.NET Global Tool](https://www.nuget.org/packages/dotnet-sonarscanner) is available from .NET Core 3.1+.
```bash
dotnet tool install --global dotnet-sonarscanner --version x.x.x
```
The `--version` argument is optional; if omitted, the latest version will be installed. The full list of release versions is available on the [NuGet page](https://www.nuget.org/packages/dotnet-sonarscanner#versions-body-tab).
If you can’t use the dotnet install tool, other versions are available for download in the SonarScanner Update Center collapsible (access above, select **Show more**).
#### **Standalone executable**
You can install the SonarScanner for .NET via the *.NET Core* hyperlink in the Sonar Update Center panel above, or directly from the [releases page](https://github.com/SonarSource/sonar-scanner-msbuild/releases).
* Expand the downloaded file into the directory of your choice. We’ll refer to it as `` in the next steps.
* On Windows, you might need to unblock the ZIP file first (right-click **file** > **Properties** > **Unblock**).
* On Linux/OSX you may need to set execute permissions on the files in `/sonar-scanner-(version)/bin`.
* Uncomment, and update the global settings to point to your instance of SonarQube Server by editing `/SonarQube.Analysis.xml`. Values set in this file will be applied to all analyses of all projects unless overwritten locally. Consider setting file system permissions to restrict access to this file.
```xml
http://localhost:9000[my-user-token]
```
* Add `` to your `PATH` environment variable.
Previous versions of the .NET Framework SonarScanner are available on the releases page or found by expanding the SonarScanner for .NET version Update Center expandable box, above.
{% endtab %}
{% tab title=".NET FRAMEWORK" %}
### **Install scanner for .NET Framework**
You can install the SonarScanner for .NET by downloading a standalone file to execute.
#### **Standalone executable**
You can install the SonarScanner for .NET via the *.NET Framework* hyperlink in the Sonar Update Center panel above, or directly from the [releases page](https://github.com/SonarSource/sonar-scanner-msbuild/releases).
* Expand the downloaded file into the directory of your choice. We’ll refer to it as `` in the next steps.
* On Windows, you might need to unblock the ZIP file first (right-click **File** > **Properties** > **Unblock**).
* On Linux/OSX you may need to set execute permissions on the files in `/sonar-scanner-(version)/bin`.
* Uncomment, and update the global settings to point to your SonarQube Server’s instance by editing `/SonarQube.Analysis.xml`. Values set in this file will be applied to all analyses of all projects unless overwritten locally. Consider setting file system permissions to restrict access to this file.
```xml
http://localhost:9000[my-user-token]
```
* Add `` to your `PATH` environment variable.
Previous versions of the .NET Framework SonarScanner are available on the releases page or found by expanding the SonarScanner for .NET version Update Center expandable box, above.
{% endtab %}
{% endtabs %}
### Setting up your pipeline
How you set up the SonarScanner for .NET in your pipeline depends on your production environment. Here we will give a high-level overview, and link to pages with more detail, covering the most common CI environments:
#### Basic steps
For the most part, your pipeline should include these basic steps to run properly:
1. Check and install the [#prerequisites](https://docs.sonarsource.com/sonarqube-server/scanners/dotnet/installing#prerequisites "mention") in your environment (Java).
2. Download the correct SonarScanner version for your .NET runtime, and install it on your CI.
3. Then, as described on the [using](https://docs.sonarsource.com/sonarqube-server/analyzing-source-code/scanners/dotnet/using "mention") page:
* specify your Begin step arguments to prepare your project for analysis,
* build your project which will generate the analysis data,
* and define the End step arguments to collect the analysis data.
4. Finally, focus your analysis as part of your build process by setting up your [dotnet-test-coverage](https://docs.sonarsource.com/sonarqube-server/analyzing-source-code/test-coverage/dotnet-test-coverage "mention") using a third-party tool to access important metrics.
For more details, select the tab box below that matches your CI:
{% tabs %}
{% tab title="AZURE" %}
**Azure DevOps Pipelines**
SonarQube Server can be integrated with both Azure DevOps Server and Azure DevOps Services. To get your analysis up and running, you will need to:
* add an Azure Personal Access Token (PAT) to your instance of SonarQube Server.
* install the [SonarQube Server extension](https://marketplace.visualstudio.com/items?itemName=SonarSource.sonarqube) from the Visual Studio Marketplace. The Azure DevOps Extension for SonarQube Server embeds the most recent SonarScanner for .NET. Check [the extension’s page](https://docs.sonarsource.com/sonarqube-server/analyzing-source-code/scanners/sonarqube-extension-for-azure-devops) for more details.
* add a new SonarQube Server service endpoint.
* finally, configure your Azure pipeline to send the analysis results to SonarQube Server.
The [dotnet-project](https://docs.sonarsource.com/sonarqube-server/devops-platform-integration/azure-devops-integration/adding-analysis-to-pipeline/dotnet-project "mention") page has all of the details to complete this process.
{% endtab %}
{% tab title="GITHUB" %}
**GitHub Actions**
SonarQube Server can be integrated with both GitHub Enterprise and GitHub.com repositories. To get your analysis up and running, you will need to:
1. create a GitHub app. Please see GitHub’s documentation on [creating a GitHub App](https://docs.github.com/apps/building-github-apps/creating-a-github-app/).
2. install your GitHub App in your organization. GitHub has documentation on [installing GitHub Apps](https://docs.github.com/en/free-pro-team@latest/developers/apps/installing-github-apps).
3. update your SonarQube Server global settings with your GitHub App information. This information can be found on the [importing-github-repositories](https://docs.sonarsource.com/sonarqube-server/devops-platform-integration/github-integration/importing-github-repositories "mention") page.
4. finally, configure your .github/workflows/build.yml file so that the SonarScanner and GitHub can talk together to send your analysis results to SonarQube Server.
The [introduction](https://docs.sonarsource.com/sonarqube-server/devops-platform-integration/github-integration/introduction "mention") page is your entry point to find all of the details to complete this process.
{% endtab %}
{% tab title="GITLAB" %}
**GitLab integration**
SonarQube Server can be integrated with GitLab self-managed and GitLab SaaS subscription repositories. To get your analysis up and running, you will need to:
1. set your environment variables for all pipelines in GitLab’s settings. You’ll need to generate a Sonar Token and define your Sonar Host URL.
2. finally, configure your .gitlab-ci.yml file so that the SonarScanner can be installed and send your analysis results to SonarQube Server. If you’re running SonarQube Commercial editions and GitLab Ultimate, you can report vulnerabilities directly in GitLab.
For more details about completing this process, check out the [adding-analysis-to-gitlab-ci-cd](https://docs.sonarsource.com/sonarqube-server/devops-platform-integration/gitlab-integration/adding-analysis-to-gitlab-ci-cd "mention") page.
Here is a code sample for your gitlab-ci.yml file:
SonarScanner for .NET
**Configure your .gitlab-ci.yml file for .NET**
```yml
sonarqube-check:
image: mcr.microsoft.com/dotnet/core/sdk:latest
variables:
SONAR_USER_HOME: "${CI_PROJECT_DIR}/.sonar" # Defines the location of the analysis task cache
GIT_DEPTH: "0" # Tells git to fetch all the branches of the project, required by the analysis task
cache:
key: "${CI_JOB_NAME}"
paths:
- .sonar/cache
script:
- "apt-get update"
- "apt-get install --yes openjdk-17-jre"
- "dotnet tool install --global dotnet-sonarscanner"
- "export PATH=\"$PATH:$HOME/.dotnet/tools\""
- "dotnet sonarscanner begin /k:\"projectKey" /d:sonar.token=\"$SONAR_TOKEN\" /d:\"sonar.host.url=$SONAR_HOST_URL\" " #Replace "projectKey" with your project key
- "dotnet build"
- "dotnet sonarscanner end /d:sonar.token=\"$SONAR_TOKEN\""
allow_failure: true
only:
- merge_requests
- master
- main
- develop
```
{% endtab %}
{% tab title="JENKINS" %}
**Jenkins integration**
A SonarQube Server analysis using the SonarScanner for .NET can be triggered from Jenkins using the standard Jenkins Build Steps or the Jenkins Pipeline DSL. To get your analysis up and running, you will need to:
1. Install the [jenkins-extension-sonarqube](https://docs.sonarsource.com/sonarqube-server/analyzing-source-code/scanners/jenkins-extension-sonarqube "mention") via the [Jenkins Update Center](https://plugins.jenkins.io/sonar/).
2. To trigger your analysis, add the SonarScanner for .NET to the Jenkins Global Tool Configuration. [global-setup](https://docs.sonarsource.com/sonarqube-server/analyzing-source-code/ci-integration/jenkins-integration/global-setup "mention") provides complete instructions.
3. Finally, construct your Jenkins pipeline, adding a `withSonarQubeEnv` block that allows you to select SonarQube Server.
Additional configurations are available to manage your pipeline for [global-setup](https://docs.sonarsource.com/sonarqube-server/analyzing-source-code/ci-integration/jenkins-integration/global-setup "mention") and [pipeline-pause](https://docs.sonarsource.com/sonarqube-server/analyzing-source-code/ci-integration/jenkins-integration/pipeline-pause "mention") while the quality gate is computed. The *Jenkins* *extension for SonarQube* and [global-setup](https://docs.sonarsource.com/sonarqube-server/analyzing-source-code/ci-integration/jenkins-integration/global-setup "mention") pages will have complete details.
{% endtab %}
{% tab title="BITBUCKET" %}
**Bitbucket integration**
SonarQube Server integrates well with Bitbucket Cloud. To get your analysis up and running, you will need to:
1. import your Bitbucket Cloud repository into SonarQube Server.
2. finally, set up your pipeline to install the SonarScanner for .NET by [#configuring-your-bitbucket-pipelines.yml-file](https://docs.sonarsource.com/sonarqube-server/devops-platform-integration/bitbucket-integration/bitbucket-cloud-integration/bitbucket-pipelines#configuring-your-bitbucket-pipelines.yml-file "mention").
It’s possible to configure more details like *reporting your quality gate status in Bitbucket Cloud* or *failing the pipeline when the quality gate fails*. Check the [bitbucket-cloud-integration](https://docs.sonarsource.com/sonarqube-server/devops-platform-integration/bitbucket-integration/bitbucket-cloud-integration "mention") page for full details.
{% endtab %}
{% endtabs %}
### Managing your analysis
Once your CI pipeline is up and running, you can improve it to integrate pull request analyses and use your quality gate status to prevent merges when the quality gate fails. Each CI, as linked to above, manages pull requests in different ways and you’ll have to check the appropriate tab item for your CI to get the details.
The [pull request analysis introduction](https://docs.sonarsource.com/sonarqube-server/analyzing-source-code/pull-request-analysis) page provides an overview of how pull requests work in SonarQube Server. The [setting-up-the-pull-request-analysis](https://docs.sonarsource.com/sonarqube-server/analyzing-source-code/pull-request-analysis/setting-up-the-pull-request-analysis "mention") page will provide you with information about pull request parameters before pointing you to pages that help configure the quality gate status.
Essentially, the main steps of the analysis process are:
1. Your build or CI pipeline starts the SonarScanner.
2. The SonarScanner scans the local repository and determines the files to be analyzed according to the configured analysis scope.
3. The scanner sends an analysis request to the respective language analyzer which retrieves the files to be analyzed from the file system and analyzes them according to the configured [quality profiles](https://docs.sonarsource.com/sonarqube-server/quality-standards-administration/managing-quality-profiles).
4. The analyzer sends the analysis results to the scanner which forwards them to SonarQube Server in the form of a report. See also the [metrics-definition](https://docs.sonarsource.com/sonarqube-server/user-guide/code-metrics/metrics-definition "mention") and [solution-overview](https://docs.sonarsource.com/sonarqube-server/user-guide/issues/solution-overview "mention") pages.
5. SonarQube Server computes the analysis results asynchronously to perform the following:
* It identifies the new issues according to the configured [new code definition](https://docs.sonarsource.com/sonarqube-server/user-guide/about-new-code) and raises them in both the new code and the overall code (It uploads the code as part of the analysis and shows users the code that it raised issues on. Unanalyzed changes in the code are not visible.).
* It computes the [quality gates](https://docs.sonarsource.com/sonarqube-server/quality-standards-administration/managing-quality-gates/introduction-to-quality-gates).
* It generates reports.
The next article, [#test-coverage](#test-coverage "mention"), explains how SonarQube Server reports work.
### Test Coverage
Test coverage reports and test execution reports are important metrics to help you assess the quality of your code.
* Test coverage reports tell you what percentage of your code is covered by test cases.
* Test execution reports tell you which tests have been run and their results.
To track code coverage in Sonar, you must use one of the supported coverage tools during your test run before the scanner can pick up the report. For instructions and examples of how to manage code coverage, refer to the [dotnet-test-coverage](https://docs.sonarsource.com/sonarqube-server/analyzing-source-code/test-coverage/dotnet-test-coverage "mention") page.
Running a standard project analysis is slightly different than running an analysis on a test project. Please see the [specify-test-project-analysis](https://docs.sonarsource.com/sonarqube-server/analyzing-source-code/dotnet-environments/specify-test-project-analysis "mention") page for more complete details.
If you’re still confused about code coverage and test data, we prepared some Community guides that might be helpful. A full list of guides on the [troubleshooting](https://docs.sonarsource.com/sonarqube-server/analyzing-source-code/dotnet-environments/troubleshooting "mention") page.
---
# Source: https://docs.sonarsource.com/sonarqube-for-eclipse/getting-started.md
# Source: https://docs.sonarsource.com/sonarqube-for-visual-studio/getting-started.md
# Source: https://docs.sonarsource.com/sonarqube-for-intellij/getting-started.md
# Source: https://docs.sonarsource.com/sonarqube-for-vs-code/getting-started.md
# Source: https://docs.sonarsource.com/sonarqube-cloud/getting-started.md
# Getting started with SonarQube Cloud
{% content-ref url="getting-started/sign-up" %}
[sign-up](https://docs.sonarsource.com/sonarqube-cloud/getting-started/sign-up)
{% endcontent-ref %}
{% content-ref url="getting-started/github" %}
[github](https://docs.sonarsource.com/sonarqube-cloud/getting-started/github)
{% endcontent-ref %}
{% content-ref url="getting-started/bitbucket-cloud" %}
[bitbucket-cloud](https://docs.sonarsource.com/sonarqube-cloud/getting-started/bitbucket-cloud)
{% endcontent-ref %}
{% content-ref url="getting-started/gitlab" %}
[gitlab](https://docs.sonarsource.com/sonarqube-cloud/getting-started/gitlab)
{% endcontent-ref %}
{% content-ref url="getting-started/azure-devops" %}
[azure-devops](https://docs.sonarsource.com/sonarqube-cloud/getting-started/azure-devops)
{% endcontent-ref %}
{% content-ref url="getting-started/first-analysis" %}
[first-analysis](https://docs.sonarsource.com/sonarqube-cloud/getting-started/first-analysis)
{% endcontent-ref %}
{% content-ref url="getting-started/viewing-organizations" %}
[viewing-organizations](https://docs.sonarsource.com/sonarqube-cloud/getting-started/viewing-organizations)
{% endcontent-ref %}
---
# Source: https://docs.sonarsource.com/sonarqube-cloud/advanced-setup/ci-based-analysis/github-actions-for-sonarcloud.md
# Github Actions
To configure an analysis of your project using GitHub Actions, you will use the SonarQube Scan GitHub Action.
### Prerequisites
From SonarQube Scan GitHub Action version 5.0.0 (`sonarqube-scan-action`):
* If your runner is [GitHub-hosted](https://docs.github.com/en/actions/using-github-hosted-runners/using-github-hosted-runners/about-github-hosted-runners), all required utilities should be already provided by default.
* If your runner is [self-hosted](https://docs.github.com/en/actions/hosting-your-own-runners/managing-self-hosted-runners/about-self-hosted-runners), you need to ensure that the following utilities are installed and available in the `PATH`: `unzip`, `wget` or `curl`.
in v7, the SonarQube Scan GitHub Action uses Scanner CLI v8
The SonarQube Scan GitHub Action version 7 uses the Scanner CLI v8. Please see this [release note for the SonarQube Scan GitHub Action](https://github.com/SonarSource/sonarqube-scan-action/releases/tag/v7.0.0).
* The main change on Scanner CLI v8 is related to the embedded JRE version which is now Java 21. Please see [this release note for the SonarScanner CLI](https://github.com/SonarSource/sonar-scanner-cli/releases/tag/8.0.0.6341).
In v6, the SonarQube Scan GitHub Action handles arguments differently
The `args` input is parsed differently in `v6`. When updating to `v6`, you might have to update your workflow to change how arguments are quoted. See [this release note](https://github.com/SonarSource/sonarqube-scan-action/releases/tag/v6.0.0) for more information.
In v5, SonarQube Scan GitHub Action is not based on Docker
`v3.1.0` and below of the GitHub Action are based on Docker: at every execution of the action, a dedicated docker container is spawned.
The advantage of using container are primarily:
* **isolation**, since the SonarScanner gets only access to the directory where the project is checked out
* **full control of the environment** where the SonarScanner is executed, in terms of required utilities such as `wget` and `keytool`
The use of Docker comes, however, with multiple disadvantages:
* issues with analyzers requiring access to a system-level directories, such as cache of dependencies in Java or Dart
* issues with DockerHub rate limit on peak workload scenarios
* requirement by GitHub to run as root user
* support for Docker-based actions limited to Linux - no Windows nor MacOS
`v5` doesn't have the Docker dependency, making the action [composite](https://docs.github.com/en/actions/sharing-automations/creating-actions/creating-a-composite-action). The action now runs in the environment of the runner executing the GitHub workflow.
### Analysis setup overview
You should follow the in-product tutorial when creating a new project. When it’s time to **Choose your Analysis Method** during setup, simply select **With GitHub Actions**. You can also access the tutorials for an existing project by going to *Your Project* > **Administration** > **Analysis Method**.
The tutorial will walk you through the precise steps to set up the analysis but the basic steps are these:
1. Define the `SONAR_TOKEN` environment variable in your repository by setting up a GitHub Secret. The `SONAR_TOKEN` identifies and authenticates you to SonarQube Cloud. The tutorial will provide the precise value for your specific account. To generate the token, see:
* From the Team plan: [scoped-organization-tokens](https://docs.sonarsource.com/sonarqube-cloud/administering-sonarcloud/managing-organization/scoped-organization-tokens "mention").
* With the Free plan: [managing-tokens](https://docs.sonarsource.com/sonarqube-cloud/managing-your-account/managing-tokens "mention").
2. Set the essential analysis parameters, `sonar.projectKey`, `sonar.organization`, and `sonar.host.url`. The tutorial will be populated with the correct values for your specific account. These parameters are set differently depending on your project type:
* In the `pom.xml` for Java Maven projects.
* In the `build.gradle` file for Java Gradle projects.
* In the SonarScanner command line for .NET projects.
* In the `sonar-project.properties` file for other types of projects. You can also add additional analysis parameters to further specify your analysis details (See the [analysis-parameters](https://docs.sonarsource.com/sonarqube-cloud/advanced-setup/analysis-parameters "mention") page).
3. Create the `.github/workflows/build.yml` file that defines the steps of your build. In addition to the usual steps that build your project, you need to invoke the SonarScanner to perform the analysis of your code. This is done differently depending on your project type:
* A Maven plugin for Java Maven projects.
* A Gradle plugin for Java Gradle projects.
* A dedicated .NET scanner for .NET projects.
* The SonarQube Cloud GitHub Action for other projects. The tutorial will provide the specific details for your project type.
The example below shows how you could set up a yml file for a single project.
### Setting up your workflow file
The workflow, usually declared in `.github/workflows/build.yml`, looks something like this:
```yaml
name: My Test Single Project
on:
push:
branches:
- main
pull_request:
types: [opened, synchronize, reopened]
jobs:
sonarqube:
name: SonarQube
runs-on: ubuntu-latest
steps:
- uses: actions/checkout@v6
with:
fetch-depth: 0
- name: SonarQubeScan
uses: SonarSource/sonarqube-scan-action@v7
env:
SONAR_TOKEN: ${{ secrets.SONAR_TOKEN }}
```
Users have reported that when working with GitHub Actions reusable workflows, your `SONAR_TOKEN` is *not intrinsically* passed to the reusable workflow. Even though your `SONAR_TOKEN` is defined in the source repository, GitHub Actions will output the `SONAR_TOKEN` value with asterisks (which make it look like it is working as expected), when in fact it is not reusing the value.
When setting up your GitHub reusable workflow, we recommend using the [GitHub feature](https://docs.github.com/en/actions/using-workflows/reusing-workflows#using-inputs-and-secrets-in-a-reusable-workflow) **secret: inherit** to completely remove the intrinsic sending of your `SONAR_TOKEN`.
For C, C++, and Objective-C projects relying on Build Wrapper to generate the compilation database (see the CFamily [prerequisites](https://docs.sonarsource.com/sonarqube-cloud/advanced-setup/languages/c-family/prerequisites "mention") page), use the `sonarqube-scan-action/install-build-wrapper` sub-action to install the Build Wrapper.
### Failing the workflow when the quality gate fails
SonarQube Cloud adds the quality gate status as a GitHub check. You can define a branch protection rule on your branch in GitHub and add this check to the [required status checks before merging](https://docs.github.com/en/repositories/configuring-branches-and-merges-in-your-repository/managing-protected-branches/about-protected-branches#require-status-checks-before-merging). This way, users won’t be able to merge a pull request into the protected branch as long as the quality gate status is red.
### Analyzing Monorepo Projects: Build Configuration
The example below shows how you could set up a yml file for multiple projects in a monorepo. If you want to analyze a monorepo that contains more than one project ensure that you specify the paths to each sub-project for analysis in your build file.
To ensure that your monorepo works as expected, you need to build each project in the monorepo separately with a unique project key for each one.
**GitHub Actions .yml file**
```yaml
name: My Test Monorepo Project
on:
push:
branches:
- main
paths:
- 'lambdas/test/**'
pull_request:
types: [opened, synchronize, reopened]
jobs:
sonarqubeScan1:
name: SonarQubeScan1
runs-on: ubuntu-latest
steps:
- uses: actions/checkout@v6
with:
fetch-depth: 0
- name: SonarQube Scan
uses: SonarSource/sonarqube-scan-action@v7
env:
SONAR_TOKEN: ${{ secrets.SONAR_TOKEN }}
with:
projectBaseDir: repo1/
sonarqubeScan2:
name: SonarQubeScan2
runs-on: ubuntu-latest
steps:
- uses: actions/checkout@v6
with:
fetch-depth: 0
- name: SonarQube Scan
uses: SonarSource/sonarqube-scan-action@v7
env:
SONAR_TOKEN: ${{ secrets.SONAR_TOKEN }}
with:
projectBaseDir: repo2/
```
### Managing certificates for the SonarQube Cloud scan GitHub Action
If you use the [sonarqube-scan-action](https://github.com/SonarSource/sonarqube-scan-action) for your GitHub Action and SonarQube Cloud is behind a secured proxy with certificates that need to be recognized by the GitHub runner, you’ll need to set the `SONAR_ROOT_CERT` environment variable in GitHub.
### Troubleshooting
#### Scanner cannot resolve file paths in test coverage report
When using GitHub Action, the SonarScanner fails to resolve the paths within the test coverage report and raises the warning "Could not resolve \ file paths in \".
You may resolve this problem by switching off `relative_paths=True` in the coverage settings.
#### "Container action is only supported on Linux" error
You may encounter this error if you use the SonarQube Scan GitHub Action before version 4, i.e. `sonarcloud-github-action`. This action is based on Docker and is only supported on Linux runners. In that case, move to `sonarqube-scan-action` (see [#prerequisites](#prerequisites "mention")).
#### "Container action is only supported on Linux" error
You may encounter this error if you use the SonarQube Scan GitHub Action before version 4, i.e. `sonarcloud-github-action`. This action is based on Docker and is only supported on Linux runners. In that case, move to `sonarqube-scan-action` (see *Preqrequisites* above).
---
# Source: https://docs.sonarsource.com/sonarqube-server/2025.5/analyzing-source-code/languages/github-actions.md
# Source: https://docs.sonarsource.com/sonarqube-server/2025.6/analyzing-source-code/languages/github-actions.md
# Source: https://docs.sonarsource.com/sonarqube-server/analyzing-source-code/languages/github-actions.md
# Source: https://docs.sonarsource.com/sonarqube-cloud/advanced-setup/languages/github-actions.md
# GitHub Actions
The analysis is searches for workflows located in `**/.github/workflows/**` and composite actions in `**/actions.yml`.
### Language-specific properties
Discover and update the YAML properties in *Your Project* > **Administration** > **General Settings** > **Languages** > **GitHub Actions**.
### Deactivating GitHub Actions analysis
You can deactivate the analysis of GitHub Actions by setting the `sonar.githubactions.activate` property to `false`.
---
# Source: https://docs.sonarsource.com/sonarqube-community-build/devops-platform-integration/github-integration.md
# Source: https://docs.sonarsource.com/sonarqube-server/8.9/alm-integration/github-integration.md
# Source: https://docs.sonarsource.com/sonarqube-server/9.8/devops-platform-integration/github-integration.md
# Source: https://docs.sonarsource.com/sonarqube-server/9.9/devops-platform-integration/github-integration.md
# Source: https://docs.sonarsource.com/sonarqube-server/10.0/devops-platform-integration/github-integration.md
# Source: https://docs.sonarsource.com/sonarqube-server/10.1/devops-platform-integration/github-integration.md
# Source: https://docs.sonarsource.com/sonarqube-server/10.2/devops-platform-integration/github-integration.md
# Source: https://docs.sonarsource.com/sonarqube-server/10.3/devops-platform-integration/github-integration.md
# Source: https://docs.sonarsource.com/sonarqube-server/10.4/devops-platform-integration/github-integration.md
# Source: https://docs.sonarsource.com/sonarqube-server/10.5/devops-platform-integration/github-integration.md
# Source: https://docs.sonarsource.com/sonarqube-server/10.6/devops-platform-integration/github-integration.md
# Source: https://docs.sonarsource.com/sonarqube-server/10.7/devops-platform-integration/github-integration.md
# Source: https://docs.sonarsource.com/sonarqube-server/10.8/devops-platform-integration/github-integration.md
# Source: https://docs.sonarsource.com/sonarqube-server/2025.2/devops-platform-integration/github-integration.md
# Source: https://docs.sonarsource.com/sonarqube-server/2025.3/devops-platform-integration/github-integration.md
# Source: https://docs.sonarsource.com/sonarqube-server/2025.5/devops-platform-integration/github-integration.md
# Source: https://docs.sonarsource.com/sonarqube-server/2025.1/devops-platform-integration/github-integration.md
# Source: https://docs.sonarsource.com/sonarqube-server/2025.4/devops-platform-integration/github-integration.md
# Source: https://docs.sonarsource.com/sonarqube-server/2025.6/devops-platform-integration/github-integration.md
# Source: https://docs.sonarsource.com/sonarqube-server/devops-platform-integration/github-integration.md
# GitHub integration
- [Introduction to GitHub integration](/sonarqube-server/devops-platform-integration/github-integration/introduction.md): Introduction to GitHub integration with SonarQube Server.
- [Setting up GitHub integration at global level](/sonarqube-server/devops-platform-integration/github-integration/setting-up-at-global-level.md): Setting up SonarQube integration with GitHub at a global level.
- [Introduction](/sonarqube-server/devops-platform-integration/github-integration/setting-up-at-global-level/introduction.md): Setting up GitHub and SonarQube for their integration at the global level.
- [Setting up a GitHub App](/sonarqube-server/devops-platform-integration/github-integration/setting-up-at-global-level/setting-up-github-app.md): Setting up a GitHub App for use with SonarQube.
- [Setting up the report of security alerts](/sonarqube-server/devops-platform-integration/github-integration/setting-up-at-global-level/report-security-alerts.md): SonarQube Server provides feedback about security issues inside the GitHub interface.
- [Setting parameters for GitHub Actions](/sonarqube-server/devops-platform-integration/github-integration/setting-up-at-global-level/setting-parameters-for-github-actions.md): Defining global-level parameters used in GitHub Actions workflows to connect to SonarQube.
- [Importing GitHub repositories](/sonarqube-server/devops-platform-integration/github-integration/importing-github-repositories.md): Importing your GitHub repositories into SonarQube Server.
- [Setting up GitHub integration for your project](/sonarqube-server/devops-platform-integration/github-integration/setting-up-at-project-level.md): Setting up GitHub integration features for projects in SonarQube.
- [Adding analysis to GitHub Actions workflow](/sonarqube-server/devops-platform-integration/github-integration/adding-analysis-to-github-actions-workflow.md): Adding SonarQube Server analysis to your GitHub Actions workflow.
---
# Source: https://docs.sonarsource.com/sonarqube-cloud/administering-sonarcloud/managing-organization/users-and-permissions/github-member-sync.md
# Disabling GitHub member synchronization
When you disable the [GitHub member synchronization](https://docs.sonarsource.com/sonarqube-cloud/administering-sonarcloud/about-sonarqube-cloud-solution/user-management/github-member-synchronization), members will no longer be added or removed automatically and membership in GitHub-based organizations must be managed manually, as it is with other repository platforms.
{% hint style="warning" %}
When you enable synchronization manually, members of the SonarQube Cloud organization who aren’t members of the corresponding GitHub organization will be removed from the organization.
{% endhint %}
To enable/disable the GitHub member synchronization for your organization
1. Retrieve your organization. See [viewing-organizations](https://docs.sonarsource.com/sonarqube-cloud/getting-started/viewing-organizations "mention") for more details.
2. Open the **Members** page.
3. Select **Configure synchronization**. The Members Management dialog opens.
4. Select the manual or automatic option and **Save**.
---
# Source: https://docs.sonarsource.com/sonarqube-cloud/administering-sonarcloud/about-sonarqube-cloud-solution/user-management/github-member-synchronization.md
# GitHub member synchronization
*This feature is only available in the Team and Enterprise plans. See* [subscription-plans](https://docs.sonarsource.com/sonarqube-cloud/administering-sonarcloud/managing-subscription/subscription-plans "mention") *for more information.*
When you import a GitHub organization to SonarQube Cloud, the member synchronization is enabled by default on the new SonarQube Cloud organization provided Single Sign-On (SSO) authentication is not enabled. It means that:
* Existing SonarQube Cloud users who are members of the GitHub organization will be automatically added to the SonarQube Cloud organization during the import.
* New SonarQube Cloud users who are members of the GitHub organization will be automatically added to the SonarQube Cloud organization when they first sign up with SonarQube Cloud.
* Adding or removing GitHub organization members will be automatically synchronized in SonarQube Cloud, provided the corresponding SonarQube Cloud user exists.
* Note that user groups and permissions are not synchronized.
You can enable or disable the synchronization of bound organizations manually.
### Related pages
[github-member-sync](https://docs.sonarsource.com/sonarqube-cloud/administering-sonarcloud/managing-organization/users-and-permissions/github-member-sync "mention")
---
# Source: https://docs.sonarsource.com/sonarqube-community-build/instance-administration/authentication/github.md
# Source: https://docs.sonarsource.com/sonarqube-server/9.8/instance-administration/authentication/github.md
# Source: https://docs.sonarsource.com/sonarqube-server/9.9/instance-administration/authentication/github.md
# Source: https://docs.sonarsource.com/sonarqube-server/10.0/instance-administration/authentication/github.md
# Source: https://docs.sonarsource.com/sonarqube-server/10.1/instance-administration/authentication/github.md
# Source: https://docs.sonarsource.com/sonarqube-server/10.2/instance-administration/authentication/github.md
# Source: https://docs.sonarsource.com/sonarqube-server/10.3/instance-administration/authentication/github.md
# Source: https://docs.sonarsource.com/sonarqube-server/10.4/instance-administration/authentication/github.md
# Source: https://docs.sonarsource.com/sonarqube-server/10.5/instance-administration/authentication/github.md
# Source: https://docs.sonarsource.com/sonarqube-server/10.6/instance-administration/authentication/github.md
# Source: https://docs.sonarsource.com/sonarqube-server/10.7/instance-administration/authentication/github.md
# Source: https://docs.sonarsource.com/sonarqube-server/10.8/instance-administration/authentication/github.md
# Source: https://docs.sonarsource.com/sonarqube-server/2025.2/instance-administration/authentication/github.md
# Source: https://docs.sonarsource.com/sonarqube-server/2025.3/instance-administration/authentication/github.md
# Source: https://docs.sonarsource.com/sonarqube-server/2025.5/instance-administration/authentication/github.md
# Source: https://docs.sonarsource.com/sonarqube-server/2025.5/user-guide/issues/in-devops-platform/github.md
# Source: https://docs.sonarsource.com/sonarqube-server/2025.1/instance-administration/authentication/github.md
# Source: https://docs.sonarsource.com/sonarqube-server/2025.4/instance-administration/authentication/github.md
# Source: https://docs.sonarsource.com/sonarqube-server/2025.6/instance-administration/authentication/github.md
# Source: https://docs.sonarsource.com/sonarqube-server/2025.6/user-guide/issues/in-devops-platform/github.md
# Source: https://docs.sonarsource.com/sonarqube-server/instance-administration/authentication/github.md
# Source: https://docs.sonarsource.com/sonarqube-server/user-guide/issues/in-devops-platform/github.md
# Source: https://docs.sonarsource.com/sonarqube-cloud/managing-your-projects/administering-your-projects/devops-platform-integration/github.md
# Source: https://docs.sonarsource.com/sonarqube-cloud/managing-your-projects/issues/in-devops-platform/github.md
# Source: https://docs.sonarsource.com/sonarqube-cloud/getting-started/github.md
# Analyzing GitHub projects
If your code is on GitHub, go to the [SonarQube Cloud](https://www.sonarsource.com/products/sonarcloud/) product page and choose **Sign up** for new users, or **Login** for existing users, then select **GitHub** from the list of DevOps cloud platforms.
Once you have successfully logged in, you will be prompted to connect your GitHub organization with SonarQube Cloud and create your SonarQube Cloud organization.
### Set up your organization
You must be an owner of the GitHub organization.
For a complete setup overview, see [setup-overview](https://docs.sonarsource.com/sonarqube-cloud/administering-sonarcloud/managing-organization/setup-overview "mention").
#### Connect your GitHub organization with SonarQube Cloud
After selecting **Analyze new project**, you will be presented with a step-by-step tutorial to install the SonarQube Cloud application on GitHub. This allows SonarQube Cloud to access your GitHub organization or personal account. You can select specific repositories to be connected to SonarQube Cloud or just select all and can always change this setting later.
#### Create your SonarQube Cloud organization
SonarQube Cloud is set up to mirror the way that code is organized in GitHub (and other repository providers):
* Each *SonarQube Cloud project* corresponds one-to-one with a *GitHub project* that resides in its own GitHub repository.
* GitHub projects are grouped into *GitHub organizations* or *personal accounts*.
* Each *SonarQube Cloud organization* corresponds one-to-one with a *GitHub organization* or *personal account*.
SonarQube Cloud will suggest an Actions secret *name* and *key* for your SonarQube Cloud organization. The key is unique across all organizations within SonarQube Cloud. You can accept the suggestion or change it manually. The interface will prevent you from changing it to an already existing key.
{% hint style="warning" %}
SonarQube Cloud does not support linking an organization to more than one DevOps platform. If you want to link to more than one, you will need to create a separate organization to link to each DevOps service.
{% endhint %}
For more information, see [importing-github-organization](https://docs.sonarsource.com/sonarqube-cloud/administering-sonarcloud/managing-organization/creating-organization/importing-github-organization "mention").
#### Choose a plan
Next, you will be asked to choose a SonarQube Cloud subscription plan. See [subscription-plans](https://docs.sonarsource.com/sonarqube-cloud/administering-sonarcloud/managing-subscription/subscription-plans "mention") for a comparison between the different plans.
If you want to analyze more than 50k lines of private code, then you need to select the Team or Enterprise plan. Monthly plans offer a 14-day free trial period. Once the 14 days have elapsed, the cost is based on the number of lines of code analyzed. For more information, see [#loc-based-pricing](https://docs.sonarsource.com/sonarqube-cloud/administering-sonarcloud/managing-subscription/subscription-plans#loc-based-pricing "mention").
Once you have chosen a plan and selected **Create Organization,** your SonarQube Cloud organization is created!
### Set up your analysis
#### Import repositories
The next step is to import the projects (that is, individual Git repositories) that you want to analyze from your GitHub organization into your newly created SonarQube Cloud organization. A corresponding, one-to-one SonarQube Cloud project will be created for each imported repository.
SonarQube Cloud will present a list of the repositories in your GitHub organization; choose the projects you want to import and select **Set Up** to get started.
The selected projects will be imported.
### Choose your new code definition
The next step is to set the new code definition (NCD) for your project. The NCD is a mandatory step and it defines which part of your code is considered *new code*. This helps you to focus your attention on the most recent changes to your code.
{% hint style="info" %}
Note that the new code definition you apply at this stage will apply to all of the projects you have selected for analysis. You can change your new code definition later on a per-project basis.
To do this, go to *Your Project* > **Administration** > **New Code.**
{% endhint %}
For more information, check out the [about-new-code](https://docs.sonarsource.com/sonarqube-cloud/standards/about-new-code "mention") page.
### Analysis methods
For GitHub repositories, there are two analysis methods available: **Automatic analysis** and **CI-based analysis**.
SonarQube Cloud will first check your imported repository to see if it qualifies for automatic analysis. If it does, the analysis will start automatically and the results will appear shortly. Otherwise, proceed with CI-based analysis.
#### Automatic analysis
SonarQube Cloud can automatically analyze your code simply by reading it from your GitHub repository, without the need to configure a CI-based analysis. After configuring SonarQube Cloud with your GitHub organization, you will see a screen like this:
Note that automatic analysis is only available for GitHub repositories. It is available for most of the languages that SonarQube Cloud supports, see [languages](https://docs.sonarsource.com/sonarqube-cloud/advanced-setup/languages "mention"), with the following exceptions:
Partial support
* C#
* Java
Not yet supported
* Objective-C
* PL/SQL
* TSQL
See the [automatic-analysis](https://docs.sonarsource.com/sonarqube-cloud/advanced-setup/automatic-analysis "mention") page for more details.
#### CI-based analysis
If automatic analysis is not recommended for your project, you will need to set up a CI-based analysis. This will be the case, for example, with projects that use PL/SQL, TSQL or Objective-C.
In a CI-based analysis scenario, scanning and analysis do not occur in SonarQube Cloud itself (as they do with automatic analysis) but rather in your build environment, as part of your build process. This means you have to configure your build process to perform the analysis on each build and communicate the results to SonarQube Cloud.
The first step is to select your build environment. SonarQube Cloud will present this page:
Select the best CI option from the choices and SonarQube Cloud will guide you through a tutorial on how to set all this up.
If you need to move from automatic analysis to CI-based analysis (for example, some projects start with automatic analysis because of their languages, and then need to move to CI-based analysis because of their size), you can [deactivate automatic analysis](https://docs.sonarsource.com/sonarqube-cloud/advanced-setup/automatic-analysis#deactivating-automatic-analysis) and set up a CI-based analysis by going to **Administration** > **Analysis Method.**
### Your analysis results
Once it is complete, you can view the results of your first analysis. See [github-actions-for-sonarcloud](https://docs.sonarsource.com/sonarqube-cloud/advanced-setup/ci-based-analysis/github-actions-for-sonarcloud "mention") to integrate SonarQube Cloud into your GitHub pipeline.
In addition, with the Enterprise plan, SonarQube Cloud displays some analysis result data directly in GitHub when finding issues that impact the security of your software. See the [github](https://docs.sonarsource.com/sonarqube-cloud/managing-your-projects/administering-your-projects/devops-platform-integration/github "mention") for more details.
{% hint style="warning" %}
If you log into SonarQube Cloud using an email address that you previously used to log into another DevOps platform, you need to be aware that SonarQube Cloud will automatically associate your email address with the new DevOps platform.
For example, if you log in through GitHub and previously used Bitbucket Cloud, Bitbucket Cloud issues will no longer be assigned to your email address and you will stop receiving Bitbucket Cloud email notifications. If you then decide to switch back to Bitbucket Cloud, the GitHub email notifications will be discontinued.
{% endhint %}
### Related pages
* [setup-overview](https://docs.sonarsource.com/sonarqube-cloud/administering-sonarcloud/managing-organization/setup-overview "mention")
* [importing-github-organization](https://docs.sonarsource.com/sonarqube-cloud/administering-sonarcloud/managing-organization/creating-organization/importing-github-organization "mention")
* [setting-up-project](https://docs.sonarsource.com/sonarqube-cloud/managing-your-projects/administering-your-projects/setting-up-project "mention")
* [github](https://docs.sonarsource.com/sonarqube-cloud/managing-your-projects/administering-your-projects/devops-platform-integration/github "mention")
* [github-actions-for-sonarcloud](https://docs.sonarsource.com/sonarqube-cloud/advanced-setup/ci-based-analysis/github-actions-for-sonarcloud "mention")
---
# Source: https://docs.sonarsource.com/sonarqube-cloud/advanced-setup/ci-based-analysis/gitlab-ci.md
# GitLab CI
You can integrate SonarQube Cloud analysis into your GitLab CI pipeline.
{% hint style="info" %}
A GitLab runner with a [Docker executor](https://docs.gitlab.com/runner/executors/#docker-executor) is required.
{% endhint %}
### Add environment variables
#### Define the SONAR\_TOKEN environment variable
Generate a token with the Execute analysis permission. See:
* From the Team plan: [scoped-organization-tokens](https://docs.sonarsource.com/sonarqube-cloud/administering-sonarcloud/managing-organization/scoped-organization-tokens "mention").
* With the Free plan: [managing-tokens](https://docs.sonarsource.com/sonarqube-cloud/managing-your-account/managing-tokens "mention").
In GitLab, go to Settings and then CI/CD Variables to add the following variable and make sure it is available for your project:
* In the Key field, enter `SONAR_TOKEN`
* In the Value field, enter the token you generated on SonarQube Cloud
* Tick the Masked checkbox (this will prevent GitLab from showing the token in your build logs)
#### Define the SONAR\_HOST\_URL environment variable
In GitLab, go to Settings and then CI/CD Variables to add the following variable and make sure it is available for your project. You can define it for each of your GitLab projects or only once on the parent GitLab group.
* In the Key field, enter `SONAR_HOST_URL`
* In the Value field, enter `https://sonarcloud.io`
* No need to select the Masked checkbox this time
### Create or update the gitlab-ci.yml file
Choose the build technology relevant to your project:
Gradle
```yaml
plugins {
id "org.sonarqube" version "6.3.1.5724"
}
sonarqube {
properties {
property "sonar.projectKey", ""
property "sonar.organization", ""
}
}
```
Create or update your .gitlab-ci.yml file with the following content:
```yaml
variables:
SONAR_USER_HOME: "${CI_PROJECT_DIR}/.sonar" # Defines the location of the analysis task cache
GIT_DEPTH: "0" # Tells git to fetch all the branches of the project, required by the analysis task
sonarcloud-check:
image: gradle:alpine
cache:
key: "${CI_JOB_NAME}"
paths:
- .sonar/cache
script: gradle sonarqube
rules:
- if: $CI_COMMIT_REF_NAME == 'main' || $CI_PIPELINE_SOURCE == 'merge_request_event'
```
Maven
Update your pom.xml file with the following properties:
```xml
your-project-key-hereyour-sonarcloud-organization-key-here
```
Create or update your .gitlab-ci.yml file with the following content:
```yaml
variables:
SONAR_USER_HOME: "${CI_PROJECT_DIR}/.sonar" # Defines the location of the analysis task cache
GIT_DEPTH: "0" # Tells git to fetch all the branches of the project, required by the analysis task
sonarcloud-check:
image: maven:3.9.3-eclipse-temurin-17
cache:
key: "${CI_JOB_NAME}"
paths:
- .sonar/cache
script:
- mvn verify org.sonarsource.scanner.maven:sonar-maven-plugin:sonar
rules:
- if: $CI_COMMIT_REF_NAME == 'main' || $CI_PIPELINE_SOURCE == 'merge_request_event'
```
Other (for JS, TS, Go, Python, PHP, …)
Create or update your .gitlab-ci.yml file with the following content.
```yaml
variables:
SONAR_USER_HOME: "${CI_PROJECT_DIR}/.sonar" # Defines the location of the analysis task cache
GIT_DEPTH: "0" # Tells git to fetch all the branches of the project, required by the analysis task
sonarcloud-check:
image:
name: sonarsource/sonar-scanner-cli:latest
entrypoint: [""]
cache:
key: "${CI_JOB_NAME}"
paths:
- .sonar/cache
script:
- sonar-scanner
rules:
- if: $CI_COMMIT_REF_NAME == 'main' || $CI_PIPELINE_SOURCE == 'merge_request_event'
```
Create a `sonar-project.properties` file in the root directory of the project:
```properties
sonar.projectKey=your-project-key-here
sonar.organization=your-sonarcloud-organization-key-here
# This is the name and version displayed in the SonarQube Cloud UI.
# sonar.projectName=Sample Project
# sonar.projectVersion=1.0
# Path is relative to the sonar-project.properties file. Replace "\" by "/" on Windows.
# sonar.sources=.
# Encoding of the source code. Default is default system encoding
# sonar.sourceEncoding=UTF-8
```
.NET
Create or update your .gitlab-ci.yml file with the following content:
```yaml
sonarqube-check:
image: mcr.microsoft.com/dotnet/sdk:latest
variables:
SONAR_USER_HOME: "${CI_PROJECT_DIR}/.sonar" # Defines the location of the analysis task cache
GIT_DEPTH: "0" # Tells git to fetch all the branches of the project, required by the analysis task
cache:
key: "${CI_JOB_NAME}"
paths:
- .sonar/cache
script:
- dotnet tool install --global dotnet-sonarscanner
- export PATH="$PATH:$HOME/.dotnet/tools"
- dotnet sonarscanner begin /k:"" /o:"" /d:sonar.token="$SONAR_TOKEN"
#Replace with your project key and with your organization key
- dotnet build
- dotnet sonarscanner end /d:sonar.token="$SONAR_TOKEN"
allow_failure: false
only:
- merge_requests
- main
- develop
```
#### Failing the pipeline job when the SonarQube Cloud Quality Gate fails
In order for the pipeline to stop on GitLab CI side when the Quality Gate fails on SonarQube Cloud side, the SonarScanner needs to wait for the report and Quality Gate status to be processed by SonarQube Cloud. To enable this feature, you can set the `sonar.qualitygate.wait=true` parameter in your sonar-project.properties or .gitlab-ci.yml file.
You can also set the `sonar.qualitygate.timeout` property to a maximum amount of time (in seconds) that the SonarScanner should wait for a report to be processed. The default is 300 seconds. Reaching this timeout will count as a failure and stop the GitLab CI pipeline.
It is also possible to allow a job to fail without impacting the rest of the CI suite with the `allow_failure: true` parameter of GitLab CI. The failing job won’t stop the pipeline but will be displayed as in a warning state.
### Merge request decoration
The decoration of your merge requests is automatically configured as soon as you import a project and set up your GitLab CI.
The same access token used for connecting your GitLab group to SonarQube Cloud is used to post comments on the merge request. It makes it all the more important to use a technical GitLab account to generate the token.
### Analyzing Monorepo Projects: Build Configuration
The example below shows how you could set up a yml file for multiple projects in a monorepo. If you want to analyze a monorepo that contains more than one project ensure that you specify the paths to each sub-project for analysis in your build file.
{% hint style="info" %}
To ensure that your monorepo works as expected, you need to build each project in the monorepo separately with a valid token. Each project of the monorepo can be configured with its own properties file. Gitlab only accepts one SONAR\_TOKEN (in the CI/CD Variables configuration) per Gitlab project so you do not need to pass tokens for each project within your monorepo.
See the section on environment variables at the top of this page for more information on setting up your token.
{% endhint %}
Below is a sample .gitlab-ci.yml file that assumes your build requires the Sonar Scanner CLI, see the examples above if your setup uses an alternative configuration.
```yaml
variables:
SONAR_USER_HOME: "${CI_PROJECT_DIR}/.sonar" # Defines the location of the analysis task cache
GIT_DEPTH: "0" # Tells git to fetch all the branches of the project, required by the analysis task
sonarcloud-check-project-1:
image:
name: sonarsource/sonar-scanner-cli:latest
entrypoint: [""]
cache:
key: "${CI_JOB_NAME}"
paths:
- .sonar/cache
script:
- sonar-scanner -Dsonar.sources=project-1 -Dsonar.organization=... -Dsonar.projectKey=...
rules:
- if: $CI_COMMIT_REF_NAME == 'main' || $CI_PIPELINE_SOURCE == 'merge_request_event'
sonarcloud-check-project-2:
image:
name: sonarsource/sonar-scanner-cli:latest
entrypoint: [""]
cache:
key: "${CI_JOB_NAME}"
paths:
- .sonar/cache
script:
- sonar-scanner -Dsonar.sources=project-2 -Dsonar.organization=... -Dsonar.projectKey=...
rules:
- if: $CI_COMMIT_REF_NAME == 'main' || $CI_PIPELINE_SOURCE == 'merge_request_event'
```
---
# Source: https://docs.sonarsource.com/sonarqube-community-build/devops-platform-integration/gitlab-integration.md
# Source: https://docs.sonarsource.com/sonarqube-server/8.9/alm-integration/gitlab-integration.md
# Source: https://docs.sonarsource.com/sonarqube-server/9.8/devops-platform-integration/gitlab-integration.md
# Source: https://docs.sonarsource.com/sonarqube-server/9.9/devops-platform-integration/gitlab-integration.md
# Source: https://docs.sonarsource.com/sonarqube-server/10.0/devops-platform-integration/gitlab-integration.md
# Source: https://docs.sonarsource.com/sonarqube-server/10.1/devops-platform-integration/gitlab-integration.md
# Source: https://docs.sonarsource.com/sonarqube-server/10.2/devops-platform-integration/gitlab-integration.md
# Source: https://docs.sonarsource.com/sonarqube-server/10.3/devops-platform-integration/gitlab-integration.md
# Source: https://docs.sonarsource.com/sonarqube-server/10.4/devops-platform-integration/gitlab-integration.md
# Source: https://docs.sonarsource.com/sonarqube-server/10.5/devops-platform-integration/gitlab-integration.md
# Source: https://docs.sonarsource.com/sonarqube-server/10.6/devops-platform-integration/gitlab-integration.md
# Source: https://docs.sonarsource.com/sonarqube-server/10.7/devops-platform-integration/gitlab-integration.md
# Source: https://docs.sonarsource.com/sonarqube-server/10.8/devops-platform-integration/gitlab-integration.md
# Source: https://docs.sonarsource.com/sonarqube-server/2025.2/devops-platform-integration/gitlab-integration.md
# Source: https://docs.sonarsource.com/sonarqube-server/2025.3/devops-platform-integration/gitlab-integration.md
# Source: https://docs.sonarsource.com/sonarqube-server/2025.5/devops-platform-integration/gitlab-integration.md
# Source: https://docs.sonarsource.com/sonarqube-server/2025.1/devops-platform-integration/gitlab-integration.md
# Source: https://docs.sonarsource.com/sonarqube-server/2025.4/devops-platform-integration/gitlab-integration.md
# Source: https://docs.sonarsource.com/sonarqube-server/2025.6/devops-platform-integration/gitlab-integration.md
# Source: https://docs.sonarsource.com/sonarqube-server/devops-platform-integration/gitlab-integration.md
# GitLab integration
- [Introduction to GitLab integration](/sonarqube-server/devops-platform-integration/gitlab-integration/introduction.md): SonarQube Servers’s integration with GitLab self-managed and GitLab SaaS subscriptions allows you to maintain code quality and security in your GitLab projects.
- [Setting up GitLab integration at global level](/sonarqube-server/devops-platform-integration/gitlab-integration/global-setup.md): Setting up GitLab and SonarQube Server for integration at the global level.
- [Importing your GitLab repositories](/sonarqube-server/devops-platform-integration/gitlab-integration/importing-repos.md): Importing a GitLab repository to create a corresponding project in SonarQube Server.
- [Setting up GitLab integration for your project](/sonarqube-server/devops-platform-integration/gitlab-integration/setting-up-at-project-level.md): Setting up GitLab integration features for a project.
- [Adding analysis to GitLab CI/CD pipeline](/sonarqube-server/devops-platform-integration/gitlab-integration/adding-analysis-to-gitlab-ci-cd.md): Integrating SonarQube analysis into your GitLab CI/CD pipeline.
---
# Source: https://docs.sonarsource.com/sonarqube-community-build/instance-administration/authentication/gitlab.md
# Source: https://docs.sonarsource.com/sonarqube-server/9.8/instance-administration/authentication/gitlab.md
# Source: https://docs.sonarsource.com/sonarqube-server/9.9/instance-administration/authentication/gitlab.md
# Source: https://docs.sonarsource.com/sonarqube-server/10.0/instance-administration/authentication/gitlab.md
# Source: https://docs.sonarsource.com/sonarqube-server/10.1/instance-administration/authentication/gitlab.md
# Source: https://docs.sonarsource.com/sonarqube-server/10.2/instance-administration/authentication/gitlab.md
# Source: https://docs.sonarsource.com/sonarqube-server/10.3/instance-administration/authentication/gitlab.md
# Source: https://docs.sonarsource.com/sonarqube-server/10.4/instance-administration/authentication/gitlab.md
# Source: https://docs.sonarsource.com/sonarqube-server/10.5/instance-administration/authentication/gitlab.md
# Source: https://docs.sonarsource.com/sonarqube-server/10.6/instance-administration/authentication/gitlab.md
# Source: https://docs.sonarsource.com/sonarqube-server/10.7/instance-administration/authentication/gitlab.md
# Source: https://docs.sonarsource.com/sonarqube-server/10.8/instance-administration/authentication/gitlab.md
# Source: https://docs.sonarsource.com/sonarqube-server/2025.2/instance-administration/authentication/gitlab.md
# Source: https://docs.sonarsource.com/sonarqube-server/2025.3/instance-administration/authentication/gitlab.md
# Source: https://docs.sonarsource.com/sonarqube-server/2025.5/instance-administration/authentication/gitlab.md
# Source: https://docs.sonarsource.com/sonarqube-server/2025.5/user-guide/issues/in-devops-platform/gitlab.md
# Source: https://docs.sonarsource.com/sonarqube-server/2025.1/instance-administration/authentication/gitlab.md
# Source: https://docs.sonarsource.com/sonarqube-server/2025.4/instance-administration/authentication/gitlab.md
# Source: https://docs.sonarsource.com/sonarqube-server/2025.6/instance-administration/authentication/gitlab.md
# Source: https://docs.sonarsource.com/sonarqube-server/2025.6/user-guide/issues/in-devops-platform/gitlab.md
# Source: https://docs.sonarsource.com/sonarqube-server/instance-administration/authentication/gitlab.md
# Source: https://docs.sonarsource.com/sonarqube-server/user-guide/issues/in-devops-platform/gitlab.md
# Source: https://docs.sonarsource.com/sonarqube-cloud/managing-your-projects/administering-your-projects/devops-platform-integration/gitlab.md
# Source: https://docs.sonarsource.com/sonarqube-cloud/managing-your-projects/issues/in-devops-platform/gitlab.md
# Source: https://docs.sonarsource.com/sonarqube-cloud/getting-started/gitlab.md
# Analyzing GitLab projects
If your code is on GitLab, go to the [SonarQube Cloud](https://www.sonarsource.com/products/sonarcloud/) product page and choose **Set up** or **Login**, then select **GitLab** from the list of DevOps cloud platforms.
You will be taken to the GitLab login page. Sign in using your GitLab credentials.
### Welcome to SonarQube Cloud
Once you have successfully logged in, you will see the SonarQube Cloud welcome screen. Select **Analyze your first projects** > **Import an organization from GitLab**.
### Set up your organization
You must be an owner of the GitLab group to be imported.
For a complete setup overview, see [setup-overview](https://docs.sonarsource.com/sonarqube-cloud/administering-sonarcloud/managing-organization/setup-overview "mention").
#### About SonarQube Cloud organizations
SonarQube Cloud is set up to mirror the way that code is organized in GitLab (and other repository providers):
* Each *SonarQube Cloud project* corresponds one-to-one with a *GitLab project*, which resides in its own Git repository.
* *GitLab projects* are grouped into \*GitLab groups \*or under a [personal namespace](https://docs.gitlab.com/ee/user/namespace/).
* Each *SonarQube Cloud organization* corresponds one-to-one with a \*GitLab group \*or personal namespace.
{% hint style="info" %}
**SonarQube Cloud supports one DevOps platform at a time.**
SonarQube Cloud does not support linking an organization to more than one DevOps platform. If you want to link to more than one, you will need to create a separate organization to link to each DevOps service.
{% endhint %}
#### Connect your GitLab group with SonarQube Cloud
First, select either
* **Import any GitLab group**, if you want to import a GitLab group other than your personal one, or
* **Import my personal namespace**, if you want to import only the repositories that are under your personal namespace.
If you select the first option, you will need your GitLab group key and a personal access token.
If you select the second option, you will just need a personal access token.
**Group key**
For the group key, you can provide *either* the *ID* of the group or the *key* of the group. The group ID can be found under the group name on the group page. The group key is the last element in the path of the group and is found in the URL. For example, `gitlab.com/my-group`.
Note that the user that is logged into SonarQube Cloud must be an *owner* of the GitLab group.
{% hint style="info" %}
We currently only support the importing of GitLab parent groups. Subgroups are not supported.
{% endhint %}
**Personal access token**
To create the token, go to **User settings** > **Personal Access Tokens** in GitLab, or while logged in to GitLab, click the [Personal Access Token](https://gitlab.com/-/profile/personal_access_tokens) hyperlink in the SonarQube Cloud **Create an organization** tutorial.
When creating your access token on the GitLab **User settings** > **Personal Access Tokens** page, make sure to select **api scope**. Then click **Create personal access token**.
When the personal access token is displayed at the top of the page, copy the token and paste it into the field on the SonarQube Cloud setup page.
{% hint style="warning" %}
**An api scope is required**
SonarQube Cloud requires that the access token have `api` scope. This gives SonarQube Cloud more access rights than strictly necessary, but due to the lack of more fine-grained access control in GitLab, it is the only viable option.
To mitigate this potential security concern, we strongly encourage you to add a technical user to your organization, log in to SonarQube Cloud using that technical user, and use the access token of that technical user to connect your GitLab group to SonarQube Cloud.
SonarQube Cloud will always limit its actions to those required for effective integration with GitLab and will never use the full access right provided by the `api` scope.
{% endhint %}
#### Import organization details
In this step, you will create a SonarQube Cloud organization that corresponds to your GitLab group. For more information, see [importing-gitlab-group](https://docs.sonarsource.com/sonarqube-cloud/administering-sonarcloud/managing-organization/creating-organization/importing-gitlab-group "mention").
SonarQube Cloud will suggest a *key* for your SonarQube Cloud organization. This is a name unique across all organizations within SonarQube Cloud. You can accept the suggestion or change it manually. The interface will prevent you from changing it to an already existing key.
#### Choose a plan
Next, you will be asked to choose a SonarQube Cloud subscription plan. See [subscription-plans](https://docs.sonarsource.com/sonarqube-cloud/administering-sonarcloud/managing-subscription/subscription-plans "mention") for a comparison between the different plans.
If you want to analyze more than 50k lines of private code, then you need to select the Team or Enterprise plan. Monthly plans offer a 14-day free trial period. Once the 14 days have elapsed, the cost is based on the number of lines of code analyzed. For more information, see [#loc-based-pricing](https://docs.sonarsource.com/sonarqube-cloud/administering-sonarcloud/managing-subscription/subscription-plans#loc-based-pricing "mention").
{% hint style="info" %}
A plan is always associated one-to-one with a SonarQube Cloud organization and therefore, with a single GitLab group. If you want to onboard multiple GitLab groups, you must sign up for a separate SonarQube Cloud plan for each group.
{% endhint %}
Once you have chosen a plan and selected **Create Organization,** your SonarQube Cloud organization will be created!
### Set up your analysis
#### Import repositories
The next step is to import the projects (that is, individual Git repositories) that you want to analyze from your GitLab group into your newly created SonarQube Cloud organization, creating a corresponding SonarQube Cloud project for each.
SonarQube Cloud will present a list of the repositories in your GitLab group. Select those that you want to import and analyze and click **Set Up**.
The selected projects will be imported.
### Choose your new code definition
The next step is to set the **New Code Definition** (NCD) for your project(s). The NCD is a mandatory step and it defines which part of your code is considered *new code*. This helps you to focus your attention on the most recent changes to your code.
{% hint style="info" %}
Note that the new code definition you apply at this stage will apply to all of the projects you have selected for analysis. You can change your new code definition later on a per-project basis.
To do this, go to *Your Project* > **Administration** > **New Code.**
{% endhint %}
For more information, see the [about-new-code](https://docs.sonarsource.com/sonarqube-cloud/standards/about-new-code "mention") page.
#### Configure analysis
With GitLab projects, the actual analysis is performed in your build environment (for example, on a cloud CI or your local machine). This means you have to configure your build process to perform the analysis on each build and communicate the results up to SonarQube Cloud.
{% hint style="info" %}
We refer to this analysis method as *CI-based analysis* (though it may take place in a cloud CI or a manually configured build environment) to contrast it with *automatic analysis* which works by SonarQube Cloud directly accessing your repository and performing the analysis itself. However, [automatic-analysis](https://docs.sonarsource.com/sonarqube-cloud/advanced-setup/automatic-analysis "mention") is currently available only for GitHub projects and only for a subset of languages.
{% endhint %}
SonarQube Cloud will guide you through a tutorial on how to set up your build environment to run your analysis.
The first step is to select your build environment. SonarQube Cloud will present this page:
If you have no particular preference and are setting up a new project on GitLab, we recommend using GitLab CI/CD as your CI.
Follow the tutorial to set up your analysis.
### See your analysis results
Once it is complete, you can view the results of your first analysis.
In addition, please see the page on [gitlab-ci](https://docs.sonarsource.com/sonarqube-cloud/advanced-setup/ci-based-analysis/gitlab-ci "mention") to integrate SonarQube Cloud into your GitLab pipelines.
{% hint style="warning" %}
**Email notifications**
If you log into SonarQube Cloud using an email address that you previously used to log into another DevOps platform, you need to be aware that SonarQube Cloud will automatically *associate your email address with the new DevOps platform*.
For example, if you log in through GitLab and previously used GitHub, GitHub issues will no longer be assigned to your email address and you will stop receiving GitHub email notifications. If you then decide to switch back to GitHub, the GitLab email notifications will be discontinued.
{% endhint %}
### Related pages
* [importing-gitlab-group](https://docs.sonarsource.com/sonarqube-cloud/administering-sonarcloud/managing-organization/creating-organization/importing-gitlab-group "mention")
* [setting-up-project](https://docs.sonarsource.com/sonarqube-cloud/managing-your-projects/administering-your-projects/setting-up-project "mention")
* [gitlab](https://docs.sonarsource.com/sonarqube-cloud/managing-your-projects/administering-your-projects/devops-platform-integration/gitlab "mention")
* [gitlab-ci](https://docs.sonarsource.com/sonarqube-cloud/advanced-setup/ci-based-analysis/gitlab-ci "mention")
---
# Source: https://docs.sonarsource.com/sonarqube-community-build/devops-platform-integration/gitlab-integration/global-setup.md
# Source: https://docs.sonarsource.com/sonarqube-community-build/analyzing-source-code/ci-integration/jenkins-integration/global-setup.md
# Source: https://docs.sonarsource.com/sonarqube-server/10.5/analyzing-source-code/ci-integration/jenkins-integration/global-setup.md
# Source: https://docs.sonarsource.com/sonarqube-server/10.6/devops-platform-integration/gitlab-integration/global-setup.md
# Source: https://docs.sonarsource.com/sonarqube-server/10.6/analyzing-source-code/ci-integration/jenkins-integration/global-setup.md
# Source: https://docs.sonarsource.com/sonarqube-server/10.7/devops-platform-integration/gitlab-integration/global-setup.md
# Source: https://docs.sonarsource.com/sonarqube-server/10.7/analyzing-source-code/ci-integration/jenkins-integration/global-setup.md
# Source: https://docs.sonarsource.com/sonarqube-server/10.8/devops-platform-integration/gitlab-integration/global-setup.md
# Source: https://docs.sonarsource.com/sonarqube-server/10.8/analyzing-source-code/ci-integration/jenkins-integration/global-setup.md
# Source: https://docs.sonarsource.com/sonarqube-server/2025.2/devops-platform-integration/gitlab-integration/global-setup.md
# Source: https://docs.sonarsource.com/sonarqube-server/2025.2/analyzing-source-code/ci-integration/jenkins-integration/global-setup.md
# Source: https://docs.sonarsource.com/sonarqube-server/2025.3/devops-platform-integration/gitlab-integration/global-setup.md
# Source: https://docs.sonarsource.com/sonarqube-server/2025.3/analyzing-source-code/ci-integration/jenkins-integration/global-setup.md
# Source: https://docs.sonarsource.com/sonarqube-server/2025.5/devops-platform-integration/gitlab-integration/global-setup.md
# Source: https://docs.sonarsource.com/sonarqube-server/2025.5/analyzing-source-code/ci-integration/jenkins-integration/global-setup.md
# Source: https://docs.sonarsource.com/sonarqube-server/2025.1/devops-platform-integration/gitlab-integration/global-setup.md
# Source: https://docs.sonarsource.com/sonarqube-server/2025.1/analyzing-source-code/ci-integration/jenkins-integration/global-setup.md
# Source: https://docs.sonarsource.com/sonarqube-server/2025.4/devops-platform-integration/gitlab-integration/global-setup.md
# Source: https://docs.sonarsource.com/sonarqube-server/2025.4/analyzing-source-code/ci-integration/jenkins-integration/global-setup.md
# Source: https://docs.sonarsource.com/sonarqube-server/2025.6/devops-platform-integration/gitlab-integration/global-setup.md
# Source: https://docs.sonarsource.com/sonarqube-server/2025.6/analyzing-source-code/ci-integration/jenkins-integration/global-setup.md
# Source: https://docs.sonarsource.com/sonarqube-server/devops-platform-integration/gitlab-integration/global-setup.md
# Source: https://docs.sonarsource.com/sonarqube-server/analyzing-source-code/ci-integration/jenkins-integration/global-setup.md
# Source: https://docs.sonarsource.com/sonarqube-cloud/advanced-setup/ci-based-analysis/jenkins/global-setup.md
# Setting up Jenkins
The Jenkins extension for SonarQube facilitates a global integration with SonarQube Cloud. Using the Jenkins extension is not mandatory but allows a centralized installation and setup of the SonarScanner directly from Jenkins.
Proceed as follows:
1. Install the Jenkins extension.
2. Install the SonarScanner from Jenkins.
3. Set up the multi-branch features.
These steps are explained below.
### Installing the Jenkins extension
[Jenkins extension](https://plugins.jenkins.io/sonar/) version 2.11 or later is required.
Proceed as follows:
1. From the Jenkins Dashboard, navigate to **Manage Jenkins** > **Manage Plugins** and install the **SonarQube Scanner** plugin.
2. Back at the Jenkins Dashboard, navigate to **Credentials** > **System** from the left navigation.
3. Click the **Global credentials (unrestricted)** link in the **System** table.
4. Click **Add credentials** in the left navigation and add the following information:
* **Kind**: Secret Text
* **Scope**: Global
* **Secret**: Generate a token at **User** > **My Account** > **Security** in SonarQube Cloud, and copy and paste it here.
5. Click **OK**.
6. From the Jenkins Dashboard, navigate to **Manage Jenkins** > **Configure System**.
7. From the **SonarQube Servers** section, click **Add SonarQube**. Add the following information:
* **Name**: SonarQube Cloud
* **Server URL**:
* **Credentials**: Select the credentials created during step 4.
8. Click **Save**
### Installing the SonarScanner
From Jenkins, install and configure the SonarScanner instance(s). This step depends on the project type.
{% tabs %}
{% tab title="MAVEN OR GRADLE" %}
1. Log into Jenkins as an administrator and go to **Manage Jenkins** > **Configure System.**
2. Scroll to the **SonarQube servers** section and check **Enable injection of SonarQube server configuration as build environment variables**.
{% endtab %}
{% tab title=".NET" %}
This step is mandatory if you want to trigger any of your analyses with the SonarScanner for .NET. You can define as many scanner instances as you wish. Then for each Jenkins job, you will be able to choose which launcher to use to run the analysis.
To install and configure the scanner instances:
1. Log into Jenkins as an administrator and go to **Manage Jenkins** > **Global Tool Configuration.**
2. Click on **Add SonarScanner for MSBuild.**
3. Add an installation of the latest available version. Check **Install automatically** to have the SonarScanner for .NET automatically provisioned on your Jenkins executors.\
If you do not see any available version under Install from GitHub, first go to **Manage Jenkins** > **Manage Plugins** > **Advanced** and click on **Check now.**
{% hint style="info" %}
In version 5.0 of the SonarScanner, we changed the name of the *SonarScanner for MSBuild* to *SonarScanner for .NET*.
The documentation is updated with the new name and we will call the scanner *SonarScanner for .NET* moving forward.
{% endhint %}
{% endtab %}
{% tab title="OTHER" %}
This step is mandatory if you want to trigger any of your analyses with the SonarScanner CLI. You can define as many scanner instances as you wish. Then, for each Jenkins job, you will be able to choose which launcher to use to run the analysis.
To install and configure the scanner instances:
1. Log into Jenkins as an administrator and go to **Manage Jenkins** > **Global Tool Configuration.**
2. Scroll down to the SonarScanner configuration section and select **Add SonarScanner**. It is based on the typical Jenkins tool auto-installation. You can either choose to point to an already installed version of the SonarScanner CLI (uncheck **Install automatically**) or tell Jenkins to grab the installer from a remote location (check **Install automatically**).\
If you don’t see a drop-down list with all available SonarScanner CLI versions but instead see an empty text field, this is because Jenkins still hasn’t downloaded the required update center file (the default period is one day). You may force this refresh by selecting **Check Now** in **Manage Plugins** > **Advanced tab**.
{% endtab %}
{% endtabs %}
### Setting up the multi-branch features
To analyze Jenkins Multibranch Pipeline jobs, you must install, on your CI host, the Branch Source plugin for Jenkins corresponding to your DevOps platform.
{% tabs %}
{% tab title="GITHUB" %}
[GitHub Branch Source plugin](https://plugins.jenkins.io/github-branch-source/) version 2.7.1 or later is required
1. From the Jenkins Dashboard, navigate to **Manage Jenkins** > **Manage Plugins** and install the **GitHub Branch Source** plugin.
2. From the Jenkins Dashboard, navigate to **Manage Jenkins** > **Configure System**.
3. From the **GitHub** or **GitHub Enterprise Servers** section, add your GitHub server.
4. Select **Save**.
{% endtab %}
{% tab title="BITBUCKET SERVER OR DATA CENTER" %}
[Bitbucket Branch Source plugin](https://plugins.jenkins.io/cloudbees-bitbucket-branch-source/) version 2.7 or later is required
From the Jenkins Dashboard, navigate to **Manage Jenkins** > **Manage Plugins** and install the **Bitbucket Branch Source** plugin. Then configure the following:
1. From the Jenkins Dashboard, navigate to **Manage Jenkins** > **Configure System**.
2. From the **Bitbucket Endpoints** section, open the **Add** drop-down menu and select **Bitbucket Server**. Add the following information:
* **Name**: Give a unique name to your Bitbucket Server or Data Center instance.
* **Server URL**: Your Bitbucket Server or Data Center instance URL.
3. Select **Save**.
{% endtab %}
{% tab title="BITBUCKET CLOUD" %}
[Bitbucket Branch Source plugin](https://plugins.jenkins.io/cloudbees-bitbucket-branch-source/) version 2.7 or later is required
From the Jenkins Dashboard, navigate to **Manage Jenkins** > **Manage Plugins** and install the **Bitbucket Branch Source** plugin.
{% endtab %}
{% tab title="GITLAB" %}
[GitLab Branch Source plugin](https://plugins.jenkins.io/gitlab-branch-source/) version 1.5.3 or later is required
1. From the Jenkins Dashboard, navigate to **Manage Jenkins** > **Manage Plugins** and install the **GitLab Branch Source** plugin.
2. From the Jenkins Dashboard, navigate to **Manage Jenkins** > **Configure System**.
3. From the **GitLab** section, add your GitLab server. Make sure to select the **Manage Web Hooks** checkbox.
4. Select **Save**.
{% endtab %}
{% endtabs %}
### Other settings
To set up an automatic interruption of the pipeline in case the quality gate fails, configure your [webhooks](https://docs.sonarsource.com/sonarqube-cloud/advanced-setup/webhooks "mention") at the global level when used in pipeline jobs. Interrupting your pipeline (with a failed quality gate) is only available in Team plans. See the [subscription-plans](https://docs.sonarsource.com/sonarqube-cloud/administering-sonarcloud/managing-subscription/subscription-plans "mention") page for more details.
---
# Source: https://docs.sonarsource.com/sonarqube-community-build/devops-platform-integration/bitbucket-integration/bitbucket-cloud-integration/global.md
# Source: https://docs.sonarsource.com/sonarqube-community-build/devops-platform-integration/bitbucket-integration/bitbucket-server-integration/global.md
# Source: https://docs.sonarsource.com/sonarqube-server/2025.5/devops-platform-integration/bitbucket-integration/bitbucket-cloud-integration/global.md
# Source: https://docs.sonarsource.com/sonarqube-server/2025.5/devops-platform-integration/bitbucket-integration/data-center/global.md
# Source: https://docs.sonarsource.com/sonarqube-server/2025.6/devops-platform-integration/bitbucket-integration/bitbucket-cloud-integration/global.md
# Source: https://docs.sonarsource.com/sonarqube-server/2025.6/devops-platform-integration/bitbucket-integration/bitbucket-server-integration/global.md
# Source: https://docs.sonarsource.com/sonarqube-server/devops-platform-integration/bitbucket-integration/bitbucket-cloud-integration/global.md
# Source: https://docs.sonarsource.com/sonarqube-server/devops-platform-integration/bitbucket-integration/bitbucket-server-integration/global.md
# Setting up Bitbucket Data Center integration at global level
This section explains how to set up Bitbucket Data Center and SonarQube to allow users to import Bitbucket Data Center repositories. To perform this setup, you need the global Administer System permission in SonarQube.
### Prerequisites
You’ve set a SonarQube Server base URL in SonarQube Server: see [server-base-url](https://docs.sonarsource.com/sonarqube-server/instance-administration/server-base-url "mention").
### Step 1: Create a Personal Access Token
You must provide a Bitbucket Data Center [Personal Access Token](https://confluence.atlassian.com/bitbucketserver0515/personal-access-tokens-961275199.html) that will be used by SonarQube to report the quality gate to the pull requests. This token will be stored in SonarQube and can be revoked at any time in Bitbucket Data Center.
To generate the token, we recommend using a dedicated Bitbucket Data Center account with Administrator permissions. In any case, the account must have the `Read` permission for the repositories that will be analyzed.
If you want to enter the token in SonarQube in encrypted format, you can encrypt this token.
See [encrypting-settings](https://docs.sonarsource.com/sonarqube-server/instance-administration/security/encrypting-settings "mention") for more information about settings encryption.
### Step 2: Create a Bitbucket configuration record
This integration is performed through a "Bitbucker Configuration" record, which is used in SonarQube to access the Bitbucket Data Center instance.
{% hint style="info" %}
Starting in SonarQube Server's [Enterprise edition](https://www.sonarsource.com/plans-and-pricing/enterprise/), you can integrate SonarQube with multiple Bitbucket Data Center instances, each instance being accessed with a different Bitbucket Configuration.
{% endhint %}
To set up a Bitbucket Configuration in SonarQube:
1. In the SonarQube UI, go to **Administration > Configuration > General Settings > DevOps Platform Integrations**.
2. Select the **Bitbucket** tab and click **Create configuration**. The **Create a configuration** dialog opens.
3. Select **Bitbucket Server**.
4. Specify the following settings:
* **Configuration Name** (Enterprise and Data Center edition only): The name used to identify your Bitbucket configuration at the project level. Use something succinct and easily recognizable.
* **Bitbucket Server URL**: Your Server or Data Center instance URL. For example, `https://bitbucket-server.your-company.com`.
* **Personal Access Token**: The token you generated in Step 1.
5. Select **Save configuration**.
### Related pages
[import-repos](https://docs.sonarsource.com/sonarqube-server/devops-platform-integration/bitbucket-integration/bitbucket-server-integration/import-repos "mention")\
[project](https://docs.sonarsource.com/sonarqube-server/devops-platform-integration/bitbucket-integration/bitbucket-server-integration/project "mention")
---
# Source: https://docs.sonarsource.com/sonarqube-community-build/glossary.md
# Source: https://docs.sonarsource.com/sonarqube-for-eclipse/resources/glossary.md
# Source: https://docs.sonarsource.com/sonarqube-for-visual-studio/resources/glossary.md
# Source: https://docs.sonarsource.com/sonarqube-for-intellij/resources/glossary.md
# Source: https://docs.sonarsource.com/sonarqube-for-vs-code/resources/glossary.md
# Source: https://docs.sonarsource.com/sonarqube-server/10.8/glossary.md
# Source: https://docs.sonarsource.com/sonarqube-server/2025.2/glossary.md
# Source: https://docs.sonarsource.com/sonarqube-server/2025.3/glossary.md
# Source: https://docs.sonarsource.com/sonarqube-server/2025.5/glossary.md
# Source: https://docs.sonarsource.com/sonarqube-server/2025.1/glossary.md
# Source: https://docs.sonarsource.com/sonarqube-server/2025.4/glossary.md
# Source: https://docs.sonarsource.com/sonarqube-server/2025.6/glossary.md
# Source: https://docs.sonarsource.com/sonarqube-server/glossary.md
# Source: https://docs.sonarsource.com/sonarqube-cloud/appendices/glossary.md
# SonarQube glossary
### A
**application**\
In SonarQube Server, the aggregation of multiple projects into a synthetic single project. Applications allow you to see your set of projects as a larger, overall meta-project.
**automated code review** A software development process in which static code analysis tools are used to automatically review and analyze the source code for potential issues and coding standard violations. Automated code review accelerates the identification and resolution of code issues and improves code quality (reliability, security, maintainability).
### C
**CI/CD host**\
The host on which the CI/CD pipeline runs and the Sonar scanner analysis is performed.
**code smell**
Issue type impacting your code in Standard Experience. It is called Maintainability in MQR Mode.
**coding attributes**
* **consistency**: the code is written in a uniform and conventional way. All the code looks similar and follows a regular pattern, even with multiple contributors at different times. Consistent code is:
* **formatted**: the code presentation is systematic and regular. Non-semantic choices, such as spacing, indentation, and character placement, remain consistent throughout the codebase, maintaining uniformity across files and authors.
* **conventional**: the code performs tasks with expected instructions. Faced with equally good options, the code adheres to a single choice across all instances, preferring language conventions. This includes using the appropriate programming interfaces and language features.
* **identifiable**: the names follow a regular structure based on language conventions. The casing, word separators, suffixes, and prefixes used in the identifiers have purpose, without arbitrary differences.
* **intentionality**: the code is precise and purposeful. Every instruction makes sense, is adequately formed, and clearly communicates its behavior. Intentional code is:
* **clear**: the code is self-explanatory, transparently communicating its functionality. It is written in a straightforward way that minimizes ambiguity, avoiding unnecessary clever or intricate solutions.
* **logical**: the code has well-formed and sound instructions that work together. It is free of explicit errors, contradictions, and commands that could be unpredictable or objectionable.
* **complete**: the code constructs are comprehensive and used adequately and thoroughly. The code is functional and achieves its implied goals. There are no obviously incomplete or lacking solutions.
* **efficient**: the code uses resources without needless waste. It prioritizes economical options when available, avoiding unnecessary consumption of memory, processor, disk, or network resources.
* **adaptability**: the code is structured to be easy to evolve and develop with confidence. It makes extending or repurposing its parts easy and promotes localized changes without undesirable side-effects. Adaptable code is:
* **focused**: the code has a single, narrow, and specific scope. Each unit should have only one concise purpose, without an overwhelming accumulation of instructions or excessive amounts of complexity.
* **distinct**: the code procedures and data are unique and distinctive, without undue duplication. The codebase has no significant repetition where it could be decomposed into smaller shared segments.
* **modular**: the code has automated checks that provide confidence in the functionality. It has enough test coverage which enables changes in implementation without the risk of functional regressions.
* **responsibility**: the code takes into account its ethical obligations on data, as well as societal norms. Responsible code is:
* **lawful**: the code respects licensing and copyright regulation. It exercises the creator’s rights and honors other’s rights to license their own code.
* **trustworthy**: the code abstains from revealing or hard-coding private information. It preserves sensitive private information such as credentials and personally identifying information.
* **respectful**: the code refrains from using discriminatory and offensive language. It chooses to prioritize inclusive terminology whenever an alternative exists that conveys the same meaning.
**cognitive complexity**\
A Sonar exclusive metric formulated to more accurately measure the relative understandability of methods. Cognitive complexity breaks from using mathematical models to assess software maintainability by combining cyclomatic complexity precedents with human assessment. It yields method complexity scores that align well with how developers perceive maintainability.
**connected mode**\
The mode used by SonarQube for IDE when connected to SonarQube (Cloud, Server) or SonarQube Community Build. This mode allows users to get the most out of the Sonar solution. The mode used by SonarQube for IDE when not in connected mode is called standalone mode.
**cyclomatic complexity**\
A software metric used to indicate the complexity of a program. It is a quantitative measure of the number of linearly independent paths through a program’s source code.
### D
**deprecated**\
A warning related to a feature indicating that the feature still works but will not work at some point in the future.
### E
**external issue**\
An issue detected by an external, third-party analyzer and imported into SonarQube.
**external rule**\
A rule applied in an external, third-party analyzer, and that raises external issues.
### F
**false positive**\
Users can assign a false positive status to an issue raised during a code analysis that was wrongly classified as an issue.
### I
**inactive branch**\
A branch that has not been analyzed for more than seven consecutive days.
**injection vulnerability**\
This is a security issue that identifies injection risks in the code. SonarQube Server and SonarQube Cloud use taint analysis - a technology used to track tainted data - to detect injection vulnerabilities. Tainted data refers to unsanitized external data, which exposes the code to injection attacks.\
SonarQube for IDE, in connected mode, can show injection vulnerabilities (also known as taint vulnerabilities) found by SonarQube (Server, Cloud).
**issue**\
A problem in your code raised by a rule. Each issue is linked to one or more software qualities in MQR mode or one type in Standard Experience, each with a level of severity.
**issue assignee**\
The user assigned to the issue.
**issue author**\
The last committer on the issue line.
**issue flow**\
A path through the code shown in the UI from the source to the sink when the issue originated upstream.
**issue primary location**\
The location where the issue message is displayed.
**issue secondary location**\
A location additional to the primary location that may help to understand the issue.
**issue severity**\
SonarQube Server and SonarQube Community Build:
* In MQR mode, it represents the impact level of the issue on a given software quality. It is inherited from the rule that raised the issue and may take the following values: Blocker, High, Medium, Low, Info.
* In Standard mode, it represents the issue’s severity level. It is inherited from the rule that raised the issue and may take the following values: Blocker, Critical, Major, Minor, or Info.
SonarQube Cloud:
* Software quality severity represents the impact level of the issue on a given software quality. It is inherited from the rule that raised the issue and may take the following values: Blocker, High, Medium, Low, Info.
* Type severity represents the issue’s severity level. It is inherited from the rule that raised the issue and may take the following values: Blocker, Critical, Major, Minor, or Info.
### K
**keystore**\
A repository that contains personal certificates, plus the corresponding private keys that are used to identify the owner of the certificate for cryptographic protocols such as TLS.
### L
**language analyzer**\
An engine used by the SonarScanners to analyze the code files. Depending on the language, different analyzers are used.
**LOC**\
Lines of Code. Number of analyzed lines of code in all private projects of your SonarQube Cloud organization or of your SonarQube Server instance. The maximum allowed LOC depends on your SonarQube Server edition or SonarQube Cloud organization’s subscription.
**local user**\
In SonarQube Server and SonarQube Community Build, if the automatic provisioning mode is enabled with a third-party identity provider (e.g. GitHub or GitLab), all users that are not auto-provisioned (i.e., manually created users, or through another identity provider Just-in-Time-provisioned users), are called local users.
**long-lived branch**\
A branch that plays a continuous role within the development process of a software project. The main branch of a repository is always considered a long-lived branch, usually representing the next release of the project. SonarQube Cloud processes the analysis of long-lived branches differently from short-lived branches.
### M
**main branch**\
The default branch. This branch typically corresponds to what’s being developed for your next release. This branch is usually known within a development team as "main", "develop" or "head" and is analyzed when no specific branch parameters are provided.
**maintainability issue**\
Issue impacting the maintainability of your code in MQR Mode. It is called Code Smell in Standard Experience.
**measure**\
The value of a metric for a given file or project at a given time. For example, 125 lines of code on class MyClass or the density of duplicated lines = 30.5% on project myProject can be considered a measure.
**metric**\
A type of measurement. Metrics can have varying measures over time. A metric may be either qualitative (for example, the density of duplicated lines, line coverage by tests, etc.) or quantitative (for example, the number of lines of code, the complexity, etc.).
**monorepo**\
A software development strategy in which the code for a number of projects is stored in the same repository.
**MQR mode**\
Multiple-Quality Rule mode. In this mode, a rule measures the impact on one or several software qualities (e.g., a rule can impact your software reliability and security). A severity is assigned to each software quality associated with the rule and determines how much that software quality is impacted when the rule is broken. Compared to the Standard Experience, this mode offers a more accurate reflection of your software’s health through different lenses. The MQR mode is supported in SonarQube (Cloud, Server) and SonarQube Community Build.
### N
**new code**\
Any line of code added or modified compared to a baseline. The baseline depends on the new code definition applied to the analysis.
**new code definition**\
The setting that determines what code is considered new code. For example, it may be code that has changed since the previous project version or since a specific date.
### O
**old code**\
Code that is not considered new code.
**organization**\
A group of projects on a repository platform. The organization (or workspace, or group) concept is represented in SonarQube Cloud but not in SonarQube Server or Community Build.
**overall code**\
All code. Consists of both new code and old code.
### P
**PDF report**\
PDF reports give a periodic, high-level overview of the code state through a number of lenses, including releasability, security, reliability, and maintainability.
**portfolio**\
A grouping of several projects that enables an aggregate view of the project metrics and risks.
**project**\
In the Sonar products, the entity that corresponds to a project in the DevOps platform and is related to the repository storing the project code.
**pull request decoration**\
The display in the DevOps platforms’ interface of the pull request analysis results.
### Q
**quality gate**\
A set of conditions on quality measures to enforce a quality policy. A project passes its associated quality gate if its analysis results meet the quality gate’s conditions.
**quality profile**\
Defines a set of rules to be applied during code analysis for a given language.
### R
**reference branch**\
In SonarQube Server, a new code definition refers to the code that has changed compared to a selected reference branch.
**regulatory report**\
In SonarQube Server, a zip file containing a snapshot of a branch including a branch overview, the relevant configuration items, and a list of findings (operational risks).
**reindexing**\
For a SonarQube Server or SonarQube Community Build project, the rebuild of the Elasticsearch indexes.
**reliability issue**\
Issue impacting the reliability of your code in MQR Mode. It is called Bug in Standard Experience.
**remediation cost**\
The estimated time required to fix code issues.
**rule**\
A coding standard or practice that should be followed. The analysis applies the rules defined through the quality profiles to the code. If a rule is broken, an issue is raised.
### S
**scanner**\
A standalone program that runs on the CI/CD host, manages the analysis of projects, and sends the results to the server. Sonar offers different scanners that can hook up into different systems to automatically extract the project’s configuration out of that system.
**security hotspot**\
A security-sensitive piece of code that needs to be manually reviewed. Upon review, users will either find that there is no threat or that there is vulnerable code that needs to be fixed.
**security issue**\
Issue impacting the security in MQR Mode. It is called Vulnerability in Standard Experience.
**security report**\
Security reports help users understand where they may have issues related to various security standards.
**short-lived branch**\
Branches that are intended to exist only temporarily. They are typically a child branch of a long-lived branch and are intended to be merged back into that parent branch within a relatively short period. SonarQube Cloud processes the analysis of short-lived branches differently from long-lived branches.
**snapshot**\
A set of measures and issues on a given project at a given time. A snapshot is generated for each analysis.
**sonar property**\
A key/value pair in which the key has the `sonar.` syntax and used to manage parameters in Sonar products.
**Standard Experience**\
In this mode, a rule impacts either the reliability, maintainability, or security of your code (the respective issues raised are called bugs, code smells, or vulnerabilities). The rule severity measures the severity level of an issue raised by this rule. The Standard Experience is supported in SonarQube Server and SonarQube Community Build.
### T
**taint vulnerability** See *injection vulnerability*, above.
**technical debt**\
The estimated time required to fix all issues impacting the maintainability.
---
# Source: https://docs.sonarsource.com/sonarqube-server/2025.2/analyzing-source-code/test-coverage/go-test-coverage.md
# Source: https://docs.sonarsource.com/sonarqube-server/2025.3/analyzing-source-code/test-coverage/go-test-coverage.md
# Source: https://docs.sonarsource.com/sonarqube-server/2025.5/analyzing-source-code/test-coverage/go-test-coverage.md
# Source: https://docs.sonarsource.com/sonarqube-server/2025.1/analyzing-source-code/test-coverage/go-test-coverage.md
# Source: https://docs.sonarsource.com/sonarqube-server/2025.4/analyzing-source-code/test-coverage/go-test-coverage.md
# Source: https://docs.sonarsource.com/sonarqube-server/2025.6/analyzing-source-code/test-coverage/go-test-coverage.md
# Source: https://docs.sonarsource.com/sonarqube-server/analyzing-source-code/test-coverage/go-test-coverage.md
# Source: https://docs.sonarsource.com/sonarqube-cloud/enriching/test-coverage/go-test-coverage.md
# Go test coverage
SonarQube Cloud supports the reporting of test coverage information as part of the analysis of your Go project.
However, SonarQube Cloud does not produce the coverage report itself. Instead, you must set up a third-party tool to produce the report as part of your build process. You then need to configure your analysis to tell the SonarScanner where the report is located so that it can pick it up and send it to SonarQube Cloud, where it will be displayed on your project dashboard along with the other analysis metrics.
For Go projects, SonarQube Cloud supports the standard Go test tooling.
### Use CI-based, not automatic analysis
Usually, when you import a new Go project, automatic analysis starts immediately. But, since coverage is not yet supported under automatic analysis, *you will need to use CI-based analysis instead*. This requires disabling automatic analysis. Here are the steps you need to follow:
If you have not yet imported your Go project, just add an empty file called `sonar-project.properties` to the root of your repository, and *then* perform the import. SonarQube Cloud will assume that you want to set up a CI-based analysis and display the onboarding tutorial.
If you have already imported your project, then SonarQube Cloud has already run at least once using automatic analysis. You can still convert your project to use a CI-based approach:
1. Go to **Administration** > **Analysis Method** and switch SonarQube Cloud’s automatic analysis to **Off**.
2. On the same screen, under **Supported analysis methods**, find your preferred CI and select **Follow the tutorial**.
### Follow the tutorial
At this point, you should be in the onboarding tutorial specific to your CI. Follow the tutorial and when it asks, **What option best describes your build?**, choose **Other (for JS, TS, Go, Python, PHP, …)**. When you are done with the tutorial, you should have a functioning CI-based analysis setup for your Go project. The next step is to adjust it to get coverage working.
### Adjust your setup
To enable coverage you need to:
* adjust your build process so that the coverage tool runs *before* the scanner report generation step runs.
* make sure that the coverage tool writes its report file to a defined path in the build environment.
* configure the scanning step of your build so that the scanner picks up the report file from that defined path.
### Add coverage to your build process
The first step is to generate the coverage reports.
The simplest way to generate a report is to run your test with the `-coverprofile=` flag.
This will tell the Go tooling to generate a coverage report file at a specific location. For example, `go test -coverprofile=coverage.out` should generate a `coverage.out` report in the working directory.
### Add the coverage analysis parameter
The next step is to add `sonar.go.coverage.reportPaths` to your analysis parameters. This parameter must be set to the path of the report file produced by your coverage tool. In this example, that path is set to the default produced by Coverage.py. It is set in the `sonar-project.properties` file, located in the project root:
```properties
sonar.projectKey=
sonar.organization=
sonar.go.coverage.reportPaths=coverage.xml
```
Wildcards and a comma-delimited list of paths are supported. See [test-coverage-parameters](https://docs.sonarsource.com/sonarqube-cloud/enriching/test-coverage/test-coverage-parameters "mention") for details.
{% hint style="info" %}
This property is usually set in the `sonar-project.properties` file, located in the project root. Alternatively, you can also set it in the command line of the scanner invocation or in the SonarQube Cloud interface under*Your Organization* > *Your Project* > **Administration** > **General Settings** > **Languages** > **Go** > **Tests and Coverage** > **Path to coverage report(s)**.
{% endhint %}
### Troubleshooting
**Missing code coverage for commented-out lines**
Users have reported receiving warnings about missing code coverage for lines that are commented out.
When you don’t provide any Go test coverage information, SonarQube considers that all executable lines of code should be covered by unit tests. Comments are not considered executable lines, and therefore, SonarQube does not expect these lines to be covered by unit tests. Once Go test coverage data is imported into SonarQube, SonarQube fully trusts and displays this data.
This warning appears because the standard Go tooling considers that commented code should be covered. This is a known bug, referenced [here](https://github.com/golang/go/issues/22545). To resolve this, we recommend removing the commented code to eliminate the warning.
---
# Source: https://docs.sonarsource.com/sonarqube-community-build/analyzing-source-code/languages/go.md
# Source: https://docs.sonarsource.com/sonarqube-server/8.9/analyzing-source-code/languages/go.md
# Source: https://docs.sonarsource.com/sonarqube-server/9.8/analyzing-source-code/languages/go.md
# Source: https://docs.sonarsource.com/sonarqube-server/9.9/analyzing-source-code/languages/go.md
# Source: https://docs.sonarsource.com/sonarqube-server/10.0/analyzing-source-code/languages/go.md
# Source: https://docs.sonarsource.com/sonarqube-server/10.1/analyzing-source-code/languages/go.md
# Source: https://docs.sonarsource.com/sonarqube-server/10.2/analyzing-source-code/languages/go.md
# Source: https://docs.sonarsource.com/sonarqube-server/10.3/analyzing-source-code/languages/go.md
# Source: https://docs.sonarsource.com/sonarqube-server/10.4/analyzing-source-code/languages/go.md
# Source: https://docs.sonarsource.com/sonarqube-server/10.5/analyzing-source-code/languages/go.md
# Source: https://docs.sonarsource.com/sonarqube-server/10.6/analyzing-source-code/languages/go.md
# Source: https://docs.sonarsource.com/sonarqube-server/10.7/analyzing-source-code/languages/go.md
# Source: https://docs.sonarsource.com/sonarqube-server/10.8/analyzing-source-code/languages/go.md
# Source: https://docs.sonarsource.com/sonarqube-server/2025.2/analyzing-source-code/languages/go.md
# Source: https://docs.sonarsource.com/sonarqube-server/2025.3/analyzing-source-code/languages/go.md
# Source: https://docs.sonarsource.com/sonarqube-server/2025.5/analyzing-source-code/languages/go.md
# Source: https://docs.sonarsource.com/sonarqube-server/2025.1/analyzing-source-code/languages/go.md
# Source: https://docs.sonarsource.com/sonarqube-server/2025.4/analyzing-source-code/languages/go.md
# Source: https://docs.sonarsource.com/sonarqube-server/2025.6/analyzing-source-code/languages/go.md
# Source: https://docs.sonarsource.com/sonarqube-server/analyzing-source-code/languages/go.md
# Source: https://docs.sonarsource.com/sonarqube-cloud/advanced-setup/languages/go.md
# Go
### Supported versions
The level of support for a language is defined as follows:
* Fully supported: Analysis will complete. All the language features are understood and examined.
* Supported: Most language features are understood and examined but the version includes unsupported features. Analysis might break or provide incomplete results.
Versions 1.0 to 1.25 are supported.
### Prerequisites
* SonarScanner should run on a x86-64 Windows, macOS or Linux 64bits machine.
* You need the [Go](https://golang.org/) installation on the scan machine only if you want to import coverage data.
### Language-specific properties
To discover and update the Go-specific properties, navigate in SonarQube Cloud to *Your Project* > **Administration** > **General Settings** > **Languages** > **Go**. See the [analysis-parameters](https://docs.sonarsource.com/sonarqube-cloud/advanced-setup/analysis-parameters "mention") page for more information about specific properties.
By default, all the `vendor` directories are excluded from the analysis. However, you can change the property `sonar.go.exclusions` to a different pattern if you want to force their analysis (not recommended).
If you modify the `sonar.go.exclusions` or the `sonar.sources` property, be sure that `go.mod` files are included in your scan. If the `go.mod` files are excluded, the analysis results are less precise.
### sonar-project.properties Sample
Here is a first version of a `sonar-project.properties` file, valid for a simple `Go` project:
```properties
sonar.projectKey=com.company.projectkey1
sonar.projectName=My Project Name
sonar.tests=.
sonar.test.inclusions=**/*_test.go
```
### Related pages
* [test-coverage](https://docs.sonarsource.com/sonarqube-cloud/enriching/test-coverage "mention")
* [external-analyzer-reports](https://docs.sonarsource.com/sonarqube-cloud/enriching/external-analyzer-reports "mention")(GoVet, GoLint, GoMetaLinter)
---
# Source: https://docs.sonarsource.com/sonarqube-community-build/devops-platform-integration/azure-devops-integration/adding-analysis-to-pipeline/gradle-or-maven-project.md
# Source: https://docs.sonarsource.com/sonarqube-server/2025.2/devops-platform-integration/azure-devops-integration/adding-analysis-to-pipeline/gradle-or-maven-project.md
# Source: https://docs.sonarsource.com/sonarqube-server/2025.3/devops-platform-integration/azure-devops-integration/adding-analysis-to-pipeline/gradle-or-maven-project.md
# Source: https://docs.sonarsource.com/sonarqube-server/2025.5/devops-platform-integration/azure-devops-integration/adding-analysis-to-pipeline/gradle-or-maven-project.md
# Source: https://docs.sonarsource.com/sonarqube-server/2025.1/devops-platform-integration/azure-devops-integration/adding-analysis-to-pipeline/gradle-or-maven-project.md
# Source: https://docs.sonarsource.com/sonarqube-server/2025.4/devops-platform-integration/azure-devops-integration/adding-analysis-to-pipeline/gradle-or-maven-project.md
# Source: https://docs.sonarsource.com/sonarqube-server/2025.6/devops-platform-integration/azure-devops-integration/adding-analysis-to-pipeline/gradle-or-maven-project.md
# Source: https://docs.sonarsource.com/sonarqube-server/devops-platform-integration/azure-devops-integration/adding-analysis-to-pipeline/gradle-or-maven-project.md
# Source: https://docs.sonarsource.com/sonarqube-cloud/advanced-setup/ci-based-analysis/azure-pipelines/adding-analysis-to-build-pipeline/gradle-or-maven-project.md
# Gradle or Maven project
Before starting, read [azure-pipelines-integration-overview](https://docs.sonarsource.com/sonarqube-cloud/advanced-setup/ci-based-analysis/azure-pipelines/azure-pipelines-integration-overview "mention").
Once you have created your project in SonarQube Cloud, set up the project integration with your DevOps platform (see the [devops-platform-integration](https://docs.sonarsource.com/sonarqube-cloud/managing-your-projects/administering-your-projects/devops-platform-integration "mention") pages) and with Azure pipelines (see the [setting-up-project-integration](https://docs.sonarsource.com/sonarqube-cloud/advanced-setup/ci-based-analysis/azure-pipelines/setting-up-project-integration "mention") page), you can add the SonarQube Cloud analysis to your Azure build pipeline.
To create your Azure build pipeline, you can use either YAML or the Azure Classic interface.
{% hint style="info" %}
* The use of the Classic interface is not always possible (e.g. if your code is stored on GitHub).
* If you use YAML, Sonar can provide you with YAML templates or code examples.
{% endhint %}
{% hint style="info" %}
Make sure to enable the pull request and branch analysis in your pipeline. See the [setting-up-project-integration](https://docs.sonarsource.com/sonarqube-cloud/advanced-setup/ci-based-analysis/azure-pipelines/setting-up-project-integration "mention") page.
{% endhint %}
### About the analysis parameter setup
[analysis-parameters](https://docs.sonarsource.com/sonarqube-cloud/advanced-setup/analysis-parameters "mention") can be set at different levels. You must define the project key in the Prepare Analysis Configuration task of your pipeline. You may define additional parameters in this task the same way. In that case, these parameters have precedence over parameters defined at the project or global level.
### Using YAML
1. Add the SonarQube analysis run to your build task.
2. Add the following SonarQube’s tasks:
* Before your build task, add a Prepare Analysis Configuration task.
* After your build task, add a Run Code Analysis task.
* After the Rune Code Analysis task, add a Publish Quality Gate Result task.
{% hint style="info" %}
By default, the scanner version used will be the one specified in your Maven/Gradle build configuration (see the [sonarscanner-for-maven](https://docs.sonarsource.com/sonarqube-cloud/advanced-setup/ci-based-analysis/sonarscanner-for-maven "mention") or [sonarscanner-for-gradle](https://docs.sonarsource.com/sonarqube-cloud/advanced-setup/ci-based-analysis/sonarscanner-for-gradle "mention") pages). You can overwrite it by using the `sqMavenPluginVersionChoice` or `sonarQubeGradlePluginVersion` input in your pipeline’s Execute build task.
{% endhint %}
See the YAML file example below. See also our [YAML pipeline templates](https://github.com/SonarSource/sonar-scanner-azdo/tree/master/its/fixtures). For information about the SonarQube task inputs, see the [sonarqube-tasks](https://docs.sonarsource.com/sonarqube-cloud/advanced-setup/ci-based-analysis/azure-pipelines/sonarqube-tasks "mention") page.
{% hint style="info" %}
Make sure the SonarQube task version used in your YAML file is the correct one.\
For example, in `SonarCloudPrepare@3`, `@3` should correspond to the version of the [sonarcloud-extension-for-azure-devops](https://docs.sonarsource.com/sonarqube-cloud/advanced-setup/ci-based-analysis/sonarcloud-extension-for-azure-devops "mention") you’re using.
{% endhint %}
YAML file example
```yaml
trigger:
- main # or another name representing your main branch
- feature/*
steps:
# Checkout the repository
- checkout: self
# Disable shallow fetch
fetchDepth: 0
# Prepare Analysis Configuration task
- task: SonarCloudPrepare@4
inputs:
SonarCloud: ''
organization: ''
scannerMode: 'other'
extraProperties: 'sonar.projectKey='
# If you use Gradle: add the Execute Gradle build as shown below
- task: Gradle@3
inputs:
sonarQubeRunAnalysis: true
# If you use Maven: add the Execute Maven goal as shown below
- task: Maven@4
inputs:
sonarQubeRunAnalysis: true
# Publish Quality Gate Result task
- task: SonarCloudPublish@4
inputs:
pollingTimeoutSec: '300'
```
### Using the Classic interface
1\. In Azure DevOps’ Classic interface editor, create or update your build pipeline.
2\. Add a **Prepare Analysis Configuration** task before your build task:
* In **SonarQube Server Service Endpoint**, select the SonarQube service connection you created during setup. See the [setting-up-project-integration](https://docs.sonarsource.com/sonarqube-cloud/advanced-setup/ci-based-analysis/azure-pipelines/setting-up-project-integration "mention") page for more information about adding a connection.
* Under **Choose a way to run the analysis**, select **Integrate with Maven or Gradle**.
* Expand the **Advanced** section and replace the **Additional Properties** with the following snippet:
```properties
# Additional properties that will be passed to the scanner,
# Put one key=value per line, example:
# sonar.exclusions=**/*.bin
sonar.projectKey=YourProjectKey
```
3\. Add a new Maven or Gradle task:
* Under **Code Analysis**, check **Run SonarQube or SonarCloud Analysis.**
4\. Add a new **Publish quality gate result** task on your build pipeline summary.
5\. Ensure that the pipeline runs automatically for all the branches you want: Under the **Triggers** tab of your pipeline, select **Enable continuous integration** and select all the branches for which you want SonarQube Cloud analysis to run automatically.
6\. Save your pipeline.
### Related pages
* [dotnet-project](https://docs.sonarsource.com/sonarqube-cloud/advanced-setup/ci-based-analysis/azure-pipelines/adding-analysis-to-build-pipeline/dotnet-project "mention")
* [c-family-project](https://docs.sonarsource.com/sonarqube-cloud/advanced-setup/ci-based-analysis/azure-pipelines/adding-analysis-to-build-pipeline/c-family-project "mention")
* [js-ts-go-python-php](https://docs.sonarsource.com/sonarqube-cloud/advanced-setup/ci-based-analysis/azure-pipelines/adding-analysis-to-build-pipeline/js-ts-go-python-php "mention")
* [monorepo-projects](https://docs.sonarsource.com/sonarqube-cloud/advanced-setup/ci-based-analysis/azure-pipelines/adding-analysis-to-build-pipeline/monorepo-projects "mention")
* [quality-gate-status-in-release-pipeline](https://docs.sonarsource.com/sonarqube-cloud/advanced-setup/ci-based-analysis/azure-pipelines/quality-gate-status-in-release-pipeline "mention")
* [sonarqube-tasks](https://docs.sonarsource.com/sonarqube-cloud/advanced-setup/ci-based-analysis/azure-pipelines/sonarqube-tasks "mention")
---
# Source: https://docs.sonarsource.com/sonarqube-server/8.9/requirements/hardware-recommendations.md
# Source: https://docs.sonarsource.com/sonarqube-server/9.8/requirements/hardware-recommendations.md
# Source: https://docs.sonarsource.com/sonarqube-server/9.9/requirements/hardware-recommendations.md
# Source: https://docs.sonarsource.com/sonarqube-server/10.0/requirements/hardware-recommendations.md
# Source: https://docs.sonarsource.com/sonarqube-server/10.1/requirements/hardware-recommendations.md
# Source: https://docs.sonarsource.com/sonarqube-server/10.2/requirements/hardware-recommendations.md
# Source: https://docs.sonarsource.com/sonarqube-server/10.3/requirements/hardware-recommendations.md
# Source: https://docs.sonarsource.com/sonarqube-server/10.4/requirements/hardware-recommendations.md
# Advanced hardware recommendations
Please review the [prerequisites-and-overview](https://docs.sonarsource.com/sonarqube-server/10.4/requirements/prerequisites-and-overview "mention") page for information on the requirements for installation before reviewing these suggestions.
### Database
We recommend that for large instances, the database used by SonarQube is hosted on a machine that is physically separate from SonarQube Server but close to it on the network.
#### Oracle
In case your SonarQube Server is running on Linux and you are using Oracle, the Oracle JDBC Driver may be blocked due to `/dev/random`. See [this Oracle article](http://www.usn-it.de/index.php/2009/02/20/oracle-11g-jdbc-driver-hangs-blocked-by-devrandom-entropy-pool-empty/) for more details about this problem.
To avoid it, you may want to add this JVM parameter to your SonarQube web server (`sonar.web.javaOpts`) configuration:
```css-79elbk
-Djava.security.egd=file:///dev/urandom
```
### Elasticsearch
* [Elasticsearch](https://www.elastic.co/) is used by SonarQube in the background. To ensure good performance of your SonarQube, you need to follow these recommendations that are linked to ES usage.
#### Disk
* Free disk space is an absolute requirement. ES implements a safety mechanism to prevent the disk from being flooded with index data that locks all indices in read-only mode when a 95% disk usage watermark is reached. For information on recovering from ES read-only indices, see the [troubleshooting](https://docs.sonarsource.com/sonarqube-server/10.4/setup-and-upgrade/troubleshooting "mention") page.
* Disk access can easily become the bottleneck of ES. If you can afford SSDs, they are by far superior to any spinning media. SSD-backed nodes see boosts in both query and indexing performance. If you use spinning media, try to obtain the fastest disks possible (high-performance server disks 15,000 RPM drives).
* Using RAID 0 is an effective way to increase disk speed, for both spinning disks and SSD. There is no need to use mirroring or parity variants of RAID because of Elasticsearch replicas and database primary storage.
* Do not use remote-mounted storage, such as NFS, SMB/CIFS, or network-attached storage (NAS). They are often slower, display larger latencies with a wider deviation in average latency, and are a single point of failure.
**Advanced**
* If you are using SSD, make sure your OS I/O Scheduler is configured correctly. When you write data to disk, the I/O Scheduler decides when that data is actually sent to the disk. The default under most Unix distributions is a scheduler called CFQ (Completely Fair Queuing). This scheduler allocates "time slices" to each process, and then optimizes the delivery of these various queues to the disk. It is optimized for spinning media: the nature of rotating platters means it is more efficient to write data to disk based on physical layout. This is very inefficient for SSD, however, since there are no spinning platters involved. Instead, deadline or NOOP should be used instead. The deadline scheduler optimizes based on how long writes have been pending, while NOOP is just a simple FIFO queue. This simple change can have dramatic impacts.
* If SQ home directory is located on a slow disk, then the property `sonar.path.data` can be used to move data to a faster disk (RAID 0 local SSD for instance).
#### Memory
* It is [recommended](https://www.elastic.co/guide/en/elasticsearch/guide/current/heap-sizing.html#_give_less_than_half_your_memory_to_lucene) that you give 50% of the available memory to Elasticsearch heap while leaving the other 50% free. The reason is that Lucene (used by ES) is designed to leverage the underlying OS for caching in-memory data structures.
* That means that by default OS must have at least 1GB of available memory.
* Don’t allocate more than 32GB.
* See the following Elasticsearch articles for more details:
* [Elasticsearch Guide: Heap Sizing](https://www.elastic.co/guide/en/elasticsearch/guide/current/heap-sizing.html)
* [A Heap of Trouble](https://www.elastic.co/blog/a-heap-of-trouble)
* [Elasticsearch Reference: JVM heap size](https://www.elastic.co/guide/en/elasticsearch/reference/7.x/advanced-configuration.html#set-jvm-heap-size)
#### CPU
* If you need to choose between faster CPUs or more cores, then choose more cores. The extra concurrency that multiple cores offer will far outweigh a slightly faster clock speed.
* By nature, data is distributed on multiple nodes, so execution time depends on the slowest node. It’s better to have multiple medium boxes than one fast and one slow.
---
# Source: https://docs.sonarsource.com/sonarqube-mcp-server/resources/help.md
# Source: https://docs.sonarsource.com/sonarqube-for-eclipse/resources/help.md
# Source: https://docs.sonarsource.com/sonarqube-for-visual-studio/resources/help.md
# Source: https://docs.sonarsource.com/sonarqube-for-intellij/resources/help.md
# Source: https://docs.sonarsource.com/sonarqube-for-vs-code/resources/help.md
# Help
### The Sonar Community
For SonarQube for IDE support questions ("How do I?", "I got this error, why?", …), please first read the [FAQ](https://community.sonarsource.com/t/frequently-asked-questions/7204) to learn how to get your logs, then head to the [Sonar forum](https://community.sonarsource.com/c/sl/11) and find your dedicated SonarQube for IDE channel. Before creating a new topic, please check if your question has already been answered because there is a chance that someone has already had the same issue.
When creating a new topic, please describe your issue with as much detail as possible. Please use this template:
* **Your IDE flavor/version/OS** (when applicable): *example: Eclipse 2023-09 on MacOSX*
* **Your SonarQube for IDE version**:
* **Is connected mode used (Y/N)**:
* **If yes, to which version of SonarQube Server, or is it SonarQube Cloud or the SonarQube Community Build?**
* **If you are using connected mode on SonarQube Server, what are the installed analyzers?** *You can easily get a list by opening* `https:///api/plugins/installed` *in a Web browser.*
* **Please include the full stacktrace of the error and logs with** ***Verbose output*** **and** ***Analysis logs*** **enabled.** *See your IDE-specific **Troubleshooting page** for detailed instructions to get these logs.*
Be aware that the Sonar Community Forum is a community, and the standard pleasantries are expected (*Hello*, *Thank you*, *I appreciate the reply*, *etc*). If you don’t get an answer to your thread, please wait for at least three days before bumping it. Operators are not standing by, but the Teams and Community Managers know that your questions are important.
### How to contribute
If you would like to see a new feature, check out the [Suggest new features](https://community.sonarsource.com/tags/c/suggestions/12/sonarqube-ide) page! There we provide a forum to discuss your needs and offer you a chance to engage the Product Manager and development teams directly. Feel free to add to an ongoing discussion or create a new thread if you have something new to bring up.
### Give SonarQube a marketplace review
Your input and feedback is what drives us forward. Sonar is on a mission to continuously improve your coding experience, and your support is essential. Please take a moment to add your review on your preferred marketplace: VS Code or on the Open VSX Registry.
* [VS Code marketplace](https://marketplace.visualstudio.com/items?itemName=SonarSource.sonarlint-vscode\&ssr=false#review-details)
* [Cursor/Windsurf](https://open-vsx.org/extension/SonarSource/sonarlint-vscode/reviews) on the Open VSX Registry
When you take a moment to rate SonarQube for IDE on the marketplace or when voting for new features on Product Board, you’re not just sharing your opinion, you’re directly contributing to our roadmap and helping us invest more in what matters most to you.
As we say at Sonar, feedback is a gift! Please give us your input.
---
# Source: https://docs.sonarsource.com/home.md
# Home
**The industry standard for integrated code quality and code security.**
---
# Source: https://docs.sonarsource.com/sonarqube-community-build/instance-administration/system-functions/housekeeping.md
# Source: https://docs.sonarsource.com/sonarqube-server/8.9/instance-administration/housekeeping.md
# Source: https://docs.sonarsource.com/sonarqube-server/9.8/instance-administration/housekeeping.md
# Source: https://docs.sonarsource.com/sonarqube-server/9.9/instance-administration/housekeeping.md
# Source: https://docs.sonarsource.com/sonarqube-server/10.0/instance-administration/housekeeping.md
# Source: https://docs.sonarsource.com/sonarqube-server/10.1/instance-administration/housekeeping.md
# Source: https://docs.sonarsource.com/sonarqube-server/10.2/instance-administration/housekeeping.md
# Source: https://docs.sonarsource.com/sonarqube-server/10.3/instance-administration/housekeeping.md
# Source: https://docs.sonarsource.com/sonarqube-server/10.4/instance-administration/housekeeping.md
# Source: https://docs.sonarsource.com/sonarqube-server/10.5/instance-administration/housekeeping.md
# Source: https://docs.sonarsource.com/sonarqube-server/10.6/instance-administration/housekeeping.md
# Source: https://docs.sonarsource.com/sonarqube-server/10.7/instance-administration/system-functions/housekeeping.md
# Source: https://docs.sonarsource.com/sonarqube-server/10.8/instance-administration/system-functions/housekeeping.md
# Source: https://docs.sonarsource.com/sonarqube-server/2025.2/instance-administration/system-functions/housekeeping.md
# Source: https://docs.sonarsource.com/sonarqube-server/2025.3/instance-administration/system-functions/housekeeping.md
# Source: https://docs.sonarsource.com/sonarqube-server/2025.5/instance-administration/system-functions/housekeeping.md
# Source: https://docs.sonarsource.com/sonarqube-server/2025.1/instance-administration/system-functions/housekeeping.md
# Source: https://docs.sonarsource.com/sonarqube-server/2025.4/instance-administration/system-functions/housekeeping.md
# Source: https://docs.sonarsource.com/sonarqube-server/2025.6/instance-administration/system-functions/housekeeping.md
# Source: https://docs.sonarsource.com/sonarqube-server/instance-administration/system-functions/housekeeping.md
# Source: https://docs.sonarsource.com/sonarqube-cloud/digging-deeper/housekeeping.md
# Housekeeping
SonarQube Cloud retains project analysis data to allow tracking of the evolution of a project, but progressively deletes older information, including source code, measures, and most snapshots over time. Specific retention policies apply to PR data, background tasks, and issues, with projects on a free plan being deleted after one year of inactivity. SonarQube Cloud’s data retention policy is outlined below.
### Data retention policy
After each analysis the following is removed:
* The source code of the previous analysis.
* Measures at the directory and file levels.
* History at the package/directory level.
**PR data** is retained for four weeks after analysis. **Background tasks** are retained for 6 months. Additionally, for each project, **snapshots** of analyses (main branch, non-main branch, and pull request) are retained or removed according to the following rules:
* All snapshots are retained for one day.
* After one day, only one snapshot per day is retained.
* After one week, only one snapshot per week is retained.
* After 4 weeks, only one snapshot for every 4 weeks is retained.
In all the above cases, in addition to the single snapshot retained at each step, any snapshots marked by an event are also retained. See the [managing-project-history](https://docs.sonarsource.com/sonarqube-cloud/digging-deeper/managing-project-history "mention") page for information on events.
Continuing on:
* After 2 years, only snapshots with version events are retained. Snapshots without events or with only non-version events are deleted.
* After 5 years all snapshots are deleted, including snapshots marked by version events.
Separately:
* All closed issues more than 30 days old are deleted.
* Projects in organizations on a **Free plan** that have not been analyzed for one year are automatically deleted. This also applies to projects that were created one year previously but were never analyzed. Users receive notifications of this event on the SonarQube Cloud project interface four weeks before the deletion will take place.
* Scoped Organization Tokens without an expiration date that have been inactive for 60 days are deleted.
* Personal Access Tokens that have been inactive for 60 days are deleted.
These settings cannot be customized.
---
# Source: https://docs.sonarsource.com/sonarqube-server/9.9/instance-administration/authentication/saml/how-to-set-up-azure-ad.md
# Source: https://docs.sonarsource.com/sonarqube-server/10.0/instance-administration/authentication/saml/how-to-set-up-azure-ad.md
# Source: https://docs.sonarsource.com/sonarqube-server/10.1/instance-administration/authentication/saml/how-to-set-up-azure-ad.md
# Source: https://docs.sonarsource.com/sonarqube-server/10.2/instance-administration/authentication/saml/how-to-set-up-azure-ad.md
# Source: https://docs.sonarsource.com/sonarqube-server/10.3/instance-administration/authentication/saml/how-to-set-up-azure-ad.md
# Source: https://docs.sonarsource.com/sonarqube-server/10.4/instance-administration/authentication/saml/how-to-set-up-azure-ad.md
# Source: https://docs.sonarsource.com/sonarqube-server/10.5/instance-administration/authentication/saml/how-to-set-up-azure-ad.md
# Source: https://docs.sonarsource.com/sonarqube-server/10.6/instance-administration/authentication/saml/how-to-set-up-azure-ad.md
# How to setup Azure AD
The following content may be useful if you’re using Azure AD as a SAML identity provider.
To integrate Azure AD (identity provider) with SonarQube (service provider), both sides need to be configured.
For SonarQube, navigate to **Administration** > **Authentication** > **SAML** and click **Create.** This will open a pop-up window with all the fields that you’ll need during the procedure. For Azure AD, login to Azure and navigate to Azure AD.
### Set up the SonarQube application in Azure AD
**Step 1**: In Azure AD, navigate to **Enterprise applications** and add a **New Application**.
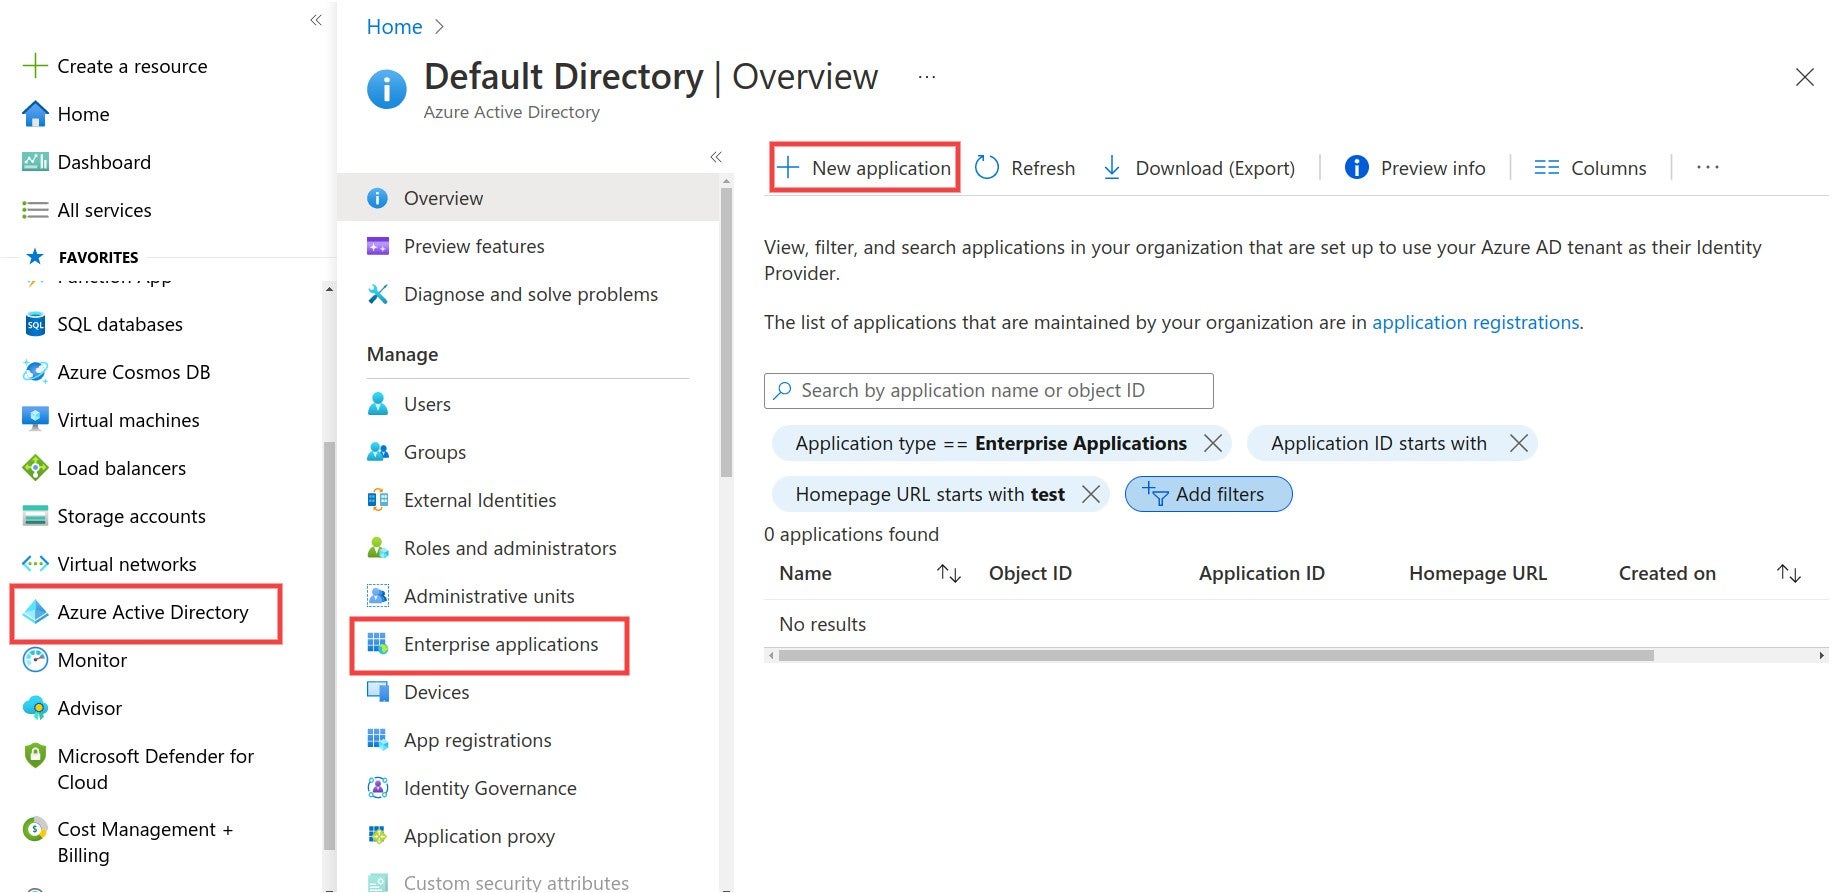
The Azure navigation path to create a new application for your SonarQube SAML authentication.
**Step 2**: Create your **own application** and fill in the **name**.
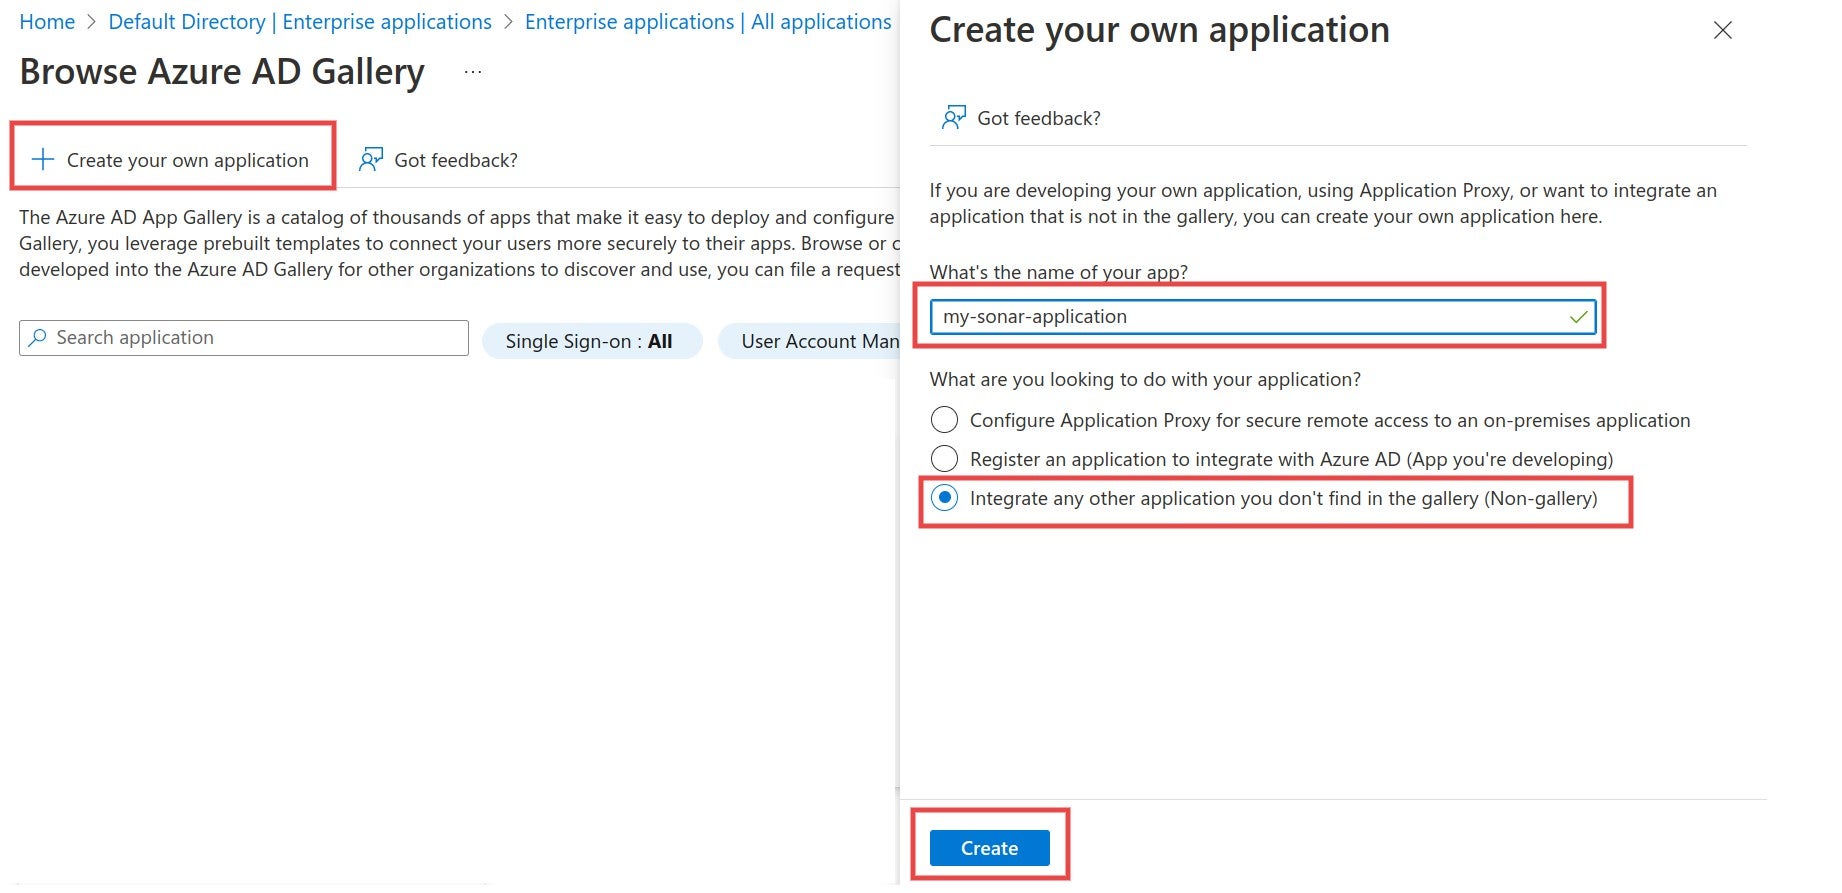
Create a new Enterprise application for SonarQube when setting up SAML authentication in Azure.
### Link SonarQube with Azure AD
**Step 1**: Navigate to **Single sign-on** and select **SAML**.

Navigate to Single sign-on in Azure and select SAML to begin the authentication process.
**Step 2**: Edit the **Basic SAML Configuration** and fill in the **Identifier** and the **Reply URL** fields. The **Identifier** has to be the same as the **Application ID** in SonarQube. The **Reply URL** must have the format `/oauth2/callback/saml`. The **Reply URL** uses the **Server base URL** provided in SonarQube under **Administration** > **General**.

When setting up your SSO with SAML, edit the Basic SAML Configuration and fill in the Identifier and the Reply URL.
**Step 3**: Make sure that the **Application ID** in SonarQube has the same value as the **Identifier** in the Identity Provider.

Confirm that the Application ID in SonarQube has the same value as the Identifier in the Identity provider.
**Step 4**: In the Azure AD SAML configuration, navigate to **Set up** and copy the **Login URL** and **Azure AD Identifier**.

In the Azure AD SAML configuration, navigate to Set up and copy the Login URL and Azure AD Identifier.
**Step 5**: Paste the **Login URL** into the **SAML login url** and the **Azure AD Identifier** into the **Provider ID** field in the SonarQube SAML configuration.

Paste the Azure AD Identifier into the Provider ID field and the Login URL into the SAML login url into your SonarQube SAML configuration.
### Attributes and claims
**Step 1**: In the Azure AD SAML configuration, edit **Attributes & Claims** to view, edit or add attributes.
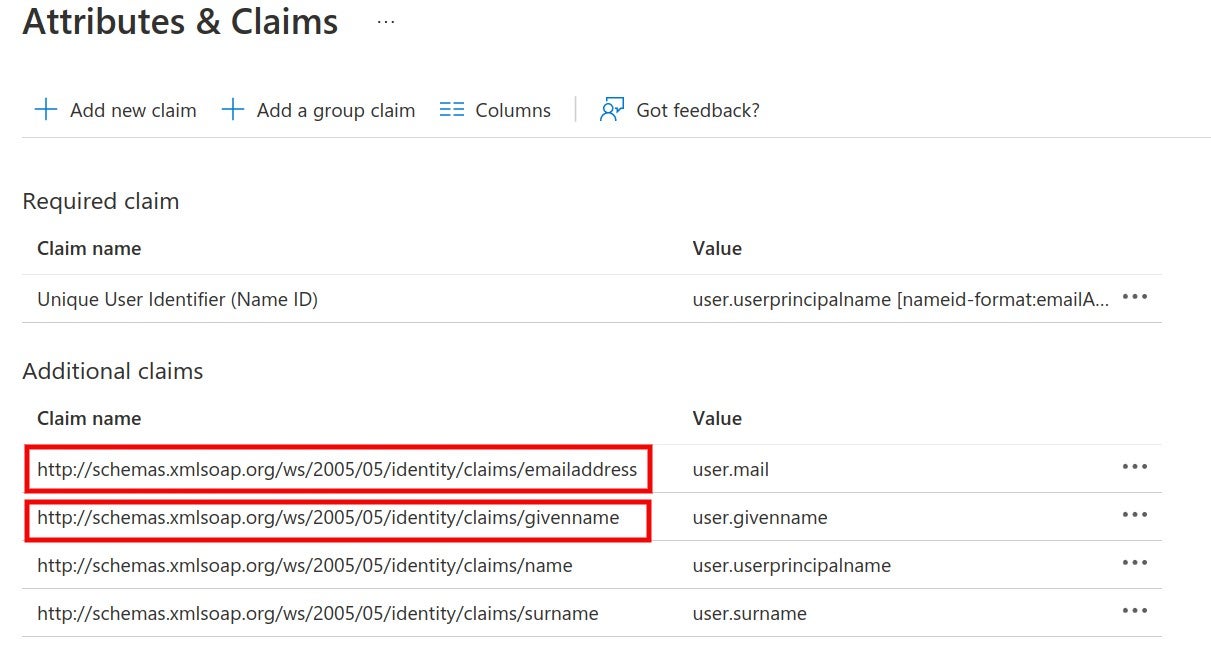
Edit Attributes & Claims to view, edit or add attributes when configuring SAML authentication in Azure.
SonarQube uses the following attributes:
* * **Login** (required) A unique name to identify the user in SonarQube. The default Azure AD attribute `emailaddress` is used in the example. You can also use the `objectID` attribute.
* **Name** (required) The full name of the user. The default Azure AD attribute `givenname` is used in the example.
* **Email** (optional) The email of the user.
* **Group** (optional) Supports mapping to group names in SonarQube. Group name passed by Azure AD and the group name in SonarQube should match. Otherwise, the default **sonar-users** group is assigned.
{% hint style="warning" %}
The **NameID** attribute is *not* used in SonarQube.
{% endhint %}
**Step 2**: Corresponding configuration in SonarQube. The namespace + name of the attribute should be used, as defined in Azure AD.

The corresponding configuration in SonarQube uses the Azure namespace + name of the attribute to be used.
### Certificates and signatures
**Step 1**: Navigate to **SAML Certificates** and download **Certificate (Base64)**.

Navigate to SAML Certificates and download Certificate (Base64).
**Step 2**: The certificate should be copied into the **Identity provider certificate** field in the SonarQube SAML configuration.
**Step 3** (Optional): Encryption for SonarQube requests can be activated by generating an asymmetric key pair. (For more information, see [SAML token encryption in Azure](https://docs.microsoft.com/en-us/azure/active-directory/manage-apps/howto-saml-token-encryption?tabs=azure-portal)) Add the private key in SonarQube.

Copied the Service provider private key field value to add to your SonarQube SAML configuration.
Import the public key certificate (.cer) file in Azure AD and activate token encryption.
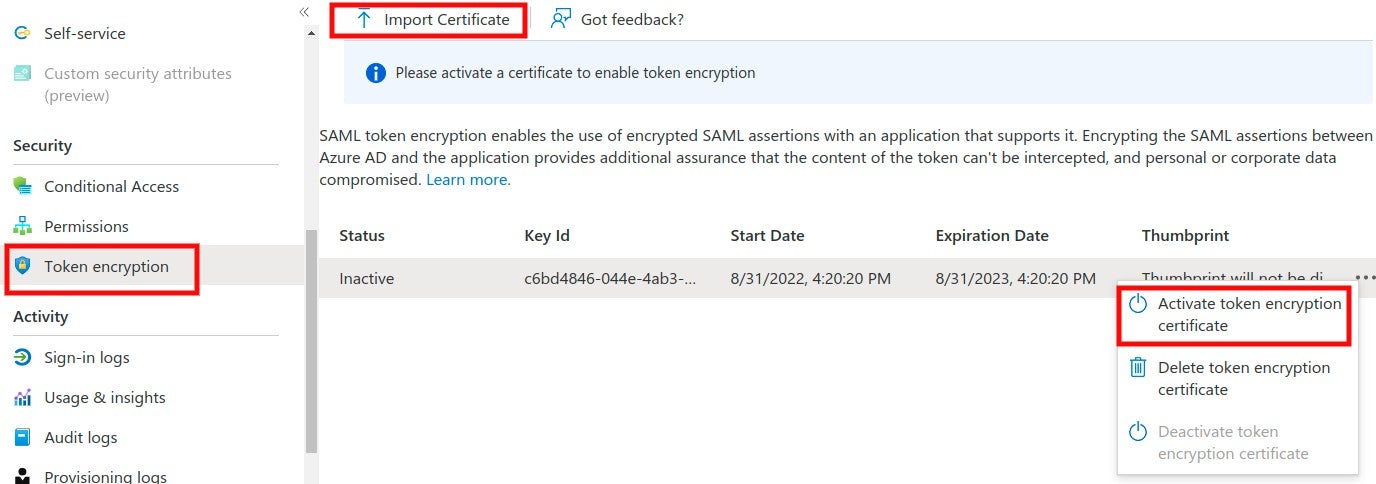
Import the public key certificate (.cer) file in Azure AD and activate token encryption for your SonarQube SAML authentication.
**Step 4** (Optional): Azure AD supports signed SAML requests from the Service Provider (under Preview). Edit the **Verification certificates**, upload a certificate, and enable the **Require verification certificates** option.

To edit the Verification certificates, upload a certificate and enable the Require verification certificates option.
In SonarQube, fill in the corresponding private key and the same certificate and enable the **Sign requests** option.
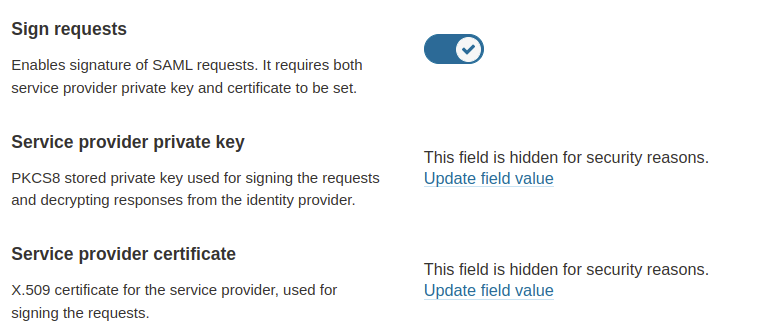
In SonarQube, fill in the corresponding private key and the same certificate and enable the Sign requests option.
### Users and groups
In the Azure AD SonarQube application, navigate to **Users and groups** and assign users or groups to the application.
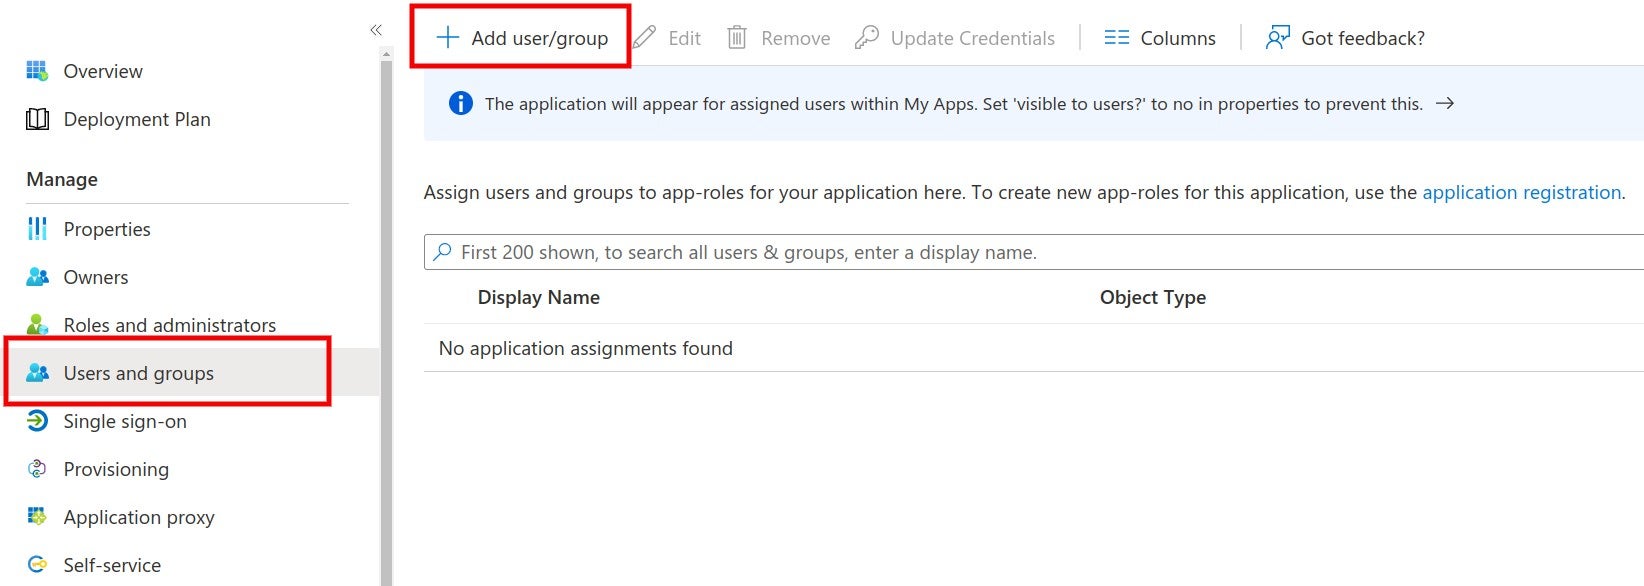
Add SonarQube users and groups when setting up your SAML authentication in Azure.
### Enabling and testing SAML authentication
**Step 1**: Save the SAML configuration by clicking **Save configuration.**
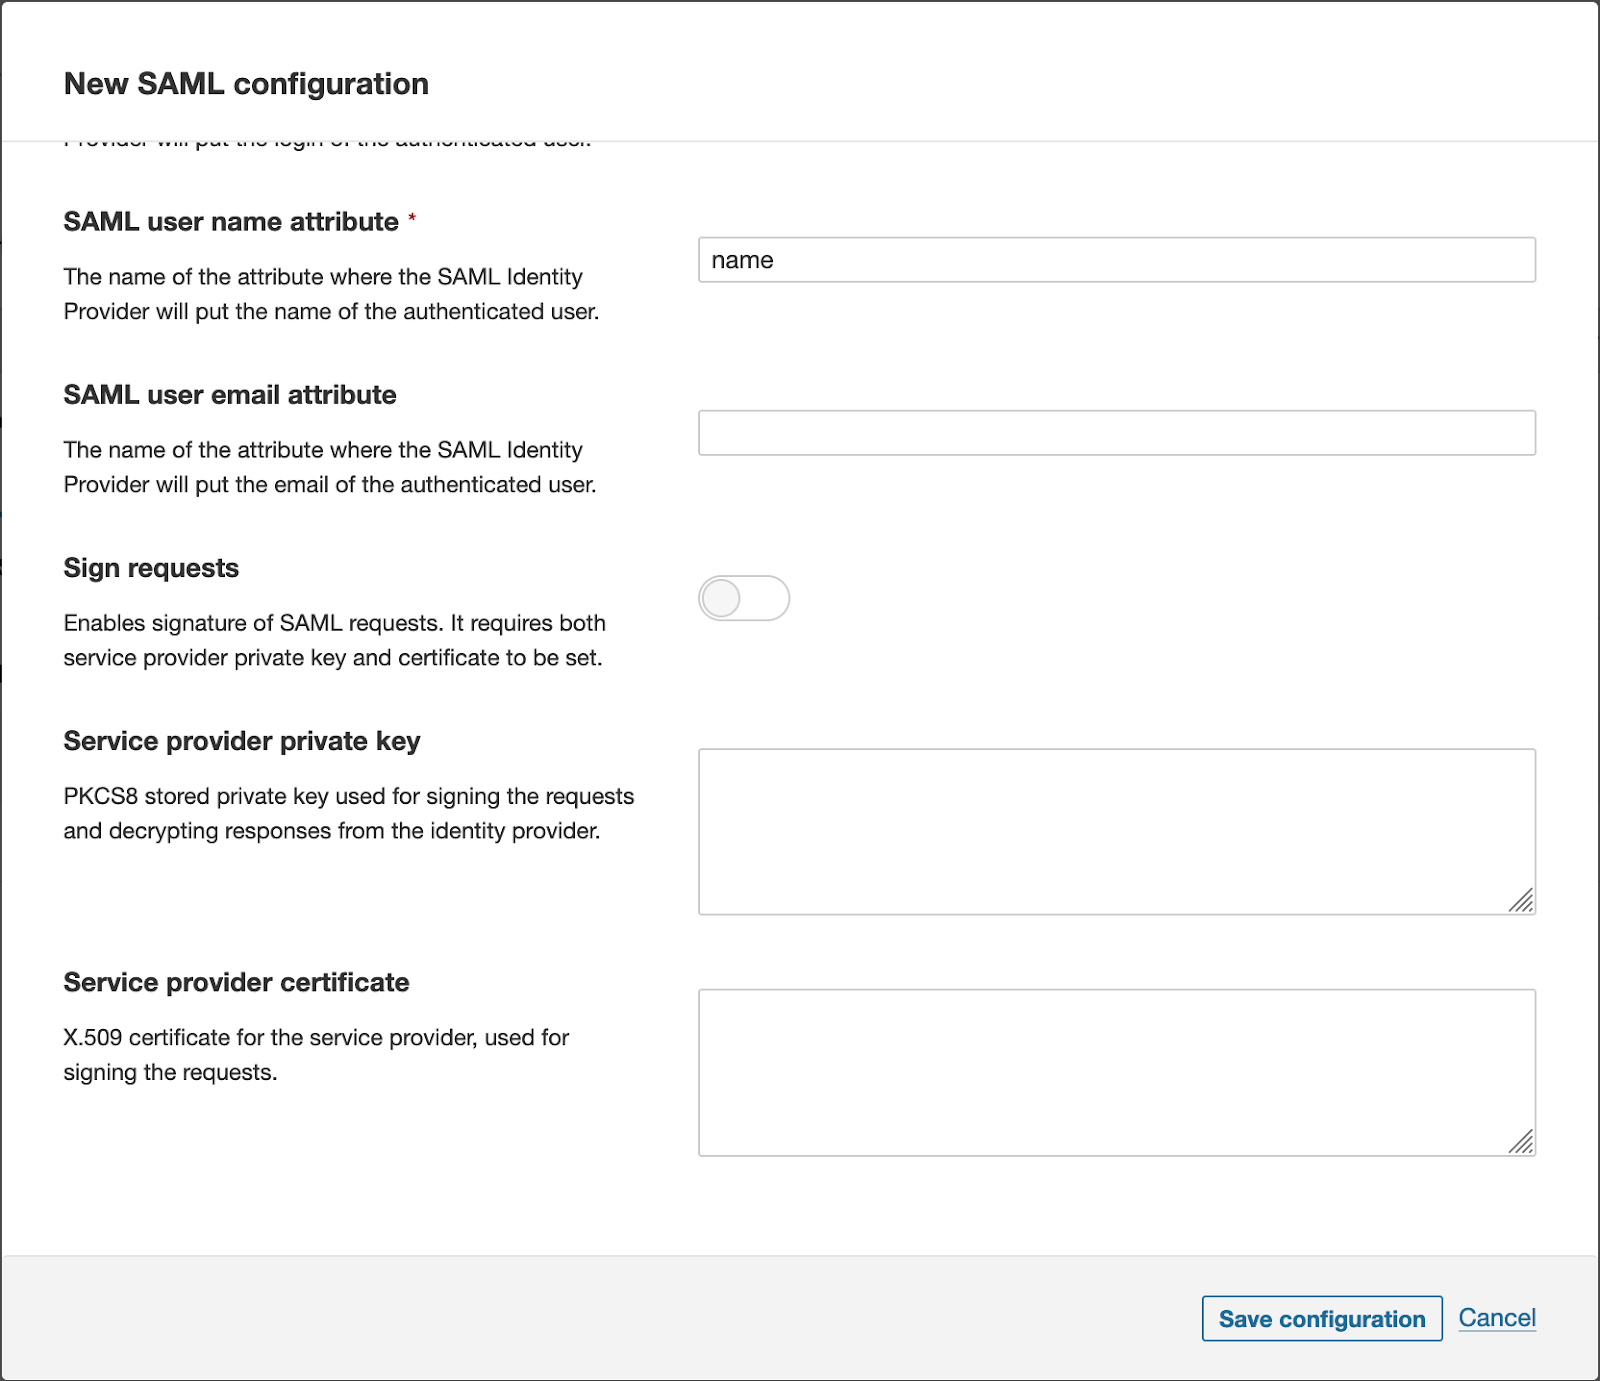
**Step 2**: Before enabling SAML authentication on SonarQube, you can verify that the configuration is correct by clicking **Test Configuration**. This will initiate a SAML login and return useful information about the SAML response obtained from the identity provider.
**Step 3**: Click **Enable configuration**.
**Step 4**: In the login form, the new **Log in with Azure** button (or a custom name specified in the **Provider Name** field) allows users to connect with their SAML account.
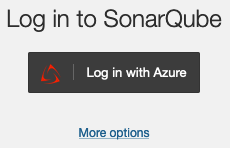
### Group synchronization
Group synchronization between Azure AD and SonarQube can be achieved either by using the Azure AD roles or the Azure AD groups. For either case, the corresponding group name should exist in SonarQube under the **Provisioning** section of the **SAML configuration**. Group synchronization only works with the **Just-in-Time user and group provisioning (default)** option.
* For synchronization with the Azure AD groups, a group claim must be added with `sAMAccountName` as a source attribute.
{% hint style="warning" %}
According to Azure, this source attribute only works for groups synchronized from an on-premises Active Directory using AAD Connect Sync 1.2.70.0 or above.
{% endhint %}

Where to map your SAML groups in Azure before you can add a group claim.
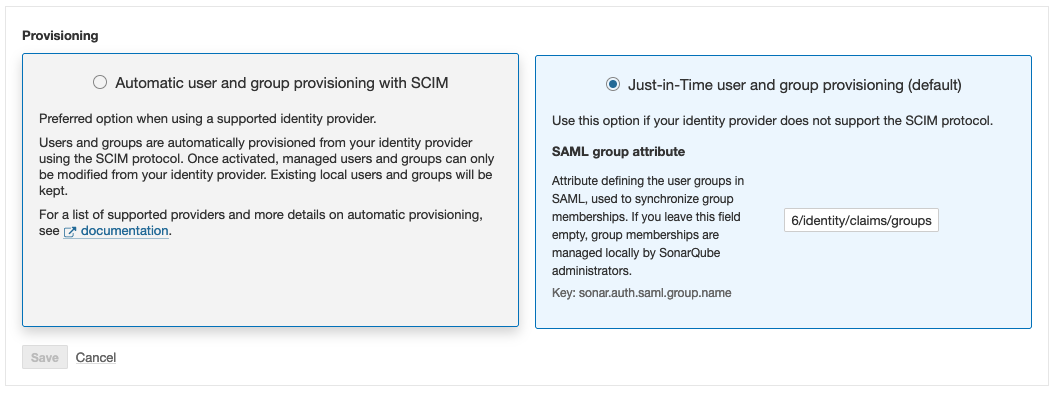
Where to enter the key in SonarQube
* For mapping with the Azure AD app roles, an application role should be assigned to the user. Azure AD sends the role claim automatically with `http://schemas.microsoft.com/ws/2008/06/identity/claims/role` as a key. Enter it as **SAML group attribute** in SonarQube.
### Enabling SCIM provisioning
Starting in [Enterprise Edition](https://www.sonarsource.com/plans-and-pricing/enterprise/), once you’ve set up Azure AD as your SAML identity provider, you can set up SCIM provisioning to automate user and group provisioning within Azure AD.
For more information, see [scim-provisioning-with-azure-ad](https://docs.sonarsource.com/sonarqube-server/10.6/instance-administration/authentication/saml/scim/scim-provisioning-with-azure-ad "mention").
### Troubleshooting
**Group limit for SAML tokens**
Azure SAML tokens have a limit regarding the number of groups a user can belong to (see the description of `groups` in the [Claims in SAML Token](https://learn.microsoft.com/en-us/entra/identity-platform/reference-saml-tokens#claims-in-saml-tokens) table). In such cases, you might need to reduce the number of groups the user is in.
---
# Source: https://docs.sonarsource.com/sonarqube-community-build/instance-administration/authentication/saml/how-to-set-up-keycloak.md
# Source: https://docs.sonarsource.com/sonarqube-server/9.8/instance-administration/authentication/saml/how-to-set-up-keycloak.md
# Source: https://docs.sonarsource.com/sonarqube-server/9.9/instance-administration/authentication/saml/how-to-set-up-keycloak.md
# Source: https://docs.sonarsource.com/sonarqube-server/10.0/instance-administration/authentication/saml/how-to-set-up-keycloak.md
# Source: https://docs.sonarsource.com/sonarqube-server/10.1/instance-administration/authentication/saml/how-to-set-up-keycloak.md
# Source: https://docs.sonarsource.com/sonarqube-server/10.2/instance-administration/authentication/saml/how-to-set-up-keycloak.md
# Source: https://docs.sonarsource.com/sonarqube-server/10.3/instance-administration/authentication/saml/how-to-set-up-keycloak.md
# Source: https://docs.sonarsource.com/sonarqube-server/10.4/instance-administration/authentication/saml/how-to-set-up-keycloak.md
# Source: https://docs.sonarsource.com/sonarqube-server/10.5/instance-administration/authentication/saml/how-to-set-up-keycloak.md
# Source: https://docs.sonarsource.com/sonarqube-server/10.6/instance-administration/authentication/saml/how-to-set-up-keycloak.md
# Source: https://docs.sonarsource.com/sonarqube-server/10.7/instance-administration/authentication/saml/how-to-set-up-keycloak.md
# Source: https://docs.sonarsource.com/sonarqube-server/10.8/instance-administration/authentication/saml/how-to-set-up-keycloak.md
# Source: https://docs.sonarsource.com/sonarqube-server/2025.2/instance-administration/authentication/saml/how-to-set-up-keycloak.md
# Source: https://docs.sonarsource.com/sonarqube-server/2025.3/instance-administration/authentication/saml/how-to-set-up-keycloak.md
# Source: https://docs.sonarsource.com/sonarqube-server/2025.5/instance-administration/authentication/saml/how-to-set-up-keycloak.md
# Source: https://docs.sonarsource.com/sonarqube-server/2025.1/instance-administration/authentication/saml/how-to-set-up-keycloak.md
# Source: https://docs.sonarsource.com/sonarqube-server/2025.4/instance-administration/authentication/saml/how-to-set-up-keycloak.md
# Source: https://docs.sonarsource.com/sonarqube-server/2025.6/instance-administration/authentication/saml/how-to-set-up-keycloak.md
# Source: https://docs.sonarsource.com/sonarqube-server/instance-administration/authentication/saml/how-to-set-up-keycloak.md
# With Keycloak
To integrate Keycloak (the identity provider) with SonarQube Server (the service provider), both sides need to be configured.
{% hint style="warning" %}
Make sure the SonarQube Server URL is correctly set in SonarQube Server. See [server-base-url](https://docs.sonarsource.com/sonarqube-server/instance-administration/server-base-url "mention") for more details.
{% endhint %}
### Keycloak server configuration
#### Create a new SAML client
1. Create your **Client ID.** Define it as something like `sonarqube`. It must not contain whitespace.
2. Define your **Client Protocol** as *saml*.
3. The **Client SAML Endpoint** can be left empty.
#### Configure the new SAML client
1. Under **Settings**:
1. **Client Signature Required:** *ON* (only if request signature is active in the SonarQube Server SAML configuration).
2. **Encrypt Assertions**: *ON* (if the responses from the IdP are to be encrypted).
3. **Valid Redirect URLs**: `/oauth2/callback/saml`. For example, [`https://sonarqube.mycompany.com/oauth2/callback/saml`](https://sonarqube.mycompany.com/oauth2/callback/saml).
2. Under **Keys**:
1. **Signing Key** (optional): Add the service provider private key and the certificate if the signature of the requests is enabled on the SonarQube Server side (Keycloak generated keys can be used). This private key will have to be provided in PKCS8 format in SonarQube Server.
2. **Encryption Key** (optional): Add the service provider certificate if you want to activate the encryption of Keycloak responses. If a request signature is used, you must use the same certificate for the encryption.
3. In **Client Scopes** > **Default Client Scopes**, remove `role_list` from **Assigned Default Client Scopes** (to prevent the error `com.onelogin.saml2.exception.ValidationError: Found an Attribute element with duplicated Name` during authentication)
4. Under **Mappers**, create a mapper for each user attribute:
1. Create a mapper for the login:
* **Name**: `Login`
* **Mapper Type**: *User property*.
* **Property**: `Username` (Note that this value should not contain any special characters other than `.-_@`, to meet SonarQube Server restrictions.)
* **SAML Attribute Name**: `login`
2. Create a mapper for the name:
* **Name**: `Name`
* **Mapper Type**: *User property*.
* **Property**: `Username` (This can also be another attribute that you previously specified for the users.)
* **SAML Attribute Name**: `name`
* (Optional) Create a mapper for the email:
1. **Name**: `Email`
2. **Mapper Type**: *User property*.
3. **Property**: `Email`
4. **SAML Attribute Name**: `email`
3. (Optional) Create a mapper for the groups (if you rely on a list of roles defined in **Roles** of the realm, not in **Roles** of the client):
* **Name**: `Groups`
* **Mapper Type**: *Role list*.
* **Role Attribute Name**: `groups`
* **Single Role Attribute**: *ON*
4. If you rely on a list of groups defined in "Groups":
* **Name**: `Groups`
* **Mapper Type**: *Group list*.
* **Role Attribute Name**: `groups`
* **Single Role Attribute**: *ON*
* **Full Group Path**: *OFF*
5. In **Realm Settings** > **General** > **Endpoints**, click on **SAML 2.0 Identify Provider Metadata** to obtain the XML configuration file from Keycloak.
### SonarQube Server configuration
Navigate to **Administration** > **Authentication** > **SAML** and click **Create configuration**, it will open a popup window with all the fields that you need to provide.
Configure the SAML authentication: **Administration** > **Configuration** > **General Settings** > **Authentication** > **SAML**:
* **Application ID**: The value of the **Client ID** you set in Keycloak (for example, `sonarqube`)
* **Provider ID**: The value of the `EntityDescriptor > entityID` attribute in the XML configuration file (for example, [`http://keycloak:8080/auth/realms/sonarqube`](http://keycloak:8080/auth/realms/sonarqube%22)).
* **SAML login URL**: The value of `SingleSignOnService > Location` attribute in the XML configuration file (for example, [`http://keycloak:8080/auth/realms/sonarqube/protocol/saml`](http://keycloak:8080/auth/realms/sonarqube/protocol/saml%22)).
* **Identity provider certificate**: The value you get from **Realm Settings > Keys > RS256**. Click on **Certificate**.
* **SAML user login attribute**: `login` (or whatever you configured above when doing the mapping)
* **SAML user name attribute**: `name` (or whatever you configured above when doing the mapping)
* (Optional) **SAML user email attribute**: `email` (or whatever you configured above when doing the mapping)
* **Sign requests**: Set to true to activate the signature of the SAML requests. It needs both the service provider private key and certificate to be set.
* **Service provider private key**: The service provider private key shared with the identity provider. This key is required for both request signature and response encryption, which can be activated individually. The key should be provided for SonarQube Server in PKCS8 format without password protection.
* **Service provider certificate**: The service provider certificate shared with the identity provider in order to activate the request signature and response encryption.
You can find some instructions to convert different key formats [here](https://manpages.ubuntu.com/manpages/focal/man1/pkcs8.1ssl.html).
### Enabling and testing SAML authentication
1. Save the SAML configuration by clicking **Save configuration.**
2. Before enabling the SAML authentication on SonarQube Server, you can verify that the configuration is correct by clicking **Test Configuration**. This will initiate a SAML login and return useful information about the SAML response obtained from the identity provider.
3. Click **Enable configuration**.
4. In the login form, the new button **Log in with Keycloak** (or a custom name specified in the **Provider Name** field) allows users to connect with their SAML account.
### Group synchronization
To use the group synchronization feature:
1. Create and/or verify the user groups in SonarQube Server so that the automatic group synchronization can take place properly. See *Group synchronization* in [#justintime-provisioning](https://docs.sonarsource.com/sonarqube-server/instance-administration/overview#justintime-provisioning "mention").
2. Configure a `groups` attribute in Keycload (see the Keycloak server configuration section).
3. Enable group synchronization in SonarQube Server as follows:\
Under **SAML** > **Provisioning,** enter `groups`, or whatever name you gave to this attribute, in the **SAML group attribute** field. If no value is entered in this field, users are assigned to the default sonar-users group only.
Group synchronization is only compatible with the **Just-in-Time user and group provisioning (default)** option.
---
# Source: https://docs.sonarsource.com/sonarqube-community-build/instance-administration/authentication/saml/how-to-set-up-okta.md
# Source: https://docs.sonarsource.com/sonarqube-server/9.8/instance-administration/authentication/saml/how-to-set-up-okta.md
# Source: https://docs.sonarsource.com/sonarqube-server/9.9/instance-administration/authentication/saml/how-to-set-up-okta.md
# Source: https://docs.sonarsource.com/sonarqube-server/10.0/instance-administration/authentication/saml/how-to-set-up-okta.md
# Source: https://docs.sonarsource.com/sonarqube-server/10.1/instance-administration/authentication/saml/how-to-set-up-okta.md
# Source: https://docs.sonarsource.com/sonarqube-server/10.2/instance-administration/authentication/saml/how-to-set-up-okta.md
# Source: https://docs.sonarsource.com/sonarqube-server/10.3/instance-administration/authentication/saml/how-to-set-up-okta.md
# Source: https://docs.sonarsource.com/sonarqube-server/10.4/instance-administration/authentication/saml/how-to-set-up-okta.md
# Source: https://docs.sonarsource.com/sonarqube-server/10.5/instance-administration/authentication/saml/how-to-set-up-okta.md
# Source: https://docs.sonarsource.com/sonarqube-server/10.6/instance-administration/authentication/saml/how-to-set-up-okta.md
# Source: https://docs.sonarsource.com/sonarqube-server/10.7/instance-administration/authentication/saml/how-to-set-up-okta.md
# Source: https://docs.sonarsource.com/sonarqube-server/10.8/instance-administration/authentication/saml/how-to-set-up-okta.md
# Source: https://docs.sonarsource.com/sonarqube-server/2025.2/instance-administration/authentication/saml/how-to-set-up-okta.md
# Source: https://docs.sonarsource.com/sonarqube-server/2025.3/instance-administration/authentication/saml/how-to-set-up-okta.md
# Source: https://docs.sonarsource.com/sonarqube-server/2025.5/instance-administration/authentication/saml/how-to-set-up-okta.md
# Source: https://docs.sonarsource.com/sonarqube-server/2025.1/instance-administration/authentication/saml/how-to-set-up-okta.md
# Source: https://docs.sonarsource.com/sonarqube-server/2025.4/instance-administration/authentication/saml/how-to-set-up-okta.md
# Source: https://docs.sonarsource.com/sonarqube-server/2025.6/instance-administration/authentication/saml/how-to-set-up-okta.md
# Source: https://docs.sonarsource.com/sonarqube-server/instance-administration/authentication/saml/how-to-set-up-okta.md
# With Okta
Note that Okta does not support service provider-signed requests even if they are enabled on the SonarQube Server side.
To integrate Okta (identity provider) with SonarQube Server (service provider), both sides need to be configured.
{% hint style="warning" %}
Make sure the SonarQube Server URL is correctly set in SonarQube Server. See [server-base-url](https://docs.sonarsource.com/sonarqube-server/instance-administration/server-base-url "mention") for more details.
{% endhint %}
### Create a new application in the Okta admin dashboard
1. Under **Applications**, select **Create App Integration**.
2. Choose **SAML 2.0** in the **Sign-in Method** dialog.
3. Under **General Settings**, fill in the **App name** with *SonarQube* (or another name that you prefer), and select **Do not display application icon to users**.
#### Configure SAML settings
1. Under **General Settings**, configure the following fields:
* **Single sign on URL**: `/oauth2/callback/saml` (e.g., `https://sonarqube.mycompany.com/oauth2/callback/saml`).
* **Audience URI (SP Entity ID)**: Something like `sonarqube` (SonarQube Server default value). It must not contain whitespace.
2. An assertion signature is mandatory. You must keep the following default settings in *Show Advanced Settings*:
* **Response**: Choose *Signed*.
* **Assertion Signature**: Choose *Signed*.
* **Signature Algorithm**: Choose *RSA-SHA256*.
3. (Optional) If you want to enable assertion encryption, expand *Show Advanced Settings* and configure the following fields:
* **Assertion Encryption**: Choose *Encrypted*.
* **Encryption Algorithm**: Choose *AES256-GCM* for high security.
* **Key Transport Algorithm**: Choose *RSA-OAEP*.
* **Encryption Certificate**: Add the service provider certificate. It should be the same certificate as the one found in the SonarQube Server SAML settings under **Service provider certificate**.
4. Under **Attribute Statements**, add the following attribute mappings:
1. Create a mapping for the *name*:
* **Name**: `name`.
* **Name format**: *Unspecified*.
* **Value**: Choose `user.displayName`.
2. Create a mapping for the *login*:
* **Name**: `login`.
* **Name format**: *Unspecified*.
* **Value**: Choose `user.login`.
3. (Optional) Create a mapping for the *email*:
* **Name**: `email`.
* **Name format**: *Unspecified*.
* **Value**: Choose `user.email`.
d. (Optional) Under *Group Attribute Statements* (See details in [overview](https://docs.sonarsource.com/sonarqube-server/instance-administration/authentication/overview "mention")):
* **Name**: `groups`.
* **Name format**: *Unspecified*.
* **Filter**: Choose *Matches regex* and set the value to `.*`.
5. Select **Finish** in the **Feedback** dialog to confirm the creation of the application.
6. You can now add users and groups in the *Assignments* tab of the application.
7. Navigate to the **Sign On** tab of the *SonarQube* application in Okta.
8. Next to the **SAML Signing Certificates** subsection, you will find the configurations needed for setting up SonarQube Server, under **View SAML setup instructions**.
### In SonarQube Server, Configure SAML authentication
1. Go to **Administration** > **Configuration** > **General Settings** > **Authentication** > **SAML.**
2. Select **Create configuration.** A dialog opens.
3. Provide the fields below:
* **Application ID**: The value of the *Audience URI (SP Entity ID)* you set in Okta (for example, `sonarqube`).
* **Provider ID**: The value of *Identity Provider Issuer* provided in **View SAML setup instructions** from Okta.
* **SAML login URL**: The value of *Identity Provider Single Sign-On URL* provided in **View SAML setup instructions** from Okta.
* **Identity provider certificate**: The value of *X.509 Certificate* provided in **View SAML setup instructions** from Okta.
* **SAML user login attribute**: `login` (or whatever you configured above when doing the mapping).
* **SAML user name attribute**: `name` (or whatever you configured above when doing the mapping).
* (Optional) **SAML user email attribute**: `email` (or whatever you configured above when doing the mapping).
* **Sign requests**: Not supported for Okta.
* (Optional) **Service provider private key**: The private key is required for assertion encryption support. It must be provided for SonarQube Server in `PKCS8` format without encryption. You can find instructions for converting to different key formats [here](https://manpages.ubuntu.com/manpages/focal/man1/pkcs8.1ssl.html).
* (Optional) **Service provider certificate**: The certificate is required for assertion encryption support. It must be shared with Okta in order to activate the assertion encryption.
The service provider private key and certificate can be either a new self-signed pair or any existing pair available in your infrastructure.
### Enabling and testing SAML authentication
1. Save the SAML configuration by selecting **Save configuration.**
2. Before enabling the SAML authentication on SonarQube Server, you can verify that the configuration is correct by clicking on **Test Configuration**. A SAML login will be initiated and useful information about the SAML response obtained from the Identity provider will be returned.
3. Enable the configuration by selecting **Enable configuration**.
4. In the login form, the new button **Log in with Okta** (or a custom name specified in the **Provider Name** field) allows users to connect with their SAML account.
### Group synchronization
To use the Just-in-Time provisioning's group synchronization feature:
1. Verify the user groups in SonarQube Server so that the automatic group synchronization can take place properly. See [#justintime-provisioning](https://docs.sonarsource.com/sonarqube-server/instance-administration/overview#justintime-provisioning "mention").
2. Make sure you have configured a `groups` attribute in your Okta application (see above).
3. Enable the group synchronization in SonarQube Server:
* Go to **Administration** > **Configuration** > **General Settings** > **Authentication** > **SAML**.
* Select the **Edit** button to open your SAML Okta configuration.
* In **SAML group attribute,** enter `groups`, or the name you gave to this attribute in your Okta Application.
* Select **Save configuration**.
### Enabling SCIM provisioning
Starting in [Enterprise edition](https://www.sonarsource.com/plans-and-pricing/enterprise/), once you’ve set up Okta as your SAML Identity Provider, you can set up SCIM provisioning to automate user and group provisioning within Okta.
For more information, see [scim-provisioning-with-okta](https://docs.sonarsource.com/sonarqube-server/instance-administration/authentication/saml/scim/scim-provisioning-with-okta "mention").
---
# Source: https://docs.sonarsource.com/sonarqube-server/9.8/instance-administration/authentication/scim/how-to-set-up-scim-in-okta.md
# Source: https://docs.sonarsource.com/sonarqube-server/9.9/instance-administration/authentication/scim/how-to-set-up-scim-in-okta.md
# How to set up SCIM in Okta
*SCIM provisioning is available starting in* [*Enterprise Edition*](https://www.sonarsource.com/plans-and-pricing/enterprise/)*.*
SCIM is a standard used to automate the exchange of user identity info between the identity provider and service provider. If you use Okta as an identity provider, you can enable SCIM to automate user provisioning and de-provisioning for SonarQube through Okta.
Once you enable SCIM in Okta, any user assigned to the SonarQube application in Okta is automatically provisioned in SonarQube. If a user gets unassigned from the SonarQube application or deactivated in Okta, the corresponding user account is automatically deactivated in SonarQube. However, if a user gets suspended in Okta, the corresponding user account remains unchanged in SonarQube.
### Prerequisites
You’ve integrated Okta with SonarQube, as described on the [how-to-set-up-okta](https://docs.sonarsource.com/sonarqube-server/9.9/instance-administration/authentication/saml/how-to-set-up-okta "mention") page.
### Enabling SCIM in SonarQube
To enable SCIM provisioning in SonarQube, do one of the following:
* In your configuration file, set the `sonar.scim.enabled` server property to *`true`.*
* In the SonarQube UI, go to **Administration** > **Configuration** > **General Settings** > **Authentication** > **SAML** and activate the **SCIM users (de)provisioning** option.
### Enabling SCIM in Okta
**Step 1**: From your Okta board, choose *your SonarQube application >* **General** > **App Settings** > **Edit**.
**Step 2**: Check **Enable SCIM provisioning** and click on **Save**. This will create a **Provisioning** tab.
**Step 3**: Choose the newly created **Provisioning** tab and click on **Edit.**
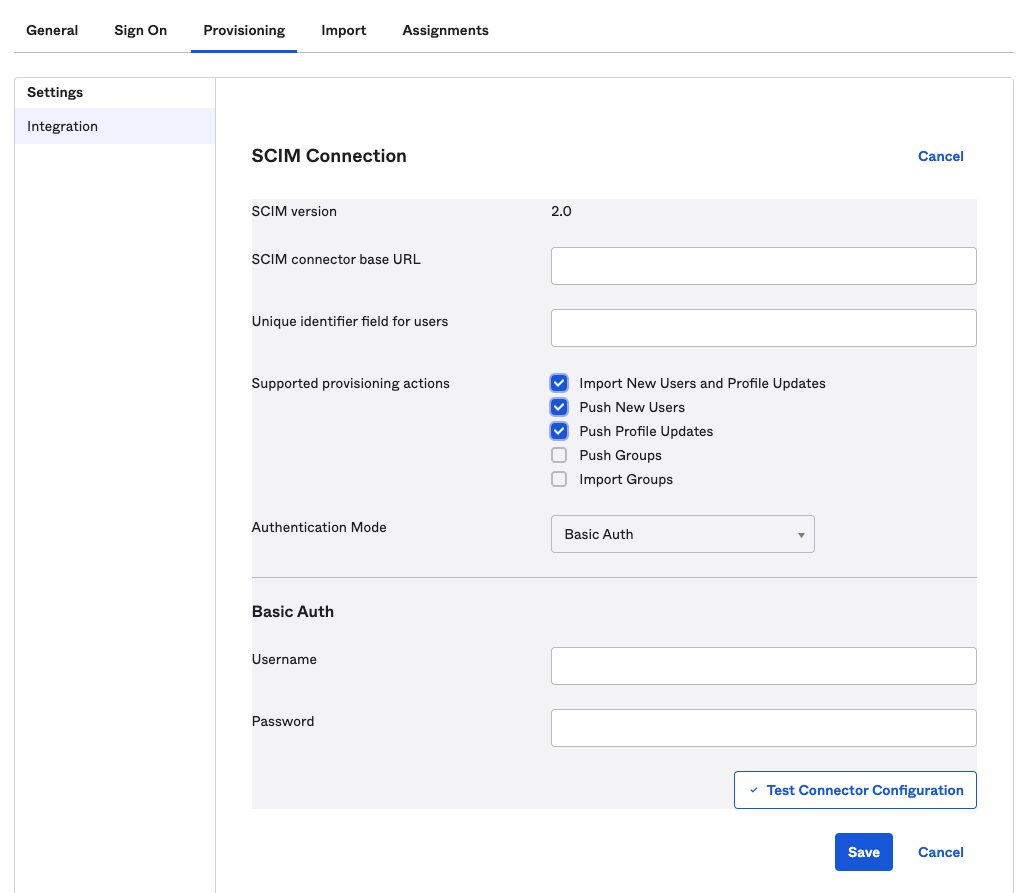
Screenshot of the SCIM connection screen.
**Step 4**: Configure the SCIM Connection fields as follows:
* **SCIM connector base URL**: `/api/scim/v2`
* **Unique identifier field for users**: *`userName`*
* **Supported provisioning actions**: enable importing new users and profile updates, pushing new users, and pushing profile updates as shown in the above picture
* **Authentication Mode**: select **Basic Auth**
**Step 5**: In SonarQube, [generating-and-using-tokens](https://docs.sonarsource.com/sonarqube-server/9.9/user-guide/user-account/generating-and-using-tokens "mention") for an admin account and copy the token into Okta’s **Basic Auth** > **Username** field.
**Step 6**: To check that the SCIM connection is valid, click on **Test Connector Configuration**. A green checkmark indicates that all the fields are properly filled.
**Step 7**: Click on **Save**.
**Step 8**: In the next screen, click **Edit** and check the **Create Users**, **Update User Attributes** and **Deactivate Users** provisioning options.
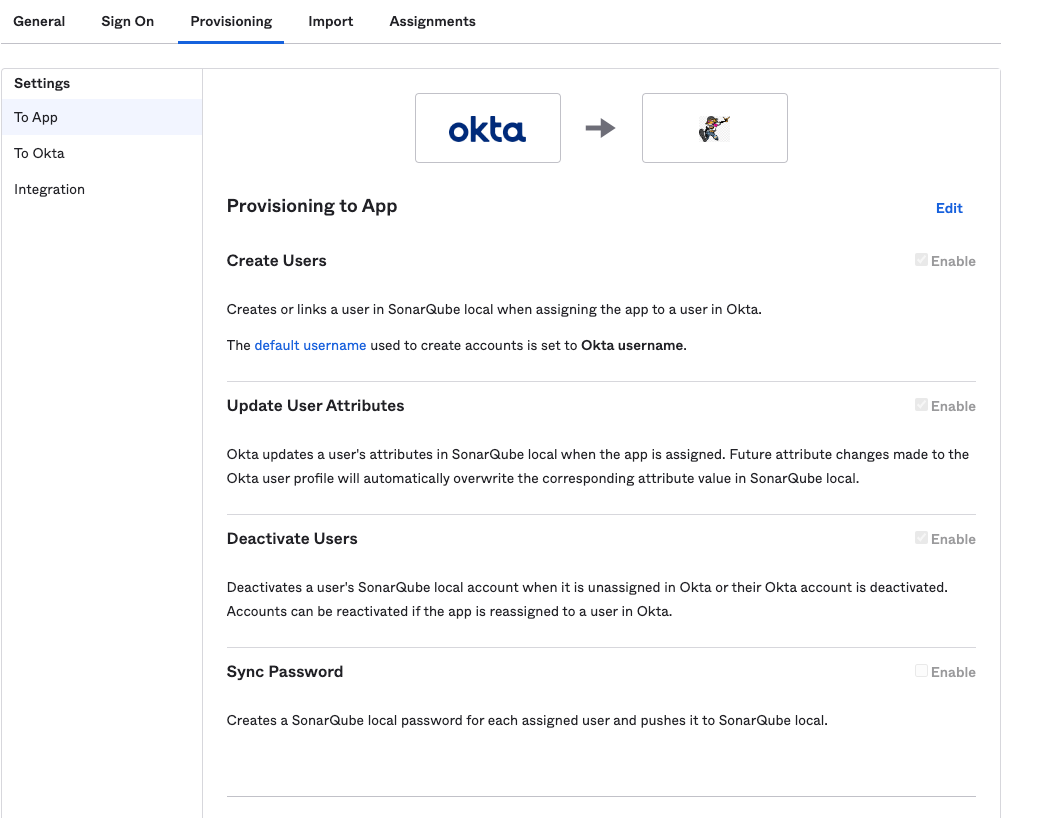
Screenshot of the SCIM Provisioning to App page in Okta.
**Step 9**: Click on **Save**.
### Provisioning already assigned users
Users that are assigned before SCIM is enabled are not automatically provisioned. In the UI, an exclamation mark is displayed next to their names in the **Assignments** tab:
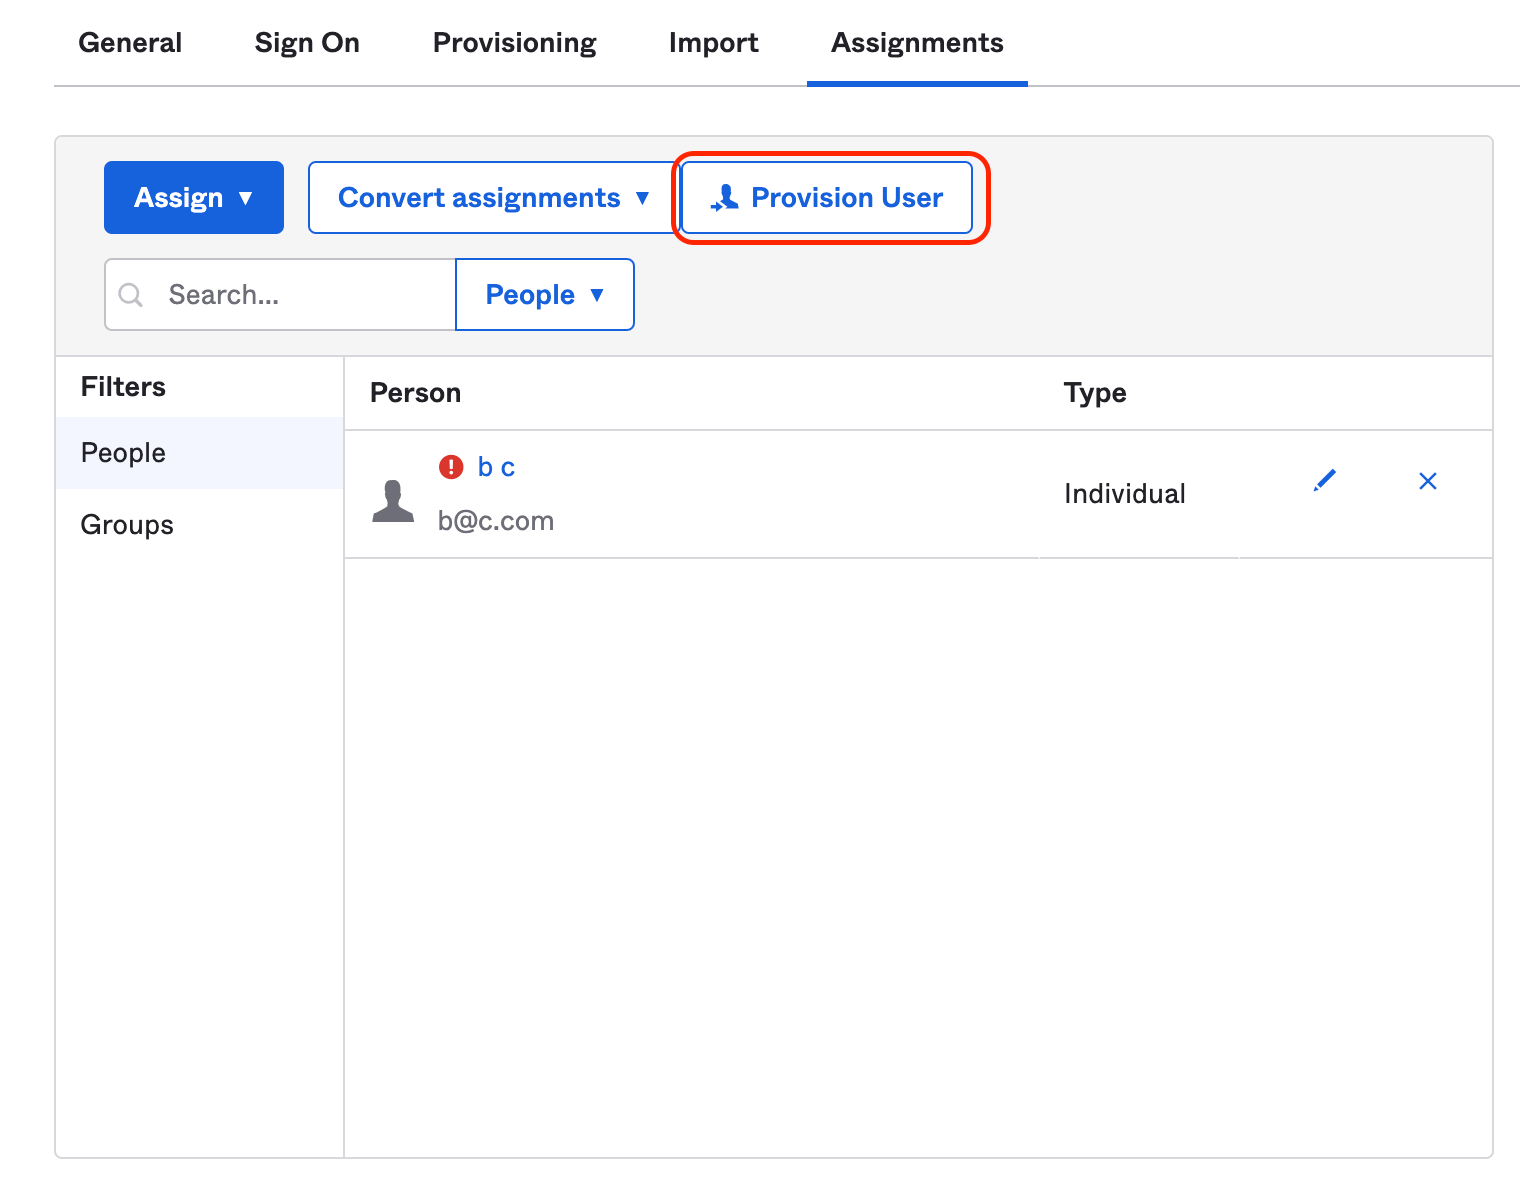
Screenshot showing the Provision User button in Okta.
To force the provision of these users, click on **Provision User**. The exclamation mark should disappear, meaning that the users have been provisioned.
---
# Source: https://docs.sonarsource.com/sonarqube-server/9.8/instance-administration/authentication/saml/how-to-setup-azure-ad.md
# How to setup Azure AD
The following content may be useful if you’re using Azure AD as a SAML Identity Provider.
To integrate Azure AD (Identity Provider) with SonarQube (Service Provider), both sides need to be configured.
For SonarQube, navigate to **Administration** > **Authentication** > **SAML**. For Azure AD, login to Azure and navigate to Azure AD.
### Set up the SonarQube application in Azure AD
**Step 1**: In Azure AD, navigate to **Enterprise applications** and add a **New Application**.

The Azure navigation path to create a new application for your SonarQube SAML authentication.
**Step 2**: Create your **own application** and fill in the **name**.

Create a new Enterprise application for SonarQube when setting up SAML authentication in Azure.
### Link SonarQube with Azure AD
**Step 1**: Navigate to **Single sign-on** and select **SAML**.
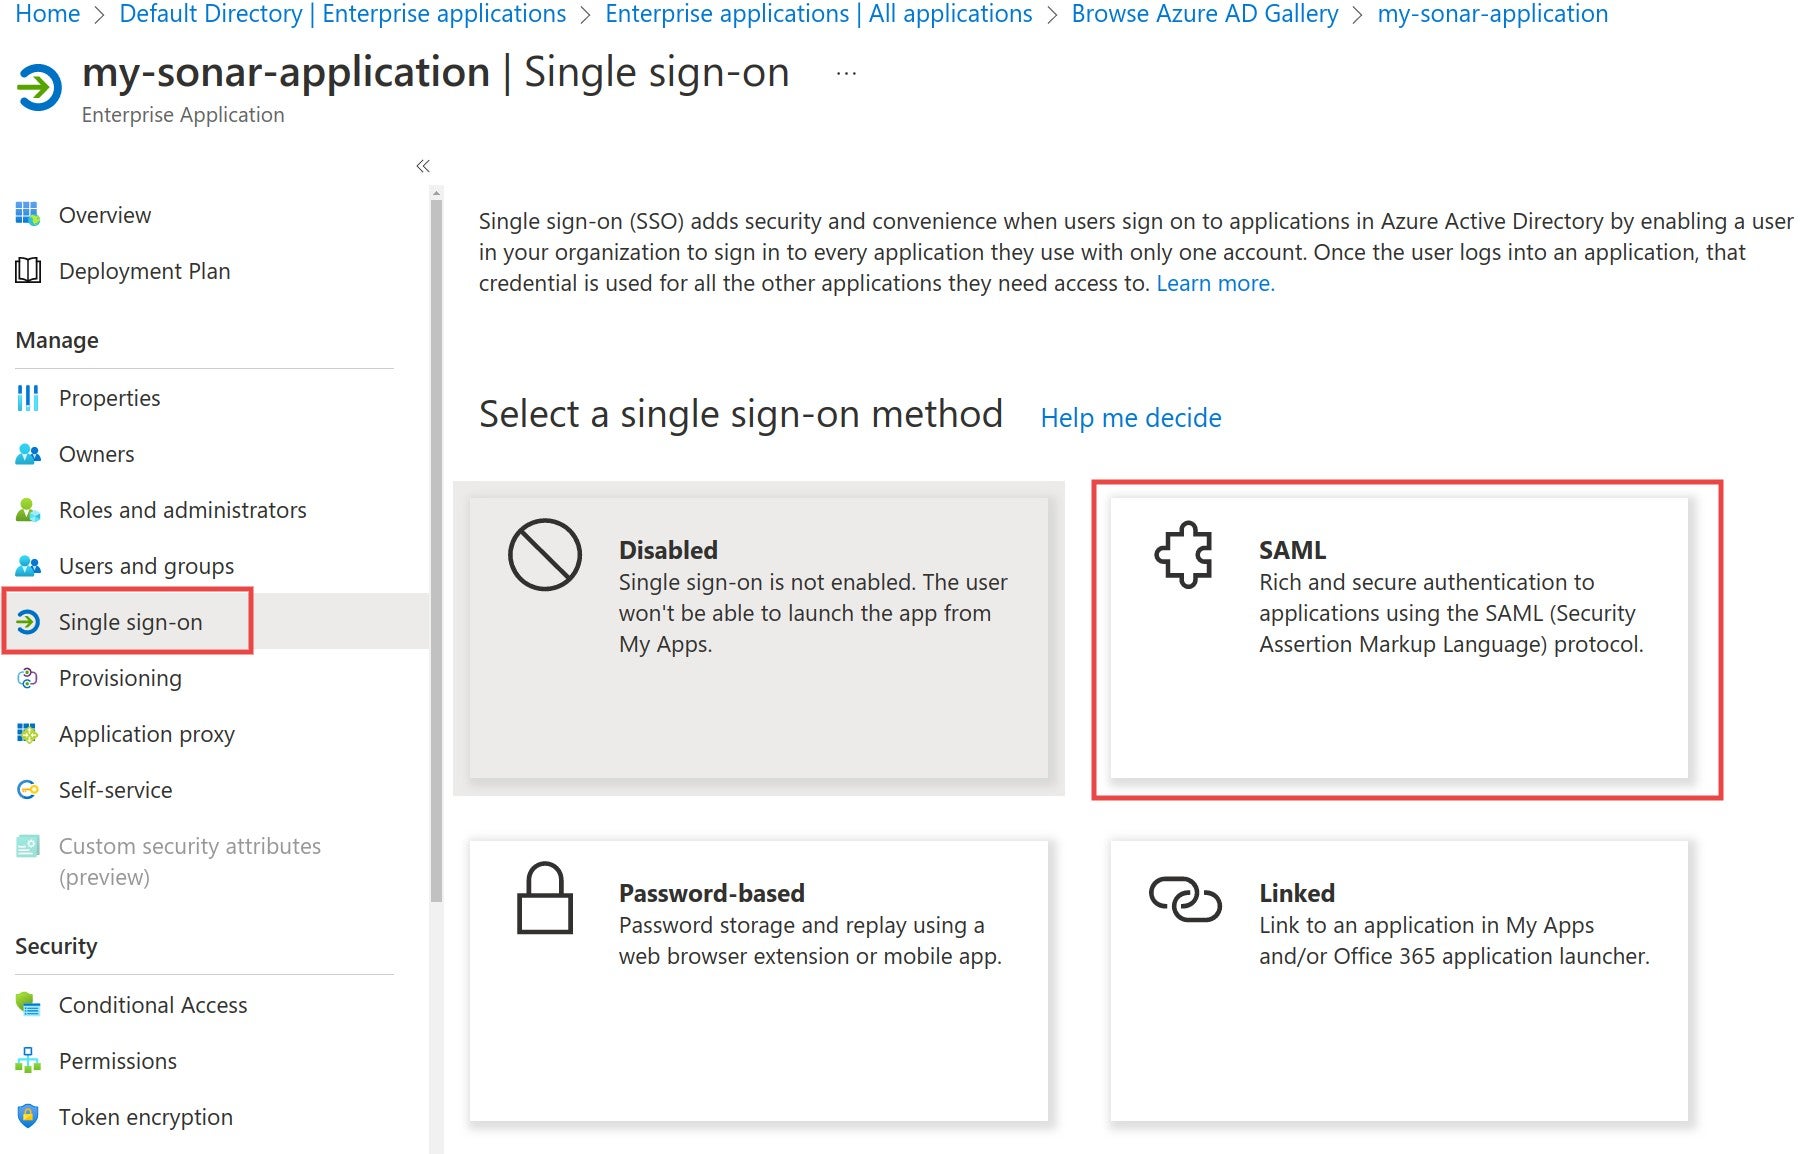
Navigate to Single sign-on in Azure and select SAML to begin the authentication process.
**Step 2**: Edit the **Basic SAML Configuration** and fill in the **Identifier** and the **Reply URL** fields. The **Identifier** has to be the same as the **Application ID** in SonarQube. The **Reply URL** must have the format `/oauth2/callback/saml`. The **Reply URL** uses the **Server base URL** provided in SonarQube under **Administration** > **General**.
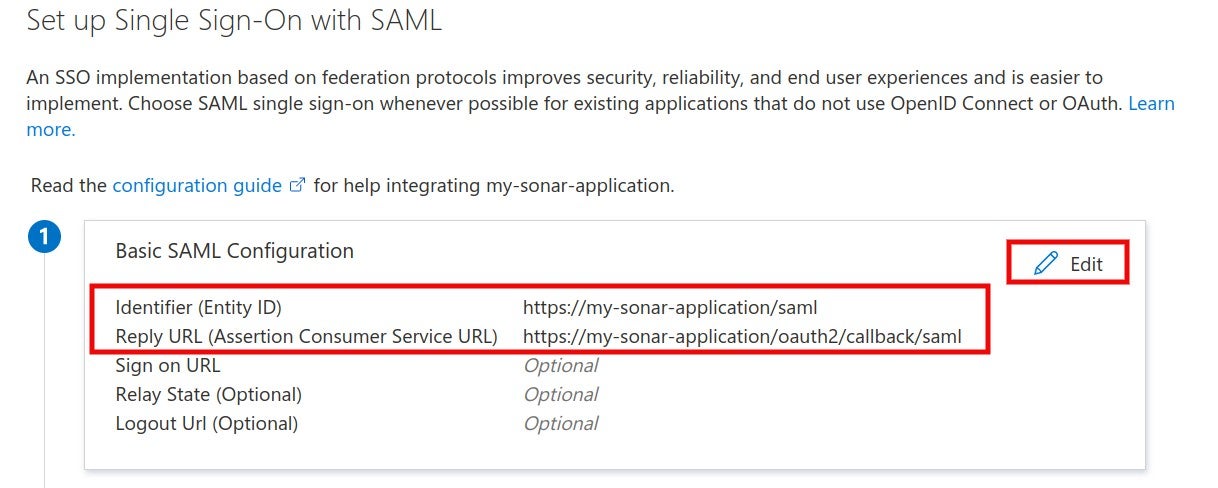
When setting up your SSO with SAML, edit the Basic SAML Configuration and fill in the Identifier and the Reply URL.
**Step 3**: Make sure that the **Application ID** in SonarQube has the same value as the **Identifier** in the Identity Provider.

Confirm that the Application ID in SonarQube has the same value as the Identifier in the Identity provider.
**Step 4**: In the Azure AD SAML configuration, navigate to **Set up** and copy the **Login URL** and **Azure AD Identifier**.
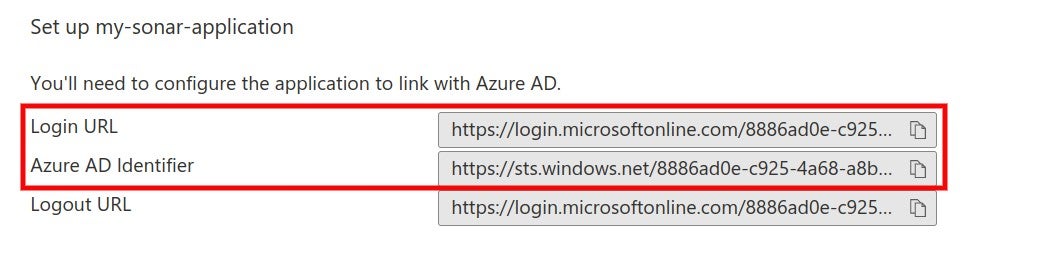
In the Azure AD SAML configuration, navigate to Set up and copy the Login URL and Azure AD Identifier.
**Step 5**: Paste the **Login URL** into the **SAML login url** and the **Azure AD Identifier** into the **Provider ID** field in the SonarQube SAML configuration.
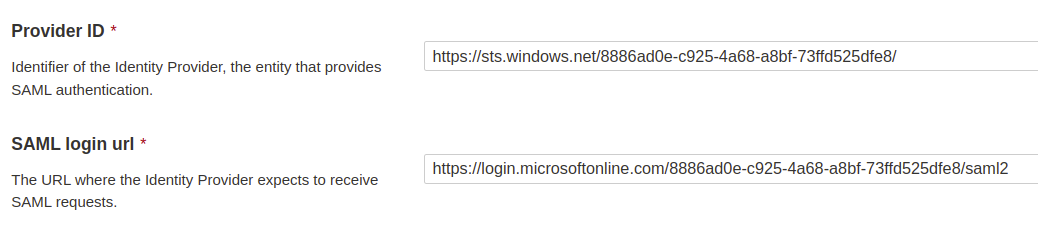
Paste the Azure AD Identifier into the Provider ID field and the Login URL into the SAML login url into your SonarQube SAML configuration.
### Attributes and claims
**Step 1**: In the Azure AD SAML configuration, edit **Attributes & Claims** to view, edit or add attributes.

Edit Attributes & Claims to view, edit or add attributes when configuring SAML authentication in Azure.
SonarQube uses the following attributes:
* * **Login** (required) A unique name to identify the user in SonarQube. The default Azure AD attribute `emailaddress` is used in the example.
* **Name** (required) The full name of the user. The default Azure AD attribute `givenname` is used in the example.
* **Email** (optional) The email of the user.
* **Group** (optional) Supports mapping to group names in SonarQube. Group name passed by Azure AD and the group name in SonarQube should match. Otherwise, the default **sonar-users** group is assigned.
{% hint style="warning" %}
The **NameID** attribute is *not* used in SonarQube.
{% endhint %}
**Step 2**: Corresponding configuration in SonarQube. The namespace + name of the attribute should be used, as defined in Azure AD.
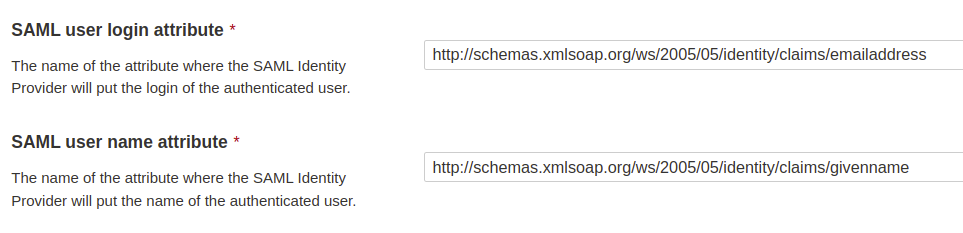
The corresponding configuration in SonarQube uses the Azure namespace + name of the attribute to be used.
### Certificates and signatures
**Step 1**: Navigate to **SAML Certificates** and download **Certificate (Base64)**.
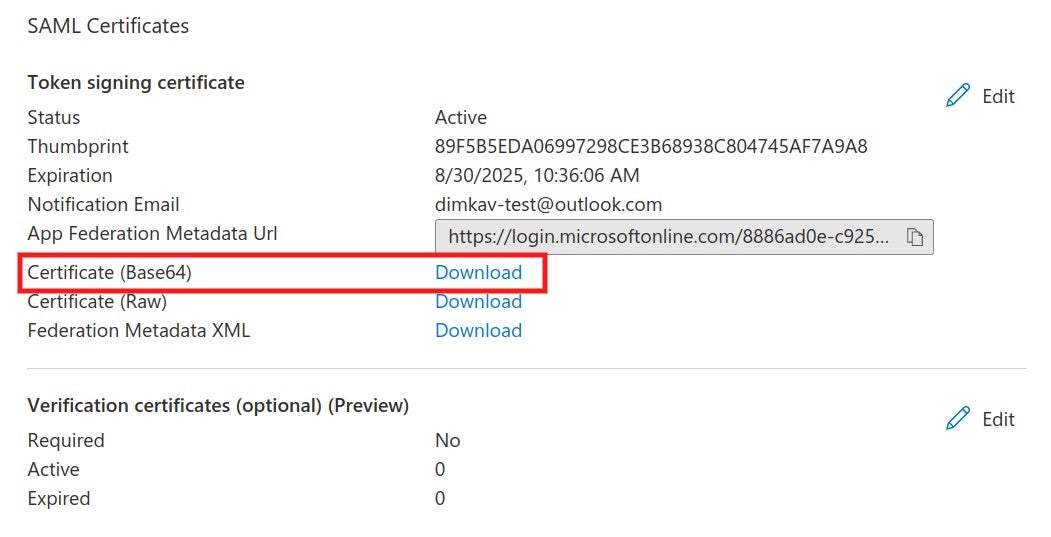
Navigate to SAML Certificates and download Certificate (Base64).
**Step 2**: The certificate should be copied into the **Identity provider certificate** field in the SonarQube SAML configuration.
**Step 3** (Optional): Encryption for SonarQube requests can be activated by generating an asymmetric key pair. (For more information, see [SAML token encryption in Azure](https://docs.microsoft.com/en-us/azure/active-directory/manage-apps/howto-saml-token-encryption?tabs=azure-portal)) Add the private key in SonarQube.

Copied the Service provider private key field value to add to your SonarQube SAML configuration.
Import the public key certificate (.cer) file in Azure AD and activate token encryption.

Import the public key certificate (.cer) file in Azure AD and activate token encryption for your SonarQube SAML authentication.
**Step 4** (Optional): Azure AD supports signed SAML requests from the Service Provider (under Preview). Edit the **Verification certificates**, upload a certificate, and enable the **Require verification certificates** option.
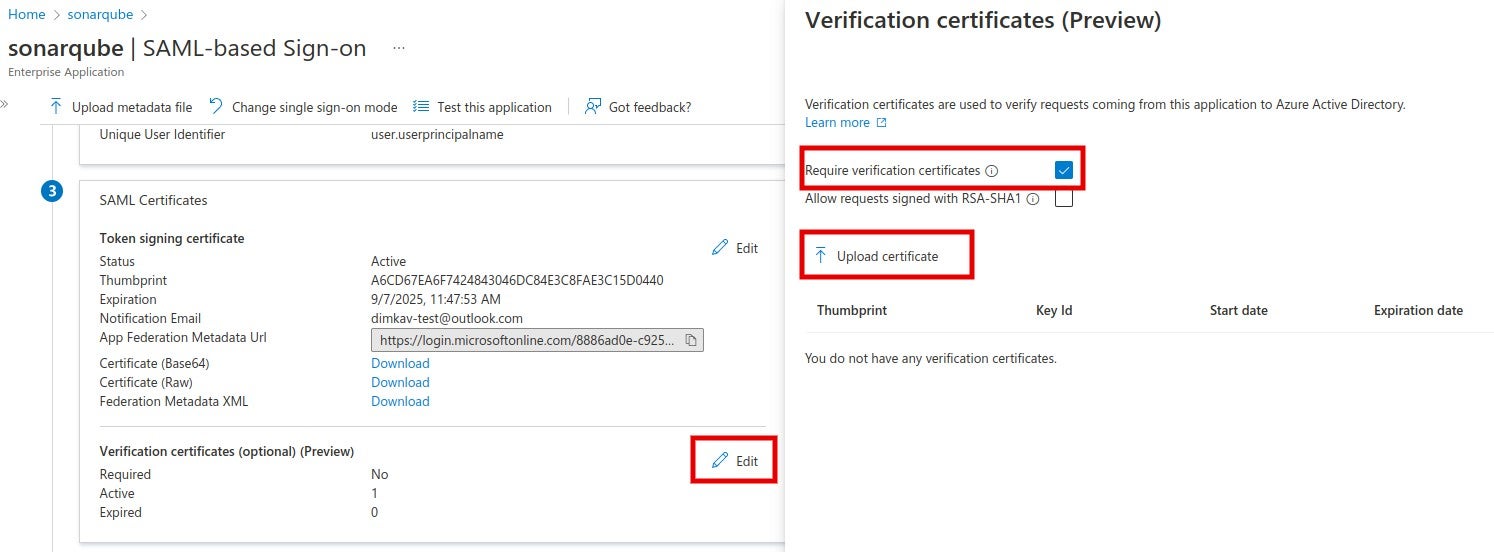
To edit the Verification certificates, upload a certificate and enable the Require verification certificates option.
In SonarQube, fill in the corresponding private key and the same certificate and enable the **Sign requests** option.

In SonarQube, fill in the corresponding private key and the same certificate and enable the Sign requests option.
### Users and groups
**Step 1**: In the Azure AD SonarQube application, navigate to **Users and groups** and assign users or groups to the application.

Add SonarQube users and groups when setting up your SAML authentication in Azure.
### Group mapping
Group mapping between Azure AD and SonarQube can be achieved either by using the Azure AD roles or the Azure AD groups. For either case, the corresponding group name should exist in SonarQube under **Administration** > **Security** > **Groups**. (For more information, see [security](https://docs.sonarsource.com/sonarqube-server/9.8/instance-administration/security "mention"))
* For mapping with the Azure AD groups, a group claim must be added with `sAMAccountName` as a source attribute.
{% hint style="warning" %}
According to Azure, this source attribute only works for groups synchronized from an on-premises Active Directory using AAD Connect Sync 1.2.70.0 or above.
{% endhint %}
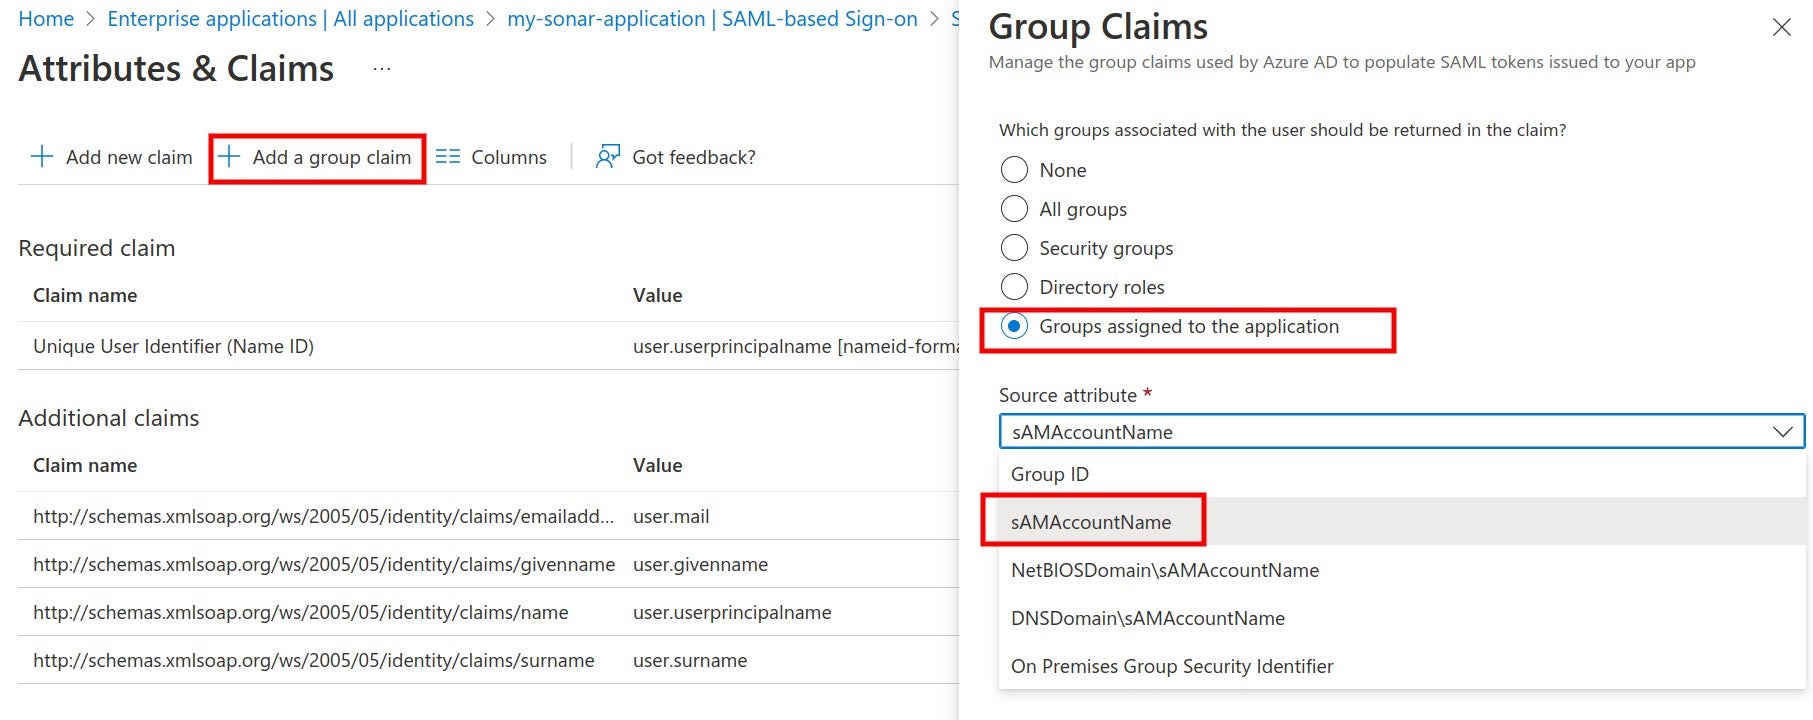
Where to map your SAML groups in Azure before you can add a group claim.

The attribute used to define your user group in SAML.
* For mapping with the Azure AD app roles, an application role should be assigned to the user. Azure AD sends the role claim automatically with `http://schemas.microsoft.com/ws/2008/06/identity/claims/role` as a key.

The attribute used to define your user group role in SAML.
### Enabling and testing SAML authentication
**Step 1**: In the SonarQube SAML settings, enable SAML.

Where to enable SAML for Azure from the SonarQube SAML settings.
**Step 2**: In the login form, the new button **Log in with SAML** (or a custom name specified in the `sonar.auth.saml.providerName` setting) allows users to connect with their SAML account.
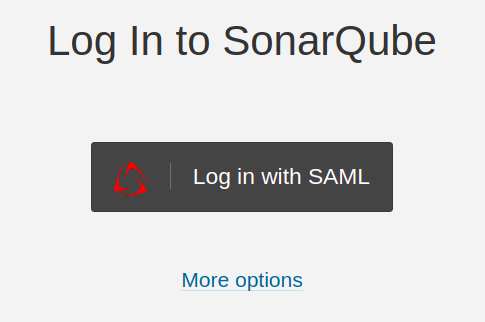
Log in to SonarQube with your SAML authentication.
Before enabling the SAML authentication on SonarQube, you can verify that the configuration is correct by clicking on **Test Configuration**. A SAML login will be initiated and useful information about the SAML response obtained from the Identity provider will be returned.
---
# Source: https://docs.sonarsource.com/sonarqube-community-build/analyzing-source-code/languages/html.md
# Source: https://docs.sonarsource.com/sonarqube-server/8.9/analyzing-source-code/languages/html.md
# Source: https://docs.sonarsource.com/sonarqube-server/9.8/analyzing-source-code/languages/html.md
# Source: https://docs.sonarsource.com/sonarqube-server/9.9/analyzing-source-code/languages/html.md
# Source: https://docs.sonarsource.com/sonarqube-server/10.0/analyzing-source-code/languages/html.md
# Source: https://docs.sonarsource.com/sonarqube-server/10.1/analyzing-source-code/languages/html.md
# Source: https://docs.sonarsource.com/sonarqube-server/10.2/analyzing-source-code/languages/html.md
# Source: https://docs.sonarsource.com/sonarqube-server/10.3/analyzing-source-code/languages/html.md
# Source: https://docs.sonarsource.com/sonarqube-server/10.4/analyzing-source-code/languages/html.md
# Source: https://docs.sonarsource.com/sonarqube-server/10.5/analyzing-source-code/languages/html.md
# Source: https://docs.sonarsource.com/sonarqube-server/10.6/analyzing-source-code/languages/html.md
# Source: https://docs.sonarsource.com/sonarqube-server/10.7/analyzing-source-code/languages/html.md
# Source: https://docs.sonarsource.com/sonarqube-server/10.8/analyzing-source-code/languages/html.md
# Source: https://docs.sonarsource.com/sonarqube-server/2025.2/analyzing-source-code/languages/html.md
# Source: https://docs.sonarsource.com/sonarqube-server/2025.3/analyzing-source-code/languages/html.md
# Source: https://docs.sonarsource.com/sonarqube-server/2025.5/analyzing-source-code/languages/html.md
# Source: https://docs.sonarsource.com/sonarqube-server/2025.1/analyzing-source-code/languages/html.md
# Source: https://docs.sonarsource.com/sonarqube-server/2025.4/analyzing-source-code/languages/html.md
# Source: https://docs.sonarsource.com/sonarqube-server/2025.6/analyzing-source-code/languages/html.md
# Source: https://docs.sonarsource.com/sonarqube-server/analyzing-source-code/languages/html.md
# Source: https://docs.sonarsource.com/sonarqube-cloud/advanced-setup/languages/html.md
# HTML
### Language-specific properties
To discover and update the HTML-specific properties, navigate in SonarQube Cloud to *Your Project* > **Administration** > **General Settings** > **Languages** > **HTML**. See the [analysis-parameters](https://docs.sonarsource.com/sonarqube-cloud/advanced-setup/analysis-parameters "mention") page for more information about specific properties.
### PHP code analysis
PHP and HTML analyzers both analyze files with extensions: `.php`, `.php3`, `.php4`, `.php5`, `.phtml`.
File metrics, such as the number of lines of code, can only be measured by one of the languages, PHP or HTML. They are handled by the PHP analyzer by default, and by HTML analyzer if for some reason the former is not present.
The HTML analyzer inspects PHP files even if the PHP file extensions are not included in the list of file extensions to analyze.
---
# Source: https://docs.sonarsource.com/sonarqube-community-build/instance-administration/authentication/http-header.md
# Source: https://docs.sonarsource.com/sonarqube-server/9.8/instance-administration/authentication/http-header.md
# Source: https://docs.sonarsource.com/sonarqube-server/9.9/instance-administration/authentication/http-header.md
# Source: https://docs.sonarsource.com/sonarqube-server/10.0/instance-administration/authentication/http-header.md
# Source: https://docs.sonarsource.com/sonarqube-server/10.1/instance-administration/authentication/http-header.md
# Source: https://docs.sonarsource.com/sonarqube-server/10.2/instance-administration/authentication/http-header.md
# Source: https://docs.sonarsource.com/sonarqube-server/10.3/instance-administration/authentication/http-header.md
# Source: https://docs.sonarsource.com/sonarqube-server/10.4/instance-administration/authentication/http-header.md
# Source: https://docs.sonarsource.com/sonarqube-server/10.5/instance-administration/authentication/http-header.md
# Source: https://docs.sonarsource.com/sonarqube-server/10.6/instance-administration/authentication/http-header.md
# Source: https://docs.sonarsource.com/sonarqube-server/10.7/instance-administration/authentication/http-header.md
# Source: https://docs.sonarsource.com/sonarqube-server/10.8/instance-administration/authentication/http-header.md
# Source: https://docs.sonarsource.com/sonarqube-server/2025.2/instance-administration/authentication/http-header.md
# Source: https://docs.sonarsource.com/sonarqube-server/2025.3/instance-administration/authentication/http-header.md
# Source: https://docs.sonarsource.com/sonarqube-server/2025.5/instance-administration/authentication/http-header.md
# Source: https://docs.sonarsource.com/sonarqube-server/2025.1/instance-administration/authentication/http-header.md
# Source: https://docs.sonarsource.com/sonarqube-server/2025.4/instance-administration/authentication/http-header.md
# Source: https://docs.sonarsource.com/sonarqube-server/2025.6/instance-administration/authentication/http-header.md
# Source: https://docs.sonarsource.com/sonarqube-server/instance-administration/authentication/http-header.md
# HTTP header
You can delegate user authentication to third-party systems (proxies/servers) using HTTP header authentication.
When this feature is activated, SonarQube Server expects that the authentication is handled prior to any query reaching the server. The tool that handles the authentication should:
* Intercept calls to the SonarQube Server.
* Take care of the authentication.
* Update the HTTP request header with the relevant SonarQube Server user information.
* Re-route the request to SonarQube Server with the appropriate header information.
All the parameters required to activate and configure this feature are available in SonarQube Server configuration file. See the `SSO AUTHENTICATION` section in `/conf/sonar.properties`.
Using HTTP header authentication is an easy way to integrate your SonarQube Server deployment with an in-house SSO implementation.
---
# Source: https://docs.sonarsource.com/sonarqube-for-vs-code/ai-capabilities/ides.md
# Source: https://docs.sonarsource.com/sonarqube-for-vs-code/getting-started/ides.md
# Supported IDEs
SonarQube for VS Code integrates with multiple IDEs built on the VS Code architecture and is designed to be easily installed and fully functional within these environments. This broad compatibility ensures that you can leverage SonarQube's code analysis tools while using your favorite IDE.
As a result, you can expect a consistent experience, with SonarQube's features like on-the-fly issue detection, quick fixes, rule customization, and connected mode working as intended, regardless of the specific VS Code-based IDE you’re using.
In addition, SonarQube's compatibility with VS Code forks extends to your integrated AI tools. SonarQube for VS Code is built to coexist with these AI features, so you can benefit from both intelligent code assistance and robust static analysis without conflicts.
### Installing a compatible IDE
| Supported IDE | Profile migration is available |
| --------------------------------------------------------------------------------------------------------- | ------------------------------------------------------------------------------------------------------------------------------------------ |
| [VS Code](https://code.visualstudio.com/docs/setup/setup-overview) | None required |
| [Cursor](https://docs.cursor.com/guides/migration/vscode) | ✅ Check our [#installation](https://docs.sonarsource.com/sonarqube-for-vs-code/ai-capabilities/ides/cursor#installation "mention") guide |
| GitPod | [Install your extension](https://www.gitpod.io/docs/classic/user/references/ides-and-editors/vscode-extensions#installing-an-extension) |
| [Kiro](https://kiro.dev/docs/guides/migrating-from-vscode/) | ✅ Check out our [#installation](https://docs.sonarsource.com/sonarqube-for-vs-code/ai-capabilities/ides/kiro#installation "mention") guide |
| [Trae](https://docs.trae.ai/ide/manage-extensions) | [Manage your extension](https://docs.trae.ai/ide/manage-extensions) |
| [VSCodium](https://github.com/VSCodium/vscodium/blob/master/docs/migration.md) | ✅ |
| [Windsurf](https://docs.windsurf.com/windsurf/getting-started#forgot-to-import-vs-code-configurations%3F) | ✅ Check our [#installation](https://docs.sonarsource.com/sonarqube-for-vs-code/ai-capabilities/ides/windsurf#installation "mention") guide |
{% hint style="info" %}
Note that although your supported IDE has migrated your extension, your SonarQube token is in secure storage and will not be migrated; you will be prompted to reauthenticate your connection.
{% endhint %}
When using Visual Studio Code and GitHub Codespaces, SonarQube for VS Code is available directly from the [VS Code Marketplace](https://marketplace.visualstudio.com/items?itemName=SonarSource.sonarlint-vscode).
### IDE-specific features
SonarQube features and workflows may differ for each supported IDE. Please see these dedicated pages as for more information as it becomes available:
{% columns %}
{% column %}
{% content-ref url="../ai-capabilities/ides/cursor" %}
[cursor](https://docs.sonarsource.com/sonarqube-for-vs-code/ai-capabilities/ides/cursor)
{% endcontent-ref %}
{% content-ref url="../ai-capabilities/ides/kiro" %}
[kiro](https://docs.sonarsource.com/sonarqube-for-vs-code/ai-capabilities/ides/kiro)
{% endcontent-ref %}
{% endcolumn %}
{% column %}
{% content-ref url="../ai-capabilities/ides/windsurf" %}
[windsurf](https://docs.sonarsource.com/sonarqube-for-vs-code/ai-capabilities/ides/windsurf)
{% endcontent-ref %}
{% endcolumn %}
{% endcolumns %}
---
# Source: https://docs.sonarsource.com/sonarqube-server/10.8/core-concepts/clean-as-you-code/implementation.md
# Implementation
For each project, the Clean as You Code implementation looks like this:
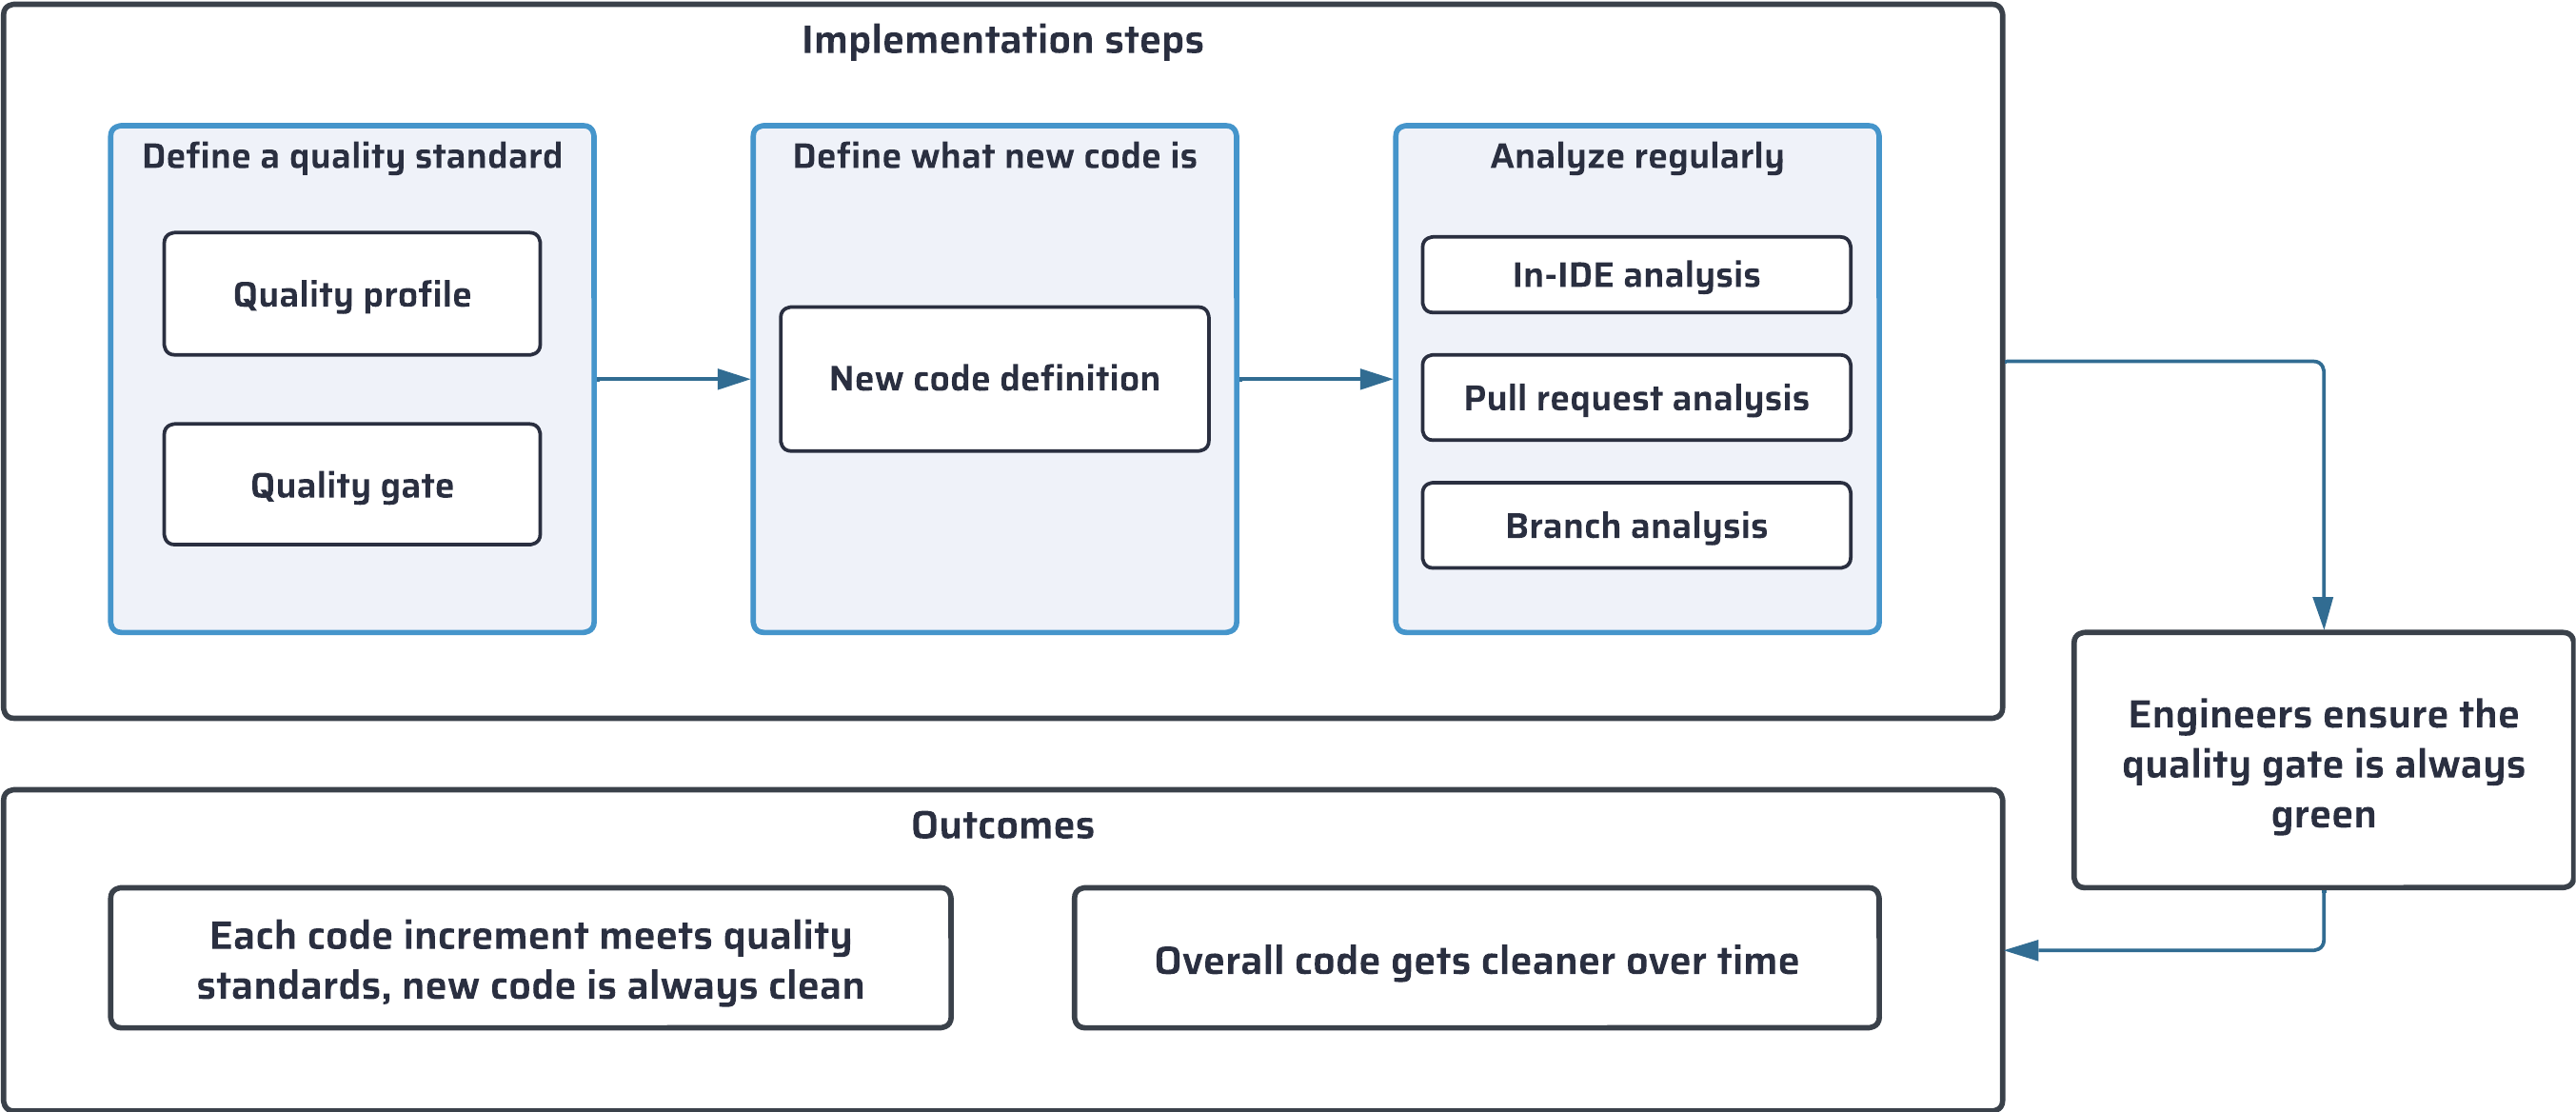
First, you define the quality standard for your project:
* With a *quality profile*, you define the set of rules to be applied during analysis.
* With a quality gate, you define a set of conditions that the code must meet.
Then, you define what is considered *new code* in your project, adapting your configuration to the nature of your project: versioned, continuous delivery, etc.
Finally, you ensure your code is analyzed frequently and at different stages of its journey, in your IDE and your DevOps platforms.
### Practicing Clean as You Code as a developer
The configuration steps described above and in the following sections are handled by project administrators. As a developer, you practice Clean as You Code by reviewing and fixing the issues detected in new code, ensuring that the quality gate is always green and that only clean code is merged.
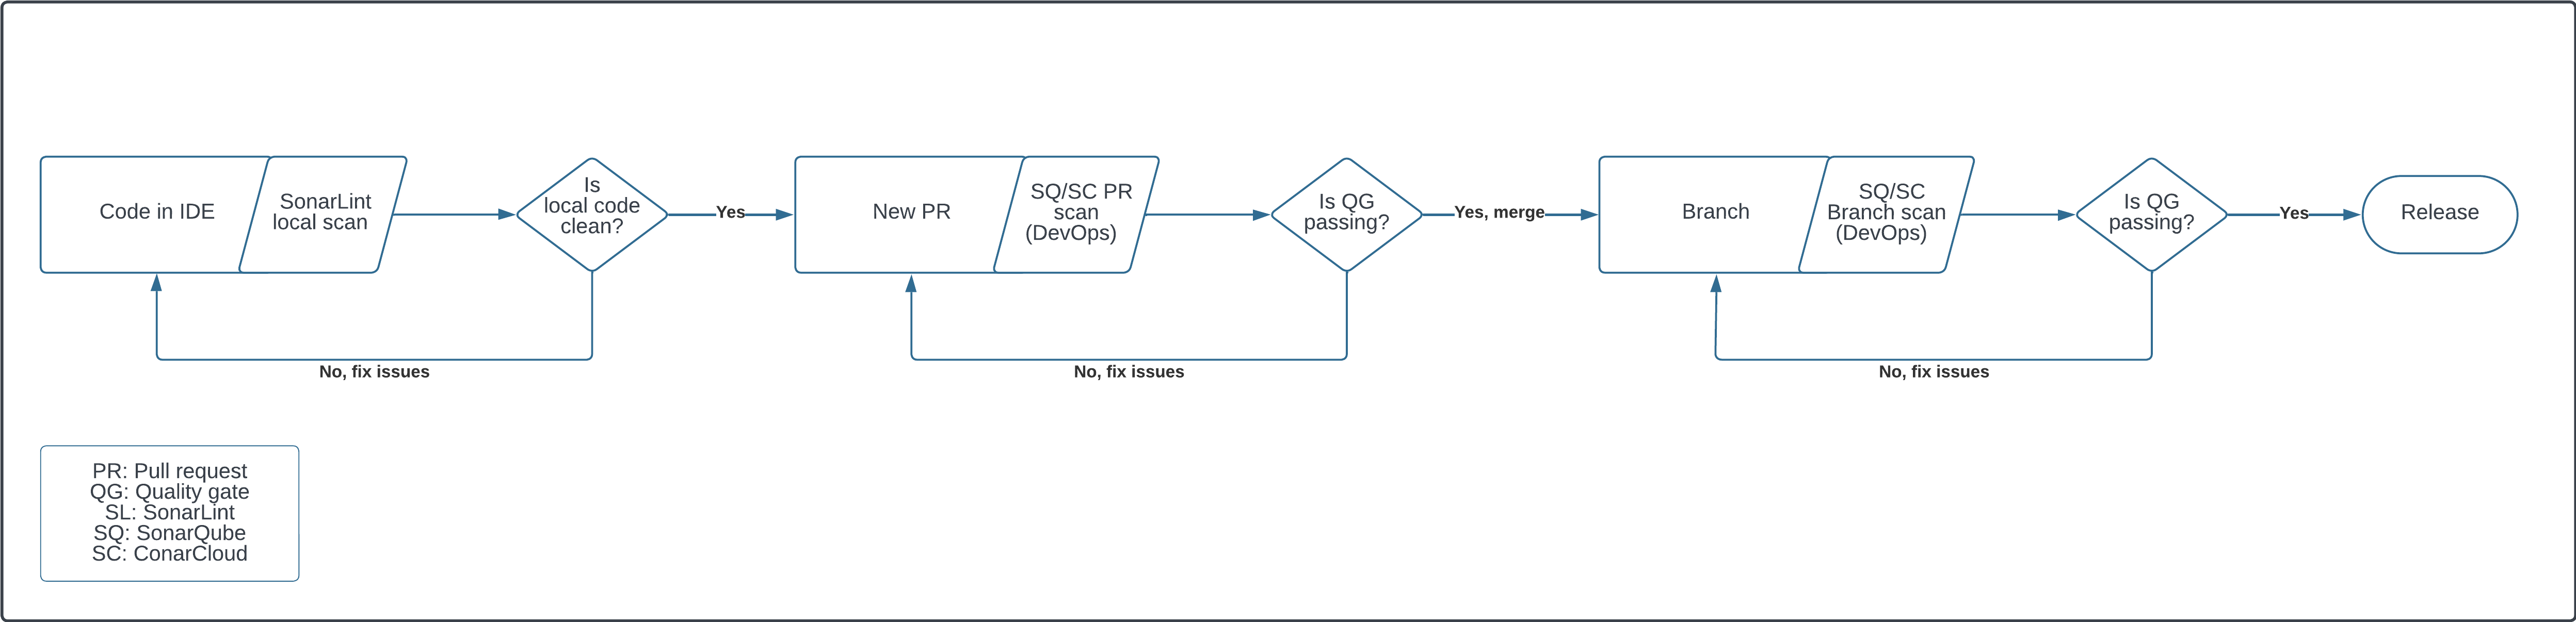
To learn more about these topics, refer to the Issues, Quality gates, and Clean Code sections (see links below).
### Related pages
* [setting-up-clean-as-you-code](https://docs.sonarsource.com/sonarqube-server/10.8/project-administration/setting-up-clean-as-you-code "mention")
* [introduction](https://docs.sonarsource.com/sonarqube-server/10.8/user-guide/issues/introduction "mention")
* [quality-gates](https://docs.sonarsource.com/sonarqube-server/10.8/instance-administration/analysis-functions/quality-gates "mention")
* [introduction](https://docs.sonarsource.com/sonarqube-server/10.8/core-concepts/clean-code/introduction "mention")
---
# Source: https://docs.sonarsource.com/sonarqube-community-build/devops-platform-integration/bitbucket-integration/bitbucket-cloud-integration/import-repos.md
# Source: https://docs.sonarsource.com/sonarqube-community-build/devops-platform-integration/bitbucket-integration/bitbucket-server-integration/import-repos.md
# Source: https://docs.sonarsource.com/sonarqube-server/2025.5/devops-platform-integration/bitbucket-integration/bitbucket-cloud-integration/import-repos.md
# Source: https://docs.sonarsource.com/sonarqube-server/2025.5/devops-platform-integration/bitbucket-integration/data-center/import-repos.md
# Source: https://docs.sonarsource.com/sonarqube-server/2025.6/devops-platform-integration/bitbucket-integration/bitbucket-cloud-integration/import-repos.md
# Source: https://docs.sonarsource.com/sonarqube-server/2025.6/devops-platform-integration/bitbucket-integration/bitbucket-server-integration/import-repos.md
# Source: https://docs.sonarsource.com/sonarqube-server/devops-platform-integration/bitbucket-integration/bitbucket-cloud-integration/import-repos.md
# Source: https://docs.sonarsource.com/sonarqube-server/devops-platform-integration/bitbucket-integration/bitbucket-server-integration/import-repos.md
# Importing your Bitbucket Data Center repositories
Once the integration of your SonarQube instance with Bitbucket Data Center has been properly set up, you can import a Bitbucket repository to create the corresponding project in SonarQube. To do so, you need the Create Project permission in SonarQube.
The so-created SonarQube project is "bound" to its Bitbucket repository. With a bound project:
* The project’s main branch name will be automatically set up from Bitbucket.
* The quality gate status report to the pull requests will be automatically set up.
{% hint style="info" %}
Starting in[ Enterprise Edition](https://www.sonarsource.com/plans-and-pricing/enterprise/), you can import a Bitbucket monorepo. See [monorepos](https://docs.sonarsource.com/sonarqube-server/project-administration/monorepos "mention").
{% endhint %}
### Step 1: Create a Personal Access Token
You must provide a Bitbucket Data Center [Personal Access Token](https://confluence.atlassian.com/bitbucketserver0717/personal-access-tokens-1087535496.html) with `Read` permissions for both projects and repositories. This token will be stored in SonarQube and can be revoked at any time in bitbucket. SonarQube will use this token to access and list your Bitbucket projects and repositories. Copy it (you will have to paste it during Step 2). You may ask your administrator to encrypt this token.
### Step 2: Import one or several Bitbucket repositories
1. In the top navigation bar of SonarQube, select the **Projects** tab.
2. In the top right corner, select **Create Project > From Bitbucket Server**. The Bitbucket project onboarding page opens.
3. In **Personal Access Token**, enter the PAT you created in Step 1 and select **Save**. The projects and repositories to which the PAT has access are listed on the page.
4. Select one or several repositories to be imported and follow the instructions.
### Related pages
[global](https://docs.sonarsource.com/sonarqube-server/devops-platform-integration/bitbucket-integration/bitbucket-server-integration/global "mention")\
[project](https://docs.sonarsource.com/sonarqube-server/devops-platform-integration/bitbucket-integration/bitbucket-server-integration/project "mention")\
[encrypting-settings](https://docs.sonarsource.com/sonarqube-server/instance-administration/security/encrypting-settings "mention")
---
# Source: https://docs.sonarsource.com/sonarqube-cloud/administering-sonarcloud/managing-organization/creating-organization/importing-azure-devops-organization.md
# Importing Azure DevOps organization
When you import an Azure DevOps organization to SonarQube Cloud, the corresponding [organization](https://docs.sonarsource.com/sonarqube-cloud/administering-sonarcloud/about-sonarqube-cloud-solution/ressources-structure/organization "mention") is created in SonarQube Cloud and is bound to the DevOps platform organization. Each SonarQube Cloud organization corresponds one-to-one with an Azure DevOps organization. See [binding-with-dop](https://docs.sonarsource.com/sonarqube-cloud/administering-sonarcloud/about-sonarqube-cloud-solution/ressources-structure/binding-with-dop "mention") for more information.
{% hint style="warning" %}
SonarQube Cloud does not support linking an organization to more than one DevOps platform. If you want to link to more than one, you will need to create a separate organization to link to each DevOps platform.
{% endhint %}
The user account you used for the import is automatically assigned to the organization’s owners group which grants you administration rights on the organization. See [user-group-concept](https://docs.sonarsource.com/sonarqube-cloud/administering-sonarcloud/about-sonarqube-cloud-solution/user-management/user-group-concept "mention") for more details.
{% hint style="warning" %}
You cannot unbind nor change the binding of an organization bound on Azure DevOps.
{% endhint %}
### Prerequisites
You must be an administrator of the Azure DevOps organization.
In SonarQube Cloud, each organization is assigned a subscription plan. Before importing your organization, choose the subscription plan suited to your needs. See [subscription-plans](https://docs.sonarsource.com/sonarqube-cloud/administering-sonarcloud/managing-subscription/subscription-plans "mention") for more information. In particular, determine the number of Lines of Code (LOC) you need. See [#loc-based-pricing](https://docs.sonarsource.com/sonarqube-cloud/managing-subscription/subscription-plans#loc-based-pricing "mention") for more details.
### Step 1: Create a PAT on the Azure organization
SonarQube Cloud uses an Azure DevOps user account to import your Azure DevOps organization and repositories. You must provide a [Personal Access Token](https://docs.microsoft.com/en-us/azure/devops/organizations/accounts/use-personal-access-tokens-to-authenticate?view=tfs-2017\&tabs=preview-page) (PAT) from this account. The PAT will be stored in the respective SonarQube Cloud organization. We highly recommend that you use a dedicated technical user account in Azure DevOps.
{% hint style="warning" %}
Be aware of the following PAT failure points:
* Azure PATs require an expiration date. Check the [Microsoft documentation](https://learn.microsoft.com/en-us/azure/devops/organizations/accounts/use-personal-access-tokens-to-authenticate?view=azure-devops\&tabs=Windows#create-a-pat) for details when creating your PAT.
* Azure requires that a user log in every 30 days, or it automatically stops a PAT; this action may cause your related pipeline to fail. Here is [an Azure Q\&A](https://learn.microsoft.com/en-us/azure/devops/organizations/accounts/use-personal-access-tokens-to-authenticate?view=azure-devops\&tabs=Windows#q-why-did-my-pat-stop-working) on this topic.
{% endhint %}
Creating a technical user account
We highly recommend that you use a dedicated technical user account in Azure DevOps to manage the integration with SonarQube.
* Do not set the technical user’s account with a **Stakeholder** access type. Use the **Basic** access type instead. (Users with the **Stakeholder** access type can have problems finding their repos when trying to analyze projects.)
* We recommend that you add the account to the **Contributors** security group.
See the Azure documentation for more information [about access levels](https://learn.microsoft.com/en-us/azure/devops/organizations/security/access-levels?view=azure-devops).
Generating your Azure PAT
1\. Log in to Azure DevOps with the technical user account created before.
2\. Go to your Azure DevOps organization **User settings** > **Personal access tokens** and select **+ New token**.

3\. On the next page, under **Scopes**, make sure that you specify at least the scope **Code** > **Read & write**.
4\. Click **Create** to generate the token.
5\. When the personal access token is displayed, copy it (you will have to paste it to SonarQube’s configuration record as described below).
{% hint style="info" %}
* If you create a project manually, you can set the Azure PAT at the project level but this is not recommended. You should create a bound organization and make sure that the PAT is entered only at the organization level, not at the project level. The project-level field should be left blank.
* If you need to change the PAT stored in the SonarQube Cloud organization, see [changing-organization-settings](https://docs.sonarsource.com/sonarqube-cloud/administering-sonarcloud/managing-organization/creating-organization/changing-organization-settings "mention") for more information.
{% endhint %}
### Step 2: Import your Azure organization
To import your Azure organization to SonarQube Cloud:
1. Log in to SonarQube Cloud with your Azure DevOps account.\
If you’re a member of an enterprise, you may use any of your DevOps Platform accounts or your SSO account. In that case, see [importing-from-multiple-platforms](https://docs.sonarsource.com/sonarqube-cloud/administering-sonarcloud/managing-organization/creating-organization/importing-from-multiple-platforms "mention") for important insights.
2. At the top right of the SonarQube Cloud interface, select the ✚ (plus) menu and select **Create new organization**. The **Create an organization** page opens.
3. Under **Import from a DevOps platform**, select the **Azure DevOps** button.
4. Follow the instructions.
5. Paste the PAT you created in Step 1 to **Personal Access Token**,.
6. Select **Continue**.
7. In **Import organization details**, SonarQube Cloud suggests a **Name** and **Key** for your SonarQube Cloud organization. The key is unique across all organizations within SonarQube Cloud. You can accept the suggestion or change it manually. The interface will prevent you from changing it to an already existing key.
8. Select **Add additional info** to add:
* An avatar: a small image representing the organization and displayed on the UI near the organization name.
* A description of the organization.
* A URL: the URL of the homepage of the organization displayed on the UI.
9. Select the subscription plan for your organization. See [subscription-plans](https://docs.sonarsource.com/sonarqube-cloud/administering-sonarcloud/managing-subscription/subscription-plans "mention") for more details.
10. If you selected a paid plan, select the number of Lines of Code (LOC) for your plan and follow the instructions to enter your billing and payment information.
11. Select **Create Organization**. The organization is created and opened in SonarQube Cloud.
{% hint style="info" %}
If the import fails because the organization already exists in SonarQube Cloud and you’ve lost administrator access to this organization, send a request to with all the necessary details.
{% endhint %}
### Related pages
* [importing-github-organization](https://docs.sonarsource.com/sonarqube-cloud/administering-sonarcloud/managing-organization/creating-organization/importing-github-organization "mention")
* [importing-bitbucket-workspace](https://docs.sonarsource.com/sonarqube-cloud/administering-sonarcloud/managing-organization/creating-organization/importing-bitbucket-workspace "mention")
* [importing-gitlab-group](https://docs.sonarsource.com/sonarqube-cloud/administering-sonarcloud/managing-organization/creating-organization/importing-gitlab-group "mention")
* [importing-from-multiple-platforms](https://docs.sonarsource.com/sonarqube-cloud/administering-sonarcloud/managing-organization/creating-organization/importing-from-multiple-platforms "mention")
* [creating-organization-manually](https://docs.sonarsource.com/sonarqube-cloud/administering-sonarcloud/managing-organization/creating-organization/creating-organization-manually "mention")
* [binding-unbound-organization](https://docs.sonarsource.com/sonarqube-cloud/administering-sonarcloud/managing-organization/creating-organization/binding-unbound-organization "mention")
* [changing-organization-binding](https://docs.sonarsource.com/sonarqube-cloud/administering-sonarcloud/managing-organization/creating-organization/changing-organization-binding "mention")
* [changing-organization-settings](https://docs.sonarsource.com/sonarqube-cloud/administering-sonarcloud/managing-organization/creating-organization/changing-organization-settings "mention")
* [deleting-organization](https://docs.sonarsource.com/sonarqube-cloud/administering-sonarcloud/managing-organization/creating-organization/deleting-organization "mention")
---
# Source: https://docs.sonarsource.com/sonarqube-cloud/administering-sonarcloud/managing-organization/creating-organization/importing-bitbucket-workspace.md
# Importing Bitbucket workspace
When you import a Bitbucket Cloud workspace to SonarQube Cloud, the corresponding [organization](https://docs.sonarsource.com/sonarqube-cloud/administering-sonarcloud/about-sonarqube-cloud-solution/ressources-structure/organization "mention") is created in SonarQube Cloud and is bound to the DevOps platform organization. Each SonarQube Cloud organization corresponds one-to-one with a Bitbucket Cloud workspace. See [binding-with-dop](https://docs.sonarsource.com/sonarqube-cloud/administering-sonarcloud/about-sonarqube-cloud-solution/ressources-structure/binding-with-dop "mention") for more information.
{% hint style="warning" %}
SonarQube Cloud does not support linking an organization to more than one DevOps platform. If you want to link to more than one, you will need to create a separate organization to link to each DevOps platform.
{% endhint %}
The user account you used for the import is automatically assigned to the organization’s owners group which grants you administration rights on the organization. See [user-group-concept](https://docs.sonarsource.com/sonarqube-cloud/administering-sonarcloud/about-sonarqube-cloud-solution/user-management/user-group-concept "mention") for more details.
### Prerequisites
You must be an administrator of the Bitbucket workspace:
* You will already be an administrator of your default workspace.
* For any other workspace, you have to add your Bitbucket account to a user group with the **Administer workspace** user right enabled.
In SonarQube Cloud, each organization is assigned a subscription plan. Before importing your organization, choose the subscription plan suited to your needs, see [subscription-plans](https://docs.sonarsource.com/sonarqube-cloud/administering-sonarcloud/managing-subscription/subscription-plans "mention") for more details. In particular, determine the number of Lines of Code (LOC) you need. See [#loc-based-pricing](https://docs.sonarsource.com/sonarqube-cloud/managing-subscription/subscription-plans#loc-based-pricing "mention") for more information.
{% hint style="info" %}
To avoid exceeding [Bitbucket Cloud API rate limits](https://support.atlassian.com/bitbucket-cloud/docs/api-request-limits/), it is recommended to use a dedicated Bitbucket user for SonarQube Cloud integration.
{% endhint %}
### Import procedure
To import a Bitbucket Cloud workspace to SonarQube Cloud:
1. Log in to SonarQube Cloud with your Bitbucket account.
2. At the top right of the SonarQube Cloud interface, select the ✚ (plus) menu and select **Create new organization**. The **Create an organization** page opens.
3. Under **Import from a DevOps platform**, select the **Bitbucket** button.
4. When prompted, grant access to the SonarQube Cloud application to read your Bitbucket Cloud workspace. SonarQube Cloud requests access for:
* Reading your account information.
* Reading your repositories and their pull requests.
* Reading your team membership information.
5. In SonarQube Cloud, in **Import organization details**, SonarQube Cloud suggests a **Name** and **Key** for your SonarQube Cloud organization. The key is unique across all organizations within SonarQube Cloud. You can accept the suggestion or change it manually. The interface will prevent you from changing it to an already existing key.
6. Select **Add additional info** to add:
* An avatar: a small image representing the organization and displayed on the UI near the organization name.
* A description of the organization.
* A URL: the URL of the homepage of the organization displayed on the UI.
7. Select the subscription plan for your organization. See [subscription-plans](https://docs.sonarsource.com/sonarqube-cloud/administering-sonarcloud/managing-subscription/subscription-plans "mention") for more information.
8. If you selected a paid plan, select the number of Lines of Code (LOC) for your plan and follow the instructions to enter your billing and payment information.
9. Select **Create Organization**. The organization is created and opened in SonarQube Cloud.
{% hint style="info" %}
If the import fails because the organization already exists in SonarQube Cloud and you’ve lost administrator access to this organization, send a request to with all the necessary details.
{% endhint %}
### Related pages
* [importing-github-organization](https://docs.sonarsource.com/sonarqube-cloud/administering-sonarcloud/managing-organization/creating-organization/importing-github-organization "mention")
* [importing-gitlab-group](https://docs.sonarsource.com/sonarqube-cloud/administering-sonarcloud/managing-organization/creating-organization/importing-gitlab-group "mention")
* [importing-azure-devops-organization](https://docs.sonarsource.com/sonarqube-cloud/administering-sonarcloud/managing-organization/creating-organization/importing-azure-devops-organization "mention")
* [creating-organization-manually](https://docs.sonarsource.com/sonarqube-cloud/administering-sonarcloud/managing-organization/creating-organization/creating-organization-manually "mention")
* [binding-unbound-organization](https://docs.sonarsource.com/sonarqube-cloud/administering-sonarcloud/managing-organization/creating-organization/binding-unbound-organization "mention")
* [changing-organization-binding](https://docs.sonarsource.com/sonarqube-cloud/administering-sonarcloud/managing-organization/creating-organization/changing-organization-binding "mention")
* [changing-organization-settings](https://docs.sonarsource.com/sonarqube-cloud/administering-sonarcloud/managing-organization/creating-organization/changing-organization-settings "mention")
* [deleting-organization](https://docs.sonarsource.com/sonarqube-cloud/administering-sonarcloud/managing-organization/creating-organization/deleting-organization "mention")
* [importing-from-multiple-platforms](https://docs.sonarsource.com/sonarqube-cloud/administering-sonarcloud/managing-organization/creating-organization/importing-from-multiple-platforms "mention")
---
# Source: https://docs.sonarsource.com/sonarqube-community-build/analyzing-source-code/importing-external-issues.md
# Source: https://docs.sonarsource.com/sonarqube-server/8.9/analyzing-source-code/importing-external-issues.md
# Source: https://docs.sonarsource.com/sonarqube-server/9.8/analyzing-source-code/importing-external-issues.md
# Source: https://docs.sonarsource.com/sonarqube-server/9.9/analyzing-source-code/importing-external-issues.md
# Source: https://docs.sonarsource.com/sonarqube-server/10.0/analyzing-source-code/importing-external-issues.md
# Source: https://docs.sonarsource.com/sonarqube-server/10.1/analyzing-source-code/importing-external-issues.md
# Source: https://docs.sonarsource.com/sonarqube-server/10.2/analyzing-source-code/importing-external-issues.md
# Source: https://docs.sonarsource.com/sonarqube-server/10.3/analyzing-source-code/importing-external-issues.md
# Source: https://docs.sonarsource.com/sonarqube-server/10.4/analyzing-source-code/importing-external-issues.md
# Source: https://docs.sonarsource.com/sonarqube-server/10.5/analyzing-source-code/importing-external-issues.md
# Source: https://docs.sonarsource.com/sonarqube-server/10.6/analyzing-source-code/importing-external-issues.md
# Source: https://docs.sonarsource.com/sonarqube-server/10.7/analyzing-source-code/importing-external-issues.md
# Source: https://docs.sonarsource.com/sonarqube-server/10.8/analyzing-source-code/importing-external-issues.md
# Source: https://docs.sonarsource.com/sonarqube-server/2025.2/analyzing-source-code/importing-external-issues.md
# Source: https://docs.sonarsource.com/sonarqube-server/2025.3/analyzing-source-code/importing-external-issues.md
# Source: https://docs.sonarsource.com/sonarqube-server/2025.5/analyzing-source-code/importing-external-issues.md
# Source: https://docs.sonarsource.com/sonarqube-server/2025.1/analyzing-source-code/importing-external-issues.md
# Source: https://docs.sonarsource.com/sonarqube-server/2025.4/analyzing-source-code/importing-external-issues.md
# Source: https://docs.sonarsource.com/sonarqube-server/2025.6/analyzing-source-code/importing-external-issues.md
# Source: https://docs.sonarsource.com/sonarqube-server/analyzing-source-code/importing-external-issues.md
# Importing external issues
SonarQube can integrate the results from many external analyzers. If your analyzer doesn't integrate with SonarQube, you can import the external issues either in the generic SonarQube format or in the SARIF format.
{% content-ref url="importing-external-issues/about-external-issues" %}
[about-external-issues](https://docs.sonarsource.com/sonarqube-server/analyzing-source-code/importing-external-issues/about-external-issues)
{% endcontent-ref %}
{% content-ref url="importing-external-issues/external-analyzer-reports" %}
[external-analyzer-reports](https://docs.sonarsource.com/sonarqube-server/analyzing-source-code/importing-external-issues/external-analyzer-reports)
{% endcontent-ref %}
{% content-ref url="importing-external-issues/generic-issue-import-format" %}
[generic-issue-import-format](https://docs.sonarsource.com/sonarqube-server/analyzing-source-code/importing-external-issues/generic-issue-import-format)
{% endcontent-ref %}
{% content-ref url="importing-external-issues/importing-issues-from-sarif-reports" %}
[importing-issues-from-sarif-reports](https://docs.sonarsource.com/sonarqube-server/analyzing-source-code/importing-external-issues/importing-issues-from-sarif-reports)
{% endcontent-ref %}
---
# Source: https://docs.sonarsource.com/sonarqube-cloud/administering-sonarcloud/managing-organization/creating-organization/importing-from-multiple-platforms.md
# Using multiple accounts
When you import an organization to SonarQube Cloud, the account you use for the import is added as a member of the organization (with the Administer Organization permission). If you want that your other SonarQube Cloud account(s) be also part of the organization, you must [organization-members](https://docs.sonarsource.com/sonarqube-cloud/administering-sonarcloud/managing-organization/users-and-permissions/organization-members "mention").
For example, if you import a GitHub organization from your GitHub account and need to view and manage this organization from your Azure DevOps account, then you must add your Azure DevOps account as a member of the organization. The procedure differs depending on whether your GitHub and Azure DevOps accounts have different email addresses or not as described below.
### Accounts with different email addresses
1. Log in to SonarQube Cloud with your GitHub account.
2. Retrieve the GitHub organization and go to **Members**.
3. Select the **Add a member** button. The **Add member** dialog opens.
4. Enter the exact email address of your Azure DevOps account.
5. Select **Add member**.
6. Go to **Administration > Permissions** to grant the Administer Organization permission to this new member.
### Accounts with the same email address
Since SonarQube Cloud doesn’t simultaneously support two accounts with the same email address, another user with an Azure DevOps account must perform the procedure. You must first set this user as an admin of the organization.
Proceed as follows:
1. Log in to SonarQube Cloud with your GitHub account (your Azure DevOps account is dissociated from SonarQube Cloud).
2. Retrieve the GitHub organization and go to **Members**.
3. Select the **Add a member** button. The **Add member** dialog opens.
4. Enter the exact email address of the other user’s Azure DevOps account.
5. Select **Add member**.
6. Go to **Administration** > **Permissions** to grant the Administer Organization permission to this new member.
7. Log out from SonarQube Cloud.
8. Log in to SonarQube Cloud with your Azure DevOps account (your Azure DevOps account is reassociated with SonarQube Cloud).
9. The other user logs in to SonarQube Cloud with their Azure DevOps account and adds your Azure DevOps account as a member of the organization as described in steps 2 to 6.
### Related pages
* [importing-github-organization](https://docs.sonarsource.com/sonarqube-cloud/administering-sonarcloud/managing-organization/creating-organization/importing-github-organization "mention")
* [importing-bitbucket-workspace](https://docs.sonarsource.com/sonarqube-cloud/administering-sonarcloud/managing-organization/creating-organization/importing-bitbucket-workspace "mention")
* [importing-gitlab-group](https://docs.sonarsource.com/sonarqube-cloud/administering-sonarcloud/managing-organization/creating-organization/importing-gitlab-group "mention")
* [importing-azure-devops-organization](https://docs.sonarsource.com/sonarqube-cloud/administering-sonarcloud/managing-organization/creating-organization/importing-azure-devops-organization "mention")
* [organization-members](https://docs.sonarsource.com/sonarqube-cloud/administering-sonarcloud/managing-organization/users-and-permissions/organization-members "mention")
* [creating-organization-manually](https://docs.sonarsource.com/sonarqube-cloud/administering-sonarcloud/managing-organization/creating-organization/creating-organization-manually "mention")
* [binding-unbound-organization](https://docs.sonarsource.com/sonarqube-cloud/administering-sonarcloud/managing-organization/creating-organization/binding-unbound-organization "mention")
* [changing-organization-settings](https://docs.sonarsource.com/sonarqube-cloud/administering-sonarcloud/managing-organization/creating-organization/changing-organization-settings "mention")
* [deleting-organization](https://docs.sonarsource.com/sonarqube-cloud/administering-sonarcloud/managing-organization/creating-organization/deleting-organization "mention")
---
# Source: https://docs.sonarsource.com/sonarqube-cloud/administering-sonarcloud/managing-organization/creating-organization/importing-github-organization.md
# Importing GitHub organization
When you import your GitHub organization or personal account to SonarQube Cloud, the corresponding [organization](https://docs.sonarsource.com/sonarqube-cloud/administering-sonarcloud/about-sonarqube-cloud-solution/ressources-structure/organization "mention") is created in SonarQube Cloud and is bound to the DevOps platform organization. Each SonarQube Cloud organization corresponds one-to-one with a GitHub organization or personal account. See [binding-with-dop](https://docs.sonarsource.com/sonarqube-cloud/administering-sonarcloud/about-sonarqube-cloud-solution/ressources-structure/binding-with-dop "mention") for more information.
{% hint style="warning" %}
SonarQube Cloud does not support linking an organization to more than one DevOps platform. If you want to link to more than one, you will need to create a separate organization to link to each DevOps platform.
{% endhint %}
The user account you used for the import is automatically assigned to the organization’s owners group which grants you administration rights on the organization. See [user-group-concept](https://docs.sonarsource.com/sonarqube-cloud/administering-sonarcloud/about-sonarqube-cloud-solution/user-management/user-group-concept "mention") for more details.
### Prerequisites
You must be an owner of the GitHub organization.
In SonarQube Cloud, each organization is assigned a subscription plan. Before importing your organization, choose the subscription plan suited to your needs, see [subscription-plans](https://docs.sonarsource.com/sonarqube-cloud/administering-sonarcloud/managing-subscription/subscription-plans "mention") for more details. In particular, determine the number of Lines of Code (LOC) you need. See [#loc-based-pricing](https://docs.sonarsource.com/sonarqube-cloud/managing-subscription/subscription-plans#loc-based-pricing "mention") for more information.
### Importing the organization
To import your GitHub organization or personal account to SonarQube Cloud:
1. Log in to SonarQube Cloud with your GitHub account. If you’re a member of an enterprise, you may use any of your DevOps Platform accounts or your SSO account. In that case, see [importing-from-multiple-platforms](https://docs.sonarsource.com/sonarqube-cloud/administering-sonarcloud/managing-organization/creating-organization/importing-from-multiple-platforms "mention") for important insights.
2. At the top right of the SonarQube Cloud interface, select the ✚ (plus) menu and select **Create new organization**. The **Create an organization** page opens.
3. Under **Import from a DevOps platform**, select the **GitHub** button. The **Install SonarQubeCloud** page opens with the list of GitHub organizations you have access to. The SonarQube Cloud app is required to allow SonarQube Cloud to access your GitHub organization.\
Note that if the GitHub organization you want to import has the SonarQube Cloud application already installed, it will be listed on the page with the **Configure** button. If this organization is not already bound to an organization in SonarQube Cloud, you will be able to import it after the configuration step. To do so, select it in the list. The application configuration opens in GitHub. Check the configuration and select the **Save** button. You’ll be redirected to SonarQube Cloud. You can then follow the instructions from step 6 below.
4\. Select the GitHub organization you want to import.
5\. In **Repository access**, you can restrict access to the Git repositories that can be imported to SonarQube Cloud for analysis (you can always change this setting later: see below).\
Once you’ve completed the app installation, you’ll be redirected to SonarQube Cloud’s **Create an organization** page.
6\. In **Import organization details**, SonarQube Cloud suggests a GitHub Actions secret **Name** and **Key** for your SonarQube Cloud organization. The key is unique across all organizations within SonarQube Cloud. You can accept the suggestion or change it manually. The interface will prevent you from changing it to an already existing key.
7\. Select **Add additional info** to add:
* An avatar: a small image representing the organization and displayed on the UI near the organization name.
* A description of the organization.
* A URL: the URL of the homepage of the organization displayed on the UI.
8\. Select the subscription plan for your organization. See [subscription-plans](https://docs.sonarsource.com/sonarqube-cloud/administering-sonarcloud/managing-subscription/subscription-plans "mention") for more details.
9\. If you selected a paid plan, select the number of Lines of Code (LOC) for your plan and follow the instructions to enter your billing and payment information.
10\. Select **Create Organization**. The organization is created and opened in SonarQube Cloud.
{% hint style="info" %}
If the import fails because the organization already exists in SonarQube Cloud and you’ve lost administrator access to this organization, send a request to with all the necessary details.
{% endhint %}
### Modifying the repository access rights of the organization
1. At the top right of the SonarQube Cloud interface, select the ✚ (plus) menu and select **Create new organization**. The **Create an organization** page opens.
2. Under **Import from a DevOps platform**, select the **GitHub** button. The **Install SonarQube Cloud** page opens.
* Alternatively, directly select (on the page) the organization whose repository access you want to change.
3. Select **Configure** in front of the organization whose repository access you want to change and authenticate to GitHub. The GitHub’s **SonarQubeCloud** page opens.
4. Scroll down to **Repository access**.
5. Change the access option and select **Save**.
### Related pages
* [importing-bitbucket-workspace](https://docs.sonarsource.com/sonarqube-cloud/administering-sonarcloud/managing-organization/creating-organization/importing-bitbucket-workspace "mention")
* [importing-gitlab-group](https://docs.sonarsource.com/sonarqube-cloud/administering-sonarcloud/managing-organization/creating-organization/importing-gitlab-group "mention")
* [importing-azure-devops-organization](https://docs.sonarsource.com/sonarqube-cloud/administering-sonarcloud/managing-organization/creating-organization/importing-azure-devops-organization "mention")
* [creating-organization-manually](https://docs.sonarsource.com/sonarqube-cloud/administering-sonarcloud/managing-organization/creating-organization/creating-organization-manually "mention")
* [binding-unbound-organization](https://docs.sonarsource.com/sonarqube-cloud/administering-sonarcloud/managing-organization/creating-organization/binding-unbound-organization "mention")
* [changing-organization-binding](https://docs.sonarsource.com/sonarqube-cloud/administering-sonarcloud/managing-organization/creating-organization/changing-organization-binding "mention")
* [changing-organization-settings](https://docs.sonarsource.com/sonarqube-cloud/administering-sonarcloud/managing-organization/creating-organization/changing-organization-settings "mention")
* [deleting-organization](https://docs.sonarsource.com/sonarqube-cloud/administering-sonarcloud/managing-organization/creating-organization/deleting-organization "mention")
---
# Source: https://docs.sonarsource.com/sonarqube-community-build/devops-platform-integration/github-integration/importing-github-repositories.md
# Source: https://docs.sonarsource.com/sonarqube-server/10.6/devops-platform-integration/github-integration/importing-github-repositories.md
# Source: https://docs.sonarsource.com/sonarqube-server/10.7/devops-platform-integration/github-integration/importing-github-repositories.md
# Source: https://docs.sonarsource.com/sonarqube-server/10.8/devops-platform-integration/github-integration/importing-github-repositories.md
# Source: https://docs.sonarsource.com/sonarqube-server/2025.2/devops-platform-integration/github-integration/importing-github-repositories.md
# Source: https://docs.sonarsource.com/sonarqube-server/2025.3/devops-platform-integration/github-integration/importing-github-repositories.md
# Source: https://docs.sonarsource.com/sonarqube-server/2025.5/devops-platform-integration/github-integration/importing-github-repositories.md
# Source: https://docs.sonarsource.com/sonarqube-server/2025.1/devops-platform-integration/github-integration/importing-github-repositories.md
# Source: https://docs.sonarsource.com/sonarqube-server/2025.4/devops-platform-integration/github-integration/importing-github-repositories.md
# Source: https://docs.sonarsource.com/sonarqube-server/2025.6/devops-platform-integration/github-integration/importing-github-repositories.md
# Source: https://docs.sonarsource.com/sonarqube-server/devops-platform-integration/github-integration/importing-github-repositories.md
# Importing GitHub repositories
Once the integration of SonarQube Server with GitHub has been set up , you can import a GitHub repository to create the corresponding project in SonarQube Server. The so-created SonarQube Server project is "bound" to its GitHub repository. With a bound project:
* You can see in the SonarQube Server UI with which repository the project is associated.
* The quality gate status report to GitHub on pull requests is automatically set up.
* You can set up report of security alerts, see [report-security-alerts](https://docs.sonarsource.com/sonarqube-server/devops-platform-integration/github-integration/setting-up-at-global-level/report-security-alerts "mention") for more details.
To import a GitHub repository into SonarQube Server, do one of the following:
* Import the GitHub repository from the SonarQube Server UI: see below.\
You need access to the GitHub repository and you need the **Create Projects** permission in SonarQube Server.
* Analyze a repository from a GitHub action. SonarQube Server will create the corresponding project in SonarQube Server and will automatically bind it to the GitHub repository if it finds a matching GitHub integration configuration in its database. See [adding-analysis-to-github-actions-workflow](https://docs.sonarsource.com/sonarqube-server/devops-platform-integration/github-integration/adding-analysis-to-github-actions-workflow "mention") for more information.
### Importing GitHub repositories
To import GitHub repositories into SonarQube Server:
1. In the top navigation bar of SonarQube Server, select the **Projects** tab.
2. In the top right corner, select the **Create Project** > **Import from DevOps platforms** button.
3. In the **Import from GitHub** section, select **Setup**. The **GitHub project onboarding** page opens.
4. In the **GitHub project onboarding** page, select the GitHub organization and then the repository(ies) you want to import.
5. Select the **Import** button. The Clean as You Code setting page opens.
6. Select the new code definition option.
7. Select the **Create projects** button.
### Importing a GitHub monorepo
Starting in [Enterprise Edition](https://www.sonarsource.com/plans-and-pricing/enterprise/), you can import a GitHub monorepo. See [monorepos](https://docs.sonarsource.com/sonarqube-server/project-administration/monorepos "mention") for more information.
---
# Source: https://docs.sonarsource.com/sonarqube-cloud/administering-sonarcloud/managing-organization/creating-organization/importing-gitlab-group.md
# Importing GitLab group
When you import a GitLab group to SonarQube Cloud, the corresponding [organization](https://docs.sonarsource.com/sonarqube-cloud/administering-sonarcloud/about-sonarqube-cloud-solution/ressources-structure/organization "mention") is created in SonarQube Cloud and is bound to the DevOpos platform organization. Each SonarQube Cloud organization corresponds one-to-one with a GitLab group. See [binding-with-dop](https://docs.sonarsource.com/sonarqube-cloud/administering-sonarcloud/about-sonarqube-cloud-solution/ressources-structure/binding-with-dop "mention") for more information.
{% hint style="info" %}
You can import subgroups and your personal GitLab group. The latter refers to the repositories that are under your personal namespace.
{% endhint %}
{% hint style="warning" %}
SonarQube Cloud does not support linking an organization to more than one DevOps platform. If you want to link to more than one, you will need to create a separate organization to link to each DevOps platform.
{% endhint %}
The user account you used for the import is automatically assigned to the organization’s owner's group which grants you administration rights on the organization. See [user-group-concept](https://docs.sonarsource.com/sonarqube-cloud/administering-sonarcloud/about-sonarqube-cloud-solution/user-management/user-group-concept "mention") for more details.
{% hint style="warning" %}
You cannot unbind nor change the binding of an organization bound on GitLab.
{% endhint %}
### Prerequisites
You must be an owner of the GitLab group to be imported.
In SonarQube Cloud, each organization is assigned a subscription plan. Before importing your organization, choose the subscription plan suited to your needs: see [subscription-plans](https://docs.sonarsource.com/sonarqube-cloud/administering-sonarcloud/managing-subscription/subscription-plans "mention"). In particular, determine the number of Lines of Code (LOC) you need. See [#loc-based-pricing](https://docs.sonarsource.com/sonarqube-cloud/managing-subscription/subscription-plans#loc-based-pricing "mention") for more information.
### Step 1: Create a GitLab personal access token
SonarQube Cloud uses a GitLab user account to import your GitLab organization and repositories. You must provide a personal access token from this account (the personal access token will be stored in the respective SonarQube Cloud organization). We highly recommend that you use a dedicated technical user account in GitLab (the account must be an owner of the GitLab group).
{% hint style="info" %}
For the token, an `api` scope is required. This gives SonarQube Cloud more access rights than strictly necessary, but due to the lack of more fine-grained access control in GitLab, it is the only viable option. Note that:
* Using a technical user account to create the token will mitigate this potential security concern.
* SonarQube Cloud will always limit its actions to those required for effective integration with GitLab and will never use the full access right provided by the `api` scope.
{% endhint %}
To create a GitLab personal access token:
1. Log in to GitLab (with the technical account mentioned above if applicable).
2. Go to **User settings** > **Personal Access Tokens** or select the [Personal Access Token](https://gitlab.com/-/profile/personal_access_tokens) hyperlink.
3. Select the **api** scope.
4. Select the **Create personal access token** button.
5. When the personal access token is displayed at the top of the page, copy the token (you will have to paste it into the field on the SonarQube Cloud setup page in Step 3 below).
{% hint style="info" %}
If you need to change the personal access token stored in the SonarQube Cloud organization, see [changing-organization-settings](https://docs.sonarsource.com/sonarqube-cloud/administering-sonarcloud/managing-organization/creating-organization/changing-organization-settings "mention") for more information.
{% endhint %}
### Step 2: Retrieve the GitLab group key
If you want to import a GitLab group that is not your personal GitLab group, you will have to provide a group key. You can provide:
* Either the ID of the group.\
The group ID can be found under the group name on the group page.
* Or the key of the group.\
The group key is the last element in the path of the group and is found in the URL.\
For example, `gitlab.com/my-group`.
### Step 3: Import the GitLab group
To import a GitLab group to SonarQube Cloud:
1. Log in to SonarQube Cloud with your GitLab account.\
If you’re a member of an enterprise, you may use any of your DevOps Platform accounts or your SSO account. In that case, see [importing-from-multiple-platforms](https://docs.sonarsource.com/sonarqube-cloud/administering-sonarcloud/managing-organization/creating-organization/importing-from-multiple-platforms "mention") for important insights.
2. At the top right of the SonarQube Cloud interface, select the ✚ (plus) menu and select **Create new organization**. The **Create an organization** page opens.
3. Under **Import from a DevOps platform**, select the **GitLab** button.
4. Select either
* **Import any GitLab group**, if you want to import a GitLab group other than your personal one, or
* **Import my personal GitLab group**, if you want to import only the repositories that are under your personal namespace.
5. **In GitLab group key** (if you don’t import your personal GitLab group), enter the group key retrieved in Step 2.
6. In **Personal Access Token**, paste the personal access token you created in Step 1.
7. Select **Continue**.
8. In **Import organization details**, SonarQube Cloud suggests a **Name** and **Key** for your SonarQube Cloud organization. The key is unique across all organizations within SonarQube Cloud. You can accept the suggestion or change it manually. The interface will prevent you from changing it to an already existing key.
9. Select **Add additional info** to add:
* An avatar: a small image representing the organization and displayed on the UI near the organization name.
* A description of the organization.
* A URL: the URL of the homepage of the organization displayed on the UI.
10. Select the subscription plan for your organization. See [subscription-plans](https://docs.sonarsource.com/sonarqube-cloud/administering-sonarcloud/managing-subscription/subscription-plans "mention") for more information.
11. If you selected a paid plan, select the number of Lines of Code (LOC) for your plan and follow the instructions to enter your billing and payment information.
12. Select **Create Organization**. The organization is created and opened in SonarQube Cloud.
{% hint style="info" %}
If the import fails because the organization already exists in SonarQube Cloud and you’ve lost administrator access to this organization, send a request to with all the necessary details.
{% endhint %}
### Related pages
* [importing-github-organization](https://docs.sonarsource.com/sonarqube-cloud/administering-sonarcloud/managing-organization/creating-organization/importing-github-organization "mention")
* [importing-bitbucket-workspace](https://docs.sonarsource.com/sonarqube-cloud/administering-sonarcloud/managing-organization/creating-organization/importing-bitbucket-workspace "mention")
* [importing-azure-devops-organization](https://docs.sonarsource.com/sonarqube-cloud/administering-sonarcloud/managing-organization/creating-organization/importing-azure-devops-organization "mention")
* [importing-from-multiple-platforms](https://docs.sonarsource.com/sonarqube-cloud/administering-sonarcloud/managing-organization/creating-organization/importing-from-multiple-platforms "mention")
* [creating-organization-manually](https://docs.sonarsource.com/sonarqube-cloud/administering-sonarcloud/managing-organization/creating-organization/creating-organization-manually "mention")
* [binding-unbound-organization](https://docs.sonarsource.com/sonarqube-cloud/administering-sonarcloud/managing-organization/creating-organization/binding-unbound-organization "mention")
* [changing-organization-binding](https://docs.sonarsource.com/sonarqube-cloud/administering-sonarcloud/managing-organization/creating-organization/changing-organization-binding "mention")
* [changing-organization-settings](https://docs.sonarsource.com/sonarqube-cloud/administering-sonarcloud/managing-organization/creating-organization/changing-organization-settings "mention")
* [deleting-organization](https://docs.sonarsource.com/sonarqube-cloud/administering-sonarcloud/managing-organization/creating-organization/deleting-organization "mention")
---
# Source: https://docs.sonarsource.com/sonarqube-community-build/analyzing-source-code/importing-external-issues/importing-issues-from-sarif-reports.md
# Source: https://docs.sonarsource.com/sonarqube-server/9.8/analyzing-source-code/importing-external-issues/importing-issues-from-sarif-reports.md
# Source: https://docs.sonarsource.com/sonarqube-server/9.9/analyzing-source-code/importing-external-issues/importing-issues-from-sarif-reports.md
# Source: https://docs.sonarsource.com/sonarqube-server/10.0/analyzing-source-code/importing-external-issues/importing-issues-from-sarif-reports.md
# Source: https://docs.sonarsource.com/sonarqube-server/10.1/analyzing-source-code/importing-external-issues/importing-issues-from-sarif-reports.md
# Source: https://docs.sonarsource.com/sonarqube-server/10.2/analyzing-source-code/importing-external-issues/importing-issues-from-sarif-reports.md
# Source: https://docs.sonarsource.com/sonarqube-server/10.3/analyzing-source-code/importing-external-issues/importing-issues-from-sarif-reports.md
# Source: https://docs.sonarsource.com/sonarqube-server/10.4/analyzing-source-code/importing-external-issues/importing-issues-from-sarif-reports.md
# Source: https://docs.sonarsource.com/sonarqube-server/10.5/analyzing-source-code/importing-external-issues/importing-issues-from-sarif-reports.md
# Source: https://docs.sonarsource.com/sonarqube-server/10.6/analyzing-source-code/importing-external-issues/importing-issues-from-sarif-reports.md
# Source: https://docs.sonarsource.com/sonarqube-server/10.7/analyzing-source-code/importing-external-issues/importing-issues-from-sarif-reports.md
# Source: https://docs.sonarsource.com/sonarqube-server/10.8/analyzing-source-code/importing-external-issues/importing-issues-from-sarif-reports.md
# Source: https://docs.sonarsource.com/sonarqube-server/2025.2/analyzing-source-code/importing-external-issues/importing-issues-from-sarif-reports.md
# Source: https://docs.sonarsource.com/sonarqube-server/2025.3/analyzing-source-code/importing-external-issues/importing-issues-from-sarif-reports.md
# Source: https://docs.sonarsource.com/sonarqube-server/2025.5/analyzing-source-code/importing-external-issues/importing-issues-from-sarif-reports.md
# Source: https://docs.sonarsource.com/sonarqube-server/2025.1/analyzing-source-code/importing-external-issues/importing-issues-from-sarif-reports.md
# Source: https://docs.sonarsource.com/sonarqube-server/2025.4/analyzing-source-code/importing-external-issues/importing-issues-from-sarif-reports.md
# Source: https://docs.sonarsource.com/sonarqube-server/2025.6/analyzing-source-code/importing-external-issues/importing-issues-from-sarif-reports.md
# Source: https://docs.sonarsource.com/sonarqube-server/analyzing-source-code/importing-external-issues/importing-issues-from-sarif-reports.md
# Source: https://docs.sonarsource.com/sonarqube-cloud/enriching/importing-issues-from-sarif-reports.md
# SARIF reports
You can import [Static Analysis Results Interchange Format (SARIF)](https://docs.oasis-open.org/sarif/sarif/v2.1.0/sarif-v2.1.0.html) reports into SonarQube Cloud. The issues will be taken into account by SonarQube Cloud in the analysis report, but the rules corresponding to these issues will not be visible on the Rules page nor reflected in quality profiles. This means that the rules that raise external issues must be managed in your third-party tool.
### Import process
SonarQube Cloud manages the import of a SARIF issue as follows:
* It assigns the `CONVENTIONAL` coding attribute and the `SECURITY` software quality to the issue.
* It maps the issue's severity level on the SECURITY software quality using the following fields:
* `runs[].tool.extensions.rules[].defaultConfiguration.level` is overridden by
* `runs[].tool.driver.rules[].defaultConfiguration.level`
| **Severity field in SARIF 2.1.0** | **Impact level in SonarQube Cloud** |
| --------------------------------- | ----------------------------------- |
| error | HIGH |
| warning | MEDIUM |
| note | LOW |
| none | LOW |
* Otherwise, the default MEDIUM impact level is applied.
See [software-qualities](https://docs.sonarsource.com/sonarqube-cloud/digging-deeper/software-qualities "mention") for more information.
### Setting up the import
To set up the import of SARIF reports into SonarQube Cloud:
1. Prepare your SARIF report files according to the import file specifications below.
2. Use on the scanner side the [analysis-parameters](https://docs.sonarsource.com/sonarqube-cloud/advanced-setup/analysis-parameters "mention") `sonar.sarifReportPaths` to define the list of SARIF report files to be imported during your project analysis. This parameter accepts a comma-delimited list of paths.
### Import file specifications
The SARIF files must:
* Be UTF-8 file encoded.
* Comply with the [official SARIF format, version 2.1.0](https://docs.oasis-open.org/sarif/sarif/v2.1.0/sarif-v2.1.0.html).
#### Mandatory fields
| Field | Description |
| ------------------------------- | ------------------------------------------------------------------------- |
| `version` | Must be set to "2.1.0". |
| `runs[].tool.driver.name` | Name of the tool that created the report. |
| `runs[].results[].message.text` | Message of the external issue. |
| `runs[].results[].ruleId` | Identifier of the corresponding rule in the tool that created the report. |
{% hint style="info" %}
If a mandatory field is missing, the report is ignored (see the corresponding line in the logs).
{% endhint %}
#### Optional fields
| Field | Sub-field | Description |
| -------------------------------- | --------------------------------------- | ------------------------------------------------------------------------------------------------------------------------------------------------------------------------------------------------------------------------------------------------------------------------------------------------------------------------------------------------------------------------------------------------------------------------ |
| `runs[].tool.driver` |
| The tool that generated the report. |
| `runs[].tool.driver.rules[]` | `id` | Identifier of the rule of the tool that created the report. |
|
| `shortDescription.text` | Short description is mapped as the name of the rule in SonarQube. If the field is empty, SonarQube constructs the name based on the driver `name` and `id` fields. |
|
| `fullDescription.text` | Full description of the rule. |
|
| `defaultConfiguration.level` | SonarQube uses this field to determine the issue's impact level on security software quality. |
| `runs[].tool.extensions.rules[]` | `defaultConfiguration.level` | SonarQube uses this field to determine the issue's impact level on security software quality, if the driver field `runs[].tool.driver.rules[].defaultConfiguration.level` above is not used. |
| `runs[].results[]` | `level` | Ignored by SonarQube Cloud. |
|
| `stacks[]` | The stacks are mapped to the issue flows. |
|
| `stacks[].frames[]` | Each frame of a stack represents one path of the whole issue flow. |
|
| `stack.frames.location` | Follows the same pattern as in locations indicated below. |
| `runs[].results[].locations[]` |
| SonarQube only uses the first item in the array. It must be a physical location. |
|
| `physicalLocation.artifactLocation.uri` |
Path of the file concerned by the issue.
If no location is defined, the issue is raised at the project level.
|
|
| `physicalLocation.region` |
Text range concerned by the issue. Is defined by the following fields:
startLine
startColumn(optional)
endLine (optional)
endColumn (optional)
If startColumn, endLine, endColumn are not specified,SonarQube automatically retrieves the full coordinates of the line.
|
|
| `relatedLocations` | Contains the same fields as `physicalLocation`. |
{% hint style="warning" %}
The `runs[].results[].level`field which defines the issue's severity will be ignored by SonarQube Cloud.
{% endhint %}
#### Import file example
```json
{
"version": "2.1.0",
"$schema": "http://json.schemastore.org/sarif-2.1.0-rtm.5",
"runs": [
{
"tool": {
"driver": {
"name": "a test linter",
"rules": [
{
"id": "rule1",
"shortDescription": {
"text": "XooLint rule 1"
},
"fullDescription": {
"text": "XooLint rule 1 full description"
}
},
{
"id": "rule2",
"shortDescription": {
"text": "XooLint rule 2"
}
}
]
}
},
"results": [
{
"level": "error",
"message": {
"text": "'toto' is assigned a value but never used."
},
"locations": [
{
"physicalLocation": {
"artifactLocation": {
"uri": "src/File0.xoo"
},
"region": {
"startLine": 1,
"startColumn": 5,
"endLine": 1,
"endColumn": 9
}
}
}
],
"relatedLocations": [
{
"message": {
"text": "Secondary location message."
},
"physicalLocation": {
"artifactLocation": {
"uri": "src/File0.xoo"
},
"region": {
"startLine": 2,
"startColumn": 1
}
}
}
],
"ruleId": "rule1"
},
{
"level": "error",
"message": {
"text": "Issue with flow"
},
"locations": [
{
"physicalLocation": {
"artifactLocation": {
"uri": "src/File1.xoo"
},
"region": {
"startLine": 1,
"startColumn": 5,
"endLine": 1,
"endColumn": 9
}
}
}
],
"stacks": [
{
"frames": [
{
"location": {
"message": {
"text": "Stack frame message."
},
"physicalLocation": {
"artifactLocation": {
"uri": "src/File1.xoo"
},
"region": {
"startLine": 3,
"startColumn": 1
}
}
}
},
{
"location": {
"message": {
"text": "Stack frame message 2."
},
"physicalLocation": {
"artifactLocation": {
"uri": "src/File1.xoo"
},
"region": {
"startLine": 4,
"startColumn": 1
}
}
}
}
]
}
],
"ruleId": "rule2"
}
]
}
]
}
```
---
# Source: https://docs.sonarsource.com/sonarqube-community-build/project-administration/creating-project/importing-repo.md
# Source: https://docs.sonarsource.com/sonarqube-server/2025.6/project-administration/creating-your-project/importing-repo.md
# Source: https://docs.sonarsource.com/sonarqube-server/project-administration/creating-your-project/importing-repo.md
# Importing your DevOps platform repository
Once the global-level integration with your DevOps platform is complete, you can create your SonarQube Server project by importing your DevOps platform repository. The so-created SonarQube Server project is "bound" to its Azure DevOps repository. With a bound project, you benefit from integration features, such as pull request decoration, code scanning alerts, permission synchronization, etc.
To import your repository, you need the Create Projects permission in SonarQube Server and the corresponding access rights on the repository.
To import a DevOps platform repository into SonarQube Server:
1. In the top navigation bar of SonarQube Server, select the **Projects** tab.
2. In the top right corner, select the **Create Project > From \** button.
3. If your instance has multiple DevOps platform Integrations, select the configuration from which you want to import your project.
4. Select the repository to be imported.
For more information, see the section corresponding to your DevOps platform:
* [importing-github-repositories](https://docs.sonarsource.com/sonarqube-server/devops-platform-integration/github-integration/importing-github-repositories "mention")
* [import-repos](https://docs.sonarsource.com/sonarqube-server/devops-platform-integration/bitbucket-integration/bitbucket-cloud-integration/import-repos "mention")
* [import-repos](https://docs.sonarsource.com/sonarqube-server/devops-platform-integration/bitbucket-integration/bitbucket-server-integration/import-repos "mention")
* [importing-repos](https://docs.sonarsource.com/sonarqube-server/devops-platform-integration/gitlab-integration/importing-repos "mention")
* [creating-your-project](https://docs.sonarsource.com/sonarqube-server/devops-platform-integration/azure-devops-integration/creating-your-project "mention")
{% hint style="info" %}
Starting in [Enterprise Edition](https://www.sonarsource.com/plans-and-pricing/enterprise/), you can import a monorepo. See [monorepos](https://docs.sonarsource.com/sonarqube-server/project-administration/monorepos "mention").
{% endhint %}
---
# Source: https://docs.sonarsource.com/sonarqube-community-build/devops-platform-integration/gitlab-integration/importing-repos.md
# Source: https://docs.sonarsource.com/sonarqube-server/10.6/devops-platform-integration/gitlab-integration/importing-repos.md
# Source: https://docs.sonarsource.com/sonarqube-server/10.7/devops-platform-integration/gitlab-integration/importing-repos.md
# Source: https://docs.sonarsource.com/sonarqube-server/10.8/devops-platform-integration/gitlab-integration/importing-repos.md
# Source: https://docs.sonarsource.com/sonarqube-server/2025.2/devops-platform-integration/gitlab-integration/importing-repos.md
# Source: https://docs.sonarsource.com/sonarqube-server/2025.3/devops-platform-integration/gitlab-integration/importing-repos.md
# Source: https://docs.sonarsource.com/sonarqube-server/2025.5/devops-platform-integration/gitlab-integration/importing-repos.md
# Source: https://docs.sonarsource.com/sonarqube-server/2025.1/devops-platform-integration/gitlab-integration/importing-repos.md
# Source: https://docs.sonarsource.com/sonarqube-server/2025.4/devops-platform-integration/gitlab-integration/importing-repos.md
# Source: https://docs.sonarsource.com/sonarqube-server/2025.6/devops-platform-integration/gitlab-integration/importing-repos.md
# Source: https://docs.sonarsource.com/sonarqube-server/devops-platform-integration/gitlab-integration/importing-repos.md
# Importing your GitLab repositories
Once the integration of your SonarQube instance with GitLab has been properly set up, you can import a GitLab repository to create the corresponding project in SonarQube. To do so, you need the Create Project permission in SonarQube Server.
The so-created SonarQube project is "bound" to its GitLab repository. With a bound project:
* The project’s main branch name will be automatically set up from GitLab.
* The quality gate status report to the merge requests will be automatically set up.
{% hint style="info" %}
Starting in [Enterprise Edition](https://www.sonarsource.com/plans-and-pricing/enterprise/), you can import a GitLab monorepo. See [monorepos](https://docs.sonarsource.com/sonarqube-server/project-administration/monorepos "mention").
{% endhint %}
### Step 1: Create a Personal Access Token
You must provide a[ GitLab Personal Access Token](https://docs.gitlab.com/user/profile/personal_access_tokens/) with `read_api` scope. This token will be stored in SonarQube and can be revoked at any time in GitLab. SonarQube will use this token to access and list your GitLab repositories. Copy it (you will have to paste it during Step 2). You may ask your administrator to encrypt this token.
### Step 2: Import one or several GitLab repositories
1. In the top navigation bar of SonarQube Server, select the **Projects** tab.
2. In the top right corner, select **Create Project** > **From GitLab**.The **GitLab project onboarding** page opens.
3. In **Personal Access Token**, enter the PAT you created in Step 1 and select **Save**. The repositories to which the PAT has access are listed on the page.
4. Select one or several repositories to be imported and follow the instructions.
### Related pages
[global-setup](https://docs.sonarsource.com/sonarqube-server/devops-platform-integration/gitlab-integration/global-setup "mention")\
[setting-up-at-project-level](https://docs.sonarsource.com/sonarqube-server/devops-platform-integration/gitlab-integration/setting-up-at-project-level "mention")
---
# Source: https://docs.sonarsource.com/sonarqube-server/8.9/analyzing-source-code/importing-external-issues/importing-third-party-issues.md
# Source: https://docs.sonarsource.com/sonarqube-server/9.8/analyzing-source-code/importing-external-issues/importing-third-party-issues.md
# Source: https://docs.sonarsource.com/sonarqube-server/9.9/analyzing-source-code/importing-external-issues/importing-third-party-issues.md
# Source: https://docs.sonarsource.com/sonarqube-server/10.0/analyzing-source-code/importing-external-issues/importing-third-party-issues.md
# Source: https://docs.sonarsource.com/sonarqube-server/10.1/analyzing-source-code/importing-external-issues/importing-third-party-issues.md
# Source: https://docs.sonarsource.com/sonarqube-server/10.2/analyzing-source-code/importing-external-issues/importing-third-party-issues.md
# Importing third-party issues
This page lists analysis parameters related to the import of issues raised by external, third-party analyzers. If your analyzer isn’t on this page, see the [generic-issue-import-format](https://docs.sonarsource.com/sonarqube-server/10.2/analyzing-source-code/importing-external-issues/generic-issue-import-format "mention") for a generic way to import external issues. You can also import [importing-issues-from-sarif-reports](https://docs.sonarsource.com/sonarqube-server/10.2/analyzing-source-code/importing-external-issues/importing-issues-from-sarif-reports "mention").
SonarQube doesn’t run your external analyzers or generate reports. It only imports pre-generated reports. Below you’ll find language- and tool-specific analysis parameters for importing reports generated by external analyzers.
We recommend checking out the [guides](https://community.sonarsource.com/c/clean-code/guides/22) category of the [Sonar community forum](https://community.sonarsource.com/), where you might find instructions on generating these reports.
### Importing reports from third-party tools
Some properties support the following wildcards in paths. The remarks for properties that support wildcards will mention that fact. If the remarks do not say wildcards are supported, then they are not.:
| **Symbol** | **Meaning** |
| ---------- | ------------------------- |
| `?` | a single character |
| `*` | any number of characters |
| `**` | any number of directories |
#### List of properties
Unless otherwise specified, the following properties accept both absolute paths and paths relative to the project root.
| **Language** | **Property** | **Remarks** |
| ----------------- | ------------------------------------------- | --------------------------------------------------------------------------------------------------------------------------------------------------------------------------------------------------------------------------------------------------------------------------------------------------------------------------------------------------------------------------------------------------------------------------------------------------------- |
| Apex | `sonar.apex.pmd.reportPaths` | Comma-delimited list of paths to [PMD Apex](https://pmd.sourceforge.io/pmd-5.5.7/pmd-apex/rules/index.html) |
| Cloudformation | `sonar.cloudformation.cfn-lint.reportPaths` | Comma-delimited list of paths to [AWS CloudFormation Linter](https://www.google.com/url?q=https://github.com/aws-cloudformation/cfn-lint\&source=gmail-imap\&ust=1681140775000000\&usg=AOvVaw3MREBmob9v1ZGdvw1_POWU) reports in JSON format |
| C/C++/Objective-C | `sonar.cfamily.valgrind.reportsPaths` | Comma-delimited list of paths to [Valgrind Memcheck](https://valgrind.org/) and Helgrind XML reports |
| CSS | `sonar.css.stylelint.reportPaths` | Comma-delimited list of paths to [StyleLint.io](https://stylelint.io/) reports |
| Docker | `sonar.docker.hadolint.reportPaths` | Comma-delimited list of paths to [Hadolint](https://www.google.com/url?q=https://github.com/hadolint/hadolint\&source=gmail-imap\&ust=1681140775000000\&usg=AOvVaw1_iyCCO7v-4-xeurWS0sRk) reports in JSON and \`sonarqube\` format |
| Go | `sonar.go.govet.reportPaths` | Comma-delimited list of paths to [GoVet](https://golang.org/cmd/vet/) reports |
| Go | `sonar.go.golint.reportPaths` | Comma-delimited list of paths to [GoLint](https://github.com/golang/lint) reports |
| Go | `sonar.go.gometalinter.reportPaths` | Comma-delimited list of paths to [GoMetaLinter](https://github.com/alecthomas/gometalinter) reports |
| Go | `sonar.go.golangci-lint.reportPaths` |
Comma-delimited list of paths to golangci-lint reports in checkstyle format (use --out-format checkstyle golangci-lint option).
Depending on how many issues you’re importing, you might want to disable the max-issues-per-linter option in your golangci config file.
|
| Go | `sonar.externalIssuesReportPaths` | Comma-delimited list of paths to [gosec](https://github.com/securego/gosec) reports in SonarQube format (use `-fmt=sonarqube` gosec option). Note: this property is the one from the [generic-issue-import-format](https://docs.sonarsource.com/sonarqube-server/10.2/analyzing-source-code/importing-external-issues/generic-issue-import-format "mention") |
| Java | `sonar.java.spotbugs.reportPaths` | Comma-delimited list of paths to reports from [SpotBugs](https://spotbugs.github.io/), FindSecBugs, or FindBugs |
| Java | `sonar.java.pmd.reportPaths` | Comma-delimited list of paths to reports from [PMD](http://maven.apache.org/plugins/maven-pmd-plugin/usage.html) |
| Java | `sonar.java.checkstyle.reportPaths` | Comma-delimited list of paths to reports from [Checkstyle](http://maven.apache.org/plugins/maven-checkstyle-plugin/checkstyle-mojo) |
| JavaScript | `sonar.eslint.reportPaths` | Comma-delimited list of paths to JSON [ESLint](https://eslint.org/) reports (use `-f json` ESLint option) |
| Kotlin | `sonar.androidLint.reportPaths` | Comma-delimited list of paths to AndroidLint reports |
| Kotlin | `sonar.kotlin.detekt.reportPaths` | Comma-delimited list of paths to [Detekt](https://github.com/arturbosch/detekt) reports |
| Kotlin | `sonar.kotlin.ktlint.reportPaths` | Comma-delimited list of paths to [Ktlint](https://ktlint.github.io/) reports |
| PHP | `sonar.php.psalm.reportPaths` | Comma-delimited list of paths to [Psalm](https://github.com/vimeo/psalm) reports. Reports should be generated in the [generic-issue-import-format](https://docs.sonarsource.com/sonarqube-server/10.2/analyzing-source-code/importing-external-issues/generic-issue-import-format "mention") (run Psalm with the option `--output-format sonarqube`). |
| PHP | `sonar.php.phpstan.reportPaths` | Comma-delimited list of paths to [PHPStan](https://phpstan.org/) reports. Reports should be generated in the [PHPStan JSON Output Format](https://phpstan.org/user-guide/output-format) (use the PHPStan `analyse` command with the option `--error-format=json`). |
| Python | `sonar.python.pylint.reportPaths` | Comma-delimited list of paths to [Pylint](http://www.pylint.org/) reports (use `--output-format=parseable`[Pylint option](https://docs.pylint.org/en/1.6.0/output.html)) |
| Python | `sonar.python.bandit.reportPaths` | Comma-delimited list of paths to [Bandit](https://github.com/PyCQA/bandit/blob/master/README.rst) reports |
| Python | `sonar.python.flake8.reportPaths` | Comma-delimited list of paths to [Flake8](https://flake8.pycqa.org/en/latest/) reports |
| Python | `sonar.python.mypy.reportPaths` | Comma-delimited list of paths to [Mypy](https://mypy.readthedocs.io/) reports |
| Python | `sonar.python.ruff.reportPaths` | Comma-delimited list of paths to [Ruff](https://beta.ruff.rs/docs/) reports. |
| Ruby | `sonar.ruby.rubocop.reportPaths` | Comma-delimited list of paths to [Rubocop](https://github.com/rubocop-hq/rubocop) reports |
| Scala | `sonar.scala.scalastyle.reportPaths` | Comma-delimited list of paths to [Scalastyle](http://www.scalastyle.org/) reports |
| Scala | `sonar.scala.scapegoat.reportPaths` | Comma-delimited list of paths to [Scapegoat](https://github.com/sksamuel/scapegoat) reports in the **Scalastyle format** |
| Swift | `sonar.swift.swiftLint.reportPaths` | Comma-delimited list of paths to [SwiftLint](https://github.com/realm/SwiftLint) reports in JSON format |
| Terraform | `sonar.terraform.tflint.reportPaths` | Comma-delimited list of paths to [TFLint](https://www.google.com/url?q=https://github.com/terraform-linters/tflint\&source=gmail-imap\&ust=1681140775000000\&usg=AOvVaw09BuBZwta0XAof1JGQR16u) reports in JSON format |
| TypeScript | `sonar.typescript.tslint.reportPaths` | Comma-delimited list of paths to [TSLint](https://palantir.github.io/tslint/) reports in JSON format (use `-t json` TSLint option) |
### External .NET issues
Issues from third-party Roslyn analyzers (including Roslyn analyzers provided by Microsoft) are included in the MSBuild output and imported by default into SonarQube therefore, no properties exist to enable that behavior. Instead, properties are available to adjust the import and to *stop* importing those issues.
| **Language** | **Property** | **Remarks** |
| ------------ | ---------------------------------------------------------------------------------------------------------------------- | -------------------------------------------------------------------------------------------------------------- |
| C# | `sonar.cs.roslyn.ignoreIssues` | Set to `true` to disable import of external issues. Defaults to `false`. |
| C# | `sonar.cs.roslyn.bugCategories``sonar.cs.roslyn.vulnerabilityCategories``sonar.cs.roslyn.codeSmellCategories` | Comma-delimited list of categories whose issues should be classified as Bugs, Vulnerabilities, or Code Smells. |
| VB.NET | `sonar.vbnet.roslyn.ignoreIssues` | Set to `true` to disable import of external issues. Defaults to `false`. |
| VB.NET | `sonar.vbnet.roslyn.bugCategories``sonar.vbnet.roslyn.vulnerabilityCategories``sonar.vbnet.roslyn.codeSmellCategories` | Comma-delimited list of categories whose issues should be classified as Bugs, Vulnerabilities, or Code Smells. |
Note that Roslyn issues with an *error* severity automatically fail the build. We don’t recommend running the Scanner for MSBuild’s end step if the MSBuild step fails for any reason because it will result in an essentially empty analysis.
### Limitations
External issues have two important limitations:
* They cannot be managed within SonarQube; for instance, there is no ability to mark them as false positives.
* The activation of the rules that raise these issues cannot be managed within SonarQube. External rules are not visible on the Rules page or reflected in any quality profile.
---
# Source: https://docs.sonarsource.com/sonarqube-server/10.4/instance-administration/improving-performance.md
# Source: https://docs.sonarsource.com/sonarqube-server/10.5/instance-administration/improving-performance.md
# Source: https://docs.sonarsource.com/sonarqube-server/10.6/instance-administration/improving-performance.md
# Source: https://docs.sonarsource.com/sonarqube-server/10.7/server-upgrade-and-maintenance/maintenance/improving-performance.md
# Source: https://docs.sonarsource.com/sonarqube-server/10.8/server-upgrade-and-maintenance/maintenance/improving-performance.md
# Source: https://docs.sonarsource.com/sonarqube-server/2025.2/server-update-and-maintenance/maintenance/improving-performance.md
# Source: https://docs.sonarsource.com/sonarqube-server/2025.3/server-update-and-maintenance/data-center-edition/improving-performance.md
# Source: https://docs.sonarsource.com/sonarqube-server/2025.3/server-update-and-maintenance/maintenance/improving-performance.md
# Source: https://docs.sonarsource.com/sonarqube-server/2025.5/server-update-and-maintenance/data-center-edition/improving-performance.md
# Source: https://docs.sonarsource.com/sonarqube-server/2025.5/server-update-and-maintenance/maintenance/improving-performance.md
# Source: https://docs.sonarsource.com/sonarqube-server/2025.1/server-update-and-maintenance/maintenance/improving-performance.md
# Source: https://docs.sonarsource.com/sonarqube-server/2025.4/server-update-and-maintenance/data-center-edition/improving-performance.md
# Source: https://docs.sonarsource.com/sonarqube-server/2025.4/server-update-and-maintenance/maintenance/improving-performance.md
# Source: https://docs.sonarsource.com/sonarqube-server/2025.6/server-update-and-maintenance/data-center-edition/improving-performance.md
# Source: https://docs.sonarsource.com/sonarqube-server/2025.6/server-update-and-maintenance/maintenance/improving-performance.md
# Source: https://docs.sonarsource.com/sonarqube-server/server-update-and-maintenance/data-center-edition/improving-performance.md
# Source: https://docs.sonarsource.com/sonarqube-server/server-update-and-maintenance/maintenance/improving-performance.md
# Improving performance
The following options are available to help you improve the performance of your SonarQube Server instance.
### Increasing the number of Compute Engine workers
{% hint style="info" %}
The ability to manage Compute Engine performance is available as part of [Enterprise edition](https://www.sonarsource.com/plans-and-pricing/enterprise/) and above.
{% endhint %}
If analyses are taking too long to process, it may be that you need to increase the number of Compute Engine (CE) workers (**Administration** > **Projects** > **Background Tasks** > **Number of Workers**).
There are two cases to consider:
1. Slowness comes from the fact that the queue is often full of pending tasks.
2. Individual tasks take a long time to process.
In the first case, increasing the number of workers could help. The second case should be carefully evaluated. In either case, when considering increasing the number of CE workers, two questions should be answered.
* Does my infrastructure allow me to increase the number of workers?
* To what extent should I increase the number of workers? What number should I configure?
Increasing the number of workers will increase the stress on the resources consumed by the CE. Those resources are:
* the DB.
* disk I/O.
* the network.
* heap.
* CPU.
Of those, only the last two are internal to the CE.
If slowness comes from any of the external resources (DB, disk I/O, network), then increasing the number of workers could actually slow the processing of individual reports (think of two people trying to go through a door at the same time). However, if your slow speed is caused by large individual analysis reports hogging the CE worker for extended periods of time, then enabling parallel processing by adding another worker could help. If parallel processing is enabled, you will need to take a look at the internal resources.
CE workers are not CPU-intensive and memory use depends entirely on the project that was analyzed. Some workers need a lot of memory, while others don’t. With multiple CE workers, you should increase CE heap size by a multiple of the number of workers. The same logic applies to CPU: if running with one worker consumes up to Y% of CPU, then you should plan for Z workers requiring Y\*Z% of CPU.
{% hint style="warning" %}
If you are increasing your CE worker count, the memory allocation for `sonar.ce.javaOpts` in your `sonar.properties` file should also be increased. Adjusting your CE worker count without adjusting the total memory available can negatively impact performance because the available memory is divided among all workers.
See the [#memory-settings](https://docs.sonarsource.com/sonarqube-server/monitoring/instance#memory-settings "mention") article for information and restart SonarQube when changing your memory allocation.
{% endhint %}
To accurately diagnose your situation, monitor network latency, the I/O of the SonarQube Server instance, the database CPU, and memory usage to evaluate whether slowness is mainly/mostly/only related to external resources.
If you increase the number of CE for clusters (*available in* [*Data Center edition*](https://redirect.sonarsource.com/editions/datacenter.html)), CE workers are replicated across each application node. The number of workers is global and cannot be configured at the application node level.
For example, if you set 4 workers in SonarQube Server UI and you have 2 application nodes, you have configured 8 workers total after you finish restarting all the application nodes (4 workers \* 2 nodes = 8 workers total). See the [dce-topology](https://docs.sonarsource.com/sonarqube-server/server-installation/data-center-edition/dce-topology "mention") page for more information.
### Parallel processing of pull request and branch analyses
{% hint style="info" %}
This feature is available as part of [Enterprise edition](https://www.sonarsource.com/plans-and-pricing/enterprise/) and above.
{% endhint %}
By default, SonarQube Server’s Compute Engine (CE) is enabled to perform parallel processing of pull request analyses and branch analyses for each project, thus enabling it to analyze one branch and several pull requests together at any given time. To avoid errors, the main branch of a project must be analyzed first, before any other branches or PRs are analyzed in parallel.
You have the option to disable this feature if you want the CE to process one analysis at a time for each project, even if there are multiple CE workers available.
To deactivate this option, go to **Administration** > **General Settings** > **General** > **Performance** and check the **Disable running project analysis tasks in parallel** option.
### Optimizing the loading of analyzers
SonarQube Server optimizes the loading of analyzers by downloading only those required for the detected languages.
For example, if you don’t have any COBOL files in your repository, the COBOL analyzer won’t be downloaded before analysis, saving network bandwidth, disk space, and time to bootstrap the code scan.
This behavior is enabled by default. To disable it:
1. Go to **Administration** > **General Settings** > **General** > **Performance**.
2. Disable the **Analyzers loading optimization** option.
### Related pages
* [performance-issues](https://docs.sonarsource.com/sonarqube-server/server-update-and-maintenance/troubleshooting/performance-issues "mention")
---
# Source: https://docs.sonarsource.com/sonarqube-cloud/improving.md
# Improving your code
{% content-ref url="improving/overview" %}
[overview](https://docs.sonarsource.com/sonarqube-cloud/improving/overview)
{% endcontent-ref %}
{% content-ref url="improving/connected-mode" %}
[connected-mode](https://docs.sonarsource.com/sonarqube-cloud/improving/connected-mode)
{% endcontent-ref %}
{% content-ref url="improving/pull-request-analysis" %}
[pull-request-analysis](https://docs.sonarsource.com/sonarqube-cloud/improving/pull-request-analysis)
{% endcontent-ref %}
{% content-ref url="improving/quality-gates" %}
[quality-gates](https://docs.sonarsource.com/sonarqube-cloud/improving/quality-gates)
{% endcontent-ref %}
{% content-ref url="improving/main-branch-analysis" %}
[main-branch-analysis](https://docs.sonarsource.com/sonarqube-cloud/improving/main-branch-analysis)
{% endcontent-ref %}
---
# Source: https://docs.sonarsource.com/sonarqube-server/2025.5/user-guide/issues/in-devops-platform.md
# Source: https://docs.sonarsource.com/sonarqube-server/2025.6/user-guide/issues/in-devops-platform.md
# Source: https://docs.sonarsource.com/sonarqube-server/user-guide/issues/in-devops-platform.md
# Source: https://docs.sonarsource.com/sonarqube-cloud/managing-your-projects/issues/in-devops-platform.md
# In your DevOps platform
The way SonarQube Cloud reports issues in your DevOps platform depends on the platform type.
{% content-ref url="in-devops-platform/github" %}
[github](https://docs.sonarsource.com/sonarqube-cloud/managing-your-projects/issues/in-devops-platform/github)
{% endcontent-ref %}
{% content-ref url="in-devops-platform/bitbucket-cloud" %}
[bitbucket-cloud](https://docs.sonarsource.com/sonarqube-cloud/managing-your-projects/issues/in-devops-platform/bitbucket-cloud)
{% endcontent-ref %}
{% content-ref url="in-devops-platform/gitlab" %}
[gitlab](https://docs.sonarsource.com/sonarqube-cloud/managing-your-projects/issues/in-devops-platform/gitlab)
{% endcontent-ref %}
{% content-ref url="in-devops-platform/azure-devops" %}
[azure-devops](https://docs.sonarsource.com/sonarqube-cloud/managing-your-projects/issues/in-devops-platform/azure-devops)
{% endcontent-ref %}
---
# Source: https://docs.sonarsource.com/sonarqube-community-build/instance-administration/inactive-projects.md
# Source: https://docs.sonarsource.com/sonarqube-server/2025.2/instance-administration/inactive-projects.md
# Source: https://docs.sonarsource.com/sonarqube-server/2025.3/instance-administration/inactive-projects.md
# Source: https://docs.sonarsource.com/sonarqube-server/2025.5/instance-administration/inactive-projects.md
# Source: https://docs.sonarsource.com/sonarqube-server/2025.1/instance-administration/inactive-projects.md
# Source: https://docs.sonarsource.com/sonarqube-server/2025.4/instance-administration/inactive-projects.md
# Source: https://docs.sonarsource.com/sonarqube-server/2025.6/instance-administration/inactive-projects.md
# Source: https://docs.sonarsource.com/sonarqube-server/instance-administration/inactive-projects.md
# Inactive projects
Projects that are not analyzed for seven consecutive days are considered inactive, and SonarQube Server automatically deletes their cached data to free space in the database. See [maintaining-the-branches-of-your-project](https://docs.sonarsource.com/sonarqube-server/project-administration/maintaining-project/maintaining-the-branches-of-your-project "mention") for more information on inactive branches and cached data.
The **Projects Management** search interface includes a date picker to help you find all projects last analyzed before your specified date. From there you can deal with them on this page as a set, or click through to the individual project homepages for individual attention and administration.
In **Administration** > **Projects** > **Management** search for **Last analysis before** to filter projects not analyzed since a specific date. Then use bulk **Delete** to remove the projects that match your filter.
This can be automated by using the corresponding Web API: `api/projects/bulk_delete?analyzedBefore=YYYY-MM-DD`.
---
# Source: https://docs.sonarsource.com/sonarqube-cloud/advanced-setup/incremental-analysis-mechanisms.md
# Incremental analysis mechanisms
Incremental analysis may be used to shorten the [main-branch-analysis](https://docs.sonarsource.com/sonarqube-cloud/improving/main-branch-analysis "mention"), the [branch-analysis](https://docs.sonarsource.com/sonarqube-cloud/enriching/branch-analysis "mention"), and the [pull-request-analysis](https://docs.sonarsource.com/sonarqube-cloud/improving/pull-request-analysis "mention").
Different mechanisms may be used:
* Unchanged files are skipped from the analysis for files that can be processed independently by the analyzer.
* The analysis cache mechanism allows reusing previous analysis results.
This section explains both mechanisms.
### Skip unchanged files mechanism
This mechanism is used for pull request analyses. With this mechanism, the analysis of (particular) unchanged files (compared to the target branch) is either skipped or optimized:
* For languages like CSS, HTML, XML, Apex, Go, Ruby, and Scala, where all files can be analyzed independently, the scanner only supplies modified files to the analyzer. This means that only the changed files are analyzed.
* For languages like Kotlin, Java, JavaScript, C#, and VB.NET, the analyzer either skips particular unchanged files or optimizes the analysis of these files. For more information, see the respective language section in this documentation.
### Analysis cache mechanism
With the analysis cache mechanism, the metadata of a branch analysis is cached on the server side at the end of the analysis. This way, this data is available to the analyzers for future analysis.
The analysis cache mechanism is supported for the following languages:
* To shorten a branch analysis: C, C++, Objective-C, and COBOL. For the other languages, the branch cache is still downloaded to be updated with the newest state of the branch, and then re-uploaded to the server.
* To shorten a pull request analysis: C, C++, Objective-C, Java, JavaScript, C#, VB.NET, TypeScript, Kotlin, PHP, and Python.
#### Caching process
The server manages a single analysis cache for each branch, which corresponds to the latest analysis.
The caching process is as follows:
1. Before an analysis, the SonarScanner downloads from the server the corresponding cache:
* For a long-lived branch analysis, the cache of the long-lived branch.
* For a short-lived branch analysis:
* If available, the cache of the short-lived branch.
* Otherwise, the cache of the target branch.
* For a pull request, the cache of the target branch.
* Or, as a fallback, the cache of the main branch.
2. During the analysis, the analyzers can access the cache locally to read and/or write to the cache.
3. At the end of the analysis:
* For a branch analysis: the SonarScanner uploads the new cache of the branch to the server (overwriting the existing one).
* For a pull request analysis: the SonarScanner doesn’t upload the cache of the pull request branch (the cache is not persisted).
Note that:
* If the SonarScanner for .NET is used, the scanner version 5.12 or higher is required.
* With the C/C++/Objective-C analyzer you can also configure the change of the cache storage to the local filesystem. However, this configuration should be used only in very specific use cases.
#### Analysis optimization
The way the analyzer optimizes the analysis based on the cached data depends on the language. For most analyzers, the optimization will be similar to the optimization done by the C/C++/Objective-C analyzer described below. The optimization done by the Kotlin analyzer is different.
C/C++/Objective-C
During a branch analysis, the C/C++/Objective-C analyzer analyzes only the code sections that are affected by the changes in the branch compared to the previous branch analysis.
During a pull request analysis, the analyzer analyzes only the code sections that are affected by the changes compared to the target branch.
To decide whether a code section is affected by the changes, the analyzer queries the loaded cache for information. It checks if the cached analysis results can be reused (cache hit). To do so, it checks various conditions such as cross-file dependencies, quality profile setting changes, build setting changes, etc. :
* If there is a cache hit, the analyzer leverages the previously stored analysis results, and thus, saves time.
* Otherwise, the analyzer performs a new analysis of the concerned code.
Kotlin
During a branch analysis, the Kotlin analyzer stores the copy-paste duplication (CPD) tokens to provide accurate duplication information on pull requests.
During a pull request analysis, the analyzer re-uses the CPD tokens cached during the last target branch analysis for files that have not changed compared to the target branch.
### Disabling the Skip unchanged files mechanism
You can disable the Skip unchanged files mechanism used by the Kotlin and Java analyzers by setting the `sonar.kotlin.skipUnchanged` or the `sonar.java.skipUnchanged` to `false`.
### Disabling the analysis cache mechanism
In particular cases, you may need to disable the analysis cache mechanism.
The analysis cache mechanism is enabled by default. If you disable it, the analyzer will analyze all files from scratch.
To disable the analysis cache mechanism:
1. In the SonarQube Cloud UI, retrieve your project.
2. In the left navigation bar of your project, select **Administration > General Settings**.
3. In **Sensor cache**, disable the **Sensor cache for project** option (`sonar.sensor.cache.project.enable` property).
### Using the local filesystem for analysis caching
With the C/C++/Objective-C analyzer, you can configure the filesystem cache instead of using the analysis cache on the server. You should use this configuration only in very specific use cases. See the article on [#analysis-cache](https://docs.sonarsource.com/sonarqube-cloud/languages/c-family/customizing-the-analysis#analysis-cache "mention") article on the [customizing-the-analysis](https://docs.sonarsource.com/sonarqube-cloud/advanced-setup/languages/c-family/customizing-the-analysis "mention") page for more details.
---
# Source: https://docs.sonarsource.com/sonarqube-community-build/analyzing-source-code/incremental-analysis.md
# Source: https://docs.sonarsource.com/sonarqube-server/10.6/analyzing-source-code/incremental-analysis.md
# Source: https://docs.sonarsource.com/sonarqube-server/10.7/analyzing-source-code/incremental-analysis.md
# Source: https://docs.sonarsource.com/sonarqube-server/10.8/analyzing-source-code/incremental-analysis.md
# Source: https://docs.sonarsource.com/sonarqube-server/2025.2/analyzing-source-code/incremental-analysis.md
# Source: https://docs.sonarsource.com/sonarqube-server/2025.3/analyzing-source-code/incremental-analysis.md
# Source: https://docs.sonarsource.com/sonarqube-server/2025.5/analyzing-source-code/incremental-analysis.md
# Source: https://docs.sonarsource.com/sonarqube-server/2025.1/analyzing-source-code/incremental-analysis.md
# Source: https://docs.sonarsource.com/sonarqube-server/2025.4/analyzing-source-code/incremental-analysis.md
# Source: https://docs.sonarsource.com/sonarqube-server/2025.6/analyzing-source-code/incremental-analysis.md
# Source: https://docs.sonarsource.com/sonarqube-server/analyzing-source-code/incremental-analysis.md
# Incremental analysis
{% content-ref url="incremental-analysis/introduction" %}
[introduction](https://docs.sonarsource.com/sonarqube-server/analyzing-source-code/incremental-analysis/introduction)
{% endcontent-ref %}
{% content-ref url="incremental-analysis/disabling-or-changing" %}
[disabling-or-changing](https://docs.sonarsource.com/sonarqube-server/analyzing-source-code/incremental-analysis/disabling-or-changing)
{% endcontent-ref %}
---
# Source: https://docs.sonarsource.com/sonarqube-community-build/server-installation/plugins/install-a-plugin.md
# Source: https://docs.sonarsource.com/sonarqube-server/8.9/setup-and-upgrade/install-a-plugin.md
# Source: https://docs.sonarsource.com/sonarqube-server/9.8/setup-and-upgrade/install-a-plugin.md
# Source: https://docs.sonarsource.com/sonarqube-server/9.9/setup-and-upgrade/install-a-plugin.md
# Source: https://docs.sonarsource.com/sonarqube-server/10.0/setup-and-upgrade/install-a-plugin.md
# Source: https://docs.sonarsource.com/sonarqube-server/10.1/setup-and-upgrade/install-a-plugin.md
# Source: https://docs.sonarsource.com/sonarqube-server/10.2/setup-and-upgrade/install-a-plugin.md
# Source: https://docs.sonarsource.com/sonarqube-server/10.3/setup-and-upgrade/install-a-plugin.md
# Source: https://docs.sonarsource.com/sonarqube-server/10.4/setup-and-upgrade/install-a-plugin.md
# Source: https://docs.sonarsource.com/sonarqube-server/10.5/setup-and-upgrade/install-a-plugin.md
# Source: https://docs.sonarsource.com/sonarqube-server/10.6/setup-and-upgrade/install-a-plugin.md
# Source: https://docs.sonarsource.com/sonarqube-server/10.7/setup-and-upgrade/plugins/install-a-plugin.md
# Source: https://docs.sonarsource.com/sonarqube-server/10.8/setup-and-upgrade/plugins/install-a-plugin.md
# Source: https://docs.sonarsource.com/sonarqube-server/2025.2/setup-and-update/plugins/install-a-plugin.md
# Source: https://docs.sonarsource.com/sonarqube-server/2025.3/server-installation/plugins/install-a-plugin.md
# Source: https://docs.sonarsource.com/sonarqube-server/2025.5/server-installation/plugins/install-a-plugin.md
# Source: https://docs.sonarsource.com/sonarqube-server/2025.1/setup-and-upgrade/plugins/install-a-plugin.md
# Source: https://docs.sonarsource.com/sonarqube-server/2025.4/server-installation/plugins/install-a-plugin.md
# Source: https://docs.sonarsource.com/sonarqube-server/2025.6/server-installation/plugins/install-a-plugin.md
# Source: https://docs.sonarsource.com/sonarqube-server/server-installation/plugins/install-a-plugin.md
# Installing a plugin
You need to manually install plugins when using SonarQube Server (you cannot use the SonarQube Marketplace).
To see what plugins are available and which version is appropriate for your SonarQube Server, use the [plugin-version-matrix](https://docs.sonarsource.com/sonarqube-server/server-installation/plugins/plugin-version-matrix "mention"), which is kept up to date with current plugin availability and compatibility.
{% hint style="warning" %}
Plugins are not provided by Sonar; therefore, you install them at your own risk. A SonarQube Server administrator needs to acknowledge this risk in the Marketplace before installing plugins or when prompted in SonarQube Server after installing a plugin manually.
{% endhint %}
### Installing a plugin
{% tabs %}
{% tab title="ZIP INSTALLATION" %}
* Download the plugin you want to install. The version needs to be compatible with your SonarQube version.
* Put the downloaded jar in `/extensions/plugins`, and remove any previous versions of the same plugins.
* Restart your SonarQube.
{% hint style="info" %}
In case of a Data Center edition:
* Plugins are not shared, meaning if you install/uninstall/upgrade a given plugin on one application node, you need to perform the same actions on the other application nodes.
* All application nodes must be stopped when installing, uninstalling, or upgrading a plugin.
{% endhint %}
{% endtab %}
{% tab title="DOCKER INSTALLATION" %}
When running SonarQube Server under Docker, any plugin you want to install must also be copied into the Docker volume you create during installation. See the [installation-overview](https://docs.sonarsource.com/sonarqube-server/server-installation/from-docker-image/installation-overview "mention") article in our documentation for more details about creating the volume and container.
{% hint style="info" %}
Once SonarQube Server UI is up, you can encrypt sensitive properties stored in `/conf/sonar.properties`. See the [encrypting-settings](https://docs.sonarsource.com/sonarqube-server/instance-administration/security/encrypting-settings "mention") page.
{% endhint %}
Let’s assume that your SonarQube docker container is called `sonarqube`. The easiest way to install manually a plugin in the container is the following.
* Check if an existing version of the plugin exists. Run `docker exec sonarqube bash -c 'ls "$SONARQUBE_HOME"/extensions/plugins'` to see the entire list of plugins that are installed manually.
* If a previous version of the plugin is listed, remove it using `docker exec sonarqube bash -c 'rm "$SONARQUBE_HOME"/extensions/plugins/'`
* Install the new plugin using `docker exec sonarqube bash -c 'wget -P "$SONARQUBE_HOME"/extensions/plugins/'`
* Restart the SonarQube docker container using `docker restart sonarqube`
Note that if you have followed the guidelines outlined on the [prepare-installation](https://docs.sonarsource.com/sonarqube-server/server-installation/from-docker-image/prepare-installation "mention") page, the resulting plugin will be available in the `sonarqube_extensions` volume, which is attached to the `/extensions/plugins` folder.
{% hint style="info" %}
In case of a Data Center edition:
* Plugins are not shared, meaning if you install/uninstall/upgrade a given plugin on one application node, you need to perform the same actions on the other application nodes.
* All application nodes must be stopped when installing, uninstalling, or upgrading a plugin.
{% endhint %}
{% endtab %}
{% tab title="KUBERNETES INSTALLATION" %}
1. Download the appropriate plugin JAR file from a trusted source, ensuring it’s compatible with your SonarQube version.
2. Add the plugins section to your `values.yaml` file as illustrated below and use the `helm upgrade` command to apply the new chart.
```yaml
plugins:
install:
- "https://github.com/SonarOpenCommunity/sonar-cxx/releases/download/cxx-2.0.7/sonar-cxx-plugin-2.0.7.3119.jar"
```
Or use the `helm upgrade` command as illustrated below:
```sh
helm upgrade --install -n sonarqube sonarqube sonarqube/sonarqube \
--set "plugins.install={https://github.com/SonarOpenCommunity/sonar-cxx/releases/download/cxx-2.0.7/sonar-cxx-plugin-2.0.7.3119.jar}"
```
{% endtab %}
{% endtabs %}
To verify the plugin installation, go to **Administration** > **Marketplace.**
### Uninstalling a plugin
To uninstall a plugin:
1. Delete the plugin from the `/extensions/plugins` folder.
2. Restart your SonarQube Server.
---
# Source: https://docs.sonarsource.com/sonarqube-server/10.4/analyzing-source-code/scanner-environment/install-self-signed-certificate.md
# Source: https://docs.sonarsource.com/sonarqube-server/10.5/analyzing-source-code/scanner-environment/install-self-signed-certificate.md
# Managing TLS certificates on client side
If your SonarQube server is [#securing-the-server-behind-a-proxy](https://docs.sonarsource.com/sonarqube-server/10.5/setup-and-upgrade/configure-and-operate-a-server/operating-the-server#securing-the-server-behind-a-proxy "mention") and a self-signed certificate then you must add the self-signed certificate to the trusted CA certificates of the SonarScanner.
In addition, if mutual TLS is used then you must define the access to the client certificate at the SonarScanner level.
### Managing the self-signed server certificate
#### Introduction to server authentication
During the TLS authentication of the server, the client requests the server certificate from the server and verifies that this certificate is signed by a CA it trusts by checking its truststore. In case a self-signed server certificate is used, it must be added to the truststore of the client. The figure below shows the certificates involved in the authentication of the SonarQube server by the SonarScanner.

#### Adding the self-signed server certificate to the trusted CA certificates For SonarScanner for Maven, Gradle, or CLI
You can either use:
* The default JVM truststore (`\jre\lib\security\cacerts`).\
To add the self-signed server certificate to the default truststore, use the JVM tool keytool. The instructions depend on your operating system and you will find many resources online, such as [this one](https://www.ibm.com/docs/en/tnpm/1.4.2?topic=security-import-certificate-jre-keystore) for Linux.
See also: [troubleshooting](https://docs.sonarsource.com/sonarqube-server/10.5/setup-and-upgrade/install-the-server/troubleshooting "mention").
* A custom Java truststore by using the following properties:
* `javax.net.ssl.trustStore`: path to the truststore file
* `javax.net.ssl.trustStorePassword:` password to the truststore
* `javax.net.ssl.trustStoreType`(optional, if the truststore file type is not JKS or PKCS12)
Define the properties by using the SONAR\_SCANNER\_OPTS environment variable.\
Example (on Windows, use forward slashes as path separators): `SONAR_SCANNER_OPTS="-Djavax.net.ssl.trustStore=/repositories/tls-mutual-nginx/cacerts -Djavax.net.ssl.trustStorePassword=changeit"`
For SonarScanner for .NET
Add the self-signed server certificate to the operating system truststore:
* On Linux and MacOS:
1. Copy the self-signed server certificate to `/usr/local/share/ca-certificates`
2. Run `sudo update-ca-certificates`
* On Windows: use [certutil](https://learn.microsoft.com/en-us/windows-server/administration/windows-commands/certutil).\
Example: `certutil -addstore -f "ROOT" `
In addition, since SonarScanner for .NET invokes SonarScanner CLI, you must add the self-signed certificate to the Java truststore as explained above.
If running the scanner with Docker
If you need to configure a self-signed certificate for the scanner to communicate with your SonarQube instance, you can use a volume under `/tmp/cacerts` to add it to the containers java trust store:
```css-79elbk
docker pull sonarsource/sonar-scanner-cli
docker run \
--rm \
-v ${YOUR_CERTS_DIR}/cacerts:/tmp/cacerts \
-v ${YOUR_CACHE_DIR}:/opt/sonar-scanner/.sonar/cache \
-v ${YOUR_REPO}:/usr/src \
-e SONAR_HOST_URL="http://${SONARQUBE_URL}" \
sonarsource/sonar-scanner-cli
```
Alternatively, you can create your own container that includes the modified `cacerts` file. Create a `Dockerfile` with the following contents:
```css-79elbk
FROM sonarsource/sonar-scanner-cli
COPY cacerts /usr/lib/jvm/default-jvm/jre/lib/security/cacerts
```
Then, assuming both the `cacerts` and `Dockerfile` are in the current directory, create the new image with a command such as:
```css-79elbk
docker build --tag our-custom/sonar-scanner-cli .
```
### Managing the client certificates
#### Introduction to client authentication
If mutual TLS is used then both the client and the server authenticate the other party. During the TLS authentication of the client, the client must provide its certificate with the corresponding CA certificate chain (intermediate and root CA certificates) to the server. The client manages its certificates in its own keystore. The figure below shows the certificates involved in the TLS authentication of the SonarScanner by the SonarQube Server.

#### Defining the access to the client certificates For SonarScanner for Maven, Gradle, or CLI
Store the client certificate and CA certificate chain in a keystore file and define the access to this file through the following properties:
* `javax.net.ssl.keyStore`: path to the keystore file
* `javax.net.ssl.keyStorePassword`: password of the keystore file
* `javax.net.ssl.keyStoreType` (optional, if the keystore file type is not JKS or PKCS12)
For SonarScanner for .NET
1. Store the client certificate and CA certificate chain in a keystore file and define the access to this file through the following properties:
* `sonar.clientcert.path` : path to the keystore file, must be set in the begin step.
* `sonar.clientcert.password:` password of the keystore file, must be set in both the begin and end steps.
2. In addition, set the following options before the end step (for the SonarScanner CLI invocation):
* `javax.net.ssl.keyStore`: same value as `sonar.clientcert.path`
* `javax.net.ssl.keyStorePassword`: same value as `sonar.clientcert.password`
---
# Source: https://docs.sonarsource.com/sonarqube-server/8.9/setup-and-upgrade/install-the-server-as-a-cluster.md
# Source: https://docs.sonarsource.com/sonarqube-server/9.8/setup-and-upgrade/install-the-server-as-a-cluster.md
# Source: https://docs.sonarsource.com/sonarqube-server/9.9/setup-and-upgrade/install-the-server-as-a-cluster.md
# Source: https://docs.sonarsource.com/sonarqube-server/10.0/setup-and-upgrade/install-the-server-as-a-cluster.md
# Source: https://docs.sonarsource.com/sonarqube-server/10.1/setup-and-upgrade/install-the-server-as-a-cluster.md
# Source: https://docs.sonarsource.com/sonarqube-server/10.2/setup-and-upgrade/install-the-server-as-a-cluster.md
# Source: https://docs.sonarsource.com/sonarqube-server/10.3/setup-and-upgrade/install-the-server-as-a-cluster.md
# Source: https://docs.sonarsource.com/sonarqube-server/10.4/setup-and-upgrade/install-the-server-as-a-cluster.md
# Source: https://docs.sonarsource.com/sonarqube-server/10.5/setup-and-upgrade/install-the-server-as-a-cluster.md
# Source: https://docs.sonarsource.com/sonarqube-server/10.6/setup-and-upgrade/install-the-server-as-a-cluster.md
# Source: https://docs.sonarsource.com/sonarqube-server/10.7/setup-and-upgrade/install-the-server-as-a-cluster.md
# Source: https://docs.sonarsource.com/sonarqube-server/10.8/setup-and-upgrade/install-the-server-as-a-cluster.md
# Source: https://docs.sonarsource.com/sonarqube-server/2025.2/setup-and-update/install-the-server-as-a-cluster.md
# Source: https://docs.sonarsource.com/sonarqube-server/2025.1/setup-and-upgrade/install-the-server-as-a-cluster.md
# Data Center Edition (DCE)
*Running SonarQube Server as a Cluster is only possible with a* [*Data Center Edition*](https://www.sonarsource.com/plans-and-pricing/data-center/)*.* As a DCE subscriber, Sonar will assist with the setup and configuration of your cluster. Get in touch with your account manager to receive appropriate onboarding resources.
The Data Center Edition (DCE) allows SonarQube Server to run in a clustered configuration to make it resilient to failures.
### Overview
The default configuration for the Data Center Edition comprises five servers, a load balancer, and a database server:
* Two application nodes responsible for handling web requests from users (WebServer process) and handling analysis reports (ComputeEngine process). You can add application nodes to increase computing capabilities.
* Three search nodes that host the Elasticsearch process that will store data indices. SSDs perform significantly better than HDDs for these nodes.
* A reverse proxy / load balancer to load balance traffic between the two application nodes. The installing organization must supply this hardware or software component.
* PostgreSQL, Oracle, or Microsoft SQL Server database server. This software must be supplied by the installing organization.
With this configuration, one application node and one search node can be lost without impacting users. Here is a diagram of the default topology:
### Requirements
#### Network
You need a minimum of five servers (two application nodes and three search nodes) to form a SonarQube Server application cluster. Servers can be virtual machines; it is not necessary to use physical machines. You can also add application nodes to increase computing capabilities.
The operating system requirements for servers are available on the [server-host](https://docs.sonarsource.com/sonarqube-server/2025.1/setup-and-upgrade/installation-requirements/server-host "mention") page.
All application nodes should be identical in terms of hardware and software. Similarly, all search nodes should be identical to each other. Application and search nodes, however, can differ from one another. Generally, search nodes are configured with more CPU and RAM than application nodes.
Search nodes can be located in different availability zones, but they must be in the same region. In this case, each search node should be located in a separate availability zone to maintain availability in the event of a failure in one zone.
**Example machines**
Here are the machines we used to perform our validation with a 200M issues database. You can use this as a minimum recommendation to build your cluster.
* App Node made of [Amazon EC2 general purpose xlarge](https://aws.amazon.com/ec2/instance-types/): 4 vCPUs, 16GB RAM
* Search Node made of [Amazon EC2 general purpose 2xlarge](https://aws.amazon.com/ec2/instance-types/): 8 vCPUs, 32GB RAM - 16GB allocated to Elasticsearch. SSDs perform significantly better than HDDs for these nodes.
#### Database server
Supported database systems are available on the [database-requirements](https://docs.sonarsource.com/sonarqube-server/2025.1/setup-and-upgrade/installation-requirements/database-requirements "mention") page.
#### Load balancer
Sonar does not provide specific recommendations for reverse proxy / load balancer or solution-specific configuration. The general requirements for the Data Center Edition are:
* Ability to balance HTTP requests (load) between the application nodes configured in the cluster.
* If terminating HTTPS, meets the requirements set out in [Operating the server](https://app.gitbook.com/s/I10pmJWeVVXYITlQJllp/setup-and-upgrade/operating-the-server "mention").
* No requirement to preserve or sticky sessions; this is handled by the built-in JWT mechanism.
* Ability to check for node health for routing
#### Example with HAproxy
```css-79elbk
frontend http-in
bind *:80
bind *:443 ssl crt /etc/ssl/private/
http-request redirect scheme https unless { ssl_fc }
default_backend sonarqube_server
backend sonarqube_server
balance roundrobin
http-request set-header X-Forwarded-Proto https
option httpchk GET /api/system/status
http-check expect rstring UP|DB_MIGRATION_NEEDED|DB_MIGRATION_RUNNING
default-server check maxconn 200
server node1
server node2
```
#### License
You need a dedicated license to activate the Data Center Edition. If you don’t have one yet, please contact the SonarSource Sales Team.
#### Support
Don’t start this journey alone! As a Data Center Edition subscriber, Sonar will assist with the setup and configuration of your cluster. Get in touch with [Sonar Support](https://help.sonarsource.com/) for help.
### Installing SonarQube Server from the ZIP file
Additional parameters are required to activate clustering capabilities and specialize each node. These parameters are in addition to standard configuration properties used in a single-node configuration.
The **sonar.properties** file on each node will be edited to configure the node’s specialization. A list of all cluster-specific configuration parameters is available in the [configure-and-operate-a-cluster](https://docs.sonarsource.com/sonarqube-server/2025.1/setup-and-upgrade/configure-and-operate-a-cluster "mention") documentation.
Prior to configuration, you will need to generate a value for the `sonar.auth.jwtBase64Hs256Secret` property for the application nodes. The value is a HS256 key encoded with base64 and will be the same for both nodes. The following examples illustrate how to generate this value, where `your_secret` and `your_key` are arbitrary strings that can be modified:
**On a Unix system**:
```css-79elbk
echo -n "your_secret" | openssl dgst -sha256 -hmac "your_key" -binary | base64
```
**On a Windows system with PowerShell**:
```css-79elbk
$message = 'your_secret'
$secret = 'your_key'
$hmacsha = New-Object System.Security.Cryptography.HMACSHA256
$hmacsha.key = [Text.Encoding]::ASCII.GetBytes($secret)
$signature = $hmacsha.ComputeHash([Text.Encoding]::ASCII.GetBytes($message))
$signature = [Convert]::ToBase64String($signature)
echo $signature
```
#### Sample Configuration
The following example represents a sample configuration of a SonarQube Server DCE. The example assumes:
* The VMs having IP addresses ip1 and ip2 (server1, server2) are application nodes
* The VMs having IP addresses ip3, ip4, and ip5 (server3, server4 and server5) are search nodes
The configuration to be added to `sonar.properties` for each node is the following. For information about the system properties used, see [#traditional-environment-configuration](https://docs.sonarsource.com/sonarqube-server/2025.1/configure-and-operate-a-cluster#traditional-environment-configuration "mention").
**Application nodes**
server1:
```css-79elbk
...
sonar.cluster.enabled=true
sonar.cluster.node.type=application
sonar.cluster.node.host=ip1
sonar.cluster.node.port=9003
sonar.cluster.node.web.port=4023
sonar.cluster.node.ce.port=4024
sonar.cluster.hosts=ip1,ip2
sonar.cluster.search.hosts=ip3:9001,ip4:9001,ip5:9001
sonar.auth.jwtBase64Hs256Secret=YOURGENERATEDSECRET
...
```
server2
```css-79elbk
...
sonar.cluster.enabled=true
sonar.cluster.node.type=application
sonar.cluster.node.host=ip2
sonar.cluster.node.port=9003
sonar.cluster.node.web.port=4023
sonar.cluster.node.ce.port=4024
sonar.cluster.hosts=ip1,ip2
sonar.cluster.search.hosts=ip3:9001,ip4:9001,ip5:9001
sonar.auth.jwtBase64Hs256Secret=YOURGENERATEDSECRET
...
```
{% hint style="info" %}
The `sonar.cluster.node.web.port` and `sonar.cluster.node.ce.port` system properties are optional. If not used, a dynamic port will be chosen.
{% endhint %}
**Search nodes**
server3
```css-79elbk
...
sonar.cluster.enabled=true
sonar.cluster.node.type=search
sonar.cluster.node.search.host=ip3
sonar.cluster.node.search.port=9001
sonar.cluster.node.es.host=ip3
sonar.cluster.node.es.port=9002
sonar.cluster.es.hosts=ip3:9002,ip4:9002,ip5:9002
...
```
server4
```css-79elbk
...
sonar.cluster.enabled=true
sonar.cluster.node.type=search
sonar.cluster.node.search.host=ip4
sonar.cluster.node.search.port=9001
sonar.cluster.node.es.host=ip4
sonar.cluster.node.es.port=9002
sonar.cluster.es.hosts=ip3:9002,ip4:9002,ip5:9002
...
```
server5
```css-79elbk
...
sonar.cluster.enabled=true
sonar.cluster.node.type=search
sonar.cluster.node.search.host=ip5
sonar.cluster.node.search.port=9001
sonar.cluster.node.es.host=ip5
sonar.cluster.node.es.port=9002
sonar.cluster.es.hosts=ip3:9002,ip4:9002,ip5:9002
...
```
#### Sample Installation Process
The following is an example of the default SonarQube Server DCE installation process. You need to tailor your installation to the specifics of the target installation environment and the operational requirements of the hosting organization.
**Prepare the cluster environment:**
1. Prepare the cluster environment by setting up the network and provisioning the nodes and load balancer.
2. Follow the [introduction](https://docs.sonarsource.com/sonarqube-server/2025.1/setup-and-upgrade/install-the-server/introduction "mention") documentation to configure the database server.
**Prepare a personalized SonarQube Server package:**
1. On a single application node of the cluster, download and install SonarQube Server DCE, following the usual [introduction](https://docs.sonarsource.com/sonarqube-server/2025.1/setup-and-upgrade/install-the-server/introduction "mention") documentation.
2. Add cluster-related parameters to `/conf/sonar.properties`.
3. This is also a good opportunity to install plugins. Download and place a copy of each plugin JAR in \`/extensions/plugins`. Be sure to check compatibility with your SonarQube Server version using the [plugin-version-matrix](https://docs.sonarsource.com/sonarqube-server/2025.1/setup-and-upgrade/plugins/plugin-version-matrix "mention").
4. Zip the directory ``. This archive is a customized SonarQube Server DCE package that can be copied to other nodes.
**Test configuration on a single node:**
1. On the application node where you created your Zip package, comment out all cluster-related parameters in `/conf/sonar.properties`.
2. Configure the load balancer to proxy with single application node.
3. Start server and test access through load balancer.
4. Request license from SonarSource Sales Team.
5. After applying license, you will have a full-featured SonarQube Server system operating on a single node.
**Deploy SonarQube package on other nodes:**
1. Unzip SonarQube Server package on the other four nodes.
2. Configure node-specific parameters on all five nodes in `/conf/sonar.properties` and ensure application node-specific and search node-specific parameters are properly set.
3. Start all search nodes.
4. After all search nodes are running, start all application nodes.
5. Configure the load balancer to proxy with both application nodes.
### Installing SonarQube Server from the Docker image
{% hint style="warning" %}
You should install SonarQube Server DCE using Docker compose on a single Docker host only for test purposes. Sonar recommends running the database, application, and search containers in different Docker hosts for production workloads.
{% endhint %}
The general setup with Docker is the same but is shifted to a Docker-specific terminology.
#### Requirements
**Network**
All containers should be in the same network. This includes search and application nodes. For the best performance, it is advised to check for low latency between the database and the cluster nodes.
**Limits**
The limits of each container depend on the workload that each container has. A good starting point would be:
* cpus: 0.5
* mem\_limit: 4096M
* mem\_reservation: 1024M
The 4Gb mem\_limit should not be lower as this is the minimal value for Elasticsearch.
**Scalability**
Application nodes can be scaled using replicas. This is not the case for the Search nodes as Elasticsearch will not become ready. See the [configure-and-operate-a-cluster](https://docs.sonarsource.com/sonarqube-server/2025.1/setup-and-upgrade/configure-and-operate-a-cluster "mention") for more information.
**Volumes**
You’ll use the following volumes in your configuration:
* `sonarqube_data` – In the Docker Compose configuration example in the following section, volumes are shared between replicas in the application nodes, so you don’t need a `sonarqube_data` volume on your application nodes. In the search nodes, the `sonarqube_data` volume contains the Elasticsearch data and helps reduce startup time, so we recommend having a `sonarqube_data` volume on each search node.
* `sonarqube_extensions` – For application nodes, we recommend sharing a common `sonarqube_extensions` volume which contains any plugins you install and the Oracle JDBC driver if necessary.
* `sonarqube_logs` – For both application and search nodes, we recommend sharing a common `sonarqube_logs` volume which contains SonarQube Server logs. The volume will be populated with a new folder depending on the container’s hostname and all logs of this container will be put into this folder. This behavior also happens when a custom log path is specified via the [environment-variables](https://docs.sonarsource.com/sonarqube-server/2025.1/setup-and-upgrade/environment-variables "mention").
### Next steps
Once you’ve completed these steps, check out the [configure-and-operate-a-cluster](https://docs.sonarsource.com/sonarqube-server/2025.1/setup-and-upgrade/configure-and-operate-a-cluster "mention") documentation.
### Post-installation steps
You can encrypt sensitive properties stored in `/conf/sonar.properties`. See [encrypting-settings](https://docs.sonarsource.com/sonarqube-server/2025.1/instance-administration/encrypting-settings "mention").
---
# Source: https://docs.sonarsource.com/sonarqube-server/8.9/setup-and-upgrade/install-the-server.md
# Source: https://docs.sonarsource.com/sonarqube-server/9.8/setup-and-upgrade/install-the-server.md
# Source: https://docs.sonarsource.com/sonarqube-server/9.9/setup-and-upgrade/install-the-server.md
# Source: https://docs.sonarsource.com/sonarqube-server/10.0/setup-and-upgrade/install-the-server.md
# Source: https://docs.sonarsource.com/sonarqube-server/10.1/setup-and-upgrade/install-the-server.md
# Source: https://docs.sonarsource.com/sonarqube-server/10.2/setup-and-upgrade/install-the-server.md
# Source: https://docs.sonarsource.com/sonarqube-server/10.3/setup-and-upgrade/install-the-server.md
# Source: https://docs.sonarsource.com/sonarqube-server/10.4/setup-and-upgrade/install-the-server.md
# Source: https://docs.sonarsource.com/sonarqube-server/10.5/setup-and-upgrade/install-the-server.md
# Source: https://docs.sonarsource.com/sonarqube-server/10.6/setup-and-upgrade/install-the-server.md
# Source: https://docs.sonarsource.com/sonarqube-server/10.7/setup-and-upgrade/install-the-server.md
# Source: https://docs.sonarsource.com/sonarqube-server/10.8/setup-and-upgrade/install-the-server.md
# Source: https://docs.sonarsource.com/sonarqube-server/2025.2/setup-and-update/install-the-server.md
# Source: https://docs.sonarsource.com/sonarqube-server/2025.1/setup-and-upgrade/install-the-server.md
# Developer and Enterprise Editions
{% content-ref url="install-the-server/introduction" %}
[introduction](https://docs.sonarsource.com/sonarqube-server/2025.1/setup-and-upgrade/install-the-server/introduction)
{% endcontent-ref %}
{% content-ref url="install-the-server/installing-the-database" %}
[installing-the-database](https://docs.sonarsource.com/sonarqube-server/2025.1/setup-and-upgrade/install-the-server/installing-the-database)
{% endcontent-ref %}
{% content-ref url="install-the-server/installing-sonarqube-from-zip-file" %}
[installing-sonarqube-from-zip-file](https://docs.sonarsource.com/sonarqube-server/2025.1/setup-and-upgrade/install-the-server/installing-sonarqube-from-zip-file)
{% endcontent-ref %}
{% content-ref url="install-the-server/installing-sonarqube-from-docker" %}
[installing-sonarqube-from-docker](https://docs.sonarsource.com/sonarqube-server/2025.1/setup-and-upgrade/install-the-server/installing-sonarqube-from-docker)
{% endcontent-ref %}
{% content-ref url="install-the-server/advanced-installation-features" %}
[advanced-installation-features](https://docs.sonarsource.com/sonarqube-server/2025.1/setup-and-upgrade/install-the-server/advanced-installation-features)
{% endcontent-ref %}
---
# Source: https://docs.sonarsource.com/sonarqube-community-build/server-installation/from-docker-image/installation-overview.md
# Source: https://docs.sonarsource.com/sonarqube-server/2025.3/server-installation/on-kubernetes-or-openshift/installation-overview.md
# Source: https://docs.sonarsource.com/sonarqube-server/2025.3/server-installation/from-docker-image/installation-overview.md
# Source: https://docs.sonarsource.com/sonarqube-server/2025.5/server-installation/on-kubernetes-or-openshift/installation-overview.md
# Source: https://docs.sonarsource.com/sonarqube-server/2025.5/server-installation/from-docker-image/installation-overview.md
# Source: https://docs.sonarsource.com/sonarqube-server/2025.4/server-installation/on-kubernetes-or-openshift/installation-overview.md
# Source: https://docs.sonarsource.com/sonarqube-server/2025.4/server-installation/from-docker-image/installation-overview.md
# Source: https://docs.sonarsource.com/sonarqube-server/2025.6/server-installation/on-kubernetes-or-openshift/installation-overview.md
# Source: https://docs.sonarsource.com/sonarqube-server/2025.6/server-installation/from-docker-image/installation-overview.md
# Source: https://docs.sonarsource.com/sonarqube-server/server-installation/on-kubernetes-or-openshift/installation-overview.md
# Source: https://docs.sonarsource.com/sonarqube-server/server-installation/from-docker-image/installation-overview.md
# Installation overview
SonarQube Server docker images support running both on the `amd64` architecture and on `arm64`-based Apple Silicon.
We recommend using [Docker Engine](https://docs.docker.com/engine/) version 20.10 and above.
To install your SonarQube Server (Developer or Enterprise edition) from the Docker image:
1. Check the [server-host-requirements](https://docs.sonarsource.com/sonarqube-server/server-installation/server-host-requirements "mention").
2. Install the database. See [installing-the-database](https://docs.sonarsource.com/sonarqube-server/server-installation/installing-the-database "mention").
3. Prepare the Docker installation. See [prepare-installation](https://docs.sonarsource.com/sonarqube-server/server-installation/from-docker-image/prepare-installation "mention")
4. Set up and start your Docker container. See [set-up-and-start-container](https://docs.sonarsource.com/sonarqube-server/server-installation/from-docker-image/set-up-and-start-container "mention").
5. You can now open SonarQube Server in your web browser at the configured address (by default `http://localhost:9000`). The default system administrator credentials are **admin**/**admin**.
6. Depending on your environment, you may have to perform advanced setup. See [advanced-setup](https://docs.sonarsource.com/sonarqube-server/server-installation/from-docker-image/advanced-setup "mention").
7. You can secure SonarQube Server behind a proxy (see [securing-behind-proxy](https://docs.sonarsource.com/sonarqube-server/server-installation/network-security/securing-behind-proxy "mention")) and configure network rules (see [network-rules](https://docs.sonarsource.com/sonarqube-server/server-installation/network-security/network-rules "mention")).
---
# Source: https://docs.sonarsource.com/sonarqube-server/10.5/setup-and-upgrade/installation-requirements.md
# Source: https://docs.sonarsource.com/sonarqube-server/10.6/setup-and-upgrade/installation-requirements.md
# Source: https://docs.sonarsource.com/sonarqube-server/10.7/setup-and-upgrade/installation-requirements.md
# Source: https://docs.sonarsource.com/sonarqube-server/10.8/setup-and-upgrade/installation-requirements.md
# Source: https://docs.sonarsource.com/sonarqube-server/2025.2/setup-and-update/installation-requirements.md
# Source: https://docs.sonarsource.com/sonarqube-server/2025.3/server-installation/data-center-edition/installation-requirements.md
# Source: https://docs.sonarsource.com/sonarqube-server/2025.5/server-installation/data-center-edition/installation-requirements.md
# Source: https://docs.sonarsource.com/sonarqube-server/2025.1/setup-and-upgrade/installation-requirements.md
# Source: https://docs.sonarsource.com/sonarqube-server/2025.4/server-installation/data-center-edition/installation-requirements.md
# Source: https://docs.sonarsource.com/sonarqube-server/2025.6/server-installation/data-center-edition/installation-requirements.md
# Source: https://docs.sonarsource.com/sonarqube-server/server-installation/data-center-edition/installation-requirements.md
# Installation requirements
As a Data Center Edition subscriber, Sonar will assist with the setup and configuration of your cluster. Get in touch with your account manager to receive appropriate onboarding resources.
### Limitations
See [#limitations](https://docs.sonarsource.com/sonarqube-server/server-host-requirements#limitations "mention").
### Cluster nodes
You need a minimum of five servers (two application nodes and three search nodes) to form a SonarQube Server application cluster. Servers can be virtual machines; it is not necessary to use physical machines. You can also add application nodes to increase computing capabilities.
We recommend having one machine for each node to be resilient to failures. To maintain an even higher level of availability, each of your three search nodes can be located in a separate availability zone *within the same region*.
The operating system requirements for servers are available on the [server-host-requirements](https://docs.sonarsource.com/sonarqube-server/server-installation/server-host-requirements "mention") page.
All application nodes should be identical in terms of hardware and software. Similarly, all search nodes should be identical to each other. Application and search nodes, however, can differ from one another. Generally, search nodes are configured with more CPU and RAM than application nodes.
Search nodes can be located in different availability zones, but they must be in the same region. In this case, each search node should be located in a separate availability zone to maintain availability in the event of a failure in one zone. SSDs perform significantly better than HDDs for these nodes.
#### Example machines
Here are the machines we used to perform our validation with a 200M issues database. You can use this as a minimum recommendation to build your cluster.
* App Node made of [Amazon EC2 general purpose xlarge](https://aws.amazon.com/ec2/instance-types/): 4 vCPUs, 16GB RAM
* Search Node made of [Amazon EC2 general purpose 2xlarge](https://aws.amazon.com/ec2/instance-types/): 8 vCPUs, 32GB RAM - 16GB allocated to Elasticsearch. SSDs perform significantly better than HDDs for these nodes.
### Docker containers
In case you install your SonarQube Server from the Docker images:
* Sonar recommends running the database, application, and search containers in different Docker hosts for production workloads. You should install on a single Docker host only for test purposes.
* All containers should be in the same network. This includes search and application nodes. For the best performance, it is advised to check for low latency between the database and the cluster nodes.
* The limits of each container depend on the workload that each container has. A good starting point would be:
* cpus: 0.5
* mem\_limit: 4096M\
4Gb mem\_limit should is the minimal value for Elasticsearch.
* mem\_reservation: 1024M
### Database server
Supported database systems are available on the [installing-the-database](https://docs.sonarsource.com/sonarqube-server/server-installation/installing-the-database "mention") page.
### TCP networks
There are three TCP networks to configure:
* the network of application nodes that relies on Hazelcast.
* the network used for Elasticsearch internal communication between search nodes (`es` properties).
* the network between application nodes and search nodes (`search` properties).
[Hazelcast](https://hazelcast.org/) is used to manage the communication between the cluster’s application nodes. You don’t need to install it yourself, it’s provided out of the box.
### Load balancer
The installing organization must supply the load balancer.
Sonar does not provide specific recommendations for reverse proxy / load balancer or solution-specific configuration. The general requirements are:
* Ability to balance HTTP requests (load) between the application nodes configured in the cluster.
* If terminating HTTPS, meets the requirements set out in [Operating the server](https://app.gitbook.com/s/I10pmJWeVVXYITlQJllp/setup-and-upgrade/operating-the-server "mention").
* No requirement to preserve or sticky sessions; this is handled by the built-in JWT mechanism.
* Ability to check for node health for routing.
### Related pages
* [dce-topology](https://docs.sonarsource.com/sonarqube-server/server-installation/data-center-edition/dce-topology "mention")
* [pre-installation](https://docs.sonarsource.com/sonarqube-server/server-installation/data-center-edition/pre-installation "mention")
* [from-zip-file](https://docs.sonarsource.com/sonarqube-server/server-installation/data-center-edition/from-zip-file "mention")
* [on-kubernetes-or-openshift](https://docs.sonarsource.com/sonarqube-server/server-installation/data-center-edition/on-kubernetes-or-openshift "mention")
* **Configuring network security features:**
* [securing-behind-proxy](https://docs.sonarsource.com/sonarqube-server/server-installation/data-center-edition/network-security/securing-behind-proxy "mention")
* [elasticsearch-security-features](https://docs.sonarsource.com/sonarqube-server/server-installation/data-center-edition/network-security/elasticsearch-security-features "mention")
* [network-rules](https://docs.sonarsource.com/sonarqube-server/server-installation/data-center-edition/network-security/network-rules "mention")
* [starting-stopping-cluster](https://docs.sonarsource.com/sonarqube-server/server-installation/data-center-edition/starting-stopping-cluster "mention")
* [installing-the-database](https://docs.sonarsource.com/sonarqube-server/server-installation/installing-the-database "mention")
---
# Source: https://docs.sonarsource.com/sonarqube-for-eclipse/getting-started/installation.md
# Source: https://docs.sonarsource.com/sonarqube-for-visual-studio/getting-started/installation.md
# Source: https://docs.sonarsource.com/sonarqube-for-intellij/getting-started/installation.md
# Source: https://docs.sonarsource.com/sonarqube-for-vs-code/getting-started/installation.md
# Installation
For the most part, SonarQube for IDE can be installed directly from your IDE’s Marketplace. Offline installations are also possible and previous versions are available if needed.
### Instructions
SonarQube for VS Code can be installed like any other VS Code extension as explained in the [VS Code documentation](https://code.visualstudio.com/docs/editor/extension-marketplace). The standard installation workflow described below works for VS Code, including the Cursor and Trae editors, as well as VSCodium, GitHub Codespaces, and GitPod, among others:
1. Select **Extensions** in the left sidebar of your VS Code app.
2. Enter `SonarQube for IDE` in the search bar.
3. Select **Install**.
Once the installation is complete, select the **Reload Required** button to finish the process.
Using the standard method, SonarQube for VS Code will be downloaded from:
* the [Microsoft Visual Studio Marketplace](https://marketplace.visualstudio.com/items?itemName=SonarSource.sonarlint-vscode) for VSCode and GitHub Codespaces.
* the [OpenVSX community marketplace](https://open-vsx.org/extension/SonarSource/sonarlint-vscode), for Cursor, [Trae](https://docs.trae.ai/ide/manage-extensions), and Windsurf editors, as well as VSCodium and GitPod.
* Both [Cursor](https://docs.cursor.com/guides/migration/vscode) and [Windsurf](https://docs.windsurf.com/windsurf/getting-started#forgot-to-import-vs-code-configurations%3F) offer profile migration tools, which should include your VS Code extensions.
* In Cursor, you can simply drag and drop the .vsix file into the extensions tab.
As an alternative, the VSIX package for any given version can be downloaded from the [/sonarlint-vscode Release page on GitHub](https://github.com/SonarSource/sonarlint-vscode/releases) and installed using the `Install from VSIX` command in accordance with Microsoft’s [Install from a VSIX instructions](https://code.visualstudio.com/docs/editor/extension-marketplace#_install-from-a-vsix).
### First taste of SonarQube for IDE
Now that you have SonarQube for VS Code installed, open or create a new project containing source files in a programming language SonarQube for VS Code can analyze out of the box. See the [rules](https://docs.sonarsource.com/sonarqube-for-vs-code/using/rules "mention") for languages that work with your IDE.
SonarQube for VS Code offers a **walkthrough** to help you make the best out of it SonarQube for IDE; it covers the basic features to help you:
* see issues in your code.
* learn more about those issues and fix them.
* synchronize the analysis configuration with other contributors.
* diagnose problems and share feedback with the SonarQube for IDE team.
The walkthrough will be automatically displayed when you install SonarQube for IDE for the first time, and you can manually open it anytime from the command palette: search **Welcome Open Walkthrough…**, then select **Welcome to SonarQube for IDE!** to have a look!
### Connect to your server
Connect SonarQube for VS Code to your instance of [SonarQube Server](https://app.gitbook.com/s/yDv2XwTC1xoOKBYeCK45/user-guide/connected-mode), [SonarQube Cloud](https://app.gitbook.com/s/B4UT2GNiZKjtxFtcFAL7/improving/connected-mode), or [SonarQube Community Build](https://app.gitbook.com/s/bqrfLGeD0Y9vE5l9Le42/user-guide/connected-mode) to expand your analysis capabilities and share quality profiles with your team. See the article about connected mode [#benefits](https://docs.sonarsource.com/sonarqube-for-vs-code/connect-your-ide/connected-mode#benefits "mention"), and the [setup](https://docs.sonarsource.com/sonarqube-for-vs-code/connect-your-ide/setup "mention") page for full instructions to get going.
### Updating SonarQube for IDE in VS Code
By default, SonarQube for VS Code will update automatically as soon as a new release is published. However, SonarQube for VS Code will *not update automatically* for users who intentionally pin a previous version of the extension.
### Limitations
SonarQube for VS Code is not supported in [Visual Studio Code Virtual Workspaces](https://code.visualstudio.com/api/extension-guides/virtual-workspaces). When installing SonarQube for VS Code you may receive the following error: `This extension has been disabled because it does not support virtual workspaces`
Support for virtual workspaces is on the Sonar roadmap; please check out the [feature description](https://portal.productboard.com/sonarsource/4-sonarqube-for-ide/c/499-support-remote-github-repositories-in-vs-code) and tell us how important the feature is to you.
---
# Source: https://docs.sonarsource.com/sonarqube-server/10.8/setup-and-upgrade/deploy-on-kubernetes/dce/installing-from-gcp.md
# Source: https://docs.sonarsource.com/sonarqube-server/2025.2/setup-and-update/deploy-on-kubernetes/dce/installing-from-gcp.md
# Source: https://docs.sonarsource.com/sonarqube-server/2025.3/server-installation/data-center-edition/on-kubernetes-or-openshift/installing-from-gcp.md
# Source: https://docs.sonarsource.com/sonarqube-server/2025.5/server-installation/data-center-edition/on-kubernetes-or-openshift/installing-from-gcp.md
# Source: https://docs.sonarsource.com/sonarqube-server/2025.1/setup-and-upgrade/deploy-on-kubernetes/dce/installing-from-gcp.md
# Source: https://docs.sonarsource.com/sonarqube-server/2025.4/server-installation/data-center-edition/on-kubernetes-or-openshift/installing-from-gcp.md
# Source: https://docs.sonarsource.com/sonarqube-server/2025.6/server-installation/data-center-edition/on-kubernetes-or-openshift/installing-from-gcp.md
# Source: https://docs.sonarsource.com/sonarqube-server/server-installation/data-center-edition/on-kubernetes-or-openshift/installing-from-gcp.md
# Installing from Google Cloud Platform
Data Center Edition can be deployed on Kubernetes through the Google Marketplace:
* Either with basic features only, by using its *Click to Deploy* feature.
* Or with advanced features by using its *Deploy via command line* feature.
### Basic installation
With the basic installation, you cannot benefit from various features such as autoscaling or deploying with Istio.
#### Prerequisites
Make sure that kubectl is configured in your environment and that your cluster has Google’s Application CustomResourceDefinition installed. That definition can be obtained from [this file](https://raw.githubusercontent.com/GoogleCloudPlatform/marketplace-k8s-app-tools/master/crd/app-crd.yaml).
#### Pre-installation steps
* Set the value of your Application authentication JWT Token. See [jwt-token](https://docs.sonarsource.com/sonarqube-server/server-installation/pre-installation/jwt-token "mention").
* If necessary, create the target namespace you want to install Data Center Edition into.
#### Installing using Click to Deploy
1. Go to the [Data Center Edition page](https://console.cloud.google.com/marketplace/product/sonarsource-public/sonarqube-data-center-edition) on the Google Cloud Platform.
2. Click **Get started** and follow the instructions.
3. In the **Deploy** page, fill in the fields in the **Click to Deploy on GKE** tab: see **Installation parameters** below.
4. At the bottom of the tab, click **Deploy**.
#### Installing manually
For manual installation or development purposes, SonarQube Server can be configured using the [mpdev CLI tool](https://github.com/GoogleCloudPlatform/marketplace-k8s-app-tools) provided by Google. See Installation parameters below for the supported parameters with key.
#### Deleting the installation
To delete the installation of SonarQube Server from your cluster:
1. Delete the created Application resource.
2. Delete the PersistentVolumeClaims related to the search nodes and database (if applicable).
#### Installation parameters
Name
Description
Key
Type
Existing Kubernetes cluster
Kubernetes cluster in which the application will be deployed.
Namespace
Target namespace to install Data Center Edition into (The namespace must exist already, it will not be created automatically.).
namespace
string
App instance name
Name of the application in your Kubernetes cluster
name
string
Application authentication JWT Token
The HS256 key encoded with base64: see Pre-installation steps above.
ApplicationNode.jwtSecret
string
JDBC URL
The JDBC URL used to connect to the database.
jdbcOverwrite.jdbcUrl
string
JDBC Username
The username used to connect to the database.
jdbcOverwrite.jdbcUsername
string
JDBC Password
The password used to connect to the database.
jdbcOverwrite.jdbcPassword
string
Application nodes replicas
The number of replicas for the Application Nodes
ApplicationNodes.replicaCount
integer
Search nodes replicas
The number of replicas for the Search Nodes
searchNodes.replicaCount
integer
Enable initSysctl privileged initContainer to setup elasticearch kernel parameters
This should be disabled and set up by your cluster administrator. Refer to this documentation for more details.
initSysctl.enabled
boolean
Enable initFs root initContainer to setup filesystem parameters
This is generally not required on a Google Kubernetes cluster. Refer to this documentation for more details.
initFs.enabled
boolean
GCP Marketplace application
This flag must be enabled in the context of the installation from GCP.
gcp_marketplace
boolean
### Advanced installation
Use the advanced installation if you want to benefit from various features such as autoscaling or deploying with Istio.
Proceed as follows:
1. Customize the Helm chart. See Customizing the Helm chart.
2. Go to the [Data Center Edition page](https://console.cloud.google.com/marketplace/product/sonarsource-public/sonarqube-data-center-edition) on the Google Cloud Platform.
3. In the **Deploy** page of your Google Cloud Platform, select the **Deploy via command line** tab.
4. Follow the instructions:
1. Clone the[ repo](https://github.com/SonarSource/helm-chart-sonarqube).
2. Use the command described in [installing-from-helm-repo](https://docs.sonarsource.com/sonarqube-server/server-installation/data-center-edition/on-kubernetes-or-openshift/installing-from-helm-repo "mention").
### Related pages
* [before-you-start](https://docs.sonarsource.com/sonarqube-server/server-installation/data-center-edition/on-kubernetes-or-openshift/before-you-start "mention")
* [customizing-helm-chart](https://docs.sonarsource.com/sonarqube-server/server-installation/data-center-edition/on-kubernetes-or-openshift/customizing-helm-chart "mention")
* [installing-from-helm-repo](https://docs.sonarsource.com/sonarqube-server/server-installation/data-center-edition/on-kubernetes-or-openshift/installing-from-helm-repo "mention")
* [set-up-monitoring](https://docs.sonarsource.com/sonarqube-server/server-installation/on-kubernetes-or-openshift/set-up-monitoring "mention")
* [setting-up-autoscaling](https://docs.sonarsource.com/sonarqube-server/server-installation/data-center-edition/on-kubernetes-or-openshift/setting-up-autoscaling "mention")
---
# Source: https://docs.sonarsource.com/sonarqube-server/10.8/setup-and-upgrade/deploy-on-kubernetes/dce/installing-from-helm-repo.md
# Source: https://docs.sonarsource.com/sonarqube-server/2025.2/setup-and-update/deploy-on-kubernetes/dce/installing-from-helm-repo.md
# Source: https://docs.sonarsource.com/sonarqube-server/2025.3/server-installation/data-center-edition/on-kubernetes-or-openshift/installing-from-helm-repo.md
# Source: https://docs.sonarsource.com/sonarqube-server/2025.5/server-installation/data-center-edition/on-kubernetes-or-openshift/installing-from-helm-repo.md
# Source: https://docs.sonarsource.com/sonarqube-server/2025.1/setup-and-upgrade/deploy-on-kubernetes/dce/installing-from-helm-repo.md
# Source: https://docs.sonarsource.com/sonarqube-server/2025.4/server-installation/data-center-edition/on-kubernetes-or-openshift/installing-from-helm-repo.md
# Source: https://docs.sonarsource.com/sonarqube-server/2025.6/server-installation/data-center-edition/on-kubernetes-or-openshift/installing-from-helm-repo.md
# Source: https://docs.sonarsource.com/sonarqube-server/server-installation/data-center-edition/on-kubernetes-or-openshift/installing-from-helm-repo.md
# Installing the DCE Helm chart
Once you have customized the Helm chart, you can install it via the command line from the Helm repository.
{% hint style="info" %}
You can also overwrite Helm chart parameters directly in the installation command.
{% endhint %}
### General installation command
Use the following command to install the latest SonarQube Server Helm chart:
```
helm repo add sonarqube https://SonarSource.github.io/helm-chart-sonarqube
helm repo update
kubectl create namespace sonarqube-dce
export JWT_SECRET=$(echo -n "your_secret" | openssl dgst -sha256 -hmac "your_key" -binary | base64)
export MONITORING_PASSCODE="yourPasscode"
export JDBC_URL="jdbc:postgresql://myPostgres/myDatabase"
export JDBC_USERNAME="sonar"
export JDBC_PASSWORD_SECRET_NAME="jdbc-secret"
export JDBC_PASSWORD_SECRET_KEY="jdbc-password"
helm upgrade --install -n sonarqube-dce sonarqube sonarqube/sonarqube-dce --set applicationNodes.jwtSecret=$JWT_SECRET,monitoringPasscode=$MONITORING_PASSCODE,jdbcOverwrite.jdbcUrl=$JDBC_URL,jdbcOverwrite.jdbcUsername=$JDBC_USERNAME,jdbcOverwrite.jdbcSecretName=$JDBC_PASSWORD_SECRET_NAME,jdbcOverwrite.jdbcSecretPasswordKey=$JDBC_PASSWORD_SECRET_KEY
```
* You must set the applicationNodes.jwtSecret value with a HS256 key encoded with base64.
* The chart requires an external database. If you want to perform a quick testing, you might want to follow the steps outlined [here](https://github.com/SonarSource/helm-chart-sonarqube/tree/master/charts/sonarqube-dce#setting-up-an-external-database-for-quick-testing). You will be required to set the following values accordingly: `jdbcOverwrite.jdbcUrl`, `jdbcOverwrite.jdbcUsername`, `jdbcOverwrite.jdbcSecretName`, and `jdbcOverwrite.jdbcSecretPasswordKey`.
* The parameters after --set can also be defined in the values.yaml file. See [customizing-helm-chart](https://docs.sonarsource.com/sonarqube-server/server-installation/data-center-edition/on-kubernetes-or-openshift/customizing-helm-chart "mention") for more information.
* If you want to deploy the SonarQube Server LTA version, you should install the LTA Helm chart, see the [Helm chart documentation](https://artifacthub.io/packages/helm/sonarqube/sonarqube-dce).
* The monitoring Passcode is required for the helm upgrade operation. See [set-up-monitoring](https://docs.sonarsource.com/sonarqube-server/server-installation/on-kubernetes-or-openshift/set-up-monitoring "mention") for a better way to store the monitoring passcode used to authenticate to the Web API.
### Example: installing on OpenShift
The following command enables OpenShift.
```
helm repo add sonarqube https://SonarSource.github.io/helm-chart-sonarqube
helm repo update
kubectl create namespace sonarqube-dce
export JWT_SECRET=$(echo -n "your_secret" | openssl dgst -sha256 -hmac "your_key" -binary | base64)
export MONITORING_PASSCODE="yourPasscode"
export JDBC_URL="jdbc:postgresql://myPostgres/myDatabase"
export JDBC_USERNAME="sonar"
export JDBC_PASSWORD_SECRET_NAME="jdbc-secret"
export JDBC_PASSWORD_SECRET_KEY="jdbc-password"
helm upgrade --install -n sonarqube-dce sonarqube sonarqube/sonarqube-dce \
--set applicationNodes.jwtSecret=$JWT_SECRET \
--set OpenShift.enabled=true \
--set applicationNodes.jwtSecret=$JWT_SECRET \
--set monitoringPasscode=$MONITORING_PASSCODE \
--set jdbcOverwrite.jdbcUrl=$JDBC_URL \
--set jdbcOverwrite.jdbcUsername=$JDBC_USERNAME \
--set jdbcOverwrite.jdbcSecretName=$JDBC_PASSWORD_SECRET_NAME \
--set jdbcOverwrite.jdbcSecretPasswordKey=$JDBC_PASSWORD_SECRET_KEY
```
#### Setting up an external database for testing
The chart requires an external database. If you want to perform a quick test, install a [PostgreSQL chart](https://artifacthub.io/packages/helm/bitnami/postgresql) on your cluster. For more information and settings, refer to the[ chart documentation](https://artifacthub.io/packages/helm/sonarqube/sonarqube).
After installing the database, set the following values accordingly: `jdbcOverwrite.jdbcUrl`, `jdbcOverwrite.jdbcUsername`, `jdbcOverwrite.jdbcSecretName`, and `jdbcOverwrite.jdbcSecretPasswordKey`.
### Related pages
* [before-you-start](https://docs.sonarsource.com/sonarqube-server/server-installation/data-center-edition/on-kubernetes-or-openshift/before-you-start "mention")
* [customizing-helm-chart](https://docs.sonarsource.com/sonarqube-server/server-installation/data-center-edition/on-kubernetes-or-openshift/customizing-helm-chart "mention")
* [installing-from-gcp](https://docs.sonarsource.com/sonarqube-server/server-installation/data-center-edition/on-kubernetes-or-openshift/installing-from-gcp "mention")
* [set-up-monitoring](https://docs.sonarsource.com/sonarqube-server/server-installation/on-kubernetes-or-openshift/set-up-monitoring "mention")
* [setting-up-autoscaling](https://docs.sonarsource.com/sonarqube-server/server-installation/data-center-edition/on-kubernetes-or-openshift/setting-up-autoscaling "mention")
---
# Source: https://docs.sonarsource.com/sonarqube-community-build/server-installation/on-kubernetes-or-openshift/installing-helm-chart.md
# Source: https://docs.sonarsource.com/sonarqube-server/10.7/setup-and-upgrade/deploy-on-kubernetes/server/installing-helm-chart.md
# Source: https://docs.sonarsource.com/sonarqube-server/10.8/setup-and-upgrade/deploy-on-kubernetes/server/installing-helm-chart.md
# Source: https://docs.sonarsource.com/sonarqube-server/2025.2/setup-and-update/deploy-on-kubernetes/server/installing-helm-chart.md
# Source: https://docs.sonarsource.com/sonarqube-server/2025.3/server-installation/on-kubernetes-or-openshift/installing-helm-chart.md
# Source: https://docs.sonarsource.com/sonarqube-server/2025.5/server-installation/on-kubernetes-or-openshift/installing-helm-chart.md
# Source: https://docs.sonarsource.com/sonarqube-server/2025.1/setup-and-upgrade/deploy-on-kubernetes/server/installing-helm-chart.md
# Source: https://docs.sonarsource.com/sonarqube-server/2025.4/server-installation/on-kubernetes-or-openshift/installing-helm-chart.md
# Source: https://docs.sonarsource.com/sonarqube-server/2025.6/server-installation/on-kubernetes-or-openshift/installing-helm-chart.md
# Source: https://docs.sonarsource.com/sonarqube-server/server-installation/on-kubernetes-or-openshift/installing-helm-chart.md
# Installing Helm chart
Once you have customized the Helm chart, you can install it. You can also overwrite Helm chart parameters directly in the installation command (see OpenShift example below).
### General installation command
Use the following command to install the latest SonarQube Server Helm chart:
```sh
helm repo add sonarqube https://SonarSource.github.io/helm-chart-sonarqube
helm repo update
kubectl create namespace sonarqube
export MONITORING_PASSCODE="yourPasscode"
helm upgrade --install -n sonarqube sonarqube sonarqube/sonarqube --set edition=developer,monitoringPasscode=$MONITORING_PASSCODE
```
{% hint style="info" %}
* You must explicitly set the `edition` parameter to either `developer` or `enterprise`.
* The parameters after `--set` can also be defined in the `values.yaml` file. See [customizing-helm-chart](https://docs.sonarsource.com/sonarqube-server/server-installation/on-kubernetes-or-openshift/customizing-helm-chart "mention").
* If you want to deploy the SonarQube Server LTA version, you should install the LTA Helm chart, see the [Helm chart documentation](https://artifacthub.io/packages/helm/sonarqube/sonarqube).
* The monitoring Passcode is required for the helm upgrade operation. See [set-up-monitoring](https://docs.sonarsource.com/sonarqube-server/server-installation/on-kubernetes-or-openshift/set-up-monitoring "mention") for a better way to store the monitoring passcode used to authenticate to the Web API.
{% endhint %}
### Example: installing on OpenShift
The following command enables OpenShift.
```
helm repo add sonarqube https://SonarSource.github.io/helm-chart-sonarqube
helm repo update
kubectl create namespace sonarqube
export MONITORING_PASSCODE="yourPasscode"
export EDITION="developer" # Choose your edition
export JDBC_URL="jdbc:postgresql://myPostgres/myDatabase"
export JDBC_USERNAME="jdbc-username"
export JDBC_PASSWORD_SECRET_NAME="jdbc-secret"
export JDBC_PASSWORD_SECRET_KEY="jdbc-password"
helm upgrade --install -n sonarqube sonarqube sonarqube/sonarqube \
--set edition=$EDITION \
--set OpenShift.enabled=true \
--set monitoringPasscode=$MONITORING_PASSCODE \
--set jdbcOverwrite.jdbcUrl=$JDBC_URL \
--set jdbcOverwrite.jdbcUsername=$JDBC_USERNAME \
--set jdbcOverwrite.jdbcSecretName=$JDBC_PASSWORD_SECRET_NAME \
--set jdbcOverwrite.jdbcSecretPasswordKey=$JDBC_PASSWORD_SECRET_KEY
```
#### Setting up an external database for testing
The chart requires an external database. If you want to perform a quick test, install a [PostgreSQL chart](https://artifacthub.io/packages/helm/bitnami/postgresql) on your cluster. For more information and settings, refer to the[ chart documentation](https://artifacthub.io/packages/helm/sonarqube/sonarqube).
After installing the database, set the following values accordingly: `jdbcOverwrite.jdbcUrl`, `jdbcOverwrite.jdbcUsername`, `jdbcOverwrite.jdbcSecretName`, and `jdbcOverwrite.jdbcSecretPasswordKey`.
### Related pages
* [installation-overview](https://docs.sonarsource.com/sonarqube-server/server-installation/on-kubernetes-or-openshift/installation-overview "mention")
* [before-you-start](https://docs.sonarsource.com/sonarqube-server/server-installation/on-kubernetes-or-openshift/before-you-start "mention")
* [customizing-helm-chart](https://docs.sonarsource.com/sonarqube-server/server-installation/on-kubernetes-or-openshift/customizing-helm-chart "mention")
* [set-up-monitoring](https://docs.sonarsource.com/sonarqube-server/server-installation/on-kubernetes-or-openshift/set-up-monitoring "mention")
* Installing Data Center Edition on Kubernetes: [on-kubernetes-or-openshift](https://docs.sonarsource.com/sonarqube-server/server-installation/data-center-edition/on-kubernetes-or-openshift "mention")
---
# Source: https://docs.sonarsource.com/sonarqube-server/10.3/setup-and-upgrade/install-the-server/installing-sonarqube-from-docker.md
# Source: https://docs.sonarsource.com/sonarqube-server/10.4/setup-and-upgrade/install-the-server/installing-sonarqube-from-docker.md
# Source: https://docs.sonarsource.com/sonarqube-server/10.5/setup-and-upgrade/install-the-server/installing-sonarqube-from-docker.md
# Source: https://docs.sonarsource.com/sonarqube-server/10.6/setup-and-upgrade/install-the-server/installing-sonarqube-from-docker.md
# Source: https://docs.sonarsource.com/sonarqube-server/10.7/setup-and-upgrade/install-the-server/installing-sonarqube-from-docker.md
# Source: https://docs.sonarsource.com/sonarqube-server/10.8/setup-and-upgrade/install-the-server/installing-sonarqube-from-docker.md
# Source: https://docs.sonarsource.com/sonarqube-server/2025.2/setup-and-update/install-the-server/installing-sonarqube-from-docker.md
# Source: https://docs.sonarsource.com/sonarqube-server/2025.1/setup-and-upgrade/install-the-server/installing-sonarqube-from-docker.md
# Installing from the Docker image
SonarQube Server docker images support running both on the `amd64` architecture and on `arm64`-based Apple Silicon.
We recommend using [Docker Engine](https://docs.docker.com/engine/) version 20.10 and above.
First, check the requirements (see [server-host](https://docs.sonarsource.com/sonarqube-server/2025.1/setup-and-upgrade/installation-requirements/server-host "mention")) and perform the pre-installation steps (see [pre-installation](https://docs.sonarsource.com/sonarqube-server/2025.1/setup-and-upgrade/pre-installation "mention")). Then follow these steps for your first installation:
### Create volumes to persist data
Creating the following volumes helps prevent the loss of information when updating to a new version or upgrading to a higher edition:
* `sonarqube_data`: contains data files, such as Elasticsearch indexes.
* `sonarqube_logs`: contains SonarQube Server logs about access, web process, CE process, and Elasticsearch.
* `sonarqube_extensions`: will contain any plugins you install and the Oracle JDBC driver if necessary.
Create the volumes with the following commands:
```css-79elbk
$> docker volume create --name sonarqube_data
$> docker volume create --name sonarqube_logs
$> docker volume create --name sonarqube_extensions
```
{% hint style="warning" %}
Make sure you’re using [**volumes**](https://docs.docker.com/storage/volumes/) as shown with the above commands, and not [**bind mounts**](https://docs.docker.com/storage/bind-mounts/). Using bind mounts prevents plugins from populating correctly.
{% endhint %}
### Add the JDBC driver (if using an Oracle database)
Drivers for supported databases (except Oracle) are already provided. If you’re using an Oracle database, you need to add the JDBC driver to the `sonar_extensions` volume. To do this:
a. Start the SonarQube Server container with the embedded H2 database:
```css-79elbk
$ docker run --rm \
-p 9000:9000 \
-v sonarqube_extensions:/opt/sonarqube/extensions \
```
For ``, check the tags currently available on the [DockerHub page](https://hub.docker.com/_/sonarqube).
b. Exit once SonarQube Server has started properly.
c. Copy the Oracle JDBC driver into `sonarqube_extensions/jdbc-driver/oracle`.
### Start the SonarQube Server container
Start the SonarQube Server container:
* either from the command line (docker run) or
* from a configuration file (docker compose).
For docker-based setups, environment variables supersede all parameters that were provided with properties. See [environment-variables](https://docs.sonarsource.com/sonarqube-server/2025.1/setup-and-upgrade/environment-variables "mention") for more details.
There is more information about installing and updating SonarQube Server plugins inside your Docker volume found on the [install-a-plugin](https://docs.sonarsource.com/sonarqube-server/2025.1/setup-and-upgrade/plugins/install-a-plugin "mention") page.
#### Port binding
By default, the server running within the container will listen on port 9000. You can expose the container port 9000 to the host port 9000 with the `-p 9000:9000` argument to `docker run`, like the command below:
```css-79elbk
docker run --name sonarqube-custom -p 9000:9000 sonarqube:10.6-community
```
You can then browse to `http://localhost:9000` or `http://host-ip:9000` in your web browser to access the SonarQube Server web interface.
#### Starting the container by using docker run
Run the image with your database properties defined using the `-e` environment variable flag:
```css-79elbk
$> docker run -d --name sonarqube \
-p 9000:9000 \
-e SONAR_JDBC_URL=... \
-e SONAR_JDBC_USERNAME=... \
-e SONAR_JDBC_PASSWORD=... \
-v sonarqube_data:/opt/sonarqube/data \
-v sonarqube_extensions:/opt/sonarqube/extensions \
-v sonarqube_logs:/opt/sonarqube/logs \
```
For ``, check the tags currently available on the [DockerHub page](https://hub.docker.com/_/sonarqube).
#### Starting the container by using Docker compose
{% hint style="info" %}
Unless you intend to delete the database and start new when running your image ,be careful not to use `-v` to `docker-compose down` and, be careful when running commands like `docker system prune` or `docker volume prune`; regardless if you use an `external: true` parameter, your database volumes will not persist beyond the initial startup and shutdown of SonarQube Server.
{% endhint %}
If you’re using [Docker Compose](https://docs.docker.com/compose/), use this [yml file example](https://github.com/SonarSource/docker-sonarqube/tree/master/example-compose-files/sq-with-postgres) as a reference when configuring your `.yml` file. In the `image` tag, use the tag value corresponding to the SonarQube Server version you want to use, e.g, to use the LTA version of the Developer Edition:
```css-79elbk
image: sonarqube:2025-lta-developer
```
Check the SonarQube Server image tags currently available on the [DockerHub page](https://hub.docker.com/_/sonarqube).
#### Next steps
Once your server is installed and running, you can access SonarQube Server UI in your web browser (the default system administrator credentials are **admin**/**admin**) and you’re ready to begin [overview](https://docs.sonarsource.com/sonarqube-server/2025.1/analyzing-source-code/overview "mention").
---
# Source: https://docs.sonarsource.com/sonarqube-server/10.3/setup-and-upgrade/install-the-server/installing-sonarqube-from-zip-file.md
# Source: https://docs.sonarsource.com/sonarqube-server/10.4/setup-and-upgrade/install-the-server/installing-sonarqube-from-zip-file.md
# Source: https://docs.sonarsource.com/sonarqube-server/10.5/setup-and-upgrade/install-the-server/installing-sonarqube-from-zip-file.md
# Source: https://docs.sonarsource.com/sonarqube-server/10.6/setup-and-upgrade/install-the-server/installing-sonarqube-from-zip-file.md
# Source: https://docs.sonarsource.com/sonarqube-server/10.7/setup-and-upgrade/install-the-server/installing-sonarqube-from-zip-file.md
# Source: https://docs.sonarsource.com/sonarqube-server/10.8/setup-and-upgrade/install-the-server/installing-sonarqube-from-zip-file.md
# Source: https://docs.sonarsource.com/sonarqube-server/2025.2/setup-and-update/install-the-server/installing-sonarqube-from-zip-file.md
# Source: https://docs.sonarsource.com/sonarqube-server/2025.1/setup-and-upgrade/install-the-server/installing-sonarqube-from-zip-file.md
# Installing from the ZIP file
First, check the requirements (see [server-host](https://docs.sonarsource.com/sonarqube-server/2025.1/setup-and-upgrade/installation-requirements/server-host "mention"), in particular, make sure the [correct Java version 17](https://adoptium.net/en-GB/temurin/releases/?version=17) or [Java version 21](https://adoptium.net/en-GB/temurin/releases/?version=21) is installed) and perform the pre-installation steps (see [pre-installation](https://docs.sonarsource.com/sonarqube-server/2025.1/setup-and-upgrade/pre-installation "mention")). Then follow these steps for your installation:
### Download the distribution
Download and unzip the [distribution](https://www.sonarsource.com/products/sonarqube/downloads/) (do not unzip into a directory starting with a digit).
`` (below) refers to the path of the directory where the SonarQube Server’s distribution has been unzipped.
### Perform various settings
#### Set access to the database
Edit `/conf/sonar.properties` to configure the database settings. Templates are available for every supported database. Just uncomment and configure the template you need and comment out the lines dedicated to H2:
```css-79elbk
Example for PostgreSQL
sonar.jdbc.username=sonarqube
sonar.jdbc.password=mypassword
sonar.jdbc.url=jdbc:postgresql://localhost/sonarqube
```
#### Add the JDBC driver
Drivers for the supported databases (except Oracle) are already provided. Do not replace the provided drivers; they are the only ones supported.
For Oracle, copy the JDBC driver into `/extensions/jdbc-driver/oracle`.
#### Configure the Elasticsearch storage path
By default, Elasticsearch data is stored in `/data`, but this is not recommended for production instances. Instead, you should store this data elsewhere, ideally in a dedicated volume with fast I/O. In addition to maintaining performance, upgrading your instance of SonarQube Server will be easier.
Edit `/conf/sonar.properties` to configure the following settings:
Linux
```css-79elbk
sonar.path.data=/var/sonarqube/data
sonar.path.temp=/var/sonarqube/temp
```
Windows
```css-79elbk
sonar.path.data=H:\sonarqube\data
sonar.path.temp=H:\sonarqube\temp
```
The user launching SonarQube Server must have read and write access to those directories.
#### Adjust the Java executable path
By default, the scripts will use the Java executable available in the PATH. If multiple versions of Java are installed on your server, you may need to explicitly define which version is used.
It is possible to overwrite the default Java executable by setting the environmental variable `SONAR_JAVA_PATH`.
Linux
`export SONAR_JAVA_PATH="path/to/java_home/bin/java"`
Windows
`setx SONAR_JAVA_PATH "C:\Program Files\java_home\bin\java.exe"`
### Start the web server
1. Execute the following script to start the server:
* On Linux: `/bin/linux-x86-64/sonar.sh start`
* On macOS: `/bin/macosx-universal-64/sonar.sh start`
* On Windows: `\bin\windows-x86-64\StartSonar.bat`
2. You can now open SonarQube Server at [http://localhost:9000](http://localhost:9000/) (the default system administrator credentials are **admin**/**admin**).
3. Once your server is installed and running, you’re ready to begin [overview](https://docs.sonarsource.com/sonarqube-server/2025.1/analyzing-source-code/overview "mention").
### Post-installation steps
You can encrypt sensitive properties stored in `/conf/sonar.properties`. See [encrypting-settings](https://docs.sonarsource.com/sonarqube-server/2025.1/instance-administration/encrypting-settings "mention").
---
# Source: https://docs.sonarsource.com/sonarqube-community-build/server-installation/installing-the-database.md
# Source: https://docs.sonarsource.com/sonarqube-server/10.3/setup-and-upgrade/install-the-server/installing-the-database.md
# Source: https://docs.sonarsource.com/sonarqube-server/10.4/setup-and-upgrade/install-the-server/installing-the-database.md
# Source: https://docs.sonarsource.com/sonarqube-server/10.5/setup-and-upgrade/install-the-server/installing-the-database.md
# Source: https://docs.sonarsource.com/sonarqube-server/10.6/setup-and-upgrade/install-the-server/installing-the-database.md
# Source: https://docs.sonarsource.com/sonarqube-server/10.7/setup-and-upgrade/install-the-server/installing-the-database.md
# Source: https://docs.sonarsource.com/sonarqube-server/10.8/setup-and-upgrade/install-the-server/installing-the-database.md
# Source: https://docs.sonarsource.com/sonarqube-server/2025.2/setup-and-update/install-the-server/installing-the-database.md
# Source: https://docs.sonarsource.com/sonarqube-server/2025.3/server-installation/installing-the-database.md
# Source: https://docs.sonarsource.com/sonarqube-server/2025.5/server-installation/installing-the-database.md
# Source: https://docs.sonarsource.com/sonarqube-server/2025.1/setup-and-upgrade/install-the-server/installing-the-database.md
# Source: https://docs.sonarsource.com/sonarqube-server/2025.4/server-installation/installing-the-database.md
# Source: https://docs.sonarsource.com/sonarqube-server/2025.6/server-installation/installing-the-database.md
# Source: https://docs.sonarsource.com/sonarqube-server/server-installation/installing-the-database.md
# Installing database
{% hint style="info" %}
We recommend that for production installation, the database used by SonarQube Server is hosted on a machine that is physically separate from the SonarQube Server host, with low latency between both hosts.
{% endhint %}
{% hint style="info" %}
The embedded H2 database is used by default. It is recommended for tests but not for production use.
{% endhint %}
### Database requirements
Several external database engines are supported.
Database engine
Requirement
PostgreSQL
Version: 14 to 18
Microsoft SQL Server
Version:
• 2022 (MSSQL Server 16.0); 2019 (MSSQL Server 15.0); 2017 (MSSQL Server 14.0)
• With bundled Microsoft JDBC driver.
Notes:
• Express Edition is supported.
• Windows and SQL Server authentication are both supported.
Oracle
Version: 23ai, 21C, 19C, XE Editions.
Recommendation: Use the latest Oracle JDBC driver.
Notes:
• The driver ojdbc14.jar is not supported.
• Only the thin mode is supported, not OCI.
• Only MAX_STRING_SIZE=STANDARD parameter is supported, not EXTENDED.
• Must be configured to use a UTF8-family charset (see the NLS_CHARACTERSET).
• The Oracle JDBC driver versions 12.1.0.1 and 12.1.0.2 have major bugs, and are not recommended for use with SonarQube (see more details).
#### H2 database not recommended in production
While SonarQube Server comes with an embedded H2 database, we do not recommend using it in production. The H2 database can be useful for:
• Development/Testing: H2 is ideal for quick prototypes, unit or integration tests, or CI/CD pipelines due to its lightweight setup.
• Trials: H2 allows users to try SonarQube without configuring a full database setup like PostgreSQL, Oracle, or MS SQL.
**Why avoid H2 in production**:
• Scalability Limits: H2 cannot handle high transaction volumes or concurrent users.
• Data Risks: In-memory mode risks data loss; file-based mode lacks robust durability.
• Concurrency Issues: H2 struggles with heavy concurrent access, which could cause slowdowns or deadlocks.
• Limited Features: H2 lacks replication, high availability, advanced security, or robust backups.
• SQL Compatibility: H2 may differ from production databases, risking transition issues.
Use PostgreSQL, Oracle, or MS SQL for production to ensure reliability and scalability. Limit H2 to development, testing, or trials.
### Creating a new database instance for SonarQube
1. Create or use an empty schema for SonarQube to populate.
2. Create a `sonarqube` user. Grant this `sonarqube` user permissions to `create`, `update`, and `delete` objects for this schema.
3. Perform the setup as described below depending on your database type.
### Setup if using an MS SQL Server database
This page describes operations to be performed on your MS SQL Server instance for SonarQube.
#### Set collation to CS and AS
Collation **MUST** be case-sensitive (CS) and accent-sensitive (AS).
#### Enable READ\_COMMITTED\_SNAPSHOT
`READ_COMMITTED_SNAPSHOT` **MUST** be set on the SonarQube database.
MS SQL database’s shared lock strategy may impact SonarQube Server runtime. Making sure that `is_read_committed_snapshot_on` is set to `true` will prevent SonarQube from facing potential deadlocks under heavy loads.
To check `is_read_committed_snapshot_on`, you may use the following query:
```sql
SELECT is_read_committed_snapshot_on FROM sys.databases WHERE name='YourSonarQubeDatabase';
```
To update `is_read_committed_snapshot_on`, you may use the following query:
```sql
ALTER DATABASE YourSonarQubeDatabase SET READ_COMMITTED_SNAPSHOT ON WITH ROLLBACK IMMEDIATE;
```
#### Encryption-related setup
If your Microsoft SQL Server doesn’t support encryption, you must add `encrypt=false` to the JDBC URL connection string.
If your Microsoft SQL Server requires encryption but you don’t want SonarQube to validate the certificate, you must add `trustServerCertificate=true` to the JDBC URL connection string.
#### Using integrated security
To use integrated security:
1. Download the [Microsoft SQL JDBC Auth 12.10.2](https://github.com/microsoft/mssql-jdbc/releases/download/v12.10.2/mssql-jdbc_auth.zip) package and copy `mssql-jdbc_auth-12.10.2.x64.dll` to a folder location set in the PATH environment variable on SonarQube Server host.
2. If you’re running SonarQube as a Windows service, make sure the Windows account under which the service is running has permission to connect your SQL server.
### Setup if using an Oracle database
If there are two SonarQube schemas on the same Oracle instance, especially if they are for two different versions, SonarQube gets confused and picks the first it finds. To avoid this issue:
* Either privileges associated to the SonarQube’s Oracle user should be decreased.
* Or a trigger should be defined on the Oracle side to automatically alter the SonarQube’s Oracle user session when establishing a new connection:
```sql
ALTER SESSION SET current_schema="MY_SONARQUBE_SCHEMA".
```
### Setup if using a PostgreSQL database
Your PostgreSQL instance for SonarQube:
* Must be configured to use UTF-8 charset.
* If you want to use a custom schema and not the default "public" one: the PostgreSQL `search_path` property must be set:
```sql
ALTER USER mySonarUser SET search_path to mySonarQubeSchema
```
---
# Source: https://docs.sonarsource.com/sonarqube-community-build/analyzing-source-code/scanners/npm/installing.md
# Source: https://docs.sonarsource.com/sonarqube-community-build/analyzing-source-code/scanners/dotnet/installing.md
# Source: https://docs.sonarsource.com/sonarqube-server/10.6/analyzing-source-code/scanners/sonarscanner-for-npm/installing.md
# Source: https://docs.sonarsource.com/sonarqube-server/10.7/analyzing-source-code/scanners/npm/installing.md
# Source: https://docs.sonarsource.com/sonarqube-server/10.7/analyzing-source-code/scanners/dotnet/installing.md
# Source: https://docs.sonarsource.com/sonarqube-server/10.8/analyzing-source-code/scanners/npm/installing.md
# Source: https://docs.sonarsource.com/sonarqube-server/10.8/analyzing-source-code/scanners/dotnet/installing.md
# Source: https://docs.sonarsource.com/sonarqube-server/2025.2/analyzing-source-code/scanners/npm/installing.md
# Source: https://docs.sonarsource.com/sonarqube-server/2025.2/analyzing-source-code/scanners/dotnet/installing.md
# Source: https://docs.sonarsource.com/sonarqube-server/2025.3/analyzing-source-code/scanners/npm/installing.md
# Source: https://docs.sonarsource.com/sonarqube-server/2025.3/analyzing-source-code/scanners/dotnet/installing.md
# Source: https://docs.sonarsource.com/sonarqube-server/2025.5/analyzing-source-code/scanners/npm/installing.md
# Source: https://docs.sonarsource.com/sonarqube-server/2025.5/analyzing-source-code/scanners/dotnet/installing.md
# Source: https://docs.sonarsource.com/sonarqube-server/2025.1/analyzing-source-code/scanners/npm/installing.md
# Source: https://docs.sonarsource.com/sonarqube-server/2025.1/analyzing-source-code/scanners/dotnet/installing.md
# Source: https://docs.sonarsource.com/sonarqube-server/2025.4/analyzing-source-code/scanners/npm/installing.md
# Source: https://docs.sonarsource.com/sonarqube-server/2025.4/analyzing-source-code/scanners/dotnet/installing.md
# Source: https://docs.sonarsource.com/sonarqube-server/2025.6/analyzing-source-code/scanners/npm/installing.md
# Source: https://docs.sonarsource.com/sonarqube-server/2025.6/analyzing-source-code/scanners/dotnet/installing.md
# Source: https://docs.sonarsource.com/sonarqube-server/analyzing-source-code/scanners/npm/installing.md
# Source: https://docs.sonarsource.com/sonarqube-server/analyzing-source-code/scanners/dotnet/installing.md
# Source: https://docs.sonarsource.com/sonarqube-cloud/advanced-setup/ci-based-analysis/sonarscanner-for-npm/installing.md
# Source: https://docs.sonarsource.com/sonarqube-cloud/advanced-setup/ci-based-analysis/sonarscanner-for-dotnet/installing.md
# Installing the scanner
SonarScanner for .NET — 11.0.0.126294 | Issue Tracker
**11.0.0.126294** **2025-10-15**\ The Scanner for .NET does not embed the SonarScanner CLI anymore and downloads it when needed. Adds support for MSTest 4.\
Download scanner for: [.NET Global Tool](https://www.nuget.org/packages/dotnet-sonarscanner) [.NET Core 3.1+](https://github.com/SonarSource/sonar-scanner-msbuild/releases/download/11.0.0.126294/sonar-scanner-11.0.0.126294-net.zip) [.NET Framework 4.6.2+](https://github.com/SonarSource/sonar-scanner-msbuild/releases/download/11.0.0.126294/sonar-scanner-11.0.0.126294-net-framework.zip)\
\
[Release notes](https://github.com/SonarSource/sonar-scanner-msbuild/releases/tag/11.0.0.126294)
***
**10.4.1.124928** **2025-09-23**\ Fix a bug that erroneously warns that Community Build is not supported.\
Download scanner for: [.NET Global Tool](https://www.nuget.org/packages/dotnet-sonarscanner) [.NET Core 3.1+](https://github.com/SonarSource/sonar-scanner-msbuild/releases/download/10.4.1.124928/sonar-scanner-10.4.1.124928-net.zip) [.NET Framework 4.6.2+](https://github.com/SonarSource/sonar-scanner-msbuild/releases/download/10.4.1.124928/sonar-scanner-10.4.1.124928-net-framework.zip)\
\
[Release notes](https://github.com/SonarSource/sonar-scanner-msbuild/releases/tag/10.4.1.124928)
***
**10.4.0.124828** **2025-09-22**\ New communication system with SonarQube.\
Download scanner for: [.NET Global Tool](https://www.nuget.org/packages/dotnet-sonarscanner) [.NET Core 3.1+](https://github.com/SonarSource/sonar-scanner-msbuild/releases/download/10.4.0.124828/sonar-scanner-10.4.0.124828-net.zip) [.NET Framework 4.6.2+](https://github.com/SonarSource/sonar-scanner-msbuild/releases/download/10.4.0.124828/sonar-scanner-10.4.0.124828-net-framework.zip)\
\
[Release notes](https://github.com/SonarSource/sonar-scanner-msbuild/releases/tag/10.4.0.124828)
***
**10.3.0.120579** **2025-07-16**\ Support xUnit v3, fix RunDeploymentRoot in trx files, remove sonar.scanner.scanAll analysis warning.\
Download scanner for: [.NET Global Tool](https://www.nuget.org/packages/dotnet-sonarscanner) [.NET Core 3.1+](https://github.com/SonarSource/sonar-scanner-msbuild/releases/download/10.3.0.120579/sonar-scanner-10.3.0.120579-net.zip) [.NET Framework 4.6.2+](https://github.com/SonarSource/sonar-scanner-msbuild/releases/download/10.3.0.120579/sonar-scanner-10.3.0.120579-net-framework.zip)\
\
[Release notes](https://github.com/SonarSource/sonar-scanner-msbuild/releases/tag/10.3.0.120579)
***
**10.2.0.117568** **2025-06-03**\ Fix a vulnerability from embedded scanner-cli.\
Download scanner for: [.NET Global Tool](https://www.nuget.org/packages/dotnet-sonarscanner) [.NET Core 3.1+](https://github.com/SonarSource/sonar-scanner-msbuild/releases/download/10.2.0.117568/sonar-scanner-10.2.0.117568-net.zip) [.NET Framework 4.6.2+](https://github.com/SonarSource/sonar-scanner-msbuild/releases/download/10.2.0.117568/sonar-scanner-10.2.0.117568-net-framework.zip)\
\
[Release notes](https://github.com/SonarSource/sonar-scanner-msbuild/releases/tag/10.2.0.117568)
***
**10.1.2.114627** **2025-04-16**\ Add 'sonar' default truststore passord fallback.\
Download scanner for: [.NET Global Tool](https://www.nuget.org/packages/dotnet-sonarscanner) [.NET Core 3.1+](https://github.com/SonarSource/sonar-scanner-msbuild/releases/download/10.1.2.114627/sonar-scanner-10.1.2.114627-net.zip) [.NET Framework 4.6.2+](https://github.com/SonarSource/sonar-scanner-msbuild/releases/download/10.1.2.114627/sonar-scanner-10.1.2.114627-net-framework.zip)\
\
[Release notes](https://github.com/SonarSource/sonar-scanner-msbuild/releases/tag/10.1.2.114627)
***
**10.1.1.111189** **2025-03-25**\ Maintenance and dependencies updates.\
Download scanner for: [.NET Global Tool](https://www.nuget.org/packages/dotnet-sonarscanner) [.NET Core 3.1+](https://github.com/SonarSource/sonar-scanner-msbuild/releases/download/10.1.1.111189/sonar-scanner-10.1.1.111189-net.zip) [.NET Framework 4.6.2+](https://github.com/SonarSource/sonar-scanner-msbuild/releases/download/10.1.1.111189/sonar-scanner-10.1.1.111189-net-framework.zip)\
\
[Release notes](https://github.com/SonarSource/sonar-scanner-msbuild/releases/tag/10.1.1.111189)
***
**10.1.0** **2025-03-19**\ Maintenance and dependencies updates.\
Download scanner for: [.NET Global Tool](https://www.nuget.org/packages/dotnet-sonarscanner) [.NET Core 3.1+](https://github.com/SonarSource/sonar-scanner-msbuild/releases/download/10.1.0.110937/sonar-scanner-10.1.0.110937-net.zip) [.NET Framework 4.6.2+](https://github.com/SonarSource/sonar-scanner-msbuild/releases/download/10.1.0.110937/sonar-scanner-10.1.0.110937-net-framework.zip)\
\
[Release notes](https://github.com/SonarSource/sonar-scanner-msbuild/releases/tag/10.1.0.110937)
***
**10.0.0** **2025-03-13**\ Fix a vulnerability. Mandate that the truststore password is passed in the end step if used in the begin step. Added support for 7 new languages.\
Download scanner for: [.NET Global Tool](https://www.nuget.org/packages/dotnet-sonarscanner) [.NET Core 3.1+](https://github.com/SonarSource/sonar-scanner-msbuild/releases/download/10.0.0.110776/sonar-scanner-10.0.0.110776-net.zip) [.NET Framework 4.6.2+](https://github.com/SonarSource/sonar-scanner-msbuild/releases/download/10.0.0.110776/sonar-scanner-10.0.0.110776-net-framework.zip)\
\
[Release notes](https://github.com/SonarSource/sonar-scanner-msbuild/releases/tag/10.0.0.110776)
***
**9.2.1** **2025-02-25**\ DEPRECATED. Use system trusted certificate or JVM certificate store.\
Download scanner for: [.NET Global Tool](https://www.nuget.org/packages/dotnet-sonarscanner) [.NET Core 3.1+](https://github.com/SonarSource/sonar-scanner-msbuild/releases/download/9.2.1.110358/sonar-scanner-9.2.1.110358-net.zip) [.NET Framework 4.6.2+](https://github.com/SonarSource/sonar-scanner-msbuild/releases/download/9.2.1.110358/sonar-scanner-9.2.1.110358-net-framework.zip)\
\
[Release notes](https://github.com/SonarSource/sonar-scanner-msbuild/releases/tag/9.2.1.110358)
***
**9.2.0** **2025-02-19**\ DEPRECATED. Support for local trust store for private and self-signed certificates.\
Download scanner for: [.NET Global Tool](https://www.nuget.org/packages/dotnet-sonarscanner) [.NET Core 3.1+](https://github.com/SonarSource/sonar-scanner-msbuild/releases/download/9.2.0.110275/sonar-scanner-9.2.0.110275-net.zip) [.NET Framework 4.6.2+](https://github.com/SonarSource/sonar-scanner-msbuild/releases/download/9.2.0.110275/sonar-scanner-9.2.0.110275-net-framework.zip)\
\
[Release notes](https://github.com/SonarSource/sonar-scanner-msbuild/releases/tag/9.2.0.110275)
***
**9.1.0** **2025-02-06**\ Read new properties for downloading plugins\
Download scanner for: [.NET Global Tool](https://www.nuget.org/packages/dotnet-sonarscanner) [.NET Core 3.1+](https://github.com/SonarSource/sonar-scanner-msbuild/releases/download/9.1.0.109947/sonar-scanner-9.1.0.109947-net.zip) [.NET Framework 4.6.2+](https://github.com/SonarSource/sonar-scanner-msbuild/releases/download/9.1.0.109947/sonar-scanner-9.1.0.109947-net-framework.zip)\
\
[Release notes](https://github.com/SonarSource/sonar-scanner-msbuild/releases/tag/9.1.0.109947)
***
**9.0.2** **2024-11-12**\ sonar.projectBaseDir passed through extraProperties is respected with Azure DevOps extensions. Do not fail during file indexing when a directory cannot be accessed.\
Download scanner for: [.NET Global Tool](https://www.nuget.org/packages/dotnet-sonarscanner) [.NET Core 3.1+](https://github.com/SonarSource/sonar-scanner-msbuild/releases/download/9.0.2.104486/sonar-scanner-9.0.2.104486-net.zip) [.NET Framework 4.6.2+](https://github.com/SonarSource/sonar-scanner-msbuild/releases/download/9.0.2.104486/sonar-scanner-9.0.2.104486-net-framework.zip)\
\
[Release notes](https://github.com/SonarSource/sonar-scanner-msbuild/releases/tag/9.0.2.104486)
***
**9.0.1** **2024-10-25**\ Fix projectBaseDir path detection on Azure DevOps Linux agents.\
Download scanner for: [.NET Global Tool](https://www.nuget.org/packages/dotnet-sonarscanner) [.NET Core 3.1+](https://github.com/SonarSource/sonar-scanner-msbuild/releases/download/9.0.1.102776/sonar-scanner-9.0.1.102776-net.zip) [.NET Framework 4.6.2+](https://github.com/SonarSource/sonar-scanner-msbuild/releases/download/9.0.1.102776/sonar-scanner-9.0.1.102776-net-framework.zip)\
\
[Release notes](https://github.com/SonarSource/sonar-scanner-msbuild/releases/tag/9.0.1.102776)
***
**9.0.0** **2024-09-27**\ Ignore sonar.sources and sonar.tests properties.\
Download scanner for: [.NET Global Tool](https://www.nuget.org/packages/dotnet-sonarscanner) [.NET Core 3.1+](https://github.com/SonarSource/sonar-scanner-msbuild/releases/download/9.0.0.100868/sonar-scanner-9.0.0.100868-net.zip) [.NET Framework 4.6.2+](https://github.com/SonarSource/sonar-scanner-msbuild/releases/download/9.0.0.100868/sonar-scanner-9.0.0.100868-net-framework.zip)\
\
[Release notes](https://github.com/SonarSource/sonar-scanner-msbuild/releases/tag/9.0.0.100868)
***
**8.0.3** **2024-09-13**\ Exclude XML files from the new automatic analysis. Do not crash on mlaformed paths. Make sure server-side exclusions are not overridden.\
Download scanner for: [.NET Global Tool](https://www.nuget.org/packages/dotnet-sonarscanner) [.NET Core 3.1+](https://github.com/SonarSource/sonar-scanner-msbuild/releases/download/8.0.3.99785/sonar-scanner-8.0.3.99785-net.zip) [.NET Framework 4.6.2+](https://github.com/SonarSource/sonar-scanner-msbuild/releases/download/8.0.3.99785/sonar-scanner-8.0.3.99785-net-framework.zip)\
\
[Release notes](https://github.com/SonarSource/sonar-scanner-msbuild/releases/tag/8.0.3.99785)
***
**8.0.2** **2024-09-02**\ Re-enabled sonar.exclusions support. Automatically exclude files passed-in as coverage. Skip transient projects that do not exist after the build.\
Download scanner for: [.NET Global Tool](https://www.nuget.org/packages/dotnet-sonarscanner) [.NET Core 3.1+](https://github.com/SonarSource/sonar-scanner-msbuild/releases/download/8.0.2.98917/sonar-scanner-8.0.2.98917-net.zip) [.NET Framework 4.6.2+](https://github.com/SonarSource/sonar-scanner-msbuild/releases/download/8.0.2.98917/sonar-scanner-8.0.2.98917-net-framework.zip)\
\
[Release notes](https://github.com/SonarSource/sonar-scanner-msbuild/releases/tag/8.0.2.98917)
***
**8.0.1** **2024-08-21**\ Bug fix release which addresses two issues, improvements on messages emmitted during the analysis.\
Download scanner for: [.NET Global Tool](https://www.nuget.org/packages/dotnet-sonarscanner) [.NET Core 3.1+](https://github.com/SonarSource/sonar-scanner-msbuild/releases/download/8.0.1.97834/sonar-scanner-8.0.1.97834-net.zip) [.NET Framework 4.6.2+](https://github.com/SonarSource/sonar-scanner-msbuild/releases/download/8.0.1.97834/sonar-scanner-8.0.1.97834-net-framework.zip)\
\
[Release notes](https://github.com/SonarSource/sonar-scanner-msbuild/releases/tag/8.0.1.97834)
***
**8.0** **2024-08-12**\ The scanner is now supporting multi-language analysis. Files for other languages are automatically picked up (SQL, YAML, XML, JSON, CSS, HTML, JS, TS)\
Download scanner for: [.NET Global Tool](https://www.nuget.org/packages/dotnet-sonarscanner) [.NET Core 3.1+](https://github.com/SonarSource/sonar-scanner-msbuild/releases/download/8.0.0.97025/sonar-scanner-8.0.0.97025-net.zip) [.NET Framework 4.6.2+](https://github.com/SonarSource/sonar-scanner-msbuild/releases/download/8.0.0.97025/sonar-scanner-8.0.0.97025-net-framework.zip)\
\
[Release notes](https://github.com/SonarSource/sonar-scanner-msbuild/releases/tag/8.0.0.97025)
***
**7.1.1** **2024-07-24**\ Fixed a small issue when not specifying sonar.host.url (defaults to )\
Download scanner for: [.NET Global Tool](https://www.nuget.org/packages/dotnet-sonarscanner) [.NET Core 3.1+](https://github.com/SonarSource/sonar-scanner-msbuild/releases/download/7.1.1.96069/sonar-scanner-7.1.1.96069-net.zip) [.NET Framework 4.6.2+](https://github.com/SonarSource/sonar-scanner-msbuild/releases/download/7.1.1.96069/sonar-scanner-7.1.1.96069-net-framework.zip)\
\
[Release notes](https://github.com/SonarSource/sonar-scanner-msbuild/releases/tag/7.1.1.96069)
***
**7.1** **2024-07-19**\ Fixed a small issue when not specifying sonar.host.url (defaults to )\
Download scanner for: [.NET Global Tool](https://www.nuget.org/packages/dotnet-sonarscanner) [.NET Core 3.1+](https://github.com/SonarSource/sonar-scanner-msbuild/releases/download/7.1.0.95705/sonar-scanner-7.1.0.95705-net.zip) [.NET Framework 4.6.2+](https://github.com/SonarSource/sonar-scanner-msbuild/releases/download/7.1.0.95705/sonar-scanner-7.1.0.95705-net-framework.zip)\
\
[Release notes](https://github.com/SonarSource/sonar-scanner-msbuild/releases/tag/7.1.0.95705)
***
**7.0** **2024-07-18**\ This version does not require a JRE to be present on the machine anymore\
Download scanner for: [.NET Global Tool](https://www.nuget.org/packages/dotnet-sonarscanner) [.NET Core 3.1+](https://github.com/SonarSource/sonar-scanner-msbuild/releases/download/7.0.0.95646/sonar-scanner-7.0.0.95646-net.zip) [.NET Framework 4.6.2+](https://github.com/SonarSource/sonar-scanner-msbuild/releases/download/7.0.0.95646/sonar-scanner-7.0.0.95646-net-framework.zip)\
\
[Release notes](https://github.com/SonarSource/sonar-scanner-msbuild/releases/tag/7.0.0.95646)
***
**6.2** **2024-02-16**\ Fixes the failing analysis on macOS with .NET 8.0. New optional sonar.http.timeout command line parameter\
Download scanner for: [.NET Global Tool](https://www.nuget.org/packages/dotnet-sonarscanner) [.NET Core 3.1+](https://github.com/SonarSource/sonar-scanner-msbuild/releases/download/6.2.0.85879/sonar-scanner-6.2.0.85879-net.zip) [.NET Framework 4.6.2+](https://github.com/SonarSource/sonar-scanner-msbuild/releases/download/6.2.0.85879/sonar-scanner-6.2.0.85879-net-framework.zip)\
\
[Release notes](https://github.com/SonarSource/sonar-scanner-msbuild/releases/tag/6.2.0.85879)
***
**6.1** **2024-01-29**\ Drop support for MSBuild 14, deprecate MSBuild 15\
Download scanner for: [.NET Global Tool](https://www.nuget.org/packages/dotnet-sonarscanner) [.NET Core 3.1+](https://github.com/SonarSource/sonar-scanner-msbuild/releases/download/6.1.0.83647/sonar-scanner-6.1.0.83647-net.zip) [.NET Framework 4.6.2+](https://github.com/SonarSource/sonar-scanner-msbuild/releases/download/6.1.0.83647/sonar-scanner-6.1.0.83647-net-framework.zip)\
\
[Release notes](https://github.com/SonarSource/sonar-scanner-msbuild/releases/tag/6.1.0.83647)
***
**6.0** **2023-12-04**\ Packaging change, drop support for .Net Framework 4.6, Net 2.1, and .Net 3.0. Drop Java 11 support. Drop support of SonarQube versions prior to 8.9\
Download scanner for: [.NET Global Tool](https://www.nuget.org/packages/dotnet-sonarscanner) [.NET Core 3.1+](https://github.com/SonarSource/sonar-scanner-msbuild/releases/download/6.0.0.81631/sonar-scanner-6.0.0.81631-net.zip) [.NET Framework 4.6.2+](https://github.com/SonarSource/sonar-scanner-msbuild/releases/download/6.0.0.81631/sonar-scanner-6.0.0.81631-net-framework.zip)\
\
[Release notes](https://github.com/SonarSource/sonar-scanner-msbuild/releases/tag/6.0.0.81631)
***
**5.15.1** **2024-03-26**\ Fix analysis on MacOSX with .NET 8 when begin runtime doesn't match with build runtime\
Download scanner for: [.NET 5+](https://github.com/SonarSource/sonar-scanner-msbuild/releases/download/5.15.1.88158/sonar-scanner-msbuild-5.15.1.88158-net5.0.zip) [.NET Global Tool](https://www.nuget.org/packages/dotnet-sonarscanner) [.NET Core 3.1](https://github.com/SonarSource/sonar-scanner-msbuild/releases/download/5.15.1.88158/sonar-scanner-msbuild-5.15.1.88158-netcoreapp3.0.zip) [.NET Core 2.1](https://github.com/SonarSource/sonar-scanner-msbuild/releases/download/5.15.1.88158/sonar-scanner-msbuild-5.15.1.88158-netcoreapp2.0.zip) [.NET Framework 4.6](https://github.com/SonarSource/sonar-scanner-msbuild/releases/download/5.15.1.88158/sonar-scanner-msbuild-5.15.1.88158-net46.zip)\
\
[Release notes](https://github.com/SonarSource/sonar-scanner-msbuild/releases/tag/5.15.1.88158)
***
**5.15** **2023-11-20**\ Add an option to specify the scanner's temporary working directory\
Download scanner for: [.NET 5+](https://github.com/SonarSource/sonar-scanner-msbuild/releases/download/5.15.0.80890/sonar-scanner-msbuild-5.15.0.80890-net5.0.zip) [.NET Global Tool](https://www.nuget.org/packages/dotnet-sonarscanner) [.NET Core 3.1](https://github.com/SonarSource/sonar-scanner-msbuild/releases/download/5.15.0.80890/sonar-scanner-msbuild-5.15.0.80890-netcoreapp3.0.zip) [.NET Core 2.1](https://github.com/SonarSource/sonar-scanner-msbuild/releases/download/5.15.0.80890/sonar-scanner-msbuild-5.15.0.80890-netcoreapp2.0.zip) [.NET Framework 4.6](https://github.com/SonarSource/sonar-scanner-msbuild/releases/download/5.15.0.80890/sonar-scanner-msbuild-5.15.0.80890-net46.zip)\
\
[Release notes](https://github.com/SonarSource/sonar-scanner-msbuild/releases/tag/5.15.0.80890)
***
**5.14** **2023-10-02**\ Support upcoming SonarQube 10.4 API changes\
Download scanner for: [.NET 5+](https://github.com/SonarSource/sonar-scanner-msbuild/releases/download/5.14.0.78575/sonar-scanner-msbuild-5.14.0.78575-net5.0.zip) [.NET Global Tool](https://www.nuget.org/packages/dotnet-sonarscanner) [.NET Core 3.1](https://github.com/SonarSource/sonar-scanner-msbuild/releases/download/5.14.0.78575/sonar-scanner-msbuild-5.14.0.78575-netcoreapp3.0.zip) [.NET Core 2.1](https://github.com/SonarSource/sonar-scanner-msbuild/releases/download/5.14.0.78575/sonar-scanner-msbuild-5.14.0.78575-netcoreapp2.0.zip) [.NET Framework 4.6](https://github.com/SonarSource/sonar-scanner-msbuild/releases/download/5.14.0.78575/sonar-scanner-msbuild-5.14.0.78575-net46.zip)\
\
[Release notes](https://github.com/SonarSource/sonar-scanner-msbuild/releases/tag/5.14.0.78575)
***
**5.13.1** **2023-08-14**\ SonarScanner CLI update\
Download scanner for: [.NET 5+](https://github.com/SonarSource/sonar-scanner-msbuild/releases/download/5.13.1.76110/sonar-scanner-msbuild-5.13.1.76110-net5.0.zip) [.NET Global Tool](https://www.nuget.org/packages/dotnet-sonarscanner) [.NET Core 3.1](https://github.com/SonarSource/sonar-scanner-msbuild/releases/download/5.13.1.76110/sonar-scanner-msbuild-5.13.1.76110-netcoreapp3.0.zip) [.NET Core 2.1](https://github.com/SonarSource/sonar-scanner-msbuild/releases/download/5.13.1.76110/sonar-scanner-msbuild-5.13.1.76110-netcoreapp2.0.zip) [.NET Framework 4.6](https://github.com/SonarSource/sonar-scanner-msbuild/releases/download/5.13.1.76110/sonar-scanner-msbuild-5.13.1.76110-net46.zip)\
\
[Release notes](https://github.com/SonarSource/sonar-scanner-msbuild/releases/tag/5.13.1.76110)
***
**5.13** **2023-04-05**\ Support for sonar.token parameter and improved error messages\
Download scanner for: [.NET 5+](https://github.com/SonarSource/sonar-scanner-msbuild/releases/download/5.13.0.66756/sonar-scanner-msbuild-5.13.0.66756-net5.0.zip) [.NET Global Tool](https://www.nuget.org/packages/dotnet-sonarscanner) [.NET Core 3.1](https://github.com/SonarSource/sonar-scanner-msbuild/releases/download/5.13.0.66756/sonar-scanner-msbuild-5.13.0.66756-netcoreapp3.0.zip) [.NET Core 2.1](https://github.com/SonarSource/sonar-scanner-msbuild/releases/download/5.13.0.66756/sonar-scanner-msbuild-5.13.0.66756-netcoreapp2.0.zip) [.NET Framework 4.6](https://github.com/SonarSource/sonar-scanner-msbuild/releases/download/5.13.0.66756/sonar-scanner-msbuild-5.13.0.66756-net46.zip)\
\
[Release notes](https://github.com/SonarSource/sonar-scanner-msbuild/releases/tag/5.13.0.66756)
***
**5.12** **2023-03-17**\ Fast PR Analysis Support For Azure Devops\
Download scanner for: [.NET 5+](https://github.com/SonarSource/sonar-scanner-msbuild/releases/download/5.12.0.64969/sonar-scanner-msbuild-5.12.0.64969-net5.0.zip) [.NET Global Tool](https://www.nuget.org/packages/dotnet-sonarscanner) [.NET Core 3.1](https://github.com/SonarSource/sonar-scanner-msbuild/releases/download/5.12.0.64969/sonar-scanner-msbuild-5.12.0.64969-netcoreapp3.0.zip) [.NET Core 2.1](https://github.com/SonarSource/sonar-scanner-msbuild/releases/download/5.12.0.64969/sonar-scanner-msbuild-5.12.0.64969-netcoreapp2.0.zip) [.NET Framework 4.6](https://github.com/SonarSource/sonar-scanner-msbuild/releases/download/5.12.0.64969/sonar-scanner-msbuild-5.12.0.64969-net46.zip)\
\
[Release notes](https://github.com/SonarSource/sonar-scanner-msbuild/releases/tag/5.12.0.64969)
***
**5.11** **2023-01-27**\ Fast PR Analysis Compatibility Fix\
Download scanner for: [.NET 5+](https://github.com/SonarSource/sonar-scanner-msbuild/releases/download/5.11.0.60783/sonar-scanner-msbuild-5.11.0.60783-net5.0.zip) [.NET Global Tool](https://www.nuget.org/packages/dotnet-sonarscanner) [.NET Core 3.1](https://github.com/SonarSource/sonar-scanner-msbuild/releases/download/5.11.0.60783/sonar-scanner-msbuild-5.11.0.60783-netcoreapp3.0.zip) [.NET Core 2.1](https://github.com/SonarSource/sonar-scanner-msbuild/releases/download/5.11.0.60783/sonar-scanner-msbuild-5.11.0.60783-netcoreapp2.0.zip) [.NET Framework 4.6](https://github.com/SonarSource/sonar-scanner-msbuild/releases/download/5.11.0.60783/sonar-scanner-msbuild-5.11.0.60783-net46.zip)\
\
[Release notes](https://github.com/SonarSource/sonar-scanner-msbuild/releases/tag/5.11.0.60783)
***
**5.10** **2023-01-13**\ Improved FIPS Compliance\
Download scanner for: [.NET 5+](https://github.com/SonarSource/sonar-scanner-msbuild/releases/download/5.10.0.59947/sonar-scanner-msbuild-5.10.0.59947-net5.0.zip) [.NET Global Tool](https://www.nuget.org/packages/dotnet-sonarscanner) [.NET Core 3.1](https://github.com/SonarSource/sonar-scanner-msbuild/releases/download/5.10.0.59947/sonar-scanner-msbuild-5.10.0.59947-netcoreapp3.0.zip) [.NET Core 2.1](https://github.com/SonarSource/sonar-scanner-msbuild/releases/download/5.10.0.59947/sonar-scanner-msbuild-5.10.0.59947-netcoreapp2.0.zip) [.NET Framework 4.6](https://github.com/SonarSource/sonar-scanner-msbuild/releases/download/5.10.0.59947/sonar-scanner-msbuild-5.10.0.59947-net46.zip)\
\
[Release notes](https://github.com/SonarSource/sonar-scanner-msbuild/releases/tag/5.10.0.59947)
***
**5.9.2** **2022-12-14**\ Bug Fix Release related to PR analysis\
Download scanner for: [.NET 5+](https://github.com/SonarSource/sonar-scanner-msbuild/releases/download/5.9.2.58699/sonar-scanner-msbuild-5.9.2.58699-net5.0.zip) [.NET Global Tool](https://www.nuget.org/packages/dotnet-sonarscanner) [.NET Core 3.1](https://github.com/SonarSource/sonar-scanner-msbuild/releases/download/5.9.2.58699/sonar-scanner-msbuild-5.9.2.58699-netcoreapp3.0.zip) [.NET Core 2.1](https://github.com/SonarSource/sonar-scanner-msbuild/releases/download/5.9.2.58699/sonar-scanner-msbuild-5.9.2.58699-netcoreapp2.0.zip) [.NET Framework 4.6](https://github.com/SonarSource/sonar-scanner-msbuild/releases/download/5.9.2.58699/sonar-scanner-msbuild-5.9.2.58699-net46.zip)\
\
[Release notes](https://github.com/SonarSource/sonar-scanner-msbuild/releases/tag/5.9.2.58699)
***
**5.9.1** **2022-12-06**\ Bug Fix Release\
Download scanner for: [.NET 5+](https://github.com/SonarSource/sonar-scanner-msbuild/releases/download/5.9.1.58166/sonar-scanner-msbuild-5.9.1.58166-net5.0.zip) [.NET Global Tool](https://www.nuget.org/packages/dotnet-sonarscanner) [.NET Core 3.1](https://github.com/SonarSource/sonar-scanner-msbuild/releases/download/5.9.1.58166/sonar-scanner-msbuild-5.9.1.58166-netcoreapp3.0.zip) [.NET Core 2.1](https://github.com/SonarSource/sonar-scanner-msbuild/releases/download/5.9.1.58166/sonar-scanner-msbuild-5.9.1.58166-netcoreapp2.0.zip) [.NET Framework 4.6](https://github.com/SonarSource/sonar-scanner-msbuild/releases/download/5.9.1.58166/sonar-scanner-msbuild-5.9.1.58166-net46.zip)\
\
[Release notes](https://github.com/SonarSource/sonar-scanner-msbuild/releases/tag/5.9.1.58166)
***
**5.9.0** **2022-12-01**\ .NET 7 bug fixes and preparation for fast PR analysis\
Download scanner for: [.NET 5+](https://github.com/SonarSource/sonar-scanner-msbuild/releases/download/5.9.0.57893/sonar-scanner-msbuild-5.9.0.57893-net5.0.zip) [.NET Global Tool](https://www.nuget.org/packages/dotnet-sonarscanner) [.NET Core 3.1](https://github.com/SonarSource/sonar-scanner-msbuild/releases/download/5.9.0.57893/sonar-scanner-msbuild-5.9.0.57893-netcoreapp3.0.zip) [.NET Core 2.1](https://github.com/SonarSource/sonar-scanner-msbuild/releases/download/5.9.0.57893/sonar-scanner-msbuild-5.9.0.57893-netcoreapp2.0.zip) [.NET Framework 4.6](https://github.com/SonarSource/sonar-scanner-msbuild/releases/download/5.9.0.57893/sonar-scanner-msbuild-5.9.0.57893-net46.zip)\
\
[Release notes](https://github.com/SonarSource/sonar-scanner-msbuild/releases/tag/5.9.0.57893)
***
**5.8.0** **2022-08-24**\ Analysis of Azure Functions on Github Actions no longer hard fails with default behavior. See release notes for details.\
Download scanner for: [.NET 5+](https://github.com/SonarSource/sonar-scanner-msbuild/releases/download/5.8.0.52797/sonar-scanner-msbuild-5.8.0.52797-net5.0.zip) [.NET Global Tool](https://www.nuget.org/packages/dotnet-sonarscanner) [.NET Core 3.1](https://github.com/SonarSource/sonar-scanner-msbuild/releases/download/5.8.0.52797/sonar-scanner-msbuild-5.8.0.52797-netcoreapp3.0.zip) [.NET Core 2.1](https://github.com/SonarSource/sonar-scanner-msbuild/releases/download/5.8.0.52797/sonar-scanner-msbuild-5.8.0.52797-netcoreapp2.0.zip) [.NET Framework 4.6](https://github.com/SonarSource/sonar-scanner-msbuild/releases/download/5.8.0.52797/sonar-scanner-msbuild-5.8.0.52797-net46.zip)\
\
[Release notes](https://github.com/SonarSource/sonar-scanner-msbuild/releases/tag/5.8.0.52797)
***
**5.7.2** **2022-07-12**\ Log warning instead of error when not parsing environment variables to avoid hard failure when Newtonsoft does not get resolved\
Download scanner for: [.NET 5+](https://github.com/SonarSource/sonar-scanner-msbuild/releases/download/5.7.2.50892/sonar-scanner-msbuild-5.7.2.50892-net5.0.zip) [.NET Global Tool](https://www.nuget.org/packages/dotnet-sonarscanner) [.NET Core 3.1](https://github.com/SonarSource/sonar-scanner-msbuild/releases/download/5.7.2.50892/sonar-scanner-msbuild-5.7.2.50892-netcoreapp3.0.zip) [.NET Core 2.1](https://github.com/SonarSource/sonar-scanner-msbuild/releases/download/5.7.2.50892/sonar-scanner-msbuild-5.7.2.50892-netcoreapp2.0.zip) [.NET Framework 4.6](https://github.com/SonarSource/sonar-scanner-msbuild/releases/download/5.7.2.50892/sonar-scanner-msbuild-5.7.2.50892-net46.zip)\
\
[Release notes](https://github.com/SonarSource/sonar-scanner-msbuild/releases/tag/5.7.2.50892)
***
**5.7.1** **2022-06-21**\ Bug Fix Release\
Download scanner for: [.NET 5+](https://github.com/SonarSource/sonar-scanner-msbuild/releases/download/5.7.1.49528/sonar-scanner-msbuild-5.7.1.49528-net5.0.zip) [.NET Global Tool](https://www.nuget.org/packages/dotnet-sonarscanner) [.NET Core 3.1](https://github.com/SonarSource/sonar-scanner-msbuild/releases/download/5.7.1.49528/sonar-scanner-msbuild-5.7.1.49528-netcoreapp3.0.zip) [.NET Core 2.1](https://github.com/SonarSource/sonar-scanner-msbuild/releases/download/5.7.1.49528/sonar-scanner-msbuild-5.7.1.49528-netcoreapp2.0.zip) [.NET Framework 4.6](https://github.com/SonarSource/sonar-scanner-msbuild/releases/download/5.7.1.49528/sonar-scanner-msbuild-5.7.1.49528-net46.zip)\
\
[Release notes](https://github.com/SonarSource/sonar-scanner-msbuild/releases/tag/5.7.1.49528)
***
**5.7.0** **2022-06-20**\ Bug Fix Release\
Download scanner for: [.NET 5+](https://github.com/SonarSource/sonar-scanner-msbuild/releases/download/5.7.0.49456/sonar-scanner-msbuild-5.7.0.49456-net5.0.zip) [.NET Global Tool](https://www.nuget.org/packages/dotnet-sonarscanner) [.NET Core 3.1](https://github.com/SonarSource/sonar-scanner-msbuild/releases/download/5.7.0.49456/sonar-scanner-msbuild-5.7.0.49456-netcoreapp3.0.zip) [.NET Core 2.1](https://github.com/SonarSource/sonar-scanner-msbuild/releases/download/5.7.0.49456/sonar-scanner-msbuild-5.7.0.49456-netcoreapp2.0.zip) [.NET Framework 4.6](https://github.com/SonarSource/sonar-scanner-msbuild/releases/download/5.7.0.49456/sonar-scanner-msbuild-5.7.0.49456-net46.zip)\
\
[Release notes](https://github.com/SonarSource/sonar-scanner-msbuild/releases/tag/5.7.0.49456)
***
**5.6.0** **2022-05-30**\ Send warnings to users of versions where support will change\
Download scanner for: [.NET 5+](https://github.com/SonarSource/sonar-scanner-msbuild/releases/download/5.6.0.48455/sonar-scanner-msbuild-5.6.0.48455-net5.0.zip) [.NET Global Tool](https://www.nuget.org/packages/dotnet-sonarscanner) [.NET Core 3.1](https://github.com/SonarSource/sonar-scanner-msbuild/releases/download/5.6.0.48455/sonar-scanner-msbuild-5.6.0.48455-netcoreapp3.0.zip) [.NET Core 2.1](https://github.com/SonarSource/sonar-scanner-msbuild/releases/download/5.6.0.48455/sonar-scanner-msbuild-5.6.0.48455-netcoreapp2.0.zip) [.NET Framework 4.6](https://github.com/SonarSource/sonar-scanner-msbuild/releases/download/5.6.0.48455/sonar-scanner-msbuild-5.6.0.48455-net46.zip)\
\
[Release notes](https://github.com/SonarSource/sonar-scanner-msbuild/releases/tag/5.6.0.48455)
***
**5.5.3** **2022-02-14**\ Support for .NET 6 Web Projects, TLS Version selection logic removed - now responsibility of OS, Fix "MSB3677 Unable to move file" regression\
Download scanner for: [.NET 5+](https://github.com/SonarSource/sonar-scanner-msbuild/releases/download/5.5.3.43281/sonar-scanner-msbuild-5.5.3.43281-net5.0.zip) [.NET Global Tool](https://www.nuget.org/packages/dotnet-sonarscanner) [.NET Core 2.1](https://github.com/SonarSource/sonar-scanner-msbuild/releases/download/5.5.3.43281/sonar-scanner-msbuild-5.5.3.43281-netcoreapp2.0.zip) [.NET Framework 4.6](https://github.com/SonarSource/sonar-scanner-msbuild/releases/download/5.5.3.43281/sonar-scanner-msbuild-5.5.3.43281-net46.zip)\
\
[Release notes](https://github.com/SonarSource/sonar-scanner-msbuild/releases/tag/5.5.3.43281)
***
**5.5.2** **2022-02-10**\ Support for .NET 6 Web Projects, TLS Version selection logic removed, now responsibility of OS\
Download scanner for: [.NET 5+](https://github.com/SonarSource/sonar-scanner-msbuild/releases/download/5.5.2.43124/sonar-scanner-msbuild-5.5.2.43124-net5.0.zip) [.NET Global Tool](https://www.nuget.org/packages/dotnet-sonarscanner) [.NET Core 2.1](https://github.com/SonarSource/sonar-scanner-msbuild/releases/download/5.5.2.43124/sonar-scanner-msbuild-5.5.2.43124-netcoreapp2.0.zip) [.NET Framework 4.6](https://github.com/SonarSource/sonar-scanner-msbuild/releases/download/5.5.2.43124/sonar-scanner-msbuild-5.5.2.43124-net46.zip)\
\
[Release notes](https://github.com/SonarSource/sonar-scanner-msbuild/releases/tag/5.5.2.43124)
***
**5.5.1** **2022-02-08**\ Support for .NET 6 Web Projects, support TLS 1.3 where supported by environment\
Download scanner for: [.NET 5+](https://github.com/SonarSource/sonar-scanner-msbuild/releases/download/5.5.1.42999/sonar-scanner-msbuild-5.5.1.42999-net5.0.zip) [.NET Global Tool](https://www.nuget.org/packages/dotnet-sonarscanner) [.NET Core 2.1](https://github.com/SonarSource/sonar-scanner-msbuild/releases/download/5.5.1.42999/sonar-scanner-msbuild-5.5.1.42999-netcoreapp2.0.zip) [.NET Framework 4.6](https://github.com/SonarSource/sonar-scanner-msbuild/releases/download/5.5.1.42999/sonar-scanner-msbuild-5.5.1.42999-net46.zip)\
\
[Release notes](https://github.com/SonarSource/sonar-scanner-msbuild/releases/tag/5.5.1.42999)
***
**5.5.0** **2022-02-07**\ Support for .NET 6 Web Projects, support TLS 1.3\
Download scanner for: [.NET 5+](https://github.com/SonarSource/sonar-scanner-msbuild/releases/download/5.5.0.42949/sonar-scanner-msbuild-5.5.0.42949-net5.0.zip) [.NET Global Tool](https://www.nuget.org/packages/dotnet-sonarscanner) [.NET Core 2.1](https://github.com/SonarSource/sonar-scanner-msbuild/releases/download/5.5.0.42949/sonar-scanner-msbuild-5.5.0.42949-netcoreapp2.0.zip) [.NET Framework 4.6](https://github.com/SonarSource/sonar-scanner-msbuild/releases/download/5.5.0.42949/sonar-scanner-msbuild-5.5.0.42949-net46.zip)\
\
[Release notes](https://github.com/SonarSource/sonar-scanner-msbuild/releases/tag/5.5.0.42949)
***
**5.4.1** **2021-12-23**\ Updated Newtonsoft.Json to latest\
Download scanner for: [.NET 5+](https://github.com/SonarSource/sonar-scanner-msbuild/releases/download/5.4.1.41282/sonar-scanner-msbuild-5.4.1.41282-net5.0.zip) [.NET Global Tool](https://www.nuget.org/packages/dotnet-sonarscanner) [.NET Core 2.1](https://github.com/SonarSource/sonar-scanner-msbuild/releases/download/5.4.1.41282/sonar-scanner-msbuild-5.4.1.41282-netcoreapp2.0.zip) [.NET Framework 4.6](https://github.com/SonarSource/sonar-scanner-msbuild/releases/download/5.4.1.41282/sonar-scanner-msbuild-5.4.1.41282-net46.zip)\
\
[Release notes](https://github.com/SonarSource/sonar-scanner-msbuild/releases/tag/5.4.1.41282)
***
**5.4** **2021-11-26**\ Updated .NET 5 Version to be forward compatible and support .NET 6 environments\
Download scanner for: [.NET 5+](https://github.com/SonarSource/sonar-scanner-msbuild/releases/download/5.4.0.40033/sonar-scanner-msbuild-5.4.0.40033-net5.0.zip) [.NET Global Tool](https://www.nuget.org/packages/dotnet-sonarscanner) [.NET Core 2.1](https://github.com/SonarSource/sonar-scanner-msbuild/releases/download/5.4.0.40033/sonar-scanner-msbuild-5.4.0.40033-netcoreapp2.0.zip) [.NET Framework 4.6](https://github.com/SonarSource/sonar-scanner-msbuild/releases/download/5.4.0.40033/sonar-scanner-msbuild-5.4.0.40033-net46.zip)\
\
[Release notes](https://github.com/SonarSource/sonar-scanner-msbuild/releases/tag/5.4.0.40033)
***
**5.3.2** **2021-10-28**\ Added parameters sonar.clientcert.path and sonar.clientcert.password for securing connections to SonarQube\
Download scanner for: [.NET 5+](https://github.com/SonarSource/sonar-scanner-msbuild/releases/download/5.3.2.38712/sonar-scanner-msbuild-5.3.2.38712-net5.0.zip) [.NET Global Tool](https://www.nuget.org/packages/dotnet-sonarscanner) [.NET Core 2.1](https://github.com/SonarSource/sonar-scanner-msbuild/releases/download/5.3.2.38712/sonar-scanner-msbuild-5.3.2.38712-netcoreapp2.0.zip) [.NET Framework 4.6](https://github.com/SonarSource/sonar-scanner-msbuild/releases/download/5.3.2.38712/sonar-scanner-msbuild-5.3.2.38712-net46.zip)\
\
[Release notes](https://github.com/SonarSource/sonar-scanner-msbuild/releases/tag/5.3.2.38712)
***
**5.3.1** **2021-09-01**\ Update scanner-cli, Compile with .NET Core 2.1 and 3.1, Improve uninstall of targets if multiple builds in the same pipeline\
Download scanner for: [.NET 5+](https://github.com/SonarSource/sonar-scanner-msbuild/releases/download/5.3.1.36242/sonar-scanner-msbuild-5.3.1.36242-net5.0.zip) [.NET Global Tool](https://www.nuget.org/packages/dotnet-sonarscanner) [.NET Core 2.1](https://github.com/SonarSource/sonar-scanner-msbuild/releases/download/5.3.1.36242/sonar-scanner-msbuild-5.3.1.36242-netcoreapp2.0.zip) [.NET Framework 4.6](https://github.com/SonarSource/sonar-scanner-msbuild/releases/download/5.3.1.36242/sonar-scanner-msbuild-5.3.1.36242-net46.zip)\
\
[Release notes](https://github.com/SonarSource/sonar-scanner-msbuild/releases/tag/5.3.1.36242)
***
**5.2.2** **2021-06-24**\ Fix test assembly detection + mTLS certificate with password\
Download scanner for: [.NET 5+](https://github.com/SonarSource/sonar-scanner-msbuild/releases/download/5.2.2.33595/sonar-scanner-msbuild-5.2.2.33595-net5.0.zip) [.NET Global Tool](https://www.nuget.org/packages/dotnet-sonarscanner) [.NET Core 2.1](https://github.com/SonarSource/sonar-scanner-msbuild/releases/download/5.2.2.33595/sonar-scanner-msbuild-5.2.2.33595-netcoreapp2.0.zip) [.NET Framework 4.6](https://github.com/SonarSource/sonar-scanner-msbuild/releases/download/5.2.2.33595/sonar-scanner-msbuild-5.2.2.33595-net46.zip)\
\
[Release notes](https://github.com/SonarSource/sonar-scanner-msbuild/releases/tag/5.2.2.33595)
***
**5.2.1** **2021-04-30**\ Update embedded SonarScanner CLI\
Download scanner for: [.NET 5+](https://github.com/SonarSource/sonar-scanner-msbuild/releases/download/5.2.1.31210/sonar-scanner-msbuild-5.2.1.31210-net5.0.zip) [.NET Global Tool](https://www.nuget.org/packages/dotnet-sonarscanner) [.NET Core 2.1](https://github.com/SonarSource/sonar-scanner-msbuild/releases/download/5.2.1.31210/sonar-scanner-msbuild-5.2.1.31210-netcoreapp2.0.zip) [.NET Framework 4.6](https://github.com/SonarSource/sonar-scanner-msbuild/releases/download/5.2.1.31210/sonar-scanner-msbuild-5.2.1.31210-net46.zip)\
\
[Release notes](https://github.com/SonarSource/sonar-scanner-msbuild/releases/tag/5.2.1.31210)
***
**5.2** **2021-04-09**\ Support for test code analysis\
Download scanner for: [.NET 5+](https://github.com/SonarSource/sonar-scanner-msbuild/releases/download/5.2.0.29862/sonar-scanner-msbuild-5.2.0.29862-net5.0.zip) [.NET Global Tool](https://www.nuget.org/packages/dotnet-sonarscanner) [.NET Core 2.1](https://github.com/SonarSource/sonar-scanner-msbuild/releases/download/5.2.0.29862/sonar-scanner-msbuild-5.2.0.29862-netcoreapp2.0.zip) [.NET Framework 4.6](https://github.com/SonarSource/sonar-scanner-msbuild/releases/download/5.2.0.29862/sonar-scanner-msbuild-5.2.0.29862-net46.zip)\
\
[Release notes](https://github.com/SonarSource/sonar-scanner-msbuild/releases/tag/5.2.0.29862)
***
**5.1** **2021-03-09**\ Support for .NET 5, support for solo .NET Core project (without .sln)\
Download scanner for: [.NET 5+](https://github.com/SonarSource/sonar-scanner-msbuild/releases/download/5.1.0.28487/sonar-scanner-msbuild-5.1.0.28487-net5.0.zip) [.NET Global Tool](https://www.nuget.org/packages/dotnet-sonarscanner) [.NET Core 2.1](https://github.com/SonarSource/sonar-scanner-msbuild/releases/download/5.1.0.28487/sonar-scanner-msbuild-5.1.0.28487-netcoreapp2.0.zip) [.NET Framework 4.6](https://github.com/SonarSource/sonar-scanner-msbuild/releases/download/5.1.0.28487/sonar-scanner-msbuild-5.1.0.28487-net46.zip)\
\
[Release notes](https://github.com/SonarSource/sonar-scanner-msbuild/releases/tag/5.1.0.28487)
***
**5.0.4** **2020-11-11**\ Support for .NET 5, support for solo .NET Core project (without .sln)\
Download scanner for: [.NET 5+](https://github.com/SonarSource/sonar-scanner-msbuild/releases/download/5.0.4.24009/sonar-scanner-msbuild-5.0.4.24009-net5.0.zip) [.NET Global Tool](https://www.nuget.org/packages/dotnet-sonarscanner) [.NET Core 2.1](https://github.com/SonarSource/sonar-scanner-msbuild/releases/download/5.0.4.24009/sonar-scanner-msbuild-5.0.4.24009-netcoreapp2.0.zip) [.NET Framework 4.6](https://github.com/SonarSource/sonar-scanner-msbuild/releases/download/5.0.4.24009/sonar-scanner-msbuild-5.0.4.24009-net46.zip)\
\
[Release notes](https://github.com/SonarSource/sonar-scanner-msbuild/releases/tag/5.0.4.24009)
***
**5.0.3** **2020-11-10**\ Support for .NET 5, support for solo .NET Core project (without .sln)\
Download scanner for: [.NET 5+](https://github.com/SonarSource/sonar-scanner-msbuild/releases/download/5.0.3.23901/sonar-scanner-msbuild-5.0.3.23901-net5.0.zip) [.NET Global Tool](https://www.nuget.org/packages/dotnet-sonarscanner) [.NET Core 2.1](https://github.com/SonarSource/sonar-scanner-msbuild/releases/download/5.0.3.23901/sonar-scanner-msbuild-5.0.3.23901-netcoreapp2.0.zip) [.NET Framework 4.6](https://github.com/SonarSource/sonar-scanner-msbuild/releases/download/5.0.3.23901/sonar-scanner-msbuild-5.0.3.23901-net46.zip)\
\
[Release notes](https://github.com/SonarSource/sonar-scanner-msbuild/releases/tag/5.0.3.23901)
***
**5.0** **2020-11-05**\ Support for .NET 5, support for solo .NET Core project (without .sln)\
Download scanner for: [.NET 5+](https://github.com/SonarSource/sonar-scanner-msbuild/releases/download/5.0.0.23533/sonar-scanner-msbuild-5.0.0.23533-net5.0.zip) [.NET Global Tool](https://www.nuget.org/packages/dotnet-sonarscanner) [.NET Core 2.1](https://github.com/SonarSource/sonar-scanner-msbuild/releases/download/5.0.0.23533/sonar-scanner-msbuild-5.0.0.23533-netcoreapp2.0.zip) [.NET Framework 4.6](https://github.com/SonarSource/sonar-scanner-msbuild/releases/download/5.0.0.23533/sonar-scanner-msbuild-5.0.0.23533-net46.zip)\
\
[Release notes](https://github.com/SonarSource/sonar-scanner-msbuild/releases/tag/5.0.0.23533)
***
**4.10** **2020-06-29**\ Support FIPS compliant cryptographic algorithm\
Download scanner for: [.NET Global Tool](https://www.nuget.org/packages/dotnet-sonarscanner) [.NET Core 2.1](https://github.com/SonarSource/sonar-scanner-msbuild/releases/download/4.10.0.19059/sonar-scanner-msbuild-4.10.0.19059-netcoreapp2.0.zip) [.NET Framework 4.6](https://github.com/SonarSource/sonar-scanner-msbuild/releases/download/4.10.0.19059/sonar-scanner-msbuild-4.10.0.19059-net46.zip)\
\
[Release notes](https://github.com/SonarSource/sonar-scanner-msbuild/releases/tag/4.10.0.19059)
***
**4.9** **2020-05-05**\ Improve detection of duplicated coverage reports, fix categorization of fakes projects\
Download scanner for: [.NET Global Tool](https://www.nuget.org/packages/dotnet-sonarscanner) [.NET Core 2.1](https://github.com/SonarSource/sonar-scanner-msbuild/releases/download/4.9.0.17385/sonar-scanner-msbuild-4.9.0.17385-netcoreapp2.0.zip) [.NET Framework 4.6](https://github.com/SonarSource/sonar-scanner-msbuild/releases/download/4.9.0.17385/sonar-scanner-msbuild-4.9.0.17385-net46.zip)\
\
[Release notes](https://github.com/SonarSource/sonar-scanner-msbuild/releases/tag/4.9.0.17385)
***
**4.8** **2019-11-06**\ Enable scanner execution when only .NET Core 3 is installed\
Download scanner for: [.NET Global Tool](https://www.nuget.org/packages/dotnet-sonarscanner) [.NET Core 2.1](https://github.com/SonarSource/sonar-scanner-msbuild/releases/download/4.8.0.12008/sonar-scanner-msbuild-4.8.0.12008-netcoreapp2.0.zip) [.NET Framework 4.6](https://github.com/SonarSource/sonar-scanner-msbuild/releases/download/4.8.0.12008/sonar-scanner-msbuild-4.8.0.12008-net46.zip)\
\
[Release notes](https://github.com/SonarSource/sonar-scanner-msbuild/releases/tag/4.8.0.12008)
***
**4.7.1** **2019-09-10**\ Update SonarScanner to version 4.1\
Download scanner for: [.NET Global Tool](https://www.nuget.org/packages/dotnet-sonarscanner) [.NET Core 2.1](https://github.com/SonarSource/sonar-scanner-msbuild/releases/download/4.7.1.2311/sonar-scanner-msbuild-4.7.1.2311-netcoreapp2.0.zip) [.NET Framework 4.6](https://github.com/SonarSource/sonar-scanner-msbuild/releases/download/4.7.1.2311/sonar-scanner-msbuild-4.7.1.2311-net46.zip)\
\
[Release notes](https://github.com/SonarSource/sonar-scanner-msbuild/releases/tag/4.7.1.2311)
***
**4.7** **2019-09-03**\ Support dash and forward-slash in dotnet command line arguments, analyze XAML files, add analyzed targets in logs\
Download scanner for: [.NET Global Tool](https://www.nuget.org/packages/dotnet-sonarscanner) [.NET Core 2.1](https://github.com/SonarSource/sonar-scanner-msbuild/releases/download/4.7.0.2295/sonar-scanner-msbuild-4.7.0.2295-netcoreapp2.0.zip) [.NET Framework 4.6](https://github.com/SonarSource/sonar-scanner-msbuild/releases/download/4.7.0.2295/sonar-scanner-msbuild-4.7.0.2295-net46.zip)\
\
[Release notes](https://github.com/SonarSource/sonar-scanner-msbuild/releases/tag/4.7.0.2295)
{% hint style="warning" %}
The SonarScanner for .NET version 9.2 [has been deprecated](https://github.com/SonarSource/sonar-scanner-msbuild/releases/tag/9.2.0.110275) and should not be used.
{% endhint %}
{% hint style="info" %}
Beginning with the Sonar Scanner for .NET v8, the way the `sonar.projectBaseDir` property is automatically detected has changed which has an impact on the files that are analyzed and how relative properties, such as `sonar.exclusions` and `sonar.test.exclusions`, are resolved.
To customize the behavior, you can set the `sonar.projectBaseDir` property to point to a directory that contains all the source code you want to analyze. The path may be relative (to the directory from which the analysis was started) or absolute.
{% endhint %}
### Prerequisites
* From version 7.0, Java is no longer required because the scanner will download it automatically.
* If internet access is limited in your configuration, skip the [#jre-autoprovisioning](https://docs.sonarsource.com/sonarqube-cloud/analysis-parameters#jre-autoprovisioning "mention") and use the Java version installed locally.
* The SDK corresponding to your build system:
* For the [.NET Framework v4.6.2](https://dotnet.microsoft.com/download/dotnet-framework/net46): use either the [Build Tools for Visual Studio 2015 Update 3](https://go.microsoft.com/fwlink/?LinkId=615458), or the [Build Tools for Visual Studio](https://www.visualstudio.com/downloads/).
* If you are using the .NET version of the scanner or the [.NET Core Global Tool](https://www.nuget.org/packages/dotnet-sonarscanner), you will need [.NET Core SDK 3.1 and above](https://dotnet.microsoft.com/download).
{% hint style="info" %}
The flavor (either .NET Framework, .NET Core or .NET) used to compile the Scanner for .NET is independent of the .NET version used to build the project you want to analyze. Concretely, you can analyze .NET Core code with the .NET Framework version of the Scanner. It’s only relevant depending on your OS, and on the versions of .NET SDKs that are installed on your build machine.
{% endhint %}
### Installation
#### .NET Core Global Tool
Using the dotnet install tool from the command line is the simplest way to install the scanner if you are using .NET Core or later when using SonarQube Cloud or on an already installed instance of SonarQube Server. The [.NET Core Global Tool](https://www.nuget.org/packages/dotnet-sonarscanner) is available from .NET Core 3.1+.
```bash
dotnet tool install --global dotnet-sonarscanner --version x.x.x
```
The `--version` argument is optional; if omitted, the latest version will be installed. The full list of release versions is available on the [NuGet page](https://www.nuget.org/packages/dotnet-sonarscanner#versions-body-tab).
If you can’t use the dotnet install tool, other Core versions are available for download in the SonarScanner Update Center collapsible (access above at the very top of the page).
#### Standalone executable
* Expand the downloaded file into the directory of your choice. We’ll refer to it as `$install_directory` in the following steps.
* On Windows, you might need to unblock the ZIP file first (right-click **File** > **Properties** > **Unblock**).
* On Linux/OSX you may need to set execute permissions on the files in `$install_directory/sonar-scanner-(version)/bin`.
* Uncomment, and update the global settings to point to SonarQube Cloud by editing `$install_directory/SonarQube.Analysis.xml`. Values set in this file will be applied to all analyses of all projects unless overwritten locally.\
Consider setting file system permissions to restrict access to this file:
```xml
https://sonarcloud.io[my-user-token]
```
* Add `$install_directory` to your `PATH` environment variable.
### Related pages
* [introduction](https://docs.sonarsource.com/sonarqube-cloud/advanced-setup/ci-based-analysis/sonarscanner-for-dotnet/introduction "mention")
* [using](https://docs.sonarsource.com/sonarqube-cloud/advanced-setup/ci-based-analysis/sonarscanner-for-dotnet/using "mention")
* [configuring](https://docs.sonarsource.com/sonarqube-cloud/advanced-setup/ci-based-analysis/sonarscanner-for-dotnet/configuring "mention")
---
# Source: https://docs.sonarsource.com/sonarqube-community-build/instance-administration.md
# Source: https://docs.sonarsource.com/sonarqube-server/8.9/instance-administration.md
# Source: https://docs.sonarsource.com/sonarqube-server/9.8/instance-administration.md
# Source: https://docs.sonarsource.com/sonarqube-server/9.9/instance-administration.md
# Source: https://docs.sonarsource.com/sonarqube-server/10.0/instance-administration.md
# Source: https://docs.sonarsource.com/sonarqube-server/10.1/instance-administration.md
# Source: https://docs.sonarsource.com/sonarqube-server/10.2/instance-administration.md
# Source: https://docs.sonarsource.com/sonarqube-server/10.3/instance-administration.md
# Source: https://docs.sonarsource.com/sonarqube-server/10.4/instance-administration.md
# Source: https://docs.sonarsource.com/sonarqube-server/10.5/instance-administration.md
# Source: https://docs.sonarsource.com/sonarqube-server/10.6/instance-administration.md
# Source: https://docs.sonarsource.com/sonarqube-server/10.7/instance-administration.md
# Source: https://docs.sonarsource.com/sonarqube-server/10.8/instance-administration.md
# Source: https://docs.sonarsource.com/sonarqube-server/2025.2/instance-administration.md
# Source: https://docs.sonarsource.com/sonarqube-server/2025.3/instance-administration.md
# Source: https://docs.sonarsource.com/sonarqube-server/2025.5/instance-administration.md
# Source: https://docs.sonarsource.com/sonarqube-server/2025.1/instance-administration.md
# Source: https://docs.sonarsource.com/sonarqube-server/2025.4/instance-administration.md
# Source: https://docs.sonarsource.com/sonarqube-server/2025.6/instance-administration.md
# Source: https://docs.sonarsource.com/sonarqube-server/instance-administration.md
# Instance administration
- [Introduction to instance administration](/sonarqube-server/instance-administration/overview.md): This section guides administrators on setting up the instance's functions, configuring analysis features at the instance level, and administering users.
- [Server base URL](/sonarqube-server/instance-administration/server-base-url.md): Configuring your base URL in SonarQube Server.
- [Global analysis setup](/sonarqube-server/instance-administration/analysis-functions.md): Setting up analysis features at the instance level.
- [Choosing a mode for your instance](/sonarqube-server/instance-administration/analysis-functions/instance-mode.md): Your SonarQube Server has two modes for customers to choose from: Standard Experience Mode and Multi-Quality Rule (MQR) Mode.
- [Overview](/sonarqube-server/instance-administration/analysis-functions/instance-mode/instance-mode-overview.md): Your SonarQube Server instance has two modes: Standard Experience Mode and Multi-Quality Rule (MQR) Mode.
- [MQR mode](/sonarqube-server/instance-administration/analysis-functions/instance-mode/mqr-mode.md): MQR Mode more accurately represents the impact an issue has on all software qualities, by assigning a separate severity to a rule for each quality it impacts.
- [Standard Experience](/sonarqube-server/instance-administration/analysis-functions/instance-mode/standard-experience.md): The Standard Experience encompasses the use of rule types such as bugs, code smells, and vulnerabilities, with a single type and severity level for each rule.
- [New code definition](/sonarqube-server/instance-administration/analysis-functions/setting-new-code-definition-at-global-level.md): The global-level new code definition option is applied by default to all new projects. Project administrators can select a specific setting for their project.
- [Quality standards](/sonarqube-server/instance-administration/analysis-functions/quality-standards.md): This page explains how to configure at the global level parameters or features impacting the quality gates or profiles.
- [Analysis scope](/sonarqube-server/instance-administration/analysis-functions/analysis-scope.md): As a System Administrator, you can define in the UI an analysis scope adjustment at the instance level.
- [Introduction](/sonarqube-server/instance-administration/analysis-functions/analysis-scope/introduction.md): As a System Administrator, you can define in the UI an analysis scope adjustment at the global level.
- [Excluding files based on file paths](/sonarqube-server/instance-administration/analysis-functions/analysis-scope/excluding-files-based-on-file-paths.md): To exclude files from the project’s analysis scope based on file paths, you can define file exclusion parameters based on directory and file name patterns.
- [Excluding from coverage or duplication](/sonarqube-server/instance-administration/analysis-functions/analysis-scope/exclude-from-coverage-duplication.md): Excluding specific files from code coverage or duplication check at the global level.
- [Using advanced exclusion features](/sonarqube-server/instance-administration/analysis-functions/analysis-scope/advanced-exclusion-features.md): Information on using the advanced exclusion features in SonarQube Server at the global level.
- [Code metrics](/sonarqube-server/instance-administration/analysis-functions/metrics-parameters.md): Modifying parameters related to the maintainability metrics in SonarQube Server at the global level.
- [Integration with external analyzers at instance level](/sonarqube-server/instance-administration/analysis-functions/integration-with-external-analyzers.md): How to integrate SonarQube Server with external analyzers at the instance level.
- [Various settings at the instance level](/sonarqube-server/instance-administration/analysis-functions/various-settings-at-the-instance-level.md): You need the Administer System permssion to perform settings at the instance level.
- [System functions setup](/sonarqube-server/instance-administration/system-functions.md): Setting system functions in your SonarQube Server instance.
- [Notifications](/sonarqube-server/instance-administration/system-functions/notifications.md): Everything you need to know about configuring SonarQube Server’s email or Slack notifications.
- [Setting up email notifications](/sonarqube-server/instance-administration/system-functions/notifications/email.md): How to set up the email notifications feature on analysis-related events.
- [Setting up Slack notifications](/sonarqube-server/instance-administration/system-functions/notifications/slack.md): With the SonarQube Server integration with Slack, users can receive real-time notifications on analysis results directly in Slack.
- [About SonarQube Server integration with Slack](/sonarqube-server/instance-administration/system-functions/notifications/slack/about.md): This page provides a technical overview of the Slack integration solution in SonarQube Server.
- [Setting up the connection to Slack](/sonarqube-server/instance-administration/system-functions/notifications/slack/setup.md): How to connect your SonarQube Server instance to your Slack workspace.
- [Troubleshooting the Slack connection](/sonarqube-server/instance-administration/system-functions/notifications/slack/troubleshooting.md): How to troubleshoot various issues with your Slack connection.
- [Security features](/sonarqube-server/instance-administration/system-functions/security.md): SonarQube Server comes with a number of global security features.
- [Housekeeping](/sonarqube-server/instance-administration/system-functions/housekeeping.md): Default settings for SonarQube Server’s database cleaner.
- [Telemetry](/sonarqube-server/instance-administration/system-functions/telemetry.md): SonarQube Server sends anonymized telemetry data to Sonar daily. No personally identifiable information is sent.
- [PDF reports](/sonarqube-server/instance-administration/system-functions/pdf-reports.md): As a system administrator, you can change the PDF report subscription frequency for projects, applications, and portfolios.
- [AI features](/sonarqube-server/instance-administration/ai-features.md): Setting up AI features at the instance level in SonarQube Server.
- [Overview](/sonarqube-server/instance-administration/ai-features/overview.md): A quick summary of SonarQube Server’s AI features that can be managed by an instance administrator.
- [Autodetect AI code](/sonarqube-server/instance-administration/ai-features/autodetect-ai-code.md): Autodetect AI-Generated Code is turned on by default, but your DevOps provider must give the appropriate permissions to allow communication with SonarQube.
- [Permissions for AI autodetect](/sonarqube-server/instance-administration/ai-features/permissions-for-ai-autodetect.md): Setting up AI autodetection in SonarQube Server requires that a DevOps platform administrator set the correct permission level in your AI-powered web service.
- [Enable AI CodeFix](/sonarqube-server/instance-administration/ai-features/enable-ai-codefix.md): Sonar’s AI CodeFix can suggest fixes for a select set of rules in Java, JavaScript, TypeScript, Python, C#, and C++.
- [Security](/sonarqube-server/instance-administration/security.md): Security-relevant setups.
- [User accounts](/sonarqube-server/instance-administration/security/user-accounts.md): Security-relevant considerations and setups regarding user accounts.
- [User sessions](/sonarqube-server/instance-administration/security/user-sessions.md): A user’s session will automatically end after a period of inactivity. This is a security measure to prevent unauthorized access to sensitive data.
- [Tokens](/sonarqube-server/instance-administration/security/administering-tokens.md): Generating and revoking user tokens in SonarQube Server.
- [Sensitive settings](/sonarqube-server/instance-administration/security/encrypting-settings.md): Encrypting SonarQube system properties.
- [Audit logs](/sonarqube-server/instance-administration/security/audit-logs.md): Managing the trail of your SonarQube audit logs.
- [User management](/sonarqube-server/instance-administration/user-management.md): Managing your user accounts in SonarQube Server.
- [Introduction to user management](/sonarqube-server/instance-administration/user-management/introduction.md): The User management section is directed at the System Administrator.
- [Viewing user accounts](/sonarqube-server/instance-administration/user-management/viewing-users.md): Retrieving and viewing user accounts in SonarQube Server.
- [Managing groups](/sonarqube-server/instance-administration/user-management/user-groups.md): This page describes the user group concept in SonarQube Server and how to create and populate them.
- [Managing permissions](/sonarqube-server/instance-administration/user-management/user-permissions.md): As a System Administrator, you can grant users and groups global permissions and you can manage the default project permissions.
- [Associating with SCM account](/sonarqube-server/instance-administration/user-management/updating-scm-details.md): As a System Administrator, you can explicitly associate an SCM (Source Control Management) account with a SonarQube Server user account.
- [Creating users manually](/sonarqube-server/instance-administration/user-management/creating-users.md): Creating user accounts manually in SonarQube Server.
- [Deactivating users](/sonarqube-server/instance-administration/user-management/deactivating-users.md): When you deactivate a user in SonarQube Server, any tokens associated with the user are revoked.
- [Changing user password](/sonarqube-server/instance-administration/user-management/changing-user-password.md): System Administrator can change the password of a user whose SonarQube Server account is not tied to a third-party identity provider.
- [Authentication and provisioning](/sonarqube-server/instance-administration/authentication.md): Setting up the user authentication and provisioning in your SonarQube Server instance.
- [Overview of authentication and provisioning](/sonarqube-server/instance-administration/authentication/overview.md): SonarQube Server can delegate authentication via HTTP Headers, GitHub Authentication, GitLab Authentication, Bitbucket Cloud Authentication, SAML, or LDAP.
- [HTTP header](/sonarqube-server/instance-administration/authentication/http-header.md): Setting up the HTTP header authentication in your SonarQube Server instance.
- [LDAP](/sonarqube-server/instance-administration/authentication/ldap.md): Setting up the LDAP authentication in your SonarQube Server instance.
- [SAML](/sonarqube-server/instance-administration/authentication/saml.md): Setting up SAML authentication in your SonarQube Server instance.
- [Overview of SAML support](/sonarqube-server/instance-administration/authentication/saml/overview.md): You can delegate authentication to a SAML 2.0 identity provider using SAML authentication. SonarQube Server uses the Service Provider (SP) initiated SAML.
- [With Microsoft Entra ID](/sonarqube-server/instance-administration/authentication/saml/ms-entra-id.md): Setting up SAML authentication with Microsoft Entra ID in your SonarQube Server instance.
- [Introduction to SAML with Microsoft Entra ID](/sonarqube-server/instance-administration/authentication/saml/ms-entra-id/introduction.md): Main steps of SAML authentication setup with Microsoft Entra ID.
- [Setup in Microsoft Entra ID](/sonarqube-server/instance-administration/authentication/saml/ms-entra-id/setup-in-entra-id.md): This page describes how to register SonarQube Server in Microsoft Entra ID.
- [Setup in SonarQube Server](/sonarqube-server/instance-administration/authentication/saml/ms-entra-id/setup-in-sq.md): This page describes how to setup in SonarQube Server SAML with Microsoft Entra ID.
- [Setup of security features](/sonarqube-server/instance-administration/authentication/saml/ms-entra-id/optional-security-features.md): To improve security, you can set up the encryption of SAML assertions sent by Microsoft Entra ID and the signing of SAML requests sent by SonarQube Server.
- [With Keycloak](/sonarqube-server/instance-administration/authentication/saml/how-to-set-up-keycloak.md): Setting up SAML authentication with Keycloak in your SonarQube Server instance.
- [With Okta](/sonarqube-server/instance-administration/authentication/saml/how-to-set-up-okta.md): Setting up SAML authentication with Okta in your SonarQube Server instance.
- [With Ping Identity](/sonarqube-server/instance-administration/authentication/saml/ping-identity.md): Setting up SAML authentication with Ping Identity in your SonarQube Server instance.
- [Introduction to SAML with Ping Identity](/sonarqube-server/instance-administration/authentication/saml/ping-identity/introduction.md): Main steps of SAML setup with Ping Identity.
- [Setup in Ping Identity](/sonarqube-server/instance-administration/authentication/saml/ping-identity/setup-in-ping-identity.md): This page explains how to register SonarQube Server in PingOne or PingFederate.
- [Setup in SonarQube Server](/sonarqube-server/instance-administration/authentication/saml/ping-identity/setup-in-sq.md): This page describes how to set up SAML with Ping Identity in SonarQube Server.
- [Setup of security features](/sonarqube-server/instance-administration/authentication/saml/ping-identity/optional-security-features.md): To improve security, you can set up the encryption of SAML assertions sent by Ping Identity and the signing of SAML requests sent by SonarQube Server.
- [With SCIM provisioning](/sonarqube-server/instance-administration/authentication/saml/scim.md): Setting up automatic provisioning between SonarQube Server and Microsoft Entra ID or Okta using SCIM.
- [SCIM overview](/sonarqube-server/instance-administration/authentication/saml/scim/overview.md): SCIM helps you automatically provision user and groups to SonarQube Server.
- [SCIM with Microsoft Entra ID](/sonarqube-server/instance-administration/authentication/saml/scim/scim-provisioning-with-azure-ad.md): Enable SCIM to automate user and group provisioning from Microsoft Entra ID to SonarQube Server.
- [SCIM with Okta](/sonarqube-server/instance-administration/authentication/saml/scim/scim-provisioning-with-okta.md): Enable SCIM to automate user and group provisioning from Okta to SonarQube Server.
- [GitHub](/sonarqube-server/instance-administration/authentication/github.md): Setting up the GitHub authentication in your SonarQube Server instance.
- [Bitbucket Cloud](/sonarqube-server/instance-administration/authentication/bitbucket-cloud.md): Setting up the Bitbucket Cloud authentication in your SonarQube Server instance.
- [GitLab](/sonarqube-server/instance-administration/authentication/gitlab.md): Setting up the GitLab authentication in your SonarQube Server instance.
- [Provisioning modes](/sonarqube-server/instance-administration/authentication/gitlab/provisioning-modes.md): This section describes GitLab provisioning modes
- [Introduction to GitLab provisioning modes](/sonarqube-server/instance-administration/authentication/gitlab/provisioning-modes/introduction.md): Overview of the GitLab authentication's provisioning modes.
- [Just-in-Time provisioning](/sonarqube-server/instance-administration/authentication/gitlab/provisioning-modes/just-in-time.md): With the Just-in-Time (JIT) provisioning mode, user accounts are automatically created in SonarQube Server when GitLab users log in for the first time.
- [Automatic provisioning](/sonarqube-server/instance-administration/authentication/gitlab/provisioning-modes/automatic.md): With GitLab automatic provisioning mode, you can benefit from automatic user provisioning, deprovisioning and synchronization of groups and permissions in SonarQube Server.
- [Setting up authentication](/sonarqube-server/instance-administration/authentication/gitlab/setting-up.md): Setting up the GitLab authentication and provisioning in SonarQube Server.
- [Managing JIT provisioning](/sonarqube-server/instance-administration/authentication/gitlab/managing-jit-mode.md): Once you’ve set up GitLab authentication and provisioning with the Just-in-Time (JIT) provisioning mode, you can set or change JIT provisioning mode options.
- [Managing automatic provisioning](/sonarqube-server/instance-administration/authentication/gitlab/managing-automatic-provisioning.md): Starting from the Developer Edition, you can enable the automatic user and group provisioning in SonarQube Server.
- [Disabling authentication](/sonarqube-server/instance-administration/authentication/gitlab/disabling.md): To disable GitLab authentication and provisioning in SonarQube Server, you must disable the GitLab authentication configuration.
- [Troubleshooting](/sonarqube-server/instance-administration/authentication/troubleshooting.md): Troubleshooting authentication and provisioning.
- [License administration](/sonarqube-server/instance-administration/license-administration.md): Learn how to retrieve, setup, stage and request new SonarQube Server licenses.
- [Server ID based license key](/sonarqube-server/instance-administration/license-administration/server-id-based-license-key.md): Learn how to retrieve, setup, stage and request your server ID based license key.
- [Online license management](/sonarqube-server/instance-administration/license-administration/online-license-management.md): Learn how to retrieve, setup, stage and request new SonarQube Server license.
- [UI customization](/sonarqube-server/instance-administration/ui-customization.md): Customizing your instance's look and feel and displaying custom messages.
- [Look and feel](/sonarqube-server/instance-administration/ui-customization/look-and-feel.md): You can set your own home logo and use a Gravatar avatar.
- [Custom messages](/sonarqube-server/instance-administration/ui-customization/custom-messages.md): Admins can configure custom messages that will be displayed in the SonarQube Server UI.
- [System info and server ID](/sonarqube-server/instance-administration/system-info-and-server-id.md): This page describes how to gather detailed information about your SonarQube Server instance.
- [Inactive projects](/sonarqube-server/instance-administration/inactive-projects.md): Managing the inactive projects in your SonarQube Server instance.
- [Jira Cloud integration](/sonarqube-server/instance-administration/jira-integration.md): Before you can create Jira work items in SonarQube Server, you need to set up your Jira Cloud integration on the SonarQube Server instance and project levels
---
# Source: https://docs.sonarsource.com/sonarqube-community-build/instance-administration/analysis-functions/instance-mode/instance-mode-overview.md
# Source: https://docs.sonarsource.com/sonarqube-server/10.8/instance-administration/analysis-functions/instance-mode/instance-mode-overview.md
# Source: https://docs.sonarsource.com/sonarqube-server/2025.2/instance-administration/analysis-functions/instance-mode/instance-mode-overview.md
# Source: https://docs.sonarsource.com/sonarqube-server/2025.3/instance-administration/analysis-functions/instance-mode/instance-mode-overview.md
# Source: https://docs.sonarsource.com/sonarqube-server/2025.5/instance-administration/analysis-functions/instance-mode/instance-mode-overview.md
# Source: https://docs.sonarsource.com/sonarqube-server/2025.1/instance-administration/analysis-functions/instance-mode/instance-mode-overview.md
# Source: https://docs.sonarsource.com/sonarqube-server/2025.4/instance-administration/analysis-functions/instance-mode/instance-mode-overview.md
# Source: https://docs.sonarsource.com/sonarqube-server/2025.6/instance-administration/analysis-functions/instance-mode/instance-mode-overview.md
# Source: https://docs.sonarsource.com/sonarqube-server/instance-administration/analysis-functions/instance-mode/instance-mode-overview.md
# Overview
{% hint style="info" %}
New SonarQube Server instances use MQR Mode by default. Upon upgrading, existing SonarQube Server 10.1 and earlier are configured with the Standard Experience by default.
{% endhint %}
* [standard-experience](https://docs.sonarsource.com/sonarqube-server/instance-administration/analysis-functions/instance-mode/standard-experience "mention"): Standard Experience mode encompasses the use of rule types such as bugs, code smells, and vulnerabilities, with a single type and severity level for each rule. This approach focuses on assigning severity to a rule based on the single software quality (e.g. security, reliability, or maintainability) it has the largest impact on.
* [mqr-mode](https://docs.sonarsource.com/sonarqube-server/instance-administration/analysis-functions/instance-mode/mqr-mode "mention")**:** MQR Mode aims to more accurately represent the impact an issue has on all software qualities. It does this by assigning a separate severity to a rule for each software quality it might impact. This approach focuses on ensuring the impact on all software qualities is clear, not just the one most severely impacted.
Instance administrators can set or update the mode by navigating to **Administration** > **Configuration** > **General Settings** > **Mode.** See [changing-modes](https://docs.sonarsource.com/sonarqube-server/user-guide/code-metrics/changing-modes "mention") for more information about how switching between the modes might affect your metrics and workflow.
Both the MQR and Standard Experience modes are compatible with [SonarQube for IDE](https://www.sonarsource.com/products/sonarlint/).
---
# Source: https://docs.sonarsource.com/sonarqube-community-build/instance-administration/analysis-functions/instance-mode.md
# Source: https://docs.sonarsource.com/sonarqube-server/10.8/instance-administration/analysis-functions/instance-mode.md
# Source: https://docs.sonarsource.com/sonarqube-server/2025.2/instance-administration/analysis-functions/instance-mode.md
# Source: https://docs.sonarsource.com/sonarqube-server/2025.3/instance-administration/analysis-functions/instance-mode.md
# Source: https://docs.sonarsource.com/sonarqube-server/2025.5/instance-administration/analysis-functions/instance-mode.md
# Source: https://docs.sonarsource.com/sonarqube-server/2025.1/instance-administration/analysis-functions/instance-mode.md
# Source: https://docs.sonarsource.com/sonarqube-server/2025.4/instance-administration/analysis-functions/instance-mode.md
# Source: https://docs.sonarsource.com/sonarqube-server/2025.6/instance-administration/analysis-functions/instance-mode.md
# Source: https://docs.sonarsource.com/sonarqube-server/instance-administration/analysis-functions/instance-mode.md
# Choosing a mode for your instance
{% content-ref url="instance-mode/instance-mode-overview" %}
[instance-mode-overview](https://docs.sonarsource.com/sonarqube-server/instance-administration/analysis-functions/instance-mode/instance-mode-overview)
{% endcontent-ref %}
{% content-ref url="instance-mode/mqr-mode" %}
[mqr-mode](https://docs.sonarsource.com/sonarqube-server/instance-administration/analysis-functions/instance-mode/mqr-mode)
{% endcontent-ref %}
{% content-ref url="instance-mode/standard-experience" %}
[standard-experience](https://docs.sonarsource.com/sonarqube-server/instance-administration/analysis-functions/instance-mode/standard-experience)
{% endcontent-ref %}
---
# Source: https://docs.sonarsource.com/sonarqube-community-build/server-update-and-maintenance/monitoring/instance.md
# Source: https://docs.sonarsource.com/sonarqube-server/10.4/instance-administration/monitoring/instance.md
# Source: https://docs.sonarsource.com/sonarqube-server/10.5/instance-administration/monitoring/instance.md
# Source: https://docs.sonarsource.com/sonarqube-server/10.6/instance-administration/monitoring/instance.md
# Source: https://docs.sonarsource.com/sonarqube-server/10.7/server-upgrade-and-maintenance/monitoring/instance.md
# Source: https://docs.sonarsource.com/sonarqube-server/10.8/server-upgrade-and-maintenance/monitoring/instance.md
# Source: https://docs.sonarsource.com/sonarqube-server/2025.2/server-update-and-maintenance/monitoring/instance.md
# Source: https://docs.sonarsource.com/sonarqube-server/2025.3/server-update-and-maintenance/monitoring/instance.md
# Source: https://docs.sonarsource.com/sonarqube-server/2025.5/server-update-and-maintenance/monitoring/instance.md
# Source: https://docs.sonarsource.com/sonarqube-server/2025.1/server-update-and-maintenance/monitoring/instance.md
# Source: https://docs.sonarsource.com/sonarqube-server/2025.4/server-update-and-maintenance/monitoring/instance.md
# Source: https://docs.sonarsource.com/sonarqube-server/2025.6/server-update-and-maintenance/monitoring/instance.md
# Source: https://docs.sonarsource.com/sonarqube-server/server-update-and-maintenance/monitoring/instance.md
# SonarQube Server instance
As a start, you can use this Web API to get an overview of the health of your SonarQube Server installation:
* `api/system/health`
### Java process memory
SonarQube Server consists of three main Java processes:
* Compute Engine
* Elasticsearch
* Web (including embedded web server)
Each of these Java processes has its own memory settings that can be configured in the `/conf/sonar.properties` file. The default memory settings that ship with SonarQube Server are fine for most instances. If you are supporting a large SonarQube Server instance (more than 100 users or more than 5,000,000 lines of code) or an instance that is part of your continuous integration pipeline, you should monitor the memory and CPU usage of all three key Java processes on your instance, along with overall disk space. Monitoring will allow you to see if any of the processes is running short of resources and take action ahead of resource shortages. There are numerous monitoring tools available, both open-source and commercial, to help you with this task. Sonar does not recommend or endorse any particular tool.
### Memory settings
You may need to increase your memory settings if you see the following symptoms:
* Your monitoring tools show one or more of the SonarQube Server processes is reaching its memory limit.
* Any of the SonarQube Server processes crashes and/or generates an out-of-memory error in the sonar.log file.
* A SonarQube Server background task fails with an out-of-memory error in the background task log.
* The store size of the Issues index of your Elasticsearch instance (visible in the System Info) is greater than or equal to the memory allocated to the Elasticsearch Java process.
You can increase the maximum memory allocated to the appropriate process by increasing the `-Xmx` memory setting for the corresponding Java process in your `/conf/sonar.properties` file:
| **Java Process** | **SonarQube Server Property** | **Notes** |
| ---------------- | ----------------------------- | ---------------------------------------------------------------------------------------------------------------------------------------------------------------------------------------------------------- |
| Compute Engine | `sonar.ce.javaOpts` |
|
| Elasticsearch | `sonar.search.javaOpts` | It is recommended to set the min and max memory to the same value to prevent the heap from resizing at runtime, which diverts JVM resources and can greatly increase response times of in-flight requests. |
| Web | `sonar.web.javaOpts` |
|
The `-Xmx` parameter accepts numbers in both megabytes (e.g. `-Xmx2048m`) and gigabytes (e.g. `-Xmx2G`). The metric suffix is case-insensitive.
### Exposed JMX MBeans
SonarQube Server offers visibility about what happens internally through the exposure of JMX MBeans.
In addition to the classical Java MBeans providing information about the ClassLoader, OS, Memory, and Threads you have access to three more MBeans in SonarQube Server:
* ComputeEngine
* Database
* SonarQube
All these MBeans are read-only. It’s not possible to modify or reset their values in real time.
ComputeEngineTasks MBean
| **Attribute Name** | **Description** |
| ------------------ | ----------------------------------------------------------------------------------------------------------------------------------------------------------------------------------------------------------------------------------------------------------------------------------------------------------------------------------------------------------------------------------------------------------------------------------------------------------------------------------------------------------------- |
| ProcessingTime | The measure the time (in ms) spent processing background tasks since the last restart of SonarQube Server. Its value will always increase and will be reset by a restart of SonarQube Server. This measure is very powerful when combined with SuccessCount and ErrorCount measures to get the average time to handle a Background Task, or when used to understand how much time the SonarQube Server is spending during a day handling Background Tasks. It gives you an indication of the load on your server. |
| ErrorCount | The number of background tasks that failed since the last restart of SonarQube Server. |
| PendingCount | The number of background tasksThe number waiting to be processed since the last restart of SonarQube Server. This measure is the same for all Compute Engine workers since Background Tasks are waiting in a common queue. |
| InProgressCount | The number of background tasks currently processing. Its value is either 1 or 0, since SonarQube Server can process only one task at a time. |
| SuccessCount | The number of background tasks successfully processed since the last restart of SonarQube Server. |
| WorkerCount | The number of background tasks that can be processed at the same time. |
| PendingTime | The amount of time (in ms) that the oldest background task has been waiting to be processed. This measure, together with PendingCount, helps you know if analyses are stacking and taking too long to start processing. This helps you evaluate if it might be worth configuring additional Compute Engine workers (Enterprise Edition) or additional nodes (Data Center Edition) to improve SonarQube Server performance. |
{% hint style="info" %}
Note that the total number of background tasks handled since the last restart of SonarQube Server is equal to SuccessCount + ErrorCount. Also, all values will reset to their default values after restarting SonarQube Server.
{% endhint %}
Database MBean
**The same attributes are available for both ComputeEngineServer and WebServer.**
| **Attribute Name** | **Description** |
| --------------------------------- | ------------------------------------------------------------------------------------------------------------------------------ |
| MigrationStatus | Possible values are: `UP_TO_DATE`, `REQUIRES_UPGRADE`*,* `REQUIRES_DOWNGRADE`, `FRESH_INSTALL` (only available for WebServer). |
| PoolActiveConnections | Number of active database connections |
| PoolIdleConnections | Number of database connections waiting to be used |
| PoolInitialSize | Initial size of the database connections pool. |
| PoolMaxActiveConnections | Maximum number of active database connections |
| PoolMaxIdleConnections | Maximum number of database connections waiting to be used |
| PoolMaxWaitMillis | In milliseconds |
| PoolRemoveAbandoned | Possible values : `true`, `false` |
| PoolRemoveAbandonedTimeoutSeconds | In seconds |
SonarQube MBean
| **Attribute Name** | **Description** |
| ------------------ | ----------------------------- |
| LogLevel | Log Level: INFO, DEBUG, TRACE |
| ServerId | SonarQube Server host ID |
| Version | SonarQube Server Version |
### How do I activate JMX?
#### Local access
There is nothing to activate to view SonarQube MBeans if your tool is running on the same server as the SonarQube Server.
#### Remote access
Here are examples of configurations to activate remote access to JMX MBeans.
For the WebServer:
```css-79elbk
# JMX WEB - 10443/10444
sonar.web.javaAdditionalOpts=-Dcom.sun.management.jmxremote=true -Dcom.sun.management.jmxremote.ssl=false -Dcom.sun.management.jmxremote.authenticate=true -Dcom.sun.management.jmxremote.port=10443 -Dcom.sun.management.jmxremote.rmi.port=10444 -Dcom.sun.management.jmxremote.password.file=/opt/sonarsource/sonar/conf/jmxremote.password -Dcom.sun.management.jmxremote.access.file=/opt/sonarsource/sonar/conf/jmxremote.access
```
For the ComputeEngine, there is no specific `javaAdditionalOpts` entry, simply amend `sonar.ce.javaOpts`.
Example of `jmxremote.access`:
```css-79elbk
#
# JMX Access Control file
#
reader readonly
admin readwrite \
create javax.management.monitor.*,javax.management.timer.*,com.sun.management.*,com.oracle.jrockit.* \
unregister
```
Example of `jmxremote.password`:
```css-79elbk
#
# JMX Access Password file
#
reader readerpassword
admin adminpassword
```
Note: You should apply `chmod 600` or `400` on the file `jmxremote.password`, for security reasons.
### Prometheus monitoring
You can monitor your SonarQube instance using SonarQube’s core integration with Prometheus. Through this integration, you can ensure your instance is running properly and know if you need to take action to prevent future issues.
See Setting up the monitoring of a Kubernetes deployment [introduction](https://docs.sonarsource.com/sonarqube-server/server-installation/on-kubernetes-or-openshift/set-up-monitoring/introduction "mention") page.
---
# Source: https://docs.sonarsource.com/sonarqube-cloud/managing-your-projects/administering-your-projects/advanced-administration/integrating-projects-with-compass.md
# Integrating projects with Compass
Monitoring your Atlassian Compass can be done using the SonarQube Cloud Quality Gate application to add scorecards and metric cards to any of your [components](https://developer.atlassian.com/cloud/compass/components/what-is-a-component/) in Compass. These cards will tell you what the current status of your quality gate.
A scorecard is a set of criteria that you apply to a component to measure its health. The SonarQube Cloud Quality Gate scorecard tells you whether your project’s quality gate is passing (100% score) or failing (0%), prompting you to address the root cause of the failure of your project.
### Integrating your project with Atlassian Compass
The SonarQube Cloud Quality Gate app is already listed in the Atlassian Compass App Catalog.
Configuration of the app takes place within Atlassian Compass itself. Here are the main steps you need to complete setup of your project:
* Create a user token in SonarQube Cloud to authenticate SonarQube Cloud to Atlassian Compass
* Start the configuration process of the app
* Add the token to complete authentication within Compass
* Add your SonarQube Cloud project to your Compass component
### Generating a SonarQube Cloud user token
First of all, you need to create a user token in SonarQube Cloud for which will be used to authenticate SonarQube Cloud Quality Gate app to Atlassian Compass. To generate a token, to go **Account** > **My Account** > **Security.** There you can see a list of your existing tokens.
Enter a name for your token, for example, *My Compass Token*, and select **Generate Token**. Make sure to copy the token and save it immediately before you dismiss the notification or leave this screen. Otherwise, you may have to start the process again. You will need to enter this token during the configuration process later in Compass.
### Configuring the SonarQube Cloud Quality Gate app in Compass
{% hint style="info" %}
Note that these steps take place within Atlassian Compass. For more details on how Compass works, see the [Atlassian Compass](https://developer.atlassian.com/cloud/compass/getting-started/get-started-using-Compass/) help center.
{% endhint %}
1. Go to your Atlassian Compass account.
2. Select **Apps** from the top navigation bar in Compass. Search for the SonarQube Cloud Quality Gate app.
3. Select **Configure**. This takes you to the configuration page.
4. Select ***Allow Access***. This takes you to the authorization screen to allow SonarQube Cloud access to your Atlassian account.
5. Select **Accept**. The configuration screen appears.
6. Enter the user token you created and saved earlier in SonarQube Cloud in the **Access Token** field and click **Connect**.
You can now add your projects to your Compass components.
### Integrating SonarQube Cloud projects with Atlassian Compass
You now need to go to your SonarQube Cloud account and copy the URL of the project that you want to integrate with Compass.
Then, go to **Atlassian Compass** > **Components** and select your component.
On your team’s dashboard on the right hand side, enter the URL saved in the project field, along with a text to display as the name of your project. Then refresh your screen.
Once you have refreshed your screen, you can view the Scorecard and Metric for your project. The status of your project will be updated every hour and you’ll receive a warning if your quality gate has failed in SonarQube Cloud.
To remove an existing SonarQube Cloud project from Atlassian Compass, just click on the **X** button to the right of the project field (highlighted above).
You can also view the current ratings of your components under the **Health** tab in Compass. Under Health, there are sub-tabs for both Scorecards and Metrics. There you can see a list of your apps and the components that the apps are applied to.
---
# Source: https://docs.sonarsource.com/sonarqube-cloud/administering-sonarcloud/managing-organization/connecting-to-slack/integration-overview.md
# About SonarQube Cloud integration with Slack
With the SonarQube Cloud integration with Slack, users can receive real-time notifications on analysis results directly in Slack. Currently, a notification is triggered when the quality gate status of a project’s main branch analysis transitions from Passed to Failed or from Failed to Passed.
The Slack messages contain context-rich notifications for immediate action, significantly cutting context-switching and improving code review feedback loop efficiency. Check out this [video](https://www.youtube.com/watch?v=oW-pp4LN9r0) on how to benefit from the Slack integration.
{% hint style="info" %}
Read our [privacy notice](https://www.sonarsource.com/company/privacy/) to learn how your personal data is collected, processed and stored.
{% endhint %}
### Integration overview
The SonarQube App for Slack, installed in your Slack workspace, allows the integration of SonarQube Cloud with Slack:
* SonarQube Cloud is connected at the global level to your Slack workspace.\
A Slack workspace admin connects the Slack workspace to SonarQube Cloud. This process links their Slack account with their SonarQube Cloud account.
* Users log in to the SonarQube App for Slack by connecting their SonarQube Cloud and Slack accounts.
* Any Slack channel can be subscribed to notifications on one or several SonarQube Cloud projects distributed across different organizations:
* The channel’s member who performs the subscription must have Browse access to the project in SonarQube Cloud.
* All channel members receive the notifications.
### Integration security
SonarQube Cloud and Slack utilize OAuth 2.0 for their integration, ensuring secure data transfer. This is achieved through secure token handling, encryption, and robust access controls, all contributing to the highest security standards.
### Notification process
The notification process is as follows:
1. When an event to be notified occurs in SonarQube Cloud following the analysis of Project\_abc, SonarQube Cloud sends the event notification to the SonarQube App for Slack to be sent to each Slack channel subscribed to this project.
2. The SonarQube App for Slack forwards the messages to all subscribed channels. All channel members receive the message.
### Related pages
* [setup](https://docs.sonarsource.com/sonarqube-cloud/administering-sonarcloud/managing-organization/connecting-to-slack/setup "mention")
* [subscribing-to-slack-notifications](https://docs.sonarsource.com/sonarqube-cloud/managing-your-account/subscribing-to-slack-notifications "mention")
---
# Source: https://docs.sonarsource.com/sonarqube-cloud/discovering-sonarcloud/integration-with-devops-platforms.md
# Integration with DevOps platforms
This integration allows you to import your DevOps platform organization and its repositories into SonarQube Cloud, automatically binding SonarQube Cloud projects to their corresponding DevOps platform repositories. The integration also enables features like automatically triggering analysis in your CI/CD pipeline, displaying quality gate status in your DevOps pipeline, and preventing merges when the quality gate fails.
By default, users can authenticate to SonarQube Cloud with their existing credentials on their DevOps platform service (no additional setup is required). With the DevOps platform service authentication, Just-in-Time user provisioning is used.
{% hint style="info" %}
With the Enterprise plan, you can use Single Sign On authentication. See [subscription-plans](https://docs.sonarsource.com/sonarqube-cloud/administering-sonarcloud/managing-subscription/subscription-plans "mention") for more information.
{% endhint %}
### GitHub
SonarQube Cloud’s integration is supported with GitHub plans running on the [github.com](https://github.com/) domain.
With this integration, you’ll be able to:
* Authenticate with GitHub (through the SonarQube Cloud GitHub application).\
Automatic member synchronization is supported.
* Import your GitHub organization and its repositories into SonarQube Cloud to easily set up SonarQube Cloud projects.
* Analyze projects with GitHub Actions.\
SonarScanners running in GitHub Actions jobs can automatically detect branches or pull requests being built.\
You can fail the job if the SonarQube quality gate fails.
* Report your quality gate status to your branches and pull requests.\
You can see your quality gate and code metric results right in GitHub so you know if it’s safe to merge your changes. You can prevent pull request merges when the quality gate fails.
* Import your monorepo into SonarQube Cloud to easily manage the related projects.
### Bitbucket Cloud
With SonarQube Cloud’s integration with Bitbucket Cloud, you’ll be able to:
* Authenticate with Bitbucket Cloud (through OAuth authentication).
* Import your Bitbucket workspace and its repositories into SonarQube Cloud to easily set up SonarQube Cloud projects.
* Analyze projects with Bitbucket Pipelines.\
SonarScanners running in Bitbucket Pipelines can automatically detect branches or pull requests being built.\
You can fail the pipeline if the SonarQube quality gate fails.
* Report your quality gate status to your branches and pull requests.\
You can see your quality gate and code metric results right in Bitbucket Cloud so you know if it’s safe to merge your changes. You can prevent pull request merges when the quality gate fails.
* Import your monorepo into SonarQube Cloud to easily manage the related projects.
### GitLab
With SonarQube Cloud’s integration with GitLab, you’ll be able to:
* Authenticate with GitLab (through OAuth authentication).
* Import your GitLab group and its repositories into SonarQube Cloud to easily set up SonarQube Cloud projects.
* Analyze projects with GitLab CI/CD.\
SonarScanners running in GitLab CI/CD jobs can automatically detect branches or pull requests being built.\
You can fail the job if the SonarQube quality gate fails.
* Report your quality gate status to your branches and pull requests.\
You can see your quality gate and code metric results right in GitLab so you know if it’s safe to merge your changes. You can prevent pull request merges when the quality gate fails.
* Import your monorepo into SonarQube Cloud to easily manage the related projects.
### Azure DevOps
SonarQube Cloud’s integration is supported with Azure DevOps Services.
With this integration, you’ll be able to:
* Authenticate with Azure DevOps (through OAuth authentication).
* Import your Azure DevOps organization and its repositories into SonarQube Cloud to easily set up SonarQube Cloud projects.
* Analyze projects with Azure Pipelines.\
SonarScanners running in Azure Pipelines can automatically detect branches or pull requests being built.\
You can fail the pipeline if the SonarQube quality gate fails.
* Report your quality gate status to your branches and pull requests.\
You can see your quality gate status right in Azure Pipeline’s Build Summary page. Issues detected on pull requests are displayed on the Azure DevOps pull request. You can prevent pull request merges when the quality gate fails.
* Import your monorepo into SonarQube Cloud to easily manage the related projects.
### Related pages
* [github](https://docs.sonarsource.com/sonarqube-cloud/getting-started/github "mention")
* [bitbucket-cloud](https://docs.sonarsource.com/sonarqube-cloud/getting-started/bitbucket-cloud "mention")
* [gitlab](https://docs.sonarsource.com/sonarqube-cloud/getting-started/gitlab "mention")
* [azure-devops](https://docs.sonarsource.com/sonarqube-cloud/getting-started/azure-devops "mention")
---
# Source: https://docs.sonarsource.com/sonarqube-community-build/instance-administration/analysis-functions/integration-with-external-analyzers.md
# Source: https://docs.sonarsource.com/sonarqube-server/2025.5/instance-administration/analysis-functions/integration-with-external-analyzers.md
# Source: https://docs.sonarsource.com/sonarqube-server/2025.6/instance-administration/analysis-functions/integration-with-external-analyzers.md
# Source: https://docs.sonarsource.com/sonarqube-server/instance-administration/analysis-functions/integration-with-external-analyzers.md
# Integration with external analyzers at instance level
Many languages have dedicated analyzers (also known as linters) that are commonly used to spot problems in code. SonarQube can integrate the results from many of these external analyzers. This lets you see this information alongside the other SonarQube metrics and allows the external results to be taken into account when calculating quality gate status.
You can set up in the UI and at the instance level the integration of the third-party analyzers supported by SonarQube, except the .NET and go analyzers. This setup can be overridden at the project level. For the list of supported analyzers, see [about-external-issues](https://docs.sonarsource.com/sonarqube-server/analyzing-source-code/importing-external-issues/about-external-issues "mention").
Proceed as follows:
1. In your SonarQube instance, go to **Administration > Configuration > General Settings > External Analyzers**.
2. In the page, navigate to the language you want to set up.
3. In the parameter corresponding to your analyzer, enter the list of import directories or files. This parameter accepts a comma-delimited list of paths. A path definition is either relative to the `sonar.projectBaseDir` analysis parameter (which is by default the directory from which the analysis was started) or absolute.
### Related pages
[about-external-issues](https://docs.sonarsource.com/sonarqube-server/analyzing-source-code/importing-external-issues/about-external-issues "mention")\
[#for-files](https://docs.sonarsource.com/sonarqube-server/project-administration/adjusting-analysis/setting-analysis-scope/defining-matching-patterns#for-files "mention")\
[importing-external-issues](https://docs.sonarsource.com/sonarqube-server/analyzing-source-code/importing-external-issues "mention") (at the project level)\
[analysis-parameters](https://docs.sonarsource.com/sonarqube-server/analyzing-source-code/analysis-parameters "mention")
---
# Source: https://docs.sonarsource.com/sonarqube-community-build/extension-guide/internationalization.md
# Source: https://docs.sonarsource.com/sonarqube-server/8.9/extension-guide/internationalization.md
# Source: https://docs.sonarsource.com/sonarqube-server/9.8/extension-guide/internationalization.md
# Source: https://docs.sonarsource.com/sonarqube-server/9.9/extension-guide/internationalization.md
# Source: https://docs.sonarsource.com/sonarqube-server/10.0/extension-guide/internationalization.md
# Source: https://docs.sonarsource.com/sonarqube-server/10.1/extension-guide/internationalization.md
# Source: https://docs.sonarsource.com/sonarqube-server/10.2/extension-guide/internationalization.md
# Source: https://docs.sonarsource.com/sonarqube-server/10.3/extension-guide/internationalization.md
# Source: https://docs.sonarsource.com/sonarqube-server/10.4/extension-guide/internationalization.md
# Source: https://docs.sonarsource.com/sonarqube-server/10.5/extension-guide/internationalization.md
# Source: https://docs.sonarsource.com/sonarqube-server/10.6/extension-guide/internationalization.md
# Source: https://docs.sonarsource.com/sonarqube-server/10.7/extension-guide/internationalization.md
# Source: https://docs.sonarsource.com/sonarqube-server/10.8/extension-guide/internationalization.md
# Source: https://docs.sonarsource.com/sonarqube-server/2025.2/extension-guide/internationalization.md
# Source: https://docs.sonarsource.com/sonarqube-server/2025.3/extension-guide/internationalization.md
# Source: https://docs.sonarsource.com/sonarqube-server/2025.5/extension-guide/internationalization.md
# Source: https://docs.sonarsource.com/sonarqube-server/2025.1/extension-guide/internationalization.md
# Source: https://docs.sonarsource.com/sonarqube-server/2025.4/extension-guide/internationalization.md
# Source: https://docs.sonarsource.com/sonarqube-server/2025.6/extension-guide/internationalization.md
# Source: https://docs.sonarsource.com/sonarqube-server/extension-guide/internationalization.md
# Internationalization
This page gives guidelines to i10n for:
* Plugin developers who would like to apply the i18n mechanism in their own plugins, so that these plugins can be available in several languages.
* People who would like to help the community by making the platform available in a new language.
### Principles
Although the basics of the i18n mechanism are the same for every part of the ecosystem, the packaging differs depending on what you are developing:
* Translations for SonarQube Server: making SonarQube Server available in a new language requires you to develop and publish a new language pack plugin.
* By default, SonarQube Server embeds the English pack.
* All other language pack plugins, like the French pack plugin, are maintained by the community and are available through the Marketplace (category "Localization").
* Translations for the SonarQube community plugins: open-source plugins from the SonarQube community must embed only the bundles for the default locale (en). Translations will be done in the language pack plugins.
* Translations for other plugins: closed-source/commercial/independent plugins must embed the bundles for the default locale and the translations for every language they want to support.
* After installing a language, users must change their browser language to see the changes reflected in their plugins.
### Translation bundles
Localized messages are stored in properties files:
* These are regular properties files with key/value pairs where you put most translations
* These files must be stored in the org.sonar.l10n package (usually in the `src/main/resources/org/sonar/l10n` directory)
* The names of these files must follow the convention `_.properties`, for example `widgetlabs_fr.properties` or `core_fr.properties` for the core bundle. See `sonar-packaging-maven-plugin` for details on plugin key derivation.
* Messages can accept arguments. Such entries would look like:
* `myplugin.foo=This is a message with 2 params: the first "{0}" and the second "{1}".`
* Messages can accept pluralization. Such entries would look like:
* `myplugin.foo={x, number} {x, plural, one {thing} other {things}}`
* We use it for example with a combination of 2 labels: `component_navigation.last_analysis_had_warnings=Last analysis had {warnings}` and `component_navigation.x_warnings={warningsCount, number} {warningsCount, plural, one {warning} other {warnings}}`. This renders `Last analysis had 1 warning` if `warningsCount` equals 1 and `Last analysis had 2 warnings` otherwise, in this case 2.
* Learn more about this syntax [here](https://formatjs.io/docs/core-concepts/icu-syntax/).
{% hint style="warning" %}
**UTF-8 encoding**\
In the Java API, properties files are supposed to be encoded in ISO-8859 charset. Without good tooling, it can be quite annoying to write translations for languages that do not fit in this charset. This is why we decided to encode the properties files in UTF-8, and let Maven turn them into ASCII at build time thanks to native2ascii-maven-plugin (check the French plugin pom.xml). This makes the process of writing translations with a standard editor far easier.
{% endhint %}
#### How to read localized messages from a plugin extension?
The component `org.sonar.api.i18n.I18n` is available for web server extensions. Scanner extensions cannot load bundles.
### Writing a language pack
A language pack defines bundles for SonarQube Server and/or plugins.
#### Creating a language pack
The easiest way to create a new pack is to copy the [Chinese pack](https://github.com/SonarQubeCommunity/sonar-l10n-zh) and adapt it to your language.
#### Maintaining a language pack
In the pom file, set the versions of SonarQube Server and of the plugins you want to translate. When it’s time to update your language pack for a new version of SonarQube Server or a plugin, the easiest way to see what keys are missing is to run:
`mvn test`
If the build fails, it means that some keys are missing. Go to `target/l10n` to check the reports for each bundle. Missing keys are listed under `Missing translations are:`
```css-79elbk
Missing translations are:
code_viewer.no_info_displayed_due_to_security=Due to security settings, no information can be displayed.
comparison.version.latest=LATEST
...
```
Each time you add a new bundle or update an existing one, please create a JIRA ticket on the corresponding l10n component in order to track changes.
### Localizing a plugin
This section applies if you are developing a closed-source plugin. If your plugin falls in this category, it must embed its own bundles. Bundles must be defined in `src/main/resources/org/sonar/l10n/_.properties`
The default bundle is mandatory and must be in English. For example, the plugin with the key `mysonarplugin` must define the following files in order to enable the French translation:
* `org/sonar/l10n/mysonarplugin.properties`
* `org/sonar/l10n/mysonarplugin_fr.properties`
---
# Source: https://docs.sonarsource.com/sonarqube-community-build/quality-standards-administration/managing-quality-gates/introduction-to-quality-gates.md
# Source: https://docs.sonarsource.com/sonarqube-server/2025.2/quality-standards-administration/managing-quality-gates/introduction-to-quality-gates.md
# Source: https://docs.sonarsource.com/sonarqube-server/2025.3/quality-standards-administration/managing-quality-gates/introduction-to-quality-gates.md
# Source: https://docs.sonarsource.com/sonarqube-server/2025.5/quality-standards-administration/managing-quality-gates/introduction-to-quality-gates.md
# Source: https://docs.sonarsource.com/sonarqube-server/2025.4/quality-standards-administration/managing-quality-gates/introduction-to-quality-gates.md
# Source: https://docs.sonarsource.com/sonarqube-server/2025.6/quality-standards-administration/managing-quality-gates/introduction-to-quality-gates.md
# Source: https://docs.sonarsource.com/sonarqube-server/quality-standards-administration/managing-quality-gates/introduction-to-quality-gates.md
# Source: https://docs.sonarsource.com/sonarqube-cloud/standards/managing-quality-gates/introduction-to-quality-gates.md
# Understanding quality gates
A quality gate consists of a set of conditions against which the code is measured during analysis. A condition is defined on either new code or overall code. Depending on the result, the code will pass or fail the quality gate, giving developers indications on whether to fix issues or merge the code.
The quality gate status (**Passed** or **Failed**) appears with analysis results of the main branch, other branches, and pull requests in the respective project’s page as illustrated below.
{% hint style="info" %}
* Any user can subscribe to email notifications on quality gate change for a project or all projects. See [notifications](https://docs.sonarsource.com/sonarqube-cloud/managing-your-account/notifications "mention").
* For pull requests, the quality gate status will also be displayed in the repository platform as a pull request decoration. It can be used to block the merge of the pull request if the quality gate fails.
* The quality gate status can be reported to your CI pipeline. It can be used to fail your CI pipeline if the quality gate fails.
* If you are using [connected-mode](https://docs.sonarsource.com/sonarqube-cloud/improving/connected-mode "mention"), changes to your main branch quality gate will also appear as notifications in your IDE (this only works if you have configured SonarQube for IDE to connect to your SonarQube Cloud account).
{% endhint %}
### Basic principles
Each project is assigned a quality gate. A default quality gate is defined in your organization and applied to all projects not explicitly assigned to a quality gate.
You may have to use several quality gates depending on your projects:
* The technological implementation differs from one application to another. For example, you might not require the same code coverage on new code for web applications as you would for Java applications.
* You want to ensure stronger requirements on some of your applications, for example, internal frameworks.
* You should use a quality gate qualified for AI Code Assurance if your project contains AI code.
Two built-in quality gates are provided: **Sonar way** which is used by default as the default quality gate, and **Sonar way for AI Code** which is recommended for projects containing AI code. See **Quality gates for AI code** below.
With the Team and Enterprise plans, you can create your own quality gates, called custom quality gates.
To create and update custom quality gates, the Administer Quality Gates permission is required. With this permission, you can also associate projects with quality gates. As a project manager, you can associate your project with a quality gate.
{% hint style="info" %}
Quality gates can be managed in the UI or through the [Web API](https://sonarcloud.io/web_api/api/qualitygates?query=qualitygates\&deprecated=false).
{% endhint %}
### Quality gate definition based on conditions
A quality gate is defined through a set of conditions on metrics calculated during the analysis. Each condition applies to a given metric applying either to new code or overall code. If one of the conditions is met, the quality gate fails. See [about-new-code](https://docs.sonarsource.com/sonarqube-cloud/standards/about-new-code "mention") for more information.
{% hint style="info" %}
In case of a pull request analysis, only the quality gate conditions applying to new code are used.
{% endhint %}
Metrics you can use include:
* Statistics and ratings on detected security, maintainability, and reliability issues.
* Statistics on test coverage.
* Code cyclomatic and cognitive complexities.
* Statistics and ratings on reviewed security hotspots.
* Statistics on duplicated lines and blocks.
* Statistics on code size (the number of various code elements).
* Global statistics on issues.
Each quality gate condition is a combination of:
* A metric
* A comparison operator
* An error value
For instance, a condition might be
* Metric: Blocker issue
* Comparison operator: >
* Error value: 0
Which can be stated as: No blocker issues.
For more information on the metrics, see [metric-definitions](https://docs.sonarsource.com/sonarqube-cloud/digging-deeper/metric-definitions "mention").
### Sonar way, the recommended quality gate
The **Sonar way** quality gate is Sonar’s recommended quality gate for your new code, helping you achieve high quality code. It is provided by Sonar, activated by default, and read-only.
This quality gate focuses on keeping high quality standards for new code, rather than spending a lot of effort remediating old code.
The Sonar way quality gate has four conditions:
* No new bugs are introduced (Reliability rating is A).
* No new vulnerabilities are introduced (Security rating is A).
* New code has limited technical debt (Maintainability rating is A).
* All new Security Hotspots are reviewed.
* New code test coverage is greater than or equal to 80.0%.
* Duplication in the new code is less than or equal to 3.0%.
### Quality gates for AI code
Sonar recognizes that AI-generated code requires additional quality standards, and we’ve created a series of tools to bring AI Code Assurance to your projects. One of these tools includes the [#use-the-sonar-way-for-ai-code](https://docs.sonarsource.com/sonarqube-cloud/ai-code-assurance/quality-gates-for-ai-code#use-the-sonar-way-for-ai-code "mention") quality gate and the option to create your own custom quality gates, specifically qualified for AI code.
For more information about using all of the Sonar tools for AI Code Assurance, see the [overview](https://docs.sonarsource.com/sonarqube-cloud/standards/ai-code-assurance/overview "mention") page.
### Quality gate computation
Within a specific project, the same quality gate definition is always used for all quality gate status computations. However, the way that the calculations are done differs somewhat between the branches and pull requests. In addition, a fudge factor is used by default during quality gate calculation. In some cases, the quality gate cannot be computed.
#### Computation for the main branch and long-lived branches
* Both the conditions defined on *overall code* and conditions defined on *new code* are applied.
* What counts as *new code* is determined by the prevailing new code definition setting for the branch, as described on the [about-new-code](https://docs.sonarsource.com/sonarqube-cloud/standards/about-new-code "mention") page.
#### Computation for short-lived branches and pull requests
* Only conditions defined on *new code* are applied.
* And, *new code* is defined as whatever has changed relative to the target branch, as described on the [branch-analysis](https://docs.sonarsource.com/sonarqube-cloud/enriching/branch-analysis "mention") and [pull-request-analysis](https://docs.sonarsource.com/sonarqube-cloud/improving/pull-request-analysis "mention") pages.
#### Quality gate fudge factor
The quality gate fudge factor refers to a mechanism where conditions on duplication and coverage are ignored until the number of new lines is at least 20. This is used to avoid overly strict enforcement when dealing with small changes, as minor issues might disproportionately impact the overall quality gate status.
The fudge factor is enabled by default in your organization. This organization’s setting is applied to all new projects. Project administrators can override it for their project.
#### Not computed status
There are two main reasons why the quality gate may not be computed:
* You have performed only one analysis on your code (the quality gate is computed after the second analysis).
* No new code definition is set up for the project.\
This may only occur for projects created a long time ago since in the current version of SonarQube Server you cannot create a new project without setting up the new code definition.
If the quality gate has not been computed then the **Not computed** message is displayed in the place where the quality gate status usually appears as illustrated below.
The **Set New Code Definition** button is displayed as well in case no new code definition is set up. To fix this, click the button. For more details on setting up the definition, see the [about-new-code](https://docs.sonarsource.com/sonarqube-cloud/standards/about-new-code "mention") page.
### Quality gate and new code
To ensure that developers are not introducing issues in their code, all built-in quality gates are configured to prevent introducing issues in new code.
**No new issues are introduced**
This is implemented through the following failing condition(s) *on new code*:
* Either:
* The Number of issues is higher than 0.
* Or:
* Reliability Rating is worse than A.
* Security Rating is worse than A.
* Maintainability Rating is worse than A.
Note that while the three rating conditions help improve the quality of new code, they still allow some technical debt to sneak into your codebase. Instead, using the 0 issues condition will ensure that your new code is completely free from any issues.
**All new security hotspots have been reviewed**
This is implemented through the following failing condition *on new code*:
* Security Hotspots Reviewed is less than 100%.
**New code has sufficient test coverage**
This is implemented through the following failing condition *on new code*:
* Coverage is less than X%, where X is configurable.
**New code has limited duplications**
This is implemented through the following failing condition *on new code*:
* The duplicated lines density is greater than X%, where X is configurable.
For information on the metrics, see the [metric-definitions](https://docs.sonarsource.com/sonarqube-cloud/digging-deeper/metric-definitions "mention") page.
### Related pages
* [viewing-quality-gate](https://docs.sonarsource.com/sonarqube-cloud/standards/managing-quality-gates/viewing-quality-gate "mention")
* [managing-custom-quality-gates](https://docs.sonarsource.com/sonarqube-cloud/standards/managing-quality-gates/managing-custom-quality-gates "mention")
* [changing-default-quality-gate](https://docs.sonarsource.com/sonarqube-cloud/standards/managing-quality-gates/changing-default-quality-gate "mention")
* [quality-standards](https://docs.sonarsource.com/sonarqube-cloud/administering-sonarcloud/managing-organization/setting-config-at-org-level/quality-standards "mention")
* [associating-projects-with-quality-gate](https://docs.sonarsource.com/sonarqube-cloud/standards/managing-quality-gates/associating-projects-with-quality-gate "mention")
* [notifications](https://docs.sonarsource.com/sonarqube-cloud/managing-your-account/notifications "mention")
* [quality-gates-for-ai-code](https://docs.sonarsource.com/sonarqube-cloud/standards/ai-code-assurance/quality-gates-for-ai-code "mention")
* [changing-quality-gate](https://docs.sonarsource.com/sonarqube-cloud/managing-your-projects/project-analysis/changing-quality-gate "mention")
**DevOps platform integration features:**
* [introduction](https://docs.sonarsource.com/sonarqube-cloud/managing-your-projects/administering-your-projects/devops-platform-integration/introduction "mention") to the integration of your project with your DevOps platform
* Failing your CI pipeline on quality gate failure:
* [pipeline-pause](https://docs.sonarsource.com/sonarqube-cloud/advanced-setup/ci-based-analysis/jenkins/pipeline-pause "mention") in Jenkins
* [github-actions-for-sonarcloud](https://docs.sonarsource.com/sonarqube-cloud/advanced-setup/ci-based-analysis/github-actions-for-sonarcloud "mention")
* [bitbucket-pipelines-for-sonarcloud](https://docs.sonarsource.com/sonarqube-cloud/advanced-setup/ci-based-analysis/bitbucket-pipelines-for-sonarcloud "mention")
* [gitlab-ci](https://docs.sonarsource.com/sonarqube-cloud/advanced-setup/ci-based-analysis/gitlab-ci "mention")
---
# Source: https://docs.sonarsource.com/sonarqube-community-build/quality-standards-administration/managing-quality-profiles/introduction.md
# Source: https://docs.sonarsource.com/sonarqube-community-build/quality-standards-administration/managing-quality-gates/introduction.md
# Source: https://docs.sonarsource.com/sonarqube-community-build/instance-administration/authentication/gitlab/provisioning-modes/introduction.md
# Source: https://docs.sonarsource.com/sonarqube-community-build/instance-administration/authentication/saml/ping-identity/introduction.md
# Source: https://docs.sonarsource.com/sonarqube-community-build/instance-administration/authentication/saml/ms-entra-id/introduction.md
# Source: https://docs.sonarsource.com/sonarqube-community-build/instance-administration/user-management/introduction.md
# Source: https://docs.sonarsource.com/sonarqube-community-build/instance-administration/analysis-functions/analysis-scope/introduction.md
# Source: https://docs.sonarsource.com/sonarqube-community-build/project-administration/adjusting-analysis/setting-analysis-scope/introduction.md
# Source: https://docs.sonarsource.com/sonarqube-community-build/user-guide/managing-your-account/introduction.md
# Source: https://docs.sonarsource.com/sonarqube-community-build/user-guide/issues/introduction.md
# Source: https://docs.sonarsource.com/sonarqube-community-build/user-guide/code-metrics/introduction.md
# Source: https://docs.sonarsource.com/sonarqube-community-build/devops-platform-integration/azure-devops-integration/adding-analysis-to-pipeline/introduction.md
# Source: https://docs.sonarsource.com/sonarqube-community-build/devops-platform-integration/azure-devops-integration/introduction.md
# Source: https://docs.sonarsource.com/sonarqube-community-build/devops-platform-integration/gitlab-integration/introduction.md
# Source: https://docs.sonarsource.com/sonarqube-community-build/devops-platform-integration/bitbucket-integration/bitbucket-cloud-integration/introduction.md
# Source: https://docs.sonarsource.com/sonarqube-community-build/devops-platform-integration/github-integration/setting-up-at-global-level/introduction.md
# Source: https://docs.sonarsource.com/sonarqube-community-build/devops-platform-integration/github-integration/introduction.md
# Source: https://docs.sonarsource.com/sonarqube-community-build/analyzing-source-code/incremental-analysis/introduction.md
# Source: https://docs.sonarsource.com/sonarqube-community-build/analyzing-source-code/scanners/npm/introduction.md
# Source: https://docs.sonarsource.com/sonarqube-community-build/analyzing-source-code/scanners/dotnet/introduction.md
# Source: https://docs.sonarsource.com/sonarqube-community-build/server-installation/on-kubernetes-or-openshift/set-up-monitoring/introduction.md
# Source: https://docs.sonarsource.com/sonarqube-community-build/server-installation/on-kubernetes-or-openshift/introduction.md
# Source: https://docs.sonarsource.com/sonarqube-community-build/server-installation/introduction.md
# Source: https://docs.sonarsource.com/sonarqube-server/10.3/setup-and-upgrade/install-the-server/introduction.md
# Source: https://docs.sonarsource.com/sonarqube-server/10.4/user-guide/clean-code/introduction.md
# Source: https://docs.sonarsource.com/sonarqube-server/10.4/setup-and-upgrade/deploy-on-kubernetes/set-up-monitoring/introduction.md
# Source: https://docs.sonarsource.com/sonarqube-server/10.4/setup-and-upgrade/install-the-server/introduction.md
# Source: https://docs.sonarsource.com/sonarqube-server/10.5/user-guide/clean-code/introduction.md
# Source: https://docs.sonarsource.com/sonarqube-server/10.5/devops-platform-integration/github-integration/introduction.md
# Source: https://docs.sonarsource.com/sonarqube-server/10.5/setup-and-upgrade/deploy-on-kubernetes/set-up-monitoring/introduction.md
# Source: https://docs.sonarsource.com/sonarqube-server/10.5/setup-and-upgrade/install-the-server/introduction.md
# Source: https://docs.sonarsource.com/sonarqube-server/10.6/user-guide/issues/introduction.md
# Source: https://docs.sonarsource.com/sonarqube-server/10.6/user-guide/code-metrics/introduction.md
# Source: https://docs.sonarsource.com/sonarqube-server/10.6/user-guide/clean-code/introduction.md
# Source: https://docs.sonarsource.com/sonarqube-server/10.6/devops-platform-integration/gitlab-integration/introduction.md
# Source: https://docs.sonarsource.com/sonarqube-server/10.6/devops-platform-integration/github-integration/setting-up-at-global-level/introduction.md
# Source: https://docs.sonarsource.com/sonarqube-server/10.6/devops-platform-integration/github-integration/introduction.md
# Source: https://docs.sonarsource.com/sonarqube-server/10.6/analyzing-source-code/incremental-analysis/introduction.md
# Source: https://docs.sonarsource.com/sonarqube-server/10.6/analyzing-source-code/branch-analysis/introduction.md
# Source: https://docs.sonarsource.com/sonarqube-server/10.6/analyzing-source-code/pull-request-analysis/introduction.md
# Source: https://docs.sonarsource.com/sonarqube-server/10.6/analyzing-source-code/scanners/sonarscanner-for-npm/introduction.md
# Source: https://docs.sonarsource.com/sonarqube-server/10.6/setup-and-upgrade/deploy-on-kubernetes/set-up-monitoring/introduction.md
# Source: https://docs.sonarsource.com/sonarqube-server/10.6/setup-and-upgrade/install-the-server/introduction.md
# Source: https://docs.sonarsource.com/sonarqube-server/10.7/instance-administration/authentication/gitlab/provisioning-modes/introduction.md
# Source: https://docs.sonarsource.com/sonarqube-server/10.7/instance-administration/authentication/saml/ping-identity/introduction.md
# Source: https://docs.sonarsource.com/sonarqube-server/10.7/instance-administration/authentication/saml/ms-entra-id/introduction.md
# Source: https://docs.sonarsource.com/sonarqube-server/10.7/user-guide/managing-your-account/introduction.md
# Source: https://docs.sonarsource.com/sonarqube-server/10.7/user-guide/issues/introduction.md
# Source: https://docs.sonarsource.com/sonarqube-server/10.7/user-guide/code-metrics/introduction.md
# Source: https://docs.sonarsource.com/sonarqube-server/10.7/devops-platform-integration/gitlab-integration/introduction.md
# Source: https://docs.sonarsource.com/sonarqube-server/10.7/devops-platform-integration/github-integration/setting-up-at-global-level/introduction.md
# Source: https://docs.sonarsource.com/sonarqube-server/10.7/devops-platform-integration/github-integration/introduction.md
# Source: https://docs.sonarsource.com/sonarqube-server/10.7/analyzing-source-code/incremental-analysis/introduction.md
# Source: https://docs.sonarsource.com/sonarqube-server/10.7/analyzing-source-code/branch-analysis/introduction.md
# Source: https://docs.sonarsource.com/sonarqube-server/10.7/analyzing-source-code/pull-request-analysis/introduction.md
# Source: https://docs.sonarsource.com/sonarqube-server/10.7/analyzing-source-code/scanners/npm/introduction.md
# Source: https://docs.sonarsource.com/sonarqube-server/10.7/analyzing-source-code/scanners/dotnet/introduction.md
# Source: https://docs.sonarsource.com/sonarqube-server/10.7/setup-and-upgrade/deploy-on-kubernetes/set-up-monitoring/introduction.md
# Source: https://docs.sonarsource.com/sonarqube-server/10.7/setup-and-upgrade/deploy-on-kubernetes/server/introduction.md
# Source: https://docs.sonarsource.com/sonarqube-server/10.7/setup-and-upgrade/install-the-server/introduction.md
# Source: https://docs.sonarsource.com/sonarqube-server/10.7/core-concepts/clean-as-you-code/introduction.md
# Source: https://docs.sonarsource.com/sonarqube-server/10.7/core-concepts/clean-code/introduction.md
# Source: https://docs.sonarsource.com/sonarqube-server/10.8/instance-administration/authentication/gitlab/provisioning-modes/introduction.md
# Source: https://docs.sonarsource.com/sonarqube-server/10.8/instance-administration/authentication/saml/ping-identity/introduction.md
# Source: https://docs.sonarsource.com/sonarqube-server/10.8/instance-administration/authentication/saml/ms-entra-id/introduction.md
# Source: https://docs.sonarsource.com/sonarqube-server/10.8/instance-administration/user-management/introduction.md
# Source: https://docs.sonarsource.com/sonarqube-server/10.8/user-guide/managing-your-account/introduction.md
# Source: https://docs.sonarsource.com/sonarqube-server/10.8/user-guide/issues/introduction.md
# Source: https://docs.sonarsource.com/sonarqube-server/10.8/user-guide/code-metrics/introduction.md
# Source: https://docs.sonarsource.com/sonarqube-server/10.8/devops-platform-integration/gitlab-integration/introduction.md
# Source: https://docs.sonarsource.com/sonarqube-server/10.8/devops-platform-integration/github-integration/setting-up-at-global-level/introduction.md
# Source: https://docs.sonarsource.com/sonarqube-server/10.8/devops-platform-integration/github-integration/introduction.md
# Source: https://docs.sonarsource.com/sonarqube-server/10.8/analyzing-source-code/incremental-analysis/introduction.md
# Source: https://docs.sonarsource.com/sonarqube-server/10.8/analyzing-source-code/branch-analysis/introduction.md
# Source: https://docs.sonarsource.com/sonarqube-server/10.8/analyzing-source-code/pull-request-analysis/introduction.md
# Source: https://docs.sonarsource.com/sonarqube-server/10.8/analyzing-source-code/scanners/npm/introduction.md
# Source: https://docs.sonarsource.com/sonarqube-server/10.8/analyzing-source-code/scanners/dotnet/introduction.md
# Source: https://docs.sonarsource.com/sonarqube-server/10.8/setup-and-upgrade/deploy-on-kubernetes/set-up-monitoring/introduction.md
# Source: https://docs.sonarsource.com/sonarqube-server/10.8/setup-and-upgrade/deploy-on-kubernetes/dce/introduction.md
# Source: https://docs.sonarsource.com/sonarqube-server/10.8/setup-and-upgrade/deploy-on-kubernetes/server/introduction.md
# Source: https://docs.sonarsource.com/sonarqube-server/10.8/setup-and-upgrade/install-the-server/introduction.md
# Source: https://docs.sonarsource.com/sonarqube-server/10.8/core-concepts/clean-as-you-code/introduction.md
# Source: https://docs.sonarsource.com/sonarqube-server/10.8/core-concepts/clean-code/introduction.md
# Source: https://docs.sonarsource.com/sonarqube-server/2025.2/instance-administration/authentication/gitlab/provisioning-modes/introduction.md
# Source: https://docs.sonarsource.com/sonarqube-server/2025.2/instance-administration/authentication/saml/ping-identity/introduction.md
# Source: https://docs.sonarsource.com/sonarqube-server/2025.2/instance-administration/authentication/saml/ms-entra-id/introduction.md
# Source: https://docs.sonarsource.com/sonarqube-server/2025.2/instance-administration/user-management/introduction.md
# Source: https://docs.sonarsource.com/sonarqube-server/2025.2/instance-administration/analysis-functions/analysis-scope/introduction.md
# Source: https://docs.sonarsource.com/sonarqube-server/2025.2/project-administration/setting-analysis-scope/introduction.md
# Source: https://docs.sonarsource.com/sonarqube-server/2025.2/user-guide/managing-your-account/introduction.md
# Source: https://docs.sonarsource.com/sonarqube-server/2025.2/user-guide/issues/introduction.md
# Source: https://docs.sonarsource.com/sonarqube-server/2025.2/user-guide/code-metrics/introduction.md
# Source: https://docs.sonarsource.com/sonarqube-server/2025.2/devops-platform-integration/azure-devops-integration/adding-analysis-to-pipeline/introduction.md
# Source: https://docs.sonarsource.com/sonarqube-server/2025.2/devops-platform-integration/azure-devops-integration/introduction.md
# Source: https://docs.sonarsource.com/sonarqube-server/2025.2/devops-platform-integration/gitlab-integration/introduction.md
# Source: https://docs.sonarsource.com/sonarqube-server/2025.2/devops-platform-integration/github-integration/setting-up-at-global-level/introduction.md
# Source: https://docs.sonarsource.com/sonarqube-server/2025.2/devops-platform-integration/github-integration/introduction.md
# Source: https://docs.sonarsource.com/sonarqube-server/2025.2/analyzing-source-code/incremental-analysis/introduction.md
# Source: https://docs.sonarsource.com/sonarqube-server/2025.2/analyzing-source-code/branch-analysis/introduction.md
# Source: https://docs.sonarsource.com/sonarqube-server/2025.2/analyzing-source-code/pull-request-analysis/introduction.md
# Source: https://docs.sonarsource.com/sonarqube-server/2025.2/analyzing-source-code/scanners/npm/introduction.md
# Source: https://docs.sonarsource.com/sonarqube-server/2025.2/analyzing-source-code/scanners/dotnet/introduction.md
# Source: https://docs.sonarsource.com/sonarqube-server/2025.2/setup-and-update/deploy-on-kubernetes/set-up-monitoring/introduction.md
# Source: https://docs.sonarsource.com/sonarqube-server/2025.2/setup-and-update/deploy-on-kubernetes/dce/introduction.md
# Source: https://docs.sonarsource.com/sonarqube-server/2025.2/setup-and-update/deploy-on-kubernetes/server/introduction.md
# Source: https://docs.sonarsource.com/sonarqube-server/2025.2/setup-and-update/install-the-server/introduction.md
# Source: https://docs.sonarsource.com/sonarqube-server/2025.3/quality-standards-administration/managing-quality-profiles/introduction.md
# Source: https://docs.sonarsource.com/sonarqube-server/2025.3/quality-standards-administration/managing-quality-gates/introduction.md
# Source: https://docs.sonarsource.com/sonarqube-server/2025.3/instance-administration/authentication/gitlab/provisioning-modes/introduction.md
# Source: https://docs.sonarsource.com/sonarqube-server/2025.3/instance-administration/authentication/saml/ping-identity/introduction.md
# Source: https://docs.sonarsource.com/sonarqube-server/2025.3/instance-administration/authentication/saml/ms-entra-id/introduction.md
# Source: https://docs.sonarsource.com/sonarqube-server/2025.3/instance-administration/user-management/introduction.md
# Source: https://docs.sonarsource.com/sonarqube-server/2025.3/instance-administration/analysis-functions/analysis-scope/introduction.md
# Source: https://docs.sonarsource.com/sonarqube-server/2025.3/project-administration/setting-analysis-scope/introduction.md
# Source: https://docs.sonarsource.com/sonarqube-server/2025.3/user-guide/managing-your-account/introduction.md
# Source: https://docs.sonarsource.com/sonarqube-server/2025.3/user-guide/issues/introduction.md
# Source: https://docs.sonarsource.com/sonarqube-server/2025.3/user-guide/code-metrics/introduction.md
# Source: https://docs.sonarsource.com/sonarqube-server/2025.3/devops-platform-integration/azure-devops-integration/adding-analysis-to-pipeline/introduction.md
# Source: https://docs.sonarsource.com/sonarqube-server/2025.3/devops-platform-integration/azure-devops-integration/introduction.md
# Source: https://docs.sonarsource.com/sonarqube-server/2025.3/devops-platform-integration/gitlab-integration/introduction.md
# Source: https://docs.sonarsource.com/sonarqube-server/2025.3/devops-platform-integration/github-integration/setting-up-at-global-level/introduction.md
# Source: https://docs.sonarsource.com/sonarqube-server/2025.3/devops-platform-integration/github-integration/introduction.md
# Source: https://docs.sonarsource.com/sonarqube-server/2025.3/analyzing-source-code/incremental-analysis/introduction.md
# Source: https://docs.sonarsource.com/sonarqube-server/2025.3/analyzing-source-code/branch-analysis/introduction.md
# Source: https://docs.sonarsource.com/sonarqube-server/2025.3/analyzing-source-code/pull-request-analysis/introduction.md
# Source: https://docs.sonarsource.com/sonarqube-server/2025.3/analyzing-source-code/scanners/npm/introduction.md
# Source: https://docs.sonarsource.com/sonarqube-server/2025.3/analyzing-source-code/scanners/dotnet/introduction.md
# Source: https://docs.sonarsource.com/sonarqube-server/2025.3/server-installation/data-center-edition/introduction.md
# Source: https://docs.sonarsource.com/sonarqube-server/2025.3/server-installation/on-kubernetes-or-openshift/set-up-monitoring/introduction.md
# Source: https://docs.sonarsource.com/sonarqube-server/2025.3/server-installation/introduction.md
# Source: https://docs.sonarsource.com/sonarqube-server/2025.3/advanced-security/introduction.md
# Source: https://docs.sonarsource.com/sonarqube-server/2025.5/quality-standards-administration/managing-quality-profiles/introduction.md
# Source: https://docs.sonarsource.com/sonarqube-server/2025.5/quality-standards-administration/managing-quality-gates/introduction.md
# Source: https://docs.sonarsource.com/sonarqube-server/2025.5/instance-administration/authentication/gitlab/provisioning-modes/introduction.md
# Source: https://docs.sonarsource.com/sonarqube-server/2025.5/instance-administration/authentication/saml/ping-identity/introduction.md
# Source: https://docs.sonarsource.com/sonarqube-server/2025.5/instance-administration/authentication/saml/ms-entra-id/introduction.md
# Source: https://docs.sonarsource.com/sonarqube-server/2025.5/instance-administration/user-management/introduction.md
# Source: https://docs.sonarsource.com/sonarqube-server/2025.5/instance-administration/analysis-functions/analysis-scope/introduction.md
# Source: https://docs.sonarsource.com/sonarqube-server/2025.5/project-administration/setting-analysis-scope/introduction.md
# Source: https://docs.sonarsource.com/sonarqube-server/2025.5/user-guide/managing-your-account/introduction.md
# Source: https://docs.sonarsource.com/sonarqube-server/2025.5/user-guide/issues/introduction.md
# Source: https://docs.sonarsource.com/sonarqube-server/2025.5/user-guide/code-metrics/introduction.md
# Source: https://docs.sonarsource.com/sonarqube-server/2025.5/devops-platform-integration/azure-devops-integration/adding-analysis-to-pipeline/introduction.md
# Source: https://docs.sonarsource.com/sonarqube-server/2025.5/devops-platform-integration/azure-devops-integration/introduction.md
# Source: https://docs.sonarsource.com/sonarqube-server/2025.5/devops-platform-integration/gitlab-integration/introduction.md
# Source: https://docs.sonarsource.com/sonarqube-server/2025.5/devops-platform-integration/github-integration/setting-up-at-global-level/introduction.md
# Source: https://docs.sonarsource.com/sonarqube-server/2025.5/devops-platform-integration/github-integration/introduction.md
# Source: https://docs.sonarsource.com/sonarqube-server/2025.5/analyzing-source-code/incremental-analysis/introduction.md
# Source: https://docs.sonarsource.com/sonarqube-server/2025.5/analyzing-source-code/branch-analysis/introduction.md
# Source: https://docs.sonarsource.com/sonarqube-server/2025.5/analyzing-source-code/pull-request-analysis/introduction.md
# Source: https://docs.sonarsource.com/sonarqube-server/2025.5/analyzing-source-code/scanners/npm/introduction.md
# Source: https://docs.sonarsource.com/sonarqube-server/2025.5/analyzing-source-code/scanners/dotnet/introduction.md
# Source: https://docs.sonarsource.com/sonarqube-server/2025.5/server-installation/data-center-edition/introduction.md
# Source: https://docs.sonarsource.com/sonarqube-server/2025.5/server-installation/on-kubernetes-or-openshift/set-up-monitoring/introduction.md
# Source: https://docs.sonarsource.com/sonarqube-server/2025.5/server-installation/introduction.md
# Source: https://docs.sonarsource.com/sonarqube-server/2025.5/advanced-security/introduction.md
# Source: https://docs.sonarsource.com/sonarqube-server/2025.1/instance-administration/authentication/gitlab/provisioning-modes/introduction.md
# Source: https://docs.sonarsource.com/sonarqube-server/2025.1/instance-administration/authentication/saml/ping-identity/introduction.md
# Source: https://docs.sonarsource.com/sonarqube-server/2025.1/instance-administration/authentication/saml/ms-entra-id/introduction.md
# Source: https://docs.sonarsource.com/sonarqube-server/2025.1/instance-administration/user-management/introduction.md
# Source: https://docs.sonarsource.com/sonarqube-server/2025.1/user-guide/managing-your-account/introduction.md
# Source: https://docs.sonarsource.com/sonarqube-server/2025.1/user-guide/issues/introduction.md
# Source: https://docs.sonarsource.com/sonarqube-server/2025.1/user-guide/code-metrics/introduction.md
# Source: https://docs.sonarsource.com/sonarqube-server/2025.1/devops-platform-integration/azure-devops-integration/adding-analysis-to-pipeline/introduction.md
# Source: https://docs.sonarsource.com/sonarqube-server/2025.1/devops-platform-integration/azure-devops-integration/introduction.md
# Source: https://docs.sonarsource.com/sonarqube-server/2025.1/devops-platform-integration/gitlab-integration/introduction.md
# Source: https://docs.sonarsource.com/sonarqube-server/2025.1/devops-platform-integration/github-integration/setting-up-at-global-level/introduction.md
# Source: https://docs.sonarsource.com/sonarqube-server/2025.1/devops-platform-integration/github-integration/introduction.md
# Source: https://docs.sonarsource.com/sonarqube-server/2025.1/analyzing-source-code/incremental-analysis/introduction.md
# Source: https://docs.sonarsource.com/sonarqube-server/2025.1/analyzing-source-code/branch-analysis/introduction.md
# Source: https://docs.sonarsource.com/sonarqube-server/2025.1/analyzing-source-code/pull-request-analysis/introduction.md
# Source: https://docs.sonarsource.com/sonarqube-server/2025.1/analyzing-source-code/scanners/npm/introduction.md
# Source: https://docs.sonarsource.com/sonarqube-server/2025.1/analyzing-source-code/scanners/dotnet/introduction.md
# Source: https://docs.sonarsource.com/sonarqube-server/2025.1/setup-and-upgrade/deploy-on-kubernetes/set-up-monitoring/introduction.md
# Source: https://docs.sonarsource.com/sonarqube-server/2025.1/setup-and-upgrade/deploy-on-kubernetes/dce/introduction.md
# Source: https://docs.sonarsource.com/sonarqube-server/2025.1/setup-and-upgrade/deploy-on-kubernetes/server/introduction.md
# Source: https://docs.sonarsource.com/sonarqube-server/2025.1/setup-and-upgrade/install-the-server/introduction.md
# Source: https://docs.sonarsource.com/sonarqube-server/2025.4/quality-standards-administration/managing-quality-profiles/introduction.md
# Source: https://docs.sonarsource.com/sonarqube-server/2025.4/quality-standards-administration/managing-quality-gates/introduction.md
# Source: https://docs.sonarsource.com/sonarqube-server/2025.4/instance-administration/authentication/gitlab/provisioning-modes/introduction.md
# Source: https://docs.sonarsource.com/sonarqube-server/2025.4/instance-administration/authentication/saml/ping-identity/introduction.md
# Source: https://docs.sonarsource.com/sonarqube-server/2025.4/instance-administration/authentication/saml/ms-entra-id/introduction.md
# Source: https://docs.sonarsource.com/sonarqube-server/2025.4/instance-administration/user-management/introduction.md
# Source: https://docs.sonarsource.com/sonarqube-server/2025.4/instance-administration/analysis-functions/analysis-scope/introduction.md
# Source: https://docs.sonarsource.com/sonarqube-server/2025.4/project-administration/setting-analysis-scope/introduction.md
# Source: https://docs.sonarsource.com/sonarqube-server/2025.4/user-guide/managing-your-account/introduction.md
# Source: https://docs.sonarsource.com/sonarqube-server/2025.4/user-guide/issues/introduction.md
# Source: https://docs.sonarsource.com/sonarqube-server/2025.4/user-guide/code-metrics/introduction.md
# Source: https://docs.sonarsource.com/sonarqube-server/2025.4/devops-platform-integration/azure-devops-integration/adding-analysis-to-pipeline/introduction.md
# Source: https://docs.sonarsource.com/sonarqube-server/2025.4/devops-platform-integration/azure-devops-integration/introduction.md
# Source: https://docs.sonarsource.com/sonarqube-server/2025.4/devops-platform-integration/gitlab-integration/introduction.md
# Source: https://docs.sonarsource.com/sonarqube-server/2025.4/devops-platform-integration/github-integration/setting-up-at-global-level/introduction.md
# Source: https://docs.sonarsource.com/sonarqube-server/2025.4/devops-platform-integration/github-integration/introduction.md
# Source: https://docs.sonarsource.com/sonarqube-server/2025.4/analyzing-source-code/incremental-analysis/introduction.md
# Source: https://docs.sonarsource.com/sonarqube-server/2025.4/analyzing-source-code/branch-analysis/introduction.md
# Source: https://docs.sonarsource.com/sonarqube-server/2025.4/analyzing-source-code/pull-request-analysis/introduction.md
# Source: https://docs.sonarsource.com/sonarqube-server/2025.4/analyzing-source-code/scanners/npm/introduction.md
# Source: https://docs.sonarsource.com/sonarqube-server/2025.4/analyzing-source-code/scanners/dotnet/introduction.md
# Source: https://docs.sonarsource.com/sonarqube-server/2025.4/server-installation/data-center-edition/introduction.md
# Source: https://docs.sonarsource.com/sonarqube-server/2025.4/server-installation/on-kubernetes-or-openshift/set-up-monitoring/introduction.md
# Source: https://docs.sonarsource.com/sonarqube-server/2025.4/server-installation/introduction.md
# Source: https://docs.sonarsource.com/sonarqube-server/2025.4/advanced-security/introduction.md
# Source: https://docs.sonarsource.com/sonarqube-server/2025.6/quality-standards-administration/managing-quality-profiles/introduction.md
# Source: https://docs.sonarsource.com/sonarqube-server/2025.6/quality-standards-administration/managing-quality-gates/introduction.md
# Source: https://docs.sonarsource.com/sonarqube-server/2025.6/instance-administration/authentication/gitlab/provisioning-modes/introduction.md
# Source: https://docs.sonarsource.com/sonarqube-server/2025.6/instance-administration/authentication/saml/ping-identity/introduction.md
# Source: https://docs.sonarsource.com/sonarqube-server/2025.6/instance-administration/authentication/saml/ms-entra-id/introduction.md
# Source: https://docs.sonarsource.com/sonarqube-server/2025.6/instance-administration/user-management/introduction.md
# Source: https://docs.sonarsource.com/sonarqube-server/2025.6/instance-administration/analysis-functions/analysis-scope/introduction.md
# Source: https://docs.sonarsource.com/sonarqube-server/2025.6/project-administration/adjusting-analysis/setting-analysis-scope/introduction.md
# Source: https://docs.sonarsource.com/sonarqube-server/2025.6/user-guide/managing-your-account/introduction.md
# Source: https://docs.sonarsource.com/sonarqube-server/2025.6/user-guide/issues/introduction.md
# Source: https://docs.sonarsource.com/sonarqube-server/2025.6/user-guide/code-metrics/introduction.md
# Source: https://docs.sonarsource.com/sonarqube-server/2025.6/devops-platform-integration/azure-devops-integration/adding-analysis-to-pipeline/introduction.md
# Source: https://docs.sonarsource.com/sonarqube-server/2025.6/devops-platform-integration/azure-devops-integration/introduction.md
# Source: https://docs.sonarsource.com/sonarqube-server/2025.6/devops-platform-integration/gitlab-integration/introduction.md
# Source: https://docs.sonarsource.com/sonarqube-server/2025.6/devops-platform-integration/bitbucket-integration/bitbucket-cloud-integration/introduction.md
# Source: https://docs.sonarsource.com/sonarqube-server/2025.6/devops-platform-integration/github-integration/setting-up-at-global-level/introduction.md
# Source: https://docs.sonarsource.com/sonarqube-server/2025.6/devops-platform-integration/github-integration/introduction.md
# Source: https://docs.sonarsource.com/sonarqube-server/2025.6/analyzing-source-code/incremental-analysis/introduction.md
# Source: https://docs.sonarsource.com/sonarqube-server/2025.6/analyzing-source-code/branch-analysis/introduction.md
# Source: https://docs.sonarsource.com/sonarqube-server/2025.6/analyzing-source-code/pull-request-analysis/introduction.md
# Source: https://docs.sonarsource.com/sonarqube-server/2025.6/analyzing-source-code/scanners/npm/introduction.md
# Source: https://docs.sonarsource.com/sonarqube-server/2025.6/analyzing-source-code/scanners/dotnet/introduction.md
# Source: https://docs.sonarsource.com/sonarqube-server/2025.6/server-installation/data-center-edition/introduction.md
# Source: https://docs.sonarsource.com/sonarqube-server/2025.6/server-installation/on-kubernetes-or-openshift/set-up-monitoring/introduction.md
# Source: https://docs.sonarsource.com/sonarqube-server/2025.6/server-installation/introduction.md
# Source: https://docs.sonarsource.com/sonarqube-server/2025.6/advanced-security/introduction.md
# Source: https://docs.sonarsource.com/sonarqube-server/quality-standards-administration/managing-quality-profiles/introduction.md
# Source: https://docs.sonarsource.com/sonarqube-server/quality-standards-administration/managing-quality-gates/introduction.md
# Source: https://docs.sonarsource.com/sonarqube-server/instance-administration/authentication/gitlab/provisioning-modes/introduction.md
# Source: https://docs.sonarsource.com/sonarqube-server/instance-administration/authentication/saml/ping-identity/introduction.md
# Source: https://docs.sonarsource.com/sonarqube-server/instance-administration/authentication/saml/ms-entra-id/introduction.md
# Source: https://docs.sonarsource.com/sonarqube-server/instance-administration/user-management/introduction.md
# Source: https://docs.sonarsource.com/sonarqube-server/instance-administration/analysis-functions/analysis-scope/introduction.md
# Source: https://docs.sonarsource.com/sonarqube-server/project-administration/adjusting-analysis/setting-analysis-scope/introduction.md
# Source: https://docs.sonarsource.com/sonarqube-server/user-guide/managing-your-account/introduction.md
# Source: https://docs.sonarsource.com/sonarqube-server/user-guide/issues/introduction.md
# Source: https://docs.sonarsource.com/sonarqube-server/user-guide/code-metrics/introduction.md
# Source: https://docs.sonarsource.com/sonarqube-server/devops-platform-integration/azure-devops-integration/adding-analysis-to-pipeline/introduction.md
# Source: https://docs.sonarsource.com/sonarqube-server/devops-platform-integration/azure-devops-integration/introduction.md
# Source: https://docs.sonarsource.com/sonarqube-server/devops-platform-integration/gitlab-integration/introduction.md
# Source: https://docs.sonarsource.com/sonarqube-server/devops-platform-integration/bitbucket-integration/bitbucket-cloud-integration/introduction.md
# Source: https://docs.sonarsource.com/sonarqube-server/devops-platform-integration/github-integration/setting-up-at-global-level/introduction.md
# Source: https://docs.sonarsource.com/sonarqube-server/devops-platform-integration/github-integration/introduction.md
# Source: https://docs.sonarsource.com/sonarqube-server/analyzing-source-code/incremental-analysis/introduction.md
# Source: https://docs.sonarsource.com/sonarqube-server/analyzing-source-code/branch-analysis/introduction.md
# Source: https://docs.sonarsource.com/sonarqube-server/analyzing-source-code/pull-request-analysis/introduction.md
# Source: https://docs.sonarsource.com/sonarqube-server/analyzing-source-code/scanners/npm/introduction.md
# Source: https://docs.sonarsource.com/sonarqube-server/analyzing-source-code/scanners/dotnet/introduction.md
# Source: https://docs.sonarsource.com/sonarqube-server/server-installation/data-center-edition/introduction.md
# Source: https://docs.sonarsource.com/sonarqube-server/server-installation/on-kubernetes-or-openshift/set-up-monitoring/introduction.md
# Source: https://docs.sonarsource.com/sonarqube-server/server-installation/introduction.md
# Source: https://docs.sonarsource.com/sonarqube-server/advanced-security/introduction.md
# Source: https://docs.sonarsource.com/sonarqube-cloud/advanced-setup/ci-based-analysis/sonarscanner-for-npm/introduction.md
# Source: https://docs.sonarsource.com/sonarqube-cloud/advanced-setup/ci-based-analysis/sonarscanner-for-dotnet/introduction.md
# Source: https://docs.sonarsource.com/sonarqube-cloud/advanced-setup/ci-based-analysis/azure-pipelines/introduction.md
# Source: https://docs.sonarsource.com/sonarqube-cloud/administering-sonarcloud/managing-enterprise/enterprise-security/sso/editing-configuration-old-method/introduction.md
# Source: https://docs.sonarsource.com/sonarqube-cloud/administering-sonarcloud/managing-organization/setting-config-at-org-level/adjusting-analysis-scope/introduction.md
# Source: https://docs.sonarsource.com/sonarqube-cloud/administering-sonarcloud/managing-organization/setting-config-at-org-level/introduction.md
# Source: https://docs.sonarsource.com/sonarqube-cloud/administering-sonarcloud/managing-subscription/introduction.md
# Source: https://docs.sonarsource.com/sonarqube-cloud/managing-your-projects/administering-your-projects/devops-platform-integration/introduction.md
# Source: https://docs.sonarsource.com/sonarqube-cloud/managing-your-projects/administering-your-projects/introduction.md
# Source: https://docs.sonarsource.com/sonarqube-cloud/managing-your-projects/project-analysis/setting-analysis-scope/introduction.md
# Source: https://docs.sonarsource.com/sonarqube-cloud/managing-your-projects/issues/introduction.md
# Source: https://docs.sonarsource.com/sonarqube-cloud/managing-your-account/introduction.md
# Source: https://docs.sonarsource.com/sonarqube-cloud/standards/managing-quality-profiles/introduction.md
# Source: https://docs.sonarsource.com/sonarqube-cloud/standards/managing-quality-gates/introduction.md
# Source: https://docs.sonarsource.com/sonarqube-cloud/getting-started-with-enterprise/viewing-enterprise-reports/introduction.md
# Source: https://docs.sonarsource.com/sonarqube-cloud/getting-started-with-enterprise/introduction.md
# Source: https://docs.sonarsource.com/sonarqube-cloud/advanced-security/introduction.md
# Introduction
Advanced Security is an add-on that requires a separate subscription to your SonarQube Cloud's [Enterprise plan](https://www.sonarsource.com/plans-and-pricing/#sonarqube-cloud-features).
## Overview
SonarQube Advanced Security is an Enterprise add-on that extends SonarQube’s capabilities by offering deeper security analysis and compliance-focused features such as Software Composition Analysis (SCA) and advanced SAST.
Designed for organizations that require enterprise-grade application security, it helps developers detect vulnerabilities and risks in open source code early in the software development lifecycle.
Advanced Security is built on top of SonarQube core security features such as:
* **SAST**: Analyzes source code to detect vulnerabilities, security hotspots, and flaws.
* **Taint Analysis**: Tracks untrusted user input with data flow analysis across functions and files to find injection and other vulnerabilities.
* **Secrets Detection**: Identifies hardcoded secrets in code repositories.
* **IaC Scanning**: Detects misconfigurations and security issues in your infrastructure definitions.
As well as features that are already part of Enterprise, such as:
* **Security Reports**: Comprehensive security reports such as PCI DSS, OWASP Top 10, CWE Top 25, STIG, CASA
## Software Composition Analysis (SCA)
SonarQube Server can identify your open source dependencies and discover issues with them, ensuring security and compliance.
* **Vulnerability identification**: Tracking, managing, & mitigating third-party vulnerabilities, including Common Vulnerabilities and Exposures (CVE).
* **License management**: Your organization’s policies for allowed software licenses.
* **Software Bills of Materials (SBOM)**: Inventories that help understand, manage, and report on the composition of the code.
The analysis results appear in the **Dependency Risks** and **Dependencies** sections of projects, applications, and portfolios. The **Dependencies** tab's location differs if you're in a project or portfolio.
### Supported platforms
Dependency analysis is currently available for the following languages:
* JavaScript/TypeScript (npm, yarn, pnpm, bun)
* Java, Kotlin, Scala (Maven, Gradle)
* Python (pip, poetry, pipenv)
* C# / .NET (nuget)
* Go
* Ruby (bundler)
* Rust (Cargo)
* PHP
### Data sources
Sonar uses the following sources of vulnerability data:
* NVD
* OSV
* EPSS
* CISA KEV
The Sonar service accesses these sites regularly to get the latest updates, and supplements it with manual research as well as insights from open source maintainers.
Sonar uses license data from upstream package managers and source repositories, and supplements it with manual research as well as insights from open source maintainers.
## Advanced SAST
SonarQube Cloud is a Static Application Security Testing (SAST) tool. It examines your project's source code, without executing it, allowing you to find vulnerabilities before they enter your codebase.
The categories of issue types detected through SAST include SQL injection, cross-site scripting, deserialization, secret detection, and more.
[Advanced SAST](https://www.sonarsource.com/solutions/security/sast/) extends code analysis and scanning to cover the unknown parts of the code that are in the open-source dependencies. It helps you identify deeper and more complex vulnerabilities due to the interaction of your application code with third-party (open-source) code.
Advanced SAST is available for the following languages:
* JavaScript/TypeScript
* Java
* C# / .NET
## Related pages
* [Viewing dependencies](https://docs.sonarsource.com/sonarqube-cloud/advanced-security/viewing-dependencies)
* [Reviewing and fixing dependency risks](https://docs.sonarsource.com/sonarqube-cloud/advanced-security/reviewing-and-fixing-dependency-risks)
* [Analyzing projects for dependencies](https://docs.sonarsource.com/sonarqube-cloud/advanced-security/analyzing-projects-for-dependencies-sca)
* [Managing license profiles and policies](https://docs.sonarsource.com/sonarqube-cloud/advanced-security/managing-license-profiles-and-policies)
* [Troubleshooting](https://docs.sonarsource.com/sonarqube-cloud/advanced-security/troubleshooting-the-dependency-analysis)
* [Best practices for managing dependency risks](https://docs.sonarsource.com/sonarqube-cloud/advanced-security/best-practices-for-managing-dependency-risks)
---
# Source: https://docs.sonarsource.com/sonarqube-for-eclipse/using/investigating-issues.md
# Source: https://docs.sonarsource.com/sonarqube-for-visual-studio/using/investigating-issues.md
# Source: https://docs.sonarsource.com/sonarqube-for-intellij/using/investigating-issues.md
# Source: https://docs.sonarsource.com/sonarqube-for-vs-code/using/investigating-issues.md
# Investigating issues
SonarQube for IDE can help developers by letting them perform local analyses to check their code before pushing it back to the SCM. While running an analysis, SonarQube for IDE raises an issue every time a piece of code breaks a coding rule.
Usually, a first analysis is performed as soon as one of the supported files is opened. Then, regular analyses are triggered when the editor content changes and/or when the file is saved.
This page describes how to find and investigate issues in your IDE.
### Defining issues
An *issue* is a problem in your code that violates one of the [Sonar rules](https://rules.sonarsource.com/). Issues found in code are linked to coding attributes and software qualities that determine the overall severity of an issue. Software qualities determine the overall severity of an issue that feeds back into the overall status of your code; please see pages on quality standards in the SonarQube Server and SonarQube Cloud documentation for more information:
* [Quality standards and new code](https://app.gitbook.com/s/yDv2XwTC1xoOKBYeCK45/user-guide/about-new-code "mention") in SonarQube Server
* [Quality standards and new code](https://app.gitbook.com/s/B4UT2GNiZKjtxFtcFAL7/standards/about-new-code "mention") in SonarQube Cloud
Each issue is linked to one coding attribute which is associated with one or more software qualities; each software quality has a level of severity. See [software-qualities](https://docs.sonarsource.com/sonarqube-for-vs-code/using/software-qualities "mention") for more information.
To communicate the code attributes, software qualities, and severity of issues found in your code, SonarQube for VS Code displays them in the **SonarQube Rule Description** webview as described below.
### Finding issues
For most issues, SonarQube for VS Code provides information about *why* there is an issue and offers one or more actions to fix your issue. Information for [fixing-issues](https://docs.sonarsource.com/sonarqube-for-vs-code/using/fixing-issues "mention") can be found in four places:
1. In the **VS Code Text Editor**, identifiable by the classic squiggles underlining issues in the code.
2. In the **Tooltip**, recommended action(s) can be found by clicking on the light bulb in the left margin of the code explorer view.
3. In the **PROBLEMS** panel, select your issue to highlight the issue-causing code in the Editor. Right-clicking on the issue opens the same tooltip action as described above.
4. In the **SONARQUBE** panel, working with issues is similar to the **PROBLEMS** panel except that all issues are shown, including [security-hotspots](https://docs.sonarsource.com/sonarqube-for-vs-code/using/security-hotspots "mention"), [taint-vulnerabilities](https://docs.sonarsource.com/sonarqube-for-vs-code/using/taint-vulnerabilities "mention"), and [dependency-risks](https://docs.sonarsource.com/sonarqube-for-vs-code/using/dependency-risks "mention").
Injection vulnerabilities work a bit differently. At the **Tooltip**, select **Show all locations** to view the execution flow in the **SONARQUBE ISSUE LOCATIONS** view. See the [taint-vulnerabilities](https://docs.sonarsource.com/sonarqube-for-vs-code/using/taint-vulnerabilities "mention") page for more details about working with these items.
#### Opening issues in the IDE
Understanding issues in context is a helpful way to address problems more effectively. Beginning in SonarQube Server 10.3, on SonarQube Cloud, and in SonarQube Community Build, it is possible to open all issues in your IDE, including taint vulnerabilities. Using the **Open in IDE** feature includes an automated connected mode setup to help with the process.
In your instance of SonarQube Server or SonarQube Community Build, or on SonarQube Cloud:
1. Navigate to your **Project** > **Issues** page,
2. select an issue’s detail view,
3. and select the **Open in IDE** button as an authenticated user to edit the issue in your IDE.
{% hint style="warning" %}
**Open in IDE** is not supported in Safari. Safari has strict security policies regarding custom protocol links which are required to open files directly in your IDE. When using SonraQube (Server, Cloud) or SonarQube Community Build, please use Chrome or Firefox for this functionality.
{% endhint %}
It’s best if your project is already open in the appropriate IDE and bound to the server using connected mode; if not, you will be prompted to set up a new connection and/or bind your project using the automatic connected mode setup feature. If you use **Open in IDE** and Windows Subsystem for Linux (WSL), check the [#open-in-ide](https://docs.sonarsource.com/sonarqube-for-vs-code/resources/troubleshooting#open-in-ide "mention") troubleshooting article if you’re having problems.
If you’ve already fixed the issue in your code, SonarQube for IDE will not be able to find it; only the matching code will be highlighted. In this case, check that recent changes have been analyzed by SonarQube (Server, Cloud) or SonarQube Community Build, then check the documentation on the relevant Issues pages for details about managing your issues on the server:
* [Managing issues](https://app.gitbook.com/s/yDv2XwTC1xoOKBYeCK45/user-guide/issues "mention") in SonarQube Server.
* [Managing code issues](https://app.gitbook.com/s/B4UT2GNiZKjtxFtcFAL7/managing-your-projects/issues "mention") in SonarQube Cloud.
* [Managing issues](https://app.gitbook.com/s/bqrfLGeD0Y9vE5l9Le42/user-guide/issues "mention") in SonarQube Community Build.
Please see the [connected-mode](https://docs.sonarsource.com/sonarqube-for-vs-code/connect-your-ide/connected-mode "mention") documentation to [#connection-setup](https://docs.sonarsource.com/sonarqube-for-vs-code/connect-your-ide/setup#connection-setup "mention") to an instance of SonarQube (Server, Cloud) or SonarQube Community Build. And if you have troubles with the automatic connected mode setup, we identified the most common errors for [#troubleshooting-connected-mode-setup](https://docs.sonarsource.com/sonarqube-for-vs-code/resources/troubleshooting#troubleshooting-connected-mode-setup "mention").
**AI CodeFix and Open in IDE**
SonarQube (Server, Cloud) will offer AI-generated fix suggestions for issues detected in your code when AI CodeFix is enabled on your project. You can view the suggestions as a diff view directly in your IDE by selecting **View Fix in IDE** from the **Issues** page in SonarQube (Server, Cloud).
The process is similar to selecting the **Open in IDE** button: it’s best to set up connected mode beforehand. Otherwise, you’ll be prompted to set up a new connection and/or bind your project using the automatic connected mode setup feature.
### Focusing on new code
The **Focus on New Code** feature works when SonarQube for VS Code is running in either connected mode or standalone mode. As mentioned above, new code is defined differently in each mode. Please see the [new-code](https://docs.sonarsource.com/sonarqube-for-vs-code/using/new-code "mention") page to understand your options when using a New Code Definition.
**Focus on new code in connected mode**
Setting your focus on new code has these prerequisites running in [connected-mode](https://docs.sonarsource.com/sonarqube-for-vs-code/connect-your-ide/connected-mode "mention"):
* Your local project must be bound to a SonarQube (Server, Cloud) or SonarQube Community Build project.
* The new code definition must be defined in SonarQube (Server, Cloud) or SonarQube Community Build using a **Previous version**, **Number of days**, or **Specific analysis**.
* The **Reference branch** new code definition is not supported. Please check the server documentation for more details about setting your new code definition:
* [Quality standards and new code](https://app.gitbook.com/s/yDv2XwTC1xoOKBYeCK45/user-guide/about-new-code "mention") in SonarQube Server
* [Quality standards and new code](https://app.gitbook.com/s/B4UT2GNiZKjtxFtcFAL7/standards/about-new-code "mention") in SonarQube Cloud
* [Quality standards and new code](https://app.gitbook.com/s/bqrfLGeD0Y9vE5l9Le42/user-guide/about-new-code "mention") in SonarQube Community Build
By default, the **Focus on New Code** feature is set to **overall code** when you set up a new connection and establish the project binding; the last saved setting persists through restarts.
**Focus on new code in standalone mode**
When not running in connected mode, the **SonarQube focus** can still be used to highlight only issues found in new code. By default, the **SonarQube focus** feature is set to **overall code** when you open SonarQube for VS Code for the first time; the last saved setting persists through restarts.
#### Change your SonarQube focus
Setting your **SonarQube focus** is easy. To activate or deactivate this mode, select either the  **eye icon** from the **SONARQUBE** panel or, when you select **SonarQube focus**: in the VS Code Status Bar, a quick pick window will pop up allowing you to switch focus.
Additionally, you can select or deselect the **Focus on New Code** mode from the VS Code > **Settings…** > **Settings** > **Extensions** > **SonarLint** > **User** settings menu.
{% hint style="info" %}
When deciding to override a globally defined new code definition at the project level in SonarQube (Server, Cloud) or SonarQube for Community Build, note that it is not possible to specify a unique new code definition at the branch level and still activate the **Focus on New Code** option.
{% endhint %}
### The SonarQube views
#### The SONARQUBE SETUP view container in VS Code
**CONNECTED MODE**
Here you can find your active connections and set up new connections if needed. Please see the [connected-mode](https://docs.sonarsource.com/sonarqube-for-vs-code/connect-your-ide/connected-mode "mention") page to learn about the Sonar solution. If you’re running an AI-enabled IDE and want to install the SonarQube MCP Server, see the [#setup-the-sonarqube-mcp-server](https://docs.sonarsource.com/sonarqube-for-vs-code/ai-capabilities/ides/cursor#setup-the-sonarqube-mcp-server "mention") article for instructions.
When you're using an AI-enabled IDE such as Cursor, Windsurf, or VS Code with Copilot enabled, and have already completed your [setup](https://docs.sonarsource.com/sonarqube-for-vs-code/connect-your-ide/setup "mention") in SonarQube for IDE with SonarQube Server or SonarQube Cloud, a quick select button is available.
* Select the icon, **Configure MCP Server** from the **CONNECTED MODE** view window to use your connected mode credentials to start using the SonarQube MCP Server. The same workflow is available in the **AI AGENTS CONFIGURATION** view.
**RULES**
Sonar Rules can individually be turned on or off while running SonarQube for VS Code in standalone mode. Simply go to **SONARQUBE SETUP** > **RULES** view in the VS Code Activity Bar and deactivate or activate rules at will. Each rule is clearly marked as *on* or *off*, and it’s possible to filter the visible list by an **Active**, **All**, and **Inactive** status.
The **RULES** view is only visible while running SonarQube for VS Code in standalone mode because, when your project is bound to SonarQube (Server, Cloud) or SonarQube Community Build using [connected-mode](https://docs.sonarsource.com/sonarqube-for-vs-code/connect-your-ide/connected-mode "mention"), the rule set is managed on the server side as defined by the quality profile.
**SONARQUBE ISSUE LOCATIONS**
If your issue is an injection vulnerability or a security hotspot with multiple locations, the security issue’s Flow will be shown here. The view will only appear when you select an injection vulnerability or security hotspot in the **SONARQUBE** panel. If there are no issues with secondary locations to report, the view is hidden.
Please see the documentation on [taint-vulnerabilities](https://docs.sonarsource.com/sonarqube-for-vs-code/using/taint-vulnerabilities "mention") and [security-hotspots](https://docs.sonarsource.com/sonarqube-for-vs-code/using/security-hotspots "mention") for more information.
**AI AGENTS CONFIGURATION**
The **AI AGENTS CONFIGURATION** view is only available when running an AI-enabled agent and offers two tools to help your AI agent engage with SonarQube (Server, Cloud).
* Select **Configure SonarQube MCP Server** to use your connected mode credentials to install the SonarQube MCP Server. You will be prompted to complete your [setup](https://docs.sonarsource.com/sonarqube-for-vs-code/connect-your-ide/setup "mention") if none exists.
* Available in Cursor, Kiro, and Windsurf: Select **Introduce SonarQube Rules File** to create explicit instructions for your AI-powered IDE to produce secure, reliable, and maintainable code.
* The file provides SonarQube MCP Server instructions to your AI agent. As an example, it instructs the agent to disable SonarQube automatic analysis before starting code generation, and to enable it after the generation is complete. It also asks the agent to analyze changed files in batches, once the changes are done.
#### Editor Groups
**Code Editor**
In the VS Code code editor, colored waves (squiggles) underline *Warning* and *Information* issues. By default, *Hint* issues are marked by an ellipsis at the beginning of the line. Hovering over the squiggles will reveal code actions and more information about the issue.
**SonarQube Rule Description**
The **SonarQube Rule Description** Editor Group will display a brief explanation of the rule, along with a noncompliant and compliant code example.
Simply select any issue in the **PROBLEMS** or **SONARQUBE** panels and the **SonarQube Rule Description** webview will open automatically. Here you will find a brief explanation of the rule, along with a noncompliant and compliant code example (where available).
For some **SonarQube Rule Descriptions**, you can visualize a diff view for the noncompliant and compliant code sample, which should help you fix your issue.
If an [ai-codefix](https://docs.sonarsource.com/sonarqube-for-vs-code/ai-capabilities/ai-codefix "mention") is available, you'll see the option in the actions menu (when right-clicking on an issue).
An issue’s coding attribute, software qualities, and severity are found when opening the SonarQube Rule tab. Below the rule title, you will find the coding attributes that highlight an issue’s classification. Check the [glossary](https://docs.sonarsource.com/sonarqube-for-vs-code/resources/glossary "mention") for details about coding attributes, and the [software-qualities](https://docs.sonarsource.com/sonarqube-for-vs-code/using/software-qualities "mention") page to better understand how they help classify your issue.
**When in Connected Mode**
If you’re running SonarQube for VS Code while in connected mode *with SonarQube Server or SonarQube Community Build*, your view will change according to the server settings. Standard Experience mode encompasses the use of rule types such as bugs, code smells, and vulnerabilities. Alternatively, if SonarQube Server is set to Multi-Quality Rule mode, you will more accurately represent the impact an issue has on all software qualities.
Please see the pages about the MQR mode and Standard Experience for detailed information about the available rule modes for your instance:
* [Choosing a mode for your instance](https://app.gitbook.com/s/yDv2XwTC1xoOKBYeCK45/instance-administration/analysis-functions/instance-mode "mention") in SonarQube Server
* [Choosing a mode for your instance](https://app.gitbook.com/s/bqrfLGeD0Y9vE5l9Le42/instance-administration/analysis-functions/instance-mode "mention") in SonarQube Community Build
#### Panels
If you don't immediately see the Panels described below, either select the **Toggle Panels** icon in the upper right corner of VS Code, or toggle the **Warnings** display switch in the **Status Bar**.
**PROBLEMS**
Ideally, the team wouldn’t introduce any new issues (any new technical debt) when writing code. But in real life, it’s not always possible to code without creating new technical debt, and sometimes it’s just not worth it.
Selecting issues from the **PROBLEMS** panel will jump you to the line of code in your file where the code is highlighted. Right-clicking on an issue will reveal fixes that are available for that issue.
Each issue’s severity is indicated by the icon to the left of the description. Selecting an issue or hovering over the severity icon is another way to reveal the **Show fixes** lightbulb. In addition, issues from open files are shown in the SONARQUBE panel where they can be filtered and accessed alongside your security hotspots and injection vulnerabilities; a complete list of available filters is [#sonarqube](#sonarqube "mention").
**OUTPUT**
This panel contains the SonarQube for VS Code logs. To view them in more detail and improve troubleshooting, you must enable the **Show Verbose Logs** option in the **Extensions** settings.
Please see the [troubleshooting](https://docs.sonarsource.com/sonarqube-for-vs-code/resources/troubleshooting "mention") page for complete details.
To better control the way you see and manage issues, check out the VS Code documentation on [fixing-issues](https://docs.sonarsource.com/sonarqube-for-vs-code/using/fixing-issues "mention") for quick ways to fix problems. Also, look at the article about running SonarQube for VS Code in [connected-mode](https://docs.sonarsource.com/sonarqube-for-vs-code/connect-your-ide/connected-mode "mention") for details about integrating your local analysis with your SonarQube (Server, Cloud) or SonarQube Community Build analysis.
**SONARQUBE**
All issues are available in the **SONARQUBE** panel. Select an issue to open its details and jump to the issue in the code editor. If multiple locations are impacted by the issue, the **Explorer** > **SONARQUBE ISSUE LOCATIONS** view will open to reveal the injection flow.
Right-click on any issue in the **SONARQUBE** panel to reveal more actions. The option to generate an AI CodeFix suggestion will be present if available. Selecting **More Actions…** will reveal Quick Fixes, the ability to **Accept** and issue, or open the SonarQube Rule description tab.
For a full list of Security Hotspots, run `SonarQube: Scan for Hotspots in Folder` from the command palette (**Ctrl** + **Shift** + **P** on Windows/Linux or **Command** + **Shift** + **P** on MacOS).
There are two filter mechanisms available in the SONARQUBE panel: **Focus on New Code** and **Filter Findings**:
1. **Focus on New Code**: switches the issues shown according to the new code definition used for your project. Changing the **SonarQube focus** is easily done from the SONARQUBE panel. Simply select the  eye icon to change your focus. More information about new code and quality standards is available on the [new-code](https://docs.sonarsource.com/sonarqube-for-vs-code/using/new-code "mention") page.
2. **Filter Findings**: sorts issues by which file state (All, Current, or Open), fix availability, or severity. Fix availability includes Quick Fix or AI CodeFix-eligible issues. When selecting **Severity**, only issues from open files will be shown. Injection vulnerabilities are also shown for open files (see point 5 below).
3. Enable or disable automatic analysis. The white circle in the status bar means that automatic analysis is enabled.
4. Filtering for **All** displays all issues in your open files.
5. In addition, when selecting **All** while in connected mode with SonarQube Server or SonarQube Cloud, you will see:
* [taint-vulnerabilities](https://docs.sonarsource.com/sonarqube-for-vs-code/using/taint-vulnerabilities "mention") in all files even if the file is not open.
* all [security-hotspots](https://docs.sonarsource.com/sonarqube-for-vs-code/using/security-hotspots "mention") in all files (even unopened files) when you run the **Scan for Hotspots in Folder** command.
### SonarQube for IDE Labs
**SONARQUBE FOR IDE LABS**
The **SONARQUBE FOR IDE LABS** panel highlights early access features; you'll need to join SonarQube for IDE Labs to have access to *Experimental* features. If closed, the panel will expand when selecting the **>** arrow on the right side of your **SONARQUBE** panel.
After signing up, a series of active features are available, ready with descriptions and links to open Feedback forms where you can share your thoughts!
It's possible to **Enable** or **Disable** *Experimental* features at anytime by selecting the gear icon; features marked as *Stable* and *New* will always remain active.
---
# Source: https://docs.sonarsource.com/sonarqube-cloud/administering-sonarcloud/managing-enterprise/enterprise-security/sso/setup/inviting-users-to-sign-in.md
# Step 3: Invite users to sign in
Once you have verified the user groups in your enterprise ([verify-user-groups](https://docs.sonarsource.com/sonarqube-cloud/administering-sonarcloud/managing-enterprise/enterprise-security/sso/setup/verify-user-groups "mention")) and mapped properly the group attributes in your IdP ([configure-sso](https://docs.sonarsource.com/sonarqube-cloud/administering-sonarcloud/managing-enterprise/enterprise-security/sso/setup/configure-sso "mention")), you can invite users to sign in to SonarQube Cloud with SSO. To do so, send them the login URL of your enterprise.
{% hint style="info" %}
SonarQube Cloud uses the Service Provider (SP) initiated SSO (Idp-initiated SSO is not supported). It means that SSO users must go to the login page of SonarQube Cloud.
{% endhint %}
When users sign in with SSO for the first time, their SSO account is created in SonarQube Cloud and they have access to their organization(s) through the automatic group synchronization with the identity provider. They should:
* Check that they have access to their organization(s) and can perform their tasks as before.
* If using Personal Access Tokens (PAT): generate their analysis tokens with their SSO account. (They can still use their DevOps platform service (DOP) account tokens to execute analysis as long as their DOP account still exists). Note that from the Team plan, it's highly recommended to use Scoped Organization Tokens (SOT) instead of PATs.
To retrieve the login URL of your enterprise:
1. Retrieve your enterprise. See [..](https://docs.sonarsource.com/sonarqube-cloud/administering-sonarcloud/managing-enterprise "mention") for more details.
2. Select **Administration** > **Single Sign-On**. The **Single Sign-On** page opens.
3. Select the copy tool at the right of the **Log in URL** field. You can now paste the copied URL to your invite message.
### Related pages
[verify-user-groups](https://docs.sonarsource.com/sonarqube-cloud/administering-sonarcloud/managing-enterprise/enterprise-security/sso/setup/verify-user-groups "mention")\
[configure-sso](https://docs.sonarsource.com/sonarqube-cloud/administering-sonarcloud/managing-enterprise/enterprise-security/sso/setup/configure-sso "mention")\
[terminate-setup](https://docs.sonarsource.com/sonarqube-cloud/administering-sonarcloud/managing-enterprise/enterprise-security/sso/setup/terminate-setup "mention")\
[editing-sso-configuration](https://docs.sonarsource.com/sonarqube-cloud/administering-sonarcloud/managing-enterprise/enterprise-security/sso/editing-sso-configuration "mention")\
[deleting-sso-configuration](https://docs.sonarsource.com/sonarqube-cloud/administering-sonarcloud/managing-enterprise/enterprise-security/sso/deleting-sso-configuration "mention")
---
# Source: https://docs.sonarsource.com/sonarqube-cloud/administering-sonarcloud/managing-enterprise/enterprise-security/ip-allow-lists.md
# IP allow lists
For SonarQube Cloud enterprises using Single Sign-On (SSO) authentication, access can be restricted to an allowed list of IP addresses. This restriction applies to the SSO user authentication, the [Personal Access Tokens (PAT)](https://docs.sonarsource.com/sonarqube-cloud/managing-your-account/managing-tokens) generated by SSO users, and the [Scoped Organization Tokens (SOT)](https://docs.sonarsource.com/sonarqube-cloud/administering-sonarcloud/managing-organization/scoped-organization-tokens).
The step-by-step procedure below explains how to configure your IP allow list in SonarQube Cloud's UI. You can also use the [Authentication domain API](https://api-docs.sonarsource.com/sonarqube-cloud/default/public-externalauthentication-0-0).
{% hint style="warning" %}
To authenticate with SonarQube Cloud, the analysis step of your CI pipeline will be subject to this restriction. This means you need to allow the IP address(es) of your CI-based runner.
{% endhint %}
To configure your IP allow list in SonarQube Cloud:
1. Retrieve your enterprise. For more details, see [retrieving-and-viewing-your-enterprise](https://docs.sonarsource.com/sonarqube-cloud/administering-sonarcloud/managing-enterprise/retrieving-and-viewing-your-enterprise "mention").
2. Go to **Administration** > **IP allow list**.
3. Enter the allowed IP addresses separated by a comma. Both IPv4 and IPv6 addresses with or without CIDR notation are supported.\
IP address examples:
* `192.0.2.0`
* `198.51.100.0/24`
* `2001:0db8:130f:0000:0000:09c0:876a:130b`
* `2001:db8:130f::9c0:876a:130b`
* `2001:db8:abcd::/48`
4. Select **Save**.
### Related pages
---
# Source: https://docs.sonarsource.com/sonarqube-community-build/user-guide/issues.md
# Source: https://docs.sonarsource.com/sonarqube-server/8.9/user-guide/issues.md
# Source: https://docs.sonarsource.com/sonarqube-server/9.8/user-guide/issues.md
# Source: https://docs.sonarsource.com/sonarqube-server/9.9/user-guide/issues.md
# Source: https://docs.sonarsource.com/sonarqube-server/10.0/user-guide/issues.md
# Source: https://docs.sonarsource.com/sonarqube-server/10.1/user-guide/issues.md
# Source: https://docs.sonarsource.com/sonarqube-server/10.2/user-guide/issues.md
# Source: https://docs.sonarsource.com/sonarqube-server/10.3/user-guide/issues.md
# Source: https://docs.sonarsource.com/sonarqube-server/10.4/user-guide/issues.md
# Source: https://docs.sonarsource.com/sonarqube-server/10.5/user-guide/issues.md
# Source: https://docs.sonarsource.com/sonarqube-server/10.6/user-guide/issues.md
# Source: https://docs.sonarsource.com/sonarqube-server/10.7/user-guide/issues.md
# Source: https://docs.sonarsource.com/sonarqube-server/10.8/user-guide/issues.md
# Source: https://docs.sonarsource.com/sonarqube-server/2025.2/user-guide/issues.md
# Source: https://docs.sonarsource.com/sonarqube-server/2025.3/user-guide/issues.md
# Source: https://docs.sonarsource.com/sonarqube-server/2025.5/user-guide/issues.md
# Source: https://docs.sonarsource.com/sonarqube-server/2025.1/user-guide/issues.md
# Source: https://docs.sonarsource.com/sonarqube-server/2025.4/user-guide/issues.md
# Source: https://docs.sonarsource.com/sonarqube-server/2025.6/user-guide/issues.md
# Source: https://docs.sonarsource.com/sonarqube-server/user-guide/issues.md
# Source: https://docs.sonarsource.com/sonarqube-cloud/managing-your-projects/issues.md
# Managing code issues
{% content-ref url="issues/introduction" %}
[introduction](https://docs.sonarsource.com/sonarqube-cloud/managing-your-projects/issues/introduction)
{% endcontent-ref %}
{% content-ref url="issues/solution-overview" %}
[solution-overview](https://docs.sonarsource.com/sonarqube-cloud/managing-your-projects/issues/solution-overview)
{% endcontent-ref %}
{% content-ref url="issues/retrieving" %}
[retrieving](https://docs.sonarsource.com/sonarqube-cloud/managing-your-projects/issues/retrieving)
{% endcontent-ref %}
{% content-ref url="issues/reviewing" %}
[reviewing](https://docs.sonarsource.com/sonarqube-cloud/managing-your-projects/issues/reviewing)
{% endcontent-ref %}
{% content-ref url="issues/editing" %}
[editing](https://docs.sonarsource.com/sonarqube-cloud/managing-your-projects/issues/editing)
{% endcontent-ref %}
{% content-ref url="issues/fixing" %}
[fixing](https://docs.sonarsource.com/sonarqube-cloud/managing-your-projects/issues/fixing)
{% endcontent-ref %}
{% content-ref url="issues/with-ai-features" %}
[with-ai-features](https://docs.sonarsource.com/sonarqube-cloud/managing-your-projects/issues/with-ai-features)
{% endcontent-ref %}
{% content-ref url="issues/with-ai-features/agents-in-your-github-pull-request" %}
[agents-in-your-github-pull-request](https://docs.sonarsource.com/sonarqube-cloud/managing-your-projects/issues/with-ai-features/agents-in-your-github-pull-request)
{% endcontent-ref %}
{% content-ref url="issues/in-devops-platform" %}
[in-devops-platform](https://docs.sonarsource.com/sonarqube-cloud/managing-your-projects/issues/in-devops-platform)
{% endcontent-ref %}
---
# Source: https://docs.sonarsource.com/sonarqube-community-build/analyzing-source-code/test-coverage/java-test-coverage.md
# Source: https://docs.sonarsource.com/sonarqube-server/9.8/analyzing-source-code/test-coverage/java-test-coverage.md
# Source: https://docs.sonarsource.com/sonarqube-server/9.9/analyzing-source-code/test-coverage/java-test-coverage.md
# Source: https://docs.sonarsource.com/sonarqube-server/10.0/analyzing-source-code/test-coverage/java-test-coverage.md
# Source: https://docs.sonarsource.com/sonarqube-server/10.1/analyzing-source-code/test-coverage/java-test-coverage.md
# Source: https://docs.sonarsource.com/sonarqube-server/10.2/analyzing-source-code/test-coverage/java-test-coverage.md
# Source: https://docs.sonarsource.com/sonarqube-server/10.3/analyzing-source-code/test-coverage/java-test-coverage.md
# Source: https://docs.sonarsource.com/sonarqube-server/10.4/analyzing-source-code/test-coverage/java-test-coverage.md
# Source: https://docs.sonarsource.com/sonarqube-server/10.5/analyzing-source-code/test-coverage/java-test-coverage.md
# Source: https://docs.sonarsource.com/sonarqube-server/10.6/analyzing-source-code/test-coverage/java-test-coverage.md
# Source: https://docs.sonarsource.com/sonarqube-server/10.7/analyzing-source-code/test-coverage/java-test-coverage.md
# Source: https://docs.sonarsource.com/sonarqube-server/10.8/analyzing-source-code/test-coverage/java-test-coverage.md
# Source: https://docs.sonarsource.com/sonarqube-server/2025.2/analyzing-source-code/test-coverage/java-test-coverage.md
# Source: https://docs.sonarsource.com/sonarqube-server/2025.3/analyzing-source-code/test-coverage/java-test-coverage.md
# Source: https://docs.sonarsource.com/sonarqube-server/2025.5/analyzing-source-code/test-coverage/java-test-coverage.md
# Source: https://docs.sonarsource.com/sonarqube-server/2025.1/analyzing-source-code/test-coverage/java-test-coverage.md
# Source: https://docs.sonarsource.com/sonarqube-server/2025.4/analyzing-source-code/test-coverage/java-test-coverage.md
# Source: https://docs.sonarsource.com/sonarqube-server/2025.6/analyzing-source-code/test-coverage/java-test-coverage.md
# Source: https://docs.sonarsource.com/sonarqube-server/analyzing-source-code/test-coverage/java-test-coverage.md
# Source: https://docs.sonarsource.com/sonarqube-cloud/enriching/test-coverage/java-test-coverage.md
# Java test coverage
SonarQube Cloud supports the reporting of test coverage as part of the analysis of your Java project.
However, SonarQube Cloud does not produce the coverage report itself. Instead, you must set up a third-party tool to produce the report as part of your build process. You then need to configure your analysis to tell the SonarScanner where the report is located so that it can pick it up and send it to SonarQube Cloud, where it will be displayed on your project dashboard along with the other analysis metrics.
For Java projects, SonarQube Cloud directly supports the JaCoCo coverage tool (see [generic-test-data](https://docs.sonarsource.com/sonarqube-cloud/enriching/test-coverage/generic-test-data "mention") for information on integrating other coverage tools).
### Follow the tutorial
When you import your Java project into SonarQube Cloud you will be guided through the setup process by an in-product tutorial. Follow the tutorial specific to your CI. When it asks, **What option best describes your build?**, choose **Maven** or **Gradle**, depending on which you are using. When you are done with the tutorial, you should have a functioning CI-based analysis setup for your Java project. The next step is to adjust it to get coverage working.
### Adjust your setup
To enable coverage you need to:
* Adjust your build process so that JaCoCo report generation step runs *before* the SonarScanner step.
* Make sure that JacCoCo writes its report file to a defined path in the build environment.
* Configure the scanning step of your build so that the SonarScanner picks up the report file from that defined path.
### Add coverage in a single-module Maven project
To add coverage to your Maven project you need to use the [`jacoco-maven-plugin`](https://mvnrepository.com/artifact/org.jacoco/jacoco-maven-plugin) and its `report` goal to create a code coverage report.
Typically, you would create a specific Maven profile for executing the unit tests with instrumentation and producing the coverage report only on demand.
In the most basic case, we will need to execute two goals: `jacoco:prepare-agent`, which allows coverage info to be collected during unit tests execution, and `jacoco:report`, which uses data collected during unit test execution to generate a report. By default, the tool generates XML, HTML, and CSV versions of the report. Here, we explicitly specify XML, since that is the only one we need for SonarQube Cloud.
**`${project.basedir}/pom.xml`**
```xml
coverageorg.jacocojacoco-maven-plugin0.8.7prepare-agentprepare-agentreportreportXML
```
By default the generated report will be saved under `target/site/jacoco/jacoco.xml`. This location will be checked automatically by the scanner, so no further configuration is required.
Just launch: `mvn org.sonarsource.scanner.maven:sonar-maven-plugin:sonar -Pcoverage` as usual and the report will be picked up.
If you need to change the directory where the report is generated, you can set the property either on the command line using Maven’s `-D` switch.
```css-79elbk
mvn -Dsonar.coverage.jacoco.xmlReportPaths=
../app-it/target/site/jacoco-aggregate/jacoco.xml
org.sonarsource.scanner.maven:sonar-maven-plugin:sonar -Pcoverage
```
or in your `pom.xml`:
**`${project.basedir}/pom.xml`**
```xml
../app-it/target/site/jacoco-aggregate/jacoco.xml
```
Wildcards and a comma-delimited list of paths are supported. See [test-execution-parameters](https://docs.sonarsource.com/sonarqube-cloud/enriching/test-coverage/test-execution-parameters "mention")for more details. The path can be either absolute or relative to the project root.
### Add coverage in a multi-module Maven project
For multi-module Maven projects, you configure the **`jacoco-maven-plugin`** in a profile in the parent pom just as in the single module case, above. By default, a separate coverage report will be generated for each module.
If you want to aggregate all the module-specific reports into one project-level report, the easiest solution is to create a special Maven module (alongside the ones you already have), that contains nothing except a `pom.xml` that uses the `report-aggregate` goal. Here is an example:
**`${project.basedir}/report-aggregate-module/pom.xml`**
```xml
my-project-report-aggregateMy ProjectAggregate Coverage Report${project.groupId}my-module-1${project.version}${project.groupId}my-module-2${project.version}org.jacocojacoco-maven-pluginreport-aggregateverifyreport-aggregate
```
When you invoke `maven clean verify` in the`report-aggregate-module` directory the aggregated report will be generated and placed inside that directory at the standard location `target/site/jacoco-aggregate/jacoco.xm`l. Then, in the top level `pom.xml` you set `sonar.coverage.jacoco.xmlReportPaths`to this location:
```xml
${maven.multiModuleProjectDirectory}/report-aggregate/target/site/
jacoco-aggregate/jacoco.xml
```
Wildcards and a comma-delimited list of paths are supported. See [test-coverage-parameters](https://docs.sonarsource.com/sonarqube-cloud/enriching/test-coverage/test-coverage-parameters "mention") for details.
### Adding coverage in a Gradle project
To set up code coverage for your Gradle files, you just need to apply the JaCoCo plugin together with the SonarScanner for Gradle to the `build.gradle` file of your project as the JaCoCo is already integrated into the default gradle distribution.
**`${project.basedir}/build.gradle`**
```properties
plugins {
id "jacoco"
id "org.sonarqube" version ""
}
jacocoTestReport {
reports {
xml.required = true
}
}
```
We recommend using the latest version of [sonarscanner-cli](https://docs.sonarsource.com/sonarqube-cloud/advanced-setup/ci-based-analysis/sonarscanner-cli "mention").
Your report will be automatically saved in the `build/reports/jacoco` directory. The sonarqube plugin automatically detects this location so no further configuration is required. To import coverage, launch:
`gradle test jacocoTestReport sonarqube`
For more details, see the [Gradle JaCoCo Plugin documentation](https://docs.gradle.org/current/userguide/jacoco_plugin.html).
---
# Source: https://docs.sonarsource.com/sonarqube-community-build/analyzing-source-code/languages/java.md
# Source: https://docs.sonarsource.com/sonarqube-server/8.9/analyzing-source-code/languages/java.md
# Source: https://docs.sonarsource.com/sonarqube-server/9.8/analyzing-source-code/languages/java.md
# Source: https://docs.sonarsource.com/sonarqube-server/9.9/analyzing-source-code/languages/java.md
# Source: https://docs.sonarsource.com/sonarqube-server/10.0/analyzing-source-code/languages/java.md
# Source: https://docs.sonarsource.com/sonarqube-server/10.1/analyzing-source-code/languages/java.md
# Source: https://docs.sonarsource.com/sonarqube-server/10.2/analyzing-source-code/languages/java.md
# Source: https://docs.sonarsource.com/sonarqube-server/10.3/analyzing-source-code/languages/java.md
# Source: https://docs.sonarsource.com/sonarqube-server/10.4/analyzing-source-code/languages/java.md
# Source: https://docs.sonarsource.com/sonarqube-server/10.5/analyzing-source-code/languages/java.md
# Source: https://docs.sonarsource.com/sonarqube-server/10.6/analyzing-source-code/languages/java.md
# Source: https://docs.sonarsource.com/sonarqube-server/10.7/analyzing-source-code/languages/java.md
# Source: https://docs.sonarsource.com/sonarqube-server/10.8/analyzing-source-code/languages/java.md
# Source: https://docs.sonarsource.com/sonarqube-server/2025.2/analyzing-source-code/languages/java.md
# Source: https://docs.sonarsource.com/sonarqube-server/2025.3/analyzing-source-code/languages/java.md
# Source: https://docs.sonarsource.com/sonarqube-server/2025.5/analyzing-source-code/languages/java.md
# Source: https://docs.sonarsource.com/sonarqube-server/2025.1/analyzing-source-code/languages/java.md
# Source: https://docs.sonarsource.com/sonarqube-server/2025.4/analyzing-source-code/languages/java.md
# Source: https://docs.sonarsource.com/sonarqube-server/2025.6/analyzing-source-code/languages/java.md
# Source: https://docs.sonarsource.com/sonarqube-server/analyzing-source-code/languages/java.md
# Source: https://docs.sonarsource.com/sonarqube-cloud/advanced-setup/languages/java.md
# Java
### Supported versions
The level of support for a language is defined as follows:
* Fully supported: Analysis will complete. All the language features are understood and examined.
* Supported: Most language features are understood and examined but the version includes unsupported features. Analysis might break or provide incomplete results.
LTS 8, 11, 17, 21 and all intermediary versions up to Java 24 are fully supported.
### Supported frameworks and tools
#### Web/Application Frameworks
Struts, Spring, JSP
#### Test Frameworks
JUnit 4/5, AssertJ, Mockito, Spring Test, TestNG
#### ORMs
Hibernate, Spring JDBC Template, JDO, VertX SQL
### Language-Specific properties
To discover and update the Java-specific properties, navigate in SonarQube Cloud to *Your Project* > **Administration** > **General Settings** > **Languages** > **Java**. See the [analysis-parameters](https://docs.sonarsource.com/sonarqube-cloud/advanced-setup/analysis-parameters "mention") page for more information about specific properties.
### Java analysis and bytecode
Compiled `.class` files are required for Java projects with more than one Java file. If not provided properly, analysis will fail with the message:
```css-79elbk
Your project contains .java files, please provide compiled classes with sonar.java.binaries property, or exclude them from the analysis with sonar.exclusions property.
```
If only some `.class` files are missing, you’ll see warnings like this:
```css-79elbk
Class 'XXXXXX' is not accessible through the ClassLoader.
```
If you are not using Maven or Gradle for analysis, you must manually provide bytecode to the analysis. You can also analyze test code, and for that, you need to provide tests binaries and test libraries properties.
Note that manually providing the `sonar.java.binaries` is very error-prone. We recommend using the [sonarscanner-for-gradle](https://docs.sonarsource.com/sonarqube-cloud/advanced-setup/ci-based-analysis/sonarscanner-for-gradle "mention") if you’re building with Gradle, or the [sonarscanner-for-maven](https://docs.sonarsource.com/sonarqube-cloud/advanced-setup/ci-based-analysis/sonarscanner-for-maven "mention") if you’re using Maven. If you analyze Java code outside of these build systems, use the [sonarscanner-cli](https://docs.sonarsource.com/sonarqube-cloud/advanced-setup/ci-based-analysis/sonarscanner-cli "mention").
| **Key** | **Value** |
| -------------------------------- | --------------------------------------------------------------------------------------------------------------------------------------------------------------------------------------------------------------------------------------------------- |
| `sonar.java.binaries` (required) | Comma-separated paths to directories containing the compiled bytecode files corresponding to your source files. |
| `sonar.java.libraries` |
Comma-separated paths to files with third-party libraries (JAR or Zip files) used by your project. Wildcards can be used: sonar.java.libraries=path/to/Library.jar,directory/\*\*/\*.jar
|
| `sonar.java.test.binaries` | Comma-separated paths to directories containing the compiled bytecode files corresponding to your test files. |
| `sonar.java.test.libraries` |
Comma-separated paths to files with third-party libraries (JAR or Zip files) used by your tests. (For example, this should include the junit jar). Wildcards can be used: sonar.java.test.libraries=directory/\*\*/\*.jar
|
Note that the Android development toolchain Jack does not provide `.class` files.
### Project-specific JDK
In some situations, you might have to analyze a project built with a different version of Java than the one executing the analysis. The most common case is to run the analysis with **Java 17**, while the project itself uses **Java 11** or before for its build. As an example, if your project is built with Java 8 JDK, and analyzed with the default Java 17 JDK, the use of a class like `java.lang.SecurityManager` would be flagged as deprecated code (since Java 17), which is not the case in Java 8.
When your project is built with a different JDK than the one used to run the analysis, you should manually set the sonar.java.jdkHome property so it points to the correct JDK. By doing this you will specify which JDK classes the analyzer must refer to during the analysis.
When setting `sonar.java.jdkHome`, you need to provide the path to the JDK directory used by the project being analyzed, if different from the Java runtime executing the analysis. For example, for a Java 11 project, by setting it as follows: `sonar.java.jdkHome=/usr/lib/jvm/jdk11/`
```properties
# Here maven uses the default version of Java on the system but we specify that we want to analyze a Java 11 project.
mvn org.sonarsource.scanner.maven:sonar-maven-plugin:sonar \
# other analysis parameters
-Dsonar.java.jdkHome=/usr/lib/jvm/jdk11/
# other analysis parameters
```
This option can of course be added to your `sonar.properties` configuration.
### JDK preview features
To enable the [JDK preview features](https://openjdk.org/jeps/12) in SonarQube Cloud, you can set the `sonar.java.enablePreview`\* *analysis* \*parameter to `true` (default is`false`).
### Turning issues off
The best way to deactivate an individual issue you don’t intend to fix is to mark it as accepted or false positive through the SonarQube Cloud UI.
If you need to deactivate a rule (or all rules) for an entire file, then issue exclusions are the way to go. But if you only want to [deactivate a rule](https://docs.sonarsource.com/sonarqube-cloud/standards/managing-quality-profiles/editing-a-custom-quality-profile#deactivating-rules-in-a-quality-profile) across a subset of a file - all the lines of a method or a class - you can use `@SuppressWarnings("all")` or `@SuppressWarnings` with rule keys: `@SuppressWarnings("java:S2077")` or `@SuppressWarnings({"java:S1118", "java:S3546"})`.
### Handling the Java version
Java analysis is able to react to the Java version used for sources. This feature allows the deactivation of rules that target higher versions of Java than the one in use in the project so that false positives aren’t generated from irrelevant rules.
The feature relies entirely on the `sonar.java.source` property, which is automatically filled by most of the scanners used for analyses (Maven, Gradle). Java version-specific rules are not disabled when `sonar.java.source` is not provided. Concretely, rules that are designed to target specific Java versions (tagged "java8" or "java11") are activated by default in the Sonar Way Java profile. From a user perspective, the feature is fully automatic, but it means that you probably want your projects to be correctly configured.
When using SonarScanner to perform analyses of project, the property `sonar.java.source` can be set manually in `sonar-project.properties`. Accepted formats are:
* "1.X" (for instance 1.6 for Java 6, 1.7 for Java 7, 1.8 for Java 8, etc.)
* "X" (for instance 8 for Java 8, 11 for Java 11, etc. )
Example: `sonar.java.source=11`
If the property is provided, the analysis will take the source version into account, and execute related rules accordingly. At run time, each of these rules will be executed – or not – depending upon the Java version used by sources within the project. For instance, on a correctly configured project built with Java 11, rules targeting Java 17 and Java 21 will never raise issues, even though they are enabled in the associated rule profile.
### Analyzing JSP and Thymeleaf for XSS vulnerabilities
On SonarQube Cloud, you can benefit from advanced security rules including XSS vulnerability detection. Java analysis supports analysis of Thymeleaf and JSP views when used with Java Servlets or Spring. To benefit from this analysis you need to make your views part of the project sources using `sonar.sources` property. In practice this usually means adding the following in your Maven `pom.xml` file:
```xml
src/main/java,src/main/webapp
```
or, if you use Gradle:
```groovy
sonarqube {
properties {
property "sonar.sources", "src/main/java,src/main/webapp"
}
}
```
where `src/main/webapp` is the directory that contains `.jsp` or Thymeleaf’s `.html` files.
### Implementation-related rule tags
* [symbolic-execution](https://rules.sonarsource.com/java/tag/symbolic-execution): This tag is for rules that reason about the state of the program using data flow analysis. They usually work together to find path-sensitive bugs and vulnerabilities. As soon as an issue is raised, the symbolic execution (SE) analysis of the current path will stop. For that reason, it is not recommended to evaluate these rules independently of each other as it can give a false sense of undetected issues. It is important to keep in mind that SE can never achieve perfection, so we are always working on improving these rules. Finally, note that the Java rules relying on the SE engine operate cross-procedurally in certain circumstances. In particular, all non-overridable methods defined in the same file as the method under analysis and called from within the method’s body, will be explored and learned from. Behaviors of overridable methods will be approximated.
### Related pages
* See the Test coverage[overview](https://docs.sonarsource.com/sonarqube-cloud/enriching/test-coverage/overview "mention") page (JaCoCo, Surefire)
* [external-analyzer-reports](https://docs.sonarsource.com/sonarqube-cloud/enriching/external-analyzer-reports "mention") ([SpotBugs](https://spotbugs.github.io/), [FindBugs](http://findbugs.sourceforge.net/), [FindSecBugs](https://github.com/find-sec-bugs/find-sec-bugs/wiki/Maven-configuration), [PMD](http://maven.apache.org/plugins/maven-pmd-plugin/usage.html), [Checkstyle](http://maven.apache.org/plugins/maven-checkstyle-plugin/checkstyle-mojo))
---
# Source: https://docs.sonarsource.com/sonarqube-community-build/analyzing-source-code/languages/javascript-typescript-css.md
# Source: https://docs.sonarsource.com/sonarqube-server/9.8/analyzing-source-code/languages/javascript-typescript-css.md
# Source: https://docs.sonarsource.com/sonarqube-server/9.9/analyzing-source-code/languages/javascript-typescript-css.md
# Source: https://docs.sonarsource.com/sonarqube-server/10.0/analyzing-source-code/languages/javascript-typescript-css.md
# Source: https://docs.sonarsource.com/sonarqube-server/10.1/analyzing-source-code/languages/javascript-typescript-css.md
# Source: https://docs.sonarsource.com/sonarqube-server/10.2/analyzing-source-code/languages/javascript-typescript-css.md
# Source: https://docs.sonarsource.com/sonarqube-server/10.3/analyzing-source-code/languages/javascript-typescript-css.md
# Source: https://docs.sonarsource.com/sonarqube-server/10.4/analyzing-source-code/languages/javascript-typescript-css.md
# Source: https://docs.sonarsource.com/sonarqube-server/10.5/analyzing-source-code/languages/javascript-typescript-css.md
# Source: https://docs.sonarsource.com/sonarqube-server/10.6/analyzing-source-code/languages/javascript-typescript-css.md
# Source: https://docs.sonarsource.com/sonarqube-server/10.7/analyzing-source-code/languages/javascript-typescript-css.md
# Source: https://docs.sonarsource.com/sonarqube-server/10.8/analyzing-source-code/languages/javascript-typescript-css.md
# Source: https://docs.sonarsource.com/sonarqube-server/2025.2/analyzing-source-code/languages/javascript-typescript-css.md
# Source: https://docs.sonarsource.com/sonarqube-server/2025.3/analyzing-source-code/languages/javascript-typescript-css.md
# Source: https://docs.sonarsource.com/sonarqube-server/2025.5/analyzing-source-code/languages/javascript-typescript-css.md
# Source: https://docs.sonarsource.com/sonarqube-server/2025.1/analyzing-source-code/languages/javascript-typescript-css.md
# Source: https://docs.sonarsource.com/sonarqube-server/2025.4/analyzing-source-code/languages/javascript-typescript-css.md
# Source: https://docs.sonarsource.com/sonarqube-server/2025.6/analyzing-source-code/languages/javascript-typescript-css.md
# Source: https://docs.sonarsource.com/sonarqube-server/analyzing-source-code/languages/javascript-typescript-css.md
# Source: https://docs.sonarsource.com/sonarqube-cloud/advanced-setup/languages/javascript-typescript-css.md
# JavaScript/TypeScript/CSS
### Supported versions
The level of support for a language is defined as follows:
* Fully supported: Analysis will complete. All the language features are understood and examined.
* Supported: Most language features are understood and examined but the version includes unsupported features. Analysis might break or provide incomplete results.
#### ECMAScript
All versions up to ECMAScript 2024 are supported.
#### TypeScript
All versions up to 5.9.3 are supported.
#### CSS
CSS 3 is supported.
### Supported frameworks and tools
#### Tools
React JSX, Angular, Vue.js, Node.js, Express, Flow.
#### Test Frameworks
Mocha, Chai.
#### CSS extensions
SASS, LESS, SCSS, Less, ‘style’ inside PHP, HTML, and VueJS files.
### Requirements and recommendations
This section describes requirements or recommendations regarding the machine running the scanner that are specific to the analysis of JavaScript/TypeScript/CSS. For general requirements, see [general-requirements](https://docs.sonarsource.com/sonarqube-cloud/advanced-setup/scanner-environment/general-requirements "mention").
#### Memory
A minimum of 4GB memory is recommended.
To allow the analysis to use more memory, see **Slow or unresponsive analysis** in the **Troubleshooting** section below.
#### Node.js
The scanner performs the analysis using the Node.js runtime environment. If your architecture is Linux x64, Windows x64, or Apple ARM64, no Node.js installation is required because the Sonar JS analyzer embeds its own Node.JS.
If you want to use your own Node.js, SonarQube requires one of these Node.js Major.Minor versions:
* for Node v20, it must be at least 20.12.0.
* for Node v22 the [Active LTS](https://nodejs.org/en/about/previous-releases#release-schedule), it must be at least 22.11.0, with acceptance of v23 and v24.
The scanner will look for and retrieve a locally installed Node.js runtime according to the following options in order:
1. The Node.js defined through the parameter `sonar.nodejs.executable` (absolute path to your Node.js). The runtime version must be compatible.
2. The Node.js downloaded by the scanner from the SonarQube Server during analysis if the detected architecture is one of the supported ones: Linux x64, Windows x64, and Apple ARM64.
3. The Node.js defined with `node` in the `PATH`. The runtime version must be compatible.
**Notes for option 1 and 3:**
If your architecture is neither Linux x64, Windows x64, nor Apple ARM64, you must set up option 1 or 3 ( see the [analysis-parameters](https://docs.sonarsource.com/sonarqube-cloud/advanced-setup/analysis-parameters "mention") page to set up option 1). The same minimum version requirements listed above still apply.
**Notes for option 2:**
When relying on the [Node.js](http://node.js) downloaded by the scanner as described in option 2, the scanner temporarily deploys the Node.js runtime installed on the host machine. It considers the following possible deployment locations in order:
1. As defined by the scanner property `sonar.userHome`.
2. As defined by the environment variable `SONAR_USER_HOME`.
3. If no Node.js is defined in location 1 or 2, it the SonarScanner creates a `.sonar` directory in the user’s home directory for deployment.
If none of these options are suitable for your environment, you can choose to skip the deployment of the embedded Node.js runtime altogether by using either:
* The scanner property `sonar.scanner.skipNodeProvisioning` set to `true`, or
* The scanner property `sonar.nodejs.executable` set to a Node.js runtime path.
The deployment may fail due to insufficient permissions on the location directory. If this occurs, the scanner property or environment variable must refer to a folder with adequate permissions.
#### File encoding
During analysis, the scanner defaults to the host file encoding. However, analyzing JavaScript and TypeScript source files requires always using the UTF-8 file encoding. If this is not the case, set the scanner property `sonar.sourceEncoding` to `UTF-8`.
#### TypeScript configuration
The scanner analyzes JavaScript and TypeScript using the TypeScript compiler. It leverages TypeScript’s semantic model and features like type-checking to improve analysis accuracy. The scanner will use a TypeScript configuration (`tsconfig.json`) if it is already present in your project or transparently create one in the background if it is not available.
When the analysis starts, the scanner follows these strategies to resolve all the TSConfig files of the project:
1. It considers only TSConfig files based on the scanner property `sonar.typescript.tsconfigPaths`.
1. The property expects a comma-separated list of TSConfig path patterns.
2. If not specified, it traverses the filesystem from the project root to collect all the existing TSConfig files.
1. This operation is time-consuming and can impact the analysis. If that’s the case, and as a workaround, users can explicitly define which TSConfig files the scanner should use.
3. If none are found, it creates a single temporary TSConfig file.
Either way, the TypeScript compiler will resolve all the files that belong to a TSConfig file. However, the scanner will only analyze the files specified through the scanner property `sonar.sources`. Therefore, the value of this property needs to be consistent with your TypeScript configuration.
#### Other
If you have a community plugin for CSS analysis installed on your SonarQube Cloud instance it will conflict with analysis of CSS, so it should be removed.
### ESLint
Along with dedicated rules, Sonar includes a selection of rules from ESLint and some of its plugins.
If there are rules that you use that we do not support yet, you can import them thanks to the External Issues feature using the ESLint format for exporting issues.
To facilitate the integration of your ESLint setup with our analysis, if you import issues for rules that we already raised in our analysis, issues won’t be duplicated.
Sonar takes into account ESLint’s issue-silencing comments that you might have in your code, so you won’t have to do additional work.
See the [external-analyzer-reports](https://docs.sonarsource.com/sonarqube-cloud/enriching/external-analyzer-reports "mention") page for more details on importing rules.
### Language-specific properties
To discover and update the JavaScript / TypeScript-specific properties, navigate in SonarQube Cloud to *Your Project* > **Administration** > **General Settings** > **Languages** > **JavaScript / TypeScript**.
Discover and update the CSS-specific properties in: **Project Administration** > **General Settings** > **Languages** > **CSS**.
See the [analysis-parameters](https://docs.sonarsource.com/sonarqube-cloud/advanced-setup/analysis-parameters "mention") page for more information about specific properties for any of these languages.
### Supported frameworks and versions
* ECMAScript 3, 5, 2015, 2016, 2017, 2018, 2019, 2020, 2021 and 2022
* TypeScript 5.0
* React JSX, Vue.js, Angular
* Flow
* CSS, SCSS, Less, also ‘style’ inside PHP, HTML and VueJS files
### Troubleshooting
#### Slow or unresponsive analysis
On a big project, more memory may need to be allocated to analyze the project. This would be manifested by analysis getting stuck and the following stacktrace might appear in the logs
`ERROR: Failed to get response while analyzing [file].ts`\
`java.io.InterruptedIOException: timeout`
You can use `sonar.javascript.node.maxspace` property to allow the analysis to use more memory. Set this property to `4096` or `8192` for big projects. This property should be set in `sonar-project.properties` file or on command line for scanner (with `-Dsonar.javascript.node.maxspace=4096`).
#### File encoding errors
If you encounter file encoding errors, use `sonar.sourceEncoding=UTF-8` configuration. To know how to perform this configuration, check out what's on the [analysis-parameters](https://docs.sonarsource.com/sonarqube-cloud/advanced-setup/analysis-parameters "mention") page.
#### Default exclusions for JS/TS
By default, analysis excludes files from dependencies in common directories, such as `node_modules`, `bower_components`, `dist`, `vendor`, and `external`. It also ignores `.d.ts` files. Use the following parameters to manage exclusions:
* `sonar.javascript.exclusions` - exclude JavaScript files by assigning comma-separated paths, or assign an empty value to include analysis in all directories, for example: `sonar.javascript.exclusions=""`.
* `sonar.exclusions` - exclude all files from the analysis. This method is preferred when configuring general exclusions for the project.
* `sonar.javascript.maxFileSize` - use this parameter to change the maximum file size limit on the scanner. By default, the analysis will exclude all files that are larger than 1000 KB. You can also change the limit in SonarQube Server UI under **Project Settings** > **General Settings** > **Languages** > **JavaScript / TypeScript** at project level or **Administration** > **Configuration** > **General Settings** > **Languages** > **JavaScript / TypeScript** at global level.
#### Detection of code bundles
The analyzer will attempt to detect bundled code or generated code. This means code that was automatically transformed and optimized with tools such as Webpack and similar. We consider generated code out of scope of the analysis since developers are not able to act upon the findings in such code. Whenever generated code is detected, the analysis will print a log message: once per the whole project on `INFO` level, and for each file on the `DEBUG` level. If you want to opt-in for analyzing the generated code or in case the detection is incorrect, you can disable it by setting `sonar.javascript.detectBundles=false`.
#### Custom rules for JS/TS
Custom rules are not supported by the analyzer. As an alternative we suggest you to have a look at [ESLint](https://eslint.org/docs/developer-guide/), it provides custom rules that you can then import thanks to the [External Issues](https://docs.sonarsource.com/sonarqube-cloud/enriching/external-analyzer-reports) feature.
#### Running out of memory
While analyzing a large project or file, the scanner may run out of memory. If this occurs, you will be notified with the following analysis logs:
```log
The analysis will stop due to the Node.js process running out of memory
You can see how Node.js heap usage evolves during analysis with "sonar.javascript.node.debugMemory=true"
Try setting "sonar.javascript.node.maxspace" to a higher value to increase Node.js heap size limit
If the problem persists, please report the issue at https://community.sonarsource.com
```
Consider the property `setting sonar.javascript.node.maxspace` to a higher value depending on the host’s available memory.
#### Large projects and monorepos
When analyzing a large project, you may encounter memory issues, such as with monorepo projects. In these cases, a possible workaround is to divide the analysis into subfolders. Given this project structure:
```json
my-app/
├─ app1/
│ ├─ tsconfig.sonar.json
├─ app2/
│ ├─ tsconfig.sonar.json
├─ ...
├─ tsconfig.json
```
The default analysis will use the root `tsconfig.json` which may include too many files if the project is very big and creates memory issues. Splitting the project into several TSConfig files should help in that case. To do so, create intermediate `tsconfig.sonar.json` for each of the subfolders and use:
```json
sonar.typescript.tsconfigPaths=my-app/app1/tsconfig.sonar.json,my-app/app2/tsconfig.sonar.json
```
#### Unavailable dependencies
In certain situations, analysis may be conducted in environments where dependencies are not available, such as with Autoscan. If possible, it is recommended to install these dependencies (e.g. `npm ci`) to enhance TypeScript type inference precision. If a `tsconfig.json` file extends external TSConfigs and cannot locate them, unexpected analysis results may occur due to potential differences in `compilerOptions`. In these cases, it’s advised to directly copy the essential contents of the extended TSConfigs into a custom `tsconfig.sonar.json` file and use it for analysis.
#### Unsupported compiler options
The scanner includes a recent version of the TypeScript compiler. Sometimes, a project might use new TSConfig options that are not supported by the embedded scanner version. We suggest holding off on using these options until the scanner is updated to the new version. If that’s not possible, you can create a custom `tsconfig.sonar.json` for the analysis without using those options.
### Related Pages
* The [external-analyzer-reports](https://docs.sonarsource.com/sonarqube-cloud/enriching/external-analyzer-reports "mention") page has information about importing external issues such as ESLint, TSLint, and/or StyleLint.
* Test coverage [overview](https://docs.sonarsource.com/sonarqube-cloud/enriching/test-coverage/overview "mention") (LCOV format)
* [SonarJS Plugin for ESLint](https://www.npmjs.com/package/eslint-plugin-sonarjs)
---
# Source: https://docs.sonarsource.com/sonarqube-community-build/analyzing-source-code/test-coverage/javascript-typescript-test-coverage.md
# Source: https://docs.sonarsource.com/sonarqube-server/9.8/analyzing-source-code/test-coverage/javascript-typescript-test-coverage.md
# Source: https://docs.sonarsource.com/sonarqube-server/9.9/analyzing-source-code/test-coverage/javascript-typescript-test-coverage.md
# Source: https://docs.sonarsource.com/sonarqube-server/10.0/analyzing-source-code/test-coverage/javascript-typescript-test-coverage.md
# Source: https://docs.sonarsource.com/sonarqube-server/10.1/analyzing-source-code/test-coverage/javascript-typescript-test-coverage.md
# Source: https://docs.sonarsource.com/sonarqube-server/10.2/analyzing-source-code/test-coverage/javascript-typescript-test-coverage.md
# Source: https://docs.sonarsource.com/sonarqube-server/10.3/analyzing-source-code/test-coverage/javascript-typescript-test-coverage.md
# Source: https://docs.sonarsource.com/sonarqube-server/10.4/analyzing-source-code/test-coverage/javascript-typescript-test-coverage.md
# Source: https://docs.sonarsource.com/sonarqube-server/10.5/analyzing-source-code/test-coverage/javascript-typescript-test-coverage.md
# Source: https://docs.sonarsource.com/sonarqube-server/10.6/analyzing-source-code/test-coverage/javascript-typescript-test-coverage.md
# Source: https://docs.sonarsource.com/sonarqube-server/10.7/analyzing-source-code/test-coverage/javascript-typescript-test-coverage.md
# Source: https://docs.sonarsource.com/sonarqube-server/10.8/analyzing-source-code/test-coverage/javascript-typescript-test-coverage.md
# Source: https://docs.sonarsource.com/sonarqube-server/2025.2/analyzing-source-code/test-coverage/javascript-typescript-test-coverage.md
# Source: https://docs.sonarsource.com/sonarqube-server/2025.3/analyzing-source-code/test-coverage/javascript-typescript-test-coverage.md
# Source: https://docs.sonarsource.com/sonarqube-server/2025.5/analyzing-source-code/test-coverage/javascript-typescript-test-coverage.md
# Source: https://docs.sonarsource.com/sonarqube-server/2025.1/analyzing-source-code/test-coverage/javascript-typescript-test-coverage.md
# Source: https://docs.sonarsource.com/sonarqube-server/2025.4/analyzing-source-code/test-coverage/javascript-typescript-test-coverage.md
# Source: https://docs.sonarsource.com/sonarqube-server/2025.6/analyzing-source-code/test-coverage/javascript-typescript-test-coverage.md
# Source: https://docs.sonarsource.com/sonarqube-server/analyzing-source-code/test-coverage/javascript-typescript-test-coverage.md
# Source: https://docs.sonarsource.com/sonarqube-cloud/enriching/test-coverage/javascript-typescript-test-coverage.md
# JavaScript / TypeScript test coverage
SonarQube Cloud supports the reporting of test coverage information as part of the analysis of your JS/TS project.
However, SonarQube Cloud does not produce the coverage report itself. Instead, you must set up a third-party tool to produce the report as part of your build process. You then need to configure your analysis to tell the SonarScanner where the report is located so that it can pick it up and send it to SonarQube Cloud, where it will be displayed on your project dashboard along with the other analysis metrics.
For JS/TS projects, SonarQube Cloud directly supports all coverage tools that produce reports in the LCOV format. Additionally, a generic coverage format is also supported if you wish to use an unsupported tool (though you will have to convert its output to the generic format yourself).
In this section, we discuss the directly supported JS/TS LCOV coverage feature. For information on the generic format, see [generic-test-data](https://docs.sonarsource.com/sonarqube-cloud/enriching/test-coverage/generic-test-data "mention").
### Use CI-based, not automatic analysis
Usually, when you import a new JS/TS project, automatic analysis starts immediately. But, since coverage is not yet supported under automatic analysis, **you will need to use CI-based analysis instead.** This requires disabling automatic analysis. Here are the steps:
**If you have not yet imported your project**, just add an empty file called `sonar-project.properties` to the root of your repository, and *then* perform the import. SonarQube Cloud will assume that you want to set up a CI-based analysis and display the onboarding tutorial.
**If you have already imported your project,** then SonarQube Cloud has already run at least once using automatic analysis. Don’t worry, you can still convert your project to use a CI-based approach. Simply go to **Administration > Analysis Method** and switch **SonarQube Cloud Automatic Analysis** to **OFF**. Then, on the same screen, under **Supported analysis methods** find your preferred CI and click **Follow the tutorial**.
### Follow the tutorial
At this point, you should be in the onboarding tutorial specific to your CI. Follow the tutorial and when it asks, **What option best describes your build?**, choose **Other (for JS, TS, Go, Python, PHP, …)**. When you are done with the tutorial, you should have a functioning CI-based analysis setup for your JS/TS project. The next step is to adjust it to get coverage working.
### Adjusting your setup
To enable coverage you need to:
* Adjust your build process so that the coverage tool runs *before* the scanner step.
* Make sure that the coverage tool writes its report file to a defined path in the build environment.
* Configure the scanning step of your build so that the scanner picks up the report file from that defined path.
### Adding coverage to your build process
The details of setting up coverage within your build process depend on which tools you are using.
The following illustrates how to do this for a JS/TS project that uses Yarn and Jest in the GitHub Actions CI. Simply add the following to your `build.yml` file:
**`.github/workflows/build.yml`**
```yaml
- name: Install dependencies
run: yarn
- name: Test and coverage
run: yarn jest --coverage
```
The resulting file should look something like this:
**`.github/workflows/build.yml`**
```yaml
name: Build
on:
push:
branches:
- main
pull_request:
types: [opened, synchronize, reopened]
jobs:
sonarqube:
name: SonarQube
runs-on: ubuntu-latest
steps:
- uses: actions/checkout@v6
with:
fetch-depth: 0
- name: Install dependencies
run: yarn
- name: Test and coverage
run: yarn jest --coverage
- name: SonarQube Scan
uses: SonarSource/sonarqube-scan-action@v7
env:
SONAR_TOKEN: ${{ secrets. SONARCLOUD_TOKEN }}
```
First, you install all your project dependencies and then invoke `jest` with the `——coverage` option to run your tests and write out the coverage data to a file.
If, as here, you do not specify an output file, the default `./coverage/lcov.info` is used.
If you are using a different package manager or a different testing tool these details will be different.
*The essential requirements are that the tool produces its report in the LCOV format and writes it to a place from which the scanner can then pick it up.*
### Adding the coverage analysis parameter
The next step is to add `sonar.javascript.lcov.reportPaths` to your analysis parameters. This parameter must be set to the path of the report file produced by your coverage tool. The path can be either absolute or relative to the project root. In this example, that path is set to the default produced by Jest: `./coverage/lcov.info`. It is set in the `sonar-project.properties` file, located in the project root:
**`sonar-project.properties`**
```properties
sonar.projectKey=
...
sonar.javascript.lcov.reportPaths=./coverage/lcov.info
```
Wildcards and a comma-delimited list of paths are supported. See [test-coverage-parameters](https://docs.sonarsource.com/sonarqube-cloud/enriching/test-coverage/test-coverage-parameters "mention") for more details.
{% hint style="warning" %}
This property is usually set in the `sonar-project.properties` file, located in the project root. Alternatively, you can also set it in the command line of the scanner invocation or in the SonarQube Cloud interface under
***Your Organization*** > ***Your Project*** > **Administration** > **General Settings** > **Languages** > **JavaScript / TypeScript** > **Tests and Coverage** > **LCOV Files**
{% endhint %}
The parameter `sonar.typescript.lcov.reportPaths` was formerly used for TypeScript coverage. This parameter has been deprecated. The parameter `sonar.javascript.lcov.reportPaths` is now used for both JavaScript and TypeScript.
---
# Source: https://docs.sonarsource.com/sonarqube-server/8.9/analyzing-source-code/languages/javascript-typescript.md
# JavaScript/TypeScript
### Prerequisites
In order to analyze JavaScript or TypeScript code, you need to have supported version of Node.js installed on the machine running the scan. Supported versions are current LTS versions (v10, v12, v14) and latest version v15. Odd (non LTS) versions might work, but are not actively tested. We recommend using the latest available LTS version (v14 as of today) for optimal stability and performance.
If standard `node` is not available, you have to set property `sonar.nodejs.executable` to an absolute path to Node.js executable.
### Language-specific properties
Discover and update the JavaScript / TypeScript [analysis-parameters](https://docs.sonarsource.com/sonarqube-server/8.9/analyzing-source-code/analysis-parameters "mention") in: **Administration > General Settings > JavaScript / TypeScript**.
### Supported frameworks, versions and languages
* ECMAScript 5 / ECMAScript 2015 (ECMAScript 6) / ECMAScript 2016-2017-2018
* TypeScript 4
* React JSX
* Vue.js
* Flow
### Troubleshooting
#### Slow or unresponsive analysis
On a big project, more memory may need to be allocated to analyze the project. This would be manifested by analysis getting stuck and the following stacktrace might appear in the logs
```css-79elbk
ERROR: Failed to get response while analyzing [file].ts
java.io.InterruptedIOException: timeout
```
You can use `sonar.javascript.node.maxspace` property to allow the analysis to use more memory. Set this property to `4096` or `8192` for big projects. This property should be set in `sonar-project.properties` file or on command line for scanner (with `-Dsonar.javascript.node.maxspace=4096`).
#### Default exclusions
By default, analysis will exclude files from dependencies in usual directories, such as `node_modules`, `bower_components`, `dist`, `vendor`, and `external`. It will also ignore `.d.ts` files. If for some reason analysis of files in these directories is desired, it can be configured by setting `sonar.javascript.exclusions` property to empty value, i.e. `sonar.javascript.exclusions=""`, or to comma separated list of paths to be excluded. This property will exclude the files also for other languages, similar to `sonar.exclusions` property, however `sonar.exclusions` property should be preferred to configure general exclusions for the project.
#### Custom rules
{% hint style="warning" %}
This feature is deprecated
{% endhint %}
As a replacement, we suggest you to have a look at [ESLint](https://eslint.org/docs/developer-guide/), it provides custom rules that you can then import thanks to the [importing-third-party-issues](https://docs.sonarsource.com/sonarqube-server/8.9/analyzing-source-code/importing-external-issues/importing-third-party-issues "mention") feature.
#### TypeScript files are not analyzed
Using a TypeScript version that is higher than the one supported by SonarQube can cause false positives or issues with parsing, and some options (such as the `useUnknownInCatchVariables` compiler option) might not get recognized, causing TypeScript files to be ignored by the analysis.
We recommend checking that the version of TypeScript used is supported by SonarQube, and upgrading to a higher SonarQube version if needed.
#### Overview
The JavaScript Analyzer parses the source code, creates an Abstract Syntax Tree (AST) and then walks through the entire tree. A coding rule is a visitor that is able to visit nodes from this AST.
As soon as the coding rule visits a node, it can navigate the tree around the node and log issues if necessary.
#### Create SonarQube Plugin
Custom rules for JavaScript can be added by writing a SonarQube Plugin and using JavaScript analyzer APIs.
To get started a sample plugin can be found here: [javascript-custom-rules](https://github.com/SonarSource/sonar-custom-rules-examples/tree/master/javascript-custom-rules). Here are the step to follow:
* Create a standard SonarQube plugin project
* Attach this plugin to the SonarQube JavaScript analyzer through the `pom.xml`:
* Add the dependency to the JavaScript analyzer.
* Add the following line in the sonar-packaging-maven-plugin configuration. `javascript`
* Implement the following extension points:
* [Plugin](http://javadocs.sonarsource.org/latest/apidocs/index.html?org/sonar/api/Plugin.html)
* [RulesDefinition](http://javadocs.sonarsource.org/latest/apidocs/index.html?org/sonar/api/server/rule/RulesDefinition.html)
* `CustomRuleRepository`, this interface registers rule classes with JavaScript plugin, so they are invoked during analysis of JavaScript files.
* Declare `RulesDefinition` as an extension in the `Plugin` extension point.
You can implement both `RulesDefinition` and `CustomRulesRepository` in a single class.
#### Implement a Rule
* Create a class that will hold the implementation of the rule. It should:
* Extend `DoubleDispatchVisitorCheck` or `SubscriptionVisitorCheck`
* Define the rule name, key, tags, etc. with Java annotations.
* Declare this class in the `RulesDefinition`.
#### Implementation Details
**Using DoubleDispatchVisitorCheck**
`DoubleDispatchVisitorCheck` extends `DoubleDispatchVisitor` which provide a set of methods to visit specific tree nodes (these methods’ names start with `visit`). To explore a part of the AST, override the required method(s). For example, if you want to explore `if` statement nodes, override the `DoubleDispatchVisitor#visitIfStatement` method that will be called each time an `IfStatementTree` node is encountered in the AST.
When overriding a visit method, you must call the `super` method in order to allow the visitor to visit the rest of the tree.
**Using SubscriptionVisitorCheck**
`SubscriptionVisitorCheck` extends `SubscriptionVisitor`. To explore a part of the AST, override `SubscribtionVisitor#nodesToVisit()` by returning the list of the `Tree#Kind` of node you want to visit. For example, if you want to explore `if` statement nodes the method will return a list containing the element `Tree#Kind#IF_STATEMENT`.
**Create issues**
Use these methods to log an issue:
* `JavaScriptCheck#addIssue(tree, message)` creates and returns an instance of `PreciseIssue`. In the SonarQube UI this issue will highlight all code corresponding to the tree passed as the first parameter. To add cost (effort to fix) or secondary locations provide these values to your just-created instance of `PreciseIssue`.
* `JavaScriptCheck#addIssue(issue)` creates and returns the instance of `Issue`. Use this method to create non-standard issues (e.g. for a file-level issue instantiate `FileIssue`).
**Check context**
Check context is provided by `DoubleDispatchVisitorCheck` or `SubscriptionVisitorCheck` by calling the `JavaScriptCheck#getContext` method. Check context provides you access to the root tree of the file, the file itself and the symbol model (information about variables).
**Test rule**
To test the rule you can use `JavaScriptCheckVerifier#verify()` or `JavaScriptCheckVerifier#issues()`. To be able to use these methods add a dependency to your project:
```css-79elbk
org.sonarsource.javascriptjavascript-checks-testkitXXXtest
```
#### API Changes
**SonarJS 6.0**
* Feature and API are deprecated.
**SonarJS 4.2.1**
* `CustomJavaScriptRulesDefinition` is deprecated. Implement extension `RulesDefinition` and `CustomRuleRepository` instead.
**SonarJS 4.0**
* Method `TreeVisitorContext#getFile()` is removed.
### Related Pages
* [importing-third-party-issues](https://docs.sonarsource.com/sonarqube-server/8.9/analyzing-source-code/importing-external-issues/importing-third-party-issues "mention") (ESLint, TSLint)
* [test-coverage-and-execution](https://docs.sonarsource.com/sonarqube-server/8.9/analyzing-source-code/test-coverage-and-execution "mention") (LCOV format)
* [SonarJS plugin for ESLint](https://github.com/SonarSource/eslint-plugin-sonarjs)
* [adding-coding-rules](https://docs.sonarsource.com/sonarqube-server/8.9/extension-guide/adding-coding-rules "mention")
### Issue tracker
Check the [issue tracker](https://github.com/SonarSource/sonar-javascript/issues) for this language.
---
# Source: https://docs.sonarsource.com/sonarqube-server/10.5/analyzing-source-code/languages/jcl.md
# Source: https://docs.sonarsource.com/sonarqube-server/10.6/analyzing-source-code/languages/jcl.md
# Source: https://docs.sonarsource.com/sonarqube-server/10.7/analyzing-source-code/languages/jcl.md
# Source: https://docs.sonarsource.com/sonarqube-server/10.8/analyzing-source-code/languages/jcl.md
# Source: https://docs.sonarsource.com/sonarqube-server/2025.2/analyzing-source-code/languages/jcl.md
# Source: https://docs.sonarsource.com/sonarqube-server/2025.3/analyzing-source-code/languages/jcl.md
# Source: https://docs.sonarsource.com/sonarqube-server/2025.5/analyzing-source-code/languages/jcl.md
# Source: https://docs.sonarsource.com/sonarqube-server/2025.1/analyzing-source-code/languages/jcl.md
# Source: https://docs.sonarsource.com/sonarqube-server/2025.4/analyzing-source-code/languages/jcl.md
# Source: https://docs.sonarsource.com/sonarqube-server/2025.6/analyzing-source-code/languages/jcl.md
# Source: https://docs.sonarsource.com/sonarqube-server/analyzing-source-code/languages/jcl.md
# Source: https://docs.sonarsource.com/sonarqube-cloud/advanced-setup/languages/jcl.md
# JCL
JCL analysis is available starting with the Enterprise plan and is supported by SonarQube for Eclipse when running in connected mode. See the[subscription-plans](https://docs.sonarsource.com/sonarqube-cloud/administering-sonarcloud/managing-subscription/subscription-plans "mention") and [Connected mode](https://docs.sonarsource.com/sonarqube-for-eclipse/connect-your-ide/connected-mode) pages for more details.
### Language-specific properties
To discover and update the JCL-specific properties, navigate in SonarQube Cloud to *Your Project* > **Administration** > **General Settings** > **Languages** > **JCL**. See the [analysis-parameters](https://docs.sonarsource.com/sonarqube-cloud/advanced-setup/analysis-parameters "mention") page for more information about specific properties.
### Source code extraction
To analyze your source code with SonarQube Cloud, you first need to extract it onto a filesystem. You can use your own tool or an open-source tool; Sonar does not provide any connectors or source code extraction tools.
### JCL source format
Depending on your extraction process, your JCL source files may include extra characters beyond the 72nd columns, and include the 8 additional characters up to column 80, or even go beyond that column.
When that happens, the parser will:
* consider everything up to the 71st column as valid JCL code,
* look at the character in the 72nd column, to determine whether a continuation is present or not,
* consider everything beyond the 72nd column as an inline comment, even when the text goes beyond the 80th column.
---
# Source: https://docs.sonarsource.com/sonarqube-community-build/analyzing-source-code/scanners/jenkins-extension-sonarqube.md
# Source: https://docs.sonarsource.com/sonarqube-server/9.8/analyzing-source-code/scanners/jenkins-extension-sonarqube.md
# Source: https://docs.sonarsource.com/sonarqube-server/9.9/analyzing-source-code/scanners/jenkins-extension-sonarqube.md
# Source: https://docs.sonarsource.com/sonarqube-server/10.0/analyzing-source-code/scanners/jenkins-extension-sonarqube.md
# Source: https://docs.sonarsource.com/sonarqube-server/10.1/analyzing-source-code/scanners/jenkins-extension-sonarqube.md
# Source: https://docs.sonarsource.com/sonarqube-server/10.2/analyzing-source-code/scanners/jenkins-extension-sonarqube.md
# Source: https://docs.sonarsource.com/sonarqube-server/10.3/analyzing-source-code/scanners/jenkins-extension-sonarqube.md
# Source: https://docs.sonarsource.com/sonarqube-server/10.4/analyzing-source-code/scanners/jenkins-extension-sonarqube.md
# Source: https://docs.sonarsource.com/sonarqube-server/10.5/analyzing-source-code/scanners/jenkins-extension-sonarqube.md
# Source: https://docs.sonarsource.com/sonarqube-server/10.6/analyzing-source-code/scanners/jenkins-extension-sonarqube.md
# Source: https://docs.sonarsource.com/sonarqube-server/10.7/analyzing-source-code/scanners/jenkins-extension-sonarqube.md
# Source: https://docs.sonarsource.com/sonarqube-server/10.8/analyzing-source-code/scanners/jenkins-extension-sonarqube.md
# Source: https://docs.sonarsource.com/sonarqube-server/2025.2/analyzing-source-code/scanners/jenkins-extension-sonarqube.md
# Source: https://docs.sonarsource.com/sonarqube-server/2025.3/analyzing-source-code/scanners/jenkins-extension-sonarqube.md
# Source: https://docs.sonarsource.com/sonarqube-server/2025.5/analyzing-source-code/scanners/jenkins-extension-sonarqube.md
# Source: https://docs.sonarsource.com/sonarqube-server/2025.1/analyzing-source-code/scanners/jenkins-extension-sonarqube.md
# Source: https://docs.sonarsource.com/sonarqube-server/2025.4/analyzing-source-code/scanners/jenkins-extension-sonarqube.md
# Source: https://docs.sonarsource.com/sonarqube-server/2025.6/analyzing-source-code/scanners/jenkins-extension-sonarqube.md
# Source: https://docs.sonarsource.com/sonarqube-server/analyzing-source-code/scanners/jenkins-extension-sonarqube.md
# Jenkins extension
SonarScanner for Jenkins — 2.18 | Issue Tracker
**2.18** **2025-01-28**\ Minor updates\
[Download](https://plugins.jenkins.io/sonar/)\
\
[Release notes](https://sonarsource.atlassian.net/issues/?jql=project%20%3D%2010138%20AND%20fixVersion%20%3D%2015464)
***
**2.17.3** **2024-11-18**\ Update dependencies to improve security\
[Download](https://plugins.jenkins.io/sonar/)\
\
[Release notes](https://sonarsource.atlassian.net/issues/?jql=project%20%3D%2010138%20AND%20fixVersion%20%3D%2016121)
***
**2.17.2** **2024-02-19**\ Fix withSonarQubeEnv step hanging when the workspace contains a symlink\
[Download](https://plugins.jenkins.io/sonar/)\
\
[Release notes](https://sonarsource.atlassian.net/issues/?jql=project%20%3D%2010138%20AND%20fixVersion%20%3D%2015473)
***
**2.16.1** **2023-10-10**\ Bug fixes\
[Download](https://plugins.jenkins.io/sonar/)\
\
[Release notes](https://sonarsource.atlassian.net/issues/?jql=project%20%3D%2010138%20AND%20fixVersion%20%3D%2015332)
***
**2.16** **2023-09-27**\ Use the sonar.token property\
[Download](https://plugins.jenkins.io/sonar/)\
\
[Release notes](https://sonarsource.atlassian.net/issues/?jql=project%20%3D%2010138%20AND%20fixVersion%20%3D%2013951)
***
**2.15** **2022-11-22**\ Fixed out of memory when querying deleted projects\
[Download](https://plugins.jenkins.io/sonar/)\
\
[Release notes](https://sonarsource.atlassian.net/issues/?jql=project%20%3D%2010138%20AND%20fixVersion%20%3D%2013860)
***
**2.14** **2021-11-18**\ Prepare SonarQube Scanner for core Guava upgrade\
[Download](https://plugins.jenkins.io/sonar/)\
\
[Release notes](https://sonarsource.atlassian.net/issues/?jql=project+%3D+10138+AND+fixVersion+%3D+12438)
***
**2.13.1** **2021-04-30**\ Update dependencies\
[Download](https://plugins.jenkins.io/sonar/)\
\
[Release notes](https://sonarsource.atlassian.net/issues/?jql=project+%3D+10138+AND+fixVersion+%3D+12437)
***
**2.12** **2020-09-07**\ Improve use of SonarQube configuration, bug fixes\
[Download](https://plugins.jenkins.io/sonar/)\
\
[Release notes](https://sonarsource.atlassian.net/issues/?jql=project+%3D+10138+AND+fixVersion+%3D+12435)
***
**2.11** **2020-01-06**\ Improvements for Jenkins Configuration as Code\
[Download](https://plugins.jenkins.io/sonar/)\
\
[Release notes](https://sonarsource.atlassian.net/issues/?jql=project+%3D+10138+AND+fixVersion+%3D+12434)
***
**2.10** **2019-10-19**\ Add webhook validation based on a shared secret\
[Download](https://plugins.jenkins.io/sonar/)\
\
[Release notes](https://sonarsource.atlassian.net/issues/?jql=project+%3D+10138+AND+fixVersion+%3D+12433)
This extension lets you centralize the configuration of your SonarQube Server connection details in Jenkins global configuration.
Then you can trigger SonarQube Server analysis from Jenkins using standard Jenkins Build Steps or [Jenkins Pipeline DSL](https://jenkins.io/solutions/pipeline/) to trigger analysis with the SonarScanner. Once the job is complete, the extension will detect that a SonarQube Server analysis was made during the build and display a badge and a widget on the job page with a link to the SonarQube Server dashboard as well as quality gate status.
See:
* [key-features](https://docs.sonarsource.com/sonarqube-server/analyzing-source-code/ci-integration/jenkins-integration/key-features "mention")
* [global-setup](https://docs.sonarsource.com/sonarqube-server/analyzing-source-code/ci-integration/jenkins-integration/global-setup "mention")
* [add-analysis-to-job](https://docs.sonarsource.com/sonarqube-server/analyzing-source-code/ci-integration/jenkins-integration/add-analysis-to-job "mention")
* [pipeline-pause](https://docs.sonarsource.com/sonarqube-server/analyzing-source-code/ci-integration/jenkins-integration/pipeline-pause "mention")
---
# Source: https://docs.sonarsource.com/sonarqube-community-build/analyzing-source-code/ci-integration/jenkins-integration.md
# Source: https://docs.sonarsource.com/sonarqube-server/8.9/analyzing-source-code/ci-integration/jenkins-integration.md
# Source: https://docs.sonarsource.com/sonarqube-server/9.8/analyzing-source-code/ci-integration/jenkins-integration.md
# Source: https://docs.sonarsource.com/sonarqube-server/9.9/analyzing-source-code/ci-integration/jenkins-integration.md
# Source: https://docs.sonarsource.com/sonarqube-server/10.0/analyzing-source-code/ci-integration/jenkins-integration.md
# Source: https://docs.sonarsource.com/sonarqube-server/10.1/analyzing-source-code/ci-integration/jenkins-integration.md
# Source: https://docs.sonarsource.com/sonarqube-server/10.2/analyzing-source-code/ci-integration/jenkins-integration.md
# Source: https://docs.sonarsource.com/sonarqube-server/10.3/analyzing-source-code/ci-integration/jenkins-integration.md
# Source: https://docs.sonarsource.com/sonarqube-server/10.4/analyzing-source-code/ci-integration/jenkins-integration.md
# Source: https://docs.sonarsource.com/sonarqube-server/10.5/analyzing-source-code/ci-integration/jenkins-integration.md
# Source: https://docs.sonarsource.com/sonarqube-server/10.6/analyzing-source-code/ci-integration/jenkins-integration.md
# Source: https://docs.sonarsource.com/sonarqube-server/10.7/analyzing-source-code/ci-integration/jenkins-integration.md
# Source: https://docs.sonarsource.com/sonarqube-server/10.8/analyzing-source-code/ci-integration/jenkins-integration.md
# Source: https://docs.sonarsource.com/sonarqube-server/2025.2/analyzing-source-code/ci-integration/jenkins-integration.md
# Source: https://docs.sonarsource.com/sonarqube-server/2025.3/analyzing-source-code/ci-integration/jenkins-integration.md
# Source: https://docs.sonarsource.com/sonarqube-server/2025.5/analyzing-source-code/ci-integration/jenkins-integration.md
# Source: https://docs.sonarsource.com/sonarqube-server/2025.1/analyzing-source-code/ci-integration/jenkins-integration.md
# Source: https://docs.sonarsource.com/sonarqube-server/2025.4/analyzing-source-code/ci-integration/jenkins-integration.md
# Source: https://docs.sonarsource.com/sonarqube-server/2025.6/analyzing-source-code/ci-integration/jenkins-integration.md
# Source: https://docs.sonarsource.com/sonarqube-server/analyzing-source-code/ci-integration/jenkins-integration.md
# Jenkins integration
{% content-ref url="jenkins-integration/key-features" %}
[key-features](https://docs.sonarsource.com/sonarqube-server/analyzing-source-code/ci-integration/jenkins-integration/key-features)
{% endcontent-ref %}
{% content-ref url="jenkins-integration/global-setup" %}
[global-setup](https://docs.sonarsource.com/sonarqube-server/analyzing-source-code/ci-integration/jenkins-integration/global-setup)
{% endcontent-ref %}
{% content-ref url="jenkins-integration/add-analysis-to-job" %}
[add-analysis-to-job](https://docs.sonarsource.com/sonarqube-server/analyzing-source-code/ci-integration/jenkins-integration/add-analysis-to-job)
{% endcontent-ref %}
{% content-ref url="jenkins-integration/pipeline-pause" %}
[pipeline-pause](https://docs.sonarsource.com/sonarqube-server/analyzing-source-code/ci-integration/jenkins-integration/pipeline-pause)
{% endcontent-ref %}
---
# Source: https://docs.sonarsource.com/sonarqube-cloud/advanced-setup/ci-based-analysis/jenkins.md
# Jenkins
{% content-ref url="jenkins/key-features" %}
[key-features](https://docs.sonarsource.com/sonarqube-cloud/advanced-setup/ci-based-analysis/jenkins/key-features)
{% endcontent-ref %}
{% content-ref url="jenkins/global-setup" %}
[global-setup](https://docs.sonarsource.com/sonarqube-cloud/advanced-setup/ci-based-analysis/jenkins/global-setup)
{% endcontent-ref %}
{% content-ref url="jenkins/add-analysis-to-job" %}
[add-analysis-to-job](https://docs.sonarsource.com/sonarqube-cloud/advanced-setup/ci-based-analysis/jenkins/add-analysis-to-job)
{% endcontent-ref %}
{% content-ref url="jenkins/pipeline-pause" %}
[pipeline-pause](https://docs.sonarsource.com/sonarqube-cloud/advanced-setup/ci-based-analysis/jenkins/pipeline-pause)
{% endcontent-ref %}
---
# Source: https://docs.sonarsource.com/sonarqube-server/analyzing-source-code/jfrog-evidence-collection-integration.md
# JFrog Evidence Collection integration
*This integration is available from SonarQube Server Enterprise Edition.*
The [JFrog Evidence Collection](https://jfrog.com/evidence/) expands JFrog’s Release Lifecycle Management capabilities to enrich artifacts, builds, and release bundles with signed attestation metadata that can be easily tracked and verified for governance and compliance.
SonarQube Server integrates with JFrog Evidence Collection to provide trusted auditing for software packages.
### Integration overview
The [JFrog CLI](https://docs.jfrog-applications.jfrog.io/jfrog-applications/jfrog-cli) is used within the CI pipeline to create the Sonar evidence that will be displayed on the JFrog platform. This evidence contains the quality gate status computed by SonarQube Server and made accessible via its API.
The figure below shows the process:
1. The CI pipeline starts the SonarQube analysis.
2. The SonarScanner performs the analysis and sends the results to SonarQube Server .
3. SonarQube Server processes the analysis results and computes the quality gate status.
4. The CI pipeline asks JFrog CLI to create the Sonar evidence for the analysis.
5. The JFrog CLI, which waits for the analysis completion, retrieves SonarQube analysis evidence payload from SonarQube Server's endpoint: `/api/v2/dop-translation/jfrog-evidence/` (see the [#example-of-a-sonar-endpoint-response](#example-of-a-sonar-endpoint-response "mention") expandable below).
Example of a Sonar endpoint response
The endpoint response contains the evidence payload in JSON format with a markdown section.
```json
{
"predicateType":"https://jfrog.com/evidence/sonarqube/v1",
"predicate":{
"projectStatus":{
"status":"ERROR",
"ignoredConditions":false,
"caycStatus":"non-compliant",
"conditions":[
{
"status":"ERROR",
"metricKey":"new_coverage",
"comparator":"LT",
"errorThreshold":"85",
"actualValue":"82.50562381034781"
},
{
"status":"OK",
"metricKey":"skipped_tests",
"comparator":"GT",
"actualValue":"0"
}
],
"period":{
"mode":"last_version",
"date":"2000-04-27T00:45:23+0200",
"parameter":"2015-12-07"
}
}
},
"createdAt": "2222-01-01T00:00:00.000Z",
"createdBy": "SonarQube",
"markdown": "# SVG in Markdown example\n\n## Details\n\n- **Type**: svg examples\n\nThis demonstrates the syntax for embedding an SVG without a separate file.\n\n!"
}
```
### Prerequisites
* SonarQube Server Enterprise Edition
* JFrog Artifactory Enterprise+ license
* Minimum JFrog CLI version: 2.78.9
### Setting up the integration
You must set up your pipeline to use the JFrog CLI to create the Sonar evidence. See the [JFrog pipelines documentation](https://jfrog.com/help/r/jfrog-pipelines-documentation/jfrog-pipelines).
---
# Source: https://docs.sonarsource.com/sonarqube-cloud/advanced-setup/ci-based-analysis/jfrog-evidence-collection.md
# JFrog Evidence Collection
The [JFrog Evidence Collection](https://jfrog.com/evidence/) expands JFrog’s Release Lifecycle Management capabilities to enrich artifacts, builds, and release bundles with signed attestation metadata that can be easily tracked and verified for governance and compliance.
SonarQube Cloud integrates with JFrog Evidence Collection to provide trusted auditing for software packages.
### Integration overview
The [JFrog CLI](https://docs.jfrog-applications.jfrog.io/jfrog-applications/jfrog-cli) is used within the CI pipeline to create the Sonar evidence that will be displayed on the JFrog platform. This evidence contains the quality gate status computed by SonarQube Cloud and made accessible via its API.
The figure below shows the process:
1. The CI pipeline starts the SonarQube analysis.
2. The SonarScanner performs the analysis and sends the results to SonarQube Cloud.
3. SonarQube Cloud processes the analysis results and computes the quality gate status.
4. The CI pipeline asks JFrog CLI to create the Sonar evidence for the analysis.
5. The JFrog CLI, which waits for the analysis completion, retrieves SonarQube analysis evidence payload from SonarQube Cloud's endpoint: [api.sonarcloud.io/dop-translation/jfrog-evidence](http://api.sonarcloud.io/dop-translation/jfrog-evidence/%7BtaskId%7D) (see the [#example-of-a-sonar-endpoint-response](#example-of-a-sonar-endpoint-response "mention") expandable below).
Example of a Sonar endpoint response
The endpoint response contains the evidence payload in JSON format with a markdown section.
```json
{
"predicateType":"https://jfrog.com/evidence/sonarqube/v1",
"predicate":{
"projectStatus":{
"status":"ERROR",
"ignoredConditions":false,
"caycStatus":"non-compliant",
"conditions":[
{
"status":"ERROR",
"metricKey":"new_coverage",
"comparator":"LT",
"errorThreshold":"85",
"actualValue":"82.50562381034781"
},
{
"status":"OK",
"metricKey":"skipped_tests",
"comparator":"GT",
"actualValue":"0"
}
],
"period":{
"mode":"last_version",
"date":"2000-04-27T00:45:23+0200",
"parameter":"2015-12-07"
}
}
},
"createdAt": "2222-01-01T00:00:00.000Z",
"createdBy": "SonarQube",
"markdown": "# SVG in Markdown example\n\n## Details\n\n- **Type**: svg examples\n\nThis demonstrates the syntax for embedding an SVG without a separate file.\n\n!"
}
```
### Prerequisites
* SonarQube Cloud Enterprise license
* JFrog Artifactory Enterprise+ license
* Minimum JFrog CLI version: 2.78.9
### Setting up the integration
You must set up your pipeline to use the JFrog CLI to create the Sonar evidence. See the [JFrog pipelines documentation](https://jfrog.com/help/r/jfrog-pipelines-documentation/jfrog-pipelines).
---
# Source: https://docs.sonarsource.com/sonarqube-server/2025.6/instance-administration/jira-integration.md
# Source: https://docs.sonarsource.com/sonarqube-server/2025.6/project-administration/jira-integration.md
# Source: https://docs.sonarsource.com/sonarqube-server/instance-administration/jira-integration.md
# Source: https://docs.sonarsource.com/sonarqube-server/project-administration/jira-integration.md
# Source: https://docs.sonarsource.com/sonarqube-cloud/managing-your-projects/administering-your-projects/jira-integration.md
# Jira Cloud integration
This integration is available in the [Team and Enterprise plans](https://www.sonarsource.com/plans-and-pricing/sonarcloud/).
Before you can create Jira work items in SonarQube Cloud, you need to set up your Jira Cloud integration on the organization and project levels, and have the right permissions.
### Permissions
1. To set up your Jira Cloud integration for your SonarQube organization you need the **Administer Organization** permissions. Go to *Your Organization* > **Administration** > **Permissions** and select the **Administer Organization** checkbox for specific users or groups.
2. To connect your SonarQube project with a Jira Cloud project you need the **Administer** project permissions. Go to *Your Project* > **Administration** > **Permissions** and select the **Administer** checkbox for specific users and groups.
### Binding your organization with Jira Cloud
First, you have to bind Jira Cloud to your organization before you can bind it to individual projects
1. Go to *Your Organization* > **Administration** > **Organization settings** > **Jira**
2. Click **Connect.** You will be redirected to the Atlassian authorization page for 3rd party vendors. Follow the instructions and if you have multiple Jira Cloud instances, make sure to select the right instance.
3. Click **Accept** to authorize the connection.
4. Once you are redirected back to SonarQube Cloud you will see a **Connected** badge displayed next to **Jira** along with information about when the connection was established and with options to **Reauthorize** and **delete** the connection.
{% hint style="info" %}
The administrator who connects a SonarQube organization to a Jira Cloud instance becomes the default reporter for all Jira work items created from this organization.
{% endhint %}
{% hint style="warning" %}
After the connection is established, all Jira operations, including project binding and Jira work item creation, utilize the Sonar organization admin token. This means that some Sonar users might see Jira projects and create Jira work items in projects where they lack permissions in Jira Cloud.
{% endhint %}
You can now bind your SonarQube projects with Jira Cloud projects. See [#binding-your-project-with-jira](#binding-your-project-with-jira "mention") for more information.
#### Reauthorizing the connection with Jira Cloud
Reauthorizing your organization is non-destructive, which means that connections to all projects and issues will remain intact.
{% hint style="info" %}
When reauthorizing, always ensure you select the same Jira Cloud instance on the Atlassian authorization page to avoid potential errors. See [#troubleshooting](#troubleshooting "mention") for more information.
{% endhint %}
In the unlikely event that your organization doesn’t use any features of the Jira Cloud integration for three months (for example, if there are no projects connected for a given organization), the connection to Jira will expire and will need to be reauthenticated by the organization’s administrator.
#### Deleting the connection with Jira Cloud
Deleting your organization’s connection with Jira removes all binding between SonarQube and Jira Cloud, as well as related data in SonarQube Cloud. To completely remove the connection, you must revoke relevant token permissions in the [Atlassian account](https://id.atlassian.com/manage-profile/apps).
By deleting the SonarQube to Jira Cloud connection, you will:
* Lose access to all Jira features in this SonarQube Cloud organization.
* Delete this organization’s project to Jira Cloud project connections.
* Disconnect all SonarQube issues from Jira work items.
{% hint style="warning" %}
You will not be able to restore this data after reconnecting the organization.
{% endhint %}
### Binding your project with Jira Cloud
After connecting your SonarQube organization with your Jira Cloud instance you are now ready to connect your SonarQube project with a Jira project.
To bind your SonarQube project with Jira Cloud at a project level, go to *Your Project* > **Administration** > **General Settings** > **Jira.** You can only bind one SonarQube project to one Jira project.
1. Click **Connect** to open the connection modal.
2. In the modal, select a Jira project from a dropdown list. A maximum of 1,000 items is available. Use the search option to quickly find a specific project.
3. Choose the work types that you can push from SonarQube to Jira Cloud.
4. Click **Connect**. Your connection is now saved and you should see the confirmation on the page.
Once your binding between SonarQube project and Jira project is created you will see the connection details along with options to edit or delete the project binding.
#### Mandatory fields without a default value
The configuration might not support all of your Jira project’s mandatory fields. The following is a list of supported mandatory fields:
* Summary
* Description
* Reporter
Jira work types that have other mandatory fields associated with them, and have no default value, are not supported and are disabled in SonarQube. You can either remove these mandatory fields in Jira or choose a supported work type in SonarQube. At least one supported Jira work type is required to save the configuration.
#### Editing your project binding with Jira Cloud
By clicking on **Edit**, you can change the binding of your SonarQube project by connecting it with another Jira project. Editing the binding is non destructive, meaning that all SonarQube-to-Jira connections will remain intact. To completely reset your project, you must unbind the SonarQube project with Jira by clicking the delete button.
#### Unbinding your project from Jira Cloud
Deleting the project binding removes all of your connections and links in the Jira project. This is a complete reset between your SonarQube project and Jira.
### Jira Cloud release widget
Once you bind your SonarQube project with a Jira Cloud project, a Jira widget appears on the Main Branch Summary page.
If you operate with version-based releases in Jira Cloud, the widget will surface any open Jira work items you have associated with the earliest release.
The widget shows the following information:
* The number of open Jira work items for a given version, regardless of whether those items are associated with SonarQube issues or not. Click on the issue count to view them in Jira Cloud.
* Release date
* Release version
The widget retrieves only open Jira work items from the earliest unreleased Jira version. If two or more unreleased versions have the same date or have no assigned date, the widget will select the version with the lowest release ID, which is the release that was created first.
### Creating a Jira work item from a single SonarQube issue
You can create a Jira work item from a SonarQube issue or from the Issues page:
1. Click the **Push to Jira** button and choose a Jira work type, if more than two work types are available. The list of Jira work types depends on your Jira Cloud integration configuration and is configured by the project administrator.
2. When the process is complete the button displays a Jira work item ID along with the status label.
3. A new Jira work item will be created in your Jira Cloud project and it will open in a new tab.
4. Click on the Jira work item ID to open it on the Jira’s website.
{% hint style="info" %}
If you are not seeing the **Push to Jira** button after properly setting your Jira Cloud integration, it might be due to unsupported mandatory fields present on all of the Jira work types. Check this in project-level Jira configuration settings in SonarQube Cloud.
{% endhint %}
On rare occasions, two or more concurrent Jira creation events might be triggered by multiple users simultaneously, resulting in two or more Jira work items being created at the same time.
#### Contents of the Jira work item
When you create a Jira work item, it includes the following information:
* Title of the SonarQube issues .
* SonarQube issue link.
* Location of the issues.
* File path.
* Code lines.
* Commit hash.
* Date the issue was introduced.
* Information about why this is an issue and how to fix it with the rule name and link.
* Impact on software quality and severity.
* The reporter for the Jira work item is the default reporter set in SonarQube organization’s Jira Cloud integration.
### Disconnecting a Jira work item
You cannot delete a Jira work item from within SonarQube Cloud, but you can disconnect it by clicking on the close icon of the Jira button either within the SonarQube issue or on the Issues page. The connection with the Jira work item will be removed but the item will still exist in Jira Cloud.
{% hint style="info" %}
You cannot push a SonarQube issue to an existing Jira work item, which means you can only create new Jira work items from SonarQube issues.
{% endhint %}
### Creating a Jira work item from multiple SonarQube issues
You can push multiple SonarQube issues into a single Jira work item from the project’s issues page in SonarQube.
1. Select the issues you want to include in the Jira work item.
2. Click **Push to Jira** at the top of the issues page to open a modal.
3. In the modal, select the work type that you want to apply to the Jira work item.
SonarQube creates a Jira work item with issues that have not been previously connected to Jira. If you have selected issues that currently have a Jira connection and you want to include them in this Jira work item, you will have to disconnect them from Jira first. See [#disconnecting-jira-work-item](#disconnecting-jira-work-item "mention") for more information.
{% hint style="info" %}
A maximum of 500 SonarQube issues can be included in a Jira work item.
{% endhint %}
### Troubleshooting
The following are the typical errors that might prompt you to troubleshoot the connection with Jira:
* The administrator who set up the connection has left the company and the Atlassian token has been removed.\
**Solution**: The new administrator has to reauthorize the Jira connection at the organizational level. See [#reauthorizing-the-connection-with-jira-cloud](#reauthorizing-the-connection-with-jira-cloud "mention") for more information.
* The connection has been reauthorized with a wrong Jira instance.\
**Solution**: Make sure to select the correct Jira instance on the Atlassian authorization page when reauthorizing the Jira connection at the organization level. SonarQube remembers previous issue-to-Jira work item connections on the project levels, but the organization has to be reauthorized to the original Jira instance for these connections to be available again. See [#reauthorizing-the-connection-with-jira-cloud](#reauthorizing-the-connection-with-jira-cloud "mention") for more information.
* Some Jira work types cannot be selected on the project settings page for Jira.\
**Solution**: Jira work types that have other mandatory fields associated with them are not supported and are disabled in SonarQube. You can either remove these mandatory fields in Jira or choose a supported work type in SonarQube.
Other issues:
* The **Push to Jira** button is not visible on the SonarQube issue page.\
**Solution**: After connecting your organization to a Jira instance you need to bind individual SonarQube projects to Jira projects. See [#binding-your-project-with-jira](#binding-your-project-with-jira "mention") for more information.
* The Jira release widget does not show any insights, even though your team is operating under a version-based release cycle.\
**Solution:** Ensure you have releases and versions enabled in your Jira project. See more on [Atlassian’s webpage](https://support.atlassian.com/jira-software-cloud/docs/enable-releases-and-versions/).
### Related pages
* [setting-permissions](https://docs.sonarsource.com/sonarqube-cloud/managing-your-projects/administering-your-projects/setting-permissions "mention")
* [organization-permissions](https://docs.sonarsource.com/sonarqube-cloud/administering-sonarcloud/managing-organization/users-and-permissions/organization-permissions "mention")
---
# Source: https://docs.sonarsource.com/sonarqube-community-build/devops-platform-integration/azure-devops-integration/adding-analysis-to-pipeline/js-ts-go-python-php.md
# Source: https://docs.sonarsource.com/sonarqube-server/2025.2/devops-platform-integration/azure-devops-integration/adding-analysis-to-pipeline/js-ts-go-python-php.md
# Source: https://docs.sonarsource.com/sonarqube-server/2025.3/devops-platform-integration/azure-devops-integration/adding-analysis-to-pipeline/js-ts-go-python-php.md
# Source: https://docs.sonarsource.com/sonarqube-server/2025.5/devops-platform-integration/azure-devops-integration/adding-analysis-to-pipeline/js-ts-go-python-php.md
# Source: https://docs.sonarsource.com/sonarqube-server/2025.1/devops-platform-integration/azure-devops-integration/adding-analysis-to-pipeline/js-ts-go-python-php.md
# Source: https://docs.sonarsource.com/sonarqube-server/2025.4/devops-platform-integration/azure-devops-integration/adding-analysis-to-pipeline/js-ts-go-python-php.md
# Source: https://docs.sonarsource.com/sonarqube-server/2025.6/devops-platform-integration/azure-devops-integration/adding-analysis-to-pipeline/js-ts-go-python-php.md
# Source: https://docs.sonarsource.com/sonarqube-server/devops-platform-integration/azure-devops-integration/adding-analysis-to-pipeline/js-ts-go-python-php.md
# Source: https://docs.sonarsource.com/sonarqube-cloud/advanced-setup/ci-based-analysis/azure-pipelines/adding-analysis-to-build-pipeline/js-ts-go-python-php.md
# JS, TS, Go, Python, PHP, etc. project
This page explains how to add the SonarQube Cloud analysis to your Azure build pipeline for projects that are not Maven, Gradle, .NET, or C family projects.
Before starting, read the [azure-pipelines-integration-overview](https://docs.sonarsource.com/sonarqube-cloud/advanced-setup/ci-based-analysis/azure-pipelines/azure-pipelines-integration-overview "mention") page.
Once you have created your project in SonarQube Cloud, set up the project integration with your DevOps platform (see the [devops-platform-integration](https://docs.sonarsource.com/sonarqube-cloud/managing-your-projects/administering-your-projects/devops-platform-integration "mention") pages) and with Azure pipelines (see the [setting-up-project-integration](https://docs.sonarsource.com/sonarqube-cloud/advanced-setup/ci-based-analysis/azure-pipelines/setting-up-project-integration "mention") page), you can add the SonarQube Cloud analysis to your Azure build pipeline.
To create your Azure build pipeline, you can use either YAML or the Azure Classic interface.
{% hint style="info" %}
* The use of the Classic interface is not always possible (e.g. if your code is stored on GitHub).
* If you use YAML, Sonar can provide you with YAML templates or code examples.
{% endhint %}
If you need to use a specific scanner version, see the [#specific-scanner-version](https://docs.sonarsource.com/sonarqube-cloud/advanced-setup/ci-based-analysis/azure-pipelines/various-features#specific-scanner-version "mention") article for instructions.
{% hint style="info" %}
Make sure to enable the pull request and branch analysis in your pipeline. Instructions are on the [setting-up-project-integration](https://docs.sonarsource.com/sonarqube-cloud/advanced-setup/ci-based-analysis/azure-pipelines/setting-up-project-integration "mention") page.
{% endhint %}
### Using YAML
Add the following SonarQube tasks to your YAML pipeline:
1. Before your build task, add a Prepare Analysis Configuration task.
2. After your build task, add a Run Code Analysis task.
3. After the Run Code Analysis task, add a Publish Quality Gate Result task.
See the YAML file example below. See also our [YAML pipeline templates](https://github.com/SonarSource/sonar-scanner-azdo/tree/master/its/fixtures). For information about the SonarQube task inputs, see the [sonarqube-tasks](https://docs.sonarsource.com/sonarqube-cloud/advanced-setup/ci-based-analysis/azure-pipelines/sonarqube-tasks "mention") page.
{% hint style="info" %}
Make sure the SonarQube task version used in your YAML file is the correct one.\
For example, in `SonarCloudPrepare@3`, `@3` should correspond to the version of the [sonarcloud-extension-for-azure-devops](https://docs.sonarsource.com/sonarqube-cloud/advanced-setup/ci-based-analysis/sonarcloud-extension-for-azure-devops "mention") you’re using.
{% endhint %}
YAML file example
trigger:
- main # or another name representing your main branch
- feature/*
steps:
# Checkout the repository
- checkout: self
# Disable shallow fetch
fetchDepth: 0
# Prepare Analysis Configuration task
- task: SonarCloudPrepare@4
inputs:
SonarCloud: '<YourSonarQubeServiceEndpoint>'
organization: '<YourOrganizationName>'
scannerMode: 'cli'
configMode: 'manual'
cliProjectKey: '<YourProjectKey>'
# Add your build task(s) here
# Run Code Analysis task
- task: SonarCloudAnalyze@4
inputs:
jdkversion: 'JAVA_HOME_17_X64'
# Publish Quality Gate Result task
- task: SonarCloudPublish@4
inputs:
pollingTimeoutSec: '300'
### Using the Classic interface
In the procedure below, the manual configuration mode is used to define analysis parameters at the pipeline level. You may use the `sonar-project.properties` file instead (or another specified configuration file). For more information, see the [various-features](https://docs.sonarsource.com/sonarqube-cloud/advanced-setup/ci-based-analysis/azure-pipelines/adding-analysis-to-build-pipeline/various-features "mention") page.
Proceed as follows:
1. In Azure DevOps’ Classic interface editor, create or edit your build pipeline.
2. Add a **Prepare Analysis Configuration** task before your build task:
* In **SonarQube Server Service Endpoint**, select the SonarQube service connection you created during setup. See the [setting-up-project-integration](https://docs.sonarsource.com/sonarqube-cloud/advanced-setup/ci-based-analysis/azure-pipelines/setting-up-project-integration "mention") page for more information about adding a connection.
* Under **Choose a way to run the analysis**, select **Use Standalone SonarScanner CLI**.
* Select the **Manually provide configuration** mode.
* In the **Project key** field, enter your project key.
3. Add a new **Run Code Analysis** task after your build task.
4. Add a new **Publish quality gate Result** on your build pipeline summary.
5. Ensure that the pipeline runs automatically for all the branches you want:
* Under the **Triggers** tab of your pipeline, select **Enable continuous integration** and select all the branches for which you want SonarQube Cloud analysis to run automatically.
6. Save your pipeline.
### Related pages
* [setting-up-project-integration](https://docs.sonarsource.com/sonarqube-cloud/advanced-setup/ci-based-analysis/azure-pipelines/setting-up-project-integration "mention")
* [gradle-or-maven-project](https://docs.sonarsource.com/sonarqube-cloud/advanced-setup/ci-based-analysis/azure-pipelines/adding-analysis-to-build-pipeline/gradle-or-maven-project "mention")
* [dotnet-project](https://docs.sonarsource.com/sonarqube-cloud/advanced-setup/ci-based-analysis/azure-pipelines/adding-analysis-to-build-pipeline/dotnet-project "mention")
* [c-family-project](https://docs.sonarsource.com/sonarqube-cloud/advanced-setup/ci-based-analysis/azure-pipelines/adding-analysis-to-build-pipeline/c-family-project "mention")
* [monorepo-projects](https://docs.sonarsource.com/sonarqube-cloud/advanced-setup/ci-based-analysis/azure-pipelines/adding-analysis-to-build-pipeline/monorepo-projects "mention")
* [sonarqube-tasks](https://docs.sonarsource.com/sonarqube-cloud/advanced-setup/ci-based-analysis/azure-pipelines/sonarqube-tasks "mention")
---
# Source: https://docs.sonarsource.com/sonarqube-server/2025.5/analyzing-source-code/languages/json.md
# Source: https://docs.sonarsource.com/sonarqube-server/2025.4/analyzing-source-code/languages/json.md
# Source: https://docs.sonarsource.com/sonarqube-server/2025.6/analyzing-source-code/languages/json.md
# Source: https://docs.sonarsource.com/sonarqube-server/analyzing-source-code/languages/json.md
# Source: https://docs.sonarsource.com/sonarqube-cloud/advanced-setup/languages/json.md
# JSON
The analysis of JSON files is disabled by default. You can enable it by setting the `sonar.json.activate` property to `true`.
This property does not affect analysis of language / framework specific JSON files.
JSON files that are detected as belonging to the [cloudformation](https://docs.sonarsource.com/sonarqube-cloud/advanced-setup/languages/cloudformation "mention") or [azure-resource-manager](https://docs.sonarsource.com/sonarqube-cloud/advanced-setup/languages/azure-resource-manager "mention") language-types will be additionally analyzed by the dedicated analyzers, adjacent to this general JSON analysis.
### Language-specific properties
To discover and update the JSON-specific properties, navigate in SonarQube Cloud to *Your Project* > **Administration** > **General Settings** > **Languages** > **JSON**. See the [analysis-parameters](https://docs.sonarsource.com/sonarqube-cloud/advanced-setup/analysis-parameters "mention") page for more information about specific properties.
---
# Source: https://docs.sonarsource.com/sonarqube-community-build/instance-administration/authentication/gitlab/provisioning-modes/just-in-time.md
# Source: https://docs.sonarsource.com/sonarqube-server/10.7/instance-administration/authentication/gitlab/provisioning-modes/just-in-time.md
# Source: https://docs.sonarsource.com/sonarqube-server/10.8/instance-administration/authentication/gitlab/provisioning-modes/just-in-time.md
# Source: https://docs.sonarsource.com/sonarqube-server/2025.2/instance-administration/authentication/gitlab/provisioning-modes/just-in-time.md
# Source: https://docs.sonarsource.com/sonarqube-server/2025.3/instance-administration/authentication/gitlab/provisioning-modes/just-in-time.md
# Source: https://docs.sonarsource.com/sonarqube-server/2025.5/instance-administration/authentication/gitlab/provisioning-modes/just-in-time.md
# Source: https://docs.sonarsource.com/sonarqube-server/2025.1/instance-administration/authentication/gitlab/provisioning-modes/just-in-time.md
# Source: https://docs.sonarsource.com/sonarqube-server/2025.4/instance-administration/authentication/gitlab/provisioning-modes/just-in-time.md
# Source: https://docs.sonarsource.com/sonarqube-server/2025.6/instance-administration/authentication/gitlab/provisioning-modes/just-in-time.md
# Source: https://docs.sonarsource.com/sonarqube-server/instance-administration/authentication/gitlab/provisioning-modes/just-in-time.md
# Just-in-Time provisioning
With this mode, you can use the group synchronization and user access restriction features described below.
### Group synchronization
Groups are used in SonarQube Server to manage user permissions.
With the group synchronization:
* The synchronization occurs each time a user logs in to SonarQube Server with their GitLab credentials.
* If a matching group is found in SonarQube Server, the GitLab account’s memberships in that group are synchronized in SonarQube Server. The groups match if the SonarQube Server group name matches the GitLab group URL. For example, the SonarQube Server group `my-gitlab-group/sub-group` matches the GitLab group whose URL is `https://gitlab.com/my-gitlab-group/sub-group`. (The name check is case-sensitive; The default built-in `sonar-users` group is excluded from the synchronization.)
* Manually added group memberships of JIT-provisioned users are reset in SonarQube Server at synchronization time.
### User access restriction (Allowed groups)
You can block the signup of new users with SonarQube. This may be useful if you want to manage user provisioning through an API.
Starting from the [Developer edition](https://www.sonarsource.com/plans-and-pricing/developer/), you can restrict access to SonarQube Server by defining Allowed groups. An Allowed group is a GitLab root group (a group with no parent): only members of the Allowed group and all its subgroups can authenticate to SonarQube Server.
{% hint style="info" %}
If group synchronization is enabled, only Allowed groups and subgroups are taken into account during synchronization.
{% endhint %}
### Related pages
* [#group-concept](https://docs.sonarsource.com/sonarqube-server/user-management/user-groups#group-concept "mention")
* [automatic](https://docs.sonarsource.com/sonarqube-server/instance-administration/authentication/gitlab/provisioning-modes/automatic "mention")
* [setting-up](https://docs.sonarsource.com/sonarqube-server/instance-administration/authentication/gitlab/setting-up "mention")
* [managing-jit-mode](https://docs.sonarsource.com/sonarqube-server/instance-administration/authentication/gitlab/managing-jit-mode "mention")
---
# Source: https://docs.sonarsource.com/sonarqube-community-build/server-installation/pre-installation/jwt-token.md
# Source: https://docs.sonarsource.com/sonarqube-server/2025.3/server-installation/pre-installation/jwt-token.md
# Source: https://docs.sonarsource.com/sonarqube-server/2025.5/server-installation/pre-installation/jwt-token.md
# Source: https://docs.sonarsource.com/sonarqube-server/2025.4/server-installation/pre-installation/jwt-token.md
# Source: https://docs.sonarsource.com/sonarqube-server/2025.6/server-installation/pre-installation/jwt-token.md
# Source: https://docs.sonarsource.com/sonarqube-server/server-installation/pre-installation/jwt-token.md
# Defining a JWT token
By default, users are logged out and sessions closed when server is restarted. If you prefer keeping user sessions open, a secret should be defined. Value is HS256 key encoded with base64. It must be unique for each installation of SonarQube Server.
The following examples illustrate how to generate a HS256 key encoded with base64, where `your_secret` and `your_key` are arbitrary strings that can be modified.
{% tabs %}
{% tab title="WINDOWS SYSTEM WITH POWERSHELL" %}
```powershell
$message = 'your_secret'
$secret = 'your_key'
$hmacsha = New-Object System.Security.Cryptography.HMACSHA256
$hmacsha.key = [Text.Encoding]::ASCII.GetBytes($secret)
$signature = $hmacsha.ComputeHash([Text.Encoding]::ASCII.GetBytes($message))
$signature = [Convert]::ToBase64String($signature)
echo $signature
```
{% endtab %}
{% tab title="UNIX SYSTEM" %}
```sh
echo -n "your_secret" | openssl dgst -sha256 -hmac "your_key" -binary | base64
```
{% endtab %}
{% endtabs %}
---
# Source: https://docs.sonarsource.com/sonarqube-community-build/analyzing-source-code/ci-integration/jenkins-integration/key-features.md
# Source: https://docs.sonarsource.com/sonarqube-server/10.5/analyzing-source-code/ci-integration/jenkins-integration/key-features.md
# Source: https://docs.sonarsource.com/sonarqube-server/10.6/analyzing-source-code/ci-integration/jenkins-integration/key-features.md
# Source: https://docs.sonarsource.com/sonarqube-server/10.7/analyzing-source-code/ci-integration/jenkins-integration/key-features.md
# Source: https://docs.sonarsource.com/sonarqube-server/10.8/analyzing-source-code/ci-integration/jenkins-integration/key-features.md
# Source: https://docs.sonarsource.com/sonarqube-server/2025.2/analyzing-source-code/ci-integration/jenkins-integration/key-features.md
# Source: https://docs.sonarsource.com/sonarqube-server/2025.3/analyzing-source-code/ci-integration/jenkins-integration/key-features.md
# Source: https://docs.sonarsource.com/sonarqube-server/2025.5/analyzing-source-code/ci-integration/jenkins-integration/key-features.md
# Source: https://docs.sonarsource.com/sonarqube-server/2025.1/analyzing-source-code/ci-integration/jenkins-integration/key-features.md
# Source: https://docs.sonarsource.com/sonarqube-server/2025.4/analyzing-source-code/ci-integration/jenkins-integration/key-features.md
# Source: https://docs.sonarsource.com/sonarqube-server/2025.6/analyzing-source-code/ci-integration/jenkins-integration/key-features.md
# Source: https://docs.sonarsource.com/sonarqube-server/analyzing-source-code/ci-integration/jenkins-integration/key-features.md
# Source: https://docs.sonarsource.com/sonarqube-cloud/advanced-setup/ci-based-analysis/jenkins/key-features.md
# Key features
The Jenkins extension for SonarQube lets you centralize the configuration of your SonarQube connection details in Jenkins global configuration.
* You can install the SonarScanner CLI, for Maven, for Gradle, or for .NET from Jenkins and centralize the configuration of SonarQube Cloud connection details in Jenkins global configuration.
* You can trigger the SonarQube Cloud analysis from your Jenkins Freestyle or Pipeline jobs using standard Jenkins build steps or [Jenkins Pipeline DSL](https://jenkins.io/solutions/pipeline/). Once the Jenkins job is complete, the extension will detect that a SonarQube Cloud analysis was made during the build and display a badge and a widget on the job page with a link to the SonarQube Cloud dashboard as well as quality gate status.
* Starting in the SonarQube Cloud Team plan, you can configure an automatic failing of your pipeline in case your code fails the quality gate you defined in SonarQube Cloud: see below.
### Automatic interruption of your pipeline in case the quality gate fails
This feature is available starting in the SonarQUbe Cloud Team plan. See the [subscription-plans](https://docs.sonarsource.com/sonarqube-cloud/administering-sonarcloud/managing-subscription/subscription-plans "mention") page for more details.
With the Jenkins extension, you can configure that your pipeline job fails in case the quality gate computed by SonarQube Cloud for your project fails. To do so, the extension makes webhook available: a webhook call must be configured in SonarQube Cloud to call back into Jenkins to allow the pipeline to continue or fail.
The figure below illustrates the process:
1. A Jenkins Pipeline job is started.
2. The job triggers the analysis by the SonarScanner.
3. The SonarScanner sends the results to SonarQube Cloud.
4. SonarQube Cloud completes the analysis, computes the quality gate configured for the project, and checks if the project fails or passes the quality gate.
5. SonarQube Cloud sends the pass or failure result back to the Jenkins webhook exposed by the extension.
6. The pipeline job continues (in case of a pass) or fails (otherwise).
### Related links
* [global-setup](https://docs.sonarsource.com/sonarqube-cloud/advanced-setup/ci-based-analysis/jenkins/global-setup "mention")
* [add-analysis-to-job](https://docs.sonarsource.com/sonarqube-cloud/advanced-setup/ci-based-analysis/jenkins/add-analysis-to-job "mention")
* [pipeline-pause](https://docs.sonarsource.com/sonarqube-cloud/advanced-setup/ci-based-analysis/jenkins/pipeline-pause "mention")
---
# Source: https://docs.sonarsource.com/sonarqube-community-build/user-guide/keyboard-shortcuts.md
# Source: https://docs.sonarsource.com/sonarqube-server/8.9/user-guide/keyboard-shortcuts.md
# Source: https://docs.sonarsource.com/sonarqube-server/9.8/user-guide/keyboard-shortcuts.md
# Source: https://docs.sonarsource.com/sonarqube-server/9.9/user-guide/keyboard-shortcuts.md
# Source: https://docs.sonarsource.com/sonarqube-server/10.0/user-guide/keyboard-shortcuts.md
# Source: https://docs.sonarsource.com/sonarqube-server/10.1/user-guide/keyboard-shortcuts.md
# Source: https://docs.sonarsource.com/sonarqube-server/10.2/user-guide/keyboard-shortcuts.md
# Source: https://docs.sonarsource.com/sonarqube-server/10.3/user-guide/keyboard-shortcuts.md
# Source: https://docs.sonarsource.com/sonarqube-server/10.4/user-guide/keyboard-shortcuts.md
# Source: https://docs.sonarsource.com/sonarqube-server/10.5/user-guide/keyboard-shortcuts.md
# Source: https://docs.sonarsource.com/sonarqube-server/10.6/user-guide/keyboard-shortcuts.md
# Source: https://docs.sonarsource.com/sonarqube-server/10.7/user-guide/keyboard-shortcuts.md
# Source: https://docs.sonarsource.com/sonarqube-server/10.8/user-guide/keyboard-shortcuts.md
# Source: https://docs.sonarsource.com/sonarqube-server/2025.2/user-guide/keyboard-shortcuts.md
# Source: https://docs.sonarsource.com/sonarqube-server/2025.3/user-guide/keyboard-shortcuts.md
# Source: https://docs.sonarsource.com/sonarqube-server/2025.5/user-guide/keyboard-shortcuts.md
# Source: https://docs.sonarsource.com/sonarqube-server/2025.1/user-guide/keyboard-shortcuts.md
# Source: https://docs.sonarsource.com/sonarqube-server/2025.4/user-guide/keyboard-shortcuts.md
# Source: https://docs.sonarsource.com/sonarqube-server/2025.6/user-guide/keyboard-shortcuts.md
# Source: https://docs.sonarsource.com/sonarqube-server/user-guide/keyboard-shortcuts.md
# Source: https://docs.sonarsource.com/sonarqube-cloud/appendices/keyboard-shortcuts.md
# Keyboard shortcuts
You can use the following shortcuts when navigating within SonarQube Cloud:
### Global
| | |
| ------------ | --------------- |
| **Shortcut** | **Action** |
| `/` | open search bar |
| `?` | open help |
### Issue list page
| | |
| --------------------------------------------------------------------------------------- | ------------------------- |
| **Shortcut** | **Action** |
| `↑``↓` | navigate between issues |
| `→` | open issue |
| `←` | return back to the list |
| `f` | transition between issues |
| `a` | assign issue |
| `m` | assign issue to me |
| `c` | comment issue |
|
ctrl + enter
⌘ + enter
| submit comment |
| `t` | change tags of issue |
| `space` | select an issue |
### Issue details page
| | |
| --------------------------------------------------------------------------------------- | -------------------------------- |
| **Shortcut** | **Action** |
| `↑``↓` | navigate between issues |
| `←` | return back to the list |
| `alt` + `↑↓
⌥ + ←→` | to switch flows |
| `f` | transition between issues |
| `a` | assign issue |
| `m` | assign issue to the current user |
| `c` | comment issue |
|
ctrl + enter
⌘ + enter
| submit comment |
| `t` | change tags of issue |
### Code page
| | |
| ------------ | ----------------------- |
| **Shortcut** | **Action** |
| `↑``↓` | select files |
| `→` | open file |
| `←` | return back to the list |
### Measures page
| | |
| ------------ | ----------------------- |
| **Shortcut** | **Action** |
| `↑``↓` | select files |
| `→` | open file |
| `←` | return back to the list |
### Rules page
| | |
| ------------ | ----------------------- |
| **Shortcut** | **Action** |
| `↑``↓` | navigate between rules |
| `→` | open rule |
| `←` | return back to the list |
---
# Source: https://docs.sonarsource.com/sonarqube-for-vs-code/ai-capabilities/ides/kiro.md
# SonarQube for VS Code in Kiro
### Installation
Kiro uses the [OpenVSX extension registry](https://open-vsx.org/extension/SonarSource/sonarlint-vscode). Install SonarQube for VS Code from there.
To install the SonarQube for VS Code extension in Kiro:
1. Open the **Extensions** view by pressing `Ctrl + Shift + X` (or `Cmd + Shift + X` on Mac).
2. Search for `sonarqube`.
3. Finish the installation by choosing **SonarQube for IDE** and selecting the **Install** button
Once installed, we recommended using [connected mode](https://docs.sonarsource.com/sonarqube-for-vs-code/connect-your-ide/setup) and setting up the [#sonarqube-mcp-server](#sonarqube-mcp-server "mention") with SonarQube Server or SonarQube Cloud to strengthen your AI integration with SonarQube.
#### Migrate extensions from VS Code
Kiro provides a workflow to complete a [Profile migration](https://kiro.dev/docs/guides/migrating-from-vscode/#profile-migration) from VS Code.
If you were using connected mode or the [#sonarqube-mcp-server](#sonarqube-mcp-server "mention"), your SonarQube token will not be migrated but you will be prompted to reauthenticate any connections you created in VS Code.
{% hint style="info" %}
Only extensions available in the OpenVSX registry can be imported. VS Code Marketplace exclusives may be unavailable in Kiro. See Kiro’s documentation on [Extension compatibility](https://kiro.dev/docs/guides/migrating-from-vscode/#extension-compatibility) for more details.
{% endhint %}
### SonarQube MCP Server
The SonarQube MCP Server is a Model Context Protocol (MCP) server that runs locally and enables a seamless connection between your AI agents and your SonarQube platform. The tools are designed to bridge the divide between productivity and quality. Please see the full details in the [SonarQube MCP Server](https://app.gitbook.com/o/2ibCvzwZt86Nlk2zloB7/s/xNksbUaDXyfRoTpHP0vQ/ "mention") documentation.
See the [Quickstart guide #Setup in Kiro](https://app.gitbook.com/s/xNksbUaDXyfRoTpHP0vQ/quickstart-guide#setup-in-kiro "mention") instructions in our SonarQube MCP Server documentation for full details.
#### Setup the SonarQube MCP Server
When you're using an AI-enabled IDE such as Cursor, Windsurf, or VS Code with Copilot enabled, and have already completed your [setup](https://docs.sonarsource.com/sonarqube-for-vs-code/connect-your-ide/setup "mention") in SonarQube for IDE with SonarQube Server or SonarQube Cloud, a quick select button is available.
* Select the icon, **Configure MCP Server** from the **CONNECTED MODE** view window to use your connected mode credentials to start using the SonarQube MCP Server. The same workflow is available in the **AI AGENTS CONFIGURATION** view.
If you prefer to set up your MCP server manually, a detailed quickstart guide is available for [Quickstart guide #Setup in Kiro](https://app.gitbook.com/s/xNksbUaDXyfRoTpHP0vQ/quickstart-guide#setup-in-kiro "mention"). In addition, more information about the available tools can be found in the SonarQube MCP Server documentation, on the [Tools](https://app.gitbook.com/s/xNksbUaDXyfRoTpHP0vQ/tools "mention") page.
#### Configure your AI agent
The **AI AGENTS CONFIGURATION** view is only available when running an AI-enabled agent and offers two tools to help your AI agent engage with SonarQube (Server, Cloud).
* Select **Configure SonarQube MCP Server** to use your connected mode credentials to install the SonarQube MCP Server. You will be prompted to complete your [setup](https://docs.sonarsource.com/sonarqube-for-vs-code/connect-your-ide/setup "mention") if none exists.
* Available in Cursor, Kiro, and Windsurf: Select **Introduce SonarQube Rules File** to create explicit instructions for your AI-powered IDE to produce secure, reliable, and maintainable code.
* The file provides SonarQube MCP Server instructions to your AI agent. As an example, it instructs the agent to disable SonarQube automatic analysis before starting code generation, and to enable it after the generation is complete. It also asks the agent to analyze changed files in batches, once the changes are done.
### Related pages
* [ai-codefix](https://docs.sonarsource.com/sonarqube-for-vs-code/ai-capabilities/ai-codefix "mention")
* SonarQube and [agents](https://docs.sonarsource.com/sonarqube-for-vs-code/ai-capabilities/agents "mention") in your IDE
* Getting started with other [ides](https://docs.sonarsource.com/sonarqube-for-vs-code/getting-started/ides "mention")
* [setup](https://docs.sonarsource.com/sonarqube-for-vs-code/connect-your-ide/setup "mention")
---
# Source: https://docs.sonarsource.com/sonarqube-community-build/analyzing-source-code/languages/kotlin.md
# Source: https://docs.sonarsource.com/sonarqube-server/8.9/analyzing-source-code/languages/kotlin.md
# Source: https://docs.sonarsource.com/sonarqube-server/9.8/analyzing-source-code/languages/kotlin.md
# Source: https://docs.sonarsource.com/sonarqube-server/9.9/analyzing-source-code/languages/kotlin.md
# Source: https://docs.sonarsource.com/sonarqube-server/10.0/analyzing-source-code/languages/kotlin.md
# Source: https://docs.sonarsource.com/sonarqube-server/10.1/analyzing-source-code/languages/kotlin.md
# Source: https://docs.sonarsource.com/sonarqube-server/10.2/analyzing-source-code/languages/kotlin.md
# Source: https://docs.sonarsource.com/sonarqube-server/10.3/analyzing-source-code/languages/kotlin.md
# Source: https://docs.sonarsource.com/sonarqube-server/10.4/analyzing-source-code/languages/kotlin.md
# Source: https://docs.sonarsource.com/sonarqube-server/10.5/analyzing-source-code/languages/kotlin.md
# Source: https://docs.sonarsource.com/sonarqube-server/10.6/analyzing-source-code/languages/kotlin.md
# Source: https://docs.sonarsource.com/sonarqube-server/10.7/analyzing-source-code/languages/kotlin.md
# Source: https://docs.sonarsource.com/sonarqube-server/10.8/analyzing-source-code/languages/kotlin.md
# Source: https://docs.sonarsource.com/sonarqube-server/2025.2/analyzing-source-code/languages/kotlin.md
# Source: https://docs.sonarsource.com/sonarqube-server/2025.3/analyzing-source-code/languages/kotlin.md
# Source: https://docs.sonarsource.com/sonarqube-server/2025.5/analyzing-source-code/languages/kotlin.md
# Source: https://docs.sonarsource.com/sonarqube-server/2025.1/analyzing-source-code/languages/kotlin.md
# Source: https://docs.sonarsource.com/sonarqube-server/2025.4/analyzing-source-code/languages/kotlin.md
# Source: https://docs.sonarsource.com/sonarqube-server/2025.6/analyzing-source-code/languages/kotlin.md
# Source: https://docs.sonarsource.com/sonarqube-server/analyzing-source-code/languages/kotlin.md
# Source: https://docs.sonarsource.com/sonarqube-cloud/advanced-setup/languages/kotlin.md
# Kotlin
### Supported versions
The level of support for a language is defined as follows:
* Fully supported: Analysis will complete. All the language features are understood and examined.
* Supported: Most language features are understood and examined but the version includes unsupported features. Analysis might break or provide incomplete results.
Version 2.2 is fully supported.
Versions 1.3 to 2.1 are supported.
### Language-specific properties
To discover and update the Kotlin-specific properties, navigate in SonarQube Cloud to *Your Project* > **Administration** > **General Settings** > **Languages** > **Kotlin**. See the [analysis-parameters](https://docs.sonarsource.com/sonarqube-cloud/advanced-setup/analysis-parameters "mention") page for more information about specific properties.
### Kotlin analysis and bytecode
If you are not using the SonarScanner for Gradle or SonarScanner for Maven, it is strongly recommended to provide the paths of all dependency binaries used by the project in order to improve analysis accuracy. You can provide these using the `sonar.java.libraries` property (note that this property is shared with the Java analyzer and as such has `java` in its name). This is a list of comma-separated paths to files with third-party libraries (JAR or Zip files) used by your project. Wildcards can be used: `sonar.java.libraries=path/to/Library.jar,directory/**/*.jar`
Note that if you use the SonarScanner for Gradle or SonarScanner for Maven to scan your code, these scanners will auto-detect the value for this property. Therefore, you don’t need to provide it.
### Specifying the Kotlin source code version
You can explicitly define which Kotlin version the analyzer should analyze your code based on. Provide the desired version in the format `X.Y` as value to the `sonar.kotlin.source.version` property, for example, `1.7`.
### Skipping unchanged files
Starting from November 2022, and by default, the Kotlin analyzer optimizes the analysis of unchanged files in pull requests. In practice, this means that the analyzer does not perform an analysis on any file that is the same as on the PR’s target branch. As long as the project is configured in such a way that the analyzer is able to find the project’s binaries, this should not impact the analysis results.
If you wish to disable this optimization, you can set the value of the analysis parameter `sonar.kotlin.skipUnchanged` to `false`. Leaving the parameter unset lets the server decide whether the optimization should be enabled.
### Related pages
* [external-analyzer-reports](https://docs.sonarsource.com/sonarqube-cloud/enriching/external-analyzer-reports "mention") (AndroidLint, Detekt, and Ktlint)
* Test coverage [overview](https://docs.sonarsource.com/sonarqube-cloud/enriching/test-coverage/overview "mention") (JaCoCo)
---
# Source: https://docs.sonarsource.com/sonarqube-community-build/analyzing-source-code/languages/kubernetes.md
# Source: https://docs.sonarsource.com/sonarqube-server/10.1/analyzing-source-code/languages/kubernetes.md
# Source: https://docs.sonarsource.com/sonarqube-server/10.2/analyzing-source-code/languages/kubernetes.md
# Source: https://docs.sonarsource.com/sonarqube-server/10.3/analyzing-source-code/languages/kubernetes.md
# Source: https://docs.sonarsource.com/sonarqube-server/10.4/analyzing-source-code/languages/kubernetes.md
# Source: https://docs.sonarsource.com/sonarqube-server/10.5/analyzing-source-code/languages/kubernetes.md
# Source: https://docs.sonarsource.com/sonarqube-server/10.6/analyzing-source-code/languages/kubernetes.md
# Source: https://docs.sonarsource.com/sonarqube-server/10.7/analyzing-source-code/languages/kubernetes.md
# Source: https://docs.sonarsource.com/sonarqube-server/10.8/analyzing-source-code/languages/kubernetes.md
# Source: https://docs.sonarsource.com/sonarqube-server/2025.2/analyzing-source-code/languages/kubernetes.md
# Source: https://docs.sonarsource.com/sonarqube-server/2025.3/analyzing-source-code/languages/kubernetes.md
# Source: https://docs.sonarsource.com/sonarqube-server/2025.5/analyzing-source-code/languages/kubernetes.md
# Source: https://docs.sonarsource.com/sonarqube-server/2025.1/analyzing-source-code/languages/kubernetes.md
# Source: https://docs.sonarsource.com/sonarqube-server/2025.4/analyzing-source-code/languages/kubernetes.md
# Source: https://docs.sonarsource.com/sonarqube-server/2025.6/analyzing-source-code/languages/kubernetes.md
# Source: https://docs.sonarsource.com/sonarqube-server/analyzing-source-code/languages/kubernetes.md
# Source: https://docs.sonarsource.com/sonarqube-cloud/advanced-setup/languages/kubernetes.md
# Kubernetes/Helm
### Supported versions
The level of support for a language is defined as follows:
* Fully supported: Analysis will complete. All the language features are understood and examined.
* Supported: Most language features are understood and examined but the version includes unsupported features. Analysis might break or provide incomplete results.
#### Kubernetes
Version 1.33 is supported.
#### Helm
Helm v3 is supported.
### Language-specific properties
To discover and update the Kubernetes-specific properties, navigate in SonarQube Cloud to *Your Project* > **Administration** > **General Settings** > **Languages** > **Kubernetes**. See the [analysis-parameters](https://docs.sonarsource.com/sonarqube-cloud/advanced-setup/analysis-parameters "mention") page for more information about specific properties.
All of the [rules](https://docs.sonarsource.com/sonarqube-cloud/digging-deeper/rules "mention") that apply to Kubernetes files also apply to Helm Chart files.
---
# Source: https://docs.sonarsource.com/sonarqube-community-build/analyzing-source-code/languages.md
# Source: https://docs.sonarsource.com/sonarqube-server/8.9/analyzing-source-code/languages.md
# Source: https://docs.sonarsource.com/sonarqube-server/9.8/analyzing-source-code/languages.md
# Source: https://docs.sonarsource.com/sonarqube-server/9.9/analyzing-source-code/languages.md
# Source: https://docs.sonarsource.com/sonarqube-server/10.0/analyzing-source-code/languages.md
# Source: https://docs.sonarsource.com/sonarqube-server/10.1/analyzing-source-code/languages.md
# Source: https://docs.sonarsource.com/sonarqube-server/10.2/analyzing-source-code/languages.md
# Source: https://docs.sonarsource.com/sonarqube-server/10.3/analyzing-source-code/languages.md
# Source: https://docs.sonarsource.com/sonarqube-server/10.4/analyzing-source-code/languages.md
# Source: https://docs.sonarsource.com/sonarqube-server/10.5/analyzing-source-code/languages.md
# Source: https://docs.sonarsource.com/sonarqube-server/10.6/analyzing-source-code/languages.md
# Source: https://docs.sonarsource.com/sonarqube-server/10.7/analyzing-source-code/languages.md
# Source: https://docs.sonarsource.com/sonarqube-server/10.8/analyzing-source-code/languages.md
# Source: https://docs.sonarsource.com/sonarqube-server/2025.2/analyzing-source-code/languages.md
# Source: https://docs.sonarsource.com/sonarqube-server/2025.3/analyzing-source-code/languages.md
# Source: https://docs.sonarsource.com/sonarqube-server/2025.5/analyzing-source-code/languages.md
# Source: https://docs.sonarsource.com/sonarqube-server/2025.1/analyzing-source-code/languages.md
# Source: https://docs.sonarsource.com/sonarqube-server/2025.4/analyzing-source-code/languages.md
# Source: https://docs.sonarsource.com/sonarqube-server/2025.6/analyzing-source-code/languages.md
# Source: https://docs.sonarsource.com/sonarqube-server/analyzing-source-code/languages.md
# Source: https://docs.sonarsource.com/sonarqube-cloud/advanced-setup/languages.md
# Languages
{% content-ref url="languages/overview" %}
[overview](https://docs.sonarsource.com/sonarqube-cloud/advanced-setup/languages/overview)
{% endcontent-ref %}
{% content-ref url="languages/abap" %}
[abap](https://docs.sonarsource.com/sonarqube-cloud/advanced-setup/languages/abap)
{% endcontent-ref %}
{% content-ref url="languages/ansible" %}
[ansible](https://docs.sonarsource.com/sonarqube-cloud/advanced-setup/languages/ansible)
{% endcontent-ref %}
{% content-ref url="languages/apex" %}
[apex](https://docs.sonarsource.com/sonarqube-cloud/advanced-setup/languages/apex)
{% endcontent-ref %}
{% content-ref url="languages/azure-resource-manager" %}
[azure-resource-manager](https://docs.sonarsource.com/sonarqube-cloud/advanced-setup/languages/azure-resource-manager)
{% endcontent-ref %}
{% content-ref url="languages/c-family" %}
[c-family](https://docs.sonarsource.com/sonarqube-cloud/advanced-setup/languages/c-family)
{% endcontent-ref %}
{% content-ref url="languages/cloudformation" %}
[cloudformation](https://docs.sonarsource.com/sonarqube-cloud/advanced-setup/languages/cloudformation)
{% endcontent-ref %}
{% content-ref url="languages/csharp" %}
[csharp](https://docs.sonarsource.com/sonarqube-cloud/advanced-setup/languages/csharp)
{% endcontent-ref %}
{% content-ref url="languages/cobol" %}
[cobol](https://docs.sonarsource.com/sonarqube-cloud/advanced-setup/languages/cobol)
{% endcontent-ref %}
{% content-ref url="languages/docker" %}
[docker](https://docs.sonarsource.com/sonarqube-cloud/advanced-setup/languages/docker)
{% endcontent-ref %}
{% content-ref url="languages/dart" %}
[dart](https://docs.sonarsource.com/sonarqube-cloud/advanced-setup/languages/dart)
{% endcontent-ref %}
{% content-ref url="languages/flex" %}
[flex](https://docs.sonarsource.com/sonarqube-cloud/advanced-setup/languages/flex)
{% endcontent-ref %}
{% content-ref url="languages/github-actions" %}
[github-actions](https://docs.sonarsource.com/sonarqube-cloud/advanced-setup/languages/github-actions)
{% endcontent-ref %}
{% content-ref url="languages/go" %}
[go](https://docs.sonarsource.com/sonarqube-cloud/advanced-setup/languages/go)
{% endcontent-ref %}
{% content-ref url="languages/html" %}
[html](https://docs.sonarsource.com/sonarqube-cloud/advanced-setup/languages/html)
{% endcontent-ref %}
{% content-ref url="languages/java" %}
[java](https://docs.sonarsource.com/sonarqube-cloud/advanced-setup/languages/java)
{% endcontent-ref %}
{% content-ref url="languages/javascript-typescript-css" %}
[javascript-typescript-css](https://docs.sonarsource.com/sonarqube-cloud/advanced-setup/languages/javascript-typescript-css)
{% endcontent-ref %}
{% content-ref url="languages/jcl" %}
[jcl](https://docs.sonarsource.com/sonarqube-cloud/advanced-setup/languages/jcl)
{% endcontent-ref %}
{% content-ref url="languages/json" %}
[json](https://docs.sonarsource.com/sonarqube-cloud/advanced-setup/languages/json)
{% endcontent-ref %}
{% content-ref url="languages/kotlin" %}
[kotlin](https://docs.sonarsource.com/sonarqube-cloud/advanced-setup/languages/kotlin)
{% endcontent-ref %}
{% content-ref url="languages/kubernetes" %}
[kubernetes](https://docs.sonarsource.com/sonarqube-cloud/advanced-setup/languages/kubernetes)
{% endcontent-ref %}
{% content-ref url="languages/php" %}
[php](https://docs.sonarsource.com/sonarqube-cloud/advanced-setup/languages/php)
{% endcontent-ref %}
{% content-ref url="languages/pl-i" %}
[pl-i](https://docs.sonarsource.com/sonarqube-cloud/advanced-setup/languages/pl-i)
{% endcontent-ref %}
{% content-ref url="languages/pl-sql" %}
[pl-sql](https://docs.sonarsource.com/sonarqube-cloud/advanced-setup/languages/pl-sql)
{% endcontent-ref %}
{% content-ref url="languages/python" %}
[python](https://docs.sonarsource.com/sonarqube-cloud/advanced-setup/languages/python)
{% endcontent-ref %}
{% content-ref url="languages/rpg" %}
[rpg](https://docs.sonarsource.com/sonarqube-cloud/advanced-setup/languages/rpg)
{% endcontent-ref %}
{% content-ref url="languages/ruby" %}
[ruby](https://docs.sonarsource.com/sonarqube-cloud/advanced-setup/languages/ruby)
{% endcontent-ref %}
{% content-ref url="languages/rust" %}
[rust](https://docs.sonarsource.com/sonarqube-cloud/advanced-setup/languages/rust)
{% endcontent-ref %}
{% content-ref url="languages/scala" %}
[scala](https://docs.sonarsource.com/sonarqube-cloud/advanced-setup/languages/scala)
{% endcontent-ref %}
{% content-ref url="languages/secrets" %}
[secrets](https://docs.sonarsource.com/sonarqube-cloud/advanced-setup/languages/secrets)
{% endcontent-ref %}
{% content-ref url="languages/shell" %}
[shell](https://docs.sonarsource.com/sonarqube-cloud/advanced-setup/languages/shell)
{% endcontent-ref %}
{% content-ref url="languages/swift" %}
[swift](https://docs.sonarsource.com/sonarqube-cloud/advanced-setup/languages/swift)
{% endcontent-ref %}
{% content-ref url="languages/terraform" %}
[terraform](https://docs.sonarsource.com/sonarqube-cloud/advanced-setup/languages/terraform)
{% endcontent-ref %}
{% content-ref url="languages/t-sql" %}
[t-sql](https://docs.sonarsource.com/sonarqube-cloud/advanced-setup/languages/t-sql)
{% endcontent-ref %}
{% content-ref url="languages/vb-net" %}
[vb-net](https://docs.sonarsource.com/sonarqube-cloud/advanced-setup/languages/vb-net)
{% endcontent-ref %}
{% content-ref url="languages/vb6" %}
[vb6](https://docs.sonarsource.com/sonarqube-cloud/advanced-setup/languages/vb6)
{% endcontent-ref %}
{% content-ref url="languages/xml" %}
[xml](https://docs.sonarsource.com/sonarqube-cloud/advanced-setup/languages/xml)
{% endcontent-ref %}
{% content-ref url="languages/yaml" %}
[yaml](https://docs.sonarsource.com/sonarqube-cloud/advanced-setup/languages/yaml)
{% endcontent-ref %}
---
# Source: https://docs.sonarsource.com/sonarqube-community-build/instance-administration/authentication/ldap.md
# Source: https://docs.sonarsource.com/sonarqube-server/9.8/instance-administration/authentication/ldap.md
# Source: https://docs.sonarsource.com/sonarqube-server/9.9/instance-administration/authentication/ldap.md
# Source: https://docs.sonarsource.com/sonarqube-server/10.0/instance-administration/authentication/ldap.md
# Source: https://docs.sonarsource.com/sonarqube-server/10.1/instance-administration/authentication/ldap.md
# Source: https://docs.sonarsource.com/sonarqube-server/10.2/instance-administration/authentication/ldap.md
# Source: https://docs.sonarsource.com/sonarqube-server/10.3/instance-administration/authentication/ldap.md
# Source: https://docs.sonarsource.com/sonarqube-server/10.4/instance-administration/authentication/ldap.md
# Source: https://docs.sonarsource.com/sonarqube-server/10.5/instance-administration/authentication/ldap.md
# Source: https://docs.sonarsource.com/sonarqube-server/10.6/instance-administration/authentication/ldap.md
# Source: https://docs.sonarsource.com/sonarqube-server/10.7/instance-administration/authentication/ldap.md
# Source: https://docs.sonarsource.com/sonarqube-server/10.8/instance-administration/authentication/ldap.md
# Source: https://docs.sonarsource.com/sonarqube-server/2025.2/instance-administration/authentication/ldap.md
# Source: https://docs.sonarsource.com/sonarqube-server/2025.3/instance-administration/authentication/ldap.md
# Source: https://docs.sonarsource.com/sonarqube-server/2025.5/instance-administration/authentication/ldap.md
# Source: https://docs.sonarsource.com/sonarqube-server/2025.1/instance-administration/authentication/ldap.md
# Source: https://docs.sonarsource.com/sonarqube-server/2025.4/instance-administration/authentication/ldap.md
# Source: https://docs.sonarsource.com/sonarqube-server/2025.6/instance-administration/authentication/ldap.md
# Source: https://docs.sonarsource.com/sonarqube-server/instance-administration/authentication/ldap.md
# LDAP
You can configure SonarQube Server authentication and authorization to an LDAP server (including the LDAP service of Active Directory) through system properties (see [system-properties](https://docs.sonarsource.com/sonarqube-server/server-installation/system-properties "mention")).
The main features are:
* Password checking against the external authentication engine.
* Automatic synchronization of usernames and emails.
* Automatic synchronization of relationships between users and groups (authorization).
* During the first successful authentication, the user account is created in the SonarQube Server database. Each time a user logs into SonarQube, the username and the email are synchronized.
* Group synchronization is an option that will sync SonarQube Server group memberships with the LDAP service.
| | Apache DS | OpenLDAP | Open DS | Active Directory |
| ---------- | ----------------------------------- | ----------------------------------- | ----------------------------------- | ----------------------------------- |
| Anonymous |  |  |  | |
| Simple |  |  |  |  |
| LDAPS |  |  |
|
= successfully tested
### Setup
1. Configure LDAP by editing `/conf/sonar.properties` (see table below).
2. Restart SonarQube Server and check the log file for:\
`INFO org.sonar.INFO Security realm: LDAP ...`\
`INFO o.s.p.l.LdapContextFactory Test LDAP connection: OK`
3. Log in to SonarQube Server.
4. On log out users will be presented with a login page (`/sessions/login`), where they can choose to log in as a technical user or a domain user by passing the appropriate credentials.
For SonarScanners, we recommend using manually created technical accounts for authentication against SonarQube Server.
#### General Configuration
Set the properties listed in [#general-1](https://docs.sonarsource.com/sonarqube-server/server-installation/system-properties/common-properties#general-1 "mention").
#### User Mapping
Set the properties listed in [#user-mapping](https://docs.sonarsource.com/sonarqube-server/server-installation/system-properties/common-properties#user-mapping "mention").
#### Group synchronization
Only groups and static groups are supported. Roles and dynamic groups are not supported; this page about [Static Vs Dynamic LDAP Group management](http://identitycontrol.blogspot.com/2007/07/static-vs-dynamic-ldap-groups.html) offers more detail about the differences.
To set up group synchronization:
1. Create first the groups in SonarQube Server (see[user-groups](https://docs.sonarsource.com/sonarqube-server/instance-administration/user-management/user-groups "mention")) so that the automatic group synchronization can take place properly.
2. After your groups are created, the properties listed in [#group-synchronization](https://docs.sonarsource.com/sonarqube-server/server-installation/system-properties/common-properties#group-synchronization "mention") must be defined to allow SonarQube Server to automatically synchronize the relationships between users and groups.
#### Configuration sample
```properties
# LDAP configuration
# General Configuration
sonar.security.realm=LDAP
ldap.url=ldap://myserver.mycompany.com
ldap.bindDn=my_bind_dn
ldap.bindPassword=my_bind_password
# User Configuration
ldap.user.baseDn=ou=Users,dc=mycompany,dc=com
ldap.user.request=(&(objectClass=inetOrgPerson)(uid={login}))
ldap.user.realNameAttribute=cn
ldap.user.emailAttribute=mail
# Group Configuration
ldap.group.baseDn=ou=Groups,dc=sonarsource,dc=com
ldap.group.request=(&(objectClass=posixGroup)(memberUid={uid}))
```
### Advanced LDAP Topics
#### Authentication Methods
* **`Anonymous`** - Used when only read-only access to non-protected entries and attributes is needed when binding to the LDAP server.
* **`Simple`** Simple authentication is not recommended for production deployments not using the LDAP secure protocol since it sends a cleartext password over the network.
* **`CRAM-MD5`** - The Challenge-Response Authentication Method (CRAM), based on the HMAC-MD5 MAC algorithm ([RFC 2195](http://tools.ietf.org/html/rfc2195)).
* **`DIGEST-MD5`** - This is an improvement on the CRAM-MD5 authentication method ([RFC 2831](http://www.ietf.org/rfc/rfc2831.txt)).
* **`GSSAPI`** - GSS-API is Generic Security Service API ([RFC 2744](http://www.ietf.org/rfc/rfc2744.txt)). One of the most popular security services available for GSS-API is the Kerberos v5, used in Microsoft’s Windows 2000 platform.
For a full discussion of LDAP authentication approaches, see [RFC 2829](http://www.ietf.org/rfc/rfc2829.txt) and [RFC 2251](http://www.ietf.org/rfc/rfc2251.txt).
#### Multiple Servers
You can use multiple LDAP servers to manage your users. The purpose is to enable connections for organizations using distinct LDAP servers for different user populations.
{% hint style="warning" %}
You cannot use multiple LDAP servers as a failover cluster. When a user authenticates for the first time via a specific LDAP server, their account is linked to that server. Subsequent authentication by the same user through a different LDAP server will result in the creation of a separate user account, leading to email address conflicts.
{% endhint %}
To configure multiple servers:
```properties
# List the different servers
ldap.servers=server1,server2
# Configure server1
ldap.server1.url=ldap://server1:1389
ldap.server1.user.baseDn=dc=dept1,dc=com
...
# Configure server2
ldap.server2.url=ldap://server2:1389
ldap.server2.user.baseDn=dc=dept2,dc=com
...
```
Authentication will be tried on each server, in the order they are listed in the configurations until one succeeds.
Note that all the LDAP servers must be available while (re)starting SonarQube Server.
#### Migrate users to a new authentication method
If you are changing your delegated authentication method and migrating existing users from your previous authentication method, you can use the `/api/v2/users-management/users/{id}` [web API](https://next.sonarqube.com/sonarqube/web_api_v2#/users-management/users/%7Bid%7D--patch) to update your users’ identity provider.
### About user and identity provider IDs
To avoid the risk of misidentification, the following identification methods are used on all LDAP setups, including SonarQube Server instances with a single LDAP connection:
* The local login of a new account is made unique with a suffix to the identifier. eg. `login_`.
* The name of the External Identity Provider is also made unique with the addition of the server key provided in the configuration, e.g., `LDAP_` where `` is defined through `ldap.servers` property.
### Troubleshooting
Detailed connection logs (and potential error codes received from the LDAP server) are output to SonarQube Server’s `/logs/web.log`, when logging is in `DEBUG` mode.
#### Timeouts
If you experience time outs when running SonarQube Server analysis using LDAP, [Java parameters are documented here](http://docs.oracle.com/javase/jndi/tutorial/ldap/connect/config.html). Such parameters can be set in `sonar.web.javaAdditionalOpts` in `/conf/sonar.properties`.
#### No subject alternative DNS name matching LDAP domain found
The following errors:
* `javax.net.ssl.SSLHandshakeException: No subject alternative DNS name matching found`
* `java.security.cert.CertificateException: No subject alternative DNS name matching found`
are typically caused by an extensive amount of time when following referrals.
To fix the error, try the following:
1. Set `ldap.followReferrals=false`.
2. Ensure that you are using port 3269 and not 636 when using LDAPS.\
Port 3269 will avoid the referral issue. For more information, see [Why You Shouldn’t Use Port 636 to Bind to LDAP Signing](https://www.nogalis.com/2020/05/18/why-you-shouldnt-use-port-636-to-bind-to-ldap-signing/).
---
# Source: https://docs.sonarsource.com/sonarqube-cloud/managing-your-account/leaving-organization.md
# Leaving an organization
You can leave SonarQube Cloud organizations you are not interested in anymore. There are a few cases where you won’t be able to leave an organization:
* If the organization membership is automatically managed through the identity provider.
* If you are the unique administrator of an Organization, you must transfer the administrator rights before transferring. See the [organization-permissions](https://docs.sonarsource.com/sonarqube-cloud/administering-sonarcloud/managing-organization/users-and-permissions/organization-permissions "mention") page for more information.
* Alternatively, you can delete your organization completely. Check the[deleting-organization](https://docs.sonarsource.com/sonarqube-cloud/administering-sonarcloud/managing-organization/creating-organization/deleting-organization "mention") page for instructions.
To leave an organization:
1. Select your account menu in the top right corner of the SonarQube Cloud interface.
2. In the menu, select **My Organizations**. The **My Organizations** page opens with the list of organizations you’re a member of.
3. Select **Leave** on the row of the organization you want to leave.
---
# Source: https://docs.sonarsource.com/sonarqube-server/8.9/instance-administration/license-administration.md
# Source: https://docs.sonarsource.com/sonarqube-server/9.8/instance-administration/license-administration.md
# Source: https://docs.sonarsource.com/sonarqube-server/9.9/instance-administration/license-administration.md
# Source: https://docs.sonarsource.com/sonarqube-server/10.0/instance-administration/license-administration.md
# Source: https://docs.sonarsource.com/sonarqube-server/10.1/instance-administration/license-administration.md
# Source: https://docs.sonarsource.com/sonarqube-server/10.2/instance-administration/license-administration.md
# Source: https://docs.sonarsource.com/sonarqube-server/10.3/instance-administration/license-administration.md
# Source: https://docs.sonarsource.com/sonarqube-server/10.4/instance-administration/license-administration.md
# Source: https://docs.sonarsource.com/sonarqube-server/10.5/instance-administration/license-administration.md
# Source: https://docs.sonarsource.com/sonarqube-server/10.6/instance-administration/license-administration.md
# Source: https://docs.sonarsource.com/sonarqube-server/10.7/instance-administration/license-administration.md
# Source: https://docs.sonarsource.com/sonarqube-server/10.8/instance-administration/license-administration.md
# Source: https://docs.sonarsource.com/sonarqube-server/2025.2/instance-administration/license-administration.md
# Source: https://docs.sonarsource.com/sonarqube-server/2025.3/instance-administration/license-administration.md
# Source: https://docs.sonarsource.com/sonarqube-server/2025.5/instance-administration/license-administration.md
# Source: https://docs.sonarsource.com/sonarqube-server/2025.1/instance-administration/license-administration.md
# Source: https://docs.sonarsource.com/sonarqube-server/2025.4/instance-administration/license-administration.md
# Source: https://docs.sonarsource.com/sonarqube-server/2025.6/instance-administration/license-administration.md
# Source: https://docs.sonarsource.com/sonarqube-server/instance-administration/license-administration.md
# License administration
To run SonarQube Server, you need a license that corresponds to the plan you had purchased, including SonarQube Server edition, Lines of Code (LOC), staging licenses, commercial support and additional features such as Advanced Security. See [Plans and Pricing](https://www.sonarsource.com/plans-and-pricing/sonarqube/) for more information about the different editions and features.
[Contact sales](https://www.sonarsource.com/plans-and-pricing/contact-sales/) to request the license key or email us at .
After your purchase is confirmed, you will receive a license key. If the license key follows this format: XXXX-XXXX-XXXX-XXXX, see [online-license-management](https://docs.sonarsource.com/sonarqube-server/instance-administration/license-administration/online-license-management "mention"). Otherwise, see [server-id-based-license-key](https://docs.sonarsource.com/sonarqube-server/instance-administration/license-administration/server-id-based-license-key "mention").
{% content-ref url="license-administration/server-id-based-license-key" %}
[server-id-based-license-key](https://docs.sonarsource.com/sonarqube-server/instance-administration/license-administration/server-id-based-license-key)
{% endcontent-ref %}
{% content-ref url="license-administration/online-license-management" %}
[online-license-management](https://docs.sonarsource.com/sonarqube-server/instance-administration/license-administration/online-license-management)
{% endcontent-ref %}
---
# Source: https://docs.sonarsource.com/sonarqube-server/9.9/instance-administration/lines-of-code.md
# Source: https://docs.sonarsource.com/sonarqube-server/10.0/instance-administration/lines-of-code.md
# Source: https://docs.sonarsource.com/sonarqube-server/10.1/instance-administration/lines-of-code.md
# Source: https://docs.sonarsource.com/sonarqube-server/10.2/instance-administration/lines-of-code.md
# Source: https://docs.sonarsource.com/sonarqube-server/10.3/instance-administration/lines-of-code.md
# Source: https://docs.sonarsource.com/sonarqube-server/10.4/instance-administration/monitoring/lines-of-code.md
# Source: https://docs.sonarsource.com/sonarqube-server/10.5/instance-administration/monitoring/lines-of-code.md
# Source: https://docs.sonarsource.com/sonarqube-server/10.6/instance-administration/monitoring/lines-of-code.md
# Source: https://docs.sonarsource.com/sonarqube-server/10.7/server-upgrade-and-maintenance/monitoring/lines-of-code.md
# Source: https://docs.sonarsource.com/sonarqube-server/10.8/server-upgrade-and-maintenance/monitoring/lines-of-code.md
# Source: https://docs.sonarsource.com/sonarqube-server/2025.2/server-update-and-maintenance/monitoring/lines-of-code.md
# Source: https://docs.sonarsource.com/sonarqube-server/2025.3/server-update-and-maintenance/monitoring/lines-of-code.md
# Source: https://docs.sonarsource.com/sonarqube-server/2025.5/server-update-and-maintenance/monitoring/lines-of-code.md
# Source: https://docs.sonarsource.com/sonarqube-server/2025.1/server-update-and-maintenance/monitoring/lines-of-code.md
# Source: https://docs.sonarsource.com/sonarqube-server/2025.4/server-update-and-maintenance/monitoring/lines-of-code.md
# Source: https://docs.sonarsource.com/sonarqube-server/2025.6/server-update-and-maintenance/monitoring/lines-of-code.md
# Source: https://docs.sonarsource.com/sonarqube-server/server-update-and-maintenance/monitoring/lines-of-code.md
# Lines of Code
In SonarQube Server, the number of Lines of Code (LOC) you intend to analyze plays an important role in your choice of commercial edition (Developer, Enterprise, or Data Center). See the Sonar [Plans and Pricing](https://www.sonarsource.com/plans-and-pricing/) page for more details.
### LOC definition
Your instance’s LOC is calculated by adding up the LOC of each project analyzed. In the case of a Data Center Edition, the LOC from each project in each cluster node is summed up.
To calculate the LOC of a project, SonarQube Server counts the lines of code found on the most recent analysis of the largest branch or pull request of the project by excluding:
* Test code.
* Files excluded from analysis.
* Code in unsupported languages.
* Comments or blank lines.
**Example**: Your instance has two projects:
* Project1 has 500 lines of code on its main branch and 400 on a secondary long-lived branch: its LOC is 500.
* Project2 has 0 lines of code on its main branch (provisioned but never analyzed) and 200 on a secondary long-lived branch: its LOC is 200.
* The total LOC for the organization is 500 + 200 = 700.
Note that you can’t *use up your license* by reanalyzing the same code (with the same number of lines).
{% hint style="info" %}
Lines of code found in an A*pplication* do not count against your LOC. This is because Applications aggregate code from projects, and we already count the LOC once for the "parent" *project*.
{% endhint %}
### Checking your LOC consumption
Go to **Administration** > **Configuration** > **License Manager** to check how many lines of code you are currently using. Select **Edit notification threshold** to define when an email should be sent with information in regards to the impending lines of code limit. You cannot exceed your LOC threshold. If you’re near your limit, you may need to purchase additional lines of code.
You can check your LOC per project, per branch, in three different locations:
* Select **Project Information** to reveal the LOC on your main branch (for that project). Note that this may not exactly be your max LOC, for example, another branch or PR might have more lines of code.
* Navigate to the *Your Project* > **Measures** > **Size** page via the UI for a list of folders & files with a count of each folders’ and files’ LOC.
* Navigate to *Your Project* > **Code** page for a list of folders & files with a count of each folders’ and files’ LOC.
{% hint style="info" %}
The LOC is a metric (`ncloc`) you can retrieve through the [web-api](https://docs.sonarsource.com/sonarqube-server/extension-guide/web-api "mention") by using the `/api/measures` endpoint.
{% endhint %}
### If you exceed your LOC threshold
Once you are near your limit, you will receive a notification. On the **License Manager** page, select the **Edit notification threshold** button to define *when* notifications will be sent.
If you reach your limit, you will receive an error message and the SonarQube Server instance will reject any analysis whose total lines of code exceed the limit defined by your license. In no way does this affect access to basic functionalities such as saving configuration changes and allowing project browsing. In all cases, you can still analyze your code if the new analysis doesn’t surpass the LOC limit defined by your license.
---
# Source: https://docs.sonarsource.com/sonarqube-community-build/server-installation/pre-installation/linux.md
# Source: https://docs.sonarsource.com/sonarqube-server/10.5/setup-and-upgrade/pre-installation/linux.md
# Source: https://docs.sonarsource.com/sonarqube-server/10.6/setup-and-upgrade/pre-installation/linux.md
# Source: https://docs.sonarsource.com/sonarqube-server/10.7/setup-and-upgrade/pre-installation/linux.md
# Source: https://docs.sonarsource.com/sonarqube-server/10.8/setup-and-upgrade/pre-installation/linux.md
# Source: https://docs.sonarsource.com/sonarqube-server/2025.2/setup-and-update/pre-installation/linux.md
# Source: https://docs.sonarsource.com/sonarqube-server/2025.3/server-installation/pre-installation/linux.md
# Source: https://docs.sonarsource.com/sonarqube-server/2025.5/server-installation/pre-installation/linux.md
# Source: https://docs.sonarsource.com/sonarqube-server/2025.1/setup-and-upgrade/pre-installation/linux.md
# Source: https://docs.sonarsource.com/sonarqube-server/2025.4/server-installation/pre-installation/linux.md
# Source: https://docs.sonarsource.com/sonarqube-server/2025.6/server-installation/pre-installation/linux.md
# Source: https://docs.sonarsource.com/sonarqube-server/server-installation/pre-installation/linux.md
# On Linux systems
### Configuring the host to comply with Elasticsearch
Because SonarQube Server uses an embedded Elasticsearch, make sure that your host configuration complies with the [Elasticsearch production mode requirements](https://www.elastic.co/guide/en/elasticsearch/reference/current/docker.html#docker-prod-prerequisites) and [File Descriptors configuration](https://www.elastic.co/guide/en/elasticsearch/reference/current/file-descriptors.html).
#### Configuring the maximum number of open files and other limits
You must ensure that:
* The maximum number of memory map areas a process may have (vm.max\_map\_count) is greater than or equal to 524288.
* The maximum number of open file descriptors (fs.file-max) is greater than or equal to 131072.
* The user running SonarQube Server can open **at least** 131072 file descriptors.
* The user running SonarQube Server can open **at least** 8192 threads.
You must set these limits on the host system, whatever the installation type:
* For a Docker installation: These settings will then apply to the Docker container.
* For a Kubernetes deployment: Check also these [guidelines](https://artifacthub.io/packages/helm/sonarqube/sonarqube#elasticsearch-prerequisites).
To check and change these limits, login as the user used to run SonarQube Server and proceed as described below depending on the type of this user.
For a non-systemd user
1\. Verify the values listed above with the following commands:
```sh
sysctl vm.max_map_count
sysctl fs.file-max
ulimit -n
ulimit -u
```
2\. To change the max map count and the file-max, insert the following in `/etc/sysctl.d/99-sonarqube.conf` (or in `/etc/sysctl.conf` if you use the default file (not recommended)). To apply the changes, run the corresponding Linux command.
```sh
vm.max_map_count=524288
fs.file-max=131072
```
3\. To change the limits on the user running SonarQube Server, insert the following in /etc/security/limits.d/99-sonarqube.conf (or in /etc/security/limits.conf if you use the default file (not recommended)) where SonarQube Server is the user used to run SonarQube Server. To apply the changes, run the corresponding Linux command.
```sh
sonarqube - nofile 131072
sonarqube - nproc 8192
```
For a systemd user
Specify those limits inside your unit file in the section `[Service]` :
```sh
[Service]
...
LimitNOFILE=131072
LimitNPROC=8192
...
```
{% hint style="info" %}
To change these values dynamically for the current session, run the following commands as `root`:
```sh
sysctl -w vm.max_map_count=524288
sysctl -w fs.file-max=131072
ulimit -n 131072
ulimit -u 8192
```
{% endhint %}
#### Enabling seccomp on the Linux kernel
By default, Elasticsearch uses the seccomp filter. Make sure you use a kernel with seccomp enabled.
To check that seccomp is available on your kernel, use:
```sh
$ grep SECCOMP /boot/config-$(uname -r)
```
If your kernel has seccomp, you’ll see the following:
```sh
CONFIG_HAVE_ARCH_SECCOMP_FILTER=y
CONFIG_SECCOMP_FILTER=y
CONFIG_SECCOMP=y
```
#### Elasticsearch filesystem requirements
Elasticsearch 8.x requires read and write access to the `/tmp` directory. This is a requirement from Elasticsearch itself and cannot be disabled.
This change affects you if your deployment uses read-only filesystem restrictions:
* Docker Compose with `read_only: true`
* Kubernetes with `readOnlyRootFilesystem: true`
* Any custom deployment with read-only filesystem policies including `/tmp`
When the `/tmp` directory is not writable you will see the following error:
```
java.lang.IllegalStateException: Unable to attach entitlement agent
Caused by: com.sun.tools.attach.AttachNotSupportedException: Unable to open socket file /tmp/.java_pid
```
**For Docker Compose**
You can keep your root filesystem read-only while providing a writable `/tmp` directory using a `tmpfs` mount (in-memory temporary filesystem).
Developer / Enterprise editions
```
services:
sonarqube:
image: sonarqube:2025.1-community
read_only: true
environment:
SONAR_JDBC_URL: jdbc:postgresql://db:5432/sonar
SONAR_JDBC_USERNAME: sonar
SONAR_JDBC_PASSWORD: sonar
volumes:
- sonarqube_data:/opt/sonarqube/data
- sonarqube_logs:/opt/sonarqube/logs
- sonarqube_temp:/opt/sonarqube/temp
tmpfs:
- /tmp:size=256M,mode=1777 # Add this line
volumes:
sonarqube_data:
sonarqube_logs:
sonarqube_temp:
```
Data Center Edition (Search Nodes)
```
services:
search-1:
read_only: true
environment:
SONAR_JDBC_URL: jdbc:postgresql://db:5432/sonar
SONAR_JDBC_USERNAME: sonar
SONAR_JDBC_PASSWORD: sonar
SONAR_CLUSTER_ES_HOSTS: "search-1,search-2"
SONAR_CLUSTER_NODE_NAME: "search-1"
volumes:
- search_data-1:/opt/sonarqube/data
- search_temp-1:/opt/sonarqube/temp
tmpfs:
- /tmp:size=256M,mode=1777 # Add this line
volumes:
search_data-1:
search_temp-1:
```
### Managing SonarQube Server access to fonts
Generating executive reports requires that fonts be installed on the server hosting SonarQube Server.
If you use a Linux server, you should ensure that Fontconfig is installed on the server host.
{% hint style="info" %}
A package of FreeType fonts is installed on the SonarQube Server host. The exact packages available will vary by distribution, but a commonly used package is libfreetype6.
{% endhint %}
### If using an Oracle database
In case your SonarQube Server is running on Linux and you are using Oracle, the Oracle JDBC Driver may be blocked due to `/dev/random`. See [this Oracle article](http://www.usn-it.de/index.php/2009/02/20/oracle-11g-jdbc-driver-hangs-blocked-by-devrandom-entropy-pool-empty/) for more details about this problem.
To avoid it, you may want to add this JVM parameter to your SonarQube Server’s web server (`sonar.web.javaOpts`) configuration:
```sh
-Djava.security.egd=file:///dev/urandom
```
### Configuring SonarQube Server to run in FIPS mode
SonarQube Server on RedHat Linux can run in FIPS (Federal Information Processing Standard) mode with some limitations. The FIPS mode may require an update of your webhooks configuration as explained below.
#### Known limitations of the FIPS mode
A FIPS-enabled SonarQube Server presents the following known limitations.
* Elasticsearch authentication in the Data Center Edition of SonarQube Server will not work on FIPS because PEM certificates are not supported as of today (but we plan to bring this support in the future).
* SAML authentication with signature and encryption of the assertion is not supported yet.
#### Updating the webhooks configuration
In the FIPS mode, the webhook secrets must be at least 16 characters long; otherwise, the webhook messages will not be sent to the FIPS environment.
Proceed as follows:
* Check that the secret of each existing webhook is at least 16 characters long. If it’s not the case, update it. See [webhooks](https://docs.sonarsource.com/sonarqube-server/project-administration/webhooks "mention").
{% hint style="info" %}
If you create a new webhook with a secret, you’ll be forced to enter a secret of at least 16 characters.
{% endhint %}
---
# Source: https://docs.sonarsource.com/sonarqube-cloud/managing-your-projects/project-analysis/long-lived-branch-pattern.md
# Long-lived branch pattern
SonarQube Cloud considers a branch to be long-lived if:
* It is the main branch, or
* Its name matches the long-lived branch name pattern.
All other branches are considered short-lived.
{% hint style="warning" %}
The type of a branch (long-lived or short-lived) is set during its first analysis and cannot be changed afterward.
{% endhint %}
If your project belongs to an Enterprise plan organization, its long-lived branch name pattern is by default the pattern set at the organization level. You can change it.
The name pattern is based on a regular expression. For example, the regular expression: *`(branch|release)-.*`* matches any name that begins with the string `branch-` or `release-`.
Changing the long-lived branch pattern of your project
1. Retrieve your project. See [retrieving-projects](https://docs.sonarsource.com/sonarqube-cloud/managing-your-projects/retrieving-projects "mention") for more details.
2. In the left navigation bar, select **Branches**.
3. In the top-right corner, select the edit icon on the right of **Long-lived branches pattern**. The **Detection of long-lived branches** dialog opens as illustrated below (in the case of an enterprise plan organization).
4. Enter your regular expression.
5. Select **Save**.
Resetting the long-lived branch pattern to default
If your project belongs to an Enterprise plan organization, you may want to reset the long-lived branch to the default set at the organization level. To do so:
1. Retrieve your project. See [retrieving-projects](https://docs.sonarsource.com/sonarqube-cloud/managing-your-projects/retrieving-projects "mention") for more details.
2. In the left navigation bar, select **Branches**.
3. In the top-right corner, select the edit icon on the right of **Long-lived branches pattern**. The **Detection of long-lived branches** dialog opens.
4. Select **Reset to default**.
---
# Source: https://docs.sonarsource.com/sonarqube-community-build/instance-administration/ui-customization/look-and-feel.md
# Source: https://docs.sonarsource.com/sonarqube-server/8.9/instance-administration/look-and-feel.md
# Source: https://docs.sonarsource.com/sonarqube-server/9.8/instance-administration/look-and-feel.md
# Source: https://docs.sonarsource.com/sonarqube-server/9.9/instance-administration/look-and-feel.md
# Source: https://docs.sonarsource.com/sonarqube-server/10.0/instance-administration/look-and-feel.md
# Source: https://docs.sonarsource.com/sonarqube-server/10.1/instance-administration/look-and-feel.md
# Source: https://docs.sonarsource.com/sonarqube-server/10.2/instance-administration/look-and-feel.md
# Source: https://docs.sonarsource.com/sonarqube-server/10.3/instance-administration/look-and-feel.md
# Source: https://docs.sonarsource.com/sonarqube-server/10.4/instance-administration/look-and-feel.md
# Source: https://docs.sonarsource.com/sonarqube-server/10.5/instance-administration/look-and-feel.md
# Source: https://docs.sonarsource.com/sonarqube-server/10.6/instance-administration/look-and-feel.md
# Source: https://docs.sonarsource.com/sonarqube-server/10.7/instance-administration/ui-customization/look-and-feel.md
# Source: https://docs.sonarsource.com/sonarqube-server/10.8/instance-administration/ui-customization/look-and-feel.md
# Source: https://docs.sonarsource.com/sonarqube-server/2025.2/instance-administration/ui-customization/look-and-feel.md
# Source: https://docs.sonarsource.com/sonarqube-server/2025.3/instance-administration/ui-customization/look-and-feel.md
# Source: https://docs.sonarsource.com/sonarqube-server/2025.5/instance-administration/ui-customization/look-and-feel.md
# Source: https://docs.sonarsource.com/sonarqube-server/2025.1/instance-administration/ui-customization/look-and-feel.md
# Source: https://docs.sonarsource.com/sonarqube-server/2025.4/instance-administration/ui-customization/look-and-feel.md
# Source: https://docs.sonarsource.com/sonarqube-server/2025.6/instance-administration/ui-customization/look-and-feel.md
# Source: https://docs.sonarsource.com/sonarqube-server/instance-administration/ui-customization/look-and-feel.md
# Look and feel
### Home logo
You can set your own home logo in **Administration** > **General Settings** > **General** > **Look & Feel**. Simply provide an image URL and width. This logo will be used in the menu bar.
### Gravatar
Gravatar support is enabled by default, using `gravatar.com`. You can configure a different server or disable the feature altogether. When enabled, gravatars show up next to most uses of the user name.
---
# Source: https://docs.sonarsource.com/sonarqube-server/2025.1/server-update-and-maintenance/release-notes-and-notices/lta-to-lta-release-notes.md
# Source: https://docs.sonarsource.com/sonarqube-server/2025.4/server-update-and-maintenance/lta-to-lta-release-notes.md
# Source: https://docs.sonarsource.com/sonarqube-server/server-update-and-maintenance/lta-to-lta-release-notes.md
# LTA to LTA release notes
### Updating from SonarQube Server 9.9 LTA and 2025.1 LTA
You can update your SonarQube Server from 2025.1 LTA to 2026.1 LTA directly. However, if you are updating from 9.9 LTA you will need to do an intermediate version update to 2025.1 LTA. Refer to the following documentation for more information:
* 9.9 [LTA to 2025.1 LTA update notes](https://docs.sonarsource.com/sonarqube-server/2025.1/server-update-and-maintenance/release-notes-and-notices/lta-to-lta-release-notes)
* 2025.1 [LTA to 2025.4 LTA update notes](https://docs.sonarsource.com/sonarqube-server/2025.4/server-update-and-maintenance/lta-to-lta-release-notes)
* The Update [roadmap](https://docs.sonarsource.com/sonarqube-server/server-update-and-maintenance/update/roadmap "mention") page for detailed procedures.
### 2025.1 LTA to 2026.1 LTA dependencies
### Update notes
#### Java requirements for SonarQube Server runtime (2026.1)
* The SonarQube Server runtime now requires Java Development Kit (JDK). The previous requirement of a Java Runtime Environment (JRE) is no longer sufficient, and a full JDK is required.
* Added Support for Java 25 in addition to Java 21.
* Removed support for Java 17.
See [server-host-requirements](https://docs.sonarsource.com/sonarqube-server/server-installation/server-host-requirements "mention") and [#deprecations-and-removals](#deprecations-and-removals "mention") sections for additional information.
#### PostgreSQL support (2026.1)
Support for PostgreSQL versions 14 through 18 is now available, enabling deployments using the most recent PostgreSQL release. PostgreSQL version 13 is not supported anymore. See [installing-the-database](https://docs.sonarsource.com/sonarqube-server/server-installation/installing-the-database "mention") for more information.
#### Kubernetes and Openshift support (2026.1)
* Supported Kubernetes Versions: From 1.32 to 1.35. Support for versions 1.30 and 1.31 has been removed.
* Supported Openshift Versions: From 4.17 to 4.20. Support for versions 4.11 to 4.16 has been removed.
#### Upgrade to Microsoft SQL JDBC Auth 12.10.2 package (2025.6.1)
To use integrated security in Microsoft SQL database, upgrade to Microsoft SQL JDBC Auth 12.10.2 package. See [installing-the-database](https://docs.sonarsource.com/sonarqube-server/server-installation/installing-the-database "mention") for more information.
#### Support for MSSQL server (2026.1)
Supported MSSQL server is now 2022 (MSSQL Server 16.0); 2019 (MSSQL Server 15.0); 2017 (MSSQL Server 14.0). Support for 2016 MSSQL Server 13.0 support has been removed. See [installing-the-database](https://docs.sonarsource.com/sonarqube-server/server-installation/installing-the-database "mention") for more information.
#### SonarQube Server includes Elasticsearch 8.x (2026.1)
SonarQube Server 2026.1 LTA and later includes Elasticsearch 8.x, which requires read and write access to the `/tmp` directory. This is a requirement from Elasticsearch itself and cannot be disabled. For more information and a solution, see [#fonts](https://docs.sonarsource.com/sonarqube-server/server-installation/pre-installation/linux#fonts "mention").
#### Setting up the Sandbox feature (2025.5)
To ensure the Sandbox feature is active before project analysis, you need to set system properties before restarting your SonarQube Server following the update. The specific configuration varies based on your installation type. See the [#sandbox](https://docs.sonarsource.com/sonarqube-server/server-installation/system-properties/common-properties#sandbox "mention") documentation and [#setting-up-the-sandbox-feature-at-the-instance-level](https://docs.sonarsource.com/sonarqube-server/instance-administration/analysis-functions/quality-standards#setting-up-the-sandbox-feature-at-the-instance-level "mention") for more information.
See [#removals-and-deprecations](#removals-and-deprecations "mention") for additional information.
### New and enhanced features
#### Languages
Apex
**New rules for Apex (2025.6)**
Expansion of code quality and security rules for [apex](https://docs.sonarsource.com/sonarqube-server/analyzing-source-code/languages/apex "mention"), 42 new rules (98 total rules), to address enterprise coverage gaps, for example:
SOQL
* [S7960](https://rules.sonarsource.com/apex/tag/soql/RSPEC-7960/) - SOQL queries should be assigned to Lists to avoid QueryException
* [S8011](https://rules.sonarsource.com/apex/tag/soql/RSPEC-8011/) - SOQL queries should use SystemModStamp instead of LastModifiedDate for better performance
* [S8129](https://rules.sonarsource.com/apex/tag/soql/RSPEC-8129/) - SOQL queries should not contain hardcoded literals
SOSL
* [S8048](https://rules.sonarsource.com/apex/tag/sosl/RSPEC-8048/) - SOSL queries in test methods should use "Test.setFixedSearchResults"
Governor limits
* [S7992](https://rules.sonarsource.com/apex/tag/governor-limits/RSPEC-7992/) - SOQL queries should include LIMIT clauses to prevent hitting governor limits
* [S8033](https://rules.sonarsource.com/apex/tag/governor-limits/RSPEC-8033/) - HTTP requests should have explicit timeout configuration
* [S8127](https://rules.sonarsource.com/apex/tag/governor-limits/RSPEC-8127/) - SOQL queries should not be executed inside loops
Cobol
**Cobol improvements (2026.1)**
Adds support for parsing additional language constructs and includes fixes for crashes and false positives for [cobol](https://docs.sonarsource.com/sonarqube-server/analyzing-source-code/languages/cobol "mention"). Related rules include:
* [S3938](https://rules.sonarsource.com/cobol/RSPEC-3938/): Track uses of forbidden statements
* [S1725](https://rules.sonarsource.com/cobol/RSPEC-1725/): Open files should be closed explicitly
* [S1574](https://rules.sonarsource.com/cobol/RSPEC-1574/): Data items should be initialized with data of the correct type
* [S1289](https://rules.sonarsource.com/cobol/RSPEC-1289/): Unused data item blocks should be removed
CFamily
**MISRA C++:2023 rules released (2025.6)**
The[ MISRA C++ 2023 rules](https://rules.sonarsource.com/cpp/tag/misra-c++2023) have been released and are no longer in Early Access. This expands coverage to all 179 MISRA C++2023 guidelines in Enterprise and Data Center editions plus SonarQube for IDE when in connected mode. See [#quality-profiles](https://docs.sonarsource.com/sonarqube-server/analyzing-source-code/languages/c-family/customizing-the-analysis#quality-profiles "mention") for more information.
**New Sonar Misra C++ 2023 quality profile available (2025.6)**
A new Sonar MISRA C++ 2023 Compliance quality profile is available starting in Enterprise edition. It combines Sonar way rules with[ MISRA C++ 2023 rules](https://rules.sonarsource.com/cpp/tag/misra-c++2023) and is designed for projects seeking MISRA compliance.
GitHub Actions
**GitHub Actions support (2025.5)**
SonarQube Server now supports analysis of YAML files detected as [github-actions](https://docs.sonarsource.com/sonarqube-server/analyzing-source-code/languages/github-actions "mention").
**IaC analysis improved for GitHub Actions (2025.5)**
The analysis of Infrastructure as Code (Ansible, Azure Resource Manager, CloudFormation, Docker, Kubernetes, Terraform) has been improved to detect security misconfigurations and vulnerabilities in GitHub Actions. To do so, the following rules have been added:
* [S7630](https://rules.sonarsource.com/githubactions/RSPEC-7630/): GitHub Actions should not be vulnerable to script injections
* [S7631](https://rules.sonarsource.com/githubactions/RSPEC-7631/): Checking out code from a fork in a privileged workflow context is security-sensitive
* [S7633](https://rules.sonarsource.com/githubactions/RSPEC-7633/): Parsing structured data as a secret is security-sensitive
* [S7634](https://rules.sonarsource.com/githubactions/RSPEC-7634/): Passing the full secrets context to a workflow step is security-sensitive
* [S7635](https://rules.sonarsource.com/githubactions/RSPEC-7635/): Passing the full secrets context to reusable workflows is security-sensitive
* [S7636](https://rules.sonarsource.com/githubactions/RSPEC-7636/): Expanding secrets in run blocks is security-sensitive
* [S7637](https://rules.sonarsource.com/githubactions/RSPEC-7637/): Using external GitHub actions and workflows without a full length commit hash is security-sensitive
* [S6596](https://rules.sonarsource.com/githubactions/RSPEC-6596/): Specific version tag for image should be used
Go
**Expansion of code quality rules for Go (2025.6)**
Added 24 new rules targeting the base [go](https://docs.sonarsource.com/sonarqube-server/analyzing-source-code/languages/go "mention") language, for example:
* [S8188](https://rules.sonarsource.com/go/tag/performance/RSPEC-8188/) - Context cancellation functions should be deferred
* [S8193](https://rules.sonarsource.com/go/type/Code%20Smell/RSPEC-8193/) - Variables in if short statements should be used beyond just the condition
* [S8197](https://rules.sonarsource.com/go/tag/performance/RSPEC-8197/) - Use "bytes.Equal" instead of "bytes.Compare" for equality checks
* [S8206](https://rules.sonarsource.com/go/type/Bug/RSPEC-8206/) - Deprecated "InterfaceData" method should not be used
* [S8208](https://rules.sonarsource.com/go/tag/http/RSPEC-8208/) - HTTP response bodies should be closed to prevent resource leaks
* [S8210](https://rules.sonarsource.com/go/type/Code%20Smell/RSPEC-8210/) - Variables should be used
* [S8239](https://rules.sonarsource.com/go/tag/performance/RSPEC-8239/) - Context parameters should be reused instead of creating new background contexts
* [S8242](https://rules.sonarsource.com/go/type/Code%20Smell/RSPEC-8242/) - Context should not be stored in struct fields
* [S8259](https://rules.sonarsource.com/go/type/Bug/RSPEC-8259/) - Busy waiting loops should use proper synchronization
**Go 1.25 support (2025.5)**
Go version 1.25 is now supported.
IaC
**IaC improvements (2026.1)**
The analysis of Infrastructure as Code (Ansible, Azure Resource Manager, CloudFormation, Docker, Kubernetes, Terraform, GitHub Actions) has been improved.
Helm templates are now evaluated even if `values.yaml` is missing.
The following rules have been added:
* [S6437](https://rules.sonarsource.com/azureresourcemanager/RSPEC-6437/): Credentials should not be hard-coded
* [S7638](https://rules.sonarsource.com/githubactions/RSPEC-7638/): ACTIONS\_ALLOW\_UNSECURE\_COMMANDS should not be used
* [S8232](https://rules.sonarsource.com/githubactions/RSPEC-8232/): Workflows should not rely on unverified GitHub context values to trust events
* [S8233](https://rules.sonarsource.com/githubactions/RSPEC-8233/): Write permissions should be defined at the job level
* [S8262](https://rules.sonarsource.com/githubactions/RSPEC-8262/): Artifacts should not contain secrets
* S8263: GitHub Action invocations should not be vulnerable to parameter injection attacks
* [S8264](https://rules.sonarsource.com/githubactions/RSPEC-8264/): Read permissions should be defined at the job level
Java
**Java improvements (2025.6)**
Improvements to [java](https://docs.sonarsource.com/sonarqube-server/analyzing-source-code/languages/java "mention") rules:
* [S1068](https://rules.sonarsource.com/java/RSPEC-1068/): Unused "private" fields should be removed
* [S1144](https://rules.sonarsource.com/java/RSPEC-1144/): Unused "private" methods should be removed
* [S1479](https://rules.sonarsource.com/java/RSPEC-1479/): "switch" statements should not have too many "case" clauses
* [S1186](https://rules.sonarsource.com/java/RSPEC-1186/): Methods should not be empty
* [S1948](https://rules.sonarsource.com/java/RSPEC-1948/): Fields in a "Serializable" class should either be transient or serializable
* [S1989](https://rules.sonarsource.com/java/RSPEC-1989/): Exceptions should not be thrown from servlet methods
* [S2097](https://rules.sonarsource.com/java/RSPEC-2097/): "equals(Object obj)" should test the argument's type
* [S2187](https://rules.sonarsource.com/java/RSPEC-2187/): TestCases should contain tests
* [S2698](https://rules.sonarsource.com/java/RSPEC-2698/): Test assertions should include messages
* [S3306](https://rules.sonarsource.com/java/RSPEC-3306/): Constructor injection should be used instead of field injection
* [S3329](https://rules.sonarsource.com/java/RSPEC-3329/): Cipher Block Chaining IVs should be unpredictable
* [S4605](https://rules.sonarsource.com/java/RSPEC-4605/): Spring beans should be considered by "@ComponentScan"
* [S5738](https://rules.sonarsource.com/java/RSPEC-5738/): "@Deprecated" code marked for removal should never be used
* [S6813](https://rules.sonarsource.com/java/RSPEC-6813/): Field dependency injection should be avoided
**Java security (2025.6)**
Related rules:
* [S2076](https://rules.sonarsource.com/java/RSPEC-2076/): OS commands should not be vulnerable to command injection attacks
* [S2083](https://rules.sonarsource.com/java/RSPEC-2083/): I/O function calls should not be vulnerable to path injection attacks
* [S5146](https://rules.sonarsource.com/java/RSPEC-5146/): HTTP request redirections should not be open to forging attacks
* [S6547](https://rules.sonarsource.com/java/RSPEC-6547/): Environment variables should not be defined from untrusted input
* [S7518](https://rules.sonarsource.com/java/RSPEC-7518/): Privileged prompts should not be vulnerable to injection attacks
JavaScript / TypeScript / CSS
**New CSS rules (2025.6)**
The following CSS accessibility rules have been added:
* S7923: Orientation of the page is not restricted using CSS transform property
* S7924: Text has minimum contrast
* S7925: Spacing and height in style attributes is not \`!important\`
**TypeScript support (2025.6)**
All versions of through 5.9.3 are supported. See [javascript-typescript-css](https://docs.sonarsource.com/sonarqube-server/analyzing-source-code/languages/javascript-typescript-css "mention") for more information.
**JavaScript / TypeScript analyzer speed improvements (2025.6)**
Optimization of the analysis engine, moving logic to Node.js and using WebSockets, resulting in up to 40% faster analysis for large projects.
**58 Quick Fixes for JavaScript / TypeScript (2025.6)**
Automatically enables Quick Fixes in SonarQube IDE for 58 existing JavaScript and TypeScript rules.
**AngularJS rules for TypeScript (2025.5)**
The following rules related to AngularJS have been added to the TypeScript analysis:
* [S7655](https://rules.sonarsource.com/typescript/RSPEC-7655/): Angular classes should implement lifecycle interfaces for their lifecycle methods
* [S7641](https://rules.sonarsource.com/typescript/RSPEC-7641/): Angular lifecycle methods should be used in the correct context
* [S7656](https://rules.sonarsource.com/typescript/RSPEC-7656/): Angular Pipes should implement PipeTransform interface
* [S7650](https://rules.sonarsource.com/typescript/RSPEC-7650/): Components and directives should not use the "inputs" metadata property
* [S7648](https://rules.sonarsource.com/typescript/RSPEC-7648/): Components, Directives, and Pipes should use standalone architecture
* [S7647](https://rules.sonarsource.com/typescript/RSPEC-7647/): Empty Angular lifecycle methods should be removed
* [S7649](https://rules.sonarsource.com/typescript/RSPEC-7649/): Input bindings should not be aliased
* [S7653](https://rules.sonarsource.com/typescript/RSPEC-7653/): Output bindings should not be aliased
* [S7652](https://rules.sonarsource.com/typescript/RSPEC-7652/): Output bindings should not be named "on" or prefixed with "on"
* [S7651](https://rules.sonarsource.com/typescript/RSPEC-7651/): Output bindings should not be named as standard DOM events
* [S7654](https://rules.sonarsource.com/typescript/RSPEC-7654/): The "outputs" metadata property should not be used in Angular components and directives
**JavaScript analysis improved (2025.5)**
68 rules from the eslint-plugin-unicorn have been added to the JavaScript analysis.
JCL
**New leaveFile API for JCL (2026.1)**
A new leaveFile API is available for custom rules for [jcl](https://docs.sonarsource.com/sonarqube-server/analyzing-source-code/languages/jcl "mention") language, giving rule authors more control over how files are processed and reported.
.NET and C#
**.NET 10 and C# 14 support (2026.1)**
Empowers .NET teams to adopt the Long Term Support (LTS) release of .NET 10 and C# 14 immediately, ensuring their analysis remains accurate, performant, and free of false positives associated with new language constructs. See [vb-dotnet](https://docs.sonarsource.com/sonarqube-server/analyzing-source-code/languages/vb-dotnet "mention") and [csharp](https://docs.sonarsource.com/sonarqube-server/analyzing-source-code/languages/csharp "mention") for more information.
Related rules:
* [S1121](https://rules.sonarsource.com/csharp/RSPEC-1121/): Assignments should not be made from within sub-expressions
* [S1144](https://rules.sonarsource.com/csharp/RSPEC-1144/): Unused private types or members should be removed
* [S2225](https://rules.sonarsource.com/csharp/RSPEC-2225/): "ToString()" method should not return null
* [S2292](https://rules.sonarsource.com/csharp/RSPEC-2292/): Trivial properties should be auto-implemented
* [S2325](https://rules.sonarsource.com/csharp/RSPEC-2325/): Methods and properties that don't access instance data should be static
* [S2583](https://rules.sonarsource.com/csharp/RSPEC-2583/): Conditionally executed code should be reachable
* [S2589](https://rules.sonarsource.com/csharp/RSPEC-2589/): Boolean expressions should not be gratuitous
* [S2692](https://rules.sonarsource.com/csharp/RSPEC-2692/): "IndexOf" checks should not be for positive numbers
* [S2953](https://rules.sonarsource.com/csharp/RSPEC-2953/): Methods named "Dispose" should implement "IDisposable.Dispose"
* [S2970](https://rules.sonarsource.com/csharp/RSPEC-2970/): Assertions should be complete
* [S3063](https://rules.sonarsource.com/csharp/RSPEC-3063/): "StringBuilder" data should be used
* [S3264](https://rules.sonarsource.com/csharp/RSPEC-3264/): Events should be invoked
* [S3398](https://rules.sonarsource.com/csharp/RSPEC-3398/): "private" methods called only by inner classes should be moved to those classes
* [S3459](https://rules.sonarsource.com/csharp/RSPEC-3459/): Unassigned members should be removed
* [S3877](https://rules.sonarsource.com/csharp/RSPEC-3877/): Exceptions should not be thrown from unexpected methods
* [S3928](https://rules.sonarsource.com/csharp/RSPEC-3928/): Parameter names used into ArgumentException constructors should match an existing one
* [S4545](https://rules.sonarsource.com/csharp/RSPEC-4545/): "DebuggerDisplayAttribute" strings should reference existing members
* [S7039](https://rules.sonarsource.com/csharp/RSPEC-7039/): Content Security Policies should be restrictive
**Injection vulnerabilities supported for .NET WPF framework (2025.5)**
Taint analysis is now supported for Windows Presentation Foundation (WPF) entry points, such as UI controls, data bindings or command parameters.
PHP
**Reduction in false positives (2026.1)**
Reduces false positives on several rules and cleans up build and dependency infrastructure. Related rules:
* [S1155](https://rules.sonarsource.com/php/RSPEC-1155/): "empty()" should be used to test for emptiness
* [S1172](https://rules.sonarsource.com/php/RSPEC-1172/): Unused function parameters should be removed
* [S2699](https://rules.sonarsource.com/php/RSPEC-2699/): Tests should include assertions
* [S1068](https://rules.sonarsource.com/php/RSPEC-1068/): Unused "private" fields should be removed
**PHP analysis improved (2025.5)**
[php](https://docs.sonarsource.com/sonarqube-server/analyzing-source-code/languages/php "mention") keyword parsing has been optimized by replacing the regex-based logic.
PL/SQL
**Support for PL/SQL 3.18.0.216 (2025.6)**
The following [pl-sql](https://docs.sonarsource.com/sonarqube-server/analyzing-source-code/languages/pl-sql "mention") rules have been updated:
* [S1135](https://rules.sonarsource.com/plsql/RSPEC-1135/): Track uses of "TODO" tags
* [S1192](https://rules.sonarsource.com/plsql/RSPEC-1192/): String literals should not be duplicated
* [S1854](https://rules.sonarsource.com/plsql/RSPEC-1854/): Unused assignments should be removed
* [S2340](https://rules.sonarsource.com/plsql/RSPEC-2340/): "LOOP ... END LOOP;" constructs should be avoided
* [S2454](https://rules.sonarsource.com/plsql/RSPEC-2454/): Columns should be aliased
* [S2534](https://rules.sonarsource.com/plsql/RSPEC-2534/): Positional and named arguments should not be mixed in invocations
* [S3651](https://rules.sonarsource.com/plsql/RSPEC-3651/): Individual "WHERE" clause conditions should not be unconditionally true or false
* [S4081](https://rules.sonarsource.com/plsql/RSPEC-4081/): "PLS\_INTEGER" types should be used
* [S4196](https://rules.sonarsource.com/plsql/RSPEC-4196/): Output parameters should be assigned
* [S4421](https://rules.sonarsource.com/plsql/RSPEC-4421/): Features deprecated in Oracle 12 should not be used
* [S5245](https://rules.sonarsource.com/plsql/RSPEC-5245/): Identifiers should be written in lower case
Python
**Support for Python 3.14 (2025.6)**
Includes the new JIT compiler and defer statement features. See [python](https://docs.sonarsource.com/sonarqube-server/analyzing-source-code/languages/python "mention") for more information. Related rules:
* [S7931](https://rules.sonarsource.com/python/RSPEC-7931/): "NotImplemented" should not be used in boolean contexts
* [S7941](https://rules.sonarsource.com/python/RSPEC-7941/): Compression modules should be imported from the compression namespace
* [S7942](https://rules.sonarsource.com/python/RSPEC-7941/): Template strings should be processed before use
* [S7943](https://rules.sonarsource.com/python/RSPEC-7943/): Template and str should not be concatenated directly
* [S7945](https://rules.sonarsource.com/python/RSPEC-7945/): Template string processing should use structural pattern matching
**Rules for Python Pytorch library (2025.6)**
Specialized rules for PyTorch to help write efficient, error-free Machine Learning code. The new rules include:
* S7697: PyTorch tensor operations should assign results or use in-place variants
* S7699: Dropout layers should be defined as model attributes in "\_\_init\_\_" method
* [S7702](https://rules.sonarsource.com/python/RSPEC-7702/): Specify "start\_dim" when using "torch.flatten" to preserve batch dimension
* [S7703](https://rules.sonarsource.com/python/RSPEC-7703/): Method calls should use parentheses when saving PyTorch model state
* [S7704](https://rules.sonarsource.com/python/RSPEC-7704/): PyTorch module classes should not be instantiated inline in forward methods
* [S7706](https://rules.sonarsource.com/python/RSPEC-7706/): Use PyTorch Lightning's built-in checkpointing instead of manual checkpoint saving
* S7709: Tensor lists should be concatenated with "torch.cat()" instead of "torch.tensor()"
* [S7708](https://rules.sonarsource.com/python/RSPEC-7708/): Tensors should not be concatenated incrementally in loops
* [S7710](https://rules.sonarsource.com/python/RSPEC-7710/): Use "torch.empty()" instead of list comprehensions for empty tensor initialization
* S7711: Dataset "\_\_len\_\_" methods should return an integer, not "torch.Size"
* [S7713](https://rules.sonarsource.com/python/RSPEC-7713/): Tensor operations should rely on automatic broadcasting instead of manual expansion
**Python security (2025.6)**
Related rules:
* [S2076](https://rules.sonarsource.com/python/RSPEC-2076/): OS commands should not be vulnerable to command injection attacks
* [S2083](https://rules.sonarsource.com/python/RSPEC-2083/): I/O function calls should not be vulnerable to path injection attacks
* [S3649](https://rules.sonarsource.com/python/RSPEC-3649/): Database queries should not be vulnerable to injection attacks
* [S5131](https://rules.sonarsource.com/python/RSPEC-5131/): Endpoints should not be vulnerable to reflected cross-site scripting (XSS) attacks
* [S5144](https://rules.sonarsource.com/python/RSPEC-5144/): Server-side requests should not be vulnerable to forging attacks
* [S5334](https://rules.sonarsource.com/python/RSPEC-5334/): Dynamic code execution should not be vulnerable to injection attacks
* [S7518](https://rules.sonarsource.com/python/RSPEC-7518/): Privileged prompts should not be vulnerable to injection attacks
* [S7693](https://rules.sonarsource.com/python/RSPEC-7693/): Operating AI agents without predefined boundaries is security-sensitive
* [S7698](https://rules.sonarsource.com/python/RSPEC-7698/): AI agent code execution without sandboxing is security-sensitive
**Python analysis: new rules for PyTorch library (2025.5)**
The following rules have been added:
* [S7508](https://rules.sonarsource.com/python/RSPEC-7508/): Redundant collection functions should be avoided
* [S7675](https://rules.sonarsource.com/python/RSPEC-7675/): Tensor copying should use recommended methods
* [S7695](https://rules.sonarsource.com/python/RSPEC-7695/): "super()" calls should not be used in TorchScript methods
**Python analysis: AWS Lambda rules (2025.5)**
The following rules related to AWS lambdas and common practices have been added to the [python](https://docs.sonarsource.com/sonarqube-server/analyzing-source-code/languages/python "mention") analysis:
* [S6249](https://rules.sonarsource.com/python/RSPEC-6249/): Authorizing HTTP communications with S3 buckets is security-sensitive
* [S7613](https://rules.sonarsource.com/python/RSPEC-7613/): AWS Lambda handlers should return only JSON serializable values
* [S7609](https://rules.sonarsource.com/python/RSPEC-7609/): AWS CloudWatch metrics namespace should not begin with \`AWS/\`
* [S6246](https://rules.sonarsource.com/python/RSPEC-6246/): Lambdas should not invoke other lambdas synchronously
* [S7608](https://rules.sonarsource.com/python/RSPEC-7608/): S3 operations should verify bucket ownership using ExpectedBucketOwner parameter
* [S7618](https://rules.sonarsource.com/python/RSPEC-7618/): Network calls in AWS Lambda functions shouldn't be made without explicit timeout parameters
* [S7617](https://rules.sonarsource.com/python/RSPEC-7617/): Reserved environment variable names should not be overridden in Lambda functions
* [S6243](https://rules.sonarsource.com/python/RSPEC-6243/): Reusable resources should be initialized at construction time of Lambda functions
* [S6262](https://rules.sonarsource.com/python/RSPEC-6262/): AWS region should not be set with a hardcoded String
* [S7622](https://rules.sonarsource.com/python/RSPEC-7622/): boto3 operations that support pagination should be performed using paginators or manual pagination handling
* [S7621](https://rules.sonarsource.com/python/RSPEC-7621/): AWS waiters should be used instead of custom polling loops
* [S7620](https://rules.sonarsource.com/python/RSPEC-7620/): AWS Lambda handlers should clean up temporary files in /tmp directory
* [S7625](https://rules.sonarsource.com/python/RSPEC-7625/): Long-term AWS access keys should not be used directly in code
* [S7614](https://rules.sonarsource.com/python/RSPEC-7614/): AWS Lambda handlers must not be an async function
* [S7619](https://rules.sonarsource.com/python/RSPEC-7619/): "botocore.exceptions.ClientError" must be explicitly catch and handled
**Parallel execution of Python rules (2025.5)**
Parallel execution of [python](https://docs.sonarsource.com/sonarqube-server/analyzing-source-code/languages/python "mention") rules is now supported. Ruby
**New rules for Ruby (2025.6)**
33 new language-specific and framework-specific rules for [ruby](https://docs.sonarsource.com/sonarqube-server/analyzing-source-code/languages/ruby "mention"), including 12[ targeting Ruby-on-rails](https://rules.sonarsource.com/ruby/tag/rails/), for example:
* [S7839](https://rules.sonarsource.com/ruby/tag/rails/RSPEC-7839/): Global variables should not be used in Rails applications
* [S7844](https://rules.sonarsource.com/ruby/tag/rails/RSPEC-7844/): Asset compilation should be disabled in production environments
* [S7867](https://rules.sonarsource.com/ruby/tag/rails/RSPEC-7867/): Rails API controllers using "respond\_to" should include "ActionController::MimeResponds"
* [S7875](https://rules.sonarsource.com/ruby/tag/rails/RSPEC-7875/): Rails applications should define a root route with proper controller#action syntax
* [S7887](https://rules.sonarsource.com/ruby/tag/rails/RSPEC-7887/): Before destroy callbacks should use proper halt mechanism
* [S7895](https://rules.sonarsource.com/ruby/tag/rails/RSPEC-7895/): HTTP status codes should use symbols instead of numeric values
* [S7897](https://rules.sonarsource.com/ruby/tag/rails/RSPEC-7897/): Rails queries should use "find\_by" instead of "where.take" for single record retrieval
* [S7899](https://rules.sonarsource.com/ruby/tag/rails/RSPEC-7899/): Rails collections should use "ids" instead of "pluck(:id)" for primary keys
* [S7904](https://rules.sonarsource.com/ruby/tag/rails/RSPEC-7904/): Rails model callback methods should be private
* [S7905](https://rules.sonarsource.com/ruby/tag/rails/RSPEC-7905/): Controllers should inherit from appropriate base classes
Rust
Rust analysis improvements (2025.5)
The Clippy analysis can now be run offline by setting `sonar.rust.clippy.offline` to `true`. This prevents Clippy from trying to fetch dependencies. Dependencies must still be available locally for the analysis to work correctly. This setting is intended for air-gapped environments. See [rust](https://docs.sonarsource.com/sonarqube-server/analyzing-source-code/languages/rust "mention") for more information.
Scala
**Reduced false positives and negatives (2026.1)**
Include fixes to false positives and negatives for [scala](https://docs.sonarsource.com/sonarqube-server/analyzing-source-code/languages/scala "mention") in the following rules:
* [S1192](https://rules.sonarsource.com/scala/RSPEC-1192/): String literals should not be duplicated
* [S126](https://rules.sonarsource.com/scala/RSPEC-126/): "if ... else if" constructs should end with "else" clauses
Secrets
**Reduced false positives (2026.1)**
[secrets](https://docs.sonarsource.com/sonarqube-server/analyzing-source-code/languages/secrets "mention") rules have been improved to reduce the detection of false positives and the following rule have been added:
* [S6418](https://rules.sonarsource.com/yaml/RSPEC-6418/): Hard-coded secrets are security-sensitive
* [S2068](https://rules.sonarsource.com/yaml/RSPEC-2068/): Hard-coded passwords are security-sensitive
* [S7552](https://rules.sonarsource.com/secrets/RSPEC-7552/): SMTP credentials should not be disclosed
* [S8350](https://rules.sonarsource.com/secrets/RSPEC-8350/): xAI API keys should not be disclosed
**New rules have been added for Secrets detection (2025.6):**
* [S8135](https://rules.sonarsource.com/secrets/RSPEC-8135/): JSON Web Tokens should not be disclosed
* [S8136](https://rules.sonarsource.com/secrets/RSPEC-8136/): HTTP authentication credentials should not be disclosed
* [S8214](https://rules.sonarsource.com/secrets/RSPEC-8214/): Handsontable License Keys should not be disclosed
* [S8215](https://rules.sonarsource.com/secrets/RSPEC-8215/): Password hashes should not be disclosed
* [S8217](https://rules.sonarsource.com/secrets/RSPEC-8217/): HTTP Authentication Bearer tokens should not be disclosed
* [S8219](https://rules.sonarsource.com/secrets/RSPEC-8219/): Azure DevOps App secrets should not be disclosed
Shell / bash
**Shell/bash analysis (2025.6)**
Introduction of 31 code quality and security rules specifically for shell/bash scripts. For example:
* [S1481](https://rules.sonarsource.com/shell/RSPEC-1481/): Unused local variables should be removed
* [S4830](https://rules.sonarsource.com/shell/RSPEC-4830/): Server certificates should be verified during SSL/TLS connections
* [S6506](https://rules.sonarsource.com/shell/RSPEC-6506/): Allowing downgrades to a clear-text protocol is security-sensitive
* [S7684](https://rules.sonarsource.com/shell/RSPEC-7684/): Variable names should follow shell naming conventions
* [S7674](http://rules.sonarsource.com/shell/RSPEC-7674/): Variables should be quoted during expansion
* [S7677](https://rules.sonarsource.com/shell/RSPEC-7677/): Error messages should be sent to stderr
* [S7689](https://rules.sonarsource.com/shell/RSPEC-7689/): Command substitution should use modern "$()" syntax instead of backticks
Swift
**Support for Swift 5.9 through 6.1 (2025.6)**
Comprehensive support for [swift](https://docs.sonarsource.com/sonarqube-server/analyzing-source-code/languages/swift "mention") versions 5.9 through 6.1, including macros, variadic generics, and new syntax features.
**Support SwiftUI (2025.6)**
Targeted support for SwiftUI that silences irrelevant rules and disables rules in preview sections, for example:
* [S107](https://rules.sonarsource.com/swift/RSPEC-107/): Functions should not have too many parameters
* [S3087](https://rules.sonarsource.com/swift/RSPEC-3087/): Closure expressions should not be nested too deeply
**SAST for Swift (2025.6)**
Introduces Static Application Security Testing (SAST) for Swift, targeting cryptography and communication issues.
**Detect passwords and secrets in Swift (2025.6)**
Enhanced secret detection for Swift using entropy checks and post-processing to reduce noise.
T-SQL
**T-SQL analyzer update (2025.6)**
Updates to ensure [t-sql](https://docs.sonarsource.com/sonarqube-server/analyzing-source-code/languages/t-sql "mention") analysis are ready for the upcoming Long Term Active (LTA) release. Related fixes and improvements to:
* [S1116](https://rules.sonarsource.com/tsql/RSPEC-1116/): Empty statements should be removed
* [S1523](https://rules.sonarsource.com/tsql/RSPEC-1523/): Dynamically executing code is security-sensitive
* Parsing of `CREATE STATISTICS` statement
* Parsing of `CREATE/DROP ASYMMETRIC KEY`
* Parsing of `CREATE MESSAGE TYPE`
VB6
**VB6 improvements (2026.1)**
Fixes parse errors and line count for [vb6](https://docs.sonarsource.com/sonarqube-server/analyzing-source-code/languages/vb6 "mention"). Related rules:
* [S138](https://rules.sonarsource.com/vb6/RSPEC-138/): Subs and functions should not have too many lines
* [S1151](https://rules.sonarsource.com/vb6/RSPEC-1151/): "Case" clauses should not have too many lines
XML
**Improvements to the XML rules (2025.6)**
Various improvements to [xml](https://docs.sonarsource.com/sonarqube-server/analyzing-source-code/languages/xml "mention") rules and analyzer. Related rules:
* [S2068](https://rules.sonarsource.com/xml/RSPEC-2068/): Hard-coded credentials are security-sensitive
* [S3330](https://rules.sonarsource.com/xml/RSPEC-3330/): Creating cookies without the "HttpOnly" flag is security-sensitive
* [S5344](https://rules.sonarsource.com/java/RSPEC-5344/): Passwords should not be stored in plaintext or with a fast hashing algorithm
* [S5734](https://rules.sonarsource.com/javascript/RSPEC-5734/): Allowing browsers to sniff MIME types is security-sensitive
* [S7630](https://rules.sonarsource.com/githubactions/RSPEC-7630/): GitHub Actions should not be vulnerable to script injections
#### Analysis
**JFrog Evidence Collection with SonarQube Server (2026.1)**
This integration provides a single, verifiable audit trail if you use both SonarQube and JFrog with strict audit trail and compliance requirements. SonarQube analysis results are automatically signed and directly attached to your JFrog packages to create a single, verifiable source of truth. You no longer have to jump between tools to prove your code meets security standards. Everything you need for a rigorous audit is now visible within the JFrog Evidence Collection interface. This feature is available in the [Enterprise](https://www.sonarsource.com/plans-and-pricing/sonarqube/) edition and above. See [jfrog-evidence-collection-integration](https://docs.sonarsource.com/sonarqube-server/analyzing-source-code/jfrog-evidence-collection-integration "mention") for more information.
**High-volume file move detection (2025.6)**
SonarQube now stops the analysis when a high-volume file move is detected and raises a warning to let users revert to their initial project configuration in case of an unintended file move.
**Sandboxing of issues coming from SonarQube update (2025.5)**
Some SonarQube updates may introduce new issues in your code on sections that have not been changed since the previous analysis. These new issues may lead to abrupt and unexplained quality gate and pipeline failures, causing frustration and delays in releases.
To eliminate these pain points, you can enable sandboxing. This way:
* The sandboxed issues won’t impact your quality gate.
* Users will be able to triage the sandboxed issues at their own pace.
See [#from-sonarqube-update](https://docs.sonarsource.com/sonarqube-server/user-guide/issues/solution-overview#from-sonarqube-update "mention") and [#update-notes](#update-notes "mention") for more information.
#### Feedback mechanism for self-hosted LLMs (2026.1)
Improves the success rate of generating valid AI CodeFix suggestions from self‑hosted LLMs.
#### Quality gate fudge factor improved (2026.1)
To avoid overly strict enforcement of small changes, the quality gate ignores coverage and duplication conditions for very small sets of new code. See [changing-default-quality-gate](https://docs.sonarsource.com/sonarqube-server/quality-standards-administration/managing-quality-gates/changing-default-quality-gate "mention") for more information.
#### Integrations
**Jira (2025.6)**
This feature introduces a secure, app-based connection for integrating SonarQube Server with Jira Cloud. This lays the groundwork for powerful future workflows, such as issue tracking, release readiness assessment and creating Jira work items from SonarQube issues. For more information see the following documentation:
* [jira-integration](https://docs.sonarsource.com/sonarqube-server/instance-administration/jira-integration "mention") on an instance level
* [jira-integration](https://docs.sonarsource.com/sonarqube-server/project-administration/jira-integration "mention") on a project level
* [managing-jira-work-items](https://docs.sonarsource.com/sonarqube-server/user-guide/issues/managing-jira-work-items "mention")
**Slack (2025.6)**
Delivers real-time notifications for quality gate status changes (failed or failed-to-passed) directly into Slack channels. See [slack](https://docs.sonarsource.com/sonarqube-server/instance-administration/system-functions/notifications/slack "mention") or more information.
**GitHub Enterprise Cloud with Data Residency now supported (2025.6)**
SonarQube’s integration with GitHub Enterprise Cloud with Data Residency is now supported.
**Navigation from SonarQube to GitHub (2025.6)**
You can now navigate from your SonarQube project to the bound GitHub repository by selecting the project bound icon.
#### Reporting
**AI and mobile compliance reporting (2026.1)**
Extends our regulatory coverage to include critical AI and Mobile security standards such as OWASP Top 10 for LLM and OWASP MASVS for project security reports. This feature is available in the [Enterprise](https://www.sonarsource.com/plans-and-pricing/sonarqube/) edition and above. See [security-related-rules](https://docs.sonarsource.com/sonarqube-server/user-guide/rules/security-related-rules "mention") for more information.\
\
**Security standards (2025.6)**
SonarQube Server rules and security reports have been updated to comply with the most recent security standards. The new and updated security standards are:
* OWASP Top 10 2025: Updating security rule mappings, documentation, and reporting to align with the newly released OWASP Top 10 2025
* STIG ASD version 6: Integration and mapping of our security rules to the latest security technical implementation guide (STIG) for application security and development, version 6.
Security reports are available in the [Enterprise](https://www.sonarsource.com/plans-and-pricing/sonarqube/) edition and higher. See [security-reports](https://docs.sonarsource.com/sonarqube-server/user-guide/viewing-reports/security-reports "mention") for the full list of security standards and language coverage.
**WCAG Accessibility compliance (2025.6)**
Introduces Accessibility reports via API to monitor compliance with[ WCAG 2.1 AA](https://www.w3.org/WAI/standards-guidelines/wcag/new-in-21/) and[ 2.2 AA](https://www.w3.org/WAI/standards-guidelines/wcag/new-in-22/) standards.
#### Security
**New rules for detecting LLM issues (2025.6)**
The new version of security analyzer contains new and improved rules for detecting LLM related security issues.
**Detect security misconfigurations in bash shell files (2025.6)**
Detects unsafe file permissions, insecure commands (`curl` / `wget`), and hardcoded secrets in `.sh` files.
#### SonarQube Advanced Security
Available as part of SonarQube Advanced Security license for [Enterprise](https://www.sonarsource.com/plans-and-pricing/sonarqube/) edition and higher. See [advanced-security](https://docs.sonarsource.com/sonarqube-server/advanced-security "mention") for more information.
**Malicious package detection (2026.1)**
Receive blocker-level alerts if a dependency matches publicly known datasets of known malicious packages.
**ASAST configs refreshed for C# and Java top 1k libraries, and Python top 100 (2025.6)**
Automatically delivers optimized Advanced SAST configurations for the Top 1,000 most used libraries in C# and Java, and top 100 Python libraries.
**C/C++ support for Conan and vcpkg projects - beta (2025.6)**
Allows customers to analyze C and C++ projects that utilize the Conan or vcpkg package managers to return vulnerability and license information.
**Software bill of materials (SBOM) import (CycloneDX, SPDX) - beta (2025.6)**
Allows customers to import software bill of materials (SBOM) in CycloneDX or SPDX format to retrieve vulnerability information. This supports the scanning of arbitrary applications and dependencies, including container images and complex C++ applications.
**SPDX 3.0 support (2025.6)**
Ensures support for the latest SPDX 3.0 standard.
**SCA service activation at the project level (2025.5)**
In the previous version, Software Composition Analysis (SCA) was enabled in the UI at the instance level for all projects. With this new version, when you enable the service as an instance admin, you can additionally define the default activation status (on or off) for all projects in your instance.
#### Server operation
**In-product communication of product news (2025.6)**
Sonar will now provide in-product notifications to users regarding important product updates. These messages will be tailored to specific audiences. Users will receive alerts for new messages and will have access to a complete message history.
**Announcement messages improved (2025.5)**
It’s now possible to add links to your custom announcement messages in the UI. For more information, see [#announcements](https://docs.sonarsource.com/sonarqube-server/instance-administration/ui-customization/custom-messages#announcements "mention").
**JRE auto-provisioning can be disabled at instance level (2025.5)**
JRE auto-provisioning for the scanners on CI/CD host is enabled by default. It was possible to disable it through an analysis parameter. You can now disable it at the SonarQube Server instance level.
**Improved memory consumption of Sonar scanners (2025.5)**
In order to reduce memory consumption for the scanner-engine, visibility information is now discarded for excluded files.
#### UI and UX
**Rules statuses visible on the Issues page (2025.6)**
Surfacing the rule status, specifically beta, directly on the Issues and Issues detail pages. This clarifies the maturity of the rule that generated the issue.
**Update to the login page (2025.6)**
Updated accessibility, layout, and error messages resulting in an improved overall login experience.
### Removals and deprecations
#### Java 17 not supported any more (2026.1)
Java version 21 is the minimum version required to run SonarQube Server. See [#software-requirements](https://docs.sonarsource.com/sonarqube-server/server-installation/server-host-requirements#software-requirements "mention") for more information.
#### PostgreSQL in Helm charts removed (2026.1)
The deprecated PostgreSQL dependency in the Helm chart has been removed. If you were relying on this dependency for production, you must take the following steps to upgrade to the new chart: back up their existing database, import the data into a new database, and then update the JDBC URL within the SonarQube chart configuration. See [installing-helm-chart](https://docs.sonarsource.com/sonarqube-server/server-installation/on-kubernetes-or-openshift/installing-helm-chart "mention") for more information.
#### Kubernetes and Openshift versions removed (2026.1)
* Support for versions 1.30 and 1.31 has been removed.
* Support for versions 4.11 to 4.16 has been removed.
#### 2016 MSSQL Server 13.0 support removed (2026.1)
Support for 2016 MSSQL Server 13.0 support has been removed. See [installing-the-database](https://docs.sonarsource.com/sonarqube-server/server-installation/installing-the-database "mention") for more information.
#### Deprecation of Ingress NGINX (2026.1)
Due to the retirement of the ingress-nginx controller in November 2025 (with best-effort support ceasing in March 2026), the dependency on this chart is now deprecated.
We advise migrating to the [Gateway API](https://gateway-api.sigs.k8s.io/guides/), which is the modern successor to Ingress. Should you need to continue using Ingress, please consult the [Kubernetes documentation](https://kubernetes.io/docs/concepts/services-networking/ingress-controllers/) for a list of suitable alternative controllers. A replacement dependency will be provided in a future release.
#### Deprecation of Automatic AI Code Detection (2026.1)
Autodetect AI-Generated Code has been deprecated. Sonar will adjust the AI Code Assurance offering to adapt to the industry changes with high AI adoption. A warning callout has been added to the SonarQube UI in global and project settings. See [ai-code-assurance](https://docs.sonarsource.com/sonarqube-server/ai-capabilities/ai-code-assurance "mention") for more information.
#### Deprecation of Design and Architecture features (2025.6)
The cycle detection and architecture as code for Java and JS/TS are deprecated (S7027, S7091, S7134, S7197), pending removal in January 2026. They will be replaced by improved architecture capabilities.
#### Deprecation of Java 17 as a scanner runtime (2025.6)
Java 17 is deprecated as a supported scanner runtime environment and its support ends with SonarQube 2026.3 (July 2026). There is no impact for this change if you use JRE auto-provisioning, enabled by default on scanners that support it, because it keeps Java version requirements always up to date. If you disabled JRE auto-provisioning or your scanner doesn’t support it, you need to update to Java 21 or newer. See:
* [#java-runtime-environment-jre](https://docs.sonarsource.com/sonarqube-server/analyzing-source-code/scanners/scanner-environment/general-requirements#java-runtime-environment-jre "mention") requirements for all SonarScanners.
* [Community post](https://community.sonarsource.com/t/phasing-out-java-17-as-a-scanner-runtime/153678) for more information about the deprecation.
* [managing-jre-auto-provisioning](https://docs.sonarsource.com/sonarqube-server/analyzing-source-code/scanners/scanner-environment/managing-jre-auto-provisioning "mention") for additional information.
---
# Source: https://docs.sonarsource.com/sonarqube-server/2025.1/server-update-and-maintenance/release-notes-and-notices/lta-to-lta-release-upgrade-notes.md
# LTA to LTA release update notes
Upgrade notes contain information on breaking changes and important updates to be aware of before upgrading.
These upgrade notes are intended for users who are directly upgrading SonarQube Server from 9.9 LTA to 2025.1 LTA. Just upgrading a few minor versions? Refer to the regular [release-upgrade-notes](https://docs.sonarsource.com/sonarqube-server/2025.1/server-update-and-maintenance/release-notes-and-notices/release-upgrade-notes "mention").
For a list of new features since the last LTA, see [lta-to-lta-release-notes](https://docs.sonarsource.com/sonarqube-server/2025.1/server-update-and-maintenance/release-notes-and-notices/lta-to-lta-release-notes "mention"). For a list of new features in 2025.1 LTA only, see [release-notes](https://docs.sonarsource.com/sonarqube-server/2025.1/server-update-and-maintenance/release-notes-and-notices/release-notes "mention").
### Authentication
**SAML configuration update required (2025.1)**
When configuring SAML on your SonarQube Server instance with assertion encryption, response signature must be enforced. You might need to update your SAML configuration:
* If you use SAML with Microsoft Entra, make sure you sign the response by selecting **Sign SAML response** or **Sign SAML response and assertion** as the sign-in response. See **Step 2 > If you use encryption, enforce response signature** in [optional-security-features](https://docs.sonarsource.com/sonarqube-server/2025.1/instance-administration/authentication/saml/ms-entra-id/optional-security-features "mention").
* If you use SAML with PingID, make sure you sign the response by selecting **Sign Response** or **Sign Assertion & Response** as the sign-in response. See **Step 2 > To enable the encryption of SAML assertions** in [optional-security-features](https://docs.sonarsource.com/sonarqube-server/2025.1/instance-administration/authentication/saml/ping-identity/optional-security-features "mention").
In addition, the assertion decryption now requires that you store also the public key certificate in SonarQube Server (not only the private key). Make sure the certificate is stored in SonarQube as follows:
1. In SonarQube Community Build, go to **Administration > Configuration > General Settings > Authentication > SAML**.
2. In **SAML Configuration > SAML**, select **Edit**. The **Edit SAML configuration** dialog opens.
3. In **Service provider certificate**, enter the certificate.
**Updated GitLab automatic provisioning feature (10.7)**
Automatic user and group provisioning with GitLab now includes permission synchronization, which automatically synchronizes project visibility. To prevent unwanted updates to project permissions and project visibility, upgrading SonarQube will suspend automatic provisioning until you confirm the choice of provisioning method in the authentication settings.
For more information, see the [setting-up](https://docs.sonarsource.com/sonarqube-server/2025.1/instance-administration/authentication/gitlab/setting-up "mention") page.
**Updated GitHub automatic provisioning feature (10.2)**
Automatic user and group provisioning with GitHub now includes permission synchronization, which automatically synchronizes project visibility:
* To prevent unwanted updates to project permissions and project visibility, upgrading SonarQube will suspend automatic provisioning until you confirm the choice of provisioning method in the authentication settings.
* The GitHub app requires new permissions to be added and approved.
For more information, see the [github](https://docs.sonarsource.com/sonarqube-server/2025.1/instance-administration/authentication/github "mention") page.
**SCIM provisioning requires configuration (10.0)**
SCIM provisioning for SAML authentication evolves for a tightened synchronization of users and groups. To use the updated set of user and group SCIM provisioning features, see [overview](https://docs.sonarsource.com/sonarqube-server/2025.1/instance-administration/authentication/overview "mention").
Without action on your part, upon upgrading, already assigned users are not deleted from SonarQube, but they are no longer bound to your IdP. You’ll need to enable SCIM again in SonarQube and adjust your IdP settings. See [overview](https://docs.sonarsource.com/sonarqube-server/2025.1/instance-administration/authentication/saml/scim/overview "mention") of SCIM provisioning for more information.
### Analysis
**SonarScanner for Maven recommended command updated**
The recommended command to run the [SonarScanner for Maven](https://docs.sonarsource.com/sonarqube-server/2025.1/analyzing-source-code/scanners/sonarscanner-for-maven) was updated. You might need to update your configuration. See the full explanation below.
Full explanation
A Maven project is configured using a `pom.xml` file. In this file, you can configure the `sonar-maven-plugin` version and properties:
```
org.sonarsource.scanner.mavensonar-maven-plugin3.7.0.1746
```
When `sonar-maven-plugin` is defined in the `pom.xml` file, it is safe and has the same effect to execute the two following commands:
`mvn sonar:sonar`
or
`mvn org.sonarsource.scanner.maven:sonar-maven-plugin:sonar`
But if you *don't declare* `sonar-maven-plugin` in your `pom.xml`, file, the two above commands are not recommended.
When Maven sees `mvn sonar:sonar`, it tries to find a plugin called `sonar` in the `pom.xml` hierarchy and fails. Then, Maven will try to download a plugin called `org.codehaus.mojo:sonar-maven-plugin` and succeed. It is a legacy mechanism that Maven still uses, so you don't have to write in full `mvn org.codehaus.mojo:sonar-maven-plugin:sonar`.
The Codehaus services officially ended around May 2015, so Sonar cannot deploy the new version of the scanner to `org.codehaus.mojo`. This is why a new group ID `org.sonarsource.scanner.maven` was created a little later.
Note that when Maven sees `mvn org.sonarsource.scanner.maven:sonar-maven-plugin:sonar` and no `sonar-maven-plugin` is set in your `pom.xml` , Maven downloads the latest version. It means that on a random day, the analysis may change because of a new scanner version. To prevent unintentional changes, we recommend explicitly setting the version. For example: `mvn org.sonarsource.scanner.maven:sonar-maven-plugin:5.2.0.4988:sonar`.
**Updated built-in Quality Profiles**
The built-in Quality Profiles for each language have been updated, meaning rules may have been added, changed, deprecated or dropped. If you are using or extending any of the "Sonar way" built-in Quality Profiles, make sure to check their Changelog to see what has changed.
**Cognitive complexity calculation updated for Javascript and Typescript (10.5)**
If you analyze Javascript and Typescript projects, note that we’ve updated how cognitive complexity is calculated. Notably, nested function complexity is no longer added to the parent. This will translate as a drop in the metric for some users.
**End of support of Node.js 16 in the scanner environment (10.5)**
Node.js 16 is no longer supported as a scanner runtime environment. If you’re using a custom Node.js installation, we recommend the latest [LTS version](https://nodejs.org/en/about/previous-releases), currently v20.
**JavaScript/TypeScript/CSS configuration (10.4)**
A minimum of 4GB memory is now recommended, use `sonar.javascript.node.maxspace` configuration if you encounter memory issues. Also, file encoding errors will now cause an analysis failure, use `sonar.sourceEncoding=UTF-8` if you encounter problems. See [javascript-typescript-css](https://docs.sonarsource.com/sonarqube-server/2025.1/analyzing-source-code/languages/javascript-typescript-css "mention") for more information.
**Node.js is no longer a requirement for analysis (10.4)**
In most cases, installing Node.js in the environment where you’re running analysis is no longer a requirement. See [javascript-typescript-css](https://docs.sonarsource.com/sonarqube-server/2025.1/analyzing-source-code/languages/javascript-typescript-css "mention") for more details.
**End of support of Java 11 as scanner environment (10.4)**
Java 11 is no longer supported as a scanner runtime environment. The minimum required version is Java 17. The impact of this change should be minimal if you use a scanner that supports JRE auto-provisioning. See [general-requirements](https://docs.sonarsource.com/sonarqube-server/2025.1/analyzing-source-code/scanners/scanner-environment/general-requirements "mention") for more details.
**SonarScanner for .NET compatibility (10.4)**
Starting with SonarQube 10.4, analysis of .NET projects requires [SonarScanner for .NET 5.14+](https://github.com/SonarSource/sonar-scanner-msbuild/releases/tag/5.14.0.78575).
**End of support of MSBuild 14 (10.4)**
MSBuild 14 is no longer supported for scanning .NET code. MSBuild 15 is deprecated and support will be removed in a future version. We recommend using MSBuild 16 as a minimal version.
To know which Web API endpoints and parameters are deprecated after an upgrade, see [api-deprecation](https://docs.sonarsource.com/sonarqube-server/2025.1/server-update-and-maintenance/monitoring/api-deprecation "mention").
**Dropping support for NET Framework < 4.6.2 (10.1)**
The minimum supported .NET Framework version is 4.6.2. Support for earlier versions has been dropped. If you’re running an earlier version, you’ll need to upgrade your build environment wherever your analysis is run. See [this release note](https://github.com/SonarSource/sonar-dotnet/releases/tag/9.0.0.68202) for more information.
**Projects displaying modules are no longer supported (10.0)**
The concept of modules was removed in v7.6. SonarQube no longer migrates the structure of projects still displaying modules. Make sure you re-analyze these projects before upgrading to SonarQube 10.0.
### Operations
**Instance mode feature (10.8)**
Your SonarQube Server instance has two modes to choose from: [standard-experience](https://docs.sonarsource.com/sonarqube-server/2025.1/instance-administration/analysis-functions/instance-mode/standard-experience "mention") and [mqr-mode](https://docs.sonarsource.com/sonarqube-server/2025.1/instance-administration/analysis-functions/instance-mode/mqr-mode "mention"). Upon upgrading, existing SonarQube Server 10.1 and earlier are configured with the Standard Experience by default whereas SonarQube Server 10.2 and later are configured with MQR mode.
For details on switching modes, see the [changing-modes](https://docs.sonarsource.com/sonarqube-server/2025.1/user-guide/code-metrics/changing-modes "mention") page.
**Disable the confidential header in portfolio PDF reports (10.7)**
Admin users have a new toggle in the Administration -> Governance -> Portfolio PDF Reports section, allowing them to dynamically enable or disable the "Confidential" header.
For details, see the [managing-portfolios](https://docs.sonarsource.com/sonarqube-server/2025.1/project-administration/managing-portfolios "mention") page.
**Project overview update in MQR mode (10.4)**
If you use MQR Mode, note that issue counts on the overall code of projects reflect the [software-qualities](https://docs.sonarsource.com/sonarqube-server/2025.1/user-guide/rules/software-qualities "mention").
These counts will be displayed when you re-analyze your projects.
**Microsoft SQL Server and Integrated Authentication (10.8)**
If you use Microsoft SQL Server with Integrated Authentication, note that the minimum supported version of the [Microsoft SQL JDBC Driver package](https://learn.microsoft.com/en-us/sql/connect/jdbc/release-notes-for-the-jdbc-driver) has been updated to 12.8.1. See [installing-the-database](https://docs.sonarsource.com/sonarqube-server/2025.1/setup-and-upgrade/install-the-server/installing-the-database "mention") for more information.
**Elasticsearch system call filters required (10.6)**
SonarQube uses Elasticsearch 8.0. System call filters are now required (see the [Elastic docs](https://www.elastic.co/guide/en/elastic-stack/8.0/elasticsearch-breaking-changes.html) for more information). If you disabled these filters, you’ll need to adjust your configuration before starting the server.
**seccomp filter required on kernel (10.0)**
The version of Elasticsearch has been updated and now requires a kernel with seccomp enabled. Make sure that seccomp is available on your kernel. See /pre-installation steps [linux](https://docs.sonarsource.com/sonarqube-server/2025.1/setup-and-upgrade/pre-installation/linux "mention") for more information.
### Plugins
**Updates to custom plugins required (10.5)**
For a faster analysis, SonarQube now optimizes the loading of analyzers by default. To avoid dependency errors, you’ll need to update the configuration of your custom plugins. See [plugin-basics](https://docs.sonarsource.com/sonarqube-server/2025.1/extension-guide/developing-a-plugin/plugin-basics "mention") for more information. Also, if you use third-party plugins, make sure to use the latest ones compatible with this feature.
**Updated security policy for page extensions (10.0)**
To improve security, pages added to the UI by plugins can no longer include inline scripts. If you use this feature, you might need to update your plugins. See [adding-pages-to-the-webapp](https://docs.sonarsource.com/sonarqube-server/2025.1/extension-guide/developing-a-plugin/adding-pages-to-the-webapp "mention") for more information.
### Clean as You Code
**Updated Sonar Way quality gate condition (10.3)**
The Sonar way quality gate now uses a zero issue condition on new code. If you’re upgrading from version 10.2 or earlier, note that your Sonar way quality gate is preserved as "Sonar way (legacy)" upon upgrading and the associated projects are moved to that custom quality gate. We recommend to start using the new Sonar way quality gate at your earliest convenience to keep up with the latest standards.
**Maximum new code definition value automatically adjusted in existing projects (10.2)**
For existing projects, if the value of the Number of days option is set to a higher value than 90 before the upgrade, SonarQube automatically changes it to 90. As a consequence, some issues might move out of the new code. See the [about-new-code](https://docs.sonarsource.com/sonarqube-server/2025.1/user-guide/about-new-code "mention") page for more information.
**Updated options for new code definition (10.2)**
To make them more in line with the Clean as You Code methodology, the following options have been updated for projects:
* Specific analysis: This setup is now available only via the Web API. Automation is required to ensure the value is kept up to date.
* Number of days: The maximum value allowed when setting it up is now 90. It’s recommended to update your existing projects accordingly.
See the [about-new-code](https://docs.sonarsource.com/sonarqube-server/2025.1/user-guide/about-new-code "mention") page for more information.
### API
**API updates (10.7)**
When querying rules or issues, INFO and BLOCKER may appear as statuses at the quality level (i.e. a rule might have a reliability severity of BLOCKER). You can also create rules and issues with these additional severities. See [Web API](https://next.sonarqube.com/sonarqube/web_api) in the help menu of SonarQube Server.
The affected APIs are:
* api/issues/\*
* api/rules/\*
* api/projects/export\_findings
* api/qualityprofiles/compare
* api/qualityprofiles/changelog
### End of support
**Deprecated web services and parameters removed (10.0)**
The web services and parameters that were deprecated in versions 8.x and 9.x have been removed. For more information, see [the corresponding list](https://sonarsource.atlassian.net/issues/?jql=project%20%3D%20SONAR%20AND%20labels%20%3D%2010.0-removed-webapi) and read the [API deprecation policy](https://community.sonarsource.com/t/api-deprecation-policy-change/57998).
---
# Source: https://docs.sonarsource.com/sonarqube-server/8.9/setup-and-upgrade/lts-to-lts-release-upgrade-notes.md
# Source: https://docs.sonarsource.com/sonarqube-server/9.9/setup-and-upgrade/lts-to-lts-release-upgrade-notes.md
# LTA to LTA release upgrade notes
These Upgrade Notes are intended for users who are directly upgrading from SonarQube 8.9 LTA. Just upgrading a few minor versions? Refer to the regular [release-upgrade-notes](https://docs.sonarsource.com/sonarqube-server/9.9/setup-and-upgrade/release-upgrade-notes "mention").
### Authentication
**Token expiry (9.6)**\
New tokens can now have an optional expiration date. Expired tokens cannot be used and must be updated. With [Enterprise Edition](https://www.sonarsource.com/plans-and-pricing/enterprise/) and [above](https://www.sonarsource.com/products/sonarqube/downloads/), system administrators can set a maximum lifetime for new tokens. See [security](https://docs.sonarsource.com/sonarqube-server/9.9/instance-administration/security "mention") documentation for more information. ([SONAR-16565](https://sonarsource.atlassian.net/browse/SONAR-16565), [SONAR-16566](https://sonarsource.atlassian.net/browse/SONAR-16566)).
**Project analysis token (9.5)**\
You can now generate tokens of different types and can create a different analysis token for every specific project. The new tokens will include a prefix to help you quickly identify SonarQube tokens and their type. The usage of project analysis tokens is encouraged to limit the access this token has. See [generating-and-using-tokens](https://docs.sonarsource.com/sonarqube-server/9.9/user-guide/user-account/generating-and-using-tokens "mention") documentation for more information. ([SONAR-16260](https://sonarsource.atlassian.net/browse/SONAR-16260)).
**Bitbucket Cloud authentication now built-in (9.2)**\
Support for Bitbucket Cloud authentication is now built-in. If you were using the Bitbucket Cloud authentication plugin before, you need to remove it from SonarQube before upgrading.
SonarQube uses the same settings as the plugin, so you do not need to update them. The Teams restriction has been replaced with the Workspaces restriction and is migrated accordingly.
**Password of old inactive account needs reset (9.4)**\
The support for SHA1 hashed password has been removed. This algorithm was replaced by a stronger hashing algorithm since version 7.2. As a result, local accounts that did not log in since 7.2 will be forced to have their password reset by a SonarQube administrator. Accounts using external authentication such as SAML, LDAP, GitHub authentication, etc., are not impacted. Information about the possibly impacted accounts will appear in the logs during the upgrade. ([SONAR-16204](https://sonarsource.atlassian.net/browse/SONAR-16204)).
### Analysis
**Updated built-in Quality Profiles (9.0-9.9)**
The built-in Quality Profiles for each language have been updated, meaning rules may have been added, changed, deprecated or dropped. If you are using or extending any of the "Sonar way" built-in Quality Profiles, make sure to check their Changelog to see what has changed.
**SonarScanner for .NET compatibility (9.9)**
Incremental analysis of C# / VB.NET in SonarQube requires [sonarscanner-for-dotnet](https://docs.sonarsource.com/sonarqube-server/9.9/analyzing-source-code/scanners/sonarscanner-for-dotnet "mention") 5.11+.
**New main branch names default to "main" (9.8)**\
In the past, newly created projects and applications would have a main branch called "master". This has now been changed to "main". The default value for a newly created main branch name can be changed under **Administration > General > Default main branch name**. See the [branch-analysis](https://docs.sonarsource.com/sonarqube-server/9.9/analyzing-source-code/branches/branch-analysis "mention") documentation for more information. ([SONAR-17524](https://sonarsource.atlassian.net/browse/SONAR-17524))
**JavaScript, TypeScript, and CSS analysis now requires Node.js 14.17+ (9.7)**\
In order to analyze Javascript, Typescript, and CSS code, Node.js 14.17+ must be installed on the machine running the scan. We recommend that you use the latest Node.js LTS, which is currently Node.js 18.
**Secured settings no longer available in web services and on the scanner side (9.1)**\
This change especially affects the analysis of SVN projects but also, possibly, the use of some 3rd-party plugins. Secured settings required to perform the analysis now need to be passed to the scanner as parameters.
**Custom measures feature has been dropped (9.1)**\
The custom measures feature, which was previously deprecated, has been removed. ([SONAR-10762](https://sonarsource.atlassian.net/browse/SONAR-10762)).
**Scanners require Java 11 (9.0)** Java 11 is required for SonarQube scanners. Use of Java 8 is no longer supported. See the documentation on [scanner-environment](https://docs.sonarsource.com/sonarqube-server/9.9/analyzing-source-code/scanner-environment "mention") for more information.
**Reporting Quality Gate status on GitHub branches requires an additional permission (9.0)**\
When working in private GitHub repositories, you need to grant read-only access to the **Contents** permission on the GitHub application that you’re using for SonarQube integration. See the [github-integration](https://docs.sonarsource.com/sonarqube-server/9.9/devops-platform-integration/github-integration "mention") for more information.
### Operations
**SonarQube server requires Java 17 (9.9)**\
Java 17 is required for SonarQube server. Use of Java 8 and Java 11 is no longer supported. See the documentation on [prerequisites-and-overview](https://docs.sonarsource.com/sonarqube-server/9.9/requirements/prerequisites-and-overview "mention") for more information.
**Microsoft SQL Server with Integrated Authentication changes in configuration (9.9)**
* If you are using Microsoft SQL Server with Integrated Authentication, you will need to replace the `mssql-jdbc_auth` dll file on your `PATH` with `mssql-jdbc_auth-11.2.2.x64.dll` from the [Microsoft SQL JDBC Auth 11.2.2 package](https://github.com/microsoft/mssql-jdbc/releases/download/v11.2.2/mssql-jdbc_auth.zip). See [install-the-server](https://docs.sonarsource.com/sonarqube-server/9.9/setup-and-upgrade/install-the-server "mention") for more information.
**Database support updated (9.9)**
* SonarQube no longer supports Oracle version 12C and 18C.
* Oracle version 21C is now supported.
* SQL Server 2022 is now supported.
**Single Helm chart for Community, Developer, and Enterprise Edition (9.9)**
The [sonarqube-lts](https://artifacthub.io/packages/helm/sonarqube/sonarqube-lts) Helm chart is no longer maintained. Please use the [sonarqube](https://artifacthub.io/packages/helm/sonarqube/sonarqube) Helm chart to install SonarQube 9.9 LTA Community, Developer, or Enterprise Edition. The Data Center Edition is available with the [sonarqube-dce](https://artifacthub.io/packages/helm/sonarqube/sonarqube-dce) Helm chart. Refer to the [upgrade-guide](https://docs.sonarsource.com/sonarqube-server/9.9/setup-and-upgrade/upgrade-the-server/upgrade-guide "mention") for more information.
**Docker images updated (9.9)**
* Recommended [Docker Engine](https://docs.docker.com/engine/) version is 20.10 and later.
* If you use self-signed certificates, you may need to adjust your Docker configuration: the path of the Java installation has changed to `/opt/java/openjdk`. See [install-the-server](https://docs.sonarsource.com/sonarqube-server/9.9/setup-and-upgrade/install-the-server "mention") for more information.
* The deprecated `SONARQUBE_JDBC_USERNAME`, `SONARQUBE_JDBC_PASSWORD`, and `SONARQUBE_JDBC_URL` variables have been removed. See [environment-variables](https://docs.sonarsource.com/sonarqube-server/9.9/setup-and-upgrade/configure-and-operate-a-server/environment-variables "mention") for up-to-date configuration variables.
* The `lts` tag on Docker images is replaced with the new LTA release. If you want to avoid any automatic major upgrades, we recommend using the corresponding `9.9-` tag instead of `lts-`.
**Change in the database connection pool (9.7)**\
The database connection pool has been replaced for better performance. The `sonar.jdbc.maxIdle`, `sonar.jdbc.minEvictableIdleTimeMillis` and `sonar.jdbc.timeBetweenEvictionRunsMillis` properties no longer have any effect and should be removed from the configuration. Also, the JMX information that is provided to monitor the connection pool has evolved. See the [monitoring](https://docs.sonarsource.com/sonarqube-server/9.9/instance-administration/monitoring "mention") for more information. ([SONAR-17200](https://sonarsource.atlassian.net/browse/SONAR-17200)).
**Running SonarQube as a Service and Java version selection (9.6)**
* To install, uninstall, start or stop SonarQube as a service on Windows, now you should use `%SONARQUBE-HOME%\bin\windows-x86-64\SonarService.bat install`. See [operating-the-server](https://docs.sonarsource.com/sonarqube-server/9.9/setup-and-upgrade/configure-and-operate-a-server/operating-the-server "mention") and [upgrade-guide](https://docs.sonarsource.com/sonarqube-server/9.9/setup-and-upgrade/upgrade-the-server/upgrade-guide "mention") for more information.
* If there are multiple versions of Java installed on your server, to select specific Java version to be used, set the environment variable `SONAR_JAVA_PATH`. Read more [install-the-server-as-a-cluster](https://docs.sonarsource.com/sonarqube-server/9.9/setup-and-upgrade/install-the-server-as-a-cluster "mention").
**Microsoft SQL Server changes in configuration and Integrated Authentication (9.6)**
* If your Microsoft SQL Server doesn’t support encryption, you will need to add `encrypt=false` to the JDBC URL connection string. ([SONAR-16249](https://sonarsource.atlassian.net/browse/SONAR-16249)).
* If your Microsoft SQL Server requires encryption but you don’t want SonarQube to validate the certificate, you will need to add `trustServerCertificate=true` to the JDBC URL connection string.
### User Interface
**Portfolio overview now shows ratings on both New Code and Overall Code (9.3)**\
The Portfolio overview and project breakdown have been redesigned to provide a high-level view on project health according to your New Code definition as well as Overall Code. New Code ratings are shown for Reliability, Security Vulnerabilities, Security Review, and Maintainability. To see these ratings on New Code, Portfolios need to be recomputed after upgrading to 9.3.
Along with this redesign, Portfolios and Applications no longer show users information on projects they don’t have access to, and Application administration has been moved out of the Portfolio administration UI.
**Support for Internet Explorer 11 dropped (9.0)**\
Support for Internet Explorer 11 and other legacy browsers has been dropped. ([SONAR-14387](https://sonarsource.atlassian.net/browse/SONAR-14387)).
### Web/Plugin API
**Deprecated WebAPI endpoints and parameters removed (9.1)**\
The WebAPI endpoints and parameters deprecated during the 7.X release cycle have been removed. For a complete list of removed endpoints and parameters see [SONAR-15313](https://sonarsource.atlassian.net/browse/SONAR-15313).
**JavaScript custom rule API removed (9.0)**\
The JavaScript custom rule API, which was previously deprecated, has been removed. Plugins can no longer use this API to implement custom rules. See the [javascript-typescript-css](https://docs.sonarsource.com/sonarqube-server/9.9/analyzing-source-code/languages/javascript-typescript-css "mention") for more information. ([SONAR-14928](https://sonarsource.atlassian.net/browse/SONAR-14928)).
**Deprecated Plugin Java API dropped (9.0)**\
Parts of the Java API for plugins that were deprecated before SonarQube 7.0 have been dropped. You should compile plugins against SonarQube 9.0 to ensure they’re compatible and to check if they’re using a deprecated API that has been dropped. ([SONAR-14925](https://sonarsource.atlassian.net/browse/SONAR-14925), [SONAR-14885](https://sonarsource.atlassian.net/browse/SONAR-14885)).
---
# Source: https://docs.sonarsource.com/sonarqube-community-build/server-installation/pre-installation/macos.md
# Source: https://docs.sonarsource.com/sonarqube-server/10.5/setup-and-upgrade/pre-installation/macos.md
# Source: https://docs.sonarsource.com/sonarqube-server/10.6/setup-and-upgrade/pre-installation/macos.md
# Source: https://docs.sonarsource.com/sonarqube-server/10.7/setup-and-upgrade/pre-installation/macos.md
# Source: https://docs.sonarsource.com/sonarqube-server/10.8/setup-and-upgrade/pre-installation/macos.md
# Source: https://docs.sonarsource.com/sonarqube-server/2025.2/setup-and-update/pre-installation/macos.md
# Source: https://docs.sonarsource.com/sonarqube-server/2025.3/server-installation/pre-installation/macos.md
# Source: https://docs.sonarsource.com/sonarqube-server/2025.5/server-installation/pre-installation/macos.md
# Source: https://docs.sonarsource.com/sonarqube-server/2025.1/setup-and-upgrade/pre-installation/macos.md
# Source: https://docs.sonarsource.com/sonarqube-server/2025.4/server-installation/pre-installation/macos.md
# Source: https://docs.sonarsource.com/sonarqube-server/2025.6/server-installation/pre-installation/macos.md
# Source: https://docs.sonarsource.com/sonarqube-server/server-installation/pre-installation/macos.md
# On macOS systems
Because SonarQube Server uses an embedded Elasticsearch, make sure that your host configuration complies with the [Elasticsearch production mode requirements](https://www.elastic.co/guide/en/elasticsearch/reference/current/docker.html#docker-cli-run-prod-mode) and [File Descriptors configuration](https://www.elastic.co/guide/en/elasticsearch/reference/current/file-descriptors.html).
## Configuring the maximum number of open files
Set the file limit values by running the following commands.
```sh
sudo sysctl kern.maxfiles=131072
sudo sysctl kern.maxfilesperproc=131072
ulimit -n 131072
```
---
# Source: https://docs.sonarsource.com/sonarqube-cloud/improving/main-branch-analysis.md
# Main branch analysis
SonarQube Cloud analyzes the **Main Branch** every time a change is made to it. Select **My Projects** in the global navigation and choose your project from the list to see the results. By default, the **Project Overview** is displayed. This view includes three sections:
1. **Latest Activity**: A summary of recent analyses performed on your project.
2. **Main Branch Status**: The quality gate status of your main branch, **Passed**, **Failed**, or **Not Computed**.
3. **Main Branch Evolution**: A summary of the code quality results for the main branch of your project.
On the left side of the page, go to **Main Branch** to see a detailed breakdown of the results for the main branch of your project.
### Quality gate
The quality gate status for your main branch is displayed under the **Summary** tab of the **Main Branch** view. It shows the releasability status of the main branch of your project, answering the question, "Can I release my project today?"
A quality gate consists of a set of conditions like "Reliability is rated at least A", "Maintainability is rated at least B", and "Test coverage is at least 80%". These conditions are applied to analysis results to determine whether the code meets the level of quality required.
If the main branch meets or exceeds the quality gate conditions, it displays a **Passed** status:
If the main branch does not meet the quality gate conditions, it displays a **Failed** status:
### Setting a new code definition
Initially, when you start a new project, you may end up performing an analysis without first setting a new code definition. Selecting a new code definition for your project is an essential part of setting up SonarQube Cloud. Without one, the default quality gate won’t work. In this case, the system directs you to set up your new code definition, like this:
What counts as new code can differ from project to project, so SonarQube Cloud provides a few options. We strongly encourage all users to choose a new code definition suitable for their project.
Once you have set up a new code definition and performed another analysis, the quality gate status should appear. See [about-new-code](https://docs.sonarsource.com/sonarqube-cloud/standards/about-new-code "mention") for more information.
### Built-in quality gate
SonarQube Cloud provides a built-in quality gate, called the *Sonar way* quality gate, enabled on the main branch by default. This quality gate reflects Sonar’s recommended settings. However, your requirements may differ, so you may wish to define a custom quality gate. For details see the [quality-gates](https://docs.sonarsource.com/sonarqube-cloud/improving/quality-gates "mention") page.
### New code quality measures
When you first look at a newly analyzed project, it can be challenging to decide where to start fixing issues. To help with this, SonarQube Cloud encourages you to focus your efforts on *new code*. This is why we encourage users to set a suitable new code definition for their project.
To help you focus on recently changed code, the main branch summary displays a specific tab for new code.
Note that the new code quality measures (and any quality gate that relies on them, like the default quality gate) will only appear upon the *second* analysis performed *after* a new code definition has been set.
### Overall code quality measures
In addition to new code quality measures, the main branch summary also displays the **Overall Code** quality measures in another tab. This tab shows the issues found in *all code*, including new code.
### Measures categories
The measures themselves are displayed as tiles corresponding to the following categories:
* **Reliability**: Details of issues with an impact on the reliability of your software.
* **Maintainability**: Details of issues with an impact on the maintainability of your software.
* **Security**: Details of issues with an impact on the security of your software.
* **Accepted issues**: Accepted issues. See the [solution-overview](https://docs.sonarsource.com/sonarqube-cloud/managing-your-projects/issues/solution-overview "mention") for more details.
* **Coverage**: Displays the percentage of potentially testable lines of code that are *actually* covered by test cases. The lines of code that *could* be covered are referred to as the **lines to cover**. Of those **lines to cover**, those that are currently *not covered* are referred to as the **uncovered lines**. The coverage percentage calculation is, therefore: `coverage = 100 - (100 * uncovered_lines / lines_to_cover)`. Note that **lines to cover** only counts lines that are included in the coverage report and testable (for example, lines that are only composed of `}` are not counted). This differs from how duplicated lines are counted. For more details see the [overview](https://docs.sonarsource.com/sonarqube-cloud/enriching/test-coverage/overview "mention") of the test coverage page.
* **Duplications**: Identical lines of code detected. All lines of code into account (including non-testable lines). Since this differs from how coverage lines are counted, the final count for the two metrics may differ.
* **Security Hotspots**: Security-sensitive hotspots needing review.
Clicking on any figure takes you to a more detailed view, either in the **Measures** tab or the **Issues** tab.
### Other tabs
*Your Project* > **Main Branch** > **Issues**
* The **Issues** tab provides an overview of all the issues detected by the analysis and lets you filter the list by adjusting the facets on the left.
*Your Project* > **Main Branch** > **Security Hotspots**
* The **Security Hotspots** tab provides information on detected [security-hotspots](https://docs.sonarsource.com/sonarqube-cloud/digging-deeper/security-hotspots "mention").
*Your Project* > **Main Branch** > **Measures**
* The **Measures** tab shows all project metrics. Choose a measure for more details. Both list and tree views are available for each measure, and tree maps are available for percentages and ratings.
*Your Project* > **Main Branch** > **Code**
* The **Code** tab takes you to an outline of your project structure. Drill down to see files in a directory, and choose a file to see its code. If your project is too large for easy exploration via drilling down, the search feature on this page lets you search within the files and directories in the current project.
*Your Project* > **Main Branch** > **Activity**
* The **Activity** tab takes you to the full list of code scans performed on your project since it was created in SonarQube Cloud. Here you can follow the evolution of the quality gate, see the changes of quality profiles and find out when a given version of your code has been scanned.
**Visualizations** allow you to compare project components and quickly spot the ones that represent the most significant risks. Several predefined visualizations are available. You can also create custom ones with the metrics of your choice.
*Your Project* > **Administration**
* If you are a project administrator, the **Administration** menu gives you access to all project-level settings.
*Your Project* > **Information**
* The **Information** page provides additional details on various aspects of your project including an option to download regulatory reports. See [viewing-project-regulatory-reports](https://docs.sonarsource.com/sonarqube-cloud/getting-started-with-enterprise/viewing-enterprise-reports/viewing-project-regulatory-reports "mention") for more details.
### Other analysis views
In this section, we looked at how the results of **Main Branch** analysis are displayed. In addition, you can also access the code review and analysis results of **Pull Requests** and other **Branches** through the project navigation on the left side of the screen.
For details on these topics see the [branch-analysis](https://docs.sonarsource.com/sonarqube-cloud/enriching/branch-analysis "mention") and [pull-request-analysis](https://docs.sonarsource.com/sonarqube-cloud/improving/pull-request-analysis "mention") sections.
### Incremental analysis
Some analyzers use the analysis cache mechanism to shorten the main branch analysis. See [incremental-analysis-mechanisms](https://docs.sonarsource.com/sonarqube-cloud/advanced-setup/incremental-analysis-mechanisms "mention") for more information.
---
# Source: https://docs.sonarsource.com/sonarqube-community-build/project-administration/maintaining-project.md
# Source: https://docs.sonarsource.com/sonarqube-server/2025.6/project-administration/maintaining-project.md
# Source: https://docs.sonarsource.com/sonarqube-server/project-administration/maintaining-project.md
# Maintaining your project
- [Maintaining project branches](/sonarqube-server/project-administration/maintaining-project/maintaining-the-branches-of-your-project.md): Manage your project’s branches to fit the needs of your organization and workflow.
- [Managing project history](/sonarqube-server/project-administration/maintaining-project/managing-project-history.md): Manage your project’s history by editing and deleting snapshots of your project.
- [Changing the project key](/sonarqube-server/project-administration/maintaining-project/changing-project-key.md): You can update the project key without losing the history of the project.
- [Project move](/sonarqube-server/project-administration/maintaining-project/project-move.md): Project Move allows you to export a project from one SonarQube Server instance and import it into another SonarQube Server instance.
- [Deleting your project](/sonarqube-server/project-administration/maintaining-project/deleting-project.md): You can delete one or multiple projects, provided you have the necessary permissions to do so.
- [Changing your project binding](/sonarqube-server/project-administration/maintaining-project/changing-project-binding.md): You can bind an unbound project and you can change the binding of a bound project.
---
# Source: https://docs.sonarsource.com/sonarqube-server/10.6/project-administration/maintaining-the-branches-of-your-project.md
# Source: https://docs.sonarsource.com/sonarqube-server/10.7/project-administration/maintaining-the-branches-of-your-project.md
# Source: https://docs.sonarsource.com/sonarqube-server/10.8/project-administration/maintaining-the-branches-of-your-project.md
# Source: https://docs.sonarsource.com/sonarqube-server/2025.2/project-administration/maintaining-the-branches-of-your-project.md
# Source: https://docs.sonarsource.com/sonarqube-server/2025.3/project-administration/maintaining-the-branches-of-your-project.md
# Source: https://docs.sonarsource.com/sonarqube-server/2025.5/project-administration/maintaining-the-branches-of-your-project.md
# Source: https://docs.sonarsource.com/sonarqube-server/2025.1/project-administration/maintaining-the-branches-of-your-project.md
# Source: https://docs.sonarsource.com/sonarqube-server/2025.4/project-administration/maintaining-the-branches-of-your-project.md
# Source: https://docs.sonarsource.com/sonarqube-server/2025.6/project-administration/maintaining-project/maintaining-the-branches-of-your-project.md
# Source: https://docs.sonarsource.com/sonarqube-server/project-administration/maintaining-project/maintaining-the-branches-of-your-project.md
# Maintaining project branches
### Renaming the main branch
Your main branch can be renamed from the project settings at **Project Settings** > **Branches and Pull Requests**. This is used mainly to maintain branch history when upgrading from SonarQube Community Build to a SonarQube Server commercial edition (see section below).
### Choosing a new main branch
You can choose a different, existing branch to become the new main branch of a project. To do this:
1. Go to **Project Settings** > **Branches & Pull Requests**.
2. On the list of branches, click on the Actions cog button for the branch you want to make your main branch and click **Set as main branch**.
Changing the main branch of your project will trigger [reindexing](https://docs.sonarsource.com/sonarqube-server/server-update-and-maintenance/maintenance/reindexing "mention") and may impact the level of information that is available for your project until reindexing is complete.
#### Impacts of choosing a new main branch
Choosing a new main branch has an effect on:
* **New code:** When some of a project’s branches use the main branch as a reference branch, changing the main branch does not update the new code settings. All branches continue to point to the previous main branch. If you want your reference branch to point to the new main branch, you must update the new code settings manually.
* **Applications:** The main branch of an application always references the main branch of a project, and changing the main branch of the project changes the main branch of the application. When a project’s main branch changes, the application is automatically scheduled for recomputation (see [managing-applications](https://docs.sonarsource.com/sonarqube-server/project-administration/managing-applications "mention")). After you change the main branch of a project, it can take a few minutes to propagate to the application.
* **Portfolios:** Portfolios are different from applications, as they can either reference the main branch of a project or a project’s branch specifically.
* In the first case, if you change the project’s main branch, the portfolio starts referencing the new main branch of the project. The recomputation mechanics are the same as for applications.
* In the second case, changing the project’s main branch does not change the portfolio, as the portfolio is referencing a specific branch.
* **Branch analysis:**
* **Impacts on CI setup:** It is possible to analyze a branch without passing an explicit branch name (`sonar.branch.name`). In this case, the analysis automatically points to the main branch of the project. If you change the main branch, you could unintentionally have analyses from the old main branch go to the new branch. To avoid this, ensure the branch analysis is always pointing to a specific branch.
* **Impacts on analysis processing:** If you change the main branch during a busy load of background tasks, it may impact certain background tasks that process analysis reports. This could lead to an inconsistent state. The solution is to re-analyze the project. This will put everything back into a consistent state.
### Deleting a branch
You can delete a branch in the **Branches** tab at **Project Settings** > **Branches and Pull Requests**.
### Managing inactive branches
Projects and branches that are not scanned for more than a configured number of consecutive days are considered inactive, and SonarQube Server automatically deletes their cached data to free space in the database. If a project has several branches, only the cache of its inactive branches is deleted.
You can configure at the global and project levels, branches to be kept from the automatic deletion when inactive.
{% hint style="info" %}
The main branch is always protected from automatic deletion, even if it’s inactive. This can’t be changed.
{% endhint %}
To configure the number of days after which an inactive branch is deleted:
* In **Administration** > **General Settings** > **Housekeeping**, set the **Number of days before deleting inactive branches.**
### Keeping specific branches from automatic deletion (permanent branches)
You can use naming patterns to protect specific branches, such as release branches, from automatic deletion. To do this, add one or several patterns under:
* At global level\*\*: Administration\*\* > **General Settings** > **Housekeeping** > **Branches** > **Branches to keep when inactive**
* At project level, from the page of the specific project: **Project settings** > **General Settings** > **Housekeeping** > **Branches** > **Branches to keep when inactive.**
When a branch is created with a name that follows one of these patterns, it will be kept indefinitely. For example, adding the pattern release/.\* would keep any branches named release/6.0, release/7, and so on.
{% hint style="info" %}
Patterns aren’t retroactive and won’t apply to branches that have already been created. They only apply to branches created after the pattern is set. You can protect an existing branch at the project level. See the following section.
{% endhint %}
You can protect a specific branch from the automatic deletion as follows:
* From the **Branches** page: in **Project Settings** > **Branches and Pull Requests** check **Keep when inactive**.
### Maintaining branch history when upgrading to a commercial edition
When upgrading to a current commercial edition version, automatic branch and pull request configuration creates branches based on their names in your code repository. If the name of your main branch in SonarQube Server doesn’t match the branch’s name in your code repository (this may be the case if you didn’t import the repository but created your project manually in SonarQube Server), the history of your main branch won’t be taken on by the branch you analyze.
**Before running analysis**, you can keep your branch history by renaming the main branch in SonarQube Server with the name of the branch in your code repository at **Project Settings** > **Branches and Pull Requests**.
For example, if your main branch is named `main` in SonarQube Server but `develop` in your code repository, rename your main branch to `develop` in SonarQube Server.
---
# Source: https://docs.sonarsource.com/sonarqube-community-build/quality-standards-administration/managing-quality-profiles/maintaining-your-custom-quality-profiles.md
# Source: https://docs.sonarsource.com/sonarqube-server/2025.3/quality-standards-administration/managing-quality-profiles/maintaining-your-custom-quality-profiles.md
# Source: https://docs.sonarsource.com/sonarqube-server/2025.5/quality-standards-administration/managing-quality-profiles/maintaining-your-custom-quality-profiles.md
# Source: https://docs.sonarsource.com/sonarqube-server/2025.4/quality-standards-administration/managing-quality-profiles/maintaining-your-custom-quality-profiles.md
# Source: https://docs.sonarsource.com/sonarqube-server/2025.6/quality-standards-administration/managing-quality-profiles/maintaining-your-custom-quality-profiles.md
# Source: https://docs.sonarsource.com/sonarqube-server/quality-standards-administration/managing-quality-profiles/maintaining-your-custom-quality-profiles.md
# Source: https://docs.sonarsource.com/sonarqube-cloud/standards/managing-quality-profiles/maintaining-your-custom-quality-profiles.md
# Maintaining quality profiles
You should regularly maintain your organization’s custom quality profiles *that do not inherit from a built-in profile*. The built-in quality profiles are regularly updated to reflect the addition of new rules and the deprecation of existing ones. As a user with Administer Quality Profile permission, you will be notified by email each time a built-in profile is updated. Updates can be introduced through a SonarQube or third-party analyzer upgrade.
To edit a custom quality profile, you need the Administer Quality Profiles permission in your organization or be authorized to manage this particular profile. To delete a custom quality profile, you need the Administer Quality Profiles permission.
### Ensuring your quality profile has all relevant new rules
To ensure that your custom quality profile has all relevant new rules, you can check for the recently added rules and for the stagnant profiles. Stagnant profiles are custom profiles that have not been updated for more than one year.
#### In the Quality Profiles page
To check for recently added rules and stagnant profiles:
1. [viewing-organizations](https://docs.sonarsource.com/sonarqube-cloud/getting-started/viewing-organizations "mention") and go to **Quality profiles**. The right-hand side of the **Quality Profiles** page shows the stagnant profiles and recently implemented rules.
2. To inspect a new rule, select it in the **Recently Added Rules** section.
3. To edit a stagnant profile, select it in the **Stagnant Profiles** section. The quality profile page opens. To add the new rules to your profile, you can now:
* Either select **\ inactive rules** in the **Inheritance** section and then activate the new rules from the list of inactive rules.
* Or compare the stagnant profile with the built-in profile.
#### In the Rules page
To check for recently added rules:
1. See [viewing-organizations](https://docs.sonarsource.com/sonarqube-cloud/getting-started/viewing-organizations "mention") to access your organization, then go to the **Rules** page.
2. In **Filters**, set the **Available Since** criterion.
### Managing the deprecated rules in quality profiles
A deprecated rule is a rule that SonarQube will not be supported any more in the near future. A rule may be deprecated if it has become obsolete or if it has been replaced by one or several new rules. When a rule becomes deprecated, it will be deactivated in the corresponding language’s built-in profile and in the profile inheriting from it.
If your custom profile does not inherit from the built-in profile, you should regularly check your quality profiles for deprecated rules as follows:
1\. See [viewing-organizations](https://docs.sonarsource.com/sonarqube-cloud/getting-started/viewing-organizations "mention") to access your organization, then go to the **Quality Profiles** page. On the right-hand side of the page, the **Deprecated Rules** section lists the quality profiles containing deprecated rules.
2\. To manage one of these profiles, select the **\ rules** hyperlink under the profile name. The list of deprecated rules in the profile is displayed.
3\. To deactivate a rule, select the respective **Deactivate** button. To deactivate all rules at a time, select **Bulk Change** > **Deacivate in <**YOUR PROFILE**>** in the top tool bar.
### Deleting a quality profile
To delete a custom quality profile:
1. See [viewing-organizations](https://docs.sonarsource.com/sonarqube-cloud/getting-started/viewing-organizations "mention") to access your organization, then go to the **Quality Profiles** page and retrieve the custom quality profile you want to delete.
2. In the top right corner of the quality profile page, select the three-dot button and select **Delete** in the menu. A confirmation dialog opens.
3. Select **Delete**.
### Related pages
* [viewing-quality-profiles](https://docs.sonarsource.com/sonarqube-cloud/standards/managing-quality-profiles/viewing-quality-profiles "mention")
* [understanding-quality-profiles](https://docs.sonarsource.com/sonarqube-cloud/standards/managing-quality-profiles/understanding-quality-profiles "mention")
* [viewing-quality-profiles](https://docs.sonarsource.com/sonarqube-cloud/standards/managing-quality-profiles/viewing-quality-profiles "mention")
* [creating-a-quality-profile](https://docs.sonarsource.com/sonarqube-cloud/standards/managing-quality-profiles/creating-a-quality-profile "mention")
* [editing-a-custom-quality-profile](https://docs.sonarsource.com/sonarqube-cloud/standards/managing-quality-profiles/editing-a-custom-quality-profile "mention")
* [associating-a-quality-profile-with-projects](https://docs.sonarsource.com/sonarqube-cloud/standards/managing-quality-profiles/associating-a-quality-profile-with-projects "mention")
* [changing-default-quality-profile](https://docs.sonarsource.com/sonarqube-cloud/standards/managing-quality-profiles/changing-default-quality-profile "mention")
* [authorizing-other-users-to-manage-quality-profile](https://docs.sonarsource.com/sonarqube-cloud/standards/managing-quality-profiles/authorizing-other-users-to-manage-quality-profile "mention")
* [quality-profile-association](https://docs.sonarsource.com/sonarqube-cloud/managing-your-projects/project-analysis/quality-profile-association "mention")
---
# Source: https://docs.sonarsource.com/sonarqube-community-build/server-update-and-maintenance/maintenance.md
# Source: https://docs.sonarsource.com/sonarqube-server/10.7/server-upgrade-and-maintenance/maintenance.md
# Source: https://docs.sonarsource.com/sonarqube-server/10.8/server-upgrade-and-maintenance/maintenance.md
# Source: https://docs.sonarsource.com/sonarqube-server/2025.2/server-update-and-maintenance/maintenance.md
# Source: https://docs.sonarsource.com/sonarqube-server/2025.3/server-update-and-maintenance/maintenance.md
# Source: https://docs.sonarsource.com/sonarqube-server/2025.5/server-update-and-maintenance/maintenance.md
# Source: https://docs.sonarsource.com/sonarqube-server/2025.1/server-update-and-maintenance/maintenance.md
# Source: https://docs.sonarsource.com/sonarqube-server/2025.4/server-update-and-maintenance/maintenance.md
# Source: https://docs.sonarsource.com/sonarqube-server/2025.6/server-update-and-maintenance/maintenance.md
# Source: https://docs.sonarsource.com/sonarqube-server/server-update-and-maintenance/maintenance.md
# Maintenance
- [Improving performance](/sonarqube-server/server-update-and-maintenance/maintenance/improving-performance.md): Improve the performance of your SonarQube Server instance by increasing the number of Compute Engine workers, parallel analysis processing, and optimizing the analyzers' loading.
- [Migrating database](/sonarqube-server/server-update-and-maintenance/maintenance/sonarqube-db-copy-tool.md): The SonarQube database copy tool helps you migrate your SonarQube Server database between vendors.
- [Backup and restore](/sonarqube-server/server-update-and-maintenance/maintenance/backup-and-restore.md): Backing up and restoring your data.
- [Reindexing](/sonarqube-server/server-update-and-maintenance/maintenance/reindexing.md): Starting SonarQube Server after an update or a restore from a backup triggers a rebuild of the Elasticsearch indexes. You can also force a reindex.
- [Deprecations](/sonarqube-server/server-update-and-maintenance/maintenance/deprecations.md): Deprecation policy and API deprecations.
- [Deprecation policy](/sonarqube-server/server-update-and-maintenance/maintenance/deprecations/deprecation-policy.md): The goal of the deprecation policy is to ensure that users are aware of what is changing and have time to adjust before a feature or an API component is dropped on a planned date.
- [Monitoring API deprecation](/sonarqube-server/server-update-and-maintenance/maintenance/deprecations/monitoring-api-deprecation.md): Monitoring deprecated Web API components is an important part of checking that your SonarQube instance is using deprecated endpoints.
---
# Source: https://docs.sonarsource.com/sonarqube-cloud/administering-sonarcloud/managing-organization/manage-org-projects.md
# Managing organization's projects
- [Using Projects Management page](/sonarqube-cloud/administering-sonarcloud/managing-organization/manage-org-projects/projects-management-page.md): As the organization admin, you can manage your organization’s SonarQube Cloud projects on a centralized page called the Projects management page.
- [Managing project permissions](/sonarqube-cloud/administering-sonarcloud/managing-organization/manage-org-projects/manage-project-permissions.md): Managing project permissions in SonarQube Cloud involves using permission templates and restoring administrator access.
- [Using permission templates](/sonarqube-cloud/administering-sonarcloud/managing-organization/manage-org-projects/manage-project-permissions/templates.md): As the organization admin in SonarQube Cloud, using permission templates allows you to define permissions granted by default on new projects and various sets of permissions.
- [Restoring administrator access](/sonarqube-cloud/administering-sonarcloud/managing-organization/manage-org-projects/manage-project-permissions/recovering-admin-access.md): This page explains how to recover administrator access to a project of your SonarQube Cloud organization.
- [Migrating projects](/sonarqube-cloud/administering-sonarcloud/managing-organization/manage-org-projects/migrate-projects-to-another-org.md): A SonarQube Cloud organization cannot be re-bound to another organization however, you can move projects if needed. This page explains how to migrate projects between organizations.
---
# Source: https://docs.sonarsource.com/sonarqube-cloud/administering-sonarcloud/managing-organization/manage-org-projects/manage-project-permissions.md
# Managing project permissions
{% content-ref url="manage-project-permissions/templates" %}
[templates](https://docs.sonarsource.com/sonarqube-cloud/administering-sonarcloud/managing-organization/manage-org-projects/manage-project-permissions/templates)
{% endcontent-ref %}
{% content-ref url="manage-project-permissions/recovering-admin-access" %}
[recovering-admin-access](https://docs.sonarsource.com/sonarqube-cloud/administering-sonarcloud/managing-organization/manage-org-projects/manage-project-permissions/recovering-admin-access)
{% endcontent-ref %}
---
# Source: https://docs.sonarsource.com/sonarqube-community-build/analyzing-source-code/scanners/scanner-environment/manage-tls-certificates.md
# Source: https://docs.sonarsource.com/sonarqube-server/10.6/analyzing-source-code/various-setups/manage-tls-certificates.md
# Source: https://docs.sonarsource.com/sonarqube-server/10.7/analyzing-source-code/scanners/scanner-environment/manage-tls-certificates.md
# Source: https://docs.sonarsource.com/sonarqube-server/10.8/analyzing-source-code/scanners/scanner-environment/manage-tls-certificates.md
# Source: https://docs.sonarsource.com/sonarqube-server/2025.2/analyzing-source-code/scanners/scanner-environment/manage-tls-certificates.md
# Source: https://docs.sonarsource.com/sonarqube-server/2025.3/analyzing-source-code/scanners/scanner-environment/manage-tls-certificates.md
# Source: https://docs.sonarsource.com/sonarqube-server/2025.5/analyzing-source-code/scanners/scanner-environment/manage-tls-certificates.md
# Source: https://docs.sonarsource.com/sonarqube-server/2025.1/analyzing-source-code/scanners/scanner-environment/manage-tls-certificates.md
# Source: https://docs.sonarsource.com/sonarqube-server/2025.4/analyzing-source-code/scanners/scanner-environment/manage-tls-certificates.md
# Source: https://docs.sonarsource.com/sonarqube-server/2025.6/analyzing-source-code/scanners/scanner-environment/manage-tls-certificates.md
# Source: https://docs.sonarsource.com/sonarqube-server/analyzing-source-code/scanners/scanner-environment/manage-tls-certificates.md
# TLS certificates on client side
If your SonarQube Server instance is secured behind a proxy and a self-signed certificate, then you must add the self-signed certificate to the trusted CA certificates of the SonarScanner.
In addition, if mutual TLS is used then you must define the access to the client certificate at the SonarScanner level.
### Managing the self-signed server certificate
#### Introduction to server authentication
During the TLS authentication of the server, the client requests the server certificate from the server and verifies that this certificate is signed by a CA it trusts by checking its TrustStore. In case a self-signed server certificate is used, it must be added to the TrustStore of the client. The figure below shows the certificates involved in the authentication of SonarQube Server by the SonarScanner.
#### Adding the self-signed server certificate to the trusted CA certificates
**Step 1: Add the certificate for your scanner**
The way you add your self-signed certificate depends on your scanner.
{% tabs %}
{% tab title="FOR MAVEN" %}
You can either:
* Insert your certificate in the default JVM TrustStore (something like `\jre\lib\security\cacerts`). To add the self-signed server certificate to the default TrustStore, use the JVM tool keytool. The instructions depend on your operating system and you will find many resources online, such as [this one](https://www.ibm.com/docs/en/tnpm/1.4.2?topic=security-import-certificate-jre-keystore) for Linux.
or:
* Provide a custom Java TrustStore. This operation depends on your scanner version:
* **Version >= 5.0**: We recommend using the properties `sonar.scanner.truststorePath` and `sonar.scanner.truststorePassword`. If this does not work, please retry after upgrading to the next scanner minor version.\
You can also use the properties described below for version <= 4.0.
* **Version <= 4.0**: Use the following properties:
* `javax.net.ssl.trustStore`: path to the TrustStore file (pkcs12 format is recommended).
* `javax.net.ssl.trustStorePassword`: password of the TrustStore.
{% hint style="warning" %}
The javax.net property is a JVM property, not a scanner property. It should be passed using the `SONAR_SCANNER_OPTS` environment variable. For example: `SONAR_SCANNER_OPTS="-Djavax.net.ssl.trustStore=C:/ssl/truststore.p12 -Djavax.net.ssl.trustStorePassword=changeit"` (on Windows, use forward slashes as path separators).
{% endhint %}
{% endtab %}
{% tab title="FOR GRADLE" %}
This scanner is still relying on the Java VM for the SSL configuration.
You can either:
* Insert your certificate in the default JVM TrustStore (something like `\jre\lib\security\cacerts` ). To add the self-signed server certificate to the default TrustStore, use the JVM tool keytool. The instructions depend on your operating system and you will find many resources online, such as [this one](https://www.ibm.com/docs/en/tnpm/1.4.2?topic=security-import-certificate-jre-keystore) for Linux.
or:
* Provide a custom Java TrustStore by using the following properties:
* `javax.net.ssl.trustStore` : path to the TrustStore file (pkcs12 format is recommended).
* `javax.net.ssl.trustStorePassword` : password of the TrustStore.
{% hint style="warning" %}
The javax.net property is a JVM property, not a scanner property. It should be passed using the `SONAR_SCANNER_OPTS` environment variable. For example: `SONAR_SCANNER_OPTS="-Djavax.net.ssl.trustStore=C:/ssl/truststore.p12 -Djavax.net.ssl.trustStorePassword=changeit"` (on Windows, use forward slashes as path separators).
{% endhint %}
{% endtab %}
{% tab title="FOR .NET" %}
The operation depends on the version of your SonarScanner for .NET.
**Scanner version > = 10.0**
You can use a PKCS#12 keystore as explained below.
{% hint style="warning" %}
The SonarScanner for .NET 10.0+ does not support a certificate revocation list (CRL) when the issuing certificate authority is given via the TrustStore file. This means that revoked certificates will still be trusted when the issuing certificate is given via the TrustStore file. To benefit from CRL, you can still use the method described for *Scanner version <= 9.1* below.
{% endhint %}
Consider the following when generating the PKCS#12 keystore:
* The default location for the TrustStore is `$SONAR_USER_HOME/ssl/truststore.p12` (default value for SONAR\_USER\_HOME is \~/.sonar). This location can be overridden using the property `sonar.scanner.truststorePath`.
* The default password for the TrustStore is `changeit`. This password can be overridden using the property `sonar.scanner.truststorePassword`.
To override the default parameters, set the sonar properties in the begin step, and, for the password, also in the end step.
**Generating the PKCS#12 keystore**
If you have a PEM or DER certificate, you can use OpenSSL or Keytool to generate the PKCS #12 keystore:
* With OpenSSL:
```bash
openssl pkcs12 -export -caname sonar -out "truststore.p12" -in "server.pem" -passout pass:"" -nokeys
```
* With Keytool
```bash
keytool -import -storetype PKCS12 -alias sonar -keystore truststore.p12 -file server.pem -storepass ""
```
**Scanner version < = 9.1**
You must use the operating system TrustStore. Proceed as follows:
1. From scanner version 7.0, disable JRE auto-provisioning (JRE auto-provisioning is not compatible with the system TrustStore if you use SonarScanner for .NET). To do so, see [#disabling-jre-auto-provisioning](https://docs.sonarsource.com/sonarqube-server/analyzing-source-code/scanners/managing-jre-auto-provisioning#disabling-jre-auto-provisioning "mention").
2. Add the self-signed server certificate to the operating system TrustStore:
* On Linux:
1. Copy the self-signed server certificate to `/usr/local/share/ca-certificates` .
2. Run `sudo update-ca-certificates` .
* On macOS: use [Keychain Access](https://support.apple.com/en-gb/guide/keychain-access/kyca2431/mac) or use the following command:
```bash
sudo security add-trusted-cert -d -r trustRoot \
-k /Library/Keychains/System.keychain
```
* On Windows: use [certutil](https://learn.microsoft.com/en-us/windows-server/administration/windows-commands/certutil). Here is an example:
```bash
certutil -addstore -f "ROOT"
```
3. Add the self-signed certificate to the Java TrustStore for SonarScanner CLI (which is used by SonarScanner for .NET) as explained in the *SonarScanner for NPM or CLI* tab, for *SonarScanner CLI < 6.0*.
{% endtab %}
{% tab title="FOR NPM OR CLI" %}
The operation depends on the version of your SonarScanner for NPM or SonarScanner CLI.
**SonarScanner for NPM >= 4.0 and SonarScanner CLI >= 6.0**
You must provide a PKCS#12 keystore.
Consider the following when generating the PKCS#12 keystore:
* The default location for the TrustStore is `$SONAR_USER_HOME/ssl/truststore.p12` (default value for SONAR\_USER\_HOME is \~/.sonar). This location can be overridden using the property `sonar.scanner.truststorePath`.
* The default password for the TrustStore is `changeit`. This password can be overridden using the property `sonar.scanner.truststorePassword`.
**Generating the PKCS#12 keystore**
If you have a PEM or DER certificate, you can use OpenSSL or Keytool to generate the PKCS #12 keystore:
* With OpenSSL:
```css-79elbk
openssl pkcs12 -export -caname sonar -out "truststore.p12" -in "server.pem" -passout pass:"" -nokeys
```
* With Keytool
```css-79elbk
keytool -import -storetype PKCS12 -alias sonar -keystore truststore.p12 -file server.pem -storepass ""
```
**If running the scanner in Docker: use a mounted volume**
The preferred way is to mount a folder containing the PKCS #12 file under `/opt/sonar-scanner/.sonar/ssl`.
```bash
docker pull sonarsource/sonar-scanner-cli
docker run \
--rm \
-v ${DIR_WITH_TRUSTSTORE_DOT_P12}:/opt/sonar-scanner/.sonar/ssl \
-v ${YOUR_CACHE_DIR}:/opt/sonar-scanner/.sonar/cache \
-v ${YOUR_REPO}:/usr/src \
-e SONAR_HOST_URL="http://${SONARQUBE_URL}" \
sonarsource/sonar-scanner-cli \
-Dsonar.scanner.truststorePassword= // Not needed if the default password is used
```
**SonarScanner for NPM < 4.0 and SonarScanner CLI < 6.0**
This scanner is still relying on the Java VM for the SSL configuration.
You can either:
* Insert your certificate in the default JVM TrustStore (something like `\jre\lib\security\cacerts` ). To add the self-signed server certificate to the default TrustStore, use the JVM tool keytool. The instructions depend on your operating system and you will find many resources online, such as [this one](https://www.ibm.com/docs/en/tnpm/1.4.2?topic=security-import-certificate-jre-keystore) for Linux.
or:
* Provide a custom Java TrustStore by using the following properties:
* `javax.net.ssl.trustStore` : path to the TrustStore file (pkcs12 format is recommended).
* `javax.net.ssl.trustStorePassword` : password of the TrustStore.
{% hint style="warning" %}
The javax.net property is a JVM property, not a scanner property. It should be passed using the `SONAR_SCANNER_OPTS` environment variable. For example: `SONAR_SCANNER_OPTS="-Djavax.net.ssl.trustStore=C:/ssl/truststore.p12 -Djavax.net.ssl.trustStorePassword=changeit"` (on Windows, use forward slashes as path separators).
{% endhint %}
{% endtab %}
{% endtabs %}
For information about setting the mentioned sonar properties, see [using](https://docs.sonarsource.com/sonarqube-server/analyzing-source-code/scanners/dotnet/using "mention") for .NET, [configuring](https://docs.sonarsource.com/sonarqube-server/analyzing-source-code/scanners/npm/configuring "mention") for NPM, or the [sonarscanner](https://docs.sonarsource.com/sonarqube-server/analyzing-source-code/scanners/sonarscanner "mention") pages.
**Step 2: Additional step depending on your CI tool**
If you use GitHub Action or Azure Pipelines, an additional step is necessary as described below.
{% tabs %}
{% tab title="GITHUB ACTION" %}
If you use the [sonarqube-scan-action](https://github.com/SonarSource/sonarqube-scan-action) for your GitHub Action and your SonarQube Server instance has certificates that need to be recognized by the GitHub runner, you’ll need to set the `SONAR_ROOT_CERT` environment variable in GitHub.
To do this, go to *your GitHub repository >* **Settings** > **Secrets and Variables** and add the `SONAR_ROOT_CERT` environment variable in PEM format. You can also add it at the level of your GitHub organization (recommended).
{% hint style="info" %}
Due to a known [GitHub issue](https://github.com/actions/runner/issues/863), if your GitHub Action `v4` and above
* uses `SONAR_ROOT_CERT`
* and is executed in a containerized environment, for example when the job running the action declares `container: `
you need to explicitly set the `SONAR_USER_HOME` environment variable to be the `"$HOME/.sonar"`.
You can do that by adding the following step before executing the action:
```properties
# Workaround for https://github.com/actions/runner/issues/863
- name: Workaround for containerized environments
run: echo "SONAR_USER_HOME=$HOME/.sonar" >> $GITHUB_ENV
- name: Run sonar analysis
uses: SonarSource/sonarqube-scan-action@
...
```
{% endhint %}
{% endtab %}
{% tab title="AZURE PIPELINES" %}
If you want to add the SonarQube analysis to your Azure build pipeline and your SonarQube Server instance uses a self-signed certificate, you must provide the server certificate so that the AzureDevOps Extension for SonarQube can connect to SonarQube Server during the Prepare Analyze Configuration and Run Code Analysis tasks.
Proceed as follows:
* Define the following environment variable (this setup is required for the Prepare Analyze Configuration task):
* Key: `NODE_EXTRA_CA_CERTS`
* Value: path to the certificate
{% hint style="info" %}
Make sure you have added the certificate for the SonarScanner used with your Azure DevOps extension (SonarScanner for Maven, Gradle, .NET, or CLI) as described above in Step 1.
{% endhint %}
{% endtab %}
{% endtabs %}
### Managing the client certificates
#### Introduction to client authentication
If mutual TLS is used then both the client and the server authenticate the other party. During the TLS authentication of the client, the client must provide its certificate with the corresponding CA certificate chain (intermediate and root CA certificates) to the server. The client manages its certificates in its own keystore. The figure below shows the certificates involved in SonarQube Server’s TLS authentication of the SonarScanner.
#### Defining the access to the client certificates For SonarScanner for Maven, Gradle, CLI, or NPM
Store the client certificate and CA certificate chain in a keystore file and define the access to this file through the following properties:
* `javax.net.ssl.keyStore` or (for SonarScanner CLI from version 6.0 and SonarScanner for NPM from version 4.0) `sonar.scanner.keystorePath`: path to the keystore file.
* `javax.net.ssl.keyStorePassword` or (for SonarScanner CLI from version 6.0 and SonarScanner for NPM from version 4.0) `sonar.scanner.keystorePassword`: password of the keystore file.
For SonarScanner for .NET
1. Store the client certificate and CA certificate chain in a keystore file and define the access to this file through the following properties:
* `sonar.clientcert.path` : path to the keystore file, must be set in the begin step.
* `sonar.clientcert.password:` password of the keystore file, must be set in both the begin and end steps.
2. In addition, set the following options before the end step (for the SonarScanner CLI invocation):
* `javax.net.ssl.keyStore`: same value as `sonar.clientcert.path`
* `javax.net.ssl.keyStorePassword`: same value as `sonar.clientcert.password`
### Related pages
* [securing-behind-proxy](https://docs.sonarsource.com/sonarqube-server/server-installation/network-security/securing-behind-proxy "mention")
---
# Source: https://docs.sonarsource.com/sonarqube-server/10.8/instance-administration/system-functions/managing-ai-features.md
# Source: https://docs.sonarsource.com/sonarqube-server/2025.2/instance-administration/system-functions/managing-ai-features.md
# Managing AI features
Sonar’s AI CodeFix uses a large language model (LLM) to automatically generate AI-driven code fixes for the issues discovered by SonarQube Server. The process is simple. When you request a fix, the affected code and issue description are sent to an LLM. AI CodeFix then proposes an edit that resolves the problem without changing the code’s functionality.
AI CodeFix currently uses space.vars.SQS\_20252\_Supported\_LLM\_version your own Azure OpenAI LLM, to suggest fixes for a select set of rules in Java, JavaScript, TypeScript, Python, C#, and C++. To learn more about which rules are eligible for AI CodeFix, please see the list of [#ai-codefix-rules](https://docs.sonarsource.com/sonarqube-server/2025.2/user-guide/rules/rules-for-ai-codefix#ai-codefix-rules "mention").
### Enabling AI-generated fix suggestions
As an Instance Admin, you can enable or disable AI-generated fix suggestions on your projects. To enable AI CodeFix:
1. Go to **Administration** > **Configuration** > **General Settings** > **Early Access** > **Enable AI-Generated fix suggestions** and select **Enable AI CodeFix**.
2. Select your **Provider**:
* The default option is Sonar’s **OpenAI** which uses space.vars.SQS\_20252\_Recommended\_LLM\_version.
* To choose your own **Azure OpenAI** LLM:
1. Select **Self-hosted Bring Your Own Model**.
2. Provide your Azure OpenAI **Endpoint**. The endpoint URL should include the `deployment-id` and `api-version` parameters.\
Here is an example: `https:///openai/deployments//completions?api-version=`
3. Provide your Azure OpenAI **API Key**. For information about using Azure AI models, see the [Azure OpenAI Service documentation](https://learn.microsoft.com/en-us/azure/ai-services/openai/).
3. Once AI CodeFix is enabled, choose either **All projects** or **Only selected projects:**
When choosing **Only selected projects**, add projects individually from the list to activate the feature. New projects will not be added automatically.
{% hint style="warning" %}
Sonar recommends using space.vars.SQS\_20252\_Recommended\_LLM\_version as your Azure OpenAI Service model because it produces the best results. Using other models may produce unexpected fix suggestions that have undesirable effects.
For more information on your choices, see the [Azure documentation on service models](https://learn.microsoft.com/en-us/azure/ai-services/openai/concepts/models?tabs=global-standard%2Cstandard-chat-completions).
{% endhint %}
{% hint style="info" %}
You’ll need a connection to the internet to access SonarQube Server’s AI CodeFix service.
The service is provided via api.sonarqube.io and has these static IP addresses:
* 99.83.135.55 (CIDR: 99.83.135.55/32)
* 15.197.164.24 (CIDR: 15.197.164.24/32)
{% endhint %}
Once enabled, developers can get AI-generated fix suggestions from the **Issues** page in their projects. See [fixing](https://docs.sonarsource.com/sonarqube-server/2025.2/user-guide/issues/fixing "mention") for more details.
#### Disabling AI CodeFix
To disable AI CodeFix completely in SonarQube Server and hide the feature from all users, including Instance Admins, set `sonar.ai.codefix.hidden=true` in your sonar.properties file.
### Usage limits
Limits are placed on the AI CodeFix feature to manage abuse. Developers will be notified directly when the monthly allocation is reached for your organization. If the instance is blocked due to reaching the allowance, users attempting to generate a fix will see an error message. Usage quotas are reset on the first day of each month.
SonarQube Server instances that are using its own self-hosted LLM are not subject to these limits.
### AI Code Assurance
Sonar recognizes that AI-generated code should be monitored with additional quality standards and offers administrators a series of tools described on the [ai-standards](https://docs.sonarsource.com/sonarqube-server/2025.2/ai-capabilities/ai-standards "mention") page.
### Related pages
* [overview](https://docs.sonarsource.com/sonarqube-server/2025.2/ai-capabilities/overview "mention")
* [#ai-codefix-rules](https://docs.sonarsource.com/sonarqube-server/2025.2/user-guide/rules/rules-for-ai-codefix#ai-codefix-rules "mention")
* see [#getting-ai-generated-fix-suggestions](https://docs.sonarsource.com/sonarqube-server/2025.2/user-guide/issues/fixing#getting-ai-generated-fix-suggestions "mention")
* see [#label-projects-with-ai-code](https://docs.sonarsource.com/sonarqube-server/2025.2/ai-capabilities/ai-standards#label-projects-with-ai-code "mention")
---
# Source: https://docs.sonarsource.com/sonarqube-server/8.9/project-administration/managing-applications.md
# Source: https://docs.sonarsource.com/sonarqube-server/9.8/project-administration/managing-applications.md
# Source: https://docs.sonarsource.com/sonarqube-server/9.9/project-administration/managing-applications.md
# Source: https://docs.sonarsource.com/sonarqube-server/10.0/project-administration/managing-applications.md
# Source: https://docs.sonarsource.com/sonarqube-server/10.1/project-administration/managing-applications.md
# Source: https://docs.sonarsource.com/sonarqube-server/10.2/project-administration/managing-applications.md
# Source: https://docs.sonarsource.com/sonarqube-server/10.3/project-administration/managing-applications.md
# Source: https://docs.sonarsource.com/sonarqube-server/10.4/project-administration/managing-applications.md
# Source: https://docs.sonarsource.com/sonarqube-server/10.5/project-administration/managing-applications.md
# Source: https://docs.sonarsource.com/sonarqube-server/10.6/project-administration/managing-applications.md
# Source: https://docs.sonarsource.com/sonarqube-server/10.7/project-administration/managing-applications.md
# Source: https://docs.sonarsource.com/sonarqube-server/10.8/project-administration/managing-applications.md
# Source: https://docs.sonarsource.com/sonarqube-server/2025.2/project-administration/managing-applications.md
# Source: https://docs.sonarsource.com/sonarqube-server/2025.3/project-administration/managing-applications.md
# Source: https://docs.sonarsource.com/sonarqube-server/2025.5/project-administration/managing-applications.md
# Source: https://docs.sonarsource.com/sonarqube-server/2025.1/project-administration/managing-applications.md
# Source: https://docs.sonarsource.com/sonarqube-server/2025.4/project-administration/managing-applications.md
# Source: https://docs.sonarsource.com/sonarqube-server/2025.6/project-administration/managing-applications.md
# Source: https://docs.sonarsource.com/sonarqube-server/project-administration/managing-applications.md
# Managing applications
### Permissions
#### Creating applications
Both users with the **Create Applications** permission and global administrators can create applications:
* **Create Applications permission** – Users with the **Create Applications** permission (granted at the global level at **Administration** > **Security** > **Global Permissions**) can create applications by clicking the **Create Application** button in the upper-right corner of the **Projects** homepage.
* **Global Administrators** – In addition to creating applications from the **Projects** homepage, global administrators (with the global **Administer System** permission granted at **Administration** > **Security** > **Global Permissions**) can create applications from the overall portfolio administration interface at **Administration** > **Configuration** > **Portfolios**.
#### Editing Applications
Users need to have either **Administer** permissions for any applications that they want to edit (set on the specific application’s page at **Application Settings** > **Permissions**) or the global **Administer System** permission.
{% hint style="info" %}
Users with **Administer** permissions for an application can see the list of projects that make up the application even if they don’t have browse permissions for those projects.
{% endhint %}
#### Changing the PDF report frequency
As an application administrator, you can change the PDF report subscription frequency of the application:
1. Retrieve the application.
2. Select **Application Settings** > **Application Report Settings**, and select an option from the **Application Reports Frequency** drop-down menu.
You have the following options for subscription frequency:
* **Daily**
* **Weekly**
* **Monthly (default)**
### Populating applications
Once your application exists, you can populate it with manually selected projects. By default, the configuration interface shows the list of projects currently selected for the application. To add additional projects, choose the **Unselected** or **All** filter.
### Creating Application Branches
Once your application is populated with projects, you can create application branches by choosing branches from the application’s component projects. This option is available in the application’s **Application Settings** > **Edit Definition** interface or from the global administration interface.
### Calculation
By default, applications are queued to be recalculated after each analysis of an included project. For each relevant application, a **Background Task** is created, and you can follow the progress on each in the **Administration** > **Projects** > **Background Tasks** by looking at the logs available for each item.
### Reindexing
During Elasticsearch reindexing due to disaster recovery or upgrading, applications become available as they are indexed. See [reindexing](https://docs.sonarsource.com/sonarqube-server/server-update-and-maintenance/maintenance/reindexing "mention") for more information.
---
# Source: https://docs.sonarsource.com/sonarqube-server/10.7/instance-administration/authentication/gitlab/managing-automatic-provisioning.md
# Source: https://docs.sonarsource.com/sonarqube-server/10.8/instance-administration/authentication/gitlab/managing-automatic-provisioning.md
# Source: https://docs.sonarsource.com/sonarqube-server/2025.2/instance-administration/authentication/gitlab/managing-automatic-provisioning.md
# Source: https://docs.sonarsource.com/sonarqube-server/2025.3/instance-administration/authentication/gitlab/managing-automatic-provisioning.md
# Source: https://docs.sonarsource.com/sonarqube-server/2025.5/instance-administration/authentication/gitlab/managing-automatic-provisioning.md
# Source: https://docs.sonarsource.com/sonarqube-server/2025.1/instance-administration/authentication/gitlab/managing-automatic-provisioning.md
# Source: https://docs.sonarsource.com/sonarqube-server/2025.4/instance-administration/authentication/gitlab/managing-automatic-provisioning.md
# Source: https://docs.sonarsource.com/sonarqube-server/2025.6/instance-administration/authentication/gitlab/managing-automatic-provisioning.md
# Source: https://docs.sonarsource.com/sonarqube-server/instance-administration/authentication/gitlab/managing-automatic-provisioning.md
# Managing automatic provisioning
You can enable the automatic user and group provisioning and benefit from:
* Automatic user and group provisioning and de-provisioning.
* Automatic synchronization of users’ group memberships.
* Automatic synchronization of user permissions on projects.
* Automatic project visibility synchronization.
For more information, see [automatic](https://docs.sonarsource.com/sonarqube-server/instance-administration/authentication/gitlab/provisioning-modes/automatic "mention").
{% hint style="warning" %}
With the automatic provisioning mode, the actions you can perform on local users are restricted (The local users are all the users who are not managed by the automatic provisioning process.): see [#limitations](https://docs.sonarsource.com/sonarqube-server/instance-administration/authentication/provisioning-modes/automatic#limitations "mention").
{% endhint %}
{% hint style="info" %}
The automatic provisioning process does not synchronize the global permissions. You must still set them manually. See [#global-permissions](https://docs.sonarsource.com/sonarqube-server/user-management/user-permissions#global-permissions "mention").
{% endhint %}
### Enabling the automatic provisioning
You can enable the automatic provisioning mode once you’ve set up the Gitlab authentication and provisioning (The automatic mode is disabled by default.).
{% hint style="warning" %}
* The first user and group provisioning run happens immediately when you enable the feature.
* During the first synchronization, existing manually added group memberships and permissions of auto-provisioned accounts are reset in SonarQube.
{% endhint %}
To enable the automatic provisioning mode:
1. In GitLab, create the GitLab token that will be used by SonarQube Server to access and synchronize with the GitLab server. You can use either a group or a personal access token, as long as it has visibility on the allowed GitLab groups (see **Setting the allowed GitLab groups** below) . The token’s scope must include `read_api`.
2. In SonarQube Server, go to **Administration > Configuration > General Settings > Authentication > GitLab**.
3. In the **Provisioning** section, select **Automatic user, group, and permission provisioning.**
4. In **Provisioning token**, enter the GitLab token created in the first step.
5. In **Allowed groups**, enter the GitLab root groups (groups with no parent) to be provisioned in SonarQube Server: see below.
6. If you want to change the role permission mapping, select the **Edit mapping** button in **Role permission mapping**. See **Editing the role permission mapping** below.
### Setting the allowed GitLab groups
When using the GitLab automatic provisioning mode in SonarQube Server, you must define which GitLab root groups (groups with no parent) will be provisioned: only members of these *Allowed* groups and all their subgroups will be provisioned. For more information, see [#user-and-group-provisioning](https://docs.sonarsource.com/sonarqube-server/instance-administration/authentication/provisioning-modes/automatic#user-and-group-provisioning "mention").
To set or change the allowed GitLab groups:
1. Go to **Administration > Configuration > General Settings > Authentication > GitLab**.
2. In **Automatic user and group provisioning > Allowed groups,** enter the root group slug as it appears in the GitLab URL. For instance, if the first group URL is `https://gitlab.com/my-root-group`, then enter `my-root-group`. A new text box is added underneath.
3. Enter the second root group slug, etc.
### Editing the role permission mapping
SonarQube Server synchronizes the project permissions of auto-provisioned users based on the configured role permission mapping. You can change the mapping provided by default, and if you use custom rules in GitLab, you can configure their mapping to SonarQube Server project permissions. For more information, see [#permissions-synchronization](https://docs.sonarsource.com/sonarqube-server/instance-administration/authentication/provisioning-modes/automatic#permissions-synchronization "mention").
To edit the mapping of GitLab roles with SonarQube Server permissions:
1. Go to **Administration > Configuration > General Settings > Authentication > GitLab**.
2. In **Provisioning > Role permission mapping**, select **Edit mapping**. The **Global GitLab role mapping** dialog opens.
3. Select or unselect a checkbox to modify the permissions of the different roles.
4. To add a custom role:
* In the **Add custom role** section, enter the exact name of the custom role.
* Select **Add**. The custom role is added below the section.
* Configure the permissions of the custom role.
5. To remove a custom role, select the dustbin icon near the custom role name.
6. Select **Close**. The dialog closes and the changes are saved.
### Enabling/disabling the Just-in-Time group membership synchronization
In addition to the hourly synchronization, you can enable SonarQube Server to synchronize the group memberships of any existing auto-provisioned user at authentication time (Just-in-Time (JIT) synchronization).
To enable or disable the JIT group membership synchronization:
1. Go to **Administration** > **Configuration** > **General Settings** > **Authentication** > **GitLab**.
2. On the far right of **App ID**, select **Edit**. The **Edit GitLab Configuration** dialog opens.
3. Select or unselect the **Synchronize user groups** option.
4. Select **Save configuration**.
### Monitoring the synchronization
You can check the status and possible errors of the last synchronization between GitLab and SonarQube Server, with statistics on the number of users and groups synchronized from GitLab, and the number of projects for which user permissions have been synchronized.
To monitor the synchronization:
* Go to **Administration > Configuration > General Settings > Authentication > GitLab**. The synchronization message is shown in the **Automatic user, group, and permission provisioning** section. If a synchronization is in progress, "Synchronization is pending" is displayed.
### Manually starting a synchronization
Synchronization is started automatically every hour. If necessary, you can start a synchronization manually. The next automatic synchronization will happen one hour after the last synchronization.
To start a synchronization:
1. Go to **Administration** > **Configuration** > **General Settings** > **Authentication** > **GitLab**.
2. In the **Automatic user, group, and permission provisioning** section, select the **Synchronize now** button.
### Changing the provisioning token
1. In GitLab, create the new GitLab token that will be used by SonarQube Server to access and synchronize with the GitLab server. You can use either a group or a personal access token, as long as it has visibility on the allowed GitLab groups (see **Setting the allowed GitLab groups** above). The token’s scope must include `read_api`.
2. In SonarQube Server, go to **Administration** > **Configuration** > **General Settings** > **Authentication** > **GitLab**.
3. In **Automatic user, group, and permission provisioning** > Provisioning token, select the **Update field value** button.
4. Copy-paste the new token.
5. Select **Save**.
### Disabling the automatic provisioning
1. Go to **Administration** > **Configuration** > **General Settings** > **Authentication** > **GitLab**.
2. In the **Provisioning** section, select the **Just-in-time user provisioning** option.
3. Select the **Save** button.
4. To manage the JIT provisioning mode, see [managing-jit-mode](https://docs.sonarsource.com/sonarqube-server/instance-administration/authentication/gitlab/managing-jit-mode "mention").
### Related pages
* [automatic](https://docs.sonarsource.com/sonarqube-server/instance-administration/authentication/gitlab/provisioning-modes/automatic "mention")
* [setting-up](https://docs.sonarsource.com/sonarqube-server/instance-administration/authentication/gitlab/setting-up "mention")
---
# Source: https://docs.sonarsource.com/sonarqube-community-build/quality-standards-administration/managing-quality-gates/managing-custom-quality-gates.md
# Source: https://docs.sonarsource.com/sonarqube-server/2025.2/quality-standards-administration/managing-quality-gates/managing-custom-quality-gates.md
# Source: https://docs.sonarsource.com/sonarqube-server/2025.3/quality-standards-administration/managing-quality-gates/managing-custom-quality-gates.md
# Source: https://docs.sonarsource.com/sonarqube-server/2025.5/quality-standards-administration/managing-quality-gates/managing-custom-quality-gates.md
# Source: https://docs.sonarsource.com/sonarqube-server/2025.4/quality-standards-administration/managing-quality-gates/managing-custom-quality-gates.md
# Source: https://docs.sonarsource.com/sonarqube-server/2025.6/quality-standards-administration/managing-quality-gates/managing-custom-quality-gates.md
# Source: https://docs.sonarsource.com/sonarqube-server/quality-standards-administration/managing-quality-gates/managing-custom-quality-gates.md
# Source: https://docs.sonarsource.com/sonarqube-cloud/standards/managing-quality-gates/managing-custom-quality-gates.md
# Managing custom quality gates
*This feature is only available in the Team and Enterprise plans. See* [subscription-plans](https://docs.sonarsource.com/sonarqube-cloud/administering-sonarcloud/managing-subscription/subscription-plans "mention") *for more information.*
Two built-in quality gates are provided in your organization but you can create your own quality gates, called custom quality gates. To manage custom quality gates, you need the Administer Quality Gates permission. With this permission, you can also associate projects to quality gates in your organization.
For more information about quality gates, read the [introduction-to-quality-gates](https://docs.sonarsource.com/sonarqube-cloud/standards/managing-quality-gates/introduction-to-quality-gates "mention") page.
To associate a custom quality gate with projects, check out the [associating-projects-with-quality-gate](https://docs.sonarsource.com/sonarqube-cloud/standards/managing-quality-gates/associating-projects-with-quality-gate "mention") page.
### Creating a custom quality gate
You can create a custom quality gate from scratch or by duplication. When you create a custom quality gate from scratch, the conditions of the built-in quality gate **Sonar way** are automatically copied to the new record to make your custom quality gate ready for Clean as You Code.
From scratch
1. See [viewing-organizations](https://docs.sonarsource.com/sonarqube-cloud/getting-started/viewing-organizations "mention") to access your organization.
2. In organization’s navigation bar, select **Quality Gates**.
3. In the left panel, select the **Create** button. The **Create Quality Gate** dialog opens.
4. In the dialog, enter the name of the new quality gate and select **Create**.
5. You can now update, add or remove the conditions of the new quality gate. See **Managing a custom quality gate’s conditions** below.
By duplication
1. See [viewing-organizations](https://docs.sonarsource.com/sonarqube-cloud/getting-started/viewing-organizations "mention") to access your organization.
2. In organization’s navigation bar, select **Quality Gates**.
3. In the left panel, select the quality gate you want to duplicate.
4. In the top right corner of the quality gate, select the More Actions button and then **Copy**. The **Copy Quality Gate** dialog opens.
5. In the dialog, enter the name of the new quality gate and select **Copy**.
6. You can now update, add or remove the conditions of the new quality gate. See **Managing a custom quality gate’s conditions** below.
### Managing a custom quality gate’s conditions
You can add or remove conditions. You can update the value of an existing condition. Remember that you define failing conditions: if one of the conditions is met, the quality gate fails. For more information about conditions, see the article about [#definition-based-on-conditions](https://docs.sonarsource.com/sonarqube-cloud/standards/introduction-to-quality-gates#definition-based-on-conditions "mention").
**To update a condition:**
1. Select the pen icon in the far right of the condition row. If there is no pen icon, select first the **Unlock editing** button, below the **Conditions** section.\
The **Update Condition** dialog opens.
2. Enter the new condition’s value and select **Update Condition**.
**To add a new condition:**
1. Select **Add Condition**. The **Add Condition** dialog opens.
2. In **Where?** select to which code, new or overall, the condition applies. New code is defined through the New Code Defintion (NCD). See the[about-new-code](https://docs.sonarsource.com/sonarqube-cloud/standards/about-new-code "mention") page for more information.
3. In **Quality Gate fails when**, select the metric to which the condition applies. For information about the metrics, see the [metric-definitions](https://docs.sonarsource.com/sonarqube-cloud/digging-deeper/metric-definitions "mention") page.
4. In **Value**, enter the condition’s value.
{% hint style="info" %}
Quality gate conditions related to severity currently use type severities. For more details, see the list of Issue management solution metrics in the [#issues](https://docs.sonarsource.com/sonarqube-cloud/digging-deeper/metric-definitions#issues "mention") table.
{% endhint %}
**To remove a condition:**
1. Select the dustbin icon in the far right of the condition row. The **Delete Condition** dialog opens.
2. Select **Delete**.
### Upgrading a quality gate for CaYC
We recommend configuring all your quality gates to prevent issues in new code. For more information, see the [#quality-gate-and-new-code](https://docs.sonarsource.com/sonarqube-cloud/standards/introduction-to-quality-gates#quality-gate-and-new-code "mention") article.
If your quality gate is not configured for CaYC, you can easily upgrade it as follows:
1. See [viewing-organizations](https://docs.sonarsource.com/sonarqube-cloud/getting-started/viewing-organizations "mention") to access your organization.
2. In organization’s navigation bar, select **Quality Gates**.
3. In the left panel, select the custom quality gate you want to upgrade.
4. In **You are a few conditions away from Clean as You Code**, select **Review and Update**. The **Update Quality Gate** dialog opens.
5. Review the proposed update and select **Update Quality Gate** to execute the update.
### Renaming a custom quality gate
1. See [viewing-organizations](https://docs.sonarsource.com/sonarqube-cloud/getting-started/viewing-organizations "mention") to access your organization.
2. In organization’s navigation bar, select **Quality Gates**.
3. In the left panel, select the custom quality gate you want to rename.
4. In the top right corner of your quality gate, select the More Actions button and then **Rename**. The **Rename Quality Gate** dialog opens.
5. Enter the new name and select **Rename**.
### Deleting a custom quality gate
1. See [viewing-organizations](https://docs.sonarsource.com/sonarqube-cloud/getting-started/viewing-organizations "mention") to access your organization.
2. In organization’s navigation bar, select **Quality Gates**.
3. In the left panel, select the custom quality gate you want to delete.
4. In the top right corner of your quality gate, select the More Actions button and then **Delete**.
5. Confirm the deletion.
### Related pages
* [introduction-to-quality-gates](https://docs.sonarsource.com/sonarqube-cloud/standards/managing-quality-gates/introduction-to-quality-gates "mention")
* [viewing-quality-gate](https://docs.sonarsource.com/sonarqube-cloud/standards/managing-quality-gates/viewing-quality-gate "mention")
* [changing-default-quality-gate](https://docs.sonarsource.com/sonarqube-cloud/standards/managing-quality-gates/changing-default-quality-gate "mention")
* [associating-projects-with-quality-gate](https://docs.sonarsource.com/sonarqube-cloud/standards/managing-quality-gates/associating-projects-with-quality-gate "mention")
* [notifications](https://docs.sonarsource.com/sonarqube-cloud/managing-your-account/notifications "mention")
* [quality-gates-for-ai-code](https://docs.sonarsource.com/sonarqube-cloud/standards/ai-code-assurance/quality-gates-for-ai-code "mention")
* [changing-quality-gate](https://docs.sonarsource.com/sonarqube-cloud/managing-your-projects/project-analysis/changing-quality-gate "mention")
---
# Source: https://docs.sonarsource.com/sonarqube-cloud/administering-sonarcloud/managing-enterprise.md
# Managing your enterprise
- [Retrieving and viewing your enterprise](/sonarqube-cloud/administering-sonarcloud/managing-enterprise/retrieving-and-viewing-your-enterprise.md): You can view the enterprises you’re an admin or a member of.
- [Creating your enterprise](/sonarqube-cloud/administering-sonarcloud/managing-enterprise/creating-your-enterprise.md): With the Enterprise license, you can group together SonarQube Cloud organizations from different DevOps platforms into an enterprise and benefit from many features.
- [Enterprise security](/sonarqube-cloud/administering-sonarcloud/managing-enterprise/enterprise-security.md): How to enhance your enterprise security with various security features.
- [IP allow lists](/sonarqube-cloud/administering-sonarcloud/managing-enterprise/enterprise-security/ip-allow-lists.md): How to restrict the IP allow list for SonarQube Cloud
- [Audit logs](/sonarqube-cloud/administering-sonarcloud/managing-enterprise/enterprise-security/audit-logs.md): The initial release of SonarQube Cloud's audit logs provides you with the essential data you need to meet your immediate compliance and security needs.
- [Single Sign-On](/sonarqube-cloud/administering-sonarcloud/managing-enterprise/enterprise-security/sso.md): This section explains the Single Sign-On (SSO) authentication solution in SonarQube Cloud and how to set it up.
- [About SSO authentication solution](/sonarqube-cloud/administering-sonarcloud/managing-enterprise/enterprise-security/sso/about.md): This page provides an overview of the SSO authentication solution in SonarQube Cloud.
- [Automatic group synchronization](/sonarqube-cloud/administering-sonarcloud/managing-enterprise/enterprise-security/sso/about/automatic-group-synchronization.md): This page describes the automatic group synchronization solution in SonarQube Cloud.
- [Setting up SSO](/sonarqube-cloud/administering-sonarcloud/managing-enterprise/enterprise-security/sso/setup.md): With the Enterprise plan, you can transition your SonarQube Cloud enterprise to Single Sign-On.
- [Step 1: Verify the user groups](/sonarqube-cloud/administering-sonarcloud/managing-enterprise/enterprise-security/sso/setup/verify-user-groups.md): Before configuring SSO for your SonarQube Cloud enterprise, you must ensure that the automatic group synchronization can take place properly.
- [Step 2: Configure SSO](/sonarqube-cloud/administering-sonarcloud/managing-enterprise/enterprise-security/sso/setup/configure-sso.md): The second step in configuring SSO for your SonarQube Cloud enterprise varies slightly, depending on your identity provider. If you use Okta or Microsoft Entra ID, go directly to the respective page.
- [Using the setup assistant (generic operation)](/sonarqube-cloud/administering-sonarcloud/managing-enterprise/enterprise-security/sso/setup/configure-sso/generic-operation.md): This page explains how to configure SSO with SonarQube Cloud’s setup assistant if you use another identity provider than Okta or Microsoft Entra ID.
- [SAML SSO with Okta](/sonarqube-cloud/administering-sonarcloud/managing-enterprise/enterprise-security/sso/setup/configure-sso/okta.md): This page explains how to setup SAML SSO with Okta and SonarQube Cloud's SSO setup assistant.
- [SAML SSO with Entra ID](/sonarqube-cloud/administering-sonarcloud/managing-enterprise/enterprise-security/sso/setup/configure-sso/microsoft-entra-id.md): This page explains how to configure SAML SSO in your enterprise with Microsoft Entra ID while using SonarQube Cloud's setup assistant.
- [Step 3: Invite users to sign in](/sonarqube-cloud/administering-sonarcloud/managing-enterprise/enterprise-security/sso/setup/inviting-users-to-sign-in.md): Once the SSO connection has been established, you can invite users to sign in to SonarQube Cloud with SSO by sending them the enterprise’s login URL.
- [Step 4: Terminate SSO setup](/sonarqube-cloud/administering-sonarcloud/managing-enterprise/enterprise-security/sso/setup/terminate-setup.md): This page describes how to terminate your Single Sign-On (SSO) setup in SonarQube Cloud.
- [Editing SSO configuration](/sonarqube-cloud/administering-sonarcloud/managing-enterprise/enterprise-security/sso/editing-sso-configuration.md): After setup, editing your SSO configuration in SonarQube Cloud is straight-forward.
- [Editing SSO configuration (old method)](/sonarqube-cloud/administering-sonarcloud/managing-enterprise/enterprise-security/sso/editing-configuration-old-method.md): Editing your SSO configuration in SonarQube Cloud was recently improved using the SSO setup assistant. These pages outline the previous editing procedures (without the SSO setup assistant).
- [Introduction](/sonarqube-cloud/administering-sonarcloud/managing-enterprise/enterprise-security/sso/editing-configuration-old-method/introduction.md): This page explains the generic steps necessary to edit the SAML SSO configuration you established in SonarQube Cloud using the older method (without the SSO setup assistant).
- [With Okta](/sonarqube-cloud/administering-sonarcloud/managing-enterprise/enterprise-security/sso/editing-configuration-old-method/okta.md): This page explains how to edit the SAML SSO configuration you established in SonarQube Cloud with Okta and using the old method (without the SSO setup assistant).
- [With Microsoft Entra ID](/sonarqube-cloud/administering-sonarcloud/managing-enterprise/enterprise-security/sso/editing-configuration-old-method/microsoft-entra-id.md): This page explains how to edit the SAML SSO configuration you established in SonarQube Cloud with Microsoft Entra ID while using the old method (without the SSO setup assistant).
- [Deleting SSO configuration](/sonarqube-cloud/administering-sonarcloud/managing-enterprise/enterprise-security/sso/deleting-sso-configuration.md): As an enterprise admin, you can delete your enterprise’s SSO configuration in SonarQube Cloud either in the UI or via the Web API.
- [Troubleshooting SSO connection](/sonarqube-cloud/administering-sonarcloud/managing-enterprise/enterprise-security/sso/troubleshooting.md): Troubleshooting your SSO connection can be tricky. Here's a list of items to check in SonarQube Cloud and with your identity provider.
- [Adding organizations to your enterprise](/sonarqube-cloud/administering-sonarcloud/managing-enterprise/adding-organizations-to-your-enterprise.md): Adding or removing organizations to / from your enterprise.
- [Managing the enterprise-related permissions](/sonarqube-cloud/administering-sonarcloud/managing-enterprise/managing-the-enterprise-related-permissions.md): You must be an admin of the enterprise to be able to manage the permissions.
- [Managing the lines of code within your enterprise](/sonarqube-cloud/administering-sonarcloud/managing-enterprise/managing-the-lines-of-code-within-your-enterprise.md): You must be an enterprise admin to be able to manage the lines of code (LOC) limits within your enterprise.
- [Changing enterprise settings](/sonarqube-cloud/administering-sonarcloud/managing-enterprise/changing-enterprise-settings.md): You can rename your enterprise provided you're an enterprise admin.
- [Downgrading your enterprise](/sonarqube-cloud/administering-sonarcloud/managing-enterprise/downgrading-your-enterprise.md): How to downgrade an enterprise.
---
# Source: https://docs.sonarsource.com/sonarqube-server/2025.6/user-guide/issues/managing-jira-work-items.md
# Source: https://docs.sonarsource.com/sonarqube-server/user-guide/issues/managing-jira-work-items.md
# Managing Jira work items
### Prerequisites
Before you can start pushing SonarQube issues to Jira Cloud, you need to connect your SonarQube instance with your Jira Cloud instance and bind your SonarQube project to a Jira Cloud project. See:
* [jira-integration](https://docs.sonarsource.com/sonarqube-server/instance-administration/jira-integration "mention") on an instance level.
* [jira-integration](https://docs.sonarsource.com/sonarqube-server/project-administration/jira-integration "mention") on a project level.
### Permissions
To create or disconnect Jira work items from Sonar issues, you must be a project administrator or have the **Administer Issues** permission.
Go to *Your Project* > **Project Settings** > **Permissions** and select the **Administer Issues** or **Administer** checkbox for specific users and groups.
### Creating a Jira work item from a single SonarQube issue
You can create a Jira work item from a SonarQube issue or from the Issues page:
1. Click the **Push to Jira** button and choose a Jira work type, if more than two work types are available. The list of Jira work types depends on your Jira Cloud integration configuration and is configured by the project administrator. See [jira-integration](https://docs.sonarsource.com/sonarqube-server/project-administration/jira-integration "mention") for more details.
2. When the process is complete the button displays a Jira work item ID along with the status label.
3. A new Jira work item will be created in your Jira Cloud project and it will open in a new tab.
4. Click on the Jira work item ID to open it on the Jira’s website.
{% hint style="info" %}
If you are not seeing the **Push to Jira** button after properly setting your Jira Cloud integration, it might be due to unsupported mandatory fields present on all of the Jira work types. See [#mandatory-fields-without-a-default-value](https://docs.sonarsource.com/sonarqube-server/project-administration/jira-integration#mandatory-fields-without-a-default-value "mention") for more information.
{% endhint %}
On rare occasions, two or more concurrent Jira creation events might be triggered by multiple users simultaneously, resulting in two or more Jira work items being created at the same time.
### Contents of a Jira work item
When you create a Jira work item, it includes the following information:
* Title of the SonarQube issues
* SonarQube issue link
* Location of the issues
* File path
* Code lines
* Commit hash
* Date the issue was introduced
* Information about why this is an issue and how to fix it with the rule name and link.
* Impact on software quality and severity
* The reporter for the Jira work item is the default reporter set in SonarQube instance’s Jira Cloud integration.
### Disconnecting a Jira work item
You cannot delete a Jira work item from within SonarQube Server, but you can disconnect it by clicking on the close icon of the Jira button either within the SonarQube issue or on the Issues page. The connection with the Jira work item will be removed but the item will still exist in Jira Cloud.
You cannot push a SonarQube issue to an existing Jira work item, which means you can only create new Jira work items from SonarQube issues.
### Troubleshooting
* The **Push to Jira** button is not visible on the SonarQube issue page.\
**Solution**: After connecting your instance to a Jira instance you need to bind individual SonarQube projects to Jira Cloud projects. See project-level [jira-integration](https://docs.sonarsource.com/sonarqube-server/project-administration/jira-integration "mention") for more information.
### Related pages
* [jira-integration](https://docs.sonarsource.com/sonarqube-server/instance-administration/jira-integration "mention") on an instance level.
* [jira-integration](https://docs.sonarsource.com/sonarqube-server/project-administration/jira-integration "mention") on a project level.
---
# Source: https://docs.sonarsource.com/sonarqube-community-build/instance-administration/authentication/gitlab/managing-jit-mode.md
# Source: https://docs.sonarsource.com/sonarqube-server/10.7/instance-administration/authentication/gitlab/managing-jit-mode.md
# Source: https://docs.sonarsource.com/sonarqube-server/10.8/instance-administration/authentication/gitlab/managing-jit-mode.md
# Source: https://docs.sonarsource.com/sonarqube-server/2025.2/instance-administration/authentication/gitlab/managing-jit-mode.md
# Source: https://docs.sonarsource.com/sonarqube-server/2025.3/instance-administration/authentication/gitlab/managing-jit-mode.md
# Source: https://docs.sonarsource.com/sonarqube-server/2025.5/instance-administration/authentication/gitlab/managing-jit-mode.md
# Source: https://docs.sonarsource.com/sonarqube-server/2025.1/instance-administration/authentication/gitlab/managing-jit-mode.md
# Source: https://docs.sonarsource.com/sonarqube-server/2025.4/instance-administration/authentication/gitlab/managing-jit-mode.md
# Source: https://docs.sonarsource.com/sonarqube-server/2025.6/instance-administration/authentication/gitlab/managing-jit-mode.md
# Source: https://docs.sonarsource.com/sonarqube-server/instance-administration/authentication/gitlab/managing-jit-mode.md
# Managing JIT provisioning
You need the global Administer System permission in SonarQube Server to perform this setup.
### Setting up the group synchronization
With the JIT provisioning mode, you can enable group synchronization. The group synchronization requires that you manually create the user groups in SonarQube Server: see below.
{% hint style="warning" %}
If you enable the group synchronization, you cannot manage group memberships manually and existing manually added group memberships of JIT-provisioned users are reset in SonarQube Server during synchronization.
{% endhint %}
1. Go to **Administration** > **Configuration** > **General Settings** > **Authentication** > **GitLab**.
2. On the far right of **App ID,** select **Edit**.
3. In the dialog, select or unselect the **Synchronize user groups** option.
4. Save.
Creating the user groups in SonarQube Server
To allow group synchronization, you must create in SonarQube Server a group for each GitLab group and subgroup you want to synchronize, see [user-groups](https://docs.sonarsource.com/sonarqube-server/instance-administration/user-management/user-groups "mention").
You must name the SonarQube Server group according to the URL of the GitLab group or subgroup. Be aware that that name check is case-sensitive.
Examples:
* If the URL of the GitLab group is `https://gitlab.com/my-gitlab-group`, the name of the SonarQube Server group mus be `my-gitlab-group`.
* If the URL of the GitLab group is `https://gitlab.com/my-gitlab-group/sub-group`, the name of the SonarQube Server group must be `my-gitlab-group/sub-group.`
{% hint style="info" %}
To set the group permissions at the system level, see [user-permissions](https://docs.sonarsource.com/sonarqube-server/instance-administration/user-management/user-permissions "mention").
{% endhint %}
### Setting the Allowed groups
Starting from the [Developer Edition](https://www.sonarsource.com/plans-and-pricing/developer/), you can restrict access to SonarQube Server by defining Allowed groups. An Allowed group is a GitLab root group (a group with no parent): only members of the Allowed group and all its subgroups can authenticate to SonarQube Server.
To set the Allowed groups:
1. Go to **Administration** > **Configuration** > **General Settings** > **Authentication** > **GitLab**.
2. In the **Provisioning** > **Just-in-Time provisioning > Allowed groups**, enter the root group slug as it appears in the GitLab URL. For instance, if the first Allowed group URL is `https://gitlab.com/my-root-group`, then enter `my-root-group`. A new text box is added underneath.
3. Enter the second Allowed group slug, etc.
### Blocking/Authorizing the sign-up of new users
You can block the signup of new users with SonarQube. This may be useful if you want to manage user provisioning through an API.
To block or authorize the sign-up of new users with SonarQube Server:
1. Go to **Administration** > **Configuration** > **General Settings** > **Authentication** > **GitLab**.
2. In the **Provisioning** > **Just-in-Time provisioning** section, unselect or select **Allow users to sign up**.
### Related pages
* [just-in-time](https://docs.sonarsource.com/sonarqube-server/instance-administration/authentication/gitlab/provisioning-modes/just-in-time "mention")
* [automatic](https://docs.sonarsource.com/sonarqube-server/instance-administration/authentication/gitlab/provisioning-modes/automatic "mention")
* [setting-up](https://docs.sonarsource.com/sonarqube-server/instance-administration/authentication/gitlab/setting-up "mention")
* [user-permissions](https://docs.sonarsource.com/sonarqube-server/instance-administration/user-management/user-permissions "mention")
---
# Source: https://docs.sonarsource.com/sonarqube-community-build/analyzing-source-code/scanners/scanner-environment/managing-jre-auto-provisioning.md
# Source: https://docs.sonarsource.com/sonarqube-server/2025.5/analyzing-source-code/scanners/scanner-environment/managing-jre-auto-provisioning.md
# Source: https://docs.sonarsource.com/sonarqube-server/2025.6/analyzing-source-code/scanners/scanner-environment/managing-jre-auto-provisioning.md
# Source: https://docs.sonarsource.com/sonarqube-server/analyzing-source-code/scanners/scanner-environment/managing-jre-auto-provisioning.md
# Managing JRE auto-provisioning
### About the JRE auto-provisioning feature
With JRE auto-provisioning, the Java Runtime Environment (JRE) version required for the scanner engine is automatically downloaded by the scanner from SonarQube. You may have to disable JRE auto-provisioning to manage your internally certified versions. In rare cases, you may have to adjust the default configuration.
If supported by your scanner, JRE auto-provisoning is enabled by default.
JRE auto-provisioning is currently supported by:
• SonarScanner CLI, from version 6.0.
• SonarScanner for .NET, from version 7.0.
• SonarScanner for NPM, from version 4.0.
• SonarScanner for Maven, from version 5.0.
• SonarScanner for Gradle, from version 6.0.
### Disabling JRE auto-provisioning
If you disable JRE auto-provisioning, make sure to provide a JRE that follows the necessary requirements. See [general-requirements](https://docs.sonarsource.com/sonarqube-server/analyzing-source-code/scanners/scanner-environment/general-requirements "mention").
To disable JRE auto-provisioning at the instance level (you need the Administer System permission):
1. Go to **Administration > Configuration > General Settings > General > General**.
2. Enable the **Disable Scanner JRE auto provisioning** option.
Alternatively, you can as well use the `sonar.scanner.skipJreProvisioning` analysis parameter and specify your own version of Java. For more details, see [#jre-autoprovisioning](https://docs.sonarsource.com/sonarqube-server/analysis-parameters#jre-autoprovisioning "mention").
### Adjusting JRE auto-provisioning
If the auto-detection doesn't work properly, you can set analysis parameters on your CI/CD host to:
* Define the operating system and / or CPU architecture type of your CI/CD host.
* Skip the JRE auto-provisioning and / or define the JRE version to be used by the scanner.
For more details, see [#jre-autoprovisioning](https://docs.sonarsource.com/sonarqube-server/analysis-parameters#jre-autoprovisioning "mention").
### Related pages
[#scanner-engine-and-analyzers-download](https://docs.sonarsource.com/sonarqube-server/analysis-overview#scanner-engine-and-analyzers-download "mention")
---
# Source: https://docs.sonarsource.com/sonarqube-server/2025.3/advanced-security/managing-license-profiles-and-policies.md
# Source: https://docs.sonarsource.com/sonarqube-server/2025.5/advanced-security/managing-license-profiles-and-policies.md
# Source: https://docs.sonarsource.com/sonarqube-server/2025.4/advanced-security/managing-license-profiles-and-policies.md
# Source: https://docs.sonarsource.com/sonarqube-server/2025.6/advanced-security/managing-license-profiles-and-policies.md
# Source: https://docs.sonarsource.com/sonarqube-server/advanced-security/managing-license-profiles-and-policies.md
# Source: https://docs.sonarsource.com/sonarqube-cloud/advanced-security/managing-license-profiles-and-policies.md
# Managing license profiles and policies
Advanced Security is an add-on that requires a separate subscription to your SonarQube Cloud's [Enterprise plan](https://www.sonarsource.com/plans-and-pricing/#sonarqube-cloud-features).
To reduce legal risk and maintain a high level of security for your software, it’s important to ensure your project’s dependencies use licenses that comply with your organization’s policies.
### About license profiles
A license profile is a collection of policies that define which licenses are allowed or prohibited for the dependencies used in your projects.
Once configured, analysis will raise a dependency risk when a dependency with a prohibited license is detected in your projects.
Depending on how your software is built, deployed, and delivered to your users, you may have different licensing requirements for different projects in your organization. You can create multiple license profiles based on the needs of your applications, and assign projects to each individual profile as needed.
#### How Sonar analyzes license combinations
Sonar proactively analyzes license combinations to give you the most accurate results according to your policy.
For example, if your policy allows MIT, but disallows LGPL-2.0:
* software that is licensed as "MIT AND LGPL-2.0" will generate a dependency risk, as a portion of it uses a license that you have not allowed.
* software that is licensed as "MIT OR LGPL-2.0" will *not* generate a dependency risk, as you can use it under the MIT license.
### Creating a license profile
To define which licenses are allowed or prohibited, you must create a license profile. Note that you need the **Administer Quality Profiles** permission to perform this task.
When you create a license profile, you choose if it applies:
* to only the projects you select
* to all the existing and future projects of your instance, except the projects already assigned to a different profile.
To create a license profile:
1. Go to **License profiles** > **Create profile.**
2. Give your license profile a name.
3. Select the scope of your license profile:
1. To use it only on certain projects, choose **Only the projects I select.**
2. To create a default profile that applies to all projects, choose **Every project I should use should use this project by default.**
### Managing license profiles
You can edit your license profiles under **License profiles** > *your license profile.*
If your profile is applied to selected projects only, go to **Projects using this profile** > **Manage** to edit the list of projects that use this license profile.
### Viewing the list of licenses
Licenses used in your projects are listed in the **License profiles** > **Licenses** section. You can search for licenses and filter them by category.
Each license in the list has a display name and an SPDX identifier based on the [SPDX License List](https://spdx.org/licenses/), a listing of common open source licenses.
By default, all the licenses are prohibited, see “Configuring license policies” below for more information.
#### About license categories
Each license has a category determined by Sonar based on [Blue Oak Council’s](https://blueoakcouncil.org/copyleft) categorization of licenses. The categories are as follows:
| **License category** | **Description** |
| ----------------------- | --------------------------------------------------------------------------------------------------------------------------------------------------------------------------------------------------------------------------------------------------------------------------------------------------------------------------------------------------------------------------------------------------- |
| Standard permissive |
The most commonly used permissive licenses. They grant broad permissions to use and modify with very minimal obligations (primarily attribution) and have all the essential elements of permissive open source licenses.
Examples: MIT and Apache software licenses.
|
| Non-standard permissive |
Permissive licenses that lack one or more essential elements of modern permissive open source licenses, or impose complex or confusing requirements.
Many use unclear, jocular, or incomplete language and can be considered less legally predictable to use.
Examples: Artistic 1.0 and the WTFPL software licenses.
|
| Weak copyleft |
Weak copyleft licenses require sharing your changes and additions to the licensed software when you give copies to others.
Examples: GNU LGPL and the Mozilla Public License software licenses.
|
| Strong copyleft |
In addition to the requirements of the weak copyleft licenses, strong copyleft licenses require you to share larger programs that you build with the licensed software when you give copies to others.
Example: the GNU GPL license.
|
| Network copyleft |
In addition to the requirements of strong copyleft licenses, network copyleft licenses require you to share larger programs that you build with the licensed software not just when you give copies to others, but also when you run the software for others to use over the Internet or another network.
Examples: the GNU AGPL and the Server-Side-Public License software licenses.
|
| Maximal copyleft |
Maximal copyleft licenses answer the question “When does the license require you to share?” differently than other families. Maximal copyleft licenses require you to share software you make with others, and to license that software alike when you do.
Example: the Parity and Reciprocal software licenses.
|
| Other |
Many detectable licenses do not fall into one of the standard categories, usually because they have non-standard requirements.
Any license in the ‘Other’ category needs to be individually reviewed and configured based on the specific license terms and use case.
|
### Configuring license policies
Once your license profile is created, you can configure license policies to define which licenses are allowed or prohibited in your license profile.
By default, all licenses are prohibited.
From the **Licenses** section, you can configure:
* *individual policies,* by assigning the **Allowed** or **Prohibited** policy to each license.
* *default policies*, by mapping each license category to the **Allowed** or **Prohibited** policy. Default policies don’t apply to 'Other' licenses.
To set default policies, go to **Default policies** > **Manage** and select **Allowed** or **Prohibited** for each license category.
It’s possible to override default policies with individual policies for each license.
### Related pages
* [Reviewing and fixing dependency risks](https://docs.sonarsource.com/sonarqube-cloud/advanced-security/reviewing-and-fixing-dependency-risks)
* [Analyzing projects for dependencies](https://docs.sonarsource.com/sonarqube-cloud/advanced-security/analyzing-projects-for-dependencies-sca)
* [Troubleshooting](https://docs.sonarsource.com/sonarqube-cloud/advanced-security/troubleshooting-the-dependency-analysis)
* [Best practices for managing dependency risks](https://docs.sonarsource.com/sonarqube-cloud/advanced-security/best-practices-for-managing-dependency-risks)
---
# Source: https://docs.sonarsource.com/sonarqube-cloud/administering-sonarcloud/managing-organization.md
# Managing your organization
- [Organization setup overview](/sonarqube-cloud/administering-sonarcloud/managing-organization/setup-overview.md): The procedure below explains how to set up your organization in SonarQube Cloud when your system uses DevOps platform (DOP) authentication.
- [Creating and editing your organization](/sonarqube-cloud/administering-sonarcloud/managing-organization/creating-organization.md): Creating and editing your SonarQube Cloud organization differs slightly depending on your DevOps platform or if you're creating it manually. These pages help you understand each step along the way.
- [Importing GitHub organization](/sonarqube-cloud/administering-sonarcloud/managing-organization/creating-organization/importing-github-organization.md): This page helps you understand how to import your GitHub organization into SonarQube Cloud and explains key details about modifying the necessary repository access rights.
- [Importing Bitbucket workspace](/sonarqube-cloud/administering-sonarcloud/managing-organization/creating-organization/importing-bitbucket-workspace.md): This page helps you understand how to import your Bitbucket workspace into SonarQube Cloud and explains prerequisites and key procedures.
- [Importing GitLab group](/sonarqube-cloud/administering-sonarcloud/managing-organization/creating-organization/importing-gitlab-group.md): This page helps you understand how to import your GitLab group into SonarQube Cloud and explains prerequisites and key procedures.
- [Importing Azure DevOps organization](/sonarqube-cloud/administering-sonarcloud/managing-organization/creating-organization/importing-azure-devops-organization.md): This page helps you understand how to import your Azure DevOps organization into SonarQube Cloud and explains prerequisites and key procedures.
- [Creating organization manually](/sonarqube-cloud/administering-sonarcloud/managing-organization/creating-organization/creating-organization-manually.md): You can manually create your SonarQube Cloud organization manually however, you will not benefit from the advantages of binding your projects to a DevOps organization.
- [Changing organization binding](/sonarqube-cloud/administering-sonarcloud/managing-organization/creating-organization/changing-organization-binding.md): You can use the workaround described on this page to change the binding of a SonarQube Cloud organization bound to a GitHub or Bitbucket organization.
- [Binding an unbound organization](/sonarqube-cloud/administering-sonarcloud/managing-organization/creating-organization/binding-unbound-organization.md): Binding your unbound SonarQube Cloud organization is slightly different depending on your DevOps platform.
- [Security contact](/sonarqube-cloud/administering-sonarcloud/managing-organization/creating-organization/security-contact.md): As an administrator of your organization you can set up a dedicated contact for urgent, security-related communications.
- [Changing organization settings](/sonarqube-cloud/administering-sonarcloud/managing-organization/creating-organization/changing-organization-settings.md): SonarQube Cloud allows to change your organization key, requiring private-only projects, and change the token used to connect to GitLab or Azure DevOps organization.
- [Deleting organization](/sonarqube-cloud/administering-sonarcloud/managing-organization/creating-organization/deleting-organization.md): Organization administrators can delete an organization in SonarQube Cloud either from the "My Organizations" page or directly from the organization's administration settings.
- [Using multiple accounts](/sonarqube-cloud/administering-sonarcloud/managing-organization/creating-organization/importing-from-multiple-platforms.md): This page explains that when importing an organization into SonarQube Cloud, the importing account automatically becomes an administrator; other accounts must be added manually.
- [Managing users and permissions](/sonarqube-cloud/administering-sonarcloud/managing-organization/users-and-permissions.md): This section contains instructions to manage your organization's members, including user groups and permissions, and user account deletion.
- [Adding organization members](/sonarqube-cloud/administering-sonarcloud/managing-organization/users-and-permissions/organization-members.md): This section explains how to add and remove members to and from a SonarQube Cloud organization.
- [Managing user groups](/sonarqube-cloud/administering-sonarcloud/managing-organization/users-and-permissions/user-groups.md): SonarQube Cloud's user groups can be used to manage organization members and their permissions. This section explains how to manage user groups.
- [Managing organization permissions](/sonarqube-cloud/administering-sonarcloud/managing-organization/users-and-permissions/organization-permissions.md): This section explains how to manage the permissions related to your SonarQube Cloud organization.
- [Disabling GitHub member synchronization](/sonarqube-cloud/administering-sonarcloud/managing-organization/users-and-permissions/github-member-sync.md): When you import a GitHub organization to SonarQube Cloud, GitHub member synchronization is enabled by default provided Single Sign-On (SSO) authentication is not enabled.
- [User onboarding and offboarding](/sonarqube-cloud/administering-sonarcloud/managing-organization/users-and-permissions/user-on-and-offboarding.md): User onboarding is automatic. You can only delete your own user account.
- [Performing global analysis setup](/sonarqube-cloud/administering-sonarcloud/managing-organization/setting-config-at-org-level.md): When performing a global analysis in SonarQube Cloud, you can manage new code definition, long-lived branch pattern, analysis scope, and control your quality standards to apply to all new projects.
- [Introduction](/sonarqube-cloud/administering-sonarcloud/managing-organization/setting-config-at-org-level/introduction.md): With SonarQube Cloud Enterprise, your can define default settings for long-lived branch patterns, automatic analysis, and set your analysis scope, all of which can be overridden at the project level.
- [Setting new code definition](/sonarqube-cloud/administering-sonarcloud/managing-organization/setting-config-at-org-level/setting-new-code-definition-at-organization-level.md): SonarQube Cloud Project administrators can set the default the new code definition.
- [Setting long-lived branch pattern](/sonarqube-cloud/administering-sonarcloud/managing-organization/setting-config-at-org-level/setting-long-lived-branch-pattern.md): This section explains how to define a long-lived branches name pattern in SonarQube Cloud at your organization level.
- [Adjusting analysis scope](/sonarqube-cloud/administering-sonarcloud/managing-organization/setting-config-at-org-level/adjusting-analysis-scope.md): With the SonarQube Cloud Enterprise plan, you can set and adjust your analysis scope at the organization level.
- [Introduction](/sonarqube-cloud/administering-sonarcloud/managing-organization/setting-config-at-org-level/adjusting-analysis-scope/introduction.md): As an organization admin, you can define in the UI an analysis scope adjustment at the organization level.
- [Excluding from coverage or duplication](/sonarqube-cloud/administering-sonarcloud/managing-organization/setting-config-at-org-level/adjusting-analysis-scope/exclude-from-coverage-duplication.md): Excluding specific files from code coverage or duplication check can be defined at the organization level for your SonarQube Cloud organization.
- [Excluding files based on file paths](/sonarqube-cloud/administering-sonarcloud/managing-organization/setting-config-at-org-level/adjusting-analysis-scope/excluding-files-based-on-file-paths.md): To exclude files from your SonarQube Cloud project’s analysis scope based on file paths, you can define file exclusion parameters based on directory and file name patterns.
- [Using advanced exclusion features](/sonarqube-cloud/administering-sonarcloud/managing-organization/setting-config-at-org-level/adjusting-analysis-scope/advanced-exclusion-features.md): In very specific situations, you may have to define, at the organization level, the exclusion of code from the analysis using SonarQube Cloud's advanced exclusion features.
- [Disabling automatic analysis](/sonarqube-cloud/administering-sonarcloud/managing-organization/setting-config-at-org-level/disabling-automatic-analysis.md): This page explains how to disable the automatic analysis in SonarQube Cloud at the organization level.
- [Managing quality standards](/sonarqube-cloud/administering-sonarcloud/managing-organization/setting-config-at-org-level/quality-standards.md): This page outlines how to manage organization-level quality standards in SonarQube Cloud, specifically focusing on the "quality gate fudge factor."
- [Managing organization's projects](/sonarqube-cloud/administering-sonarcloud/managing-organization/manage-org-projects.md): Managing your SonarQube Cloud organization's projects involves using the Project Management page and understanding project permissions. This section also contains information about migrating projects.
- [Using Projects Management page](/sonarqube-cloud/administering-sonarcloud/managing-organization/manage-org-projects/projects-management-page.md): As the organization admin, you can manage your organization’s SonarQube Cloud projects on a centralized page called the Projects management page.
- [Managing project permissions](/sonarqube-cloud/administering-sonarcloud/managing-organization/manage-org-projects/manage-project-permissions.md): Managing project permissions in SonarQube Cloud involves using permission templates and restoring administrator access.
- [Using permission templates](/sonarqube-cloud/administering-sonarcloud/managing-organization/manage-org-projects/manage-project-permissions/templates.md): As the organization admin in SonarQube Cloud, using permission templates allows you to define permissions granted by default on new projects and various sets of permissions.
- [Restoring administrator access](/sonarqube-cloud/administering-sonarcloud/managing-organization/manage-org-projects/manage-project-permissions/recovering-admin-access.md): This page explains how to recover administrator access to a project of your SonarQube Cloud organization.
- [Migrating projects](/sonarqube-cloud/administering-sonarcloud/managing-organization/manage-org-projects/migrate-projects-to-another-org.md): A SonarQube Cloud organization cannot be re-bound to another organization however, you can move projects if needed. This page explains how to migrate projects between organizations.
- [Managing Scoped Organization Tokens](/sonarqube-cloud/administering-sonarcloud/managing-organization/scoped-organization-tokens.md): Scoped Organization Tokens provide a secure way to manage non-user-specific authentication.
- [Connecting to Slack](/sonarqube-cloud/administering-sonarcloud/managing-organization/connecting-to-slack.md): With the SonarQube Cloud integration with Slack, users can receive real-time notifications on analysis results directly in Slack.
- [About SonarQube Cloud integration with Slack](/sonarqube-cloud/administering-sonarcloud/managing-organization/connecting-to-slack/integration-overview.md): Understanding how the SonarQube Cloud integration with Slack works.
- [Setting up the connection to Slack](/sonarqube-cloud/administering-sonarcloud/managing-organization/connecting-to-slack/setup.md): How to install the SonarQube app for Slack in your workspace.
---
# Source: https://docs.sonarsource.com/sonarqube-server/8.9/project-administration/managing-portfolios.md
# Source: https://docs.sonarsource.com/sonarqube-server/9.8/project-administration/managing-portfolios.md
# Source: https://docs.sonarsource.com/sonarqube-server/9.9/project-administration/managing-portfolios.md
# Source: https://docs.sonarsource.com/sonarqube-server/10.0/project-administration/managing-portfolios.md
# Source: https://docs.sonarsource.com/sonarqube-server/10.1/project-administration/managing-portfolios.md
# Source: https://docs.sonarsource.com/sonarqube-server/10.2/project-administration/managing-portfolios.md
# Source: https://docs.sonarsource.com/sonarqube-server/10.3/project-administration/managing-portfolios.md
# Source: https://docs.sonarsource.com/sonarqube-server/10.4/project-administration/managing-portfolios.md
# Source: https://docs.sonarsource.com/sonarqube-server/10.5/project-administration/managing-portfolios.md
# Source: https://docs.sonarsource.com/sonarqube-server/10.6/project-administration/managing-portfolios.md
# Source: https://docs.sonarsource.com/sonarqube-server/10.7/project-administration/managing-portfolios.md
# Source: https://docs.sonarsource.com/sonarqube-server/10.8/project-administration/managing-portfolios.md
# Source: https://docs.sonarsource.com/sonarqube-server/2025.2/project-administration/managing-portfolios.md
# Source: https://docs.sonarsource.com/sonarqube-server/2025.3/project-administration/managing-portfolios.md
# Source: https://docs.sonarsource.com/sonarqube-server/2025.5/project-administration/managing-portfolios.md
# Source: https://docs.sonarsource.com/sonarqube-server/2025.1/project-administration/managing-portfolios.md
# Source: https://docs.sonarsource.com/sonarqube-server/2025.4/project-administration/managing-portfolios.md
# Source: https://docs.sonarsource.com/sonarqube-server/2025.6/project-administration/managing-portfolios.md
# Source: https://docs.sonarsource.com/sonarqube-server/project-administration/managing-portfolios.md
# Source: https://docs.sonarsource.com/sonarqube-cloud/managing-portfolios.md
# Managing portfolios
This feature is only available in the [Enterprise plan](https://www.sonarsource.com/plans-and-pricing/).
Releasability is based on the projects’ quality gates included in your portfolio. Each portfolio home page offers an aggregate view of the releasability status of all projects in the portfolio. See [viewing-portfolios](https://docs.sonarsource.com/sonarqube-cloud/getting-started-with-enterprise/viewing-enterprise-reports/viewing-portfolios "mention") for more information.
### Permissions
To manage a portfolio, you will need at least Edit permissions granted by the portfolio’s administrator. See [administering-portfolios](https://docs.sonarsource.com/sonarqube-cloud/getting-started-with-enterprise/administering-portfolios "mention") for more details.
### Creating a portfolio
You can create a portfolio if you have the **Create Portfolio** permission enabled. See [#create-portfolios-permission](https://docs.sonarsource.com/sonarqube-cloud/getting-started-with-enterprise/administering-portfolios#create-portfolios-permission "mention") for more details.
1. Select **My Portfolios** in the top navigation bar and select the enterprise to which you want to add a new portfolio.
2. Select **Create portfolio** on the Portfolios home page to start the portfolio creation wizard.
You can also create a portfolio by selecting the ‘+’ sign at the top right of the page.
#### Portfolio creation wizard
The wizard takes you through 4 steps of the portfolio creation process and the system automatically saves the information you have entered when you go to the next step. You can find the draft portfolios on the Portfolios home page and resume the process in case you get interrupted.
The portfolio creation process consists of the following steps:
1. **Add details**: Choose the enterprise where the portfolio will reside if you have permission to more than one enterprise. Then, enter the portfolio name and description.
2. **Add projects**: From the **How do you want to add projects?** dropdown menu choose projects either:
* **By name**: This option shows the list of organizations and projects associated with them. Select the projects and choose the project’s branch you want to include in the portfolio.
* **By tags**: Select existing tags by which you want to query projects and define the project branch to add to the portfolio. If you choose a branch other than the main branch, you need to specify the branch’s name.
* **By regular expression** (RegEx) using project keys: Write RegEx to query the project by project key and define the project branch to add to the portfolio. If you choose a branch other than the main branch, you need to specify the branch’s name.
* **By organization**: Select the organizations and define the project’s branch to include in the portfolio. If you choose a branch other than the main branch, you need to specify the branch’s name.
3. **Set permissions**: Add portfolio Administer, Edit, and View permissions to specific groups and users or apply a permission template.
4. **Review**: Take a final look at all the portfolio details and select **Complete** to finalize the process.
{% hint style="info" %}
Currently, you cannot mix and match portfolio creation methods. For example, mixing RegEx and Tags to generate a list of projects for a portfolio is not possible. You can only use one method.
{% endhint %}
Once the portfolio is created, it will be populated with ratings for Releasability, Security, Reliability, Maintainability, and Security Review.
{% hint style="info" %}
The maximum number of projects that you can add to your portfolio is 5,000.
{% endhint %}
#### Ensuring a reliable security report
To ensure a reliable security report, check that the relevant security rules are activated in your quality profiles for projects you have included in your portfolio. For instance, if no rule corresponding to a given OWASP category is activated in your quality profile, you won’t get Security issues or Security Hotspots linked to that specific category in the OWASP report. See [#checking-security-rules](https://docs.sonarsource.com/sonarqube-cloud/getting-started-with-enterprise/viewing-enterprise-reports/project-security-reports#checking-security-rules "mention") for more information.
### Defining a portfolio with regular expressions (RegEx)
You write RegEx against project keys included in your enterprise. A project key is not necessarily the same as a project name and, by default, it starts with the name of the organization that the project belongs to.
* To retrieve a project key, go to your project and select **Information** located in the left side bar.
* To change a project key, go to *Your Project* > **Administration** > **Update Key** and enter the new project key.
Following are examples of RegEx that may help you write your own expressions and retrieve matches against project keys.
Selects all projects with a key that includes `python`:
```regex
.*python.*
```
Selects all projects with a key that starts with `sonar`:
```regex
^sonar.*
```
Select all projects with a key that starts with either `docs` or `Docs`. Keep in mind that RegEx matches are case sensitive.
```regex
^[dD]ocs.*
```
Selects all projects with a key that ends with `-scanner`:
.*-scanner$
Select all projects with a key that contains `sonar` but does not contain `test`. If your enterprise has a large number of projects, more complex expressions might impact performance.
```regex
(?=.*sonar)(?!.*test).*
```
For more information about how to write regular expressions, see [regex101.com](https://regex101.com/). When testing your RegEx in third-party tools such as [regex101.com](https://regex101.com/) make sure that the whole test string is selected when the match is found.
### Editing a portfolio
With the Edit permission on a portfolio, you can add and remove projects from it. Note that you don’t add a project, but a long-lived branch of a project. Currently, you can only add a single branch per project.
Proceed as follows:
1. In the top navigation bar, go to **My Portfolios** and select your enterprise from the drop-down menu.
2. On the Portfolios home page, select the portfolio you want to edit.
3. Go to **Settings** > **Portfolio Definition**.
4. Select **Edit selection**.
5. From a list of organizations and projects to which you have permissions, select projects to include or exclude from the portfolio. Alternatively, use the search field to find projects by name.
6. If the selected project contains several long-lived branches, select the branch to be added. By default, the **main** branch is selected.
7. Select **Save**.
### Deleting a portfolio
With the Edit permission on a portfolio, you can remove it from the system.
1. In the top navigation bar, go to **My Portfolios** and select your enterprise from the drop-down menu.
2. Select the portfolio you want to remove.
3. Go to **Settings** > **Delete** portfolio.
### Portfolio recomputation
The following events will trigger the recalculation of a portfolio:
* When a project within the portfolio has a new analysis.
* If a project is removed from an organization within the enterprise.
* When an organization is removed from the enterprise.
For information on how ratings are calculated, see [metric-definitions](https://docs.sonarsource.com/sonarqube-cloud/digging-deeper/metric-definitions "mention") for more information.
### Related pages
* [introduction](https://docs.sonarsource.com/sonarqube-cloud/getting-started-with-enterprise/introduction "mention") to Getting started with Enterprise
* [viewing-portfolios](https://docs.sonarsource.com/sonarqube-cloud/getting-started-with-enterprise/viewing-enterprise-reports/viewing-portfolios "mention")
* [administering-portfolios](https://docs.sonarsource.com/sonarqube-cloud/getting-started-with-enterprise/administering-portfolios "mention")
---
# Source: https://docs.sonarsource.com/sonarqube-community-build/project-administration/maintaining-project/managing-project-history.md
# Source: https://docs.sonarsource.com/sonarqube-server/8.9/project-administration/managing-project-history.md
# Source: https://docs.sonarsource.com/sonarqube-server/9.8/project-administration/managing-project-history.md
# Source: https://docs.sonarsource.com/sonarqube-server/9.9/project-administration/managing-project-history.md
# Source: https://docs.sonarsource.com/sonarqube-server/10.0/project-administration/managing-project-history.md
# Source: https://docs.sonarsource.com/sonarqube-server/10.1/project-administration/managing-project-history.md
# Source: https://docs.sonarsource.com/sonarqube-server/10.2/project-administration/managing-project-history.md
# Source: https://docs.sonarsource.com/sonarqube-server/10.3/project-administration/managing-project-history.md
# Source: https://docs.sonarsource.com/sonarqube-server/10.4/project-administration/managing-project-history.md
# Source: https://docs.sonarsource.com/sonarqube-server/10.5/project-administration/managing-project-history.md
# Source: https://docs.sonarsource.com/sonarqube-server/10.6/project-administration/managing-project-history.md
# Source: https://docs.sonarsource.com/sonarqube-server/10.7/project-administration/managing-project-history.md
# Source: https://docs.sonarsource.com/sonarqube-server/10.8/project-administration/managing-project-history.md
# Source: https://docs.sonarsource.com/sonarqube-server/2025.2/project-administration/managing-project-history.md
# Source: https://docs.sonarsource.com/sonarqube-server/2025.3/project-administration/managing-project-history.md
# Source: https://docs.sonarsource.com/sonarqube-server/2025.5/project-administration/managing-project-history.md
# Source: https://docs.sonarsource.com/sonarqube-server/2025.1/project-administration/managing-project-history.md
# Source: https://docs.sonarsource.com/sonarqube-server/2025.4/project-administration/managing-project-history.md
# Source: https://docs.sonarsource.com/sonarqube-server/2025.6/project-administration/maintaining-project/managing-project-history.md
# Source: https://docs.sonarsource.com/sonarqube-server/project-administration/maintaining-project/managing-project-history.md
# Source: https://docs.sonarsource.com/sonarqube-cloud/digging-deeper/managing-project-history.md
# Managing project history
One of the most powerful features of SonarQube Cloud is that it shows you not just your project health today, but how it has changed over time. It does that by selectively keeping data from previous analyses (see the [housekeeping](https://docs.sonarsource.com/sonarqube-cloud/digging-deeper/housekeeping "mention") page). It doesn’t keep all previous analyses - that would bloat the database. Similarly, for the analyses it does keep, SonarQube Cloud doesn’t keep all the data. Once a project snapshot moves from the "last analysis", that is, the most recent, to being part of the project’s history, data below the project level is purged - again to keep from bloating the database.
Typically, these aren’t things you need to even think about; SonarQube Cloud just handles them for you, but occasionally, you may need to remove a bad snapshot from a project’s history or change the housekeeping algorithms.
### Managing history
Occasionally, you may need to manually delete a project snapshot, whether because the wrong quality profile was used, or because there was a problem with analysis, and so on. Note that the most recent snapshot (labeled "last snapshot") can never be deleted.
**Deleting snapshots**
{% hint style="info" %}
Deleting a snapshot is a 2-step process:
1. The snapshot must first be removed from the project history by selecting **Delete snapshot.** It won’t be displayed anymore on this **History** page but will still be present in the database.
2. The snapshot is actually deleted during the next project analysis.
{% endhint %}
At the project level, from the front page **Activity** list, choose **Show More** to see the full activity list.
For every snapshot, it is possible to manually:
* Add, rename or remove a version
* Add, rename or remove an event
* Delete the snapshot
---
# Source: https://docs.sonarsource.com/sonarqube-community-build/project-administration/setting-up-features/managing-project-tags.md
# Source: https://docs.sonarsource.com/sonarqube-server/2025.2/project-administration/managing-project-tags.md
# Source: https://docs.sonarsource.com/sonarqube-server/2025.3/project-administration/managing-project-tags.md
# Source: https://docs.sonarsource.com/sonarqube-server/2025.5/project-administration/managing-project-tags.md
# Source: https://docs.sonarsource.com/sonarqube-server/2025.4/project-administration/managing-project-tags.md
# Source: https://docs.sonarsource.com/sonarqube-server/2025.6/project-administration/setting-up-features/managing-project-tags.md
# Source: https://docs.sonarsource.com/sonarqube-server/project-administration/setting-up-features/managing-project-tags.md
# Managing project tags
To manage the tags of your projects:
1. Retrieve your project. See [retrieving-projects](https://docs.sonarsource.com/sonarqube-server/user-guide/viewing-projects/retrieving-projects "mention") for more details.
2. In the top right corner, select **Project Information**.
3. In the **Tags** section left panel, select the plus sign to assign a new tag to the project. A window pops up with the list of existing tags.
4. In the list, select the tag(s) you want to assign.
5. To create a new tag, enter it in the **Search for tags…** field, and select it in the list.
---
# Source: https://docs.sonarsource.com/sonarqube-community-build/quality-standards-administration/managing-quality-gates.md
# Source: https://docs.sonarsource.com/sonarqube-server/2025.2/quality-standards-administration/managing-quality-gates.md
# Source: https://docs.sonarsource.com/sonarqube-server/2025.3/quality-standards-administration/managing-quality-gates.md
# Source: https://docs.sonarsource.com/sonarqube-server/2025.5/quality-standards-administration/managing-quality-gates.md
# Source: https://docs.sonarsource.com/sonarqube-server/2025.4/quality-standards-administration/managing-quality-gates.md
# Source: https://docs.sonarsource.com/sonarqube-server/2025.6/quality-standards-administration/managing-quality-gates.md
# Source: https://docs.sonarsource.com/sonarqube-server/quality-standards-administration/managing-quality-gates.md
# Source: https://docs.sonarsource.com/sonarqube-cloud/standards/managing-quality-gates.md
# Managing quality gates
{% content-ref url="managing-quality-gates/introduction" %}
[introduction](https://docs.sonarsource.com/sonarqube-cloud/standards/managing-quality-gates/introduction)
{% endcontent-ref %}
{% content-ref url="managing-quality-gates/introduction-to-quality-gates" %}
[introduction-to-quality-gates](https://docs.sonarsource.com/sonarqube-cloud/standards/managing-quality-gates/introduction-to-quality-gates)
{% endcontent-ref %}
{% content-ref url="managing-quality-gates/viewing-quality-gate" %}
[viewing-quality-gate](https://docs.sonarsource.com/sonarqube-cloud/standards/managing-quality-gates/viewing-quality-gate)
{% endcontent-ref %}
{% content-ref url="managing-quality-gates/managing-custom-quality-gates" %}
[managing-custom-quality-gates](https://docs.sonarsource.com/sonarqube-cloud/standards/managing-quality-gates/managing-custom-quality-gates)
{% endcontent-ref %}
{% content-ref url="managing-quality-gates/changing-default-quality-gate" %}
[changing-default-quality-gate](https://docs.sonarsource.com/sonarqube-cloud/standards/managing-quality-gates/changing-default-quality-gate)
{% endcontent-ref %}
{% content-ref url="managing-quality-gates/associating-projects-with-quality-gate" %}
[associating-projects-with-quality-gate](https://docs.sonarsource.com/sonarqube-cloud/standards/managing-quality-gates/associating-projects-with-quality-gate)
{% endcontent-ref %}
---
# Source: https://docs.sonarsource.com/sonarqube-community-build/quality-standards-administration/managing-quality-profiles.md
# Source: https://docs.sonarsource.com/sonarqube-server/2025.2/quality-standards-administration/managing-quality-profiles.md
# Source: https://docs.sonarsource.com/sonarqube-server/2025.3/quality-standards-administration/managing-quality-profiles.md
# Source: https://docs.sonarsource.com/sonarqube-server/2025.5/quality-standards-administration/managing-quality-profiles.md
# Source: https://docs.sonarsource.com/sonarqube-server/2025.4/quality-standards-administration/managing-quality-profiles.md
# Source: https://docs.sonarsource.com/sonarqube-server/2025.6/quality-standards-administration/managing-quality-profiles.md
# Source: https://docs.sonarsource.com/sonarqube-server/quality-standards-administration/managing-quality-profiles.md
# Source: https://docs.sonarsource.com/sonarqube-cloud/standards/managing-quality-profiles.md
# Managing quality profiles
{% content-ref url="managing-quality-profiles/introduction" %}
[introduction](https://docs.sonarsource.com/sonarqube-cloud/standards/managing-quality-profiles/introduction)
{% endcontent-ref %}
{% content-ref url="managing-quality-profiles/understanding-quality-profiles" %}
[understanding-quality-profiles](https://docs.sonarsource.com/sonarqube-cloud/standards/managing-quality-profiles/understanding-quality-profiles)
{% endcontent-ref %}
{% content-ref url="managing-quality-profiles/viewing-quality-profiles" %}
[viewing-quality-profiles](https://docs.sonarsource.com/sonarqube-cloud/standards/managing-quality-profiles/viewing-quality-profiles)
{% endcontent-ref %}
{% content-ref url="managing-quality-profiles/creating-a-quality-profile" %}
[creating-a-quality-profile](https://docs.sonarsource.com/sonarqube-cloud/standards/managing-quality-profiles/creating-a-quality-profile)
{% endcontent-ref %}
{% content-ref url="managing-quality-profiles/editing-a-custom-quality-profile" %}
[editing-a-custom-quality-profile](https://docs.sonarsource.com/sonarqube-cloud/standards/managing-quality-profiles/editing-a-custom-quality-profile)
{% endcontent-ref %}
{% content-ref url="managing-quality-profiles/associating-a-quality-profile-with-projects" %}
[associating-a-quality-profile-with-projects](https://docs.sonarsource.com/sonarqube-cloud/standards/managing-quality-profiles/associating-a-quality-profile-with-projects)
{% endcontent-ref %}
{% content-ref url="managing-quality-profiles/changing-default-quality-profile" %}
[changing-default-quality-profile](https://docs.sonarsource.com/sonarqube-cloud/standards/managing-quality-profiles/changing-default-quality-profile)
{% endcontent-ref %}
{% content-ref url="managing-quality-profiles/maintaining-your-custom-quality-profiles" %}
[maintaining-your-custom-quality-profiles](https://docs.sonarsource.com/sonarqube-cloud/standards/managing-quality-profiles/maintaining-your-custom-quality-profiles)
{% endcontent-ref %}
{% content-ref url="managing-quality-profiles/authorizing-other-users-to-manage-quality-profile" %}
[authorizing-other-users-to-manage-quality-profile](https://docs.sonarsource.com/sonarqube-cloud/standards/managing-quality-profiles/authorizing-other-users-to-manage-quality-profile)
{% endcontent-ref %}
---
# Source: https://docs.sonarsource.com/sonarqube-cloud/administering-sonarcloud/managing-subscription.md
# Managing your subscription
- [Introduction](/sonarqube-cloud/administering-sonarcloud/managing-subscription/introduction.md): The SonarQube Cloud subscription plans are: free, Team, or Enterprise.
- [Subscription plans](/sonarqube-cloud/administering-sonarcloud/managing-subscription/subscription-plans.md): SonarQube Cloud offers three subscription-based plans: Free, Team, and Enterprise, each with varying features and suitable for different team sizes.
- [Billing model](/sonarqube-cloud/administering-sonarcloud/managing-subscription/billing-model.md): In SonarQube Cloud each Team or Enterprise plan organization is billed separately. You can be billed monthly or yearly.
- [Signing up for a plan](/sonarqube-cloud/administering-sonarcloud/managing-subscription/signing-up-for-plan.md): Signing up for a SonarQube Cloud subscription happens at the organization level.
- [Changing your subscription plan](/sonarqube-cloud/administering-sonarcloud/managing-subscription/changing-plan.md): Changing your SonarQube Cloud plan is straight forward however, it depends on the move you're making (upgrade/downgrade) and if your on a monthly or yearly subscription billing schedule.
- [Updating billing or payment details](/sonarqube-cloud/administering-sonarcloud/managing-subscription/updating-billing-payment-details.md): SonarQube Cloud's monthly subscribers can directly update the billing and payment details of their organization. Read this page to learn about how to add, remove, or change your payment method.
- [Viewing billing or usage information](/sonarqube-cloud/administering-sonarcloud/managing-subscription/viewing-billing-and-usage.md): This page provides instructions on how to view billing and usage information for both SonarQube Cloud organizations and enterprises.
- [Viewing taxes and invoices](/sonarqube-cloud/administering-sonarcloud/managing-subscription/viewing-taxes-and-invoices.md): This page explains how to access monthly invoices for your SonarQube Cloud subscriptions, detailing the steps to view and download them from the customer portal.
---
# Source: https://docs.sonarsource.com/sonarqube-cloud/administering-sonarcloud/managing-enterprise/managing-the-enterprise-related-permissions.md
# Managing the enterprise-related permissions
### About the enterprise-related permissions
Permission
Description
Administer Enterprise
An enterprise must have at least one admin (The initial user who created the enterprise is automatically its admin). An enterprise admin can:
• Add or remove an organization to/from the enterprise provided they are also an admin of the organization.
• Rename the enterprise.
• Change the member permissions.
Create Portfolios
Can create portfolios.
{% hint style="info" %}
We recommend having two admins per enterprise.
{% endhint %}
### Setting the permissions of users
1. Retrieve your enterprise. See [retrieving-and-viewing-your-enterprise](https://docs.sonarsource.com/sonarqube-cloud/administering-sonarcloud/managing-enterprise/retrieving-and-viewing-your-enterprise "mention").
2. Go to **Administration** > **Enterprise Permissions**.
### Related pages
[retrieving-and-viewing-your-enterprise](https://docs.sonarsource.com/sonarqube-cloud/administering-sonarcloud/managing-enterprise/retrieving-and-viewing-your-enterprise "mention")\
[creating-your-enterprise](https://docs.sonarsource.com/sonarqube-cloud/administering-sonarcloud/managing-enterprise/creating-your-enterprise "mention")\
[enterprise-security](https://docs.sonarsource.com/sonarqube-cloud/administering-sonarcloud/managing-enterprise/enterprise-security "mention")\
[adding-organizations-to-your-enterprise](https://docs.sonarsource.com/sonarqube-cloud/administering-sonarcloud/managing-enterprise/adding-organizations-to-your-enterprise "mention")\
[managing-the-lines-of-code-within-your-enterprise](https://docs.sonarsource.com/sonarqube-cloud/administering-sonarcloud/managing-enterprise/managing-the-lines-of-code-within-your-enterprise "mention")\
[changing-enterprise-settings](https://docs.sonarsource.com/sonarqube-cloud/administering-sonarcloud/managing-enterprise/changing-enterprise-settings "mention")\
[downgrading-your-enterprise](https://docs.sonarsource.com/sonarqube-cloud/administering-sonarcloud/managing-enterprise/downgrading-your-enterprise "mention")
---
# Source: https://docs.sonarsource.com/sonarqube-cloud/administering-sonarcloud/managing-enterprise/managing-the-lines-of-code-within-your-enterprise.md
# Managing the lines of code within your enterprise
### About the enterprise lines of code limit (Shared LOC and Allocated LOC)
Your enterprise license entitles you to a maximum lines of code (enterprise LOC limit). For more information about lines of code, see [#loc-based-pricing](https://docs.sonarsource.com/sonarqube-cloud/managing-subscription/subscription-plans#loc-based-pricing "mention").
By default, the enterprise LOC limit is *shared* by all organizations in the enterprise: the total LOC consumed by all organizations in the enterprise cannot exceed this limit.
You have the flexibility to **allocate** an individual LOC limit to one or more organizations within your enterprise (including the option to apply it to all): the LOC consumed by the organization cannot exceed the limit allocated to this organization. The other organizations in your enterprise will share the remaining LOC limit. For example, an enterprise with a total LOC limit of 5 M and containing 4 organizations may be configured as follows:
* Organization1 is allocated a 2M LOC limit.
* Organization2 is allocated a 1.3M LOC limit.
* Organization3 and Organization4 share the remaining LOC limit, i.e. 1.7 M.
We use the following concepts to refer to the different LOC limit uses:
* **Shared LOC** refers to the collective lines of code limit shared by organizations within the enterprise.
* **Allocated LOC** refers to the individual lines of code limits allocated to organizations within the enterprise.
{% hint style="info" %}
An allocated LOC must be a multiple of 100k with a minimum allocation of 100k. If you have less than 1M LOC limit in your enterprise, we recommend that you use only the Shared LOC.
{% endhint %}
### Allocating a LOC limit to an organization
You can allocate a LOC limit to an organization within your enterprise, as long as the enterprise LOC limit has not been fully allocated. The remaining LOC available for allocation are determined by subtracting already allocated LOC limits from the enterprise LOC limit.
To allocate a LOC limit to an organization within your enterprise:
1. Retrieve your enterprise.
2. Go to the **Billing and usage** tab.
3. In front of **Usage**, select the **Manage lines of code** link.
In the page that opens, the **Shared LOC** tab lists the organizations that use the shared LOC.
4. Locate the organization in the list (navigate to the next page if necessary) and select **Allocate LOC**. The corresponding dialog opens.
5. Enter the LOC limit value to be allocated and select **Allocate LOC**. The LOC limit is allocated and the organization is moved to the **Allocated LOC** tab.
### Changing the LOC limit allocated to an organization
To change the allocated LOC limit of an organization within your enterprise:
1. Retrieve your enterprise.
2. Go to the **Billing and usage** tab.
3. In front of **Usage**, select the **Manage lines of code** link. In the page that opens, select the **Allocated LOC** tab. The tab lists the organizations using an allocated lines of code limit.
4. Locate the organization in the list (navigate to the next page if necessary). Select the three-dot menu and then **Modify LOC limit**. The corresponding dialog opens.
5. Enter the new LOC limit value and select **Modify limit**. The limit is changed.
### Changing the enterprise LOC limit
To change your enterprise LOC limit, you must change your enterprise license: [contact our team](https://www.sonarsource.com/products/sonarcloud/contact-enterprise-sales/).
### Removing the LOC limit allocated to an organization
To remove the allocated LOC limit of an organization within your enterprise:
1. Retrieve your enterprise.
2. Go to the **Billing and usage** tab.
3. In front of **Usage**, select the **Manage lines of code** link. In the page that opens, select the **Allocated LOC** tab. The tab lists the organizations using an allocated lines of code limit.
4. Locate the organization in the list (navigate to the next page if necessary). Select the three-dot menu and then **Remove LOC limit**. The confirmation dialog opens.
5. Select **Confirm removal.** The allocated limit is removed and the organization is moved to the **Shared LOC** tab.
### Viewing the lines of code consumption
1. Retrieve your enterprise.
2. Go to the **Billing and usage** tab.
3. In front of **Usage**, select the **Manage lines of code** link. In the page that opens:
* The **Shared LOC** tab shows the consumption of the organizations using the shared LOC.
* The **Allocated LOC** tab shows the allocated LOC consumption for each organization.
### Related pages
[retrieving-and-viewing-your-enterprise](https://docs.sonarsource.com/sonarqube-cloud/administering-sonarcloud/managing-enterprise/retrieving-and-viewing-your-enterprise "mention")\
[creating-your-enterprise](https://docs.sonarsource.com/sonarqube-cloud/administering-sonarcloud/managing-enterprise/creating-your-enterprise "mention")\
[enterprise-security](https://docs.sonarsource.com/sonarqube-cloud/administering-sonarcloud/managing-enterprise/enterprise-security "mention")\
[adding-organizations-to-your-enterprise](https://docs.sonarsource.com/sonarqube-cloud/administering-sonarcloud/managing-enterprise/adding-organizations-to-your-enterprise "mention")\
[managing-the-enterprise-related-permissions](https://docs.sonarsource.com/sonarqube-cloud/administering-sonarcloud/managing-enterprise/managing-the-enterprise-related-permissions "mention")\
[changing-enterprise-settings](https://docs.sonarsource.com/sonarqube-cloud/administering-sonarcloud/managing-enterprise/changing-enterprise-settings "mention")\
[downgrading-your-enterprise](https://docs.sonarsource.com/sonarqube-cloud/administering-sonarcloud/managing-enterprise/downgrading-your-enterprise "mention")
---
# Source: https://docs.sonarsource.com/sonarqube-community-build/user-guide/managing-tokens.md
# Source: https://docs.sonarsource.com/sonarqube-server/10.7/user-guide/managing-tokens.md
# Source: https://docs.sonarsource.com/sonarqube-server/10.8/user-guide/managing-tokens.md
# Source: https://docs.sonarsource.com/sonarqube-server/2025.2/user-guide/managing-tokens.md
# Source: https://docs.sonarsource.com/sonarqube-server/2025.3/user-guide/managing-tokens.md
# Source: https://docs.sonarsource.com/sonarqube-server/2025.5/user-guide/managing-tokens.md
# Source: https://docs.sonarsource.com/sonarqube-server/2025.1/user-guide/managing-tokens.md
# Source: https://docs.sonarsource.com/sonarqube-server/2025.4/user-guide/managing-tokens.md
# Source: https://docs.sonarsource.com/sonarqube-server/2025.6/user-guide/managing-tokens.md
# Source: https://docs.sonarsource.com/sonarqube-server/user-guide/managing-tokens.md
# Source: https://docs.sonarsource.com/sonarqube-cloud/managing-your-account/managing-tokens.md
# Managing Personal Access Tokens
Each user has the ability to generate tokens that can be used to run analyses or invoke web services without access to the user’s actual credentials. When a user is deleted, their user access tokens are also deleted.
{% hint style="warning" %}
From the Team plan, it's highly recommended to use Scoped Organization Tokens (SOT) instead of PATs. For more information, see [scoped-organization-tokens](https://docs.sonarsource.com/sonarqube-cloud/administering-sonarcloud/managing-organization/scoped-organization-tokens "mention").
{% endhint %}
{% hint style="info" %}
For security reasons, tokens that have been inactive for 60 days will be automatically removed.
{% endhint %}
To generate a token, select your account menu in the top right corner of the SonarQube Cloud interface. In the menu, select **My Account** > **Security**. Your existing tokens are listed here, each with a **Revoke** button.
The form at the top of the page allows you to generate new tokens. Once you select **Generate**, you will see the token value. Copy it immediately; if your dismiss the notification or leave the page, you will not be able to retrieve the token's value.
Tokens are used as a replacement for your usual login:
* When running analyses on your code. Replace your login with the token in the `sonar.token` property. (Note that the property `sonar.password` is deprecated.)
* When invoking web services. See [web-api](https://docs.sonarsource.com/sonarqube-cloud/advanced-setup/web-api "mention") for more details.
In either case, no password is needed.
---
# Source: https://docs.sonarsource.com/sonarqube-server/10.8/instance-administration/user-management/managing-user-authentication.md
# Source: https://docs.sonarsource.com/sonarqube-server/2025.2/instance-administration/user-management/managing-user-authentication.md
# Source: https://docs.sonarsource.com/sonarqube-server/2025.1/instance-administration/user-management/managing-user-authentication.md
# Managing user authentication
By default, authentication is forced.
Authentication can be managed:
* Via the SonarQube Server built-in users/groups database. See [creating-users](https://docs.sonarsource.com/sonarqube-server/2025.1/instance-administration/user-management/creating-users "mention")
* Via several delegated authentication methods, see the [authentication](https://docs.sonarsource.com/sonarqube-server/2025.1/instance-administration/authentication "mention") pages for more information.
### Disabling forced user authentication
You can disable forced user authentication, and allow anonymous users to browse projects and run analyses in your instance. To do so, you need the Administer System permission.
{% hint style="warning" %}
Disabling forced authentication can expose your SonarQube Server instance to security risks. We strongly recommend forcing user authentication on production instances or carefully configuring the security (user permissions, project visibility, etc.) on your instance. See also **Accessible API endpoints if forced authentication is disabled** below.
We advise keeping forced authentication if you have your SonarQube Server instance publicly accessible.
{% endhint %}
Accessible API endpoints if forced authentication disabled
If forced authentication is disabled, the following API endpoints are accessible **without authentication**:
* api/components/search
* api/issues/tags
* api/languages/list
* api/metrics/domains
* api/metrics/search
* api/metrics/types
* api/plugins/installed
* api/project\_tags/search
* api/qualitygates/list
* api/qualitygates/search
* api/qualitygates/show
* api/qualityprofiles/backup
* api/qualityprofiles/changelog
* api/qualityprofiles/export
* api/qualityprofiles/exporters
* api/qualityprofiles/importers
* api/qualityprofiles/inheritance
* api/qualityprofiles/projects
* api/qualityprofiles/search
* api/rules/repositories
* api/rules/search
* api/rules/show
* api/rules/tags
* api/server/version
* api/settings/login\_message
* api/sources/scm (for public repositories)
* api/sources/show (for public repositories)
* api/system/db*migration*status
* api/system/migrate\_db
* api/system/ping
* api/system/status
* api/system/upgrades
* api/users/search
* api/webservices/list
* api/webservices/response\_example
To disable forced authentication:
1. Go to **Administration** > **Configuration** > **General Settings** > **Security.**
2. Disable **Force user authentication**.
---
# Source: https://docs.sonarsource.com/sonarqube-community-build/user-guide/managing-your-account.md
# Source: https://docs.sonarsource.com/sonarqube-server/10.7/user-guide/managing-your-account.md
# Source: https://docs.sonarsource.com/sonarqube-server/10.8/user-guide/managing-your-account.md
# Source: https://docs.sonarsource.com/sonarqube-server/2025.2/user-guide/managing-your-account.md
# Source: https://docs.sonarsource.com/sonarqube-server/2025.3/user-guide/managing-your-account.md
# Source: https://docs.sonarsource.com/sonarqube-server/2025.5/user-guide/managing-your-account.md
# Source: https://docs.sonarsource.com/sonarqube-server/2025.1/user-guide/managing-your-account.md
# Source: https://docs.sonarsource.com/sonarqube-server/2025.4/user-guide/managing-your-account.md
# Source: https://docs.sonarsource.com/sonarqube-server/2025.6/user-guide/managing-your-account.md
# Source: https://docs.sonarsource.com/sonarqube-server/user-guide/managing-your-account.md
# Source: https://docs.sonarsource.com/sonarqube-cloud/managing-your-account.md
# Managing your account
{% content-ref url="managing-your-account/introduction" %}
[introduction](https://docs.sonarsource.com/sonarqube-cloud/managing-your-account/introduction)
{% endcontent-ref %}
{% content-ref url="managing-your-account/signing-in" %}
[signing-in](https://docs.sonarsource.com/sonarqube-cloud/managing-your-account/signing-in)
{% endcontent-ref %}
{% content-ref url="managing-your-account/managing-tokens" %}
[managing-tokens](https://docs.sonarsource.com/sonarqube-cloud/managing-your-account/managing-tokens)
{% endcontent-ref %}
{% content-ref url="managing-your-account/notifications" %}
[notifications](https://docs.sonarsource.com/sonarqube-cloud/managing-your-account/notifications)
{% endcontent-ref %}
{% content-ref url="managing-your-account/user-interface" %}
[user-interface](https://docs.sonarsource.com/sonarqube-cloud/managing-your-account/user-interface)
{% endcontent-ref %}
{% content-ref url="managing-your-account/deleting" %}
[deleting](https://docs.sonarsource.com/sonarqube-cloud/managing-your-account/deleting)
{% endcontent-ref %}
{% content-ref url="managing-your-account/leaving-organization" %}
[leaving-organization](https://docs.sonarsource.com/sonarqube-cloud/managing-your-account/leaving-organization)
{% endcontent-ref %}
---
# Source: https://docs.sonarsource.com/sonarqube-cloud/managing-your-projects/managing-your-project-as-developer.md
# Managing your project as a developer
This page explains various procedures you can perform on your project without being a project admin.
### Connecting your project to SonarQube for IDE
[SonarQube for IDE](https://www.sonarsource.com/products/sonarlint/) is a free IDE extension that integrates with SonarQube Cloud using connected mode. This way, SonarQube for IDE can catch issues immediately, right in the IDE, before you even commit them.
Check the SonarQube for IDE documentation for the details about setting up Connected Mode:
* [Connected mode](https://docs.sonarsource.com/sonarqube-for-intellij/connect-your-ide/connected-mode) for SonarQube for IntelliJ
* [Connected mode](https://docs.sonarsource.com/sonarqube-for-visual-studio/connect-your-ide/connected-mode) for SonarQube for Visual Studio
* [Connected mode](https://docs.sonarsource.com/sonarqube-for-vs-code/connect-your-ide/connected-mode) for SonarQube for VS Code
* [Connected mode](https://docs.sonarsource.com/sonarqube-for-eclipse/connect-your-ide/connected-mode) for SonarQube for Eclipse
### Generating a token for your project analysis
From the Team plan, see [scoped-organization-tokens](https://docs.sonarsource.com/sonarqube-cloud/administering-sonarcloud/managing-organization/scoped-organization-tokens "mention").
With the Free plan, see[managing-tokens](https://docs.sonarsource.com/sonarqube-cloud/managing-your-account/managing-tokens "mention").
### Subscribing to notifications on project events
You can choose to receive email notifications when specific events occur in your project. See [notifications](https://docs.sonarsource.com/sonarqube-cloud/managing-your-account/notifications "mention").
### Marking a project as favorite
Favorite projects are displayed on **My projects** page.
{% hint style="info" %}
When you create a project, it’s automatically marked as favorite.
{% endhint %}
To mark a project as a favorite:
1. Retrieve the project. See [retrieving-projects](https://docs.sonarsource.com/sonarqube-cloud/managing-your-projects/retrieving-projects "mention") for more information.
2. In the top of the left-side panel, select the star icon.
Alternatively, you can select or unselect the star in a list of projects as illustrated below.
### Using a project badge
If you have project access, you can include dynamic SonarQube Cloud badges on your web pages to display information about the project such as:
* The current value of specific metrics.
* The current quality gate status.
* The fact that you are using SonarQube Cloud.
* That your [ai-code-assurance](https://docs.sonarsource.com/sonarqube-cloud/ai-capabilities/ai-code-assurance "mention") has been analyzed, available for Team and Enterprise plans.
Markdown snippets and simple image URLs are provided to generate the badge code.
To generate the code of your dynamic project badge:
1. Retrieve the project. See [retrieving-projects](https://docs.sonarsource.com/sonarqube-cloud/managing-your-projects/retrieving-projects "mention") for more information.
2. In the left navigation bar, select **Information**.
3. In the **Badges** section:
1. Select the information type you want to display:
* Metric value
* Quality gate status
* SonarQube Cloud user
2. If you selected the metric value information type, select the metric in **Customize badge**.
3. In Code format, select **Markdown** (markdown snippet) or **Image URL** depending on how you want to include your badge.
4. Select the **Copy** button to copy the code of your badge.
---
# Source: https://docs.sonarsource.com/sonarqube-cloud/managing-your-projects.md
# Managing your project
{% content-ref url="managing-your-projects/retrieving-projects" %}
[retrieving-projects](https://docs.sonarsource.com/sonarqube-cloud/managing-your-projects/retrieving-projects)
{% endcontent-ref %}
{% content-ref url="managing-your-projects/issues" %}
[issues](https://docs.sonarsource.com/sonarqube-cloud/managing-your-projects/issues)
{% endcontent-ref %}
{% content-ref url="managing-your-projects/managing-your-project-as-developer" %}
[managing-your-project-as-developer](https://docs.sonarsource.com/sonarqube-cloud/managing-your-projects/managing-your-project-as-developer)
{% endcontent-ref %}
{% content-ref url="managing-your-projects/project-analysis" %}
[project-analysis](https://docs.sonarsource.com/sonarqube-cloud/managing-your-projects/project-analysis)
{% endcontent-ref %}
{% content-ref url="managing-your-projects/administering-your-projects" %}
[administering-your-projects](https://docs.sonarsource.com/sonarqube-cloud/managing-your-projects/administering-your-projects)
{% endcontent-ref %}
---
# Source: https://docs.sonarsource.com/sonarqube-community-build/user-guide/issues/managing.md
# Source: https://docs.sonarsource.com/sonarqube-server/10.6/user-guide/issues/managing.md
# Source: https://docs.sonarsource.com/sonarqube-server/10.7/user-guide/issues/managing.md
# Source: https://docs.sonarsource.com/sonarqube-server/10.8/user-guide/issues/managing.md
# Source: https://docs.sonarsource.com/sonarqube-server/2025.2/user-guide/issues/managing.md
# Source: https://docs.sonarsource.com/sonarqube-server/2025.3/user-guide/issues/managing.md
# Source: https://docs.sonarsource.com/sonarqube-server/2025.5/user-guide/issues/managing.md
# Source: https://docs.sonarsource.com/sonarqube-server/2025.1/user-guide/issues/managing.md
# Source: https://docs.sonarsource.com/sonarqube-server/2025.4/user-guide/issues/managing.md
# Source: https://docs.sonarsource.com/sonarqube-server/2025.6/user-guide/issues/managing.md
# Source: https://docs.sonarsource.com/sonarqube-server/user-guide/issues/managing.md
# Editing issues
In SonarQube Server, you can change the status of an issue in the following cases and provided you have the Administer Issues permission:
* If you want to fix the issue later, you can accept an issue. The issue status is then marked as **Accepted**.
* If you think the analysis is mistaken, you can mark it as **False positive**.
In addition, you can reassign an issue, tag an issue, and comment on an issue.
{% hint style="info" %}
* You can receive an email notification for issue-related events: see the [email](https://docs.sonarsource.com/sonarqube-server/user-guide/managing-your-account/subscribing-to-notifications/email "mention") page.
* You can manage external issues (issues detected by an external tool and imported into SonarQube Server) in the same way as internal issues. Be aware that managing an external issue within SonarQube Server has no impact on its state in the external tool. For example, when you mark an issue as **False positive** in SonarQube Server, it is not reflected in the external tool.
* As you edit issues, the related metrics, for example, number of issues taken into account, will update automatically; as will the quality gate status if it’s relevant.
{% endhint %}
### Accepting an issue
You may accept an issue if you decide to fix the issue later provided you have the Administer Issues permission on your project. Note that SonarQube Server ignores accepted issues in the quality reports and ratings of the code.
{% hint style="info" %}
You can add a comment to your issue change action. See [#commenting](#commenting "mention") for more information.
{% endhint %}
The procedure below explains how to accept a single issue. To accept several issues at once, see [#bulk-change](#bulk-change "mention").
To accept an issue:
1\. Retrieve the issue, it’s not necessary to open the detail view. See [retrieving](https://docs.sonarsource.com/sonarqube-server/user-guide/issues/retrieving "mention") for more information.
2\. In the issue card, select the **Open** issue status and select **Accept** in the contextual menu. A **Status change comment** box appears.
3\. Enter your change comment (optional) and select **Resolve**. The issue status is changed to **Accepted**.
### Marking an issue as False positive
If the analysis is mistaken, you can mark an issue as False positive provided you have the Administer Issues permission on your project. Note that SonarQube Server ignores False positive issues in the quality reports and ratings of the code.
{% hint style="info" %}
You can add a comment to your issue change action. See [#commenting](#commenting "mention") for more information.
{% endhint %}
The procedure below explains how to mark a single issue as False positive. To mark several issues at once, see [#bulk-change](#bulk-change "mention").
To mark an issue as False positive:
1. Retrieve the issue, it’s not necessary to open the detail view. See [retrieving](https://docs.sonarsource.com/sonarqube-server/user-guide/issues/retrieving "mention") for more information.
2. In the issue card, select the **Open** issue status and select **False positive** in the contextual menu. A **Status change comment** box appears.
3. Enter your change comment (optional) and select **Resolve**. The issue status is changed to **False positive**.
### Reopening an issue
You can reopen an Accepted issue (when it’s time to fix it) or a False positive issue (if it turns out to be a true positive).
The procedure below explains how to reopen a single issue. To reopen several issues at once, see [#bulk-change](#bulk-change "mention").
To reopen one or several issues:
1. Retrieve the issue, it’s not necessary to open the detail view. See [retrieving](https://docs.sonarsource.com/sonarqube-server/user-guide/issues/retrieving "mention") for more information.
2. In the issue card, select the **Accepted** or **False positive** issue status and select **Open** in the contextual menu. The issue status is reset to **Open**.
### Marking an issue as reviewed
To mark issues as reviewed, you may use the tagging feature: create the Reviewed tag and assign it to reviewed issues: see [#tagging](#tagging "mention"). This way, you can filter the reviewed issues by using the Tag filter.
### Assigning an issue
When possible, SonarQube Server assigns a default assignee at issue creation time (see [solution-overview](https://docs.sonarsource.com/sonarqube-server/user-guide/issues/solution-overview "mention") for more information). You can assign an unassigned issue to a user, reassign an issue to another user, or unassign an issue.
The procedure below explains how to assign a single issue. To assign several issues at once, see [#bulk-change](#bulk-change "mention").
To assign an issue:
1. Retrieve the issue, it’s not necessary to open the detail view. See [retrieving](https://docs.sonarsource.com/sonarqube-server/user-guide/issues/retrieving "mention") for more information. To filter the unassigned issues, select **Not assigned** in the **Assignee** filter.
2. In the issue card, click the assignee name or the **Not assigned** mention. The list of users to whom you can assign the issue appears.
3. In the list, select the new assignee (or select **Not assigned** in the list to unassign the issue).
### Customizing a software quality severity level
Issues inherit software quality severity levels from the rules that raised them. If you decide that a different level is more appropriate for a given issue, you can customize it. Keep in mind that changing the severity level may impact your quality gates.
The following table shows the severity levels of software qualities for [standard-experience](https://docs.sonarsource.com/sonarqube-server/instance-administration/analysis-functions/instance-mode/standard-experience "mention") and [mqr-mode](https://docs.sonarsource.com/sonarqube-server/instance-administration/analysis-functions/instance-mode/mqr-mode "mention").
{% tabs %}
{% tab title="MQR SEVERITY TYPES" %}
The table below lists the severity metrics used in Multi-Quality Rule mode.
| **Severity** | **Definition** |
| ------------ | ------------------------------------------------------------------------------------------------------------------------------------------------------------------------------------------------------------------------------------------------------------------------------ |
| Blocker | An issue that has a significant probability of severe unintended consequences on the application that should be fixed immediately. This includes bugs leading to production crashes and security flaws allowing attackers to extract sensitive data or execute malicious code. |
| High | An issue with a high impact on the application that should be fixed as soon as possible. |
| Medium | An issue with a medium impact. |
| Low | An issue with a low impact. |
| Info | There is no expected impact on the application. For informational purposes only. |
{% hint style="info" %}
Users with appropriate permissions are able to set a custom severity on a rule.
{% endhint %}
{% endtab %}
{% tab title="STANDARD EXPERIENCE SEVERITY TYPES" %}
The table below lists the severity metrics used in Standard Experience mode.
| **Severity** | Definition |
| ------------ | ------------------------------------------------------------------------------------------------------------------------------------------------------------------------------------------------------------------------------------------------------------------------------ |
| Blocker | An issue that has a significant probability of severe unintended consequences on the application that should be fixed immediately. This includes bugs leading to production crashes and security flaws allowing attackers to extract sensitive data or execute malicious code. |
| Critical | An issue with a critical impact on the application that should be fixed as soon as possible. |
| Major | An issue with a major impact on the application. |
| Minor | An issue with a minor impact on the application. |
| Info | There is no expected impact on the application. For informational purposes only. |
{% hint style="info" %}
Users with appropriate permissions are able to set a custom severity on a rule.
{% endhint %}
{% endtab %}
{% endtabs %}
To customize the issue severity level for **Software qualities impacted**:
1. Retrieve the issue you want to manage. See [retrieving](https://docs.sonarsource.com/sonarqube-server/user-guide/issues/retrieving "mention") for more information.
2. Select an issue from the search results list:
* For Standard Experience, select by issue type: **Bug**, **Vulnerability**, **Code Smells**.
* For Multi-Quality Rule Mode, select by issue quality: **Security**, **Reliability**, **Maintainability**.
3. Select the severity level you wish to apply from the drop-down list. You can also change the severity level from the issue’s details page.
### Tagging an issue
You can create tags and assign them to issues in order to retrieve issues more easily or to indicate a workflow step. For example, you can use a tag to mark an issue as reviewed. The figure below shows how tags are displayed in the issue item.
{% hint style="info" %}
Rules can also be tagged (In particular, [built-in-rule-tags](https://docs.sonarsource.com/sonarqube-server/user-guide/rules/built-in-rule-tags "mention") may be assigned to some rules and your Quality Standards administrator can assign custom ones). An issue inherits the tags assigned to the rule that raised the issue. You can remove the inherited tags.
{% endhint %}
The procedure below explains how to tag a single issue. To add or remove a tag to/from several issues at once, see [#bulk-change](#bulk-change "mention").
To manage the tags assigned to an issue:
1. Retrieve the issue you want to manage. See [retrieving](https://docs.sonarsource.com/sonarqube-server/user-guide/issues/retrieving "mention") for more information.
2. In the search results list or in the detail view, select in the **Tags** section if the issue. A dialog opens with the list of existing tags.
3. In the dialog, you can use the search field to search for an existing tag. To create a new tag, enter the new tag in the search field: the new tag will appear in the list of tags with a plus sign in front of it .
4. To assign or unassign a tag, select or clear the tag’s checkbox in the list.
5. Click anywhere outside the dialog to close the dialog.
### Commenting on an issue
When accepting an issue or marking an issue as **False positive**, you can add a comment. You can also add a comment to an issue anytime. These comments are visible from the **Activity** tab of the issue: see [#history-and-comments](https://docs.sonarsource.com/sonarqube-server/user-guide/reviewing#history-and-comments "mention").
By default, comments are shared between all users (it can be disabled at the global level).
To add a comment to an issue:
1. Retrieve the issue and open its detail view. See [retrieving](https://docs.sonarsource.com/sonarqube-server/user-guide/issues/retrieving "mention") for more information.
2. Open the **Activity** tab.
3. Select **Add a comment**. The "Add a comment" dialog box opens.
4. Enter your comment and select **Comment**.
5. Your comment is added to the **Activity** tab.
### Suppressing the issues on a given line
In most languages, you can use the `//NOSONAR` comment at the end of a line to suppress all issues on the line. This will suppress all issues - now and in the future - that might be raised on the line.
### Managing several issues in bulk
To manage several issues at once:
1\. In the list of filtered issues, select the issues you want to manage:
* To select one issue, select the issue check box.
* To select all issues, select the **Bulk change** check box. Issues you do not want included in your action can be individually unselected.
2\. Select the **Bulk change** button. The **Change issues** dialog opens.
3\. In the dialog, select the action you want to perform:
* **Assign**: to assign the issues to the same user.
* **Add tags**: to add the same tag to the issues.
* **Remove tags**: to remove the same tag from the issues.
* **Change status**: to reopen the issues, accept the issues, or mark the issues as **False positive**.
4\. Select **Apply** to complete the bulk changes.
### Related pages
* [fixing](https://docs.sonarsource.com/sonarqube-server/user-guide/issues/fixing "mention")
* [adding-tags-to-rule](https://docs.sonarsource.com/sonarqube-server/quality-standards-administration/managing-quality-profiles/adding-tags-to-rule "mention")
---
# Source: https://docs.sonarsource.com/sonarqube-community-build/server-update-and-maintenance/update/marketplace.md
# Source: https://docs.sonarsource.com/sonarqube-server/8.9/instance-administration/marketplace.md
# Source: https://docs.sonarsource.com/sonarqube-server/9.8/instance-administration/marketplace.md
# Source: https://docs.sonarsource.com/sonarqube-server/9.9/instance-administration/marketplace.md
# Source: https://docs.sonarsource.com/sonarqube-server/10.0/instance-administration/marketplace.md
# Source: https://docs.sonarsource.com/sonarqube-server/10.1/instance-administration/marketplace.md
# Source: https://docs.sonarsource.com/sonarqube-server/10.2/instance-administration/marketplace.md
# Source: https://docs.sonarsource.com/sonarqube-server/10.3/instance-administration/marketplace.md
# Source: https://docs.sonarsource.com/sonarqube-server/10.4/instance-administration/marketplace.md
# Source: https://docs.sonarsource.com/sonarqube-server/10.5/instance-administration/marketplace.md
# Source: https://docs.sonarsource.com/sonarqube-server/10.6/instance-administration/marketplace.md
# Source: https://docs.sonarsource.com/sonarqube-server/10.7/server-upgrade-and-maintenance/upgrade/marketplace.md
# Source: https://docs.sonarsource.com/sonarqube-server/10.8/server-upgrade-and-maintenance/upgrade/marketplace.md
# Source: https://docs.sonarsource.com/sonarqube-server/2025.2/server-update-and-maintenance/upgrade/marketplace.md
# Source: https://docs.sonarsource.com/sonarqube-server/2025.3/server-update-and-maintenance/upgrade/marketplace.md
# Source: https://docs.sonarsource.com/sonarqube-server/2025.5/server-update-and-maintenance/update/marketplace.md
# Source: https://docs.sonarsource.com/sonarqube-server/2025.1/server-update-and-maintenance/update/marketplace.md
# Source: https://docs.sonarsource.com/sonarqube-server/2025.4/server-update-and-maintenance/update/marketplace.md
# Source: https://docs.sonarsource.com/sonarqube-server/2025.6/server-update-and-maintenance/update/marketplace.md
# Source: https://docs.sonarsource.com/sonarqube-server/server-update-and-maintenance/update/marketplace.md
# Using Marketplace
Administrators can access the SonarQube Server Marketplace via **Administration** > **Marketplace**. The Marketplace tab is the place for keeping the pieces of the SonarQube Server platform up to date. It lets you:
See:
* The currently installed SonarQube Server Edition
* Which plugins are installed
Discover:
* Which other Editions are available, to enable more features
{% hint style="warning" %}
A third-party website called `sonarplugins.com` also exists. This website is not the same as the Marketplace and is not endorsed by, affiliated with, maintained, authorized, or sponsored by Sonar.
{% endhint %}
### Pending operations
When you perform an action in the Marketplace (install, update, or uninstall a plugin), a yellow banner appears at the top of the page showing pending operations that will be executed once SonarQube Server is restarted. Pending operations can be canceled until the server is restarted.
### Restart SonarQube Server
Restarting SonarQube Server can be done manually from the command line by running `sonar.sh restart`. When you have Pending Changes, the restart button will be displayed in the yellow banner (see **Pending Operations** above). Please note that restarting SonarQube Server won’t reload the changes applied to the `sonar.properties`.
### Manual updates
If you’re using a commercial edition or your server doesn’t have internet access, you won’t be able to rely on the Marketplace tab for plugins and will have to handle plugin installations and updates manually.
To see what plugins are available and which version of a plugin is appropriate for your server, use the [plugin-version-matrix](https://docs.sonarsource.com/sonarqube-server/server-installation/plugins/plugin-version-matrix "mention"), which is kept up to date with current plugin availability and compatibility.
To install a plugin, simply download it using the manual download link on the plugin’s documentation page, place it in `/extensions/plugins`, and restart the server.
#### Stopping the Marketplace from searching for plugin updates
Your SonarQube Server needs internet access for the Marketplace to search for plugin updates. If your server doesn’t have internet access, you may get errors in your logs when the Marketplace tries to search for new plugins. You can stop this by updating `sonar.updatecenter.activate` in `/conf/sonar.properties`.
### Which URLs does the Marketplace connect to?
The SonarQube Marketplace connects to to get the list of plugins. Most of the referenced plugins are downloaded from:
*
*
### Using the Marketplace behind a proxy
Marketplace uses HTTP(S) connections to external servers to provide these services. If SonarQube Server is located behind a proxy, additional information must be provided in `/conf/sonar.properties`:
```css-79elbk
http.proxyHost=
http.proxyPort=
#If proxy authentication is required
http.proxyUser=
http.proxyPassword=
```
Note:
* the same properties can be used in the `https.*` form for HTTPS connections.
* `http.proxyHost` does not work it if contains a schema ("http\://" or "https\://")
### Deploying to the Marketplace
If you have developed a SonarQube Server plugin, you can check out the [requirements](https://community.sonarsource.com/t/deploying-to-the-marketplace/35236) for adding it to the Marketplace in the [Plugin Development community](https://community.sonarsource.com/c/plugins/15).
---
# Source: https://docs.sonarsource.com/sonarqube-server/8.9/user-guide/metric-definitions.md
# Source: https://docs.sonarsource.com/sonarqube-server/9.8/user-guide/metric-definitions.md
# Source: https://docs.sonarsource.com/sonarqube-server/9.9/user-guide/metric-definitions.md
# Source: https://docs.sonarsource.com/sonarqube-server/10.0/user-guide/metric-definitions.md
# Source: https://docs.sonarsource.com/sonarqube-server/10.1/user-guide/metric-definitions.md
# Source: https://docs.sonarsource.com/sonarqube-server/10.2/user-guide/metric-definitions.md
# Source: https://docs.sonarsource.com/sonarqube-server/10.3/user-guide/metric-definitions.md
# Source: https://docs.sonarsource.com/sonarqube-server/10.4/user-guide/metric-definitions.md
# Source: https://docs.sonarsource.com/sonarqube-server/10.5/user-guide/metric-definitions.md
# Source: https://docs.sonarsource.com/sonarqube-cloud/digging-deeper/metric-definitions.md
# Understanding measures and metrics
Metrics are used to measure:
* Security, maintainability, and reliability attributes on the basis of statistics on the detected security, maintainability, and reliability issues, respectively.
* Test coverage on the basis of coverage statistics on executable lines and evaluated conditions.
* Code cyclomatic and cognitive complexities.
* Security review level on the basis of statistics on reviewed security hotspots.
Metrics also include statistics on:
* Duplicated lines and blocks.
* Code size (the number of various code elements).
* Issues.
Finally, metrics also include the quality gate status result.
A metric refers to either new code or overall code. Most metrics can be used to define the quality gate conditions.
You can find these metrics in the **Measures** tab of your projects and portfolios.
You can retrieve the metrics via the [web-api](https://docs.sonarsource.com/sonarqube-cloud/advanced-setup/web-api "mention") by using the metric key.
### Security
A list of security metrics used in the Sonar solution. See the [security-related-rules](https://docs.sonarsource.com/sonarqube-cloud/digging-deeper/security-related-rules "mention") page for more details.
Metric
Metric key
Definition
Vulnerabilities
vulnerabilities
The total number of vulnerabilities.
Vulnerabilities on new code
new_vulnerabilities
The total number of vulnerabilities raised for the first time on new code.
Security rating
security_rating
Rating related to security. The rating grid is as follows: A = 0 vulnerability B = at least one minor vulnerability C = at least one major vulnerability D = at least one critical vulnerability E = at least one blocker vulnerability
Security rating on new code
new_security_rating
Rating related to security on new code.
Security remediation effort
security_remediation_effort
The effort to fix all vulnerabilities. The remediation cost of an issue is taken over from the effort (in minutes) assigned to the rule that raised the issue (see Technical debt in the Maintainability section).
An 8-hour day is assumed when values are shown in days.
Security remediation effort on new code
new_security_remediation_effort
The same as Security remediation effort but on new code.
### Reliability
A list of [#reliability](https://docs.sonarsource.com/sonarqube-cloud/software-qualities#reliability "mention") metrics used in the Sonar solution.
Metric
Metric key
Definition
Bugs
bugs
The total number of bugs.
Bugs on new code
new_bugs
The total number of bugs raised for the first time on new code.
Reliability rating
reliability_rating
Rating related to reliability. The rating grid is as follows:
A = 0 bug
B = at least one minor bug
C = at least one major bug
D = at least one critical bug
E = at least one blocker bug
Reliability rating on new code
new_reliability_rating
Rating related to reliability on new code.
Reliability remediation effort
reliability_remediation_effort
The effort to fix all reliability issues. The remediation cost of an issue is taken over from the effort (in minutes) assigned to the rule that raised the issue. An 8-hour day is assumed when values are shown in days.
Reliability remediation effort on new code
new_reliability_remmediation_effort
The same as Reliability remediation effort but on new code.
### Maintainability
A list of [#maintainability](https://docs.sonarsource.com/sonarqube-cloud/software-qualities#maintainability "mention") metrics used in the Sonar solution.
Metric
Metric key
Definition
Code smells
code_smells
The total number of code smells.
Code smells on new code
new_code_smells
The total number of code smells raised for the first time on new code.
Technical debt
sqale_index
A measure of effort to fix all code smells.
Technical debt on new code
new_technical_debt
A measure of effort to fix the code smells raised for the first time on new code.
Technical debt ratio
sqale_debt_ratio
The ratio between the cost to develop the software and the cost to fix it.
Technical debt ratio on new code
new_sqale_debt_ratio
The ratio between the cost to develop the code changed on new code and the cost of the issues linked to it.
Maintainability rating
sqale_rating
The rating related to the value of the technical debt ratio.
Maintainability rating on new code
new_squale _rating
The rating related to the value of the technical debt ratio on new code.
Technical debt
The [technical debt](https://www.sonarsource.com/learn/technical-debt/) is the sum of the maintainability issue remediation costs. An issue remediation cost is the effort (in minutes) evaluated to fix the issue. It is taken over from the effort assigned to the rule that raised the issue.
An 8-hour day is assumed when the technical debt is shown in days.
Technical debt ratio
The technical debt ratio is the ratio between the cost to develop the software and the technical debt (the cost to fix it). It is calculated based on the following formula:
`sqale_debt_ratio` = technical debt /(cost to develop one line of code \* number of lines of code)
Where the cost to develop one line of code is predefined in the database (by default, 30 minutes)
**Example**:
* Technical debt: 122,563
* Number of lines of code: 63,987
* Cost to develop one line of code: 30 minutes
* Technical debt ratio: 6.4%
Maintainability rating
The default Maintainability rating scale `(sqale_rating)` is:
* **A** ≤ 5%
* **B** ≥ 5% to <10%
* **C** ≥ 10% to <20%
* **D** ≥ 20% to < 50%
* **E** ≥ 50%
### Security review
A list of security review metrics used in the Sonar solution. See [security-hotspots](https://docs.sonarsource.com/sonarqube-cloud/digging-deeper/security-hotspots "mention") for more details.
Metric
Metric key
Definition
Security hotspots
security_hotspots
The number of security hotspots.
Security hotspots on new code
new_security_hotspots
The number of security hotspots on new code.
Security hotspots reviewed
security_hotspots_reviewed
The percentage of reviewed security hotspots compared in relation to the total number of security hotspots.
New security hotspots reviewed
new_security_hotspots_reviewed
The percentage of reviewed security hotspots on new code.
Security review rating
security_review_rating
The security review rating is a letter grade based on the percentage of reviewed security hotspots. Note that security hotspots are considered reviewed if they are marked as Acknowledged, Fixed, or Safe.
The rating grid is as follows: A = >= 80% B = >= 70% and <80% C = >= 50% and <70% D = >= 30% and <50% E = < 30%
Security review rating on new code
new_security_review_rating
The security review rating for new code.
### Coverage
A list of coverage metrics used in the Sonar solution. See the [overview](https://docs.sonarsource.com/sonarqube-cloud/enriching/test-coverage/overview "mention") page on test coverage, for more details.
Metric
Metric key
Definition
Coverage
coverage
A mix of line coverage and condition coverage. Its goal is to provide an even more accurate answer to the question:
How much of the source code has been covered by unit tests?
coverage = (CT + LC)/(B + EL)
where:
CT: conditions that have been evaluated to true at least once
EL: total number of executable lines (lines_to_cover)
Coverage on new code
new_coverage
This definition is identical to coverage but is restricted to new or updated source code.
Lines to cover
lines_to_cover
Coverable lines. The number of lines of code that could be covered by unit tests, for example, blank lines or full comments lines are not considered as lines to cover. Note that this metric is about what is possible, not what is left to do - that’s uncovered lines.
Lines to cover on new code
new_lines_to_cover
This definition is identical to lines to cover but restricted to new or updated source code.
Uncovered lines
uncovered_lines
The number of lines of code that are not covered by unit tests.
Uncovered lines on new code
new_uncovered_lines
This definition is identical to uncovered lines but restricted to new or updated source code.
Line coverage
line_coverage
On a given line of code, line coverage simply answers the question:
Has this line of code been executed during the execution of the unit tests?
### Duplications
A list of duplication metrics used in the Sonar solution.
{% hint style="warning" %}
Duplication detection is not supported for Terraform and similar IaC languages, Dart, and CSS.
{% endhint %}
Metric
Metric key
Definition
Duplicated lines density (%)
duplicated_lines_density
Duplicated lines density is calculated by using the following formula:
The same as duplicated lines density but on new code.
Duplicated lines
duplicated_lines
The number of lines involved in duplications.
Duplicated lines on new code
new_duplicated_lines
The number of lines involved in duplications on new code.
Duplicated blocks
duplicated_blocks
The number of duplicated blocks of lines.
For a block of code to be considered as duplicated, for Non-Java projects:
There should be at least 100 successive and duplicated tokens.
Those tokens should be spread at least on:
30 lines of code for COBOL
20 lines of code for ABAP
10 lines of code for other languages
for Java projects:
There should be at least 10 successive and duplicated statements whatever the number of tokens and lines.
Differences in indentation and in string literals are ignored while detecting duplications.
Duplicated block on new code
new_duplicated_blocks
The number of duplicated blocks of lines on new code.
Duplicated files
duplicated_files
The number of files involved in duplications.
### Size
A list of size metrics used in the Sonar solution.
Metric
Metric key
Definition
New lines
new_lines
The number of physical lines on new code (number of carriage returns).
Lines of code
ncloc
The number of physical lines that contain at least one character which is neither a whitespace nor a tabulation nor part of a comment.
Lines
lines
The number of physical lines (number of carriage returns).
Statements
statements
The number of statements.
Functions
functions
The number of functions. Depending on the language, a function is defined as either a function, a method, or a paragraph. Language-specific details:
COBOL: It’s the number of paragraphs.
Dart: Any function expression is included, whether it’s the body of a function declaration, of a method, constructor, getter, top-level or nested function, top-level or nested lambda.
Java: Methods in anonymous classes are ignored.
VB.NET: Accessors are not considered to be methods.
Classes
classes
The number of classes (including nested classes, interfaces, enums, annotations, mixins, extensions, and extension types).
Files
files
The number of files.
Comment lines
comment_lines
The number of lines containing either comment or commented-out code. See below for calculation details.
Comments (%)
comment_lines_density
The comment lines density. It is calculated based on the following formula: comment_lines_density=[comment_lines / (lines + comment_lines)] * 100
Examples:
50% means that the number of lines of code equals the number of comment lines.
100% means that the file only contains comment lines.
Lines of code per language
ncloc_language_distribution
The non-commented lines of code distributed by language.
Projects
projects
The number of projects in a portfolio.
Comment lines
Non-significant comment lines (empty comment lines, comment lines containing only special characters, etc.) do not increase the number of comment lines.
The following piece of code contains 9 comment lines:
```css-79elbk
/** +0 => empty comment line
* +0 => empty comment line
* This is my documentation +1 => significant comment
* although I don't +1 => significant comment
* have much +1 => significant comment
* to say +1 => significant comment
* +0 => empty comment line
*************************** +0 => non-significant comment
* +0 => empty comment line
* blabla... +1 => significant comment
*/ +0 => empty comment line
/** +0 => empty comment line
* public String foo() { +1 => commented-out code
* System.out.println(message); +1 => commented-out code
* return message; +1 => commented-out code
* } +1 => commented-out code
*/ +0 => empty comment line
```
In addition:
* For COBOL: Generated lines of code and pre-processing instructions (SKIP1, SKIP2, SKIP3, COPY, EJECT, REPLACE) are not counted as lines of code.
* For Java and Dart: File headers are not counted as comment lines (because they usually define the license).
### Complexity
Complexity metrics used in the Sonar solution.
Metric
Metric key
Definition
Cyclomatic complexity
complexity
A quantitative metric used to calculate the number of paths through the code.
#### Cyclomatic complexity
Cyclomatic complexity is a quantitative metric used to calculate the number of paths through the code. The analyzer calculates the score of this metric for a given function (depending on the language, it may be a function, a method, a subroutine, etc.) by incrementing the function’s cyclomatic complexity counter by one each time the control flow of the function splits resulting in a new conditional branch. Each function has a minimum complexity of 1. The calculation formula is as follows:
Cyclomatic complexity = 1 + number of conditional branches
The calculation of the overall code’s cyclomatic complexity is basically the sum of all complexity scores calculated at the function level. In some languages, the complexity of external functions is additionally taken into account.
Split detection by language.
ABAP
The ABAP analyzer calculates the cyclomatic complexity at the function level. It increments the cyclomatic complexity by one each time it detects one of the following keywords:
* `AND`
* `CATCH`
* `DO`
* `ELSEIF`
* `IF`
* `LOOP`
* `LOOPAT`
* `OR`
* `PROVIDE`
* `SELECT…ENDSELECT`
* `TRY`
* `WHEN`
* `WHILE`
C/C++/Objective-C
The C/C++/Objective-C analyzer calculates the cyclomatic complexity at function and coroutine levels. It increments the cyclomatic complexity by one each time it detects:
* A control statement such as: `if`, `while`, `do while`, `for`
* A switch statement keyword such as: `case`, `default`
* The `&&` and `||` operators
* The `?` ternary operator
* A lambda expression definition
{% hint style="info" %}
Each time the analyzer scans a header file as part of a compilation unit, it computes the measures for this header: statements, functions, classes, cyclomatic complexity, and cognitive complexity. That means that each measure may be computed more than once for a given header. In that case, it stores the largest value for each measure.
{% endhint %}
C#
The C# analyzer calculates the cyclomatic complexity at method and property levels. It increments the cyclomatic complexity by one each time it detects:
* one of these function declarations: method, constructor, destructor, property, accessor, operator, or local function declaration.
* A conditional expression
* A conditional access
* A switch case or switch expression arm
* An and/or pattern
* One of these statements: `do`, `for`, `foreach`, `if`, `while`
* One of these expressions: `??`, `??=`, `||`, or `&&`
COBOL
The COBOL analyzer calculates the cyclomatic complexity at paragraph, section, and program levels. It increments the cyclomatic complexity by one each time it detects one of these commands (except when they are used in a copybook):
* `ALSO`
* `ALTER`
* `AND`
* `DEPENDING`
* `END_OF_PAGE`
* `ENTRY`
* `EOP`
* `EXCEPTION`
* `EXEC CICS HANDLE`
* `EXEC CICS LINK`
* `EXEC CICS XCTL`
* `EXEC CICS RETURN`
* `EXIT`
* `GOBACK`
* `IF`
* `INVALID`
* `OR`
* `OVERFLOW`
* `SIZE`
* `STOP`
* `TIMES`
* `UNTIL`
* `USE`
* `VARYING`
* `WHEN`
Dart
The Dart analyzer calculates the cyclomatic complexity for:
* top-level functions
* top-level function expressions (lambdas)
* methods
* accessors (getters and setters)
* constructors
It increments the complexity by one for each of the structures listed above. It doesn’t increment the complexity for nested function declarations or expressions.
In addition, the count is incremented by one for each:
* short-circuit binary expression or logical patterns (`&&`, `||`, `??`)
* if-null assignments (`??=`)
* conditional expressions (`?:`)
* null-aware operators (`?[`, `?.`, `?..`, `...?`)
* propagating cascades (`a?..b..c`)
* `if` statement or collection
* loop (`for`, `while`, `do`, and `for` collection)
`case` or pattern in a `switch` statement or expression
Java
The Java analyzer calculates the cyclomatic complexity at the method level. It increments the Cyclomatic complexity by one each time it detects one of these keywords:
* `if`
* `for`
* `while`
* `case`
* `&&`
* `||`
* `?`
* `->`
JS/TS, PHP
The JS/TS analyzer calculates the cyclomatic complexity at the function level. The PHP analyzer calculates the cyclomatic complexity at the function and class levels. Both analyzers increment the cyclomatic complexity by one each time they detect:
* A function (i.e non-abstract and non-anonymous constructors, functions, procedures or methods)
* An `if` or (for PHP) `elsif` keyword
* A short-circuit (AKA lazy) logical conjunction (`&&`)
* A short-circuit (AKA lazy) logical disjunction (`||`)
* A ternary conditional expression
* A loop
* A `case` clause of a `switch` statement
* A `throw` or a `catch` statement
* A `goto` statement (only for PHP)
PL/I
The PL/I analyzer increments the cyclomatic complexity by one each time it detects one of the following keywords:
* `PROC`
* `PROCEDURE`
* `GOTO`
* `GO TO`
* `DO`
* `IF`
* `WHEN`
* `|`
* `!`
* `|=`
* `!=`
* `&`
* `&=`
* A `DO` statement with conditions (Type 1 `DO` statements are ignored)
{% hint style="info" %}
For procedures having more than one return statement: each additional return statement except for the last one, will increment the complexity metric.
{% endhint %}
PL/SQL
The PL/SQL analyzer calculates the cyclomatic complexity at the function and procedure level. It increments the cyclomatic complexity by one each time it detects:
* The main PL/SQL anonymous block (not inner ones)
* One of the following statements:
* `CREATE PROCEDURE`
* `CREATE TRIGGER`
* basic `LOOP`
* `WHEN` clause (the `WHEN` of simple `CASE` statement and searched `CASE` statement)
* cursor `FOR LOOP`
* `CONTINUE` / `EXIT WHEN` clause (The `WHEN` part of the `CONTINUE` and `EXIT` statements)
* exception handler (every individual `WHEN`)
* `EXIT`
* `FORLOOP`
* `FORALL`
* `IF`
* `ELSIF`
* `RAISE`
* `WHILELOOP`
* One of the following expressions:
* `AND` expression (`AND` reserved word used within PL/SQL expressions)
* `OR` expression (`OR` reserved word used within PL/SQL expressions),
* `WHEN` clause expression (the `WHEN` of simple `CASE` expression and searched `CASE` expression)
VB.NET
The VB.NET analyzer calculates the cyclomatic complexity at function, procedure, and property levels. It increments the cyclomatic complexity by one each time it detects:
* a method or constructor declaration (`Sub`, `Function`),
* `AndAlso`
* `Case`
* `Do`
* `End`
* `Error`
* `Exit`
* `For`
* `ForEach`
* `GoTo`
* If
* `Loop`
* `On Error`
* `OrElse`
* `Resume`
* `Stop`
* `Throw`
* `Try`
* `While`
### Issues
A list of issues metrics used in the Sonar solution. See the [solution-overview](https://docs.sonarsource.com/sonarqube-cloud/managing-your-projects/issues/solution-overview "mention") page for information about how SonarQube Cloud identifies issues and manages its life cycle.
Metric
Metric key
Definition
Issues
violations
The number of issues in all states.
Issues on new code
new_violations
The number of issues raised for the first time on new code.
Accepted issues
accepted_issues
The number of issues marked as Accepted.
Open issues
open_issues
The number of issues in the Openstatus.
Accepted issues on new code
new_accepted_issues
The number of Accepted issues on new code.
False positive issues
false_positive_issues
The number of issues marked as False positive.
Blocker issues (software quality)
software_quality_blocker_issues
Issues with Blocker software quality severity level.
High issues (software quality)
software_quality_high_issues
Issues with High software quality severity level.
Medium issues (software quality)
software_quality_medium_issues
Issues with Medium software quality severity level.
Low issues (software quality)
software_quality_low_issues
Issues with Low software quality severity level.
Info issues (software quality)
software_quality_info_issues
Issues with Info software quality severity level.
Blocker issues (type)
blocker_violations
Issues with Blocker type severity level.
Critical issues (type)
critical_violations
Issues with Critical type severity level.
Major issues (type)
major_violations
Issues with Major type severity level.
Minor issues (type)
minor_violations
Issues with Minor type severity level.
Info issues (type)
info_violations
Issues with Info type severity level.
{% hint style="warning" %}
Severities are tied to the [software-qualities](https://docs.sonarsource.com/sonarqube-cloud/digging-deeper/software-qualities "mention") (security, reliability, maintainability) and types (vulnerability, bug, code smell) of issues they impact. Quality gate conditions related to severity currently use type severities.
{% endhint %}
### Quality Gates
[quality-gates](https://docs.sonarsource.com/sonarqube-cloud/improving/quality-gates "mention") metrics used in the Sonar solution.
Metric
Metric key
Definition
Quality gate status
alert_status
The state of the quality gate associated with your project. Possible values are ERROR and OK.
Quality gate details
quality_gate_details
Status (passed or failed) of each condition in the quality gate.
---
# Source: https://docs.sonarsource.com/sonarqube-community-build/user-guide/code-metrics/metrics-definition.md
# Source: https://docs.sonarsource.com/sonarqube-server/10.6/user-guide/code-metrics/metrics-definition.md
# Source: https://docs.sonarsource.com/sonarqube-server/10.7/user-guide/code-metrics/metrics-definition.md
# Source: https://docs.sonarsource.com/sonarqube-server/10.8/user-guide/code-metrics/metrics-definition.md
# Source: https://docs.sonarsource.com/sonarqube-server/2025.2/user-guide/code-metrics/metrics-definition.md
# Source: https://docs.sonarsource.com/sonarqube-server/2025.3/user-guide/code-metrics/metrics-definition.md
# Source: https://docs.sonarsource.com/sonarqube-server/2025.5/user-guide/code-metrics/metrics-definition.md
# Source: https://docs.sonarsource.com/sonarqube-server/2025.1/user-guide/code-metrics/metrics-definition.md
# Source: https://docs.sonarsource.com/sonarqube-server/2025.4/user-guide/code-metrics/metrics-definition.md
# Source: https://docs.sonarsource.com/sonarqube-server/2025.6/user-guide/code-metrics/metrics-definition.md
# Source: https://docs.sonarsource.com/sonarqube-server/user-guide/code-metrics/metrics-definition.md
# Understanding measures and metrics
Metrics are used to measure:
* Security, maintainability, and reliability attributes on the basis of statistics on the detected security, maintainability, and reliability issues, respectively.
* Test coverage on the basis of coverage statistics on executable lines and evaluated conditions.
* Code cyclomatic and cognitive complexities.
* Security review level on the basis of statistics on reviewed security hotspots.
Metrics also include statistics on:
* Duplicated lines and blocks.
* Code size (the number of various code elements).
* Issues.
Finally, metrics also include the quality gate status result.
A metric refers to either new code or overall code. Most metrics can be used to define the quality gate conditions.
You can find these metrics in the **Measures** tab of your projects and portfolios.
You can retrieve the metrics through the [web-api](https://docs.sonarsource.com/sonarqube-server/extension-guide/web-api "mention") by using the metric key.
### Security
A list of security metrics used in the Sonar solution. See [security-related-rules](https://docs.sonarsource.com/sonarqube-server/user-guide/rules/security-related-rules "mention") for more information.
{% tabs %}
{% tab title="MULTI-QUALITY RULE MODE METRICS" %}
Metric
Metric key
Definition
Security issues
software_quality_security_issues
The total number of issues impacting security.
Security issues on new code
new_software_quality_security_issues
The total number of security issues raised for the first time on new code.
Security rating
software_quality_security_rating
Rating related to security. The rating grid is as follows: A = 0 or more info issues B = at least one low issue C = at least one medium issue D = at least one high issue E = at least one blocker issue
Security rating on new code
new_software_quality_security_rating
Rating related to security on new code.
Security remediation effort
software_quality_security_remediation_effort
The effort to fix all vulnerabilities. The remediation cost of an issue is taken over from the effort (in minutes) assigned to the rule that raised the issue (see Technical debt in the Maintainability section).
An 8-hour day is assumed when values are shown in days.
Security remediation effort on new code
new_software_quality_security_remediation_effort
The same as Security remediation effort but on new code.
The total number of vulnerabilities raised for the first time on new code.
Security rating
security_rating
Rating related to security. The rating grid is as follows: A = 0 vulnerability B = at least one minor vulnerability C = at least one major vulnerability D = at least one critical vulnerability E = at least one blocker vulnerability
Security rating on new code
new_security_rating
Rating related to security on new code.
Security remediation effort
security_remediation_effort
The effort to fix all vulnerabilities. The remediation cost of an issue is taken over from the effort (in minutes) assigned to the rule that raised the issue (see Technical debt in the Maintainability section).
An 8-hour day is assumed when values are shown in days.
Security remediation effort on new code
new_security_remediation_effort
The same as Security remediation effort but on new code.
{% endtab %}
{% endtabs %}
### Reliability
A list of [#reliability](https://docs.sonarsource.com/sonarqube-server/rules/software-qualities#reliability "mention") metrics used in the Sonar solution.
{% tabs %}
{% tab title="MULTI-QUALITY RULE MODE METRICS" %}
Metric
Metric Key
Definition
Reliability issues
software_quality_reliability_issues
The total number of issues impacting reliability.
Reliability issues on new code
new_software_quality_reliability_issues
The total number of reliability issues raised for the first time on new code.
Reliability rating
software_quality_reliability_rating
Rating related to reliability. The rating grid is as follows:
A = 0 or more info issues B = at least one low issue
C = at least one medium issue
D = at least one high issue
E = at least one blocker issue
Reliability rating on new code
new_software_quality_reliability_rating
Rating related to reliability on new code.
Reliability remediation effort
software_quality_reliability_remediation_effort
The effort to fix all reliability issues. The remediation cost of an issue is taken over from the effort (in minutes) assigned to the rule that raised the issue. An 8-hour day is assumed when values are shown in days.
The total number of bugs raised for the first time on new code.
Reliability rating
reliability_rating
Rating related to reliability. The rating grid is as follows:
A = 0 bug
B = at least one minor bug
C = at least one major bug
D = at least one critical bug
E = at least one blocker bug
Reliability rating on new code
new_reliability_rating
Rating related to reliability on new code.
Reliability remediation effort
reliability_remediation_effort
The effort to fix all reliability issues. The remediation cost of an issue is taken over from the effort (in minutes) assigned to the rule that raised the issue. An 8-hour day is assumed when values are shown in days.
Reliability remediation effort on new code
new_reliability_remmediation_effort
The same as Reliability remediation effort but on new code.
{% endtab %}
{% endtabs %}
### Maintainability
A list of [#maintainability](https://docs.sonarsource.com/sonarqube-server/rules/software-qualities#maintainability "mention") metrics used in the Sonar solution.
{% tabs %}
{% tab title="MULTI-QUALITY RULE MODE METRICS" %}
Metric
Metric key
Definition
Maintainability issues
software_quality_maintainability_issues
The total number of issues impacting maintainability.
Maintainability issues on new code
new_software_quality_maintainability_issues
The total number of maintainability issues raised for the first time on new code.
The total number of code smells raised for the first time on new code.
Technical debt
sqale_index
A measure of effort to fix all code smells.
Technical debt on new code
new_technical_debt
A measure of effort to fix the code smells raised for the first time on new code.
Technical debt ratio
sqale_debt_ratio
The ratio between the cost to develop the software and the cost to fix it.
Technical debt ratio on new code
new_sqale_debt_ratio
The ratio between the cost to develop the code changed on new code and the cost of the issues linked to it.
Maintainability rating
sqale_rating
The rating related to the value of the technical debt ratio.
Maintainability rating on new code
new_squale _rating
The rating related to the value of the technical debt ratio on new code.
{% endtab %}
{% endtabs %}
Technical debt
The [technical debt](https://www.sonarsource.com/learn/technical-debt/) is the sum of the maintainability issue remediation costs. An issue remediation cost is the effort (in minutes) evaluated to fix the issue. It is taken over from the effort assigned to the rule that raised the issue.
An 8-hour day is assumed when the technical debt is shown in days.
Technical debt ratio
The *technical debt ratio* is the ratio between the *cost to fix the software* (known as [#technical-debt](#technical-debt "mention")) and the *cost to develop the software*. It is calculated based on the following formula:
`sqale_debt_ratio` = technical debt /(cost to develop one line of code \* number of lines of code)
Where the cost to develop one line of code is predefined in the database (by default, 30 minutes, can be changed, see [metrics-parameters](https://docs.sonarsource.com/sonarqube-server/instance-administration/analysis-functions/metrics-parameters "mention")).
**Example**:
* Technical debt: 122,563
* Number of lines of code: 63,987
* Cost to develop one line of code: 30 minutes
* Technical debt ratio: 6.4%
See the [#calculating-lines-of-code](https://docs.sonarsource.com/sonarqube-server/server-update-and-maintenance/monitoring/lines-of-code#calculating-lines-of-code "mention") to understand what is considered *a line of code*.
Maintainability rating
The default Maintainability rating scale `(sqale_rating)` is:
* **A** ≤ 5% to 0%
* **B** ≥ 5% to <10%
* **C** ≥ 10% to <20%
* **D** ≥ 20% to < 50%
* **E** ≥ 50%
You can define another maintainability rating grid: see [#maintainability-rating](https://docs.sonarsource.com/sonarqube-server/instance-administration/analysis-functions/metrics-parameters#maintainability-rating "mention").
### Security review
A list of security review metrics used in the Sonar solution. See [security-hotspots](https://docs.sonarsource.com/sonarqube-server/user-guide/security-hotspots "mention") for more information.
{% tabs %}
{% tab title="MULTI-QUALITY RULE MODE METRICS" %}
Metric
Metric key
Definition
Security hotspots
security_hotspots
The number of security hotspots.
Security hotspots on new code
new_security_hotspots
The number of security hotspots on new code.
Security hotspots reviewed
security_hotspots_reviewed
The percentage of reviewed security hotspots compared in relation to the total number of security hotspots.
New security hotspots reviewed
new_security_hotspots_reviewed
The percentage of reviewed security hotspots on new code.
Security review rating
security_review_rating
The security review rating is a letter grade based on the percentage of reviewed security hotspots. Note that security hotspots are considered reviewed if they are marked as Acknowledged, Fixed, or Safe.
The rating grid is as follows: A = >= 80% B = >= 70% and <80% C = >= 50% and <70% D = >= 30% and <50% E = < 30%
Security review rating on new code
new_security_review_rating
The security review rating for new code.
{% endtab %}
{% endtabs %}
### Coverage
A list of coverage metrics used in the Sonar solution. See Test coverage [overview](https://docs.sonarsource.com/sonarqube-server/analyzing-source-code/test-coverage/overview "mention") page for more information.
Metric
Metric key
Definition
Coverage
coverage
A mix of line coverage and condition coverage. Its goal is to provide an even more accurate answer to the question:
How much of the source code has been covered by unit tests?
coverage = (CT + LC)/(B + EL)
where:
CT: conditions that have been evaluated to true at least once
EL: total number of executable lines (lines_to_cover)
Coverage on new code
new_coverage
This definition is identical to coverage but is restricted to new or updated source code.
Lines to cover
lines_to_cover
Coverable lines. The number of lines of code that could be covered by unit tests, for example, blank lines or full comments lines are not considered as lines to cover. Note that this metric is about what is possible, not what is left to do - that’s uncovered lines.
Lines to cover on new code
new_lines_to_cover
This definition is identical to lines to cover but restricted to new or updated source code.
Uncovered lines
uncovered_lines
The number of lines of code that are not covered by unit tests.
Uncovered lines on new code
new_uncovered_lines
This definition is identical to uncovered lines but restricted to new or updated source code.
Line coverage
line_coverage
On a given line of code, line coverage simply answers the question:
Has this line of code been executed during the execution of the unit tests?
### Duplications
A list of duplication metrics used in the Sonar solution.
{% hint style="warning" %}
Duplication detection is not supported for Terraform and similar IaC languages, Dart, and CSS.
{% endhint %}
Metric
Metric key
Definition
Duplicated lines density (%)
duplicated_lines_density
Duplicated lines density is calculated by using the following formula:
The same as duplicated lines density but on new code.
Duplicated lines
duplicated_lines
The number of lines involved in duplications.
Duplicated lines on new code
new_duplicated_lines
The number of lines involved in duplications on new code.
Duplicated blocks
duplicated_blocks
The number of duplicated blocks of lines.
For a block of code to be considered as duplicated, for Non-Java projects:
There should be at least 100 successive and duplicated tokens.
Those tokens should be spread at least on:
30 lines of code for COBOL
20 lines of code for ABAP
10 lines of code for other languages
for Java projects:
There should be at least 10 successive and duplicated statements whatever the number of tokens and lines.
Differences in indentation and in string literals are ignored while detecting duplications.
Duplicated block on new code
new_duplicated_blocks
The number of duplicated blocks of lines on new code.
Duplicated files
duplicated_files
The number of files involved in duplications.
### Size
A list of size metrics used in the Sonar solution.
Metric
Metric key
Definition
New lines
new_lines
The number of physical lines on new code (number of carriage returns).
Lines of code
ncloc
The number of physical lines that contain at least one character which is neither a whitespace nor a tabulation nor part of a comment.
Lines
lines
The number of physical lines (number of carriage returns).
Statements
statements
The number of statements.
Functions
functions
The number of functions. Depending on the language, a function is defined as either a function, a method, or a paragraph. Language-specific details:
COBOL: It’s the number of paragraphs.
Dart: Any function expression is included, whether it’s the body of a function declaration, of a method, constructor, getter, top-level or nested function, top-level or nested lambda.
Java: Methods in anonymous classes are ignored.
VB.NET: Accessors are not considered to be methods.
Classes
classes
The number of classes (including nested classes, interfaces, enums, annotations, mixins, extensions, and extension types).
Files
files
The number of files.
Comment lines
comment_lines
The number of lines containing either comment or commented-out code. See below for calculation details.
Comments (%)
comment_lines_density
The comment lines density. It is calculated based on the following formula: comment_lines_density=[comment_lines / (lines + comment_lines)] * 100
Examples:
50% means that the number of lines of code equals the number of comment lines.
100% means that the file only contains comment lines.
Lines of code per language
ncloc_language_distribution
The non-commented lines of code distributed by language.
Projects
projects
The number of projects in a portfolio.
Comment lines
Non-significant comment lines (empty comment lines, comment lines containing only special characters, etc.) do not increase the number of comment lines.
The following piece of code contains 9 comment lines:
```css-79elbk
/** +0 => empty comment line
* +0 => empty comment line
* This is my documentation +1 => significant comment
* although I don't +1 => significant comment
* have much +1 => significant comment
* to say +1 => significant comment
* +0 => empty comment line
*************************** +0 => non-significant comment
* +0 => empty comment line
* blabla... +1 => significant comment
*/ +0 => empty comment line
/** +0 => empty comment line
* public String foo() { +1 => commented-out code
* System.out.println(message); +1 => commented-out code
* return message; +1 => commented-out code
* } +1 => commented-out code
*/ +0 => empty comment line
```
In addition:
* For COBOL: Generated lines of code and pre-processing instructions (SKIP1, SKIP2, SKIP3, COPY, EJECT, REPLACE) are not counted as lines of code.
* For Java and Dart: File headers are not counted as comment lines (because they usually define the license).
### Complexity
Complexity metrics used in the Sonar solution.
Metric
Metric key
Definition
Cyclomatic complexity
complexity
A quantitative metric used to calculate the number of paths through the code.
#### Cyclomatic complexity
Cyclomatic complexity is a quantitative metric used to calculate the number of paths through the code. The analyzer calculates the score of this metric for a given function (depending on the language, it may be a function, a method, a subroutine, etc.) by incrementing the function’s cyclomatic complexity counter by one each time the control flow of the function splits resulting in a new conditional branch. Each function has a minimum complexity of 1. The calculation formula is as follows:
Cyclomatic complexity = 1 + number of conditional branches
The calculation of the overall code’s cyclomatic complexity is basically the sum of all complexity scores calculated at the function level. In some languages, the complexity of external functions is additionally taken into account.
Note that function-level complexity scores cannot be viewed directly in SonarQube, they are only used to calculate the overall code's cyclomatic complexity.
Split detection by language.
ABAP
The ABAP analyzer calculates the cyclomatic complexity at the function level. It increments the cyclomatic complexity by one each time it detects one of the following keywords:
* `AND`
* `CATCH`
* `DO`
* `ELSEIF`
* `IF`
* `LOOP`
* `LOOPAT`
* `OR`
* `PROVIDE`
* `SELECT…ENDSELECT`
* `TRY`
* `WHEN`
* `WHILE`
C/C++/Objective-C
The C/C++/Objective-C analyzer calculates the cyclomatic complexity at function and coroutine levels. It increments the cyclomatic complexity by one each time it detects:
* A control statement such as: `if`, `while`, `do while`, `for`
* A switch statement keyword such as: `case`, `default`
* The `&&` and `||` operators
* The `?` ternary operator
* A lambda expression definition
{% hint style="info" %}
Each time the analyzer scans a header file as part of a compilation unit, it computes the measures for this header: statements, functions, classes, cyclomatic complexity, and cognitive complexity. That means that each measure may be computed more than once for a given header. In that case, it stores the largest value for each measure.
{% endhint %}
C#
The C# analyzer calculates the cyclomatic complexity at method and property levels. It increments the cyclomatic complexity by one each time it detects:
* one of these function declarations: method, constructor, destructor, property, accessor, operator, or local function declaration.
* A conditional expression
* A conditional access
* A switch case or switch expression arm
* An and/or pattern
* One of these statements: `do`, `for`, `foreach`, `if`, `while`
* One of these expressions: `??`, `??=`, `||`, or `&&`
COBOL
The COBOL analyzer calculates the cyclomatic complexity at paragraph, section, and program levels. It increments the cyclomatic complexity by one each time it detects one of these commands (except when they are used in a copybook):
* `ALSO`
* `ALTER`
* `AND`
* `DEPENDING`
* `END_OF_PAGE`
* `ENTRY`
* `EOP`
* `EXCEPTION`
* `EXEC CICS HANDLE`
* `EXEC CICS LINK`
* `EXEC CICS XCTL`
* `EXEC CICS RETURN`
* `EXIT`
* `GOBACK`
* `IF`
* `INVALID`
* `OR`
* `OVERFLOW`
* `SIZE`
* `STOP`
* `TIMES`
* `UNTIL`
* `USE`
* `VARYING`
* `WHEN`
Dart
The Dart analyzer calculates the cyclomatic complexity for:
* top-level functions
* top-level function expressions (lambdas)
* methods
* accessors (getters and setters)
* constructors
It increments the complexity by one for each of the structures listed above. It doesn’t increment the complexity for nested function declarations or expressions.
In addition, the count is incremented by one for each:
* short-circuit binary expression or logical patterns (`&&`, `||`, `??`)
* if-null assignments (`??=`)
* conditional expressions (`?:`)
* null-aware operators (`?[`, `?.`, `?..`, `...?`)
* propagating cascades (`a?..b..c`)
* `if` statement or collection
* loop (`for`, `while`, `do`, and `for` collection)
`case` or pattern in a `switch` statement or expression
Java
The Java analyzer calculates the cyclomatic complexity at the method level. It increments the Cyclomatic complexity by one each time it detects one of these keywords:
* `if`
* `for`
* `while`
* `case`
* `&&`
* `||`
* `?`
* `->`
JS/TS, PHP
The JS/TS analyzer calculates the cyclomatic complexity at the function level. The PHP analyzer calculates the cyclomatic complexity at the function and class levels. Both analyzers increment the cyclomatic complexity by one each time they detect:
* A function (i.e non-abstract and non-anonymous constructors, functions, procedures or methods)
* An `if` or (for PHP) `elsif` keyword
* A short-circuit (AKA lazy) logical conjunction (`&&`)
* A short-circuit (AKA lazy) logical disjunction (`||`)
* A ternary conditional expression
* A loop
* A `case` clause of a `switch` statement
* A `throw` or a `catch` statement
* A `goto` statement (only for PHP)
PL/I
The PL/I analyzer increments the cyclomatic complexity by one each time it detects one of the following keywords:
* `PROC`
* `PROCEDURE`
* `GOTO`
* `GO TO`
* `DO`
* `IF`
* `WHEN`
* `|`
* `!`
* `|=`
* `!=`
* `&`
* `&=`
* A `DO` statement with conditions (Type 1 `DO` statements are ignored)
{% hint style="info" %}
For procedures having more than one return statement: each additional return statement except for the last one, will increment the complexity metric.
{% endhint %}
PL/SQL
The PL/SQL analyzer calculates the cyclomatic complexity at the function and procedure level. It increments the cyclomatic complexity by one each time it detects:
* The main PL/SQL anonymous block (not inner ones)
* One of the following statements:
* `CREATE PROCEDURE`
* `CREATE TRIGGER`
* basic `LOOP`
* `WHEN` clause (the `WHEN` of simple `CASE` statement and searched `CASE` statement)
* cursor `FOR LOOP`
* `CONTINUE` / `EXIT WHEN` clause (The `WHEN` part of the `CONTINUE` and `EXIT` statements)
* exception handler (every individual `WHEN`)
* `EXIT`
* `FORLOOP`
* `FORALL`
* `IF`
* `ELSIF`
* `RAISE`
* `WHILELOOP`
* One of the following expressions:
* `AND` expression (`AND` reserved word used within PL/SQL expressions)
* `OR` expression (`OR` reserved word used within PL/SQL expressions),
* `WHEN` clause expression (the `WHEN` of simple `CASE` expression and searched `CASE` expression)
VB.NET
The VB.NET analyzer calculates the cyclomatic complexity at function, procedure, and property levels. It increments the cyclomatic complexity by one each time it detects:
* a method or constructor declaration (`Sub`, `Function`),
* `AndAlso`
* `Case`
* `Do`
* `End`
* `Error`
* `Exit`
* `For`
* `ForEach`
* `GoTo`
* If
* `Loop`
* `On Error`
* `OrElse`
* `Resume`
* `Stop`
* `Throw`
* `Try`
* `While`
### Issues
A list of issues metrics used in the Sonar solution. See the Issues [introduction](https://docs.sonarsource.com/sonarqube-server/user-guide/issues/introduction "mention") page for more information.
{% tabs %}
{% tab title="MULTI-QUALITY RULE MODE ISSUE METRIC" %}
Metric
Metric key
Definition
Issues
violations
The number of issues in all states.
Issues on new code
new_violations
The number of issues raised for the first time on new code.
The number of issues raised for the first time on new code.
Accepted issues
accepted_issues
The number of issues marked as Accepted.
Open issues
open_issues
The number of issues in the Open status.
Accepted issues on new code
new_accepted_issues
The number of Accepted issues on new code.
False positive issues
false_positive_issues
The number of issues marked as False positive.
Blocker issues
blocker_violations
Issues with a Blocker severity level.
Critical issues
critical_violations
Issues with a Critical severity level.
Major issues
major_violations
Issues with a Major severity level.
Minor issues
minor_violations
Issues with a Minor severity level.
Info issues
info_violations
Issues with an Info severity level.
{% endtab %}
{% endtabs %}
### Severity
A lists of severity levels used in the Sonar solution. See [#software-quality-severity](https://docs.sonarsource.com/sonarqube-server/rules/software-qualities#software-quality-severity "mention") for more information.
{% tabs %}
{% tab title="MQR SEVERITY TYPES" %}
Severity
Definition
Blocker
An issue that has a significant probability of severe unintended consequences on the application that should be fixed immediately. This includes bugs leading to production crashes and security flaws allowing attackers to extract sensitive data or execute malicious code.
High
An issue with a high impact on the application that should be fixed as soon as possible.
Medium
An issue with a medium impact.
Low
An issue with a low impact.
Info
There is no expected impact on the application. For informational purposes only.
An issue that has a significant probability of severe unintended consequences on the application that should be fixed immediately. This includes bugs leading to production crashes and security flaws allowing attackers to extract sensitive data or execute malicious code.
Critical
An issue with a critical impact on the application that should be fixed as soon as possible.
Major
An issue with a major impact on the application.
Minor
An issue with a minor impact on the application.
Info
There is no expected impact on the application. For informational purposes only.
{% endtab %}
{% endtabs %}
### Quality gates
Quality gates metrics used in the Sonar solution. See [introduction-to-quality-gates](https://docs.sonarsource.com/sonarqube-server/quality-standards-administration/managing-quality-gates/introduction-to-quality-gates "mention") for more information.
Metric
Metric key
Definition
Quality gate status
alert_status
The state of the quality gate associated with your project. Possible values are ERROR and OK.
Quality gate details
quality_gate_details
Status (passed or failed) of each condition in the quality gate.
### Advanced security (SCA)
Advanced security (SCA) metrics used in the Sonar solution. Advanced security is available as an [add-on starting in Enterprise](https://www.sonarsource.com/plans-and-pricing/sonarqube/).
{% hint style="info" %}
SCA metrics are not shown in the user interface for portfolios at this time.
{% endhint %}
Metric
Metric key
Definition
SCA issue threshold
sca_count_any_issue
The total number of dependency risks.
SCA issue threshold on new code
new_sca_count_any_issue
The total number of dependency risks raised for the first time on new code.
SCA severity threshold
sca_severity_any_issue
Indicates whether there is any dependency risk at or above the specified severity.
SCA severity threshold on new code
new_sca_severity_any_issue
Indicates whether there is any dependency risk at or above the specified severity raised for the first time on new code.
SCA vulnerability threshold
sca_severity_vulnerability
Indicates whether there is any vulnerability dependency risk at or above the specified severity.
SCA vulnerability threshold on new code
new_sca_severity_vulnerability
Indicates whether there is any vulnerability dependency risk at or above the specified severity raised for the first time on new code.
SCA licensing risk threshold
sca_severity_licensing
Indicates whether there is any license dependency risk at or above the specified severity.
Note: License risks are currently always HIGH severity. If this parameter is set to BLOCKER, no license risk will fail the quality gate.
SCA licensing risk threshold on new code
new_sca_severity_licensing
Indicates whether there is any license dependency risk at or above the specified severity raised for the first time on new code.
Note: License risks are currently always HIGH severity. If this parameter is set to BLOCKER, no license risk will fail the quality gate.
SCA rating threshold
sca_rating_any_issue
Rating related to dependency risks. The rating grid is as follows:
A = 0 or more info risks
B = at least one low risks
C = at least one medium risk
D = at least one high risk
E = at least one blocker risk
SCA rating threshold on new code
new_sca_rating_any_issue
Rating related to dependency risks in new code.
SCA vulnerability rating threshold
sca_rating_vulnerability
Rating related to vulnerability risks.
SCA vulnerability rating threshold on new code
new_sca_rating_vulnerability
Rating related to vulnerability risks in new code.
SCA license rating threshold
sca_rating_licensing
Rating related to dependency licenses. License risks always have a rating of D. so using a threshold of E will not fail the quality gate.
SCA license rating threshold on new code
new_sca_rating_licensing
Rating related to dependency licenses in new code.
### Related pages
* [monitoring-project-metrics](https://docs.sonarsource.com/sonarqube-server/user-guide/code-metrics/monitoring-project-metrics "mention")
* [monitoring-portfolio-metrics](https://docs.sonarsource.com/sonarqube-server/user-guide/code-metrics/monitoring-portfolio-metrics "mention")
* [metrics-parameters](https://docs.sonarsource.com/sonarqube-server/instance-administration/analysis-functions/metrics-parameters "mention")
* [introduction-to-quality-gates](https://docs.sonarsource.com/sonarqube-server/quality-standards-administration/managing-quality-gates/introduction-to-quality-gates "mention")
* [web-api](https://docs.sonarsource.com/sonarqube-server/extension-guide/web-api "mention")
---
# Source: https://docs.sonarsource.com/sonarqube-community-build/instance-administration/analysis-functions/metrics-parameters.md
# Source: https://docs.sonarsource.com/sonarqube-server/10.7/instance-administration/analysis-functions/metrics-parameters.md
# Source: https://docs.sonarsource.com/sonarqube-server/10.8/instance-administration/analysis-functions/metrics-parameters.md
# Source: https://docs.sonarsource.com/sonarqube-server/2025.2/instance-administration/analysis-functions/metrics-parameters.md
# Source: https://docs.sonarsource.com/sonarqube-server/2025.3/instance-administration/analysis-functions/metrics-parameters.md
# Source: https://docs.sonarsource.com/sonarqube-server/2025.5/instance-administration/analysis-functions/metrics-parameters.md
# Source: https://docs.sonarsource.com/sonarqube-server/2025.1/instance-administration/analysis-functions/metrics-parameters.md
# Source: https://docs.sonarsource.com/sonarqube-server/2025.4/instance-administration/analysis-functions/metrics-parameters.md
# Source: https://docs.sonarsource.com/sonarqube-server/2025.6/instance-administration/analysis-functions/metrics-parameters.md
# Source: https://docs.sonarsource.com/sonarqube-server/instance-administration/analysis-functions/metrics-parameters.md
# Code metrics
You can modify some parameters related to the maintainability metrics at the global level in the SonarQube Server UI, provided you have the Administer system permission. Alternatively, you can set the corresponding sonar property on the CI/CD host (see [analysis-parameters](https://docs.sonarsource.com/sonarqube-server/analyzing-source-code/analysis-parameters "mention")).
### Changing the software development cost calculation
The development cost of one line of code is used in the Technical debt ratio calculation. To change the default value:
1. In the top navigation bar of SonarQube Server, select **Administration > Configuration > General settings > Technical Debt**.
2. In **Development cost**, change the values (in minutes).
The corresponding sonar property is `sonar.technicalDebt.developmentCost`.
### Changing the maintainability rating grid
To change the default Maintainability rating grid:
1. In the top navigation bar of SonarQube Server, select **Administration > Configuration > General settings > Technical Debt**.
2. In **Maintainability rating grid**, change the rating definition.
The corresponding sonar property is `sonar.technicalDebt.ratingGrid`.
### Related pages
* [metrics-definition](https://docs.sonarsource.com/sonarqube-server/user-guide/code-metrics/metrics-definition "mention")
---
# Source: https://docs.sonarsource.com/sonarqube-cloud/administering-sonarcloud/managing-enterprise/enterprise-security/sso/editing-configuration-old-method/microsoft-entra-id.md
# Source: https://docs.sonarsource.com/sonarqube-cloud/administering-sonarcloud/managing-enterprise/enterprise-security/sso/setup/configure-sso/microsoft-entra-id.md
# SAML SSO with Entra ID
To set up SAML SSO with Microsoft Entra ID, first open the SSO setup assistant as described below:
1. Retrieve your enterprise. See [..](https://docs.sonarsource.com/sonarqube-cloud/administering-sonarcloud/managing-enterprise "mention") for more details.
2. Select **Administration** > **Single Sign-On**. The **Single Sign-On** page opens.
3. Select **Open Configuration** and then **Get started**. The setup assistant opens.
4. Select **Custom SAML**.
5. Follow the steps described below.
{% hint style="warning" %}
* Group synchronization doesn’t work with Microsoft Entra ID’s nested groups.
* Microsoft Entra ID’s SAML tokens have a limit regarding the number of groups a user can belong to (see the description of groups in the [Claims in SAML Token](https://learn.microsoft.com/en-us/entra/identity-platform/reference-saml-tokens#claims-in-saml-tokens) table). In such cases, you might need to reduce the number of groups the user is in.
{% endhint %}
### Step 1: Create the SonarQube Cloud application in Microsoft Entra ID

1\. In Microsoft Entra ID, go to **Applications** > **Enterprise applications** > **All applications**.
2\. Select **New application** and then **Create your own application**.
{% hint style="warning" %}
Make sure you choose **Create your own application**. Do not select the non-affiliated **Sonarqube** Microsoft Entra Gallery app, which contains configurations that may prevent proper integration.
{% endhint %}
3\. Fill in the name and select the **Integrate any other application you don’t find in the gallery** option.
4\. Select **Create**.
5\. From the **Manage** section of the SonarQube Cloud application, go to **Single sign-on** > **SAML**.
6\. In the **Basic SAML Configuration** section, select **Edit,** fill in the **Identifier** and the **Reply URL** fields as described below, and save.
Identifier and Reply URL fields
Field
Description
Identifier
Copy-paste the Service Provider Identity ID field value from the setup assistant.
Reply URL
Copy-paste the Single Sign-On URL field value from the setup assistant.
5\. In the setup assistant, select **Next** to go to the step **2. Configure Connection**.
### Step 2: Configure the connection
1. In your SonarQube Cloud application in Microsoft Entra ID, go to **SAML Certificates**. Copy the value of the **App Federation Metadata Url** field and paste it into the **Metadata URL** field in the **Automatic** tab of the setup assistant page.
2. In the assistant, select **Create Connection** and **Proceed.** SonarQube Cloud is trying to connect to your Identity Provider. If the connection is established, the assistant moves to step **3. Attribute Mapping**.
### Step 3: Set up the attributes
1\. In the **Attributes & Claims** section of your SonarQube Cloud application in Microsoft Entra ID, configure the attributes used by SonarQube Cloud as described below. To add an attribute, select **Add new claim**.
Attributes
Attribute name
Source attribute
Description
Mapping for name
Copy-paste from the assistant.
givenname or your own user name attribute
The full name of the user.
The default list of attributes includes givenname (first name) and surname (last name). If you prefer to show the full name, you must create a new claim in MS Entra ID.
Mapping for login
Copy-paste from the assistant.
userprincipalname
A unique name to identify the user in SonarQube Cloud.
Mapping for email
Copy-paste from the assistant.
mail
The email of the user.
2\. Select **Add a group claim**, and configure the group attribute as described below. Once done, the option to add a group will be unavailable and the group attribute will be listed with the other attributes in the **Add new claim** tab.
Group attribute
The group attribute is used for automatic group synchronization.
Parameter or option
Value
Group Claims
Groups assigned to the application
Source attribute
Cloud-only group display names or (if using on-prem Active Directory for group synchronisation) sAMAccountName
Emit group name for cloud-only groups
• If using sAMAccountName: select the option
• Otherwise: ignore the option
3\. In the assistant, select **Next** to go to the step **4. Test SSO**.
### Step 4: Test SSO
1. Select the **Test Connection** button. The test is started and the results are displayed on the page as illustrated below.
2. If the test was successful, select **Done**.
### Related pages
[verify-user-groups](https://docs.sonarsource.com/sonarqube-cloud/administering-sonarcloud/managing-enterprise/enterprise-security/sso/setup/verify-user-groups "mention")\
[inviting-users-to-sign-in](https://docs.sonarsource.com/sonarqube-cloud/administering-sonarcloud/managing-enterprise/enterprise-security/sso/setup/inviting-users-to-sign-in "mention")\
[terminate-setup](https://docs.sonarsource.com/sonarqube-cloud/administering-sonarcloud/managing-enterprise/enterprise-security/sso/setup/terminate-setup "mention")\
[deleting-sso-configuration](https://docs.sonarsource.com/sonarqube-cloud/administering-sonarcloud/managing-enterprise/enterprise-security/sso/deleting-sso-configuration "mention")
---
# Source: https://docs.sonarsource.com/sonarqube-for-visual-studio/connect-your-ide/migrate-connected-mode-to-v7.md
# Migrate connected mode to v7
SonarQube for Visual Studio 7.0+ no longer stores the connected mode settings files in a location that could be under source control, and no longer modifies C# and VB.NET project files to configure the analysis rules.
This makes binding a solution for the first time much simpler because no source-controlled files will be modified. However, any solutions that were bound using the old configuration model will need to have their configuration settings migrated to the new model.
#### Migration is required for connected mode
Any features that require a connection to the Sonar server will not be available until you have migrated to the new model, including the following:
* issues suppressed on the server will not be suppressed in the IDE
* changes to Quality Profiles will not be synchronized to the IDE
* taint issues reported on the server will not be shown in the IDE
Analyses will still be performed using the old-style analysis configuration that is part of the solution (but without suppressions).
### Automating the migration process
To help automate the migration process, SonarLint for Visual Studio 7.0 provides a migration wizard.
* If you did not customize your binding settings in earlier versions, the wizard should be able to complete the migration without error.
* If you did customize your binding settings, you might need to manually undo your changes.
* If you are upgrading from a legacy version of Sonarlint (version 3.10 or earlier), please skip directly to the **Migrating from a legacy version** header below for instructions.
It is recommended to first run the wizard; once completed, SonarLint will announce whether or not the migration was successful. Please check the instructions below about what to do with the wizard logs if there is an error.
### Using the migration wizard
When you open a solution that is bound using the old model, SonarQube for Visual Studio will display a notification in Visual Studio and offer an option to open a wizard to help with migration.
Before starting the wizard, it is ***highly recommended*** that you begin in a clean state. For example, you should have no unsaved files and no uncommitted changes to files under source control before starting the migration.
Select **Migrate configuration** to start the connected mode migration wizard. The wizard will do the following:
* Delete the existing .sonarlint settings folder.
* Note: this may cause source control changes.
* Write the settings files in the new location.
In addition, ***for C# and VB.NET projects only***, the migration wizard will attempt to do the following:
* Remove any entries that point to the SonarQube for Visual Studio-generated SonarLint.xml file.
* Remove any MSBuild properties that point to the SonarLint-generated ruleset.
SonarQube for Visual Studio will attempt to remove these settings from the project files themselves, and also from any .props or .targets files it finds.
SonarQube for Visual Studio will announce whether or not the migration was successful. If SonarLint cannot remove all of the settings automatically, it will do its best to identify any changes that must be made manually.
If your code is under source control, you can review the diff after the wizard has finished and see what was changed. Once complete, commiting the change to source control will complete the migration process.
#### If the wizard cannot make changes automatically
If the wizard cannot make changes automatically, use the logs to identify what was missed. Then, manually locate and remove the setting.
To manually remove the setting, you will need to:
1. delete the .sonarlint folder, and
2. remove the relevant settings from C# and VB.NET project files. See this page for more information about the settings that need to be removed.
Once complete, commit the change to source control to complete the process.
If you have problems with the migration, please open a thread in the [SonarQube for Visual Studio Community Forum](https://community.sonarsource.com/tags/c/sl/visual-studio/35/connected_mode) and tag it with the tags `connected_mode` and `migration`.
### Migrating from a legacy version
If you are upgrading from a legacy version of Sonarlint for Visual Studio (version 3.10 or earlier), the migration must be done manually. In addition to the deletion of all SonarLint-related folders, as described above in the **If the wizard cannot make changes automatically** article, you must delete the SonarQube folder from the project before binding again to SonarQube (Server, Cloud) or SonarQube Community Build.
### Notes for Tfvc users
If you are using Team Foundation Version Control **and** have C# or VB.NET projects in your solution, it’s possible that you will see some additional dialogs from Tfvc appearing when the migration finishes. If your solution does not contain C# or VB.NET projects or you are migrating to SonarQube for Visual Studio version 8.28 or newer, you will probably not see this warning and can disregard the rest of this section.
As described above, the settings files are no longer written to a source-controlled location. Instead, they are written under the per-user roaming folder (`%APPDATA%\SonarLint for Visual Studio`). However, the projects still need to reference the settings files that configure the Roslyn-based Sonar C# and VB.NET rules.
Tfvc will detect that these files are being referenced and may pop up one or more dialogs like the one below warning that files outside the workspace are being referenced and asking for confirmation that this is ok. Select **Add the item** to dismiss the dialog.
It is possible that multiple Visual Studio dialogs will appear, or that they will appear behind the migration wizard dialog. In that case, you might need to dismiss the wizard dialog before the Visual Studio dialogs can be closed. The wizard dialog can be closed by selecting Enter or Escape on your keyboard, or by using the mouse.
Once you have dismissed the Tfvc dialogs they should not appear again.
---
# Source: https://docs.sonarsource.com/sonarqube-cloud/administering-sonarcloud/managing-organization/manage-org-projects/migrate-projects-to-another-org.md
# Migrating projects
Once an organization is created on the SonarQube Cloud side, it is bound to its peer organization on the repository platform until one or the other is deleted. The SonarQube Cloud organization cannot be re-bound to another organization.
If you are migrating projects to another organization:
1. Create a new SonarQube Cloud organization and bind it to the new platform organization. See [setup-overview](https://docs.sonarsource.com/sonarqube-cloud/administering-sonarcloud/managing-organization/setup-overview "mention") for more information
2. Re-import the projects you want to analyze. See [setting-up-project](https://docs.sonarsource.com/sonarqube-cloud/managing-your-projects/administering-your-projects/setting-up-project "mention") for more information.
---
# Source: https://docs.sonarsource.com/sonarqube-server/10.6/user-guide/code-metrics/modifying-technical-debt-parameters.md
# Modifying technical-debt parameters
You can modify in the SonarQube UI at the global level some parameters related to the [metrics-definition](https://docs.sonarsource.com/sonarqube-server/10.6/user-guide/code-metrics/metrics-definition "mention") provided you have the Administer system permission. Alternatively, you can set the corresponding sonar property on the CI/CD host (see Analysis parameters).
### Changing the software development cost calculation
The development cost of one line of code is used in the Technical debt ratio calculation. To change the default value:
1. In the top navigation bar of SonarQube, select **Administration > Configuration > General settings > Technical Debt**.
2. In **Development cost**, change the values (in minutes).
The corresponding sonar property is `sonar.technicalDebt.developmentCost`.
### Changing the maintainability rating grid
To change the default Maintainability rating grid:
1. In the top navigation bar of SonarQube, select **Administration > Configuration > General settings > Technical Debt**.
2. In **Maintainability rating grid**, change the rating definition.
The corresponding sonar property is `sonar.technicalDebt.ratingGrid`.
---
# Source: https://docs.sonarsource.com/sonarqube-server/2025.3/quality-standards-administration/ai-code-assurance/monitor-projects-with-ai-code.md
# Source: https://docs.sonarsource.com/sonarqube-server/2025.5/quality-standards-administration/ai-code-assurance/monitor-projects-with-ai-code.md
# Source: https://docs.sonarsource.com/sonarqube-server/2025.1/instance-administration/analysis-functions/ai-code-assurance/monitor-projects-with-ai-code.md
# Source: https://docs.sonarsource.com/sonarqube-server/2025.4/quality-standards-administration/ai-code-assurance/monitor-projects-with-ai-code.md
# Source: https://docs.sonarsource.com/sonarqube-server/2025.6/quality-standards-administration/ai-code-assurance/monitor-projects-with-ai-code.md
# Source: https://docs.sonarsource.com/sonarqube-server/quality-standards-administration/ai-code-assurance/monitor-projects-with-ai-code.md
# Source: https://docs.sonarsource.com/sonarqube-cloud/standards/ai-code-assurance/monitor-projects-with-ai-code.md
# Monitor projects with AI code
Monitoring projects containing AI code is the final step in ensuring that your projects in SonarQube Cloud meet your AI Code Assurance standards.
Sonar’s AI Code Assurance helps you ensure security and code quality within projects containing AI-generated code. By utilizing project labels, custom quality gate certification and marking, and dynamic project badge publishing, you can maintain high standards and confidently assure the quality of your AI projects.
By now, you’ve likely completed the first two steps to qualify your projects as AI Code Assured:
1. [#label-projects-with-ai-code](https://docs.sonarsource.com/sonarqube-cloud/standards/overview#label-projects-with-ai-code "mention")
2. [#apply-a-quality-gate-for-ai-code-assurance](https://docs.sonarsource.com/sonarqube-cloud/standards/overview#apply-a-quality-gate-for-ai-code-assurance "mention")
You should be able to see your projects’ AI Code Assurance status on the **Projects** page and on each of the branch overview pages (**Overview**, **Main Branch**, **Pull Requests**, and **Branches**).
With those objectives in place, you can publish dynamic AI Code Assurance badges to your external websites to monitor projects.
### Understanding your AI Code Assurance labels
Your project **Overview** and **Project Information** pages show labels highlighting the state of AI Code Assurance. These labels provide a quick visual reference of your project’s state of AI Code Assurance status, including the state of containing AI-generated code and the status of your project’s quality gate.
#### Internal AI Code Assurance status
Here’s what each AI Code Assurance label represents, and what you can do to update the status.
: Defined by a Project Admin that the project contains AI-generated code.
* Go to **Project settings** > **AI-generated code** or use the API to activate and deactivate this label.
 **AI Code Assurance passed**: Your code *is passing the quality gate qualified for AI-generated code*.
* Run a new analysis to check your code against the quality gate.
 **AI Code Assurance failed**: Your code *is not passing the quality gate qualified for AI-generated code*.
* Address the issues in your code to meet the standards defined by your quality gate.
 **AI Code Assurance is on**: Your code *uses a quality gate qualified for AI-generated code* and the quality gate status has not been computed.
* Run a new analysis to update the status of your quality gate.
 **AI Code Assurance is off**: Your code is *not marked* as containing AI code or is *not using* a quality gate qualified for AI-generated code.
* Check that your project is marked as **Contains AI-Generated Code**,
* assign a quality gate qualified for AI-generated code,
* then run an analysis to update the quality gate status.
### Using the AI Code Assurance badge
To complete the final objective for AI Code Assurance, add a dynamic AI Code Assurance badge to monitor the current status of your AI Code Assured projects on your web pages. This badge works like other SonarQube external badges and can be used by any team member with project access.
See the documentation on [#using-project-badge](https://docs.sonarsource.com/sonarqube-cloud/managing-your-projects/managing-your-project-as-developer#using-project-badge "mention") for instructions on how to publish SonarQube badges externally.
#### External AI Code Assurance badges
Here’s what each AI Code Assurance badge represents, and what you should do to update the status.
![$AI Code Assurance \[sonar\] | Pass](https://2223713658-files.gitbook.io/~/files/v0/b/gitbook-x-prod.appspot.com/o/spaces%2FB4UT2GNiZKjtxFtcFAL7%2Fuploads%2Fgit-blob-f6accdfe0649afcd7fdfbf228000611c57ed1bf4%2Feb510566bfd00a317fb0b12d22ba75312a947283.svg?alt=media): Your code *is passing the quality gate qualified for AI-generated code*.
* Run a new analysis to check your code against the quality gate.
![$AI Code Assurance \[sonar\] | Fail](https://2223713658-files.gitbook.io/~/files/v0/b/gitbook-x-prod.appspot.com/o/spaces%2FB4UT2GNiZKjtxFtcFAL7%2Fuploads%2Fgit-blob-0dd716479df5fd525e80b1b631bcf2900254a481%2F175eb12b2229f37861dfa00e772b2d4ed85f387e.svg?alt=media): Your code *is not passing the quality gate qualified for AI-generated code*.
* Address the issues in your code to meet the standards defined by your quality gate.
![$AI Code Assurance \[sonar\] | On](https://2223713658-files.gitbook.io/~/files/v0/b/gitbook-x-prod.appspot.com/o/spaces%2FB4UT2GNiZKjtxFtcFAL7%2Fuploads%2Fgit-blob-fa10dba8ca8559ee9640a0f256cd8be492317080%2Fa27578006c1ca9edf322166ebcf63d17a6699a8d.svg?alt=media): Your code *is using a quality gate qualified for AI-generated code* and the quality gate status has not been computed.
* Run a new analysis to update the status of your quality gate.
![$AI Code Assurance \[sonar\] | Off](https://2223713658-files.gitbook.io/~/files/v0/b/gitbook-x-prod.appspot.com/o/spaces%2FB4UT2GNiZKjtxFtcFAL7%2Fuploads%2Fgit-blob-86f586a1a1a3cf56890b5bfa2d319dcef66926db%2F750bf1cc94f61c39fc41f300a20cf68e08889434.svg?alt=media): Your code is *not using* a quality gate qualified for AI-generated code.
* Assign a quality gate qualified for AI-generated code and run an analysis to update the quality gate status.
### Related pages
* SonarQube Cloud's [ai-capabilities](https://docs.sonarsource.com/sonarqube-cloud/ai-capabilities "mention")
* [overview](https://docs.sonarsource.com/sonarqube-cloud/standards/ai-code-assurance/overview "mention")
* Administering your [ai-features](https://docs.sonarsource.com/sonarqube-cloud/administering-sonarcloud/ai-features "mention") as an Organization Admin
* Learn how to[autodetect-ai-code](https://docs.sonarsource.com/sonarqube-cloud/administering-sonarcloud/ai-features/autodetect-ai-code "mention") in projects using GitHub and GitHub Copilot
* Quickly [enable-ai-codefix](https://docs.sonarsource.com/sonarqube-cloud/administering-sonarcloud/ai-features/enable-ai-codefix "mention") to get AI-generated fix suggestions
---
# Source: https://docs.sonarsource.com/sonarqube-server/2025.2/server-update-and-maintenance/maintenance/deprecations/monitoring-api-deprecation.md
# Source: https://docs.sonarsource.com/sonarqube-server/2025.3/server-update-and-maintenance/maintenance/deprecations/monitoring-api-deprecation.md
# Source: https://docs.sonarsource.com/sonarqube-server/2025.5/server-update-and-maintenance/maintenance/deprecations/monitoring-api-deprecation.md
# Source: https://docs.sonarsource.com/sonarqube-server/2025.4/server-update-and-maintenance/maintenance/deprecations/monitoring-api-deprecation.md
# Source: https://docs.sonarsource.com/sonarqube-server/2025.6/server-update-and-maintenance/maintenance/deprecations/monitoring-api-deprecation.md
# Source: https://docs.sonarsource.com/sonarqube-server/server-update-and-maintenance/maintenance/deprecations/monitoring-api-deprecation.md
# Monitoring API deprecation
If you use custom plugins based on the plugin API or consume SonarQube Server services through the [web-api](https://docs.sonarsource.com/sonarqube-server/extension-guide/web-api "mention") then you will have to manage the possible API deprecations. See also the [deprecation-policy](https://docs.sonarsource.com/sonarqube-server/server-update-and-maintenance/maintenance/deprecations/deprecation-policy "mention").
### Monitoring the deprecated Web API components
After an update, you can check if an authenticated client of your SonarQube Server instance uses deprecated Web API endpoints and parameters in order to anticipate their drop. To do so, browse the deprecation log as illustrated below.
To download the deprecation log from the UI (with the **Administer System** permission):
1. In the top navigation bar of the SonarQube Server UI, select **Administration** > **System**.
2. In the top right corner of the **System Info** page, click **Download Logs** > **Deprecation Logs**.
{% hint style="info" %}
You can automate the retrieval of the deprecation log information by calling the Web API endpoint [`api/system/logs`](https://next.sonarqube.com/sonarqube/web_api/api/system/logs) with `deprecation` as the value of the `name` parameter.
{% endhint %}
### Monitoring the deprecated Plugin API components
Check the [Plugin API release notes](https://github.com/SonarSource/sonar-plugin-api/releases) for deprecation notes.
---
# Source: https://docs.sonarsource.com/sonarqube-server/10.6/user-guide/code-metrics/monitoring-metrics-through-web-api.md
# Monitoring metrics through Web API
Through the SonarQube Web API’s, you can retrieve code metric values and histories by using the [`/api/measures`](https://next.sonarqube.com/sonarqube/web_api/api/measures)\`\`endpoint. The metric keys are listed in the metric tables in [metrics-definition](https://docs.sonarsource.com/sonarqube-server/10.6/user-guide/code-metrics/metrics-definition "mention") or you can use the `/api/metrics` endpoint to retrieve them.
---
# Source: https://docs.sonarsource.com/sonarqube-server/10.6/user-guide/code-metrics/monitoring-portfolio-metrics.md
# Source: https://docs.sonarsource.com/sonarqube-server/10.7/user-guide/code-metrics/monitoring-portfolio-metrics.md
# Source: https://docs.sonarsource.com/sonarqube-server/10.8/user-guide/code-metrics/monitoring-portfolio-metrics.md
# Source: https://docs.sonarsource.com/sonarqube-server/2025.2/user-guide/code-metrics/monitoring-portfolio-metrics.md
# Source: https://docs.sonarsource.com/sonarqube-server/2025.3/user-guide/code-metrics/monitoring-portfolio-metrics.md
# Source: https://docs.sonarsource.com/sonarqube-server/2025.5/user-guide/code-metrics/monitoring-portfolio-metrics.md
# Source: https://docs.sonarsource.com/sonarqube-server/2025.1/user-guide/code-metrics/monitoring-portfolio-metrics.md
# Source: https://docs.sonarsource.com/sonarqube-server/2025.4/user-guide/code-metrics/monitoring-portfolio-metrics.md
# Source: https://docs.sonarsource.com/sonarqube-server/2025.6/user-guide/code-metrics/monitoring-portfolio-metrics.md
# Source: https://docs.sonarsource.com/sonarqube-server/user-guide/code-metrics/monitoring-portfolio-metrics.md
# Monitoring portfolio metrics
Portfolios are available starting in [*Enterprise Edition*](https://www.sonarsource.com/plans-and-pricing/enterprise/).
To view the values of all code metrics in your portfolio:
1. In the top navigation bar, click **Portfolios** and then click the portfolio you want to monitor.
2. In the portfolio navigation bar, click **Measures**.
To view the value history of one or several code metrics in your portfolio:
1\. In the top navigation bar, click **Portfolios** and then click the portfolio you want to monitor.
2\. In the portfolio navigation bar, click **Activity**. The number of issues is shown in a graph.
3\. To change the metrics shown, click **Issues** and select another metric category in the drop-down list.
4\. Select **Custom** if you want to monitor other metrics: the **Add metric** drop-down list is displayed. Then, click **Add metric** and select in the drop-down list the metric(s) you want to monitor. A graph is displayed for each selected metric so that you can compare them.
---
# Source: https://docs.sonarsource.com/sonarqube-community-build/user-guide/code-metrics/monitoring-project-metrics.md
# Source: https://docs.sonarsource.com/sonarqube-server/10.6/user-guide/code-metrics/monitoring-project-metrics.md
# Source: https://docs.sonarsource.com/sonarqube-server/10.7/user-guide/code-metrics/monitoring-project-metrics.md
# Source: https://docs.sonarsource.com/sonarqube-server/10.8/user-guide/code-metrics/monitoring-project-metrics.md
# Source: https://docs.sonarsource.com/sonarqube-server/2025.2/user-guide/code-metrics/monitoring-project-metrics.md
# Source: https://docs.sonarsource.com/sonarqube-server/2025.3/user-guide/code-metrics/monitoring-project-metrics.md
# Source: https://docs.sonarsource.com/sonarqube-server/2025.5/user-guide/code-metrics/monitoring-project-metrics.md
# Source: https://docs.sonarsource.com/sonarqube-server/2025.1/user-guide/code-metrics/monitoring-project-metrics.md
# Source: https://docs.sonarsource.com/sonarqube-server/2025.4/user-guide/code-metrics/monitoring-project-metrics.md
# Source: https://docs.sonarsource.com/sonarqube-server/2025.6/user-guide/code-metrics/monitoring-project-metrics.md
# Source: https://docs.sonarsource.com/sonarqube-server/user-guide/code-metrics/monitoring-project-metrics.md
# Monitoring project metrics
You can view the values of all code metrics in your project and you can view the value history of one or several code metrics in your project.
### Viewing the values of all code metrics
1. In the top navigation bar, click **Projects** and then click the project you want to monitor.
2. In the project navigation bar, click **Measures**.
### Viewing the value history of one or several metrics
1\. In the top navigation bar, click **Projects** and then click the project you want to monitor.
2\. In the project navigation bar, select **Activity**. The left sidebar contains the list of code scans performed on your project.
3\. In **Filter events**, you can filter the scans list by event type. See **Event types** in [activity-and-history](https://docs.sonarsource.com/sonarqube-server/user-guide/viewing-projects/activity-and-history "mention") for more information.
4\. Issues are shown in the graph by default. To change the metrics shown, click **Issues** and select another metric category in the drop-down list.
5\. Select **Custom** if you want to monitor other metrics: the **Add metric** drop-down list is displayed. Then, click **Add metric** and select in the drop-down list the metric(s) you want to monitor. The selected metrics are displayed in one or several graphs so that you can compare them.
---
# Source: https://docs.sonarsource.com/sonarqube-community-build/server-update-and-maintenance/monitoring.md
# Source: https://docs.sonarsource.com/sonarqube-server/8.9/instance-administration/monitoring.md
# Source: https://docs.sonarsource.com/sonarqube-server/9.8/instance-administration/monitoring.md
# Source: https://docs.sonarsource.com/sonarqube-server/9.9/instance-administration/monitoring.md
# Source: https://docs.sonarsource.com/sonarqube-server/10.0/instance-administration/monitoring.md
# Source: https://docs.sonarsource.com/sonarqube-server/10.1/instance-administration/monitoring.md
# Source: https://docs.sonarsource.com/sonarqube-server/10.2/instance-administration/monitoring.md
# Source: https://docs.sonarsource.com/sonarqube-server/10.3/instance-administration/monitoring.md
# Source: https://docs.sonarsource.com/sonarqube-server/10.4/instance-administration/monitoring.md
# Source: https://docs.sonarsource.com/sonarqube-server/10.5/instance-administration/monitoring.md
# Source: https://docs.sonarsource.com/sonarqube-server/10.6/instance-administration/monitoring.md
# Source: https://docs.sonarsource.com/sonarqube-server/10.7/server-upgrade-and-maintenance/monitoring.md
# Source: https://docs.sonarsource.com/sonarqube-server/10.8/server-upgrade-and-maintenance/monitoring.md
# Source: https://docs.sonarsource.com/sonarqube-server/2025.2/server-update-and-maintenance/monitoring.md
# Source: https://docs.sonarsource.com/sonarqube-server/2025.3/server-update-and-maintenance/data-center-edition/monitoring.md
# Source: https://docs.sonarsource.com/sonarqube-server/2025.3/server-update-and-maintenance/monitoring.md
# Source: https://docs.sonarsource.com/sonarqube-server/2025.5/server-update-and-maintenance/data-center-edition/monitoring.md
# Source: https://docs.sonarsource.com/sonarqube-server/2025.5/server-update-and-maintenance/monitoring.md
# Source: https://docs.sonarsource.com/sonarqube-server/2025.1/server-update-and-maintenance/monitoring.md
# Source: https://docs.sonarsource.com/sonarqube-server/2025.4/server-update-and-maintenance/data-center-edition/monitoring.md
# Source: https://docs.sonarsource.com/sonarqube-server/2025.4/server-update-and-maintenance/monitoring.md
# Source: https://docs.sonarsource.com/sonarqube-server/2025.6/server-update-and-maintenance/data-center-edition/monitoring.md
# Source: https://docs.sonarsource.com/sonarqube-server/2025.6/server-update-and-maintenance/monitoring.md
# Source: https://docs.sonarsource.com/sonarqube-server/server-update-and-maintenance/data-center-edition/monitoring.md
# Source: https://docs.sonarsource.com/sonarqube-server/server-update-and-maintenance/monitoring.md
# Monitoring
- [SonarQube Server instance](/sonarqube-server/server-update-and-maintenance/monitoring/instance.md): Monitoring your SonarQube Server instance is key to keeping it healthy and ensuring user satisfaction.
- [Lines of Code](/sonarqube-server/server-update-and-maintenance/monitoring/lines-of-code.md): SonarQube calculates the Lines of Code analyzed against the subscription’s limit defined by the license.
---
# Source: https://docs.sonarsource.com/sonarqube-server/2025.2/devops-platform-integration/azure-devops-integration/adding-analysis-to-pipeline/monorepo-projects.md
# Source: https://docs.sonarsource.com/sonarqube-server/2025.3/devops-platform-integration/azure-devops-integration/adding-analysis-to-pipeline/monorepo-projects.md
# Source: https://docs.sonarsource.com/sonarqube-server/2025.5/devops-platform-integration/azure-devops-integration/adding-analysis-to-pipeline/monorepo-projects.md
# Source: https://docs.sonarsource.com/sonarqube-server/2025.1/devops-platform-integration/azure-devops-integration/adding-analysis-to-pipeline/monorepo-projects.md
# Source: https://docs.sonarsource.com/sonarqube-server/2025.4/devops-platform-integration/azure-devops-integration/adding-analysis-to-pipeline/monorepo-projects.md
# Source: https://docs.sonarsource.com/sonarqube-server/2025.6/devops-platform-integration/azure-devops-integration/adding-analysis-to-pipeline/monorepo-projects.md
# Source: https://docs.sonarsource.com/sonarqube-server/devops-platform-integration/azure-devops-integration/adding-analysis-to-pipeline/monorepo-projects.md
# Source: https://docs.sonarsource.com/sonarqube-cloud/advanced-setup/ci-based-analysis/azure-pipelines/adding-analysis-to-build-pipeline/monorepo-projects.md
# Monorepo projects
You can add the SonarQube Cloud analysis to your Azure build pipeline for a monorepo.
Proceed as follows:
1. If not already done, import your monorepo to create the corresponding projects in SonarQube Cloud: see the [monorepo-support](https://docs.sonarsource.com/sonarqube-cloud/advanced-setup/monorepo-support "mention") page.
2. For each project, configure your [analysis-parameters](https://docs.sonarsource.com/sonarqube-cloud/advanced-setup/analysis-parameters "mention").
3. For each project, set up the integration features. See the [azure-devops](https://docs.sonarsource.com/sonarqube-cloud/managing-your-projects/administering-your-projects/devops-platform-integration/azure-devops "mention") page for more details.
4. Add the SonarQube Cloud analysis to your YAML pipeline. To do so, see the section corresponding to your project type and use the YAML file example below add analysis to a:
* [gradle-or-maven-project](https://docs.sonarsource.com/sonarqube-cloud/advanced-setup/ci-based-analysis/azure-pipelines/adding-analysis-to-build-pipeline/gradle-or-maven-project "mention")
* [dotnet-project](https://docs.sonarsource.com/sonarqube-cloud/advanced-setup/ci-based-analysis/azure-pipelines/adding-analysis-to-build-pipeline/dotnet-project "mention")
* [c-family-project](https://docs.sonarsource.com/sonarqube-cloud/advanced-setup/ci-based-analysis/azure-pipelines/adding-analysis-to-build-pipeline/c-family-project "mention")
* [js-ts-go-python-php](https://docs.sonarsource.com/sonarqube-cloud/advanced-setup/ci-based-analysis/azure-pipelines/adding-analysis-to-build-pipeline/js-ts-go-python-php "mention")
### Typical YAML file example for a monorepo analysis
```yaml
# Template pipeline that build 2 distinct .NET projects, living in 2 separate folders in the repo. We are analyzing them on SonarQube Cloud, each targets a specific SonarQube Cloud project.
trigger:
- main # or another name representing your main branch
pool:
vmImage: windows-latest
steps:
- task: VisualStudioTestPlatformInstaller@1
inputs:
packageFeedSelector: 'nugetOrg'
versionSelector: 'latestPreRelease'
- task: UseDotNet@2
inputs:
packageType: 'sdk'
version: '6.x'
includePreviewVersions: true
- task: NuGetToolInstaller@1
inputs:
versionSpec: '5.9.0'
checkLatest: true
- task: DotNetCoreCLI@2
inputs:
command: 'restore'
projects: '**/*.sln'
feedsToUse: 'select'
- task: SonarCloudPrepare@4
inputs:
SonarCloud: ''
scannerMode: 'dotnet'
projectKey: 'myRepo_myProject1'
- task: DotNetCoreCLI@2
inputs:
command: 'build'
projects: 'myproject1/solution.sln'
arguments: '/nr:false' // this flag is important to avoid DLL lock for the 2nd build/analysis
- task: SonarCloudAnalyze@4
- task: SonarCloudPrepare@4
inputs:
SonarCloud: ''
scannerMode: 'dotnet'
projectKey: 'myRepo_myProject2'
- task: DotNetCoreCLI@2
inputs:
command: 'build'
projects: 'myProject2/solution.sln'
arguments: '/nr:false'
- task: SonarCloudAnalyze@4
```
---
# Source: https://docs.sonarsource.com/sonarqube-cloud/advanced-setup/monorepo-support.md
# Monorepo support
SonarQube Cloud supports repositories that use the monorepo strategy.
### What is a monorepo?
Traditionally, software projects have been organized so that each project is stored within a single, distinct repository of its own.
As software projects have become more complex and interconnected, some organizations have moved to having all their projects in a single large repository. This is called the **monorepo strategy**.
In a typical monorepo, each project occupies its own directory within the repository and each is independently buildable and deployable, though the exact setup depends on how the procedures that build each project are defined. In general, there are many ways that multiple projects can be arranged within a single repository.
Fortunately, SonarQube Cloud’s support for the monorepo strategy does not depend on the specifics of the monorepo setup. SonarQube Cloud relies on the fact that each build procedure can be configured to perform the analysis for its particular project in the repository and send the result to the corresponding SonarQube Cloud project.
### About the monorepo support in SonarQube Cloud
In a standard setup, each SonarQube Cloud project corresponds to a single repository. In a monorepo setup, multiple SonarQube Cloud projects, each corresponding to a separate monorepo project, are all bound to the same repository. This way:
* The analysis setup of each project in the monorepo is easier.
* When you do an analysis, information from SonarQube Cloud that appears in the pull request view is clearly distinguished by project name.
* The monorepo associated with a project is shown in the SonarQube Cloud UI.
See the [binding-with-dop](https://docs.sonarsource.com/sonarqube-cloud/administering-sonarcloud/about-sonarqube-cloud-solution/ressources-structure/binding-with-dop "mention") page for information about project binding.
Currently, monorepo support is available for GitHub, Bitbucket Cloud, Azure DevOps and GitLab repositories. Note that the analysis of a monorepo configuration is only supported for the CI-based analysis , not for the automatic analysis.
### Setting up the analysis of your monorepo
Once you have set up your monorepo in SonarQube Cloud, you can add the SonarQube Cloud analysis to your monorepo’s CI pipeline.
#### Before your start
A wizard will guide you through setting up your monorepo in SonarQube Cloud. However, you will need to manually create each project within the monorepo during this process, as SonarQube Cloud cannot detect projects within a monorepo. To create the projects of a monorepo, you need the **Create Projects** permission in your organization.
Each SonarQube Cloud project must have a key unique across SonarQube Cloud (see [#project-identification](https://docs.sonarsource.com/sonarqube-cloud/analysis-parameters/parameters-not-settable-in-ui#project-identification "mention")). This is the key that you will use when you configure your CI service. We recommend using a pattern that includes your organization name, the monorepo name, and an internal reference to the project within the monorepo (for example, `myorg_mymonorepo_myproject`).
#### Step 1: Set up your monorepo in SonarQube Cloud
During this step, you will import your monorepo to SonarQube Cloud. Each project within the monorepo must be created manually.
Proceed as follows:
1. Select the ✚ (plus) menu on the top right of the SonarQube Cloud interface and select **Analyze new project**. The **Analyze projects** page opens.
2. Select **Setup a monorepo** (it is a small text link to the right of the **Organization** field). The **Analyze monorepo projects** page opens.
3. In **Organization**, select your organization.
4. In **Repository**, select the monorepo that you want to import.
5. Create the projects within your monorepo. For each project within your monorepo:
1. Select the **Add new project** button.
2. Review the proposed project name and key.
5. Once you’ve completed the project list, select the **Set up monorepo** button. The **Set up new code** page opens.
6. Select the New Code Definition (NCD) you want to apply by default to the SonarQube Cloud projects in the monorepo. More information about defining your NCD is on the [Defining new code](https://app.gitbook.com/s/eu7dHWcqP9Cr3eUAzwWg/project-administration/clean-as-you-code-settings/defining-new-code "mention") page.
7. Select the **Create projects** button.
{% hint style="info" %}
If you select a repository that is already bound to SonarQube Cloud, then this creates new projects as part of a monorepo setup and converts the existing project, which is bound to the selected repository, to the monorepo.
{% endhint %}
#### Step 2: Add the SonarQube Cloud analysis to your monorepo’s CI pipeline
To perform the configuration, follow the procedure for your CI service:
* [github-actions-for-sonarcloud](https://docs.sonarsource.com/sonarqube-cloud/advanced-setup/ci-based-analysis/github-actions-for-sonarcloud "mention")
* [bitbucket-pipelines-for-sonarcloud](https://docs.sonarsource.com/sonarqube-cloud/advanced-setup/ci-based-analysis/bitbucket-pipelines-for-sonarcloud "mention")
* [introduction](https://docs.sonarsource.com/sonarqube-cloud/advanced-setup/ci-based-analysis/azure-pipelines/introduction "mention") to Azure pipelines
* [gitlab-ci](https://docs.sonarsource.com/sonarqube-cloud/advanced-setup/ci-based-analysis/gitlab-ci "mention")
* [circleci](https://docs.sonarsource.com/sonarqube-cloud/advanced-setup/ci-based-analysis/circleci "mention")
* [other-cis](https://docs.sonarsource.com/sonarqube-cloud/advanced-setup/ci-based-analysis/other-cis "mention")
In the build procedure for each monorepo project, make sure to specify the SonarQube Cloud project key that you designated for it. This provides the binding between the project within the monorepo and the corresponding project in SonarQube Cloud. This enables SonarQube Cloud to correctly process the analysis results and to dispatch pull request decorations back to the DevOps platform for each project individually; see the [pull-request-analysis](https://docs.sonarsource.com/sonarqube-cloud/improving/pull-request-analysis "mention") page for information on decorating your pull request.
---
# Source: https://docs.sonarsource.com/sonarqube-server/10.5/devops-platform-integration/github-integration/monorepo.md
# If you're using a monorepo
In a monorepo setup, multiple SonarQube projects, each corresponding to a separate project within the monorepo, are all bound to the same GitHub repository. If the [setting-up-global-integration](https://docs.sonarsource.com/sonarqube-server/10.5/devops-platform-integration/github-integration/setting-up-global-integration "mention") has been properly set up, then you can easily import the projects managed in a GitHub monorepo from the SonarQube UI and thus, benefit from the integration features, such as the pull request decoration.
The monorepo feature is supported starting in the [Enterprise Edition](https://www.sonarsource.com/plans-and-pricing/enterprise/).
### Analysis setup roadmap
To manage the analysis of your projects in a monorepo:
1. Create the SonarQube projects related to your monorepo by importing the GitHub monorepo: see [monorepos](https://docs.sonarsource.com/sonarqube-server/10.5/project-administration/monorepos "mention").
2. Add the analysis to your GitHub Actions’ monorepo workflow: see below.
3. You can fail a job inside the monorepo workflow when the quality gate fails and/or prevent pull request merges when the quality gate fails: see [adding-sonarqube-analysis-to-your-workflow](https://docs.sonarsource.com/sonarqube-server/10.5/devops-platform-integration/github-integration/adding-sonarqube-analysis-to-your-workflow "mention").
### Adding the analysis to your monorepo workflow
To add the SonarQube analysis to your GitHub Actions’ monorepo workflow:
1. For each project in the monorepo, set the necessary analysis parameters: see [analysis-parameters](https://docs.sonarsource.com/sonarqube-server/10.5/analyzing-source-code/analysis-parameters "mention") and the respective SonarScanner page ([sonarscanner-for-gradle](https://docs.sonarsource.com/sonarqube-server/10.5/analyzing-source-code/scanners/sonarscanner-for-gradle "mention"), [sonarscanner-for-dotnet](https://docs.sonarsource.com/sonarqube-server/10.5/analyzing-source-code/scanners/sonarscanner-for-dotnet "mention"), [sonarscanner-for-maven](https://docs.sonarsource.com/sonarqube-server/10.5/analyzing-source-code/scanners/sonarscanner-for-maven "mention"), [sonarscanner](https://docs.sonarsource.com/sonarqube-server/10.5/analyzing-source-code/scanners/sonarscanner "mention")) for more information. The mandatory parameter is the `sonar.projectKey` property.
2. Set up the authentication to the SonarQube Server: see below.
3. Add a workflow file (`build.yml`) in the home directory of the monorepo: see below.
#### Setting up the authentication to the SonarQube Server
You have to create the Sonar tokens used to authenticate to the SonarQube Server during the analysis of the monorepo projects and store them securely in GitHub secrets. You can either use one single global-level token for the monorepo or use a project-level token for each project in the monorepo.
Note that the Sonar Host URL must be stored in a GitHub secret as described in **Creating your GitHub secrets** in [adding-sonarqube-analysis-to-your-workflow](https://docs.sonarsource.com/sonarqube-server/10.5/devops-platform-integration/github-integration/adding-sonarqube-analysis-to-your-workflow "mention").
Proceed as follows:
1. Generate the [generating-and-using-tokens](https://docs.sonarsource.com/sonarqube-server/10.5/user-guide/user-account/generating-and-using-tokens "mention")(s) in SonarQube:
* For project tokens, create a token for each project (you need the Administer permission on the project): Go to the **Security** page of your SonarQube account and create a **Project analysis token**.
* For a global token, ask your administrator (The procedure is similar but you need the global Administer system permission.).
2. In your GitHub repository, go to **Settings > Secrets**.
3. Select **New repository secret**.
4. In the **Name** field:
* If you use a global token: enter SONAR\_TOKEN.
* Otherwise: enter SONAR\_TOKEN\_1 (or another unique identifier within the monorepo) for the token of your first project in the monorepo.
5. In the **Value** field, enter the corresponding token value.
6. Select **Add secret**.
7. If you use project-level tokens, repeat steps 3 to 6 for each additional project in the monorepo.
#### Configuring the build.yml file
In the `build.yml` file of your monorepo:
* Define the paths to the projects.
* Add a job for each project in the monorepo.
See the file example below.
{% tabs %}
{% tab title="MAVEN" %}
```css-79elbk
name: Build
on:
push:
branches:
- master # main branch name
paths:
- 'PROJECT1_PATH/**' # monorepo projects paths from the monorepo root directory
- 'PROJECT2_PATH/**'
pull_request:
types: [opened, synchronize, reopened]
jobs:
sonarQubeScan1:
name: sonarQubeScan1
runs-on: ubuntu-latest
steps:
- uses: actions/checkout@v4
with:
fetch-depth: 0 # Shallow clones should be disabled for a better relevancy of analysis
- name: Set up JDK 17
uses: actions/setup-java@v1
with:
java-version: 17
- name: Cache SonarQube packages
uses: actions/cache@v1
with:
path: ~/.sonar/cache
key: ${{ runner.os }}-sonar
restore-keys: ${{ runner.os }}-sonar
- name: Cache Maven packages
uses: actions/cache@v1
with:
path: ~/.m2
key: ${{ runner.os }}-m2-${{ hashFiles('**/pom.xml') }}
restore-keys: ${{ runner.os }}-m2
- name: SonarQube Scan 1
env:
SONAR_TOKEN: ${{ secrets.SONAR_TOKEN_1 }} # analysis token associated to your project
SONAR_HOST_URL: ${{ secrets.SONAR_HOST_URL }}
run: |
cd PROJECT1_PATH/
mvn -B verify org.sonarsource.scanner.maven:sonar-maven-plugin:sonar -Dsonar.projectKey=SONAR_PROJECT1_KEY -Dsonar.projectName='SONAR_PROJECT1_NAME'
# Replace variables with project path, key and name
sonarQubeScan2:
name: sonarQubeScan2
runs-on: ubuntu-latest
steps:
- uses: actions/checkout@v4
with:
fetch-depth: 0 # Shallow clones should be disabled for a better relevancy of analysis
- name: Set up JDK 17
uses: actions/setup-java@v1
with:
java-version: 17
- name: Cache SonarQube packages
uses: actions/cache@v1
with:
path: ~/.sonar/cache
key: ${{ runner.os }}-sonar
restore-keys: ${{ runner.os }}-sonar
- name: Cache Maven packages
uses: actions/cache@v1
with:
path: ~/.m2
key: ${{ runner.os }}-m2-${{ hashFiles('**/pom.xml') }}
restore-keys: ${{ runner.os }}-m2
- name: SonarQube Scan 2
env:
SONAR_TOKEN: ${{ secrets.SONAR_TOKEN_2 }} # analysis token associated to your project
SONAR_HOST_URL: ${{ secrets.SONAR_HOST_URL }}
run: run: |
cd PROJECT2_PATH/
mvn -B verify org.sonarsource.scanner.maven:sonar-maven-plugin:sonar -Dsonar.projectKey=SONAR_PROJECT2_KEY -Dsonar.projectName='SONAR_PROJECT2_NAME'
# Replace variables with project path, key and name
# Add other scan jobs if you wish to scan more projects in the monorepo
```
{% endtab %}
{% tab title="GRADLE" %}
```css-79elbk
name: Build
on:
push:
branches:
- master # main branch name
paths:
- 'PROJECT1_PATH/**' # monorepo projects paths from the monorepo root directory
- 'PROJECT2_PATH/**'
pull_request:
types: [opened, synchronize, reopened]
jobs:
sonarQubeScan1:
name: sonarQube Scan 1
runs-on: ubuntu-latest
steps:
- uses: actions/checkout@v4
with:
fetch-depth: 0 # Shallow clones should be disabled for a better relevancy of analysis
- name: Set up JDK 17
uses: actions/setup-java@v1
with:
java-version: 17
- name: Cache SonarQube packages
uses: actions/cache@v1
with:
path: ~/.sonar/cache
key: ${{ runner.os }}-sonar
restore-keys: ${{ runner.os }}-sonar
- name: Cache Gradle packages
uses: actions/cache@v1
with:
path: ~/.gradle/caches
key: ${{ runner.os }}-gradle-${{ hashFiles('**/*.gradle') }}
restore-keys: ${{ runner.os }}-gradle
- name: sonarQube Scan 1
env:
SONAR_TOKEN: ${{ secrets.SONAR_TOKEN_1 }} # analysis token associated to your project
SONAR_HOST_URL: ${{ secrets.SONAR_HOST_URL }}
run: |
cd PROJECT1_PATH/
./gradlew build sonar --info
#Replace variable with the project path
sonarQubeScan2:
name: sonarQubeScan2
runs-on: ubuntu-latest
steps:
- uses: actions/checkout@v4
with:
fetch-depth: 0 # Shallow clones should be disabled for a better relevancy of analysis
- name: Set up JDK 17
uses: actions/setup-java@v1
with:
java-version: 17
- name: Cache SonarQube packages
uses: actions/cache@v1
with:
path: ~/.sonar/cache
key: ${{ runner.os }}-sonar
restore-keys: ${{ runner.os }}-sonar
- name: Cache Gradle packages
uses: actions/cache@v1
with:
path: ~/.gradle/caches
key: ${{ runner.os }}-gradle-${{ hashFiles('**/*.gradle') }}
restore-keys: ${{ runner.os }}-gradle
- name: sonarQube Scan 2
env:
SONAR_TOKEN: ${{ secrets.SONAR_TOKEN_2 }} # analysis token associated to your project
SONAR_HOST_URL: ${{ secrets.SONAR_HOST_URL }}
run: |
cd PROJECT2_PATH/
./gradlew build sonar --info
#Replace variable with the project path
# Add other scan jobs if you wish to scan more projects in the monorepo
```
{% endtab %}
{% tab title=".NET" %}
```css-79elbk
name: Build
on:
push:
branches:
- master # main branch name
paths:
- 'PROJECT1_PATH/**' # monorepo projects paths from the monorepo root directory
- 'PROJECT2_PATH/**'
pull_request:
types: [opened, synchronize, reopened]
jobs:
sonarQubeScan1:
name: sonarQube Scan 1
runs-on: windows-latest
steps:
- uses: actions/checkout@v4
with:
fetch-depth: 0 # Shallow clones should be disabled for a better relevancy of analysis
- name: Set up JDK 17
uses: actions/setup-java@v1
with:
java-version: 17
- name: Cache SonarQube packages
uses: actions/cache@v1
with:
path: ~\.sonar\cache
key: ${{ runner.os }}-sonar
restore-keys: ${{ runner.os }}-sonar
- name: Cache SonarQube scanner
id: cache-sonar-scanner
uses: actions/cache@v1
with:
path: .\.sonar\scanner
key: ${{ runner.os }}-sonar-scanner
restore-keys: ${{ runner.os }}-sonar-scanner
- name: Install SonarQube scanner
if: steps.cache-sonar-scanner.outputs.cache-hit != 'true'
shell: powershell
run: |
New-Item -Path .\.sonar\scanner -ItemType Directory
dotnet tool update dotnet-sonarscanner --tool-path .\.sonar\scanner
- name: sonarQube Scan 1
shell: powershell
run: |
.\.sonar\scanner\dotnet-sonarscanner begin /k:"SONAR_PROJECT1_KEY" /d:sonar.token="${{ secrets.SONAR_TOKEN_1 }}" /d:sonar.host.url="${{ secrets.SONAR_HOST_URL }}"
dotnet build PROJECT1_PATH\SLN_FILE.SLN
.\.sonar\scanner\dotnet-sonarscanner end /d:sonar.token="${{ secrets.SONAR_TOKEN_1 }}"
# Replace variables with the project key and the path to the project solution file
sonarQubeScan2:
name: sonarQube Scan 2
runs-on: windows-latest
steps:
- uses: actions/checkout@v4
with:
fetch-depth: 0 # Shallow clones should be disabled for a better relevancy of analysis
- name: Set up JDK 17
uses: actions/setup-java@v1
with:
java-version: 17
- name: Cache SonarQube packages
uses: actions/cache@v1
with:
path: ~\.sonar\cache
key: ${{ runner.os }}-sonar
restore-keys: ${{ runner.os }}-sonar
- name: Cache SonarQube scanner
id: cache-sonar-scanner
uses: actions/cache@v1
with:
path: .\.sonar\scanner
key: ${{ runner.os }}-sonar-scanner
restore-keys: ${{ runner.os }}-sonar-scanner
- name: Install SonarQube scanner
if: steps.cache-sonar-scanner.outputs.cache-hit != 'true'
shell: powershell
run: |
New-Item -Path .\.sonar\scanner -ItemType Directory
dotnet tool update dotnet-sonarscanner --tool-path .\.sonar\scanner
- name: sonarQube Scan 2
shell: powershell
run: |
.\.sonar\scanner\dotnet-sonarscanner begin /k:"SONAR_PROJECT2_KEY" /d:sonar.token="${{ secrets.SONAR_TOKEN_2 }}" /d:sonar.host.url="${{ secrets.SONAR_HOST_URL }}"
dotnet build PROJECT2_PATH\SLN_FILE.SLN
.\.sonar\scanner\dotnet-sonarscanner end /d:sonar.token="${{ secrets.SONAR_TOKEN_2 }}"
# Replace variables with the project key and the path to the project solution file
# Add other scan jobs if you wish to scan more projects in the monorepo
```
{% endtab %}
{% tab title="C, C++, OBJECTIVE-C" %}
```css-79elbk
name: Build
on:
push:
branches:
- master # main branch name
paths:
- 'PROJECT1_PATH/**' # monorepo projects paths from the monorepo root directory
- 'PROJECT2_PATH/**'
pull_request:
types: [opened, synchronize, reopened]
jobs:
sonarQubeScan1:
name: sonarQube Scan 1
runs-on: ubuntu-latest
env:
BUILD_WRAPPER_OUT_DIR: build_wrapper_output_directory # Directory where build-wrapper output will be placed
steps:
- uses: actions/checkout@v4
with:
fetch-depth: 0 # Shallow clones should be disabled for a better relevancy of analysis
- name: Install sonar-scanner and build-wrapper
env:
SONAR_HOST_URL: ${{secrets.SONAR_HOST_URL}}
uses: SonarSource/sonarqube-github-c-cpp@v1
- name: Run build-wrapper for project 1
run: |
build-wrapper-linux-x86-64 --out-dir ${{ env.BUILD_WRAPPER_OUT_DIR }}
- name: Run sonar-scanner for project 1
env:
GITHUB_TOKEN: ${{ secrets.GITHUB_TOKEN_1 }}
SONAR_TOKEN: ${{ secrets.SONAR_TOKEN_1 }}
SONAR_HOST_URL: ${{secrets.SONAR_HOST_URL}}
run: |
sonar-scanner --define sonar.cfamily.build-wrapper-output="${{ env.BUILD_WRAPPER_OUT_DIR }}" -Dsonar.projectBaseDir="PROJECT1_PATH/"
#Replace variable with project path
sonarQubeScan2:
name: sonarQube Scan 2
runs-on: ubuntu-latest
env:
BUILD_WRAPPER_OUT_DIR: build_wrapper_output_directory # Directory where build-wrapper output will be placed
steps:
- uses: actions/checkout@v4
with:
fetch-depth: 0 # Shallow clones should be disabled for a better relevancy of analysis
- name: Install sonar-scanner and build-wrapper
env:
SONAR_HOST_URL: ${{secrets.SONAR_HOST_URL}}
uses: SonarSource/sonarqube-github-c-cpp@v1
- name: Run build-wrapper for project 2
run: |
build-wrapper-linux-x86-64 --out-dir ${{ env.BUILD_WRAPPER_OUT_DIR }}
- name: Run sonar-scanner for project 2
env:
GITHUB_TOKEN: ${{ secrets.GITHUB_TOKEN_2 }}
SONAR_TOKEN: ${{ secrets.SONAR_TOKEN_2 }}
SONAR_HOST_URL: ${{secrets.SONAR_HOST_URL}}
run: |
sonar-scanner --define sonar.cfamily.build-wrapper-output="${{ env.BUILD_WRAPPER_OUT_DIR }}" -Dsonar.projectBaseDir="PROJECT2_PATH/"4
#Replace variable with project path
# Add other scan jobs if you wish to scan more projects in the monorepo
```
{% endtab %}
{% tab title="OTHER" %}
```css-79elbk
name: Build
on:
push:
branches:
- master # main branch name
paths:
- 'PROJECT1_PATH/**' # monorepo projects paths from the monorepo root directory
- 'PROJECT2_PATH/**'
pull_request:
types: [opened, synchronize, reopened]
jobs:
sonarQubeScan1:
name: sonarQubeScan1
runs-on: ubuntu-latest
steps:
- uses: actions/checkout@v4
with:
fetch-depth: 0 # Shallow clones should be disabled for a better relevancy of analysis
- name: SonarQube Scan 1
uses: sonarsource/sonarqube-scan-action@master
env:
SONAR_TOKEN: ${{ secrets.SONAR_TOKEN_1 }} # analysis token associated to your project
SONAR_HOST_URL: ${{ secrets.SONAR_HOST_URL }}
with:
projectBaseDir: PROJECT1_PATH/ # the path to your project from the monorepo root directory
# If you wish to fail your job when the Quality Gate is red, uncomment the
# following lines. This would typically be used to fail a deployment.
# We do not recommend to use this in a pull request. Prefer using pull request
# decoration instead.
# - uses: sonarsource/sonarqube-quality-gate-action@master
# timeout-minutes: 5
# env:
# SONAR_TOKEN: ${{ secrets.SONAR_TOKEN_1 }}
sonarQubeScan2:
name: sonarQubeScan2
runs-on: ubuntu-latest
steps:
- uses: actions/checkout@v4
with:
fetch-depth: 0 # Shallow clones should be disabled for a better relevancy of analysis
- name: SonarQube Scan 2
uses: sonarsource/sonarqube-scan-action@master
env:
SONAR_TOKEN: ${{ secrets.SONAR_TOKEN_2 }} # analysis token associated to your project
SONAR_HOST_URL: ${{ secrets.SONAR_HOST_URL }}
with:
projectBaseDir: PROJECT2_PATH/ # project path from the monorepo root directory
# If you wish to fail your job when the Quality Gate is red, uncomment the
# following lines. This would typically be used to fail a deployment.
# We do not recommend to use this in a pull request. Prefer using pull request
# decoration instead.
# - uses: sonarsource/sonarqube-quality-gate-action@master
# timeout-minutes: 5
# env:
# SONAR_TOKEN: ${{ secrets.SONAR_TOKEN_2 }}
# Add other scan jobs if you wish to scan more projects in the monorepo
```
{% endtab %}
{% endtabs %}
---
# Source: https://docs.sonarsource.com/sonarqube-server/10.5/project-administration/monorepos.md
# Source: https://docs.sonarsource.com/sonarqube-server/10.6/project-administration/monorepos.md
# Source: https://docs.sonarsource.com/sonarqube-server/10.7/project-administration/monorepos.md
# Source: https://docs.sonarsource.com/sonarqube-server/10.8/project-administration/monorepos.md
# Source: https://docs.sonarsource.com/sonarqube-server/2025.2/project-administration/monorepos.md
# Source: https://docs.sonarsource.com/sonarqube-server/2025.3/project-administration/monorepos.md
# Source: https://docs.sonarsource.com/sonarqube-server/2025.5/project-administration/monorepos.md
# Source: https://docs.sonarsource.com/sonarqube-server/2025.1/project-administration/monorepos.md
# Source: https://docs.sonarsource.com/sonarqube-server/2025.4/project-administration/monorepos.md
# Source: https://docs.sonarsource.com/sonarqube-server/2025.6/project-administration/monorepos.md
# Source: https://docs.sonarsource.com/sonarqube-server/project-administration/monorepos.md
# Managing monorepo projects
The monorepo feature is supported starting in [Enterprise Edition](https://www.sonarsource.com/plans-and-pricing/enterprise/). It requires that the DevOps platform integration with GitHub, GitLab, Azure DevOps, or Bitbucket has been properly set up.
{% hint style="warning" %}
The blocking of pull request merge when the quality gate fails is not supported for monorepos.
{% endhint %}
### What is a monorepo?
Traditionally, software projects have been organized so that each project is stored within a single, distinct repository of its own.
As software projects have become more complex and interconnected, some organizations have moved to having all their projects in a single large repository. This is called the monorepo strategy.
In a typical monorepo, each project occupies its own directory within the repository and each is independently buildable and deployable, though the exact setup depends on how the procedures that build each project are defined. In general, there are many ways that multiple projects can be arranged within a single repository.
Fortunately, SonarQube Server’s support for the monorepo strategy does not depend on the specifics of the monorepo setup. SonarQube Server relies on the fact that each build procedure can be configured to perform the analysis for its particular project in the repository and send the result to the corresponding SonarQube Server project.
### About the monorepo support in SonarQube Server
In a monorepo setup, multiple SonarQube Server projects, each corresponding to a separate monorepo project, are all bound to the same repository. This way:
* The analysis setup of each project in the monorepo is easier.
* The quality gate status report of pull requests in your DevOps platform is clearly distinguished by project name.
* The monorepo associated with a project is shown in the SonarQube Server UI.
### Setting up the analysis of your monorepo
Once you have set up your monorepo in SonarQube Server, you can add the SonarQube analysis to your monorepo’s CI pipeline.
#### Before your start
A wizard will guide you through setting up your monorepo in SonarQube Server. However, you will need to manually create each project within the monorepo during this process, as SonarQube Server cannot detect projects within a monorepo. To create the projects of a monorepo, you need the **Create Projects** permission in SonarQube Server.
Each SonarQube Server project must have a key unique across SonarQube Server. This is the key that you will use when you configure your CI service. We recommend using a pattern that includes the monorepo name, and an internal reference to the project within the monorepo (for example, `mymonorepo_myproject`).
#### Step 1: Set up your monorepo in SonarQube Server
During this step, you will import your monorepo to SonarQube Server. Each project within the monorepo must be created manually.
Proceed as follows:
1. In the top navigation bar of SonarQube Server, select **Projects**.
2. In the top right corner, select **Create Project > From \[DevOps platform]**. The **Project onboarding** page opens.
3. Select **Set up a monorepo**. The **Monorepo project onboarding** page opens. The **Create new projects** section opens with a first project.
4. Check and complete the proposed project name and key.
5. Select **Add new project** to add additional projects.
6. Once you’ve completed the project list, select **Next**. The **Set up new code** page opens.
7. Select the new code definition to be applied by default to the SonarQube Server projects in the monorepo. Once the projects have been created, you can change the new code definition applying to a given project, see below.
8. Select **Create projects**. The **Projects** page opens and displays the newly created projects at the top.
{% hint style="info" %}
If you configure in the **Monorepo project onboarding** page a repository already bound to a standard project then this standard project will be converted to a monorepo project.
{% endhint %}
#### Step 2: Add the SonarQube analysis to your monorepo’s CI pipeline
To perform the configuration, follow the procedure for your CI service:
* GitLab CI/CD: [#monorepo](https://docs.sonarsource.com/sonarqube-server/devops-platform-integration/gitlab-integration/adding-analysis-to-gitlab-ci-cd#monorepo "mention")
* GitHub Actions workflow:[#monorepo](https://docs.sonarsource.com/sonarqube-server/devops-platform-integration/github-integration/adding-analysis-to-github-actions-workflow#monorepo "mention")
* Azure Pipelines: [monorepo-projects](https://docs.sonarsource.com/sonarqube-server/devops-platform-integration/azure-devops-integration/adding-analysis-to-pipeline/monorepo-projects "mention")
* Bitbucket Pipelines: [#monorepo](https://docs.sonarsource.com/sonarqube-server/devops-platform-integration/bitbucket-integration/bitbucket-cloud-integration/bitbucket-pipelines#monorepo "mention")
### Removing a project from a monorepo
You can remove a project from a monorepo provided you are an administrator of the project:
1. Go to the project page.
2. Select **Project settings > General settings > \[DevOps platform] Integration** and uncheck **Enable monorepo support**.\
Re-selecting the option brings the project back to its monorepo.
{% hint style="info" %}
You can delete a project belonging to a monorepo the same way as you delete any SonarQube Server project (**Project settings > Deletion**).
{% endhint %}
### Modifying the new code definition of a project in a monorepo
You can set up a different new code definition for each project in the monorepo provided you are an administrator of the project.
To set up a new code definition for a given project:
1. Open your project in SonarQube Server.
2. Go to **Project Settings > New Code**.
### Related pages
[setting-up-at-global-level](https://docs.sonarsource.com/sonarqube-server/devops-platform-integration/github-integration/setting-up-at-global-level "mention")\
[global-setup](https://docs.sonarsource.com/sonarqube-server/devops-platform-integration/gitlab-integration/global-setup "mention")\
[setting-up-integration-at-global-level](https://docs.sonarsource.com/sonarqube-server/devops-platform-integration/azure-devops-integration/setting-up-integration-at-global-level "mention")\
[bitbucket-cloud-integration](https://docs.sonarsource.com/sonarqube-server/devops-platform-integration/bitbucket-integration/bitbucket-cloud-integration "mention")
---
# Source: https://docs.sonarsource.com/sonarqube-server/8.9/analyzing-source-code/moving-analysis-to-java-11.md
# Moving Analysis to Java 11
Use of Java 8 is deprecated for SonarQube scanners, and scanners will require Java 11 in the near future. If you’re using a previous version of the Java, see the section below that aligns with your build for information on moving your analysis to Java 11.
### Maven or Gradle
We suggest basing your whole build on Java 11. If that’s not compatible, you can have a dedicated script for the analysis that overrides the `JAVA_HOME` environment variable just before running it. See the following examples:
#### Maven
```css-79elbk
mvn verify ...
export JAVA_HOME=/path/to/java11
mvn sonar:sonar ...
```
#### Gradle
```css-79elbk
gradle build ...
export JAVA_HOME=/path/to/java11
gradle sonarqube ...
```
### Azure DevOps
If you are running your build with a Microsoft-hosted agent, this is already automatically done, and you’re all set.
If you’re using a self-hosted agent, you can either modify your build pipeline to ensure that it runs with Java 11 by default or override the `JAVA_HOME` environment variable just before running the analysis.
#### Xamarin
In the specific case of Xamarin only allowing Java 8, you will need to specify a Java 8 path while invoking MSBuild, allowing the JAVA\_HOME environment variable for the scanner only.
```css-79elbk
$env:XAMARIN_JAVA_HOME=/path/to/java8
msbuild.exe /p:JavaSdkDirectory=$env:XAMARIN_JAVA_HOME
```
### Dockerfile
You can use several base images to run your build with Java 11. Here are some examples:
* openjdk:11-jre-slim
* debian:buster and above
* gradle:jre11-slim
If your build is not compatible with Java 11, you can override `JAVA_HOME` environment variable before running scanners.
### Jenkins
You can easily define a new JDK version by navigating to **Manage Jenkins > Global Tool Configuration** if you have the [JDK Tool Plugin](https://plugins.jenkins.io/jdk-tool/) installed.
#### Declarative Pipelines
If you are using a declarative pipeline with different stages you can add a ‘tools’ section to the stage in which the code scan occurs. This makes the scanner use the specificed JDK version.
```css-79elbk
stage('SonarQube analysis') {
tools {
jdk "jdk11" // the name you have given the JDK installation in Global Tool Configuration
}
environment {
scannerHome = tool 'SonarQube Scanner' // the name you have given the Sonar Scanner (in Global Tool Configuration)
}
steps {
withSonarQubeEnv(installationName: 'SonarQube') {
sh "${scannerHome}/bin/sonar-scanner -X"
}
}
}
```
If you are analyzing a Java 8 project you probably want to continue using Java 8 to build your project. The following example allows you to continue building in Java 8 but will use Java 11 to scan the code:
```css-79elbk
stage('Build') {
tools {
jdk "jdk8" // the name you have given the JDK installation using the JDK manager (Global Tool Configuration)
}
steps {
sh 'mvn compile'
}
}
stage('SonarQube analysis') {
tools {
jdk "jdk11" // the name you have given the JDK installation using the JDK manager (Global Tool Configuration)
}
environment {
scannerHome = tool 'SonarQube Scanner' // the name you have given the Sonar Scanner (Global Tool Configuration)
}
steps {
withSonarQubeEnv(installationName: 'SonarQube') {
sh 'mvn sonar:sonar'
}
}
}
```
The previous example is for Maven, but you can easily modify it for Gradle.
#### Classical Pipelines
**Set Job JDK version**
You can set the JDK version that a job should use in the **General** section of your configuration. This option is only visible if you have configured multiple JDK versions under **Manage Jenkins > Global Tool Configuration**.
**Set Execute SonarQube Scanner JDK version**
If you’re using the **Execute SonarQube Scanner** step in your configuration, you can set the JDK for this step in the configuration dialog. This allows you to use JDK 11 for the code scanning performed by SonarQube and the globally configured JDK for all other steps in the job.
**Java 8 projects**
Jenkins doesn’t let you switch JDKs when using a ‘Freestyle project’ or ‘Maven project’ configuration, so when you want to build your project using Java 8 you have to manually set the `JAVA_HOME` variable to Java 11 when executing the scanner.
You can do this with the [Tool Environment Plugin](https://plugins.jenkins.io/toolenv/). When this plugin is installed, you can expose the location of the JDK you added under **Manage Jenkins > Global Tool Configuration**.
The location of the JDK can then be used to set the `JAVA_HOME` environment variable. The build and post steps sections can be configured as following
---
# Source: https://docs.sonarsource.com/sonarqube-server/2025.2/server-update-and-maintenance/upgrade/moving-to-another-edition.md
# Source: https://docs.sonarsource.com/sonarqube-server/2025.3/server-update-and-maintenance/upgrade/moving-to-another-edition.md
# Source: https://docs.sonarsource.com/sonarqube-server/2025.5/server-update-and-maintenance/update/moving-to-another-edition.md
# Source: https://docs.sonarsource.com/sonarqube-server/2025.1/server-update-and-maintenance/update/moving-to-another-edition.md
# Source: https://docs.sonarsource.com/sonarqube-server/2025.4/server-update-and-maintenance/update/moving-to-another-edition.md
# Source: https://docs.sonarsource.com/sonarqube-server/2025.6/server-update-and-maintenance/update/moving-to-another-edition.md
# Source: https://docs.sonarsource.com/sonarqube-server/server-update-and-maintenance/update/moving-to-another-edition.md
# Moving to another SonarQube Server edition
To move to another SonarQube Server edition during an update:
* Follow the instructions in the respective update section below on the [update](https://docs.sonarsource.com/sonarqube-server/server-update-and-maintenance/update/update "mention") page by using the appropriate edition file or Docker image tag:
* **Updating a ZIP file instance**
* **Upgdating a Docker image instance**
* **Updating a Helm chart instance**
To move to another SonarQube Server edition without updating your SonarQube Server version:
* Follow the instructions in the respective update section on the [update](https://docs.sonarsource.com/sonarqube-server/server-update-and-maintenance/update/update "mention") page:
* By using the appropriate edition file or Docker image tag.
* Without navigating to `http:///setup`.
---
# Source: https://docs.sonarsource.com/sonarqube-community-build/instance-administration/analysis-functions/instance-mode/mqr-mode.md
# Source: https://docs.sonarsource.com/sonarqube-server/10.8/instance-administration/analysis-functions/instance-mode/mqr-mode.md
# Source: https://docs.sonarsource.com/sonarqube-server/2025.2/instance-administration/analysis-functions/instance-mode/mqr-mode.md
# Source: https://docs.sonarsource.com/sonarqube-server/2025.3/instance-administration/analysis-functions/instance-mode/mqr-mode.md
# Source: https://docs.sonarsource.com/sonarqube-server/2025.5/instance-administration/analysis-functions/instance-mode/mqr-mode.md
# Source: https://docs.sonarsource.com/sonarqube-server/2025.1/instance-administration/analysis-functions/instance-mode/mqr-mode.md
# Source: https://docs.sonarsource.com/sonarqube-server/2025.4/instance-administration/analysis-functions/instance-mode/mqr-mode.md
# Source: https://docs.sonarsource.com/sonarqube-server/2025.6/instance-administration/analysis-functions/instance-mode/mqr-mode.md
# Source: https://docs.sonarsource.com/sonarqube-server/instance-administration/analysis-functions/instance-mode/mqr-mode.md
# MQR mode
This approach focuses on ensuring the impact on all [software-qualities](https://docs.sonarsource.com/sonarqube-server/user-guide/rules/software-qualities "mention") is clear, not just the one most severely impacted.
### How severity works in MQR mode
Severity
Definition
Blocker
An issue that has a significant probability of severe unintended consequences on the application that should be fixed immediately. This includes bugs leading to production crashes and security flaws allowing attackers to extract sensitive data or execute malicious code.
High
An issue with a high impact on the application that should be fixed as soon as possible.
Medium
An issue with a medium impact.
Low
An issue with a low impact.
Info
There is no expected impact on the application. For informational purposes only.
### Related pages
* [standard-experience](https://docs.sonarsource.com/sonarqube-server/instance-administration/analysis-functions/instance-mode/standard-experience "mention")
* [changing-modes](https://docs.sonarsource.com/sonarqube-server/user-guide/code-metrics/changing-modes "mention")
---
# Source: https://docs.sonarsource.com/sonarqube-community-build/instance-administration/authentication/saml/ms-entra-id.md
# Source: https://docs.sonarsource.com/sonarqube-server/10.7/instance-administration/authentication/saml/ms-entra-id.md
# Source: https://docs.sonarsource.com/sonarqube-server/10.8/instance-administration/authentication/saml/ms-entra-id.md
# Source: https://docs.sonarsource.com/sonarqube-server/2025.2/instance-administration/authentication/saml/ms-entra-id.md
# Source: https://docs.sonarsource.com/sonarqube-server/2025.3/instance-administration/authentication/saml/ms-entra-id.md
# Source: https://docs.sonarsource.com/sonarqube-server/2025.5/instance-administration/authentication/saml/ms-entra-id.md
# Source: https://docs.sonarsource.com/sonarqube-server/2025.1/instance-administration/authentication/saml/ms-entra-id.md
# Source: https://docs.sonarsource.com/sonarqube-server/2025.4/instance-administration/authentication/saml/ms-entra-id.md
# Source: https://docs.sonarsource.com/sonarqube-server/2025.6/instance-administration/authentication/saml/ms-entra-id.md
# Source: https://docs.sonarsource.com/sonarqube-server/instance-administration/authentication/saml/ms-entra-id.md
# With Microsoft Entra ID
- [Introduction to SAML with Microsoft Entra ID](/sonarqube-server/instance-administration/authentication/saml/ms-entra-id/introduction.md): Main steps of SAML authentication setup with Microsoft Entra ID.
- [Setup in Microsoft Entra ID](/sonarqube-server/instance-administration/authentication/saml/ms-entra-id/setup-in-entra-id.md): This page describes how to register SonarQube Server in Microsoft Entra ID.
- [Setup in SonarQube Server](/sonarqube-server/instance-administration/authentication/saml/ms-entra-id/setup-in-sq.md): This page describes how to setup in SonarQube Server SAML with Microsoft Entra ID.
- [Setup of security features](/sonarqube-server/instance-administration/authentication/saml/ms-entra-id/optional-security-features.md): To improve security, you can set up the encryption of SAML assertions sent by Microsoft Entra ID and the signing of SAML requests sent by SonarQube Server.
---
# Source: https://docs.sonarsource.com/sonarqube-server/8.9/project-administration/narrowing-the-focus.md
# Source: https://docs.sonarsource.com/sonarqube-server/9.8/project-administration/narrowing-the-focus.md
# Source: https://docs.sonarsource.com/sonarqube-server/9.9/project-administration/narrowing-the-focus.md
# Source: https://docs.sonarsource.com/sonarqube-server/10.0/project-administration/narrowing-the-focus.md
# Narrowing the focus
There are many cases where you do not want to analyze every aspect of every source file in your project. For example, your project may contain generated code, source code from libraries, or intentionally duplicated code.
In such cases, it makes sense to skip some or all aspects of analysis for these files, thus removing noise and allowing you to focus on the issues that really matter.
To help narrow the focus, SonarQube gives you several options to precisely configure what will be analyzed and how. Most of the properties that define your analysis scope can be defined in the SonarQube UI. Other parameters must be set explicitly in the scanner invocation or in the appropriate configuration file as we describe in more detail below; see the [analysis-parameters](https://docs.sonarsource.com/sonarqube-server/10.0/analyzing-source-code/analysis-parameters "mention") page for more detail.
### Setting the initial scope
The initial scope of analysis is controlled by the following parameters:
* `sonar.sources` define the initial scope of analysis for non-test code in your project.
* `sonar.tests` define the initial scope of analysis for test code in your project.
These parameters define the starting point for analysis scope adjustment:
* Files outside the scope defined by these parameters *will not* be analyzed at all.
* Files within the scope defined by these parameters *will* be analyzed *unless excluded by further adjustments* (exclusions, inclusions, etc. See below.)
Additionally, these parameters are:
* only set at the project level. There are no global, server-level equivalents for these parameters.
* either set automatically by your SonarScanner, set explicitly in the `sonar-project.properties` configuration file, or set on the command line that invokes the scanner. There are no UI settings for these parameters.
* set explicitly and both accept a comma-delimited list of paths. Pattern matching with wildcards is not supported.
#### Why is test code scoped separately?
Test and non-test code are distinguished because
* Different analysis rules are applied to the two categories.
* The two categories have different metrics
* Test code does not count toward lines-of-code limits defined by your license.
* Test code does not count towards coverage (you don’t have to test your test code)
#### Automatic setting for Maven, Gradle, and .NET
If you are analyzing code using SonarScanner for Maven, SonarScanner for Gradle, or SonarScanner for .NET, the `sonar.sources` and `sonar.tests` parameters are automatically determined based on information in your project configuration. You do not have to explicitly set the parameters. If you do explicitly set the parameters (for example in your `pom.xml`, in the case of Maven), this will override the automatically determined values.
#### Defaults settings for other scenarios
If you are not using Maven, Gradle or .NET then
* By default, `sonar.sources` is set to the current working directory (the path `.`).
* By default, `sonar.tests` is not set.
#### Explicit settings
If the defaults are not suitable (for example, if you *do* have test code) you must set the parameters explicitly in the scanner invocation or in the appropriate configuration file (see [analysis-parameters](https://docs.sonarsource.com/sonarqube-server/10.0/analyzing-source-code/analysis-parameters "mention")).
When explicitly set, both `sonar.sources` and `sonar.tests` take a comma-delimited list of directories or files.
* The entries in the list are simple paths. Wildcards (`*`, `**`, and `?`) are not allowed.
* A directory in the list means that all analyzable files and directories recursively below it are included. An individual file in the list means that the file is included.
* The paths are interpreted relative to the project base directory. The base directory is defined by the scanner you are using. In most cases, this is the root directory of the project. If you are using the SonarScanner CLI, your base directory will be the current directory from which you invoke the tool (though this can be overridden using the parameter `sonar.projectBaseDir`).
#### Example
Let’s say your repository looks something like this, with your source and test code clearly separated at the top level:
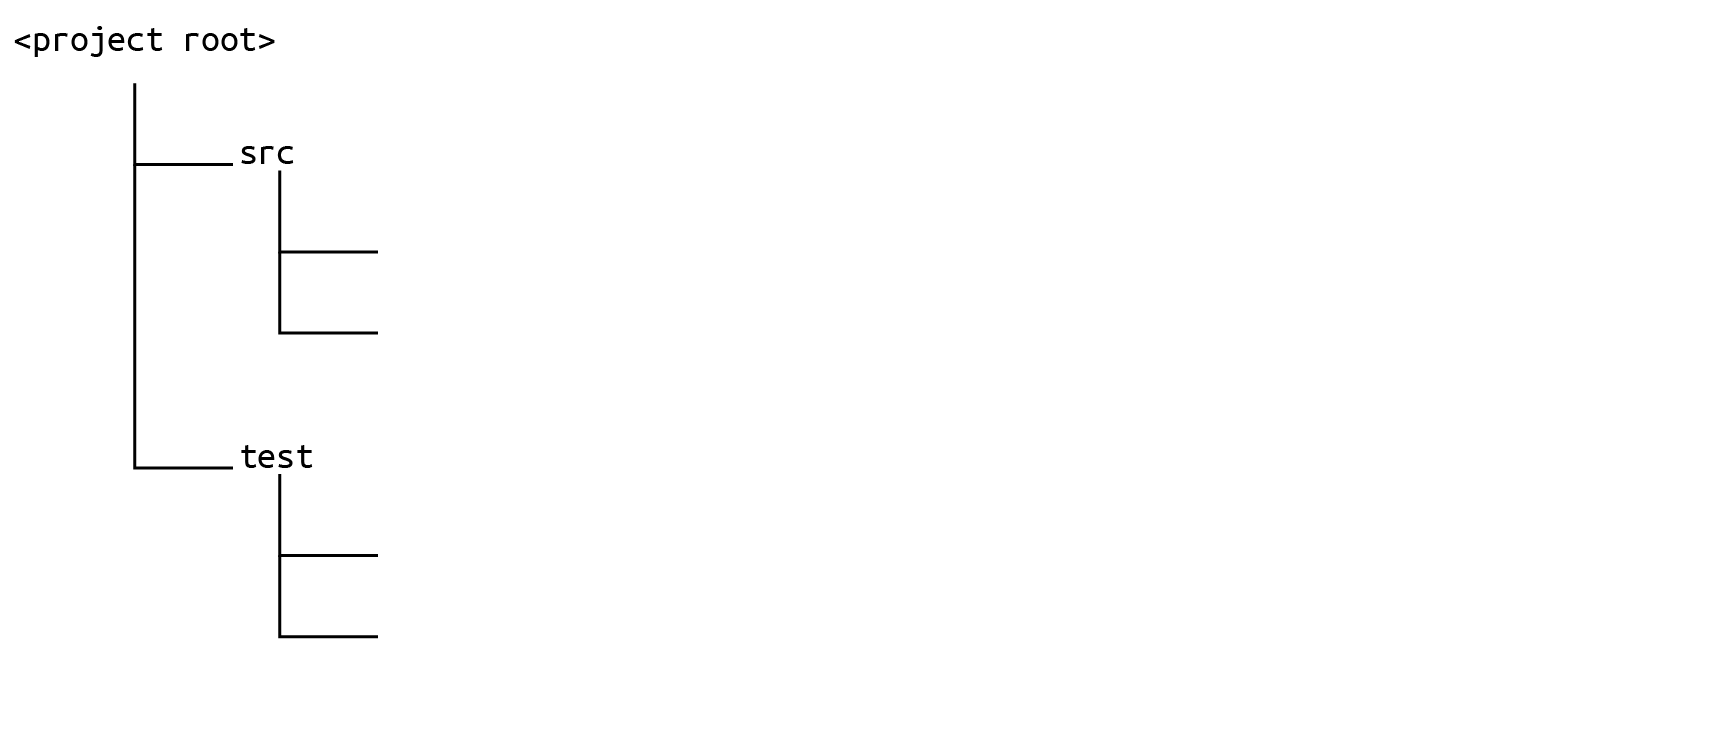
In this case, you would set your `sonar.sources` like this:

and your `sonar.tests` like this:
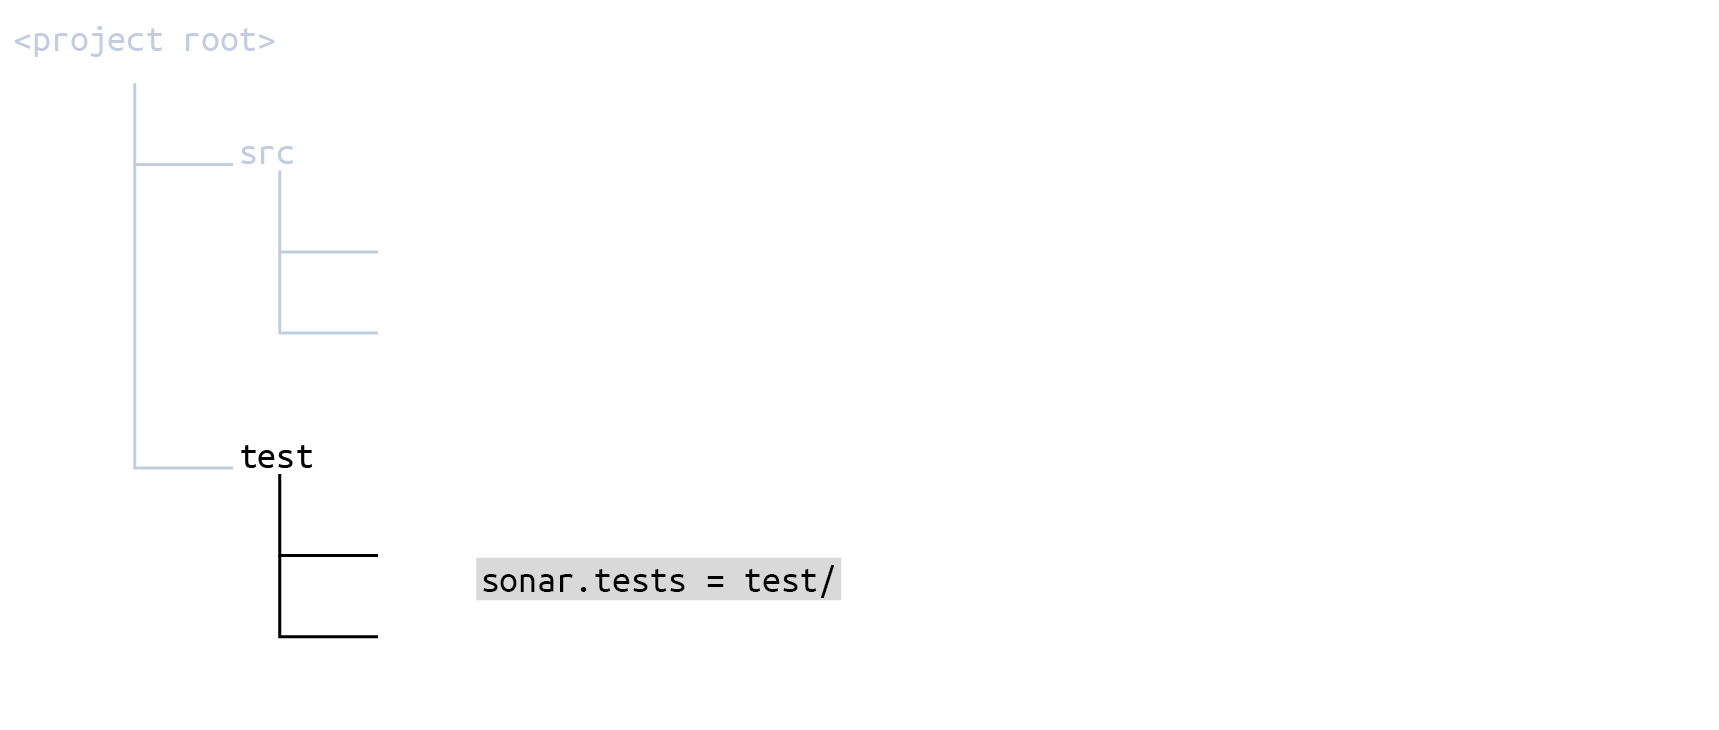
If you configure your scope in the `sonar-project.properties` file, it would look like this:
```css-79elbk
# Define separate root directories for sources and tests
sonar.sources = src/
sonar.tests = test/
```
There is no need for any further fine-tuning.
### Wildcard patterns
While the `sonar.sources` and `sonar.tests` parameters take simple paths, most of the parameters discussed below use path-matching patterns.
The patterns are defined using the following wildcards:
* `*` Match zero or more characters (not including the directory delimiter, `/`).
* `**` Match zero or more directory segments within the path.
* `?` Match a single character (not including the directory delimiter, `/`).
#### Examples
* The pattern `**/*.css`
* matches `anyDirectory/anyFile.css`
* doesn’t match `org/sonar.api/MyBean.java`
* The pattern `**/*Bean.java`
* matches `org/sonar.api/MyBean.java`
* doesn’t match `org/sonar/util/MyDTO.java`
* The pattern `**/*Bean?.java`
* matches `org/sonar/util/MyOtherBean1.java`
* doesn’t match `org/sonar/util/MyOtherBean.java`
* The pattern `org/sonar/*`
* matches `org/sonar/MyClass.java`
* doesn’t match `org/sonar/util/MyClassUtil.java`
* The pattern `org/sonar/**/*`
* matches `org/sonar/MyClass.java`
* doesn’t match `org/radar/MyClass.java`
### Location of UI settings
Unless otherwise noted, all the parameters below are settable at both the global and project level. The UI locations for the settings are found under:
* **Administration** > **Configuration** > **General Settings** (for global settings)
* **Project Settings** > **General Settings** (for project-level settings)
Any setting made at the global level will apply to all projects unless overridden at the project level (the only exceptions are the global exclusion parameters discussed above).
### File exclusion and inclusion
If the directory structure of your project does not cleanly separate source code from test code at the top level, you may have to adjust the scope using exclusions and inclusions.
{% hint style="warning" %}
Inclusions and exclusions should not be part of the initial analysis configuration. We recommend setting them only to solve issues. For example, when you notice that an analysis picked up files that you did not want analyzed.
{% endhint %}
These are set in the UI for both global and project levels, as follows:
#### Global level
**Administration** > **Configuration** > **General Settings** > **Analysis Scope** > **A. File Exclusions**
* **Global Source File Exclusions**: One or more wildcard patterns defining which files are filtered out from those defined by `sonar.sources`. This setting will apply to all projects on your SonarQube server. It cannot be overridden by any project-level source file exclusion. It also cannot be set as a key in a configuration file. If it is set, it must be set in the UI.
* **Source File Exclusions**: The same as the global version above except that it *can* be overridden by a project-level source file exclusion. It cannot be set as a key in a configuration file. If it is set, it must be set in the UI.
* **Global Test File Exclusions**: Same as the Global Source File Exclusions, above, except that it applies to test files.
* **Source File Inclusions**: One or more wildcard patterns defining which files to retain, while filtering out all others, from those defined by `sonar.sources`. This applies to all projects on your SonarQube server, though it can be overridden at the project level. It cannot be set as a key in a configuration file. If it is set, it must be set in the UI.
* **Test File Exclusions**: Same as the Source File Exclusions, above, except that it applies to test files.
* **Test File Inclusions**: Same as the Source File Inclusions, above, except that it applies to test files.
#### Project level
**Project Settings** > **General Settings** > **Analysis Scope** > **A. File Exclusions**
* **Source File Exclusions**: One or more wildcard patterns defining which files are filtered out from those defined by `sonar.sources`. This can also be set in a configuration file using the key `sonar.exclusions`.
* **Source File Inclusions**: One or more wildcard patterns defining which files to retain, while filtering out all others, from those defined by `sonar.sources`. This can also be set in a configuration file using the key `sonar.inclusions`.
* **Test File Exclusions**: One or more wildcard patterns defining which files are filtered out from those defined by `sonar.tests`. This can also be set in a configuration file with the key `sonar.test.exclusions`.
* **Test File Inclusions**: One or more wildcard patterns defining which files to retain, while filtering out all others, from those defined by `sonar.tests`. This can also be set in a configuration file using the key `sonar.test.inclusions`.
To set these parameters by key you can:
* Set them in the configuration file `/sonar-project.properties`
* Set them on the command line when invoking the scanner.
* In the case of Maven, Gradle, or .NET projects, set them in the appropriate framework-specific configuration file.
#### How the parameter values are interpreted
The wildcard patterns are interpreted relative to the project base directory.
Exclusions and inclusions apply *on top of* the `sonar.sources` and `sonar.tests` settings. Both the exclusion and inclusion parameters act as filters. They only ever reduce the number of files in the analyzable set, they never add to the set.
#### Example
Let’s say your repository looks something like this, with your test code intermingled with your source code:
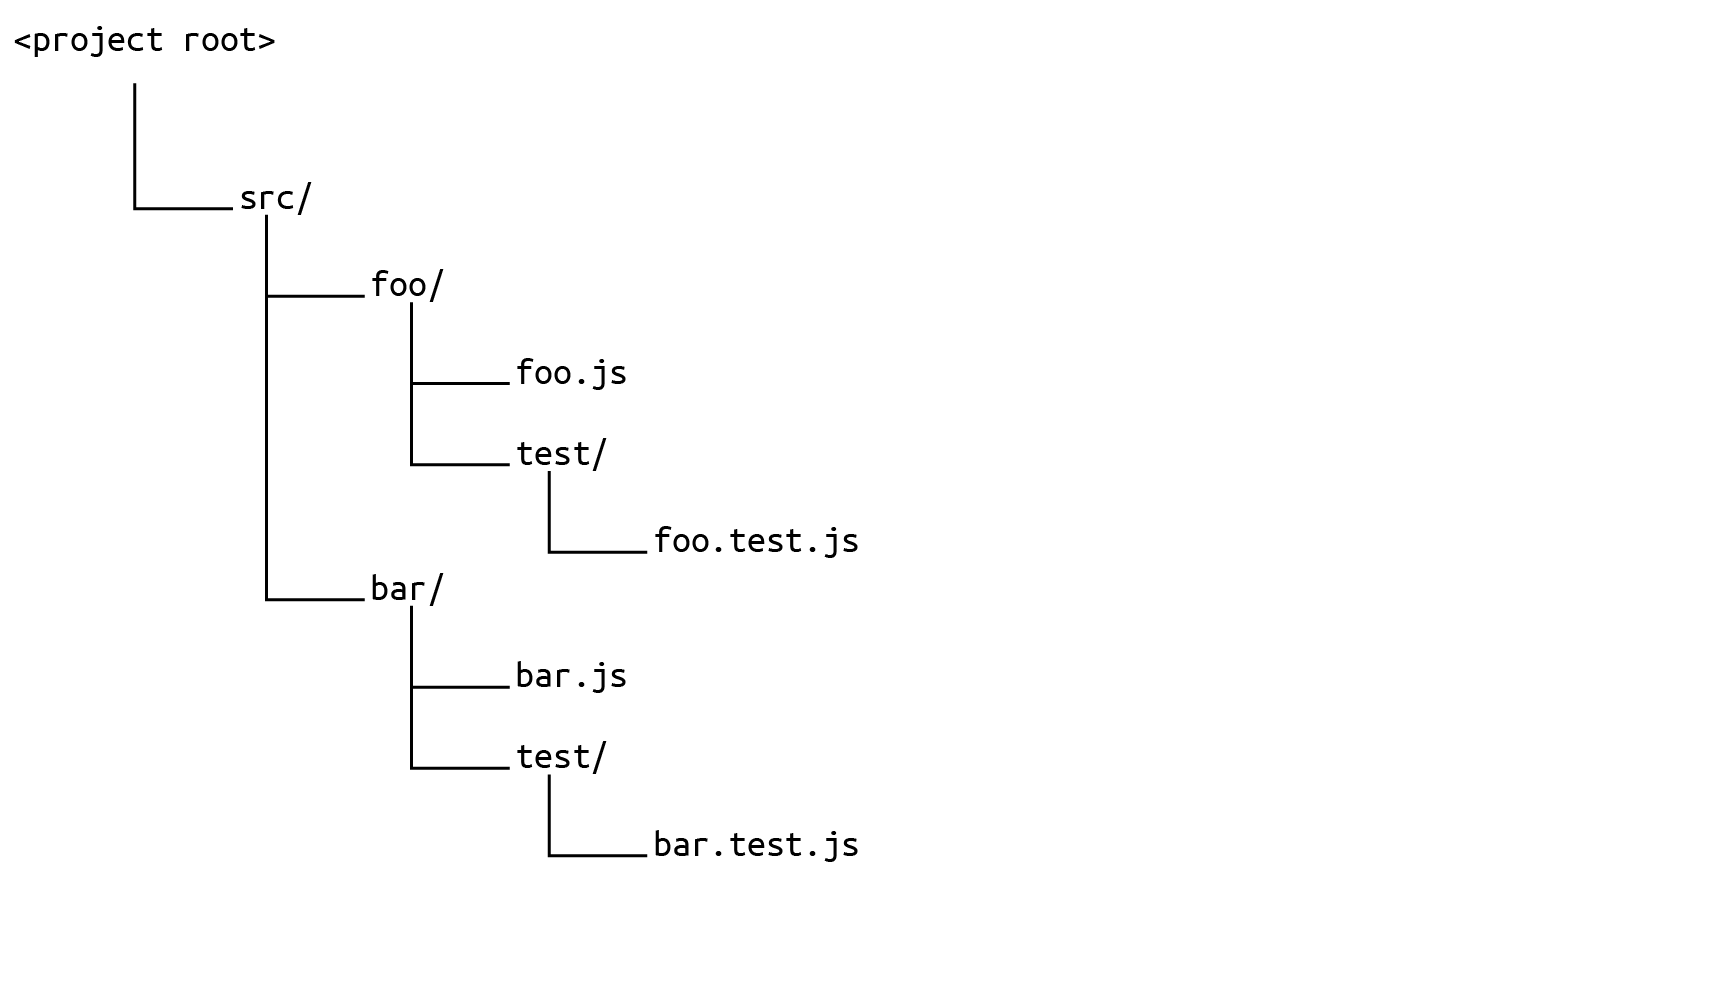
You would define your `sonar.sources` like this, taking in the whole `src` directory:
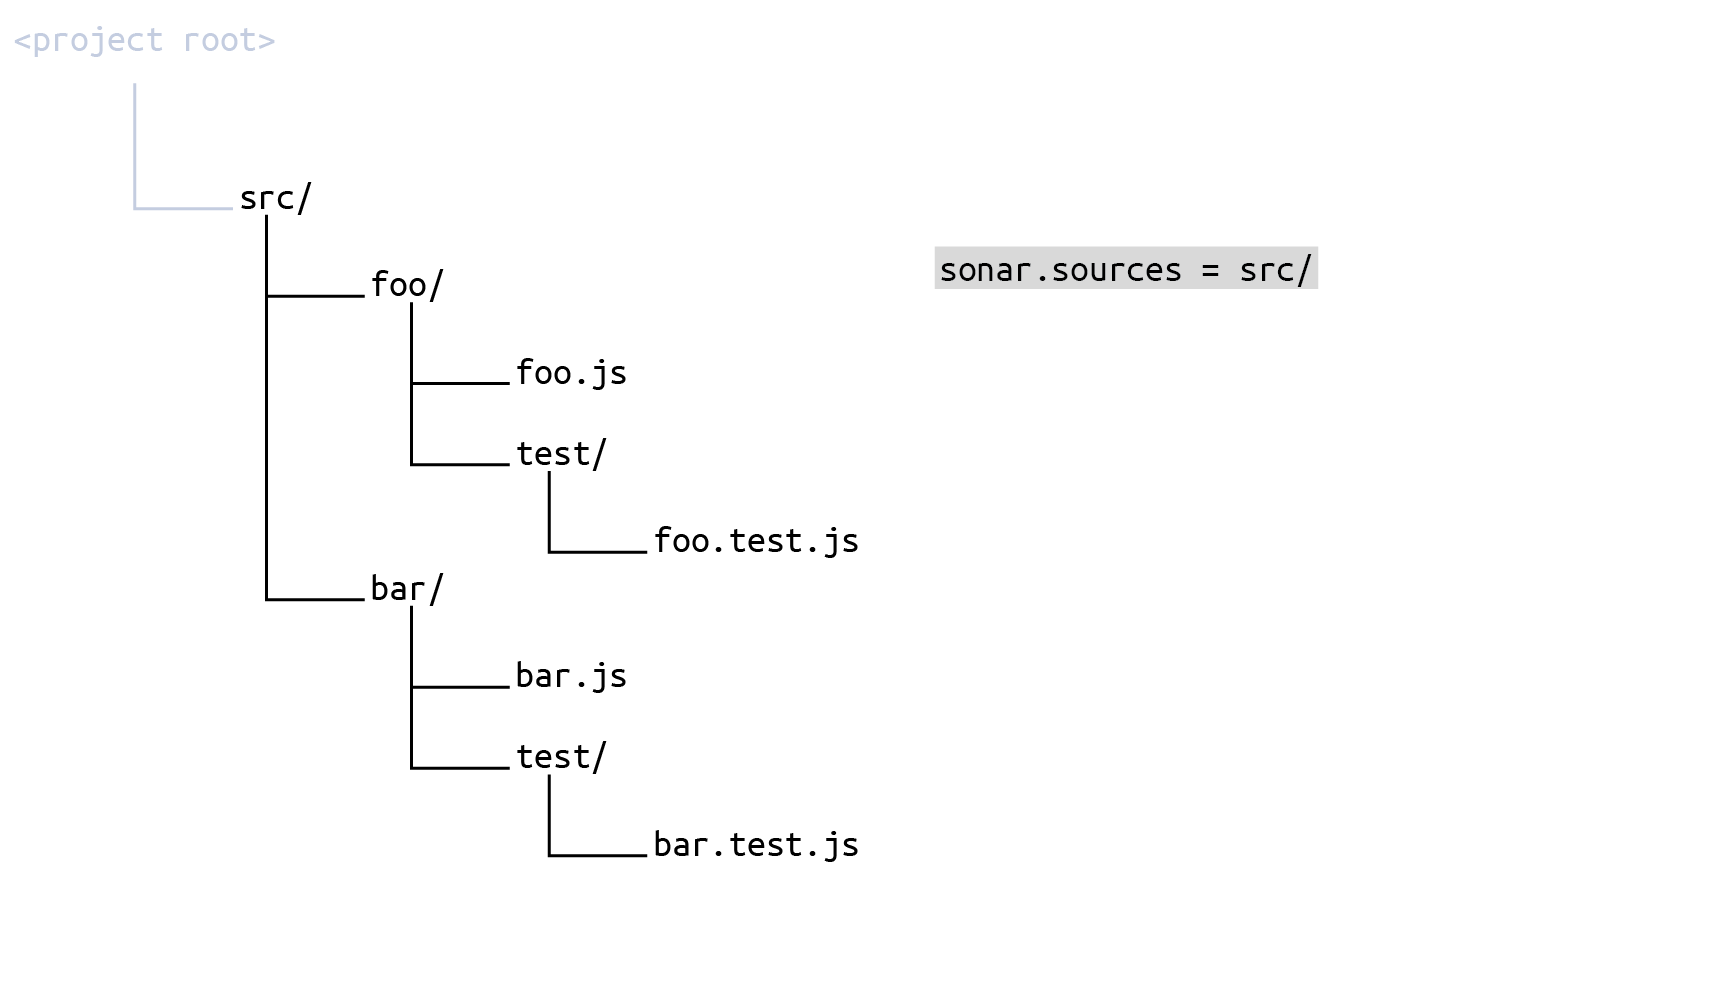
and then set **Source File Exclusions** (key `sonar.exclusions`) to
```css-79elbk
src/**/test/**/*
```
The result is that the set of source files to be scanned is everything under `src` minus every `test` subdirectory:
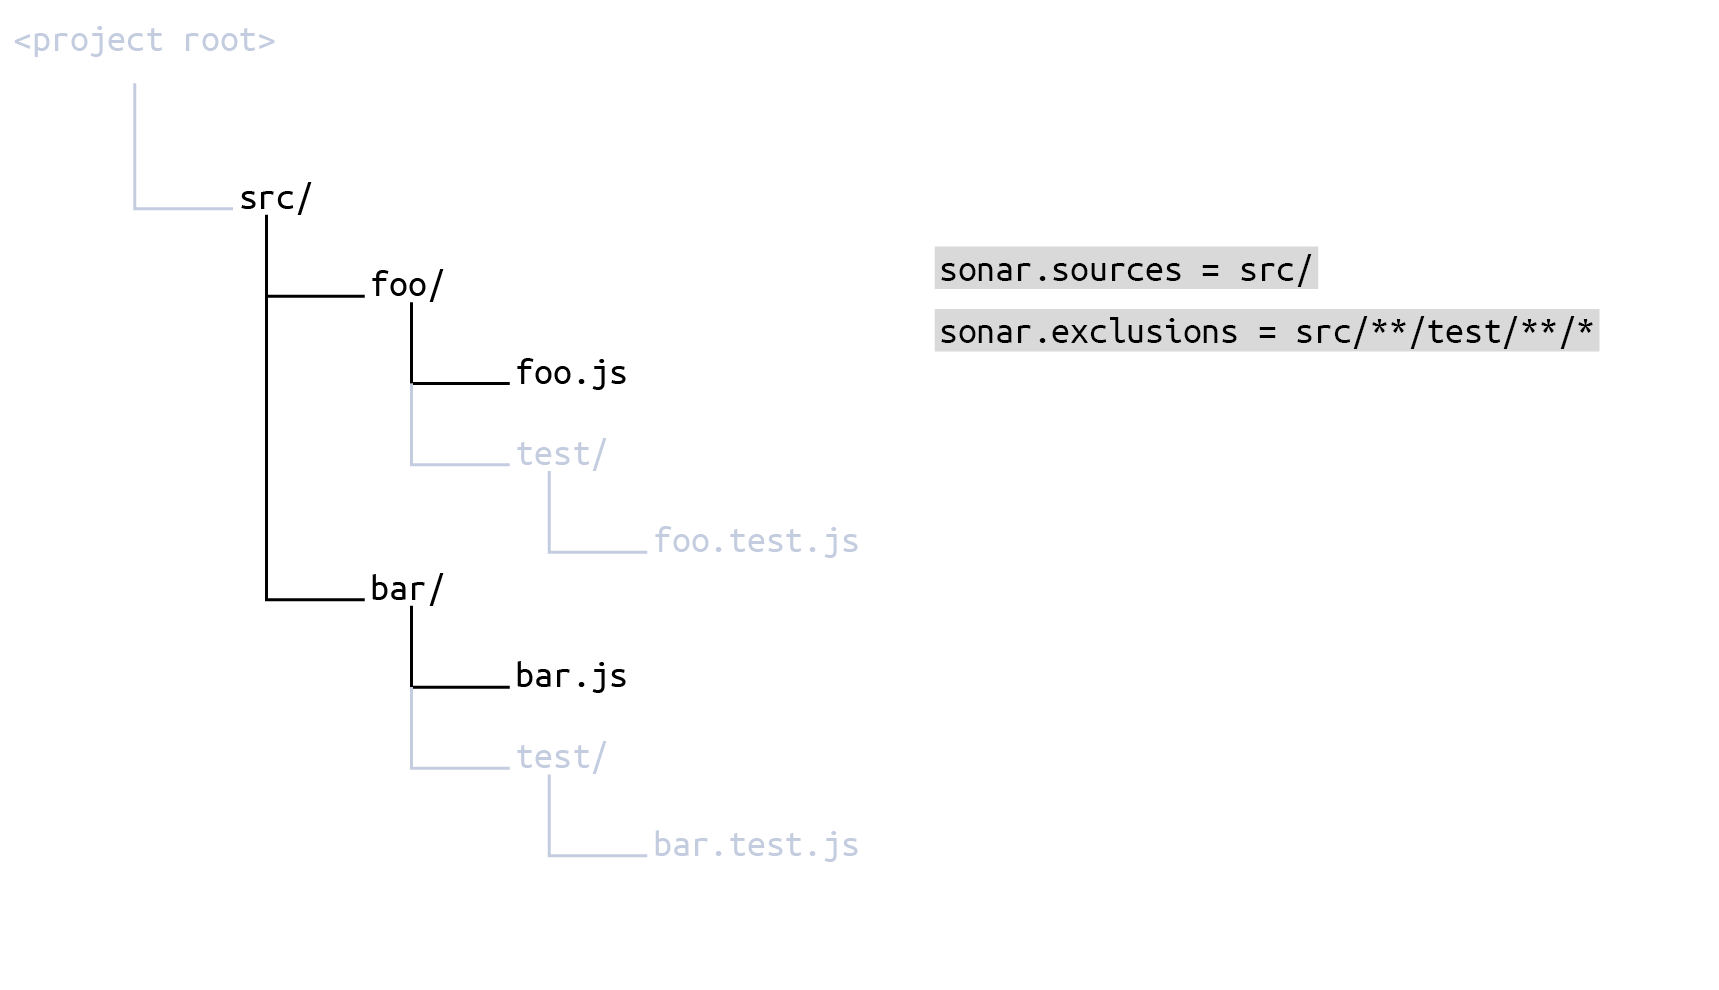
To define the test files, first set `sonar.tests` to the whole `src` directory:
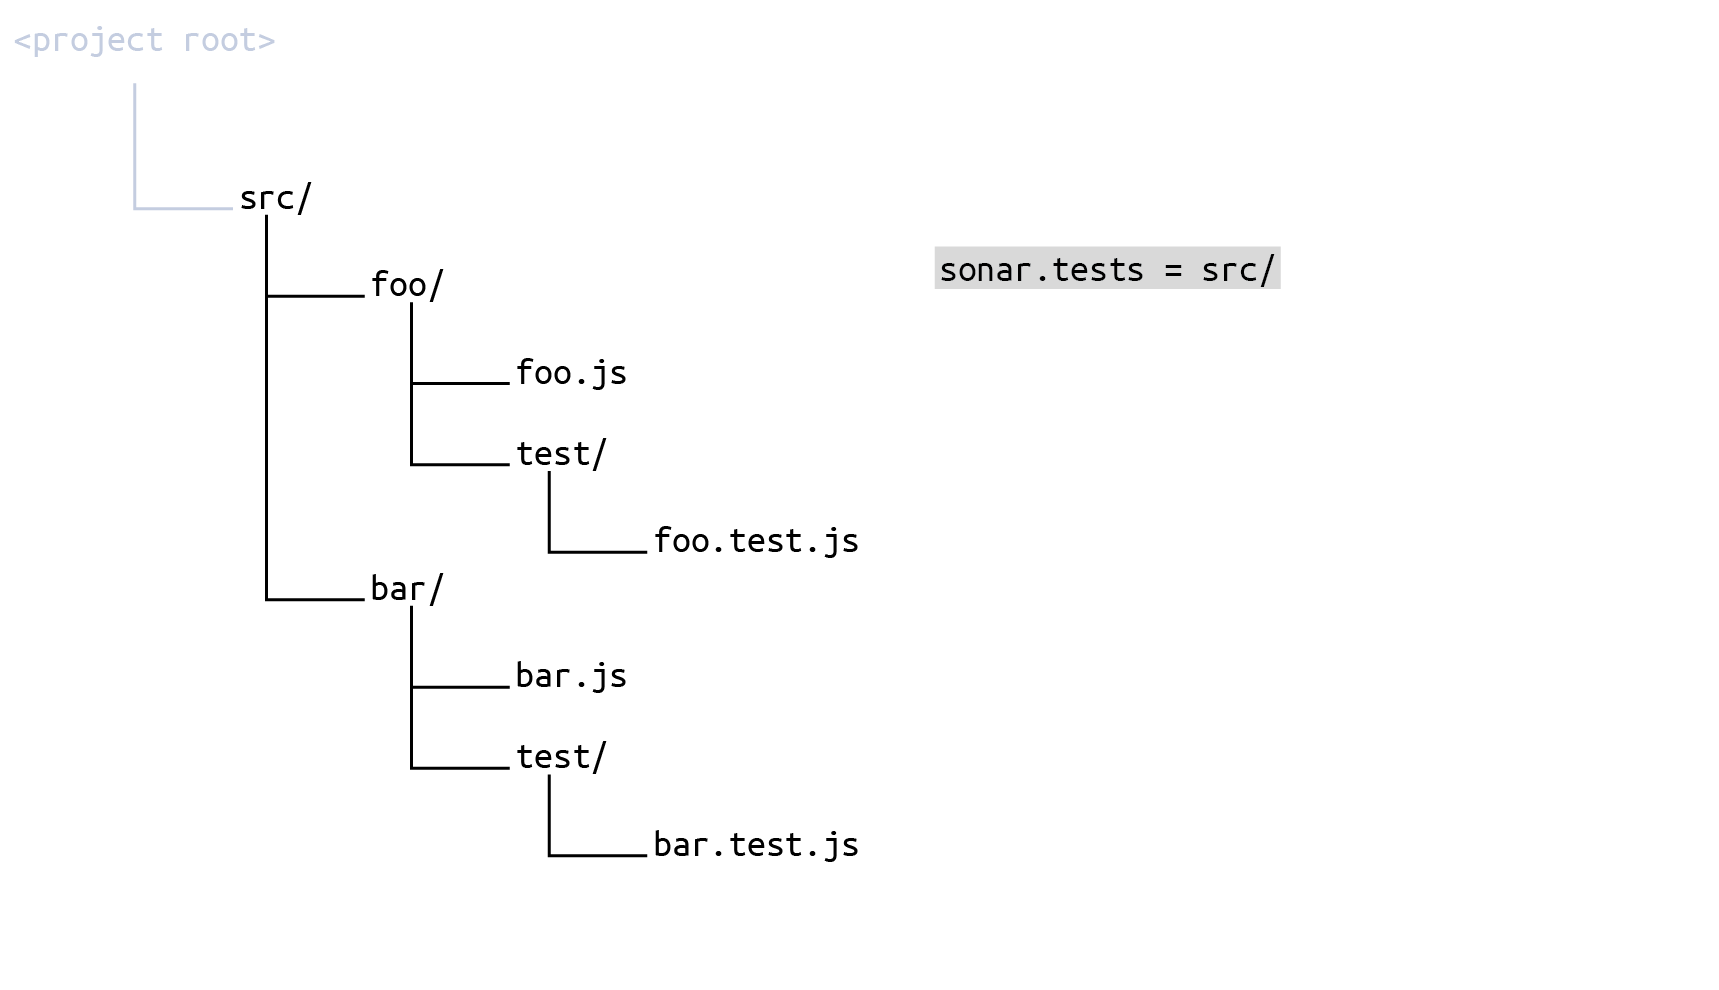
and then set **Test File Inclusions** (key `sonar.test.inclusions`) to
```css-79elbk
src/**/test/**/*
```
The result is that the set of source files to be scanned is everything under `src` *minus everything that is not* a `test` subdirectory:
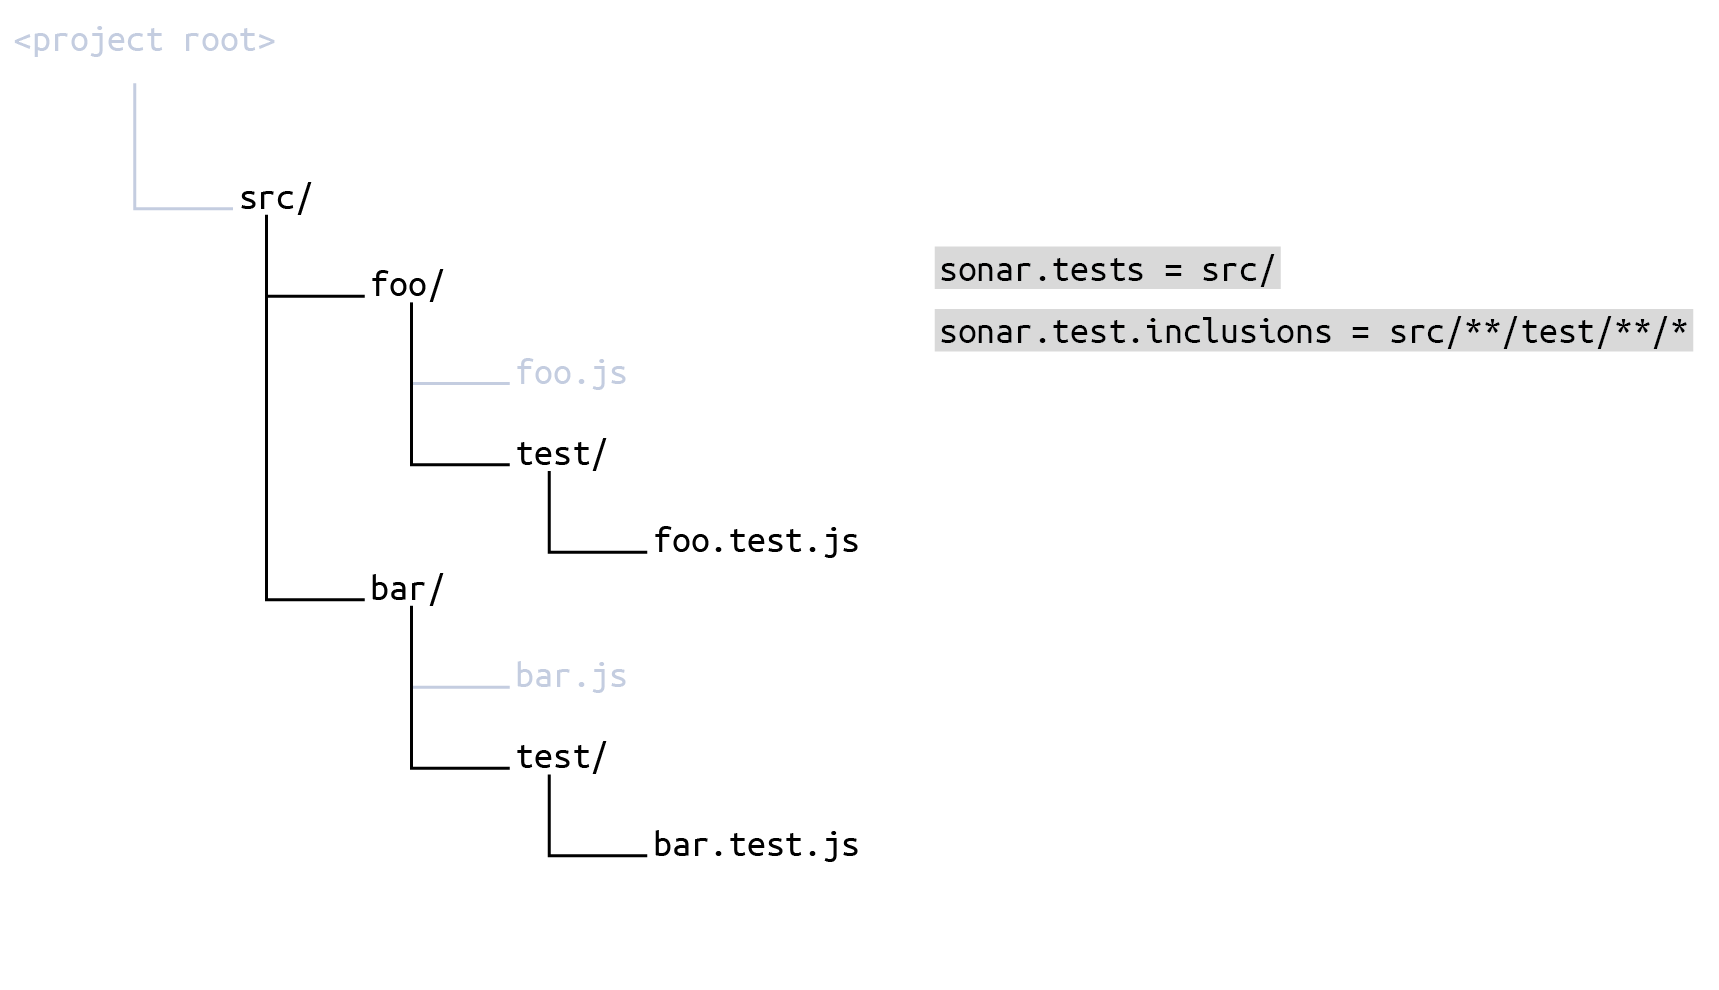
If you configure your scope in the `sonar-project.properties` file, it would look like this:
```css-79elbk
# Define the same root directory for sources and tests
sonar.sources = src/
sonar.tests = src/
# Include test subdirectories in test scope
sonar.test.inclusions = src/**/test/**/*
# Exclude test subdirectories from source scope
sonar.exclusions = src/**/test/**/*
```
#### Naming of parameters
Note that the initial scoping parameter for test code is `sonar.tests` (that’s `tests` with an `s`!) while the exclusion and inclusion parameters for test code are `sonar.test.exclusions` and `sonar.test.inclusions` (that’s `test`, without an `s`!).
#### Relationship with test coverage reporting
The test scoping parameters ( `sonar.tests`, `sonar.test.exclusion`, and `sonar.test.inclusion`) do not have anything to do with setting up test coverage reporting (see [overview](https://docs.sonarsource.com/sonarqube-server/10.0/analyzing-source-code/test-coverage/overview "mention")). However, SonarQube will report an error if an imported coverage report lists a test file not encountered in the directories specified by the scoping parameters.
The parameter `sonar.coverage.exclusions`, on the other hand, is directly related to test coverage reporting (see below).
### Code coverage exclusion
**Analysis Scope** > **B. Code Coverage Exclusions**
This setting lets you exclude specific files or directories from code coverage reporting. The value of the parameter is a comma-delimited list of path-matching patterns relative to the current working directory.
When setting by key, use `sonar.coverage.exclusions`
### Duplication exclusions
**Analysis Scope** > **C. Duplication Exclusions**
This setting lets you exclude specific files or directories from duplication checking. The value is a comma-delimited list of path-matching patterns relative to the current working directory.
When setting by key, use `sonar.cpd.exclusions`
### Setting the scope by file type
**Languages** > *Your Language*
Most languages offer a way to restrict the scope of analysis to files matching a set of extensions. You can specify one or more suffixes (file extensions) for each language. For example, for the C language, `.c` and `.h` are set by default.
When setting by key, use the appropriate parameter of the form `sonar..file.suffixes`.
### Ignoring issues in files based on content
**Analysis Scope** > **D. Issue Exclusions** > **Ignore Issues on Files**
You can ignore files that contain a block of code matching a given regular expression. All issues (bugs, code smells, and vulnerabilities), as well as security hotspots, will be ignored within those files. In this setting, you can enter one or more regular expression patterns. Any file containing at least one of the specified patterns will be ignored.
For example, let’s say you have generated class files in your Java project that you wish to exclude. The files look something like this:
```css-79elbk
@Generated("com.example.generated")
public class GeneratedClass extends AnotherClass {
// Some generated code
}
```
To exclude all such files, you might set this parameter to:
```css-79elbk
@Generated\(".*"\)
```
Note that since this value is a regular expression, you need to escape the `(` and `)` parentheses characters and use the expression `.*` match the string in between those parentheses.
The key for this parameter is `sonar.issue.ignore.allfile`, however, because it is a multi-value property, we recommend that it only be set through the UI.
### Ignoring blocks within files
**Analysis Scope** > **D. Issue Exclusions** > **Ignore Issues on Blocks**
You can ignore specific blocks of code within a file while continuing to scan the remainder of the file. Blocks to be ignored are delimited within the file by start and end strings. You specify these start and end strings by regular expressions. All issues (bugs, code smells, and vulnerabilities), as well as security hotspots within those blocks, will be ignored. You can enter one or more pairs of regular expression patterns. Any code in any file that lies between the start pattern and its corresponding end pattern will be ignored. Note that:
* If the first regular expression is found but not the second one, the end of the file is considered to be the end of the block.
* Regular expressions are not matched across multiple lines.
For example, let’s say you want to ignore the code in the method `doSomethingElse` using block delimiters, like this:
```css-79elbk
public class MyClass {
public MyClass() {
...
}
public void doSomething() {
...
}
// BEGIN-NOSCAN
public void doSomethingElse()
{
...
}
// END-NOSCAN
}
```
You could specify the following regular expressions:
**Start of block**: `\s*//\s*START-NOSCAN`
**End of block:** `\s*//\s*END-NOSCAN`
These regular expressions ensure that the start and end block delimiters will be recognized regardless of the number of spaces around the line comment characters (`//`).
The key for this parameter is `sonar.issue.ignore.block`. However, because it is a multi-value property, we recommend that it only be set through the UI.
### Excluding specific rules from specific files
**Analysis Scope** > **D. Issue Exclusions** > **Ignore Issues on Multiple Criteria**
You can prevent specific rules from being applied to specific files by combining one or more pairs of strings consisting of a *rule key pattern* and a *file path pattern*.
The key for this parameter is `sonar.issue.ignore.multicriteria,` however, because it is a multi-value property, we recommend that only be set through the UI.
#### Rule key pattern
A rule key pattern consists of a rule repository name, followed by a colon, followed by a rule key, or a rule name globbing pattern.
For example:
* `java:S1195` matches exactly the [rule S1195 ](https://sonarcloud.io/organizations/sonarsource/rules?q=s1195\&open=java%3AS1195)in the Java rule repository.
* `java:*Naming*` matches all rules in the Java repository that include the string `Naming` in their rule name.
You can find the fully qualified rule ID of the rule definition and the rule name in the rule definition.
For example, for [this rule](https://sonarcloud.io/organizations/sonarsource/rules?open=css%3AS4655\&rule_key=css%3AS4655):
* Rule ID: `css:S4655`
* Rule name: *"!important" should not be used on "keyframes"*
#### File path pattern
A file path pattern uses the path-matching format described above to specify a set of directories or files.
#### Examples
* Ignore all issues in all files:
* Rule key pattern: `*`
* File path pattern: `**/*`
* Ignore all issues in the file `bank/ZTR00021.cbl`:
* Rule key pattern: `*`
* File path pattern: `bank/ZTR00021.cbl`
* Ignore all issues in files located directly in the Java package `com.foo`, but not in its sub-packages:
* Rule key pattern: `*`
* File path pattern: `com/foo/*`
* Ignore all issues against the coding rule `cpp:Union` in files in the directory `object` and its sub-directories:
* Rule key pattern: `cpp:Union`
* File path pattern: `object/**/*`
### Applying specific rules to specific files
You can only apply specific rules to specific files.
* Global level: **Administration** > **Configuration** > **General Settings** > **Analysis Scope** > **D. Issue Exclusions** > **Restrict Scope of Coding Rules**
* Project level: **Project Settings** > **General Settings** > **Analysis Scope** > **D. Issue Exclusions** > **Restrict Scope of Coding Rules**
The mechanics of setting these parameters are the same as for `sonar.issue.ignore.multicriteria`, above: Each entry consists of a rule key pattern and a file path pattern. The difference is that in this case, it means that the specified rule will only be applied to the specified set of files.
The key for this parameter is `sonar.issue.enforce.multicriteria`. However, because it is a multi-value property, we recommend that it should only be set through the UI.
#### Examples
* Only check the rule "Magic Number" on "Bean" objects and not on anything else:
* Rule key pattern: `checkstyle:com.puppycrawl.tools.checkstyle.checks.coding.MagicNumberCheck`
* File path pattern: `**/*Bean.java`
* Only check against the rule *Prevent GO TO statement from transferring control outside current module on COBOL programs* in the directories `bank/creditcard` and `bank/bankcard` (this restriction requires two criteria):
* Rule key pattern 1: `cobol:COBOL.GotoTransferControlOutsideCurrentModuleCheck`
* File path pattern 1: `bank/creditcard/**/*`
* Rule key pattern 2: `cobol:COBOL.GotoTransferControlOutsideCurrentModuleCheck`
* File path pattern 2: `bank/bankcard/**/*`
### SonarQube respects ignored files
Your SonarQube analysis will automatically exclude files that are ignored by your source code control system. For example, in git repositories, it respects the `.gitignore` file. SonarQube also respects the ignore directives used in SVN repositories.
This behavior can be disabled by setting
```css-79elbk
sonar.scm.exclusions.disabled = true
```
in the configuration file or command line.
Note that while SonarQube understands standard `.gitignore` directives, it does not understand `.gitignore` *negation patterns*. These are the patterns preceded by an exclamation mark(`!`). We recommend not using them in SonarQube projects.
---
# Source: https://docs.sonarsource.com/sonarqube-community-build/server-installation/network-security/network-rules.md
# Source: https://docs.sonarsource.com/sonarqube-server/2025.3/server-installation/data-center-edition/network-security/network-rules.md
# Source: https://docs.sonarsource.com/sonarqube-server/2025.3/server-installation/network-security/network-rules.md
# Source: https://docs.sonarsource.com/sonarqube-server/2025.5/server-installation/data-center-edition/network-security/network-rules.md
# Source: https://docs.sonarsource.com/sonarqube-server/2025.5/server-installation/network-security/network-rules.md
# Source: https://docs.sonarsource.com/sonarqube-server/2025.4/server-installation/data-center-edition/network-security/network-rules.md
# Source: https://docs.sonarsource.com/sonarqube-server/2025.4/server-installation/network-security/network-rules.md
# Source: https://docs.sonarsource.com/sonarqube-server/2025.6/server-installation/data-center-edition/network-security/network-rules.md
# Source: https://docs.sonarsource.com/sonarqube-server/2025.6/server-installation/network-security/network-rules.md
# Source: https://docs.sonarsource.com/sonarqube-server/server-installation/data-center-edition/network-security/network-rules.md
# Source: https://docs.sonarsource.com/sonarqube-server/server-installation/network-security/network-rules.md
# Network rules
To lock down the communication in between the reverse proxy and SonarQube, you can define the following network rules:
| Protocol | Source | Destination | Port | Default |
| -------- | ------------- | ----------- | ------------------- | ------- |
| TCP | Reverse Proxy | SonarQube | `sonar.web.port` | 9000 |
| TCP | SonarQube | SonarQube | `sonar.search.port` | 9001 |
| TCP | SonarQube | SonarQube | `sonar.es.port` | random |
You can further segment your network configuration if you specify a frontend network and keep Elasticsearch restricted to the loopback NiC.
| Network | Parameter | Description | Default |
| ------------- | ------------------- | --------------------- | --------- |
| Frontend | `sonar.web.host` | Frontend HTTP Network | 0.0.0.0 |
| Elasticsearch | `sonar.search.host` | Elasticsearch Network | 127.0.0.1 |
For information about the parameters, see [common-properties](https://docs.sonarsource.com/sonarqube-server/server-installation/system-properties/common-properties "mention").
### Related pages
* [securing-behind-proxy](https://docs.sonarsource.com/sonarqube-server/server-installation/network-security/securing-behind-proxy "mention")
---
# Source: https://docs.sonarsource.com/sonarqube-community-build/server-installation/network-security.md
# Source: https://docs.sonarsource.com/sonarqube-server/2025.3/server-installation/data-center-edition/network-security.md
# Source: https://docs.sonarsource.com/sonarqube-server/2025.3/server-installation/network-security.md
# Source: https://docs.sonarsource.com/sonarqube-server/2025.5/server-installation/data-center-edition/network-security.md
# Source: https://docs.sonarsource.com/sonarqube-server/2025.5/server-installation/network-security.md
# Source: https://docs.sonarsource.com/sonarqube-server/2025.4/server-installation/data-center-edition/network-security.md
# Source: https://docs.sonarsource.com/sonarqube-server/2025.4/server-installation/network-security.md
# Source: https://docs.sonarsource.com/sonarqube-server/2025.6/server-installation/data-center-edition/network-security.md
# Source: https://docs.sonarsource.com/sonarqube-server/2025.6/server-installation/network-security.md
# Source: https://docs.sonarsource.com/sonarqube-server/server-installation/data-center-edition/network-security.md
# Source: https://docs.sonarsource.com/sonarqube-server/server-installation/network-security.md
# Network security
- [Securing behind a proxy](/sonarqube-server/server-installation/network-security/securing-behind-proxy.md): Securing SonarQube Server behind a proxy.
- [Network rules](/sonarqube-server/server-installation/network-security/network-rules.md): Defining network rules to enhance the security.
---
# Source: https://docs.sonarsource.com/sonarqube-for-eclipse/using/new-code.md
# Source: https://docs.sonarsource.com/sonarqube-for-visual-studio/using/new-code.md
# Source: https://docs.sonarsource.com/sonarqube-for-intellij/using/new-code.md
# Source: https://docs.sonarsource.com/sonarqube-for-vs-code/using/new-code.md
# New code
### New code and your quality standards
Focusing on new code is an important step in getting the most out of SonarQube for IDE. When you run an analysis on your main branch (or other long-lived branches) in SonarQube (Server, Cloud) and have set up [connected-mode](https://docs.sonarsource.com/sonarqube-for-vs-code/connect-your-ide/connected-mode "mention"), SonarQube for IDE uses the server’s New Code Definition (NCD) to determine which issues you should focus on fixing, and calls out the issues found in new code. Focusing on *new code* is at the core of implementing the SonarQube strategy, knowing that the other code will be incrementally fixed over time.
To achieve this, SonarQube for IDE offers the [#focusing-on-new-code](https://docs.sonarsource.com/sonarqube-for-vs-code/investigating-issues#focusing-on-new-code "mention") feature to highlight new code in the IDE.
### Your new code definition
When SonarQube for IDE is running in connected mode, the SonarQube for IDE uses the NCD defined in SonarQube Server or on SonarQube Cloud. When SonarQube for IDE is running in standalone mode, a locally defined *new code period* highlights your new code.
Running SonarQube for IDE in connected mode with SonarQube (Server, Cloud) offers more opportunities to choose how you define new code.
#### New code definition options
When you use the NCD found in your SonarQube (Server, Cloud) quality profile, you have more opportunities to choose how to define new code. Check out their respective pages for details:
* [Quality standards and new code](https://app.gitbook.com/s/yDv2XwTC1xoOKBYeCK45/user-guide/about-new-code "mention") in SonarQube Server
* [Quality standards and new code](https://app.gitbook.com/s/B4UT2GNiZKjtxFtcFAL7/standards/about-new-code "mention") in SonarQube Cloud
Without [connected-mode](https://docs.sonarsource.com/sonarqube-for-vs-code/connect-your-ide/connected-mode "mention"), new code is defined by a *new code period*: any code added or changed in the last 30 days is considered new code. The 30-day timeframe is defined using Git.
*When not using Git*, the new code period begins with the first SonarQube for IDE analysis.
There is no option to manually define a new code period in SonarQube for IDE.
### Setting your focus on new code
The **Focus on new code** feature works when SonarQube for IDE is running in either connected mode or standalone mode. New code is defined differently in each mode as mentioned above.
**Focus on new code in connected mode**
Setting your focus on new code has these prerequisites running in [connected-mode](https://docs.sonarsource.com/sonarqube-for-vs-code/connect-your-ide/connected-mode "mention"):
* Your local project must be bound to a SonarQube (Server, Cloud) or SonarQube Community Build project.
* The new code definition must be defined in SonarQube (Server, Cloud) or SonarQube Community Build using a **Previous version**, **Number of days**, or **Specific analysis**.
* The **Reference branch** new code definition is not supported. Please see the [#new-code-definition-options](#new-code-definition-options "mention") article above for links to learn how to properly set your new code definition on the server.
By default, the **Focus on New Code** feature is set to **overall code** when you set up a new connection and establish the project binding; the last saved setting persists through restarts.
**Focus on new code in standalone mode**
When not running in connected mode, the **SonarQube focus** can still be used to highlight only issues found in new code. By default, the **SonarQube focus** feature is set to **overall code** when you open SonarQube for VS Code for the first time; the last saved setting persists through restarts.
#### Change your SonarQube focus
Setting your **SonarQube focus** is easy. To activate or deactivate this mode, select either the  **eye icon** from the **SONARQUBE** panel or, when you select **SonarQube focus**: in the VS Code Status Bar, a quick pick window will pop up allowing you to switch focus.
Additionally, you can select or deselect the **Focus on New Code** mode from the VS Code > **Settings…** > **Settings** > **Extensions** > **SonarLint** > **User** settings menu.
{% hint style="info" %}
When deciding to override a globally defined new code definition at the project level in SonarQube (Server, Cloud) or SonarQube for Community Build, note that it is not possible to specify a unique new code definition at the branch level and still activate the **Focus on New Code** option.
{% endhint %}
Running SonarQube for Eclipse in connected mode with SonarQube (Server, Cloud) and SonarQube Community Build offers more opportunities to choose how you define new code.
### How the new code definition affects the analysis results
Focusing on new code and understanding how to work with new code to apply your quality standards are only applicable in SonarQube Server, SonarQube Cloud, and SonarQube Community Build. Learn more about setting quality standards in the server documentation:
* [Quality standards administration](https://app.gitbook.com/s/yDv2XwTC1xoOKBYeCK45/quality-standards-administration "mention") in SonarQube Server
* [Setting your quality standards](https://app.gitbook.com/s/B4UT2GNiZKjtxFtcFAL7/standards "mention") in SonarQube Cloud
* [Quality standards administation](https://app.gitbook.com/s/bqrfLGeD0Y9vE5l9Le42/quality-standards-administration "mention") in SonarQube Community Build
Here are two important points to consider regarding your NCD and SonarQube for VS Code:
* When running SonarQube for IDE in connected mode and enabling the **Focus on New Code** feature, the NCD from SonarQube (Server, Cloud) is used to show you only issues found in *new code*.
* When running SonarQube for IDE while not in connected mode and enabling the **Focus on New Code** feature, [running-an-analysis](https://docs.sonarsource.com/sonarqube-for-vs-code/getting-started/running-an-analysis "mention") will show you only issues found in *new code*.
The **Focus on New Code** feature gives you immediate feedback in the IDE, before you submit new code with new issues. Read the [#focusing-on-new-code](https://docs.sonarsource.com/sonarqube-for-vs-code/investigating-issues#focusing-on-new-code "mention") article for more information.
---
# Source: https://docs.sonarsource.com/sonarqube-community-build/instance-administration/system-functions/notifications.md
# Source: https://docs.sonarsource.com/sonarqube-server/8.9/instance-administration/notifications.md
# Source: https://docs.sonarsource.com/sonarqube-server/9.8/instance-administration/notifications.md
# Source: https://docs.sonarsource.com/sonarqube-server/9.9/instance-administration/notifications.md
# Source: https://docs.sonarsource.com/sonarqube-server/10.0/instance-administration/notifications.md
# Source: https://docs.sonarsource.com/sonarqube-server/10.1/instance-administration/notifications.md
# Source: https://docs.sonarsource.com/sonarqube-server/10.2/instance-administration/notifications.md
# Source: https://docs.sonarsource.com/sonarqube-server/10.3/instance-administration/notifications.md
# Source: https://docs.sonarsource.com/sonarqube-server/10.4/instance-administration/notifications.md
# Source: https://docs.sonarsource.com/sonarqube-server/10.5/instance-administration/notifications.md
# Source: https://docs.sonarsource.com/sonarqube-server/10.6/instance-administration/notifications.md
# Source: https://docs.sonarsource.com/sonarqube-server/10.7/instance-administration/system-functions/notifications.md
# Source: https://docs.sonarsource.com/sonarqube-server/10.8/instance-administration/system-functions/notifications.md
# Source: https://docs.sonarsource.com/sonarqube-server/2025.2/instance-administration/system-functions/notifications.md
# Source: https://docs.sonarsource.com/sonarqube-server/2025.3/instance-administration/system-functions/notifications.md
# Source: https://docs.sonarsource.com/sonarqube-server/2025.5/instance-administration/system-functions/notifications.md
# Source: https://docs.sonarsource.com/sonarqube-server/2025.1/instance-administration/system-functions/notifications.md
# Source: https://docs.sonarsource.com/sonarqube-server/2025.4/instance-administration/system-functions/notifications.md
# Source: https://docs.sonarsource.com/sonarqube-server/2025.6/instance-administration/system-functions/notifications.md
# Source: https://docs.sonarsource.com/sonarqube-server/instance-administration/system-functions/notifications.md
# Source: https://docs.sonarsource.com/sonarqube-cloud/managing-your-account/notifications.md
# Subscribing to email notifications
You can choose to receive email notifications on specific events.
### List of notifications
The notifications you can subscribe to are listed below.
{% hint style="info" %}
* Notifications can only be sent on events occurring on the main branch and long-lived branches.
* Notifications are not sent on new issues if the issue creation date has been backdated.
{% endhint %}
Overall notifications (for any project)
| **Notification** | **Description** |
| ------------------------------------------------------- | ---------------------------------------------------------------------------------------------------------------- |
| Background tasks in failure on my administered projects | You are notified of any background task failure for any project you’re an admin of. |
| Changes happen in issues/hotspots assigned to me | You are notified of any change performed by another user on any issue or hotspot assigned to you on any project. |
| My new issues | You are notified of any new issues introduced by your code for any project. |
Project notifications (for a specific project)
| **Notification** | **Description** |
| ------------------------------------------------ | -------------------------------------------------------------------------------------------------------------------------- |
| Background tasks fail | You are notified of any background task failure on the specific project. |
| Changes happen in issues/hotspots assigned to me | You are notified of any change performed by another user on any issue or hotspot assigned to you for the specific project. |
| New Quality Gate status | You are notified of any quality gate status change for the specific project. |
| Issues resolved as false positive or accepted | You are notified if issues have been marked as False Positive or Accepted in an analysis of the specific project. |
| New issues are assigned to me | You are notified if new issues are assigned to you for the specific project. |
| My new issues | You are notified of any new issues introduced by your code for the specific project. |
### Subscribing to overall notifications
1. Select your account menu in the top right corner of the SonarQube Cloud interface.
2. In the menu, select **My Account**, and then **Notifications**.
3. In the **Overall Notifications** section, select the checkbox corresponding to the kind of notification you want to subscribe to. See **Overall notifications** above.
### Subscribing to notifications on a specific project
You can perform this configuration either from your account menu or from your project page.
From your account menu
1. Select your account menu in the top right corner of the SonarQube Cloud interface.
2. In the menu, select **My Account**; then select **Notifications**.
3. In the **Project Notifications** section, select **Add a project**, and select the project.
4. For the added project, select the checkbox corresponding to the kind of notification you want to subscribe to. See **Project notifications** above.
From your project page
1. Check the [retrieving-projects](https://docs.sonarsource.com/sonarqube-cloud/managing-your-projects/retrieving-projects "mention") page for information about accessing your project.
2. In the left sidebar, select **Information**.
3. In the **Notifications** section, select the checkbox corresponding to the kind of notification you want to subscribe to. See **Project notifications** above.
---
# Source: https://docs.sonarsource.com/sonarqube-community-build/analyzing-source-code/scanners/npm.md
# Source: https://docs.sonarsource.com/sonarqube-server/10.7/analyzing-source-code/scanners/npm.md
# Source: https://docs.sonarsource.com/sonarqube-server/10.8/analyzing-source-code/scanners/npm.md
# Source: https://docs.sonarsource.com/sonarqube-server/2025.2/analyzing-source-code/scanners/npm.md
# Source: https://docs.sonarsource.com/sonarqube-server/2025.3/analyzing-source-code/scanners/npm.md
# Source: https://docs.sonarsource.com/sonarqube-server/2025.5/analyzing-source-code/scanners/npm.md
# Source: https://docs.sonarsource.com/sonarqube-server/2025.1/analyzing-source-code/scanners/npm.md
# Source: https://docs.sonarsource.com/sonarqube-server/2025.4/analyzing-source-code/scanners/npm.md
# Source: https://docs.sonarsource.com/sonarqube-server/2025.6/analyzing-source-code/scanners/npm.md
# Source: https://docs.sonarsource.com/sonarqube-server/analyzing-source-code/scanners/npm.md
# SonarScanner for NPM
- [Introduction](/sonarqube-server/analyzing-source-code/scanners/npm/introduction.md): The SonarScanner for NPM makes it very easy to trigger a SonarQube Server analysis on your JavaScript code base, without needing additional tools or resources.
- [Installing the scanner](/sonarqube-server/analyzing-source-code/scanners/npm/installing.md): Depending on how you want to start the SonarScanner for NPM, you will use a different method to install the scanner.
- [Using the scanner](/sonarqube-server/analyzing-source-code/scanners/npm/using.md): To start the SonarScanner for NPM, you can either add the analysis to your build files or use the scanner start command line (with or without npx).
- [Configuring the scanner](/sonarqube-server/analyzing-source-code/scanners/npm/configuring.md): This section explains how to configure the parameters used for an analysis with the SonarScanner for NPM when running it with SonarQube Server.
---
# Source: https://docs.sonarsource.com/sonarqube-for-eclipse/getting-started/offline-installation.md
# Source: https://docs.sonarsource.com/sonarqube-for-visual-studio/getting-started/offline-installation.md
# Source: https://docs.sonarsource.com/sonarqube-for-intellij/getting-started/offline-installation.md
# Source: https://docs.sonarsource.com/sonarqube-for-vs-code/getting-started/offline-installation.md
# Offline installation
Typically, offline installations start with a download of SonarQube for IDE from your IDE’s Marketplace.
Please check the [VS Code Marketplace](https://marketplace.visualstudio.com/items?itemName=SonarSource.sonarlint-vscode) > **Version History** page to download the most recent versions.
If you don’t have access to your IDE’s Marketplace, you can find the [SonarQube for VS Code VSIX release files here](https://github.com/SonarSource/sonarlint-vscode/releases).
### Instructions
To install SonarQube for IDE offline, you need to first get access to SonarQube for IDE’s VSIX file from either the Marketplace or the release files as described above.
You can download official versions on the Marketplace, or sometimes an ad-hoc version can be built mainly for debugging purposes when a user reports a bug on the Sonar Community forum.
To install the extension, use the dedicated command `>Extensions: Install from VSIX...` in the Visual Studio Code **Command Palette**. Select the VSIX file from the explorer and install it.
### CFamily analyzer
To optimize download times, the CFamily analyzer is not included by default with the VSIX release files. You can perform an offline installation by getting the analyzer’s JAR file and deploying it in an installation folder.
#### Finding the installation path
By default, the CFamily analyzer is downloaded to a persistent folder next to the extension’s installation folder (see the [Visual Studio Code documentation](https://code.visualstudio.com/docs/editor/extension-marketplace#_where-are-extensions-installed)).
For example, if SonarQube for VS Code is installed at `/home/user/.vscode/extensions/SonarSource.sonarlint-vscode-{extensionVersion}`, a given analyzer will be downloaded to `/home/user/.vscode/extensions/sonarsource.sonarlint_ondemand-analyzers/sonar-cfamily-version/{analyzerVersion}/sonarcfamily.jar`
#### Performing the offline installation
1. Find the required version of the analyzer, declared in the extension’s `package.json` file.
2. With this version number, download the analyzer’s JAR file from .
3. Deploy the downloaded JAR as `/home/user/.vscode/extensions/sonarsource.sonarlint_ondemand-analyzers/sonar-cfamily-plugin/{analyzerVersion}/sonarcfamily.jar`
---
# Source: https://docs.sonarsource.com/sonarqube-cloud/administering-sonarcloud/managing-enterprise/enterprise-security/sso/editing-configuration-old-method/okta.md
# Source: https://docs.sonarsource.com/sonarqube-cloud/administering-sonarcloud/managing-enterprise/enterprise-security/sso/setup/configure-sso/okta.md
# SAML SSO with Okta
To set up SAML SSO with Okta, first open the SSO setup assistant as described below:
1. Retrieve your enterprise. See [..](https://docs.sonarsource.com/sonarqube-cloud/administering-sonarcloud/managing-enterprise "mention") for more details.
2. Select **Administration** > **Single Sign-On**. The **Single Sign-On** page opens.
3. Select **Open Configuration** and then **Get Started**. The setup assistant opens.
4. Select **Custom SAML**. Follow the steps described below.
### Step 1: Create the SonarQube Cloud application in Okta

1\. In Okta, under **Applications**, select **Create App Integration**.
2\. In the **Sign-in Method** dialog, select **SAML 2.0**.
3\. Select **Create**.
4\. Fill in the fields and options as described in the table below.
Step
Field or option
Description
General settings
Application label
SonarQube Cloud application name.
Example**: SonarQube Cloud**.
Do not display application icon to users
Select this option. (This is because SonarQube Cloud doesn’t support IdP-initiated SSO).
SAML settings
Single sign on URL
Copy-paste the Single Sign-On URL field value from the setup assistant.
Audience URI (SP Entity ID)
Copy-paste the Service Provider Identity ID field value from the setup assistant.
Response
Select Signed.
Assertion Signature
Select Signed.
Signature Algorithm
Select RSA-SHA256.
SAML settings: Advanced settings
If you want to enable assertion encryption, expand Show Advanced Settings
Assertion Encryption
Select Encrypted.
Encryption Algorithm
Select AES256-GCM for high security.
Key Transport Algorithm
Select RSA-OAEP.
Encryption Certificate
The public X.509 certificate used by the identity provider to authenticate SAML messages.
5\. In the **Feedback** dialog, select **Finish** to confirm the creation of the SonarQube Cloud application.
6\. In the setup assistant, select **Next** to go to the step **2. Configure Connection**.
### Step 2: Configure the connection
1. In Okta’s SonarQube Cloud application, go to **Sign On** > **Settings** > **Sign on methods**. Copy the value of the **Metadata URL** field and paste it to the **Metadata URL** field in the **Automatic** tab of the setup assistant page.
2. In the assistant, select **Create Connection** and **Proceed.** SonarQube Cloud is trying to connect to your Identity Provider. If the connection is established, the assistant moves to step **3. Attribute Mapping**.
### Step 3: Set up the attributes
1. In Okta’s SonarQube Cloud application, go to **Sign On** and select **Edit** in the **SAML Attributes** section.
2. Add three attribute mappings as described in the table below.
3. In **Group Attribute Statements**, enter the values for the groups attribute as described in the table below.
4. In the assistant, select **Next** to go to the step **4. Test SSO**.
Attribute name
Name format
Value
Filter
Mapping for name
Copy-paste from the assistant.
Unspecified
user.displayName
Mapping for login
Copy-paste from the assistant.
Unspecified
user.login
Mapping for email
Copy-paste from the assistant.
Unspecified
user.email
Mapping for groups
Copy-paste from the assistant.
Unspecified
Select Matches regex and set the value to .*.
### Step 4: Test SSO
1. Select the **Test Connection** button. The test is started and the results are displayed on the page as illustrated below.
2. If the test was successful, select **Done**.
### Related pages
[verify-user-groups](https://docs.sonarsource.com/sonarqube-cloud/administering-sonarcloud/managing-enterprise/enterprise-security/sso/setup/verify-user-groups "mention")\
[inviting-users-to-sign-in](https://docs.sonarsource.com/sonarqube-cloud/administering-sonarcloud/managing-enterprise/enterprise-security/sso/setup/inviting-users-to-sign-in "mention")\
[terminate-setup](https://docs.sonarsource.com/sonarqube-cloud/administering-sonarcloud/managing-enterprise/enterprise-security/sso/setup/terminate-setup "mention")\
[deleting-sso-configuration](https://docs.sonarsource.com/sonarqube-cloud/administering-sonarcloud/managing-enterprise/enterprise-security/sso/deleting-sso-configuration "mention")
---
# Source: https://docs.sonarsource.com/sonarqube-community-build/server-installation/on-kubernetes-or-openshift.md
# Source: https://docs.sonarsource.com/sonarqube-server/2025.3/server-installation/data-center-edition/on-kubernetes-or-openshift.md
# Source: https://docs.sonarsource.com/sonarqube-server/2025.3/server-installation/on-kubernetes-or-openshift.md
# Source: https://docs.sonarsource.com/sonarqube-server/2025.5/server-installation/data-center-edition/on-kubernetes-or-openshift.md
# Source: https://docs.sonarsource.com/sonarqube-server/2025.5/server-installation/on-kubernetes-or-openshift.md
# Source: https://docs.sonarsource.com/sonarqube-server/2025.4/server-installation/data-center-edition/on-kubernetes-or-openshift.md
# Source: https://docs.sonarsource.com/sonarqube-server/2025.4/server-installation/on-kubernetes-or-openshift.md
# Source: https://docs.sonarsource.com/sonarqube-server/2025.6/server-installation/data-center-edition/on-kubernetes-or-openshift.md
# Source: https://docs.sonarsource.com/sonarqube-server/2025.6/server-installation/on-kubernetes-or-openshift.md
# Source: https://docs.sonarsource.com/sonarqube-server/server-installation/data-center-edition/on-kubernetes-or-openshift.md
# Source: https://docs.sonarsource.com/sonarqube-server/server-installation/on-kubernetes-or-openshift.md
# Installing on Kubernetes or OpenShift
- [Installation overview](/sonarqube-server/server-installation/on-kubernetes-or-openshift/installation-overview.md): Main steps for installing SonarQube Server on Kubernetes or Openshift.
- [Before you start](/sonarqube-server/server-installation/on-kubernetes-or-openshift/before-you-start.md): Requirements and known limitations of a SonarQube Server deployment on Kubernetes or OpenShift.
- [Customizing Helm chart](/sonarqube-server/server-installation/on-kubernetes-or-openshift/customizing-helm-chart.md): How to perform the most important SonarQube Helm chart customization when working with SonarQube Server.
- [Installing Helm chart](/sonarqube-server/server-installation/on-kubernetes-or-openshift/installing-helm-chart.md): How to install the Helm chart for SonarQube Server’s Developer or Enterprise Edition.
- [Setting up monitoring](/sonarqube-server/server-installation/on-kubernetes-or-openshift/set-up-monitoring.md): Setting up monitoring on a Kubernetes deployment of SonarQube Server.
- [Introduction](/sonarqube-server/server-installation/on-kubernetes-or-openshift/set-up-monitoring/introduction.md): If you deploy SonarQube Server on Kubernetes, Prometheus metrics can be collected.
- [Setting up with Prometheus server](/sonarqube-server/server-installation/on-kubernetes-or-openshift/set-up-monitoring/prometheus.md): This article describes how to use SonarQube’s core integration with Prometheus to collect Prometheus metrics in a Kubernetes deployment.
- [Setting up with Datadog](/sonarqube-server/server-installation/on-kubernetes-or-openshift/set-up-monitoring/datadog.md): In case of a Kubernetes deployment, you can use Datadog to collect the metrics provided through the SonarQube Server’s Web API (Openmetrics format).
- [List of Prometheus metrics](/sonarqube-server/server-installation/on-kubernetes-or-openshift/set-up-monitoring/prometheus-metrics.md): List of the SonarQube Server metrics exposed by Prometheus.
- [Encrypting sensitive data](/sonarqube-server/server-installation/on-kubernetes-or-openshift/encrypting-helm-chart-sensitive-data.md): Encrypting sensitive Sonar properties.
---
# Source: https://docs.sonarsource.com/sonarqube-cloud/getting-started-with-enterprise/onboarding-new-org.md
# Onboarding a new organization
To perform this procedure, you must be an admin of your enterprise. The procedure is different if the enterprise is SSO-enabled or not.
### Without SSO
1. Create your organization in SonarQube Cloud by importing the DevOps platform organization and select the Free plan. See:
* [importing-github-organization](https://docs.sonarsource.com/sonarqube-cloud/administering-sonarcloud/managing-organization/creating-organization/importing-github-organization "mention")
* [importing-bitbucket-workspace](https://docs.sonarsource.com/sonarqube-cloud/administering-sonarcloud/managing-organization/creating-organization/importing-bitbucket-workspace "mention")
* [importing-gitlab-group](https://docs.sonarsource.com/sonarqube-cloud/administering-sonarcloud/managing-organization/creating-organization/importing-gitlab-group "mention")
* [importing-azure-devops-organization](https://docs.sonarsource.com/sonarqube-cloud/administering-sonarcloud/managing-organization/creating-organization/importing-azure-devops-organization "mention")
2. Add the organization to the enterprise:
* Retrieve your enterprise.
* Go to **Administration** > **Organizations** and select **Add organization**.
3. Optionally, allocate an individual LOC limit to the organization. See [#allocating-loc-limit](https://docs.sonarsource.com/sonarqube-cloud/administering-sonarcloud/managing-enterprise/managing-the-lines-of-code-within-your-enterprise#allocating-loc-limit "mention").
4. Create the organization's user groups. See [user-groups](https://docs.sonarsource.com/sonarqube-cloud/administering-sonarcloud/managing-organization/users-and-permissions/user-groups "mention") for more details.
5. Verify the groups' default permissions on new projects in the organization. See [templates](https://docs.sonarsource.com/sonarqube-cloud/administering-sonarcloud/managing-organization/manage-org-projects/manage-project-permissions/templates "mention") for more details.
6. Set project configurations at the organization level. See [introduction](https://docs.sonarsource.com/sonarqube-cloud/administering-sonarcloud/managing-organization/setting-config-at-org-level/introduction "mention") to Performing global analysis setup for more details.
7. Set the enterprise permissions for the new enterprise members. See [managing-enterprise](https://docs.sonarsource.com/sonarqube-cloud/administering-sonarcloud/managing-enterprise "mention") for more details.
8. Authorized organization members can now create projects or portfolios.
### With SSO
The procedure below explains how to onboard a new organization on an SSO-enabled enterprise.
1. Create your organization in SonarQube Cloud by importing the DevOps platform organization and select the Free plan. See:
* [importing-github-organization](https://docs.sonarsource.com/sonarqube-cloud/administering-sonarcloud/managing-organization/creating-organization/importing-github-organization "mention")
* [importing-bitbucket-workspace](https://docs.sonarsource.com/sonarqube-cloud/administering-sonarcloud/managing-organization/creating-organization/importing-bitbucket-workspace "mention")
* [importing-gitlab-group](https://docs.sonarsource.com/sonarqube-cloud/administering-sonarcloud/managing-organization/creating-organization/importing-gitlab-group "mention")
* [importing-azure-devops-organization](https://docs.sonarsource.com/sonarqube-cloud/administering-sonarcloud/managing-organization/creating-organization/importing-azure-devops-organization "mention")
2. Add the organization to the enterprise:
* Retrieve your enterprise.
* Go to **Administration** > **Organizations** and select **Add organization**.
3. Optionally, allocate an individual LOC limit to the organization. See [#allocating-loc-limit](https://docs.sonarsource.com/sonarqube-cloud/administering-sonarcloud/managing-enterprise/managing-the-lines-of-code-within-your-enterprise#allocating-loc-limit "mention").
4. Create the organization's user groups in order to ensure that the automatic group synchronization can take place properly. See [user-groups](https://docs.sonarsource.com/sonarqube-cloud/administering-sonarcloud/managing-organization/users-and-permissions/user-groups "mention") for more details. Make sure that:
* The relevant user groups defined in your IdP service exist in your organization (i.e. a group with the same name exists in the organization).
* The user groups in your organizations have the correct organization-related permissions. See [organization-permissions](https://docs.sonarsource.com/sonarqube-cloud/administering-sonarcloud/managing-organization/users-and-permissions/organization-permissions "mention") for more information.
5. Verify the groups' default permissions on new projects in the organization. See [templates](https://docs.sonarsource.com/sonarqube-cloud/administering-sonarcloud/managing-organization/manage-org-projects/manage-project-permissions/templates "mention") for more details.
6. Set the enterprise permissions at the organization level. See [introduction](https://docs.sonarsource.com/sonarqube-cloud/administering-sonarcloud/managing-organization/setting-config-at-org-level/introduction "mention") to Performing global analysis setup for more information.
7. Set the enterprise permissions of the new enterprise members. See [managing-enterprise](https://docs.sonarsource.com/sonarqube-cloud/administering-sonarcloud/managing-enterprise "mention") for more information.
8. Invite your DevOps platform organization users to sign up for SonarQube Cloud. See [inviting-users-to-sign-in](https://docs.sonarsource.com/sonarqube-cloud/administering-sonarcloud/managing-enterprise/enterprise-security/sso/setup/inviting-users-to-sign-in "mention") for more details. Their SonarQube Cloud SSO account will be automatically created.
9. Authorized organization members can now create projects or portfolios.
### Related pages
* [setting-up-your-enterprise](https://docs.sonarsource.com/sonarqube-cloud/getting-started-with-enterprise/setting-up-your-enterprise "mention")\
View the different steps necessary to create and configure an enterprise.
* [viewing-billing-usage-info](https://docs.sonarsource.com/sonarqube-cloud/getting-started-with-enterprise/viewing-billing-usage-info "mention")
* [setting-up-sso](https://docs.sonarsource.com/sonarqube-cloud/getting-started-with-enterprise/setting-up-sso "mention")
* [managing-enterprise](https://docs.sonarsource.com/sonarqube-cloud/administering-sonarcloud/managing-enterprise "mention")
---
# Source: https://docs.sonarsource.com/sonarqube-server/2025.5/instance-administration/license-administration/online-license-management.md
# Source: https://docs.sonarsource.com/sonarqube-server/2025.4/instance-administration/license-administration/online-license-management.md
# Source: https://docs.sonarsource.com/sonarqube-server/2025.6/instance-administration/license-administration/online-license-management.md
# Source: https://docs.sonarsource.com/sonarqube-server/instance-administration/license-administration/online-license-management.md
# Online license management
To run SonarQube Server, you need a license that corresponds to the plan you purchased, including the SonarQube Server edition, Lines of Code (LOC), staging licenses, commercial support, and additional features such as Advanced Security. See [Plans and Pricing](https://www.sonarsource.com/plans-and-pricing/sonarqube/) for more information about the different editions and features.
[Contact sales](https://www.sonarsource.com/plans-and-pricing/enterprise/) to request the license key or email us at .
After your purchase is confirmed, you will receive a license key. If the license key follows this format XXXX-XXXX-XXXX-XXXX, continue reading this page. Otherwise, see [server-id-based-license-key](https://docs.sonarsource.com/sonarqube-server/instance-administration/license-administration/server-id-based-license-key "mention").
### Permissions
To manage your licenses and additional features in SonarQube Server you must have the **Administer System** permission.
To apply the permission to users or groups go to **Administration** > **Security** > **Global Permissions** and select the **Administer System** check box.
### Activating your license
To activate your SonarQube Server license:
1. Go to **Administration** > **Configuration** > **License Manager**.
2. Click **Add license** button to open a modal.
3. Enter your license key in the modal and accept the terms and conditions.
4. Click **Set license** to confirm.
An internet connection is required to activate your license. Your instance should be allowed to reach the following resources: `https://api.prod.sonarsource.licensespring.com`
#### Activating your license offline
If your SonarQube Server instance is offline and cannot reach the online resource listed in the previous section after you enter the license key, you will have to choose the **Activate offline** option.
Then follow these steps:
1. Click **Download .req file**, to download the request file to your computer. You will need this file in the next step.
2. Upload this .req request file to the activation page that opens in a new tab. The license activation URL is `https://offlinelicense.sonarsource.com` and it will automatically trigger the download of a .lic license file to your computer.
3. Click **Upload .lic file** and locate the .lic file to upload it into your SonarQube Server instance to complete the activation.
### SonarQube Server license page
Once your activation has been completed you will see the following information on the SonarQube license page.
1. Click **Set a new license** and enter a new license key to replace your current license. Click on the dropdown menu and select **Unset license** to remove it. See [#unsetting-a-license](#unsetting-a-license "mention") for more information.
2. Click **Refresh license** to fetch all the up-to-date information about the license from the license server. This is required if the license was changed by Sonar to update, for example, the maximum LOC. To refresh the offline activated license you can use **Set a new license** with the same license key.
3. **License information**:
* **Edition**: This is based on the plan you had purchased (Developer, Enterprise or Data Center).
* **Type**: Type of license, the options are production, test and evaluation.
* **Start date**: Displays the license start date.
* **Expiration date**: Shows when the license expires.
* **Support included**: Indicates whether commercial support is included in your license.
* **Activation method**: Displays whether the license was activated online, offline or is based on server ID.
* **License key** currently used.
4. **License usage**:
* **Lines of code** (LOC): Shows the number of LOC currently analyzed out of the total allowed by your license.
* **Notification threshold**: Shows the LOC threshold that triggers email notification. A reminder is sent two months and again one month before your license expires. Click the **Edit notification threshold** to change it. See [#checking-your-lines-of-code-consumption](https://docs.sonarsource.com/sonarqube-server/server-update-and-maintenance/monitoring/lines-of-code#checking-your-lines-of-code-consumption "mention") for more information.
5. **Additional features**: Lists all the extra features your organization has purchased. It shows the feature’s name, start and expiration dates, availability and enablement.
### Changing server ID
To move your license to an instance with another server ID you have to unset it on the current instance. See [#unsetting-a-license](#unsetting-a-license "mention") for more information.
{% hint style="info" %}
If the license was not unset and it’s no longer possible to do so, for example, due to an incident, contact us at and we will adjust the activation count on the license server for you so you can use the same license on another instance of SonarQube Server. In case you require zero downtime, use the [#break-glass-license](#break-glass-license "mention").
{% endhint %}
#### License invalidation scenarios
Certain actions will change your server ID and invalidate your license activation. The following are some of the most common cases:
* Moving, upgrading, or changing your database server to another host, available with a different IP or DNS name.
* Changing the existing database server IP or DNS name.
* Changing the database/schema name on the database server.
* Restoring the database content from another SonarQube Server instance (except for production/staging synchronization).
* Reinstalling SonarQube Server on an empty database.
* Using DBCopy or MySQL Migrator to copy your old database into a new one.
If you plan on going through one of these scenarios and you have commercial support, open a [support ticket](https://help.sonarsource.com/) beforehand to confirm the plan of action or to explore alternatives.
### Unsetting a license
The operation of unsetting a license is necessary in several situations:
* When reusing the license on a different instance with another server ID.
* When changing the server ID of the current instance.
* When applying a different license to the current instance.
#### Unsetting a license activated online
To unset a license activated online click on the dropdown menu next to **Set a new license** button and select **Unset license** to remove it. Unsetting a license removes it both locally and from the license server and allows you to use it again on another instance or to set a different license on the current instance. Using **Set a new license** button will first unset the current license and then activate a new one.
#### Unsetting license activated offline
If you activated your license offline, unsetting the license in SonarQube UI will not remove it from the license server because your SonarQube Server is not connected to it. The license will only be removed locally, and the license server will still consider it activated.
To fully unset the license from the license server, follow these instructions:
1. **Retrieve the .req file**: Use the `POST /api/v2/entitlements/offline-deactivation` endpoint (requires the Administer System permission).
2. **Unset on the license server**: Go to[ https://offlinelicense.sonarsource.com/](https://offlinelicense.sonarsource.com/) and upload the `.req` file retrieved in the previous step.
This process unsets the license on the license server, allowing you to activate it again on an instance with a different server ID.
You can still rely on the **Unset license** or **Set a new license** functionality in SonarQube UI if you need to set another license on the same instance, for example, after a renewal.
### Break glass license
{% hint style="info" %}
Before performing maintenance on your SonarQube Server deployment that could result in a server ID change (see [#changing-server-id](#changing-server-id "mention")), it is highly recommended to first unset the current license. See [#unsetting-a-license](#unsetting-a-license "mention") for more details.
{% endhint %}
You are entitled to a break glass license available in the License user portal along with the production license. The break glass license should be used if the main production license can’t be activated. It expires in 7 days after the day of activation. The process for activating a break-glass license is the same as for a production license.
To reactivate your main production license, reach out to us at .
### Staging license
A staging license is available in Enterprise and Data Center editions, or in editions with commercial support. Your staging license may include one or more activations, which you can use for non-production instances to test new features, for update purposes, new integrations, and other purposes. The process of activating staging licenses is the same as for production.
### License user portal
As soon as a license is created, your organization will receive an email with access to the License user portal, where you can see all available licenses.
#### Logging into the License user portal
Sonar License user portal is available at .
* Access to the license user portal requires your email address to be registered by Sonar as a license manager for your organization.
* It is recommended to log in using one of the available Single Sign-On (SSO) authentication providers.
* If this is your first time logging in and you are using an email address instead of an SSO provider, you must first **Sign up** to create an account.
* Your existing[ Help Center](https://help.sonarsource.com/) account credentials are also valid for accessing the License user portal.
#### Checking the license status
To retrieve the license’s status:
* Click on **Licenses** in the left-side navigation to see a list of all licenses for your organization.
* Select a license and navigate to the **Devices** tab.
The **Devices** tab contains a list of SonarQube Server instances. The **Status** column shows the status of the license on that instance, **Active** or **Inactive**. Note that the **Hardware ID** column shows the server ID of your SonarQube Server.
### License key isn't working
If your license key isn't working, send an email to that includes the following information:
1. Server ID found under **Administration** > **System.**
2. SonarQube Server version found under **Administration** > **System**.
3. Clarify which existing license (production or staging) and server ID it is replacing.
4. Confirm the status of the existing license.
We will fix the problem with the license or issue a new one within one business day once we receive an email with the required information at .
### Related pages
* [](https://docs.sonarsource.com/sonarqube-server/instance-administration/license-administration "mention"): server ID based activation method
* [#checking-your-lines-of-code-consumption](https://docs.sonarsource.com/sonarqube-server/server-update-and-maintenance/monitoring/lines-of-code#checking-your-lines-of-code-consumption "mention")
* [Plans and pricing](https://www.sonarsource.com/plans-and-pricing/sonarqube/)
---
# Source: https://docs.sonarsource.com/sonarqube-server/8.9/setup-and-upgrade/configure-and-operate-a-server/operating-the-server.md
# Source: https://docs.sonarsource.com/sonarqube-server/9.8/setup-and-upgrade/configure-and-operate-a-server/operating-the-server.md
# Source: https://docs.sonarsource.com/sonarqube-server/9.9/setup-and-upgrade/configure-and-operate-a-server/operating-the-server.md
# Source: https://docs.sonarsource.com/sonarqube-server/10.0/setup-and-upgrade/configure-and-operate-a-server/operating-the-server.md
# Source: https://docs.sonarsource.com/sonarqube-server/10.1/setup-and-upgrade/configure-and-operate-a-server/operating-the-server.md
# Source: https://docs.sonarsource.com/sonarqube-server/10.2/setup-and-upgrade/configure-and-operate-a-server/operating-the-server.md
# Source: https://docs.sonarsource.com/sonarqube-server/10.3/setup-and-upgrade/configure-and-operate-a-server/operating-the-server.md
# Source: https://docs.sonarsource.com/sonarqube-server/10.4/setup-and-upgrade/configure-and-operate-a-server/operating-the-server.md
# Source: https://docs.sonarsource.com/sonarqube-server/10.5/setup-and-upgrade/configure-and-operate-a-server/operating-the-server.md
# Source: https://docs.sonarsource.com/sonarqube-server/10.6/setup-and-upgrade/configure-and-operate-a-server/operating-the-server.md
# Source: https://docs.sonarsource.com/sonarqube-server/10.7/setup-and-upgrade/operating-the-server.md
# Source: https://docs.sonarsource.com/sonarqube-server/10.8/setup-and-upgrade/operating-the-server.md
# Source: https://docs.sonarsource.com/sonarqube-server/2025.2/setup-and-update/operating-the-server.md
# Source: https://docs.sonarsource.com/sonarqube-server/2025.1/setup-and-upgrade/operating-the-server.md
# Operating the server
### Running SonarQube Server as a service on Windows
#### Install or uninstall SonarQube as a service
```css-79elbk
> \bin\windows-x86-64\SonarService.bat install
> \bin\windows-x86-64\SonarService.bat uninstall
```
#### Start or stop the service
```css-79elbk
> \bin\windows-x86-64\SonarService.bat start
```
{% hint style="info" %}
By default, the service will use the Java executable available on the Windows PATH. This setting can be changed by setting the environmental variable `SONAR_JAVA_PATH`. See more in [installing-sonarqube-from-zip-file](https://docs.sonarsource.com/sonarqube-server/2025.1/setup-and-upgrade/install-the-server/installing-sonarqube-from-zip-file "mention").
{% endhint %}
```css-79elbk
> \bin\windows-x86-64\SonarService.bat stop
```
{% hint style="info" %}
`> \bin\windows-x86-64\SonarService.bat stop` does a graceful shutdown where no new analysis report processing can start, but the tasks in progress are allowed to finish. The time a stop will take depends on the processing time of the tasks in progress. You’ll need to end all SonarQube Server processes manually to force a stop.
{% endhint %}
#### Service status
Check if the SonarQube service is running:
```css-79elbk
> \bin\windows-x86-64\SonarService.bat status
```
### Running SonarQube Server manually on Linux
#### Start or stop the instance
```sh
Start:
/bin/linux-x86-64/sonar.sh start
Graceful shutdown:
/bin/linux-x86-64/sonar.sh stop
Hard stop:
/bin/linux-x86-64/sonar.sh force-stop
```
{% hint style="info" %}
Stop does a graceful shutdown where no new analysis report processing can start, but the tasks in progress are allowed to finish. The time a stop will take depends on the processing time of the tasks in progress. Use force stop for a hard stop.
{% endhint %}
### Running SonarQube Server as a service on Linux with systemd
On a Unix system using systemd, you can install SonarQube as a service. You cannot run SonarQube as root in Unix systems. Ideally, you will have created a new account dedicated to the purpose of running SonarQube. Let’s suppose:
* The user used to start the service is `sonarqube`
* The group used to start the service is `sonarqube`
* The Java Virtual Machine is installed in `/opt/java/`
* SonarQube has been unzipped into `/opt/sonarqube/`
Then create the file `/etc/systemd/system/sonarqube.service` *based on* the following:
```css-79elbk
[Unit]
Description=SonarQube service
After=syslog.target network.target
[Service]
Type=simple
User=sonarqube
Group=sonarqube
PermissionsStartOnly=true
ExecStart=/bin/nohup /opt/java/bin/java -Xms32m -Xmx32m -Djava.net.preferIPv4Stack=true -jar /opt/sonarqube/lib/sonar-application-25.1.0.102122.jar
StandardOutput=journal
LimitNOFILE=131072
LimitNPROC=8192
TimeoutStartSec=5
Restart=always
SuccessExitStatus=143
[Install]
WantedBy=multi-user.target
```
{% hint style="info" %}
* Because the sonar-application jar name ends with the version of SonarQube Server, you will need to adjust the `ExecStart` command accordingly on install and at each upgrade.
* All SonarQube Server directories should be owned by the `sonarqube` user.
* If you have multiple Java versions, you will need to modify the `java` path in the `ExecStart` command. This also means `SONAR_JAVA_PATH` will not work with SonarQube Server as a service.
{% endhint %}
Once your `sonarqube.service` file is created and properly configured, run:
```css-79elbk
sudo systemctl enable sonarqube.service
sudo systemctl start sonarqube.service
```
### Running SonarQube Server as a service on Linux with initd
The following has been tested on Ubuntu 20.04 and CentOS 6.2.
You cannot run SonarQube Server as `root` in \*nix systems. Ideally, you will have created a new account dedicated to the purpose of running SonarQube Server. Let’s suppose the user used to start the service is `sonarqube`. Then create the file`/etc/init.d/sonar` *based on* the following:
```css-79elbk
#!/bin/sh
#
# rc file for SonarQube
#
# chkconfig: 345 96 10
# description: SonarQube system (www.sonarsource.org)
#
### BEGIN INIT INFO
# Provides: sonar
# Required-Start: $network
# Required-Stop: $network
# Default-Start: 3 4 5
# Default-Stop: 0 1 2 6
# Short-Description: SonarQube system (www.sonarsource.org)
# Description: SonarQube system (www.sonarsource.org)
### END INIT INFO
su sonarqube -c "/usr/bin/sonar $*"
```
Register SonarQube Server at boot time (RedHat, CentOS, 64 bit):
```css-79elbk
sudo ln -s /bin/linux-x86-64/sonar.sh /usr/bin/sonar
sudo chmod 755 /etc/init.d/sonar
sudo chkconfig --add sonar
```
Register SonarQube Server at boot time (Ubuntu, 64 bit):
```css-79elbk
sudo ln -s /bin/linux-x86-64/sonar.sh /usr/bin/sonar
sudo chmod 755 /etc/init.d/sonar
sudo update-rc.d sonar defaults
```
Once registration is done, run:
```css-79elbk
sudo service sonar start
```
### Securing SonarQube Server behind a proxy
This section helps you configure SonarQube Server if you want to run it behind a proxy. This can be done for security concerns or to consolidate multiple disparate applications. To run SonarQube Server over HTTPS, see the HTTPS Configuration section below.
{% hint style="warning" %}
For security reasons, we recommend only giving external access to the main port.
{% endhint %}
#### Using an Apache Proxy
We assume that you’ve already installed Apache 2 with module mod\_proxy, that SonarQube Server is running and available on `http://private_sonar_host:sonar_port/`, and that you want to configure a Virtual Host for `www.public_sonar.com`.
At this point, edit the HTTPd configuration file for the `www.public_sonar.com` virtual host. Include the following to expose SonarQube Server via `mod_proxy` at `http://www.public_sonar.com/`
```css-79elbk
ProxyRequests Off
ProxyPreserveHost On
ServerName www.public_sonar.com
ServerAdmin admin@somecompany.com
ProxyPass / http://private_sonar_host:sonar_port/
ProxyPassReverse / http://www.public_sonar.com/
ErrorLog logs/somecompany/sonar/error.log
CustomLog logs/somecompany/sonar/access.log common
```
Apache configuration is going to vary based on your own application’s requirements and the way you intend to expose SonarQube Server to the outside world. If you need more details about Apache HTTPd and mod\_proxy, please see [https://httpd.apache.org](http://httpd.apache.org/).
#### Using Nginx
We assume that you’ve already installed Nginx, that you are using a Virtual Host for `www.somecompany.com` and that SonarQube Server is running and available on `http://sonarhost:sonarport/`.
At this point, edit the Nginx configuration file. Include the following to expose SonarQube Server at `http://www.somecompany.com/`:
```css-79elbk
# the server directive is Nginx's virtual host directive
server {
# port to listen on. Can also be set to an IP:PORT
listen 80;
# sets the domain[s] that this vhost server requests for
server_name www.somecompany.com;
location / {
proxy_pass http://sonarhost:sonarport;
}
}
```
Nginx configuration will vary based on your own application’s requirements and the way you intend to expose SonarQube Server to the outside world. If you need more details about Nginx, please see .
Note that you may need to increase the max URL length since SonarQube Server requests can have URLs longer than 2048.
#### Using IIS on Windows
Using IIS on Windows, you can create a website that acts as a reverse proxy and access your SonarQube Server instance over SSL.
{% hint style="warning" %}
To accommodate potentially long query strings with the SonarQube web API, you can increase the Microsoft limit on HTTP requests by setting the following attributes to much larger values:
* `maxQueryString` (default is 2048) on `system.webServer`
* `maxQueryStringLength` on `system.web`
If you don’t, request filtering (`requestFiltering`) will be applied which can yield HTTP 404 errors. For example, this may cause projects to not appear on the projects dashboard.
To adjust both `maxQueryString` on `system.webServer` and `maxQueryStringLength` on `system.web`, add the following to your Microsoft’s `web.config` file for the associated IIS site using the Configuration Editor:
```css-79elbk
```
See [Request Limits \ | Microsoft Learn](https://learn.microsoft.com/en-us/iis/configuration/system.webServer/security/requestFiltering/requestLimits/) for more information.
{% endhint %}
**Prerequisites**
* Internet Information Services (IIS) enabled. In the following example, IIS is enabled on the same machine as the SonarQube instance.
* The [Url Rewrite extension for IIS](https://www.iis.net/downloads/microsoft/url-rewrite)
* The [Application Based Routing extension for IIS](https://www.iis.net/downloads/microsoft/application-request-routing)
* [A self-signed SSL certificate, or a real one](https://learn.microsoft.com/en-us/iis/manage/configuring-security/how-to-set-up-ssl-on-iis#obtain-a-certificate)\
Note that you must import the certificate to the Java truststore of the machine running the scanner. See [manage-tls-certificates](https://docs.sonarsource.com/sonarqube-server/2025.1/analyzing-source-code/scanners/scanner-environment/manage-tls-certificates "mention").
{% hint style="info" %}
To make sure the extensions are enabled, restart your IIS Manager after you install them.
{% endhint %}
**Creating an IIS website**
1. In the IIS Manager, select *Your machine* > **Sites** > **Add Website…**
2. Under **Site name**, enter a name for your website.
3. Under **Content Directory** > **Physical path**, select a physical path for your website’s folder. Based on the default IIS website, we recommend creating a `%SystemDrive%\inetpub\wwwroot_sonarqube` folder and using it as a physical path.
4. In **Binding**, select **Type** > **https**.
5. For **Host name**, enter the hostname you will use to access SonarQube.
6. Under **SSL certificate**, select an SSL certificate.
7. Click **OK**.
**Using your IIS website as a reverse proxy**
Once you’ve created your website using the IIS Manager, you can use the URL Rewrite extension to use that website as a reverse proxy.
1. From the IIS Manager home page, select your website and open **URL Rewrite**.
2. Click **Add Rule(s)** to create a new rule.
3. Select **Reverse Proxy** from the list of templates.
4. Enter the destination server URL. It can be `localhost:9000` or a remote server.
5. Click **OK** to create the rule.
The URL Rewrite page now displays a reverse proxy inbound rule.
**Adding the HTTP\_X\_FORWARDED\_PROTO server variable**
Using the URL Rewrite module, you can create a server variable to handle the `HTTP_X_FORWARDED_PROTO` header and pass it to SonarQube. See the HTTPS Configuration section on this page for more information on that server variable.
From the URL Rewrite page:
1. Click **View Server Variables**. This opens the **Allowed Server Variables** page.
2. To add a server variable, click **Add…**, enter `HTTP_X_FORWARDED_PROTO` in the field and click **OK**. The server variable is now displayed on the **Allowed Server Variables** page.
3. Click **Back to Rules** to go to the URL Rewrite rules list.
4. Select the reverse proxy inbound rule for your website. Under **Inbound Rules**, click **Edit**.
5. Expand the **Server variables** section of the rule definition.
6. Add the `HTTP_X_FORWARDED_PROTO` server variable and give it the value **https**.
7. Apply the changes.
SonarQube can now be accessed over SSL.
**If SAML authentication is used**
For SAML through IIS, you must perform the following additional steps:
1. Make sure the host headers are preserved. This is set at the IIS server level, by executing the following command:\
`%windir%\system32\inetsrv\appcmd.exe set config -section:system.webServer/proxy -preserveHostHeader:true /commit:apphost`\
You should then see an output that says something like:\
`Applied configuration changes to section "system.webServer/proxy" for "MACHINE/WEBROOT/APPHOST" at configuration commit path "MACHINE/WEBROOT/APPHOST"`
2. Disable the Reverse rewrite host in the response headers as follows:
* At the server level in IIS, go to **Application Request Routing > Server proxy settings**.
* Uncheck the box **Reverse rewrite host in response headers**.
* Apply the change.
* Restart IIS.
**Checking that the connection is enabled**
With your SonarQube instance and your IIS website running, open the IIS Manager and click the link under *Your website* > **Browse Website** > **Browse**, or enter the website’s URL in a browser. You should see the login or home page of your SonarQube instance.
**Next steps**
You can configure your SonarQube instance to only accept traffic from your reverse proxy, by adding the following line to the `sonar.properties` file:
`sonar.web.host=127.0.0.1`
Another option is to use the Windows Firewall to only accept traffic from localhost.
**Resources**
The setup described here is inspired by this [Configure SSL for SonarQube on Windows](https://jessehouwing.net/sonarqube-configure-ssl-on-windows/) blog post.
#### HTTPS configuration
```css-79elbk
# the server directive is Nginx's virtual host directive
server {
# port to listen on. Can also be set to an IP:PORT
listen 443 ssl;
ssl_certificate ${path_to_your_certificate_file};
ssl_certificate_key ${path_to_your_certificate_key_file};
location / {
proxy_pass ${address_of_your_sonarqube_instance_behind_proxy};
proxy_set_header Host $host;
proxy_set_header X-Forwarded-For $remote_addr;
proxy_set_header X-Forwarded-Proto https;
}
}
```
#### Forward SonarQube Server custom headers
SonarQube Server adds custom HTTP headers. The reverse proxy should be configured to forward the following headers:
* `SonarQube-Authentication-Token-Expiration`\
This header is added to a web service response when using tokens to authenticate (see [managing-tokens](https://docs.sonarsource.com/sonarqube-server/2025.1/user-guide/managing-tokens "mention")). Forwarding this header is not required for the SonarQube Server features to work properly.
* `Sonar-MD5`\
This header is used to verify the integrity of the plugins downloaded by the scanner. You must forward this header to successfully execute analyses that use plugins.
### Secure your network
To further lock down the communication in between the reverse proxy and SonarQube Server, you can define the following network rules:
| | | | | |
| ------------------------------------------- | ---------------- | ---------------- | ------------------- | ----------- |
|
Protocol
| **Source** | **Destination** | **Port** | **default** |
| TCP | Reverse Proxy | SonarQube Server | `sonar.web.port` | 9000 |
| TCP | SonarQube Server | SonarQube Server | `sonar.search.port` | 9001 |
| TCP | SonarQube Server | SonarQube Server | `sonar.es.port` | random |
You can further segment your network configuration if you specify a frontend network and keep Elasticsearch restricted to the loopback NiC.
| | | | |
| ------------- | ------------------- | --------------------- | ----------- |
| **Network** | **Parameter** | **Description** | **default** |
| Frontend | `sonar.web.host` | Frontend HTTP Network | 0.0.0.0 |
| Elasticsearch | `sonar.search.host` | Elasticsearch Network | 127.0.0.1 |
---
# Source: https://docs.sonarsource.com/sonarqube-community-build/instance-administration/authentication/saml/ping-identity/optional-security-features.md
# Source: https://docs.sonarsource.com/sonarqube-community-build/instance-administration/authentication/saml/ms-entra-id/optional-security-features.md
# Source: https://docs.sonarsource.com/sonarqube-server/10.7/instance-administration/authentication/saml/ping-identity/optional-security-features.md
# Source: https://docs.sonarsource.com/sonarqube-server/10.7/instance-administration/authentication/saml/ms-entra-id/optional-security-features.md
# Source: https://docs.sonarsource.com/sonarqube-server/10.8/instance-administration/authentication/saml/ping-identity/optional-security-features.md
# Source: https://docs.sonarsource.com/sonarqube-server/10.8/instance-administration/authentication/saml/ms-entra-id/optional-security-features.md
# Source: https://docs.sonarsource.com/sonarqube-server/2025.2/instance-administration/authentication/saml/ping-identity/optional-security-features.md
# Source: https://docs.sonarsource.com/sonarqube-server/2025.2/instance-administration/authentication/saml/ms-entra-id/optional-security-features.md
# Source: https://docs.sonarsource.com/sonarqube-server/2025.3/instance-administration/authentication/saml/ping-identity/optional-security-features.md
# Source: https://docs.sonarsource.com/sonarqube-server/2025.3/instance-administration/authentication/saml/ms-entra-id/optional-security-features.md
# Source: https://docs.sonarsource.com/sonarqube-server/2025.5/instance-administration/authentication/saml/ping-identity/optional-security-features.md
# Source: https://docs.sonarsource.com/sonarqube-server/2025.5/instance-administration/authentication/saml/ms-entra-id/optional-security-features.md
# Source: https://docs.sonarsource.com/sonarqube-server/2025.1/instance-administration/authentication/saml/ping-identity/optional-security-features.md
# Source: https://docs.sonarsource.com/sonarqube-server/2025.1/instance-administration/authentication/saml/ms-entra-id/optional-security-features.md
# Source: https://docs.sonarsource.com/sonarqube-server/2025.4/instance-administration/authentication/saml/ping-identity/optional-security-features.md
# Source: https://docs.sonarsource.com/sonarqube-server/2025.4/instance-administration/authentication/saml/ms-entra-id/optional-security-features.md
# Source: https://docs.sonarsource.com/sonarqube-server/2025.6/instance-administration/authentication/saml/ping-identity/optional-security-features.md
# Source: https://docs.sonarsource.com/sonarqube-server/2025.6/instance-administration/authentication/saml/ms-entra-id/optional-security-features.md
# Source: https://docs.sonarsource.com/sonarqube-server/instance-administration/authentication/saml/ping-identity/optional-security-features.md
# Source: https://docs.sonarsource.com/sonarqube-server/instance-administration/authentication/saml/ms-entra-id/optional-security-features.md
# Setup of security features
Once you have registered SonarQube Server in Microsoft Entra ID (see [setup-in-entra-id](https://docs.sonarsource.com/sonarqube-server/instance-administration/authentication/saml/ms-entra-id/setup-in-entra-id "mention")), you can set up the following security features:
* The encryption of SAML assertions emitted by Microsoft Entra ID for SonarQube Server. For more information, see [SAML token encryption in Entra ID](https://docs.microsoft.com/en-us/azure/active-directory/manage-apps/howto-saml-token-encryption?tabs=azure-portal).
* The signing of the SAML requests from SonarQube Server to Entra ID. For more information, see [Enforce signed SAML authentication requests](https://learn.microsoft.com/en-us/entra/identity/enterprise-apps/howto-enforce-signed-saml-authentication).
{% hint style="info" %}
The same key pair is used for both security features (encryption and signing).
{% endhint %}
### Step 1: Generate the asymmetric key pair and certificate
Generate the asymmetric key pair to use for encryption (PKCS8). The public key should be stored in an X.509 certificate file in `.cer` format. You can copy the contents of the certificate file to a text editor and save it as a `.cer` file. The certificate file should contain only the public key, not the private key.
### Step 2: Configure the security feature(s) in Microsoft Entra ID To enable the encryption of SAML assertions
Add the certificate to the Microsoft Entra ID application you created for SonarQube Server:
1. Go to **Identity** > **Applications** > **Enterprise applications** > **All applications** and select the application for SonarQube Server.
2. On the application’s page, select **Token encryption**.
3. On the Token encryption page, select **Import Certificate** to import the `.cer` file that contains your public X.509 certificate.
4. Once the certificate is imported, activate encryption by selecting the three dots next to the thumbprint status and then selecting **Activate token encryption**.
5. Select **Yes** to confirm activation of the token encryption certificate.
6. Confirm that the SAML assertions emitted for the application are encrypted.
7. Enforce the response signature: see below.
If you use encryption, enforce response signature
1. In Microsoft Entra ID, go to **Identity** > **Applications** > **Enterprise applications** > **All applications** and select the application for SonarQube Server.
2. On the application’s page, select **Single sign-on**.
3. In **SAML Certificates** > **Token signing certificates**, select **Edit**. The **SAML Signing Certificate** dialog opens.
4. In **Signing option**, enforce the response signature. It means, select either the **Sign SAML Response** or **Sign SAML response and assertion** option.
5. Save.
To enable the signing verification
1. In Microsoft Entra ID, go to **Identity** > **Applications** > **Enterprise applications** > **All applications** and select the application for SonarQube Server.
2. On the application’s page, select **Single sign-on**.
3. In **SAML Certificates > Verification certificates**, select **Edit**.
4. Go to **Identity** > **Applications** > **Enterprise applications** > **All applications** and select the application for SonarQube Server.
5. Select **Require verification certificates**.
6. Upload the public key certificate.
7. Save. The **Verification certificates** section shows **1** active certificate.
### Step 3: Configure the security feature(s) in SonarQube Server
To configure the resquest signing and/or the assertion decryption in SonarQube Server:
1. Go to **Administration** > **Configuration** > **General Settings** > **Authentication > SAML**.
2. In **SAML Configuration** > **SAML**, select **Edit**. The **Edit SAML configuration** dialog opens.
3. Copy the PKCS8 private key file contents.
4. Paste it in **Service provider private key.**
5. Copy the self-signed certificate contents.
6. Paste it in **Service provider certificate.**
7. To enable the signing of the SAML requests, select in addition the **Sign requests** option.
8. Select **Save configuration**.
9. Select **Test Configuration**.
### Related pages
* [overview](https://docs.sonarsource.com/sonarqube-server/instance-administration/authentication/saml/overview "mention")
* [setup-in-entra-id](https://docs.sonarsource.com/sonarqube-server/instance-administration/authentication/saml/ms-entra-id/setup-in-entra-id "mention")
* [setup-in-sq](https://docs.sonarsource.com/sonarqube-server/instance-administration/authentication/saml/ms-entra-id/setup-in-sq "mention")
* [scim-provisioning-with-azure-ad](https://docs.sonarsource.com/sonarqube-server/instance-administration/authentication/saml/scim/scim-provisioning-with-azure-ad "mention")
---
# Source: https://docs.sonarsource.com/sonarqube-cloud/administering-sonarcloud/managing-organization/users-and-permissions/organization-members.md
# Adding organization members
This page explains how to manually add users to your organization. Adding users manually is not necessary (and not possible) if:
* The GitHub member synchronization is activated. See [devops-platform-authentication](https://docs.sonarsource.com/sonarqube-cloud/administering-sonarcloud/about-sonarqube-cloud-solution/user-management/devops-platform-authentication "mention") for more details. If your users are onboarded through GitHub, the organization member synchronization between GitHub and SonarQube Cloud is enabled by default.
* Or the automatic group synchronization is activated. If your enterprise users are onboarded with your SSO identity provider, synchronized group members are automatically added to the respective organization.
{% hint style="warning" %}
* The Free plan limits the maximum authorized number of members. See [subscription-plans](https://docs.sonarsource.com/sonarqube-cloud/administering-sonarcloud/managing-subscription/subscription-plans "mention") for more details.
* Be aware that, when you import an organization to SonarQube Cloud, the account you use for the import is added as a member of the organization (with the Administer Organization permission). If you want that your other SonarQube Cloud account(s) be also part of the organization, you must add them manually. For example, if you imported a GitHub organization by using your GitHub account and you are now logged in to SonarQube Cloud with your Azure DevOps account, then you will not view your GitHub organization if you haven’t added your Azure DevOps account as a member of this organization. For more information, see [importing-from-multiple-platforms](https://docs.sonarsource.com/sonarqube-cloud/administering-sonarcloud/managing-organization/creating-organization/importing-from-multiple-platforms "mention").
{% endhint %}
You must be an organization admin to be able to add or remove organization members. You can only add users to an organization who have already signed up with SonarQube Cloud.
To add or remove a member to/from your organization:
1. Retrieve your organization. See [viewing-organizations](https://docs.sonarsource.com/sonarqube-cloud/getting-started/viewing-organizations "mention") for more details.
2. Go to **Members**.
3. To add a member:
* Select the **Add a member** button. The **Add member** dialog opens.
* Enter the exact email address of the member.
* Select **Add member**.\
If you cannot see the email address of a DevOps platform user account, it may be because the address has not been verified. See [signing-in](https://docs.sonarsource.com/sonarqube-cloud/managing-your-account/signing-in "mention") for more information
4. To remove a member, select the three-dot menu to the far right of the member’s name.
5. In the menu, select **Remove from organization’s members**. The **Remove user** dialog opens.
6. Confirm the deletion.
### Related pages
* [setup-overview](https://docs.sonarsource.com/sonarqube-cloud/administering-sonarcloud/managing-organization/setup-overview "mention")
* [introduction](https://docs.sonarsource.com/sonarqube-cloud/administering-sonarcloud/managing-subscription/introduction "mention") to Managing your subscription
* [introduction](https://docs.sonarsource.com/sonarqube-cloud/administering-sonarcloud/managing-organization/setting-config-at-org-level/introduction "mention") to Performing global analysis setup
* [user-groups](https://docs.sonarsource.com/sonarqube-cloud/administering-sonarcloud/managing-organization/users-and-permissions/user-groups "mention")
* [organization-permissions](https://docs.sonarsource.com/sonarqube-cloud/administering-sonarcloud/managing-organization/users-and-permissions/organization-permissions "mention")
* [projects-management-page](https://docs.sonarsource.com/sonarqube-cloud/administering-sonarcloud/managing-organization/manage-org-projects/projects-management-page "mention")
---
# Source: https://docs.sonarsource.com/sonarqube-cloud/administering-sonarcloud/managing-organization/users-and-permissions/organization-permissions.md
# Managing organization permissions
This section explains how to manage the user and group permissions related to an organization.
{% hint style="info" %}
It’s recommended to manage the permissions through the user groups, see [user-groups](https://docs.sonarsource.com/sonarqube-cloud/administering-sonarcloud/managing-organization/users-and-permissions/user-groups "mention"). This feature is available starting in Team plan. In addition, with the Team plan, you can manage the permissions set by default to new projects, see [templates](https://docs.sonarsource.com/sonarqube-cloud/administering-sonarcloud/managing-organization/manage-org-projects/manage-project-permissions/templates "mention").
{% endhint %}
### Permissions related to an organization
Permission Type
Description
Execute analysis
Can start an analysis on every project in the organization. This includes the ability to get all settings required to perform an analysis (including secured settings like passwords) and to push analysis results to the SonarQube Cloud server.
Administer Quality Gates
Can create and update quality-gates that can be applied to the organization’s projects.
Administer Quality Profiles
Can create and update quality profiles that can be applied to the organization’s projects. See managing-quality-profiles for more details.
Create Projects
Can create new projects in the organization.
Administer Organization
Has full control over the organization.
{% hint style="info" %}
View access to organizations is not managed through permissions but depends on the organization’s subscription plan: any user can view a free plan organization whereas access to a Team or Enterprise plan organization is restricted to its members. See [subscription-plans](https://docs.sonarsource.com/sonarqube-cloud/administering-sonarcloud/managing-subscription/subscription-plans "mention") for more information.
{% endhint %}
### Setting the permissions of the groups and users
You must be an organization admin to be able to manage the permissions related to your organization.
{% hint style="info" %}
If you have a Free plan organization, you cannot change group permissions.
{% endhint %}
To set the organization-related permissions of the groups and users:
1. Retrieve your organization. See [viewing-organizations](https://docs.sonarsource.com/sonarqube-cloud/getting-started/viewing-organizations "mention") for more information.
2. Go to **Administration** > **Permissions**. The **Permissions** page opens.
3. In the permissions grid, select a check box to grant the corresponding permission.
### Transferring ownership of an organization
As the administrator, there may be cases where you wish to transfer ownership of an organization. For example, if you are leaving a team or company, you can simply grant the **Administer Organization** permission to another member, see [organization-permissions](https://docs.sonarsource.com/sonarqube-cloud/administering-sonarcloud/managing-organization/users-and-permissions/organization-permissions "mention") for more details.
### Restoring administrator access to an organization
If you lost administrator access to your organization, send a request to [contact@sonarsource.com](http://contact@sonarsource.com) with all the necessary details.
### Related pages
* [setup-overview](https://docs.sonarsource.com/sonarqube-cloud/administering-sonarcloud/managing-organization/setup-overview "mention")
* [introduction](https://docs.sonarsource.com/sonarqube-cloud/administering-sonarcloud/managing-subscription/introduction "mention") to Managing your subscription
* [introduction](https://docs.sonarsource.com/sonarqube-cloud/administering-sonarcloud/managing-organization/setting-config-at-org-level/introduction "mention") to Performing global analysis setup
* [organization-members](https://docs.sonarsource.com/sonarqube-cloud/administering-sonarcloud/managing-organization/users-and-permissions/organization-members "mention")
* [user-groups](https://docs.sonarsource.com/sonarqube-cloud/administering-sonarcloud/managing-organization/users-and-permissions/user-groups "mention")
* [projects-management-page](https://docs.sonarsource.com/sonarqube-cloud/administering-sonarcloud/managing-organization/manage-org-projects/projects-management-page "mention")
---
# Source: https://docs.sonarsource.com/sonarqube-cloud/administering-sonarcloud/about-sonarqube-cloud-solution/ressources-structure/organization.md
# Organization
Projects on a repository platform are typically grouped into organizations. This enables teams to work together, define different permissions for different users, and configure common settings and features.
{% hint style="info" %}
In GitHub and Azure DevOps collections of projects are called organizations, in BitBucket Cloud, workspaces, and in GitLab, groups. For simplicity, we will refer to all of these generically as organizations.
{% endhint %}
SonarQube Cloud uses the same organization-based structure. Each organization represents an organization on the repository platform side. The SonarQube Cloud organization is created by importing and binding it to the DevOps platform organization. It’s also possible to create organizations manually but they won’t benefit from the same features. A SonarQube Cloud user can be a member of one or several organizations.
{% hint style="warning" %}
SonarQube Cloud does not support linking an organization to more than one DevOps platform. If you want to link to more than one, you will need to create a separate organization to link to each DevOps platform.
{% endhint %}
Different management and analysis features are supported for an organization depending on its [subscription-plans](https://docs.sonarsource.com/sonarqube-cloud/administering-sonarcloud/managing-subscription/subscription-plans "mention").
The figure below shows SonarQube Cloud reproducing the organization-based structure of the DevOps platform service it is used with.
### Related pages
* [setup-overview](https://docs.sonarsource.com/sonarqube-cloud/administering-sonarcloud/managing-organization/setup-overview "mention")
* [introduction](https://docs.sonarsource.com/sonarqube-cloud/administering-sonarcloud/managing-subscription/introduction "mention") to Managing your subscription
* [importing-github-organization](https://docs.sonarsource.com/sonarqube-cloud/administering-sonarcloud/managing-organization/creating-organization/importing-github-organization "mention")
* [importing-bitbucket-workspace](https://docs.sonarsource.com/sonarqube-cloud/administering-sonarcloud/managing-organization/creating-organization/importing-bitbucket-workspace "mention")
* [importing-gitlab-group](https://docs.sonarsource.com/sonarqube-cloud/administering-sonarcloud/managing-organization/creating-organization/importing-gitlab-group "mention")
* [importing-azure-devops-organization](https://docs.sonarsource.com/sonarqube-cloud/administering-sonarcloud/managing-organization/creating-organization/importing-azure-devops-organization "mention")
* [introduction](https://docs.sonarsource.com/sonarqube-cloud/administering-sonarcloud/managing-organization/setting-config-at-org-level/introduction "mention") to Performing global analysis setup
* [organization-members](https://docs.sonarsource.com/sonarqube-cloud/administering-sonarcloud/managing-organization/users-and-permissions/organization-members "mention")
* [user-groups](https://docs.sonarsource.com/sonarqube-cloud/administering-sonarcloud/managing-organization/users-and-permissions/user-groups "mention")
* [organization-permissions](https://docs.sonarsource.com/sonarqube-cloud/administering-sonarcloud/managing-organization/users-and-permissions/organization-permissions "mention")
* [projects-management-page](https://docs.sonarsource.com/sonarqube-cloud/administering-sonarcloud/managing-organization/manage-org-projects/projects-management-page "mention")
---
# Source: https://docs.sonarsource.com/sonarqube-community-build/project-administration/adjusting-analysis/setting-analysis-scope/other-adjustments.md
# Source: https://docs.sonarsource.com/sonarqube-server/2025.2/project-administration/setting-analysis-scope/other-adjustments.md
# Source: https://docs.sonarsource.com/sonarqube-server/2025.3/project-administration/setting-analysis-scope/other-adjustments.md
# Source: https://docs.sonarsource.com/sonarqube-server/2025.5/project-administration/setting-analysis-scope/other-adjustments.md
# Source: https://docs.sonarsource.com/sonarqube-server/2025.4/project-administration/setting-analysis-scope/other-adjustments.md
# Source: https://docs.sonarsource.com/sonarqube-server/2025.6/project-administration/adjusting-analysis/setting-analysis-scope/other-adjustments.md
# Source: https://docs.sonarsource.com/sonarqube-server/project-administration/adjusting-analysis/setting-analysis-scope/other-adjustments.md
# Source: https://docs.sonarsource.com/sonarqube-cloud/managing-your-projects/project-analysis/setting-analysis-scope/other-adjustments.md
# Other analysis scope adjustments
See [overview](https://docs.sonarsource.com/sonarqube-cloud/advanced-setup/languages/overview "mention") page for language-specific properties related to analysis scope adjustment.
### Adjusting the secret detection scope
By default, SonarQube Cloud detects exposed secrets in all files processed by the language analyzers. You can refine the scope of the secret detection, see [secrets](https://docs.sonarsource.com/sonarqube-cloud/advanced-setup/languages/secrets "mention") for more details.
### Excluding files over a certain size
You can set the `sonar.filesize.limit` and `sonar.javascript.maxFileSize` properties on the CI/CD host to exclude files over a certain limit. For more information, see [analysis-parameters](https://docs.sonarsource.com/sonarqube-cloud/advanced-setup/analysis-parameters "mention").
### Disabling the SCM’s file ignore patterns
Your SonarQube analysis will automatically exclude files that are ignored by your source code control system. For example, in git repositories, it respects the `.gitignore` file. SonarQube also respects the ignore directives used in SVN repositories.
You can disable this behavior by setting the sonar property `sonar.scm.exclusions.disabled` to `true` on the CI/CD host. For more information, see [analysis-parameters](https://docs.sonarsource.com/sonarqube-cloud/advanced-setup/analysis-parameters "mention").
### Related pages
* [setting-initial-scope](https://docs.sonarsource.com/sonarqube-cloud/managing-your-projects/project-analysis/setting-analysis-scope/setting-initial-scope "mention")
* [exclude-from-coverage-duplication](https://docs.sonarsource.com/sonarqube-cloud/managing-your-projects/project-analysis/setting-analysis-scope/exclude-from-coverage-duplication "mention")
* [excluding-files-based-on-patterns](https://docs.sonarsource.com/sonarqube-cloud/managing-your-projects/project-analysis/setting-analysis-scope/excluding-files-based-on-patterns "mention")
* [excluding-based-on-file-extension](https://docs.sonarsource.com/sonarqube-cloud/managing-your-projects/project-analysis/setting-analysis-scope/excluding-based-on-file-extension "mention")
* [verifying-analysis-scope](https://docs.sonarsource.com/sonarqube-cloud/managing-your-projects/project-analysis/setting-analysis-scope/verifying-analysis-scope "mention")
* [introduction](https://docs.sonarsource.com/sonarqube-cloud/administering-sonarcloud/managing-organization/setting-config-at-org-level/adjusting-analysis-scope/introduction "mention") to Adjusting the analysis scope at the organization level
---
# Source: https://docs.sonarsource.com/sonarqube-cloud/managing-your-projects/administering-your-projects/advanced-administration/other-advanced-procedures.md
# Other advanced procedures
### Managing webhooks at project level
See [webhooks](https://docs.sonarsource.com/sonarqube-cloud/advanced-setup/webhooks "mention") for more information.
### Monitoring the background tasks
1. Retrieve your project. See [retrieving-projects](https://docs.sonarsource.com/sonarqube-cloud/managing-your-projects/retrieving-projects "mention") for more information.
2. In the left navigation bar, select **Administration** > **Background tasks**. The **Background Tasks** page opens. The list of executed and pending background tasks is displayed.
### Viewing the analysis parameters of a given analysis run
1. Retrieve your project. See [retrieving-projects](https://docs.sonarsource.com/sonarqube-cloud/managing-your-projects/retrieving-projects "mention") for more information.
2. In the left navigation bar, select **Administration** > **Background tasks**. The **Background Tasks** page opens.
3. Select the three-dot menu to the far right of the analysis run you want to view and select **Show SonarScanner context**. The SonarScanner context opens in a new window.
---
# Source: https://docs.sonarsource.com/sonarqube-cloud/advanced-setup/ci-based-analysis/other-cis.md
# Other CIs
To run an analysis on a CI provider other than those with specific integrations:
1. Integrate the SonarScanner analysis into your build pipeline as explained in the corresponding scanner section:
* [sonarscanner-for-dotnet](https://docs.sonarsource.com/sonarqube-cloud/advanced-setup/ci-based-analysis/sonarscanner-for-dotnet "mention")
* [sonarscanner-for-maven](https://docs.sonarsource.com/sonarqube-cloud/advanced-setup/ci-based-analysis/sonarscanner-for-maven "mention"),
* [sonarscanner-for-gradle](https://docs.sonarsource.com/sonarqube-cloud/advanced-setup/ci-based-analysis/sonarscanner-for-gradle "mention")
* [sonarscanner-for-npm](https://docs.sonarsource.com/sonarqube-cloud/advanced-setup/ci-based-analysis/sonarscanner-for-npm "mention")
2. If necessary, adjust the [setting-analysis-scope](https://docs.sonarsource.com/sonarqube-cloud/managing-your-projects/project-analysis/setting-analysis-scope "mention") or customize other default [analysis-parameters](https://docs.sonarsource.com/sonarqube-cloud/advanced-setup/analysis-parameters "mention").
3. Start and test the analysis.
4. Add the branch analysis or pull request analysis to your pipeline. See the [branch-analysis-setup](https://docs.sonarsource.com/sonarqube-cloud/enriching/branch-analysis-setup "mention") and [pull-request-analysis](https://docs.sonarsource.com/sonarqube-cloud/improving/pull-request-analysis "mention") pages for more information.
Here is an example of a configuration for pull requests in a CI job:
```properties
sonar.pullrequest.base=main
sonar.pullrequest.branch=feature/my-new-feature
sonar.pullrequest.key=5
```
---
# Source: https://docs.sonarsource.com/sonarqube-community-build/server-update-and-maintenance/troubleshooting/other-issues.md
# Source: https://docs.sonarsource.com/sonarqube-server/10.8/server-upgrade-and-maintenance/troubleshooting/other-issues.md
# Source: https://docs.sonarsource.com/sonarqube-server/2025.2/server-update-and-maintenance/troubleshooting/other-issues.md
# Source: https://docs.sonarsource.com/sonarqube-server/2025.3/server-update-and-maintenance/troubleshooting/other-issues.md
# Source: https://docs.sonarsource.com/sonarqube-server/2025.5/server-update-and-maintenance/troubleshooting/other-issues.md
# Source: https://docs.sonarsource.com/sonarqube-server/2025.1/server-update-and-maintenance/troubleshooting/other-issues.md
# Source: https://docs.sonarsource.com/sonarqube-server/2025.4/server-update-and-maintenance/troubleshooting/other-issues.md
# Source: https://docs.sonarsource.com/sonarqube-server/2025.6/server-update-and-maintenance/troubleshooting/other-issues.md
# Source: https://docs.sonarsource.com/sonarqube-server/server-update-and-maintenance/troubleshooting/other-issues.md
# Other issues
### Issues with IIS and SAML integration
If you are using an IIS reverse proxy with SAML authentication, you may encounter one of the following issues:
* The URL redirection to the SAML Identity Provider (sonar.auth.saml.loginUrl) is not managed correctly.
* "You are not authorized to access this page" error is raised when logging in.
In that case, make sure that, at the IIS server level, you have performed all the configuration steps described in the [#using-iis-on-windows](https://docs.sonarsource.com/sonarqube-server/server-installation/network-security/securing-behind-proxy#using-iis-on-windows "mention") section.
### Issue with downloading regulatory reports
If nothing happens when you try to download a regulatory report (in the SonarQube Server UI at **Project Information > Regulatory Report**) and your SonarQube Server is deployed on Kubernetes, the issue could be your download speed or the report size. To fix this, increase your body size and connection timeout Ingress settings as follows:
```css-79elbk
annotations:
cert-manager.io/cluster-issuer: sectigo
nginx.ingress.kubernetes.io/proxy-body-size: "64m"
nginx.ingress.kubernetes.io/proxy-connect-timeout: "300"
nginx.ingress.kubernetes.io/proxy-read-timeout: "300"
```
### Invalid destination error
To help you find out what the issue is, check the valid destination in the log file as follows:
1. Set the log level to **`DEBUG`**. See [server-logs](https://docs.sonarsource.com/sonarqube-server/server-update-and-maintenance/troubleshooting/server-logs "mention") for more information.
2. Check the `web.log` file for the `valid recipient` as illustrated below.
```css-79elbk
Failed to match SubjectConfirmationData@Recipient to any supplied valid recipients: [http://localhost:9000/oauth2/callback/saml]
```
### IIS 10 on Windows: running SonarQube as a service raises an error
If you’ve secured your SonarQube Server instance behind a proxy by using IIS 10 on Windows and the error `WinSW.CommandException: Failed to open the service control manager database. Access is denied —> System.ComponentModel.Win32Exception: Access is denied` is raised when you try to run SonarQube as a service, try the following:
* In IIS, disable **Dynamic Restriction Settings** which come enabled by default under the **IP Address and Domain Restrictions** feature.
### SonarQube on AWS ECS: startup fails with unknownhostexception
If your SonarQube, installed on AWS ECS, fails to start up with `unknownhostexception`, try the following:
* Check if the ECS container is running in network bridge mode and change it to host mode.
### Related pages
* [server-logs](https://docs.sonarsource.com/sonarqube-server/server-update-and-maintenance/troubleshooting/server-logs "mention")
* [performance-issues](https://docs.sonarsource.com/sonarqube-server/server-update-and-maintenance/troubleshooting/performance-issues "mention")
* [database-related-issues](https://docs.sonarsource.com/sonarqube-server/server-update-and-maintenance/troubleshooting/database-related-issues "mention")
* [elasticsearch](https://docs.sonarsource.com/sonarqube-server/server-update-and-maintenance/troubleshooting/elasticsearch "mention")
---
# Source: https://docs.sonarsource.com/sonarqube-community-build/server-update-and-maintenance/update/other-procedures.md
# Source: https://docs.sonarsource.com/sonarqube-server/10.4/setup-and-upgrade/upgrade-the-server/other-procedures.md
# Source: https://docs.sonarsource.com/sonarqube-server/10.5/setup-and-upgrade/upgrade-the-server/other-procedures.md
# Source: https://docs.sonarsource.com/sonarqube-server/10.6/setup-and-upgrade/upgrade-the-server/other-procedures.md
# Source: https://docs.sonarsource.com/sonarqube-server/10.7/server-upgrade-and-maintenance/upgrade/upgrade-the-server/other-procedures.md
# Source: https://docs.sonarsource.com/sonarqube-server/10.8/server-upgrade-and-maintenance/upgrade/upgrade-the-server/other-procedures.md
# Source: https://docs.sonarsource.com/sonarqube-server/2025.2/server-update-and-maintenance/upgrade/other-procedures.md
# Source: https://docs.sonarsource.com/sonarqube-server/2025.3/server-update-and-maintenance/upgrade/other-procedures.md
# Source: https://docs.sonarsource.com/sonarqube-server/2025.5/server-update-and-maintenance/update/other-procedures.md
# Source: https://docs.sonarsource.com/sonarqube-server/2025.1/server-update-and-maintenance/update/other-procedures.md
# Source: https://docs.sonarsource.com/sonarqube-server/2025.4/server-update-and-maintenance/update/other-procedures.md
# Source: https://docs.sonarsource.com/sonarqube-server/2025.6/server-update-and-maintenance/update/other-procedures.md
# Source: https://docs.sonarsource.com/sonarqube-server/server-update-and-maintenance/update/other-procedures.md
# Other migration-related tasks
### Reverting to the previous version
If you need to revert to the previous version of SonarQube Server, the high-level rollback procedure for all deployments is as follows:
1. Shut down your SonarQube Server instance or cluster.
2. Roll back your database to the backup you took before starting the update.
3. Switch back to the previous version of your SonarQube Server installation.
4. Start your SonarQube Server instance or cluster.
### Migrating the SonarQube Server database to another vendor
To migrate your SonarQube Server database from one database vendor to another, use the [sonarqube-db-copy-tool](https://docs.sonarsource.com/sonarqube-server/server-update-and-maintenance/maintenance/sonarqube-db-copy-tool "mention").
### Moving from a ZIP file installation to a Docker installation
To move from a ZIP file installation to a Docker installation:
1. Configure your Docker container to point to your existing database.
2. Shut down your ZIP instance.
3. [set-up-and-start-container](https://docs.sonarsource.com/sonarqube-server/server-installation/from-docker-image/set-up-and-start-container "mention").
### Updating a plugin
You need to manually install plugins when using SonarQube Server, you cannot use the SonarQube Marketplace. See [install-a-plugin](https://docs.sonarsource.com/sonarqube-server/server-installation/plugins/install-a-plugin "mention") for more information.
### Downgrading to SonarQube Community Build
Ensure the target SonarQube Community Build version was released after the source SonarQube Server version. See [Releases - Sonar Community](https://community.sonarsource.com/c/sq/releases/24) for release dates of SonarQube Community Build and SonarQube Server. In most cases, migrating to the latest version of the target product will suffice.
However, if you are using the latest version of SonarQube Server, you may need to wait for the next version of SonarQube Community Build accordingly, typically available within a month.
Once the target version is confirmed, proceed with the standard update procedure.
{% hint style="info" %}
To update your SonarQube Community Build to SonarQube Server, see [updating-from-sonarqube-community-build](https://docs.sonarsource.com/sonarqube-server/server-update-and-maintenance/update/updating-from-sonarqube-community-build "mention").
{% endhint %}
### Moving between SonarQube Server editions
If you’re moving to a different SonarQube Server edition (Data Center Edition, Enterprise Edition, or Developer Edition) with the same version, the steps are the same as described in [roadmap](https://docs.sonarsource.com/sonarqube-server/server-update-and-maintenance/update/roadmap "mention") without the need to browse to `http://yourSonarQubeServerURL/setup` or reanalyze your projects.
---
# Source: https://docs.sonarsource.com/sonarqube-cloud/advanced-setup/ci-based-analysis/overview-of-integrated-cis.md
# Overview of integrated CIs
### CI integrations
SonarQube Cloud supports integration with the following continuous integration (CI) systems:
* [github-actions-for-sonarcloud](https://docs.sonarsource.com/sonarqube-cloud/advanced-setup/ci-based-analysis/github-actions-for-sonarcloud "mention")
* [bitbucket-pipelines-for-sonarcloud](https://docs.sonarsource.com/sonarqube-cloud/advanced-setup/ci-based-analysis/bitbucket-pipelines-for-sonarcloud "mention")
* [azure-pipelines](https://docs.sonarsource.com/sonarqube-cloud/advanced-setup/ci-based-analysis/azure-pipelines "mention")
* [gitlab-ci](https://docs.sonarsource.com/sonarqube-cloud/advanced-setup/ci-based-analysis/gitlab-ci "mention")
* [circleci](https://docs.sonarsource.com/sonarqube-cloud/advanced-setup/ci-based-analysis/circleci "mention")
* [other-cis](https://docs.sonarsource.com/sonarqube-cloud/advanced-setup/ci-based-analysis/other-cis "mention")
### Scanners
In SonarQube Cloud terminology, a *scanner* is the piece of software that performs the actual analysis on your code.
Typically, a scanner is configured to work as part of your build pipeline. Sonar provides different versions of the *SonarScanner* tool for different set-ups.
If your build process takes place on an on-premises machine (your own or some central build machine in your organization), you will need to download the appropriate scanner from Sonar, install it, and configure it.
If your build process is cloud-based (using CircleCI or similar), Sonar provides SonarScanner plugins that can be installed in those services.
SonarQube Cloud supports the following scanners and extensions, adapted to different setups:
* [sonarscanner-cli](https://docs.sonarsource.com/sonarqube-cloud/advanced-setup/ci-based-analysis/sonarscanner-cli "mention"): Generic command-line tool for setups where no specialized scanner is available.
* [sonarcloud-extension-for-azure-devops](https://docs.sonarsource.com/sonarqube-cloud/advanced-setup/ci-based-analysis/sonarcloud-extension-for-azure-devops "mention"): For use with Azure Pipelines.
* [sonarscanner-for-gradle](https://docs.sonarsource.com/sonarqube-cloud/advanced-setup/ci-based-analysis/sonarscanner-for-gradle "mention"): For use with Java Gradle projects.
* [sonarcloud-extension-for-jenkins](https://docs.sonarsource.com/sonarqube-cloud/advanced-setup/ci-based-analysis/sonarcloud-extension-for-jenkins "mention"): For use with Jenkins jobs.
* [sonarscanner-for-maven](https://docs.sonarsource.com/sonarqube-cloud/advanced-setup/ci-based-analysis/sonarscanner-for-maven "mention"): For use with Java Maven projects.
* [sonarscanner-for-dotnet](https://docs.sonarsource.com/sonarqube-cloud/advanced-setup/ci-based-analysis/sonarscanner-for-dotnet "mention"): For use with .NET projects.
* [sonarscanner-for-npm](https://docs.sonarsource.com/sonarqube-cloud/advanced-setup/ci-based-analysis/sonarscanner-for-npm "mention"): For use with analysis on JS/TS and CSS code bases.
### Prerequisites for scanners
See [general-requirements](https://docs.sonarsource.com/sonarqube-cloud/advanced-setup/scanner-environment/general-requirements "mention").
### How the scanners work
All the scanner variants just wrap SonarQube Cloud’s powerful set of language analyzers. Since the scanner is installed as part of your build process, we don’t want you to have to re-install it every time a SonarQube Cloud language analyzer is added or improved. To ensure this, SonarScanner always checks for updates to its analyzer set from SonarQube Cloud and downloads any recent additions or changes, thus always staying up-to-date.
When the scanner is invoked it executes the analysis on the code and sends the results back up to SonarQube Cloud, where they are processed, stored, and displayed in the SonarQube Cloud interface.
### Comparison with automatic analysis
SonarQube Cloud’s *automatic analysis* can be thought of as a scanner that is integrated into the cloud service. It can be used without installing any additional software or integrating anything into your build pipeline.
For more details on automatic analysis, see [automatic-analysis](https://docs.sonarsource.com/sonarqube-cloud/advanced-setup/automatic-analysis "mention").
### Conflict between CI-based and automatic analysis
CI-based analysis (i.e., using SonarScanner as part of your build process) is not meant to run concurrently with automatic analysis. If automatic analysis is enabled on a project, any attempt to run a SonarScanner on the same project will fail, failing the build pipeline as it does so. Either use automatic analysis or use a CI-based analysis with SonarScanner, but not both!
For details on [#deactivating-automatic-analysis](https://docs.sonarsource.com/sonarqube-cloud/automatic-analysis#deactivating-automatic-analysis "mention") or reactivating automatic analysis, see the[automatic-analysis](https://docs.sonarsource.com/sonarqube-cloud/advanced-setup/automatic-analysis "mention") page.
---
# Source: https://docs.sonarsource.com/sonarqube-community-build/instance-administration/authentication/saml/overview.md
# Source: https://docs.sonarsource.com/sonarqube-community-build/instance-administration/authentication/overview.md
# Source: https://docs.sonarsource.com/sonarqube-community-build/user-guide/rules/overview.md
# Source: https://docs.sonarsource.com/sonarqube-community-build/analyzing-source-code/ci-integration/overview.md
# Source: https://docs.sonarsource.com/sonarqube-community-build/analyzing-source-code/test-coverage/overview.md
# Source: https://docs.sonarsource.com/sonarqube-community-build/analyzing-source-code/dotnet-environments/overview.md
# Source: https://docs.sonarsource.com/sonarqube-community-build/analyzing-source-code/languages/overview.md
# Source: https://docs.sonarsource.com/sonarqube-community-build/analyzing-source-code/overview.md
# Source: https://docs.sonarsource.com/sonarqube-community-build/server-installation/from-zip-file/overview.md
# Source: https://docs.sonarsource.com/sonarqube-server/8.9/user-guide/user-account/overview.md
# Source: https://docs.sonarsource.com/sonarqube-server/8.9/user-guide/rules/overview.md
# Source: https://docs.sonarsource.com/sonarqube-server/8.9/analyzing-source-code/ci-integration/overview.md
# Source: https://docs.sonarsource.com/sonarqube-server/8.9/analyzing-source-code/languages/overview.md
# Source: https://docs.sonarsource.com/sonarqube-server/8.9/analyzing-source-code/overview.md
# Source: https://docs.sonarsource.com/sonarqube-server/8.9/setup-and-upgrade/overview.md
# Source: https://docs.sonarsource.com/sonarqube-server/9.8/instance-administration/authentication/saml/overview.md
# Source: https://docs.sonarsource.com/sonarqube-server/9.8/instance-administration/authentication/overview.md
# Source: https://docs.sonarsource.com/sonarqube-server/9.8/user-guide/user-account/overview.md
# Source: https://docs.sonarsource.com/sonarqube-server/9.8/user-guide/rules/overview.md
# Source: https://docs.sonarsource.com/sonarqube-server/9.8/analyzing-source-code/ci-integration/overview.md
# Source: https://docs.sonarsource.com/sonarqube-server/9.8/analyzing-source-code/test-coverage/overview.md
# Source: https://docs.sonarsource.com/sonarqube-server/9.8/analyzing-source-code/languages/overview.md
# Source: https://docs.sonarsource.com/sonarqube-server/9.8/analyzing-source-code/overview.md
# Source: https://docs.sonarsource.com/sonarqube-server/9.8/setup-and-upgrade/overview.md
# Source: https://docs.sonarsource.com/sonarqube-server/9.9/instance-administration/authentication/saml/overview.md
# Source: https://docs.sonarsource.com/sonarqube-server/9.9/instance-administration/authentication/overview.md
# Source: https://docs.sonarsource.com/sonarqube-server/9.9/user-guide/user-account/overview.md
# Source: https://docs.sonarsource.com/sonarqube-server/9.9/user-guide/rules/overview.md
# Source: https://docs.sonarsource.com/sonarqube-server/9.9/analyzing-source-code/ci-integration/overview.md
# Source: https://docs.sonarsource.com/sonarqube-server/9.9/analyzing-source-code/test-coverage/overview.md
# Source: https://docs.sonarsource.com/sonarqube-server/9.9/analyzing-source-code/languages/overview.md
# Source: https://docs.sonarsource.com/sonarqube-server/9.9/analyzing-source-code/overview.md
# Source: https://docs.sonarsource.com/sonarqube-server/9.9/setup-and-upgrade/overview.md
# Source: https://docs.sonarsource.com/sonarqube-server/10.0/instance-administration/authentication/saml/scim/overview.md
# Source: https://docs.sonarsource.com/sonarqube-server/10.0/instance-administration/authentication/saml/overview.md
# Source: https://docs.sonarsource.com/sonarqube-server/10.0/instance-administration/authentication/overview.md
# Source: https://docs.sonarsource.com/sonarqube-server/10.0/user-guide/user-account/overview.md
# Source: https://docs.sonarsource.com/sonarqube-server/10.0/user-guide/rules/overview.md
# Source: https://docs.sonarsource.com/sonarqube-server/10.0/analyzing-source-code/ci-integration/overview.md
# Source: https://docs.sonarsource.com/sonarqube-server/10.0/analyzing-source-code/test-coverage/overview.md
# Source: https://docs.sonarsource.com/sonarqube-server/10.0/analyzing-source-code/languages/overview.md
# Source: https://docs.sonarsource.com/sonarqube-server/10.0/analyzing-source-code/overview.md
# Source: https://docs.sonarsource.com/sonarqube-server/10.0/setup-and-upgrade/overview.md
# Source: https://docs.sonarsource.com/sonarqube-server/10.1/instance-administration/authentication/saml/scim/overview.md
# Source: https://docs.sonarsource.com/sonarqube-server/10.1/instance-administration/authentication/saml/overview.md
# Source: https://docs.sonarsource.com/sonarqube-server/10.1/instance-administration/authentication/overview.md
# Source: https://docs.sonarsource.com/sonarqube-server/10.1/user-guide/user-account/overview.md
# Source: https://docs.sonarsource.com/sonarqube-server/10.1/user-guide/rules/overview.md
# Source: https://docs.sonarsource.com/sonarqube-server/10.1/analyzing-source-code/ci-integration/overview.md
# Source: https://docs.sonarsource.com/sonarqube-server/10.1/analyzing-source-code/test-coverage/overview.md
# Source: https://docs.sonarsource.com/sonarqube-server/10.1/analyzing-source-code/languages/overview.md
# Source: https://docs.sonarsource.com/sonarqube-server/10.1/analyzing-source-code/overview.md
# Source: https://docs.sonarsource.com/sonarqube-server/10.1/setup-and-upgrade/overview.md
# Source: https://docs.sonarsource.com/sonarqube-server/10.2/instance-administration/authentication/saml/scim/overview.md
# Source: https://docs.sonarsource.com/sonarqube-server/10.2/instance-administration/authentication/saml/overview.md
# Source: https://docs.sonarsource.com/sonarqube-server/10.2/instance-administration/authentication/overview.md
# Source: https://docs.sonarsource.com/sonarqube-server/10.2/user-guide/user-account/overview.md
# Source: https://docs.sonarsource.com/sonarqube-server/10.2/user-guide/rules/overview.md
# Source: https://docs.sonarsource.com/sonarqube-server/10.2/analyzing-source-code/ci-integration/overview.md
# Source: https://docs.sonarsource.com/sonarqube-server/10.2/analyzing-source-code/test-coverage/overview.md
# Source: https://docs.sonarsource.com/sonarqube-server/10.2/analyzing-source-code/languages/overview.md
# Source: https://docs.sonarsource.com/sonarqube-server/10.2/analyzing-source-code/overview.md
# Source: https://docs.sonarsource.com/sonarqube-server/10.2/setup-and-upgrade/overview.md
# Source: https://docs.sonarsource.com/sonarqube-server/10.3/instance-administration/authentication/saml/scim/overview.md
# Source: https://docs.sonarsource.com/sonarqube-server/10.3/instance-administration/authentication/saml/overview.md
# Source: https://docs.sonarsource.com/sonarqube-server/10.3/instance-administration/authentication/overview.md
# Source: https://docs.sonarsource.com/sonarqube-server/10.3/user-guide/user-account/overview.md
# Source: https://docs.sonarsource.com/sonarqube-server/10.3/user-guide/rules/overview.md
# Source: https://docs.sonarsource.com/sonarqube-server/10.3/analyzing-source-code/ci-integration/overview.md
# Source: https://docs.sonarsource.com/sonarqube-server/10.3/analyzing-source-code/test-coverage/overview.md
# Source: https://docs.sonarsource.com/sonarqube-server/10.3/analyzing-source-code/languages/overview.md
# Source: https://docs.sonarsource.com/sonarqube-server/10.3/analyzing-source-code/overview.md
# Source: https://docs.sonarsource.com/sonarqube-server/10.3/setup-and-upgrade/overview.md
# Source: https://docs.sonarsource.com/sonarqube-server/10.4/instance-administration/authentication/saml/scim/overview.md
# Source: https://docs.sonarsource.com/sonarqube-server/10.4/instance-administration/authentication/saml/overview.md
# Source: https://docs.sonarsource.com/sonarqube-server/10.4/instance-administration/authentication/overview.md
# Source: https://docs.sonarsource.com/sonarqube-server/10.4/user-guide/user-account/overview.md
# Source: https://docs.sonarsource.com/sonarqube-server/10.4/user-guide/rules/overview.md
# Source: https://docs.sonarsource.com/sonarqube-server/10.4/analyzing-source-code/ci-integration/overview.md
# Source: https://docs.sonarsource.com/sonarqube-server/10.4/analyzing-source-code/test-coverage/overview.md
# Source: https://docs.sonarsource.com/sonarqube-server/10.4/analyzing-source-code/languages/overview.md
# Source: https://docs.sonarsource.com/sonarqube-server/10.4/analyzing-source-code/overview.md
# Source: https://docs.sonarsource.com/sonarqube-server/10.4/setup-and-upgrade/overview.md
# Source: https://docs.sonarsource.com/sonarqube-server/10.5/instance-administration/authentication/saml/scim/overview.md
# Source: https://docs.sonarsource.com/sonarqube-server/10.5/instance-administration/authentication/saml/overview.md
# Source: https://docs.sonarsource.com/sonarqube-server/10.5/instance-administration/authentication/overview.md
# Source: https://docs.sonarsource.com/sonarqube-server/10.5/user-guide/user-account/overview.md
# Source: https://docs.sonarsource.com/sonarqube-server/10.5/user-guide/rules/overview.md
# Source: https://docs.sonarsource.com/sonarqube-server/10.5/analyzing-source-code/ci-integration/overview.md
# Source: https://docs.sonarsource.com/sonarqube-server/10.5/analyzing-source-code/test-coverage/overview.md
# Source: https://docs.sonarsource.com/sonarqube-server/10.5/analyzing-source-code/languages/overview.md
# Source: https://docs.sonarsource.com/sonarqube-server/10.5/analyzing-source-code/overview.md
# Source: https://docs.sonarsource.com/sonarqube-server/10.5/setup-and-upgrade/installation-requirements/overview.md
# Source: https://docs.sonarsource.com/sonarqube-server/10.5/setup-and-upgrade/overview.md
# Source: https://docs.sonarsource.com/sonarqube-server/10.6/instance-administration/authentication/saml/scim/overview.md
# Source: https://docs.sonarsource.com/sonarqube-server/10.6/instance-administration/authentication/saml/overview.md
# Source: https://docs.sonarsource.com/sonarqube-server/10.6/instance-administration/authentication/overview.md
# Source: https://docs.sonarsource.com/sonarqube-server/10.6/user-guide/user-account/overview.md
# Source: https://docs.sonarsource.com/sonarqube-server/10.6/user-guide/rules/overview.md
# Source: https://docs.sonarsource.com/sonarqube-server/10.6/analyzing-source-code/ci-integration/overview.md
# Source: https://docs.sonarsource.com/sonarqube-server/10.6/analyzing-source-code/test-coverage/overview.md
# Source: https://docs.sonarsource.com/sonarqube-server/10.6/analyzing-source-code/languages/c-family/overview.md
# Source: https://docs.sonarsource.com/sonarqube-server/10.6/analyzing-source-code/languages/overview.md
# Source: https://docs.sonarsource.com/sonarqube-server/10.6/analyzing-source-code/overview.md
# Source: https://docs.sonarsource.com/sonarqube-server/10.6/setup-and-upgrade/installation-requirements/overview.md
# Source: https://docs.sonarsource.com/sonarqube-server/10.6/setup-and-upgrade/overview.md
# Source: https://docs.sonarsource.com/sonarqube-server/10.7/instance-administration/authentication/saml/scim/overview.md
# Source: https://docs.sonarsource.com/sonarqube-server/10.7/instance-administration/authentication/saml/overview.md
# Source: https://docs.sonarsource.com/sonarqube-server/10.7/instance-administration/authentication/overview.md
# Source: https://docs.sonarsource.com/sonarqube-server/10.7/user-guide/rules/overview.md
# Source: https://docs.sonarsource.com/sonarqube-server/10.7/analyzing-source-code/ci-integration/overview.md
# Source: https://docs.sonarsource.com/sonarqube-server/10.7/analyzing-source-code/test-coverage/overview.md
# Source: https://docs.sonarsource.com/sonarqube-server/10.7/analyzing-source-code/dotnet-environments/overview.md
# Source: https://docs.sonarsource.com/sonarqube-server/10.7/analyzing-source-code/languages/c-family/overview.md
# Source: https://docs.sonarsource.com/sonarqube-server/10.7/analyzing-source-code/languages/overview.md
# Source: https://docs.sonarsource.com/sonarqube-server/10.7/analyzing-source-code/overview.md
# Source: https://docs.sonarsource.com/sonarqube-server/10.7/setup-and-upgrade/installation-requirements/overview.md
# Source: https://docs.sonarsource.com/sonarqube-server/10.7/setup-and-upgrade/overview.md
# Source: https://docs.sonarsource.com/sonarqube-server/10.7/core-concepts/clean-as-you-code/overview.md
# Source: https://docs.sonarsource.com/sonarqube-server/10.8/instance-administration/authentication/saml/scim/overview.md
# Source: https://docs.sonarsource.com/sonarqube-server/10.8/instance-administration/authentication/saml/overview.md
# Source: https://docs.sonarsource.com/sonarqube-server/10.8/instance-administration/authentication/overview.md
# Source: https://docs.sonarsource.com/sonarqube-server/10.8/user-guide/rules/overview.md
# Source: https://docs.sonarsource.com/sonarqube-server/10.8/analyzing-source-code/ci-integration/overview.md
# Source: https://docs.sonarsource.com/sonarqube-server/10.8/analyzing-source-code/test-coverage/overview.md
# Source: https://docs.sonarsource.com/sonarqube-server/10.8/analyzing-source-code/dotnet-environments/overview.md
# Source: https://docs.sonarsource.com/sonarqube-server/10.8/analyzing-source-code/languages/c-family/overview.md
# Source: https://docs.sonarsource.com/sonarqube-server/10.8/analyzing-source-code/languages/overview.md
# Source: https://docs.sonarsource.com/sonarqube-server/10.8/analyzing-source-code/overview.md
# Source: https://docs.sonarsource.com/sonarqube-server/10.8/setup-and-upgrade/installation-requirements/overview.md
# Source: https://docs.sonarsource.com/sonarqube-server/10.8/setup-and-upgrade/overview.md
# Source: https://docs.sonarsource.com/sonarqube-server/2025.2/design-and-architecture/overview.md
# Source: https://docs.sonarsource.com/sonarqube-server/2025.2/instance-administration/authentication/saml/scim/overview.md
# Source: https://docs.sonarsource.com/sonarqube-server/2025.2/instance-administration/authentication/saml/overview.md
# Source: https://docs.sonarsource.com/sonarqube-server/2025.2/instance-administration/authentication/overview.md
# Source: https://docs.sonarsource.com/sonarqube-server/2025.2/user-guide/rules/overview.md
# Source: https://docs.sonarsource.com/sonarqube-server/2025.2/analyzing-source-code/ci-integration/overview.md
# Source: https://docs.sonarsource.com/sonarqube-server/2025.2/analyzing-source-code/test-coverage/overview.md
# Source: https://docs.sonarsource.com/sonarqube-server/2025.2/analyzing-source-code/dotnet-environments/overview.md
# Source: https://docs.sonarsource.com/sonarqube-server/2025.2/analyzing-source-code/languages/c-family/overview.md
# Source: https://docs.sonarsource.com/sonarqube-server/2025.2/analyzing-source-code/languages/overview.md
# Source: https://docs.sonarsource.com/sonarqube-server/2025.2/analyzing-source-code/overview.md
# Source: https://docs.sonarsource.com/sonarqube-server/2025.2/setup-and-update/installation-requirements/overview.md
# Source: https://docs.sonarsource.com/sonarqube-server/2025.2/setup-and-update/overview.md
# Source: https://docs.sonarsource.com/sonarqube-server/2025.2/ai-capabilities/overview.md
# Source: https://docs.sonarsource.com/sonarqube-server/2025.3/design-and-architecture/overview.md
# Source: https://docs.sonarsource.com/sonarqube-server/2025.3/quality-standards-administration/ai-code-assurance/overview.md
# Source: https://docs.sonarsource.com/sonarqube-server/2025.3/instance-administration/authentication/saml/scim/overview.md
# Source: https://docs.sonarsource.com/sonarqube-server/2025.3/instance-administration/authentication/saml/overview.md
# Source: https://docs.sonarsource.com/sonarqube-server/2025.3/instance-administration/authentication/overview.md
# Source: https://docs.sonarsource.com/sonarqube-server/2025.3/instance-administration/ai-features/overview.md
# Source: https://docs.sonarsource.com/sonarqube-server/2025.3/instance-administration/overview.md
# Source: https://docs.sonarsource.com/sonarqube-server/2025.3/project-administration/ai-features/overview.md
# Source: https://docs.sonarsource.com/sonarqube-server/2025.3/user-guide/rules/overview.md
# Source: https://docs.sonarsource.com/sonarqube-server/2025.3/analyzing-source-code/ci-integration/overview.md
# Source: https://docs.sonarsource.com/sonarqube-server/2025.3/analyzing-source-code/test-coverage/overview.md
# Source: https://docs.sonarsource.com/sonarqube-server/2025.3/analyzing-source-code/dotnet-environments/overview.md
# Source: https://docs.sonarsource.com/sonarqube-server/2025.3/analyzing-source-code/languages/c-family/overview.md
# Source: https://docs.sonarsource.com/sonarqube-server/2025.3/analyzing-source-code/languages/overview.md
# Source: https://docs.sonarsource.com/sonarqube-server/2025.3/analyzing-source-code/overview.md
# Source: https://docs.sonarsource.com/sonarqube-server/2025.3/server-installation/data-center-edition/on-kubernetes-or-openshift/overview.md
# Source: https://docs.sonarsource.com/sonarqube-server/2025.3/server-installation/from-zip-file/overview.md
# Source: https://docs.sonarsource.com/sonarqube-server/2025.3/ai-capabilities/overview.md
# Source: https://docs.sonarsource.com/sonarqube-server/2025.5/design-and-architecture/overview.md
# Source: https://docs.sonarsource.com/sonarqube-server/2025.5/quality-standards-administration/ai-code-assurance/overview.md
# Source: https://docs.sonarsource.com/sonarqube-server/2025.5/instance-administration/authentication/saml/scim/overview.md
# Source: https://docs.sonarsource.com/sonarqube-server/2025.5/instance-administration/authentication/saml/overview.md
# Source: https://docs.sonarsource.com/sonarqube-server/2025.5/instance-administration/authentication/overview.md
# Source: https://docs.sonarsource.com/sonarqube-server/2025.5/instance-administration/ai-features/overview.md
# Source: https://docs.sonarsource.com/sonarqube-server/2025.5/instance-administration/overview.md
# Source: https://docs.sonarsource.com/sonarqube-server/2025.5/project-administration/ai-features/overview.md
# Source: https://docs.sonarsource.com/sonarqube-server/2025.5/user-guide/rules/overview.md
# Source: https://docs.sonarsource.com/sonarqube-server/2025.5/analyzing-source-code/ci-integration/overview.md
# Source: https://docs.sonarsource.com/sonarqube-server/2025.5/analyzing-source-code/test-coverage/overview.md
# Source: https://docs.sonarsource.com/sonarqube-server/2025.5/analyzing-source-code/dotnet-environments/overview.md
# Source: https://docs.sonarsource.com/sonarqube-server/2025.5/analyzing-source-code/languages/c-family/overview.md
# Source: https://docs.sonarsource.com/sonarqube-server/2025.5/analyzing-source-code/languages/overview.md
# Source: https://docs.sonarsource.com/sonarqube-server/2025.5/analyzing-source-code/overview.md
# Source: https://docs.sonarsource.com/sonarqube-server/2025.5/server-installation/data-center-edition/on-kubernetes-or-openshift/overview.md
# Source: https://docs.sonarsource.com/sonarqube-server/2025.5/server-installation/from-zip-file/overview.md
# Source: https://docs.sonarsource.com/sonarqube-server/2025.5/ai-capabilities/overview.md
# Source: https://docs.sonarsource.com/sonarqube-server/2025.1/instance-administration/authentication/saml/scim/overview.md
# Source: https://docs.sonarsource.com/sonarqube-server/2025.1/instance-administration/authentication/saml/overview.md
# Source: https://docs.sonarsource.com/sonarqube-server/2025.1/instance-administration/authentication/overview.md
# Source: https://docs.sonarsource.com/sonarqube-server/2025.1/instance-administration/ai-features/overview.md
# Source: https://docs.sonarsource.com/sonarqube-server/2025.1/instance-administration/analysis-functions/ai-code-assurance/overview.md
# Source: https://docs.sonarsource.com/sonarqube-server/2025.1/project-administration/ai-features/overview.md
# Source: https://docs.sonarsource.com/sonarqube-server/2025.1/user-guide/rules/overview.md
# Source: https://docs.sonarsource.com/sonarqube-server/2025.1/analyzing-source-code/ci-integration/overview.md
# Source: https://docs.sonarsource.com/sonarqube-server/2025.1/analyzing-source-code/test-coverage/overview.md
# Source: https://docs.sonarsource.com/sonarqube-server/2025.1/analyzing-source-code/dotnet-environments/overview.md
# Source: https://docs.sonarsource.com/sonarqube-server/2025.1/analyzing-source-code/languages/c-family/overview.md
# Source: https://docs.sonarsource.com/sonarqube-server/2025.1/analyzing-source-code/languages/overview.md
# Source: https://docs.sonarsource.com/sonarqube-server/2025.1/analyzing-source-code/overview.md
# Source: https://docs.sonarsource.com/sonarqube-server/2025.1/setup-and-upgrade/installation-requirements/overview.md
# Source: https://docs.sonarsource.com/sonarqube-server/2025.1/setup-and-upgrade/overview.md
# Source: https://docs.sonarsource.com/sonarqube-server/2025.1/ai-capabilities/overview.md
# Source: https://docs.sonarsource.com/sonarqube-server/2025.4/design-and-architecture/overview.md
# Source: https://docs.sonarsource.com/sonarqube-server/2025.4/quality-standards-administration/ai-code-assurance/overview.md
# Source: https://docs.sonarsource.com/sonarqube-server/2025.4/instance-administration/authentication/saml/scim/overview.md
# Source: https://docs.sonarsource.com/sonarqube-server/2025.4/instance-administration/authentication/saml/overview.md
# Source: https://docs.sonarsource.com/sonarqube-server/2025.4/instance-administration/authentication/overview.md
# Source: https://docs.sonarsource.com/sonarqube-server/2025.4/instance-administration/ai-features/overview.md
# Source: https://docs.sonarsource.com/sonarqube-server/2025.4/instance-administration/overview.md
# Source: https://docs.sonarsource.com/sonarqube-server/2025.4/project-administration/ai-features/overview.md
# Source: https://docs.sonarsource.com/sonarqube-server/2025.4/user-guide/rules/overview.md
# Source: https://docs.sonarsource.com/sonarqube-server/2025.4/analyzing-source-code/ci-integration/overview.md
# Source: https://docs.sonarsource.com/sonarqube-server/2025.4/analyzing-source-code/test-coverage/overview.md
# Source: https://docs.sonarsource.com/sonarqube-server/2025.4/analyzing-source-code/dotnet-environments/overview.md
# Source: https://docs.sonarsource.com/sonarqube-server/2025.4/analyzing-source-code/languages/c-family/overview.md
# Source: https://docs.sonarsource.com/sonarqube-server/2025.4/analyzing-source-code/languages/overview.md
# Source: https://docs.sonarsource.com/sonarqube-server/2025.4/analyzing-source-code/overview.md
# Source: https://docs.sonarsource.com/sonarqube-server/2025.4/server-installation/data-center-edition/on-kubernetes-or-openshift/overview.md
# Source: https://docs.sonarsource.com/sonarqube-server/2025.4/server-installation/from-zip-file/overview.md
# Source: https://docs.sonarsource.com/sonarqube-server/2025.4/ai-capabilities/overview.md
# Source: https://docs.sonarsource.com/sonarqube-server/2025.6/design-and-architecture/overview.md
# Source: https://docs.sonarsource.com/sonarqube-server/2025.6/quality-standards-administration/ai-code-assurance/overview.md
# Source: https://docs.sonarsource.com/sonarqube-server/2025.6/instance-administration/authentication/saml/scim/overview.md
# Source: https://docs.sonarsource.com/sonarqube-server/2025.6/instance-administration/authentication/saml/overview.md
# Source: https://docs.sonarsource.com/sonarqube-server/2025.6/instance-administration/authentication/overview.md
# Source: https://docs.sonarsource.com/sonarqube-server/2025.6/instance-administration/ai-features/overview.md
# Source: https://docs.sonarsource.com/sonarqube-server/2025.6/instance-administration/overview.md
# Source: https://docs.sonarsource.com/sonarqube-server/2025.6/project-administration/ai-features/overview.md
# Source: https://docs.sonarsource.com/sonarqube-server/2025.6/user-guide/rules/overview.md
# Source: https://docs.sonarsource.com/sonarqube-server/2025.6/analyzing-source-code/ci-integration/overview.md
# Source: https://docs.sonarsource.com/sonarqube-server/2025.6/analyzing-source-code/test-coverage/overview.md
# Source: https://docs.sonarsource.com/sonarqube-server/2025.6/analyzing-source-code/dotnet-environments/overview.md
# Source: https://docs.sonarsource.com/sonarqube-server/2025.6/analyzing-source-code/languages/c-family/overview.md
# Source: https://docs.sonarsource.com/sonarqube-server/2025.6/analyzing-source-code/languages/overview.md
# Source: https://docs.sonarsource.com/sonarqube-server/2025.6/analyzing-source-code/overview.md
# Source: https://docs.sonarsource.com/sonarqube-server/2025.6/server-installation/data-center-edition/on-kubernetes-or-openshift/overview.md
# Source: https://docs.sonarsource.com/sonarqube-server/2025.6/server-installation/from-zip-file/overview.md
# Source: https://docs.sonarsource.com/sonarqube-server/2025.6/ai-capabilities/overview.md
# Source: https://docs.sonarsource.com/sonarqube-server/quality-standards-administration/ai-code-assurance/overview.md
# Source: https://docs.sonarsource.com/sonarqube-server/instance-administration/authentication/saml/scim/overview.md
# Source: https://docs.sonarsource.com/sonarqube-server/instance-administration/authentication/saml/overview.md
# Source: https://docs.sonarsource.com/sonarqube-server/instance-administration/authentication/overview.md
# Source: https://docs.sonarsource.com/sonarqube-server/instance-administration/ai-features/overview.md
# Source: https://docs.sonarsource.com/sonarqube-server/instance-administration/overview.md
# Source: https://docs.sonarsource.com/sonarqube-server/project-administration/ai-features/overview.md
# Source: https://docs.sonarsource.com/sonarqube-server/user-guide/rules/overview.md
# Source: https://docs.sonarsource.com/sonarqube-server/analyzing-source-code/ci-integration/overview.md
# Source: https://docs.sonarsource.com/sonarqube-server/analyzing-source-code/test-coverage/overview.md
# Source: https://docs.sonarsource.com/sonarqube-server/analyzing-source-code/dotnet-environments/overview.md
# Source: https://docs.sonarsource.com/sonarqube-server/analyzing-source-code/languages/c-family/overview.md
# Source: https://docs.sonarsource.com/sonarqube-server/analyzing-source-code/languages/overview.md
# Source: https://docs.sonarsource.com/sonarqube-server/analyzing-source-code/overview.md
# Source: https://docs.sonarsource.com/sonarqube-server/server-installation/data-center-edition/on-kubernetes-or-openshift/overview.md
# Source: https://docs.sonarsource.com/sonarqube-server/server-installation/from-zip-file/overview.md
# Source: https://docs.sonarsource.com/sonarqube-server/ai-capabilities/overview.md
# Source: https://docs.sonarsource.com/sonarqube-cloud/advanced-setup/languages/c-family/overview.md
# Source: https://docs.sonarsource.com/sonarqube-cloud/advanced-setup/languages/overview.md
# Source: https://docs.sonarsource.com/sonarqube-cloud/advanced-setup/overview.md
# Source: https://docs.sonarsource.com/sonarqube-cloud/standards/ai-code-assurance/overview.md
# Source: https://docs.sonarsource.com/sonarqube-cloud/enriching/test-coverage/overview.md
# Source: https://docs.sonarsource.com/sonarqube-cloud/enriching/overview.md
# Source: https://docs.sonarsource.com/sonarqube-cloud/improving/overview.md
# Overview
At this point, if you followed the [sign-up](https://docs.sonarsource.com/sonarqube-cloud/getting-started/sign-up "mention") guides, you will have completed your first code analysis with SonarQube Cloud. Congratulations!
Now we will move on to take a look at the key features and concepts of SonarQube Cloud and how you can use them to improve your code quality and security.
### What is automated code review?
An automated code review is a software development process in which static code analysis tools are used to automatically review and analyze the source code for potential issues and coding standard violations. Automated code review accelerates the identification and resolution of code issues and improves code quality (reliability, security, maintainability).
### Analyze early, analyze often!
SonarQube Cloud is designed to be integrated into your daily development workflow so that the results of code review and analysis surface as early as possible each time you make changes to your code. The focus is on catching issues early in the cycle before they become embedded in the codebase.
SonarQube Cloud provides multiple layers of defense to keep your code clean:
1. Catch issues before they even exist: Automated code review in SonarQube for IDE.
2. Catch issues before they are committed to your main branch: Pull request analysis.
3. Catch issues every time you push to the main branch: Main branch analysis.
### Catching issues with SonarQube for IDE
SonarQube for IDE is your first line of defense against code quality and security issues. It can catch issues in your code right in your IDE, before you even push changes to your repository, using the SonarQube for IDE extension.
SonarQube for IDE is available for:
* [JetBrains IDEs](https://www.sonarsource.com/products/sonarlint/features/jetbrains/), including IntelliJ IDEA, CLion, and others
* [Visual Studio](https://www.sonarsource.com/products/sonarlint/features/visual-studio/)
* [VS Code](https://www.sonarsource.com/products/sonarlint/features/vs-code/), including Cursor, Windsurf and more.
* [Eclipse](https://www.sonarsource.com/products/sonarlint/features/eclipse/)
The automated code review in SonarQube for IDE works like a spell checker, highlighting issues in your code as you type. When an issue is identified, SonarQube for IDE provides you with clear remediation guidance so you can fix it right away. In many cases, it also provides a *quick fix* that can automatically fix the issue for you.
You can also connect SonarQube for IDE to your SonarQube Cloud project. This allows SonarQube for IDE to leverage your team’s quality profiles, synchronize other analysis settings and alert you to analysis results that appear at later stages in the dev cycle.
For more details, see [connected-mode](https://docs.sonarsource.com/sonarqube-cloud/improving/connected-mode "mention").
### Pull request analysis
A pull request code review and analysis is your second line of defense against code quality and security issues after SonarQube for IDE. Issues that SonarQube for IDE cannot detect are detected by pull request analysis before they are merged into the main branch.
When you open a pull request (or, in GitLab, a merge request) SonarQube Cloud will automatically analyze all (and only) the changes introduced by that pull request. The result is reported both in the pull request view of the SonarQube Cloud interface and in your DevOps platform (GitHub, Bitbucket Cloud, Azure DevOps, or GitLab), as a pull request decoration. On every subsequent push to the pull request branch, the analysis is run again.
Each pull request analysis result displays [quality-gates](https://docs.sonarsource.com/sonarqube-cloud/improving/quality-gates "mention"). The quality gate applies only to the actual code that was changed in the pull request. It can be set to prevent the merging of the pull request branch into its target branch if the analysis results do not meet your requirements.
For more details, see the [pull-request-analysis](https://docs.sonarsource.com/sonarqube-cloud/improving/pull-request-analysis "mention") page.
### Main branch analysis
A main branch code review and analysis is your third line of defense against code quality and security issues, after SonarQube for IDE and pull request analysis. Issues that neither SonarQube for IDE nor pull request analysis can detect are detected by main branch analysis.
Every time you make a change to the main branch of your project SonarQube Cloud will automatically analyze all the code in the current state of the main branch.
The main branch results display [quality-gates](https://docs.sonarsource.com/sonarqube-cloud/improving/quality-gates "mention"). The quality gate applies to all the code in the main branch. For more details, see [main-branch-analysis](https://docs.sonarsource.com/sonarqube-cloud/improving/main-branch-analysis "mention").
### Keeping the focus on new code
SonarQube Cloud provides developers with a host of insights into issues in their code. However, all this information is only useful if it can be acted upon to improve the code that is shipped. In many cases, the number of issues in a mature project can initially be quite large and developers can feel overwhelmed.
To address this, SonarQube Cloud is designed with two principles in mind:
1. Focus on preventing issues from being introduced in the first place.
2. If issues are introduced, catch them early by always maintaining a focus on *recent code changes*.
The first point is covered by pull request analysis, as we saw above. The second is supported by main branch analysis.
The basic idea is to make the remediation of quality and security issues something you do as part of your normal feature-driven development work, and not a separate, daunting task.
### What counts as new code
As we have seen, the key to using SonarQube Cloud effectively is to distinguish between new and old code. But, what counts as new and old can depend on the details of your project. So, SonarQube Cloud allows the administrator of a project to control how that division is defined, by setting the project *new code definition*. See [about-new-code](https://docs.sonarsource.com/sonarqube-cloud/standards/about-new-code "mention") for the available options.
Because setting your new code definition is important, if it is not set, SonarQube Cloud will make it clear by displaying a **Not computed** quality gate in your project overview and main branch summary, along with a link to **Set the New Code Definition**:
Once set, the new code definition is used to highlight new code throughout the SonarQube Cloud interface. It is used to:
* compute the result for the default quality gate (see below),
* display the new and overall code tabs in the main branch summary,
* and display metrics and other information using the new/old distinction.
### Quality gates
The quality gate is an indicator that tells you whether your code meets your quality and security requirements. A **failed** quality gate means that your code does not meet these requirements:
A passed quality gate means that your code does meet these requirements and is ready to be merged or deployed:
#### Quality gate definition
In most cases, you will never need to adjust the definition of your quality gate, as the default quality gate built into SonarQube Cloud, called the "Sonar Way" quality gate, is suitable for most projects.
But, you should still be aware that a quality gate is defined by a *set of if-then conditions on analysis metrics*. These are things like:
* *If* the maintainability rating is less than A, *then* **fail**
* *If* code duplication is greater than 1%, *then* **fail**
See [metric-definitions](https://docs.sonarsource.com/sonarqube-cloud/digging-deeper/metric-definitions "mention") for more details.
The default quality gate consists of a set of such conditions, which are applied only to new code. On a long-lived branch (like the main branch) this new code is defined by the new code definition. This is why you need to set a new code definition before the main branch quality gate will work. On pull request branches and other short-lived branches, the new code is defined as whatever has changed in that branch. However, as you become more advanced, you may wish to define your own quality gates.
See the [quality-gates](https://docs.sonarsource.com/sonarqube-cloud/improving/quality-gates "mention") page for more details.
---
# Source: https://docs.sonarsource.com/sonarqube-community-build/analyzing-source-code/analysis-parameters/parameters-not-settable-in-ui.md
# Source: https://docs.sonarsource.com/sonarqube-server/2025.5/analyzing-source-code/analysis-parameters/parameters-not-settable-in-ui.md
# Source: https://docs.sonarsource.com/sonarqube-server/2025.6/analyzing-source-code/analysis-parameters/parameters-not-settable-in-ui.md
# Source: https://docs.sonarsource.com/sonarqube-server/analyzing-source-code/analysis-parameters/parameters-not-settable-in-ui.md
# Source: https://docs.sonarsource.com/sonarqube-cloud/advanced-setup/analysis-parameters/parameters-not-settable-in-ui.md
# Parameters not settable in the UI
### Introduction
The sections below list the analysis parameters by category. Only the parameters listed in the first three categories are mandatory:
* [#project-information](#project-information "mention")
* [#server-connection](#server-connection "mention")
* [#project-identification](#project-identification "mention")
The following default values are indicated for a parameter when applicable:
* **Default from build**: It indicates from which build system(s) the scanner can read a default value for the sonar property. The build property used as the default value is not indicated: see the corresponding scanner section for more information.
* **Default**: This value applies if the property was neither defined on the CI/CD host nor in the UI.
In addition, if the analysis parameter can be set through an environment variable, the variable name is indicated.
### Authentication to the server
Property key
Description
sonar.token
Token used by the scanner to authenticate to the SonarQube Cloud. The corresponding SonarQube Cloud user must have the Execute Analysis permission on the project. This parameter is mandatory.
Environment variable: SONAR_TOKEN (not supported by SonarScanner for .NET)
Notes:
From the Team plan, it's recommended to use Scoped Organization Tokens (SOT). See scoped-organization-tokens.
This property replaces sonar.login and sonar.password properties which are deprecated.
Recommendation: It is recommended not to write passwords or authentication tokens in files and not to pass them as parameters in the command line.
### Server connection
Property key
Description
Default
sonar.host.url
The URL of the SonarQube Cloud. Must be defined as https://sonarcloud.io. This parameter is mandatory.
Environment variable: SONAR_HOST_URL
For SonarScanners CLI from v6.0, SonarScanner for Maven from v5.0, SonarScanner for Gradle from v6.0, SonarScanner for .NET from v7.0, SonarScanner for NPM from v4.0, and SonarScanner for Python: https://sonarcloud.io
Otherwise: http://localhost:9000
### Project identification
Property key
Description
sonar.projectKey
The project’s unique key. Can include up to 400 characters. All letters, digits, dash, underscore, periods, and colons are accepted. This parameter is mandatory.
Default from build:
Maven
Gradle
sonar.organization
The key of the organization to which the project belongs. This parameter is mandatory.
### Project information
Property key
Description
sonar.projectName
Name of the project that will be displayed on the web interface.
Notes:
Is set in the UI if the project is manually created in SonarQube Cloud (cannot be changed in the UI).
If passed in the command line, will only be read by the scanner if the command applies to the main branch.
White space is allowed.
Default from build: Maven
sonar.projectVersion
The project version. It should be set for long-lived branch analysis in case you use the new code definition based on the previous version.
Note: Do not use your build number as the project version because this would prevent a correct application of the new code definition based on the previous project version since the build version usually changes much more often than the project release version.
Default from build:
Maven
Gradle
### Analysis scope
Check that the specific property key is supported by your scanner. Adding unsupported properties to your `.sonarcloud.properties` can create problems if the scanner tries to reindex them.
Property key
Description
Default
sonar.sources
The initial analysis scope for main source code (non-test code) in the project.
This property is not supported by the SonarScanner for .NET.
Possible values: Comma-separated paths to directories are included. An individual file in the list means that the file is included. A directory in the list means that all analyzable files and directories recursively below it are included. The path can be relative (to the sonar.projectBaseDir property) or absolute. Wildcards (*, ** and ?) are not allowed.
Default from build:
Maven
Gradle
.NET
The value of the sonar.projectBaseDir property.
sonar.tests
The initial analysis scope for test code in the project.
This property is not supported by the SonarScanner for .NET.
Possible values: See sonar.sources above.
Note: If this property is not defined, no code will be analyzed as test code as there is no default value.
Default from build:
Maven
Gradle
.NET
sonar.projectBaseDir
The project’s base directory. Use this property when you need the analysis to take place in a directory other than the one from which it was started. For example, the analysis starts from jenkins/jobs/myjob/workspace but the files to be analyzed are in ftpdrop/cobol/project1.
Possible values: The path may be relative (to the directory from which the analysis was started) or absolute. Specify not the source directory, but some ancestor of the source directory. The value specified here becomes the new "analysis directory", and other paths are then specified as though the analysis were starting from that specified value.
Note: The analysis process will need Write permissions in this directory; it is where the sonar.working.directory will be created by default.
Default from build:
Maven
Gradle
.NET
The directory from which the analysis was started.
sonar.scm.exclusions.disabled
For supported SCMs, defines whether files ignored by the SCM, e.g., files listed in .gitignore, will be excluded from the analysis or not.
Possible values:
true: exclusion disable
false: exclusion enabled
false
sonar.filesize.limit
Sets the limit in MB for files to be discarded from the analysis scope if the size is greater than specified.
Note: The sonar.javascript.maxFileSize property (default: 1000 KB) discards JavaScript and TypeScript files from the analysis scope if the file size is greater than specified (This parameter can be set in the UI).
20
### Duplication check
Property key
Description
Default
sonar.cpd.<language>.minimumTokens
Is used for non-Java projects to define the duplication check rule: a piece of code is considered duplicated if sonar.cpd.<language>.minimumTokens identical tokens are found across at least sonar.cpd.<language>.minimumLines lines of code.
Note: For Java projects, a piece of code is considered duplicated when there is a series of at least 10 statements in a row, regardless of the number of tokens and lines. This threshold cannot be overridden.
100
sonar.cpd.<language>.minimumLines
Is used for non-Java projects to define the duplication check rule: see above.
10
### Analysis logging
Property key
Description
Default
sonar.log.level
Controls the quantity/level of logs produced during an analysis.
Possible values: From least to most verbose:
INFO
DEBUG
TRACE: like DEBUG with possible additional information output by plugins or libraries used by the scanner.
INFO
sonar.verbose
Possible values:
true: adds more details to the analysis logs by activating the DEBUG mode for the scanner.
false
Note: There is the potential for this setting to expose sensitive information such as passwords if they are stored as server-side environment variables.
false
sonar.scanner.metadataFilePath
Sets the location where the scanner writes the report-task.txt file containing among other things the ceTaskId.
The value of sonar.working.directory.
### Quality gate
Property key
Description
Default
sonar.qualitygate.wait
Forces the analysis step to poll the server instance and wait for the Quality Gate status. This setting will fail the pipeline if the quality gate fails.
Possible values: true or false
false
sonar.qualitygate.timeout
The number of seconds that the scanner should wait for a report to be processed.
300
### Test coverage
See the [test-coverage-parameters](https://docs.sonarsource.com/sonarqube-cloud/enriching/test-coverage/test-coverage-parameters "mention") page.
### Import of external issues
The properties below are used to set up the import of issue reports in SonarQube format or in SARIF format. A path defined through these properties is either relative to the `sonar.projectBaseDir` property (which is by default the directory from which the analysis was started) or absolute.
For more information about the import of external issues, see [external-analyzer-reports](https://docs.sonarsource.com/sonarqube-cloud/enriching/external-analyzer-reports "mention").
Property key
Description
sonar.externalIssuesReportPaths
Comma-delimited list of paths (directories or files) to generic issue reports1).
sonar.sarifReportPaths
Comma-delimited list of paths (directories or files) to SARIF reports2).
1\) See [generic-issue-data](https://docs.sonarsource.com/sonarqube-cloud/enriching/generic-issue-data "mention")\
2\) See [importing-issues-from-sarif-reports](https://docs.sonarsource.com/sonarqube-cloud/enriching/importing-issues-from-sarif-reports "mention")
### Links displayed in the UI
Property key
Description
sonar.links.ci
The URL of the continuous integration system used. The property is effective only for the main branch analysis.
Default from build: Maven
sonar.links.homepage
The URL of the build project home page. The property is effective only for the main branch analysis.
Default from build: Maven
sonar.links.issue
The URL to the issue tracker being used. The property is effective only for the main branch analysis.
Default from build: Maven
sonar.links.scm
The URL of the build project source code repository. The property is effective only for the main branch analysis.
Default from build: Maven
### **Dependency analysis (SCA)**
The following parameters influence the results of the [dependency analysis](https://docs.sonarsource.com/sonarqube-cloud/advanced-security/analyzing-projects-for-dependencies-sca).
| Parameter | Type | Default | Description |
| -------------------------------------- | ------- | --------------- | -------------------------------------------------------------------------------------------------------------------------------------------------------------------------------------------------------------------------------------------------------------------------------------------------------------------------------------------------- |
| `sonar.sca.enabled` | Boolean | true | Indicates whether to perform Software Composition Analysis (SCA) on this project. Set it to false to disable SCA for this project. |
| `sonar.sca.exclusions` | String |
|
A comma-separated list of global patterns of paths to exclude as part of analysis.
For example, to ignore all manifests under the tests/ and fixtures/ directories, set:
When performing analysis, SonarQube attempts to run your build tools (such as Maven or Gradle) to create a full dependency graph.
By default, SonarQube does not fail the analysis if these tools fail, and returns information on a limited set of dependencies. Set this parameter to false to force a failure in this scenario.
|
| `sonar.sca.goNoResolve` | Boolean | false | Disables automatic generation of a Go lock file. This results in degraded dependency information. |
| `sonar.sca.mavenNoResolve` | Boolean | false |
Disables automatic generation of a Maven lock file and dependency graph file.
This results in degraded dependency information.
|
| `sonar.sca.mavenForceDepPlugin` | Boolean | true | Ensures Maven Dependency Plugin is installed even when it’s not available in the environment. |
| `sonar.sca.mavenIgnoreWrapper` | Boolean | false | Disables a search for a Maven wrapper script `mvnw.` Set this to true if the default Maven wrapper in your `PATH` is not functioning. |
| `sonar.sca.mavenOptions` | String |
| Sends additional options to any Maven commands used to generate the lock file and dependency graph file. |
| `sonar.sca.gradleNoResolve` | Boolean | false | Disables automatic generation of a Gradle dependencies lock file. This results in degraded dependency information. |
| `sonar.sca.gradleConfigurationPattern` | String |
| Java regex of configurations to include. This is passed to gradle via `-PconfigurationPattern`. When unset, all configurations will be resolved. |
| `sonar.sca.pythonBinary` | String | /usr/bin/python | Path to a specific Python binary that should be used if lock files need to be generated. |
| `sonar.sca.pythonNoResolve` | Boolean | false | Disables automatic generation of a Python lock file. This results in degraded dependency information. |
| `sonar.sca.pythonResolveLocal` | Boolean | false | When generating a python lockfile, dependency resolution is done in a temporary virtual environment. Set this to true to skip creation of the virtual environment and resolve against the local python environment. |
| `sonar.sca.npmNoResolve` | Boolean | false | Disables automatic generation of a lock file for an NPM project when a supported lockfile (`yarn.lock`, `package-lock.json`, `pnpm-lock.yaml`, `bun.lock`) is not present. |
| `sonar.sca.npmEnableScripts` | Boolean | false | By default, when generating a lockfile, the `--ignore-scripts NPM/Yarn` option is passed to ignore any lifecycle scripts. If lifecycle scripts are needed to properly generate dependencies, enable this option. |
| `sonar.sca.nugetNoResolve` | Boolean | false | Disables automatic generation of a lock file for a Nuget project. |
| `sonar.sca.resolveAsRoot` | Boolean | false |
By default, Sonar does not run dependency resolution commands as an admin, as installing packages could lead to compromise if a malicious package is specified.
While not recommended, you can set this to true if you have vetted your dependencies and need to resolve dependencies while running as an admin.
|
| `sonar.scanner.keepReport` | Boolean | false | Not specific to SCA. Keeps the scanner work directory after analysis, including the `dependency-files.tar.xz` that contains dependency files to analyze. Useful if you have access to [commercial support](https://www.sonarsource.com/support/), as the Sonar support team may ask for this file to assist with resolving issues. |
### JRE auto-provisioning
See also the Scanner's [general-requirements](https://docs.sonarsource.com/sonarqube-cloud/advanced-setup/scanner-environment/general-requirements "mention") page for information about JRE auto-provisioning.
JRE auto-provisioning is available only for these SonarScanners:
* SonarScanner CLI from v6.0
* SonarScanner for Maven from v5.0
* SonarScanner for Gradle from v6.0
* SonarScanner for .NET from v7.0
* SonarScanner for NPM from v4.0
Here are their parameters and environment variables:
Property key
Description
sonar.scanner.os
The operating system of the machine hosting the SonarScanner.
Default: the autodetected value
Environment variable: SONAR_SCANNER_OS Not supported by the SonarScanner for .NET.
Possible values: windows, linux, macos, alpine.
sonar.scanner.arch
The CPU architecture type.
Environment variable: SONAR_SCANNER_ARCH Not supported by the SonarScanner for .NET.
Default: the autodetected value
Possible values: x64, aarch64.
sonar.scanner.skipJreProvisioning
Defines whether the JRE auto-detection is disabled (true) or not (false).
Environment variable: SONAR_SCANNER_SKIP_JRE_PROVISIONING Not supported by the SonarScanner for .NET.
Default: false
sonar.scanner.javaExePath
If defined, the SonarScanner will be run with this JRE.
Environment variable: SONAR_SCANNER_JAVA_EXE_PATH Not supported by the SonarScanner for .NET.
Default: The provisioned JRE, or use java from your PATH if sonar.scanner.skipJreProvisioning=true.
### Timeout
Property key
Description
sonar.scanner.connectTimeout
The time period to establish connections with the server (in seconds).
Default: 5
Supported by: SonarScanner CLI from v6.0, Maven from v5.0, Gradle from v6.0, .NET from v7.0, and NPM from v4.0.
sonar.scanner.socketTimeout
The Maximum time of inactivity between two data packets when exchanging data with the server (in seconds).
Default: 60
Supported by: SonarScanner CLI from v6.0, Maven from v5.0, Gradle from v6.0, .NET from v7.0, and NPM from v4.0.
sonar.scanner.responseTimeout
The maximum time to wait for the response of a web service call (in seconds). Modifying this value from the default is useful only when you’re experiencing timeouts during analysis while waiting for the server to respond to web service calls.
Default: 60
Supported by: SonarScanner CLI from v6.0, Maven from v5.0, Gradle from v6.0, .NET from v7.0, and NPM from v4.0.
sonar.plugins.download.timeout
Maximum time to wait when downloading a plugin from SonarQube (in seconds).
Default: 300
### Proxy
If the CI/CD host is behind a proxy, you’ll have to setup the connection to the proxy server by using the parameters below. These parameters are supported only by:
* SonarScanner CLI (from v6.0)
* SonarScanner for Maven (from v5.0)
* SonarScanner for Gradle (from v6.0)
* SonarScanner for NPM (from v4.0)
Property key
Description
sonar.scanner.proxyHost
The host name of the proxy server (mandatory).
Example: mycompanyproxy.com
Environment variable: SONAR_SCANNER_PROXY_HOST
sonar.scanner.proxyPort
The port of the proxy server.
Environment variable: SONAR_SCANNER_PROXY_PORT
Default value:
• If sonar.host.url starts with https: 443
• Otherwise: 80
sonar.scanner.proxyUser
In case of an authenticated proxy: the user name.
Environment variable: SONAR_SCANNER_PROXY_USER
sonar.scanner.proxyPassword
In case of an authenticated proxy: the user password.
### Branch analysis
The following parameters relate to branch analysis and are, in the main cases, only required when using a non-integrated CI. For detailed information on their use, see the [branch-analysis-setup](https://docs.sonarsource.com/sonarqube-cloud/enriching/branch-analysis-setup "mention") page.
Property key
Description
sonar.branch.name
The name of the branch to be analyzed.
sonar.branch.target
The name of:
If the branch to be analyzed is a long-lived branch: its reference branch.
If the branch to be analyzed is a short-lived branch: its target branch.
### Pull request analysis
The following parameters relate to Pull request analysis and are only required for manual projects. For detailed information on their use, see [pull-request-analysis](https://docs.sonarsource.com/sonarqube-cloud/improving/pull-request-analysis "mention").
Property key
Description
Default
sonar.pullrequest.key
This property is the unique identifier of your Pull Request. Must correspond to the key of the Pull Request in your DevOps platform.
Example: sonar.pullrequest.key=5
sonar.pullrequest.branch
This property is the name of the branch that contains the changes to be merged.
The branch into which the pull request will be merged (target branch).
Example: sonar.pullrequest.base=main
main branch
### Other parameters
Property key
Description
Default
sonar.scm.revision
Overrides the revision, for instance, the Git sha1, displayed in analysis results.
Note: May be provided by the CI environment or guessed from the checked-out sources.
sonar.buildString
The string passed with this property will be stored with the analysis and available in the results of api/project_analyses/search, thus allowing you to later identify a specific analysis and obtain its key for use with api/project_analyses/set_baseline on the SPECIFIC_ANALYSIS type.
sonar.sourceEncoding
Encoding of the source files. For example, UTF-8, MacRoman, Shift_JIS. The list of available encodings depends on your JVM.
Default from build:
• Maven
• Gradle
The system encoding
sonar.working.directory
Path to the working directory used by the SonarScanner during a project analysis to store temporary data. This property is not compatible with the SonarScanner for .NET.
The path can be relative (to the sonar.projectBaseDir property) or absolute. It must be unique for each project.
Warning: The specified directory is deleted before each analysis.
Default from build:
• Maven
• Gradle
.scannerwork
sonar.scm.forceReloadAll
By default, blame information is only retrieved for changed files. Set this property to true to load blame information for all files, which may significantly increase analysis duration. This can be useful if you feel that some SCM data is outdated but SonarQube does not get the latest information from the SCM engine and this analysis parameter should not be a permanent part of your analysis configuration.
false
sonar.analysis.<key>=<value>
This property stub allows you to insert custom key/value pairs into the analysis context, which will also be passed forward to webhooks1).
Example: sonar.analysis.buildNumber=12345
Note: Depending on the environment, using this property in the command line may not work.
sonar.userHome
The base directory for various locations, such as the user cache.
Environment variable: SONAR_USER_HOME
~/.sonar
sonar.scanner.javaOpts
Since SonarScanner CLI 6.0.0, the scanner engine will be started as a separate Java process. This property is used to pass arguments to the JVM running the forked scanner engine process.
Can be used only with the SonarScanner CLI (from v6.0), SonarScanner for Maven (from v5.0), Gradle (from v6.0) and NPM (from v4.0).
Examples:
SONAR_SCANNER_JAVA_OPTS="-Xmx4g"
Or
SONAR_SCANNER_JAVA_OPTS="-Xmx512m"
Environment variable: SONAR_SCANNER_JAVA_OPTS
1\) See [webhooks](https://docs.sonarsource.com/sonarqube-cloud/advanced-setup/webhooks "mention").
### Deprecated parameters
{% hint style="warning" %}
These parameters are listed for completeness, but are deprecated and should not be used in new analyses. They will be removed in the future. A user warning appears on the project interface if you activate this parameter.
{% endhint %}
* `sonar.login`
* `sonar.projectDate`
* `http.proxyHost` or `https.proxyHost`
* `http.proxyPort`
* `http.proxyUser`
* `http.proxyPassword`
* `sonar.ws.timeout`
* `sonar.scanner.dumpToFile` - the name has changed. For more information, see [#debugging-analysis](https://docs.sonarsource.com/sonarqube-cloud/appendices/troubleshooting#debugging-analysis "mention").
### Related pages
[configuration-overview](https://docs.sonarsource.com/sonarqube-cloud/advanced-setup/analysis-parameters/configuration-overview "mention")
---
# Source: https://docs.sonarsource.com/sonarqube-server/9.8/project-administration/pdf-reports.md
# Source: https://docs.sonarsource.com/sonarqube-server/9.9/project-administration/pdf-reports.md
# Source: https://docs.sonarsource.com/sonarqube-server/10.0/project-administration/pdf-reports.md
# Source: https://docs.sonarsource.com/sonarqube-server/10.1/project-administration/pdf-reports.md
# Source: https://docs.sonarsource.com/sonarqube-server/10.2/project-administration/pdf-reports.md
# Source: https://docs.sonarsource.com/sonarqube-server/10.3/project-administration/pdf-reports.md
# Source: https://docs.sonarsource.com/sonarqube-server/10.4/project-administration/pdf-reports.md
# Source: https://docs.sonarsource.com/sonarqube-server/10.5/project-administration/pdf-reports.md
# Source: https://docs.sonarsource.com/sonarqube-server/10.6/project-administration/pdf-reports.md
# Source: https://docs.sonarsource.com/sonarqube-server/10.7/instance-administration/system-functions/pdf-reports.md
# Source: https://docs.sonarsource.com/sonarqube-server/10.7/user-guide/viewing-reports/pdf-reports.md
# Source: https://docs.sonarsource.com/sonarqube-server/10.8/instance-administration/system-functions/pdf-reports.md
# Source: https://docs.sonarsource.com/sonarqube-server/10.8/user-guide/viewing-reports/pdf-reports.md
# Source: https://docs.sonarsource.com/sonarqube-server/2025.2/instance-administration/system-functions/pdf-reports.md
# Source: https://docs.sonarsource.com/sonarqube-server/2025.2/user-guide/viewing-reports/pdf-reports.md
# Source: https://docs.sonarsource.com/sonarqube-server/2025.3/instance-administration/system-functions/pdf-reports.md
# Source: https://docs.sonarsource.com/sonarqube-server/2025.3/user-guide/viewing-reports/pdf-reports.md
# Source: https://docs.sonarsource.com/sonarqube-server/2025.5/instance-administration/system-functions/pdf-reports.md
# Source: https://docs.sonarsource.com/sonarqube-server/2025.5/user-guide/viewing-reports/pdf-reports.md
# Source: https://docs.sonarsource.com/sonarqube-server/2025.1/instance-administration/system-functions/pdf-reports.md
# Source: https://docs.sonarsource.com/sonarqube-server/2025.1/user-guide/viewing-reports/pdf-reports.md
# Source: https://docs.sonarsource.com/sonarqube-server/2025.4/instance-administration/system-functions/pdf-reports.md
# Source: https://docs.sonarsource.com/sonarqube-server/2025.4/user-guide/viewing-reports/pdf-reports.md
# Source: https://docs.sonarsource.com/sonarqube-server/2025.6/instance-administration/system-functions/pdf-reports.md
# Source: https://docs.sonarsource.com/sonarqube-server/2025.6/user-guide/viewing-reports/pdf-reports.md
# Source: https://docs.sonarsource.com/sonarqube-server/instance-administration/system-functions/pdf-reports.md
# Source: https://docs.sonarsource.com/sonarqube-server/user-guide/viewing-reports/pdf-reports.md
# PDF reports
*PDF reports are available as part of* [*Enterprise Edition*](https://www.sonarsource.com/plans-and-pricing/enterprise/) *and above.*
{% hint style="info" %}
The content on this page is aimed at developers who want to get PDF reports and subscribe to updates. If you're an admin, see [pdf-reports](https://docs.sonarsource.com/sonarqube-server/instance-administration/system-functions/pdf-reports "mention") in the instance administration section.
{% endhint %}
The PDF reports focus mainly on new code and quality gate conditions. This means that, if there are failing conditions on the overall code, they will appear in the report as well.
Depending on the configuration of your SonarQube Server instance, the PDF reports are generated with metrics either from [standard-experience](https://docs.sonarsource.com/sonarqube-server/instance-administration/analysis-functions/instance-mode/standard-experience "mention") or [mqr-mode](https://docs.sonarsource.com/sonarqube-server/instance-administration/analysis-functions/instance-mode/mqr-mode "mention").
### Project and application PDF reports
You can download PDF reports for a permanent branch of a project or application and subscribe to regular updates. The frequency with which you receive reports is set by a project or system administrator. See [maintaining-the-branches-of-your-project](https://docs.sonarsource.com/sonarqube-server/project-administration/maintaining-project/maintaining-the-branches-of-your-project "mention") for more information.
To download a PDF report for a project or application:
1. Retrieve the project or application. See [retrieving-projects](https://docs.sonarsource.com/sonarqube-server/user-guide/viewing-projects/retrieving-projects "mention") for more information.
2. In the upper right corner of the project or application’s Overview page, click **Project PDF report** or **Application PDF report** and select **Download** or **Subscribe to report** from the drop-down menu.
{% hint style="info" %}
You cannot download or subscribe to a PDF report for a temporary branch. If you are unable to download or subscribe to a PDF report for a branch, go to **Project Settings** > **Branches and Pull Requests** and make sure that the **Keep when inactive** toggle is on for that branch (you must be a project admin).
{% endhint %}
### Portfolio PDF reports
You can download a PDF report for a portfolio from the portfolio’s Overview page by selecting **Portfolio PDF report** from the upper-right corner and clicking **Download**. This is really convenient, for example, if you’re going into a meeting where you may not have access to your SonarQube Server instance.
You can subscribe to receive a PDF by email by selecting **Subscribe to report** from the **Portfolio PDF report** drop-down menu. The default subscription frequency is monthly, but a portfolio administrator can change it. See [managing-portfolios](https://docs.sonarsource.com/sonarqube-server/project-administration/managing-portfolios "mention") for more information.
{% hint style="info" %}
You will only receive the PDF when the portfolio is computed.
{% endhint %}
### Related pages
* [security-reports](https://docs.sonarsource.com/sonarqube-server/user-guide/viewing-reports/security-reports "mention")
* [regulatory-reports](https://docs.sonarsource.com/sonarqube-server/user-guide/viewing-reports/regulatory-reports "mention")
* [portfolios](https://docs.sonarsource.com/sonarqube-server/user-guide/viewing-reports/portfolios "mention")
* [pdf-reports](https://docs.sonarsource.com/sonarqube-server/instance-administration/system-functions/pdf-reports "mention")
---
# Source: https://docs.sonarsource.com/sonarqube-community-build/server-update-and-maintenance/troubleshooting/performance-issues.md
# Source: https://docs.sonarsource.com/sonarqube-server/10.8/server-upgrade-and-maintenance/troubleshooting/performance-issues.md
# Source: https://docs.sonarsource.com/sonarqube-server/2025.2/server-update-and-maintenance/troubleshooting/performance-issues.md
# Source: https://docs.sonarsource.com/sonarqube-server/2025.3/server-update-and-maintenance/troubleshooting/performance-issues.md
# Source: https://docs.sonarsource.com/sonarqube-server/2025.5/server-update-and-maintenance/troubleshooting/performance-issues.md
# Source: https://docs.sonarsource.com/sonarqube-server/2025.1/server-update-and-maintenance/troubleshooting/performance-issues.md
# Source: https://docs.sonarsource.com/sonarqube-server/2025.4/server-update-and-maintenance/troubleshooting/performance-issues.md
# Source: https://docs.sonarsource.com/sonarqube-server/2025.6/server-update-and-maintenance/troubleshooting/performance-issues.md
# Source: https://docs.sonarsource.com/sonarqube-server/server-update-and-maintenance/troubleshooting/performance-issues.md
# Performance issues
In case of performance issues, you may try the following:
* Review the [server-host-requirements](https://docs.sonarsource.com/sonarqube-server/server-installation/server-host-requirements "mention") for SonarQube Server linked to **Elasticsearch** usage.
* Move the Elasticsearch storage to a storage with high IOPS and low latency. See [#configure-es-storage-path](https://docs.sonarsource.com/sonarqube-server/server-installation/from-zip-file/basic-installation#configure-es-storage-path "mention") for more information.
* Set the [housekeeping](https://docs.sonarsource.com/sonarqube-server/instance-administration/system-functions/housekeeping "mention") with a reduced retention time, to limit the database size.
* Configure the analysis scope to reduce the number of files analyzed, leading to shorter analysis and smaller database footprint. See [introduction](https://docs.sonarsource.com/sonarqube-server/project-administration/adjusting-analysis/setting-analysis-scope/introduction "mention") for more information.
* From the [Enterprise Edition](https://www.sonarsource.com/plans-and-pricing/enterprise/): increase the number of Compute Engine workers and/or configure the Compute Engine to enable parallel processing of pull requests and branch analyses for each project. See [improving-performance](https://docs.sonarsource.com/sonarqube-server/server-update-and-maintenance/maintenance/improving-performance "mention").
* For the Data Center Edition on Kubernetes: set up autoscaling. See [setting-up-autoscaling](https://docs.sonarsource.com/sonarqube-server/server-installation/data-center-edition/on-kubernetes-or-openshift/setting-up-autoscaling "mention") for more details.
* If performance issues occur after a PostgreSQL database upgrade, try reindexing the following database tables: issues, rules, and components.
### Related pages
* [server-logs](https://docs.sonarsource.com/sonarqube-server/server-update-and-maintenance/troubleshooting/server-logs "mention")
* [database-related-issues](https://docs.sonarsource.com/sonarqube-server/server-update-and-maintenance/troubleshooting/database-related-issues "mention")
* [elasticsearch](https://docs.sonarsource.com/sonarqube-server/server-update-and-maintenance/troubleshooting/elasticsearch "mention")
* [other-issues](https://docs.sonarsource.com/sonarqube-server/server-update-and-maintenance/troubleshooting/other-issues "mention")
* [improving-performance](https://docs.sonarsource.com/sonarqube-server/server-update-and-maintenance/maintenance/improving-performance "mention")
---
# Source: https://docs.sonarsource.com/sonarqube-server/2025.3/instance-administration/ai-features/permissions-for-ai-autodetect.md
# Source: https://docs.sonarsource.com/sonarqube-server/2025.5/instance-administration/ai-features/permissions-for-ai-autodetect.md
# Source: https://docs.sonarsource.com/sonarqube-server/2025.1/instance-administration/ai-features/permissions-for-ai-autodetect.md
# Source: https://docs.sonarsource.com/sonarqube-server/2025.4/instance-administration/ai-features/permissions-for-ai-autodetect.md
# Source: https://docs.sonarsource.com/sonarqube-server/2025.6/instance-administration/ai-features/permissions-for-ai-autodetect.md
# Source: https://docs.sonarsource.com/sonarqube-server/instance-administration/ai-features/permissions-for-ai-autodetect.md
# Source: https://docs.sonarsource.com/sonarqube-cloud/administering-sonarcloud/ai-features/permissions-for-ai-autodetect.md
# Permissions for AI Autodetect
To activate AI Code Autodetection, a SonarQube Cloud Organization Administrator must first check that the feature is enabled.
Then, a DevOps platform administrator must set the correct permission level in your AI-powered web service. For specific instructions in your DevOps platform, please refer to the applicable section below.
### GitHub Copilot Business
When a SonarCloud administrator activates AI Code Autodetection (see the [autodetect-ai-code](https://docs.sonarsource.com/sonarqube-cloud/administering-sonarcloud/ai-features/autodetect-ai-code "mention") page) for a SonarCloud organization, GitHub Copilot Business app administrators will receive an email notification to review the SonarCloud App’s permission request. The App administrator should review the request and accept the **Read-only** access to GitHub Copilot Business.
With access to your GitHub Copilot Business App, SonarQube Cloud can evaluate users’ GitHub Copilot usage and code contribution patterns to identify potential AI-generated code. If there is a match in user data, SonarQube Cloud will display the **AI code detected** status on the project’s Overview and Project Information pages.
SonarQube Cloud does not retroactively check older code from previous commits. In addition, projects that have the  label applied by a quality standards administrator will be excluded from automatic AI code detection. See the [#label-projects-with-ai-code](https://docs.sonarsource.com/sonarqube-cloud/standards/ai-code-assurance/overview#label-projects-with-ai-code "mention") article to learn more.
{% hint style="warning" %}
If the GitHub Copilot Business and Enterprise account administrator chooses to ignore the request, Sonar’s AI Code Autodetection will be turned on, but not be activated.
{% endhint %}
### Related pages
* SonarQube Cloud's [ai-capabilities](https://docs.sonarsource.com/sonarqube-cloud/ai-capabilities "mention")
* Use [ai-codefix](https://docs.sonarsource.com/sonarqube-cloud/ai-capabilities/ai-codefix "mention") to get AI-generated fix suggestions
* To learn about AI Code Assurance:
* [overview](https://docs.sonarsource.com/sonarqube-cloud/standards/ai-code-assurance/overview "mention") for AI-generated code
* [#marking-a-project-as-containing-ai-generated-code](https://docs.sonarsource.com/sonarqube-cloud/ai-capabilities/ai-code-assurance#marking-a-project-as-containing-ai-generated-code "mention")
* and learn how to use [quality-gates-for-ai-code](https://docs.sonarsource.com/sonarqube-cloud/standards/ai-code-assurance/quality-gates-for-ai-code "mention")
---
# Source: https://docs.sonarsource.com/sonarqube-community-build/analyzing-source-code/test-coverage/php-test-coverage.md
# Source: https://docs.sonarsource.com/sonarqube-server/9.8/analyzing-source-code/test-coverage/php-test-coverage.md
# Source: https://docs.sonarsource.com/sonarqube-server/9.9/analyzing-source-code/test-coverage/php-test-coverage.md
# Source: https://docs.sonarsource.com/sonarqube-server/10.0/analyzing-source-code/test-coverage/php-test-coverage.md
# Source: https://docs.sonarsource.com/sonarqube-server/10.1/analyzing-source-code/test-coverage/php-test-coverage.md
# Source: https://docs.sonarsource.com/sonarqube-server/10.2/analyzing-source-code/test-coverage/php-test-coverage.md
# Source: https://docs.sonarsource.com/sonarqube-server/10.3/analyzing-source-code/test-coverage/php-test-coverage.md
# Source: https://docs.sonarsource.com/sonarqube-server/10.4/analyzing-source-code/test-coverage/php-test-coverage.md
# Source: https://docs.sonarsource.com/sonarqube-server/10.5/analyzing-source-code/test-coverage/php-test-coverage.md
# Source: https://docs.sonarsource.com/sonarqube-server/10.6/analyzing-source-code/test-coverage/php-test-coverage.md
# Source: https://docs.sonarsource.com/sonarqube-server/10.7/analyzing-source-code/test-coverage/php-test-coverage.md
# Source: https://docs.sonarsource.com/sonarqube-server/10.8/analyzing-source-code/test-coverage/php-test-coverage.md
# Source: https://docs.sonarsource.com/sonarqube-server/2025.2/analyzing-source-code/test-coverage/php-test-coverage.md
# Source: https://docs.sonarsource.com/sonarqube-server/2025.3/analyzing-source-code/test-coverage/php-test-coverage.md
# Source: https://docs.sonarsource.com/sonarqube-server/2025.5/analyzing-source-code/test-coverage/php-test-coverage.md
# Source: https://docs.sonarsource.com/sonarqube-server/2025.1/analyzing-source-code/test-coverage/php-test-coverage.md
# Source: https://docs.sonarsource.com/sonarqube-server/2025.4/analyzing-source-code/test-coverage/php-test-coverage.md
# Source: https://docs.sonarsource.com/sonarqube-server/2025.6/analyzing-source-code/test-coverage/php-test-coverage.md
# Source: https://docs.sonarsource.com/sonarqube-server/analyzing-source-code/test-coverage/php-test-coverage.md
# Source: https://docs.sonarsource.com/sonarqube-cloud/enriching/test-coverage/php-test-coverage.md
# PHP test coverage
SonarQube Cloud supports the reporting of test coverage information as part of the analysis of your PHP project.
However, SonarQube Cloud does not produce the coverage report itself. Instead, you must set up a third-party tool to produce the report as part of your build process. You then need to configure your analysis to tell the SonarScanner where the report is located so that it can pick it up and send it to SonarQube Cloud, where it will be displayed on your project dashboard along with the other analysis metrics.
For PHP projects, we recommend PHPUnit for testing and coverage reporting.
### Use CI-based, not automatic analysis
Usually, when you import a new PHP project, automatic analysis starts immediately. But, since coverage is not yet supported under automatic analysis, *you will need to use CI-based analysis instead.* This requires disabling automatic analysis. Here are the steps you need to follow:
**If you have not yet imported your PHP project**, just add an empty file called `sonar-project.properties` to the root of your repository, and *then* perform the import. SonarQube Cloud will assume that you want to set up a CI-based analysis and display the onboarding tutorial.
**If you have already imported your project,** then SonarQube Cloud has already run at least once using automatic analysis. Don’t worry, you can still convert your project to use a CI-based approach. Simply go to **Administration** > **Analysis Method** and switch **SonarQube Cloud Automatic Analysis** to **OFF**. Then, on the same screen, under **Supported analysis methods** find your preferred CI and select **Follow the tutorial**.
### Follow the tutorial
At this point, you should be in the onboarding tutorial specific to your CI. Follow the tutorial and when it asks, **What option best describes your build?**, choose **Other (for JS, TS, Go, Python, PHP, …)**. When you are done with the tutorial, you should have a functioning CI-based analysis setup for your PHP project. The next step is to adjust it to get coverage working.
### Adjust your setup
To enable coverage you need to:
* Adjust your build process so that the coverage tool runs *before* the scanner report generation step runs.
* Make sure that the coverage tool writes its report file to a defined path in the build environment.
* Configure the scanning step of your build so that the scanner picks up the report file from that defined path.
### Add coverage to your build process
The details of setting up coverage within your build process depend on which tools you are using. In our example below we use:
* Composer, as a package manager
* PHPUnit with Xdebug, to execute the tests, and
* GitHub Actions to perform the build.
Simply add the following to your `ci.yml` file:
```yaml
- name: Setup PHP with Xdebug
uses: shivammathur/setup-php@v2
with:
php-version: '8.1'
coverage: xdebug
- name: Install dependencies with composer
run: composer update --no-ansi --no-interaction --no-progress
- name: Run tests with phpunit/phpunit
run: vendor/bin/phpunit --coverage-clover=coverage.xml
```
The resulting file should look something like this:
**`.github/workflows/CI.yml`**
```yaml
name: CI
on:
- pull_request
- push
jobs:
tests:
name: Tests
runs-on: ubuntu-latest
steps:
- name: Checkout
uses: actions/checkout@v6
with:
fetch-depth: 0
- name: Setup PHP with Xdebug
uses: shivammathur/setup-php@v2
with:
php-version: '8.1'
coverage: xdebug
- name: Install dependencies with composer
run: composer update --no-ansi --no-interaction --no-progress
- name: Run tests with phpunit/phpunit
run: vendor/bin/phpunit --coverage-clover=coverage.xml
- name: SonarQube Scan
uses: SonarSource/sonarqube-scan-action@v7
env:
SONAR_TOKEN: ${{ secrets.SONAR_TOKEN }}
```
First you install all your project dependencies using Composer as a package manager and then invoke *PHPUnit with XDebug* to run your tests and generate a coverage report file.
**The essential requirements are that the tool produces its report in the clover.xml format and writes it to a place from which the scanner can then pick it up.**
### Add the coverage analysis parameter
The next step is to add `sonar.php.coverage.reportPaths` to your analysis parameters. This parameter must be set to the path of the report file on GitHub Actions produced by your coverage tool. In this example, that path is set to the default produced by GitHub Actions. It is set in the `sonar-project.properties` file, located in the project root:
**`sonar-project.properties`**
```properties
sonar.projectKey=
sonar.organization=
sonar.php.coverage.reportPaths=coverage.xml
```
Wildcards and a comma-delimited list of paths are supported. See [test-coverage-parameters](https://docs.sonarsource.com/sonarqube-cloud/enriching/test-coverage/test-coverage-parameters "mention") for details.
{% hint style="warning" %}
This property is usually set in the `sonar-project.properties` file, located in the project root. Alternatively, you can also set it in the command line of the scanner invocation or in the SonarQube Cloud interface under:
*Your Organization* > ***Your Project*** > **Administration** > **General Settings** > **Languages** > **PHP** > **PHP Unit** > **Coverage Reports**
{% endhint %}
---
# Source: https://docs.sonarsource.com/sonarqube-community-build/analyzing-source-code/languages/php.md
# Source: https://docs.sonarsource.com/sonarqube-server/8.9/analyzing-source-code/languages/php.md
# Source: https://docs.sonarsource.com/sonarqube-server/9.8/analyzing-source-code/languages/php.md
# Source: https://docs.sonarsource.com/sonarqube-server/9.9/analyzing-source-code/languages/php.md
# Source: https://docs.sonarsource.com/sonarqube-server/10.0/analyzing-source-code/languages/php.md
# Source: https://docs.sonarsource.com/sonarqube-server/10.1/analyzing-source-code/languages/php.md
# Source: https://docs.sonarsource.com/sonarqube-server/10.2/analyzing-source-code/languages/php.md
# Source: https://docs.sonarsource.com/sonarqube-server/10.3/analyzing-source-code/languages/php.md
# Source: https://docs.sonarsource.com/sonarqube-server/10.4/analyzing-source-code/languages/php.md
# Source: https://docs.sonarsource.com/sonarqube-server/10.5/analyzing-source-code/languages/php.md
# Source: https://docs.sonarsource.com/sonarqube-server/10.6/analyzing-source-code/languages/php.md
# Source: https://docs.sonarsource.com/sonarqube-server/10.7/analyzing-source-code/languages/php.md
# Source: https://docs.sonarsource.com/sonarqube-server/10.8/analyzing-source-code/languages/php.md
# Source: https://docs.sonarsource.com/sonarqube-server/2025.2/analyzing-source-code/languages/php.md
# Source: https://docs.sonarsource.com/sonarqube-server/2025.3/analyzing-source-code/languages/php.md
# Source: https://docs.sonarsource.com/sonarqube-server/2025.5/analyzing-source-code/languages/php.md
# Source: https://docs.sonarsource.com/sonarqube-server/2025.1/analyzing-source-code/languages/php.md
# Source: https://docs.sonarsource.com/sonarqube-server/2025.4/analyzing-source-code/languages/php.md
# Source: https://docs.sonarsource.com/sonarqube-server/2025.6/analyzing-source-code/languages/php.md
# Source: https://docs.sonarsource.com/sonarqube-server/analyzing-source-code/languages/php.md
# Source: https://docs.sonarsource.com/sonarqube-cloud/advanced-setup/languages/php.md
# PHP
### Supported versions
The level of support for a language is defined as follows:
* Fully supported: Analysis will complete. All the language features are understood and examined.
* Supported: Most language features are understood and examined but the version includes unsupported features. Analysis might break or provide incomplete results.
Versions 5.0 to 8.4 are fully supported.
### Supported frameworks and tools
Laravel, Symfony, WordPress, Laminas, and Zend.
### Language-specific properties
To discover and update the PHP-specific properties, navigate in SonarQube Cloud to *Your Project* > **Administration** > **General Settings** > **Languages** > **PHP**. See the [analysis-parameters](https://docs.sonarsource.com/sonarqube-cloud/advanced-setup/analysis-parameters "mention") page for more information about specific properties.
### Turning issues off
The best way to deactivate an individual issue you don’t intend to fix is to mark it as accepted or false positive through the Sonar UI.
If you need to deactivate a rule (or all rules) for an entire file, then issue exclusions are the way to go. But if you only want to deactivate a rule across a subset of a file - all the lines of a method or a class - you can use a PHPDoc comment `/* @SuppressWarnings("php:S2077") */` or an attribute `#[SuppressWarnings("php:S2077")]`.
### Analyze php.ini files
The PHP analyzer can analyze `php.ini` files with some specific rules (if these rules are activated in your quality profile). `php.ini` files must be part of the project you are analyzing, meaning the `php.ini` files have to be inside the directories listed in `sonar.sources`. Rules targeting `php.ini` files can be quickly identified through the ["php-ini"](https://rules.sonarsource.com/php/tag/php-ini) tag set on them.
### Related pages
* Test coverage [overview](https://docs.sonarsource.com/sonarqube-cloud/enriching/test-coverage/overview "mention")
* [External Analyzer Reports](https://docs.sonarsource.com/sonarqube-cloud/enriching/external-analyzer-reports) ([PHPStan](https://phpstan.org/), [Psalm](https://psalm.dev/))
---
# Source: https://docs.sonarsource.com/sonarqube-community-build/instance-administration/authentication/saml/ping-identity.md
# Source: https://docs.sonarsource.com/sonarqube-server/10.7/instance-administration/authentication/saml/ping-identity.md
# Source: https://docs.sonarsource.com/sonarqube-server/10.8/instance-administration/authentication/saml/ping-identity.md
# Source: https://docs.sonarsource.com/sonarqube-server/2025.2/instance-administration/authentication/saml/ping-identity.md
# Source: https://docs.sonarsource.com/sonarqube-server/2025.3/instance-administration/authentication/saml/ping-identity.md
# Source: https://docs.sonarsource.com/sonarqube-server/2025.5/instance-administration/authentication/saml/ping-identity.md
# Source: https://docs.sonarsource.com/sonarqube-server/2025.1/instance-administration/authentication/saml/ping-identity.md
# Source: https://docs.sonarsource.com/sonarqube-server/2025.4/instance-administration/authentication/saml/ping-identity.md
# Source: https://docs.sonarsource.com/sonarqube-server/2025.6/instance-administration/authentication/saml/ping-identity.md
# Source: https://docs.sonarsource.com/sonarqube-server/instance-administration/authentication/saml/ping-identity.md
# With Ping Identity
- [Introduction to SAML with Ping Identity](/sonarqube-server/instance-administration/authentication/saml/ping-identity/introduction.md): Main steps of SAML setup with Ping Identity.
- [Setup in Ping Identity](/sonarqube-server/instance-administration/authentication/saml/ping-identity/setup-in-ping-identity.md): This page explains how to register SonarQube Server in PingOne or PingFederate.
- [Setup in SonarQube Server](/sonarqube-server/instance-administration/authentication/saml/ping-identity/setup-in-sq.md): This page describes how to set up SAML with Ping Identity in SonarQube Server.
- [Setup of security features](/sonarqube-server/instance-administration/authentication/saml/ping-identity/optional-security-features.md): To improve security, you can set up the encryption of SAML assertions sent by Ping Identity and the signing of SAML requests sent by SonarQube Server.
---
# Source: https://docs.sonarsource.com/sonarqube-community-build/analyzing-source-code/ci-integration/jenkins-integration/pipeline-pause.md
# Source: https://docs.sonarsource.com/sonarqube-server/10.5/analyzing-source-code/ci-integration/jenkins-integration/pipeline-pause.md
# Source: https://docs.sonarsource.com/sonarqube-server/10.6/analyzing-source-code/ci-integration/jenkins-integration/pipeline-pause.md
# Source: https://docs.sonarsource.com/sonarqube-server/10.7/analyzing-source-code/ci-integration/jenkins-integration/pipeline-pause.md
# Source: https://docs.sonarsource.com/sonarqube-server/10.8/analyzing-source-code/ci-integration/jenkins-integration/pipeline-pause.md
# Source: https://docs.sonarsource.com/sonarqube-server/2025.2/analyzing-source-code/ci-integration/jenkins-integration/pipeline-pause.md
# Source: https://docs.sonarsource.com/sonarqube-server/2025.3/analyzing-source-code/ci-integration/jenkins-integration/pipeline-pause.md
# Source: https://docs.sonarsource.com/sonarqube-server/2025.5/analyzing-source-code/ci-integration/jenkins-integration/pipeline-pause.md
# Source: https://docs.sonarsource.com/sonarqube-server/2025.1/analyzing-source-code/ci-integration/jenkins-integration/pipeline-pause.md
# Source: https://docs.sonarsource.com/sonarqube-server/2025.4/analyzing-source-code/ci-integration/jenkins-integration/pipeline-pause.md
# Source: https://docs.sonarsource.com/sonarqube-server/2025.6/analyzing-source-code/ci-integration/jenkins-integration/pipeline-pause.md
# Source: https://docs.sonarsource.com/sonarqube-server/analyzing-source-code/ci-integration/jenkins-integration/pipeline-pause.md
# Source: https://docs.sonarsource.com/sonarqube-cloud/advanced-setup/ci-based-analysis/jenkins/pipeline-pause.md
# Setting up a pipeline pause
Starting in the SonarQube Cloud Team plan, you can configure an automatic failing of your pipeline in case the quality gate fails (see the [#pipeline-interruption](https://docs.sonarsource.com/sonarqube-cloud/advanced-setup/ci-based-analysis/key-features#pipeline-interruption "mention") article). To do so, you must set up a pipeline pause by using the `waitForQualityGate` step.
Proceed as follows:
1. Make sure the `withSonarQubeEnv` step is included in your pipeline so that the taskId is correctly attached to the pipeline context; see the [#pipeline-job](https://docs.sonarsource.com/sonarqube-cloud/advanced-setup/ci-based-analysis/add-analysis-to-job#pipeline-job "mention") article.
2. Configure a webhook for your project in SonarQube Cloud pointing to `/sonarqube-webhook/`(This is the URL exposed by the Jenkins extension). You may use a webhook configured at the global level if applicable to your project. This step is mandatory (and cannot be performed in a Free plan organization)! For more information, check the [webhooks](https://docs.sonarsource.com/sonarqube-cloud/advanced-setup/webhooks "mention") page.
3. You may want to enable the verification of the quality gate payload sent to Jenkins by setting a webhook secret: see below.
4. Add a quality gate stage with `waitForQualityGate` to your Jenkins file as described below through examples.
### Adding a quality gate stage
This section gives examples of the adding of a quality gate stage to your Jenkins file with `waitForQualityGate`.
#### Scripted pipeline
Thanks to the webhook, the step is implemented in a very lightweight way: no need to occupy a node doing polling, and it doesn’t prevent Jenkins from restarting (the step will be restored after restart). Note that to prevent race conditions, when the step starts (or is restarted) a direct call is made to the server to check if the task is already completed.
Example
```groovy
node {
stage('SonarCloud analysis') {
withSonarQubeEnv('SonarCloud') {
sh 'mvn clean verify org.sonarsource.scanner.maven:sonar-maven-plugin:sonar'
} // submitted taskId is automatically attached to the pipeline context
}
}
// No need to occupy a node
stage("Quality Gate"){
timeout(time: 1, unit: 'HOURS') { // Just in case something goes wrong, pipeline will be stopped after a timeout
def qg = waitForQualityGate() // Reuse taskId previously collected by withSonarQubeEnv
if (qg.status != 'OK') {
error "Pipeline aborted due to quality gate failure: ${qg.status}"
}
}
}
```
#### Declarative pipeline Example
```groovy
pipeline {
agent any
stages {
stage('build && SonarCloud analysis') {
steps {
withSonarQubeEnv('SonarCloud') {
// Optionally use a Maven environment you've configured already
withMaven(maven:'Maven 3.5') {
sh 'mvn clean package org.sonarsource.scanner.maven:sonar-maven-plugin:sonar'
}
}
}
}
stage("Quality Gate") {
steps {
timeout(time: 1, unit: 'HOURS') {
// Parameter indicates whether to set pipeline to UNSTABLE if Quality Gate fails
// true = set pipeline to UNSTABLE, false = don't
waitForQualityGate abortPipeline: true
}
}
}
}
}
```
Multiple analyses in the same pipeline
If you want to run multiple analyses in the same pipeline and use waitForQualityGate you have to do everything in order as shown in the example below.
```groovy
pipeline {
agent any
stages {
stage('SonarCloud analysis 1') {
steps {
sh 'mvn clean verify org.sonarsource.scanner.maven:sonar-maven-plugin:sonar'
}
}
stage("Quality Gate 1") {
steps {
waitForQualityGate abortPipeline: true
}
}
stage('SonarCloud analysis 2') {
steps {
sh 'gradle sonar'
}
}
stage("Quality Gate 2") {
steps {
waitForQualityGate abortPipeline: true
}
}
}
}
```
### Configuring a Webhook secret
If you want to verify the webhook payload that is sent to Jenkins, you can add a secret to your webhook on SonarQube Cloud.
To set the secret:
1. In Jenkins, navigate to **Manage Jenkins** > **Configure System** > **SonarQube Server** > **Advanced** > **Webhook Secret** and click the **Add** button.
2. Select **Secret text** and give the secret an ID.
3. Select the secret from the dropdown menu.
If you want to override the webhook secret on a project level, you can add the secret to Jenkins and then reference the secret ID when calling `waitForQualityGate` as follows:
Scripted pipeline
```groovy
waitForQualityGate webhookSecretId: 'yourSecretID'
```
Declarative pipeline
```groovy
waitForQualityGate(webhookSecretId: 'yourSecretID')
```
---
# Source: https://docs.sonarsource.com/sonarqube-cloud/advanced-setup/languages/pl-i.md
# PL/I
This language is available only in the SonarQube Cloud Enterprise plan. See the [subscription-plans](https://docs.sonarsource.com/sonarqube-cloud/administering-sonarcloud/managing-subscription/subscription-plans "mention") page for more details.
### Language-specific properties
To discover and update the PL/I-specific properties, navigate in SonarQube Cloud to *Your Project* > **Administration** > **General Settings** > **Languages** > **PL/I**. See the [analysis-parameters](https://docs.sonarsource.com/sonarqube-cloud/advanced-setup/analysis-parameters "mention") page for more information about specific properties.
### Source code extraction
In order to analyze your source code with SonarQube Cloud you need to first extract it onto a file system. You can use your own tool or an open-source tool. Sonar does not provide any connectors or source code extraction tools.
### Dealing with-includes
There are two possible ways to tell SonarQube Cloud where to retrieve the source code referenced by an `%INCLUDE` statement.
The following syntaxes are supported:
```php
%INCLUDE 'C:/temp/myLib.pli'
%INCLUDE ddname(member);
%INCLUDE member;
/* With member not enclosed within single or double quotes, i.e. a SYSLIB member */
```
Example:
If you want to interpret:
```php
%INCLUDE O (XX02511) as %INCLUDE 'C:/temp/o/XX02511.99IPO';
%INCLUDE lib1 as %INCLUDE 'C:/temp/syslib/lib1.pli';
```
the Ddnames are defined as:
```php
sonar.pli.includeDdnames=O,SYSLIB
sonar.pli.includeDdname.O.path=c:/temp/o
sonar.pli.includeDdname.O.suffix=.99IPO
sonar.pli.includeDdname.SYSLIB.path=c:/temp/syslib
sonar.pli.includeDdname.SYSLIB.suffix=.pli
```
Note that the following constructs, involving at least two members, are currently not supported:
```php
%INCLUDE member1, member2;
%INCLUDE ddname1(member1), member2;
%INCLUDE member1, ddname1(member2);
%INCLUDE ddname1(member1), ddname2(member2);
```
---
# Source: https://docs.sonarsource.com/sonarqube-server/8.9/analyzing-source-code/languages/pl-sql.md
# Source: https://docs.sonarsource.com/sonarqube-server/9.8/analyzing-source-code/languages/pl-sql.md
# Source: https://docs.sonarsource.com/sonarqube-server/9.9/analyzing-source-code/languages/pl-sql.md
# Source: https://docs.sonarsource.com/sonarqube-server/10.0/analyzing-source-code/languages/pl-sql.md
# Source: https://docs.sonarsource.com/sonarqube-server/10.1/analyzing-source-code/languages/pl-sql.md
# Source: https://docs.sonarsource.com/sonarqube-server/10.2/analyzing-source-code/languages/pl-sql.md
# Source: https://docs.sonarsource.com/sonarqube-server/10.3/analyzing-source-code/languages/pl-sql.md
# Source: https://docs.sonarsource.com/sonarqube-server/10.4/analyzing-source-code/languages/pl-sql.md
# Source: https://docs.sonarsource.com/sonarqube-server/10.5/analyzing-source-code/languages/pl-sql.md
# Source: https://docs.sonarsource.com/sonarqube-server/10.6/analyzing-source-code/languages/pl-sql.md
# Source: https://docs.sonarsource.com/sonarqube-server/10.7/analyzing-source-code/languages/pl-sql.md
# Source: https://docs.sonarsource.com/sonarqube-server/10.8/analyzing-source-code/languages/pl-sql.md
# Source: https://docs.sonarsource.com/sonarqube-server/2025.2/analyzing-source-code/languages/pl-sql.md
# Source: https://docs.sonarsource.com/sonarqube-server/2025.3/analyzing-source-code/languages/pl-sql.md
# Source: https://docs.sonarsource.com/sonarqube-server/2025.5/analyzing-source-code/languages/pl-sql.md
# Source: https://docs.sonarsource.com/sonarqube-server/2025.1/analyzing-source-code/languages/pl-sql.md
# Source: https://docs.sonarsource.com/sonarqube-server/2025.4/analyzing-source-code/languages/pl-sql.md
# Source: https://docs.sonarsource.com/sonarqube-server/2025.6/analyzing-source-code/languages/pl-sql.md
# Source: https://docs.sonarsource.com/sonarqube-server/analyzing-source-code/languages/pl-sql.md
# Source: https://docs.sonarsource.com/sonarqube-cloud/advanced-setup/languages/pl-sql.md
# PL/SQL
### Language-Specific Properties
To discover and update the PL/SQL-specific properties, navigate in SonarQube Cloud to *Your Project* > **Administration** > **General Settings** > **Languages** > **PL/SQL**. See the [analysis-parameters](https://docs.sonarsource.com/sonarqube-cloud/advanced-setup/analysis-parameters "mention") page for more information about specific properties.
### Advanced parameters
#### Default Schema
| **Parameter** | **Description** |
| --------------------------- | -------------------------------------------------------------------------------------------------------------------------------------------------------------------------------------------------------------------------------------------- |
| `sonar.plsql.defaultSchema` |
When a schema object (table, view, index, synonym) is referenced in SQL code without a schema prefix, the analyzer will assume that it belongs to this schema.
Defaults to sonar.plsql.jdbc.user.
|
#### Data Dictionary
Some rules raise issues only when a data dictionary is provided during analysis. To provide a data dictionary, you must define the following properties in the `sonar-project.properties` file or on the scanner command line using the `-D` prefix:
| **Parameter** | **Description** |
| ------------------------------- | --------------------------------------------------------------------------------------------------------------------------------------------------------------------- |
| `sonar.plsql.jdbc.url` |
URL of the JDBC connection. Required for data dictionary lookup. For example: jdbc:oracle:thin:@my-oracle-server:1521/my-db
|
| `sonar.plsql.jdbc.user` |
JDBC user to authenticate the connection.
Will be used as the default schema name if not specified otherwise via sonar.plsql.defaultSchema.
|
| `sonar.plsql.jdbc.password` | JDBC password provided to authenticate the connection. |
| `sonar.plsql.jdbc.driver.path` | Path or URL of the Oracle jdbc driver jar. |
| `sonar.plsql.jdbc.driver.class` |
Java class name of the Oracle Driver. For example: oracle.jdbc.OracleDriver
|
Providing this configuration allows SonarPLSQL to query data dictionary views such as `SYS.ALL_TAB_COLUMNS` in order to better analyze your SQL.
---
# Source: https://docs.sonarsource.com/sonarqube-server/8.9/analyzing-source-code/languages/pli.md
# Source: https://docs.sonarsource.com/sonarqube-server/9.8/analyzing-source-code/languages/pli.md
# Source: https://docs.sonarsource.com/sonarqube-server/9.9/analyzing-source-code/languages/pli.md
# Source: https://docs.sonarsource.com/sonarqube-server/10.0/analyzing-source-code/languages/pli.md
# Source: https://docs.sonarsource.com/sonarqube-server/10.1/analyzing-source-code/languages/pli.md
# Source: https://docs.sonarsource.com/sonarqube-server/10.2/analyzing-source-code/languages/pli.md
# Source: https://docs.sonarsource.com/sonarqube-server/10.3/analyzing-source-code/languages/pli.md
# Source: https://docs.sonarsource.com/sonarqube-server/10.4/analyzing-source-code/languages/pli.md
# Source: https://docs.sonarsource.com/sonarqube-server/10.5/analyzing-source-code/languages/pli.md
# Source: https://docs.sonarsource.com/sonarqube-server/10.6/analyzing-source-code/languages/pli.md
# Source: https://docs.sonarsource.com/sonarqube-server/10.7/analyzing-source-code/languages/pli.md
# Source: https://docs.sonarsource.com/sonarqube-server/10.8/analyzing-source-code/languages/pli.md
# Source: https://docs.sonarsource.com/sonarqube-server/2025.2/analyzing-source-code/languages/pli.md
# Source: https://docs.sonarsource.com/sonarqube-server/2025.3/analyzing-source-code/languages/pli.md
# Source: https://docs.sonarsource.com/sonarqube-server/2025.5/analyzing-source-code/languages/pli.md
# Source: https://docs.sonarsource.com/sonarqube-server/2025.1/analyzing-source-code/languages/pli.md
# Source: https://docs.sonarsource.com/sonarqube-server/2025.4/analyzing-source-code/languages/pli.md
# Source: https://docs.sonarsource.com/sonarqube-server/2025.6/analyzing-source-code/languages/pli.md
# Source: https://docs.sonarsource.com/sonarqube-server/analyzing-source-code/languages/pli.md
# PLI
*PLI* analysis is available starting in [*Enterprise Edition.*](https://www.sonarsource.com/plans-and-pricing/enterprise/)
### Language-specific properties
Discover and update the PL/I-specific [analysis-parameters](https://docs.sonarsource.com/sonarqube-server/analyzing-source-code/analysis-parameters "mention") in: **Administration** > **Configuration** > **General Settings** > **Languages** > **PL/I**
### Source code extraction
In order to analyze your source code with SonarQube Server, you need to first extract it onto a filesystem. You can use your own tool or an open-source tool. Sonar does not provide any connectors or source code extraction tools.
### Dealing with-includes
There are two possible ways to tell SonarQube Server where to retrieve the source code referenced by a `%INCLUDE` statement.
The following syntaxes are supported:
```css-79elbk
%INCLUDE 'C:/temp/myLib.pli'
%INCLUDE ddname(member);
%INCLUDE member; /* With member not enclosed within single or double quotes, i.e. a SYSLIB member */
```
Example:
If you want to interpret:
```css-79elbk
%INCLUDE O (XX02511) as %INCLUDE 'C:/temp/o/XX02511.99IPO';
%INCLUDE lib1 as %INCLUDE 'C:/temp/syslib/lib1.pli';
```
the Ddnames are defined as:
```css-79elbk
sonar.pli.includeDdnames=O,SYSLIB
sonar.pli.includeDdname.O.path=c:/temp/o
sonar.pli.includeDdname.O.suffix=.99IPO
sonar.pli.includeDdname.SYSLIB.path=c:/temp/syslib
sonar.pli.includeDdname.SYSLIB.suffix=.pli
```
Note that the following constructs, involving at least two members, are currently not supported:
```css-79elbk
%INCLUDE member1, member2;
%INCLUDE ddname1(member1), member2;
%INCLUDE member1, ddname1(member2);
%INCLUDE ddname1(member1), ddname2(member2);
```
### Related Pages
* [adding-coding-rules](https://docs.sonarsource.com/sonarqube-server/extension-guide/adding-coding-rules "mention")
---
# Source: https://docs.sonarsource.com/sonarqube-community-build/extension-guide/developing-a-plugin/plugin-basics.md
# Source: https://docs.sonarsource.com/sonarqube-server/8.9/extension-guide/developing-a-plugin/plugin-basics.md
# Source: https://docs.sonarsource.com/sonarqube-server/9.8/extension-guide/developing-a-plugin/plugin-basics.md
# Source: https://docs.sonarsource.com/sonarqube-server/9.9/extension-guide/developing-a-plugin/plugin-basics.md
# Source: https://docs.sonarsource.com/sonarqube-server/10.0/extension-guide/developing-a-plugin/plugin-basics.md
# Source: https://docs.sonarsource.com/sonarqube-server/10.1/extension-guide/developing-a-plugin/plugin-basics.md
# Source: https://docs.sonarsource.com/sonarqube-server/10.2/extension-guide/developing-a-plugin/plugin-basics.md
# Source: https://docs.sonarsource.com/sonarqube-server/10.3/extension-guide/developing-a-plugin/plugin-basics.md
# Source: https://docs.sonarsource.com/sonarqube-server/10.4/extension-guide/developing-a-plugin/plugin-basics.md
# Source: https://docs.sonarsource.com/sonarqube-server/10.5/extension-guide/developing-a-plugin/plugin-basics.md
# Source: https://docs.sonarsource.com/sonarqube-server/10.6/extension-guide/developing-a-plugin/plugin-basics.md
# Source: https://docs.sonarsource.com/sonarqube-server/10.7/extension-guide/developing-a-plugin/plugin-basics.md
# Source: https://docs.sonarsource.com/sonarqube-server/10.8/extension-guide/developing-a-plugin/plugin-basics.md
# Source: https://docs.sonarsource.com/sonarqube-server/2025.2/extension-guide/developing-a-plugin/plugin-basics.md
# Source: https://docs.sonarsource.com/sonarqube-server/2025.3/extension-guide/developing-a-plugin/plugin-basics.md
# Source: https://docs.sonarsource.com/sonarqube-server/2025.5/extension-guide/developing-a-plugin/plugin-basics.md
# Source: https://docs.sonarsource.com/sonarqube-server/2025.1/extension-guide/developing-a-plugin/plugin-basics.md
# Source: https://docs.sonarsource.com/sonarqube-server/2025.4/extension-guide/developing-a-plugin/plugin-basics.md
# Source: https://docs.sonarsource.com/sonarqube-server/2025.6/extension-guide/developing-a-plugin/plugin-basics.md
# Source: https://docs.sonarsource.com/sonarqube-server/extension-guide/developing-a-plugin/plugin-basics.md
# Plugin basics
### Building your plugin
#### Prerequisites
To build a plugin, you need Java 8 and Maven 3.1 (or greater). Gradle can also be used thanks to the [gradle-sonar-packaging-plugin](https://github.com/iwarapter/gradle-sonar-packaging-plugin) (note that this plugin is not officially supported by Sonar).
#### Sonar Plugin API
The `sonar-plugin-api` is a Java API that is used to develop plugins.
{% hint style="warning" %}
The API used to be part of SonarQube Server and released with it, but it is a separate component since v9.5, with its own releases. You can find it here: [sonar-plugin-api](https://github.com/SonarSource/sonar-plugin-api).
The `groupId` was relocated from `org.sonarsource.sonarqube` to `org.sonarsource.api.plugin`.
The new coordinates of the dependency are
`org.sonarsource.api.plugin:sonar-plugin-api:`
{% endhint %}
#### Create a Maven project
The recommended way to start is by duplicating the plugin example project: .
If you want to start the project from scratch, use the following Maven `pom.xml` template:
pom.xml
```css-79elbk
4.0.0YOUR_GROUP_IDYOUR_ARTIFACT_IDYOUR_VERSIONsonar-pluginorg.sonarsource.sonarqubesonar-plugin-api8.9providedorg.sonarsource.sonar-packaging-maven-pluginsonar-packaging-maven-plugin1.18.0.372truecom.mycompany.sonar.reference.ExamplePlugin
```
#### Build
To build your plugin project, execute this command from the project root directory:
`mvn clean package`
The plugin jar file is generated in the project’s `target/` directory.
#### Deploy
**"Cold" Deploy**\
The standard way to install the plugin for regular users is to copy the jar artifact, from the `target/` directory to the `extensions/plugins/` directory of your SonarQube Server installation, then start the server. The file `logs/web.log` will then contain a log line similar to:\
`Deploy plugin Example Plugin / 0.1-SNAPSHOT`\
Scanner extensions such as sensors are immediately retrieved and loaded when scanning source code.
#### Debug
**Debugging web server extensions**
1. Edit conf/sonar.properties and set: `sonar.web.javaAdditionalOpts=-agentlib:jdwp=transport=dt_socket,server=y,suspend=y,address=8000`.
2. Install your plugin by copying its jar file to extensions/plugins.
3. Start the server. The line `Listening for transport dt_socket at address: 5005` is logged in `logs/sonar.log`.
4. Attach your IDE to the debug process (listening on port 8000 in the example).
**Debugging compute engine extensions**\
Same procedure as for web server extensions (see above), but with the following property:
```css-79elbk
sonar.ce.javaAdditionalOpts=-agentlib:jdwp=transport=dt_socket,server=y,suspend=y,address=8000
```
**Debugging scanner extensions**
```css-79elbk
$ export SONAR_SCANNER_OPTS="-agentlib:jdwp=transport=dt_socket,server=y,suspend=y,address=8000"
$ cd /path/to/project
$ sonar-scanner
```
When using the Scanner for Maven, then simply execute:
```css-79elbk
$ cd /path/to/project
$ mvnDebug org.sonarsource.scanner.maven:sonar-maven-plugin:sonar
```
#### Advanced build properties
Plugin properties are defined in the file `META-INF/MANIFEST.MF` of the plugin jar file.
Most of them are defined through the `` section of the [sonar-packaging-maven-plugin](https://mvnrepository.com/artifact/org.sonarsource.sonar-packaging-maven-plugin/sonar-packaging-maven-plugin). Some are taken from standard pom nodes Effective values are listed at the end of the build log:
```css-79elbk
[INFO] --- sonar-packaging-maven-plugin:1.15:sonar-plugin (default-sonar-plugin) @ sonar-widget-lab-plugin ---
[INFO] -------------------------------------------------------
[INFO] Plugin definition in Marketplace
[INFO] Key: widgetlab
[INFO] Name: Widget Lab
[INFO] Description: Additional widgets
[INFO] Version: 1.9-SNAPSHOT
[INFO] Entry-point Class: org.codehaus.sonar.plugins.widgetlab.WidgetLabPlugin
[INFO] Required Plugins:
[INFO] Use Child-first ClassLoader: false
[INFO] Base Plugin:
[INFO] Homepage URL: https://redirect.sonarsource.com/plugins/widgetlab.html
[INFO] Minimal SonarQube Version: 4.5.1
[INFO] Licensing: GNU LGPL 3
[INFO] Organization: Shaw Industries
[INFO] Organization URL: http://shawfloors.com
[INFO] Terms and Conditions:
[INFO] Issue Tracker URL: http://jira.codehaus.org/browse/SONARWIDLB
[INFO] Build date: 2015-12-15T18:28:54+0100
[INFO] Sources URL: https://github.com/SonarCommunity/sonar-widget-lab
[INFO] Developers: G. Ann Campbell,Patroklos Papapetrou
[INFO] -------------------------------------------------------
[INFO] Building jar: /dev/sonar-widget-lab/target/sonar-widget-lab-plugin-1.9-SNAPSHOT.jar
```
Supported standard pom node properties:
| | | |
| --------------------- | ----------------- | ---------------------------------------------------------------------------------------------------------------------------------------------------------------------------------------------------------------------------------------------------------------------------------------------------------------------------------------------------------------------------------------------------------------------------------------------------------------------------------------------------------------------------------------------------------------------------------------------------------------------------- |
| **Maven property** | **Manifest key** | **Notes** |
| `version` | Plugin-Version | (required) Plugin version as displayed in page "Marketplace". Default: `${project.version}` |
| `pluginApiMinVersion` | Sonar-Version | Minimal version of supported Sonar Plugin API at runtime. For example, if the value is 9.8.0.203, then deploying the plugin on SonarQube Server versions with `sonar-plugin-api` 9.6.1.114 (ie. SonarQube 9.5) and lower will fail. The default value is given by the version of `sonar-plugin-api` dependency. It can be overridden with the Maven property `pluginApiMinVersion` (since `sonar-packaging-maven-plugin` 1.22). That allows in some cases to use new features of recent API and to still be compatible at runtime with older versions of SonarQube Server. Default: version of dependency `sonar-plugin-api` |
| `license` | Plugin-License | Plugin license as displayed on page "Marketplace". Default `${project.licenses}` |
| `developers` | Plugin-Developers | A list of developers is displayed on the page "Marketplace". Default: `${project.developers}` |
Supported `` properties:
| | | |
| -------------------------- | ---------------------------- | ------------------------------------------------------------------------------------------------------------------------------------------------------------------------------------------------------------------------------------------------------------------------------------------------------------------------------------------------------------------------------------------------------------------------------------------------------------------------------------------------------------------------ |
| **Maven property** | **Manifest key** | **Notes** |
| `pluginKey` | Plugin-Key | (required) Contains only letters/digits and is unique among all plugins. Examples: groovy, widgetlab. Constructed from `${project.artifactId}.` Given an artifactId of: `sonar-widget-lab-plugin`, your pluginKey will be: `widgetlab` |
| `pluginClass` | Plugin-Class | (required) Name of the entry-point class that extends `org.sonar.api.SonarPlugin`. Example: `org.codehaus.sonar.plugins.widgetlab.WidgetLabPlugin` |
| `pluginName` | Plugin-Name | (required) Displayed in the page "Marketplace". Default: `${project.name}` |
| `pluginDescription` | Plugin-Description | Displayed in the page "Marketplace". Default: `${project.description}` |
| `pluginUrl` | Plugin-Homepage | Homepage of website, for example `${project.url}` |
| `pluginIssueTrackerUrl` | Plugin-IssueTrackerUrl | Example: . Default: `${project.issueManagement.url}` |
| `pluginTermsConditionsUrl` | Plugin-TermsConditionsUrl | Users must read this document when installing the plugin from Marketplace. Default: `${sonar.pluginTermsConditionsUrl}` |
| `useChildFirstClassLoader` | Plugin-ChildFirstClassLoader | Each plugin is executed in an isolated classloader, which inherits a shared classloader that contains API and some other classes. By default the loading strategy of classes is parent-first (look up in shared classloader then in plugin classloader). If the property is true, then the strategy is child-first. This property is mainly used when building plugin against API < 5.2, as the shared classloader contained many 3rd party libraries (guava 10, commons-lang, …) false. |
| `basePlugin` | Plugin-Base | If specified, then the plugin is executed in the same classloader as `basePlugin`. |
| `pluginSourcesUrl` | Plugin-SourcesUrl | URL of SCM repository for open-source plugins. Displayed on page "Marketplace". Default: `${project.scm.url}` |
| `pluginOrganizationName` | Plugin-Organization | The organization which develops the plugin is displayed on the page "Marketplace". Default: `${project.organization.name}` |
| `pluginOrganizationUrl` | Plugin-OrganizationUrl | URL of the organization, displayed on the page "Marketplace". Default: `${project.organization.url}` |
| `sonarLintSupported` | SonarQube for IDE-Supported | Whether the language plugin supports SonarQube for IDE or not. Only SonarSource analyzers and custom rules plugins for SonarSource analyzers should set this to true. |
| `pluginDisplayVersion` | Plugin-Display-Version | The version is displayed in SonarQube Server administration console. By default it’s the raw version, for example, "1.2", but can be overridden to "1.2 (build 12345)" for instance. Supported in sonar-packaging-maven-plugin 1.18.0.372. Default: `${project.version}` |
| `requiredForLanguages` | Plugin-RequiredForLanguages |
Languages for which this plugin should be downloaded. Use to make sure dependency errors are avoided when improving-performance. This property must be added to the \ section of the plugin’s pom.xml file.
For an example, see the Custom Rules section of the java page.
|
The Maven `sonar-packaging-maven-plugin` supports also these properties:
| | | |
| --------------------------- | ------------------------------------------------------------------ | --------------------------------------------------------- |
| **Maven property** | **Manifest key** | **Notes** |
| `addMavenDescriptor` | Copy pom file inside the directory META-INF of generated jar file? | Boolean. Default: `${sonar.addMavenDescriptor}` / `true`. |
| `skipDependenciesPackaging` | Do not copy Maven dependencies into jar file. | Default: `${sonar.skipDependenciesPackaging} /`false\`. |
Other Manifest fields:
* `Implementation-Build`: Identifier of build or commit, for example, the Git SHA1. `94638028f0099de59f769cdca776e506684235d6`. It is displayed for debugging purposes in logs when SonarQube Server starts.
### API basics
#### Extension points
SonarQube Server provides extension points for its three technical stacks:
* Scanner, which runs the source code analysis.
* Compute Engine, which consolidates the output of scanners, for example by:
* computing 2nd-level measures such as ratings.
* aggregating measures (for example number of lines of code of project = sum of lines of code of all files).
* assigning new issues to developers.
* persisting everything in data stores.
* Web application.
Extension points are not designed to add new features but to complete existing features. Technically they are contracts defined by a Java interface or an abstract class annotated with `@ExtensionPoint`. The exhaustive list of extension points is available in the Javadoc.
The implementations of extension points (named *extensions*) provided by a plugin must be declared in its entry point class, which implements `org.sonar.api.Plugin`and which is referenced in the `pom.xml`:
**ExamplePlugin.java**
```css-79elbk
package org.sonarqube.plugins.example;
import org.sonar.api.Plugin;
public class ExamplePlugin implements Plugin {
@Override
public void define(Context context) {
// implementations of extension points
context.addExtensions(FooLanguage.class, ExampleProperties.class);
}
}
```
**pom.xml**
```css-79elbk
...
org.sonarsource.sonar-packaging-maven-pluginsonar-packaging-maven-plugintrueorg.sonarqube.plugins.example.ExamplePlugin
```
#### Lifecycle
A plugin extension exists only in its associated technical stacks. A scanner sensor is for example instantiated and executed only in a scanner runtime, but not in the web server nor in Compute Engine. The stack is defined by the annotations [@ScannerSide](https://javadocs.sonarsource.org/latest/org/sonar/api/batch/ScannerSide.html), [@ServerSide](https://javadocs.sonarsource.org/latest/org/sonar/api/server/ServerSide.html) (for a web server), and [@ComputeEngineSide](https://javadocs.sonarsource.org/latest/org/sonar/api/ce/ComputeEngineSide.html).
An extension can call core components or another extension of the same stack. These dependencies are defined by constructor injection:
```css-79elbk
@ScannerSide
public class Foo {
public void call() {}
}
// Sensor is a scanner extension point
public class MySensor implements Sensor {
private final Foo foo;
private final Languages languages;
// Languages is core component which lists all the supported programming languages.
public MySensor(Foo foo, Languages languages) {
this.foo = foo;
this.languages = languages;
}
@Override
public void execute(SensorContext context) {
System.out.println(this.languages.all());
foo.call();
}
}
public class ExamplePlugin implements Plugin {
@Override
public void define(Context context) {
// Languages is a core component. It must not be declared by plugins.
context.addExtensions(Foo.class, MySensor.class);
}
}
```
It is recommended not to call other components in constructors. Indeed, they may not be initialized at that time. Constructors should only be used for dependency injection.
A compilation will not fail if incorrect dependencies are defined, such as a scanner extension trying to call a web server extension. Still, it will fail at runtime when a plugin is loaded.
#### Third-party libraries
Plugins are executed in their own isolated classloaders. That allows the packaging and use of 3rd-party libraries without runtime conflicts with core internal libraries or other plugins. Note that since version 5.2, SonarQube Server API does not bring transitive dependencies, except SLF4J. The libraries just have to be declared in the `pom.xml` with the default scope "compile":
**pom.xml**
```css-79elbk
...
...
commons-codeccommons-codec1.10
```
Technically, the libraries are packaged in the directory META-INF/lib of the generated jar file. An alternative is to shade libraries, for example with `maven-shade-plugin`. That minimizes the size of the plugin jar file by copying only the effective used classes.
The command `mvn dependency:tree` gives the list of all dependencies, including transitive ones.
#### Configuration
The core component [`org.sonar.api.config.Configuration`](http://javadocs.sonarsource.org/latest/org/sonar/api/config/Configuration.html) provides access to configuration. It deals with default values and the decryption of values. It is available in all stacks (scanner, web server, Compute Engine). As recommended earlier, it must not be called from constructors.
**MyExtension.java**
```css-79elbk
public class MyRules implements RulesDefinition {
private final Configuration config;
public MyRules(Configuration config) {
this.config = config;
}
@Override
public void define(Context context) {
int value = config.getInt("sonar.property").orElse(0);
}
}
```
Scanner sensors can get config directly from SensorContext, without using constructor injection:
**MySensor.java**
```css-79elbk
public class MySensor extends Sensor {
@Override
public void execute(SensorContext context) {
int value = context.config().getInt("sonar.property").orElse(0);
}
}
```
In the scanner stack, properties are checked in the following order, and the first non-blank value is the one that is used:
1. System property.
2. Scanner command-line (-Dsonar.property=foo for instance).
3. Scanner tool ( of scanner for Maven for instance).
4. Project configuration defined in the web UI.
5. Global configuration defined in the web UI.
6. Default value.
Plugins can define their own properties so that they can be configured from the web administration console. The extension point `org.sonar.api.config.PropertyDefinition` must be used:
```css-79elbk
public class ExamplePlugin implements Plugin {
@Override
public void define(Context context) {
context.addExtension(
PropertyDefinition.builder("sonar.my.property")
.name("My Property")
.description("This is the description displayed in web admin console")
.defaultValue("42")
.build()
);
}
}
```
{% hint style="info" %}
Values of the properties suffixed with `.secured` are not available to be read by any users. The `.secured` suffix is needed for passwords, for instance.
{% endhint %}
The annotation `org.sonar.api.config.PropertyDefinition` can be used on an extension to declare a property.
```css-79elbk
@Properties(
@Property(key="sonar.my.property", name="My Property", defaultValue="42")
)
public class MySensor implements Sensor {
// ...
}
public class ExamplePlugin implements Plugin {
@Override
public void define(Context context) {
context.addExtension(MySensor.class);
}
}
```
#### Logging
The class [`org.sonar.api.utils.log.Logger`](https://javadocs.sonarsource.org/latest/org/sonar/api/utils/log/Logger.html) is used to log messages to scanner output, web server logs/sonar.log, or Compute Engine logs (available from the administration web console). It’s convenient for unit testing (see class [`LogTester`](https://javadocs.sonarsource.org/latest/org/sonar/api/utils/log/LogTester.html)).
```css-79elbk
import org.sonar.api.utils.log.*;
public class MyClass {
private static final Logger LOGGER = Loggers.get(MyClass.class);
public void doSomething() {
LOGGER.info("foo");
}
}
```
Internally, [SLF4J](https://www.slf4j.org/) is used as a facade of various logging frameworks (`log4j`, `commons-log`, `logback`, `java.util.logging`). That allows all these frameworks to work at runtime, such as when they are required for a 3rd party library. SLF4J loggers can also be used instead of `org.sonar.api.utils.log.Logger`. Read the [SLF4J manual](https://www.slf4j.org/manual.html) for more details.
As an exception, plugins must not package logging libraries. Dependencies like SLF4J or `log4j` must be declared with the scope "provided".
#### Exposing APIs to other plugins
The common use case is to write a language plugin that will allow some other plugins to contribute additional rules (see for example how it is done for [Java](https://github.com/SonarSource/sonar-java) analysis). The main plugin will expose some APIs that will be implemented/used by the "rule" plugins.
Plugins are loaded in isolated classloaders. It means a plugin can’t access another plugin’s classes. There is an exception for package names following pattern `org.sonar.plugins..api`. For example, all classes in a plugin with the key `myplugin` that are located in `org.sonar.plugins.myplugin.api` are visible to other plugins.
#### Serving static resources
If you need to serve static resources from your plugin such as images or JavaScript files, place them in a directory under `resources` named `static` (`myplugin/src/main/resources/static`). At runtime, they’ll be available from `https://{server}/static/{pluginKey}/{file}`.
### Configuring plugins for analyzer loading optimization
By default, SonarQube Server downloads Sonar analyzers and third-party plugins only when they are really required by the scanner (see [improving-performance](https://docs.sonarsource.com/sonarqube-server/server-update-and-maintenance/maintenance/improving-performance "mention")). To make this feature work, each analyzer or third-party plugin should declare the list of languages on which they expect to raise issues through a MANIFEST property called `Plugin-RequiredForLanguages`.
#### Optimization behavior
At the Scanner level, the behavior is as follows:
* **Case 1**: When the property is not set by the plugin, the plugin is downloaded whatever the contents of the project.
* **Case 2**: When the property is defined and there are files corresponding to the language declared by the plugin, the plugin is downloaded.
* **Case 3**: When the property is defined and there are no files corresponding to the language declared by the plugin, the plugin is not downloaded.
This helps save network bandwidth and speed up the bootstrap of the scans. As a side effect, the logs are also cleaner, with fewer "nothing to do" logs for plugins that really have nothing to perform on the repository content.
#### Avoiding dependency errors
For plugins that have a dependency on a base analyzer provided by default with SonarQube Server (for example, a plugin to add rules or reports to an existing language), it is mandatory to add to the MANIFEST the property `Plugin-RequiredForLanguages` to avoid a hard failure.
Take, for example, plugin sonar-xyz which provides additional rules for Java:
1. A user scans a repository that only contains Python code.
2. sonar-xyz is downloaded because it doesn’t declare the property. So it is downloaded from the server at each scan (case 1 above).
3. sonar-java is not downloaded because there are no .java files in the repository to scan (case 3 above).
4. Analysis errors-out because a `NoClassDefFoundError` is thrown since sonar-xyz has an unsatisfied dependency on sonar-java, which wasn’t downloaded.
#### Configuration steps
To avoid dependency errors, you’ll need to:
1. Upgrade sonar-packaging-maven-plugin to version [1.22.0.705 1](https://github.com/SonarSource/sonar-packaging-maven-plugin/releases/tag/1.22.0.705).
2. Add java to the configuration of sonar-packaging-maven-plugin where "java" is replaced by the language your plugin is dealing with.
3. Add the property `` to the configuration of sonar-packaging-maven-plugin, so that `Plugin-RequiredForLanguages` is added to the MANIFEST. The property accepts several values such as `js`,`ts`,`css`,`web`, `yaml`, etc.
Example configurations are available on the language pages (see the **Custom rules** section of the [java](https://docs.sonarsource.com/sonarqube-server/analyzing-source-code/languages/java "mention") page for example).
### API deprecation
See [deprecation-policy](https://docs.sonarsource.com/sonarqube-server/server-update-and-maintenance/maintenance/deprecations/deprecation-policy "mention").
### API Changes
{% hint style="info" %}
Starting with v9.5, the API is released independently of SonarQube Server. You can find the changes for newer releases in its [code repository](https://github.com/SonarSource/sonar-plugin-api/releases).
{% endhint %}
#### Release 2025.3
The following deprecated classes have been removed: `MutableModuleSettings` and `MutableProjectSettings`.
#### Release 9.3
Added
* `sonar-plugin-api.src.main.java.org.sonar.api.resources.Language#publishAllFiles` to define whether the files identified with the language should be automatically published to SonarQube Server.
* `org.sonar.api.batch.sensor.SensorDescriptor#processesFilesIndependently`
#### Release 9.0
Deprecated:
* `org.sonar.api.server.rule.RulesDefinitionXmlLoader` is deprecated. Use the `sonar-check-api` to annotate rule classes instead of loading the metadata from XML files.
Removed:
* `org.sonar.api.ExtensionProvider` Use `org.sonar.api.Plugin.Context#addExtensions()` to add objects to the container.
* `org.sonar.api.batch.sensor.SensorDescriptor#requireProperty()`. Use `#onlyWhenConfiguration()` instead.
* All API related to preview/issues analysis mode.
* Coverage types (unit, IT, overall) was removed.
* Resource perspectives. Use methods in `SensorContext`.
* `org.sonar.api.platform.Server#getRootDir()`. Use `ServerFileSystem#getHomeDir()`.
* `org.sonar.api.profiles.ProfileDefinition.java`. Define quality profiles with `BuiltInQualityProfilesDefinition`.
* `org.sonar.api.rules.XMLRuleParser`. Use the `sonar-check-api` to annotate rule classes.
#### Release 8.4
Added:
* `org.sonar.api.batch.scm.ScmProvider#forkDate`
Deprecated:
* `org.sonar.api.rules.Rule#getId()` is deprecated and will always throw UnsupportedOperationException.
#### Release 8.3
Deprecated:
* `org.sonar.api.utils.text.JsonWriter`
#### Release 7.8
Added:
* `org.sonar.api.web.WebAnalytics`
Deprecated:
* `org.sonar.api.i18n.I18`
* `org.sonar.api.SonarQubeVersion` use `org.sonar.api.SonarRuntime` instead.
* `org.sonar.api.profiles.XMLProfileParser`
* `org.sonar.api.notifications.NotificationChannel`
Removed:
* Pico components relying on reflection to have their `start` or `stop` method called. Make your component implements `org.sonar.api.Startable` instead.
#### Release 7.7
Added:
* `org.sonar.api.batch.scm.ScmProvider#ignoreCommand`
Deprecated:
* `org.sonar.api.batch.fs.InputFile::status`
* `org.sonar.api.resources.Qualifiers#BRC`
Removed:
* The preview/issues mode of the scanner has been removed.
#### Release 7.6
Changed:
* `PostJob` moved to project level IoC container.
* `InputFileFilter` moved to project level IoC container.
Added:
* New annotation `org.sonar.api.scanner.ScannerSide` to mark (project level) scanner components.
* `org.sonar.api.batch.fs.InputProject` to create issues on projects.
* `org.sonar.api.scanner.ProjectSensor` to declare Sensors that only run at the project level.
Deprecated:
* `org.sonar.scanner.issue.IssueFilter` is deprecated.
* `org.sonar.api.batch.InstantiationStrategy` is deprecated.
* `org.sonar.api.batch.ScannerSide` is deprecated.
* `org.sonar.api.batch.fs.InputModule` is deprecated.
* The concept of global Sensor is deprecated (use `ProjectSensor` instead).
Removed:
* Support of scanner tasks was removed.
* `RulesProfile` is no longer available for scanner side components (use `ActiveRules` instead).
#### Release 7.4
Changed:
* Allow identity provider to not provide login.
Added:
* Allow sensors to report adhoc rules metadata.
Removed:
* `org.sonar.api.rules.RuleFinder` removed from scanner side.
* `sonar-channel` removed from plugin classloader.
* stop support of plugins compiled with API < 5.2.
#### Release 7.3
Added:
* `RulesDefinitions` supports HotSpots and security standards.
Deprecated:
* `org.sonar.api.batch.AnalysisMode` and `org.sonar.api.issue.ProjectIssues` since preview mode is already deprecated for a while.
#### Release 7.2
Added:
* `org.sonar.api.batch.sensor.SensorContext#newExternalIssue` to report external issues.
* `org.sonar.api.batch.sensor.SensorContext#newSignificantCode` to report part of the source file that should be used for issue tracking.
* `org.sonar.api.scan.issue.filter.FilterableIssue#textRange`
Deprecated:
* `org.sonar.api.scan.issue.filter.FilterableIssue#line`
#### Release 7.1
Added:
* `org.sonar.api.Plugin.Context#getBootConfiguration`
* `org.sonar.api.server.rule.RulesDefinition.NewRule#addDeprecatedRuleKey` to support deprecated rule keys.
#### Release 7.0
Added:
* `org.sonar.api.batch.scm.ScmProvider#relativePathFromScmRoot`, `org.sonar.api.batch.scm.ScmProvider#branchChangedFiles` and `org.sonar.api.batch.scm.ScmProvider#revisionId` to improve branch and PR support.
---
# Source: https://docs.sonarsource.com/sonarqube-community-build/server-installation/plugins/plugin-version-matrix.md
# Source: https://docs.sonarsource.com/sonarqube-server/8.9/instance-administration/plugin-version-matrix.md
# Source: https://docs.sonarsource.com/sonarqube-server/9.8/instance-administration/plugin-version-matrix.md
# Source: https://docs.sonarsource.com/sonarqube-server/9.9/instance-administration/plugin-version-matrix.md
# Source: https://docs.sonarsource.com/sonarqube-server/10.0/instance-administration/plugin-version-matrix.md
# Source: https://docs.sonarsource.com/sonarqube-server/10.1/instance-administration/plugin-version-matrix.md
# Source: https://docs.sonarsource.com/sonarqube-server/10.2/instance-administration/plugin-version-matrix.md
# Source: https://docs.sonarsource.com/sonarqube-server/10.3/instance-administration/plugin-version-matrix.md
# Source: https://docs.sonarsource.com/sonarqube-server/10.4/instance-administration/plugin-version-matrix.md
# Source: https://docs.sonarsource.com/sonarqube-server/10.5/instance-administration/plugin-version-matrix.md
# Source: https://docs.sonarsource.com/sonarqube-server/10.6/instance-administration/plugin-version-matrix.md
# Source: https://docs.sonarsource.com/sonarqube-server/10.7/setup-and-upgrade/plugins/plugin-version-matrix.md
# Source: https://docs.sonarsource.com/sonarqube-server/10.8/setup-and-upgrade/plugins/plugin-version-matrix.md
# Source: https://docs.sonarsource.com/sonarqube-server/2025.2/setup-and-update/plugins/plugin-version-matrix.md
# Source: https://docs.sonarsource.com/sonarqube-server/2025.3/server-installation/plugins/plugin-version-matrix.md
# Source: https://docs.sonarsource.com/sonarqube-server/2025.5/server-installation/plugins/plugin-version-matrix.md
# Source: https://docs.sonarsource.com/sonarqube-server/2025.1/setup-and-upgrade/plugins/plugin-version-matrix.md
# Source: https://docs.sonarsource.com/sonarqube-server/2025.4/server-installation/plugins/plugin-version-matrix.md
# Source: https://docs.sonarsource.com/sonarqube-server/2025.6/server-installation/plugins/plugin-version-matrix.md
# Source: https://docs.sonarsource.com/sonarqube-server/server-installation/plugins/plugin-version-matrix.md
# Plugin version matrix
{% @sonar-embeds/plugin-version-matrix-sqs %}
---
# Source: https://docs.sonarsource.com/sonarqube-server/10.7/server-upgrade-and-maintenance/upgrade/plugin.md
# Source: https://docs.sonarsource.com/sonarqube-server/10.8/server-upgrade-and-maintenance/upgrade/plugin.md
# Upgrading a plugin
See [install-a-plugin](https://docs.sonarsource.com/sonarqube-server/10.8/setup-and-upgrade/plugins/install-a-plugin "mention"). For the Community Build, see [marketplace](https://docs.sonarsource.com/sonarqube-server/10.8/server-upgrade-and-maintenance/upgrade/marketplace "mention").
---
# Source: https://docs.sonarsource.com/sonarqube-community-build/server-installation/plugins.md
# Source: https://docs.sonarsource.com/sonarqube-server/10.7/setup-and-upgrade/plugins.md
# Source: https://docs.sonarsource.com/sonarqube-server/10.8/setup-and-upgrade/plugins.md
# Source: https://docs.sonarsource.com/sonarqube-server/2025.2/setup-and-update/plugins.md
# Source: https://docs.sonarsource.com/sonarqube-server/2025.3/server-installation/plugins.md
# Source: https://docs.sonarsource.com/sonarqube-server/2025.5/server-installation/plugins.md
# Source: https://docs.sonarsource.com/sonarqube-server/2025.1/setup-and-upgrade/plugins.md
# Source: https://docs.sonarsource.com/sonarqube-server/2025.4/server-installation/plugins.md
# Source: https://docs.sonarsource.com/sonarqube-server/2025.6/server-installation/plugins.md
# Source: https://docs.sonarsource.com/sonarqube-server/server-installation/plugins.md
# Installing plugins
- [Plugin version matrix](/sonarqube-server/server-installation/plugins/plugin-version-matrix.md): This table describes the version of each plugin that is compatible with each version of SonarQube Server.
- [Installing a plugin](/sonarqube-server/server-installation/plugins/install-a-plugin.md): Learn how to install or uninstall a plugin in SonarQube Server.
---
# Source: https://docs.sonarsource.com/sonarqube-server/8.9/project-administration/portfolio-pdf-configuration.md
# Portfolio PDF configuration
*PDF reports are available as part of the* [*Enterprise Edition*](https://app.gitbook.com/u/IjlgA9XCtdf4qR4Sdfz6QWWoRks1) *and* [*above*](https://www.sonarsource.com/plans-and-pricing/)*.*
A user with administrative rights on a portfolio can configure email distribution of the PDF. From a Portfolio Home Page go to **Administration > Executive Report**.
#### Frequency
You can tune the email frequency of the PDF Report. The possible values are:
* Daily: report is sent during the first portfolio calculation of the day (if any)
* Weekly: report is sent during the first portfolio calculation of the week (if any) from Monday
* Monthly (default): report is sent during the first portfolio calculation of the month (if any), starting from the first day of the current month
#### Other Recipients
If people without SonarQube accounts want to receive the PDF, you can feed the administrative "Other Recipients" field with their email addresses.
PDF reports give a periodic, high-level overview of the overall code quality and security of your projects, applications, or portfolios.
---
# Source: https://docs.sonarsource.com/sonarqube-cloud/getting-started-with-enterprise/viewing-enterprise-reports/portfolio-security-reports.md
# Viewing portfolio security reports
This feature is only available in the [Enterprise plan](https://www.sonarsource.com/plans-and-pricing/#sonarqube-cloud-features).
{% hint style="info" %}
Before you can view the Enterprise-level reports, your organization must be added to an enterprise. For more information, see [managing-enterprise](https://docs.sonarsource.com/sonarqube-cloud/administering-sonarcloud/managing-enterprise "mention").
{% endhint %}
### Overview
Portfolio security reports provide an aggregated view of your organization’s security across multiple projects. They are aimed at enterprise security teams, compliance and audit teams, and IT administrators who manage multiple projects and require an in-depth view of their enterprise security status.
Portfolio security reports are based on the following security standards:
* [OWASP Top 10](https://owasp.org/Top10/) (versions 2021 and 2017)
OWASP Top 10 security standards covered by Sonar for version 2021
| | | | | | | | |
| ----------------------------------------------- | ------------------------------------------------------------------------------------------------------------------------------------------------------------------------------------------------------------------------ | ------------------------------------------------------------------------------------------------------------------------------------------------------------------------------------------------------------------------ | ------------------------------------------------------------------------------------------------------------------------------------------------------------------------------------------------------------------------ | ------------------------------------------------------------------------------------------------------------------------------------------------------------------------------------------------------------------------ | ------------------------------------------------------------------------------------------------------------------------------------------------------------------------------------------------------------------------ | ------------------------------------------------------------------------------------------------------------------------------------------------------------------------------------------------------------------------ | ------------------------------------------------------------------------------------------------------------------------------------------------------------------------------------------------------------------------ |
| **Category** | **Python** | **JS/TS** | **Java** | **C#** | **C/C++** | **PHP** | **Kotlin** |
| A01:Broken Access Control |  |  |  |  |  |  |  |
| A02: Cryptographic Failures |  |  |  |  |  |  |  |
| A03: Injection |  |  |  |  |
|  |  |
| CWE-306 Missing Authentication for Critical Function |
|
|
|
|
|
|
|
* [OWASP ASVS 4.0 Level 1, 2, 3](https://owasp.org/www-project-application-security-verification-standard/)
* [PCI DSS](https://www.pcisecuritystandards.org/) (versions 4.0 and 3.2.1)
* [CASA](https://appdefensealliance.dev/casa)
* [STIG](https://public.cyber.mil/stigs/)
You can view security reports for any portfolio that contains projects that have previously undergone an analysis. For a given standard, the report displays the number of raised Security issues and Security Hotspots by security category.
{% hint style="info" %}
To ensure reliable security reports, the relevant security rules must be activated in your portfolio’s project quality profiles. For instance, if no rule corresponding to a given OWASP category is activated in your quality profile, you won’t get Security issues or Security Hotspots linked to that specific category in the OWASP report. See [#checking-security-rules](https://docs.sonarsource.com/sonarqube-cloud/getting-started-with-enterprise/project-security-reports#checking-security-rules "mention") for more information.
{% endhint %}
### Retrieving portfolio security reports
1. Retrieve your portfolio. See [viewing-portfolios](https://docs.sonarsource.com/sonarqube-cloud/getting-started-with-enterprise/viewing-enterprise-reports/viewing-portfolios "mention") for more information.
2. Click on the **Security Reports** tab to open the report.
The portfolio report displays:
1. Security standards can be filtered in the left sidebar. Select a security standard to filter the results.
2. The Security reports overview and filtered standard are found in the main window.
3. Your **Security reports overview** is at the top of the page which includes your **Portfolio overall Security rating** and **Portfolio overall Security Review** rating.
4. This section shows the full number of **Security** issues and **Security Hotspots** that need to be addressed for your selected Security standard. The report results are generated based on relevant active security rules for projects in your portfolio.
5. A list of Categories that contain Security issues and Security Hotspots fitting each category are sorted by rating. Select a **Category** row from the table to open a category specific report. Note that a single Security issue or Security Hotspot may show up in more than one category.
### Related pages
* [introduction](https://docs.sonarsource.com/sonarqube-cloud/getting-started-with-enterprise/viewing-enterprise-reports/introduction "mention") to Viewing the enterprise reports
* [viewing-portfolios](https://docs.sonarsource.com/sonarqube-cloud/getting-started-with-enterprise/viewing-enterprise-reports/viewing-portfolios "mention")
* [administering-portfolios](https://docs.sonarsource.com/sonarqube-cloud/getting-started-with-enterprise/administering-portfolios "mention")
* [viewing-portfolio-pdf-reports](https://docs.sonarsource.com/sonarqube-cloud/getting-started-with-enterprise/viewing-enterprise-reports/viewing-portfolio-pdf-reports "mention")
---
# Source: https://docs.sonarsource.com/sonarqube-server/8.9/user-guide/portfolios.md
# Source: https://docs.sonarsource.com/sonarqube-server/9.8/user-guide/portfolios.md
# Source: https://docs.sonarsource.com/sonarqube-server/9.9/user-guide/portfolios.md
# Source: https://docs.sonarsource.com/sonarqube-server/10.0/user-guide/portfolios.md
# Source: https://docs.sonarsource.com/sonarqube-server/10.1/user-guide/portfolios.md
# Source: https://docs.sonarsource.com/sonarqube-server/10.2/user-guide/portfolios.md
# Source: https://docs.sonarsource.com/sonarqube-server/10.3/user-guide/portfolios.md
# Source: https://docs.sonarsource.com/sonarqube-server/10.4/user-guide/portfolios.md
# Source: https://docs.sonarsource.com/sonarqube-server/10.5/user-guide/portfolios.md
# Source: https://docs.sonarsource.com/sonarqube-server/10.6/user-guide/portfolios.md
# Source: https://docs.sonarsource.com/sonarqube-server/10.7/user-guide/viewing-reports/portfolios.md
# Source: https://docs.sonarsource.com/sonarqube-server/10.8/user-guide/viewing-reports/portfolios.md
# Source: https://docs.sonarsource.com/sonarqube-server/2025.2/user-guide/viewing-reports/portfolios.md
# Source: https://docs.sonarsource.com/sonarqube-server/2025.3/user-guide/viewing-reports/portfolios.md
# Source: https://docs.sonarsource.com/sonarqube-server/2025.5/user-guide/viewing-reports/portfolios.md
# Source: https://docs.sonarsource.com/sonarqube-server/2025.1/user-guide/viewing-reports/portfolios.md
# Source: https://docs.sonarsource.com/sonarqube-server/2025.4/user-guide/viewing-reports/portfolios.md
# Source: https://docs.sonarsource.com/sonarqube-server/2025.6/user-guide/viewing-reports/portfolios.md
# Source: https://docs.sonarsource.com/sonarqube-server/user-guide/viewing-reports/portfolios.md
# Portfolios
*Portfolios are available starting in* [*Enterprise Edition*](https://www.sonarsource.com/plans-and-pricing/enterprise/)*.*
### Portfolio Overview page
The Portfolio Overview page is the central place for managers and tech leads to keep an eye on the releasability of the projects under their supervision. Releasability is based on the projects’ quality gates included in the portfolio. Each portfolio home page offers an aggregate view of the releasability status of all projects in the portfolio.
Depending on the configuration of your SonarQube Server instance, the portfolio report is generated with metrics either from [standard-experience](https://docs.sonarsource.com/sonarqube-server/instance-administration/analysis-functions/instance-mode/standard-experience "mention") or [mqr-mode](https://docs.sonarsource.com/sonarqube-server/instance-administration/analysis-functions/instance-mode/mqr-mode "mention").
At the top of the page, you can see the overall releasablilty of the portfolio, a graph showing the releasability trend, and the number of project branches that are failing and passing their quality gate.
Reliability, Security (in MQR Mode) or Security Vulnerabilities (in Standard Experience), Security Review, and Maintainability ratings show the portfolio’s overall health, both for new code and overall code.
Below the new code rating for each metric, you see how many project branches are doing well and how many are at risk.
Below the overall code rating, a graph showing the trend for each metric is displayed, along with the number of at risk project branches.
### Releasability rating
The releasability rating is the ratio of projects in the portfolio that have a **passed** quality gate:
**A**: > 80%\
**B**: > 60%\
**C**: > 40%\
**D**: > 20%\
**E**: <= 20%
### Rating conversion
Reliability, Security (in MQR Mode) or Security Vulnerabilities (in Standard Experience), Security Review, and Maintainability ratings for a portfolio are calculated as the average of the ratings for all projects included in the portfolio.
SonarQube Server converts each project’s letter rating to a number (see conversion table below), calculates an average number for the projects in the portfolio, and converts that average to a letter rating. Averages ending with .5 are rounded up resulting in the "lower" of the two possible ratings, so an average of 2.5 would be rounded up to 3 and result in a "C" rating).
This gives a *problem density* measure on the four axes of Reliability, Security (in MQR Mode) or Security Vulnerability (in Standard Experience), Security Review, and Maintainability for your portfolio.
Rating conversion:
**E**: 5\
**D**: 4\
**C**: 3\
**B**: 2\
**A**: 1
*Note: the Portfolio Overview page is also available at the sub-portfolio level*
### Portfolio breakdown
The Portfolio Breakdown page shows ratings for your portfolio’s **Releasability**, **Security**, **Reliability**, **Maintainability**, and **Security Review** for new and overall code. Additional columns include **Lines of code** and **Last analysis**.
#### Viewing your portfolio details
The **Portfolio details** section shows the aggregated portfolio rating. If the projects included in the portfolio have AI Code Assurance enabled on their quality gates, additional ratings appear for:
* **AI Code Assurance enabled projects**
* **Projects without AI Code Assurance enabled**
See the [ai-code-assurance](https://docs.sonarsource.com/sonarqube-server/ai-capabilities/ai-code-assurance "mention") page for more information about enabling AI Code Assurance on your projects.
#### Viewing the portfolio breakdown
The breakdown section includes a list of all projects, applications and nested portfolios included in your portfolio. The  label indicates that the item includes AI-generated code, as marked by a Quality Standard admin.
### Related pages
* [pdf-reports](https://docs.sonarsource.com/sonarqube-server/user-guide/viewing-reports/pdf-reports "mention")
* [managing-portfolios](https://docs.sonarsource.com/sonarqube-server/project-administration/managing-portfolios "mention")
---
# Source: https://docs.sonarsource.com/sonarqube-community-build/server-update-and-maintenance/update/post-update-steps.md
# Source: https://docs.sonarsource.com/sonarqube-server/2025.5/server-update-and-maintenance/update/post-update-steps.md
# Source: https://docs.sonarsource.com/sonarqube-server/2025.1/server-update-and-maintenance/update/post-update-steps.md
# Source: https://docs.sonarsource.com/sonarqube-server/2025.4/server-update-and-maintenance/update/post-update-steps.md
# Source: https://docs.sonarsource.com/sonarqube-server/2025.6/server-update-and-maintenance/update/post-update-steps.md
# Source: https://docs.sonarsource.com/sonarqube-server/server-update-and-maintenance/update/post-update-steps.md
# Post-update steps
### Post-update checklist
Here’s a list of steps to perform after the update:
* Verify the SonarScanner version (see below).
* For an Oracle database: clean up the database (see below).
* For a PostgreSQL database: clean up the database (see below).
* For a Microsoft SQL database with Windows authentication: verify the JDBC driver version (see below).
* If using an external configuration to control SonarQube Server (through a script or running as a service): update the service to point to the new installation directory (see below).
* If SonarQube Server is running as a service on Linux with SystemD, then you must configure SonarQube Server to run as a service by updating the `sonarqube.service` file.
* If you use the Web API, check at some point the usage of deprecated Web API endpoints and parameters: see [monitoring-api-deprecation](https://docs.sonarsource.com/sonarqube-server/server-update-and-maintenance/maintenance/deprecations/monitoring-api-deprecation "mention").
See the sections below for more details on each step.
{% hint style="info" %}
If some projects fail to reindex after the update, see **Reindexing a single project** in [reindexing](https://docs.sonarsource.com/sonarqube-server/server-update-and-maintenance/maintenance/reindexing "mention").
{% endhint %}
### Verifying the installed SonarScanner version
When updating SonarQube Server, you should also make sure you’re using the latest versions of the SonarScanners to take advantage of features and fixes on the scanner side. Please check the documentation pages of the scanners you use for the most recent version compatible with SonarQube Server and your build tools:
* SonarScanner for Maven: [sonarscanner-for-maven](https://docs.sonarsource.com/sonarqube-server/analyzing-source-code/scanners/sonarscanner-for-maven "mention")
* SonarScanner for Gradle: [sonarscanner-for-gradle](https://docs.sonarsource.com/sonarqube-server/analyzing-source-code/scanners/sonarscanner-for-gradle "mention")
* SonarScanner for .NET: [installing](https://docs.sonarsource.com/sonarqube-server/analyzing-source-code/scanners/dotnet/installing "mention")
* SonarScanner for NPM: [installing](https://docs.sonarsource.com/sonarqube-server/analyzing-source-code/scanners/npm/installing "mention")
* SonarScanner for Python: [sonarscanner-for-python](https://docs.sonarsource.com/sonarqube-server/analyzing-source-code/scanners/sonarscanner-for-python "mention")
### Cleaning up the Oracle database
On Oracle, the database columns to be dropped are marked as UNUSED and are not physically dropped. To reclaim disk space, Oracle administrators must drop these unused columns manually. The SQL request is:
```css-79elbk
ALTER TABLE foo DROP UNUSED COLUMNS
```
The relevant tables are listed in the system table `all_unused_col_tabs`.
### Cleaning up the PostgreSQL database
You can fix the table and index bloating by performing [vacuuming](https://www.postgresql.org/docs/16/routine-vacuuming.html#VACUUM-FOR-SPACE-RECOVERY) in order to reclaim unused disk space. In some specific cases, a [reindex](https://www.postgresql.org/docs/16/routine-reindex.html) is required afterward.
### Verifying the Microsoft SQL JDBC driver version
If you use Microsoft SQL Server with Windows Authentication, make sure that you’re using a supported version of the Microsoft SQL JDBC Driver package. The minimum supported version is the one mentioned on the [installing-the-database](https://docs.sonarsource.com/sonarqube-server/server-installation/installing-the-database "mention") page.
### Updating a service to point to the new installation directory
If you use an external configuration, such as a script or Windows Service to control your server, you’ll need to update it to point to the new value of installation directory (\).
For Linux it depends how you implemented the service.
For Windows, update your service by running the following commands:
```css-79elbk
sc delete SonarQube
\bin\windows-x86-64\SonarService.bat install
```
---
# Source: https://docs.sonarsource.com/sonarqube-server/10.4/setup-and-upgrade/upgrade-the-server/post-upgrade-steps.md
# Source: https://docs.sonarsource.com/sonarqube-server/10.5/setup-and-upgrade/upgrade-the-server/post-upgrade-steps.md
# Source: https://docs.sonarsource.com/sonarqube-server/10.6/setup-and-upgrade/upgrade-the-server/post-upgrade-steps.md
# Source: https://docs.sonarsource.com/sonarqube-server/10.7/server-upgrade-and-maintenance/upgrade/upgrade-the-server/post-upgrade-steps.md
# Source: https://docs.sonarsource.com/sonarqube-server/10.8/server-upgrade-and-maintenance/upgrade/upgrade-the-server/post-upgrade-steps.md
# Source: https://docs.sonarsource.com/sonarqube-server/2025.2/server-update-and-maintenance/upgrade/post-upgrade-steps.md
# Source: https://docs.sonarsource.com/sonarqube-server/2025.3/server-update-and-maintenance/upgrade/post-upgrade-steps.md
# Post-update steps
### Post-update checklist
Here’s a list of steps to perform after the update:
* Verify the SonarScanner version (see below).
* For an Oracle database: clean up the database (see below).
* For a PostgreSQL database: clean up the database (see below).
* For a Microsoft SQL database with Windows authentication: verify the JDBC driver version (see below).
* If using an external configuration to control SonarQube Server (through a script or running as a service): update the service to point to the new installation directory (see below).
* If SonarQube Server is running as a service on Linux with SystemD, then you must configure SonarQube Server to run as a service by updating the `sonarqube.service` file.
* If you use the Web API, check at some point the usage of deprecated Web API endpoints and parameters: see [monitoring-api-deprecation](https://docs.sonarsource.com/sonarqube-server/2025.3/server-update-and-maintenance/maintenance/deprecations/monitoring-api-deprecation "mention").
See the sections below for more details on each step.
{% hint style="info" %}
If some projects fail to reindex after the update, see **Reindexing a single project** in [reindexing](https://docs.sonarsource.com/sonarqube-server/2025.3/server-update-and-maintenance/maintenance/reindexing "mention").
{% endhint %}
### Verifying the installed SonarScanner version
When updating SonarQube Server, you should also make sure you’re using the latest versions of the SonarScanners to take advantage of features and fixes on the scanner side. Please check the documentation pages of the scanners you use for the most recent version compatible with SonarQube Server and your build tools: [sonarscanner-for-maven](https://docs.sonarsource.com/sonarqube-server/2025.3/analyzing-source-code/scanners/sonarscanner-for-maven "mention"), [sonarscanner-for-gradle](https://docs.sonarsource.com/sonarqube-server/2025.3/analyzing-source-code/scanners/sonarscanner-for-gradle "mention"), [installing](https://docs.sonarsource.com/sonarqube-server/2025.3/analyzing-source-code/scanners/dotnet/installing "mention"), [installing](https://docs.sonarsource.com/sonarqube-server/2025.3/analyzing-source-code/scanners/npm/installing "mention"), [sonarscanner-for-python](https://docs.sonarsource.com/sonarqube-server/2025.3/analyzing-source-code/scanners/sonarscanner-for-python "mention").
### Cleaning up the Oracle database
On Oracle, the database columns to be dropped are marked as UNUSED and are not physically dropped. To reclaim disk space, Oracle administrators must drop these unused columns manually. The SQL request is:
```css-79elbk
ALTER TABLE foo DROP UNUSED COLUMNS
```
The relevant tables are listed in the system table `all_unused_col_tabs`.
### Cleaning up the PostgreSQL database
You can fix the table and index bloating by performing [vacuuming](https://www.postgresql.org/docs/16/routine-vacuuming.html#VACUUM-FOR-SPACE-RECOVERY) in order to reclaim unused disk space. In some specific cases, a [reindex](https://www.postgresql.org/docs/16/routine-reindex.html)is required afterward.
### Verifying the Microsoft SQL JDBC driver version
If you use Microsoft SQL Server with Windows Authentication, make sure that you’re using a supported version of the Microsoft SQL JDBC Driver package. The minimum supported version is the one mentioned on the [installing-the-database](https://docs.sonarsource.com/sonarqube-server/2025.3/server-installation/installing-the-database "mention") page.
### Updating a service to point to the new installation directory
If you use an external configuration, such as a script or Windows Service to control your server, you’ll need to update it to point to the new value of installation directory (\).
For Linux it depends how you implemented the service.
For Windows, update your service by running the following commands:
```css-79elbk
sc delete SonarQube
\bin\windows-x86-64\SonarService.bat install
```
---
# Source: https://docs.sonarsource.com/sonarqube-community-build/server-installation/pre-installation.md
# Source: https://docs.sonarsource.com/sonarqube-server/10.5/setup-and-upgrade/pre-installation.md
# Source: https://docs.sonarsource.com/sonarqube-server/10.6/setup-and-upgrade/pre-installation.md
# Source: https://docs.sonarsource.com/sonarqube-server/10.7/setup-and-upgrade/pre-installation.md
# Source: https://docs.sonarsource.com/sonarqube-server/10.8/setup-and-upgrade/pre-installation.md
# Source: https://docs.sonarsource.com/sonarqube-server/2025.2/setup-and-update/pre-installation.md
# Source: https://docs.sonarsource.com/sonarqube-server/2025.3/server-installation/data-center-edition/pre-installation.md
# Source: https://docs.sonarsource.com/sonarqube-server/2025.3/server-installation/pre-installation.md
# Source: https://docs.sonarsource.com/sonarqube-server/2025.5/server-installation/data-center-edition/pre-installation.md
# Source: https://docs.sonarsource.com/sonarqube-server/2025.5/server-installation/pre-installation.md
# Source: https://docs.sonarsource.com/sonarqube-server/2025.1/setup-and-upgrade/pre-installation.md
# Source: https://docs.sonarsource.com/sonarqube-server/2025.4/server-installation/data-center-edition/pre-installation.md
# Source: https://docs.sonarsource.com/sonarqube-server/2025.4/server-installation/pre-installation.md
# Source: https://docs.sonarsource.com/sonarqube-server/2025.6/server-installation/data-center-edition/pre-installation.md
# Source: https://docs.sonarsource.com/sonarqube-server/2025.6/server-installation/pre-installation.md
# Source: https://docs.sonarsource.com/sonarqube-server/server-installation/data-center-edition/pre-installation.md
# Source: https://docs.sonarsource.com/sonarqube-server/server-installation/pre-installation.md
# Pre-installation steps
{% content-ref url="pre-installation/linux" %}
[linux](https://docs.sonarsource.com/sonarqube-server/server-installation/pre-installation/linux)
{% endcontent-ref %}
{% content-ref url="pre-installation/unix" %}
[unix](https://docs.sonarsource.com/sonarqube-server/server-installation/pre-installation/unix)
{% endcontent-ref %}
{% content-ref url="pre-installation/macos" %}
[macos](https://docs.sonarsource.com/sonarqube-server/server-installation/pre-installation/macos)
{% endcontent-ref %}
{% content-ref url="pre-installation/jwt-token" %}
[jwt-token](https://docs.sonarsource.com/sonarqube-server/server-installation/pre-installation/jwt-token)
{% endcontent-ref %}
---
# Source: https://docs.sonarsource.com/sonarqube-community-build/server-update-and-maintenance/update/pre-update-steps.md
# Source: https://docs.sonarsource.com/sonarqube-server/2025.5/server-update-and-maintenance/update/pre-update-steps.md
# Source: https://docs.sonarsource.com/sonarqube-server/2025.1/server-update-and-maintenance/update/pre-update-steps.md
# Source: https://docs.sonarsource.com/sonarqube-server/2025.4/server-update-and-maintenance/update/pre-update-steps.md
# Source: https://docs.sonarsource.com/sonarqube-server/2025.6/server-update-and-maintenance/update/pre-update-steps.md
# Source: https://docs.sonarsource.com/sonarqube-server/server-update-and-maintenance/update/pre-update-steps.md
# Pre-update steps
### Before you start
Consider the following before starting your upgdate:
* SonarQube Server releases come with specific recommendations for updating from the previous versions. You should first read the [#upgrade-notes](https://docs.sonarsource.com/sonarqube-server/release-notes#upgrade-notes "mention") for each version between your current version and the target version.
* Database disk usage recommendations: During your update, tables may be duplicated to speed up the migration process. This could cause your database disk usage to temporarily increase to as much as double the normal usage. Because of this, we recommend that your database disk usage is below 50% before starting a migration.
### Backup the database
First, we *strongly recommend* creating a backup of your database. A backup dump of the database creates a safety net should anything go wrong during the update process. It also allows for testing the update on a testing instance. See Testing the update section below for details.
### Recommended database maintenance steps
For large instances, it can be helpful to perform database maintenance tasks like vacuuming, reindexing, and collecting statistics to ensure a smooth and efficient migration. These steps help eliminate table and index bloat, reclaim disk space, and optimize query performance, preventing unnecessary slowdowns during the update process.
Additionally, gathering fresh statistics ensures that the database query planner can make optimal execution choices. Neglecting these optimizations can lead to longer update times, increased disk usage, and potential indexing issues, affecting responsiveness after the migration.
{% hint style="warning" %}
The following commands will lock your database tables so they should be performed during the downtime window. The best effect will be achieved when they are run one after another.
{% endhint %}
#### PostgreSQL
```css-79elbk
VACUUM FULL
REINDEX DATABASE
ANALYZE
```
#### Oracle
```css-79elbk
SELECT 'ALTER TABLE ' || OBJECT_NAME || ' MOVE';
FROM DBA_OBJECTS WHERE OBJECT_TYPE = 'TABLE' AND OWNER = 'SONARQUBE';
BEGIN
FOR i IN (SELECT INDEX_NAME FROM USER_INDEXES WHERE TABLE_OWNER = 'SONARQUBE') LOOP
EXECUTE IMMEDIATE 'ALTER INDEX ' || i.INDEX_NAME || ' REBUILD';
END LOOP;
END;
BEGIN
DBMS_STATS.GATHER_SCHEMA_STATS('SONARQUBE');
END;
```
#### Microsoft SQL Server
```css-79elbk
EXEC sp_MSforeachtable 'ALTER INDEX ALL ON ? REBUILD';
EXEC sp_MSforeachtable 'UPDATE STATISTICS ? WITH FULLSCAN';
```
### SonarScanner compatibility
Check the minimum required SonarScanner version for the SonarQube Server version that you are updating to. See SonarScanners [general-requirements](https://docs.sonarsource.com/sonarqube-server/analyzing-source-code/scanners/scanner-environment/general-requirements "mention") and individual scanner pages for more details.
SonarScanner
2026.1
2025.6
2025.5
2025.4
2025.1
9.9
SonarScanner for CLI
8.01
8.01
7.2
7.2
7.0.1
4.8
Azure DevOp Extension
8.0.1
8.0.0
7.4.1
7.3
7.1.1
5.11.1
Jenkins extension
2.18
2.18
2.18
2.18
2.17.3
2.15
SonarScanner for Maven
5.5.0.6356
5.5.0.6356
5.2.0.4988
5.1.0.4751
5.0.0.4389
3.9.1.2184
SonarScanner for Gradle
7.2.2.6593
7.2.0.6526
6.3.1.5724
6.2.0.5505
6.0.1.5171
3.5.0.2730
SonarScanner for .Net
11.0.0.126294
11.0.0.126294
10.4.0.124828
10.3.0.120579
9.0.2
5.11
SonarScanner for NPM
4.3.0
4.3.0
4.3.0
4.3.0
4.2.6
3.7.0
SonarScanner for Python
1.3.0.4086
1.3.0.4086
1.1.0.2035
1.1.0.2035
0.2.0.520
N/A
### Testing the update
We recommend testing your update to:
* Make sure your infrastructure can run the update and the new version of SonarQube.
* Get an idea of how long the update will take.
* Gain a better understanding of the update process and anticipate what you’ll need to do when performing the actual update.
To test your update:
1. Create a staging environment using a recent backup of your production database.\
Your staging environment should be as similar to your production instance as possible because the resources and time needed to update depend on what’s stored in your database.
2. Use this staging environment to test the update.
3. Observe how long it takes to back up and restore systems and complete the process.
### Related pages
* [release-cycle-model](https://docs.sonarsource.com/sonarqube-server/server-update-and-maintenance/update/release-cycle-model "mention")
* [determine-path](https://docs.sonarsource.com/sonarqube-server/server-update-and-maintenance/update/determine-path "mention")
* [update](https://docs.sonarsource.com/sonarqube-server/server-update-and-maintenance/update/update "mention")
* [post-update-steps](https://docs.sonarsource.com/sonarqube-server/server-update-and-maintenance/update/post-update-steps "mention")
---
# Source: https://docs.sonarsource.com/sonarqube-server/2025.2/server-update-and-maintenance/upgrade/pre-upgrade-steps.md
# Source: https://docs.sonarsource.com/sonarqube-server/2025.3/server-update-and-maintenance/upgrade/pre-upgrade-steps.md
# Pre-update steps
### Before you start
Consider the following before starting your upgdate:
* SonarQube Server releases come with specific recommendations for updating from the previous versions. You should first read the [#upgrade-notes](https://docs.sonarsource.com/sonarqube-server/2025.3/release-notes#upgrade-notes "mention") for each version between your current version and the target version.
* Database disk usage recommendations: During your update, tables may be duplicated to speed up the migration process. This could cause your database disk usage to temporarily increase to as much as double the normal usage. Because of this, we recommend that your database disk usage is below 50% before starting a migration.
### Backup the database
First, we *strongly recommend* creating a backup of your database. A backup dump of the database creates a safety net should anything go wrong during the update process. It also allows for testing the update on a testing instance. See Testing the update section below for details.
### Recommended database maintenance steps
For large instances, it can be helpful to perform database maintenance tasks like vacuuming, reindexing, and collecting statistics to ensure a smooth and efficient migration. These steps help eliminate table and index bloat, reclaim disk space, and optimize query performance, preventing unnecessary slowdowns during the update process.
Additionally, gathering fresh statistics ensures that the database query planner can make optimal execution choices. Neglecting these optimizations can lead to longer update times, increased disk usage, and potential indexing issues, affecting responsiveness after the migration.
{% hint style="warning" %}
The following commands will lock your database tables so they should be performed during the downtime window. The best effect will be achieved when they are run one after another.
{% endhint %}
#### PostgreSQL
```css-79elbk
VACUUM FULL
REINDEX DATABASE
ANALYZE
```
#### Oracle
```css-79elbk
SELECT 'ALTER TABLE ' || OBJECT_NAME || ' MOVE';
FROM DBA_OBJECTS WHERE OBJECT_TYPE = 'TABLE' AND OWNER = 'SONARQUBE';
BEGIN
FOR i IN (SELECT INDEX_NAME FROM USER_INDEXES WHERE TABLE_OWNER = 'SONARQUBE') LOOP
EXECUTE IMMEDIATE 'ALTER INDEX ' || i.INDEX_NAME || ' REBUILD';
END LOOP;
END;
BEGIN
DBMS_STATS.GATHER_SCHEMA_STATS('SONARQUBE');
END;
```
#### Microsoft SQL Server
```css-79elbk
EXEC sp_MSforeachtable 'ALTER INDEX ALL ON ? REBUILD';
EXEC sp_MSforeachtable 'UPDATE STATISTICS ? WITH FULLSCAN';
```
### Testing the update
We recommend testing your update to:
* Make sure your infrastructure can run the update and the new version of SonarQube.
* Get an idea of how long the update will take.
* Gain a better understanding of the update process and anticipate what you’ll need to do when performing the actual update.
To test your update:
1. Create a staging environment using a recent backup of your production database.\
Your staging environment should be as similar to your production instance as possible because the resources and time needed to update depend on what’s stored in your database.
2. Use this staging environment to test the update.
3. Observe how long it takes to back up and restore systems and complete the process.
### Related pages
* [release-cycle-model](https://docs.sonarsource.com/sonarqube-server/2025.3/server-update-and-maintenance/upgrade/release-cycle-model "mention")
* [determine-path](https://docs.sonarsource.com/sonarqube-server/2025.3/server-update-and-maintenance/upgrade/determine-path "mention")
* [upgrade](https://docs.sonarsource.com/sonarqube-server/2025.3/server-update-and-maintenance/upgrade/upgrade "mention")
* [post-upgrade-steps](https://docs.sonarsource.com/sonarqube-server/2025.3/server-update-and-maintenance/upgrade/post-upgrade-steps "mention")
---
# Source: https://docs.sonarsource.com/sonarqube-community-build/server-installation/from-docker-image/prepare-installation.md
# Source: https://docs.sonarsource.com/sonarqube-server/2025.5/server-installation/from-docker-image/prepare-installation.md
# Source: https://docs.sonarsource.com/sonarqube-server/2025.4/server-installation/from-docker-image/prepare-installation.md
# Source: https://docs.sonarsource.com/sonarqube-server/2025.6/server-installation/from-docker-image/prepare-installation.md
# Source: https://docs.sonarsource.com/sonarqube-server/server-installation/from-docker-image/prepare-installation.md
# Prepare the Docker installation
### Perform the pre-installation steps
See:
* [linux](https://docs.sonarsource.com/sonarqube-server/server-installation/pre-installation/linux "mention")
* [unix](https://docs.sonarsource.com/sonarqube-server/server-installation/pre-installation/unix "mention")
* [macos](https://docs.sonarsource.com/sonarqube-server/server-installation/pre-installation/macos "mention")
* [jwt-token](https://docs.sonarsource.com/sonarqube-server/server-installation/pre-installation/jwt-token "mention") (to keep user sessions alive during startup)
### Create volumes to persist data
Creating the following volumes helps prevent the loss of information when updating to a new version or upgrading to a higher edition:
* `sonarqube_data`: contains data files, such as Elasticsearch indexes
* `sonarqube_logs`: contains SonarQube Server logs about access, web process, CE process, and Elasticsearch
* `sonarqube_extensions`: will contain any plugins you install and the Oracle JDBC driver if necessary.
Create the volumes with the following commands:
```bash
docker volume create --name sonarqube_data
docker volume create --name sonarqube_logs
docker volume create --name sonarqube_extensions
```
{% hint style="warning" %}
Make sure you’re using [**volumes**](https://docs.docker.com/storage/volumes/) as shown with the above commands, and not [**bind mounts**](https://docs.docker.com/storage/bind-mounts/). Using bind mounts prevents plugins from populating correctly.
{% endhint %}
### Oracle database: add the JDBC driver
Drivers for supported databases (except Oracle) are already provided. If you’re using an Oracle database, you need to add the JDBC driver to the `sonar_extensions` volume. To do this:
1. Start the SonarQube container with the embedded H2 database:
```bash
docker run --rm \
-p 9000:9000 \
-v sonarqube_extensions:/opt/sonarqube/extensions \
```
For ``, check the tags currently available on the [DockerHub page](https://hub.docker.com/_/sonarqube).
2. Exit once SonarQube Server has started properly.
3. Copy the Oracle JDBC driver into `sonarqube_extensions/jdbc-driver/oracle`.
### Related pages
* [installation-overview](https://docs.sonarsource.com/sonarqube-server/server-installation/from-docker-image/installation-overview "mention")
* [set-up-and-start-container](https://docs.sonarsource.com/sonarqube-server/server-installation/from-docker-image/set-up-and-start-container "mention")
* [advanced-setup](https://docs.sonarsource.com/sonarqube-server/server-installation/from-docker-image/advanced-setup "mention")
* **Configuring network security features:**
* [securing-behind-proxy](https://docs.sonarsource.com/sonarqube-server/server-installation/network-security/securing-behind-proxy "mention")
* [network-rules](https://docs.sonarsource.com/sonarqube-server/server-installation/network-security/network-rules "mention")
---
# Source: https://docs.sonarsource.com/sonarqube-server/8.9/requirements/prerequisites-and-overview.md
# Source: https://docs.sonarsource.com/sonarqube-server/9.8/requirements/prerequisites-and-overview.md
# Source: https://docs.sonarsource.com/sonarqube-server/9.9/requirements/prerequisites-and-overview.md
# Source: https://docs.sonarsource.com/sonarqube-server/10.0/requirements/prerequisites-and-overview.md
# Source: https://docs.sonarsource.com/sonarqube-server/10.1/requirements/prerequisites-and-overview.md
# Source: https://docs.sonarsource.com/sonarqube-server/10.2/requirements/prerequisites-and-overview.md
# Source: https://docs.sonarsource.com/sonarqube-server/10.3/requirements/prerequisites-and-overview.md
# Source: https://docs.sonarsource.com/sonarqube-server/10.4/requirements/prerequisites-and-overview.md
# Prerequisites and overview
### Prerequisite
You must be able to install Java (Oracle JRE or OpenJDK) on the machine where you plan to run SonarQube.
### Hardware requirements
1. A small-scale (individual or small team) instance of the SonarQube server requires at least 2GB of RAM to run efficiently and 1GB of free RAM for the OS. If you are installing an instance for a large team or an enterprise, please consider the additional recommendations below.
2. The amount of disk space you need will depend on how much code you analyze with SonarQube.
3. SonarQube must be installed on hard drives that have excellent read & write performance. Most importantly, the "data" folder houses the Elasticsearch indices on which a huge amount of I/O will be done when the server is up and running. Read and write hard drive performance will therefore have a big impact on the overall SonarQube server performance.
4. SonarQube and the SonarScanner support only 64-bit systems.
{% hint style="info" %}
Support for 32-bit Java Runtime Environments has been dropped in all Sonar products. This drop affects all Sonar products: SonarLint (for all IDEs), SonarQube, and SonarCloud, including the scanners.
{% endhint %}
#### Enterprise hardware recommendations
For large teams or enterprise-scale installations of SonarQube, additional hardware is required. At the enterprise level, [instance](https://docs.sonarsource.com/sonarqube-server/10.4/instance-administration/monitoring/instance "mention") is essential and should guide further hardware upgrades as your instance grows. A starting configuration should include at least:
* 8 cores, to allow the main SonarQube platform to run with multiple compute engine workers
* 16GB of RAM For additional requirements and recommendations relating to database and Elasticsearch, see [hardware-recommendations](https://docs.sonarsource.com/sonarqube-server/10.4/requirements/hardware-recommendations "mention").
### Supported platforms
#### Java
The SonarQube server requires Java version 17.
For the SonarScanners, the minimum recommended version is Java 17.
SonarQube is able to analyze any kind of Java source files regardless of the version of Java they comply with.
We recommend using the *critical patch update* (CPU) releases.
| **Java** | **Server** | **Scanners** |
| ---------- | ------------------------------------------------------------------------------------------------------------------------------------------------------------------------------------------------------------------------------------------------------ | ------------------------------------------------------------------------------------------------------------------------------------------------------------------------------------------------------------------------------------------------------ |
| Oracle JRE |
2022 (MSSQL 16.0) with bundled Microsoft JDBC driver. Express Edition is supported.
|
|
|
2019 (MSSQL Server 15.0) with bundled Microsoft JDBC driver. Express Edition is supported.
|
|
|
2017 (MSSQL Server 14.0) with bundled Microsoft JDBC driver. Express Edition is supported.
|
|
|
2016 (MSSQL Server 13.0) with bundled Microsoft JDBC driver. Express Edition is supported.
|
|
|
2014 (MSSQL Server 12.0) with bundled Microsoft JDBC driver. Express Edition is supported.
|
|
|
Collation must be case-sensitive (CS) and accent-sensitive (AS) (example: Latin1\_General\_CS\_AS).
|
|
|
READ\_COMMITTED\_SNAPSHOT must be set on the SonarQube database to avoid potential deadlocks under heavy load.
|
|
|
Both Windows authentication ("Integrated Security") and SQL Server authentication are supported. See the Microsoft SQL Server section in installing-the-database for instructions on configuring authentication.
|
| [Oracle](http://www.oracle.com/database/) |
21C
|
|
|
19C
|
|
|
XE Editions
|
|
|
Must be configured to use a UTF8-family charset (see NLS\_CHARACTERSET).
|
|
|
The driver ojdbc14.jar is not supported.
|
|
|
We recommend using the latest Oracle JDBC driver.
|
|
|
Only the thin mode is supported, not OCI.
|
|
|
Only MAX\_STRING\_SIZE=STANDARD parameter is supported, not EXTENDED.
|
#### Web browser
To get the full experience SonarQube has to offer, you must enable JavaScript in your browser.
| **Browser** | |
| --------------- | ---------------------------------------------------------------------------------------------------------------------------------------------------------------------------------------------------------------------------------------------------------- |
| Microsoft Edge |
Latest
|
| Mozilla Firefox |
Latest
|
| Google Chrome |
Latest
|
| Safari |
Latest
|
### Platform notes
#### Linux
If you’re running on Linux, you must ensure that:
* `vm.max_map_count` is greater than or equal to 524288
* `fs.file-max` is greater than or equal to 131072
* the user running SonarQube can open at least 131072 file descriptors
* the user running SonarQube can open at least 8192 threads
You can see the values with the following commands:
```css-79elbk
sysctl vm.max_map_count
sysctl fs.file-max
ulimit -n
ulimit -u
```
You can set them dynamically for the current session by running the following commands as `root`:
```css-79elbk
sysctl -w vm.max_map_count=524288
sysctl -w fs.file-max=131072
ulimit -n 131072
ulimit -u 8192
```
To set these values more permanently, you must update either `/etc/sysctl.d/99-sonarqube.conf` (or `/etc/sysctl.conf` as you wish) to reflect these values.
If the user running SonarQube (`sonarqube` in this example) does not have permission to have at least 131072 open descriptors, you must insert this line in `/etc/security/limits.d/99-sonarqube.conf` (or `/etc/security/limits.conf` as you wish):
```css-79elbk
sonarqube - nofile 131072
sonarqube - nproc 8192
```
If you are using `systemd` to start SonarQube, you must specify those limits inside your unit file in the section `[Service]` :
```css-79elbk
[Service]
...
LimitNOFILE=131072
LimitNPROC=8192
...
```
#### macOS
Same as for Linux: If you’re running into maximum file limit issues on macOS, you can fix them by setting the file limit values by running the following commands:
```css-79elbk
sudo sysctl -w kern.maxfiles=131072
sudo sysctl -w kern.maxfilesperproc=131072
ulimit -n 131072
```
#### seccomp filter
By default, Elasticsearch uses the [`seccomp` filter](https://www.kernel.org/doc/Documentation/prctl/seccomp_filter.txt). Make sure you use a kernel with seccomp enabled.
To check that `seccomp` is available on your kernel, use:
```css-79elbk
$ grep SECCOMP /boot/config-$(uname -r)
```
If your kernel has `seccomp`, you’ll see the following:
```css-79elbk
CONFIG_HAVE_ARCH_SECCOMP_FILTER=y
CONFIG_SECCOMP_FILTER=y
CONFIG_SECCOMP=y
```
#### Fonts
Generating [pdf-reports](https://docs.sonarsource.com/sonarqube-server/10.4/project-administration/pdf-reports "mention") requires that fonts be installed on the server hosting SonarQube. On Windows servers, this is a given. However, this is not always the case for Linux servers.
The following should be ensured:
* [Fontconfig](https://en.wikipedia.org/wiki/Fontconfig) is installed on the server hosting SonarQube
* A package of [FreeType](https://www.freetype.org/) fonts is installed on the SonarQube server. The exact packages available will vary by distribution, but a commonly used package is `libfreetype6`
#### FIPS
SonarQube will not run on Linux hosts where FIPS (Federal Information Processing Standard) is enforced.
### Azure App Service not supported
While SonarQube is provider agnostic, some environments do not work well as platforms for a SonarQube installation.
The issue with Azure App Service is linked to the fact that SonarQube’s Elasticsearch component runs bootstrap checks on values at startup. This includes the prerequisites for Linux platforms documented above. If the values are too low for any of these properties, the SonarQube startup will fail. These values need to be set on the host system, which Azure does not make possible for this service.
---
# Source: https://docs.sonarsource.com/sonarqube-server/10.6/analyzing-source-code/languages/c-family/prerequisites.md
# Source: https://docs.sonarsource.com/sonarqube-server/10.7/analyzing-source-code/languages/c-family/prerequisites.md
# Source: https://docs.sonarsource.com/sonarqube-server/10.8/analyzing-source-code/languages/c-family/prerequisites.md
# Source: https://docs.sonarsource.com/sonarqube-server/2025.2/analyzing-source-code/languages/c-family/prerequisites.md
# Source: https://docs.sonarsource.com/sonarqube-server/2025.3/analyzing-source-code/languages/c-family/prerequisites.md
# Source: https://docs.sonarsource.com/sonarqube-server/2025.5/analyzing-source-code/languages/c-family/prerequisites.md
# Source: https://docs.sonarsource.com/sonarqube-server/2025.1/analyzing-source-code/languages/c-family/prerequisites.md
# Source: https://docs.sonarsource.com/sonarqube-server/2025.4/analyzing-source-code/languages/c-family/prerequisites.md
# Source: https://docs.sonarsource.com/sonarqube-server/2025.6/analyzing-source-code/languages/c-family/prerequisites.md
# Source: https://docs.sonarsource.com/sonarqube-server/analyzing-source-code/languages/c-family/prerequisites.md
# Source: https://docs.sonarsource.com/sonarqube-cloud/advanced-setup/languages/c-family/prerequisites.md
# Prerequisites
### Supported language standards
Please check the C, C++, and Objective-C rows in the [overview](https://docs.sonarsource.com/sonarqube-cloud/advanced-setup/languages/overview "mention") for an up-to-date list of supported versions.
### Additional prerequisites for Compilation Database mode
#### Supported runtime environments
For the SonarScanner to analyze CFamily code, it must run on one of the following environments:
* Microsoft Windows on x86-64
* Linux on x86-64 or ARM64
* macOS with version 10.14.3 and later on x86-64 or Apple Silicon
#### SonarScanner
SonarScanner executes the analysis of CFamily languages on the CI.
* Use [sonarscanner-for-dotnet](https://docs.sonarsource.com/sonarqube-cloud/advanced-setup/ci-based-analysis/sonarscanner-for-dotnet "mention") for projects with mixed CFamily and .Net code.
* Use [sonarscanner-for-maven](https://docs.sonarsource.com/sonarqube-cloud/advanced-setup/ci-based-analysis/sonarscanner-for-maven "mention") for Maven projects with mixed CFamily and Java code.
* Use [sonarscanner-for-gradle](https://docs.sonarsource.com/sonarqube-cloud/advanced-setup/ci-based-analysis/sonarscanner-for-gradle "mention") for Gradle projects with mixed CFamily and Java code.
* Otherwise, use the default [sonarscanner-cli](https://docs.sonarsource.com/sonarqube-cloud/advanced-setup/ci-based-analysis/sonarscanner-cli "mention").
#### Supported compilers
To be analyzed in Compilation Database mode, a project must compiled by one of the following compilers:
* Any version of Clang, clang-cl, GCC, and Microsoft C/C++ compilers
* Any version of the Intel compiler for Linux and macOS
* ARM5 and ARM6 compilers
* IAR compilers for ARM, Atmel AVR32, Atmel AVR, Renesas H8, Renesas RL78, Renesas RX, Renesas V850, Texas Instruments MSP430, and for 8051
* QNX compilers
* Texas Instruments compilers for ARM (`armcl` and `tiarmclang`), C2000, C6000, C7000, MSP430, and PRU
* Wind River Diab and GCC compilers
* Microchip MPLAB XC8, XC16, and XC32 Compilers
* Compilers based wholly on GCC, including Linaro GCC
#### Generating a compilation database
To analyze in Compilation Database mode, you need to be able to use one of two alternative ways to generate the compilation database:
* Sonar *Build Wrapper*
* Third-Party tools
**Choosing the right tool**
The general recommendation is to use Build Wrapper unless there is a compelling reason not to.
**Reasons to use Build Wrapper**
* Build Wrapper enforces running the build before the analysis, which ensures that the code is in good shape for analysis: the code is compilable, the configuration file is not outdated, and the generated source files are available during the analysis.
* The project build relies on environment variables, which can only be captured using *Build Wrapper*.
* Recommended and supported by Sonar
**Reasons to use third-party tools**
* When build-wrapper doesn’t work as expected with your build-system or environment. For example, recent versions of XCode
* You want to use a third-party tool that, unlike build-wrapper, does not require a clean build to generate a compilation database
* You already generate and use a reliable Compilation Database in your CI pipeline
**Using Build Wrapper**
Analysis configuration example projects with Build Wrapper are available on [GitHub](https://github.com/orgs/sonarsource-cfamily-examples/repositories?q=topic%3Abuild-wrapper+topic%3Asonarqube) for various compilers, build systems, and operating systems.
*Build Wrapper* is a tool developed by SonarSource that generates a compilation database, capturing your build configuration at build time. To run Build Wrapper, prepend your clean build command with the *Build Wrapper* executable.
When you wrap your build command with Build Wrapper, it will run the given command and gather all the configuration required for a correct analysis of C/C++/Objective-C projects, such as macro definitions and include directories. Build Wrapper does not impact your build; it merely monitors and writes what it learns into files in your specified directory.
Build Wrapper must be downloaded each time from SonarQube Cloud before executing it to ensure that the latest version is used:
* [Download Build Wrapper for Linux x86-64](https://sonarcloud.io/static/cpp/build-wrapper-linux-x86.zip)
* [Download Build Wrapper for Linux aarch64](https://sonarcloud.io/static/cpp/build-wrapper-linux-aarch64.zip)
* [Download Build Wrapper for macOS](https://sonarcloud.io/static/cpp/build-wrapper-macosx-x86.zip)
* [Download Build Wrapper for Windows](https://sonarcloud.io/static/cpp/build-wrapper-win-x86.zip)
{% hint style="info" %}
If you’re using the [GitHub Action for SonarQube](https://github.com/marketplace/actions/official-sonarqube-scan) to perform the scan, use the `sonarqube-scan-action/install-build-wrapper` sub-action to install the Build Wrapper.
{% endhint %}
Unzip the downloaded Build Wrapper and configure it in your `PATH` because doing so is just more convenient.
Execute Build Wrapper as a prefix to your usual clean build command. A clean build command should always build the project from scratch. At the end of your build, a `compile_commands.json` file should be generated in the specified output directory. This file contains information about the compilation units that were built by your build command.
Any file that doesn’t end up in a compiled compilation unit will not be analyzed. As a consequence, source files that are not compiled and header files that are not included in any compiled source file will not be analyzed.
Executing build-wrapper doesn’t interfere with your build command. There is no need to build a second time without a build-wrapper. Just make one build and wrap it up.
Notes:
* Build Wrapper supports [ccache](https://ccache.dev/). This can be used to speed up clean builds by caching previous compilations and detecting when the same compilation is being done again. It is commonly used to compensate for the need for a clean build when using the build-wrapper.
* Build Wrapper does not support statically linked compilers on Linux and macOS, such as some versions of Texas Instruments compilers on Linux.
The examples below use make, xcodebuild, and MSBuild, but any build tool that performs a full build can be used:
Linux
* For Linux x86-64:
```bash
build-wrapper-linux-x86-64 --out-dir build_wrapper_output_directory make clean all
```
* For Linux aarch64:
```bash
build-wrapper-linux-aarch64 --out-dir build_wrapper_output_directory make clean all
```
macOS
```bash
build-wrapper-macosx-x86 --out-dir build_wrapper_output_directory xcodebuild clean build
```
Windows
```bash
build-wrapper-win-x86-64.exe --out-dir build_wrapper_output_directory MSBuild.exe /t:Rebuild /nodeReuse:False
```
**Important notes**
* Build Wrapper collects information about the build, including absolute file paths (source files, standard headers, libraries, etc.). Later, SonarScanner CLI uses this information and needs to access those paths. While this is straightforward when running these two steps on the same host, it is worth considering when using any containerization. A consequence of this is that Compilation-Database based C/C++/Objective-C analysis is NOT supported by the [SonarScanner CLI Docker image](https://hub.docker.com/r/sonarsource/sonar-scanner-cli).
* Build Wrapper generates three files in its output directory: build-wrapper-dump.json, compile\_commands.json, and build-wrapper.log. All these files contain a dump of the environment, which can be a security concern in some contexts.
**Specifics of using Build Wrapper with Bazel**
[Bazel](https://www.bazel.build/) recommends that you use the [`--batch`](https://docs.bazel.build/versions/master/user-manual.html#flag--batch) parameter when running in a Continuous Build context. When using Build Wrapper, you are in such a context. Also, you need to deactivate Bazel’s ["sandbox"](https://bazel.build/docs/sandboxing) mechanism so that the compiled file paths can be retrieved after the compilation phase.
Here is an example of the Build Wrapper command with Bazel parameters on macOS:
```bash
build-wrapper-macosx-x86 --out-dir bw bazel
--batch
build
--spawn_strategy=local
--strategy=Genrule=local
--bazelrc=/dev/null
//main:hello-world
```
**Specifics of using build-wrapper with MSBuild**
Instead of starting new nodes when building your code, MsBuild can reuse previously launched build nodes. In that case, Build Wrapper cannot monitor files compiled on these nodes. Therefore, we advise turning off this feature using the [`nodeReuse:False`](https://docs.microsoft.com/en-us/visualstudio/msbuild/msbuild-command-line-reference?view=vs-2022) command-line option.
**Using third-party tools**
Depending on your build system, some third-party options can be used to generate a compilation database.
Some examples
Some examples:
* [CMake](https://cmake.org/cmake/help/latest/variable/CMAKE_EXPORT_COMPILE_COMMANDS.html) by setting the option `CMAKE_EXPORT_COMPILE_COMMANDS`
* [Ninja](https://ninja-build.org/manual.html) by setting the `compdb` flag
* XCode through Clang’s `-gen-cdb-fragment-path` feature:
```properties
# Add the following "OTHER_CFLAGS" option to the xcodebuild command
xcodebuild clean build OTHER_CFLAGS="\$(inherited) -gen-cdb-fragment-path \$(PROJECT_DIR)/CompilationDatabase"
# After the build, aggregate the fragments into "compile_commands.json"
cd CompilationDatabase && sed -e '1s/^/[\'$'\n''/' -e '$s/,$/\'$'\n'']/' *.json > ../compile_commands.json && cd ..
```
* Clang using the -MJ option. Note that this will generate a compilation database entry by input. The merge of all entries can be done through something like `sed -e '1s/^/[\'$'\n''/' -e '$s/,$/\'$'\n'']/' *.o.json > compile_commands.json`
* Open source wrappers like [Bear](https://github.com/rizsotto/Bear) and [Bazel compile commands extractor](https://github.com/hedronvision/bazel-compile-commands-extractor)
Analysis configuration example projects that generate compilation databases using third-party tools are available on [GitHub](https://github.com/orgs/sonarsource-cfamily-examples/repositories?q=topic%3Abuild-wrapper+topic%3Asonarqube).
**Important notes**
* Make sure that the tool you are using generates the right up-to-date compile commands. To do so, generate a compilation database before every analysis. Also, verify that the Compilation Database contains your actual build commands by running one of the compilation commands and ensuring that it succeeds.
* The environment where you execute the analysis should be the same as the build environment; the analyzer may need to access the build-related environment variables. For example, when using the Microsoft Visual C++ compiler, execute the analysis from the same Visual Studio Developer Command Prompt you use to build your project. The command prompt sets some environment variables, like `INCLUDE`, that must be set during the analysis.
---
# Source: https://docs.sonarsource.com/sonarqube-for-eclipse/resources/previous-versions.md
# Source: https://docs.sonarsource.com/sonarqube-for-visual-studio/resources/previous-versions.md
# Source: https://docs.sonarsource.com/sonarqube-for-intellij/resources/previous-versions.md
# Source: https://docs.sonarsource.com/sonarqube-for-vs-code/resources/previous-versions.md
# Previous versions
Please remember that Sonar officially supports only the latest version of [VS Code](https://app.gitbook.com/o/2ibCvzwZt86Nlk2zloB7/s/6LPRABg3ubAJhpfR5K0Y/ "mention").
In version 4.13.0, *SonarLint for VS Code* was renamed *SonarQube for VS Code*. Below, we’ve retained the name *SonarLint* when appropriate because it is what you should see in that version of the extension.
### Installing previous versions
A limited version history is available on the **Version History** tab of the [SonarQube for VS Code Marketplace page](https://marketplace.visualstudio.com/items?itemName=SonarSource.sonarlint-vscode).
Installation of an earlier version is possible by downloading the appropriate asset from the [Releases](https://github.com/SonarSource/sonarlint-vscode/releases) page before following the [offline-installation](https://docs.sonarsource.com/sonarqube-for-vs-code/getting-started/offline-installation "mention") instructions.
### Legacy Connected Mode
#### SonarLint v3.6-v3.7
Starting from v3.6 of SonarLint for VSCode, to set up SonarQube Server or SonarQube Cloud connections, open a **SONARLINT CONNECTED MODE** view in VSCode.
Select either **Add SonarQube Connection** or **Add SonarCloud Connection**, and complete the fields.
For SonarQube connections, provide your **SonarQube Server URL** and **User Token**. For SonarCloud connections, provide your **Organization Key** and **User Token**. User Tokens should be generated on the SonarQube/SonarCloud side and pasted into the **User Token field**.
User Tokens can be generated using these pages:
* SonarQube - `https:///account/security/`
* SonarCloud - `https://sonarcloud.io/account/security/`
**Connection Name** is a friendly name for your connections. In the case of multiple connections, it also acts as a `connectionId`.
SonarLint for VSCode v3.6 and above has the option to enable/disable **Receive notifications** when starting a new connection. Notifications can also be enabled/disabled from the UI while editing the connection setting (see next image below). Action buttons used to edit/delete existing, or create additional connections will be revealed in the UI when hovering over each connection.
Select **Save Connection** and verify that the new connection was set up successfully in the Connected Mode view.
Action buttons to edit/delete existing, or create additional connections will be revealed when hovering over each connection.
**Project binding v3.6-3.7**
Establish your SONARLINT CONNECTED MODE as described above.
Project Bindings can be configured either at the workspace level or in every workspace folder by modifying the `settings.json` file. Example:
```json
{
"sonarlint.connectedMode.project": {
"projectKey": "the-project-key"
}
}
```
If you plan to use multiple connections to different SonarQube servers and/or SonarQube Cloud organizations, simply give a unique `connectionId` to each entry and use them as reference in the binding. Example:
```json
// In project1/.vscode/settings.json
{
"sonarlint.connectedMode.project": {
"connectionId": "mySonar",
"projectKey": "the-project-key-on-sq"
}
}
// In project2/.vscode/settings.json
{
"sonarlint.connectedMode.project": {
"connectionId": "myOrgOnSonarCloud",
"projectKey": "the-project-key-on-sc"
}
}
```
#### SonarLint v3.5.4 and lower
Connection details should be configured in the VSCode user settings (user token, SonarQube Server URL, or SonarQube Cloud organization). For security reasons, the token should not be stored in SCM with workspace settings (why we suggest configuring in VSCode user settings).
Example for SonarQube Server:
```json
{
"sonarlint.connectedMode.connections.sonarqube": [
{
"serverUrl": "https://sonarqube.mycompany.com",
"token": ""
}
]
}
```
Example for SonarCloud:
```json
{
"sonarlint.connectedMode.connections.sonarcloud": [
{
"organizationKey": "myOrg",
"token": ""
}
]
}
```
Notifications from your project’s Quality Gate can be toggled using the `disableNotifications` field in a server connection definition.
**Project binding v3.5.4 and lower**
SonarLint v3.5.4 and earlier allows bindings either at the workspace level, or at each workspace folder. Example:
```json
{
"sonarlint.connectedMode.project": {
"projectKey": "the-project-key"
}
}
```
If you plan to use multiple connections, to different SonarQube servers and/or SonarQube Cloud organizations, simply give a unique `connectionId` to each entry, and use them as reference in the binding. Example:
```json
// In user settings
{
"sonarlint.connectedMode.connections.sonarqube": [
{
"connectionId": "mySonar",
"serverUrl": "https://sonarqube.mycompany.com",
"token": "xxx"
}
]
"sonarlint.connectedMode.connections.sonarcloud": [
{
"connectionId": "myOrgOnSonarCloud",
"organizationKey": "myOrg",
"token": "yyy"
}
]
}
// In project1/.vscode/settings.json
{
"sonarlint.connectedMode.project": {
"connectionId": "mySonar",
"projectKey": "the-project-key-on-sq"
}
}
// In project2/.vscode/settings.json
{
"sonarlint.connectedMode.project": {
"connectionId": "myOrgOnSonarCloud",
"projectKey": "the-project-key-on-sc"
}
}
```
---
# Source: https://docs.sonarsource.com/sonarqube-server/2025.2/server-update-and-maintenance/product-release-lifecycle.md
# Source: https://docs.sonarsource.com/sonarqube-server/2025.3/server-update-and-maintenance/product-release-lifecycle.md
# Source: https://docs.sonarsource.com/sonarqube-server/2025.5/server-update-and-maintenance/product-release-lifecycle.md
# Source: https://docs.sonarsource.com/sonarqube-server/2025.1/server-update-and-maintenance/product-release-lifecycle.md
# Source: https://docs.sonarsource.com/sonarqube-server/2025.4/server-update-and-maintenance/product-release-lifecycle.md
# Source: https://docs.sonarsource.com/sonarqube-server/2025.6/server-update-and-maintenance/product-release-lifecycle.md
# Source: https://docs.sonarsource.com/sonarqube-server/server-update-and-maintenance/product-release-lifecycle.md
# Source: https://docs.sonarsource.com/sonarqube-cloud/appendices/product-release-lifecycle.md
# Product release lifecycle
This document describes Sonar’s product release lifecycle and standard definitions for alpha, beta, and general availability (GA) stages. The alpha and beta stages replace the previously used Early Access (deprecated) programs.
### Alpha
Products or features in the alpha stage have limited functionality and are subject to significant change or cancellation. Access is invitation-only. Products or features in alpha are not covered under SLA.
### Beta
Products or features in the beta stage have nearly complete functionality. Access is by request and requires approval. Products or features in beta are not covered under SLA.
### General availability (GA)
A public release of a product or feature. It includes all planned functionalities and is available to customers for purchase. A GA product is publicly announced by Sonar, fully functional, stable, documented, supported, and covered under SLA.
---
# Source: https://docs.sonarsource.com/sonarqube-community-build/project-administration.md
# Source: https://docs.sonarsource.com/sonarqube-server/8.9/project-administration.md
# Source: https://docs.sonarsource.com/sonarqube-server/9.8/project-administration.md
# Source: https://docs.sonarsource.com/sonarqube-server/9.9/project-administration.md
# Source: https://docs.sonarsource.com/sonarqube-server/10.0/project-administration.md
# Source: https://docs.sonarsource.com/sonarqube-server/10.1/project-administration.md
# Source: https://docs.sonarsource.com/sonarqube-server/10.2/project-administration.md
# Source: https://docs.sonarsource.com/sonarqube-server/10.3/project-administration.md
# Source: https://docs.sonarsource.com/sonarqube-server/10.4/project-administration.md
# Source: https://docs.sonarsource.com/sonarqube-server/10.5/project-administration.md
# Source: https://docs.sonarsource.com/sonarqube-server/10.6/project-administration.md
# Source: https://docs.sonarsource.com/sonarqube-server/10.7/project-administration.md
# Source: https://docs.sonarsource.com/sonarqube-server/10.8/project-administration.md
# Source: https://docs.sonarsource.com/sonarqube-server/2025.2/project-administration.md
# Source: https://docs.sonarsource.com/sonarqube-server/2025.3/project-administration.md
# Source: https://docs.sonarsource.com/sonarqube-server/2025.5/project-administration.md
# Source: https://docs.sonarsource.com/sonarqube-server/2025.1/project-administration.md
# Source: https://docs.sonarsource.com/sonarqube-server/2025.4/project-administration.md
# Source: https://docs.sonarsource.com/sonarqube-server/2025.6/project-administration.md
# Source: https://docs.sonarsource.com/sonarqube-server/project-administration.md
# Project administration
- [Creating your project](/sonarqube-server/project-administration/creating-your-project.md): How to create your project in SonarQube Server.
- [Importing your DevOps platform repository](/sonarqube-server/project-administration/creating-your-project/importing-repo.md): Creating and importing projects from a DevOps platform repository.
- [Automating project creation and import](/sonarqube-server/project-administration/creating-your-project/automating-project-creation-and-import.md): When you have a large project base, it can be beneficial to automate project creation and import using the Web API.
- [Creating your project manually](/sonarqube-server/project-administration/creating-your-project/creating-project-manually.md): For a project not linked to a DevOps platform, you can create your SonarQube project manually.
- [Setting project permissions](/sonarqube-server/project-administration/setting-project-permissions.md): Setting up your permissions and creating permission templates.
- [Setting up project features](/sonarqube-server/project-administration/setting-up-features.md): How to set up various features for your project.
- [DevOps platform integration features](/sonarqube-server/project-administration/setting-up-features/devops-platform-integration.md): Setting up DevOps integration features for your project.
- [Managing project tags](/sonarqube-server/project-administration/setting-up-features/managing-project-tags.md): SonarQube Server's Project Tags allow you to categorize and group projects for easier selection on the Projects page.
- [Customizing Project Information page](/sonarqube-server/project-administration/setting-up-features/customizing-project-information-page.md): Managing project links on the project information page.
- [Setting various features at project level](/sonarqube-server/project-administration/setting-up-features/project-settings.md): Changing and customizing your project’s settings.
- [Adjusting project analysis](/sonarqube-server/project-administration/adjusting-analysis.md): How to adjust the analysis parameters and quality standards of your SonarQube Server project.
- [Setting analysis scope](/sonarqube-server/project-administration/adjusting-analysis/setting-analysis-scope.md): Setting and managing your analysis scope.
- [Introduction](/sonarqube-server/project-administration/adjusting-analysis/setting-analysis-scope/introduction.md): Main steps for setting the project's analysis scope.
- [Setting initial scope](/sonarqube-server/project-administration/adjusting-analysis/setting-analysis-scope/setting-initial-scope.md): Setting the initial scope of analysis for your project's source and test files.
- [Excluding based on path-matching patterns](/sonarqube-server/project-administration/adjusting-analysis/setting-analysis-scope/excluding-files-based-on-patterns.md): Adjust your project’s initial analysis scope by excluding files based on path-matching patterns.
- [Excluding based on file extension](/sonarqube-server/project-administration/adjusting-analysis/setting-analysis-scope/excluding-based-on-file-extension.md): For each programming language, define the file extensions to be analyzed.
- [Excluding from coverage or duplication](/sonarqube-server/project-administration/adjusting-analysis/setting-analysis-scope/exclude-from-coverage-duplication.md): Exclude specific files from your project's code coverage analysis or duplication checks.
- [Applying advanced exclusions](/sonarqube-server/project-administration/adjusting-analysis/setting-analysis-scope/advanced-exclusions.md): Tailor your project's analysis by applying advanced exclusions based on file content, specific code blocks, and defined coding rules.
- [Other adjustments](/sonarqube-server/project-administration/adjusting-analysis/setting-analysis-scope/other-adjustments.md): Adjust your project's analysis based on secret detection scope, file size, and SCM file ignore patterns.
- [Verifying analysis scope](/sonarqube-server/project-administration/adjusting-analysis/setting-analysis-scope/verifying-analysis-scope.md): Review configured properties and properties identified by the SonarScanner to determine your SonarQube project's analysis scope.
- [Defining matching patterns](/sonarqube-server/project-administration/adjusting-analysis/setting-analysis-scope/defining-matching-patterns.md): Define matching patterns for files and coding rules.
- [Managing your project's quality gate](/sonarqube-server/project-administration/adjusting-analysis/changing-quality-gate-and-fudge-factor.md): Changing your project's default quality gate and other parameters or features impacting your quality gate.
- [Changing your project's quality profiles](/sonarqube-server/project-administration/adjusting-analysis/changing-quality-gate.md): Changing the project's default quality profile.
- [Configuring new code calculation](/sonarqube-server/project-administration/adjusting-analysis/configuring-new-code-calculation.md): Configuring your project’s new code definition.
- [Maintaining your project](/sonarqube-server/project-administration/maintaining-project.md): How to perform various maintenance tasks on your SonarQube Server project.
- [Maintaining project branches](/sonarqube-server/project-administration/maintaining-project/maintaining-the-branches-of-your-project.md): Manage your project’s branches to fit the needs of your organization and workflow.
- [Managing project history](/sonarqube-server/project-administration/maintaining-project/managing-project-history.md): Manage your project’s history by editing and deleting snapshots of your project.
- [Changing the project key](/sonarqube-server/project-administration/maintaining-project/changing-project-key.md): You can update the project key without losing the history of the project.
- [Project move](/sonarqube-server/project-administration/maintaining-project/project-move.md): Project Move allows you to export a project from one SonarQube Server instance and import it into another SonarQube Server instance.
- [Deleting your project](/sonarqube-server/project-administration/maintaining-project/deleting-project.md): You can delete one or multiple projects, provided you have the necessary permissions to do so.
- [Changing your project binding](/sonarqube-server/project-administration/maintaining-project/changing-project-binding.md): You can bind an unbound project and you can change the binding of a bound project.
- [Managing monorepo projects](/sonarqube-server/project-administration/monorepos.md): Managing monorepo projects, a feature supported by SonarQube for GitHub and GitLab repositories.
- [Jira Cloud integration](/sonarqube-server/project-administration/jira-integration.md): Binding a SonarQube project with a Jira Cloud project.
- [AI features](/sonarqube-server/project-administration/ai-features.md): These pages contain information about administering SonarQube Server's AI features at the project level.
- [Overview](/sonarqube-server/project-administration/ai-features/overview.md): SonarQube Server provides a series of tools to help you identify, manage, and use AI-generated code in your projects.
- [Set up AI Code Assurance](/sonarqube-server/project-administration/ai-features/set-up-ai-code-assurance.md): Manage your AI Code Assurance standards using the SonarQube API.
- [AI CodeFix](/sonarqube-server/project-administration/ai-features/enable-ai-codefix.md): SonarQube's AI CodeFix service can suggest fixes for a select set of rules in Java, JavaScript, TypeScript, Python, C#, and C++ and can be enabled at the project level.
- [Configuring webhooks](/sonarqube-server/project-administration/webhooks.md): SonarQube webhooks notify external services when a project analysis is complete.
- [Managing portfolios](/sonarqube-server/project-administration/managing-portfolios.md): Setting up and managing portfolios in SonarQube Server.
- [Managing applications](/sonarqube-server/project-administration/managing-applications.md): Setting up and managing applications in SonarQube Server.
---
# Source: https://docs.sonarsource.com/sonarqube-cloud/managing-your-projects/project-analysis.md
# Setting up project analysis
If you don’t use [automatic-analysis](https://docs.sonarsource.com/sonarqube-cloud/advanced-setup/automatic-analysis "mention"), you must configure a CI-based analysis with a SonarScanner before setting up a project analysis. If needed, see the [overview-of-integrated-cis](https://docs.sonarsource.com/sonarqube-cloud/advanced-setup/ci-based-analysis/overview-of-integrated-cis "mention") page to learn about CI integrations.
{% content-ref url="project-analysis/setting-analysis-scope" %}
[setting-analysis-scope](https://docs.sonarsource.com/sonarqube-cloud/managing-your-projects/project-analysis/setting-analysis-scope)
{% endcontent-ref %}
{% content-ref url="project-analysis/long-lived-branch-pattern" %}
[long-lived-branch-pattern](https://docs.sonarsource.com/sonarqube-cloud/managing-your-projects/project-analysis/long-lived-branch-pattern)
{% endcontent-ref %}
{% content-ref url="project-analysis/changing-quality-gate" %}
[changing-quality-gate](https://docs.sonarsource.com/sonarqube-cloud/managing-your-projects/project-analysis/changing-quality-gate)
{% endcontent-ref %}
{% content-ref url="project-analysis/quality-profile-association" %}
[quality-profile-association](https://docs.sonarsource.com/sonarqube-cloud/managing-your-projects/project-analysis/quality-profile-association)
{% endcontent-ref %}
{% content-ref url="project-analysis/configuring-new-code-calculation" %}
[configuring-new-code-calculation](https://docs.sonarsource.com/sonarqube-cloud/managing-your-projects/project-analysis/configuring-new-code-calculation)
{% endcontent-ref %}
### Related pages
* Set and adjust your [setting-analysis-scope](https://docs.sonarsource.com/sonarqube-cloud/managing-your-projects/project-analysis/setting-analysis-scope "mention"). To get started with understanding your analysis scope, see the section's [introduction](https://docs.sonarsource.com/sonarqube-cloud/managing-your-projects/project-analysis/setting-analysis-scope/introduction "mention") page.
* Enrich you analysis results with test coverage, external analyzers, and branch analysis. See the [overview](https://docs.sonarsource.com/sonarqube-cloud/enriching/overview "mention") page to Enriching your analysis.
* Disable or enable [automatic-analysis](https://docs.sonarsource.com/sonarqube-cloud/advanced-setup/automatic-analysis "mention").
* Define a [long-lived-branch-pattern](https://docs.sonarsource.com/sonarqube-cloud/managing-your-projects/project-analysis/long-lived-branch-pattern "mention").
---
# Source: https://docs.sonarsource.com/sonarqube-community-build/user-guide/project-badge.md
# Source: https://docs.sonarsource.com/sonarqube-server/10.7/user-guide/project-badge.md
# Source: https://docs.sonarsource.com/sonarqube-server/10.8/user-guide/project-badge.md
# Source: https://docs.sonarsource.com/sonarqube-server/2025.2/user-guide/project-badge.md
# Source: https://docs.sonarsource.com/sonarqube-server/2025.3/user-guide/project-badge.md
# Source: https://docs.sonarsource.com/sonarqube-server/2025.5/user-guide/project-badge.md
# Source: https://docs.sonarsource.com/sonarqube-server/2025.1/user-guide/project-badge.md
# Source: https://docs.sonarsource.com/sonarqube-server/2025.4/user-guide/project-badge.md
# Source: https://docs.sonarsource.com/sonarqube-server/2025.6/user-guide/project-badge.md
# Source: https://docs.sonarsource.com/sonarqube-server/user-guide/project-badge.md
# Using a project badge
You can include dynamic SonarQube Server badges on your web pages to display information about your project such as the current value of specific metrics or the current quality gate status.
Markdown snippets and simple image URLs are provided to generate the badge code. A unique security token is generated for each project badge and is required to make the badge accessible from third-party tools.
{% hint style="warning" %}
Using project badges can expose sensitive information like your security rating and other metrics. You should only use them in trusted environments.
{% endhint %}
### Generating the badge code
To generate the code of your dynamic project badge:
1. Retrieve your project. See [retrieving-projects](https://docs.sonarsource.com/sonarqube-server/user-guide/viewing-projects/retrieving-projects "mention") for more information.
2. In the top right corner, select **Project Information**.
3. In the **Badges** section:
1. Select the information type you want to display: metric value or quality gate status.
2. If you selected the metric value information type, select the metric in **Customize badge**.
3. In Code format, select **Markdown** (markdown snippet) or **Image URL only** depending on how you want to include your badge.
4. Select the **Copy** button to copy the code of your badge.
### Renewing the badge token
If a project badge URL is accessed by someone who should not have access to it, you can renew the project badge’s unique token provided you’re a project admin. This invalidates any existing project badge URLs, and you’ll have to update all locations where the badge is being used.
To renew the badge token:
1. Retrieve your project. See [retrieving-projects](https://docs.sonarsource.com/sonarqube-server/user-guide/viewing-projects/retrieving-projects "mention") for more information.
2. In the top right corner, select **Project Information**.
3. In the **Badges** section, select **Renew token**.
### Using the AI Code Assurance project badge
The AI Code Assurance project badge is available if your project adheres to recommended Standards for AI generated code. See [ai-code-assurance](https://docs.sonarsource.com/sonarqube-server/ai-capabilities/ai-code-assurance "mention") for more information. Follow these instructions before using the AI Code Assurance badge.
Sonar recognizes that AI-generated code should be monitored with additional quality standards. Recommended checks include high standards to reduce code complexity, remove bugs, and eliminate injection vulnerabilities. SonarQube’s AI Code Assurance features bring confidence that your AI-generated code is being reviewed to avoid any accountability crisis.
These objectives are achieved with three features that allow Quality Standard administrators to qualify projects as AI Code Assured:
1. [#label-projects-with-ai-code](https://docs.sonarsource.com/sonarqube-server/quality-standards-administration/ai-code-assurance/overview#label-projects-with-ai-code "mention")
2. [#apply-qualified-quality-gate](https://docs.sonarsource.com/sonarqube-server/quality-standards-administration/ai-code-assurance/overview#apply-qualified-quality-gate "mention")
3. Publish an AI Code Assurance badge externally to your websites to [monitor-projects-with-ai-code](https://docs.sonarsource.com/sonarqube-server/quality-standards-administration/ai-code-assurance/monitor-projects-with-ai-code "mention").
---
# Source: https://docs.sonarsource.com/sonarqube-server/8.9/project-administration/project-existence.md
# Source: https://docs.sonarsource.com/sonarqube-server/9.8/project-administration/project-existence.md
# Source: https://docs.sonarsource.com/sonarqube-server/9.9/project-administration/project-existence.md
# Source: https://docs.sonarsource.com/sonarqube-server/10.0/project-administration/project-existence.md
# Source: https://docs.sonarsource.com/sonarqube-server/10.1/project-administration/project-existence.md
# Source: https://docs.sonarsource.com/sonarqube-server/10.2/project-administration/project-existence.md
# Project existence
Typically, projects are created during their first analysis and never deleted (because old software never dies). For atypical situations, there is the page at **Administration > Projects > Management**, which allows you to manage project existence.
### How do I provision a project before its first analysis?
Provisioning a project allows you to declare and configure it (define permissions, set quality profiles, etc.) before running the first analysis. To be able to provision projects, you have to be logged in and be granted the **Provision Projects** permission.
To provision a new project, either go to the **Projects** page and select **Create Project**, or go to **Administration > Projects > Management** and select **Create Project**.
Once the project is provisioned, you can configure it (define permissions, set quality profiles, etc.), and when you’re finished with the configuration, you can simply run the project’s first analysis.
You can also provision and configure projects using the Web API.
### How do I find provisioned projects (that haven’t been analyzed yet)?
The **Projects Management** search interface includes a toggle to allow you to narrow your results on this page to only projects that have never been analyzed. From there you can deal with them on this page as a set, or click through to the individual project homepages for individual attention and administration.
### How do I lock down permissions on a project? (Private vs Public)
By default, any newly created project will be public. It means every SonarQube user, authenticated or not, will be able to:
* **Browse**: Access a project, browse its measures and issues, and perform some issue edits (confirm, assign, comment).
* **See Source Code**: View the project’s source code.
If you want to be sure only a limited list of groups and users can see the project, you need to mark it Private. Once a project is private you will be able to define which groups and users can **Browse** the project or **See Source Code**.
If you want all newly created projects to be private, you can change the default visibility in **Administration > Projects > Management**.
### How do I delete projects?
A project may be deleted individually from the **Administration** page of the project. See [project-settings](https://docs.sonarsource.com/sonarqube-server/10.2/project-administration/project-settings "mention") for more details. To delete projects in bulk, use **Administration > Projects > Management**. Here you can select the projects to delete. A deleted project is gone for good, there is no way to undo this action.
### How do I find projects that are no longer analyzed?
The **Projects Management** search interface includes a date picker to help you find all projects last analyzed before your specified date. From there you can deal with them on this page as a set, or click through to the individual project homepages for individual attention and administration.
In **Administration** > **Projects** > **Management** search for **Last analysis before** to filter projects not analyzed since a specific date. Then use bulk **Delete** to remove the projects that match your filter.
This can be automated by using the corresponding Web API: `api/projects/bulk_delete?analyzedBefore=YYYY-MM-DD`.
Note that projects that are not analyzed for seven consecutive days are considered inactive, and SonarQube automatically deletes their cached data to free space in the database. See [branch-analysis](https://docs.sonarsource.com/sonarqube-server/10.2/analyzing-source-code/branches/branch-analysis "mention") for more information on inactive branches and cached data.
---
# Source: https://docs.sonarsource.com/sonarqube-community-build/devops-platform-integration/azure-devops-integration/project-integation.md
# Source: https://docs.sonarsource.com/sonarqube-server/2025.1/devops-platform-integration/azure-devops-integration/project-integation.md
# Setting up project integration
### Setting up pull request integration with Azure DevOps
SonarQube Server can:
* Report the quality gate status and analysis metrics to your pull requests in Azure DevOps.
* Show issues detected on a pull request in Azure DevOps. Each issue will be a comment on the Azure DevOps pull request. If you change the status of an issue in SonarQube Server, that status change is immediately reflected in the Azure DevOps interface.
* Note that it is possible to [#disable-pull-request-annotations](#disable-pull-request-annotations "mention").
{% hint style="info" %}
The report of the analysis results to your pull requests is supported for monorepo projects starting in [Enterprise Edition](https://www.sonarsource.com/plans-and-pricing/enterprise/).
{% endhint %}
To set up the pull request analysis:
1. Check the [#prerequisites](https://docs.sonarsource.com/sonarqube-server/2025.1/analyzing-source-code/pull-request-analysis/setting-up-the-pull-request-analysis#prerequisites "mention") for setting up a pull request analysis.
2. Enable the pull request analysis on the target branch; open the [#enabling-pull-request-analysis-on-target-branch](#enabling-pull-request-analysis-on-target-branch "mention") collapsible below for details
3. If you don't use an integrated CI tool like Azure Pipelines, you must set up the pull request parameters manually; check the [#setup-pull-request-parameters](https://docs.sonarsource.com/sonarqube-server/2025.1/analyzing-source-code/pull-request-analysis/setting-up-the-pull-request-analysis#setup-pull-request-parameters "mention") article for instructions.
4. For an unbound project, an additional setup is required; open the [#additional-setup-for-an-unbound-project](#additional-setup-for-an-unbound-project "mention") collapsible below for instructions.
5. You can prevent the pull request merge if the quality gate fails; open the [#prevent-pull-request-merges-when-the-quality-gate-fails](#prevent-pull-request-merges-when-the-quality-gate-fails "mention") collapsible below for more information.
Enabling pull request analysis on target branch
To ensure that all of your pull requests get automatically analyzed:
* Add a [build validation branch policy](https://docs.microsoft.com/en-us/azure/devops/pipelines/repos/azure-repos-git#pr-triggers) on the target branch.
Additional setup for an unbound project
For an unbound project (a project *not* created by importing the corresponding Azure DevOps repository), an additional setup is required as explained below:
1. Retrieve the project in SonarQube Server and select **Project Settings** > **General Settings** > **DevOps Platform Integration**.
2. Enter the **Project name** and **Repository name**.
Prevent pull request merges when the quality gate fails
To prevent the merge of pull requests when the quality gate fails, proceed as follows (you can also watch this [video](https://www.youtube.com/watch?v=be5aw9_7bBU) for a quick overview of the procedure):
1. Go to the **Branch policies** page of your main branch.
2. Under **Require approval from additional services**, select **Add status policy**.
3. In the **Status to check** dropdown, select **SonarQube/quality gate**.
4. Then choose the option depending on your need:
* **Optional:** Users will be able to merge a pull request even if the quality gate fails.
* **Required:** Users will not be able to merge a pull request unless the quality gate passes.
5. Select **Save**.
{% hint style="info" %}
This feature is not supported for projects on a monorepo.
{% endhint %}
### Setting up integration with Azure Pipelines
If you use Azure Pipelines, you must configure a service connection in Azure and enable the pull request analysis in your pipeline.
#### Adding SonarQube Server service connection to Azure Pipelines (SonarQube Server endpoint)
Service connections are authenticated connections between Azure Pipelines and external or remote services. You must declare your SonarQube Server as a service connection in your Azure DevOps project.
Proceed as follows:
1. In SonarQube Server, create an authentication token that will be used by Azure DevOps to execute the analysis of your project in SonarQube Server. To do so, create a Project analysis token for your project *and copy it* (you may also use a Global analysis token, but it’s not recommended). For more information, see [managing-tokens](https://docs.sonarsource.com/sonarqube-server/2025.1/user-guide/managing-tokens "mention").
2. In your Azure DevOps project, go to **Project Settings** > **Service connections**.
3. Select **New service connection** and then select **SonarQube Server** from the service connection list.
4. Enter your SonarQube Server URL, the token created in the first step, and a memorable **Service connection name** (You will need this name when configuring your Azure build pipelines). Then, select **Save** to save your connection.
#### Enabling the pull request analysis in your build pipeline
The Azure DevOps extension running in your Azure pipeline can automatically detect branches or pull requests being built (you don’t need to pass them as parameters to the scanner).
To enable the pull request analysis in your Azure pipeline of code stored on Azure DevOps, you must configure a pull request trigger on the target branch (main development branch) as explained above in [#enabling-pull-request-analysis-on-target-branch](#enabling-pull-request-analysis-on-target-branch "mention"). If your code is stored on GitHub or Bitbucket Cloud, see below.
Code stored on GitHub or Bitbucket Cloud
To configure a pull request trigger in your Azure build pipeline for code stored on GitHub or Bitbucket Cloud:
1. Select **Edit** to modify your build pipeline.
2. Go to the **Triggers** tab.
3. Select the correct repository under **Pull request validation**.
4. Select **Enable pull request validation**.
5. Set up the branch filters: Note that this is the **target** branch of the pull request. See the [Microsoft documentation](https://docs.microsoft.com/en-us/azure/devops/pipelines/build/triggers?view=azure-devops\&tabs=yaml#pr-triggers) for more details.
6. Select **Save** to update your pipeline.
### Disable pull request annotations
Using the default setup, SonarQube Server will add annotations on issues it detects in your Azure DevOps pull request (PR). It’s possible to completely remove the PR integration with Azure DevOps to remove these, but that’s not ideal if you want to keep reporting the quality gate status and analysis metrics to your PRs.\
\
To disable annotations from SonarQube Server on your Azure DevOps PRs:
1. First check if your Azure organization has already been integrated with SonarQube Server. See the [setting-up-integration-at-global-level](https://docs.sonarsource.com/sonarqube-server/2025.1/devops-platform-integration/azure-devops-integration/setting-up-integration-at-global-level "mention") page.
2. Next, retrieve your project and navigate to **Project Settings** > **General Settings** > **DevOps Platform Integration**.
3. Complete all of the required fields and deselect **Enable Inline Pull Request Annotations**.
4. Select **Save** to finish and if successful, you will see confirmation and configuration validation notifications.
### Related pages
* [azure-pipelines-integration-overview](https://docs.sonarsource.com/sonarqube-server/2025.1/devops-platform-integration/azure-devops-integration/azure-pipelines-integration-overview "mention")
* [setting-up-integration-at-global-level](https://docs.sonarsource.com/sonarqube-server/2025.1/devops-platform-integration/azure-devops-integration/setting-up-integration-at-global-level "mention")
* [creating-your-project](https://docs.sonarsource.com/sonarqube-server/2025.1/devops-platform-integration/azure-devops-integration/creating-your-project "mention")
* [troubleshooting-analysis](https://docs.sonarsource.com/sonarqube-server/2025.1/devops-platform-integration/azure-devops-integration/troubleshooting-analysis "mention")
---
# Source: https://docs.sonarsource.com/sonarqube-server/8.9/instance-administration/project-move.md
# Source: https://docs.sonarsource.com/sonarqube-server/9.8/instance-administration/project-move.md
# Source: https://docs.sonarsource.com/sonarqube-server/9.9/instance-administration/project-move.md
# Source: https://docs.sonarsource.com/sonarqube-server/10.0/instance-administration/project-move.md
# Source: https://docs.sonarsource.com/sonarqube-server/10.1/instance-administration/project-move.md
# Source: https://docs.sonarsource.com/sonarqube-server/10.2/instance-administration/project-move.md
# Source: https://docs.sonarsource.com/sonarqube-server/10.3/instance-administration/project-move.md
# Source: https://docs.sonarsource.com/sonarqube-server/10.4/instance-administration/project-move.md
# Source: https://docs.sonarsource.com/sonarqube-server/10.5/instance-administration/project-move.md
# Source: https://docs.sonarsource.com/sonarqube-server/10.6/instance-administration/project-move.md
# Source: https://docs.sonarsource.com/sonarqube-server/10.7/project-administration/project-move.md
# Source: https://docs.sonarsource.com/sonarqube-server/10.8/project-administration/project-move.md
# Source: https://docs.sonarsource.com/sonarqube-server/2025.2/project-administration/project-move.md
# Source: https://docs.sonarsource.com/sonarqube-server/2025.3/project-administration/project-move.md
# Source: https://docs.sonarsource.com/sonarqube-server/2025.5/project-administration/project-move.md
# Source: https://docs.sonarsource.com/sonarqube-server/2025.1/project-administration/project-move.md
# Source: https://docs.sonarsource.com/sonarqube-server/2025.4/project-administration/project-move.md
# Source: https://docs.sonarsource.com/sonarqube-server/2025.6/project-administration/maintaining-project/project-move.md
# Source: https://docs.sonarsource.com/sonarqube-server/project-administration/maintaining-project/project-move.md
# Project move
To use **Project Move**, you must have **Administer** permission rights on the project in the source instance and access to the file systems of both instances.
When you move a project from a source to a target instance, all project data are moved except:
* Source code
* Issue assignments
* Security reports
### When to use project move
**Project Move** can help you with the following situations:
* You want to create a central SonarQube Server instance at the enterprise level and you want to keep the history created on instances used previously at the team level.
* You want to consolidate your editions and move projects from a SonarQube Community Build instance to an [Enterprise Edition](https://www.sonarsource.com/plans-and-pricing/enterprise/) instance or above.
* Your company is acquiring another company that already has a central SonarQube Server instance.
* You are at a large company with several SonarQube Server instances and an application is transferred from one team to another.
### Prerequisites
* The project to be moved has never been analyzed on the target instance.
* The target instance must be [Enterprise Edition](https://www.sonarsource.com/plans-and-pricing/enterprise/) or above.
* The source instance can be a SonarQuber Server or a SonarQube Community Build instance.
* Both source and target instances must have:
* If your source instance is a SonarQube Server instance: the exact same SonarQube Server version.
* The same custom metrics.
* The same custom rules
* The target instance must have all the plugins of the source instance, with the same versions.\
If your source instance has plugins that aren’t in your target instance, either remove them and reanalyze your project or add them to your target instance.
### Preliminary step if moving from a SonarQube Community Build instance
If your source instance is a SonarQube Community Build instance, a preliminary step is necessary before performing Step 1 to Step 3 below:
* Create a new SonarQube Server Enterprise Edition of the same version as the target instance from the database of your SonarQube Community Build instance (no license is required). This Enterprise Edition instance becomes your source instance.
### Step 1: Export the source project to a ZIP file
On the source instance (if the source instance was originally a SonarQube Community Build instance, go directly to 3.):
1. Review the branches of the project by navigating to **Project Settings** > **Branches & Pull Requests** and enable **Keep when inactive** for each branch you want to keep. Note that pull requests are not saved when exporting a project.
2. Reanalyze the project one last time for each branch that has enabled the **Keep when inactive** option to ensure it is populated with data corresponding to your current SonarQube Server installation.
3. Navigate to the project and at the project level, choose **Project Settings** > **Import / Export**.
4. Click on the **Export** button to generate a ZIP file containing the settings and history of your project (but not the source code). Note that if you need to change the project’s key, you must do it before performing the export.
A zip file containing all project data is generated in a file named:
`/data/governance/project_dumps/export/.zip`
where \:
* For a ZIP installation: is the location where the SonarQube Server distribution has been unzipped.
* For a Docker installation: is the installation directory of SonarQube Server within your container. This path is stored in the SONARQUBE\_HOME environment variable.
If the source instance is a Data Center Edition instance, the ZIP file is generated on the application node that processed the export. You have to find out which one to copy the ZIP file from there.
### Step 2: Create the target project and import the ZIP file
The procedure is different depending on the target instance edition.
Enterprise Edition
On the target instance:
1\. With a user having the **Administer System** and **Create Projects** permission rights, go to **Administration** > **Projects** > **Management** and create the project using *the same key* the project had in the source instance. See [importing-repo](https://docs.sonarsource.com/sonarqube-server/project-administration/creating-your-project/importing-repo "mention") for more details.
2\. In the Clean as You Code setup step, select **Use the global settings**, the project import will take care of importing your former new code configuration.
3\. Configure the project’s permissions and the quality profiles and quality gate associated with the project.
{% hint style="warning" %}
Do not change anything else on the project’s configuration, otherwise the import might not work.
{% endhint %}
4\. Put the generated ZIP file into the directory `/data/governance/project_dumps/import/` (create this folder if it does not already exist).
5\. Go to the Project’s Home Page and choose **Project Settings** > **Import / Export**.
6\. Select **Import** to start importing your data.
7\. Monitor the import.
{% hint style="warning" %}
The SonarQube Server application will only read and open ZIP archives with a project key that matches the project key of a brand new, unanalyzed SonarQube Server project. Do not overlook the project key configuration when importing and exporting your project.
{% endhint %}
{% hint style="info" %}
If the import is successful, the ZIP file will automatically be deleted.
{% endhint %}
Data Center Edition
You can use one of the following methods:
**Scaling down your target instance to one application node**
1. Scale down your SonarQube Server instance to one application node:
* Scale in the `-app` deployment to 1 replica only.
* Manually update the replica, mounting it to the appropriate sub-directory.
2. Create and import the project on the target instance as explained above for the Enterprise Edition instance.
3. Scale the application nodes back up to the desired number.
**Importing the file to all application nodes**
Proceed as described above for an Enterprise Edition instance but in step 4, duplicate the export ZIP file onto `data/governance/project_dumps/import` **on all application nodes** of the target instance. Then, import the ZIP file as described in the following steps of the procedure.
{% hint style="info" %}
If the import is successful, one of the ZIP files will automatically be deleted. We recommend that you delete the ZIP files stored on the other application nodes.
{% endhint %}
### Step 3: Trigger an analysis on the moved project
The export ZIP file does not include source code and security reports. Once the import is finished, trigger an analysis to import source files into the new instance and generate security reports.
{% hint style="warning" %}
Note that if the import is done without SCM data, the code will be considered new code and the analysis may provide imprecise results.
{% endhint %}
---
# Source: https://docs.sonarsource.com/sonarqube-community-build/user-guide/viewing-projects/project-overview.md
# Source: https://docs.sonarsource.com/sonarqube-server/10.7/user-guide/viewing-projects/project-overview.md
# Source: https://docs.sonarsource.com/sonarqube-server/10.8/user-guide/viewing-projects/project-overview.md
# Source: https://docs.sonarsource.com/sonarqube-server/2025.2/user-guide/viewing-projects/project-overview.md
# Source: https://docs.sonarsource.com/sonarqube-server/2025.3/user-guide/viewing-projects/project-overview.md
# Source: https://docs.sonarsource.com/sonarqube-server/2025.5/user-guide/viewing-projects/project-overview.md
# Source: https://docs.sonarsource.com/sonarqube-server/2025.1/user-guide/viewing-projects/project-overview.md
# Source: https://docs.sonarsource.com/sonarqube-server/2025.4/user-guide/viewing-projects/project-overview.md
# Source: https://docs.sonarsource.com/sonarqube-server/2025.6/user-guide/viewing-projects/project-overview.md
# Source: https://docs.sonarsource.com/sonarqube-server/user-guide/viewing-projects/project-overview.md
# Viewing analysis summary
The project overview page allows you to view:
* The releasability status of the project.
* The current state of its quality.
* The quality of what has been produced since the start of your new code.
and answers two questions:
* Can I release my project today?
* If I cannot release it today, what should I improve to make the project pass its quality gate?
To open the project overview page:
* Retrieve your project. See [retrieving-projects](https://docs.sonarsource.com/sonarqube-server/user-guide/viewing-projects/retrieving-projects "mention") for more information. The **Overview** page opens. This page contains the following sections:
Quality gate status
The quality gate is your most powerful tool to enforce your quality policy. If the project passes, the **Quality Gate Status** will show a simple, green all-clear banner. See [introduction-to-quality-gates](https://docs.sonarsource.com/sonarqube-server/quality-standards-administration/managing-quality-gates/introduction-to-quality-gates "mention") for more information.
If not, details and drill-downs are immediately available to quickly identify what went wrong. A section for each error condition shows the current project value and what it should be. As usual, you’ll be able to click through on current values to get more details about each issue.
Measures
In this section, you see all project measures. Select a measure for more details. Both list and tree views are available for each measure, and tree maps are available for percentages and ratings.
Activity
This section contains the full list of code scans performed on your project since it was created in SonarQube Server. By going there, you can follow the evolution of the quality gate, see the changes in quality profiles, discover when a given version of your code has been scanned, and more.
See also [activity-and-history](https://docs.sonarsource.com/sonarqube-server/user-guide/viewing-projects/activity-and-history "mention").
### Related pages
* [viewing-project-structure](https://docs.sonarsource.com/sonarqube-server/user-guide/viewing-projects/viewing-project-structure "mention")
* [managing-tokens](https://docs.sonarsource.com/sonarqube-server/user-guide/managing-tokens "mention")
* [project-badge](https://docs.sonarsource.com/sonarqube-server/user-guide/project-badge "mention")
* [subscribing-to-notifications](https://docs.sonarsource.com/sonarqube-server/user-guide/managing-your-account/subscribing-to-notifications "mention")
* [introduction](https://docs.sonarsource.com/sonarqube-server/user-guide/issues/introduction "mention")
* [security-hotspots](https://docs.sonarsource.com/sonarqube-server/user-guide/security-hotspots "mention")
---
# Source: https://docs.sonarsource.com/sonarqube-server/8.9/user-guide/project-page.md
# Source: https://docs.sonarsource.com/sonarqube-server/9.8/user-guide/project-page.md
# Source: https://docs.sonarsource.com/sonarqube-server/9.9/user-guide/project-page.md
# Source: https://docs.sonarsource.com/sonarqube-server/10.0/user-guide/project-page.md
# Source: https://docs.sonarsource.com/sonarqube-server/10.1/user-guide/project-page.md
# Source: https://docs.sonarsource.com/sonarqube-server/10.2/user-guide/project-page.md
# Source: https://docs.sonarsource.com/sonarqube-server/10.3/user-guide/project-page.md
# Source: https://docs.sonarsource.com/sonarqube-server/10.4/user-guide/project-page.md
# Source: https://docs.sonarsource.com/sonarqube-server/10.5/user-guide/project-page.md
# Source: https://docs.sonarsource.com/sonarqube-server/10.6/user-guide/project-page.md
# Project page
The **Project homepage** is the entry point of any project showing:
* the releasability status of the project.
* the current state of its quality.
* the quality of what has been produced since the start of your [defining-new-code](https://docs.sonarsource.com/sonarqube-server/10.6/project-administration/clean-as-you-code-settings/defining-new-code "mention").
The **Project homepage** answers two questions:
* Can I release my project today?
* If I cannot release it today, what should I improve to make the project pass it’s quality gate?
### Quality gate
Since the [quality-gates](https://docs.sonarsource.com/sonarqube-server/10.6/user-guide/quality-gates "mention") is your most powerful tool to enforce your quality policy, the page starts with the project’s current quality gate status. If the project passes, the **Quality Gate Status** will show a simple, green all-clear banner.
If not, details and drill-downs are immediately available to quickly identify what went wrong, with a section for each error condition showing what the current project value is and what it should be. As usual, you’ll be able to click through on current values to get more details about each issue.
### Prioritizing issues
Because the best way to improve a project’s quality is to catch and fix new problems before they become entrenched, the first view of a project is centered around *new code* which is highlighted in yellow on the right of the project homepage. The project space page shows a high-level summary of critical metrics, including current values, and their new code values.
Just below the quality gate information, you have the numbers of old and new issues in the reliability and security domains and then the maintainability domain. Clicking on any figure on the page will take you to a detailed view, either on the **Measures** page or the **Issues** page.
The most important thing a developer must do is to ensure the new issues in the yellow part of the screen are acknowledged, reviewed, and fixed to make sure that new code is covered by tests that help prevent future regressions. Regardless of how many Issues were introduced in the past or how little test coverage there is overall, focusing on newly added issues will ensure that the situation won’t degrade versus the version you previously released in production.
Which issues should you go after first? Bugs, vulnerabilities or code smells? The correct answer depends on the nature of your issues. Let’s say you have issues with a block of code that is duplicated 5 times, and inside this duplicated block of code, you have 3 bugs and 5 security issues. The best approach is probably to fix the duplication first, then resolve the bugs and vulnerabilities in the new centralized location, rather than fixing each bug and vulnerability 5 times.
This is why you need to review your new issues before jumping into resolving each.
### Viewing project measures at a lower level
The project-level **Measures** menu item takes you to a dedicated sub-space where you see all project measures. Select a measure for more details. Both list and tree views are available for each measure, and treemaps are available for percentages and ratings.
#### Viewing all issues in a project
The project-level **Issues** menu item takes you to a project-specific issues page, where you can perform all the same actions you can at the higher level. On this page, you can easily narrow the list to the new issues as set by your new code definition, by selecting *New Code* in the **Creation Date** facet.
### Viewing project structure and code
The project-level **Code** menu item takes you to an outline of your project structure. Drill down to see files in a directory, and choose a file to see its code.
If your project is too large for easy exploration via drilling, the search feature on this page will help. While the global search in the main menu returns results from throughout the SonarQube instance, the localized search on the code page is restricted to files and directories in the current project.
### Viewing project activity and history
The project-level **Activity** menu item takes you to the full list of code scans performed on your project since it was created in SonarQube. By going there you can follow the evolution of the quality gate, see the changes in quality profiles, and know discover when a given version of your code has been scanned, and more. For details, see [activity-and-history](https://docs.sonarsource.com/sonarqube-server/10.6/user-guide/activity-and-history "mention").
### Spotting risks with visualizations
Visualizations allow you to compare project components and quickly spot the ones that represent the greatest risks. The **Activity** page offers several pre-defined visualizations, and you can also create custom visualizations with the metrics of your choice.
### Using project badges to promote project health
You can promote your project’s status in third-party tools and external websites using project badges. To find the project badges, go to *your project’s homepage* > **Project Information** > **Get project badges**.
From there, you can choose and fine-tune your badge then copy the markdown text or image URL for it. Each project badge has a unique security token, which is required to make it accessible from third-party tools.
Using project badges can expose sensitive information like your security rating and other metrics. You should only use them in trusted environments. If a project badge URL is accessed by someone who should not have access to it, a project administrator can renew the project badge’s unique token by clicking **Renew token**. This invalidates any existing project badge URLs, and you’ll have to update all locations where the badge is being used.
---
# Source: https://docs.sonarsource.com/sonarqube-cloud/getting-started-with-enterprise/viewing-enterprise-reports/project-pdf-reports.md
# Viewing project PDF reports
This feature is only available in the [Enterprise plan](https://www.sonarsource.com/plans-and-pricing/#sonarqube-cloud-features).
PDF reports give a view of a project’s state through a number of lenses, including releasability, security, reliability, and maintainability. They focus mainly on new code and quality gate conditions. You can subscribe to receive a monthly report by email. A project PDF report is available for the main or other long-lived branches.
{% hint style="info" %}
Before you can view the Enterprise-level reports, your organization must be added to an enterprise. For more information, see [managing-enterprise](https://docs.sonarsource.com/sonarqube-cloud/administering-sonarcloud/managing-enterprise "mention").
{% endhint %}
### Viewing the PDF report of a project branch
1. Retrieve your project. See [retrieving-projects](https://docs.sonarsource.com/sonarqube-cloud/managing-your-projects/retrieving-projects "mention") for more details.
2. Select the project branch you want to view:
* For the main branch: In the left-side panel, select **Main Branch**.
* For another branch: In the left-side panel, select **Branches** and choose a long-lived branch from the list.
3. In the top right corner of the **Summary** page, select **Project PDF > Download**. The PDF report is downloaded.
### Subscribing to the monthly PDF report
If you subscribe to the monthly PDF report of a project branch, you’ll receive a report by email during the first portfolio calculation of the month (if any), starting from the first day of the current month.
To subscribe or unsubscribe to the monthly PDF report for a project:
1. Retrieve your project. See [retrieving-projects](https://docs.sonarsource.com/sonarqube-cloud/managing-your-projects/retrieving-projects "mention") for more details.
2. Select the project branch you want to view:
* For the main branch: In the left-side panel, select **Main Branch**.
* For another branch: In the left-side panel, select **Branches**, and choose a long-lived branch from the list.
3. In the top right corner of the **Summary** page, select **Project PDF > Subscribe** ***(or*** *Unsubscribe)*\*\* **to monthly report**.
### Related pages
* [project-security-reports](https://docs.sonarsource.com/sonarqube-cloud/getting-started-with-enterprise/viewing-enterprise-reports/project-security-reports "mention")
* [viewing-project-regulatory-reports](https://docs.sonarsource.com/sonarqube-cloud/getting-started-with-enterprise/viewing-enterprise-reports/viewing-project-regulatory-reports "mention")
---
# Source: https://docs.sonarsource.com/sonarqube-cloud/getting-started-with-enterprise/viewing-enterprise-reports/project-security-reports.md
# Viewing project security reports
This feature is only available in the [Enterprise plan](https://www.sonarsource.com/plans-and-pricing/#sonarqube-cloud-features).
{% hint style="info" %}
Before you can view the Enterprise-level reports, your organization must be added to an enterprise. For more information, see [managing-enterprise](https://docs.sonarsource.com/sonarqube-cloud/administering-sonarcloud/managing-enterprise "mention").
{% endhint %}
Security reports help you understand where you may have issues related to the following security standards:
* [OWASP Top 10](https://owasp.org/Top10/) (versions 2021 and 2017)
OWASP Top 10 security standards covered by Sonar for version 2021
| | | | | | | | |
| ----------------------------------------------- | ------------------------------------------------------------------------------------------------------------------------------------------------------------------------------------------------------------------------ | ------------------------------------------------------------------------------------------------------------------------------------------------------------------------------------------------------------------------ | ------------------------------------------------------------------------------------------------------------------------------------------------------------------------------------------------------------------------ | ------------------------------------------------------------------------------------------------------------------------------------------------------------------------------------------------------------------------ | ------------------------------------------------------------------------------------------------------------------------------------------------------------------------------------------------------------------------ | ------------------------------------------------------------------------------------------------------------------------------------------------------------------------------------------------------------------------ | ------------------------------------------------------------------------------------------------------------------------------------------------------------------------------------------------------------------------ |
| **Category** | **Python** | **JS/TS** | **Java** | **C#** | **C/C++** | **PHP** | **Kotlin** |
| A01:Broken Access Control |  |  |  |  |  |  |  |
| A02: Cryptographic Failures |  |  |  |  |  |  |  |
| A03: Injection |  |  |  |  |
|  |  |
| CWE-306 Missing Authentication for Critical Function |
|
|
|
|
|
|
|
* [OWASP ASVS 4.0 Level 1, 2, 3](https://owasp.org/www-project-application-security-verification-standard/)
* [PCI DSS](https://www.pcisecuritystandards.org/) (versions 4.0 and 3.2.1)
* [CASA](https://appdefensealliance.dev/casa)
* [STIG](https://public.cyber.mil/stigs/)
You can view the security report of any branch: main, long-lived, or short-lived of your project. For a given standard, it displays the number of raised security issues and hotspots by security category. Only the security rules activated in the project’s quality profiles are taken into account. See [#checking-security-rules](#checking-security-rules "mention") for more details.
### Viewing the security reports of a project branch
1. Retrieve a project by going to **My Projects** in the top navigation bar and selecting your project.
2. From the left-side panel of the project page, select a branch for which you want to view the security report. You can select:
* **Main Branch**
* **Branches** > select your branch
3. Select the **Security Reports** tab.
4. Select the security standards you want to review. The grid displays the number of raised issues and hotspots by security category.
5. View **Project overall Security rating** and **Project overall Security Review rating** in the **Security reports overview** section.
6. Select the number in the **Security** or **Security Hotspots** columns to open a view listing the issues with more detail. From there, you can remedy review and mange the issue with more precision.
7. Select **Download Security report (PDF)** for a PDF version of the report.
### Checking the security rules included in a project’s quality profile
1. Retrieve a project by going to **My Projects** in the top navigation bar and selecting your project, and go to the **Information** page.
2. In **About This Project**, select a quality profile to open it.
3. Once on the **Quality Profiles** page, select the active **Security** rules from the **Software qualities** table’s **Active** column. The **Rules** page will open.
4. (image below) In the left-side panel of the **Rules** page, scroll to the **Security Category** and filter the results by specific standards to view the security categories covered by code review and analysis.
### Downloading a project security PDF report for a branch
As a member of a security or compliance team, you can generate and download project security reports in a PDF format for any given branch.
1. Retrieve the project by going to **My Projects** in the top navigation bar and selecting your project.
2. From the left-side panel of the project page, select a branch for which you want to view the security report. You can select:
1. **Main Branch**
2. **Branches** > Select your branch
3. Click on the **Security Reports** tab.
4. In the top right corner of the page click **Download Security report (PDF)**.
#### Download options
The following download options are available:
* **Default**: Includes Sonar, OWASP top 10 2021 and CWE TOP 25 2024 security standards.
* **Custom**: Choose from a list of all security standards used by SonarQube.
#### Contents of the PDF Report
A Security Overview page that includes:
* Project and branch information
* The number of open **Security** issues, **Security Hotspots**, and **Accepted Security issues** on new code and overall code.
* Overall code security ratings for **Security** issues and **Security Hotspots**, including the percentage of reviewed **Security Hotspots**
A report for a given standard that includes:
* A list of categories for **Security** issues and **Security Hotspots**
* Number of issues to address and their relevant rating per category
* Breakdown by severity (Blocker, High, Medium, Low, Info)
* Hotspots that need review
### Related pages
* [project-pdf-reports](https://docs.sonarsource.com/sonarqube-cloud/getting-started-with-enterprise/viewing-enterprise-reports/project-pdf-reports "mention")
* [portfolio-security-reports](https://docs.sonarsource.com/sonarqube-cloud/getting-started-with-enterprise/viewing-enterprise-reports/portfolio-security-reports "mention")
* [viewing-project-regulatory-reports](https://docs.sonarsource.com/sonarqube-cloud/getting-started-with-enterprise/viewing-enterprise-reports/viewing-project-regulatory-reports "mention")
---
# Source: https://docs.sonarsource.com/sonarqube-community-build/project-administration/setting-up-features/project-settings.md
# Source: https://docs.sonarsource.com/sonarqube-server/8.9/project-administration/project-settings.md
# Source: https://docs.sonarsource.com/sonarqube-server/9.8/project-administration/project-settings.md
# Source: https://docs.sonarsource.com/sonarqube-server/9.9/project-administration/project-settings.md
# Source: https://docs.sonarsource.com/sonarqube-server/10.0/project-administration/project-settings.md
# Source: https://docs.sonarsource.com/sonarqube-server/10.1/project-administration/project-settings.md
# Source: https://docs.sonarsource.com/sonarqube-server/10.2/project-administration/project-settings.md
# Source: https://docs.sonarsource.com/sonarqube-server/10.3/project-administration/project-settings.md
# Source: https://docs.sonarsource.com/sonarqube-server/10.4/project-administration/project-settings.md
# Source: https://docs.sonarsource.com/sonarqube-server/10.5/project-administration/project-settings.md
# Source: https://docs.sonarsource.com/sonarqube-server/10.6/project-administration/project-settings.md
# Source: https://docs.sonarsource.com/sonarqube-server/10.7/project-administration/project-settings.md
# Source: https://docs.sonarsource.com/sonarqube-server/10.8/project-administration/project-settings.md
# Source: https://docs.sonarsource.com/sonarqube-server/2025.2/project-administration/project-settings.md
# Source: https://docs.sonarsource.com/sonarqube-server/2025.3/project-administration/project-settings.md
# Source: https://docs.sonarsource.com/sonarqube-server/2025.5/project-administration/project-settings.md
# Source: https://docs.sonarsource.com/sonarqube-server/2025.1/project-administration/project-settings.md
# Source: https://docs.sonarsource.com/sonarqube-server/2025.4/project-administration/project-settings.md
# Source: https://docs.sonarsource.com/sonarqube-server/2025.6/project-administration/setting-up-features/project-settings.md
# Source: https://docs.sonarsource.com/sonarqube-server/project-administration/setting-up-features/project-settings.md
# Setting various features at project level
Project administration is accessible through the **Project Settings** menu of each project. Only project administrators can access project’s settings.
### PDF reports
As a project administrator, you can change the PDF report subscription frequency of the project or application:
1. Retrieve your project. See [retrieving-projects](https://docs.sonarsource.com/sonarqube-server/user-guide/viewing-projects/retrieving-projects "mention") for more details.
2. In the top right corner, select **Project Settings** > **General Settings** > **Governance**.
3. Under **Project and Application PDF Reports**, select an option from the **PDF Reports Frequency** drop-down menu.
You have the following options for subscription frequency:
* **Daily**
* **Weekly**
* **Monthly (default)**
{% hint style="info" %}
Users can only download or subscribe to a PDF report for a permanent branch. To set a branch as permanent, go to **Project Settings** > **Branches and Pull Requests** and make sure that the **Keep when inactive** toggle is on for that branch.
{% endhint %}
### Changing your project's default issue assignee
When new issues are created during analysis, they are assigned to the last committer where the issue was raised. When it is not possible to identify the last committer, issues can be assigned to a default assignee if set at the global or project level. To set the default assigned for your project (this setting has precedence over the global-level setting):
1. Retrieve your project. See [retrieving-projects](https://docs.sonarsource.com/sonarqube-server/user-guide/viewing-projects/retrieving-projects "mention") for more details.
2. In the top right corner, select **Project Settings** > **General Settings > General**.
3. In **Issues > Default Assignee**, enter the user account.
### Related pages
* [pdf-reports](https://docs.sonarsource.com/sonarqube-server/instance-administration/system-functions/pdf-reports "mention") (setup at the instance level)
* [#changing-default-issue-assignee](https://docs.sonarsource.com/sonarqube-server/instance-administration/analysis-functions/various-settings-at-the-instance-level#changing-default-issue-assignee "mention")
---
# Source: https://docs.sonarsource.com/sonarqube-server/2025.5/devops-platform-integration/bitbucket-integration/bitbucket-cloud-integration/project.md
# Source: https://docs.sonarsource.com/sonarqube-server/2025.5/devops-platform-integration/bitbucket-integration/data-center/project.md
# Source: https://docs.sonarsource.com/sonarqube-server/2025.6/devops-platform-integration/bitbucket-integration/bitbucket-cloud-integration/project.md
# Source: https://docs.sonarsource.com/sonarqube-server/2025.6/devops-platform-integration/bitbucket-integration/bitbucket-server-integration/project.md
# Source: https://docs.sonarsource.com/sonarqube-server/devops-platform-integration/bitbucket-integration/bitbucket-cloud-integration/project.md
# Source: https://docs.sonarsource.com/sonarqube-server/devops-platform-integration/bitbucket-integration/bitbucket-server-integration/project.md
# Setting up Bitbucket Data Center integration for your project
### Reporting your quality gate status to Bitbucket for unbound projects
On SonarQube Server projects bound to their Bitbucket repository, SonarQube Server automatically sets up the report of your quality gate status and analysis metrics directly to your pull requests. For unbound projects, you must set up the quality gate status report manually. The integration of your SonarQube Server instance with Bitbucket Data Center must be properly set up.
To report your quality gate status in Bitbucket for unbound projects:
1. In the SonarQube Server UI page of your project, select Project Settings > General Settings > DevOps Platform Integration.
2. Set:
* **Configuration name**: The configuration name that corresponds to your DevOps Platform instance.
* **Project Key**: the project key is part of your BitBucket repository URL (`.../projects//repos//browse`).
* **Repository SLUG**: The repository slug is part of your BitBucket repository URL (`.../projects//repos//browse`).
### Preventing pull request merges when the quality gate fails
After setting up pull request analysis, you can block pull requests from being merged if it is failing the quality gate. To do this:
1. In Bitbucket Data Center, navigate to Repository settings > Code Insights.
2. Add a Required report called com.sonarsource.sonarqube
3. Select Must pass as the Required status.
4. Select Must not have any annotations as the Annotation requirements.
{% hint style="info" %}
Preventing pull request merges when the quality gate fails is not supported for monorepos.
{% endhint %}
### Related pages
[global](https://docs.sonarsource.com/sonarqube-server/devops-platform-integration/bitbucket-integration/bitbucket-server-integration/global "mention")\
[import-repos](https://docs.sonarsource.com/sonarqube-server/devops-platform-integration/bitbucket-integration/bitbucket-server-integration/import-repos "mention")
---
# Source: https://docs.sonarsource.com/sonarqube-cloud/administering-sonarcloud/managing-organization/manage-org-projects/projects-management-page.md
# Using Projects Management page
This feature is only available in the [Enterprise plan](https://www.sonarsource.com/plans-and-pricing/#sonarqube-cloud-features).
As the organization admin, you can manage the projects of your organization on the **Projects Management** page. There, you can manage any project individually, you can delete or apply a permission template to several projects at a time, and you can create new projects. You can also recover lost administrator access to a project.
Proceed as follows:
1. Retrieve your organization. See [viewing-organizations](https://docs.sonarsource.com/sonarqube-cloud/getting-started/viewing-organizations "mention") for more details.
2. Go to **Administration** > **Projects Management**.
3. To manage the permissions of a single project, use the three-dot menu at the far right of the project line.
4. To manage several projects at a time:
* Retrieve and select the projects you want to manage.
* In the toolbar, select the tool you want to use, either **Delete** or **Bulk Apply Permission Template.** The corresponding dialog opens.
5. To create new projects, select the **Analyze new projects** button. See [setting-up-project](https://docs.sonarsource.com/sonarqube-cloud/managing-your-projects/administering-your-projects/setting-up-project "mention") for more information.
---
# Source: https://docs.sonarsource.com/sonarqube-cloud/administering-sonarcloud/about-sonarqube-cloud-solution/ressources-structure/projects.md
# Organization's projects
A project in SonarQube Cloud represents a repository of a DevOps platform organization.
The project’s visibility may be:
* Public: anyone, including anonymous users, can view the code and analysis results of public projects.\
However:
* Non-members are not able to see the list of members in the organization.
* Anonymous and unauthorized users are prevented from easily downloading source code via API and web views.
* Or private: only authorized users, who are organization members, can view a private project. By default, the visibility of newly created projects is set to private on [Free, Team and Enterprise](https://www.sonarsource.com/plans-and-pricing/#sonarqube-cloud-features) plans.
A project is created by importing and binding to a repository from the DevOps platform. It’s also possible to create projects manually, but they won’t benefit from the same features. A bound project inherits its visibility from its corresponding repository. However, you can change it if the organization is not on a free subscription plan. See [changing-binding](https://docs.sonarsource.com/sonarqube-cloud/managing-your-projects/administering-your-projects/changing-binding "mention") for more information.
You can grant SonarQube Cloud users analysis-related permissions on the projects of the organizations they are members of. You can manage permissions through the user group function. See [user-group-concept](https://docs.sonarsource.com/sonarqube-cloud/administering-sonarcloud/about-sonarqube-cloud-solution/user-management/user-group-concept "mention") for more details.
The figure below shows SonarQube Cloud projects that were created by importing the repositories from a DevOps platform’s organization.
{% hint style="info" %}
Default project analysis configurations can be defined at the organization level: new code definition, quality gate, and quality profiles.
{% endhint %}
### Related pages
* [retrieving-projects](https://docs.sonarsource.com/sonarqube-cloud/managing-your-projects/retrieving-projects "mention")
* [managing-your-project-as-developer](https://docs.sonarsource.com/sonarqube-cloud/managing-your-projects/managing-your-project-as-developer "mention")
* [introduction](https://docs.sonarsource.com/sonarqube-cloud/managing-your-projects/administering-your-projects/introduction "mention") to Administering your project
---
# Source: https://docs.sonarsource.com/sonarqube-community-build/server-installation/on-kubernetes-or-openshift/set-up-monitoring/prometheus-metrics.md
# Source: https://docs.sonarsource.com/sonarqube-server/10.4/setup-and-upgrade/deploy-on-kubernetes/set-up-monitoring/prometheus-metrics.md
# Source: https://docs.sonarsource.com/sonarqube-server/10.5/setup-and-upgrade/deploy-on-kubernetes/set-up-monitoring/prometheus-metrics.md
# Source: https://docs.sonarsource.com/sonarqube-server/10.6/setup-and-upgrade/deploy-on-kubernetes/set-up-monitoring/prometheus-metrics.md
# Source: https://docs.sonarsource.com/sonarqube-server/10.7/setup-and-upgrade/deploy-on-kubernetes/set-up-monitoring/prometheus-metrics.md
# Source: https://docs.sonarsource.com/sonarqube-server/10.8/setup-and-upgrade/deploy-on-kubernetes/set-up-monitoring/prometheus-metrics.md
# Source: https://docs.sonarsource.com/sonarqube-server/2025.2/setup-and-update/deploy-on-kubernetes/set-up-monitoring/prometheus-metrics.md
# Source: https://docs.sonarsource.com/sonarqube-server/2025.3/server-installation/on-kubernetes-or-openshift/set-up-monitoring/prometheus-metrics.md
# Source: https://docs.sonarsource.com/sonarqube-server/2025.5/server-installation/on-kubernetes-or-openshift/set-up-monitoring/prometheus-metrics.md
# Source: https://docs.sonarsource.com/sonarqube-server/2025.1/setup-and-upgrade/deploy-on-kubernetes/set-up-monitoring/prometheus-metrics.md
# Source: https://docs.sonarsource.com/sonarqube-server/2025.4/server-installation/on-kubernetes-or-openshift/set-up-monitoring/prometheus-metrics.md
# Source: https://docs.sonarsource.com/sonarqube-server/2025.6/server-installation/on-kubernetes-or-openshift/set-up-monitoring/prometheus-metrics.md
# Source: https://docs.sonarsource.com/sonarqube-server/server-installation/on-kubernetes-or-openshift/set-up-monitoring/prometheus-metrics.md
# List of Prometheus metrics
### Metrics exposed by the Web API
Metric name
Type
Unit
Description
SonarQube_Database_PoolMaxConnections
Untyped
Connections
Maximum number of connections to the Database pool.
SonarQube_AsyncExecution_LargestWorkerCount
Untyped
n/a
Maximum number of asynchronous workers.
SonarQube_Database_PoolMinIdleConnections
Untyped
Connections
Minimum number of idle connections to the Database pool.
SonarQube_AsyncExecution_QueueSize
Untyped
n/a
Queue size for asynchronous jobs.
SonarQube_Database_PoolTotalConnections
Untyped
Connections
Total number of connections to the Database pool.
SonarQube_AsyncExecution_WorkerCount
Untyped
Workers
Total number of asynchronous job workers.
SonarQube_Database_PoolMaxLifeTimeMillis
Untyped
Milliseconds
Maximum time a connection can stay in the alive in the Database pool.
SonarQube_Database_PoolActiveConnections
Untyped
Connections
Maximum number of active connections in the Database pool.
SonarQube_Database_PoolMaxWaitMillis
Untyped
Milliseconds
Maximum time a connection can keep waiting in the Database pool.
SonarQube_Database_PoolIdleConnections
Untyped
Maximum number of idle connections in the Database pool.
### JMX metrics
#### Main SonarQube Server process
The metrics coming from the main Java process are listed below.
Metric name
Type
Unit
Description
process_cpu_seconds_total
Counter
Seconds
Total user and system CPU time spent in seconds.
process_start_time_seconds
Gauge
Seconds
Start time of the process since Unix epoch in seconds.
process_open_fds
Gauge
n/a
Number of open file descriptors.
process_max_fds
Gauge
n/a
Maximum number of open file descriptors.
process_virtual_memory_bytes
Gauge
Bytes
Virtual memory size in bytes.
process_resident_memory_bytes
Gauge
Bytes
Resident memory size in bytes.
#### Tomcat
The metrics coming from Tomcat are listed below. All metrics are untyped.
Connector
Metric name
Description
Tomcat_Connector_portOffset
The offset that will be applied to the port to determine the actual port number used.
Tomcat_Connector_maxThreads
The maximum number of request processing threads to be created for the internal Executor. -1 indicates an external Executor is being used.
Tomcat_Connector_tcpNoDelay
Should we use TCP no delay?
Tomcat_Connector_maxParameterCount
The maximum number of parameters (GET plus POST) that will be automatically parsed by the container. 10000 by default. The default Tomcat server.xml configures a lower default of 1000. A value of less than 0 means no limit.
Tomcat_Connector_maxHeaderCount
The maximum number of headers that are allowed by the container. 100 by default. A value of less than 0 means no limit.
Tomcat_Connector_maxKeepAliveRequests
Maximum number of Keep-Alive requests to honor per connection.
Tomcat_Connector_allowTrace
Allow disabling TRACE method.
Tomcat_Connector_enableLookups
The ‘enable DNS lookups’ flag for this Connector.
Tomcat_Connector_localPort
The port number on which this connector is listening to requests. If the special value for port of zero is used then this method will report the actual port bound.
Tomcat_Connector_threadPriority
The thread priority for processors using the internal Executor. -1 indicates an external Executor is being used.
Tomcat_Connector_processorCache
The processor cache size.
Tomcat_Connector_xpoweredBy
Is generation of X-Powered-By response header enabled/disabled?
Tomcat_Connector_useIPVHosts
Should IP-based virtual hosting be used?
Tomcat_Connector_port
The port number (excluding any offset) on which this connector is configured to listen for requests. The special value of 0 means select a random free port when the socket is bound.
Tomcat_Connector_redirectPort
The redirect port (excluding any offset) for non-SSL to SSL redirects.
Tomcat_Connector_proxyPort
The Server port to which we should pretend requests to this Connector.
Tomcat_Connector_acceptCount
The accept count for this Connector.
Tomcat_Connector_maxSwallowSize
The maximum number of request body bytes to be swallowed by Tomcat for an aborted upload.
Tomcat_Connector_portWithOffset
The actual port number (including any offset) on which this connector is configured to listen for requests.
Tomcat_Connector_maxPostSize
Maximum size in bytes of a POST which will be handled by the servlet API provided features.
Tomcat_Connector_connectionTimeout
Timeout value on the incoming connection.
Tomcat_Connector_connectionLinger
Linger value on the incoming connection.
Engine
| Metric name | Description |
| ---------------------------------------- | -------------------------------------------------------------------- |
| `Tomcat_Engine_backgroundProcessorDelay` | The processor delay for this component. |
| `Tomcat_Engine_startChildren` | Will children be started automatically when they are added? |
| `Tomcat_Engine_startStopThreads` | The number of threads to use when starting and stopping child Hosts. |
GlobalRequestProcessor
| Metric name | Description |
| ---------------------------------------------- | ------------------------------------------------------------ |
| `Tomcat_GlobalRequestProcessor_bytesReceived` | Amount of data received, in bytes. |
| `Tomcat_GlobalRequestProcessor_bytesSent` | Amount of data sent, in bytes. |
| `Tomcat_GlobalRequestProcessor_errorCount` | Number of errors for the GlobalRequestProcessor. |
| `Tomcat_GlobalRequestProcessor_maxTime` | Maximum time to process a request. |
| `Tomcat_GlobalRequestProcessor_processingTime` | Total time to process the requests. |
| `Tomcat_GlobalRequestProcessor_requestCount` | Number of requests processed for the GlobalRequestProcessor. |
Host
| Metric name | Description |
| -------------------------------------- | ------------------------------------------------------------------------------------------------------------------------------------------------------------------ |
| `Tomcat_Host_autoDeploy` | The auto deploy flag for this Host. |
| `Tomcat_Host_backgroundProcessorDelay` | The processor delay for this component. |
| `Tomcat_Host_copyXML` | Should XML files be copied to $CATALINA\_BASE/conf/{engine}/{host} by default when a web application is deployed? |
| `Tomcat_Host_createDirs` | Should we create directories upon startup for appBase and xmlBase? |
| `Tomcat_Host_deployOnStartup` | The deploy on startup flag for this Host. |
| `Tomcat_Host_deployXML` | Deploy Context XML config files property. |
| `Tomcat_Host_startChildren` | Will children be started automatically when they are added? |
| `Tomcat_Host_startStopThreads` | The number of threads to use when starting, stopping, and deploying child Contexts. |
| `Tomcat_Host_undeployOldVersions` | Determines if old versions of applications deployed using parallel deployment are automatically undeployed when no longer used. Requires autoDeploy to be enabled. |
| `Tomcat_Host_unpackWARs` | Unpack WARs property. |
Manager
| Metric name | Description |
| ---------------------------------------------------- | ------------------------------------------------------------------------------------------------------------------------------------------------- |
| `Tomcat_Manager_activeSessions` | Number of active sessions at this moment. |
| `Tomcat_Manager_duplicates` | Number of duplicated session ids generated. |
| `Tomcat_Manager_expiredSessions` | Number of sessions that expired (doesn’t include explicit invalidations). |
| `Tomcat_Manager_maxActive` | Maximum number of active sessions so far. |
| `Tomcat_Manager_maxActiveSessions` | The maximum number of active Sessions allowed, or -1 for no limit. |
| `Tomcat_Manager_persistAuthentication` | Indicates whether sessions shall persist authentication information when being persisted (e.g. across application restarts). |
| `Tomcat_Manager_processExpiresFrequency` | The frequency of the manager checks (expiration and passivation). |
| `Tomcat_Manager_processingTime` | Time spent doing housekeeping and expiration. |
| `Tomcat_Manager_rejectedSessions` | Number of sessions we rejected due to maxActive being reached. |
| `Tomcat_Manager_sessionAverageAliveTime` | Average time an expired session had been alive. |
| `Tomcat_Manager_sessionCounter` | Total number of sessions created by this manager. |
| `Tomcat_Manager_sessionCreateRate` | Session creation rate in sessions per minute. |
| `Tomcat_Manager_sessionExpireRate` | Session expiration rate in sessions per minute. |
| `Tomcat_Manager_sessionMaxAliveTime` | Longest time an expired session had been alive. |
| `Tomcat_Manager_warnOnSessionAttributeFilterFailure` | Should a WARN level log message be generated if a session attribute fails to match sessionAttributeNameFilter or sessionAttributeClassNameFilter? |
ProtocolHandler
| Metric name | Description |
| ------------------------------------------------------ | ----------------------------------------------------- |
| `Tomcat_ProtocolHandler_acceptCount` | Introspected attribute acceptCount. |
| `Tomcat_ProtocolHandler_acceptorThreadCount` | Introspected attribute acceptorThreadCount. |
| `Tomcat_ProtocolHandler_acceptorThreadPriority` | Introspected attribute acceptorThreadPriority. |
| `Tomcat_ProtocolHandler_allowHostHeaderMismatch` | Introspected attribute allowHostHeaderMismatch. |
| `Tomcat_ProtocolHandler_aprRequired` | Introspected attribute aprRequired. |
| `Tomcat_ProtocolHandler_compressionMinSize` | Introspected attribute compressionMinSize. |
| `Tomcat_ProtocolHandler_connectionCount` | Introspected attribute connectionCount. |
| `Tomcat_ProtocolHandler_connectionLinger` | Introspected attribute connectionLinger. |
| `Tomcat_ProtocolHandler_connectionTimeout` | Introspected attribute connectionTimeout. |
| `Tomcat_ProtocolHandler_connectionUploadTimeout` | Introspected attribute connectionUploadTimeout. |
| `Tomcat_ProtocolHandler_desiredBufferSize` | Introspected attribute desiredBufferSize. |
| `Tomcat_ProtocolHandler_disableUploadTimeout` | Introspected attribute disableUploadTimeout. |
| `Tomcat_ProtocolHandler_keepAliveTimeout` | Introspected attribute keepAliveTimeout. |
| `Tomcat_ProtocolHandler_localPort` | Introspected attribute localPort. |
| `Tomcat_ProtocolHandler_maxConnections` | Introspected attribute maxConnections. |
| `Tomcat_ProtocolHandler_maxExtensionSize` | Introspected attribute maxExtensionSize. |
| `Tomcat_ProtocolHandler_maxHeaderCount` | Introspected attribute maxHeaderCount. |
| `Tomcat_ProtocolHandler_maxHttpHeaderSize` | Introspected attribute maxHttpHeaderSize. |
| `Tomcat_ProtocolHandler_maxHttpRequestHeaderSize` | Introspected attribute maxHttpRequestHeaderSize. |
| `Tomcat_ProtocolHandler_maxHttpResponseHeaderSize` | Introspected attribute maxHttpResponseHeaderSize. |
| `Tomcat_ProtocolHandler_maxKeepAliveRequests` | Introspected attribute maxKeepAliveRequests. |
| `Tomcat_ProtocolHandler_maxSavePostSize` | Introspected attribute maxSavePostSize. |
| `Tomcat_ProtocolHandler_maxSwallowSize` | Introspected attribute maxSwallowSize. |
| `Tomcat_ProtocolHandler_maxThreads` | Introspected attribute maxThreads. |
| Tomcat\*\_ProtocolHandler\_\*maxTrailerSize | Introspected attribute maxTrailerSize. |
| `Tomcat_ProtocolHandler_minSpareThreads` | Introspected attribute minSpareThreads. |
| `Tomcat_ProtocolHandler_nameIndex` | Introspected attribute nameIndex. |
| `Tomcat_ProtocolHandler_noCompressionStrongETag` | Introspected attribute noCompressionStrongETag. |
| `Tomcat_ProtocolHandler_paused` | Introspected attribute paused. |
| `Tomcat_ProtocolHandler_pollerThreadCount` | Introspected attribute pollerThreadCount. |
| `Tomcat_ProtocolHandler_pollerThreadPriority` | Introspected attribute pollerThreadPriority. |
| `Tomcat_ProtocolHandler_port` | Introspected attribute port. |
| `Tomcat_ProtocolHandler_portOffset` | Introspected attribute portOffset. |
| `Tomcat_ProtocolHandler_portWithOffset` | Introspected attribute portWithOffset. |
| `Tomcat_ProtocolHandler_processorCache` | Introspected attribute processorCache. |
| `Tomcat_ProtocolHandler_rejectIllegalHeader` | Introspected attribute rejectIllegalHeader. |
| `Tomcat_ProtocolHandler_rejectIllegalHeaderName` | Introspected attribute rejectIllegalHeaderName. |
| `Tomcat_ProtocolHandler_secure` | Introspected attribute secure. |
| `Tomcat_ProtocolHandler_selectorTimeout` | Introspected attribute selectorTimeout. |
| `Tomcat_ProtocolHandler_sendfileSupported` | Introspected attribute sendfileSupported. |
| `Tomcat_ProtocolHandler_serverRemoveAppProvidedValues` | Introspected attribute serverRemoveAppProvidedValues. |
| `Tomcat_ProtocolHandler_sessionCacheSize` | Introspected attribute sessionCacheSize. |
| `Tomcat_ProtocolHandler_sessionTimeout` | Introspected attribute sessionTimeout. |
| `Tomcat_ProtocolHandler_sniParseLimit` | Introspected attribute sniParseLimit. |
| `Tomcat_ProtocolHandler_sSLDisableCompression` | Introspected attribute sSLDisableCompression. |
| `Tomcat_ProtocolHandler_sSLDisableSessionTickets` | Introspected attribute sSLDisableSessionTickets. |
| `Tomcat_ProtocolHandler_sSLEnabled` | Introspected attribute sSLEnabled. |
| `Tomcat_ProtocolHandler_sSLHonorCipherOrder` | Introspected attribute sSLHonorCipherOrder. |
| `Tomcat_ProtocolHandler_sSLVerifyDepth` | Introspected attribute sSLVerifyDepth. |
| `Tomcat_ProtocolHandler_tcpNoDelay` | Introspected attribute tcpNoDelay. |
| `Tomcat_ProtocolHandler_threadPriority` | Introspected attribute threadPriority. |
| `Tomcat_ProtocolHandler_trustMaxCertLength` | Introspected attribute trustMaxCertLength. |
| `Tomcat_ProtocolHandler_useKeepAliveResponseHeader` | Introspected attribute useKeepAliveResponseHeader. |
| `Tomcat_ProtocolHandler_useSendfile` | Introspected attribute useSendfile. |
| `Tomcat_ProtocolHandler_useServerCipherSuitesOrder` | Introspected attribute useServerCipherSuitesOrder. |
| `Tomcat_ProtocolHandler_waitingProcessorCount` | Introspected attribute waitingProcessorCount. |
Realm
| Metric name | Description |
| ----------------------------------------------- | -------------------------------------------------------- |
| `Tomcat_Realm_available` | Introspected attribute available. |
| `Tomcat_Realm_stripRealmForGss` | Introspected attribute stripRealmForGss. |
| `Tomcat_Realm_throwOnFailure` | Introspected attribute throwOnFailure. |
| `Tomcat_Realm_transportGuaranteeRedirectStatus` | Introspected attribute transportGuaranteeRedirectStatus. |
| `Tomcat_Realm_validate` | Introspected attribute validate. |
RequestProcessor
| Metric name | Description |
| --------------------------------------------------- | ------------------------------------------------- |
| `Tomcat_RequestProcessor_bytesReceived` | Introspected attribute bytesReceived. |
| `Tomcat_RequestProcessor_bytesSent` | Introspected attribute bytesSent. |
| `Tomcat_RequestProcessor_contentLength` | Introspected attribute contentLength. |
| `Tomcat_RequestProcessor_errorCount` | Introspected attribute errorCount. |
| `Tomcat_RequestProcessor_lastRequestProcessingTime` | Introspected attribute lastRequestProcessingTime. |
| `Tomcat_RequestProcessor_maxTime` | Introspected attribute maxTime. |
| `Tomcat_RequestProcessor_processingTime` | Introspected attribute processingTime. |
| `Tomcat_RequestProcessor_requestBytesReceived` | Introspected attribute requestBytesReceived. |
| `Tomcat_RequestProcessor_requestBytesSent` | Introspected attribute requestBytesSent. |
| `Tomcat_RequestProcessor_requestCount` | Introspected attribute requestCount. |
| `Tomcat_RequestProcessor_requestProcessingTime` | Introspected attribute requestProcessingTime. |
| `Tomcat_RequestProcessor_serverPort` | Introspected attribute serverPort. |
| `Tomcat_RequestProcessor_stage` | Introspected attribute stage. |
Server
| Metric name | Description |
| ------------------------------ | ------------------------------------------------------------------------------- |
| `Tomcat_Server_port` | TCP port (excluding any offset) for shutdown messages. |
| `Tomcat_Server_portOffset` | The offset applied to port and to the port attributes of any nested connectors. |
| `Tomcat_Server_portWithOffset` | Actual TCP port (including any offset) for shutdown messages. |
Servlet
| Metric name | Description |
| ----------------------------------------- | --------------------------------------------------------------------------------------------------------------------------------------------------------------------------------------------------------------------------------------- |
| `Tomcat_Servlet_available` | The date and time at which this servlet will become available (in milliseconds since the epoch), or zero if the servlet is available. If this value equals Long.MAX\_VALUE, the unavailability of this servlet is considered permanent. |
| `Tomcat_Servlet_asyncSupported` | Async support. |
| `Tomcat_Servlet_backgroundProcessorDelay` | The processor delay for this component. |
| `Tomcat_Servlet_classLoadTime` | Time taken to load the Servlet class. |
| `Tomcat_Servlet_countAllocated` | The count of allocations that are currently active (even if they are for the same instance, as will be true on a non-STM servlet). |
| `Tomcat_Servlet_errorCount` | Error count. |
| `Tomcat_Servlet_loadOnStartup` | The load-on-startup order value (negative value means load on first call) for this servlet. |
| `Tomcat_Servlet_loadTime` | Time taken to load and initialize the Servlet. |
| `Tomcat_Servlet_maxInstances` | Deprecated. Will be removed in Tomcat 10.1 onwards. Maximum number of STM instances. |
| `Tomcat_Servlet_maxTime` | Maximum processing time of a request. |
| `Tomcat_Servlet_minTime` | Minimum processing time of a request. |
| `Tomcat_Servlet_processingTime` | Total execution time of the servlet’s service method. |
| `Tomcat_Servlet_requestCount` | Number of requests processed by this wrapper. |
| `Tomcat_Servlet_singleThreadModel` | Deprecated. Will be removed in Tomcat 10.1 onwards. Does this servlet implement the SingleThreadModel interface? |
SSLHostConfig
| Metric name | Description |
| ------------------------------------------------------------- | -------------------------------------------------------------- |
| `Tomcat_SSLHostConfig_certificateVerificationDepth` | Introspected attribute certificateVerificationDepth. |
| `Tomcat_SSLHostConfig_certificateVerificationDepthConfigured` | Introspected attribute certificateVerificationDepthConfigured. |
| `Tomcat_SSLHostConfig_disableCompression` | Introspected attribute disableCompression. |
| `Tomcat_SSLHostConfig_disableSessionTickets` | Introspected attribute disableSessionTickets. |
| `Tomcat_SSLHostConfig_honorCipherOrder` | Introspected attribute honorCipherOrder. |
| `Tomcat_SSLHostConfig_insecureRenegotiation` | Introspected attribute insecureRenegotiation. |
| `Tomcat_SSLHostConfig_openSslConfContext` | Introspected attribute openSslConfContext. |
| `Tomcat_SSLHostConfig_openSslContext` | Introspected attribute openSslContext. |
| `Tomcat_SSLHostConfig_revocationEnabled` | Introspected attribute revocationEnabled. |
| `Tomcat_SSLHostConfig_sessionCacheSize` | Introspected attribute sessionCacheSize. |
| `Tomcat_SSLHostConfig_sessionTimeout` | Introspected attribute sessionTimeout. |
| `Tomcat_SSLHostConfig_tls13RenegotiationAvailable` | Introspected attribute tls13RenegotiationAvailable. |
SocketProperties
| Metric name | Description |
| ------------------------------------------ | ---------------------------------------- |
| `Tomcat_SocketProperties_appReadBufSize` | Introspected attribute appReadBufSize. |
| `Tomcat_SocketProperties_appWriteBufSize` | Introspected attribute appWriteBufSize. |
| `Tomcat_SocketProperties_bufferPool` | Introspected attribute bufferPool. |
| `Tomcat_SocketProperties_bufferPoolSize` | Introspected attribute bufferPoolSize. |
| `Tomcat_SocketProperties_directBuffer` | Introspected attribute directBuffer. |
| `Tomcat_SocketProperties_directBufferPool` | Introspected attribute directBufferPool. |
| `Tomcat_SocketProperties_directSslBuffer` | Introspected attribute directSslBuffer. |
| `Tomcat_SocketProperties_eventCache` | Introspected attribute eventCache. |
| `Tomcat_SocketProperties_processorCache` | Introspected attribute processorCache. |
| `Tomcat_SocketProperties_soLingerOn` | Introspected attribute soLingerOn. |
| `Tomcat_SocketProperties_soLingerTime` | Introspected attribute soLingerTime. |
| `Tomcat_SocketProperties_soReuseAddress` | Introspected attribute soReuseAddress. |
| `Tomcat_SocketProperties_soTimeout` | Introspected attribute soTimeout. |
| `Tomcat_SocketProperties_tcpNoDelay` | Introspected attribute tcpNoDelay. |
| `Tomcat_SocketProperties_timeoutInterval` | Introspected attribute timeoutInterval. |
| `Tomcat_SocketProperties_unlockTimeout` | Introspected attribute unlockTimeout. |
StringCache
| Metric name | Description |
| ----------------------------------- | -------------------------------------- |
| `Tomcat_StringCache_accessCount` | Introspected attribute accessCount. |
| `Tomcat_StringCache_byteEnabled` | Introspected attribute byteEnabled. |
| `Tomcat_StringCache_cacheSize` | Introspected attribute cacheSize. |
| `Tomcat_StringCache_charEnabled` | Introspected attribute charEnabled. |
| `Tomcat_StringCache_hitCount` | Introspected attribute hitCount. |
| `Tomcat_StringCache_trainThreshold` | Introspected attribute trainThreshold. |
ThreadPool
| Metric name | Description |
| ---------------------------------------------------- | ---------------------------------------------------------------------------------------------- |
| `Tomcat_ThreadPool_acceptCount` | Tomcat ThreadPool acceptCount. |
| `Tomcat_ThreadPool_acceptorThreadCount` | Tomcat ThreadPool acceptorThreadCount. |
| `Tomcat_ThreadPool_acceptorThreadPriority` | Tomcat:name="http-nio-0.0.0.0-9000",type=ThreadPool,attribute=acceptorThreadPriority |
| `Tomcat_ThreadPool_alpnSupported` | Tomcat ThreadPool alpnSupported. |
| `Tomcat_ThreadPool_bindOnInit` | Tomcat ThreadPool bindOnInit. |
| `Tomcat_ThreadPool_connectionCount` | Tomcat ThreadPool connectionCount. |
| `Tomcat_ThreadPool_connectionLinger` | Tomcat:name="http-nio-0.0.0.0-9000",type=ThreadPool,attribute=connectionLinger |
| `Tomcat_ThreadPool_connectionTimeout` | Tomcat ThreadPool connection timeout. |
| `Tomcat_ThreadPool_currentThreadCount` | Tomcat ThreadPool currentThreadCount. |
| `Tomcat_ThreadPool_currentThreadsBusy` | The number of currently busy threads in the ThreadPool. |
| `Tomcat_ThreadPool_daemon` | Tomcat:name="http-nio-0.0.0.0-9000",type=ThreadPool,attribute=daemon |
| `Tomcat_ThreadPool_deferAccept` | Tomcat ThreadPool deferAccept. |
| `Tomcat_ThreadPool_executorTerminationTimeoutMillis` | Tomcat:name="http-nio-0.0.0.0-9000",type=ThreadPool,attribute=executorTerminationTimeoutMillis |
| `Tomcat_ThreadPool_keepAliveCount` | Tomcat ThreadPool keepAliveCount. |
| `Tomcat_ThreadPool_keepAliveTimeout` | Tomcat:name="http-nio-0.0.0.0-9000",type=ThreadPool,attribute=keepAliveTimeout |
| `Tomcat_ThreadPool_localPort` | Tomcat:name="http-nio-0.0.0.0-9000",type=ThreadPool,attribute=localPort |
| `Tomcat_ThreadPool_maxConnections` | Tomcat ThreadPool maxConnections. |
| `Tomcat_ThreadPool_maxKeepAliveRequests` | Tomcat ThreadPool maxKeepAliveRequests. |
| `Tomcat_ThreadPool_maxThreads` | Tomcat:name="http-nio-0.0.0.0-9000",type=ThreadPool,attribute=maxThreads |
| `Tomcat_ThreadPool_minSpareThreads` | Tomcat:name="http-nio-0.0.0.0-9000",type=ThreadPool,attribute=minSpareThreads |
| `Tomcat_ThreadPool_paused` | Tomcat ThreadPool paused. |
| `Tomcat_ThreadPool_pollerThreadCount` | Tomcat:name="http-nio-0.0.0.0-9000",type=ThreadPool,attribute=pollerThreadCount |
| `Tomcat_ThreadPool_pollerThreadPriority` | Tomcat ThreadPool pollerThreadPriority. |
| `Tomcat_ThreadPool_port` | Tomcat ThreadPool port. |
| `Tomcat_ThreadPool_portOffset` | Tomcat:name="http-nio-0.0.0.0-9000",type=ThreadPool,attribute=portOffset |
| `Tomcat_ThreadPool_portWithOffset` | Tomcat ThreadPool portWithOffset. |
| `Tomcat_ThreadPool_running` | Tomcat ThreadPool running. |
| `Tomcat_ThreadPool_selectorTimeout` | Introspected attribute selectorTimeout. |
| `Tomcat_ThreadPool_sniParseLimit` | Tomcat:name="http-nio-0.0.0.0-9000",type=ThreadPool,attribute=sniParseLimit |
| `Tomcat_ThreadPool_sSLEnabled` | Tomcat ThreadPool sSLEnabled. |
| `Tomcat_ThreadPool_tcpNoDelay` | Tomcat:name="http-nio-0.0.0.0-9000",type=ThreadPool,attribute=tcpNoDelay |
| `Tomcat_ThreadPool_threadPriority` | Tomcat:name="http-nio-0.0.0.0-9000",type=ThreadPool,attribute=threadPriority |
| `Tomcat_ThreadPool_useInheritedChannel` | Tomcat ThreadPool useInheritedChannel. |
| `Tomcat_ThreadPool_useSendfile` | Tomcat:name="http-nio-0.0.0.0-9000",type=ThreadPool,attribute=useSendfile |
UtilityExecutor
| Metric name | Description |
| ------------------------------------------------------------------------- | ------------------------------------------------------------------------ |
| `Tomcat_UtilityExecutor_activeCount` | Introspected attribute activeCount. |
| `Tomcat_UtilityExecutor_completedTaskCount` | Introspected attribute completedTaskCount. |
| `Tomcat_UtilityExecutor_continueExistingPeriodicTasksAfterShutdownPolicy` | Introspected attribute continueExistingPeriodicTasksAfterShutdownPolicy. |
| `Tomcat_UtilityExecutor_corePoolSize` | Introspected attribute corePoolSize. |
| `Tomcat_UtilityExecutor_executeExistingDelayedTasksAfterShutdownPolicy` | Introspected attribute executeExistingDelayedTasksAfterShutdownPolicy. |
| `Tomcat_UtilityExecutor_largestPoolSize` | Introspected attribute largestPoolSize. |
| `Tomcat_UtilityExecutor_maximumPoolSize` | Introspected attribute maximumPoolSize. |
| `Tomcat_UtilityExecutor_poolSize` | Introspected attribute poolSize. |
| `Tomcat_UtilityExecutor_removeOnCancelPolicy` | Introspected attribute removeOnCancelPolicy. |
| `Tomcat_UtilityExecutor_shutdown` | Introspected attribute shutdown. |
| `Tomcat_UtilityExecutor_taskCount` | Introspected attribute taskCount. |
| `Tomcat_UtilityExecutor_terminated` | Introspected attribute terminated. |
| `Tomcat_UtilityExecutor_terminating` | Introspected attribute terminating. |
Valve
| Metric name | Description |
| ---------------------------------------------- | ----------------------------------------------------------------------------------------------------- |
| `Tomcat_Valve_asyncSupported` | Does this valve support async reporting? |
| `Tomcat_Valve_birthTime` | Introspected attribute birthTime. |
| `Tomcat_Valve_cache` | Should we cache authenticated Principals if the request is part of an HTTP session? |
| `Tomcat_Valve_changeSessionIdOnAuthentication` | Controls if the session ID is changed if a session exists at the point where users are authenticated. |
| `Tomcat_Valve_disableProxyCaching` | Controls the caching of pages that are protected by security constraints. |
| `Tomcat_Valve_quiet` | Introspected attribute quiet. |
| `Tomcat_Valve_securePagesWithPragma` | Controls the caching of pages that are protected by security constraints. |
| `Tomcat_Valve_showReport` | Enables/Disables full error reports. |
| `Tomcat_Valve_showServerInfo` | Enables/Disables server info on error pages. |
| `Tomcat_Valve_started` | Introspected attribute started. |
| `Tomcat_Valve_throwOnFailure` | Introspected attribute throwOnFailure. |
WebModule
| Metric name | Description |
| --------------------------------------------------- | ------------------------------------------------------------------------------------------------------------------------------------------------------ |
| `Tomcat_WebModule_antiResourceLocking` | Take care not to lock resources. |
| `Tomcat_WebModule_clearReferencesRmiTargets` | Should Tomcat look for memory leaks in RMI Targets and clear them if found as a workaround for application coding errors? |
| `Tomcat_WebModule_clearReferencesStopTimerThreads` | Should Tomcat attempt to terminate TimerThreads that have been started by the web application? Advisable to be used only in a development environment. |
| `Tomcat_WebModule_clearReferencesStopThreads` | Should Tomcat attempt to terminate threads that have been started by the web application? Advisable to be used only in a development environment. |
| `Tomcat_WebModule_clearReferencesThreadLocals` | Should Tomcat attempt to clear ThreadLocal variables that have been populated with classes loaded by the web application? |
| `Tomcat_WebModule_configured` | The correctly configured flag for this Context. |
| `Tomcat_WebModule_cookies` | Should we attempt to use cookies for session id communication? |
| `Tomcat_WebModule_crossContext` | Should we allow the ServletContext.getContext() method to access the context of other web applications in this server? |
| `Tomcat_WebModule_delegate` | Tomcat WebModule delegate. |
| `Tomcat_WebModule_distributable` | The distributable flag for this web application. |
| `Tomcat_WebModule_errorCount` | Cumulative error count of all servlets in this context. |
| `Tomcat_WebModule_ignoreAnnotations` | Ignore annotations flag. |
| `Tomcat_WebModule_logEffectiveWebXml` | Should the effective web.xml be logged when the context starts? |
| `Tomcat_WebModule_mapperContextRootRedirectEnabled` | Should the Mapper be used for context root redirects? |
| `Tomcat_WebModule_mapperDirectoryRedirectEnabled` | Should the Mapper be used for directory redirects? |
| `Tomcat_WebModule_maxTime` | Maximum execution time of all servlets in this context. |
| `Tomcat_WebModule_minTime` | Minimum execution time of all servlets in this context. |
| `Tomcat_WebModule_override` | The default context.xml override flag for this web application. |
| `Tomcat_WebModule_parallelAnnotationScanning` | The parallel annotation scanning flag. |
| `Tomcat_WebModule_paused` | The request processing pause flag (while reloading occurs). |
| `Tomcat_WebModule_privileged` | Access to Tomcat internals. |
| `Tomcat_WebModule_processingTime` | Cumulative execution times of all servlets in this context. |
| `Tomcat_WebModule_reloadable` | The reloadable flag for this web application. |
| `Tomcat_WebModule_renewThreadsWhenStoppingContext` | Should Tomcat renew the threads of the thread pool when the application is stopped to avoid memory leaks because of uncleaned ThreadLocal variables? |
| `Tomcat_WebModule_requestCount` | Cumulative request count of all servlets in this context. |
| `Tomcat_WebModule_sessionTimeout` | The session timeout (in minutes) for this web application. |
| `Tomcat_WebModule_startTime` | Time (in milliseconds since January 1, 1970, 00:00:00) when this context was started. |
| `Tomcat_WebModule_startupTime` | Time (in milliseconds) it took to start this context. |
| `Tomcat_WebModule_swallowOutput` | Flag to set to cause the system.out and system.err to be redirected to the logger when executing a servlet. |
| `Tomcat_WebModule_tldScanTime` | Time spent scanning jars for TLDs for this context. |
| `Tomcat_WebModule_tldValidation` | Should the parsing of \*.tld files be performed by a validating parser? |
| | Amount of ms that the container will wait for servlets to unload. |
| `Tomcat_WebModule_unpackWAR` | Unpack WAR property. |
| `Tomcat_WebModule_useBloomFilterForArchives` | DEPRECATED: Use a bloom filter for archives lookups. |
| `Tomcat_WebModule_useHttpOnly` | Indicates that session cookies should use HttpOnly. |
| `Tomcat_WebModule_useNaming` | Create a JNDI naming context for this application? |
| `Tomcat_WebModule_useRelativeRedirects` | When generating location headers for 302 responses, should a relative URI be used? |
| `Tomcat_WebModule_xmlNamespaceAware` | Should the parsing of web.xml and web-fragment.xml files be performed by a namespace-aware parser? |
| `Tomcat_WebModule_xmlValidation` | Should the parsing of web.xml and web-fragment.xml files be performed by a validating parser? |
WebResourceRoot
| Metric name | Description |
| ----------------------------------------- | --------------------------------------------------------------------- |
| `Tomcat_WebResourceRoot_allowLinking` | Does this resources implementation allow the use of symbolic links? |
| `Tomcat_WebResourceRoot_cachingAllowed` | Is in-memory caching of resource content and metadata enabled? |
| `Tomcat_WebResourceRoot_hitCount` | The number of requests for resources that were served from the cache. |
| `Tomcat_WebResourceRoot_lookupCount` | The number of requests for resources in the WebResourceRoot. |
| `Tomcat_WebResourceRoot_maxSize` | The maximum permitted size of the cache in kB. |
| `Tomcat_WebResourceRoot_objectMaxSize` | The maximum permitted size for a single object in the cache in kB. |
| `Tomcat_WebResourceRoot_size` | The current estimate of the cache size in kB. |
| `Tomcat_WebResourceRoot_trackLockedFiles` | Does this resources implementation track requests that lock files? |
| `Tomcat_WebResourceRoot_ttl` | The time-to-live for cache entries in milliseconds. |
---
# Source: https://docs.sonarsource.com/sonarqube-community-build/server-installation/on-kubernetes-or-openshift/set-up-monitoring/prometheus.md
# Source: https://docs.sonarsource.com/sonarqube-server/10.4/setup-and-upgrade/deploy-on-kubernetes/set-up-monitoring/prometheus.md
# Source: https://docs.sonarsource.com/sonarqube-server/10.5/setup-and-upgrade/deploy-on-kubernetes/set-up-monitoring/prometheus.md
# Source: https://docs.sonarsource.com/sonarqube-server/10.6/setup-and-upgrade/deploy-on-kubernetes/set-up-monitoring/prometheus.md
# Source: https://docs.sonarsource.com/sonarqube-server/10.7/setup-and-upgrade/deploy-on-kubernetes/set-up-monitoring/prometheus.md
# Source: https://docs.sonarsource.com/sonarqube-server/10.8/setup-and-upgrade/deploy-on-kubernetes/set-up-monitoring/prometheus.md
# Source: https://docs.sonarsource.com/sonarqube-server/2025.2/setup-and-update/deploy-on-kubernetes/set-up-monitoring/prometheus.md
# Source: https://docs.sonarsource.com/sonarqube-server/2025.3/server-installation/on-kubernetes-or-openshift/set-up-monitoring/prometheus.md
# Source: https://docs.sonarsource.com/sonarqube-server/2025.5/server-installation/on-kubernetes-or-openshift/set-up-monitoring/prometheus.md
# Source: https://docs.sonarsource.com/sonarqube-server/2025.1/setup-and-upgrade/deploy-on-kubernetes/set-up-monitoring/prometheus.md
# Source: https://docs.sonarsource.com/sonarqube-server/2025.4/server-installation/on-kubernetes-or-openshift/set-up-monitoring/prometheus.md
# Source: https://docs.sonarsource.com/sonarqube-server/2025.6/server-installation/on-kubernetes-or-openshift/set-up-monitoring/prometheus.md
# Source: https://docs.sonarsource.com/sonarqube-server/server-installation/on-kubernetes-or-openshift/set-up-monitoring/prometheus.md
# Setting up with Prometheus server
To set up the monitoring, follow the steps described below. We refer here to a setup using the Prometheus Operator which requires the PodMonitor to collect the metrics. The Prometheus Operator needs to be installed separately.
### Introduction
The deployment process is as follows:
1. When you install the SonarQube Server’s Helm chart in the Kubernetes cluster, the chart creates a PodMonitor resource (`podmonitor.yaml`), which configures the pulling of metrics from SonarQube Server.
2. The Prometheus operator deploys the Prometheus server and watches the PodMonitor to inject the relevant configuration to the Prometheus server.
3. The Prometheus server will pull the metrics from SonarQube Server according to the PodMonitor configuration. To pull the metrics from the Web API endpoint, it needs to authenticate to the Web API. The Helm chart sets up the PodMonitor to use the system passcode defined in the Helm chart for Bearer authentication scheme.
The figure below illustrates this process.
### Step 1: Set up the Prometheus server authentication to the Web API’s monitoring endpoint
The PodMonitor needs to authenticate to the SonarQube Server’s Web API for getting metrics from the `/api/monitoring/metrics` endpoint. To setup this authentication, you must define the monitoring password in `values.yaml`: the Helm chart will store this value in the `SONAR_WEB_SYSTEMPASSCODE` environment variable on SonarQube Server.
To set the monitoring passcode in SonarQube Server, use one of the following methods (see also the [Helm chart documentation](https://artifacthub.io/packages/helm/sonarqube/sonarqube#sonarqube-specific)):
* Define the passcode in the `monitoringPasscode` property within the `values.yaml` file (default value is "define\_it").\
For security reasons, this method is not recommended.
* Use a secret that contains the passcode that will be retrieved at runtime, and define the following properties in `values.yaml`:
* `monitoringPasscodeSecretName`: name of the secret object.
* `monitoringPasscodeSecretKey`: key identifying the passcode to be extracted from the secret object.
### Step 2: Enable the export of the JMX metrics
To expose the Prometheus JMX metrics, the JMX exporter must be enabled in the Helm chart configuration as follows:
* Add the following block in the `values.yaml` file of the SonarQube Server Helm chart:
```css-79elbk
prometheusExporter:
enabled: true
config:
rules:
- pattern: ".*"
```
### Step 3: Enable the PodMonitor
1. If not already done, install the Prometheus Operator in the Kubernetes cluster (it’s not installed through the Helm chart).
2. In the SonarQube Helm chart, enable the PodMonitor by setting `prometheusMonitoring.podMonitor.enabled` to `true`.
3. If necessary, adjust the PodMonitor created by default by the SonarQube Helm chart. Below is the default `podmonitor.yaml` file depending on the SonarQube Edition.\
To adjust the PodMonitor:
* Either edit the Helm chart.\
For more information, see [Prometheus PodMonitor](https://artifacthub.io/packages/helm/sonarqube/sonarqube#monitoring-prometheus-podmonitor) in the Helm chart documentation.
* Or edit the created `podmonitor.yaml` file directly.
Default PodMonitor: Developer and Enterprise Editions
```css-79elbk
apiVersion: monitoring.coreos.com/v1
kind: PodMonitor
metadata:
name: sonarqube
namespace: monitoring
spec:
namespaceSelector:
matchNames:
- sonarqube
podMetricsEndpoints:
- interval: 30s
path: /
scheme: http
targetPort: monitoring-ce
- interval: 30s
path: /
scheme: http
targetPort: monitoring-web
selector:
matchLabels:
app: sonarqube
```
Default PodMonitor: Data Center Edition
```css-79elbk
apiVersion: monitoring.coreos.com/v1
kind: PodMonitor
metadata:
name: sonarqube
namespace: monitoring
spec:
namespaceSelector:
matchNames:
- sonarqube-dce
podMetricsEndpoints:
- interval: 30s
path: /
scheme: http
targetPort: monitoring-ce
- interval: 30s
path: /
scheme: http
targetPort: monitoring-web
selector:
matchLabels:
app: sonarqube-dce
```
### Step 4: Set up the export of the metrics to an observability platform
See [prometheus-metrics](https://docs.sonarsource.com/sonarqube-server/server-installation/on-kubernetes-or-openshift/set-up-monitoring/prometheus-metrics "mention") for more information.
### Related pages
* [introduction](https://docs.sonarsource.com/sonarqube-server/server-installation/on-kubernetes-or-openshift/set-up-monitoring/introduction "mention") to Setting up monitoring
* [customizing-helm-chart](https://docs.sonarsource.com/sonarqube-server/server-installation/on-kubernetes-or-openshift/customizing-helm-chart "mention") (Developer and Enterprise Editions)
* [customizing-helm-chart](https://docs.sonarsource.com/sonarqube-server/server-installation/data-center-edition/on-kubernetes-or-openshift/customizing-helm-chart "mention") (Data Center Edition)
---
# Source: https://docs.sonarsource.com/sonarqube-community-build/instance-administration/authentication/gitlab/provisioning-modes.md
# Source: https://docs.sonarsource.com/sonarqube-server/10.7/instance-administration/authentication/gitlab/provisioning-modes.md
# Source: https://docs.sonarsource.com/sonarqube-server/10.8/instance-administration/authentication/gitlab/provisioning-modes.md
# Source: https://docs.sonarsource.com/sonarqube-server/2025.2/instance-administration/authentication/gitlab/provisioning-modes.md
# Source: https://docs.sonarsource.com/sonarqube-server/2025.3/instance-administration/authentication/gitlab/provisioning-modes.md
# Source: https://docs.sonarsource.com/sonarqube-server/2025.5/instance-administration/authentication/gitlab/provisioning-modes.md
# Source: https://docs.sonarsource.com/sonarqube-server/2025.1/instance-administration/authentication/gitlab/provisioning-modes.md
# Source: https://docs.sonarsource.com/sonarqube-server/2025.4/instance-administration/authentication/gitlab/provisioning-modes.md
# Source: https://docs.sonarsource.com/sonarqube-server/2025.6/instance-administration/authentication/gitlab/provisioning-modes.md
# Source: https://docs.sonarsource.com/sonarqube-server/instance-administration/authentication/gitlab/provisioning-modes.md
# Provisioning modes
- [Introduction to GitLab provisioning modes](/sonarqube-server/instance-administration/authentication/gitlab/provisioning-modes/introduction.md): Overview of the GitLab authentication's provisioning modes.
- [Just-in-Time provisioning](/sonarqube-server/instance-administration/authentication/gitlab/provisioning-modes/just-in-time.md): With the Just-in-Time (JIT) provisioning mode, user accounts are automatically created in SonarQube Server when GitLab users log in for the first time.
- [Automatic provisioning](/sonarqube-server/instance-administration/authentication/gitlab/provisioning-modes/automatic.md): With GitLab automatic provisioning mode, you can benefit from automatic user provisioning, deprovisioning and synchronization of groups and permissions in SonarQube Server.
---
# Source: https://docs.sonarsource.com/sonarqube-server/8.9/analyzing-source-code/pull-request-analysis.md
# Source: https://docs.sonarsource.com/sonarqube-server/9.8/analyzing-source-code/pull-request-analysis.md
# Source: https://docs.sonarsource.com/sonarqube-server/9.9/analyzing-source-code/pull-request-analysis.md
# Source: https://docs.sonarsource.com/sonarqube-server/10.0/analyzing-source-code/pull-request-analysis.md
# Source: https://docs.sonarsource.com/sonarqube-server/10.1/analyzing-source-code/pull-request-analysis.md
# Source: https://docs.sonarsource.com/sonarqube-server/10.2/analyzing-source-code/pull-request-analysis.md
# Source: https://docs.sonarsource.com/sonarqube-server/10.3/analyzing-source-code/pull-request-analysis.md
# Source: https://docs.sonarsource.com/sonarqube-server/10.4/analyzing-source-code/pull-request-analysis.md
# Source: https://docs.sonarsource.com/sonarqube-server/10.5/analyzing-source-code/pull-request-analysis.md
# Source: https://docs.sonarsource.com/sonarqube-server/10.6/analyzing-source-code/pull-request-analysis.md
# Source: https://docs.sonarsource.com/sonarqube-server/10.7/analyzing-source-code/pull-request-analysis.md
# Source: https://docs.sonarsource.com/sonarqube-server/10.8/analyzing-source-code/pull-request-analysis.md
# Source: https://docs.sonarsource.com/sonarqube-server/2025.2/analyzing-source-code/pull-request-analysis.md
# Source: https://docs.sonarsource.com/sonarqube-server/2025.3/analyzing-source-code/pull-request-analysis.md
# Source: https://docs.sonarsource.com/sonarqube-server/2025.5/analyzing-source-code/pull-request-analysis.md
# Source: https://docs.sonarsource.com/sonarqube-server/2025.1/analyzing-source-code/pull-request-analysis.md
# Source: https://docs.sonarsource.com/sonarqube-server/2025.4/analyzing-source-code/pull-request-analysis.md
# Source: https://docs.sonarsource.com/sonarqube-server/2025.6/analyzing-source-code/pull-request-analysis.md
# Source: https://docs.sonarsource.com/sonarqube-server/analyzing-source-code/pull-request-analysis.md
# Source: https://docs.sonarsource.com/sonarqube-cloud/improving/pull-request-analysis.md
# Pull request analysis
A pull request code review and analysis is your second line of defense in keeping your code clean. Your first line of defense is using SonarQube for IDE to find issues right in your IDE. Once you have addressed those issues, you can go ahead and create a pull request to merge your changes into the main branch of your project. SonarQube Cloud will automatically analyze the code changes it introduces and report the result, both in the SonarQube Cloud interface and in the pull requests view of your DevOps platform. This step can find issues that are not detectable inside the IDE with SonarQube for IDE, giving you the opportunity to address them before you merge the pull request.
In the SonarQube Cloud Free plan, pull request analysis is available only when the pull request is merged into the main branch. Please see the [#comparison-table](https://docs.sonarsource.com/sonarqube-cloud/administering-sonarcloud/managing-subscription/subscription-plans#comparison-table "mention") for plan details.
{% hint style="info" %}
The term *pull request* is used by most repository providers. GitLab, however, uses the term "merge request". Both terms refer to the same functionality and are handled equivalently in Sonar products. In our documentation, any use of the term *pull request* applies equally to GitLab merge requests.
{% endhint %}
### Understanding your pull request analysis
From your project's main page, select **Pull Requests** to see a list of all pull requests for which an analysis has been completed:
For each pull request in the list, the name of the pull request, the commit at which the latest analysis was performed, and the resulting quality gate status on that pull request are displayed. To see more details, select your pull request by name:
### Pull request decoration
In addition to appearing in the SonarQube Cloud interface, the quality gate status and a summary of the results also appear in your DevOps platform interface (that is, in the pull request view of GitHub, Bitbucket Cloud, Azure DevOps or GitLab). This is referred to as pull request decoration. But, it is not just decorative! It also integrates with your DevOps platform to block the merge of the pull request if the quality gate fails. In this way, you can benefit from SonarQube Cloud code review and analysis without even leaving the environment of your DevOps platform.
A pull request decoration summary comment will look like this (it is similar on the supported platforms):
In addition, depending on your platform, issues may be reported as inline annotations. For more information, see [in-devops-platform](https://docs.sonarsource.com/sonarqube-cloud/managing-your-projects/issues/in-devops-platform "mention").
### Quality gate and metrics
Pull request analysis differs from main branch (and other long-lived branch) analysis in two important ways:
* Pull request analysis only reports issues that were introduced by the pull request itself. When SonarQube Cloud analyzes a pull request **P** for the merge of branch **B** into base branch **T** it scans the HEAD commit of **B** and compares the result with the most recent scan of **T**. Only issues that appear in **B** but not in **T** are reported in the analysis results. In cases where **T** includes new issues added since the most recent scan (in other words the scan is outdated) those additional issues will appear as part of the pull request analysis, even though they were not introduced by the pull request. Therefore, an up-to-date analysis of **T** is required to correctly detect which issues are new.
* The quality gate for the pull request is computed based on this analysis. The quality gate used is the one set at the project level, however, *only the conditions on new code within the quality gate are applied*.
{% hint style="info" %}
As outlined above, the scanner starts by analyzing the HEAD commit, the most recent commit in your current branch. If the head commit is not defined, it scans the remote branch and, if that is not available, the upstream branch.
{% endhint %}
Above you can see that on the **Summary** tab, the quality gate and the five quality metrics are displayed. In addition, the other tabs, **Issues**, **Measures**, and **Code** let you see more details about the analysis.
### Enabling pull request analysis
Pull request analysis is available on all supported repository providers. Of course, to see an analysis result, an analysis must be performed on the pull request. If you are using automatic analysis (which is only available on GitHub) then this happens without any further configuration on pull request creation and on every push to the pull request branch. If you are using build analysis then you must make sure that your build script is configured to build on pull request creation and push.
### Prerequisites for CI-based analysis
Before analyzing your pull requests, make sure that:
* The pull request source branch is checked out in CI/CD host’s local repository.
* The branch being targeted by the pull request is fetched and present in the local repository (This is usually done through the cloning of the remote repository by the CI pipeline).
* The local repository contains valid repository metadata (e.g. the `.git` folders have not been removed). See [verifying-code-checkout-step](https://docs.sonarsource.com/sonarqube-cloud/advanced-setup/scanner-environment/verifying-code-checkout-step "mention").
* The code in the local repository matches the code in the remote repository (e.g once a pull request is issued, no code is added to the local branch on the CI side before analysis).
### Existing pull requests on first automatic analysis
When a project is first imported into SonarQube Cloud and analyzed by automatic analysis the first analysis behaves differently from subsequent analyses. On the first analysis not only will the main branch be analyzed, but, also *the most recently active pull requests, up to a maximum of five*. The main branch and pull request results will appear on the [project overview](https://docs.sonarsource.com/sonarqube-cloud/improving/main-branch-analysis), as usual. Subsequent analyses will occur normally, on pushes to the main branch and on pushes to pull request branches.
### SonarQube Remediation agent
{% hint style="success" %}
The SonarQube Remediation Agent is a [Beta](https://docs.sonarsource.com/sonarqube-cloud/appendices/product-release-lifecycle#beta) feature available with Enterprise plan accounts. It is free during the beta phase and will be a paid feature when it moves to [General Availability](https://docs.sonarsource.com/sonarqube-cloud/appendices/product-release-lifecycle#general-availability). To learn more about the terms & conditions, please see our legal page about features in [Early Access](https://www.sonarsource.com/legal/early-access/).
If your SonarQube Cloud organization is not on an Enterprise plan, please see the [getting-started-with-enterprise](https://docs.sonarsource.com/sonarqube-cloud/getting-started-with-enterprise "mention") pages to get the process started.
{% endhint %}
The SonarQube Remediation agent can generate fix suggestions for certain types of issues found during a pull request analysis of your GitHub repository. AI-generated fix suggestions offered by the agent that are reviewed and accepted by users, can be included as new commits to the pull request before merging.
See the [sonarqube-remediation-agent](https://docs.sonarsource.com/sonarqube-cloud/administering-sonarcloud/ai-features/sonarqube-remediation-agent "mention") page for the full list of requirements and instructions to install and enable the agent. If your agent is already enabled and you're ready to engage, check out the [agents-in-your-github-pull-request](https://docs.sonarsource.com/sonarqube-cloud/managing-your-projects/issues/with-ai-features/agents-in-your-github-pull-request "mention") page to understand how the agent's behavior.
### Pull request analysis and SonarQube for IDE
The [connected-mode](https://docs.sonarsource.com/sonarqube-cloud/improving/connected-mode "mention") extension works well with pull request analysis. When running [SonarQube for IDE](https://www.sonarsource.com/products/sonarlint/), issues will be highlighted even before you create your pull request.
If SonarQube for IDE shows your code as clean, you can open a pull request and SonarQube Cloud will perform the pull request analysis to detect more complex issues that were not detectable by SonarQube for IDE.
In this way SonarQube for IDE together with pull request analysis give you two levels of protection to help keep your code clean.
### Incremental analysis
[incremental-analysis-mechanisms](https://docs.sonarsource.com/sonarqube-cloud/advanced-setup/incremental-analysis-mechanisms "mention") are used to shorten the pull request analysis.
---
# Source: https://docs.sonarsource.com/sonarqube-community-build/analyzing-source-code/test-coverage/python-test-coverage.md
# Source: https://docs.sonarsource.com/sonarqube-server/9.8/analyzing-source-code/test-coverage/python-test-coverage.md
# Source: https://docs.sonarsource.com/sonarqube-server/9.9/analyzing-source-code/test-coverage/python-test-coverage.md
# Source: https://docs.sonarsource.com/sonarqube-server/10.0/analyzing-source-code/test-coverage/python-test-coverage.md
# Source: https://docs.sonarsource.com/sonarqube-server/10.1/analyzing-source-code/test-coverage/python-test-coverage.md
# Source: https://docs.sonarsource.com/sonarqube-server/10.2/analyzing-source-code/test-coverage/python-test-coverage.md
# Source: https://docs.sonarsource.com/sonarqube-server/10.3/analyzing-source-code/test-coverage/python-test-coverage.md
# Source: https://docs.sonarsource.com/sonarqube-server/10.4/analyzing-source-code/test-coverage/python-test-coverage.md
# Source: https://docs.sonarsource.com/sonarqube-server/10.5/analyzing-source-code/test-coverage/python-test-coverage.md
# Source: https://docs.sonarsource.com/sonarqube-server/10.6/analyzing-source-code/test-coverage/python-test-coverage.md
# Source: https://docs.sonarsource.com/sonarqube-server/10.7/analyzing-source-code/test-coverage/python-test-coverage.md
# Source: https://docs.sonarsource.com/sonarqube-server/10.8/analyzing-source-code/test-coverage/python-test-coverage.md
# Source: https://docs.sonarsource.com/sonarqube-server/2025.2/analyzing-source-code/test-coverage/python-test-coverage.md
# Source: https://docs.sonarsource.com/sonarqube-server/2025.3/analyzing-source-code/test-coverage/python-test-coverage.md
# Source: https://docs.sonarsource.com/sonarqube-server/2025.5/analyzing-source-code/test-coverage/python-test-coverage.md
# Source: https://docs.sonarsource.com/sonarqube-server/2025.1/analyzing-source-code/test-coverage/python-test-coverage.md
# Source: https://docs.sonarsource.com/sonarqube-server/2025.4/analyzing-source-code/test-coverage/python-test-coverage.md
# Source: https://docs.sonarsource.com/sonarqube-server/2025.6/analyzing-source-code/test-coverage/python-test-coverage.md
# Source: https://docs.sonarsource.com/sonarqube-server/analyzing-source-code/test-coverage/python-test-coverage.md
# Source: https://docs.sonarsource.com/sonarqube-cloud/enriching/test-coverage/python-test-coverage.md
# Python test coverage
SonarQube Cloud supports the reporting of test coverage information as part of the analysis of your Python project.
However, SonarQube Cloud does not produce the coverage report itself. Instead, you must set up a third-party tool to produce the report as part of your build process. You then need to configure your analysis to tell the SonarScanner where the report is located so that it can pick it up and send it to SonarQube Cloud, where it will be displayed on your project dashboard along with the other analysis metrics.
### Use CI-based, not automatic analysis
Usually, when you import a new Python project, automatic analysis starts immediately. But, since coverage is not yet supported under automatic analysis, *you will need to use CI-based analysis instead*. This requires disabling automatic analysis. Here are the steps you need to follow:
**If you have not yet imported your python project**, just add an empty file called `sonar-project.properties` to the root of your repository, and *then* perform the import. SonarQube Cloud will assume that you want to set up a CI-based analysis and display the onboarding tutorial.
**If you have already imported your project**, then SonarQube Cloud has already run at least once using automatic analysis. Don’t worry, you can still convert your project to use a CI-based approach. Simply go to **Administration** > **Analysis Method** and switch **SonarQube Cloud Automatic Analysis** to **OFF**. Then, on the same screen, under **Supported analysis methods** find your preferred CI and select **Follow the tutorial**.
### Follow the tutorial
At this point, you should be in the onboarding tutorial specific to your CI. Follow the tutorial and when it asks, **What option best describes your build?**, choose **Other (for JS, TS, Go, Python, PHP, …)**. When you are done with the tutorial, you should have a functioning CI-based analysis setup for your Python project. The next step is to adjust it to get coverage working.
### Adjust your setup
To enable coverage you need to:
* Adjust your build process so that the coverage tool runs *before* the scanner report generation step runs.
* Make sure that the coverage tool writes its report file to a defined path in the build environment.
* Configure the scanning step of your build so that the scanner picks up the report file from that defined path.
### Add coverage to your build process
The details of setting up coverage within your build process depend on which tools you are using. In our example we use:
* Tox, to configure the tests
* Pytest, to execute the tests
* Coverage, (the Coverage.py tool,) to measure code coverage, and
* GitHub Actions, to perform the build.
In this example, we invoke `pytest` and use the `pytest-cov` plugin which, in turn, uses Coverage.py. Simply add the text below to the `tox.ini` file at the root of your project:
**`Tox.ini (Coverage.py and Pytest)`**
```ini
[tox]
envlist = py39
skipsdist = True
[testenv]
deps =
pytest
pytest-cov
commands = pytest --cov=my_project --cov-report=xml --cov-config=tox.ini --cov-branch
```
Alternatively, in this example, we start the test by invoking the Coverage.py tool (the command `coverage`) with the `pytest` invocation as an argument.
**`Alternative tox.ini (Coverage.py only)`**
```python
[tox]
envlist = py39
skipsdist = True
[testenv]
deps =
pytest
coverage
commands =
coverage run -m pytest
coverage xml
[coverage:run]
relative_files = True
source = my_project/
branch = True
```
Note that we specify `relative_files = True` in the `tox.ini` file to ensure that GitHub Actions will correctly parse your coverage results.
The following shows how to configure the GitHub Actions build file for your Python project so that it works in conjunction with the `tox.ini` configuration file described above to generate code coverage. Your `build.yml` file should look something like this:
**`.github/workflows/build.yml`**
```yaml
name: Build
on:
push:
branches:
- main
pull_request:
types: [opened, synchronize, reopened]
jobs:
sonarqube:
name: SonarQube Cloud
runs-on: ubuntu-latest
steps:
- uses: actions/checkout@v6
with:
fetch-depth: 0
- name: Setup Python
uses: actions/setup-python@v6
with:
python-version: ${{ matrix.python }}
- name: Install tox and any other packages
run: pip install tox
- name: Run tox
run: tox -e py
- name: SonarQube Scan
uses: SonarSource/sonarqube-scan-action@v7
env:
SONAR_TOKEN: ${{ secrets.SONAR_TOKEN }}
```
First of all, install all of your project dependencies and then invoke `tox` to run your tests and generate a coverage report file.
If, as here, you do not specify an output file, the scanner will look for report paths located under the default `.coverage-reports/*coverage-*.xml.`
If you are using a different package manager and/or a different testing tool these details will be different.
**The essential requirements are that the tool produces its report in the Cobertura XML format and writes it to a place from which the scanner can then pick it up.**
### Add the coverage analysis parameter
The next step is to add `sonar.python.coverage.reportPaths` to your analysis parameters. This parameter must be set to the path of the report file produced by your coverage tool. In this example, that path is set to the default produced by Coverage.py. It is set in the `sonar-project.properties` file, located in the project root:
**`sonar-project.properties`**
```properties
sonar.projectKey=
sonar.organization=
sonar.python.coverage.reportPaths=coverage.xml
```
Wildcards and a comma-delimited list of paths are supported. See [test-coverage-parameters](https://docs.sonarsource.com/sonarqube-cloud/enriching/test-coverage/test-coverage-parameters "mention") for details.
{% hint style="warning" %}
This property is usually set in the `sonar-project.properties` file, located in the project root. Alternatively, you can also set it in the command line of the scanner invocation or in the SonarQube Cloud interface under
***Your Organization*** > ***Your Project*** > **Administration** > **General Settings** > **Languages** > **Python** > **Tests and Coverage** > **Path to coverage report(s)**
{% endhint %}
---
# Source: https://docs.sonarsource.com/sonarqube-community-build/analyzing-source-code/languages/python.md
# Source: https://docs.sonarsource.com/sonarqube-server/8.9/analyzing-source-code/languages/python.md
# Source: https://docs.sonarsource.com/sonarqube-server/9.8/analyzing-source-code/languages/python.md
# Source: https://docs.sonarsource.com/sonarqube-server/9.9/analyzing-source-code/languages/python.md
# Source: https://docs.sonarsource.com/sonarqube-server/10.0/analyzing-source-code/languages/python.md
# Source: https://docs.sonarsource.com/sonarqube-server/10.1/analyzing-source-code/languages/python.md
# Source: https://docs.sonarsource.com/sonarqube-server/10.2/analyzing-source-code/languages/python.md
# Source: https://docs.sonarsource.com/sonarqube-server/10.3/analyzing-source-code/languages/python.md
# Source: https://docs.sonarsource.com/sonarqube-server/10.4/analyzing-source-code/languages/python.md
# Source: https://docs.sonarsource.com/sonarqube-server/10.5/analyzing-source-code/languages/python.md
# Source: https://docs.sonarsource.com/sonarqube-server/10.6/analyzing-source-code/languages/python.md
# Source: https://docs.sonarsource.com/sonarqube-server/10.7/analyzing-source-code/languages/python.md
# Source: https://docs.sonarsource.com/sonarqube-server/10.8/analyzing-source-code/languages/python.md
# Source: https://docs.sonarsource.com/sonarqube-server/2025.2/analyzing-source-code/languages/python.md
# Source: https://docs.sonarsource.com/sonarqube-server/2025.3/analyzing-source-code/languages/python.md
# Source: https://docs.sonarsource.com/sonarqube-server/2025.5/analyzing-source-code/languages/python.md
# Source: https://docs.sonarsource.com/sonarqube-server/2025.1/analyzing-source-code/languages/python.md
# Source: https://docs.sonarsource.com/sonarqube-server/2025.4/analyzing-source-code/languages/python.md
# Source: https://docs.sonarsource.com/sonarqube-server/2025.6/analyzing-source-code/languages/python.md
# Source: https://docs.sonarsource.com/sonarqube-server/analyzing-source-code/languages/python.md
# Source: https://docs.sonarsource.com/sonarqube-cloud/advanced-setup/languages/python.md
# Python
### Supported versions
The level of support for a language is defined as follows:
* Fully supported: Analysis will complete. All the language features are understood and examined.
* Supported: Most language features are understood and examined but the version includes unsupported features. Analysis might break or provide incomplete results.
Versions 3.0 to 3.14 are fully supported.
Version 2.7 is supported.
### Supported tools and frameworks
Django, FastAPI, Flask, Jupyter Notebooks, Numpy, Pandas, PySpark, PyTorch, Tensorflow and Scikit-learn.
### Language-specific properties
To discover and update the Python-specific properties, navigate in SonarQube Cloud to *Your Project* > **Administration** > **General Settings** > **Languages** > **Python**. See the [analysis-parameters](https://docs.sonarsource.com/sonarqube-cloud/advanced-setup/analysis-parameters "mention") page for more information about specific properties.
### Handling project python version
Python code is analyzed by default as compatible with python 2 and python 3. Some issues will be automatically silenced to avoid raising False Positives. In order to get a more precise analysis you can specify the python versions your code supports via the `sonar.python.version` parameter.
Accepted format are a comma separated list of versions having the format "X.Y"
Examples:
* `sonar.python.version=2.7`
* `sonar.python.version=3.8`
* `sonar.python.version=2.7, 3.7, 3.8, 3.9`
### Jupyter Notebooks
Jupyter Notebooks are an open document format based on JSON. They are used for all sorts of data science tasks: data cleaning and transformation, data visualization, statistical modeling, machine learning, deep learning, etc.
#### Supported versions
SonarQube Cloud can analyze Jupyter Notebooks nbformat.v4 and later.
#### Specific properties
Discover and update the Jupyter Notebooks-specific [analysis-parameters](https://docs.sonarsource.com/sonarqube-cloud/advanced-setup/analysis-parameters "mention") in **Administration** > **General Settings** > **Languages** > **Python** > **Jupyter Notebooks**.
#### Managing rules
Jupyter Notebook rules can be enabled and disabled in your quality profile. See the [quality-profile-association](https://docs.sonarsource.com/sonarqube-cloud/managing-your-projects/project-analysis/quality-profile-association "mention") pages for more details.
#### Jupyter Notebooks in SonarQube for IDE for VSCode
You can analyze your Jupyter Notebooks projects directly in VS Code; see the [Scan my project #Jupyter Notebooks](https://app.gitbook.com/s/6LPRABg3ubAJhpfR5K0Y/using/scan-my-project#jupyter-notebooks "mention") article in the SonarQube for VS Code docs. Note that [Connected mode](https://docs.sonarsource.com/sonarqube-for-vs-code/connect-your-ide/connected-mode) will be ignored when working with Jupyter Notebooks (if using connected mode with Jupyter Notebooks is important to you, please [submit the idea on SonarQube Cloud’s portal](https://portal.productboard.com/sonarsource/1-sonarcloud/tabs/1-under-consideration/sonarcloud/tabs/under-consideration) in Productboard).
#### Important notes
* Only Python code is analyzed in Jupyter Notebooks.
* Only primary locations are shown (see the [issues](https://docs.sonarsource.com/sonarqube-cloud/managing-your-projects/issues "mention") pages to learn more about primary vs secondary locations).
* Analysis does not measure code duplication at this time.
### Parallel code scan
By default, the Python analyzer tries to parallelize the analysis of files; it uses 90% of the cores available, up until 6.
If required, it is possible to customize the number of scheduled parallel jobs by configuring the property `sonar.python.analysis.threads n` at the scanner level, where `n` is an integer indicating the number of threads allocated for the analysis.
You should consider setting the `sonar.python.analysis.threads` property only when the automatic detection of the number of logical CPUs cannot detect the desired number.
A typical example is when the analysis should not consume all the available computing resources to leave room for other tasks running in parallel on the same machine.
When setting the `sonar.python.analysis.threads` property, you should set it to a value less or equal to the number of logical CPUs available. Over-committing does not accelerate the analysis and can even slow it down.
You can disable parallel code scan for Python by setting the property `sonar.python.analysis.parallel` to `false`. This can be useful when debugging an analysis.
### Related pages
* [external-analyzer-reports](https://docs.sonarsource.com/sonarqube-cloud/enriching/external-analyzer-reports "mention") ([Pylint](https://pylint.pycqa.org/), [Bandit](https://github.com/PyCQA/bandit/blob/master/README.rst), [Flake8](https://flake8.pycqa.org/en/latest/))
* Test coverage [overview](https://docs.sonarsource.com/sonarqube-cloud/enriching/test-coverage/overview "mention") (the [Coverage.py tool](https://coverage.readthedocs.io/en/7.3.2/) provided by [Ned Batchelder](https://nedbatchelder.com/), [Nose](https://nose.readthedocs.io/), [pytest](https://docs.pytest.org/en/latest/))
---
# Source: https://docs.sonarsource.com/sonarqube-community-build/devops-platform-integration/azure-devops-integration/adding-analysis-to-pipeline/quality-gate-status-in-release-pipeline.md
# Source: https://docs.sonarsource.com/sonarqube-server/2025.2/devops-platform-integration/azure-devops-integration/adding-analysis-to-pipeline/quality-gate-status-in-release-pipeline.md
# Source: https://docs.sonarsource.com/sonarqube-server/2025.3/devops-platform-integration/azure-devops-integration/adding-analysis-to-pipeline/quality-gate-status-in-release-pipeline.md
# Source: https://docs.sonarsource.com/sonarqube-server/2025.5/devops-platform-integration/azure-devops-integration/adding-analysis-to-pipeline/quality-gate-status-in-release-pipeline.md
# Source: https://docs.sonarsource.com/sonarqube-server/2025.1/devops-platform-integration/azure-devops-integration/adding-analysis-to-pipeline/quality-gate-status-in-release-pipeline.md
# Source: https://docs.sonarsource.com/sonarqube-server/2025.4/devops-platform-integration/azure-devops-integration/adding-analysis-to-pipeline/quality-gate-status-in-release-pipeline.md
# Source: https://docs.sonarsource.com/sonarqube-server/2025.6/devops-platform-integration/azure-devops-integration/adding-analysis-to-pipeline/quality-gate-status-in-release-pipeline.md
# Source: https://docs.sonarsource.com/sonarqube-server/devops-platform-integration/azure-devops-integration/adding-analysis-to-pipeline/quality-gate-status-in-release-pipeline.md
# Source: https://docs.sonarsource.com/sonarqube-cloud/advanced-setup/ci-based-analysis/azure-pipelines/quality-gate-status-in-release-pipeline.md
# Checking quality gate in release pipeline
If the Publish Quality Gate Result task in your build pipeline is enabled, you can check the SonarQube Cloud quality gate status in your release pipeline. It takes place as a [pre-deployment gate](https://docs.microsoft.com/en-us/azure/devops/pipelines/release/approvals/gates?view=azure-devops).
Note that this feature is in preview and:
* Only the quality gate related to the primary build artifact of the release will be checked.
* During a build, if multiple analyses are performed, all of the related quality gates are checked. If one of them has the status WARN, ERROR, or NONE, then the quality gate status on the release pipeline will be failed.
* If the quality gate is in the failed state, it will not be possible to get the pre-deployment gate passing as this status will remain in its initial state. You will have to execute another build with either the current issues corrected in SonarQube Cloud or with another commit for fixing them.
* The pre-deployment gates in the release pipeline check the status every five minutes for one day, by default. If you know that the SonarQube quality gate has failed and will remain in the failed state on Azure DevOps, you can increase this duration to a maximum of 6 minutes (so the gate will be evaluated only twice), or just cancel the release itself.
To check the SonarQube Cloud quality gate status in your Azure release pipeline:
1. In the Azure **release pipeline**, add a stage, then select **pre-deployment conditions**.
2. Enable the **gates**, then select **add**. Choose **SonarQube Cloud Quality Gate status check**.
3. Save your pipeline.
### Related pages
Adding the analysis to your build pipeline:
* [gradle-or-maven-project](https://docs.sonarsource.com/sonarqube-cloud/advanced-setup/ci-based-analysis/azure-pipelines/adding-analysis-to-build-pipeline/gradle-or-maven-project "mention")
* [dotnet-project](https://docs.sonarsource.com/sonarqube-cloud/advanced-setup/ci-based-analysis/azure-pipelines/adding-analysis-to-build-pipeline/dotnet-project "mention")
* [c-family-project](https://docs.sonarsource.com/sonarqube-cloud/advanced-setup/ci-based-analysis/azure-pipelines/adding-analysis-to-build-pipeline/c-family-project "mention")
* [js-ts-go-python-php](https://docs.sonarsource.com/sonarqube-cloud/advanced-setup/ci-based-analysis/azure-pipelines/adding-analysis-to-build-pipeline/js-ts-go-python-php "mention")
* [monorepo-projects](https://docs.sonarsource.com/sonarqube-cloud/advanced-setup/ci-based-analysis/azure-pipelines/adding-analysis-to-build-pipeline/monorepo-projects "mention")
* [sonarqube-tasks](https://docs.sonarsource.com/sonarqube-cloud/advanced-setup/ci-based-analysis/azure-pipelines/sonarqube-tasks "mention")
---
# Source: https://docs.sonarsource.com/sonarqube-server/2025.3/quality-standards-administration/ai-code-assurance/quality-gates-for-ai-code.md
# Source: https://docs.sonarsource.com/sonarqube-server/2025.5/quality-standards-administration/ai-code-assurance/quality-gates-for-ai-code.md
# Source: https://docs.sonarsource.com/sonarqube-server/2025.1/instance-administration/analysis-functions/ai-code-assurance/quality-gates-for-ai-code.md
# Source: https://docs.sonarsource.com/sonarqube-server/2025.4/quality-standards-administration/ai-code-assurance/quality-gates-for-ai-code.md
# Source: https://docs.sonarsource.com/sonarqube-server/2025.6/quality-standards-administration/ai-code-assurance/quality-gates-for-ai-code.md
# Source: https://docs.sonarsource.com/sonarqube-server/quality-standards-administration/ai-code-assurance/quality-gates-for-ai-code.md
# Source: https://docs.sonarsource.com/sonarqube-cloud/standards/ai-code-assurance/quality-gates-for-ai-code.md
# Quality gates for AI code
### Overview
The first objective for AI Code Assurance is labeling projects with the  label. For details, see [#label-projects-with-ai-code](https://docs.sonarsource.com/sonarqube-cloud/standards/overview#label-projects-with-ai-code "mention").
To complete the second objective, you will assign a quality gate qualified for AI Code Assurance to your projects. You can use the default quality gate, Sonar way for AI Code, or create a custom quality gate to meet your requirements; all of the instructions are on this page. If you already have an AI-qualified quality gate you want to use, skip to [#apply-your-quality-gate-for-ai-code-assurance](#apply-your-quality-gate-for-ai-code-assurance "mention") below.
With the correct quality gate applied, check if your project qualifies for [#autodetecting-ai-code](#autodetecting-ai-code "mention").
Projects completing these steps will show their AI Code Assurance status on the **Projects**, main-branch **Overview**, and **Project Information** pages. When using AI Code Assured quality gates, a series of external badges are available to publish on your websites. For more details, please see the [monitor-projects-with-ai-code](https://docs.sonarsource.com/sonarqube-cloud/standards/ai-code-assurance/monitor-projects-with-ai-code "mention") page.
### Quality gates for AI code
#### Creating a custom quality gate for AI code
Creating a custom quality gate for AI code begins like any other. In SonarQube Cloud, navigate to *Your Organization* > **Quality Gates** and select **Create**. For more details about defining your conditions, see the [managing-custom-quality-gates](https://docs.sonarsource.com/sonarqube-cloud/standards/managing-quality-gates/managing-custom-quality-gates "mention") page. Once you’ve defined your conditions, go to the three-dots menu and select **Qualify for AI Code Assurance**.
The use of the *Sonar way* quality gate is no longer enforced on projects marked as containing AI code.
#### Recommendations on custom quality gates for AI code
To safeguard your projects from potential issues introduced by AI-generated code and fixes, it’s crucial to implement stringent quality control and review processes. By setting conditions on your [about-new-code](https://docs.sonarsource.com/sonarqube-cloud/standards/about-new-code "mention") (NCD) within your quality gate, you can proactively prevent the buildup of new issues as you leverage AI assistance in your coding process.
Remember that AI assistants might have been used to generate code in your projects even before you defined your NCD. Therefore, it’s essential to also apply conditions to Overall Code. This extra layer of protection helps catch vulnerabilities and critical reliability issues that could be lurking in your project, beyond the reach of your NCD.
#### Sonar way for AI code
The *Sonar way for AI Code* quality gate is the recommended quality gate for AI Code Assurance and is the suggested quality gate for AI code projects. To ensure your AI-generated code is secure, high-quality, and maintainable, while also boosting development productivity and avoiding business risks, it needs strict quality control and reviews on both new and overall code.
**Conditions applied to the Sonar way for AI code quality gate**
The Sonar way for AI code quality gate has seven conditions:
* Conditions on new code:
* No new issues are introduced
* All new Security Hotspots are reviewed
* New code test coverage is greater than or equal to 80.0%
* Duplication in the new code is less than or equal to 3.0%
* Conditions on overall code:
* Security rating: A
* All security hotspots are reviewed
* Reliability rating: C
{% hint style="info" %}
It’s possible that AI-generated code exists in your overall code, outside of the scope of your new code definition. To address this, Sonar recommends *adding a coverage condition with suitable threshold on overall code* because AI-generated code found in old code can be risky. See the [#managing-conditions](https://docs.sonarsource.com/sonarqube-cloud/managing-quality-gates/managing-custom-quality-gates#managing-conditions "mention") article to learn how to add a coverage condition.
{% endhint %}
### Qualifying your quality gate for AI Code Assurance
Any quality gate can be marked as qualified for AI code with the **AI Code Assurance** status label available for quality gates. To activate this label, open the **Actions** menu of your quality gate on the **Quality Gates** page and select **Qualify for AI Code Assurance**. Before you create a custom quality gate for AI code, check the recommendations listed above for conditions included in the *Sonar way for AI Code* quality gate.
### Apply your quality gate for AI Code Assurance
The final step in achieving AI Code Assurance requires that an AI-qualified quality gate be applied to your project. In SonarQube Cloud, navigate to *Your Organization* > *Your Project* > **Administration** > **AI Code Assurance**.
1. If you’ve already [#label-projects-with-ai-code](https://docs.sonarsource.com/sonarqube-cloud/standards/overview#label-projects-with-ai-code "mention"), it’s eligible for the **AI Code Assurance** status label; all you need to do is apply an AI-qualified quality gate.
2. Select a quality gate qualified for AI Code Assurance.
Projects completing these steps will show their AI Code Assurance status on the **Projects** page, each of the branch overview pages (**Overview**, **Main Branch**, **Pull Requests**, and **Branches**), and your project’s **Information** page. To understand the status labels and badges for AI Code Assurance, see the [monitor-projects-with-ai-code](https://docs.sonarsource.com/sonarqube-cloud/standards/ai-code-assurance/monitor-projects-with-ai-code "mention") page.
Projects marked as containing AI-generated code and *do not use an AI Code Assured quality gate* will only display the  label.
### Autodetecting AI code
If your SonarCloud Organization is integrated with GitHub and you’re using GitHub Copilot, your project is eligible for automatically detecting AI-generated code. For more information, see [autodetect-ai-code](https://docs.sonarsource.com/sonarqube-cloud/administering-sonarcloud/ai-features/autodetect-ai-code "mention").
### Monitoring your projects
If you’ve completed the steps above to apply AI Code Assured quality gates to your project, a series of external badges are available to publish on your websites. For more details, please see the [monitor-projects-with-ai-code](https://docs.sonarsource.com/sonarqube-cloud/standards/ai-code-assurance/monitor-projects-with-ai-code "mention") page.
### Related pages
* SonarQube Cloud's [ai-capabilities](https://docs.sonarsource.com/sonarqube-cloud/ai-capabilities "mention")
* [overview](https://docs.sonarsource.com/sonarqube-cloud/standards/ai-code-assurance/overview "mention")
* Administering your [ai-features](https://docs.sonarsource.com/sonarqube-cloud/administering-sonarcloud/ai-features "mention") as an Organization Admin
* Learn how to[autodetect-ai-code](https://docs.sonarsource.com/sonarqube-cloud/administering-sonarcloud/ai-features/autodetect-ai-code "mention") in projects using GitHub and GitHub Copilot
* Quickly [enable-ai-codefix](https://docs.sonarsource.com/sonarqube-cloud/administering-sonarcloud/ai-features/enable-ai-codefix "mention") to get AI-generated fix suggestions
---
# Source: https://docs.sonarsource.com/sonarqube-server/8.9/user-guide/quality-gates.md
# Source: https://docs.sonarsource.com/sonarqube-server/9.8/user-guide/quality-gates.md
# Source: https://docs.sonarsource.com/sonarqube-server/9.9/user-guide/quality-gates.md
# Source: https://docs.sonarsource.com/sonarqube-server/10.0/user-guide/quality-gates.md
# Source: https://docs.sonarsource.com/sonarqube-server/10.1/user-guide/quality-gates.md
# Source: https://docs.sonarsource.com/sonarqube-server/10.2/user-guide/quality-gates.md
# Source: https://docs.sonarsource.com/sonarqube-server/10.3/user-guide/quality-gates.md
# Source: https://docs.sonarsource.com/sonarqube-server/10.4/user-guide/quality-gates.md
# Source: https://docs.sonarsource.com/sonarqube-server/10.5/user-guide/quality-gates.md
# Source: https://docs.sonarsource.com/sonarqube-server/10.6/user-guide/quality-gates.md
# Source: https://docs.sonarsource.com/sonarqube-server/10.7/instance-administration/analysis-functions/quality-gates.md
# Source: https://docs.sonarsource.com/sonarqube-server/10.8/instance-administration/analysis-functions/quality-gates.md
# Source: https://docs.sonarsource.com/sonarqube-server/2025.1/instance-administration/analysis-functions/quality-gates.md
# Source: https://docs.sonarsource.com/sonarqube-cloud/improving/quality-gates.md
# Quality gates
A quality gate is an indicator that tells you whether your code meets the minimum level of quality required for your project. It consists of a set of conditions that are applied to the results of each code analysis and review. If the analysis results meet or exceed the quality gate conditions then it shows a **Passed** status otherwise, it shows a **Failed** status. For more information, see [introduction-to-quality-gates](https://docs.sonarsource.com/sonarqube-cloud/standards/managing-quality-gates/introduction-to-quality-gates "mention").
### Quality gates appear with analysis results
Quality gates are displayed in the SonarQube Cloud interface along with the code review and analysis results of the main branch of the project, other non-main branches, and pull requests.
For pull requests, the quality gate will also be displayed in the repository platform as a pull request decoration.
The quality gates will indicate a **Passed** or **Failed** status (or if not properly set up, a **Not Computed** status, see below)
For example, go to **Main Branch** > **Summary** > **Quality Gate**; here you can see the quality gate for the main branch of a project with a **Passed** status:
If you are using the [connected-mode](https://docs.sonarsource.com/sonarqube-cloud/improving/connected-mode "mention"), changes to your main branch quality gate will also appear as notifications in your IDE (this only works if you have configured SonarQube for IDE to connect to your SonarQube Cloud account).
### When is a quality gate not computed?
There are two main reasons why the quality gate may not be computed:
* You have performed only one analysis on your code (the quality gate is computed after the second analysis).
* No new code definition is set up for the project. This may only occur for projects created a long time ago since in the recent versions of SonarQube Server you cannot create a new project without setting up the new code definition.
If the quality gate has not been computed then the **Not computed** message is displayed in the place where the quality gate status usually appears as illustrated below.
The **Set New Code Definition** button is displayed as well in case no new code definition is set up. To fix this, click the button. For more details on setting up the definition, see [about-new-code](https://docs.sonarsource.com/sonarqube-cloud/standards/about-new-code "mention") page.
### How quality gates are used
The purpose of the quality gate is to tell you whether your code is good enough to be pushed to the next step:
* For the main branch and other long-lived branches, the quality gate answers the question: "Can I release my code today?"
* For pull requests (and short-lived branches), the quality gate answers the question: "Can I merge this pull request?"
By keeping an eye on the quality gate you can quickly judge the status of your code and decide on what to do next.
### Related pages
* [introduction-to-quality-gates](https://docs.sonarsource.com/sonarqube-cloud/standards/managing-quality-gates/introduction-to-quality-gates "mention")
* [notifications](https://docs.sonarsource.com/sonarqube-cloud/managing-your-account/notifications "mention")
* [viewing-quality-gate](https://docs.sonarsource.com/sonarqube-cloud/standards/managing-quality-gates/viewing-quality-gate "mention")
* [managing-custom-quality-gates](https://docs.sonarsource.com/sonarqube-cloud/standards/managing-quality-gates/managing-custom-quality-gates "mention")
* [changing-default-quality-gate](https://docs.sonarsource.com/sonarqube-cloud/standards/managing-quality-gates/changing-default-quality-gate "mention")
* [associating-projects-with-quality-gate](https://docs.sonarsource.com/sonarqube-cloud/standards/managing-quality-gates/associating-projects-with-quality-gate "mention")
* [changing-quality-gate](https://docs.sonarsource.com/sonarqube-cloud/managing-your-projects/project-analysis/changing-quality-gate "mention")
---
# Source: https://docs.sonarsource.com/sonarqube-cloud/managing-your-projects/project-analysis/quality-profile-association.md
# Quality profile
If you do not explicitly associate a language with a specific quality profile in your project, the default quality profile will be used for the analysis of this language’s code. To change a quality profile association in your project, you need the Administer permission on the project.
{% hint style="info" %}
With the Administer Quality Profiles permission, you can change the associations of a profile for any project. This is done from the respective quality profile. In addition, you can delegate this permission to any user for a given custom quality profile. See [authorizing-other-users-to-manage-quality-profile](https://docs.sonarsource.com/sonarqube-cloud/standards/managing-quality-profiles/authorizing-other-users-to-manage-quality-profile "mention") for more information.
{% endhint %}
To associate another quality profile to a language in your project:
1. Retrieve your project. See [retrieving-projects](https://docs.sonarsource.com/sonarqube-cloud/managing-your-projects/retrieving-projects "mention") for more details.
2. In the left-side panel, select **Administration** > **Quality Profiles**.
3. Select another profile for the language.
---
# Source: https://docs.sonarsource.com/sonarqube-server/2025.3/quality-standards-administration/ai-code-assurance/quality-profiles-for-ai-code.md
# Source: https://docs.sonarsource.com/sonarqube-server/2025.5/quality-standards-administration/ai-code-assurance/quality-profiles-for-ai-code.md
# Source: https://docs.sonarsource.com/sonarqube-server/2025.4/quality-standards-administration/ai-code-assurance/quality-profiles-for-ai-code.md
# Source: https://docs.sonarsource.com/sonarqube-server/2025.6/quality-standards-administration/ai-code-assurance/quality-profiles-for-ai-code.md
# Source: https://docs.sonarsource.com/sonarqube-server/quality-standards-administration/ai-code-assurance/quality-profiles-for-ai-code.md
# Source: https://docs.sonarsource.com/sonarqube-cloud/standards/ai-code-assurance/quality-profiles-for-ai-code.md
# Quality profiles for AI code
### Overview
SonarQube Cloud’s AI Code Assurance features help you set appropriate standards for projects containing AI-generated code. The process begins with [#label-projects-with-ai-code](https://docs.sonarsource.com/sonarqube-cloud/standards/overview#label-projects-with-ai-code "mention") and continues with [#apply-a-quality-gate-for-ai-code-assurance](https://docs.sonarsource.com/sonarqube-cloud/standards/overview#apply-a-quality-gate-for-ai-code-assurance "mention"). The final step involves assigning a quality profile recommended for AI Generated code to assign a collection of rules applied during an analysis.
If you need more information about what a quality profile does, please read [understanding-quality-profiles](https://docs.sonarsource.com/sonarqube-cloud/standards/managing-quality-profiles/understanding-quality-profiles "mention"). There, you’ll learn how quality profiles are assigned by language, what the inheritance tree looks like, and how to profiles are associated with projects.
### Quality profiles for AI code
The Sonar way quality profile and its derivatives are excellent choices for AI-generated code. Leveraging the Sonar way provides a solid foundation, and extending it allows for tailored rule sets to further enhance coverage. While the Sonar way profile currently features the recommended for AI-generated code badge , we are actively working to broaden this recognition to include customized profiles in upcoming releases. Using Sonar way is a great starting point for setting up robust analysis for projects with AI code and allows for the creation and assignment of custom profiles that meet specific needs.
#### Recommendations on custom quality profiles for AI code
The Sonar way quality profile is recommended for projects containing AI-generated code. It and any of its derivatives, which may apply more rules than the parent to an analysis, are recommended for AI code. The Sonar way is recommended because it contains the most optimum rules and thresholds for most projects, and helps detect issues at scale that might be introduced by the injection of AI-generated code.
If you want to add rules or avoid unexpected changes on the BUILT-IN profile, copy the Sonar way and modify it to fit your workflow. Choosing a different quality profile will not affect your AI Code Assurance status.
### Assigning a quality profile for AI code
The "Sonar way" profile comes BUILT-IN and ready to use for every programming language. If you haven’t changed your default settings, this profile will automatically be applied to all new projects you create.
You aren’t required to use a profile recommended for AI-generated code to get the benefits of AI Code Assurance. However, using one is highly encouraged as it helps keep all your projects consistent and organized.
#### Assign profiles by project
To assign a quality profile recommended for AI code to multiple languages by project, navigate to the *Your project* > **Administration / Quality profiles** page. Under each language you have in your project, select a profile that’s a derivative of the Sonar way.
#### Assign profiles by language
To set an AI Code Assured profile for multiple projects by language, go to the *Your organization* > **Quality profiles** page and pick the language you want to update. You’ll likely see the default *Sonar way* profile, or if it’s been copied or extended, you’ll also see those versions.
Next, with your desired profile chosen, select **Change Projects**. Adjust the filters to see a list of your projects. Then, just check or uncheck the boxes to select or deselect projects and select **Close**. If the changes don’t show up right away, refresh the page.
Remember, after assigning a new quality profile, you’ll need to run a new analysis to see the update on the project’s **Information** page.
For detailed instructions about assigning quality profiles, check out the [associating-a-quality-profile-with-projects](https://docs.sonarsource.com/sonarqube-cloud/standards/managing-quality-profiles/associating-a-quality-profile-with-projects "mention") page.
### Customizing a quality profile for AI code
Any derivative of the Sonar way can be extended to cover more rules and catch more issues. Please see the [creating-a-quality-profile](https://docs.sonarsource.com/sonarqube-cloud/standards/managing-quality-profiles/creating-a-quality-profile "mention") page for complete details.
Remember that at this time, only the Sonar way carries the recommended for AI-generated code badge ; the ability to assign that badge to custom profiles is on our development roadmap.
### Related pages
* SonarQube Cloud's [ai-capabilities](https://docs.sonarsource.com/sonarqube-cloud/ai-capabilities "mention")
* [overview](https://docs.sonarsource.com/sonarqube-cloud/standards/ai-code-assurance/overview "mention")
* Administering your [ai-features](https://docs.sonarsource.com/sonarqube-cloud/administering-sonarcloud/ai-features "mention") as an Organization Admin
* Learn how to[autodetect-ai-code](https://docs.sonarsource.com/sonarqube-cloud/administering-sonarcloud/ai-features/autodetect-ai-code "mention") in projects using GitHub and GitHub Copilot
* Quickly [enable-ai-codefix](https://docs.sonarsource.com/sonarqube-cloud/administering-sonarcloud/ai-features/enable-ai-codefix "mention") to get AI-generated fix suggestions
---
# Source: https://docs.sonarsource.com/sonarqube-server/8.9/instance-administration/quality-profiles.md
# Source: https://docs.sonarsource.com/sonarqube-server/9.8/instance-administration/quality-profiles.md
# Source: https://docs.sonarsource.com/sonarqube-server/9.9/instance-administration/quality-profiles.md
# Source: https://docs.sonarsource.com/sonarqube-server/10.0/instance-administration/quality-profiles.md
# Source: https://docs.sonarsource.com/sonarqube-server/10.1/instance-administration/quality-profiles.md
# Source: https://docs.sonarsource.com/sonarqube-server/10.2/instance-administration/quality-profiles.md
# Source: https://docs.sonarsource.com/sonarqube-server/10.3/instance-administration/quality-profiles.md
# Source: https://docs.sonarsource.com/sonarqube-server/10.4/instance-administration/quality-profiles.md
# Source: https://docs.sonarsource.com/sonarqube-server/10.5/instance-administration/quality-profiles.md
# Source: https://docs.sonarsource.com/sonarqube-server/10.6/instance-administration/quality-profiles.md
# Source: https://docs.sonarsource.com/sonarqube-server/10.7/instance-administration/analysis-functions/quality-profiles.md
# Source: https://docs.sonarsource.com/sonarqube-server/10.8/instance-administration/analysis-functions/quality-profiles.md
# Source: https://docs.sonarsource.com/sonarqube-server/2025.1/instance-administration/analysis-functions/quality-profiles.md
# Quality profiles
Quality profiles are a key part of your SonarQube Server configuration. They define the set of rules to be applied during code analysis and review; see the Rules [overview](https://docs.sonarsource.com/sonarqube-server/2025.1/user-guide/rules/overview "mention") page. The mode your SonarQube Server instance is set to will determine how your rules are categorized. See the [changing-modes](https://docs.sonarsource.com/sonarqube-server/2025.1/user-guide/code-metrics/changing-modes "mention") page for details.
Every project has a quality profile set for each supported language. When a project is analyzed, SonarQube Server determines which languages are used and uses the active quality profile for each of those languages in that specific project.
Go to **Quality Profiles** to see all the currently defined profiles grouped by language.
### Built-in and default profiles
SonarQube Server comes with a built-in quality profile defined for each supported language, called the **Sonar way** profile (it is marked with the **BUILT-IN** tag in the interface). The **Sonar way** activates a set of rules that should be applicable to most projects.
In a newly set up instance, the **Sonar way** profile is the default for every language (marked with the **DEFAULT** tag in the interface). The default profile is used for that language if no other profile is explicitly defined at the project level. The default profile for a given language can be changed.
{% hint style="info" %}
As a Quality Profile Administrator, you receive an email notification when a built-in quality profile is modified (after a SonarQube Server or analyzer update).
{% endhint %}
### Customizing a quality profile
The **Sonar way** profile is designed to be broadly suitable for most projects, but it is intended only as a starting point. In most cases, you will want to adjust your profile as the project progresses.
If you have multiple projects, you might also need to have different profiles for each. You might run into the following situations
* You have different technical requirements from one project to another.
* You want to ensure stronger requirements for some of your projects than for others.
New profiles can be created in two ways:
1. Copying an existing profile and adjusting the copy.
2. Extending an existing profile.
{% hint style="info" %}
Customizing your profiles by extending the **Sonar way** profile allows you to manage most use cases. Indeed, it is highly recommended that your profiles inherit from the **Sonar way** profile because in that case, you will automatically benefit from:
* Newly implemented rules.
* Changes in a rule’s default configuration.
{% endhint %}
#### Extending a quality profile
When you extend a profile, you create a child profile that inherits all the *activated* rules in the parent profile. You can then activate additional rules in the child, beyond those that are inherited. If enabled in your SonarQube Server instance, you can also deactivate rules that are activated in the parent.
Follow these steps to extend a profile:
1. Create a base profile with your core set of rules by selecting the **Create** button on the Quality Profiles page, or use an existing profile as a base profile.
2. Find your base profile (**Quality Profiles** > *profile name*) and select **Extend** from the menu.
3. After giving your new profile a name, SonarQube Server opens your new profile page.\
Your new profile has all of the activated rules from the profile you extended.
4. To activate more rules in your extended profile: Below the **Rules** table, select **Activate More**.
5. To deactivate rules: In the **Rules** table, select a number in the **Active** column.
6. From the **Inheritance** table, you can see the hierarchy of inheritance for your profile, and you can change the parent profile by selecting **Change Parent**.
#### Copying a quality profile
When you copy a profile, you clone all activated rules of the original. From here, you independently activate or deactivate rules to fit your needs; your new profile won’t inherit changes made to the original profile.
Follow these steps to copy a profile
1. Go to the page of the profile you want to copy (**Quality Profiles** > ***profile name***).
2. Select **Copy** from the menu in the upper-right corner of the page.
3. Give your new profile a name and select **Copy**.
4. Modify the copy as needed.
#### Differences between copying and extending
The key differences between an extension of a profile and a copy are:
* With an extension, any changes made to the parent will be automatically reflected in the child. This includes rules activated in the parent, rules deactivated in the parent, and new rules added to the parent by Sonar. With a copy, changes are not propagated because the copy is entirely independent.
* In case the deactivation of inherited rules is disabled in your SonarQube Server instance then, with an extension, you can only activate rules that are deactivated in the parent. With a copy, you can activate or deactivate any rules you like.
Copied profiles are typically used to establish a new common profile that you want full control over and that can serve as the base profile for all your projects. Extension is typically used to provide customized profiles for projects which all follow a common base set of rules, but where each also requires different additional ones.
#### Overriding a rule in a quality profile
Some rules have configuration parameters. A quality profile may define different configuration parameter values than the rule’s default parameter values. In that case, the rule is considered "overridden" in the profile. The number of overridden rules in a quality profile is displayed in the **Inheritance** section of the profile page.
You can change the configuration parameters of a rule during the activation of the rule in the profile.
### Prioritizing Rules
*Prioritized rules are available starting in* [*Enterprise edition*](https://www.sonarsource.com/plans-and-pricing/enterprise/)*.*
Prioritized rules recognize the need to specify a set of rules that will break the quality gate on a per-rule per-project basis. More information is available on the Rules [overview](https://docs.sonarsource.com/sonarqube-server/2025.1/user-guide/rules/overview "mention") page. Using this option allows for early intervention on high-impact issues detected in your overall code.
When you activate a rule, you have the option to mark it as prioritized:
1. Go to **Quality Profiles** > *your quality profile.*
2. In the **Inheritance** section, click on the number of active rules for your quality profile.
3. For the rule you want to prioritize, click **Change** and activate the **Prioritized rule** option.
For your [quality-gates](https://docs.sonarsource.com/sonarqube-server/2025.1/instance-administration/analysis-functions/quality-gates "mention") to fail when corresponding issues exist in the overall code, you must add a condition that checks whether any issues have been raised from prioritized rules. To add this condition go to **Quality Gates** > **Unlock editing** > **Add condition** > **On Overall Code** > **Issues from prioritized rules**. Once added, prioritized rules have a value of 0, so any issues found cause your quality gate to fail.
### Quality profile permissions
By default, only users with the global **Administer Quality Profiles** permission can edit quality profiles. User permissions are defined at **Administration** > **Security** > **Global Permissions**.
SonarQube Server also allows users with the global **Administer Quality Profiles** permission to give an expert or group of experts permission to manage a specific profile. These experts only have permission for that specific profile.
Permissions can be granted to manage specific quality profiles on that profile’s page (**Quality Profiles >** ***profile name*****)** under **Permissions** by selecting **Grant permissions to more users**.
The permission to deactivate inherited rules in a child profile is managed at the level of the SonarQube Server instance. It is by default enabled. As a SonarQube Server Administrator, you can disable it in **Administration** > **Configuration** > **General Settings** > **Quality Profile** by unchecking the **Enable deactivation of inherited rules** option.
### Comparing two quality profiles
You can compare the activated rules between two quality profiles. This is especially useful when you’re using a quality profile copied from another profile because you won’t automatically inherit new rules added to the original quality profile.
To compare two profiles:
1. From the **Quality Profiles** page, select the name of the first profile you’d like to compare.
2. Select **Compare** from the menu.
3. Select the second profile you’d like to compare from the **Compare with** drop-down menu.
From here you can push rules between the two profiles using the buttons.
### Finding out what has changed in a quality profile
When SonarQube Server notices that an analysis was performed with a quality profile that is different in some way from the previous analysis, a *quality profile event* is added to the project’s event log. To see the changes in a profile, navigate to the profile (**Quality Profiles** > ***profile name***) and choose **Changelog**. This can help you understand how profile changes impact the issues raised in an analysis.
Additionally, users with the **Administer Quality Profile** privilege are notified by email each time a built-in profile is updated. These updates can be caused by updating SonarQube Server or updating third-party analyzers.
### Importing a quality profile from another SonarQube Server instance
To import a profile from another SonarQube Server instance, do the following:
1. From the source SonarQube Server instance, open the quality profile you want to use.
2. Select **Back up** from the menu. This exports the profile as an XML file.
3. From the target SonarQube Server instance, select the **Restore** button on the **Quality Profiles** main page.
4. Choose the XML file that you exported previously, and select **Restore**.
### Applying profiles to projects
One profile for each language is marked as the default. Barring any other intervention, all projects that use that language will be analyzed with that profile. To have a project analyzed by a non-default profile instead, start from **Quality Profiles**, and navigate to your target profile, then use the **Projects** part of the interface to manage which projects are explicitly assigned to that profile.
### Ensuring your quality profile has all relevant new rules
Each time a new SonarQube Server version is released, new rules are added. New rules won’t appear automatically in your profile unless you’re using a built-in profile or a profile extended from a built-in profile.
If you’re not using a built-in profile, you can compare your profile to the built-in profile to see which rules you’re missing.
Another option is to go to the **Rules** page in SonarQube Server and use the **Available Since** search facet to see what rules have been added to the platform since the day you upgraded.
Finally, the **Quality Profiles** main page shows recently added rules in the **Recently Added Rules** section on the right side of the page.
### Avoiding deprecated rules
The **Deprecated Rules** section of the **Quality Profiles** page has a pink background and is your first warning that a profile contains deprecated rules. This section gives the total number of instances of deprecated rule(s) that are currently active in each quality profile and provides a breakdown of deprecated rule(s) per profile. Selecting the **Deprecated Rules** section takes you either to the **Rules** page or to the relevant quality profile to investigate further.
Alternatively, you can perform a **Rules** search for the rules in a profile and use the **Status** rule search facet (in the left sidebar) to narrow the list to the ones that need attention.
### Security
The **Quality Profiles** page can be accessed by any user (even anonymous users). All users can view every aspect of any profile. That means anyone can see which rules are included in a profile, which rules have been left out, how a profile has changed over time, and compare the rules between any two profiles.
To create, edit, or delete a profile, a user must be granted the **Administer Quality Profiles** permission.
A project administrator can choose which profiles their project is associated with.
### Rule Severity in your Quality Profile
If you have the proper permissions, you can customize the severity of a rule in your quality profile, however, this will not change the recommended severity of the rule.
In MQR mode, a rule’s severity is defined by the impact of [software-qualities](https://docs.sonarsource.com/sonarqube-server/2025.1/user-guide/rules/software-qualities "mention"). A rule can impact multiple software qualities, and each software quality has its own severity.
---
# Source: https://docs.sonarsource.com/sonarqube-community-build/quality-standards-administration.md
# Source: https://docs.sonarsource.com/sonarqube-server/2025.2/quality-standards-administration.md
# Source: https://docs.sonarsource.com/sonarqube-server/2025.3/quality-standards-administration.md
# Source: https://docs.sonarsource.com/sonarqube-server/2025.5/quality-standards-administration.md
# Source: https://docs.sonarsource.com/sonarqube-server/2025.4/quality-standards-administration.md
# Source: https://docs.sonarsource.com/sonarqube-server/2025.6/quality-standards-administration.md
# Source: https://docs.sonarsource.com/sonarqube-server/quality-standards-administration.md
# Quality standards administration
- [Managing quality gates](/sonarqube-server/quality-standards-administration/managing-quality-gates.md): This section helps you understand how to view, manage, and change your quality gates in SonarQube Server.
- [Introduction](/sonarqube-server/quality-standards-administration/managing-quality-gates/introduction.md): Your introduction to understanding how to use quality gates in SonarQube Server.
- [Understanding quality gates](/sonarqube-server/quality-standards-administration/managing-quality-gates/introduction-to-quality-gates.md): SonarQube Server quality gates use sets of conditions to measure checks against your code during analysis. Depending on result, code passes or fails the quality gate.
- [Viewing a quality gate](/sonarqube-server/quality-standards-administration/managing-quality-gates/viewing-quality-gate.md): Any user can view the quality gates and their conditions defined in a SonarQube Server instance.
- [Managing custom quality gates](/sonarqube-server/quality-standards-administration/managing-quality-gates/managing-custom-quality-gates.md): You can create your own, custom quality gates in SonarQube Server. To manage custom quality gates, you must have the Administer Quality Gates permission.
- [Changing instance's default quality gate](/sonarqube-server/quality-standards-administration/managing-quality-gates/changing-default-quality-gate.md): A default quality gate is assigned in your SonarQube Server settings. This quality gate is automatically applied to new projects and can be modified at any time.
- [Associating a quality gate with projects](/sonarqube-server/quality-standards-administration/managing-quality-gates/associating-projects-with-quality-gate.md): The default quality gate is associated with all projects in the organization that are not explicitly associated with a quality gate.
- [Managing quality profiles](/sonarqube-server/quality-standards-administration/managing-quality-profiles.md): This section helps you understand how to view, manage, and change your quality profiles in SonarQube Server.
- [Introduction](/sonarqube-server/quality-standards-administration/managing-quality-profiles/introduction.md): Your introduction to understanding how to use quality profiles in SonarQube Server.
- [Understanding quality profiles](/sonarqube-server/quality-standards-administration/managing-quality-profiles/understanding-quality-profiles.md): Quality profiles are a key part of your SonarQube Server configuration because they are composed of a list of rules to check your code against.
- [Viewing quality profiles](/sonarqube-server/quality-standards-administration/managing-quality-profiles/viewing-quality-profiles.md): Any user can view and compare quality profiles in SonarQube Server.
- [Creating a quality profile](/sonarqube-server/quality-standards-administration/managing-quality-profiles/creating-a-quality-profile.md): The Sonar way quality profile is designed to be broadly suitable for most projects and you can use custom quality profiles to adjust your project as it progresses.
- [Editing a quality profile](/sonarqube-server/quality-standards-administration/managing-quality-profiles/editing-a-custom-quality-profile.md): To edit a quality profile in SonarQube Server, you need the Administer Quality Profiles permission or be authorized to manage this particular profile.
- [Associating with projects](/sonarqube-server/quality-standards-administration/managing-quality-profiles/associating-a-quality-profile-with-projects.md): By default, a SonarQube Server project is associated with each language’s default quality profile. You can also explicitly associate a quality profile with projects.
- [Changing default quality profile](/sonarqube-server/quality-standards-administration/managing-quality-profiles/changing-default-quality-profile.md): By default, the language’s BUILT-IN quality profile, Sonar way, is the profile assigned to projects not explicitly associated with another quality profile.
- [Maintaining quality profiles](/sonarqube-server/quality-standards-administration/managing-quality-profiles/maintaining-your-custom-quality-profiles.md): Maintaining your custom quality profile in SonarQube Server is important if it's not inherited from the Sonar way built-in profile.
- [Granting permissions to users](/sonarqube-server/quality-standards-administration/managing-quality-profiles/authorizing-other-users-to-manage-quality-profile.md): It is a simple process in SonarQube Server to assign the correct quality profile administration permission to users and groups.
- [Adding tags to a rule](/sonarqube-server/quality-standards-administration/managing-quality-profiles/adding-tags-to-rule.md): Tags are a way to categorize rules and issues.
- [Standards for AI Code Assurance](/sonarqube-server/quality-standards-administration/ai-code-assurance.md): SonarQube Server's AI Code Assurance features help you set appropriate standards for projects containing AI-generated code.
- [Set your AI standards](/sonarqube-server/quality-standards-administration/ai-code-assurance/overview.md): This section explains how to manage AI standards, including the use of tools for Sonar’s AI Code Assurance in your SonarQube Server project.
- [Quality gates for AI code](/sonarqube-server/quality-standards-administration/ai-code-assurance/quality-gates-for-ai-code.md): This page explains how to manage quality gates for AI Code Assurance for securing your SonarQube Server project.
- [Quality profiles for AI code](/sonarqube-server/quality-standards-administration/ai-code-assurance/quality-profiles-for-ai-code.md): This page explains how to manage quality profiles for AI Code Assurance for securing your SonarQube Server project.
- [Monitor projects with AI code](/sonarqube-server/quality-standards-administration/ai-code-assurance/monitor-projects-with-ai-code.md): This page explains the internal and external AI Code Assurance labels and badges you have to mark your SonarQube Server projects.
---
# Source: https://docs.sonarsource.com/sonarqube-community-build/instance-administration/analysis-functions/quality-standards.md
# Source: https://docs.sonarsource.com/sonarqube-server/2025.2/instance-administration/analysis-functions/quality-standards.md
# Source: https://docs.sonarsource.com/sonarqube-server/2025.3/instance-administration/analysis-functions/quality-standards.md
# Source: https://docs.sonarsource.com/sonarqube-server/2025.5/instance-administration/analysis-functions/quality-standards.md
# Source: https://docs.sonarsource.com/sonarqube-server/2025.4/instance-administration/analysis-functions/quality-standards.md
# Source: https://docs.sonarsource.com/sonarqube-server/2025.6/instance-administration/analysis-functions/quality-standards.md
# Source: https://docs.sonarsource.com/sonarqube-server/instance-administration/analysis-functions/quality-standards.md
# Source: https://docs.sonarsource.com/sonarqube-cloud/administering-sonarcloud/managing-organization/setting-config-at-org-level/quality-standards.md
# Managing quality standards
This page explains how to configure organization settings related to quality gates or quality profiles and requiring the Administer organization permission.
To manage the quality gates in your organization, see [introduction-to-quality-gates](https://docs.sonarsource.com/sonarqube-cloud/standards/managing-quality-gates/introduction-to-quality-gates "mention").
To manage the quality profiles in your organization, see [introduction](https://docs.sonarsource.com/sonarqube-cloud/standards/managing-quality-profiles/introduction "mention").
### Configuring the quality gate fudge factor of your organization
The quality gate fudge factor refers to a mechanism where conditions on duplication and coverage are ignored until the number of new lines is at least 20. This is used to avoid overly strict enforcement when dealing with small changes, as minor issues might disproportionately impact the overall quality gate status.
The fudge factor is enabled by default in your organization. This organization’s setting is applied to all new projects. Project administrators can override it for their project.
To enable or disable the quality gate fudge factor of your organization:
1. Retrieve your organization. See [viewing-organizations](https://docs.sonarsource.com/sonarqube-cloud/getting-started/viewing-organizations "mention") for more details.
2. Go to **Administration** > **Quality gate settings**.
3. Select or unselect **Ignore duplication and coverage on small changes**.
4. Select **Save**.
### Related pages
* [introduction-to-quality-gates](https://docs.sonarsource.com/sonarqube-cloud/standards/managing-quality-gates/introduction-to-quality-gates "mention")
* [understanding-quality-profiles](https://docs.sonarsource.com/sonarqube-cloud/standards/managing-quality-profiles/understanding-quality-profiles "mention")
* [changing-quality-gate](https://docs.sonarsource.com/sonarqube-cloud/managing-your-projects/project-analysis/changing-quality-gate "mention")
---
# Source: https://docs.sonarsource.com/sonarqube-mcp-server/quickstart-guide.md
# Source: https://docs.sonarsource.com/sonarqube-server/2025.5/quickstart-guide.md
# Source: https://docs.sonarsource.com/sonarqube-server/2025.6/quickstart-guide.md
# Source: https://docs.sonarsource.com/sonarqube-server/quickstart-guide.md
# Source: https://docs.sonarsource.com/sonarqube-cloud/quickstart-guide.md
# Quickstart guide
By completing this guide you will:
1. [Set up your SonarQube Cloud account](#set-up-your-sonarqube-cloud-account)
1. Set up your Organization
2. Upgrade to Enterprise
1. SSO via SAML
2. [Onboard projects](#onboard-your-projects)
3. [Configure CI analysis](#configure-your-ci-analysis)
4. [Integrate with SonarQube for IDE](#connect-with-sonarqube-for-ide)
5. [Review quality gates](#review-your-quality-gates)
1. Review pull/merge request analysis for failed quality gates.
2. Configure pull request decoration on your DevOps platform
### Set up your SonarQube Cloud account
We use an [organization-based structure](https://docs.sonarsource.com/sonarqube-cloud/administering-sonarcloud/about-sonarqube-cloud-solution/ressources-structure/organization) that mirrors the structure on your chosen DevOps platforms.
Create an organization based on:
* [GitHub](https://docs.sonarsource.com/sonarqube-cloud/administering-sonarcloud/managing-organization/creating-organization/importing-github-organization)
* [BitBucket Cloud](https://docs.sonarsource.com/sonarqube-cloud/administering-sonarcloud/managing-organization/creating-organization/importing-bitbucket-workspace)
* [GitLab](https://docs.sonarsource.com/sonarqube-cloud/administering-sonarcloud/managing-organization/creating-organization/importing-gitlab-group)
* [Azure DevOps](https://docs.sonarsource.com/sonarqube-cloud/administering-sonarcloud/managing-organization/creating-organization/importing-azure-devops-organization)
Consider upgrading to [Enterprise](https://docs.sonarsource.com/sonarqube-cloud/administering-sonarcloud/managing-subscription/subscription-plans) so you can begin [setting-up-sso](https://docs.sonarsource.com/sonarqube-cloud/getting-started-with-enterprise/setting-up-sso "mention").
### Onboard your projects
Import repositories from your DevOps platform to create projects:
* [GitHub](https://docs.sonarsource.com/sonarqube-cloud/getting-started/github)
* [Bitbucket Cloud](https://docs.sonarsource.com/sonarqube-cloud/getting-started/bitbucket-cloud)
* [GitLab](https://docs.sonarsource.com/sonarqube-cloud/getting-started/gitlab)
* [Azure DevOps](https://docs.sonarsource.com/sonarqube-cloud/getting-started/azure-devops)
### Configure your CI analysis
Set up analysis for your imported projects:
* [GitHub](https://docs.sonarsource.com/sonarqube-cloud/getting-started/github#set-up-your-analysis)
* [Bitbucket Cloud](https://docs.sonarsource.com/sonarqube-cloud/getting-started/bitbucket-cloud#set-up-your-analysis)
* [GitLab](https://docs.sonarsource.com/sonarqube-cloud/getting-started/gitlab#set-up-your-analysis)
* [Azure DevOps](https://docs.sonarsource.com/sonarqube-cloud/getting-started/azure-devops#set-up-your-analysis)
Now that you can review the [main branch’s analysis](https://docs.sonarsource.com/sonarqube-cloud/improving/main-branch-analysis) on any of your imported projects.
### Connect with SonarQube for IDE
Have your developers install [connected-mode](https://docs.sonarsource.com/sonarqube-cloud/improving/connected-mode "mention") to leverage the power of SonarQube in their IDE.
### Review your quality gates
The purpose of [quality-gates](https://docs.sonarsource.com/sonarqube-cloud/improving/quality-gates "mention") is to tell you whether your code is good enough to be pushed to the next step:
* For the main branch and other long-lived branches, the quality gate answers the question: "Can I release my code today?"
* For pull requests (and short-lived branches), the quality gate answers the question: "Can I merge this pull request?"
By setting up [pull-request-analysis](https://docs.sonarsource.com/sonarqube-cloud/improving/pull-request-analysis "mention"), you ensure pull requests are analyzed when they are opened and every time a change is pushed to the pull request branch. You can also configure [pull request decoration](https://docs.sonarsource.com/sonarqube-cloud/improving/pull-request-analysis#pull-request-decoration) to allow your developers to view the analysis from SonarQube Cloud directly on the PRs they submit.
By keeping an eye on the quality gates, the decision makers can quickly judge the status of code and decide what to do next.
### Develop with Sonar
Now that you have seen the benefits of using [SonarQube Cloud](https://docs.sonarsource.com/sonarqube-cloud/discovering-sonarcloud/what-sonarcloud-can-do) with your DevOPs platforms, managers and tech leads can check out the [security reports](https://docs.sonarsource.com/sonarqube-cloud/digging-deeper/security-reports) and [portfolios](https://docs.sonarsource.com/sonarqube-cloud/managing-portfolios) features to begin monitoring the security and releasability of projects.
---
# Source: https://docs.sonarsource.com/sonarqube-mcp-server/readme.md
# Source: https://docs.sonarsource.com/sonarqube-community-build/readme.md
# Source: https://docs.sonarsource.com/sonarqube-for-eclipse/readme.md
# Source: https://docs.sonarsource.com/sonarqube-for-visual-studio/readme.md
# Source: https://docs.sonarsource.com/sonarqube-for-intellij/readme.md
# Source: https://docs.sonarsource.com/sonarqube-for-vs-code/readme.md
# Source: https://docs.sonarsource.com/sonarqube-server/8.9/readme.md
# Source: https://docs.sonarsource.com/sonarqube-server/9.8/readme.md
# Source: https://docs.sonarsource.com/sonarqube-server/9.9/readme.md
# Source: https://docs.sonarsource.com/sonarqube-server/10.0/readme.md
# Source: https://docs.sonarsource.com/sonarqube-server/10.1/readme.md
# Source: https://docs.sonarsource.com/sonarqube-server/10.2/readme.md
# Source: https://docs.sonarsource.com/sonarqube-server/10.3/readme.md
# Source: https://docs.sonarsource.com/sonarqube-server/10.4/readme.md
# Source: https://docs.sonarsource.com/sonarqube-server/10.5/readme.md
# Source: https://docs.sonarsource.com/sonarqube-server/10.6/readme.md
# Source: https://docs.sonarsource.com/sonarqube-server/10.7/readme.md
# Source: https://docs.sonarsource.com/sonarqube-server/10.8/readme.md
# Source: https://docs.sonarsource.com/sonarqube-server/2025.2/readme.md
# Source: https://docs.sonarsource.com/sonarqube-server/2025.3/readme.md
# Source: https://docs.sonarsource.com/sonarqube-server/2025.5/readme.md
# Source: https://docs.sonarsource.com/sonarqube-server/2025.1/readme.md
# Source: https://docs.sonarsource.com/sonarqube-server/2025.4/readme.md
# Source: https://docs.sonarsource.com/sonarqube-server/2025.6/readme.md
# Source: https://docs.sonarsource.com/sonarqube-server/readme.md
# Source: https://docs.sonarsource.com/sonarqube-cloud/readme.md
# Homepage
### What is SonarQube Cloud?
SonarQube Cloud is an industry standard Software-as-a-Service (SaaS) automated code review and static analysis tool designed to detect coding issues in more than [30+ languages, frameworks, and IaC platforms](https://docs.sonarsource.com/sonarqube-cloud/advanced-setup/languages/overview). By integrating directly with your [CI pipeline](https://docs.sonarsource.com/sonarqube-cloud/advanced-setup/ci-based-analysis/overview-of-integrated-cis) or one of the supported [DevOps platforms](https://docs.sonarsource.com/sonarqube-cloud/getting-started/sign-up), your code is checked against an extensive set of rules that cover many attributes of code, such as maintainability, reliability, and security issues, on each merge/pull request.
SonarQube Cloud extends your DevOps experience by performing automated code checks within minutes. Please have a look at the Discovering SonarQube Cloud section to learn more about [what-sonarcloud-can-do](https://docs.sonarsource.com/sonarqube-cloud/discovering-sonarcloud/what-sonarcloud-can-do "mention"). For on-premise code repositories, see the SonarQube Server [Server 2025.4 LTA](https://app.gitbook.com/o/2ibCvzwZt86Nlk2zloB7/s/yDv2XwTC1xoOKBYeCK45/ "mention") documentation.
Additionally, you can explore [featured public projects](https://sonarcloud.io/explore/projects) on SonarQube Cloud and experience how other organizations leverage the platform to improve their code.
### Achieving high quality code
SonarQube sets high standards for all code that results in secure, reliable, and maintainable software that is essential to maintaining a healthy codebase. This applies to all code: source code, test code, infrastructure as code, glue code, scripts, and more.
All new code, whether added or recently modified, should adhere to quality standards. SonarQube achieves this by providing automated code reviews that alert you to potential issues within your new code. This helps you maintain high standards and focus on code quality, ultimately leading to a healthier codebase over time.
SonarQube Cloud comes with a built-in quality profile designed for each supported language, called the Sonar way profile. The Sonar way activates a set of rules that should be applicable to most projects and is a starting point to help you implement good practices in your organization.
### The SonarQube solution
SonarQube is designed to help you achieve a state of high quality code. By linking SonarQube for IDE with SonarQube Cloud or SonarQube Server, the automated code analysis and reviews are performed at every stage of the development process. We call this the SonarQube solution. This means your project settings, new code definitions, and the quality profiles managed in SonarQube Cloud are applied locally to an analysis in the IDE.
* [SonarQube for IDE](https://app.gitbook.com/o/2ibCvzwZt86Nlk2zloB7/s/6LPRABg3ubAJhpfR5K0Y/) brings automated code reviews directly into your development environment, helping you catch issues as you write code. By providing immediate feedback, it enables engineers to identify and fix problems before they even commit, ensuring cleaner, higher-quality code from the start.
* Then, [SonarQube Server](https://app.gitbook.com/s/yDv2XwTC1xoOKBYeCK45/analyzing-source-code/pull-request-analysis) and [SonarQube Cloud](https://docs.sonarsource.com/sonarqube-cloud/improving/pull-request-analysis) deliver powerful static code analysis by thoroughly reviewing each pull request before it’s merged. This proactive approach adds an essential layer of protection, ensuring code quality and preventing issues from entering your codebase.
* Finally, [SonarQube Server](https://app.gitbook.com/s/yDv2XwTC1xoOKBYeCK45/quality-standards-administration) and [SonarQube Cloud](https://docs.sonarsource.com/sonarqube-cloud/standards) seamlessly integrate into your CI/CD pipeline, analyzing code on every build. By leveraging quality profiles and quality gates, they automatically block code with issues from being released to production, ensuring only maintainable, reliable, and secure code makes it through.
The SonarQube solution helps you incorporate a proper methodology by helping engineers pay attention to new code. Focusing on writing high quality new code during development ensures that all code released for production will be incrementally improved over time.
### Connected Mode
Connected mode joins SonarQube Cloud with SonarQube for IDE to deliver the full SonarQube solution. While in connected mode, SonarQube Cloud sends notifications to SonarQube for IDE when a quality gate changes or a new issue is assigned to the user. Smart notifications can be enabled or disabled from the SonarQube for IDE UI while creating or editing the connection settings. In addition, SonarQube for IDE helps the engineer focus on writing high quality code by using the new code definition on the server.
Be sure to check out all of the [#connected-mode-benefits](https://docs.sonarsource.com/sonarqube-cloud/improving/connected-mode#connected-mode-benefits "mention").
### Getting started
Now that you’ve heard about how [SonarQube Cloud](https://www.sonarsource.com/products/sonarcloud/) can help you write high quality code, you are ready to try out SonarQube Cloud for yourself. After signing up for SonarQube Cloud using the login from your DevOps platform account (see [sign-up](https://docs.sonarsource.com/sonarqube-cloud/getting-started/sign-up "mention")), you can import your organizations and repositories to set up a [first analysis](https://docs.sonarsource.com/sonarqube-cloud/getting-started/first-analysis).
The [ci-based-analysis](https://docs.sonarsource.com/sonarqube-cloud/advanced-setup/ci-based-analysis "mention") pages explain how to connect your scanner to your CI pipeline and provides instructions for analyzing your project’s branches and pull requests.
Here's a page with everything you need to learn [what-sonarcloud-can-do](https://docs.sonarsource.com/sonarqube-cloud/discovering-sonarcloud/what-sonarcloud-can-do "mention").
### Learn more
Check out the entire suite of Sonar products on the main website: [SonarQube Server](https://www.sonarsource.com/products/sonarqube/), [SonarQube Cloud](https://www.sonarsource.com/products/sonarcloud/), and [SonarQube for IDE](https://www.sonarsource.com/products/sonarlint/).
Then, have a look at how to fix issues detected by SonarQube for [IntelliJ](https://app.gitbook.com/s/NvI4wotPmITyM0mnsmtp/using/fixing-issues), [Visual Studio](https://app.gitbook.com/s/5CSDwdOaYoOAGYNiRqgl/using/fixing-issues), [VS Code](https://app.gitbook.com/s/6LPRABg3ubAJhpfR5K0Y/using/fixing-issues), and [Eclipse](https://app.gitbook.com/s/kadXEH8HkykK7lKaDvVq/using/fixing-issues) when combined with managing your code issues in [SonarQube Server](https://app.gitbook.com/s/yDv2XwTC1xoOKBYeCK45/user-guide/issues/introduction) and [SonarQube Cloud](https://docs.sonarsource.com/sonarqube-cloud/managing-your-projects/issues/introduction), and browse a full list of [Sonar Rules and Rule Descriptions](http://rules.sonarsource.com/) available for static code analysis.
#### More getting started resources
* [sign-up](https://docs.sonarsource.com/sonarqube-cloud/getting-started/sign-up "mention")
* [advanced-setup](https://docs.sonarsource.com/sonarqube-cloud/advanced-setup "mention") and [automatic-analysis](https://docs.sonarsource.com/sonarqube-cloud/advanced-setup/automatic-analysis "mention")
* [managing-quality-profiles](https://docs.sonarsource.com/sonarqube-cloud/standards/managing-quality-profiles "mention")
* [managing-portfolios](https://docs.sonarsource.com/sonarqube-cloud/managing-portfolios "mention")
And if you need help, visit our [online community](https://community.sonarsource.com/c/sc/9) to search for answers and reach out with questions!
---
# Source: https://docs.sonarsource.com/sonarqube-cloud/administering-sonarcloud/managing-organization/manage-org-projects/manage-project-permissions/recovering-admin-access.md
# Restoring administrator access
If you lost administrator access to a project of your organization, you can restore it if you’re an organization admin:
* At the project level. This requires the Browse Project permission in case of a private project.
* By using the Projects Management page. This is only possible with an Enterprise plan.
* By using the API.
### At the project level
1. Retrieve your project. See [retrieving-projects](https://docs.sonarsource.com/sonarqube-cloud/managing-your-projects/retrieving-projects "mention") for more details.
2. In the left sidebar, select **Administration** > **Restore access**. The **Restore admin permissions** dialog opens.
3. Select the **Restore permissions** button. You are now granted the Administer and/or Browse permission for the project.
### By using the Projects Management page
This method is only possible with an Enterprise plan organization.
To restore administrator access to a project by using the Projects Management page:
1. Retrieve your organization. See [viewing-organizations](https://docs.sonarsource.com/sonarqube-cloud/getting-started/viewing-organizations "mention") for more details.
2. Go to **Administration** > **Projects Management**.
3. In the three-dot menu at the far right of the project line, select **Restore access**. You will then be granted the Administer and/or Browse permission for the project.
### By using the API
Use the [add\_user API endpoint](https://sonarcloud.io/web_api/api/permissions/add_user?deprecated=false) to grant an organization administrator `admin` permission to the project. To identify the project, you can use the `projectKey` (the `projectId` is optional).
### Related page
* [setting-permissions](https://docs.sonarsource.com/sonarqube-cloud/managing-your-projects/administering-your-projects/setting-permissions "mention")
---
# Source: https://docs.sonarsource.com/sonarqube-server/10.6/setup-and-upgrade/reference-architectures.md
# Source: https://docs.sonarsource.com/sonarqube-server/10.7/setup-and-upgrade/reference-architectures.md
# Source: https://docs.sonarsource.com/sonarqube-server/10.8/setup-and-upgrade/reference-architectures.md
# Source: https://docs.sonarsource.com/sonarqube-server/2025.2/setup-and-update/reference-architectures.md
# Source: https://docs.sonarsource.com/sonarqube-server/2025.3/server-installation/reference-architectures.md
# Source: https://docs.sonarsource.com/sonarqube-server/2025.5/server-installation/reference-architectures.md
# Source: https://docs.sonarsource.com/sonarqube-server/2025.1/setup-and-upgrade/reference-architectures.md
# Source: https://docs.sonarsource.com/sonarqube-server/2025.4/server-installation/reference-architectures.md
# Source: https://docs.sonarsource.com/sonarqube-server/2025.6/server-installation/reference-architectures.md
# Source: https://docs.sonarsource.com/sonarqube-server/server-installation/reference-architectures.md
# Reference architectures
- [Up to 10 M LOC](/sonarqube-server/server-installation/reference-architectures/up-to-10m-loc.md): This page describes the architecture of a SonarQube Server instance that will support up to 10 million lines of code under normal usage patterns in a non-high availability setup.
- [Up to 50 M LOC](/sonarqube-server/server-installation/reference-architectures/up-to-50m-loc.md): This architecture describes the setup of a SonarQube Server Enterprise Editon instance that will support up to 50 million lines of code.
---
# Source: https://docs.sonarsource.com/sonarqube-server/10.7/user-guide/viewing-reports/regulatory-reports.md
# Source: https://docs.sonarsource.com/sonarqube-server/10.8/user-guide/viewing-reports/regulatory-reports.md
# Source: https://docs.sonarsource.com/sonarqube-server/2025.2/user-guide/viewing-reports/regulatory-reports.md
# Source: https://docs.sonarsource.com/sonarqube-server/2025.3/user-guide/viewing-reports/regulatory-reports.md
# Source: https://docs.sonarsource.com/sonarqube-server/2025.5/user-guide/viewing-reports/regulatory-reports.md
# Source: https://docs.sonarsource.com/sonarqube-server/2025.1/user-guide/viewing-reports/regulatory-reports.md
# Source: https://docs.sonarsource.com/sonarqube-server/2025.4/user-guide/viewing-reports/regulatory-reports.md
# Source: https://docs.sonarsource.com/sonarqube-server/2025.6/user-guide/viewing-reports/regulatory-reports.md
# Source: https://docs.sonarsource.com/sonarqube-server/user-guide/viewing-reports/regulatory-reports.md
# Regulatory reports
Starting in [Enterprise](https://www.sonarsource.com/plans-and-pricing/enterprise/), you can download a regulatory report for any permanent branch of a project. A permanent branch is one that has been set to **Keep when inactive**, see [maintaining-the-branches-of-your-project](https://docs.sonarsource.com/sonarqube-server/project-administration/maintaining-project/maintaining-the-branches-of-your-project "mention") for details.
### Downloading regulatory reports
To download a regulatory report:
1. Retrieve your project. See [retrieving-projects](https://docs.sonarsource.com/sonarqube-server/user-guide/viewing-projects/retrieving-projects "mention") for more information.
2. On the Overview page, click **Downloadable reports** and select **Download Regulatory report (.zip)** from the drop down menu.
Alternatively:
1. Select **Project Information** from the project’s navigation bar.
2. In the **Regulatory Report** section, choose a project branch from the drop down menu.
3. Click **Download report**.
SonarQube generates the report for download, which may take a few minutes depending on the size of the project.
### Contents of the regulator report’s ZIP file
The reports are in a ZIP file containing a snapshot of the latest analysis of the selected branch and include TXT, CSV, and PDF files.
The PDF file includes:
* **Project overview**:
* Project details
* Quality gates information and status
* **Project rating** **overview** for:
* New code broken down by new issues, accepted issues, coverage, duplication, and security hotspots.
* Overall code broken down by security, reliability, maintainability (in [mqr-mode](https://docs.sonarsource.com/sonarqube-server/instance-administration/analysis-functions/instance-mode/mqr-mode "mention")) or vulnerabilities, bugs, and code smells (in [standard-experience](https://docs.sonarsource.com/sonarqube-server/instance-administration/analysis-functions/instance-mode/standard-experience "mention")), accepted issues, coverage, duplication, and security hotspots.
* **Distribution of issues in new code** showing open issues and breakdown by severity, based on security, reliability, maintainability (in [mqr-mode](https://docs.sonarsource.com/sonarqube-server/instance-administration/analysis-functions/instance-mode/mqr-mode "mention")) or vulnerabilities, bugs, and code smells (in [standard-experience](https://docs.sonarsource.com/sonarqube-server/instance-administration/analysis-functions/instance-mode/standard-experience "mention")).
* **Distribution of issues in overall code** showing open issues and breakdown by severity, based on security, reliability, maintainability (in [mqr-mode](https://docs.sonarsource.com/sonarqube-server/instance-administration/analysis-functions/instance-mode/mqr-mode "mention")) or vulnerabilities, bugs, and code smells (in [standard-experience](https://docs.sonarsource.com/sonarqube-server/instance-administration/analysis-functions/instance-mode/standard-experience "mention")).
* **Quality gate and quality profiles** information.
* **Files** lists all relevant files included in the ZIP file.
* **Definitions** lists all the definitions of terms related to the report.
Depending on the configuration of your SonarQube Server instance, the regulatory report is generated with metrics either from [standard-experience](https://docs.sonarsource.com/sonarqube-server/instance-administration/analysis-functions/instance-mode/standard-experience "mention") or [mqr-mode](https://docs.sonarsource.com/sonarqube-server/instance-administration/analysis-functions/instance-mode/mqr-mode "mention"). Some CSV files may contain metrics from both modes and they are marked accordingly.
### Related pages
* [security-reports](https://docs.sonarsource.com/sonarqube-server/user-guide/viewing-reports/security-reports "mention")
* [pdf-reports](https://docs.sonarsource.com/sonarqube-server/user-guide/viewing-reports/pdf-reports "mention")
* [portfolios](https://docs.sonarsource.com/sonarqube-server/user-guide/viewing-reports/portfolios "mention")
* [other-issues](https://docs.sonarsource.com/sonarqube-server/server-update-and-maintenance/troubleshooting/other-issues "mention")
---
# Source: https://docs.sonarsource.com/sonarqube-community-build/server-update-and-maintenance/maintenance/reindexing.md
# Source: https://docs.sonarsource.com/sonarqube-server/10.1/instance-administration/reindexing.md
# Source: https://docs.sonarsource.com/sonarqube-server/10.2/instance-administration/reindexing.md
# Source: https://docs.sonarsource.com/sonarqube-server/10.3/instance-administration/reindexing.md
# Source: https://docs.sonarsource.com/sonarqube-server/10.4/instance-administration/reindexing.md
# Source: https://docs.sonarsource.com/sonarqube-server/10.5/instance-administration/reindexing.md
# Source: https://docs.sonarsource.com/sonarqube-server/10.6/instance-administration/reindexing.md
# Source: https://docs.sonarsource.com/sonarqube-server/10.7/server-upgrade-and-maintenance/maintenance/reindexing.md
# Source: https://docs.sonarsource.com/sonarqube-server/10.8/server-upgrade-and-maintenance/maintenance/reindexing.md
# Source: https://docs.sonarsource.com/sonarqube-server/2025.2/server-update-and-maintenance/maintenance/reindexing.md
# Source: https://docs.sonarsource.com/sonarqube-server/2025.3/server-update-and-maintenance/maintenance/reindexing.md
# Source: https://docs.sonarsource.com/sonarqube-server/2025.5/server-update-and-maintenance/maintenance/reindexing.md
# Source: https://docs.sonarsource.com/sonarqube-server/2025.1/server-update-and-maintenance/maintenance/reindexing.md
# Source: https://docs.sonarsource.com/sonarqube-server/2025.4/server-update-and-maintenance/maintenance/reindexing.md
# Source: https://docs.sonarsource.com/sonarqube-server/2025.6/server-update-and-maintenance/maintenance/reindexing.md
# Source: https://docs.sonarsource.com/sonarqube-server/server-update-and-maintenance/maintenance/reindexing.md
# Reindexing
### Project, application, and portfolio availability
Most features are available during reindexing (for example, you can already analyze your projects), but some only become available when the process is complete:
* Project issues and security hotspots: Available, but some filters and the ability to add tags become available only when reindexing is complete.
* Security reports: Available when reindexing is complete.
* Applications and portfolios: Issues, security hotspots, and security reports become available once all their associated projects are reindexed.
* The global Issues page is unavailable until all projects are reindexed.
SonarQube Server uses analysis dates to determine which projects to prioritize during reindexing. Your projects with the most recent analysis dates are the first to become fully available in the UI.
Administrators can track the full reindexing progress:
* Within the banner displayed in SonarQube Server.
* In the [background-tasks](https://docs.sonarsource.com/sonarqube-server/analyzing-source-code/background-tasks "mention").
{% hint style="info" %}
If a project fails to reindex, see **Reindexing a single project** below.
{% endhint %}
### Running analyses during reindexing
Reindexing starts once SonarQube Server is up and running. You can run analyses on your projects on the CI side while indexes are being rebuilt. The processing of analysis results takes priority over reindexing tasks, so your SonarQube Server instance is effectively operational.
Administrators can check the progress of these analyses in **Administration** > **Projects** > **Background tasks**.
### Quality gate timeout
When calculating the quality gate of a project that is actively being indexed, SonarQube Server will finish indexing to allow computation to complete before returning quality gate status. If the indexing does not finish by the Quality Gate timeout setting, then the Quality Gate will time out.
### Forcing an Elasticsearch reindex
You can trigger a full Elasticsearch reindex. During the reindex, SonarQube Server will detect out-of-sync indices and correct them.
{% hint style="warning" %}
Full Elasticsearch reindex can be quite lengthy depending on the size of your instance.
{% endhint %}
#### ZIP file deployment In SonarQube Server (Developer Edition, Enterprise Edition)
1. Stop the server.
2. Remove the contents of the `/data/es8` directory where `` is the location where the SonarQube distribution has been unzipped.
3. Start the server.
In SonarQube Server Data Center Edition
1. Stop the cluster as follows: stop first the application nodes and then the search nodes.
2. On each search node, remove the contents of the `/data/es8` directory where `` is the location where the SonarQube distribution has been unzipped.
3. Start your cluster as follows: start first the search nodes and then the application nodes.
#### Docker deployment In SonarQube Server (Developer Edition, Enterprise Edition)
1. Stop the server.
2. Remove the contents of the `/data/es8` directory where \ is the installation directory of SonarQube within your container. This path is stored in the `SONARQUBE_HOME` environment variable.
3. Start the server.
In SonarQube Server Data Center Edition
1. Stop the cluster as follows: stop first the application nodes and then the search nodes.
2. On each search node, remove the contents of the `/data/es8` directory where `` is the installation directory of SonarQube within your container. This path is stored in the `SONARQUBE_HOME` environment variable.
3. Start your cluster as follows: start first the search nodes and then the application nodes.
#### Helm chart deployment In SonarQube Server (Developer Edition, Enterprise Edition)
If `persistence.enabled=false`, an ES reindex is not necessary since no ES data will have persisted.
If `persistence.enabled=true`, proceed to perform ES reindex as follows:
1. Scale down the replica count from 1 to 0. For example, if you deployed via Helm:\
`helm upgrade -n sonarqube sonarqube sonarqube/sonarqube --set replicaCount=0`
2. If you are using any PVC with SonarQube deployment, delete the PVC, which should delete any PV assuming the reclaim policy is *Delete*. Otherwise, manually delete/remove any PV. For example:\
`kubectl delete pvc my-sonarqube-pvc -n sonarqube`
3. Scale up the replica count of the deployment from 0 to 1.
4. Verify that SonarQube starts up without issue.
In SonarQube Server Data Center Edition
If `searchNodes.persistence.enabled=false`, an ES reindex is not necessary since no ES data will have persisted.
If `searchNodes.persistence.enabled=true`, proceed to perform an ES reindex, proceed as follows:
1. Scale down the replica count of the search pods from 3 to 0. For example, if you deployed via Helm:\
`helm upgrade -n sonarqube-dce sonarqube sonarqube/sonarqube-dce --set searchNodes.replicaCount=0`
2. If you are using any PVC with SonarQube deployment, delete the PVC, which should delete any PV assuming the reclaim policy is *Delete*. Otherwise, manually delete/remove any PV. For example:\
`kubectl delete pvc my-sonarqube-pvc -n sonarqube-dce`
3. Scale up the replica count of the deployment from 0 to 3.
4. Verify that SonarQube starts up without issue.
### Reindexing a single project
You may have to reindex a project if it shows inconsistent data or fails to reindex after an instance version update or during a forced ElasticSearch reindex. To perform this procedure, you need the Administer System permission.
To reindex a single project:
* Use the SonarQube Server Web API [api/issues/reindex](https://next.sonarqube.com/sonarqube/web_api/api/issues?query=reindex).
---
# Source: https://docs.sonarsource.com/sonarqube-server/10.6/analyzing-source-code/languages/c-family/related-pages.md
# Source: https://docs.sonarsource.com/sonarqube-server/10.7/analyzing-source-code/languages/c-family/related-pages.md
# Source: https://docs.sonarsource.com/sonarqube-server/10.8/analyzing-source-code/languages/c-family/related-pages.md
# Source: https://docs.sonarsource.com/sonarqube-server/2025.2/analyzing-source-code/languages/c-family/related-pages.md
# Source: https://docs.sonarsource.com/sonarqube-server/2025.3/analyzing-source-code/languages/c-family/related-pages.md
# Source: https://docs.sonarsource.com/sonarqube-server/2025.5/analyzing-source-code/languages/c-family/related-pages.md
# Source: https://docs.sonarsource.com/sonarqube-server/2025.1/analyzing-source-code/languages/c-family/related-pages.md
# Source: https://docs.sonarsource.com/sonarqube-server/2025.4/analyzing-source-code/languages/c-family/related-pages.md
# Source: https://docs.sonarsource.com/sonarqube-server/2025.6/analyzing-source-code/languages/c-family/related-pages.md
# Source: https://docs.sonarsource.com/sonarqube-server/analyzing-source-code/languages/c-family/related-pages.md
# Source: https://docs.sonarsource.com/sonarqube-cloud/advanced-setup/languages/c-family/related-pages.md
# Related pages
* [sonarcloud-extension-for-azure-devops](https://docs.sonarsource.com/sonarqube-cloud/advanced-setup/ci-based-analysis/sonarcloud-extension-for-azure-devops "mention") for SonarQube Cloud (analyzing Visual C++ project)
* [C and C++ sample projects for SonarQube Cloud](https://github.com/search?q=org%3Asonarsource-cfamily-examples+topic%3Acpp+topic%3Asonarcloud\&type=repositories)
* [test-coverage](https://docs.sonarsource.com/sonarqube-cloud/enriching/test-coverage "mention") and execution (CPPUnit, GCOV, llvm-cov, Visual Studio, Bullseye)
* [Test coverage sample projects](https://github.com/sonarsource-cfamily-examples?q=topic%3Acoverage\&type=all\&language=\&sort=)
---
# Source: https://docs.sonarsource.com/sonarqube-community-build/server-update-and-maintenance/update/release-cycle-model.md
# Source: https://docs.sonarsource.com/sonarqube-server/2025.2/server-update-and-maintenance/upgrade/release-cycle-model.md
# Source: https://docs.sonarsource.com/sonarqube-server/2025.3/server-update-and-maintenance/upgrade/release-cycle-model.md
# Source: https://docs.sonarsource.com/sonarqube-server/2025.5/server-update-and-maintenance/update/release-cycle-model.md
# Source: https://docs.sonarsource.com/sonarqube-server/2025.1/server-update-and-maintenance/update/release-cycle-model.md
# Source: https://docs.sonarsource.com/sonarqube-server/2025.4/server-update-and-maintenance/update/release-cycle-model.md
# Source: https://docs.sonarsource.com/sonarqube-server/2025.6/server-update-and-maintenance/update/release-cycle-model.md
# Source: https://docs.sonarsource.com/sonarqube-server/server-update-and-maintenance/update/release-cycle-model.md
# Release cycle model
A new version of SonarQube Server is released every two months, with a new Long-Term Active (LTA) version (previously known as LTS) released every year. LTA is a functionally complete version of the product that will receive longer-term support.
This means that there are six releases of SonarQube Server per year, including the LTA version at the beginning of each year.
### Version scheme
SonarQube Server releases follow the following version scheme:
`YYYY.ReleaseNumber.PatchReleaseNumber`
{% hint style="info" %}
Up to version 10.8, SonarQube Server followed the `MAJOR.MINOR.PATCH` version scheme.
{% endhint %}
### Support policy
The support policy is as follows:
* The latest version receives new features, enhancements, patches, and technical support.
* The latest-1 version receives technical support.
* The latest LTA receives:
* Patches to fix vulnerabilities or blocker bugs until the next LTA is released.
* Technical support up to 6 months after the next LTA is released.
The figure below shows the provided support when the latest version is 2025.6.
### Active versions
In order to ensure that you continue to have the best user experience, you need to make sure that you are on an *active version*. An active version of SonarQube Server is a version that is deemed suitable for use and support.
How do I know if my SonarQube version is active?
There are two main ways to check if you are using an active version of SonarQube Server:
1. In SonarQube Server, in the footer next to the version number, you can immediately see if your version is *active* or *no longer active.*
2\. Administrators can go to the **Administration** > **System.** As per above, you can see in the footer if you are on an active version.
If there is a new version available, administrators will see a message at the top of the screen prompting you to update to the latest version:
Active version definition
The following count as active versions:
* The latest version of SonarQube Server
* Latest -1
* LTA
* LTA -1, up to 6 months after the new LTA is released and as long as a maximum of 3 versions are active.
### Related pages
* [SonarQube Server Long Term Active (LTA) and FAQ](https://www.sonarsource.com/products/sonarqube/downloads/lts/)
* [determine-path](https://docs.sonarsource.com/sonarqube-server/server-update-and-maintenance/update/determine-path "mention")
---
# Source: https://docs.sonarsource.com/sonarqube-server/10.7/server-upgrade-and-maintenance/release-notes-and-notices.md
# Source: https://docs.sonarsource.com/sonarqube-server/10.8/server-upgrade-and-maintenance/release-notes-and-notices.md
# Source: https://docs.sonarsource.com/sonarqube-server/2025.1/server-update-and-maintenance/release-notes-and-notices.md
# Release and deprecation notes
{% content-ref url="release-notes-and-notices/release-notes" %}
[release-notes](https://docs.sonarsource.com/sonarqube-server/2025.1/server-update-and-maintenance/release-notes-and-notices/release-notes)
{% endcontent-ref %}
{% content-ref url="release-notes-and-notices/release-upgrade-notes" %}
[release-upgrade-notes](https://docs.sonarsource.com/sonarqube-server/2025.1/server-update-and-maintenance/release-notes-and-notices/release-upgrade-notes)
{% endcontent-ref %}
{% content-ref url="release-notes-and-notices/deprecations-and-removals" %}
[deprecations-and-removals](https://docs.sonarsource.com/sonarqube-server/2025.1/server-update-and-maintenance/release-notes-and-notices/deprecations-and-removals)
{% endcontent-ref %}
{% content-ref url="release-notes-and-notices/lta-to-lta-release-notes" %}
[lta-to-lta-release-notes](https://docs.sonarsource.com/sonarqube-server/2025.1/server-update-and-maintenance/release-notes-and-notices/lta-to-lta-release-notes)
{% endcontent-ref %}
{% content-ref url="release-notes-and-notices/lta-to-lta-release-upgrade-notes" %}
[lta-to-lta-release-upgrade-notes](https://docs.sonarsource.com/sonarqube-server/2025.1/server-update-and-maintenance/release-notes-and-notices/lta-to-lta-release-upgrade-notes)
{% endcontent-ref %}
---
# Source: https://docs.sonarsource.com/sonarqube-community-build/server-update-and-maintenance/release-notes.md
# Source: https://docs.sonarsource.com/sonarqube-server/10.6/setup-and-upgrade/release-notes.md
# Source: https://docs.sonarsource.com/sonarqube-server/10.7/server-upgrade-and-maintenance/release-notes-and-notices/release-notes.md
# Source: https://docs.sonarsource.com/sonarqube-server/10.8/server-upgrade-and-maintenance/release-notes-and-notices/release-notes.md
# Source: https://docs.sonarsource.com/sonarqube-server/2025.2/server-update-and-maintenance/release-notes.md
# Source: https://docs.sonarsource.com/sonarqube-server/2025.3/server-update-and-maintenance/release-notes.md
# Source: https://docs.sonarsource.com/sonarqube-server/2025.5/server-update-and-maintenance/release-notes.md
# Source: https://docs.sonarsource.com/sonarqube-server/2025.1/server-update-and-maintenance/release-notes-and-notices/release-notes.md
# Source: https://docs.sonarsource.com/sonarqube-server/2025.4/server-update-and-maintenance/release-notes.md
# Source: https://docs.sonarsource.com/sonarqube-server/2025.6/server-update-and-maintenance/release-notes.md
# Source: https://docs.sonarsource.com/sonarqube-server/server-update-and-maintenance/release-notes.md
# Release notes
These release notes describe the relevant changes implemented for SonarQube Server 2026.1 LTA. If you’re upgrading from the previous LTA, see the [lta-to-lta-release-notes](https://docs.sonarsource.com/sonarqube-server/server-update-and-maintenance/lta-to-lta-release-notes "mention"). For a complete list of all changes, see the [#full-release-notes](#full-release-notes "mention").
### New and enhanced features
View the release notes for new and enhanced features for SonarQube Server.
2026.1
#### AI and mobile compliance reporting
Extends our regulatory coverage to include critical AI and Mobile security standards such as OWASP Top 10 for LLM and OWASP MASVS for project security reports. This feature is available in the [Enterprise](https://www.sonarsource.com/plans-and-pricing/sonarqube/) edition and above. See [security-related-rules](https://docs.sonarsource.com/sonarqube-server/user-guide/rules/security-related-rules "mention") for more information.
#### Feedback mechanism for self-hosted LLMs
Improves the success rate of generating valid AI CodeFix suggestions from self‑hosted LLMs.
#### JFrog Evidence Collection with SonarQube Server
This integration provides a single, verifiable audit trail if you use both SonarQube and JFrog with strict audit trail and compliance requirements. SonarQube analysis results are automatically signed and directly attached to your JFrog packages to create a single, verifiable source of truth. You no longer have to jump between tools to prove your code meets security standards. Everything you need for a rigorous audit is now visible within the JFrog Evidence Collection interface. This feature is available in the [Enterprise](https://www.sonarsource.com/plans-and-pricing/sonarqube/) edition and above. See [jfrog-evidence-collection-integration](https://docs.sonarsource.com/sonarqube-server/analyzing-source-code/jfrog-evidence-collection-integration "mention") for more information.
#### SonarQube Advanced Security
This feature is available in the [Enterprise](https://www.sonarsource.com/plans-and-pricing/sonarqube/) edition and above.
**Malicious package detection**
Receive blocker-level alerts if a dependency matches publicly known datasets of known malicious packages. See [advanced-security](https://docs.sonarsource.com/sonarqube-server/advanced-security "mention") for more information.
#### Quality gate fudge factor improved
To avoid overly strict enforcement of small changes, the quality gate ignores coverage and duplication conditions for very small sets of new code. See [changing-default-quality-gate](https://docs.sonarsource.com/sonarqube-server/quality-standards-administration/managing-quality-gates/changing-default-quality-gate "mention") for more information.
#### Languages
**Cobol**
Adds support for parsing additional language constructs and includes fixes for crashes and false positives for [cobol](https://docs.sonarsource.com/sonarqube-server/analyzing-source-code/languages/cobol "mention"). Related rules include:
* [S3938](https://rules.sonarsource.com/cobol/RSPEC-3938/): Track uses of forbidden statements
* [S1725](https://rules.sonarsource.com/cobol/RSPEC-1725/): Open files should be closed explicitly
* [S1574](https://rules.sonarsource.com/cobol/RSPEC-1574/): Data items should be initialized with data of the correct type
* [S1289](https://rules.sonarsource.com/cobol/RSPEC-1289/): Unused data item blocks should be removed
**IaC**
The analysis of Infrastructure as Code (Ansible, Azure Resource Manager, CloudFormation, Docker, Kubernetes, Terraform, Shell, GitHub Actions) has been improved.
Helm templates are now evaluated even if values.yaml is missing.
The following rules have been added:
* [S6437](https://rules.sonarsource.com/azureresourcemanager/RSPEC-6437/): Credentials should not be hard-coded
* [S7638](https://rules.sonarsource.com/githubactions/RSPEC-7638/): ACTIONS\_ALLOW\_UNSECURE\_COMMANDS should not be used
* [S8232](https://rules.sonarsource.com/githubactions/RSPEC-8232/): Workflows should not rely on unverified GitHub context values to trust events
* [S8233](https://rules.sonarsource.com/githubactions/RSPEC-8233/): Write permissions should be defined at the job level
* [S8262](https://rules.sonarsource.com/githubactions/RSPEC-8262/): Artifacts should not contain secrets
* S8263: GitHub Action invocations should not be vulnerable to parameter injection attacks
* [S8264](https://rules.sonarsource.com/githubactions/RSPEC-8264/): Read permissions should be defined at the job level
**JCL**
A new `leaveFile` API is available for custom rules for [jcl](https://docs.sonarsource.com/sonarqube-server/analyzing-source-code/languages/jcl "mention") language, giving rule authors more control over how files are processed and reported.
**.NET 10 and C# 14 support**
Empowers .NET teams to adopt the Long Term Support (LTS) release of .NET 10 and C# 14 immediately, ensuring their analysis remains accurate, performant, and free of false positives associated with new language constructs. See [vb-dotnet](https://docs.sonarsource.com/sonarqube-server/analyzing-source-code/languages/vb-dotnet "mention") and [csharp](https://docs.sonarsource.com/sonarqube-server/analyzing-source-code/languages/csharp "mention") for more information.
Related rules:
* [S1121](https://rules.sonarsource.com/csharp/RSPEC-1121/): Assignments should not be made from within sub-expressions
* [S1144](https://rules.sonarsource.com/csharp/RSPEC-1144/): Unused private types or members should be removed
* [S2225](https://rules.sonarsource.com/csharp/RSPEC-2225/): "ToString()" method should not return null
* [S2292](https://rules.sonarsource.com/csharp/RSPEC-2292/): Trivial properties should be auto-implemented
* [S2325](https://rules.sonarsource.com/csharp/RSPEC-2325/): Methods and properties that don't access instance data should be static
* [S2583](https://rules.sonarsource.com/csharp/RSPEC-2583/): Conditionally executed code should be reachable
* [S2589](https://rules.sonarsource.com/csharp/RSPEC-2589/): Boolean expressions should not be gratuitous
* [S2692](https://rules.sonarsource.com/csharp/RSPEC-2692/): "IndexOf" checks should not be for positive numbers
* [S2953](https://rules.sonarsource.com/csharp/RSPEC-2953/): Methods named "Dispose" should implement "IDisposable.Dispose"
* [S2970](https://rules.sonarsource.com/csharp/RSPEC-2970/): Assertions should be complete
* [S3063](https://rules.sonarsource.com/csharp/RSPEC-3063/): "StringBuilder" data should be used
* [S3264](https://rules.sonarsource.com/csharp/RSPEC-3264/): Events should be invoked
* [S3398](https://rules.sonarsource.com/csharp/RSPEC-3398/): "private" methods called only by inner classes should be moved to those classes
* [S3459](https://rules.sonarsource.com/csharp/RSPEC-3459/): Unassigned members should be removed
* [S3877](https://rules.sonarsource.com/csharp/RSPEC-3877/): Exceptions should not be thrown from unexpected methods
* [S3928](https://rules.sonarsource.com/csharp/RSPEC-3928/): Parameter names used into ArgumentException constructors should match an existing one
* [S4545](https://rules.sonarsource.com/csharp/RSPEC-4545/): "DebuggerDisplayAttribute" strings should reference existing members
* [S7039](https://rules.sonarsource.com/csharp/RSPEC-7039/): Content Security Policies should be restrictive
**PHP**
Reduces false positives on several rules and cleans up build and dependency infrastructure for [php](https://docs.sonarsource.com/sonarqube-server/analyzing-source-code/languages/php "mention"). Related rules:
* [S1155](https://rules.sonarsource.com/php/RSPEC-1155/): "empty()" should be used to test for emptiness
* [S1172](https://rules.sonarsource.com/php/RSPEC-1172/): Unused function parameters should be removed
* [S2699](https://rules.sonarsource.com/php/RSPEC-2699/): Tests should include assertions
* [S1068](https://rules.sonarsource.com/php/RSPEC-1068/): Unused "private" fields should be removed
**Scala**
Include fixes to false positives and negatives for [scala](https://docs.sonarsource.com/sonarqube-server/analyzing-source-code/languages/scala "mention") on the following rules:
* [S1192](https://rules.sonarsource.com/scala/RSPEC-1192/): String literals should not be duplicated
* [S126](https://rules.sonarsource.com/scala/RSPEC-126/): "if ... else if" constructs should end with "else" clauses
**Secrets**
[secrets](https://docs.sonarsource.com/sonarqube-server/analyzing-source-code/languages/secrets "mention") rules have been improved to reduce the detection of false positives and the following rule have been added:
* [S6418](https://rules.sonarsource.com/yaml/RSPEC-6418/): Hard-coded secrets are security-sensitive
* [S2068](https://rules.sonarsource.com/yaml/RSPEC-2068/): Hard-coded passwords are security-sensitive
* [S7552](https://rules.sonarsource.com/secrets/RSPEC-7552/): SMTP credentials should not be disclosed
* [S8350](https://rules.sonarsource.com/secrets/RSPEC-8350/): xAI API keys should not be disclosed
**VB6**
Fixes parse errors and line count for [vb6](https://docs.sonarsource.com/sonarqube-server/analyzing-source-code/languages/vb6 "mention"). Related rules:
* [S138](https://rules.sonarsource.com/vb6/RSPEC-138/): Subs and functions should not have too many lines
* [S1151](https://rules.sonarsource.com/vb6/RSPEC-1151/): "Case" clauses should not have too many lines
### Update notes
This section contains notes about breaking changes and important updates to be aware of before updating. If you’re updating from the previous LTA, see [LTA to LTA release notes](https://app.gitbook.com/s/4FzELVjsPO4ijRo3jtBV/server-update-and-maintenance/release-notes-and-notices/lta-to-lta-release-notes "mention").
2026.1
#### Java requirements for SonarQube Server runtime
* The SonarQube Server runtime now requires Java Development Kit (JDK). The previous requirement of a Java Runtime Environment (JRE) is no longer sufficient, and a full JDK is required.
* Added Support for Java 25 in addition to Java 21.
* Removed support for Java 17.
See [#software-requirements](https://docs.sonarsource.com/sonarqube-server/server-installation/server-host-requirements#software-requirements "mention") for more details.
#### PostgreSQL support
Support for PostgreSQL versions 14 through 18 is now available, enabling deployments using the most recent PostgreSQL release. PostgreSQL version 13 is not supported anymore. See [installing-the-database](https://docs.sonarsource.com/sonarqube-server/server-installation/installing-the-database "mention") for more information.
#### Kubernetes and Openshift support
* Supported Kubernetes Versions: From 1.32 to 1.35. Support for versions 1.30 and 1.31 has been removed.
* Supported Openshift Versions: From 4.17 to 4.20. Support for versions 4.11 to 4.16 has been removed.
#### Support for MSSQL server
Supported MSSQL server is now 2022 (MSSQL Server 16.0); 2019 (MSSQL Server 15.0); 2017 (MSSQL Server 14.0). Support for 2016 MSSQL Server 13.0 support has been removed. See [installing-the-database](https://docs.sonarsource.com/sonarqube-server/server-installation/installing-the-database "mention") for more information.
#### SonarQube Server includes Elasticsearch 8.x
SonarQube Server 2026.1 LTA and later includes Elasticsearch 8.x, which requires read and write access to the `/tmp` directory. This is a requirement from Elasticsearch itself and cannot be disabled. For more information and a solution, see [#fonts](https://docs.sonarsource.com/sonarqube-server/server-installation/pre-installation/linux#fonts "mention").
### Deprecations and removals
This section contains information on the deprecation and removal of SonarQube Server features and API endpoints. See the [deprecation-policy](https://docs.sonarsource.com/sonarqube-server/server-update-and-maintenance/maintenance/deprecations/deprecation-policy "mention") for more information.
2026.1
#### Java 17 not supported any more
Java version 21 is the minimum version required to run SonarQube Server. See [#software-requirements](https://docs.sonarsource.com/sonarqube-server/server-installation/server-host-requirements#software-requirements "mention") for more details.
#### PostgreSQL in Helm charts removed
The deprecated PostgreSQL dependency in the Helm chart has been removed. If you were relying on this dependency for production, you must take the following steps to upgrade to the new chart: back up their existing database, import the data into a new database, and then update the JDBC URL within the SonarQube chart configuration. See [installing-helm-chart](https://docs.sonarsource.com/sonarqube-server/server-installation/on-kubernetes-or-openshift/installing-helm-chart "mention") for more information.
#### Kubernetes and Openshift versions removed
* Support for versions 1.30 and 1.31 has been removed.
* Support for versions 4.11 to 4.16 has been removed.
#### 2016 MSSQL Server 13.0 support removed
Support for 2016 MSSQL Server 13.0 support has been removed. See [installing-the-database](https://docs.sonarsource.com/sonarqube-server/server-installation/installing-the-database "mention") for more information.
#### Deprecation of Ingress NGINX
Due to the retirement of the ingress-nginx controller in November 2025 (with best-effort support ceasing in March 2026), the dependency on this chart is now deprecated.
We advise migrating to the [Gateway API](https://gateway-api.sigs.k8s.io/guides/), which is the modern successor to Ingress. Should you need to continue using Ingress, consult the [Kubernetes documentation](https://kubernetes.io/docs/concepts/services-networking/ingress-controllers/) for a list of suitable alternative controllers. A replacement dependency will be provided in a future release.
#### Deprecation of Automatic AI Code Detection
Autodetect AI-Generated Code has been deprecated. Sonar will adjust the AI Code Assurance offering to adapt to the industry changes with high AI adoption. A warning callout has been added to the SonarQube UI in global and project settings. See [ai-code-assurance](https://docs.sonarsource.com/sonarqube-server/ai-capabilities/ai-code-assurance "mention") for more information.
### Full release notes
Links to the full release notes in Jira:
* [2026.1](https://sonarsource.atlassian.net/issues?jql=project%20%3D%2010139%20AND%20issuetype%20!%3D%20Task%20AND%20fixversion%20%3D%2023523)
### Related page
* [lta-to-lta-release-notes](https://docs.sonarsource.com/sonarqube-server/server-update-and-maintenance/lta-to-lta-release-notes "mention")
---
# Source: https://docs.sonarsource.com/sonarqube-server/8.9/setup-and-upgrade/release-upgrade-notes.md
# Source: https://docs.sonarsource.com/sonarqube-server/9.8/setup-and-upgrade/release-upgrade-notes.md
# Source: https://docs.sonarsource.com/sonarqube-server/9.9/setup-and-upgrade/release-upgrade-notes.md
# Source: https://docs.sonarsource.com/sonarqube-server/10.0/setup-and-upgrade/release-upgrade-notes.md
# Source: https://docs.sonarsource.com/sonarqube-server/10.1/setup-and-upgrade/release-upgrade-notes.md
# Source: https://docs.sonarsource.com/sonarqube-server/10.2/setup-and-upgrade/release-upgrade-notes.md
# Source: https://docs.sonarsource.com/sonarqube-server/10.3/setup-and-upgrade/release-upgrade-notes.md
# Source: https://docs.sonarsource.com/sonarqube-server/10.4/setup-and-upgrade/release-upgrade-notes.md
# Source: https://docs.sonarsource.com/sonarqube-server/10.5/setup-and-upgrade/release-upgrade-notes.md
# Source: https://docs.sonarsource.com/sonarqube-server/10.6/setup-and-upgrade/release-upgrade-notes.md
# Source: https://docs.sonarsource.com/sonarqube-server/10.7/server-upgrade-and-maintenance/release-notes-and-notices/release-upgrade-notes.md
# Source: https://docs.sonarsource.com/sonarqube-server/10.8/server-upgrade-and-maintenance/release-notes-and-notices/release-upgrade-notes.md
# Source: https://docs.sonarsource.com/sonarqube-server/2025.1/server-update-and-maintenance/release-notes-and-notices/release-upgrade-notes.md
# Release update notes
This page contains notes about breaking changes and important updates to be aware of before upgrading. We recommend reading the notes for all the versions between your current version and the version you’re upgrading to.
If you’re upgrading from the previous LTA, see [lta-to-lta-release-upgrade-notes](https://docs.sonarsource.com/sonarqube-server/2025.1/server-update-and-maintenance/release-notes-and-notices/lta-to-lta-release-upgrade-notes "mention").
For the list of new features in this version, see the [release-notes](https://docs.sonarsource.com/sonarqube-server/2025.1/server-update-and-maintenance/release-notes-and-notices/release-notes "mention").
### Release 2025.1 upgrade notes
**Update in PostgreSQL support**
PostgreSQL versions 11 and 12 are no longer supported. Supported versions are now from 13 to 17.
**SAML configuration update required**
When configuring SAML on your SonarQube Server instance with assertion encryption, the response signature must be enforced. You might need to update your SAML configuration:
* If you use SAML with Microsoft Entra, make sure you sign the response by selecting **Sign SAML response** or **Sign SAML response and assertion** as the sign-in response. See **Step 2 > If you use encryption, enforce response signature** in [optional-security-features](https://docs.sonarsource.com/sonarqube-server/2025.1/instance-administration/authentication/saml/ms-entra-id/optional-security-features "mention").
* If you use SAML with PingID, make sure you sign the response by selecting **Sign Response** or **Sign Assertion & Response** as the sign-in response. See **Step 2 > To enable the encryption of SAML assertions** in [optional-security-features](https://docs.sonarsource.com/sonarqube-server/2025.1/instance-administration/authentication/saml/ms-entra-id/optional-security-features "mention").
In addition, the assertion decryption now requires that you also store the public key certificate in SonarQube Server (not only the private key). Make sure the certificate is stored in SonarQube as follows:
1. In SonarQube Server, go to **Administration > Configuration > General Settings > Authentication > SAML**.
2. In **SAML Configuration > SAML**, select **Edit**. The **Edit SAML configuration** dialog opens.
3. In **Service provider certificate**, enter the certificate.
**Server base URL setup now mandatory for SAML authentication**
Your SAML authentication setup will not work if the SonarQube Server base URL is not set in SonarQube Server. See [server-base-url](https://docs.sonarsource.com/sonarqube-server/2025.1/instance-administration/server-base-url "mention").
**If migrating from 10.7: AI Code Assurance lost on projects**
In SonarQube Server 10.7, the **Sonar way** quality gate was enforced on projects marked as containing AI Code. If you’re migrating from this version, these projects will loose AI Code Assurance. To resolve this, you must apply a quality gate qualified for AI Code Assurance to these projects. To do so, you can use the **Sonar way for AI Code** quality gate or a custom quality gate you have qualified for AI Code Assurance. See [ai-standards](https://docs.sonarsource.com/sonarqube-server/2025.1/ai-capabilities/ai-standards "mention").
### Release 10.8 upgrade notes
**Instance mode feature**
Your SonarQube Server instance has two modes to choose from: [standard-experience](https://docs.sonarsource.com/sonarqube-server/2025.1/instance-administration/analysis-functions/instance-mode/standard-experience "mention") and [mqr-mode](https://docs.sonarsource.com/sonarqube-server/2025.1/instance-administration/analysis-functions/instance-mode/mqr-mode "mention"). Upon upgrading, existing SonarQube Server 10.1 and earlier are configured with the Standard Experience by default whereas SonarQube Server 10.2 and later are configured with MQR mode.
For details on switching modes, see the [changing-modes](https://docs.sonarsource.com/sonarqube-server/2025.1/user-guide/code-metrics/changing-modes "mention") page.
### Release 10.7 upgrade notes
**Updated GitLab automatic provisioning feature**
Automatic user and group provisioning with GitLab now includes permission synchronization, which automatically synchronizes project visibility:
* To prevent unwanted updates to project permissions and project visibility, upgrading SonarQube will suspend automatic provisioning until you confirm the choice of provisioning method in the authentication settings.
For details, see the [setting-up](https://docs.sonarsource.com/sonarqube-server/2025.1/instance-administration/authentication/gitlab/setting-up "mention") page.
**Disable the confidential header in portfolio PDF reports**
Admin users have a new toggle in the **Administration -> Governance -> Portfolio PDF Reports** section, allowing them to dynamically enable or disable the "Confidential" header.
For details, see the [managing-portfolios](https://docs.sonarsource.com/sonarqube-server/2025.1/project-administration/managing-portfolios "mention") page.
**API updates**
When querying rules or issues, INFO and BLOCKER may appear as statuses at the quality level (i.e. a rule might have a reliability severity of BLOCKER). You can also create rules and issues with these additional severities. See [Web API](https://next.sonarqube.com/sonarqube/web_api) in the help menu of SonarQube Server.
The affected APIs are:
* api/issues/\*
* api/rules/\*
* api/projects/export\_findings
* api/qualityprofiles/compare
* api/qualityprofiles/changelog
### Release 10.6 upgrade notes
There are no upgrade notes for SonarQube 10.6. For the release notes, see [Release notes](https://app.gitbook.com/s/VhGCsZJo9Ao0Jjyhvpxl/setup-and-upgrade/release-notes "mention").
### Release 10.5 upgrade notes
**Cognitive complexity calculation updated for Javascript and Typescript**
If you analyze Javascript and Typescript projects, note that we’ve updated how cognitive complexity is calculated. Notably, nested function complexity is no longer added to the parent. This will translate as a drop in the metric for some users.
**End of support of Node.js 16 in the scanner environment**
Node.js 16 is no longer supported as a scanner runtime environment. If you’re using a custom Node.js installation, we recommend the latest [LTS version](https://nodejs.org/en/about/previous-releases), currently v20.
**Updates to custom plugins required**
For a faster analysis, SonarQube now [improving-performance](https://docs.sonarsource.com/sonarqube-server/2025.1/server-update-and-maintenance/maintenance/improving-performance "mention") by default. To avoid dependency errors, you’ll need to update the configuration of your custom plugins. See [plugin-basics](https://docs.sonarsource.com/sonarqube-server/2025.1/extension-guide/developing-a-plugin/plugin-basics "mention") for more information. Also, if you use third-party plugins, make sure to use the latest ones compatible with this feature.
[Full release notes](https://sonarsource.atlassian.net/issues/?jql=project%20%3D%2010139%20AND%20fixVersion%20%3D%2015441%20AND%20issuetype%20%21%3D%20Task)
### Release 10.4 upgrade notes
**Project overview update**
Issue counts on the overall code of projects now reflect the Clean Code software qualities.
Make sure you re-analyze your projects after upgrading to compute and display these counts.
**JavaScript/TypeScript/CSS configuration**
A minimum of 4GB memory is now [javascript-typescript-css](https://docs.sonarsource.com/sonarqube-server/2025.1/analyzing-source-code/languages/javascript-typescript-css "mention"), use `sonar.javascript.node.maxspace` configuration if you encounter memory issues. Also, file encoding errors will now cause an analysis failure, use `sonar.sourceEncoding=UTF-8` if you encounter problems.
**Node.js is no longer a requirement for analysis**
In most cases, installing Node.js in the environment where you’re running analysis is [javascript-typescript-css](https://docs.sonarsource.com/sonarqube-server/2025.1/analyzing-source-code/languages/javascript-typescript-css "mention").
**End of support of Node.js 14 in the scanner environment**
Node.js 14 is [no longer supported](https://community.sonarsource.com/t/node-js-v14-no-longer-supported-v16-stops-early-next-year/105428) as a scanner runtime environment. Also, Node.js v16 will soon be unsupported. If you are using a custom Node.js installation, we recommend the [latest LTS version](https://nodejs.org/en/about/previous-releases), currently v20.
**End of support of Java 11 as scanner environment**
Java 11 is no longer supported as a scanner runtime environment. The minimum required version is Java 17. See the [general-requirements](https://docs.sonarsource.com/sonarqube-server/2025.1/analyzing-source-code/scanners/scanner-environment/general-requirements "mention") for more information. ([SONAR-21157](https://sonarsource.atlassian.net/browse/SONAR-21157))
**SonarScanner for .NET compatibility**
Starting SonarQube 10.4, analysis of .NET projects requires [SonarScanner for .NET 5.14+](https://github.com/SonarSource/sonar-scanner-msbuild/releases/tag/5.14.0.78575).
**End of support of MSBuild 14**
MSBuild 14 is no longer supported for scanning .NET code. MSBuild 15 is deprecated and support will be removed in a future version. We recommend using MSBuild 16 as a minimal version. ([SONAR-21554](https://sonarsource.atlassian.net/browse/SONAR-21554))
{% hint style="info" %}
To know which Web API endpoints and parameters are deprecated after an upgrade, see [api-deprecation](https://docs.sonarsource.com/sonarqube-server/2025.1/server-update-and-maintenance/monitoring/api-deprecation "mention").
{% endhint %}
Full release notes
[Version 10.4.1 release notes](https://sonarsource.atlassian.net/issues/?jql=project%20%3D%2010139%20AND%20fixVersion%20%3D%2015509%20AND%20issuetype%20!%3D%20Task)\
[Version 10.4 release notes](https://sonarsource.atlassian.net/issues/?jql=project%20%3D%2010139%20AND%20fixVersion%20%3D%2014265%20AND%20issuetype%20!%3D%20Task)
### Release 10.3 upgrade notes
**Updated quality gate conditions for Clean as You Code**
Clean as You Code conditions have evolved: The Sonar way quality gate now uses a 0 issues condition on new code. We recommend updating your custom quality gates after the upgrade. The ratings on the project overview page will stay unchanged while your quality gate may now fail. For details, see [quality-gates](https://docs.sonarsource.com/sonarqube-server/2025.1/instance-administration/analysis-functions/quality-gates "mention").
The previous Sonar way quality gate is preserved as "Sonar way (legacy)" upon upgrading. You can keep using it if you’re not ready for the change. ([SONAR-20604](https://sonarsource.atlassian.net/browse/SONAR-20604) & [SONAR-20607](https://sonarsource.atlassian.net/browse/SONAR-20607))
[Full release notes](https://sonarsource.atlassian.net/issues/?jql=project%20%3D%2010139%20AND%20fixVersion%20%3D%2014267%20AND%20issuetype%20!%3D%20Task)
### Release 10.2 upgrade notes
**Maximum new code definition value automatically adjusted in existing projects**
For existing projects, if the value of the **Number of days** option is set to a higher value than 90 before the upgrade, SonarQube automatically changes it to 90. As a consequence, some issues might move out of the new code. See the [about-new-code](https://docs.sonarsource.com/sonarqube-server/2025.1/user-guide/about-new-code "mention") page for more information. ([SONAR-20155](https://sonarsource.atlassian.net/browse/SONAR-20155))
**Updated GitHub automatic provisioning feature**
Automatic user and group provisioning with GitHub now includes permission synchronization, which automatically synchronizes project visibility:
* To prevent unwanted updates to project permissions and project visibility, upgrading SonarQube will suspend automatic provisioning until you confirm the choice of provisioning method in the authentication settings.
* The GitHub app requires new permissions to be added and approved.
For details, see the [github](https://docs.sonarsource.com/sonarqube-server/2025.1/instance-administration/authentication/github "mention") page. ([SONAR-20309](https://sonarsource.atlassian.net/browse/SONAR-20309))
**Clean Code updates**
The classification of issues and rules has evolved:
* Issue types are deprecated. Issues are now classified based on Clean Code attributes and software qualities.
* The severity of an issue is now tied to the issue’s impact on the software qualities.
Existing types and severities are preserved and are still used to evaluate the Quality Gate conditions. Type and severity can no longer be edited on issues and rules via the UI.
For details, see [introduction](https://docs.sonarsource.com/sonarqube-server/2025.1/user-guide/issues/introduction "mention") to Managing issues. ([SONAR-20023](https://sonarsource.atlassian.net/browse/SONAR-20023))
Full release notes
* [Version 10.2.1 release notes](https://sonarsource.atlassian.net/issues/?jql=project%20%3D%2010139%20AND%20fixVersion%20%3D%2014296)
* [Version 10.2 release notes](https://sonarsource.atlassian.net/issues/?jql=project%20%3D%2010139%20AND%20fixVersion%20%3D%2014093)
### Release 10.1 upgrade notes
**Dropping support for NET Framework < 4.6.2**\
The minimum supported .NET Framework version is 4.6.2. Support for earlier versions has been dropped. If you’re running an earlier version, you’ll need to upgrade your build environment wherever your analysis is run. See [this release note](https://github.com/SonarSource/sonar-dotnet/releases/tag/9.0.0.68202) for more information.
**Updated options for new code definition**\
To make them more in line with the Clean as You Code methodology, the following options have been updated for projects:
* Specific analysis: This setup is now available only via the Web API. Automation is required to ensure the value is kept up to date.
* Number of days: The maximum value allowed when setting it up is now 90. It’s recommended to update your existing projects accordingly.
See the [about-new-code](https://docs.sonarsource.com/sonarqube-server/2025.1/user-guide/about-new-code "mention") page for more information. ([SONAR-19294](https://sonarsource.atlassian.net/browse/SONAR-19294))
[Full release notes](https://sonarsource.atlassian.net/issues/?jql=project%20%3D%2010139%20AND%20fixVersion%20%3D%2014087)
### Release 10.0 upgrade notes
**SCIM provisioning requires configuration**\
SCIM provisioning for SAML authentication evolves for a tightened synchronization of users and groups. To use the updated set of user and group SCIM provisioning features, see [overview](https://docs.sonarsource.com/sonarqube-server/2025.1/instance-administration/authentication/overview "mention").
Without action on your part, upon upgrading, already assigned users are not deleted from SonarQube, but they are no longer bound to your IdP. You’ll need to [overview](https://docs.sonarsource.com/sonarqube-server/2025.1/instance-administration/authentication/saml/scim/overview "mention") in SonarQube and adjust your IdP settings. ([SONAR-18797](https://sonarsource.atlassian.net/browse/SONAR-18797)).
**Updated security policy for page extensions**\
To improve security, pages added to the UI by plugins can no longer include inline scripts. If you use this feature, you might need to update your plugins. See [adding-pages-to-the-webapp](https://docs.sonarsource.com/sonarqube-server/2025.1/extension-guide/developing-a-plugin/adding-pages-to-the-webapp "mention") for more information. ([SONAR-18809](https://sonarsource.atlassian.net/browse/SONAR-18809)).
**Projects displaying modules are no longer supported**\
The concept of modules was removed in v7.6. SonarQube no longer migrates the structure of projects still displaying modules. Make sure you re-analyze these projects before upgrading to SonarQube 10.0. ([SONAR-17706](https://sonarsource.atlassian.net/browse/SONAR-17706)).\
**Deprecated pull request configuration properties removed**\
DevOps Platform Integration settings are no longer inferred from scanner-level analysis parameters, which were deprecated in SonarQube 8.1. To prevent pull request decoration from failing, make sure you have configured each project with the settings found under the project-level **Project Settings > DevOps Platform Integration**.
This particularly affects users integrating with Azure DevOps who formerly relied on the [sonarqube-extension-for-azure-devops](https://docs.sonarsource.com/sonarqube-server/2025.1/analyzing-source-code/scanners/sonarqube-extension-for-azure-devops "mention") to pass these properties. ([SONAR-17711](https://sonarsource.atlassian.net/browse/SONAR-17711)).
**Deprecated web services and parameters removed**\
The web services and parameters that were deprecated in versions 8.x and 9.x have been removed. For more information, see [the corresponding list](https://sonarsource.atlassian.net/issues/?jql=project%20%3D%20SONAR%20AND%20labels%20%3D%2010.0-removed-webapi) and read the [API deprecation policy](https://community.sonarsource.com/t/api-deprecation-policy-change/57998).
**Microsoft SQL Server and Integrated Authentication**\
If you use Microsoft SQL Server with Integrated Authentication, note that the minimum supported version of the [Microsoft SQL JDBC Driver package](https://learn.microsoft.com/en-us/sql/connect/jdbc/release-notes-for-the-jdbc-driver) has been updated to 11.2.3. See [installing-the-database](https://docs.sonarsource.com/sonarqube-server/2025.1/setup-and-upgrade/install-the-server/installing-the-database "mention") for more information.
**seccomp filter required on kernel**
The version of Elasticsearch has been updated and now requires a kernel with seccomp enabled. Make sure that seccomp is available on your kernel. See [linux](https://docs.sonarsource.com/sonarqube-server/2025.1/setup-and-upgrade/pre-installation/linux "mention") for more information. ([SONAR-17714](https://sonarsource.atlassian.net/browse/SONAR-17714))
[Full release notes](https://sonarsource.atlassian.net/issues/?jql=project%20%3D%2010139%20AND%20fixVersion%20%3D%2012624)
### Release 9.9 and earlier upgrade notes
See the SonarQube Server 9.9 LTA [Release upgrade notes](https://app.gitbook.com/s/Bmptmznn7RpPe5u7vdup/setup-and-upgrade/release-upgrade-notes "mention").
---
# Source: https://docs.sonarsource.com/sonarqube-server/10.6/devops-platform-integration/github-integration/setting-up-at-global-level/report-security-alerts.md
# Source: https://docs.sonarsource.com/sonarqube-server/10.7/devops-platform-integration/github-integration/setting-up-at-global-level/report-security-alerts.md
# Source: https://docs.sonarsource.com/sonarqube-server/10.8/devops-platform-integration/github-integration/setting-up-at-global-level/report-security-alerts.md
# Source: https://docs.sonarsource.com/sonarqube-server/2025.2/devops-platform-integration/github-integration/setting-up-at-global-level/report-security-alerts.md
# Source: https://docs.sonarsource.com/sonarqube-server/2025.3/devops-platform-integration/github-integration/setting-up-at-global-level/report-security-alerts.md
# Source: https://docs.sonarsource.com/sonarqube-server/2025.5/devops-platform-integration/github-integration/setting-up-at-global-level/report-security-alerts.md
# Source: https://docs.sonarsource.com/sonarqube-server/2025.1/devops-platform-integration/github-integration/setting-up-at-global-level/report-security-alerts.md
# Source: https://docs.sonarsource.com/sonarqube-server/2025.4/devops-platform-integration/github-integration/setting-up-at-global-level/report-security-alerts.md
# Source: https://docs.sonarsource.com/sonarqube-server/2025.6/devops-platform-integration/github-integration/setting-up-at-global-level/report-security-alerts.md
# Source: https://docs.sonarsource.com/sonarqube-server/devops-platform-integration/github-integration/setting-up-at-global-level/report-security-alerts.md
# Setting up the report of security alerts
SonarQube Server can provide feedback about security issues inside the GitHub interface itself as code scanning alerts under the **Security** tab. This feature is supported for bound projects only.
This page explains the feature and how to set it up. To view and manage the security issues reported in GitHub see [in-devops-platform](https://docs.sonarsource.com/sonarqube-server/user-guide/issues/in-devops-platform "mention").
### Security alerts report overview
The report of security alerts in GitHub is part of the [GitHub Advanced Security package](https://docs.github.com/en/get-started/learning-about-github/about-github-advanced-security) and is currently free for public projects. It is available as a paid option for private projects and GitHub Enterprise. This option is entirely on the GitHub side. Sonar does not charge anything extra to enable the code scanning alerts feature.
#### Issue status synchronization
When users change the status of a security issue in the SonarQube Server interface, that status change is immediately reflected in the GitHub interface. Similarly, if users change an alert status in GitHub, that change is reflected in SonarQube Server.
Initially, all issues marked Open on SonarQube Server are marked Open on GitHub. Because the available statuses on the two systems are not exactly the same, the following logic is used to manage the transitions.
| **In SonarQube Server, a transition to:** | **Results in this On GitHub:** |
| ----------------------------------------- | ------------------------------ |
| Confirm (deprecated) | Open |
| Fixed | Open |
| Accept | Dismiss: Won’t Fix |
| False Positive | Dismiss: False positive |
| Open | Open |
| **On Github, a transition to:** | **Results in this in SonarQube Server:** |
| ------------------------------- | ---------------------------------------- |
| Dismiss: False positive | False Positive |
| Dismiss: Used in tests | Accept |
| Dismiss: Won’t fix | Accept |
#### Issue report and synchronization from SonarQube Server to GitHub
SonarQube Server reports security issues to GitHub’s Code scanning alerts by accessing GitHub through the GitHub App configured in [setting-up-github-app](https://docs.sonarsource.com/sonarqube-server/devops-platform-integration/github-integration/setting-up-at-global-level/setting-up-github-app "mention").
#### Synchronization process from GitHub to SonarQube Server
The update in SonarQube Server of a security alert status change performed by a GitHub user is performed through a webhook mechanism as illustrated below. The procedure is as follows:
1. When a user changes a security alert status in GitHub, a webhook event is generated.
2. GitHub sends a webhook request to SonarQube Server to inform it about the event. To do so, it retrieves the webhook URL and the webhook secret from the GitHub App for SonarQube Server.
3. SonarQube Server checks the received webhook secret against the secret stored in the GitHub Configuration for security import.
4. If the check is successful, SonarQube Server updates the status of the respective security issue.
### Prerequisites
The feature is only available to projects bound to their respective GitHub repository. It means that the integration of SonarQube Server with GitHub for repository import must have been set up.
In addition, GitHub must reach SonarQube to send the webhook request. This means that either SonarQube server base URL is a public URL, or you can use a reverse proxy to forward webhooks from GitHub to SonarQube’s private URL. for more information, see GitHub documentation on [Delivering webhooks to private systems](https://docs.github.com/en/webhooks/using-webhooks/delivering-webhooks-to-private-systems).
### Setting up the report in SonarQube Server
#### Enabling the feature in the GitHub App for SonarQube Server
If not already done, edit your GitHub App for SonarQube Server to enable and set up the report of security alerts to GitHub:
1. In GitHub, go to **Settings** > **Developer settings** > **GitHub Apps** and select your GitHub App.
2. Go to the **General** > **Webhook** section and make sure to select the active checkbox.
3. Add the following Webhook URL: https\://\.sonarqube.com/api/alm\_integrations/webhook\_github. Replace \.sonarqube.com with your SonarQube Server instance.
4. Set a Webhook secret, see [GitHub’s webhook security recommendations](https://docs.github.com/en/developers/webhooks-and-events/webhooks/securing-your-webhooks).
5. Under **Permissions & events** > **Repository permissions** > **Code scanning alerts**, set the access level to Read and write. When you update this permission, GitHub sends an email to the GitHub organization’s administrator, asking them to validate the changes on the installation of the GitHub App.
6. Under **Permissions & events > Subscribe to events**, select **Code scanning alert**.
#### Managing the user access to security alerts in GitHub
In GitHub, you can [configure access to security alerts](https://docs.github.com/en/repositories/managing-your-repositorys-settings-and-features/enabling-features-for-your-repository/managing-security-and-analysis-settings-for-your-repository) for a repository to enable and disable security and analysis features.
---
# Source: https://docs.sonarsource.com/sonarqube-for-eclipse/getting-started/requirements.md
# Source: https://docs.sonarsource.com/sonarqube-for-visual-studio/getting-started/requirements.md
# Source: https://docs.sonarsource.com/sonarqube-for-intellij/getting-started/requirements.md
# Source: https://docs.sonarsource.com/sonarqube-for-vs-code/getting-started/requirements.md
# Source: https://docs.sonarsource.com/sonarqube-server/8.9/requirements.md
# Source: https://docs.sonarsource.com/sonarqube-server/9.8/requirements.md
# Source: https://docs.sonarsource.com/sonarqube-server/9.9/requirements.md
# Source: https://docs.sonarsource.com/sonarqube-server/10.0/requirements.md
# Source: https://docs.sonarsource.com/sonarqube-server/10.1/requirements.md
# Source: https://docs.sonarsource.com/sonarqube-server/10.2/requirements.md
# Source: https://docs.sonarsource.com/sonarqube-server/10.3/requirements.md
# Source: https://docs.sonarsource.com/sonarqube-server/10.4/requirements.md
# Requirements
{% content-ref url="requirements/prerequisites-and-overview" %}
[prerequisites-and-overview](https://docs.sonarsource.com/sonarqube-server/10.4/requirements/prerequisites-and-overview)
{% endcontent-ref %}
{% content-ref url="requirements/hardware-recommendations" %}
[hardware-recommendations](https://docs.sonarsource.com/sonarqube-server/10.4/requirements/hardware-recommendations)
{% endcontent-ref %}
---
# Source: https://docs.sonarsource.com/sonarqube-mcp-server/resources.md
# Source: https://docs.sonarsource.com/sonarqube-for-eclipse/resources.md
# Source: https://docs.sonarsource.com/sonarqube-for-visual-studio/resources.md
# Source: https://docs.sonarsource.com/sonarqube-for-intellij/resources.md
# Source: https://docs.sonarsource.com/sonarqube-for-vs-code/resources.md
# Resources
{% content-ref url="resources/help" %}
[help](https://docs.sonarsource.com/sonarqube-for-vs-code/resources/help)
{% endcontent-ref %}
{% content-ref url="resources/troubleshooting" %}
[troubleshooting](https://docs.sonarsource.com/sonarqube-for-vs-code/resources/troubleshooting)
{% endcontent-ref %}
{% content-ref url="resources/previous-versions" %}
[previous-versions](https://docs.sonarsource.com/sonarqube-for-vs-code/resources/previous-versions)
{% endcontent-ref %}
{% content-ref url="resources/glossary" %}
[glossary](https://docs.sonarsource.com/sonarqube-for-vs-code/resources/glossary)
{% endcontent-ref %}
---
# Source: https://docs.sonarsource.com/sonarqube-cloud/administering-sonarcloud/about-sonarqube-cloud-solution/ressources-structure.md
# Ressources structure
- [Organization](/sonarqube-cloud/administering-sonarcloud/about-sonarqube-cloud-solution/ressources-structure/organization.md): SonarQube Cloud mirrors the organization-based structure of your DevOps platform. Projects are grouped together for collaborative work and permission management.
- [Organization's projects](/sonarqube-cloud/administering-sonarcloud/about-sonarqube-cloud-solution/ressources-structure/projects.md): SonarQube Cloud projects represent DevOps platform repos and can be public or private, with binding to the repository determining visibility. Project permissions are managed through user groups.
- [Enterprise](/sonarqube-cloud/administering-sonarcloud/about-sonarqube-cloud-solution/ressources-structure/enterprise.md): SonarQube Cloud's Enterprise plan allows the centralized administration of multiple Organizations which may or may not be linked to multiple DevOps platforms.
- [Binding with the DevOps platform](/sonarqube-cloud/administering-sonarcloud/about-sonarqube-cloud-solution/ressources-structure/binding-with-dop.md): Your organizations and projects in SonarQube Cloud are bound to their respective organization or repository on GitHub, Bitbucket Cloud, GitLab, or Azure DevOps.
---
# Source: https://docs.sonarsource.com/sonarqube-cloud/administering-sonarcloud/managing-enterprise/retrieving-and-viewing-your-enterprise.md
# Retrieving and viewing your enterprise
To retrieve and view your enterprise:
1. Select your account menu in the top right corner of the SonarQube Cloud interface. In the menu, under **My Enterprises**, select the enterprise you want to view. The **Organizations** page of the enterprise opens.
2. You can navigate through the different pages of the enterprise (The administration pages are restricted to the enterprise admins.):
* **Organizations**: This page lists the organizations belonging to the enterprise and of which you’re a member. It allows admins to add or remove organizations.
* **Billing**: This page shows the Lines of Code (LOC) consumption in your enterprise.
* **Portfolios.** See [viewing-portfolios](https://docs.sonarsource.com/sonarqube-cloud/getting-started-with-enterprise/viewing-enterprise-reports/viewing-portfolios "mention") for more information.
* **Administration**: This menu allows you to access administration settings related to your enterprise such as Single Sign-On authentication and enterprise-related permissions (see **Managing enterprise-related permissions**).
### Related pages
[creating-your-enterprise](https://docs.sonarsource.com/sonarqube-cloud/administering-sonarcloud/managing-enterprise/creating-your-enterprise "mention")\
[enterprise-security](https://docs.sonarsource.com/sonarqube-cloud/administering-sonarcloud/managing-enterprise/enterprise-security "mention")\
[adding-organizations-to-your-enterprise](https://docs.sonarsource.com/sonarqube-cloud/administering-sonarcloud/managing-enterprise/adding-organizations-to-your-enterprise "mention")\
[managing-the-enterprise-related-permissions](https://docs.sonarsource.com/sonarqube-cloud/administering-sonarcloud/managing-enterprise/managing-the-enterprise-related-permissions "mention")\
[managing-the-lines-of-code-within-your-enterprise](https://docs.sonarsource.com/sonarqube-cloud/administering-sonarcloud/managing-enterprise/managing-the-lines-of-code-within-your-enterprise "mention")\
[changing-enterprise-settings](https://docs.sonarsource.com/sonarqube-cloud/administering-sonarcloud/managing-enterprise/changing-enterprise-settings "mention")\
[downgrading-your-enterprise](https://docs.sonarsource.com/sonarqube-cloud/administering-sonarcloud/managing-enterprise/downgrading-your-enterprise "mention")
---
# Source: https://docs.sonarsource.com/sonarqube-community-build/user-guide/viewing-projects/retrieving-projects.md
# Source: https://docs.sonarsource.com/sonarqube-server/10.7/user-guide/viewing-projects/retrieving-projects.md
# Source: https://docs.sonarsource.com/sonarqube-server/10.8/user-guide/viewing-projects/retrieving-projects.md
# Source: https://docs.sonarsource.com/sonarqube-server/2025.2/user-guide/viewing-projects/retrieving-projects.md
# Source: https://docs.sonarsource.com/sonarqube-server/2025.3/user-guide/viewing-projects/retrieving-projects.md
# Source: https://docs.sonarsource.com/sonarqube-server/2025.5/user-guide/viewing-projects/retrieving-projects.md
# Source: https://docs.sonarsource.com/sonarqube-server/2025.1/user-guide/viewing-projects/retrieving-projects.md
# Source: https://docs.sonarsource.com/sonarqube-server/2025.4/user-guide/viewing-projects/retrieving-projects.md
# Source: https://docs.sonarsource.com/sonarqube-server/2025.6/user-guide/viewing-projects/retrieving-projects.md
# Source: https://docs.sonarsource.com/sonarqube-server/user-guide/viewing-projects/retrieving-projects.md
# Source: https://docs.sonarsource.com/sonarqube-cloud/managing-your-projects/retrieving-projects.md
# Retrieving projects
You can view any public project. You can view a private project of your organization provided you have the corresponding permission.
### Retrieving any public or private project
In the top right corner, select the magnifier icon. The **Search for projects…** box is displayed along with a list of pre-selected projects as illustrated below. the project name (1) is followed by the respective organization name (2). The yellow star (3) indicates that the project belongs to your favorite projects.
You can enter a part of the project name in the box to filter the search and select the project in the list. The project opens as illustrated below:
1. Project's avatar and name.
2. Project's visibility ([public or private](https://docs.sonarsource.com/sonarqube-cloud/administering-sonarcloud/about-sonarqube-cloud-solution/ressources-structure/projects)).
3. Icon of the DevOps platform to which the project is [bound](https://docs.sonarsource.com/sonarqube-cloud/administering-sonarcloud/about-sonarqube-cloud-solution/ressources-structure/binding-with-dop). You can select it to navigate to the bound DevOps platform repository.
4. Project's navigation bar.
### Retrieving the projects of your organization
1. Retrieve your organization:
1. Select your account menu in the top right corner of the SonarQube Cloud interface.
2. In the menu, under **My Organizations**, select your organization. The organization’s **Projects** page opens.
2. In the left sidebar, you can define filter conditions.
3. Above the list, you can use the search box to search by project name.
4. Click the project name hyperlink to open the project.
### Retrieving your favorite projects
To mark a project as favorite, see the instructions on the [managing-your-project-as-developer](https://docs.sonarsource.com/sonarqube-cloud/managing-your-projects/managing-your-project-as-developer "mention") page.
To retrieve your favorite projects:
1. In the top navigation bar, select **My Projects**. Your favorite projects are listed on the page.
2. In the left sidebar, you can define filter conditions.
3. Above the list, you can use the search box to search by project name.
4. Click the project name hyperlink to open the project.
### Exploring open-source projects
To explore open-source projects:
* Select **Explore** in the top navigation bar of the SonarQube Cloud UI.
* Or go to `sonarcloud.io/explore/projects`.
### Viewing and copying project information
1. Retrieve the project as explained above.
2. In the left navigation bar, select **Information** to open the page.
The **Information** page displays:
* The quality gate currently being used for your project.
* The quality profiles currently being used for your project. If the project contains multiple languages, the profile for each language is shown.
* The project and organization keys; you can copy them for pasting.
* The last analysis method: the method used for this project’s most recent analysis. If the last analysis was done by automatic analysis, this section will display *Analyzed by SonarQube Cloud*. If the last analysis was done by CI-based analysis, the CI system used will be indicated.
See these articles for tasks you can complete while on the **Information** page:
* [#subscribing-to-notifications](https://docs.sonarsource.com/sonarqube-cloud/managing-your-project-as-developer#subscribing-to-notifications "mention")
* [#using-project-badge](https://docs.sonarsource.com/sonarqube-cloud/managing-your-project-as-developer#using-project-badge "mention")
---
# Source: https://docs.sonarsource.com/sonarqube-community-build/user-guide/issues/retrieving.md
# Source: https://docs.sonarsource.com/sonarqube-server/10.7/user-guide/issues/retrieving.md
# Source: https://docs.sonarsource.com/sonarqube-server/10.8/user-guide/issues/retrieving.md
# Source: https://docs.sonarsource.com/sonarqube-server/2025.2/user-guide/issues/retrieving.md
# Source: https://docs.sonarsource.com/sonarqube-server/2025.3/user-guide/issues/retrieving.md
# Source: https://docs.sonarsource.com/sonarqube-server/2025.5/user-guide/issues/retrieving.md
# Source: https://docs.sonarsource.com/sonarqube-server/2025.1/user-guide/issues/retrieving.md
# Source: https://docs.sonarsource.com/sonarqube-server/2025.4/user-guide/issues/retrieving.md
# Source: https://docs.sonarsource.com/sonarqube-server/2025.6/user-guide/issues/retrieving.md
# Source: https://docs.sonarsource.com/sonarqube-server/user-guide/issues/retrieving.md
# Source: https://docs.sonarsource.com/sonarqube-cloud/managing-your-projects/issues/retrieving.md
# Retrieving issues
You can retrieve and view the issues detected during a project’s analysis. Ensure you have proper [#issues-permissions](https://docs.sonarsource.com/sonarqube-cloud/managing-your-projects/introduction#issues-permissions "mention") on a project to view and administer the issues.
{% hint style="info" %}
Issues can also be reported in your DevOps platform. For more information, see [in-devops-platform](https://docs.sonarsource.com/sonarqube-cloud/managing-your-projects/issues/in-devops-platform "mention").
{% endhint %}
### Different ways of retrieving issues
1. From **My issues,** located at the top navigation bar. **My issues** lists all issues assigned to you.
2. From the **Issues** tab at a project level.
3. From the analysis report cards on branches and pull requests of your projects.
4. From the **Issues** tab at the organization level, if your organization belongs to an enterprise.
### Filtering issues
The Issues page is divided into two sections:
1. Filters are located in the left sidebar. This is where you enter your search criteria.
2. A list of issues is in the right section of the page, where your search results are displayed.
#### Issue card
Each issue card contains information that helps you identify the following:
1. Project name and the path to the code file.
2. The name of the rule that triggered the issue.
3. Impacted software quality and severity level.
4. Status of the issue.
5. Assignee
6. Coding attribute
7. Tags
8. Additional information: line number, estimated time effort to fix the issue, the amount of time that has passed since the introduction of the code, and type.
### Navigating issues
To navigate to an issue, select the issue card in the search results and press the Right arrow key or click on its name. A detail view of the issue opens in the right section, and the left sidebar shows the search results. To start a new search, press the Left arrow key or navigate one step back in your browser.
### Copying the URL of an issue
1. Retrieve an issue and navigate to the issue’s detail page.
2. Click on the link icon next to the name of the issue to copy the issue’s URL.
---
# Source: https://docs.sonarsource.com/sonarqube-server/2025.3/advanced-security/reviewing-and-fixing-dependency-risks.md
# Source: https://docs.sonarsource.com/sonarqube-server/2025.5/advanced-security/reviewing-and-fixing-dependency-risks.md
# Source: https://docs.sonarsource.com/sonarqube-server/2025.4/advanced-security/reviewing-and-fixing-dependency-risks.md
# Source: https://docs.sonarsource.com/sonarqube-server/2025.6/advanced-security/reviewing-and-fixing-dependency-risks.md
# Source: https://docs.sonarsource.com/sonarqube-server/advanced-security/reviewing-and-fixing-dependency-risks.md
# Source: https://docs.sonarsource.com/sonarqube-cloud/advanced-security/reviewing-and-fixing-dependency-risks.md
# Reviewing and fixing dependency risks
Advanced Security is an add-on that requires a separate subscription to your SonarQube Cloud's [Enterprise plan](https://www.sonarsource.com/plans-and-pricing/#sonarqube-cloud-features).
SonarQube Cloud lets you manage dependency risks, mark them as safe, confirmed, or accepted, and assign them to other members of your team.
### Permissions
On private projects, and portfolios, the following permissions apply:
* **Browse**: access, browse, confirm dependency risks, change assignee.
* **Administer issues**: change risk severity, resolve risks as **Accepted** or **Safe**.
Anyone is allowed to browse dependency risks on public projects and portfolios.
Changing the status of a dependency risk requires the **Administer Issues** permission.
### Reviewing and fixing dependency risks
Navigate to the **Dependency Risks** tab of your project or portfolio.
Use **Filters** in the left side bar to narrow down the results. You can filter the results by:
* **Risk type**: Vulnerability, Malicious package, and Prohibited license
* **Risk severity**: Blocker, High, Medium, Low, or Info
* **Software quality**: Security, Maintainability
* **Dependency type**: Direct or Transitive
* **Dependency scope**: Production or Development
* **Package manager**: See [Analyzing project for dependencies](https://docs.sonarsource.com/sonarqube-cloud/advanced-security/analyzing-projects-for-dependencies-sca) for a list of supported package managers and languages.
* **Status**: Accepted, Confirmed, Open, Fixed, Safe
* **Assignee**: Type in the name of the person assigned and select it from the list.
From there, you can sort the list of results:
* by choosing the sorting criteria from the **Sort by** dropdown menu
* by vulnerability name by entering a vulnerability ID (such as CVE-2022-38392) into the search box
The following information is displayed for each dependency risk in the list:
1. Descriptive title of the dependency risk. Click on the title to open a detailed view.
2. Software quality, risk type, and severity
3. Status: Open, Confirmed, Accepted, Safe
4. Assignee of the risk
5. Amount of time that has passed since the risk was first detected
6. Affected dependency and version
### Understanding the risk types
Each dependency risk has an assigned risk type:
* **Vulnerability**: When a third-party dependency is affected by a publicly reported vulnerability, such as a record on [CVE.org](http://cve.org/)
* **Malicious package**: When a third-party dependency is known to be malicious
* **Prohibited license**: When a third-party dependency has a software license not allowed by the project's associated [license profile and policy](https://docs.sonarsource.com/sonarqube-cloud/advanced-security/managing-license-profiles-and-policies).
### Changing dependency status and assigning risks
#### Dependency risk lifecycle
A dependency risk can have the following statuses:
* **Open**: Initial state of a dependency risk after analysis. The risk has not been yet reviewed.
* **Confirmed**: Indicates that the dependency risk has been reviewed and the risk is valid.
* **Accepted**: The risk is valid but it may not be fixed for a while.
* **Safe**: Indicates that the dependency risk does not compromise the security of the software. A mandatory justification must be provided.
To change the status of the dependency risk, click the **Change Status** button to open a modal. From the **Status** dropdown list select a new status for the risk and enter a description for the change in the **Explain your decision** text box.
#### Assigning a dependency risk
You can delegate a review of dependency risks to other team members by clicking the **Unassigned** dropdown menu and entering a name. You can also assign the risk to yourself.
#### Email notifications
If you have subscribed to [email notifications](https://docs.sonarsource.com/sonarqube-cloud/managing-your-account/notifications) for a project, note that the notifications that apply to issues also apply to dependency risks.
### Detailed view
Clicking the title of the dependency risk in the list of results opens its detailed view page:
1. Details of the dependency risk, including **Risk type**, **Risk Severity**, **First detected**, **Assignee**, and **Status**.
2. **What’s the Risk?** and **How can I fix it?** allow you to review information about the dependency risk, the factors affecting the risk’s severity, and information about currently used dependency versions and fixes.
3. **Affected dependencies** shows the dependency version that raised the risk, dependency type, package manager and the associated risks. Click the **View all risks for this dependency** for a full list.
### What’s the risk?
Sonar uses a holistic approach to determine the severity of a dependency risk. The methods used depend on the associated risk type.
#### Vulnerability risk
Sonar partners with select open source maintainers to uphold their software to secure development practices. As part of this partnership, Sonar-partnered maintainers provide guidance on vulnerabilities. This guidance includes:
* Whether the vulnerability is real, or a false positive
* How likely it is that the vulnerability will affect typical usage
* Whether the vulnerability affects development or test usage, or only production usage
* What workarounds, if any, are available
* What specific functions or methods are affected
This guidance ensures that developers have comprehensive information to speed up remediation times.
**Risk evaluation**
The risk evaluation is based on the following factors:
* **Severity**: Evaluates the technical severity of a vulnerability based on an assessment by [CVSS](https://www.first.org/cvss/).
* **Known exploited**: Shows if the risk has been actively exploited in the wild. It’s measured by [KEV](https://www.cisa.gov/known-exploited-vulnerabilities-catalog).
* **Chance of future exploitation**: Estimates the likelihood (percentage) of a software vulnerability being exploited in the wild over the next 30 days. It’s measured by [EPSS](http://first.org/epss).
Sonar combines these factors to assign a severity to a discovered vulnerability to ensure that developers are prioritizing the most urgent risk in their applications.
#### Malicious package risk
Malicious package risks are always BLOCKER severity. They should be remediated immediately.
#### Prohibited license risk
The dependency risk for prohibited license risk type depends on the configuration of your instance’s license profile and policy. The **What’s the risk?** tab provides information about the risk associated with the license and links to relevant resources. For more information, see [Managing license profiles and policies](https://docs.sonarsource.com/sonarqube-cloud/advanced-security/managing-license-profiles-and-policies).
### Dependency risk severities
The table below lists the dependency risk severities used for vulnerability risks and their definition.
| **Risk severity** | **Definition** |
| ----------------- | -------------------------------------------------------------------------------------------------------------------------------------------------------------------------------------------------------------------------------------------------------------------------------------------------------------------------------------------------------------------------------------- |
| Blocker | A vulnerability is on the CISA KEV list. |
| High |
Vulnerability has both:
High exploitability (an EPSS probability greater than 5%)
High risk (a CVSS score over 7.0)
|
| Medium |
Any other vulnerability that has both:
Moderate or unknown exploitability (an EPSS probability greater than 0.5%, or no EPSS scoring)
Moderate risk (a CVSS score over 4.0)
|
| Low | Any remaining vulnerability that does not fit into another category. |
| Info |
Any of the following is true:
A Tidelift or Sonar partnered maintainer has declared the vulnerability a false positive
The vulnerability has been declared as withdrawn by a vulnerability source (NIST, OSV)
Note: this categorization for Info overrides any criteria that would place the risk into Critical, High, or Low severity.
|
**Editing risk severities**
If you decide that a different level is more appropriate for a given risk, you can manually set a new severity level. Keep in mind that doing so may impact your quality gates.
To customize the risk severity level for **Software qualities impacted**:
1. Select a risk from the search results list.
2. Click on the quality: **Security**, **Reliability**, or **Maintainability**.
3. Select the severity level you wish to apply from the dropdown list. You can also change the severity level from the risk's details page.
Note that if you manually update the severity level for a risk, it will no longer be updated automatically by Sonar, even if the data used in the severity calculation changes.
### How can I fix it?
#### Vulnerability
The **How can I fix it?** tab displays information about dependency versions, starting with the latest, and available fixes.
The following options are available:
* **Complete fix**: A dependency version that fixes all associated vulnerabilities.
* **Partial fix**: A dependency version that fixes the vulnerability but not all other vulnerabilities associated with the dependency.
* **Affected version**: A dependency version for which the vulnerability was detected.
#### Malicious package \
The dependency risk for prohibited license risk type depends on the configuration of your instance’s license profile and policy. The How can I fix it? tab provides information about different license categories and links to relevant resources. In general, resolving a license risk will require choosing a different software package to use instead. For more information, see [Managing license profiles and policies](https://docs.sonarsource.com/sonarqube-cloud/advanced-security/managing-license-profiles-and-policies).
### Setting a license profile and policy
Instance admins can configure a license profile and policy to define which licenses are allowed or prohibited for the dependencies used in your projects or the whole instance. For more information, see Managing license profiles and policies.
### Dependency risks in quality gates
The **Project overview** page displays dependency risks and indicates whether they pass or fail the associated quality gate.
As a quality gate administrator, you can configure quality gate conditions for **Prohibited license**, **Malicious package**, and **Vulnerability** types for new and overall code, or set limits on the number or severity of dependency risks that will cause the quality gate to fail. See [Managing custom quality gates](https://docs.sonarsource.com/sonarqube-cloud/standards/managing-quality-gates/managing-custom-quality-gates) for more information.
If your organization has recently purchased the Advanced Security package, you will have to create a custom quality gate to make sure no new dependency risks are introduced in your projects.
See [Understanding measures and metrics](https://docs.sonarsource.com/sonarqube-cloud/digging-deeper/metric-definitions) for more information about Advanced Security metrics used in quality gates.
### Downloading a dependency risk report
You can download a report of the dependency risks for your project, applications, and portfolios from the project overview page, or by calling a [SonarQube Cloud API endpoint](https://api-docs.sonarsource.com/sonarqube-cloud/default/public-dependencyservice-v1-1).
The report lists dependency risks based on the latest scan for the default branch of your project, application or portfolio. It can help managers identify:
* What violations exist in their team’s projects
* What patterns of risk are associated with higher-level dependencies, and how to use the information to guide developers effectively
* What specific upgrades developers can perform to remove multiple violations.
The report is downloaded JSON and CSV format and contains information on:
* Project, Application, Portfolio
* Dependency chain(s)
* Risk title (a short description of the risk)
* Risk type
* Risk severity
* Risk status, including comments when status was changed
* CVSS score associated to the risk
* CVE and CWE ids, if relevant
* Date when Sonar assigned the Risk to the project
### Related pages
* [Viewing dependencies](https://docs.sonarsource.com/sonarqube-cloud/advanced-security/viewing-dependencies)
* [Analyzing projects for dependencies](https://docs.sonarsource.com/sonarqube-cloud/advanced-security/analyzing-projects-for-dependencies-sca)
* [Managing license profiles and policies](https://docs.sonarsource.com/sonarqube-cloud/advanced-security/managing-license-profiles-and-policies)
* [Troubleshooting](https://docs.sonarsource.com/sonarqube-cloud/advanced-security/troubleshooting-the-dependency-analysis)
* [Best practices for managing dependency risks](https://docs.sonarsource.com/sonarqube-cloud/advanced-security/best-practices-for-managing-dependency-risks)
---
# Source: https://docs.sonarsource.com/sonarqube-community-build/user-guide/issues/reviewing.md
# Source: https://docs.sonarsource.com/sonarqube-server/10.6/user-guide/issues/reviewing.md
# Source: https://docs.sonarsource.com/sonarqube-server/10.7/user-guide/issues/reviewing.md
# Source: https://docs.sonarsource.com/sonarqube-server/10.8/user-guide/issues/reviewing.md
# Source: https://docs.sonarsource.com/sonarqube-server/2025.2/user-guide/issues/reviewing.md
# Source: https://docs.sonarsource.com/sonarqube-server/2025.3/user-guide/issues/reviewing.md
# Source: https://docs.sonarsource.com/sonarqube-server/2025.5/user-guide/issues/reviewing.md
# Source: https://docs.sonarsource.com/sonarqube-server/2025.1/user-guide/issues/reviewing.md
# Source: https://docs.sonarsource.com/sonarqube-server/2025.4/user-guide/issues/reviewing.md
# Source: https://docs.sonarsource.com/sonarqube-server/2025.6/user-guide/issues/reviewing.md
# Source: https://docs.sonarsource.com/sonarqube-server/user-guide/issues/reviewing.md
# Source: https://docs.sonarsource.com/sonarqube-cloud/managing-your-projects/issues/reviewing.md
# Reviewing issues
### Viewing issue details
To view the issue’s details, retrieve an issue and click on its title. See [retrieving](https://docs.sonarsource.com/sonarqube-cloud/managing-your-projects/issues/retrieving "mention") for more information.
The main components of the issue detail page are as follows:
1. A list of filtered issues.
2. A path to the code file where the issue is located.
3. Current issue.
4. Other issues that were raised in the same code file.
5. A detailed view of the issue.
6. The coding rule that raised the issue. Click on the link to read more about the rule that raised the issue.
7. Tabs with detailed information about the issue:
* **Where is the issue?** See the issue’s location and message in the code.
* **Why is this an issue?** Read the issue’s description.
* **How can I fix it?** See how to fix the issue and view a noncompliant code example and a compliant solution.
* **Activity**: Read comments and management history of the issue.
* **More info**: View additional resources and information that can help you to understand and fix the issue.
8. Issue message displayed in the code.
### Navigating through the issue’s secondary locations
All SonarQube Cloud issues specify a location in the code showing where the issue occurs. However, some of the more complex rules produce issues for which a single location is not enough to adequately explain why the issue has occurred. These more complex rules often identify additional locations in the code to help understand the problem. These additional locations are referred to as secondary locations. Secondary locations may just indicate other locations that are related to the issue or may identify a flow through the code that leads to the issue.
#### Other locations
Retrieve the issue and navigate to the issue's detail view. See [retrieving](https://docs.sonarsource.com/sonarqube-cloud/managing-your-projects/issues/retrieving "mention") for more information.
1. Additional locations are shown in the left sidebar. Click on the locations to highlight them in the code on the right. You can also use the keyboard combination indicated under the list to navigate to the previous or next location.
2. The highlighted location of the issue in the code with the issue’s message.
3. List of additional locations in the code on the right side.
#### Execution flow
When the issue originates upstream, paths through the code (execution flows) are shown from the source to the sink (destination). In particular, for issues breaking a security-injection rule, there is a vulnerability when the inputs handled by your application are controlled by a user (potentially an attacker) and not validated or sanitized. In that case, SonarQube Cloud displays the execution flow from the sources (user-controlled inputs) to sinks (sensitive functions).
{% hint style="info" %}
Check out this [video](https://www.youtube.com/watch?v=17G-aZcuMKw) for an example of a security issue with an execution flow.
{% endhint %}
To navigate through the execution flow of an issue:
1. Retrieve the issue and open its detail view. See [retrieving](https://docs.sonarsource.com/sonarqube-cloud/managing-your-projects/issues/retrieving "mention") for more information. The execution flows are listed in the left sidebar.
2. To navigate to a location in the execution flow, select it in the list. You can also use the key combination indicated under the flow to navigate to the previous or next location in the flow.
### Management history and comments
1. Retrieve the issue and open its detail view. See [retrieving](https://docs.sonarsource.com/sonarqube-cloud/managing-your-projects/issues/retrieving "mention") for more information.
2. Open the **Activity** tab. The tab shows the number of comments added to the issue.
3. View the activities and comments or click **Add a comment** to leave a comment about the issue.
---
# Source: https://docs.sonarsource.com/sonarqube-community-build/server-update-and-maintenance/update/roadmap.md
# Source: https://docs.sonarsource.com/sonarqube-server/10.4/setup-and-upgrade/upgrade-the-server/roadmap.md
# Source: https://docs.sonarsource.com/sonarqube-server/10.5/setup-and-upgrade/upgrade-the-server/roadmap.md
# Source: https://docs.sonarsource.com/sonarqube-server/10.6/setup-and-upgrade/upgrade-the-server/roadmap.md
# Source: https://docs.sonarsource.com/sonarqube-server/10.7/server-upgrade-and-maintenance/upgrade/upgrade-the-server/roadmap.md
# Source: https://docs.sonarsource.com/sonarqube-server/10.8/server-upgrade-and-maintenance/upgrade/upgrade-the-server/roadmap.md
# Source: https://docs.sonarsource.com/sonarqube-server/2025.2/server-update-and-maintenance/upgrade/roadmap.md
# Source: https://docs.sonarsource.com/sonarqube-server/2025.3/server-update-and-maintenance/upgrade/roadmap.md
# Source: https://docs.sonarsource.com/sonarqube-server/2025.5/server-update-and-maintenance/update/roadmap.md
# Source: https://docs.sonarsource.com/sonarqube-server/2025.1/server-update-and-maintenance/update/roadmap.md
# Source: https://docs.sonarsource.com/sonarqube-server/2025.4/server-update-and-maintenance/update/roadmap.md
# Source: https://docs.sonarsource.com/sonarqube-server/2025.6/server-update-and-maintenance/update/roadmap.md
# Source: https://docs.sonarsource.com/sonarqube-server/server-update-and-maintenance/update/roadmap.md
# Overview
### Reasons to update immediately
In SonarQube Server, you need to perform an update in the following situations:
1. If you are on a version of SonarQube Server that is no longer active.
2. If you are on the latest version of SonarQube Server and there is a new update available.
3. If you are on the latest version or Long-Term-Active (LTA) for which there is a new patch version available (security and bug fixes).
### Update steps
Follow these steps to perform an update of your SonarQube Server:
1. Read [release-cycle-model](https://docs.sonarsource.com/sonarqube-server/server-update-and-maintenance/update/release-cycle-model "mention").
2. [determine-path](https://docs.sonarsource.com/sonarqube-server/server-update-and-maintenance/update/determine-path "mention").
3. Read the [#upgrade-notes](https://docs.sonarsource.com/sonarqube-server/release-notes#upgrade-notes "mention") between the SonarQube versions.
4. [pre-update-steps](https://docs.sonarsource.com/sonarqube-server/server-update-and-maintenance/update/pre-update-steps "mention").
5. Back up the SonarQube Server database.
6. [update](https://docs.sonarsource.com/sonarqube-server/server-update-and-maintenance/update/update "mention").
7. [post-update-steps](https://docs.sonarsource.com/sonarqube-server/server-update-and-maintenance/update/post-update-steps "mention").
Check out this video on how to ace your SonarQube Server update.
{% embed url="" %}
### Related pages
* [updating-from-sonarqube-community-build](https://docs.sonarsource.com/sonarqube-server/server-update-and-maintenance/update/updating-from-sonarqube-community-build "mention")
* [moving-to-another-edition](https://docs.sonarsource.com/sonarqube-server/server-update-and-maintenance/update/moving-to-another-edition "mention")
* [other-procedures](https://docs.sonarsource.com/sonarqube-server/server-update-and-maintenance/update/other-procedures "mention")
---
# Source: https://docs.sonarsource.com/sonarqube-server/8.9/analyzing-source-code/languages/rpg.md
# Source: https://docs.sonarsource.com/sonarqube-server/9.8/analyzing-source-code/languages/rpg.md
# Source: https://docs.sonarsource.com/sonarqube-server/9.9/analyzing-source-code/languages/rpg.md
# Source: https://docs.sonarsource.com/sonarqube-server/10.0/analyzing-source-code/languages/rpg.md
# Source: https://docs.sonarsource.com/sonarqube-server/10.1/analyzing-source-code/languages/rpg.md
# Source: https://docs.sonarsource.com/sonarqube-server/10.2/analyzing-source-code/languages/rpg.md
# Source: https://docs.sonarsource.com/sonarqube-server/10.3/analyzing-source-code/languages/rpg.md
# Source: https://docs.sonarsource.com/sonarqube-server/10.4/analyzing-source-code/languages/rpg.md
# Source: https://docs.sonarsource.com/sonarqube-server/10.5/analyzing-source-code/languages/rpg.md
# Source: https://docs.sonarsource.com/sonarqube-server/10.6/analyzing-source-code/languages/rpg.md
# Source: https://docs.sonarsource.com/sonarqube-server/10.7/analyzing-source-code/languages/rpg.md
# Source: https://docs.sonarsource.com/sonarqube-server/10.8/analyzing-source-code/languages/rpg.md
# Source: https://docs.sonarsource.com/sonarqube-server/2025.2/analyzing-source-code/languages/rpg.md
# Source: https://docs.sonarsource.com/sonarqube-server/2025.3/analyzing-source-code/languages/rpg.md
# Source: https://docs.sonarsource.com/sonarqube-server/2025.5/analyzing-source-code/languages/rpg.md
# Source: https://docs.sonarsource.com/sonarqube-server/2025.1/analyzing-source-code/languages/rpg.md
# Source: https://docs.sonarsource.com/sonarqube-server/2025.4/analyzing-source-code/languages/rpg.md
# Source: https://docs.sonarsource.com/sonarqube-server/2025.6/analyzing-source-code/languages/rpg.md
# Source: https://docs.sonarsource.com/sonarqube-server/analyzing-source-code/languages/rpg.md
# Source: https://docs.sonarsource.com/sonarqube-cloud/advanced-setup/languages/rpg.md
# RPG
This language is available only in the SonarQube Cloud Enterprise plan. See the [subscription-plans](https://docs.sonarsource.com/sonarqube-cloud/administering-sonarcloud/managing-subscription/subscription-plans "mention") page for more details.
### Supported versions
The level of support for a language is defined as follows:
* Fully supported: Analysis will complete. All the language features are understood and examined.
* Supported: Most language features are understood and examined but the version includes unsupported features. Analysis might break or provide incomplete results.
RPG IV (ILE RPG) for IBM™ i Version >= V3R1 <= 7.3 are fully supported1
RPG IV (ILE RPG) for IBM™ i Version > 7.3 are supported11 : Free-form partial and full formats are supported.
### Language specific properties
To discover and update the RPG-specific properties, navigate in SonarQube Cloud to *Your Project* > **Administration** > **General Settings** > **Languages** > **RPG**. See the [analysis-parameters](https://docs.sonarsource.com/sonarqube-cloud/advanced-setup/analysis-parameters "mention") page for more information about specific properties.
### Source code extraction
In order to analyze your source code with SonarQube Cloud you need to first extract it onto a file system. You can use your own tool or an open-source tool; Sonar does not provide any connectors or source code extraction tools.
### RPG source format
Depending on your extraction process, your RPG source files may include an extra margin on the left of the 80 columns used for code. This margin is in addition to the standard margin which takes up characters 1-5 in the 80-character source format (when "fully free-form" is not used). The extra margin is controlled through the `sonar.rpg.leftMarginWidth` property. By default, it is set to 12, which is the size of the margin in an IBM "source physical file". If your RPG source files do not contain such a margin, you should set `sonar.rpg.leftMarginWidth` to `0`.
You can find an [example file](https://github.com/SonarSource/sonar-scanning-examples/blob/master/sonar-scanner/src/rpg/MYPROGRAM.rpg) illustrating a 12-character margin in our sample project.
You should also make sure to set `sonar.sourceEncoding` to the appropriate encoding. Please check the [analysis-parameters](https://docs.sonarsource.com/sonarqube-cloud/advanced-setup/analysis-parameters "mention") page for details.
### Free-Form Support
Free-form is supported for all kinds of specifications and SQL statements that exist in IBM i 7.4. Fully free-form code (starting with `**FREE`) is also supported.
---
# Source: https://docs.sonarsource.com/sonarqube-community-build/analyzing-source-code/languages/ruby.md
# Source: https://docs.sonarsource.com/sonarqube-server/8.9/analyzing-source-code/languages/ruby.md
# Source: https://docs.sonarsource.com/sonarqube-server/9.8/analyzing-source-code/languages/ruby.md
# Source: https://docs.sonarsource.com/sonarqube-server/9.9/analyzing-source-code/languages/ruby.md
# Source: https://docs.sonarsource.com/sonarqube-server/10.0/analyzing-source-code/languages/ruby.md
# Source: https://docs.sonarsource.com/sonarqube-server/10.1/analyzing-source-code/languages/ruby.md
# Source: https://docs.sonarsource.com/sonarqube-server/10.2/analyzing-source-code/languages/ruby.md
# Source: https://docs.sonarsource.com/sonarqube-server/10.3/analyzing-source-code/languages/ruby.md
# Source: https://docs.sonarsource.com/sonarqube-server/10.4/analyzing-source-code/languages/ruby.md
# Source: https://docs.sonarsource.com/sonarqube-server/10.5/analyzing-source-code/languages/ruby.md
# Source: https://docs.sonarsource.com/sonarqube-server/10.6/analyzing-source-code/languages/ruby.md
# Source: https://docs.sonarsource.com/sonarqube-server/10.7/analyzing-source-code/languages/ruby.md
# Source: https://docs.sonarsource.com/sonarqube-server/10.8/analyzing-source-code/languages/ruby.md
# Source: https://docs.sonarsource.com/sonarqube-server/2025.2/analyzing-source-code/languages/ruby.md
# Source: https://docs.sonarsource.com/sonarqube-server/2025.3/analyzing-source-code/languages/ruby.md
# Source: https://docs.sonarsource.com/sonarqube-server/2025.5/analyzing-source-code/languages/ruby.md
# Source: https://docs.sonarsource.com/sonarqube-server/2025.1/analyzing-source-code/languages/ruby.md
# Source: https://docs.sonarsource.com/sonarqube-server/2025.4/analyzing-source-code/languages/ruby.md
# Source: https://docs.sonarsource.com/sonarqube-server/2025.6/analyzing-source-code/languages/ruby.md
# Source: https://docs.sonarsource.com/sonarqube-server/analyzing-source-code/languages/ruby.md
# Source: https://docs.sonarsource.com/sonarqube-cloud/advanced-setup/languages/ruby.md
# Ruby
### Supported versions
The level of support for a language is defined as follows:
* Fully supported: Analysis will complete. All the language features are understood and examined.
* Supported: Most language features are understood and examined but the version includes unsupported features. Analysis might break or provide incomplete results.
Versions 3.0, 3.1 and 3.2 are supported.
### Language-specific properties
To discover and update the Ruby-specific properties, navigate in SonarQube Cloud to *Your Project* > **Administration** > **General Settings** > **Languages** > **Ruby**. See the [analysis-parameters](https://docs.sonarsource.com/sonarqube-cloud/advanced-setup/analysis-parameters "mention") page for more information about specific properties.
By default, all the `vendor` directories are excluded from the analysis. However, you can change the property `sonar.ruby.exclusions` to a different pattern if you want to force their analysis (not recommended).
### Related pages
* [external-analyzer-reports](https://docs.sonarsource.com/sonarqube-cloud/enriching/external-analyzer-reports "mention") (Rubocop)
* Test coverage [overview](https://docs.sonarsource.com/sonarqube-cloud/enriching/test-coverage/overview "mention") (SimpleCov)
---
# Source: https://docs.sonarsource.com/sonarqube-server/2025.2/user-guide/rules/rules-for-ai-codefix.md
# Source: https://docs.sonarsource.com/sonarqube-server/2025.3/user-guide/rules/rules-for-ai-codefix.md
# Source: https://docs.sonarsource.com/sonarqube-server/2025.5/user-guide/rules/rules-for-ai-codefix.md
# Source: https://docs.sonarsource.com/sonarqube-server/2025.1/user-guide/rules/rules-for-ai-codefix.md
# Source: https://docs.sonarsource.com/sonarqube-server/2025.4/user-guide/rules/rules-for-ai-codefix.md
# Source: https://docs.sonarsource.com/sonarqube-server/2025.6/user-guide/rules/rules-for-ai-codefix.md
# Source: https://docs.sonarsource.com/sonarqube-server/user-guide/rules/rules-for-ai-codefix.md
# Source: https://docs.sonarsource.com/sonarqube-cloud/digging-deeper/rules-for-ai-codefix.md
# Rules for AI CodeFix
*AI features are only available in SonarQube Cloud Team and Enterprise plans*. See the [subscription-plans](https://docs.sonarsource.com/sonarqube-cloud/administering-sonarcloud/managing-subscription/subscription-plans "mention") page for more details*.*
In SonarQube, analyzers contribute rules executed on source code to generate issues. Some of these rules are more complex than others and therefore, not suitable for use with the [ai-codefix](https://docs.sonarsource.com/sonarqube-cloud/ai-capabilities/ai-codefix "mention"). This page lists rules that work with the AI CodeFix service.
### Rules covered with AI CodeFix
Below you’ll find a list of Sonar Rules that are eligible for use with our AI CodeFix feature. We’ve tested each of these rules in the supported AI models and given them a confidence score to ensure they can effectively help you resolve issues. Once a rule passes our certification, it’s added to the AI CodeFix service and becomes available to you. We’re constantly working to expand this list by evaluating more rules and enhancing our AI capabilities.
Each collapsible holds a list of rules for the listed language. You will find instructions inside on how to find the detailed rule description on the [Sonar Rules website](https://rules.sonarsource.com/).
AI CodeFix rules for C++
**AI CodeFix rules for C++**
Go to the [Sonar Rules website](https://rules.sonarsource.com/) to search for more information about your rule.
* select any rule at
* replace the RSPEC number in the rule’s URL with the relevant rule number listed below.
For example, to read about rule `cpp:S1048`, go to
cpp:S1048
cpp:S1051
cpp:S1052
cpp:S1065
cpp:S1066
cpp:S1079
cpp:S1110
cpp:S1117
cpp:S1121
cpp:S1131
cpp:S1155
cpp:S117
cpp:S1172
cpp:S1188
cpp:S1199
cpp:S1235
cpp:S1238
cpp:S125
cpp:S1264
cpp:S1270
cpp:S1271
cpp:S1301
cpp:S134
cpp:S1481
cpp:S1669
cpp:S1705
cpp:S1751
cpp:S1764
cpp:S1768
cpp:S1772
cpp:S1854
cpp:S1905
cpp:S1912
cpp:S1915
cpp:S1916
cpp:S2259
cpp:S2275
cpp:S2305
cpp:S2343
cpp:S2681
cpp:S2807
cpp:S3229
cpp:S3358
cpp:S3458
cpp:S3490
cpp:S3539
cpp:S3542
cpp:S3549
cpp:S3574
cpp:S3659
cpp:S3806
cpp:S3923
cpp:S3972
cpp:S3973
cpp:S4334
cpp:S4962
cpp:S5028
cpp:S5271
cpp:S5303
cpp:S5319
cpp:S5350
cpp:S5416
cpp:S5523
cpp:S5536
cpp:S5566
cpp:S5817
cpp:S5820
cpp:S5825
cpp:S5827
cpp:S5946
cpp:S5951
cpp:S5997
cpp:S6005
cpp:S6024
cpp:S6045
cpp:S6164
cpp:S6171
cpp:S6178
cpp:S6180
cpp:S6185
cpp:S6186
cpp:S6195
cpp:S6197
cpp:S6226
cpp:S6229
cpp:S6230
cpp:S6234
cpp:S6391
cpp:S7034
cpp:S7116
cpp:S811
cpp:S818
cpp:S831
cpp:S834
cpp:S835
cpp:S836
cpp:S864
cpp:S868
cpp:S871
cpp:S872
cpp:S878
cpp:S905
cpp:S959
cpp:S963
cpp:S966
cpp:S982
cpp:S991
cpp:S994
cpp:S995
cpp:S998
AI CodeFix rules for C# and Roslyn security
**AI CodeFix rules for C#**
Go to the [Sonar Rules website](https://rules.sonarsource.com/) to search for more information about your rule.
* select any rule at
* replace the RSPEC number in the rule’s URL with the relevant rule number listed below.
For example, to read about rule `csharpsquid:S100`, go to
csharpsquid:S100
csharpsquid:S101
csharpsquid:S1066
csharpsquid:S107
csharpsquid:S1110
csharpsquid:S1116
csharpsquid:S1117
csharpsquid:S1118
csharpsquid:S112
csharpsquid:S1121
csharpsquid:S1125
csharpsquid:S1128
csharpsquid:S1135
csharpsquid:S1144
csharpsquid:S1155
csharpsquid:S1168
csharpsquid:S1172
csharpsquid:S1186
csharpsquid:S1199
csharpsquid:S121
csharpsquid:S1244
csharpsquid:S125
csharpsquid:S1264
csharpsquid:S1450
csharpsquid:S1481
csharpsquid:S1643
csharpsquid:S1656
csharpsquid:S1659
csharpsquid:S1764
csharpsquid:S1848
csharpsquid:S1854
csharpsquid:S1871
csharpsquid:S1905
csharpsquid:S1939
csharpsquid:S1940
csharpsquid:S2178
csharpsquid:S2219
csharpsquid:S2223
csharpsquid:S2259
csharpsquid:S2292
csharpsquid:S2325
csharpsquid:S2342
csharpsquid:S2344
csharpsquid:S2368
csharpsquid:S2372
csharpsquid:S2376
csharpsquid:S2386
csharpsquid:S2445
csharpsquid:S2479
csharpsquid:S2583
csharpsquid:S2629
csharpsquid:S2681
csharpsquid:S2701
csharpsquid:S2933
csharpsquid:S2971
csharpsquid:S3010
csharpsquid:S3052
csharpsquid:S3217
csharpsquid:S3218
csharpsquid:S3220
csharpsquid:S3241
csharpsquid:S3242
csharpsquid:S3247
csharpsquid:S3257
csharpsquid:S3260
csharpsquid:S3267
csharpsquid:S3353
csharpsquid:S3358
csharpsquid:S3415
csharpsquid:S3442
csharpsquid:S3445
csharpsquid:S3456
csharpsquid:S3457
csharpsquid:S3604
csharpsquid:S3626
csharpsquid:S3655
csharpsquid:S3878
csharpsquid:S3881
csharpsquid:S3897
csharpsquid:S3903
csharpsquid:S3928
csharpsquid:S3949
csharpsquid:S3973
csharpsquid:S4035
csharpsquid:S4050
csharpsquid:S4056
csharpsquid:S4058
csharpsquid:S4275
csharpsquid:S4487
csharpsquid:S4581
csharpsquid:S4663
csharpsquid:S6602
csharpsquid:S6603
csharpsquid:S6605
csharpsquid:S6608
csharpsquid:S6667
csharpsquid:S6668
csharpsquid:S6672
csharpsquid:S6678
csharpsquid:S6966
csharpsquid:S927
**AI CodeFix rules for Roslyn rules**
Go to the [Sonar Rules website](https://rules.sonarsource.com/) to search for more information about your rule.
* select any rule at
* replace the RSPEC number in the rule’s URL with the relevant rule number listed below.
For example, to read about rule `roslyn.sonaranalyzer.security.cs:S2076`, go to
roslyn.sonaranalyzer.security.cs:S2076
roslyn.sonaranalyzer.security.cs:S2078
roslyn.sonaranalyzer.security.cs:S2091
roslyn.sonaranalyzer.security.cs:S3649
roslyn.sonaranalyzer.security.cs:S5131
roslyn.sonaranalyzer.security.cs:S5145
roslyn.sonaranalyzer.security.cs:S5146
roslyn.sonaranalyzer.security.cs:S5334
roslyn.sonaranalyzer.security.cs:S6096
roslyn.sonaranalyzer.security.cs:S6173
roslyn.sonaranalyzer.security.cs:S6639
roslyn.sonaranalyzer.security.cs:S6641
AI CodeFix rules for Java and Java security
**AI CodeFix rules for Java**
Go to the [Sonar Rules website](https://rules.sonarsource.com/) to search for more information about your rule.
* select any rule at
* replace the RSPEC number in the rule’s URL with the relevant rule number listed below.
For example, to read about rule `java:S100`, go to
java:S100
java:S101
java:S1065
java:S1068
java:S108
java:S1104
java:S1110
java:S1116
java:S1117
java:S1118
java:S1121
java:S1124
java:S1125
java:S1126
java:S1128
java:S1130
java:S1132
java:S1135
java:S1144
java:S1149
java:S115
java:S116
java:S1168
java:S1155
java:S1157
java:S117
java:S1170
java:S1171
java:S1172
java:S1181
java:S1182
java:S1186
java:S119
java:S1192
java:S1197
java:S120
java:S1206
java:S1210
java:S1221
java:S1223
java:S1244
java:S125
java:S1264
java:S1301
java:S131
java:S1319
java:S135
java:S1444
java:S1450
java:S1481
java:S1488
java:S1602
java:S1604
java:S1611
java:S1612
java:S1643
java:S1656
java:S1659
java:S1764
java:S1845
java:S1854
java:S1858
java:S1871
java:S1905
java:S1940
java:S1994
java:S2039
java:S2047
java:S2094
java:S2129
java:S2130
java:S2140
java:S2148
java:S2153
java:S2162
java:S2164
java:S2178
java:S2184
java:S2185
java:S2189
java:S2200
java:S2201
java:S2209
java:S2211
java:S2251
java:S2252
java:S2259
java:S2293
java:S2325
java:S2326
java:S2333
java:S2386
java:S2440
java:S2479
java:S2589
java:S2681
java:S2694
java:S2701
java:S2786
java:S2864
java:S2974
java:S3008
java:S3012
java:S3052
java:S3358
java:S3400
java:S3457
java:S3518
java:S3626
java:S3740
java:S3776
java:S3923
java:S3973
java:S3985
java:S4144
java:S4165
java:S4274
java:S4838
java:S4973
java:S5361
java:S5411
java:S5738
java:S5867
java:S6208
java:S6213
java:S7158
java:S818
java:S881
**AI CodeFix rules for Java security**
Go to the [Sonar Rules website](https://rules.sonarsource.com/) to search for more information about your rule.
* select any rule at
* replace the RSPEC number in the rule’s URL with the relevant rule number listed below.
For example, to read about rule `javasecurity:S2076`, go to
javasecurity:S2076
javasecurity:S2078
javasecurity:S2083
javasecurity:S2091
javasecurity:S2631
javasecurity:S3649
javasecurity:S5131
javasecurity:S5145
javasecurity:S5146
javasecurity:S5167
javasecurity:S5883
javasecurity:S6173
javasecurity:S6547
javasecurity:S6549
AI CodeFix rules for JavaScript and JavaScript security
**AI CodeFix rules for JavaScript**
Go to the [Sonar Rules website](https://rules.sonarsource.com/) to search for more information about your rule.
* select any rule at
* replace the RSPEC number in the rule’s URL with the relevant rule number listed below.
For example, to read about rule `javascript:S100`, go to
javascript:S100
javascript:S101
javascript:S1066
javascript:S108
javascript:S1082
javascript:S1105
javascript:S1117
javascript:S1121
javascript:S1125
javascript:S1126
javascript:S113
javascript:S1131
javascript:S117
javascript:S1172
javascript:S1186
javascript:S1199
javascript:S121
javascript:S125
javascript:S126
javascript:S1264
javascript:S1438
javascript:S1440
javascript:S1441
javascript:S1481
javascript:S1533
javascript:S1534
javascript:S1539
javascript:S1656
javascript:S1751
javascript:S1763
javascript:S1764
javascript:S1788
javascript:S1854
javascript:S1871
javascript:S1874
javascript:S1940
javascript:S1994
javascript:S2094
javascript:S2137
javascript:S2427
javascript:S2430
javascript:S2681
javascript:S2703
javascript:S2814
javascript:S2871
javascript:S3353
javascript:S3358
javascript:S3403
javascript:S3504
javascript:S3512
javascript:S3514
javascript:S3516
javascript:S3524
javascript:S3579
javascript:S3626
javascript:S3696
javascript:S3699
javascript:S3760
javascript:S3782
javascript:S3800
javascript:S3801
javascript:S3972
javascript:S3973
javascript:S4138
javascript:S4144
javascript:S6509
javascript:S6557
javascript:S6582
javascript:S6594
javascript:S6638
javascript:S6643
javascript:S6644
javascript:S6645
javascript:S6647
javascript:S6661
javascript:S6666
javascript:S6836
javascript:S6959
javascript:S878
javascript:S881
javascript:S905
javascript:S909
javascript:S930
**AI CodeFix rules for JS security**
Go to the [Sonar Rules website](https://rules.sonarsource.com/) to search for more information about your rule.
* select any rule at
* replace the RSPEC number in the rule’s URL with the relevant rule number listed below.
For example, to read about rule `jssecurity:S2083`, go to
jssecurity:S2083
jssecurity:S2631
jssecurity:S3649
jssecurity:S5131
jssecurity:S5146
jssecurity:S5696
jssecurity:S6096
AI CodeFix rules for Python and Python security
**AI CodeFix rules for Python**
Go to the [Sonar Rules website](https://rules.sonarsource.com/) to search for more information about your rule.
* select any rule at
* replace the RSPEC number in the rule’s URL with the relevant rule number listed below.
For example, to read about rule `python:S100`, go to
python:S100
python:S101
python:S1066
python:S108
python:S1110
python:S112
python:S1128
python:S1142
python:S117
python:S1172
python:S1186
python:S1244
python:S125
python:S1481
python:S1515
python:S1542
python:S1720
python:S1721
python:S1722
python:S1854
python:S1871
python:S1940
python:S2772
python:S2836
python:S3457
python:S3626
python:S3801
python:S5603
python:S5717
python:S5754
python:S5795
python:S5799
python:S5806
python:S5890
python:S5906
python:S6538
python:S6660
python:S6711
python:S6903
**AI CodeFix rules for Python security**
Go to the [Sonar Rules website](https://rules.sonarsource.com/) to search for more information about your rule.
* select any rule at
* replace the RSPEC number in the rule’s URL with the relevant rule number listed below.
For example, to read about rule `pythonsecurity:S2076`, go to
pythonsecurity:S2076
pythonsecurity:S2078
pythonsecurity:S2083
pythonsecurity:S3649
pythonsecurity:S5131
pythonsecurity:S5144
pythonsecurity:S5145
pythonsecurity:S5146
pythonsecurity:S5167
pythonsecurity:S5334
AI CodeFix rules for TypeScript and TypeScript security
**AI CodeFix rules for TypeScript**
Go to the [Sonar Rules website](https://rules.sonarsource.com/) to search for more information about your rule.
* select any rule at
* replace the RSPEC number in the rule’s URL with the relevant rule number listed below.
For example, to read about rule `typescript:S100`, go to
typescript:S100
typescript:S101
typescript:S1066
typescript:S108
typescript:S1082
typescript:S1105
typescript:S1117
typescript:S1121
typescript:S1125
typescript:S113
typescript:S1131
typescript:S117
typescript:S1172
typescript:S1186
typescript:S1199
typescript:S121
typescript:S125
typescript:S126
typescript:S1264
typescript:S1438
typescript:S1440
typescript:S1441
typescript:S1533
typescript:S1539
typescript:S1656
typescript:S1751
typescript:S1763
typescript:S1764
typescript:S1788
typescript:S1854
typescript:S1871
typescript:S1874
typescript:S1940
typescript:S1994
typescript:S2094
typescript:S2137
typescript:S2427
typescript:S2430
typescript:S2681
typescript:S2871
typescript:S3353
typescript:S3358
typescript:S3504
typescript:S3512
typescript:S3514
typescript:S3516
typescript:S3524
typescript:S3579
typescript:S3626
typescript:S3696
typescript:S3699
typescript:S3972
typescript:S4138
typescript:S4144
typescript:S4325
typescript:S6509
typescript:S6557
typescript:S6564
typescript:S6582
typescript:S6594
typescript:S6638
typescript:S6643
typescript:S6644
typescript:S6647
typescript:S6661
typescript:S6666
typescript:S6836
typescript:S6959
typescript:S878
typescript:S881
typescript:S905
**AI CodeFix rules for TypeScript security**
Go to the [Sonar Rules website](https://rules.sonarsource.com/) to search for more information about your rule.
* select any rule at
* replace the RSPEC number in the rule’s URL with the relevant rule number listed below.
For example, to read about rule `tssecurity:S2083`, go to
tssecurity:S2083
tssecurity:S2631
tssecurity:S3649
tssecurity:S5131
tssecurity:S5146
tssecurity:S5696
tssecurity:S6096
---
# Source: https://docs.sonarsource.com/sonarqube-community-build/user-guide/rules.md
# Source: https://docs.sonarsource.com/sonarqube-for-eclipse/using/rules.md
# Source: https://docs.sonarsource.com/sonarqube-for-visual-studio/using/rules.md
# Source: https://docs.sonarsource.com/sonarqube-for-intellij/using/rules.md
# Source: https://docs.sonarsource.com/sonarqube-for-vs-code/using/rules.md
# Source: https://docs.sonarsource.com/sonarqube-server/8.9/user-guide/rules.md
# Source: https://docs.sonarsource.com/sonarqube-server/9.8/user-guide/rules.md
# Source: https://docs.sonarsource.com/sonarqube-server/9.9/user-guide/rules.md
# Source: https://docs.sonarsource.com/sonarqube-server/10.0/user-guide/rules.md
# Source: https://docs.sonarsource.com/sonarqube-server/10.1/user-guide/rules.md
# Source: https://docs.sonarsource.com/sonarqube-server/10.2/user-guide/rules.md
# Source: https://docs.sonarsource.com/sonarqube-server/10.3/user-guide/rules.md
# Source: https://docs.sonarsource.com/sonarqube-server/10.4/user-guide/rules.md
# Source: https://docs.sonarsource.com/sonarqube-server/10.5/user-guide/rules.md
# Source: https://docs.sonarsource.com/sonarqube-server/10.6/user-guide/rules.md
# Source: https://docs.sonarsource.com/sonarqube-server/10.7/user-guide/rules.md
# Source: https://docs.sonarsource.com/sonarqube-server/10.8/user-guide/rules.md
# Source: https://docs.sonarsource.com/sonarqube-server/2025.2/user-guide/rules.md
# Source: https://docs.sonarsource.com/sonarqube-server/2025.3/user-guide/rules.md
# Source: https://docs.sonarsource.com/sonarqube-server/2025.5/user-guide/rules.md
# Source: https://docs.sonarsource.com/sonarqube-server/2025.1/user-guide/rules.md
# Source: https://docs.sonarsource.com/sonarqube-server/2025.4/user-guide/rules.md
# Source: https://docs.sonarsource.com/sonarqube-server/2025.6/user-guide/rules.md
# Source: https://docs.sonarsource.com/sonarqube-server/user-guide/rules.md
# Source: https://docs.sonarsource.com/sonarqube-cloud/digging-deeper/rules.md
# Rules
### Overview
SonarQube's analyzers run rules on source code, resulting in the generation of issues and security hotspots. These rules address three software qualities—security, reliability, and maintainability—and are categorized into four types: bugs, vulnerabilities, code smells, and security hotspots.
For code smells and bugs, zero false-positives are expected. At least this is the target so you don’t have to wonder if a fix is required.
For vulnerabilities, the target is to have more than 80% of issues be *true* positives.
Security hotspot rules draw attention to code that is security-sensitive. After being reviewed by a developer, more than 80% of issues are expected to be quickly resolved.
The [Sonar Rules website](https://rules.sonarsource.com/) is the entry point where you can discover all the existing rules.
### Rules page
1. From within your organization, select **Rules** in the navigation bar to see all the available rules.
2. Use filters to narrow your results.
3. A list of rules appears on the right side of the page.
#### Filters
You can filter the list of rules using the following criteria in the left sidebar:
* **Language**: the language to which a rule applies.
* **Code Attribute**: the single attribute evaluated by the rule. A code attribute contributes to the long-term value of your software. The possible values are: consistency, intentionality, adaptability, responsibility. For more information, see the [glossary](https://docs.sonarsource.com/sonarqube-cloud/appendices/glossary#c).
* **Software Quality**: the software quality addressed by the rule. The same rule may address several software qualities. The possible values are: security, reliability, maintainability.
* **Severity** (software quality): the impact level with which a software quality is impacted if the rule is broken. The possible values are: blocker, high, medium, low, info.
* **Type**: the category of the issue raised by the rule if the rule is broken. The possible values are: bug, vulnerability, code smell, security hotspot.
* **Type severity**: the severity of the issue or hotspot raised by the rule if the rule is broken. The possible values are : blocker, critical, major, minor, info. \
Note that quality gate conditions related to severity currently use type severities.
* **Tag**: you can add tags to rules in order to classify them and to help discover them more easily.
* **Repository**: the engine/analyzer that contributes rules to SonarQube Cloud.
* **Status**: rules can have 3 different statuses:
* **Ready**: the rule is ready to be used in production.
* **Beta**: the rule has been recently implemented and Sonar hasn’t gotten enough feedback from users yet, so there may be false positives or false negatives.
* **Deprecated**: the rule should no longer be used because a similar, but more powerful and accurate rule exists.
* **Security Category**: security rules are classified according to well-established security standards such as [CWE](https://cwe.mitre.org/) and [OWASP Top 10](https://owasp.org/Top10/). See the [security-related-rules](https://docs.sonarsource.com/sonarqube-cloud/digging-deeper/security-related-rules "mention") page for more detail.
* **Available Since**: The date when a rule was first added on SonarQube Cloud. This is useful to list all the new rules since the last upgrade of a plugin, for instance.
* **Quality Profile**: *Inclusion in* or *exclusion from* a specific profile.
* **Inheritance**: Available when an inherited quality profile is selected. It filters inherited rules, other rules, or inherited rules that have been overridden by other settings.
* **Activation severity** is available when an inherited quality profile is selected. It can filter by severity using the value chosen when the rule was activated in the quality profile.
See the [understanding-quality-profiles](https://docs.sonarsource.com/sonarqube-cloud/standards/managing-quality-profiles/understanding-quality-profiles "mention") for more details about how your rule selection affects your analysis.
### Rule details
To see the details of a rule, either select the rule title or use the arrow keys to cycle through the list. Inside the detailed view, along side the basic rule data, you’ll also see which profiles the rule is active in.
**Add/Remove tags**:
* You can add existing tags to a rule or create new ones, just enter a new name while typing in the text field. For more information, see [#tagging](https://docs.sonarsource.com/sonarqube-cloud/managing-your-projects/issues/editing#tagging "mention").
* Note that some rules have built-in tags that you cannot remove. They are provided by the plugins that contribute the rules.
**Extend description**:
* You can extend rule descriptions to let users know how your organization uses a particular rule or give more insight into a rule.
### Rule types, software qualities and severities
{% tabs %}
{% tab title="SOFTWARE QUALITY CATEGORIZATION" %}
How are rules categorized by software qualities impacted? There are four categories: security, reliability, maintainability, and security hotspots. Rules are assigned to one or more software quality categories based on the answers to these questions:
**Is the rule about code that could be exploited by an attacker?** If yes, then it’s a security rule.
**Is the rule about code that is demonstrably wrong, or more likely wrong than not?** If the answer is "yes", then it’s a reliability rule.
**Is the rule neither a bug nor a vulnerability?** If yes, then it’s a maintainability rule.
{% endtab %}
{% tab title="TYPES CATEGORIZATION" %}
How are rules categorized by type? There are four categories: bugs, vulnerabilities, code smells, and security hotspots. Rules are assigned to categories based on the answers to these questions:
**Is the rule about code that could be exploited by an attacker?** If yes, then it’s a vulnerability rule.
**Is the rule about code that is security-sensitive?** If yes, then it’s a security hotspot rule.
**Is the rule about code that is demonstrably wrong, or more likely wrong than not?** If the answer is "yes", then it’s a bug rule.
**Is the rule neither a bug nor a vulnerability?** If yes, then it’s a code smell rule.
{% endtab %}
{% endtabs %}
### How severities are assigned
{% tabs %}
{% tab title="SOFTWARE QUALITY SEVERITIES" %}
List of severity metrics used in software qualities.
Severity
Definition
Blocker
An issue that has a significant probability of severe unintended consequences on the application that should be fixed immediately. This includes bugs leading to production crashes and security flaws allowing attackers to extract sensitive data or run malicious code.
High
An issue with a high impact on the application that should be fixed as soon as possible.
Medium
An issue with a medium impact on the application.
Low
An issue with a low impact on the application.
Info
There is no expected impact on the application. For informational purposes only.
{% endtab %}
{% tab title="TYPE SEVERITIES" %}
List of severity metrics used in types.
Severity
Definition
Blocker
An issue that has a significant probability of severe unintended consequences on the application that should be fixed immediately. This includes bugs leading to production crashes and security flaws allowing attackers to extract sensitive data or run malicious code.
Critical
An issue with a critical impact on the application that should be fixed as soon as possible.
Major
An issue with a major impact on the application.
Minor
An issue with a minor impact on the application.
Info
There is no expected impact on the application. For informational purposes only.
{% endtab %}
{% endtabs %}
To assign severity to a rule, we ask a further series of questions. The first one is:
**What’s the worst-case scenario that could happen?**
In answering this question, we try to factor in Murphy’s Law, without predicting Armageddon.
Then we assess whether the impact and likelihood of the worst-case scenario are high or low (see [#how-severity-and-likelihood-are-decided](#how-severity-and-likelihood-are-decided "mention")), and plug the answers into a truth table:
| Software quality | Type | Impact | Likelihood |
| ---------------- | -------- | ------ | ---------- |
| Blocker | Blocker | ✅ | ✅ |
| High | Critical | ✅ | ❌ |
| Medium | Major | ❌ | ✅ |
| Low | Minor | ❌ | ❌ |
### How severity and likelihood are decided
To assess the severity of a rule, we start from the worst-case scenario (see [#how-severity-and-likelihood-are-decided](#how-severity-and-likelihood-are-decided "mention")) and ask category-specific questions.
{% tabs %}
{% tab title="SOFTWARE QUALITY" %}
**Reliability**
Impact: Could the worst thing cause the application to crash or corrupt stored data?
Likelihood: What’s the probability that the worst thing will happen?
**Security**
Impact: Could the exploitation of the worst thing result in significant damage to your assets or your users?
Likelihood: What is the probability that an attacker will be able to exploit the worst thing.
{% endtab %}
{% tab title="TYPES" %}
**Bugs**
Impact: Could the worst thing cause the application to crash or corrupt stored data?
Likelihood: What’s the probability that the worst thing will happen?
**Vulnerabilities**
Impact: Could the exploitation of the worst thing result in significant damage to your assets or your users?
Likelihood: What is the probability that an attacker will be able to exploit the worst thing?
**Security Hotspot**
Security hotspots are not assigned severities as it is unknown whether there is truly an underlying vulnerability until they are reviewed.
{% endtab %}
{% endtabs %}
### Commercial-level rules
There are commercial-level rules that are available in SonarQube Cloud to all plans. This availability is shown on the Sonar rules page.
In order for these rules to appear in SonarQube for IDE, it must be in connected mode. In the standalone mode these rules are not visible. See [connected-mode](https://docs.sonarsource.com/sonarqube-cloud/improving/connected-mode "mention") for more information about the connected mode.
### What might change after a software update
Sonar developers continually re-evaluate Sonar rules to provide the best results. This process is evident in each release and means some rule-specific properties may change after a software update, even in a custom quality profile. This is normal and expected, and is no cause for alarm. The following are rule-specific properties that may change after a software update.
* **Software quality** (security, reliability, maintainability) updates to rules can occur. Changes to a rule’s software qualities will not be applied to issues previously raised by the rule until the project is reanalyzed.
* **Type** (bug, vulnerability, code smell) updates happen on occasion. When a rule type is updated, its value will update automatically in every profile that uses it. Although the rule will be updated, issues previously raised by the rule will remain the same. For example, if a rule transitioned from bug to code smell, the existing issues will retain their original bug type, and new issues will get the new type, code smell.
* **Severity**: Changes to a rule’s default severity will automatically be applied in quality profiles where the default severity was used. Although the rule will be updated, existing issues raised by the rule will remain the same. Note that it is possible to override a rule’s default severity in a profile, and your custom override should remain intact in your Quality Profile after the software update.
* **Tags** include two types: the default tags that come out of the box, and the custom tags added by administrators. When the default tags attached to a rule are updated in SonarQube Cloud, those changes will happen automatically. Custom tags associated with a rule will not change.
* **Key** can change but this is uncommon. Typically this happens in the rare case that, for whatever reason, a key that was non-normal and needs to be normalized. When the key of a rule is changed, related issues are updated as well, so that they remain related to the re-keyed rule.
* **Status** does not affect the operation of a rule and has no impact on its issues. There are three possible rule statuses: ready, beta, and deprecated. Sometimes, rules are first issued in beta status and then moved to ready. Most rules are in ready status; ready to be used in production. When Sonar developers realize that a rule no longer makes sense, they first deprecate the rule, then eventually drop it.
See the [Sonar Rules catalog](https://rules.sonarsource.com/) for a comprehensive list of rules and their properties.
### Rules covered with AI CodeFix
SonarQube Cloud’s AI CodeFix is a feature that uses space.vars.SQC\_Supported\_LLM\_version to suggest fixes for a select set of rules in Java, JavaScript, TypeScript, Python, C#, and C++. See the [Sonar AI CodeFix terms](https://www.sonarsource.com/legal/ai-codefix-terms/) for details about the terms of access.
To learn more about which rules are eligible for AI CodeFix, please see the list of [#ai-codefix-rules](https://docs.sonarsource.com/sonarqube-cloud/rules-for-ai-codefix#ai-codefix-rules "mention").
### Related pages
* [security-related-rules](https://docs.sonarsource.com/sonarqube-cloud/digging-deeper/security-related-rules "mention")
* [security-hotspots](https://docs.sonarsource.com/sonarqube-cloud/digging-deeper/security-hotspots "mention")
* [rules-for-ai-codefix](https://docs.sonarsource.com/sonarqube-cloud/digging-deeper/rules-for-ai-codefix "mention")
* [metric-definitions](https://docs.sonarsource.com/sonarqube-cloud/digging-deeper/metric-definitions "mention")
* [introduction](https://docs.sonarsource.com/sonarqube-cloud/managing-your-projects/issues/introduction "mention") to managing your code issues
* [understanding-quality-profiles](https://docs.sonarsource.com/sonarqube-cloud/standards/managing-quality-profiles/understanding-quality-profiles "mention")
* [quality-gates](https://docs.sonarsource.com/sonarqube-cloud/improving/quality-gates "mention")
---
# Source: https://docs.sonarsource.com/sonarqube-for-eclipse/getting-started/running-an-analysis.md
# Source: https://docs.sonarsource.com/sonarqube-for-visual-studio/getting-started/running-an-analysis.md
# Source: https://docs.sonarsource.com/sonarqube-for-intellij/getting-started/running-an-analysis.md
# Source: https://docs.sonarsource.com/sonarqube-for-vs-code/getting-started/running-an-analysis.md
# Running an analysis
Now that you’ve installed the SonarQube for IDE extension in your IDE, running an analysis is straight-forward. For the most part, new analyses are automatically triggered when you open a file, as you type, or with each file save following a change in the code. Below we’ve outlined other ways to trigger a SonarQube for IDE analysis.
### Triggering an analysis
First, open a project using one of the [rules](https://docs.sonarsource.com/sonarqube-for-vs-code/using/rules "mention"). Some languages can only be unlocked when running in [connected-mode](https://docs.sonarsource.com/sonarqube-for-vs-code/connect-your-ide/connected-mode "mention"). For C and C++, check the **Analyze C and C++ code** section below.
New analyses are automatically triggered in VS Code when you open or save a file; with Autosave configured, new issues will be reported as you type.
Check the [investigating-issues](https://docs.sonarsource.com/sonarqube-for-vs-code/using/investigating-issues "mention") page for details about how to recognize issues in your IDE.
### Enable or disable automatic analysis
It is possible to manually enable or disable automatic analysis. In the VS Code Status Bar, select **SonarQube** to toggle the setting. Alternatively, from the **SONARQUBE** panel, select the dual-arrow refresh icon to toggle automatic analysis.
### How it works
With Auto Save enabled in VS Code, SonarQube for IDE continuously analyzes the code while you type. Simply open any source file, start coding, and you will start seeing issues reported by SonarQube for IDE. Issues are highlighted in your code and also listed in the **PROBLEMS** panel.
You can access the detailed rule description directly from your editor, using the provided contextual menu.
### Analyze changed files
{% hint style="success" %}
This is a SonarQube for IDE Labs feature. Update your SonarQube for VS Code installation to version 4.37 or newer, then sign up for IDE Labs to get early access to our newest features and help shape the future of SonarQube for IDE!
Open the **SONARQUBE FOR IDE LABS** panel from the right side of your **SONARQUBE** panel.
{% endhint %}
Navigate to the **SOURCE CONTROL** > **Changes** view container and select the **Analyze Changed Files with SonarQube** () icon to trigger an analysis on all files changed since the last commit to ensure fewer issues reach your remote repository. This is especially useful if automatic analysis is disabled for your development project. It can be your last check on changes you made before creating a pull request.
### Analyze C and C++ code
#### Prerequisites
To analyze C and C++ code, you need to satisfy both of these conditions:
1. **Generate a compilation database** and
2. be on one of the **Supported environments**
See below for details.
#### Generate a compilation database
[Compilation database](https://clang.llvm.org/docs/JSONCompilationDatabase.html) is a JSON file format introduced by the LLVM project. It contains the compile commands used to build a project. For instructions on how to generate a compilation database, choose the appropriate collapsible below. The preferred option is to use the build system.
{% hint style="info" %}
The C and C++ ecosystem is diverse. This documentation provides a general overview of how to set up your environment under common circumstances. If you need more assistance than we can provide here, please check if the compilation database is a feature in your extension, search the [SonarQube for VS Code Community forum](https://community.sonarsource.com/c/sl/vs-code/36) for details about your build system, and reach out with questions if you have any troubles.
{% endhint %}
Using the build system
**Generate a compilation database using the build system**
Many build systems support the automatic generation of compilation databases. For example:
* CMake by simply setting this option `CMAKE_EXPORT_COMPILE_COMMANDS`
* VS Code [Makefile Tools](https://devblogs.microsoft.com/cppblog/makefile-tools-december-2021-update-problem-matchers-and-compilation-database-generation/) extension
* Ninja by setting the `compdb` flag
* Xcode through Clang’s `-gen-cdb-fragment-path` feature:
```css-79elbk
# Add the following "OTHER_CFLAGS" option to the xcodebuild command
xcodebuild clean build OTHER_CFLAGS="\$(inherited) -gen-cdb-fragment-path \$(PROJECT_DIR)/CompilationDatabase"
# After the build, aggregate the fragments into "compile_commands.json"
cd CompilationDatabase && sed -e '1s/^/[\'$'\n''/' -e '$s/,$/\'$'\n'']/' *.json > ../compile_commands.json && cd ..
```
* Clang using the -MJ option. Note that this will generate a compilation database entry by input. The merge of all entries can be done through something like `sed -e '1s/^/[\'$'\n''/' -e '$s/,$/\'$'\n'']/' *.o.json > compile_commands.json`
When different choices are available, generating a compilation database through the build system should be preferred.
Using Sonar’s Build Wrapper
Build Wrapper is a tool developed by Sonar that generates a compilation database, capturing your build configuration at build time. To run Build Wrapper, you should prepend your clean build command with the Build Wrapper executable.
When you wrap your build command with the build wrapper, it will run the given command and gather all the configuration required for a correct analysis of C/C++/Objective-C projects such as macro definitions and include directories. The Build Wrapper does not impact your build; it merely monitors it and writes what it learns into files in a directory you specify. There is no need to build a second time without Build Wrapper.
You should download the build wrapper directly from SonarQube Cloud:
* [Download Build Wrapper for Linux](https://sonarcloud.io/static/cpp/build-wrapper-linux-x86.zip)
* [Download Build Wrapper for macOS](https://sonarcloud.io/static/cpp/build-wrapper-macosx-x86.zip)
* [Download Build Wrapper for Windows](https://sonarcloud.io/static/cpp/build-wrapper-win-x86.zip)
Unzip the downloaded build wrapper and configure it in your PATH because doing so is just more convenient.
Execute build wrapper as a prefix to your usual clean build command. A clean build command should always build the project from scratch.
The examples below use `make`, `xcodebuild` and `MSBuild`, but any build tool that performs a full build can be used:
**Linux**
```bash
build-wrapper-linux-x86-64 --out-dir build_wrapper_output_directory make clean all
```
**macOS**
```bash
build-wrapper-macosx-x86 --out-dir build_wrapper_output_directory xcodebuild clean build
```
**Windows**
```bash
build-wrapper-win-x86-64.exe --out-dir build_wrapper_output_directory MSBuild.exe /t:Rebuild /nodeReuse:False
```
At the end of your build, a `compile_commands.json` file should be generated in the specified output directory.
{% hint style="warning" %}
All the files generated by Build Wrapper in the output directory contain a dump of the environment. Sharing these files, in some contexts, can be a security concern.
{% endhint %}
Using open-source wrappers
**Generate a compilation database using open-source wrappers**
In case the above options are not successful in generating a compilation database, some open-source wrappers can help. For example:
* [Bear](https://github.com/rizsotto/Bear)
* [Bazel compile commands extractor](https://github.com/hedronvision/bazel-compile-commands-extractor)
Using a custom script
**Generate a compilation database using a custom script**
A compilation database is simply a JSON file that describes how to compile a project. If none of the previous approaches are feasible, for example, in the case of an *internal build system*, writing a script that generates a compilation database to describe how source files are supposed to be compiled might be the best solution.
**Best practices**
* Make sure that the compilation database contains the actual compile commands. This can be checked by running the compilation commands inside the `compile_commands.json` and verifying that they succeed.
* The compilation database should not contain header files entries. We use internal heuristics to analyze header files
* Make sure that the compilation database is up to date. It should be refreshed as part of the development cycle.
If you don’t use the Build Wrapper to generate a compilation database and the build relies on environment variables, make sure that they are set in the VS Code environment.
General recommendations
**Best practices**
* Make sure that the compilation database contains the actual compile commands. This can be checked by running the compilation commands inside the `compile_commands.json` and verifying that they succeed
* Make sure that the compilation database is up to date. It should be refreshed as part of the development cycle
* If the build system uses environment variables, make sure that they are set in the VS Code environment
* The compilation database should not contain header files entries. We use internal heuristics to analyze header files
#### Supported environments Compilers
**Supported compilers**
* Any version of Clang, GCC, and Microsoft C/C++ compilers
* Any version of Intel compiler for Linux and macOS
* ARM5 and ARM6 compilers
* IAR compilers for ARM, Atmel AVR32, Atmel AVR, Renesas H8, Renesas RL78, Renesas RX, Renesas V850, Texas Instruments MSP430, and 8051
* QNX compilers
* Texas Instruments compilers on Windows and macOS for ARM, C2000, C6000, C7000, MSP430, and PRU
* Wind River Diab and GCC compilers
* Compilers based wholly on GCC, including, for instance, Linaro GCC, are also supported
Language standards
**Supported language standards**
C standards: C89, C99, C11, C17
C++ standards: C++03, C++11, C++14, C++17, C++20 and C++23.
GNU extensions
Runtime environments
**Supported runtime environments**
* Microsoft Windows on x86-64
* Linux on x86-64
* macOS with version 10.14.3 and later on x86-64
### Activating C and C++ Analysis
The analysis can be activated by simply pointing to a compilation database that describes the project to be analyzed. This can be done through a notification that pops up when a folder that contains a file named `compile_commands.json` is opened, or through the SonarQube for VS Code embedded action that lists all compilation database files in the folder, or by manually assigning the `sonarlint.pathToCompileCommands` option in the settings to the full path of the compilation database.
Note that the SonarQube for IDE embedded action can be used to switch the active compilation database.
### Troubleshooting C and C++ Analysis
In case the analysis is not working or obvious false positives are raised, here are the recommended actions in order:
1\. **Investigate the logs**:
* First, enable the `Verbose Logs` and look if there is any error or failures that indicate what went wrong.
* Check the [troubleshooting](https://docs.sonarsource.com/sonarqube-for-vs-code/resources/troubleshooting "mention") page for instructions to enable these logs.
2\. **Make sure that the compilation database is credible**:
* Check that the compilation database is up to date. It shouldn’t contain outdated commands or point to files that no longer exist.
* Make sure that the compilation database contains the actual compilation commands. This can be done by running the `commands` inside the `compile_commands.json` and verifying that they succeed.
* Make sure that the VS Code environment has the environment variables required to build the project.
3\. **Enable Rule \`S2260\`**:
* In case of obvious false positives in the raised issues, enable the [`cpp:S2260`](https://rules.sonarsource.com/cpp/RSPEC-2260/) or [`c:S2260`](https://rules.sonarsource.com/c/RSPEC-2260/) rule and check if it raises issues in the culprit file. This rule indicates that the analyzer failed to parse part of the code and might give hints or indicate a configuration problem.
* If it raises issues, follow the rule description to fix your code; if not, move to the step in troubleshooting.
4\. **Generate the CFamily reproducer File and Report the Issue**:
* When none of the previous suggestions work, please report the problem you encountered in the [Sonar community](https://community.sonarsource.com/).
* In case of a false positive or an analysis failure, we need the CFamily reproducer file to investigate the issue. To generate the reproducer file, add the following analyzer option to the `settings.json`:
* `"sonarlint.analyzerProperties": {"sonar.cfamily.reproducer" : "C:\\replace\\by\\path\\to\\file.cpp"}`
* The `sonar.cfamily.reproducer` should point to the source or header file on which you face the issue. After setting that option, trigger the analysis on the culprit file. You should see in the logs that a file name `sonar-cfamily.reproducer` is generated in a temporary directory. Upload that file in your community report or ask us to share it privately if it contains sensitive information.
---
# Source: https://docs.sonarsource.com/sonarqube-community-build/server-installation/from-zip-file/starting-stopping-server/running-as-a-service.md
# Source: https://docs.sonarsource.com/sonarqube-server/2025.3/server-installation/from-zip-file/starting-stopping-server/running-as-a-service.md
# Source: https://docs.sonarsource.com/sonarqube-server/2025.5/server-installation/from-zip-file/starting-stopping-server/running-as-a-service.md
# Source: https://docs.sonarsource.com/sonarqube-server/2025.4/server-installation/from-zip-file/starting-stopping-server/running-as-a-service.md
# Source: https://docs.sonarsource.com/sonarqube-server/2025.6/server-installation/from-zip-file/starting-stopping-server/running-as-a-service.md
# Source: https://docs.sonarsource.com/sonarqube-server/server-installation/from-zip-file/starting-stopping-server/running-as-a-service.md
# Running as a service
### On Windows
#### Installing or uninstalling SonarQube as a service
```css-79elbk
> \bin\windows-x86-64\SonarService.bat install
> \bin\windows-x86-64\SonarService.bat uninstall
```
#### Starting the service
```css-79elbk
> \bin\windows-x86-64\SonarService.bat start
```
{% hint style="info" %}
By default, the service will use the Java executable available on the Windows PATH. This setting can be changed by setting the environmental variable `SONAR_JAVA_PATH`. See more in [advanced-setup](https://docs.sonarsource.com/sonarqube-server/server-installation/from-zip-file/advanced-setup "mention").
{% endhint %}
#### Stopping the service
```css-79elbk
> \bin\windows-x86-64\SonarService.bat stop
```
{% hint style="info" %}
This command does a graceful shutdown where no new analysis report processing can start, but the tasks in progress are allowed to finish. The time a stop will take depends on the processing time of the tasks in progress. You’ll need to end all SonarQube Server processes manually to force a stop.
{% endhint %}
#### Checking the service status
To check if the SonarQube service is running:
```css-79elbk
> \bin\windows-x86-64\SonarService.bat status
```
### On Linux with systemd
On a Unix system using systemd, you can install SonarQube as a service. You cannot run SonarQube as root in Unix systems. Ideally, you will have created a new account dedicated to the purpose of running SonarQube. Let’s suppose:
* The user used to start the service is `sonarqube`
* The group used to start the service is `sonarqube`
* The Java Virtual Machine is installed in `/opt/java/`
* SonarQube has been unzipped into `/opt/sonarqube/`
Then create the file `/etc/systemd/system/sonarqube.service` *based on* the following:
```css-79elbk
[Unit]
Description=SonarQube service
After=syslog.target network.target
[Service]
Type=simple
User=sonarqube
Group=sonarqube
PermissionsStartOnly=true
ExecStart=/bin/nohup /opt/java/bin/java -Xms32m -Xmx32m -Djava.net.preferIPv4Stack=true -jar /opt/sonarqube/lib/sonar-application-25.1.0.102122.jar
StandardOutput=journal
LimitNOFILE=131072
LimitNPROC=8192
TimeoutStartSec=5
Restart=always
SuccessExitStatus=143
[Install]
WantedBy=multi-user.target
```
{% hint style="info" %}
* Because the sonar-application jar name ends with the version of SonarQube, you will need to adjust the `ExecStart` command accordingly on install and at each upgrade.
* All SonarQube directories should be owned by the `sonarqube` user.
* If you have multiple Java versions, you will need to modify the `java` path in the `ExecStart` command. This also means `SONAR_JAVA_PATH` will not work with SonarQube as a service.
{% endhint %}
Once your `sonarqube.service` file is created and properly configured, run:
```css-79elbk
sudo systemctl enable sonarqube.service
sudo systemctl start sonarqube.service
```
### On Linux with initd
The following has been tested on Ubuntu 20.04 and CentOS 6.2.
You cannot run SonarQube as `root` in \*nix systems. Ideally, you will have created a new account dedicated to the purpose of running SonarQube. Let’s suppose the user used to start the service is `sonarqube`. Then create the file`/etc/init.d/sonar` *based on* the following:
```css-79elbk
#!/bin/sh
#
# rc file for SonarQube
#
# chkconfig: 345 96 10
# description: SonarQube system (www.sonarsource.org)
#
### BEGIN INIT INFO
# Provides: sonar
# Required-Start: $network
# Required-Stop: $network
# Default-Start: 3 4 5
# Default-Stop: 0 1 2 6
# Short-Description: SonarQube system (www.sonarsource.org)
# Description: SonarQube system (www.sonarsource.org)
### END INIT INFO
su sonarqube -c "/usr/bin/sonar $*"
```
Register SonarQube at boot time (RedHat, CentOS, 64 bit):
```css-79elbk
sudo ln -s /bin/linux-x86-64/sonar.sh /usr/bin/sonar
sudo chmod 755 /etc/init.d/sonar
sudo chkconfig --add sonar
```
Register SonarQube at boot time (Ubuntu, 64 bit):
```css-79elbk
sudo ln -s /bin/linux-x86-64/sonar.sh /usr/bin/sonar
sudo chmod 755 /etc/init.d/sonar
sudo update-rc.d sonar defaults
```
Once registration is done, run:
```css-79elbk
sudo service sonar start
```
---
# Source: https://docs.sonarsource.com/sonarqube-server/10.6/analyzing-source-code/languages/c-family/running-the-analysis.md
# Source: https://docs.sonarsource.com/sonarqube-server/10.7/analyzing-source-code/languages/c-family/running-the-analysis.md
# Source: https://docs.sonarsource.com/sonarqube-server/10.8/analyzing-source-code/languages/c-family/running-the-analysis.md
# Source: https://docs.sonarsource.com/sonarqube-server/2025.2/analyzing-source-code/languages/c-family/running-the-analysis.md
# Source: https://docs.sonarsource.com/sonarqube-server/2025.3/analyzing-source-code/languages/c-family/running-the-analysis.md
# Source: https://docs.sonarsource.com/sonarqube-server/2025.5/analyzing-source-code/languages/c-family/running-the-analysis.md
# Source: https://docs.sonarsource.com/sonarqube-server/2025.1/analyzing-source-code/languages/c-family/running-the-analysis.md
# Source: https://docs.sonarsource.com/sonarqube-server/2025.4/analyzing-source-code/languages/c-family/running-the-analysis.md
# Source: https://docs.sonarsource.com/sonarqube-server/2025.6/analyzing-source-code/languages/c-family/running-the-analysis.md
# Source: https://docs.sonarsource.com/sonarqube-server/analyzing-source-code/languages/c-family/running-the-analysis.md
# Source: https://docs.sonarsource.com/sonarqube-cloud/advanced-setup/languages/c-family/running-the-analysis.md
# Running the analysis
For Automatic Analysis mode, the analysis will run automatically after your project is activated (see the [#activating-automatic-analysis](https://docs.sonarsource.com/sonarqube-cloud/automatic-analysis#activating-automatic-analysis "mention") article on the [automatic-analysis](https://docs.sonarsource.com/sonarqube-cloud/advanced-setup/automatic-analysis "mention") page). For Compilation Database mode, continue reading this page to learn how to execute the analysis on your CI.
Refer to the CFamily [prerequisites](https://docs.sonarsource.com/sonarqube-cloud/advanced-setup/languages/c-family/prerequisites "mention") to pick the suitable scanner variant, and refer to the picked scanner documentation to learn how to execute it. In addition, you need to set the `sonar.cfamily.compile-commands` scanner property to analyze in Compilation Database mode.
### SonarScanner CLI
If you decide to use the Compilation Database mode, please ensure you have generated the `compile_commands.json` file before proceeding.
**Step 1:** Add the `sonar-project.properties` file at the root of your project. Sample `sonar-project.properties`:
```properties
sonar.projectKey=myFirstProject
sonar.projectName=My First C++ Project
sonar.projectVersion=1.0
sonar.sources=src
sonar.sourceEncoding=UTF-8
sonar.host.url=SonarCloudURL
```
Gathering all your code trees in a subdirectory of your project is recommended to avoid analyzing irrelevant source files like third-party dependencies. You can specify this subdirectory by setting the property `sonar.sources` accordingly. In this example, we named it `src`.
**Step 2:** Add the property `sonar.cfamily.compile-commands` in the `sonar-project.properties` file. You should set it to the path of the *Compilation Database* file relative to the project directory (`compile_commands.json` in these examples):\
`sonar.cfamily.compile-commands=compile_commands.json`
**Step 3:** Execute the SonarScanner CLI (`sonar-scanner`) from the root directory of your project: `sonar-scanner`\
For more SonarScanner CLI-related options, see the [sonarscanner-cli](https://docs.sonarsource.com/sonarqube-cloud/advanced-setup/ci-based-analysis/sonarscanner-cli "mention") page.
**Step 4:** Follow the link provided at the end of the analysis to browse your project’s quality metrics in the UI.
### SonarScanner for .NET
This is an example of analyzing a Solution using a C++ and C# mix in Compilation Database mode with a build wrapper\*.\*
The SonarScanner for .NET does not handle `sonar-project.properties` files, so the compilation database must be set during the .NET `begin` step.
Note that in this scenario, source code stored in shared folders, which are not considered a "Project" by Visual Studio, won’t be scanned.
1. Download and install the SonarScanner for .NET (see [installing](https://docs.sonarsource.com/sonarqube-cloud/advanced-setup/ci-based-analysis/sonarscanner-for-dotnet/installing "mention")) and the build wrapper (see the CFamily [prerequisites](https://docs.sonarsource.com/sonarqube-cloud/advanced-setup/languages/c-family/prerequisites "mention") page).
2. Execute the SonarScanner for .NET `begin` step with the build wrapper output parameter:\
`/d:sonar.cfamily.compile-commands=/compile_commands.json`
3. Add execution of the build wrapper to your normal .NET build command
4. Execute the SonarScanner for .NET `end` step to complete the analysis
```bash
SonarScanner.MSBuild.exe begin /k:"cs-and-cpp-project-key" /n:"My C# and C++ project" /v:"1.0" /d:sonar.cfamily.compile-commands="build_wrapper_output_directory/compile_commands.json"
build-wrapper-win-x86-64.exe --out-dir build_wrapper_output_directory MSBuild.exe /t:Rebuild /nodeReuse:False
SonarScanner.MSBuild.exe end
```
An analysis configuration example project with a mix of C# and C++ is available on [GitHub](https://github.com/sonarsource-cfamily-examples/windows-msbuild-dotnet-cpp-azure-sc).
---
# Source: https://docs.sonarsource.com/sonarqube-community-build/analyzing-source-code/languages/rust.md
# Source: https://docs.sonarsource.com/sonarqube-server/2025.3/analyzing-source-code/languages/rust.md
# Source: https://docs.sonarsource.com/sonarqube-server/2025.5/analyzing-source-code/languages/rust.md
# Source: https://docs.sonarsource.com/sonarqube-server/2025.4/analyzing-source-code/languages/rust.md
# Source: https://docs.sonarsource.com/sonarqube-server/2025.6/analyzing-source-code/languages/rust.md
# Source: https://docs.sonarsource.com/sonarqube-server/analyzing-source-code/languages/rust.md
# Source: https://docs.sonarsource.com/sonarqube-cloud/advanced-setup/languages/rust.md
# Rust
### Supported versions
The level of support for a language is defined as follows:
* Fully supported: Analysis will complete. All the language features are understood and examined.
* Supported: Most language features are understood and examined but the version includes unsupported features. Analysis might break or provide incomplete results.
All versions are fully supported through the Clippy linter.
The Rust analyzer supports:
* Code Coverage import (LCOV and Cobertura formats)
* Cognitive Complexity metric
* Cyclomatic Complexity metric
* Import of Clippy output as external rules (JSON format)
### Prerequisites
Before using the Sonar Rust analyzer, ensure the following tools are installed and available in your system’s PATH:
* **Cargo**: The Rust package manager. You can install it from [rustup.rs](https://rustup.rs/).
* **Clippy (cargo clippy)**: A Rust linter to catch common mistakes and improve your code. Install it using `rustup component add clippy`.
### Running the analysis
You can analyze Rust projects using the [sonarscanner-cli](https://docs.sonarsource.com/sonarqube-cloud/advanced-setup/ci-based-analysis/sonarscanner-cli "mention"). Make sure it is available on the machine running the analysis.
### Clippy integration
The Sonar Rust analyzer integrates with Clippy to provide code analysis. You can configure the Clippy integration in two ways:
* Run Clippy Analysis: The analyzer runs Clippy automatically (default).
* Import External Reports: Load pre-generated Clippy JSON reports.
These two methods are not mutually exclusive and can be used simultaneously. However, be aware that using both methods might lead to undesirable effects, such as duplicated Clippy issues.
#### Running the Clippy analysis
By default, the Sonar Rust analyzer automatically triggers a Clippy analysis. The analyzer will look for a *Cargo.toml* manifest in the project’s root directory and run Clippy.
* You can specify custom paths to `Cargo.toml` manifest files using `sonar.rust.cargo.manifestPaths`, which accepts a comma-separated list of file paths.
* You can disable the automatic Clippy analysis by setting the `sonar.rust.clippy.enable` property to `false`.
Even when Clippy analysis is disabled, all other Sonar Rust analysis features, such as code metrics calculation, code complexity, and code duplication, will remain active.
#### Importing external Clippy reports
You can import Clippy issues from external JSON reports using the `sonar.rust.clippy.reportPaths` property. This property accepts a comma-separated list of file paths to your Clippy JSON reports.
You can generate Clippy JSON reports with the command `cargo clippy --message-format=json`.
### Code coverage
See the [test-coverage-parameters](https://docs.sonarsource.com/sonarqube-cloud/enriching/test-coverage/test-coverage-parameters "mention") page for information on importing coverage reports for Rust.
### Language-specific properties
For a complete list of available properties and their descriptions, please refer to the Rust-specific properties in the project **Administration** > **Configuration** > **General Settings** > **Languages** > **Rust**.
To discover and update the Rust-specific properties, navigate in SonarQube Cloud to *Your Project* > **Administration** > **General Settings** > **Languages** > **Rust**. See the [analysis-parameters](https://docs.sonarsource.com/sonarqube-cloud/advanced-setup/analysis-parameters "mention") page for more information about specific properties.
### Troubleshooting
If the automatically triggered analysis fails, a warning will be displayed in the logs and on the SonarQube project page. To troubleshoot the issue, try manually running `cargo clippy` in the project directory to examine the error details.
---
# Source: https://docs.sonarsource.com/sonarqube-community-build/instance-administration/authentication/saml.md
# Source: https://docs.sonarsource.com/sonarqube-server/9.8/instance-administration/authentication/saml.md
# Source: https://docs.sonarsource.com/sonarqube-server/9.9/instance-administration/authentication/saml.md
# Source: https://docs.sonarsource.com/sonarqube-server/10.0/instance-administration/authentication/saml.md
# Source: https://docs.sonarsource.com/sonarqube-server/10.1/instance-administration/authentication/saml.md
# Source: https://docs.sonarsource.com/sonarqube-server/10.2/instance-administration/authentication/saml.md
# Source: https://docs.sonarsource.com/sonarqube-server/10.3/instance-administration/authentication/saml.md
# Source: https://docs.sonarsource.com/sonarqube-server/10.4/instance-administration/authentication/saml.md
# Source: https://docs.sonarsource.com/sonarqube-server/10.5/instance-administration/authentication/saml.md
# Source: https://docs.sonarsource.com/sonarqube-server/10.6/instance-administration/authentication/saml.md
# Source: https://docs.sonarsource.com/sonarqube-server/10.7/instance-administration/authentication/saml.md
# Source: https://docs.sonarsource.com/sonarqube-server/10.8/instance-administration/authentication/saml.md
# Source: https://docs.sonarsource.com/sonarqube-server/2025.2/instance-administration/authentication/saml.md
# Source: https://docs.sonarsource.com/sonarqube-server/2025.3/instance-administration/authentication/saml.md
# Source: https://docs.sonarsource.com/sonarqube-server/2025.5/instance-administration/authentication/saml.md
# Source: https://docs.sonarsource.com/sonarqube-server/2025.1/instance-administration/authentication/saml.md
# Source: https://docs.sonarsource.com/sonarqube-server/2025.4/instance-administration/authentication/saml.md
# Source: https://docs.sonarsource.com/sonarqube-server/2025.6/instance-administration/authentication/saml.md
# Source: https://docs.sonarsource.com/sonarqube-server/instance-administration/authentication/saml.md
# SAML
- [Overview of SAML support](/sonarqube-server/instance-administration/authentication/saml/overview.md): You can delegate authentication to a SAML 2.0 identity provider using SAML authentication. SonarQube Server uses the Service Provider (SP) initiated SAML.
- [With Microsoft Entra ID](/sonarqube-server/instance-administration/authentication/saml/ms-entra-id.md): Setting up SAML authentication with Microsoft Entra ID in your SonarQube Server instance.
- [Introduction to SAML with Microsoft Entra ID](/sonarqube-server/instance-administration/authentication/saml/ms-entra-id/introduction.md): Main steps of SAML authentication setup with Microsoft Entra ID.
- [Setup in Microsoft Entra ID](/sonarqube-server/instance-administration/authentication/saml/ms-entra-id/setup-in-entra-id.md): This page describes how to register SonarQube Server in Microsoft Entra ID.
- [Setup in SonarQube Server](/sonarqube-server/instance-administration/authentication/saml/ms-entra-id/setup-in-sq.md): This page describes how to setup in SonarQube Server SAML with Microsoft Entra ID.
- [Setup of security features](/sonarqube-server/instance-administration/authentication/saml/ms-entra-id/optional-security-features.md): To improve security, you can set up the encryption of SAML assertions sent by Microsoft Entra ID and the signing of SAML requests sent by SonarQube Server.
- [With Keycloak](/sonarqube-server/instance-administration/authentication/saml/how-to-set-up-keycloak.md): Setting up SAML authentication with Keycloak in your SonarQube Server instance.
- [With Okta](/sonarqube-server/instance-administration/authentication/saml/how-to-set-up-okta.md): Setting up SAML authentication with Okta in your SonarQube Server instance.
- [With Ping Identity](/sonarqube-server/instance-administration/authentication/saml/ping-identity.md): Setting up SAML authentication with Ping Identity in your SonarQube Server instance.
- [Introduction to SAML with Ping Identity](/sonarqube-server/instance-administration/authentication/saml/ping-identity/introduction.md): Main steps of SAML setup with Ping Identity.
- [Setup in Ping Identity](/sonarqube-server/instance-administration/authentication/saml/ping-identity/setup-in-ping-identity.md): This page explains how to register SonarQube Server in PingOne or PingFederate.
- [Setup in SonarQube Server](/sonarqube-server/instance-administration/authentication/saml/ping-identity/setup-in-sq.md): This page describes how to set up SAML with Ping Identity in SonarQube Server.
- [Setup of security features](/sonarqube-server/instance-administration/authentication/saml/ping-identity/optional-security-features.md): To improve security, you can set up the encryption of SAML assertions sent by Ping Identity and the signing of SAML requests sent by SonarQube Server.
- [With SCIM provisioning](/sonarqube-server/instance-administration/authentication/saml/scim.md): Setting up automatic provisioning between SonarQube Server and Microsoft Entra ID or Okta using SCIM.
- [SCIM overview](/sonarqube-server/instance-administration/authentication/saml/scim/overview.md): SCIM helps you automatically provision user and groups to SonarQube Server.
- [SCIM with Microsoft Entra ID](/sonarqube-server/instance-administration/authentication/saml/scim/scim-provisioning-with-azure-ad.md): Enable SCIM to automate user and group provisioning from Microsoft Entra ID to SonarQube Server.
- [SCIM with Okta](/sonarqube-server/instance-administration/authentication/saml/scim/scim-provisioning-with-okta.md): Enable SCIM to automate user and group provisioning from Okta to SonarQube Server.
---
# Source: https://docs.sonarsource.com/sonarqube-community-build/analyzing-source-code/languages/scala.md
# Source: https://docs.sonarsource.com/sonarqube-server/8.9/analyzing-source-code/languages/scala.md
# Source: https://docs.sonarsource.com/sonarqube-server/9.8/analyzing-source-code/languages/scala.md
# Source: https://docs.sonarsource.com/sonarqube-server/9.9/analyzing-source-code/languages/scala.md
# Source: https://docs.sonarsource.com/sonarqube-server/10.0/analyzing-source-code/languages/scala.md
# Source: https://docs.sonarsource.com/sonarqube-server/10.1/analyzing-source-code/languages/scala.md
# Source: https://docs.sonarsource.com/sonarqube-server/10.2/analyzing-source-code/languages/scala.md
# Source: https://docs.sonarsource.com/sonarqube-server/10.3/analyzing-source-code/languages/scala.md
# Source: https://docs.sonarsource.com/sonarqube-server/10.4/analyzing-source-code/languages/scala.md
# Source: https://docs.sonarsource.com/sonarqube-server/10.5/analyzing-source-code/languages/scala.md
# Source: https://docs.sonarsource.com/sonarqube-server/10.6/analyzing-source-code/languages/scala.md
# Source: https://docs.sonarsource.com/sonarqube-server/10.7/analyzing-source-code/languages/scala.md
# Source: https://docs.sonarsource.com/sonarqube-server/10.8/analyzing-source-code/languages/scala.md
# Source: https://docs.sonarsource.com/sonarqube-server/2025.2/analyzing-source-code/languages/scala.md
# Source: https://docs.sonarsource.com/sonarqube-server/2025.3/analyzing-source-code/languages/scala.md
# Source: https://docs.sonarsource.com/sonarqube-server/2025.5/analyzing-source-code/languages/scala.md
# Source: https://docs.sonarsource.com/sonarqube-server/2025.1/analyzing-source-code/languages/scala.md
# Source: https://docs.sonarsource.com/sonarqube-server/2025.4/analyzing-source-code/languages/scala.md
# Source: https://docs.sonarsource.com/sonarqube-server/2025.6/analyzing-source-code/languages/scala.md
# Source: https://docs.sonarsource.com/sonarqube-server/analyzing-source-code/languages/scala.md
# Source: https://docs.sonarsource.com/sonarqube-cloud/advanced-setup/languages/scala.md
# Scala
### Language-specific properties
To discover and update the Scala-specific properties, navigate in SonarQube Cloud to *Your Project* > **Administration** > **General Settings** > **Languages** > **Scala**. See the [analysis-parameters](https://docs.sonarsource.com/sonarqube-cloud/advanced-setup/analysis-parameters "mention") page for more information about specific properties.
### Related pages
* [external-analyzer-reports](https://docs.sonarsource.com/sonarqube-cloud/enriching/external-analyzer-reports "mention") (Scalastyle or Scapegoat)
* Test coverage [overview](https://docs.sonarsource.com/sonarqube-cloud/enriching/test-coverage/overview "mention") (Scoverage)
---
# Source: https://docs.sonarsource.com/sonarqube-server/2025.3/server-update-and-maintenance/data-center-edition/scaling.md
# Source: https://docs.sonarsource.com/sonarqube-server/2025.5/server-update-and-maintenance/data-center-edition/scaling.md
# Source: https://docs.sonarsource.com/sonarqube-server/2025.4/server-update-and-maintenance/data-center-edition/scaling.md
# Source: https://docs.sonarsource.com/sonarqube-server/2025.6/server-update-and-maintenance/data-center-edition/scaling.md
# Source: https://docs.sonarsource.com/sonarqube-server/server-update-and-maintenance/data-center-edition/scaling.md
# Scaling
You have the option of adding application nodes (up to 10 total application nodes) to your cluster to increase computing capabilities. The operation is different depending on the SonarQube Server installation type.
### ZIP installation
#### Adding an Application Node
To add an application node:
1. Configure your new application node in sonar.properties. The following is an example of the configuration to be added to `sonar.properties` for a sixth application node (server6, ip6) in a cluster with the default five servers. For information about the system properties used, see [#general](https://docs.sonarsource.com/sonarqube-server/server-installation/system-properties/dce-specific#general "mention").
**Server6:**
```css-79elbk
...
sonar.cluster.enabled=true
sonar.cluster.node.type=application
sonar.cluster.node.host=ip6
sonar.cluster.node.port=9003
sonar.cluster.node.web.port=4023
sonar.cluster.node.ce.port=4024
sonar.cluster.hosts=ip1,ip2,ip6
sonar.cluster.search.hosts=ip3:9001,ip4:9001,ip5:9001
sonar.auth.jwtBase64Hs256Secret=YOURGENERATEDSECRET
...
```
{% hint style="info" %}
In the example:
* The hosts followed by ports are written using the IPv4 notation (e.g. `ip3:9001`). If you use IPv6 addresses, enclose the IP address in square brackets (`[ip3]:9001`).
* The `sonar.cluster.node.web.port` and `sonar.cluster.node.ce.port` system properties are used but are optional. If not used, a dynamic port will be chosen.
{% endhint %}
2. Update the configuration of the preexisting nodes to include your new node. While you don’t need to restart the cluster after adding a node, you should ensure the configuration is up to date on all of your nodes to avoid issues when you eventually do need to restart.
#### Removing an Application Node
When you remove an application node, make sure to update the configuration of the remaining nodes. Much like adding a node, while you don’t need to restart the cluster after removing a node, you should ensure the configuration is up to date on all of your nodes to avoid issues when you eventually do need to restart.
### Docker installation
#### Adding Application Nodes
If you’re using docker-compose, you can scale the application nodes using the following command:
`docker-compose up -d --scale sonarqube=3`
#### Removing Application Nodes
You can reduce the number of application nodes with the same command used to add application nodes by lowering the number.
### Kubernetes installation
With Kubernetes’ Horizontal Pod Autoscaling (HPA), you can automatically scale your SonarQube Server out and in, resolving any performance issues you may have. See [setting-up-autoscaling](https://docs.sonarsource.com/sonarqube-server/server-installation/data-center-edition/on-kubernetes-or-openshift/setting-up-autoscaling "mention").
### Related pages
* [dce-topology](https://docs.sonarsource.com/sonarqube-server/server-installation/data-center-edition/dce-topology "mention")
* [starting-stopping-cluster](https://docs.sonarsource.com/sonarqube-server/server-installation/data-center-edition/starting-stopping-cluster "mention")
* [monitoring](https://docs.sonarsource.com/sonarqube-server/server-update-and-maintenance/data-center-edition/monitoring "mention") your cluster
* [improving-performance](https://docs.sonarsource.com/sonarqube-server/server-update-and-maintenance/data-center-edition/improving-performance "mention") of your cluster
* [updating](https://docs.sonarsource.com/sonarqube-server/server-update-and-maintenance/data-center-edition/updating "mention") your cluster
---
# Source: https://docs.sonarsource.com/sonarqube-for-eclipse/using/scan-my-project.md
# Source: https://docs.sonarsource.com/sonarqube-for-visual-studio/using/scan-my-project.md
# Source: https://docs.sonarsource.com/sonarqube-for-intellij/using/scan-my-project.md
# Source: https://docs.sonarsource.com/sonarqube-for-vs-code/using/scan-my-project.md
# Scan my project
SonarQube for IDE, a core component of the [SonarQube solution](https://www.sonarsource.com/), is a developer’s first line of defense to find and fix coding issues in real-time. The results of a SonarQube for IDE scan provide rich contextual guidance to help you improve your skills while enhancing productivity to help you resolve issues in code.
SonarQube for IDE scans your project to provide instant feedback against hundreds of language-specific rules. When running in connected mode with SonarQube Server or SonarQube Cloud, you can benefit from additional rules that identify security vulnerabilities and security hotspots as well as take advantage of team features that help your organization achieve high-quality code.
Every organization has custom policies and procedures; the SonarQube for IDE analyzer offers a level of customization to help you achieve those practices.
### Overview
SonarQube for VS Code will automatically analyze all open files. Scanning a full project, including unopened files, is only available in the search for Security hotspots; please see the documentation on [#reporting-security-hotspots-in-the-whole-folder](https://docs.sonarsource.com/sonarqube-for-vs-code/security-hotspots#reporting-security-hotspots-in-the-whole-folder "mention") for the full details.
### First steps
SonarQube for VS Code will only analyze open files when a file is opened or saved. It is not possible to manually trigger an analysis.
### Scanning while in Connected Mode
When running in [connected-mode](https://docs.sonarsource.com/sonarqube-for-vs-code/connect-your-ide/connected-mode "mention"), SonarQube for IDE will sync with the SonarQube (Server, Cloud) or SonarQube Community Build quality profile to download issues and suppress those marked as *safe* or *won’t fix* on the server. The analyzer properties and rules will be respected and SonarQube for IDE will use locally what is defined on the server.
{% hint style="info" %}
When running in connected mode with SonarQube Server 10.4 or newer, **Won’t Fix** becomes **Accept**.
{% endhint %}
### Specify additional analyzer properties
It is possible to specify extra analyzer properties that will be used for analysis.
```json
// /.vscode/settings.json
{
"sonarlint.analyzerProperties": {
"sonar.javascript.node.maxspace": "4096"
}
}
```
### Language-specific information
#### C and C++ analysis
Please see the specific requirements for supported compilers and language standards described on the [running-an-analysis](https://docs.sonarsource.com/sonarqube-for-vs-code/getting-started/running-an-analysis "mention") page.
#### Jupyter Notebooks Jupyter Notebooks in VS Code
SonarQube for VS Code v3.16+ supports analysis of Python code inside Jupyter notebooks. When opening an `.ipynb` file, SonarQube Server, or SonarQube Community Build analyze the Python code and Python cells inside your Jupyter Notebooks.
There is nothing special to do to run a SonarQube for IDE analysis; simply open a Jupyter Notebook file. As with any Jupyter Notebook, you must set up your [VS Code environment](https://code.visualstudio.com/docs/datascience/jupyter-notebooks#_setting-up-your-environment) to run a project. The usual Quick Fix and issue investigation options you are accustomed to are available.
**Managing rules**
IPython Notebooks is a new rules category in the SonarQube for IDE explorer. Go to **RULES** > **IPython Notebooks** in the **SONARQUBE SETUP** view container to enable/disable rules, just as you would any rule for other languages.
The following rules have been disabled by default for Jupyter documents because they tend to be noisy in the notebook environment:
* [ipython:S905](https://rules.sonarsource.com/python/RSPEC-905), [ipython:S1481](https://rules.sonarsource.com/python/RSPEC-1481), [ipython:S2201](https://rules.sonarsource.com/python/RSPEC-2201), [ipython:S5754](https://rules.sonarsource.com/python/RSPEC-5754)
**Connected mode**
[connected-mode](https://docs.sonarsource.com/sonarqube-for-vs-code/connect-your-ide/connected-mode "mention") will be ignored when working with Jupyter Notebooks. You will only have local analysis; this is because analysis of Jupyter Notebooks is not yet supported by SonarQube (Server, Cloud) or SonarQube Community Build.
**Magic commands**
All Magic commands are ignored by SonarQube for VS Code (for example, `%matplotlib inline` and `%%timeit`). When a line magic command is found, that line will be ignored. Similarly, when a cell magic command is found, the entire cell will be ignored. The next image below shows a normal Jupyter cell; the second image illustrates the same cell with a cell magic command. Note how SonarQube for VS Code ignores issues in the cell with the magic command.
---
# Source: https://docs.sonarsource.com/sonarqube-community-build/analyzing-source-code/scanners/scanner-environment.md
# Source: https://docs.sonarsource.com/sonarqube-server/9.8/analyzing-source-code/scanner-environment.md
# Source: https://docs.sonarsource.com/sonarqube-server/9.9/analyzing-source-code/scanner-environment.md
# Source: https://docs.sonarsource.com/sonarqube-server/10.0/analyzing-source-code/scanner-environment.md
# Source: https://docs.sonarsource.com/sonarqube-server/10.1/analyzing-source-code/scanner-environment.md
# Source: https://docs.sonarsource.com/sonarqube-server/10.2/analyzing-source-code/scanner-environment.md
# Source: https://docs.sonarsource.com/sonarqube-server/10.3/analyzing-source-code/scanner-environment.md
# Source: https://docs.sonarsource.com/sonarqube-server/10.4/analyzing-source-code/scanner-environment.md
# Source: https://docs.sonarsource.com/sonarqube-server/10.5/analyzing-source-code/scanner-environment.md
# Source: https://docs.sonarsource.com/sonarqube-server/10.7/analyzing-source-code/scanners/scanner-environment.md
# Source: https://docs.sonarsource.com/sonarqube-server/10.8/analyzing-source-code/scanners/scanner-environment.md
# Source: https://docs.sonarsource.com/sonarqube-server/2025.2/analyzing-source-code/scanners/scanner-environment.md
# Source: https://docs.sonarsource.com/sonarqube-server/2025.3/analyzing-source-code/scanners/scanner-environment.md
# Source: https://docs.sonarsource.com/sonarqube-server/2025.5/analyzing-source-code/scanners/scanner-environment.md
# Source: https://docs.sonarsource.com/sonarqube-server/2025.1/analyzing-source-code/scanners/scanner-environment.md
# Source: https://docs.sonarsource.com/sonarqube-server/2025.4/analyzing-source-code/scanners/scanner-environment.md
# Source: https://docs.sonarsource.com/sonarqube-server/2025.6/analyzing-source-code/scanners/scanner-environment.md
# Source: https://docs.sonarsource.com/sonarqube-server/analyzing-source-code/scanners/scanner-environment.md
# Source: https://docs.sonarsource.com/sonarqube-cloud/advanced-setup/scanner-environment.md
# Scanner environment
{% content-ref url="scanner-environment/general-requirements" %}
[general-requirements](https://docs.sonarsource.com/sonarqube-cloud/advanced-setup/scanner-environment/general-requirements)
{% endcontent-ref %}
{% content-ref url="scanner-environment/verifying-code-checkout-step" %}
[verifying-code-checkout-step](https://docs.sonarsource.com/sonarqube-cloud/advanced-setup/scanner-environment/verifying-code-checkout-step)
{% endcontent-ref %}
---
# Source: https://docs.sonarsource.com/sonarqube-community-build/analyzing-source-code/scanners.md
# Source: https://docs.sonarsource.com/sonarqube-server/8.9/analyzing-source-code/scanners.md
# Source: https://docs.sonarsource.com/sonarqube-server/9.8/analyzing-source-code/scanners.md
# Source: https://docs.sonarsource.com/sonarqube-server/9.9/analyzing-source-code/scanners.md
# Source: https://docs.sonarsource.com/sonarqube-server/10.0/analyzing-source-code/scanners.md
# Source: https://docs.sonarsource.com/sonarqube-server/10.1/analyzing-source-code/scanners.md
# Source: https://docs.sonarsource.com/sonarqube-server/10.2/analyzing-source-code/scanners.md
# Source: https://docs.sonarsource.com/sonarqube-server/10.3/analyzing-source-code/scanners.md
# Source: https://docs.sonarsource.com/sonarqube-server/10.4/analyzing-source-code/scanners.md
# Source: https://docs.sonarsource.com/sonarqube-server/10.5/analyzing-source-code/scanners.md
# Source: https://docs.sonarsource.com/sonarqube-server/10.6/analyzing-source-code/scanners.md
# Source: https://docs.sonarsource.com/sonarqube-server/10.7/analyzing-source-code/scanners.md
# Source: https://docs.sonarsource.com/sonarqube-server/10.8/analyzing-source-code/scanners.md
# Source: https://docs.sonarsource.com/sonarqube-server/2025.2/analyzing-source-code/scanners.md
# Source: https://docs.sonarsource.com/sonarqube-server/2025.3/analyzing-source-code/scanners.md
# Source: https://docs.sonarsource.com/sonarqube-server/2025.5/analyzing-source-code/scanners.md
# Source: https://docs.sonarsource.com/sonarqube-server/2025.1/analyzing-source-code/scanners.md
# Source: https://docs.sonarsource.com/sonarqube-server/2025.4/analyzing-source-code/scanners.md
# Source: https://docs.sonarsource.com/sonarqube-server/2025.6/analyzing-source-code/scanners.md
# Source: https://docs.sonarsource.com/sonarqube-server/analyzing-source-code/scanners.md
# Scanners
- [Scanner environment](/sonarqube-server/analyzing-source-code/scanners/scanner-environment.md): Information on scanner environment requirements, TLS certificates, and checked out code.
- [General requirements](/sonarqube-server/analyzing-source-code/scanners/scanner-environment/general-requirements.md): General requirements for setting up your SonarScanner for SonarQube Server.
- [TLS certificates on client side](/sonarqube-server/analyzing-source-code/scanners/scanner-environment/manage-tls-certificates.md): If your SonarQube Server instance is secured, add the self-signed certificate to the CI/CD host. If mutual TLS is used, an additional setup is required.
- [Checked-out code](/sonarqube-server/analyzing-source-code/scanners/scanner-environment/verifying-code-checkout-step.md): During the checkout of a working copy (clone) of the code from the project repository, we recommend using the full depth.
- [Managing JRE auto-provisioning](/sonarqube-server/analyzing-source-code/scanners/scanner-environment/managing-jre-auto-provisioning.md): How to disable or adjust JRE auto-provisioning for scanners.
- [SonarScanner CLI](/sonarqube-server/analyzing-source-code/scanners/sonarscanner.md): The SonarScanner CLI is the scanner to use when there is no specific scanner for your build system.
- [Azure DevOps Extension](/sonarqube-server/analyzing-source-code/scanners/sonarqube-extension-for-azure-devops.md): The Azure DevOps Extension for SonarQube Server makes it easy to integrate analysis into your build pipeline, allowing you to analyze all supported languages.
- [Jenkins extension](/sonarqube-server/analyzing-source-code/scanners/jenkins-extension-sonarqube.md): This extension lets you centralize the configuration of your SonarQube Server connection details in your Jenkins global configuration.
- [SonarScanner for Maven](/sonarqube-server/analyzing-source-code/scanners/sonarscanner-for-maven.md): The SonarScanner for Maven is recommended as the default scanner for Maven projects.
- [SonarScanner for Gradle](/sonarqube-server/analyzing-source-code/scanners/sonarscanner-for-gradle.md): The SonarScanner for Gradle provides an easy way to start the analysis of a Gradle project with SonarQube Server.
- [SonarScanner for .NET](/sonarqube-server/analyzing-source-code/scanners/dotnet.md): Information on installing, using, and configuring the SonarScanner for .NET.
- [Introduction](/sonarqube-server/analyzing-source-code/scanners/dotnet/introduction.md): Your entry point to understanding how the SonarScanner for .NET works with SonarQube Server.
- [Installing the scanner](/sonarqube-server/analyzing-source-code/scanners/dotnet/installing.md): Installing the SonarScanner for .NET to run with SonarQube Server is easy. Everything you need to know is on this page.
- [Using the scanner](/sonarqube-server/analyzing-source-code/scanners/dotnet/using.md): Check this page to learn how to invoke the SonarScanner for .NET and understand which parameters to use in your SonarQube Server analysis.
- [Configuring the scanner](/sonarqube-server/analyzing-source-code/scanners/dotnet/configuring.md): Configuring the SonarScanner for .NET in SonarQube Server can be tricky. Here is everything you need to know.
- [SonarScanner for NPM](/sonarqube-server/analyzing-source-code/scanners/npm.md): This section describes how to install, use, and configure the sonarScanner for NPM.
- [Introduction](/sonarqube-server/analyzing-source-code/scanners/npm/introduction.md): The SonarScanner for NPM makes it very easy to trigger a SonarQube Server analysis on your JavaScript code base, without needing additional tools or resources.
- [Installing the scanner](/sonarqube-server/analyzing-source-code/scanners/npm/installing.md): Depending on how you want to start the SonarScanner for NPM, you will use a different method to install the scanner.
- [Using the scanner](/sonarqube-server/analyzing-source-code/scanners/npm/using.md): To start the SonarScanner for NPM, you can either add the analysis to your build files or use the scanner start command line (with or without npx).
- [Configuring the scanner](/sonarqube-server/analyzing-source-code/scanners/npm/configuring.md): This section explains how to configure the parameters used for an analysis with the SonarScanner for NPM when running it with SonarQube Server.
- [SonarScanner for Python](/sonarqube-server/analyzing-source-code/scanners/sonarscanner-for-python.md): The SonarScanner for Python provides an easy way to start the analysis of a Python project with SonarQube Server.
---
# Source: https://docs.sonarsource.com/sonarqube-server/10.0/instance-administration/authentication/saml/scim/scim-provisioning-with-azure-ad.md
# Source: https://docs.sonarsource.com/sonarqube-server/10.1/instance-administration/authentication/saml/scim/scim-provisioning-with-azure-ad.md
# Source: https://docs.sonarsource.com/sonarqube-server/10.2/instance-administration/authentication/saml/scim/scim-provisioning-with-azure-ad.md
# Source: https://docs.sonarsource.com/sonarqube-server/10.3/instance-administration/authentication/saml/scim/scim-provisioning-with-azure-ad.md
# Source: https://docs.sonarsource.com/sonarqube-server/10.4/instance-administration/authentication/saml/scim/scim-provisioning-with-azure-ad.md
# Source: https://docs.sonarsource.com/sonarqube-server/10.5/instance-administration/authentication/saml/scim/scim-provisioning-with-azure-ad.md
# Source: https://docs.sonarsource.com/sonarqube-server/10.6/instance-administration/authentication/saml/scim/scim-provisioning-with-azure-ad.md
# Source: https://docs.sonarsource.com/sonarqube-server/10.7/instance-administration/authentication/saml/scim/scim-provisioning-with-azure-ad.md
# Source: https://docs.sonarsource.com/sonarqube-server/10.8/instance-administration/authentication/saml/scim/scim-provisioning-with-azure-ad.md
# Source: https://docs.sonarsource.com/sonarqube-server/2025.2/instance-administration/authentication/saml/scim/scim-provisioning-with-azure-ad.md
# Source: https://docs.sonarsource.com/sonarqube-server/2025.3/instance-administration/authentication/saml/scim/scim-provisioning-with-azure-ad.md
# Source: https://docs.sonarsource.com/sonarqube-server/2025.5/instance-administration/authentication/saml/scim/scim-provisioning-with-azure-ad.md
# Source: https://docs.sonarsource.com/sonarqube-server/2025.1/instance-administration/authentication/saml/scim/scim-provisioning-with-azure-ad.md
# Source: https://docs.sonarsource.com/sonarqube-server/2025.4/instance-administration/authentication/saml/scim/scim-provisioning-with-azure-ad.md
# Source: https://docs.sonarsource.com/sonarqube-server/2025.6/instance-administration/authentication/saml/scim/scim-provisioning-with-azure-ad.md
# Source: https://docs.sonarsource.com/sonarqube-server/instance-administration/authentication/saml/scim/scim-provisioning-with-azure-ad.md
# SCIM with Microsoft Entra ID
*Automatic provisioning through SCIM is available starting in* [*Enterprise Edition*](https://www.sonarsource.com/plans-and-pricing/enterprise/)*.*
You can enable SCIM to automate user and group provisioning from Microsoft Entra ID (previously known as Azure AD) to SonarQube Server. For an overall understanding of the feature, see the [overview](https://docs.sonarsource.com/sonarqube-server/instance-administration/authentication/saml/scim/overview "mention") page.
### Prerequisites
* You have a working SAML configuration. See [introduction](https://docs.sonarsource.com/sonarqube-server/instance-administration/authentication/saml/ms-entra-id/introduction "mention").
* The connection from the Identity Provider to SonarQube must not be blocked on the network (unlike SAML, SCIM requires a direct network connection from the Identity Provider to SonarQube).
### Configuring SonarQube Server
1\. Within SonarQube Server, go to **Administration** > **Authentication** > **SAML**.
2\. Under **Provisioning**, click **Automatic user and group provisioning with SCIM**.
3\. Click **Save** and validate the pop-up window if you are sure you want to enable SCIM.
SCIM is now enabled in SonarQube Server, it will handle all the queries coming from Microsoft Entra ID about users and groups.
### Configuring Microsoft Entra ID
1. In Microsoft Entra ID, go to **Identity** > **Applications** > **Enterprise applications** > **All applications** and select the application created for SonarQube Server. On the application’s page, select **Provisioning**.
2. On the **Provisioning** page, click **Get started**.
3. Under **Provisioning Mode**, select **Automatic**.
4. Configure the **Admin Credentials** section as follows:
* **Tenant Url**: `/api/scim/v2`
* **Secret token**: Paste a SonarQube Server's user-type token, see [managing-tokens](https://docs.sonarsource.com/sonarqube-server/user-guide/managing-tokens "mention"), for an admin account in this field. For safety reasons, we recommend using a token from a local admin account (not managed through SCIM).
5. Click **Test Connection** to check that your credentials are valid, then click **Save.**
6. Under **Mappings**, click on **Provision Microsoft Entra ID Groups**. This opens the **Attribute Mapping** dialog for groups.
7. Under **Target Object Actions**, make sure that **Create**, **Update**, and **Delete** are enabled.
8. In **Attribute Mappings**, make sure `displayName` appears in both columns of the mapping. This ensures groups are mapped based on their names.
9. Click **Save.** This takes you back to the **Provisioning** page. If this was the default configuration, go back to the previous page.
10. Under **Mappings**, click on **Provision Microsoft Entra ID Users**. This opens the **Attribute Mapping** dialog for users.
11. Under **Target Object Actions**, make sure that **Create**, **Update,** and **Delete** are enabled.
12. In **Attribute Mappings** , map the `userName` **customappsso Attribute** (target) to the **Microsoft Entra ID Attribute** (source) used as SAML user login attribute in your SAML configuration.\
For example, if your login attribute is `http://schemas.xmlsoap.org/ws/2005/05/identity/claims/emailaddress` in your SonarQube Server’s SAML configuration and it is mapped to `user.userprincipalname` (default), use `userprincipalname` here. Otherwise, if it is mapped to `user.mail`, then use `mail` instead.
{% hint style="info" %}
To check which Microsoft Entra ID attribute is used as SAML user login attribute:
1. In SonarQube, go to **Administration** > **Authentication** > **SAML**.
2. In **SAML Configuration > SAML**, select **Edit**. The MS Entra ID attribute is the value of **SAML user login attribute**.
{% endhint %}
3. Click **Save.** This takes you back to the **Provisioning** page.
4. In the **Settings > Scope** section, select **Sync only assigned users and groups**.
15. Set the provisioning status to **On** and click **Save**. The Microsoft Entra ID users and groups will be synchronized with SonarQube Server.
{% hint style="info" %}
Microsoft Entra ID runs a SCIM synchronization every 40 minutes. Changes in Microsoft Entra ID are not reflected immediately in SonarQube Server.
{% endhint %}
---
# Source: https://docs.sonarsource.com/sonarqube-server/10.0/instance-administration/authentication/saml/scim/scim-provisioning-with-okta.md
# Source: https://docs.sonarsource.com/sonarqube-server/10.1/instance-administration/authentication/saml/scim/scim-provisioning-with-okta.md
# Source: https://docs.sonarsource.com/sonarqube-server/10.2/instance-administration/authentication/saml/scim/scim-provisioning-with-okta.md
# Source: https://docs.sonarsource.com/sonarqube-server/10.3/instance-administration/authentication/saml/scim/scim-provisioning-with-okta.md
# Source: https://docs.sonarsource.com/sonarqube-server/10.4/instance-administration/authentication/saml/scim/scim-provisioning-with-okta.md
# Source: https://docs.sonarsource.com/sonarqube-server/10.5/instance-administration/authentication/saml/scim/scim-provisioning-with-okta.md
# Source: https://docs.sonarsource.com/sonarqube-server/10.6/instance-administration/authentication/saml/scim/scim-provisioning-with-okta.md
# Source: https://docs.sonarsource.com/sonarqube-server/10.7/instance-administration/authentication/saml/scim/scim-provisioning-with-okta.md
# Source: https://docs.sonarsource.com/sonarqube-server/10.8/instance-administration/authentication/saml/scim/scim-provisioning-with-okta.md
# Source: https://docs.sonarsource.com/sonarqube-server/2025.2/instance-administration/authentication/saml/scim/scim-provisioning-with-okta.md
# Source: https://docs.sonarsource.com/sonarqube-server/2025.3/instance-administration/authentication/saml/scim/scim-provisioning-with-okta.md
# Source: https://docs.sonarsource.com/sonarqube-server/2025.5/instance-administration/authentication/saml/scim/scim-provisioning-with-okta.md
# Source: https://docs.sonarsource.com/sonarqube-server/2025.1/instance-administration/authentication/saml/scim/scim-provisioning-with-okta.md
# Source: https://docs.sonarsource.com/sonarqube-server/2025.4/instance-administration/authentication/saml/scim/scim-provisioning-with-okta.md
# Source: https://docs.sonarsource.com/sonarqube-server/2025.6/instance-administration/authentication/saml/scim/scim-provisioning-with-okta.md
# Source: https://docs.sonarsource.com/sonarqube-server/instance-administration/authentication/saml/scim/scim-provisioning-with-okta.md
# SCIM with Okta
*Automatic provisioning through SCIM is available starting in* [*Enterprise Edition*](https://www.sonarsource.com/plans-and-pricing/enterprise/)*.*
You can enable SCIM to automate user and group provisioning from Okta to SonarQube Server. For an overall understanding of the feature, see the [overview](https://docs.sonarsource.com/sonarqube-server/instance-administration/authentication/saml/scim/overview "mention") page.
### Prerequisites
* You have a working SAML configuration. See [how-to-set-up-okta](https://docs.sonarsource.com/sonarqube-server/instance-administration/authentication/saml/how-to-set-up-okta "mention").
* The connection from the Identity Provider to SonarQube must not be blocked on the network (unlike SAML, SCIM requires a direct network connection from the Identity Provider to SonarQube).
* If your SonarQube Server is unaccessible over the public internet, you need to configure an [Okta On-Premises Provisioning (OPP)](https://help.okta.com/en-us/content/topics/provisioning/opp/opp-architecture.htm) agent and [SCIM connector](https://help.okta.com/en-us/content/topics/provisioning/opp/opp-create-scim-connectors.htm). The OPP agent acts as a bridge, enabling Okta to interact with your on-premise SonarQube instance via the SCIM protocol.
### Configuring SonarQube Server
To enable SCIM provisioning in SonarQube Server:
1\. Go to **Administration** > **Authentication** > **SAML**
2\. Select **Automatically provision user and group with SCIM** under the **Provisioning** section.
3\. Select **Save** and validate the popup if you are sure you want to enable SCIM.
SCIM is now enabled in SonarQube Server, it will handle all queries coming from Okta about users and groups.
### Configuring Okta
1. In SonarQube Server, [managing-tokens](https://docs.sonarsource.com/sonarqube-server/user-guide/managing-tokens "mention") from an admin account. We strongly advise that the admin account used is a local one (not SCIM managed) for safety reasons. You will use this token in Step 5 below.
2. From your Okta board, choose *Your SonarQube Server application* > **General** > **App Settings** and select **Edit**.
3. Choose **SCIM** and select **Save**. This will create a new **Provisioning** tab.
4. Choose the newly created **Provisioning** tab and click on **Edit.**
5. Configure the SCIM Connection fields as follows:
* **SCIM connector base URL**: `/api/scim/v2`
* **Unique identifier field for users**: *`userName`*
* **Supported provisioning actions**: enable **Push New Users**, **Push Profile Updates** and **Push Groups**, as shown in the above picture
* **Authentication Mode**: select **HTTP Header** and copy the token generated in Step 1 into Okta’s **HTTP Header** > **Bearer** field\*\*.\*\*
6. Click **Save**. Under the **Push Groups** tab that appears, select the groups to provision to SonarQube Server. You have two options:
1. Select them by name, one by one, by clicking **+ Push Groups** > **Find groups by name**.
2. Create a rule to match multiple groups at once. Click **+ Push Groups** > **Find groups by rule**, give it the name and the criteria of your choice, then click **Create rule**. Note that Okta does not support regular expressions here and that matching groups are immediately provisioned when the rule is created.
7. **T**o check that the SCIM connection is valid, click on **Test Connector Configuration**. A green checkmark indicates that all the fields are properly filled.
8. Click **Save**.
9. In the next screen, click **Edit** and check the **Create Users**, **Update User Attributes** and **Deactivate Users** provisioning options.
10. Click **Save**. Okta users will be automatically provisioned with SonarQube Server.
Note that if a user gets suspended in Okta, the corresponding user account remains unchanged in SonarQube Server.
### Provisioning already assigned users
Users that are assigned before SCIM is enabled are not automatically provisioned. In the UI, an exclamation mark is displayed next to their names in the **Assignments** tab:
To force the provision of these users, click on **Provision User**. The exclamation mark should disappear, meaning that the users have been provisioned.
---
# Source: https://docs.sonarsource.com/sonarqube-server/9.8/instance-administration/authentication/scim.md
# Source: https://docs.sonarsource.com/sonarqube-server/9.9/instance-administration/authentication/scim.md
# Source: https://docs.sonarsource.com/sonarqube-server/10.0/instance-administration/authentication/saml/scim.md
# Source: https://docs.sonarsource.com/sonarqube-server/10.1/instance-administration/authentication/saml/scim.md
# Source: https://docs.sonarsource.com/sonarqube-server/10.2/instance-administration/authentication/saml/scim.md
# Source: https://docs.sonarsource.com/sonarqube-server/10.3/instance-administration/authentication/saml/scim.md
# Source: https://docs.sonarsource.com/sonarqube-server/10.4/instance-administration/authentication/saml/scim.md
# Source: https://docs.sonarsource.com/sonarqube-server/10.5/instance-administration/authentication/saml/scim.md
# Source: https://docs.sonarsource.com/sonarqube-server/10.6/instance-administration/authentication/saml/scim.md
# Source: https://docs.sonarsource.com/sonarqube-server/10.7/instance-administration/authentication/saml/scim.md
# Source: https://docs.sonarsource.com/sonarqube-server/10.8/instance-administration/authentication/saml/scim.md
# Source: https://docs.sonarsource.com/sonarqube-server/2025.2/instance-administration/authentication/saml/scim.md
# Source: https://docs.sonarsource.com/sonarqube-server/2025.3/instance-administration/authentication/saml/scim.md
# Source: https://docs.sonarsource.com/sonarqube-server/2025.5/instance-administration/authentication/saml/scim.md
# Source: https://docs.sonarsource.com/sonarqube-server/2025.1/instance-administration/authentication/saml/scim.md
# Source: https://docs.sonarsource.com/sonarqube-server/2025.4/instance-administration/authentication/saml/scim.md
# Source: https://docs.sonarsource.com/sonarqube-server/2025.6/instance-administration/authentication/saml/scim.md
# Source: https://docs.sonarsource.com/sonarqube-server/instance-administration/authentication/saml/scim.md
# With SCIM provisioning
*Automatic provisioning through SCIM is available starting in* [*Enterprise Edition*](https://www.sonarsource.com/plans-and-pricing/enterprise/)*.*
{% content-ref url="scim/overview" %}
[overview](https://docs.sonarsource.com/sonarqube-server/instance-administration/authentication/saml/scim/overview)
{% endcontent-ref %}
{% content-ref url="scim/scim-provisioning-with-azure-ad" %}
[scim-provisioning-with-azure-ad](https://docs.sonarsource.com/sonarqube-server/instance-administration/authentication/saml/scim/scim-provisioning-with-azure-ad)
{% endcontent-ref %}
{% content-ref url="scim/scim-provisioning-with-okta" %}
[scim-provisioning-with-okta](https://docs.sonarsource.com/sonarqube-server/instance-administration/authentication/saml/scim/scim-provisioning-with-okta)
{% endcontent-ref %}
---
# Source: https://docs.sonarsource.com/sonarqube-community-build/analyzing-source-code/scm-integration.md
# Source: https://docs.sonarsource.com/sonarqube-server/8.9/analyzing-source-code/scm-integration.md
# Source: https://docs.sonarsource.com/sonarqube-server/9.8/analyzing-source-code/scm-integration.md
# Source: https://docs.sonarsource.com/sonarqube-server/9.9/analyzing-source-code/scm-integration.md
# Source: https://docs.sonarsource.com/sonarqube-server/10.0/analyzing-source-code/scm-integration.md
# Source: https://docs.sonarsource.com/sonarqube-server/10.1/analyzing-source-code/scm-integration.md
# Source: https://docs.sonarsource.com/sonarqube-server/10.2/analyzing-source-code/scm-integration.md
# Source: https://docs.sonarsource.com/sonarqube-server/10.3/analyzing-source-code/scm-integration.md
# Source: https://docs.sonarsource.com/sonarqube-server/10.4/analyzing-source-code/scm-integration.md
# Source: https://docs.sonarsource.com/sonarqube-server/10.5/analyzing-source-code/scm-integration.md
# Source: https://docs.sonarsource.com/sonarqube-server/10.6/analyzing-source-code/scm-integration.md
# Source: https://docs.sonarsource.com/sonarqube-server/10.7/analyzing-source-code/scm-integration.md
# Source: https://docs.sonarsource.com/sonarqube-server/10.8/analyzing-source-code/scm-integration.md
# Source: https://docs.sonarsource.com/sonarqube-server/2025.2/analyzing-source-code/scm-integration.md
# Source: https://docs.sonarsource.com/sonarqube-server/2025.3/analyzing-source-code/scm-integration.md
# Source: https://docs.sonarsource.com/sonarqube-server/2025.5/analyzing-source-code/scm-integration.md
# Source: https://docs.sonarsource.com/sonarqube-server/2025.1/analyzing-source-code/scm-integration.md
# Source: https://docs.sonarsource.com/sonarqube-server/2025.4/analyzing-source-code/scm-integration.md
# Source: https://docs.sonarsource.com/sonarqube-server/2025.6/analyzing-source-code/scm-integration.md
# Source: https://docs.sonarsource.com/sonarqube-server/analyzing-source-code/scm-integration.md
# SCM integration
Collecting SCM data during code analysis can unlock a number of SonarQube Server features:
* Automatic Issue Assignment
* Code annotation (blame data) in the Code Viewer
* SCM-driven detection of new code. Without SCM data, SonarQube Server determines new code using analysis dates (to timestamp modification of lines).
SCM integration requires support for your individual SCM provider. Git and SVN are supported by default. For other SCM providers, see the Marketplace.
If need be, you can toggle it off at the global level via administration settings and at a project level via project settings.
### Git
[Git](http://www.git-scm.com/) integration is supported out of the box with a pure Java implementation so there’s no need to have Git command line tool installed on the machine where analysis is performed.
Auto-detection of Git during analysis will happen if there is a .git folder in the project root directory or in one of its parent folders. Otherwise, you can force the provider using `-Dsonar.scm.provider=git`.
{% hint style="warning" %}
A full Git clone is required. If a shallow clone is found, the blame information retrieval will be skipped and the analysis may fail.
{% endhint %}
Git integration uses [JGit](https://www.eclipse.org/jgit/). JGit is a pure Java implementation of the Git client.
#### Known Issues
* Git doesn’t consider old macOS line ends (CR) as new lines. As a result, the blame operation will contain fewer lines than expected by SonarQube Server and analysis will fail. The solution is to fix line ends to use either Windows (CR/LF) or Unix (LF) line ends.
* JGit doesn’t support `.mailmap` file to clean email address during the blame.
* "Missing blame information…" and "Could not find ref…" can be caused by checking out with a partial / shallow clone, or using Git submodules.
#### How to investigate error during blame (only possible on Unix/Linux)?
If you get an error when blame is executed on a file, it may be a limitation or a bug in JGit. To confirm please follow these steps:
1. Download the standalone JGit command line distribution
2. Try to execute the blame command on the offending file:\
`chmod +x /path/to/org.eclipse.jgit.pgm-4.9.0.201710071750-r.sh /path/to/org.eclipse.jgit.pgm-4.9.0.201710071750-r.sh blame -w /path/to/offending/file`
3. If you get the same error as during analysis, then this really looks like a bug in JGit (especially if you don’t have an issue with the native git command line tool). Please try to do the previous steps with the latest version of JGit and report all information to the [SonarQube Community Forum](https://community.sonarsource.com/).
### Subversion
[Subversion](https://subversion.apache.org/) integration is supported out of the box for Subversion 1.6 to 1.9.x.
Auto-detection of SVN during analysis will happen if there is a `.svn` folder somewhere in the parent hierarchy of the project root. Otherwise, you can force the provider using `-Dsonar.scm.provider=svn` on the analysis command line.
#### Authentication
In order to get blame information on your code you will need to supply authentication data to the scanner. You can do it by passing the following parameters to it when starting an analysis:
| **Parameter Name** | **Description** |
| ------------------------------ | ------------------------------------------------------------------------------------ |
| `sonar.svn.username` | Username to be used for SVN server or SVN+SSH authentication |
| `sonar.svn.password.secured` | Password to be used for SVN server or SVN+SSH authentication |
| `sonar.svn.privateKeyPath` | Path to private key file. Can be used instead of password for SVN+SSH authentication |
| `sonar.svn.passphrase.secured` | Optional passphrase of your private key file |
#### Known issues
If you get errors like:
`Caused by: org.tmatesoft.svn.core.SVNException: svn: E200007: Retrieval of mergeinfo unsupported by 'https://pmd.svn.sourceforge.net/svnroot/pmd/trunk/pmd/src/main/java/net/sourceforge/pmd/AbstractConfiguration.java';` It means the SVN server is not advertising the ‘mergeinfo’ capability. You can check the advertised capabilities by simply connecting to it:
`telnet 3690` Often this is because your SVN server is not >= 1.5 or your project was not properly migrated after a server upgrade. It could also be a misconfiguration of the server.
You should try to run svnadmin upgrade **on the server**. For more information, please read .
---
# Source: https://docs.sonarsource.com/sonarqube-cloud/administering-sonarcloud/managing-organization/scoped-organization-tokens.md
# Managing Scoped Organization Tokens
*This feature is only available in the Team and Enterprise plans. See* [subscription-plans](https://docs.sonarsource.com/sonarqube-cloud/administering-sonarcloud/managing-subscription/subscription-plans "mention") *for more information.*
Scoped Organization Tokens are used to run analyses on your code. To do so, the `sonar.token` property is used. For more details see [#authentication-to-the-server](https://docs.sonarsource.com/sonarqube-cloud/advanced-setup/analysis-parameters#authentication-to-the-server "mention").
You must be an organization admin to be able to retrieve and manage Scoped Organization Tokens. This section explains how to do this in the UI. You can also use the [Authentication domain API](https://api-docs.sonarsource.com/sonarqube-cloud/default/public-externalauthentication-0-0).
### About Scoped Organization Tokens
Scoped Organization Tokens provide a secure way to manage non-user-specific authentication. Attached to an organization, they are created and managed by the organization admin who can revoke them anytime. Revoked tokens are automatically deleted.
{% hint style="info" %}
* Scoped Organization Tokens are identified through their `sqco_` prefix.
* SonarQube's S7791 rule can verify the non-disclosure of Scoped Organization Tokens within your code.
{% endhint %}
Scoped Organization Tokens comply with the principle of least privilege through its scope definition:
* You define the projects within the organization to which the token gives access. You can limit the access to a custom selection of existing projects or select all current and future projects.
* You define the permissions granted by the token. Currently, you can only grant the Execute analysis permission but other permissions will be supported soon.
You can define any expiry date for your Scoped Organization Token, or no expiration. The different token statuses are:
* Active
* About to expire (in less that 7 days)
* Expired
{% hint style="info" %}
For security reasons, tokens without expiry date that have been inactive for 60 days will be automatically removed.
{% endhint %}
### Retrieving and viewing Scoped Organization Tokens
1. Retrieve your organization. See [viewing-organizations](https://docs.sonarsource.com/sonarqube-cloud/getting-started/viewing-organizations "mention") for more details.
2. Go to **Administration** > **Scoped Organization Tokens**. The list of tokens is displayed as illustrated below.
3. In the list of tokens, locate the token you want to view and select the **Actions** menu at the end of the row.
4. In the menu, select **View details**. The token details are displayed as illustrated below.
### Creating a Scoped Organization Token
1. Retrieve your organization. See [viewing-organizations](https://docs.sonarsource.com/sonarqube-cloud/getting-started/viewing-organizations "mention") for more details.
2. Go to **Administration > Scoped Organization Tokens**.
3. In the top right corner, select the **Create token** button.
4. Enter the token name and description. Choose a name that accurately represents the token purpose.
5. In **Expires in**, select the token lifetime or select **No expiration**.
6. In **Projects this token can access**, select the option you want to use, either a custom selection of projects or all projects within the organization.\
If you selected **Custom selection of projects**:
1. Select the **Select projects** button. The **Projects scope** dialog opens.
2. Select the projects to which the token will give access.as illustrated below.
3. Close the dialog.
7. Select the **Generate token** button. A message pops up to notify the successful token generation.
8. Immediately copy the generated token from the notification message. Once you’ve left the notification, you won’t be able to view the token value any more.
12. You can now close the notification.
### Revoking a Scoped Organization Token
When you revoke a Scoped Organization Token, it’s automatically deleted.
To revoke a Scoped Organization Token:
1. Retrieve your token as described above in [#retrieving-and-viewing-scoped-organization-tokens](#retrieving-and-viewing-scoped-organization-tokens "mention").
2. In the **Actions** menu, select **Revoke**. A confirmation dialog opens.
3. Confirm. The token disappears from the list of tokens.
### Modifying the scope of a Scoped Organization Token
You can modify the custom list of projects to which a Scoped Organization Token gives access.
{% hint style="warning" %}
You cannot modify the scope of a Scoped Organization Token configured for all current and future projects.
{% endhint %}
To modify the custom scope of a Scoped Organization Token:
1. Retrieve your token as described above in [#retrieving-and-viewing-scoped-organization-tokens](#retrieving-and-viewing-scoped-organization-tokens "mention").
2. In the **Actions** menu, select **View details**.
3. Select the **Edit projects** button. The **Projects scope** dialog opens.
4. Change the project selection.
5. Select **Close**.
### Related pages
[#authenticate-to-api](https://docs.sonarsource.com/sonarqube-cloud/advanced-setup/web-api#authenticate-to-api "mention")
---
# Source: https://docs.sonarsource.com/sonarqube-community-build/analyzing-source-code/languages/secrets.md
# Source: https://docs.sonarsource.com/sonarqube-server/10.2/analyzing-source-code/languages/secrets.md
# Source: https://docs.sonarsource.com/sonarqube-server/10.3/analyzing-source-code/languages/secrets.md
# Source: https://docs.sonarsource.com/sonarqube-server/10.4/analyzing-source-code/languages/secrets.md
# Source: https://docs.sonarsource.com/sonarqube-server/10.5/analyzing-source-code/languages/secrets.md
# Source: https://docs.sonarsource.com/sonarqube-server/10.6/analyzing-source-code/languages/secrets.md
# Source: https://docs.sonarsource.com/sonarqube-server/10.7/analyzing-source-code/languages/secrets.md
# Source: https://docs.sonarsource.com/sonarqube-server/10.8/analyzing-source-code/languages/secrets.md
# Source: https://docs.sonarsource.com/sonarqube-server/2025.2/analyzing-source-code/languages/secrets.md
# Source: https://docs.sonarsource.com/sonarqube-server/2025.3/analyzing-source-code/languages/secrets.md
# Source: https://docs.sonarsource.com/sonarqube-server/2025.5/analyzing-source-code/languages/secrets.md
# Source: https://docs.sonarsource.com/sonarqube-server/2025.1/analyzing-source-code/languages/secrets.md
# Source: https://docs.sonarsource.com/sonarqube-server/2025.4/analyzing-source-code/languages/secrets.md
# Source: https://docs.sonarsource.com/sonarqube-server/2025.6/analyzing-source-code/languages/secrets.md
# Source: https://docs.sonarsource.com/sonarqube-server/analyzing-source-code/languages/secrets.md
# Source: https://docs.sonarsource.com/sonarqube-cloud/advanced-setup/languages/secrets.md
# Secrets
Secrets are pieces of user-specific or system-level credentials that should be protected and accessible to legitimate users only.
### Configuring secret-specific parameters (general procedure)
To discover and update the Secret-specific properties, navigate in SonarQube Cloud to *Your Project* > **Administration** > **General Settings** > **Languages** > **Secrets**. See the [analysis-parameters](https://docs.sonarsource.com/sonarqube-cloud/advanced-setup/analysis-parameters "mention") page for more information about specific properties.
### Adjusting the secret detection scope
By default, SonarQube Cloud detects exposed secrets in all files processed by the language analyzers. You can refine the scope of the secret detection by:
* Excluding hidden files from the analysis.
* Adding files based on path-matching patterns.
* Adjusting the binary file exclusion setup.
#### Analysis of hidden files
Depending on which scanner is used, additional hidden files tracked by Git are included in the secrets analysis.
This behavior can be disabled by setting the `sonar.scanner.excludeHiddenFiles` analysis parameter to `true`.
{% hint style="warning" %}
Analyzing additional hidden files is currently only partially supported with the SonarScanner for Maven and Gradle. Additional hidden files are only analyzed if they’re inside the `src/main/java` or `src/test/java` folder in the root or module directories.
Analyzing additional hidden files is currently not supported with SonarScanner for .NET.
{% endhint %}
#### Adding files based on path-matching patterns
If you’re using a git repository, you can add files to the secret detection scope by defining path-matching patterns: the files matching the patterns will be included **provided they are tracked by git**.
To add additional files to the secret detection:
1. In the SonarQube Cloud UI, go to *Your Organization > Your Project* > **Administration** > **General Settings** > **Languages** > **Secrets**.
2. Enable the **Activate inclusion of custom file path patterns** option.
3. In the **List of file path patterns to include**, adjust the default path-matching patterns if necessary. See the [defining-matching-patterns](https://docs.sonarsource.com/sonarqube-cloud/appendices/defining-matching-patterns "mention") page for instructions.
Alternatively, configure the parameters listed below on the CI/CD host (see the [analysis-parameters](https://docs.sonarsource.com/sonarqube-cloud/advanced-setup/analysis-parameters "mention") page for more information).
| **Property** | **Description** |
| -------------------------------- | ---------------------------------------------------------------------------------------------------------------------------------------------------------------------------------------------------------------------------------------------------------------------------------------------------------------------------------------------------------------------------------------------------------------------------------------------------------------------------------------------------------------------------------------------------------------------------------------------------------------- |
| `sonar.text.inclusions.activate` | Enables the inclusion of files to the secret detection according to the path-matching patterns defined in `sonar.text.inclusions`. |
| `sonar.text.inclusions` |
Comma-separated list of path-matching patterns.
Possible values: A path can be relative (to the sonar.projectBaseDir property, which is by default the directory from which the analysis was started) or absolute. See also the defining-matching-patterns page.
|
#### Adjusting the binary file exclusion setup
SonarQube Cloud excludes binary files from the analysis. In case binary file types are still included in your analysis, you can exclude these additional files.
To do so:
1. In the SonarQube Cloud UI, go to *Your Organization > Your Project >* **Administration > General Settings > Languages > Secrets**.
2. In **Additional binary file suffixes**, enter the list of suffixes to be excluded.
Alternatively, configure the parameter below on the CI/CD host (see the [analysis-parameters](https://docs.sonarsource.com/sonarqube-cloud/advanced-setup/analysis-parameters "mention") page for more information).
| **Property** | **Description** |
| ----------------------------------- | ----------------------------------------------------------------------- |
| `sonar.text.excluded.file.suffixes` | Comma-separated list of additional binary file suffixes to be excluded. |
### Parallel code scan
By default, the analyzer tries to parallelize the analysis of compilation units; it spawns as many jobs as logical CPUs available on the machine.
If required, it is possible to customize the number of scheduled parallel jobs by configuring the property `sonar.text.threads=n` at the scanner level, where `n` is an integer indicating the maximum number of parallel jobs.
You should consider setting the `sonar.text.threads` property only when the automatic detection of the number of logical CPUs cannot detect the desired number. A typical example is when the analysis should not consume all the available computing resources to leave room for other tasks running in parallel on the same machine.
When setting the `sonar.text.threads` property, you should set it to a value less or equal to the number of logical CPUs available. Over-committing does not accelerate the analysis and can even slow it down.
### Analysis of files that don't contain code
Files that don’t contain code (for example, `build.gradle` and `sonar-project.properties`) are scanned durning analysis and displayed in the SonarQube Cloud UI after an issue is detected in them. If no secrets are detected in those files, they are not displayed in the UI.
### Deactivating secrets analysis
You can deactivate the analysis of secrets by setting the `sonar.text.activate` property to `false`.
### Related pages
* See Sonar's [Secrets rules](https://rules.sonarsource.com/secrets/) for static code analysis
---
# Source: https://docs.sonarsource.com/sonarqube-community-build/server-installation/network-security/securing-behind-proxy.md
# Source: https://docs.sonarsource.com/sonarqube-server/2025.3/server-installation/data-center-edition/network-security/securing-behind-proxy.md
# Source: https://docs.sonarsource.com/sonarqube-server/2025.3/server-installation/network-security/securing-behind-proxy.md
# Source: https://docs.sonarsource.com/sonarqube-server/2025.5/server-installation/data-center-edition/network-security/securing-behind-proxy.md
# Source: https://docs.sonarsource.com/sonarqube-server/2025.5/server-installation/network-security/securing-behind-proxy.md
# Source: https://docs.sonarsource.com/sonarqube-server/2025.4/server-installation/data-center-edition/network-security/securing-behind-proxy.md
# Source: https://docs.sonarsource.com/sonarqube-server/2025.4/server-installation/network-security/securing-behind-proxy.md
# Source: https://docs.sonarsource.com/sonarqube-server/2025.6/server-installation/data-center-edition/network-security/securing-behind-proxy.md
# Source: https://docs.sonarsource.com/sonarqube-server/2025.6/server-installation/network-security/securing-behind-proxy.md
# Source: https://docs.sonarsource.com/sonarqube-server/server-installation/data-center-edition/network-security/securing-behind-proxy.md
# Source: https://docs.sonarsource.com/sonarqube-server/server-installation/network-security/securing-behind-proxy.md
# Securing behind a proxy
For most production instances, traffic encryption (and therefore HTTPS) is required. As SonarQube only supports plain HTTP for inbound traffic, a reverse proxy is necessary to terminate SSL/TLS encryption before SonarQube.
If you deploy SonarQube on Kubernetes, you’ll need an ingress controller. An ingress controller is a specialized load balancer for Kubernetes that acts as a reverse proxy and manages traffic routing to services within the Kubernetes cluster. See [#ingress](https://docs.sonarsource.com/sonarqube-server/on-kubernetes-or-openshift/customizing-helm-chart#ingress "mention").
### General guidelines
{% hint style="info" %}
For security reasons, we recommend only giving external access to the main port.
{% endhint %}
The reverse proxy should be configured to set the following standard headers:
* `X-Forwarded-Proto`
* `X-Forwarded-For`
This setting is mandatory if you use HTTPS or SAML authentication for SonarQube.
In the example below, where HTTPS is used from the client to the reverse proxy, the reverse proxy will set:
* `X-Forwarded-Proto` to `HTTPS`
* `X-Forwarded-For` to ``
In addition, the reverse proxy may be configured to forward the following custom headers:
* `SonarQube-Authentication-Token-Expiration`\
This header is added to a web service response when using tokens to authenticate. Forwarding this header is not required for the SonarQube features to work properly.
* `Sonar-MD5`\
This header is used to verify the integrity of the plugins downloaded by the scanner. You must forward this header to successfully execute analyses that use plugins.
For information about tokens, see [managing-tokens](https://docs.sonarsource.com/sonarqube-server/user-guide/managing-tokens "mention").
### Using Nginx proxy
Nginx configuration will vary based on your own application’s requirements and the way you intend to expose SonarQube to the outside world. If you need more details about Nginx, see [Nginx documentation](https://docs.nginx.com/nginx/admin-guide/web-server/reverse-proxy/).
In the following, we assume that you’ve already installed Nginx, that you are using a Virtual Host for `www.somecompany.com` and that SonarQube is running and available on `http(s)://sonarhost:sonarport/`.
At this point, edit the Nginx configuration file:
* Include the code below to expose SonarQube at `http://www.somecompany.com/` or `https://www.somecompany.com/`
{% tabs %}
{% tab title="WITH HTTP" %}
```nginx
# the server directive is Nginx's virtual host directive
server {
# port to listen on. Can also be set to an IP:PORT
listen 80;
# sets the domain[s] that this vhost server requests for
server_name www.somecompany.com;
location / {
proxy_pass http://:;
}
}
```
{% endtab %}
{% tab title="WITH HTTPS" %}
```nginx
# the server directive is Nginx's virtual host directive
server {
# port to listen on. Can also be set to an IP:PORT
listen 443 ssl;
ssl_certificate ;
ssl_certificate_key ;
location / {
proxy_pass ;
proxy_set_header Host $host;
proxy_set_header X-Forwarded-For $remote_addr;
proxy_set_header X-Forwarded-Proto https;
}
}
```
{% endtab %}
{% endtabs %}
{% hint style="info" %}
You may need to increase the max URL length since SonarQube requests can have URLs longer than 2048.
{% endhint %}
### Using Apache proxy
Apache configuration is going to vary based on your own application’s requirements and the way you intend to expose SonarQube to the outside world. If you need more details about Apache HTTPd and mod\_proxy, see the [Apache documentation](https://httpd.apache.org).
In the following, we assume that you’ve already installed Apache 2 with module mod\_proxy, that SonarQube is running and available on `http://private_sonar_host:sonar_port/`, and that you want to configure a Virtual Host for `www.public_sonar.com`.
At this point, edit the HTTPd configuration file for the `www.public_sonar.com` virtual host:
* Include the following to expose SonarQube via `mod_proxy` at [`http://www.public_sonar.com/`](http://www.public_sonar.com/)
```apacheconf
ProxyRequests Off
ProxyPreserveHost On
ServerName www.public_sonar.com
ServerAdmin admin@somecompany.com
ProxyPass / http://private_sonar_host:sonar_port/
ProxyPassReverse / http://www.public_sonar.com/
ErrorLog logs/somecompany/sonar/error.log
CustomLog logs/somecompany/sonar/access.log common
```
### Using F5 proxy
Use an iRule to insert the original client IP address in an `X-Forwarded-For` HTTP header (see also [F5 documentation](https://my.f5.com/manage/s/article/K4816#2)) as illustrated below.
```css-79elbk
when HTTP_REQUEST {
HTTP::header insert X-Forwarded-For [IP::remote_addr]
HTTP::header insert X-Forwarded-Proto "https"
}
```
### Using HAproxy
The example below shows the configuration of an HAproxy for a Data Center Edition (load balancer and reverse proxy at the same time).
```css-79elbk
frontend http-in
bind *:80
bind *:443 ssl crt /etc/ssl/private/
http-request redirect scheme https unless { ssl_fc }
default_backend sonarqube_server
backend sonarqube_server
balance roundrobin
http-request set-header X-Forwarded-Proto https
option httpchk GET /api/system/status
http-check expect rstring UP|DB_MIGRATION_NEEDED|DB_MIGRATION_RUNNING
default-server check maxconn 200
server node1
server node2
```
### Using IIS on Windows
Using IIS on Windows, you can create a website that acts as a reverse proxy and access your SonarQube instance over SSL.
#### Prerequisites ISS enabled
Internet Information Services (IIS) must be enabled with the following extensions:
* The [Url Rewrite extension for IIS](https://www.iis.net/downloads/microsoft/url-rewrite)
* The [Application Based Routing extension for IIS](https://www.iis.net/downloads/microsoft/application-request-routing)
{% hint style="info" %}
To make sure the extensions are enabled, restart your IIS Manager after you install them.
{% endhint %}
In the example used below, IIS is enabled on the same machine as the SonarQube instance.
SSL certificate
You must provide a [self-signed SSL certificate, or a real one](https://learn.microsoft.com/en-us/iis/manage/configuring-security/how-to-set-up-ssl-on-iis#obtain-a-certificate) and import it (see [manage-tls-certificates](https://docs.sonarsource.com/sonarqube-server/analyzing-source-code/scanners/scanner-environment/manage-tls-certificates "mention")) to the Java truststore of the machine running the scanner.
Microsoft limit on HTTP requests
To accommodate potentially long query strings with the SonarQube web API, you can increase the Microsoft limit on HTTP requests by setting the following attributes to much larger values:
* `maxQueryString` (default is 2048) on `system.webServer`
* `maxQueryStringLength` on `system.web`
If you don’t, request filtering (`requestFiltering`) will be applied which can yield HTTP 404 errors. For example, this may cause projects to not appear on the projects dashboard.
To adjust both `maxQueryString` on `system.webServer` and `maxQueryStringLength` on `system.web`, add the following to your Microsoft’s `web.config` file for the associated IIS site using the Configuration Editor:
```css-79elbk
```
See [Request Limits \ | Microsoft Learn](https://learn.microsoft.com/en-us/iis/configuration/system.webServer/security/requestFiltering/requestLimits/) for more information.
#### Step 1: Create an IIS website
1. In the IIS Manager, select *Your machine* > **Sites** > **Add Website…**
2. Under Site name, enter a name for your website.
3. Under **Content Directory** > **Physical path**, select a physical path for your website’s folder. Based on the default IIS website, we recommend creating a `%SystemDrive%\inetpub\wwwroot_sonarqube` folder and using it as a physical path.
4. In Binding, select **Type** > **https**.
5. For Host name, enter the hostname you will use to access SonarQube.
6. Under SSL certificate, select an SSL certificate.
7. Click **OK**.
#### Step 2: Configure your IIS website as a reverse proxy
Once you’ve created your website using the IIS Manager, you can use the URL Rewrite extension to use that website as a reverse proxy:
1. From the IIS Manager home page, select your website and open **URL Rewrite**.
2. Click **Add Rule(s)** to create a new rule.
3. Select **Reverse Proxy** from the list of templates.
4. Enter the destination server URL. It can be `localhost:9000` or a remote server.
5. Click **OK** to create the rule. The URL Rewrite page now displays a reverse proxy inbound rule.
#### Step 3: Add the HTTP\_X\_FORWARDED\_PROTO server variable
Using the URL Rewrite module, you can create a server variable to handle the `HTTP_X_FORWARDED_PROTO` header and pass it to SonarQube.
From the URL Rewrite page:
1. Click **View Server Variables**. This opens the **Allowed Server Variables** page.
2. To add a server variable, click **Add…**, enter **HTTP\_X\_FORWARDED\_PROTO** in the field and click **OK**. The server variable is now displayed on the **Allowed Server Variables** page.
3. Click **Back to Rules** to go to the **URL Rewrite rules list**.
4. Select the reverse proxy inbound rule for your website. Under **Inbound Rules**, click **Edit**.
5. Expand the **Server variables** section of the rule definition.
6. Add the **HTTP\_X\_FORWARDED\_PROTO** server variable and give it the value **https**.
7. Apply the changes.
SonarQube can now be accessed over SSL.
#### Step 4: If SAML authentication is used
For SAML through IIS, you must perform the following additional steps:
1. Make sure the host headers are preserved. This is set at the IIS server level, by executing the following command:
```sh
%windir%\system32\inetsrv\appcmd.exe set config -section:system.webServer/proxy -preserveHostHeader:true /commit:apphost
```
You should then see an output that says something like:\
Applied configuration changes to section "system.webServer/proxy" for "MACHINE/WEBROOT/APPHOST" at configuration commit path "MACHINE/WEBROOT/APPHOST"
2. Disable the Reverse rewrite host in the response headers as follows:
1. At the server level in IIS, go to **Application Request Routing** > **Server proxy settings**.
2. Uncheck the box **Reverse rewrite host in response headers**.
3. Apply the change.
4. Restart IIS.
#### Step 5: Check that the connection is enabled
With your SonarQube instance and your IIS website running, open the IIS Manager and click the link under *Your website* > **Browse Website** > **Browse**, or enter the website’s URL in a browser. You should see the login or home page of your SonarQube instance.
#### Step 6: Additional optional configuration
You can configure your SonarQube instance to only accept traffic from your reverse proxy, by setting the `sonar.web.host` system property to `127.0.0.1`.
Another option is to use the Windows Firewall to only accept traffic from localhost.
For information about system properties setup, see [configuration-methods](https://docs.sonarsource.com/sonarqube-server/server-installation/system-properties/configuration-methods "mention").
### Related pages
* [network-rules](https://docs.sonarsource.com/sonarqube-server/server-installation/network-security/network-rules "mention") (Developer and Enterprise editions)
* [network-rules](https://docs.sonarsource.com/sonarqube-server/server-installation/data-center-edition/network-security/network-rules "mention") (Data Center Edition)
---
# Source: https://docs.sonarsource.com/sonarqube-cloud/administering-sonarcloud/managing-organization/creating-organization/security-contact.md
# Security contact
### Permissions
You need the Administer Organization permission to set up the security contact for an organization. To change the permissions, select your organization from the **Account** menu and go to **Administration** > **Permissions** to apply the permission to users or groups.
### Setting up the security contact email address
To set up the security contact email address:
1. Select your organization from the **Accounts** menu and go to **Administration** > **Organization settings** > **Security contact**.
2. Click on **Add email** and enter the email address for your security contact.
3. Click **Save**.
{% hint style="info" %}
Sonar recommends that you use a distribution list or group alias, for example , for the security contact email.
{% endhint %}
Once you have saved the security contact email address, you can **Edit** it, or delete it. Additionally, the entry shows the email address of the user who set up the security contact and the date when it was updated.
### Related pages
* [organization-permissions](https://docs.sonarsource.com/sonarqube-cloud/administering-sonarcloud/managing-organization/users-and-permissions/organization-permissions "mention")
* [changing-organization-settings](https://docs.sonarsource.com/sonarqube-cloud/administering-sonarcloud/managing-organization/creating-organization/changing-organization-settings "mention")
---
# Source: https://docs.sonarsource.com/sonarqube-server/8.9/analyzing-source-code/security-engine-custom-configuration.md
# Source: https://docs.sonarsource.com/sonarqube-server/9.8/analyzing-source-code/security-engine-custom-configuration.md
# Source: https://docs.sonarsource.com/sonarqube-server/9.9/analyzing-source-code/security-engine-custom-configuration.md
# Source: https://docs.sonarsource.com/sonarqube-server/10.0/analyzing-source-code/security-engine-custom-configuration.md
# Source: https://docs.sonarsource.com/sonarqube-server/10.1/analyzing-source-code/security-engine-custom-configuration.md
# Source: https://docs.sonarsource.com/sonarqube-server/10.2/analyzing-source-code/security-engine-custom-configuration.md
# Source: https://docs.sonarsource.com/sonarqube-server/10.3/analyzing-source-code/security-engine-custom-configuration.md
# Source: https://docs.sonarsource.com/sonarqube-server/10.4/analyzing-source-code/security-engine-custom-configuration.md
# Source: https://docs.sonarsource.com/sonarqube-server/10.5/analyzing-source-code/security-engine-custom-configuration.md
# Source: https://docs.sonarsource.com/sonarqube-server/10.6/analyzing-source-code/security-engine-custom-configuration.md
# Source: https://docs.sonarsource.com/sonarqube-server/10.7/analyzing-source-code/security-engine-custom-configuration.md
# Source: https://docs.sonarsource.com/sonarqube-server/10.8/analyzing-source-code/security-engine-custom-configuration.md
# Source: https://docs.sonarsource.com/sonarqube-server/2025.2/analyzing-source-code/security-engine-custom-configuration.md
# Source: https://docs.sonarsource.com/sonarqube-server/2025.3/analyzing-source-code/security-engine-custom-configuration.md
# Source: https://docs.sonarsource.com/sonarqube-server/2025.5/analyzing-source-code/security-engine-custom-configuration.md
# Source: https://docs.sonarsource.com/sonarqube-server/2025.1/analyzing-source-code/security-engine-custom-configuration.md
# Source: https://docs.sonarsource.com/sonarqube-server/2025.4/analyzing-source-code/security-engine-custom-configuration.md
# Source: https://docs.sonarsource.com/sonarqube-server/2025.6/analyzing-source-code/security-engine-custom-configuration.md
# Source: https://docs.sonarsource.com/sonarqube-server/analyzing-source-code/security-engine-custom-configuration.md
# Security engine custom configuration
*Security Engine Custom Configuration is available as part of the* [*Enterprise edition*](https://www.sonarsource.com/plans-and-pricing/enterprise/) *and* [*above*](https://www.sonarsource.com/plans-and-pricing/)*.*
The security engine tracks the path that data follows through your code. It detects when data that’s potentially manipulated by a malicious user reaches a sensitive piece of code where an attack can occur.
Those potentially malicious data are also called tainted data because they are tainted by user inputs.
SonarQube Server’s security engine already knows a lot of APIs that are potential sources or targets of attack. While we do our best to identify publicly available APIs, we can’t know everything about your homemade frameworks particularly when it comes to sanitizing your data. Because of this, SonarQube Server allows you to customize the security engine to add your own sources, sanitizers, passthroughs, and sinks (see the **Elements** section below for more on these elements).
For example, you may want to:
* Add a source to add support for a framework that SonarQube Server doesn’t cover out of the box.
* Use a custom sanitizer to tell the security engine that all data going through sanitizers should be considered safe. This allows you to remove false positives and tailor the security engine to your company.
### Rules
You can customize elements for Java, PHP, C#, and Python rules in the security engine. Click the languages below to expand a list of customizable rules for that language:
Java
* [S2076](https://rules.sonarsource.com/java/RSPEC-2076): OS commands should not be vulnerable to command injection attacks
* [S2078](https://rules.sonarsource.com/java/RSPEC-2078): LDAP queries should not be vulnerable to injection attacks
* [S2083](https://rules.sonarsource.com/java/RSPEC-2083): I/O function calls should not be vulnerable to path injection attacks
* [S2091](https://rules.sonarsource.com/java/RSPEC-2091): XPath expressions should not be vulnerable to injection attacks
* [S2631](https://rules.sonarsource.com/java/RSPEC-2631): Regular expressions should not be vulnerable to Denial of Service attacks
* [S3649](https://rules.sonarsource.com/java/RSPEC-3649): Database queries should not be vulnerable to injection attacks
* [S5131](https://rules.sonarsource.com/java/RSPEC-5131): Endpoints should not be vulnerable to reflected cross-site scripting (XSS) attacks
* [S5135](https://rules.sonarsource.com/java/RSPEC-5135): Deserialization should not be vulnerable to injection attacks
* [S5144](https://rules.sonarsource.com/java/RSPEC-5144): Server-side requests should not be vulnerable to forging attacks
* [S5145](https://rules.sonarsource.com/java/RSPEC-5145): Logging should not be vulnerable to injection attacks
* [S5146](https://rules.sonarsource.com/java/RSPEC-5146): HTTP request redirections should not be open to forging attacks
* [S5147](https://rules.sonarsource.com/java/RSPEC-5147): NoSQL operations should not be vulnerable to injection attacks
* [S5883](https://rules.sonarsource.com/java/RSPEC-5883): OS commands should not be vulnerable to argument injection attacks
* [S5334](https://rules.sonarsource.com/java/RSPEC-5334): Dynamic code execution should not be vulnerable to injection attacks
* [S6096](https://rules.sonarsource.com/java/RSPEC-6096): Extracting archives should not lead to zip slip vulnerabilities
* [S6173](https://rules.sonarsource.com/java/RSPEC-6173): Reflection should not be vulnerable to injection attacks
* [S6287](https://rules.sonarsource.com/java/RSPEC-6287): Applications should not create session cookies from untrusted input
* [S6350](https://rules.sonarsource.com/java/RSPEC-6350/): Constructing arguments of system commands from user input is security-sensitive
* [S6384](https://rules.sonarsource.com/java/RSPEC-6384): Components should not be vulnerable to intent redirection
* [S6390](https://rules.sonarsource.com/java/RSPEC-6390): Thread suspensions should not be vulnerable to Denial of Service attacks
* [S6398](https://rules.sonarsource.com/java/RSPEC-6398): JSON operations should not be vulnerable to injection attacks
* [S6399](https://rules.sonarsource.com/java/RSPEC-6399): XML operations should not be vulnerable to injection attacks
* [S6547](https://rules.sonarsource.com/java/RSPEC-6547): Environment variables should not be defined from untrusted input
* [S6549](https://rules.sonarsource.com/java/RSPEC-6549/): Accessing files should not lead to filesystem oracle attacks
PHP
* [S2076](https://rules.sonarsource.com/php/RSPEC-2076): OS commands should not be vulnerable to command injection attacks
* [S2078](https://rules.sonarsource.com/php/RSPEC-2078): LDAP queries should not be vulnerable to injection attacks
* [S2083](https://rules.sonarsource.com/php/RSPEC-2083): I/O function calls should not be vulnerable to path injection attacks
* [S2091](https://rules.sonarsource.com/php/RSPEC-2091): XPath expressions should not be vulnerable to injection attacks
* [S2631](https://rules.sonarsource.com/php/RSPEC-2631): Regular expressions should not be vulnerable to Denial of Service attacks
* [S3649](https://rules.sonarsource.com/php/RSPEC-3649): Database queries should not be vulnerable to injection attacks
* [S5131](https://rules.sonarsource.com/php/RSPEC-5131): Endpoints should not be vulnerable to reflected cross-site scripting (XSS) attacks
* [S5135](https://rules.sonarsource.com/php/RSPEC-5135): Deserialization should not be vulnerable to injection attacks
* [S5144](https://rules.sonarsource.com/php/RSPEC-5144): Server-side requests should not be vulnerable to forging attacks
* [S5145](https://rules.sonarsource.com/php/RSPEC-5145): Logging should not be vulnerable to injection attacks
* [S5146](https://rules.sonarsource.com/php/RSPEC-5146): HTTP request redirections should not be open to forging attacks
* [S5334](https://rules.sonarsource.com/php/RSPEC-5334): Dynamic code execution should not be vulnerable to injection attacks
* [S5335](https://rules.sonarsource.com/php/RSPEC-5335): Include expressions should not be vulnerable to injection attacks
* [S5883](https://rules.sonarsource.com/php/RSPEC-5883): OS commands should not be vulnerable to argument injection attacks
* [S6173](https://rules.sonarsource.com/php/RSPEC-6173): Reflection should not be vulnerable to injection attacks
* [S6287](https://rules.sonarsource.com/php/RSPEC-6287): Applications should not create session cookies from untrusted input
* [S6350](https://rules.sonarsource.com/php/RSPEC-6350): Constructing arguments of system commands from user input is security-sensitive
C#
* [S2076](https://rules.sonarsource.com/csharp/RSPEC-2076): OS commands should not be vulnerable to command injection attacks
* [S2078](https://rules.sonarsource.com/csharp/RSPEC-2078): LDAP queries should not be vulnerable to injection attacks
* [S2083](https://rules.sonarsource.com/csharp/RSPEC-2083): I/O function calls should not be vulnerable to path injection attacks
* [S2091](https://rules.sonarsource.com/csharp/RSPEC-2091): XPath expressions should not be vulnerable to injection attacks
* [S2631](https://rules.sonarsource.com/csharp/RSPEC-2631): Regular expressions should not be vulnerable to Denial of Service attacks
* [S3649](https://rules.sonarsource.com/csharp/RSPEC-3649): Database queries should not be vulnerable to injection attacks
* [S5131](https://rules.sonarsource.com/csharp/RSPEC-5131): Endpoints should not be vulnerable to reflected cross-site scripting (XSS) attacks
* [S5135](https://rules.sonarsource.com/csharp/RSPEC-5135): Deserialization should not be vulnerable to injection attacks
* [S5144](https://rules.sonarsource.com/csharp/RSPEC-5144): Server-side requests should not be vulnerable to forging attacks
* [S5145](https://rules.sonarsource.com/csharp/RSPEC-5145): Logging should not be vulnerable to injection attacks
* [S5146](https://rules.sonarsource.com/csharp/RSPEC-5146): HTTP request redirections should not be open to forging attacks
* [S5334](https://rules.sonarsource.com/csharp/RSPEC-5334): Dynamic code execution should not be vulnerable to injection attacks
* [S5883](https://rules.sonarsource.com/csharp/RSPEC-5883): OS commands should not be vulnerable to argument injection attacks
* [S6096](https://rules.sonarsource.com/csharp/RSPEC-6096): Extracting archives should not lead to zip slip vulnerabilities
* [S6173](https://rules.sonarsource.com/csharp/RSPEC-6173): Reflection should not be vulnerable to injection attacks
* [S6287](https://rules.sonarsource.com/csharp/RSPEC-6287): Applications should not create session cookies from untrusted input
* [S6350](https://rules.sonarsource.com/csharp/RSPEC-6350): Constructing arguments of system commands from user input is security-sensitive
* [S6399](https://rules.sonarsource.com/csharp/RSPEC-6399): XML operations should not be vulnerable to injection attacks
* [S6639](https://rules.sonarsource.com/csharp/RSPEC-6639): Memory allocations should not be vulnerable to Denial of Service attacks
* [S6641](https://rules.sonarsource.com/csharp/RSPEC-6641): Connection strings should not be vulnerable to injections attacks
Python
* [S2076](https://rules.sonarsource.com/python/RSPEC-2076): OS commands should not be vulnerable to command injection attacks
* [S2078](https://rules.sonarsource.com/python/RSPEC-2078): LDAP queries should not be vulnerable to injection attacks
* [S2083](https://rules.sonarsource.com/python/RSPEC-2083): I/O function calls should not be vulnerable to path injection attacks
* [S2091](https://rules.sonarsource.com/python/RSPEC-2091): XPath expressions should not be vulnerable to injection attacks
* [S2631](https://rules.sonarsource.com/python/RSPEC-2631): Regular expressions should not be vulnerable to Denial of Service attacks
* [S3649](https://rules.sonarsource.com/python/RSPEC-3649): Database queries should not be vulnerable to injection attacks
* [S5131](https://rules.sonarsource.com/python/RSPEC-5131): Endpoints should not be vulnerable to reflected cross-site scripting (XSS) attacks
* [S5135](https://rules.sonarsource.com/python/RSPEC-5135): Deserialization should not be vulnerable to injection attacks
* [S5144](https://rules.sonarsource.com/python/RSPEC-5144): Server-side requests should not be vulnerable to forging attacks
* [S5145](https://rules.sonarsource.com/python/RSPEC-5145): Logging should not be vulnerable to injection attacks
* [S5146](https://rules.sonarsource.com/python/RSPEC-5146): HTTP request redirections should not be open to forging attacks
* [S5147](https://rules.sonarsource.com/python/RSPEC-5147): NoSQL operations should not be vulnerable to injection attacks
* [S5334](https://rules.sonarsource.com/python/RSPEC-5334): Dynamic code execution should not be vulnerable to injection attacks
* [S5496](https://rules.sonarsource.com/python/RSPEC-5496): Server-side templates should not be vulnerable to injection attacks
* [S6287](https://rules.sonarsource.com/python/RSPEC-6287): Applications should not create session cookies from untrusted input
* [S6350](https://rules.sonarsource.com/csharp/RSPEC-6350): Constructing arguments of system commands from user input is security-sensitive
### Elements
You can add the following elements to your custom configuration:
* **Source** – Where you get user data. You should always consider user data tainted and vulnerable to injection attacks. Example: Calling `HttpServletRequest#getParam("foo")` will return tainted content.
* **Sanitizer** – Finds and removes malicious content from one or more potentially tainted arguments. Example: `DatabaseUtils#sqlEscapeString(String str)` returns a modified version of `str` where characters used in an SQL injection attack are removed.
* **Validator** - Marks one or more arguments as safe from malicious content. Example: `String#matches(String str)` can be used to verify that `str` does not contain any content which may be used in an injection attack.
* **Passthrough** – Allows you to keep track of tainted data sent to a library outside the current function. When you pass a tainted value to a library function outside the current function, SonarQube Server automatically assumes it’s being passed to a sanitizer. If the tainted data isn’t being passed to a sanitizer, you can set up a passthrough to keep track of the data.
* **Sink** – A piece of code that can perform a security-sensitive task. Data should not contain any malicious content once it reaches a sink. Example: Running an SQL query with `java.sql.Statement#execute`.
### MethodId
All custom configurations rely on the accuracy of the provided `methodId`. The `methodId` format differs for each language. Click the language you’re using below for more information on the format for that language.
### Creating your custom configuration JSON file
You need to add your custom configurations to SonarQube Server using a JSON file. You can apply your custom configuration to a specific project or to all of your projects at the global level in SonarQube Server:
* **Project level** – go to **Project Settings** > **General Settings** > **SAST Engine** and add your JSON file to the **JAVA/PHP/C#/Python custom configuration** field.
* **Global level** – go to **Administration** > **General Settings** > **SAST Engine** and add your JSON file to the **JAVA/PHP/C#/Python custom configuration** field.
See the following section for more information on formatting your JSON file.
#### Configuration file format
Your JSON file should include the rule you’re adding a custom element to, the element you are customizing, and the `methodId` for each element. Each language needs a separate JSON file but can contain multiple rules. You may use the special rule key `common` to apply the given configuration to all the rules. Click your language below to expand an example of a JSON file to help you understand the expected format.
Java JSON file example
```json
{
"S3649": {
"sources": [
{
"methodId": "my.package.ServerRequest#getQuery()Ljava/lang/String;"
}
],
"sanitizers": [
{
"methodId": "my.package.StringUtils#stringReplace(Ljava/lang/String;Ljava/lang/String;)Ljava/lang/String;",
"args": [
2
]
}
],
"validators": [
{
"methodId": "my.package.StringUtils#equals(Ljava/lang/String;)Z",
"args": [
1
]
}
],
"passthroughs": [
{
"methodId": "my.package.RawUrl#(Ljava/lang/String;)V",
"isWhitelist": true,
"args": [
1
]
}
],
"sinks": [
{
"methodId": "my.package.MySql#query(Ljava/lang/String;)V",
"args": [
1
]
},
{
"methodId": "my.package.SqlStatement#execute",
"isMethodPrefix": true,
"args": [
0,
1
]
},
{
"methodId": "my.package.SqlStatement#run(Ljava/lang/String;Ljava/lang/String;Ljava/lang/String;)V",
"interval": {
"fromIndex": 1
}
}
]
},
"S5131": {
"sources": [
{
"methodId": "my.package.ServerRequest#getQueryString()Ljava/lang/String;"
}
],
"sinks": [
{
"methodId": "my.package.Server#write(",
"isMethodPrefix": true,
"interval": {
"fromIndex": 1
}
}
]
},
"common": {
"sources": [
{
"methodId": "my.package.Input#getUserInput()Ljava/lang/String;"
}
]
}
}
```
The `args` is the index of the parameter that can receive a tainted variable. Index starts:
* `1` for a function call.
* `0` for a method call, index `0` being the current instance (`this`). The `args` field must be a non-empty array of non-negative integers, and it is a mandatory field for sanitizers and validators.
PHP JSON file example
```json
{
"S3649": {
"sources": [
{
"methodId": "My\\Namespace\\ClassName\\ServerRequest::getQuery"
}
],
"sanitizers": [
{
"methodId": "str_replace",
"args": [
3
]
}
],
"validators": [
{
"methodId": "My\\Namespace\\Validator\\inArray::isValid",
"args": [
1
]
}
],
"passthroughs": [
{
"methodId": "My\\Namespace\\RawUrl::RawUrl",
"isWhitelist": true,
"args": [
1
]
}
],
"sinks": [
{
"methodId": "mysql_query",
"args": [
1
]
},
{
"methodId": "My\\Namespace\\SqlStatement::execute",
"isMethodPrefix": true,
"args": [
0,
1
]
},
{
"methodId": "My\\Namespace\\SqlStatement::run",
"interval": {
"fromIndex": 1
}
}
]
},
"S5131": {
"sources": [
{
"methodId": "My\\Namespace\\ClassName\\ServerRequest::getQueryString"
}
],
"sinks": [
{
"methodId": "My\\Namespace\\ClassName\\Server::write",
"isMethodPrefix": true,
"interval": {
"fromIndex": 1
}
}
]
},
"common": {
"sources": [
{
"methodId": "My\\Namespace\\ClassName\\Input::getUserInput"
}
]
}
}
```
The `args` is the index of the parameter that can receive a tainted variable. Index starts:
* `1` for a function call.
* `0` for a method call, index `0` being the current instance (`this`). The `args` field must be a non-empty array of non-negative integers, and it is a mandatory field for sanitizers and validators.
C# JSON file example
```json
{
"S3649": {
"sources": [
{
"methodId": "My.Namespace.ServerRequest.GetQuery()"
}
],
"sanitizers": [
{
"methodId": "My.Namespace.StringUtils.StringReplace(string, string)",
"args": [
0
]
}
],
"validators": [
{
"methodId": "My.Namespace.StringUtils.Regex.Matches(string)",
"args": [
0
]
}
],
"passthroughs": [
{
"methodId": "My.Namespace.RawUrl.RawUrl(string)",
"isWhitelist": true,
"args": [
1
]
}
],
"sinks": [
{
"methodId": "My.Namespace.MySql.Query(string)",
"args": [
1
]
},
{
"methodId": "My.Namespace.SqlStatement.Execute",
"isMethodPrefix": true,
"args": [
0,
1
]
},
{
"methodId": "My.Namespace.SqlStatement.Run(string, string, string)",
"interval": {
"fromIndex": 1
}
}
]
},
"S5131": {
"sources": [
{
"$comment": "The following method id is a getter on the 'QueryString' property",
"methodId": "My.Namespace.ServerRequest.QueryString.get"
}
],
"sinks": [
{
"methodId": "My.Namespace.Server.Write(",
"isMethodPrefix": true,
"interval": {
"fromIndex": 1
}
}
]
},
"common": {
"sources": [
{
"methodId": "My.Namespace.Input.GetUserInput()"
}
]
}
}
```
The `args` is the index of the parameter that can receive a tainted variable. Index starts:
* `1` for a function call.
* `0` for a method call, index `0` being the current instance (`this`). The `args` field must be a non-empty array of non-negative integers, and it is a mandatory field for sanitizers and validators.
Python JSON file example
```json
{
"S3649": {
"sources": [
{
"methodId": "my.namespace.ServerRequest.get_query"
}
],
"sanitizers": [
{
"methodId": "str_replace",
"args": [
1
]
}
],
"validators": [
{
"methodId": "my.namespace.regex.matches",
"args": [
1
]
}
],
"passthroughs": [
{
"methodId": "my.namespace.RawUrl",
"isWhitelist": true,
"args": [
1
]
}
],
"sinks": [
{
"methodId": "mysql_query",
"args": [
1
]
},
{
"methodId": "my.namespace.SqlStatement.execute",
"isMethodPrefix": true,
"args": [
0,
1
]
},
{
"methodId": "my.namespace.SqlStatement.run",
"interval": {
"fromIndex": 1
}
}
]
},
"S5131": {
"sources": [
{
"methodId": "my.namespace.ServerRequest.get_query_string"
}
],
"sinks": [
{
"methodId": "my.namespace.Server.write(",
"isMethodPrefix": true,
"interval": {
"fromIndex": 1
}
}
]
},
"common": {
"sources": [
{
"methodId": "my.namespace.Input.get_input"
}
]
}
}
```
The `args` is the index of the parameter that can receive a tainted variable. Index starts:
* `1` for a function call.
* `0` for a method call, index `0` being the current instance (`this`). The `args` field must be a non-empty array of non-negative integers, and it is a mandatory field for sanitizers and validators.
#### (Deprecated) Customizing through analysis parameters
{% hint style="warning" %}
Customizing the security engine through analysis parameters is deprecated. We recommend adding your custom configuration in SonarQube Server as shown above. This allows you to create a single configuration file for each language and to easily apply it to multiple projects or globally.
{% endhint %}
To customize the SonarQube Server security engine, you can feed security configuration data through parameters given to the SonarScanners. To do this, you should provide JSON files with the value of the new analysis parameters.
{% hint style="info" %}
The configuration works per rule. You can’t share a configuration between rules.
{% endhint %}
The parameters should use the following syntax:
```css-79elbk
sonar.security.[ConfigType].[RuleRepository].[RuleKey]=[FileName]
```
The `ConfigType` value can be one of the following:
* `sources`
* `sanitizers`
* `passthroughs`
* `sinks`
The `RuleRepository` value can be one of the following:
* `javasecurity`: if you want to customize the Java Security Engine
* `phpsecurity`: if you want to customize the PHP Security Engine
* `roslyn.sonaranalyzer.security.cs`: if you want to customize the C# Security Engine
* `pythonsecurity`: if you want to customize the Python Security Engine
The `RuleKey` value should be one of the values shown in the **Rules** section above.
**JSON formatting example**
Configuration is provided using JSON files. Click the heading below to expand an example PHP JSON file to help you understand the expected format.
JSON File Format Example for PHP
{% hint style="info" %}
You need to create a configuration for each rule. There is no way to share a configuration between rules.
{% endhint %}
```json
{
"sources": [
{
"methodId": "My\\Namespace\\ClassName\\ServerRequest::getQuery"
}
],
"sanitizers": [
{
"methodId": "str_replace",
"args": [
3
]
}
],
"validators": [
{
"methodId": "My\\Namespace\\Validator\\inArray::isValid",
"args": [
1
]
}
],
"passthroughs": [
{
"methodId": "rawurldecode",
"args": [
1
]
}
],
"sinks": [
{
"methodId": "mysql_query",
"args": [
1
]
},
{
"methodId": "My\\Namespace\\SqlStatement::execute",
"isMethodPrefix": true, // this is to say that all the methods starting with execute on the SqlStatement object will be considered
"args": [
0,
1
]
},
{
"methodId": "My\\Namespace\\SqlStatement::run",
"interval": {
"fromIndex": 1 // every parameter from the number 1 will be considered
}
}
]
}
```
The `args` is the index of the parameter that can receive a tainted variable. Index starts:
* `1` for a function call.
* `0` for a method call, index `0` being the current instance (`this`) . The `args` field must be a non-empty array of non-negative integers, and it is a mandatory field for sanitizers and validators.
---
# Source: https://docs.sonarsource.com/sonarqube-community-build/user-guide/security-hotspots.md
# Source: https://docs.sonarsource.com/sonarqube-for-eclipse/using/security-hotspots.md
# Source: https://docs.sonarsource.com/sonarqube-for-visual-studio/using/security-hotspots.md
# Source: https://docs.sonarsource.com/sonarqube-for-intellij/using/security-hotspots.md
# Source: https://docs.sonarsource.com/sonarqube-for-vs-code/using/security-hotspots.md
# Source: https://docs.sonarsource.com/sonarqube-server/8.9/user-guide/security-hotspots.md
# Source: https://docs.sonarsource.com/sonarqube-server/9.8/user-guide/security-hotspots.md
# Source: https://docs.sonarsource.com/sonarqube-server/9.9/user-guide/security-hotspots.md
# Source: https://docs.sonarsource.com/sonarqube-server/10.0/user-guide/security-hotspots.md
# Source: https://docs.sonarsource.com/sonarqube-server/10.1/user-guide/security-hotspots.md
# Source: https://docs.sonarsource.com/sonarqube-server/10.2/user-guide/security-hotspots.md
# Source: https://docs.sonarsource.com/sonarqube-server/10.3/user-guide/security-hotspots.md
# Source: https://docs.sonarsource.com/sonarqube-server/10.4/user-guide/security-hotspots.md
# Source: https://docs.sonarsource.com/sonarqube-server/10.5/user-guide/security-hotspots.md
# Source: https://docs.sonarsource.com/sonarqube-server/10.6/user-guide/security-hotspots.md
# Source: https://docs.sonarsource.com/sonarqube-server/10.7/user-guide/security-hotspots.md
# Source: https://docs.sonarsource.com/sonarqube-server/10.8/user-guide/security-hotspots.md
# Source: https://docs.sonarsource.com/sonarqube-server/2025.2/user-guide/security-hotspots.md
# Source: https://docs.sonarsource.com/sonarqube-server/2025.3/user-guide/security-hotspots.md
# Source: https://docs.sonarsource.com/sonarqube-server/2025.5/user-guide/security-hotspots.md
# Source: https://docs.sonarsource.com/sonarqube-server/2025.1/user-guide/security-hotspots.md
# Source: https://docs.sonarsource.com/sonarqube-server/2025.4/user-guide/security-hotspots.md
# Source: https://docs.sonarsource.com/sonarqube-server/2025.6/user-guide/security-hotspots.md
# Source: https://docs.sonarsource.com/sonarqube-server/user-guide/security-hotspots.md
# Source: https://docs.sonarsource.com/sonarqube-cloud/digging-deeper/security-hotspots.md
# Security hotspots
### What is a security hotspot?
SonarQube’s code analysis and review finds Security issues and Security Hotspots within your code. Security Hotspot highlights security-sensitive code that the developer needs to review. Upon review, you’ll either find no threat, or you will need to apply a fix to secure the code.
You can think of hotspots as an example of [defense in depth](https://en.wikipedia.org/wiki/Defense_in_depth_\(computing\)), where several redundant layers of protection are added to an application to make it more resilient in the event of an attack.
### Vulnerability or hotspot?
The main difference between a hotspot and a vulnerability is *the need for a review* before deciding whether to apply a fix:
* With a hotspot, a security-sensitive piece of code is highlighted, but overall application security may not be impacted; It’s up to the developer to review the code to determine whether or not a fix is needed to secure the code.
* With a vulnerability, a problem that impacts the application’s security has been discovered that needs to be fixed immediately.
An example is the [RSPEC-2092](https://jira.sonarsource.com/browse/RSPEC-2092), where the use of *cookie secure flag* is recommended to prevent cookies from being sent over non-HTTPS connections, but a review is needed because:
* HTTPS is the main protection against MITM attacks; the secure flag only acts as additional protection in case of failures in network security.
* The cookie may be designed to be sent everywhere (non-HTTPS websites included) because it’s a tracking cookie or similar.
With hotspots, we try to give some freedom to users and educate them on how to choose the most relevant/appropriate protections, depending on the context - budget, threats, etc.
### Why are security hotspots important?
While the need to fix individual hotspots depends on the context, you should view security hotspots as an essential part of improving an application’s robustness. The more fixed hotspots there are, the more secure your code is in the event of an attack. Reviewing security hotspots allows you to:
* **Understand the risk**: Understand when and why you need to apply a fix in order to reduce an information security risk (threats and impacts).
* **Identify protections**: While reviewing hotspots, you’ll see how to avoid writing code that is at risk, determine which fixes are in place, and determine which fixes still need to be implemented to fix the highlighted code.
* **Identify impacts**: With hotspots, you’ll learn how to apply fixes to secure your code based on the impact on overall application security. Recommended secure coding practices are included on the hotspots page to assist you during your review.
### Lifecycle
Security hotspots have a dedicated lifecycle. To make status changes, the user needs the **Administer Security Hotspots** permission, which is enabled by default. Users with the **Browse** permission can comment on or change the user assigned to a security hotspot.
#### Statuses
Through the lifecycle, a security hotspot takes one of the following statuses:
* **To review**: The default status of new Security Hotspots set by SonarQube Cloud. Security Hotspot has been reported and needs to be checked.
* **Fixed**: A developer has reviewed the Security Hotspot and applied a fix.
* **Safe**: A developer has reviewed the Security Hotspot and determined that no change is necessary, for example, because other more relevant protections are already in place.
### Workflow
Follow this workflow to review security hotspots and apply any fixes needed to secure your code.
#### Review priority
When SonarQube Cloud detects a security hotspot, it’s added to the list of security hotspots according to its review priority from high to low. Hotspots with a high review priority are the most likely to contain code that needs to be secured and require your attention first.
Review priority is determined by the security category of each security rule. Rules in categories that are ranked high on the OWASP Top 10 and CWE Top 25 standards are considered to have a high review priority. Rules in categories that aren’t ranked high or aren’t mentioned on the OWASP Top 10 or CWE Top 25 standards are rated as medium or low.
#### Reviewing hotspots
When reviewing a hotspot, you should:
1. Review the **What’s the risk** tab to understand why the security hotspot was raised.
2. From the **Are you at risk** tab, read the **Ask Yourself Whether** section to determine if you need to apply a fix to secure the code highlighted in the hotspot.
3. From the **How can you fix it** tab, follow the **Recommended Secure Coding Practices** to fix your code if you’ve determined it’s unsafe.
After following these steps, assign one of the following status updates to the security hotspot:
* **To Review**: if the issue needs to be reviewed.
* **Fixed**: if you have applied a fix to secure the code highlighted by the hotspot.
* **Safe**: if the code is already secure and doesn’t need to be fixed. (for example, other more relevant protections are already in place).
#### Review history
The **Review history** tab shows the history of the security hotspot, including the status that it’s been assigned, and any comments the reviewer had regarding the hotspot.
### Reviewing hotspots in your IDE
Seeing a security hotspot directly in the IDE can help you better understand its context and decide whether it is safe or not. Unfortunately, the SonarQube Cloud Open in IDE feature is not available for security hotspots at this time. See the [#opening-in-ide](https://docs.sonarsource.com/sonarqube-cloud/managing-your-projects/issues/fixing#opening-in-ide "mention") article for details.
The methods to find and fix security hotspots vary by IDE. Please check out the respective SonarQube for IDE documentation pages for these details:
* [Security hotspots](https://app.gitbook.com/s/6LPRABg3ubAJhpfR5K0Y/using/security-hotspots "mention") in SonarQube for VS Code
* [Security hotspots](https://app.gitbook.com/s/NvI4wotPmITyM0mnsmtp/using/security-hotspots "mention") in SonarQube for IntelliJ
* [Security hotspots](https://app.gitbook.com/s/5CSDwdOaYoOAGYNiRqgl/using/security-hotspots "mention") in SonarQube for Visual Studio
* [Security hotspots](https://app.gitbook.com/s/kadXEH8HkykK7lKaDvVq/using/security-hotspots "mention") in SonarQube for Eclipse
---
# Source: https://docs.sonarsource.com/sonarqube-server/10.6/user-guide/issues/security-issues-in-devops-platform.md
# Source: https://docs.sonarsource.com/sonarqube-server/10.7/user-guide/issues/security-issues-in-devops-platform.md
# Source: https://docs.sonarsource.com/sonarqube-server/10.8/user-guide/issues/security-issues-in-devops-platform.md
# Source: https://docs.sonarsource.com/sonarqube-server/2025.2/user-guide/issues/security-issues-in-devops-platform.md
# Source: https://docs.sonarsource.com/sonarqube-server/2025.3/user-guide/issues/security-issues-in-devops-platform.md
# Source: https://docs.sonarsource.com/sonarqube-server/2025.1/user-guide/issues/security-issues-in-devops-platform.md
# Source: https://docs.sonarsource.com/sonarqube-server/2025.4/user-guide/issues/security-issues-in-devops-platform.md
# Issues reported in DevOps platform
### Managing security issues in GitHub
When you analyze a project in SonarQube, the detected security issues are displayed on the GitHub interface as code scanning alerts, if set up in your system. See [report-security-alerts](https://docs.sonarsource.com/sonarqube-server/2025.4/devops-platform-integration/github-integration/setting-up-at-global-level/report-security-alerts "mention") for more information. When you change the status of a security issue in the SonarQube interface that status change is immediately reflected in the GitHub interface. Similarly, if you change the status of a code scanning alert in GitHub, that change is reflected in SonarQube.
To view and manage your code scanning alerts:
1. In GitHub, go to your repository’s **Security** > **Code scanning alerts** tab.
2. Select **View alerts** to see the full list.
### Viewing the security issues in GitLab
When you analyze a project in SonarQube Server, the detected security issues are displayed on the GitLab interface as security vulnerabilities if set up in GitLab CI/CD. See [setting-up-at-project-level](https://docs.sonarsource.com/sonarqube-server/2025.4/devops-platform-integration/gitlab-integration/setting-up-at-project-level "mention") for more information. When you change the status of a security issue in the SonarQube Server interface that status change is immediately reflected in the GitLab interface. If you change the status of a security vulnerability in GitLab, that change is reflected in SonarQube Server during the next analysis.
To view the security vulnerabilities:
* Go to the **GitLab** > **Vulnerability** report page.
{% hint style="info" %}
If your issues appear duplicated (it may be the case after the modification of a file), we recommend using the **Activity** > **Still detected** filter.
{% endhint %}
### Viewing the issues detected on a pull request in Azure DevOps
When you run a SonarQube Server analysis for a pull request, each SonarQube issue is displayed as a comment on the Azure DevOps pull request. If the Azure DevOps instance is configured correctly and you change the status of an issue in SonarQube Server, that status change is immediately reflected in the Azure DevOps interface.
If you want to decorate your pull request with a quality gate status and are not interested to have SonarQube Server annotations in your PR, see the [#disable-pull-request-annotations](https://docs.sonarsource.com/sonarqube-server/2025.4/devops-platform-integration/azure-devops-integration/setting-up-project-integration#disable-pull-request-annotations "mention") article.
---
# Source: https://docs.sonarsource.com/sonarqube-server/8.9/user-guide/rules/security-related-rules.md
# Source: https://docs.sonarsource.com/sonarqube-server/9.8/user-guide/rules/security-related-rules.md
# Source: https://docs.sonarsource.com/sonarqube-server/9.9/user-guide/rules/security-related-rules.md
# Source: https://docs.sonarsource.com/sonarqube-server/10.0/user-guide/rules/security-related-rules.md
# Source: https://docs.sonarsource.com/sonarqube-server/10.1/user-guide/rules/security-related-rules.md
# Source: https://docs.sonarsource.com/sonarqube-server/10.2/user-guide/rules/security-related-rules.md
# Source: https://docs.sonarsource.com/sonarqube-server/10.3/user-guide/rules/security-related-rules.md
# Source: https://docs.sonarsource.com/sonarqube-server/10.4/user-guide/rules/security-related-rules.md
# Source: https://docs.sonarsource.com/sonarqube-server/10.5/user-guide/rules/security-related-rules.md
# Source: https://docs.sonarsource.com/sonarqube-server/10.6/user-guide/rules/security-related-rules.md
# Source: https://docs.sonarsource.com/sonarqube-server/10.7/user-guide/rules/security-related-rules.md
# Source: https://docs.sonarsource.com/sonarqube-server/10.8/user-guide/rules/security-related-rules.md
# Source: https://docs.sonarsource.com/sonarqube-server/2025.2/user-guide/rules/security-related-rules.md
# Source: https://docs.sonarsource.com/sonarqube-server/2025.3/user-guide/rules/security-related-rules.md
# Source: https://docs.sonarsource.com/sonarqube-server/2025.5/user-guide/rules/security-related-rules.md
# Source: https://docs.sonarsource.com/sonarqube-server/2025.1/user-guide/rules/security-related-rules.md
# Source: https://docs.sonarsource.com/sonarqube-server/2025.4/user-guide/rules/security-related-rules.md
# Source: https://docs.sonarsource.com/sonarqube-server/2025.6/user-guide/rules/security-related-rules.md
# Source: https://docs.sonarsource.com/sonarqube-server/user-guide/rules/security-related-rules.md
# Source: https://docs.sonarsource.com/sonarqube-cloud/digging-deeper/security-related-rules.md
# Security-related rules
The SonarQube quality model is applied to an automated code review and analysis based on the following types of rules:
* Reliability (Bug)
* Maintainability (Code Smell)
* Security (Vulnerability)
* Security Hotspot
Security-related rules include Security rules and Security Hotspot rules. They are divided into two types: security-injection and security-configuration rules.
### Security-injection rules
Security-injection rules are used to detect injection vulnerabilities. An injection vulnerability (also known as injection flaw or taint vulnerability) occurs when the inputs handled by your application are controlled by a user (potentially an attacker) and not validated or sanitized. When this occurs, the flow from sources (user-controlled inputs) to sinks (sensitive functions) will be presented. Common types include [SQL Injection](https://rules.sonarsource.com/java/type/Vulnerability/RSPEC-3649/), [Deserialization](https://rules.sonarsource.com/java/type/Vulnerability/RSPEC-5135/), and [Command Injection](https://rules.sonarsource.com/java/type/Vulnerability/RSPEC-2076/) vulnerabilities.
To show the flow of tainted issues, SonarQube uses well-known taint analysis technology on source code which allows, for example, the detection of:
* [CWE-89](https://cwe.mitre.org/data/definitions/89.html): SQL Injection
* [CWE-79](https://cwe.mitre.org/data/definitions/79.html): Cross-site Scripting
* [CWE-94](https://cwe.mitre.org/data/definitions/94.html): Code Injection
{% hint style="info" %}
* Security-injection rules are supported only by SonarQube Cloud and SonarQube Server. SonarQube for IDE pulls the injection vulnerabilities raised by these products during a project analysis.
{% endhint %}
### Security-configuration rules
The security-configuration rules are used to raise a security issue when:
* A sensitive function is called with a wrong parameter (invalid cryptographic algorithm or TLS version).
* A check (for example, a `check_permissions()` kind of function) is not done or is not in the correct order.\
This problem is likely to appear often when the program is executed.
Examples:
* [CWE-1004](https://cwe.mitre.org/data/definitions/1004.html): Sensitive Cookie Without ‘HttpOnly’ Flag
* [CWE-297](https://cwe.mitre.org/data/definitions/297.html): Improper Validation of Certificate with Host Mismatch
* [CWE-327](https://cwe.mitre.org/data/definitions/327.html): Use of a Broken or Risky Cryptographic Algorithm
### Differences between security issues (vulnerabilities) and hotspots
Security hotspots have been introduced for security protections that have no direct impact on the overall application’s security. With hotspots, we want to help developers understand information security risks, threats, impacts, root causes of security issues, and the choice of relevant software protections. In short, we really want to educate developers and help them develop secure, ethical, and privacy-friendly applications.
For more information about hotspots and vulnerabilities, see the [security-hotspots](https://docs.sonarsource.com/sonarqube-cloud/digging-deeper/security-hotspots "mention") page.
### Security standards covered
* [OWASP Top 10](https://owasp.org/Top10/) (versions 2021 and 2017)
OWASP Top 10 security standards covered by Sonar for version 2021
| | | | | | | | |
| ----------------------------------------------- | ------------------------------------------------------------------------------------------------------------------------------------------------------------------------------------------------------------------------ | ------------------------------------------------------------------------------------------------------------------------------------------------------------------------------------------------------------------------ | ------------------------------------------------------------------------------------------------------------------------------------------------------------------------------------------------------------------------ | ------------------------------------------------------------------------------------------------------------------------------------------------------------------------------------------------------------------------ | ------------------------------------------------------------------------------------------------------------------------------------------------------------------------------------------------------------------------ | ------------------------------------------------------------------------------------------------------------------------------------------------------------------------------------------------------------------------ | ------------------------------------------------------------------------------------------------------------------------------------------------------------------------------------------------------------------------ |
| **Category** | **Python** | **JS/TS** | **Java** | **C#** | **C/C++** | **PHP** | **Kotlin** |
| A01:Broken Access Control |  |  |  |  |  |  |  |
| A02: Cryptographic Failures |  |  |  |  |  |  |  |
| A03: Injection |  |  |  |  |
|  |  |
| CWE-306 Missing Authentication for Critical Function |
|
|
|
|
|
|
|
* [OWASP ASVS 4.0 Level 1, 2, 3](https://owasp.org/www-project-application-security-verification-standard/)
* [PCI DSS](https://www.pcisecuritystandards.org/) (versions 4.0 and 3.2.1)
* [CASA](https://appdefensealliance.dev/casa)
* [STIG](https://public.cyber.mil/stigs/)
They represent the bare minimum to comply with for anyone putting in place a secure development lifecycle.
Make sure the relevant security rules are activated in your quality profiles; otherwise, your security reports will not be reliable. For instance, if no rule corresponding to a given OWASP category is activated in your quality profile, you won’t get issues or hotspots linked to that specific category in the OWASP report.
### Related pages
* [project-security-reports](https://docs.sonarsource.com/sonarqube-cloud/getting-started-with-enterprise/viewing-enterprise-reports/project-security-reports "mention")
* [portfolio-security-reports](https://docs.sonarsource.com/sonarqube-cloud/getting-started-with-enterprise/viewing-enterprise-reports/portfolio-security-reports "mention")
---
# Source: https://docs.sonarsource.com/sonarqube-community-build/instance-administration/security.md
# Source: https://docs.sonarsource.com/sonarqube-community-build/instance-administration/system-functions/security.md
# Source: https://docs.sonarsource.com/sonarqube-server/8.9/instance-administration/security.md
# Source: https://docs.sonarsource.com/sonarqube-server/9.8/instance-administration/security.md
# Source: https://docs.sonarsource.com/sonarqube-server/9.9/instance-administration/security.md
# Source: https://docs.sonarsource.com/sonarqube-server/10.0/instance-administration/security.md
# Source: https://docs.sonarsource.com/sonarqube-server/10.1/instance-administration/security.md
# Source: https://docs.sonarsource.com/sonarqube-server/10.2/instance-administration/security.md
# Source: https://docs.sonarsource.com/sonarqube-server/10.3/instance-administration/security.md
# Source: https://docs.sonarsource.com/sonarqube-server/10.4/instance-administration/security.md
# Source: https://docs.sonarsource.com/sonarqube-server/10.5/instance-administration/security.md
# Source: https://docs.sonarsource.com/sonarqube-server/10.6/instance-administration/security.md
# Source: https://docs.sonarsource.com/sonarqube-server/10.7/instance-administration/system-functions/security.md
# Source: https://docs.sonarsource.com/sonarqube-server/10.8/instance-administration/system-functions/security.md
# Source: https://docs.sonarsource.com/sonarqube-server/2025.2/instance-administration/system-functions/security.md
# Source: https://docs.sonarsource.com/sonarqube-server/2025.3/instance-administration/security.md
# Source: https://docs.sonarsource.com/sonarqube-server/2025.3/instance-administration/system-functions/security.md
# Source: https://docs.sonarsource.com/sonarqube-server/2025.5/instance-administration/security.md
# Source: https://docs.sonarsource.com/sonarqube-server/2025.5/instance-administration/system-functions/security.md
# Source: https://docs.sonarsource.com/sonarqube-server/2025.1/instance-administration/system-functions/security.md
# Source: https://docs.sonarsource.com/sonarqube-server/2025.4/instance-administration/security.md
# Source: https://docs.sonarsource.com/sonarqube-server/2025.4/instance-administration/system-functions/security.md
# Source: https://docs.sonarsource.com/sonarqube-server/2025.6/instance-administration/security.md
# Source: https://docs.sonarsource.com/sonarqube-server/2025.6/instance-administration/system-functions/security.md
# Source: https://docs.sonarsource.com/sonarqube-server/instance-administration/security.md
# Source: https://docs.sonarsource.com/sonarqube-server/instance-administration/system-functions/security.md
# Source: https://docs.sonarsource.com/sonarqube-cloud/appendices/security.md
# Security
Sonar takes security extremely seriously. Our security and governance program is focused on the security and privacy of your data. We are continuously assessing and improving our controls and associated processes by driving priorities through our Information Security Management framework.
You can find detailed information about Sonar’s standards and security policies in our [Trust Center](https://www.sonarsource.com/trust-center/).
---
# Source: https://docs.sonarsource.com/sonarqube-community-build/instance-administration/server-base-url.md
# Source: https://docs.sonarsource.com/sonarqube-server/9.9/instance-administration/server-base-url.md
# Source: https://docs.sonarsource.com/sonarqube-server/10.7/instance-administration/server-base-url.md
# Source: https://docs.sonarsource.com/sonarqube-server/10.8/instance-administration/server-base-url.md
# Source: https://docs.sonarsource.com/sonarqube-server/2025.2/instance-administration/server-base-url.md
# Source: https://docs.sonarsource.com/sonarqube-server/2025.3/instance-administration/server-base-url.md
# Source: https://docs.sonarsource.com/sonarqube-server/2025.5/instance-administration/server-base-url.md
# Source: https://docs.sonarsource.com/sonarqube-server/2025.1/instance-administration/server-base-url.md
# Source: https://docs.sonarsource.com/sonarqube-server/2025.4/instance-administration/server-base-url.md
# Source: https://docs.sonarsource.com/sonarqube-server/2025.6/instance-administration/server-base-url.md
# Source: https://docs.sonarsource.com/sonarqube-server/instance-administration/server-base-url.md
# Server base URL
You must configure your base URL in the SonarQube Server. Otherwise, integration and authentication features will not work correctly, the URLs generated in reports and emails will be wrong, etc.
{% hint style="warning" %}
If you want to delegate the SonarQube Server user authentication to an OAUTH provider (GitHub, Bitbucket, GitLab, SAML), you should use HTTPS for security reasons. This means that the SonarQube Server instance should be secured behind a proxy (see [securing-behind-proxy](https://docs.sonarsource.com/sonarqube-server/server-installation/network-security/securing-behind-proxy "mention")).
{% endhint %}
{% hint style="info" %}
The SonarQube base URL needs to be a public URL if SonarQube expects to receive information from an external system. This is basically only relevant if you use SCIM (since it requires SonarQube to be reachable by the Identity Provider).
{% endhint %}
To configure the server base URL in SonarQube Server:
1. Go to **Administration** > **Configuration** > **General Settings** > **General** > **General.**
2. In **Server base URL**, set your SonarQube Server instance’s URL.
---
# Source: https://docs.sonarsource.com/sonarqube-community-build/server-installation/server-components-overview.md
# Source: https://docs.sonarsource.com/sonarqube-server/2025.3/server-installation/server-components-overview.md
# Source: https://docs.sonarsource.com/sonarqube-server/2025.5/server-installation/server-components-overview.md
# Source: https://docs.sonarsource.com/sonarqube-server/2025.4/server-installation/server-components-overview.md
# Source: https://docs.sonarsource.com/sonarqube-server/2025.6/server-installation/server-components-overview.md
# Source: https://docs.sonarsource.com/sonarqube-server/server-installation/server-components-overview.md
# Server components
SonarQube Server runs the following Java processes:
* **Web**: serves the SonarQube Server user interface.
* **Elasticsearch (ES)**: manages an indexed copy of the database.
* **Compute Engine (CE)**: is in charge of processing code analysis reports and saving them in the SonarQube Server database.
In addition, the Java process **Sonar** is used to manage the availability of these processes.
The SonarQube database is used to store the following:
* Metrics and issues for code quality and security generated during code scans.
* The SonarQube Server instance configuration.
* The report job queue that is populated by the Sonarscanner and processed by the Compute Engine.
Both the Web and the CE process ensure data consistency when writing to the ES and SonarQube databases. In case of a disaster recovery of the ES database, it’s the Web process’s responsibility to rebuild the ES indexes.
---
# Source: https://docs.sonarsource.com/sonarqube-community-build/server-installation/server-host-requirements.md
# Source: https://docs.sonarsource.com/sonarqube-server/2025.3/server-installation/server-host-requirements.md
# Source: https://docs.sonarsource.com/sonarqube-server/2025.5/server-installation/server-host-requirements.md
# Source: https://docs.sonarsource.com/sonarqube-server/2025.4/server-installation/server-host-requirements.md
# Source: https://docs.sonarsource.com/sonarqube-server/2025.6/server-installation/server-host-requirements.md
# Source: https://docs.sonarsource.com/sonarqube-server/server-installation/server-host-requirements.md
# Server host requirements
This section describes the general requirements, recommendations, and limitations for the machine running SonarQube Server in case of a ZIP, Docker, or Kubernetes installation. Additional requirements specific to an installation type may be mentioned in the respective installation section. For the Data Center Edition, see also [installation-requirements](https://docs.sonarsource.com/sonarqube-server/server-installation/data-center-edition/installation-requirements "mention").
{% hint style="info" %}
We recommend that for production installation, the database used by SonarQube Server is hosted on a machine that is physically separate from the SonarQube Server host, with low latency between both hosts. See [installing-the-database](https://docs.sonarsource.com/sonarqube-server/server-installation/installing-the-database "mention").
{% endhint %}
{% hint style="info" %}
See also our reference architectures:
* [up-to-10m-loc](https://docs.sonarsource.com/sonarqube-server/server-installation/reference-architectures/up-to-10m-loc "mention")
* [up-to-50m-loc](https://docs.sonarsource.com/sonarqube-server/server-installation/reference-architectures/up-to-50m-loc "mention")
{% endhint %}
### Limitations
Running SonarQube Server on environments where ElasticSearch-related Linux prerequisites can’t be met is not supported (see also [linux](https://docs.sonarsource.com/sonarqube-server/server-installation/pre-installation/linux "mention")).
This concerns (the list is not exhaustive): Azure App Service, AWS App Runner, and AWS Fargate. Using these services may cause issues that will ultimately make SonarQube unreliable and unsuitable for enterprise production use.
The application models of Azure Container Instances (ACI) and Azure Container Apps (ACA) are not suitable for SonarQube, making their use not recommended.
### Supported operating systems
SonarQube Server can run on the following operating systems (note that z/OS is *not* supported):
* Linux (x64, AArch64)
* Windows (x64)
* macOS (x64, AArch64)
{% hint style="info" %}
SonarQube Server can run, with limitations, on Linux hosts where FIPS (Federal Information Processing Standard) is enabled. See [#fips-mode](https://docs.sonarsource.com/sonarqube-server/pre-installation/linux#fips-mode "mention")**.**
{% endhint %}
### Hardware requirements
In the table below:
* A small-scale installation is typically a SonarQube Community Build or SonarQube Server Developer Edition installation that supports up to 1M lines of code.
* A large-scale installation is typically a single-node installation of SonarQube Server Enterprise Edition that supports up to 50M lines of code, or a search or application node of a SonarQube Server Data Center Edition cluster.
{% hint style="info" %}
The requirements below should be considered a starting point for new installations. As usage patterns vary across installations, it is important that SonarQube Server instances are monitored for CPU, memory, and storage usage. Periodic adjustments may be necessary based on monitoring (see [instance](https://docs.sonarsource.com/sonarqube-server/server-update-and-maintenance/monitoring/instance "mention")).
{% endhint %}
Category
Requirement
RAM
For a small-scale installation:
• 4GB of RAM
For a large-scale installation:
• 16 GB of RAM
Processor
64-bit system.
For a small-scale installation:
• 2 cores
For a large-scale installation:
• 8 cores
In addition, for a server installation from a Docker image:
• amd64 architecture or arm64-based Apple Silicon
Disk space
Depends on how much code you analyze with SonarQube.
For a small-scale installation:
• 30 GB
Free disk space
10% free disk space.
Note: This requirement stems from Elasticsearch's susceptibility to crashing if disk usage exceeds its high disk watermark, which is set at 90% by default. For more information, see the Elasticsearch documentation.
### Hardware configuration recommendations
[Elasticsearch](https://www.elastic.co/) is used by SonarQube Server in the background. To ensure good performance of your SonarQube Server, you need to follow these recommendations that are linked to Elasticsearch usage.
Category
Recommendation
Disk
• Free disk space is an absolute requirement. Elasticsearch implements a safety mechanism to prevent the disk from being flooded with index data that locks all indices in read-only mode when a 95% disk usage watermark is reached.
• Disk access can easily become the bottleneck of Elasticsearch. If you can afford SSDs, they are by far superior to any spinning media. SSD-backed nodes see boosts in both query and indexing performance. If you use spinning media, try to obtain the fastest disks possible (high-performance server disks 15,000 RPM drives).
• Using RAID 0 is an effective way to increase disk speed, for both spinning disks and SSD. There is no need to use mirroring or parity variants of RAID because of Elasticsearch replicas and database primary storage.
• Do not use remote-mounted storage, such as NFS, SMB/CIFS, or network-attached storage (NAS). They are often slower, display larger latencies with a wider deviation in average latency, and are a single point of failure.
• You may put <sonarqubeHome>/Data (where sonarqubeHome is the SonarQube Server installation directory; it is recommended to use /opt/sonarqube for this directory) into a separate partition to help alleviate the single point of failure mentioned above.
RAM
It is recommended that you give 50% of the available memory to Elasticsearch heap while leaving the other 50% free. The reason is that Lucene (used by Elasticsearch) is designed to leverage the underlying OS for caching in-memory data structures.
• Don’t allocate more than 32GB.
See the following Elasticsearch articles for more details:
• Elasticsearch Guide: Heap Sizing
• A Heap of Trouble
• Elasticsearch Reference: JVM heap size
CPU
If you need to choose between faster CPUs or more cores, then choose more cores. The extra concurrency that multiple cores offer will far outweigh a slightly faster clock speed.
By nature, data is distributed on multiple nodes, so execution time depends on the slowest node. It’s better to have multiple medium boxes than one fast and one slow.
I/O scheduler for SSD
If you use SSD, do not use the CFQ (Completely Fair Queuing) I/O scheduler (this is the defaul I/O scheduler under most Unix distributions). Use either the deadline or the NOOP scheduler instead.
When you write data to disk, the I/O Scheduler decides when that data is actually sent to the disk. The CFQ allocates "time slices" to each process, and then optimizes the delivery of these various queues to the disk. It is optimized for spinning media: the nature of rotating platters means it is more efficient to write data to disk based on physical layout. The deadline scheduler optimizes based on how long writes have been pending, while NOOP is just a simple FIFO queue.
Hard drives
They should have excellent read and write performance.
Most importantly, the "data" folder houses the Elasticsearch indices on which a huge amount of I/O will be done when the server is up and running. Read and write hard drive performance will therefore have a big impact on the overall SonarQube Server host performance.
### Software requirements
Category
Requirement
Client web browser
• Microsoft Edge: latest version
• Mozilla Firefox: latest version
• Google Chrome: latest version
• Safari: latest version
Java
Applies only to a server installation from the ZIP file.
• JDK
• Java version 21 or Java 25
• Recommendation: Use Java CPU (critical patch update) releases.
Note: SonarQube Server is able to analyze any kind of Java source files regardless of the version of Java they comply with.
### Related pages
* [installing-the-database](https://docs.sonarsource.com/sonarqube-server/server-installation/installing-the-database "mention")
* **Pre-installation steps:**
* [linux](https://docs.sonarsource.com/sonarqube-server/server-installation/pre-installation/linux "mention")
* [unix](https://docs.sonarsource.com/sonarqube-server/server-installation/pre-installation/unix "mention")
* [macos](https://docs.sonarsource.com/sonarqube-server/server-installation/pre-installation/macos "mention")
---
# Source: https://docs.sonarsource.com/sonarqube-server/10.5/setup-and-upgrade/installation-requirements/server-host.md
# Source: https://docs.sonarsource.com/sonarqube-server/10.6/setup-and-upgrade/installation-requirements/server-host.md
# Source: https://docs.sonarsource.com/sonarqube-server/10.7/setup-and-upgrade/installation-requirements/server-host.md
# Source: https://docs.sonarsource.com/sonarqube-server/10.8/setup-and-upgrade/installation-requirements/server-host.md
# Source: https://docs.sonarsource.com/sonarqube-server/2025.2/setup-and-update/installation-requirements/server-host.md
# Source: https://docs.sonarsource.com/sonarqube-server/2025.1/setup-and-upgrade/installation-requirements/server-host.md
# SonarQube Server host
This section describes the general requirements, recommendations, and limitations for the machine running SonarQube Server in case of a ZIP, Docker, or Kubernetes installation. Additional requirements specific to an installation type may be mentioned in the respective installation section. For the Data Center Edition, see also [install-the-server-as-a-cluster](https://docs.sonarsource.com/sonarqube-server/2025.1/setup-and-upgrade/install-the-server-as-a-cluster "mention").
{% hint style="info" %}
We recommend that for production installation, the database used by SonarQube Server is hosted on a machine that is physically separate from the SonarQube Server host, with low latency between both hosts.
{% endhint %}
{% hint style="info" %}
See also our reference architectures:
* [up-to-10m-loc](https://docs.sonarsource.com/sonarqube-server/2025.1/setup-and-upgrade/reference-architectures/up-to-10m-loc "mention")
* [up-to-50m-loc](https://docs.sonarsource.com/sonarqube-server/2025.1/setup-and-upgrade/reference-architectures/up-to-50m-loc "mention")
{% endhint %}
### Limitations
Running SonarQube Server on environments where ElasticSearch-related Linux prerequisites can’t be met is not supported (see also [linux](https://docs.sonarsource.com/sonarqube-server/2025.1/setup-and-upgrade/pre-installation/linux "mention")).
This concerns (the list is not exhaustive): Azure App Service, AWS App Runner, and AWS Fargate. Using these services may cause issues that will ultimately make SonarQube unreliable and unsuitable for enterprise production use.
The application models of Azure Container Instances (ACI) and Azure Container Apps (ACA) are not suitable for SonarQube, making their use not recommended.
### Supported operating systems
SonarQube Server can run on the following operating systems (note that z/OS is *not* supported):
* Linux (x64, AArch64)
* Windows (x64)
* macOS (x64, AArch64)
{% hint style="info" %}
SonarQube Server can run, with limitations, on Linux hosts where FIPS (Federal Information Processing Standard) is enabled. See [#fips-mode](https://docs.sonarsource.com/sonarqube-server/2025.1/pre-installation/linux#fips-mode "mention").
{% endhint %}
### Hardware requirements
In the table below:
* A small-scale installation is typically a SonarQube Community Build or SonarQube Server Developer Edition installation that supports up to 1M lines of code.
* A large-scale installation is typically a single-node installation of SonarQube Server Enterprise Edition that supports up to 50M lines of code, or a search or application node of a SonarQube Server Data Center Edition cluster.
{% hint style="info" %}
The requirements below should be considered a starting point for new installations. As usage patterns vary across installations, it is important that SonarQube Server instances are monitored for CPU, memory, and storage usage. Periodic adjustments may be necessary based on monitoring.
{% endhint %}
Category
Requirement
RAM
For a small-scale installation:
• 4GB of RAM
For a large-scale installation:
• 16 GB of RAM
Processor
64-bit system.
For a small-scale installation:
• 2 cores
For a large-scale installation:
• 8 cores
In addition, for a server installation from a Docker image:
• amd64 architecture or arm64-based Apple Silicon
Disk space
Depends on how much code you analyze with SonarQube.
For a small-scale installation:
• 30 GB
Free disk space
10% free disk space.
Note: This requirement stems from Elasticsearch's susceptibility to crashing if disk usage exceeds its high disk watermark, which is set at 90% by default. For more information, see the Elasticsearch documentation.
### Hardware configuration recommendations
[Elasticsearch](https://www.elastic.co/) is used by SonarQube Server in the background. To ensure good performance of your SonarQube Server, you need to follow these recommendations that are linked to Elasticsearch usage.
Category
Recommendation
Disk
• Free disk space is an absolute requirement. Elasticsearch implements a safety mechanism to prevent the disk from being flooded with index data that locks all indices in read-only mode when a 95% disk usage watermark is reached.
• Disk access can easily become the bottleneck of Elasticsearch. If you can afford SSDs, they are by far superior to any spinning media. SSD-backed nodes see boosts in both query and indexing performance. If you use spinning media, try to obtain the fastest disks possible (high-performance server disks 15,000 RPM drives).
• Using RAID 0 is an effective way to increase disk speed, for both spinning disks and SSD. There is no need to use mirroring or parity variants of RAID because of Elasticsearch replicas and database primary storage.
• Do not use remote-mounted storage, such as NFS, SMB/CIFS, or network-attached storage (NAS). They are often slower, display larger latencies with a wider deviation in average latency, and are a single point of failure.
• You may put <sonarqubeHome>/Data (where sonarqubeHome is the SonarQube Server installation directory; it is recommended to use /opt/sonarqube for this directory) into a separate partition to help alleviate the single point of failure mentioned above.
RAM
It is recommended that you give 50% of the available memory to Elasticsearch heap while leaving the other 50% free. The reason is that Lucene (used by Elasticsearch) is designed to leverage the underlying OS for caching in-memory data structures.
• Don’t allocate more than 32GB.
See the following Elasticsearch articles for more details:
• Elasticsearch Guide: Heap Sizing
• A Heap of Trouble
• Elasticsearch Reference: JVM heap size
CPU
If you need to choose between faster CPUs or more cores, then choose more cores. The extra concurrency that multiple cores offer will far outweigh a slightly faster clock speed.
By nature, data is distributed on multiple nodes, so execution time depends on the slowest node. It’s better to have multiple medium boxes than one fast and one slow.
I/O scheduler for SSD
If you use SSD, do not use the CFQ (Completely Fair Queuing) I/O scheduler (this is the defaul I/O scheduler under most Unix distributions). Use either the deadline or the NOOP scheduler instead.
When you write data to disk, the I/O Scheduler decides when that data is actually sent to the disk. The CFQ allocates "time slices" to each process, and then optimizes the delivery of these various queues to the disk. It is optimized for spinning media: the nature of rotating platters means it is more efficient to write data to disk based on physical layout. The deadline scheduler optimizes based on how long writes have been pending, while NOOP is just a simple FIFO queue.
Hard drives
They should have excellent read and write performance.
Most importantly, the "data" folder houses the Elasticsearch indices on which a huge amount of I/O will be done when the server is up and running. Read and write hard drive performance will therefore have a big impact on the overall SonarQube Server host performance.
### Software requirements
Category
Requirement
Client web browser
• Microsoft Edge: latest version
• Mozilla Firefox: latest version
• Google Chrome: latest version
• Safari: latest version
Java
Applies only to a server installation from the ZIP file.
• Oracle JRE or OpenJDK
• Java version 17 or 21
• Recommendation: Use Java CPU (critical patch update) releases.
Note: SonarQube Server is able to analyze any kind of Java source files regardless of the version of Java they comply with.
---
# Source: https://docs.sonarsource.com/sonarqube-server/2025.5/instance-administration/license-administration/server-id-based-license-key.md
# Source: https://docs.sonarsource.com/sonarqube-server/2025.4/instance-administration/license-administration/server-id-based-license-key.md
# Source: https://docs.sonarsource.com/sonarqube-server/2025.6/instance-administration/license-administration/server-id-based-license-key.md
# Source: https://docs.sonarsource.com/sonarqube-server/instance-administration/license-administration/server-id-based-license-key.md
# Server ID based license key
To run SonarQube Server, you need a license that corresponds to the plan you had purchased, including SonarQube Server edition, Lines of Code (LOC), staging licenses, commercial support and additional features such as Advanced Security. See [Plans and Pricing](https://www.sonarsource.com/plans-and-pricing/sonarqube/) for more information about the different editions and features.
[Contact sales](https://www.sonarsource.com/plans-and-pricing/contact-sales/) to request the license key or email us at .
After your purchase is confirmed, you will receive a license key. If the license key follows this format: XXXX-XXXX-XXXX-XXXX, see [online-license-management](https://docs.sonarsource.com/sonarqube-server/instance-administration/license-administration/online-license-management "mention"). Otherwise, continue reading this page.
### Permissions
To manage your licenses and additional features in SonarQube Server you must have the Administer System permission.
To apply the permission to users or groups go to **Administration** > **Security** > **Global Permissions** and select the **Administer System** check box.
### Activating your license
After your purchase is confirmed, you will have to request the license key based on your server ID.
To get your license key based on the server ID:
1. Go to **Administration** > **System**
2. Click **Copy ID information**. You will need the server ID when requesting the license.
3. Email us at to request the license key, provide the info you just copied.
{% hint style="info" %}
The server ID is specific to the current database. Make sure to configure an external database for long-term use prior to requesting your license with this server ID.
{% endhint %}
To activate your SonarQube Server license:
1. Go to **Administration** > **Configuration** > **License Manager**
2. Click **Add license** button to open a modal.
3. Enter your license key in the modal and accept the terms and conditions.
4. Click **Set license** to confirm.
### License invalidation scenarios
Certain actions will change your server ID and invalidate your license. The following are some of the most common cases:
* Moving, upgrading, or changing your database server to another host, available with a different IP or DNS name.
* Changing the existing database server IP or DNS name.
* Changing the database/schema name on the database server.
* Restoring the database content from another SonarQube Server instance (except for production/staging synchronization).
* Reinstalling SonarQube Server on an empty database.
* Using DBCopy or MySQL Migrator to copy your old database into a new one.
If you plan on going through one of these scenarios and you have commercial support, open a support ticket beforehand to confirm the plan of action or to explore alternatives.
When your license is invalidated due to a change of server ID, you can extend it using `api/editions/activate_grace_period` api endpoint to benefit from a grace period of seven days. After this period, the license will remain invalid. Note that you can only do this once and the procedure requires the Administer System permission.
**Curl example:**
```hurl
curl -X POST -u : /api/editions/activate_grace_period
```
Replace `` and `` with information relevant to your use case.
### SonarQube Server license page
Once your activation has been completed you will see the following information on the SonarQube license page.
1. Click **Set a new license** and enter a new license key to replace your current license. Click on the dropdown menu and select **Unset license** to remove it.
2. **License information**:
* **Edition**: This is based on the plan you had purchased (Developer, Enterprise or Data Center).
* **Type**: Type of license, the options are production, test or evaluation.
* **Expiration date**: Displays when the license expires.
* **Support included**: Indicates whether commercial support is included in your license.
* **Activation method**: Displays whether the license was activated online, offline or is based on server ID.
* **Server ID** of your instance.
3. **License usage**:
* **Lines of code** (LOC): Shows the number of LOC currently analyzed out of the total allowed by your license.
* **Notification threshold**: Shows the LOC threshold that triggers email notification. A reminder is sent two months and again one month before your license expires. Click the **Edit notification threshold** to change it. For more information, see [lines-of-code](https://docs.sonarsource.com/sonarqube-server/server-update-and-maintenance/monitoring/lines-of-code "mention") for more information.
4. **Additional features**: Lists all the extra features your organization has purchased, such as [advanced-security](https://docs.sonarsource.com/sonarqube-server/advanced-security "mention"). It shows the feature’s name, availability and enablement.
### Unsetting a license
To remove the license from the system click on the dropdown menu next to the **Set a new license** button and select **Unset license** to remove it.
### Staging licenses
Staging licenses are available in Enterprise and Data Center editions, or with editions with commercial support. Your contract may include one or more staging licenses. You can use these licenses for non-production instances to test new features, for update purposes, new integrations, etc.
The process of activating staging licenses is the same as for production. However, you should consider the following:
#### Setting up staging instance and database
1. Create a staging database and copy the production database into it.
2. Connect your SonarQube Server staging instance to the staging database.
3. Start SonarQube Server and retrieve the generated server ID.
4. Request your staging license key for this server ID.
5. Activate the license on the license administration page.
#### Synchronizing your staging database
To synchronize your staging database with your production database:
1. Empty the staging database and copy the production database into it.
2. Start SonarQube Server.
3. The server ID will be the same as generated the first time, so you can reuse the same license key.
### License key isn't working
If your license key isn't working, send an email to that includes the following information:
1. Server ID found under **Administration** > **System**.
2. SonarQube Server version found under **Administration** > **System**.
3. Clarify what current license, production or staging, and server ID it is replacing.
4. Confirm the status of the existing license.
A new license key will be issued within one business day once we receive an email with the required information.
### Related pages
* [lines-of-code](https://docs.sonarsource.com/sonarqube-server/server-update-and-maintenance/monitoring/lines-of-code "mention")
* [Plans and Pricing](https://www.sonarsource.com/plans-and-pricing/sonarqube/)
---
# Source: https://docs.sonarsource.com/sonarqube-community-build/server-installation.md
# Source: https://docs.sonarsource.com/sonarqube-server/2025.3/server-installation.md
# Source: https://docs.sonarsource.com/sonarqube-server/2025.5/server-installation.md
# Source: https://docs.sonarsource.com/sonarqube-server/2025.4/server-installation.md
# Source: https://docs.sonarsource.com/sonarqube-server/2025.6/server-installation.md
# Source: https://docs.sonarsource.com/sonarqube-server/server-installation.md
# Server installation and setup
- [Introduction](/sonarqube-server/server-installation/introduction.md): This section explains how to install and setup your SonarQube Server.
- [Server components](/sonarqube-server/server-installation/server-components-overview.md): Overview of Java processes run by SonarQube Server and of SonarQube Server database.
- [Installing database](/sonarqube-server/server-installation/installing-the-database.md): Install the SonarQube Server database according to the database engine used: MicrosoftSQL Server, Oracle, PostgreSQL.
- [Server host requirements](/sonarqube-server/server-installation/server-host-requirements.md): This section describes the requirements and recommendations for a machine running SonarQube Server.
- [Pre-installation steps](/sonarqube-server/server-installation/pre-installation.md): The pre-installation steps depend on your operating system.
- [On Linux systems](/sonarqube-server/server-installation/pre-installation/linux.md): Pre-installation steps on SonarQube Server host for the Developer and Enterprise Editions on Linux systems.
- [On Unix-based systems](/sonarqube-server/server-installation/pre-installation/unix.md): Pre-installation steps on SonarQube Server host for the Developer and Enterprise Editions on Unix systems.
- [On macOS systems](/sonarqube-server/server-installation/pre-installation/macos.md): Pre-installation steps on SonarQube Server host for the Developer and Enterprise Editions on macOS systems.
- [Defining a JWT token](/sonarqube-server/server-installation/pre-installation/jwt-token.md): Optional pre-installation step to keep user sessions alive during startup.
- [From ZIP file](/sonarqube-server/server-installation/from-zip-file.md): Installing SonarQube Server Developer or Enterprise Edition from the ZIP file.
- [Installation overview](/sonarqube-server/server-installation/from-zip-file/overview.md): Main steps for installing SonarQube Server from the ZIP file.
- [Basic installation](/sonarqube-server/server-installation/from-zip-file/basic-installation.md): How to install SonarQube Server Developer or Enterprise edition from the ZIP file and perform the basic setup.
- [Advanced setup](/sonarqube-server/server-installation/from-zip-file/advanced-setup.md): Advanced setup when installing SonarQube Server from the ZIP file.
- [Starting / stopping server](/sonarqube-server/server-installation/from-zip-file/starting-stopping-server.md): How to start or stop the server in case of a ZIP installation
- [From the ZIP file](/sonarqube-server/server-installation/from-zip-file/starting-stopping-server/from-zip-file.md): Starting SonarQube Server from the ZIP file
- [Running as a service](/sonarqube-server/server-installation/from-zip-file/starting-stopping-server/running-as-a-service.md): How to install and start SonarQube Server as a service in case of a ZIP installation. The operation depends on your operating system.
- [From Docker image](/sonarqube-server/server-installation/from-docker-image.md): Installing SonarQube Server Developer or Enterprise Edition from the Docker image.
- [Installation overview](/sonarqube-server/server-installation/from-docker-image/installation-overview.md): Main steps for installing SonarQube Server from the Docker image.
- [Prepare the Docker installation](/sonarqube-server/server-installation/from-docker-image/prepare-installation.md): How to prepare the installation of SonarQube Server Developer or Enterprise edition from the Docker image.
- [Set up and start your container](/sonarqube-server/server-installation/from-docker-image/set-up-and-start-container.md): How to set up and start your SonarQube Server container with the Developer or Enterprise edition.
- [Advanced setup](/sonarqube-server/server-installation/from-docker-image/advanced-setup.md): Advanced setup when installing SonarQube Server from the Docker image.
- [Installing on Kubernetes or OpenShift](/sonarqube-server/server-installation/on-kubernetes-or-openshift.md): Installing SonarQube Server Developer or Enterprise Edition on Kubernetes or Openshift.
- [Installation overview](/sonarqube-server/server-installation/on-kubernetes-or-openshift/installation-overview.md): Main steps for installing SonarQube Server on Kubernetes or Openshift.
- [Before you start](/sonarqube-server/server-installation/on-kubernetes-or-openshift/before-you-start.md): Requirements and known limitations of a SonarQube Server deployment on Kubernetes or OpenShift.
- [Customizing Helm chart](/sonarqube-server/server-installation/on-kubernetes-or-openshift/customizing-helm-chart.md): How to perform the most important SonarQube Helm chart customization when working with SonarQube Server.
- [Installing Helm chart](/sonarqube-server/server-installation/on-kubernetes-or-openshift/installing-helm-chart.md): How to install the Helm chart for SonarQube Server’s Developer or Enterprise Edition.
- [Setting up monitoring](/sonarqube-server/server-installation/on-kubernetes-or-openshift/set-up-monitoring.md): Setting up monitoring on a Kubernetes deployment of SonarQube Server.
- [Introduction](/sonarqube-server/server-installation/on-kubernetes-or-openshift/set-up-monitoring/introduction.md): If you deploy SonarQube Server on Kubernetes, Prometheus metrics can be collected.
- [Setting up with Prometheus server](/sonarqube-server/server-installation/on-kubernetes-or-openshift/set-up-monitoring/prometheus.md): This article describes how to use SonarQube’s core integration with Prometheus to collect Prometheus metrics in a Kubernetes deployment.
- [Setting up with Datadog](/sonarqube-server/server-installation/on-kubernetes-or-openshift/set-up-monitoring/datadog.md): In case of a Kubernetes deployment, you can use Datadog to collect the metrics provided through the SonarQube Server’s Web API (Openmetrics format).
- [List of Prometheus metrics](/sonarqube-server/server-installation/on-kubernetes-or-openshift/set-up-monitoring/prometheus-metrics.md): List of the SonarQube Server metrics exposed by Prometheus.
- [Encrypting sensitive data](/sonarqube-server/server-installation/on-kubernetes-or-openshift/encrypting-helm-chart-sensitive-data.md): Encrypting sensitive Sonar properties.
- [Network security](/sonarqube-server/server-installation/network-security.md): Enhancing the network security.
- [Securing behind a proxy](/sonarqube-server/server-installation/network-security/securing-behind-proxy.md): Securing SonarQube Server behind a proxy.
- [Network rules](/sonarqube-server/server-installation/network-security/network-rules.md): Defining network rules to enhance the security.
- [Data Center Edition](/sonarqube-server/server-installation/data-center-edition.md): Installing SonarQube Server's Data Center Edition.
- [Introduction](/sonarqube-server/server-installation/data-center-edition/introduction.md): Content of the Data Center Edition (DCE) installation section.
- [DCE topology](/sonarqube-server/server-installation/data-center-edition/dce-topology.md): The Data Center Edition (DCE) allows SonarQube Server to run in a clustered configuration to make it resilient to failures.
- [Installation requirements](/sonarqube-server/server-installation/data-center-edition/installation-requirements.md): General requirements, recommendations, and limitations for SonarQube Server’s cluster. Additional requirements specific to an installation type may be mentioned in the respective installation section.
- [Pre-installation steps](/sonarqube-server/server-installation/data-center-edition/pre-installation.md): Steps to perform before installing Data Center Edition (DCE).
- [Installing from ZIP file](/sonarqube-server/server-installation/data-center-edition/from-zip-file.md): Installing SonarQube Server's Data Center Edition (DCE) form the ZIP file.
- [Installing on Kubernetes or Openshift](/sonarqube-server/server-installation/data-center-edition/on-kubernetes-or-openshift.md): Installating SonarQube Server's Data Center Edition on Kubernetes or Openshift.
- [Installation overview](/sonarqube-server/server-installation/data-center-edition/on-kubernetes-or-openshift/overview.md): Your entry point to deploy the Data Center Edition (DCE) on Kubernetes or OpenShift.
- [Before you start](/sonarqube-server/server-installation/data-center-edition/on-kubernetes-or-openshift/before-you-start.md): This page describes the requirements and known limitations of a SonarQube Server’s Data Center Edition (DCE) deployment on Kubernetes or Openshift.
- [Customizing the DCE Helm chart](/sonarqube-server/server-installation/data-center-edition/on-kubernetes-or-openshift/customizing-helm-chart.md): How to perform the most important customization of the Helm chart for SonarQube Server’s Data Center Edition (DCE).
- [Setting up autoscaling](/sonarqube-server/server-installation/data-center-edition/on-kubernetes-or-openshift/setting-up-autoscaling.md): With Kubernetes’ Horizontal Pod Autoscaling (HPA), you can automatically scale your SonarQube Server out and in, resolving any performance issues you may have.
- [Setting up disaster recovery](/sonarqube-server/server-installation/data-center-edition/on-kubernetes-or-openshift/setting-up-disaster-recovery.md): How to set up a disaster recovery for SonarQube Server’s Data Center Edition (DCE) deployed on Kubernetes.
- [Disaster recovery architecture example with Azure resources](/sonarqube-server/server-installation/data-center-edition/on-kubernetes-or-openshift/setting-up-disaster-recovery/architecture-example.md): Example of disaster recovery architecture used for SonarQube Server’s Data Center Edition (DCE) deployed on Kubernetes.
- [Step 1: Deploy the primary and replica databases](/sonarqube-server/server-installation/data-center-edition/on-kubernetes-or-openshift/setting-up-disaster-recovery/deploy-databases.md): The first step of the disaster recovery setup for the Data Center Edition (DCE) deployed on Kubernetes consists in deploying the primary and replica databases.
- [Step 2: Set up the primary and replica clusters on AKS](/sonarqube-server/server-installation/data-center-edition/on-kubernetes-or-openshift/setting-up-disaster-recovery/set-up-clusters-on-aks.md): The second step of the disaster recovery setup for the Data Center Edition (DCE) on Kubernetes consists in setting up the primary and replica clusters.
- [Step 3: Configure the Azure Front Door](/sonarqube-server/server-installation/data-center-edition/on-kubernetes-or-openshift/setting-up-disaster-recovery/configure-azure-front-door.md): The third step of the disaster recovery setup for the Data Center Edition (DCE) deployed on Kubernetes consists in configuring the Azure Front Door.
- [Step 4: Test failover scenarios](/sonarqube-server/server-installation/data-center-edition/on-kubernetes-or-openshift/setting-up-disaster-recovery/test-failover-scenarios.md): How to test the failover of the Data Center Edition (DCE) deployed on Kubernetes.
- [Installing the DCE Helm chart](/sonarqube-server/server-installation/data-center-edition/on-kubernetes-or-openshift/installing-from-helm-repo.md): SonarQube Data Center Edition (DCE) can be installed from a customized SonarQube Server Helm chart.
- [Installing from Google Cloud Platform](/sonarqube-server/server-installation/data-center-edition/on-kubernetes-or-openshift/installing-from-gcp.md): SonarQube Data Center Edition (DCE) can be deployed on Kubernetes through the Google Marketplace.
- [Network security](/sonarqube-server/server-installation/data-center-edition/network-security.md): Enhancing network security for your Data Center Edition.
- [Securing behind a proxy](/sonarqube-server/server-installation/data-center-edition/network-security/securing-behind-proxy.md): It is recommended to run SonarQube behind a proxy, if it should be accessible from outside.
- [Elasticsearch security features](/sonarqube-server/server-installation/data-center-edition/network-security/elasticsearch-security-features.md): How to to set up Elasticsearch security features.
- [Network rules](/sonarqube-server/server-installation/data-center-edition/network-security/network-rules.md): Defining network rules to enhance the security.
- [Starting and stopping cluster](/sonarqube-server/server-installation/data-center-edition/starting-stopping-cluster.md): How to start and stop your Data Center Edition's cluster.
- [Setting system properties](/sonarqube-server/server-installation/system-properties.md): The system properties are the properties used by SonarQube at startup and not stored in the database.
- [Configuration methods](/sonarqube-server/server-installation/system-properties/configuration-methods.md): The system properties are the properties used by SonarQube at startup and not stored in the database. They can be configured using different methods.
- [List of properties common to all editions](/sonarqube-server/server-installation/system-properties/common-properties.md): This page lists the configurable system properties that are common to all SonarQube editions.
- [List of DCE-specific properties](/sonarqube-server/server-installation/system-properties/dce-specific.md): This page lists the configurable system properties that are specific to the Data Center Edition.
- [Installing plugins](/sonarqube-server/server-installation/plugins.md): Installing plugins for SonarQube Server.
- [Plugin version matrix](/sonarqube-server/server-installation/plugins/plugin-version-matrix.md): This table describes the version of each plugin that is compatible with each version of SonarQube Server.
- [Installing a plugin](/sonarqube-server/server-installation/plugins/install-a-plugin.md): Learn how to install or uninstall a plugin in SonarQube Server.
- [Reference architectures](/sonarqube-server/server-installation/reference-architectures.md): This section describes the architecture of a SonarQube Server instance for different contexts.
- [Up to 10 M LOC](/sonarqube-server/server-installation/reference-architectures/up-to-10m-loc.md): This page describes the architecture of a SonarQube Server instance that will support up to 10 million lines of code under normal usage patterns in a non-high availability setup.
- [Up to 50 M LOC](/sonarqube-server/server-installation/reference-architectures/up-to-50m-loc.md): This architecture describes the setup of a SonarQube Server Enterprise Editon instance that will support up to 50 million lines of code.
---
# Source: https://docs.sonarsource.com/sonarqube-server/8.9/instance-administration/server-logs-and-system-info.md
# Source: https://docs.sonarsource.com/sonarqube-server/9.8/instance-administration/server-logs-and-system-info.md
# Source: https://docs.sonarsource.com/sonarqube-server/9.9/instance-administration/server-logs-and-system-info.md
# Source: https://docs.sonarsource.com/sonarqube-server/10.0/instance-administration/server-logs-and-system-info.md
# Source: https://docs.sonarsource.com/sonarqube-server/10.1/instance-administration/server-logs-and-system-info.md
# Source: https://docs.sonarsource.com/sonarqube-server/10.2/instance-administration/server-logs-and-system-info.md
# Source: https://docs.sonarsource.com/sonarqube-server/10.3/instance-administration/server-logs-and-system-info.md
# Source: https://docs.sonarsource.com/sonarqube-server/10.4/instance-administration/server-logs-and-system-info.md
# Source: https://docs.sonarsource.com/sonarqube-server/10.5/instance-administration/server-logs-and-system-info.md
# Source: https://docs.sonarsource.com/sonarqube-server/10.6/instance-administration/server-logs-and-system-info.md
# Source: https://docs.sonarsource.com/sonarqube-server/10.7/instance-administration/system-functions/server-logs-and-system-info.md
# Source: https://docs.sonarsource.com/sonarqube-server/10.8/instance-administration/system-functions/server-logs-and-system-info.md
# Source: https://docs.sonarsource.com/sonarqube-server/2025.1/instance-administration/system-functions/server-logs-and-system-info.md
# Server logs and system info
### Viewing your system Info
The **System Info** page is found at **Administration** > **System**. It gives you access to detailed information on the state of your SonarQube Server instance.
You can browse details about your running instance on this page.
#### Downloading your system info
If you have a support contract, you might be asked by a support representative to send in your system info, which can be downloaded using the **Download System Info** button at the top.
### Getting your Server ID
If you want to switch to a paid SonarQube Server edition, you will be asked by your sales representative to send in your Server ID.
Your server ID can be found at the top of the page **Administration** > **System**.
If you’re running a commercial instance, you can also find this value on the **License** page (**Administration** > **Configuration** > **License Manager**)
### Viewing the server logs
See [checking-server-logs](https://docs.sonarsource.com/sonarqube-server/2025.1/server-update-and-maintenance/troubleshooting/checking-server-logs "mention").
### Setting up the server-side logging
Server-side logging is controlled by properties set in `/conf/sonar.properties`. The standard output of SonarQube Server logs can be converted to JSON with the environment variable `SONAR_LOG_JSONOUTPUT=true`. A configuration of the log format is currently not possible.
#### Log level
The server-side log level can be customized via the `sonar.log.level` property in `/conf/sonar.properties`. Supported values are:
* **`INFO`**: The default.
* **`DEBUG`**: For advanced logs. Starting from this log level, some personal user information can be logged.
* **`TRACE`**: Show advanced logs and all SQL and ElasticSearch requests. `TRACE` level logging slows down the server environment, and should be used only for tracking web request performance problems.
{% hint style="info" %}
You can tune the log level via controls at the top of the page **Administration > System**. Changes made here are temporary, and last only until the next time the instance is restarted, at which point the level will be reset to the more permanent value set in `sonar.properties`. Regardless, if you change your log level *from* `INFO`, be sure to change it back as soon as is practical; log files can get very large very quickly at lower log levels.
{% endhint %}
#### Log level by process
The server-side log level can be adjusted more precisely for the four processes of SonarQube Server via the following properties:
* **`sonar.log.level.app`**: for the Main process of SonarQube Server (aka WrapperSimpleApp, the bootstrapper process starting the 3 others)
* **`sonar.log.level.web`**: for the WebServer
* **`sonar.log.level.ce`**: for the ComputeEngineServer
* **`sonar.log.level.es`**: for the SearchServer
#### Log rotation
To control log rolling, use the `sonar.log.rollingPolicy`.
* **`time:[value]`**: for time-based rotation. For example, use `time:yyyy-MM-dd` for daily rotation, and `time:yyyy-MM` for monthly rotation.
* **`size:[value]`**: for size-based rotation. For example, `size:10MB`.
* **`none`**: for no rotation. Typically this would be used when logs are handled by an external system like logrotate.
`sonar.log.maxFiles` is the maximum number of files to keep. This property is ignored if `sonar.log.rollingPolicy=none`.
### Retrieving the total Lines of Code (LOC)
The number of [lines-of-code](https://docs.sonarsource.com/sonarqube-server/2025.1/server-update-and-maintenance/monitoring/lines-of-code "mention") (for licensing purposes) in an instance can be found in the **System** section of the **System Info** page and on the **License page** (**Administration** > **Configuration** > **License Manager**) in commercial editions.
---
# Source: https://docs.sonarsource.com/sonarqube-community-build/server-update-and-maintenance/troubleshooting/server-logs.md
# Source: https://docs.sonarsource.com/sonarqube-server/2025.2/server-update-and-maintenance/troubleshooting/server-logs.md
# Source: https://docs.sonarsource.com/sonarqube-server/2025.3/server-update-and-maintenance/troubleshooting/server-logs.md
# Source: https://docs.sonarsource.com/sonarqube-server/2025.5/server-update-and-maintenance/troubleshooting/server-logs.md
# Source: https://docs.sonarsource.com/sonarqube-server/2025.4/server-update-and-maintenance/troubleshooting/server-logs.md
# Source: https://docs.sonarsource.com/sonarqube-server/2025.6/server-update-and-maintenance/troubleshooting/server-logs.md
# Source: https://docs.sonarsource.com/sonarqube-server/server-update-and-maintenance/troubleshooting/server-logs.md
# Server logs
If you’re having trouble starting your server for the first time (or any subsequent time!) the first thing to do is check your server logs.
The following log files are created (log files rotate on a regular basis):
* One per SonarQube Server process (main process, compute engine, search engine, and web server).
* The access log.
* The deprecation log which stores the Web API requests that use deprecated Web API endpoints or parameters. See [monitoring-api-deprecation](https://docs.sonarsource.com/sonarqube-server/server-update-and-maintenance/maintenance/deprecations/monitoring-api-deprecation "mention") for more information.
If you have a support contract, you can download your instance’s current log files from the UI. To do so:
* Go to **Administration > System** and click **Download logs** in the top right corner.
Otherwise, you’ll find them in `/logs`:
* `sonar.log`: Log for the main process. Holds general information about startup and shutdown. You’ll get overall status here but not details. Look to the other logs for that.
* `web.log`: Information about initial connection to the database, database migration and reindexing, and the processing of HTTP requests. This includes database and search engine logs related to those requests.
* `ce.log`: Information about background task processing and the database and search engine logs related to those tasks.
* `es.log`: Ops information from the search engine, such as Elasticsearch startup, health status changes, cluster-, node- and index-level operations, etc.
* `access.log`: access log.
### Understanding the logs
When there’s an error, you’ll very often find a stacktrace in the logs. If you’re not familiar stacktraces, they can be intimidatingly tall walls of incomprehensible text. As a sample, here’s a fairly short one:
```css-79elbk
java.lang.IllegalStateException: Unable to blame file **/**/foo.java
at org.sonarsource.scm.git.JGitBlameCommand.blame(JGitBlameCommand.java:128)
at org.sonarsource.scm.git.JGitBlameCommand.access$000(JGitBlameCommand.java:44)
at org.sonarsource.scm.git.JGitBlameCommand$1.call(JGitBlameCommand.java:112)
at org.sonarsource.scm.git.JGitBlameCommand$1.call(JGitBlameCommand.java:109)
at java.util.concurrent.FutureTask.run(Unknown Source)
at java.util.concurrent.ThreadPoolExecutor.runWorker(Unknown Source)
at java.util.concurrent.ThreadPoolExecutor$Worker.run(Unknown Source)
at java.lang.Thread.run(Unknown Source)
Caused by: java.lang.NullPointerException
at org.eclipse.jgit.treewalk.filter.PathFilter.create(PathFilter.java:77)
at org.eclipse.jgit.blame.BlameGenerator.(BlameGenerator.java:161)
at org.eclipse.jgit.api.BlameCommand.call(BlameCommand.java:203)
at org.sonarsource.scm.git.JGitBlameCommand.blame(JGitBlameCommand.java:126)
... 7 more
```
Unless you wrote the code that produced this error, you really only care about:
* the first line, which ought to have a human-readable message after the colon. In this case, it’s Unable to blame file `**/**/foo.java`
* and any line that starts with `Caused by`. There are often several `Caused by` lines, and indentation makes them easy to find as you scroll through the error. Be sure to read each of these lines. Very often one of them - the last one or next-to-last one - contains the real problem.
### Setting up the server-side logging
Server-side logging is controlled by system properties. A configuration of the log format is currently not possible.
#### Log level
The server-side log level can be customized via the `sonar.log.level` property in `/conf/sonar.properties`. Supported values are:
* **`INFO`**: The default.
* **`DEBUG`**: For advanced logs. Starting from this log level, some personal user information can be logged.
* **`TRACE`**: Show advanced logs and all SQL and ElasticSearch requests. `TRACE` level logging slows down the server environment, and should be used only for tracking web request performance problems.
{% hint style="info" %}
You can tune the log level via controls at the top of the page **Administration > System**. Changes made here are temporary, and last only until the next time the instance is restarted, at which point the level will be reset to the more permanent value set in `sonar.properties`. Regardless, if you change your log level *from* `INFO`, be sure to change it back as soon as is practical; log files can get very large very quickly at lower log levels.
{% endhint %}
#### Log level by process
The server-side log level can be adjusted more precisely for the four processes of SonarQube via the following system properties:
* **`sonar.log.level.app`**: for the Main process of SonarQube (aka WrapperSimpleApp, the bootstrapper process starting the 3 others)
* **`sonar.log.level.web`**: for the WebServer
* **`sonar.log.level.ce`**: for the ComputeEngineServer
* **`sonar.log.level.es`**: for the SearchServer
#### Log rotation
To control log rolling, set the `sonar.log.rollingPolicy` property to one of these values:
* **`time:[value]`**: for time-based rotation. For example, use `time:yyyy-MM-dd` for daily rotation, and `time:yyyy-MM` for monthly rotation.
* **`size:[value]`**: for size-based rotation. For example, `size:10MB`.
* **`none`**: for no rotation. Typically this would be used when logs are handled by an external system like logrotate.
`sonar.log.maxFiles` is the maximum number of files to keep. This property is ignored if `sonar.log.rollingPolicy=none`.
#### Log output in JSON format
By default, SonarQube prints all logs in plain text. You can convert the standard output of SonarQube logs to [JSON format](https://edgedelta.com/company/blog/what-are-json-logs/) by setting the system property `sonar.log.jsonOutput` to `true`. This will enable log collection tools like [Loki](https://grafana.com/docs/loki/latest/) to post-process the information provided by the application.
### Related pages
* [system-info-and-server-id](https://docs.sonarsource.com/sonarqube-server/instance-administration/system-info-and-server-id "mention")
* [performance-issues](https://docs.sonarsource.com/sonarqube-server/server-update-and-maintenance/troubleshooting/performance-issues "mention")
* [database-related-issues](https://docs.sonarsource.com/sonarqube-server/server-update-and-maintenance/troubleshooting/database-related-issues "mention")
* [elasticsearch](https://docs.sonarsource.com/sonarqube-server/server-update-and-maintenance/troubleshooting/elasticsearch "mention")
* [other-issues](https://docs.sonarsource.com/sonarqube-server/server-update-and-maintenance/troubleshooting/other-issues "mention")
---
# Source: https://docs.sonarsource.com/sonarqube-community-build/server-update-and-maintenance.md
# Source: https://docs.sonarsource.com/sonarqube-server/2025.2/server-update-and-maintenance.md
# Source: https://docs.sonarsource.com/sonarqube-server/2025.3/server-update-and-maintenance.md
# Source: https://docs.sonarsource.com/sonarqube-server/2025.5/server-update-and-maintenance.md
# Source: https://docs.sonarsource.com/sonarqube-server/2025.1/server-update-and-maintenance.md
# Source: https://docs.sonarsource.com/sonarqube-server/2025.4/server-update-and-maintenance.md
# Source: https://docs.sonarsource.com/sonarqube-server/2025.6/server-update-and-maintenance.md
# Source: https://docs.sonarsource.com/sonarqube-server/server-update-and-maintenance.md
# Server update and maintenance
- [Update](/sonarqube-server/server-update-and-maintenance/update.md): Information about updating your SonarQube Server.
- [Overview](/sonarqube-server/server-update-and-maintenance/update/roadmap.md): The section lists the steps you have to perform to update your SonarQube Server installation.
- [Release cycle model](/sonarqube-server/server-update-and-maintenance/update/release-cycle-model.md): A detailed explanation of the SonarQube Server release cycle.
- [Determining the update path](/sonarqube-server/server-update-and-maintenance/update/determine-path.md): This explains the steps to follow to determine the path you need to take to update your version of SonarQube Server
- [Pre-update steps](/sonarqube-server/server-update-and-maintenance/update/pre-update-steps.md): The pre-update steps you must perform before you start updating SonarQube Server.
- [Performing the update](/sonarqube-server/server-update-and-maintenance/update/update.md): Once you have determined your update path and tested your update, you can perform your SonarQube Server update.
- [Post-update steps](/sonarqube-server/server-update-and-maintenance/update/post-update-steps.md): The tasks you must perform after you update SonarQube Server.
- [Upgrading from SonarQube Community Build](/sonarqube-server/server-update-and-maintenance/update/updating-from-sonarqube-community-build.md): How to update from SonarQube Community Build to SonarQube Server
- [Moving to another SonarQube Server edition](/sonarqube-server/server-update-and-maintenance/update/moving-to-another-edition.md): How to move to another SonarQube Server edition during an update.
- [Using Marketplace](/sonarqube-server/server-update-and-maintenance/update/marketplace.md): Using the Marketplace to keep the SonarQube platform up to date.
- [Other migration-related tasks](/sonarqube-server/server-update-and-maintenance/update/other-procedures.md): This section explains how to revert to the previous version of SonarQube Server and how to migrate the database to another vendor.
- [Maintenance](/sonarqube-server/server-update-and-maintenance/maintenance.md): Maintaining your SonarQube Server instance.
- [Improving performance](/sonarqube-server/server-update-and-maintenance/maintenance/improving-performance.md): Improve the performance of your SonarQube Server instance by increasing the number of Compute Engine workers, parallel analysis processing, and optimizing the analyzers' loading.
- [Migrating database](/sonarqube-server/server-update-and-maintenance/maintenance/sonarqube-db-copy-tool.md): The SonarQube database copy tool helps you migrate your SonarQube Server database between vendors.
- [Backup and restore](/sonarqube-server/server-update-and-maintenance/maintenance/backup-and-restore.md): Backing up and restoring your data.
- [Reindexing](/sonarqube-server/server-update-and-maintenance/maintenance/reindexing.md): Starting SonarQube Server after an update or a restore from a backup triggers a rebuild of the Elasticsearch indexes. You can also force a reindex.
- [Deprecations](/sonarqube-server/server-update-and-maintenance/maintenance/deprecations.md): Deprecation policy and API deprecations.
- [Deprecation policy](/sonarqube-server/server-update-and-maintenance/maintenance/deprecations/deprecation-policy.md): The goal of the deprecation policy is to ensure that users are aware of what is changing and have time to adjust before a feature or an API component is dropped on a planned date.
- [Monitoring API deprecation](/sonarqube-server/server-update-and-maintenance/maintenance/deprecations/monitoring-api-deprecation.md): Monitoring deprecated Web API components is an important part of checking that your SonarQube instance is using deprecated endpoints.
- [Monitoring](/sonarqube-server/server-update-and-maintenance/monitoring.md): Monitoring your SonarQube Server instance.
- [SonarQube Server instance](/sonarqube-server/server-update-and-maintenance/monitoring/instance.md): Monitoring your SonarQube Server instance is key to keeping it healthy and ensuring user satisfaction.
- [Lines of Code](/sonarqube-server/server-update-and-maintenance/monitoring/lines-of-code.md): SonarQube calculates the Lines of Code analyzed against the subscription’s limit defined by the license.
- [Troubleshooting](/sonarqube-server/server-update-and-maintenance/troubleshooting.md): Troubleshooting your SonarQube Server instance.
- [Server logs](/sonarqube-server/server-update-and-maintenance/troubleshooting/server-logs.md): Accessing and using server logs for troubleshooting.
- [Performance issues](/sonarqube-server/server-update-and-maintenance/troubleshooting/performance-issues.md): Steps to consider when addressing performance issues.
- [Database-related issues](/sonarqube-server/server-update-and-maintenance/troubleshooting/database-related-issues.md): Troubleshooting database-related issues.
- [Elasticsearch-related issues](/sonarqube-server/server-update-and-maintenance/troubleshooting/elasticsearch.md): Troubleshooting Elasticsearch-related issues.
- [Other issues](/sonarqube-server/server-update-and-maintenance/troubleshooting/other-issues.md): Troubleshooting other issues related to the server updates and maintenance.
- [Creating support ticket](/sonarqube-server/server-update-and-maintenance/troubleshooting/creating-support-ticket.md): Accessing Sonar support and creating support tickets.
- [Data Center Edition](/sonarqube-server/server-update-and-maintenance/data-center-edition.md): Maintaining your Data Center Edition.
- [Monitoring](/sonarqube-server/server-update-and-maintenance/data-center-edition/monitoring.md): Monitoring your Data Center Edition.
- [Improving performance](/sonarqube-server/server-update-and-maintenance/data-center-edition/improving-performance.md): Improving performance of your Data Center Edition.
- [Scaling](/sonarqube-server/server-update-and-maintenance/data-center-edition/scaling.md): Scaling and managing the application nodes for your Data Center Edition.
- [Updating](/sonarqube-server/server-update-and-maintenance/data-center-edition/updating.md): Updating your Data Center Edition.
- [Release notes](/sonarqube-server/server-update-and-maintenance/release-notes.md): These release notes describe the relevant changes implemented for each SonarQube Server release version since the 2025.1 LTA version.
- [LTA to LTA release notes](/sonarqube-server/server-update-and-maintenance/lta-to-lta-release-notes.md): LTA to LTA release notes include all new features, update notes, deprecations and removals between version 2025.4 LTA and 2026.1 LTA.
- [Product release lifecycle](/sonarqube-server/server-update-and-maintenance/product-release-lifecycle.md): Sonar’s product release lifecycle and standard definitions for alpha, beta, and general availability (GA) stages.
---
# Source: https://docs.sonarsource.com/sonarqube-server/10.7/server-upgrade-and-maintenance.md
# Source: https://docs.sonarsource.com/sonarqube-server/10.8/server-upgrade-and-maintenance.md
# Server upgrade and maintenance
{% content-ref url="server-upgrade-and-maintenance/upgrade" %}
[upgrade](https://docs.sonarsource.com/sonarqube-server/10.8/server-upgrade-and-maintenance/upgrade)
{% endcontent-ref %}
{% content-ref url="server-upgrade-and-maintenance/maintenance" %}
[maintenance](https://docs.sonarsource.com/sonarqube-server/10.8/server-upgrade-and-maintenance/maintenance)
{% endcontent-ref %}
{% content-ref url="server-upgrade-and-maintenance/monitoring" %}
[monitoring](https://docs.sonarsource.com/sonarqube-server/10.8/server-upgrade-and-maintenance/monitoring)
{% endcontent-ref %}
{% content-ref url="server-upgrade-and-maintenance/troubleshooting" %}
[troubleshooting](https://docs.sonarsource.com/sonarqube-server/10.8/server-upgrade-and-maintenance/troubleshooting)
{% endcontent-ref %}
{% content-ref url="server-upgrade-and-maintenance/release-notes-and-notices" %}
[release-notes-and-notices](https://docs.sonarsource.com/sonarqube-server/10.8/server-upgrade-and-maintenance/release-notes-and-notices)
{% endcontent-ref %}
---
# Source: https://docs.sonarsource.com/sonarqube-server/10.7/setup-and-upgrade/deploy-on-kubernetes/server.md
# Source: https://docs.sonarsource.com/sonarqube-server/10.8/setup-and-upgrade/deploy-on-kubernetes/server.md
# Source: https://docs.sonarsource.com/sonarqube-server/2025.2/setup-and-update/deploy-on-kubernetes/server.md
# Source: https://docs.sonarsource.com/sonarqube-server/2025.1/setup-and-upgrade/deploy-on-kubernetes/server.md
# Developer and Enterprise Editions
{% content-ref url="server/introduction" %}
[introduction](https://docs.sonarsource.com/sonarqube-server/2025.1/setup-and-upgrade/deploy-on-kubernetes/server/introduction)
{% endcontent-ref %}
{% content-ref url="server/before-you-start" %}
[before-you-start](https://docs.sonarsource.com/sonarqube-server/2025.1/setup-and-upgrade/deploy-on-kubernetes/server/before-you-start)
{% endcontent-ref %}
{% content-ref url="server/customizing-helm-chart" %}
[customizing-helm-chart](https://docs.sonarsource.com/sonarqube-server/2025.1/setup-and-upgrade/deploy-on-kubernetes/server/customizing-helm-chart)
{% endcontent-ref %}
{% content-ref url="server/installing-helm-chart" %}
[installing-helm-chart](https://docs.sonarsource.com/sonarqube-server/2025.1/setup-and-upgrade/deploy-on-kubernetes/server/installing-helm-chart)
{% endcontent-ref %}
---
# Source: https://docs.sonarsource.com/sonarqube-server/2025.3/project-administration/ai-features/set-up-ai-code-assurance.md
# Source: https://docs.sonarsource.com/sonarqube-server/2025.5/project-administration/ai-features/set-up-ai-code-assurance.md
# Source: https://docs.sonarsource.com/sonarqube-server/2025.1/project-administration/ai-features/set-up-ai-code-assurance.md
# Source: https://docs.sonarsource.com/sonarqube-server/2025.4/project-administration/ai-features/set-up-ai-code-assurance.md
# Source: https://docs.sonarsource.com/sonarqube-server/2025.6/project-administration/ai-features/set-up-ai-code-assurance.md
# Source: https://docs.sonarsource.com/sonarqube-server/project-administration/ai-features/set-up-ai-code-assurance.md
# Source: https://docs.sonarsource.com/sonarqube-cloud/managing-your-projects/administering-your-projects/ai-features/set-up-ai-code-assurance.md
# Set up AI Code Assurance
Setting up AI Code Assurance is a three-step process laid out in full on the [overview](https://docs.sonarsource.com/sonarqube-cloud/standards/ai-code-assurance/overview "mention") page.
### Assuring your AI code
SonarQube Cloud recognizes that AI-generated code should be monitored with additional quality standards. Recommended checks include high standards to reduce code complexity, remove bugs, and eliminate injection vulnerabilities. SonarQube’s AI Code Assurance features bring confidence that your AI-generated code is being reviewed to avoid any accountability crisis.
These objectives are achieved with three features that allow Quality Standard administrators to qualify projects as AI Code Assured:
1. [#label-projects-with-ai-code](https://docs.sonarsource.com/sonarqube-cloud/standards/ai-code-assurance/overview#label-projects-with-ai-code "mention")
2. [#apply-a-quality-gate-for-ai-code-assurance](https://docs.sonarsource.com/sonarqube-cloud/standards/ai-code-assurance/overview#apply-a-quality-gate-for-ai-code-assurance "mention")
3. Publish an AI Code Assurance badge externally to your websites to [#monitor-projects-containing-ai-code](https://docs.sonarsource.com/sonarqube-cloud/standards/ai-code-assurance/overview#monitor-projects-containing-ai-code "mention").
Steps 1 and 2 are applied in the **Project Settings**. Step 3 reports the AI Code Assurance status of the project. Check the [monitor-projects-with-ai-code](https://docs.sonarsource.com/sonarqube-cloud/standards/ai-code-assurance/monitor-projects-with-ai-code "mention") page for a description of the AI Code Assurance labels and badges.
### Related pages
* Administering your [ai-features](https://docs.sonarsource.com/sonarqube-cloud/administering-sonarcloud/ai-features "mention") as an Organization Admin
* [enable-ai-codefix](https://docs.sonarsource.com/sonarqube-cloud/administering-sonarcloud/ai-features/enable-ai-codefix "mention") to get AI-generated fix suggestions
---
# Source: https://docs.sonarsource.com/sonarqube-community-build/server-installation/from-docker-image/set-up-and-start-container.md
# Source: https://docs.sonarsource.com/sonarqube-server/2025.5/server-installation/from-docker-image/set-up-and-start-container.md
# Source: https://docs.sonarsource.com/sonarqube-server/2025.4/server-installation/from-docker-image/set-up-and-start-container.md
# Source: https://docs.sonarsource.com/sonarqube-server/2025.6/server-installation/from-docker-image/set-up-and-start-container.md
# Source: https://docs.sonarsource.com/sonarqube-server/server-installation/from-docker-image/set-up-and-start-container.md
# Set up and start your container
You can set up and start the SonarQube container either from the command line (docker run) or from a configuration file (docker compose). Installation setup relies on system properties, which are preferably configured via environment variables in a Docker environment.
### Using docker run
Run the image as illustrated in the docker run command below. You can define your system properties by using the `-e` environment variable flag in the command. See [#mandatory-and-relevant-settings](#mandatory-and-relevant-settings "mention") below for information about the properties to be set.
```sh
$> docker run -d --name sonarqube \
-p 9000:9000 \
-e SONAR_JDBC_URL=... \
-e SONAR_JDBC_USERNAME=... \
-e SONAR_JDBC_PASSWORD=... \
-v sonarqube_data:/opt/sonarqube/data \
-v sonarqube_extensions:/opt/sonarqube/extensions \
-v sonarqube_logs:/opt/sonarqube/logs \
```
Note that:
* By default, the server running within the container will listen on port 9000. The `-p 9000:9000` argument is used to expose the container port 9000 to the host port 9000: `-p port1:port2` maps container’s port `port1` as `port2` on the host.
* For ``, check the tags currently available on the [DockerHub page](https://hub.docker.com/_/sonarqube).
### Using Docker compose
If you’re using [Docker Compose](https://docs.docker.com/compose/), use this [yml file example](https://github.com/SonarSource/docker-sonarqube/tree/master/example-compose-files/sq-with-postgres) as a reference when configuring your `.yml` file. You can define the system properties by setting the corresponding environment variables in the `environment` section of the .`yml` file. See [#mandatory-and-relevant-settings](#mandatory-and-relevant-settings "mention") below for information about the properties to be set.
Note that:
* By default, the server running within the container will listen on port 9000. The following code is used to expose the container port 9000 to the host port 9000 (`"port1:port2"` maps container’s port `port1` as `port2` on the host):
```yaml
ports:
- "9000:9000"
```
* In the `image` tag, use the tag value corresponding to the SonarQube Server version you want to use. Check the SonarQube Server image tags currently available on the [DockerHub page](https://hub.docker.com/_/sonarqube). For example, to use the LTA version of the Developer Edition:
```yaml
image: sonarqube:2025-lta-developer
```
{% hint style="info" %}
Unless you intend to delete the database and start new when running your image, be careful not to use `-v` to `docker-compose down` and, be careful when running commands like `docker system prune` or `docker volume prune`; regardless if you use an `external: true` parameter, your database volumes will not persist beyond the initial startup and shutdown of SonarQube.
{% endhint %}
### Mandatory and relevant settings
You must set the access to your database and you should check the web server connection parameters. This section explains also other settings that are optional.
#### Set access to the database
You must configure the access to your database (except if you want to use SonarQube for test purposes and want to use the embedded database H2). To do so, set the system properties (environment variables) related to database access:
* SONAR\_JDBC\_USERNAME
* SONAR\_JDBC\_PASSWORD
* SONAR\_JDBC\_URL
For more information, see [#general](https://docs.sonarsource.com/sonarqube-server/system-properties/common-properties#general "mention").
#### Check the web server connection parameters
Check the default values of the following system properties and change their values if necessary:
* SONAR\_WEB\_HOST
* SONAR\_WEB\_PORT
* SONAR\_WEB\_CONTEXT
To do so, see [#web-server-connection](https://docs.sonarsource.com/sonarqube-server/system-properties/common-properties#web-server-connection "mention").
#### Enabling IPv6
When you run your Docker container:
* Enable IPv6 in the JVM by setting the `JAVA_TOOL_OPTIONS` environment variable to `-Djava.net.preferIPv6Addresses=true`.
* Enable IPv6 in SonarQube by setting the `SONAR_WEB_JAVAADDITIONALOPTS` environment variable (system property) to `-Djava.net.preferIPv6Addresses=true`.
See below for instructions depending on the Docker tool used.
With docker-run
Set the environment variables in the docker run command as illustrated below.
```sh
docker run -d --name sonarqube \
-p 9000:9000 \
-e JAVA_TOOL_OPTIONS="-Djava.net.preferIPv6Addresses=true" \
-e SONAR_WEB_JAVAADDITIONALOPTS="-Djava.net.preferIPv6Addresses=true" \
... \
```
With docker-compose
Set the environment variables in the `environment` section of the .`yml` file as illustrated below.
```yaml
...
environment:
SONAR_JDBC_URL: jdbc:postgresql://db:5432/sonar
SONAR_JDBC_USERNAME: sonar
SONAR_JDBC_PASSWORD: sonar
JAVA_TOOL_OPTIONS: ‘-Djava.net.preferIPv6Addresses=true’
SONAR_WEB_JAVAADDITIONALOPTS: ‘-Djava.net.preferIPv6Addresses=true’
...
```
{% hint style="warning" %}
IPv6 is not officially supported for the Docker images of the Data Center Edition.
{% endhint %}
#### Keeping user sessions alive on server restart
To maintain your user sessions accross server restarts:
* Store the JWT token you generated during pre-installation in the `SONAR_AUTH_JWTBASE64HS256SECRET` system property.
See also [jwt-token](https://docs.sonarsource.com/sonarqube-server/server-installation/pre-installation/jwt-token "mention").
### Related pages
* [installation-overview](https://docs.sonarsource.com/sonarqube-server/server-installation/from-docker-image/installation-overview "mention")
* [prepare-installation](https://docs.sonarsource.com/sonarqube-server/server-installation/from-docker-image/prepare-installation "mention")
* [advanced-setup](https://docs.sonarsource.com/sonarqube-server/server-installation/from-docker-image/advanced-setup "mention")
* [system-properties](https://docs.sonarsource.com/sonarqube-server/server-installation/system-properties "mention")
* **Configuring network security features:**
* [securing-behind-proxy](https://docs.sonarsource.com/sonarqube-server/server-installation/network-security/securing-behind-proxy "mention")
* [network-rules](https://docs.sonarsource.com/sonarqube-server/server-installation/network-security/network-rules "mention")
---
# Source: https://docs.sonarsource.com/sonarqube-server/2025.3/server-installation/data-center-edition/on-kubernetes-or-openshift/setting-up-disaster-recovery/set-up-clusters-on-aks.md
# Source: https://docs.sonarsource.com/sonarqube-server/2025.5/server-installation/data-center-edition/on-kubernetes-or-openshift/setting-up-disaster-recovery/set-up-clusters-on-aks.md
# Source: https://docs.sonarsource.com/sonarqube-server/2025.4/server-installation/data-center-edition/on-kubernetes-or-openshift/setting-up-disaster-recovery/set-up-clusters-on-aks.md
# Source: https://docs.sonarsource.com/sonarqube-server/2025.6/server-installation/data-center-edition/on-kubernetes-or-openshift/setting-up-disaster-recovery/set-up-clusters-on-aks.md
# Source: https://docs.sonarsource.com/sonarqube-server/server-installation/data-center-edition/on-kubernetes-or-openshift/setting-up-disaster-recovery/set-up-clusters-on-aks.md
# Step 2: Set up the primary and replica clusters on AKS
The setup instructions are based on a [architecture-example](https://docs.sonarsource.com/sonarqube-server/server-installation/data-center-edition/on-kubernetes-or-openshift/setting-up-disaster-recovery/architecture-example "mention").
### Requirements on AKS clusters
The only requirement for the AKS clusters creation step is to create the primary and replica clusters in different geographical regions.
Default networking (Azure CNI Overlay) and storage settings are supported and capable of hosting a SonarQube DCE instance using the Helm chart provided by Sonar.
Sizing of the clusters is outside the scope of this section.
### Step 1: Deploy your DCE on AKS
You must set in the Helm chart the access to the PostgreSQL Virtual Writer endpoint as follows:
1\. Modify the Helm chart for each cluster to add the JDBC URL with the Database Virtual Writer Endpoint as follows (see [customizing-helm-chart](https://docs.sonarsource.com/sonarqube-server/server-installation/data-center-edition/on-kubernetes-or-openshift/customizing-helm-chart "mention")):
```yaml
jdbcOverwrite:
enabled: true
jdbcPassword:
jdbcUrl: jdbc:postgresql://yourVirtualWriterEndpoint:5432/yourDB
jdbcUsername:
```
2. Deploy the two clusters following the instructions on the [installing-from-helm-repo](https://docs.sonarsource.com/sonarqube-server/server-installation/data-center-edition/on-kubernetes-or-openshift/installing-from-helm-repo "mention") page.
3. Once the clusters are deployed, keep only the primary cluster up and stop the replica cluster as it could create conflicts.
{% hint style="info" %}
Do not enable the Nginx dependencies in the Helm chart since an Azure mechanism is used (see below).
{% endhint %}
### Step 2: Set up the Azure managed NGINX ingress controllers
You must create an ingress for each one of your clusters, primary and replica. These ingresses will be configured as origins for the Azure Front Door’s origin group.
{% hint style="info" %}
For production environments, Azure Front Door requires FQDNs with a CA-signed certificate (self-signed certificates are not supported). IP addresses can be used for testing purposes only.
{% endhint %}
For each cluster:
1\. Enable Application Routing using Azure CLI on your AKS cluster as follows.
```
az aks approuting enable --resource-group --name
```
2. Configure Kubectl to connect to your AKS cluster as follows.
```
az aks get-credentials --resource-group --name
```
3. Create the Ingress object. Copy the following YAML file into a new file named `ingress.yaml` and save it to your computer. If you used a namespace when deploying your SonarQube Server, it should be added to the metadata section.
```yaml
apiVersion: networking.k8s.io/v1
kind: Ingress
metadata:
name: sonarqube-dce
namespace: sonarqube-dce
annotations:
nginx.ingress.kubernetes.io/proxy-body-size: 120m
spec:
ingressClassName: webapprouting.kubernetes.azure.com
rules:
- http:
paths:
- backend:
service:
name: sonarqube-dce-sonarqube-dce
port:
number: 9000
path: /
pathType: Prefix
```
4. Create the ingress with the `kubectl` apply command (using a namespace is optional) as follows.
```
kubectl apply -f ingress.yaml -n
```
5. Verify the Ingress was created as follows.
```
kubectl get ingress -n
```
### Related pages
* [architecture-example](https://docs.sonarsource.com/sonarqube-server/server-installation/data-center-edition/on-kubernetes-or-openshift/setting-up-disaster-recovery/architecture-example "mention")
* [deploy-databases](https://docs.sonarsource.com/sonarqube-server/server-installation/data-center-edition/on-kubernetes-or-openshift/setting-up-disaster-recovery/deploy-databases "mention")
* [configure-azure-front-door](https://docs.sonarsource.com/sonarqube-server/server-installation/data-center-edition/on-kubernetes-or-openshift/setting-up-disaster-recovery/configure-azure-front-door "mention")
* [test-failover-scenarios](https://docs.sonarsource.com/sonarqube-server/server-installation/data-center-edition/on-kubernetes-or-openshift/setting-up-disaster-recovery/test-failover-scenarios "mention")
---
# Source: https://docs.sonarsource.com/sonarqube-community-build/server-installation/on-kubernetes-or-openshift/set-up-monitoring.md
# Source: https://docs.sonarsource.com/sonarqube-server/10.4/setup-and-upgrade/deploy-on-kubernetes/set-up-monitoring.md
# Source: https://docs.sonarsource.com/sonarqube-server/10.5/setup-and-upgrade/deploy-on-kubernetes/set-up-monitoring.md
# Source: https://docs.sonarsource.com/sonarqube-server/10.6/setup-and-upgrade/deploy-on-kubernetes/set-up-monitoring.md
# Source: https://docs.sonarsource.com/sonarqube-server/10.7/setup-and-upgrade/deploy-on-kubernetes/set-up-monitoring.md
# Source: https://docs.sonarsource.com/sonarqube-server/10.8/setup-and-upgrade/deploy-on-kubernetes/set-up-monitoring.md
# Source: https://docs.sonarsource.com/sonarqube-server/2025.2/setup-and-update/deploy-on-kubernetes/set-up-monitoring.md
# Source: https://docs.sonarsource.com/sonarqube-server/2025.3/server-installation/on-kubernetes-or-openshift/set-up-monitoring.md
# Source: https://docs.sonarsource.com/sonarqube-server/2025.5/server-installation/on-kubernetes-or-openshift/set-up-monitoring.md
# Source: https://docs.sonarsource.com/sonarqube-server/2025.1/setup-and-upgrade/deploy-on-kubernetes/set-up-monitoring.md
# Source: https://docs.sonarsource.com/sonarqube-server/2025.4/server-installation/on-kubernetes-or-openshift/set-up-monitoring.md
# Source: https://docs.sonarsource.com/sonarqube-server/2025.6/server-installation/on-kubernetes-or-openshift/set-up-monitoring.md
# Source: https://docs.sonarsource.com/sonarqube-server/server-installation/on-kubernetes-or-openshift/set-up-monitoring.md
# Setting up monitoring
- [Introduction](/sonarqube-server/server-installation/on-kubernetes-or-openshift/set-up-monitoring/introduction.md): If you deploy SonarQube Server on Kubernetes, Prometheus metrics can be collected.
- [Setting up with Prometheus server](/sonarqube-server/server-installation/on-kubernetes-or-openshift/set-up-monitoring/prometheus.md): This article describes how to use SonarQube’s core integration with Prometheus to collect Prometheus metrics in a Kubernetes deployment.
- [Setting up with Datadog](/sonarqube-server/server-installation/on-kubernetes-or-openshift/set-up-monitoring/datadog.md): In case of a Kubernetes deployment, you can use Datadog to collect the metrics provided through the SonarQube Server’s Web API (Openmetrics format).
- [List of Prometheus metrics](/sonarqube-server/server-installation/on-kubernetes-or-openshift/set-up-monitoring/prometheus-metrics.md): List of the SonarQube Server metrics exposed by Prometheus.
---
# Source: https://docs.sonarsource.com/sonarqube-community-build/project-administration/adjusting-analysis/setting-analysis-scope.md
# Source: https://docs.sonarsource.com/sonarqube-server/2025.2/project-administration/setting-analysis-scope.md
# Source: https://docs.sonarsource.com/sonarqube-server/2025.3/project-administration/setting-analysis-scope.md
# Source: https://docs.sonarsource.com/sonarqube-server/2025.5/project-administration/setting-analysis-scope.md
# Source: https://docs.sonarsource.com/sonarqube-server/2025.4/project-administration/setting-analysis-scope.md
# Source: https://docs.sonarsource.com/sonarqube-server/2025.6/project-administration/adjusting-analysis/setting-analysis-scope.md
# Source: https://docs.sonarsource.com/sonarqube-server/project-administration/adjusting-analysis/setting-analysis-scope.md
# Source: https://docs.sonarsource.com/sonarqube-cloud/managing-your-projects/project-analysis/setting-analysis-scope.md
# Analysis scope
{% content-ref url="setting-analysis-scope/introduction" %}
[introduction](https://docs.sonarsource.com/sonarqube-cloud/managing-your-projects/project-analysis/setting-analysis-scope/introduction)
{% endcontent-ref %}
{% content-ref url="setting-analysis-scope/setting-initial-scope" %}
[setting-initial-scope](https://docs.sonarsource.com/sonarqube-cloud/managing-your-projects/project-analysis/setting-analysis-scope/setting-initial-scope)
{% endcontent-ref %}
{% content-ref url="setting-analysis-scope/excluding-files-based-on-patterns" %}
[excluding-files-based-on-patterns](https://docs.sonarsource.com/sonarqube-cloud/managing-your-projects/project-analysis/setting-analysis-scope/excluding-files-based-on-patterns)
{% endcontent-ref %}
{% content-ref url="setting-analysis-scope/excluding-based-on-file-extension" %}
[excluding-based-on-file-extension](https://docs.sonarsource.com/sonarqube-cloud/managing-your-projects/project-analysis/setting-analysis-scope/excluding-based-on-file-extension)
{% endcontent-ref %}
{% content-ref url="setting-analysis-scope/exclude-from-coverage-duplication" %}
[exclude-from-coverage-duplication](https://docs.sonarsource.com/sonarqube-cloud/managing-your-projects/project-analysis/setting-analysis-scope/exclude-from-coverage-duplication)
{% endcontent-ref %}
{% content-ref url="setting-analysis-scope/advanced-exclusions" %}
[advanced-exclusions](https://docs.sonarsource.com/sonarqube-cloud/managing-your-projects/project-analysis/setting-analysis-scope/advanced-exclusions)
{% endcontent-ref %}
{% content-ref url="setting-analysis-scope/other-adjustments" %}
[other-adjustments](https://docs.sonarsource.com/sonarqube-cloud/managing-your-projects/project-analysis/setting-analysis-scope/other-adjustments)
{% endcontent-ref %}
{% content-ref url="setting-analysis-scope/verifying-analysis-scope" %}
[verifying-analysis-scope](https://docs.sonarsource.com/sonarqube-cloud/managing-your-projects/project-analysis/setting-analysis-scope/verifying-analysis-scope)
{% endcontent-ref %}
---
# Source: https://docs.sonarsource.com/sonarqube-cloud/administering-sonarcloud/managing-organization/setting-config-at-org-level.md
# Performing global analysis setup
- [Introduction](/sonarqube-cloud/administering-sonarcloud/managing-organization/setting-config-at-org-level/introduction.md): With SonarQube Cloud Enterprise, your can define default settings for long-lived branch patterns, automatic analysis, and set your analysis scope, all of which can be overridden at the project level.
- [Setting new code definition](/sonarqube-cloud/administering-sonarcloud/managing-organization/setting-config-at-org-level/setting-new-code-definition-at-organization-level.md): SonarQube Cloud Project administrators can set the default the new code definition.
- [Setting long-lived branch pattern](/sonarqube-cloud/administering-sonarcloud/managing-organization/setting-config-at-org-level/setting-long-lived-branch-pattern.md): This section explains how to define a long-lived branches name pattern in SonarQube Cloud at your organization level.
- [Adjusting analysis scope](/sonarqube-cloud/administering-sonarcloud/managing-organization/setting-config-at-org-level/adjusting-analysis-scope.md): With the SonarQube Cloud Enterprise plan, you can set and adjust your analysis scope at the organization level.
- [Introduction](/sonarqube-cloud/administering-sonarcloud/managing-organization/setting-config-at-org-level/adjusting-analysis-scope/introduction.md): As an organization admin, you can define in the UI an analysis scope adjustment at the organization level.
- [Excluding from coverage or duplication](/sonarqube-cloud/administering-sonarcloud/managing-organization/setting-config-at-org-level/adjusting-analysis-scope/exclude-from-coverage-duplication.md): Excluding specific files from code coverage or duplication check can be defined at the organization level for your SonarQube Cloud organization.
- [Excluding files based on file paths](/sonarqube-cloud/administering-sonarcloud/managing-organization/setting-config-at-org-level/adjusting-analysis-scope/excluding-files-based-on-file-paths.md): To exclude files from your SonarQube Cloud project’s analysis scope based on file paths, you can define file exclusion parameters based on directory and file name patterns.
- [Using advanced exclusion features](/sonarqube-cloud/administering-sonarcloud/managing-organization/setting-config-at-org-level/adjusting-analysis-scope/advanced-exclusion-features.md): In very specific situations, you may have to define, at the organization level, the exclusion of code from the analysis using SonarQube Cloud's advanced exclusion features.
- [Disabling automatic analysis](/sonarqube-cloud/administering-sonarcloud/managing-organization/setting-config-at-org-level/disabling-automatic-analysis.md): This page explains how to disable the automatic analysis in SonarQube Cloud at the organization level.
- [Managing quality standards](/sonarqube-cloud/administering-sonarcloud/managing-organization/setting-config-at-org-level/quality-standards.md): This page outlines how to manage organization-level quality standards in SonarQube Cloud, specifically focusing on the "quality gate fudge factor."
---
# Source: https://docs.sonarsource.com/sonarqube-community-build/project-administration/adjusting-analysis/setting-analysis-scope/setting-initial-scope.md
# Source: https://docs.sonarsource.com/sonarqube-server/2025.2/project-administration/setting-analysis-scope/setting-initial-scope.md
# Source: https://docs.sonarsource.com/sonarqube-server/2025.3/project-administration/setting-analysis-scope/setting-initial-scope.md
# Source: https://docs.sonarsource.com/sonarqube-server/2025.5/project-administration/setting-analysis-scope/setting-initial-scope.md
# Source: https://docs.sonarsource.com/sonarqube-server/2025.4/project-administration/setting-analysis-scope/setting-initial-scope.md
# Source: https://docs.sonarsource.com/sonarqube-server/2025.6/project-administration/adjusting-analysis/setting-analysis-scope/setting-initial-scope.md
# Source: https://docs.sonarsource.com/sonarqube-server/project-administration/adjusting-analysis/setting-analysis-scope/setting-initial-scope.md
# Source: https://docs.sonarsource.com/sonarqube-cloud/managing-your-projects/project-analysis/setting-analysis-scope/setting-initial-scope.md
# Setting initial scope
The initial analysis scope of a project must be defined for source code (also called main code) on one side and for test code on the other side.
{% hint style="info" %}
* Test and source code are distinguished because test files must be excluded from the source-related metrics and different analysis rules are applied to each category.
* Additionally, test code does not count toward your lines of code (LOC) usage in SonarQube accounts and does not count toward coverage (you don’t have to test your test code).
{% endhint %}
The initial analysis scope of a project is controlled by the following sonar properties:
* For source code (non-test code): `sonar.sources`
* For test code (test code): `sonar.tests`
which define that:
* Files outside the initial scope will not be analyzed at all.
* Files within the initial scope will be analyzed unless excluded by further adjustments.
Each project’s initial scope is defined by default. If it doesn’t suit you, you can set it explicitly.
### Default initial scope
{% tabs %}
{% tab title="MAVEN" %}
If you are analyzing code using the SonarScanner for Maven, the `sonar.sources` and `sonar.tests` parameters are automatically determined based on information in your project configuration. You do not have to explicitly set the parameters.
If you do explicitly set the parameters, for example in your *pom.xml* file, they will override the automatically determined values.
See [#analysis-scope](https://docs.sonarsource.com/sonarqube-cloud/advanced-setup/ci-based-analysis/sonarscanner-for-maven#analysis-scope "mention") for more details.
{% endtab %}
{% tab title="GRADLE" %}
If you are analyzing code using the SonarScanner for Gradle, the `sonar.sources` and `sonar.tests` parameters are automatically determined based on information in your project configuration. You do not have to explicitly set the parameters.
If you do explicitly set the parameters, for example in your *gradle.properties* file, they will override the automatically determined values.
See [sonarscanner-for-gradle](https://docs.sonarsource.com/sonarqube-cloud/advanced-setup/ci-based-analysis/sonarscanner-for-gradle "mention") for details about customizing your analysis.
{% endtab %}
{% tab title=".NET" %}
The `sonar.sources` and `sonar.tests` parameters are not compatible with the SonarScanner for .NET. They are automatically detected and cannot be changed.
If you are analyzing code using the SonarScanner for .NET v8.0.1 or earlier, the `sonar.sources` and `sonar.tests` parameters are automatically determined based on information in your project configuration. The SonarScanner for .NET does not support user-defined values for `sonar.sources` and `sonar.tests`.
See [configuring](https://docs.sonarsource.com/sonarqube-cloud/advanced-setup/ci-based-analysis/sonarscanner-for-dotnet/configuring "mention") for details about customizing your analysis.
{% endtab %}
{% tab title="OTHER SCENARIOS" %}
In cases other than Maven, Gradle or .NET (including both CI-based analysis and automatic analysis):
* By default, `sonar.sources` is set to the value of `sonar.projectBaseDir` property, which is, by default, the current working directory (i.e.: the path `.`).
* `sonar.tests` defaults to `null`, meaning there is assumed to be no test code.
{% endtab %}
{% endtabs %}
### Setting the initial scope explicitely
If the default initial scope is not suitable (see example below), you must set the initial scope explicitly.
Example where an explicit setting of the initial scope is necessary
We consider the following repository example where the `src` and `test` directories are clearly separated.
If the SonarScanner CLI is used, the corresponding code below can be used in the `sonar-project.properties` file to change the default initial scope (for an integrated scanner, the configuration can be done in the build’s project definition file).
```css-79elbk
# Define separate root directories for main and test sources
sonar.sources = src
sonar.tests = test
```
The parameters `sonar.sources` and `sonar.tests` are only settable by key on the CI/CD host (mainly in configuration files or on the command line), not in the SonarQube Cloud UI. For more information, see [analysis-parameters](https://docs.sonarsource.com/sonarqube-cloud/advanced-setup/analysis-parameters "mention").
To set `sonar.sources` and `sonar.tests`:
* Use a comma-delimited list of directories or files.
* The entries in the list are simple paths. Wildcard patterns are not allowed.
* A directory in the list means that all analyzable files and directories recursively below it are included. An individual file in the list means that the file is included.
* The paths are interpreted relative to the project base directory which is defined through the `sonar.projectBaseDir` property. In most cases, this is the root directory of the project. For more information about this property, see [#analysis-scope](https://docs.sonarsource.com/sonarqube-cloud/advanced-setup/analysis-parameters#analysis-scope "mention") for more details.
{% hint style="warning" %}
The C/C++/Objective-C analyzer doesn’t currently support `sonar.tests`. See **Analyzing test files** in [customizing-the-analysis](https://docs.sonarsource.com/sonarqube-cloud/advanced-setup/languages/c-family/customizing-the-analysis "mention").
{% endhint %}
### Related pages
* [exclude-from-coverage-duplication](https://docs.sonarsource.com/sonarqube-cloud/managing-your-projects/project-analysis/setting-analysis-scope/exclude-from-coverage-duplication "mention")
* [excluding-files-based-on-patterns](https://docs.sonarsource.com/sonarqube-cloud/managing-your-projects/project-analysis/setting-analysis-scope/excluding-files-based-on-patterns "mention")
* [excluding-based-on-file-extension](https://docs.sonarsource.com/sonarqube-cloud/managing-your-projects/project-analysis/setting-analysis-scope/excluding-based-on-file-extension "mention")
* [advanced-exclusions](https://docs.sonarsource.com/sonarqube-cloud/managing-your-projects/project-analysis/setting-analysis-scope/advanced-exclusions "mention")
* [other-adjustments](https://docs.sonarsource.com/sonarqube-cloud/managing-your-projects/project-analysis/setting-analysis-scope/other-adjustments "mention")
* [verifying-analysis-scope](https://docs.sonarsource.com/sonarqube-cloud/managing-your-projects/project-analysis/setting-analysis-scope/verifying-analysis-scope "mention")
* [introduction](https://docs.sonarsource.com/sonarqube-cloud/administering-sonarcloud/managing-organization/setting-config-at-org-level/adjusting-analysis-scope/introduction "mention") to Adjusting the analysis scope.
---
# Source: https://docs.sonarsource.com/sonarqube-cloud/administering-sonarcloud/managing-organization/setting-config-at-org-level/setting-long-lived-branch-pattern.md
# Setting long-lived branch pattern
This feature is only available in the [Enterprise plan](https://www.sonarsource.com/plans-and-pricing/#sonarqube-cloud-features).
As an organization admin, you can set the long-lived branch name pattern at the organization level provided you have an Enterprise plan organization. The organization-level patter applies by default to all projects. If the project admin sets a custom pattern for their project, this pattern overrides the organization’s pattern. See [long-lived-branch-pattern](https://docs.sonarsource.com/sonarqube-cloud/managing-your-projects/project-analysis/long-lived-branch-pattern "mention") for more information.
### Introduction to the long-lived branches name pattern
SonarQube Cloud considers a branch to be long-lived if:
* It is the main branch, or
* Its name matches the long-lived branch name pattern.
All other branches are considered short-lived.
{% hint style="info" %}
The type of a branch (long-lived or short-lived) is set during its first analysis and cannot be changed afterward.
{% endhint %}
The name pattern is based on a regular expression. For example, the regular expression *`(branch|release)-.*`* matches any branch name that begins with the string `branch-` or `release-`.
If you don’t set any pattern at the organization level, the default pattern *`(branch|release)-.*`* applies.\* \*You can reset the organization pattern to this value.
### Setting a long-lived branches pattern for your organization
To set the long-lived branches pattern of your organization:
1. Retrieve your organization. See [viewing-organizations](https://docs.sonarsource.com/sonarqube-cloud/getting-started/viewing-organizations "mention") for more details.
2. Go to **Administration** > **Organization settings.**
3. In **Branch** > **Long-lived branches detection**, enter your regular expression.
4. Select **Save**.
### Resetting the organization-level pattern to its default
1. Retrieve your organization. See [viewing-organizations](https://docs.sonarsource.com/sonarqube-cloud/getting-started/viewing-organizations "mention") for more details.
2. Go to **Administration** > **Organization settings.**
3. In **Branch > Long-lived branches detection**, select reset. The pattern is reset to `(branch|release)-.*`.
---
# Source: https://docs.sonarsource.com/sonarqube-community-build/instance-administration/analysis-functions/setting-new-code-definition-at-global-level.md
# Source: https://docs.sonarsource.com/sonarqube-server/2025.2/instance-administration/analysis-functions/setting-new-code-definition-at-global-level.md
# Source: https://docs.sonarsource.com/sonarqube-server/2025.3/instance-administration/analysis-functions/setting-new-code-definition-at-global-level.md
# Source: https://docs.sonarsource.com/sonarqube-server/2025.5/instance-administration/analysis-functions/setting-new-code-definition-at-global-level.md
# Source: https://docs.sonarsource.com/sonarqube-server/2025.4/instance-administration/analysis-functions/setting-new-code-definition-at-global-level.md
# Source: https://docs.sonarsource.com/sonarqube-server/2025.6/instance-administration/analysis-functions/setting-new-code-definition-at-global-level.md
# Source: https://docs.sonarsource.com/sonarqube-server/instance-administration/analysis-functions/setting-new-code-definition-at-global-level.md
# New code definition
The global-level new code definition is called *baseline for new code*:
* It applies by default to all projects. A specific new code definition can be applied to the project instead.
* If it applies to a project, the project consistently uses the baseline for new code. Consequently, any modifications to the baseline will automatically be applied to the project.
The default baseline for new code is the Previous version option. With the Administer System permission, you can change it to the Number of days option, either in the UI or via the Web API.
For more information about the new code options, see [about-new-code](https://docs.sonarsource.com/sonarqube-server/user-guide/about-new-code "mention").
### In the UI
1. In the top navigation bar, select **Administration** > **Configuration** > **General Settings** > **New Code**.
2. Select the new code option.
3. Select **Save**.
### Via the Web API
Use the [api/new\_code\_periods/set](https://next.sonarqube.com/sonarqube/web_api/api/new_code_periods/set) endpoint without specifying a branch or a project.
### Related pages
* [about-new-code](https://docs.sonarsource.com/sonarqube-server/user-guide/about-new-code "mention")
* [configuring-new-code-calculation](https://docs.sonarsource.com/sonarqube-server/project-administration/adjusting-analysis/configuring-new-code-calculation "mention")
---
# Source: https://docs.sonarsource.com/sonarqube-cloud/administering-sonarcloud/managing-organization/setting-config-at-org-level/setting-new-code-definition-at-organization-level.md
# Setting new code definition
The new code option defined at the organization level (if any) is applied by default to all *new* projects. At the organization level, you can only select the Previous version or Number of days option (by default, no option is selected). Project administrators can change this setting for their project. For more information about the new code options, see [about-new-code](https://docs.sonarsource.com/sonarqube-cloud/standards/about-new-code "mention").
To set the new code definition for your organization (you must be an organization admin):
1. Retrieve your organization. See [viewing-organizations](https://docs.sonarsource.com/sonarqube-cloud/getting-started/viewing-organizations "mention") for more information.
2. Go to **Administration** > **New Code**.
3. Select the new code option.
4. Select **Save**.
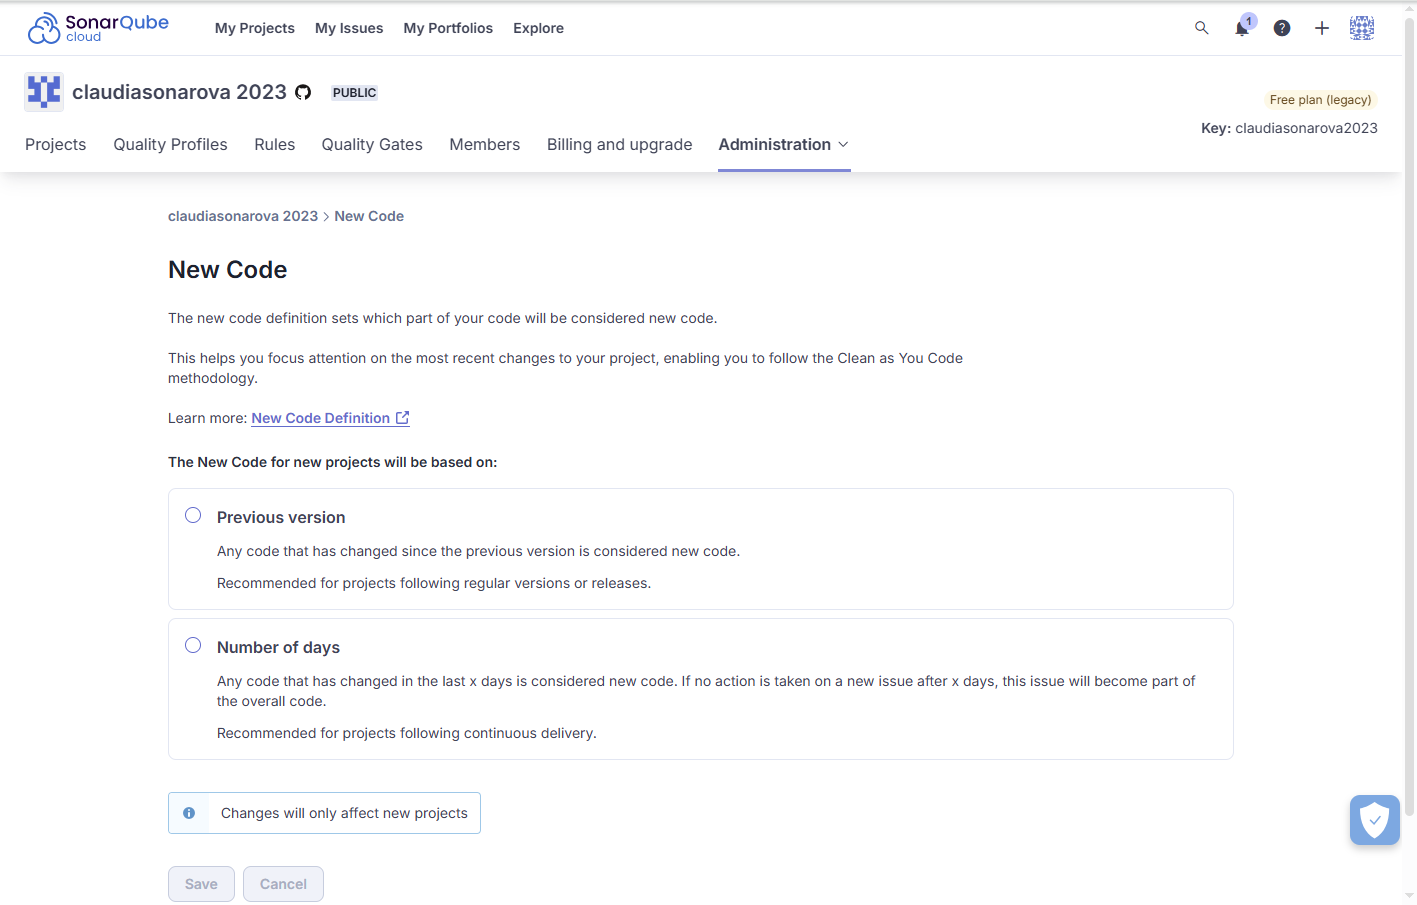
### Related pages
* [Quality standards and new code](https://app.gitbook.com/s/4vN6mMcoPndARxvycboz/user-guide/about-new-code "mention")
* [Configuring new code calculation](https://app.gitbook.com/s/4vN6mMcoPndARxvycboz/project-administration/configuring-new-code-calculation "mention")
---
# Source: https://docs.sonarsource.com/sonarqube-community-build/devops-platform-integration/github-integration/setting-up-at-global-level/setting-parameters-for-github-actions.md
# Source: https://docs.sonarsource.com/sonarqube-server/10.6/devops-platform-integration/github-integration/setting-up-at-global-level/setting-parameters-for-github-actions.md
# Source: https://docs.sonarsource.com/sonarqube-server/10.7/devops-platform-integration/github-integration/setting-up-at-global-level/setting-parameters-for-github-actions.md
# Source: https://docs.sonarsource.com/sonarqube-server/10.8/devops-platform-integration/github-integration/setting-up-at-global-level/setting-parameters-for-github-actions.md
# Source: https://docs.sonarsource.com/sonarqube-server/2025.2/devops-platform-integration/github-integration/setting-up-at-global-level/setting-parameters-for-github-actions.md
# Source: https://docs.sonarsource.com/sonarqube-server/2025.3/devops-platform-integration/github-integration/setting-up-at-global-level/setting-parameters-for-github-actions.md
# Source: https://docs.sonarsource.com/sonarqube-server/2025.5/devops-platform-integration/github-integration/setting-up-at-global-level/setting-parameters-for-github-actions.md
# Source: https://docs.sonarsource.com/sonarqube-server/2025.1/devops-platform-integration/github-integration/setting-up-at-global-level/setting-parameters-for-github-actions.md
# Source: https://docs.sonarsource.com/sonarqube-server/2025.4/devops-platform-integration/github-integration/setting-up-at-global-level/setting-parameters-for-github-actions.md
# Source: https://docs.sonarsource.com/sonarqube-server/2025.6/devops-platform-integration/github-integration/setting-up-at-global-level/setting-parameters-for-github-actions.md
# Source: https://docs.sonarsource.com/sonarqube-server/devops-platform-integration/github-integration/setting-up-at-global-level/setting-parameters-for-github-actions.md
# Setting parameters for GitHub Actions
You can define at the global level the parameters used in GitHub Actions workflows to connect to the SonarQube Server (Server URL and token).
### Storing the authentication token in GitHub at the global level
To store sensitive data, use GitHub secrets: see GitHub’s documentation on [Encrypted secrets](https://docs.github.com/en/actions/reference/encrypted-secrets) for more information.
{% hint style="warning" %}
A token defined at the global level gives permissions on all projects in the SonarQube Server instance.
{% endhint %}
Proceed as follows to store the authentication token at the global level:
1. In the SonarQube Server UI, generate a SonarQube Server token at the global level.
2. Create an organization secret in GitHub with:
* Name: SONAR\_TOKEN
* Value: the token you generated in the previous step.
### Storing the SonarQube Server URL in GitHub at the global level
Create an [organization variable](https://docs.github.com/en/actions/writing-workflows/choosing-what-your-workflow-does/store-information-in-variables) in GitHub with:
* Name: SONAR\_HOST\_URL
* Value: SonarQube Server URL.
---
# Source: https://docs.sonarsource.com/sonarqube-cloud/managing-your-projects/administering-your-projects/setting-permissions.md
# Setting user permissions
As a project admin, you can update your project’s permissions manually or, with a [Team or Enterprise plan](https://www.sonarsource.com/plans-and-pricing/sonarcloud/) organization, reset the default permissions and apply a permission template defined by the organization administrator.
{% hint style="info" %}
If you are an organization admin, you can:
* Apply a permission template to several projects of your Enterprise plan organization at a time. See [projects-management-page](https://docs.sonarsource.com/sonarqube-cloud/administering-sonarcloud/managing-organization/manage-org-projects/projects-management-page "mention") for more information.
* Recover administration access to an organization’s project. See [recovering-admin-access](https://docs.sonarsource.com/sonarqube-cloud/administering-sonarcloud/managing-organization/manage-org-projects/manage-project-permissions/recovering-admin-access "mention") for more information.
{% endhint %}
### Permissions related to a project
| **Permission Type** | **Description** |
| ---------------------------- | ------------------------------------------------------------------------------------------------------------------------------------------------------------------------------------------------------------------------------------------------------------------------------------------------------------------------- |
| Browse Project |
Applies only to private projects (Anyone, including anonymous users, can view the public projects.).
Can view the project.
|
| See Source Code |
Applies only to private projects.
Can view the source code (via API and web view) provided the Browse project permission is also granted.
Note: Anonymous and unauthorized users are prevented from easily downloading public projects’ source code via API and web views.
|
| Administer Issues |
Can perform the following actions:
• Accept an issue
• Mark an issue as False positive
|
| Administer Security Hotspots | Can change the status of a security hotspot. For private projects, the Browse project permission must also be granted. |
| Execute Analysis on project | Can start an analysis on the project. This includes the ability to get all settings required to perform an analysis (including secured settings like passwords) and to push analysis results to the SonarQube Cloud server. |
| Administer project |
Can perform the following actions:
• Delete a project.
• Change the project settings including project-level permissions.
• Configure various project functions, such as PDF reporting, snapshots, and webhooks.
For private projects, the Browse project permission must also be granted.
|
### Updating the permissions of your project
To update the permissions of your project:
1. Retrieve your project. See [retrieving-projects](https://docs.sonarsource.com/sonarqube-cloud/managing-your-projects/retrieving-projects "mention") for more details.
2. In the left sidebar, select **Administration** > **Permissions**. The **Permissions** page opens.
3. Navigate to the bottom of the page to view the list of users and groups.
4. Select the check box to change the permissions.
### Changing the project’s visibility
The project’s visibility may be:
* Public: Anyone, including anonymous users, can view public projects. A public project may be part of any organization.
* Or private: Only authorized users, who are members of the organization, can view a private project. By default, the visibility of newly created projects is set to private on [Free, Team and Enterprise](https://www.sonarsource.com/plans-and-pricing/#sonarqube-cloud-features) plans.
If you’re a project admin, you can change your project’s visibility.
To change the visibility of your project:
1. Retrieve your project. See [retrieving-projects](https://docs.sonarsource.com/sonarqube-cloud/managing-your-projects/retrieving-projects "mention") for more details.
2. In the left sidebar, select **Administration** > **Permissions**. The **Permissions** page opens.
3. In the **Project visibility** section, select the **Public** or **Private** checkbox. (You can also upgrade your organization from this section.) The **Turn to Private / Public** dialog opens.
4. Confirm the change.
### Related pages
* [setting-up-project](https://docs.sonarsource.com/sonarqube-cloud/managing-your-projects/administering-your-projects/setting-up-project "mention")
* [introduction](https://docs.sonarsource.com/sonarqube-cloud/managing-your-projects/administering-your-projects/devops-platform-integration/introduction "mention") to Setting up the integration of your project with your DevOps platform
* [changing-binding](https://docs.sonarsource.com/sonarqube-cloud/managing-your-projects/administering-your-projects/changing-binding "mention")
* [customizing-info-page](https://docs.sonarsource.com/sonarqube-cloud/managing-your-projects/administering-your-projects/customizing-info-page "mention")
* [deleting-project](https://docs.sonarsource.com/sonarqube-cloud/managing-your-projects/administering-your-projects/deleting-project "mention")
---
# Source: https://docs.sonarsource.com/sonarqube-community-build/project-administration/setting-project-permissions.md
# Source: https://docs.sonarsource.com/sonarqube-server/10.7/project-administration/setting-project-permissions.md
# Source: https://docs.sonarsource.com/sonarqube-server/10.8/project-administration/setting-project-permissions.md
# Source: https://docs.sonarsource.com/sonarqube-server/2025.2/project-administration/setting-project-permissions.md
# Source: https://docs.sonarsource.com/sonarqube-server/2025.3/project-administration/setting-project-permissions.md
# Source: https://docs.sonarsource.com/sonarqube-server/2025.5/project-administration/setting-project-permissions.md
# Source: https://docs.sonarsource.com/sonarqube-server/2025.1/project-administration/setting-project-permissions.md
# Source: https://docs.sonarsource.com/sonarqube-server/2025.4/project-administration/setting-project-permissions.md
# Source: https://docs.sonarsource.com/sonarqube-server/2025.6/project-administration/setting-project-permissions.md
# Source: https://docs.sonarsource.com/sonarqube-server/project-administration/setting-project-permissions.md
# Setting project permissions
When a project is created, a set of permissions defined through a permission template is applied by default. You can update these permissions provided you’re a project admin.
{% hint style="info" %}
If permissions are synchronized automatically in your system, you cannot update them manually. See [#if-permission-synchronization](#if-permission-synchronization "mention") for additional information.
{% endhint %}
### Permissions related to a project
Permission Type
Description
Browse Project
Applies only to private projects (Anyone, including anonymous users, can view the public projects.).
Can view the project.
See Source Code
Applies only to private projects.
Can view the source code (via API and web view) provided the Browse project permission is also granted.
Administer Issues
Can perform the following actions:
• Accept an issue
• Mark an issue as False positive
Administer Security Hotspots
Can change the status of a security hotspot. For private projects, the Browse project permission must also be granted.
Administer project
Can perform the following actions:
• Delete a project.
• Change the project settings including project-level permissions.
• Configure various project functions, such as PDF reporting, snapshots, and webhooks.
For private projects, the Browse project permission must also be granted.
Execute Analysis on project
Can start an analysis on the project. This includes the ability to get all settings required to perform an analysis (including secured settings like passwords) and to push analysis results to SonarQube.
### Changing the project visibility
By default, any newly created project will be public. It means every SonarQube user, authenticated or not, will be able to:
* **Browse**: Access a project, browse its measures and issues, and perform some issue edits (confirm, assign, comment).
* **See Source Code**: View the project’s source code.
If you want to be sure only a limited list of groups and users can see the project, you need to change its visibility to private. Once a project is private you will be able to define which groups and users can **Browse** the project or **See Source Code**.
To change the visibility of your project:
1. Retrieve the project. See [retrieving-projects](https://docs.sonarsource.com/sonarqube-server/user-guide/viewing-projects/retrieving-projects "mention") for more information.
2. Go to **Project settings > Permissions**. The **Permissions** page opens.
3. Select **Public** or **Private**.
{% hint style="info" %}
As a system administrator, you can change the default project visibility for new projects. See [user-permissions](https://docs.sonarsource.com/sonarqube-server/instance-administration/user-management/user-permissions "mention").
{% endhint %}
### Updating the permissions of your project
To update the permissions of your project
1. Retrieve the project. See [retrieving-projects](https://docs.sonarsource.com/sonarqube-server/user-guide/viewing-projects/retrieving-projects "mention") for more information.
2. Go to **Project settings > Permissions**. The **Permissions** page opens.
3. Select a check box on a user or group row to change the respective permission.
{% hint style="info" %}
Only System Administrator can apply a permission template to a project. See [#permission-templates](https://docs.sonarsource.com/sonarqube-server/instance-administration/user-management/user-permissions#permission-templates "mention") for more information.
{% endhint %}
### If permissions are synchronized automatically
Project permission synchronization is enabled if you use GitHub, GitLab, or SCIM’s automatic user and group provisioning mode in SonarQube Server. In that case, you cannot change the project permissions of auto-provisioned users. However, you can remove the permissions of local users (Local users are all the users who are not managed through the automatic provisioning process, i.e. manually created users and through another identity provider Just-in-Time-provisioned users.).
### Related pages
* As a System Administrator, you can set permissions at the system level for global and project permissions:
* [user-permissions](https://docs.sonarsource.com/sonarqube-server/instance-administration/user-management/user-permissions "mention")
* Project permission synchronization is enabled with:
* SCIM automatic provisioning [overview](https://docs.sonarsource.com/sonarqube-server/instance-administration/authentication/saml/scim/overview "mention") page
* [github](https://docs.sonarsource.com/sonarqube-server/instance-administration/authentication/github "mention") automatic provisioning
* GitLab [automatic](https://docs.sonarsource.com/sonarqube-server/instance-administration/authentication/gitlab/provisioning-modes/automatic "mention")
---
# Source: https://docs.sonarsource.com/sonarqube-community-build/devops-platform-integration/github-integration/setting-up-at-global-level.md
# Source: https://docs.sonarsource.com/sonarqube-server/10.6/devops-platform-integration/github-integration/setting-up-at-global-level.md
# Source: https://docs.sonarsource.com/sonarqube-server/10.7/devops-platform-integration/github-integration/setting-up-at-global-level.md
# Source: https://docs.sonarsource.com/sonarqube-server/10.8/devops-platform-integration/github-integration/setting-up-at-global-level.md
# Source: https://docs.sonarsource.com/sonarqube-server/2025.2/devops-platform-integration/github-integration/setting-up-at-global-level.md
# Source: https://docs.sonarsource.com/sonarqube-server/2025.3/devops-platform-integration/github-integration/setting-up-at-global-level.md
# Source: https://docs.sonarsource.com/sonarqube-server/2025.5/devops-platform-integration/github-integration/setting-up-at-global-level.md
# Source: https://docs.sonarsource.com/sonarqube-server/2025.1/devops-platform-integration/github-integration/setting-up-at-global-level.md
# Source: https://docs.sonarsource.com/sonarqube-server/2025.4/devops-platform-integration/github-integration/setting-up-at-global-level.md
# Source: https://docs.sonarsource.com/sonarqube-server/2025.6/devops-platform-integration/github-integration/setting-up-at-global-level.md
# Source: https://docs.sonarsource.com/sonarqube-server/devops-platform-integration/github-integration/setting-up-at-global-level.md
# Setting up GitHub integration at global level
- [Introduction](/sonarqube-server/devops-platform-integration/github-integration/setting-up-at-global-level/introduction.md): Setting up GitHub and SonarQube for their integration at the global level.
- [Setting up a GitHub App](/sonarqube-server/devops-platform-integration/github-integration/setting-up-at-global-level/setting-up-github-app.md): Setting up a GitHub App for use with SonarQube.
- [Setting up the report of security alerts](/sonarqube-server/devops-platform-integration/github-integration/setting-up-at-global-level/report-security-alerts.md): SonarQube Server provides feedback about security issues inside the GitHub interface.
- [Setting parameters for GitHub Actions](/sonarqube-server/devops-platform-integration/github-integration/setting-up-at-global-level/setting-parameters-for-github-actions.md): Defining global-level parameters used in GitHub Actions workflows to connect to SonarQube.
---
# Source: https://docs.sonarsource.com/sonarqube-server/10.6/devops-platform-integration/gitlab-integration/setting-up-at-project-level.md
# Source: https://docs.sonarsource.com/sonarqube-server/10.6/devops-platform-integration/github-integration/setting-up-at-project-level.md
# Source: https://docs.sonarsource.com/sonarqube-server/10.7/devops-platform-integration/gitlab-integration/setting-up-at-project-level.md
# Source: https://docs.sonarsource.com/sonarqube-server/10.7/devops-platform-integration/github-integration/setting-up-at-project-level.md
# Source: https://docs.sonarsource.com/sonarqube-server/10.8/devops-platform-integration/gitlab-integration/setting-up-at-project-level.md
# Source: https://docs.sonarsource.com/sonarqube-server/10.8/devops-platform-integration/github-integration/setting-up-at-project-level.md
# Source: https://docs.sonarsource.com/sonarqube-server/2025.2/devops-platform-integration/gitlab-integration/setting-up-at-project-level.md
# Source: https://docs.sonarsource.com/sonarqube-server/2025.2/devops-platform-integration/github-integration/setting-up-at-project-level.md
# Source: https://docs.sonarsource.com/sonarqube-server/2025.3/devops-platform-integration/gitlab-integration/setting-up-at-project-level.md
# Source: https://docs.sonarsource.com/sonarqube-server/2025.3/devops-platform-integration/github-integration/setting-up-at-project-level.md
# Source: https://docs.sonarsource.com/sonarqube-server/2025.5/devops-platform-integration/gitlab-integration/setting-up-at-project-level.md
# Source: https://docs.sonarsource.com/sonarqube-server/2025.5/devops-platform-integration/github-integration/setting-up-at-project-level.md
# Source: https://docs.sonarsource.com/sonarqube-server/2025.1/devops-platform-integration/gitlab-integration/setting-up-at-project-level.md
# Source: https://docs.sonarsource.com/sonarqube-server/2025.1/devops-platform-integration/github-integration/setting-up-at-project-level.md
# Source: https://docs.sonarsource.com/sonarqube-server/2025.4/devops-platform-integration/gitlab-integration/setting-up-at-project-level.md
# Source: https://docs.sonarsource.com/sonarqube-server/2025.4/devops-platform-integration/github-integration/setting-up-at-project-level.md
# Source: https://docs.sonarsource.com/sonarqube-server/2025.6/devops-platform-integration/gitlab-integration/setting-up-at-project-level.md
# Source: https://docs.sonarsource.com/sonarqube-server/2025.6/devops-platform-integration/github-integration/setting-up-at-project-level.md
# Source: https://docs.sonarsource.com/sonarqube-server/devops-platform-integration/gitlab-integration/setting-up-at-project-level.md
# Source: https://docs.sonarsource.com/sonarqube-server/devops-platform-integration/github-integration/setting-up-at-project-level.md
# Setting up GitHub integration for your project
### Setting up pull request integration
For bound projects (projects created by importing the GitHub repository), pull request decoration is supported in GitHub provided the pull request analysis has been properly set up in your project. See [setting-up-the-pull-request-analysis](https://docs.sonarsource.com/sonarqube-server/analyzing-source-code/pull-request-analysis/setting-up-the-pull-request-analysis "mention").
You can bind an existing and manually created project to its GitHub repository provided the global integration of SonarQube Server with GitHub has been properly set up. To do so, see [changing-project-binding](https://docs.sonarsource.com/sonarqube-server/project-administration/maintaining-project/changing-project-binding "mention").
### Disabling the analysis summary in GitHub Conversation tab
By default, SonarQube Server shows the analysis summary in the Conversation and Checks tab of your GitHub pull requests.
To disable the summary in the Conversation tab:
* In your SonarQube Server project page, navigate to **Project Settings** > **General Settings** > **DevOps Platform Integration** and unselect **Enable analysis summary under the GitHub Conversation tab**.
### Preventing pull request merges when the quality gate fails
In GitHub, you can block pull requests from being merged if it is failing the quality gate. To do this:
1. In GitHub, go to your repository **Settings** > **Branches** > **Branch protection rules** and select either the **Add rule** or **Edit** button if you already have a rule on the branch you wish to protect.
2. Complete the **Branch protection rule** form:
* Define the **Branch name pattern** (the name of the branch you wish to protect)
* Select **Require status checks to pass before merging** to open supplementary form fields.
* In the **Search for status checks in the last week** for this repository field, select **Require branches to be up to date before merging**, then find `SonarQube Code Analysis` and add it to the list of required checks.
### Related pages
* [github](https://docs.sonarsource.com/sonarqube-server/user-guide/issues/in-devops-platform/github "mention")
---
# Source: https://docs.sonarsource.com/sonarqube-server/10.6/setup-and-upgrade/deploy-on-kubernetes/setting-up-autoscaling.md
# Source: https://docs.sonarsource.com/sonarqube-server/10.7/setup-and-upgrade/deploy-on-kubernetes/setting-up-autoscaling.md
# Source: https://docs.sonarsource.com/sonarqube-server/10.8/setup-and-upgrade/deploy-on-kubernetes/setting-up-autoscaling.md
# Source: https://docs.sonarsource.com/sonarqube-server/2025.2/setup-and-update/deploy-on-kubernetes/setting-up-autoscaling.md
# Source: https://docs.sonarsource.com/sonarqube-server/2025.3/server-installation/data-center-edition/on-kubernetes-or-openshift/setting-up-autoscaling.md
# Source: https://docs.sonarsource.com/sonarqube-server/2025.5/server-installation/data-center-edition/on-kubernetes-or-openshift/setting-up-autoscaling.md
# Source: https://docs.sonarsource.com/sonarqube-server/2025.1/setup-and-upgrade/deploy-on-kubernetes/setting-up-autoscaling.md
# Source: https://docs.sonarsource.com/sonarqube-server/2025.4/server-installation/data-center-edition/on-kubernetes-or-openshift/setting-up-autoscaling.md
# Source: https://docs.sonarsource.com/sonarqube-server/2025.6/server-installation/data-center-edition/on-kubernetes-or-openshift/setting-up-autoscaling.md
# Source: https://docs.sonarsource.com/sonarqube-server/server-installation/data-center-edition/on-kubernetes-or-openshift/setting-up-autoscaling.md
# Setting up autoscaling
With Kubernetes’ Horizontal Pod Autoscaling (HPA), you can automatically scale your SonarQube Server out and in, resolving any performance issues you may have.
The HPA increases or decreases the number of deployment replicas according to the overall CPU consumption of the SonarQube Server Pods.
### Warning before you start
Currently, autoscaling targets only the Data Center Edition application nodes. The initial goal is to improve the pull request analysis time by ensuring that background tasks do not pile up.
This feature should be used with caution, as it can significantly increase costs. This is the first iteration, and future improvements will come.
{% hint style="info" %}
We suggest disabling autoscaling for long-running upgrades to prevent unnecessary scaling due to this initial upgrade load.
{% endhint %}
### Requirements
Make sure the [metric server](https://github.com/kubernetes-sigs/metrics-server) is installed in your Kubernetes cluster.
Autoscaling can function optimally only if the system does not have a bottleneck. You should monitor your system to avoid bottlenecks (see **Troubleshooting autoscaling** below).
### Enabling autoscaling
To enable autoscaling in your DCE cluster:
* In the `values.yaml` file of the SonarQube Server’s DCE Helm chart, set the `ApplicationNodes.hpa.enabled` to `true`.
### Testing autoscaling
To test autoscaling:
* Check the `pending_count` and `pending_time` of background tasks (see [instance](https://docs.sonarsource.com/sonarqube-server/server-update-and-maintenance/monitoring/instance "mention")). If they are increasing, SonarQube Server should scale up. If not (autoscaling is not triggered), perform the steps described below.
If the autoscaling test is negative, see [#troubleshooting](#troubleshooting "mention") below.
### Troubleshooting autoscaling
Autoscaling can function optimally only if the system does not have a bottleneck. You should monitor your system to avoid bottlenecks.
If autoscaling is not triggered properly:
1. Change the number of workers per node that will process background tasks. For the DCE Helm chart’s default request/limit resources (see Default configuration in Autoscaling configuration below), set this number to 3 ( 3 is the ideal number for maximizing performance and inducing a constant load to trigger autoscaling).
2. Check that your database is not under heavy load. This can be because the database’s CPU/RAM/IO are capped at the maximum value. Some databases also have an IO burst balance that can get exhausted (Database I/Os are very important for optimal performances.)
3. Perform the same checks regarding networking and resource cap on the reverse proxy, load balancer, network, and Kubernetes nodes I/Os.
4. If autoscaling still does not work properly, try to adjust the configuration with caution. See the Autoscaling configuration section below for details.
### Disabling autoscaling
* In the `values.yaml` file of the SonarQube Server’s DCE Helm chart, set the `ApplicationNodes.hpa.enabled` to `false`.
### Autoscaling configuration Default configuration
The [default autoscaling configuration](https://github.com/SonarSource/helm-chart-sonarqube/blob/master/charts/sonarqube-dce/values.yaml#L374) in the SonarQube Server’s DCE Helm chart is shown below. Note that it’s designed to work with the default resources (see below the configuration).
```yaml
hpa:
enabled: false
minReplicas: 2
maxReplicas: 10
metrics:
- type: Resource
resource:
name: cpu
target:
type: Utilization
averageUtilization: 80
behavior:
scaleDown:
stabilizationWindowSeconds: 60
policies:
- type: Pods
value: 1
periodSeconds: 20
scaleUp:
stabilizationWindowSeconds: 0
policies:
- type: Percent
value: 100
periodSeconds: 600
```
**Default resources**
The default autoscaling setup is designed to work with the helm chart’s default resources block shown below.
```yaml
resources:
limits:
cpu: 800m
memory: 3072M
requests:
cpu: 400m
memory: 3072M
```
Minimum number of deployment replicas
We highly recommend not setting `minReplicas` below 2, but you can adjust according to your availability needs.
Maximum number of deployment replicas
`maxReplicas` can be freely edited, but remember that this can induce a huge increase in costs.
Scale-up policy
The scale-up policy (`scaleUp:policies`) defines the extent to which the number of Pods increases (`value`) during a given period of time (`periodSeconds`) in case 80% of the CPU request is reached.
The default scale-up policy aims at best-effort efficiency over cost by **at most** doubling the number of Pods (`value` = 100%) every 10 minutes. We are aggressively scaling up to compensate for SonarQube Server long startup time (about a minute) and to let the stabilization happen after startup:
* The 10-minute period is important as it lets the new Pod stabilize its CPU consumption at startup, preventing an autoscaling loop in which the Pods are scaled up to the maximum number directly.
* Doubling allows for an exponential scale-up that can catch up with the load and ensure a 10-minute lag at most.
Scale-down policy
The scale-down policy (`scaleDown:policies`) defines the extent to which the number of Pods decreases (`value`) during a given period of time (`periodSeconds`) in case the CPU max value of the past 60 seconds is below the 80% CPU request.
The default scale-down policy removes 1 Pod every 20 seconds. It suits the aggressive default scale-up policy by scaling down quickly to the required number of Pods to accommodate the load.
---
# Source: https://docs.sonarsource.com/sonarqube-server/10.7/project-administration/setting-up-clean-as-you-code.md
# Source: https://docs.sonarsource.com/sonarqube-server/10.8/project-administration/setting-up-clean-as-you-code.md
# Setting up Clean as You Code
As a project administrator, you set up Clean as You Code in three steps:
1. You set the quality standard for your project.
2. You set a new code definition.
3. You set up pull request and branch analysis.
### Setting your quality standard
We recommend using the default Sonar way quality profile and quality gate. For details and configuration options, see the [quality-profiles](https://docs.sonarsource.com/sonarqube-server/10.8/instance-administration/analysis-functions/quality-profiles "mention") and [quality-gates](https://docs.sonarsource.com/sonarqube-server/10.8/instance-administration/analysis-functions/quality-gates "mention") pages.
### Setting a new code definition
This section describes how to set up a new code definition for your project. To learn about new code, see [about-new-code](https://docs.sonarsource.com/sonarqube-server/10.8/core-concepts/clean-as-you-code/about-new-code "mention").
For each project you create in SonarQube Server, you need to choose a new code definition.
#### Configuration levels
You can define new code at the global, project, or branch level:
* Global level: Set a global new code definition at **Administration** > **Configuration** > **General Settings** > **New Code**. What you define as new code at the global level will be the default for your projects.
* Project level: Set a new code definition for your project at **Project Settings** > **New Code.** If you’re using an edition that supports multiple branches (starting in [Developer Edition](https://www.sonarsource.com/plans-and-pricing/developer/)), what you define as new code at the project level will be the default for the project’s branches.
* Branch level: If you’re using an edition that supports multiple branches (starting in [Developer Edition](https://www.sonarsource.com/plans-and-pricing/developer/)) You can define new code for each branch:
1. Go to *your project* > **Settings** > **New Code**.
2. In the branches table, define your new code option in the Actions column.
Both project and branch-specific new code definitions can be reset to use the default setting (only if the default setting is configured to follow the Clean as You Code methodology).
#### Option-specific details
**Previous version**
Recommended for projects with regular versions or releases. Defines new code as any code that has changed since the most recent version increment of the project.
Available at the global, project, and branch levels.
The current version of a project is determined in different ways depending on the build system:
* If the analysis is done using the [sonarscanner-for-maven](https://docs.sonarsource.com/sonarqube-server/10.8/analyzing-source-code/scanners/sonarscanner-for-maven "mention"), then SonarQube Server reads the version from the `pom.xml` file.
* If the analysis is done with the [sonarscanner-for-gradle](https://docs.sonarsource.com/sonarqube-server/10.8/analyzing-source-code/scanners/sonarscanner-for-gradle "mention") then SonarQube Server reads the version from the `build.gradle` file.
* In all other cases, the version must be explicitly specified by setting the analysis parameter `sonar.projectVersion`.
**Number of days**
Recommended for projects following continuous delivery. Available at the global, project, and branch levels. Defines new code as any code that has changed in the last X days.
For example, setting the Number of days to 30 creates a new code period beginning 30 days before the current date. If no action is taken on a new code issue after 30 days, this issue becomes part of the overall code.
The default value is 30 days, 7 or 14 days are other common values. The maximum possible value is 90 days.
**Specific analysis**
Available at the branch (Developer edition and above) and project levels. Defines new code as any changes made since that specific analysis.
To comply with the Clean as You Code methodology, this option cannot be set in the UI, as it would require frequent user action to keep it up to date. It can only be set via the Web API using the `api/new_code_periods`endpoint, with analysis `uuid`, `project` and `branch` keys as parameters.
**Reference branch**
Recommended for projects using feature branches. Available at the project and branch levels. Any differences between your branch and a selected reference branch (in the clone the scanner has access to at analysis time) are considered new code.
On the scanner side, it’s possible to use the `sonar.newCode.referenceBranch` property to apply the Reference branch option to the analysis of a branch, overriding the global new code definition set in the UI (see the [analysis-parameters](https://docs.sonarsource.com/sonarqube-server/10.8/analyzing-source-code/analysis-parameters "mention") page for more information about setting hierarchies).
This setting is particularly useful during the first analysis when the branch to be analyzed does not exist yet in SonarQube Server. The `sonar.newCode.referenceBranch` property specifies the reference branch value.
**Recommendations**
* To avoid reference errors when cloning a repository, we recommend cloning all its branches.
* The Reference branch new code definition is useful for short-lived branch analysis before a pull request is created, or for short-lived branch analysis where pull requests are not in use (e.g. trunk-based developments). For the latest, the setting will also allow issues on the reference branch to inherit their status from your short-lived branch after its merge (see [solution-overview](https://docs.sonarsource.com/sonarqube-server/10.8/user-guide/issues/solution-overview "mention")).
* When using any new code period type other than Reference Branch, we recommend completing your merges using the fast-forward option without a merge commit; examples include GitHub’s squash and merge or rebase and merge options. In this way, the blame for the merged commits will always have a more recent commit date.
While choosing an option, you should take into account your development context. If you’re importing several projects at once (bulk project import) using the [web-api](https://docs.sonarsource.com/sonarqube-server/10.8/extension-guide/web-api "mention"), it’s important to know about the new code definition options and how they affect your analysis results.
### Setting up the analysis
To learn how to set up analysis in your IDE and with SonarQube Server, refer to the following links:
* SonarQube for [Intellij](https://app.gitbook.com/o/2ibCvzwZt86Nlk2zloB7/s/NvI4wotPmITyM0mnsmtp/ "mention"), [Visual Studio](https://app.gitbook.com/o/2ibCvzwZt86Nlk2zloB7/s/5CSDwdOaYoOAGYNiRqgl/ "mention"), [VS Code](https://app.gitbook.com/o/2ibCvzwZt86Nlk2zloB7/s/6LPRABg3ubAJhpfR5K0Y/ "mention"), [Eclipse](https://app.gitbook.com/o/2ibCvzwZt86Nlk2zloB7/s/kadXEH8HkykK7lKaDvVq/ "mention")
* [setting-up-the-branch-analysis](https://docs.sonarsource.com/sonarqube-server/10.8/analyzing-source-code/branch-analysis/setting-up-the-branch-analysis "mention")
* [setting-up-the-pull-request-analysis](https://docs.sonarsource.com/sonarqube-server/10.8/analyzing-source-code/pull-request-analysis/setting-up-the-pull-request-analysis "mention")
### Related pages
* [introduction](https://docs.sonarsource.com/sonarqube-server/10.8/core-concepts/clean-as-you-code/introduction "mention")
* [implementation](https://docs.sonarsource.com/sonarqube-server/10.8/core-concepts/clean-as-you-code/implementation "mention")
---
# Source: https://docs.sonarsource.com/sonarqube-server/2025.3/server-installation/data-center-edition/on-kubernetes-or-openshift/setting-up-disaster-recovery.md
# Source: https://docs.sonarsource.com/sonarqube-server/2025.5/server-installation/data-center-edition/on-kubernetes-or-openshift/setting-up-disaster-recovery.md
# Source: https://docs.sonarsource.com/sonarqube-server/2025.4/server-installation/data-center-edition/on-kubernetes-or-openshift/setting-up-disaster-recovery.md
# Source: https://docs.sonarsource.com/sonarqube-server/2025.6/server-installation/data-center-edition/on-kubernetes-or-openshift/setting-up-disaster-recovery.md
# Source: https://docs.sonarsource.com/sonarqube-server/server-installation/data-center-edition/on-kubernetes-or-openshift/setting-up-disaster-recovery.md
# Setting up disaster recovery
To explain the disaster recovery setup in SonarQube Server’s Data Center Edition (DCE) deployed on Kubernetes, we use the example of a system deployed on Azure Kubernetes Service (AKS). But the overall concept can be adapted to Google Cloud Platform (GCP) or Amazon Web Services (AWS) with a few modifications.
For the setup explained in this section, you need a basic understanding of Azure Cloud Services.
{% hint style="info" %}
A forced Elasticsearch reindex is required after a failover event of the Kubernetes cluster hosting the SonarQube DCE server.
{% endhint %}
{% content-ref url="setting-up-disaster-recovery/architecture-example" %}
[architecture-example](https://docs.sonarsource.com/sonarqube-server/server-installation/data-center-edition/on-kubernetes-or-openshift/setting-up-disaster-recovery/architecture-example)
{% endcontent-ref %}
{% content-ref url="setting-up-disaster-recovery/deploy-databases" %}
[deploy-databases](https://docs.sonarsource.com/sonarqube-server/server-installation/data-center-edition/on-kubernetes-or-openshift/setting-up-disaster-recovery/deploy-databases)
{% endcontent-ref %}
{% content-ref url="setting-up-disaster-recovery/set-up-clusters-on-aks" %}
[set-up-clusters-on-aks](https://docs.sonarsource.com/sonarqube-server/server-installation/data-center-edition/on-kubernetes-or-openshift/setting-up-disaster-recovery/set-up-clusters-on-aks)
{% endcontent-ref %}
{% content-ref url="setting-up-disaster-recovery/configure-azure-front-door" %}
[configure-azure-front-door](https://docs.sonarsource.com/sonarqube-server/server-installation/data-center-edition/on-kubernetes-or-openshift/setting-up-disaster-recovery/configure-azure-front-door)
{% endcontent-ref %}
{% content-ref url="setting-up-disaster-recovery/test-failover-scenarios" %}
[test-failover-scenarios](https://docs.sonarsource.com/sonarqube-server/server-installation/data-center-edition/on-kubernetes-or-openshift/setting-up-disaster-recovery/test-failover-scenarios)
{% endcontent-ref %}
---
# Source: https://docs.sonarsource.com/sonarqube-community-build/project-administration/setting-up-features.md
# Source: https://docs.sonarsource.com/sonarqube-server/2025.6/project-administration/setting-up-features.md
# Source: https://docs.sonarsource.com/sonarqube-server/project-administration/setting-up-features.md
# Setting up project features
- [DevOps platform integration features](/sonarqube-server/project-administration/setting-up-features/devops-platform-integration.md): Setting up DevOps integration features for your project.
- [Managing project tags](/sonarqube-server/project-administration/setting-up-features/managing-project-tags.md): SonarQube Server's Project Tags allow you to categorize and group projects for easier selection on the Projects page.
- [Customizing Project Information page](/sonarqube-server/project-administration/setting-up-features/customizing-project-information-page.md): Managing project links on the project information page.
- [Setting various features at project level](/sonarqube-server/project-administration/setting-up-features/project-settings.md): Changing and customizing your project’s settings.
---
# Source: https://docs.sonarsource.com/sonarqube-community-build/devops-platform-integration/github-integration/setting-up-at-global-level/setting-up-github-app.md
# Source: https://docs.sonarsource.com/sonarqube-server/10.6/devops-platform-integration/github-integration/setting-up-at-global-level/setting-up-github-app.md
# Source: https://docs.sonarsource.com/sonarqube-server/10.7/devops-platform-integration/github-integration/setting-up-at-global-level/setting-up-github-app.md
# Source: https://docs.sonarsource.com/sonarqube-server/10.8/devops-platform-integration/github-integration/setting-up-at-global-level/setting-up-github-app.md
# Source: https://docs.sonarsource.com/sonarqube-server/2025.2/devops-platform-integration/github-integration/setting-up-at-global-level/setting-up-github-app.md
# Source: https://docs.sonarsource.com/sonarqube-server/2025.3/devops-platform-integration/github-integration/setting-up-at-global-level/setting-up-github-app.md
# Source: https://docs.sonarsource.com/sonarqube-server/2025.5/devops-platform-integration/github-integration/setting-up-at-global-level/setting-up-github-app.md
# Source: https://docs.sonarsource.com/sonarqube-server/2025.1/devops-platform-integration/github-integration/setting-up-at-global-level/setting-up-github-app.md
# Source: https://docs.sonarsource.com/sonarqube-server/2025.4/devops-platform-integration/github-integration/setting-up-at-global-level/setting-up-github-app.md
# Source: https://docs.sonarsource.com/sonarqube-server/2025.6/devops-platform-integration/github-integration/setting-up-at-global-level/setting-up-github-app.md
# Source: https://docs.sonarsource.com/sonarqube-server/devops-platform-integration/github-integration/setting-up-at-global-level/setting-up-github-app.md
# Setting up a GitHub App
You need to use a GitHub App to connect SonarQube Server with a GitHub instance in order to be able to use the following features:
* Importing your GitHub repositories into SonarQube Server.
* Delegating the SonarQube Server user authentication to GitHub.
* [autodetect-ai-code](https://docs.sonarsource.com/sonarqube-server/ai-capabilities/autodetect-ai-code "mention") in projects using GitHub and GitHub Copilot.
You need the global Administer System permission in SonarQube Server to perform this setup.
### Setup overview
To set up a GitHub App to integrate SonarQube Server with GitHub:
1. Before starting, see [#related-pages](https://docs.sonarsource.com/sonarqube-server/devops-platform-integration/introduction#related-pages "mention").
2. Register a GitHub App for SonarQube Server.
3. Install the App on the organizations SonarQube Server needs to access.
4. Add the App to SonarQube Server’s global setup through a "GitHub Configuration" record. You must:
* Create one GitHub Configuration for the GitHub repository import.
* Create one GitHub Configuration for the user authentication delegation.
### Step 1: Register a GitHub App for SonarQube Server
See GitHub’s documentation on [registering a GitHub App](https://docs.github.com/en/apps/creating-github-apps/registering-a-github-app/registering-a-github-app) for general information on GitHub Apps.
In the procedure below, we recommend registering a public App. You can register a private App if you have only one GitHub organization. In that case, you must register the App under that organization.
Specify the following settings in your app:
* **GitHub App Name**: Your app’s name. Example: sonarqubeserver.
* **Homepage URL**: Your SonarQube Server instance’s base URL (for information purposes only).
* **Callback URL**: Your SonarQube Server instance’s base URL (the URL used to redirect to the SonarQube Server).
* **Webhook URL**: To improve security, webhooks, by default, are not allowed to point to the SonarQube Server. Therefore, we recommend that you disable the feature unless you want to enable alerts for security issues in GitHub. See [report-security-alerts](https://docs.sonarsource.com/sonarqube-server/devops-platform-integration/github-integration/setting-up-at-global-level/report-security-alerts "mention") for more information. To disable the feature, clear the Webhook Active checkbox to silence a forthcoming deprecation warning, and clear the Webhook URL and Webhook secret fields.
* **Under Permissions & events**, set up the permissions and events as explained below. Some permissions or events are only necessary depending on the purpose of the integration.
Permissions & events
**Repository permissions**
| Permission | Access | Note |
| ----------------------------------------------------------------------------------------------------------------- | ------------ | ----------------------------------------------------------------------------------------------------------------------------------------------------------------------------------------------------------------------------------------------------------------------- |
| Checks | Read & Write |
|
| Administration | Read-only | Required only for user provisioning. |
|
|
| Code scanning alerts | Read & Write | Required only if you want to report security alerts raised in SonarQube Server to GitHub. When you update this permission, GitHub sends an email to the GitHub organization’s administrator, asking them to validate the changes on the installation of the GitHub App. |
**Organization permissions**
| Permission | Access | Note |
| ----------------------- | --------- | ----------------------------------------------------------------------------- |
| Administration | Read-only | Required only for user provisioning. |
| GitHub Copilot Business | Read-only | Required only to use SonarQube Server’s Autodetect AI-Generated Code feature. |
| Members | Read-only |
|
| Projects | Read-only |
|
**Account permissions**
| Permission | Access | Note |
| --------------- | --------- | ------------------------------------------------------- |
| Email addresses | Read-only | Required only for user authentication and provisioning. |
**Subscribe to events**
Only if you want to report security alerts raised in SonarQube Server to GitHub:
Select **Code scanning alert**.
* Under **Where can this GitHub App be installed?** select **Any account** to make the App public in order to allow you in step 2 to install the App on any organization.
### Step 2: Install the GitHub App for SonarQube Server in your organizations
You need to install the GitHub App for SonarQube Server on the GitHub organizations that SonarQube Server will need to access. See GitHub’s documentation on [installing GitHub Apps](https://docs.github.com/en/free-pro-team@latest/developers/apps/installing-github-apps) for more information.
### Step 3: Add the GitHub App to SonarQube Server’s global setup
You need to create a GitHub Configuration record in SonarQube Server and add the GitHub App to it. The setup is different depending on your integration purpose:
If you want to support the GitHub repository import
To add the GitHub App to SonarQube Server’s global setup for repository import:
1. In the SonarQube UI, go to **Administration** > **Configuration** > **General Settings** > **DevOps Platform Integrations**.
2. Select the **GitHub** tab and click **Create configuration**. The **New GitHub configuration** dialog opens.
3. Specify the settings: see **Configuration settings** below.
If you want to delegate the user authentication to GitHub
To add the GitHub App to SonarQube Server’s global setup for user delegation, go to **Administration** > **Configuration** > **General Settings** > **Authentication** > **GitHub**. See Connecting your GitHub App to SonarQube Server in [github](https://docs.sonarsource.com/sonarqube-server/instance-administration/authentication/github "mention") authentication.
Configuration settings
| **Field** | **Description** | **Note** |
| ------------------ | ----------------------------------------------------------------------------------------------------------------------------------------------------------------------------------------------------------------------------- | ----------------------------------------------------------------------------------------------------------------------------------------------------------------------------- |
| Configuration name |
The name used to identify your GitHub Configuration. Use something succinct and easily recognizable.
| Only available in editions authorizing the integration with multiple GitHub instances: Enterprise Edition and Data Center Edition. |
| GitHub API URL |
The API URL of the GitHub instance. For example, for GitHub Enterprise or for GitHub.com.
|
|
| GitHub App ID | The App ID of your GitHub App (on GitHub, go to **Settings** > **Developer Settings** > **GitHub Apps** to view your App). |
|
| Client ID | The Client ID of your GitHub App’s page. |
|
| Client Secret | The Client secret of your GitHub App’s page. Administrators can encrypt this secret. See [encrypting-settings](https://docs.sonarsource.com/sonarqube-server/instance-administration/security/encrypting-settings "mention"). |
|
| Private Key | Your GitHub App’s private key in PEM format. You can generate a .pem file from your GitHub App’s page under Private keys. Copy and paste the whole contents of the file here. | Administrators can encrypt this key. See [encrypting-settings](https://docs.sonarsource.com/sonarqube-server/instance-administration/security/encrypting-settings "mention"). |
| Webhook Secret | Webhook secret defined in your GitHub App to enable the report of code scanning alerts.. | Required only if you want to enable code scanning alerts for security issues in GitHub. |
{% hint style="info" %}
Standard GitHub procedures require confirmation when access levels are changed. Typically, this is done by confirming via an email sent to administrators.
{% endhint %}
---
# Source: https://docs.sonarsource.com/sonarqube-server/10.5/devops-platform-integration/github-integration/setting-up-global-integration.md
# Setting up the GitHub integration
This section explains how to set up GitHub and SonarQube for their integration at the global level. You need the global Administer System permission in SonarQube to perform this setup.
### Verifying that the SonarQube server URL is correctly set
If the URL of your SonarQube server is not configured then the quality gate status report to your pull requests will not work correctly (the issues in GitHub will not be linked to their counterparts in SonarQube).
To verify the server URL:
* Go to **Administration > Configuration > General Settings > General > General** and set the instance’s **Server base URL**.
### Setting up the import of your GitHub repositories to SonarQube
You need to use a GitHub App to connect SonarQube with GitHub and import your GitHub repositories into SonarQube. This is also the first step in adding authentication, and, starting in [Developer Edition](https://www.sonarsource.com/plans-and-pricing/developer/), the first step in reporting your analysis and quality gate status to your pull requests.
If you want to set up authentication without importing your GitHub repositories, see [github](https://docs.sonarsource.com/sonarqube-server/10.5/instance-administration/authentication/github "mention") for instructions on setting up authentication.
In this section, you’ll complete the following steps to connect SonarQube and GitHub with a GitHub App:
1. Register SonarQube as a GitHub App.
2. Install your GitHub App in your organization.
3. Update your SonarQube global settings with your GitHub App’s information.
#### Step 1: Registering SonarQube as a GitHub App
See GitHub’s documentation on [registering a GitHub App](https://docs.github.com/en/apps/creating-github-apps/registering-a-github-app/registering-a-github-app) for general information on GitHub Apps.
Specify the following settings in your app:
* **GitHub App Name**: Your app’s name.
* **Homepage URL**: You can use any URL, such as `https://www.sonar.com/`.
* **User authorization callback URL**: Your instance’s base URL. For example, [`http://sonarqube.yourcompany.com`](http://sonarqube.yourcompany.com)[.](https://yourinstance.sonarqube.com) Note that for this to work, your SonarQube instance must be accessible through a public URL.
* **Webhook URL**: To improve security, webhooks, by default, are not allowed to point to the SonarQube server since version 8.9LTS, therefore we recommend that you disable the feature. Unless you want to enable code scanning alerts for security vulnerabilities in GitHub, you should clear the **Webhook Active** checkbox to silence a forthcoming deprecation warning, and clear the **Webhook URL** and **Webhook secret** fields when creating your GitHub App.
* Grant access for the following **Repository permissions**:
| | |
| -------------------------------------------------------------------------------------------------------------------------------------------------------- | ------------ |
| **Permission** | **Access** |
| Checks | Read & write |
|
GitHub Enterprise: Repository metadata GitHub.com: Metadata (this setting is automatically set by GitHub)
| Read-only |
| Pull Requests | Read & write |
* For private repositories, grant access to the following **Repository permissions**:
| | |
| -------------- | ---------- |
| **Permission** | **Access** |
| Contents | Read-only |
* And grant access for the following **Organization permissions**:
| | |
| -------------- | ---------- |
| **Permission** | **Access** |
| Members | Read-only |
| Projects | Read-only |
* If setting up **GitHub Authentication**, in addition to the aforementioned Repository permissions, grant access for the following **Account permissions**:
| | |
| --------------- | ---------- |
| **Permission** | **Access** |
| Email addresses | Read-only |
* Under "Where can this GitHub App be installed?" select **Any account**.
{% hint style="warning" %}
For security reasons, make sure you’re using `HTTPS` protocol for your URLs in your app.
{% endhint %}
#### Step 2: Installing your GitHub App in your organization
Next, you need to install your GitHub App in your organization. See GitHub’s documentation on [installing GitHub Apps](https://docs.github.com/en/free-pro-team@latest/developers/apps/installing-github-apps) for more information.
#### Step 3: Updating your SonarQube global settings with your GitHub App information
After you’ve registered and installed your GitHub App, update your global SonarQube settings to finish integration and allow for the import of GitHub projects:
Navigate to **Administration** > **Configuration** > **General Settings** > **DevOps Platform Integrations** > **GitHub** and specify the following settings:
* **Configuration Name** (Enterprise and Data Center Edition only): The name used to identify your GitHub configuration at the project level. Use something succinct and easily recognizable.
* **GitHub URL**: For example, `https://github.company.com/api/v3` for GitHub Enterprise or `https://api.github.com/` for GitHub.com.
* **GitHub App ID**: The App ID is found on your GitHub App’s page on GitHub at **Settings** > **Developer Settings** > **GitHub Apps**.
* **Client ID**: The Client ID is found on your GitHub App’s page.
* **Client secret**: The Client secret is found on your GitHub App’s page. Administrators can encrypt this secret at **Administration** > **Configuration** > **Encryption**. See [#settings-encryption](https://docs.sonarsource.com/sonarqube-server/10.5/instance-administration/security#settings-encryption "mention") for more information.
* **Private Key**: Your GitHub App’s private key in PEM format. You can generate a `.pem` file from your GitHub App’s page under **Private keys**. Copy and paste the whole contents of the file here. Administrators can encrypt this key at **Administration** > **Configuration** > **Encryption**. See [#settings-encryption](https://docs.sonarsource.com/sonarqube-server/10.5/instance-administration/security#settings-encryption "mention") for more information.
### Setting up SonarQube user provisioning and authentication through GitHub
See [github](https://docs.sonarsource.com/sonarqube-server/10.5/instance-administration/authentication/github "mention").
### Setting up the display of SonarQube security alerts in GitHub
Starting in Developer Edition, SonarQube can provide feedback about security vulnerabilities inside the GitHub interface itself. The security vulnerabilities found by SonarQube will appear in both:
* The SonarQube interface, as part of the displayed analysis results.
* The GitHub interface, as code scanning alerts under the **Security** tab.
Note: This feature is part of the [GitHub Advanced Security package](https://docs.github.com/en/get-started/learning-about-github/about-github-advanced-security) and is currently free for public projects. It is available as a paid option for private projects and GitHub Enterprise. This option is entirely on the GitHub side. Sonar does not charge anything extra to enable the code scanning alerts feature.
Before you can configure GitHub code scanning alerts for vulnerability issues, you must first import your GitHub repository to SonarQube as explained above.
Once you’ve enabled this feature, you must run a SonarQube analysis to see your security vulnerabilities as GitHub code scanning alerts.
#### Configuring GitHub
1. Go to **Settings** > **Developer settings** > **GitHub Apps** and select your GitHub App.
2. Go to the **General** > **Webhook** section and make sure to select the **active** checkbox.
3. Add the following Webhook URL: `https://.sonarqube.com/api/alm_integrations/webhook_github`. Replace `.sonarqube.com` with your SonarQube instance.
4. Set a **Webhook secret** (see [GitHub’s webhook security recommendations](https://docs.github.com/en/developers/webhooks-and-events/webhooks/securing-your-webhooks)).
5. Under **Permissions & events** > **Repository permissions** > **Code scanning alerts**, set the access level to **Read and write**. When you update this permission, GitHub sends an email to the GitHub organization’s administrator, asking them to validate the changes on the installation of the GitHub App.
6. Under **Permissions & events** > **Subscribe to events**, select **Code scanning alert**.
#### Configuring SonarQube
1. In your SonarQube project, go to **Administration** > **DevOps Platform Integrations** > **GitHub**.
2. Click on your GitHub App and select **edit**.
3. Enter the webhook secret defined in your GitHub App.
You can now analyze a project in SonarQube and check that the detected vulnerability issues are displayed on the GitHub interface, under your repository’s **Security** > **Code scanning alerts** tab.
Select **View alerts** to see the full list:
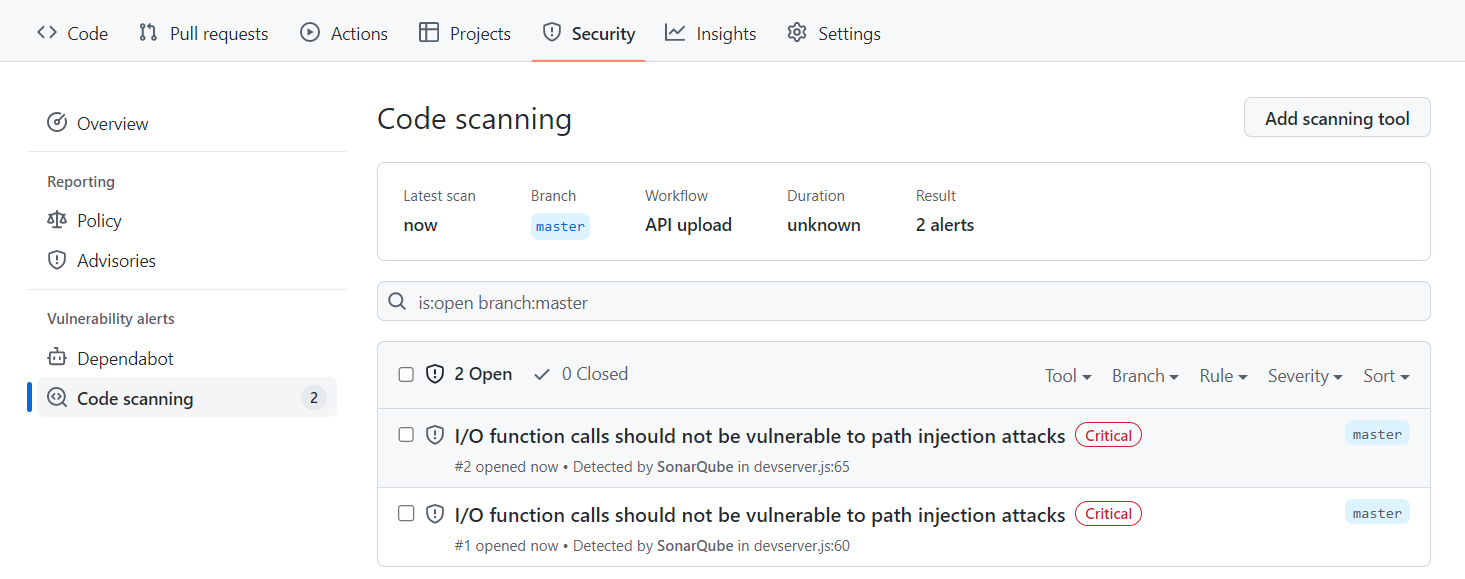
github code scanning alerts for sonarqube
#### Managing access to security alerts
In GitHub, you can [configure access to security alerts for a repository](https://docs.github.com/en/repositories/managing-your-repositorys-settings-and-features/enabling-features-for-your-repository/managing-security-and-analysis-settings-for-your-repository) to enable and disable security and analysis features.
#### About synchronized status changes
When you change the status of a security vulnerability in the SonarQube interface, that status change is immediately reflected in the GitHub interface.
For example, if you change an issue from *Open* to *Resolve as false positive* in SonarQube:

sync github code scanning alert in sonarqube
That change is reflected in the code scanning alert in GitHub as shown here:
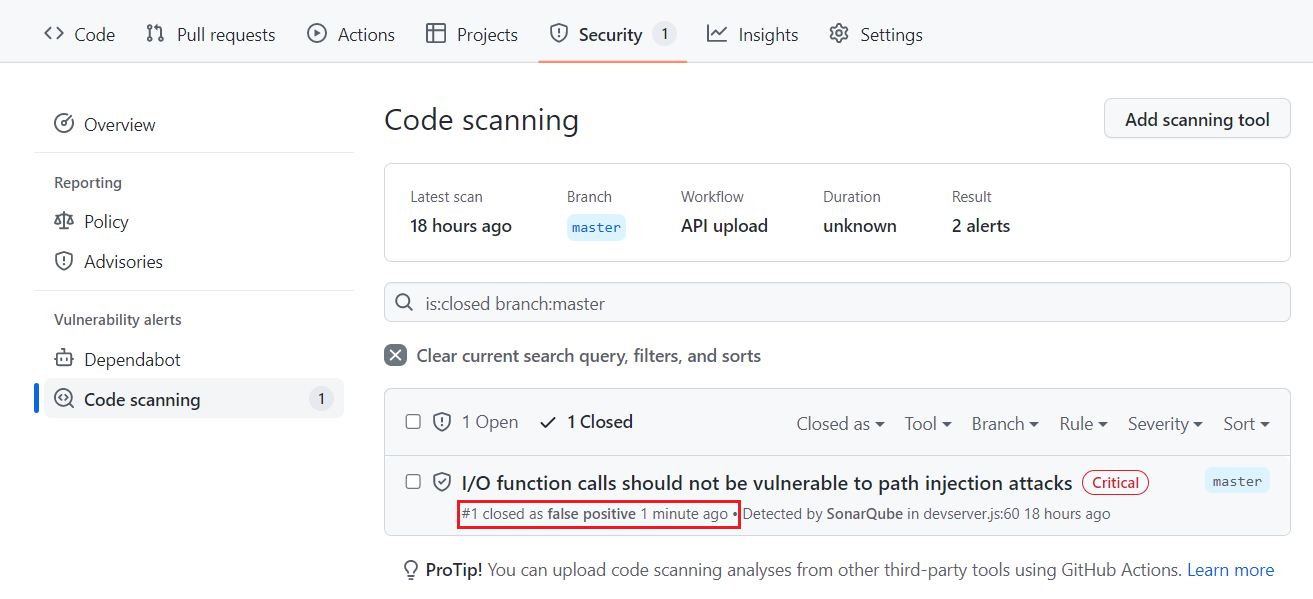
change in github code scanning alert for sonarqube
Similarly, if you change an issue from *Open* to *Dismiss: Won’t Fix* in GitHub, that change is reflected in SonarQube.
#### Correspondence of statuses
Initially, all issues marked **Open** on SonarQube are marked **Open** on GitHub. Because the available statuses on the two systems are not exactly the same, the following logic is used to manage the transitions.
| | |
| ---------------------------------- | ------------------------------ |
| **In SonarQube, a transition to**: | **Results in this On GitHub**: |
| Confirm (deprecated) | Open |
| Fixed | Open |
| Accept | Dismiss: Won’t Fix |
| False Positive | Dismiss: False positive |
| Open | Open |
| | |
| ------------------------------- | --------------------------------- |
| **On Github, a transition to**: | **Results in this in SonarQube**: |
| Dismiss: False positive | False Positive |
| Dismiss: Used in tests | Accept |
| Dismiss: Won’t fix | Accept |
### Configuring multiple GitHub instances
SonarQube can report the analysis’ quality gate status to multiple DevOps platform instances. To do this, you need to create a configuration for each DevOps Platform instance and assign that configuration to the appropriate projects.
* As part of [Developer Edition](https://www.sonarsource.com/plans-and-pricing/developer/), you can create one configuration for each DevOps Platform.
* Starting in [Enterprise Edition](https://www.sonarsource.com/plans-and-pricing/enterprise/), you can create multiple configurations for each DevOps Platform.
---
# Source: https://docs.sonarsource.com/sonarqube-community-build/devops-platform-integration/azure-devops-integration/setting-up-integration-at-global-level.md
# Source: https://docs.sonarsource.com/sonarqube-server/2025.2/devops-platform-integration/azure-devops-integration/setting-up-integration-at-global-level.md
# Source: https://docs.sonarsource.com/sonarqube-server/2025.3/devops-platform-integration/azure-devops-integration/setting-up-integration-at-global-level.md
# Source: https://docs.sonarsource.com/sonarqube-server/2025.5/devops-platform-integration/azure-devops-integration/setting-up-integration-at-global-level.md
# Source: https://docs.sonarsource.com/sonarqube-server/2025.1/devops-platform-integration/azure-devops-integration/setting-up-integration-at-global-level.md
# Source: https://docs.sonarsource.com/sonarqube-server/2025.4/devops-platform-integration/azure-devops-integration/setting-up-integration-at-global-level.md
# Source: https://docs.sonarsource.com/sonarqube-server/2025.6/devops-platform-integration/azure-devops-integration/setting-up-integration-at-global-level.md
# Source: https://docs.sonarsource.com/sonarqube-server/devops-platform-integration/azure-devops-integration/setting-up-integration-at-global-level.md
# Setting up Azure DevOps integration at global level
For the integration of an Azure DevOps Services organization or an Azure DevOps Server collection with SonarQube Server, you must:
* Create a configuration record in SonarQube Server. This record stores the Personal Access Token (PAT) of the technical account used by SonarQube Server to connect to Azure DevOps. This is necessary for importing Azure DevOps repositories and reporting the quality gate status.
* Install an Azure DevOps Extension for SonarQube Server on the CI/CD host to integrate with Azure Pipelines.
For more information about the Azure DevOps integration solution, see [#related-pages](https://docs.sonarsource.com/sonarqube-server/devops-platform-integration/introduction#related-pages "mention").
### Prerequisites
See [#requirements](https://docs.sonarsource.com/sonarqube-server/analyzing-source-code/scanners/sonarqube-extension-for-azure-devops#requirements "mention") for Azure DevOps extension.
The SonarQube Server base URL must be properly set, otherwise, integration features will not work correctly. See [server-base-url](https://docs.sonarsource.com/sonarqube-server/instance-administration/server-base-url "mention").
### Preparing the integration
SonarQube Server uses an Azure DevOps user account to import Azure DevOps repositories to SonarQube Server and report the quality gate status to Azure DevOps. You must provide a [Personal Access Token](https://docs.microsoft.com/en-us/azure/devops/organizations/accounts/use-personal-access-tokens-to-authenticate?view=tfs-2017\&tabs=preview-page) (PAT) from this account.
{% hint style="warning" %}
Be aware of the following PAT failure points:
* Azure PATs require an expiration date. Check the [Microsoft documentation](https://learn.microsoft.com/en-us/azure/devops/organizations/accounts/use-personal-access-tokens-to-authenticate?view=azure-devops\&tabs=Windows#create-a-pat) for details when creating your PAT.
* Azure requires that a user log in every 30 days, or it automatically stops a PAT; this action may cause your related pipeline to fail. Here is [an Azure Q\&A](https://learn.microsoft.com/en-us/azure/devops/organizations/accounts/use-personal-access-tokens-to-authenticate?view=azure-devops\&tabs=Windows#q-why-did-my-pat-stop-working) on this topic.
{% endhint %}
Creating a technical user account
We highly recommend that you use a dedicated technical user account in Azure DevOps to manage the integration with SonarQube.
* Do not set the technical user’s account with a **Stakeholder** access type. Use the **Basic** access type instead. (Users with the **Stakeholder** access type can have problems finding their repos when trying to Analyze projects.)
* We recommend that you add the account to the **Contributors** security group.
See the Azure documentation for more information [about access levels](https://learn.microsoft.com/en-us/azure/devops/organizations/security/access-levels?view=azure-devops).
Generating your Azure PAT
1\. Log in to Azure DevOps with the technical user account created before.
2\. Go to your Azure DevOps organization **User settings** > **Personal access tokens** and select **+ New token**.
3\. On the next page, under **Scopes**, make sure that you specify at least the scope **Code** > **Read & write**.
4\. Click **Create** to generate the token.
5\. When the personal access token is displayed, copy it (you will have to paste it to SonarQube’s configuration record as described below).
6\. If necessary, encrypt this token: see [encrypting-settings](https://docs.sonarsource.com/sonarqube-server/instance-administration/security/encrypting-settings "mention").
### Creating the global configuration record in SonarQube Server
You need the global System Administration permission to perform this procedure.
In SonarQube Server, a global configuration record stores the parameters necessary to connect to your Azure DevOps Server collection or Azure DevOps Services organization.
{% hint style="info" %}
Starting in [Enterprise edition](https://www.sonarsource.com/plans-and-pricing/enterprise/), you can set up the integration of SonarQube Server with multiple Azure DevOps platform instances. To do so, you create in SonarQube Server a configuration record for each instance.
{% endhint %}
To create the Azure DevOps configuration record in SonarQube:
1. Go to **Administration** > **Configuration** > **General Settings** > **DevOps Platform Integrations**.
2. Select the **Azure DevOps** tab.
3. Select the **Create configuration** button. The **Create a configuration** dialog opens.
4. Specify the settings as described below.
| Field | Description |
| --------------------- | --------------------------------------------------------------------------------------------------------------------------------------------------------------------------------------------------------------------------------------------------------------------------------------------------- |
| Configuration Name | Enterprise and Data Center edition only. The name used to identify your Azure DevOps configuration at the project level. Use something succinct and easily recognizable. |
| Azure DevOps URL |
• If you are using Azure DevOps Server: the full Azure DevOps collection URL. For example, .
• If you are using Azure DevOps Services: the full Azure DevOps organization URL. For example, .
|
| Personal Access Token | Personal access token generated in **Generating your Azure PAT** above (or its encrypted value). |
### Installing the Azure DevOps Extension for SonarQube
See the [sonarqube-extension-for-azure-devops](https://docs.sonarsource.com/sonarqube-server/analyzing-source-code/scanners/sonarqube-extension-for-azure-devops "mention") page.
### Related pages
* [azure-pipelines-integration-overview](https://docs.sonarsource.com/sonarqube-server/devops-platform-integration/azure-devops-integration/azure-pipelines-integration-overview "mention")
* [creating-your-project](https://docs.sonarsource.com/sonarqube-server/devops-platform-integration/azure-devops-integration/creating-your-project "mention")
* [setting-up-project-integration](https://docs.sonarsource.com/sonarqube-server/devops-platform-integration/azure-devops-integration/setting-up-project-integration "mention")
* [adding-analysis-to-pipeline](https://docs.sonarsource.com/sonarqube-server/devops-platform-integration/azure-devops-integration/adding-analysis-to-pipeline "mention")
* [troubleshooting-analysis](https://docs.sonarsource.com/sonarqube-server/devops-platform-integration/azure-devops-integration/troubleshooting-analysis "mention")
---
# Source: https://docs.sonarsource.com/sonarqube-server/2025.2/devops-platform-integration/azure-devops-integration/setting-up-project-integration.md
# Source: https://docs.sonarsource.com/sonarqube-server/2025.3/devops-platform-integration/azure-devops-integration/setting-up-project-integration.md
# Source: https://docs.sonarsource.com/sonarqube-server/2025.5/devops-platform-integration/azure-devops-integration/setting-up-project-integration.md
# Source: https://docs.sonarsource.com/sonarqube-server/2025.4/devops-platform-integration/azure-devops-integration/setting-up-project-integration.md
# Source: https://docs.sonarsource.com/sonarqube-server/2025.6/devops-platform-integration/azure-devops-integration/setting-up-project-integration.md
# Source: https://docs.sonarsource.com/sonarqube-server/devops-platform-integration/azure-devops-integration/setting-up-project-integration.md
# Source: https://docs.sonarsource.com/sonarqube-cloud/advanced-setup/ci-based-analysis/azure-pipelines/setting-up-project-integration.md
# Setting up project integration
### Adding SonarQube service connection to Azure Pipelines (SonarQube endpoint)
Service connections are authenticated connections between Azure Pipelines and external or remote services. You must declare your SonarQube Cloud as a service connection in your Azure DevOps project.
Proceed as follows:
1. In SonarQube Cloud, create an authentication token that will be used by Azure DevOps to execute the analysis of your project in SonarQube Cloud. To do so, create a personal access token *and copy it*. For more information about tokens, see [managing-tokens](https://docs.sonarsource.com/sonarqube-cloud/managing-your-account/managing-tokens "mention").
2. In your Azure DevOps project, go to **Project Settings** > **Service connections**.
3. Select **New service connection** and then select **SonarQube Cloud** from the service connection list.
4. Set the parameters:
* In **Region (optional)** field, make sure **Global** is selected (default value).
* In **SonarQube Cloud Token**, enter the token created in the first step.
* In **Service Connection Name**, enter a memorable name (You will need this name when configuring your Azure build pipelines).
5. Select **Save** to save your connection.
### Enabling the pull request analysis in your build pipeline
The Azure DevOps extension running in your Azure pipeline can automatically detect branches or pull requests being built (you don't need to pass them as parameters to the scanner).
To enable the pull request analysis in your Azure pipeline of code stored on Azure DevOps, you must configure a pull request trigger on the target branch (main development branch) as explained on the [azure-devops](https://docs.sonarsource.com/sonarqube-cloud/managing-your-projects/administering-your-projects/devops-platform-integration/azure-devops "mention") page. If your code is stored on GitHub or Bitbucket Cloud, open the expandable content below.
GitHub or Bitbucket Cloud
To configure a pull request trigger in your Azure build pipeline for code stored on GitHub or Bitbucket Cloud:
1. Select **Edit** to modify your build pipeline.
2. Go to the **Triggers** tab.
3. Select the correct repository under **Pull request validation**.
4. Select **Enable pull request validation**.
5. Set up the branch filters: Note that this is the **target** branch of the pull request. See the [Microsoft documentation](https://docs.microsoft.com/en-us/azure/devops/pipelines/build/triggers?view=azure-devops\&tabs=yaml#pr-triggers) for more details.
6. Select **Save** to update your pipeline.
---
# Source: https://docs.sonarsource.com/sonarqube-cloud/managing-your-projects/administering-your-projects/setting-up-project.md
# Creating and setting up your project
To set up your project on SonarQube Cloud:
1. Create your project: You can create projects by importing your DevOps platform repositories (see below) which automatically binds new projects to the respective repository. This binding has many advantages, see [binding-with-dop](https://docs.sonarsource.com/sonarqube-cloud/administering-sonarcloud/about-sonarqube-cloud-solution/ressources-structure/binding-with-dop "mention") for more details. Users will need the correct permission level to create new projects. You can also create projects manually however, manually created projects are unbound.
2. Set up project integration with your DevOps platform. See [introduction](https://docs.sonarsource.com/sonarqube-cloud/managing-your-projects/administering-your-projects/devops-platform-integration/introduction "mention") to DevOps platform for more details.
3. Set up user permissions for your project. See [setting-permissions](https://docs.sonarsource.com/sonarqube-cloud/managing-your-projects/administering-your-projects/setting-permissions "mention") for more information.
4. Set up project analysis. See the [project-analysis](https://docs.sonarsource.com/sonarqube-cloud/managing-your-projects/project-analysis "mention") pages for details.
### Importing one or several repositories to SonarQube Cloud
{% hint style="info" %}
Repository import is only possible if your SonarQube Cloud organization is bound to its corresponding DevOps platform organization (i.e. the DevOps platform organization has been imported to SonarQube Cloud). See [binding-with-dop](https://docs.sonarsource.com/sonarqube-cloud/administering-sonarcloud/about-sonarqube-cloud-solution/ressources-structure/binding-with-dop "mention") for more details.
{% endhint %}
1. On the top right of the SonarQube Cloud interface, select the ✚ (plus) menu and select **Analyze new project**. The **Analyze projects** page opens.
2. Select your organization.
3. Select the repositories you want to import.
4. Select the **Set up** button. The **Set up project for Clean as You Code** page opens.
5. Select the new code definition for your project, see [about-new-code](https://docs.sonarsource.com/sonarqube-cloud/standards/about-new-code "mention") for more details.
6. Select the **Create project** button. The project is created and the [automatic-analysis](https://docs.sonarsource.com/sonarqube-cloud/advanced-setup/automatic-analysis "mention") is started if supported.
{% hint style="info" %}
To import a monorepo, see [monorepo-support](https://docs.sonarsource.com/sonarqube-cloud/advanced-setup/monorepo-support "mention").
{% endhint %}
### Creating a project manually
1. On the top right of the SonarQube Cloud interface, select the ✚ (plus) menu and select **Analyze new project**. The **Analyze projects** page opens.
2. On the right of the page, select **create a project manually**.
3. Select the organization and enter the project name and key.
4. Click **Next**.
5. Select the new code definition for your project, see [about-new-code](https://docs.sonarsource.com/sonarqube-cloud/standards/about-new-code "mention").
6. Select the **Create project** button. The project is created. You must now set up your [overview-of-integrated-cis](https://docs.sonarsource.com/sonarqube-cloud/advanced-setup/ci-based-analysis/overview-of-integrated-cis "mention"). Automatic analysis is not supported for unbound projects.
By default, the visibility of newly created projects is set to private on [Free, Team and Enterprise](https://www.sonarsource.com/plans-and-pricing/#sonarqube-cloud-features) plans.
### Related pages
* [introduction](https://docs.sonarsource.com/sonarqube-cloud/managing-your-projects/administering-your-projects/devops-platform-integration/introduction "mention") Setting up the integration of your project with your DevOps platform
* [setting-permissions](https://docs.sonarsource.com/sonarqube-cloud/managing-your-projects/administering-your-projects/setting-permissions "mention") and visibility
* [changing-binding](https://docs.sonarsource.com/sonarqube-cloud/managing-your-projects/administering-your-projects/changing-binding "mention") and other parameters
* [customizing-info-page](https://docs.sonarsource.com/sonarqube-cloud/managing-your-projects/administering-your-projects/customizing-info-page "mention")
* [deleting-project](https://docs.sonarsource.com/sonarqube-cloud/managing-your-projects/administering-your-projects/deleting-project "mention")
* [importing-github-organization](https://docs.sonarsource.com/sonarqube-cloud/administering-sonarcloud/managing-organization/creating-organization/importing-github-organization "mention")
* [importing-bitbucket-workspace](https://docs.sonarsource.com/sonarqube-cloud/administering-sonarcloud/managing-organization/creating-organization/importing-bitbucket-workspace "mention")
* [importing-gitlab-group](https://docs.sonarsource.com/sonarqube-cloud/administering-sonarcloud/managing-organization/creating-organization/importing-gitlab-group "mention")
* [importing-azure-devops-organization](https://docs.sonarsource.com/sonarqube-cloud/administering-sonarcloud/managing-organization/creating-organization/importing-azure-devops-organization "mention")
---
# Source: https://docs.sonarsource.com/sonarqube-cloud/managing-your-projects/administering-your-projects/advanced-administration/setting-up-run-tasks-in-tfc.md
# Setting up run tasks in TFC
{% hint style="info" %}
Currently, SonarQube Cloud only supports GitHub and GitLab for use with the TFC integration.
{% endhint %}
The run task allows Terraform Cloud (TFC) to interact with SonarQube Cloud at a specific point in the TFC run lifecycle. It retrieves the status of the latest SonarQube Cloud scan results and communicates the pass/fail result to Terraform, blocking the TFC workflow if the quality gate has failed. This ensures that no infrastructure changes in Terraform can take place until all unreviewed hotspots or security vulnerabilities within the code analyzed by SonarQube Cloud have been reviewed and remedied.
The process for integrating SonarQube Cloud into your TFC workflow consists of the steps described below.
{% stepper %}
{% step %}
### Generate an HMAC key
You must generate the HMAC key which will be used to authenticate SonarQube Cloud to TFC.
To ensure the security of your integration, you must use a high-entropy secret key. Do not use human-readable passwords or phrases. According to [NIST SP 800-107](https://csrc.nist.gov/pubs/sp/800/107/r1/final), the key should be randomly generated and at least as long as the hash output (e.g., 32 bytes for SHA-256).
Below is a recommended command to generate a compliant key.
```bash
# Generates a 32-byte key in Hex format (secure for HMAC-SHA256)
openssl rand -hex 32
```
{% endstep %}
{% step %}
### Configure the run task integration in SonarQube Cloud
You must have administrator permissions for your organization to be able to configure the Terraform Cloud integration.
Proceed as follows:
1. In SonarQube Cloud, retrieve your project. For more information, see [retrieving-projects](https://docs.sonarsource.com/sonarqube-cloud/managing-your-projects/retrieving-projects "mention").
2. Go to **Administration** > **General settings** > **Integration.**
3. In **Terraform Cloud Run Task HMAC Key**, enter the HMAC key you generated in [#generate-an-hmac-key](#generate-an-hmac-key "mention") above.
{% endstep %}
{% step %}
### Configure the Terraform Cloud workspace to use the run task
You must create a new run task for SonarQube Cloud within TFC using the URL and HMAC key values from SonarQube Cloud. Note that these steps take place within TFC. For more details on Terraform and the Terraform Cloud workflow, see HashiCorp’s articles on run tasks in the [Terraform help center.](https://developer.hashicorp.com/terraform/cloud-docs/workspaces/settings/run-tasks)
To create the run task:
1. In [Terraform Cloud](https://app.terraform.io/), navigate to your organization’s global settings.
2. When logged in to your Terraform account, go to the run tasks settings for your TFC organization: `https://app.terraform.io/app/{YOUR_TFC_ORG}/settings/tasks`.
3. Go to **Settings** > **General** > **Run tasks** > **Create run task.**
4. In the on-screen form, edit the following fields:
* **Name** (required)
* **Endpoint URL** (required)**:** The URL endpoint configured in the run task to send requests to. Enter `https://api.sonarcloud.io/ci-interface/htc-integration/run-tasks`
* **Description** (optional)
* **HMAC key** (required): HMAC key you generated in [#generate-an-hmac-key](#generate-an-hmac-key "mention") above.\
This field is required because the SonarQube Cloud project needs to validate the HMAC key with the one in the TFC workspace.
5. Choose **Create** to complete the configuration of your run task.
The run task is now available within the organization, and you can associate it with one or more workspaces. Go to the [Terraform Cloud registry](https://registry.terraform.io/browse/run-tasks?page=2) to view all available run tasks.
{% endstep %}
{% step %}
### Associate the TFC run task with your client workspace
Associate your newly-created run task with the TFC workspace that will use the run task:
1. In Terraform Cloud, click **Workspaces** and then go to the workspace where you want to associate your run tasks.
2. Go to **Settings** > **Run Tasks.**\
The run task you created is available under **Available Run Tasks.** Click the ✚ next to the run task you want to add to the workspace.
3. Select **Pre-plan** to indicate when Terraform Cloud should start the run task.
4. Select the Enforcement level **Mandatory**. If the task fails, the run will enter an errored state with a warning in the UI.
5. Click **Create** to complete the configuration of your run task.
{% endstep %}
{% endstepper %}
### Viewing the run task result
SonarQube Cloud will scan all Terraform plans on each push within your workspace.
If all goes well, you will receive a success message.
If the run task has failed, then you will received a failure message and you will need to go back to SonarQube Cloud and address whatever caused your quality gate to fail.
---
# Source: https://docs.sonarsource.com/sonarqube-cloud/getting-started-with-enterprise/setting-up-sso.md
# Setting up SSO
With the [Enterprise plan](https://www.sonarsource.com/plans-and-pricing/#sonarqube-cloud-features), you can transition from the DevOps platform authentication mode to Single Sign On (SSO) with any identity provider (IdP) that supports SAML. SonarQube Cloud uses the Service Provider (SP) initiated SSO.
With SSO you benefit from:
* Increased security and a single source of truth for user authentication.
* [automatic-group-synchronization](https://docs.sonarsource.com/sonarqube-cloud/administering-sonarcloud/managing-enterprise/enterprise-security/sso/about/automatic-group-synchronization "mention").
* Just-in-Time user provisioning. When a user signs up with SonarQube Cloud with SSO for the first time, their SSO user account is automatically created in SonarQube Cloud.
SSO is set up for a given enterprise, see [setting-up-your-enterprise](https://docs.sonarsource.com/sonarqube-cloud/getting-started-with-enterprise/setting-up-your-enterprise "mention") for more information. At SSO login time, users select the enterprise they want to access.
For more information, see [about](https://docs.sonarsource.com/sonarqube-cloud/administering-sonarcloud/managing-enterprise/enterprise-security/sso/about "mention").
To set up SSO in your enterprise:
1. Verify the user groups of the enterprise’s organizations to ensure proper user onboarding through automatic group synchronization. For more information, see [automatic-group-synchronization](https://docs.sonarsource.com/sonarqube-cloud/administering-sonarcloud/managing-enterprise/enterprise-security/sso/about/automatic-group-synchronization "mention") for more details.
To do so, verify that:
* The user groups defined in your IdP service exist in the relevant organizations of your SonarQube Cloud enterprise (i.e. a group with the same (context-sensitive) name exists in the relevant organization(s)).
* The user groups in SonarQube Cloud have the correct permissions.
To manage the user groups in SonarQube Cloud, see [user-groups](https://docs.sonarsource.com/sonarqube-cloud/administering-sonarcloud/managing-organization/users-and-permissions/user-groups "mention").
For more information, see [verify-user-groups](https://docs.sonarsource.com/sonarqube-cloud/administering-sonarcloud/managing-enterprise/enterprise-security/sso/setup/verify-user-groups "mention").
2. Transition your enterprise to SSO [setup](https://docs.sonarsource.com/sonarqube-cloud/administering-sonarcloud/managing-enterprise/enterprise-security/sso/setup "mention") to Setting up Single Sign-On
3. Send the SSO login URL to [inviting-users-to-sign-in](https://docs.sonarsource.com/sonarqube-cloud/administering-sonarcloud/managing-enterprise/enterprise-security/sso/setup/inviting-users-to-sign-in "mention") to sign in to SonarQube Cloud with SSO. Once they have signed in, their SSO account is created in SonarQube Cloud and they have access to their organization(s) through the automatic group synchronization with the identity provider. They should:
* Check that they have access to their organization(s) and can perform their tasks as before.
* Generate their analysis tokens with their SSO account. (They can still use their DevOps platform service (DOP) account tokens to execute analysis as long as their DOP account still exists).
4\. Sign up with SonarQube Cloud by using the enterprise’s SSO log in URL. Your SSO account has been created.
5\. Sign in to SonarQube Cloud with your DOP account and grant your SSO account the Administer Enterprise permission. See [#manage-permissions](https://docs.sonarsource.com/sonarqube-cloud/administering-sonarcloud/managing-enterprise#manage-permissions "mention") for more information.
6\. Once the enterprise users have successfully transitioned to SSO, you can remove their DOP accounts from the organizations and the users can delete their DOP account. See [user-on-and-offboarding](https://docs.sonarsource.com/sonarqube-cloud/administering-sonarcloud/managing-organization/users-and-permissions/user-on-and-offboarding "mention") for more details. We recommend that you don’t remove the admin DOP accounts since, with a SSO account, you cannot bind a SonarQube Cloud organization with the corresponding DOP organization. See [onboarding-new-org](https://docs.sonarsource.com/sonarqube-cloud/getting-started-with-enterprise/onboarding-new-org "mention") for more information.
{% hint style="warning" %}
When created, SSO accounts will have no history. That means that comments on issues, favorite projects, etc., will not be transferred from the corresponding DOP account’s history.
{% endhint %}
### Related pages
* [setting-up-your-enterprise](https://docs.sonarsource.com/sonarqube-cloud/getting-started-with-enterprise/setting-up-your-enterprise "mention")\
View the different steps necessary to create and configure an enterprise.
* [viewing-billing-usage-info](https://docs.sonarsource.com/sonarqube-cloud/getting-started-with-enterprise/viewing-billing-usage-info "mention")
* [onboarding-new-org](https://docs.sonarsource.com/sonarqube-cloud/getting-started-with-enterprise/onboarding-new-org "mention")
---
# Source: https://docs.sonarsource.com/sonarqube-server/10.6/analyzing-source-code/branch-analysis/setting-up-the-branch-analysis.md
# Source: https://docs.sonarsource.com/sonarqube-server/10.7/analyzing-source-code/branch-analysis/setting-up-the-branch-analysis.md
# Source: https://docs.sonarsource.com/sonarqube-server/10.8/analyzing-source-code/branch-analysis/setting-up-the-branch-analysis.md
# Source: https://docs.sonarsource.com/sonarqube-server/2025.2/analyzing-source-code/branch-analysis/setting-up-the-branch-analysis.md
# Source: https://docs.sonarsource.com/sonarqube-server/2025.3/analyzing-source-code/branch-analysis/setting-up-the-branch-analysis.md
# Source: https://docs.sonarsource.com/sonarqube-server/2025.5/analyzing-source-code/branch-analysis/setting-up-the-branch-analysis.md
# Source: https://docs.sonarsource.com/sonarqube-server/2025.1/analyzing-source-code/branch-analysis/setting-up-the-branch-analysis.md
# Source: https://docs.sonarsource.com/sonarqube-server/2025.4/analyzing-source-code/branch-analysis/setting-up-the-branch-analysis.md
# Source: https://docs.sonarsource.com/sonarqube-server/2025.6/analyzing-source-code/branch-analysis/setting-up-the-branch-analysis.md
# Source: https://docs.sonarsource.com/sonarqube-server/analyzing-source-code/branch-analysis/setting-up-the-branch-analysis.md
# Setting up the branch analysis
To set up branch analysis:
1. Add the analysis step to your multi-branch CI pipeline. See the corresponding section of your CI tool in this documentation:
* [add-analysis-to-job](https://docs.sonarsource.com/sonarqube-server/analyzing-source-code/ci-integration/jenkins-integration/add-analysis-to-job "mention")
* [introduction](https://docs.sonarsource.com/sonarqube-server/devops-platform-integration/azure-devops-integration/adding-analysis-to-pipeline/introduction "mention")
* [bitbucket-cloud-integration](https://docs.sonarsource.com/sonarqube-server/devops-platform-integration/bitbucket-integration/bitbucket-cloud-integration "mention")
* [codemagic-integration](https://docs.sonarsource.com/sonarqube-server/analyzing-source-code/ci-integration/codemagic-integration "mention")
* [adding-analysis-to-github-actions-workflow](https://docs.sonarsource.com/sonarqube-server/devops-platform-integration/github-integration/adding-analysis-to-github-actions-workflow "mention")
* [adding-analysis-to-gitlab-ci-cd](https://docs.sonarsource.com/sonarqube-server/devops-platform-integration/gitlab-integration/adding-analysis-to-gitlab-ci-cd "mention")
2. Make sure the branch to be analyzed is properly checked out in the CI repository: see [verifying-code-checkout-step](https://docs.sonarsource.com/sonarqube-server/analyzing-source-code/scanners/scanner-environment/verifying-code-checkout-step "mention").
3. Make sure that the SonarScanner gets the branch name parameter (otherwise the analysis will be performed on the main branch): see **Setting up the branch name parameter** below.
4. Limit the analysis to the relevant branches: see **Limiting the analysis to the relevant branches** below.
5. Configure the Clean as You Code settings for the branches: see **Configuring the CaYC settings for branches** below.
### Setting up the branch name parameter
The SonarScanner can automatically detect the branch name parameters when running on the following CI services (you don’t need to perform any additional setup):
* Azure Pipelines
* Bitbucket Pipelines
* Cirrus CI
* Codemagic
* GitHub Actions
* GitLab CI/CD
* Jenkins (with the Branch Source plugin configured, see the [global-setup](https://docs.sonarsource.com/sonarqube-server/analyzing-source-code/ci-integration/jenkins-integration/global-setup "mention") page)
The table below shows the branch name parameter. See Analysis parameters for information about the setup of analysis parameters for the scanner.
| | |
| ------------------ | -------------------------------------- |
| **Parameter Name** | **Description** |
| sonar.branch.name | Name of the branch (visible in the UI) |
### Limiting the analysis to the relevant branches
You need to add a condition to your pipeline script to ensure that only the relevant branches are analyzed. For example, you wouldn’t want to run analysis on feature branches that won’t need analysis until they have pull requests.
In the following example, analysis would be limited to branches named `main` or `release/*`.
```css-79elbk
if [[ "$CI_BRANCH_NAME" == main ]] || [[ "$CI_BRANCH_NAME" == release/* ]]; then
./gradlew sonarqube
fi
```
### Configuring the CaYC settings for branches
See [about-new-code](https://docs.sonarsource.com/sonarqube-server/user-guide/about-new-code "mention") to learn how to implement this best practice.
The quality gate cannot be configured at the branch level, only at the project level. And ideally, all projects will use the same quality gate: see [introduction-to-quality-gates](https://docs.sonarsource.com/sonarqube-server/quality-standards-administration/managing-quality-gates/introduction-to-quality-gates "mention").
You can set a new code definition for each branch. This is especially helpful if you are likely to develop and release multiple versions from the branch. See the the [about-new-code](https://docs.sonarsource.com/sonarqube-server/user-guide/about-new-code "mention") page for more information.
{% hint style="info" %}
When using any new code period type other than Reference branch, we recommend completing your merges using the fast-forward option without a merge commit; examples include GitHub’s squash and merge or rebase and merge options. In this way, the blame for the merged commits will always have a more recent commit date.
{% endhint %}
---
# Source: https://docs.sonarsource.com/sonarqube-server/10.6/analyzing-source-code/pull-request-analysis/setting-up-the-pull-request-analysis.md
# Source: https://docs.sonarsource.com/sonarqube-server/10.7/analyzing-source-code/pull-request-analysis/setting-up-the-pull-request-analysis.md
# Source: https://docs.sonarsource.com/sonarqube-server/10.8/analyzing-source-code/pull-request-analysis/setting-up-the-pull-request-analysis.md
# Source: https://docs.sonarsource.com/sonarqube-server/2025.2/analyzing-source-code/pull-request-analysis/setting-up-the-pull-request-analysis.md
# Source: https://docs.sonarsource.com/sonarqube-server/2025.3/analyzing-source-code/pull-request-analysis/setting-up-the-pull-request-analysis.md
# Source: https://docs.sonarsource.com/sonarqube-server/2025.5/analyzing-source-code/pull-request-analysis/setting-up-the-pull-request-analysis.md
# Source: https://docs.sonarsource.com/sonarqube-server/2025.1/analyzing-source-code/pull-request-analysis/setting-up-the-pull-request-analysis.md
# Source: https://docs.sonarsource.com/sonarqube-server/2025.4/analyzing-source-code/pull-request-analysis/setting-up-the-pull-request-analysis.md
# Source: https://docs.sonarsource.com/sonarqube-server/2025.6/analyzing-source-code/pull-request-analysis/setting-up-the-pull-request-analysis.md
# Source: https://docs.sonarsource.com/sonarqube-server/analyzing-source-code/pull-request-analysis/setting-up-the-pull-request-analysis.md
# Setting up the pull request analysis
### Prerequisites
The pull request analysis must be integrated into a CI pipeline. For more information, see **Integration into your CI pipeline** on the [analysis-overview](https://docs.sonarsource.com/sonarqube-server/analyzing-source-code/analysis-overview "mention") page.
Before analyzing your pull requests, make sure that:
* The pull request source branch is checked out in the CI/CD host’s local repository.
* The branch being targeted by the pull request (target branch) is fetched in the CI/CD host’s local repository (This is usually done through the cloning of the remote repository by the CI pipeline).
* The CI/CD host’s local repository contains valid repository metadata (e.g. the `.git` folders have not been removed). Avoid any attempt at previewing the merge or actions involving your main branch.\
See [verifying-code-checkout-step](https://docs.sonarsource.com/sonarqube-server/analyzing-source-code/scanners/scanner-environment/verifying-code-checkout-step "mention").
* The code in the CI/CD host’s local repository matches the code in the remote repository (e.g once a pull request is issued, no code is added to the local branch on the CI side before analysis).
* If you use AWS CodeBuild, the `LOCAL_SOURCE_CACHE` feature must be disabled for accurate pull request analysis (otherwise, new code won’t be properly detected).
### Setting up the pull request analysis
1. Add the SonarQube Server analysis step to your pull request CI pipeline. See the corresponding section of your CI tool in this documentation:
* [add-analysis-to-job](https://docs.sonarsource.com/sonarqube-server/analyzing-source-code/ci-integration/jenkins-integration/add-analysis-to-job "mention")
* [introduction](https://docs.sonarsource.com/sonarqube-server/devops-platform-integration/azure-devops-integration/adding-analysis-to-pipeline/introduction "mention")
* [bitbucket-cloud-integration](https://docs.sonarsource.com/sonarqube-server/devops-platform-integration/bitbucket-integration/bitbucket-cloud-integration "mention")
* [codemagic-integration](https://docs.sonarsource.com/sonarqube-server/analyzing-source-code/ci-integration/codemagic-integration "mention")
* [adding-analysis-to-github-actions-workflow](https://docs.sonarsource.com/sonarqube-server/devops-platform-integration/github-integration/adding-analysis-to-github-actions-workflow "mention")
* [adding-analysis-to-gitlab-ci-cd](https://docs.sonarsource.com/sonarqube-server/devops-platform-integration/gitlab-integration/adding-analysis-to-gitlab-ci-cd "mention")
2. Make sure that the SonarScanner gets the pull request parameters required for the project analysis: see **Setting up the pull request parameters** below.
3. In addition, you can configure the pull request decoration: see **Configuring the quality gate status report** below.
### Setting up the pull request parameters
The SonarScanner can automatically detect the pull request parameters when running on the following CI services (you don’t need to perform any additional setup):
* Azure Pipelines
* Bitbucket Pipelines
* Cirrus CI
* Codemagic
* GitHub Actions
* GitLab CI/CD
* Jenkins (with the Branch Source plugin configured)
The table below lists the analysis parameters specific to the pull request analysis that are required by the SonarScanner. See Analysis parameters for information about the setup of analysis parameters for the scanner.
| **Parameter Name** | **Description** |
| ------------------------ | -------------------------------------------------------------------------------------------------------------------------------------------------------------------------------------------------- |
| sonar.pullrequest.key |
Unique identifier of your pull request. Must correspond to the key of the pull request in your DevOps Platform.
Example: sonar.pullrequest.key=5
|
| sonar.pullrequest.branch |
The name of the branch that contains the changes to be merged.
The branch into which the pull request will be merged (target branch).
Default: main branch
Example: sonar.pullrequest.base=main
|
{% hint style="warning" %}
Manually setting pull request parameters overrides automatic detection.
{% endhint %}
### Configuring the quality gate status report
You can report the pull request analysis and quality gate status directly in your DevOps platform’s interface (pull request decoration). For projects bound in SonarQube Server to their DevOps platform repository (this requires the integration setup of your DevOps platform with SonarQube Server), the quality gate status report is automatically set up. For more information, see the DevOps platform integration page that corresponds with your DevOps platform:
* [introduction](https://docs.sonarsource.com/sonarqube-server/devops-platform-integration/github-integration/introduction "mention")
* [bitbucket-server-integration](https://docs.sonarsource.com/sonarqube-server/devops-platform-integration/bitbucket-integration/bitbucket-server-integration "mention")
* [bitbucket-cloud-integration](https://docs.sonarsource.com/sonarqube-server/devops-platform-integration/bitbucket-integration/bitbucket-cloud-integration "mention")
* [introduction](https://docs.sonarsource.com/sonarqube-server/devops-platform-integration/gitlab-integration/introduction "mention")
* [introduction](https://docs.sonarsource.com/sonarqube-server/devops-platform-integration/azure-devops-integration/introduction "mention")
---
# Source: https://docs.sonarsource.com/sonarqube-cloud/getting-started-with-enterprise/setting-up-your-enterprise.md
# Setting up your enterprise
With the Enterprise license, you can group together SonarQube Cloud organizations from different DevOps platforms into an enterprise and benefit from many features.
This page explains how to set up your enterprise from scratch.
{% hint style="info" %}
Currently, Sonar restricts each enterprise to a maximum of 200 organizations.
{% endhint %}
### Step 1: Prepare the enterprise onboarding
#### Prepare the organizations to be added
You must add at least one organization to be able to complete your enterprise setup. You can add any existing organization that is under your administration. Once an organization is added to your enterprise, it’s assigned the Enterprise plan.
{% hint style="warning" %}
If you add a Team plan organization to your enterprise, the organization’s Team plan subscription will be automatically cancelled and the organization will be moved to the Enterprise plan without a refund. Therefore, we recommend adding your organizations before their next billing date to avoid double charges.
{% endhint %}
To create a new organization to be added to your enterprise, import the DevOps platform organization and select the Free plan. For instructions to import your DevOps organization, please see:
* [importing-github-organization](https://docs.sonarsource.com/sonarqube-cloud/administering-sonarcloud/managing-organization/creating-organization/importing-github-organization "mention")
* [importing-gitlab-group](https://docs.sonarsource.com/sonarqube-cloud/administering-sonarcloud/managing-organization/creating-organization/importing-gitlab-group "mention")
* [importing-bitbucket-workspace](https://docs.sonarsource.com/sonarqube-cloud/administering-sonarcloud/managing-organization/creating-organization/importing-bitbucket-workspace "mention")
* [importing-azure-devops-organization](https://docs.sonarsource.com/sonarqube-cloud/administering-sonarcloud/managing-organization/creating-organization/importing-azure-devops-organization "mention")
#### Request a license
[Contact our team](https://www.sonarsource.com/products/sonarcloud/contact-enterprise-sales/) to request an Enterprise license. Provide the maximum number of Lines of Code (LOC) you want to have in your enterprise. For more information, see [#loc-based-pricing](https://docs.sonarsource.com/sonarqube-cloud/administering-sonarcloud/managing-subscription/subscription-plans#loc-based-pricing "mention") for more information.
### Step 2: Create the SonarQube Cloud enterprise
You must be an Admin of the organization you wish to add to the enterprise. Once you’ve created the enterprise, you become an Enterprise Admin automatically.
To create your enterprise:
1\. Log in to SonarQube Cloud with your organization’s administrator account.
2\. Select the **+** icon in the top right corner of SonarQube Cloud UI and select **Create new enterprise** in the menu. The **Create an enterprise** page opens.
3\. In **License key**, enter the key you received from Sonar.
4\. Enter the name and key of your enterprise.
5\. In **Add organization**, select the first organization to be added to your enterprise to complete the setup.
6\. Select the **Create enterprise** button. The enterprise is created.
7\. To add other organizations, select **Add organization**.
### Step 3: Set the enterprise permissions of users
As an Enterprise Admin, you can grant the Administer Enterprise and Create Portfolios permissions. For more information, check out the [managing-the-enterprise-related-permissions](https://docs.sonarsource.com/sonarqube-cloud/administering-sonarcloud/managing-enterprise/managing-the-enterprise-related-permissions "mention") page.
To set the enterprise-related permissions of users, follow the instructions to [retrieving-and-viewing-your-enterprise](https://docs.sonarsource.com/sonarqube-cloud/administering-sonarcloud/managing-enterprise/retrieving-and-viewing-your-enterprise "mention"). Once inside of your enterprise:
1. Navigate to **Administration** > **Enterprise Permissions**.
2. If necessary, filter the list of users.
3. For each user, select or unselect the permissions in the table.
### Step 4: Complete the enterprise onboarding
For each organization in your enterprise:
* If not already done, verify the group's default permissions on new projects. See the [templates](https://docs.sonarsource.com/sonarqube-cloud/administering-sonarcloud/managing-organization/manage-org-projects/manage-project-permissions/templates "mention") page for more information.
* You can set project configurations at the organization level. The details are outlined in the [setting-config-at-org-level](https://docs.sonarsource.com/sonarqube-cloud/administering-sonarcloud/managing-organization/setting-config-at-org-level "mention") pages.
By default, all organizations share the enterprise LOC limit. You can allocate an individual LOC limit to one or several organizations within your enterprise; please check the [managing-the-lines-of-code-within-your-enterprise](https://docs.sonarsource.com/sonarqube-cloud/administering-sonarcloud/managing-enterprise/managing-the-lines-of-code-within-your-enterprise "mention") page.
With the Enterprise license, you can now:
* Transition your enterprise to [Single Sign-On](https://docs.sonarsource.com/sonarqube-cloud/administering-sonarcloud/managing-enterprise/enterprise-security/sso).
* Restrict access to your SonarQube Cloud by configuring an [IP allow list](https://docs.sonarsource.com/sonarqube-cloud/administering-sonarcloud/managing-enterprise/enterprise-security/ip-allow-lists).
### Related pages
* [viewing-billing-usage-info](https://docs.sonarsource.com/sonarqube-cloud/getting-started-with-enterprise/viewing-billing-usage-info "mention")
* [setting-up-sso](https://docs.sonarsource.com/sonarqube-cloud/getting-started-with-enterprise/setting-up-sso "mention")
* [onboarding-new-org](https://docs.sonarsource.com/sonarqube-cloud/getting-started-with-enterprise/onboarding-new-org "mention")
* [managing-enterprise](https://docs.sonarsource.com/sonarqube-cloud/administering-sonarcloud/managing-enterprise "mention")
* [enterprise-security](https://docs.sonarsource.com/sonarqube-cloud/administering-sonarcloud/managing-enterprise/enterprise-security "mention")
---
# Source: https://docs.sonarsource.com/sonarqube-server/10.5/devops-platform-integration/github-integration/setting-up-your-projects.md
# Setting up your projects
For general information about project creation and import, see [creating-and-importing-projects](https://docs.sonarsource.com/sonarqube-server/10.5/project-administration/creating-and-importing-projects "mention").
### Reporting your quality gate status in GitHub
After [setting-up-global-integration](https://docs.sonarsource.com/sonarqube-server/10.5/devops-platform-integration/github-integration/setting-up-global-integration "mention"), SonarQube can report your quality gate status and analysis metrics directly to your GitHub branches and pull requests.
To do this, add a project from GitHub by doing one of the following:
* On the **Projects Overview** page, select **Add project** > **GitHub**, and follow the steps in SonarQube to analyze your project.
* Scan a project from a GitHub action. SonarQube will find a matching GitHub configuration.
SonarQube automatically sets the project settings required to show your quality gate in your branches and pull requests.
{% hint style="info" %}
To report your quality gate status in your branches and pull requests, a SonarQube analysis needs to be run on your code. You can find the additional parameters required for pull request analysis on the [pull-request-analysis](https://docs.sonarsource.com/sonarqube-server/10.5/analyzing-source-code/pull-request-analysis "mention") page.
{% endhint %}
If you’re creating your projects manually or adding quality gate reporting to an existing project, see the following section.
#### Reporting your quality gate status in manually created or existing projects
SonarQube can also report your quality gate status to GitHub pull requests and branches for existing and manually created projects. After you’ve created and installed your GitHub App and updated your global DevOps Platform Integration settings as shown in the **Importing your GitHub repositories into SonarQube** section above, set the following project settings at **Project Settings** > **General Settings** > **DevOps Platform Integration**:
* **Configuration name**: The configuration name that corresponds to your GitHub instance.
* **Repository identifier**: The path of your repository URL.
#### Showing your analysis summary under the GitHub Conversation tab
Make sure that for your project, **Enable analysis summary** under the **GitHub Conversation** tab in **Project settings > General settings > Pull Request Decoration** is on (default value). If it’s the case, your pull request analysis will be shown under both the **Conversation** and **Checks** tabs in GitHub. When off, your pull request analysis summary is only shown under the **Checks** tab.
---
# Source: https://docs.sonarsource.com/sonarqube-community-build/instance-administration/authentication/gitlab/setting-up.md
# Source: https://docs.sonarsource.com/sonarqube-server/10.7/instance-administration/authentication/gitlab/setting-up.md
# Source: https://docs.sonarsource.com/sonarqube-server/10.8/instance-administration/authentication/gitlab/setting-up.md
# Source: https://docs.sonarsource.com/sonarqube-server/2025.2/instance-administration/authentication/gitlab/setting-up.md
# Source: https://docs.sonarsource.com/sonarqube-server/2025.3/instance-administration/authentication/gitlab/setting-up.md
# Source: https://docs.sonarsource.com/sonarqube-server/2025.5/instance-administration/authentication/gitlab/setting-up.md
# Source: https://docs.sonarsource.com/sonarqube-server/2025.1/instance-administration/authentication/gitlab/setting-up.md
# Source: https://docs.sonarsource.com/sonarqube-server/2025.4/instance-administration/authentication/gitlab/setting-up.md
# Source: https://docs.sonarsource.com/sonarqube-server/2025.6/instance-administration/authentication/gitlab/setting-up.md
# Source: https://docs.sonarsource.com/sonarqube-server/instance-administration/authentication/gitlab/setting-up.md
# Setting up authentication
You can delegate in SonarQube Server the authentication to GitLab by using one of the following provisioning modes:
* Just-in-Time
* Automatic
You need the global Administer System permission in SonarQube Server to set up the authentication delegation.
{% hint style="info" %}
When you set up GitLab authentication and provisioning, existing manual users are not removed and you cannot edit their group membership or permissions anymore. For security reasons, we recommend that you deactivate them: see [deactivating-users](https://docs.sonarsource.com/sonarqube-server/instance-administration/user-management/deactivating-users "mention").
{% endhint %}
### Setup overview
SonarQube Server uses a GitLab OAuth 2 application to manage the authentication delegation to GitLab and the user or group synchronization. SonarQube Server uses a "GitLab Configuration" record to access the GitLab application.
### Step 1: Create a GitLab application for authentication and provisioning
1. Create a GitLab OAuth 2 application: see the [GitLab documentation](https://docs.gitlab.com/ee/integration/oauth_provider.html).
2. Specify the following settings in your GitLab application:
* **Name**: Your app’s name, such as SonarQube Server.
* **Redirect URI**: `/oauth2/callback/gitlab`. For example, .
* **Scopes**: Select `api`if you plan to enable group synchronization with Just-in-Time or enable automatic provisioning. Select `read_user` otherwise.
3. Save your application. GitLab takes you to the application’s page, where you can find your Application ID and Secret you’ll need in Step 2 below.
### Step 2: Configure GitLab authentication and provisioning in SonarQube Server
1. In in SonarQube Server, go to **Administration** > **Configuration** > **General Settings** > **Authentication** > **GitLab**.
2. In **GitLab configuration**, select **Create configuration**. The New **GitLab Configuration** dialog opens.
3. Fill the fields of **GitLab configuration** with information from the GitLab application created in Step 1:
* **Application ID**
* **GitLab URL**: Enter `https://gitlab.com` or your own GitLab server URL where applicable.
* **Secret**
4. Select the **Synchronize user groups** option if you want to enable group synchronization at user login:
* In Just-in-Time provisioning mode, this means that group synchronization is enabled.
* In automatic provisioning mode, this means that users’ group memberships are also synchronized at user authentication time (and not only on an hourly basis).
5. Select **Save configuration**. The configuration is created.
6. Select **Test configuration** to check the configuration. Correct it if necessary.
7. You can now enable the automatic provisioning option by selecting **Automatic user, group, and permission provisioning**. See [managing-automatic-provisioning](https://docs.sonarsource.com/sonarqube-server/instance-administration/authentication/gitlab/managing-automatic-provisioning "mention") for more information.\
If you don’t want to use the automatic provisioning option, you can configure JIT provisioning options in the **Provisioning** > **Just-in-Time provisioning** section, see [managing-jit-mode](https://docs.sonarsource.com/sonarqube-server/instance-administration/authentication/gitlab/managing-jit-mode "mention").
### Related pages
* [just-in-time](https://docs.sonarsource.com/sonarqube-server/instance-administration/authentication/gitlab/provisioning-modes/just-in-time "mention")
* [automatic](https://docs.sonarsource.com/sonarqube-server/instance-administration/authentication/gitlab/provisioning-modes/automatic "mention")
* [disabling](https://docs.sonarsource.com/sonarqube-server/instance-administration/authentication/gitlab/disabling "mention")
---
# Source: https://docs.sonarsource.com/sonarqube-server/2025.2/setup-and-update.md
# Server installation and setup
{% content-ref url="setup-and-update/overview" %}
[overview](https://docs.sonarsource.com/sonarqube-server/2025.2/setup-and-update/overview)
{% endcontent-ref %}
{% content-ref url="setup-and-update/installation-requirements" %}
[installation-requirements](https://docs.sonarsource.com/sonarqube-server/2025.2/setup-and-update/installation-requirements)
{% endcontent-ref %}
{% content-ref url="setup-and-update/pre-installation" %}
[pre-installation](https://docs.sonarsource.com/sonarqube-server/2025.2/setup-and-update/pre-installation)
{% endcontent-ref %}
{% content-ref url="setup-and-update/install-the-server" %}
[install-the-server](https://docs.sonarsource.com/sonarqube-server/2025.2/setup-and-update/install-the-server)
{% endcontent-ref %}
{% content-ref url="setup-and-update/install-the-server-as-a-cluster" %}
[install-the-server-as-a-cluster](https://docs.sonarsource.com/sonarqube-server/2025.2/setup-and-update/install-the-server-as-a-cluster)
{% endcontent-ref %}
{% content-ref url="setup-and-update/deploy-on-kubernetes" %}
[deploy-on-kubernetes](https://docs.sonarsource.com/sonarqube-server/2025.2/setup-and-update/deploy-on-kubernetes)
{% endcontent-ref %}
{% content-ref url="setup-and-update/operating-the-server" %}
[operating-the-server](https://docs.sonarsource.com/sonarqube-server/2025.2/setup-and-update/operating-the-server)
{% endcontent-ref %}
{% content-ref url="setup-and-update/configure-and-operate-a-cluster" %}
[configure-and-operate-a-cluster](https://docs.sonarsource.com/sonarqube-server/2025.2/setup-and-update/configure-and-operate-a-cluster)
{% endcontent-ref %}
{% content-ref url="setup-and-update/plugins" %}
[plugins](https://docs.sonarsource.com/sonarqube-server/2025.2/setup-and-update/plugins)
{% endcontent-ref %}
{% content-ref url="setup-and-update/reference-architectures" %}
[reference-architectures](https://docs.sonarsource.com/sonarqube-server/2025.2/setup-and-update/reference-architectures)
{% endcontent-ref %}
{% content-ref url="setup-and-update/environment-variables" %}
[environment-variables](https://docs.sonarsource.com/sonarqube-server/2025.2/setup-and-update/environment-variables)
{% endcontent-ref %}
---
# Source: https://docs.sonarsource.com/sonarqube-server/8.9/setup-and-upgrade.md
# Source: https://docs.sonarsource.com/sonarqube-server/9.8/setup-and-upgrade.md
# Source: https://docs.sonarsource.com/sonarqube-server/9.9/setup-and-upgrade.md
# Source: https://docs.sonarsource.com/sonarqube-server/10.0/setup-and-upgrade.md
# Source: https://docs.sonarsource.com/sonarqube-server/10.1/setup-and-upgrade.md
# Source: https://docs.sonarsource.com/sonarqube-server/10.2/setup-and-upgrade.md
# Source: https://docs.sonarsource.com/sonarqube-server/10.3/setup-and-upgrade.md
# Source: https://docs.sonarsource.com/sonarqube-server/10.4/setup-and-upgrade.md
# Source: https://docs.sonarsource.com/sonarqube-server/10.5/setup-and-upgrade.md
# Source: https://docs.sonarsource.com/sonarqube-server/10.6/setup-and-upgrade.md
# Source: https://docs.sonarsource.com/sonarqube-server/10.7/setup-and-upgrade.md
# Source: https://docs.sonarsource.com/sonarqube-server/10.8/setup-and-upgrade.md
# Source: https://docs.sonarsource.com/sonarqube-server/2025.1/setup-and-upgrade.md
# Server installation and setup
{% content-ref url="setup-and-upgrade/overview" %}
[overview](https://docs.sonarsource.com/sonarqube-server/2025.1/setup-and-upgrade/overview)
{% endcontent-ref %}
{% content-ref url="setup-and-upgrade/installation-requirements" %}
[installation-requirements](https://docs.sonarsource.com/sonarqube-server/2025.1/setup-and-upgrade/installation-requirements)
{% endcontent-ref %}
{% content-ref url="setup-and-upgrade/pre-installation" %}
[pre-installation](https://docs.sonarsource.com/sonarqube-server/2025.1/setup-and-upgrade/pre-installation)
{% endcontent-ref %}
{% content-ref url="setup-and-upgrade/install-the-server" %}
[install-the-server](https://docs.sonarsource.com/sonarqube-server/2025.1/setup-and-upgrade/install-the-server)
{% endcontent-ref %}
{% content-ref url="setup-and-upgrade/install-the-server-as-a-cluster" %}
[install-the-server-as-a-cluster](https://docs.sonarsource.com/sonarqube-server/2025.1/setup-and-upgrade/install-the-server-as-a-cluster)
{% endcontent-ref %}
{% content-ref url="setup-and-upgrade/deploy-on-kubernetes" %}
[deploy-on-kubernetes](https://docs.sonarsource.com/sonarqube-server/2025.1/setup-and-upgrade/deploy-on-kubernetes)
{% endcontent-ref %}
{% content-ref url="setup-and-upgrade/operating-the-server" %}
[operating-the-server](https://docs.sonarsource.com/sonarqube-server/2025.1/setup-and-upgrade/operating-the-server)
{% endcontent-ref %}
{% content-ref url="setup-and-upgrade/configure-and-operate-a-cluster" %}
[configure-and-operate-a-cluster](https://docs.sonarsource.com/sonarqube-server/2025.1/setup-and-upgrade/configure-and-operate-a-cluster)
{% endcontent-ref %}
{% content-ref url="setup-and-upgrade/plugins" %}
[plugins](https://docs.sonarsource.com/sonarqube-server/2025.1/setup-and-upgrade/plugins)
{% endcontent-ref %}
{% content-ref url="setup-and-upgrade/reference-architectures" %}
[reference-architectures](https://docs.sonarsource.com/sonarqube-server/2025.1/setup-and-upgrade/reference-architectures)
{% endcontent-ref %}
{% content-ref url="setup-and-upgrade/environment-variables" %}
[environment-variables](https://docs.sonarsource.com/sonarqube-server/2025.1/setup-and-upgrade/environment-variables)
{% endcontent-ref %}
---
# Source: https://docs.sonarsource.com/sonarqube-community-build/instance-administration/authentication/saml/ms-entra-id/setup-in-entra-id.md
# Source: https://docs.sonarsource.com/sonarqube-server/10.7/instance-administration/authentication/saml/ms-entra-id/setup-in-entra-id.md
# Source: https://docs.sonarsource.com/sonarqube-server/10.8/instance-administration/authentication/saml/ms-entra-id/setup-in-entra-id.md
# Source: https://docs.sonarsource.com/sonarqube-server/2025.2/instance-administration/authentication/saml/ms-entra-id/setup-in-entra-id.md
# Source: https://docs.sonarsource.com/sonarqube-server/2025.3/instance-administration/authentication/saml/ms-entra-id/setup-in-entra-id.md
# Source: https://docs.sonarsource.com/sonarqube-server/2025.5/instance-administration/authentication/saml/ms-entra-id/setup-in-entra-id.md
# Source: https://docs.sonarsource.com/sonarqube-server/2025.1/instance-administration/authentication/saml/ms-entra-id/setup-in-entra-id.md
# Source: https://docs.sonarsource.com/sonarqube-server/2025.4/instance-administration/authentication/saml/ms-entra-id/setup-in-entra-id.md
# Source: https://docs.sonarsource.com/sonarqube-server/2025.6/instance-administration/authentication/saml/ms-entra-id/setup-in-entra-id.md
# Source: https://docs.sonarsource.com/sonarqube-server/instance-administration/authentication/saml/ms-entra-id/setup-in-entra-id.md
# Setup in Microsoft Entra ID
This is the first step of SAML authentication setup with Microsoft Entra ID. For an overview of the complete setup, see [introduction](https://docs.sonarsource.com/sonarqube-server/instance-administration/authentication/saml/ms-entra-id/introduction "mention").
### Step 1: Create the SAML application for SonarQube Server in MS Entra ID
1. In **Microsoft Entra ID**, go to **Manage** > **Enterprise applications** > **All applications**.
2. Select **New application** and then **Create your own application**.
{% hint style="warning" %}
Make sure you choose "Create your own application". Do not select the non-affiliated "Sonarqube" Microsoft Entra Gallery app, which contains configurations that may prevent proper integration.
{% endhint %}
3. Fill in the name and select the **Integrate any other application you don’t find in the gallery** option.
4. Select **Create**.
### Step 2: Configure the application for SonarQube Server in MS Entra ID
1. Go to **Single sign-on** > **SAML**. The **Set up Single Sign-On with SAML** page opens
2. In the **Basic SAML Configuration** section of the page, select **Edit**, fill in the **Identifier** and the **Reply URL** fields as described below, and save.
Basic configuration fields
Field
Description
Identifier
Identifier of the SonarQube application in Entra ID.
Reply URL
Must be in the format: <sqServerBaseUrl>/oauth2/callback/saml
Note: Make sure the server base URL is correctly set in SonarQube1).
1\) See [server-base-url](https://docs.sonarsource.com/sonarqube-server/instance-administration/server-base-url "mention").
3. In the **Attributes & Claims** section of the page, configure the attributes used by SonarQube Server as described below. To add an attribute, select **Add new claim**.
Attributes & claims
The table below shows possible mappings you can use for the SAML attributes used by SonarQube Server.
SAML attribute used by SonarQube
Description
Attribute in Microsoft Entra ID
Required
Login
A unique name to identify the user in SonarQube.
Example: user.userprincipalname
x
Name
The full name of the user.
Example: user.displayname
x
Email
The email of the user.
Example: user.mail
{% hint style="warning" %}
The NameID attribute is not used in SonarQube Server.
{% endhint %}
4. If you use Just-in-Time provisioning with the group synchronization feature:
1. Verify the user groups in SonarQube Server (see see *Group synchronization* in [#justintime-provisioning](https://docs.sonarsource.com/sonarqube-server/instance-administration/overview#justintime-provisioning "mention"))
2. Add a group attribute by selecting Add a group claim and do one of the following:
* To enable the synchronization of Active Directory (AD) groups, set **Source attribute** to **sAMAccountname**.
* To enable the synchronization of cloud-only groups, set **Source attribute** to **Cloud-only group display names.**
* To enable the synchronization of both AD groups and cloud-only groups, set **Source attribute** to **sAMAccountname** and select the **Emit group name for cloud-only groups** checkbox.
Once done, the option to add a group will be unavailable and the group attribute will be listed with the other attributes in the **Add new claim** tab.
{% hint style="warning" %}
* Group synchronization doesn’t work with Microsoft Entra ID’s nested groups.
* Microsoft Entra ID SAML tokens have a limit regarding the number of groups a user can belong to (see the description of groups in the [Claims in SAML Token](https://learn.microsoft.com/en-us/entra/identity-platform/reference-saml-tokens#claims-in-saml-tokens) table). In such cases, you might need to reduce the number of groups the user is in.
{% endhint %}
5. Alternatively to step 4 above, you may use SCIM user and group provisioning, see [scim-provisioning-with-azure-ad](https://docs.sonarsource.com/sonarqube-server/instance-administration/authentication/saml/scim/scim-provisioning-with-azure-ad "mention").
6. In the **SAML Certificates** section of the page, download **Certificate (Base64)**. (You will have to copy-paste the downloaded certificate into SonarQube Server during the setup of SonarQube Server).
7. Assign users and groups as follows:
1. Go to **Manage** > **Users and groups**.
2. Select **Add user/group** to assign users or groups to the application.
### Related pages
* [overview](https://docs.sonarsource.com/sonarqube-server/instance-administration/authentication/saml/overview "mention")
* [setup-in-sq](https://docs.sonarsource.com/sonarqube-server/instance-administration/authentication/saml/ms-entra-id/setup-in-sq "mention")
* [optional-security-features](https://docs.sonarsource.com/sonarqube-server/instance-administration/authentication/saml/ms-entra-id/optional-security-features "mention")
* [scim-provisioning-with-azure-ad](https://docs.sonarsource.com/sonarqube-server/instance-administration/authentication/saml/scim/scim-provisioning-with-azure-ad "mention")
---
# Source: https://docs.sonarsource.com/sonarqube-community-build/instance-administration/authentication/saml/ping-identity/setup-in-ping-identity.md
# Source: https://docs.sonarsource.com/sonarqube-server/10.7/instance-administration/authentication/saml/ping-identity/setup-in-ping-identity.md
# Source: https://docs.sonarsource.com/sonarqube-server/10.8/instance-administration/authentication/saml/ping-identity/setup-in-ping-identity.md
# Source: https://docs.sonarsource.com/sonarqube-server/2025.2/instance-administration/authentication/saml/ping-identity/setup-in-ping-identity.md
# Source: https://docs.sonarsource.com/sonarqube-server/2025.3/instance-administration/authentication/saml/ping-identity/setup-in-ping-identity.md
# Source: https://docs.sonarsource.com/sonarqube-server/2025.5/instance-administration/authentication/saml/ping-identity/setup-in-ping-identity.md
# Source: https://docs.sonarsource.com/sonarqube-server/2025.1/instance-administration/authentication/saml/ping-identity/setup-in-ping-identity.md
# Source: https://docs.sonarsource.com/sonarqube-server/2025.4/instance-administration/authentication/saml/ping-identity/setup-in-ping-identity.md
# Source: https://docs.sonarsource.com/sonarqube-server/2025.6/instance-administration/authentication/saml/ping-identity/setup-in-ping-identity.md
# Source: https://docs.sonarsource.com/sonarqube-server/instance-administration/authentication/saml/ping-identity/setup-in-ping-identity.md
# Setup in Ping Identity
This page explains how to register SonarQube Server in PingOne. The procedure with PingFederate is similar as the properties and values to be configured are the same.
This is the first step of SAML authentication setup with Ping Identity. For an overview of the complete setup, see [introduction](https://docs.sonarsource.com/sonarqube-server/instance-administration/authentication/saml/ping-identity/introduction "mention").
### Step 1: Create the SAML application for SonarQube Server
1. In PingOne, go to **Applications > Applications**.
2. Select the **+** icon.
3. Enter the application name and description.
4. In **Choose Application Type**, select **SAML Application**.
5. Select **Configure**.
6. Select the **Manually Enter** option and set:
* **ACS URL** (Assertion Consumer Service): Must be in the format: `/oauth2/callback/saml`\
\
\
\
\
Example: `https://my-sonarqube.com/oauth2/callback/saml`
* **Entity ID:** Identifier of the application for SonarQube Server in PingOne\
Example: `sonarqube`
7. Select **Save**.
### Step 2: Configure the application
1. Go to the **Attribute mappings** tab of the application for SonarQube Server you created in step 1. To retrieve the application, go to **Applications > Applications** and open the application details page.
2. Select the pencil icon and the **+Add** button to add an attribute mapping: select a PingOne user attribute and map it to an attribute in the application. See the example below.
SAML attribute mapping example
| SAML attribute in the application | PingOne user attribute | Description |
| --------------------------------- | ---------------------- | ------------------------------------------------------------------------------------------ |
| saml\_subject | User ID | |
| login | Family Name | A unique name to identify the user in SonarQube Server. |
| name | Given Name | User name. |
| email | Email Address | User email address. |
| group\_names | Group Names | Required only if you use the group synchronization feature with Just-in-Time provisioning. |
3. Select **Save**.
4. Go to the **Configuration** tab and select the **Download Metadata** button to download the SAML metadata containing your X.509 certificate.
### Step 3: Enable the application
1. In PingOne, retrieve the application: go to **Applications > Applications** and open the application details page.
2. In the top right corner of the application, select the toggle button.
### Step 4: Assign users and groups to the application
1. To create users, go to **Identities > Users** and select **+ Add User**.
2. To create a group:
* Go to **Identities > Groups.**
* Select **+** to create and save a group.
* On the page of the new group, open the **Users** tab, and add users to the group.
### Related pages
* [overview](https://docs.sonarsource.com/sonarqube-server/instance-administration/authentication/saml/overview "mention")
* [setup-in-sq](https://docs.sonarsource.com/sonarqube-server/instance-administration/authentication/saml/ping-identity/setup-in-sq "mention")
* [optional-security-features](https://docs.sonarsource.com/sonarqube-server/instance-administration/authentication/saml/ping-identity/optional-security-features "mention")
* [#justintime-provisioning](https://docs.sonarsource.com/sonarqube-server/instance-administration/overview#justintime-provisioning "mention")
---
# Source: https://docs.sonarsource.com/sonarqube-community-build/instance-administration/authentication/saml/ping-identity/setup-in-sq.md
# Source: https://docs.sonarsource.com/sonarqube-community-build/instance-administration/authentication/saml/ms-entra-id/setup-in-sq.md
# Source: https://docs.sonarsource.com/sonarqube-server/10.7/instance-administration/authentication/saml/ping-identity/setup-in-sq.md
# Source: https://docs.sonarsource.com/sonarqube-server/10.7/instance-administration/authentication/saml/ms-entra-id/setup-in-sq.md
# Source: https://docs.sonarsource.com/sonarqube-server/10.8/instance-administration/authentication/saml/ping-identity/setup-in-sq.md
# Source: https://docs.sonarsource.com/sonarqube-server/10.8/instance-administration/authentication/saml/ms-entra-id/setup-in-sq.md
# Source: https://docs.sonarsource.com/sonarqube-server/2025.2/instance-administration/authentication/saml/ping-identity/setup-in-sq.md
# Source: https://docs.sonarsource.com/sonarqube-server/2025.2/instance-administration/authentication/saml/ms-entra-id/setup-in-sq.md
# Source: https://docs.sonarsource.com/sonarqube-server/2025.3/instance-administration/authentication/saml/ping-identity/setup-in-sq.md
# Source: https://docs.sonarsource.com/sonarqube-server/2025.3/instance-administration/authentication/saml/ms-entra-id/setup-in-sq.md
# Source: https://docs.sonarsource.com/sonarqube-server/2025.5/instance-administration/authentication/saml/ping-identity/setup-in-sq.md
# Source: https://docs.sonarsource.com/sonarqube-server/2025.5/instance-administration/authentication/saml/ms-entra-id/setup-in-sq.md
# Source: https://docs.sonarsource.com/sonarqube-server/2025.1/instance-administration/authentication/saml/ping-identity/setup-in-sq.md
# Source: https://docs.sonarsource.com/sonarqube-server/2025.1/instance-administration/authentication/saml/ms-entra-id/setup-in-sq.md
# Source: https://docs.sonarsource.com/sonarqube-server/2025.4/instance-administration/authentication/saml/ping-identity/setup-in-sq.md
# Source: https://docs.sonarsource.com/sonarqube-server/2025.4/instance-administration/authentication/saml/ms-entra-id/setup-in-sq.md
# Source: https://docs.sonarsource.com/sonarqube-server/2025.6/instance-administration/authentication/saml/ping-identity/setup-in-sq.md
# Source: https://docs.sonarsource.com/sonarqube-server/2025.6/instance-administration/authentication/saml/ms-entra-id/setup-in-sq.md
# Source: https://docs.sonarsource.com/sonarqube-server/instance-administration/authentication/saml/ping-identity/setup-in-sq.md
# Source: https://docs.sonarsource.com/sonarqube-server/instance-administration/authentication/saml/ms-entra-id/setup-in-sq.md
# Setup in SonarQube Server
This is the second step of SAML authentication setup with Microsoft Entra ID. For an overview of the complete setup, see [introduction](https://docs.sonarsource.com/sonarqube-server/instance-administration/authentication/saml/ms-entra-id/introduction "mention").
Proceed as follows:
1. Open MS Entra ID to prepare the copy-paste of single-sign-on settings in SonarQube Server.
2. Configure SAML in SonarQube Server.
### Open MS Entra ID
To prepare the copy-paste of single-sign-on settings in SonarQube Server:
1. In Microsoft Entra ID, go to **Identity** > **Applications** > **Enterprise applications** > **All applications and** select the application you created for SonarQube Server.
2. On the application’s page, select **Single sign-on**. You will need to retrieve values related to sections **1**, **2**, and **4**. In section **2**, select **Edit** first to open the **Attributes & Claims** page.
### Configure SonarQube Server
1. Go to **Administration** > **Configuration** > **General Settings** > **Authentication> SAML**.
2. Select **Create Configuration**.
3. Fill in the fields as explained in the table below.
Field in SonarQube Server
Description
Application ID
Value in MS Entra ID:In the Basic SAML Configuration section (1), value of the Identifier(Entity ID) field.
Provider ID
Value in MS Entra ID:In the Set up <applicationForSonarQubeServer> section (4), value of the Microsoft Entra ID Identifier field.
Provider Name
Name of the Identity Provider displayed in SonarQube Server login page when SAML authentication is active.
SAML Login URL
Value in MS Entra ID:In the Set up <applicationForSonarQubeServer> section (4), value of the Login URL field.
Identity provider certificate
Certificate downloaded from SonarQube app in Microsoft Entra ID1).
SAML user login attribute
Value in MS Entra ID:In the Attributes & Claims section (2), select Edit and retrieve the Claim name (URL type value) of the attribute to be used for Login.
For an example, see the SonarQube Server screenshot below.
SAML user name attribute
Value in MS Entra ID:In the Attributes & Claims section (2), select Edit and retrieve the Claim name (URL type value) of the attribute to be used for Name.
For an example, see the SonarQube Server screenshot below.
SAML user email attribute
Optional. Value in MS Entra ID:In the Attributes & Claims section (2), select Edit and retrieve the Claim name (URL type value) of the attribute to be used for email.
SAML group attribute
Optional (if you use the Just-in-Time provisioning’s group synchronization feature). Value in MS Entra ID:In the Attributes & Claims section (2), select Edit and retrieve the Claim name (URL type value) of the groups attribute.
1\) See [#configure-app](https://docs.sonarsource.com/sonarqube-server/instance-administration/authentication/saml/setup-in-entra-id#configure-app "mention").
Below is a SonarQube Server screenshot with SAML attribute value examples in SonarQube.
4. Save the configuration.
5. Before enabling SAML authentication on SonarQube Server, you can verify that the configuration is correct by selecting **Test Configuration**. This will initiate a SAML login and return useful information about the SAML response obtained from the identity provider.
6. Select **Enable configuration**.
7. Check that the SonarQube Server login form now contains a SAML login button. The text highlighed in the figure below can be configured through the **Provider Name** field of the SAML configuration in SonarQube Server.
### Related pages
* [overview](https://docs.sonarsource.com/sonarqube-server/instance-administration/authentication/saml/overview "mention")
* [setup-in-entra-id](https://docs.sonarsource.com/sonarqube-server/instance-administration/authentication/saml/ms-entra-id/setup-in-entra-id "mention")
* [optional-security-features](https://docs.sonarsource.com/sonarqube-server/instance-administration/authentication/saml/ms-entra-id/optional-security-features "mention")
* [scim-provisioning-with-azure-ad](https://docs.sonarsource.com/sonarqube-server/instance-administration/authentication/saml/scim/scim-provisioning-with-azure-ad "mention")
---
# Source: https://docs.sonarsource.com/sonarqube-cloud/administering-sonarcloud/managing-organization/setup-overview.md
# Organization setup overview
For the Single Sign-On (SSO) authentication, see [managing-enterprise](https://docs.sonarsource.com/sonarqube-cloud/administering-sonarcloud/managing-enterprise "mention").
To set up a new organization in SonarQube Cloud:
1. Select the [subscription-plans](https://docs.sonarsource.com/sonarqube-cloud/administering-sonarcloud/managing-subscription/subscription-plans "mention") you want to assign to your new SonarQube Cloud organization.
2. Import your DevOps platform organization (or workspace, group, etc.). The corresponding SonarQube Cloud organization is automatically created and is bound to the DevOps platform organization, see [binding-with-dop](https://docs.sonarsource.com/sonarqube-cloud/administering-sonarcloud/about-sonarqube-cloud-solution/ressources-structure/binding-with-dop "mention"). You’re granted Administer permission on the new organization.\
Refer to:
* [importing-github-organization](https://docs.sonarsource.com/sonarqube-cloud/administering-sonarcloud/managing-organization/creating-organization/importing-github-organization "mention")
* [importing-bitbucket-workspace](https://docs.sonarsource.com/sonarqube-cloud/administering-sonarcloud/managing-organization/creating-organization/importing-bitbucket-workspace "mention")
* [importing-gitlab-group](https://docs.sonarsource.com/sonarqube-cloud/administering-sonarcloud/managing-organization/creating-organization/importing-gitlab-group "mention")
* [importing-azure-devops-organization](https://docs.sonarsource.com/sonarqube-cloud/administering-sonarcloud/managing-organization/creating-organization/importing-azure-devops-organization "mention")
3. Set project configuration at the organization level. See [introduction](https://docs.sonarsource.com/sonarqube-cloud/administering-sonarcloud/managing-organization/setting-config-at-org-level/introduction "mention") to Performing global analysis setup.
4. Invite your DevOps platform organization users to sign up for SonarQube Cloud. Their SonarQube Cloud account will be automatically created.
5. If you use a GitHub platform with automatic member synchronization, the organization members are automatically synchronized in SonarQube Cloud. Otherwise, you must add the SonarQube Cloud users to your organization manually. See [organization-members](https://docs.sonarsource.com/sonarqube-cloud/administering-sonarcloud/managing-organization/users-and-permissions/organization-members "mention") for more information.
6. Manage the permissions of the users and groups. In particular:
* Create the user groups in your organization. See [user-groups](https://docs.sonarsource.com/sonarqube-cloud/administering-sonarcloud/managing-organization/users-and-permissions/user-groups "mention") for more details.
* Define the users and groups that can create projects in the organization. See [organization-members](https://docs.sonarsource.com/sonarqube-cloud/administering-sonarcloud/managing-organization/users-and-permissions/organization-members "mention") for more information.
* Verify the default permissions on new projects. See [templates](https://docs.sonarsource.com/sonarqube-cloud/administering-sonarcloud/managing-organization/manage-org-projects/manage-project-permissions/templates "mention") for more details.
7. Authorized organization members can now create projects. See [setting-up-project](https://docs.sonarsource.com/sonarqube-cloud/managing-your-projects/administering-your-projects/setting-up-project "mention") for more information.
8. Set up a dedicated [security-contact](https://docs.sonarsource.com/sonarqube-cloud/administering-sonarcloud/managing-organization/creating-organization/security-contact "mention") for urgent, security-related communications.
---
# Source: https://docs.sonarsource.com/sonarqube-for-eclipse/connect-your-ide/setup.md
# Source: https://docs.sonarsource.com/sonarqube-for-visual-studio/connect-your-ide/setup.md
# Source: https://docs.sonarsource.com/sonarqube-for-intellij/connect-your-ide/setup.md
# Source: https://docs.sonarsource.com/sonarqube-for-vs-code/connect-your-ide/setup.md
# Source: https://docs.sonarsource.com/sonarqube-server/2025.6/instance-administration/system-functions/notifications/slack/setup.md
# Source: https://docs.sonarsource.com/sonarqube-server/instance-administration/system-functions/notifications/slack/setup.md
# Source: https://docs.sonarsource.com/sonarqube-cloud/administering-sonarcloud/managing-enterprise/enterprise-security/sso/setup.md
# Source: https://docs.sonarsource.com/sonarqube-cloud/administering-sonarcloud/managing-organization/connecting-to-slack/setup.md
# Setting up the connection to Slack
{% stepper %}
{% step %}
#### **Log in to SonarQube Cloud** [**through this page**](https://sonarcloud.io/login?return_to=%2Foauth-callback%2Fslack%3Fredirect_uri%3Dhttps%253A%252F%252Fslack.com%252Foauth%252Fv2%252Fauthorize%253Fclient_id%253D3702920631.9467182584262%2526redirect_uri%253Dhttps%253A%252F%252Fslack.com%252Foauth%252Fv2%252Fauthorize%253Fclient_id%253D3702920631.9467182584262%2526scope%253Dchannels%253Aread%252Cchat%253Awrite%252Ccommands%252Cgroups%253Aread%252Cmpim%253Aread%252Cchat%253Awrite.public%2526user_scope%253D%2526redirect_uri%253Dhttps%253A%252F%252Fsonarcloud.io%252Foauth-callback%252Fslack%26_gl%3D1*10nfome*_gcl_au*MTg4ODI3Nzk5Mi4xNzYyNTEzNTE3*_ga*MTMxMzk4MzAwMi4xNzU0NDc5Nzgz*_ga_9JZ0GZ5TC6*czE3NjMzODA3OTkkbzg3JGcxJHQxNzYzMzgxNjgxJGo1NCRsMCRoMA\&error=authentication\&skipRegionSelection=true)
This will allow SonarQube Cloud to connect your SonarQube Cloud account to your Slack account.\
Once you've successfully logged in to SonarQube Cloud, you'll be redirected to the Slack app installation page as illustrated below.
{% endstep %}
{% step %}
#### Finish the installation
1. In **Workspace**, select your Slack workspace. You must be an admin of the workspace.
2. Review the app permissions in the right section.
3. Select **Install SonarQube**.
{% endstep %}
{% step %}
#### Users can now subscribe to notifications
Users can subscribe to SonarQube Cloud notifications directly within their Slack account: see [subscribing-to-slack-notifications](https://docs.sonarsource.com/sonarqube-cloud/managing-your-account/subscribing-to-slack-notifications "mention").
{% endstep %}
{% endstepper %}
{% hint style="info" %}
Check out this video on how to benefit from the Slack integration.
{% embed url="" %}
{% endhint %}
### Related pages
* [integration-overview](https://docs.sonarsource.com/sonarqube-cloud/administering-sonarcloud/managing-organization/connecting-to-slack/integration-overview "mention")
* [subscribing-to-slack-notifications](https://docs.sonarsource.com/sonarqube-cloud/managing-your-account/subscribing-to-slack-notifications "mention")
---
# Source: https://docs.sonarsource.com/sonarqube-server/2025.6/analyzing-source-code/languages/shell.md
# Source: https://docs.sonarsource.com/sonarqube-server/analyzing-source-code/languages/shell.md
# Source: https://docs.sonarsource.com/sonarqube-cloud/advanced-setup/languages/shell.md
# Shell
### Language-specific properties
You can discover and update the Shell-specific [properties](https://docs.sonarsource.com/sonarqube-cloud/advanced-setup/analysis-parameters) in: **Administration** > **General Settings** > **Languages** > **Shell.**
### Supported languages and syntaxes
The analyzer is designed to analyze Bash and POSIX shell scripts, which are the only officially supported shell flavors.
However, analysis for other shell flavors (e.g. `ksh`, `zsh`) is also possible. This support is partial, and the analyzer will perform best on scripts that use syntax compatible with or similar to POSIX and Bash. You may encounter parsing errors when analyzing scripts that rely on features or syntaxes specific to other shells. This may lead to raising issues unrelated to your shell flavor.
### Troubleshooting
**Some files are not analyzed or issues are missing**
The Shell analyzer processes files in size-based batches, and each batch is given an adaptive timeout to ensure the overall project analysis completes in a timely manner. If you notice that some files are not being analyzed or issues are missing, it is likely that one or more of these batches has timed out. When a batch times out, the analysis of files within that specific batch is skipped, and the scan continues with the next batch.
You can increase the baseline timeout value, which gives each batch more time to complete. This property can be adjusted in the UI:
1. Go to **Administration** > **General Settings** > **Declarative Rule Engine**.
2. Find the `sonar.dre.baselineTimeout` property and increase its value.
The property can be specified during the scanner invocation as well.
---
# Source: https://docs.sonarsource.com/sonarqube-cloud/getting-started/sign-up.md
# Signing up and onboarding
This page is directed at administrators when onboarding their first DevOps platform organization. For sign-in instructions, see [signing-in](https://docs.sonarsource.com/sonarqube-cloud/managing-your-account/signing-in "mention").
When you first sign up for SonarQube Cloud, you have to choose which DevOps platform you want to connect to.
Then sign into SonarQube Cloud with your existing credentials on that service (there is no such thing as a SonarQube Cloud-only account). Your SonarQube Cloud account will be created and bound to your account on the DevOps platform. For more information, see [Authentication](https://www.sonarsource.com/trust-center/#authentication) in the Trust Center.
At this point, you can import organizations from your DevOps platform to SonarQube Cloud and then import repositories from those organizations. Each imported organization becomes a SonarQube Cloud organization and each imported repository becomes a SonarQube Cloud project. Once you import a project, it appears in your **My Projects** list.
### Related pages
* [github](https://docs.sonarsource.com/sonarqube-cloud/getting-started/github "mention")
* [bitbucket-cloud](https://docs.sonarsource.com/sonarqube-cloud/getting-started/bitbucket-cloud "mention")
* [gitlab](https://docs.sonarsource.com/sonarqube-cloud/getting-started/gitlab "mention")
* [azure-devops](https://docs.sonarsource.com/sonarqube-cloud/getting-started/azure-devops "mention")
---
# Source: https://docs.sonarsource.com/sonarqube-cloud/managing-your-account/signing-in.md
# Signing in to SonarQube Cloud
You may sign in to SonarQube Cloud [via your DevOps platform service](https://www.sonarsource.com/trust-center/#authentication) (GitHub, Bitbucket, GitLab, or Azure DevOps) or, if the Single Sign-On (SSO) authentication is set up in your enterprise, through SSO. There is no such thing as a SonarQube Cloud-only account.
{% hint style="info" %}
SonarQube Cloud doesn’t simultaneously support two accounts with the same email address. If you already have a SonarQube Cloud account and want to sign in to SonarQube Cloud with another DevOps platform account associated with the same email address, SonarQube Cloud will warn you that doing so will dissociate your first account from SonarQube Cloud (Signing in again with this account will re-associate it).
{% endhint %}
{% hint style="info" %}
If you no longer have access to the DevOps platform account or associated e-mail address that was used to sign in to SonarQube Cloud, you will not be able to restore your account and will have to create a new one.
{% endhint %}
### Signing in via your DevOps platform service
When you sign in for the first time, your SonarQube Cloud account is created and bound to your account on the DevOps platform.
#### Prerequisites for your DevOps account's email address
To use all the features of SonarQube Cloud, the email address in your DevOps account must be verified. If it’s not the case, you’ll face the inability to join an organization, be assigned issues, receive notifications, or import an organization.
For Azure DevOps users:
* SonarQube Cloud considers an email address as verified if its domain has been verified in Microsoft Entra ID.
* If it’s not the case, a one-time email address verification is required. SonarQube Cloud provides guidance through this email verification process during your initial sign-up.
For other users, check your DevOps platform’s documentation for email verification steps. For GitHub users, see [Verifying your email address](https://docs.github.com/en/account-and-profile/how-tos/setting-up-and-managing-your-personal-account-on-github/managing-email-preferences/verifying-your-email-address#verifying-your-email-address).
#### Signing in
To sign in to SonarQube Cloud via your DevOps platform service:
1. Go to . The SonarQube Cloud login page is displayed.
2. Select your DevOps platform. You’re redirected to your DevOps platform login page.
3. Enter your existing credentials on that DevOps platform service.
### Signing in with SSO
If single sign-on (SSO) has been set up for your SonarQube Cloud enterprise, you can log in to SonarQube Cloud with SSO. In most cases, your administrator has shared an SSO link with you. If not, you can log in from the main login page, but you need to know the key that identifies your enterprise in SonarQube Cloud. See [setting-up-sso](https://docs.sonarsource.com/sonarqube-cloud/getting-started-with-enterprise/setting-up-sso "mention") for additional information.
{% hint style="info" %}
In systems using SAML SSO, a one-time email address verification is required. SonarQube Cloud provides guidance through this email verification process during your initial sign-up (or during sign-in if your account existed before this feature implementation).
{% endhint %}
#### With the SSO login link
1. Select the SSO login link sent to you by your administrator. The **Log in with SSO** page is displayed and your organization key is prefilled (the key that identifies your organization in SonarQube Cloud).
2. Bookmark the link for future logins.
3. Select **Log in**.
#### From the main login page
1. Go to . The SonarQube Cloud login page is displayed.
2. Select **Log in with SSO**. The **Log in with SSO** dialog is displayed
3. Enter your enterprise key and select the **Log in** button.
### Signing out
To sign out from SonarQube Cloud:
1. Select your account menu in the top right corner of the SonarQube Cloud interface.
2. In the menu, select **Log out**.
---
# Source: https://docs.sonarsource.com/sonarqube-cloud/administering-sonarcloud/managing-subscription/signing-up-for-plan.md
# Signing up for a plan
For information about the different subscription plans, see [subscription-plans](https://docs.sonarsource.com/sonarqube-cloud/administering-sonarcloud/managing-subscription/subscription-plans "mention"). If you want to sign up for a commercial plan, you'll have to select the number of lines of code (LOC) you want to purchase within your subscription. For more information, see [#loc-based-pricing](https://docs.sonarsource.com/sonarqube-cloud/administering-sonarcloud/subscription-plans#loc-based-pricing "mention").
### Signing up for Free
1. Create your organization in SonarQube Cloud, either by importing a DevOps platform organization or by creating an organization manually. Refer to:
* [importing-github-organization](https://docs.sonarsource.com/sonarqube-cloud/administering-sonarcloud/managing-organization/creating-organization/importing-github-organization "mention")
* [importing-bitbucket-workspace](https://docs.sonarsource.com/sonarqube-cloud/administering-sonarcloud/managing-organization/creating-organization/importing-bitbucket-workspace "mention")
* [importing-gitlab-group](https://docs.sonarsource.com/sonarqube-cloud/administering-sonarcloud/managing-organization/creating-organization/importing-gitlab-group "mention")
* [importing-azure-devops-organization](https://docs.sonarsource.com/sonarqube-cloud/administering-sonarcloud/managing-organization/creating-organization/importing-azure-devops-organization "mention")
* [creating-organization-manually](https://docs.sonarsource.com/sonarqube-cloud/administering-sonarcloud/managing-organization/creating-organization/creating-organization-manually "mention")
2. In the **Create an organization** page, enter the organization details.
3. Choose the Free plan by selecting the **Select free** button in the **Free** section.
3. Verify the selected plan and select the **Create Organization** button.
### Signing up for Team
For the Team plan, you can use different billing methods: monthly, with a credit card, or yearly, with a coupon. See [billing-model](https://docs.sonarsource.com/sonarqube-cloud/administering-sonarcloud/managing-subscription/billing-model "mention") for more information.
This procedure explains how to sign up for the Team plan when the organization is created. You can also sign up for the Team plan by upgrading a Free plan organization or downgrading an Enterprise plan organization. See [changing-plan](https://docs.sonarsource.com/sonarqube-cloud/administering-sonarcloud/managing-subscription/changing-plan "mention") for more details.
Monthly subscription
1. Create your organization in SonarQube Cloud, either by importing a DevOps platform organization or by creating an organization manually. Refer to:
* [importing-github-organization](https://docs.sonarsource.com/sonarqube-cloud/administering-sonarcloud/managing-organization/creating-organization/importing-github-organization "mention")
* [importing-bitbucket-workspace](https://docs.sonarsource.com/sonarqube-cloud/administering-sonarcloud/managing-organization/creating-organization/importing-bitbucket-workspace "mention")
* [importing-gitlab-group](https://docs.sonarsource.com/sonarqube-cloud/administering-sonarcloud/managing-organization/creating-organization/importing-gitlab-group "mention")
* [importing-azure-devops-organization](https://docs.sonarsource.com/sonarqube-cloud/administering-sonarcloud/managing-organization/creating-organization/importing-azure-devops-organization "mention")
* [creating-organization-manually](https://docs.sonarsource.com/sonarqube-cloud/administering-sonarcloud/managing-organization/creating-organization/creating-organization-manually "mention")
2. In the **Create an organization** page, enter the organization details.
3. Choose the Team plan by selecting the **Get 14-day trial** button in the **Team** section.
4. In **Lines of code**, select the Lines of Code (LOC threshold) for the organization in the drop-down list. See [#loc-based-pricing](https://docs.sonarsource.com/sonarqube-cloud/administering-sonarcloud/subscription-plans#loc-based-pricing "mention") for more information.
5. Select **Continue to billing information**.
6. In **Billing information**, enter your billing information.
7. Select **Continue to payment information**.
8. In **Payment information**, enter your credit card information.
9. Select **Create Organization and Upgrade**.
Yearly or custom subscription
1. Contact our sales team to purchase a yearly or custom coupon for the selected number of lines of code.
2. Perform as described above in [#monthly-subscription](#monthly-subscription "mention") untill step 4.
3. Once you have selected the number of lines of code, select the **I already purchased a coupon** link.
4. Enter your coupon and select **Apply coupon**.
### Signing up for Enterprise
To create your enterprise, you need to purchase a license. Each organization you add to your enterprise is assigned the Enterprise plan. See [setting-up-your-enterprise](https://docs.sonarsource.com/sonarqube-cloud/getting-started-with-enterprise/setting-up-your-enterprise "mention") for more information.
{% hint style="info" %}
The Enterprise's add-ons require a separate subscription to your Enterprise license.
{% endhint %}
### Signing up for OSS
1. Create your organization in SonarQube Cloud, either by importing a DevOps platform organization or by creating an organization manually. Refer to:
* [importing-github-organization](https://docs.sonarsource.com/sonarqube-cloud/administering-sonarcloud/managing-organization/creating-organization/importing-github-organization "mention")
* [importing-bitbucket-workspace](https://docs.sonarsource.com/sonarqube-cloud/administering-sonarcloud/managing-organization/creating-organization/importing-bitbucket-workspace "mention")
* [importing-gitlab-group](https://docs.sonarsource.com/sonarqube-cloud/administering-sonarcloud/managing-organization/creating-organization/importing-gitlab-group "mention")
* [importing-azure-devops-organization](https://docs.sonarsource.com/sonarqube-cloud/administering-sonarcloud/managing-organization/creating-organization/importing-azure-devops-organization "mention")
* [creating-organization-manually](https://docs.sonarsource.com/sonarqube-cloud/administering-sonarcloud/managing-organization/creating-organization/creating-organization-manually "mention")
2. In the **Create an organization** page, enter the organization details.
3. Choose the OSS plan by selecting the **Get SonarQube for OSS** link in the **Are you part of an open source organization?** section, under the other plan options.
4. Verify the selected plan and select the **Create Organization** button.
### Related pages
* [subscription-plans](https://docs.sonarsource.com/sonarqube-cloud/administering-sonarcloud/managing-subscription/subscription-plans "mention")
* [billing-model](https://docs.sonarsource.com/sonarqube-cloud/administering-sonarcloud/managing-subscription/billing-model "mention")
* [changing-plan](https://docs.sonarsource.com/sonarqube-cloud/administering-sonarcloud/managing-subscription/changing-plan "mention")
* [updating-billing-payment-details](https://docs.sonarsource.com/sonarqube-cloud/administering-sonarcloud/managing-subscription/updating-billing-payment-details "mention")
* [viewing-billing-and-usage](https://docs.sonarsource.com/sonarqube-cloud/administering-sonarcloud/managing-subscription/viewing-billing-and-usage "mention")
* [viewing-taxes-and-invoices](https://docs.sonarsource.com/sonarqube-cloud/administering-sonarcloud/managing-subscription/viewing-taxes-and-invoices "mention")
---
# Source: https://docs.sonarsource.com/sonarqube-server/2025.6/instance-administration/system-functions/notifications/slack.md
# Source: https://docs.sonarsource.com/sonarqube-server/2025.6/user-guide/managing-your-account/subscribing-to-notifications/slack.md
# Source: https://docs.sonarsource.com/sonarqube-server/instance-administration/system-functions/notifications/slack.md
# Source: https://docs.sonarsource.com/sonarqube-server/user-guide/managing-your-account/subscribing-to-notifications/slack.md
# Subscribing to Slack notifications
Once your Slack workspace administrator [has connected the workspace to SonarQube Server](https://docs.sonarsource.com/sonarqube-server/instance-administration/system-functions/notifications/slack/setup), you can subscribe to Slack notifications for your project. Follow the steps below to subscribe to your project in the Slack channel of your choice.
{% hint style="info" %}
In the following sections, you will need to execute the required operation by entering a slash command starting with `/sonarqube-server`. **If your Slack workspace is connected to multiple SonarQube Server instances**, your administrator may have configured for your instance a custom slash command, like `/sonarqube-server-2`, which you will need to use instead. For more information, consult your administrator.
{% endhint %}
{% hint style="warning" %}
If your organization uses Slack Enterprise and the SonarQube Server app for Slack is already installed on a different workspace, you might see the app in your workspace even if it hasn't been installed there yet. \
If you install the app via a `@SonarQube Server` command or directly from the Slack app configuration page in this state, the app will install on your workspace but will not function correctly.\
The SonarQube Server app for Slack must be installed directly through SonarQube Server (see [setup](https://docs.sonarsource.com/sonarqube-server/instance-administration/system-functions/notifications/slack/setup "mention")). If you are unsure about your installation status, please consult your administrator.
{% endhint %}
### Step 1: Log in to the SonarQube Server app for Slack
Logging in to the SonarQube Server app for Slack connects your Slack account to your SonarQube Server account. You only need to do this once.
To log in to the SonarQube Server app for Slack:
1. In your Slack workspace, go to **Apps** and open the **SonarQube Server** app.
2. In the **Messages** tab, type `/sonarqube-server connect`. You will be prompted to connect your SonarQube Server account to Slack.
### Step 2: Prepare the channel to be used for subscription
You must select the Slack channel to be used to receive your project’s notifications. You can create a new one. Note that:
* All channel members will receive the SonarQube Server notifications.
* You can use the same channel to receive the notifications on different projects distributed across various organizations.
* You may need specific permissions to add the app to private channels.
If your Slack channel is private, you need to add the SonarQube Server app for Slack to your channel:
1. In your Slack workspace, navigate to your private channel.
2. In the private channel, type `/invite @SonarQube Server`.
### Step 3: Subscribe your channel to your project
Make sure that you have the Browse permission on the project in SonarQube Server.
{% hint style="warning" %}
All channel members will receive the SonarQube Server notifications on your project.
{% endhint %}
To subscribe your channel to your project:
1. In SonarQube Server, copy your project key. You'll find the project key in the **Project Information** page as illustrated below.
2. In your Slack workspace, navigate to the channel in which you want to enable the subscription.
3. In the channel, type `/sonarqube-server subscribe ` .
### Unsubscribing a channel from a project
To unsubscribe a channel from a project, you need the Browse permission on the project in SonarQube Server.
{% hint style="warning" %}
Unsubscribing a channel from a project disables the subscription for all members of the channel.
{% endhint %}
To unsubscribe a channel from a project:
1. In SonarQube Server, copy the project key. You'll find the project key in the **Project Information** page.
2. In your Slack workspace, navigate to the channel subscribed to your project.
3. In the channel, type `/sonarqube-server unsubscribe `.
### Relates pages
[setup](https://docs.sonarsource.com/sonarqube-server/instance-administration/system-functions/notifications/slack/setup "mention")\
[about](https://docs.sonarsource.com/sonarqube-server/instance-administration/system-functions/notifications/slack/about "mention")
---
# Source: https://docs.sonarsource.com/sonarqube-community-build/user-guide/rules/software-qualities.md
# Source: https://docs.sonarsource.com/sonarqube-for-eclipse/using/software-qualities.md
# Source: https://docs.sonarsource.com/sonarqube-for-visual-studio/using/software-qualities.md
# Source: https://docs.sonarsource.com/sonarqube-for-intellij/using/software-qualities.md
# Source: https://docs.sonarsource.com/sonarqube-for-vs-code/using/software-qualities.md
# Source: https://docs.sonarsource.com/sonarqube-server/10.4/user-guide/clean-code/software-qualities.md
# Source: https://docs.sonarsource.com/sonarqube-server/10.5/user-guide/clean-code/software-qualities.md
# Source: https://docs.sonarsource.com/sonarqube-server/10.6/user-guide/clean-code/software-qualities.md
# Source: https://docs.sonarsource.com/sonarqube-server/10.7/core-concepts/clean-code/software-qualities.md
# Source: https://docs.sonarsource.com/sonarqube-server/10.8/core-concepts/clean-code/software-qualities.md
# Source: https://docs.sonarsource.com/sonarqube-server/2025.2/user-guide/rules/software-qualities.md
# Source: https://docs.sonarsource.com/sonarqube-server/2025.3/user-guide/rules/software-qualities.md
# Source: https://docs.sonarsource.com/sonarqube-server/2025.5/user-guide/rules/software-qualities.md
# Source: https://docs.sonarsource.com/sonarqube-server/2025.1/user-guide/rules/software-qualities.md
# Source: https://docs.sonarsource.com/sonarqube-server/2025.4/user-guide/rules/software-qualities.md
# Source: https://docs.sonarsource.com/sonarqube-server/2025.6/user-guide/rules/software-qualities.md
# Source: https://docs.sonarsource.com/sonarqube-server/user-guide/rules/software-qualities.md
# Source: https://docs.sonarsource.com/sonarqube-cloud/digging-deeper/software-qualities.md
# Software qualities
High quality code contributes to software that is secure, reliable, and maintainable. These three aspects - security, reliability, and maintainability - are called software qualities in SonarQube and they contribute to the long-term value of your software.
### Security
Security is the protection of your software from unauthorized access, use, or destruction.
### Reliability
Reliability is a measure of how your software is capable of maintaining its level of performance under stated conditions for a stated period of time.
### Maintainability
Maintainability refers to the ease with which you can repair, improve and understand software code.
### Severity at the software quality level
| **Severity** | **Definition** |
| ------------ | ------------------------------------------------------------------------------------------------------------------------------------------------------------------------------------------------------------------------------------------------------------------------------ |
| Blocker | An issue that has a significant probability of severe unintended consequences on the application that should be fixed immediately. This includes bugs leading to production crashes and security flaws allowing attackers to extract sensitive data or execute malicious code. |
| High | An issue with a high impact on the application that should be fixed as soon as possible. |
| Medium | An issue with a medium impact. |
| Low | An issue with a low impact. |
| Info | There is no expected impact on the application. For informational purposes only. |
### Code analysis
The Sonar automated code review aims to identify any issue in your code. Each code attribute is evaluated, for a given language, based on a series of rules.
* Each rule is associated with one or more software qualities (security, reliability, or maintainability).
* Each associated software quality is assigned a severity (blocker, high, medium, low, or info). This severity determines how much that software quality is impacted when the rule is broken.
When a rule is broken, an issue is raised. The issue affects one or more software qualities with varying severity as inherited from the rule.
### Related pages
* [rules](https://docs.sonarsource.com/sonarqube-cloud/digging-deeper/rules "mention")
* [introduction](https://docs.sonarsource.com/sonarqube-cloud/managing-your-projects/issues/introduction "mention") to managing your code issues
---
# Source: https://docs.sonarsource.com/sonarqube-community-build/user-guide/issues/solution-overview.md
# Source: https://docs.sonarsource.com/sonarqube-server/10.6/user-guide/issues/solution-overview.md
# Source: https://docs.sonarsource.com/sonarqube-server/10.7/user-guide/issues/solution-overview.md
# Source: https://docs.sonarsource.com/sonarqube-server/10.8/user-guide/issues/solution-overview.md
# Source: https://docs.sonarsource.com/sonarqube-server/2025.2/user-guide/issues/solution-overview.md
# Source: https://docs.sonarsource.com/sonarqube-server/2025.3/user-guide/issues/solution-overview.md
# Source: https://docs.sonarsource.com/sonarqube-server/2025.5/user-guide/issues/solution-overview.md
# Source: https://docs.sonarsource.com/sonarqube-server/2025.1/user-guide/issues/solution-overview.md
# Source: https://docs.sonarsource.com/sonarqube-server/2025.4/user-guide/issues/solution-overview.md
# Source: https://docs.sonarsource.com/sonarqube-server/2025.6/user-guide/issues/solution-overview.md
# Source: https://docs.sonarsource.com/sonarqube-server/user-guide/issues/solution-overview.md
# Source: https://docs.sonarsource.com/sonarqube-cloud/managing-your-projects/issues/solution-overview.md
# Issue management solution
This page explains how SonarQube Cloud identifies, assigns, and synchronizes issues. Information is included about issue lifecycles and also explains issue-related features and concepts.
### Issue identification and assignment by SonarQube Cloud
For each code file:
1. SonarQube Cloud checks if the file has been renamed.
2. SonarQube Cloud determines:
* Whether an issue found during the current analysis is new or existed previously.
* If an issue found during the previous analysis has been fixed.
3. For each new issue:
* SonarQube Cloud determines and sets the issue date. The issue date is the analysis date except in some cases where issue backdating to the line commit date is necessary.
* SonarQube Cloud tries to automatically assign the issue to an appropriate SonarQube Cloud user.
#### Method used to identify if an issue is new
SonarQube (Server, Cloud) use the same algorithm to determine whether an issue is new or existed previously:
* For each issue found in the file from the previous analysis, it compares it to each issue found in this file during the current analysis:
* If there is no match then it considers the issue as Fixed.
* If there is a match and the issue status is Fixed in the previous analysis then it reopens the issue.
* For each issue found in the file during the current analysis, if there is no matching issue in the file from the previous analysis then it is considered new.
This algorithm relies on the issue’s line hash. The line hash is calculated based on the content of the first line the issue is reported on, excluding the white spaces.
The figure below shows the comparison process between two issues.
* If the issue is on the same rule, with the same line hash (but not necessarily with the same message) : MATCH
* If the issue is on the same rule, on the same line number with the same message (but not necessarily with the same line hash): MATCH
* If the issue is on the same rule but the detected block moved inside the file, then if the issue is on the same line within the moved block, and has the same message: MATCH
#### Issue backdating (new issues raised on old code)
In some corner cases, new issues or issues that didn’t exist in the previous analysis, may be detected on old code or code outside of the new code definition period. See [about-new-code](https://docs.sonarsource.com/sonarqube-cloud/standards/about-new-code "mention") for more details. This may be the case, for instance, if the issue has existed in code for a long time but was only found in the most recent analysis because new rules were added to the quality profile. In such cases, SonarQube Cloud doesn’t apply the analysis date as the issue date but uses backdating so that it can correctly identify whether the new issue is to be reported on new code or old code (overall code).
If the date of the last change to the line is available then SonarQube Cloud will backdate to this date an issue identified as new in the following cases:
* On the first analysis of a project or branch.
* When the rule is new in the quality profile (a brand new rule activated or a rule that was deactivated and is now activated) or when a rule parameter was changed.
* When SonarQube Cloud has just been upgraded because rule implementations could be smarter now.
* When the rule is external, rule managed and applied by an external, third-party analyzer.
* Previously excluded files are now analyzed.
{% hint style="warning" %}
During a pull request analysis, new issues on old code are not reported since only new code issues are reported. It means that the first analysis on the target branch after the merge may report new issues on old code that were not reported by the pull request analysis.
{% endhint %}
#### Automatic issue assignment
SonarQube Cloud automatically assigns an issue during analysis to the last committer on the issue line - called issue author - if the author can be correlated to a SonarQube Cloud user.
Login and email correlations between SCM account and SonarQube Cloud user are made automatically. For example, if the user commits with their email address and that email address is part of their SonarQube Cloud user profile, then new issues raised on lines where the user was the last committer will be automatically assigned to the user.
{% hint style="info" %}
* Currently, issues on any level above a file, for example, issues reported at a directory or project level, cannot be automatically assigned.
* If the SCM login associated with an issue is longer than 255 characters including the characters for an issue author, the author will be left blank.
{% endhint %}
### Issue life cycle
An issue can have one of the following statuses:
* **Open**: initial value after the first analysis. A user can reopen an **Accepted** or **False positive** issue.
* **Accepted**: set by an authorized user if they decide to fix the issue later or not fix the issue. \
SonarQube Cloud ignores **Accepted** issues in the ratings of the code but displays the number of **Accepted** issues in the various analysis snapshots.
* **False positive:** set by an authorized user if the analysis is mistaken. \
SonarQube Cloud ignores **False positive** issues in the quality reports and the ratings of the code.
* **Fixed**: set by SonarQube Cloud after a subsequent analysis if the previously open issue has been fixed in the code (is no longer being detected). \
SonarQube Cloud purges **Fixed** issues after 30 days.
{% hint style="info" %}
If users tend to mark a lot of issues as **False positive**, it means that some coding rules are not appropriate for the project. In that case, rules can be deactivated in quality profiles or the analysis scope of the project can be adjusted to exclude files. See [editing-a-custom-quality-profile](https://docs.sonarsource.com/sonarqube-cloud/standards/managing-quality-profiles/editing-a-custom-quality-profile "mention") and the [setting-analysis-scope](https://docs.sonarsource.com/sonarqube-cloud/managing-your-projects/project-analysis/setting-analysis-scope "mention") pages for more information.
{% endhint %}
The figure below shows the issue life cycle.
---
# Source: https://docs.sonarsource.com/sonarqube-cloud/advanced-setup/ci-based-analysis/sonarcloud-extension-for-azure-devops.md
# Azure DevOps Extension
{% hint style="info" %}
**4.0.1** *2025-12-10*
* Rotation of binary signing keys
[**Download**](https://marketplace.visualstudio.com/items?itemName=SonarSource.sonarqube) [Release notes](https://sonarsource.atlassian.net/issues?jql=project%20%3D%2010078%20AND%20fixversion%20%3D%20sq-8.0.1)
{% endhint %}
The [Azure DevOps extension for SonarQube Cloud](https://marketplace.visualstudio.com/items?itemName=SonarSource.sonarcloud) makes it easy to integrate analysis into your Azure build pipeline. The extension allows the analysis of all languages supported by SonarQube Cloud. For more information, see [azure-pipelines-integration-overview](https://docs.sonarsource.com/sonarqube-cloud/advanced-setup/ci-based-analysis/azure-pipelines/azure-pipelines-integration-overview "mention") page.
This page explains how to install the extension. Once you have [setting-up-project](https://docs.sonarsource.com/sonarqube-cloud/managing-your-projects/administering-your-projects/setting-up-project "mention"), you can add your SonarQube analyses to your [azure-pipelines](https://docs.sonarsource.com/sonarqube-cloud/advanced-setup/ci-based-analysis/azure-pipelines "mention").
### Installation requirements
Category
Requirement
Azure DevOps
The extension will work with:
• Azure DevOps Services
Azure pipeline agents
The extension will work with all of the hosted agents (Windows, Linux, and macOS):
• If you are using Microsoft-hosted agents, there is nothing else to install.
• If you are self-hosting the agents, check that at least the minimal version of Java supported by SonarQube Cloud is installed. In addition, make sure the appropriate build tools are installed on the agent for the type of project you are analyzing. For example, .NET Framework v4.6.2+/NET Core 3.1+ if building using MSBuild, Maven for Java projects, etc.
The minimum agent version for @4 tasks of the Azure DevOps extension for SonarQube Cloud is 3.218.0.
Allowed websites
In order to download binaries and communicate with SonarQube Cloud, the following URLs should be allow listed:
• sonarcloud.io
• If using the Maven/Gradle mode or not using the default version of SonarScanner for .NET or CLI: the Sonar binaries site (binaries.sonarsource.com).
### Installing the extension
1. Sign in to your Azure DevOps Services organization with the dedicated technical account you created when [importing-azure-devops-organization](https://docs.sonarsource.com/sonarqube-cloud/administering-sonarcloud/managing-organization/creating-organization/importing-azure-devops-organization "mention").
2. From the Visual Studio Marketplace, install the [Azure DevOps extension for SonarQube Cloud](https://marketplace.visualstudio.com/items?itemName=SonarSource.sonarcloud) by selecting the **Get it free** button.
### If upgrading from a previous version of the extension
#### Smooth migration
The latest version of the Azure DevOps extension for SonarQube embeds the latest version of SonarScanner for .NET and SonarScanner CLI. However, to allow a smooth migration, you can set up your Azure build pipeline to use a previous version of one of these scanners and thus, continue using a previous SonarQube tasks version until you’re ready to upgrade. See the [#specific-scanner-version](https://docs.sonarsource.com/sonarqube-cloud/advanced-setup/azure-pipelines/adding-analysis-to-build-pipeline/various-features#specific-scanner-version "mention") article.
{% hint style="info" %}
In that case, the Sonar binaries site (`binaries.sonarsource.com`) must be allow listed.
{% endhint %}
#### Prepare analysis configuration task: new scanner mode values
Allowable values for the `scannerMode` required property of the [#prepare-analysis-configuration](https://docs.sonarsource.com/sonarqube-cloud/advanced-setup/azure-pipelines/sonarqube-tasks#prepare-analysis-configuration "mention") have changed with the v3 extension. Please use the following in your @4 tasks:
* `dotnet` for the .NET mode
* `cli` for the CLI mode
* `other` for the Maven / Gradle mode
#### Deprecation notices
* Version @3 tasks were deprecated in v4.0 of the extension and will be dropped in a subsequent release.
* Version @1 and @2 tasks were dropped in v4.0 of the extension.
### Previous versions
As new scanner versions are released, previous requirements and/or deprecations will be listed here.
Azure DevOps extension v3.x.x for SonarQube Cloud
* The minimum Azure pipeline agents version for @3 tasks of the Azure DevOps extension for SonarQube Cloud is 3.218.0.
* Version @2 tasks were deprecated in v3.0 and will be dropped in a subsequent release.
Azure DevOps extension v2.2.x for SonarQube Cloud
Because the current versions of the [sonarscanner-for-dotnet](https://docs.sonarsource.com/sonarqube-cloud/advanced-setup/ci-based-analysis/sonarscanner-for-dotnet "mention") or [sonarscanner-cli](https://docs.sonarsource.com/sonarqube-cloud/advanced-setup/ci-based-analysis/sonarscanner-cli "mention") scanners are embedded, some additional setup may be required depending on your configuration.
* The SonarScanner for .NET has a new parameter for scanning multiple languages. The [#multi-language-analysis](https://docs.sonarsource.com/sonarqube-cloud/advanced-setup/sonarscanner-for-dotnet/configuring#multi-language-analysis "mention") article has full details.
* If you want to specify the exact .NET or CLI scanner version, use the `msBuildVersion` and `cliVersion` properties. See the [#prepare-analysis-configuration](https://docs.sonarsource.com/sonarqube-cloud/advanced-setup/azure-pipelines/sonarqube-tasks#prepare-analysis-configuration "mention") article for details.
When specifying a particular scanner version, internet access is required by the pipelines calling the .NET or CLI scanners:
* Access to [github.com](http://github.com/) is required to download previous versions of the SonarScanner for .NET; see the [installing](https://docs.sonarsource.com/sonarqube-cloud/advanced-setup/ci-based-analysis/sonarscanner-for-dotnet/installing "mention") page. If you are allow listing [sonarcloud.io](http://sonarcloud.io/), GitHub and its HTTP redirect, `objects.githubusercontent.com`, should also be allow listed.
* Access to [binaries.sonarsource.com](http://binaries.sonarsource.com/) is required to download previous versions of the [sonarscanner-cli](https://docs.sonarsource.com/sonarqube-cloud/advanced-setup/ci-based-analysis/sonarscanner-cli "mention"). If you are allow-listing [sonarcloud.io](http://sonarcloud.io/), the Sonar binaries should also be allow listed.
For users running on-premise or using self-hosted agents, the minimum Azure pipeline agents version for SonarCloud v2 tasks is 3.218.0.
**in v2.0.1**
* Version @1 tasks were deprecated and will be dropped in a subsequent release.
Azure DevOps extension for SonarQube Cloud v1.x.x
From version 1.0 of the Azure DevOps extension, the extension was fully rewritten in Node.js which means that analyses can be triggered on Linux and macOS agents. The mono dependency was dropped in version 1.3; this is not possible when using previous versions of the extension.
For users running on-premise or using self-hosted agents, the minimum Azure pipeline agents version for SonarCloud v1 tasks is 2.114.0.
---
# Source: https://docs.sonarsource.com/sonarqube-cloud/advanced-setup/ci-based-analysis/sonarcloud-extension-for-jenkins.md
# Jenkins Extension
SonarScanner for Jenkins — 2.18 | Issue Tracker
**2.18** **2025-01-28**\ Minor updates\
[Download](https://plugins.jenkins.io/sonar/)\
\
[Release notes](https://sonarsource.atlassian.net/issues/?jql=project%20%3D%2010138%20AND%20fixVersion%20%3D%2015464)
***
**2.17.3** **2024-11-18**\ Update dependencies to improve security\
[Download](https://plugins.jenkins.io/sonar/)\
\
[Release notes](https://sonarsource.atlassian.net/issues/?jql=project%20%3D%2010138%20AND%20fixVersion%20%3D%2016121)
***
**2.17.2** **2024-02-19**\ Fix withSonarQubeEnv step hanging when the workspace contains a symlink\
[Download](https://plugins.jenkins.io/sonar/)\
\
[Release notes](https://sonarsource.atlassian.net/issues/?jql=project%20%3D%2010138%20AND%20fixVersion%20%3D%2015473)
***
**2.16.1** **2023-10-10**\ Bug fixes\
[Download](https://plugins.jenkins.io/sonar/)\
\
[Release notes](https://sonarsource.atlassian.net/issues/?jql=project%20%3D%2010138%20AND%20fixVersion%20%3D%2015332)
***
**2.16** **2023-09-27**\ Use the sonar.token property\
[Download](https://plugins.jenkins.io/sonar/)\
\
[Release notes](https://sonarsource.atlassian.net/issues/?jql=project%20%3D%2010138%20AND%20fixVersion%20%3D%2013951)
***
**2.15** **2022-11-22**\ Fixed out of memory when querying deleted projects\
[Download](https://plugins.jenkins.io/sonar/)\
\
[Release notes](https://sonarsource.atlassian.net/issues/?jql=project%20%3D%2010138%20AND%20fixVersion%20%3D%2013860)
***
**2.14** **2021-11-18**\ Prepare SonarQube Scanner for core Guava upgrade\
[Download](https://plugins.jenkins.io/sonar/)\
\
[Release notes](https://sonarsource.atlassian.net/issues/?jql=project+%3D+10138+AND+fixVersion+%3D+12438)
***
**2.13.1** **2021-04-30**\ Update dependencies\
[Download](https://plugins.jenkins.io/sonar/)\
\
[Release notes](https://sonarsource.atlassian.net/issues/?jql=project+%3D+10138+AND+fixVersion+%3D+12437)
***
**2.12** **2020-09-07**\ Improve use of SonarQube configuration, bug fixes\
[Download](https://plugins.jenkins.io/sonar/)\
\
[Release notes](https://sonarsource.atlassian.net/issues/?jql=project+%3D+10138+AND+fixVersion+%3D+12435)
***
**2.11** **2020-01-06**\ Improvements for Jenkins Configuration as Code\
[Download](https://plugins.jenkins.io/sonar/)\
\
[Release notes](https://sonarsource.atlassian.net/issues/?jql=project+%3D+10138+AND+fixVersion+%3D+12434)
***
**2.10** **2019-10-19**\ Add webhook validation based on a shared secret\
[Download](https://plugins.jenkins.io/sonar/)\
\
[Release notes](https://sonarsource.atlassian.net/issues/?jql=project+%3D+10138+AND+fixVersion+%3D+12433)
You can trigger SonarQube Cloud analysis from Jenkins using standard Jenkins Build Steps or [Jenkins Pipeline DSL](https://jenkins.io/solutions/pipeline/) to trigger analysis with the SonarScanner. Once the job is complete, the extension will detect that an analysis was made during the build and display a badge and a widget on the job page with a link to the SonarQube Cloud dashboard as well as quality gate status.
See:
* [key-features](https://docs.sonarsource.com/sonarqube-cloud/advanced-setup/ci-based-analysis/jenkins/key-features "mention") of the SonarQube Cloud integration with Jenkins
* [global-setup](https://docs.sonarsource.com/sonarqube-cloud/advanced-setup/ci-based-analysis/jenkins/global-setup "mention") for SonarQube Cloud integration
* [add-analysis-to-job](https://docs.sonarsource.com/sonarqube-cloud/advanced-setup/ci-based-analysis/jenkins/add-analysis-to-job "mention")
* [pipeline-pause](https://docs.sonarsource.com/sonarqube-cloud/advanced-setup/ci-based-analysis/jenkins/pipeline-pause "mention") until the quality gate is computed
---
# Source: https://docs.sonarsource.com/sonarqube-server/9.8/user-guide/sonarlint-connected-mode.md
# Source: https://docs.sonarsource.com/sonarqube-server/9.9/user-guide/sonarlint-connected-mode.md
# Source: https://docs.sonarsource.com/sonarqube-server/10.0/user-guide/sonarlint-connected-mode.md
# Source: https://docs.sonarsource.com/sonarqube-server/10.1/user-guide/sonarlint-connected-mode.md
# Source: https://docs.sonarsource.com/sonarqube-server/10.2/user-guide/sonarlint-connected-mode.md
# Source: https://docs.sonarsource.com/sonarqube-server/10.3/user-guide/sonarlint-connected-mode.md
# Source: https://docs.sonarsource.com/sonarqube-server/10.4/user-guide/sonarlint-connected-mode.md
# Source: https://docs.sonarsource.com/sonarqube-server/10.5/user-guide/sonarlint-connected-mode.md
# Source: https://docs.sonarsource.com/sonarqube-server/10.6/user-guide/sonarlint-connected-mode.md
# Source: https://docs.sonarsource.com/sonarqube-server/10.7/user-guide/sonarlint-connected-mode.md
# Source: https://docs.sonarsource.com/sonarqube-server/10.8/user-guide/sonarlint-connected-mode.md
# Connected mode
SonarQube for IDE is your first line of defense in keeping your code clean. Connected mode binds your SonarQube (Server, Cloud) project to a project open in SonarQube for IDE so that you can catch issues immediately, even before you commit them.
SonarQube for IDE is a free IDE extension that integrates with SonarQube (Server, Cloud) using connected mode. Like a spell checker, SonarQube for IDE highlights issues as you type. When an issue is identified, SonarQube for IDE provides you with clear remediation guidance so you can fix it before the code is even committed. In many cases, it also provides a *quick fix* that can automatically fix the issue for you.
{% tabs %}
{% tab title="INTELLIJ" %}
SonarQube for IDE integrates with most JetBrains IDEs including IntelliJ IDEA, CLion, GoLand, WebStorm, PHPStorm, PyCharm, Rider, Android Studio & RubyMine.
* [Feature overview](https://www.sonarsource.com/products/sonarlint/features/jetbrains/)
* [Installation](https://app.gitbook.com/s/NvI4wotPmITyM0mnsmtp/getting-started/installation "mention") instructions
* Supported [Rules and languages](https://app.gitbook.com/s/NvI4wotPmITyM0mnsmtp/using/rules "mention")
* [Connected mode setup](https://docs.sonarsource.com/sonarqube-for-intellij/connect-your-ide/setup) and list of [Connected mode](https://docs.sonarsource.com/sonarqube-for-intellij/connect-your-ide/connected-mode) benefits.
* [Download](https://plugins.jetbrains.com/plugin/7973-sonarlint)
{% endtab %}
{% tab title="VISUAL STUDIO" %}
SonarQube for IDE provides Visual Studio developers with a comprehensive in-IDE solution for improving the quality and security of the code they deliver.
* [Feature overview](https://www.sonarsource.com/products/sonarlint/features/visual-studio/)
* [Installation](https://app.gitbook.com/s/5CSDwdOaYoOAGYNiRqgl/getting-started/installation "mention") instructions
* Supported [Rules and languages](https://app.gitbook.com/s/5CSDwdOaYoOAGYNiRqgl/using/rules "mention")
* [Connected mode setup](https://docs.sonarsource.com/sonarqube-for-visual-studio/connect-your-ide/setup) and list of [Connected mode](https://docs.sonarsource.com/sonarqube-for-visual-studio/connect-your-ide/connected-mode) benefits.
* Downloads for:
* [VS-2022](https://marketplace.visualstudio.com/items?itemName=SonarSource.SonarLintforVisualStudio2022)
* [VS-2019](https://marketplace.visualstudio.com/items?itemName=SonarSource.SonarLintforVisualStudio2019)
* [VS-2017](https://marketplace.visualstudio.com/items?itemName=SonarSource.SonarLintforVisualStudio2017)
{% endtab %}
{% tab title="VS CODE" %}
SonarQube for VS Code will automatically identify and fix quality and security issues as you code with enhanced linting capabilities directly in your VS Code IDE.
* [Feature overview](https://www.sonarsource.com/products/sonarlint/features/vs-code/)
* [Installation](https://app.gitbook.com/s/6LPRABg3ubAJhpfR5K0Y/getting-started/installation "mention") instructions
* Supported [Rules and languages](https://app.gitbook.com/s/6LPRABg3ubAJhpfR5K0Y/using/rules "mention")
* [Connected mode setup](https://docs.sonarsource.com/sonarqube-for-vs-code/connect-your-ide/setup) and list of [Connected mode](https://docs.sonarsource.com/sonarqube-for-vs-code/connect-your-ide/connected-mode) benefits.
* [Download](https://marketplace.visualstudio.com/items?itemName=SonarSource.sonarlint-vscode)
{% endtab %}
{% tab title="ECLIPSE" %}
SonarQube for Eclipse will automatically identify and fix quality and security issues as you code with enhanced linting capabilities right in your Eclipse IDE.
* [Feature overview](https://www.sonarsource.com/products/sonarlint/features/eclipse/)
* [Installation](https://app.gitbook.com/s/kadXEH8HkykK7lKaDvVq/getting-started/installation "mention") instructions
* Supported [Rules and languages](https://app.gitbook.com/s/kadXEH8HkykK7lKaDvVq/using/rules "mention")
* [Connected mode setup](https://docs.sonarsource.com/sonarqube-for-eclipse/connect-your-ide/setup) and list of [Connected mode](https://docs.sonarsource.com/sonarqube-for-eclipse/connect-your-ide/connected-mode) benefits.
* [Download](https://marketplace.eclipse.org/content/sonarlint)
{% endtab %}
{% endtabs %}
**Shared code quality and security expectations**
When using SonarQube for IDE without connected mode, a default quality profile is applied and users can customize their own ruleset. If you’re using a different [quality-profiles](https://docs.sonarsource.com/sonarqube-server/10.8/instance-administration/analysis-functions/quality-profiles "mention") in SonarQube (Server, Cloud), you may see new issues in SonarQube (Server, Cloud) even though your commit looked clean in SonarQube for IDE. With connected mode, the quality profile defined in SonarQube (Server, Cloud) is also applied to your IDE, and you’re notified in your IDE when your local instance isn’t meeting the project’s [quality-gates](https://docs.sonarsource.com/sonarqube-server/10.8/instance-administration/analysis-functions/quality-gates "mention") standards.
Additional code quality and security benefits include sharing the SonarQube (Server, Cloud) settings with all team members, guaranteeing that every developer is connected to the same profile.
**More security**
When using SonarQube for IDE alone, taint analysis issues found by commercial editions of SonarQube Server aren’t raised in SonarQube for IDE for performance reasons (we don’t want to slow down your editing). In connected mode, you’ll see the taint analysis issues SonarQube (Server, Cloud) raised in your project. You’ll get all of the context in your IDE that you need to triage and fix security problems thereby making sure the code you commit is safe.
**Using the Open in IDE feature**
When using Connected Mode with SonarLint for IntelliJ, Visual Studio, VS Code, or Eclipse, it’s possible to use the **Open in IDE** button to open most all issues in the code editor, speeding up the time it takes to find and fix the issue. Simply click the **Open in IDE** button from SonarQube to view it in your IDE; you’ll be prompted to set up Connected Mode if the project is not already bound.
Opening Security hotspots using the **Open in IDE** feature is available for all of the supported IDEs. See [#opening-in-ide](https://docs.sonarsource.com/sonarqube-server/10.8/issues/fixing#opening-in-ide "mention") for more details.
### SonarQube for IDE - SonarQube Server version support policy
SonarQube for IDE enables users to establish a connection to the latest SonarQube Server version and to the latest LTA (Long-Term Active) version. When a new LTA version is released, we still enable connecting SonarQube for IDE to the previous LTA version for a certain period of time (currently 9 months after the latest LTA release) to allow enough time for organizations to update their SonarQube Server version.
For more information about long-term support of SonarQube Server, check out our page describing the [active-versions](https://docs.sonarsource.com/sonarqube-server/10.8/server-upgrade-and-maintenance/upgrade/upgrade-the-server/active-versions "mention"). Review your SonarQube for IDE-specific requirements for version-to-version differences.
{% hint style="warning" %}
*The 8.9LTA reached its support expiration date (in November ’23)*.
{% endhint %}
### Setting up connected mode
See the following links for instructions on setting up connected mode for each supported IDE:
* [Connected mode setup](https://docs.sonarsource.com/sonarqube-for-intellij/connect-your-ide/setup) in SonarQube for IntelliJ
* [Connected mode setup](https://docs.sonarsource.com/sonarqube-for-visual-studio/connect-your-ide/setup) in SonarQube for Visual Studio
* [Connected mode setup](https://docs.sonarsource.com/sonarqube-for-vs-code/connect-your-ide/setup) in SonarQube for VS Code
* [Connected mode setup](https://docs.sonarsource.com/sonarqube-for-eclipse/connect-your-ide/setup) in SonarQube for Eclipse
### Understanding SonarQube for IDE usage
SonarQube Server Instance Admins can get an overview of users’ usage of SonarQube for IDE by going to **Administration** > **Security** > **Users.**
The **Last SonarQube for IDE connection** column indicates the last time the user used SonarQube for IDE in connected mode.
You can filter users based on their activity. The available options are:
* **All users**
* **Active users with SonarQube for IDE**: users of SonarQube for IDE in connected mode who were active at least once in the past 30 days.
* **Active users without SonarQube for IDE**: users who have connected to SonarQube Server at least once in the past 30 days.
* **Inactive users**: users who have not connected to SonarQube Server or used SonarQube for IDE in connected mode in the past 30 days.
### Smart notifications
Connected mode allows SonarQube (Server, Cloud) to send smart alerts to individuals or teams when new issues are discovered. With everyone in the loop, issues can be addressed promptly, improving the overall software quality and delivery. You’ll receive smart notifications in your IDE when:
* the [quality-gates](https://docs.sonarsource.com/sonarqube-server/10.8/instance-administration/analysis-functions/quality-gates "mention") status of a project *open in your IDE* changes
* a SonarQube Server analysis raises new issues *that you’ve introduced in a project open in your IDE*
You can activate or deactivate smart notifications in SonarQube for IDE on the IDE side on a server-by-server basis.
### Reviewing issues in your IDE
Seeing an issue directly in the IDE can help you better understand its context. This is the purpose of the **Open in IDE** button that you’ll see as an authenticated user.
This feature is available if you’re using a compatible version and flavor of SonarQube for IDE. The project must be open in the appropriate IDE and bound to the server using connected mode. To learn more about managing issues locally, please check the SonarQube for IDE documentation for your IDE
* [Investigating issues](https://app.gitbook.com/s/NvI4wotPmITyM0mnsmtp/using/investigating-issues "mention")
* [Investigating issues](https://app.gitbook.com/s/5CSDwdOaYoOAGYNiRqgl/using/investigating-issues "mention")
* [Investigating issues](https://app.gitbook.com/s/6LPRABg3ubAJhpfR5K0Y/using/investigating-issues "mention")
* [Investigating issues](https://app.gitbook.com/s/kadXEH8HkykK7lKaDvVq/using/investigating-issues "mention")
Keep in mind that the revision or branch analyzed by SonarQube (Server, Cloud) may not be the same as what you have opened in the IDE. In this case, SonarQube for IDE will do its best to locate the issue in your local code.
### Troubleshooting unexpected analysis results Unexpected analysis results
Observing different analysis results between SonarQube (Server, Cloud) and SonarQube for IDE can have different causes.
**Some issues might be detected by a third-party**
Due to extensive resource requirements, injection vulnerability and some advanced bug detection rules are ignored by SonarQube for IDE. Please check the analyzer (PMD, Checkstyle, ESLint, PyLint, …). SonarQube for IDE will only run [rules from Sonar analyzers](https://rules.sonarsource.com/) including [custom rules extending Sonar analyzers](https://docs.sonarsource.com/sonarqube-server/10.8/extension-guide/adding-coding-rules). Third-party analyzers usually have their own IDE integration, so we have no plan to run them in SonarQube for IDE.
**Your test files might be mistaken as source files**
Test files can be defined on the server or in the IDE and when running in connected mode, these test sources will be used by SonarQube for IDE. Each SonarQube for IDE flavor has its own way of detecting which file is considered a test file; in SonarQube for IntelliJ, you must define your test files as a [Test Sources Root](https://www.jetbrains.com/help/idea/testing.html#add-test-root). To define test files on the server, please see the [analysis-scope](https://docs.sonarsource.com/sonarqube-server/10.8/project-administration/analysis-scope "mention") page to set the scope of your analysis.
**Some complex rules are not run in SonarQube for IDE**
Due to extensive resource requirements, injection vulnerabilities and some advanced bug detection rules are ignored by SonarQube for IDE. Please check the [SonarQube for IDE roadmap](https://www.sonarsource.com/products/sonarlint/roadmap/) for a list of features and enhancements on the horizon.
**Only line-level issues are reported**
Some rules are able to report issues at the project level. Such issues are not displayed in SonarQube Server for IDE, only in [security-related-rules](https://docs.sonarsource.com/sonarqube-server/10.8/user-guide/rules/security-related-rules "mention").
**When analyzing Java files, the analyzer might need some context for some issues to be found**
In IntelliJ, there is no incremental compilation of the .class files found in the compiler output folder; these are only produced or refreshed when the project is built. The workaround is to simply build your project with the green hammer (when using SonarQube for IntelliJ) in the top-right toolbar. The project should be built on a regular basis to keep the compiled files up-to-date and overcome this [known limitation](https://sonarsource.atlassian.net/browse/SLI-488).
---
# Source: https://docs.sonarsource.com/sonarqube-server/8.9/user-guide/sonarlint-smart-notifications.md
# SonarLint smart notifications
Smart notifications allow developers using Connected Mode in SonarLint to receive in-IDE notifications from SonarQube when:
* the Quality Gate status (failed / success) of a project /solution *open in the IDE* changes
* a SonarQube analysis raises new issues *introduced by this developer in a project /solution open in the IDE*
### Activate/deactivate notifications
The activation or deactivation of notifications must be done individually, by each developer directly in SonarLint (on the IDE side).
Receiving notifications is configurable on the SonarLint side on a SonarQube server-by-server basis.
---
# Source: https://docs.sonarsource.com/sonarqube-community-build/server-update-and-maintenance/maintenance/sonarqube-db-copy-tool.md
# Source: https://docs.sonarsource.com/sonarqube-server/8.9/instance-administration/sonarqube-db-copy-tool.md
# Source: https://docs.sonarsource.com/sonarqube-server/9.8/instance-administration/sonarqube-db-copy-tool.md
# Source: https://docs.sonarsource.com/sonarqube-server/9.9/instance-administration/sonarqube-db-copy-tool.md
# Source: https://docs.sonarsource.com/sonarqube-server/10.0/instance-administration/sonarqube-db-copy-tool.md
# Source: https://docs.sonarsource.com/sonarqube-server/10.1/instance-administration/sonarqube-db-copy-tool.md
# Source: https://docs.sonarsource.com/sonarqube-server/10.2/instance-administration/sonarqube-db-copy-tool.md
# Source: https://docs.sonarsource.com/sonarqube-server/10.3/instance-administration/sonarqube-db-copy-tool.md
# Source: https://docs.sonarsource.com/sonarqube-server/10.4/instance-administration/sonarqube-db-copy-tool.md
# Source: https://docs.sonarsource.com/sonarqube-server/10.5/instance-administration/sonarqube-db-copy-tool.md
# Source: https://docs.sonarsource.com/sonarqube-server/10.6/instance-administration/sonarqube-db-copy-tool.md
# Source: https://docs.sonarsource.com/sonarqube-server/10.7/server-upgrade-and-maintenance/maintenance/sonarqube-db-copy-tool.md
# Source: https://docs.sonarsource.com/sonarqube-server/10.8/server-upgrade-and-maintenance/maintenance/sonarqube-db-copy-tool.md
# Source: https://docs.sonarsource.com/sonarqube-server/2025.2/server-update-and-maintenance/maintenance/sonarqube-db-copy-tool.md
# Source: https://docs.sonarsource.com/sonarqube-server/2025.3/server-update-and-maintenance/maintenance/sonarqube-db-copy-tool.md
# Source: https://docs.sonarsource.com/sonarqube-server/2025.5/server-update-and-maintenance/maintenance/sonarqube-db-copy-tool.md
# Source: https://docs.sonarsource.com/sonarqube-server/2025.1/server-update-and-maintenance/maintenance/sonarqube-db-copy-tool.md
# Source: https://docs.sonarsource.com/sonarqube-server/2025.4/server-update-and-maintenance/maintenance/sonarqube-db-copy-tool.md
# Source: https://docs.sonarsource.com/sonarqube-server/2025.6/server-update-and-maintenance/maintenance/sonarqube-db-copy-tool.md
# Source: https://docs.sonarsource.com/sonarqube-server/server-update-and-maintenance/maintenance/sonarqube-db-copy-tool.md
# Migrating database
Download the [SonarQube DB Copy Tool](https://binaries.sonarsource.com/CommercialDistribution/sonar-db-copy/sonar-db-copy-1.6.0.2092-jar-with-dependencies.jar).
We provide SonarQube DB Copy Tool to help you migrate your SonarQube Server database from one database vendor to another. For example, if you’ve been using your SonarQube Server instance with Oracle and want to migrate to PostgreSQL, the **SonarQube DB Copy Tool** will help. DB Copy is preferred for database migration because it does SonarQube-specific checks, ensures data consistency, and outputs meaningful logs.
On this page, *source* refers to your current database and *target* refers to the database you are moving to.
{% hint style="info" %}
After completing the migration, your SonarQube Server ID will change, which invalidates your current license key. For details on how to avoid license invalidation or how to renew your license, see [license-administration](https://docs.sonarsource.com/sonarqube-server/instance-administration/license-administration "mention").
{% endhint %}
### 1. DB Copy - preparation phase
DB Copy only copies data, not the schema. This is why the purpose of this step is to populate *target* with an empty SonarQube schema. For this, you have to install a temporary SonarQube Server instance.
{% hint style="info" %}
As creating the database schema is a quick operation, you don’t need to provision a specific server to do this. A workstation or any non-production server with Java 17 available would be enough.
{% endhint %}
1. Make sure you can connect to your *target* database.
2. Install a SonarQube Server that matches the version and edition of your *source* instance:
* For a ZIP installation (for more information, see [basic-installation](https://docs.sonarsource.com/sonarqube-server/server-installation/from-zip-file/basic-installation "mention")):
1. Download the distribution.
2. Unzip and put it in a relevant place on the machine.
3. Configure SonarQube Server to connect to your *target* database (ie. provide JDBC parameters in the `/conf/sonar.properties` file).
4. Start SonarQube Server using the script matching your operating system. See [from-zip-file](https://docs.sonarsource.com/sonarqube-server/server-installation/from-zip-file/starting-stopping-server/from-zip-file "mention") for more details.
* For a Docker installation:
1. Follow the steps in Docker [prepare-installation](https://docs.sonarsource.com/sonarqube-server/server-installation/from-docker-image/prepare-installation "mention") by configuring SonarQube Server to connect to your *target* database.
2. [set-up-and-start-container](https://docs.sonarsource.com/sonarqube-server/server-installation/from-docker-image/set-up-and-start-container "mention").
3. Verify that the SonarQube schema was correctly created. To do this, look at the `logs/web.log` file to see the line *"Executed DB migrations: success"*. Once this is done, it means that your *target* database had been populated with the SonarQube schema.
4. Stop SonarQube Server:
* For a ZIP installation: see [starting-stopping-server](https://docs.sonarsource.com/sonarqube-server/server-installation/from-zip-file/starting-stopping-server "mention").
5. You can now delete this temporary SonarQube Server instance.
### 2. DB Copy - execution phase
Because this step is about copying data from *source* to *target*, the overall performance makes a difference. Make sure you execute this on a powerful machine that has fast network access to both database servers.
1. Unzip the DB Copy package provided by Sonar Support on the machine where it will be executed. Java is required.
2. Stop the SonarQube Server instance connected to your *source* database. This is to ensure that we don’t have records being inserted/updated while copying.
3. Execute the base command with the correct parameters. See below how to do it.
4. If you see something else other than the success message \*\**THE COPY HAS FINISHED SUCCESSFULLY\*\** please open a [Sonar Support Ticket](https://help.sonarsource.com/) and provide the complete DB Copy logs for investigation (logs are just the standard output of the tool).
#### Base command and parameters
**Migrating with an Oracle database**
If you wish to migrate with an Oracle database, you need to include the Oracle driver in the classpath so it is available to the sonar-db-copy tool. In this case, the syntax is:
```css-79elbk
java -cp ojdbc11-21.8.0.0.jar:sonar-db-copy-1.6.0.2092.jar com.sonar.dbcopy.StartApp
```
{% hint style="warning" %}
On Windows, the classpath arguments separator is a semicolon (;), while on a Unix system (like in the example) it is a colon (:).
{% endhint %}
**Migrating with all other databases**
If you are not migrating from or to an Oracle database, then the syntax is:
```css-79elbk
java -jar sonar-db-copy-1.6.0.2092-jar-with-dependencies.jar
```
| | | |
| -------------------- | --------------------------------- | ------------ |
| **Parameter** | **Description** | **Required** |
| `-help` | Print this help information | no |
| `-urlSrc JDBC_URL` | JDBC URL of the *source* database | yes |
| `-userSrc USERNAME` | Username of the *source* database | yes |
| `-pwdSrc PASSWORD` | Password of the *source* database | yes |
| `-urlDest JDBC_URL` | JDBC URL of the *target* database | yes |
| `-userDest USERNAME` | Username of the *target* database | yes |
| `-pwdDest PASSWORD` | Password of the *target* database | yes |
Here is an example of a copy from an Oracle to a Postgres database. Note that each parameter is on one line and there are \ (backslash) characters to continue the command. While this works on most shell command-line interpreters, it is not necessarily the case. Use only one line and remove backslashes in that case.
```css-79elbk
java \
-cp ojdbc11-21.8.0.0.jar:sonar-db-copy-1.6.0.2092.jar com.sonar.dbcopy.StartApp \
-urlSrc jdbc:oracle:thin:@10.18.51.1:1521/XEPDB1 \
-userSrc sonar \
-pwdSrc 05xlAz1EhgQb9Pl8 \
-urlDest jdbc:postgresql://10.10.1.138/sonarqube \
-userDest sonar \
-pwdDest Ck23L1OpqF4BdwJv
```
---
# Source: https://docs.sonarsource.com/sonarqube-community-build/analyzing-source-code/scanners/sonarqube-extension-for-azure-devops.md
# Source: https://docs.sonarsource.com/sonarqube-server/9.8/analyzing-source-code/scanners/sonarqube-extension-for-azure-devops.md
# Source: https://docs.sonarsource.com/sonarqube-server/9.9/analyzing-source-code/scanners/sonarqube-extension-for-azure-devops.md
# Source: https://docs.sonarsource.com/sonarqube-server/10.0/analyzing-source-code/scanners/sonarqube-extension-for-azure-devops.md
# Source: https://docs.sonarsource.com/sonarqube-server/10.1/analyzing-source-code/scanners/sonarqube-extension-for-azure-devops.md
# Source: https://docs.sonarsource.com/sonarqube-server/10.2/analyzing-source-code/scanners/sonarqube-extension-for-azure-devops.md
# Source: https://docs.sonarsource.com/sonarqube-server/10.3/analyzing-source-code/scanners/sonarqube-extension-for-azure-devops.md
# Source: https://docs.sonarsource.com/sonarqube-server/10.4/analyzing-source-code/scanners/sonarqube-extension-for-azure-devops.md
# Source: https://docs.sonarsource.com/sonarqube-server/10.5/analyzing-source-code/scanners/sonarqube-extension-for-azure-devops.md
# Source: https://docs.sonarsource.com/sonarqube-server/10.6/analyzing-source-code/scanners/sonarqube-extension-for-azure-devops.md
# Source: https://docs.sonarsource.com/sonarqube-server/10.7/analyzing-source-code/scanners/sonarqube-extension-for-azure-devops.md
# Source: https://docs.sonarsource.com/sonarqube-server/10.8/analyzing-source-code/scanners/sonarqube-extension-for-azure-devops.md
# Source: https://docs.sonarsource.com/sonarqube-server/2025.2/analyzing-source-code/scanners/sonarqube-extension-for-azure-devops.md
# Source: https://docs.sonarsource.com/sonarqube-server/2025.3/analyzing-source-code/scanners/sonarqube-extension-for-azure-devops.md
# Source: https://docs.sonarsource.com/sonarqube-server/2025.5/analyzing-source-code/scanners/sonarqube-extension-for-azure-devops.md
# Source: https://docs.sonarsource.com/sonarqube-server/2025.1/analyzing-source-code/scanners/sonarqube-extension-for-azure-devops.md
# Source: https://docs.sonarsource.com/sonarqube-server/2025.4/analyzing-source-code/scanners/sonarqube-extension-for-azure-devops.md
# Source: https://docs.sonarsource.com/sonarqube-server/2025.6/analyzing-source-code/scanners/sonarqube-extension-for-azure-devops.md
# Source: https://docs.sonarsource.com/sonarqube-server/analyzing-source-code/scanners/sonarqube-extension-for-azure-devops.md
# Azure DevOps Extension
SonarScanner for Azure DevOps — 8.0.1 | Issue Tracker
**8.0.1** **2025-12-10**\ Rotation of binary signing keys\
[Download](https://marketplace.visualstudio.com/items?itemName=SonarSource.sonarqube)\
\
[Release notes](https://sonarsource.atlassian.net/issues?jql=project%20%3D%2010078%20AND%20fixversion%20%3D%20sq-8.0.1)
***
**8.0.0** **2025-12-08**\ Update scanner for .NET to 11.0.0 and CLI to 8.0.0\
[Download](https://marketplace.visualstudio.com/items?itemName=SonarSource.sonarqube)\
\
[Release notes](https://sonarsource.atlassian.net/issues/?jql=project%20%3D%2010078%20AND%20fixversion%20%3D%20sq-8.0.0)
***
**7.4.2** **2025-11-05**\ Update marketplace documentation\
[Download](https://marketplace.visualstudio.com/items?itemName=SonarSource.sonarqube)\
\
[Release notes](https://sonarsource.atlassian.net/issues/?jql=project%20%3D%2010078%20AND%20fixversion%20%3D%20sq-7.4.2)
***
**7.4.1** **2025-08-07**\ Update tasks to Node 20+\
[Download](https://marketplace.visualstudio.com/items?itemName=SonarSource.sonarqube)\
\
[Release notes](https://sonarsource.atlassian.net/issues/?jql=project%20%3D%2010078%20AND%20fixversion%20%3D%20sq-7.4.1)
***
**7.3** **2025-04-23**\ Bump Scanner for .NET to 10.1.2.114627\
[Download](https://marketplace.visualstudio.com/items?itemName=SonarSource.sonarqube)\
\
[Release notes](https://sonarsource.atlassian.net/issues/?jql=project%20%3D%2010078%20AND%20fixVersion%20%3D%2018869)
***
**7.2** **2025-04-09**\ Bump Scanner for .NET to 10.1.0.110937\
[Download](https://marketplace.visualstudio.com/items?itemName=SonarSource.sonarqube)\
\
[Release notes](https://sonarsource.atlassian.net/issues/?jql=project%20%3D%2010078%20AND%20fixVersion%20%3D%2016144)
***
**7.1.1** **2024-11-26**\ Bump Scanner for .NET to 9.0.2.104486\
[Download](https://marketplace.visualstudio.com/items?itemName=SonarSource.sonarqube)\
\
[Release notes](https://sonarsource.atlassian.net/issues/?jql=project%20%3D%2010078%20AND%20fixVersion%20%3D%2016127)
***
**7.1.0** **2024-11-19**\ Align with SonarQube rebranding\
[Download](https://marketplace.visualstudio.com/items?itemName=SonarSource.sonarqube)\
\
[Release notes](https://sonarsource.atlassian.net/issues/?jql=project%20%3D%2010078%20AND%20fixVersion%20%3D%2016109)
***
**7.0.4** **2024-11-12**\ Fix PR decorations for dark mode\
[Download](https://marketplace.visualstudio.com/items?itemName=SonarSource.sonarqube)\
\
[Release notes](https://sonarsource.atlassian.net/issues/?jql=project%20%3D%2010078%20AND%20fixVersion%20%3D%2016079)
***
**7.0.3** **2024-10-29**\ Bump Scanner for .NET 9.0.1 & Fix missing translation messages\
[Download](https://marketplace.visualstudio.com/items?itemName=SonarSource.sonarqube)\
\
[Release notes](https://sonarsource.atlassian.net/issues/?jql=project%20%3D%2010078%20AND%20fixVersion%20%3D%2016078)
***
**7.0.2** **2024-10-22**\ Fix windows path parsing coming from predefined variables correctly in extraProperties\
[Download](https://marketplace.visualstudio.com/items?itemName=SonarSource.sonarqube)\
\
[Release notes](https://sonarsource.atlassian.net/issues/?jql=project%20%3D%2010078%20AND%20fixVersion%20%3D%2016073)
***
**7.0.1** **2024-10-21**\ Fix .NET Framework scanner embedding logic.\
[Download](https://marketplace.visualstudio.com/items?itemName=SonarSource.sonarqube)\
\
[Release notes](https://sonarsource.atlassian.net/issues/?jql=project%20%3D%2010078%20AND%20fixVersion%20%3D%2016068)
***
**7.0.0** **2024-10-21**\ .NET analysis defaults to Scanner for .NET v9 with multi-language analysis. Embeds scanner-CLI v6.2.1 with JRE auto-provisioning.\
[Download](https://marketplace.visualstudio.com/items?itemName=SonarSource.sonarqube)\
\
[Release notes](https://sonarsource.atlassian.net/issues/?jql=project%20%3D%2010078%20AND%20fixVersion%20%3D%2015852)
***
**6.2.0** **2024-07-01**\ Default scanners are embedded for offline use\
[Download](https://marketplace.visualstudio.com/items?itemName=SonarSource.sonarqube)\
\
[Release notes](https://sonarsource.atlassian.net/issues/?jql=project%20%3D%2010078%20AND%20fixVersion%20%3D%2015754)
***
**6.1.0** **2024-06-18**\ Scanner CLI now defaults to v6\
[Download](https://marketplace.visualstudio.com/items?itemName=SonarSource.sonarqube)\
\
[Release notes](https://sonarsource.atlassian.net/issues/?jql=project%20%3D%2010078%20AND%20fixVersion%20%3D%2015740)
***
**6.0.1** **2024-06-10**\ Deprecate the old SonarQube v5 tasks with proper warnings\
[Download](https://marketplace.visualstudio.com/items?itemName=SonarSource.sonarqube)\
\
[Release notes](https://sonarsource.atlassian.net/issues/?jql=project%20%3D%2010078%20AND%20fixVersion%20%3D%2015684)
***
**6.0.0** **2024-05-31**\ New V6 task with configurable scanner version, Drop of V3 tasks, bump of agent requirements for V4 tasks\
[Download](https://marketplace.visualstudio.com/items?itemName=SonarSource.sonarqube)\
\
[Release notes](https://sonarsource.atlassian.net/issues/?jql=project%20%3D%2010078%20AND%20fixVersion%20%3D%2015492)
***
**5.20.0** **2024-04-15**\ Support for JDK 21 and Bump to Scanner for .NET 5.15.1 (fix for .NET 8 on MacOS)\
[Download](https://marketplace.visualstudio.com/items?itemName=SonarSource.sonarqube)\
\
[Release notes](https://sonarsource.atlassian.net/issues/?jql=project%20%3D%2010078%20AND%20fixVersion%20%3D%2015558)
***
**5.19.2** **2024-03-11**\ Ignore specified JDK 11 if SonarQube does not support it\
[Download](https://marketplace.visualstudio.com/items?itemName=SonarSource.sonarqube)\
\
[Release notes](https://sonarsource.atlassian.net/issues/?jql=project%20%3D%2010078%20AND%20fixVersion%20%3D%2015528)
***
**5.19.1** **2024-03-04**\ Reintroduce compatibility for v4 tasks with node6\
[Download](https://marketplace.visualstudio.com/items?itemName=SonarSource.sonarqube)\
\
[Release notes](https://sonarsource.atlassian.net/issues/?jql=project%20%3D%2010078%20AND%20fixVersion%20%3D%2015517)
***
**5.19.0** **2024-01-24**\ PRs show issues that will be fixed by the merge & Accepted, Retry mechanism during publish polling to tolerate unstable network conditions.\
[Download](https://marketplace.visualstudio.com/items?itemName=SonarSource.sonarqube)\
\
[Release notes](https://sonarsource.atlassian.net/issues/?jql=project%20%3D%2010078%20AND%20fixVersion%20%3D%2015451)
***
**5.18.4** **2023-11-28**\ Bump MSBuild Scanner to 5.15\
[Download](https://marketplace.visualstudio.com/items?itemName=SonarSource.sonarqube)\
\
[Release notes](https://sonarsource.atlassian.net/issues/?jql=project%20%3D%2010078%20AND%20fixVersion%20%3D%2015420)
***
**5.18.3** **2023-11-20**\ Maximize proxy compatibility with tasks <5.18.0\
[Download](https://marketplace.visualstudio.com/items?itemName=SonarSource.sonarqube)\
\
[Release notes](https://sonarsource.atlassian.net/issues/?jql=project%20%3D%2010078%20AND%20fixVersion%20%3D%2015410)
***
**5.18.2** **2023-11-17**\ Adjust PR decorations to Clean Code Taxonomy, Migrate from request to node-fetch, Support Azure proxy, Fix vulnerabilities\
[Download](https://marketplace.visualstudio.com/items?itemName=SonarSource.sonarqube)\
\
[Release notes](https://sonarsource.atlassian.net/issues/?jql=project%20%3D%2010078%20AND%20fixVersion%20%3D%2015395)
***
**5.17.2** **2023-10-18**\ Revert request library\
[Download](https://marketplace.visualstudio.com/items?itemName=SonarSource.sonarqube)\
\
[Release notes](https://sonarsource.atlassian.net/issues/?jql=project%20%3D%2010078%20AND%20fixVersion%20%3D%2015355)
***
**5.16.0** **2023-10-17**\ Fix Mend vulnerabilities & Dependencies bump\
[Download](https://marketplace.visualstudio.com/items?itemName=SonarSource.sonarqube)\
\
[Release notes](https://sonarsource.atlassian.net/issues/?jql=project%20%3D%2010078%20AND%20fixVersion%20%3D%2015334)
***
**5.15.0** **2023-06-14**\ Fix computation and retrieval of report-task.txt + Let user choose which java version to use for analysis\
[Download](https://marketplace.visualstudio.com/items?itemName=SonarSource.sonarqube)\
\
[Release notes](https://sonarsource.atlassian.net/issues/?jql=project%20%3D%2010078%20AND%20fixVersion%20%3D%2014178)
***
**5.14.0** **2023-06-13**\ Improved support for SQ >= 10.0, Change computation of metadata file path, added detection of JAVA\_17 environment variable\
[Download](https://marketplace.visualstudio.com/items?itemName=SonarSource.sonarqube)\
\
[Release notes](https://sonarsource.atlassian.net/issues/?jql=project%20%3D%2010078%20AND%20fixVersion%20%3D%2014120)
***
**5.13.0** **2023-04-27**\ Support for sonar.token, incremental analysis outside Azure, better error message\
[Download](https://marketplace.visualstudio.com/items?itemName=SonarSource.sonarqube)\
\
[Release notes](https://sonarsource.atlassian.net/issues/?jql=project%20%3D%2010078%20AND%20fixVersion%20%3D%2014118)
***
**5.12.0** **2023-03-17**\ Supports for SonarCloud incremental analysis cache\
[Download](https://marketplace.visualstudio.com/items?itemName=SonarSource.sonarqube)\
\
[Release notes](https://sonarsource.atlassian.net/issues/?jql=project%20%3D%2010078%20AND%20fixVersion%20%3D%2014078)
***
**5.11.1** **2023-02-02**\ Azure DevOps extension is compatible with SonarQube 10.0\
[Download](https://marketplace.visualstudio.com/items?itemName=SonarSource.sonarqube)\
\
[Release notes](https://sonarsource.atlassian.net/issues/?jql=project%20%3D%2010078%20AND%20fixVersion%20%3D%2014042)
***
**5.11.0** **2023-02-02**\ Update scanner for .NET to 5.11.0\
[Download](https://marketplace.visualstudio.com/items?itemName=SonarSource.sonarqube)\
\
[Release notes](https://sonarsource.atlassian.net/issues/?jql=project%20%3D%2010078%20AND%20fixVersion%20%3D%2014040)
***
**5.10.0** **2023-01-23**\ Bump Scanner for .NET to 5.10.0 and ScannerCLI to 4.8.0\
[Download](https://marketplace.visualstudio.com/items?itemName=SonarSource.sonarqube)\
\
[Release notes](https://sonarsource.atlassian.net/issues/?jql=project%20%3D%2010078%20AND%20fixVersion%20%3D%2013846)
***
**5.9.0** **2023-01-03**\ Bump Scanner for .NET to 5.9.2\
[Download](https://marketplace.visualstudio.com/items?itemName=SonarSource.sonarqube)\
\
[Release notes](https://sonarsource.atlassian.net/issues/?jql=project%20%3D%2010078%20AND%20fixVersion%20%3D%2013846)
***
**5.8.1** **2022-10-11**\ Fix task status spelling (CANCEL -> CANCELED)\
[Download](https://marketplace.visualstudio.com/items?itemName=SonarSource.sonarqube)\
\
[Release notes](https://sonarsource.atlassian.net/issues/?jql=project%20%3D%2010078%20AND%20fixVersion%20%3D%2013890)
***
**5.8.0** **2022-09-05**\ Bump Scanner for .NET to 5.8.0\
[Download](https://marketplace.visualstudio.com/items?itemName=SonarSource.sonarqube)\
\
[Release notes](https://sonarsource.atlassian.net/issues/?jql=project%20%3D%2010078%20AND%20fixVersion%20%3D%2013846)
***
**5.7.0** **2022-08-09**\ Bump Scanner for .NET to 5.7.2 and ScannerCLI to 4.7.0\
[Download](https://marketplace.visualstudio.com/items?itemName=SonarSource.sonarqube)\
\
[Release notes](https://sonarsource.atlassian.net/issues/?jql=project%20%3D%2010078%20AND%20fixVersion%20%3D%2013813)
***
**5.6.1** **2022-07-06**\ Revert Scanner for .NET to 5.6.0 and ScannerCLi to 4.6.2\
[Download](https://marketplace.visualstudio.com/items?itemName=SonarSource.sonarqube)\
\
[Release notes](https://sonarsource.atlassian.net/issues/?jql=project+%3D+10078+AND+fixVersion+%3D+10890)
***
**5.6.0** **2022-07-05**\ Bumped Scanner for .NET to 5.7.1 and Scanner CLI to 4.7.0\
[Download](https://marketplace.visualstudio.com/items?itemName=SonarSource.sonarqube)\
\
[Release notes](https://sonarsource.atlassian.net/issues/?jql=project+%3D+10078+AND+fixVersion+%3D+10887)
***
**5.5.0** **2022-06-15**\ Bumped Scanner for .NET to 5.6.0\
[Download](https://marketplace.visualstudio.com/items?itemName=SonarSource.sonarqube)\
\
[Release notes](https://sonarsource.atlassian.net/issues/?jql=project+%3D+10078+AND+fixVersion+%3D+10885)
***
**5.4.0** **2022-02-16**\ Bumped Scanner for .NET to 5.5.3\
[Download](https://marketplace.visualstudio.com/items?itemName=SonarSource.sonarqube)\
\
[Release notes](https://sonarsource.atlassian.net/issues/?jql=project+%3D+10078+AND+fixVersion+%3D+10882)
***
**5.3.0** **2022-02-07**\ Bumped Scanner for .NET 5.5.0\
[Download](https://marketplace.visualstudio.com/items?itemName=SonarSource.sonarqube)\
\
[Release notes](https://sonarsource.atlassian.net/issues/?jql=project+%3D+10078+AND+fixVersion+%3D+10878)
***
**5.2.0** **2022-02-07**\ Bump Scanner for .NET 5.4.1\
[Download](https://marketplace.visualstudio.com/items?itemName=SonarSource.sonarqube)\
\
[Release notes](https://sonarsource.atlassian.net/issues/?jql=project+%3D+10078+AND+fixVersion+%3D+10877)
***
**5.1.1** **2021-11-30**\ Revert part of the change for SONARAZDO-264\
[Download](https://marketplace.visualstudio.com/items?itemName=SonarSource.sonarqube)\
\
[Release notes](https://sonarsource.atlassian.net/issues/?jql=project+%3D+10078+AND+fixVersion+%3D+10874)
***
**5.1.0** **2021-11-30**\ Fix SSF-194, Bump Scanner for .NET 5.4.0\
[Download](https://marketplace.visualstudio.com/items?itemName=SonarSource.sonarqube)\
\
[Release notes](https://sonarsource.atlassian.net/issues/?jql=project+%3D+10078+AND+fixVersion+%3D+10872)
***
**5.0.0** **2021-09-28**\ New Major Version for Azure Devops 2019 only, that resolves issues with LetsEncrypt Certs. For TFS2017/2018 use version 4.23.1\
[Download](https://marketplace.visualstudio.com/items?itemName=SonarSource.sonarqube)\
\
[Release notes](https://sonarsource.atlassian.net/issues/?jql=project+%3D+10078+AND+fixVersion+%3D+10869)
***
**4.23.1** **2021-10-08**\ Rollback changes to Node handler and az pipeline task due to incompabilities with TFS 2017/2018\
[Download](https://marketplace.visualstudio.com/items?itemName=SonarSource.sonarqube)\
\
[Release notes](https://sonarsource.atlassian.net/issues/?jql=project+%3D+10078+AND+fixVersion+%3D+10868)
***
**4.23** **2021-10-01**\ Change to Node10 execution handler to fix issues with LetEncrypt Certs\
[Download](https://marketplace.visualstudio.com/items?itemName=SonarSource.sonarqube)\
\
[Release notes](https://sonarsource.atlassian.net/issues/?jql=project+%3D+10078+AND+fixVersion+%3D+10867)
***
**4.22** **2021-09-20**\ Updated plugin SDK from .NET Core 2 to .NET Core 3 + Bump SonarScanner for .NET v.5.3.1\
[Download](https://marketplace.visualstudio.com/items?itemName=SonarSource.sonarqube)\
\
[Release notes](https://sonarsource.atlassian.net/issues/?jql=project+%3D+10078+AND+fixVersion+%3D+10865)
***
**4.21** **2021-06-24**\ Bump SonarScanner for .NET v.5.2.2\
[Download](https://marketplace.visualstudio.com/items?itemName=SonarSource.sonarqube)\
\
[Release notes](https://sonarsource.atlassian.net/issues/?jql=project+%3D+10078+AND+fixVersion+%3D+10863)
***
**4.20** **2021-04-30**\ Bug fix + Bump SonarScanner for .NET and ScannerCLi versions\
[Download](https://marketplace.visualstudio.com/items?itemName=SonarSource.sonarqube)\
\
[Release notes](https://sonarsource.atlassian.net/issues/?jql=project+%3D+10078+AND+fixVersion+%3D+10862)
***
**4.19** **2021-04-09**\ Support for Scanner for .NET 5.2 (Analyze test code)\
[Download](https://marketplace.visualstudio.com/items?itemName=SonarSource.sonarqube)\
\
[Release notes](https://sonarsource.atlassian.net/issues/?jql=project+%3D+10078+AND+fixVersion+%3D+10859)
***
**4.18** **2021-03-09**\ Support for .NET 5, support for solo .NET Core project (without .sln)\
[Download](https://marketplace.visualstudio.com/items?itemName=SonarSource.sonarqube)\
\
[Release notes](https://sonarsource.atlassian.net/issues/?jql=project+%3D+10078+AND+fixVersion+%3D+10858)
***
**4.17** **2020-11-11**\ Support for .NET 5, support for solo .NET Core project (without .sln)\
[Download](https://marketplace.visualstudio.com/items?itemName=SonarSource.sonarqube)\
\
[Release notes](https://sonarsource.atlassian.net/issues/?jql=project+%3D+10078+AND+fixVersion+%3D+10855)
***
**4.16** **2020-11-10**\ Support for .NET 5, support for solo .NET Core project (without .sln)\
[Download](https://marketplace.visualstudio.com/items?itemName=SonarSource.sonarqube)\
\
[Release notes](https://sonarsource.atlassian.net/issues/?jql=project+%3D+10078+AND+fixVersion+%3D+10852)
***
**4.12** **2020-11-05**\ Support for .NET 5, support for solo .NET Core project (without .sln)\
[Download](https://marketplace.visualstudio.com/items?itemName=SonarSource.sonarqube)\
\
[Release notes](https://sonarsource.atlassian.net/issues/?jql=project+%3D+10078+AND+fixVersion+%3D+10851)
***
**4.11** **2020-06-29**\ Support FIPS compliant cryptographic algorithm, update to SonarScanner 4.4 and SonarScanner for MSBuild 4.10\
[Download](https://marketplace.visualstudio.com/items?itemName=SonarSource.sonarqube)\
\
[Release notes](https://sonarsource.atlassian.net/issues/?jql=project+%3D+10078+AND+fixVersion+%3D+10847)
***
**4.10** **2020-05-05**\ Improve detection of duplicated coverage reports, update to SonarScanner 4.3 and SonarScanner for MSBuild 4.9\
[Download](https://marketplace.visualstudio.com/items?itemName=SonarSource.sonarqube)\
\
[Release notes](https://sonarsource.atlassian.net/issues/?jql=project+%3D+10078+AND+fixVersion+%3D+10842)
***
**4.9** **2020-01-29**\ Enable scanner execution when only .NET Core 3 is installed, update to SonarScanner 4.2 and SonarScanner for MSBuild 4.8\
[Download](https://marketplace.visualstudio.com/items?itemName=SonarSource.sonarqube)\
\
[Release notes](https://sonarsource.atlassian.net/issues/?jql=project+%3D+10078+AND+fixVersion+%3D+10841)
***
**4.8.1** **2019-10-15**\ Bug fix\
[Download](https://marketplace.visualstudio.com/items?itemName=SonarSource.sonarqube)\
\
[Release notes](https://sonarsource.atlassian.net/issues/?jql=project+%3D+10078+AND+fixVersion+%3D+10840)
***
**4.8** **2019-09-16**\ Several bug fixes, update to SonarScanner 4.1 and SonarScanner for MSBuild 4.7.1\
[Download](https://marketplace.visualstudio.com/items?itemName=SonarSource.sonarqube)\
\
[Release notes](https://sonarsource.atlassian.net/issues/?jql=project+%3D+10078+AND+fixVersion+%3D+10835)
***
**4.7.2** **2019-08-14**\ Bug fix\
[Download](https://marketplace.visualstudio.com/items?itemName=SonarSource.sonarqube)\
\
[Release notes](https://sonarsource.atlassian.net/issues/?jql=project+%3D+10078+AND+fixVersion+%3D+10838)
***
**4.7.1** **2019-08-14**\ Bug fix\
[Download](https://marketplace.visualstudio.com/items?itemName=SonarSource.sonarqube)\
\
[Release notes](https://sonarsource.atlassian.net/issues/?jql=project+%3D+10078+AND+fixVersion+%3D+10833)
***
**4.7** **2019-08-13**\ Fix a bug on the Publish Quality Gate Result task\
[Download](https://marketplace.visualstudio.com/items?itemName=SonarSource.sonarqube)\
\
[Release notes](https://sonarsource.atlassian.net/issues/?jql=project+%3D+10078+AND+fixVersion+%3D+10831)
The [Azure DevOps extension for SonarQube Server](https://marketplace.visualstudio.com/items?itemName=SonarSource.sonarqube) makes it easy to integrate analysis into your Azure build pipeline. The extension allows the analysis of all languages supported by SonarQube Server. For more information, see [azure-pipelines-integration-overview](https://docs.sonarsource.com/sonarqube-server/devops-platform-integration/azure-devops-integration/azure-pipelines-integration-overview "mention").
This page explains how to install the extension. Once the integration at a global level with Azure DevOps is complete, and you have set up project integration, you can Add SonarQube analysis to your pipeline.
### Installation requirements
Category
Requirement
Azure DevOps
The extension will work with these Azure product versions:
• Azure DevOps Services
• Azure DevOps Server 2022.2
• Azure DevOps Server 2020.1.2
• Azure DevOps Server 2019.1.2
Azure pipeline agents
The extension will work with all of the hosted agents (Windows, Linux, and macOS):
• If you are using Microsoft-hosted agents, there is nothing else to install.
• If you are self-hosting the agents, see General requirements on scanner environment. In addition, make sure the appropriate build tools are installed on the agent for the type of project you are analyzing. For example, .NET Framework v4.6.2+/NET Core 3.1+ if building using MSBuild, Maven for Java projects, etc.
The minimum agent version for @8 tasks of the Azure DevOps Extension for SonarQube Server is 3.218.0.
Allowed websites
In order to download binaries and communicate with SonarQube Server, the following URLs should be allowed:
• SonarQube base URL.
• If using the Maven/Gradle mode or not using the default version of SonarScanner for .NET or CLI: the Sonar binaries site (binaries.sonarsource.com).
If your instance of SonarQube Server is secured
If your SonarQube Server instance is secured behind a proxy and a self-signed certificate, you must add the self-signed certificate to the trusted CA certificates of the SonarScanner. In addition, if mutual TLS is used, you must define the access to the client certificate at the SonarScanner level.
### Installing the extension
1. Sign in to your Azure DevOps Services organization or Azure DevOps Server collection with the dedicated technical account you created in [setting-up-integration-at-global-level](https://docs.sonarsource.com/sonarqube-server/devops-platform-integration/azure-devops-integration/setting-up-integration-at-global-level "mention").
2. From the Visual Studio Marketplace, install the [Azure DevOps extension for SonarQube](https://marketplace.visualstudio.com/items?itemName=SonarSource.sonarqube) by selecting the **Get it free** button.
### If upgrading from a previous version of the extension
#### Smooth migration
The latest version of the Azure DevOps extension for SonarQube embeds the latest version of SonarScanner for .NET and SonarScanner CLI. However, to allow a smooth migration, you can set up your Azure build pipeline to use a previous version of one of these scanners and thus, continue using a previous SonarQube tasks version until you’re ready to upgrade. See [various-features](https://docs.sonarsource.com/sonarqube-server/devops-platform-integration/azure-devops-integration/adding-analysis-to-pipeline/various-features "mention").
{% hint style="info" %}
In that case, the Sonar binaries site (`binaries.sonarsource.com`) must be allowed.
{% endhint %}
#### Prepare analysis configuration task: new scanner mode values
Allowable values for the `scannerMode` required property of the SonarQube tasks (see the [sonarqube-tasks](https://docs.sonarsource.com/sonarqube-server/devops-platform-integration/azure-devops-integration/adding-analysis-to-pipeline/sonarqube-tasks "mention") page) have changed with the v7 extension. Please use the following in your @8 tasks:
* `dotnet` for the .NET mode
* `cli` for the CLI mode
* `other` for the Maven / Gradle mode
#### Deprecation notices
* @7 tasks are deprecated in v8.0 of the extension and will be dropped in a subsequent release.
* @5 and @6 tasks were dropped in v8.0 of the extension.
### Previous versions
As new scanner versions are released, previous requirements and/or planned deprecations will be listed here.
Azure DevOps v7.x.x extension for SonarQube Server
* @6 tasks were deprecated in v7.0 extension.
* The minimum Azure pipeline agents version for @7 tasks of the Azure DevOps Extension for SonarQube Server is 3.218.0.
Azure DevOps v6.2.x extension for SonarQube Server
The current versions of the SonarScanner for .NET and SonarScanner CLI are embedded and depending on your configuration, some additional setup may be required.
If you want to specify the exact .NET or CLI scanner version, use the the `msBuildVersion` and `cliVersion` properties. Please check the **Using the Prepare Analysis Configuration task** on the [Azure DevOps integration](https://app.gitbook.com/s/I10pmJWeVVXYITlQJllp/devops-platform-integration/azure-devops-integration "mention") page for details.
When specifying a particular scanner version, internet access is required by the pipelines calling the .NET or CLI scanners:
* Access to [github.com](http://github.com/) is required to download the SonarScanner for .NET. The GitHub URL and its HTTP redirect, `objects.githubusercontent.com`, should be allowed.
* Access to [binaries.sonarsource.com](http://binaries.sonarsource.com/) is required to download the SonarScanner CLI. The Sonar binaries should be allowed.
For users running on-premise or using self-hosted agents, the minimum agent version for SonarQube v6 tasks is 3.218.0.
**in v6.0.1**
* Version @5 tasks were deprecated .
Azure DevOps v5.x.x extension for SonarQube Server
* For users running on-premise or using self-hosted agents, the minimum agent version for SonarQube version @5 tasks is 2.114.0.
### Related pages
* [setting-up-integration-at-global-level](https://docs.sonarsource.com/sonarqube-server/devops-platform-integration/azure-devops-integration/setting-up-integration-at-global-level "mention")
* [setting-up-project-integration](https://docs.sonarsource.com/sonarqube-server/devops-platform-integration/azure-devops-integration/setting-up-project-integration "mention")
* [introduction](https://docs.sonarsource.com/sonarqube-server/devops-platform-integration/azure-devops-integration/adding-analysis-to-pipeline/introduction "mention")
---
# Source: https://docs.sonarsource.com/sonarqube-integrations.md
# SonarQube integrations
## Sonar certified integrations
Some of our certified integrations include:
* [Cortex](https://www.sonarsource.com/integrations/cortex/) which allows you to pull in a wide range of code quality and security metrics.
* [Jellyfish](https://www.sonarsource.com/integrations/jellyfish/) which provides engineering leaders with valuable insights into how code quality impacts their team's performance and delivery.
* [JFrog](https://www.sonarsource.com/integrations/jfrog/) which provides trusted auditing for software packages by enriching artifacts and builds with signed attestation metadata.
* [Port](https://www.sonarsource.com/integrations/port/) which brings SonarQube's code quality and security metrics directly into your internal developer portal.
## First and third party integrations
Please see the list of all available [SonarQube integrations](https://www.sonarsource.com/integrations/overview/).
## Partner with Sonar
Interested in partnering with Sonar? Fill out [the form](https://www.sonarsource.com/company/contact-partner/) and let us know how we can collaborate
---
# Source: https://docs.sonarsource.com/sonarqube-community-build/extension-guide/sonarqube-mcp-server.md
# Source: https://docs.sonarsource.com/sonarqube-server/2025.3/ai-capabilities/sonarqube-mcp-server.md
# Source: https://docs.sonarsource.com/sonarqube-server/2025.5/ai-capabilities/sonarqube-mcp-server.md
# Source: https://docs.sonarsource.com/sonarqube-server/2025.1/ai-capabilities/sonarqube-mcp-server.md
# Source: https://docs.sonarsource.com/sonarqube-server/2025.4/ai-capabilities/sonarqube-mcp-server.md
# Source: https://docs.sonarsource.com/sonarqube-server/2025.6/ai-capabilities/sonarqube-mcp-server.md
# Source: https://docs.sonarsource.com/sonarqube-server/ai-capabilities/sonarqube-mcp-server.md
# Source: https://docs.sonarsource.com/sonarqube-cloud/ai-capabilities/sonarqube-mcp-server.md
# SonarQube MCP Server
{% hint style="info" %}
The SonarQube MCP Server is in Alpha release, see the [product-release-lifecycle](https://docs.sonarsource.com/sonarqube-cloud/appendices/product-release-lifecycle "mention") page for more information.
{% endhint %}
For complete details please see the [SonarQube MCP Server](https://app.gitbook.com/o/2ibCvzwZt86Nlk2zloB7/s/xNksbUaDXyfRoTpHP0vQ/ "mention") documentation.
### Overview
The SonarQube MCP Server is a [Model Context Protocol](https://modelcontextprotocol.io/introduction) (MCP) server that provides seamless integration with SonarQube Server or SonarQube Cloud for code quality and code security. It enables the analysis of code snippets directly within the agent context and allows you to retrieve information and perform actions on your SonarQube Server instance or SonarQube Cloud organization. Check the [SonarQube MCP Server #Prerequisites](https://app.gitbook.com/s/xNksbUaDXyfRoTpHP0vQ/#prerequisites "mention") for compatibility details.
Upon receiving a request from an MCP client, the SonarQube MCP Server calls the SonarQube Cloud or SonarQube Server API to perform actions:
### Setting up the SonarQube MCP Server
See the SonarQube MCP Server [Quickstart guide](https://app.gitbook.com/s/xNksbUaDXyfRoTpHP0vQ/quickstart-guide "mention") for the easiest way to get going.
### Tools
Once the SonarQube MCP server is connected, its tools become available. The current list of all tools available with the SonarQube MCP Server are listed on the [Tools](https://app.gitbook.com/s/xNksbUaDXyfRoTpHP0vQ/tools "mention") page.
For complete details please see [SonarQube MCP Server](https://app.gitbook.com/o/2ibCvzwZt86Nlk2zloB7/s/xNksbUaDXyfRoTpHP0vQ/ "mention")documentation.
---
# Source: https://docs.sonarsource.com/sonarqube-cloud/administering-sonarcloud/ai-features/sonarqube-remediation-agent.md
# SonarQube Remediation Agent
{% hint style="success" %}
The SonarQube Remediation Agent is a [Beta](https://docs.sonarsource.com/sonarqube-cloud/appendices/product-release-lifecycle#beta) feature available with Enterprise plan accounts. It is free during the beta phase and will be a paid feature when it moves to [General Availability](https://docs.sonarsource.com/sonarqube-cloud/appendices/product-release-lifecycle#general-availability). To learn more about the terms & conditions, please see our legal page about features in [Early Access](https://www.sonarsource.com/legal/early-access/).
If your SonarQube Cloud organization is not on an Enterprise plan, please see the [getting-started-with-enterprise](https://docs.sonarsource.com/sonarqube-cloud/getting-started-with-enterprise "mention") pages to get the process started.
{% endhint %}
The SonarQube Remediation Agent runs an independent review and analysis to help you fix reliability and maintainability issues found in your latest code. It focuses on new issues discovered in your latest GitHub pull request (PR). These issues, picked up by the agent, would otherwise break the new code conditions of your quality gate and block the merge of your PR.
The agent uses space.vars.SQC\_Remediation\_agent\_LLM to generate fix suggestions in the background and checks that the new code does not introduce new issues before offering the suggestion.
The SonarQube Remediation Agent is only triggered by a [pull-request-analysis](https://docs.sonarsource.com/sonarqube-cloud/improving/pull-request-analysis "mention") and does not engage with your branch analysis. See the [#quality-gate-and-metrics](https://docs.sonarsource.com/sonarqube-cloud/improving/pull-request-analysis#quality-gate-and-metrics "mention") article to learn more about how the quality gate is computed on during a PR analysis.
### Requirements and limitations
The [SonarQube Remediation Agent](https://github.com/apps/sonarqube-agent), when enabled, runs in your PR on private projects in GitHub.
You must have either [automatic-analysis](https://docs.sonarsource.com/sonarqube-cloud/advanced-setup/automatic-analysis "mention") enabled or be running a [#ci-based-analysis](https://docs.sonarsource.com/sonarqube-cloud/getting-started/github#ci-based-analysis "mention") on your GitHub repository.
The agent can suggest code fixes on your pull request for [#maintainability](https://docs.sonarsource.com/sonarqube-cloud/digging-deeper/software-qualities#maintainability "mention"), [#reliability](https://docs.sonarsource.com/sonarqube-cloud/digging-deeper/software-qualities#reliability "mention"), and a select set of [#security](https://docs.sonarsource.com/sonarqube-cloud/digging-deeper/software-qualities#security "mention") issues found in Java, JavaScript/TypeScript, and Python code; the agent can also suggest fixes for [secrets](https://docs.sonarsource.com/sonarqube-cloud/advanced-setup/languages/secrets "mention") detected in your code.
For a full list of supported rules, open the expandable below with your selected language:
Java
#### Supported Java rules
* see the languages page about [java](https://docs.sonarsource.com/sonarqube-cloud/advanced-setup/languages/java "mention") for general information about rule support
* [Java maintainability rules](https://rules.sonarsource.com/java/impact/maintainability/)
* [Java reliability rules](https://rules.sonarsource.com/java/impact/reliability/)
#### **Supported Java security rules**
Go to the [Sonar Rules website](https://rules.sonarsource.com/) to search for more information about your rule.
* select any rule at
* replace the RSPEC number in the rule’s URL with the relevant rule number listed below.
For example, to read about rule `java:S2053`, go to
java:S2053
java:S2658
java:S4347
java:S4426
java:S4433
java:S5445
java:S5547
#### **Blocked Java rules**
The SonarQube Remediation Agent does not have access to a limited number of rules because they are too complex for an LLM to solve.
java:S1135
java:S1134
java:S1144
java:S3776
java:S1228
JavaScript
#### Supported JavaScript rules
* see the languages page about [javascript-typescript-css](https://docs.sonarsource.com/sonarqube-cloud/advanced-setup/languages/javascript-typescript-css "mention") for general information about rule support
* [JavaScript maintainability rules](https://rules.sonarsource.com/javascript/impact/maintainability/)
* [JavaScript reliability rules](https://rules.sonarsource.com/javascript/impact/reliability/)
#### **Supported JavaScript security rules**
Go to the [Sonar Rules website](https://rules.sonarsource.com/) to search for more information about your rule.
* select any rule at
* replace the RSPEC number in the rule’s URL with the relevant rule number listed below.
For example, to read about rule `javascript:S1442`, go to
javascript:S1442
javascript:S2598
javascript:S2755
javascript:S4423
javascript:S4426
javascript:S4830
javascript:S5527
javascript:S5542
javascript:S5547
javascript:S5659
javascript:S6317
javascript:S6321
#### **Blocked JavaScript rules**
The SonarQube Remediation Agent does not have access to a limited number of rules because they are too complex for an LLM to solve.
javascript:S1135
javascript:S1134
javascript:S1144
javascript:S3776
Python
#### Supported Python rules
* see the languages page about [python](https://docs.sonarsource.com/sonarqube-cloud/advanced-setup/languages/python "mention") for general information about rule support
* [Python maintainability rules](https://rules.sonarsource.com/python/impact/maintainability/)
* [Python reliability rules](https://rules.sonarsource.com/python/impact/reliability/)
#### **Supported Python security rules**
Go to the [Sonar Rules website](https://rules.sonarsource.com/) to search for more information about your rule.
* select any rule at
* replace the RSPEC number in the rule’s URL with the relevant rule number listed below.
For example, to read about rule `python:S2053`, go to
python:S2053
python:S2115
python:S2755
python:S3329
python:S4423
python:S4426
python:S4830
python:S5344
python:S5439
python:S5445
python:S5527
python:S5542
python:S5547
python:S5659
python:S6321
python:S6437
python:S6727
python:S6779
python:S6781
python:S6785
python:S6786
#### **Blocked Python rules**
The SonarQube Remediation Agent does not have access to a limited number of rules because they are too complex for an LLM to solve.
python:S1135
python:S1134
python:S1144
python:S3776
TypeScript
#### Supported TypeScript rules
* see the languages page about [javascript-typescript-css](https://docs.sonarsource.com/sonarqube-cloud/advanced-setup/languages/javascript-typescript-css "mention") for general information about rule support
* [TypeScript maintainability rules](https://rules.sonarsource.com/typescript/impact/maintainability/)
* [TypeScript reliability rules](https://rules.sonarsource.com/typescript/impact/reliability/)
Go to the [Sonar Rules website](https://rules.sonarsource.com/) to search for more information about your rule.
* select any rule at
* replace the RSPEC number in the rule’s URL with the relevant rule number listed below.
For example, to read about rule `typescript:S2598`, go to
typescript:S2598
typescript:S2755
typescript:S4426
typescript:S5542
typescript:S6321
#### **Blocked TypeScript rules**
The SonarQube Remediation Agent does not have access to a limited number of rules because they are too complex for an LLM to solve.
typescript:S1135
typescript:S1134
typescript:S1144
typescript:S3776
Secrets
#### **Supported Secrets rules**
* see the page about [secrets](https://docs.sonarsource.com/sonarqube-cloud/advanced-setup/languages/secrets "mention") detection for general information about rule support
* [Secrets rules](https://rules.sonarsource.com/secrets/)
Limits are placed on the agent’s activity to avoid noise in the comment history of your GitHub pull request. Currently, the limit is 50 issues; if more than 50 issues are introduced in your PR, the agent will not be triggered.
{% hint style="warning" %}
The SonarQube Remediation Agent will only work with issues found in one of the supported language types.
Once enabled in SonarQube Cloud, any of your GitHub repositories can add the SonarQube Remediation Agent as a GitHub App, irregardless of the language type.
Although SonarQube Cloud may find issues in a repository that contains an unsupported language for example, in C++, the agent won't be triggered in a pull request because C++ is not a supported language type.
{% endhint %}
### Subscription
The SonarQube Remediation Agent is a [#beta](https://docs.sonarsource.com/sonarqube-cloud/appendices/product-release-lifecycle#beta "mention") feature available with Enterprise plan accounts. It is free during the beta phase and will be a paid feature when it moves to [#general-availability](https://docs.sonarsource.com/sonarqube-cloud/appendices/product-release-lifecycle#general-availability "mention").
If your SonarQube Cloud organization is not on an Enterprise plan, please see the [getting-started-with-enterprise](https://docs.sonarsource.com/sonarqube-cloud/getting-started-with-enterprise "mention") pages to get the process started. To learn more about the terms & conditions for Beta, please see our legal page about features in [Early Access](https://www.sonarsource.com/legal/early-access/).
### Sharing your code with Sonar
If you use the SonarQube Remediation Agent, the affected code snippet will be sent by the agent to an LLM to generate a fix suggestion. These suggestions are verified by Sonar before being offered as an issue fix. Service agreements with Sonar’s LLMs prevent your code from being used to train those models and it is not stored by the LLM provider nor by any third party.
For details about terms and conditions, please refer to the [Early Access terms](https://www.sonarsource.com/legal/early-access/) in our [Legal Documentation](https://www.sonarsource.com/legal/).
### Enable your agent
A SonarQube Cloud organization admin and an administrator for your GitHub account are needed to set up Sonar's AI Agent for automated developer workflows:
1. If you haven't already, follow the instructions about [#activating-automatic-analysis](https://docs.sonarsource.com/sonarqube-cloud/advanced-setup/automatic-analysis#activating-automatic-analysis "mention") or enabling a [#ci-based-analysis](https://docs.sonarsource.com/sonarqube-cloud/getting-started/github#ci-based-analysis "mention") on your project hosted in a GitHub repository.
2. Navigate to *Your SonarQube Cloud Organization* > **Administration** > **AI capabilities** > **AI agent**.
3. A GitHub administrator needs to install the [SonarQube Agent GitHub app](https://github.com/apps/sonarqube-agent). Under **Install app**, select **GitHub**. The administrator will be prompted to install the app on the GitHub organization already linked to your SonarQube Cloud organization. If installed, the agent will be granted:
* Read and write access to code and pull requests,
* And Read-only access to issues and metadata.
4. Choose either **All repositories** or **Only select repositories** to control which repositories the AI agent can access. Once you've made your selection, select **Install & Authorize** to finish the setup. Please note that the installation may take a few seconds to complete.
5. After all the steps are successfully finished, the **Enable agent** > **Remediation agent** option will be automatically selected in SonarQube Cloud, and you will be able to commit the agent’s suggestions directly from your PRs.
### Manage agent access
The SonarQube Remediation agent only has access to the repositories you define. To change repository access, a GitHub administrator who is also a SonarCloud Administrator can navigate in SonarQube Cloud to *Your Organization* > **Administration** > **AI capabilities** > **AI agent**. Under Install app, select **Manage Permissions** which takes you to your GitHub Apps page.
Alternatively, a GitHub administrator can navigate in GitHub to *Your GitHub Organization* > **Settings** > **Third-party Access** > **GitHub Apps**. Under **Installed GitHub Apps** > **SonarQube Agent**, select **Configure**.
* In GitHub, under **SonarQube Agent** > **Repository access**, add or remove your repositories from the list. When finished, select **Save** to confirm your selection.
#### Disable or suspend agent access
It is possible to disable the SonarQube Remediation agent in SonarQube Cloud or in GitHub, if you prefer.
A SonarCloud Administrator can navigate to *Your Organization* > **Administration** > **AI capabilities** > **AI agent** > **Enable agent** and unselect **Remediation agent**. Once **Save** is selected, the agent will no longer be triggered in GitHub.
To suspend or uninstall SonarQube Agent completely, navigate in GitHub to *Your GitHub Organization* > **Third-party Access** > **GitHub Apps** > **SonarQube Agent** > **Danger zone** and select **Suspend** or **Uninstall**.
* **Suspend** will block the agent’s access to your repositories. Choosing this option is the easiest way to restart the agent, when you're ready.
* If you select and confirm **Uninstall**, the SonarQube Agent will be removed from all of your repositories and from your SonarQube Cloud Organization. The agent's activity will be remain in your PR history but if you want to use the agent again, you must return to the beginning to [#enable-your-agent](#enable-your-agent "mention").
### Agent behavior
The SonarQube Remediation agent's behavior is described on the [agents-in-your-github-pull-request](https://docs.sonarsource.com/sonarqube-cloud/managing-your-projects/issues/with-ai-features/agents-in-your-github-pull-request "mention") page, along side other topics about [issues](https://docs.sonarsource.com/sonarqube-cloud/managing-your-projects/issues "mention") in SonarQube Cloud.
---
# Source: https://docs.sonarsource.com/sonarqube-community-build/devops-platform-integration/azure-devops-integration/adding-analysis-to-pipeline/sonarqube-tasks.md
# Source: https://docs.sonarsource.com/sonarqube-server/2025.2/devops-platform-integration/azure-devops-integration/adding-analysis-to-pipeline/sonarqube-tasks.md
# Source: https://docs.sonarsource.com/sonarqube-server/2025.3/devops-platform-integration/azure-devops-integration/adding-analysis-to-pipeline/sonarqube-tasks.md
# Source: https://docs.sonarsource.com/sonarqube-server/2025.5/devops-platform-integration/azure-devops-integration/adding-analysis-to-pipeline/sonarqube-tasks.md
# Source: https://docs.sonarsource.com/sonarqube-server/2025.1/devops-platform-integration/azure-devops-integration/adding-analysis-to-pipeline/sonarqube-tasks.md
# Source: https://docs.sonarsource.com/sonarqube-server/2025.4/devops-platform-integration/azure-devops-integration/adding-analysis-to-pipeline/sonarqube-tasks.md
# Source: https://docs.sonarsource.com/sonarqube-server/2025.6/devops-platform-integration/azure-devops-integration/adding-analysis-to-pipeline/sonarqube-tasks.md
# Source: https://docs.sonarsource.com/sonarqube-server/devops-platform-integration/azure-devops-integration/adding-analysis-to-pipeline/sonarqube-tasks.md
# Source: https://docs.sonarsource.com/sonarqube-cloud/advanced-setup/ci-based-analysis/azure-pipelines/sonarqube-tasks.md
# List of SonarQube tasks
Examples of each SonarQube task described on this page can be found in code samples located on pages in this section of the docs. Select your project type from the pages listed on the [adding-analysis-to-build-pipeline](https://docs.sonarsource.com/sonarqube-cloud/advanced-setup/ci-based-analysis/azure-pipelines/adding-analysis-to-build-pipeline "mention") page, then read through the setup instructions to locate the example pipeline to reference.
For more information about customizing your Azure pipeline with the task inputs listed below, please see the [various-features](https://docs.sonarsource.com/sonarqube-cloud/advanced-setup/ci-based-analysis/azure-pipelines/adding-analysis-to-build-pipeline/various-features "mention") page.
### Prepare Analysis Configuration task
This task configures the required settings before executing the build. For .NET solutions or Java projects, it helps integrate seamlessly with MSBuild, Maven, and Gradle tasks.
The Prepare Analysis Configuration task shows up in your Azure pipeline as task: `SonarCloudPrepare@X`
* where `X` = the current version of the [sonarcloud-extension-for-azure-devops](https://docs.sonarsource.com/sonarqube-cloud/advanced-setup/ci-based-analysis/sonarcloud-extension-for-azure-devops "mention") for SonarQube Cloud.
Task inputs common to all modes
The table below lists the **Prepare Analysis Configuration** task inputs common to all modes of the Azure DevOps extension for SonarQube Cloud.
Task input
Description
Required in YAML file
SonarCloud
Name of the SonarQube service connection(s) (SonarQube Service Endpoint) to your Azure DevOps project. See the #adding-sonarqube-service-connection article for more details.
scannerMode
The running mode of the Azure DevOps extension for SonarQube Cloud.
Possible values:
• dotnet: .NET mode, for .NET projects.
• other: Maven / Gradle mode, for Maven and Gradle projects.
• cli: CLI mode, for other projects.
Task inputs specific to the Maven / Gradle mode
The table below lists the **Prepare Analysis Configuration** task inputs specific to the Maven / Gradle mode of the Azure DevOps Extension for SonarQube Cloud.
Task input
Description
Required in YAML file
extraProperties
Additional sonar properties to be passed to the scanner. A property is defined through a [key, value] pair.
Format: One [key, value] pair per line as follows: <key>=<value> For example: sonar.exclusions=**/*.bin
(to set the project key)
Task inputs specific to the .NET mode
The table below lists the **Prepare Analysis Configuration** task inputs specific to the .NET mode of the Azure DevOps extension for SonarQube Cloud. The **Corresponding sonar property** column indicates the sonar property that SonarQube Cloud will set with the input value. See the sonar property description in [analysis-parameters](https://docs.sonarsource.com/sonarqube-cloud/advanced-setup/analysis-parameters "mention") for more information on the possible values and default-from-build values.
Task input
Description
Corresponding sonar property
Required in YAML file
projectKey
• If the project exists already in SonarQube Cloud (It is highly recommended to create your project first: see Creating your project): the project’s unique key (is displayed in SonarQube UI).
• If the project doesn’t exist yet in SonarQube Cloud, it will be created with this key. Allowed characters are letters, numbers, -, _, ., and :, with at least one non-digit.
sonar.projectKey
projectName
The name of the SonarQube Cloud project that will be displayed on the web interface.
Default: projectKey input value (if no default-from-build value applies).
sonar.projectName
projectVersion
The version of the SonarQube Cloud project.
sonar.projectVersion
dotnetScannerVersion
The version of the SonarScanner for .NET to be downloaded; see the #specific-scanner-versionarticle for more details.
Default: The extension’s default version of the SonarScanner for .NET (the latest compatible version).
extraProperties
Additional sonar properties to be passed to the scanner. A property is defined through a [key, value] pair.
Format: One [key, value] pair per line as follows: <key>=<value> For example: sonar.scanner.scanAll=false
Task inputs specific to the CLI mode
The table below lists the **Prepare Analysis Configuration** task inputs specific to the CLI mode of the Azure DevOps Extension for SonarQube Cloud. The **Corresponding sonar property** column indicates the sonar property that SonarQube Cloud will set with the input value. See the sonar property description found on the [analysis-parameters](https://docs.sonarsource.com/sonarqube-cloud/advanced-setup/analysis-parameters "mention") page for more information about the possible values and default-from-build values.
Task input
Description
Corresponding sonar property
Required in YAML file
cliSources
The path to the root directory containing source files. The path can be absolute, or relative to the repository root.
Warning: The possible values are different from the sonar.sources property:
• You can only set a single path.
• The relative path must be relative to the repository root (and not the to the sonar.projectBaseDir property).
• If you want to set a list of paths, define instead sonar.sources in the extraProperties input or in sonar-project.properties (See Choosing your configuration mode)
Default: .
sonar.sources
configMode
Specifies the configuration mode.
Possible values:
• file (default): The configuration is stored in the file defined through the configFile input.
• manual: The configuration is defined through the extraProperties input.
cliScannerVersion
Version of the SonarScanner CLI to be downloaded; see the #specific-scanner-versionarticle for more details.
Default: The extension’s default version of the SonarScanner CLI (the last available version).
configFile
Is used if configModeis set to file. The path to the file containing your analysis configuration. Path can be absolute or relative to the repository root.
Default: sonar-project.properties
cliProjectKey
Is used if configMode is set to manual.
• If the project exists already in SonarQube Cloud (It is highly recommended to create your project first: see Creating your project): the project’s unique key (is displayed in SonarQube UI).
• If the project doesn’t exist yet in SonarQube Cloud, it will be created with this key. Allowed characters are letters, numbers, -, _, ., and :, with at least one non-digit.
sonar.projectKey
cliProjectName
Is used if configMode is set to manual.
The name of the SonarQube Cloud project that will be displayed on the web interface.
Default: cliProjectKey input value (if no default-from-build value applies).
sonar.projectName
cliProjectVersion
Is used if configMode is set to manual. The version of the SonarQube Cloud project.
sonar.projectVersion
extraProperties
Is used if configMode is set to manual.
Additional sonar properties to be passed to the scanner. A property is defined through a [key, value] pair.
Format: One [key, value] pair per line as follows: <key>=<value> For example: sonar.exclusions=**/*.bin
### Run Code Analysis task
This task executes the analysis of the source code. It is not used in the Gradle / Maven mode of the Azure DevOps Extension for SonarQube Cloud.
The Run Code Analysis task shows up in your Azure pipeline as task: `SonarCloudAnalyze@X`
* where `X` = the current version of the [sonarcloud-extension-for-azure-devops](https://docs.sonarsource.com/sonarqube-cloud/advanced-setup/ci-based-analysis/sonarcloud-extension-for-azure-devops "mention") for SonarQube Cloud.
The table below lists the task inputs.
| Task input | Description |
| ----------------------------------------- | -------------------------------------------------------------------------------------------------------------------------------------------------------------------------------------------------------------------------------------------------------------------------------------------------------------------------------------------------------------------------------------------------------------------------------------------------------------------------------------------------------------------------------------------------------------------------------------------------------------------------------------------------------------------------------------------------------------------------------------------------------------------------------------------------- |
|
jdkversion
|
The version of Java used by the scanner for analysis.
If you select a value other than JAVA\_HOME, the analyze task will revert to using JAVA\_HOME if the selected environment variable does not exist.
Possible values:
• JAVA\_HOME: Use the value of the JAVA\_HOME environment variable on the system.
• JAVA\_HOME\_17\_X64: Use the value of the JAVA\_HOME\_17\_X64 environment variable on the system, if available. This environment variable is already set when running on Microsoft-hosted agents.
• JAVA\_HOME\_21\_X64: Use the value of the JAVA\_HOME\_17\_X64 environment variable on the system. This environment variable is already set when running on Microsoft-hosted agents.
Default: JAVA\_HOME
|
### Publish Quality Gate Result task
This task allows you to report the quality gate status directly to your Azure Pipeline’s Build Summary page. It is not mandatory but highly recommended.
{% hint style="info" %}
The Publish Quality Gate Result task can significantly increase the overall build time because it will poll SonarQube until the analysis is complete.
{% endhint %}
The Publish Quality Gate Result task shows up in your Azure pipeline as task: `SonarCloudPublish@X`
* where `X` = the current version of the [sonarcloud-extension-for-azure-devops](https://docs.sonarsource.com/sonarqube-cloud/advanced-setup/ci-based-analysis/sonarcloud-extension-for-azure-devops "mention") for SonarQube Cloud.
The table below lists the task inputs.
| Task input | Description |
| ------------------- | ----------------------------------------------------------------------------------------------------------------------------------------------- |
| `pollingTimeoutSec` |
The maximum time (in seconds) for the task to wait for the analysis results sent by SonarQube Cloud.
Default: 300
|
### Related pages
* [gradle-or-maven-project](https://docs.sonarsource.com/sonarqube-cloud/advanced-setup/ci-based-analysis/azure-pipelines/adding-analysis-to-build-pipeline/gradle-or-maven-project "mention")
* [dotnet-project](https://docs.sonarsource.com/sonarqube-cloud/advanced-setup/ci-based-analysis/azure-pipelines/adding-analysis-to-build-pipeline/dotnet-project "mention")
* [c-family-project](https://docs.sonarsource.com/sonarqube-cloud/advanced-setup/ci-based-analysis/azure-pipelines/adding-analysis-to-build-pipeline/c-family-project "mention")
* [js-ts-go-python-php](https://docs.sonarsource.com/sonarqube-cloud/advanced-setup/ci-based-analysis/azure-pipelines/adding-analysis-to-build-pipeline/js-ts-go-python-php "mention")
* [monorepo-projects](https://docs.sonarsource.com/sonarqube-cloud/advanced-setup/ci-based-analysis/azure-pipelines/adding-analysis-to-build-pipeline/monorepo-projects "mention")
---
# Source: https://docs.sonarsource.com/sonarqube-server/10.4/setup-and-upgrade/deploy-on-kubernetes/sonarqube.md
# Source: https://docs.sonarsource.com/sonarqube-server/10.5/setup-and-upgrade/deploy-on-kubernetes/sonarqube.md
# Source: https://docs.sonarsource.com/sonarqube-server/10.6/setup-and-upgrade/deploy-on-kubernetes/sonarqube.md
# Deploying SonarQube
This part of the Documentation is only valid for Community, Developer, and Enterprise Editions. For information on deploying the Data Center Edition of SonarQube on Kubernetes, see [cluster](https://docs.sonarsource.com/sonarqube-server/10.6/setup-and-upgrade/deploy-on-kubernetes/cluster "mention") documentation\*.\*
### Overview
You can find the SonarQube Helm chart on [GitHub](https://github.com/SonarSource/helm-chart-sonarqube/tree/master/charts/sonarqube).
Your feedback is welcome at [our community forum](https://community.sonarsource.com/).
### Kubernetes environment recommendations
When you want to operate SonarQube on Kubernetes, consider the following recommendations.
#### Prerequisites
**Supported versions**
The SonarQube helm chart should only be used with the latest version of SonarQube and a supported version of Kubernetes. There is a dedicated helm chart for the LTA([active-versions](https://docs.sonarsource.com/sonarqube-server/10.6/setup-and-upgrade/upgrade-the-server/active-versions "mention")) version of SonarQube that follows the same patch policy as the application, while also being compatible with the supported versions of Kubernetes.
#### Pod Security Standards
Here is the list of containers that are compatible with the [Pod Security levels](https://kubernetes.io/docs/concepts/security/pod-security-admission/#pod-security-levels):
* privileged:
* `init-sysctl`
* baseline:
* `init-fs`
* restricted:
* SQ application containers
* SQ init containers.
* postgresql containers.
This is achieved by setting this `SecurityContext` as default on most containers:
```css-79elbk
allowPrivilegeEscalation: false
runAsNonRoot: true
runAsUser: 1000
runAsGroup: 1000
seccompProfile:
type: RuntimeDefault
capabilities:
drop: ["ALL"]
```
Based on that, one can run the SQ helm chart in a full restricted namespace, by deactivating the `initSysctl.enabled` and `initFs.enabled` parameters, which require root access.
For more information, see the [production-use-case](https://github.com/SonarSource/helm-chart-sonarqube/blob/master/charts/sonarqube/README.md#production-use-case) or take a look at the `values.yaml` file.
#### Installation
Currently, only Helm 3 is supported.
To install the Helm Chart from our Helm Repository, you can use the following commands:
```css-79elbk
helm repo add sonarqube https://SonarSource.github.io/helm-chart-sonarqube
helm repo update
kubectl create namespace sonarqube
helm upgrade --install -n sonarqube sonarqube sonarqube/sonarqube
```
#### Persistency
SonarQube comes with a bundled Elasticsearch and, as Elasticsearch is stateful, so is SonarQube. There is an option to persist the Elasticsearch indexes in a Persistent Volume, but with regular killing operations by the Kubernetes Cluster, these indexes can be corrupted. By default, persistency is disabled in the Helm chart.
Enabling persistency decreases the startup time of the SonarQube Pod significantly, but you are risking corrupting your Elasticsearch index. You can enable persistency by adding the following to the `values.yaml`:
```css-79elbk
persistence:
enabled: true
```
Leaving persistency disabled results in a longer startup time until SonarQube is fully available, but you won’t lose any data as SonarQube will persist all data in the database.
#### Self-signed certificate
When you’re working with your own CA or in an environment that uses self-signed certificates for your code repository platform, you can create a secret containing this certificate and add this certificate to the Java truststore inside the SonarQube deployment directly during the deployment.
To enable this behavior, add the following to your `value.yaml` file:
```css-79elbk
caCerts:
secret:
```
**Get Certificate via openssl**
If you already have a running installation of your code repository platform, you can extract the certificate with the following snippet using `openssl`
```css-79elbk
echo -n | openssl s_client -connect :443 | sed -ne '/-BEGIN CERTIFICATE-/,/-END CERTIFICATE-/p' > cert.pem
```
This certificate needs to be Base64 encoded in order to be added as secret data.
```css-79elbk
Create base64 string
cat cert.pem | base64 | tr -d "\n"
```
Note that you can also use `string-data` here if you don’t want to encode your certificate.
**Create secret**
The Base64 encoded certificate can be added to the secret’s data:
```css-79elbk
apiVersion: v1
kind: Secret
metadata:
name:
namespace:
data:
cert:
```
Then, create the secret in your Kubernetes cluster with the following command:
```css-79elbk
kubectl apply -f secret.yaml
```
#### Ingress creation
To make the SonarQube service accessible from outside of your cluster, you most likely need an ingress. Creating a new ingress is also covered by the Helm chart. See the following section for help with creating one.
**Ingress Class**
The SonarSource Helm chart has an optional dependency on the [NGINX-ingress helm chart](https://kubernetes.github.io/ingress-nginx). If you already have NGINX-ingress present in your cluster, you can use it.
If you want to install NGINX as well, add the following to your `values.yaml`.
```css-79elbk
nginx:
enabled: true
```
We recommend using the ingress-class NGINX with a body size of at least 64MB (see also **Issue with downloading regulatory reports** in [troubleshooting](https://docs.sonarsource.com/sonarqube-server/10.6/setup-and-upgrade/troubleshooting "mention")). This can be achieved with the following changes to your values.yaml:
```css-79elbk
ingress:
enabled: true
# Used to create an Ingress record.
hosts:
- name:
# Different clouds or configurations might need /* as the default path
path: /
# For additional control over serviceName and servicePort
# serviceName: someService
# servicePort: somePort
annotations:
nginx.ingress.kubernetes.io/proxy-body-size: "64m"
```
#### Monitoring
See [introduction](https://docs.sonarsource.com/sonarqube-server/10.6/setup-and-upgrade/deploy-on-kubernetes/set-up-monitoring/introduction "mention")
#### Customizing Helm chart values
You can customize the [Helm chart values](https://helm.sh/docs/chart_template_guide/values_files/) with various methods. One example is directly at the command line:
```css-79elbk
helm upgrade --install --set edition=enterprise sonarqube sonarqube/sonarqube
```
#### Other configuration options
While we only document the most pressing Helm chart customizations in this documentation, there are other possibilities for you to choose to [customize the chart before installing](https://helm.sh/docs/intro/using_helm/#customizing-the-chart-before-installing). Please see the Helm chart [README](https://github.com/SonarSource/helm-chart-sonarqube/tree/master/charts/sonarqube) file for more information on these.
### Known limitations
As SonarQube is intended to be run anywhere, there are some drawbacks that are currently known when operating in Kubernetes. This list is not comprehensive, but something to keep in mind and points for us to improve on.
#### Readiness and startup delays
When persistence is disabled, SonarQube startup takes significantly longer as the Elasticsearch indexes need to be rebuilt. As this delay depends on the amount of data in your SonarQube instance, the values for the startup/readiness and liveness probes need to be adjusted to your environment. We also recommend taking a look at the default limits for the SonarQube deployment as the amount of CPU available to SonarQube also impacts the startup time.
#### Problems with Azure Fileshare PVC
Currently, there is a known limitation when working on AKS that resonates around the use of Azure Fileshare. We recommend using another storage class for persistency on AKS.
---
# Source: https://docs.sonarsource.com/sonarqube-cloud/advanced-setup/ci-based-analysis/sonarscanner-cli.md
# SonarScanner CLI
SonarScanner — 8.0.1 | Issue Tracker
**8.0.1** **2025-12-05**\ Update embedded JREs to Java 21\
Download scanner for: [Linux x64](https://binaries.sonarsource.com/Distribution/sonar-scanner-cli/sonar-scanner-cli-8.0.1.6346-linux-x64.zip) [Linux AArch64](https://binaries.sonarsource.com/Distribution/sonar-scanner-cli/sonar-scanner-cli-8.0.1.6346-linux-aarch64.zip) [Windows x64](https://binaries.sonarsource.com/Distribution/sonar-scanner-cli/sonar-scanner-cli-8.0.1.6346-windows-x64.zip) [macOS x64](https://binaries.sonarsource.com/Distribution/sonar-scanner-cli/sonar-scanner-cli-8.0.1.6346-macosx-x64.zip) [macOS AArch64](https://binaries.sonarsource.com/Distribution/sonar-scanner-cli/sonar-scanner-cli-8.0.1.6346-macosx-aarch64.zip) [Docker](https://hub.docker.com/r/sonarsource/sonar-scanner-cli) [Any (Requires a pre-installed JVM)](https://binaries.sonarsource.com/Distribution/sonar-scanner-cli/sonar-scanner-cli-8.0.1.6346.zip)\
\
[Release notes](https://sonarsource.atlassian.net/issues/?jql=fixVersion%20%3D%2023522%20ORDER%20BY%20created%20ASC)
***
**7.3** **2025-10-06**\ Support z/OS as an Operating System to execute Scanners\
Download scanner for: [Linux x64](https://binaries.sonarsource.com/Distribution/sonar-scanner-cli/sonar-scanner-cli-7.3.0.5189-linux-x64.zip) [Linux AArch64](https://binaries.sonarsource.com/Distribution/sonar-scanner-cli/sonar-scanner-cli-7.3.0.5189-linux-aarch64.zip) [Windows x64](https://binaries.sonarsource.com/Distribution/sonar-scanner-cli/sonar-scanner-cli-7.3.0.5189-windows-x64.zip) [macOS x64](https://binaries.sonarsource.com/Distribution/sonar-scanner-cli/sonar-scanner-cli-7.3.0.5189-macosx-x64.zip) [macOS AArch64](https://binaries.sonarsource.com/Distribution/sonar-scanner-cli/sonar-scanner-cli-7.3.0.5189-macosx-aarch64.zip) [Docker](https://hub.docker.com/r/sonarsource/sonar-scanner-cli) [Any (Requires a pre-installed JVM)](https://binaries.sonarsource.com/Distribution/sonar-scanner-cli/sonar-scanner-cli-7.3.0.5189.zip)\
\
[Release notes](https://sonarsource.atlassian.net/issues/?jql=project%20%3D%2010143%20AND%20fixversion%20%3D%207.3)
***
**7.2** **2025-07-21**\ Restore ability to run the scanner with Java 11, update dependencies\
Download scanner for: [Linux x64](https://binaries.sonarsource.com/Distribution/sonar-scanner-cli/sonar-scanner-cli-7.2.0.5079-linux-x64.zip) [Linux AArch64](https://binaries.sonarsource.com/Distribution/sonar-scanner-cli/sonar-scanner-cli-7.2.0.5079-linux-aarch64.zip) [Windows x64](https://binaries.sonarsource.com/Distribution/sonar-scanner-cli/sonar-scanner-cli-7.2.0.5079-windows-x64.zip) [macOS x64](https://binaries.sonarsource.com/Distribution/sonar-scanner-cli/sonar-scanner-cli-7.2.0.5079-macosx-x64.zip) [macOS AArch64](https://binaries.sonarsource.com/Distribution/sonar-scanner-cli/sonar-scanner-cli-7.2.0.5079-macosx-aarch64.zip) [Docker](https://hub.docker.com/r/sonarsource/sonar-scanner-cli) [Any (Requires a pre-installed JVM)](https://binaries.sonarsource.com/Distribution/sonar-scanner-cli/sonar-scanner-cli-7.2.0.5079.zip)\
\
[Release notes](https://sonarsource.atlassian.net/issues/?jql=project%20%3D%2010143%20AND%20fixversion%20%3D%207.2)
***
**7.1** **2025-03-21**\ Support for SonarQube Cloud regions\
Download scanner for: [Linux x64](https://binaries.sonarsource.com/Distribution/sonar-scanner-cli/sonar-scanner-cli-7.1.0.4889-linux-x64.zip) [Linux AArch64](https://binaries.sonarsource.com/Distribution/sonar-scanner-cli/sonar-scanner-cli-7.1.0.4889-linux-aarch64.zip) [Windows x64](https://binaries.sonarsource.com/Distribution/sonar-scanner-cli/sonar-scanner-cli-7.1.0.4889-windows-x64.zip) [macOS x64](https://binaries.sonarsource.com/Distribution/sonar-scanner-cli/sonar-scanner-cli-7.1.0.4889-macosx-x64.zip) [macOS AArch64](https://binaries.sonarsource.com/Distribution/sonar-scanner-cli/sonar-scanner-cli-7.1.0.4889-macosx-aarch64.zip) [Docker](https://hub.docker.com/r/sonarsource/sonar-scanner-cli) [Any (Requires a pre-installed JVM)](https://binaries.sonarsource.com/Distribution/sonar-scanner-cli/sonar-scanner-cli-7.1.0.4889.zip)\
\
[Release notes](https://sonarsource.atlassian.net/issues/?jql=project%20%3D%2010143%20AND%20fixversion%20%3D%207.1)
***
**7.0.2** **2025-02-14**\ Bug fix to support SONAR\_TOKEN on old SonarQube versions\
Download scanner for: [Linux x64](https://binaries.sonarsource.com/Distribution/sonar-scanner-cli/sonar-scanner-cli-7.0.2.4839-linux-x64.zip) [Linux AArch64](https://binaries.sonarsource.com/Distribution/sonar-scanner-cli/sonar-scanner-cli-7.0.2.4839-linux-aarch64.zip) [Windows x64](https://binaries.sonarsource.com/Distribution/sonar-scanner-cli/sonar-scanner-cli-7.0.2.4839-windows-x64.zip) [macOS x64](https://binaries.sonarsource.com/Distribution/sonar-scanner-cli/sonar-scanner-cli-7.0.2.4839-macosx-x64.zip) [macOS AArch64](https://binaries.sonarsource.com/Distribution/sonar-scanner-cli/sonar-scanner-cli-7.0.2.4839-macosx-aarch64.zip) [Docker](https://hub.docker.com/r/sonarsource/sonar-scanner-cli) [Any (Requires a pre-installed JVM)](https://binaries.sonarsource.com/Distribution/sonar-scanner-cli/sonar-scanner-cli-7.0.2.4839.zip)\
\
[Release notes](https://sonarsource.atlassian.net/issues/?jql=project%20%3D%2010143%20AND%20fixversion%20%3D%207.0.2)
***
**7.0.1** **2025-02-03**\ Support empty truststore password\
Download scanner for: [Linux x64](https://binaries.sonarsource.com/Distribution/sonar-scanner-cli/sonar-scanner-cli-7.0.1.4817-linux-x64.zip) [Linux AArch64](https://binaries.sonarsource.com/Distribution/sonar-scanner-cli/sonar-scanner-cli-7.0.1.4817-linux-aarch64.zip) [Windows x64](https://binaries.sonarsource.com/Distribution/sonar-scanner-cli/sonar-scanner-cli-7.0.1.4817-windows-x64.zip) [macOS x64](https://binaries.sonarsource.com/Distribution/sonar-scanner-cli/sonar-scanner-cli-7.0.1.4817-macosx-x64.zip) [macOS AArch64](https://binaries.sonarsource.com/Distribution/sonar-scanner-cli/sonar-scanner-cli-7.0.1.4817-macosx-aarch64.zip) [Docker](https://hub.docker.com/r/sonarsource/sonar-scanner-cli) [Any (Requires a pre-installed JVM)](https://binaries.sonarsource.com/Distribution/sonar-scanner-cli/sonar-scanner-cli-7.0.1.4817.zip)\
\
[Release notes](https://sonarsource.atlassian.net/issues/?jql=project%20%3D%2010143%20AND%20fixversion%20%3D%207.0.1)
***
**7.0** **2025-01-20**\ Non-latin character support in properties files, ISO-8859-1 support dropped\
Download scanner for: [Linux x64](https://binaries.sonarsource.com/Distribution/sonar-scanner-cli/sonar-scanner-cli-7.0.0.4796-linux-x64.zip) [Linux AArch64](https://binaries.sonarsource.com/Distribution/sonar-scanner-cli/sonar-scanner-cli-7.0.0.4796-linux-aarch64.zip) [Windows x64](https://binaries.sonarsource.com/Distribution/sonar-scanner-cli/sonar-scanner-cli-7.0.0.4796-windows-x64.zip) [macOS x64](https://binaries.sonarsource.com/Distribution/sonar-scanner-cli/sonar-scanner-cli-7.0.0.4796-macosx-x64.zip) [macOS AArch64](https://binaries.sonarsource.com/Distribution/sonar-scanner-cli/sonar-scanner-cli-7.0.0.4796-macosx-aarch64.zip) [Docker](https://hub.docker.com/r/sonarsource/sonar-scanner-cli) [Any (Requires a pre-installed JVM)](https://binaries.sonarsource.com/Distribution/sonar-scanner-cli/sonar-scanner-cli-7.0.0.4796.zip)\
\
[Release notes](https://sonarsource.atlassian.net/issues/?jql=project%20%3D%2010143%20AND%20fixversion%20%3D%207.0)
***
**6.2.1** **2024-10-01**\ FIPS support and improved SSL configuration\
Download scanner for: [Linux x64](https://binaries.sonarsource.com/Distribution/sonar-scanner-cli/sonar-scanner-cli-6.2.1.4610-linux-x64.zip) [Linux AArch64](https://binaries.sonarsource.com/Distribution/sonar-scanner-cli/sonar-scanner-cli-6.2.1.4610-linux-aarch64.zip) [Windows x64](https://binaries.sonarsource.com/Distribution/sonar-scanner-cli/sonar-scanner-cli-6.2.1.4610-windows-x64.zip) [macOS x64](https://binaries.sonarsource.com/Distribution/sonar-scanner-cli/sonar-scanner-cli-6.2.1.4610-macosx-x64.zip) [macOS AArch64](https://binaries.sonarsource.com/Distribution/sonar-scanner-cli/sonar-scanner-cli-6.2.1.4610-macosx-aarch64.zip) [Docker](https://hub.docker.com/r/sonarsource/sonar-scanner-cli) [Any (Requires a pre-installed JVM)](https://binaries.sonarsource.com/Distribution/sonar-scanner-cli/sonar-scanner-cli-6.2.1.4610.zip)\
\
[Release notes](https://sonarsource.atlassian.net/issues/?jql=project%20%3D%2010143%20AND%20fixversion%20%3D%206.2.1)
***
**6.2** **2024-09-17**\ Support PKCS12 truststore generated with OpenSSL\
Download scanner for: [Linux x64](https://binaries.sonarsource.com/Distribution/sonar-scanner-cli/sonar-scanner-cli-6.2.0.4584-linux-x64.zip) [Linux AArch64](https://binaries.sonarsource.com/Distribution/sonar-scanner-cli/sonar-scanner-cli-6.2.0.4584-linux-aarch64.zip) [Windows x64](https://binaries.sonarsource.com/Distribution/sonar-scanner-cli/sonar-scanner-cli-6.2.0.4584-windows-x64.zip) [macOS x64](https://binaries.sonarsource.com/Distribution/sonar-scanner-cli/sonar-scanner-cli-6.2.0.4584-macosx-x64.zip) [macOS AArch64](https://binaries.sonarsource.com/Distribution/sonar-scanner-cli/sonar-scanner-cli-6.2.0.4584-macosx-aarch64.zip) [Docker](https://hub.docker.com/r/sonarsource/sonar-scanner-cli) [Any (Requires a pre-installed JVM)](https://binaries.sonarsource.com/Distribution/sonar-scanner-cli/sonar-scanner-cli-6.2.0.4584.zip)\
\
[Release notes](https://sonarsource.atlassian.net/issues/?jql=project%20%3D%2010143%20AND%20fixversion%20%3D%206.2)
***
**6.1** **2024-06-27**\ macOS and Linux AArch64 distributions\
Download scanner for: [Linux x64](https://binaries.sonarsource.com/Distribution/sonar-scanner-cli/sonar-scanner-cli-6.1.0.4477-linux-x64.zip) [Linux AArch64](https://binaries.sonarsource.com/Distribution/sonar-scanner-cli/sonar-scanner-cli-6.1.0.4477-linux-aarch64.zip) [Windows x64](https://binaries.sonarsource.com/Distribution/sonar-scanner-cli/sonar-scanner-cli-6.1.0.4477-windows-x64.zip) [macOS x64](https://binaries.sonarsource.com/Distribution/sonar-scanner-cli/sonar-scanner-cli-6.1.0.4477-macosx-x64.zip) [macOS AArch64](https://binaries.sonarsource.com/Distribution/sonar-scanner-cli/sonar-scanner-cli-6.1.0.4477-macosx-aarch64.zip) [Docker](https://hub.docker.com/r/sonarsource/sonar-scanner-cli) [Any (Requires a pre-installed JVM)](https://binaries.sonarsource.com/Distribution/sonar-scanner-cli/sonar-scanner-cli-6.1.0.4477.zip)\
\
[Release notes](https://sonarsource.atlassian.net/issues/?jql=project%20%3D%2010143%20AND%20fixVersion%20%3D%2015671)
***
**6.0** **2024-06-04**\ New bootstrapping mechanism and JRE provisioning with SonarQube 10.6+ and SonarCloud\
Download scanner for: [Linux x64](https://binaries.sonarsource.com/Distribution/sonar-scanner-cli/sonar-scanner-cli-6.0.0.4432-linux.zip) [Windows x64](https://binaries.sonarsource.com/Distribution/sonar-scanner-cli/sonar-scanner-cli-6.0.0.4432-windows.zip) [macOS x64](https://binaries.sonarsource.com/Distribution/sonar-scanner-cli/sonar-scanner-cli-6.0.0.4432-macosx.zip) [Docker](https://hub.docker.com/r/sonarsource/sonar-scanner-cli) [Any (Requires a pre-installed JVM)](https://binaries.sonarsource.com/Distribution/sonar-scanner-cli/sonar-scanner-cli-6.0.0.4432.zip)\
\
[Release notes](https://sonarsource.atlassian.net/issues/?jql=project%20%3D%2010143%20AND%20fixVersion%20%3D%2015344)
***
**5.0.2** **2025-06-02**\ Security fix\
Download scanner for: [Linux x64](https://binaries.sonarsource.com/Distribution/sonar-scanner-cli/sonar-scanner-cli-5.0.2.4997-linux.zip) [Windows x64](https://binaries.sonarsource.com/Distribution/sonar-scanner-cli/sonar-scanner-cli-5.0.2.4997-windows.zip) [macOS x64](https://binaries.sonarsource.com/Distribution/sonar-scanner-cli/sonar-scanner-cli-5.0.2.4997-macosx.zip) [Docker](https://hub.docker.com/r/sonarsource/sonar-scanner-cli) [Any (Requires a pre-installed JVM)](https://binaries.sonarsource.com/Distribution/sonar-scanner-cli/sonar-scanner-cli-5.0.2.4997.zip)\
\
[Release notes](https://sonarsource.atlassian.net/issues/?jql=project%20%3D%2010143%20AND%20fixVersion%20%3D%2020322)
***
**5.0.1** **2023-08-04**\ Bug fix to the JRE binaries for Linux\
Download scanner for: [Linux x64](https://binaries.sonarsource.com/Distribution/sonar-scanner-cli/sonar-scanner-cli-5.0.1.3006-linux.zip) [Windows x64](https://binaries.sonarsource.com/Distribution/sonar-scanner-cli/sonar-scanner-cli-5.0.1.3006-windows.zip) [macOS x64](https://binaries.sonarsource.com/Distribution/sonar-scanner-cli/sonar-scanner-cli-5.0.1.3006-macosx.zip) [Docker](https://hub.docker.com/r/sonarsource/sonar-scanner-cli) [Any (Requires a pre-installed JVM)](https://binaries.sonarsource.com/Distribution/sonar-scanner-cli/sonar-scanner-cli-5.0.1.3006.zip)\
\
[Release notes](https://sonarsource.atlassian.net/issues/?jql=project%20%3D%2010143%20AND%20fixVersion%20%3D%2014231)
***
**5.0** **2023-07-31**\ Update embedded JRE to Java 17\
Download scanner for: [Linux x64](https://binaries.sonarsource.com/Distribution/sonar-scanner-cli/sonar-scanner-cli-5.0.0.2966-linux.zip) [Windows x64](https://binaries.sonarsource.com/Distribution/sonar-scanner-cli/sonar-scanner-cli-5.0.0.2966-windows.zip) [macOS x64](https://binaries.sonarsource.com/Distribution/sonar-scanner-cli/sonar-scanner-cli-5.0.0.2966-macosx.zip) [Docker](https://hub.docker.com/r/sonarsource/sonar-scanner-cli) [Any (Requires a pre-installed JVM)](https://binaries.sonarsource.com/Distribution/sonar-scanner-cli/sonar-scanner-cli-5.0.0.2966.zip)\
\
[Release notes](https://sonarsource.atlassian.net/issues/?jql=project%20%3D%2010143%20AND%20fixVersion%20%3D%2013991)
***
**4.8.1** **2023-08-14**\ Security fix\
Download scanner for: [Linux x64](https://binaries.sonarsource.com/Distribution/sonar-scanner-cli/sonar-scanner-cli-4.8.1.3023-linux.zip) [Windows x64](https://binaries.sonarsource.com/Distribution/sonar-scanner-cli/sonar-scanner-cli-4.8.1.3023-windows.zip) [macOS x64](https://binaries.sonarsource.com/Distribution/sonar-scanner-cli/sonar-scanner-cli-4.8.1.3023-macosx.zip) [Docker](https://hub.docker.com/r/sonarsource/sonar-scanner-cli) [Any (Requires a pre-installed JVM)](https://binaries.sonarsource.com/Distribution/sonar-scanner-cli/sonar-scanner-cli-4.8.1.3023.zip)\
\
[Release notes](https://sonarsource.atlassian.net/issues/?jql=project%20%3D%2010143%20AND%20fixVersion%20%3D%2014243)
***
**4.8** **2022-02-06**\ Update embedded JRE 11 to the latest, bug fixes\
Download scanner for: [Linux x64](https://binaries.sonarsource.com/Distribution/sonar-scanner-cli/sonar-scanner-cli-4.8.0.2856-linux.zip) [Windows x64](https://binaries.sonarsource.com/Distribution/sonar-scanner-cli/sonar-scanner-cli-4.8.0.2856-windows.zip) [macOS x64](https://binaries.sonarsource.com/Distribution/sonar-scanner-cli/sonar-scanner-cli-4.8.0.2856-macosx.zip) [Docker](https://hub.docker.com/r/sonarsource/sonar-scanner-cli) [Any (Requires a pre-installed JVM)](https://binaries.sonarsource.com/Distribution/sonar-scanner-cli/sonar-scanner-cli-4.8.0.2856.zip)\
\
[Release notes](https://sonarsource.atlassian.net/issues/?jql=project%20%3D%2010143%20AND%20fixVersion%20%3D%2012892)
***
**4.7** **2022-02-02**\ Ease import of custom certificates with the Docker image, update embedded JRE 11\
Download scanner for: [Linux x64](https://binaries.sonarsource.com/Distribution/sonar-scanner-cli/sonar-scanner-cli-4.7.0.2747-linux.zip) [Windows x64](https://binaries.sonarsource.com/Distribution/sonar-scanner-cli/sonar-scanner-cli-4.7.0.2747-windows.zip) [macOS x64](https://binaries.sonarsource.com/Distribution/sonar-scanner-cli/sonar-scanner-cli-4.7.0.2747-macosx.zip) [Docker](https://hub.docker.com/r/sonarsource/sonar-scanner-cli) [Any (Requires a pre-installed JVM)](https://binaries.sonarsource.com/Distribution/sonar-scanner-cli/sonar-scanner-cli-4.7.0.2747.zip)\
\
[Release notes](https://sonarsource.atlassian.net/issues/?jql=project+%3D+10143+AND+fixVersion+%3D+12891)
***
**4.6.2** **2021-05-07**\ Update dependencies, bug fix\
Download scanner for: [Linux x64](https://binaries.sonarsource.com/Distribution/sonar-scanner-cli/sonar-scanner-cli-4.6.2.2472-linux.zip) [Windows x64](https://binaries.sonarsource.com/Distribution/sonar-scanner-cli/sonar-scanner-cli-4.6.2.2472-windows.zip) [macOS x64](https://binaries.sonarsource.com/Distribution/sonar-scanner-cli/sonar-scanner-cli-4.6.2.2472-macosx.zip) [Docker](https://hub.docker.com/r/sonarsource/sonar-scanner-cli) [Any (Requires a pre-installed JVM)](https://binaries.sonarsource.com/Distribution/sonar-scanner-cli/sonar-scanner-cli-4.6.2.2472.zip)\
\
[Release notes](https://sonarsource.atlassian.net/issues/?jql=project+%3D+10143+AND+fixVersion+%3D+12890)
***
**4.6.1** **2021-04-30**\ Update dependencies\
Download scanner for: [Linux x64](https://binaries.sonarsource.com/Distribution/sonar-scanner-cli/sonar-scanner-cli-4.6.1.2450-linux.zip) [Windows x64](https://binaries.sonarsource.com/Distribution/sonar-scanner-cli/sonar-scanner-cli-4.6.1.2450-windows.zip) [macOS x64](https://binaries.sonarsource.com/Distribution/sonar-scanner-cli/sonar-scanner-cli-4.6.1.2450-macosx.zip) [Docker](https://hub.docker.com/r/sonarsource/sonar-scanner-cli) [Any (Requires a pre-installed JVM)](https://binaries.sonarsource.com/Distribution/sonar-scanner-cli/sonar-scanner-cli-4.6.1.2450.zip)\
\
[Release notes](https://sonarsource.atlassian.net/issues/?jql=project+%3D+10143+AND+fixVersion+%3D+12889)
***
**4.6** **2021-01-13**\ Support for Bitbucket Pipelines with SonarQube 8.7+\
Download scanner for: [Linux x64](https://binaries.sonarsource.com/Distribution/sonar-scanner-cli/sonar-scanner-cli-4.6.0.2311-linux.zip) [Windows x64](https://binaries.sonarsource.com/Distribution/sonar-scanner-cli/sonar-scanner-cli-4.6.0.2311-windows.zip) [macOS x64](https://binaries.sonarsource.com/Distribution/sonar-scanner-cli/sonar-scanner-cli-4.6.0.2311-macosx.zip) [Docker](https://hub.docker.com/r/sonarsource/sonar-scanner-cli) [Any (Requires a pre-installed JVM)](https://binaries.sonarsource.com/Distribution/sonar-scanner-cli/sonar-scanner-cli-4.6.0.2311.zip)\
\
[Release notes](https://sonarsource.atlassian.net/issues/?jql=project+%3D+10143+AND+fixVersion+%3D+12888)
***
**4.5** **2020-10-05**\ Fix a bug preventing the analysis in some environments\
Download scanner for: [Linux x64](https://binaries.sonarsource.com/Distribution/sonar-scanner-cli/sonar-scanner-cli-4.5.0.2216-linux.zip) [Windows x64](https://binaries.sonarsource.com/Distribution/sonar-scanner-cli/sonar-scanner-cli-4.5.0.2216-windows.zip) [macOS x64](https://binaries.sonarsource.com/Distribution/sonar-scanner-cli/sonar-scanner-cli-4.5.0.2216-macosx.zip) [Docker](https://hub.docker.com/r/sonarsource/sonar-scanner-cli) [Any (Requires a pre-installed JVM)](https://binaries.sonarsource.com/Distribution/sonar-scanner-cli/sonar-scanner-cli-4.5.0.2216.zip)\
\
[Release notes](https://sonarsource.atlassian.net/issues/?jql=project+%3D+10143+AND+fixVersion+%3D+12887)
***
**4.4** **2020-07-03**\ New supported Docker image, bug fix\
Download scanner for: [Linux x64](https://binaries.sonarsource.com/Distribution/sonar-scanner-cli/sonar-scanner-cli-4.4.0.2170-linux.zip) [Windows x64](https://binaries.sonarsource.com/Distribution/sonar-scanner-cli/sonar-scanner-cli-4.4.0.2170-windows.zip) [macOS x64](https://binaries.sonarsource.com/Distribution/sonar-scanner-cli/sonar-scanner-cli-4.4.0.2170-macosx.zip) [Docker](https://hub.docker.com/r/sonarsource/sonar-scanner-cli) [Any (Requires a pre-installed JVM)](https://binaries.sonarsource.com/Distribution/sonar-scanner-cli/sonar-scanner-cli-4.4.0.2170.zip)\
\
[Release notes](https://sonarsource.atlassian.net/issues/?jql=project+%3D+10143+AND+fixVersion+%3D+12886)
***
**4.3** **2019-03-09**\ Use SonarScanner name and better handle SonarCloud case in logs\
Download scanner for: [Linux x64](https://binaries.sonarsource.com/Distribution/sonar-scanner-cli/sonar-scanner-cli-4.3.0.2102-linux.zip) [Windows x64](https://binaries.sonarsource.com/Distribution/sonar-scanner-cli/sonar-scanner-cli-4.3.0.2102-windows.zip) [macOS x64](https://binaries.sonarsource.com/Distribution/sonar-scanner-cli/sonar-scanner-cli-4.3.0.2102-macosx.zip) [Docker](https://hub.docker.com/r/sonarsource/sonar-scanner-cli) [Any (Requires a pre-installed JVM)](https://binaries.sonarsource.com/Distribution/sonar-scanner-cli/sonar-scanner-cli-4.3.0.2102.zip)\
\
[Release notes](https://sonarsource.atlassian.net/issues/?jql=project+%3D+10143+AND+fixVersion+%3D+12885)
***
**4.2** **2019-10-01**\ Support SONAR\_HOST\_URL environment variable to configure the server URL\
Download scanner for: [Linux x64](https://binaries.sonarsource.com/Distribution/sonar-scanner-cli/sonar-scanner-cli-4.2.0.1873-linux.zip) [Windows x64](https://binaries.sonarsource.com/Distribution/sonar-scanner-cli/sonar-scanner-cli-4.2.0.1873-windows.zip) [macOS x64](https://binaries.sonarsource.com/Distribution/sonar-scanner-cli/sonar-scanner-cli-4.2.0.1873-macosx.zip) [Docker](https://hub.docker.com/r/sonarsource/sonar-scanner-cli) [Any (Requires a pre-installed JVM)](https://binaries.sonarsource.com/Distribution/sonar-scanner-cli/sonar-scanner-cli-4.2.0.1873.zip)\
\
[Release notes](https://sonarsource.atlassian.net/issues/?jql=project+%3D+10143+AND+fixVersion+%3D+12884)
***
**4.1** **2019-09-09**\ Improve the use of a custom project configuration file\
Download scanner for: [Linux x64](https://binaries.sonarsource.com/Distribution/sonar-scanner-cli/sonar-scanner-cli-4.1.0.1829-linux.zip) [Windows x64](https://binaries.sonarsource.com/Distribution/sonar-scanner-cli/sonar-scanner-cli-4.1.0.1829-windows.zip) [macOS x64](https://binaries.sonarsource.com/Distribution/sonar-scanner-cli/sonar-scanner-cli-4.1.0.1829-macosx.zip) [Docker](https://hub.docker.com/r/sonarsource/sonar-scanner-cli) [Any (Requires a pre-installed JVM)](https://binaries.sonarsource.com/Distribution/sonar-scanner-cli/sonar-scanner-cli-4.1.0.1829.zip)\
\
[Release notes](https://sonarsource.atlassian.net/issues/?jql=project+%3D+10143+AND+fixVersion+%3D+12883)
The SonarScanner CLI is the scanner to use when there is no specific scanner for your build system. It supports ARM architecture for macOS and Linux.
### Prerequisites
* Java 21 or later, Java 17 has been deprecated. See [#java-runtime-environment-jre](https://docs.sonarsource.com/sonarqube-cloud/scanner-environment/general-requirements#java-runtime-environment-jre "mention") for more details.
* With JRE auto-provisioning:
* Java 11 or later from SonarScanner CLI version 7.2
* Java 17 or later before SonarScanner CLI version 7.2
See [general-requirements](https://docs.sonarsource.com/sonarqube-cloud/advanced-setup/scanner-environment/general-requirements "mention") for more information.
### Installation
* Expand the downloaded file into the directory of your choice. We’ll refer to it as `$install_directory` in the next step.
* Add the `$install_directory/bin` directory to your path.
* Verify your installation by opening a new shell and executing the command `sonar-scanner -h`(`sonar-scanner.bat -h` on Windows). You should get an output like this:
```bash
usage: sonar-scanner [options]
Options:
-D,--define Define property
-h,--help Display help information
-v,--version Display version information
-X,--debug Produce execution debug output
```
If you need more debug information you can add one of the following to your command line:
`-X`, `--verbose`, or `-Dsonar.verbose=true`.
### Use
* Create a configuration file in the root directory of the project: `sonar-project.properties`
```properties
# Organization and project keys are displayed in the right sidebar of the project homepage
sonar.organization=my_organization
sonar.projectKey=my_project
sonar.host.url=https://sonarcloud.io
# --- optional properties ---
# defaults to project key
#sonar.projectName=My project
# defaults to 'not provided'
#sonar.projectVersion=1.0
# Path is relative to the sonar-project.properties file. Defaults to .
#sonar.sources=.
# Encoding of the source code. Default is default system encoding
#sonar.sourceEncoding=UTF-8
```
* Set the environment variable `SONAR_TOKEN` with the Scoped Organization Token (SOT) (recommended from the Team plan) or Personal Access Token (PAT). Note that the token can also be set through the command line argument `-Dsonar.token`.\
To generate the token, see [scoped-organization-tokens](https://docs.sonarsource.com/sonarqube-cloud/administering-sonarcloud/managing-organization/scoped-organization-tokens "mention") or [managing-tokens](https://docs.sonarsource.com/sonarqube-cloud/managing-your-account/managing-tokens "mention").
* Run the command `sonar-scanner`, or `sonar-scanner.bat` on Windows, from the project base directory to run the analysis.
### sample-projects
To help you get started, simple project samples are available for most languages on GitHub. They can be [browsed](https://github.com/SonarSource/sonar-scanning-examples/tree/master) or [downloaded](https://github.com/SonarSource/sonar-scanning-examples/archive/master.zip).
### Alternatives to the sonar-project.properties file
If the `sonar-project.properties` file cannot be created in the root directory of the project, the alternatives are:
* The properties can be specified directly through the command line. Example:
```bash
sonar-scanner -Dsonar.organization=my_organization -Dsonar.projectKey=my_project -Dsonar.sources=src
```
* The property `project.settings` can be used to specify the path to the project configuration file (this option is incompatible with the `sonar.projectBaseDir.`property).
* The root folder of the project to analyze can be set through the `sonar.projectBaseDir` property. This folder must contain a `sonar-project.properties` file if the `sonar.projectKey` is not specified on the command line. Additional analysis parameters can be defined in this project configuration file or through command line parameters.
### Alternate analysis directory
If the files to be analyzed are not in the directory where the analysis starts from, use the `sonar.projectBaseDir` property to move analysis to a different directory. For example, when an analysis begins from `jenkins/jobs/myjob/workspace` but the files to be analyzed are in `ftpdrop/cobol/project1`.
```properties
sonar.projectBaseDir=/home/ftpdrop/cobol/project1
sonar.sources=src
sonar.cobol.copy.directories=/copy
```
For more, see the listing of [analysis-parameters](https://docs.sonarsource.com/sonarqube-cloud/advanced-setup/analysis-parameters "mention").
### Troubleshooting
**Java heap space error or java.lang.OutOfMemoryError**
Increase the memory using `SONAR_SCANNER_JAVA_OPTS` environment variable for SonarScanner CLI version 6.0 and higher. For the previous versions use `SONAR_SCANNER_OPTS`:
```properties
export SONAR_SCANNER_JAVA_OPTS="-Xmx512m"
```
In Windows environments, avoid using double-quotes, since they get misinterpreted, with the result that the two parameters are combined into a single one.
```properties
set SONAR_SCANNER_JAVA_OPTS=-Xmx512m
```
**"java" cannot be opened because the developer cannot be verified**
The SonarScanner CLI is not yet Apple verified therefore, when using the macOS AArch64 version, you may get an OS security window displaying this message. A solution us to run:
```bash
sudo xattr -dr com.apple.quarantine /path/to/sonar-scanner-version-macosx-aarch64
```
**Unsupported major.minor version**
Install the last version of SonarScanner CLI (from version 6.0, no JRE installation is required). Otherwise, upgrade the version of Java being used for analysis or use one of the core packages that embed its own Java runtime.
**Property sonar.cs.analyzer.projectOutPaths is missing**
No protobuf files will be loaded for this project. SonarScanner is not able to analyze .NET projects. Please use the [sonarscanner-for-dotnet](https://docs.sonarsource.com/sonarqube-cloud/advanced-setup/ci-based-analysis/sonarscanner-for-dotnet "mention").
---
# Source: https://docs.sonarsource.com/sonarqube-server/8.9/analyzing-source-code/scanners/sonarscanner-for-ant.md
# Source: https://docs.sonarsource.com/sonarqube-server/9.8/analyzing-source-code/scanners/sonarscanner-for-ant.md
# Source: https://docs.sonarsource.com/sonarqube-server/9.9/analyzing-source-code/scanners/sonarscanner-for-ant.md
# Source: https://docs.sonarsource.com/sonarqube-server/10.0/analyzing-source-code/scanners/sonarscanner-for-ant.md
# Source: https://docs.sonarsource.com/sonarqube-server/10.1/analyzing-source-code/scanners/sonarscanner-for-ant.md
# Source: https://docs.sonarsource.com/sonarqube-server/10.2/analyzing-source-code/scanners/sonarscanner-for-ant.md
# Source: https://docs.sonarsource.com/sonarqube-server/10.3/analyzing-source-code/scanners/sonarscanner-for-ant.md
# Source: https://docs.sonarsource.com/sonarqube-server/10.4/analyzing-source-code/scanners/sonarscanner-for-ant.md
# Source: https://docs.sonarsource.com/sonarqube-server/10.5/analyzing-source-code/scanners/sonarscanner-for-ant.md
# Source: https://docs.sonarsource.com/sonarqube-server/10.6/analyzing-source-code/scanners/sonarscanner-for-ant.md
# Source: https://docs.sonarsource.com/sonarqube-server/10.7/analyzing-source-code/scanners/sonarscanner-for-ant.md
# Source: https://docs.sonarsource.com/sonarqube-server/10.8/analyzing-source-code/scanners/sonarscanner-for-ant.md
# SonarScanner for Ant (Deprecated)
SonarScanner for Ant — 2.7.1 | Issue Tracker
**2.7.1** **2021-04-30**\ Update dependencies\
[Download](https://binaries.sonarsource.com/Distribution/sonarqube-ant-task/sonarqube-ant-task-2.7.1.1951.jar)\
\
[Release notes](https://sonarsource.atlassian.net/issues/?jql=project+%3D+10136+AND+fixVersion+%3D+12372)
***
**2.7** **2019-10-01**\ Support SONAR\_HOST\_URL environment variable to configure the server URL\
[Download](https://binaries.sonarsource.com/Distribution/sonarqube-ant-task/sonarqube-ant-task-2.7.0.1612.jar)\
\
[Release notes](https://sonarsource.atlassian.net/issues/?jql=project+%3D+10136+AND+fixVersion+%3D+12371)
{% hint style="warning" %}
SonarScanner for Ant is deprecated. You can start using the SonarScanner instead by following the instructions below.
{% endhint %}
The SonarScanner for Ant provides a `task` to allow the integration of a SonarQube Server analysis into an Apache Ant build script.
### Moving from SonarScanner for Ant to SonarScanner CLI
The SonarScanner for Ant is an Ant Task that is a wrapper of the [sonarscanner](https://docs.sonarsource.com/sonarqube-server/10.8/analyzing-source-code/scanners/sonarscanner "mention"), which works by invoking the SonarScanner CLI and passing to it all [analysis-parameters](https://docs.sonarsource.com/sonarqube-server/10.8/analyzing-source-code/analysis-parameters "mention") named following a `sonar.*` convention. It is now deprecated. We recommend using the SonarScanner CLI directly.
If you’re still using the SonarScanner for Ant, follow these steps to remove the wrapper from your build file, create a `sonar-project.properties` in your project, and run the analysis.
#### Prerequisites
The [sonarscanner](https://docs.sonarsource.com/sonarqube-server/10.8/analyzing-source-code/scanners/sonarscanner "mention") is installed on your machine.
#### Configuring your sonar properties
1. Create a `sonar-project.properties` in your project.
2. Move the `sonar.*` properties from your `build.xml` file to the `sonar-project.properties` file. For example:
```css-79elbk
sonar.host.url="sonarHostUrl"
sonar.projectKey="projectKey"
sonar.projectName="projectName"
sonar.projectVersion="1.0"
sonar.sources="src"
sonar.java.binaries="build"
sonar.java.libraries="lib/*.jar"
```
See [sonarscanner](https://docs.sonarsource.com/sonarqube-server/10.8/analyzing-source-code/scanners/sonarscanner "mention") for more information on how to configure project properties.
### Running the analysis
Create a [managing-tokens](https://docs.sonarsource.com/sonarqube-server/10.8/user-guide/managing-tokens "mention") and run the analysis using `sonar-scanner -Dsonar.token=myAuthenticationToken`.
Alternatively, instead of passing the token in your command line, you can create the `SONAR_TOKEN` environment variable and set the token as its value before you launch the analysis.
See [sonarscanner](https://docs.sonarsource.com/sonarqube-server/10.8/analyzing-source-code/scanners/sonarscanner "mention") for more information.
#### \[Archived] sample project
For comparison purposes, a sample SonarScanner for Ant project is available here:
---
# Source: https://docs.sonarsource.com/sonarqube-server/8.9/analyzing-source-code/scanners/sonarscanner-for-azure-devops.md
# SonarScanner for Azure DevOps
SonarScanner for Azure DevOps — 8.0.1 | Issue Tracker
**8.0.1** **2025-12-10**\ Rotation of binary signing keys\
[Download](https://marketplace.visualstudio.com/items?itemName=SonarSource.sonarqube)\
\
[Release notes](https://sonarsource.atlassian.net/issues?jql=project%20%3D%2010078%20AND%20fixversion%20%3D%20sq-8.0.1)
***
**8.0.0** **2025-12-08**\ Update scanner for .NET to 11.0.0 and CLI to 8.0.0\
[Download](https://marketplace.visualstudio.com/items?itemName=SonarSource.sonarqube)\
\
[Release notes](https://sonarsource.atlassian.net/issues/?jql=project%20%3D%2010078%20AND%20fixversion%20%3D%20sq-8.0.0)
***
**7.4.2** **2025-11-05**\ Update marketplace documentation\
[Download](https://marketplace.visualstudio.com/items?itemName=SonarSource.sonarqube)\
\
[Release notes](https://sonarsource.atlassian.net/issues/?jql=project%20%3D%2010078%20AND%20fixversion%20%3D%20sq-7.4.2)
***
**7.4.1** **2025-08-07**\ Update tasks to Node 20+\
[Download](https://marketplace.visualstudio.com/items?itemName=SonarSource.sonarqube)\
\
[Release notes](https://sonarsource.atlassian.net/issues/?jql=project%20%3D%2010078%20AND%20fixversion%20%3D%20sq-7.4.1)
***
**7.3** **2025-04-23**\ Bump Scanner for .NET to 10.1.2.114627\
[Download](https://marketplace.visualstudio.com/items?itemName=SonarSource.sonarqube)\
\
[Release notes](https://sonarsource.atlassian.net/issues/?jql=project%20%3D%2010078%20AND%20fixVersion%20%3D%2018869)
***
**7.2** **2025-04-09**\ Bump Scanner for .NET to 10.1.0.110937\
[Download](https://marketplace.visualstudio.com/items?itemName=SonarSource.sonarqube)\
\
[Release notes](https://sonarsource.atlassian.net/issues/?jql=project%20%3D%2010078%20AND%20fixVersion%20%3D%2016144)
***
**7.1.1** **2024-11-26**\ Bump Scanner for .NET to 9.0.2.104486\
[Download](https://marketplace.visualstudio.com/items?itemName=SonarSource.sonarqube)\
\
[Release notes](https://sonarsource.atlassian.net/issues/?jql=project%20%3D%2010078%20AND%20fixVersion%20%3D%2016127)
***
**7.1.0** **2024-11-19**\ Align with SonarQube rebranding\
[Download](https://marketplace.visualstudio.com/items?itemName=SonarSource.sonarqube)\
\
[Release notes](https://sonarsource.atlassian.net/issues/?jql=project%20%3D%2010078%20AND%20fixVersion%20%3D%2016109)
***
**7.0.4** **2024-11-12**\ Fix PR decorations for dark mode\
[Download](https://marketplace.visualstudio.com/items?itemName=SonarSource.sonarqube)\
\
[Release notes](https://sonarsource.atlassian.net/issues/?jql=project%20%3D%2010078%20AND%20fixVersion%20%3D%2016079)
***
**7.0.3** **2024-10-29**\ Bump Scanner for .NET 9.0.1 & Fix missing translation messages\
[Download](https://marketplace.visualstudio.com/items?itemName=SonarSource.sonarqube)\
\
[Release notes](https://sonarsource.atlassian.net/issues/?jql=project%20%3D%2010078%20AND%20fixVersion%20%3D%2016078)
***
**7.0.2** **2024-10-22**\ Fix windows path parsing coming from predefined variables correctly in extraProperties\
[Download](https://marketplace.visualstudio.com/items?itemName=SonarSource.sonarqube)\
\
[Release notes](https://sonarsource.atlassian.net/issues/?jql=project%20%3D%2010078%20AND%20fixVersion%20%3D%2016073)
***
**7.0.1** **2024-10-21**\ Fix .NET Framework scanner embedding logic.\
[Download](https://marketplace.visualstudio.com/items?itemName=SonarSource.sonarqube)\
\
[Release notes](https://sonarsource.atlassian.net/issues/?jql=project%20%3D%2010078%20AND%20fixVersion%20%3D%2016068)
***
**7.0.0** **2024-10-21**\ .NET analysis defaults to Scanner for .NET v9 with multi-language analysis. Embeds scanner-CLI v6.2.1 with JRE auto-provisioning.\
[Download](https://marketplace.visualstudio.com/items?itemName=SonarSource.sonarqube)\
\
[Release notes](https://sonarsource.atlassian.net/issues/?jql=project%20%3D%2010078%20AND%20fixVersion%20%3D%2015852)
***
**6.2.0** **2024-07-01**\ Default scanners are embedded for offline use\
[Download](https://marketplace.visualstudio.com/items?itemName=SonarSource.sonarqube)\
\
[Release notes](https://sonarsource.atlassian.net/issues/?jql=project%20%3D%2010078%20AND%20fixVersion%20%3D%2015754)
***
**6.1.0** **2024-06-18**\ Scanner CLI now defaults to v6\
[Download](https://marketplace.visualstudio.com/items?itemName=SonarSource.sonarqube)\
\
[Release notes](https://sonarsource.atlassian.net/issues/?jql=project%20%3D%2010078%20AND%20fixVersion%20%3D%2015740)
***
**6.0.1** **2024-06-10**\ Deprecate the old SonarQube v5 tasks with proper warnings\
[Download](https://marketplace.visualstudio.com/items?itemName=SonarSource.sonarqube)\
\
[Release notes](https://sonarsource.atlassian.net/issues/?jql=project%20%3D%2010078%20AND%20fixVersion%20%3D%2015684)
***
**6.0.0** **2024-05-31**\ New V6 task with configurable scanner version, Drop of V3 tasks, bump of agent requirements for V4 tasks\
[Download](https://marketplace.visualstudio.com/items?itemName=SonarSource.sonarqube)\
\
[Release notes](https://sonarsource.atlassian.net/issues/?jql=project%20%3D%2010078%20AND%20fixVersion%20%3D%2015492)
***
**5.20.0** **2024-04-15**\ Support for JDK 21 and Bump to Scanner for .NET 5.15.1 (fix for .NET 8 on MacOS)\
[Download](https://marketplace.visualstudio.com/items?itemName=SonarSource.sonarqube)\
\
[Release notes](https://sonarsource.atlassian.net/issues/?jql=project%20%3D%2010078%20AND%20fixVersion%20%3D%2015558)
***
**5.19.2** **2024-03-11**\ Ignore specified JDK 11 if SonarQube does not support it\
[Download](https://marketplace.visualstudio.com/items?itemName=SonarSource.sonarqube)\
\
[Release notes](https://sonarsource.atlassian.net/issues/?jql=project%20%3D%2010078%20AND%20fixVersion%20%3D%2015528)
***
**5.19.1** **2024-03-04**\ Reintroduce compatibility for v4 tasks with node6\
[Download](https://marketplace.visualstudio.com/items?itemName=SonarSource.sonarqube)\
\
[Release notes](https://sonarsource.atlassian.net/issues/?jql=project%20%3D%2010078%20AND%20fixVersion%20%3D%2015517)
***
**5.19.0** **2024-01-24**\ PRs show issues that will be fixed by the merge & Accepted, Retry mechanism during publish polling to tolerate unstable network conditions.\
[Download](https://marketplace.visualstudio.com/items?itemName=SonarSource.sonarqube)\
\
[Release notes](https://sonarsource.atlassian.net/issues/?jql=project%20%3D%2010078%20AND%20fixVersion%20%3D%2015451)
***
**5.18.4** **2023-11-28**\ Bump MSBuild Scanner to 5.15\
[Download](https://marketplace.visualstudio.com/items?itemName=SonarSource.sonarqube)\
\
[Release notes](https://sonarsource.atlassian.net/issues/?jql=project%20%3D%2010078%20AND%20fixVersion%20%3D%2015420)
***
**5.18.3** **2023-11-20**\ Maximize proxy compatibility with tasks <5.18.0\
[Download](https://marketplace.visualstudio.com/items?itemName=SonarSource.sonarqube)\
\
[Release notes](https://sonarsource.atlassian.net/issues/?jql=project%20%3D%2010078%20AND%20fixVersion%20%3D%2015410)
***
**5.18.2** **2023-11-17**\ Adjust PR decorations to Clean Code Taxonomy, Migrate from request to node-fetch, Support Azure proxy, Fix vulnerabilities\
[Download](https://marketplace.visualstudio.com/items?itemName=SonarSource.sonarqube)\
\
[Release notes](https://sonarsource.atlassian.net/issues/?jql=project%20%3D%2010078%20AND%20fixVersion%20%3D%2015395)
***
**5.17.2** **2023-10-18**\ Revert request library\
[Download](https://marketplace.visualstudio.com/items?itemName=SonarSource.sonarqube)\
\
[Release notes](https://sonarsource.atlassian.net/issues/?jql=project%20%3D%2010078%20AND%20fixVersion%20%3D%2015355)
***
**5.16.0** **2023-10-17**\ Fix Mend vulnerabilities & Dependencies bump\
[Download](https://marketplace.visualstudio.com/items?itemName=SonarSource.sonarqube)\
\
[Release notes](https://sonarsource.atlassian.net/issues/?jql=project%20%3D%2010078%20AND%20fixVersion%20%3D%2015334)
***
**5.15.0** **2023-06-14**\ Fix computation and retrieval of report-task.txt + Let user choose which java version to use for analysis\
[Download](https://marketplace.visualstudio.com/items?itemName=SonarSource.sonarqube)\
\
[Release notes](https://sonarsource.atlassian.net/issues/?jql=project%20%3D%2010078%20AND%20fixVersion%20%3D%2014178)
***
**5.14.0** **2023-06-13**\ Improved support for SQ >= 10.0, Change computation of metadata file path, added detection of JAVA\_17 environment variable\
[Download](https://marketplace.visualstudio.com/items?itemName=SonarSource.sonarqube)\
\
[Release notes](https://sonarsource.atlassian.net/issues/?jql=project%20%3D%2010078%20AND%20fixVersion%20%3D%2014120)
***
**5.13.0** **2023-04-27**\ Support for sonar.token, incremental analysis outside Azure, better error message\
[Download](https://marketplace.visualstudio.com/items?itemName=SonarSource.sonarqube)\
\
[Release notes](https://sonarsource.atlassian.net/issues/?jql=project%20%3D%2010078%20AND%20fixVersion%20%3D%2014118)
***
**5.12.0** **2023-03-17**\ Supports for SonarCloud incremental analysis cache\
[Download](https://marketplace.visualstudio.com/items?itemName=SonarSource.sonarqube)\
\
[Release notes](https://sonarsource.atlassian.net/issues/?jql=project%20%3D%2010078%20AND%20fixVersion%20%3D%2014078)
***
**5.11.1** **2023-02-02**\ Azure DevOps extension is compatible with SonarQube 10.0\
[Download](https://marketplace.visualstudio.com/items?itemName=SonarSource.sonarqube)\
\
[Release notes](https://sonarsource.atlassian.net/issues/?jql=project%20%3D%2010078%20AND%20fixVersion%20%3D%2014042)
***
**5.11.0** **2023-02-02**\ Update scanner for .NET to 5.11.0\
[Download](https://marketplace.visualstudio.com/items?itemName=SonarSource.sonarqube)\
\
[Release notes](https://sonarsource.atlassian.net/issues/?jql=project%20%3D%2010078%20AND%20fixVersion%20%3D%2014040)
***
**5.10.0** **2023-01-23**\ Bump Scanner for .NET to 5.10.0 and ScannerCLI to 4.8.0\
[Download](https://marketplace.visualstudio.com/items?itemName=SonarSource.sonarqube)\
\
[Release notes](https://sonarsource.atlassian.net/issues/?jql=project%20%3D%2010078%20AND%20fixVersion%20%3D%2013846)
***
**5.9.0** **2023-01-03**\ Bump Scanner for .NET to 5.9.2\
[Download](https://marketplace.visualstudio.com/items?itemName=SonarSource.sonarqube)\
\
[Release notes](https://sonarsource.atlassian.net/issues/?jql=project%20%3D%2010078%20AND%20fixVersion%20%3D%2013846)
***
**5.8.1** **2022-10-11**\ Fix task status spelling (CANCEL -> CANCELED)\
[Download](https://marketplace.visualstudio.com/items?itemName=SonarSource.sonarqube)\
\
[Release notes](https://sonarsource.atlassian.net/issues/?jql=project%20%3D%2010078%20AND%20fixVersion%20%3D%2013890)
***
**5.8.0** **2022-09-05**\ Bump Scanner for .NET to 5.8.0\
[Download](https://marketplace.visualstudio.com/items?itemName=SonarSource.sonarqube)\
\
[Release notes](https://sonarsource.atlassian.net/issues/?jql=project%20%3D%2010078%20AND%20fixVersion%20%3D%2013846)
***
**5.7.0** **2022-08-09**\ Bump Scanner for .NET to 5.7.2 and ScannerCLI to 4.7.0\
[Download](https://marketplace.visualstudio.com/items?itemName=SonarSource.sonarqube)\
\
[Release notes](https://sonarsource.atlassian.net/issues/?jql=project%20%3D%2010078%20AND%20fixVersion%20%3D%2013813)
***
**5.6.1** **2022-07-06**\ Revert Scanner for .NET to 5.6.0 and ScannerCLi to 4.6.2\
[Download](https://marketplace.visualstudio.com/items?itemName=SonarSource.sonarqube)\
\
[Release notes](https://sonarsource.atlassian.net/issues/?jql=project+%3D+10078+AND+fixVersion+%3D+10890)
***
**5.6.0** **2022-07-05**\ Bumped Scanner for .NET to 5.7.1 and Scanner CLI to 4.7.0\
[Download](https://marketplace.visualstudio.com/items?itemName=SonarSource.sonarqube)\
\
[Release notes](https://sonarsource.atlassian.net/issues/?jql=project+%3D+10078+AND+fixVersion+%3D+10887)
***
**5.5.0** **2022-06-15**\ Bumped Scanner for .NET to 5.6.0\
[Download](https://marketplace.visualstudio.com/items?itemName=SonarSource.sonarqube)\
\
[Release notes](https://sonarsource.atlassian.net/issues/?jql=project+%3D+10078+AND+fixVersion+%3D+10885)
***
**5.4.0** **2022-02-16**\ Bumped Scanner for .NET to 5.5.3\
[Download](https://marketplace.visualstudio.com/items?itemName=SonarSource.sonarqube)\
\
[Release notes](https://sonarsource.atlassian.net/issues/?jql=project+%3D+10078+AND+fixVersion+%3D+10882)
***
**5.3.0** **2022-02-07**\ Bumped Scanner for .NET 5.5.0\
[Download](https://marketplace.visualstudio.com/items?itemName=SonarSource.sonarqube)\
\
[Release notes](https://sonarsource.atlassian.net/issues/?jql=project+%3D+10078+AND+fixVersion+%3D+10878)
***
**5.2.0** **2022-02-07**\ Bump Scanner for .NET 5.4.1\
[Download](https://marketplace.visualstudio.com/items?itemName=SonarSource.sonarqube)\
\
[Release notes](https://sonarsource.atlassian.net/issues/?jql=project+%3D+10078+AND+fixVersion+%3D+10877)
***
**5.1.1** **2021-11-30**\ Revert part of the change for SONARAZDO-264\
[Download](https://marketplace.visualstudio.com/items?itemName=SonarSource.sonarqube)\
\
[Release notes](https://sonarsource.atlassian.net/issues/?jql=project+%3D+10078+AND+fixVersion+%3D+10874)
***
**5.1.0** **2021-11-30**\ Fix SSF-194, Bump Scanner for .NET 5.4.0\
[Download](https://marketplace.visualstudio.com/items?itemName=SonarSource.sonarqube)\
\
[Release notes](https://sonarsource.atlassian.net/issues/?jql=project+%3D+10078+AND+fixVersion+%3D+10872)
***
**5.0.0** **2021-09-28**\ New Major Version for Azure Devops 2019 only, that resolves issues with LetsEncrypt Certs. For TFS2017/2018 use version 4.23.1\
[Download](https://marketplace.visualstudio.com/items?itemName=SonarSource.sonarqube)\
\
[Release notes](https://sonarsource.atlassian.net/issues/?jql=project+%3D+10078+AND+fixVersion+%3D+10869)
***
**4.23.1** **2021-10-08**\ Rollback changes to Node handler and az pipeline task due to incompabilities with TFS 2017/2018\
[Download](https://marketplace.visualstudio.com/items?itemName=SonarSource.sonarqube)\
\
[Release notes](https://sonarsource.atlassian.net/issues/?jql=project+%3D+10078+AND+fixVersion+%3D+10868)
***
**4.23** **2021-10-01**\ Change to Node10 execution handler to fix issues with LetEncrypt Certs\
[Download](https://marketplace.visualstudio.com/items?itemName=SonarSource.sonarqube)\
\
[Release notes](https://sonarsource.atlassian.net/issues/?jql=project+%3D+10078+AND+fixVersion+%3D+10867)
***
**4.22** **2021-09-20**\ Updated plugin SDK from .NET Core 2 to .NET Core 3 + Bump SonarScanner for .NET v.5.3.1\
[Download](https://marketplace.visualstudio.com/items?itemName=SonarSource.sonarqube)\
\
[Release notes](https://sonarsource.atlassian.net/issues/?jql=project+%3D+10078+AND+fixVersion+%3D+10865)
***
**4.21** **2021-06-24**\ Bump SonarScanner for .NET v.5.2.2\
[Download](https://marketplace.visualstudio.com/items?itemName=SonarSource.sonarqube)\
\
[Release notes](https://sonarsource.atlassian.net/issues/?jql=project+%3D+10078+AND+fixVersion+%3D+10863)
***
**4.20** **2021-04-30**\ Bug fix + Bump SonarScanner for .NET and ScannerCLi versions\
[Download](https://marketplace.visualstudio.com/items?itemName=SonarSource.sonarqube)\
\
[Release notes](https://sonarsource.atlassian.net/issues/?jql=project+%3D+10078+AND+fixVersion+%3D+10862)
***
**4.19** **2021-04-09**\ Support for Scanner for .NET 5.2 (Analyze test code)\
[Download](https://marketplace.visualstudio.com/items?itemName=SonarSource.sonarqube)\
\
[Release notes](https://sonarsource.atlassian.net/issues/?jql=project+%3D+10078+AND+fixVersion+%3D+10859)
***
**4.18** **2021-03-09**\ Support for .NET 5, support for solo .NET Core project (without .sln)\
[Download](https://marketplace.visualstudio.com/items?itemName=SonarSource.sonarqube)\
\
[Release notes](https://sonarsource.atlassian.net/issues/?jql=project+%3D+10078+AND+fixVersion+%3D+10858)
***
**4.17** **2020-11-11**\ Support for .NET 5, support for solo .NET Core project (without .sln)\
[Download](https://marketplace.visualstudio.com/items?itemName=SonarSource.sonarqube)\
\
[Release notes](https://sonarsource.atlassian.net/issues/?jql=project+%3D+10078+AND+fixVersion+%3D+10855)
***
**4.16** **2020-11-10**\ Support for .NET 5, support for solo .NET Core project (without .sln)\
[Download](https://marketplace.visualstudio.com/items?itemName=SonarSource.sonarqube)\
\
[Release notes](https://sonarsource.atlassian.net/issues/?jql=project+%3D+10078+AND+fixVersion+%3D+10852)
***
**4.12** **2020-11-05**\ Support for .NET 5, support for solo .NET Core project (without .sln)\
[Download](https://marketplace.visualstudio.com/items?itemName=SonarSource.sonarqube)\
\
[Release notes](https://sonarsource.atlassian.net/issues/?jql=project+%3D+10078+AND+fixVersion+%3D+10851)
***
**4.11** **2020-06-29**\ Support FIPS compliant cryptographic algorithm, update to SonarScanner 4.4 and SonarScanner for MSBuild 4.10\
[Download](https://marketplace.visualstudio.com/items?itemName=SonarSource.sonarqube)\
\
[Release notes](https://sonarsource.atlassian.net/issues/?jql=project+%3D+10078+AND+fixVersion+%3D+10847)
***
**4.10** **2020-05-05**\ Improve detection of duplicated coverage reports, update to SonarScanner 4.3 and SonarScanner for MSBuild 4.9\
[Download](https://marketplace.visualstudio.com/items?itemName=SonarSource.sonarqube)\
\
[Release notes](https://sonarsource.atlassian.net/issues/?jql=project+%3D+10078+AND+fixVersion+%3D+10842)
***
**4.9** **2020-01-29**\ Enable scanner execution when only .NET Core 3 is installed, update to SonarScanner 4.2 and SonarScanner for MSBuild 4.8\
[Download](https://marketplace.visualstudio.com/items?itemName=SonarSource.sonarqube)\
\
[Release notes](https://sonarsource.atlassian.net/issues/?jql=project+%3D+10078+AND+fixVersion+%3D+10841)
***
**4.8.1** **2019-10-15**\ Bug fix\
[Download](https://marketplace.visualstudio.com/items?itemName=SonarSource.sonarqube)\
\
[Release notes](https://sonarsource.atlassian.net/issues/?jql=project+%3D+10078+AND+fixVersion+%3D+10840)
***
**4.8** **2019-09-16**\ Several bug fixes, update to SonarScanner 4.1 and SonarScanner for MSBuild 4.7.1\
[Download](https://marketplace.visualstudio.com/items?itemName=SonarSource.sonarqube)\
\
[Release notes](https://sonarsource.atlassian.net/issues/?jql=project+%3D+10078+AND+fixVersion+%3D+10835)
***
**4.7.2** **2019-08-14**\ Bug fix\
[Download](https://marketplace.visualstudio.com/items?itemName=SonarSource.sonarqube)\
\
[Release notes](https://sonarsource.atlassian.net/issues/?jql=project+%3D+10078+AND+fixVersion+%3D+10838)
***
**4.7.1** **2019-08-14**\ Bug fix\
[Download](https://marketplace.visualstudio.com/items?itemName=SonarSource.sonarqube)\
\
[Release notes](https://sonarsource.atlassian.net/issues/?jql=project+%3D+10078+AND+fixVersion+%3D+10833)
***
**4.7** **2019-08-13**\ Fix a bug on the Publish Quality Gate Result task\
[Download](https://marketplace.visualstudio.com/items?itemName=SonarSource.sonarqube)\
\
[Release notes](https://sonarsource.atlassian.net/issues/?jql=project+%3D+10078+AND+fixVersion+%3D+10831)
The [SonarScanner for Azure DevOps](https://marketplace.visualstudio.com/items?itemName=SonarSource.sonarqube) makes it easy to integrate analysis into your build pipeline. The extension allows the analysis of all languages supported by SonarQube.
### Compatibility
The SonarQube extension for Azure DevOps is compatible with:
* TFS 2017 Update 2+
* TFS 2018
* Azure DevOps Server 2019
* Azure DevOps Server 2020
* Azure DevOps Services
### Analysis
For information on setting up analysis with the SonarQube Extension for Azure DevOps, see the [azure-devops-integration](https://docs.sonarsource.com/sonarqube-server/8.9/alm-integration/azure-devops-integration "mention") page.
---
# Source: https://docs.sonarsource.com/sonarqube-community-build/analyzing-source-code/dotnet-environments/sonarscanner-for-dotnet.md
# Source: https://docs.sonarsource.com/sonarqube-server/8.9/analyzing-source-code/scanners/sonarscanner-for-dotnet.md
# Source: https://docs.sonarsource.com/sonarqube-server/9.8/analyzing-source-code/scanners/sonarscanner-for-dotnet.md
# Source: https://docs.sonarsource.com/sonarqube-server/9.9/analyzing-source-code/scanners/sonarscanner-for-dotnet.md
# Source: https://docs.sonarsource.com/sonarqube-server/10.0/analyzing-source-code/scanners/sonarscanner-for-dotnet.md
# Source: https://docs.sonarsource.com/sonarqube-server/10.1/analyzing-source-code/scanners/sonarscanner-for-dotnet.md
# Source: https://docs.sonarsource.com/sonarqube-server/10.2/analyzing-source-code/scanners/sonarscanner-for-dotnet.md
# Source: https://docs.sonarsource.com/sonarqube-server/10.3/analyzing-source-code/scanners/sonarscanner-for-dotnet.md
# Source: https://docs.sonarsource.com/sonarqube-server/10.4/analyzing-source-code/scanners/sonarscanner-for-dotnet.md
# Source: https://docs.sonarsource.com/sonarqube-server/10.5/analyzing-source-code/scanners/sonarscanner-for-dotnet.md
# Source: https://docs.sonarsource.com/sonarqube-server/10.6/analyzing-source-code/scanners/sonarscanner-for-dotnet.md
# Source: https://docs.sonarsource.com/sonarqube-server/10.7/analyzing-source-code/dotnet-environments/sonarscanner-for-dotnet.md
# Source: https://docs.sonarsource.com/sonarqube-server/10.8/analyzing-source-code/dotnet-environments/sonarscanner-for-dotnet.md
# Source: https://docs.sonarsource.com/sonarqube-server/2025.2/analyzing-source-code/dotnet-environments/sonarscanner-for-dotnet.md
# Source: https://docs.sonarsource.com/sonarqube-server/2025.3/analyzing-source-code/dotnet-environments/sonarscanner-for-dotnet.md
# Source: https://docs.sonarsource.com/sonarqube-server/2025.5/analyzing-source-code/dotnet-environments/sonarscanner-for-dotnet.md
# Source: https://docs.sonarsource.com/sonarqube-server/2025.1/analyzing-source-code/dotnet-environments/sonarscanner-for-dotnet.md
# Source: https://docs.sonarsource.com/sonarqube-server/2025.4/analyzing-source-code/dotnet-environments/sonarscanner-for-dotnet.md
# Source: https://docs.sonarsource.com/sonarqube-server/2025.6/analyzing-source-code/dotnet-environments/sonarscanner-for-dotnet.md
# Source: https://docs.sonarsource.com/sonarqube-server/analyzing-source-code/dotnet-environments/sonarscanner-for-dotnet.md
# Source: https://docs.sonarsource.com/sonarqube-cloud/advanced-setup/ci-based-analysis/sonarscanner-for-dotnet.md
# SonarScanner for .NET
{% content-ref url="sonarscanner-for-dotnet/introduction" %}
[introduction](https://docs.sonarsource.com/sonarqube-cloud/advanced-setup/ci-based-analysis/sonarscanner-for-dotnet/introduction)
{% endcontent-ref %}
{% content-ref url="sonarscanner-for-dotnet/installing" %}
[installing](https://docs.sonarsource.com/sonarqube-cloud/advanced-setup/ci-based-analysis/sonarscanner-for-dotnet/installing)
{% endcontent-ref %}
{% content-ref url="sonarscanner-for-dotnet/using" %}
[using](https://docs.sonarsource.com/sonarqube-cloud/advanced-setup/ci-based-analysis/sonarscanner-for-dotnet/using)
{% endcontent-ref %}
{% content-ref url="sonarscanner-for-dotnet/configuring" %}
[configuring](https://docs.sonarsource.com/sonarqube-cloud/advanced-setup/ci-based-analysis/sonarscanner-for-dotnet/configuring)
{% endcontent-ref %}
---
# Source: https://docs.sonarsource.com/sonarqube-community-build/analyzing-source-code/scanners/sonarscanner-for-gradle.md
# Source: https://docs.sonarsource.com/sonarqube-server/8.9/analyzing-source-code/scanners/sonarscanner-for-gradle.md
# Source: https://docs.sonarsource.com/sonarqube-server/9.8/analyzing-source-code/scanners/sonarscanner-for-gradle.md
# Source: https://docs.sonarsource.com/sonarqube-server/9.9/analyzing-source-code/scanners/sonarscanner-for-gradle.md
# Source: https://docs.sonarsource.com/sonarqube-server/10.0/analyzing-source-code/scanners/sonarscanner-for-gradle.md
# Source: https://docs.sonarsource.com/sonarqube-server/10.1/analyzing-source-code/scanners/sonarscanner-for-gradle.md
# Source: https://docs.sonarsource.com/sonarqube-server/10.2/analyzing-source-code/scanners/sonarscanner-for-gradle.md
# Source: https://docs.sonarsource.com/sonarqube-server/10.3/analyzing-source-code/scanners/sonarscanner-for-gradle.md
# Source: https://docs.sonarsource.com/sonarqube-server/10.4/analyzing-source-code/scanners/sonarscanner-for-gradle.md
# Source: https://docs.sonarsource.com/sonarqube-server/10.5/analyzing-source-code/scanners/sonarscanner-for-gradle.md
# Source: https://docs.sonarsource.com/sonarqube-server/10.6/analyzing-source-code/scanners/sonarscanner-for-gradle.md
# Source: https://docs.sonarsource.com/sonarqube-server/10.7/analyzing-source-code/scanners/sonarscanner-for-gradle.md
# Source: https://docs.sonarsource.com/sonarqube-server/10.8/analyzing-source-code/scanners/sonarscanner-for-gradle.md
# Source: https://docs.sonarsource.com/sonarqube-server/2025.2/analyzing-source-code/scanners/sonarscanner-for-gradle.md
# Source: https://docs.sonarsource.com/sonarqube-server/2025.3/analyzing-source-code/scanners/sonarscanner-for-gradle.md
# Source: https://docs.sonarsource.com/sonarqube-server/2025.5/analyzing-source-code/scanners/sonarscanner-for-gradle.md
# Source: https://docs.sonarsource.com/sonarqube-server/2025.1/analyzing-source-code/scanners/sonarscanner-for-gradle.md
# Source: https://docs.sonarsource.com/sonarqube-server/2025.4/analyzing-source-code/scanners/sonarscanner-for-gradle.md
# Source: https://docs.sonarsource.com/sonarqube-server/2025.6/analyzing-source-code/scanners/sonarscanner-for-gradle.md
# Source: https://docs.sonarsource.com/sonarqube-server/analyzing-source-code/scanners/sonarscanner-for-gradle.md
# Source: https://docs.sonarsource.com/sonarqube-cloud/advanced-setup/ci-based-analysis/sonarscanner-for-gradle.md
# SonarScanner for Gradle
SonarScanner for Gradle — 7.2.2.6593 | Issue Tracker
**7.2.2.6593** **2025-12-18**\ Fix regression where wildcards were no longer supported in path properties\
[Download](https://plugins.gradle.org/plugin/org.sonarqube/7.2.2.6593)\
\
[Release notes](https://sonarsource.atlassian.net/issues/?jql=fixVersion%20%3D%2027680)
***
**7.2.1.6560** **2025-12-12**\ Fix an issue where Gradle would fail to write the configuration cache because of concurrent modifications\
[Download](https://plugins.gradle.org/plugin/org.sonarqube/7.2.1.6560)\
\
[Release notes](https://sonarsource.atlassian.net/issues/?jql=project%20%3D%2010137%20AND%20fixversion%20%3D%207.2.1)
***
**7.2.0.6526** **2025-12-04**\ Support for Gradle configuration-cache feature.\
[Download](https://plugins.gradle.org/plugin/org.sonarqube/7.2.0.6526)\
\
[Release notes](https://sonarsource.atlassian.net/issues/?jql=project%20%3D%2010137%20AND%20fixversion%20%3D%207.2)
***
**7.1.0.6387** **2025-11-20**\ Fix execution failure when executing Sonar with Gradle parallel execution activated.\
[Download](https://plugins.gradle.org/plugin/org.sonarqube/7.1.0.6387)\
\
[Release notes](https://sonarsource.atlassian.net/issues/?jql=project%20%3D%2010137%20AND%20fixversion%20%3D%207.1)
***
**7.0.1.6134** **2025-10-24**\ Support of Gradle 9\
[Download](https://plugins.gradle.org/plugin/org.sonarqube/7.0.1.6134)\
\
[Release notes](https://sonarsource.atlassian.net/issues/?jql=project%20%3D%2010137%20AND%20fixversion%20%3D%207.0.1)
***
**7.0.0.6105** **2025-10-14**\ Support of Gradle 9\
[Download](https://plugins.gradle.org/plugin/org.sonarqube/7.0.0.6105)\
\
[Release notes](https://sonarsource.atlassian.net/issues/?jql=project%20%3D%2010137%20and%20fixversion%20%3D%207.0)
***
**6.3.1.5724** **2025-08-27**\ Fix a bug where the scanner would crash when users would define`sonar.sources`.\
[Download](https://plugins.gradle.org/plugin/org.sonarqube/6.3.1.5724)\
\
[Release notes](https://sonarsource.atlassian.net/issues/?jql=project%20%3D%2010137%20and%20fixversion%20%3D%206.3.1)
***
**6.3.0.5676** **2025-08-25**\ Index .github folder for analysis.\
[Download](https://plugins.gradle.org/plugin/org.sonarqube/6.3.0.5676)\
\
[Release notes](https://sonarsource.atlassian.net/issues/?jql=project%20%3D%2010137%20and%20fixversion%20%3D%206.3)
***
**6.2.0.5505** **2025-05-15**\ Better logging of the execution context and migration from deprecated Gradle APIs.\
[Download](https://plugins.gradle.org/plugin/org.sonarqube/6.2.0.5505)\
\
[Release notes](https://sonarsource.atlassian.net/issues/?jql=project%20%3D%2010137%20and%20fixversion%20%3D%206.2)
***
**6.1.0.5360** **2025-03-25**\ Add support for SonarQube Cloud regions\
[Download](https://plugins.gradle.org/plugin/org.sonarqube/6.1.0.5360)\
\
[Release notes](https://sonarsource.atlassian.net/issues/?jql=project%20%3D%2010137%20and%20fixversion%20%3D%206.1)
***
**6.0.1.5171** **2024-11-27**\ Support of JRE auto-provisioning\
[Download](https://plugins.gradle.org/plugin/org.sonarqube/6.0.1.5171)\
\
[Release notes](https://sonarsource.atlassian.net/issues/?jql=project%20%3D%2010137%20and%20fixversion%20%3D%206.0.1)
***
**6.0.0.5145** **2024-11-19**\ Support of JRE auto-provisioning\
[Download](https://plugins.gradle.org/plugin/org.sonarqube/6.0.0.5145)\
\
[Release notes](https://sonarsource.atlassian.net/issues/?jql=project%20%3D%2010137%20and%20fixversion%20%3D%206.0)
***
**5.1.0.4882** **2024-07-04**\ Scan additional files outside of conventional Gradle folders\
[Download](https://plugins.gradle.org/plugin/org.sonarqube/5.1.0.4882)\
\
[Release notes](https://sonarsource.atlassian.net/issues/?jql=project%20%3D%2010137%20and%20fixversion%20%3D%205.1)
***
**5.0.0.4638** **2024-03-26**\ Decouple sonar task from Gradle compile tasks\
[Download](https://plugins.gradle.org/plugin/org.sonarqube)\
\
[Release notes](https://sonarsource.atlassian.net/issues/?jql=project%20%3D%2010137%20and%20fixversion%20%3D%205.0)
***
**4.4.1.3373** **2023-10-03**\ Allow the skipping/forcing of compile tasks through the property "sonar.gradle.skipCompile"\
[Download](https://plugins.gradle.org/plugin/org.sonarqube)\
\
[Release notes](https://sonarsource.atlassian.net/issues/?jql=project%20%3D%2010137%20AND%20fixVersion%20in%20\(4.4%2C%204.4.1\))
***
**4.3.1.3277** **2023-09-01**\ Support for analysis of Gradle Kotlin DSL files\
[Download](https://plugins.gradle.org/plugin/org.sonarqube)\
\
[Release notes](https://sonarsource.atlassian.net/issues/?jql=project%20%3D%2010137%20AND%20fixVersion%20%3D%2014283)
***
**4.2.1.3168** **2023-06-12**\ Support for Kotlin Multiplatform and 'sonar.java.enablePreview' property, Java 11+ required\
[Download](https://plugins.gradle.org/plugin/org.sonarqube)\
\
[Release notes](https://sonarsource.atlassian.net/issues/?jql=project%20%3D%2010137%20AND%20fixVersion%20%3D%2014114)
***
**4.0.0.2929** **2023-02-17**\ Support for Gradle 8\
[Download](https://plugins.gradle.org/plugin/org.sonarqube)\
\
[Release notes](https://sonarsource.atlassian.net/issues/?jql=project+%3D+10137+AND+fixVersion+%3D+14039)
***
**3.5.0.2730** **2022-10-27**\ New 'sonar' task name and better support for Android projects\
[Download](https://plugins.gradle.org/plugin/org.sonarqube)\
\
[Release notes](https://sonarsource.atlassian.net/issues/?jql=project+%3D+10137+AND+fixVersion+%3D+12396)
***
**3.4.0.2513** **2022-06-08**\ Support Gradle 8 and Java 17, increase socket connect timeout to 30s\
[Download](https://plugins.gradle.org/plugin/org.sonarqube)\
\
[Release notes](https://sonarsource.atlassian.net/issues/?jql=project+%3D+10137+AND+fixVersion+%3D+12395)
***
**3.3** **2021-06-10**\ Support Android dynamic features modules\
[Download](https://plugins.gradle.org/plugin/org.sonarqube)\
\
[Release notes](https://sonarsource.atlassian.net/issues/?jql=project+%3D+10137+AND+fixVersion+%3D+12394)
***
**3.2** **2021-04-30**\ Support configuration caching\
[Download](https://plugins.gradle.org/plugin/org.sonarqube)\
\
[Release notes](https://sonarsource.atlassian.net/issues/?jql=project+%3D+10137+AND+fixVersion+%3D+12392)
***
**3.1.1** **2021-01-25**\ Bug fix on the JDK path\
[Download](https://plugins.gradle.org/plugin/org.sonarqube)\
\
[Release notes](https://sonarsource.atlassian.net/issues/?jql=project+%3D+10137+AND+fixVersion+%3D+12393)
***
**3.1** **2021-01-13**\ Support for Bitbucket Pipelines with SonarQube 8.7+, use JDK from the build\
[Download](https://plugins.gradle.org/plugin/org.sonarqube)\
\
[Release notes](https://sonarsource.atlassian.net/issues/?jql=project+%3D+10137+AND+fixVersion+%3D+12391)
***
**3.0** **2020-06-02**\ Change task dependencies on tests, upgrade to Gradle 5\
[Download](https://plugins.gradle.org/plugin/org.sonarqube)\
\
[Release notes](https://sonarsource.atlassian.net/issues/?jql=project+%3D+10137+AND+fixVersion+%3D+12390)
***
**2.8** **2019-10-01**\ Support SONAR\_HOST\_URL environment variable to configure the server URL\
[Download](https://plugins.gradle.org/plugin/org.sonarqube)\
\
[Release notes](https://sonarsource.atlassian.net/issues/?jql=project+%3D+10137+AND+fixVersion+%3D+12388)
The SonarScanner for Gradle provides an easy way to start SonarQube Cloud analysis of a Gradle project.
The ability to execute the SonarQube Cloud analysis via a regular Gradle task makes it available anywhere Gradle is available (CI service, etc.), without the need to manually download, setup, and maintain a SonarScanner installation. The Gradle build already has much of the information needed for SonarQube Cloud to successfully analyze a project. By configuring the analysis based on that information, the need for manual configuration is reduced significantly.
### Prerequisites
Gradle 7.6.4 or 8.4 and later
Java 21 or later, Java 17 has been deprecated. See [#java-runtime-environment-jre](https://docs.sonarsource.com/sonarqube-cloud/scanner-environment/general-requirements#java-runtime-environment-jre "mention") for more details.
With JRE auto-provisioning:
* Gradle 5 or later
* Java 11 or later
Bytecode created by `javac` compilation is required for Java analysis, including Android projects.
See [general-requirements](https://docs.sonarsource.com/sonarqube-cloud/advanced-setup/scanner-environment/general-requirements "mention") for more information.
### Configure the scanner
Installation is automatic, but certain global properties should still be configured. A good place to configure global properties is `~/.gradle/gradle.properties`. Be aware that the scanner uses system properties so all properties should be prefixed by `systemProp`.
```properties
systemProp.sonar.host.url=https://sonarcloud.io
# Token generated from an account with 'Execute analysis' permission.
# It can also be set with the environment variable SONAR_TOKEN.
systemProp.sonar.token=
```
### Analyzing
The first step in the process is to activate the scanner in your build. Kotlin DSL is now the default choice for new Gradle builds. However, Groovy is still used by some developers. Apply the SonarQube Server plugin dependency to your `build.gradle.kts` file below:
{% tabs %}
{% tab title="KOTLIN DSL - SONARQUBE CLOUD" %}
Apply the SonarQube Cloud plugin dependency to your `build.gradle.kts` file:
```kotlin
plugins {
id("org.sonarqube") version "versionNumber" // Replace with latest scanner version number
}
sonar {
properties {
property("sonar.projectKey", "myProjectKey")
property("sonar.organization", "myOrganization")
property("sonar.host.url", "myHostUrl")
}
}
```
{% endtab %}
{% tab title="GROOVY DSL - SONARQUBE CLOUD" %}
If you use Groovy DSL, it is still supported for Gradle 2.1+. In that case, apply the SonarQube plugin dependency to your `build.gradle` file:
```groovy
plugins {
id "org.sonarqube" version "versionNumber" // Replace with latest scanner version number
}
sonar {
properties {
property "sonar.projectKey", "myProjectKey"
property "sonar.organization", "myOrganization"
property "sonar.host.url", "myHostUrl"
}
}
```
{% endtab %}
{% endtabs %}
Ensure that you declare the plugins in the correct sequence required by Gradle, that is, after the `buildscript` block in your `build.gradle` file. More details on .
Execute `gradle build sonar` and wait until the build has been completed, then open the web page indicated at the bottom of the console output. You should now be able to browse the analysis results.
### Analyzing multi-project builds
To analyze a project hierarchy, apply the SonarQube Server plugin to the root project of the hierarchy. Typically (but not necessarily) this will be the root project of the Gradle build. Information pertaining to the analysis as a whole has to be configured in the sonar block of this project. Any properties set on the command line also apply to this project.
```groovy
// build.gradle
sonar {
properties {
property "sonar.sourceEncoding", "UTF-8"
}
}
```
Configuration settings shared between subprojects can be specified in a subprojects block.
```groovy
// build.gradle
subprojects {
sonar {
properties {
property "sonar.sources", "src"
}
}
}
```
Project-specific information is configured in the `sonar` block of the corresponding project.
```groovy
// build.gradle
project(":project1") {
sonar {
properties {
property "sonar.branch", "Foo"
}
}}
```
To skip analysis for a particular subproject, set `sonar.skipProject` to true.
```groovy
// build.gradle
project(":project2") {
sonar {
skipProject = true
}
}
```
### Task dependencies
All tasks that produce output that should be included in the analysis need to be executed before the `sonar` task runs. Typically, these are compile tasks, test tasks, and [overview](https://docs.sonarsource.com/sonarqube-cloud/enriching/test-coverage/overview "mention") tasks. To meet these needs, the plugin adds a task dependency from `sonar` on `test` if the Java plugin is applied. Further task dependencies can be added as needed. For example:
```groovy
// build.gradle
project.tasks["sonar"].dependsOn "anotherTask"
```
### Sample project
Check out this [simple working example](https://github.com/SonarSource/sonar-scanning-examples/tree/master/sonar-scanner-gradle) to see if everything is correctly configured in your environment.
### Adjusting the analysis scope
The analysis scope of a project determines the source and test files to be analyzed.
An initial analysis scope is set by default. With the SonarScanner for Gradle, the initial analysis scope is:
* For source files: all the files stored under `src/main/java` (in the root or module directories).
* For test files: all the files stored under `src/test/java` (in the root or module directories).
Since SonarScanner for Gradle also supports Groovy and Kotlin, the initial scope will also include `src/main/kotlin` or `src/main/groovy` for source and test files, depending on the type of project.
To adjust the analysis scope, you can:
* Adjust the initial scope: see below.
* And/or exclude specific files from the initial scope: see the pages about setting your [setting-analysis-scope](https://docs.sonarsource.com/sonarqube-cloud/managing-your-projects/project-analysis/setting-analysis-scope "mention").
#### Adjusting the initial scope
The initial scope is set through the `sonar.sources` property (for source files) and the `sonar.tests` property (for test files). See the [analysis-parameters](https://docs.sonarsource.com/sonarqube-cloud/advanced-setup/analysis-parameters "mention") page for more information.
To adjust the initial scope, you can do one of the following:
* Override these properties by setting them explicitly in your build like any other relevant gradle property. The[setting-initial-scope](https://docs.sonarsource.com/sonarqube-cloud/managing-your-projects/project-analysis/setting-analysis-scope/setting-initial-scope "mention") page has more information.
* Use the scanAll option to extend the initial scope to non-JVM-related files. See below.
#### Using the scanAll option to include non-JVM-related files
You may want to analyze not only the JVM main files but also files related to configuration, infrastructure, etc. An easy way to do that is to enable the scanAll option (By default, this option is disabled.)
If the scanAll option is enabled, then the initial analysis scope of source files will be:
* The files stored in `src/main/java` (and `src/main/kotlin` or `src/main/groovy`, depending on the type of project).
* The non-JVM-related files stored in the root directory of your project.
**Warning**: The scanAll option is disabled if the `sonar.sources` property is overridden.
To enable the scanAll option:
* Set the `sonar.gradle.scanAll` property to `True`.
### Analysis property defaults
The SonarScanner for Gradle uses information contained in Gradle’s object model to provide smart defaults for most of the standard [analysis-parameters](https://docs.sonarsource.com/sonarqube-cloud/advanced-setup/analysis-parameters "mention"), as listed below. Note that additional defaults are provided depending on the projects.
#### Gradle defaults for standard SonarQube Cloud properties
| **Property** | **Gradle default** |
| -------------------------- | ----------------------------------------------------------------------------------------------------------------------------------------- |
| `sonar.projectKey` |
\[${project.group}:]${project.name} for root module; \:\ for submodules
${sourceSets.test.compileClasspath} (filtering to only include files; rt.jar and jfxrt.jar added if necessary)
|
| `sonar.junit.reportPaths` |
${test.testResultsDir} (if the directory exists)
|
#### Additional default for Groovy projects
| **Property** | **Gradle default** |
| ----------------------- | -------------------------------------- |
| `sonar.groovy.binaries` | `${sourceSets.main.output.classesDir}` |
#### Additional defaults for Android projects
More default properties apply to Android projects (`com.android.application`, `com.android.library`, or `com.android.test`). By default, the first variant of type `debug` will be used to configure the analysis. You can override the name of the variant to be used using the parameter `androidVariant`:
```groovy
// build.gradle
sonar {
androidVariant 'fullDebug'
}
```
| **Property** | **Gradle default** |
| --------------------------------------- | -------------------------------------------------------------------------------------------------------------------------------------------------------------------------------------- |
| `sonar.sources` (for non-test variants) | `${variant.sourcesets.map}` (`ManifestFile/CDirectories/AidlDirectories/AssetsDirectories/CppDirectories/JavaDirectories/RenderscriptDirectories/ResDirectories/ResourcesDirectories`) |
| `sonar.tests` (for test variants) | `${variant.sourcesets.map}` (`ManifestFile/CDirectories/AidlDirectories/AssetsDirectories/CppDirectories/JavaDirectories/RenderscriptDirectories/ResDirectories/ResourcesDirectories`) |
| `sonar.java[.test].binaries` | `${variant.destinationDir}` |
| `sonar.java[.test].libraries` | `${variant.javaCompile.classpath} + ${bootclasspath}` |
| `sonar.java.source` | `${variant.javaCompile.sourceCompatibility}` |
| `sonar.java.target` | `${variant.javaCompile.targetCompatibility}` |
### Passing manual properties / overriding defaults
The SonarScanner for Gradle adds a SonarQubeExtension extension to a project and its subprojects, which allows you to configure or override the analysis properties.
```groovy
// build.gradle
sonar {
properties {
property "sonar.exclusions", "**/*Generated.java"
}
}
```
SonarQube Cloud properties can also be set from the command line, or by setting a system property named exactly like the SonarQube Cloud property in question. This can be useful when dealing with sensitive information (e.g. credentials), environment information, or for ad-hoc configuration.
`gradle sonar -Dsonar.verbose=true`
While certainly useful at times, we recommend keeping the bulk of the configuration in a (versioned) build script, readily available to everyone. A SonarQube Cloud property value set via a system property overrides any value set in a build script (for the same property). When analyzing a project hierarchy, values set via system properties apply to the root project of the analyzed hierarchy. Every system property starting with `sonar` will be taken into account.
#### Analyzing custom source sets
By default, the SonarScanner for Gradle passes on the project’s main source set as production sources, and the project’s test source set as test sources. This works regardless of the project’s source directory layout. Additional source sets can be added as needed.
```groovy
// build.gradle
sonar {
properties {
property("sonar.projectKey", "myProjectKey")
property("sonar.organization", "myOrganization")
property("sonar.host.url", "https://sonarcloud.io")
}
}
```
### More on configuring properties
Let’s take a closer look at the `sonar.properties` `{}` block. As we have already seen in the examples, the `property()` method allows you to set new properties or override existing ones. Furthermore, all properties that have been configured up to this point, including all properties preconfigured by Gradle, are available via the properties accessor.
Entries in the properties map can be read and written with the usual Groovy syntax. To facilitate their manipulation, values still have their "idiomatic" type (File, List, etc.). After the `sonar properties` block has been evaluated, values are converted to Strings as follows: Collection values are (recursively) converted to comma-separated Strings, and all other values are converted by calling their `toString()` methods.
Because the `sonar properties` block is evaluated lazily, properties of Gradle’s object model can be safely referenced from within the block, without fear that they have not yet been set.
### Troubleshooting
**If you get a java.lang.OutOfMemoryError**
With SonarScanner for Gradle version 6.0 or later
Configure the sonar task in the `build.gradle` file:
```groovy
sonar {
properties {
property("sonar.scanner.javaOpts", "-Xmx512m")
}
}
```
Or set the SONAR\_SCANNER\_JAVA\_OPTS environment variable, like this in Unix environments:
```bash
export SONAR_SCANNER_JAVA_OPTS="-Xmx512m"
```
In Windows environments, avoid the double quotes, since they get misinterpreted.
```bash
set SONAR_SCANNER_JAVA_OPTS=-Xmx512m
```
With SonarScanner for Gradle version 5.1 or earlier
Increase the java heap size in your `gradle.properties` file:
```properties
org.gradle.jvmargs=-Xmx512m
```
**If you get a java.lang.OutOfMemoryError: Metaspace**
With SonarScanner for Gradle version 6.0 or later
Configure the sonar task in the `build.gradle` file:
```groovy
sonar {
properties {
property("sonar.scanner.javaOpts", "--XX:MetaspaceSize=512M -XX:MaxMetaspaceSize=512M")
}
}
```
Or set the SONAR\_SCANNER\_JAVA\_OPTS environment variable, like this in Unix environments.
```bash
export SONAR_SCANNER_JAVA_OPTS="-XX:MetaspaceSize=512M -XX:MaxMetaspaceSize=512M"
```
In Windows environments, avoid the double quotes, since they get misinterpreted.
```bash
set SONAR_SCANNER_JAVA_OPTS=-XX:MetaspaceSize=512M -XX:MaxMetaspaceSize=512M
```
With SonarScanner for Gradle version 5.1 or earlier
[NextSonarScanner for .NET](https://docs.sonarsource.com/sonarqube-cloud/advanced-setup/ci-based-analysis/sonarscanner-for-dotnet)Increase the java heap size in your `gradle.properties` file:
```properties
org.gradle.jvmargs=-XX:MetaspaceSize=512M -XX:MaxMetaspaceSize=512M
```
---
# Source: https://docs.sonarsource.com/sonarqube-server/8.9/analyzing-source-code/scanners/sonarscanner-for-jenkins.md
# SonarScanner for Jenkins
SonarScanner for Jenkins — 2.18 | Issue Tracker
**2.18** **2025-01-28**\ Minor updates\
[Download](https://plugins.jenkins.io/sonar/)\
\
[Release notes](https://sonarsource.atlassian.net/issues/?jql=project%20%3D%2010138%20AND%20fixVersion%20%3D%2015464)
***
**2.17.3** **2024-11-18**\ Update dependencies to improve security\
[Download](https://plugins.jenkins.io/sonar/)\
\
[Release notes](https://sonarsource.atlassian.net/issues/?jql=project%20%3D%2010138%20AND%20fixVersion%20%3D%2016121)
***
**2.17.2** **2024-02-19**\ Fix withSonarQubeEnv step hanging when the workspace contains a symlink\
[Download](https://plugins.jenkins.io/sonar/)\
\
[Release notes](https://sonarsource.atlassian.net/issues/?jql=project%20%3D%2010138%20AND%20fixVersion%20%3D%2015473)
***
**2.16.1** **2023-10-10**\ Bug fixes\
[Download](https://plugins.jenkins.io/sonar/)\
\
[Release notes](https://sonarsource.atlassian.net/issues/?jql=project%20%3D%2010138%20AND%20fixVersion%20%3D%2015332)
***
**2.16** **2023-09-27**\ Use the sonar.token property\
[Download](https://plugins.jenkins.io/sonar/)\
\
[Release notes](https://sonarsource.atlassian.net/issues/?jql=project%20%3D%2010138%20AND%20fixVersion%20%3D%2013951)
***
**2.15** **2022-11-22**\ Fixed out of memory when querying deleted projects\
[Download](https://plugins.jenkins.io/sonar/)\
\
[Release notes](https://sonarsource.atlassian.net/issues/?jql=project%20%3D%2010138%20AND%20fixVersion%20%3D%2013860)
***
**2.14** **2021-11-18**\ Prepare SonarQube Scanner for core Guava upgrade\
[Download](https://plugins.jenkins.io/sonar/)\
\
[Release notes](https://sonarsource.atlassian.net/issues/?jql=project+%3D+10138+AND+fixVersion+%3D+12438)
***
**2.13.1** **2021-04-30**\ Update dependencies\
[Download](https://plugins.jenkins.io/sonar/)\
\
[Release notes](https://sonarsource.atlassian.net/issues/?jql=project+%3D+10138+AND+fixVersion+%3D+12437)
***
**2.12** **2020-09-07**\ Improve use of SonarQube configuration, bug fixes\
[Download](https://plugins.jenkins.io/sonar/)\
\
[Release notes](https://sonarsource.atlassian.net/issues/?jql=project+%3D+10138+AND+fixVersion+%3D+12435)
***
**2.11** **2020-01-06**\ Improvements for Jenkins Configuration as Code\
[Download](https://plugins.jenkins.io/sonar/)\
\
[Release notes](https://sonarsource.atlassian.net/issues/?jql=project+%3D+10138+AND+fixVersion+%3D+12434)
***
**2.10** **2019-10-19**\ Add webhook validation based on a shared secret\
[Download](https://plugins.jenkins.io/sonar/)\
\
[Release notes](https://sonarsource.atlassian.net/issues/?jql=project+%3D+10138+AND+fixVersion+%3D+12433)
This plugin lets you centralize the configuration of SonarQube server connection details in Jenkins global configuration.
Then you can trigger SonarQube analysis from Jenkins using standard Jenkins Build Steps or [Jenkins Pipeline DSL](https://jenkins.io/solutions/pipeline/) to trigger analysis with:
* [sonarscanner](https://docs.sonarsource.com/sonarqube-server/8.9/analyzing-source-code/scanners/sonarscanner "mention")
* [sonarscanner-for-maven](https://docs.sonarsource.com/sonarqube-server/8.9/analyzing-source-code/scanners/sonarscanner-for-maven "mention")
* [sonarscanner-for-gradle](https://docs.sonarsource.com/sonarqube-server/8.9/analyzing-source-code/scanners/sonarscanner-for-gradle "mention")
* [sonarscanner-for-dotnet](https://docs.sonarsource.com/sonarqube-server/8.9/analyzing-source-code/scanners/sonarscanner-for-dotnet "mention")
Once the job is complete, the plugin will detect that a SonarQube analysis was made during the build and display a badge and a widget on the job page with a link to the SonarQube dashboard as well as quality gate status.
### Installation
1. [Install the Jenkins Extension for SonarQube via the Jenkins Update Center](https://plugins.jenkins.io/sonar).
2. Configure your SonarQube server(s):
1. Log into Jenkins as an administrator and go to **Manage Jenkins > Configure System**.
2. Scroll down to the SonarQube configuration section, click **Add SonarQube**, and add the values you’re prompted for.
3. The server [generating-and-using-tokens](https://docs.sonarsource.com/sonarqube-server/8.9/user-guide/user-account/generating-and-using-tokens "mention") should be created as a **Secret Text** credential.
### Analyzing a .NET solution
#### Global configuration
This step is mandatory if you want to trigger any of your analyses with the SonarScanner for .NET. You can define as many scanner instances as you wish. Then for each Jenkins job, you will be able to choose which launcher to use to run the SonarQube analysis.
1. Log into Jenkins as an administrator and go to **Manage Jenkins > Global Tool Configuration**
2. Click on **Add SonarScanner for MSBuild**
3. Add an installation of the latest available version. Check **Install automatically** to have the SonarScanner for MSBuild automatically provisioned on your Jenkins executors
If you do not see any available version under Install from GitHub, first go to Manage Jenkins > Manage Plugins > Advanced and click on Check now
#### Job configuration
1. Configure the project, and go to the **Build** section.
2. Add the SonarQube for MSBuild - Begin Analysis to your build
3. Configure the SonarQube Project Key, Name, and Version in the SonarScanner for MSBuild - Begin Analysis build step
4. Add the MSBuild build step or the Execute Windows batch command to execute the build with MSBuild 14 (see compatibility) to your build.
5. Add the SonarQube for MSBuild - End Analysis build steps to your build
### Analyzing a Java project with Maven or Gradle
#### Global configuration
1. Log into Jenkins as an administrator and go to Manage Jenkins > Configure System
2. Scroll to the SonarQube servers section and check Enable injection of SonarQube server configuration as build environment variables
#### Job configuration
1. **Configure** the project, and go to the **Build Environment** section.
2. Enable **Prepare SonarScanner environment** to allow the injection of SonarQube server values into this particular job. If multiple SonarQube instances are configured, you will be able to choose which one to use. Once the environment variables are available, use them in a standard Maven build step (Invoke top-level Maven targets) by setting the Goals to include, or a standard Gradle build step (Invoke Gradle script) by setting the Tasks to execute.
Maven goal:
```css-79elbk
$SONAR_MAVEN_GOAL
```
Gradle task:
```css-79elbk
sonarqube
```
In both cases, launching your analysis may require authentication. In that case, make sure that the global configuration defines a valid SonarQube token.
### Analyzing other project types
#### Global configuration
This step is mandatory if you want to trigger any of your SonarQube analyses with the SonarScanner. You can define as many scanner instances as you wish. Then for each Jenkins job, you will be able to choose which launcher to use to run the SonarQube analysis.
1. Log into Jenkins as an administrator and go to **Manage Jenkins > Global Tool Configuration**
2. Scroll down to the SonarScanner configuration section and click on Add SonarScanner. It is based on the typical Jenkins tool auto-installation. You can either choose to point to an already installed version of SonarScanner (uncheck ‘Install automatically’) or tell Jenkins to grab the installer from a remote location (check ‘Install automatically’)
If you don’t see a drop-down list with all available SonarScanner versions but instead see an empty text field then this is because Jenkins still hasn’t downloaded the required update center file (default period is 1 day). You may force this refresh by clicking the ‘Check Now’ button in Manage Plugins > Advanced tab.
#### Job configuration
1. **Configure** the project, and go to the **Build** section.
2. Add the SonarScanner build step to your build.
3. Configure the SonarQube analysis properties. You can either point to an existing sonar-project.properties file or set the analysis properties directly in the **Analysis properties** field.
### Using a Jenkins pipeline
We provide a `withSonarQubeEnv` block that allows you to select the SonarQube server you want to interact with. Connection details you have configured in Jenkins global configuration will be automatically passed to the scanner.
If needed you can override the `credentialsId` if you don’t want to use the one defined in global configuration (for example if you define credentials at the folder level).
If you only need the SonarQube environment variables to be expanded in the build context then you can override the `envOnly` flag.
```css-79elbk
withSonarQubeEnv('My SonarQube Server', envOnly: true) {
// This expands the evironment variables SONAR_CONFIG_NAME, SONAR_HOST_URL, SONAR_AUTH_TOKEN that can be used by any script.
println ${env.SONAR_HOST_URL}
}
```
Here are some examples for every scanner, assuming you run on Unix slaves and you have configured a server named "My SonarQube Server" as well as the required tools. If you run on Windows slaves, just replace `sh` with `bat`.
SonarScanner:
```css-79elbk
node {
stage('SCM') {
git 'https://github.com/foo/bar.git'
}
stage('SonarQube analysis') {
def scannerHome = tool 'SonarScanner 4.0';
withSonarQubeEnv('My SonarQube Server') { // If you have configured more than one global server connection, you can specify its name
sh "${scannerHome}/bin/sonar-scanner"
}
}
}
```
SonarScanner for Gradle:
```css-79elbk
node {
stage('SCM') {
git 'https://github.com/foo/bar.git'
}
stage('SonarQube analysis') {
withSonarQubeEnv() { // Will pick the global server connection you have configured
sh './gradlew sonarqube'
}
}
}
```
SonarScanner for Maven:
```css-79elbk
node {
stage('SCM') {
git 'https://github.com/foo/bar.git'
}
stage('SonarQube analysis') {
withSonarQubeEnv(credentialsId: 'f225455e-ea59-40fa-8af7-08176e86507a', installationName: 'My SonarQube Server') { // You can override the credential to be used
sh 'mvn org.sonarsource.scanner.maven:sonar-maven-plugin:3.7.0.1746:sonar'
}
}
}
```
SonarScanner for .NET:
```css-79elbk
node {
stage('SCM') {
git 'https://github.com/foo/bar.git'
}
stage('Build + SonarQube analysis') {
def sqScannerMsBuildHome = tool 'Scanner for .Net Framework'
withSonarQubeEnv('My SonarQube Server') {
bat "${sqScannerMsBuildHome}\\SonarScanner.MSBuild.exe begin /k:myKey"
bat 'MSBuild.exe /t:Rebuild'
bat "${sqScannerMsBuildHome}\\SonarScanner.MSBuild.exe end"
}
}
}
```
### Pause pipeline until the Quality Gate is computed
The `waitForQualityGate` step will pause the pipeline until SonarQube analysis is completed and returns Quality Gate status.
#### Prerequisites:
* Configure a webhook in your SonarQube server pointing to `/sonarqube-webhook/`
* Use `withSonarQubeEnv` step in your pipeline (so that SonarQube taskId is correctly attached to the pipeline context).
Scripted pipeline example:
```css-79elbk
node {
stage('SCM') {
git 'https://github.com/foo/bar.git'
}
stage('SonarQube analysis') {
withSonarQubeEnv('My SonarQube Server') {
sh 'mvn clean package sonar:sonar'
} // submitted SonarQube taskId is automatically attached to the pipeline context
}
}
// No need to occupy a node
stage("Quality Gate"){
timeout(time: 1, unit: 'HOURS') { // Just in case something goes wrong, pipeline will be killed after a timeout
def qg = waitForQualityGate() // Reuse taskId previously collected by withSonarQubeEnv
if (qg.status != 'OK') {
error "Pipeline aborted due to quality gate failure: ${qg.status}"
}
}
}
```
Thanks to the webhook, the step is implemented in a very lightweight way: no need to occupy a node doing polling, and it doesn’t prevent Jenkins to restart (the step will be restored after restart). Note that to prevent race conditions, when the step starts (or is restarted) a direct call is made to the server to check if the task is already completed.
Declarative pipeline example:
```css-79elbk
pipeline {
agent any
stages {
stage('SCM') {
steps {
git url: 'https://github.com/foo/bar.git'
}
}
stage('build && SonarQube analysis') {
steps {
withSonarQubeEnv('My SonarQube Server') {
// Optionally use a Maven environment you've configured already
withMaven(maven:'Maven 3.5') {
sh 'mvn clean package sonar:sonar'
}
}
}
}
stage("Quality Gate") {
steps {
timeout(time: 1, unit: 'HOURS') {
// Parameter indicates whether to set pipeline to UNSTABLE if Quality Gate fails
// true = set pipeline to UNSTABLE, false = don't
waitForQualityGate abortPipeline: true
}
}
}
}
}
```
If you want to run multiple analyses in the same pipeline and use `waitForQualityGate` you have to do everything in order:
```css-79elbk
pipeline {
agent any
stages {
stage('SonarQube analysis 1') {
steps {
sh 'mvn clean package sonar:sonar'
}
}
stage("Quality Gate 1") {
steps {
waitForQualityGate abortPipeline: true
}
}
stage('SonarQube analysis 2') {
steps {
sh 'gradle sonarqube'
}
}
stage("Quality Gate 2") {
steps {
waitForQualityGate abortPipeline: true
}
}
}
}
```
#### Configuring a webhook secret
If you want to verify the webhook payload that is sent to Jenkins, you can add a secret to your webhook on SonarQube.
To set the secret:
1. In Jenkins, navigate to **Manage Jenkins > Configure System > SonarQube Server > Advanced > Webhook Secret** and click the **Add** button.
2. Select **Secret text** and give the secret an ID.
3. Select the secret from the dropdown menu.
If you want to override the webhook secret on a project level, you can add the secret to Jenkins and then reference the secret ID when calling `waitForQualityGate`.
```css-79elbk
waitForQualityGate(webhookSecretId: 'yourSecretID')
```
if your pipeline is declarative or
```css-79elbk
waitForQualityGate webhookSecretId: 'yourSecretID'
```
if your pipeline is scripted.
---
# Source: https://docs.sonarsource.com/sonarqube-community-build/analyzing-source-code/scanners/sonarscanner-for-maven.md
# Source: https://docs.sonarsource.com/sonarqube-server/8.9/analyzing-source-code/scanners/sonarscanner-for-maven.md
# Source: https://docs.sonarsource.com/sonarqube-server/9.8/analyzing-source-code/scanners/sonarscanner-for-maven.md
# Source: https://docs.sonarsource.com/sonarqube-server/9.9/analyzing-source-code/scanners/sonarscanner-for-maven.md
# Source: https://docs.sonarsource.com/sonarqube-server/10.0/analyzing-source-code/scanners/sonarscanner-for-maven.md
# Source: https://docs.sonarsource.com/sonarqube-server/10.1/analyzing-source-code/scanners/sonarscanner-for-maven.md
# Source: https://docs.sonarsource.com/sonarqube-server/10.2/analyzing-source-code/scanners/sonarscanner-for-maven.md
# Source: https://docs.sonarsource.com/sonarqube-server/10.3/analyzing-source-code/scanners/sonarscanner-for-maven.md
# Source: https://docs.sonarsource.com/sonarqube-server/10.4/analyzing-source-code/scanners/sonarscanner-for-maven.md
# Source: https://docs.sonarsource.com/sonarqube-server/10.5/analyzing-source-code/scanners/sonarscanner-for-maven.md
# Source: https://docs.sonarsource.com/sonarqube-server/10.6/analyzing-source-code/scanners/sonarscanner-for-maven.md
# Source: https://docs.sonarsource.com/sonarqube-server/10.7/analyzing-source-code/scanners/sonarscanner-for-maven.md
# Source: https://docs.sonarsource.com/sonarqube-server/10.8/analyzing-source-code/scanners/sonarscanner-for-maven.md
# Source: https://docs.sonarsource.com/sonarqube-server/2025.2/analyzing-source-code/scanners/sonarscanner-for-maven.md
# Source: https://docs.sonarsource.com/sonarqube-server/2025.3/analyzing-source-code/scanners/sonarscanner-for-maven.md
# Source: https://docs.sonarsource.com/sonarqube-server/2025.5/analyzing-source-code/scanners/sonarscanner-for-maven.md
# Source: https://docs.sonarsource.com/sonarqube-server/2025.1/analyzing-source-code/scanners/sonarscanner-for-maven.md
# Source: https://docs.sonarsource.com/sonarqube-server/2025.4/analyzing-source-code/scanners/sonarscanner-for-maven.md
# Source: https://docs.sonarsource.com/sonarqube-server/2025.6/analyzing-source-code/scanners/sonarscanner-for-maven.md
# Source: https://docs.sonarsource.com/sonarqube-server/analyzing-source-code/scanners/sonarscanner-for-maven.md
# Source: https://docs.sonarsource.com/sonarqube-cloud/advanced-setup/ci-based-analysis/sonarscanner-for-maven.md
# SonarScanner for Maven
SonarScanner for Maven — 5.5.0.6356 | Issue Tracker
**5.5.0.6356** **2025-12-05**\ Release after change of signing key\
[Download](https://central.sonatype.com/artifact/org.sonarsource.scanner.maven/sonar-maven-plugin/versions)\
\
[Release notes](https://sonarsource.atlassian.net/issues/?jql=project%20%3D%2010140%20AND%20fixversion%20%3D%205.5\&selectedIssue=SCANMAVEN-339)
***
**5.4.0.6343** **2025-12-02**\ Release after change of signing key\
[Download](https://central.sonatype.com/artifact/org.sonarsource.scanner.maven/sonar-maven-plugin/versions)\
\
[Release notes](https://sonarsource.atlassian.net/issues/?jql=project%20%3D%2010140%20AND%20fixversion%20%3D%205.4\&selectedIssue=SCANMAVEN-338)
***
**5.3.0.6276** **2025-11-10**\ Support of Maven 4\
[Download](https://central.sonatype.com/artifact/org.sonarsource.scanner.maven/sonar-maven-plugin/versions)\
\
[Release notes](https://sonarsource.atlassian.net/issues/?jql=project%20%3D%2010140%20AND%20fixversion%20%3D%205.3)
***
**5.2.0.4988** **2025-08-29**\ Index .github folder for analysis\
[Download](https://central.sonatype.com/artifact/org.sonarsource.scanner.maven/sonar-maven-plugin/versions)\
\
[Release notes](https://sonarsource.atlassian.net/issues/?jql=project%20%3D%2010140%20AND%20fixversion%20%3D%205.2)
***
**5.1.0.4751** **2025-03-25**\ Support sonar.region\
[Download](https://central.sonatype.com/artifact/org.sonarsource.scanner.maven/sonar-maven-plugin/versions)\
\
[Release notes](https://sonarsource.atlassian.net/issues/?jql=project%20%3D%2010140%20AND%20fixversion%20%3D%205.1)
***
**5.0.0.4389** **2024-11-06**\ Automatic JRE provisioning\
[Download](https://central.sonatype.com/artifact/org.sonarsource.scanner.maven/sonar-maven-plugin/versions)\
\
[Release notes](https://sonarsource.atlassian.net/issues/?jql=project%20%3D%2010140%20AND%20fixversion%20%3D%205.0)
***
**4.0.0.4121** **2024-05-31**\ Drop support of Java 8 runtime\
[Download](https://central.sonatype.com/artifact/org.sonarsource.scanner.maven/sonar-maven-plugin/versions)\
\
[Release notes](https://sonarsource.atlassian.net/issues/?jql=project%20%3D%2010140%20AND%20fixversion%20%3D%204.0)
***
**3.11.0.3922** **2024-03-13**\ Collects files outside of conventional sonar.sources (aka scan more files)\
[Download](https://central.sonatype.com/artifact/org.sonarsource.scanner.maven/sonar-maven-plugin/versions)\
\
[Release notes](https://sonarsource.atlassian.net/issues/?jql=project%20%3D%2010140%20AND%20fixVersion%20%3D%2014294)
***
**3.10.0.2594** **2023-09-15**\ Support Maven 4\
[Download](https://central.sonatype.com/artifact/org.sonarsource.scanner.maven/sonar-maven-plugin/versions)\
\
[Release notes](https://sonarsource.atlassian.net/issues/?jql=project%20%3D%2010140%20AND%20fixVersion%20%3D%2012662)
***
**3.9.1.2184** **2022-01-12**\ Increase socket connect timeout to 30s\
[Download](https://central.sonatype.com/artifact/org.sonarsource.scanner.maven/sonar-maven-plugin/versions)\
\
[Release notes](https://sonarsource.atlassian.net/issues/?jql=project+%3D+10140+AND+fixVersion+%3D+12661)
***
**3.9.0.2155** **2021-04-30**\ Update dependencies\
[Download](https://central.sonatype.com/artifact/org.sonarsource.scanner.maven/sonar-maven-plugin/versions)\
\
[Release notes](https://sonarsource.atlassian.net/issues/?jql=project+%3D+10140+AND+fixVersion+%3D+12660)
***
**3.8.0.2131** **2021-01-13**\ Support for Bitbucket Pipelines with SonarQube 8.7+, use JDK from the build\
[Download](https://central.sonatype.com/artifact/org.sonarsource.scanner.maven/sonar-maven-plugin/versions)\
\
[Release notes](https://sonarsource.atlassian.net/issues/?jql=project+%3D+10140+AND+fixVersion+%3D+12659)
***
**3.7.0.1746** **2019-10-01**\ Support SONAR\_HOST\_URL environment variable to configure the server URL\
[Download](https://central.sonatype.com/artifact/org.sonarsource.scanner.maven/sonar-maven-plugin/versions)\
\
[Release notes](https://sonarsource.atlassian.net/issues/?jql=project+%3D+10140+AND+fixVersion+%3D+12657)
***
**3.6.1.1688** **2019-09-02**\ Fix a vulnerable dependency\
[Download](https://central.sonatype.com/artifact/org.sonarsource.scanner.maven/sonar-maven-plugin/versions)\
\
[Release notes](https://sonarsource.atlassian.net/issues/?jql=project+%3D+10140+AND+fixVersion+%3D+12658)
As a Maven goal, the SonarScanner for Maven is available anywhere Maven is available (locally, in CI services, etc.), without the need to manually download, set up, and maintain a separate installation.
Additionally, because the Maven build process already has much of the information needed for SonarQube Cloud to successfully analyze a project, this information is automatically available to the scanner, reducing the amount of manual configuration needed.
### Prerequisites
* Maven 3.2.5+
* Java 21 or later, Java 17 has been deprecated. See [#java-runtime-environment-jre](https://docs.sonarsource.com/sonarqube-cloud/scanner-environment/general-requirements#java-runtime-environment-jre "mention") for more details.
* Java 11 or later with JRE auto-provisioning
See also the [general-requirements](https://docs.sonarsource.com/sonarqube-cloud/advanced-setup/scanner-environment/general-requirements "mention") for your scanner environment page.
### A simple example
In the simplest case, you could perform the analysis manually by invoking the Maven goal, while providing the essential parameters. Something like this:
```bash
mvn clean verify org.sonarsource.scanner.maven:sonar-maven-plugin:sonar \
-Dsonar.token= \
-Dsonar.host.url=https://sonarcloud.io \
-Dsonar.organization= \
-Dsonar.projectKey=
```
Usually, you would integrate the `mvn` invocation into your build pipeline, to be run on each commit to your repository. The following sections describe how to do this.
### Configuration
While the SonarScanner for Maven does automatically detect much of the information needed to perform code analysis, some manual configuration is needed. At the minimum you need to supply the parameters mentioned above: `sonar.token`, `sonar.host.url`, `sonar.organization`, and `sonar.projectKey`.
In general, any of these parameters can be configured just like any other maven property (in order of override priority):
* On the `mvn` command line where the scanner goal is invoked, using the `-D` argument prefix.
* In the `pom.xml` file of the project. Unlike the plain-vanilla SonarScanner CLI, the SonarScanner for Maven uses the `pom.xml` instead of the `sonar-project.properties` file.
* In the global `settings.xml`.
#### Authentication
`sonar.token`: This is a personal access token generated in your SonarQube Cloud account at [**My Account** > **Security** > **Generate Tokens**](https://sonarcloud.io/account/security/). It allows the scanner to authenticate to SonarQube Cloud. This is usually set via the `SONAR_TOKEN` environment variable.
For example, in the GitHub Actions CI environment, you would configure a GitHub Secret called `SONAR_TOKEN` with the access token as its value. Then you might have something like the following in your `.github/workflows/build.yml`:
```yaml
...
- name: Build and Analyze
env:
SONAR_TOKEN: ${{ secrets.SONAR_TOKEN }}
...
```
The SonarScanner for Maven automatically picks up the value directly from the environment variable. If you use an environment variable, you do not need to pass the token on the `mvn` command line.
#### Server, organization, and project
`sonar.host.url`: This is the URL of the SonarQube Cloud server. It is needed because the SonarScanner for Maven plugin also works with the on-premise SonarQube Server product, where this parameter is set to the URL of the locally installed server. In our case, this parameter should always be set to `https://sonarcloud.io`.
`sonar.organization`: This is the key of the SonarQube Cloud organization where your project resides. It can be found in the top right of the organization overview page and on the information page of your project.
`sonar.projectKey`: This is the key of the SonarQube Cloud project itself, that is, the one resulting from importing the repository that you are now configuring. It can be found on the information page of your project.
These three parameters are usually set on the command line of the `mvn` command invoked during your build in your CI environment. For example, in the GitHub Actions CI environment you might have the following in your `.github/workflows/build.yml`:
```yaml
- name: Build and analyze
env:
SONAR_TOKEN: ${{ secrets.SONAR_TOKEN }}
run: mvn verify org.sonarsource.scanner.maven:sonar-maven-plugin:sonar \
-Dsonar.host.url=https://sonarcloud.io \
-Dsonar.organization= \
-Dsonar.projectKey=
```
### Optional parameters
Additional parameters beyond the required ones can also be set, either
* in the SonarQube Cloud UI,
* in your project `pom.xml`,
* or on the command line, as appropriate.
If set on the command line they are simply appended to the `mvn` command using additional `-D` argument prefixes.
If set in the `pom.xml` they are included as part of the project properties. For example:
```xml
...
...
...
```
See the [analysis-parameters](https://docs.sonarsource.com/sonarqube-cloud/advanced-setup/analysis-parameters "mention") page for an overview of available parameters.
### Invoking the goal
When invoking the SonarScanner goal it is recommended that you do it as part of a single maven command in line with the other goals needed for the build. For example:
```bash
mvn verify org.sonarsource.scanner.maven:sonar-maven-plugin:sonar \
-Dsonar.organization= \
-Dsonar.projectKey=
```
where the `org.sonarsource.scanner.maven:sonar-maven-plugin:sonar` goal follows the `verify` goal.
This is in contrast to invoking `org.sonarsource.scanner.maven:sonar-maven-plugin:sonar` in a dedicated `mvn` invocation. For example:
```bash
mvn clean install
mvn org.sonarsource.scanner.maven:sonar-maven-plugin:sonar \
-Dsonar.organization= \
-Dsonar.projectKey=
```
The advantage with the first technique is that the SonarScanner has access to the full build context and can therefore make a more thorough analysis. For this reason, the first technique is preferred.
#### Setting the plugin version
**In the pom.xml file**
We recommend locking down versions of Maven plugins in the `pom.xml` file of the project:
```xml
org.sonarsource.scanner.mavensonar-maven-pluginyourPluginVersion
```
**When invoking the goal**
When invoking the scanner goal, there are two ways to set the plugin version:
* Using the fully qualified name:
```bash
org.sonarsource.scanner.maven:sonar-maven-plugin::sonar
```
* Using the shorthand `org.sonarsource.scanner.maven:sonar-maven-plugin:sonar` instead of the fully qualified name. In this case, the latest plugin version is used:
```bash
mvn org.sonarsource.scanner.maven:sonar-maven-plugin:sonar
```
As of version 5.0 of the scanner, the analysis will run on a provided JDK17 by default. If you are working with a different Java version for your project, there might be inconsistencies between the Java API your project uses and the ones provided during the analysis. Specifying the correct JDK version will ensure that you are running the analysis with the correct Java version. See [#project-specific-jdk](https://docs.sonarsource.com/sonarqube-cloud/languages/java#project-specific-jdk "mention") article for more information.
### Code coverage
To get coverage information, you will need to generate the coverage report before the analysis and specify the location of the resulting report in an analysis parameter. See the [test-coverage](https://docs.sonarsource.com/sonarqube-cloud/enriching/test-coverage "mention") page for details.
### Adjusting the analysis scope
The analysis scope of a project determines the source and test files to be analyzed.
An initial analysis scope is set by default. With the SonarScanner for Maven, the initial analysis scope is:
* For source files: all the files stored under `src/main/java` (in the root or module directories).
* For test files: all the files stored under `src/test/java` (in the root or module directories).
To adjust the analysis scope, you can:
* Adjust the initial scope. See [#adjusting-the-initial-scope](#adjusting-the-initial-scope "mention") below.
* Exclude specific files from the initial scope. See the [setting-analysis-scope](https://docs.sonarsource.com/sonarqube-cloud/managing-your-projects/project-analysis/setting-analysis-scope "mention") pages.
* Exclude specific modules from the analysis. See [#excluding-a-module-from-the-analysis](#excluding-a-module-from-the-analysis "mention") below.
#### Adjusting the initial scope
The initial scope is set through the `sonar.sources` property (for source files) and the `sonar.tests` property (for test files). See Analysis parameters for more information.
To adjust the initial scope, you have two options:
* override these properties by setting them explicitly in your build like any other relevant maven property. See the [setting-initial-scope](https://docs.sonarsource.com/sonarqube-cloud/managing-your-projects/project-analysis/setting-analysis-scope/setting-initial-scope "mention") page.
* use the scanAll option to extend the initial scope to non-JVM-related files. See [#using-the-scanall-option-to-include-nonjvmrelated-files](#using-the-scanall-option-to-include-nonjvmrelated-files "mention") below.
#### Using the scanAll option to include non-JVM-related files
You may want to analyze not only the JVM main files but also files related to configuration, infrastructure, etc. An easy way to do that is to enable the scanAll option (By default, this option is disabled.).
If the scanAll option is enabled then the initial analysis scope of *source files* will be:
* The files stored in `src/main/java.`
* The non-JVM-related files stored in the root directory of your project.
{% hint style="warning" %}
The scanAll option is disabled if the `sonar.sources` property is overridden.
{% endhint %}
To enable the scanAll option:
* Set the `sonar.maven.scanAll` property to `True`. See the [analysis-parameters](https://docs.sonarsource.com/sonarqube-cloud/advanced-setup/analysis-parameters "mention") page.
#### Excluding a module from the analysis
To exclude a module from the analysis, you may:
* In the `pom.xml` of the module you want to exclude, define the `true` property.
* Use build profiles to exclude some modules (like for integration tests).
* Use Advanced Reactor Options (such as `-pl`). For example `mvn org.sonarsource.scanner.maven:sonar-maven-plugin:sonar -pl !module2`
### Troubleshooting
#### If you get a java.lang.OutOfMemoryError With SonarScanner for Maven version 5.0 or later
Set the `SONAR_SCANNER_JAVA_OPTS` environment variable, like this in Unix environments.
```bash
export SONAR_SCANNER_JAVA_OPTS="-Xmx512m"
```
In Windows environments, avoid the double quotes, since they get misinterpreted.
```bash
set SONAR_SCANNER_JAVA_OPTS=-Xmx512m
```
With SonarScanner for Maven version 4.0 or earlier
Set the `MAVEN_OPTS` environment variable, like this in Unix environments:
```bash
export MAVEN_OPTS="-Xmx512m"
```
In Windows environments, avoid the double quotes, since they get misinterpreted:
```bash
set MAVEN_OPTS=-Xmx512m
```
---
# Source: https://docs.sonarsource.com/sonarqube-server/10.6/analyzing-source-code/scanners/sonarscanner-for-npm.md
# Source: https://docs.sonarsource.com/sonarqube-cloud/advanced-setup/ci-based-analysis/sonarscanner-for-npm.md
# SonarScanner for NPM
{% content-ref url="sonarscanner-for-npm/introduction" %}
[introduction](https://docs.sonarsource.com/sonarqube-cloud/advanced-setup/ci-based-analysis/sonarscanner-for-npm/introduction)
{% endcontent-ref %}
{% content-ref url="sonarscanner-for-npm/installing" %}
[installing](https://docs.sonarsource.com/sonarqube-cloud/advanced-setup/ci-based-analysis/sonarscanner-for-npm/installing)
{% endcontent-ref %}
{% content-ref url="sonarscanner-for-npm/using" %}
[using](https://docs.sonarsource.com/sonarqube-cloud/advanced-setup/ci-based-analysis/sonarscanner-for-npm/using)
{% endcontent-ref %}
{% content-ref url="sonarscanner-for-npm/configuring" %}
[configuring](https://docs.sonarsource.com/sonarqube-cloud/advanced-setup/ci-based-analysis/sonarscanner-for-npm/configuring)
{% endcontent-ref %}
---
# Source: https://docs.sonarsource.com/sonarqube-community-build/analyzing-source-code/scanners/sonarscanner-for-python.md
# Source: https://docs.sonarsource.com/sonarqube-server/9.9/analyzing-source-code/scanners/sonarscanner-for-python.md
# Source: https://docs.sonarsource.com/sonarqube-server/10.5/analyzing-source-code/scanners/sonarscanner-for-python.md
# Source: https://docs.sonarsource.com/sonarqube-server/10.6/analyzing-source-code/scanners/sonarscanner-for-python.md
# Source: https://docs.sonarsource.com/sonarqube-server/10.7/analyzing-source-code/scanners/sonarscanner-for-python.md
# Source: https://docs.sonarsource.com/sonarqube-server/10.8/analyzing-source-code/scanners/sonarscanner-for-python.md
# Source: https://docs.sonarsource.com/sonarqube-server/2025.2/analyzing-source-code/scanners/sonarscanner-for-python.md
# Source: https://docs.sonarsource.com/sonarqube-server/2025.3/analyzing-source-code/scanners/sonarscanner-for-python.md
# Source: https://docs.sonarsource.com/sonarqube-server/2025.5/analyzing-source-code/scanners/sonarscanner-for-python.md
# Source: https://docs.sonarsource.com/sonarqube-server/2025.1/analyzing-source-code/scanners/sonarscanner-for-python.md
# Source: https://docs.sonarsource.com/sonarqube-server/2025.4/analyzing-source-code/scanners/sonarscanner-for-python.md
# Source: https://docs.sonarsource.com/sonarqube-server/2025.6/analyzing-source-code/scanners/sonarscanner-for-python.md
# Source: https://docs.sonarsource.com/sonarqube-server/analyzing-source-code/scanners/sonarscanner-for-python.md
# Source: https://docs.sonarsource.com/sonarqube-cloud/advanced-setup/ci-based-analysis/sonarscanner-for-python.md
# SonarScanner for Python
SonarScanner for Python — 1.3.0.4086 | Issue Tracker
**1.3.0.4086** **2025-12-02**\ Shai-Hulud security release\
[Download](https://pypi.org/project/pysonar/1.3.0.4086)\
\
[Release notes](https://sonarsource.atlassian.net/issues/?jql=project%20%3D%20%22Sonar%20Scanner%20Python%22%20AND%20fixversion%20%3D%201.3.0)
***
**1.2.1.3951** **2025-10-31**\ Ensure compatibility with Python 3.14\
[Download](https://pypi.org/project/pysonar/1.2.1.3951)\
\
[Release notes](https://sonarsource.atlassian.net/issues/?jql=project%20%3D%20%22Sonar%20Scanner%20Python%22%20AND%20fixversion%20%3D%201.2.1)
***
**1.1.0.2035** **2025-06-18**\ Improve handling of arguments and environment variables. Fix the return code on failure\
[Download](https://pypi.org/project/pysonar/1.1.0.2035/)\
\
[Release notes](https://sonarsource.atlassian.net/issues/?jql=project%20%3D%20%22Sonar%20Scanner%20Python%22%20AND%20fixVersion%20%3D%201.1)
***
**1.0.2.1722** **2025-05-28**\ Fix incompatibility with tarfile.extractall\
[Download](https://pypi.org/project/pysonar/1.0.2.1722/)\
\
[Release notes](https://sonarsource.atlassian.net/issues/?jql=project%20%3D%20%22Sonar%20Scanner%20Python%22%20AND%20fixVersion%20%3D%201.0.2)
***
**1.0.1.1548** **2025-04-02**\ Add support for sonar.organization property\
[Download](https://pypi.org/project/pysonar/1.0.1.1548/)\
\
[Release notes](https://sonarsource.atlassian.net/issues/?jql=project%20%3D%20%22Sonar%20Scanner%20Python%22%20AND%20fixVersion%20%3D%201.0.1)
***
**1.0.0.1453** **2025-04-01**\ First production-ready release, includes support for automatic JRE provisioning\
[Download](https://pypi.org/project/pysonar/1.0.0.1453/)\
\
[Release notes](https://sonarsource.atlassian.net/issues/?jql=project%20%3D%20%22Sonar%20Scanner%20Python%22%20AND%20fixVersion%20%3D%201.0)
***
**0.3.0.2016** **2025-06-17**\ Deprecate pysonar-scanner in favor of pysonar\
[Download](https://pypi.org/project/pysonar-scanner/0.3.0.2016/)\
\
[Release notes](https://sonarsource.atlassian.net/issues/?jql=project%20%3D%20%22Sonar%20Scanner%20Python%22%20AND%20fixVersion%20%3D%200.3)
***
**0.2.0.520** **2024-10-15**\ Update embedded sonar-scanner-cli\
[Download](https://pypi.org/project/pysonar-scanner/0.2.0.520/)\
\
[Release notes](https://sonarsource.atlassian.net/issues/?jql=project%20%3D%20%22Sonar%20Scanner%20Python%22%20AND%20fixVersion%20%3D%200.2)
***
**0.1.0.340** **2024-06-10**\ First beta release on PyPI\
[Download](https://pypi.org/project/pysonar-scanner/0.1.0.340/)\
\
[Release notes](https://sonarsource.atlassian.net/issues/?jql=project%20%3D%20%22Sonar%20Scanner%20Python%22%20AND%20fixVersion%20%3D%200.1.0.340)
***
**0.1.0.285** **2024-04-08**\ First beta release on test.pypi.org\
[Download](https://test.pypi.org/project/pysonar/0.1.0.285/)\
\
[Release notes](https://sonarsource.atlassian.net/issues/?jql=project%20%3D%20%22Sonar%20Scanner%20Python%22%20AND%20fixVersion%20%3D%200.1.0.285)
pysonar is a wrapper around SonarScanner CLI, available on PyPI.
### Prerequisites
* Python 3.9 or later
### Installing the SonarScanner for Python
To install with pip, run the following command:
```bash
pip install pysonar
```
### Using the SonarScanner for Python
Once installed, you can configure the analysis and run the scanner from the command line. It assumes a running instance of SonarQube Server or a project configured on SonarQube Cloud.
We do not recommend running an antivirus scanner on the machine where a SonarQube Server analysis runs, it could result in unpredictable behavior.
#### Setting the analysis properties
For the analysis to run, you’ll need to define analysis properties. There are multiple ways of providing them, described below in descending order of priority:
* Through CLI arguments to the `pysonar` command
* Environment variables for individual properties (e.g. `SONAR_TOKEN`, `SONAR_VERBOSE`, `SONAR_HOST_URL`, …)
* Generic environment variable `SONAR_SCANNER_JSON_PARAMS`
* Under the `[tool.sonar]` key of the `pyproject.toml` file
* In a dedicated `sonar-project.properties` file
* Through common properties extracted from the `pyproject.toml`
**Using CLI arguments**
Analysis properties can be provided as CLI arguments to the `pysonar` command. They follow the same convention as when running the [sonarscanner-cli](https://docs.sonarsource.com/sonarqube-cloud/advanced-setup/ci-based-analysis/sonarscanner-cli "mention") directly. This means that analysis properties provided that way should be prepended with `-D`, for instance:
```bash
pysonar -Dsonar.token=myAuthenticationToken
```
You can use all the arguments allowed by the SonarScanner CLI.
Additionally, some common properties can be provided using a shorter alias, such as:
```bash
pysonar --token "MyToken"
```
See [CLI\_ARGS](https://github.com/SonarSource/sonar-scanner-python/blob/master/CLI_ARGS.md) for more details.
**With a pyproject.toml file**
Inside a `pyproject.toml`, Sonar analysis properties can be defined under the `tool.sonar` table.
```toml
[tool.sonar]
# must be unique in a given SonarQube Server/SonarQube Cloud instance
projectKey=my:project
# --- optional properties ---
# defaults to project key
#projectName=My project
# defaults to 'not provided'
#projectVersion=1.0
# Path is relative to the pyproject.toml file. Defaults to .
#sources=.
# Encoding of the source code. Default is default system encoding
#sourceEncoding=UTF-8
```
For a list of analysis parameters, see the [analysis-parameters](https://docs.sonarsource.com/sonarqube-cloud/advanced-setup/analysis-parameters "mention") page.
In the `pyproject.toml` file, the prefix `sonar.` for parameter keys should be omitted. For example, `sonar.scm.provider` in the documentation will become `scm.provider` in the `pyproject.toml` file.
Properties in `pyproject.toml` files are expected to be provided in camel case. However, kebab case is also accepted:
```toml
[tool.sonar]
project-key=My Project key # valid alias for projectKey
```
By default, the scanner will expect the `pyproject.toml` file to be present in the current directory. However, its path can be provided manually through the `toml-path` CLI argument as well as through the `sonar.projectBaseDir` argument. For instance:
```bash
pysonar --toml-path "path/to/pyproject.toml"
```
Or:
```bash
pysonar --sonar-project-base-dir "path/to/projectBaseDir"
```
Or:
```bash
pysonar -Dsonar.projectBaseDir="path/to/projectBaseDir"
```
**Using project properties extracted from the pyproject.toml file**
When a `pyproject.toml` file is available, the scanner can deduce analysis properties from the project configuration. This is currently supported only for projects using `poetry`.
**With a sonar-project.properties file**
The analysis can be configured with a `sonar-project.properties` file, exactly like when you analyze with the [sonarscanner-cli](https://docs.sonarsource.com/sonarqube-cloud/advanced-setup/ci-based-analysis/sonarscanner-cli "mention"):
```toml
# must be unique in a given SonarQube Server/SonarQube Cloud instance
sonar.projectKey=my:project
# --- optional properties ---
# defaults to project key
#sonar.projectName=My project
# defaults to 'not provided'
#sonar.projectVersion=1.0
# Path is relative to the sonar-project.properties file. Defaults to .
#sonar.sources=.
# Encoding of the source code. Default is default system encoding
#sonar.sourceEncoding=UTF-8
```
**Through environment variables**
It is also possible to configure the scanner through environment variables:
```properties
export SONAR_HOST_URL="https://sonarcloud.io"
pysonar
```
### Installing from testPyPI
To install the latest pre-released version of SonarScanner for Python. Execute the following command:
```bash
pip install --index-url https://test.pypi.org/simple/ --extra-index-url https://pypi.org/simple/ pysonar
```
---
# Source: https://docs.sonarsource.com/sonarqube-community-build/analyzing-source-code/scanners/sonarscanner.md
# Source: https://docs.sonarsource.com/sonarqube-server/8.9/analyzing-source-code/scanners/sonarscanner.md
# Source: https://docs.sonarsource.com/sonarqube-server/9.8/analyzing-source-code/scanners/sonarscanner.md
# Source: https://docs.sonarsource.com/sonarqube-server/9.9/analyzing-source-code/scanners/sonarscanner.md
# Source: https://docs.sonarsource.com/sonarqube-server/10.0/analyzing-source-code/scanners/sonarscanner.md
# Source: https://docs.sonarsource.com/sonarqube-server/10.1/analyzing-source-code/scanners/sonarscanner.md
# Source: https://docs.sonarsource.com/sonarqube-server/10.2/analyzing-source-code/scanners/sonarscanner.md
# Source: https://docs.sonarsource.com/sonarqube-server/10.3/analyzing-source-code/scanners/sonarscanner.md
# Source: https://docs.sonarsource.com/sonarqube-server/10.4/analyzing-source-code/scanners/sonarscanner.md
# Source: https://docs.sonarsource.com/sonarqube-server/10.5/analyzing-source-code/scanners/sonarscanner.md
# Source: https://docs.sonarsource.com/sonarqube-server/10.6/analyzing-source-code/scanners/sonarscanner.md
# Source: https://docs.sonarsource.com/sonarqube-server/10.7/analyzing-source-code/scanners/sonarscanner.md
# Source: https://docs.sonarsource.com/sonarqube-server/10.8/analyzing-source-code/scanners/sonarscanner.md
# Source: https://docs.sonarsource.com/sonarqube-server/2025.2/analyzing-source-code/scanners/sonarscanner.md
# Source: https://docs.sonarsource.com/sonarqube-server/2025.3/analyzing-source-code/scanners/sonarscanner.md
# Source: https://docs.sonarsource.com/sonarqube-server/2025.5/analyzing-source-code/scanners/sonarscanner.md
# Source: https://docs.sonarsource.com/sonarqube-server/2025.1/analyzing-source-code/scanners/sonarscanner.md
# Source: https://docs.sonarsource.com/sonarqube-server/2025.4/analyzing-source-code/scanners/sonarscanner.md
# Source: https://docs.sonarsource.com/sonarqube-server/2025.6/analyzing-source-code/scanners/sonarscanner.md
# Source: https://docs.sonarsource.com/sonarqube-server/analyzing-source-code/scanners/sonarscanner.md
# SonarScanner CLI
SonarScanner — 8.0.1 | Issue Tracker
**8.0.1** **2025-12-05**\ Update embedded JREs to Java 21\
Download scanner for: [Linux x64](https://binaries.sonarsource.com/Distribution/sonar-scanner-cli/sonar-scanner-cli-8.0.1.6346-linux-x64.zip) [Linux AArch64](https://binaries.sonarsource.com/Distribution/sonar-scanner-cli/sonar-scanner-cli-8.0.1.6346-linux-aarch64.zip) [Windows x64](https://binaries.sonarsource.com/Distribution/sonar-scanner-cli/sonar-scanner-cli-8.0.1.6346-windows-x64.zip) [macOS x64](https://binaries.sonarsource.com/Distribution/sonar-scanner-cli/sonar-scanner-cli-8.0.1.6346-macosx-x64.zip) [macOS AArch64](https://binaries.sonarsource.com/Distribution/sonar-scanner-cli/sonar-scanner-cli-8.0.1.6346-macosx-aarch64.zip) [Docker](https://hub.docker.com/r/sonarsource/sonar-scanner-cli) [Any (Requires a pre-installed JVM)](https://binaries.sonarsource.com/Distribution/sonar-scanner-cli/sonar-scanner-cli-8.0.1.6346.zip)\
\
[Release notes](https://sonarsource.atlassian.net/issues/?jql=fixVersion%20%3D%2023522%20ORDER%20BY%20created%20ASC)
***
**7.3** **2025-10-06**\ Support z/OS as an Operating System to execute Scanners\
Download scanner for: [Linux x64](https://binaries.sonarsource.com/Distribution/sonar-scanner-cli/sonar-scanner-cli-7.3.0.5189-linux-x64.zip) [Linux AArch64](https://binaries.sonarsource.com/Distribution/sonar-scanner-cli/sonar-scanner-cli-7.3.0.5189-linux-aarch64.zip) [Windows x64](https://binaries.sonarsource.com/Distribution/sonar-scanner-cli/sonar-scanner-cli-7.3.0.5189-windows-x64.zip) [macOS x64](https://binaries.sonarsource.com/Distribution/sonar-scanner-cli/sonar-scanner-cli-7.3.0.5189-macosx-x64.zip) [macOS AArch64](https://binaries.sonarsource.com/Distribution/sonar-scanner-cli/sonar-scanner-cli-7.3.0.5189-macosx-aarch64.zip) [Docker](https://hub.docker.com/r/sonarsource/sonar-scanner-cli) [Any (Requires a pre-installed JVM)](https://binaries.sonarsource.com/Distribution/sonar-scanner-cli/sonar-scanner-cli-7.3.0.5189.zip)\
\
[Release notes](https://sonarsource.atlassian.net/issues/?jql=project%20%3D%2010143%20AND%20fixversion%20%3D%207.3)
***
**7.2** **2025-07-21**\ Restore ability to run the scanner with Java 11, update dependencies\
Download scanner for: [Linux x64](https://binaries.sonarsource.com/Distribution/sonar-scanner-cli/sonar-scanner-cli-7.2.0.5079-linux-x64.zip) [Linux AArch64](https://binaries.sonarsource.com/Distribution/sonar-scanner-cli/sonar-scanner-cli-7.2.0.5079-linux-aarch64.zip) [Windows x64](https://binaries.sonarsource.com/Distribution/sonar-scanner-cli/sonar-scanner-cli-7.2.0.5079-windows-x64.zip) [macOS x64](https://binaries.sonarsource.com/Distribution/sonar-scanner-cli/sonar-scanner-cli-7.2.0.5079-macosx-x64.zip) [macOS AArch64](https://binaries.sonarsource.com/Distribution/sonar-scanner-cli/sonar-scanner-cli-7.2.0.5079-macosx-aarch64.zip) [Docker](https://hub.docker.com/r/sonarsource/sonar-scanner-cli) [Any (Requires a pre-installed JVM)](https://binaries.sonarsource.com/Distribution/sonar-scanner-cli/sonar-scanner-cli-7.2.0.5079.zip)\
\
[Release notes](https://sonarsource.atlassian.net/issues/?jql=project%20%3D%2010143%20AND%20fixversion%20%3D%207.2)
***
**7.1** **2025-03-21**\ Support for SonarQube Cloud regions\
Download scanner for: [Linux x64](https://binaries.sonarsource.com/Distribution/sonar-scanner-cli/sonar-scanner-cli-7.1.0.4889-linux-x64.zip) [Linux AArch64](https://binaries.sonarsource.com/Distribution/sonar-scanner-cli/sonar-scanner-cli-7.1.0.4889-linux-aarch64.zip) [Windows x64](https://binaries.sonarsource.com/Distribution/sonar-scanner-cli/sonar-scanner-cli-7.1.0.4889-windows-x64.zip) [macOS x64](https://binaries.sonarsource.com/Distribution/sonar-scanner-cli/sonar-scanner-cli-7.1.0.4889-macosx-x64.zip) [macOS AArch64](https://binaries.sonarsource.com/Distribution/sonar-scanner-cli/sonar-scanner-cli-7.1.0.4889-macosx-aarch64.zip) [Docker](https://hub.docker.com/r/sonarsource/sonar-scanner-cli) [Any (Requires a pre-installed JVM)](https://binaries.sonarsource.com/Distribution/sonar-scanner-cli/sonar-scanner-cli-7.1.0.4889.zip)\
\
[Release notes](https://sonarsource.atlassian.net/issues/?jql=project%20%3D%2010143%20AND%20fixversion%20%3D%207.1)
***
**7.0.2** **2025-02-14**\ Bug fix to support SONAR\_TOKEN on old SonarQube versions\
Download scanner for: [Linux x64](https://binaries.sonarsource.com/Distribution/sonar-scanner-cli/sonar-scanner-cli-7.0.2.4839-linux-x64.zip) [Linux AArch64](https://binaries.sonarsource.com/Distribution/sonar-scanner-cli/sonar-scanner-cli-7.0.2.4839-linux-aarch64.zip) [Windows x64](https://binaries.sonarsource.com/Distribution/sonar-scanner-cli/sonar-scanner-cli-7.0.2.4839-windows-x64.zip) [macOS x64](https://binaries.sonarsource.com/Distribution/sonar-scanner-cli/sonar-scanner-cli-7.0.2.4839-macosx-x64.zip) [macOS AArch64](https://binaries.sonarsource.com/Distribution/sonar-scanner-cli/sonar-scanner-cli-7.0.2.4839-macosx-aarch64.zip) [Docker](https://hub.docker.com/r/sonarsource/sonar-scanner-cli) [Any (Requires a pre-installed JVM)](https://binaries.sonarsource.com/Distribution/sonar-scanner-cli/sonar-scanner-cli-7.0.2.4839.zip)\
\
[Release notes](https://sonarsource.atlassian.net/issues/?jql=project%20%3D%2010143%20AND%20fixversion%20%3D%207.0.2)
***
**7.0.1** **2025-02-03**\ Support empty truststore password\
Download scanner for: [Linux x64](https://binaries.sonarsource.com/Distribution/sonar-scanner-cli/sonar-scanner-cli-7.0.1.4817-linux-x64.zip) [Linux AArch64](https://binaries.sonarsource.com/Distribution/sonar-scanner-cli/sonar-scanner-cli-7.0.1.4817-linux-aarch64.zip) [Windows x64](https://binaries.sonarsource.com/Distribution/sonar-scanner-cli/sonar-scanner-cli-7.0.1.4817-windows-x64.zip) [macOS x64](https://binaries.sonarsource.com/Distribution/sonar-scanner-cli/sonar-scanner-cli-7.0.1.4817-macosx-x64.zip) [macOS AArch64](https://binaries.sonarsource.com/Distribution/sonar-scanner-cli/sonar-scanner-cli-7.0.1.4817-macosx-aarch64.zip) [Docker](https://hub.docker.com/r/sonarsource/sonar-scanner-cli) [Any (Requires a pre-installed JVM)](https://binaries.sonarsource.com/Distribution/sonar-scanner-cli/sonar-scanner-cli-7.0.1.4817.zip)\
\
[Release notes](https://sonarsource.atlassian.net/issues/?jql=project%20%3D%2010143%20AND%20fixversion%20%3D%207.0.1)
***
**7.0** **2025-01-20**\ Non-latin character support in properties files, ISO-8859-1 support dropped\
Download scanner for: [Linux x64](https://binaries.sonarsource.com/Distribution/sonar-scanner-cli/sonar-scanner-cli-7.0.0.4796-linux-x64.zip) [Linux AArch64](https://binaries.sonarsource.com/Distribution/sonar-scanner-cli/sonar-scanner-cli-7.0.0.4796-linux-aarch64.zip) [Windows x64](https://binaries.sonarsource.com/Distribution/sonar-scanner-cli/sonar-scanner-cli-7.0.0.4796-windows-x64.zip) [macOS x64](https://binaries.sonarsource.com/Distribution/sonar-scanner-cli/sonar-scanner-cli-7.0.0.4796-macosx-x64.zip) [macOS AArch64](https://binaries.sonarsource.com/Distribution/sonar-scanner-cli/sonar-scanner-cli-7.0.0.4796-macosx-aarch64.zip) [Docker](https://hub.docker.com/r/sonarsource/sonar-scanner-cli) [Any (Requires a pre-installed JVM)](https://binaries.sonarsource.com/Distribution/sonar-scanner-cli/sonar-scanner-cli-7.0.0.4796.zip)\
\
[Release notes](https://sonarsource.atlassian.net/issues/?jql=project%20%3D%2010143%20AND%20fixversion%20%3D%207.0)
***
**6.2.1** **2024-10-01**\ FIPS support and improved SSL configuration\
Download scanner for: [Linux x64](https://binaries.sonarsource.com/Distribution/sonar-scanner-cli/sonar-scanner-cli-6.2.1.4610-linux-x64.zip) [Linux AArch64](https://binaries.sonarsource.com/Distribution/sonar-scanner-cli/sonar-scanner-cli-6.2.1.4610-linux-aarch64.zip) [Windows x64](https://binaries.sonarsource.com/Distribution/sonar-scanner-cli/sonar-scanner-cli-6.2.1.4610-windows-x64.zip) [macOS x64](https://binaries.sonarsource.com/Distribution/sonar-scanner-cli/sonar-scanner-cli-6.2.1.4610-macosx-x64.zip) [macOS AArch64](https://binaries.sonarsource.com/Distribution/sonar-scanner-cli/sonar-scanner-cli-6.2.1.4610-macosx-aarch64.zip) [Docker](https://hub.docker.com/r/sonarsource/sonar-scanner-cli) [Any (Requires a pre-installed JVM)](https://binaries.sonarsource.com/Distribution/sonar-scanner-cli/sonar-scanner-cli-6.2.1.4610.zip)\
\
[Release notes](https://sonarsource.atlassian.net/issues/?jql=project%20%3D%2010143%20AND%20fixversion%20%3D%206.2.1)
***
**6.2** **2024-09-17**\ Support PKCS12 truststore generated with OpenSSL\
Download scanner for: [Linux x64](https://binaries.sonarsource.com/Distribution/sonar-scanner-cli/sonar-scanner-cli-6.2.0.4584-linux-x64.zip) [Linux AArch64](https://binaries.sonarsource.com/Distribution/sonar-scanner-cli/sonar-scanner-cli-6.2.0.4584-linux-aarch64.zip) [Windows x64](https://binaries.sonarsource.com/Distribution/sonar-scanner-cli/sonar-scanner-cli-6.2.0.4584-windows-x64.zip) [macOS x64](https://binaries.sonarsource.com/Distribution/sonar-scanner-cli/sonar-scanner-cli-6.2.0.4584-macosx-x64.zip) [macOS AArch64](https://binaries.sonarsource.com/Distribution/sonar-scanner-cli/sonar-scanner-cli-6.2.0.4584-macosx-aarch64.zip) [Docker](https://hub.docker.com/r/sonarsource/sonar-scanner-cli) [Any (Requires a pre-installed JVM)](https://binaries.sonarsource.com/Distribution/sonar-scanner-cli/sonar-scanner-cli-6.2.0.4584.zip)\
\
[Release notes](https://sonarsource.atlassian.net/issues/?jql=project%20%3D%2010143%20AND%20fixversion%20%3D%206.2)
***
**6.1** **2024-06-27**\ macOS and Linux AArch64 distributions\
Download scanner for: [Linux x64](https://binaries.sonarsource.com/Distribution/sonar-scanner-cli/sonar-scanner-cli-6.1.0.4477-linux-x64.zip) [Linux AArch64](https://binaries.sonarsource.com/Distribution/sonar-scanner-cli/sonar-scanner-cli-6.1.0.4477-linux-aarch64.zip) [Windows x64](https://binaries.sonarsource.com/Distribution/sonar-scanner-cli/sonar-scanner-cli-6.1.0.4477-windows-x64.zip) [macOS x64](https://binaries.sonarsource.com/Distribution/sonar-scanner-cli/sonar-scanner-cli-6.1.0.4477-macosx-x64.zip) [macOS AArch64](https://binaries.sonarsource.com/Distribution/sonar-scanner-cli/sonar-scanner-cli-6.1.0.4477-macosx-aarch64.zip) [Docker](https://hub.docker.com/r/sonarsource/sonar-scanner-cli) [Any (Requires a pre-installed JVM)](https://binaries.sonarsource.com/Distribution/sonar-scanner-cli/sonar-scanner-cli-6.1.0.4477.zip)\
\
[Release notes](https://sonarsource.atlassian.net/issues/?jql=project%20%3D%2010143%20AND%20fixVersion%20%3D%2015671)
***
**6.0** **2024-06-04**\ New bootstrapping mechanism and JRE provisioning with SonarQube 10.6+ and SonarCloud\
Download scanner for: [Linux x64](https://binaries.sonarsource.com/Distribution/sonar-scanner-cli/sonar-scanner-cli-6.0.0.4432-linux.zip) [Windows x64](https://binaries.sonarsource.com/Distribution/sonar-scanner-cli/sonar-scanner-cli-6.0.0.4432-windows.zip) [macOS x64](https://binaries.sonarsource.com/Distribution/sonar-scanner-cli/sonar-scanner-cli-6.0.0.4432-macosx.zip) [Docker](https://hub.docker.com/r/sonarsource/sonar-scanner-cli) [Any (Requires a pre-installed JVM)](https://binaries.sonarsource.com/Distribution/sonar-scanner-cli/sonar-scanner-cli-6.0.0.4432.zip)\
\
[Release notes](https://sonarsource.atlassian.net/issues/?jql=project%20%3D%2010143%20AND%20fixVersion%20%3D%2015344)
***
**5.0.2** **2025-06-02**\ Security fix\
Download scanner for: [Linux x64](https://binaries.sonarsource.com/Distribution/sonar-scanner-cli/sonar-scanner-cli-5.0.2.4997-linux.zip) [Windows x64](https://binaries.sonarsource.com/Distribution/sonar-scanner-cli/sonar-scanner-cli-5.0.2.4997-windows.zip) [macOS x64](https://binaries.sonarsource.com/Distribution/sonar-scanner-cli/sonar-scanner-cli-5.0.2.4997-macosx.zip) [Docker](https://hub.docker.com/r/sonarsource/sonar-scanner-cli) [Any (Requires a pre-installed JVM)](https://binaries.sonarsource.com/Distribution/sonar-scanner-cli/sonar-scanner-cli-5.0.2.4997.zip)\
\
[Release notes](https://sonarsource.atlassian.net/issues/?jql=project%20%3D%2010143%20AND%20fixVersion%20%3D%2020322)
***
**5.0.1** **2023-08-04**\ Bug fix to the JRE binaries for Linux\
Download scanner for: [Linux x64](https://binaries.sonarsource.com/Distribution/sonar-scanner-cli/sonar-scanner-cli-5.0.1.3006-linux.zip) [Windows x64](https://binaries.sonarsource.com/Distribution/sonar-scanner-cli/sonar-scanner-cli-5.0.1.3006-windows.zip) [macOS x64](https://binaries.sonarsource.com/Distribution/sonar-scanner-cli/sonar-scanner-cli-5.0.1.3006-macosx.zip) [Docker](https://hub.docker.com/r/sonarsource/sonar-scanner-cli) [Any (Requires a pre-installed JVM)](https://binaries.sonarsource.com/Distribution/sonar-scanner-cli/sonar-scanner-cli-5.0.1.3006.zip)\
\
[Release notes](https://sonarsource.atlassian.net/issues/?jql=project%20%3D%2010143%20AND%20fixVersion%20%3D%2014231)
***
**5.0** **2023-07-31**\ Update embedded JRE to Java 17\
Download scanner for: [Linux x64](https://binaries.sonarsource.com/Distribution/sonar-scanner-cli/sonar-scanner-cli-5.0.0.2966-linux.zip) [Windows x64](https://binaries.sonarsource.com/Distribution/sonar-scanner-cli/sonar-scanner-cli-5.0.0.2966-windows.zip) [macOS x64](https://binaries.sonarsource.com/Distribution/sonar-scanner-cli/sonar-scanner-cli-5.0.0.2966-macosx.zip) [Docker](https://hub.docker.com/r/sonarsource/sonar-scanner-cli) [Any (Requires a pre-installed JVM)](https://binaries.sonarsource.com/Distribution/sonar-scanner-cli/sonar-scanner-cli-5.0.0.2966.zip)\
\
[Release notes](https://sonarsource.atlassian.net/issues/?jql=project%20%3D%2010143%20AND%20fixVersion%20%3D%2013991)
***
**4.8.1** **2023-08-14**\ Security fix\
Download scanner for: [Linux x64](https://binaries.sonarsource.com/Distribution/sonar-scanner-cli/sonar-scanner-cli-4.8.1.3023-linux.zip) [Windows x64](https://binaries.sonarsource.com/Distribution/sonar-scanner-cli/sonar-scanner-cli-4.8.1.3023-windows.zip) [macOS x64](https://binaries.sonarsource.com/Distribution/sonar-scanner-cli/sonar-scanner-cli-4.8.1.3023-macosx.zip) [Docker](https://hub.docker.com/r/sonarsource/sonar-scanner-cli) [Any (Requires a pre-installed JVM)](https://binaries.sonarsource.com/Distribution/sonar-scanner-cli/sonar-scanner-cli-4.8.1.3023.zip)\
\
[Release notes](https://sonarsource.atlassian.net/issues/?jql=project%20%3D%2010143%20AND%20fixVersion%20%3D%2014243)
***
**4.8** **2022-02-06**\ Update embedded JRE 11 to the latest, bug fixes\
Download scanner for: [Linux x64](https://binaries.sonarsource.com/Distribution/sonar-scanner-cli/sonar-scanner-cli-4.8.0.2856-linux.zip) [Windows x64](https://binaries.sonarsource.com/Distribution/sonar-scanner-cli/sonar-scanner-cli-4.8.0.2856-windows.zip) [macOS x64](https://binaries.sonarsource.com/Distribution/sonar-scanner-cli/sonar-scanner-cli-4.8.0.2856-macosx.zip) [Docker](https://hub.docker.com/r/sonarsource/sonar-scanner-cli) [Any (Requires a pre-installed JVM)](https://binaries.sonarsource.com/Distribution/sonar-scanner-cli/sonar-scanner-cli-4.8.0.2856.zip)\
\
[Release notes](https://sonarsource.atlassian.net/issues/?jql=project%20%3D%2010143%20AND%20fixVersion%20%3D%2012892)
***
**4.7** **2022-02-02**\ Ease import of custom certificates with the Docker image, update embedded JRE 11\
Download scanner for: [Linux x64](https://binaries.sonarsource.com/Distribution/sonar-scanner-cli/sonar-scanner-cli-4.7.0.2747-linux.zip) [Windows x64](https://binaries.sonarsource.com/Distribution/sonar-scanner-cli/sonar-scanner-cli-4.7.0.2747-windows.zip) [macOS x64](https://binaries.sonarsource.com/Distribution/sonar-scanner-cli/sonar-scanner-cli-4.7.0.2747-macosx.zip) [Docker](https://hub.docker.com/r/sonarsource/sonar-scanner-cli) [Any (Requires a pre-installed JVM)](https://binaries.sonarsource.com/Distribution/sonar-scanner-cli/sonar-scanner-cli-4.7.0.2747.zip)\
\
[Release notes](https://sonarsource.atlassian.net/issues/?jql=project+%3D+10143+AND+fixVersion+%3D+12891)
***
**4.6.2** **2021-05-07**\ Update dependencies, bug fix\
Download scanner for: [Linux x64](https://binaries.sonarsource.com/Distribution/sonar-scanner-cli/sonar-scanner-cli-4.6.2.2472-linux.zip) [Windows x64](https://binaries.sonarsource.com/Distribution/sonar-scanner-cli/sonar-scanner-cli-4.6.2.2472-windows.zip) [macOS x64](https://binaries.sonarsource.com/Distribution/sonar-scanner-cli/sonar-scanner-cli-4.6.2.2472-macosx.zip) [Docker](https://hub.docker.com/r/sonarsource/sonar-scanner-cli) [Any (Requires a pre-installed JVM)](https://binaries.sonarsource.com/Distribution/sonar-scanner-cli/sonar-scanner-cli-4.6.2.2472.zip)\
\
[Release notes](https://sonarsource.atlassian.net/issues/?jql=project+%3D+10143+AND+fixVersion+%3D+12890)
***
**4.6.1** **2021-04-30**\ Update dependencies\
Download scanner for: [Linux x64](https://binaries.sonarsource.com/Distribution/sonar-scanner-cli/sonar-scanner-cli-4.6.1.2450-linux.zip) [Windows x64](https://binaries.sonarsource.com/Distribution/sonar-scanner-cli/sonar-scanner-cli-4.6.1.2450-windows.zip) [macOS x64](https://binaries.sonarsource.com/Distribution/sonar-scanner-cli/sonar-scanner-cli-4.6.1.2450-macosx.zip) [Docker](https://hub.docker.com/r/sonarsource/sonar-scanner-cli) [Any (Requires a pre-installed JVM)](https://binaries.sonarsource.com/Distribution/sonar-scanner-cli/sonar-scanner-cli-4.6.1.2450.zip)\
\
[Release notes](https://sonarsource.atlassian.net/issues/?jql=project+%3D+10143+AND+fixVersion+%3D+12889)
***
**4.6** **2021-01-13**\ Support for Bitbucket Pipelines with SonarQube 8.7+\
Download scanner for: [Linux x64](https://binaries.sonarsource.com/Distribution/sonar-scanner-cli/sonar-scanner-cli-4.6.0.2311-linux.zip) [Windows x64](https://binaries.sonarsource.com/Distribution/sonar-scanner-cli/sonar-scanner-cli-4.6.0.2311-windows.zip) [macOS x64](https://binaries.sonarsource.com/Distribution/sonar-scanner-cli/sonar-scanner-cli-4.6.0.2311-macosx.zip) [Docker](https://hub.docker.com/r/sonarsource/sonar-scanner-cli) [Any (Requires a pre-installed JVM)](https://binaries.sonarsource.com/Distribution/sonar-scanner-cli/sonar-scanner-cli-4.6.0.2311.zip)\
\
[Release notes](https://sonarsource.atlassian.net/issues/?jql=project+%3D+10143+AND+fixVersion+%3D+12888)
***
**4.5** **2020-10-05**\ Fix a bug preventing the analysis in some environments\
Download scanner for: [Linux x64](https://binaries.sonarsource.com/Distribution/sonar-scanner-cli/sonar-scanner-cli-4.5.0.2216-linux.zip) [Windows x64](https://binaries.sonarsource.com/Distribution/sonar-scanner-cli/sonar-scanner-cli-4.5.0.2216-windows.zip) [macOS x64](https://binaries.sonarsource.com/Distribution/sonar-scanner-cli/sonar-scanner-cli-4.5.0.2216-macosx.zip) [Docker](https://hub.docker.com/r/sonarsource/sonar-scanner-cli) [Any (Requires a pre-installed JVM)](https://binaries.sonarsource.com/Distribution/sonar-scanner-cli/sonar-scanner-cli-4.5.0.2216.zip)\
\
[Release notes](https://sonarsource.atlassian.net/issues/?jql=project+%3D+10143+AND+fixVersion+%3D+12887)
***
**4.4** **2020-07-03**\ New supported Docker image, bug fix\
Download scanner for: [Linux x64](https://binaries.sonarsource.com/Distribution/sonar-scanner-cli/sonar-scanner-cli-4.4.0.2170-linux.zip) [Windows x64](https://binaries.sonarsource.com/Distribution/sonar-scanner-cli/sonar-scanner-cli-4.4.0.2170-windows.zip) [macOS x64](https://binaries.sonarsource.com/Distribution/sonar-scanner-cli/sonar-scanner-cli-4.4.0.2170-macosx.zip) [Docker](https://hub.docker.com/r/sonarsource/sonar-scanner-cli) [Any (Requires a pre-installed JVM)](https://binaries.sonarsource.com/Distribution/sonar-scanner-cli/sonar-scanner-cli-4.4.0.2170.zip)\
\
[Release notes](https://sonarsource.atlassian.net/issues/?jql=project+%3D+10143+AND+fixVersion+%3D+12886)
***
**4.3** **2019-03-09**\ Use SonarScanner name and better handle SonarCloud case in logs\
Download scanner for: [Linux x64](https://binaries.sonarsource.com/Distribution/sonar-scanner-cli/sonar-scanner-cli-4.3.0.2102-linux.zip) [Windows x64](https://binaries.sonarsource.com/Distribution/sonar-scanner-cli/sonar-scanner-cli-4.3.0.2102-windows.zip) [macOS x64](https://binaries.sonarsource.com/Distribution/sonar-scanner-cli/sonar-scanner-cli-4.3.0.2102-macosx.zip) [Docker](https://hub.docker.com/r/sonarsource/sonar-scanner-cli) [Any (Requires a pre-installed JVM)](https://binaries.sonarsource.com/Distribution/sonar-scanner-cli/sonar-scanner-cli-4.3.0.2102.zip)\
\
[Release notes](https://sonarsource.atlassian.net/issues/?jql=project+%3D+10143+AND+fixVersion+%3D+12885)
***
**4.2** **2019-10-01**\ Support SONAR\_HOST\_URL environment variable to configure the server URL\
Download scanner for: [Linux x64](https://binaries.sonarsource.com/Distribution/sonar-scanner-cli/sonar-scanner-cli-4.2.0.1873-linux.zip) [Windows x64](https://binaries.sonarsource.com/Distribution/sonar-scanner-cli/sonar-scanner-cli-4.2.0.1873-windows.zip) [macOS x64](https://binaries.sonarsource.com/Distribution/sonar-scanner-cli/sonar-scanner-cli-4.2.0.1873-macosx.zip) [Docker](https://hub.docker.com/r/sonarsource/sonar-scanner-cli) [Any (Requires a pre-installed JVM)](https://binaries.sonarsource.com/Distribution/sonar-scanner-cli/sonar-scanner-cli-4.2.0.1873.zip)\
\
[Release notes](https://sonarsource.atlassian.net/issues/?jql=project+%3D+10143+AND+fixVersion+%3D+12884)
***
**4.1** **2019-09-09**\ Improve the use of a custom project configuration file\
Download scanner for: [Linux x64](https://binaries.sonarsource.com/Distribution/sonar-scanner-cli/sonar-scanner-cli-4.1.0.1829-linux.zip) [Windows x64](https://binaries.sonarsource.com/Distribution/sonar-scanner-cli/sonar-scanner-cli-4.1.0.1829-windows.zip) [macOS x64](https://binaries.sonarsource.com/Distribution/sonar-scanner-cli/sonar-scanner-cli-4.1.0.1829-macosx.zip) [Docker](https://hub.docker.com/r/sonarsource/sonar-scanner-cli) [Any (Requires a pre-installed JVM)](https://binaries.sonarsource.com/Distribution/sonar-scanner-cli/sonar-scanner-cli-4.1.0.1829.zip)\
\
[Release notes](https://sonarsource.atlassian.net/issues/?jql=project+%3D+10143+AND+fixVersion+%3D+12883)
{% hint style="warning" %}
We do not recommend running an antivirus scanner on the machine where a SonarQube Server analysis runs, it could result in unpredictable behavior.
{% endhint %}
The SonarScanner CLI is the scanner to use when there is no specific scanner for your build system. It supports ARM architecture for macOS and Linux.
{% hint style="info" %}
The SonarScanners run on code that is checked out. See [verifying-code-checkout-step](https://docs.sonarsource.com/sonarqube-server/analyzing-source-code/scanners/scanner-environment/verifying-code-checkout-step "mention").
{% endhint %}
### Prerequisites
* Java 21 or later, Java 17 has been deprecated. See [#java-runtime-environment-jre](https://docs.sonarsource.com/sonarqube-server/analyzing-source-code/scanner-environment/general-requirements#java-runtime-environment-jre "mention") for more details.
* With JRE auto-provisioning:
* Java 11 or later from SonarScanner CLI version 7.2
* Java 17 or later before SonarScanner CLI version 7.2
See also [general-requirements](https://docs.sonarsource.com/sonarqube-server/analyzing-source-code/scanners/scanner-environment/general-requirements "mention") and [managing-jre-auto-provisioning](https://docs.sonarsource.com/sonarqube-server/analyzing-source-code/scanners/scanner-environment/managing-jre-auto-provisioning "mention") for more details.
### Configuring your project
Create a configuration file in your project’s root directory called `sonar-project.properties`.
```properties
# must be unique in a given SonarQube Server instance
sonar.projectKey=my:project
# --- optional properties ---
# defaults to project key
#sonar.projectName=My project
# defaults to 'not provided'
#sonar.projectVersion=1.0
# Path is relative to the sonar-project.properties file. Defaults to .
#sonar.sources=.
# Encoding of the source code. Default is default system encoding
#sonar.sourceEncoding=UTF-8
```
### Running SonarScanner CLI from the zip file
To run SonarScanner CLI from the zip file, follow these steps:
{% tabs %}
{% tab title="MACOS, LINUX, Z/OS" %}
1. Expand the downloaded file into the directory of your choice. We’ll refer to it as `` in the next steps.
2. Add the `/bin` directory to your path.
3. Verify your installation by opening a new shell and executing the command `sonar-scanner.bat -h`. You should get an output like this:\
`usage: sonar-scanner [options]`
`Options:`\
`-D,--define Define property`\
`-h,--help Display help information`\
`-v,--version Display version information`\
`-X,--debug Produce execution debug output`
If you need more debug information, you can add one of the following to your command line: `-X`, `--verbose`, or `-Dsonar.verbose=true`.
4. Run the following command from the project base directory to launch analysis:
```shellscript
sonar-scanner -Dsonar.token=myAuthenticationToken -Dsonar.host.url=http://${SONARQUBE_URL}
```
Alternatively, you can use environment variables to define the token ( `SONAR_TOKEN` ) and the server base URL (`SONAR_HOST_URL`).
For more information, see [parameters-not-settable-in-ui](https://docs.sonarsource.com/sonarqube-server/analyzing-source-code/analysis-parameters/parameters-not-settable-in-ui "mention") and [managing-tokens](https://docs.sonarsource.com/sonarqube-server/user-guide/managing-tokens "mention").
{% endtab %}
{% tab title="WINDOWS" %}
1. Expand the downloaded file into the directory of your choice. We’ll refer to it as `` in the next steps.
2. Add the `\bin` directory to your path.
3. Verify your installation by opening a new shell and executing the command `sonar-scanner.bat -h`. You should get an output like this:\
`usage: sonar-scanner [options]`
`Options:`\
`-D,--define Define property`\
`-h,--help Display help information`\
`-v,--version Display version information`\
`-X,--debug Produce execution debug output`
If you need more debug information, you can add one of the following to your command line: `-X`, `--verbose`, or `-Dsonar.verbose=true`.
4. Run the following command from the project base directory to launch analysis:
```shellscript
sonar-scanner -Dsonar.token=myAuthenticationToken -Dsonar.host.url=http://${SONARQUBE_URL}
```
Alternatively, you can use environment variables to define the token ( `SONAR_TOKEN` ) and the server base URL (`SONAR_HOST_URL`).
For more information, see [parameters-not-settable-in-ui](https://docs.sonarsource.com/sonarqube-server/analyzing-source-code/analysis-parameters/parameters-not-settable-in-ui "mention") and [managing-tokens](https://docs.sonarsource.com/sonarqube-server/user-guide/managing-tokens "mention").
{% endtab %}
{% endtabs %}
### Running SonarScanner CLI from the Docker image
To scan using the SonarScanner CLI Docker image, use the following command:
```bash
docker run \
--rm \
-e SONAR_HOST_URL="http://${SONARQUBE_URL}" \
-e SONAR_TOKEN="myAuthenticationToken" \
-v "${YOUR_REPO}:/usr/src" \
sonarsource/sonar-scanner-cli
```
Use a `sonar-project.properties` file to configure other analysis parameters: see **Configuring your project** above.
By default, the the scanner will run the analysis from the `/usr/src` folder with `/usr/src` as the base directory. It's possible to configure an [alternate analysis directory](#alternate-analysis-directory) using the `sonar.projectBaseDir` analysis parameter.
{% hint style="warning" %}
When running the container you have to make sure the user **1000** has read and write access to the directories you are mounting (like your source code or scanner cache directory), otherwise you may encounter permission-related problems.
{% endhint %}
Caching scanner files
To prevent SonarScanner from re-downloading language analyzers each time you run a scan, you can mount a directory where the scanner stores the downloads so that the downloads are reused between scanner runs. On some CI systems, you also need to add this directory to your CI cache configuration.
The following command will store and use cache between runs:
```bash
docker run \
--rm \
-v ${YOUR_CACHE_DIR}:/opt/sonar-scanner/.sonar/cache \
-v ${YOUR_REPO}:/usr/src \
-e SONAR_HOST_URL="http://${SONARQUBE_URL}" \
sonarsource/sonar-scanner-cli
```
You can also change the location of where the scanner puts the downloads with the `SONAR_USER_HOME` environment variable.
{% hint style="info" %}
The user must have the appropriate access to the cache target to avoid permission-related problems
{% endhint %}
### Scanning C, C++, or Objective-C projects
Scanning projects that contain C, C++, or Objective-C code requires some additional analysis steps. You can find full details on the [overview](https://docs.sonarsource.com/sonarqube-server/analyzing-source-code/languages/c-family/overview "mention") language page.
### Sample projects
To help you get started, simple project samples are available for most languages on GitHub. They can be [browsed](https://github.com/SonarSource/sonar-scanning-examples) or [downloaded](https://github.com/SonarSource/sonar-scanning-examples/archive/master.zip). You’ll find them filed under `sonarqube-scanner/src`.
### Alternatives to sonar-project.properties
If a `sonar-project.properties` file cannot be created in the root directory of the project, there are several alternatives:
* The properties can be specified directly through the command line. Example:\
`sonar-scanner -Dsonar.projectKey=myproject -Dsonar.sources=src1`
* The property `project.settings` can be used to specify the path to the project configuration file (this option is incompatible with the `sonar.projectBaseDir` property). Example:\
`sonar-scanner -Dproject.settings=../myproject.properties`
* The root folder of the project to analyze can be set through the `sonar.projectBaseDir` property since SonarScanner CLI 2.4. This folder must contain a `sonar-project.properties` file if `sonar.projectKey` is not specified on the command line. Additional analysis parameters can be defined in this project configuration file or through command-line parameters.
### Alternate analysis directory
If the files to be analyzed are not in the directory where the analysis starts from, use the `sonar.projectBaseDir` property to move analysis to a different directory. E.g. analysis begins from `jenkins/jobs/myjob/workspace` but the files to be analyzed are in `ftpdrop/cobol/project1`. This is configured in `sonar-project.properties` as follows:
```properties
sonar.projectBaseDir=/home/ftpdrop/cobol/project1
sonar.sources=src
sonar.cobol.copy.directories=/copy
```
{% hint style="info" %}
You can configure more parameters. See [analysis-parameters](https://docs.sonarsource.com/sonarqube-server/analyzing-source-code/analysis-parameters "mention") for details.
{% endhint %}
### Advanced configuration
#### If your SonarQube Server instance is secured
If your SonarQube Server instance is secured behind a proxy and a self-signed certificate, you must add the self-signed certificate to the trusted CA certificates of the SonarScanner. In addition, if mutual TLS is used, you must define the access to the client certificate at the SonarScanner level.
See [manage-tls-certificates](https://docs.sonarsource.com/sonarqube-server/analyzing-source-code/scanners/scanner-environment/manage-tls-certificates "mention") and [securing-behind-proxy](https://docs.sonarsource.com/sonarqube-server/server-installation/network-security/securing-behind-proxy "mention") for more information.
### Troubleshooting
**Java heap space error or java.lang.OutOfMemoryError**
Increase the memory using `SONAR_SCANNER_JAVA_OPTS` environment variable for SonarScanner CLI version 6.0 and higher. For the previous versions use `SONAR_SCANNER_OPTS`:
```bash
export SONAR_SCANNER_JAVA_OPTS="-Xmx512m"
```
In Windows environments, avoid the double quotes, since they get misinterpreted, and combine the two parameters into a single one.
```bash
set SONAR_SCANNER_JAVA_OPTS=-Xmx512m
```
**"java" cannot be opened because the developer cannot be verified**
The SonarScanner CLI is not yet Apple verified therefore, when using the macOS AArch64 version, you may get an OS security window displaying this message. A solution us to run:
```bash
sudo xattr -dr com.apple.quarantine /path/to/sonar-scanner-version-macosx-aarch64
```
**Unsupported major.minor version**
Install the last version of SonarScanner CLI (from version 6.0, no JRE installation is required). Otherwise, upgrade the version of Java being used for analysis or use one of the native package (that embed its own Java runtime).
**Property missing: ‘sonar.cs.analyzer.projectOutPaths’. No protobuf files will be loaded for this project.**
The SonarScanner CLI cannot analyze .NET projects; please use the SonarScanner for .NET. If you are running the SonarScanner for .NET, ensure that you are not hitting a known limitation. See the [introduction](https://docs.sonarsource.com/sonarqube-server/analyzing-source-code/scanners/dotnet/introduction "mention") to SonarScanner for .NET for more information.
---
# Source: https://docs.sonarsource.com/sonarqube-community-build/analyzing-source-code/dotnet-environments/specify-test-project-analysis.md
# Source: https://docs.sonarsource.com/sonarqube-server/10.7/analyzing-source-code/dotnet-environments/specify-test-project-analysis.md
# Source: https://docs.sonarsource.com/sonarqube-server/10.8/analyzing-source-code/dotnet-environments/specify-test-project-analysis.md
# Source: https://docs.sonarsource.com/sonarqube-server/2025.2/analyzing-source-code/dotnet-environments/specify-test-project-analysis.md
# Source: https://docs.sonarsource.com/sonarqube-server/2025.3/analyzing-source-code/dotnet-environments/specify-test-project-analysis.md
# Source: https://docs.sonarsource.com/sonarqube-server/2025.5/analyzing-source-code/dotnet-environments/specify-test-project-analysis.md
# Source: https://docs.sonarsource.com/sonarqube-server/2025.1/analyzing-source-code/dotnet-environments/specify-test-project-analysis.md
# Source: https://docs.sonarsource.com/sonarqube-server/2025.4/analyzing-source-code/dotnet-environments/specify-test-project-analysis.md
# Source: https://docs.sonarsource.com/sonarqube-server/2025.6/analyzing-source-code/dotnet-environments/specify-test-project-analysis.md
# Source: https://docs.sonarsource.com/sonarqube-server/analyzing-source-code/dotnet-environments/specify-test-project-analysis.md
# Specifying test projects
This page refers to the SonarScanner for .NET, also known as SonarScanner for MSBuild. For more information about how to install and use it, read the [installing](https://docs.sonarsource.com/sonarqube-server/analyzing-source-code/scanners/dotnet/installing "mention") documentation page.
### Analyzer references
* The SonarScanner for .NET adds the SonarAnalyzer.CSharp and SonarAnalyzer.VB analyzers on the fly during the build, even if they are not specifically referenced in the .NET project. The set of rules to execute is determined by the project type and quality profile defined in your instance of SonarQube Server.
* All third-party analyzers referenced by the .NET project (for example, via NuGet package references) will be executed as part of the build. Issues from those analyzers will be uploaded to SonarQube Server as [external analyzer reports](https://docs.sonarsource.com/sonarqube-server/analyzing-source-code/importing-external-issues). You can configure the third-party rules as you normally would using a [rule set](https://learn.microsoft.com/en-us/visualstudio/code-quality/using-rule-sets-to-group-code-analysis-rules?view=vs-2019) or [EditorConfig file](https://learn.microsoft.com/en-us/visualstudio/ide/create-portable-custom-editor-options?view=vs-2022).
During the build, SonarScanner for .NET will merge your custom rule set with a rule set generated from the quality profile. In the event of a conflict, the settings in the generated rule set take precedence.
#### Differences between analysis of main projects and test projects
The SonarScanner for .NET analyzes main projects differently from test projects.
* Main projects implement new functionalities; an example would be a project for production or tooling.
* Test projects test functionalities implemented by main projects and are typically using a test framework.
**Analysis of main projects**
* Analysis rules will be run against main projects unless the rule or project is explicitly excluded. Raised issues will be uploaded to SonarQube Server.
* Only rules related to the main project code will be executed.
* The [metrics](https://docs.sonarsource.com/sonarqube-server/instance-administration/analysis-functions/metrics-parameters) for commercial versions of SonarQube Server are calculated.
* [Lines of code](https://docs.sonarsource.com/sonarqube-server/server-update-and-maintenance/monitoring/lines-of-code) (LOC) limits for projects in commercial versions of SonarQube Server are calculated.
* Syntax colorization and symbol highlighting are supported for both main projects and test projects.
**Analysis of test projects**
* Analysis rules will be run against test projects unless the rule or project is explicitly excluded. Raised issues will be uploaded to SonarQube Server.
* Only the rules related to test code will be executed on test projects. Likewise, rules that are explicitly excluded will not be executed.
* Test projects do not count towards the Lines of Code (LOC) limits for projects in commercial versions of SonarQube Server.
* Metrics and copy/paste detection data are not calculated for test projects.
* Syntax colorization and symbol highlighting are supported for both main projects and test projects.
**Analysis of excluded test projects**
* Analysis rules are not run against excluded test projects, no issues will be reported to SonarQube Server or SonarQube Cloud. This is the case even if the test project references third-party NuGet analyzer packages; those analyzers will not be executed.
* In SonarQube 9.9+, all test projects can be excluded from analysis by adding the `/d:sonar.dotnet.excludeTestProjects=true` SonarScanner for .NET parameter in the command line.
* In SonarQube versions 8.8 and older, all test projects are excluded from analysis on SonarQube.
**Analysis of projects excluded with \true\**
* Any project can be excluded from analysis using `true` in a project file.
* No rule diagnostics, metrics, syntax colorization, or symbol highlighting will be calculated during the analysis. Excluding these can help to reduce the time it takes to run an analysis.
### Explicit project categorization
It is possible to explicitly mark a project as being a test project by setting the MSBuild property `SonarQubeTestProject` to `true` or `false`.
```xml
false
```
{% hint style="info" %}
Setting `SonarQubeTestProject` explicitly takes precedence over the default project categorization behavior.
{% endhint %}
### Implicit project categorization
SonarScanner for .NET decides whether a project contains main code or test code by looking at data in the project file. Categorization is assigned at the project level. In other words, all the code within a project is considered *as either main code or test code*; it is not possible to treat some of the code within the same project *as main code and other code as test code*.
The SonarScanner for .NET will treat the project as containing test code if any of the following are true:
* The project file contains the `MSTest ProjectTypeGuid`: `3AC096D0-A1C2-E12C-1390-A8335801FDAB`
* The project file contains the MSTest GUID (`{3AC096D0-A1C2-E12C-1390-A8335801FDAB}`) in the `ProjectTypeGuid` property.
* The project file contains the legacy Service GUID (`{82A7F48D-3B50-4B1E-B82E-3ADA8210C358}`) which is added by the Test Explorer to mark a project as containing tests.
* The project file contains the `ProjectCapability TestContainer` for [SDK-style .NET projects](https://learn.microsoft.com/en-us/dotnet/core/project-sdk/overview#project-files). Note: this property can be set indirectly as a result of importing a NuGet package. See below for more information.
* The project file name matches the RegEx set in the deprecated property `sonar.msbuild.testProjectPattern`.
* The project references a known unit test-related assembly. The list of recognized assemblies is [here](https://github.com/SonarSource/sonar-scanner-msbuild/blob/master/src/SonarScanner.MSBuild.Tasks/IsTestByReference.cs#L35).
There are a few special project types for which MSBuild will create and build a temporary project (e.g., Microsoft Fakes, WPF) as part of the "main" build. The SonarScanner for .NET ignores such temporary projects. The "main" project will be categorized and treated as normal.
**Importing third-party unit test NuGet packages**
A project can be classified as a test project because it references a third-party unit test NuGet package. Packages can add MSBuild targets to the build.
For example, if your project references e.g. XUnit as follows:
```xml
```
Then the XUnit package will add a target to the build containing the following property assignment:
```xml
```
This will cause your project to be classified as a test project, and the MSBuild output will contain a message like the following:
```css-79elbk
Sonar: (MyProject.csproj) project has the ProjectCapability 'TestContainer' -> test project
```
### Project categorization
SonarScanner for .NET writes information about the project categorization to the MSBuild output log. The information will appear in logs at `normal` verbosity or greater.
When building with `MSBuild.exe`, the default logging verbosity is `normal`. Therefore, the categorization messages will be logged automatically by default.
When building with `dotnet build`, the default logging verbosity is `minimal`. Therefore, you must increase the logging verbosity to see categorization messages; this is achieved, for example, by passing a `-v:n` argument to `dotnet build`; for reference, here is the Microsoft documentation on [.NET build options](https://learn.microsoft.com/en-us/dotnet/core/tools/dotnet-build#options).
Please note that this log output was added in SonarScanner for .NET [v4.7](https://github.com/SonarSource/sonar-scanner-msbuild/releases/tag/4.7.0.2295).
**Analysis setup examples**
The following examples are taken from an analysis setup used in the [SonarQube for Visual Studio](https://github.com/sonarsource/sonarlint-visualstudio) repository:
```css-79elbk
...
SonarQubeCategoriseProject:
Sonar: (Progress.csproj) Categorizing project as test or product code...
Sonar: (Progress.csproj) Project categorized. SonarQubeTestProject=False
...
```
```css-79elbk
...
SonarQubeCategoriseProject:
Sonar: (Progress.TestFramework.csproj) Categorizing project as test or product code...
Sonar: (Progress.TestFramework.csproj) SonarQubeTestProject has been set explicitly to true
Sonar: (Progress.TestFramework.csproj) Project categorized. SonarQubeTestProject=true
...
```
```css-79elbk
...
SonarQubeCategoriseProject:
Sonar: (SonarQube.Client.Tests.csproj) Categorizing project as test or product code...
Sonar: (SonarQube.Client.Tests.csproj) project is evaluated as a test project based on the project name
Sonar: (SonarQube.Client.Tests.csproj) Project categorized. SonarQubeTestProject=True
...
```
Please note that when a file is categorized as a test, verbose mode will show similar logs in the END step. For more details, please check `sonar.verbose` in the list of [#begin](https://docs.sonarsource.com/sonarqube-server/scanners/dotnet/using#begin "mention") step command line parameters.
```css-79elbk
DEBUG: 'foo/bar/baz/SomeClass.cs' generated metadata as test with charset 'UTF-8'
DEBUG: 'foo\bar\baz\SomeClass.cs' indexed as test with language 'cs'
```
---
# Source: https://docs.sonarsource.com/sonarqube-cloud/administering-sonarcloud/managing-enterprise/enterprise-security/sso.md
# Single Sign-On
- [About SSO authentication solution](/sonarqube-cloud/administering-sonarcloud/managing-enterprise/enterprise-security/sso/about.md): This page provides an overview of the SSO authentication solution in SonarQube Cloud.
- [Automatic group synchronization](/sonarqube-cloud/administering-sonarcloud/managing-enterprise/enterprise-security/sso/about/automatic-group-synchronization.md): This page describes the automatic group synchronization solution in SonarQube Cloud.
- [Setting up SSO](/sonarqube-cloud/administering-sonarcloud/managing-enterprise/enterprise-security/sso/setup.md): With the Enterprise plan, you can transition your SonarQube Cloud enterprise to Single Sign-On.
- [Step 1: Verify the user groups](/sonarqube-cloud/administering-sonarcloud/managing-enterprise/enterprise-security/sso/setup/verify-user-groups.md): Before configuring SSO for your SonarQube Cloud enterprise, you must ensure that the automatic group synchronization can take place properly.
- [Step 2: Configure SSO](/sonarqube-cloud/administering-sonarcloud/managing-enterprise/enterprise-security/sso/setup/configure-sso.md): The second step in configuring SSO for your SonarQube Cloud enterprise varies slightly, depending on your identity provider. If you use Okta or Microsoft Entra ID, go directly to the respective page.
- [Using the setup assistant (generic operation)](/sonarqube-cloud/administering-sonarcloud/managing-enterprise/enterprise-security/sso/setup/configure-sso/generic-operation.md): This page explains how to configure SSO with SonarQube Cloud’s setup assistant if you use another identity provider than Okta or Microsoft Entra ID.
- [SAML SSO with Okta](/sonarqube-cloud/administering-sonarcloud/managing-enterprise/enterprise-security/sso/setup/configure-sso/okta.md): This page explains how to setup SAML SSO with Okta and SonarQube Cloud's SSO setup assistant.
- [SAML SSO with Entra ID](/sonarqube-cloud/administering-sonarcloud/managing-enterprise/enterprise-security/sso/setup/configure-sso/microsoft-entra-id.md): This page explains how to configure SAML SSO in your enterprise with Microsoft Entra ID while using SonarQube Cloud's setup assistant.
- [Step 3: Invite users to sign in](/sonarqube-cloud/administering-sonarcloud/managing-enterprise/enterprise-security/sso/setup/inviting-users-to-sign-in.md): Once the SSO connection has been established, you can invite users to sign in to SonarQube Cloud with SSO by sending them the enterprise’s login URL.
- [Step 4: Terminate SSO setup](/sonarqube-cloud/administering-sonarcloud/managing-enterprise/enterprise-security/sso/setup/terminate-setup.md): This page describes how to terminate your Single Sign-On (SSO) setup in SonarQube Cloud.
- [Editing SSO configuration](/sonarqube-cloud/administering-sonarcloud/managing-enterprise/enterprise-security/sso/editing-sso-configuration.md): After setup, editing your SSO configuration in SonarQube Cloud is straight-forward.
- [Editing SSO configuration (old method)](/sonarqube-cloud/administering-sonarcloud/managing-enterprise/enterprise-security/sso/editing-configuration-old-method.md): Editing your SSO configuration in SonarQube Cloud was recently improved using the SSO setup assistant. These pages outline the previous editing procedures (without the SSO setup assistant).
- [Introduction](/sonarqube-cloud/administering-sonarcloud/managing-enterprise/enterprise-security/sso/editing-configuration-old-method/introduction.md): This page explains the generic steps necessary to edit the SAML SSO configuration you established in SonarQube Cloud using the older method (without the SSO setup assistant).
- [With Okta](/sonarqube-cloud/administering-sonarcloud/managing-enterprise/enterprise-security/sso/editing-configuration-old-method/okta.md): This page explains how to edit the SAML SSO configuration you established in SonarQube Cloud with Okta and using the old method (without the SSO setup assistant).
- [With Microsoft Entra ID](/sonarqube-cloud/administering-sonarcloud/managing-enterprise/enterprise-security/sso/editing-configuration-old-method/microsoft-entra-id.md): This page explains how to edit the SAML SSO configuration you established in SonarQube Cloud with Microsoft Entra ID while using the old method (without the SSO setup assistant).
- [Deleting SSO configuration](/sonarqube-cloud/administering-sonarcloud/managing-enterprise/enterprise-security/sso/deleting-sso-configuration.md): As an enterprise admin, you can delete your enterprise’s SSO configuration in SonarQube Cloud either in the UI or via the Web API.
- [Troubleshooting SSO connection](/sonarqube-cloud/administering-sonarcloud/managing-enterprise/enterprise-security/sso/troubleshooting.md): Troubleshooting your SSO connection can be tricky. Here's a list of items to check in SonarQube Cloud and with your identity provider.
---
# Source: https://docs.sonarsource.com/sonarqube-community-build/instance-administration/analysis-functions/instance-mode/standard-experience.md
# Source: https://docs.sonarsource.com/sonarqube-server/10.8/instance-administration/analysis-functions/instance-mode/standard-experience.md
# Source: https://docs.sonarsource.com/sonarqube-server/2025.2/instance-administration/analysis-functions/instance-mode/standard-experience.md
# Source: https://docs.sonarsource.com/sonarqube-server/2025.3/instance-administration/analysis-functions/instance-mode/standard-experience.md
# Source: https://docs.sonarsource.com/sonarqube-server/2025.5/instance-administration/analysis-functions/instance-mode/standard-experience.md
# Source: https://docs.sonarsource.com/sonarqube-server/2025.1/instance-administration/analysis-functions/instance-mode/standard-experience.md
# Source: https://docs.sonarsource.com/sonarqube-server/2025.4/instance-administration/analysis-functions/instance-mode/standard-experience.md
# Source: https://docs.sonarsource.com/sonarqube-server/2025.6/instance-administration/analysis-functions/instance-mode/standard-experience.md
# Source: https://docs.sonarsource.com/sonarqube-server/instance-administration/analysis-functions/instance-mode/standard-experience.md
# Standard Experience
This approach focuses on assigning severity to a rule based on the single software quality (e.g. security, reliability, or maintainability) it has the largest impact on.
### How severity works in Standard Experience mode
Severity
Severity
Blocker
An issue that has a significant probability of severe unintended consequences on the application that should be fixed immediately. This includes bugs leading to production crashes and security flaws allowing attackers to extract sensitive data or execute malicious code.
Critical
An issue with a critical impact on the application that should be fixed as soon as possible.
Major
An issue with a major impact on the application.
Minor
An issue with a minor impact on the application.
Info
There is no expected impact on the application. For informational purposes only.
### Related pages
* [mqr-mode](https://docs.sonarsource.com/sonarqube-server/instance-administration/analysis-functions/instance-mode/mqr-mode "mention")
* [changing-modes](https://docs.sonarsource.com/sonarqube-server/user-guide/code-metrics/changing-modes "mention")
---
# Source: https://docs.sonarsource.com/sonarqube-cloud/standards.md
# Setting your quality standards
In SonarQube Cloud, code quality and code security standards are enforced through two mechanisms: *quality profiles* and *quality gates*.
Every project has a quality profile set for each supported language. The profile defines which rules will be applied during code review and analysis.
After analysis, the *quality gate* takes the resulting metrics and compares them to its defined thresholds to determine if the code meets the requirements for release or merge.
The quality profile and quality gate of every new project are set to built-in defaults, (called *Sonar way*). The Sonar way quality profile and quality gate represent the optimum combination of rules and thresholds for most projects, guiding developers in using good coding practices and principles to improve code quality and code security.
{% hint style="info" %}
*While in most projects you can leave the quality gate and quality profile with their default definitions, there are cases where you may want to change them. This section will help you do that.*
{% endhint %}
{% content-ref url="standards/about-new-code" %}
[about-new-code](https://docs.sonarsource.com/sonarqube-cloud/standards/about-new-code)
{% endcontent-ref %}
{% content-ref url="standards/managing-quality-gates" %}
[managing-quality-gates](https://docs.sonarsource.com/sonarqube-cloud/standards/managing-quality-gates)
{% endcontent-ref %}
{% content-ref url="standards/managing-quality-profiles" %}
[managing-quality-profiles](https://docs.sonarsource.com/sonarqube-cloud/standards/managing-quality-profiles)
{% endcontent-ref %}
{% content-ref url="standards/ai-code-assurance" %}
[ai-code-assurance](https://docs.sonarsource.com/sonarqube-cloud/standards/ai-code-assurance)
{% endcontent-ref %}
---
# Source: https://docs.sonarsource.com/sonarqube-server/2025.3/server-installation/from-docker-image/starting-sonarqube-container.md
# Starting SonarQube container
### Starting the container by using docker run
Run the image with your database properties defined using the `-e` environment variable flag:
```sh
$> docker run -d --name sonarqube \
-p 9000:9000 \
-e SONAR_JDBC_URL=... \
-e SONAR_JDBC_USERNAME=... \
-e SONAR_JDBC_PASSWORD=... \
-v sonarqube_data:/opt/sonarqube/data \
-v sonarqube_extensions:/opt/sonarqube/extensions \
-v sonarqube_logs:/opt/sonarqube/logs \
```
Note that:
* By default, the server running within the container will listen on port 9000. The `-p 9000:9000` argument is used to expose the container port 9000 to the host port 9000: `-p port1:port2` maps container’s port `port1` as `port2` on the host.
* For ``, check the tags currently available on the [DockerHub page](https://hub.docker.com/_/sonarqube).
### Starting the container by using Docker compose
If you’re using [Docker Compose](https://docs.docker.com/compose/), use this [yml file example](https://github.com/SonarSource/docker-sonarqube/tree/master/example-compose-files/sq-with-postgres) as a reference when configuring your `.yml` file.
Note that:
* By default, the server running within the container will listen on port 9000. The following code is used to expose the container port 9000 to the host port 9000 (`"port1:port2"` maps container’s port `port1` as `port2` on the host):
```css-79elbk
ports:
- "9000:9000"
```
* In the `image` tag, use the tag value corresponding to the SonarQube Server version you want to use. Check the SonarQube Server image tags currently available on the [DockerHub page](https://hub.docker.com/_/sonarqube). For example, to use the LTA version of the Developer Edition:
```css-79elbk
image: sonarqube:2025-lta-developer
```
{% hint style="info" %}
Unless you intend to delete the database and start new when running your image, be careful not to use `-v` to `docker-compose down` and, be careful when running commands like `docker system prune` or `docker volume prune`; regardless if you use an `external: true` parameter, your database volumes will not persist beyond the initial startup and shutdown of SonarQube.
{% endhint %}
### Related pages
* [installation-overview](https://docs.sonarsource.com/sonarqube-server/2025.3/server-installation/from-docker-image/installation-overview "mention")
* [basic-installation](https://docs.sonarsource.com/sonarqube-server/2025.3/server-installation/from-docker-image/basic-installation "mention")
* [advanced-setup](https://docs.sonarsource.com/sonarqube-server/2025.3/server-installation/from-docker-image/advanced-setup "mention")
* **Configuring network security features:**
* [securing-behind-proxy](https://docs.sonarsource.com/sonarqube-server/2025.3/server-installation/network-security/securing-behind-proxy "mention")
* [network-rules](https://docs.sonarsource.com/sonarqube-server/2025.3/server-installation/network-security/network-rules "mention")
---
# Source: https://docs.sonarsource.com/sonarqube-server/2025.3/server-installation/data-center-edition/starting-stopping-cluster.md
# Source: https://docs.sonarsource.com/sonarqube-server/2025.5/server-installation/data-center-edition/starting-stopping-cluster.md
# Source: https://docs.sonarsource.com/sonarqube-server/2025.4/server-installation/data-center-edition/starting-stopping-cluster.md
# Source: https://docs.sonarsource.com/sonarqube-server/2025.6/server-installation/data-center-edition/starting-stopping-cluster.md
# Source: https://docs.sonarsource.com/sonarqube-server/server-installation/data-center-edition/starting-stopping-cluster.md
# Starting and stopping cluster
{% hint style="info" %}
There is no way to perform actions on the cluster from a central app - all operations must be done manually on each node of the cluster.
{% endhint %}
### Start the cluster
To start a cluster, you need to follow these steps in order:
1. Start the search nodes.
2. Start the application nodes.
### Stop the cluster
To stop a cluster, you need to follow these steps in order:
1. Stop the application nodes.
2. Stop the search nodes.
### Start or stop a node
You can start or stop a single node in the same way as starting and stopping an instance using a single server. By default, it’s a graceful shutdown where no new analysis report processing can start, but the tasks in progress are allowed to finish.
### Related pages
* [dce-topology](https://docs.sonarsource.com/sonarqube-server/server-installation/data-center-edition/dce-topology "mention")
* [installation-requirements](https://docs.sonarsource.com/sonarqube-server/server-installation/data-center-edition/installation-requirements "mention")
* [pre-installation](https://docs.sonarsource.com/sonarqube-server/server-installation/data-center-edition/pre-installation "mention")
* [from-zip-file](https://docs.sonarsource.com/sonarqube-server/server-installation/data-center-edition/from-zip-file "mention")
* [on-kubernetes-or-openshift](https://docs.sonarsource.com/sonarqube-server/server-installation/data-center-edition/on-kubernetes-or-openshift "mention")
* **Configuring network security features:**
* [securing-behind-proxy](https://docs.sonarsource.com/sonarqube-server/server-installation/data-center-edition/network-security/securing-behind-proxy "mention")
* [elasticsearch-security-features](https://docs.sonarsource.com/sonarqube-server/server-installation/data-center-edition/network-security/elasticsearch-security-features "mention")
* [network-rules](https://docs.sonarsource.com/sonarqube-server/server-installation/data-center-edition/network-security/network-rules "mention")
---
# Source: https://docs.sonarsource.com/sonarqube-community-build/server-installation/from-zip-file/starting-stopping-server.md
# Source: https://docs.sonarsource.com/sonarqube-server/2025.3/server-installation/from-zip-file/starting-stopping-server.md
# Source: https://docs.sonarsource.com/sonarqube-server/2025.5/server-installation/from-zip-file/starting-stopping-server.md
# Source: https://docs.sonarsource.com/sonarqube-server/2025.4/server-installation/from-zip-file/starting-stopping-server.md
# Source: https://docs.sonarsource.com/sonarqube-server/2025.6/server-installation/from-zip-file/starting-stopping-server.md
# Source: https://docs.sonarsource.com/sonarqube-server/server-installation/from-zip-file/starting-stopping-server.md
# Starting / stopping server
- [From the ZIP file](/sonarqube-server/server-installation/from-zip-file/starting-stopping-server/from-zip-file.md): Starting SonarQube Server from the ZIP file
- [Running as a service](/sonarqube-server/server-installation/from-zip-file/starting-stopping-server/running-as-a-service.md): How to install and start SonarQube Server as a service in case of a ZIP installation. The operation depends on your operating system.
---
# Source: https://docs.sonarsource.com/sonarqube-community-build/user-guide/managing-your-account/subscribing-to-notifications.md
# Source: https://docs.sonarsource.com/sonarqube-server/10.7/user-guide/managing-your-account/subscribing-to-notifications.md
# Source: https://docs.sonarsource.com/sonarqube-server/10.8/user-guide/managing-your-account/subscribing-to-notifications.md
# Source: https://docs.sonarsource.com/sonarqube-server/2025.2/user-guide/managing-your-account/subscribing-to-notifications.md
# Source: https://docs.sonarsource.com/sonarqube-server/2025.3/user-guide/managing-your-account/subscribing-to-notifications.md
# Source: https://docs.sonarsource.com/sonarqube-server/2025.5/user-guide/managing-your-account/subscribing-to-notifications.md
# Source: https://docs.sonarsource.com/sonarqube-server/2025.1/user-guide/managing-your-account/subscribing-to-notifications.md
# Source: https://docs.sonarsource.com/sonarqube-server/2025.4/user-guide/managing-your-account/subscribing-to-notifications.md
# Source: https://docs.sonarsource.com/sonarqube-server/2025.6/user-guide/managing-your-account/subscribing-to-notifications.md
# Source: https://docs.sonarsource.com/sonarqube-server/user-guide/managing-your-account/subscribing-to-notifications.md
# Notifications
- [Subscribing to email notifications](/sonarqube-server/user-guide/managing-your-account/subscribing-to-notifications/email.md): You can subscribe to email notifications for various analysis-related events. You cannot subscribe for another user.
- [Subscribing to Slack notifications](/sonarqube-server/user-guide/managing-your-account/subscribing-to-notifications/slack.md): You can subscribe to real-time notifications on analysis results directly in Slack.
---
# Source: https://docs.sonarsource.com/sonarqube-cloud/managing-your-account/subscribing-to-slack-notifications.md
# Subscribing to Slack notifications
Once your Slack workspace admin [has connected the workspace to SonarQube Cloud](https://docs.sonarsource.com/sonarqube-cloud/administering-sonarcloud/managing-organization/connecting-to-slack/setup), you can subscribe to Slack notifications for your project. To do so, you subscribe to your project in the Slack channel of your choice.
For more information about the Slack integration in SonarQube Cloud, see [integration-overview](https://docs.sonarsource.com/sonarqube-cloud/administering-sonarcloud/managing-organization/connecting-to-slack/integration-overview "mention"), or check out this [video](https://www.youtube.com/watch?v=oW-pp4LN9r0) on how to benefit from the Slack integration.
### Step 1: Connect your Slack and SonarQube Cloud accounts
You only need to perform this step once.
Proceed as follows:
1. In your Slack workspace, navigate to any channel.
2. In the channel, type `/sonarqube connect`. You will be prompted to connect your account.
### Step 2: Prepare the channel to be used for subscription
You must select the Slack channel to be used to receive your project’s notifications. You can create a new one. Note that:
* All channel members will receive the SonarQube Cloud notifications.
* You can use the same channel to receive the notifications on different projects distributed across various organizations.
* You may need specific permissions to add the app to private channels.
If your Slack channel is private, you need to add the SonarQube App for Slack to your channel:
1. In your Slack workspace, navigate to your private channel.
2. In the private channel, type `/invite @SonarQube`.
### Step 3: Subscribe your channel to your project
Make sure that you have the Browse permission on the project in SonarQube Cloud.
{% hint style="warning" %}
All channel members will receive the SonarQube Cloud notifications on your project.
{% endhint %}
To subscribe your channel to your project:
1. In SonarQube Cloud, copy your project key. See [#viewing-project-information](https://docs.sonarsource.com/sonarqube-cloud/managing-your-projects/retrieving-projects#viewing-project-information "mention").
2. In your Slack workspace, navigate to the channel in which you want to enable the subscription.
3. In the channel, type `/sonarqube subscribe ` .
### Unsubscribing a channel from a project
To unsubscribe a channel from a project, you need the Browse permission on the project in SonarQube Cloud.
{% hint style="warning" %}
Unsubscribing a channel from a project disables the subscription for all members of the channel.
{% endhint %}
To unsubscribe a channel from a project:
1. In SonarQube Cloud, copy the project key. See [#viewing-project-information](https://docs.sonarsource.com/sonarqube-cloud/managing-your-projects/retrieving-projects#viewing-project-information "mention").
2. In your Slack workspace, navigate to the channel subscribed to your project.
3. In the channel, type `/sonarqube unsubscribe `.
### Related pages
* [integration-overview](https://docs.sonarsource.com/sonarqube-cloud/administering-sonarcloud/managing-organization/connecting-to-slack/integration-overview "mention")
* [setup](https://docs.sonarsource.com/sonarqube-cloud/administering-sonarcloud/managing-organization/connecting-to-slack/setup "mention")
---
# Source: https://docs.sonarsource.com/sonarqube-cloud/administering-sonarcloud/managing-subscription/subscription-plans.md
# Subscription plans
The SonarQube Cloud’s [pricing model](https://www.sonarsource.com/plans-and-pricing/sonarcloud/) is subscription-based: each organization is assigned a subscription plan. Four different plans are available:
* Free plan, for small teams. Only basic analysis features are available.
* Team plan, if you want to benefit from advanced analysis features.
* Enterprise plan, for larger organizations and teams, and if you want to benefit from the enterprise-level hierarchy and from even more features.
* OSS plan, a free plan for open source organizations that offers unlimited access to branch analysis and pull request analysis.
{% hint style="warning" %}
The legacy paid plan will soon no longer be supported. We recommend that you migrate your legacy plan organization to the plan that meets your current and future needs. See [changing-plan](https://docs.sonarsource.com/sonarqube-cloud/administering-sonarcloud/managing-subscription/changing-plan "mention").
{% endhint %}
For information about the billing model, see the [billing-model](https://docs.sonarsource.com/sonarqube-cloud/administering-sonarcloud/managing-subscription/billing-model "mention") page.
### Comparison table (Free, Team, and Enterprise)
The table below shows a comparison between the SonarQube Cloud's Free, Team, and Enterprise.
Feature
Free
Team
Enterprise
Note
General
Analysis of public projects: unlimited number of projects
Unlimited (ideal from 5M LOC for the whole enterprise)
The maximum number of lines of code (LOC) in a plan restricts the analysis of private projects in your organization or enterprise. See #loc-based-pricing below.
Organization onboarding from multiple DevOps platforms (except Bitbucket)
As an enterprise member, you can import a DevOps organization using any of your DevOps accounts or SSO account (except for a Bitbucket workspace which can only be imported using a Bitbucket account).
Maximum number of organization members
5
Unlimited
Unlimited
Enterprise-level hierarchy
You can group several organizations into an enterprise.
SonarQube Cloud supports the configuration of webhooks, allowing you to send automatic notifications to external services of analysis activity. See webhooks.
User authentication and provisioning
GitHub member synchronization
SonarQube Cloud synchronizes automatically organization members with GitHub. See GitHub member synchronization in devops-platform-authentication
As an organization admin, you can manage custom groups and change the permissions of any group. See user-group-concept
Permission templates
As an organization admin, you can use permissions templates to manage the default permissions applying to new projects. See templates
Organization-wide project configurations
As an organization admin, you can define the long-lived branch name pattern, the analysis scope adjustment, and the automatic analysis disabling for new projects at the organization level. See introduction to Performing global analysis setup.
Projects Management page
As an organization admin, you can manage the projects of your organization on a centralized page: the Projects Management page. See projects-management-page
Delegation of the quality profile management permission
1\) Enterprise's add-ons require a separate subscription to your Enterprise license.
{% hint style="info" %}
ABAP, APEX, COBOL, JCL, PL/I, and RPG languages are only supported with the Enterprise plan. See [overview](https://docs.sonarsource.com/sonarqube-cloud/advanced-setup/languages/overview "mention") for more information.
{% endhint %}
### OSS plan (SonarQube for OSS)
If you are part of an open source organization, you may be interested in the OSS plan. This plan is a free plan that allows you to analyze an unlimited number of public repositories but *no private project*, and to benefit from advanced features as described below. Note that all legacy free organizations have been moved to the OSS plan.
Feature
Description
Maximum number of organization members
Unlimited.
Code analysis
Languages
All languages supported in the Team plan. See overview.
Branch analysis
Unlimited. For more information about the feature, see branch-analysis.
SonarQube Cloud supports the configuration of webhooks, allowing you to send automatic notifications to external services of analysis activity. See webhooks.
User administration
Projects Management page
As an organization admin, you can manage the projects of your organization on a centralized page: the Projects Management page. See projects-management-page.
As an organization admin, you can manage custom groups and change the permissions of any group. See user-group-concept.
Permission templates
As an organization admin, you can use permissions templates to manage the default permissions applying to new projects. See templates.
### LOC-based pricing
Your subscription plan determines the maximum number of private Lines of Code (LOC) you are permitted to analyze, in your organization (for a Free or Team plan) or in your enterprise (for an Enterprise plan):
* Free: You can analyze up to 50k LOC in your organization.
* Team: You can choose a LOC between 100k and 1.9M for your organization.
* Enterprise: You can choose any LOC you want for your entire enterprise (ideal from 5M LOC). By default, the enterprise LOC is shared by all organizations in the enterprise (Shared LOC). You can also allocate an individual LOC limit to one or more organizations within the enterprise (Allocated LOC). The other organizations will share the remaining LOC limit. For more information, see [#about-enterprise-loc-limit](https://docs.sonarsource.com/sonarqube-cloud/managing-enterprise/managing-the-lines-of-code-within-your-enterprise#about-enterprise-loc-limit "mention").
{% hint style="warning" %}
You need to ensure that your choice of plan covers all of the LOCs you want to analyze; otherwise, you may not be able to onboard all of your organization’s projects.
{% endhint %}
#### LOC limit management
You cannot exceed your LOC limit in SonarQube Cloud. Once you are near your LOC limit, you will receive a notification informing you of this and advising you to upgrade your current subscription plan to a higher LOC limit or to reduce the number of LOC in your projects. This notification is currently not supported for the enterprise LOC limit.
You can analyze the same code as often as you like. However, if you try to analyze more LOC than is allowed under your current subscription, SonarQube Cloud will not perform the analysis, and you will also receive an error message clearly explaining the reason for this.
LOC limit application example
Your organization has a 20,000 LOC license.
When you analyze a project that contains 10,000 lines of code (LOC) once, you have used 10,000 LOC from your organization’s license. If you analyze the same project 20 more times, you will still have only used 10,000 LOC from the license.
However, if you then try to analyze a different project that has 15,000 LOC, you will exceed the 20,000 LOC limit of your organization’s license and receive an error message.
#### Used LOC calculation
The LOC used by an organization is calculated by adding up the LOC of each private project analyzed for your organization. The calculation is a measure of the sum of the LOC of the largest long-lived branches for all your projects. It is not a measure of the new code analyzed in a given billing cycle. During calculation, the following are excluded from your LOC count:
* Test code.
* Files excluded from analysis.
* Code in unsupported languages.
* Comments or blank lines.
Organization LOC calculation example
Your organization has two private projects:
* Project-1 has 500 lines of code on its main branch and 400 on a secondary long-lived branch: its LOC is 500.
* Project-2 has 0 lines of code on its main branch (provisioned but never analyzed) and 200 on a secondary long-lived branch: its LOC is 200.
* The total LOC for your organization is 500 + 200 = 700.
### Related pages
* [billing-model](https://docs.sonarsource.com/sonarqube-cloud/administering-sonarcloud/managing-subscription/billing-model "mention")
* [signing-up-for-plan](https://docs.sonarsource.com/sonarqube-cloud/administering-sonarcloud/managing-subscription/signing-up-for-plan "mention")
* [getting-started-with-enterprise](https://docs.sonarsource.com/sonarqube-cloud/getting-started-with-enterprise "mention")
* [changing-plan](https://docs.sonarsource.com/sonarqube-cloud/administering-sonarcloud/managing-subscription/changing-plan "mention")
* [updating-billing-payment-details](https://docs.sonarsource.com/sonarqube-cloud/administering-sonarcloud/managing-subscription/updating-billing-payment-details "mention")
* [viewing-billing-and-usage](https://docs.sonarsource.com/sonarqube-cloud/administering-sonarcloud/managing-subscription/viewing-billing-and-usage "mention")
* [viewing-taxes-and-invoices](https://docs.sonarsource.com/sonarqube-cloud/administering-sonarcloud/managing-subscription/viewing-taxes-and-invoices "mention")
---
# Source: https://docs.sonarsource.com/sonarqube-community-build/extension-guide/developing-a-plugin/supporting-new-languages.md
# Source: https://docs.sonarsource.com/sonarqube-server/8.9/extension-guide/developing-a-plugin/supporting-new-languages.md
# Source: https://docs.sonarsource.com/sonarqube-server/9.8/extension-guide/developing-a-plugin/supporting-new-languages.md
# Source: https://docs.sonarsource.com/sonarqube-server/9.9/extension-guide/developing-a-plugin/supporting-new-languages.md
# Source: https://docs.sonarsource.com/sonarqube-server/10.0/extension-guide/developing-a-plugin/supporting-new-languages.md
# Source: https://docs.sonarsource.com/sonarqube-server/10.1/extension-guide/developing-a-plugin/supporting-new-languages.md
# Source: https://docs.sonarsource.com/sonarqube-server/10.2/extension-guide/developing-a-plugin/supporting-new-languages.md
# Source: https://docs.sonarsource.com/sonarqube-server/10.3/extension-guide/developing-a-plugin/supporting-new-languages.md
# Source: https://docs.sonarsource.com/sonarqube-server/10.4/extension-guide/developing-a-plugin/supporting-new-languages.md
# Source: https://docs.sonarsource.com/sonarqube-server/10.5/extension-guide/developing-a-plugin/supporting-new-languages.md
# Source: https://docs.sonarsource.com/sonarqube-server/10.6/extension-guide/developing-a-plugin/supporting-new-languages.md
# Source: https://docs.sonarsource.com/sonarqube-server/10.7/extension-guide/developing-a-plugin/supporting-new-languages.md
# Source: https://docs.sonarsource.com/sonarqube-server/10.8/extension-guide/developing-a-plugin/supporting-new-languages.md
# Source: https://docs.sonarsource.com/sonarqube-server/2025.2/extension-guide/developing-a-plugin/supporting-new-languages.md
# Source: https://docs.sonarsource.com/sonarqube-server/2025.3/extension-guide/developing-a-plugin/supporting-new-languages.md
# Source: https://docs.sonarsource.com/sonarqube-server/2025.5/extension-guide/developing-a-plugin/supporting-new-languages.md
# Source: https://docs.sonarsource.com/sonarqube-server/2025.1/extension-guide/developing-a-plugin/supporting-new-languages.md
# Source: https://docs.sonarsource.com/sonarqube-server/2025.4/extension-guide/developing-a-plugin/supporting-new-languages.md
# Source: https://docs.sonarsource.com/sonarqube-server/2025.6/extension-guide/developing-a-plugin/supporting-new-languages.md
# Source: https://docs.sonarsource.com/sonarqube-server/extension-guide/developing-a-plugin/supporting-new-languages.md
# Supporting new languages
The steps to cover a new programming language are:
1. Write the grammar. This is the hardest part.
2. Write a parser (a parser simply parses an input based on your grammar to yield a parse tree).
3. Test your grammar, to ensure it is able to parse real-life language files.
4. Write a few parse tree visitors. Some visitors will compute metrics such as [executable-lines](https://docs.sonarsource.com/sonarqube-server/extension-guide/developing-a-plugin/executable-lines "mention"), while others will enforce [adding-coding-rules](https://docs.sonarsource.com/sonarqube-server/extension-guide/adding-coding-rules "mention"). A dozen or so visitors are sufficient for an initial release.
5. Write a scanner Sensor, in a SonarQube Server plugin, to launch the visitors.
6. Compute
1. issues
2. raw measures
3. code duplications
4. syntax highlighting
5. symbol table
6. coverage information (lines/branches to cover, line/branch hits)
In fulfilling these steps, the [Sonar Language Recognizer (SSLR)](https://github.com/SonarSource/sslr) can be an important resource.
---
# Source: https://docs.sonarsource.com/sonarqube-community-build/extension-guide/developing-a-plugin/supporting-scm-providers.md
# Source: https://docs.sonarsource.com/sonarqube-server/8.9/extension-guide/developing-a-plugin/supporting-scm-providers.md
# Source: https://docs.sonarsource.com/sonarqube-server/9.8/extension-guide/developing-a-plugin/supporting-scm-providers.md
# Source: https://docs.sonarsource.com/sonarqube-server/9.9/extension-guide/developing-a-plugin/supporting-scm-providers.md
# Source: https://docs.sonarsource.com/sonarqube-server/10.0/extension-guide/developing-a-plugin/supporting-scm-providers.md
# Source: https://docs.sonarsource.com/sonarqube-server/10.1/extension-guide/developing-a-plugin/supporting-scm-providers.md
# Source: https://docs.sonarsource.com/sonarqube-server/10.2/extension-guide/developing-a-plugin/supporting-scm-providers.md
# Source: https://docs.sonarsource.com/sonarqube-server/10.3/extension-guide/developing-a-plugin/supporting-scm-providers.md
# Source: https://docs.sonarsource.com/sonarqube-server/10.4/extension-guide/developing-a-plugin/supporting-scm-providers.md
# Source: https://docs.sonarsource.com/sonarqube-server/10.5/extension-guide/developing-a-plugin/supporting-scm-providers.md
# Source: https://docs.sonarsource.com/sonarqube-server/10.6/extension-guide/developing-a-plugin/supporting-scm-providers.md
# Source: https://docs.sonarsource.com/sonarqube-server/10.7/extension-guide/developing-a-plugin/supporting-scm-providers.md
# Source: https://docs.sonarsource.com/sonarqube-server/10.8/extension-guide/developing-a-plugin/supporting-scm-providers.md
# Source: https://docs.sonarsource.com/sonarqube-server/2025.2/extension-guide/developing-a-plugin/supporting-scm-providers.md
# Source: https://docs.sonarsource.com/sonarqube-server/2025.3/extension-guide/developing-a-plugin/supporting-scm-providers.md
# Source: https://docs.sonarsource.com/sonarqube-server/2025.5/extension-guide/developing-a-plugin/supporting-scm-providers.md
# Source: https://docs.sonarsource.com/sonarqube-server/2025.1/extension-guide/developing-a-plugin/supporting-scm-providers.md
# Source: https://docs.sonarsource.com/sonarqube-server/2025.4/extension-guide/developing-a-plugin/supporting-scm-providers.md
# Source: https://docs.sonarsource.com/sonarqube-server/2025.6/extension-guide/developing-a-plugin/supporting-scm-providers.md
# Source: https://docs.sonarsource.com/sonarqube-server/extension-guide/developing-a-plugin/supporting-scm-providers.md
# Supporting SCM providers
The SonarScanners use information from the project’s SCM provider, if available, to:
* Assign a new issue to the person who introduced it. The last committer on the related line of code is considered to be the author of the issue.
* Estimate the coverage on new code, including added and changed code since in your new code.
* Display the most recent commit on each line in the code viewer.
Exempt a block of Python code from coverage
The only required SCM command is "blame", which gets the last committer of each line for a given file. This command is executed by a SonarQube Server plugin through the extension point `org.sonar.api.batch.scm.ScmProvider`. See the embedded [scm-integration](https://docs.sonarsource.com/sonarqube-server/analyzing-source-code/scm-integration "mention") documentation for more details.
---
# Source: https://docs.sonarsource.com/sonarqube-server/8.9/analyzing-source-code/languages/swift.md
# Source: https://docs.sonarsource.com/sonarqube-server/9.8/analyzing-source-code/languages/swift.md
# Source: https://docs.sonarsource.com/sonarqube-server/9.9/analyzing-source-code/languages/swift.md
# Source: https://docs.sonarsource.com/sonarqube-server/10.0/analyzing-source-code/languages/swift.md
# Source: https://docs.sonarsource.com/sonarqube-server/10.1/analyzing-source-code/languages/swift.md
# Source: https://docs.sonarsource.com/sonarqube-server/10.2/analyzing-source-code/languages/swift.md
# Source: https://docs.sonarsource.com/sonarqube-server/10.3/analyzing-source-code/languages/swift.md
# Source: https://docs.sonarsource.com/sonarqube-server/10.4/analyzing-source-code/languages/swift.md
# Source: https://docs.sonarsource.com/sonarqube-server/10.5/analyzing-source-code/languages/swift.md
# Source: https://docs.sonarsource.com/sonarqube-server/10.6/analyzing-source-code/languages/swift.md
# Source: https://docs.sonarsource.com/sonarqube-server/10.7/analyzing-source-code/languages/swift.md
# Source: https://docs.sonarsource.com/sonarqube-server/10.8/analyzing-source-code/languages/swift.md
# Source: https://docs.sonarsource.com/sonarqube-server/2025.2/analyzing-source-code/languages/swift.md
# Source: https://docs.sonarsource.com/sonarqube-server/2025.3/analyzing-source-code/languages/swift.md
# Source: https://docs.sonarsource.com/sonarqube-server/2025.5/analyzing-source-code/languages/swift.md
# Source: https://docs.sonarsource.com/sonarqube-server/2025.1/analyzing-source-code/languages/swift.md
# Source: https://docs.sonarsource.com/sonarqube-server/2025.4/analyzing-source-code/languages/swift.md
# Source: https://docs.sonarsource.com/sonarqube-server/2025.6/analyzing-source-code/languages/swift.md
# Source: https://docs.sonarsource.com/sonarqube-server/analyzing-source-code/languages/swift.md
# Source: https://docs.sonarsource.com/sonarqube-cloud/advanced-setup/languages/swift.md
# Swift
### Supported versions
The level of support for a language is defined as follows:
* Fully supported: Analysis will complete. All the language features are understood and examined.
* Supported: Most language features are understood and examined but the version includes unsupported features. Analysis might break or provide incomplete results.
Versions 3 to 6.2 are fully supported.
### Language-specific properties
To discover and update the Swift-specific properties, navigate in SonarQube Cloud to *Your Project* > **Administration** > **General Settings** > **Languages** > **Swift**. See the [analysis-parameters](https://docs.sonarsource.com/sonarqube-cloud/advanced-setup/analysis-parameters "mention") page for more information about specific properties.
### Related pages
* [external-analyzer-reports](https://docs.sonarsource.com/sonarqube-cloud/enriching/external-analyzer-reports "mention") (SwiftLint)
* Test coverage [overview](https://docs.sonarsource.com/sonarqube-cloud/enriching/test-coverage/overview "mention") (Xcode A.K.A. ProfData)
---
# Source: https://docs.sonarsource.com/sonarqube-community-build/instance-administration/system-functions.md
# Source: https://docs.sonarsource.com/sonarqube-server/10.7/instance-administration/system-functions.md
# Source: https://docs.sonarsource.com/sonarqube-server/10.8/instance-administration/system-functions.md
# Source: https://docs.sonarsource.com/sonarqube-server/2025.2/instance-administration/system-functions.md
# Source: https://docs.sonarsource.com/sonarqube-server/2025.3/instance-administration/system-functions.md
# Source: https://docs.sonarsource.com/sonarqube-server/2025.5/instance-administration/system-functions.md
# Source: https://docs.sonarsource.com/sonarqube-server/2025.1/instance-administration/system-functions.md
# Source: https://docs.sonarsource.com/sonarqube-server/2025.4/instance-administration/system-functions.md
# Source: https://docs.sonarsource.com/sonarqube-server/2025.6/instance-administration/system-functions.md
# Source: https://docs.sonarsource.com/sonarqube-server/instance-administration/system-functions.md
# System functions setup
- [Notifications](/sonarqube-server/instance-administration/system-functions/notifications.md): Everything you need to know about configuring SonarQube Server’s email or Slack notifications.
- [Setting up email notifications](/sonarqube-server/instance-administration/system-functions/notifications/email.md): How to set up the email notifications feature on analysis-related events.
- [Setting up Slack notifications](/sonarqube-server/instance-administration/system-functions/notifications/slack.md): With the SonarQube Server integration with Slack, users can receive real-time notifications on analysis results directly in Slack.
- [About SonarQube Server integration with Slack](/sonarqube-server/instance-administration/system-functions/notifications/slack/about.md): This page provides a technical overview of the Slack integration solution in SonarQube Server.
- [Setting up the connection to Slack](/sonarqube-server/instance-administration/system-functions/notifications/slack/setup.md): How to connect your SonarQube Server instance to your Slack workspace.
- [Troubleshooting the Slack connection](/sonarqube-server/instance-administration/system-functions/notifications/slack/troubleshooting.md): How to troubleshoot various issues with your Slack connection.
- [Security features](/sonarqube-server/instance-administration/system-functions/security.md): SonarQube Server comes with a number of global security features.
- [Housekeeping](/sonarqube-server/instance-administration/system-functions/housekeeping.md): Default settings for SonarQube Server’s database cleaner.
- [Telemetry](/sonarqube-server/instance-administration/system-functions/telemetry.md): SonarQube Server sends anonymized telemetry data to Sonar daily. No personally identifiable information is sent.
- [PDF reports](/sonarqube-server/instance-administration/system-functions/pdf-reports.md): As a system administrator, you can change the PDF report subscription frequency for projects, applications, and portfolios.
---
# Source: https://docs.sonarsource.com/sonarqube-community-build/instance-administration/system-info-and-server-id.md
# Source: https://docs.sonarsource.com/sonarqube-server/2025.2/instance-administration/system-info-and-server-id.md
# Source: https://docs.sonarsource.com/sonarqube-server/2025.3/instance-administration/system-info-and-server-id.md
# Source: https://docs.sonarsource.com/sonarqube-server/2025.5/instance-administration/system-info-and-server-id.md
# Source: https://docs.sonarsource.com/sonarqube-server/2025.4/instance-administration/system-info-and-server-id.md
# Source: https://docs.sonarsource.com/sonarqube-server/2025.6/instance-administration/system-info-and-server-id.md
# Source: https://docs.sonarsource.com/sonarqube-server/instance-administration/system-info-and-server-id.md
# System info and server ID
### Viewing your system Info
The **System Info** page is found at **Administration** > **System**. It gives you access to detailed information on the state of your SonarQube Server instance.
You can browse details about your running instance on this page.
#### Downloading your system info
If you have a support contract, you might be asked by a support representative to send in your system info, which can be downloaded using the **Download System Info** button at the top.
### Getting your Server ID
If you want to switch to a another SonarQube Server edition, you will be asked by your sales representative to send in your Server ID.
Your server ID can be found at the top of the page **Administration** > **System**.
If you’re running a commercial instance, you can also find this value on the **License** page by going to **Administration** > **Configuration** > **License Manager.**
---
# Source: https://docs.sonarsource.com/sonarqube-community-build/server-installation/system-properties/system-properties.md
# Source: https://docs.sonarsource.com/sonarqube-community-build/server-installation/system-properties.md
# Source: https://docs.sonarsource.com/sonarqube-server/2025.3/server-installation/system-properties.md
# Source: https://docs.sonarsource.com/sonarqube-server/2025.5/server-installation/system-properties.md
# Source: https://docs.sonarsource.com/sonarqube-server/2025.4/server-installation/system-properties.md
# Source: https://docs.sonarsource.com/sonarqube-server/2025.6/server-installation/system-properties.md
# Source: https://docs.sonarsource.com/sonarqube-server/server-installation/system-properties.md
# Setting system properties
- [Configuration methods](/sonarqube-server/server-installation/system-properties/configuration-methods.md): The system properties are the properties used by SonarQube at startup and not stored in the database. They can be configured using different methods.
- [List of properties common to all editions](/sonarqube-server/server-installation/system-properties/common-properties.md): This page lists the configurable system properties that are common to all SonarQube editions.
- [List of DCE-specific properties](/sonarqube-server/server-installation/system-properties/dce-specific.md): This page lists the configurable system properties that are specific to the Data Center Edition.
---
# Source: https://docs.sonarsource.com/sonarqube-server/8.9/analyzing-source-code/languages/t-sql.md
# Source: https://docs.sonarsource.com/sonarqube-server/9.8/analyzing-source-code/languages/t-sql.md
# Source: https://docs.sonarsource.com/sonarqube-server/9.9/analyzing-source-code/languages/t-sql.md
# Source: https://docs.sonarsource.com/sonarqube-server/10.0/analyzing-source-code/languages/t-sql.md
# Source: https://docs.sonarsource.com/sonarqube-server/10.1/analyzing-source-code/languages/t-sql.md
# Source: https://docs.sonarsource.com/sonarqube-server/10.2/analyzing-source-code/languages/t-sql.md
# Source: https://docs.sonarsource.com/sonarqube-server/10.3/analyzing-source-code/languages/t-sql.md
# Source: https://docs.sonarsource.com/sonarqube-server/10.4/analyzing-source-code/languages/t-sql.md
# Source: https://docs.sonarsource.com/sonarqube-server/10.5/analyzing-source-code/languages/t-sql.md
# Source: https://docs.sonarsource.com/sonarqube-server/10.6/analyzing-source-code/languages/t-sql.md
# Source: https://docs.sonarsource.com/sonarqube-server/10.7/analyzing-source-code/languages/t-sql.md
# Source: https://docs.sonarsource.com/sonarqube-server/10.8/analyzing-source-code/languages/t-sql.md
# Source: https://docs.sonarsource.com/sonarqube-server/2025.2/analyzing-source-code/languages/t-sql.md
# Source: https://docs.sonarsource.com/sonarqube-server/2025.3/analyzing-source-code/languages/t-sql.md
# Source: https://docs.sonarsource.com/sonarqube-server/2025.5/analyzing-source-code/languages/t-sql.md
# Source: https://docs.sonarsource.com/sonarqube-server/2025.1/analyzing-source-code/languages/t-sql.md
# Source: https://docs.sonarsource.com/sonarqube-server/2025.4/analyzing-source-code/languages/t-sql.md
# Source: https://docs.sonarsource.com/sonarqube-server/2025.6/analyzing-source-code/languages/t-sql.md
# Source: https://docs.sonarsource.com/sonarqube-server/analyzing-source-code/languages/t-sql.md
# Source: https://docs.sonarsource.com/sonarqube-cloud/advanced-setup/languages/t-sql.md
# T-SQL
### Language-specific properties
To discover and update the T-SQL-specific properties, navigate in SonarQube Cloud to *Your Project* > **Administration** > **General Settings** > **Languages** > **T-SQL**. See the [analysis-parameters](https://docs.sonarsource.com/sonarqube-cloud/advanced-setup/analysis-parameters "mention") page for more information about specific properties.
### Important Note
With the default configuration, only files with the `.tsql` are analyzed as T-SQL, and files with the `.sql` file extension are analyzed as PL/SQL. This behavior is defined in Project **Administration** > **General Settings > T-SQL > File Suffixes** and *Your Project* > **Administration** > **General Settings** > **Languages** > **PL/SQL** > **File Suffixes**. You can override these properties at the project level.
---
# Source: https://docs.sonarsource.com/sonarqube-for-eclipse/using/taint-vulnerabilities.md
# Source: https://docs.sonarsource.com/sonarqube-for-visual-studio/using/taint-vulnerabilities.md
# Source: https://docs.sonarsource.com/sonarqube-for-intellij/using/taint-vulnerabilities.md
# Source: https://docs.sonarsource.com/sonarqube-for-vs-code/using/taint-vulnerabilities.md
# Injection vulnerabilities
*Injection vulnerabilities* are also known as *injection flaws* or *taint vulnerabilities*; the names are often used interchangeably (ie: injection flaws, injection vulnerabilities, and taint vulnerabilities). They are issues raised by specific security-related rules in SonarQube (Server, Cloud) and remain a top concern. Common types include [SQL Injection](https://rules.sonarsource.com/java/type/Vulnerability/RSPEC-3649/), [Deserialization](https://rules.sonarsource.com/java/type/Vulnerability/RSPEC-5135/), and [Command Injection](https://rules.sonarsource.com/java/type/Vulnerability/RSPEC-2076/) vulnerabilities. See the server related documentation for more details about this type of rule:
* [Security-related rules](https://app.gitbook.com/s/yDv2XwTC1xoOKBYeCK45/user-guide/rules/security-related-rules "mention") in SonarQube Cloud
* [Security-related rules](https://app.gitbook.com/s/B4UT2GNiZKjtxFtcFAL7/digging-deeper/security-related-rules "mention") in SonarQube Cloud
[Injection vulnerabilities](https://docs.sonarsource.com/sonarqube-for-vs-code/resources/glossary#i) are unique issues because of how data and information flow within your application. This flow becomes a problem when a user controls the data input into the application (source), and that data is not validated or sanitized before it is used by sensitive functions (sink). This lack of validation or sanitization is what allows a potential attacker to manipulate the data flow for malicious purposes.
Because injection vulnerabilities (i.e., taint vulnerabilities) often involve code in multiple files and functions, SonarQube for IDE can only raise them after a full project analysis. This is why taint vulnerabilities are pulled from SonarQube Server or SonarQube Cloud after a project analysis.
### Prerequisites
* Running SonarQube for IDE in connected mode with SonarQube Cloud or a SonarQube Server commercial edition is required. See the pages on [connected-mode](https://docs.sonarsource.com/sonarqube-for-vs-code/connect-your-ide/connected-mode "mention") and [setup](https://docs.sonarsource.com/sonarqube-for-vs-code/connect-your-ide/setup "mention") for more details.
* Your project should be analyzed regularly, ideally by your CI server.
#### Limitations
* Only taint vulnerabilities in open files are shown in the IDE.
* SonarQube for IDE does not support short-lived branches therefore, when running in connected mode with SonarQube Cloud, you must work with [Branch analysis setup #Long-lived and short-lived branches](https://app.gitbook.com/s/B4UT2GNiZKjtxFtcFAL7/enriching/branch-analysis-setup#long-lived-and-short-lived-branches "mention"); SonarQube Server does not distinguish between long- and short-lived branches.
* SonarQube for VS Code follows a logic pattern as defined in the [#branch-awareness](https://docs.sonarsource.com/sonarqube-for-vs-code/connect-your-ide/connected-mode#branch-awareness "mention") article to sync the branch analysis on SonarQube (Server, Cloud) with the local analysis, including the synchronization of taint vulnerabilities, in your IDE.
* You’re limited by your SonarQube (Server, Cloud) plan restrictions regarding lines of code limits and branches you can analyze.
### How to display taint vulnerabilities
1. Complete your [setup](https://docs.sonarsource.com/sonarqube-for-vs-code/connect-your-ide/setup "mention") and bind your project to SonarQube (Server, Cloud).
2. In the standard VS Code Panel below the editor region, open the **SONARQUBE** panel.
3. The **SONARQUBE** panel displays the list of injection vulnerabilities that are found in the bound folder. The injection vulnerabilities found in the entire project will be listed by file.
### How to fix your taint vulnerabilities
Injection vulnerabilities are distinguished in the **SONARQUBE** panel as shown in the following image. Learn how to fix your injection vulnerability by using the tooltip options:
1. Note that your issue list might be collapsed depending on the new code period that is activated when selecting **Focus on New Code** (see [#setting-your-focus-on-new-code](https://docs.sonarsource.com/sonarqube-for-vs-code/new-code#setting-your-focus-on-new-code "mention")).
2. In the **SONARQUBE** panel, your taint vulnerabilities are easily identifiable by looking at the  identifying badge. You will also see how many locations this vulnerability occupies.
3. Select one of your taint vulnerabilities to focus the code editor and open the **SONARQUBE ISSUE LOCATIONS** view.
4. Selecting an issue will also open the **SonarQube Rule Description** view.
5. Find more information under the **How can I fix it?** tab.
Because the detection of taint vulnerabilities requires that you run in connected mode, any changes you make to the code must be analyzed by your instance of SonarQube (Server, Cloud). Here are two options to resolve taint vulnerabilities displayed by SonarQube for IDE:
* After you fix the taint vulnerability in your IDE, commit your code to the server and rerun the analysis on SonarQube (Server, Cloud). The new status (of the vulnerability) will be reflected in your IDE.
* Go to the issue in SonarQube (Server, Cloud) and mark it as **Accept** or **False positive**. The new status will be updated locally in less than one minute.
{% hint style="info" %}
When running in connected mode with SonarQube Server 10.4 or newer, **Won’t Fix** becomes **Accept**.
{% endhint %}
See the [fixing-issues](https://docs.sonarsource.com/sonarqube-for-vs-code/using/fixing-issues "mention") page for complete details about fixing issues, including [#fixing-taint-vulnerabilities](https://docs.sonarsource.com/sonarqube-for-vs-code/fixing-issues#fixing-taint-vulnerabilities "mention"), in SonarQube for VS Code.
---
# Source: https://docs.sonarsource.com/sonarqube-community-build/instance-administration/system-functions/telemetry.md
# Source: https://docs.sonarsource.com/sonarqube-server/9.8/instance-administration/telemetry.md
# Source: https://docs.sonarsource.com/sonarqube-server/9.9/instance-administration/telemetry.md
# Source: https://docs.sonarsource.com/sonarqube-server/10.0/instance-administration/telemetry.md
# Source: https://docs.sonarsource.com/sonarqube-server/10.1/instance-administration/telemetry.md
# Source: https://docs.sonarsource.com/sonarqube-server/10.2/instance-administration/telemetry.md
# Source: https://docs.sonarsource.com/sonarqube-server/10.3/instance-administration/telemetry.md
# Source: https://docs.sonarsource.com/sonarqube-server/10.4/instance-administration/telemetry.md
# Source: https://docs.sonarsource.com/sonarqube-server/10.5/instance-administration/telemetry.md
# Source: https://docs.sonarsource.com/sonarqube-server/10.6/instance-administration/telemetry.md
# Source: https://docs.sonarsource.com/sonarqube-server/10.7/instance-administration/system-functions/telemetry.md
# Source: https://docs.sonarsource.com/sonarqube-server/10.8/instance-administration/system-functions/telemetry.md
# Source: https://docs.sonarsource.com/sonarqube-server/2025.2/instance-administration/system-functions/telemetry.md
# Source: https://docs.sonarsource.com/sonarqube-server/2025.3/instance-administration/system-functions/telemetry.md
# Source: https://docs.sonarsource.com/sonarqube-server/2025.5/instance-administration/system-functions/telemetry.md
# Source: https://docs.sonarsource.com/sonarqube-server/2025.1/instance-administration/system-functions/telemetry.md
# Source: https://docs.sonarsource.com/sonarqube-server/2025.4/instance-administration/system-functions/telemetry.md
# Source: https://docs.sonarsource.com/sonarqube-server/2025.6/instance-administration/system-functions/telemetry.md
# Source: https://docs.sonarsource.com/sonarqube-server/instance-administration/system-functions/telemetry.md
# Telemetry
Your SonarQube Server installation sends telemetry data to Sonar daily. This data helps us understand how SonarQube Server is used, which in turn helps us improve our products.
### No personally identifiable information is sent.
The telemetry feature only sends anonymized, non-project-specific data related to which features of the product are being used.
Personal data, such as usernames or email addresses, is never sent. Neither is source code nor any project-specific data such as project name, repository, or author is ever sent. No IP addresses are ever sent.
The data is sent securely, held under restricted access, and not published outside of Sonar.
Protecting your privacy is important to us. If you have any concerns about telemetry data collection, please email us at `security@sonarsource.com`.
### What information is sent?
Every 24 hours, SonarQube Server sends a JSON payload and selected measure payloads to:
* `https://telemetry.sonarsource.com/sonarqube`
* `https://telemetry.sonarsource.com/sonarqube/metrics`
The data consists of anonymized information about:
* The SonarQube Server instance: version, license type, edition, database type, cloud usage and other information about the instance.
* Each project on the instance:
* A technical identifier that does not reveal any project-specific details.
* Project characteristics such as last analysis time, number of findings, and new code definition.
* Each user on the instance:
* A technical identifier that does not reveal any personal information about the user.
* Instance usage information, like last activity time and current status.
* Each quality gate on the instance:
* A technical identifier that does not reveal any project-specific details.
* A quality gate compliance status.
* Quality gate conditions.
* Each quality profile of the instance:
* A technical identifier that does not reveal any project-specific details.
* Quality profile characteristics such as language, if the default Sonar way quality profile is used or if the parent of the quality profile is Sonar way.
* Number of rules that are activated, deactivated, or overridden in the quality profile.
* Each branch on the instance:
* A technical identifier that does not reveal any branch-specific details.
* Branch characteristics, like its new code definition.
In addition to the payload, SonarQube Server also sends measures consisting of anonymized information about the usage of SonarQube Server for future product improvements. For example: the number of lines per language, AI code detection, installation data, user active status, and other anonymized data.
### Turning telemetry off
You can disable telemetry at any time by setting the `sonar.telemetry.enable = false` in `conf/sonar.properties`. By default, it is set to `true`.
#### Telemetry from SonarScanners
SonarScanners gather and transmit telemetry data to SonarQube Server. This data is then relayed to Sonar, but only if telemetry is enabled. SonarScanners do not send telemetry directly to Sonar, and there are no scanner-specific settings to enable or disable it.
\\
---
# Source: https://docs.sonarsource.com/sonarqube-cloud/administering-sonarcloud/managing-organization/manage-org-projects/manage-project-permissions/templates.md
# Using permission templates
*This feature is only available in the Team and Enterprise plans. See* [subscription-plans](https://docs.sonarsource.com/sonarqube-cloud/administering-sonarcloud/managing-subscription/subscription-plans "mention") *for more information.*
As the organization admin, using permission templates allows you to:
* Define the permissions granted by default to users, groups, project creators, and individual users on new projects.
* Apply different sets of permissions to one or several projects at a time.
{% hint style="info" %}
If you have a Free plan organization, the permissions set to the built-in groups (Members and Owners) on new projects are defined through the default built-in template and cannot be changed. See [#built-in-group-permissions-on-free](https://docs.sonarsource.com/sonarqube-cloud/about-sonarqube-cloud-solution/user-management/user-group-concept#built-in-group-permissions-on-free "mention")for more information.
{% endhint %}
### Introduction to the permission template concept
A permission template defines the project-related permissions granted to groups and members of the organization.
You can define several permission templates in your organization:
* You define the default template.
* You can define a template that applies to specific projects according to their key pattern by using a regular expression.
When a new project is created, SonarQube Cloud uses a permission template to grant the default permissions on the project. It retrieves the template according to the following rules:
* If the project key complies with the project key pattern of a template, then this template is used.\
If several templates comply, an error is raised.
* Otherwise, the default template is used.
### Creating a new template
1. Retrieve your organization. See [viewing-organizations](https://docs.sonarsource.com/sonarqube-cloud/getting-started/viewing-organizations "mention") for more details.
2. Go to **Administration** > **Permission Templates**. The **Permission Templates** page opens with the list of templates.
3. Select the **Create** button. The **Create Permission Template** dialog opens.
4. Enter the template name and description.
5. If you want to apply the template to specific new projects according to their key, enter the corresponding regular expression in **Project key pattern**.\
The regular expression must specify the complete key (not only a part of the key). For example, to match the project keys `abc-def1-` and `abc-def2-`, use the pattern `^abc-(def1|def2)-.*`.
6. Select the **Create** button. The dialog closes and the new template is displayed.
7. Set the permissions by selecting the respective check boxes. See [#project-level-permissions](https://docs.sonarsource.com/sonarqube-cloud/managing-your-projects/administering-your-projects/setting-permissions#project-level-permissions "mention") for more information about the project permissions.
### Setting the default template
1. Retrieve your organization. See [viewing-organizations](https://docs.sonarsource.com/sonarqube-cloud/getting-started/viewing-organizations "mention") for more details.
2. Go to **Administration** > **Permission Templates**. The **Permission Templates** page opens with the list of templates.
3. Select the three-dot menu to the far right of the template you want to change.
4. In the menu, select **Set Default**.
### Deleting a template
1. Retrieve your organization. See [viewing-organizations](https://docs.sonarsource.com/sonarqube-cloud/getting-started/viewing-organizations "mention") for more details.
2. Go to **Administration** > **Permission Templates**. The **Permission Templates** page opens with the list of templates.
3. Select the three-dot menu to the far right of the template you want to delete.
4. In the menu, select **Delete** and confirm.
### Changing a template
1. Retrieve your organization. See [viewing-organizations](https://docs.sonarsource.com/sonarqube-cloud/getting-started/viewing-organizations "mention") for more details.
2. Go to **Administration** > **Permission Templates**. The **Permission Templates** page opens with the list of templates.
3. Select the three-dot menu to the far right of the template you want to change.
4. In the menu:
* To change the template name, description or patter: select **Update Details**.
* To change the template permissions, description or patter: select **Edit Permissions**.
### Applying a permission template to projects
You can apply a permission template to a project, or, with the Enterprise plan, to several projects at a time.
#### To a single project
1. Retrieve the project. See [retrieving-projects](https://docs.sonarsource.com/sonarqube-cloud/managing-your-projects/retrieving-projects "mention") for more details.
2. In the left sidebar, select **Administration** > **Permissions**. The **Permissions** page opens.
3. Select the **Apply Permission Template** button in the top right corner of the page. The **Apply Permission Template** dialog opens.
4. Select the template you want to apply and select the **Apply** button.
#### To several projects at a time
1. Retrieve your organization. See [viewing-organizations](https://docs.sonarsource.com/sonarqube-cloud/getting-started/viewing-organizations "mention") for more details.
2. Go to **Administration** > **Projects management.**
3. Retrieve and select the projects you want to update.
4. In the tool bar, select **Bulk Apply Permission Template**. The **Bulk Apply Permission Template** dialog opens.
5. Select the template and select **Apply**.
---
# Source: https://docs.sonarsource.com/sonarqube-cloud/administering-sonarcloud/managing-enterprise/enterprise-security/sso/setup/terminate-setup.md
# Step 4: Terminate SSO setup
To terminate the transition of your enterprise to SSO:
1. Sign up with SonarQube Cloud by using the enterprise’s SSO log in URL. Your SSO account is created.
2. Sign in to SonarQube Cloud with your DOP account and grant your SSO account the Administer Enterprise permissions. See [..](https://docs.sonarsource.com/sonarqube-cloud/administering-sonarcloud/managing-enterprise "mention") for more details.
3. Once the enterprise users have successfully transitioned to SSO you can remove their DOP accounts from the organizations and the users can delete their DOP account. If you use Bitbucket Cloud, we recommend that you don’t remove the *admin* DOP accounts since, with an SSO account, you currently cannot bind a SonarQube Cloud organization with a Bitbucket Cloud workspace.
### Related pages
[verify-user-groups](https://docs.sonarsource.com/sonarqube-cloud/administering-sonarcloud/managing-enterprise/enterprise-security/sso/setup/verify-user-groups "mention")\
[configure-sso](https://docs.sonarsource.com/sonarqube-cloud/administering-sonarcloud/managing-enterprise/enterprise-security/sso/setup/configure-sso "mention")\
[inviting-users-to-sign-in](https://docs.sonarsource.com/sonarqube-cloud/administering-sonarcloud/managing-enterprise/enterprise-security/sso/setup/inviting-users-to-sign-in "mention")\
[editing-sso-configuration](https://docs.sonarsource.com/sonarqube-cloud/administering-sonarcloud/managing-enterprise/enterprise-security/sso/editing-sso-configuration "mention")\
[deleting-sso-configuration](https://docs.sonarsource.com/sonarqube-cloud/administering-sonarcloud/managing-enterprise/enterprise-security/sso/deleting-sso-configuration "mention")
---
# Source: https://docs.sonarsource.com/sonarqube-server/9.9/analyzing-source-code/languages/terraform-cloudformation-kubernetes-docker.md
# Source: https://docs.sonarsource.com/sonarqube-server/10.0/analyzing-source-code/languages/terraform-cloudformation-kubernetes-docker.md
# Terraform/CloudFormation/Kubernetes/Docker
### Language-specific properties
Discover and update the Terraform [analysis-parameters](https://docs.sonarsource.com/sonarqube-server/10.0/analyzing-source-code/analysis-parameters "mention") in **Administration > General Settings > Languages > Terraform**
Discover and update the CloudFormation [analysis-parameters](https://docs.sonarsource.com/sonarqube-server/10.0/analyzing-source-code/analysis-parameters "mention") in **Administration > General Settings > Languages > CloudFormation**
Discover and update the Kubernetes [analysis-parameters](https://docs.sonarsource.com/sonarqube-server/10.0/analyzing-source-code/analysis-parameters "mention") in **Administration > General Settings > Languages > Kubernetes**
Discover and update the Docker [analysis-parameters](https://docs.sonarsource.com/sonarqube-server/10.0/analyzing-source-code/analysis-parameters "mention") in **Administration > General Settings > Languages > Docker**
### Supported versions
* Terraform 1.x (HCL format only)
* CloudFormation with AWSTemplateFormatVersion 2010-09-09 (YAML and JSON)
* Kubernetes (YAML)
* AWS, Azure and GCP
#### Terraform provider versions
The respective Terraform providers are frequently updated. New resources, properties and default values are added. At the same time, others are deprecated or dropped. For this reason, the Terraform analysis is defensive by default: some issues will be automatically silenced to avoid raising false positives. In order to get a more precise analysis you can specify the provider versions your code supports via a parameter.
**AWS**: `sonar.terraform.provider.aws.version`\
**Azure**: `sonar.terraform.provider.azure.version`\
**GCP**: For Google Cloud Platform, no versions are currently considered in the analysis.
Accepted are versions having the format: `X.Y.Z`, `X.Y` or `X`Examples:
* `sonar.terraform.provider.aws.version=1.93.4`
* `sonar.terraform.provider.aws.version=3.4`
* `sonar.terraform.provider.aws.version=4`
### Dockerfiles
**No NoSonar Support:**
Trailing comments are not permitted in Dockerfiles. For this reason, our Dockerfile parser does not support NOSONAR comments to suppress issues. Issues and hotspots must be reviewed in the UI.
**Missing Uniform Filename Convention:**
Dockerfiles can have all kinds of names and do not need a file extension. For this reason, it is difficult for the scanner and the analyzer to recognize all Dockerfiles. By default, all files named Dockerfile, Dockerfile.\*, or \*.dockerfile are considered Dockerfiles. If other conventions apply, these can be specified via the scanner property sonar.lang.patterns.docker.
### Related pages
For CloudFormation you can import `cfn-lint` reports. See **Administration > General Settings > External Analyzers** for more information
---
# Source: https://docs.sonarsource.com/sonarqube-server/9.8/analyzing-source-code/languages/terraform-cloudformation-kubernetes.md
# Terraform/CloudFormation/Kubernetes
### Language-specific properties
Discover and update the Terraform [analysis-parameters](https://docs.sonarsource.com/sonarqube-server/9.8/analyzing-source-code/analysis-parameters "mention") in **Administration > General Settings > Languages > Terraform**
Discover and update the CloudFormation [analysis-parameters](https://docs.sonarsource.com/sonarqube-server/9.8/analyzing-source-code/analysis-parameters "mention") in **Administration > General Settings > Languages > CloudFormation**
Discover and update the Kubernetes [analysis-parameters](https://docs.sonarsource.com/sonarqube-server/9.8/analyzing-source-code/analysis-parameters "mention") in **Administration > General Settings > Languages > Kubernetes**
### Supported versions
* Terraform 1.x (HCL format only)
* CloudFormation with AWSTemplateFormatVersion 2010-09-09 (YAML and JSON)
* Kubernetes (YAML)
* AWS, Azure and GCP
#### Terraform provider versions
The respective Terraform providers are frequently updated. New resources, properties and default values are added. At the same time, others are deprecated or dropped. For this reason, the Terraform analysis is defensive by default: some issues will be automatically silenced to avoid raising false positives. In order to get a more precise analysis you can specify the provider versions your code supports via a parameter.
**AWS**: `sonar.terraform.provider.aws.version`\
**Azure**: `sonar.terraform.provider.azure.version`\
**GCP**: For Google Cloud Platform, no versions are currently considered in the analysis.
Accepted are versions having the format: `X.Y.Z`, `X.Y` or `X`
Examples:
* `sonar.terraform.provider.aws.version=1.93.4`
* `sonar.terraform.provider.aws.version=3.4`
* `sonar.terraform.provider.aws.version=4`
### Related pages
For CloudFormation you can import `cfn-lint` reports. See **Administration > General Settings > External Analyzers** for more information
### Issue tracker
Check the [issue tracker](https://sonarsource.atlassian.net/jira/software/c/projects/SONARIAC/boards/365) for this language.
---
# Source: https://docs.sonarsource.com/sonarqube-community-build/analyzing-source-code/languages/terraform.md
# Source: https://docs.sonarsource.com/sonarqube-server/10.1/analyzing-source-code/languages/terraform.md
# Source: https://docs.sonarsource.com/sonarqube-server/10.2/analyzing-source-code/languages/terraform.md
# Source: https://docs.sonarsource.com/sonarqube-server/10.3/analyzing-source-code/languages/terraform.md
# Source: https://docs.sonarsource.com/sonarqube-server/10.4/analyzing-source-code/languages/terraform.md
# Source: https://docs.sonarsource.com/sonarqube-server/10.5/analyzing-source-code/languages/terraform.md
# Source: https://docs.sonarsource.com/sonarqube-server/10.6/analyzing-source-code/languages/terraform.md
# Source: https://docs.sonarsource.com/sonarqube-server/10.7/analyzing-source-code/languages/terraform.md
# Source: https://docs.sonarsource.com/sonarqube-server/10.8/analyzing-source-code/languages/terraform.md
# Source: https://docs.sonarsource.com/sonarqube-server/2025.2/analyzing-source-code/languages/terraform.md
# Source: https://docs.sonarsource.com/sonarqube-server/2025.3/analyzing-source-code/languages/terraform.md
# Source: https://docs.sonarsource.com/sonarqube-server/2025.5/analyzing-source-code/languages/terraform.md
# Source: https://docs.sonarsource.com/sonarqube-server/2025.1/analyzing-source-code/languages/terraform.md
# Source: https://docs.sonarsource.com/sonarqube-server/2025.4/analyzing-source-code/languages/terraform.md
# Source: https://docs.sonarsource.com/sonarqube-server/2025.6/analyzing-source-code/languages/terraform.md
# Source: https://docs.sonarsource.com/sonarqube-server/analyzing-source-code/languages/terraform.md
# Source: https://docs.sonarsource.com/sonarqube-cloud/advanced-setup/languages/terraform.md
# Terraform
### Supported versions
The level of support for a language is defined as follows:
* Fully supported: Analysis will complete. All the language features are understood and examined.
* Supported: Most language features are understood and examined but the version includes unsupported features. Analysis might break or provide incomplete results.
Versions 1.3, 1.4 and 1.5 are supported
### Language-specific properties
To discover and update the Terraform-specific properties, navigate in SonarQube Cloud to *Your Project* > **Administration** > **General Settings** > **Languages** > **Terraform**. See the [analysis-parameters](https://docs.sonarsource.com/sonarqube-cloud/advanced-setup/analysis-parameters "mention") page for more information about specific properties.
### Supported platforms
Platforms:
* Amazon Web Services
* Azure Cloud
* Google Cloud Platform
### Terraform provider versions
The various Terraform providers are frequently updated. New resources, properties, and default values are added, while at the same time, others are deprecated or dropped. For this reason, Terraform analysis is defensive by default; some issues will be automatically silenced to avoid raising false positives. In order to get a more precise analysis, you can specify the provider versions your code supports via a parameter.
**AWS**: `sonar.terraform.provider.aws.version`\
**Azure**: `sonar.terraform.provider.azure.version`\
**GCP**: For Google Cloud Platform, no versions are currently considered in the analysis
Accepted are versions having the format: `X.Y.Z`, `X.Y` or `X`.
Examples:
* `sonar.terraform.provider.aws.version=1.93.4`
* `sonar.terraform.provider.aws.version=3.4`
* `sonar.terraform.provider.aws.version=4`
---
# Source: https://docs.sonarsource.com/sonarqube-server/8.9/analyzing-source-code/test-coverage-and-execution.md
# Test coverage and execution
This page lists analysis parameters related to test coverage and execution reports. For more other parameters, see [analysis-parameters](https://docs.sonarsource.com/sonarqube-server/8.9/analyzing-source-code/analysis-parameters "mention").
SonarQube doesn’t run your tests or generate reports. It only imports pre-generated reports. Below you’ll find language- and tool-specific analysis parameters for importing coverage and execution reports.
In the [guides](https://community.sonarsource.com/c/announce/guides) category of the [Sonar community forum](https://community.sonarsource.com/) you might find instructions on generating these reports.
Some properties support the following wildcards in paths. The remarks for properties that support wildcards will mention that fact. If the remarks do not say wildcards are supported, then they are not.:
| | |
| ---------- | ------------------------- |
| **Symbol** | **Meaning** |
| `?` | a single character |
| `*` | any number of characters |
| `**` | any number of directories |
### Test Coverage
Unless otherwise specified, these properties require values that are relative to project root.
| | | |
| --------------------------- | ----------------------------------------- | ---------------------------------------------------------------------------------------------------------------------------------------------------------------------------------------------------------------------------------------------------------------------------------------------------------------------------------------------------------------------------------------------------------------------------------------------------------------------------------------------------------------------------------------- |
| **Language** | **Property** | **Remarks** |
| **Any** | `sonar.coverageReportPaths` | Path to coverage report in the [generic-test-data](https://docs.sonarsource.com/sonarqube-server/8.9/analyzing-source-code/generic-test-data "mention") format. |
| Apex | `sonar.apex.coverage.reportPath` | Path to the `test-result-codecoverage.json` report file generated by the [`apex:test:run`](https://developer.salesforce.com/docs/atlas.en-us.sfdx_cli_reference.meta/sfdx_cli_reference/cli_reference_force_apex.htm?search_text=apex%20test#cli_reference_test_run) command of the [Salesforce CLI](https://developer.salesforce.com/tools/sfdxcli). Note, you must have a [Salesforce DX project](https://developer.salesforce.com/docs/atlas.en-us.sfdx_dev.meta/sfdx_dev/sfdx_dev_workspace_setup.htm) set up and linked to your Org |
| C / C++ / Objective-C | `sonar.cfamily.gcov.reportsPath` | Path to the directory containing native `*.gcov` reports (not the XML reports generated by gcovr) |
| C / C++ / Objective-C | `sonar.cfamily.llvm-cov.reportPath` | Path to a llvm-cov report |
| C / C++ / Objective-C | `sonar.cfamily.vscoveragexml.reportsPath` | Path may be absolute or relative to the solution directory. Path wildcards (see above) are supported. Note that the `.coveragexml` report format offered by Visual Studio is not supported. |
| C / C++ / Objective-C | `sonar.cfamily.bullseye.reportPath` | Path to the report from Bullseye, version >= 8.9.63 (use [covxml](http://www.bullseye.com/help/ref-covxml.html) tool) |
| C# | `sonar.cs.vscoveragexml.reportsPaths` | Path to Visual Studio Code Coverage report. Multiple paths may be comma-delimited, or included via wildcards. See *Notes on importing .NET reports* below. |
| C# | `sonar.cs.dotcover.reportsPaths` | Path to dotCover coverage report. See *Notes on importing .NET reports* below. |
| C# | `sonar.cs.opencover.reportsPaths` | Path to OpenCover coverage report. See *Notes on importing .NET reports* below. |
| C# | `sonar.cs.ncover3.reportsPaths` | **Deprecated.** Path to NCover3 coverage report. See *Notes on importing .NET reports* below. |
| Flex | `sonar.flex.cobertura.reportPaths` | Path to the Cobertura XML reports. Multiple paths may be comma-delimited. May be absolute or relative to the project base directory. |
| Go | `sonar.go.coverage.reportPaths` | Comma-delimited list of paths to coverage report files. Path wildcards are supported (see above) since SonarGo 1.1. |
| Java / Kotlin / Scala / JVM | `sonar.coverage.jacoco.xmlReportPaths` | Path to JaCoCo XML coverage reports. Path wildcards are supported (see above). |
| JavaScript / TypeScript | `sonar.javascript.lcov.reportPaths` | Comma-delimited list of paths to LCOV coverage report files. Paths may be absolute or relative to project root. |
| PHP | `sonar.php.coverage.reportPaths` | Comma-delimited list of paths to Clover XML-format coverage report files. Paths may be absolute or relative to project root. |
| Python | `sonar.python.coverage.reportPaths` | Comma-delimited list of paths to coverage reports in the Cobertura XML format. Path wildcards are supported (see above). Leave unset to use the default (`coverage-reports/*coverage-*.xml`). |
| Ruby | `sonar.ruby.coverage.reportPaths` | Comma-delimited list of paths to SimpleCov report files generated with the [JSON formatter](https://github.com/simplecov-ruby/simplecov#json-formatter) (availaible from SimpleCov 0.20). For SimpleCov versions < 0.18, you can provide `.resultset.json` report files (not recommended). Paths may be absolute or relative to project-root. |
| Scala | `sonar.scala.coverage.reportPaths` | Comma-separated list of paths to `scoverage.xml` report files generaged by Scoverage. |
| Swift, Xcode 9.3+ | | You can use the [xccov-to-sonarqube-generic.sh](https://github.com/SonarSource/sonar-scanning-examples/blob/master/swift-coverage/swift-coverage-example/xccov-to-sonarqube-generic.sh) script from the [sonar-scanning-examples/swift-coverage](https://github.com/SonarSource/sonar-scanning-examples/tree/master/swift-coverage) project convert output from Xcode 9.3’s xccov tool to the [generic-test-data](https://docs.sonarsource.com/sonarqube-server/8.9/analyzing-source-code/generic-test-data "mention") format. |
| Swift, Xcode 7-9.2 | `sonar.swift.coverage.reportPath` | Path to the report generated by `llvm-cov show`. Path may be absolute or relative to project root. |
| VB.NET | `sonar.vbnet.vscoveragexml.reportsPaths` | Path to Visual Studio Code Coverage report. Multiple paths may be comma-delimited, or included via wildcards. See *Notes on importing .NET reports* below. |
| VB.NET | `sonar.vbnet.dotcover.reportsPaths` | Path to dotCover coverage report. See *Notes on importing .NET reports* below. |
| VB.NET | `sonar.vbnet.opencover.reportsPaths` | Path to OpenCover coverage report. See *Notes on importing .NET reports* below. |
| VB.Net | `sonar.vbnet.ncover3.reportsPaths` | **Deprecated.** Path to NCover3 coverage report. See *Notes on importing .NET reports* below. |
### Test Execution
Unless otherwise specified, these properties require values that are relative to project root.
| | | |
| ----------------------- | ----------------------------------- | ------------------------------------------------------------------------------------------------------------------------------------------------------------------------------------------------------------------------------------------------------------------------------------------------------------------------------------------------------------------------------- |
| **Language** | **Property** | **Remarks** |
| **All** | `sonar.testExecutionReportPaths` | Comma-delimited list of paths to execution reports in the [generic-test-data](https://docs.sonarsource.com/sonarqube-server/8.9/analyzing-source-code/generic-test-data "mention") format. |
| C / C++ / Objective-C | `sonar.cfamily.cppunit.reportsPath` | Path to the directory holding the [CPPUnit](http://sourceforge.net/projects/cppunit/) reports. Note that while measures such as the number of tests are displayed at project level, no drilldown is available. |
| C# | `sonar.cs.vstest.reportsPaths` | Paths to VSTest reports. Multiple paths may be comma-delimited, or included via wildcards. Note that while measures such as the number of tests are displayed at project level, no drilldown is available. |
| C# | `sonar.cs.nunit.reportsPaths` | Paths to NUnit execution reports. Multiple paths may be comma-delimited, or included via wildcards. Note that while measures such as the number of tests are displayed at project level, no drilldown is available. |
| C# | `sonar.cs.xunit.reportsPaths` | Paths to xUnit execution reports. Multiple paths may be comma-delimited, or included via wildcards. Note that while measures such as the number of tests are displayed at project level, no drilldown is available. |
| Go | `sonar.go.tests.reportPaths` | Comma-delimited list of paths to unit test report files. Paths may be absolute or relative to project root. |
| Java / Kotlin | `sonar.junit.reportPaths` | Comma-delimited list of paths to Surefire XML-format reports. |
| JavaScript / TypeScript | | You can use [jest-sonar-reporter](https://www.npmjs.com/package/jest-sonar-reporter) or [karma-sonarqube-unit-reporter](https://github.com/tornaia/karma-sonarqube-unit-reporter) to create reports in the [generic-test-data](https://docs.sonarsource.com/sonarqube-server/8.9/analyzing-source-code/generic-test-data "mention") format. Both packages are available on npm. |
| PHP | `sonar.php.tests.reportPath` | Path to the PHPUnit unit test execution report file. Path may be absolute or relative to project root. |
| Python | `sonar.python.xunit.reportPath` | Path to unit test execution report. Leave unset to use the default (`xunit-reports/xunit-result-*.xml`). Path wildcards (see above) are supported. If any paths in the report are invalid, set `sonar.python.xunit.skipDetails=true` to collect only project-level details. |
| VB.NET | `sonar.vbnet.vstest.reportsPaths` | Paths to VSTest execution reports. Multiple paths may be comma-delimited, or included via wildcards. Note that while measures such as the number of tests are displayed at project level, no drilldown is available. |
| VB.NET | `sonar.vbnet.nunit.reportsPaths` | Paths to NUnit execution reports. Multiple paths may be comma-delimited, or included via wildcards. Note that while measures such as the number of tests are displayed at project level, no drilldown is available. |
| VB.NET | `sonar.vbnet.xunit.reportsPaths` | Paths to xUnit execution reports. Multiple paths may be comma-delimited, or included via wildcards. Note that while measures such as the number of tests are displayed at project level, no drilldown is available. |
### Importing .NET reports
To import .NET reports, the report generation process must be executed after the begin step and before the end MSBuild command. The following steps detail importing .NET reports:
1. Run the SonarScanner.MSBuild.exe `begin` command, specifying the absolute path where the reports *will be* available using the `/d:propertyKey="path"` syntax ("propertyKey" depends on the tool)
2. Build your project using MSBuild
3. Run your test tool, instructing it to produce a report at the same location specified earlier to the MSBuild SonarQube Runner ([How to generate reports with different tools](https://community.sonarsource.com/t/coverage-test-data-generate-reports-for-c-vb-net/9871))
4. Run the SonarScanner.MSBuild.exe `end` command
For more information, see the [Generate Reports for C#, VB.net Community Post](https://community.sonarsource.com/t/coverage-test-data-generate-reports-for-c-vb-net/9871).
---
# Source: https://docs.sonarsource.com/sonarqube-community-build/analyzing-source-code/test-coverage/test-coverage-parameters.md
# Source: https://docs.sonarsource.com/sonarqube-server/9.8/analyzing-source-code/test-coverage/test-coverage-parameters.md
# Source: https://docs.sonarsource.com/sonarqube-server/9.9/analyzing-source-code/test-coverage/test-coverage-parameters.md
# Source: https://docs.sonarsource.com/sonarqube-server/10.0/analyzing-source-code/test-coverage/test-coverage-parameters.md
# Source: https://docs.sonarsource.com/sonarqube-server/10.1/analyzing-source-code/test-coverage/test-coverage-parameters.md
# Source: https://docs.sonarsource.com/sonarqube-server/10.2/analyzing-source-code/test-coverage/test-coverage-parameters.md
# Source: https://docs.sonarsource.com/sonarqube-server/10.3/analyzing-source-code/test-coverage/test-coverage-parameters.md
# Source: https://docs.sonarsource.com/sonarqube-server/10.4/analyzing-source-code/test-coverage/test-coverage-parameters.md
# Source: https://docs.sonarsource.com/sonarqube-server/10.5/analyzing-source-code/test-coverage/test-coverage-parameters.md
# Source: https://docs.sonarsource.com/sonarqube-server/10.6/analyzing-source-code/test-coverage/test-coverage-parameters.md
# Source: https://docs.sonarsource.com/sonarqube-server/10.7/analyzing-source-code/test-coverage/test-coverage-parameters.md
# Source: https://docs.sonarsource.com/sonarqube-server/10.8/analyzing-source-code/test-coverage/test-coverage-parameters.md
# Source: https://docs.sonarsource.com/sonarqube-server/2025.2/analyzing-source-code/test-coverage/test-coverage-parameters.md
# Source: https://docs.sonarsource.com/sonarqube-server/2025.3/analyzing-source-code/test-coverage/test-coverage-parameters.md
# Source: https://docs.sonarsource.com/sonarqube-server/2025.5/analyzing-source-code/test-coverage/test-coverage-parameters.md
# Source: https://docs.sonarsource.com/sonarqube-server/2025.1/analyzing-source-code/test-coverage/test-coverage-parameters.md
# Source: https://docs.sonarsource.com/sonarqube-server/2025.4/analyzing-source-code/test-coverage/test-coverage-parameters.md
# Source: https://docs.sonarsource.com/sonarqube-server/2025.6/analyzing-source-code/test-coverage/test-coverage-parameters.md
# Source: https://docs.sonarsource.com/sonarqube-server/analyzing-source-code/test-coverage/test-coverage-parameters.md
# Source: https://docs.sonarsource.com/sonarqube-cloud/enriching/test-coverage/test-coverage-parameters.md
# Test coverage parameters
\*Test coverage reports \*describe the percentage of your code that has been tested by your test suite during a build.
This differs from *test execution reports*, which describe which tests within your test suite have been run during a build. For details, see [test-execution-parameters](https://docs.sonarsource.com/sonarqube-cloud/enriching/test-coverage/test-execution-parameters "mention").
Test coverage reports are not generated by SonarQube Cloud itself. They must be generated by an external tool and then imported into SonarQube Cloud by specifying a parameter telling the scanner where to look for the report.
The data is then displayed in your SonarQube Cloud analysis.
Below, you will find language- and tool-specific analysis parameters for importing test coverage reports.
For information on analysis parameters in general, see [analysis-parameters](https://docs.sonarsource.com/sonarqube-cloud/advanced-setup/analysis-parameters "mention").
Unless otherwise specified, these properties require values that are relative to the project root. Some properties support the following wildcards in paths. The remarks for properties that support wildcards will mention this fact. If wildcards are not noted for a given property, then they are not supported for that property.
| **Symbol** | **Meaning** |
| ---------- | ------------------------- |
| `?` | a single character |
| `*` | any number of characters |
| `**` | any number of directories |
### All languages
**sonar.coverageReportPaths**
Comma-delimited list of paths to coverage reports in the [generic-test-data](https://docs.sonarsource.com/sonarqube-cloud/enriching/test-coverage/generic-test-data "mention") format.
### Apex
**sonar.apex.coverage.reportPath**
Path to the `test-result-codecoverage.json` report file generated by the [`apex:test:run`](https://developer.salesforce.com/docs/atlas.en-us.sfdx_cli_reference.meta/sfdx_cli_reference/cli_reference_force_apex.htm?search_text=apex%20test#cli_reference_test_run) command of the [Salesforce CLI](https://developer.salesforce.com/tools/sfdxcli). Note, you must have a [Salesforce DX project](https://developer.salesforce.com/docs/atlas.en-us.sfdx_dev.meta/sfdx_dev/sfdx_dev_workspace_setup.htm) set up and linked to your organization.
### C/C++/Objective-C
See [c-c-objective-c-test-coverage](https://docs.sonarsource.com/sonarqube-cloud/enriching/test-coverage/c-c-objective-c-test-coverage "mention") for examples and details.
**sonar.cfamily.gcov.reportsPath**
Path to the directory containing core `*.gcov` reports (not the XML reports generated by `gcovr`).
**sonar.cfamily.llvm-cov.reportPath**
Path to the `llvm-cov` report files.
**sonar.cfamily.vscoveragexml.reportsPath**
Path to the code coverage report files generated by Visual Studio. The path may be absolute or relative to the solution directory. Path wildcards (see above) are supported. Note that the `.coverage` report format must be converted to `.coveragexml` format using the tool `CodeCoverage.exe` tool in order to be imported.
**sonar.cfamily.bullseye.reportPath**
Path to the report files generated by Bullseye, version >= 8.9.63 (use the [`covxml`](http://www.bullseye.com/help/ref-covxml.html) tool)
### C#
See [dotnet-test-coverage](https://docs.sonarsource.com/sonarqube-cloud/enriching/test-coverage/dotnet-test-coverage "mention") for examples and details.
**sonar.cs.vscoveragexml.reportsPaths**
Comma-delimited list of paths to the coverage reports produced by Visual Studio [Code Coverage](https://www.nuget.org/packages/Microsoft.CodeCoverage/17.7.2#readme-body-tab) or the `dotnet-coverage` tool. Wildcards are supported.
**sonar.cs.dotcover.reportsPaths**
Comma-delimited list of paths to the coverage reports produced by dotCover coverage .
**sonar.cs.opencover.reportsPaths**
Comma-delimited list of paths to the coverage reports produced by OpenCover or Coverlet. When working with Coverlet, choose the opencover output format.
### Dart
See [dart-test-coverage](https://docs.sonarsource.com/sonarqube-cloud/enriching/test-coverage/dart-test-coverage "mention") for examples and details.
**sonar.dart.lcov.reportPaths**
Paths to [LCOV](https://github.com/linux-test-project/lcov) reports. Multiple paths may be comma-delimited or included via wildcards. Paths may be absolute or relative to the project root.
To produce this format, you need to activate coverage and run tests with it. If no path is provided, or no report coverage report is found at the provided paths, the default location is used: `coverage/lcov.info`
### Flex
**sonar.flex.cobertura.reportPaths**
Path to the Cobertura XML reports. Multiple paths may be comma-delimited. May be absolute or relative to the project base directory.
### Go
**sonar.go.coverage.reportPaths**
See [go-test-coverage](https://docs.sonarsource.com/sonarqube-cloud/enriching/test-coverage/go-test-coverage "mention") for examples and details.
Comma-delimited list of paths to coverage report files. Wildcards are supported.
### Java/Kotlin/Scala/JVM
See [java-test-coverage](https://docs.sonarsource.com/sonarqube-cloud/enriching/test-coverage/java-test-coverage "mention") for examples and details.
**sonar.coverage.jacoco.xmlReportPaths**
Comma-delimited list of paths to JaCoCo XML coverage reports. Wildcards are supported.
**sonar.jacoco.reportPaths**
**Deprecated.** Use `sonar.coverage.jacoco.xmlReportPaths`**.**
### JavaScript/TypeScript
See [javascript-typescript-test-coverage](https://docs.sonarsource.com/sonarqube-cloud/enriching/test-coverage/javascript-typescript-test-coverage "mention") for examples and details.
**sonar.javascript.lcov.reportPaths**
Comma-delimited list of paths to LCOV coverage report files. Paths may be absolute or relative to the project root.
### PHP
See [php-test-coverage](https://docs.sonarsource.com/sonarqube-cloud/enriching/test-coverage/php-test-coverage "mention") for examples and details.
**sonar.php.coverage.reportPaths**
Comma-delimited list of paths to Clover XML-format coverage report files. Paths may be absolute or relative to the project root.
### Python
See [python-test-coverage](https://docs.sonarsource.com/sonarqube-cloud/enriching/test-coverage/python-test-coverage "mention") for examples and details.
**sonar.python.coverage.reportPaths**
Comma-delimited list of paths to coverage reports in the Cobertura XML format. Wildcards are supported. Leave unset to use the default (`coverage-reports/*coverage-*.xml`).
### Ruby
**sonar.ruby.coverage.reportPaths**
Comma-delimited list of paths to SimpleCov report files generated with the [JSON formatter](https://github.com/simplecov-ruby/simplecov#json-formatter) (available from SimpleCov 0.20). For SimpleCov versions before 0.18, you can provide `.resultset.json` report files (though we recommend updating to 0.20 and using the JSON formatter). Paths may be absolute or relative to the project root.
### Rust
The Sonar Rust analyzer supports importing test coverage reports in the following formats:
* **Cobertura:** You can import Cobertura reports using the `sonar.rust.cobertura.reportPaths` property. This property accepts a comma-separated list of file paths to your Cobertura XML files.
* **LCOV:** You can import LCOV reports using the `sonar.rust.lcov.reportPaths` property. This property accepts a comma-separated list of file paths to your LCOV files.
If both `sonar.rust.lcov.reportPaths` and `sonar.rust.cobertura.reportPaths` are defined, the analyzer will consume both sets of reports sequentially. No merging or specific strategy is defined for handling conflicts or overlapping coverage data.
### Scala
**sonar.scala.coverage.reportPaths**
Comma-delimited list of paths to `scoverage.xml` report files generated by Scoverage.
### Swift with Xcode 13.3+
You can use the [xccov-to-sonarqube-generic.sh](https://github.com/SonarSource/sonar-scanning-examples/blob/master/swift-coverage/swift-coverage-example/xccov-to-sonarqube-generic.sh) script from the [sonar-scanning-examples/swift-coverage](https://github.com/SonarSource/sonar-scanning-examples/tree/master/swift-coverage) project to convert output from Xcode 13.3’s `xccov` tool to the [generic-test-data](https://docs.sonarsource.com/sonarqube-cloud/enriching/test-coverage/generic-test-data "mention") format.
### Swift with Xcode 7-13.2
**sonar.swift.coverage.reportPaths**
Comma-delimited list of paths to the report files generated by `llvm-cov show`. The path may be absolute or relative to the project root.
### VB.NET
See [dotnet-test-coverage](https://docs.sonarsource.com/sonarqube-cloud/enriching/test-coverage/dotnet-test-coverage "mention") for examples and details.
**sonar.vbnet.vscoveragexml.reportsPaths**
Comma-delimited list of paths to Visual Studio Code Coverage report files. Multiple paths may be comma-delimited or included via wildcards.
**sonar.vbnet.dotcover.reportsPaths**
Comma-delimited list of paths to dotCover coverage report files.
**sonar.vbnet.opencover.reportsPaths**
Comma-delimited list of paths to the coverage report files produced by OpenCover.
---
# Source: https://docs.sonarsource.com/sonarqube-community-build/analyzing-source-code/test-coverage.md
# Source: https://docs.sonarsource.com/sonarqube-server/9.8/analyzing-source-code/test-coverage.md
# Source: https://docs.sonarsource.com/sonarqube-server/9.9/analyzing-source-code/test-coverage.md
# Source: https://docs.sonarsource.com/sonarqube-server/10.0/analyzing-source-code/test-coverage.md
# Source: https://docs.sonarsource.com/sonarqube-server/10.1/analyzing-source-code/test-coverage.md
# Source: https://docs.sonarsource.com/sonarqube-server/10.2/analyzing-source-code/test-coverage.md
# Source: https://docs.sonarsource.com/sonarqube-server/10.3/analyzing-source-code/test-coverage.md
# Source: https://docs.sonarsource.com/sonarqube-server/10.4/analyzing-source-code/test-coverage.md
# Source: https://docs.sonarsource.com/sonarqube-server/10.5/analyzing-source-code/test-coverage.md
# Source: https://docs.sonarsource.com/sonarqube-server/10.6/analyzing-source-code/test-coverage.md
# Source: https://docs.sonarsource.com/sonarqube-server/10.7/analyzing-source-code/test-coverage.md
# Source: https://docs.sonarsource.com/sonarqube-server/10.8/analyzing-source-code/test-coverage.md
# Source: https://docs.sonarsource.com/sonarqube-server/2025.2/analyzing-source-code/test-coverage.md
# Source: https://docs.sonarsource.com/sonarqube-server/2025.3/analyzing-source-code/test-coverage.md
# Source: https://docs.sonarsource.com/sonarqube-server/2025.5/analyzing-source-code/test-coverage.md
# Source: https://docs.sonarsource.com/sonarqube-server/2025.1/analyzing-source-code/test-coverage.md
# Source: https://docs.sonarsource.com/sonarqube-server/2025.4/analyzing-source-code/test-coverage.md
# Source: https://docs.sonarsource.com/sonarqube-server/2025.6/analyzing-source-code/test-coverage.md
# Source: https://docs.sonarsource.com/sonarqube-server/analyzing-source-code/test-coverage.md
# Source: https://docs.sonarsource.com/sonarqube-cloud/enriching/test-coverage.md
# Test coverage
{% content-ref url="test-coverage/overview" %}
[overview](https://docs.sonarsource.com/sonarqube-cloud/enriching/test-coverage/overview)
{% endcontent-ref %}
{% content-ref url="test-coverage/c-c-objective-c-test-coverage" %}
[c-c-objective-c-test-coverage](https://docs.sonarsource.com/sonarqube-cloud/enriching/test-coverage/c-c-objective-c-test-coverage)
{% endcontent-ref %}
{% content-ref url="test-coverage/dart-test-coverage" %}
[dart-test-coverage](https://docs.sonarsource.com/sonarqube-cloud/enriching/test-coverage/dart-test-coverage)
{% endcontent-ref %}
{% content-ref url="test-coverage/go-test-coverage" %}
[go-test-coverage](https://docs.sonarsource.com/sonarqube-cloud/enriching/test-coverage/go-test-coverage)
{% endcontent-ref %}
{% content-ref url="test-coverage/java-test-coverage" %}
[java-test-coverage](https://docs.sonarsource.com/sonarqube-cloud/enriching/test-coverage/java-test-coverage)
{% endcontent-ref %}
{% content-ref url="test-coverage/javascript-typescript-test-coverage" %}
[javascript-typescript-test-coverage](https://docs.sonarsource.com/sonarqube-cloud/enriching/test-coverage/javascript-typescript-test-coverage)
{% endcontent-ref %}
{% content-ref url="test-coverage/dotnet-test-coverage" %}
[dotnet-test-coverage](https://docs.sonarsource.com/sonarqube-cloud/enriching/test-coverage/dotnet-test-coverage)
{% endcontent-ref %}
{% content-ref url="test-coverage/php-test-coverage" %}
[php-test-coverage](https://docs.sonarsource.com/sonarqube-cloud/enriching/test-coverage/php-test-coverage)
{% endcontent-ref %}
{% content-ref url="test-coverage/python-test-coverage" %}
[python-test-coverage](https://docs.sonarsource.com/sonarqube-cloud/enriching/test-coverage/python-test-coverage)
{% endcontent-ref %}
{% content-ref url="test-coverage/test-execution-parameters" %}
[test-execution-parameters](https://docs.sonarsource.com/sonarqube-cloud/enriching/test-coverage/test-execution-parameters)
{% endcontent-ref %}
{% content-ref url="test-coverage/generic-test-data" %}
[generic-test-data](https://docs.sonarsource.com/sonarqube-cloud/enriching/test-coverage/generic-test-data)
{% endcontent-ref %}
{% content-ref url="test-coverage/test-coverage-parameters" %}
[test-coverage-parameters](https://docs.sonarsource.com/sonarqube-cloud/enriching/test-coverage/test-coverage-parameters)
{% endcontent-ref %}
---
# Source: https://docs.sonarsource.com/sonarqube-community-build/analyzing-source-code/test-coverage/test-execution-parameters.md
# Source: https://docs.sonarsource.com/sonarqube-server/9.8/analyzing-source-code/test-coverage/test-execution-parameters.md
# Source: https://docs.sonarsource.com/sonarqube-server/9.9/analyzing-source-code/test-coverage/test-execution-parameters.md
# Source: https://docs.sonarsource.com/sonarqube-server/10.0/analyzing-source-code/test-coverage/test-execution-parameters.md
# Source: https://docs.sonarsource.com/sonarqube-server/10.1/analyzing-source-code/test-coverage/test-execution-parameters.md
# Source: https://docs.sonarsource.com/sonarqube-server/10.2/analyzing-source-code/test-coverage/test-execution-parameters.md
# Source: https://docs.sonarsource.com/sonarqube-server/10.3/analyzing-source-code/test-coverage/test-execution-parameters.md
# Source: https://docs.sonarsource.com/sonarqube-server/10.4/analyzing-source-code/test-coverage/test-execution-parameters.md
# Source: https://docs.sonarsource.com/sonarqube-server/10.5/analyzing-source-code/test-coverage/test-execution-parameters.md
# Source: https://docs.sonarsource.com/sonarqube-server/10.6/analyzing-source-code/test-coverage/test-execution-parameters.md
# Source: https://docs.sonarsource.com/sonarqube-server/10.7/analyzing-source-code/test-coverage/test-execution-parameters.md
# Source: https://docs.sonarsource.com/sonarqube-server/10.8/analyzing-source-code/test-coverage/test-execution-parameters.md
# Source: https://docs.sonarsource.com/sonarqube-server/2025.2/analyzing-source-code/test-coverage/test-execution-parameters.md
# Source: https://docs.sonarsource.com/sonarqube-server/2025.3/analyzing-source-code/test-coverage/test-execution-parameters.md
# Source: https://docs.sonarsource.com/sonarqube-server/2025.5/analyzing-source-code/test-coverage/test-execution-parameters.md
# Source: https://docs.sonarsource.com/sonarqube-server/2025.1/analyzing-source-code/test-coverage/test-execution-parameters.md
# Source: https://docs.sonarsource.com/sonarqube-server/2025.4/analyzing-source-code/test-coverage/test-execution-parameters.md
# Source: https://docs.sonarsource.com/sonarqube-server/2025.6/analyzing-source-code/test-coverage/test-execution-parameters.md
# Source: https://docs.sonarsource.com/sonarqube-server/analyzing-source-code/test-coverage/test-execution-parameters.md
# Source: https://docs.sonarsource.com/sonarqube-cloud/enriching/test-coverage/test-execution-parameters.md
# Test execution parameters
*Test execution reports* describe which tests within your test suite have been run during a build.
This differs from *test coverage reports*, which describe the percentage of your code that has been tested by your test suite during a build. For details, see [test-coverage-parameters](https://docs.sonarsource.com/sonarqube-cloud/enriching/test-coverage/test-coverage-parameters "mention").
Test execution reports are not generated by SonarQube Cloud itself. Much like tests coverage reports, test execution reports must be generated by an external tool and then imported into SonarQube Cloud by specifying a parameter telling the scanner where to look for the report. The data is then displayed in your SonarQube Cloud analysis.
{% hint style="info" %}
**Only long-lived branches are supported for test execution**
SonarQube Cloud only supports test execution reports for the [branch-analysis](https://docs.sonarsource.com/sonarqube-cloud/enriching/branch-analysis "mention") of a project (including the main branch) not for pull requests and [#short-lived-branch-analysis](https://docs.sonarsource.com/sonarqube-cloud/branch-analysis#short-lived-branch-analysis "mention"). This differs from the case with test coverage reports where pull requests and short-lived branches are supported.
{% endhint %}
Below, you will find language- and tool-specific analysis parameters for importing test execution reports.
For information on analysis parameters in general, see [analysis-parameters](https://docs.sonarsource.com/sonarqube-cloud/advanced-setup/analysis-parameters "mention").
Unless otherwise specified, these properties require values that are relative to the project root. Some properties support the following wildcards in paths. The remarks for properties that support wildcards will mention this fact. If wildcards are not noted for a given property, then they are not supported for that property.
| **Symbol** | **Meaning** |
| ---------- | ------------------------- |
| `?` | a single character |
| `*` | any number of characters |
| `**` | any number of directories |
### All languages
**sonar.testExecutionReportPaths**
Comma-delimited list of paths to execution reports in the [generic-test-data](https://docs.sonarsource.com/sonarqube-cloud/enriching/test-coverage/generic-test-data "mention") format.
### C/C++/Objective-C
**sonar.cfamily.cppunit.reportsPath**
Path to the directory holding the [CPPUnit](https://sourceforge.net/projects/cppunit/) reports. Note that while measures such as the number of tests are displayed at the project level, no drill-down is available.
### C#
**sonar.cs.vstest.reportsPaths**
Paths to VSTest reports. Multiple paths may be comma-delimited or included via wildcards. Note that while measures such as the number of tests are displayed at the project level, no drill-down is available.
**sonar.cs.nunit.reportsPaths**
Paths to NUnit execution reports. Multiple paths may be comma-delimited or included via wildcards. Note that while measures such as the number of tests are displayed at the project level, no drill-down is available.
**sonar.cs.xunit.reportsPaths**
Paths to xUnit execution reports. Multiple paths may be comma-delimited or included via wildcards. Note that while measures such as the number of tests are displayed at the project level, no drill-down is available.
### Go
**sonar.go.tests.reportPaths**
Comma-delimited list of paths to unit test report files. Paths may be absolute or relative to the project root.
### Java
**sonar.junit.reportPaths**
Comma-delimited list of paths to Surefire XML-format reports.
### PHP
**sonar.php.tests.reportPath**
Path to the PHPUnit unit test execution report file. The path may be absolute or relative to the project root.
### Python
**sonar.python.xunit.reportPath**
Path to unit test execution report. Leave unset to use the default (`xunit-reports/xunit-result-*.xml`). Path wildcards (see above) are supported. If any paths in the report are invalid, set `sonar.python.xunit.skipDetails=true` to collect only project-level details.
### VB.NET
**sonar.vbnet.vstest.reportsPaths**
Paths to VSTest execution reports. Multiple paths may be comma-delimited or included via wildcards. Note that while measures such as the number of tests are displayed at the project level, no drill-down is available.
**sonar.vbnet.nunit.reportsPaths**
Paths to NUnit execution reports. Multiple paths may be comma-delimited or included via wildcards. Note that while measures such as the number of tests are displayed at the project level, no drill-down is available.
**sonar.vbnet.xunit.reportsPaths**
Paths to xUnit execution reports. Multiple paths may be comma-delimited or included via wildcards. Note that while measures such as the number of tests are displayed at the project level, no drill-down is available.
---
# Source: https://docs.sonarsource.com/sonarqube-server/2025.3/server-installation/data-center-edition/on-kubernetes-or-openshift/setting-up-disaster-recovery/test-failover-scenarios.md
# Source: https://docs.sonarsource.com/sonarqube-server/2025.5/server-installation/data-center-edition/on-kubernetes-or-openshift/setting-up-disaster-recovery/test-failover-scenarios.md
# Source: https://docs.sonarsource.com/sonarqube-server/2025.4/server-installation/data-center-edition/on-kubernetes-or-openshift/setting-up-disaster-recovery/test-failover-scenarios.md
# Source: https://docs.sonarsource.com/sonarqube-server/2025.6/server-installation/data-center-edition/on-kubernetes-or-openshift/setting-up-disaster-recovery/test-failover-scenarios.md
# Source: https://docs.sonarsource.com/sonarqube-server/server-installation/data-center-edition/on-kubernetes-or-openshift/setting-up-disaster-recovery/test-failover-scenarios.md
# Step 4: Test failover scenarios
The disaster scenarios described below are based on a [architecture-example](https://docs.sonarsource.com/sonarqube-server/server-installation/data-center-edition/on-kubernetes-or-openshift/setting-up-disaster-recovery/architecture-example "mention").
### Regional failure of AKS
1. Stop the primary AKS cluster and go to Azure portal's **Home** > **Kubernetes services**.
2. Select the primary cluster and select **Stop**.
3. Wait until the cluster's **Power state** changes to **Stopped** and the **Cluster operation status** changes to **Succeeded**.
4. Power on the Replica cluster and wait for the cluster's **Power state** to change to **Started** and **Cluster operation status** to **Succeeded**.
5. Once the cluster starts, perform a forced Elasticsearch reindexing. The [reindexing](https://docs.sonarsource.com/sonarqube-server/server-update-and-maintenance/maintenance/reindexing "mention") page has a special article about [#forcing-es-reindex](https://docs.sonarsource.com/sonarqube-server/server-update-and-maintenance/maintenance/reindexing#forcing-es-reindex "mention").
6. Using the Azure CLI, make sure the correct cluster credentials are set to your Helm and kubectl commands context with the command below.
```
az aks get-credentials --resource-group --name
```
7. Run the following command to reduce the replica count of the search nodes from 3 to 0. The monitoring passcode is required for the helm upgrade operation.
```
helm upgrade sonarqube-dce sonarqube/sonarqube-dce --set searchNodes.replicaCount=0,monitoringPasscode="mypassword" -n sonarqube-dce
```
8. If you are using any PVC with SonarQube deployment, delete the PVC, which should delete any PV, assuming the reclaim policy is Delete. Otherwise, manually delete/remove any PV. Typically, there is one PVC for each search node. Repeat this step for all the PVCs associated with the search nodes.
```
kubectl delete pvc
sonarqube-dce-sonarqube-dce-sonarqube-dce-sonarqube-dce-search-0 -n sonarqube-dce
```
9. Run the following commands to bring the replica count back to 3 for the search nodes.
```
export JWT_SECRET=$(echo -n "your_secret" | openssl dgst -sha256 -hmac "your_key" -binary | base64)
helm upgrade sonarqube-dce sonarqube/sonarqube-dce --set searchNodes.replicaCount=3,monitoringPasscode="mypassword",applicationNodes.jwtSecret=$JWT_SECRET -n sonarqube-dce
```
10. Login to your SonarQube Server instance using the Azure FrontDoor endpoint to confirm the failover was successful.
### Regional failure of Azure Database for PostgreSQL flexible server
1. On the Azure portal home page, go to **Azure Database for PostgreSQL flexible servers**.
2. Select the primary SonarQube database from the list.
3. On the database home page, go to **Settings** > **High availability.**
4. Select **Planned failover** or **Forced failover**. For less downtime, select **Planned failover**.
5. Once the failover is complete, open your SonarQube server instance and check the integrity of your data.
### Related pages
* [architecture-example](https://docs.sonarsource.com/sonarqube-server/server-installation/data-center-edition/on-kubernetes-or-openshift/setting-up-disaster-recovery/architecture-example "mention")
* [deploy-databases](https://docs.sonarsource.com/sonarqube-server/server-installation/data-center-edition/on-kubernetes-or-openshift/setting-up-disaster-recovery/deploy-databases "mention")
* [set-up-clusters-on-aks](https://docs.sonarsource.com/sonarqube-server/server-installation/data-center-edition/on-kubernetes-or-openshift/setting-up-disaster-recovery/set-up-clusters-on-aks "mention")
* [configure-azure-front-door](https://docs.sonarsource.com/sonarqube-server/server-installation/data-center-edition/on-kubernetes-or-openshift/setting-up-disaster-recovery/configure-azure-front-door "mention")
---
# Source: https://docs.sonarsource.com/sonarqube-server/10.4/setup-and-upgrade/upgrade-the-server/testing.md
# Source: https://docs.sonarsource.com/sonarqube-server/10.5/setup-and-upgrade/upgrade-the-server/testing.md
# Source: https://docs.sonarsource.com/sonarqube-server/10.6/setup-and-upgrade/upgrade-the-server/testing.md
# Source: https://docs.sonarsource.com/sonarqube-server/10.7/server-upgrade-and-maintenance/upgrade/upgrade-the-server/testing.md
# Source: https://docs.sonarsource.com/sonarqube-server/10.8/server-upgrade-and-maintenance/upgrade/upgrade-the-server/testing.md
# Testing the upgrade
We recommend testing your upgrade to:
* Make sure your infrastructure can run the upgrade.
* Get an idea of how long the upgrade will take.
* Gain a better understanding of the upgrade process and anticipate what you’ll need to do when performing the actual upgrade.
* Address any issues you encounter during the practice upgrade on the Sonar community.
To test your upgrade:
1. Create a staging environment using a recent backup of your production database. You want your staging environment to be as similar to your production instance as possible because the resources and time needed to upgrade depends on what’s stored in your database.
2. Use this staging environment to test the upgrade.
3. Observe how long it takes to back up and restore systems and complete the process.
---
# Source: https://docs.sonarsource.com/sonarqube-mcp-server/tools.md
# Tools
Note also the SONARQUBE\_TOOLSETS environment variable that accepts a comma-separated list of toolsets to enable. See the [#tool-enablement](https://docs.sonarsource.com/sonarqube-mcp-server/build-and-configure/environment-variables#tool-enablement "mention") article for a list of available toolsets.
### Analysis
| Tool | Type |
| --------------------------------------------------------------------------------------------------------------------------------------------------------------------------------------------------- | ---------------------------------------------------------------------------------------------------------------------------------------------------------------------------------------- |
| **analyze\_code\_snippet**: Analyze a file or code snippet with SonarQube analyzers to identify code quality and security issues. Specify the language of the snippet to improve analysis accuracy. |
codeSnippet (string, required): Code snippet or full file content.
language (string, optional): Language of the code snippet.
|
#### **When integration with SonarQube for IDE is enabled:**
| Tool | Type |
| --------------------------------------------------------------------------------------------------------------------------------------------------------------------------------------------------------------------------------------------------------- | ------------------------------------------------------------------------------------------- |
| **analyze\_file\_list**: Analyze files in the current working directory using SonarQube for IDE. This tool connects to a running SonarQube for IDE instance to perform code quality analysis on a list of files. | `file_absolute_paths` (array of strings, required): List of absolute file paths to analyze. |
| **toggle\_automatic\_analysis**: Enable or disable SonarQube for IDE automatic analysis. When enabled, SonarQube for IDE will automatically analyze files as they are modified in the working directory. When disabled, automatic analysis is turned off. | `enabled` (boolean, required): Enable or disable the automatic analysis. |
### Dependency risks
{% hint style="info" %}
Dependency risks are only available when connecting to SonarQube Server 2025.4 Enterprise edition or higher with [SonarQube Advanced Security](https://app.gitbook.com/s/yDv2XwTC1xoOKBYeCK45/advanced-security) enabled.
{% endhint %}
| Tool | Type |
| --------------------------------------------------------------------------------------------------------------------------------------------------------------------------------------------------------------- | -------------------------------------------------------------------------------------------------------------------------------------------------------------------------------- |
| **search\_dependency\_risks** - Search for software composition analysis issues (dependency risks) of a SonarQube project, paired with releases that appear in the analyzed project, application, or portfolio. |
|
### Enterprises
{% hint style="info" %}
Enterprise tools are only available when connecting to a SonarQube Cloud Enterprise edition.
{% endhint %}
| Tool | Type |
| ----------------------------------------------------------------------------------------------------------------------------------------------------------------------------- | --------------------------------------------------------------------- |
| **list\_enterprises**: List the enterprises available in SonarQube Cloud that you have access to. Use this tool to discover enterprise IDs that can be used with other tools. | `enterpriseKey` (string, optional): Enterprise key to filter results. |
### Issues
| Tool | Type |
| ------------------------------------------------------------------------------------------------------------------------------ | ------------------------------------------------------------------------------------------------------------------------------------------------------------------------------------------------------------------------------------------------------------------------------------------------------------------------------------------------------------------------------------------------------------------------------------------------------------------------------------------------------------------------------- |
| **change\_sonar\_issue\_status**: Change the status of a SonarQube issue to "accept", "falsepositive" or to "reopen" an issue. |
severities (array of strings, optional): List of severities to filter by. Possible values: INFO, LOW, MEDIUM, HIGH, BLOCKER.
p (integer, optional): Page number. Default: 1.
ps (integer, optional): Page size. Must be greater than 0 and less than or equal to 500. Default: 100.
|
### Languages
| Tool | Type |
| ----------------------------------------------------------------------------------------- | -------------------------------------------------- |
| **list\_languages**: List all programming languages supported in this SonarQube instance. | `q`: Pattern to match language keys/names against. |
### Measures
| Tool | Type |
| ------------------------------------------------------------------------------------------------ | ----------------------------------------------------------------------------------------------------------------------------------------------------------------------------------------------------------------------------------------------------------------------------------------------------------------------------------------------------------------------------------------------------------------------------------------------- |
| **get\_component\_measures**: Get SonarQube measures for a component (project, directory, file). |
component (string, optional): Component key to get measures.
branch (string, optional): Branch to analyze for measures.
metricKeys (array of strings, optional): Metric keys to retrieve (for example: ncloc, complexity, violations, coverage).
pullRequest (string, optional): Optional pull request identifier to analyze for measures - String
|
### Metrics
| Tool | Type |
| -------------------------------------------------- | ---------------------------------------------------------------------------------------------------------------------------------------------------------------------------------------------------- |
| **search\_metrics**: Search for SonarQube metrics. |
p (integer, optional): Page number. Default: 1.
ps (integer, optional): Page size. Must be greater than 0 and less than or equal to 500. Default: 100.
|
### Portfolios
| Tool | Type |
| -------------------------------------------------------------------------------------------------------------- | --------------------------------------------------------------------------------------------------------------------------------------------------------------------------------------------------------------------------------------------------------------------------------------------------------------------------------------------------------------------------------------------------------------------------------------------------------------------------------------------------------------------------------------------------------------------------------------------------------------------------------------------------------------------------------------------------------------------------------------------------------------------------------------------------------------------------------------------------------------------------------------------------------------------------------------------------------------------------------------------------------------------------------------------------------------------------------------------------------------------------------------------------------------------------------------------------------------------------------------------------------------------------------- |
| **list\_portfolios**: List enterprise portfolios available in SonarQube with filtering and pagination options. |
For SonarQube Server:
q (string, optional): Search query to filter portfolios by name or key.
favorite (boolean): If true, returns favorite portfolios.
pageSize (integer, optional): Optional page size, max 500. Default: 100.
For SonarQube Cloud:
enterpriseId (string): Enterprise uuid. Can be omitted only if the favorite parameter is supplied with value true.
q (string, optional): Search query to filter portfolios by name.
favorite (boolean, required): Required to be true if the enterpriseId parameter is omitted. If true, returns portfolios favorited by the logged-in user. Cannot be true when draft is true.
draft (boolean): If true, returns drafts created by the logged-in user. Cannot be true when favorite is true.
pageIndex (integer, optional): Index of the page to fetch. Default: 1,
pageSize (integer, optional): Size of the page to fetch. Default: 50.
|
### Projects
| Tool | Type |
| ---------------------------------------------------------------------------------------- | ---------------------------------------------------------- |
| **search\_my\_sonarqube\_projects**: Find SonarQube projects. The response is paginated. | `page` (string, optional): Optional page number - *String* |
### Quality gates
| Tool | Type |
| ----------------------------------------------------------------------------------------------- | -------------------------------------------------------------------------------------------------------------------------------------------------------------------------------------------------------------------------------------------------------------------------------------------------------------------------------- |
| **get\_project\_quality\_gate\_status**: Get the quality gate status for the SonarQube project. |
analysisId (string, optional): Analysis ID.
branch (string, optional): Branch key.
projectId (string, optional): Project ID.
projectKey (string, optional): Project key.
pullRequest (string, optional): Pull request ID.
|
| **list\_quality\_gates**: List all quality gates in my SonarQube. | |
### Rules
| Tool | Type |
| ---------------------------------------------------------------------------- | ---------------------------------------------------------------------------------------------------------------------------- |
| **list\_rule\_repositories**: List rule repositories available in SonarQube. |
language (string, optional): Language key.
q (string, optional): Search query.
|
| **show\_rule**: Shows detailed information about a SonarQube rule. | `key` (string, required): Rule key. |
### Sources
| Tool | Type |
| ----------------------------------------------------------------------------------------------------------------------------------- | ------------------------------------------------------------------------------------------------------------------------------------------------------------------------------------------------------------------------------------------------------------------------------------------------------------------------------ |
| **get\_raw\_source**: Get source code as raw text from SonarQube. Requires the *See Source Code* permission on file. |
key (string, required): File key.
branch (string, optional): Branch key.
pullRequest (string, optional): Pull request id.
|
| **get\_scm\_info**: Get SCM information of SonarQube source files. Requires the *See Source Code* permission on the file's project. |
key (string, required): File key.
commits\_by\_line (string): If the value is false, group lines by SCM commit; else display commits for each line.
from (number): First line to return. Starts at 1.
to (inclusive): Last line to return.
|
### System
{% hint style="info" %}
System tools are only available when connecting to SonarQube Server.
{% endhint %}
| Tool | Type |
| ------------------------------------------------------------------------------------------------------------------------------------------------------------------------------------------- | ------------------------------------------------------------------------------------------------------------------------ |
| **get\_system\_health**: Get the health status of SonarQube Server instance. Returns GREEN (fully operational), YELLOW (usable but needs attention), or RED (not operational). | |
| **get\_system\_info**: Get detailed information about SonarQube Server system configuration including JVM state, database, search indexes, and settings. Requires 'Administer' permissions. | |
| **get\_system\_logs**: Get SonarQube Server system logs in plain-text format. Requires system administration permission. | `name` (string, optional): Name of the logs to get. Possible values: access, app, ce, deprecation, es, web. Default: app |
| **ping\_system**: Ping the SonarQube Server system to check if it's alive. Returns 'pong' as plain text. | |
| **get\_system\_status**: Get state information about SonarQube Server. Returns status (STARTING, UP, DOWN, RESTARTING, DB\_MIGRATION\_NEEDED, DB\_MIGRATION\_RUNNING), version, and id. | |
### Webhooks
| Tool | Type |
| ------------------------------------------------------------------------------------------------------------------------------------------------------------------------------------------ | -------------------------------------------------------------------------------------------------------------------------------------------------------------------------------------------------------------------------------------------------------------------------------------------------------------------- |
| **create\_webhook**: Create a new webhook for the SonarQube organization or project. Requires *Administrator* permissions on the specified project, or *Global Administrator* permissions. |
name (string, required): Webhook name.
url (string, required): Webhook URL.
projectKey (string, optional): Project key for project-specific webhook.
secret (string, optional): Webhook secret for securing the webhook payload.
|
| **list\_webhooks**: List all webhooks for the SonarQube organization or project. Requires *Administrator* permissions on the specified project, or *Global Administrator* permissions. | `projectKey` (string, optional): Project key to list project-specific webhooks. |
---
# Source: https://docs.sonarsource.com/sonarqube-server/2025.5/user-guide/issues/triaging-issues-in-sandbox.md
# Source: https://docs.sonarsource.com/sonarqube-server/2025.6/user-guide/issues/triaging-issues-in-sandbox.md
# Source: https://docs.sonarsource.com/sonarqube-server/user-guide/issues/triaging-issues-in-sandbox.md
# Triaging issues in Sandbox
If the Sandbox feature is enabled for your project, issues coming from a SonarQube Server update and according to predefined conditions will be moved to the Sandbox. SonarQube ignores issues in sandbox in ratings/measure calculations and quality gate assessment but displays the number of sandboxed issues in the various analysis snapshots in the UI. The purpose is to prevent unexpected disruptions to your CI/CD pipelines after a SonarQube update by letting you triage the sandboxed issues at your convenience.
With the Administer Issue permission, you can perform the following actions on an issue stored in the Sandbox:
* You can open the issue if you want the issue to follow your standard fixing process.\
The issue will impact the quality gate.
* You can accept the issue if you want to fix it later. The issue status is then marked as **Accepted**.\
The issue will not impact the quality gate.
* You can mark the issue as **False positive** if you think the analysis is mistaken.
In addition, you can reassign an issue, tag an issue, and comment on an issue.
To triage your issues in Sandbox:
1. Retrieve your sandboxed issues. Do one of the following:
* Retrieve your project and select **Issues** in the project navigation bar. See [retrieving-projects](https://docs.sonarsource.com/sonarqube-server/user-guide/viewing-projects/retrieving-projects "mention") for more information.
* Retrieve issues from an analysis report by selecting the reported number of issues in Sandbox.
The **Issues** page opens with search filters in the left-side panel and issue results in the right section of the page. If not already done, select **In sandbox** in the search filters as illustrated below.
2. In the issue results, in the card of the issue you want to triage, select the **In sandbox** status and select the action you want to perform on the issue.
3. To reassign an issue, tag an issue, or comment on an issue, see [managing](https://docs.sonarsource.com/sonarqube-server/user-guide/issues/managing "mention").
### Related pages
* [#sandboxing-of-issues-coming-from-sonarqube-update](https://docs.sonarsource.com/sonarqube-server/user-guide/solution-overview#sandboxing-of-issues-coming-from-sonarqube-update "mention")
* [retrieving](https://docs.sonarsource.com/sonarqube-server/user-guide/issues/retrieving "mention")
* [reviewing](https://docs.sonarsource.com/sonarqube-server/user-guide/issues/reviewing "mention")
* [managing](https://docs.sonarsource.com/sonarqube-server/user-guide/issues/managing "mention")
* [fixing](https://docs.sonarsource.com/sonarqube-server/user-guide/issues/fixing "mention")
---
# Source: https://docs.sonarsource.com/sonarqube-community-build/devops-platform-integration/azure-devops-integration/troubleshooting-analysis.md
# Source: https://docs.sonarsource.com/sonarqube-server/2025.2/devops-platform-integration/azure-devops-integration/troubleshooting-analysis.md
# Source: https://docs.sonarsource.com/sonarqube-server/2025.3/devops-platform-integration/azure-devops-integration/troubleshooting-analysis.md
# Source: https://docs.sonarsource.com/sonarqube-server/2025.5/devops-platform-integration/azure-devops-integration/troubleshooting-analysis.md
# Source: https://docs.sonarsource.com/sonarqube-server/2025.1/devops-platform-integration/azure-devops-integration/troubleshooting-analysis.md
# Source: https://docs.sonarsource.com/sonarqube-server/2025.4/devops-platform-integration/azure-devops-integration/troubleshooting-analysis.md
# Source: https://docs.sonarsource.com/sonarqube-server/2025.6/devops-platform-integration/azure-devops-integration/troubleshooting-analysis.md
# Source: https://docs.sonarsource.com/sonarqube-server/devops-platform-integration/azure-devops-integration/troubleshooting-analysis.md
# Troubleshooting analysis
See also [troubleshooting-the-analysis](https://docs.sonarsource.com/sonarqube-server/analyzing-source-code/troubleshooting-the-analysis "mention").
### Azure build pipeline fails
If your Azure build pipeline fails on the analysis stage, check that you correctly set the integration at the global level. In particular, check the PAT failure points. See [#preparing](https://docs.sonarsource.com/sonarqube-server/devops-platform-integration/setting-up-integration-at-global-level#preparing "mention") for more information.
### Missing blame information or Could not find ref error
The errors "*Missing blame information…*" and "*Could not find ref…*" can be caused by checking out with a partial or shallow clone, or when using Git submodules. You should disable git shallow clone to make sure the scanner has access to all of your history when running analysis with Azure DevOps.
For more information, see the MS article on [Shallow fetch](https://learn.microsoft.com/en-us/azure/devops/pipelines/repos/azure-repos-git?view=azure-devops\&tabs=yaml#shallow-fetch).
### Self-signed certificate error on Prepare Analysis Configuration task
Try to add the server self-signed certificate as described in [#azure-pipelines](https://docs.sonarsource.com/sonarqube-server/analyzing-source-code/scanners/scanner-environment/manage-tls-certificates#azure-pipelines "mention").
---
# Source: https://docs.sonarsource.com/sonarqube-community-build/analyzing-source-code/troubleshooting-the-analysis.md
# Source: https://docs.sonarsource.com/sonarqube-server/10.4/analyzing-source-code/troubleshooting-the-analysis.md
# Source: https://docs.sonarsource.com/sonarqube-server/10.5/analyzing-source-code/troubleshooting-the-analysis.md
# Source: https://docs.sonarsource.com/sonarqube-server/10.6/analyzing-source-code/troubleshooting-the-analysis.md
# Source: https://docs.sonarsource.com/sonarqube-server/10.7/analyzing-source-code/troubleshooting-the-analysis.md
# Source: https://docs.sonarsource.com/sonarqube-server/10.8/analyzing-source-code/troubleshooting-the-analysis.md
# Source: https://docs.sonarsource.com/sonarqube-server/2025.2/analyzing-source-code/troubleshooting-the-analysis.md
# Source: https://docs.sonarsource.com/sonarqube-server/2025.3/analyzing-source-code/troubleshooting-the-analysis.md
# Source: https://docs.sonarsource.com/sonarqube-server/2025.5/analyzing-source-code/troubleshooting-the-analysis.md
# Source: https://docs.sonarsource.com/sonarqube-server/2025.1/analyzing-source-code/troubleshooting-the-analysis.md
# Source: https://docs.sonarsource.com/sonarqube-server/2025.4/analyzing-source-code/troubleshooting-the-analysis.md
# Source: https://docs.sonarsource.com/sonarqube-server/2025.6/analyzing-source-code/troubleshooting-the-analysis.md
# Source: https://docs.sonarsource.com/sonarqube-server/analyzing-source-code/troubleshooting-the-analysis.md
# Troubleshooting the analysis
See also the Troubleshooting section on the corresponding Scanner and CI tool page.
To find the scanner logs, see this [Community guide](https://community.sonarsource.com/t/how-to-find-logs-about-importing-code-coverage/73317).
### Viewing the analysis progress status
During analysis, data is requested from the server, the files provided to the analysis are processed, and the resulting data is sent back to the server in the form of a report, which is then analyzed asynchronously on the server side.
Analysis reports are queued and processed sequentially, so it is quite possible that for a brief period after your analysis log shows completion, the updated values are not visible in your SonarQube Server project. However, you will be able to tell what’s going on because an icon will be added on the project overview page, to the right of the project name. Mouse over it for more information. The icon goes away once the analysis processing is complete. However, if there are issues with the analysis, a warning message appears. Click on the **see details** link to reveal a list of analysis issues.
### Out of memory error
If your analysis errors out with `java.lang.OutOfMemoryError: GC overhead limit exceeded` then it means that your project is too large or too intricate for the scanner to analyze with the default memory allocation. To fix this you’ll want to allocate a larger heap (using `-Xmx[numeric value here]`) to the process running the analysis. Some CI engines may give you an input to specify the necessary values, for instance if you’re using a Maven Build Step in a Jenkins job to run analysis. Otherwise, use Java Options to set a higher value. Note that details of setting Java Options are omitted here because they vary depending on the environment.
You can also add an exclusion to manage the files and folders you don’t need to analyze by limiting your [analysis scope](https://docs.sonarsource.com/sonarqube-server/project-administration/adjusting-analysis/setting-analysis-scope). Additionally, using a Solid-state drive or something similar will help speed up the analysis process and thus use less memory, especially for small file access.
### PKIX path building failed
If your analysis errors out with `PKIX path building failed` then it means that your SonarQube Server is configured with HTTPS and a self-signed SSL certificate (see [securing-behind-proxy](https://docs.sonarsource.com/sonarqube-server/server-installation/network-security/securing-behind-proxy "mention")). However, the certificate is not correctly configured in the scanner machine’s JVM. This configuration is outside of SonarQube Server scope. The server certificate is unknown and could not be validated with the provided truststore. To solve the issue, you need to import the SonarQube Server certificate to the Java truststore (see [manage-tls-certificates](https://docs.sonarsource.com/sonarqube-server/analyzing-source-code/scanners/scanner-environment/manage-tls-certificates "mention")). See also [Oracle’s documentation](https://docs.oracle.com/cd/E19830-01/819-4712/ablqw/index.html) for more information.
### No response from server
If, for example, after a PostgreSQL database upgrade, the CPU usage has increased drastically in SonarQube Server and your build process is blocked at the code scanning step (no response from SonarQube Server), try reindexing the following database tables: issues, rules, and components.
### Various error messages
#### The format of the analysis property sonar.token= is invalid
You may encounter this issue when using SONAR\_TOKEN as a secret in a calling workflow in GitHub Actions in case the called workflow doesn’t manage to read it as a secret. In that case, make sure that the secret is inherited from the calling workflow (you may use the `secrets: inherit` keyword). See [GitHub documentation](https://docs.github.com/en/actions/sharing-automations/reusing-workflows#using-inputs-and-secrets-in-a-reusable-workflow) for more information.
#### The maximum number of open files was reached
On a Linux system, see **Configuring the maximum number of open files and other limits** in [linux](https://docs.sonarsource.com/sonarqube-server/server-installation/pre-installation/linux "mention").
On a MacOS system, see **Configuring the maximum number of open files** in [macos](https://docs.sonarsource.com/sonarqube-server/server-installation/pre-installation/macos "mention").
#### Error when analyzing files with non-ASCII characters in the name
When analyzing files with non-ASCII characters in the name, if the `Malformed input or input contains unmappable characters` error is raised then you should make sure that the environment variables `LC_ALL` and `LANG` are properly set before running the analysis as shown below.
```css-79elbk
export LC_ALL="en_US.UTF-8"
export LANG="en_US.UTF-8"
```
#### No coverage data in pull request analysis report with AWS CodeBuild
Verify that AWS CodeBuild `LOCAL_SOURCE_CACHE` feature is disabled.
#### Failed to upload analysis report on cloud platform
If you encounter the "SonarQubeAnalyze fails at upload report - error POST 403 - Failed to upload: You’re not authorized" error and you’re running SonarQube Server on a cloud platform, check that the cloud environment’s firewall (WAF) configuration allows the upload. WAF rules can potentially block SonarQube Server APIs, including the report submission.
#### Self-signed certificate error
See [manage-tls-certificates](https://docs.sonarsource.com/sonarqube-server/analyzing-source-code/scanners/scanner-environment/manage-tls-certificates "mention").
#### Analysis stops with an error on Windows
If your username on Windows ends with a special character, for example `C:\Users\myUser!\`, the analysis will fail. Either change the username or, if that’s not possible, use the `sonar.userHome` parameter and set a path that doesn’t include any special characters. See [analysis-parameters](https://docs.sonarsource.com/sonarqube-server/analyzing-source-code/analysis-parameters "mention") for more information about `sonar.userHome.`
#### Missing blame information or Could not find ref error
The errors "*Missing blame information…*" and "*Could not find ref…*" can be caused by checking out with a partial or shallow clone, or when using Git submodules. You should disable git shallow clone to make sure the scanner has access to all of your history when running analysis. See [verifying-code-checkout-step](https://docs.sonarsource.com/sonarqube-server/analyzing-source-code/scanners/scanner-environment/verifying-code-checkout-step "mention").
### Debugging the analysis
For debugging purposes, you can use the `sonar.scanner.internal.dumpToFile` parameter to output to a specific file a full list of properties retrieved by the scanners (CLI, Gradle, Maven, and NPM). The properties include user properties passed through command line arguments, configuration files, environmental variables, and other properties relevant to the specific scanners.
**Possible value**: path to the output file name.
Deprecated: `sonar.scanner.dumpToFile`
**Note**: The equivalent output is available in ***Your Project*** > **Project Settings** > **Background Tasks** > **3-dots menu** > **Show SonarScanner Context**. If the analysis report fails, the list is not generated in Show SonarScanner Context.
---
# Source: https://docs.sonarsource.com/sonarqube-cloud/advanced-security/troubleshooting-the-dependency-analysis.md
# Troubleshooting the dependency analysis
Advanced Security is an add-on that requires a separate subscription to your SonarQube Cloud's [Enterprise plan](https://www.sonarsource.com/plans-and-pricing/#sonarqube-cloud-features).
### Issues with analysis results
Guidelines for troubleshooting analysis result issues.
#### I don't see any issues on my first PR analysis
If the first analysis for your project is on a pull request, the analysis will be unable to determine what dependencies and risks are new in your pull request, so you may not see the results you expect. We recommend running at least one analysis on the main branch before running analyses on pull requests.
#### I don't see any dependencies analyzed (No packages were found.)
Make sure that you have a supported manifest and lockfile (shown in the [Supported languages and package managers](https://docs.sonarsource.com/sonarqube-cloud/analyzing-projects-for-dependencies-sca#supported-languages-and-package-managers) section) available, not excluded from analysis, and not excluded by SCM exclusions (such as `.gitignore`). For example, if you exclude XML files (e.g. `sonar.exclusions=**/*.xml` ) for a Maven Java project or JSON files (e.g. `sonar.exclusions=**/*.json`) in JavaScript/TypeScript projects, then Sonar scanner will not find `pom.xml`, `package.json`, etc.
#### My SCA analysis takes too long
A properly configured analysis with a lockfile should take minimal time. Common causes of extended analysis time are:
**JavaScript**
Ensure the directory is excluded via `sonar.exclusions` or `sonar.sca.exclusions`. See [Analyzing projects for dependencies](https://docs.sonarsource.com/sonarqube-cloud/advanced-security/analyzing-projects-for-dependencies-sca) for more information.
**Pip / requirements.txt**
The Sonar analysis will run `pip install -r requirements.txt` in a temporary virtual environment for any discovered `requirements.txt`file. This may take significant memory or time if the installation process requires building core Python wheels.
**Maven/Gradle**
The Sonar analysis will run Maven or Gradle to resolve the dependencies of your project. If a wrapper is used, it will use the specified JVM memory configuration for maven/gradle, which may be more than what your analysis previously required.
Ensure that the memory parameters are set appropriately, or that your analysis runners have enough memory for your configured JVM memory parameters.
#### How do I see what the SCA analysis is doing?
You can see the commands being run by examining the scanner log and looking for `Running…` lines after the `----- Gather SCA dependencies on project` line. Running the scanner in debug mode `sonar.verbose`, or passing `-X` provides additional detail.
#### I see more dependencies than expected on my PNPM workspace projects
SonarQube's SCA support currently does not distinguish between workspaces in a PNPM monorepo setup. If run in a workspace of a monorepo, all dependencies in the monorepo are reported.
### Unknown lifecycle phase error
When analyzing some java projects, you may get an error that says "there was a problem running `mvn dependency:tree”`, and the following message in the details of the error:
`[ERROR] Unknown lifecycle phase "/some/path/.m2"`
This is due to a conflict between a `MAVEN_CONFIG` environment variable that was present during analysis and the `mvnw` maven wrapper in your project directory. You can solve this by doing one of the following:
* unset the `MAVEN_CONFIG` environment variable
* update the maven wrapper in your repository by running `./mvnw wrapper:wrapper`, and commit the result
* force the use of `mvn` instead of the wrapper by setting the `sonar.sca.mavenIgnoreWrapper` property to `true`
### No dependency chains found
Sonar uses lockfiles that contain a full dependency graph to determine how dependencies are used by your project. If a lockfile is missing, or cannot be generated, dependency chains will be missing.
You can fix this error by ensuring a lockfile is present when analysis is run. Sonar recommends committing the lockfile to your source control system. For examples, you can see the documentation for the [python dependency manager poetry](https://python-poetry.org/docs/basic-usage/#committing-your-poetrylock-file-to-version-control) and the [JavaScript dependency manager yarn](https://classic.yarnpkg.com/lang/en/docs/yarn-lock/).
### Errors in the dependency analysis
The scanner will warn you of any errors when processing your dependency files.
| **Error message** | **Recommendation** |
| ---------------------------------------------------------- | ------------------------------------------------------------------------------------------------------------------------------------------------------------------------------------------------------------------------------------------------------------------------------------------------------------------------------------------------------------------------------------------------------------------------------------------------------------------------------------------------------------------------------------------------------------------------------------------------------------------------------------------------------------------------------------------------------------------------------------------------------------------------------------------------------------------------------ |
| No packages were found. | Make sure that you have a supported manifest and lockfile shown in [Analyzing project for dependencies](https://docs.sonarsource.com/sonarqube-cloud/advanced-security/analyzing-projects-for-dependencies-sca) (see the "Supported languages and package managers" section). |
| There was a problem parsing the manifests. | Same as above. |
| This type of file is not supported. | Same as above. |
| \ (\) has inexact version '\' |
Certain manifest files (such as a NPM package.json file) list a range of allowable dependencies. When a dependency is specified as a range, Sonar uses a lockfile to determine the exact dependency in use.
When a lockfile is either not present, or cannot be properly generated, the scanner raises an error that the version specified is not exact and cannot be resolved to a specific software version.
You can fix this error by ensuring a lockfile is present when analysis is run.
|
### Related pages
* [Reviewing and fixing dependency risks](https://docs.sonarsource.com/sonarqube-cloud/advanced-security/reviewing-and-fixing-dependency-risks)
* [Analyzing projects for dependencies](https://docs.sonarsource.com/sonarqube-cloud/advanced-security/analyzing-projects-for-dependencies-sca)
* [Managing license profiles and policies](https://docs.sonarsource.com/sonarqube-cloud/advanced-security/managing-license-profiles-and-policies)
* [Best practices for managing dependency risks](https://docs.sonarsource.com/sonarqube-cloud/advanced-security/best-practices-for-managing-dependency-risks)
---
# Source: https://docs.sonarsource.com/sonarqube-mcp-server/resources/troubleshooting.md
# Source: https://docs.sonarsource.com/sonarqube-community-build/instance-administration/authentication/troubleshooting.md
# Source: https://docs.sonarsource.com/sonarqube-community-build/devops-platform-integration/bitbucket-integration/bitbucket-cloud-integration/troubleshooting.md
# Source: https://docs.sonarsource.com/sonarqube-community-build/analyzing-source-code/dotnet-environments/troubleshooting.md
# Source: https://docs.sonarsource.com/sonarqube-community-build/server-update-and-maintenance/troubleshooting.md
# Source: https://docs.sonarsource.com/sonarqube-for-eclipse/resources/troubleshooting.md
# Source: https://docs.sonarsource.com/sonarqube-for-visual-studio/resources/troubleshooting.md
# Source: https://docs.sonarsource.com/sonarqube-for-intellij/resources/troubleshooting.md
# Source: https://docs.sonarsource.com/sonarqube-for-vs-code/resources/troubleshooting.md
# Source: https://docs.sonarsource.com/sonarqube-server/8.9/setup-and-upgrade/troubleshooting.md
# Source: https://docs.sonarsource.com/sonarqube-server/9.8/setup-and-upgrade/troubleshooting.md
# Source: https://docs.sonarsource.com/sonarqube-server/9.9/setup-and-upgrade/troubleshooting.md
# Source: https://docs.sonarsource.com/sonarqube-server/10.0/setup-and-upgrade/troubleshooting.md
# Source: https://docs.sonarsource.com/sonarqube-server/10.1/setup-and-upgrade/troubleshooting.md
# Source: https://docs.sonarsource.com/sonarqube-server/10.2/setup-and-upgrade/troubleshooting.md
# Source: https://docs.sonarsource.com/sonarqube-server/10.3/setup-and-upgrade/troubleshooting.md
# Source: https://docs.sonarsource.com/sonarqube-server/10.3/setup-and-upgrade/install-the-server/troubleshooting.md
# Source: https://docs.sonarsource.com/sonarqube-server/10.4/setup-and-upgrade/troubleshooting.md
# Source: https://docs.sonarsource.com/sonarqube-server/10.4/setup-and-upgrade/install-the-server/troubleshooting.md
# Source: https://docs.sonarsource.com/sonarqube-server/10.5/setup-and-upgrade/troubleshooting.md
# Source: https://docs.sonarsource.com/sonarqube-server/10.5/setup-and-upgrade/install-the-server/troubleshooting.md
# Source: https://docs.sonarsource.com/sonarqube-server/10.6/setup-and-upgrade/troubleshooting.md
# Source: https://docs.sonarsource.com/sonarqube-server/10.6/setup-and-upgrade/install-the-server/troubleshooting.md
# Source: https://docs.sonarsource.com/sonarqube-server/10.7/analyzing-source-code/dotnet-environments/troubleshooting.md
# Source: https://docs.sonarsource.com/sonarqube-server/10.7/server-upgrade-and-maintenance/troubleshooting.md
# Source: https://docs.sonarsource.com/sonarqube-server/10.7/setup-and-upgrade/install-the-server/troubleshooting.md
# Source: https://docs.sonarsource.com/sonarqube-server/10.8/instance-administration/authentication/troubleshooting.md
# Source: https://docs.sonarsource.com/sonarqube-server/10.8/analyzing-source-code/dotnet-environments/troubleshooting.md
# Source: https://docs.sonarsource.com/sonarqube-server/10.8/server-upgrade-and-maintenance/troubleshooting.md
# Source: https://docs.sonarsource.com/sonarqube-server/2025.2/instance-administration/authentication/troubleshooting.md
# Source: https://docs.sonarsource.com/sonarqube-server/2025.2/analyzing-source-code/dotnet-environments/troubleshooting.md
# Source: https://docs.sonarsource.com/sonarqube-server/2025.2/server-update-and-maintenance/troubleshooting.md
# Source: https://docs.sonarsource.com/sonarqube-server/2025.3/instance-administration/authentication/troubleshooting.md
# Source: https://docs.sonarsource.com/sonarqube-server/2025.3/analyzing-source-code/dotnet-environments/troubleshooting.md
# Source: https://docs.sonarsource.com/sonarqube-server/2025.3/server-update-and-maintenance/troubleshooting.md
# Source: https://docs.sonarsource.com/sonarqube-server/2025.3/advanced-security/troubleshooting.md
# Source: https://docs.sonarsource.com/sonarqube-server/2025.5/instance-administration/authentication/troubleshooting.md
# Source: https://docs.sonarsource.com/sonarqube-server/2025.5/devops-platform-integration/bitbucket-integration/bitbucket-cloud-integration/troubleshooting.md
# Source: https://docs.sonarsource.com/sonarqube-server/2025.5/analyzing-source-code/dotnet-environments/troubleshooting.md
# Source: https://docs.sonarsource.com/sonarqube-server/2025.5/server-update-and-maintenance/troubleshooting.md
# Source: https://docs.sonarsource.com/sonarqube-server/2025.5/advanced-security/troubleshooting.md
# Source: https://docs.sonarsource.com/sonarqube-server/2025.1/instance-administration/authentication/troubleshooting.md
# Source: https://docs.sonarsource.com/sonarqube-server/2025.1/analyzing-source-code/dotnet-environments/troubleshooting.md
# Source: https://docs.sonarsource.com/sonarqube-server/2025.1/server-update-and-maintenance/troubleshooting.md
# Source: https://docs.sonarsource.com/sonarqube-server/2025.4/instance-administration/authentication/troubleshooting.md
# Source: https://docs.sonarsource.com/sonarqube-server/2025.4/analyzing-source-code/dotnet-environments/troubleshooting.md
# Source: https://docs.sonarsource.com/sonarqube-server/2025.4/server-update-and-maintenance/troubleshooting.md
# Source: https://docs.sonarsource.com/sonarqube-server/2025.4/advanced-security/troubleshooting.md
# Source: https://docs.sonarsource.com/sonarqube-server/2025.6/instance-administration/authentication/troubleshooting.md
# Source: https://docs.sonarsource.com/sonarqube-server/2025.6/instance-administration/system-functions/notifications/slack/troubleshooting.md
# Source: https://docs.sonarsource.com/sonarqube-server/2025.6/devops-platform-integration/bitbucket-integration/bitbucket-cloud-integration/troubleshooting.md
# Source: https://docs.sonarsource.com/sonarqube-server/2025.6/analyzing-source-code/dotnet-environments/troubleshooting.md
# Source: https://docs.sonarsource.com/sonarqube-server/2025.6/server-update-and-maintenance/troubleshooting.md
# Source: https://docs.sonarsource.com/sonarqube-server/2025.6/advanced-security/troubleshooting.md
# Source: https://docs.sonarsource.com/sonarqube-server/instance-administration/authentication/troubleshooting.md
# Source: https://docs.sonarsource.com/sonarqube-server/instance-administration/system-functions/notifications/slack/troubleshooting.md
# Source: https://docs.sonarsource.com/sonarqube-server/devops-platform-integration/bitbucket-integration/bitbucket-cloud-integration/troubleshooting.md
# Source: https://docs.sonarsource.com/sonarqube-server/analyzing-source-code/dotnet-environments/troubleshooting.md
# Source: https://docs.sonarsource.com/sonarqube-server/server-update-and-maintenance/troubleshooting.md
# Source: https://docs.sonarsource.com/sonarqube-server/advanced-security/troubleshooting.md
# Source: https://docs.sonarsource.com/sonarqube-cloud/appendices/troubleshooting.md
# Source: https://docs.sonarsource.com/sonarqube-cloud/administering-sonarcloud/managing-enterprise/enterprise-security/sso/troubleshooting.md
# Troubleshooting SSO connection
There may be several reasons for this failure:
* The user entered an invalid key or you sent them an invalid login URL. See [inviting-users-to-sign-in](https://docs.sonarsource.com/sonarqube-cloud/administering-sonarcloud/managing-enterprise/enterprise-security/sso/setup/inviting-users-to-sign-in "mention").
* The user is not a member of any organization in the enterprise. See [organization-members](https://docs.sonarsource.com/sonarqube-cloud/administering-sonarcloud/managing-organization/users-and-permissions/organization-members "mention").
* The group synchronization failed. See [verify-user-groups](https://docs.sonarsource.com/sonarqube-cloud/administering-sonarcloud/managing-enterprise/enterprise-security/sso/setup/verify-user-groups "mention").
* The SSO configuration is incorrect:
* Check the attribute mapping (specifically email). See [editing-sso-configuration](https://docs.sonarsource.com/sonarqube-cloud/administering-sonarcloud/managing-enterprise/enterprise-security/sso/editing-sso-configuration "mention").
* If it still doesn’t work, check the other SSO settings and test your connection.
* You use GitHub and SSO and have configured an IP allow list in GitHub. In that case, disable the configuration in GitHub and try again.
### Related pages
[about](https://docs.sonarsource.com/sonarqube-cloud/administering-sonarcloud/managing-enterprise/enterprise-security/sso/about "mention")\
[setting-up-sso](https://docs.sonarsource.com/sonarqube-cloud/getting-started-with-enterprise/setting-up-sso "mention")\
[editing-sso-configuration](https://docs.sonarsource.com/sonarqube-cloud/administering-sonarcloud/managing-enterprise/enterprise-security/sso/editing-sso-configuration "mention")\
[deleting-sso-configuration](https://docs.sonarsource.com/sonarqube-cloud/administering-sonarcloud/managing-enterprise/enterprise-security/sso/deleting-sso-configuration "mention")\
[#deleting-sso-account](https://docs.sonarsource.com/sonarqube-cloud/managing-organization/users-and-permissions/user-on-and-offboarding#deleting-sso-account "mention")
---
# Source: https://docs.sonarsource.com/sonarqube-community-build/try-out-sonarqube.md
# Source: https://docs.sonarsource.com/sonarqube-server/8.9/try-out-sonarqube.md
# Source: https://docs.sonarsource.com/sonarqube-server/9.8/try-out-sonarqube.md
# Source: https://docs.sonarsource.com/sonarqube-server/9.9/try-out-sonarqube.md
# Source: https://docs.sonarsource.com/sonarqube-server/10.0/try-out-sonarqube.md
# Source: https://docs.sonarsource.com/sonarqube-server/10.1/try-out-sonarqube.md
# Source: https://docs.sonarsource.com/sonarqube-server/10.2/try-out-sonarqube.md
# Source: https://docs.sonarsource.com/sonarqube-server/10.3/try-out-sonarqube.md
# Source: https://docs.sonarsource.com/sonarqube-server/10.4/try-out-sonarqube.md
# Source: https://docs.sonarsource.com/sonarqube-server/10.5/try-out-sonarqube.md
# Source: https://docs.sonarsource.com/sonarqube-server/10.6/try-out-sonarqube.md
# Source: https://docs.sonarsource.com/sonarqube-server/10.7/try-out-sonarqube.md
# Source: https://docs.sonarsource.com/sonarqube-server/10.8/try-out-sonarqube.md
# Source: https://docs.sonarsource.com/sonarqube-server/2025.2/try-out-sonarqube.md
# Source: https://docs.sonarsource.com/sonarqube-server/2025.3/try-out-sonarqube.md
# Source: https://docs.sonarsource.com/sonarqube-server/2025.5/try-out-sonarqube.md
# Source: https://docs.sonarsource.com/sonarqube-server/2025.1/try-out-sonarqube.md
# Source: https://docs.sonarsource.com/sonarqube-server/2025.4/try-out-sonarqube.md
# Source: https://docs.sonarsource.com/sonarqube-server/2025.6/try-out-sonarqube.md
# Source: https://docs.sonarsource.com/sonarqube-server/try-out-sonarqube.md
# Try out SonarQube Server
You’ve heard about how [SonarQube Server](https://www.sonarsource.com/products/sonarqube/) can help you write high quality, safer code, and now you’re ready to try it out for yourself. This guide shows you how to install a local instance of SonarQube Server and analyze a project. Installing a local instance gets you up and running quickly, so you can experience SonarQube Server firsthand.
You can try [Developer edition](https://www.sonarsource.com/plans-and-pricing/developer/) or [Enterprise edition](https://www.sonarsource.com/plans-and-pricing/enterprise/) for free for 14 days.
Once you’re ready to set up a production instance, take a look at the [introduction](https://docs.sonarsource.com/sonarqube-server/server-installation/introduction "mention") documentation on installing the Developer or Enterprise Editions.
### Installing a local instance of SonarQube Server
You can evaluate SonarQube Server using a traditional installation with the [zip file](https://www.sonarsource.com/products/sonarqube/downloads/) or you can spin up a Docker container using one of our [Docker images](https://hub.docker.com/_/sonarqube/). Select the method you prefer below to expand the installation instructions:
From the zip file
1. Download and install [Java 21](https://adoptium.net/en-GB/temurin/releases/?version=21) on your system.
2. [Download](https://www.sonarsource.com/products/sonarqube/downloads/) the SonarQube Developer Edition zip file.
3. As a **non-`root`** **user**, unzip it in, for example, `C:\sonarqube` or `/opt/sonarqube`.
4. As a **non-`root`** **user**, start the SonarQube server:
```bash
# On Windows, execute:
C:\sonarqube\bin\windows-x86-64\StartSonar.bat
# On other operating systems, as a non-root user execute:
/opt/sonarqube/bin//sonar.sh console
```
If your instance fails to start, check your [server-logs](https://docs.sonarsource.com/sonarqube-server/server-update-and-maintenance/troubleshooting/server-logs "mention") to find the cause.
From the Docker image
Find the Developer Edition Docker image on [Docker hub](https://hub.docker.com/_/sonarqube/).
1. Start the server by running:
```bash
$ docker run -d --name sonarqube -e SONAR_ES_BOOTSTRAP_CHECKS_DISABLE=true -p 9000:9000 sonarqube:latest
```
Once your instance is up and running, Log in to using System Administrator credentials:
* login: admin
* password: admin
### Analyzing a project
Now that you’re logged in to your local SonarQube Server instance, let’s analyze a project:
1. Select **Create new project**.
2. Give your project a **Project key** and a **Display name** and select **Set up**.
3. Under **Provide a token**, select **Generate a token**. Give your token a name, select **Generate**, and click **Continue**.
4. Select your project’s main language under **Run analysis on your project**, and follow the instructions to analyze your project. Here you’ll download and execute a scanner on your code (if you’re using Maven or Gradle, the scanner is automatically downloaded).
After successfully analyzing your code, you’ll see your first analysis on SonarQube Server:
Your first analysis is a measure of your current code. As a developer, you focus on maintaining high standards and taking responsibility specifically for the new code you’re working on. Code that has been added or changed from this point should be your focus moving forward. See [about-new-code](https://docs.sonarsource.com/sonarqube-server/user-guide/about-new-code "mention") for more information.
---
# Source: https://docs.sonarsource.com/sonarqube-community-build/instance-administration/ui-customization.md
# Source: https://docs.sonarsource.com/sonarqube-server/10.7/instance-administration/ui-customization.md
# Source: https://docs.sonarsource.com/sonarqube-server/10.8/instance-administration/ui-customization.md
# Source: https://docs.sonarsource.com/sonarqube-server/2025.2/instance-administration/ui-customization.md
# Source: https://docs.sonarsource.com/sonarqube-server/2025.3/instance-administration/ui-customization.md
# Source: https://docs.sonarsource.com/sonarqube-server/2025.5/instance-administration/ui-customization.md
# Source: https://docs.sonarsource.com/sonarqube-server/2025.1/instance-administration/ui-customization.md
# Source: https://docs.sonarsource.com/sonarqube-server/2025.4/instance-administration/ui-customization.md
# Source: https://docs.sonarsource.com/sonarqube-server/2025.6/instance-administration/ui-customization.md
# Source: https://docs.sonarsource.com/sonarqube-server/instance-administration/ui-customization.md
# UI customization
- [Look and feel](/sonarqube-server/instance-administration/ui-customization/look-and-feel.md): You can set your own home logo and use a Gravatar avatar.
- [Custom messages](/sonarqube-server/instance-administration/ui-customization/custom-messages.md): Admins can configure custom messages that will be displayed in the SonarQube Server UI.
---
# Source: https://docs.sonarsource.com/sonarqube-community-build/quality-standards-administration/managing-quality-profiles/understanding-quality-profiles.md
# Source: https://docs.sonarsource.com/sonarqube-server/2025.3/quality-standards-administration/managing-quality-profiles/understanding-quality-profiles.md
# Source: https://docs.sonarsource.com/sonarqube-server/2025.5/quality-standards-administration/managing-quality-profiles/understanding-quality-profiles.md
# Source: https://docs.sonarsource.com/sonarqube-server/2025.4/quality-standards-administration/managing-quality-profiles/understanding-quality-profiles.md
# Source: https://docs.sonarsource.com/sonarqube-server/2025.6/quality-standards-administration/managing-quality-profiles/understanding-quality-profiles.md
# Source: https://docs.sonarsource.com/sonarqube-server/quality-standards-administration/managing-quality-profiles/understanding-quality-profiles.md
# Source: https://docs.sonarsource.com/sonarqube-cloud/standards/managing-quality-profiles/understanding-quality-profiles.md
# Understanding quality profiles
### Quality profile set assigned to a language
Several quality profiles can be assigned to a language in your organization:
* A built-in profile is provided and is called the Sonar way profile. You cannot edit this profile.
* From the Team plan, you can create custom quality profiles to meet your coding analysis needs.\
The Sonar way profile is designed to be broadly suitable for most projects, but it is intended only as a starting point.
In the quality profile set of a language, a profile is defined as the default profile. The default profile is used for the analysis of a project if no profile is explicitly defined for that project.
The figure below shows a quality profile set example of the Java language. In this example, the built-in profile is the default profile and one custom profile has been added.
A user with the Administer Quality Profiles permission in the organization can create and edit any custom profile and change the default profile of a set. These users can also give other users permission to edit a given custom profile.
### Quality profile definition
In your organization, a quality profile:
* Relates to a given programming language.
* Is based on the set of coding rules supported for this language.
* Defines which rules of this set are active in the profile, it means which rules will be taken into account during the code analysis.
A custom quality profile may customize, for a given rule, configurable parameters. For example, rules that verify conditions against a threshold might allow customization of the threshold value. The customization applies only within the quality profile.
### Quality profile inheritance
The inheritance feature allows you to define a parent/child relationship between two quality profiles within the profile set of a language. This way, changes in the parent profile are dynamically reported to the child profile. Note that a child profile can only be a custom quality profile.
The figure below shows the Java’s profile set example with a custom profile inheriting from the built-in Sonar way profile.
By inheriting from the built-in quality profile Sonar way, you ensure that you automatically benefit from:
* Newly implemented rules.
* Changes in a rule’s configuration.
* The deactivation of deprecated rules.
You can also create a quality profile hierarchy: a change in a parent profile is reflected in all its child profiles on all hierarchy levels.
The following principles govern the quality profile inheritance:
* The inheritance relationship can be established or removed according to the following:
* A parent profile can be assigned to a child profile during the child profile creation or at any time during the lifecycle of a custom profile.
* The inheritance relationship can be removed at any time.
* A child profile can change to another parent at any time.
* A parent profile may be a built-in or a custom profile (A child profile is always a custom profile.).
* When an inheritance relationship is established:
* The child quality profile inherits its parent’s active rules.
* Active rules existing already in the child profile are not changed.
* A change in a parent profile is automatically reflected in all its child profiles (note that if a child profile changes to another parent, this is considered a change in the parent profile). It means that:
* A rule activation or deactivation in the parent profile is reflected in the child profiles whatever the status (active or inactive) of the rule in the child profile.
* A rule parameter change in the parent profile is reflected in the child profiles if the rule is not overridden in the child profile.
* A child quality profile can be changed as follows:
* An inactive rule can be activated.
* An active rule can be deactivated.
* A rule’s configurable parameters can be modified compared to the parent profile. In that case, the rule is considered *overridden*.
{% hint style="info" %}
The principles described above are the same whether the parent profile is a built-in or a custom profile.
{% endhint %}
### Quality profile association with projects
The default quality profile of a language’s profile set is used for a project if the project is not explicitly associated with another profile for this language.
By default, the built-in profile is the organization’s default profile for every language. With the Administer Quality Profiles permission, you can change the default profile of a given language in your organization.
As a project administrator, you can assign quality profiles to your project. With the Administer Quality Profiles permission, you can assign a quality profile to a list of projects in your organization.
### Related pages
* [viewing-quality-profiles](https://docs.sonarsource.com/sonarqube-cloud/standards/managing-quality-profiles/viewing-quality-profiles "mention")
* [creating-a-quality-profile](https://docs.sonarsource.com/sonarqube-cloud/standards/managing-quality-profiles/creating-a-quality-profile "mention")
* [editing-a-custom-quality-profile](https://docs.sonarsource.com/sonarqube-cloud/standards/managing-quality-profiles/editing-a-custom-quality-profile "mention")
* [associating-a-quality-profile-with-projects](https://docs.sonarsource.com/sonarqube-cloud/standards/managing-quality-profiles/associating-a-quality-profile-with-projects "mention")
* [changing-default-quality-profile](https://docs.sonarsource.com/sonarqube-cloud/standards/managing-quality-profiles/changing-default-quality-profile "mention")
* [maintaining-your-custom-quality-profiles](https://docs.sonarsource.com/sonarqube-cloud/standards/managing-quality-profiles/maintaining-your-custom-quality-profiles "mention")
* [authorizing-other-users-to-manage-quality-profile](https://docs.sonarsource.com/sonarqube-cloud/standards/managing-quality-profiles/authorizing-other-users-to-manage-quality-profile "mention")
* [quality-profile-association](https://docs.sonarsource.com/sonarqube-cloud/managing-your-projects/project-analysis/quality-profile-association "mention")
---
# Source: https://docs.sonarsource.com/sonarqube-server/10.6/analyzing-source-code/languages/c-family/understanding-the-analysis.md
# Source: https://docs.sonarsource.com/sonarqube-server/10.7/analyzing-source-code/languages/c-family/understanding-the-analysis.md
# Source: https://docs.sonarsource.com/sonarqube-server/10.8/analyzing-source-code/languages/c-family/understanding-the-analysis.md
# Source: https://docs.sonarsource.com/sonarqube-server/2025.2/analyzing-source-code/languages/c-family/understanding-the-analysis.md
# Source: https://docs.sonarsource.com/sonarqube-server/2025.3/analyzing-source-code/languages/c-family/understanding-the-analysis.md
# Source: https://docs.sonarsource.com/sonarqube-server/2025.5/analyzing-source-code/languages/c-family/understanding-the-analysis.md
# Source: https://docs.sonarsource.com/sonarqube-server/2025.1/analyzing-source-code/languages/c-family/understanding-the-analysis.md
# Source: https://docs.sonarsource.com/sonarqube-server/2025.4/analyzing-source-code/languages/c-family/understanding-the-analysis.md
# Source: https://docs.sonarsource.com/sonarqube-server/2025.6/analyzing-source-code/languages/c-family/understanding-the-analysis.md
# Source: https://docs.sonarsource.com/sonarqube-server/analyzing-source-code/languages/c-family/understanding-the-analysis.md
# Source: https://docs.sonarsource.com/sonarqube-cloud/advanced-setup/languages/c-family/understanding-the-analysis.md
# Understanding the analysis
### Analysis scope
For complete details, see the [setting-analysis-scope](https://docs.sonarsource.com/sonarqube-cloud/managing-your-projects/project-analysis/setting-analysis-scope "mention") pages. You can specifically set the CFamily analysis scope by changing the file extensions specified using the following SonarScanner properties: `sonar.c.file.suffixes, sonar.cpp.file.suffixes`, and `sonar.objc.file.suffixes`.
The files that are ultimately analyzed depend on the selected analysis mode:
* In Automatic analysis mode, every non-header source file within the CFamily analysis scope is analyzed individually. That’s why the `sonar.sources` property should be set to prevent the analysis of third-party code.
* In Compilation Database mode, the analyzed files represent the intersection between the CFamily analysis scope and the \`file\` entry in the `compile_commands.json`. This implies that only compiled files within the CFamily scope are analyzed. Therefore, ensuring that the `compile_commands.json` accurately encompasses the entire project is advisable.
* In both modes, header files get analyzed in the context of the source files in which they are included. This means header files not included in any source file will not be analyzed.
### Measures for header files
Each time a header file is analyzed as part of a compilation unit, the measures are computed for this header: statements, functions, classes, cyclomatic complexity, and cognitive complexity. Each measure may be computed more than once for a given header. In that case, the largest value is stored for each measure.
### Language-specific rule tags
On top of the [built-in-rule-tags](https://docs.sonarsource.com/sonarqube-cloud/digging-deeper/built-in-rule-tags "mention"), a few additional rule tags are specific to C/C++/Objective-C rules.
#### C++ standard version-related rule tags
Some rules are relevant only since a specific version of the C++ standard. These rules will run only when analyzing a C++ code compiled against a later or equal standard version. The following tags are used to mark these rules for the corresponding C++ standard version:
* `since-c++11`
* `since-c++14`
* `since-c++17`
* `since-c++20`
* `since-c++23`
C++ rules not carrying any of these four tags started running since C++98.
#### Implementation-related rule tags
* `full-project`: This tag is for rules that do cross-compilation unit analysis. For these rules to work properly, it is important to analyze the entire project. Excluding part of the project from the analysis will impact the accuracy of these rules: it might lead to false positives or negatives.
* `symbolic-execution`: this tag is for rules that reason about the program’s state. They usually work together to find path-sensitive bugs and vulnerabilities. Once a fatal state of the program is reached, one issue will be raised, and the symbolic execution analysis of the current path will stop. For that reason, evaluating these rules independently of each other is not recommended as it might give a false sense of undetected issues. It is important to keep in mind that Sonar is always working on improving these rules, as symbolic execution can never be perfect.
#### External standard rule tags
The following tags indicate how a rule relates to the MISRA guidelines:
* `based-on-misra`: This tag is for rules that address the same issues as MISRA rules but only partially correspond to what MISRA specifies (usually to make them less strict).
* `misra-c++2008`
* `misra-c++2023`
* `misra-c2004`
* `misra-c2012`
The following tags represent the category of the rule according to the [MISRA compliance 2020](https://www.misra.org.uk/app/uploads/2021/06/MISRA-Compliance-2020.pdf) document and indicate whether violations of the rule are permitted (see Chapter 5: "The guideline re-categorization plan"):
* `misra-mandatory`
* `misra-required`
* `misra-advisory`
---
# Source: https://docs.sonarsource.com/sonarqube-community-build/server-installation/pre-installation/unix.md
# Source: https://docs.sonarsource.com/sonarqube-server/10.5/setup-and-upgrade/pre-installation/unix.md
# Source: https://docs.sonarsource.com/sonarqube-server/10.6/setup-and-upgrade/pre-installation/unix.md
# Source: https://docs.sonarsource.com/sonarqube-server/10.7/setup-and-upgrade/pre-installation/unix.md
# Source: https://docs.sonarsource.com/sonarqube-server/10.8/setup-and-upgrade/pre-installation/unix.md
# Source: https://docs.sonarsource.com/sonarqube-server/2025.2/setup-and-update/pre-installation/unix.md
# Source: https://docs.sonarsource.com/sonarqube-server/2025.3/server-installation/pre-installation/unix.md
# Source: https://docs.sonarsource.com/sonarqube-server/2025.5/server-installation/pre-installation/unix.md
# Source: https://docs.sonarsource.com/sonarqube-server/2025.1/setup-and-upgrade/pre-installation/unix.md
# Source: https://docs.sonarsource.com/sonarqube-server/2025.4/server-installation/pre-installation/unix.md
# Source: https://docs.sonarsource.com/sonarqube-server/2025.6/server-installation/pre-installation/unix.md
# Source: https://docs.sonarsource.com/sonarqube-server/server-installation/pre-installation/unix.md
# On Unix-based systems
SonarQube Server should not be run as root on Unix-based systems. It is recommended to create a dedicated user account for SonarQube Server (It is highly recommended for a ZIP installation).
For a ZIP installation, proceed as follows:
1. Create a dedicated user account for SonarQube Server. Note that:
* This user does not need to have a login shell.
* This user does not need to have a password.
* We recommend that the user’s home directory be the same as the installation directory (recommended: `/opt/sonarqube)`.
2. Grant to this user account the read/write/execute (or owner) privileges on the installation directory.
---
# Source: https://docs.sonarsource.com/sonarqube-server/10.6/setup-and-upgrade/reference-architectures/up-to-10m-loc.md
# Source: https://docs.sonarsource.com/sonarqube-server/10.7/setup-and-upgrade/reference-architectures/up-to-10m-loc.md
# Source: https://docs.sonarsource.com/sonarqube-server/10.8/setup-and-upgrade/reference-architectures/up-to-10m-loc.md
# Source: https://docs.sonarsource.com/sonarqube-server/2025.2/setup-and-update/reference-architectures/up-to-10m-loc.md
# Source: https://docs.sonarsource.com/sonarqube-server/2025.3/server-installation/reference-architectures/up-to-10m-loc.md
# Source: https://docs.sonarsource.com/sonarqube-server/2025.5/server-installation/reference-architectures/up-to-10m-loc.md
# Source: https://docs.sonarsource.com/sonarqube-server/2025.1/setup-and-upgrade/reference-architectures/up-to-10m-loc.md
# Source: https://docs.sonarsource.com/sonarqube-server/2025.4/server-installation/reference-architectures/up-to-10m-loc.md
# Source: https://docs.sonarsource.com/sonarqube-server/2025.6/server-installation/reference-architectures/up-to-10m-loc.md
# Source: https://docs.sonarsource.com/sonarqube-server/server-installation/reference-architectures/up-to-10m-loc.md
# Up to 10 M LOC
### Overview
This reference architecture covers the following components:
* A dedicated virtual machine with SonarQube Server (Developer or Enterprise Edition) installed and an nginx HTTPS proxy.
* PostgreSQL database on a dedicated host.
* Analysis integrated with GitHub Actions.
* Authentication through GitHub.com.
* Monitoring with Prometheus.
* Outbound email notifications using an SMTP relay.
This architecture favors the use of open-source components when available. These may be substituted with other similarly capable components, and it is recommended that organizations use components that they are comfortable supporting.
### SonarQube Server Host
The dedicated SonarQube Server Host will have the SonarQube Server software installed as well as nginx acting as an HTTPS proxy.
Host specification
* **VM configuration**:
* 4 vCPU
* 8 GB RAM
* 50GB SSD Local Storage
* **AWS EC2**: c5d.large
* **Azure VM**: F4s\_v2
* **GCE**: c3-highcpu-4
Networking
By source/destination:
* **SonarQube Server host**:
* **Direction**: Outbound
* **Port**: 5432
* **Purpose**: Database
* **SonarQube Server host**:
* **Direction**: Outbound
* **Port** (Protocol): 25 (SMTP)
* **Purpose**: Email notifications
* **Internal network (user desktops):**
* **Direction**: Inbound
* **Port (Protocol):** 443 (HTTPS)
* **Purpose:** Inbound web and API traffic
* **CI platform (GitHub Runners):**
* **Direction**: Inbound
* **Port (Protocol):** 443 (HTTPS)
* **Purpose:** Analysis reports
* **DevOps platform (GitHub.com):**
* **Direction**: Inbound
* **Port (Protocol):** 443 (HTTPS)
* **Purpose:** Pull Request reports
Software
* OS - Ubuntu Server (or other Linux distribution)
* OpenJDK 17
* SonarQube Server’s Developer or Enterprise Edition
* If using Enterprise Edition, up to two Compute Engine workers (see [improving-performance](https://docs.sonarsource.com/sonarqube-server/server-update-and-maintenance/maintenance/improving-performance "mention"))
* nginx
* Configured as a reverse proxy between incoming traffic and SonarQube Server port 9000.
* Secured with SSL. Use of self-signed SSL certificates will require installation of the certificate on all CI build agents, and developer desktops using SonarQube for IDE.
* May be substituted with other reverse proxy (ex. haproxy) or a solution from a cloud provider, such as an AWS Application Load Balancer (ALB).
### Database
This architecture utilizes a dedicated PostgreSQL database installed on a separate host.
Host specification
* **VM Configuration:**
* 2vCPU
* 8 GB RAM
* 30 GB table space
* **AWS RDS:**
* db.t3.large
* 30 GB table space
* **Azure SQL:**
* B2ms
* 30 GB table space
* **Google Cloud SQL:**
* 2 vCPU
* 8 GB memory
* 30 GB table space
{% hint style="info" %}
If you use the Enterprise edition with the Advanced Security add-on, allocate 30% more table space.
{% endhint %}
Database requirements can vary widely based on the usage patterns of each SonarQube Server installation. Therefore, it is important to monitor and adjust database resources as needed.
PostgreSQL may be substituted with other supported database platforms.
### DevOps/CI platform
Automated analysis of source code is enabled through the installation of the various SonarScanners into continuous integration pipelines. When using GitHub Actions, scanners are initiated through the repository’s workflow YAML file(s).
Upon analysis completion, SonarQube Server submits reports back to pull requests to integrate with code review processes. This functionality is enabled in GitHub.com using a GitHub App.
GitHub.com may be substituted with other supported DevOps and/or CI platforms without changes to other components in this architecture.
### Authentication
It is recommended that authentication and authorization be handled through an external identity provider. The architecture utilizes the GitHub App to authorize users and synchronize access to SonarQube Server projects.
Other external identity providers such as SAML may be substituted. Features such as group and permission synchronization are not available for all authentication methods.
### Monitoring
SonarQube Server exposes endpoints that are easy to monitor using Prometheus or other monitoring solutions. In addition to the overall system health of both the SonarQube Server host and database, it is recommended to monitor SonarQube Server’s Compute Engine performance statistics to ensure incoming analyses are being promptly processed.
### Email notifications
Users can be notified of new issues and events via email. SonarQube Server will deliver these notifications through an SMTP mail relay. The volume of emails is low, dependent on the number of users subscribed, and a dedicated SMTP server is typically not required.
### Resiliency
As a single-host installation, this architecture relies on robust monitoring, automated backups of the database, and a rapid recovery process to maximize resiliency. If high availability is critical, SonarQube Server Data Center Edition is recommended.
### Scalability
This architecture is designed to support typical production usage for up to 10 million lines of code. Beyond this, it is recommended that organizations use SonarQube Server Enterprise Edition or Data Center Edition to support high-volume workloads.
The following use cases are considered outside of "normal usage" and may require additional capacity:
High-frequency analysis
Normal usage assumes a daily scan of main branches and analysis of several pull requests. Scanning code more frequently may require an increase in the number of Compute Engine workers (using SonarQube Server Enterprise Edition) as well as additional memory and CPU resources allocated to SonarQube Server’s Compute Engine process. Monitoring of the Compute Engine process will ensure that your installation can keep up with demand.
Large repositories
This architecture assumes analyzed repositories average 50,000 lines of code. If your organization is scanning a majority of very large repositories (where the repositories average 500,000 lines of code or more), additional memory and CPU resources may be required for SonarQube Server’s Compute Engine process.
Heavy API integration
SonarQube Server exposes a REST-based API for reporting and automation of administration tasks. This architecture assumes occasional use of this API. Heavy use of this API may require the allocation of additional memory and CPU resources to SonarQube Server’s Web process.
Third-party plugins
This architecture assumes that no third-party plugins are in use. As these extensions are developed by open-source developers, their impact on the performance of a SonarQube Server instance varies based on the function being performed and the quality of the implementation. It is recommended that the use of third-party plugins is carefully considered and monitored for performance throughout the life of your SonarQube Server implementation.
### Related pages
* [server-host-requirements](https://docs.sonarsource.com/sonarqube-server/server-installation/server-host-requirements "mention")
* [#database-requirements](https://docs.sonarsource.com/sonarqube-server/installing-the-database#database-requirements "mention")
* [..](https://docs.sonarsource.com/sonarqube-server/server-installation "mention")
* [securing-behind-proxy](https://docs.sonarsource.com/sonarqube-server/server-installation/network-security/securing-behind-proxy "mention")
* [github-integration](https://docs.sonarsource.com/sonarqube-server/devops-platform-integration/github-integration "mention")
* [set-up-monitoring](https://docs.sonarsource.com/sonarqube-server/server-installation/on-kubernetes-or-openshift/set-up-monitoring "mention")(on Kubernetes)
* [notifications](https://docs.sonarsource.com/sonarqube-server/instance-administration/system-functions/notifications "mention")
---
# Source: https://docs.sonarsource.com/sonarqube-server/10.6/setup-and-upgrade/reference-architectures/up-to-50m-loc.md
# Source: https://docs.sonarsource.com/sonarqube-server/10.7/setup-and-upgrade/reference-architectures/up-to-50m-loc.md
# Source: https://docs.sonarsource.com/sonarqube-server/10.8/setup-and-upgrade/reference-architectures/up-to-50m-loc.md
# Source: https://docs.sonarsource.com/sonarqube-server/2025.2/setup-and-update/reference-architectures/up-to-50m-loc.md
# Source: https://docs.sonarsource.com/sonarqube-server/2025.3/server-installation/reference-architectures/up-to-50m-loc.md
# Source: https://docs.sonarsource.com/sonarqube-server/2025.5/server-installation/reference-architectures/up-to-50m-loc.md
# Source: https://docs.sonarsource.com/sonarqube-server/2025.1/setup-and-upgrade/reference-architectures/up-to-50m-loc.md
# Source: https://docs.sonarsource.com/sonarqube-server/2025.4/server-installation/reference-architectures/up-to-50m-loc.md
# Source: https://docs.sonarsource.com/sonarqube-server/2025.6/server-installation/reference-architectures/up-to-50m-loc.md
# Source: https://docs.sonarsource.com/sonarqube-server/server-installation/reference-architectures/up-to-50m-loc.md
# Up to 50 M LOC
### Overview
This reference architecture covers the following components:
* A dedicated virtual machine with SonarQube Server Enterprise Edition installed and an nginx HTTPS proxy.
* PostgreSQL database on a dedicated host.
* Analysis integrated with Jenkins CI.
* Pull request reporting and authentication through GitHub Enterprise.
* Monitoring with Prometheus.
* Outbound email notifications using an SMTP relay.
This architecture favors the use of open-source components when available. These may be substituted with other similarly-capable components and it is recommended that organizations use components that they are comfortable supporting.
### SonarQube Server Host
The dedicated SonarQube Server Host will have the SonarQube Server software installed as well as nginx acting as an HTTPS proxy.
Host specification
* **VM configuration**:
* 8 vCPU
* 16 GB RAM
* 50GB SSD Local Storage
* **AWS EC2**: c5d.2xlarge
* **Azure VM**: F8s\_v2
* **GCE**: c3-highcpu-8
Networking
By source/destination:
* **SonarQube Server host**:
* **Direction**: Outbound
* **Port**: 5432
* **Purpose**: Database
* **SonarQube Server host**:
* **Direction**: Outbound
* **Port** (Protocol): 25 (SMTP)
* **Purpose**: Email notifications
* **Internal network (user desktops):**
* **Direction**: Inbound
* **Port (Protocol):** 443 (HTTPS)
* **Purpose:** Inbound web and API traffic
* **CI platform (Jenkins):**
* **Direction**: Inbound
* **Port (Protocol):** 443 (HTTPS)
* **Purpose:** Analysis reports
* **DevOps platform (GitHub Enterprise):**
* **Direction**: Inbound
* **Port (Protocol):** 443 (HTTPS)
* **Purpose:** Pull Request reports
Software
* OS - Ubuntu Server (or other Linux distribution)
* OpenJDK 17
* SonarQube Server Developer or Enterprise Edition
* Four Compute Engine workers (see [Improving performance](https://app.gitbook.com/s/I10pmJWeVVXYITlQJllp/server-upgrade-and-maintenance/maintenance/improving-performance "mention"))
* nginx
* Configured as a reverse proxy between incoming traffic and SonarQube Server port 9000.
* Secured with SSL. Use of self-signed SSL certificates will require installation of the certificate on all CI build agents, and developer desktops using SonarQube for IDE.
* May be substituted with other reverse proxy (ex. haproxy) or a solution from a cloud provider, such as an AWS Application Load Balancer (ALB).
### Database
This architecture utilizes a dedicated PostgreSQL database installed on a separate host.
Host specification
* **VM Configuration:**
* 4vCPU
* 16 GB RAM
* 150 GB table space
* **AWS RDS:**
* db.t3.xlarge
* 150 GB table space
* **Azure SQL:**
* B4ms
* 150 GB table space
* **Google Cloud SQL:**
* 4 vCPU
* 16 GB memory
* 150 GB table space
{% hint style="info" %}
If you use the Enterprise edition with the Advanced Security add-on, allocate 30% more table space.
{% endhint %}
Database requirements can vary widely based on the usage patterns of each SonarQube Server installation. Therefore, it is important to monitor and adjust database resources as needed.
PostgreSQL may be substituted with other supported database platforms.
### DevOps platform
SonarQube Server submits analysis reports back to pull requests to integrate with code review processes. This functionality is enabled in GitHub Enterprise using a GitHub App.
GitHub Enterprise may be substituted with other supported DevOps platforms without changes to other components in this architecture.
### CI/CD platform
Automated analysis of source code is enabled through the installation of the various SonarScanners into continuous integration pipelines. When using Jenkins, the SonarQube extension for Jenkins manages the installation of the scanners and provides functionality to ease the integration of Sonar analysis into build pipelines.
Other CI platforms may be used without changes to other components in this architecture.
### Authentication
It is recommended that authentication and authorization be handled through an external identity provider. The architecture utilizes the GitHub App to authorize users and synchronize access to SonarQube Server projects.
Other external identity providers such as SAML may be substituted. Features such as group and permission synchronization are not available for all authentication methods.
### Monitoring
SonarQube Server exposes endpoints that are easy to monitor using Prometheus or other monitoring solutions. In addition to the overall system health of both the SonarQube Server host and database, it is recommended to monitor SonarQube Server’s Compute Engine performance statistics to ensure incoming analyses are being promptly processed.
### Email notifications
Users can be notified of new issues and events via email. SonarQube Server will deliver these notifications through an SMTP mail relay. The volume of emails is low, dependent on the number of users subscribed, and a dedicated SMTP server is typically not required.
### Resiliency
As a single-host installation, this architecture relies on robust monitoring, automated backups of the database, and a rapid recovery process to maximize resiliency. If high availability is critical, SonarQube Server Data Center edition is recommended.
### Scalability
This architecture is designed to support typical production usage for up to 50 million lines of code. Beyond this, it is recommended that organizations use SonarQube Server Enterprise Edition or Data Center Edition to support high-volume workloads.
The following use cases are considered outside of "normal usage" and may require additional capacity:
High-frequency analysis
Normal usage assumes a daily scan of main branches and analysis of several pull requests. Scanning code more frequently may require an increase in the number of Compute Engine workers (using SonarQube Server Enterprise Edition) as well as additional memory and CPU resources allocated to SonarQube Server’s Compute Engine process. Monitoring of the Compute Engine process will ensure that your installation can keep up with demand.
Large repositories
This architecture assumes analyzed repositories average 50,000 lines of code. If your organization is scanning a majority of very large repositories (where the repositories average 500,000 lines of code or more), additional memory and CPU resources may be required for SonarQube Server’s Compute Engine process.
Heavy API integration
SonarQube Server exposes a REST-based API for reporting and automation of administration tasks. This architecture assumes occasional use of this API. Heavy use of this API may require the allocation of additional memory and CPU resources to SonarQube Server’s Web process.
Third-party plugins
This architecture assumes that no third-party plugins are in use. As these extensions are developed by non-sponsored developers, their impact on the performance of a SonarQube Server instance varies based on the function being performed and the quality of the implementation. It is recommended that the use of third-party plugins is carefully considered and monitored for performance throughout the life of your SonarQube Server implementation.
### Related pages
* [server-host-requirements](https://docs.sonarsource.com/sonarqube-server/server-installation/server-host-requirements "mention")
* [#database-requirements](https://docs.sonarsource.com/sonarqube-server/installing-the-database#database-requirements "mention")
* [..](https://docs.sonarsource.com/sonarqube-server/server-installation "mention")
* [securing-behind-proxy](https://docs.sonarsource.com/sonarqube-server/server-installation/network-security/securing-behind-proxy "mention")
* [github-integration](https://docs.sonarsource.com/sonarqube-server/devops-platform-integration/github-integration "mention")
* [set-up-monitoring](https://docs.sonarsource.com/sonarqube-server/server-installation/on-kubernetes-or-openshift/set-up-monitoring "mention")
---
# Source: https://docs.sonarsource.com/sonarqube-community-build/server-update-and-maintenance/update/update.md
# Source: https://docs.sonarsource.com/sonarqube-community-build/server-update-and-maintenance/update.md
# Source: https://docs.sonarsource.com/sonarqube-server/2025.5/server-update-and-maintenance/update/update.md
# Source: https://docs.sonarsource.com/sonarqube-server/2025.5/server-update-and-maintenance/update.md
# Source: https://docs.sonarsource.com/sonarqube-server/2025.1/server-update-and-maintenance/update/update.md
# Source: https://docs.sonarsource.com/sonarqube-server/2025.1/server-update-and-maintenance/update.md
# Source: https://docs.sonarsource.com/sonarqube-server/2025.4/server-update-and-maintenance/update/update.md
# Source: https://docs.sonarsource.com/sonarqube-server/2025.4/server-update-and-maintenance/update.md
# Source: https://docs.sonarsource.com/sonarqube-server/2025.6/server-update-and-maintenance/update/update.md
# Source: https://docs.sonarsource.com/sonarqube-server/2025.6/server-update-and-maintenance/update.md
# Source: https://docs.sonarsource.com/sonarqube-server/server-update-and-maintenance/update/update.md
# Source: https://docs.sonarsource.com/sonarqube-server/server-update-and-maintenance/update.md
# Update
- [Overview](/sonarqube-server/server-update-and-maintenance/update/roadmap.md): The section lists the steps you have to perform to update your SonarQube Server installation.
- [Release cycle model](/sonarqube-server/server-update-and-maintenance/update/release-cycle-model.md): A detailed explanation of the SonarQube Server release cycle.
- [Determining the update path](/sonarqube-server/server-update-and-maintenance/update/determine-path.md): This explains the steps to follow to determine the path you need to take to update your version of SonarQube Server
- [Pre-update steps](/sonarqube-server/server-update-and-maintenance/update/pre-update-steps.md): The pre-update steps you must perform before you start updating SonarQube Server.
- [Performing the update](/sonarqube-server/server-update-and-maintenance/update/update.md): Once you have determined your update path and tested your update, you can perform your SonarQube Server update.
- [Post-update steps](/sonarqube-server/server-update-and-maintenance/update/post-update-steps.md): The tasks you must perform after you update SonarQube Server.
- [Upgrading from SonarQube Community Build](/sonarqube-server/server-update-and-maintenance/update/updating-from-sonarqube-community-build.md): How to update from SonarQube Community Build to SonarQube Server
- [Moving to another SonarQube Server edition](/sonarqube-server/server-update-and-maintenance/update/moving-to-another-edition.md): How to move to another SonarQube Server edition during an update.
- [Using Marketplace](/sonarqube-server/server-update-and-maintenance/update/marketplace.md): Using the Marketplace to keep the SonarQube platform up to date.
- [Other migration-related tasks](/sonarqube-server/server-update-and-maintenance/update/other-procedures.md): This section explains how to revert to the previous version of SonarQube Server and how to migrate the database to another vendor.
---
# Source: https://docs.sonarsource.com/sonarqube-cloud/administering-sonarcloud/managing-subscription/updating-billing-payment-details.md
# Updating billing or payment details
If you have a montly subscription, you can update the billing and payment details of your organization. We recently introduced a new billing customer portal that is currently only available to new customers.
{% hint style="info" %}
* If your company has moved, you should change your billing information so that we can calculate and charge you the appropriate rate for indirect taxes.
* You currently cannot change to a monthly subscription (credit card payment) if a coupon still applies to your organization.
{% endhint %}
### Managing your payment methods (new customer)
You can manage several payment methods. The default method is the method that will be used for payment.
Adding a payment method
1. Retrieve your organization. See [viewing-organizations](https://docs.sonarsource.com/sonarqube-cloud/getting-started/viewing-organizations "mention") for more details.
2. Open the **Billing & Upgrade** tab.
3. In the **Billing and payment information** section, select **Edit**. The customer portal opens.
4. In **Payment Method**, select **+ Add payment method**.
5. Enter your credit card information. By default, the new card is used as the default payment method but you can unselect the default option box.
6. Select **Add**. The new payment method has been added.
7. Select **Return to SonarQube Cloud** in the left-side panel to go back to SonarQube Cloud.
Removing a payment method
1. Retrieve your organization. See [viewing-organizations](https://docs.sonarsource.com/sonarqube-cloud/getting-started/viewing-organizations "mention") for more details.
2. Open the **Billing & Upgrade** tab.
3. In the **Billing and payment information** section, select **Edit**. The customer portal opens.
4. In **Payment Method**, in the far right of the payment method to remove, select the three-dot menu.
5. In the menu, select **Delete**.
6. Select **Return to SonarQube Cloud** in the left-side panel to go back to SonarQube Cloud.
Changing the default payment method
To make a payment method your default method:
1. Retrieve your organization. See [viewing-organizations](https://docs.sonarsource.com/sonarqube-cloud/getting-started/viewing-organizations "mention") for more details.
2. Open the **Billing & Upgrade** tab.
3. In the **Billing and payment information** section, select **Edit**. The customer portal opens. In **Payment Method**, you can see your registered payment methods. The default one is marked with the **Default** label.
4. In the far right of the payment method to make default, select the three-dot menu.
5. In the menu, select **Make default**.
6. Select **Return to SonarQube Cloud** in the left-side panel to go back to SonarQube Cloud.
### Updating your payment method (existing customer)
1. Retrieve your organization. See [viewing-organizations](https://docs.sonarsource.com/sonarqube-cloud/getting-started/viewing-organizations "mention") for more details.
2. Open the **Billing & Upgrade** page.
3. In the **Payment method** section, select **Edit**. The **Update payment method** page opens.
4. Update the payment details and select **Save**.
### Updating your billing information
1. Retrieve your organization. See [viewing-organizations](https://docs.sonarsource.com/sonarqube-cloud/getting-started/viewing-organizations "mention") for more details.
2. Open the **Billing & Upgrade** tab.
3. In the **Billing and payment information** section, select **Edit**. If you’re a new customer, the customer portal opens: follow the steps below. Otherwise, edit the information and save.
4. In the **Billing Information** section, select **Update information**.
5. Edit your billing information.
6. Select **Save**.
7. Select **Return to SonarQube Cloud** in the left-side panel to go back to SonarQube Cloud.
### Related pages
* [subscription-plans](https://docs.sonarsource.com/sonarqube-cloud/administering-sonarcloud/managing-subscription/subscription-plans "mention")
* [billing-model](https://docs.sonarsource.com/sonarqube-cloud/administering-sonarcloud/managing-subscription/billing-model "mention")
* [signing-up-for-plan](https://docs.sonarsource.com/sonarqube-cloud/administering-sonarcloud/managing-subscription/signing-up-for-plan "mention")
* [changing-plan](https://docs.sonarsource.com/sonarqube-cloud/administering-sonarcloud/managing-subscription/changing-plan "mention")
* [viewing-billing-and-usage](https://docs.sonarsource.com/sonarqube-cloud/administering-sonarcloud/managing-subscription/viewing-billing-and-usage "mention")
* [viewing-taxes-and-invoices](https://docs.sonarsource.com/sonarqube-cloud/administering-sonarcloud/managing-subscription/viewing-taxes-and-invoices "mention")
---
# Source: https://docs.sonarsource.com/sonarqube-server/2025.2/server-update-and-maintenance/upgrade/updating-from-sonarqube-community-build.md
# Source: https://docs.sonarsource.com/sonarqube-server/2025.5/server-update-and-maintenance/update/updating-from-sonarqube-community-build.md
# Source: https://docs.sonarsource.com/sonarqube-server/2025.1/server-update-and-maintenance/update/updating-from-sonarqube-community-build.md
# Source: https://docs.sonarsource.com/sonarqube-server/2025.4/server-update-and-maintenance/update/updating-from-sonarqube-community-build.md
# Source: https://docs.sonarsource.com/sonarqube-server/2025.6/server-update-and-maintenance/update/updating-from-sonarqube-community-build.md
# Source: https://docs.sonarsource.com/sonarqube-server/server-update-and-maintenance/update/updating-from-sonarqube-community-build.md
# Upgrading from SonarQube Community Build
You can use different options to update your SonarQube Community Build to SonarQube Server depending on your situation.
{% hint style="info" %}
If you are moving to Data Center Edition, since all DCE customers are entitled to commercial support, please [get in touch with the team](http://help.sonarsource.com) to help plan your update.
{% endhint %}
### Option 1: Update your existing database
Use this option if:
* You use an external database for your SonarQube data (not the embedded one).
* You regularly analyzed a substantial amount of code.
* Developers interacted with the results, including resolving and/or accepting issues, and maintaining this history is important for you.
Proceed as follows:
1. Determine the update path as follows:\
Ensure that the target SonarQube Server version was released after your SonarQube Community Build version.\
In most cases, migrating to the latest version of the target product will suffice. However, if you are using the latest version of SonarQube Community Build, you may need to wait for the next version of SonarQube Server, typically available within a month.
2. [pre-update-steps](https://docs.sonarsource.com/sonarqube-server/server-update-and-maintenance/update/pre-update-steps "mention").
3. Back up the SonarQube Community Build database and ensure it complies with the [installing-the-database](https://docs.sonarsource.com/sonarqube-server/server-installation/installing-the-database "mention") of the target SonarQube Server version. If you want to migrate to another database vendor, see [sonarqube-db-copy-tool](https://docs.sonarsource.com/sonarqube-server/server-update-and-maintenance/maintenance/sonarqube-db-copy-tool "mention").
4. [update](https://docs.sonarsource.com/sonarqube-server/server-update-and-maintenance/update/update "mention").
5. [post-update-steps](https://docs.sonarsource.com/sonarqube-server/server-update-and-maintenance/update/post-update-steps "mention").
### Option 2: Start over with a fresh installation
Use this option if:
* Your SonarQube Community Build instance is far behind the current version so that the length and complexity of the update path may outweigh the benefits of data preservation for you.
* Your SonarQube Community Build instance was sporadically used, managed inconsistently, or isn’t known to represent the projects you plan to analyze and maintain actively.
* You made extensive use of 3rd party plugins that may conflict with Sonar commercial features.
* You created multiple "projects" representing branches of the same individual code repositories and have a messy Project overview as a result. The cleanup may be more burdensome than a fresh start.
Proceed as follows:
1. [introduction](https://docs.sonarsource.com/sonarqube-server/server-installation/introduction "mention").
2. Re-provision your projects through the SonarQube UI or web API, or else give the user account that will be running analysis permission to [user-permissions](https://docs.sonarsource.com/sonarqube-server/instance-administration/user-management/user-permissions "mention").
3. For existing CI/CD pipelines involving Sonar analysis, revisit the URL and [managing-tokens](https://docs.sonarsource.com/sonarqube-server/user-guide/managing-tokens "mention") used to connect to Sonar and update with values appropriate to your new SonarQube Server instance.
4. You may (of course) keep your old SonarQube Community Build instance online during a transitional period until you’re confident all needed project workflows have been migrated to your new SonarQube Server instance
### Option 3: Move your project data to the new instance
Use this option if:
* You’d like to preserve project analysis and issue history.
* You’d rather revisit all the administrative details, or you built up valuable history while using the embedded non-updateable product database.
* Your administrators are able to dedicate time and effort to a data migration project.
* You’re migrating to Enterprise or Data Center Edition.
Proceed as follows:
1. Install your SonarQube Server’s Enterprise or Data Center Edition as explained above in *Option 2: Start over with a fresh installation*.
2. [project-move](https://docs.sonarsource.com/sonarqube-server/project-administration/maintaining-project/project-move "mention") from your old SonarQube Community Build instance to your new SonarQube Server instance.
### Related pages
* [project-move](https://docs.sonarsource.com/sonarqube-server/project-administration/maintaining-project/project-move "mention")
* [other-procedures](https://docs.sonarsource.com/sonarqube-server/server-update-and-maintenance/update/other-procedures "mention")
* [Other migration-related tasks](https://app.gitbook.com/s/bqrfLGeD0Y9vE5l9Le42/server-update-and-maintenance/update/other-procedures "mention")
---
# Source: https://docs.sonarsource.com/sonarqube-community-build/instance-administration/user-management/updating-scm-details.md
# Source: https://docs.sonarsource.com/sonarqube-server/10.7/instance-administration/user-management/updating-scm-details.md
# Source: https://docs.sonarsource.com/sonarqube-server/10.8/instance-administration/user-management/updating-scm-details.md
# Source: https://docs.sonarsource.com/sonarqube-server/2025.2/instance-administration/user-management/updating-scm-details.md
# Source: https://docs.sonarsource.com/sonarqube-server/2025.3/instance-administration/user-management/updating-scm-details.md
# Source: https://docs.sonarsource.com/sonarqube-server/2025.5/instance-administration/user-management/updating-scm-details.md
# Source: https://docs.sonarsource.com/sonarqube-server/2025.1/instance-administration/user-management/updating-scm-details.md
# Source: https://docs.sonarsource.com/sonarqube-server/2025.4/instance-administration/user-management/updating-scm-details.md
# Source: https://docs.sonarsource.com/sonarqube-server/2025.6/instance-administration/user-management/updating-scm-details.md
# Source: https://docs.sonarsource.com/sonarqube-server/instance-administration/user-management/updating-scm-details.md
# Associating with SCM account
{% hint style="info" %}
SonarQube Server users can view the SCM accounts associated with their account: see [viewing-user-profile](https://docs.sonarsource.com/sonarqube-server/user-guide/managing-your-account/viewing-user-profile "mention").
{% endhint %}
### About the SCM account association
SonarQube Server associates users with SCM (Source Control Management) accounts to automatically assign issues to users:
* If SonarQube Server delegates the authentication to a third-party identity provider, this association is done through the delegation. However, you can associate the user with additional SCM accounts.
* If no delegation is used, SonarQube Server recognizes the SCM account from the SonarQube Servers account’s Login and/or Email address. If it cannot perform the association (or if you want to associate other SCM accounts with the user account), you can do it explicitly.
To add an SCM account to a SonarQube Server user account, you associate the SCM account’s login name or email address with the SonarQube Server account.
{% hint style="warning" %}
You should not associate the same SCM account with several SonarQube Server accounts; otherwise, SonarQube Server may not be able to properly assign issues to SonarQube Server users. In particular, this means that you should not configure the same email address in several SonarQube Server user accounts (Note that the email address check is case-insensitive in SonarQube Server). To ensure a proper issue assignment, SonarQube Server may reject a user login attempt, for example, if a SAML user logs in with an email address that is associated with a local user (In this case, the error "This account is already associated with another authentication method" is raised).
{% endhint %}
### Adding an SCM account to a SonarQube Server user account
1. Got to **Administration** > **Security** > **Users** and retrieve the user (see [viewing-users](https://docs.sonarsource.com/sonarqube-server/instance-administration/user-management/viewing-users "mention")).
2. In the user’s **Actions** column, select the three-dot menu.
3. Select **Update (SCM) details**.
4. Near **SCM Accounts**, select **Add**. A box is displayed.
5. In the box, enter the SCM account’s login or email address.
6. To add another account, re-select **Add**, etc.
7. Select **Update**. The added SCM accounts are displayed in the **SCM Accounts** column as illustrated below.
The figure below shows:
1. The user's login name and email address.
2. The login name or email address added to the user account as *SCM account*.
### Related pages
* [viewing-users](https://docs.sonarsource.com/sonarqube-server/instance-administration/user-management/viewing-users "mention")
* [solution-overview](https://docs.sonarsource.com/sonarqube-server/user-guide/issues/solution-overview "mention")
* [#local-user-concept](https://docs.sonarsource.com/sonarqube-server/authentication/overview#local-user-concept "mention")
---
# Source: https://docs.sonarsource.com/sonarqube-community-build/server-update-and-maintenance/update/updating-to-sonarqube-server.md
# Moving to SonarQube Server
See the [Updating from SonarQube Community Build](https://app.gitbook.com/s/yDv2XwTC1xoOKBYeCK45/server-update-and-maintenance/update/updating-from-sonarqube-community-build "mention") page in the SonarQube Server documentation.
### Related pages
* The Update [roadmap](https://docs.sonarsource.com/sonarqube-community-build/server-update-and-maintenance/update/roadmap "mention") page when updating to a new version of SonarQube Community Build.
* [other-procedures](https://docs.sonarsource.com/sonarqube-community-build/server-update-and-maintenance/update/other-procedures "mention") page when reverting to the previous version of SonarQube Community Build or migrating your database to another vender.
* [Project move](https://app.gitbook.com/s/yDv2XwTC1xoOKBYeCK45/project-administration/project-move "mention") page when exporting a project from one SonarQube Server instance and import it into another SonarQube Server instance.
---
# Source: https://docs.sonarsource.com/sonarqube-server/2025.3/server-update-and-maintenance/data-center-edition/updating.md
# Source: https://docs.sonarsource.com/sonarqube-server/2025.5/server-update-and-maintenance/data-center-edition/updating.md
# Source: https://docs.sonarsource.com/sonarqube-server/2025.4/server-update-and-maintenance/data-center-edition/updating.md
# Source: https://docs.sonarsource.com/sonarqube-server/2025.6/server-update-and-maintenance/data-center-edition/updating.md
# Source: https://docs.sonarsource.com/sonarqube-server/server-update-and-maintenance/data-center-edition/updating.md
# Updating
To update your Data Center Edition to a newer version:
1. [determine-path](https://docs.sonarsource.com/sonarqube-server/server-update-and-maintenance/update/determine-path "mention").
2. Read the [release-notes](https://docs.sonarsource.com/sonarqube-server/server-update-and-maintenance/release-notes "mention") between the SonarQube Server versions.
3. Back up the SonarQube Server database.
4. [starting-stopping-cluster](https://docs.sonarsource.com/sonarqube-server/server-installation/data-center-edition/starting-stopping-cluster "mention").
5. Update each application and search node as follows (do not trigger the setup phase):
* [pre-update-steps](https://docs.sonarsource.com/sonarqube-server/server-update-and-maintenance/update/pre-update-steps "mention").
* [update](https://docs.sonarsource.com/sonarqube-server/server-update-and-maintenance/update/update "mention").
* [post-update-steps](https://docs.sonarsource.com/sonarqube-server/server-update-and-maintenance/update/post-update-steps "mention").
6. Once all nodes have the same binaries, restart the cluster. See [starting-stopping-cluster](https://docs.sonarsource.com/sonarqube-server/server-installation/data-center-edition/starting-stopping-cluster "mention") for more information.
7. At this point, only one of the application nodes is up and waiting for the /setup endpoint to be accessed. Try to access `node_ip:port/setup` on each application node, and trigger the setup operation on the one that responds.
### Related pages
* [dce-topology](https://docs.sonarsource.com/sonarqube-server/server-installation/data-center-edition/dce-topology "mention")
* [starting-stopping-cluster](https://docs.sonarsource.com/sonarqube-server/server-installation/data-center-edition/starting-stopping-cluster "mention")
* [monitoring](https://docs.sonarsource.com/sonarqube-server/server-update-and-maintenance/data-center-edition/monitoring "mention") your cluster
* [improving-performance](https://docs.sonarsource.com/sonarqube-server/server-update-and-maintenance/data-center-edition/improving-performance "mention") of your cluster
* [scaling](https://docs.sonarsource.com/sonarqube-server/server-update-and-maintenance/data-center-edition/scaling "mention") your cluster
---
# Source: https://docs.sonarsource.com/sonarqube-server/9.8/setup-and-upgrade/upgrade-the-server/upgrade-guide.md
# Source: https://docs.sonarsource.com/sonarqube-server/9.9/setup-and-upgrade/upgrade-the-server/upgrade-guide.md
# Source: https://docs.sonarsource.com/sonarqube-server/10.0/setup-and-upgrade/upgrade-the-server/upgrade-guide.md
# Source: https://docs.sonarsource.com/sonarqube-server/10.1/setup-and-upgrade/upgrade-the-server/upgrade-guide.md
# Source: https://docs.sonarsource.com/sonarqube-server/10.2/setup-and-upgrade/upgrade-the-server/upgrade-guide.md
# Source: https://docs.sonarsource.com/sonarqube-server/10.3/setup-and-upgrade/upgrade-the-server/upgrade-guide.md
# Upgrade guide
This is a generic guide for upgrading across versions of SonarQube. Carefully read the [release-upgrade-notes](https://docs.sonarsource.com/sonarqube-server/10.3/setup-and-upgrade/release-upgrade-notes "mention") of your target version and of any intermediate version(s).
Before upgrading, we recommend practicing your upgrade on a staging environment that’s as similar to your production environment as possible. For more on this and other important upgrading concepts, read through the [before-you-upgrade](https://docs.sonarsource.com/sonarqube-server/10.3/setup-and-upgrade/upgrade-the-server/before-you-upgrade "mention") page.
If you need to upgrade a cluster, see [configure-and-operate-a-cluster](https://docs.sonarsource.com/sonarqube-server/10.3/setup-and-upgrade/configure-and-operate-a-cluster "mention").
{% hint style="warning" %}
Before upgrading, back up your SonarQube database. Upgrade problems are rare, but you’ll want the backup if anything does happen.
{% endhint %}
### Database disk usage recommendations
During your upgrade, tables may be duplicated to speed up the migration process. This could cause your database disk usage to temporarily increase to as much as double the normal usage. Because of this, we recommend that your database disk usage is below 50% before starting a migration.
### Upgrading instructions
You can upgrade your SonarQube instance using the ZIP file, Docker image, or Helm Chart. To expand the upgrading instructions, click the option below that corresponds to your setup.
{% hint style="info" %}
After an upgrade, some projects might be temporarily greyed out in the UI. This is because SonarQube is reindexing your projects, and they become available in the UI as they are reindexed. Note that you can already run analyses on these projects. See [reindexing](https://docs.sonarsource.com/sonarqube-server/10.3/instance-administration/reindexing "mention") for more information.
{% endhint %}
Upgrading from the ZIP file
Before you upgrade, make sure you know how to [installing-sonarqube-from-zip-file](https://docs.sonarsource.com/sonarqube-server/10.3/setup-and-upgrade/install-the-server/installing-sonarqube-from-zip-file "mention") from the ZIP file and check that your environment [prerequisites-and-overview](https://docs.sonarsource.com/sonarqube-server/10.3/requirements/prerequisites-and-overview "mention") of the version you’re upgrading to.
**To upgrade from the ZIP file:**
1. Download and unzip the SonarQube distribution of your edition in a fresh directory, let’s say ``
2. If you’re using third-party plugins, Manually install plugins that are compatible with your version of SonarQube. Use the [plugin-version-matrix](https://docs.sonarsource.com/sonarqube-server/10.3/instance-administration/plugin-version-matrix "mention") to ensure that the versions you install are compatible with your server version. Simply copying plugins from the old server to the new is not recommended; incompatible or duplicate plugins could cause startup errors. Analysis of all languages provided by your edition is available by default without plugins.
3. Update the contents of `sonar.properties` file (in `/conf`) with the settings in the `/conf` directory (web server URL, database, ldap settings, etc.). Do not copy-paste the old files. If you are using the Oracle DB, copy its JDBC driver into `/extensions/jdbc-driver/oracle`
4. Stop your old SonarQube Server
5. Start your new SonarQube Server
6. Browse to `http://yourSonarQubeServerURL/setup` and follow the setup instructions
7. Reanalyze your projects to get fresh data.
Upgrading from the Docker image
{% hint style="info" %}
If you’re upgrading with an Oracle database or you’re using plugins, you can reuse your extensions volume from the previous version to avoid moving plugins or drivers. Use the [Broken link](https://docs.sonarsource.com/sonarqube-server/10.3/setup-and-upgrade/upgrade-the-server/broken-reference "mention") to ensure that your plugins are compatible with your version. Analysis of all languages provided by your edition is available by default without plugins.
{% endhint %}
**To upgrade SonarQube using the Docker image:**
1. Stop and remove the existing SonarQube container (a restart from the UI is not enough as the environment variables are only evaluated during the first run, not during a restart):
```css-79elbk
$ docker stop
$ docker rm
```
2\. Run Docker
```css-79elbk
$> docker run -d --name sonarqube \
-p 9000:9000 \
-e SONAR_JDBC_URL=... \
-e SONAR_JDBC_USERNAME=... \
-e SONAR_JDBC_PASSWORD=... \
-v sonarqube_data:/opt/sonarqube/data \
-v sonarqube_extensions:/opt/sonarqube/extensions \
-v sonarqube_logs:/opt/sonarqube/logs \
```
3\. Go to `http://yourSonarQubeServerURL/setup` and follow the setup instructions.
4\. Reanalyze your projects to get fresh data.
**From 8.9.x LTS to 9.9.x LTS**
Please note that the `lts` tag on Docker images is replaced with every new LTS release. If you want to avoid an automatic major upgrade, we recommend using the corresponding `9.9-` tag instead of relying on the `lts-` tag.
{% hint style="info" %}
* Unless you intend to delete the database and start new when running your image, be careful not to use `-v` to `docker-compose down` and, be careful when running commands like `docker system prune` or `docker volume prune`; regardless if you use an `external: true` parameter, your database volumes will not persist beyond the initial startup and shutdown of SonarQube.
{% endhint %}
Upgrading from the Helm chart
{% hint style="info" %}
If you’re upgrading with an Oracle database or you’re using plugins, you can reuse your extensions PVC from the previous version to avoid moving plugins or drivers. Use the [plugin-version-matrix](https://docs.sonarsource.com/sonarqube-server/10.3/instance-administration/plugin-version-matrix "mention") to ensure that your plugins are compatible with your version. Analysis of all languages provided by your edition is available by default without plugins.
{% endhint %}
**To upgrade SonarQube using our official Helm Chart:**
1. Change the SonarQube version on your `values.yaml`.
2. Redeploy SonarQube with the same helm chart:
```css-79elbk
helm upgrade --install -f values.yaml -n
```
3\. If you’re upgrading a Data Center Edition: after SonarQube search pods are running and ready, only one application (app) replica will be running and ready. You can confirm that it’s because of the ongoing upgrade by inspecting the logs of the pod for this text: `The database must be manually upgraded. Please backup the database and browse /setup`
4\. Go to `http://yourSonarQubeServerURL/setup` and follow the setup instructions.
5\. Reanalyze your projects to get fresh data.
{% hint style="warning" %}
Please verify that any custom configurations or custom `values.yaml` files contain *only parameters that are still compatible with the targeted chart*, and adjust them if needed. Some default parameters may have changed between versions of the chart.
{% endhint %}
**From 8.9.x LTS to 9.9.x LTS**
To install SonarQube 9.9 LTS, use the [sonarqube](https://artifacthub.io/packages/helm/sonarqube/sonarqube) Helm chart. The [sonarqube-lts](https://artifacthub.io/packages/helm/sonarqube/sonarqube-lts) Helm chart is no longer maintained and cannot be used to install the new LTS.
* For SonarQube 9.9 LTS Community, Developer, and Enterprise Editions, the [Helm chart ](https://artifacthub.io/packages/helm/sonarqube/sonarqube)version to use is `8.x.x` . See [`sonarqube` ArtifactHub](https://artifacthub.io/packages/helm/sonarqube/sonarqube#installing-the-sonarqube-9-9-lts-chart) for more information.
* For SonarQube 9.9 LTS Data Center Edition, the [Helm chart ](https://artifacthub.io/packages/helm/sonarqube/sonarqube)version to use is `7.x.x` . See [`sonarqube-dce` ArtifactHub](https://artifacthub.io/packages/helm/sonarqube/sonarqube-dce#installing-the-sonarqube-9-9-lts-chart) for more information.
Remember to verify that any custom configurations or custom `values.yaml` files contain *only parameters that are still compatible with the targeted chart*, as mentioned in the warning above.
As SonarQube only requires to persist the database, the general upgrade process will consist of uninstalling your instance before installing the new LTS.
If you are using an external database, you don’t have any persistent data inside kubernetes. Therefore, there is no action required.
Instead, if you rely on the embedded PostgreSQL chart (**not recommended**), uninstalling the chart will keep the PVC alive. The PVC can then be reused either:
* by specifying `postgresql.existingClaim` in the `values.yaml` file
* by not changing parameter values, but making sure you install the new chart in the same namespace (auto-generated name will be the same).
### Reverting to the previous version
If you need to revert to the previous version of SonarQube, the high-level rollback procedure for all deployments is as follows:
1. Shutdown your SonarQube instance or cluster.
2. Roll back your database to the backup you took before starting the upgrade.
3. Switch back to the previous version of your SonarQube installation.
4. Start your SonarQube instance or cluster.
### Changing your edition
You can move to a different SonarQube edition (for example, moving from Community Edition to a commercial edition) while you’re upgrading your version. Just use the appropriate edition file or Docker image tag in the upgrade instructions above.
If you want to move to a different edition without upgrading your SonarQube version, the steps are exactly the same as in the upgrading instructions above without needing to navigate to `http://yourSonarQubeServerURL/setup` or reanalyze your projects.
### Migrating from a ZIP file instance to a Docker instance
To migrate from the ZIP file to Docker:
1. Configure your Docker instance to point to your existing database.
2. Shut down your ZIP instance.
3. Start your Docker instance.
### Additional steps and information
#### Oracle clean-up
There’s an additional step you may want to perform if you’re using Oracle. On Oracle, the database columns to be dropped are now marked as UNUSED and are not physically dropped anymore. To reclaim disk space, Oracle administrators must drop these unused columns manually. The SQL request is `ALTER TABLE foo DROP UNUSED COLUMNS`. The relevant tables are listed in the system table `all_unused_col_tabs`.
#### PostgreSQL clean-up
Once you’ve finished a technical upgrade, **you should rebuild database indexes and refresh database statistics** before starting SonarQube and reanalyzing your projects.
For PostgreSQL, that means executing three operations:
1. `VACUUM FULL`
2. `REINDEX DATABASE `
3. `ANALYZE`
According to the PostgreSQL documentation:
```css-79elbk
In normal PostgreSQL operation, tuples that are deleted or obsoleted by an update are not physically removed from their table; they remain present until a VACUUM is done.
```
#### Scanner update
When upgrading SonarQube, you should also make sure you’re using the latest versions of the SonarQube scanners to take advantage of features and fixes on the scanner side. Please check the documentation pages of the scanners you use for the most recent version compatible with SonarQube and your build tools.
See also this section for [overview](https://docs.sonarsource.com/sonarqube-server/10.3/user-guide/rules/overview "mention").
#### Microsoft SQL Server and Integrated Authentication
If you use Microsoft SQL Server with Integrated Authentication, make sure that you’re using a supported version of the [Microsoft SQL JDBC Driver package](https://learn.microsoft.com/en-us/sql/connect/jdbc/release-notes-for-the-jdbc-driver). The minimum supported version is the one mentioned on the [installing-the-database](https://docs.sonarsource.com/sonarqube-server/10.3/setup-and-upgrade/install-the-server/installing-the-database "mention") page.
### SonarQube as Linux or Windows service
If you use an external configuration, such as a script or Windows Service to control your server, you’ll need to update it to point to ``.
* For Linux it depends how you implemented the service
* For Windows you can update your service by running:
```css-79elbk
> sc delete SonarQube
> $NEW_SONARQUBE_HOME\bin\windows-x86-64\SonarService.bat install
```
### Release upgrade notes
Usually, SonarQube releases come with some specific recommendations for upgrading from the previous version. You should read the upgrade notes for each version between your current version and the target version.
---
# Source: https://docs.sonarsource.com/sonarqube-server/8.9/setup-and-upgrade/upgrade-the-server.md
# Source: https://docs.sonarsource.com/sonarqube-server/9.8/setup-and-upgrade/upgrade-the-server.md
# Source: https://docs.sonarsource.com/sonarqube-server/9.9/setup-and-upgrade/upgrade-the-server.md
# Source: https://docs.sonarsource.com/sonarqube-server/10.0/setup-and-upgrade/upgrade-the-server.md
# Source: https://docs.sonarsource.com/sonarqube-server/10.1/setup-and-upgrade/upgrade-the-server.md
# Source: https://docs.sonarsource.com/sonarqube-server/10.2/setup-and-upgrade/upgrade-the-server.md
# Source: https://docs.sonarsource.com/sonarqube-server/10.3/setup-and-upgrade/upgrade-the-server.md
# Source: https://docs.sonarsource.com/sonarqube-server/10.4/setup-and-upgrade/upgrade-the-server.md
# Source: https://docs.sonarsource.com/sonarqube-server/10.5/setup-and-upgrade/upgrade-the-server.md
# Source: https://docs.sonarsource.com/sonarqube-server/10.6/setup-and-upgrade/upgrade-the-server.md
# Source: https://docs.sonarsource.com/sonarqube-server/10.7/server-upgrade-and-maintenance/upgrade/upgrade-the-server.md
# Source: https://docs.sonarsource.com/sonarqube-server/10.8/server-upgrade-and-maintenance/upgrade/upgrade-the-server.md
# SonarQube Server
{% content-ref url="upgrade-the-server/roadmap" %}
[roadmap](https://docs.sonarsource.com/sonarqube-server/10.8/server-upgrade-and-maintenance/upgrade/upgrade-the-server/roadmap)
{% endcontent-ref %}
{% content-ref url="upgrade-the-server/determine-path" %}
[determine-path](https://docs.sonarsource.com/sonarqube-server/10.8/server-upgrade-and-maintenance/upgrade/upgrade-the-server/determine-path)
{% endcontent-ref %}
{% content-ref url="upgrade-the-server/testing" %}
[testing](https://docs.sonarsource.com/sonarqube-server/10.8/server-upgrade-and-maintenance/upgrade/upgrade-the-server/testing)
{% endcontent-ref %}
{% content-ref url="upgrade-the-server/upgrade" %}
[upgrade](https://docs.sonarsource.com/sonarqube-server/10.8/server-upgrade-and-maintenance/upgrade/upgrade-the-server/upgrade)
{% endcontent-ref %}
{% content-ref url="upgrade-the-server/post-upgrade-steps" %}
[post-upgrade-steps](https://docs.sonarsource.com/sonarqube-server/10.8/server-upgrade-and-maintenance/upgrade/upgrade-the-server/post-upgrade-steps)
{% endcontent-ref %}
{% content-ref url="upgrade-the-server/other-procedures" %}
[other-procedures](https://docs.sonarsource.com/sonarqube-server/10.8/server-upgrade-and-maintenance/upgrade/upgrade-the-server/other-procedures)
{% endcontent-ref %}
{% content-ref url="upgrade-the-server/active-versions" %}
[active-versions](https://docs.sonarsource.com/sonarqube-server/10.8/server-upgrade-and-maintenance/upgrade/upgrade-the-server/active-versions)
{% endcontent-ref %}
---
# Source: https://docs.sonarsource.com/sonarqube-server/10.4/setup-and-upgrade/upgrade-the-server/upgrade.md
# Source: https://docs.sonarsource.com/sonarqube-server/10.5/setup-and-upgrade/upgrade-the-server/upgrade.md
# Source: https://docs.sonarsource.com/sonarqube-server/10.6/setup-and-upgrade/upgrade-the-server/upgrade.md
# Source: https://docs.sonarsource.com/sonarqube-server/10.7/server-upgrade-and-maintenance/upgrade/upgrade-the-server/upgrade.md
# Source: https://docs.sonarsource.com/sonarqube-server/10.7/server-upgrade-and-maintenance/upgrade.md
# Source: https://docs.sonarsource.com/sonarqube-server/10.8/server-upgrade-and-maintenance/upgrade/upgrade-the-server/upgrade.md
# Source: https://docs.sonarsource.com/sonarqube-server/10.8/server-upgrade-and-maintenance/upgrade.md
# Source: https://docs.sonarsource.com/sonarqube-server/2025.2/server-update-and-maintenance/upgrade/upgrade.md
# Source: https://docs.sonarsource.com/sonarqube-server/2025.2/server-update-and-maintenance/upgrade.md
# Source: https://docs.sonarsource.com/sonarqube-server/2025.3/server-update-and-maintenance/upgrade/upgrade.md
# Source: https://docs.sonarsource.com/sonarqube-server/2025.3/server-update-and-maintenance/upgrade.md
# Update
{% content-ref url="upgrade/roadmap" %}
[roadmap](https://docs.sonarsource.com/sonarqube-server/2025.3/server-update-and-maintenance/upgrade/roadmap)
{% endcontent-ref %}
{% content-ref url="upgrade/release-cycle-model" %}
[release-cycle-model](https://docs.sonarsource.com/sonarqube-server/2025.3/server-update-and-maintenance/upgrade/release-cycle-model)
{% endcontent-ref %}
{% content-ref url="upgrade/determine-path" %}
[determine-path](https://docs.sonarsource.com/sonarqube-server/2025.3/server-update-and-maintenance/upgrade/determine-path)
{% endcontent-ref %}
{% content-ref url="upgrade/pre-upgrade-steps" %}
[pre-upgrade-steps](https://docs.sonarsource.com/sonarqube-server/2025.3/server-update-and-maintenance/upgrade/pre-upgrade-steps)
{% endcontent-ref %}
{% content-ref url="upgrade/upgrade" %}
[upgrade](https://docs.sonarsource.com/sonarqube-server/2025.3/server-update-and-maintenance/upgrade/upgrade)
{% endcontent-ref %}
{% content-ref url="upgrade/post-upgrade-steps" %}
[post-upgrade-steps](https://docs.sonarsource.com/sonarqube-server/2025.3/server-update-and-maintenance/upgrade/post-upgrade-steps)
{% endcontent-ref %}
{% content-ref url="upgrade/upgrading-from-sonarqube-community-build" %}
[upgrading-from-sonarqube-community-build](https://docs.sonarsource.com/sonarqube-server/2025.3/server-update-and-maintenance/upgrade/upgrading-from-sonarqube-community-build)
{% endcontent-ref %}
{% content-ref url="upgrade/moving-to-another-edition" %}
[moving-to-another-edition](https://docs.sonarsource.com/sonarqube-server/2025.3/server-update-and-maintenance/upgrade/moving-to-another-edition)
{% endcontent-ref %}
{% content-ref url="upgrade/marketplace" %}
[marketplace](https://docs.sonarsource.com/sonarqube-server/2025.3/server-update-and-maintenance/upgrade/marketplace)
{% endcontent-ref %}
{% content-ref url="upgrade/other-procedures" %}
[other-procedures](https://docs.sonarsource.com/sonarqube-server/2025.3/server-update-and-maintenance/upgrade/other-procedures)
{% endcontent-ref %}
---
# Source: https://docs.sonarsource.com/sonarqube-server/2025.3/server-update-and-maintenance/upgrade/upgrading-from-sonarqube-community-build.md
# Updating from SonarQube Community Build
You can use different options to update your SonarQube Community Build to SonarQube Server depending on your situation.
{% hint style="info" %}
If you are moving to Data Center Edition, since all DCE customers are entitled to commercial support, please [get in touch with the team](http://help.sonarsource.com) to help plan your update.
{% endhint %}
### Option 1: Update your existing database
Use this option if:
* You use an external database for your SonarQube data (not the embedded one).
* You regularly analyzed a substantial amount of code.
* Developers interacted with the results, including resolving and/or accepting issues, and maintaining this history is important for you.
Proceed as follows:
1. Determine the update path as follows:\
Ensure that the target SonarQube Server version was released after your SonarQube Community Build version.\
In most cases, migrating to the latest version of the target product will suffice. However, if you are using the latest version of SonarQube Community Build, you may need to wait for the next version of SonarQube Server, typically available within a month.
2. [pre-upgrade-steps](https://docs.sonarsource.com/sonarqube-server/2025.3/server-update-and-maintenance/upgrade/pre-upgrade-steps "mention").
3. Back up the SonarQube Community Build database and ensure it complies with the [installing-the-database](https://docs.sonarsource.com/sonarqube-server/2025.3/server-installation/installing-the-database "mention") of the target SonarQube Server version. If you want to migrate to another database vendor, see [sonarqube-db-copy-tool](https://docs.sonarsource.com/sonarqube-server/2025.3/server-update-and-maintenance/maintenance/sonarqube-db-copy-tool "mention").
4. [upgrade](https://docs.sonarsource.com/sonarqube-server/2025.3/server-update-and-maintenance/upgrade/upgrade "mention").
5. [post-upgrade-steps](https://docs.sonarsource.com/sonarqube-server/2025.3/server-update-and-maintenance/upgrade/post-upgrade-steps "mention").
### Option 2: Start over with a fresh installation
Use this option if:
* Your SonarQube Community Build instance is far behind the current version so that the length and complexity of the update path may outweigh the benefits of data preservation for you.
* Your SonarQube Community Build instance was sporadically used, managed inconsistently, or isn’t known to represent the projects you plan to analyze and maintain actively.
* You made extensive use of 3rd party plugins that may conflict with Sonar commercial features.
* You created multiple "projects" representing branches of the same individual code repositories and have a messy Project overview as a result. The cleanup may be more burdensome than a fresh start.
Proceed as follows:
1. [introduction](https://docs.sonarsource.com/sonarqube-server/2025.3/server-installation/introduction "mention").
2. Re-provision your projects through the SonarQube UI or web API, or else give the user account that will be running analysis permission to [user-permissions](https://docs.sonarsource.com/sonarqube-server/2025.3/instance-administration/user-management/user-permissions "mention").
3. For existing CI/CD pipelines involving Sonar analysis, revisit the URL and [managing-tokens](https://docs.sonarsource.com/sonarqube-server/2025.3/user-guide/managing-tokens "mention") used to connect to Sonar and update with values appropriate to your new SonarQube Server instance.
4. You may (of course) keep your old SonarQube Community Build instance online during a transitional period until you’re confident all needed project workflows have been migrated to your new SonarQube Server instance
### Option 3: Move your project data to the new instance
Use this option if:
* You’d like to preserve project analysis and issue history.
* You’d rather revisit all the administrative details, or you built up valuable history while using the embedded non-updateable product database.
* Your administrators are able to dedicate time and effort to a data migration project.
* You’re migrating to Enterprise or Data Center Edition.
Proceed as follows:
1. Install your SonarQube Server’s Enterprise or Data Center Edition as explained above in *Option 2: Start over with a fresh installation*.
2. [project-move](https://docs.sonarsource.com/sonarqube-server/2025.3/project-administration/project-move "mention") from your old SonarQube Community Build instance to your new SonarQube Server instance.
### Related pages
* [project-move](https://docs.sonarsource.com/sonarqube-server/2025.3/project-administration/project-move "mention")
* [other-procedures](https://docs.sonarsource.com/sonarqube-server/2025.3/server-update-and-maintenance/upgrade/other-procedures "mention")
* [Other migration-related tasks](https://app.gitbook.com/s/bqrfLGeD0Y9vE5l9Le42/server-update-and-maintenance/update/other-procedures "mention")
---
# Source: https://docs.sonarsource.com/sonarqube-server/8.9/user-guide/user-account.md
# Source: https://docs.sonarsource.com/sonarqube-server/9.8/user-guide/user-account.md
# Source: https://docs.sonarsource.com/sonarqube-server/9.9/user-guide/user-account.md
# Source: https://docs.sonarsource.com/sonarqube-server/10.0/user-guide/user-account.md
# Source: https://docs.sonarsource.com/sonarqube-server/10.1/user-guide/user-account.md
# Source: https://docs.sonarsource.com/sonarqube-server/10.2/user-guide/user-account.md
# Source: https://docs.sonarsource.com/sonarqube-server/10.3/user-guide/user-account.md
# Source: https://docs.sonarsource.com/sonarqube-server/10.4/user-guide/user-account.md
# Source: https://docs.sonarsource.com/sonarqube-server/10.5/user-guide/user-account.md
# Source: https://docs.sonarsource.com/sonarqube-server/10.6/user-guide/user-account.md
# User account
{% content-ref url="user-account/overview" %}
[overview](https://docs.sonarsource.com/sonarqube-server/10.6/user-guide/user-account/overview)
{% endcontent-ref %}
{% content-ref url="user-account/generating-and-using-tokens" %}
[generating-and-using-tokens](https://docs.sonarsource.com/sonarqube-server/10.6/user-guide/user-account/generating-and-using-tokens)
{% endcontent-ref %}
---
# Source: https://docs.sonarsource.com/sonarqube-community-build/instance-administration/security/user-accounts.md
# Source: https://docs.sonarsource.com/sonarqube-server/2025.3/instance-administration/security/user-accounts.md
# Source: https://docs.sonarsource.com/sonarqube-server/2025.5/instance-administration/security/user-accounts.md
# Source: https://docs.sonarsource.com/sonarqube-server/2025.4/instance-administration/security/user-accounts.md
# Source: https://docs.sonarsource.com/sonarqube-server/2025.6/instance-administration/security/user-accounts.md
# Source: https://docs.sonarsource.com/sonarqube-server/instance-administration/security/user-accounts.md
# User accounts
By default, authentication is forced.
Authentication can be managed:
* Via the SonarQube Server built-in users/groups database. See [creating-users](https://docs.sonarsource.com/sonarqube-server/instance-administration/user-management/creating-users "mention")
* Via several delegated authentication methods, see [authentication](https://docs.sonarsource.com/sonarqube-server/instance-administration/authentication "mention") for more information.
To change the password of a manually created account, see [changing-user-password](https://docs.sonarsource.com/sonarqube-server/instance-administration/user-management/changing-user-password "mention").
To deactivate a user account, see [deactivating-users](https://docs.sonarsource.com/sonarqube-server/instance-administration/user-management/deactivating-users "mention").
To manage the user account permissions, see:
* [user-permissions](https://docs.sonarsource.com/sonarqube-server/instance-administration/user-management/user-permissions "mention")
* [setting-project-permissions](https://docs.sonarsource.com/sonarqube-server/project-administration/setting-project-permissions "mention")
### Disabling forced user authentication
You can disable forced user authentication, and allow anonymous users to browse projects and run analyses in your instance. To do so, you need the Administer System permission.
{% hint style="warning" %}
Disabling forced authentication can expose your SonarQube Server instance to security risks. We strongly recommend forcing user authentication on production instances or carefully configuring the security (user permissions, project visibility, etc.) on your instance. See also [#accessible-api-endpoints-if-forced-authentication-disabled](#accessible-api-endpoints-if-forced-authentication-disabled "mention") below.
We advise keeping forced authentication if you have your SonarQube Server instance publicly accessible.
{% endhint %}
Accessible API endpoints if forced authentication disabled
If forced authentication is disabled, the following API endpoints are accessible **without authentication**:
* api/components/search
* api/issues/tags
* api/languages/list
* api/metrics/domains
* api/metrics/search
* api/metrics/types
* api/plugins/installed
* api/project\_tags/search
* api/qualitygates/list
* api/qualitygates/search
* api/qualitygates/show
* api/qualityprofiles/backup
* api/qualityprofiles/changelog
* api/qualityprofiles/export
* api/qualityprofiles/exporters
* api/qualityprofiles/importers
* api/qualityprofiles/inheritance
* api/qualityprofiles/projects
* api/qualityprofiles/search
* api/rules/repositories
* api/rules/search
* api/rules/show
* api/rules/tags
* api/server/version
* api/settings/login\_message
* api/sources/scm (for public repositories)
* api/sources/show (for public repositories)
* api/system/db*migration*status
* api/system/migrate\_db
* api/system/ping
* api/system/status
* api/system/upgrades
* api/users/search
* api/webservices/list
* api/webservices/response\_example
To disable forced authentication:
1. Go to **Administration** > **Configuration** > **General Settings** > **Security.**
2. Disable **Force user authentication**.
---
# Source: https://docs.sonarsource.com/sonarqube-cloud/administering-sonarcloud/about-sonarqube-cloud-solution/user-management/user-group-concept.md
# User group concept
To manage permissions more easily, the members of an organization are managed through groups. The following applies:
* Permissions can be set at both user and group levels.
* A user can belong to several groups within an organization.
* A user’s permissions are the sum of all the permissions granted to them individually plus all the permissions granted by the groups they are a member of.
Built-in groups are added to each organization. Starting in [Team plan](https://www.sonarsource.com/plans-and-pricing/sonarcloud/), you can define and add custom groups to your organization.
### Built-in groups
When a new organization is created, two built-in groups are automatically created for the organization:
* **Members** group: This group contains all DevOps platform (DOP) users of the organization. Any DOP user added to the organization is automatically added to this group. See [devops-platform-authentication](https://docs.sonarsource.com/sonarqube-cloud/administering-sonarcloud/about-sonarqube-cloud-solution/user-management/devops-platform-authentication "mention") for more details.
* **Owners** group: This group is intended to include the organization admins. The organization’s creator, if they use a DOP user account, is automatically added to this group. By default, members of this group have full control over the organization.
You can never delete the Members group, or change its name and composition. Starting in Team plan, you can:
* Change the permissions of the Members group.
* Manage the Owners group: change its name, composition, and permissions; or delete it.
The figure below shows the two groups related by default to an organization.
### Built-in group permissions on Free plan
This section shows the permissions assigned to the built-in groups in a Free plan organization.
{% hint style="info" %}
In a Team or Enterprise organization, those permissions are default permissions that you can change.
{% endhint %}
Organization-level permissions
| **Permission type** | **Description** | **Members** | **Owners** |
| --------------------------- | ------------------------------------------------------------------------------------------ | ----------- | ---------- |
| Administer Quality Gates | Can create and update quality gates that can be applied to the organization’s projects. |
| x |
| Administer Quality Profiles | Can create and update quality profiles that can be applied to the organization’s projects. |
| x |
| Create Projects | Can create new projects in the organization. |
| x |
| Administer | Has full control over the organization. |
Applies only to private projects. Can view the project.
| x |
|
| See Source Code |
Applies only to private projects. Can view the source code (via API and web view) provided the Browse project permission is also granted.
| x |
|
| Administer Issues |
Can perform the following actions:
• Accept an issue
• Mark an issue as False positive
| x |
|
| Administer Security Hotspots | Can change the status of a security hotspot. For private projects, the Browse project permission must also be granted. | x |
|
| Execute Analysis | Can start an analysis on the project. This includes the ability to get all settings required to perform an analysis (including secured settings like passwords) and to push analysis results to the SonarQube Cloud server. |
| x |
| Administer |
Can perform the following actions:
• Delete a project.
• Change the project settings including project-level permissions.
• Configure various project functions, such as PDF reporting, snapshots, and webhooks.
For private projects, the Browse project permission must also be granted.
|
| x |
{% hint style="info" %}
Groups are only supported at the organization level.
{% endhint %}
### Related pages
* [user-groups](https://docs.sonarsource.com/sonarqube-cloud/administering-sonarcloud/managing-organization/users-and-permissions/user-groups "mention")
* [organization-permissions](https://docs.sonarsource.com/sonarqube-cloud/administering-sonarcloud/managing-organization/users-and-permissions/organization-permissions "mention")
* Setting the project-related permissions of a group:
* [templates](https://docs.sonarsource.com/sonarqube-cloud/administering-sonarcloud/managing-organization/manage-org-projects/manage-project-permissions/templates "mention") (through templates)
* [setting-permissions](https://docs.sonarsource.com/sonarqube-cloud/managing-your-projects/administering-your-projects/setting-permissions "mention")
---
# Source: https://docs.sonarsource.com/sonarqube-community-build/instance-administration/user-management/user-groups.md
# Source: https://docs.sonarsource.com/sonarqube-server/10.7/instance-administration/user-management/user-groups.md
# Source: https://docs.sonarsource.com/sonarqube-server/10.8/instance-administration/user-management/user-groups.md
# Source: https://docs.sonarsource.com/sonarqube-server/2025.2/instance-administration/user-management/user-groups.md
# Source: https://docs.sonarsource.com/sonarqube-server/2025.3/instance-administration/user-management/user-groups.md
# Source: https://docs.sonarsource.com/sonarqube-server/2025.5/instance-administration/user-management/user-groups.md
# Source: https://docs.sonarsource.com/sonarqube-server/2025.1/instance-administration/user-management/user-groups.md
# Source: https://docs.sonarsource.com/sonarqube-server/2025.4/instance-administration/user-management/user-groups.md
# Source: https://docs.sonarsource.com/sonarqube-server/2025.6/instance-administration/user-management/user-groups.md
# Source: https://docs.sonarsource.com/sonarqube-server/instance-administration/user-management/user-groups.md
# Source: https://docs.sonarsource.com/sonarqube-cloud/administering-sonarcloud/managing-organization/users-and-permissions/user-groups.md
# Managing user groups
This feature is only available in the [Enterprise plan](https://www.sonarsource.com/plans-and-pricing/#sonarqube-cloud-features).
With the Free plan organization, only the built-in groups are used and you cannot change them.
User groups are used to manage organization members and their permissions. This article describes how to create, update, or delete user groups. For more information about user groups, see [user-group-concept](https://docs.sonarsource.com/sonarqube-cloud/administering-sonarcloud/about-sonarqube-cloud-solution/user-management/user-group-concept "mention").
You must be an organization admin to be able to manage the user groups of the organization.
### Creating a new user group
1. Retrieve your organization. See [viewing-organizations](https://docs.sonarsource.com/sonarqube-cloud/getting-started/viewing-organizations "mention") for more details.
2. Go to **Administration** > **Groups**. The **Groups** page opens with the list of user groups for the organization.
3. Select the **Create Group** button. The **Create Group** dialog opens.
4. Enter the group name and description.
5. Confirm with **Create**. The new group is added to the list.
6. In the **Members** column, select the pen icon to add users to the group: see below.
### Adding/removing users to/from a group
1. Retrieve your organization. See [viewing-organizations](https://docs.sonarsource.com/sonarqube-cloud/getting-started/viewing-organizations "mention") for more details.
2. Go to **Administration** > **Groups**. The **Groups** page opens with the list of user groups for the organization.
3. In the **Members** column, select the pen icon next to the group you want to change. The **Update users** dialog opens.
4. Select the **All** option. All users belonging to the organization are listed.
5. Select or unselect the check box to add or remove a user to or from the group.
6. Select the **Close** button.
### Changing the name or description of a group
1. Retrieve your organization. See [viewing-organizations](https://docs.sonarsource.com/sonarqube-cloud/getting-started/viewing-organizations "mention") for more details.
2. Go to **Administration** > **Groups**. The **Groups** page opens with the list of user groups for the organization.
3. Select the three-dot menu to the far right of the group you want to change.
4. In the menu, select the **Update details** command. The **Update Group** dialog opens.
5. Edit the group details and select the **Update** button.
### Deleting a user group
You cannot delete the **Members** group. You can only delete a group if it does not result in the removal of all organization admins.
To delete a group:
1. Retrieve your organization. See [viewing-organizations](https://docs.sonarsource.com/sonarqube-cloud/getting-started/viewing-organizations "mention") for more details.
2. Go to **Administration** > **Groups**. The **Groups** page opens with the list of user groups for the organization.
3. Select the three-dot menu to the far right of the group you want to delete.
4. In the menu, select the **Delete** command and confirm.
### Related pages
* [setup-overview](https://docs.sonarsource.com/sonarqube-cloud/administering-sonarcloud/managing-organization/setup-overview "mention")
* [introduction](https://docs.sonarsource.com/sonarqube-cloud/administering-sonarcloud/managing-subscription/introduction "mention") to Managing your subscription
* [introduction](https://docs.sonarsource.com/sonarqube-cloud/administering-sonarcloud/managing-organization/setting-config-at-org-level/introduction "mention") to Performing global analysis setup
* [organization-members](https://docs.sonarsource.com/sonarqube-cloud/administering-sonarcloud/managing-organization/users-and-permissions/organization-members "mention")
* [organization-permissions](https://docs.sonarsource.com/sonarqube-cloud/administering-sonarcloud/managing-organization/users-and-permissions/organization-permissions "mention")
* [projects-management-page](https://docs.sonarsource.com/sonarqube-cloud/administering-sonarcloud/managing-organization/manage-org-projects/projects-management-page "mention")
---
# Source: https://docs.sonarsource.com/sonarqube-community-build/user-guide.md
# Source: https://docs.sonarsource.com/sonarqube-server/8.9/user-guide.md
# Source: https://docs.sonarsource.com/sonarqube-server/9.8/user-guide.md
# Source: https://docs.sonarsource.com/sonarqube-server/9.9/user-guide.md
# Source: https://docs.sonarsource.com/sonarqube-server/10.0/user-guide.md
# Source: https://docs.sonarsource.com/sonarqube-server/10.1/user-guide.md
# Source: https://docs.sonarsource.com/sonarqube-server/10.2/user-guide.md
# Source: https://docs.sonarsource.com/sonarqube-server/10.3/user-guide.md
# Source: https://docs.sonarsource.com/sonarqube-server/10.4/user-guide.md
# Source: https://docs.sonarsource.com/sonarqube-server/10.5/user-guide.md
# Source: https://docs.sonarsource.com/sonarqube-server/10.6/user-guide.md
# Source: https://docs.sonarsource.com/sonarqube-server/10.7/user-guide.md
# Source: https://docs.sonarsource.com/sonarqube-server/10.8/user-guide.md
# Source: https://docs.sonarsource.com/sonarqube-server/2025.2/user-guide.md
# Source: https://docs.sonarsource.com/sonarqube-server/2025.3/user-guide.md
# Source: https://docs.sonarsource.com/sonarqube-server/2025.5/user-guide.md
# Source: https://docs.sonarsource.com/sonarqube-server/2025.1/user-guide.md
# Source: https://docs.sonarsource.com/sonarqube-server/2025.4/user-guide.md
# Source: https://docs.sonarsource.com/sonarqube-server/2025.6/user-guide.md
# Source: https://docs.sonarsource.com/sonarqube-server/user-guide.md
# User guide
- [Connected mode](/sonarqube-server/user-guide/connected-mode.md): SonarQube for IDE is a free IDE extension that integrates with SonarQube Server. Like a spell checker, it highlights issues as you type.
- [Viewing projects](/sonarqube-server/user-guide/viewing-projects.md): Retrieving and viewing projects.
- [Retrieving projects](/sonarqube-server/user-guide/viewing-projects/retrieving-projects.md): Retrieving public, private, administered and favorite projects in SonarQube Server.
- [Viewing analysis summary](/sonarqube-server/user-guide/viewing-projects/project-overview.md): View the analysis summary on the project overview page.
- [Viewing project activity](/sonarqube-server/user-guide/viewing-projects/activity-and-history.md): The Activity page shows the evolution of your project over time based on various measures and events.
- [Viewing project structure](/sonarqube-server/user-guide/viewing-projects/viewing-project-structure.md): The Code page shows your project's structure.
- [Viewing project information](/sonarqube-server/user-guide/viewing-projects/viewing-project-information.md): SonarQube Server's Project Information page shows details of your project settings, such as quality gate and quality profiles used for project analysis.
- [Viewing reports](/sonarqube-server/user-guide/viewing-reports.md): Retrieving and viewing reports.
- [PDF reports](/sonarqube-server/user-guide/viewing-reports/pdf-reports.md): PDF reports give a periodic, high-level overview of the overall code quality and security for your projects, applications, and portfolios.
- [Security reports](/sonarqube-server/user-guide/viewing-reports/security-reports.md): Security reports provide a big picture overview of your application's security standing in relation to industry standards.
- [Regulatory reports](/sonarqube-server/user-guide/viewing-reports/regulatory-reports.md): Regulatory reports provide important information about your project, such as quality gate status, ratings, and the distribution of issues for new and overall code.
- [Portfolios](/sonarqube-server/user-guide/viewing-reports/portfolios.md): Portfolios allow you to track releasability and ratings information for multiple projects.
- [Monitoring code metrics](/sonarqube-server/user-guide/code-metrics.md): Understanding and monitoring code metrics.
- [Introduction](/sonarqube-server/user-guide/code-metrics/introduction.md): SonarQube’s automated code review and analysis uses various code metrics to evaluate code quality.
- [Understanding measures and metrics](/sonarqube-server/user-guide/code-metrics/metrics-definition.md): Measures and metrics used in SonarQube to evaluate your code.
- [Monitoring project metrics](/sonarqube-server/user-guide/code-metrics/monitoring-project-metrics.md): SonarQube offers various tools to monitor and compare code metrics for your project.
- [Monitoring portfolio metrics](/sonarqube-server/user-guide/code-metrics/monitoring-portfolio-metrics.md): SonarQube offers various tools to monitor and compare code metrics for your portfolio.
- [Changing instance modes](/sonarqube-server/user-guide/code-metrics/changing-modes.md): SonarQube Server uses two different modes that affect metric calculations.
- [Understanding rules](/sonarqube-server/user-guide/rules.md): Understanding rules, software qualities, security-related rules and rules for AI CodeFix.
- [Overview](/sonarqube-server/user-guide/rules/overview.md): SonarQube evaluates your code against a set of rules to generate issues.
- [Software qualities](/sonarqube-server/user-guide/rules/software-qualities.md): Software qualities refer to code that is secure, reliable, and maintainable.
- [Security-related rules](/sonarqube-server/user-guide/rules/security-related-rules.md): The SonarQube quality model is applied to an automated code review and analysis based on four types of rules.
- [Built-in rule tags](/sonarqube-server/user-guide/rules/built-in-rule-tags.md): Tags are a way to categorize rules and issues. Some built-in tags are language-specific, but many more appear across languages.
- [Rules for AI CodeFix](/sonarqube-server/user-guide/rules/rules-for-ai-codefix.md): AI CodeFix uses rules selected from a set of languages.
- [Quality standards and new code](/sonarqube-server/user-guide/about-new-code.md): SonarQube warns you whenever issues are detected in your new code.
- [Managing issues](/sonarqube-server/user-guide/issues.md): Retrieving, viewing and managing issues.
- [Introduction](/sonarqube-server/user-guide/issues/introduction.md): An automated code review detects an issue as a problem in your code.
- [Issue management solution](/sonarqube-server/user-guide/issues/solution-overview.md): This document describes how SonarQube Server and its automated code review identify, assign, and synchronize issues. It also presents the issue's lifecycle and details issue-related features.
- [Retrieving issues](/sonarqube-server/user-guide/issues/retrieving.md): Retrieve and view detected issues after your project's analysis.
- [Reviewing issues](/sonarqube-server/user-guide/issues/reviewing.md): Navigate and review issues raised by SonarQube's automated code review and analysis.
- [Editing issues](/sonarqube-server/user-guide/issues/managing.md): Manage issues in SonarQube Server by changing their status, reassigning them, customizing the severity level, tagging them, and commenting on them.
- [Fixing issues](/sonarqube-server/user-guide/issues/fixing.md): Starting with the Enterprise edition, you can get AI-suggested fixes for your code issues.
- [Triaging issues in Sandbox](/sonarqube-server/user-guide/issues/triaging-issues-in-sandbox.md): Triaging issues automatically moved to the Sandbox by SonarQube Server.
- [In your DevOps platform](/sonarqube-server/user-guide/issues/in-devops-platform.md): How to view and/or manage the issues reported by SonarQube Server in your GitHub, GitLab, Bitbucket Cloud, or Azure DevOps instance.
- [Issues reported in GitHub](/sonarqube-server/user-guide/issues/in-devops-platform/github.md): SonarQube Server reports an analysis summary on your GitHub pull requests and can display security issues as code scanning alerts in the GitHub interface.
- [Issues reported in Bitbucket](/sonarqube-server/user-guide/issues/in-devops-platform/bitbucket.md): In Bitbucket, you can view your analysis results directly to your pull requests.
- [Issues reported in GitLab](/sonarqube-server/user-guide/issues/in-devops-platform/gitlab.md): SonarQube Server reports analysis summary comments in your GitLab merge requests and security issues in GitLab vulnerability report.
- [Issues reported in Azure DevOps](/sonarqube-server/user-guide/issues/in-devops-platform/azure-devops.md): SonarQube Server issues reports the issues as comments on your Azure DevOps pull requests.
- [Managing Jira work items](/sonarqube-server/user-guide/issues/managing-jira-work-items.md): You can push SonarQube issues to Jira work items directly from SonarQube Server.
- [Managing Security Hotspots](/sonarqube-server/user-guide/security-hotspots.md): Security Hotspot highlights a security-sensitive piece of code that the developer needs to review.
- [Managing your account](/sonarqube-server/user-guide/managing-your-account.md): Managing user profiles, subscribing to notifications and changing your password.
- [Introduction](/sonarqube-server/user-guide/managing-your-account/introduction.md): Managing your SonarQube Server account.
- [Viewing your user profile](/sonarqube-server/user-guide/managing-your-account/viewing-user-profile.md): Your user profile displays your login name, email address, user groups, and associated SCM accounts.
- [Notifications](/sonarqube-server/user-guide/managing-your-account/subscribing-to-notifications.md): You can subscribe to email notifications for various analysis-related events. You cannot subscribe for another user.
- [Subscribing to email notifications](/sonarqube-server/user-guide/managing-your-account/subscribing-to-notifications/email.md): You can subscribe to email notifications for various analysis-related events. You cannot subscribe for another user.
- [Subscribing to Slack notifications](/sonarqube-server/user-guide/managing-your-account/subscribing-to-notifications/slack.md): You can subscribe to real-time notifications on analysis results directly in Slack.
- [Changing password](/sonarqube-server/user-guide/managing-your-account/changing-password.md): Changing your SonarQube Server password.
- [Managing your tokens](/sonarqube-server/user-guide/managing-tokens.md): Generate tokens to run analysis or invoke web services without accessing your actual credentials.
- [Using a project badge](/sonarqube-server/user-guide/project-badge.md): You can promote your project’s status in third-party tools and external websites using project badges.
- [Using applications](/sonarqube-server/user-guide/applications.md): An application aggregates multiple projects that share a lifecycle into a single, synthetic project.
- [Keyboard shortcuts](/sonarqube-server/user-guide/keyboard-shortcuts.md): A list of keyboard shortcuts for use with SonarQube Server.
---
# Source: https://docs.sonarsource.com/sonarqube-cloud/managing-your-account/user-interface.md
# Customizing your UI
The SonarQube Cloud interface theme defines the appearance of windows, dialog boxes, buttons, and other visual elements of the user interface. It is not the same as the color scheme (that covers colors, fonts, etc).
When you first log into SonarQube Cloud, the default setting is the *Sync with system* theme. For existing users, the light theme is selected as the default option, but in both cases, you can select any of the three options:
* **Sync with system**: SonarQube Cloud detects the current system settings and uses the default dark or light theme accordingly.
* **Light theme**: The traditional light theme.
* **Dark theme**: A darkened appearance in which the UI text and content stand out while windows and controls appear to recede into the background.
If you change your mind later, you can change your selection by going to **User** > **My Account** > **Appearance** and switching to the theme of your choice.
---
# Source: https://docs.sonarsource.com/sonarqube-community-build/instance-administration/user-management.md
# Source: https://docs.sonarsource.com/sonarqube-server/10.7/instance-administration/user-management.md
# Source: https://docs.sonarsource.com/sonarqube-server/10.8/instance-administration/user-management.md
# Source: https://docs.sonarsource.com/sonarqube-server/2025.2/instance-administration/user-management.md
# Source: https://docs.sonarsource.com/sonarqube-server/2025.3/instance-administration/user-management.md
# Source: https://docs.sonarsource.com/sonarqube-server/2025.5/instance-administration/user-management.md
# Source: https://docs.sonarsource.com/sonarqube-server/2025.1/instance-administration/user-management.md
# Source: https://docs.sonarsource.com/sonarqube-server/2025.4/instance-administration/user-management.md
# Source: https://docs.sonarsource.com/sonarqube-server/2025.6/instance-administration/user-management.md
# Source: https://docs.sonarsource.com/sonarqube-server/instance-administration/user-management.md
# Source: https://docs.sonarsource.com/sonarqube-cloud/administering-sonarcloud/about-sonarqube-cloud-solution/user-management.md
# User management
- [User group concept](/sonarqube-cloud/administering-sonarcloud/about-sonarqube-cloud-solution/user-management/user-group-concept.md): To manage user permissions more easily in SonarQube Cloud, the members of your organization are managed through groups.
- [Associated SCM accounts](/sonarqube-cloud/administering-sonarcloud/about-sonarqube-cloud-solution/user-management/associated-scm-accounts.md): SonarQube Cloud uses the association of users with Source Control Management (SCM) accounts to automatically assign issues to users.
- [Default authentication through DevOps platform](/sonarqube-cloud/administering-sonarcloud/about-sonarqube-cloud-solution/user-management/devops-platform-authentication.md): By default, users can authenticate to SonarQube Cloud with their existing credentials on their DevOps platform service (DOP). No additional setup is required.
- [GitHub member synchronization](/sonarqube-cloud/administering-sonarcloud/about-sonarqube-cloud-solution/user-management/github-member-synchronization.md): The GitHub member synchronization allows the automatic synchronization of organization members between GitHub and SonarQube Cloud.
---
# Source: https://docs.sonarsource.com/sonarqube-cloud/administering-sonarcloud/managing-organization/users-and-permissions/user-on-and-offboarding.md
# User onboarding and offboarding
### User onboarding
Whether through a DevOps platform or an SSO identity provider, when users first sign up with SonarQube Cloud, their account is automatically created in SonarQube Cloud.
At login time, users are automatically added to organizations in the following cases:
* With a DevOps platform (DOP) service, through the GitHub member synchronization. In this case, you cannot add DOP users manually.
* In an SSO-enabled enterprise, through group synchronization wiht the identity provider. You cannot add SSO users manually.
Otherwise, you must manually add the DOP users to their organization, see [organization-members](https://docs.sonarsource.com/sonarqube-cloud/administering-sonarcloud/managing-organization/users-and-permissions/organization-members "mention") for more information.
{% hint style="info" %}
In an SSO-enabled enterprise, DOP users can be added manually to organizations.
{% endhint %}
### Deleting a DOP account
You can only delete your own account, see [deleting](https://docs.sonarsource.com/sonarqube-cloud/managing-your-account/deleting "mention"). If you want to delete another user’s DevOps platform (DOP) account:
* If the GitHub member synchronization is used, remove the user from the GitHub organization.
* Otherwise, remove the user’s DOP account from the SonarQube Cloud organizations they are a member of, see [organization-members](https://docs.sonarsource.com/sonarqube-cloud/administering-sonarcloud/managing-organization/users-and-permissions/organization-members "mention").
### Deleting an SSO account
You can only delete your own account, see [deleting](https://docs.sonarsource.com/sonarqube-cloud/managing-your-account/deleting "mention")for more details.
To prevent an SSO user from logging in to your SonarQube Cloud organizations, remove their access rights from the identity provider.
---
# Source: https://docs.sonarsource.com/sonarqube-community-build/instance-administration/user-management/user-permissions.md
# Source: https://docs.sonarsource.com/sonarqube-server/10.7/instance-administration/user-management/user-permissions.md
# Source: https://docs.sonarsource.com/sonarqube-server/10.8/instance-administration/user-management/user-permissions.md
# Source: https://docs.sonarsource.com/sonarqube-server/2025.2/instance-administration/user-management/user-permissions.md
# Source: https://docs.sonarsource.com/sonarqube-server/2025.3/instance-administration/user-management/user-permissions.md
# Source: https://docs.sonarsource.com/sonarqube-server/2025.5/instance-administration/user-management/user-permissions.md
# Source: https://docs.sonarsource.com/sonarqube-server/2025.1/instance-administration/user-management/user-permissions.md
# Source: https://docs.sonarsource.com/sonarqube-server/2025.4/instance-administration/user-management/user-permissions.md
# Source: https://docs.sonarsource.com/sonarqube-server/2025.6/instance-administration/user-management/user-permissions.md
# Source: https://docs.sonarsource.com/sonarqube-server/instance-administration/user-management/user-permissions.md
# Managing permissions
As a System Administrator, you can grant users and groups global permissions (permissions not related to a project) and you can manage the project-related permissions granted by default when a new project is created.
{% hint style="info" %}
Permissions can be set automatically depending on the authentication and provisioning method used.
{% endhint %}
### Setting the global permissions List of global permissions
Permission type
Description
Administer System
Has full control over the SonarQube instance.
Administer Quality Gates
Can create and update quality gates that can be applied to the organization’s projects.
Administer Quality Profiles
Can create and update quality profiles that can be applied to the organization’s projects.
Can add tags to rules.
Execute analysis
Can start an analysis on every project in SonarQube. This includes the ability to get all settings required to perform an analysis, including secured settings like passwords, and to push analysis results to SonarQube.
This permission is applied by default to the sonar-users group, which means that its users can see the branch status of any project, even if they don’t have explicit permissions for it. We recommend that after you install SonarQube, you review all global permissions and ensure they comply with your company policy.
Create Projects
Can create new projects in SonarQube.
Create Applications
Can create new applications in SonarQube.
Create Portfolios
Can create new portfolios in SonarQube.
Setting the global permissions of groups and users
To set the global-level permissions of the groups and users:
1. In the top navigation bar, go to **Administration** > **Security** > **Global permissions**. The **Global Permissions** page opens.
2. You can search for users or groups.
3. In the permissions grid, select a check box to grant the corresponding permission.
### Changing the default visibility of new projects
By default, any newly created project will be public. It means every SonarQube user, authenticated or not, will be able to:
* **Browse**: Access a project, browse its measures and issues, and perform some issue edits (confirm, assign, comment).
* **See Source Code**: View the project’s source code.
To change the default visibility of new projects:
1. In the top navigation bar, go to **Administration** > **Projects** > **Management**.
2. In the top right corner of the page, select the pen icon near **Default visibility of new projects**. The **Set Default Visibility of New Projects** dialog opens.
3. Select **Public** or **Private**.
4. Select **Change default visibility**.
### Managing project-related permissions through templates
A permission template defines the project-related permissions granted to groups and members of the organization.
As a System Administrator, you can define several permission templates in your organization:
* You define the default template.
* You can define a template that applies to specific projects according to their key pattern by using a regular expression.
When a new project is created, SonarQube Server uses a permission template to grant the default permissions on the project. It retrieves the template according to the following rules:
* If the project key complies with the project key pattern of a template, then this template is used.\
If several templates comply, an error is raised.
* Otherwise, the default template is used.
Creating a new template
1. In the top navigation bar, go to **Administration > Security > Permission Templates**. The **Permission Templates** page opens with the list of templates.
2. Select the **Create** button. The **Create Permission Template** dialog opens.
3. Enter the template name and description.
4. If you want to apply the template to specific new projects according to their key, enter the corresponding regular expression in **Project key pattern**.\
The regular expression must specify the complete key (not only a part of the key). For example, to match the project keys `abc-def1-` and `abc-def2-`, use the pattern `^abc-(def1|def2)-.*`.
5. Select the **Create** button. The dialog closes and the new template is displayed.
6. Set the permissions by selecting the respective check boxes.
Setting the default template for projects, applications or portfolios
1. In the top navigation bar, go to **Administration > Security > Permission Templates**. The **Permission Templates** page opens with the list of templates.
2. Select the three-dot menu to the far right of the template you want to change.
3. In the menu, select **Set Default for Projects**, **Set Default for Applications**, or **Set Default for Portfolios**.
Deleting a template
1. In the top navigation bar, go to **Administration > Security > Permission Templates**. The **Permission Templates** page opens with the list of templates.
2. Select the three-dot menu to the far right of the template you want to delete.
3. In the menu, select **Delete** and confirm.
Changing a template
1. In the top navigation bar, go to **Administration > Security > Permission Templates**. The **Permission Templates** page opens with the list of templates.
2. Select the three-dot menu to the far right of the template you want to change.
3. In the menu:
* To change the template name, description or patter: select **Update Details**.
* To change the template permissions, description or patter: select **Edit Permissions**.
Please note that changing the template does not automatically apply the updated permissions to projects associated with it. You must reapply the template to your projects.
Applying a permission template to several projects at a time
1. In the top navigation bar, go to **Administration > Projects > Management.**
2. Retrieve and select in the grid the projects you want to update.
3. In the tool bar, select **Bulk Apply Permission Template**. The **Bulk Apply Permission Template** dialog opens.
4. Select the template and select **Apply**.
Following are the project related permissions that you can manage through a permission template:
List of project related permissions
Permission Type
Description
Browse Project
Applies only to private projects (Anyone, including anonymous users, can view the public projects.).
Can view the project.
See Source Code
Applies only to private projects.
Can view the source code (via API and web view) provided the Browse project permission is also granted.
Administer Issues
Can perform the following actions:
• Accept an issue
• Mark an issue as False positive
Administer Security Hotspots
Can change the status of a security hotspot. For private projects, the Browse project permission must also be granted.
Administer project
Can perform the following actions:
• Delete a project.
• Change the project settings including project-level permissions.
• Configure various project functions, such as PDF reporting, snapshots, and webhooks.
For private projects, the Browse project permission must also be granted.
Execute Analysis on project
Can start an analysis on the project. This includes the ability to get all settings required to perform an analysis (including secured settings like passwords) and to push analysis results to SonarQube.
### Restoring administrator access to SonarQube Server
If you lost global administrator access to SonarQube Server, you can restore it by executing the following queries directly in your database. You can:
* Regrant the global Administer System permission to an existing user.
* Reactivate and/or reset the password of the built-in `admin` account
Regranting the Administer System permission to a user
Use the query below where `` represents the login of the user who should become a system administrator:
```sql
insert into user_roles(uuid, user_uuid, role)
values ('random-uuid', (select uuid from users where login=''), 'admin');
```
Reactivating the built-in admin account
If you changed and then lost the password to the built-in `admin` account or deactivated this user, you can activate the user and reset the password using the following query, depending on the database engine:
**PostgreSQL and Microsoft SQL Server**
```sql
update users set
crypted_password='100000$t2h8AtNs1AlCHuLobDjHQTn9XppwTIx88UjqUm4s8RsfTuXQHSd/fpFexAnewwPsO6jGFQUv/24DnO55hY6Xew==',
salt='k9x9eN127/3e/hf38iNiKwVfaVk=',
hash_method='PBKDF2',
reset_password='true',
user_local='true',
active='true'
where login='admin';
```
**Oracle**
```sql
update users set
crypted_password='100000$t2h8AtNs1AlCHuLobDjHQTn9XppwTIx88UjqUm4s8RsfTuXQHSd/fpFexAnewwPsO6jGFQUv/24DnO55hY6Xew==',
salt='k9x9eN127/3e/hf38iNiKwVfaVk=',
hash_method='PBKDF2',
reset_password=1,
user_local=1,
active=1
where login='admin';
```
### Related pages
* [setting-project-permissions](https://docs.sonarsource.com/sonarqube-server/project-administration/setting-project-permissions "mention")
* [authentication](https://docs.sonarsource.com/sonarqube-server/instance-administration/authentication "mention")
---
# Source: https://docs.sonarsource.com/sonarqube-community-build/instance-administration/security/user-sessions.md
# Source: https://docs.sonarsource.com/sonarqube-server/2025.3/instance-administration/security/user-sessions.md
# Source: https://docs.sonarsource.com/sonarqube-server/2025.5/instance-administration/security/user-sessions.md
# Source: https://docs.sonarsource.com/sonarqube-server/2025.4/instance-administration/security/user-sessions.md
# Source: https://docs.sonarsource.com/sonarqube-server/2025.6/instance-administration/security/user-sessions.md
# Source: https://docs.sonarsource.com/sonarqube-server/instance-administration/security/user-sessions.md
# User sessions
A user’s session will automatically end after a period of inactivity. This feature is called inactive session timeout. This is a security measure to prevent unauthorized access to sensitive data if a user leaves their computer unattended. SonarQube will log the user out after the timeout period. By default, the inactive session timeout is 3 days. You can change it.
The active session timeout is supported starting in [Enterprise edition](https://www.sonarsource.com/plans-and-pricing/enterprise/). An active session timeout means a user’s session will automatically end after a period of time, regardless of activity. SonarQube will log the user out after the timeout period even if the user is actively using the system. By default, the active session timeout is 90 days. You can change it.
To configure the user session timeouts, set the following sonar properties in `/conf/sonar.properties`. If applicable, you can use the environment variable instead.
System property (sonar property and ENVIRONMENT_VARIABLE)
Description
sonar.web.sessionTimeoutInMinutes
SONAR_WEB_SESSIONTIMEOUTINMINUTES
Inactive session timeout (in minutes). The maximum time a user can remain idle (no activity) before the session ends. If the user does not interact with the system within this time, they are logged out.
Active session timeout (in minutes). The maximum time a user can remain logged in, regardless of activity. After this time, the session ends automatically even if the user is actively using the system.
Default value: 129 600 (90 days)
Minimum value:15
Maximum value: 129 600 (90 days)
---
# Source: https://docs.sonarsource.com/sonarqube-cloud/administering-sonarcloud/managing-organization/users-and-permissions.md
# Managing users and permissions
- [Adding organization members](/sonarqube-cloud/administering-sonarcloud/managing-organization/users-and-permissions/organization-members.md): This section explains how to add and remove members to and from a SonarQube Cloud organization.
- [Managing user groups](/sonarqube-cloud/administering-sonarcloud/managing-organization/users-and-permissions/user-groups.md): SonarQube Cloud's user groups can be used to manage organization members and their permissions. This section explains how to manage user groups.
- [Managing organization permissions](/sonarqube-cloud/administering-sonarcloud/managing-organization/users-and-permissions/organization-permissions.md): This section explains how to manage the permissions related to your SonarQube Cloud organization.
- [Disabling GitHub member synchronization](/sonarqube-cloud/administering-sonarcloud/managing-organization/users-and-permissions/github-member-sync.md): When you import a GitHub organization to SonarQube Cloud, GitHub member synchronization is enabled by default provided Single Sign-On (SSO) authentication is not enabled.
- [User onboarding and offboarding](/sonarqube-cloud/administering-sonarcloud/managing-organization/users-and-permissions/user-on-and-offboarding.md): User onboarding is automatic. You can only delete your own user account.
---
# Source: https://docs.sonarsource.com/sonarqube-server/10.6/analyzing-source-code/scanners/sonarscanner-for-npm/using-the-sonarscanner-for-npm.md
# Using the SonarScanner for NPM
You can start the [introduction](https://docs.sonarsource.com/sonarqube-server/10.6/analyzing-source-code/scanners/sonarscanner-for-npm/introduction "mention") and thus, integrate it into your CI or build pipeline, in the following ways:
* From the command line.\
A global mode installation of the scanner is required.
* From the command line with npx.\
No scanner installation is required.
* By adding the analysis step to your build files.\
The scanner must be added to the project’s devDependencies.
You can pass analysis parameters in the command line and in the analysis step coded in JS. In addition, the SonarScanner for NPM gets analysis parameters from different other sources: see [configuring-the-analysis-parameters](https://docs.sonarsource.com/sonarqube-server/10.6/analyzing-source-code/scanners/sonarscanner-for-npm/configuring-the-analysis-parameters "mention"). To get started, you must configure at a minimum the [analysis-parameters](https://docs.sonarsource.com/sonarqube-server/10.6/analyzing-source-code/analysis-parameters "mention") and the [analysis-parameters](https://docs.sonarsource.com/sonarqube-server/10.6/analyzing-source-code/analysis-parameters "mention") used to connect to the server.
{% hint style="info" %}
The SonarScanners run on code that is checked out. See [verifying-code-checkout-step](https://docs.sonarsource.com/sonarqube-server/10.6/analyzing-source-code/various-setups/verifying-code-checkout-step "mention").
{% endhint %}
### Starting the scanner from the command line
1. Make sure the scanner is installed in global mode: see [installing](https://docs.sonarsource.com/sonarqube-server/10.6/analyzing-source-code/scanners/sonarscanner-for-npm/installing "mention").
2. Use the `sonar-scanner` command to start the analysis.\
To pass analysis parameters in the command line, use the standard `-Dsonar.xxx=yyy` syntax.\
Example:
```css-79elbk
sonar-scanner -Dsonar.host.url=https://myserver.com -Dsonar.token=019d1e2e04e
```
### Starting the scanner from the command line with npx
* Use the `npx sonarqube-scanner` command to start the analysis.\
To pass analysis parameters in the command line, use the standard `-Dsonar.xxx=yyy` syntax.\
Example:
```css-79elbk
npx sonarqube-scanner -Dsonar.host.url=https://myserver.com -Dsonar.token=019d1e2e04e
```
### Adding the analysis step to your build files
1. Make sure the scanner is installed in your project’s devDependencies: see [installing](https://docs.sonarsource.com/sonarqube-server/10.6/analyzing-source-code/scanners/sonarscanner-for-npm/installing "mention").
2. Code the analysis step in JS in your build files, as shown in the example below.
```css-79elbk
const scanner = require('sonarqube-scanner');
scanner(
{
serverUrl: 'https://sonarqube.mycompany.com',
token: '019d1e2e04eefdcd0caee1468f39a45e69d33d3f',
options: {
'sonar.projectName': 'My App',
'sonar.projectDescription': 'Description for "My App" project...',
'sonar.sources': 'src',
'sonar.tests': 'test',
},
},
() => process.exit(),
);
```
Where the syntax is as follows:
```css-79elbk
sonarqube-scanner ( parameters, [callback] )
```
* parameters (format: Map)
* serverUrl (format: String; optional): The URL of the SonarQube server. Defaults to the value of the SonarCloud URL (`sonar.scanner.cloudUrl` property).
* token (format: String; optional): The [generating-and-using-tokens](https://docs.sonarsource.com/sonarqube-server/10.6/user-guide/user-account/generating-and-using-tokens "mention") used to connect to the SonarQube server or SonarCloud. Empty by default.
* options (format: Map; optional): Used to pass extra parameters for the analysis. See [configuring-the-analysis-parameters](https://docs.sonarsource.com/sonarqube-server/10.6/analyzing-source-code/scanners/sonarscanner-for-npm/configuring-the-analysis-parameters "mention") for more details.
* callback (format: Function; optional): Callback (the execution of the analysis is asynchronous).
---
# Source: https://docs.sonarsource.com/sonarqube-mcp-server/using.md
# Source: https://docs.sonarsource.com/sonarqube-community-build/analyzing-source-code/scanners/npm/using.md
# Source: https://docs.sonarsource.com/sonarqube-community-build/analyzing-source-code/scanners/dotnet/using.md
# Source: https://docs.sonarsource.com/sonarqube-for-eclipse/using.md
# Source: https://docs.sonarsource.com/sonarqube-for-visual-studio/using.md
# Source: https://docs.sonarsource.com/sonarqube-for-intellij/using.md
# Source: https://docs.sonarsource.com/sonarqube-for-vs-code/using.md
# Source: https://docs.sonarsource.com/sonarqube-server/10.7/analyzing-source-code/scanners/npm/using.md
# Source: https://docs.sonarsource.com/sonarqube-server/10.7/analyzing-source-code/scanners/dotnet/using.md
# Source: https://docs.sonarsource.com/sonarqube-server/10.8/analyzing-source-code/scanners/npm/using.md
# Source: https://docs.sonarsource.com/sonarqube-server/10.8/analyzing-source-code/scanners/dotnet/using.md
# Source: https://docs.sonarsource.com/sonarqube-server/2025.2/analyzing-source-code/scanners/npm/using.md
# Source: https://docs.sonarsource.com/sonarqube-server/2025.2/analyzing-source-code/scanners/dotnet/using.md
# Source: https://docs.sonarsource.com/sonarqube-server/2025.3/analyzing-source-code/scanners/npm/using.md
# Source: https://docs.sonarsource.com/sonarqube-server/2025.3/analyzing-source-code/scanners/dotnet/using.md
# Source: https://docs.sonarsource.com/sonarqube-server/2025.5/analyzing-source-code/scanners/npm/using.md
# Source: https://docs.sonarsource.com/sonarqube-server/2025.5/analyzing-source-code/scanners/dotnet/using.md
# Source: https://docs.sonarsource.com/sonarqube-server/2025.1/analyzing-source-code/scanners/npm/using.md
# Source: https://docs.sonarsource.com/sonarqube-server/2025.1/analyzing-source-code/scanners/dotnet/using.md
# Source: https://docs.sonarsource.com/sonarqube-server/2025.4/analyzing-source-code/scanners/npm/using.md
# Source: https://docs.sonarsource.com/sonarqube-server/2025.4/analyzing-source-code/scanners/dotnet/using.md
# Source: https://docs.sonarsource.com/sonarqube-server/2025.6/analyzing-source-code/scanners/npm/using.md
# Source: https://docs.sonarsource.com/sonarqube-server/2025.6/analyzing-source-code/scanners/dotnet/using.md
# Source: https://docs.sonarsource.com/sonarqube-server/analyzing-source-code/scanners/npm/using.md
# Source: https://docs.sonarsource.com/sonarqube-server/analyzing-source-code/scanners/dotnet/using.md
# Source: https://docs.sonarsource.com/sonarqube-cloud/advanced-setup/ci-based-analysis/sonarscanner-for-npm/using.md
# Source: https://docs.sonarsource.com/sonarqube-cloud/advanced-setup/ci-based-analysis/sonarscanner-for-dotnet/using.md
# Using the scanner
{% hint style="warning" %}
The SonarScanner for .NET version 9.2 [has been deprecated](https://github.com/SonarSource/sonar-scanner-msbuild/releases/tag/9.2.0.110275) and should not be used.
{% endhint %}
### Use
{% hint style="info" %}
You can invoke the Scanner using arguments with both dash (-) or forward-slash (/) separators. For example:
`SonarScanner.MSBuild.exe begin /k:"project-key"` or
`SonarScanner.MSBuild.exe begin -k:"project-key"`
{% endhint %}
There are two versions of the SonarScanner for .NET. In the following commands, you need to pass an authentication token using the `sonar.token` property. To manage your tokens, see:
* From the Team plan: [scoped-organization-tokens](https://docs.sonarsource.com/sonarqube-cloud/administering-sonarcloud/managing-organization/scoped-organization-tokens "mention").
* With the Free plan: [managing-tokens](https://docs.sonarsource.com/sonarqube-cloud/managing-your-account/managing-tokens "mention").
Any project file accepted by MSBuild.exe or dotnet can be used, for example *.sln*, *.proj*, *.csproj*, or *.vbproj*.
#### "Classic" .NET Framework invocation
The first version is based on the "classic" .NET Framework. To use it, execute the following commands from the root folder of your project:
```bash
SonarScanner.MSBuild.exe begin /k:"project-key" /o:"" /d:sonar.token=""
MSBuild.exe /t:Rebuild
SonarScanner.MSBuild.exe end /d:sonar.token=""
```
#### .NET Core and .NET Core Global Tool invocation
The second version is based on .NET Core which has a very similar usage:
```bash
dotnet begin /k:"project-key" /o:"" /d:sonar.token=""
dotnet build --no-incremental
dotnet end /d:sonar.token=""
```
The .NET Core version can also be used as a .NET Core Global Tool. After installing the Scanner as a global tool as described above, it can be invoked as follows:
```bash
dotnet tool install --global dotnet-sonarscanner
dotnet sonarscanner begin /k:"project-key" /o:"" /d:sonar.token=""
dotnet build --no-incremental
dotnet sonarscanner end /d:sonar.token=""
```
In summary, the invocation of the SonarScanner for .NET will depend on the scanner flavor you want to use:
| **Scanner Flavor** | **Invocation** |
| --------------------- | ------------------------------------------------ |
| .NET Core Global Tool | `dotnet sonarscanner begin` etc. |
| .NET Core 3.1+ | `dotnet ` etc. |
| .NET Framework 4.6.2+ | `SonarScanner.MSBuild.exe begin` etc. |
**Notes:**
* The .NET Core version of the scanner does not support TFS XAML builds and automatic finding/conversion of Code Coverage files. Apart from that, all versions of the Scanner have the same capabilities and command-line arguments.
### Analysis steps
The construction of your pipeline will be slightly different according to your DevOps platform integration. Please see the appropriate pages for your platform:
{% tabs %}
{% tab title="GITHUB" %}
See the [github](https://docs.sonarsource.com/sonarqube-cloud/getting-started/github "mention") page.
{% endtab %}
{% tab title="BITBUCKET CLOUD" %}
See the [bitbucket-cloud](https://docs.sonarsource.com/sonarqube-cloud/getting-started/bitbucket-cloud "mention") page.
{% endtab %}
{% tab title="GITLAB" %}
See the [gitlab](https://docs.sonarsource.com/sonarqube-cloud/getting-started/gitlab "mention") page.
{% endtab %}
{% tab title="AZURE DEVOPS" %}
See the [azure-devops](https://docs.sonarsource.com/sonarqube-cloud/getting-started/azure-devops "mention") page.
{% endtab %}
{% endtabs %}
#### Begin
The `begin` step is executed when you add the `begin` command-line argument. It hooks into the build pipeline, downloads SonarQube Cloud quality profiles and settings, and prepares your project for analysis.
**Begin step command line parameters**
* `/k:`
* **\[required]** Specifies the key of the analyzed project in SonarQube Cloud.
* `/n:`
* **\[optional]** Specifies the name of the analyzed project in SonarQube Cloud.
* Adding this argument will overwrite the project name in SonarQube Cloud if it already exists.
* `/v:`
* **\[recommended]** Specifies the version of your project.
* `/o:`
* **\[required]** Specifies the name of the target organization in SonarQube Cloud.
* `/d:sonar.token= or `
* **\[recommended]** Specifies the authentication token or username used to authenticate with to SonarQube Cloud.
* If this argument is added to the begin step, it must also be added to the end step.
* `/d:sonar.verbose=true`
* **\[optional]** Sets the logging verbosity to detailed.
* Add this argument before sending logs for troubleshooting.
* `/d:sonar.dotnet.excludeTestProjects=true`
* **\[optional]** Excludes Test Projects from analysis.
* Add this argument to improve build performance when issues should not be detected in Test Projects.
* `/d:sonar.http.timeout=60`
* **\[optional]** Specifies the time in seconds to wait before the HTTP requests time out.
* `/d:=`
* **\[optional]** Specifies an additional SonarQube Cloud analysis parameter, you can add this argument multiple times. Please note that the `sonar.sources` and `sonar.tests` parameters are not supported.
* `/s:`
* **\[optional]** Overrides the `$install_directory/SonarQube.Analysis.xml`. You need to give the absolute path to the file.
* `/d:sonar.plugin.cache.directory=`
* **\[optional]** Requires version 5.15+. Overrides the path where the scanner downloads its plugins. Plugins that are already present will not be downloaded again, unless newer versions are available.
* You can provide a relative or an absolute path.
* Defaults to the machine’s temporary files directory.
* `/d:sonar.scanner.scanAll=true`
* **\[optional]** Enables and Disables the analysis of multiple file types. See the [#multi-language-analysis](https://docs.sonarsource.com/sonarqube-cloud/advanced-setup/ci-based-analysis/configuring#multi-language-analysis "mention") article for the full details. Unless manually excluded, the files linked by the *.csproj* project file will be analyzed even if the value is false.
* **Default**: true
* `/d:sonar.cs.analyzeRazorCode=`
* **\[optional]** If set to "true", .razor and .cshtml files will be fully analyzed, this may increase the analysis time. If set to "false", .cshtml files will be analyzed for taint vulnerabilities only.
* **Caution**: Defining this in your begin step overrides the value set in SonarQube (Server, Cloud).
* `/d:sonar.scanner.useSonarScannerCLI=true`
* **\[optional]** If set to `true`, the [sonarscanner-cli](https://docs.sonarsource.com/sonarqube-cloud/advanced-setup/ci-based-analysis/sonarscanner-cli "mention") will be used in the end step. Without this parameter, the end step will use the scanner engine downloaded from SonarQube Cloud. Use this setting if you encounter failures in the end step or incomplete analysis results with the SonarScanner for .NET version 10.4 or higher.
**Default**: true
For detailed information about all available parameters, see the [analysis-parameters](https://docs.sonarsource.com/sonarqube-cloud/advanced-setup/analysis-parameters "mention") page.
{% hint style="warning" %}
The "begin" step will modify your build like this:
* the active `CodeAnalysisRuleSet` will be updated to match the SonarQube Cloud quality profile
* `WarningsAsErrors` will be turned off
If your build process cannot tolerate these changes we recommend creating a second build job for SonarQube Cloud analysis.
{% endhint %}
#### Build
Between the `begin` and `end` steps, you need to build your project, execute tests and generate code coverage data. This part is specific to your needs, and it is not detailed here. See the [dotnet-test-coverage](https://docs.sonarsource.com/sonarqube-cloud/enriching/test-coverage/dotnet-test-coverage "mention") page for more information.
The rules configured in your quality profile are run during the build, and it is expected that analyzing with SonarQube Cloud can increase build duration from 4 to 8 times. The impact on duration will vary by project and by what rules are enabled; some rules are simple to execute and others take additional time to have the expected impact and precision. See the [understanding-quality-profiles](https://docs.sonarsource.com/sonarqube-cloud/standards/managing-quality-profiles/understanding-quality-profiles "mention") page for information about managing those rules.
#### End
The end step is executed when you add the "end" command-line argument. It cleans the `MSBuild/dotnet` build hooks, collects the analysis data generated by the build, the test results, and the code coverage, and then uploads everything to SonarQube Cloud. There are only two additional arguments that are allowed for the end step.
**End step command line parameters:**
* `/d:sonar.token=` or `/d:sonar.token=`
* If this argument is added to the Begin step, it must also be added to the End step.
#### Known limitations
* MSBuild versions 14 and older are not supported. MSBuild 15 is deprecated and support will be removed in a future version. We recommend using MSBuild 16 as a minimal version.
* Web Application projects are supported. Legacy Web Site projects are not.
* Projects targeting multiple frameworks and using preprocessor directives could have slightly inaccurate metrics (lines of code, complexity, etc.) because the metrics are calculated only from the first of the built targets.
### Related pages
* [introduction](https://docs.sonarsource.com/sonarqube-cloud/advanced-setup/ci-based-analysis/sonarscanner-for-dotnet/introduction "mention")
* [installing](https://docs.sonarsource.com/sonarqube-cloud/advanced-setup/ci-based-analysis/sonarscanner-for-dotnet/installing "mention")
* [configuring](https://docs.sonarsource.com/sonarqube-cloud/advanced-setup/ci-based-analysis/sonarscanner-for-dotnet/configuring "mention")
---
# Source: https://docs.sonarsource.com/sonarqube-community-build/devops-platform-integration/azure-devops-integration/adding-analysis-to-pipeline/various-features.md
# Source: https://docs.sonarsource.com/sonarqube-server/2025.2/devops-platform-integration/azure-devops-integration/adding-analysis-to-pipeline/various-features.md
# Source: https://docs.sonarsource.com/sonarqube-server/2025.3/devops-platform-integration/azure-devops-integration/adding-analysis-to-pipeline/various-features.md
# Source: https://docs.sonarsource.com/sonarqube-server/2025.5/devops-platform-integration/azure-devops-integration/adding-analysis-to-pipeline/various-features.md
# Source: https://docs.sonarsource.com/sonarqube-server/2025.1/devops-platform-integration/azure-devops-integration/adding-analysis-to-pipeline/various-features.md
# Source: https://docs.sonarsource.com/sonarqube-server/2025.4/devops-platform-integration/azure-devops-integration/adding-analysis-to-pipeline/various-features.md
# Source: https://docs.sonarsource.com/sonarqube-server/2025.6/devops-platform-integration/azure-devops-integration/adding-analysis-to-pipeline/various-features.md
# Source: https://docs.sonarsource.com/sonarqube-server/devops-platform-integration/azure-devops-integration/adding-analysis-to-pipeline/various-features.md
# Source: https://docs.sonarsource.com/sonarqube-cloud/advanced-setup/ci-based-analysis/azure-pipelines/adding-analysis-to-build-pipeline/various-features.md
# Using various features
This page explains features you may use when adding SonarQube analysis to your Azure build pipeline:
* Choosing the analysis configuration mode (only in the Standalone SonarScanner CLI mode).
* Using a specific version of the SonarScanner for .NET or CLI
* Using the cache feature
### Choosing the configuration mode
In the CLI mode of the Azure DevOps extension for SonarQube Server, you may:
* Either use the file configuration mode (default mode) which consists of setting analysis parameters in the `sonar-project.properties` file stored in the repository root (or another specified configuration file).
* Or use the manual configuration mode to define analysis parameters at the pipeline level.
{% hint style="info" %}
If you use the manual configuration mode, the scanner still checks the `sonar-project.properties` file. Parameters set through the manual configuration mode have precedence over parameters set in the `sonar-project.properties` file.
{% endhint %}
Using the file configuration mode
The file configuration mode is the default mode of the Azure DevOps extension for SonarQube.
**YAML pipeline for file configuration**
1. Make sure the `configMode` input of the `SonarQubePrepare` task is set to `file`.
2. To use a different configuration file than `sonar-project.properties`, add the `configFile` task input to the `SonarQubePrepare` task, with the path to the configuration file as the value. The path can be absolute, or relative to the repository root.
**Classic pipeline for file configuration**
In the Prepare Analysis Configuration task:
1. Make sure the **Store configuration with my source code** mode is selected.
2. In **Settings file**, you can define a different configuration file than `sonar-project.properties`. The path can be absolute, or relative to the repository root.
Using the manual configuration mode
To define analysis parameters at the pipeline level in Standalone SonarScanner CLI mode, proceed as described below.
**YAML pipeline for manual configuration**
1. Make sure the `configMode` task input in the `SonarQubePrepare` task is set to `manual`.
2. Use the `extraProperties` task input in the `SonarQubePrepare` task to define the analysis parameters: define a new sonar property by adding `=` on a new line.
**Classic pipeline for manual configuration**
In the Prepare Analysis Configuration task:
1\. Select the **Manually provide configuration** mode and enter the required parameters.
2\. In **Advanced section** > **Additional properties**, define a new sonar property by adding `=` on a new line.\
**Example**: `sonar.exclusions=**/*.bin`
For information about the required settings in the `SonarQubePrepare` task for either configuration mode, see the [#prepare-analysis-configuration](https://docs.sonarsource.com/sonarqube-cloud/advanced-setup/ci-based-analysis/sonarqube-tasks#prepare-analysis-configuration "mention") article.
### Using a specific version of SonarScanner for .NET or CLI
The Azure DevOps extension for SonarQube Cloud embeds the latest compatible version of the SonarScanner for .NET and SonarScanner CLI. In very particular situations, you may want to use another scanner version. In such a case, you can configure the download of this specific version from the Sonar binaries site. In addition, you can use the Azure cache task (see below) in your pipeline to manage the caching of the SonarScanner.
The figure below shows the download process of a specific version of SonarScanner for .NET or SonarScanner CLI.
Set up the download in the Prepare Analysis Configuration task of your pipeline as described below.
SonarScanner for .NET
You must specify the full version number, such as 10.1.2.114627 (and not 10.1.2). All of the available version numbers can be found [here](https://github.com/SonarSource/sonar-scanner-msbuild/tags).
**YAML pipeline to specify .NET scanner version**
Add the following input to the Prepare Analysis Configuration task:
* `dotnetScannerVersion`: The SonarScanner for .NET version to be downloaded.
The code snippet below shows a task configuration example. For more information about the task inputs, see the [sonarqube-tasks](https://docs.sonarsource.com/sonarqube-cloud/advanced-setup/ci-based-analysis/azure-pipelines/sonarqube-tasks "mention") page.
```yaml
- task: SonarCloudPrepare@4
inputs:
SonarQube: ''
organization: ''
scannerMode: 'dotnet'
dotnetScannerVersion: '10.1.2.114627'
projectKey: ''
```
**Classic pipeline**
In **Scanner Version**, enter the version to be downloaded.
SonarScanner CLI
You must specify the full version number, such as 7.1.0.4889 (and not 7.1.0). All of the available version numbers can be found [here](https://github.com/SonarSource/sonar-scanner-cli/tags).
**YAML pipeline to specify CLI scanner version**
Add the following input to the Prepare Analysis Configuration task
* `cliScannerVersion`: The SonarScanner CLI version to be downloaded.
The code snippet below shows a task configuration example. For more information about the task inputs, see the [sonarqube-tasks](https://docs.sonarsource.com/sonarqube-cloud/advanced-setup/ci-based-analysis/azure-pipelines/sonarqube-tasks "mention") page.
```yaml
- task: SonarCloudPrepare@4
inputs:
SonarQube: ''
organization: ''
scannerMode: 'cli'
configMode: 'file'
configFile: ''
cliScannerVersion: '7.1.0.4889'
cliProjectKey: ''
cliSources: '.'
```
**Classic pipeline**
In **Scanner CLI Version**, enter the version to be downloaded.
### Using the cache feature
Azure DevOps allows [pipeline caching](https://learn.microsoft.com/en-us/azure/devops/pipelines/release/caching?view=azure-devops) to improve build performance by facilitating the download of dependencies between pipeline runs. Currently, you can only cache the SonarScanner (bootstrapper) that is downloaded when you need a specific version of SonarScanner for .NET or CLI.
Proceed as follows:
* Add a [cache task](https://learn.microsoft.com/en-us/azure/devops/pipelines/tasks/reference/cache-v2?view=azure-pipelines) to your Azure build pipeline before SonarQube’s **Prepare Analysis Configuration** task. See the code snippet below according to the extension mode.
.NET
```yaml
- task: Cache@2
displayName: Cache SonarScanner
inputs:
key: '"SonarScanner" | ".NET" | "$(Agent.OS)"'
path: '$(Agent.ToolsDirectory)/SonarScanner .NET
```
CLI
```yaml
- task: Cache@2
displayName: Cache SonarScanner
inputs:
key: '"SonarScanner" | "CLI" | "$(Agent.OS)"'
path: '$(Agent.ToolsDirectory)/SonarScanner CLI'
```
### Adding the quality gate status widget to your project
You can monitor the quality gate status of your projects directly in your Azure DevOps dashboard. Follow these steps to configure your widget:
1. Once the Azure DevOps extension is installed and your project has been successfully analyzed, go to one of your Azure DevOps dashboards (or create a new dashboard). Click on the **Pen** icon to edit, and then select **Add Widget**.
2. In the **Add Widget** list, select **Code Quality**, and then select **Add**. An empty **Configure widget** is added to your dashboard.
3. Select the widget’s **Cogwheel** icon to configure it.
* *For public projects,* you can simply select your project from the dropdown. A search bar inside the drop-down will help you find it easily. Just select it and **Save**.
* *For private projects*, log in using the links provided under the drop-down. Once logged in, your private projects will appear in the drop-down. Select the project you are interested in and **Save**.
### Related pages
* [gradle-or-maven-project](https://docs.sonarsource.com/sonarqube-cloud/advanced-setup/ci-based-analysis/azure-pipelines/adding-analysis-to-build-pipeline/gradle-or-maven-project "mention")
* [dotnet-project](https://docs.sonarsource.com/sonarqube-cloud/advanced-setup/ci-based-analysis/azure-pipelines/adding-analysis-to-build-pipeline/dotnet-project "mention")
* [c-family-project](https://docs.sonarsource.com/sonarqube-cloud/advanced-setup/ci-based-analysis/azure-pipelines/adding-analysis-to-build-pipeline/c-family-project "mention")
* [js-ts-go-python-php](https://docs.sonarsource.com/sonarqube-cloud/advanced-setup/ci-based-analysis/azure-pipelines/adding-analysis-to-build-pipeline/js-ts-go-python-php "mention")
* [monorepo-projects](https://docs.sonarsource.com/sonarqube-cloud/advanced-setup/ci-based-analysis/azure-pipelines/adding-analysis-to-build-pipeline/monorepo-projects "mention")
* [sonarqube-tasks](https://docs.sonarsource.com/sonarqube-cloud/advanced-setup/ci-based-analysis/azure-pipelines/sonarqube-tasks "mention")
---
# Source: https://docs.sonarsource.com/sonarqube-server/2025.5/instance-administration/analysis-functions/various-settings-at-the-instance-level.md
# Source: https://docs.sonarsource.com/sonarqube-server/2025.6/instance-administration/analysis-functions/various-settings-at-the-instance-level.md
# Source: https://docs.sonarsource.com/sonarqube-server/instance-administration/analysis-functions/various-settings-at-the-instance-level.md
# Various settings at the instance level
### Changing the default issue assignee at the instance level
When new issues are created during analysis, they are assigned to the last committer where the issue was raised. When it is not possible to identify the last committer, issues can be assigned to a default assignee if set at the global or project level. To set the default assigned for your instance (the project-level setting has precedence over the instance-level setting):
1. Go to **Administration > Configuration > General Setting > General > Issues.**
2. In **Default Assignee**, enter the user account.
3. Select **Save**.
### Related pages
* [#changing-default-issue-assignee](https://docs.sonarsource.com/sonarqube-server/project-administration/setting-up-features/project-settings#changing-default-issue-assignee "mention")
---
# Source: https://docs.sonarsource.com/sonarqube-server/10.6/analyzing-source-code/various-setups.md
# Various setups
{% content-ref url="various-setups/manage-tls-certificates" %}
[manage-tls-certificates](https://docs.sonarsource.com/sonarqube-server/10.6/analyzing-source-code/various-setups/manage-tls-certificates)
{% endcontent-ref %}
{% content-ref url="various-setups/verifying-code-checkout-step" %}
[verifying-code-checkout-step](https://docs.sonarsource.com/sonarqube-server/10.6/analyzing-source-code/various-setups/verifying-code-checkout-step)
{% endcontent-ref %}
---
# Source: https://docs.sonarsource.com/sonarqube-community-build/analyzing-source-code/dotnet-environments/vb-dotnet.md
# Source: https://docs.sonarsource.com/sonarqube-community-build/analyzing-source-code/languages/vb-dotnet.md
# Source: https://docs.sonarsource.com/sonarqube-server/8.9/analyzing-source-code/languages/vb-dotnet.md
# Source: https://docs.sonarsource.com/sonarqube-server/9.8/analyzing-source-code/languages/vb-dotnet.md
# Source: https://docs.sonarsource.com/sonarqube-server/9.9/analyzing-source-code/languages/vb-dotnet.md
# Source: https://docs.sonarsource.com/sonarqube-server/10.0/analyzing-source-code/languages/vb-dotnet.md
# Source: https://docs.sonarsource.com/sonarqube-server/10.1/analyzing-source-code/languages/vb-dotnet.md
# Source: https://docs.sonarsource.com/sonarqube-server/10.2/analyzing-source-code/languages/vb-dotnet.md
# Source: https://docs.sonarsource.com/sonarqube-server/10.3/analyzing-source-code/languages/vb-dotnet.md
# Source: https://docs.sonarsource.com/sonarqube-server/10.4/analyzing-source-code/languages/vb-dotnet.md
# Source: https://docs.sonarsource.com/sonarqube-server/10.5/analyzing-source-code/languages/vb-dotnet.md
# Source: https://docs.sonarsource.com/sonarqube-server/10.6/analyzing-source-code/languages/vb-dotnet.md
# Source: https://docs.sonarsource.com/sonarqube-server/10.7/analyzing-source-code/dotnet-environments/vb-dotnet.md
# Source: https://docs.sonarsource.com/sonarqube-server/10.7/analyzing-source-code/languages/vb-dotnet.md
# Source: https://docs.sonarsource.com/sonarqube-server/10.8/analyzing-source-code/dotnet-environments/vb-dotnet.md
# Source: https://docs.sonarsource.com/sonarqube-server/10.8/analyzing-source-code/languages/vb-dotnet.md
# Source: https://docs.sonarsource.com/sonarqube-server/2025.2/analyzing-source-code/dotnet-environments/vb-dotnet.md
# Source: https://docs.sonarsource.com/sonarqube-server/2025.2/analyzing-source-code/languages/vb-dotnet.md
# Source: https://docs.sonarsource.com/sonarqube-server/2025.3/analyzing-source-code/dotnet-environments/vb-dotnet.md
# Source: https://docs.sonarsource.com/sonarqube-server/2025.3/analyzing-source-code/languages/vb-dotnet.md
# Source: https://docs.sonarsource.com/sonarqube-server/2025.5/analyzing-source-code/dotnet-environments/vb-dotnet.md
# Source: https://docs.sonarsource.com/sonarqube-server/2025.5/analyzing-source-code/languages/vb-dotnet.md
# Source: https://docs.sonarsource.com/sonarqube-server/2025.1/analyzing-source-code/dotnet-environments/vb-dotnet.md
# Source: https://docs.sonarsource.com/sonarqube-server/2025.1/analyzing-source-code/languages/vb-dotnet.md
# Source: https://docs.sonarsource.com/sonarqube-server/2025.4/analyzing-source-code/dotnet-environments/vb-dotnet.md
# Source: https://docs.sonarsource.com/sonarqube-server/2025.4/analyzing-source-code/languages/vb-dotnet.md
# Source: https://docs.sonarsource.com/sonarqube-server/2025.6/analyzing-source-code/dotnet-environments/vb-dotnet.md
# Source: https://docs.sonarsource.com/sonarqube-server/2025.6/analyzing-source-code/languages/vb-dotnet.md
# Source: https://docs.sonarsource.com/sonarqube-server/analyzing-source-code/dotnet-environments/vb-dotnet.md
# Source: https://docs.sonarsource.com/sonarqube-server/analyzing-source-code/languages/vb-dotnet.md
# VB.NET
### Supported versions
The level of support for a language is defined as follows:
* Fully supported: Analysis will complete. All the language features are understood and examined.
* Supported: Most language features are understood and examined but the version includes unsupported features. Analysis might break or provide incomplete results.
Versions 7 to 16 are fully supported.
### Supported frameworks and tools
ASP.NET MVC, ASP.NET Core MVC
### Language-specific properties
Discover and update the VB.NET-specific [analysis-parameters](https://docs.sonarsource.com/sonarqube-server/analyzing-source-code/analysis-parameters "mention") in **Administration** > **Configuration** > **General Settings** > **Languages** > **VB.NET**
#### Analyze generated code
To analyze tool-generated code (e.g. WCF code generated by `SvcUtil.exe`) for a specific VB.NET project, enable the "Analyze generated code" setting inside **Project settings** > **General Settings** > **Languages** > **VB.NET**. By default, tool-generated code files are skipped from the analysis.
The detection of generated code is based on file name, special comments, and attributes. The currently recognized values are in [GeneratedCodeRecognizer.cs](https://github.com/SonarSource/sonar-dotnet/blob/master/analyzers/src/SonarAnalyzer.Core/Syntax/Utilities/GeneratedCodeRecognizer.cs).
{% hint style="info" %}
When a `Generated` comment is present in the file, SonarQube ignores the *entire* \*\* *file*, even if only parts of it were generated. It’s possible to enable or disable analysis of *files containing generated code* at the instance or project level in **General Settings** > **Languages** > *Your language* > **Analyze generated code**.
{% endhint %}
### Scanner compatibility
To analyze VB.NET code, you need to use the [SonarScanner for .NET](https://docs.sonarsource.com/sonarqube-server/analyzing-source-code/scanners/dotnet) version 4.x or newer.
### Exclusions
Files to be excluded should be set in the project configuration. Excluded files are still going to be analyzed during the compilation and the results will be filtered according to the exclusion settings.
As an alternative, an `.editorconfig` file can be used to disable the analysis for a specific rule on a file or directory. This can solve performance problems on large files.
`[Path/File.vb]`\
`dotnet_diagnostic.Sxxx.severity = none`
### Known limitations
Currently, an error will be thrown when an issue is raised on a line of code containing the following pattern `\s+error\s*:` (i.e. one or more spaces, the string ‘error’, zero or more spaces and a ‘:’ ). This is a well known problem on the Microsoft side (see [issue](https://github.com/dotnet/roslyn/issues/5724/)). In order to work around this problem, analysis will skip issues reported on any line where the pattern is detected.
### Related Pages
* [external-analyzer-reports](https://docs.sonarsource.com/sonarqube-server/analyzing-source-code/importing-external-issues/external-analyzer-reports "mention") (VSTest, NUnit, MSTest, xUnit)
* [external-analyzer-reports](https://docs.sonarsource.com/sonarqube-server/analyzing-source-code/importing-external-issues/external-analyzer-reports "mention") (See "Notes on external .NET issues")
* [overview](https://docs.sonarsource.com/sonarqube-server/analyzing-source-code/test-coverage/overview "mention") (Visual Studio Code Coverage, dotCover, OpenCover, Coverlet, Altcover)
* [introduction](https://docs.sonarsource.com/sonarqube-server/analyzing-source-code/scanners/dotnet/introduction "mention")
* [sonarqube-extension-for-azure-devops](https://docs.sonarsource.com/sonarqube-server/analyzing-source-code/scanners/sonarqube-extension-for-azure-devops "mention")
* [Analysis of product projects vs. test projects](https://github.com/SonarSource/sonar-scanner-msbuild/wiki/Analysis-of-product-projects-vs.-test-projects)
* [Troubleshooting guide for .NET code coverage import](https://community.sonarsource.com/t/37151)
* [Investigating the performance of .NET Analysis](https://community.sonarsource.com/t/47279)
---
# Source: https://docs.sonarsource.com/sonarqube-cloud/advanced-setup/languages/vb-net.md
# VB.NET
### Supported versions
The level of support for a language is defined as follows:
* Fully supported: Analysis will complete. All the language features are understood and examined.
* Supported: Most language features are understood and examined but the version includes unsupported features. Analysis might break or provide incomplete results.
Versions 7 to 16 are fully supported.
### Supported frameworks and tools
ASP.NET MVC, ASP.NET Core MVC
### Language-specific properties
To discover and update the VB.NET-specific properties, navigate in SonarQube Cloud to *Your Project* > **Administration** > **General Settings** > **Languages** > **VB.NET**. See the [analysis-parameters](https://docs.sonarsource.com/sonarqube-cloud/advanced-setup/analysis-parameters "mention") page for more information about specific properties.
#### Analyze Generated Code
To analyze tool-generated code (e.g. WCF code generated by `SvcUtil.exe`) for a specific VB.NET project, enable the "Analyze generated code" setting inside **Project** > **Administration** > **General Settings** > **Languages** > **VB.NET**. By default, tool-generated code files are skipped from the analysis.
The detection of generated code is based on the file name, special comments, and attributes. The currently recognized values are in [GeneratedCodeRecognizer.cs](https://github.com/SonarSource/sonar-dotnet/blob/master/analyzers/src/SonarAnalyzer.Core/Syntax/Utilities/GeneratedCodeRecognizer.cs).
{% hint style="info" %}
When a `Generated` comment is present in the file, SonarQube ignores the *entire* \*\* *file*, even if only parts of it were generated. It’s possible to enable or disable analysis of *files containing generated code* at the project level in *Your project* > **Administration** > **General Settings** > **Languages** > *Your language* > **Analyze generated code**.
{% endhint %}
### Scanner compatibility
To analyze VB.NET code, you need to use the [introduction](https://docs.sonarsource.com/sonarqube-cloud/advanced-setup/ci-based-analysis/sonarscanner-for-dotnet/introduction "mention") version 4.x or newer.
### Exclusions
Files to be excluded should be set in the project configuration. Excluded files are still going to be analyzed during the compilation and the results will be filtered according to the exclusion settings.
As an alternative, a `.editorconfig` file can be used to disable the analysis for a specific rule on a file or directory. This can solve performance problems on large files.
```css-79elbk
[Path/File.vb]
dotnet_diagnostic.Sxxx.severity = none
```
### Known Limitations
Currently, an error will be thrown when an issue is raised on a line of code containing the following pattern `\s+error\s*:` (i.e. one or more spaces, the string ‘error’, zero or more spaces, and a ‘:’ ). This is a well-known problem on the Microsoft side (see [issue](https://github.com/dotnet/roslyn/issues/5724/)). In order to work around this problem, the analysis will skip issues reported on any line where the pattern is detected.
### Related pages
* [Investigating the performance of .NET Analysis](https://community.sonarsource.com/t/the-sonarsource-guide-for-investigating-the-performance-of-net-analysis/47279), on the Sonar Community
* See the [external-analyzer-reports](https://docs.sonarsource.com/sonarqube-cloud/enriching/external-analyzer-reports "mention") page about importing external issues (VSTest, NUnit, MSTest, xUnit)
* Also on that page, see the [#notes-on-external-.net-c-or-vb.net-issues](https://docs.sonarsource.com/sonarqube-cloud/enriching/external-analyzer-reports#notes-on-external-.net-c-or-vb.net-issues "mention") article.
* [dotnet-test-coverage](https://docs.sonarsource.com/sonarqube-cloud/enriching/test-coverage/dotnet-test-coverage "mention") (Visual Studio Code Coverage, dotCover, OpenCover, Coverlet, Altcover)
* [sonarscanner-for-dotnet](https://docs.sonarsource.com/sonarqube-cloud/advanced-setup/ci-based-analysis/sonarscanner-for-dotnet "mention")
* [sonarcloud-extension-for-azure-devops](https://docs.sonarsource.com/sonarqube-cloud/advanced-setup/ci-based-analysis/sonarcloud-extension-for-azure-devops "mention")
* [Specifying test projects](https://app.gitbook.com/s/yDv2XwTC1xoOKBYeCK45/analyzing-source-code/dotnet-environments/specify-test-project-analysis "mention") (the page is in the SonarQube Server docs, but also applies when setting up SonarQube Cloud .NET projects)
---
# Source: https://docs.sonarsource.com/sonarqube-server/8.9/analyzing-source-code/languages/vb6.md
# Source: https://docs.sonarsource.com/sonarqube-server/9.8/analyzing-source-code/languages/vb6.md
# Source: https://docs.sonarsource.com/sonarqube-server/9.9/analyzing-source-code/languages/vb6.md
# Source: https://docs.sonarsource.com/sonarqube-server/10.0/analyzing-source-code/languages/vb6.md
# Source: https://docs.sonarsource.com/sonarqube-server/10.1/analyzing-source-code/languages/vb6.md
# Source: https://docs.sonarsource.com/sonarqube-server/10.2/analyzing-source-code/languages/vb6.md
# Source: https://docs.sonarsource.com/sonarqube-server/10.3/analyzing-source-code/languages/vb6.md
# Source: https://docs.sonarsource.com/sonarqube-server/10.4/analyzing-source-code/languages/vb6.md
# Source: https://docs.sonarsource.com/sonarqube-server/10.5/analyzing-source-code/languages/vb6.md
# Source: https://docs.sonarsource.com/sonarqube-server/10.6/analyzing-source-code/languages/vb6.md
# Source: https://docs.sonarsource.com/sonarqube-server/10.7/analyzing-source-code/languages/vb6.md
# Source: https://docs.sonarsource.com/sonarqube-server/10.8/analyzing-source-code/languages/vb6.md
# Source: https://docs.sonarsource.com/sonarqube-server/2025.2/analyzing-source-code/languages/vb6.md
# Source: https://docs.sonarsource.com/sonarqube-server/2025.3/analyzing-source-code/languages/vb6.md
# Source: https://docs.sonarsource.com/sonarqube-server/2025.5/analyzing-source-code/languages/vb6.md
# Source: https://docs.sonarsource.com/sonarqube-server/2025.1/analyzing-source-code/languages/vb6.md
# Source: https://docs.sonarsource.com/sonarqube-server/2025.4/analyzing-source-code/languages/vb6.md
# Source: https://docs.sonarsource.com/sonarqube-server/2025.6/analyzing-source-code/languages/vb6.md
# Source: https://docs.sonarsource.com/sonarqube-server/analyzing-source-code/languages/vb6.md
# Source: https://docs.sonarsource.com/sonarqube-cloud/advanced-setup/languages/vb6.md
# VB6
To discover and update the VB6-specific properties, navigate in SonarQube Cloud to *Your Project* > **Administration** > **General Settings** > **Languages** > **Visual Basic**. See the [analysis-parameters](https://docs.sonarsource.com/sonarqube-cloud/advanced-setup/analysis-parameters "mention") page for more information about specific properties.
{% hint style="info" %}
Although `.cls` files can contain VB6 code, they are not analyzed by default in order to avoid clashes with other plugins.
{% endhint %}
---
# Source: https://docs.sonarsource.com/sonarqube-server/10.6/devops-platform-integration/github-integration/setting-up-at-global-level/verify-sonarqube-server-base-url.md
# Source: https://docs.sonarsource.com/sonarqube-server/10.7/devops-platform-integration/github-integration/setting-up-at-global-level/verify-sonarqube-server-base-url.md
# Source: https://docs.sonarsource.com/sonarqube-server/10.8/devops-platform-integration/github-integration/setting-up-at-global-level/verify-sonarqube-server-base-url.md
# Verifying the server base URL
If you want to delegate the SonarQube Server user authentication to GitHub: you must use HTTPS. This means that the SonarQube Server instance must be [#securing-the-server-behind-a-proxy](https://docs.sonarsource.com/sonarqube-server/10.8/setup-and-upgrade/operating-the-server#securing-the-server-behind-a-proxy "mention").
You must configure your SonarQube Server base URL in SonarQube Server, otherwise, integration features will not work correctly.
To verify the server base URL configuration in SonarQube Server:
* Go to **Administration** > **Configuration** > **General Settings** > **General** > **General** and check the instance’s **Server base URL**.
---
# Source: https://docs.sonarsource.com/sonarqube-cloud/administering-sonarcloud/managing-enterprise/enterprise-security/sso/setup/verify-user-groups.md
# Step 1: Verify the user groups
Before configuring [about](https://docs.sonarsource.com/sonarqube-cloud/administering-sonarcloud/managing-enterprise/enterprise-security/sso/about "mention"), you must ensure that the [automatic-group-synchronization](https://docs.sonarsource.com/sonarqube-cloud/administering-sonarcloud/managing-enterprise/enterprise-security/sso/about/automatic-group-synchronization "mention") can take place properly. To do so, verify that:
* The user groups defined in your IdP service exist in the relevant organizations of your SonarQube Cloud enterprise (i.e. a group with the same (context-sensitive) name exists in the relevant organization(s)).
* The user groups in SonarQube Cloud have the correct permissions.
To manage the user groups in SonarQube Cloud, see [user-groups](https://docs.sonarsource.com/sonarqube-cloud/administering-sonarcloud/managing-organization/users-and-permissions/user-groups "mention").
### In Okta
The automatic group synchronization of a group applies if the group in Okta and the corresponding group in the SonarQube Cloud organization have the same (case-sensitive) name. Note that the default SonarQube Cloud’s Members group is excluded from the synchronization.
The figure below shows on the left groups defined in Okta and on the right the corresponding groups defined in SonarQube Cloud in two different organizations (`OrgA` and `OrgB`). In this example, the SSO users belonging to `ENT_ORGA_ADMINS` will be automatically added to the corresponding `EN_ORG_ADMINS` group in SonarQube Cloud. it means that they will have access to `OrgA` with the permissions defined in SonarQube Cloud.
### In Microsoft Entra ID
The automatic group synchronization of a group applies if the group in Microsoft Entra ID and the corresponding group in the SonarQube Cloud organization have the same (case-sensitive) name. Note that the default SonarQube Cloud’s Members group is excluded from the synchronization.
The figure below shows on the left groups defined in Microsoft Entra ID and on the right the corresponding groups defined in SonarQube Cloud in two different organizations (`Docs-Team` and `claudiasonarova 2023`). In this example, the SSO users belonging to `Communications` will be automatically added to the corresponding `Communications` group in SonarQube Cloud. it means that they will have access to the `Docs-Team` organization with the permissions defined in SonarQube Cloud.
{% hint style="warning" %}
* Group synchronization doesn’t work with Microsoft Entra ID’s nested groups.
* Microsoft Entra ID’s SAML tokens have a limit regarding the number of groups a user can belong to (see the description of groups in the [Claims in SAML Token](https://learn.microsoft.com/en-us/entra/identity-platform/reference-saml-tokens#claims-in-saml-tokens) table). In such cases, you might need to reduce the number of groups the user is in.
{% endhint %}
### Related pages
[configure-sso](https://docs.sonarsource.com/sonarqube-cloud/administering-sonarcloud/managing-enterprise/enterprise-security/sso/setup/configure-sso "mention")\
[inviting-users-to-sign-in](https://docs.sonarsource.com/sonarqube-cloud/administering-sonarcloud/managing-enterprise/enterprise-security/sso/setup/inviting-users-to-sign-in "mention")\
[terminate-setup](https://docs.sonarsource.com/sonarqube-cloud/administering-sonarcloud/managing-enterprise/enterprise-security/sso/setup/terminate-setup "mention")\
[editing-sso-configuration](https://docs.sonarsource.com/sonarqube-cloud/administering-sonarcloud/managing-enterprise/enterprise-security/sso/editing-sso-configuration "mention")\
[deleting-sso-configuration](https://docs.sonarsource.com/sonarqube-cloud/administering-sonarcloud/managing-enterprise/enterprise-security/sso/deleting-sso-configuration "mention")
---
# Source: https://docs.sonarsource.com/sonarqube-community-build/project-administration/adjusting-analysis/setting-analysis-scope/verifying-analysis-scope.md
# Source: https://docs.sonarsource.com/sonarqube-server/2025.2/project-administration/setting-analysis-scope/verifying-analysis-scope.md
# Source: https://docs.sonarsource.com/sonarqube-server/2025.3/project-administration/setting-analysis-scope/verifying-analysis-scope.md
# Source: https://docs.sonarsource.com/sonarqube-server/2025.5/project-administration/setting-analysis-scope/verifying-analysis-scope.md
# Source: https://docs.sonarsource.com/sonarqube-server/2025.4/project-administration/setting-analysis-scope/verifying-analysis-scope.md
# Source: https://docs.sonarsource.com/sonarqube-server/2025.6/project-administration/adjusting-analysis/setting-analysis-scope/verifying-analysis-scope.md
# Source: https://docs.sonarsource.com/sonarqube-server/project-administration/adjusting-analysis/setting-analysis-scope/verifying-analysis-scope.md
# Source: https://docs.sonarsource.com/sonarqube-cloud/managing-your-projects/project-analysis/setting-analysis-scope/verifying-analysis-scope.md
# Verifying analysis scope
This section explains how to verify the configured properties and the properties read by the scanner to compute the project's analysis scope. See [introduction](https://docs.sonarsource.com/sonarqube-cloud/managing-your-projects/project-analysis/setting-analysis-scope/introduction "mention") to Setting analysis scope for more information.
### Verifying the analysis scope properties configured for the project
This procedure lets you view the properties configured in the different possible locations on the CI/CD host and in SonarQube Cloud UI for a given analysis run.
To verify the configured analysis properties for a project:
1. Run the project analysis.
2. The analysis debug logs show which source and test files are indexed for the analysis (the scanner logs out to the place it was invoked from).\
If the analysis fails with the error `File can't be indexed twice. Please check that inclusion/exclusion patterns produce disjoint sets for main and test files` then it means that the indicated file is defined in your analysis scope as both source (main) and test file. In this case, you must correct your analysis scope.
3. You can also verify all the project’s exclusion parameters. To do so, proceed as follows:
1. Retrieve the project. See [retrieving-projects](https://docs.sonarsource.com/sonarqube-cloud/managing-your-projects/retrieving-projects "mention") for details.
2. Go to *Your Project* > **Administration** > **Background Tasks**.
3. In the list, locate the project run you want to verify and click the three-dot menu in the far right column.
4. In the contextual menu, select **Show SonarScanner Context**. The scanner context is shown:
* The **Organization server settings** section (supported only with the Enterprise plan) shows the analysis parameters set in the UI for the organization.
* The **Project server settings** section shows the analysis parameters set in the UI for the project.
* The **Project scanner properties** section shows the analysis parameters set on the CI/CD host for the project.
{% hint style="warning" %}
Any property set on the CI/CD host and identified by the scanner as a sonar property (that means, with a key starting with `sonar.`) will be listed as a scanner property even if the scanner does not know about it (in that case, the scanner will just ignore the property, and no error will be raised).
{% endhint %}
### Verifying the analysis scope properties read by the scanner
To know which properties the scanner processes during the analysis run:
* In analysis debug logs, search for the `Project configuration` section as illustrated below (The scanner logs out to the place it was invoked from). The section may show:
* `Excluded sources`: exclusion patterns processed by the scanner to compute the source files to be analyzed.
* `Included sources`**:** inclusion patterns processed by the scanner to compute the source files to be analyzed.
* `Excluded tests`: exclusion patterns processed by the scanner to compute the test files to be analyzed.
* `Included tests`**:** inclusion patterns processed by the scanner to compute the test files to be analyzed.
### Related pages
* [setting-initial-scope](https://docs.sonarsource.com/sonarqube-cloud/managing-your-projects/project-analysis/setting-analysis-scope/setting-initial-scope "mention")
* [exclude-from-coverage-duplication](https://docs.sonarsource.com/sonarqube-cloud/managing-your-projects/project-analysis/setting-analysis-scope/exclude-from-coverage-duplication "mention")
* [excluding-files-based-on-patterns](https://docs.sonarsource.com/sonarqube-cloud/managing-your-projects/project-analysis/setting-analysis-scope/excluding-files-based-on-patterns "mention")
* [excluding-based-on-file-extension](https://docs.sonarsource.com/sonarqube-cloud/managing-your-projects/project-analysis/setting-analysis-scope/excluding-based-on-file-extension "mention")
* [advanced-exclusions](https://docs.sonarsource.com/sonarqube-cloud/managing-your-projects/project-analysis/setting-analysis-scope/advanced-exclusions "mention")
* [other-adjustments](https://docs.sonarsource.com/sonarqube-cloud/managing-your-projects/project-analysis/setting-analysis-scope/other-adjustments "mention")
---
# Source: https://docs.sonarsource.com/sonarqube-community-build/analyzing-source-code/scanners/scanner-environment/verifying-code-checkout-step.md
# Source: https://docs.sonarsource.com/sonarqube-server/10.6/analyzing-source-code/various-setups/verifying-code-checkout-step.md
# Source: https://docs.sonarsource.com/sonarqube-server/10.7/analyzing-source-code/scanners/scanner-environment/verifying-code-checkout-step.md
# Source: https://docs.sonarsource.com/sonarqube-server/10.8/analyzing-source-code/scanners/scanner-environment/verifying-code-checkout-step.md
# Source: https://docs.sonarsource.com/sonarqube-server/2025.2/analyzing-source-code/scanners/scanner-environment/verifying-code-checkout-step.md
# Source: https://docs.sonarsource.com/sonarqube-server/2025.3/analyzing-source-code/scanners/scanner-environment/verifying-code-checkout-step.md
# Source: https://docs.sonarsource.com/sonarqube-server/2025.5/analyzing-source-code/scanners/scanner-environment/verifying-code-checkout-step.md
# Source: https://docs.sonarsource.com/sonarqube-server/2025.1/analyzing-source-code/scanners/scanner-environment/verifying-code-checkout-step.md
# Source: https://docs.sonarsource.com/sonarqube-server/2025.4/analyzing-source-code/scanners/scanner-environment/verifying-code-checkout-step.md
# Source: https://docs.sonarsource.com/sonarqube-server/2025.6/analyzing-source-code/scanners/scanner-environment/verifying-code-checkout-step.md
# Source: https://docs.sonarsource.com/sonarqube-server/analyzing-source-code/scanners/scanner-environment/verifying-code-checkout-step.md
# Source: https://docs.sonarsource.com/sonarqube-cloud/advanced-setup/scanner-environment/verifying-code-checkout-step.md
# Checked-out code
The SonarScanners run on code that is checked out from the repository. During the checkout of a working copy (clone) of the code from the project repository, we recommend using the full depth. Indeed, the so-retrieved SCM metadata enables various features such as:
* New Code detection:
* On pull requests, not just the last commit but all the commits that are not on the target branch are considered. This requires a history long enough to find the common commit.
* On long-living branches, the New Code definition can be set in different ways but a longer history is always better.
* Blame information display and automatic issue assignment based on the blame information.
* [#issue-backdating-new-issues-raised-on-old-code](https://docs.sonarsource.com/sonarqube-cloud/managing-your-projects/issues/solution-overview#issue-backdating-new-issues-raised-on-old-code "mention")
In addition, we recommend cloning all the branches of the repository to avoid reference errors during the checkout.
With Git, this means using `fetch-depth: 0`. This disables shallow clones and fetches all branches.
{% hint style="warning" %}
* Avoid any attempt at performing actions on the cloned repository to make sure the repository contains valid repository metadata (e.g. the .git folders have not been removed).
* The code in the cloned repository matches the code in the original repository (e.g no code is added to the branch on the cloned repository before analysis).
{% endhint %}
---
# Source: https://docs.sonarsource.com/sonarqube-cloud/managing-your-projects/dashboards/viewing-and-managing-dashboards.md
# Viewing and managing dashboards
This feature is available in the [Enterprise](https://www.sonarsource.com/plans-and-pricing/sonarcloud/) plan.
### Retrieving dashboards
To retrieve **Dashboards**:
{% embed url="" %}
1. Retrieve your project. See [retrieving-projects](https://docs.sonarsource.com/sonarqube-cloud/managing-your-projects/retrieving-projects "mention") for more information.
2. Select the **Main Branch** from the left side menu.
3. Click **Dashboards** in the top menu. The drop-down menu provides shortcuts to the **Project health dashboard**, a built-in dashboard, and **All dashboards** page which includes your custom dashboards.
### Permissions
Private project:
* Browse permission is required to view, create and edit project dashboards.
Public projects:
* Anyone can view project dashboards, including any custom dashboards.
* Members of the organization that the project belongs to can edit and create project dashboards.
### A list of all dashboards
The **All dashboards** page shows a list of dashboards for your project.
1. Click on **All**, **Built-in** or **Custom** buttons to filter the dashboard or use the search to find a dashboard by name.
2. Click **Create custom dashboards** to create a new dashboard. See [creating-dashboards](https://docs.sonarsource.com/sonarqube-cloud/managing-your-projects/dashboards/creating-dashboards "mention") for more details.
3. The list is organized by **Dashboard name**, **Last edited**, and **Creator**.
4. The action menu at the end of each row shows:
* **Edit name and description**: Available to custom dashboards.
* **Edit**: Available to custom dashboards.
* **Duplicate**: Available to custom and built-in dashboards.
* **Delete dashboard**: Available to custom dashboards.
### Viewing dashboards
Dashboards comprise configurable widgets. Depending on the type of a measure they represent, the widgets are count, rating badge, line chart, pie and donut charts.
#### Count
Count represents a single metric. It displays a numerical value for a measure, for example, the number of security hotspots or the percentage of debt ratio.
* In the upper-right corner, the chart shows whether the data is applied to new or overall code.
* If enabled during widget creation, the widget displays the net change in the last 30 days. Click on it to investigate further on the Activity page.
#### Rating badge
A rating represents a single metric. It displays the current rating for a measure, for example, a security rating or reliability rating.
In the upper-right corner, the chart shows whether the data is applied to new or overall code.
#### Line chart
A line chart represents metrics that change over time, displaying historical data for a selected measure.
* Hover over the line to reveal a tooltip with additional information.
* In the upper-right corner, the chart shows that data is applied to overall code, which is the only option for line charts.
* If enabled during widget creation, the chart displays a legend.
#### Pie and donut charts
Pie and donut charts display information for multiple metrics.
* Hover over a section of the pie or donut chart to reveal a tooltip with more information.
* Click on the pie or donut chart sections, or on the legend, to drill down into the metrics.
* In the upper-right corner, the chart shows whether the data is applied to new or overall code.
* If enabled during widget creation, the chart displays a legend.
See [#metrics](https://docs.sonarsource.com/sonarqube-cloud/managing-your-projects/creating-dashboards#metrics "mention") for more information about metrics and associated visualizations.
#### Missing a visualization or metric?
Your feedback is important to us. Submit your ideas for a visualization or metric that you would like to see in Dashboards through our [Portal card](https://portal.productboard.com/sonarsource/1-sonarqube-cloud/c/802-dashboards-improvements).
### Editing a dashboard
Navigate to the dashboard you wish to edit and select **Edit** from the action menu located in the upper-right corner of the page. Alternatively, you can navigate to the **All dashboards** page and select **Edit** from the action menu located on the right-side of the dashboard you wish to edit.
In the edit mode you have an option to:
* **Cancel and exit**: Exits the edit mode without saving the changes.
* **Save changes**: Saves the existing changes.
* **Add widget**: You can choose from available widgets.
* **Add section:** Sections group a set of widgets together and are collapsible.
See [creating-dashboards](https://docs.sonarsource.com/sonarqube-cloud/managing-your-projects/dashboards/creating-dashboards "mention") for more details about how to create and customize the widgets and sections.
#### Organizing your dashboards
**Widgets**
You can organize widgets by moving them from one section to another. In edit mode, click the handle located in the top-left corner of a widget and drag it to another location.
Additionally, you can resize a widget by clicking and dragging its lower-right corner.
**Sections**
Similarly to widgets, you can drag sections from one location of the dashboard to another.
Sections are collapsible, even after you save the changes and exit the edit mode. This can help you save screen real estate and show only information that is important to you at a given moment.
### Related pages
* [](https://docs.sonarsource.com/sonarqube-cloud/managing-your-projects/dashboards "mention")
* [creating-dashboards](https://docs.sonarsource.com/sonarqube-cloud/managing-your-projects/dashboards/creating-dashboards "mention")
---
# Source: https://docs.sonarsource.com/sonarqube-cloud/administering-sonarcloud/managing-subscription/viewing-billing-and-usage.md
# Viewing billing or usage information
This page explains how to view your billing and usage information. If you are concerned that you might be close to the LOC (number of lines of code) limit defined in your subscription plan, you can check your current consumption as described below. For more information, see [#loc-based-pricing](https://docs.sonarsource.com/sonarqube-cloud/administering-sonarcloud/subscription-plans#loc-based-pricing "mention"). To change the LOC limit, see [changing-plan](https://docs.sonarsource.com/sonarqube-cloud/administering-sonarcloud/managing-subscription/changing-plan "mention").
{% hint style="info" %}
The LOC is a metric (`ncloc`) that you can also retrieve through the [web-api](https://docs.sonarsource.com/sonarqube-cloud/advanced-setup/web-api "mention") by using the `/api/measures` endpoint. See [metric-definitions](https://docs.sonarsource.com/sonarqube-cloud/digging-deeper/metric-definitions "mention") for more information.
{% endhint %}
### Viewing your organization’s billing and usage information
To view your organization’s billing and usage information, you must be an admin of the organization. Proceed as follows:
1. Retrieve your organization. See [viewing-organizations](https://docs.sonarsource.com/sonarqube-cloud/getting-started/viewing-organizations "mention") for more details.
2. Select the **Billing & Usage** tab.\
The dashboard shows details of the total LOC analyzed to date and the total number of projects.\
If your organization belongs to an enterprise:
* If your organization uses the shared LOCs, you will see the usage of the shared LOCs. For more information about shared LOCs, see [#about-enterprise-loc-limit](https://docs.sonarsource.com/sonarqube-cloud/managing-enterprise/managing-the-lines-of-code-within-your-enterprise#about-enterprise-loc-limit "mention").
* You will see the subscription status of the enterprise add-ons.
3. Click on the number of projects to view a breakdown of the number of lines of code contained in each project within your organization.
### Viewing your enterprise’s billing and usage information
To view your enterprise’s billing and usage information, you must be an admin of the enterprise. Proceed as follows:
1. Retrieve your enterprise. See [retrieving-and-viewing-your-enterprise](https://docs.sonarsource.com/sonarqube-cloud/administering-sonarcloud/managing-enterprise/retrieving-and-viewing-your-enterprise "mention") for more details.
2. Select the **Billing and Usage** tab.
The dashboard shows:
1. The characteristics of your enterprise plan with the subscription status of the enterprise add-ons (add-ons require a separate subscription to your Enterprise license).
2. Usage information:
* An overview of the lines of code consumption. For more details, see [#loc-consumption](https://docs.sonarsource.com/sonarqube-cloud/managing-enterprise/managing-the-lines-of-code-within-your-enterprise#loc-consumption "mention").
### Related pages
* [subscription-plans](https://docs.sonarsource.com/sonarqube-cloud/administering-sonarcloud/managing-subscription/subscription-plans "mention")
* [billing-model](https://docs.sonarsource.com/sonarqube-cloud/administering-sonarcloud/managing-subscription/billing-model "mention")
* [signing-up-for-plan](https://docs.sonarsource.com/sonarqube-cloud/administering-sonarcloud/managing-subscription/signing-up-for-plan "mention")
* [changing-plan](https://docs.sonarsource.com/sonarqube-cloud/administering-sonarcloud/managing-subscription/changing-plan "mention")
* [updating-billing-payment-details](https://docs.sonarsource.com/sonarqube-cloud/administering-sonarcloud/managing-subscription/updating-billing-payment-details "mention")
* [viewing-taxes-and-invoices](https://docs.sonarsource.com/sonarqube-cloud/administering-sonarcloud/managing-subscription/viewing-taxes-and-invoices "mention")
---
# Source: https://docs.sonarsource.com/sonarqube-cloud/getting-started-with-enterprise/viewing-billing-usage-info.md
# Viewing usage information
To view your enterprise’s usage information, see [#loc-consumption](https://docs.sonarsource.com/sonarqube-cloud/administering-sonarcloud/managing-enterprise/managing-the-lines-of-code-within-your-enterprise#loc-consumption "mention").
### Related pages
* [setting-up-your-enterprise](https://docs.sonarsource.com/sonarqube-cloud/getting-started-with-enterprise/setting-up-your-enterprise "mention")\
This page explains the different steps necessary to create and configure an enterprise.
* [setting-up-sso](https://docs.sonarsource.com/sonarqube-cloud/getting-started-with-enterprise/setting-up-sso "mention")
* [onboarding-new-org](https://docs.sonarsource.com/sonarqube-cloud/getting-started-with-enterprise/onboarding-new-org "mention")
---
# Source: https://docs.sonarsource.com/sonarqube-server/2025.3/advanced-security/viewing-dependencies.md
# Source: https://docs.sonarsource.com/sonarqube-server/2025.5/advanced-security/viewing-dependencies.md
# Source: https://docs.sonarsource.com/sonarqube-server/2025.4/advanced-security/viewing-dependencies.md
# Source: https://docs.sonarsource.com/sonarqube-server/2025.6/advanced-security/viewing-dependencies.md
# Source: https://docs.sonarsource.com/sonarqube-server/advanced-security/viewing-dependencies.md
# Source: https://docs.sonarsource.com/sonarqube-cloud/advanced-security/viewing-dependencies.md
# Viewing dependencies
Advanced Security is an add-on that requires a separate subscription to your SonarQube Cloud's [Enterprise plan](https://www.sonarsource.com/plans-and-pricing/#sonarqube-cloud-features).
During project analysis, SonarQube Advanced Security conducts software composition analysis (SCA) to identify and list project dependencies and associated risks. It's also possible to export the software bill of materials (SBOM) for your project.
### Viewing the list of dependencies
You must build, or rebuild your project's main branch to see the SCA results. After an analysis, a list of dependencies becomes available in the SonarQube Cloud UI under the **Dependencies** tab for projects and portfolios. It is updated with each analysis. You need the **Browse** permission to view dependencies on private projects and portfolios.
You can use **Filters** to narrow down the results. Dependencies can be filtered by:
* **Dependency type**: Direct or Transitive
* **Dependency scope**: Production or Development
* **Package manager**: A list of package managers. See [Analyzing projects for dependencies](https://docs.sonarsource.com/sonarqube-cloud/advanced-security/analyzing-projects-for-dependencies-sca) for supported package managers and languages.
Use the search feature to find specific dependencies.
The following information is displayed for each dependency card in the list:
1. Dependency name
2. Dependency version
3. Dependency type
4. Dependency scope
5. Files where the dependency was identified
6. Package manager
7. License
Click on the dependency name to open a detailed view.
### Detailed view
The detailed view of a dependency provides the following information:
* Details of the dependency, including **Dependency type**, **Dependency scope**, **Identified using**, **Package manager** and **License**. Click on the info icon for **Identify using** to reveal all the files where the dependency was identified.
* Dependency chains: A list of direct and transitive dependency chains, if available.
#### About dependency chains
Dependency chains show how a dependency is brought into your project.
Project components often rely on other components, creating dependencies. These dependencies can be direct, where one component immediately uses another, or transitive, where a component relies on another component which, in turn, depends on yet another.
For example In a Project > Component 1 > Component 2 scenario:
* The dependency between Project and Component 1 is direct.
* The dependency between Project and Component 2 is transitive because Component 1 is built using Component 2.
The detailed view indicates whether a dependency has direct and transitive dependency chains and displays the complete path for transitive dependencies.
### Getting a high-level view of your dependency usage
You can also view dependencies for portfolios to get a higher-level view of your dependency usage. For example, to get a list, or bill of materials, for all software in use by your organization, you can create a [portfolio](https://docs.sonarsource.com/sonarqube-cloud/managing-portfolios) of **All Projects**.
After you create and refresh a portfolio, you can view **Dependencies** and **Dependency Risks**. Searching Dependencies by name allows you to see where a dependency is used in your organization. Searching Dependency Risks by a CVE name allows you to discover where your in organization you may be affected by a newly reported CVE.
### Software Bill of Materials (SBOM)
A software bill of materials (SBOM) is an inventory of components your project is built with, including details such as the component name, version, and license.
Because your project depends on these components to build and run your software, getting the SBOM for a project is a key element to track all the items that you depend on for both internal use in the remediation of dependency risks, and external use for compliance with regulations.
Compliance teams can use SBOMs as an index to keep an inventory of licenses in use. Developers can use SBOMs to manage dependencies. All of this creates greater interoperability and efficiency within an organization. It is a shared language for all of these teams that can be passively generated and maintained based on application builds.
Sonar supports exporting an SBOM in two major SBOM formats: Software Package Data Exchange (SPDX) and CycloneDX.
#### Exporting the SBOM
You can export the SBOM from the **Dependencies** page of **Projects** and **Portfolios**. SBOMs are available in the CycloneDX and SPDX, in both XML and JSON formats.
SBOMs are generated when requested in the UI or API; there is no storage or history for SBOMs in SonarQube. If your needs require storing SBOMs for particular released versions of your projects or portfolios, you should export a SBOM at release time and save it somewhere outside of SonarQube for later use.
### Related pages
* [Reviewing and fixing dependency risks](https://docs.sonarsource.com/sonarqube-cloud/advanced-security/reviewing-and-fixing-dependency-risks)
* [Analyzing projects for dependencies](https://docs.sonarsource.com/sonarqube-cloud/advanced-security/analyzing-projects-for-dependencies-sca)
* [Managing license profiles and policies](https://docs.sonarsource.com/sonarqube-cloud/advanced-security/managing-license-profiles-and-policies)
* [Troubleshooting](https://docs.sonarsource.com/sonarqube-cloud/appendices/troubleshooting)
* [Best practices for managing dependency risks](https://docs.sonarsource.com/sonarqube-cloud/advanced-security/best-practices-for-managing-dependency-risks)
---
# Source: https://docs.sonarsource.com/sonarqube-cloud/getting-started-with-enterprise/viewing-enterprise-reports.md
# Viewing the enterprise reports
{% content-ref url="viewing-enterprise-reports/introduction" %}
[introduction](https://docs.sonarsource.com/sonarqube-cloud/getting-started-with-enterprise/viewing-enterprise-reports/introduction)
{% endcontent-ref %}
{% content-ref url="viewing-enterprise-reports/project-security-reports" %}
[project-security-reports](https://docs.sonarsource.com/sonarqube-cloud/getting-started-with-enterprise/viewing-enterprise-reports/project-security-reports)
{% endcontent-ref %}
{% content-ref url="viewing-enterprise-reports/project-pdf-reports" %}
[project-pdf-reports](https://docs.sonarsource.com/sonarqube-cloud/getting-started-with-enterprise/viewing-enterprise-reports/project-pdf-reports)
{% endcontent-ref %}
{% content-ref url="viewing-enterprise-reports/viewing-portfolios" %}
[viewing-portfolios](https://docs.sonarsource.com/sonarqube-cloud/getting-started-with-enterprise/viewing-enterprise-reports/viewing-portfolios)
{% endcontent-ref %}
{% content-ref url="viewing-enterprise-reports/portfolio-security-reports" %}
[portfolio-security-reports](https://docs.sonarsource.com/sonarqube-cloud/getting-started-with-enterprise/viewing-enterprise-reports/portfolio-security-reports)
{% endcontent-ref %}
---
# Source: https://docs.sonarsource.com/sonarqube-cloud/getting-started/viewing-organizations.md
# Retrieving your organizations
You can view any free or paid plan organization if you’re a member.
### Listing all your organizations
This procedure explains how to open your account’s **Organizations** page.
{% hint style="info" %}
From the Organizations page, you can leave an organization. With the appropriate permissions, you can also create, delete, or upgrade an organization.
{% endhint %}
To list your organizations:
1. Select your account menu in the top right corner of the SonarQube Cloud interface.
2. In the menu, select **View all** in front of **My Organizations**.
3. The **Organizations** page opens with the list of organizations you’re a member of.
4. The `Admin` tag indicates that you're an admin of the organization.

### Retrieving and viewing your organization
To retrieve your organization, you can:
1. Select your account menu in the top right corner of the SonarQube Cloud interface. In the menu, under **My Organizations**, select the organization you want to view.
2. Alternatively, open the **My Projects** page and select the organization hyperlink in the projects list.
The organization record opens as illustrated below:
1. Organization's avatar and name. \
The avatar is a small image representing the organization. As an organiziation admin, you can add one, see [#change-details](https://docs.sonarsource.com/sonarqube-cloud/administering-sonarcloud/managing-organization/creating-organization/changing-organization-settings#change-details "mention").
2. Button to navigate to the [bound DevOps organization](https://docs.sonarsource.com/sonarqube-cloud/administering-sonarcloud/about-sonarqube-cloud-solution/ressources-structure/binding-with-dop).
3. Organization's navigation bar.
4. Organization key.
5. Organization's subscription plan.
You can navigate through the different pages by using the Organization's navigation bar (some pages require specific access permission) :
* **Projects**: This page lists the [projects](https://docs.sonarsource.com/sonarqube-cloud/administering-sonarcloud/about-sonarqube-cloud-solution/ressources-structure/projects "mention") belonging to the organization and to which you have access.
* **Quality Profiles**: This page allows authorized users to manage the quality profiles available by language for the organization’s projects. See [introduction](https://docs.sonarsource.com/sonarqube-cloud/standards/managing-quality-profiles/introduction "mention") for more information.
* **Rules**: This page allows the retrieval of [rules](https://docs.sonarsource.com/sonarqube-cloud/digging-deeper/rules "mention") available in the organization through its quality profiles.
* **Quality Gates**: This page allows authorized users to manage the quality gates available for the organization’s projects. See [introduction-to-quality-gates](https://docs.sonarsource.com/sonarqube-cloud/standards/managing-quality-gates/introduction-to-quality-gates "mention") for more information.
* **Members**: This page lists the organization's members and allows the organization admins to manage them. See [organization-members](https://docs.sonarsource.com/sonarqube-cloud/administering-sonarcloud/managing-organization/users-and-permissions/organization-members "mention") for more information.
* **Billing & Upgrade**: This page allows the organization admins to manage the organization's subscription. See Managing your subscription [introduction](https://docs.sonarsource.com/sonarqube-cloud/administering-sonarcloud/managing-subscription/introduction "mention") for more information.
* **Administration**: This menu allows the organization admins to access various administration menus.
### Retrieving any free organization
* If you know the organization key, go to `sonarcloud.io/organizations/.`
* Otherwise, in the top navigation bar of the SonarQube Cloud UI, select **Explore** or go to [`sonarcloud.io/explore/projects`](http://sonarcloud.io/explore/projects), and select an organization.
---
# Source: https://docs.sonarsource.com/sonarqube-cloud/getting-started-with-enterprise/viewing-enterprise-reports/viewing-portfolio-pdf-reports.md
# Viewing portfolio PDF reports
This feature is only available in the [Enterprise plan](https://www.sonarsource.com/plans-and-pricing/#sonarqube-cloud-features).
The code quality in the portfolio PDF report is presented through a number of lenses such as security, reliability, maintainability, security review, and releasability. Additionally, it includes information about code coverage and duplication for new and overall code.
{% hint style="info" %}
Before you can view the Enterprise-level reports, your organization must be added to an enterprise. For more information, see [managing-enterprise](https://docs.sonarsource.com/sonarqube-cloud/administering-sonarcloud/managing-enterprise "mention").
{% endhint %}
### Downloading a portfolio report
1. Retrieve a portfolio. See [#retrieving-portfolio](https://docs.sonarsource.com/sonarqube-cloud/getting-started-with-enterprise/viewing-portfolios#retrieving-portfolio "mention") for more details.
2. Click on **Download Portfolio Report (pdf)** located in the top right of the Overview page.
### Contents of the portfolio report PDF file
#### Portfolio overview page
* **Portfolio information** includes the name of the portfolio, number of projects that make up the portfolio, links to Portfolio Breakdown, number of Lines of Code (LOC), and a link to Language Breakdown
* **Portfolio metrics** overview shows software quality matrices for new and overall code, and releasability rating.
#### Portfolio health factors
The ratings for new and overall code in the portfolio health factors include security, reliability, maintainability, security review, coverage, and duplication. See the Portfolio metrics article for more information about how these ratings are calculated.
#### Definitions
The last page of the portfolio PDF report is the definitions page. It includes information about the ratings, rating conversion, and related definitions.
### Related pages
* [managing-portfolios](https://docs.sonarsource.com/sonarqube-cloud/managing-portfolios "mention")
* [viewing-portfolios](https://docs.sonarsource.com/sonarqube-cloud/getting-started-with-enterprise/viewing-enterprise-reports/viewing-portfolios "mention")
* [portfolio-security-reports](https://docs.sonarsource.com/sonarqube-cloud/getting-started-with-enterprise/viewing-enterprise-reports/portfolio-security-reports "mention")
---
# Source: https://docs.sonarsource.com/sonarqube-cloud/getting-started-with-enterprise/viewing-enterprise-reports/viewing-portfolios.md
# Viewing portfolios
This feature is only available in the [Enterprise plan](https://www.sonarsource.com/plans-and-pricing/#sonarqube-cloud-features).
A portfolio is a set of projects within your enterprise that enables an aggregate view of the project metrics and risks. More precisely, a portfolio consists of project branches and for each project, you can add a single long-lived branch to the portfolio.
{% hint style="info" %}
Before you can view the Enterprise-level reports, your organization must be added to an enterprise. For more information, see [managing-enterprise](https://docs.sonarsource.com/sonarqube-cloud/administering-sonarcloud/managing-enterprise "mention").
{% endhint %}
### Retrieving a portfolio
1. Click **My Portfolios** in the top navigation bar and select your enterprise
2. The **Portfolios** home page lists all the portfolios that belong to this organization. Use the search box to narrow down the results.
3. Here, you can review the portfolio’s overall code ratings, including the number of projects with the worst rating, see the number of Lines of Code analyzed, and see the number of projects included in the portfolio.
4. Click on the portfolio name to view more details.
See [managing-portfolios](https://docs.sonarsource.com/sonarqube-cloud/managing-portfolios "mention") for more information about how to create, edit, and delete portfolios.
### Portfolio metrics
The reliability, security vulnerabilities, security review, and maintainability ratings are calculated as the average of the ratings for all projects included in the portfolio.
SonarQube Cloud converts each project’s letter rating to a number, calculates an average number for the projects in the portfolio, and converts that average to a letter rating. Averages ending with .5 are rounded up, resulting in the "lower" of the two possible ratings, so an average of 2.5 would be rounded up to 3 and result in a "C" rating).
This gives a "problem density" measure for your portfolio’s four axes: reliability, security vulnerabilities, security review, and maintainability.
Rating conversion: E->5, D->4, C->3, B->2, A->1
A risk level is associated with each metric, except for the Releasability:
* **High**: if at least one project in the portfolio is rated E or D.
* **Medium**: if at least one project in the portfolio is rated C or B.
* **Low**: If all projects in the portfolio are rated A.
Each metric is calculated by SonarQube Cloud for New and Overall Code.
Releasability
* The releasability rating is based on the proportion of projects in the portfolio that have passed their quality gate. The rating is as follows:\
**A**: > 80%\
**B**: > 60% and <= 80%\
**C**: > 40% and <= 60%\
**D**: > 20% and <= 40%\
**E**: <= 20%
* At the project level: The state of the quality gate associated with the project can be passed or failed.
Security
* The average security rating of all projects in the portfolio.
* At the project level: The security rating is related to issues that mark potential weaknesses to hackers. The rating is as follows:\
**A**: 0 vulnerability\
**B**: at least one minor vulnerability\
**C**: at least one major vulnerability\
**D**: at least one critical vulnerability\
**E**: at least one blocker vulnerability
Reliability
* The average reliability rating of all projects in the portfolio.
* At the project level: The reliability rating is related to issues that mark code where you will get behavior other than what was expected. The rating is as follows:\
**A**: 0 bugs\
**B**: at least one minor bug\
**C**: at least one major bug\
**D**: at least one critical bug\
**E**: at least one blocker bug
Maintainability
* The average maintainability rating of all projects in the portfolio.
* At the project level: The maintainability rating is related to issues that mark code that will be more difficult to update competently than it should. The maintainability rating is based on the technical debt ratio value (the ratio between the cost to develop the software and the cost to fix it). The default rating is as follows (this rating definition can be changed):\
**A**: <= 0.05\
**B**: > 0.05 and <= 0.1\
**C**: > 0.1 and <= 0.20\
**D**: > 0.2 and <= 0.5\
**E**: > 0.5
Security review
* The average security review rating of all projects in the portfolio.
* At the project level: The security review rating is based on the percentage of reviewed security hotspots. Note that security hotspots are considered reviewed if they are marked as **Fixed** or **Safe**. The rating is as follows:\
**A**: >= 80%\
**B**: >= 70% and <80%\
**C**: >= 50% and <70%\
**D**: >= 30% and <50%\
**E**: < 30%
### Overview page
Once you retrieve a portfolio, you will land on an Overview page, which displays a summary of information from the project branches included in the portfolio for Releasability, Security, Reliability, Maintainability, and Security Review. The ratings are calculated on new and overall code and include project distribution for a rating as well as a risk level.
### Portfolio Breakdown page
The Portfolio Breakdown page lists projects included in the portfolio for which you have the **Browse** permission. They are ordered alphabetically, and you can switch between **New code** and **Overall code** views.
### Measures page
The Measures page provides an in-depth breakdown of metrics across your portfolio projects, helping you gain broader visibility. It includes:
* **Software quality rating breakdown**: View ratings breakdown across multiple projects at once.
* **Code coverage visibility**: Easily see code coverage at the portfolio level without manually aggregating project data.
* **Duplication insights**: View duplications by project in your portfolio to maintain high-quality, maintainable software. Note that his feature does not cover cross-project duplications.
* **Lines of Code (LOC) tracking**: Quickly understand LOC usage breakdown by language and by project.
See [metric-definitions](https://docs.sonarsource.com/sonarqube-cloud/digging-deeper/metric-definitions "mention") for more information about code metrics used in the Sonar solution.
### Related pages
* [managing-portfolios](https://docs.sonarsource.com/sonarqube-cloud/managing-portfolios "mention")
* [administering-portfolios](https://docs.sonarsource.com/sonarqube-cloud/getting-started-with-enterprise/administering-portfolios "mention")
* [portfolio-security-reports](https://docs.sonarsource.com/sonarqube-cloud/getting-started-with-enterprise/viewing-enterprise-reports/portfolio-security-reports "mention")
* [managing-enterprise](https://docs.sonarsource.com/sonarqube-cloud/administering-sonarcloud/managing-enterprise "mention")
* [viewing-portfolio-pdf-reports](https://docs.sonarsource.com/sonarqube-cloud/getting-started-with-enterprise/viewing-enterprise-reports/viewing-portfolio-pdf-reports "mention")
---
# Source: https://docs.sonarsource.com/sonarqube-community-build/user-guide/viewing-projects/viewing-project-information.md
# Source: https://docs.sonarsource.com/sonarqube-server/2025.2/user-guide/viewing-projects/viewing-project-information.md
# Source: https://docs.sonarsource.com/sonarqube-server/2025.3/user-guide/viewing-projects/viewing-project-information.md
# Source: https://docs.sonarsource.com/sonarqube-server/2025.5/user-guide/viewing-projects/viewing-project-information.md
# Source: https://docs.sonarsource.com/sonarqube-server/2025.4/user-guide/viewing-projects/viewing-project-information.md
# Source: https://docs.sonarsource.com/sonarqube-server/2025.6/user-guide/viewing-projects/viewing-project-information.md
# Source: https://docs.sonarsource.com/sonarqube-server/user-guide/viewing-projects/viewing-project-information.md
# Viewing project information
To view various project information such the project key, visibility, tags, or total lines of code consumed on your main branch; or project settings such as quality gate and quality profiles used for project analyis, AI Code Assurance or AI CodeFix status, proceed as follows:
1. Retrieve the project you wish to view. See the [retrieving-projects](https://docs.sonarsource.com/sonarqube-server/user-guide/viewing-projects/retrieving-projects "mention") page for more information.
2. In the top right corner, select **Project Information**.
---
# Source: https://docs.sonarsource.com/sonarqube-cloud/getting-started-with-enterprise/viewing-enterprise-reports/viewing-project-regulatory-reports.md
# Viewing project regulatory reports
Starting in [Enterprise](https://www.sonarsource.com/plans-and-pricing/enterprise/), you can download a regulatory report for any long-lived branch of a project, typically the main branch. See [long-lived-branch-pattern](https://docs.sonarsource.com/sonarqube-cloud/managing-your-projects/project-analysis/long-lived-branch-pattern "mention") if the long-lived branch is other than main.
{% hint style="info" %}
Before you can view the Enterprise-level reports, your organization must be added to an enterprise. For more information, see [managing-enterprise](https://docs.sonarsource.com/sonarqube-cloud/administering-sonarcloud/managing-enterprise "mention").
{% endhint %}
### Downloading regulatory reports
To download a regulatory report:
1. Retrieve the project. See [retrieving-projects](https://docs.sonarsource.com/sonarqube-cloud/managing-your-projects/retrieving-projects "mention") for more details.
2. On the Branch Summary page, click **Downloadable reports** and select **Download Regulatory report (.zip)** from the drop down menu.
Alternatively:
1. Click **Information** in the left side navigation bar.
2. In the **Regulatory Report** section, choose a project branch from the drop down menu**.**
3. Click **Download report**.
SonarQube generates the report for download, which may take a few minutes depending on the size of the project.
### Contents of the regulatory report’s ZIP file
The reports are in a ZIP file containing a snapshot of the latest analysis of the selected branch and include TXT, CSV, and PDF files.
The PDF file includes:
* **Project overview**:
* Project details
* Quality gates information and status
* **Project rating** **overview** for:
* New code broken down by new issues, accepted issues, coverage, duplication, and security hotspots.
* Overall code broken down by security, reliability, maintainability, accepted issues, coverage, duplication, and security hotspots.
* **Distribution of issues in new code** showing open issues and breakdown by severity, based on security, reliability, maintainability.
* **Distribution of issues in overall code** showing open issues and breakdown by severity, based on security, reliability, maintainability.
* **Quality gate and quality profiles** information.
* **Files** lists all relevant files included in the ZIP file.
* **Definitions** lists all the definitions of terms related to the report.
The PDF regulatory report is generated with metrics from software qualities (security, reliability, maintainability). Some CSV files may contain metrics from both software qualities and rule types (vulnerabilities, bugs and code smells) and they are marked accordingly.
### Related pages
* [project-security-reports](https://docs.sonarsource.com/sonarqube-cloud/getting-started-with-enterprise/viewing-enterprise-reports/project-security-reports "mention")
* [project-pdf-reports](https://docs.sonarsource.com/sonarqube-cloud/getting-started-with-enterprise/viewing-enterprise-reports/project-pdf-reports "mention")
---
# Source: https://docs.sonarsource.com/sonarqube-community-build/user-guide/viewing-projects/viewing-project-structure.md
# Source: https://docs.sonarsource.com/sonarqube-server/10.7/user-guide/viewing-projects/viewing-project-structure.md
# Source: https://docs.sonarsource.com/sonarqube-server/10.8/user-guide/viewing-projects/viewing-project-structure.md
# Source: https://docs.sonarsource.com/sonarqube-server/2025.2/user-guide/viewing-projects/viewing-project-structure.md
# Source: https://docs.sonarsource.com/sonarqube-server/2025.3/user-guide/viewing-projects/viewing-project-structure.md
# Source: https://docs.sonarsource.com/sonarqube-server/2025.5/user-guide/viewing-projects/viewing-project-structure.md
# Source: https://docs.sonarsource.com/sonarqube-server/2025.1/user-guide/viewing-projects/viewing-project-structure.md
# Source: https://docs.sonarsource.com/sonarqube-server/2025.4/user-guide/viewing-projects/viewing-project-structure.md
# Source: https://docs.sonarsource.com/sonarqube-server/2025.6/user-guide/viewing-projects/viewing-project-structure.md
# Source: https://docs.sonarsource.com/sonarqube-server/user-guide/viewing-projects/viewing-project-structure.md
# Viewing project structure
You can view the project’s structure and code in SonarQube Server. For private projects, you need the **Browse** and **See Source Code** permission.
To view the structure and code of a project:
1. Retrieve your project. See [retrieving-projects](https://docs.sonarsource.com/sonarqube-server/user-guide/viewing-projects/retrieving-projects "mention") for more information.
2. In the project navigation bar, select **Code**. It takes you to an outline of your project structure.
3. Drill down to see files in a directory, and select a file to see its code.
{% hint style="info" %}
If your project is too large for easy exploration via drilling, the search feature on this page will help. While the global search in the main menu returns results from throughout the SonarQube Server instance, the localized search on the code page is restricted to files and directories in the current project.
{% endhint %}
---
# Source: https://docs.sonarsource.com/sonarqube-community-build/user-guide/viewing-projects.md
# Source: https://docs.sonarsource.com/sonarqube-server/10.7/user-guide/viewing-projects.md
# Source: https://docs.sonarsource.com/sonarqube-server/10.8/user-guide/viewing-projects.md
# Source: https://docs.sonarsource.com/sonarqube-server/2025.2/user-guide/viewing-projects.md
# Source: https://docs.sonarsource.com/sonarqube-server/2025.3/user-guide/viewing-projects.md
# Source: https://docs.sonarsource.com/sonarqube-server/2025.5/user-guide/viewing-projects.md
# Source: https://docs.sonarsource.com/sonarqube-server/2025.1/user-guide/viewing-projects.md
# Source: https://docs.sonarsource.com/sonarqube-server/2025.4/user-guide/viewing-projects.md
# Source: https://docs.sonarsource.com/sonarqube-server/2025.6/user-guide/viewing-projects.md
# Source: https://docs.sonarsource.com/sonarqube-server/user-guide/viewing-projects.md
# Viewing projects
{% content-ref url="viewing-projects/retrieving-projects" %}
[retrieving-projects](https://docs.sonarsource.com/sonarqube-server/user-guide/viewing-projects/retrieving-projects)
{% endcontent-ref %}
{% content-ref url="viewing-projects/project-overview" %}
[project-overview](https://docs.sonarsource.com/sonarqube-server/user-guide/viewing-projects/project-overview)
{% endcontent-ref %}
{% content-ref url="viewing-projects/activity-and-history" %}
[activity-and-history](https://docs.sonarsource.com/sonarqube-server/user-guide/viewing-projects/activity-and-history)
{% endcontent-ref %}
{% content-ref url="viewing-projects/viewing-project-structure" %}
[viewing-project-structure](https://docs.sonarsource.com/sonarqube-server/user-guide/viewing-projects/viewing-project-structure)
{% endcontent-ref %}
{% content-ref url="viewing-projects/viewing-project-information" %}
[viewing-project-information](https://docs.sonarsource.com/sonarqube-server/user-guide/viewing-projects/viewing-project-information)
{% endcontent-ref %}
---
# Source: https://docs.sonarsource.com/sonarqube-community-build/quality-standards-administration/managing-quality-gates/viewing-quality-gate.md
# Source: https://docs.sonarsource.com/sonarqube-server/2025.2/quality-standards-administration/managing-quality-gates/viewing-quality-gate.md
# Source: https://docs.sonarsource.com/sonarqube-server/2025.3/quality-standards-administration/managing-quality-gates/viewing-quality-gate.md
# Source: https://docs.sonarsource.com/sonarqube-server/2025.5/quality-standards-administration/managing-quality-gates/viewing-quality-gate.md
# Source: https://docs.sonarsource.com/sonarqube-server/2025.4/quality-standards-administration/managing-quality-gates/viewing-quality-gate.md
# Source: https://docs.sonarsource.com/sonarqube-server/2025.6/quality-standards-administration/managing-quality-gates/viewing-quality-gate.md
# Source: https://docs.sonarsource.com/sonarqube-server/quality-standards-administration/managing-quality-gates/viewing-quality-gate.md
# Source: https://docs.sonarsource.com/sonarqube-cloud/standards/managing-quality-gates/viewing-quality-gate.md
# Viewing a quality gate
Any user, even an ananymous user, can view the quality gates defined in a SonarQube Cloud instance. For information about quality gates, see [introduction-to-quality-gates](https://docs.sonarsource.com/sonarqube-cloud/standards/managing-quality-gates/introduction-to-quality-gates "mention").
To view the definition of a quality gate:
1. See [viewing-organizations](https://docs.sonarsource.com/sonarqube-cloud/getting-started/viewing-organizations "mention") to access your organization.
2. In the organization’s navigation bar, select **Quality Gates**.
3. In the left panel, select the quality gate you want to view. Its definition is displayed in the right panel. For information about the metrics used in the conditions, see the [metric-definitions](https://docs.sonarsource.com/sonarqube-cloud/digging-deeper/metric-definitions "mention") page.
4. To view the projects explicitly associated with this quality gate, navigate down to **Projects** in the right panel (Note that projects cannot be explicitly associated with the default quality gate). The **With** tab lists the associated projects. The **Without** tab lists the projects not associated with this quality gate. The **All** tab shows all projects.
The figure below shows the **Quality Gates** page:
1. The list of quality gates in your organization. Icons are used to indicate if a quality gate is qualified for Clean as You Code and/or AI Code Assurance.
2. The definition of the selected quality gate.
3. The projects associated with the selected project.
### Related pages
* [introduction-to-quality-gates](https://docs.sonarsource.com/sonarqube-cloud/standards/managing-quality-gates/introduction-to-quality-gates "mention")
* [managing-custom-quality-gates](https://docs.sonarsource.com/sonarqube-cloud/standards/managing-quality-gates/managing-custom-quality-gates "mention")
* [changing-default-quality-gate](https://docs.sonarsource.com/sonarqube-cloud/standards/managing-quality-gates/changing-default-quality-gate "mention")
* [associating-projects-with-quality-gate](https://docs.sonarsource.com/sonarqube-cloud/standards/managing-quality-gates/associating-projects-with-quality-gate "mention")
* [notifications](https://docs.sonarsource.com/sonarqube-cloud/managing-your-account/notifications "mention")
* [quality-gates-for-ai-code](https://docs.sonarsource.com/sonarqube-cloud/standards/ai-code-assurance/quality-gates-for-ai-code "mention")
* [changing-quality-gate](https://docs.sonarsource.com/sonarqube-cloud/managing-your-projects/project-analysis/changing-quality-gate "mention")
---
# Source: https://docs.sonarsource.com/sonarqube-community-build/quality-standards-administration/managing-quality-profiles/viewing-quality-profiles.md
# Source: https://docs.sonarsource.com/sonarqube-server/2025.3/quality-standards-administration/managing-quality-profiles/viewing-quality-profiles.md
# Source: https://docs.sonarsource.com/sonarqube-server/2025.5/quality-standards-administration/managing-quality-profiles/viewing-quality-profiles.md
# Source: https://docs.sonarsource.com/sonarqube-server/2025.4/quality-standards-administration/managing-quality-profiles/viewing-quality-profiles.md
# Source: https://docs.sonarsource.com/sonarqube-server/2025.6/quality-standards-administration/managing-quality-profiles/viewing-quality-profiles.md
# Source: https://docs.sonarsource.com/sonarqube-server/quality-standards-administration/managing-quality-profiles/viewing-quality-profiles.md
# Source: https://docs.sonarsource.com/sonarqube-cloud/standards/managing-quality-profiles/viewing-quality-profiles.md
# Viewing quality profiles
For information about the how a quality profile works, see the [understanding-quality-profiles](https://docs.sonarsource.com/sonarqube-cloud/standards/managing-quality-profiles/understanding-quality-profiles "mention") page.
### Retrieving quality profiles
See [viewing-organizations](https://docs.sonarsource.com/sonarqube-cloud/getting-started/viewing-organizations "mention") to access your organization and navigate to **Quality Profiles**. The **Quality Profiles** page opens with:
1. On the left-hand side, you will see a list of profile sets by language. Quality profiles inherited from a parent profile are displayed under their parent and with a left indent.\
This list includes the following columns:
* The **Projects** column shows the count of projects associated with a quality profile. Alternatively, it displays **`DEFAULT`** when the profile is the language’s default (any profile not explicitly associated with a quality profile is associated with the organization’s default profile).
* The **Rules** column shows the total count of active rules within the profile. Additionally, if any of these active rules are deprecated, their number will also be indicated with a pink background.
* The **Updated** column shows when the quality profile was last updated.
* The **Used** column shows when the quality profile was last used during a project analysis.
2. On the right-hand side, you will see different sections with information relating to details associated with existing quality profiles:
* The **Deprecated Rules** section lists the quality profiles that contain deprecated rules.
* The **Recently Added Rules** section lists newly added rules and shows whether they are currently active in each profile.
* The **Stagnant Profiles** section lists the custom profiles that have not been updated for more than one year.
### Viewing a quality profile
On the **Quality Profiles** page:
1. To view a specific language, select a language in **Filter by** at the top of the left-hand side list of quality profiles.
2. Select the quality profile you want to view. The quality profile is displayed as illustrated below.
The quality profile page includes the following sections:
1. **Inheritance**: shows the quality profile with its possible parent(s) and / or children. For each profile, the number of active, inactive, and overridden rules in the profile is shown. Select a number to view the corresponding list of rules.
2. **Projects**: shows the projects explicitly associated with the quality profile.
3. **Rule breakdown**: shows statistics about active and inactive rules contained in the quality profile. Select a statistic to view the corresponding rules.
If you have the Administer Quality Profiles permission, you will also see a **Permissions** section under the **Projects** section. The **Permissions** section shows the users and groups authorized to manage this quality profile.
### Comparing quality profiles
You can compare quality profiles of the same language.
To compare one profile with another:
1. In the SonarQube UI, retrieve one of the quality profiles you want to compare (quality-profile-1).
2. In the top right corner of the quality profile page, select the three-dot button, and select **Compare** in the menu. The comparison page opens.
3. In **Compare with**, select the profile to be compared to (quality-profile-2). The comparison results are displayed on the page as illustrated below. The left column corresponds to quality-profile-1 and the right column to quality-profile-2. In the comparison results, you can select a rule to inspect it.
In the example shown below, the comparison reveals the following differences between the two example profiles: **My ABAP profile** and **Sonar way**.
1. In part 1, the first column shows that **My ABAP profile** includes one rule that **Sonar way** excludes. In the second column shows that **My ABAP profile** excludes two rules that **Sonar way** includes.
2. In part 2, one rule has a different configuration in **My ABAP profile** that it does in the **Sonar way**.
### Viewing the overridden rules of a quality profile
A rule is considered overridden in a custom quality profile if this profile defines, for this rule, different configurable parameters than its parent quality profile.
To view the overridden rules of a quality profile:
1\. Retrieve the quality profile as described above. The number of overridden rules in the profile (if any) is shown in the **Inheritance** section.
2\. Select the **<*****X*****> overridden rules** hyperlink. The list of overridden rules is displayed.
3\. In the list, select a rule on the **Rules** page and navigate to the **Quality Profiles** section to **Change**, **Revert**, or **Deactivate** the rule completely.
### Viewing the change history of a quality profile
1. Retrieve the quality profile as described above.
2. In the top right corner of the profile page, select **See Changelog**. The profile change history opens and lists the different actions performed on rules in the quality profile:
* **Date**: action date.
* **User**: user who performed the action.
* **Action**: action type (the user activated, deactivated, or updated the rule).
* **Rule**: rule on which the action was performed.
* **Updates**:
* For an Updated action: describes the update.
* For an Activated action: shows the rule’s severity level.
### Viewing the projects associated with a quality profile
The **Projects** section of a quality profile shows the projects associated with the profile. See **Retrieving a quality profile** above.
### Viewing the quality profiles where a rule is active
To view the quality profiles where a given rule is active:
1. See [viewing-organizations](https://docs.sonarsource.com/sonarqube-cloud/getting-started/viewing-organizations "mention") to access your organization.
2. Go to the **Rules** page and retrieve the rule.
3. In the rule page, navigate to the bottom to the **Quality Profiles** section. The section lists all quality profiles where the rule is active.
### Related pages
* [understanding-quality-profiles](https://docs.sonarsource.com/sonarqube-cloud/standards/managing-quality-profiles/understanding-quality-profiles "mention")
* [creating-a-quality-profile](https://docs.sonarsource.com/sonarqube-cloud/standards/managing-quality-profiles/creating-a-quality-profile "mention")
* [editing-a-custom-quality-profile](https://docs.sonarsource.com/sonarqube-cloud/standards/managing-quality-profiles/editing-a-custom-quality-profile "mention")
* [associating-a-quality-profile-with-projects](https://docs.sonarsource.com/sonarqube-cloud/standards/managing-quality-profiles/associating-a-quality-profile-with-projects "mention")
* [changing-default-quality-profile](https://docs.sonarsource.com/sonarqube-cloud/standards/managing-quality-profiles/changing-default-quality-profile "mention")
* [maintaining-your-custom-quality-profiles](https://docs.sonarsource.com/sonarqube-cloud/standards/managing-quality-profiles/maintaining-your-custom-quality-profiles "mention")
* [authorizing-other-users-to-manage-quality-profile](https://docs.sonarsource.com/sonarqube-cloud/standards/managing-quality-profiles/authorizing-other-users-to-manage-quality-profile "mention")
* [quality-profile-association](https://docs.sonarsource.com/sonarqube-cloud/managing-your-projects/project-analysis/quality-profile-association "mention")
---
# Source: https://docs.sonarsource.com/sonarqube-server/10.7/user-guide/viewing-reports.md
# Source: https://docs.sonarsource.com/sonarqube-server/10.8/user-guide/viewing-reports.md
# Source: https://docs.sonarsource.com/sonarqube-server/2025.2/user-guide/viewing-reports.md
# Source: https://docs.sonarsource.com/sonarqube-server/2025.3/user-guide/viewing-reports.md
# Source: https://docs.sonarsource.com/sonarqube-server/2025.5/user-guide/viewing-reports.md
# Source: https://docs.sonarsource.com/sonarqube-server/2025.1/user-guide/viewing-reports.md
# Source: https://docs.sonarsource.com/sonarqube-server/2025.4/user-guide/viewing-reports.md
# Source: https://docs.sonarsource.com/sonarqube-server/2025.6/user-guide/viewing-reports.md
# Source: https://docs.sonarsource.com/sonarqube-server/user-guide/viewing-reports.md
# Viewing reports
{% content-ref url="viewing-reports/pdf-reports" %}
[pdf-reports](https://docs.sonarsource.com/sonarqube-server/user-guide/viewing-reports/pdf-reports)
{% endcontent-ref %}
{% content-ref url="viewing-reports/security-reports" %}
[security-reports](https://docs.sonarsource.com/sonarqube-server/user-guide/viewing-reports/security-reports)
{% endcontent-ref %}
{% content-ref url="viewing-reports/regulatory-reports" %}
[regulatory-reports](https://docs.sonarsource.com/sonarqube-server/user-guide/viewing-reports/regulatory-reports)
{% endcontent-ref %}
{% content-ref url="viewing-reports/portfolios" %}
[portfolios](https://docs.sonarsource.com/sonarqube-server/user-guide/viewing-reports/portfolios)
{% endcontent-ref %}
---
# Source: https://docs.sonarsource.com/sonarqube-cloud/administering-sonarcloud/managing-subscription/viewing-taxes-and-invoices.md
# Viewing taxes and invoices
### Getting monthly invoices
If you have a monthly subscription, you can download PDF invoices for every payment.
To view and manage invoices:
1. Retrieve your organization. See [viewing-organizations](https://docs.sonarsource.com/sonarqube-cloud/getting-started/viewing-organizations "mention") for more information.
2. Open the **Billing & Upgrade** tab.
3. In the **Billing and payment information** section, select **Edit**. The customer portal opens.
4. The **Invoice History** section shows the list of invoices for the organization.
5. To view an invoice, select it in the list. The invoice page opens.
6. To view more details, select **View invoice and payment details**.
7. To download the invoice, select **Download invoice**.
8. To download the receipt, select **Download receipt**.
### Viewing the indirect taxes
Depending on where your business is located, you may be charged taxes in addition to your subscription fee. Tax rates are calculated based on the tax laws where you live. SonarQube Cloud determines where you live based on the country, state/county, street number, and ZIP Code that you provided when you purchased your subscription.
{% hint style="info" %}
* The tax amounts can change over time with local tax requirements.
* If your company has moved, change your billing details accordingly. We will calculate and charge you the appropriate rate for your new company address. See [updating-billing-payment-details](https://docs.sonarsource.com/sonarqube-cloud/administering-sonarcloud/managing-subscription/updating-billing-payment-details "mention") for more information.
{% endhint %}
To view the details of what you’re being charged (indirect taxes), look at your invoices: see above.
### Related pages
* [subscription-plans](https://docs.sonarsource.com/sonarqube-cloud/administering-sonarcloud/managing-subscription/subscription-plans "mention")
* [billing-model](https://docs.sonarsource.com/sonarqube-cloud/administering-sonarcloud/managing-subscription/billing-model "mention")
* [signing-up-for-plan](https://docs.sonarsource.com/sonarqube-cloud/administering-sonarcloud/managing-subscription/signing-up-for-plan "mention")
* [changing-plan](https://docs.sonarsource.com/sonarqube-cloud/administering-sonarcloud/managing-subscription/changing-plan "mention")
* [updating-billing-payment-details](https://docs.sonarsource.com/sonarqube-cloud/administering-sonarcloud/managing-subscription/updating-billing-payment-details "mention")
* [viewing-billing-and-usage](https://docs.sonarsource.com/sonarqube-cloud/administering-sonarcloud/managing-subscription/viewing-billing-and-usage "mention")
---
# Source: https://docs.sonarsource.com/sonarqube-community-build/user-guide/managing-your-account/viewing-user-profile.md
# Source: https://docs.sonarsource.com/sonarqube-server/10.7/user-guide/managing-your-account/viewing-user-profile.md
# Source: https://docs.sonarsource.com/sonarqube-server/10.8/user-guide/managing-your-account/viewing-user-profile.md
# Source: https://docs.sonarsource.com/sonarqube-server/2025.2/user-guide/managing-your-account/viewing-user-profile.md
# Source: https://docs.sonarsource.com/sonarqube-server/2025.3/user-guide/managing-your-account/viewing-user-profile.md
# Source: https://docs.sonarsource.com/sonarqube-server/2025.5/user-guide/managing-your-account/viewing-user-profile.md
# Source: https://docs.sonarsource.com/sonarqube-server/2025.1/user-guide/managing-your-account/viewing-user-profile.md
# Source: https://docs.sonarsource.com/sonarqube-server/2025.4/user-guide/managing-your-account/viewing-user-profile.md
# Source: https://docs.sonarsource.com/sonarqube-server/2025.6/user-guide/managing-your-account/viewing-user-profile.md
# Source: https://docs.sonarsource.com/sonarqube-server/user-guide/managing-your-account/viewing-user-profile.md
# Viewing your user profile
To view your user profile:
1. Select your account menu in the top right corner of the SonarQube Server interface.
2. In the menu, select **My Account**. The **Profile** tab opens.
---
# Source: https://docs.sonarsource.com/sonarqube-community-build/instance-administration/user-management/viewing-users.md
# Source: https://docs.sonarsource.com/sonarqube-server/10.7/instance-administration/user-management/viewing-users.md
# Source: https://docs.sonarsource.com/sonarqube-server/10.8/instance-administration/user-management/viewing-users.md
# Source: https://docs.sonarsource.com/sonarqube-server/2025.2/instance-administration/user-management/viewing-users.md
# Source: https://docs.sonarsource.com/sonarqube-server/2025.3/instance-administration/user-management/viewing-users.md
# Source: https://docs.sonarsource.com/sonarqube-server/2025.5/instance-administration/user-management/viewing-users.md
# Source: https://docs.sonarsource.com/sonarqube-server/2025.1/instance-administration/user-management/viewing-users.md
# Source: https://docs.sonarsource.com/sonarqube-server/2025.4/instance-administration/user-management/viewing-users.md
# Source: https://docs.sonarsource.com/sonarqube-server/2025.6/instance-administration/user-management/viewing-users.md
# Source: https://docs.sonarsource.com/sonarqube-server/instance-administration/user-management/viewing-users.md
# Viewing user accounts
To retrieve and view the user accounts existing in your SonarQube Server:
1. In the top navigation bar, go to **Administration > Security > Users**. The **Users** page opens.
2. Use the filter bar to filter the list of users.
{% hint style="info" %}
If the automatic provisioning mode is used in your system, the users are organized in two different tabs on the **Users** page:
* The **From \** tab (where \ is the provider with which auto-provisioning is configured in SonarQube Server, e.g., GitHub or GitLab) contains the auto-provisioned user accounts.
* The **Local** tab contains all other users (called local users in SonarQube Server). For more information, see [#local-user-concept](https://docs.sonarsource.com/sonarqube-server/authentication/overview#local-user-concept "mention").
{% endhint %}
### Related pages
* [user-groups](https://docs.sonarsource.com/sonarqube-server/instance-administration/user-management/user-groups "mention")
* [user-permissions](https://docs.sonarsource.com/sonarqube-server/instance-administration/user-management/user-permissions "mention")
* [updating-scm-details](https://docs.sonarsource.com/sonarqube-server/instance-administration/user-management/updating-scm-details "mention")
* [creating-users](https://docs.sonarsource.com/sonarqube-server/instance-administration/user-management/creating-users "mention")
* [deactivating-users](https://docs.sonarsource.com/sonarqube-server/instance-administration/user-management/deactivating-users "mention")
* [changing-user-password](https://docs.sonarsource.com/sonarqube-server/instance-administration/user-management/changing-user-password "mention")
---
# Source: https://docs.sonarsource.com/sonarqube-server/8.9/user-guide/visualizations.md
# Visualizations
Visualizations are available to help you gain deeper insights into your projects’ current statuses and histories.
### How do I compare current state for multiple projects or project components?
The projects space allows you to filter the projects in your instance by multiple, measure-based criteria. Once you’ve chosen your set, you don’t have to stare at the raw numbers to identify the risks its projects face. Instead, several visualizations (**Projects** > **Perspective**) are available to help you understand each project’s relative position in terms of each of the major axes:
* Risk: reliability and security ratings, test coverage, technical debt, and lines of code.
* Reliability: reliability rating, reliability remediation effort, lines of code, and bug count.
* Security: security rating, security remediation effort, lines of code, and vulnerability count.
* Maintainability: maintainability rating, technical debt, lines of code, and code smell count.
* Coverage: coverage, complexity, and uncovered lines.
* Duplications: duplicated lines %, lines of code, and duplicated blocks.
* At the project level, these same visualizations are available in the measures tab to help you compare project components. The project overview corresponds to the risk visualization in the projects space, For the other five graphs, choose the overview option under the relevant domain.
Additionally, treemaps are also available for percentage and rating metrics at the project level. Navigate to them in the **Measures** tab using the perspective selector in the right pane.
### How to visualize metric history
At the project level, the activity tab offers several canned line graphs of selected metrics across time, with convenient mouseovers to show graph details and the ability to easily narrow the graph to a slice of the project’s history. Beyond the canned graphs, you also have the ability to map the metrics of your choice against each other in a custom graph.
---
# Source: https://docs.sonarsource.com/sonarqube-community-build/extension-guide/web-api.md
# Source: https://docs.sonarsource.com/sonarqube-server/8.9/extension-guide/web-api.md
# Source: https://docs.sonarsource.com/sonarqube-server/9.8/extension-guide/web-api.md
# Source: https://docs.sonarsource.com/sonarqube-server/9.9/extension-guide/web-api.md
# Source: https://docs.sonarsource.com/sonarqube-server/10.0/extension-guide/web-api.md
# Source: https://docs.sonarsource.com/sonarqube-server/10.1/extension-guide/web-api.md
# Source: https://docs.sonarsource.com/sonarqube-server/10.2/extension-guide/web-api.md
# Source: https://docs.sonarsource.com/sonarqube-server/10.3/extension-guide/web-api.md
# Source: https://docs.sonarsource.com/sonarqube-server/10.4/extension-guide/web-api.md
# Source: https://docs.sonarsource.com/sonarqube-server/10.5/extension-guide/web-api.md
# Source: https://docs.sonarsource.com/sonarqube-server/10.6/extension-guide/web-api.md
# Source: https://docs.sonarsource.com/sonarqube-server/10.7/extension-guide/web-api.md
# Source: https://docs.sonarsource.com/sonarqube-server/10.8/extension-guide/web-api.md
# Source: https://docs.sonarsource.com/sonarqube-server/2025.2/extension-guide/web-api.md
# Source: https://docs.sonarsource.com/sonarqube-server/2025.3/extension-guide/web-api.md
# Source: https://docs.sonarsource.com/sonarqube-server/2025.5/extension-guide/web-api.md
# Source: https://docs.sonarsource.com/sonarqube-server/2025.1/extension-guide/web-api.md
# Source: https://docs.sonarsource.com/sonarqube-server/2025.4/extension-guide/web-api.md
# Source: https://docs.sonarsource.com/sonarqube-server/2025.6/extension-guide/web-api.md
# Source: https://docs.sonarsource.com/sonarqube-server/extension-guide/web-api.md
# Source: https://docs.sonarsource.com/sonarqube-cloud/advanced-setup/web-api.md
# Web API
SonarQube Cloud provides a web API to access its functionalities from applications.
The web services composing the web API are documented within SonarQube Cloud, through the URL . You can also access the web API documentation from the top bar in Cloud by selecting the help button:
### Authenticating to the Web API
Administrative web services are secured and require the user to have specific permissions.
To authenticate to the Web API, we recommend that you use the [bearer authentication scheme](https://swagger.io/docs/specification/v3_0/authentication/bearer-authentication/). With this scheme, a SonarQube Cloud token is used:
* The token is generated in SonarQube Cloud UI. See [managing-tokens](https://docs.sonarsource.com/sonarqube-cloud/managing-your-account/managing-tokens "mention").
* The token is provided through the `Authorization: Bearer ` header. See [#sample-api-request](#sample-api-request "mention") below.
### Sending an API request
To make a request, you need to find the HTTP method and the right path for the operation that you want to use.
{% hint style="warning" %}
It’s highly recommended to use form data parameters when making POST requests to the Web API. If you use URI query parameters instead then these parameters won’t be securely passed to the endpoint.
{% endhint %}
#### Content-Type header
Unless the Sonar Web API endpoint specifications list a specific `Content-Type` value, your request should use the following `Content-Type` header:
`Content-Type: application/x-www-form-urlencoded`
This is the default `Content-Type` value set by most tools and libraries, such as `curl` and Python’s `requests` module, but you should check their documentation for proper usage.
#### Sample API request
If, for example, you want to use the Web API to extract measures, you can make a "GET MEASURES" call to the SonarQube Cloud [`/api/measures`](https://sonarcloud.io/web_api/api/measures?deprecated=false) endpoint in order to extract measures of a given metric for a given project. For this example, a possible request and response are shown below.
Sample request
```bash
curl --request GET \
--url 'https://sonarcloud.io/api/measures/component?metricKeys=ncloc%2Ccode_smells%2Ccomplexity&component=my_project_key' \
--header 'Authorization: Bearer my_token'
```
Sample response
```bash
{
"component": {
"id": "id",
"key": "my_project_key",
"name": "my_project_name",
"qualifier": "TRK",
"measures": [
{
"metric": "complexity",
"value": "4214"
},
{
"metric": "code_smells",
"value": "8595",
"bestValue": false
},
{
"metric": "ncloc",
"value": "51667"
}
]
}
}
```
### Taking into account the API rate limiting
Some of SonarQube Cloud’s APIs are rate-limited in order to ensure that we can continue to deliver the service smoothly and with optimum performance. In most cases, you should take this into account when automating tasks and processes by using the SonarQube Cloud Web API.
Your API calls will fail with a 429 status code when the rate limit has been reached. If this happens, wait a few minutes before retrying the operation.
---
# Source: https://docs.sonarsource.com/sonarqube-community-build/project-administration/webhooks.md
# Source: https://docs.sonarsource.com/sonarqube-server/8.9/project-administration/webhooks.md
# Source: https://docs.sonarsource.com/sonarqube-server/9.8/project-administration/webhooks.md
# Source: https://docs.sonarsource.com/sonarqube-server/9.9/project-administration/webhooks.md
# Source: https://docs.sonarsource.com/sonarqube-server/10.0/project-administration/webhooks.md
# Source: https://docs.sonarsource.com/sonarqube-server/10.1/project-administration/webhooks.md
# Source: https://docs.sonarsource.com/sonarqube-server/10.2/project-administration/webhooks.md
# Source: https://docs.sonarsource.com/sonarqube-server/10.3/project-administration/webhooks.md
# Source: https://docs.sonarsource.com/sonarqube-server/10.4/project-administration/webhooks.md
# Source: https://docs.sonarsource.com/sonarqube-server/10.5/project-administration/webhooks.md
# Source: https://docs.sonarsource.com/sonarqube-server/10.6/project-administration/webhooks.md
# Source: https://docs.sonarsource.com/sonarqube-server/10.7/project-administration/webhooks.md
# Source: https://docs.sonarsource.com/sonarqube-server/10.8/project-administration/webhooks.md
# Source: https://docs.sonarsource.com/sonarqube-server/2025.2/project-administration/webhooks.md
# Source: https://docs.sonarsource.com/sonarqube-server/2025.3/project-administration/webhooks.md
# Source: https://docs.sonarsource.com/sonarqube-server/2025.5/project-administration/webhooks.md
# Source: https://docs.sonarsource.com/sonarqube-server/2025.1/project-administration/webhooks.md
# Source: https://docs.sonarsource.com/sonarqube-server/2025.4/project-administration/webhooks.md
# Source: https://docs.sonarsource.com/sonarqube-server/2025.6/project-administration/webhooks.md
# Source: https://docs.sonarsource.com/sonarqube-server/project-administration/webhooks.md
# Source: https://docs.sonarsource.com/sonarqube-cloud/advanced-setup/webhooks.md
# Webhooks
*This feature is only available in the Team and Enterprise plans. See* [subscription-plans](https://docs.sonarsource.com/sonarqube-cloud/administering-sonarcloud/managing-subscription/subscription-plans "mention") *for more information.*
### Introduction to webhooks
Webhooks notify external services when:
* A project analysis is complete.\
This is done regardless of the status of the background task or of the quality gate.
* An issue type, severity, or status is updated, and this update changes the quality gate status.\
For example:
* A user marks an issue as False Positive and the quality gate status turns green.
* The severity of an issue is increased and the quality gate status turns red.
An HTTP(S) call including a JSON payload is sent to each configured URL. URLs may be specified at both the project and global levels. The project-level specification does not replace global-level webhooks. All hooks at both levels are called.
#### HTTP(S) call
The HTTP(S) call:
* Has an HTTP header `X-SonarQube-Project` with the project key to allow quick identification of the project involved.
* Includes a JSON document as payload, using the POST method. See below.
* Has a content type of `application/json`, with UTF-8 encoding.
#### Payload
The payload is a JSON document that includes:
* `analysedAt`: when the analysis was performed.
* `project`: the identification of the project analyzed.
* `qualityGate`: each quality gate criterion checked and its status.
* `qualityGate.status`: the quality gate status of the analysis.
* `status` and `taskID`: the status and the identifier of the background task.
* `properties`: user-specified properties.
{% hint style="info" %}
You can define project parameters to be added to the payload.
{% endhint %}
Payload example
```json
{
"serverUrl": "",
"taskId": "AVh21JS2JepAEhwQ-b3u",
"status": "SUCCESS",
"analysedAt": "2016-11-18T10:46:28+0100",
"revision": "c739069ec7105e01303e8b3065a81141aad9f129",
"project": {
"key": "myProject",
"name": "My Project",
"url": "https://mycompany.com/sonarqube/project/overview?id=myproject"
},
"properties": {
},
"qualityGate": {
"conditions": [
{
"errorThreshold": "1",
"metric": "new_security_rating",
"onLeakPeriod": true,
"operator": "GREATER_THAN",
"status": "OK",
"value": "1"
},
{
"errorThreshold": "1",
"metric": "new_reliability_rating",
"onLeakPeriod": true,
"operator": "GREATER_THAN",
"status": "OK",
"value": "1"
},
{
"errorThreshold": "1",
"metric": "new_maintainability_rating",
"onLeakPeriod": true,
"operator": "GREATER_THAN",
"status": "OK",
"value": "1"
},
{
"errorThreshold": "80",
"metric": "new_coverage",
"onLeakPeriod": true,
"operator": "LESS_THAN",
"status": "NO_VALUE"
}
],
"name": "SonarQube way",
"status": "OK"
}
}
```
#### Webhook protection with HMAC
SonarQube can generate an HMAC to allow the third party service to verify the integrity and authenticity of the webhook they receive. To do so, it uses the HMAC-SHA256 algorithm and the secret stored in the webhook configuration.
### Configuring webhooks
This paragraph explains how to configure webhooks in the UI. You can also use the [Web API](https://sonarcloud.io/web_api/api/webhooks).
You can configure up to 10 webhooks at the project level and at the organization level. If configured, all 20 webhooks will be executed.
#### Configuring webhooks for your project
You must be a project admin.
Proceed as follows:
1. [retrieving-projects](https://docs.sonarsource.com/sonarqube-cloud/managing-your-projects/retrieving-projects "mention").
2. Go to **Administration** > **Webhooks**.
3. Select **Create**. The **Create Webhook** dialog is displayed.
4. Enter the webhook name.
5. Enter the URL to which the webhook is to be delivered.
6. Enter a secret if you want to protect the webhook with HMAC. See **Securing your webhooks** below.
7. To update or delete a webhook, select the corresponding command in the three-dot menu at the far right of the webhook row.
#### Configuring webhooks for your organization
You must be an organization admin.
Proceed as follows:
1. [viewing-organizations](https://docs.sonarsource.com/sonarqube-cloud/getting-started/viewing-organizations "mention").
2. Go to **Administration** > **Configuration** > **Webhooks**.
3. Select **Create**. The **Create Webhook** dialog is displayed.
4. Enter the webhook name.
5. Enter the URL to which the webhook is to be delivered. You can provide user/password in the URL as described in **Securing your webhooks** below.
6. Enter a secret if you want to protect the webhook with HMAC. See **Securing your webhooks** below.
7. To update or delete a webhook, select the corresponding command in the three-dot menu at the far right of the webhook row.
#### Testing the webhooks
It’s important that you test your configured webhooks. To do so, you can use various webhook testing/debugging tools.
### Monitoring the webhook delivery
You can monitor the delivery of your webhooks configured at the project or organization level in the SonarQube UI. You can also use the [Web API](https://sonarcloud.io/web_api/api/webhooks) to retrieve the webhook deliveries.
Each webhook’s delivery status is indicated. A delivery is marked as failed if the URL doesn’t respond within 10 seconds. Response records are purged after 30 days.
{% hint style="info" %}
SonarQube Cloud doesn’t retry to deliver failed webhook deliveries. You may use the Web API to implement an automatic redelivering mechanism.
{% endhint %}
{% hint style="info" %}
If you downgraded your organization to the Free plan, existing webhooks are still visible on the UI but won’t be invoked by SonarQube Cloud. If you upgrade your organization, you regain access to them.
{% endhint %}
#### Monitoring your project’s webhooks
You must be a project admin.
Proceed as follows:
1. Retrieve your project (see the[retrieving-projects](https://docs.sonarsource.com/sonarqube-cloud/managing-your-projects/retrieving-projects "mention") page for instructions).
2. Go to **Administration** > **Webhooks**. The page shows the result and timestamp of each webhook’s most recent delivery.
3. To view the payload of the last delivery, select the three-dot menu at the far right of the webhook row.
4. To view the results and payloads of earlier deliveries, select the three-dot menu at the far right of the webhook row.
#### Monitoring your organization’s webhooks
You must be an organization admin.
Proceed as follows:
1. Retrieve your organization ( see the [viewing-organizations](https://docs.sonarsource.com/sonarqube-cloud/getting-started/viewing-organizations "mention") page for instructions).
2. Go to **Administration** > **Configuration** > **Webhooks**. The page shows the result and timestamp of each webhook’s most recent delivery.
3. To view the payload of the last delivery, select the three-dot menu at the far right of the webhook row.
4. To view the results and payloads of earlier deliveries, select the three-dot menu at the far right of the webhook row.
### Securing webhooks
After you’ve configured your server to receive payloads, you want to be sure that the payloads you receive are initiated by SonarQube Cloud and not by attackers. You can do this by validating a hash signature that ensures that requests originate from SonarQube Cloud.
{% hint style="info" %}
A basic authentication mechanism is supported by providing user/password in the URL of the Webhook such as `https://myLogin:myPassword@my_server/foo`.
{% endhint %}
#### Setting your secret
To set your secret in SonarQube Cloud:
1. From the project or organization where you’re securing your webhooks, navigate to the webhooks settings at **Administration** > **Webhooks**
2. You can either select **Create** to create a new webhook or click an existing webhook’s settings drop-down and select **Update**.
3. Enter a random string in the **Secret** text box. This is used as the key to generate the HMAC hex digest value in the `X-Sonar-Webhook-HMAC-SHA256` header.
4. Select **Update**.
#### Validating the received payload
After setting your secret, it’s used by SonarQube Cloud to create a hash signature with each payload that’s passed using the `X-Sonar-Webhook-HMAC-SHA256` HTTP header. The header value needs to match the signature you are expecting to receive. SonarQube Cloud uses a HMAC lower-case SHA256 digest to compute the signature of the request body. Below is some sample Java code for your server. In this example, we are using the lib from [apache commons-codec HmacUtils class](https://commons.apache.org/proper/commons-codec/apidocs/org/apache/commons/codec/digest/HmacUtils.html).
```java
private static boolean isValidSignature(YourHttpRequest request) {
String receivedSignature = request.getHeader("X-Sonar-Webhook-HMAC-SHA256");
// See Apache commons-codec
String expectedSignature = new HmacUtils(HmacAlgorithms.HMAC_SHA_256, "your_secret").hmacHex(request.getBody())
return Objects.equals(expectedSignature, receivedSignature);
}
```
If the signatures don’t match, then the payload should be ignored.
### Adding parameters to the webhook payload
If you provide additional properties to your SonarScanner using the pattern `sonar.analysis.*`, these properties will be automatically added to the section `"properties"` of the payload.
For example these additional parameters:
```properties
sonar-scanner -Dsonar.analysis.buildNumber=12345
```
would add this to the payload:
```properties
"properties": {
"sonar.analysis.buildNumber": "12345"
}
```
---
# Source: https://docs.sonarsource.com/sonarqube-cloud/discovering-sonarcloud/what-sonarcloud-can-do.md
# What SonarQube Cloud can do
SonarQube Cloud’s code review and analysis is designed to help you achieve a state of high-quality code, that is, code with attributes that contribute to making your software reliable, maintainable, and secure.
To do this, SonarQube Cloud identifies both *issues* and *security hotspots* in your code.
Explore [featured public projects](https://sonarcloud.io/explore/projects) on SonarQube Cloud and experience how other organizations leverage the platform to improve their code.
### Issues
In SonarQube Cloud terminology, an issue is a problem in your code that requires fixing. When scanning for issues, the automated code review algorithms are purposely conservative. They are designed to minimize the number of false positives, that is, things wrongly identified as problems. If the code analysis identifies an issue, you can be quite confident that it really is something that should be fixed. SonarQube Cloud will not overwhelm the developer with false alarms concerning issues.
For details, see the Issues [introduction](https://docs.sonarsource.com/sonarqube-cloud/managing-your-projects/issues/introduction "mention") page.
### Security hotspots
Security hotspots are areas of the code that may cause security issues and therefore need to be reviewed. By design, automated code review is more permissive when identifying security hotspots than when identifying vulnerabilities and other issues. An issue is almost always a real problem, while a security hotspot can often be a false alarm (but it is still worth checking). By separating hotspots from issues, SonarQube Cloud maintains the accuracy of its issue detection while still providing developers with useful warnings under the less stringent criteria of the hotspot
### Where SonarQube Cloud fits In
SonarQube Cloud is designed to be integrated into your CI/CD workflow in order to intervene early when coding, allowing you to remediate fresh issues rapidly and prevent them from reaching production. It does so in three different places: In the IDE, in the pull request, and in the codebase.
#### In the IDE
SonarQube Cloud’s companion product, [connected-mode](https://docs.sonarsource.com/sonarqube-cloud/improving/connected-mode "mention"), provides developers with immediate feedback through its automated code review, right in the IDE, catching issues before they even get to the repository. SonarQube for IDE is the first line of defense to find and fix issues in real time, ensuring the quality of the code and enhancing productivity.
Supporting 25 languages and the most popular IDEs, SonarQube for IDE leverages over 5,000 language-specific rules to instantly highlight common coding mistakes and vulnerabilities. In parallel, SonarQube for IDE provides rich contextual educational guidance to help developers improve their skills while resolving the issue.
Sonar’s IDE extensions are available for IntelliJ (and other JetBrains IDEs including IntelliJ IDEA, CLion, WebStorm, PHPStorm, PyCharm, Rider, Android Studio & RubyMine), Visual Studio, VS Code, and Eclipse, and can be installed directly from your IDE’s plugin marketplace.
Much like a spellchecker, automated code review in SonarQube for IDE highlights problems in your code using error squiggles, provides quick fixes, and gives you detailed information about issues found in your code.
In Connected Mode, SonarQube for IDE becomes part of the full SonarQube solution that integrates code review and analysis throughout your development process from IDE to CI pipeline to DevOps platform, helping to make sure that only high-quality code makes it into your project. For more information, see the Connected Mode pages in the SonarQube for IDE docs:
* [Connected mode](https://docs.sonarsource.com/sonarqube-for-intellij/connect-your-ide/connected-mode) - SonarQube for IntelliJ
* [Connected mode](https://docs.sonarsource.com/sonarqube-for-visual-studio/connect-your-ide/connected-mode) - SonarQube for Visual Studio
* [Connected mode](https://docs.sonarsource.com/sonarqube-for-vs-code/connect-your-ide/connected-mode) - SonarQube for VS Code
* [Connected mode](https://docs.sonarsource.com/sonarqube-for-eclipse/connect-your-ide/connected-mode) - SonarQube for Eclipse
#### In the pull request
Pull requests (on some platforms, called "merge requests") are a mechanism to allow developers to collaborate more effectively. They enable a developer to ask others to review their work (usually their *personal feature branch*) prior to it being merged into the main body of the code, or *main branch*. In the DevOps platform, the pull request is displayed in a dedicated interface that allows the reviewer to see the changes proposed and to either approve or deny the merge.
SonarQube Cloud annotates the pull requst interface of the repository service, providing the results of its code review and analysis on the pull request branch right in the interface and granting or denying approval of the pull request depending on quality gate criteria. In effect, this augments human code review with automatic code review. This feature is often called pull request decoration because it "decorates" the pull request interface with additional information.
#### In the codebase
Code review and analysis at the IDE and pull request level helps to identify problems before they are merged into the main codebase. However, there are some types of issues and hotspots that can only be found after the code is merged. To find these types of problems, SonarQube Cloud needs to analyze the entire codebase as a single unit and (in the case of some languages) also analyze the results of compiling the code. To do this, SonarQube Cloud offers two approaches: *automatic analysis* and *CI-based analysis*.
### Automatic analysis
With automatic analysis, SonarQube Cloud detects every change to your pull requests or main branch and analyzes the new state of the code in your repository. It uses the same set of analysis methods as CI-based analysis (see below) but it is subject to the following restrictions:
* It only works with GitHub (as of today).
* It does not work on repositories that were imported as monorepos into SonarQube Cloud.
* It does not work on all SonarQube Cloud supported languages.
However, if you are using GitHub and the project you imported is in a language that is supported by automatic analysis, then no configuration is needed for analysis to occur so you can start improving your code quality right away. For details, see the [automatic-analysis](https://docs.sonarsource.com/sonarqube-cloud/advanced-setup/automatic-analysis "mention") page.
Because automatic analysis does not work with providers other than GitHub or with certain compiled languages, there are many cases where you will need to configure CI-based analysis instead.
### CI-based analysis
A CI-based analysis refers to the configuration of SonarQube Cloud so that it performs code review and analysis as part of your regular continuous integration (CI) process, in other words, your build process.
To enable CI-based analysis you have to install and configure a piece of software called a *scanner*. SonarQube Cloud offers scanner extensions and integrations for all of the leading *continuous integration* (CI) systems used today.
Typically, the scanner is configured to run as part of your continuous integration pipeline so that whenever you push changes to your repository, the scanner is invoked and performs a scan on the code.
The details of how SonarQube Cloud is integrated with your CI/CD process depend on which build tools and the continuous integration system you use. SonarQube Cloud provides custom integrations for the following:
* GitHub Actions
* Bitbucket Pipelines
* Azure Pipelines
* make
* npm
* Maven
* Gradle
* .NET
* Jenkins
* TravisCI
* CircleCI
Additionally, SonarQube Cloud also offers a stand-alone command-line tool (called SonarScanner) that you can install and integrate into your build process manually. For an overview on the SonarScanner, see the [overview-of-integrated-cis](https://docs.sonarsource.com/sonarqube-cloud/advanced-setup/ci-based-analysis/overview-of-integrated-cis "mention") page.
The results of the scan are sent automatically to SonarQube Cloud where they are processed and made available in the dashboard, that is, the SonarQube Cloud interface itself. There you will find all the results of all code analyzed in your repositories. You can sort and filter the results according to a wide range of criteria in order to get a clear picture of the state of your code.
Additionally, the outcome of the SonarQube Cloud analysis (in both automatic and CI-based analyses) can be used to control subsequent build actions such as automatic deployment, etc.
---
# Source: https://docs.sonarsource.com/sonarqube-for-vs-code/ai-capabilities/ides/windsurf.md
# SonarQube for VS Code in Windsurf
### Installation
The SonarQube for VS Code extension can easily be installed in Windsurf during the Set up process, via the [Open VSX registry](https://open-vsx.org/extension/SonarSource/sonarlint-vscode), or by using Windsurf’s migration tool: Open your Windsurf command palette and type: `>Import VS Code`. See the [Welcome to Windsurf](https://docs.windsurf.com/windsurf/getting-started) page for details.
Because Windsurf references a mirror of Open VSX as a marketplace, installing a new instance of the SonarQube for VS Code extension is easy:
1. Open the **Extensions** view by pressing `Ctrl + Shift + X` (or `Cmd + Shift + X` on Mac).
2. Search for `sonarqube`.
3. Finish the installation by choosing **SonarQube for IDE** and selecting the **Install** button
Once installed, we recommended using [connected mode](https://docs.sonarsource.com/sonarqube-for-vs-code/connect-your-ide/setup) and setting up the [#sonarqube-mcp-server](#sonarqube-mcp-server "mention") with SonarQube Server or SonarQube Cloud to strengthen your AI integration with SonarQube.
#### Migrate extensions from VS Code
Windsurf provides a workflow to [import your configuration from VS Code](https://docs.windsurf.com/windsurf/getting-started#forgot-to-import-vs-code-configurations).
If you were using connected mode or the [#sonarqube-mcp-server](#sonarqube-mcp-server "mention"), your SonarQube token will not be migrated but you will be prompted to reauthenticate any connections you created in VS Code.
{% hint style="info" %}
Windsurf subscribers on their Team & Enterprise plans should add the SonarQube MCP Server to the list of allowed servers. Please see the Windsurf documentation about [Admin Controls](https://docs.windsurf.com/plugins/cascade/mcp#admin-controls-teams-&-enterprises).
{% endhint %}
### Cascade Hooks
Windsurf allows you to run deterministic scripts that are executed after specific events. SonarQube for VS Code provides a hook script that tells Windsurf to run an analysis after any generation of new code in your project. Issues will be reported in your **SonarQube** panel. See option 4 in the [#finding-issues](https://docs.sonarsource.com/sonarqube-for-vs-code/using/investigating-issues#finding-issues "mention") article.
To install this Cascade Hook, go to **SonarQube Setup** > **AI Agents Configuration** and select **Install Hook for Code Analysis**. You will receive a confirmation notification that the script was installed successfully.
### SonarQube MCP Server
The SonarQube MCP Server is a Model Context Protocol (MCP) server that runs locally and enables a seamless connection between your AI agents and your SonarQube platform. The tools are designed to bridge the divide between productivity and quality. Please see the full details in the [SonarQube MCP Server](https://app.gitbook.com/o/2ibCvzwZt86Nlk2zloB7/s/xNksbUaDXyfRoTpHP0vQ/ "mention") documentation.
See the [Quickstart guide #Setup in Windsurf](https://app.gitbook.com/s/xNksbUaDXyfRoTpHP0vQ/quickstart-guide#setup-in-windsurf "mention") instructions in our SonarQube MCP Server documentation for full details.
#### Setup the SonarQube MCP Server
When you're using an AI-enabled IDE such as Cursor, Windsurf, or VS Code with Copilot enabled, and have already completed your [setup](https://docs.sonarsource.com/sonarqube-for-vs-code/connect-your-ide/setup "mention") in SonarQube for IDE with SonarQube Server or SonarQube Cloud, a quick select button is available.
* Select the icon, **Configure MCP Server** from the **CONNECTED MODE** view window to use your connected mode credentials to start using the SonarQube MCP Server. The same workflow is available in the **AI AGENTS CONFIGURATION** view.
If you prefer to set up your MCP server manually, a detailed quickstart guide is available for [Quickstart guide #Setup in Windsurf](https://app.gitbook.com/s/xNksbUaDXyfRoTpHP0vQ/quickstart-guide#setup-in-windsurf "mention"). More information about the available tools can be found in the SonarQube MCP Server documentation, on the [Tools](https://app.gitbook.com/s/xNksbUaDXyfRoTpHP0vQ/tools "mention") page.
#### Configure your AI agent
The **AI AGENTS CONFIGURATION** view is only available when running an AI-enabled agent and offers two tools to help your AI agent engage with SonarQube (Server, Cloud).
* Select **Configure SonarQube MCP Server** to use your connected mode credentials to install the SonarQube MCP Server. You will be prompted to complete your [setup](https://docs.sonarsource.com/sonarqube-for-vs-code/connect-your-ide/setup "mention") if none exists.
* Available in Cursor, Kiro, and Windsurf: Select **Introduce SonarQube Rules File** to create explicit instructions for your AI-powered IDE to produce secure, reliable, and maintainable code.
* The file provides SonarQube MCP Server instructions to your AI agent. As an example, it instructs the agent to disable SonarQube automatic analysis before starting code generation, and to enable it after the generation is complete. It also asks the agent to analyze changed files in batches, once the changes are done.
### Related pages
* [ai-codefix](https://docs.sonarsource.com/sonarqube-for-vs-code/ai-capabilities/ai-codefix "mention")
* SonarQube and [agents](https://docs.sonarsource.com/sonarqube-for-vs-code/ai-capabilities/agents "mention") in your IDE
* Getting started with other [ides](https://docs.sonarsource.com/sonarqube-for-vs-code/getting-started/ides "mention")
* [setup](https://docs.sonarsource.com/sonarqube-for-vs-code/connect-your-ide/setup "mention")
---
# Source: https://docs.sonarsource.com/sonarqube-cloud/managing-your-projects/issues/with-ai-features.md
# With AI features
{% content-ref url="with-ai-features/agents-in-your-github-pull-request" %}
[agents-in-your-github-pull-request](https://docs.sonarsource.com/sonarqube-cloud/managing-your-projects/issues/with-ai-features/agents-in-your-github-pull-request)
{% endcontent-ref %}
---
# Source: https://docs.sonarsource.com/sonarqube-community-build/analyzing-source-code/languages/xml.md
# Source: https://docs.sonarsource.com/sonarqube-server/8.9/analyzing-source-code/languages/xml.md
# Source: https://docs.sonarsource.com/sonarqube-server/9.8/analyzing-source-code/languages/xml.md
# Source: https://docs.sonarsource.com/sonarqube-server/9.9/analyzing-source-code/languages/xml.md
# Source: https://docs.sonarsource.com/sonarqube-server/10.0/analyzing-source-code/languages/xml.md
# Source: https://docs.sonarsource.com/sonarqube-server/10.1/analyzing-source-code/languages/xml.md
# Source: https://docs.sonarsource.com/sonarqube-server/10.2/analyzing-source-code/languages/xml.md
# Source: https://docs.sonarsource.com/sonarqube-server/10.3/analyzing-source-code/languages/xml.md
# Source: https://docs.sonarsource.com/sonarqube-server/10.4/analyzing-source-code/languages/xml.md
# Source: https://docs.sonarsource.com/sonarqube-server/10.5/analyzing-source-code/languages/xml.md
# Source: https://docs.sonarsource.com/sonarqube-server/10.6/analyzing-source-code/languages/xml.md
# Source: https://docs.sonarsource.com/sonarqube-server/10.7/analyzing-source-code/languages/xml.md
# Source: https://docs.sonarsource.com/sonarqube-server/10.8/analyzing-source-code/languages/xml.md
# Source: https://docs.sonarsource.com/sonarqube-server/2025.2/analyzing-source-code/languages/xml.md
# Source: https://docs.sonarsource.com/sonarqube-server/2025.3/analyzing-source-code/languages/xml.md
# Source: https://docs.sonarsource.com/sonarqube-server/2025.5/analyzing-source-code/languages/xml.md
# Source: https://docs.sonarsource.com/sonarqube-server/2025.1/analyzing-source-code/languages/xml.md
# Source: https://docs.sonarsource.com/sonarqube-server/2025.4/analyzing-source-code/languages/xml.md
# Source: https://docs.sonarsource.com/sonarqube-server/2025.6/analyzing-source-code/languages/xml.md
# Source: https://docs.sonarsource.com/sonarqube-server/analyzing-source-code/languages/xml.md
# Source: https://docs.sonarsource.com/sonarqube-cloud/advanced-setup/languages/xml.md
# XML
### Language-specific properties
To discover and update the XML-specific properties, navigate in SonarQube Cloud to *Your Project* > **Administration** > **General Settings** > **Languages** > **XML**. See the [analysis-parameters](https://docs.sonarsource.com/sonarqube-cloud/advanced-setup/analysis-parameters "mention") page for more information about specific properties.
---
# Source: https://docs.sonarsource.com/sonarqube-server/2025.5/analyzing-source-code/languages/yaml.md
# Source: https://docs.sonarsource.com/sonarqube-server/2025.4/analyzing-source-code/languages/yaml.md
# Source: https://docs.sonarsource.com/sonarqube-server/2025.6/analyzing-source-code/languages/yaml.md
# Source: https://docs.sonarsource.com/sonarqube-server/analyzing-source-code/languages/yaml.md
# Source: https://docs.sonarsource.com/sonarqube-cloud/advanced-setup/languages/yaml.md
# YAML
The analysis of YAML files is disabled by default. You can enable it by setting the `sonar.yaml.activate` property to `true`.
This property does not affect analysis of language / framework specific YAML files.
YAML files that are detected as belonging to [cloudformation](https://docs.sonarsource.com/sonarqube-cloud/advanced-setup/languages/cloudformation "mention"), [kubernetes](https://docs.sonarsource.com/sonarqube-cloud/advanced-setup/languages/kubernetes "mention"), or [ansible](https://docs.sonarsource.com/sonarqube-cloud/advanced-setup/languages/ansible "mention") will be additionally analyzed by the dedicated analyzers, next to the general YAML analysis.
### Language-specific properties
To discover and update the YAML-specific properties, navigate in SonarQube Cloud to *Your Project* > **Administration** > **General Settings** > **Languages** > **YAML**. See the [analysis-parameters](https://docs.sonarsource.com/sonarqube-cloud/advanced-setup/analysis-parameters "mention") page for more information about specific properties.
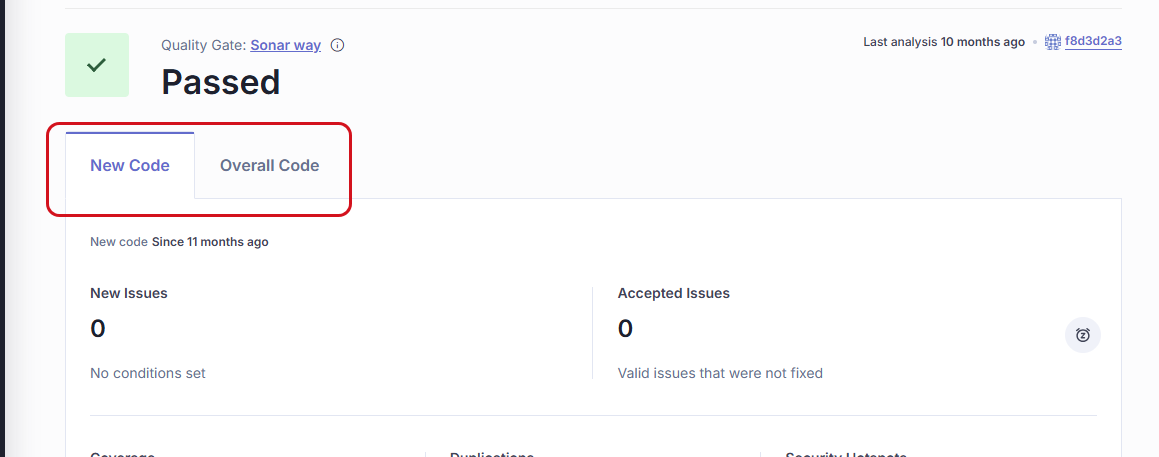
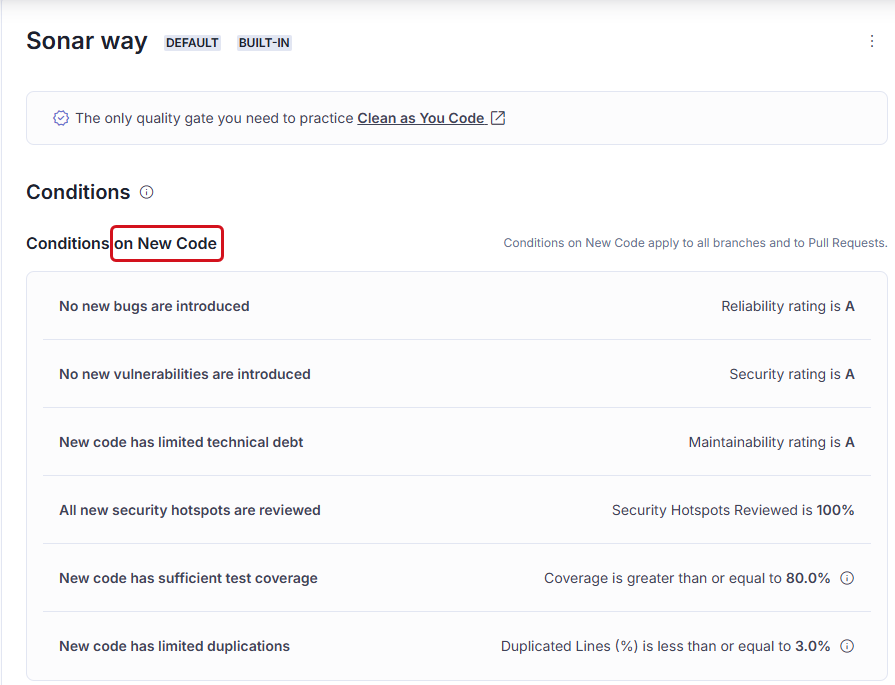


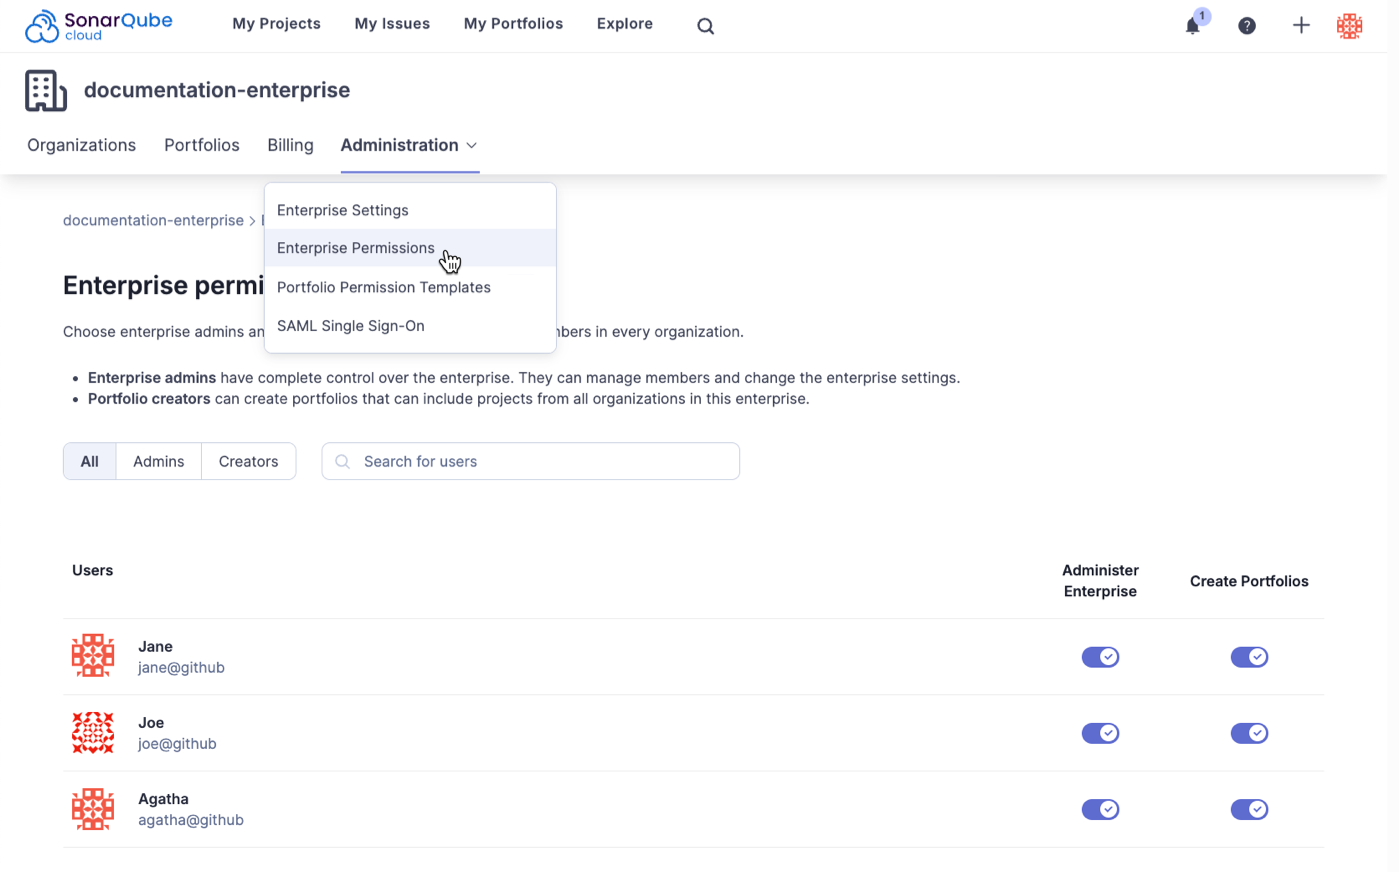
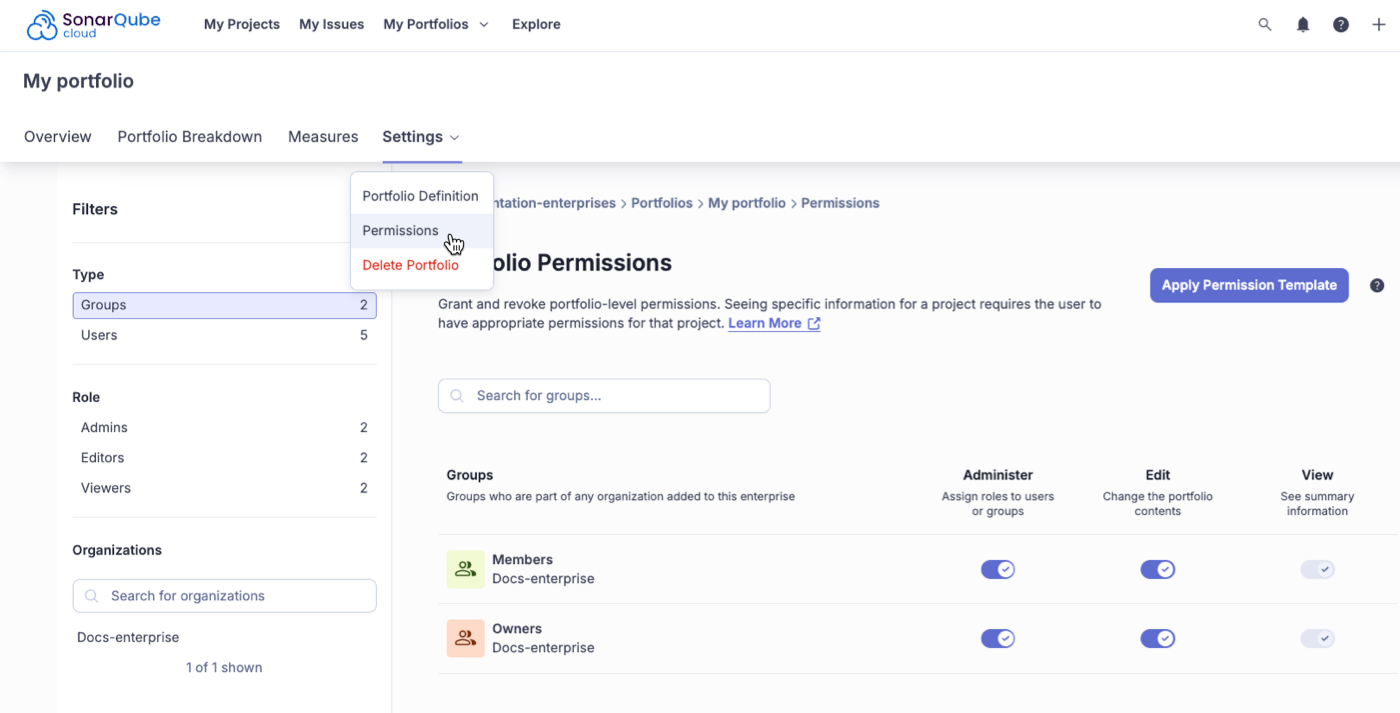
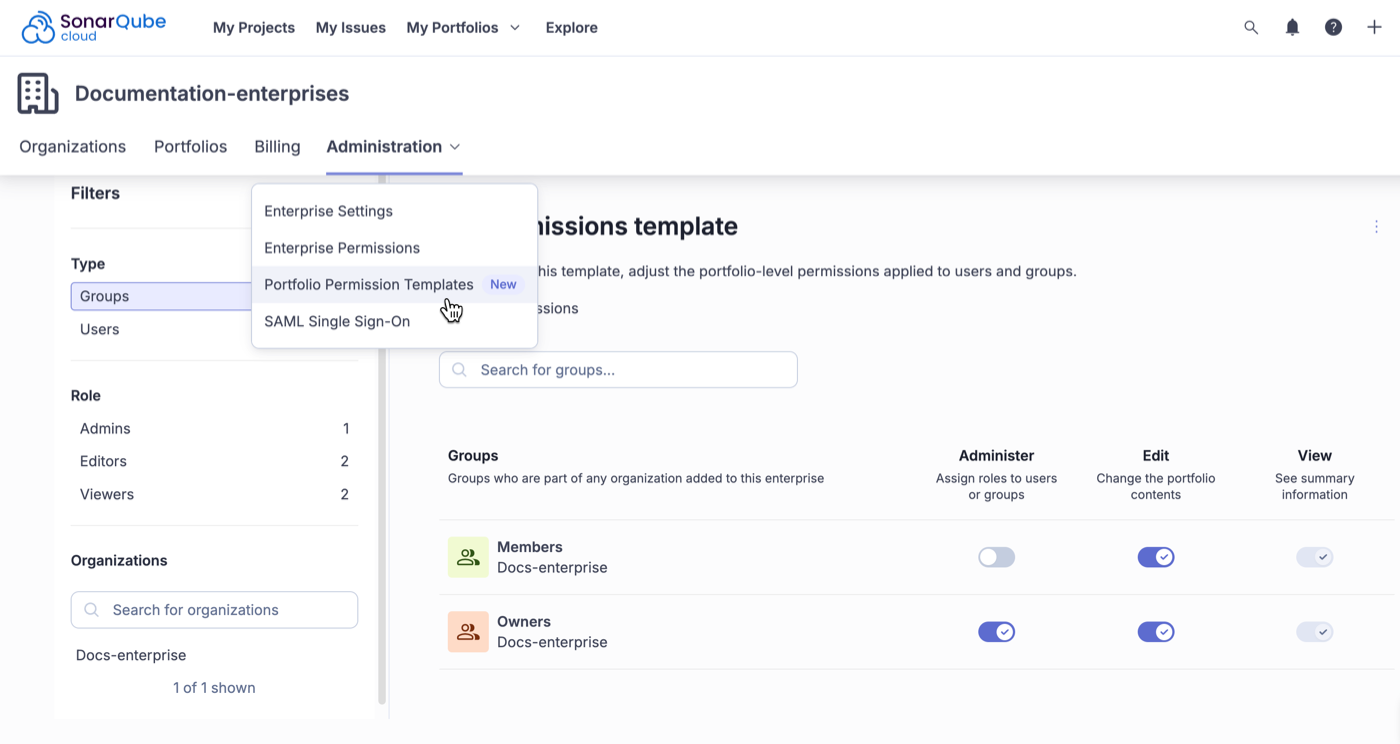
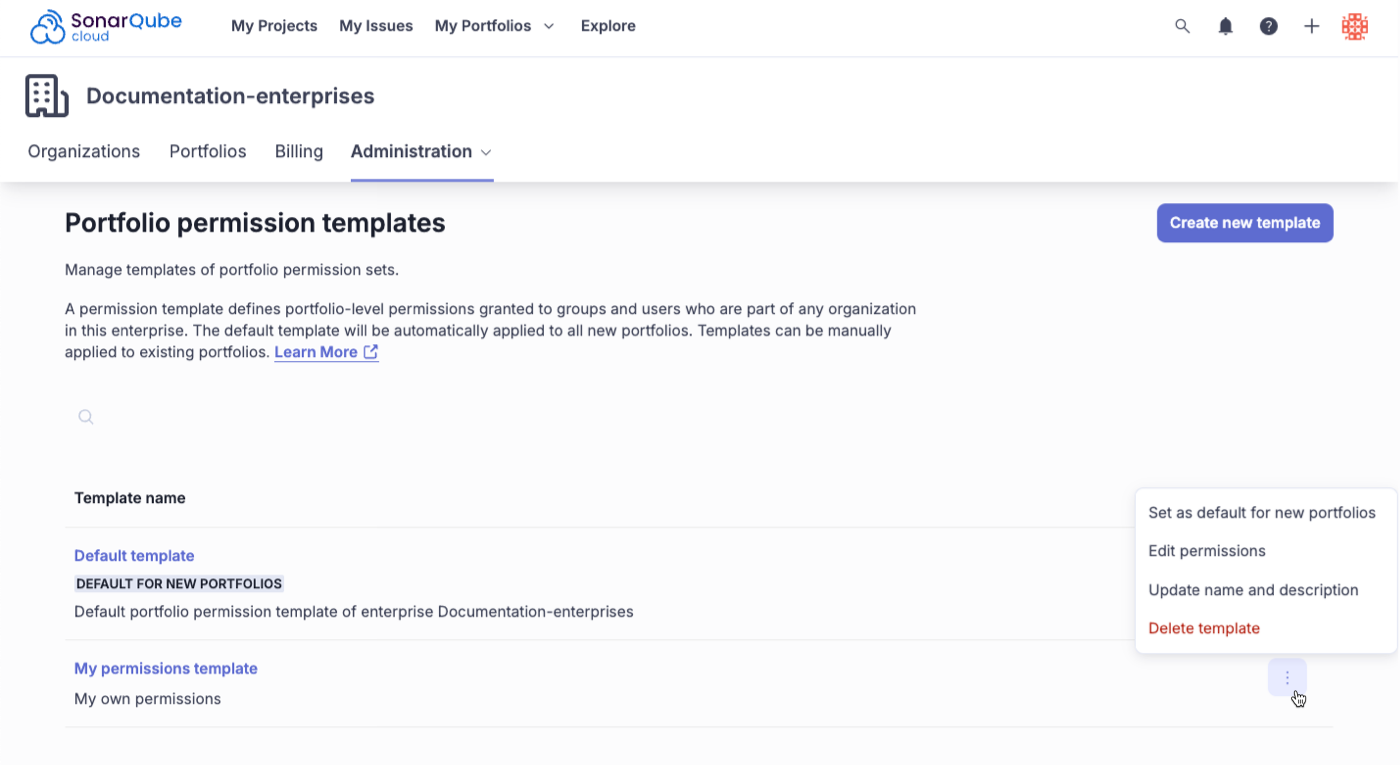
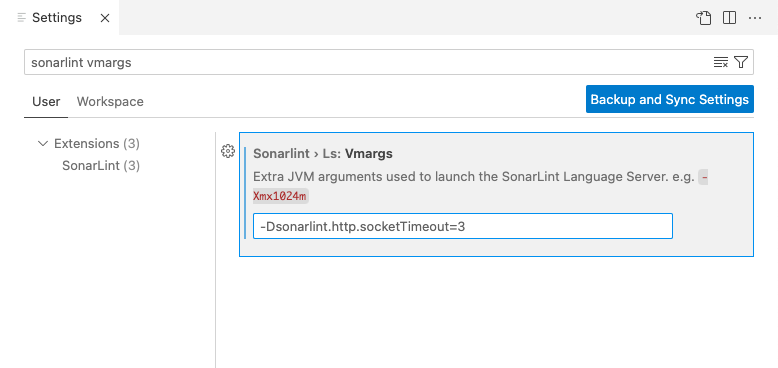

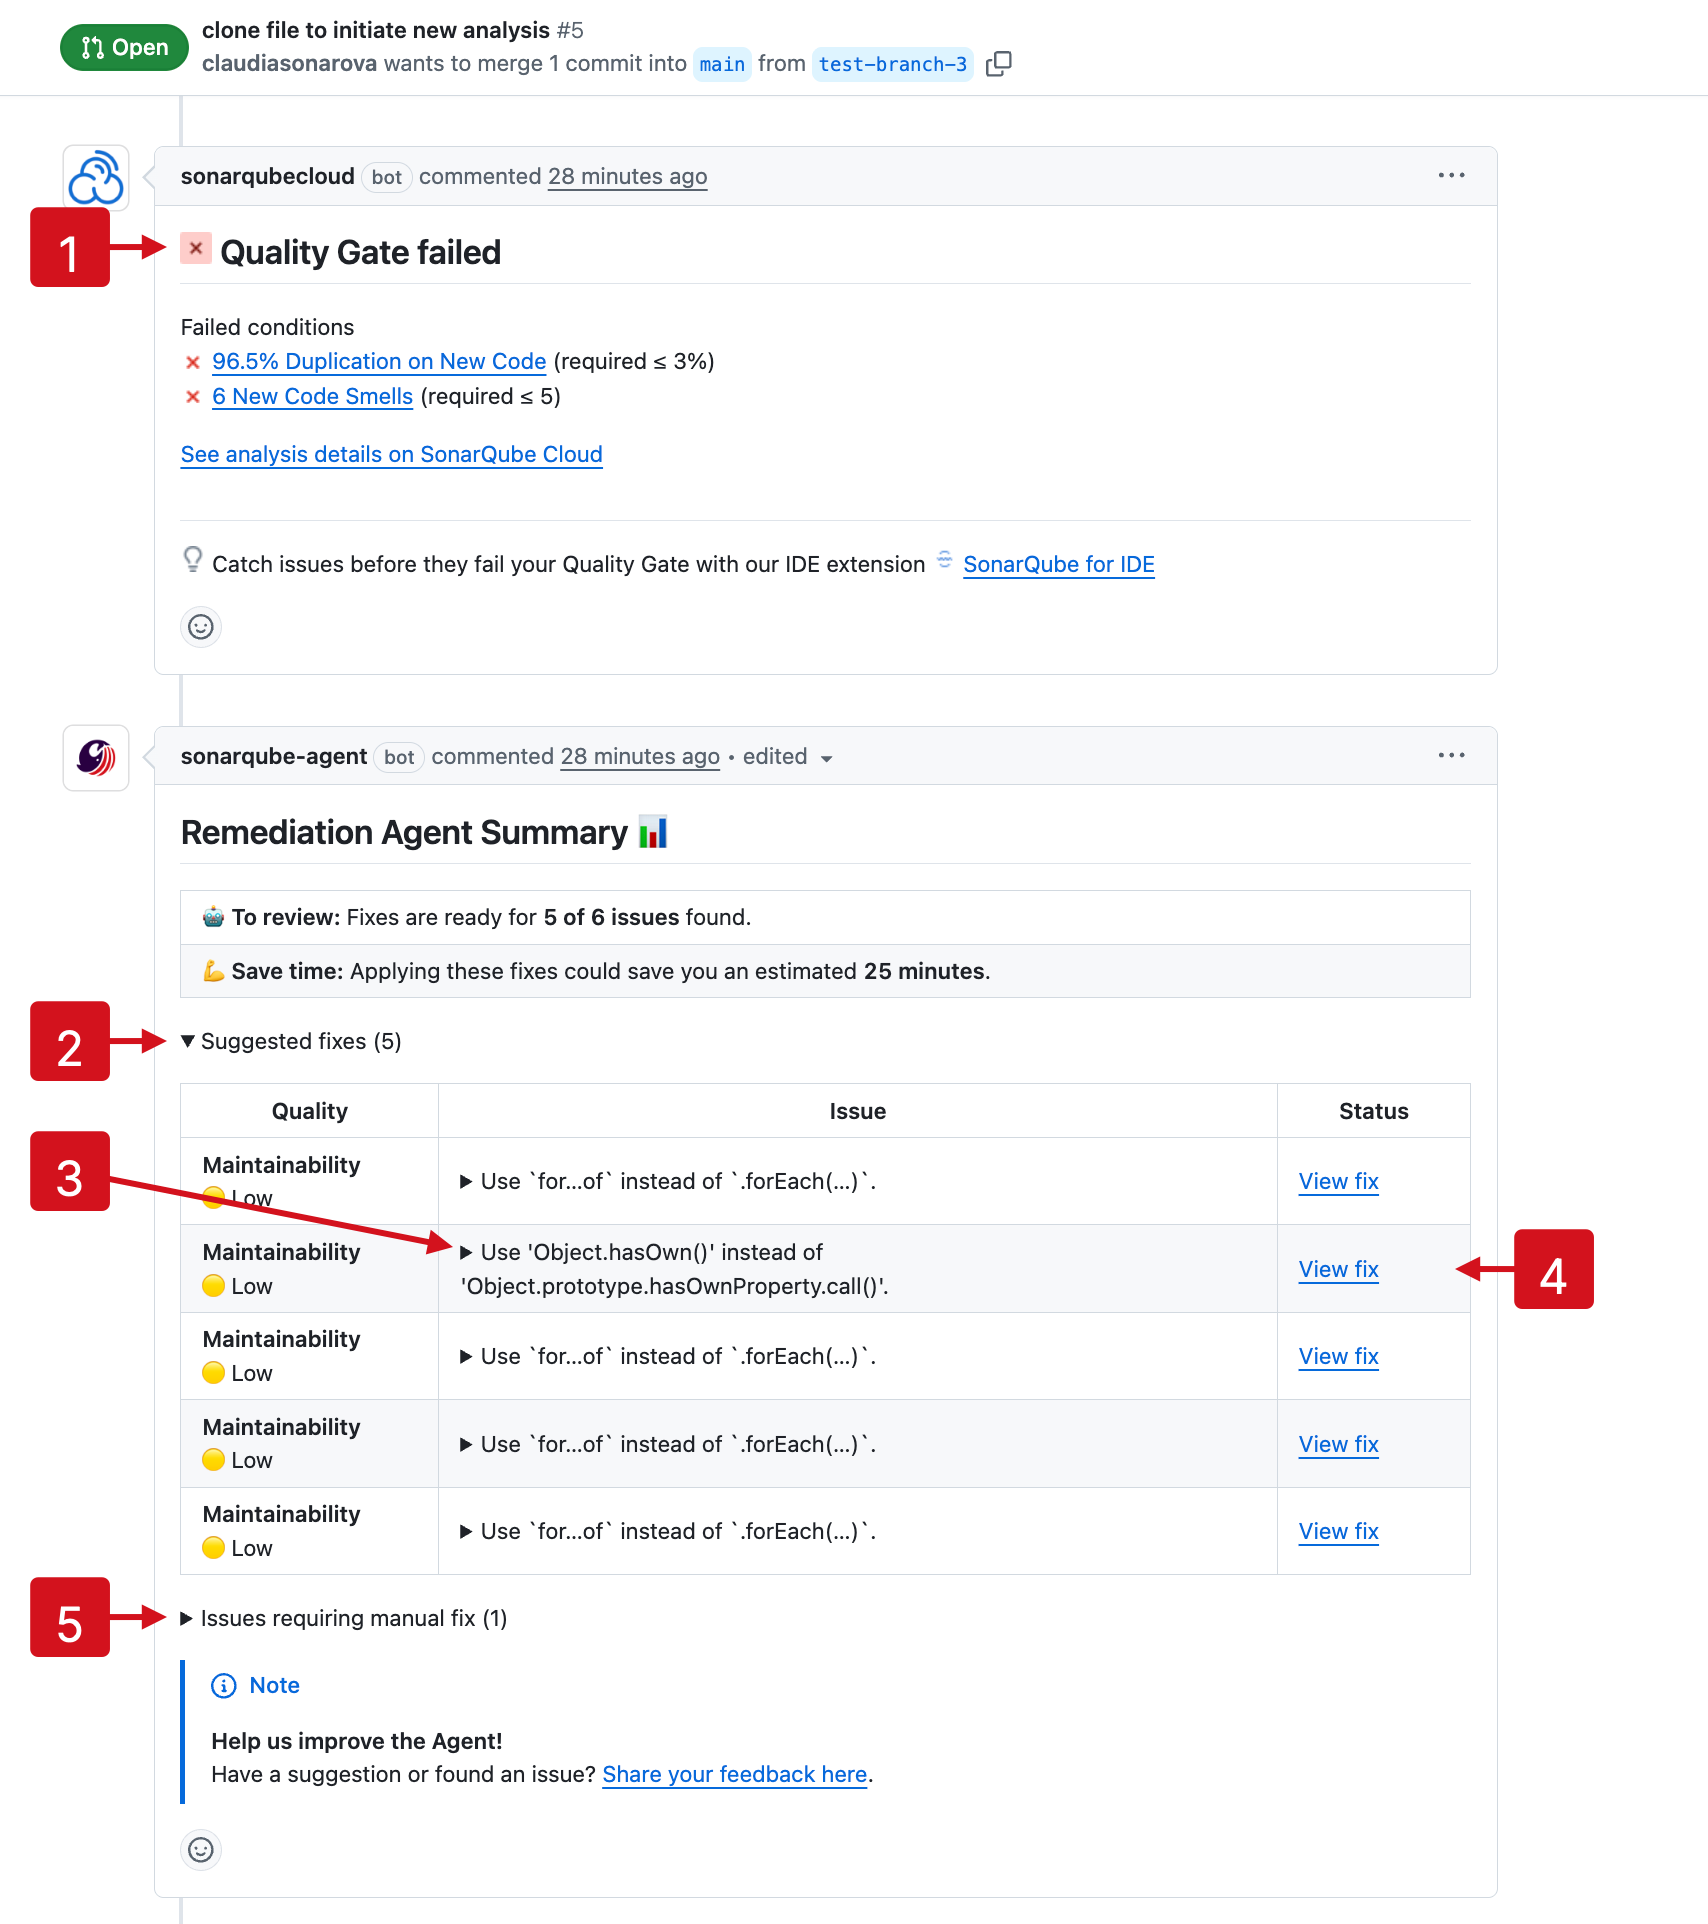


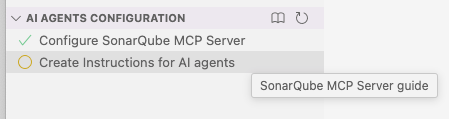

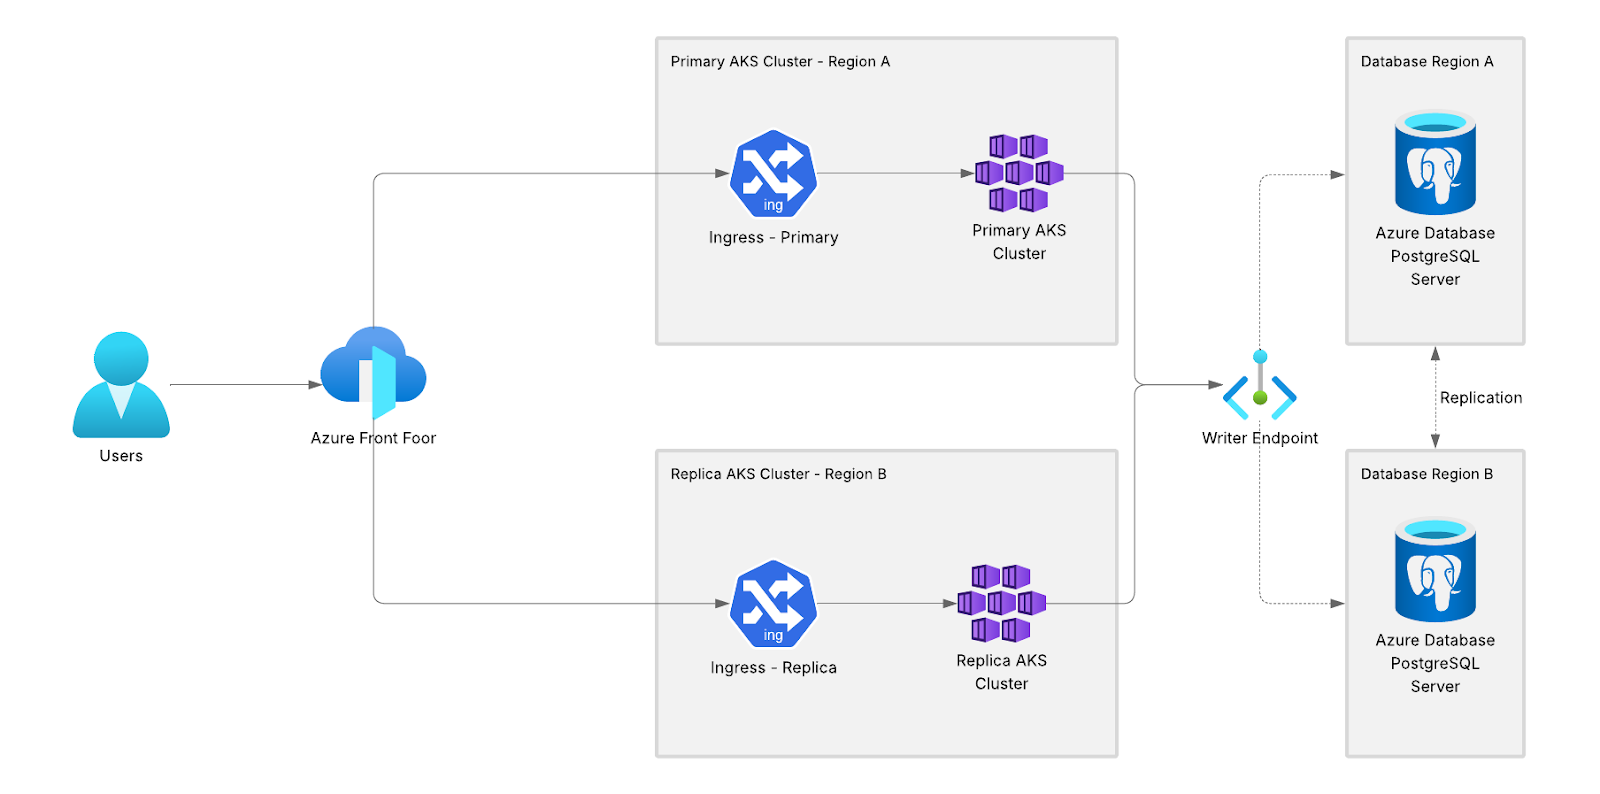
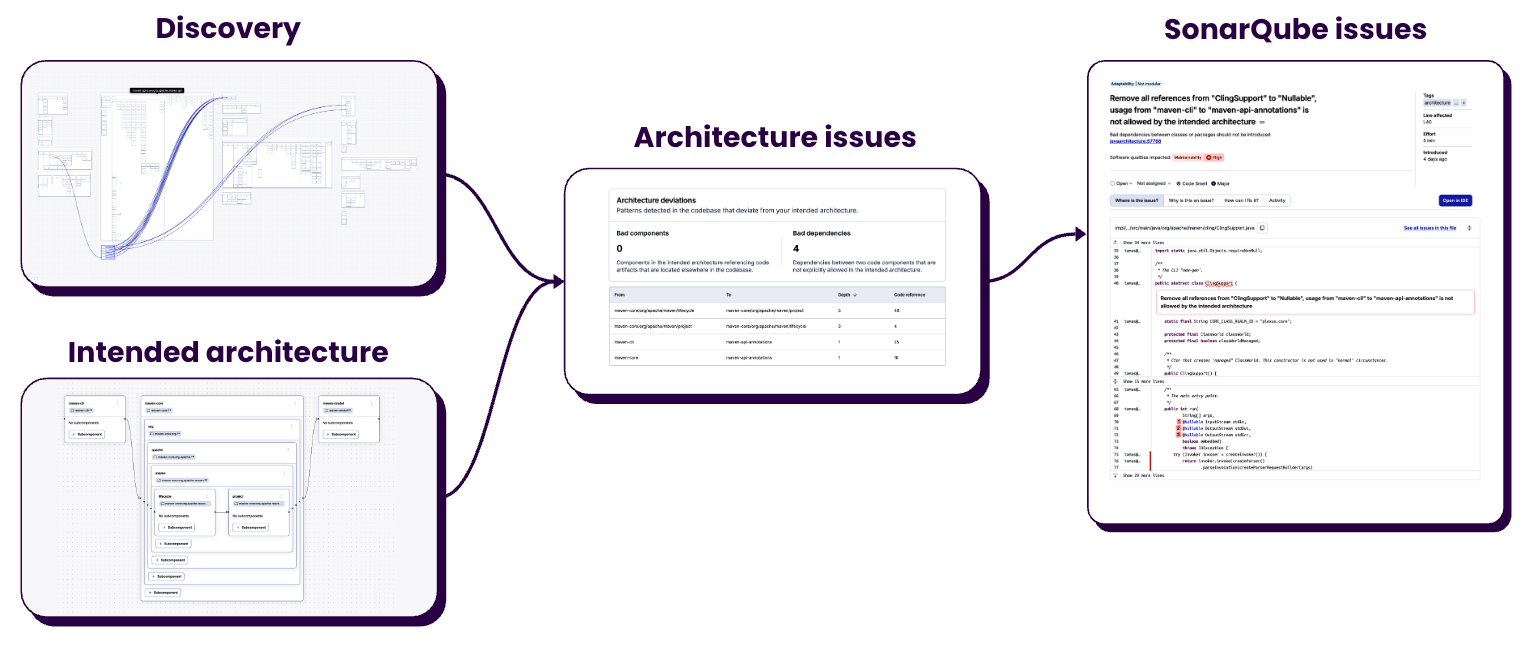

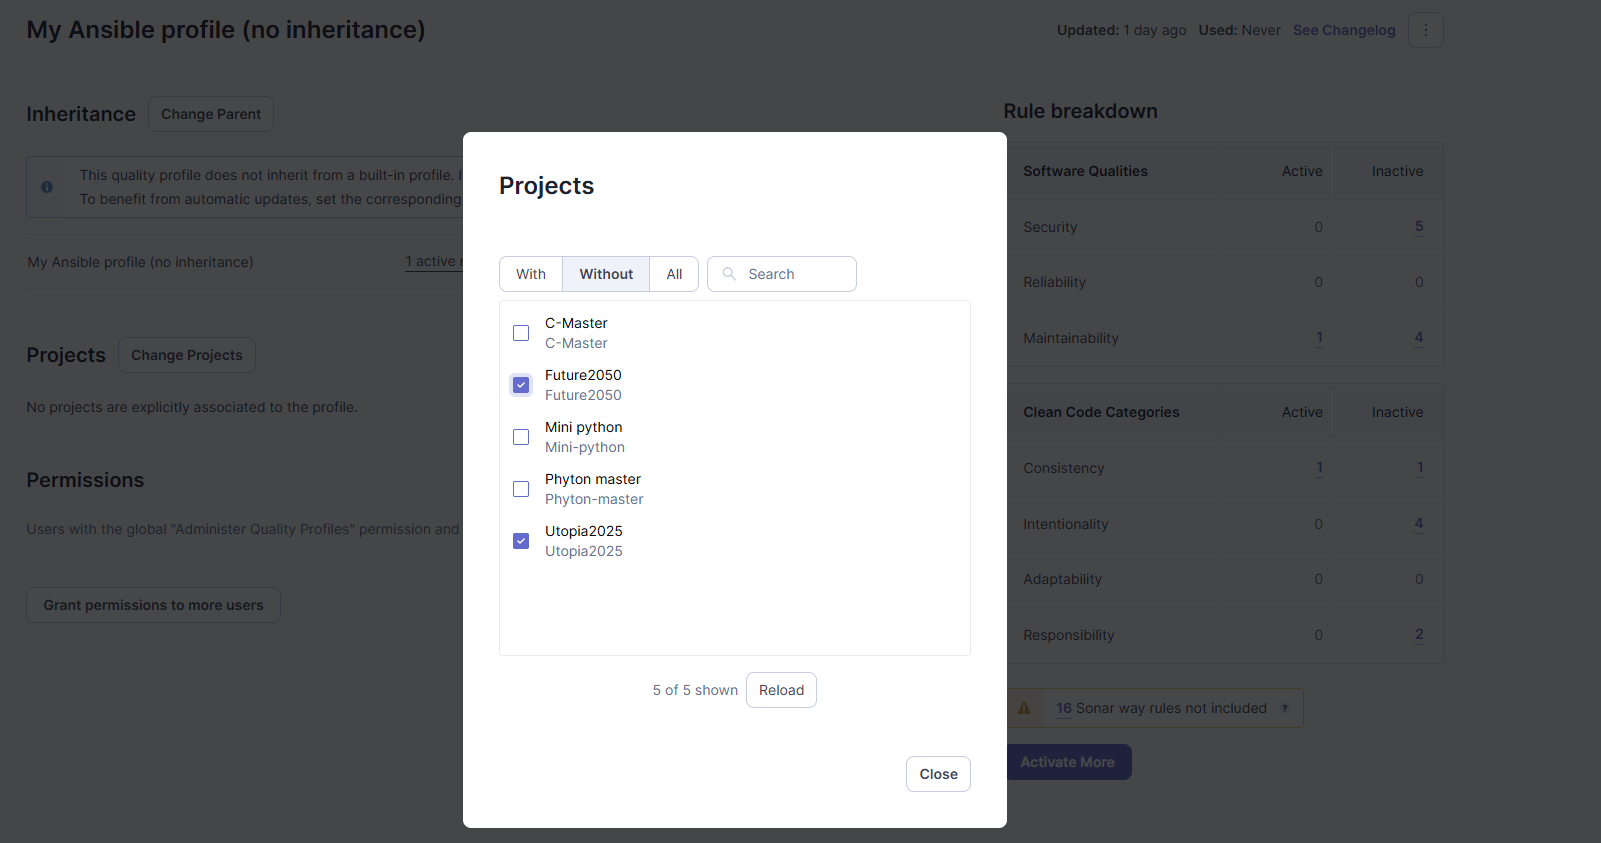
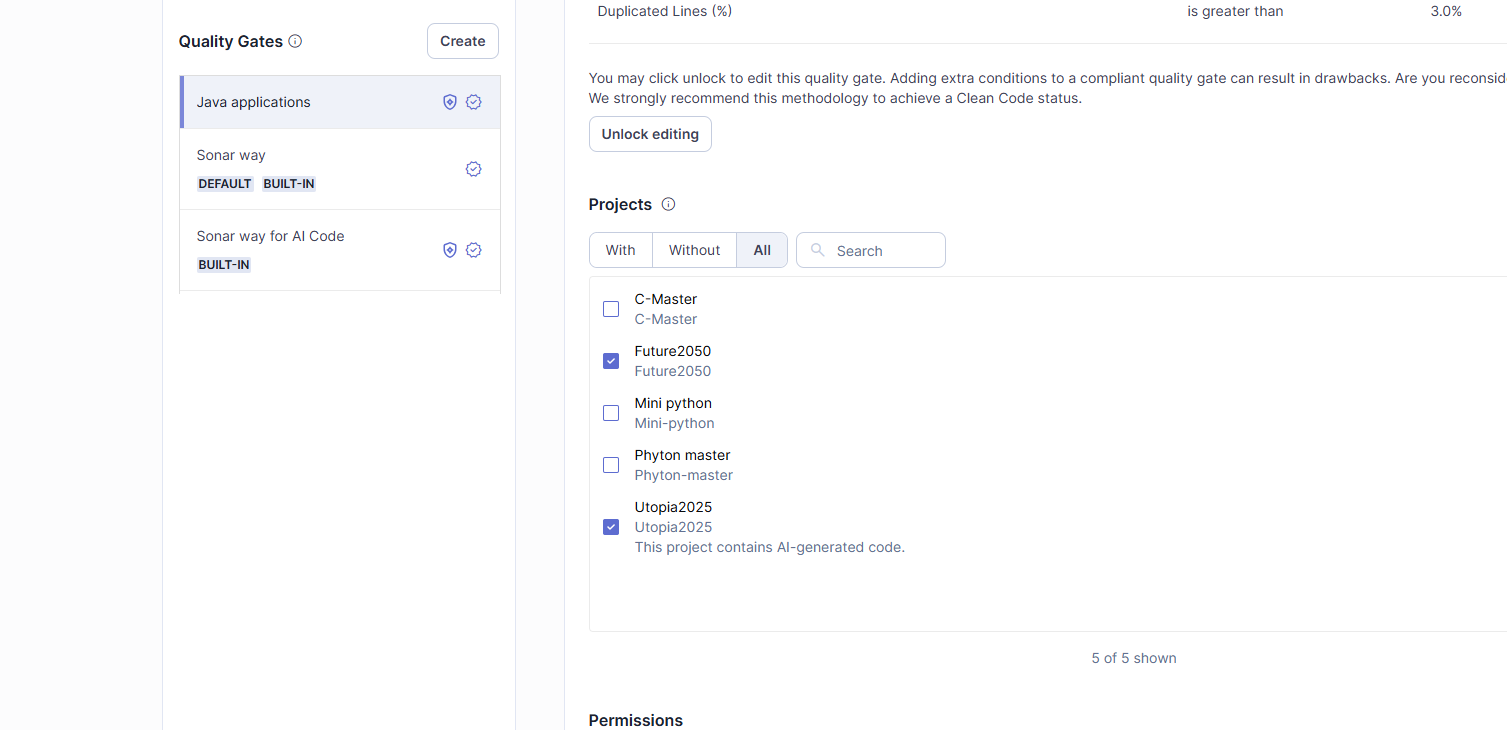
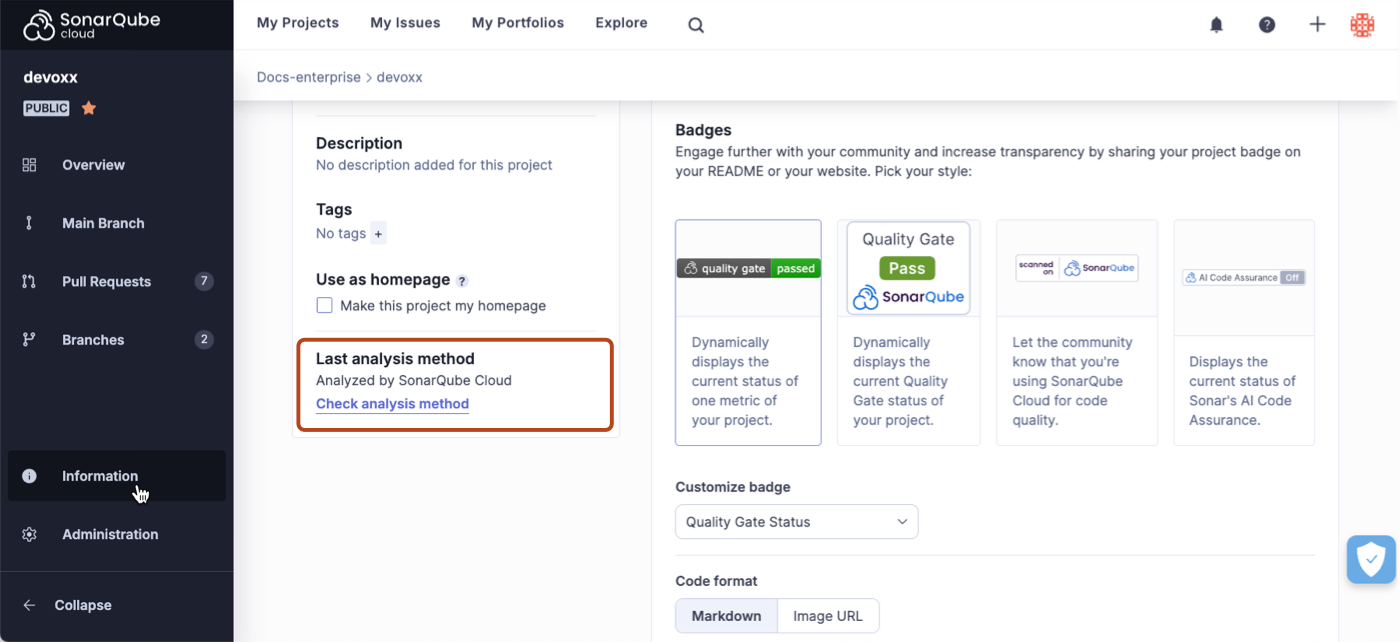
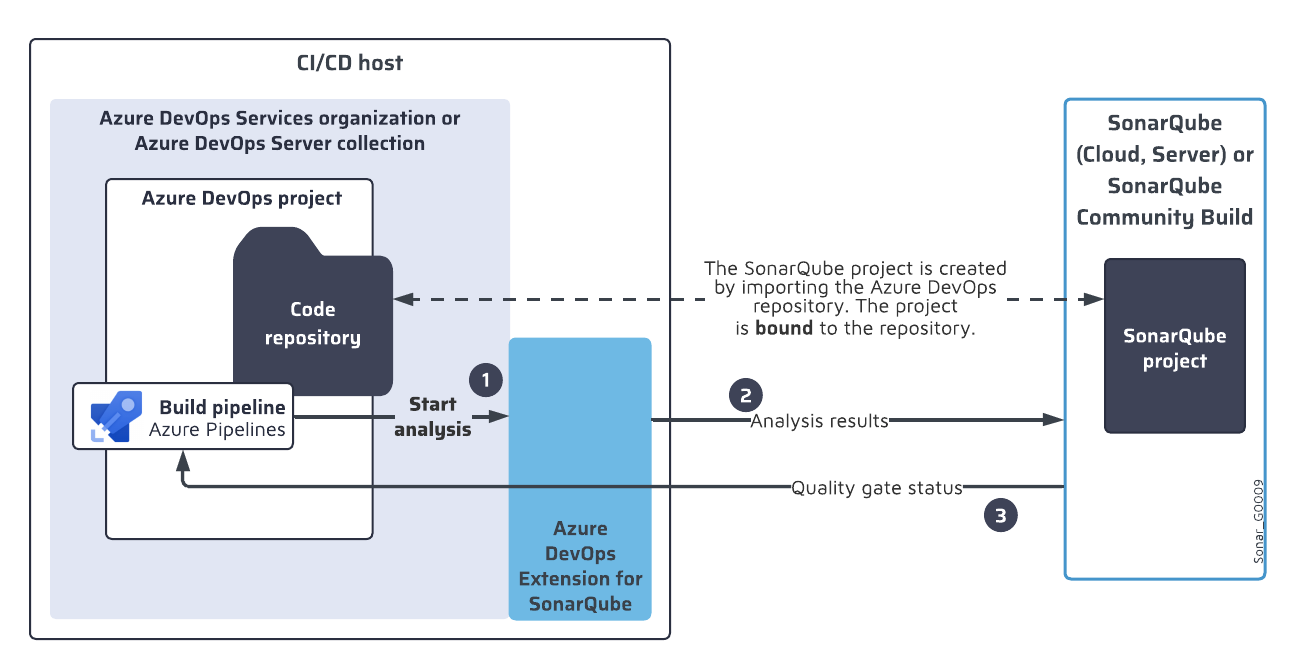
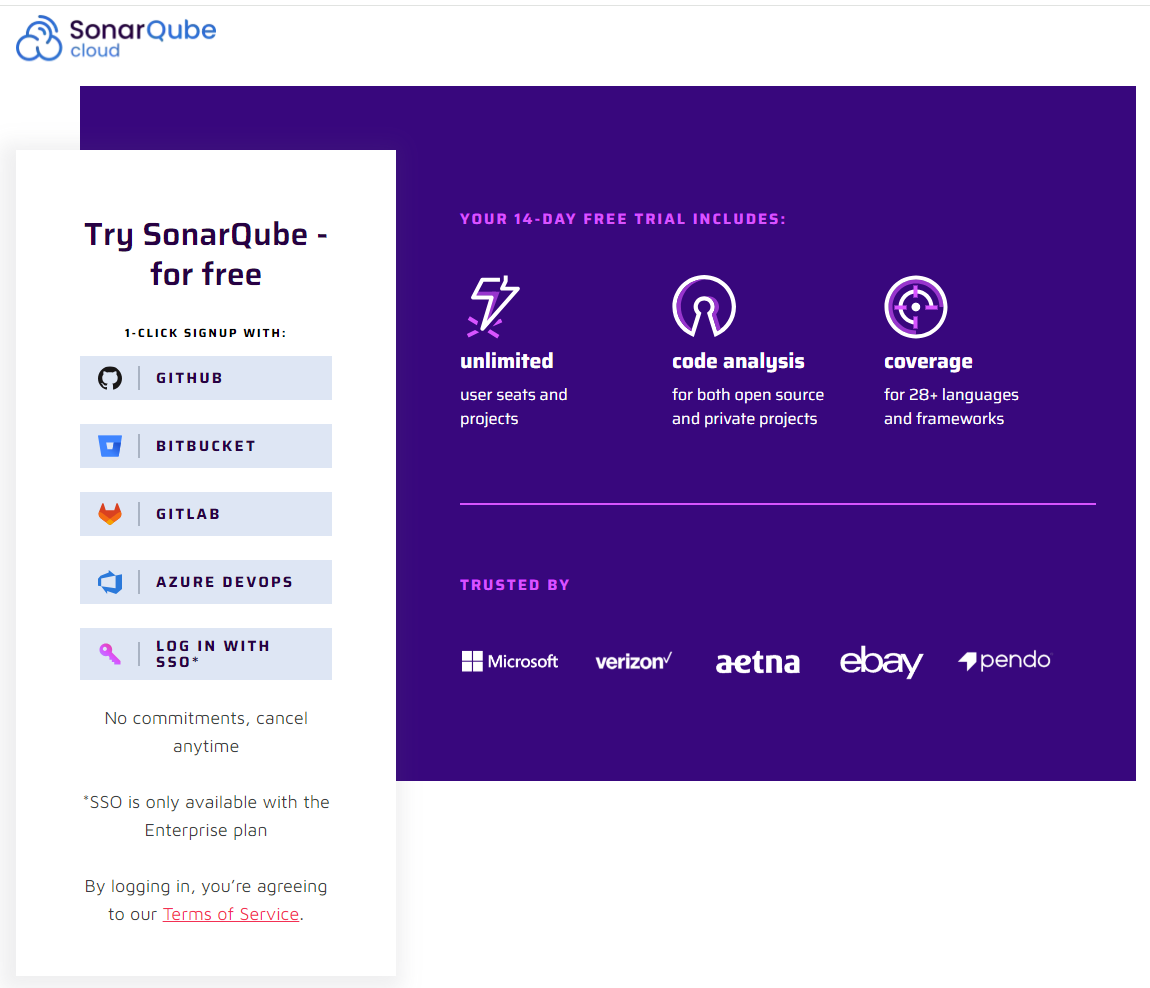
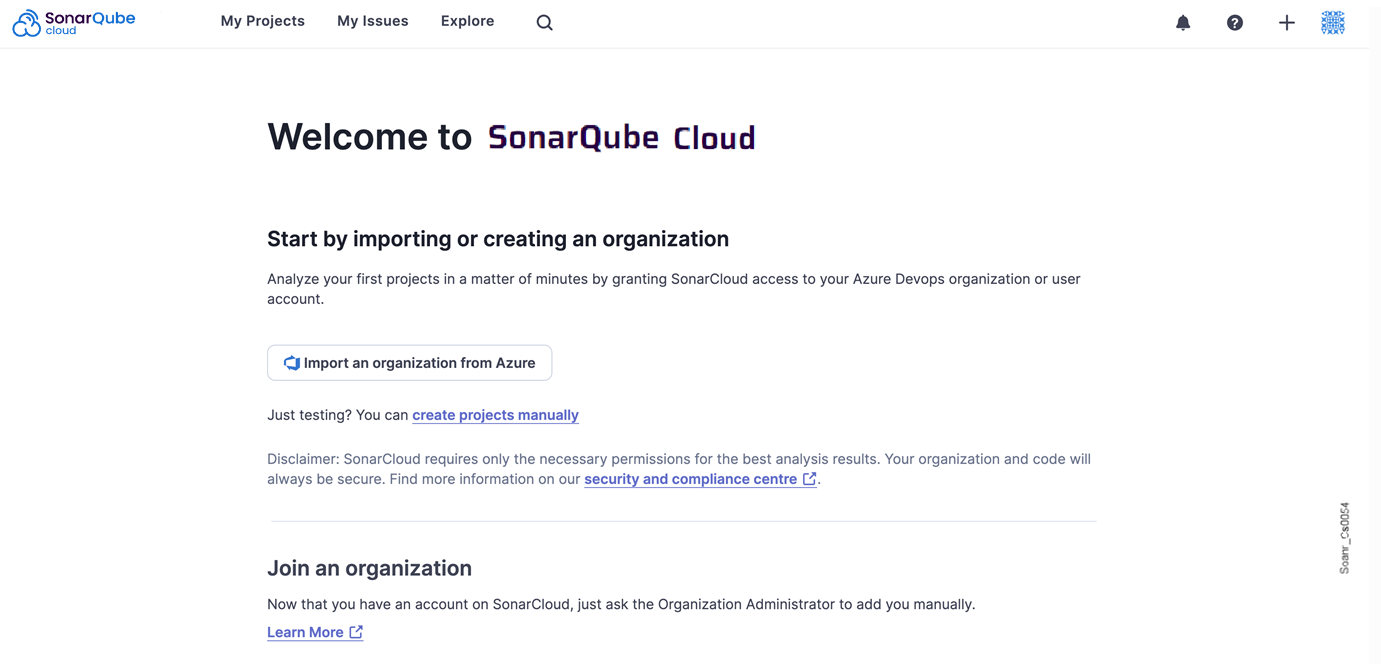
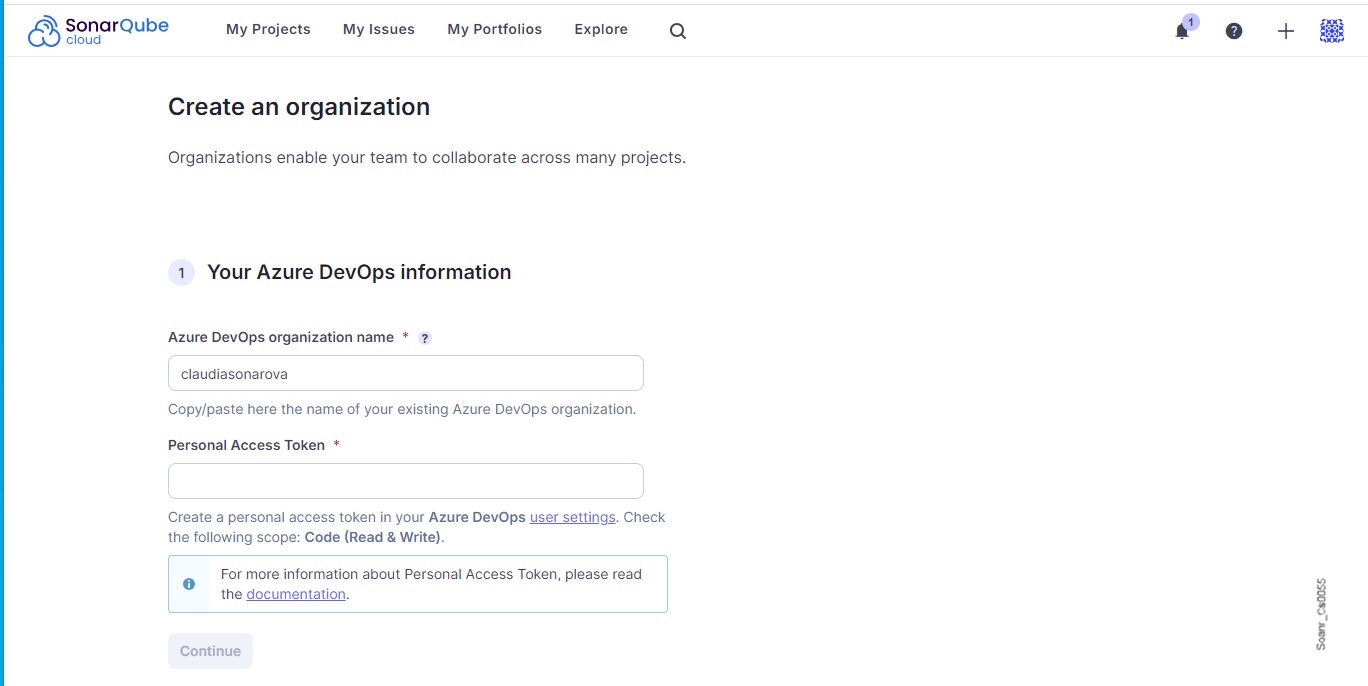
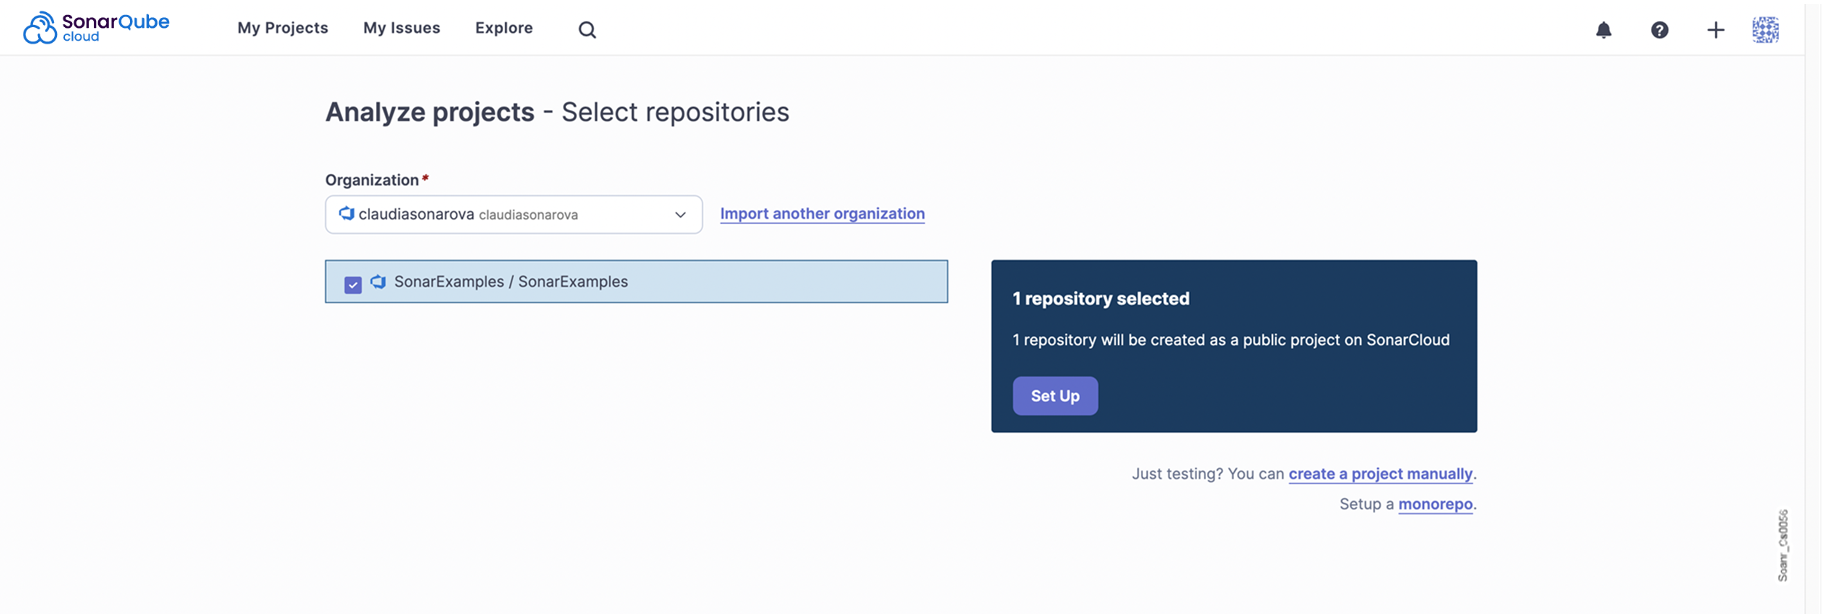
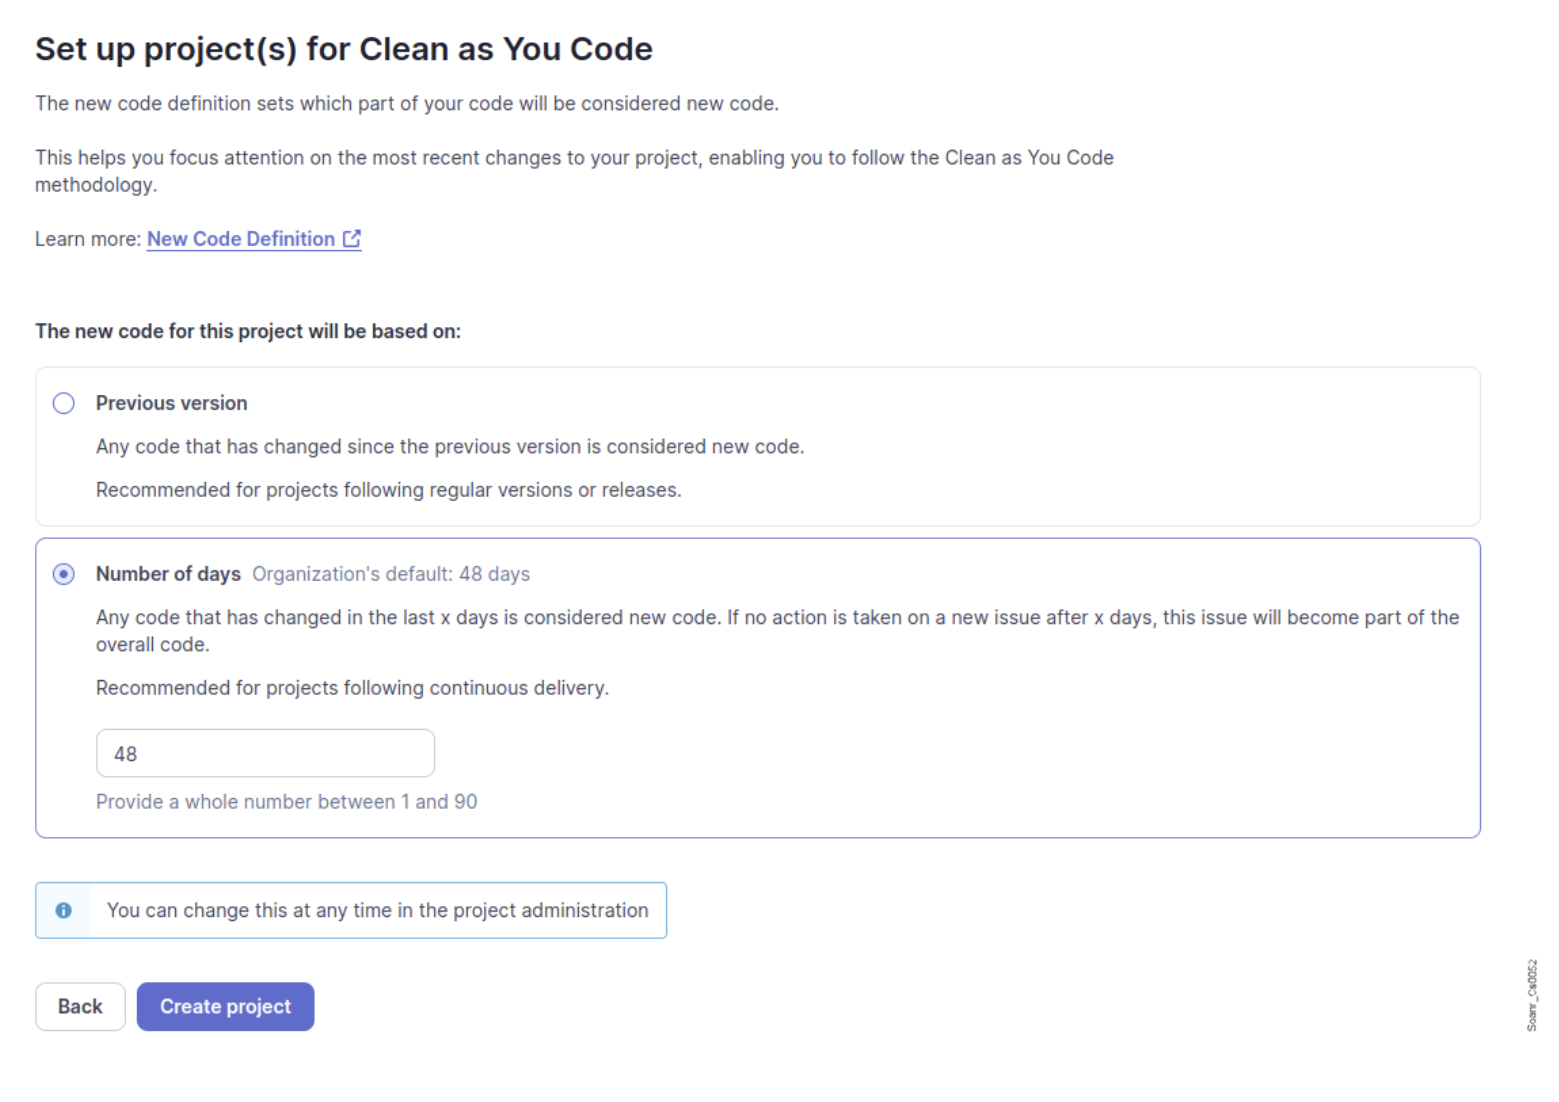
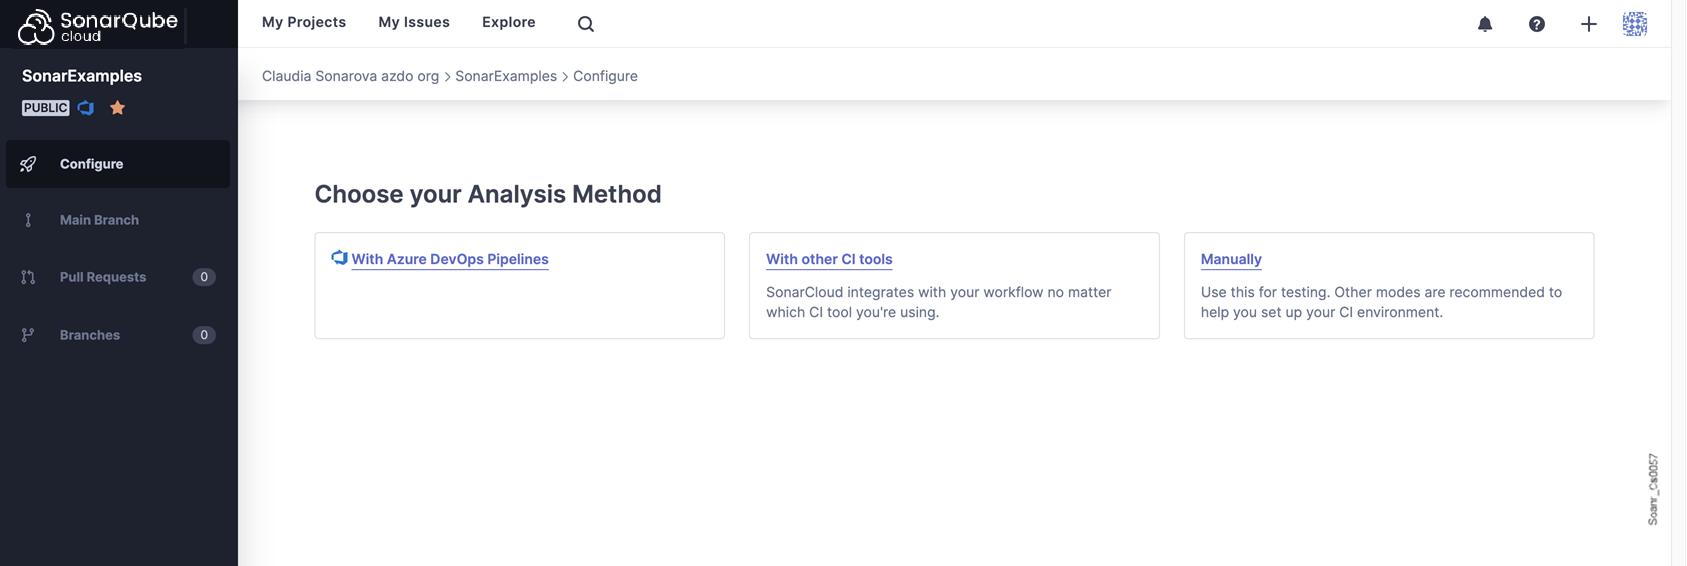
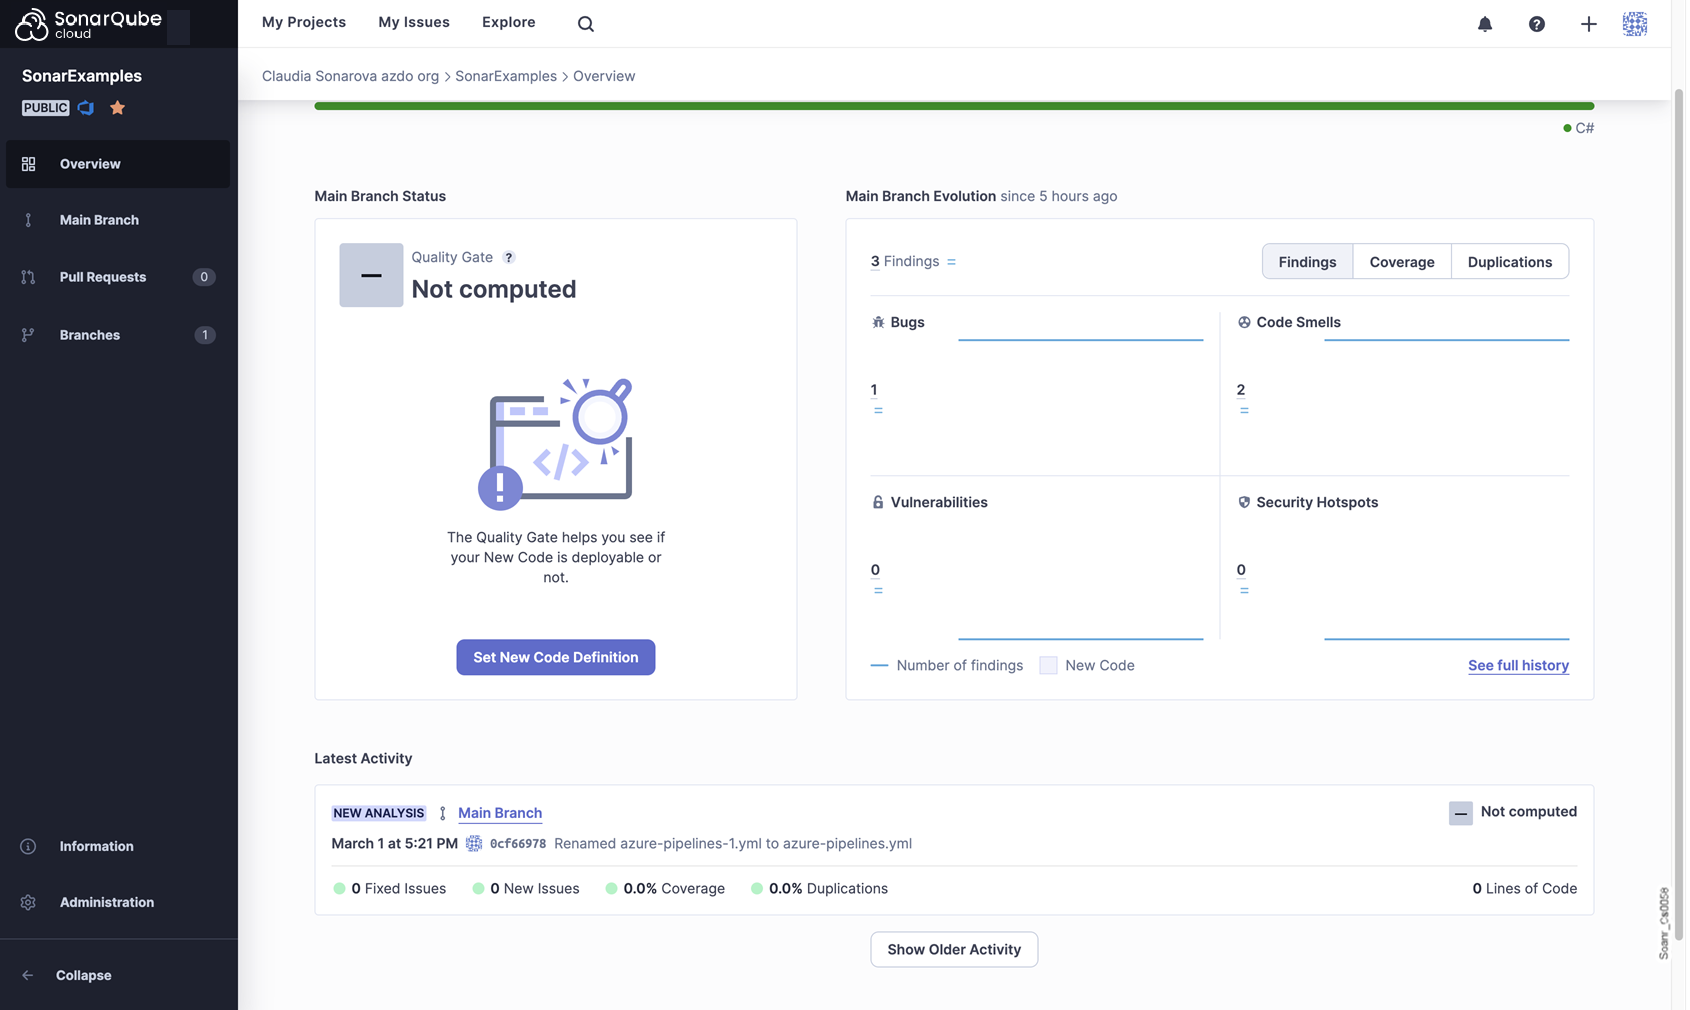
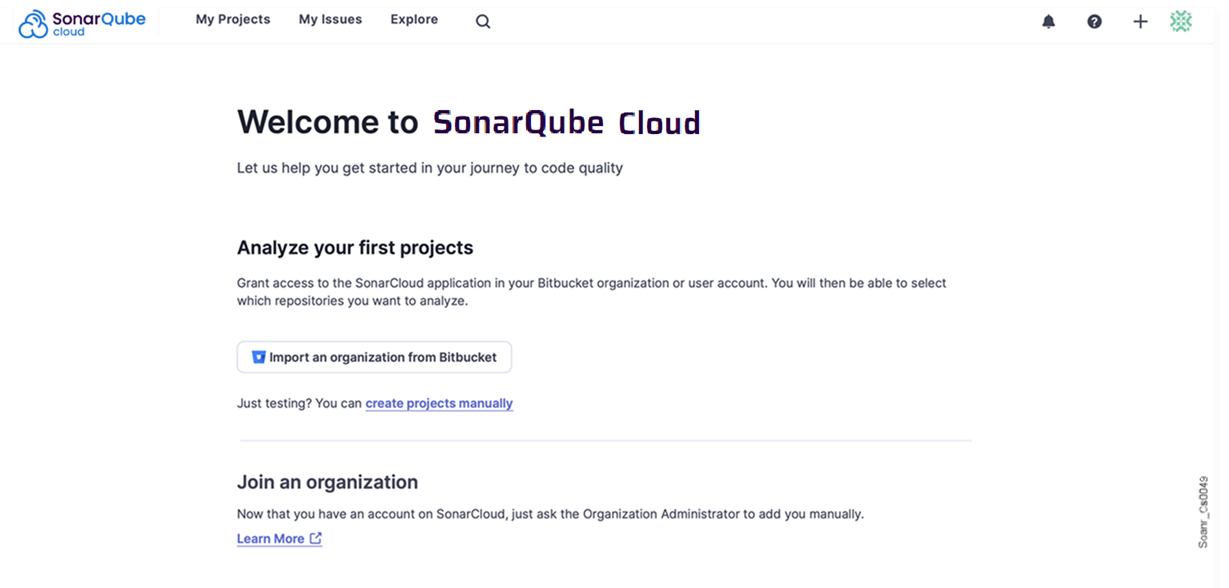
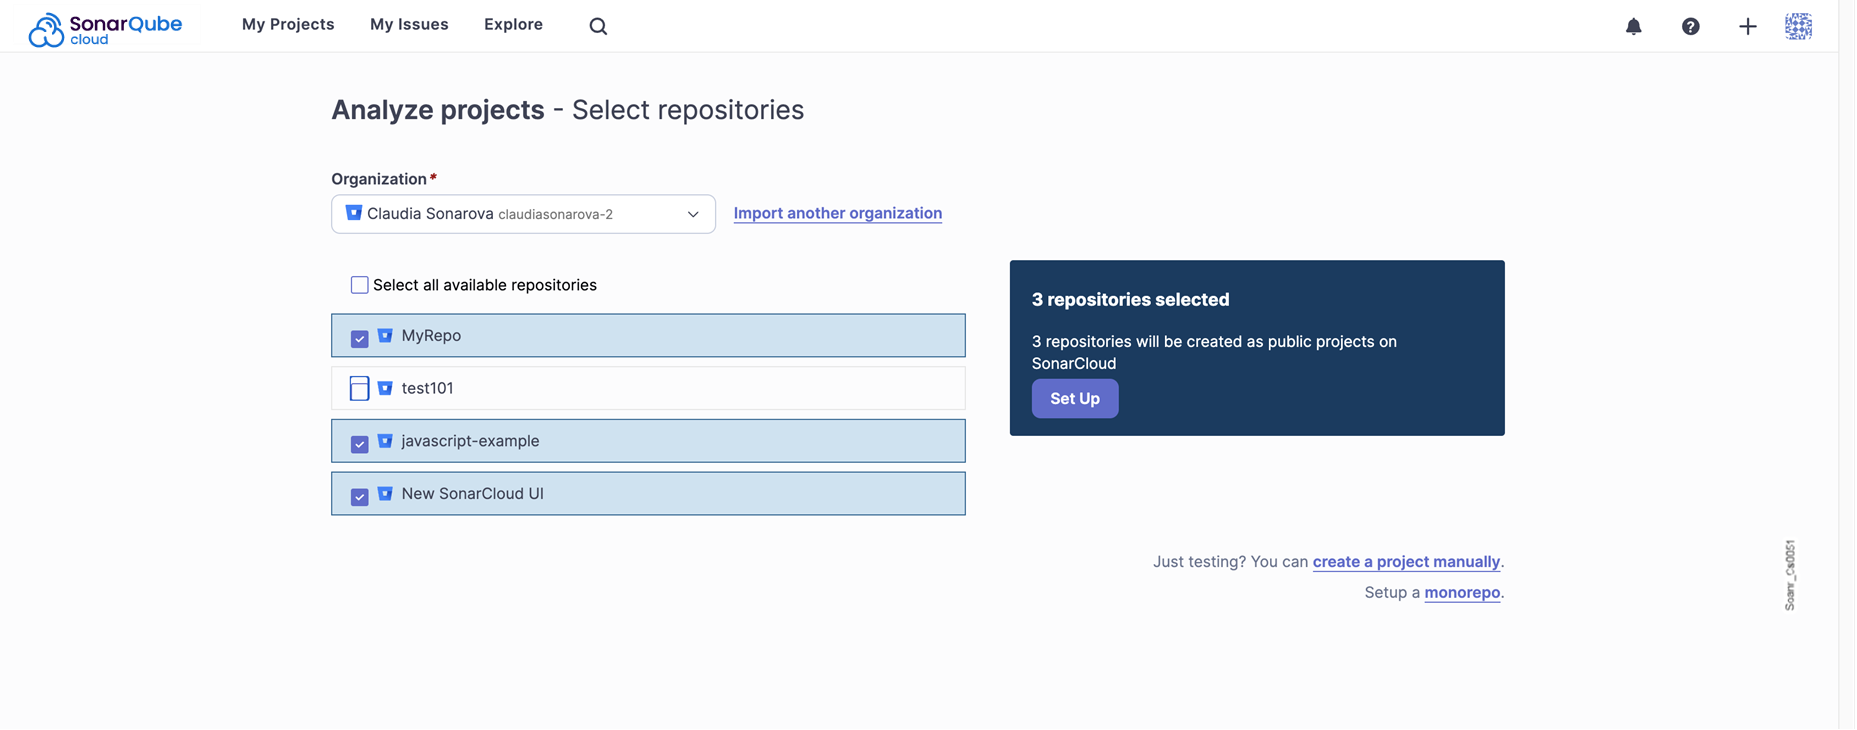
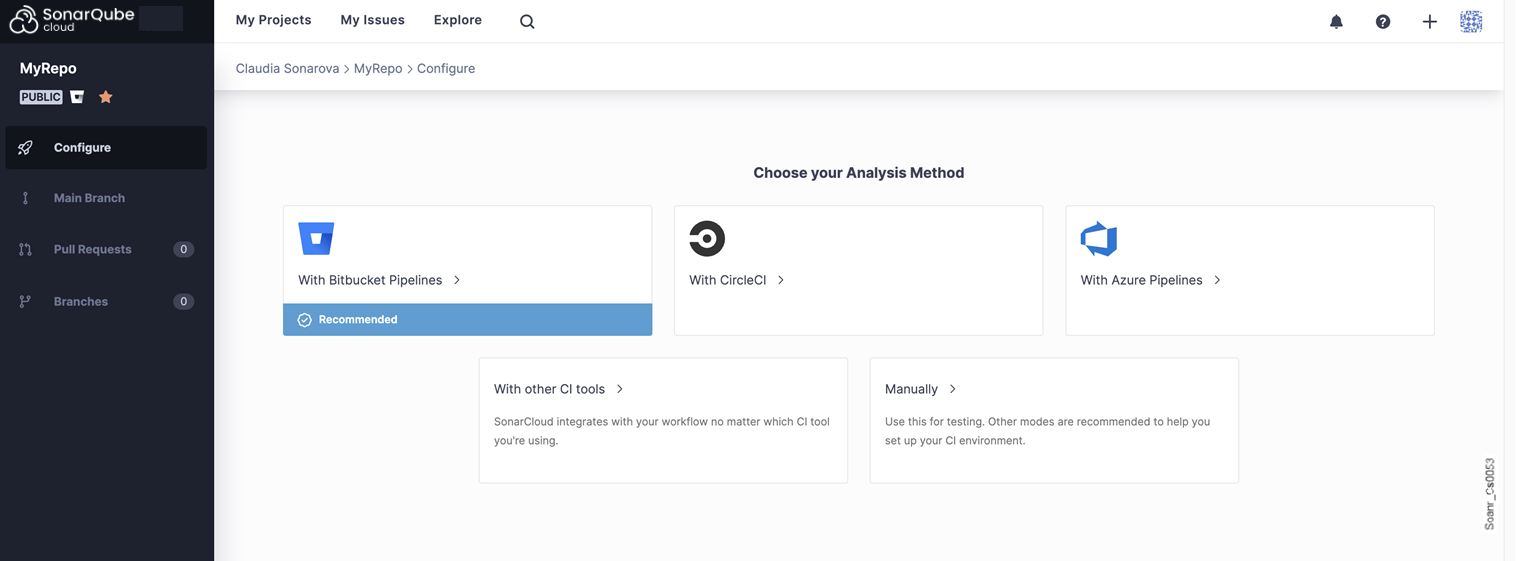
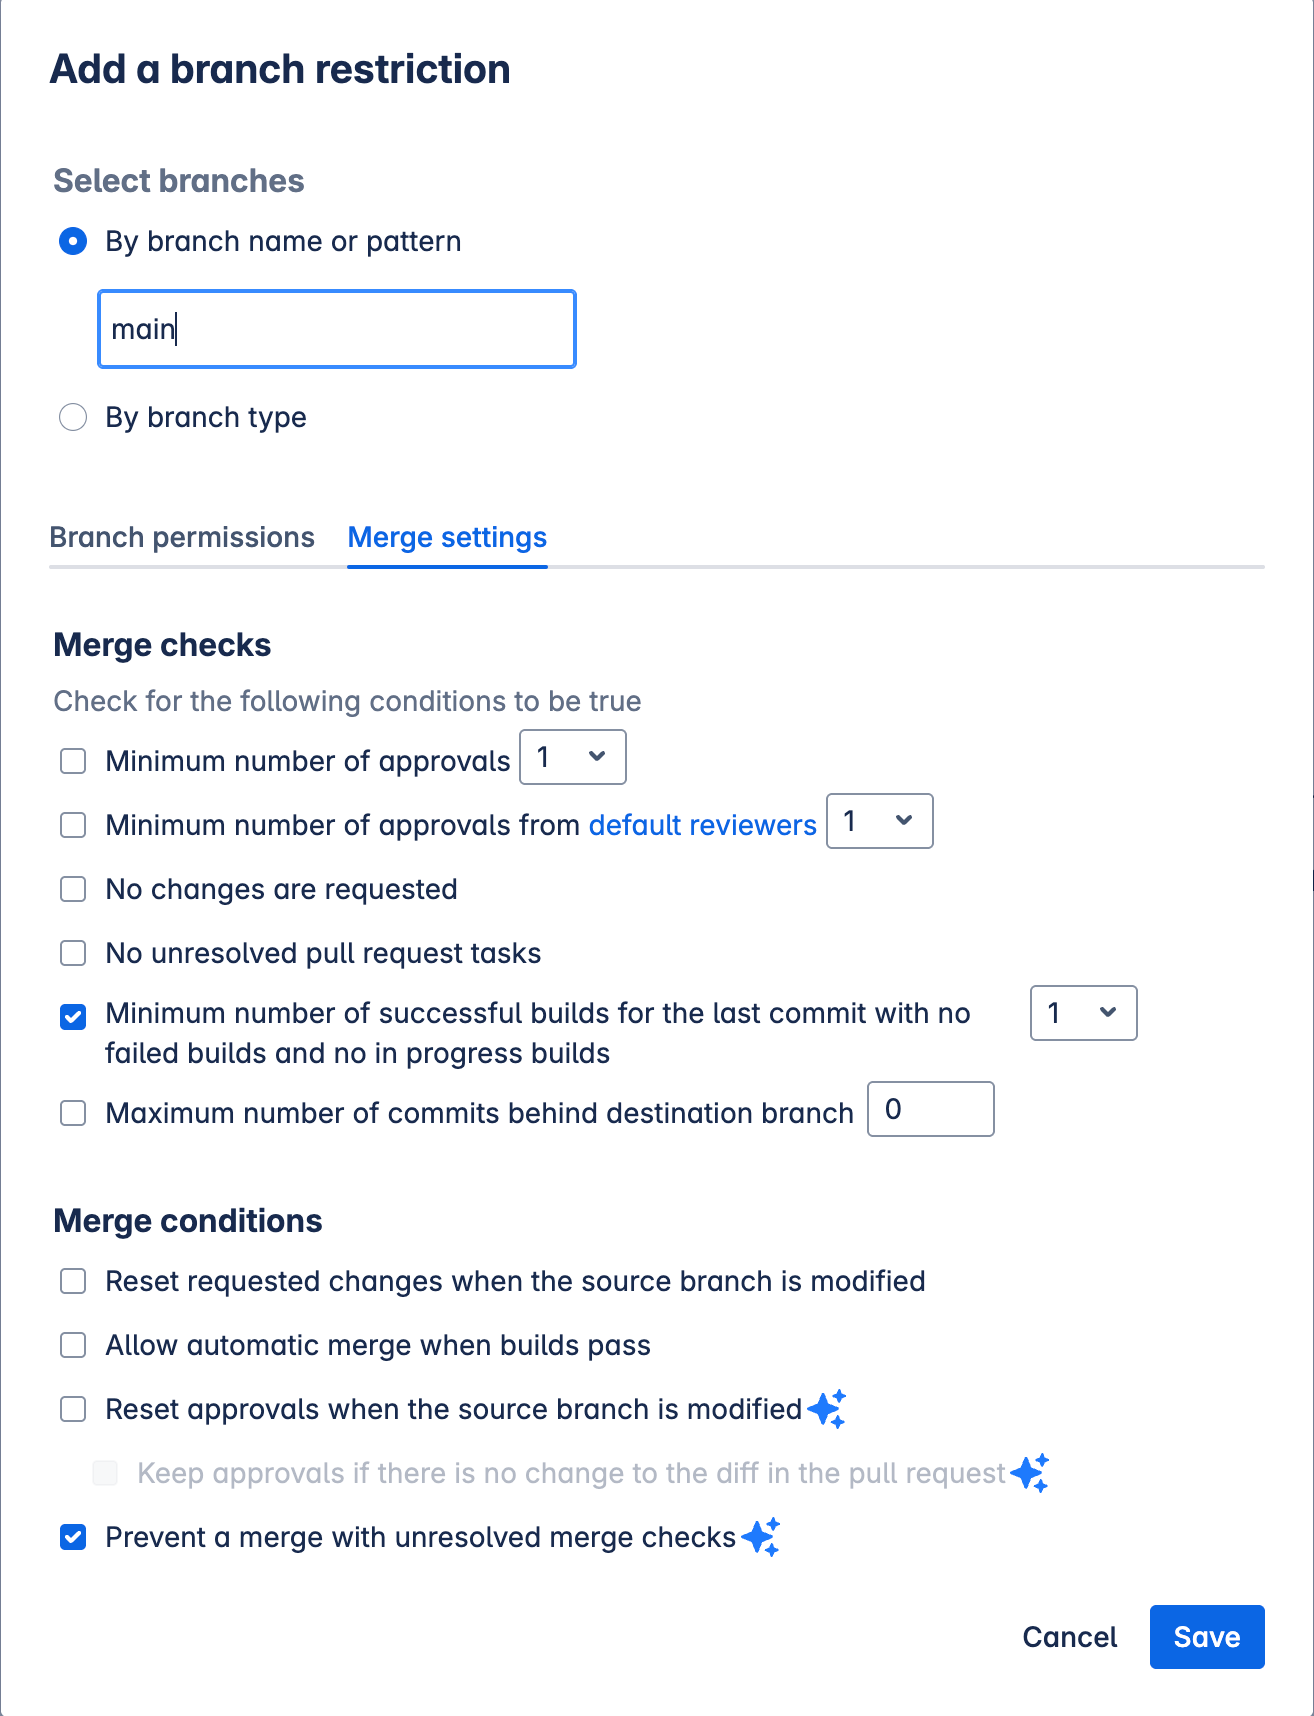
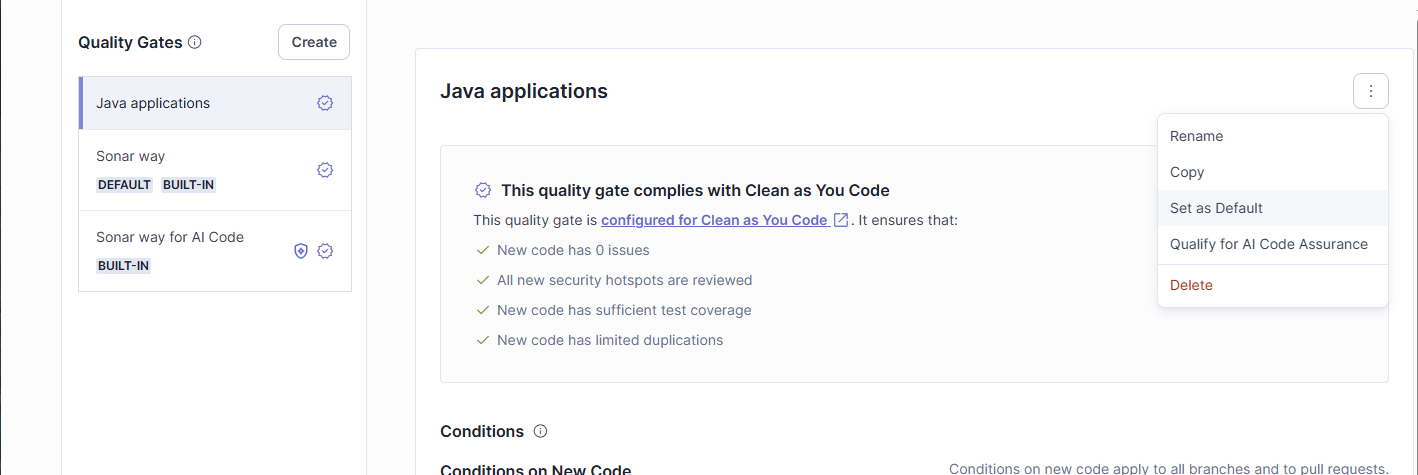
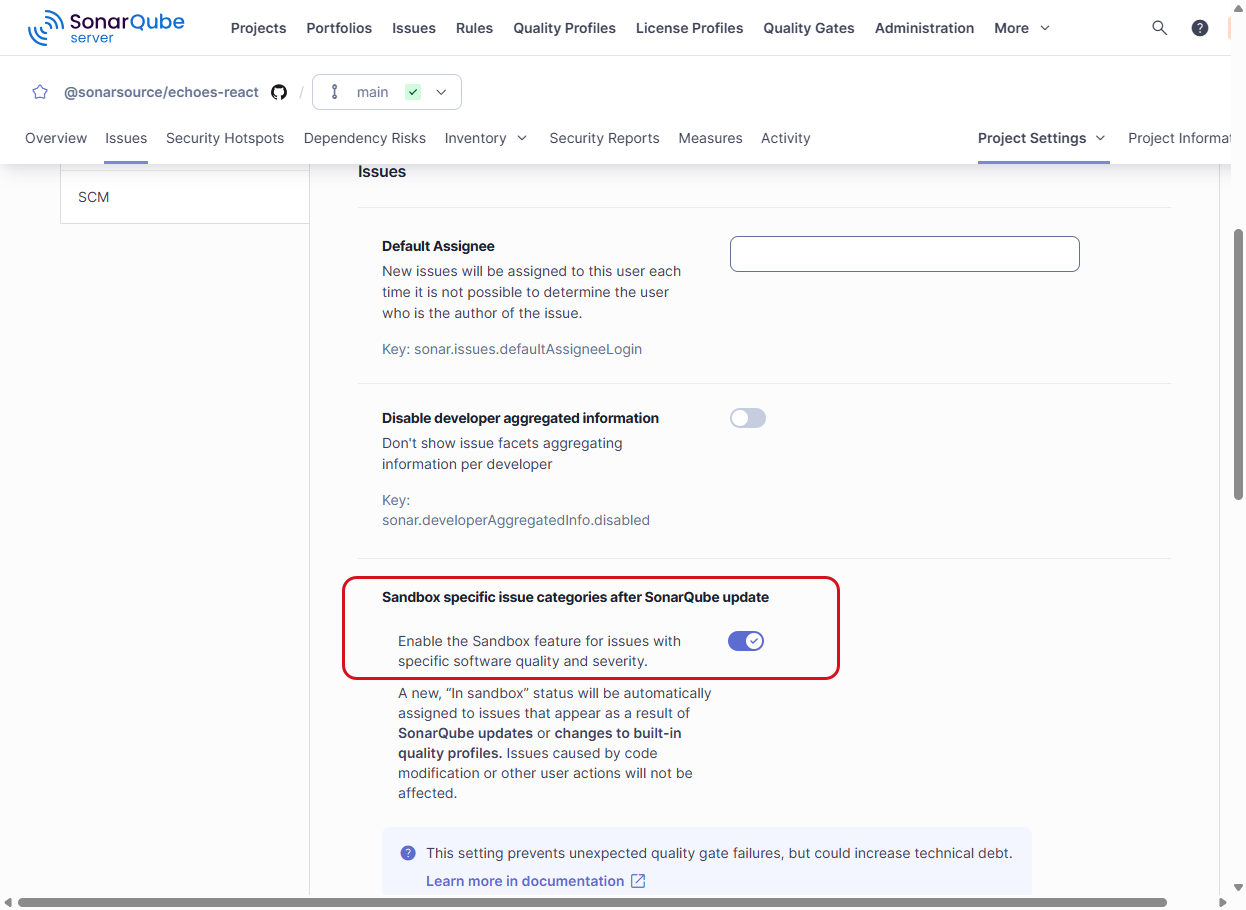
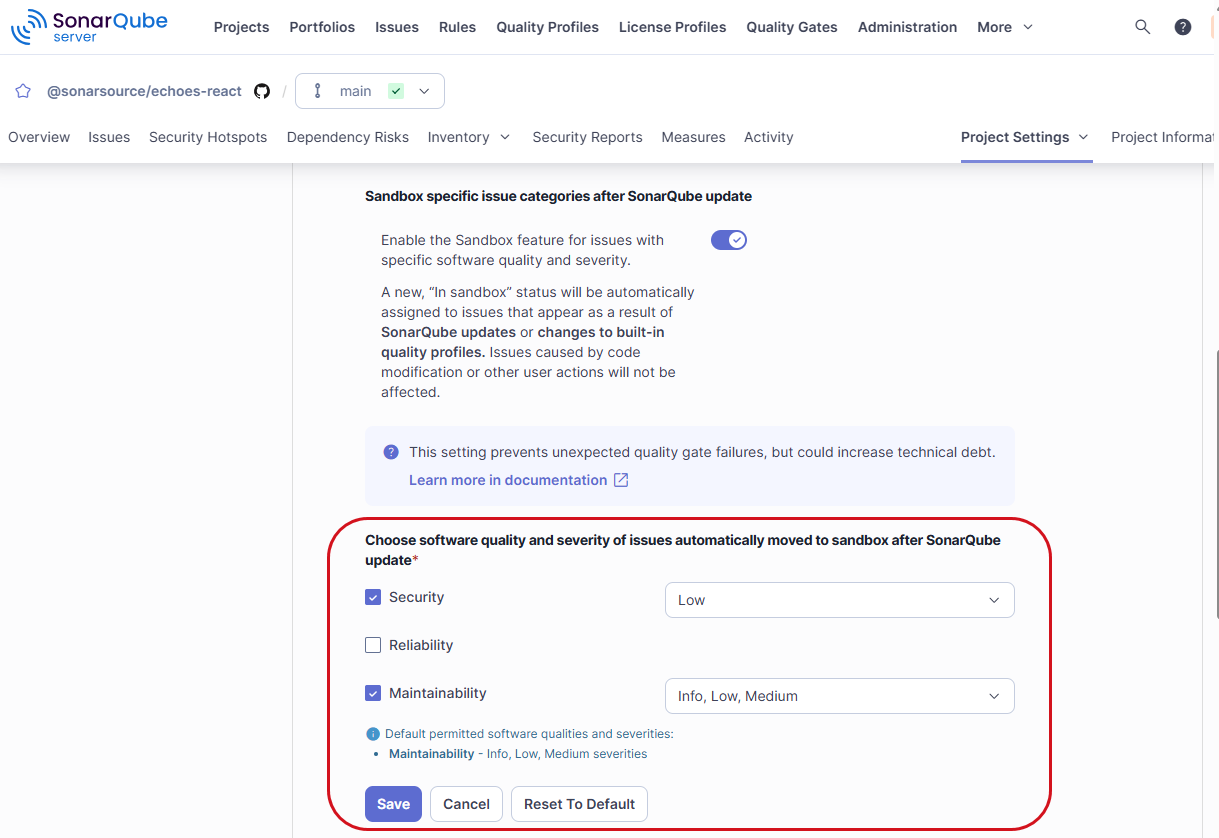

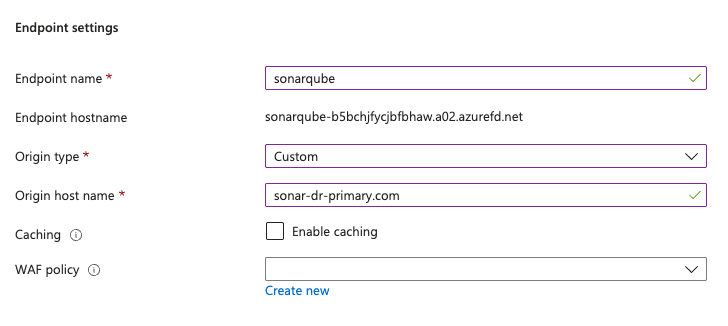
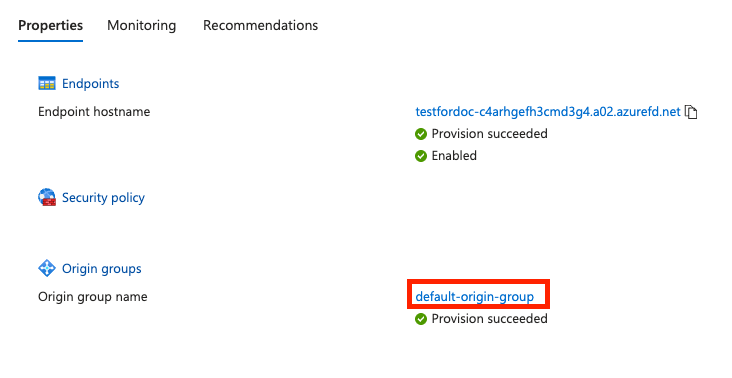
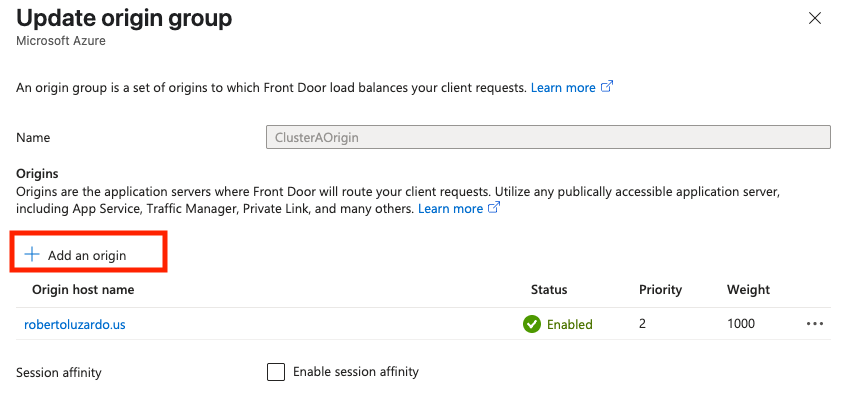
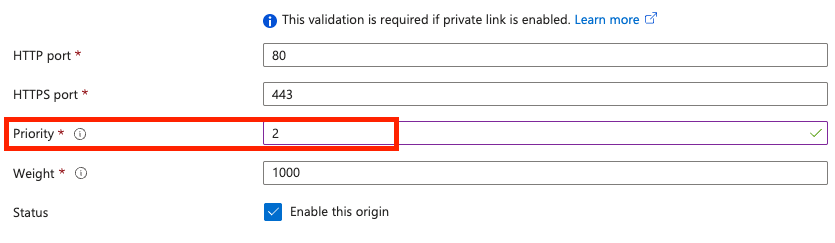
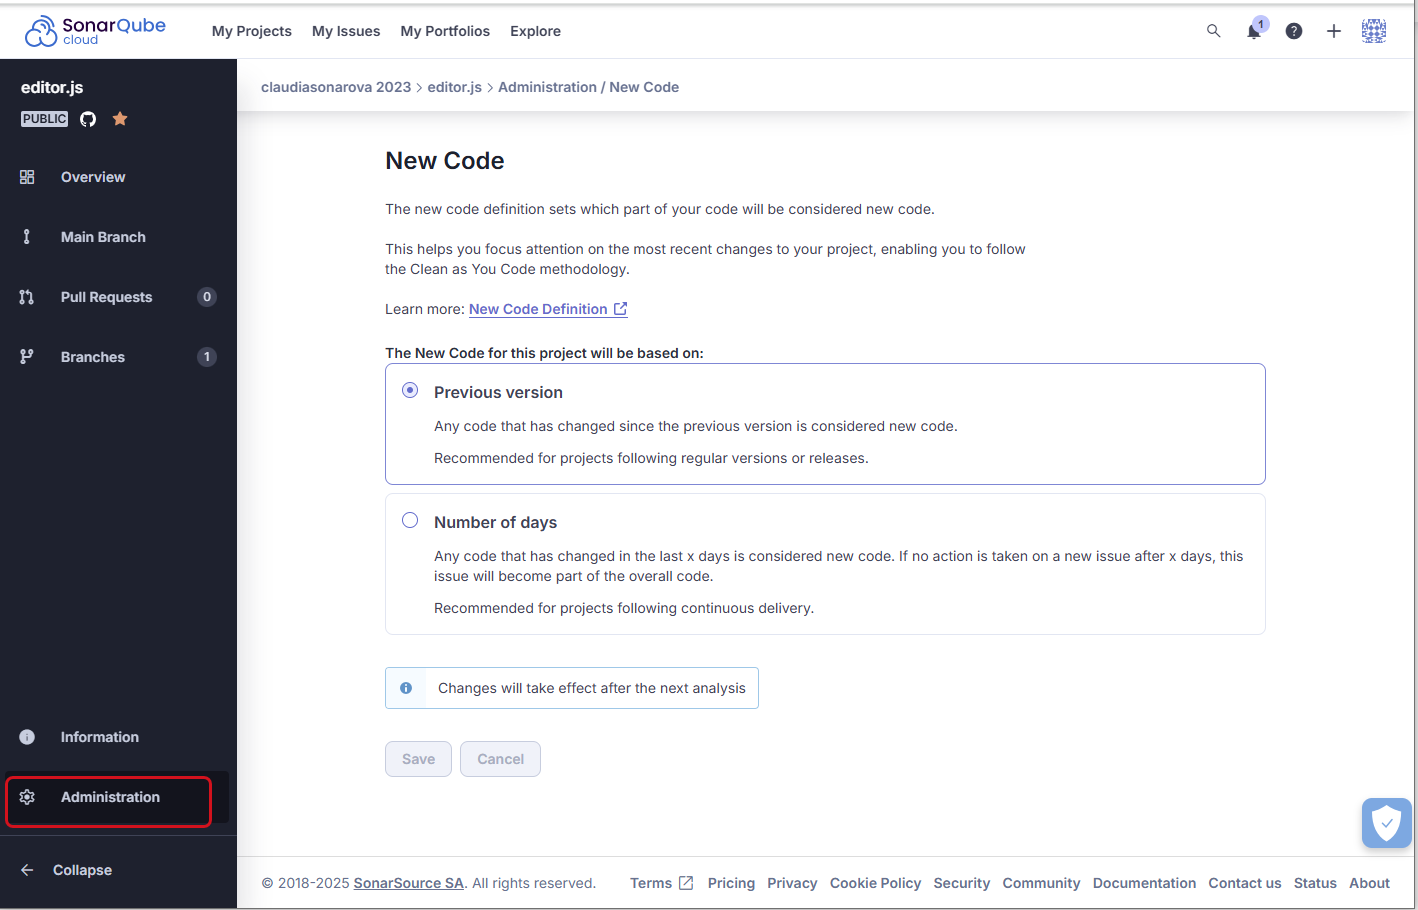


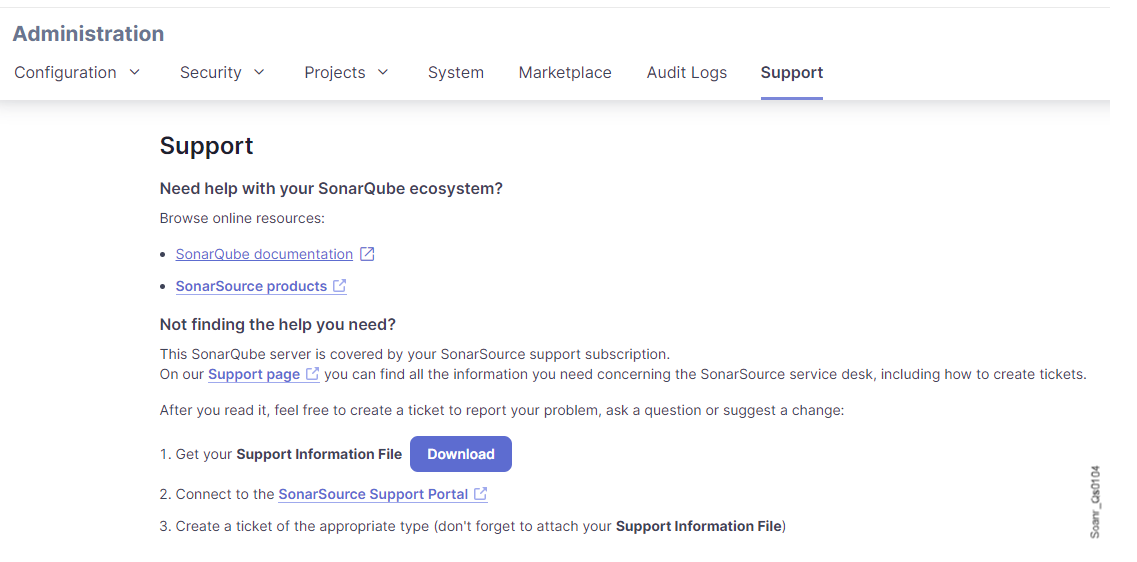
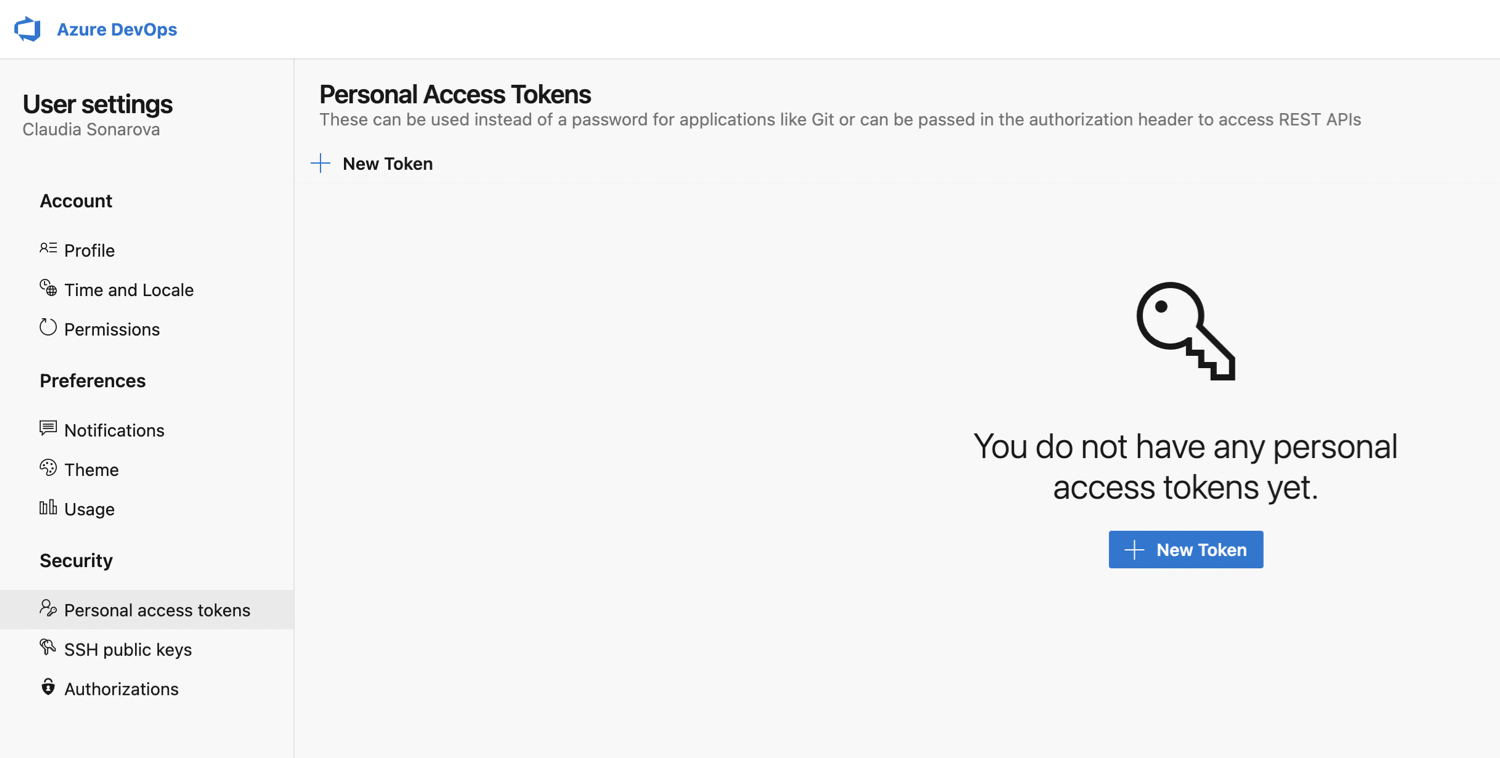
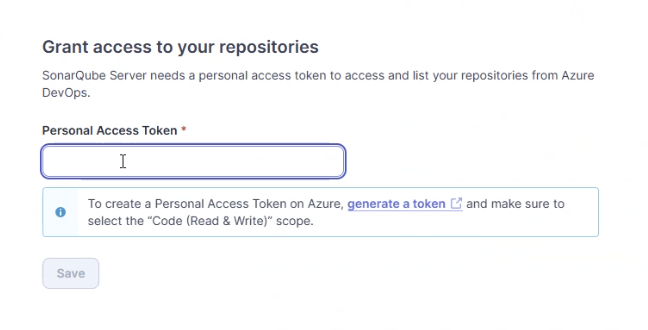

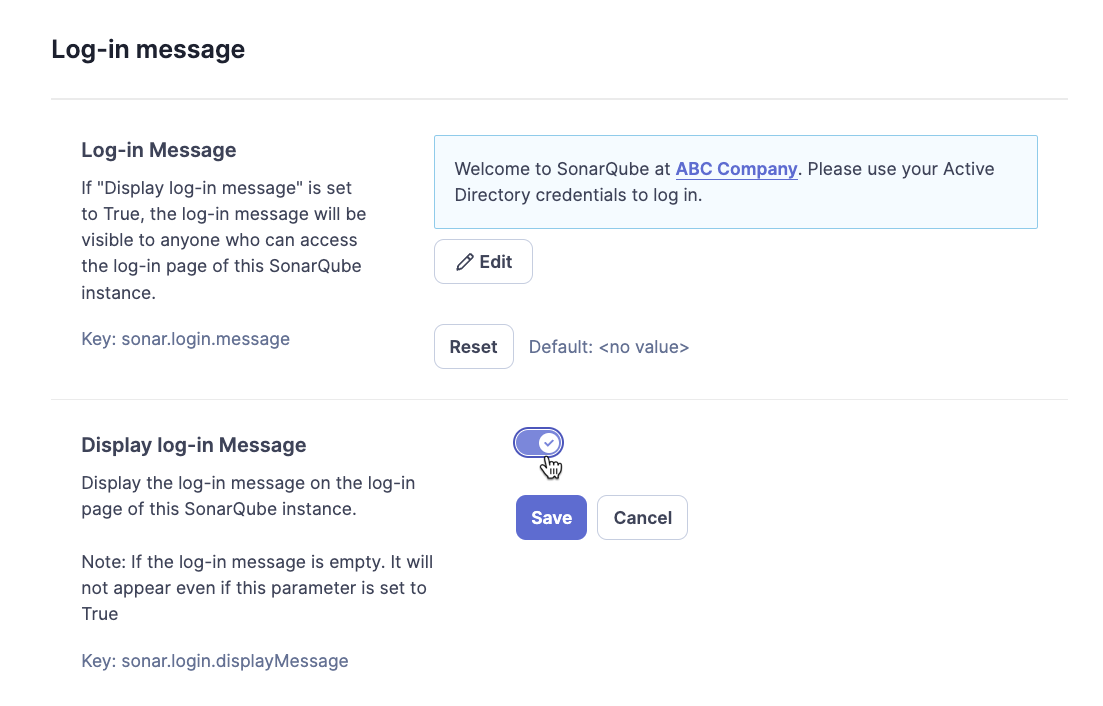
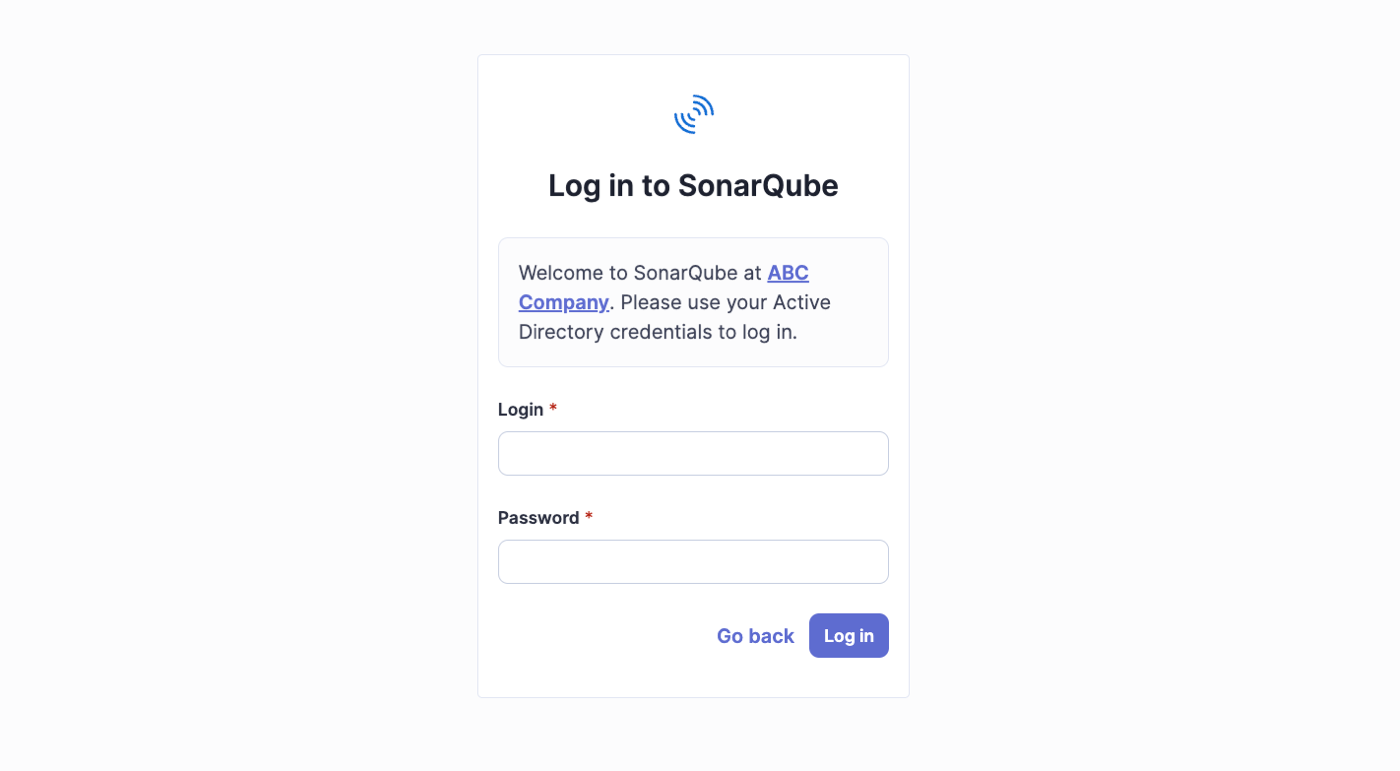
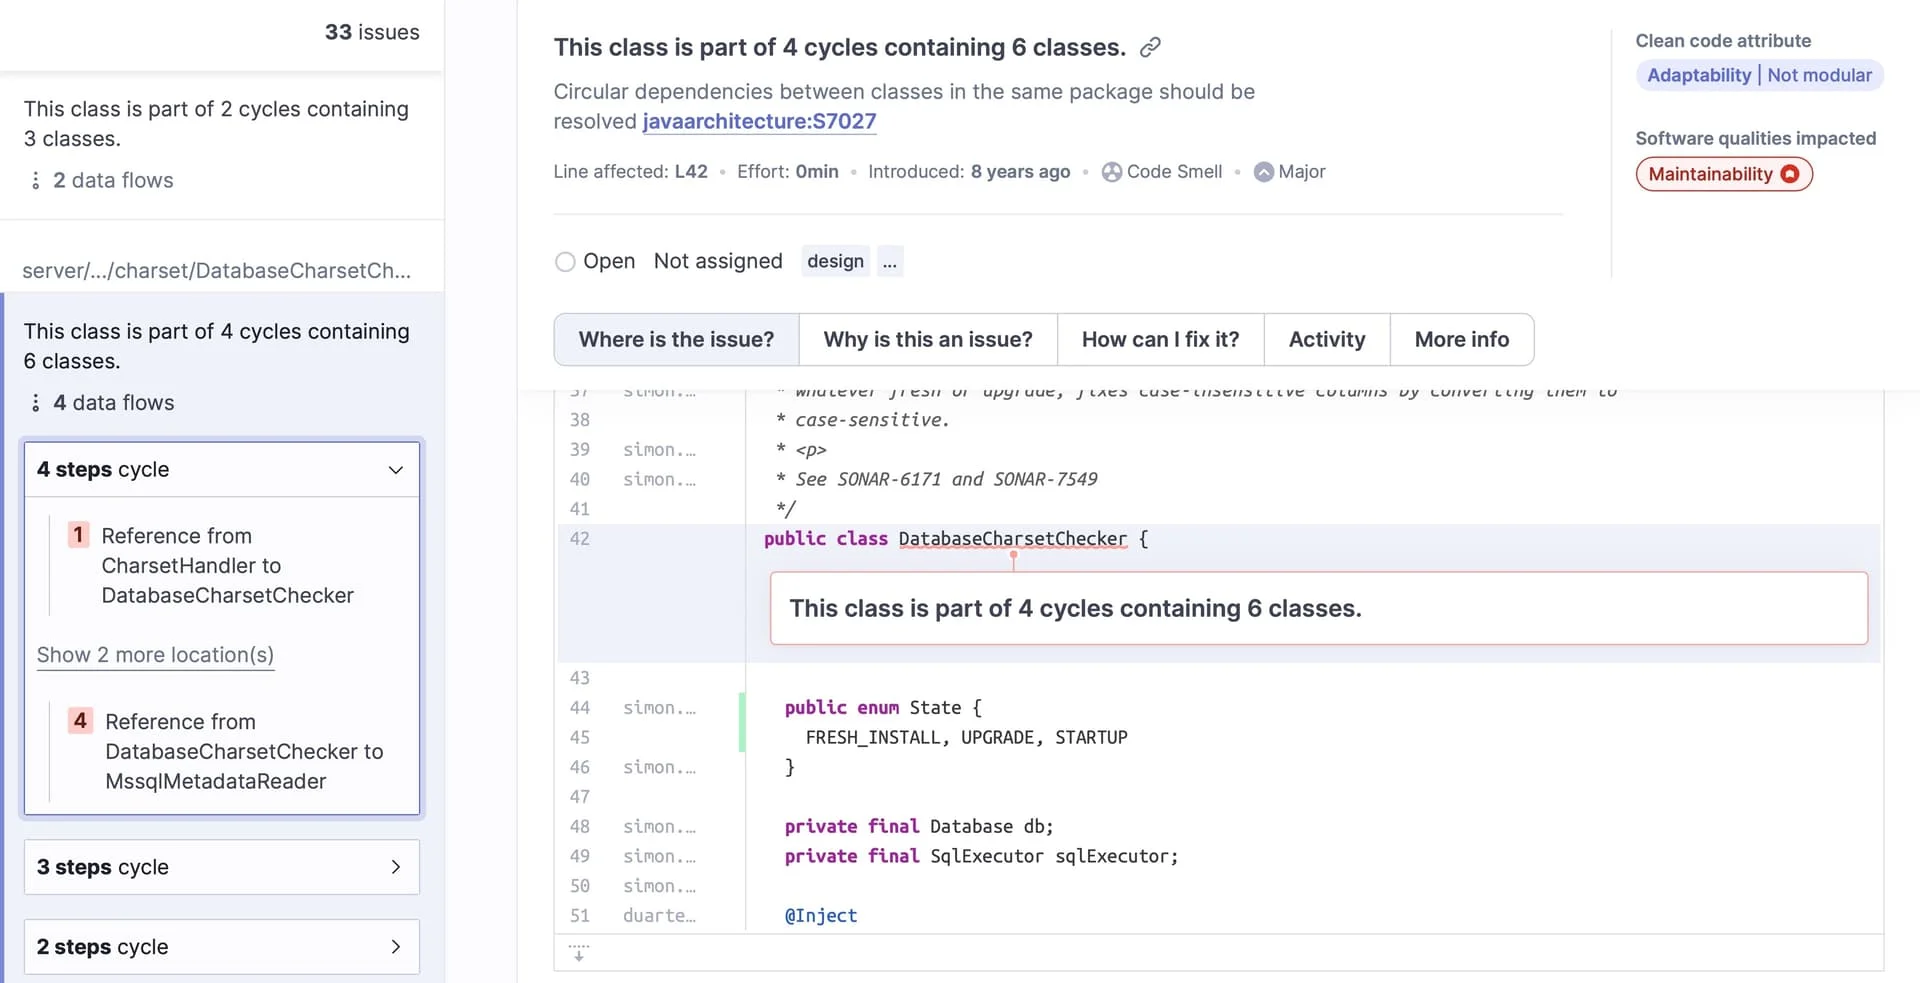
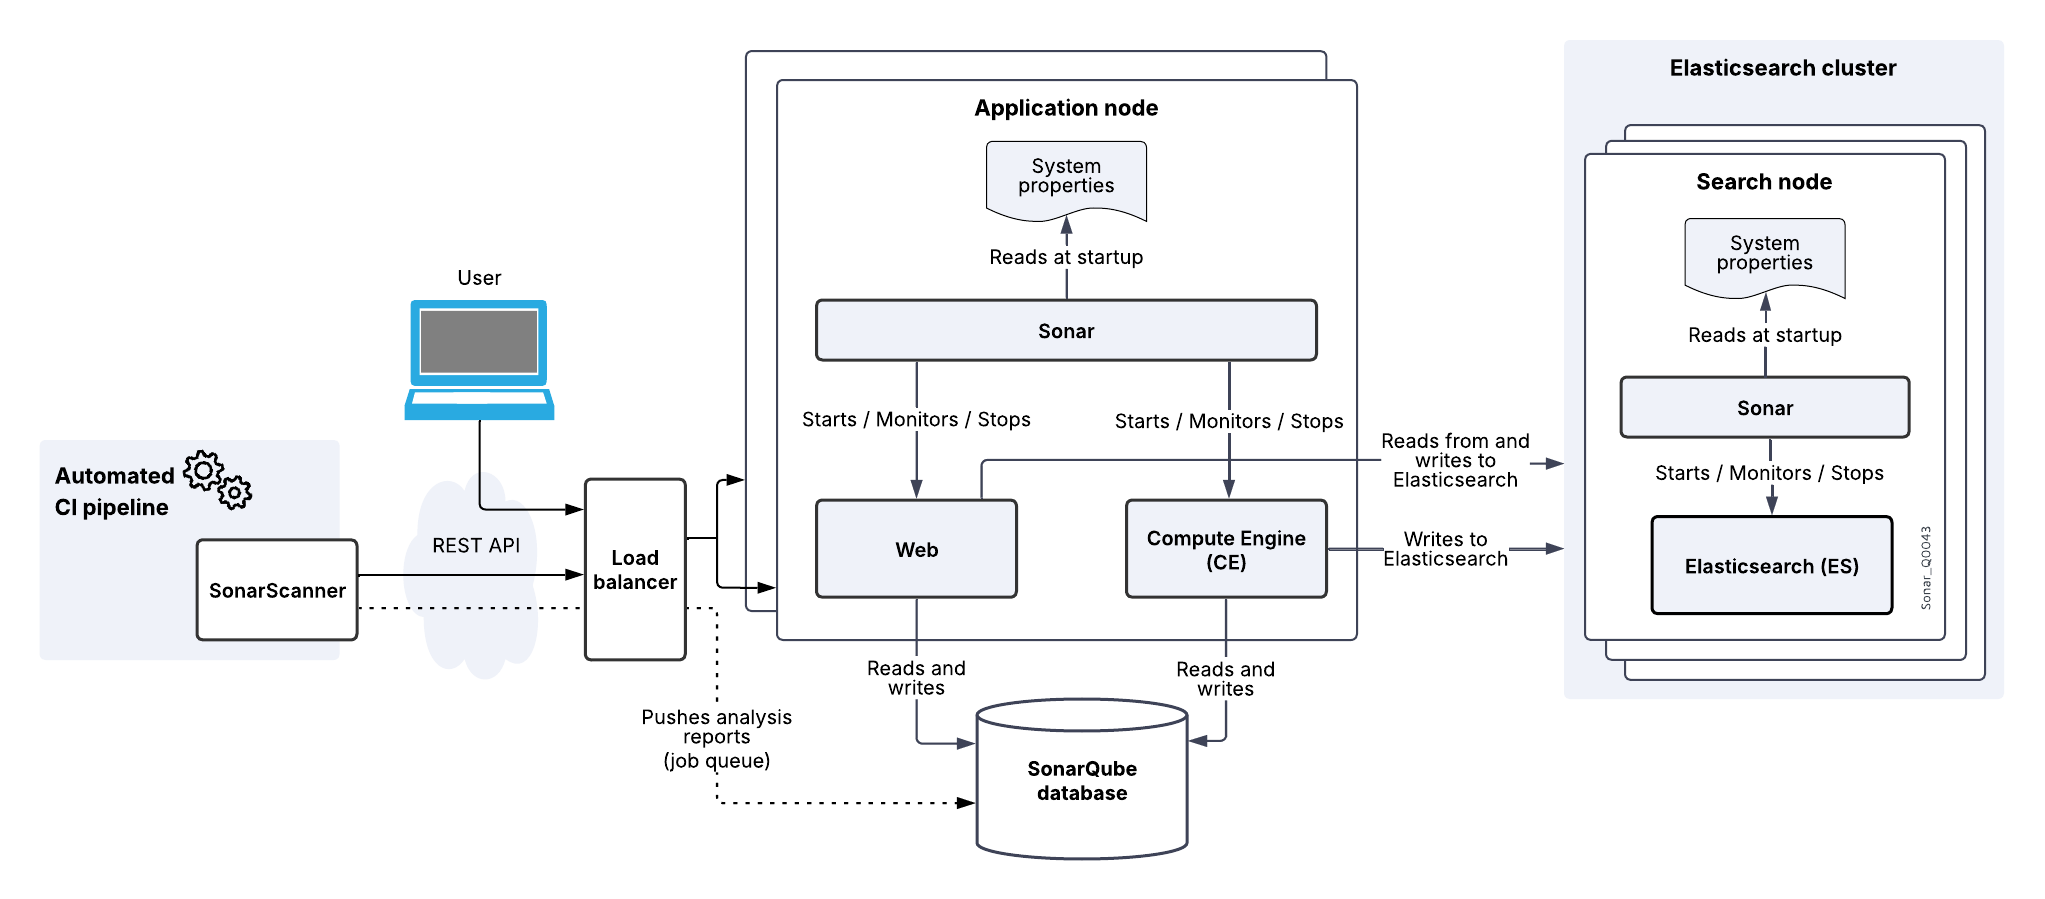
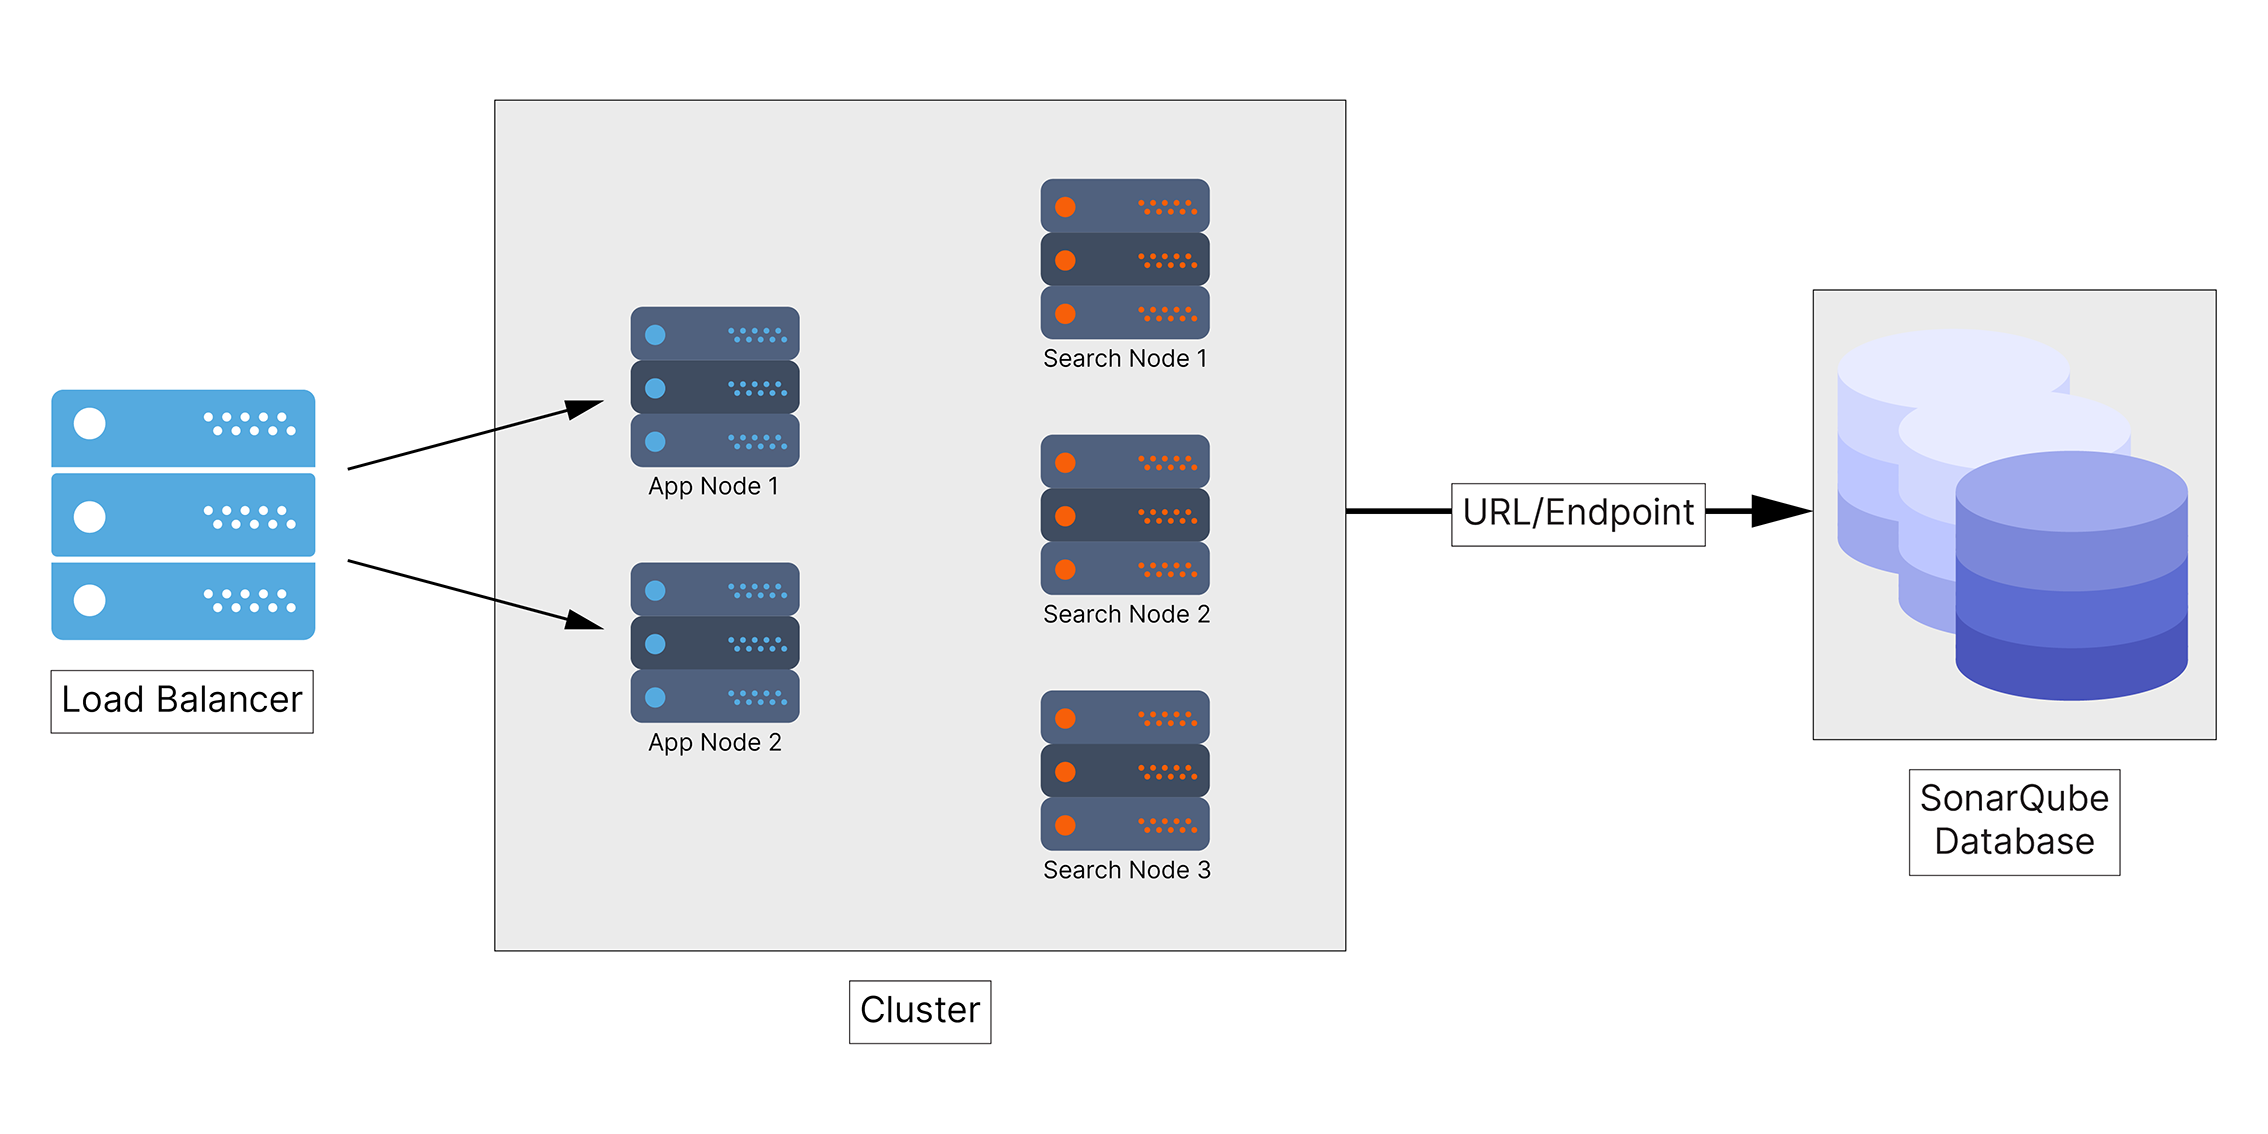
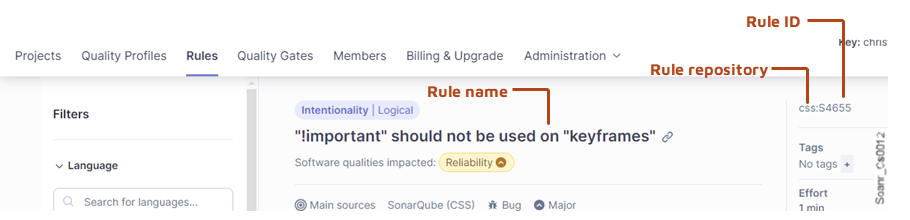
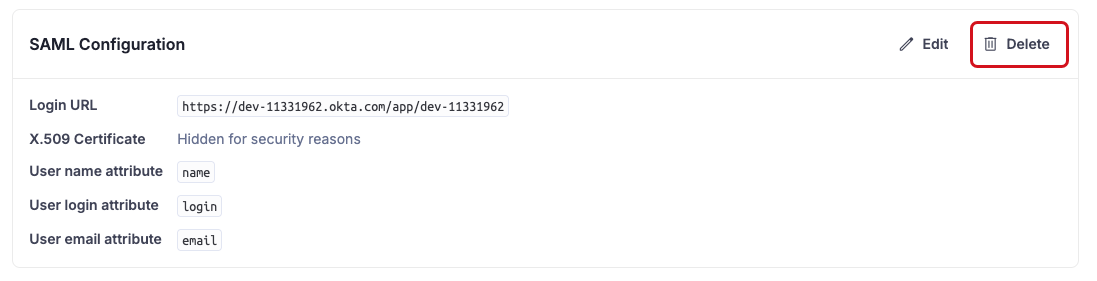

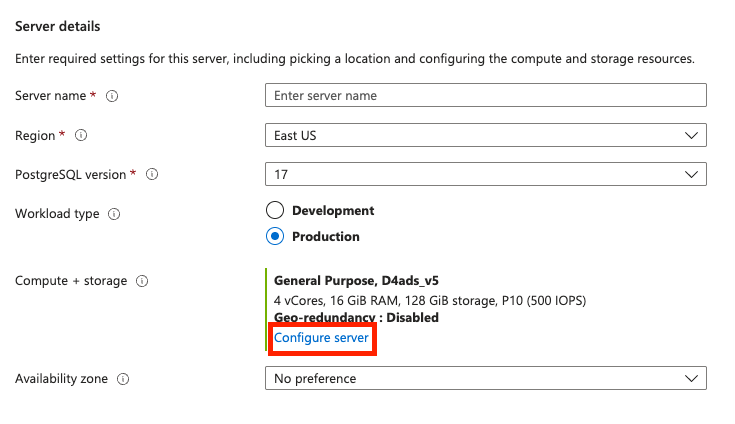
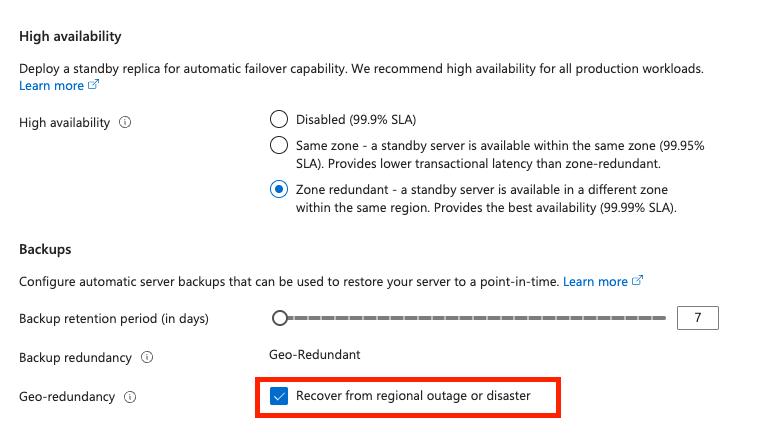
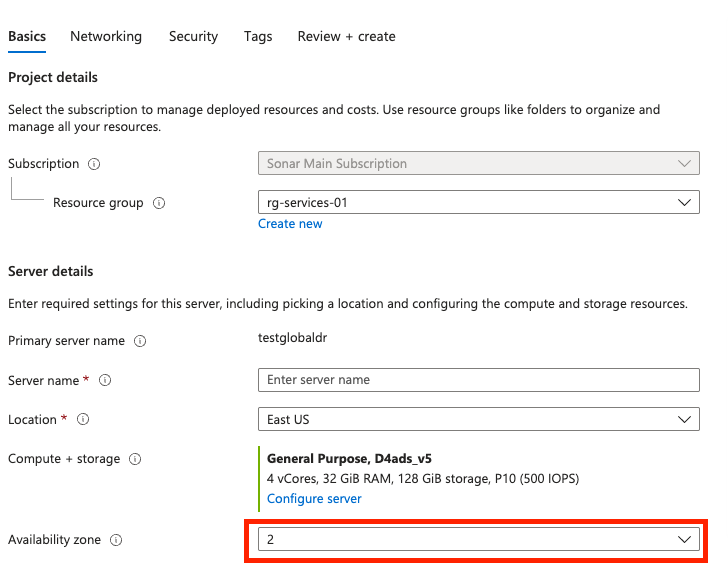
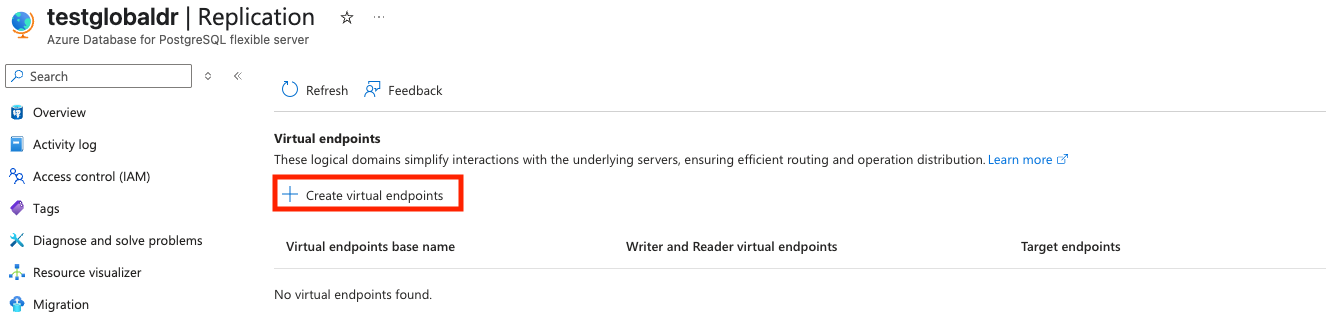
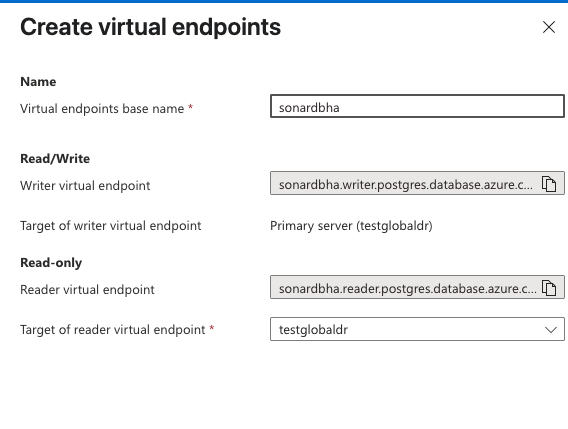

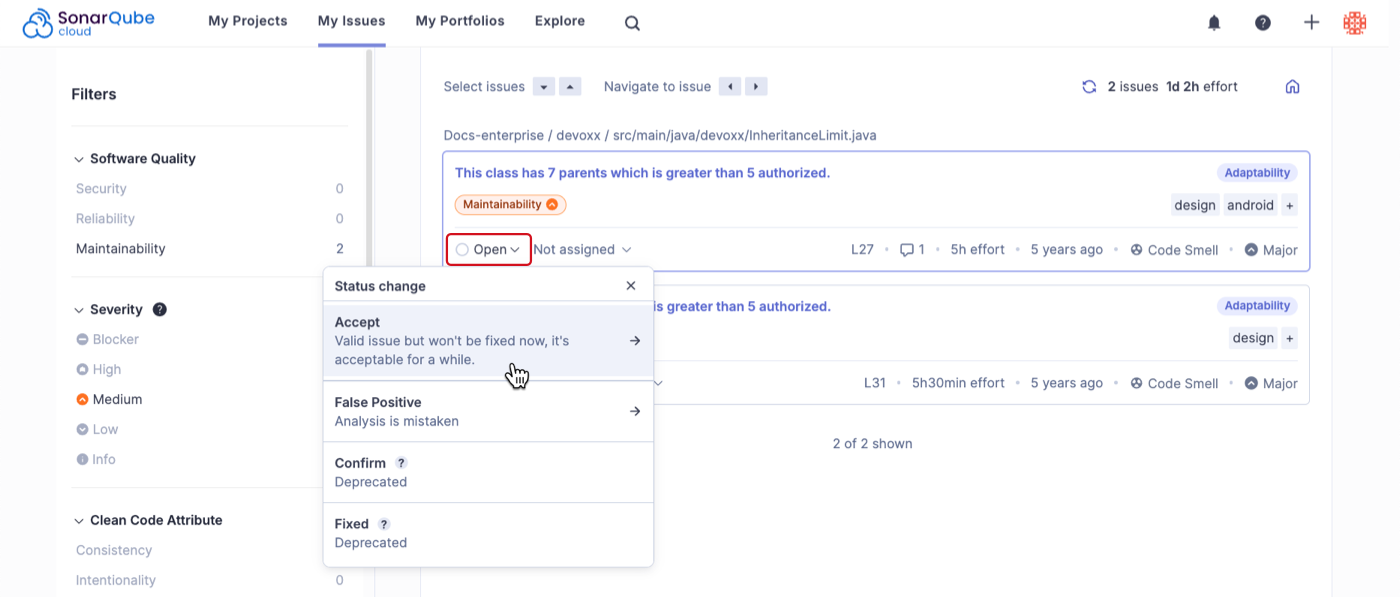
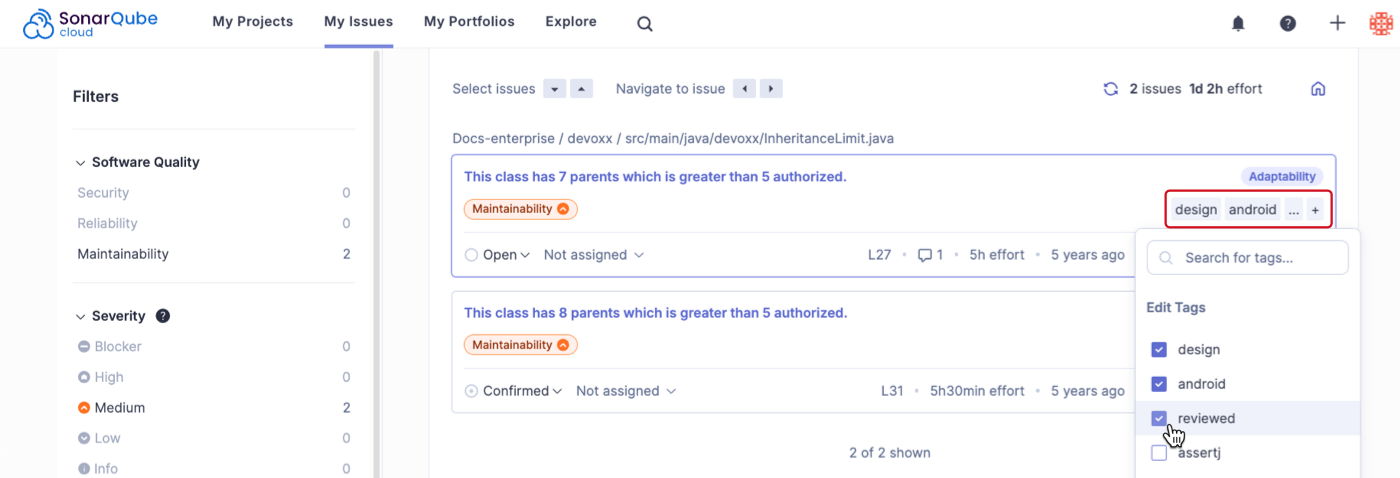
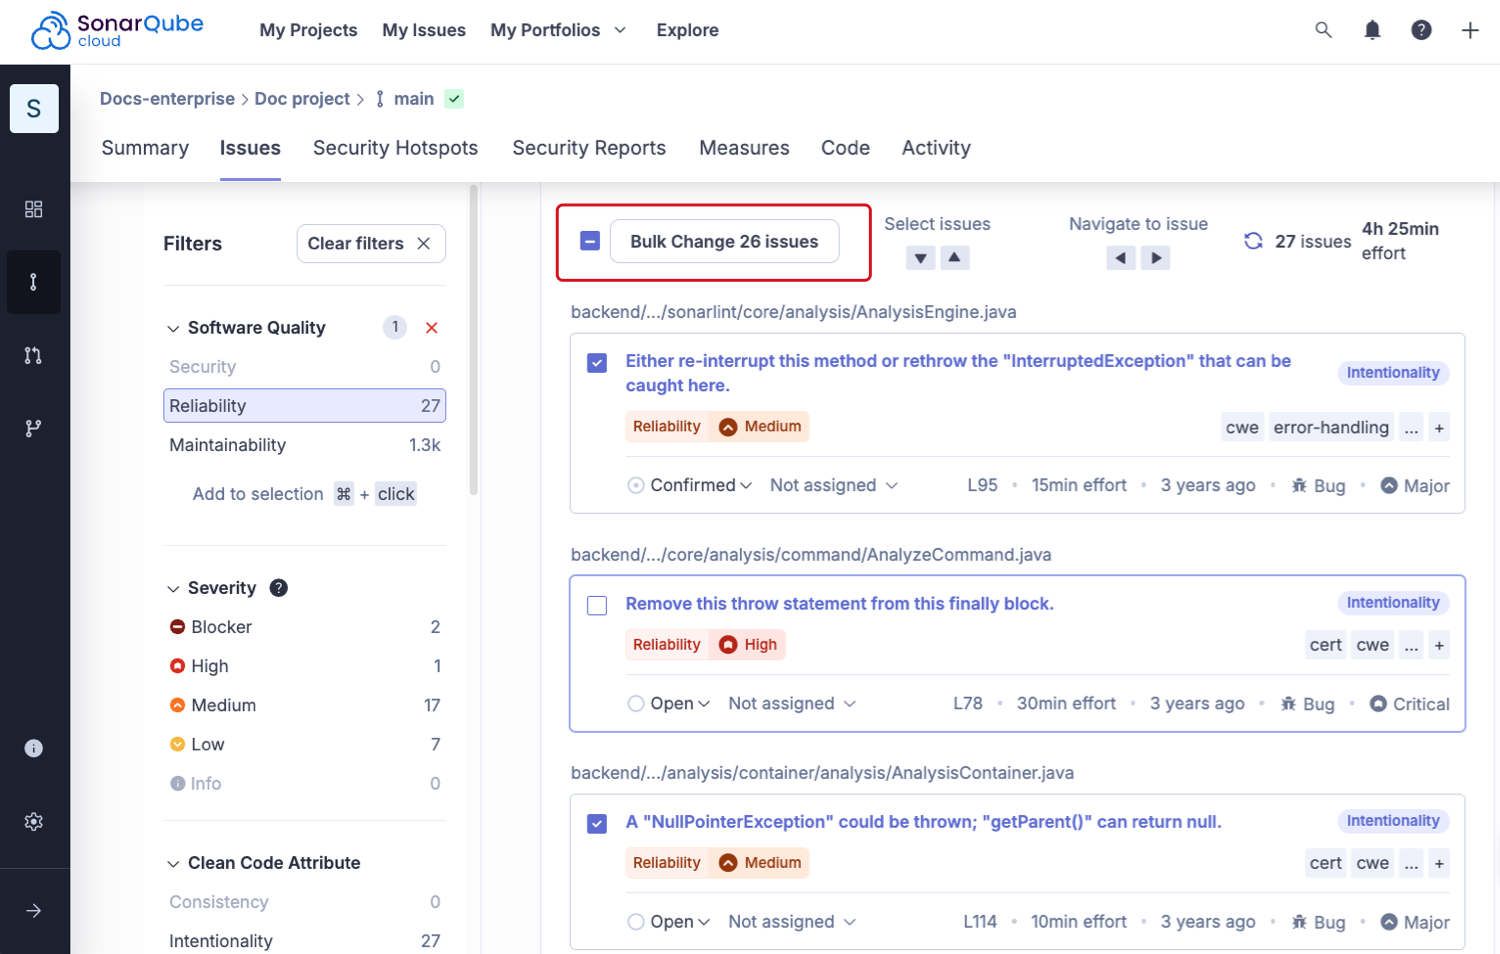
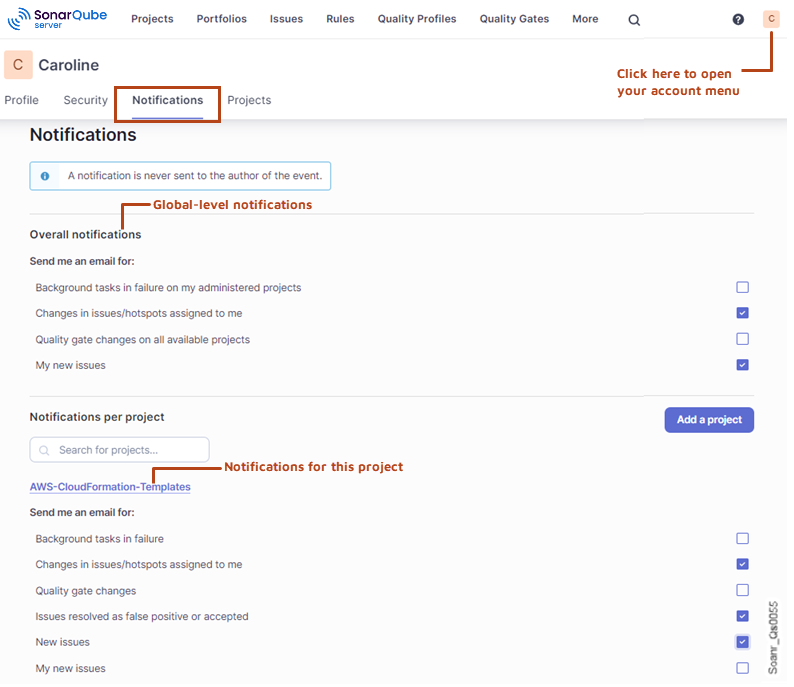
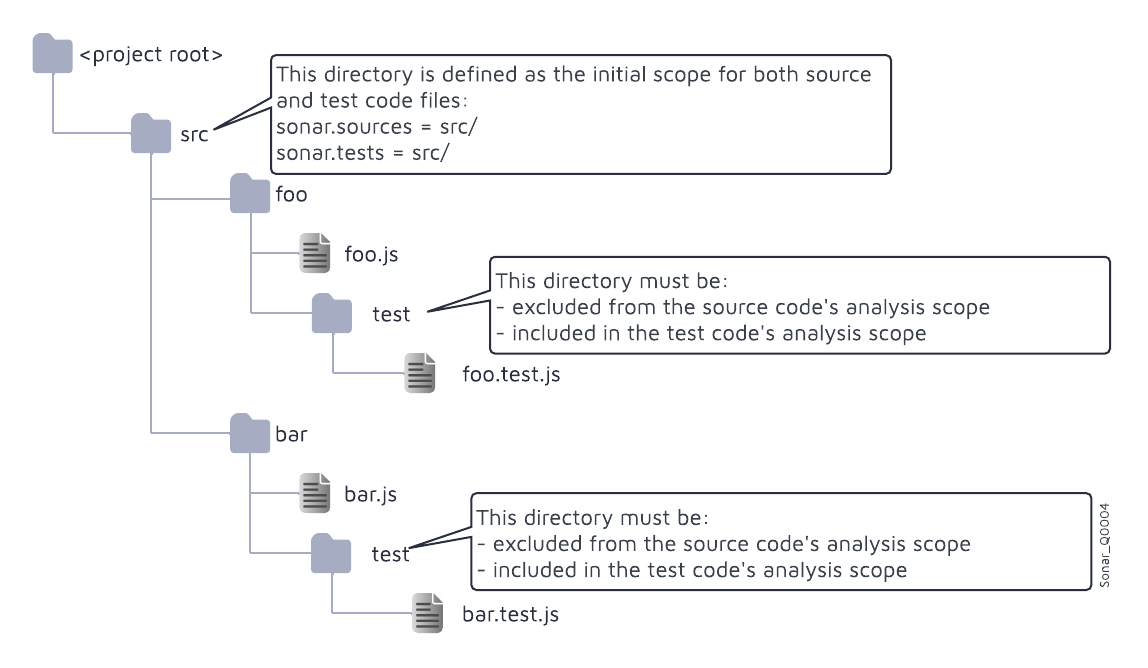


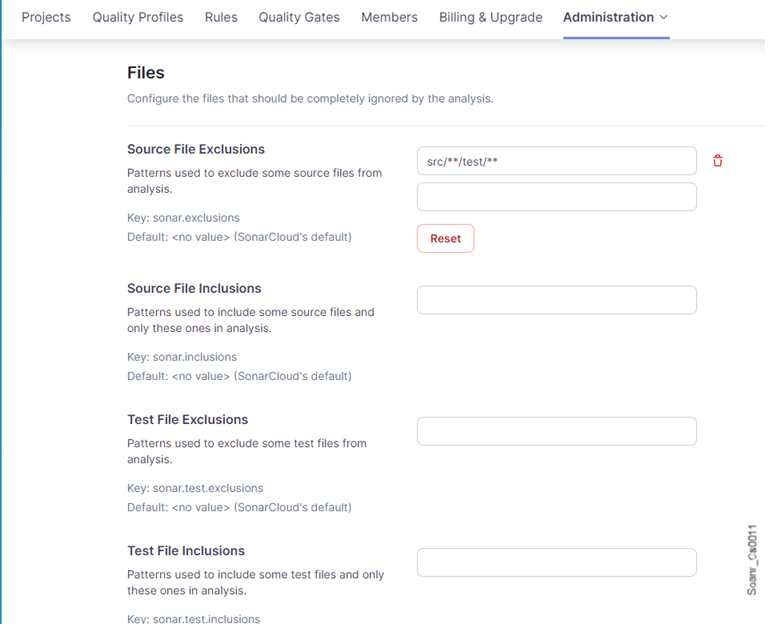


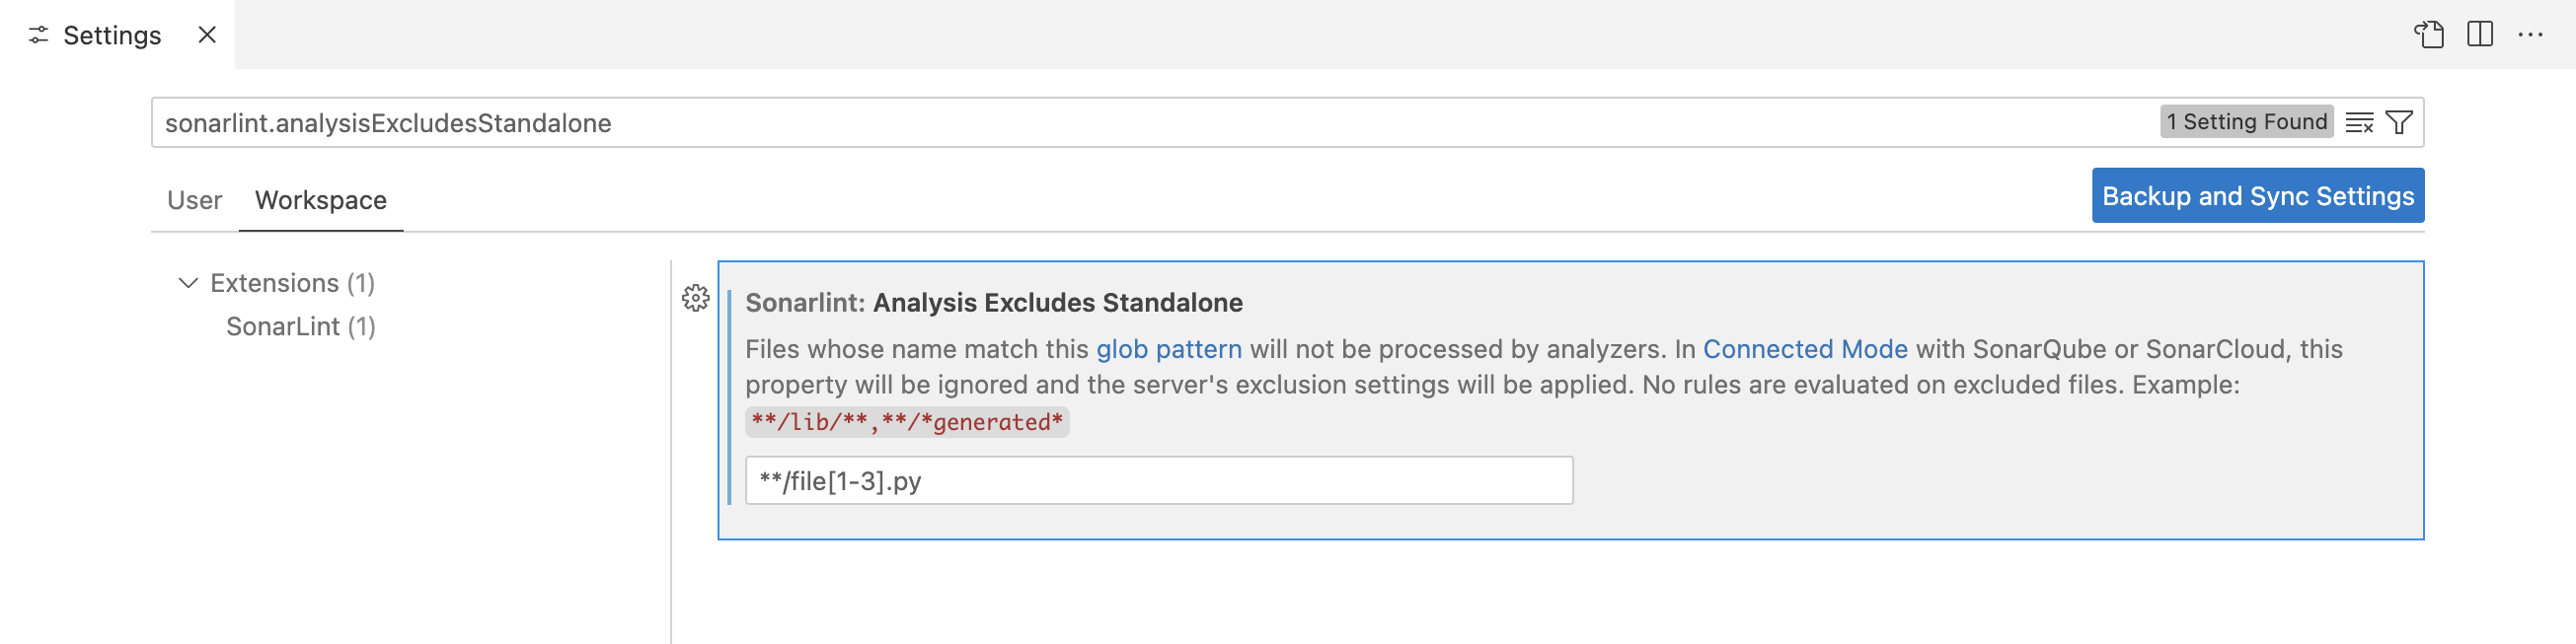
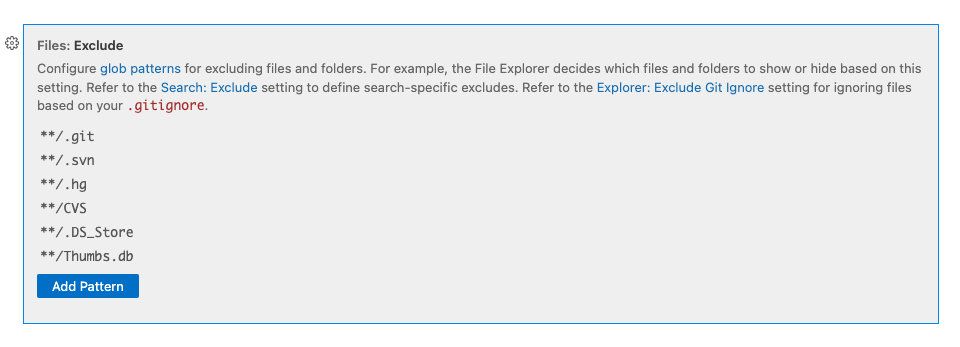
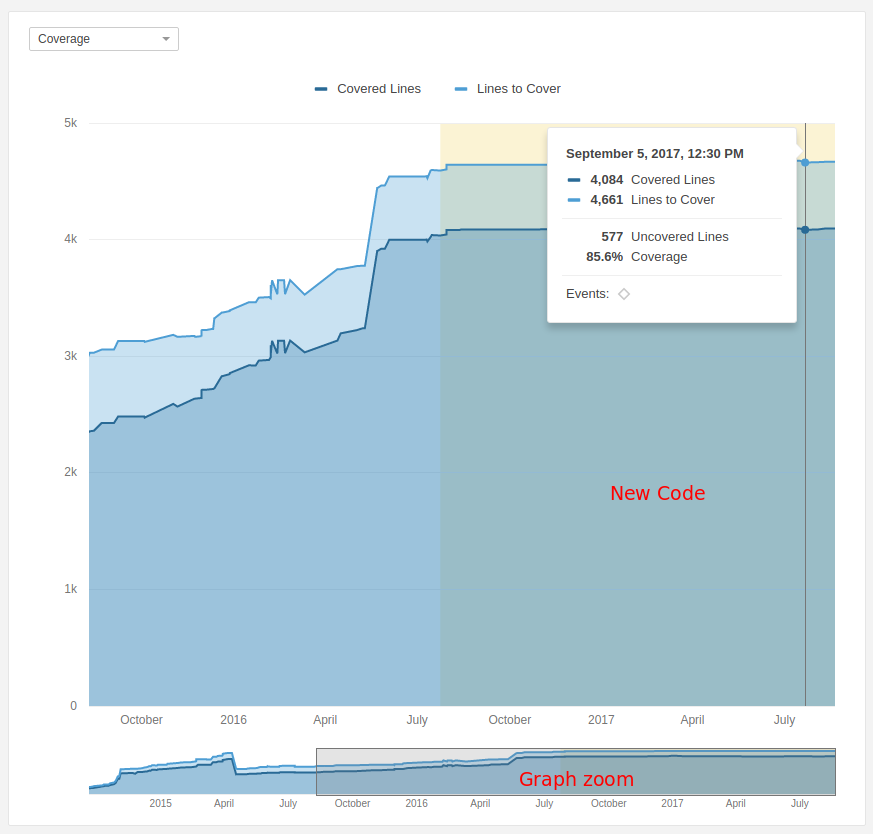
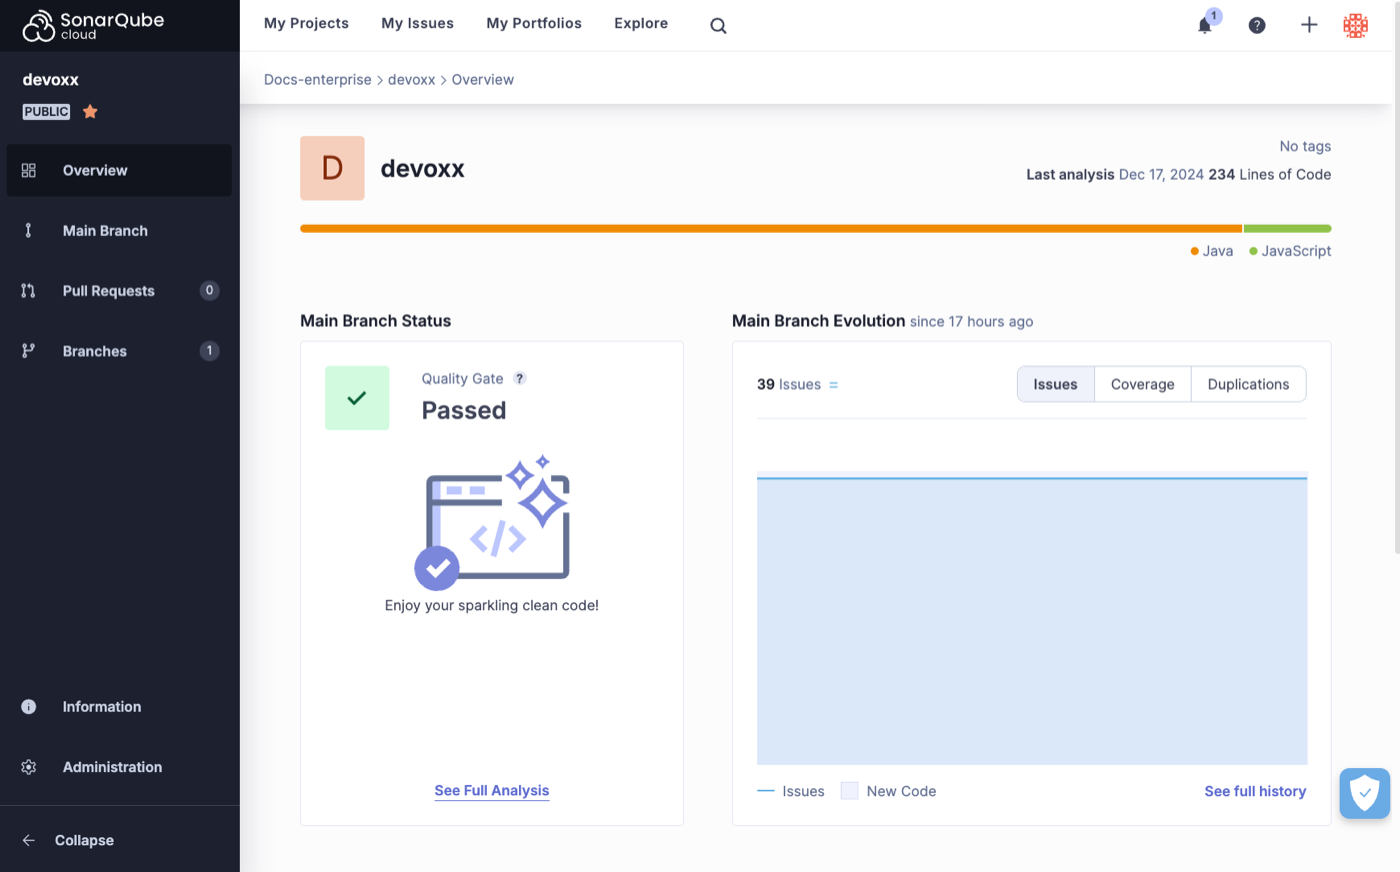
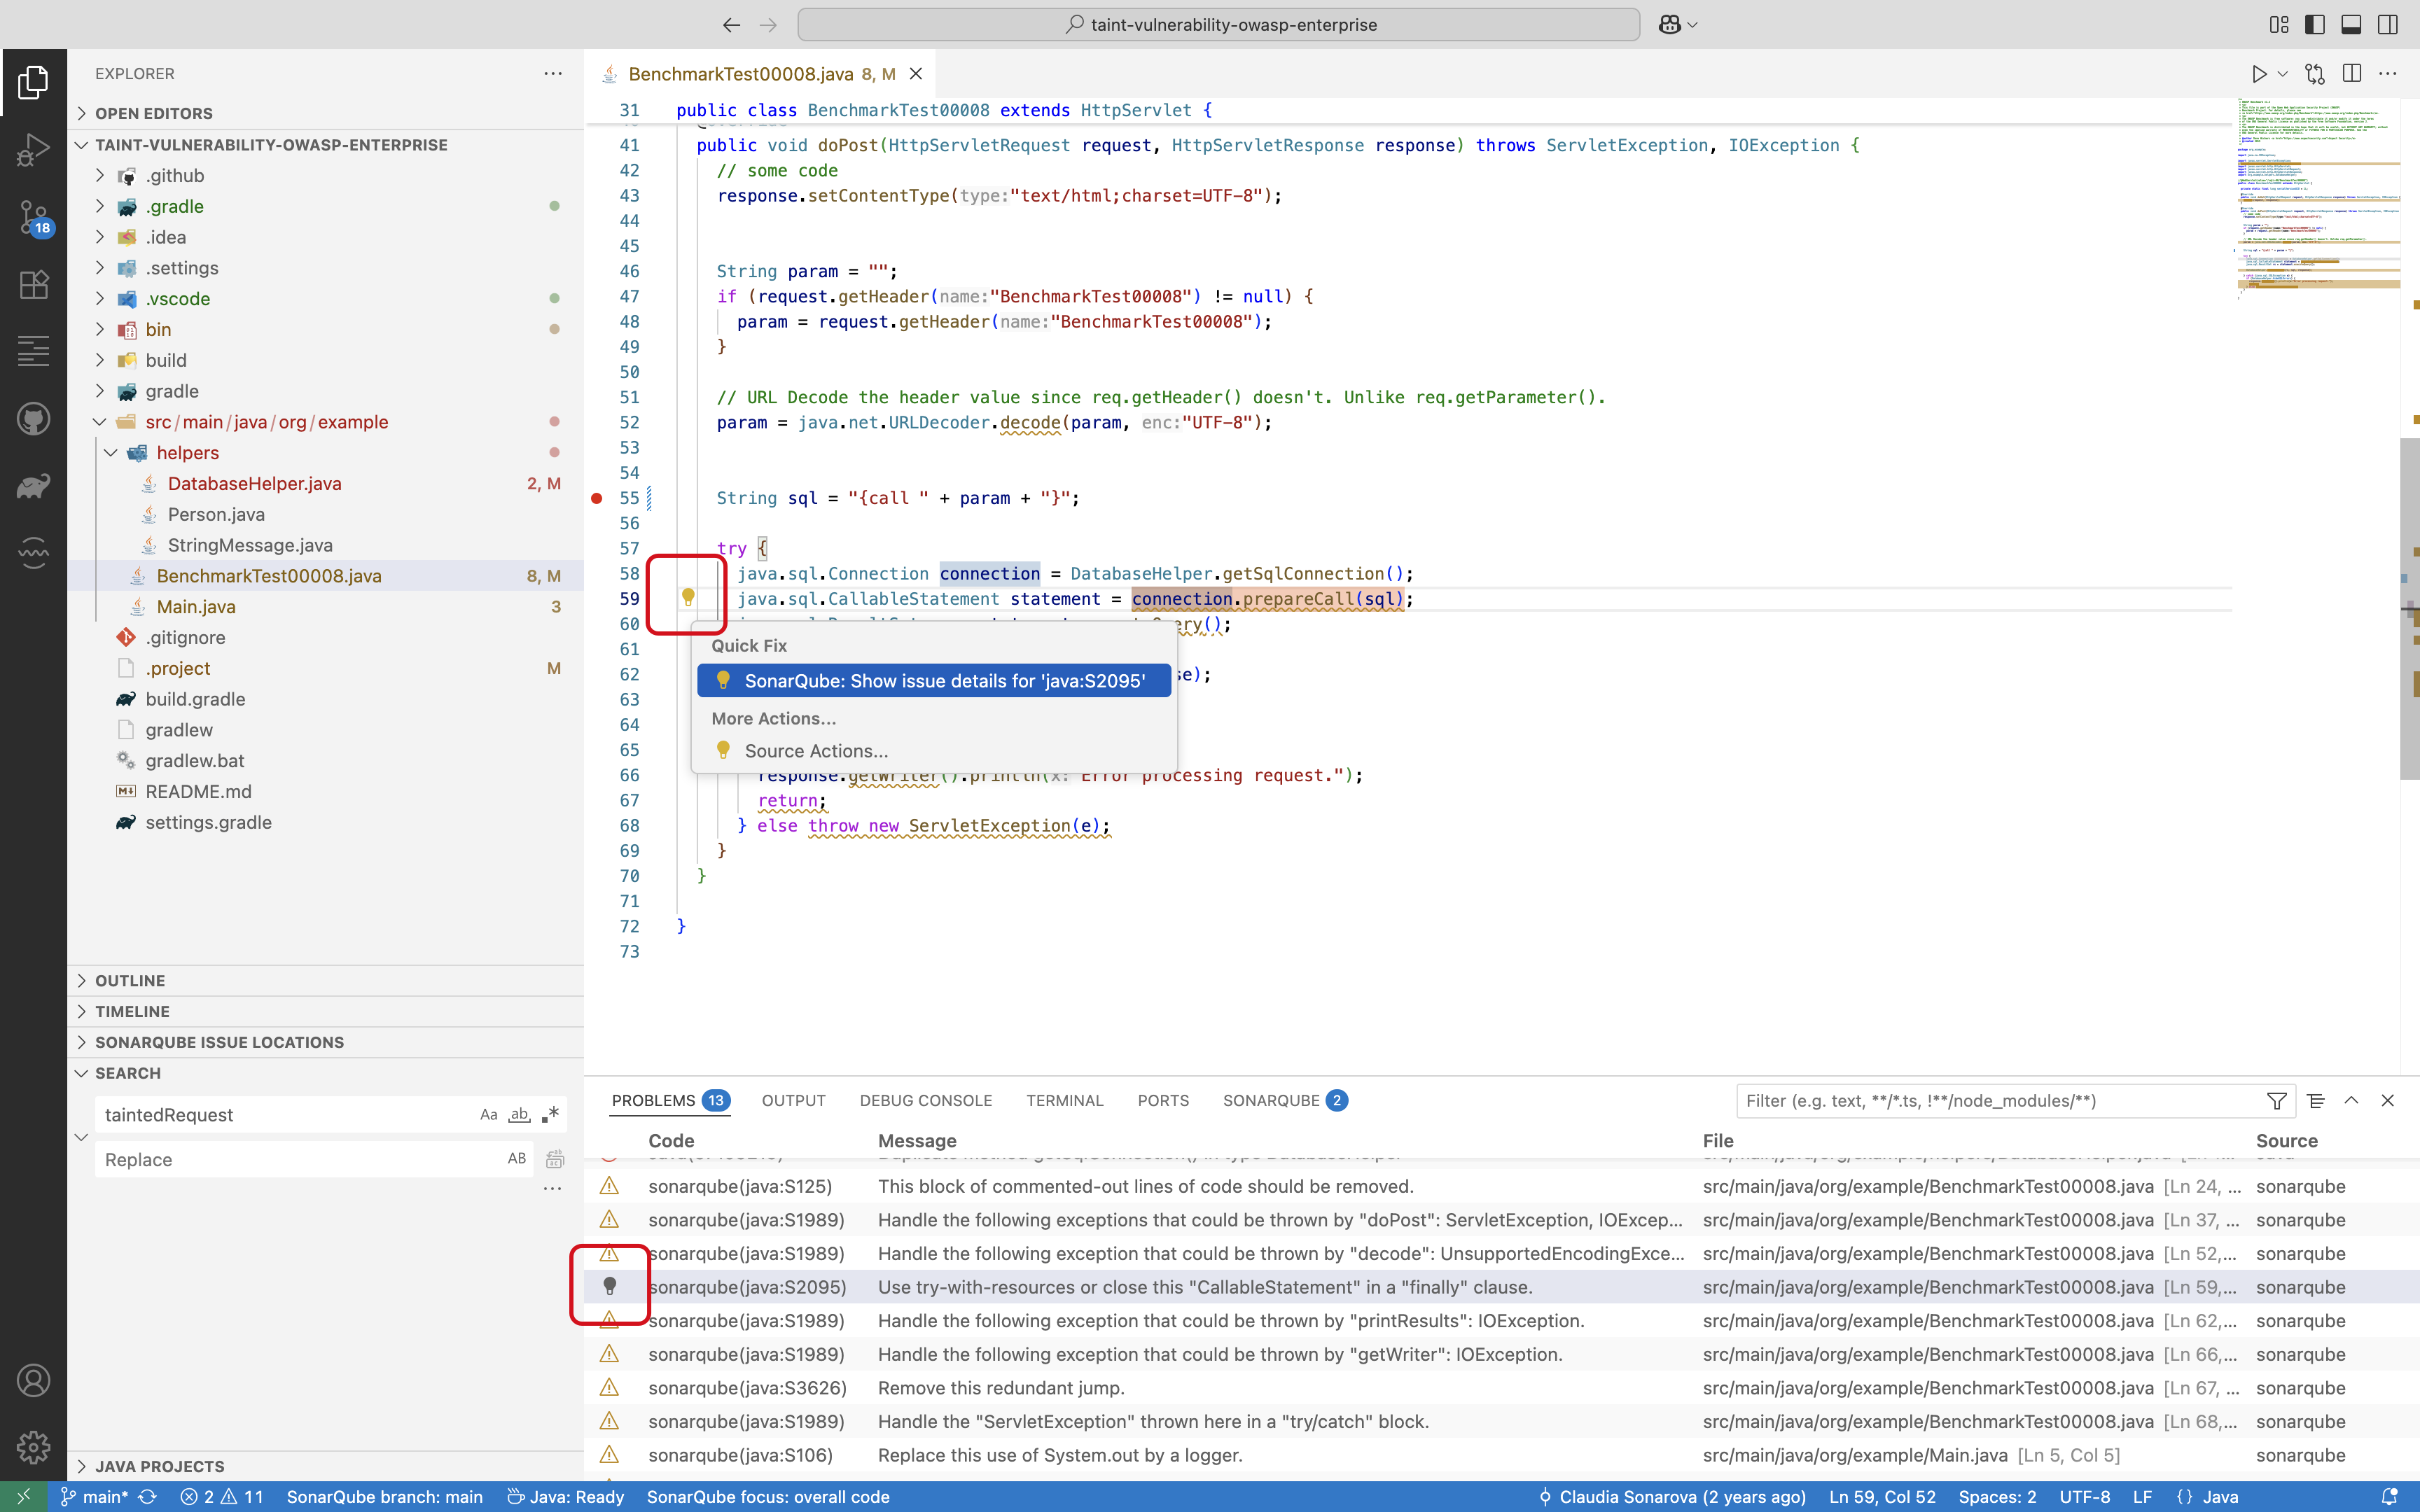

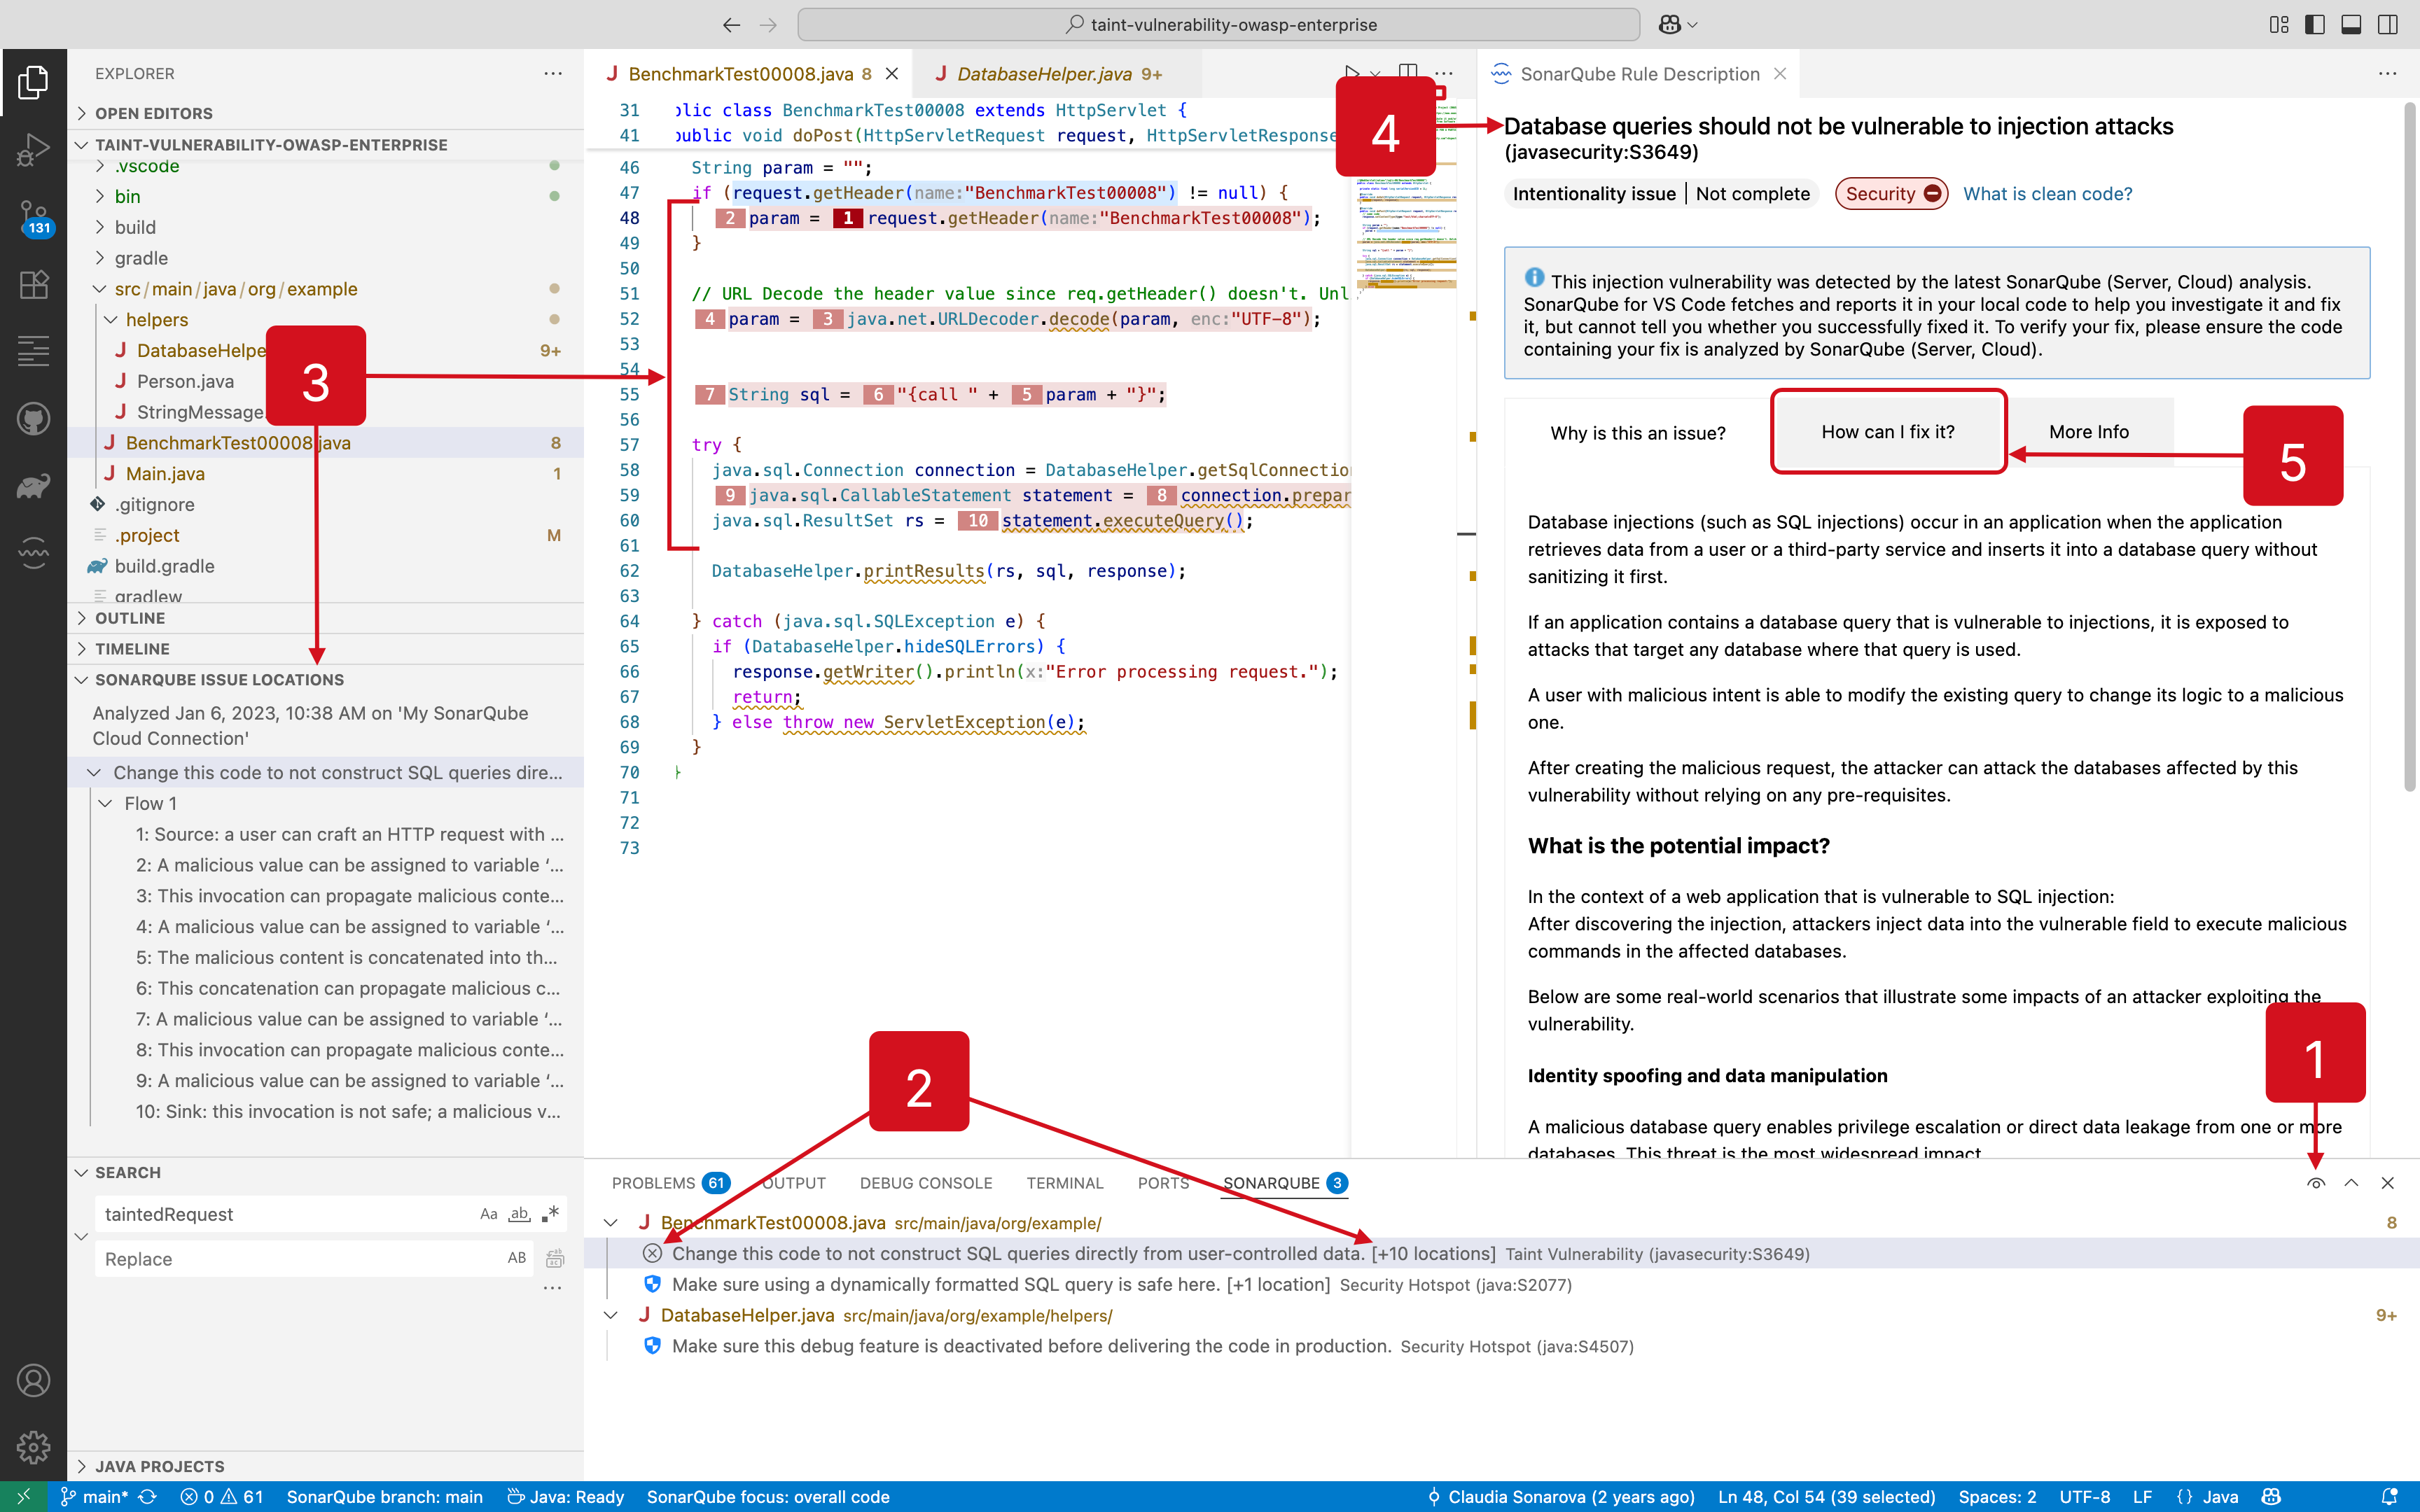

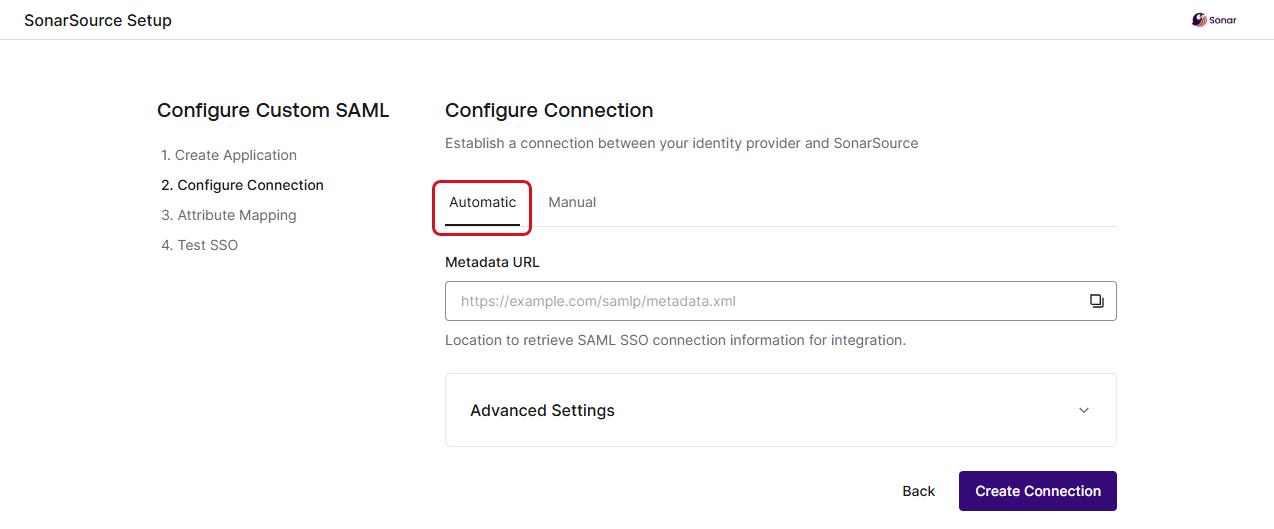
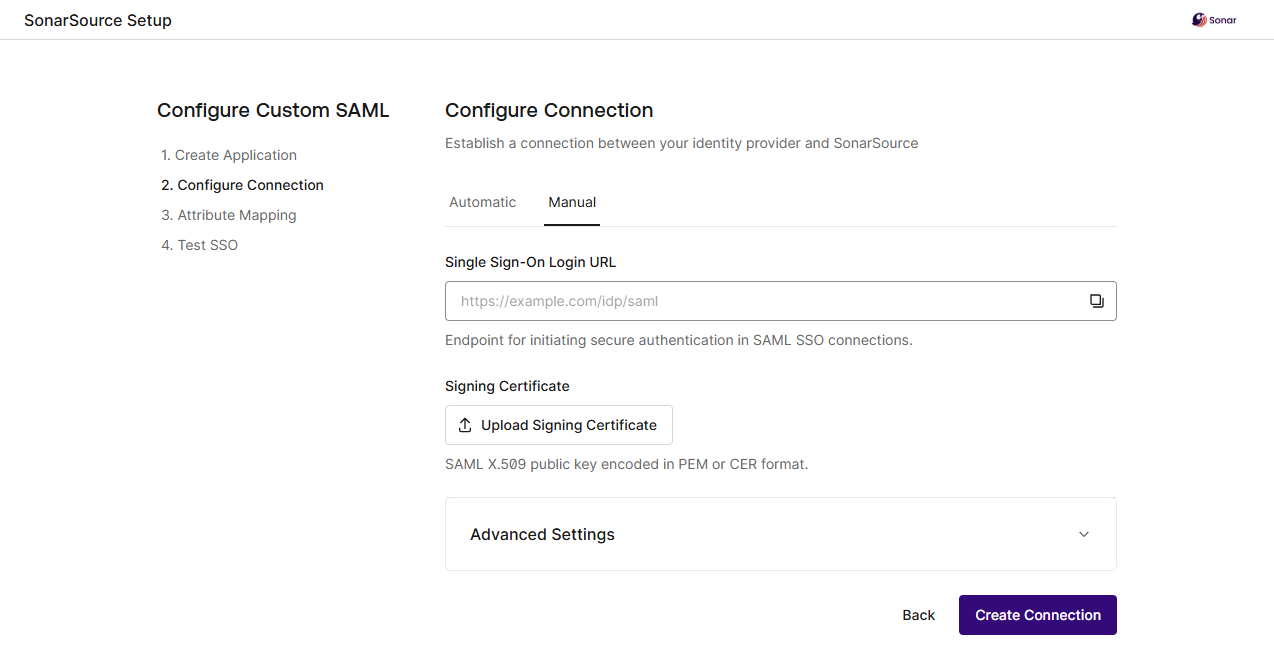
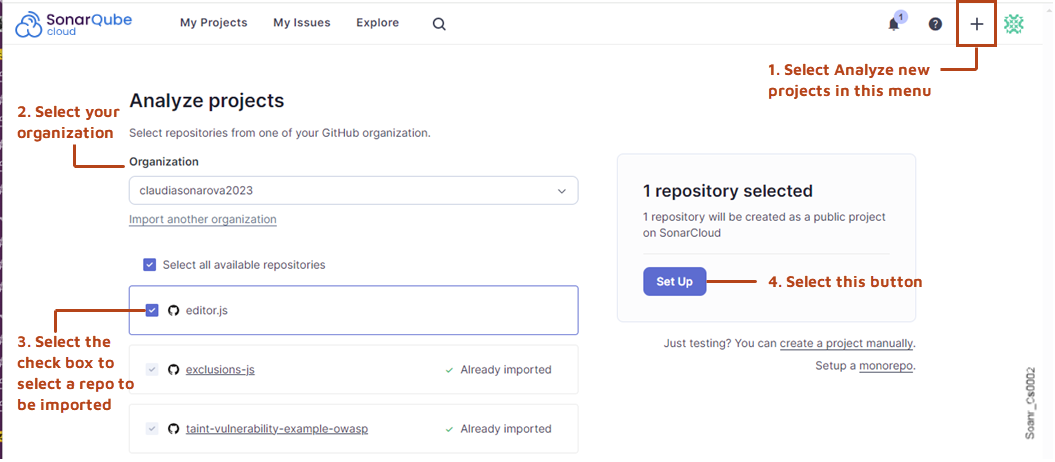
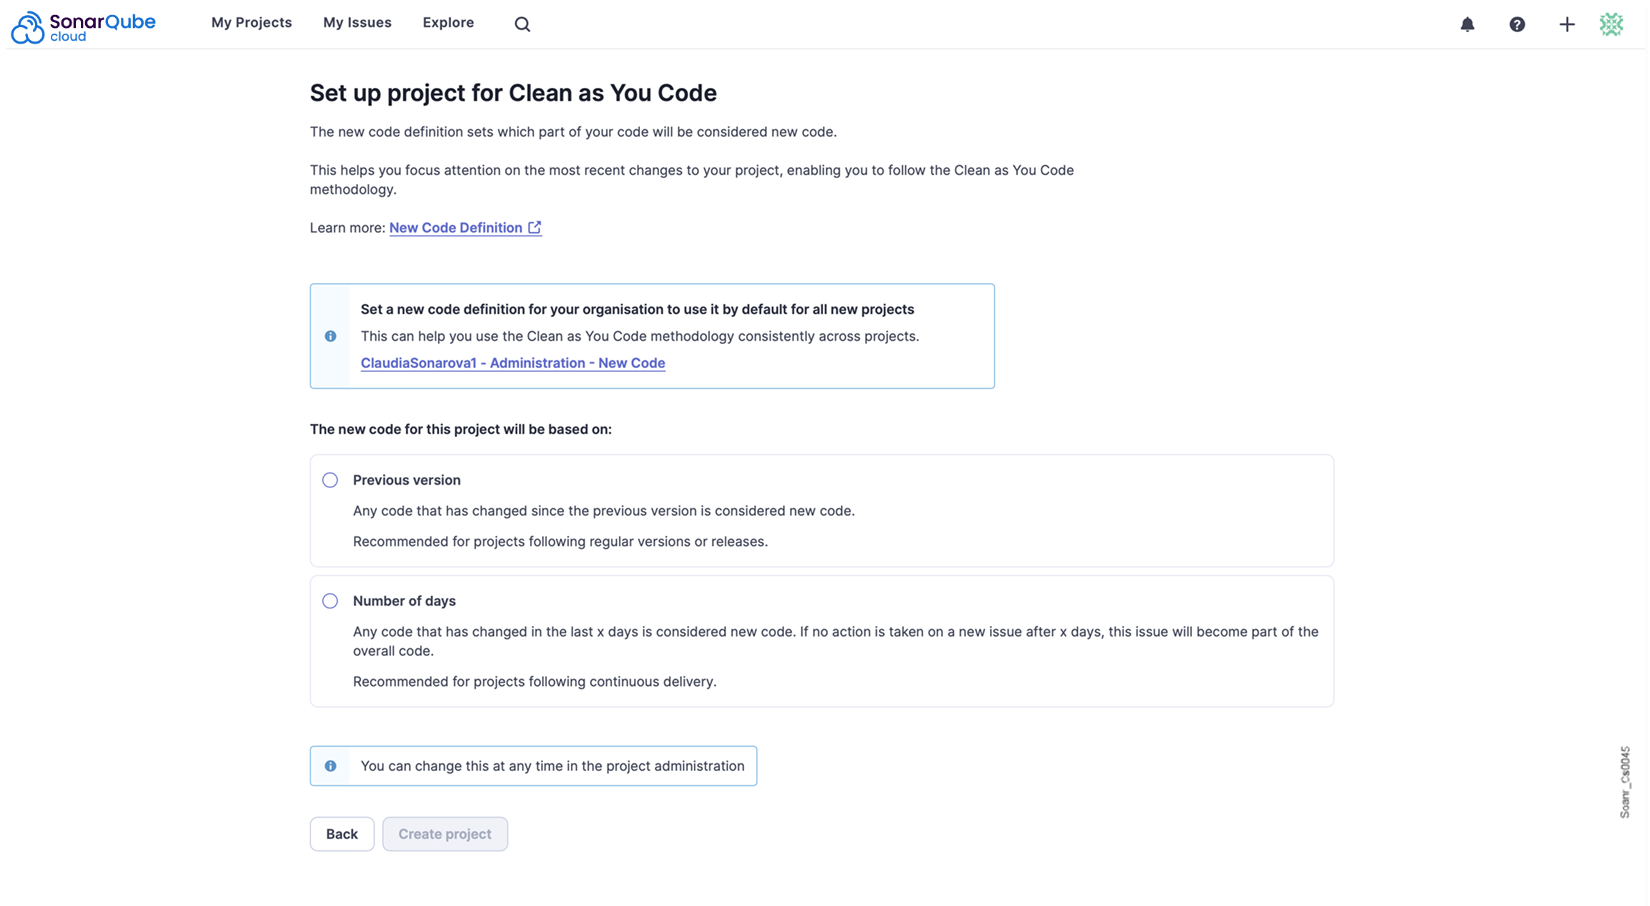

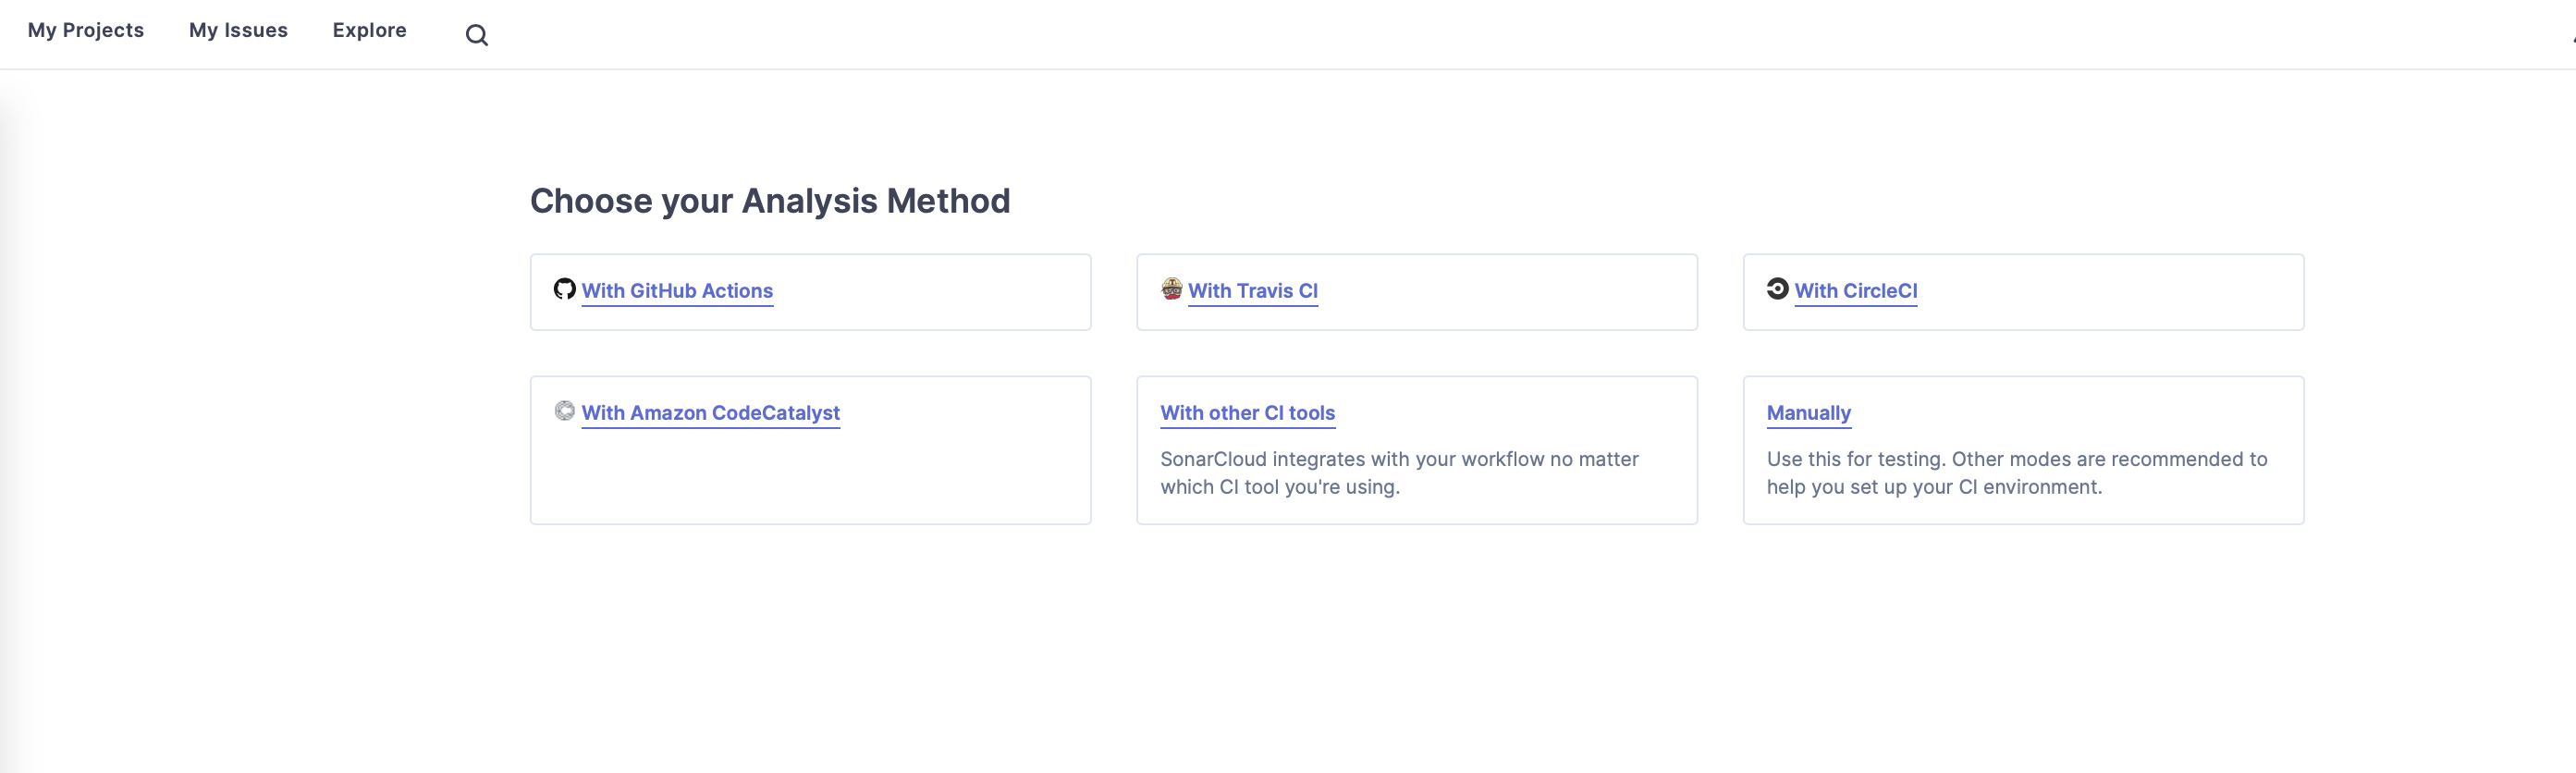
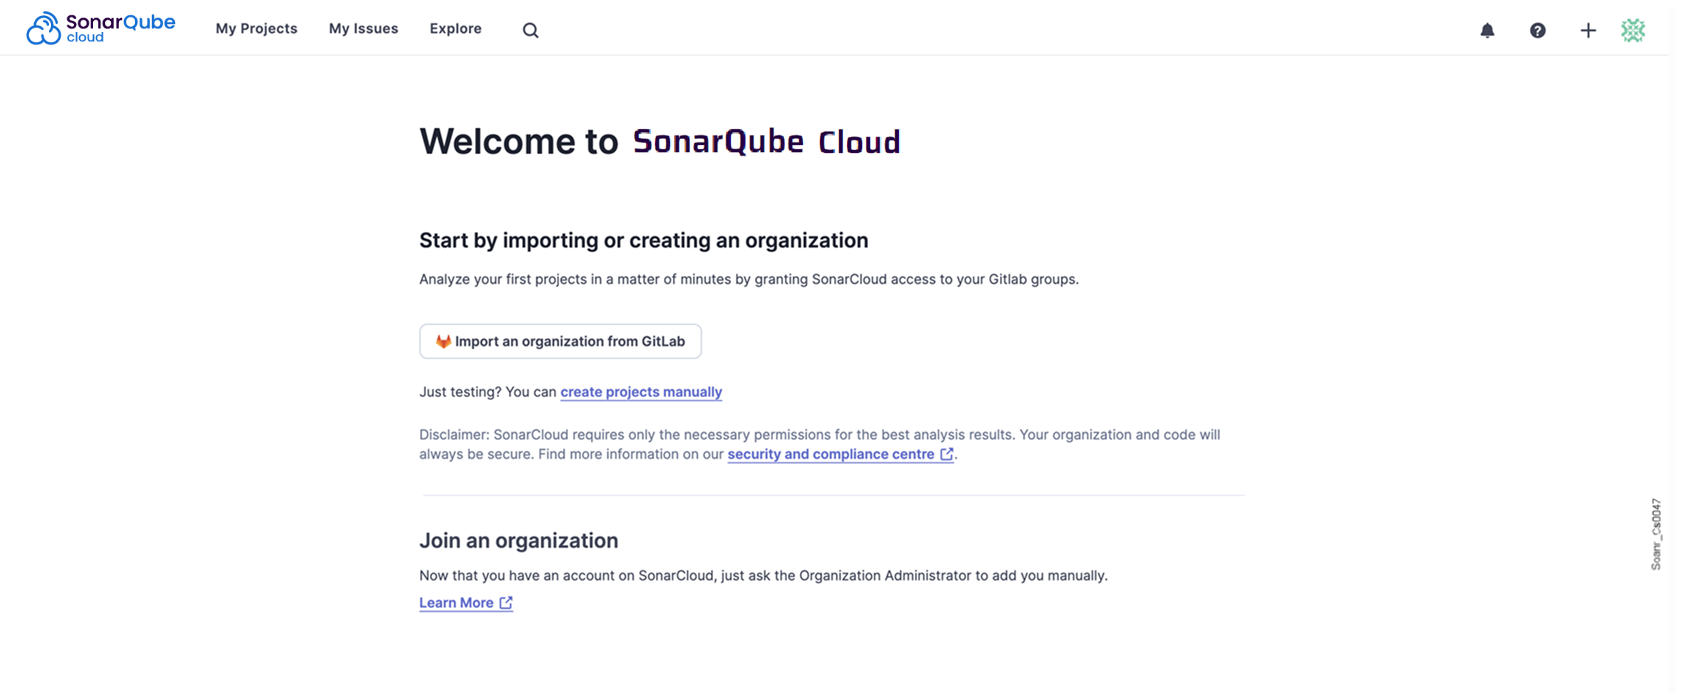
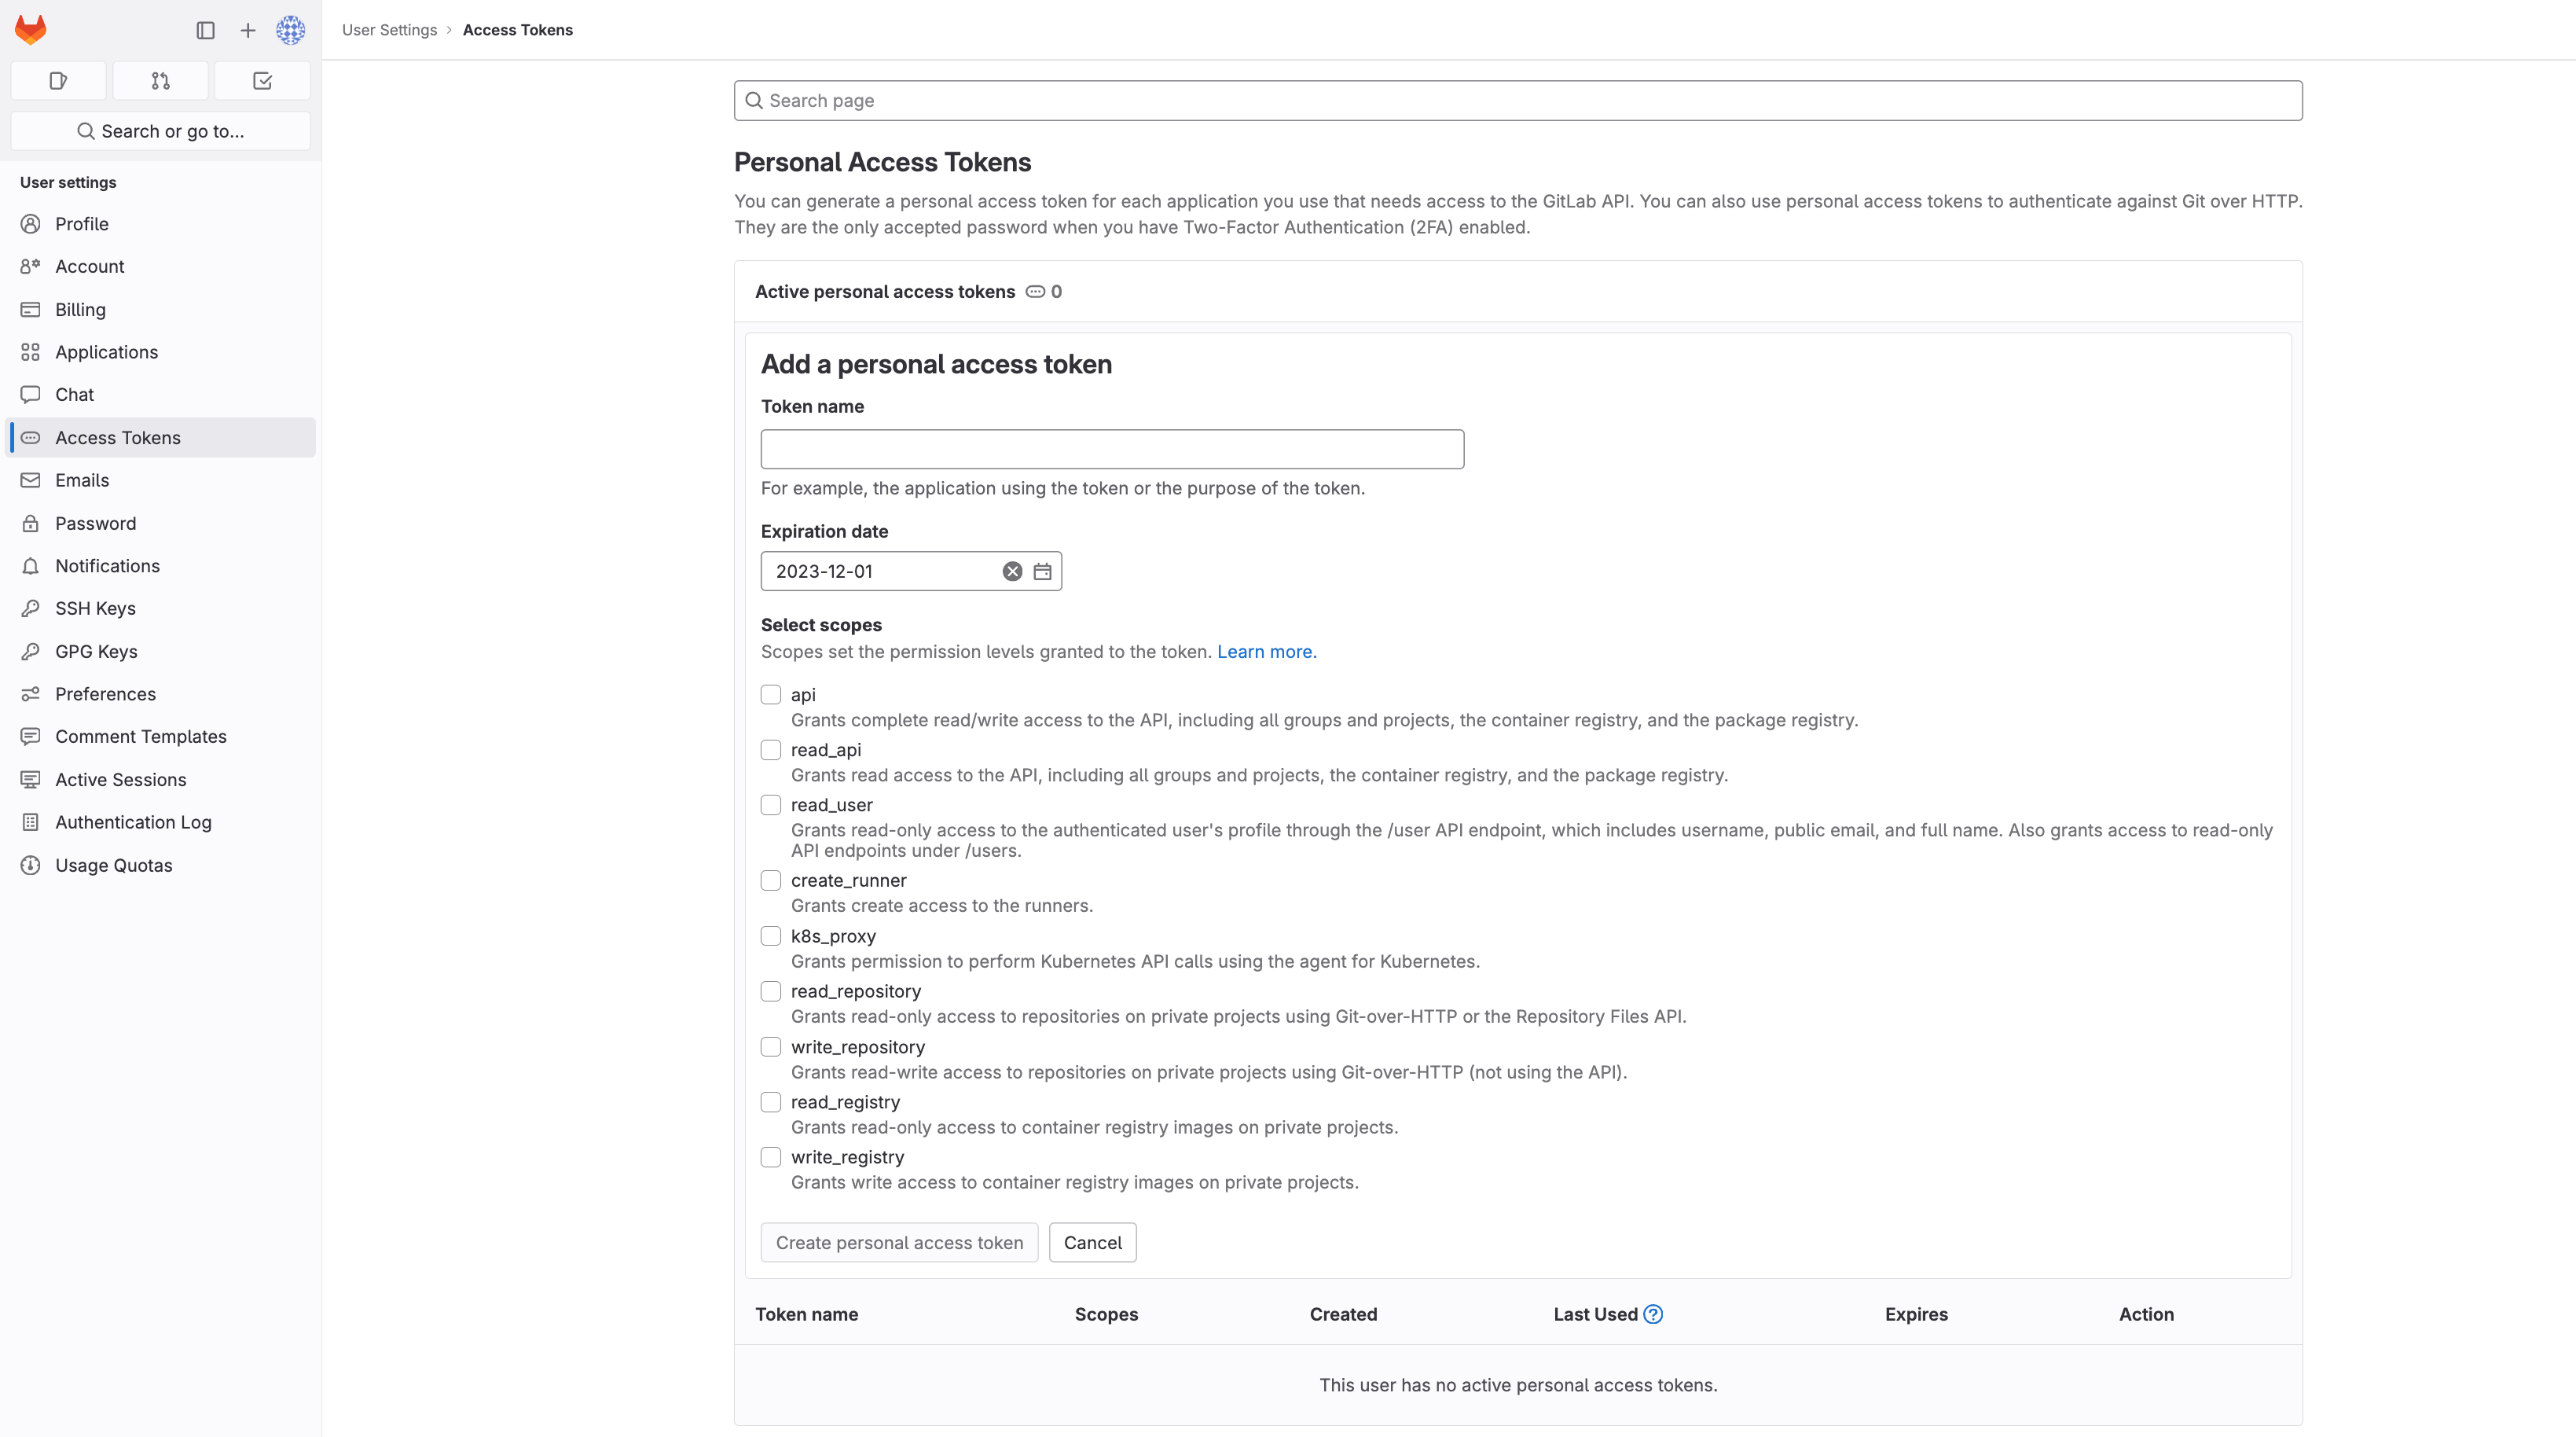
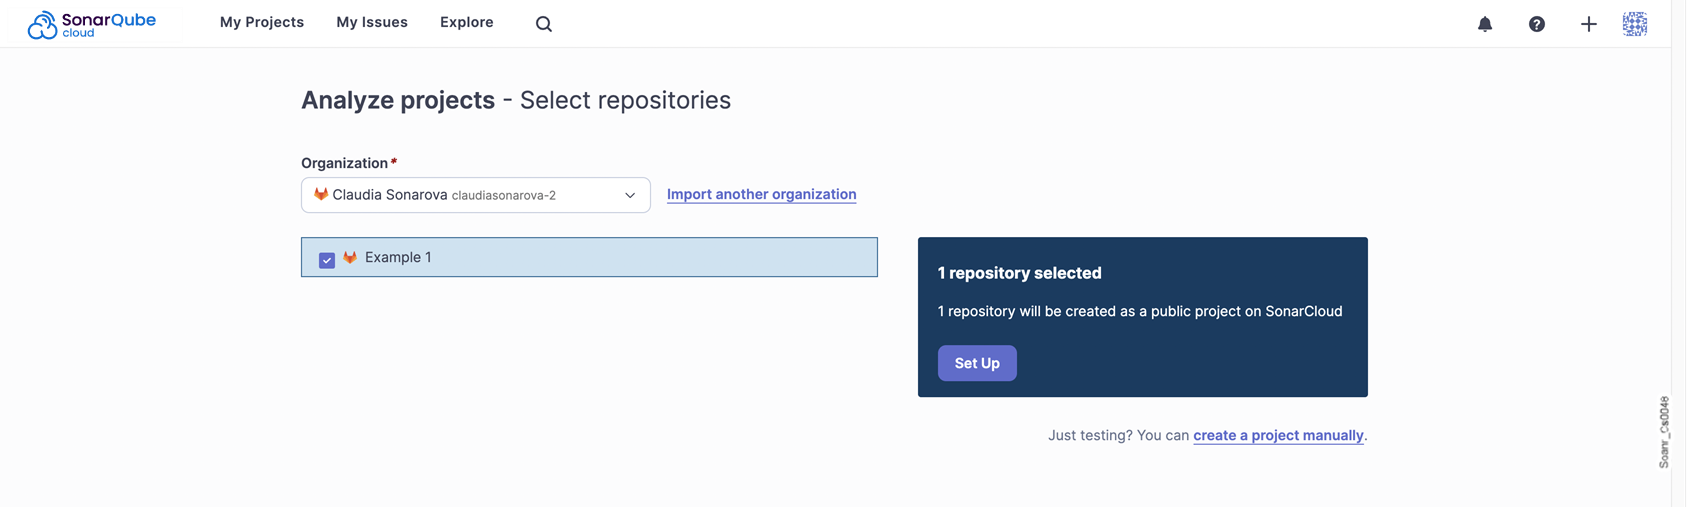
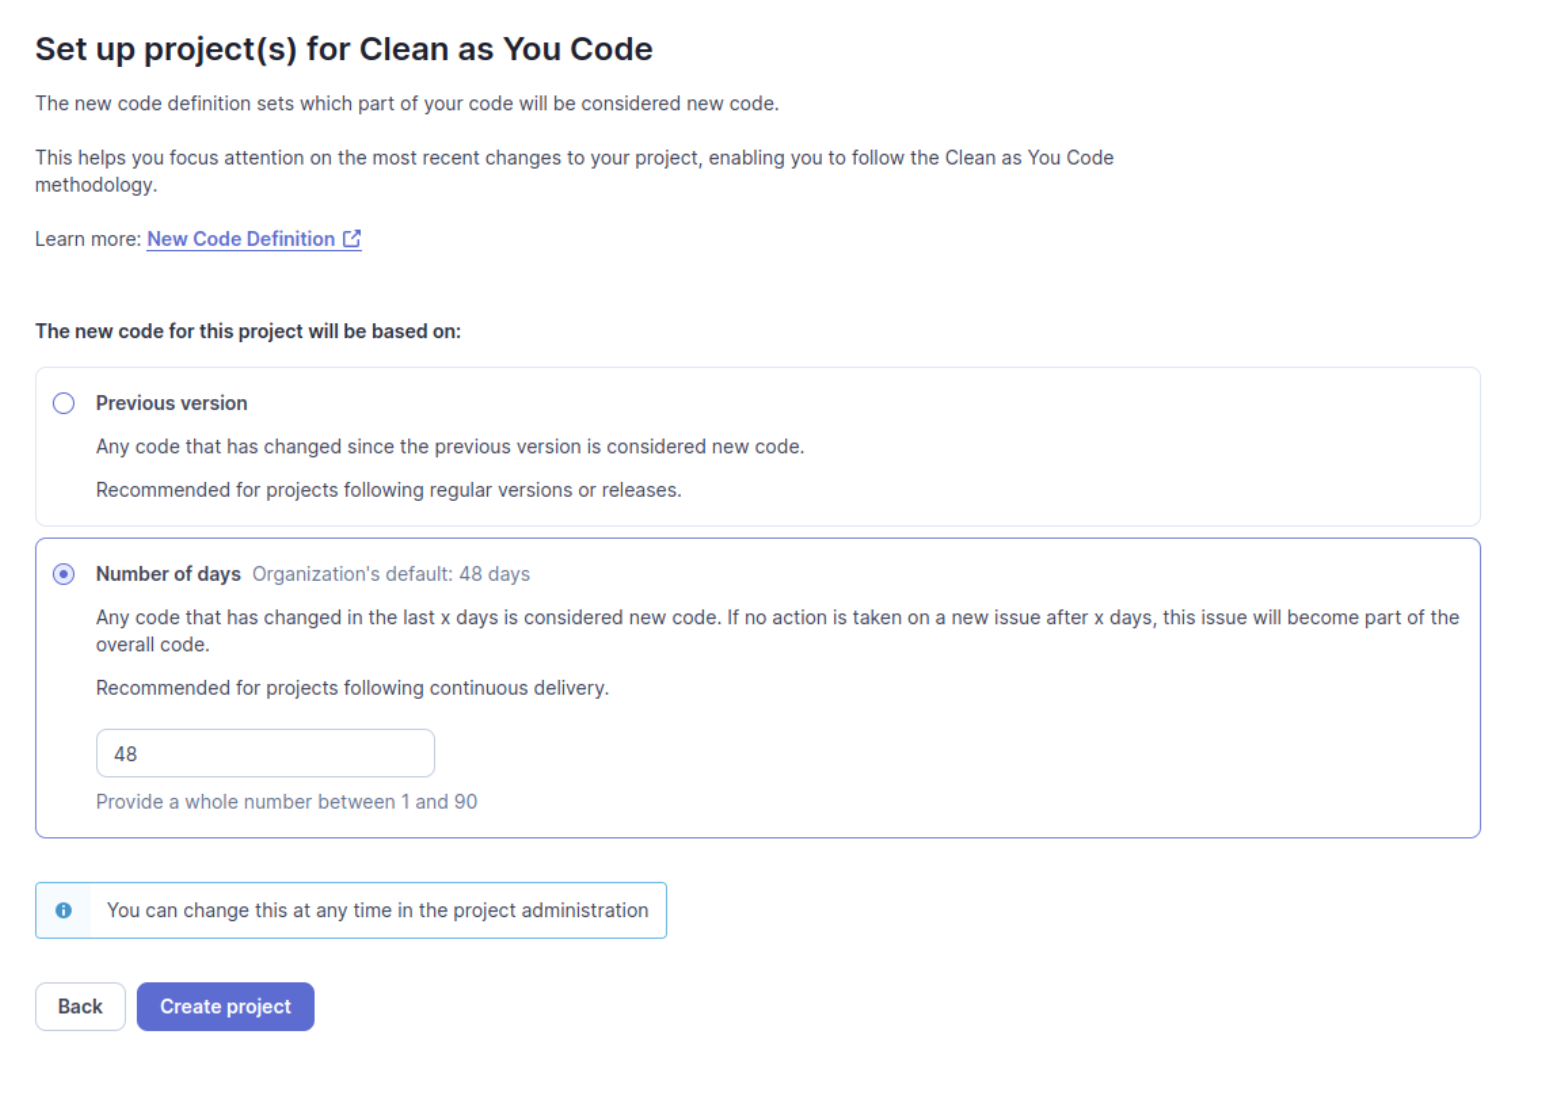
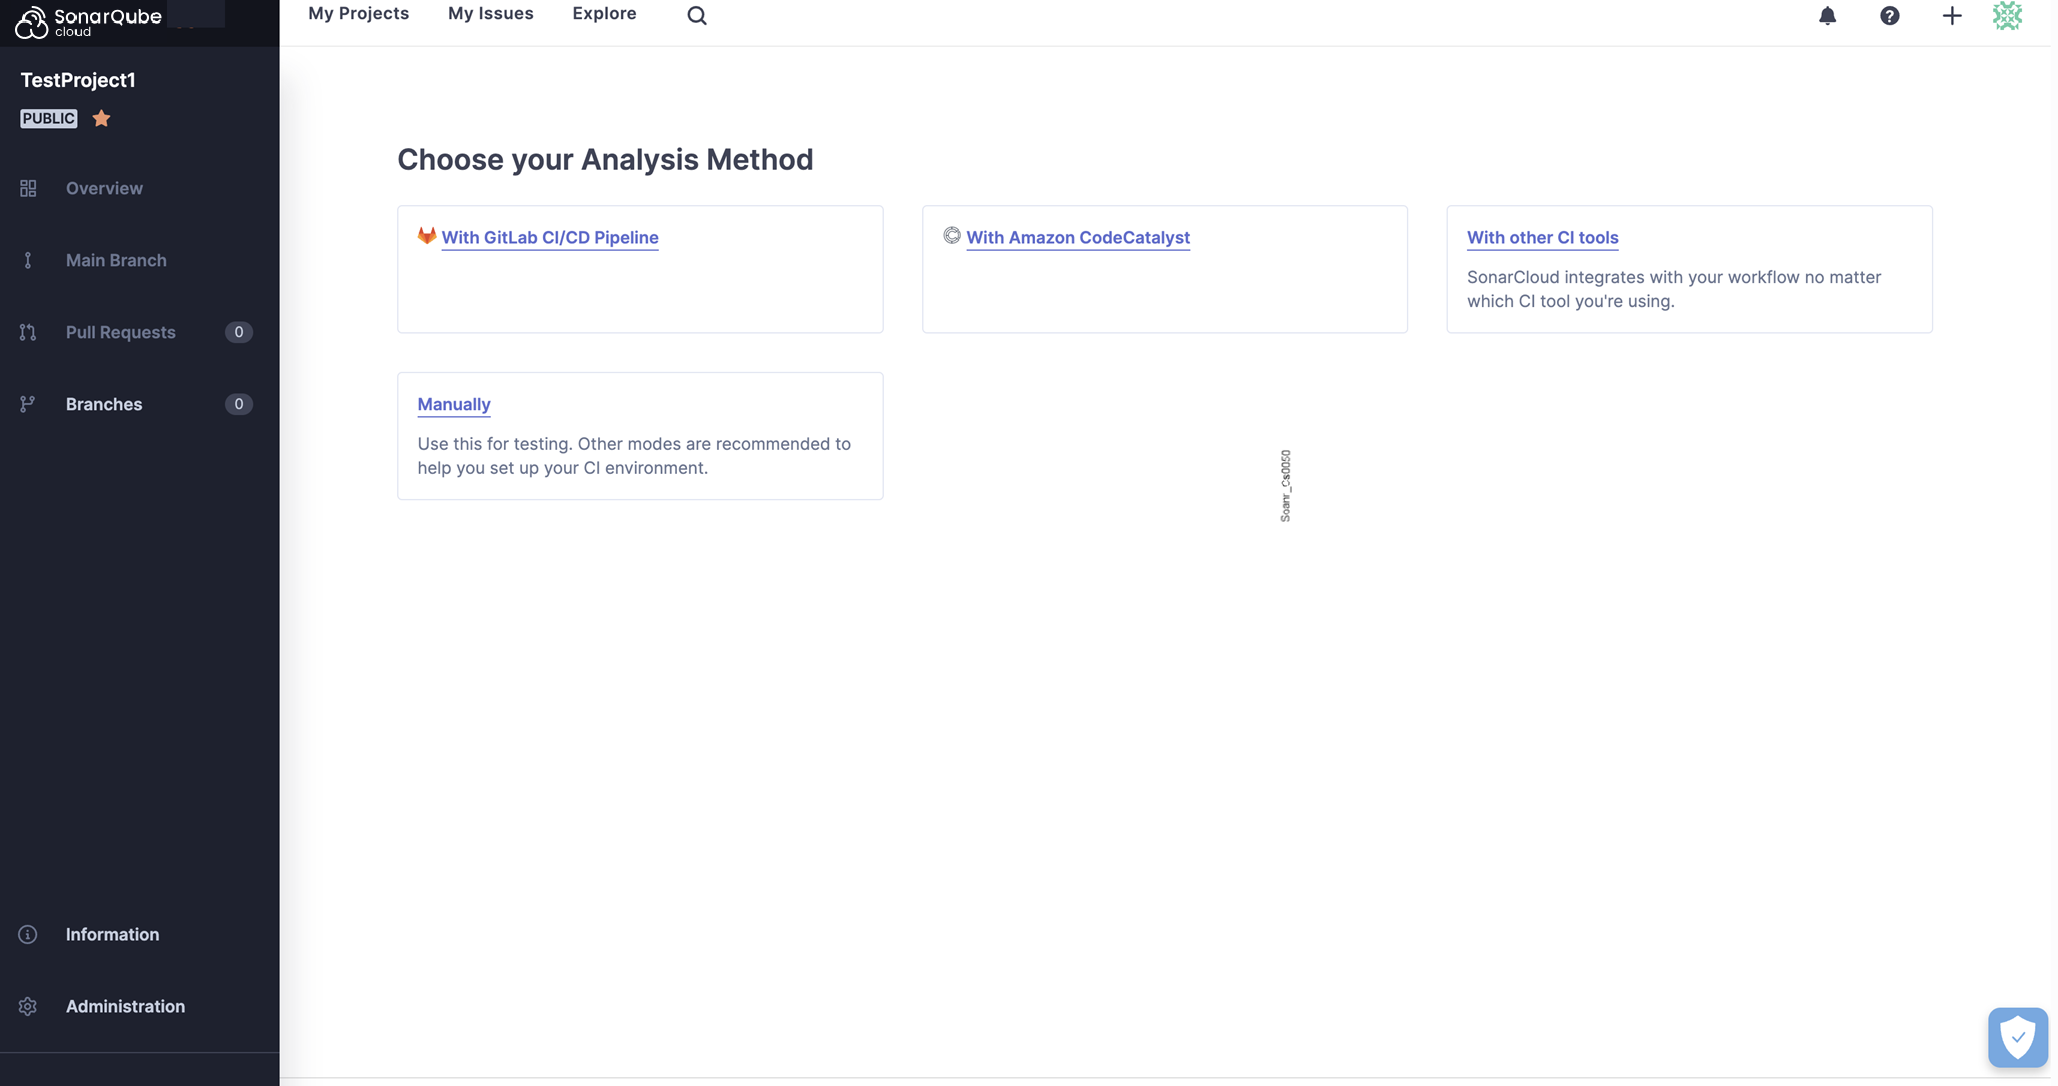

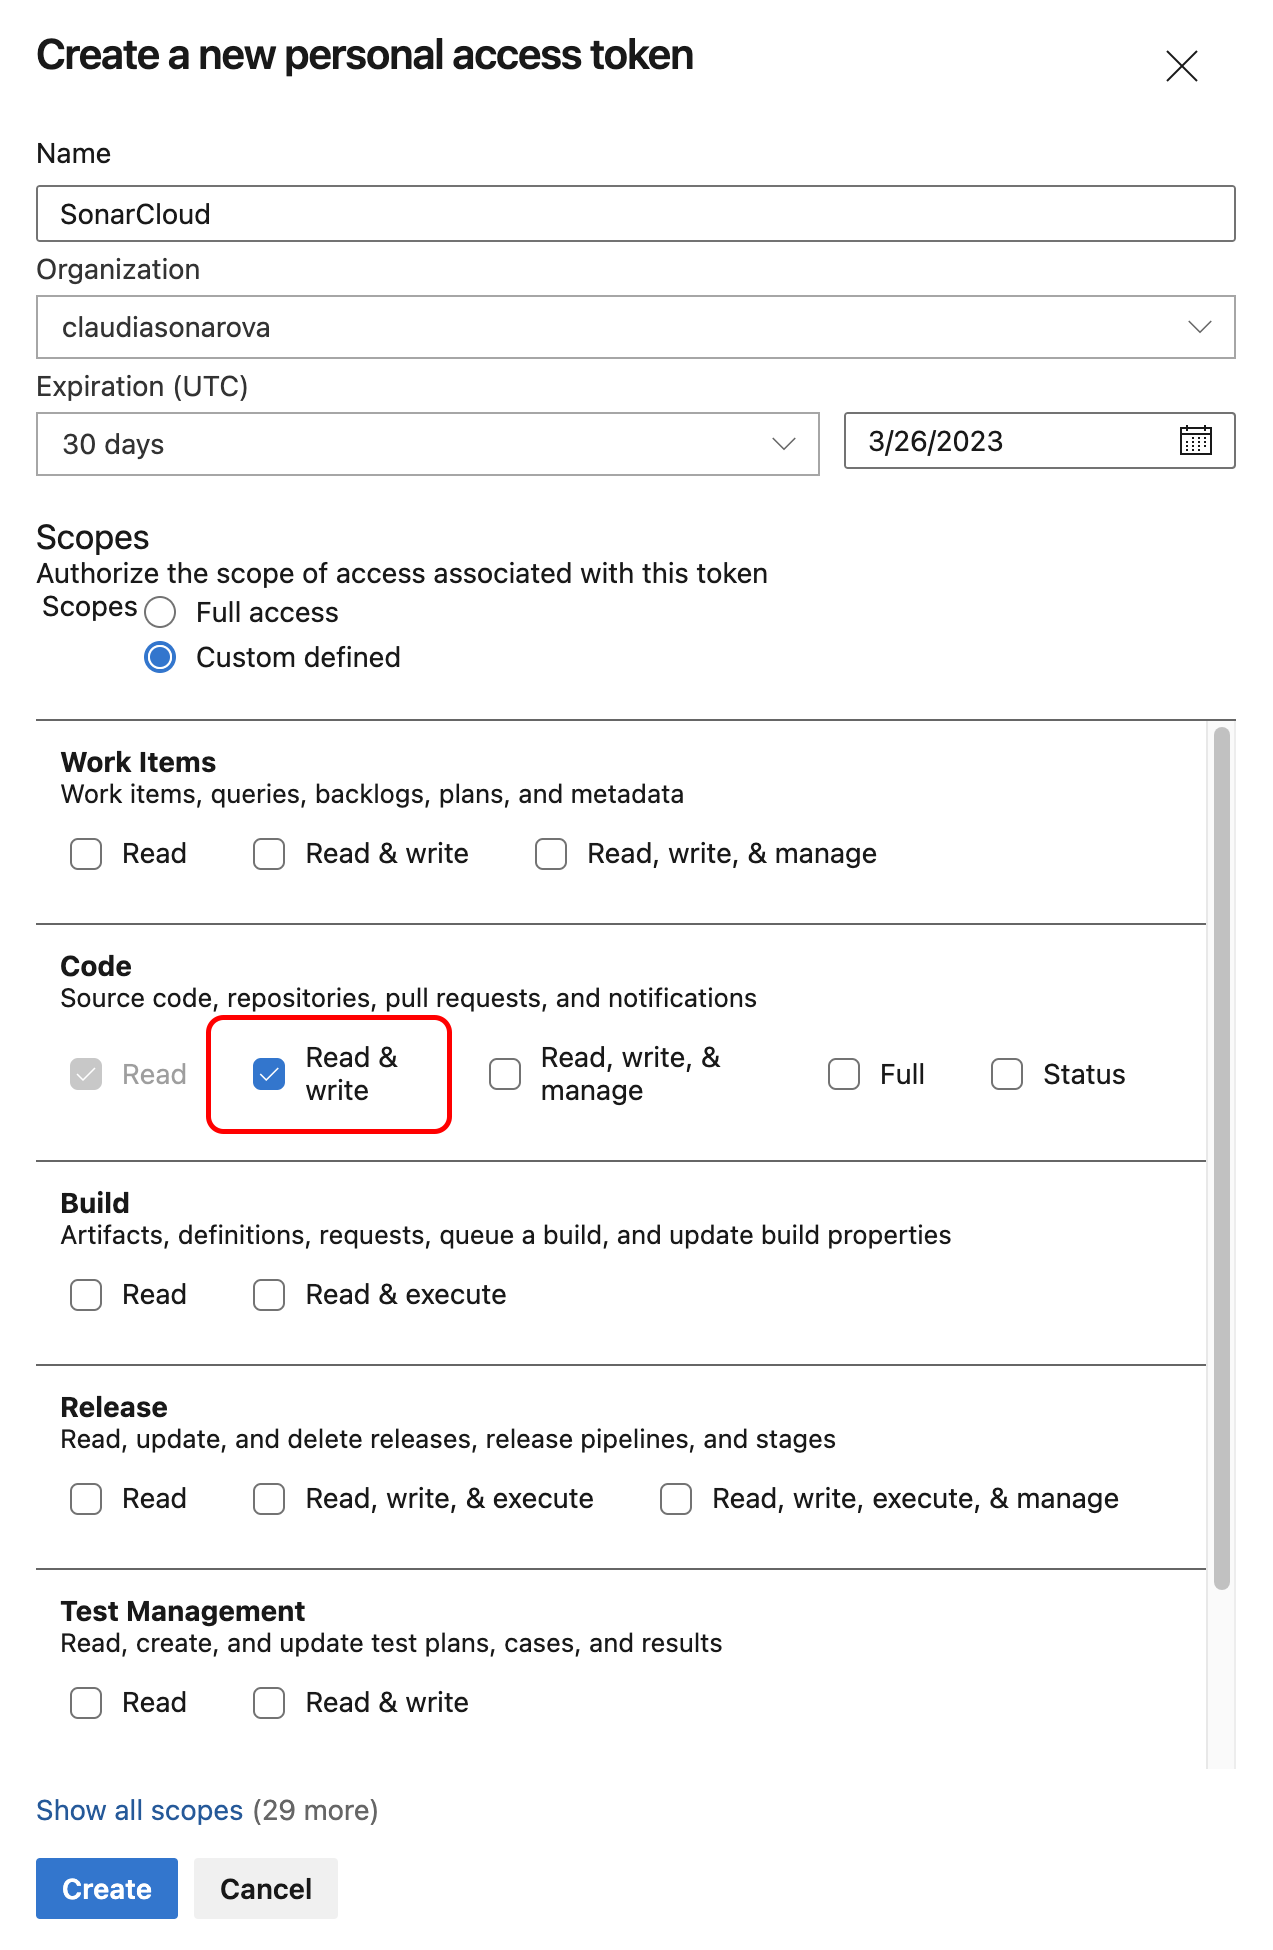 4\. Click **Create** to generate the token.
5\. When the personal access token is displayed, copy it (you will have to paste it to SonarQube’s configuration record as described below).
{% hint style="info" %}
* If you create a project manually, you can set the Azure PAT at the project level but this is not recommended. You should create a bound organization and make sure that the PAT is entered only at the organization level, not at the project level. The project-level field should be left blank.
* If you need to change the PAT stored in the SonarQube Cloud organization, see [changing-organization-settings](https://docs.sonarsource.com/sonarqube-cloud/administering-sonarcloud/managing-organization/creating-organization/changing-organization-settings "mention") for more information.
{% endhint %}
### Step 2: Import your Azure organization
To import your Azure organization to SonarQube Cloud:
1. Log in to SonarQube Cloud with your Azure DevOps account.\
If you’re a member of an enterprise, you may use any of your DevOps Platform accounts or your SSO account. In that case, see [importing-from-multiple-platforms](https://docs.sonarsource.com/sonarqube-cloud/administering-sonarcloud/managing-organization/creating-organization/importing-from-multiple-platforms "mention") for important insights.
2. At the top right of the SonarQube Cloud interface, select the ✚ (plus) menu and select **Create new organization**. The **Create an organization** page opens.
3. Under **Import from a DevOps platform**, select the **Azure DevOps** button.
4. Follow the instructions.
5. Paste the PAT you created in Step 1 to **Personal Access Token**,.
6. Select **Continue**.
7. In **Import organization details**, SonarQube Cloud suggests a **Name** and **Key** for your SonarQube Cloud organization. The key is unique across all organizations within SonarQube Cloud. You can accept the suggestion or change it manually. The interface will prevent you from changing it to an already existing key.
8. Select **Add additional info** to add:
* An avatar: a small image representing the organization and displayed on the UI near the organization name.
* A description of the organization.
* A URL: the URL of the homepage of the organization displayed on the UI.
9. Select the subscription plan for your organization. See [subscription-plans](https://docs.sonarsource.com/sonarqube-cloud/administering-sonarcloud/managing-subscription/subscription-plans "mention") for more details.
10. If you selected a paid plan, select the number of Lines of Code (LOC) for your plan and follow the instructions to enter your billing and payment information.
11. Select **Create Organization**. The organization is created and opened in SonarQube Cloud.
{% hint style="info" %}
If the import fails because the organization already exists in SonarQube Cloud and you’ve lost administrator access to this organization, send a request to
4\. Click **Create** to generate the token.
5\. When the personal access token is displayed, copy it (you will have to paste it to SonarQube’s configuration record as described below).
{% hint style="info" %}
* If you create a project manually, you can set the Azure PAT at the project level but this is not recommended. You should create a bound organization and make sure that the PAT is entered only at the organization level, not at the project level. The project-level field should be left blank.
* If you need to change the PAT stored in the SonarQube Cloud organization, see [changing-organization-settings](https://docs.sonarsource.com/sonarqube-cloud/administering-sonarcloud/managing-organization/creating-organization/changing-organization-settings "mention") for more information.
{% endhint %}
### Step 2: Import your Azure organization
To import your Azure organization to SonarQube Cloud:
1. Log in to SonarQube Cloud with your Azure DevOps account.\
If you’re a member of an enterprise, you may use any of your DevOps Platform accounts or your SSO account. In that case, see [importing-from-multiple-platforms](https://docs.sonarsource.com/sonarqube-cloud/administering-sonarcloud/managing-organization/creating-organization/importing-from-multiple-platforms "mention") for important insights.
2. At the top right of the SonarQube Cloud interface, select the ✚ (plus) menu and select **Create new organization**. The **Create an organization** page opens.
3. Under **Import from a DevOps platform**, select the **Azure DevOps** button.
4. Follow the instructions.
5. Paste the PAT you created in Step 1 to **Personal Access Token**,.
6. Select **Continue**.
7. In **Import organization details**, SonarQube Cloud suggests a **Name** and **Key** for your SonarQube Cloud organization. The key is unique across all organizations within SonarQube Cloud. You can accept the suggestion or change it manually. The interface will prevent you from changing it to an already existing key.
8. Select **Add additional info** to add:
* An avatar: a small image representing the organization and displayed on the UI near the organization name.
* A description of the organization.
* A URL: the URL of the homepage of the organization displayed on the UI.
9. Select the subscription plan for your organization. See [subscription-plans](https://docs.sonarsource.com/sonarqube-cloud/administering-sonarcloud/managing-subscription/subscription-plans "mention") for more details.
10. If you selected a paid plan, select the number of Lines of Code (LOC) for your plan and follow the instructions to enter your billing and payment information.
11. Select **Create Organization**. The organization is created and opened in SonarQube Cloud.
{% hint style="info" %}
If the import fails because the organization already exists in SonarQube Cloud and you’ve lost administrator access to this organization, send a request to 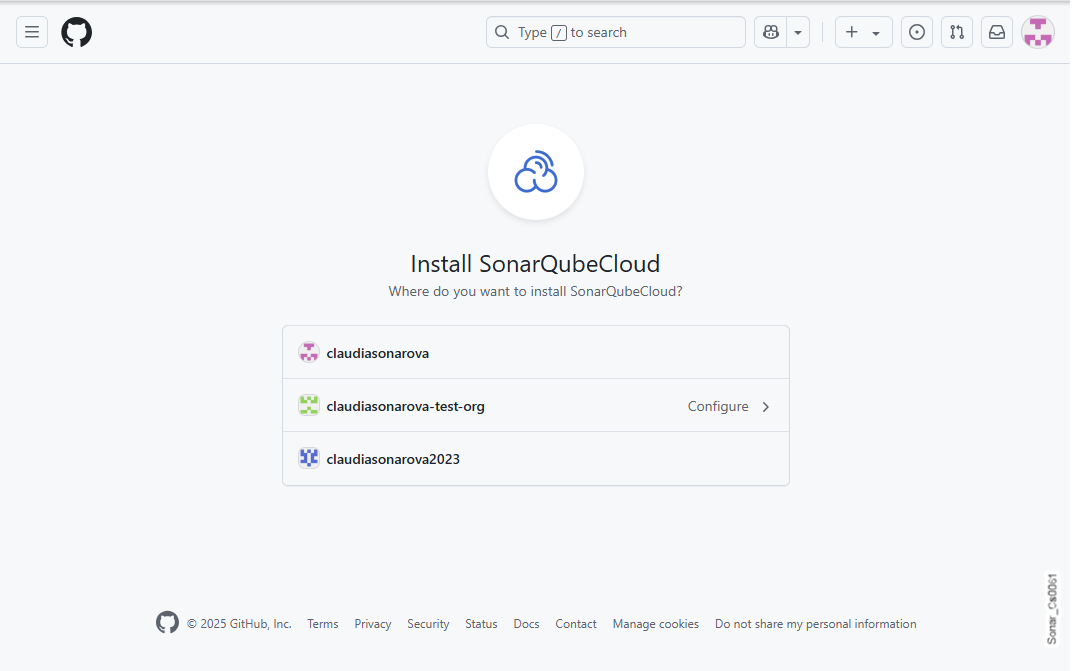

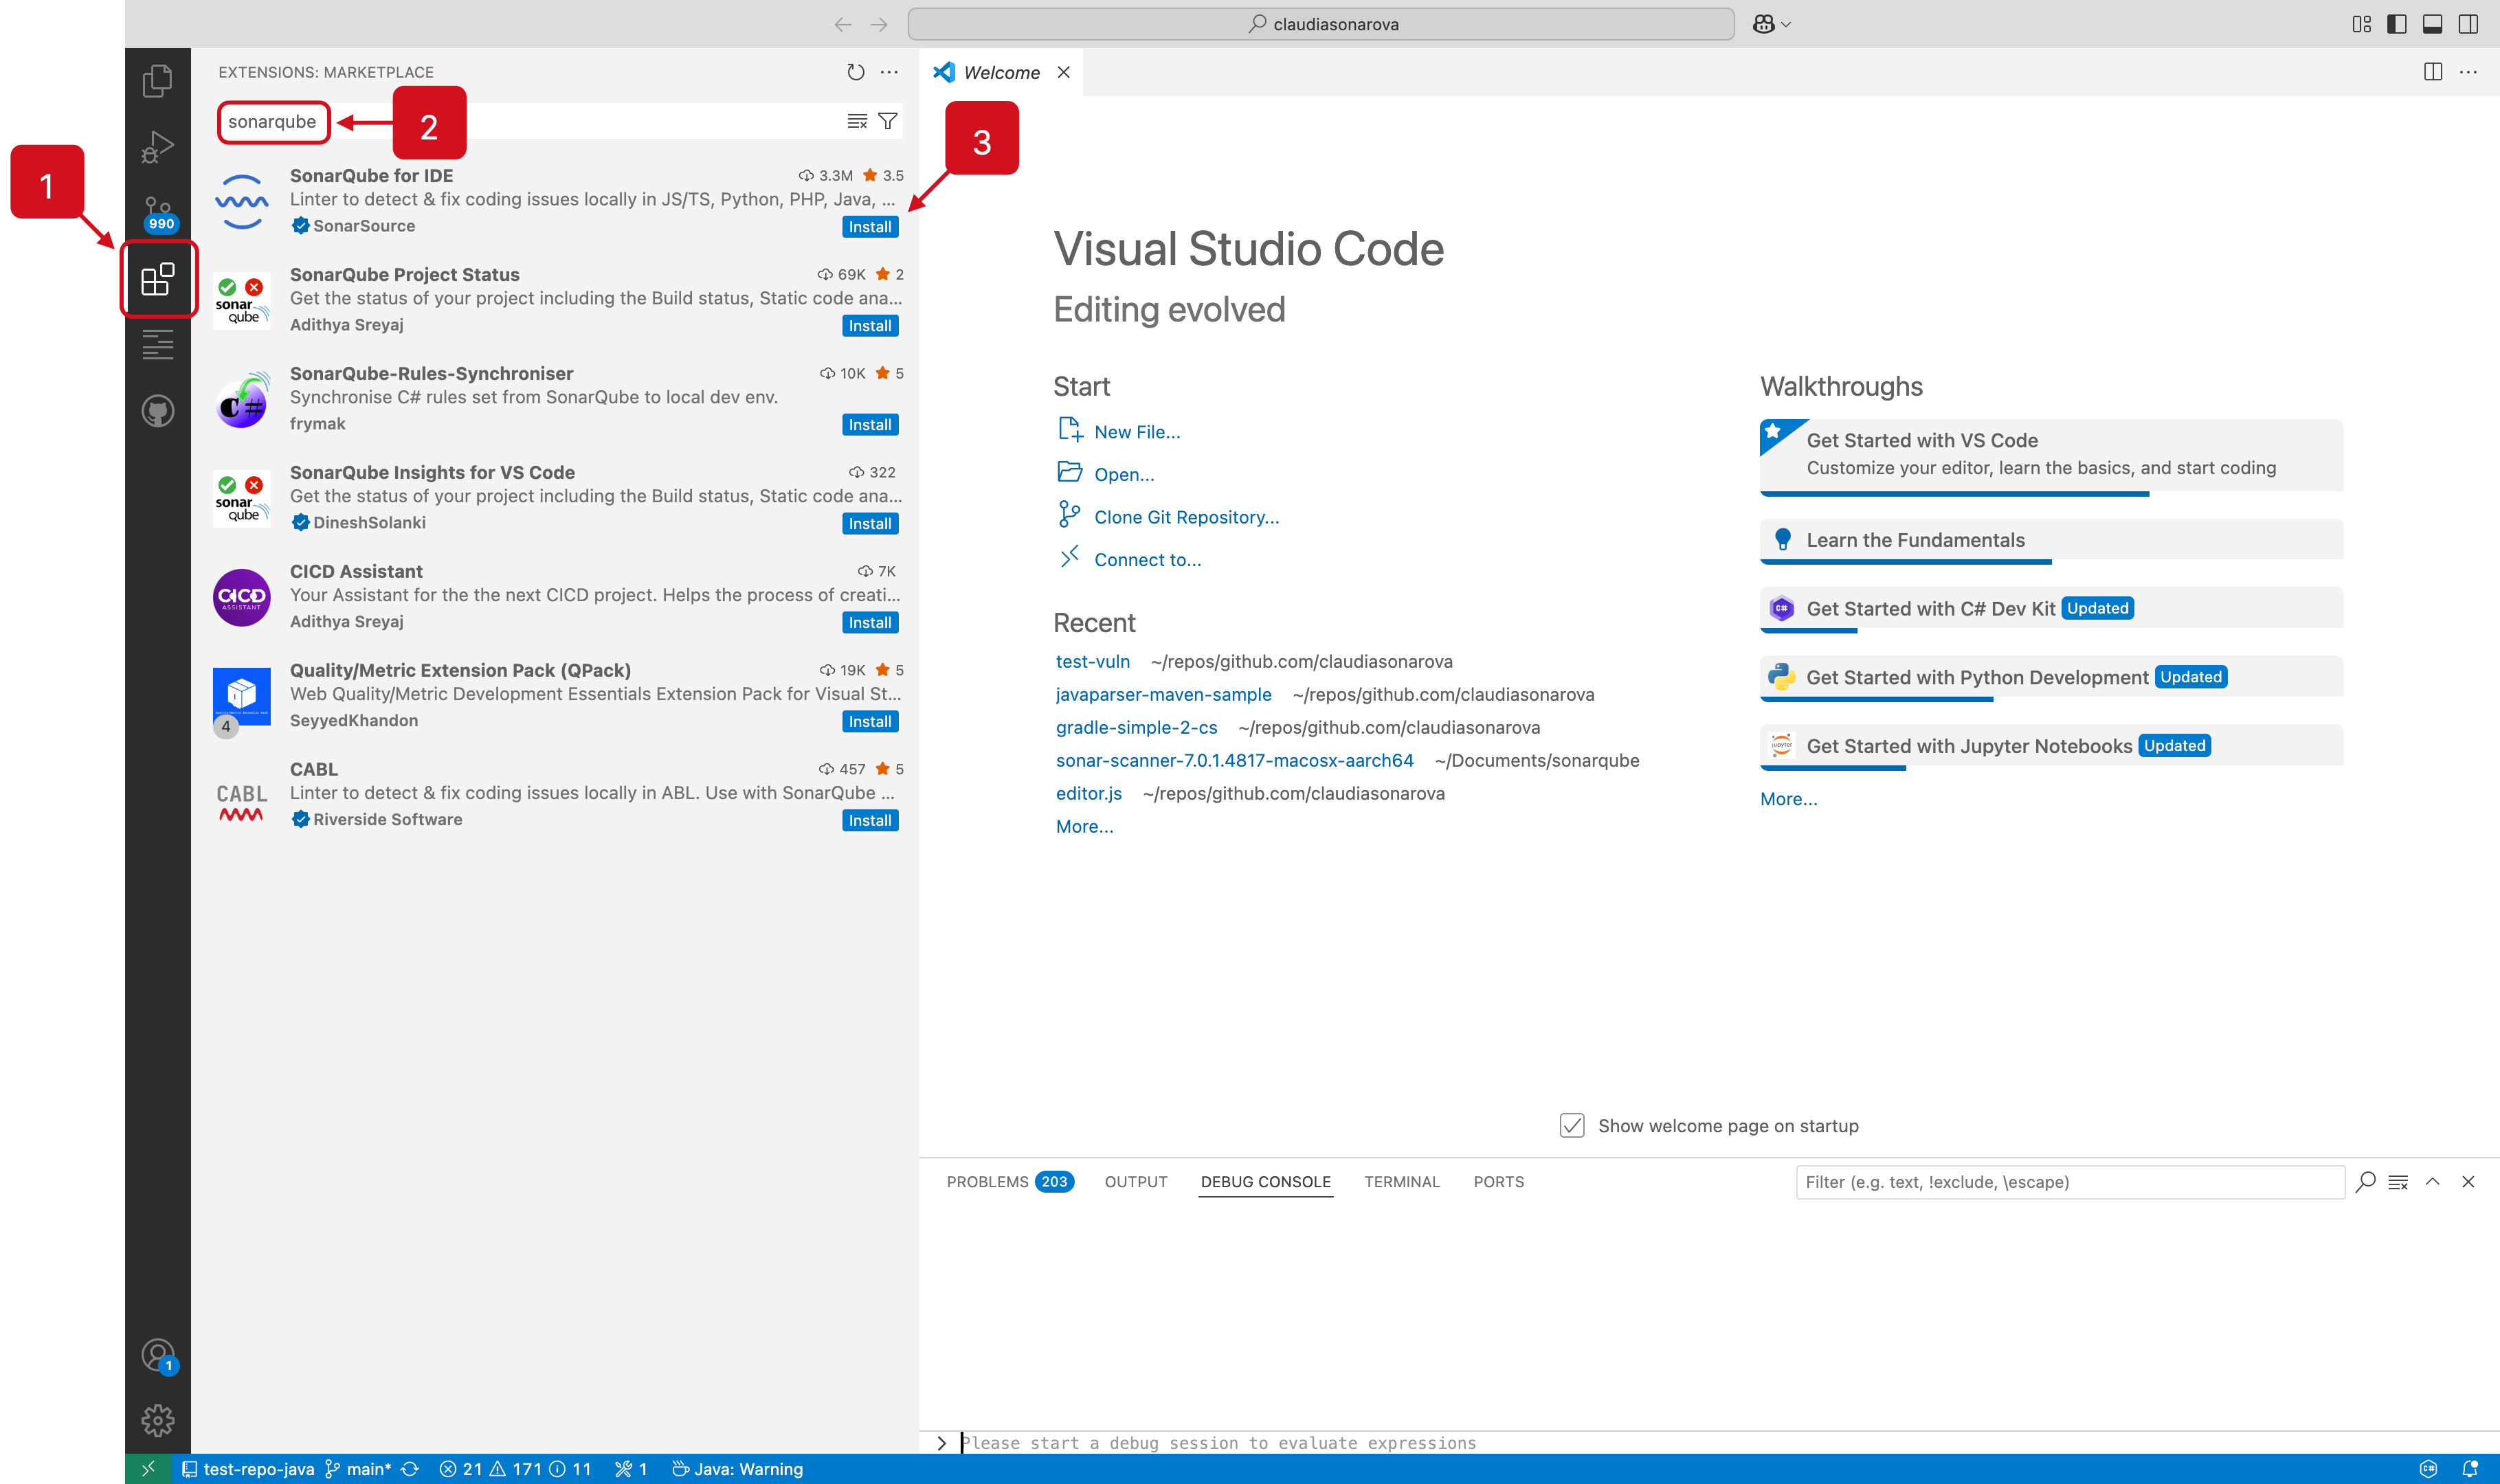
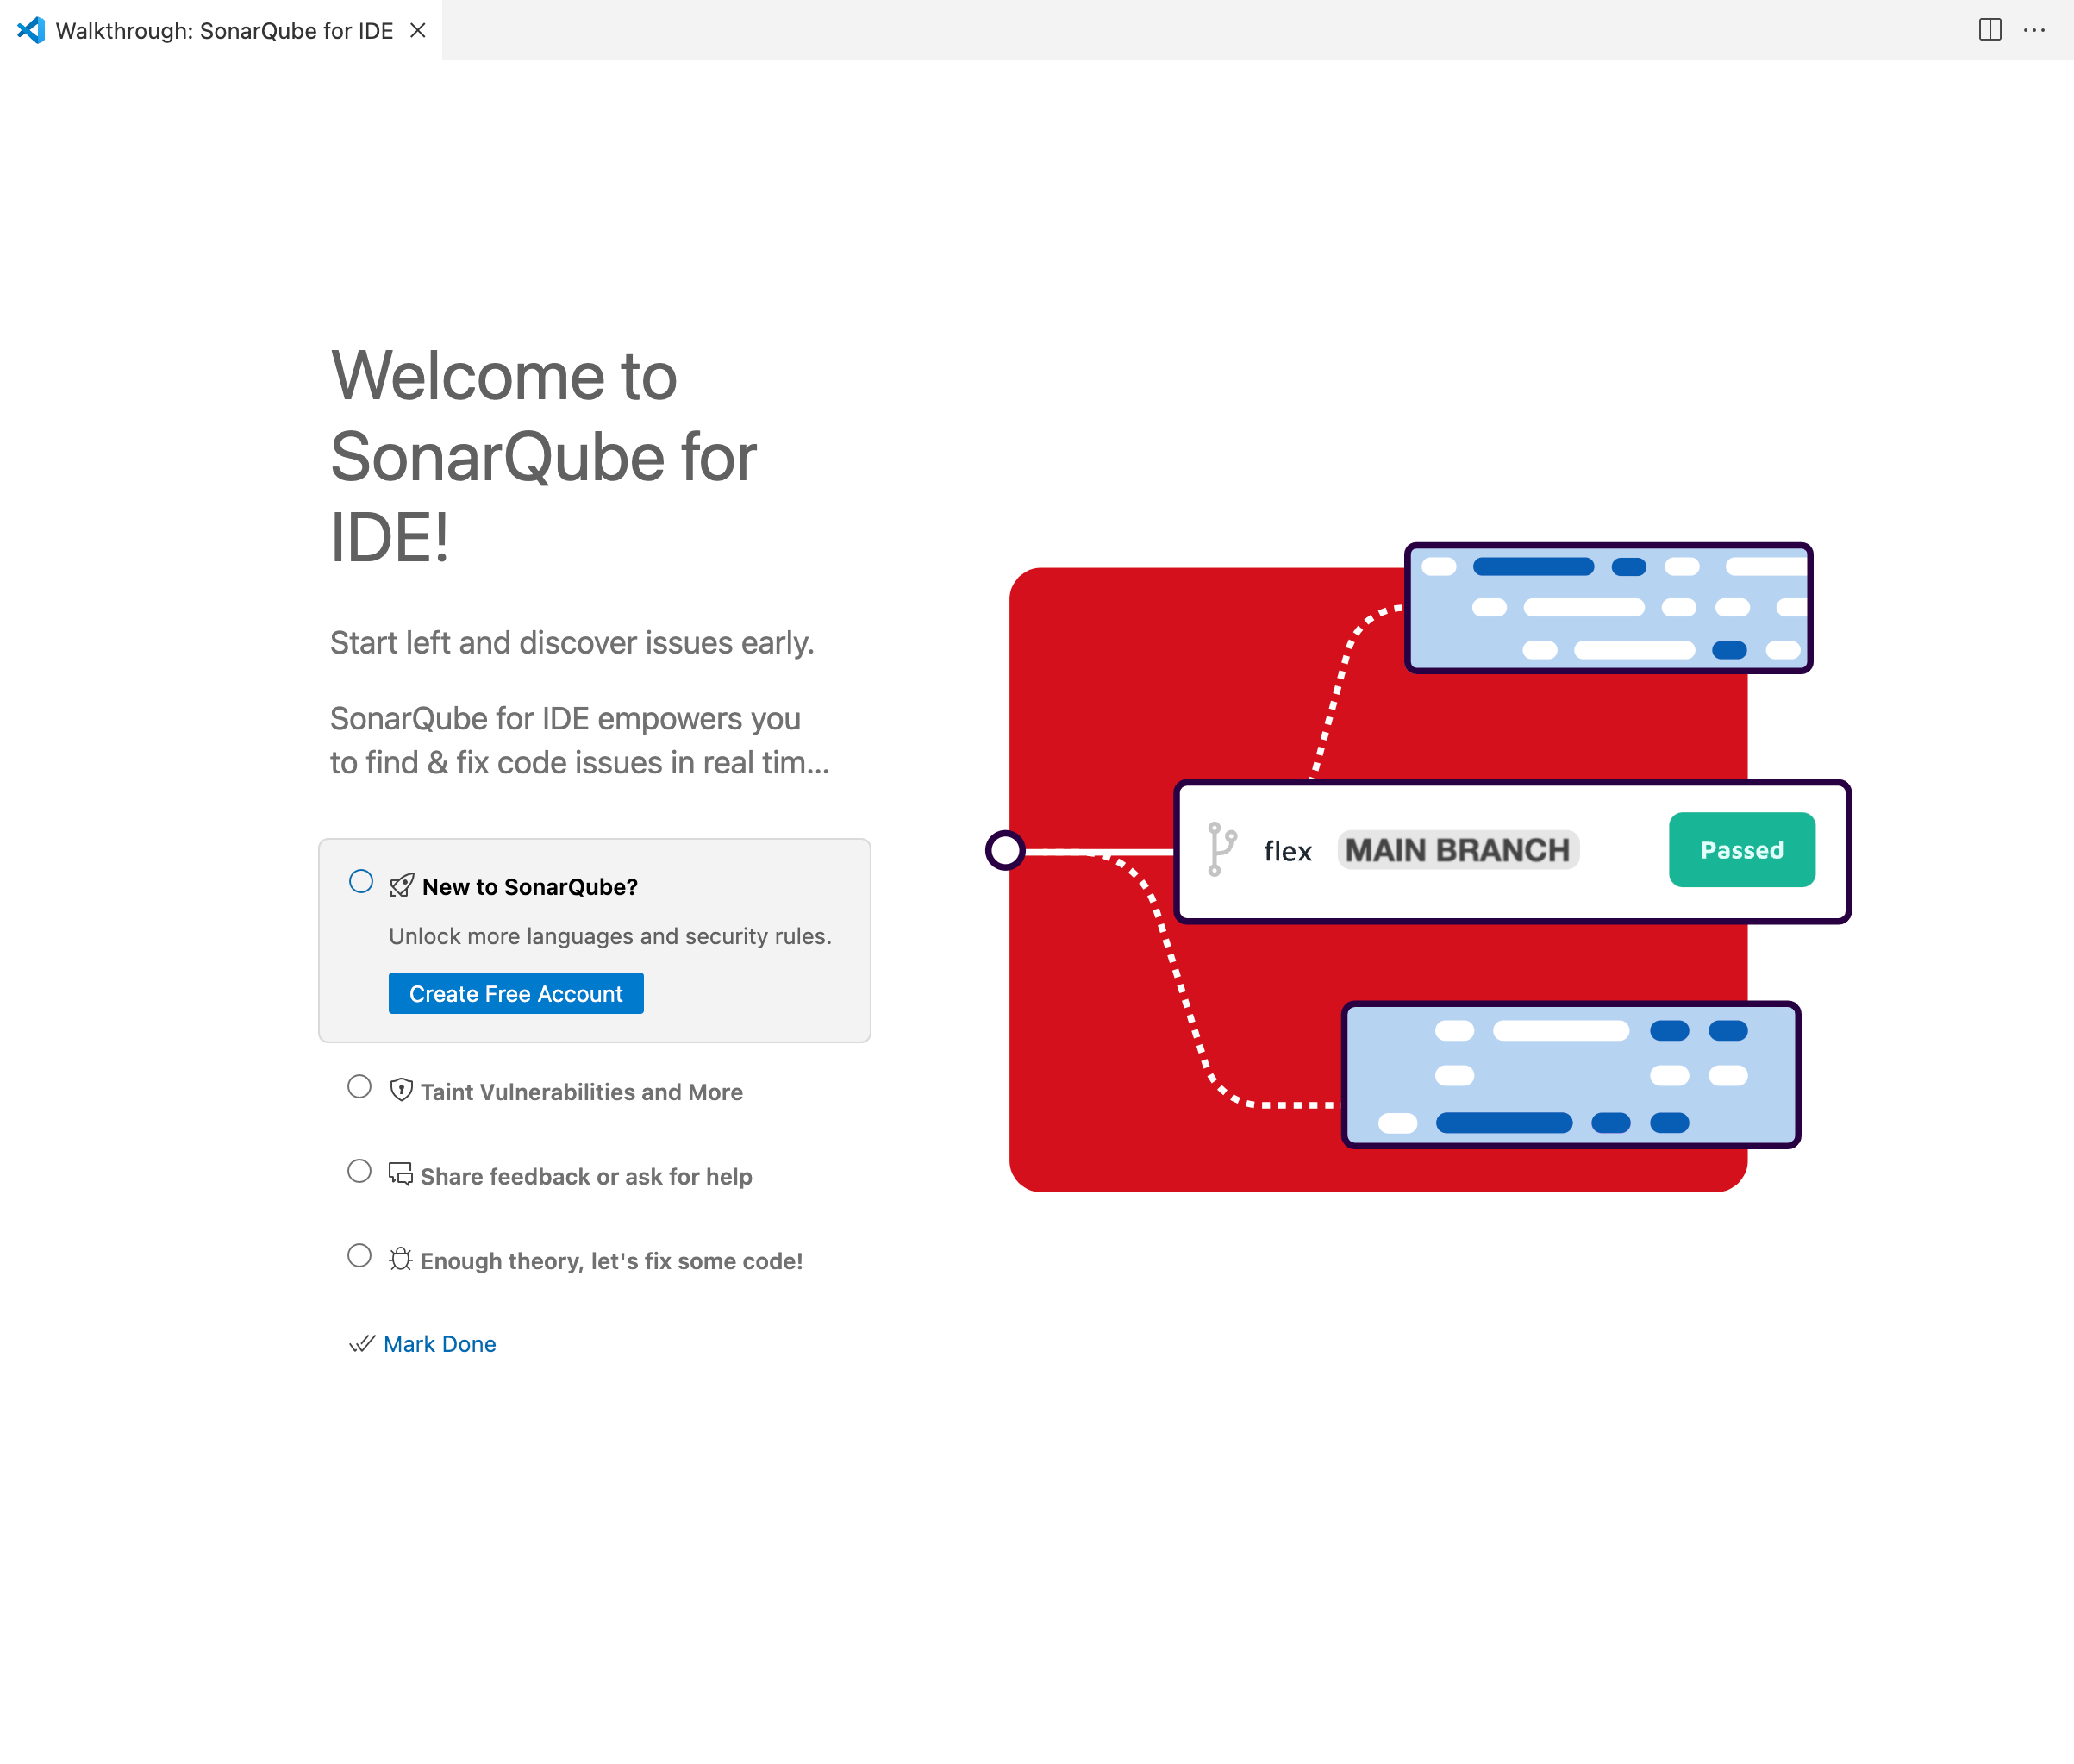
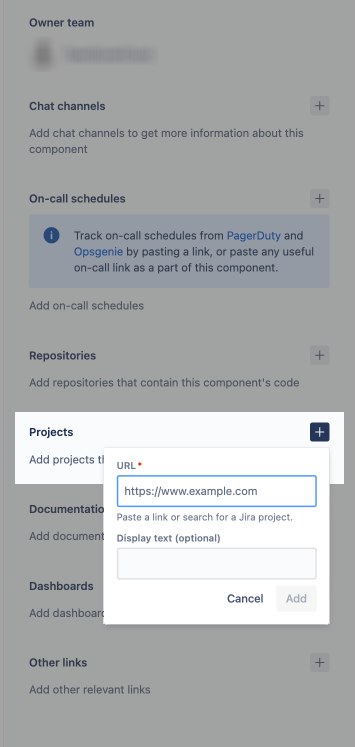
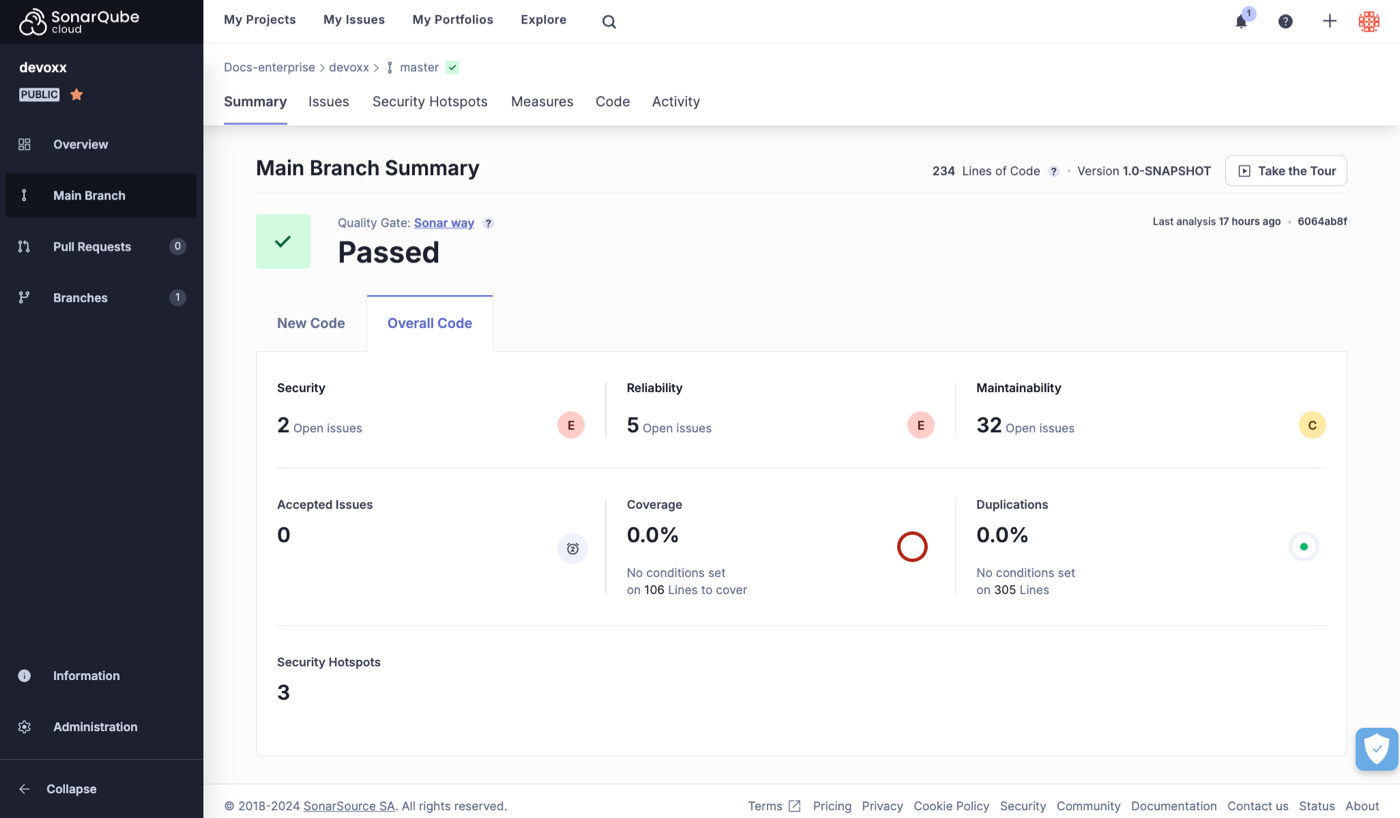

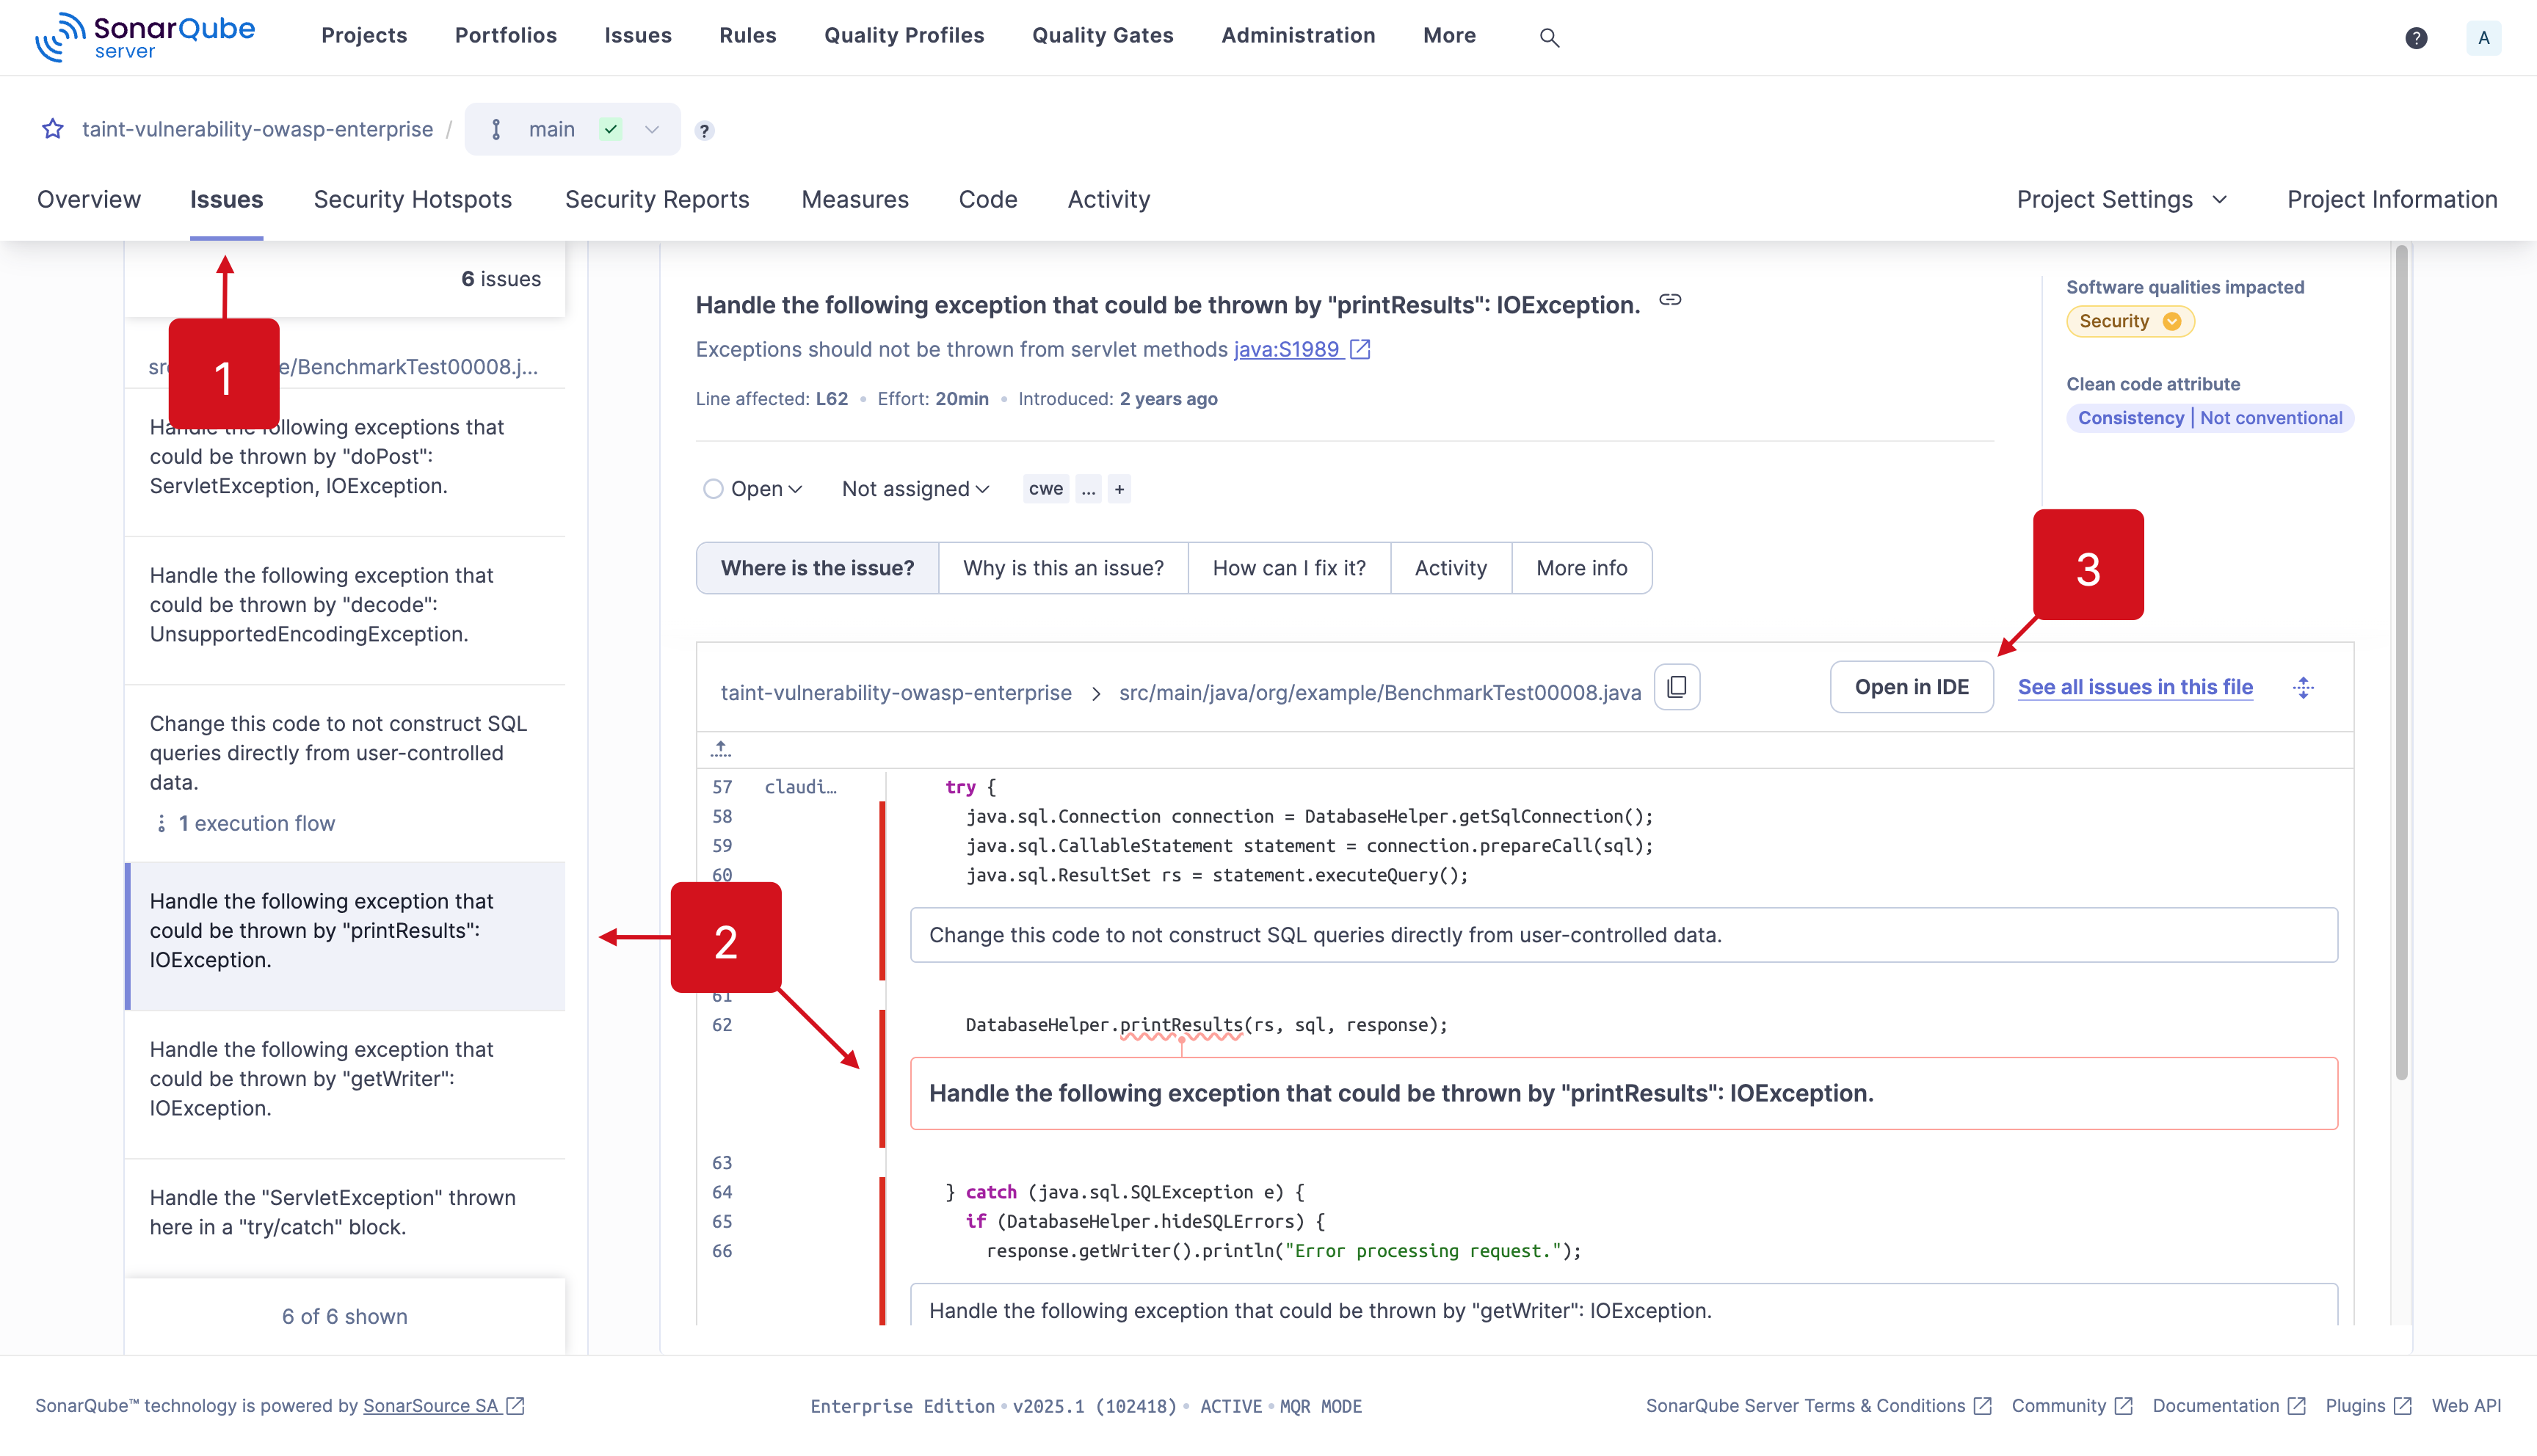
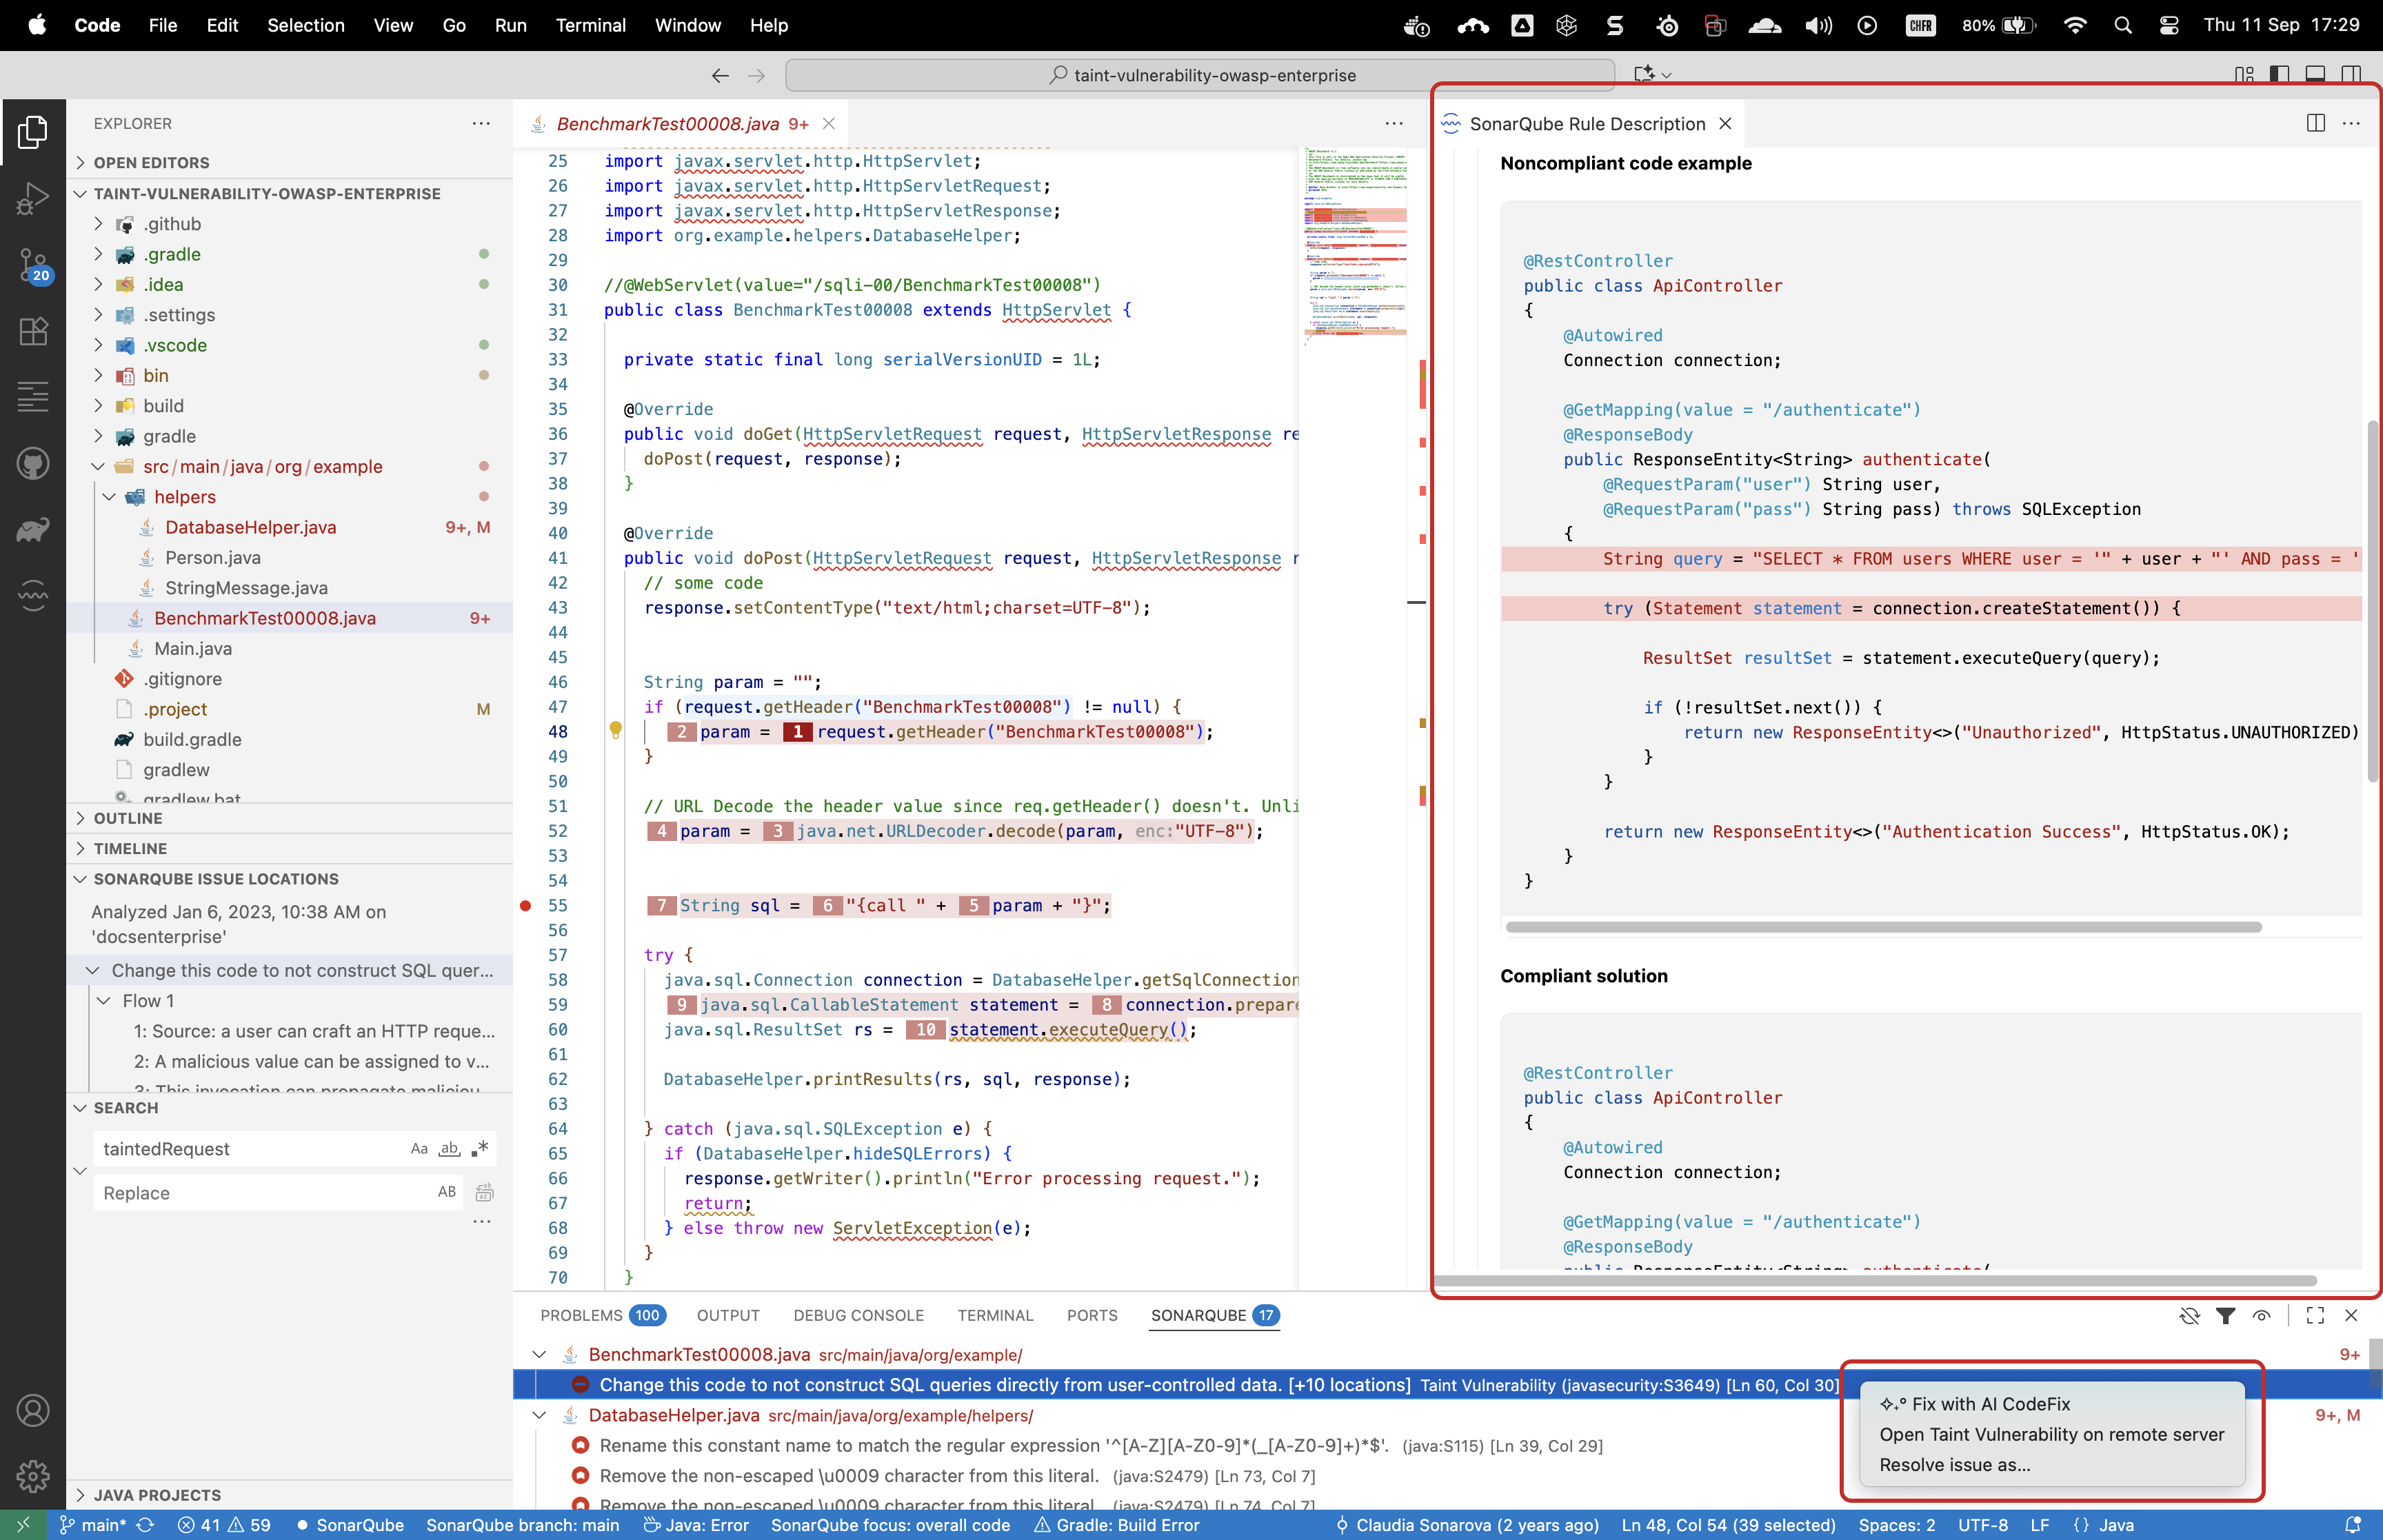


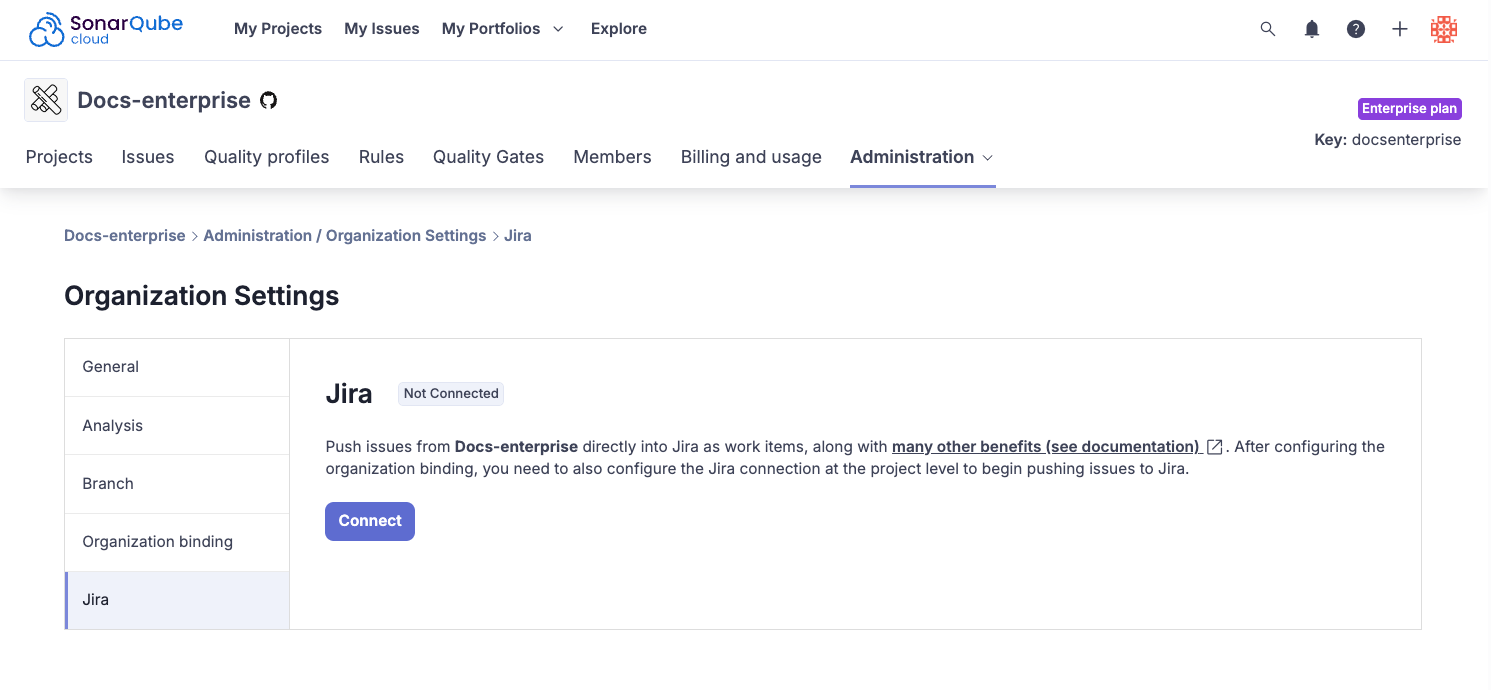
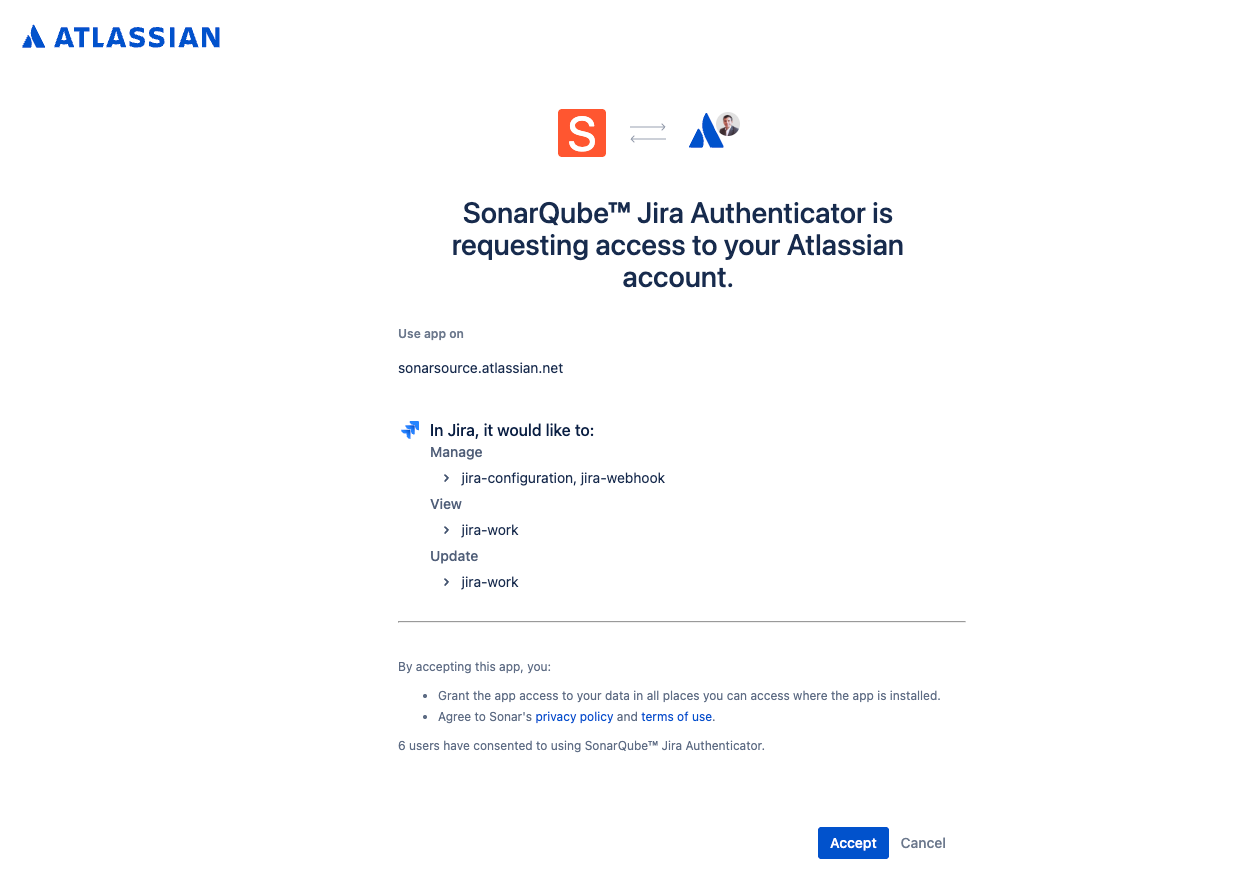
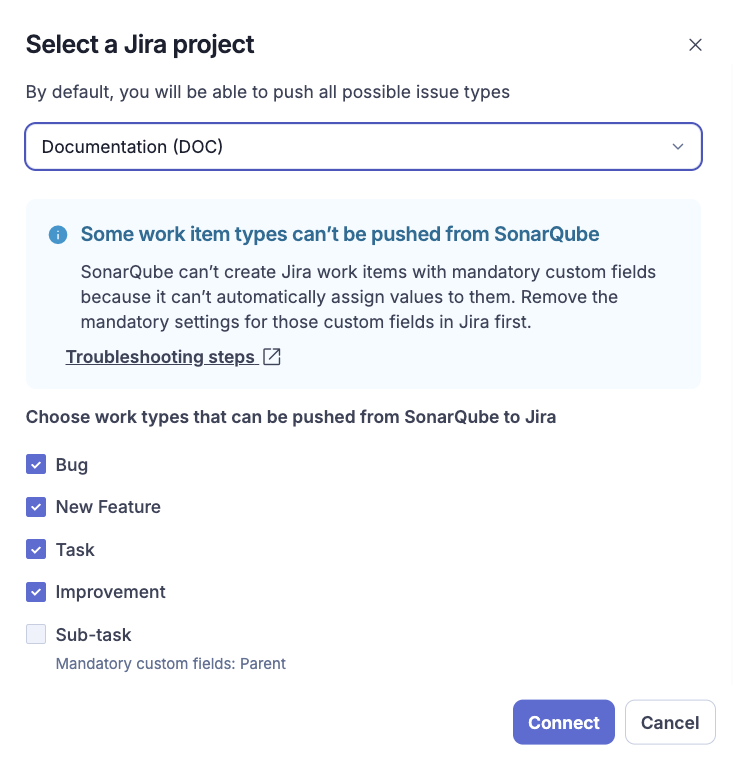
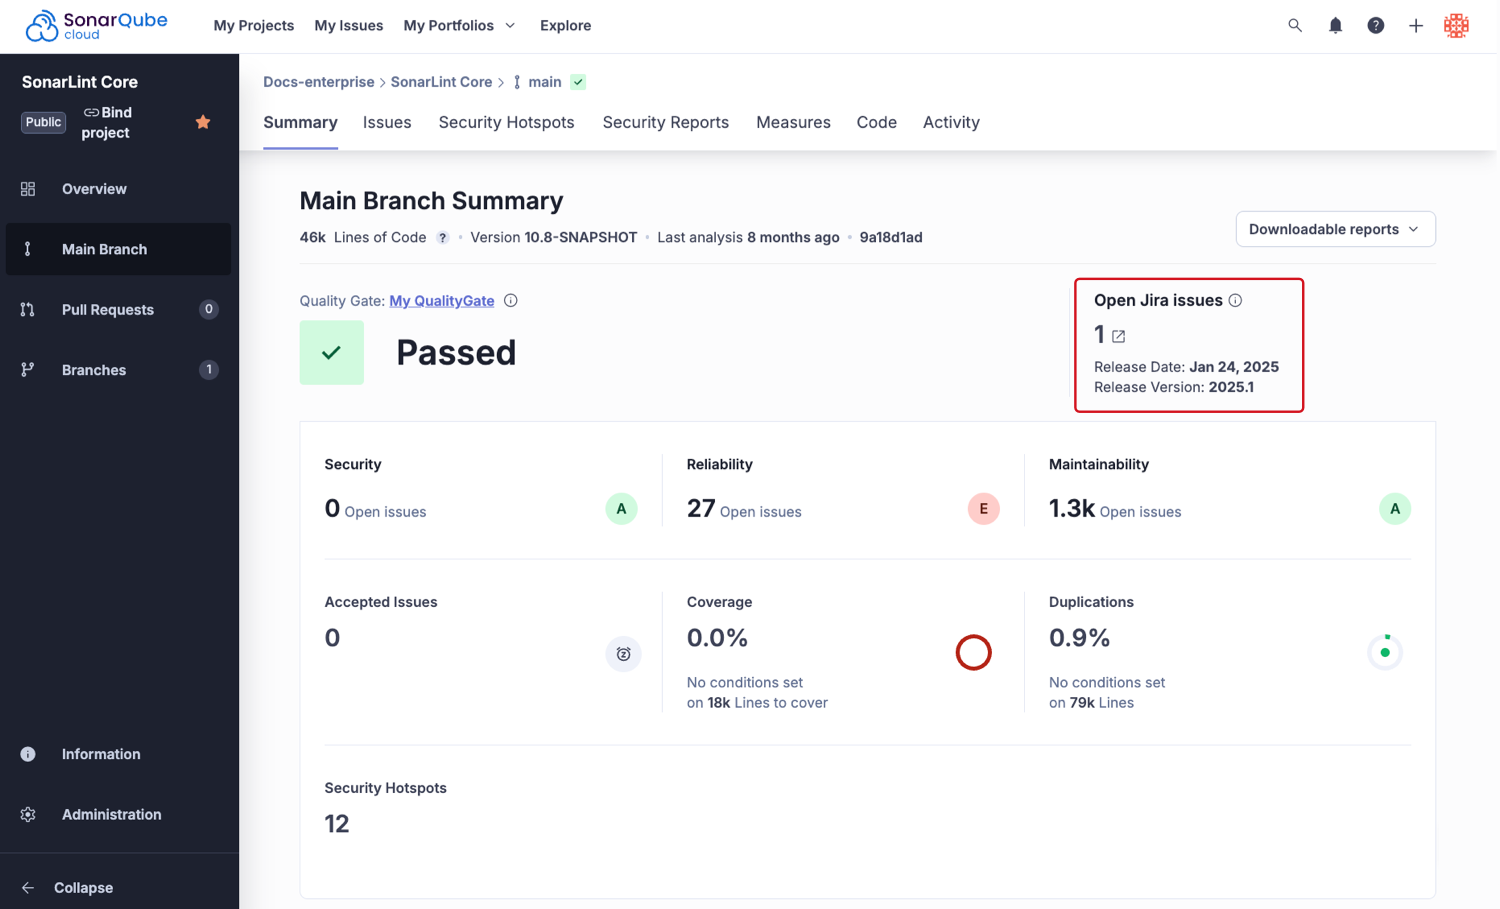
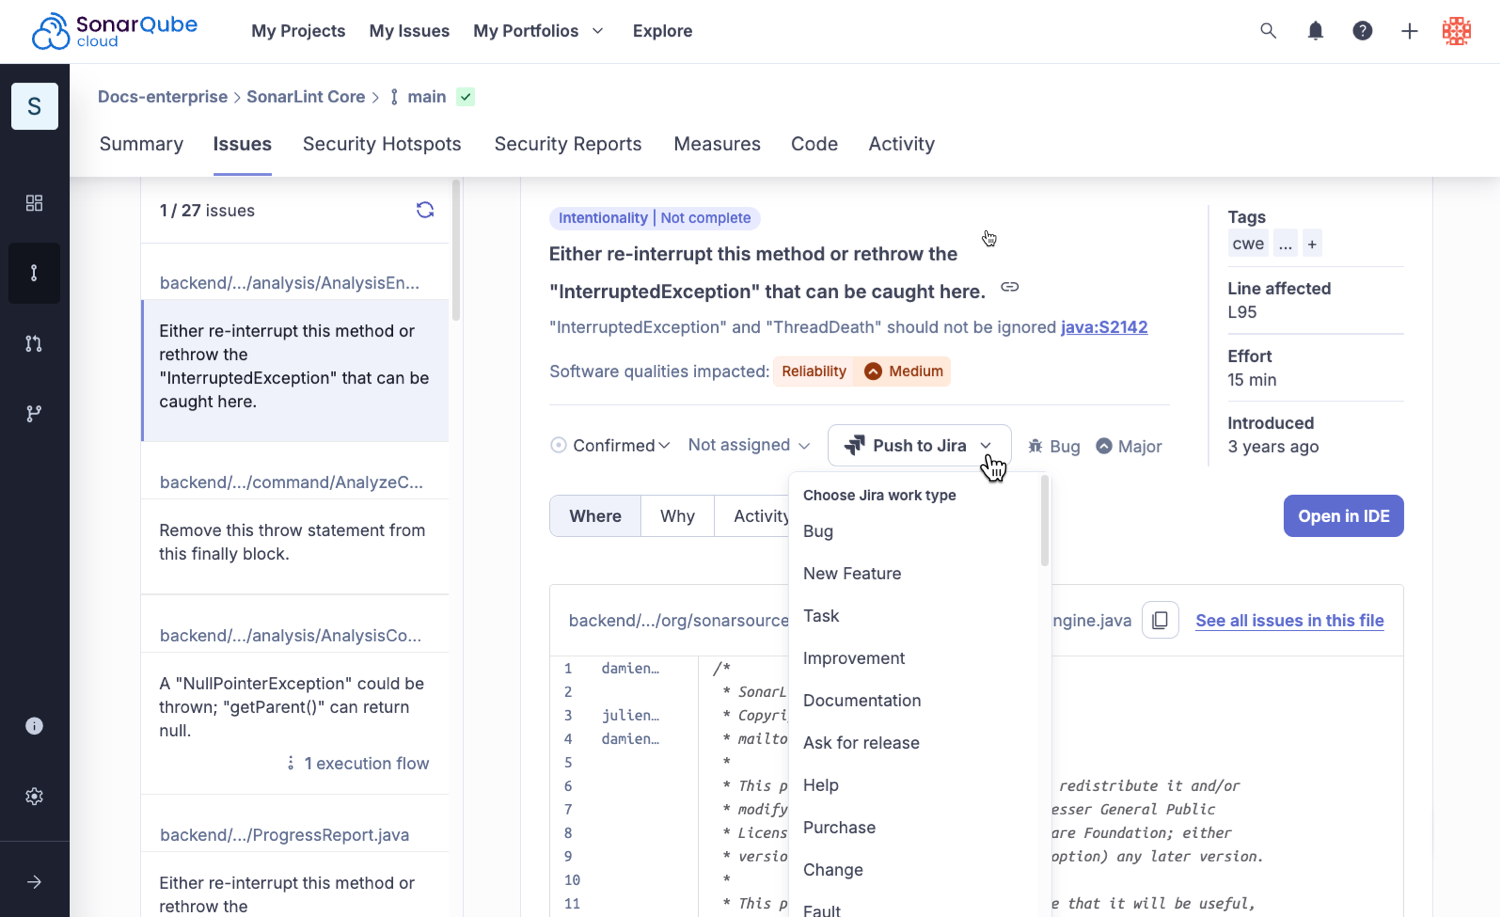
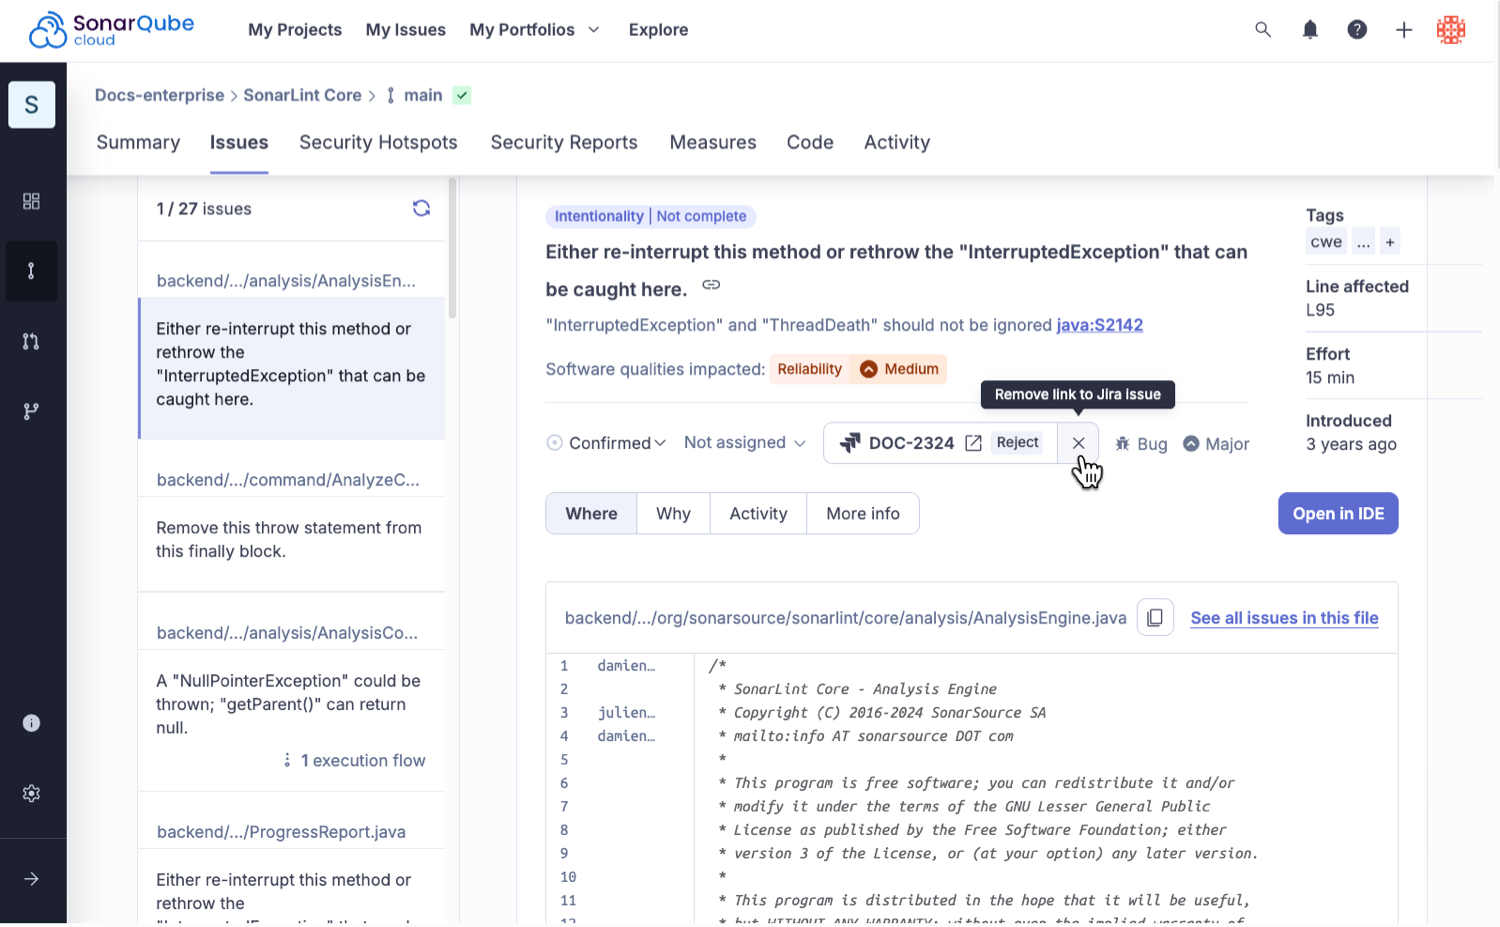
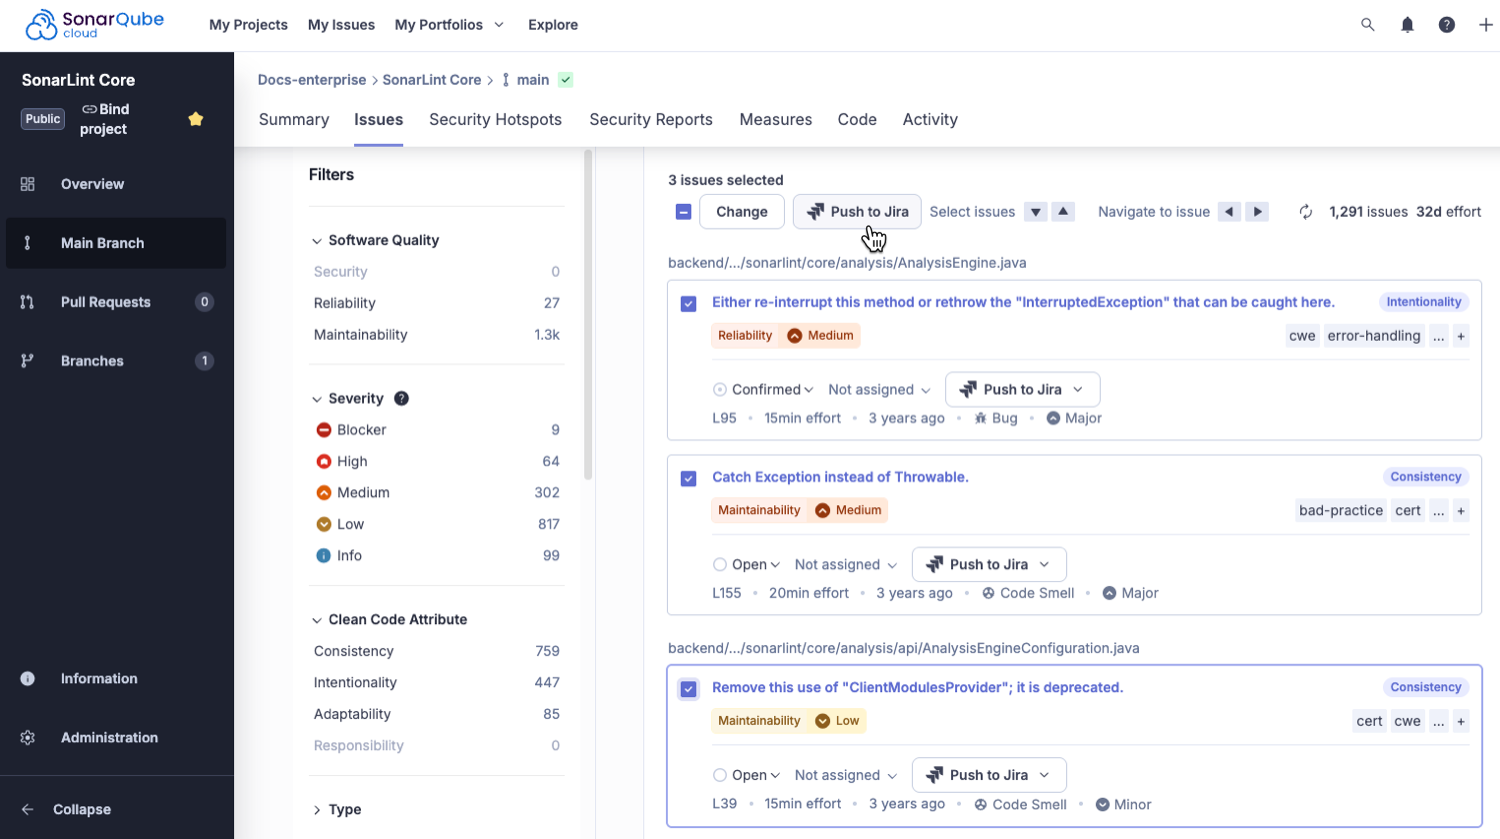
 If you prefer to set up your MCP server manually, a detailed quickstart guide is available for [Quickstart guide #Setup in Kiro](https://app.gitbook.com/s/xNksbUaDXyfRoTpHP0vQ/quickstart-guide#setup-in-kiro "mention"). In addition, more information about the available tools can be found in the SonarQube MCP Server documentation, on the [Tools](https://app.gitbook.com/s/xNksbUaDXyfRoTpHP0vQ/tools "mention") page.
#### Configure your AI agent
The **AI AGENTS CONFIGURATION** view is only available when running an AI-enabled agent and offers two tools to help your AI agent engage with SonarQube (Server, Cloud).
* Select **Configure SonarQube MCP Server** to use your connected mode credentials to install the SonarQube MCP Server. You will be prompted to complete your [setup](https://docs.sonarsource.com/sonarqube-for-vs-code/connect-your-ide/setup "mention") if none exists.
* Available in Cursor, Kiro, and Windsurf: Select **Introduce SonarQube Rules File** to create explicit instructions for your AI-powered IDE to produce secure, reliable, and maintainable code.
* The file provides SonarQube MCP Server instructions to your AI agent. As an example, it instructs the agent to disable SonarQube automatic analysis before starting code generation, and to enable it after the generation is complete. It also asks the agent to analyze changed files in batches, once the changes are done.
### Related pages
* [ai-codefix](https://docs.sonarsource.com/sonarqube-for-vs-code/ai-capabilities/ai-codefix "mention")
* SonarQube and [agents](https://docs.sonarsource.com/sonarqube-for-vs-code/ai-capabilities/agents "mention") in your IDE
* Getting started with other [ides](https://docs.sonarsource.com/sonarqube-for-vs-code/getting-started/ides "mention")
* [setup](https://docs.sonarsource.com/sonarqube-for-vs-code/connect-your-ide/setup "mention")
---
# Source: https://docs.sonarsource.com/sonarqube-community-build/analyzing-source-code/languages/kotlin.md
# Source: https://docs.sonarsource.com/sonarqube-server/8.9/analyzing-source-code/languages/kotlin.md
# Source: https://docs.sonarsource.com/sonarqube-server/9.8/analyzing-source-code/languages/kotlin.md
# Source: https://docs.sonarsource.com/sonarqube-server/9.9/analyzing-source-code/languages/kotlin.md
# Source: https://docs.sonarsource.com/sonarqube-server/10.0/analyzing-source-code/languages/kotlin.md
# Source: https://docs.sonarsource.com/sonarqube-server/10.1/analyzing-source-code/languages/kotlin.md
# Source: https://docs.sonarsource.com/sonarqube-server/10.2/analyzing-source-code/languages/kotlin.md
# Source: https://docs.sonarsource.com/sonarqube-server/10.3/analyzing-source-code/languages/kotlin.md
# Source: https://docs.sonarsource.com/sonarqube-server/10.4/analyzing-source-code/languages/kotlin.md
# Source: https://docs.sonarsource.com/sonarqube-server/10.5/analyzing-source-code/languages/kotlin.md
# Source: https://docs.sonarsource.com/sonarqube-server/10.6/analyzing-source-code/languages/kotlin.md
# Source: https://docs.sonarsource.com/sonarqube-server/10.7/analyzing-source-code/languages/kotlin.md
# Source: https://docs.sonarsource.com/sonarqube-server/10.8/analyzing-source-code/languages/kotlin.md
# Source: https://docs.sonarsource.com/sonarqube-server/2025.2/analyzing-source-code/languages/kotlin.md
# Source: https://docs.sonarsource.com/sonarqube-server/2025.3/analyzing-source-code/languages/kotlin.md
# Source: https://docs.sonarsource.com/sonarqube-server/2025.5/analyzing-source-code/languages/kotlin.md
# Source: https://docs.sonarsource.com/sonarqube-server/2025.1/analyzing-source-code/languages/kotlin.md
# Source: https://docs.sonarsource.com/sonarqube-server/2025.4/analyzing-source-code/languages/kotlin.md
# Source: https://docs.sonarsource.com/sonarqube-server/2025.6/analyzing-source-code/languages/kotlin.md
# Source: https://docs.sonarsource.com/sonarqube-server/analyzing-source-code/languages/kotlin.md
# Source: https://docs.sonarsource.com/sonarqube-cloud/advanced-setup/languages/kotlin.md
# Kotlin
### Supported versions
The level of support for a language is defined as follows:
* Fully supported: Analysis will complete. All the language features are understood and examined.
* Supported: Most language features are understood and examined but the version includes unsupported features. Analysis might break or provide incomplete results.
Version 2.2 is fully supported.
Versions 1.3 to 2.1 are supported.
### Language-specific properties
To discover and update the Kotlin-specific properties, navigate in SonarQube Cloud to *Your Project* > **Administration** > **General Settings** > **Languages** > **Kotlin**. See the [analysis-parameters](https://docs.sonarsource.com/sonarqube-cloud/advanced-setup/analysis-parameters "mention") page for more information about specific properties.
### Kotlin analysis and bytecode
If you are not using the SonarScanner for Gradle or SonarScanner for Maven, it is strongly recommended to provide the paths of all dependency binaries used by the project in order to improve analysis accuracy. You can provide these using the `sonar.java.libraries` property (note that this property is shared with the Java analyzer and as such has `java` in its name). This is a list of comma-separated paths to files with third-party libraries (JAR or Zip files) used by your project. Wildcards can be used: `sonar.java.libraries=path/to/Library.jar,directory/**/*.jar`
Note that if you use the SonarScanner for Gradle or SonarScanner for Maven to scan your code, these scanners will auto-detect the value for this property. Therefore, you don’t need to provide it.
### Specifying the Kotlin source code version
You can explicitly define which Kotlin version the analyzer should analyze your code based on. Provide the desired version in the format `X.Y` as value to the `sonar.kotlin.source.version` property, for example, `1.7`.
### Skipping unchanged files
Starting from November 2022, and by default, the Kotlin analyzer optimizes the analysis of unchanged files in pull requests. In practice, this means that the analyzer does not perform an analysis on any file that is the same as on the PR’s target branch. As long as the project is configured in such a way that the analyzer is able to find the project’s binaries, this should not impact the analysis results.
If you wish to disable this optimization, you can set the value of the analysis parameter `sonar.kotlin.skipUnchanged` to `false`. Leaving the parameter unset lets the server decide whether the optimization should be enabled.
### Related pages
* [external-analyzer-reports](https://docs.sonarsource.com/sonarqube-cloud/enriching/external-analyzer-reports "mention") (AndroidLint, Detekt, and Ktlint)
* Test coverage [overview](https://docs.sonarsource.com/sonarqube-cloud/enriching/test-coverage/overview "mention") (JaCoCo)
---
# Source: https://docs.sonarsource.com/sonarqube-community-build/analyzing-source-code/languages/kubernetes.md
# Source: https://docs.sonarsource.com/sonarqube-server/10.1/analyzing-source-code/languages/kubernetes.md
# Source: https://docs.sonarsource.com/sonarqube-server/10.2/analyzing-source-code/languages/kubernetes.md
# Source: https://docs.sonarsource.com/sonarqube-server/10.3/analyzing-source-code/languages/kubernetes.md
# Source: https://docs.sonarsource.com/sonarqube-server/10.4/analyzing-source-code/languages/kubernetes.md
# Source: https://docs.sonarsource.com/sonarqube-server/10.5/analyzing-source-code/languages/kubernetes.md
# Source: https://docs.sonarsource.com/sonarqube-server/10.6/analyzing-source-code/languages/kubernetes.md
# Source: https://docs.sonarsource.com/sonarqube-server/10.7/analyzing-source-code/languages/kubernetes.md
# Source: https://docs.sonarsource.com/sonarqube-server/10.8/analyzing-source-code/languages/kubernetes.md
# Source: https://docs.sonarsource.com/sonarqube-server/2025.2/analyzing-source-code/languages/kubernetes.md
# Source: https://docs.sonarsource.com/sonarqube-server/2025.3/analyzing-source-code/languages/kubernetes.md
# Source: https://docs.sonarsource.com/sonarqube-server/2025.5/analyzing-source-code/languages/kubernetes.md
# Source: https://docs.sonarsource.com/sonarqube-server/2025.1/analyzing-source-code/languages/kubernetes.md
# Source: https://docs.sonarsource.com/sonarqube-server/2025.4/analyzing-source-code/languages/kubernetes.md
# Source: https://docs.sonarsource.com/sonarqube-server/2025.6/analyzing-source-code/languages/kubernetes.md
# Source: https://docs.sonarsource.com/sonarqube-server/analyzing-source-code/languages/kubernetes.md
# Source: https://docs.sonarsource.com/sonarqube-cloud/advanced-setup/languages/kubernetes.md
# Kubernetes/Helm
### Supported versions
The level of support for a language is defined as follows:
* Fully supported: Analysis will complete. All the language features are understood and examined.
* Supported: Most language features are understood and examined but the version includes unsupported features. Analysis might break or provide incomplete results.
#### Kubernetes
Version 1.33 is supported.
#### Helm
Helm v3 is supported.
### Language-specific properties
To discover and update the Kubernetes-specific properties, navigate in SonarQube Cloud to *Your Project* > **Administration** > **General Settings** > **Languages** > **Kubernetes**. See the [analysis-parameters](https://docs.sonarsource.com/sonarqube-cloud/advanced-setup/analysis-parameters "mention") page for more information about specific properties.
All of the [rules](https://docs.sonarsource.com/sonarqube-cloud/digging-deeper/rules "mention") that apply to Kubernetes files also apply to Helm Chart files.
---
# Source: https://docs.sonarsource.com/sonarqube-community-build/analyzing-source-code/languages.md
# Source: https://docs.sonarsource.com/sonarqube-server/8.9/analyzing-source-code/languages.md
# Source: https://docs.sonarsource.com/sonarqube-server/9.8/analyzing-source-code/languages.md
# Source: https://docs.sonarsource.com/sonarqube-server/9.9/analyzing-source-code/languages.md
# Source: https://docs.sonarsource.com/sonarqube-server/10.0/analyzing-source-code/languages.md
# Source: https://docs.sonarsource.com/sonarqube-server/10.1/analyzing-source-code/languages.md
# Source: https://docs.sonarsource.com/sonarqube-server/10.2/analyzing-source-code/languages.md
# Source: https://docs.sonarsource.com/sonarqube-server/10.3/analyzing-source-code/languages.md
# Source: https://docs.sonarsource.com/sonarqube-server/10.4/analyzing-source-code/languages.md
# Source: https://docs.sonarsource.com/sonarqube-server/10.5/analyzing-source-code/languages.md
# Source: https://docs.sonarsource.com/sonarqube-server/10.6/analyzing-source-code/languages.md
# Source: https://docs.sonarsource.com/sonarqube-server/10.7/analyzing-source-code/languages.md
# Source: https://docs.sonarsource.com/sonarqube-server/10.8/analyzing-source-code/languages.md
# Source: https://docs.sonarsource.com/sonarqube-server/2025.2/analyzing-source-code/languages.md
# Source: https://docs.sonarsource.com/sonarqube-server/2025.3/analyzing-source-code/languages.md
# Source: https://docs.sonarsource.com/sonarqube-server/2025.5/analyzing-source-code/languages.md
# Source: https://docs.sonarsource.com/sonarqube-server/2025.1/analyzing-source-code/languages.md
# Source: https://docs.sonarsource.com/sonarqube-server/2025.4/analyzing-source-code/languages.md
# Source: https://docs.sonarsource.com/sonarqube-server/2025.6/analyzing-source-code/languages.md
# Source: https://docs.sonarsource.com/sonarqube-server/analyzing-source-code/languages.md
# Source: https://docs.sonarsource.com/sonarqube-cloud/advanced-setup/languages.md
# Languages
{% content-ref url="languages/overview" %}
[overview](https://docs.sonarsource.com/sonarqube-cloud/advanced-setup/languages/overview)
{% endcontent-ref %}
{% content-ref url="languages/abap" %}
[abap](https://docs.sonarsource.com/sonarqube-cloud/advanced-setup/languages/abap)
{% endcontent-ref %}
{% content-ref url="languages/ansible" %}
[ansible](https://docs.sonarsource.com/sonarqube-cloud/advanced-setup/languages/ansible)
{% endcontent-ref %}
{% content-ref url="languages/apex" %}
[apex](https://docs.sonarsource.com/sonarqube-cloud/advanced-setup/languages/apex)
{% endcontent-ref %}
{% content-ref url="languages/azure-resource-manager" %}
[azure-resource-manager](https://docs.sonarsource.com/sonarqube-cloud/advanced-setup/languages/azure-resource-manager)
{% endcontent-ref %}
{% content-ref url="languages/c-family" %}
[c-family](https://docs.sonarsource.com/sonarqube-cloud/advanced-setup/languages/c-family)
{% endcontent-ref %}
{% content-ref url="languages/cloudformation" %}
[cloudformation](https://docs.sonarsource.com/sonarqube-cloud/advanced-setup/languages/cloudformation)
{% endcontent-ref %}
{% content-ref url="languages/csharp" %}
[csharp](https://docs.sonarsource.com/sonarqube-cloud/advanced-setup/languages/csharp)
{% endcontent-ref %}
{% content-ref url="languages/cobol" %}
[cobol](https://docs.sonarsource.com/sonarqube-cloud/advanced-setup/languages/cobol)
{% endcontent-ref %}
{% content-ref url="languages/docker" %}
[docker](https://docs.sonarsource.com/sonarqube-cloud/advanced-setup/languages/docker)
{% endcontent-ref %}
{% content-ref url="languages/dart" %}
[dart](https://docs.sonarsource.com/sonarqube-cloud/advanced-setup/languages/dart)
{% endcontent-ref %}
{% content-ref url="languages/flex" %}
[flex](https://docs.sonarsource.com/sonarqube-cloud/advanced-setup/languages/flex)
{% endcontent-ref %}
{% content-ref url="languages/github-actions" %}
[github-actions](https://docs.sonarsource.com/sonarqube-cloud/advanced-setup/languages/github-actions)
{% endcontent-ref %}
{% content-ref url="languages/go" %}
[go](https://docs.sonarsource.com/sonarqube-cloud/advanced-setup/languages/go)
{% endcontent-ref %}
{% content-ref url="languages/html" %}
[html](https://docs.sonarsource.com/sonarqube-cloud/advanced-setup/languages/html)
{% endcontent-ref %}
{% content-ref url="languages/java" %}
[java](https://docs.sonarsource.com/sonarqube-cloud/advanced-setup/languages/java)
{% endcontent-ref %}
{% content-ref url="languages/javascript-typescript-css" %}
[javascript-typescript-css](https://docs.sonarsource.com/sonarqube-cloud/advanced-setup/languages/javascript-typescript-css)
{% endcontent-ref %}
{% content-ref url="languages/jcl" %}
[jcl](https://docs.sonarsource.com/sonarqube-cloud/advanced-setup/languages/jcl)
{% endcontent-ref %}
{% content-ref url="languages/json" %}
[json](https://docs.sonarsource.com/sonarqube-cloud/advanced-setup/languages/json)
{% endcontent-ref %}
{% content-ref url="languages/kotlin" %}
[kotlin](https://docs.sonarsource.com/sonarqube-cloud/advanced-setup/languages/kotlin)
{% endcontent-ref %}
{% content-ref url="languages/kubernetes" %}
[kubernetes](https://docs.sonarsource.com/sonarqube-cloud/advanced-setup/languages/kubernetes)
{% endcontent-ref %}
{% content-ref url="languages/php" %}
[php](https://docs.sonarsource.com/sonarqube-cloud/advanced-setup/languages/php)
{% endcontent-ref %}
{% content-ref url="languages/pl-i" %}
[pl-i](https://docs.sonarsource.com/sonarqube-cloud/advanced-setup/languages/pl-i)
{% endcontent-ref %}
{% content-ref url="languages/pl-sql" %}
[pl-sql](https://docs.sonarsource.com/sonarqube-cloud/advanced-setup/languages/pl-sql)
{% endcontent-ref %}
{% content-ref url="languages/python" %}
[python](https://docs.sonarsource.com/sonarqube-cloud/advanced-setup/languages/python)
{% endcontent-ref %}
{% content-ref url="languages/rpg" %}
[rpg](https://docs.sonarsource.com/sonarqube-cloud/advanced-setup/languages/rpg)
{% endcontent-ref %}
{% content-ref url="languages/ruby" %}
[ruby](https://docs.sonarsource.com/sonarqube-cloud/advanced-setup/languages/ruby)
{% endcontent-ref %}
{% content-ref url="languages/rust" %}
[rust](https://docs.sonarsource.com/sonarqube-cloud/advanced-setup/languages/rust)
{% endcontent-ref %}
{% content-ref url="languages/scala" %}
[scala](https://docs.sonarsource.com/sonarqube-cloud/advanced-setup/languages/scala)
{% endcontent-ref %}
{% content-ref url="languages/secrets" %}
[secrets](https://docs.sonarsource.com/sonarqube-cloud/advanced-setup/languages/secrets)
{% endcontent-ref %}
{% content-ref url="languages/shell" %}
[shell](https://docs.sonarsource.com/sonarqube-cloud/advanced-setup/languages/shell)
{% endcontent-ref %}
{% content-ref url="languages/swift" %}
[swift](https://docs.sonarsource.com/sonarqube-cloud/advanced-setup/languages/swift)
{% endcontent-ref %}
{% content-ref url="languages/terraform" %}
[terraform](https://docs.sonarsource.com/sonarqube-cloud/advanced-setup/languages/terraform)
{% endcontent-ref %}
{% content-ref url="languages/t-sql" %}
[t-sql](https://docs.sonarsource.com/sonarqube-cloud/advanced-setup/languages/t-sql)
{% endcontent-ref %}
{% content-ref url="languages/vb-net" %}
[vb-net](https://docs.sonarsource.com/sonarqube-cloud/advanced-setup/languages/vb-net)
{% endcontent-ref %}
{% content-ref url="languages/vb6" %}
[vb6](https://docs.sonarsource.com/sonarqube-cloud/advanced-setup/languages/vb6)
{% endcontent-ref %}
{% content-ref url="languages/xml" %}
[xml](https://docs.sonarsource.com/sonarqube-cloud/advanced-setup/languages/xml)
{% endcontent-ref %}
{% content-ref url="languages/yaml" %}
[yaml](https://docs.sonarsource.com/sonarqube-cloud/advanced-setup/languages/yaml)
{% endcontent-ref %}
---
# Source: https://docs.sonarsource.com/sonarqube-community-build/instance-administration/authentication/ldap.md
# Source: https://docs.sonarsource.com/sonarqube-server/9.8/instance-administration/authentication/ldap.md
# Source: https://docs.sonarsource.com/sonarqube-server/9.9/instance-administration/authentication/ldap.md
# Source: https://docs.sonarsource.com/sonarqube-server/10.0/instance-administration/authentication/ldap.md
# Source: https://docs.sonarsource.com/sonarqube-server/10.1/instance-administration/authentication/ldap.md
# Source: https://docs.sonarsource.com/sonarqube-server/10.2/instance-administration/authentication/ldap.md
# Source: https://docs.sonarsource.com/sonarqube-server/10.3/instance-administration/authentication/ldap.md
# Source: https://docs.sonarsource.com/sonarqube-server/10.4/instance-administration/authentication/ldap.md
# Source: https://docs.sonarsource.com/sonarqube-server/10.5/instance-administration/authentication/ldap.md
# Source: https://docs.sonarsource.com/sonarqube-server/10.6/instance-administration/authentication/ldap.md
# Source: https://docs.sonarsource.com/sonarqube-server/10.7/instance-administration/authentication/ldap.md
# Source: https://docs.sonarsource.com/sonarqube-server/10.8/instance-administration/authentication/ldap.md
# Source: https://docs.sonarsource.com/sonarqube-server/2025.2/instance-administration/authentication/ldap.md
# Source: https://docs.sonarsource.com/sonarqube-server/2025.3/instance-administration/authentication/ldap.md
# Source: https://docs.sonarsource.com/sonarqube-server/2025.5/instance-administration/authentication/ldap.md
# Source: https://docs.sonarsource.com/sonarqube-server/2025.1/instance-administration/authentication/ldap.md
# Source: https://docs.sonarsource.com/sonarqube-server/2025.4/instance-administration/authentication/ldap.md
# Source: https://docs.sonarsource.com/sonarqube-server/2025.6/instance-administration/authentication/ldap.md
# Source: https://docs.sonarsource.com/sonarqube-server/instance-administration/authentication/ldap.md
# LDAP
You can configure SonarQube Server authentication and authorization to an LDAP server (including the LDAP service of Active Directory) through system properties (see [system-properties](https://docs.sonarsource.com/sonarqube-server/server-installation/system-properties "mention")).
The main features are:
* Password checking against the external authentication engine.
* Automatic synchronization of usernames and emails.
* Automatic synchronization of relationships between users and groups (authorization).
* During the first successful authentication, the user account is created in the SonarQube Server database. Each time a user logs into SonarQube, the username and the email are synchronized.
* Group synchronization is an option that will sync SonarQube Server group memberships with the LDAP service.
| | Apache DS | OpenLDAP | Open DS | Active Directory |
| ---------- | ----------------------------------- | ----------------------------------- | ----------------------------------- | ----------------------------------- |
| Anonymous |  |  |  | |
| Simple |  |  |  |  |
| LDAPS |  |  |
If you prefer to set up your MCP server manually, a detailed quickstart guide is available for [Quickstart guide #Setup in Kiro](https://app.gitbook.com/s/xNksbUaDXyfRoTpHP0vQ/quickstart-guide#setup-in-kiro "mention"). In addition, more information about the available tools can be found in the SonarQube MCP Server documentation, on the [Tools](https://app.gitbook.com/s/xNksbUaDXyfRoTpHP0vQ/tools "mention") page.
#### Configure your AI agent
The **AI AGENTS CONFIGURATION** view is only available when running an AI-enabled agent and offers two tools to help your AI agent engage with SonarQube (Server, Cloud).
* Select **Configure SonarQube MCP Server** to use your connected mode credentials to install the SonarQube MCP Server. You will be prompted to complete your [setup](https://docs.sonarsource.com/sonarqube-for-vs-code/connect-your-ide/setup "mention") if none exists.
* Available in Cursor, Kiro, and Windsurf: Select **Introduce SonarQube Rules File** to create explicit instructions for your AI-powered IDE to produce secure, reliable, and maintainable code.
* The file provides SonarQube MCP Server instructions to your AI agent. As an example, it instructs the agent to disable SonarQube automatic analysis before starting code generation, and to enable it after the generation is complete. It also asks the agent to analyze changed files in batches, once the changes are done.
### Related pages
* [ai-codefix](https://docs.sonarsource.com/sonarqube-for-vs-code/ai-capabilities/ai-codefix "mention")
* SonarQube and [agents](https://docs.sonarsource.com/sonarqube-for-vs-code/ai-capabilities/agents "mention") in your IDE
* Getting started with other [ides](https://docs.sonarsource.com/sonarqube-for-vs-code/getting-started/ides "mention")
* [setup](https://docs.sonarsource.com/sonarqube-for-vs-code/connect-your-ide/setup "mention")
---
# Source: https://docs.sonarsource.com/sonarqube-community-build/analyzing-source-code/languages/kotlin.md
# Source: https://docs.sonarsource.com/sonarqube-server/8.9/analyzing-source-code/languages/kotlin.md
# Source: https://docs.sonarsource.com/sonarqube-server/9.8/analyzing-source-code/languages/kotlin.md
# Source: https://docs.sonarsource.com/sonarqube-server/9.9/analyzing-source-code/languages/kotlin.md
# Source: https://docs.sonarsource.com/sonarqube-server/10.0/analyzing-source-code/languages/kotlin.md
# Source: https://docs.sonarsource.com/sonarqube-server/10.1/analyzing-source-code/languages/kotlin.md
# Source: https://docs.sonarsource.com/sonarqube-server/10.2/analyzing-source-code/languages/kotlin.md
# Source: https://docs.sonarsource.com/sonarqube-server/10.3/analyzing-source-code/languages/kotlin.md
# Source: https://docs.sonarsource.com/sonarqube-server/10.4/analyzing-source-code/languages/kotlin.md
# Source: https://docs.sonarsource.com/sonarqube-server/10.5/analyzing-source-code/languages/kotlin.md
# Source: https://docs.sonarsource.com/sonarqube-server/10.6/analyzing-source-code/languages/kotlin.md
# Source: https://docs.sonarsource.com/sonarqube-server/10.7/analyzing-source-code/languages/kotlin.md
# Source: https://docs.sonarsource.com/sonarqube-server/10.8/analyzing-source-code/languages/kotlin.md
# Source: https://docs.sonarsource.com/sonarqube-server/2025.2/analyzing-source-code/languages/kotlin.md
# Source: https://docs.sonarsource.com/sonarqube-server/2025.3/analyzing-source-code/languages/kotlin.md
# Source: https://docs.sonarsource.com/sonarqube-server/2025.5/analyzing-source-code/languages/kotlin.md
# Source: https://docs.sonarsource.com/sonarqube-server/2025.1/analyzing-source-code/languages/kotlin.md
# Source: https://docs.sonarsource.com/sonarqube-server/2025.4/analyzing-source-code/languages/kotlin.md
# Source: https://docs.sonarsource.com/sonarqube-server/2025.6/analyzing-source-code/languages/kotlin.md
# Source: https://docs.sonarsource.com/sonarqube-server/analyzing-source-code/languages/kotlin.md
# Source: https://docs.sonarsource.com/sonarqube-cloud/advanced-setup/languages/kotlin.md
# Kotlin
### Supported versions
The level of support for a language is defined as follows:
* Fully supported: Analysis will complete. All the language features are understood and examined.
* Supported: Most language features are understood and examined but the version includes unsupported features. Analysis might break or provide incomplete results.
Version 2.2 is fully supported.
Versions 1.3 to 2.1 are supported.
### Language-specific properties
To discover and update the Kotlin-specific properties, navigate in SonarQube Cloud to *Your Project* > **Administration** > **General Settings** > **Languages** > **Kotlin**. See the [analysis-parameters](https://docs.sonarsource.com/sonarqube-cloud/advanced-setup/analysis-parameters "mention") page for more information about specific properties.
### Kotlin analysis and bytecode
If you are not using the SonarScanner for Gradle or SonarScanner for Maven, it is strongly recommended to provide the paths of all dependency binaries used by the project in order to improve analysis accuracy. You can provide these using the `sonar.java.libraries` property (note that this property is shared with the Java analyzer and as such has `java` in its name). This is a list of comma-separated paths to files with third-party libraries (JAR or Zip files) used by your project. Wildcards can be used: `sonar.java.libraries=path/to/Library.jar,directory/**/*.jar`
Note that if you use the SonarScanner for Gradle or SonarScanner for Maven to scan your code, these scanners will auto-detect the value for this property. Therefore, you don’t need to provide it.
### Specifying the Kotlin source code version
You can explicitly define which Kotlin version the analyzer should analyze your code based on. Provide the desired version in the format `X.Y` as value to the `sonar.kotlin.source.version` property, for example, `1.7`.
### Skipping unchanged files
Starting from November 2022, and by default, the Kotlin analyzer optimizes the analysis of unchanged files in pull requests. In practice, this means that the analyzer does not perform an analysis on any file that is the same as on the PR’s target branch. As long as the project is configured in such a way that the analyzer is able to find the project’s binaries, this should not impact the analysis results.
If you wish to disable this optimization, you can set the value of the analysis parameter `sonar.kotlin.skipUnchanged` to `false`. Leaving the parameter unset lets the server decide whether the optimization should be enabled.
### Related pages
* [external-analyzer-reports](https://docs.sonarsource.com/sonarqube-cloud/enriching/external-analyzer-reports "mention") (AndroidLint, Detekt, and Ktlint)
* Test coverage [overview](https://docs.sonarsource.com/sonarqube-cloud/enriching/test-coverage/overview "mention") (JaCoCo)
---
# Source: https://docs.sonarsource.com/sonarqube-community-build/analyzing-source-code/languages/kubernetes.md
# Source: https://docs.sonarsource.com/sonarqube-server/10.1/analyzing-source-code/languages/kubernetes.md
# Source: https://docs.sonarsource.com/sonarqube-server/10.2/analyzing-source-code/languages/kubernetes.md
# Source: https://docs.sonarsource.com/sonarqube-server/10.3/analyzing-source-code/languages/kubernetes.md
# Source: https://docs.sonarsource.com/sonarqube-server/10.4/analyzing-source-code/languages/kubernetes.md
# Source: https://docs.sonarsource.com/sonarqube-server/10.5/analyzing-source-code/languages/kubernetes.md
# Source: https://docs.sonarsource.com/sonarqube-server/10.6/analyzing-source-code/languages/kubernetes.md
# Source: https://docs.sonarsource.com/sonarqube-server/10.7/analyzing-source-code/languages/kubernetes.md
# Source: https://docs.sonarsource.com/sonarqube-server/10.8/analyzing-source-code/languages/kubernetes.md
# Source: https://docs.sonarsource.com/sonarqube-server/2025.2/analyzing-source-code/languages/kubernetes.md
# Source: https://docs.sonarsource.com/sonarqube-server/2025.3/analyzing-source-code/languages/kubernetes.md
# Source: https://docs.sonarsource.com/sonarqube-server/2025.5/analyzing-source-code/languages/kubernetes.md
# Source: https://docs.sonarsource.com/sonarqube-server/2025.1/analyzing-source-code/languages/kubernetes.md
# Source: https://docs.sonarsource.com/sonarqube-server/2025.4/analyzing-source-code/languages/kubernetes.md
# Source: https://docs.sonarsource.com/sonarqube-server/2025.6/analyzing-source-code/languages/kubernetes.md
# Source: https://docs.sonarsource.com/sonarqube-server/analyzing-source-code/languages/kubernetes.md
# Source: https://docs.sonarsource.com/sonarqube-cloud/advanced-setup/languages/kubernetes.md
# Kubernetes/Helm
### Supported versions
The level of support for a language is defined as follows:
* Fully supported: Analysis will complete. All the language features are understood and examined.
* Supported: Most language features are understood and examined but the version includes unsupported features. Analysis might break or provide incomplete results.
#### Kubernetes
Version 1.33 is supported.
#### Helm
Helm v3 is supported.
### Language-specific properties
To discover and update the Kubernetes-specific properties, navigate in SonarQube Cloud to *Your Project* > **Administration** > **General Settings** > **Languages** > **Kubernetes**. See the [analysis-parameters](https://docs.sonarsource.com/sonarqube-cloud/advanced-setup/analysis-parameters "mention") page for more information about specific properties.
All of the [rules](https://docs.sonarsource.com/sonarqube-cloud/digging-deeper/rules "mention") that apply to Kubernetes files also apply to Helm Chart files.
---
# Source: https://docs.sonarsource.com/sonarqube-community-build/analyzing-source-code/languages.md
# Source: https://docs.sonarsource.com/sonarqube-server/8.9/analyzing-source-code/languages.md
# Source: https://docs.sonarsource.com/sonarqube-server/9.8/analyzing-source-code/languages.md
# Source: https://docs.sonarsource.com/sonarqube-server/9.9/analyzing-source-code/languages.md
# Source: https://docs.sonarsource.com/sonarqube-server/10.0/analyzing-source-code/languages.md
# Source: https://docs.sonarsource.com/sonarqube-server/10.1/analyzing-source-code/languages.md
# Source: https://docs.sonarsource.com/sonarqube-server/10.2/analyzing-source-code/languages.md
# Source: https://docs.sonarsource.com/sonarqube-server/10.3/analyzing-source-code/languages.md
# Source: https://docs.sonarsource.com/sonarqube-server/10.4/analyzing-source-code/languages.md
# Source: https://docs.sonarsource.com/sonarqube-server/10.5/analyzing-source-code/languages.md
# Source: https://docs.sonarsource.com/sonarqube-server/10.6/analyzing-source-code/languages.md
# Source: https://docs.sonarsource.com/sonarqube-server/10.7/analyzing-source-code/languages.md
# Source: https://docs.sonarsource.com/sonarqube-server/10.8/analyzing-source-code/languages.md
# Source: https://docs.sonarsource.com/sonarqube-server/2025.2/analyzing-source-code/languages.md
# Source: https://docs.sonarsource.com/sonarqube-server/2025.3/analyzing-source-code/languages.md
# Source: https://docs.sonarsource.com/sonarqube-server/2025.5/analyzing-source-code/languages.md
# Source: https://docs.sonarsource.com/sonarqube-server/2025.1/analyzing-source-code/languages.md
# Source: https://docs.sonarsource.com/sonarqube-server/2025.4/analyzing-source-code/languages.md
# Source: https://docs.sonarsource.com/sonarqube-server/2025.6/analyzing-source-code/languages.md
# Source: https://docs.sonarsource.com/sonarqube-server/analyzing-source-code/languages.md
# Source: https://docs.sonarsource.com/sonarqube-cloud/advanced-setup/languages.md
# Languages
{% content-ref url="languages/overview" %}
[overview](https://docs.sonarsource.com/sonarqube-cloud/advanced-setup/languages/overview)
{% endcontent-ref %}
{% content-ref url="languages/abap" %}
[abap](https://docs.sonarsource.com/sonarqube-cloud/advanced-setup/languages/abap)
{% endcontent-ref %}
{% content-ref url="languages/ansible" %}
[ansible](https://docs.sonarsource.com/sonarqube-cloud/advanced-setup/languages/ansible)
{% endcontent-ref %}
{% content-ref url="languages/apex" %}
[apex](https://docs.sonarsource.com/sonarqube-cloud/advanced-setup/languages/apex)
{% endcontent-ref %}
{% content-ref url="languages/azure-resource-manager" %}
[azure-resource-manager](https://docs.sonarsource.com/sonarqube-cloud/advanced-setup/languages/azure-resource-manager)
{% endcontent-ref %}
{% content-ref url="languages/c-family" %}
[c-family](https://docs.sonarsource.com/sonarqube-cloud/advanced-setup/languages/c-family)
{% endcontent-ref %}
{% content-ref url="languages/cloudformation" %}
[cloudformation](https://docs.sonarsource.com/sonarqube-cloud/advanced-setup/languages/cloudformation)
{% endcontent-ref %}
{% content-ref url="languages/csharp" %}
[csharp](https://docs.sonarsource.com/sonarqube-cloud/advanced-setup/languages/csharp)
{% endcontent-ref %}
{% content-ref url="languages/cobol" %}
[cobol](https://docs.sonarsource.com/sonarqube-cloud/advanced-setup/languages/cobol)
{% endcontent-ref %}
{% content-ref url="languages/docker" %}
[docker](https://docs.sonarsource.com/sonarqube-cloud/advanced-setup/languages/docker)
{% endcontent-ref %}
{% content-ref url="languages/dart" %}
[dart](https://docs.sonarsource.com/sonarqube-cloud/advanced-setup/languages/dart)
{% endcontent-ref %}
{% content-ref url="languages/flex" %}
[flex](https://docs.sonarsource.com/sonarqube-cloud/advanced-setup/languages/flex)
{% endcontent-ref %}
{% content-ref url="languages/github-actions" %}
[github-actions](https://docs.sonarsource.com/sonarqube-cloud/advanced-setup/languages/github-actions)
{% endcontent-ref %}
{% content-ref url="languages/go" %}
[go](https://docs.sonarsource.com/sonarqube-cloud/advanced-setup/languages/go)
{% endcontent-ref %}
{% content-ref url="languages/html" %}
[html](https://docs.sonarsource.com/sonarqube-cloud/advanced-setup/languages/html)
{% endcontent-ref %}
{% content-ref url="languages/java" %}
[java](https://docs.sonarsource.com/sonarqube-cloud/advanced-setup/languages/java)
{% endcontent-ref %}
{% content-ref url="languages/javascript-typescript-css" %}
[javascript-typescript-css](https://docs.sonarsource.com/sonarqube-cloud/advanced-setup/languages/javascript-typescript-css)
{% endcontent-ref %}
{% content-ref url="languages/jcl" %}
[jcl](https://docs.sonarsource.com/sonarqube-cloud/advanced-setup/languages/jcl)
{% endcontent-ref %}
{% content-ref url="languages/json" %}
[json](https://docs.sonarsource.com/sonarqube-cloud/advanced-setup/languages/json)
{% endcontent-ref %}
{% content-ref url="languages/kotlin" %}
[kotlin](https://docs.sonarsource.com/sonarqube-cloud/advanced-setup/languages/kotlin)
{% endcontent-ref %}
{% content-ref url="languages/kubernetes" %}
[kubernetes](https://docs.sonarsource.com/sonarqube-cloud/advanced-setup/languages/kubernetes)
{% endcontent-ref %}
{% content-ref url="languages/php" %}
[php](https://docs.sonarsource.com/sonarqube-cloud/advanced-setup/languages/php)
{% endcontent-ref %}
{% content-ref url="languages/pl-i" %}
[pl-i](https://docs.sonarsource.com/sonarqube-cloud/advanced-setup/languages/pl-i)
{% endcontent-ref %}
{% content-ref url="languages/pl-sql" %}
[pl-sql](https://docs.sonarsource.com/sonarqube-cloud/advanced-setup/languages/pl-sql)
{% endcontent-ref %}
{% content-ref url="languages/python" %}
[python](https://docs.sonarsource.com/sonarqube-cloud/advanced-setup/languages/python)
{% endcontent-ref %}
{% content-ref url="languages/rpg" %}
[rpg](https://docs.sonarsource.com/sonarqube-cloud/advanced-setup/languages/rpg)
{% endcontent-ref %}
{% content-ref url="languages/ruby" %}
[ruby](https://docs.sonarsource.com/sonarqube-cloud/advanced-setup/languages/ruby)
{% endcontent-ref %}
{% content-ref url="languages/rust" %}
[rust](https://docs.sonarsource.com/sonarqube-cloud/advanced-setup/languages/rust)
{% endcontent-ref %}
{% content-ref url="languages/scala" %}
[scala](https://docs.sonarsource.com/sonarqube-cloud/advanced-setup/languages/scala)
{% endcontent-ref %}
{% content-ref url="languages/secrets" %}
[secrets](https://docs.sonarsource.com/sonarqube-cloud/advanced-setup/languages/secrets)
{% endcontent-ref %}
{% content-ref url="languages/shell" %}
[shell](https://docs.sonarsource.com/sonarqube-cloud/advanced-setup/languages/shell)
{% endcontent-ref %}
{% content-ref url="languages/swift" %}
[swift](https://docs.sonarsource.com/sonarqube-cloud/advanced-setup/languages/swift)
{% endcontent-ref %}
{% content-ref url="languages/terraform" %}
[terraform](https://docs.sonarsource.com/sonarqube-cloud/advanced-setup/languages/terraform)
{% endcontent-ref %}
{% content-ref url="languages/t-sql" %}
[t-sql](https://docs.sonarsource.com/sonarqube-cloud/advanced-setup/languages/t-sql)
{% endcontent-ref %}
{% content-ref url="languages/vb-net" %}
[vb-net](https://docs.sonarsource.com/sonarqube-cloud/advanced-setup/languages/vb-net)
{% endcontent-ref %}
{% content-ref url="languages/vb6" %}
[vb6](https://docs.sonarsource.com/sonarqube-cloud/advanced-setup/languages/vb6)
{% endcontent-ref %}
{% content-ref url="languages/xml" %}
[xml](https://docs.sonarsource.com/sonarqube-cloud/advanced-setup/languages/xml)
{% endcontent-ref %}
{% content-ref url="languages/yaml" %}
[yaml](https://docs.sonarsource.com/sonarqube-cloud/advanced-setup/languages/yaml)
{% endcontent-ref %}
---
# Source: https://docs.sonarsource.com/sonarqube-community-build/instance-administration/authentication/ldap.md
# Source: https://docs.sonarsource.com/sonarqube-server/9.8/instance-administration/authentication/ldap.md
# Source: https://docs.sonarsource.com/sonarqube-server/9.9/instance-administration/authentication/ldap.md
# Source: https://docs.sonarsource.com/sonarqube-server/10.0/instance-administration/authentication/ldap.md
# Source: https://docs.sonarsource.com/sonarqube-server/10.1/instance-administration/authentication/ldap.md
# Source: https://docs.sonarsource.com/sonarqube-server/10.2/instance-administration/authentication/ldap.md
# Source: https://docs.sonarsource.com/sonarqube-server/10.3/instance-administration/authentication/ldap.md
# Source: https://docs.sonarsource.com/sonarqube-server/10.4/instance-administration/authentication/ldap.md
# Source: https://docs.sonarsource.com/sonarqube-server/10.5/instance-administration/authentication/ldap.md
# Source: https://docs.sonarsource.com/sonarqube-server/10.6/instance-administration/authentication/ldap.md
# Source: https://docs.sonarsource.com/sonarqube-server/10.7/instance-administration/authentication/ldap.md
# Source: https://docs.sonarsource.com/sonarqube-server/10.8/instance-administration/authentication/ldap.md
# Source: https://docs.sonarsource.com/sonarqube-server/2025.2/instance-administration/authentication/ldap.md
# Source: https://docs.sonarsource.com/sonarqube-server/2025.3/instance-administration/authentication/ldap.md
# Source: https://docs.sonarsource.com/sonarqube-server/2025.5/instance-administration/authentication/ldap.md
# Source: https://docs.sonarsource.com/sonarqube-server/2025.1/instance-administration/authentication/ldap.md
# Source: https://docs.sonarsource.com/sonarqube-server/2025.4/instance-administration/authentication/ldap.md
# Source: https://docs.sonarsource.com/sonarqube-server/2025.6/instance-administration/authentication/ldap.md
# Source: https://docs.sonarsource.com/sonarqube-server/instance-administration/authentication/ldap.md
# LDAP
You can configure SonarQube Server authentication and authorization to an LDAP server (including the LDAP service of Active Directory) through system properties (see [system-properties](https://docs.sonarsource.com/sonarqube-server/server-installation/system-properties "mention")).
The main features are:
* Password checking against the external authentication engine.
* Automatic synchronization of usernames and emails.
* Automatic synchronization of relationships between users and groups (authorization).
* During the first successful authentication, the user account is created in the SonarQube Server database. Each time a user logs into SonarQube, the username and the email are synchronized.
* Group synchronization is an option that will sync SonarQube Server group memberships with the LDAP service.
| | Apache DS | OpenLDAP | Open DS | Active Directory |
| ---------- | ----------------------------------- | ----------------------------------- | ----------------------------------- | ----------------------------------- |
| Anonymous |  |  |  | |
| Simple |  |  |  |  |
| LDAPS |  |  | 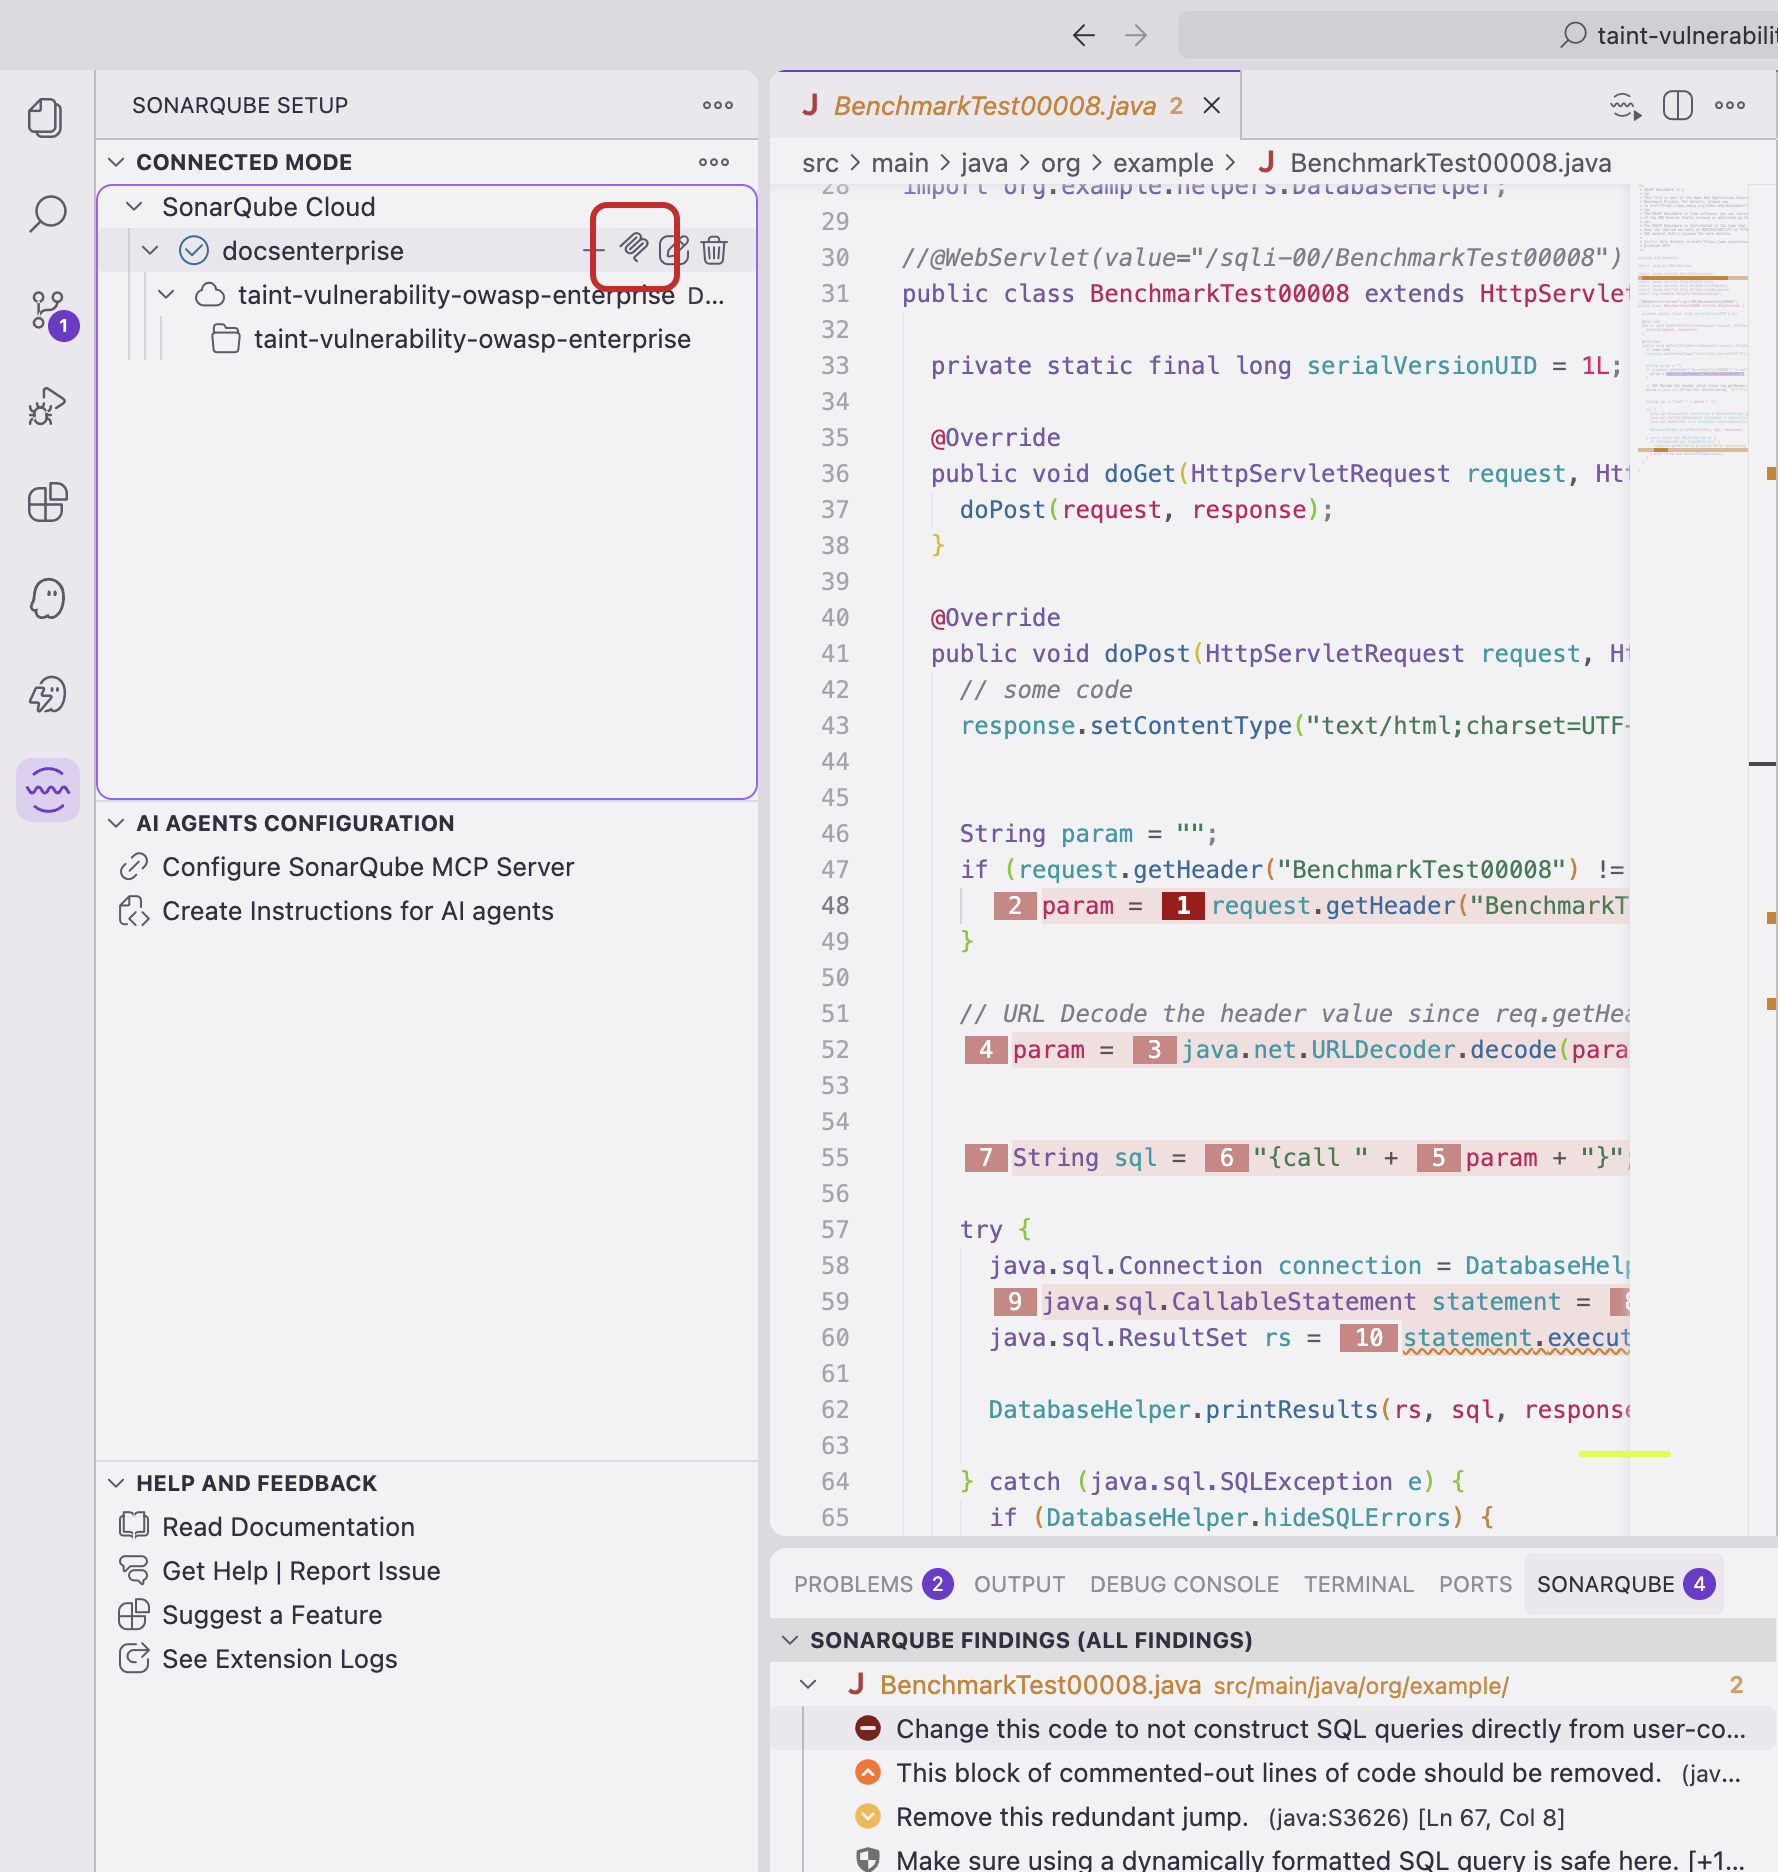
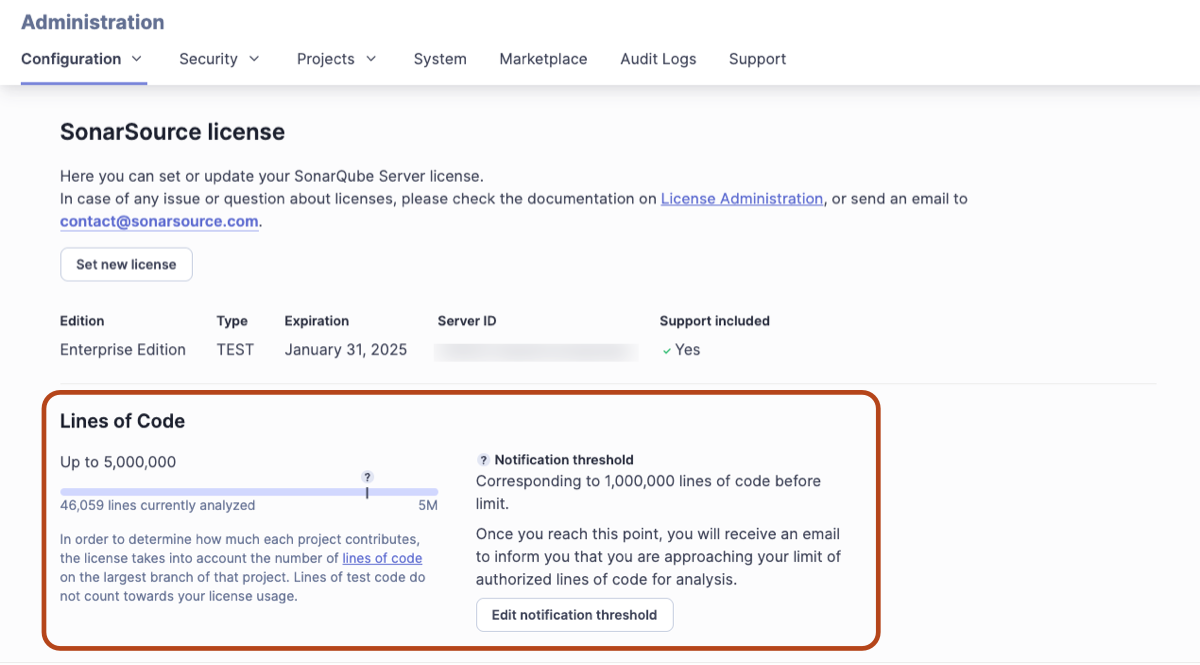
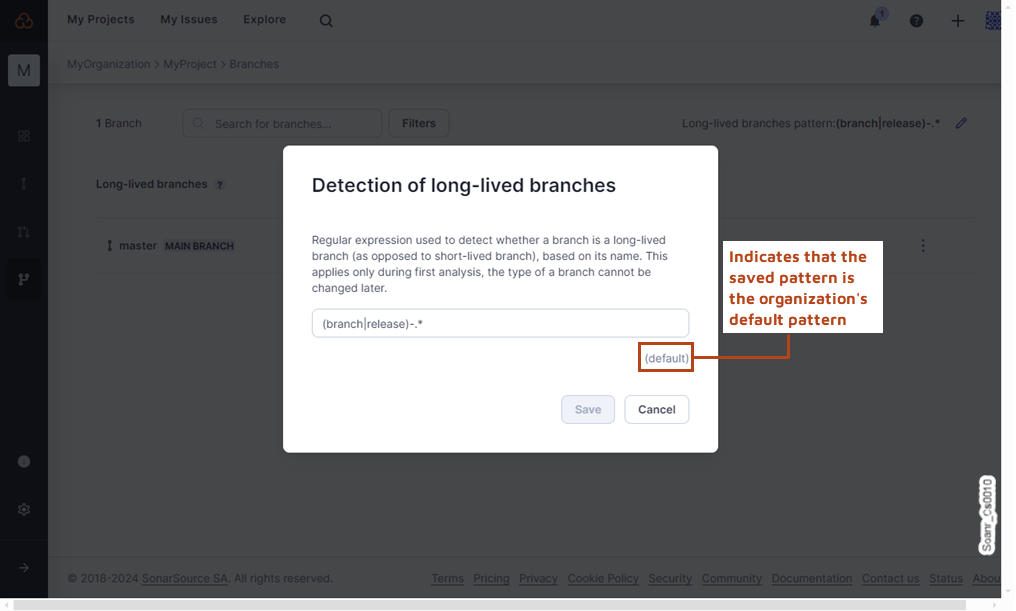 ---
# Source: https://docs.sonarsource.com/sonarqube-community-build/instance-administration/ui-customization/look-and-feel.md
# Source: https://docs.sonarsource.com/sonarqube-server/8.9/instance-administration/look-and-feel.md
# Source: https://docs.sonarsource.com/sonarqube-server/9.8/instance-administration/look-and-feel.md
# Source: https://docs.sonarsource.com/sonarqube-server/9.9/instance-administration/look-and-feel.md
# Source: https://docs.sonarsource.com/sonarqube-server/10.0/instance-administration/look-and-feel.md
# Source: https://docs.sonarsource.com/sonarqube-server/10.1/instance-administration/look-and-feel.md
# Source: https://docs.sonarsource.com/sonarqube-server/10.2/instance-administration/look-and-feel.md
# Source: https://docs.sonarsource.com/sonarqube-server/10.3/instance-administration/look-and-feel.md
# Source: https://docs.sonarsource.com/sonarqube-server/10.4/instance-administration/look-and-feel.md
# Source: https://docs.sonarsource.com/sonarqube-server/10.5/instance-administration/look-and-feel.md
# Source: https://docs.sonarsource.com/sonarqube-server/10.6/instance-administration/look-and-feel.md
# Source: https://docs.sonarsource.com/sonarqube-server/10.7/instance-administration/ui-customization/look-and-feel.md
# Source: https://docs.sonarsource.com/sonarqube-server/10.8/instance-administration/ui-customization/look-and-feel.md
# Source: https://docs.sonarsource.com/sonarqube-server/2025.2/instance-administration/ui-customization/look-and-feel.md
# Source: https://docs.sonarsource.com/sonarqube-server/2025.3/instance-administration/ui-customization/look-and-feel.md
# Source: https://docs.sonarsource.com/sonarqube-server/2025.5/instance-administration/ui-customization/look-and-feel.md
# Source: https://docs.sonarsource.com/sonarqube-server/2025.1/instance-administration/ui-customization/look-and-feel.md
# Source: https://docs.sonarsource.com/sonarqube-server/2025.4/instance-administration/ui-customization/look-and-feel.md
# Source: https://docs.sonarsource.com/sonarqube-server/2025.6/instance-administration/ui-customization/look-and-feel.md
# Source: https://docs.sonarsource.com/sonarqube-server/instance-administration/ui-customization/look-and-feel.md
# Look and feel
### Home logo
You can set your own home logo in **Administration** > **General Settings** > **General** > **Look & Feel**. Simply provide an image URL and width. This logo will be used in the menu bar.
### Gravatar
Gravatar support is enabled by default, using `gravatar.com`. You can configure a different server or disable the feature altogether. When enabled, gravatars show up next to most uses of the user name.
---
# Source: https://docs.sonarsource.com/sonarqube-server/2025.1/server-update-and-maintenance/release-notes-and-notices/lta-to-lta-release-notes.md
# Source: https://docs.sonarsource.com/sonarqube-server/2025.4/server-update-and-maintenance/lta-to-lta-release-notes.md
# Source: https://docs.sonarsource.com/sonarqube-server/server-update-and-maintenance/lta-to-lta-release-notes.md
# LTA to LTA release notes
### Updating from SonarQube Server 9.9 LTA and 2025.1 LTA
You can update your SonarQube Server from 2025.1 LTA to 2026.1 LTA directly. However, if you are updating from 9.9 LTA you will need to do an intermediate version update to 2025.1 LTA. Refer to the following documentation for more information:
* 9.9 [LTA to 2025.1 LTA update notes](https://docs.sonarsource.com/sonarqube-server/2025.1/server-update-and-maintenance/release-notes-and-notices/lta-to-lta-release-notes)
* 2025.1 [LTA to 2025.4 LTA update notes](https://docs.sonarsource.com/sonarqube-server/2025.4/server-update-and-maintenance/lta-to-lta-release-notes)
* The Update [roadmap](https://docs.sonarsource.com/sonarqube-server/server-update-and-maintenance/update/roadmap "mention") page for detailed procedures.
### 2025.1 LTA to 2026.1 LTA dependencies
---
# Source: https://docs.sonarsource.com/sonarqube-community-build/instance-administration/ui-customization/look-and-feel.md
# Source: https://docs.sonarsource.com/sonarqube-server/8.9/instance-administration/look-and-feel.md
# Source: https://docs.sonarsource.com/sonarqube-server/9.8/instance-administration/look-and-feel.md
# Source: https://docs.sonarsource.com/sonarqube-server/9.9/instance-administration/look-and-feel.md
# Source: https://docs.sonarsource.com/sonarqube-server/10.0/instance-administration/look-and-feel.md
# Source: https://docs.sonarsource.com/sonarqube-server/10.1/instance-administration/look-and-feel.md
# Source: https://docs.sonarsource.com/sonarqube-server/10.2/instance-administration/look-and-feel.md
# Source: https://docs.sonarsource.com/sonarqube-server/10.3/instance-administration/look-and-feel.md
# Source: https://docs.sonarsource.com/sonarqube-server/10.4/instance-administration/look-and-feel.md
# Source: https://docs.sonarsource.com/sonarqube-server/10.5/instance-administration/look-and-feel.md
# Source: https://docs.sonarsource.com/sonarqube-server/10.6/instance-administration/look-and-feel.md
# Source: https://docs.sonarsource.com/sonarqube-server/10.7/instance-administration/ui-customization/look-and-feel.md
# Source: https://docs.sonarsource.com/sonarqube-server/10.8/instance-administration/ui-customization/look-and-feel.md
# Source: https://docs.sonarsource.com/sonarqube-server/2025.2/instance-administration/ui-customization/look-and-feel.md
# Source: https://docs.sonarsource.com/sonarqube-server/2025.3/instance-administration/ui-customization/look-and-feel.md
# Source: https://docs.sonarsource.com/sonarqube-server/2025.5/instance-administration/ui-customization/look-and-feel.md
# Source: https://docs.sonarsource.com/sonarqube-server/2025.1/instance-administration/ui-customization/look-and-feel.md
# Source: https://docs.sonarsource.com/sonarqube-server/2025.4/instance-administration/ui-customization/look-and-feel.md
# Source: https://docs.sonarsource.com/sonarqube-server/2025.6/instance-administration/ui-customization/look-and-feel.md
# Source: https://docs.sonarsource.com/sonarqube-server/instance-administration/ui-customization/look-and-feel.md
# Look and feel
### Home logo
You can set your own home logo in **Administration** > **General Settings** > **General** > **Look & Feel**. Simply provide an image URL and width. This logo will be used in the menu bar.
### Gravatar
Gravatar support is enabled by default, using `gravatar.com`. You can configure a different server or disable the feature altogether. When enabled, gravatars show up next to most uses of the user name.
---
# Source: https://docs.sonarsource.com/sonarqube-server/2025.1/server-update-and-maintenance/release-notes-and-notices/lta-to-lta-release-notes.md
# Source: https://docs.sonarsource.com/sonarqube-server/2025.4/server-update-and-maintenance/lta-to-lta-release-notes.md
# Source: https://docs.sonarsource.com/sonarqube-server/server-update-and-maintenance/lta-to-lta-release-notes.md
# LTA to LTA release notes
### Updating from SonarQube Server 9.9 LTA and 2025.1 LTA
You can update your SonarQube Server from 2025.1 LTA to 2026.1 LTA directly. However, if you are updating from 9.9 LTA you will need to do an intermediate version update to 2025.1 LTA. Refer to the following documentation for more information:
* 9.9 [LTA to 2025.1 LTA update notes](https://docs.sonarsource.com/sonarqube-server/2025.1/server-update-and-maintenance/release-notes-and-notices/lta-to-lta-release-notes)
* 2025.1 [LTA to 2025.4 LTA update notes](https://docs.sonarsource.com/sonarqube-server/2025.4/server-update-and-maintenance/lta-to-lta-release-notes)
* The Update [roadmap](https://docs.sonarsource.com/sonarqube-server/server-update-and-maintenance/update/roadmap "mention") page for detailed procedures.
### 2025.1 LTA to 2026.1 LTA dependencies
 If the main branch does not meet the quality gate conditions, it displays a **Failed** status:
 ### Setting a new code definition
Initially, when you start a new project, you may end up performing an analysis without first setting a new code definition. Selecting a new code definition for your project is an essential part of setting up SonarQube Cloud. Without one, the default quality gate won’t work. In this case, the system directs you to set up your new code definition, like this:
### Setting a new code definition
Initially, when you start a new project, you may end up performing an analysis without first setting a new code definition. Selecting a new code definition for your project is an essential part of setting up SonarQube Cloud. Without one, the default quality gate won’t work. In this case, the system directs you to set up your new code definition, like this:
 What counts as new code can differ from project to project, so SonarQube Cloud provides a few options. We strongly encourage all users to choose a new code definition suitable for their project.
Once you have set up a new code definition and performed another analysis, the quality gate status should appear. See [about-new-code](https://docs.sonarsource.com/sonarqube-cloud/standards/about-new-code "mention") for more information.
### Built-in quality gate
SonarQube Cloud provides a built-in quality gate, called the *Sonar way* quality gate, enabled on the main branch by default. This quality gate reflects Sonar’s recommended settings. However, your requirements may differ, so you may wish to define a custom quality gate. For details see the [quality-gates](https://docs.sonarsource.com/sonarqube-cloud/improving/quality-gates "mention") page.
### New code quality measures
When you first look at a newly analyzed project, it can be challenging to decide where to start fixing issues. To help with this, SonarQube Cloud encourages you to focus your efforts on *new code*. This is why we encourage users to set a suitable new code definition for their project.
To help you focus on recently changed code, the main branch summary displays a specific tab for new code.
What counts as new code can differ from project to project, so SonarQube Cloud provides a few options. We strongly encourage all users to choose a new code definition suitable for their project.
Once you have set up a new code definition and performed another analysis, the quality gate status should appear. See [about-new-code](https://docs.sonarsource.com/sonarqube-cloud/standards/about-new-code "mention") for more information.
### Built-in quality gate
SonarQube Cloud provides a built-in quality gate, called the *Sonar way* quality gate, enabled on the main branch by default. This quality gate reflects Sonar’s recommended settings. However, your requirements may differ, so you may wish to define a custom quality gate. For details see the [quality-gates](https://docs.sonarsource.com/sonarqube-cloud/improving/quality-gates "mention") page.
### New code quality measures
When you first look at a newly analyzed project, it can be challenging to decide where to start fixing issues. To help with this, SonarQube Cloud encourages you to focus your efforts on *new code*. This is why we encourage users to set a suitable new code definition for their project.
To help you focus on recently changed code, the main branch summary displays a specific tab for new code.
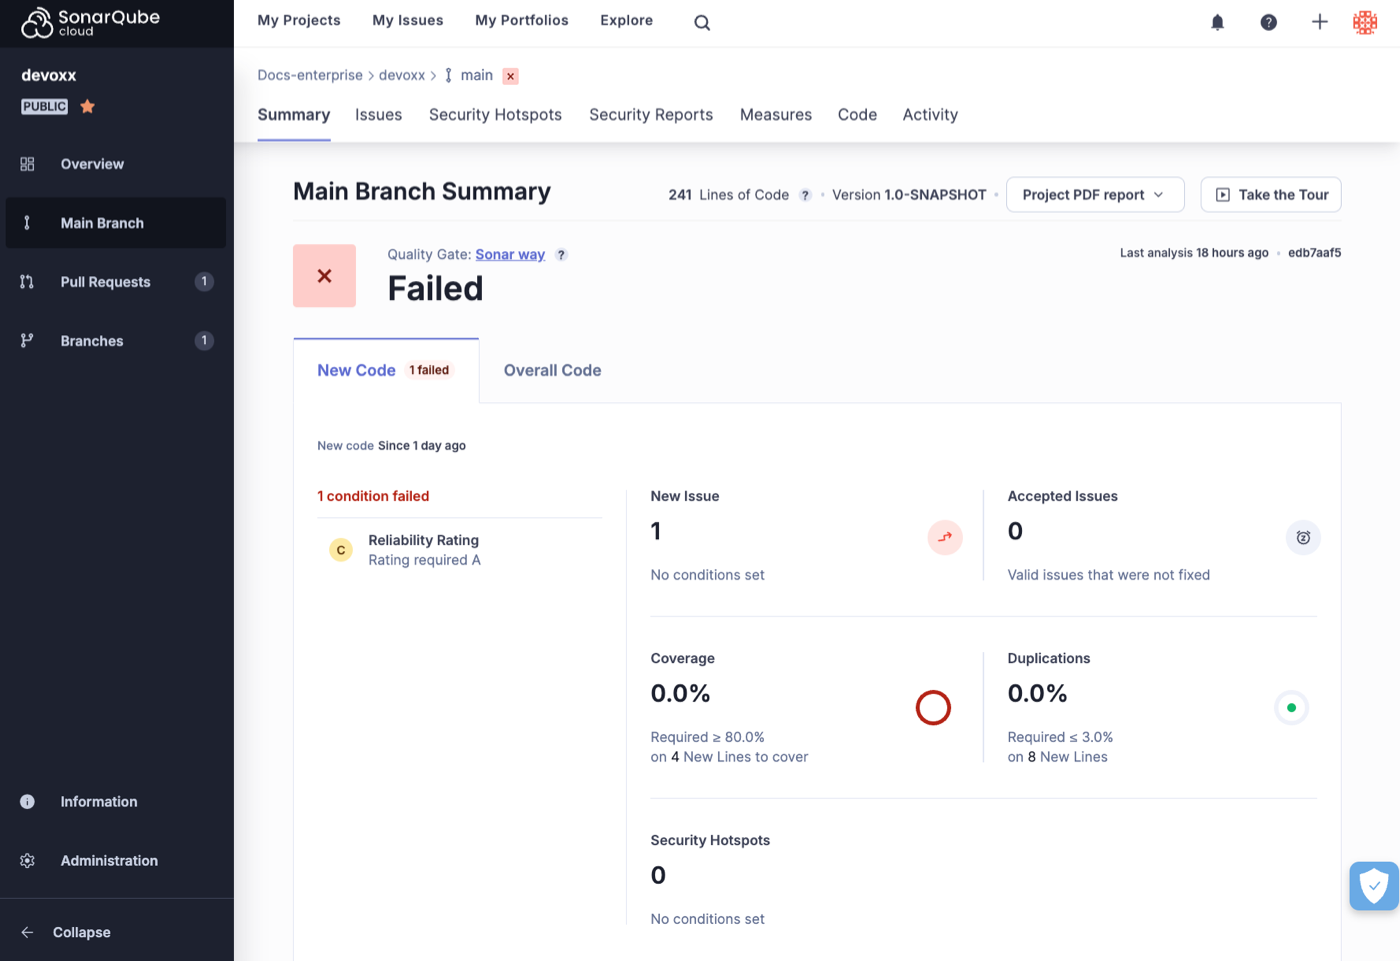 *Your Project* > **Information**
* The **Information** page provides additional details on various aspects of your project including an option to download regulatory reports. See [viewing-project-regulatory-reports](https://docs.sonarsource.com/sonarqube-cloud/getting-started-with-enterprise/viewing-enterprise-reports/viewing-project-regulatory-reports "mention") for more details.
*Your Project* > **Information**
* The **Information** page provides additional details on various aspects of your project including an option to download regulatory reports. See [viewing-project-regulatory-reports](https://docs.sonarsource.com/sonarqube-cloud/getting-started-with-enterprise/viewing-enterprise-reports/viewing-project-regulatory-reports "mention") for more details.
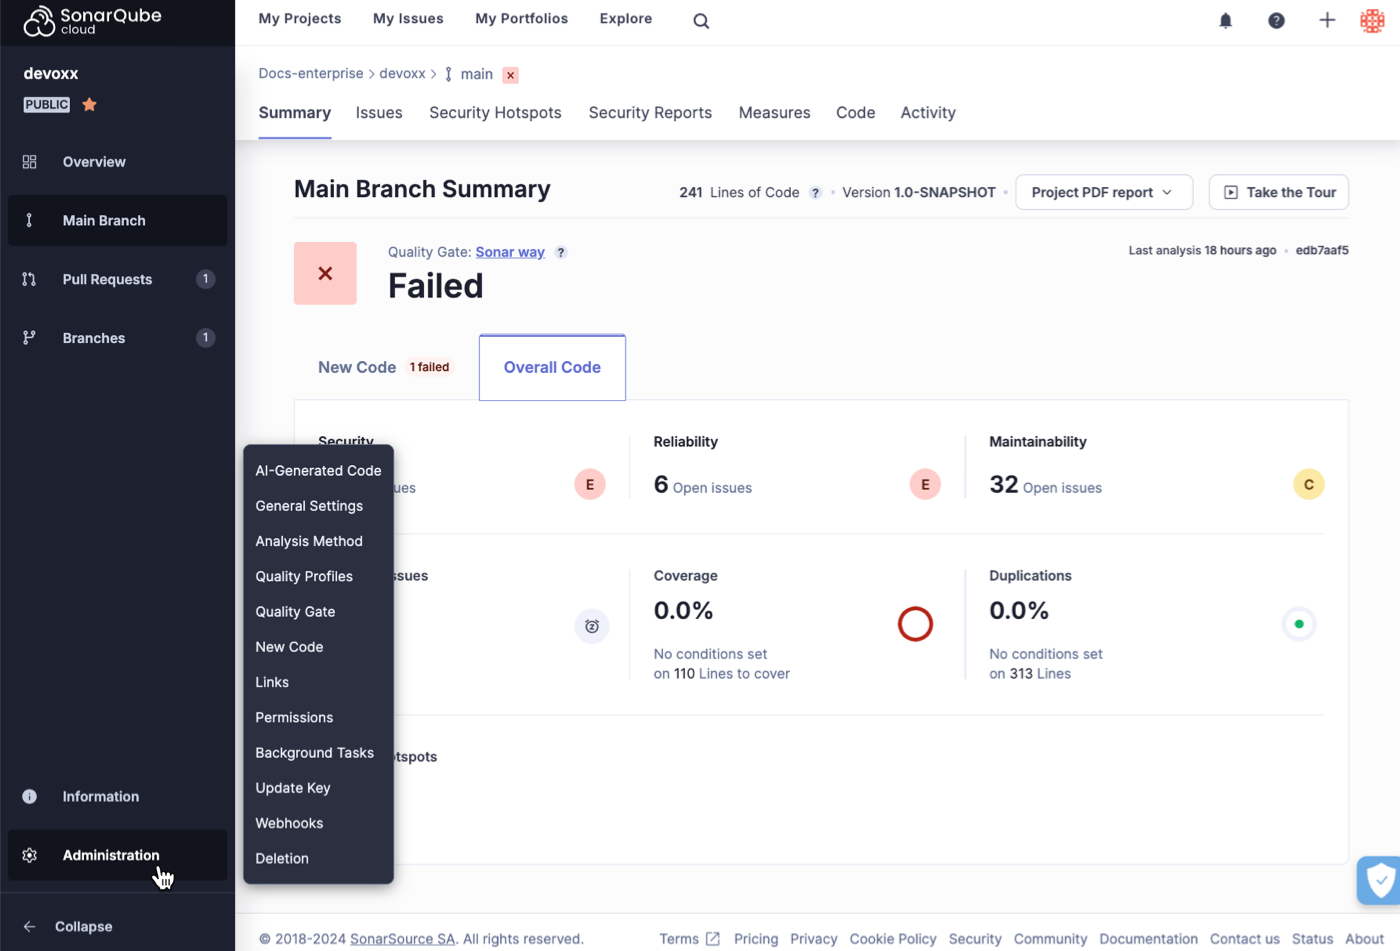 ### Other analysis views
In this section, we looked at how the results of **Main Branch** analysis are displayed. In addition, you can also access the code review and analysis results of **Pull Requests** and other **Branches** through the project navigation on the left side of the screen.
For details on these topics see the [branch-analysis](https://docs.sonarsource.com/sonarqube-cloud/enriching/branch-analysis "mention") and [pull-request-analysis](https://docs.sonarsource.com/sonarqube-cloud/improving/pull-request-analysis "mention") sections.
### Incremental analysis
Some analyzers use the analysis cache mechanism to shorten the main branch analysis. See [incremental-analysis-mechanisms](https://docs.sonarsource.com/sonarqube-cloud/advanced-setup/incremental-analysis-mechanisms "mention") for more information.
---
# Source: https://docs.sonarsource.com/sonarqube-community-build/project-administration/maintaining-project.md
# Source: https://docs.sonarsource.com/sonarqube-server/2025.6/project-administration/maintaining-project.md
# Source: https://docs.sonarsource.com/sonarqube-server/project-administration/maintaining-project.md
# Maintaining your project
- [Maintaining project branches](/sonarqube-server/project-administration/maintaining-project/maintaining-the-branches-of-your-project.md): Manage your project’s branches to fit the needs of your organization and workflow.
- [Managing project history](/sonarqube-server/project-administration/maintaining-project/managing-project-history.md): Manage your project’s history by editing and deleting snapshots of your project.
- [Changing the project key](/sonarqube-server/project-administration/maintaining-project/changing-project-key.md): You can update the project key without losing the history of the project.
- [Project move](/sonarqube-server/project-administration/maintaining-project/project-move.md): Project Move allows you to export a project from one SonarQube Server instance and import it into another SonarQube Server instance.
- [Deleting your project](/sonarqube-server/project-administration/maintaining-project/deleting-project.md): You can delete one or multiple projects, provided you have the necessary permissions to do so.
- [Changing your project binding](/sonarqube-server/project-administration/maintaining-project/changing-project-binding.md): You can bind an unbound project and you can change the binding of a bound project.
---
# Source: https://docs.sonarsource.com/sonarqube-server/10.6/project-administration/maintaining-the-branches-of-your-project.md
# Source: https://docs.sonarsource.com/sonarqube-server/10.7/project-administration/maintaining-the-branches-of-your-project.md
# Source: https://docs.sonarsource.com/sonarqube-server/10.8/project-administration/maintaining-the-branches-of-your-project.md
# Source: https://docs.sonarsource.com/sonarqube-server/2025.2/project-administration/maintaining-the-branches-of-your-project.md
# Source: https://docs.sonarsource.com/sonarqube-server/2025.3/project-administration/maintaining-the-branches-of-your-project.md
# Source: https://docs.sonarsource.com/sonarqube-server/2025.5/project-administration/maintaining-the-branches-of-your-project.md
# Source: https://docs.sonarsource.com/sonarqube-server/2025.1/project-administration/maintaining-the-branches-of-your-project.md
# Source: https://docs.sonarsource.com/sonarqube-server/2025.4/project-administration/maintaining-the-branches-of-your-project.md
# Source: https://docs.sonarsource.com/sonarqube-server/2025.6/project-administration/maintaining-project/maintaining-the-branches-of-your-project.md
# Source: https://docs.sonarsource.com/sonarqube-server/project-administration/maintaining-project/maintaining-the-branches-of-your-project.md
# Maintaining project branches
### Renaming the main branch
Your main branch can be renamed from the project settings at **Project Settings** > **Branches and Pull Requests**. This is used mainly to maintain branch history when upgrading from SonarQube Community Build to a SonarQube Server commercial edition (see section below).
### Choosing a new main branch
You can choose a different, existing branch to become the new main branch of a project. To do this:
1. Go to **Project Settings** > **Branches & Pull Requests**.
2. On the list of branches, click on the Actions cog button for the branch you want to make your main branch and click **Set as main branch**.
Changing the main branch of your project will trigger [reindexing](https://docs.sonarsource.com/sonarqube-server/server-update-and-maintenance/maintenance/reindexing "mention") and may impact the level of information that is available for your project until reindexing is complete.
#### Impacts of choosing a new main branch
Choosing a new main branch has an effect on:
* **New code:** When some of a project’s branches use the main branch as a reference branch, changing the main branch does not update the new code settings. All branches continue to point to the previous main branch. If you want your reference branch to point to the new main branch, you must update the new code settings manually.
* **Applications:** The main branch of an application always references the main branch of a project, and changing the main branch of the project changes the main branch of the application. When a project’s main branch changes, the application is automatically scheduled for recomputation (see [managing-applications](https://docs.sonarsource.com/sonarqube-server/project-administration/managing-applications "mention")). After you change the main branch of a project, it can take a few minutes to propagate to the application.
* **Portfolios:** Portfolios are different from applications, as they can either reference the main branch of a project or a project’s branch specifically.
* In the first case, if you change the project’s main branch, the portfolio starts referencing the new main branch of the project. The recomputation mechanics are the same as for applications.
* In the second case, changing the project’s main branch does not change the portfolio, as the portfolio is referencing a specific branch.
* **Branch analysis:**
* **Impacts on CI setup:** It is possible to analyze a branch without passing an explicit branch name (`sonar.branch.name`). In this case, the analysis automatically points to the main branch of the project. If you change the main branch, you could unintentionally have analyses from the old main branch go to the new branch. To avoid this, ensure the branch analysis is always pointing to a specific branch.
* **Impacts on analysis processing:** If you change the main branch during a busy load of background tasks, it may impact certain background tasks that process analysis reports. This could lead to an inconsistent state. The solution is to re-analyze the project. This will put everything back into a consistent state.
### Deleting a branch
You can delete a branch in the **Branches** tab at **Project Settings** > **Branches and Pull Requests**.
### Managing inactive branches
Projects and branches that are not scanned for more than a configured number of consecutive days are considered inactive, and SonarQube Server automatically deletes their cached data to free space in the database. If a project has several branches, only the cache of its inactive branches is deleted.
You can configure at the global and project levels, branches to be kept from the automatic deletion when inactive.
{% hint style="info" %}
The main branch is always protected from automatic deletion, even if it’s inactive. This can’t be changed.
{% endhint %}
To configure the number of days after which an inactive branch is deleted:
* In **Administration** > **General Settings** > **Housekeeping**, set the **Number of days before deleting inactive branches.**
### Keeping specific branches from automatic deletion (permanent branches)
You can use naming patterns to protect specific branches, such as release branches, from automatic deletion. To do this, add one or several patterns under:
* At global level\*\*: Administration\*\* > **General Settings** > **Housekeeping** > **Branches** > **Branches to keep when inactive**
* At project level, from the page of the specific project: **Project settings** > **General Settings** > **Housekeeping** > **Branches** > **Branches to keep when inactive.**
When a branch is created with a name that follows one of these patterns, it will be kept indefinitely. For example, adding the pattern release/.\* would keep any branches named release/6.0, release/7, and so on.
{% hint style="info" %}
Patterns aren’t retroactive and won’t apply to branches that have already been created. They only apply to branches created after the pattern is set. You can protect an existing branch at the project level. See the following section.
{% endhint %}
You can protect a specific branch from the automatic deletion as follows:
* From the **Branches** page: in **Project Settings** > **Branches and Pull Requests** check **Keep when inactive**.
### Maintaining branch history when upgrading to a commercial edition
When upgrading to a current commercial edition version, automatic branch and pull request configuration creates branches based on their names in your code repository. If the name of your main branch in SonarQube Server doesn’t match the branch’s name in your code repository (this may be the case if you didn’t import the repository but created your project manually in SonarQube Server), the history of your main branch won’t be taken on by the branch you analyze.
**Before running analysis**, you can keep your branch history by renaming the main branch in SonarQube Server with the name of the branch in your code repository at **Project Settings** > **Branches and Pull Requests**.
For example, if your main branch is named `main` in SonarQube Server but `develop` in your code repository, rename your main branch to `develop` in SonarQube Server.
---
# Source: https://docs.sonarsource.com/sonarqube-community-build/quality-standards-administration/managing-quality-profiles/maintaining-your-custom-quality-profiles.md
# Source: https://docs.sonarsource.com/sonarqube-server/2025.3/quality-standards-administration/managing-quality-profiles/maintaining-your-custom-quality-profiles.md
# Source: https://docs.sonarsource.com/sonarqube-server/2025.5/quality-standards-administration/managing-quality-profiles/maintaining-your-custom-quality-profiles.md
# Source: https://docs.sonarsource.com/sonarqube-server/2025.4/quality-standards-administration/managing-quality-profiles/maintaining-your-custom-quality-profiles.md
# Source: https://docs.sonarsource.com/sonarqube-server/2025.6/quality-standards-administration/managing-quality-profiles/maintaining-your-custom-quality-profiles.md
# Source: https://docs.sonarsource.com/sonarqube-server/quality-standards-administration/managing-quality-profiles/maintaining-your-custom-quality-profiles.md
# Source: https://docs.sonarsource.com/sonarqube-cloud/standards/managing-quality-profiles/maintaining-your-custom-quality-profiles.md
# Maintaining quality profiles
You should regularly maintain your organization’s custom quality profiles *that do not inherit from a built-in profile*. The built-in quality profiles are regularly updated to reflect the addition of new rules and the deprecation of existing ones. As a user with Administer Quality Profile permission, you will be notified by email each time a built-in profile is updated. Updates can be introduced through a SonarQube or third-party analyzer upgrade.
To edit a custom quality profile, you need the Administer Quality Profiles permission in your organization or be authorized to manage this particular profile. To delete a custom quality profile, you need the Administer Quality Profiles permission.
### Ensuring your quality profile has all relevant new rules
To ensure that your custom quality profile has all relevant new rules, you can check for the recently added rules and for the stagnant profiles. Stagnant profiles are custom profiles that have not been updated for more than one year.
#### In the Quality Profiles page
To check for recently added rules and stagnant profiles:
1. [viewing-organizations](https://docs.sonarsource.com/sonarqube-cloud/getting-started/viewing-organizations "mention") and go to **Quality profiles**. The right-hand side of the **Quality Profiles** page shows the stagnant profiles and recently implemented rules.
2. To inspect a new rule, select it in the **Recently Added Rules** section.
3. To edit a stagnant profile, select it in the **Stagnant Profiles** section. The quality profile page opens. To add the new rules to your profile, you can now:
* Either select **\
### Other analysis views
In this section, we looked at how the results of **Main Branch** analysis are displayed. In addition, you can also access the code review and analysis results of **Pull Requests** and other **Branches** through the project navigation on the left side of the screen.
For details on these topics see the [branch-analysis](https://docs.sonarsource.com/sonarqube-cloud/enriching/branch-analysis "mention") and [pull-request-analysis](https://docs.sonarsource.com/sonarqube-cloud/improving/pull-request-analysis "mention") sections.
### Incremental analysis
Some analyzers use the analysis cache mechanism to shorten the main branch analysis. See [incremental-analysis-mechanisms](https://docs.sonarsource.com/sonarqube-cloud/advanced-setup/incremental-analysis-mechanisms "mention") for more information.
---
# Source: https://docs.sonarsource.com/sonarqube-community-build/project-administration/maintaining-project.md
# Source: https://docs.sonarsource.com/sonarqube-server/2025.6/project-administration/maintaining-project.md
# Source: https://docs.sonarsource.com/sonarqube-server/project-administration/maintaining-project.md
# Maintaining your project
- [Maintaining project branches](/sonarqube-server/project-administration/maintaining-project/maintaining-the-branches-of-your-project.md): Manage your project’s branches to fit the needs of your organization and workflow.
- [Managing project history](/sonarqube-server/project-administration/maintaining-project/managing-project-history.md): Manage your project’s history by editing and deleting snapshots of your project.
- [Changing the project key](/sonarqube-server/project-administration/maintaining-project/changing-project-key.md): You can update the project key without losing the history of the project.
- [Project move](/sonarqube-server/project-administration/maintaining-project/project-move.md): Project Move allows you to export a project from one SonarQube Server instance and import it into another SonarQube Server instance.
- [Deleting your project](/sonarqube-server/project-administration/maintaining-project/deleting-project.md): You can delete one or multiple projects, provided you have the necessary permissions to do so.
- [Changing your project binding](/sonarqube-server/project-administration/maintaining-project/changing-project-binding.md): You can bind an unbound project and you can change the binding of a bound project.
---
# Source: https://docs.sonarsource.com/sonarqube-server/10.6/project-administration/maintaining-the-branches-of-your-project.md
# Source: https://docs.sonarsource.com/sonarqube-server/10.7/project-administration/maintaining-the-branches-of-your-project.md
# Source: https://docs.sonarsource.com/sonarqube-server/10.8/project-administration/maintaining-the-branches-of-your-project.md
# Source: https://docs.sonarsource.com/sonarqube-server/2025.2/project-administration/maintaining-the-branches-of-your-project.md
# Source: https://docs.sonarsource.com/sonarqube-server/2025.3/project-administration/maintaining-the-branches-of-your-project.md
# Source: https://docs.sonarsource.com/sonarqube-server/2025.5/project-administration/maintaining-the-branches-of-your-project.md
# Source: https://docs.sonarsource.com/sonarqube-server/2025.1/project-administration/maintaining-the-branches-of-your-project.md
# Source: https://docs.sonarsource.com/sonarqube-server/2025.4/project-administration/maintaining-the-branches-of-your-project.md
# Source: https://docs.sonarsource.com/sonarqube-server/2025.6/project-administration/maintaining-project/maintaining-the-branches-of-your-project.md
# Source: https://docs.sonarsource.com/sonarqube-server/project-administration/maintaining-project/maintaining-the-branches-of-your-project.md
# Maintaining project branches
### Renaming the main branch
Your main branch can be renamed from the project settings at **Project Settings** > **Branches and Pull Requests**. This is used mainly to maintain branch history when upgrading from SonarQube Community Build to a SonarQube Server commercial edition (see section below).
### Choosing a new main branch
You can choose a different, existing branch to become the new main branch of a project. To do this:
1. Go to **Project Settings** > **Branches & Pull Requests**.
2. On the list of branches, click on the Actions cog button for the branch you want to make your main branch and click **Set as main branch**.
Changing the main branch of your project will trigger [reindexing](https://docs.sonarsource.com/sonarqube-server/server-update-and-maintenance/maintenance/reindexing "mention") and may impact the level of information that is available for your project until reindexing is complete.
#### Impacts of choosing a new main branch
Choosing a new main branch has an effect on:
* **New code:** When some of a project’s branches use the main branch as a reference branch, changing the main branch does not update the new code settings. All branches continue to point to the previous main branch. If you want your reference branch to point to the new main branch, you must update the new code settings manually.
* **Applications:** The main branch of an application always references the main branch of a project, and changing the main branch of the project changes the main branch of the application. When a project’s main branch changes, the application is automatically scheduled for recomputation (see [managing-applications](https://docs.sonarsource.com/sonarqube-server/project-administration/managing-applications "mention")). After you change the main branch of a project, it can take a few minutes to propagate to the application.
* **Portfolios:** Portfolios are different from applications, as they can either reference the main branch of a project or a project’s branch specifically.
* In the first case, if you change the project’s main branch, the portfolio starts referencing the new main branch of the project. The recomputation mechanics are the same as for applications.
* In the second case, changing the project’s main branch does not change the portfolio, as the portfolio is referencing a specific branch.
* **Branch analysis:**
* **Impacts on CI setup:** It is possible to analyze a branch without passing an explicit branch name (`sonar.branch.name`). In this case, the analysis automatically points to the main branch of the project. If you change the main branch, you could unintentionally have analyses from the old main branch go to the new branch. To avoid this, ensure the branch analysis is always pointing to a specific branch.
* **Impacts on analysis processing:** If you change the main branch during a busy load of background tasks, it may impact certain background tasks that process analysis reports. This could lead to an inconsistent state. The solution is to re-analyze the project. This will put everything back into a consistent state.
### Deleting a branch
You can delete a branch in the **Branches** tab at **Project Settings** > **Branches and Pull Requests**.
### Managing inactive branches
Projects and branches that are not scanned for more than a configured number of consecutive days are considered inactive, and SonarQube Server automatically deletes their cached data to free space in the database. If a project has several branches, only the cache of its inactive branches is deleted.
You can configure at the global and project levels, branches to be kept from the automatic deletion when inactive.
{% hint style="info" %}
The main branch is always protected from automatic deletion, even if it’s inactive. This can’t be changed.
{% endhint %}
To configure the number of days after which an inactive branch is deleted:
* In **Administration** > **General Settings** > **Housekeeping**, set the **Number of days before deleting inactive branches.**
### Keeping specific branches from automatic deletion (permanent branches)
You can use naming patterns to protect specific branches, such as release branches, from automatic deletion. To do this, add one or several patterns under:
* At global level\*\*: Administration\*\* > **General Settings** > **Housekeeping** > **Branches** > **Branches to keep when inactive**
* At project level, from the page of the specific project: **Project settings** > **General Settings** > **Housekeeping** > **Branches** > **Branches to keep when inactive.**
When a branch is created with a name that follows one of these patterns, it will be kept indefinitely. For example, adding the pattern release/.\* would keep any branches named release/6.0, release/7, and so on.
{% hint style="info" %}
Patterns aren’t retroactive and won’t apply to branches that have already been created. They only apply to branches created after the pattern is set. You can protect an existing branch at the project level. See the following section.
{% endhint %}
You can protect a specific branch from the automatic deletion as follows:
* From the **Branches** page: in **Project Settings** > **Branches and Pull Requests** check **Keep when inactive**.
### Maintaining branch history when upgrading to a commercial edition
When upgrading to a current commercial edition version, automatic branch and pull request configuration creates branches based on their names in your code repository. If the name of your main branch in SonarQube Server doesn’t match the branch’s name in your code repository (this may be the case if you didn’t import the repository but created your project manually in SonarQube Server), the history of your main branch won’t be taken on by the branch you analyze.
**Before running analysis**, you can keep your branch history by renaming the main branch in SonarQube Server with the name of the branch in your code repository at **Project Settings** > **Branches and Pull Requests**.
For example, if your main branch is named `main` in SonarQube Server but `develop` in your code repository, rename your main branch to `develop` in SonarQube Server.
---
# Source: https://docs.sonarsource.com/sonarqube-community-build/quality-standards-administration/managing-quality-profiles/maintaining-your-custom-quality-profiles.md
# Source: https://docs.sonarsource.com/sonarqube-server/2025.3/quality-standards-administration/managing-quality-profiles/maintaining-your-custom-quality-profiles.md
# Source: https://docs.sonarsource.com/sonarqube-server/2025.5/quality-standards-administration/managing-quality-profiles/maintaining-your-custom-quality-profiles.md
# Source: https://docs.sonarsource.com/sonarqube-server/2025.4/quality-standards-administration/managing-quality-profiles/maintaining-your-custom-quality-profiles.md
# Source: https://docs.sonarsource.com/sonarqube-server/2025.6/quality-standards-administration/managing-quality-profiles/maintaining-your-custom-quality-profiles.md
# Source: https://docs.sonarsource.com/sonarqube-server/quality-standards-administration/managing-quality-profiles/maintaining-your-custom-quality-profiles.md
# Source: https://docs.sonarsource.com/sonarqube-cloud/standards/managing-quality-profiles/maintaining-your-custom-quality-profiles.md
# Maintaining quality profiles
You should regularly maintain your organization’s custom quality profiles *that do not inherit from a built-in profile*. The built-in quality profiles are regularly updated to reflect the addition of new rules and the deprecation of existing ones. As a user with Administer Quality Profile permission, you will be notified by email each time a built-in profile is updated. Updates can be introduced through a SonarQube or third-party analyzer upgrade.
To edit a custom quality profile, you need the Administer Quality Profiles permission in your organization or be authorized to manage this particular profile. To delete a custom quality profile, you need the Administer Quality Profiles permission.
### Ensuring your quality profile has all relevant new rules
To ensure that your custom quality profile has all relevant new rules, you can check for the recently added rules and for the stagnant profiles. Stagnant profiles are custom profiles that have not been updated for more than one year.
#### In the Quality Profiles page
To check for recently added rules and stagnant profiles:
1. [viewing-organizations](https://docs.sonarsource.com/sonarqube-cloud/getting-started/viewing-organizations "mention") and go to **Quality profiles**. The right-hand side of the **Quality Profiles** page shows the stagnant profiles and recently implemented rules.
2. To inspect a new rule, select it in the **Recently Added Rules** section.
3. To edit a stagnant profile, select it in the **Stagnant Profiles** section. The quality profile page opens. To add the new rules to your profile, you can now:
* Either select **\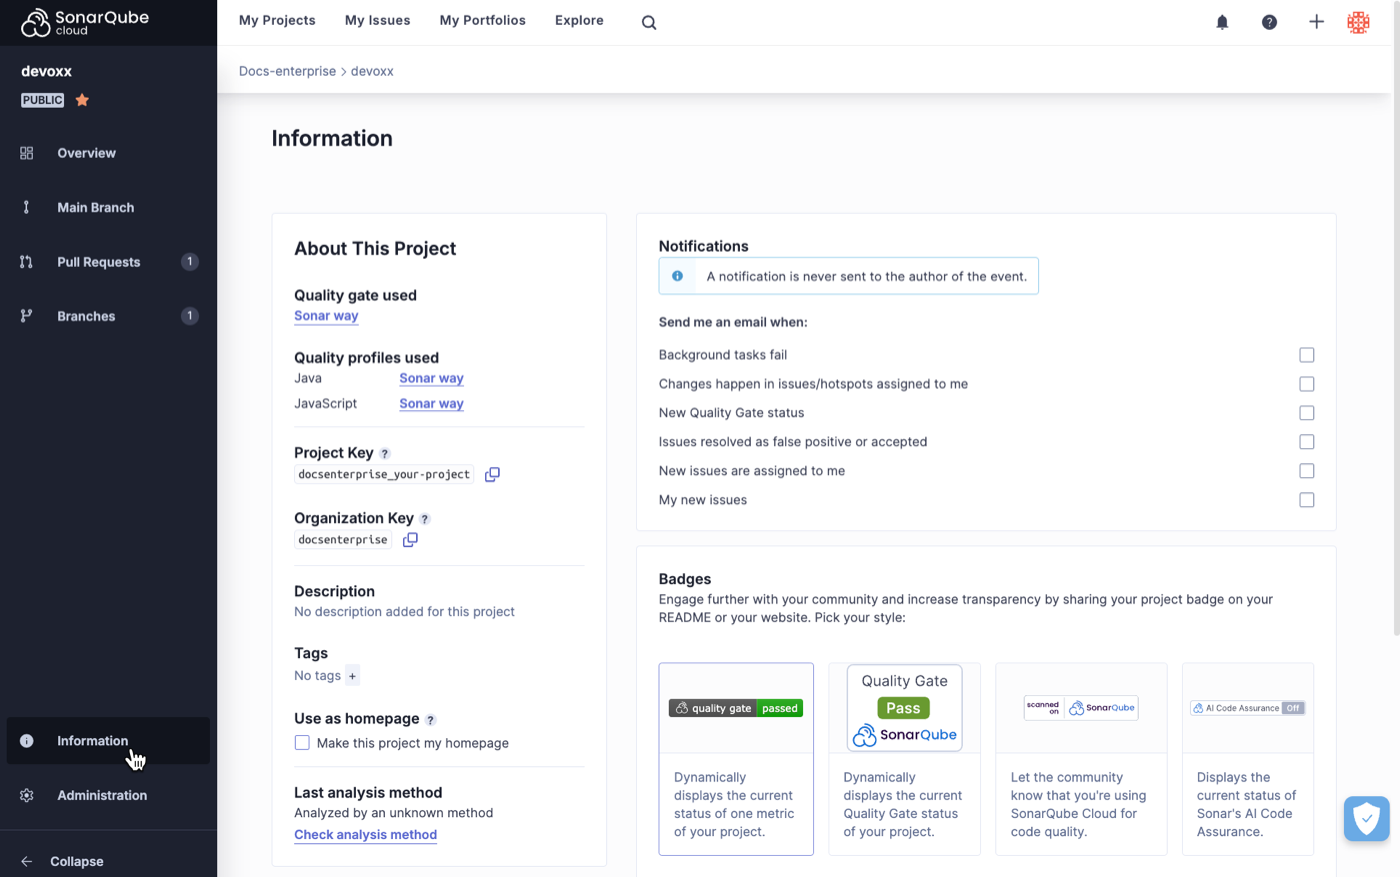 #### In the Rules page
To check for recently added rules:
1. See [viewing-organizations](https://docs.sonarsource.com/sonarqube-cloud/getting-started/viewing-organizations "mention") to access your organization, then go to the **Rules** page.
2. In **Filters**, set the **Available Since** criterion.
### Managing the deprecated rules in quality profiles
A deprecated rule is a rule that SonarQube will not be supported any more in the near future. A rule may be deprecated if it has become obsolete or if it has been replaced by one or several new rules. When a rule becomes deprecated, it will be deactivated in the corresponding language’s built-in profile and in the profile inheriting from it.
If your custom profile does not inherit from the built-in profile, you should regularly check your quality profiles for deprecated rules as follows:
1\. See [viewing-organizations](https://docs.sonarsource.com/sonarqube-cloud/getting-started/viewing-organizations "mention") to access your organization, then go to the **Quality Profiles** page. On the right-hand side of the page, the **Deprecated Rules** section lists the quality profiles containing deprecated rules.
#### In the Rules page
To check for recently added rules:
1. See [viewing-organizations](https://docs.sonarsource.com/sonarqube-cloud/getting-started/viewing-organizations "mention") to access your organization, then go to the **Rules** page.
2. In **Filters**, set the **Available Since** criterion.
### Managing the deprecated rules in quality profiles
A deprecated rule is a rule that SonarQube will not be supported any more in the near future. A rule may be deprecated if it has become obsolete or if it has been replaced by one or several new rules. When a rule becomes deprecated, it will be deactivated in the corresponding language’s built-in profile and in the profile inheriting from it.
If your custom profile does not inherit from the built-in profile, you should regularly check your quality profiles for deprecated rules as follows:
1\. See [viewing-organizations](https://docs.sonarsource.com/sonarqube-cloud/getting-started/viewing-organizations "mention") to access your organization, then go to the **Quality Profiles** page. On the right-hand side of the page, the **Deprecated Rules** section lists the quality profiles containing deprecated rules.
 2\. To manage one of these profiles, select the **\
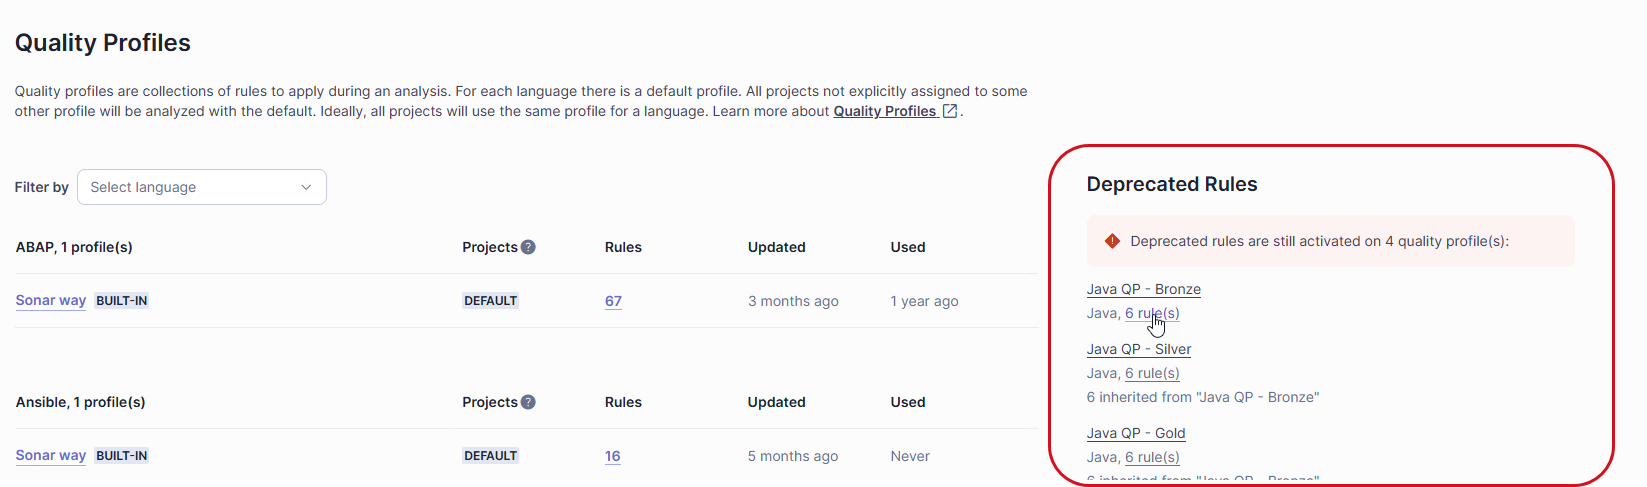
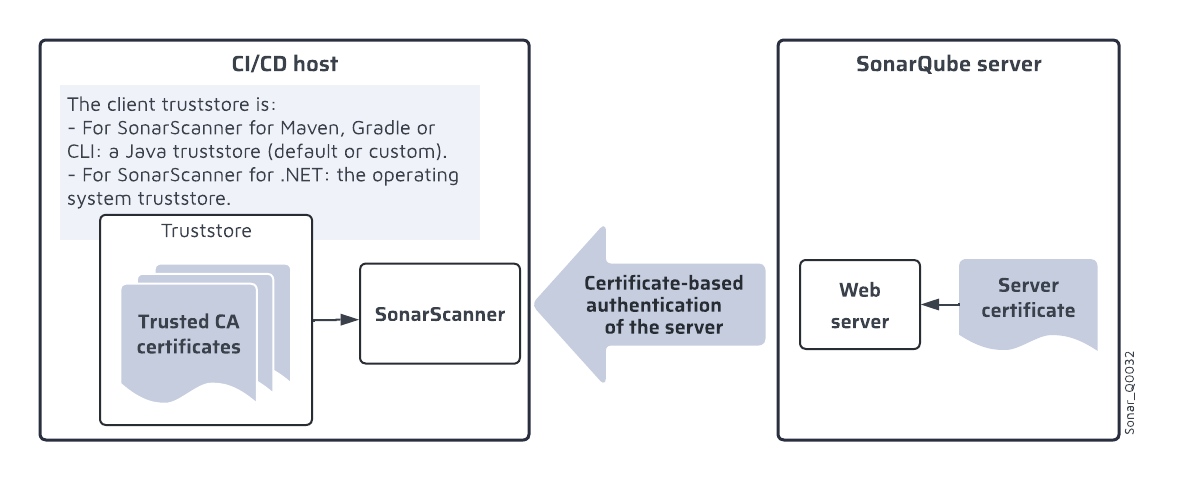
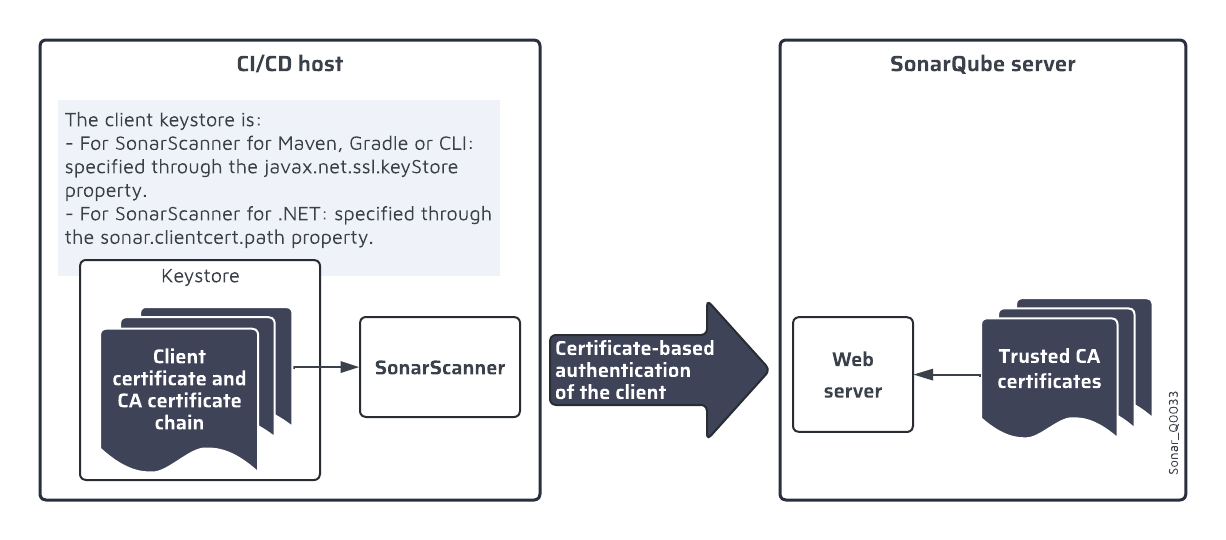
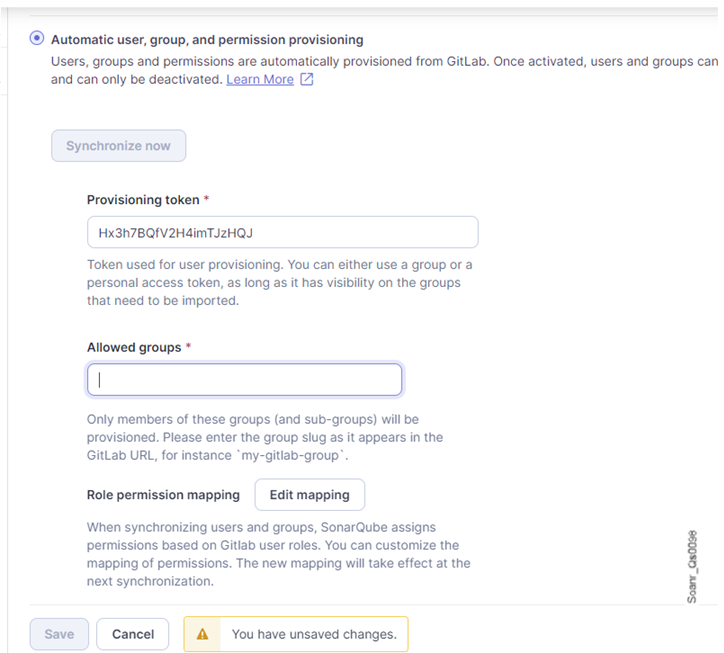 ### Editing the role permission mapping
SonarQube Server synchronizes the project permissions of auto-provisioned users based on the configured role permission mapping. You can change the mapping provided by default, and if you use custom rules in GitLab, you can configure their mapping to SonarQube Server project permissions. For more information, see [#permissions-synchronization](https://docs.sonarsource.com/sonarqube-server/instance-administration/authentication/provisioning-modes/automatic#permissions-synchronization "mention").
To edit the mapping of GitLab roles with SonarQube Server permissions:
1. Go to **Administration > Configuration > General Settings > Authentication > GitLab**.
2. In **Provisioning > Role permission mapping**, select **Edit mapping**. The **Global GitLab role mapping** dialog opens.
3. Select or unselect a checkbox to modify the permissions of the different roles.
4. To add a custom role:
* In the **Add custom role** section, enter the exact name of the custom role.
* Select **Add**. The custom role is added below the section.
* Configure the permissions of the custom role.
5. To remove a custom role, select the dustbin icon near the custom role name.
6. Select **Close**. The dialog closes and the changes are saved.
### Editing the role permission mapping
SonarQube Server synchronizes the project permissions of auto-provisioned users based on the configured role permission mapping. You can change the mapping provided by default, and if you use custom rules in GitLab, you can configure their mapping to SonarQube Server project permissions. For more information, see [#permissions-synchronization](https://docs.sonarsource.com/sonarqube-server/instance-administration/authentication/provisioning-modes/automatic#permissions-synchronization "mention").
To edit the mapping of GitLab roles with SonarQube Server permissions:
1. Go to **Administration > Configuration > General Settings > Authentication > GitLab**.
2. In **Provisioning > Role permission mapping**, select **Edit mapping**. The **Global GitLab role mapping** dialog opens.
3. Select or unselect a checkbox to modify the permissions of the different roles.
4. To add a custom role:
* In the **Add custom role** section, enter the exact name of the custom role.
* Select **Add**. The custom role is added below the section.
* Configure the permissions of the custom role.
5. To remove a custom role, select the dustbin icon near the custom role name.
6. Select **Close**. The dialog closes and the changes are saved.

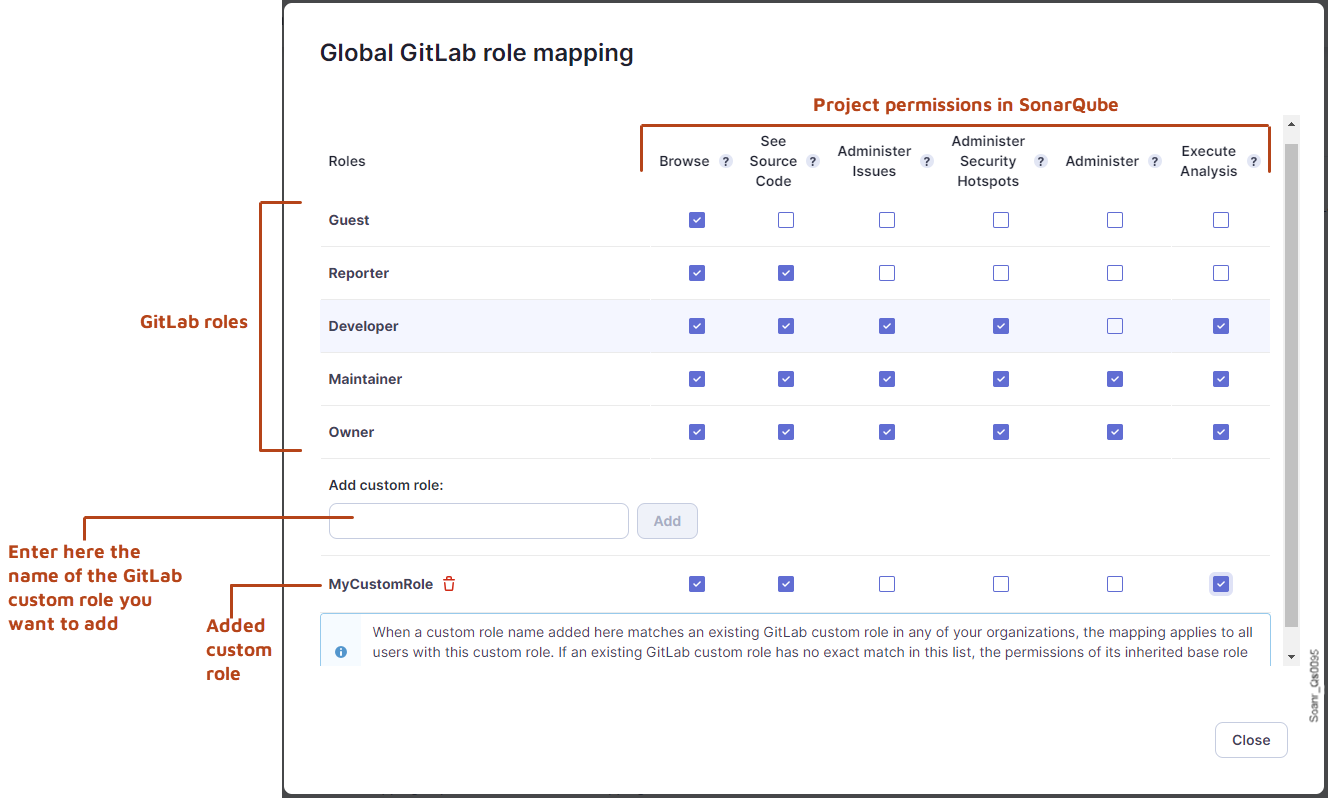
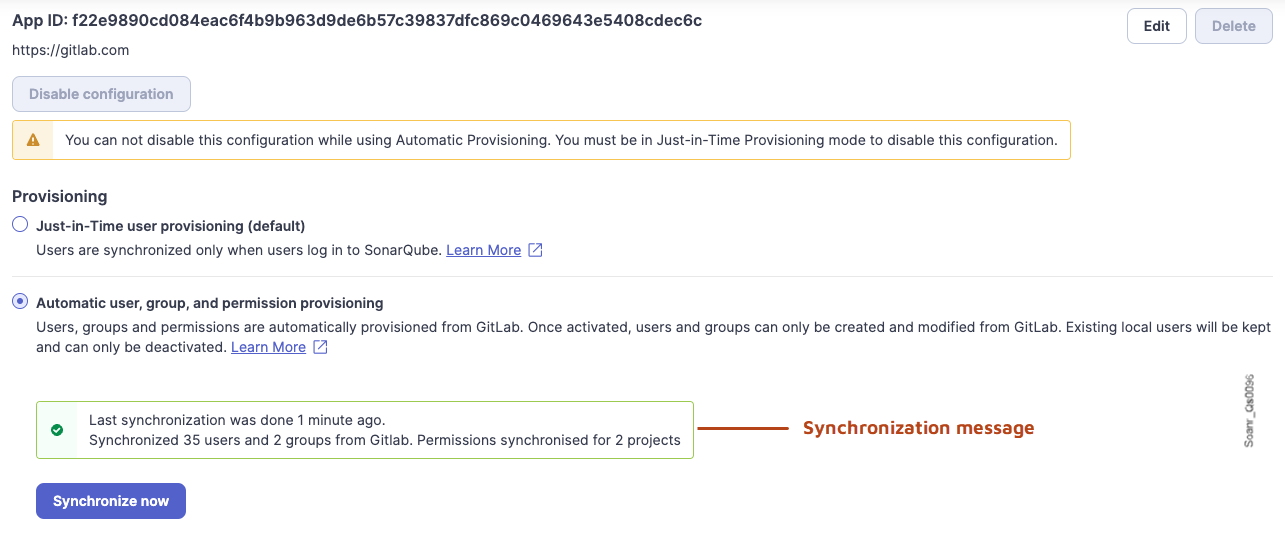
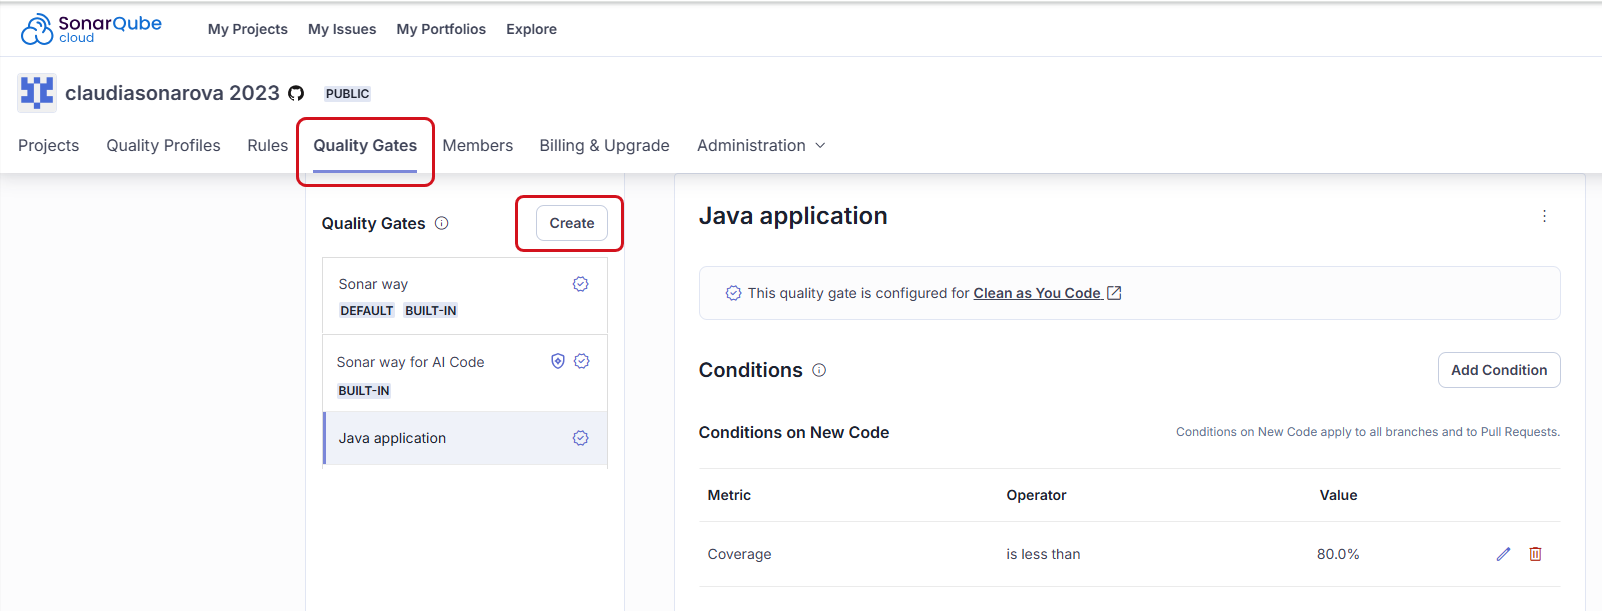 ### Managing a custom quality gate’s conditions
You can add or remove conditions. You can update the value of an existing condition. Remember that you define failing conditions: if one of the conditions is met, the quality gate fails. For more information about conditions, see the article about [#definition-based-on-conditions](https://docs.sonarsource.com/sonarqube-cloud/standards/introduction-to-quality-gates#definition-based-on-conditions "mention").
**To update a condition:**
1. Select the pen icon in the far right of the condition row. If there is no pen icon, select first the **Unlock editing** button, below the **Conditions** section.\
The **Update Condition** dialog opens.
2. Enter the new condition’s value and select **Update Condition**.
**To add a new condition:**
1. Select **Add Condition**. The **Add Condition** dialog opens.
2. In **Where?** select to which code, new or overall, the condition applies. New code is defined through the New Code Defintion (NCD). See the[about-new-code](https://docs.sonarsource.com/sonarqube-cloud/standards/about-new-code "mention") page for more information.
3. In **Quality Gate fails when**, select the metric to which the condition applies. For information about the metrics, see the [metric-definitions](https://docs.sonarsource.com/sonarqube-cloud/digging-deeper/metric-definitions "mention") page.
4. In **Value**, enter the condition’s value.
{% hint style="info" %}
Quality gate conditions related to severity currently use type severities. For more details, see the list of Issue management solution metrics in the [#issues](https://docs.sonarsource.com/sonarqube-cloud/digging-deeper/metric-definitions#issues "mention") table.
{% endhint %}
**To remove a condition:**
1. Select the dustbin icon in the far right of the condition row. The **Delete Condition** dialog opens.
2. Select **Delete**.
### Upgrading a quality gate for CaYC
We recommend configuring all your quality gates to prevent issues in new code. For more information, see the [#quality-gate-and-new-code](https://docs.sonarsource.com/sonarqube-cloud/standards/introduction-to-quality-gates#quality-gate-and-new-code "mention") article.
If your quality gate is not configured for CaYC, you can easily upgrade it as follows:
1. See [viewing-organizations](https://docs.sonarsource.com/sonarqube-cloud/getting-started/viewing-organizations "mention") to access your organization.
2. In organization’s navigation bar, select **Quality Gates**.
3. In the left panel, select the custom quality gate you want to upgrade.
4. In **You are a few conditions away from Clean as You Code**, select **Review and Update**. The **Update Quality Gate** dialog opens.
5. Review the proposed update and select **Update Quality Gate** to execute the update.
### Renaming a custom quality gate
1. See [viewing-organizations](https://docs.sonarsource.com/sonarqube-cloud/getting-started/viewing-organizations "mention") to access your organization.
2. In organization’s navigation bar, select **Quality Gates**.
3. In the left panel, select the custom quality gate you want to rename.
4. In the top right corner of your quality gate, select the More Actions button and then **Rename**. The **Rename Quality Gate** dialog opens.
5. Enter the new name and select **Rename**.
### Deleting a custom quality gate
1. See [viewing-organizations](https://docs.sonarsource.com/sonarqube-cloud/getting-started/viewing-organizations "mention") to access your organization.
2. In organization’s navigation bar, select **Quality Gates**.
3. In the left panel, select the custom quality gate you want to delete.
4. In the top right corner of your quality gate, select the More Actions button and then **Delete**.
5. Confirm the deletion.
### Related pages
* [introduction-to-quality-gates](https://docs.sonarsource.com/sonarqube-cloud/standards/managing-quality-gates/introduction-to-quality-gates "mention")
* [viewing-quality-gate](https://docs.sonarsource.com/sonarqube-cloud/standards/managing-quality-gates/viewing-quality-gate "mention")
* [changing-default-quality-gate](https://docs.sonarsource.com/sonarqube-cloud/standards/managing-quality-gates/changing-default-quality-gate "mention")
* [associating-projects-with-quality-gate](https://docs.sonarsource.com/sonarqube-cloud/standards/managing-quality-gates/associating-projects-with-quality-gate "mention")
* [notifications](https://docs.sonarsource.com/sonarqube-cloud/managing-your-account/notifications "mention")
* [quality-gates-for-ai-code](https://docs.sonarsource.com/sonarqube-cloud/standards/ai-code-assurance/quality-gates-for-ai-code "mention")
* [changing-quality-gate](https://docs.sonarsource.com/sonarqube-cloud/managing-your-projects/project-analysis/changing-quality-gate "mention")
---
# Source: https://docs.sonarsource.com/sonarqube-cloud/administering-sonarcloud/managing-enterprise.md
# Managing your enterprise
- [Retrieving and viewing your enterprise](/sonarqube-cloud/administering-sonarcloud/managing-enterprise/retrieving-and-viewing-your-enterprise.md): You can view the enterprises you’re an admin or a member of.
- [Creating your enterprise](/sonarqube-cloud/administering-sonarcloud/managing-enterprise/creating-your-enterprise.md): With the Enterprise license, you can group together SonarQube Cloud organizations from different DevOps platforms into an enterprise and benefit from many features.
- [Enterprise security](/sonarqube-cloud/administering-sonarcloud/managing-enterprise/enterprise-security.md): How to enhance your enterprise security with various security features.
- [IP allow lists](/sonarqube-cloud/administering-sonarcloud/managing-enterprise/enterprise-security/ip-allow-lists.md): How to restrict the IP allow list for SonarQube Cloud
- [Audit logs](/sonarqube-cloud/administering-sonarcloud/managing-enterprise/enterprise-security/audit-logs.md): The initial release of SonarQube Cloud's audit logs provides you with the essential data you need to meet your immediate compliance and security needs.
- [Single Sign-On](/sonarqube-cloud/administering-sonarcloud/managing-enterprise/enterprise-security/sso.md): This section explains the Single Sign-On (SSO) authentication solution in SonarQube Cloud and how to set it up.
- [About SSO authentication solution](/sonarqube-cloud/administering-sonarcloud/managing-enterprise/enterprise-security/sso/about.md): This page provides an overview of the SSO authentication solution in SonarQube Cloud.
- [Automatic group synchronization](/sonarqube-cloud/administering-sonarcloud/managing-enterprise/enterprise-security/sso/about/automatic-group-synchronization.md): This page describes the automatic group synchronization solution in SonarQube Cloud.
- [Setting up SSO](/sonarqube-cloud/administering-sonarcloud/managing-enterprise/enterprise-security/sso/setup.md): With the Enterprise plan, you can transition your SonarQube Cloud enterprise to Single Sign-On.
- [Step 1: Verify the user groups](/sonarqube-cloud/administering-sonarcloud/managing-enterprise/enterprise-security/sso/setup/verify-user-groups.md): Before configuring SSO for your SonarQube Cloud enterprise, you must ensure that the automatic group synchronization can take place properly.
- [Step 2: Configure SSO](/sonarqube-cloud/administering-sonarcloud/managing-enterprise/enterprise-security/sso/setup/configure-sso.md): The second step in configuring SSO for your SonarQube Cloud enterprise varies slightly, depending on your identity provider. If you use Okta or Microsoft Entra ID, go directly to the respective page.
- [Using the setup assistant (generic operation)](/sonarqube-cloud/administering-sonarcloud/managing-enterprise/enterprise-security/sso/setup/configure-sso/generic-operation.md): This page explains how to configure SSO with SonarQube Cloud’s setup assistant if you use another identity provider than Okta or Microsoft Entra ID.
- [SAML SSO with Okta](/sonarqube-cloud/administering-sonarcloud/managing-enterprise/enterprise-security/sso/setup/configure-sso/okta.md): This page explains how to setup SAML SSO with Okta and SonarQube Cloud's SSO setup assistant.
- [SAML SSO with Entra ID](/sonarqube-cloud/administering-sonarcloud/managing-enterprise/enterprise-security/sso/setup/configure-sso/microsoft-entra-id.md): This page explains how to configure SAML SSO in your enterprise with Microsoft Entra ID while using SonarQube Cloud's setup assistant.
- [Step 3: Invite users to sign in](/sonarqube-cloud/administering-sonarcloud/managing-enterprise/enterprise-security/sso/setup/inviting-users-to-sign-in.md): Once the SSO connection has been established, you can invite users to sign in to SonarQube Cloud with SSO by sending them the enterprise’s login URL.
- [Step 4: Terminate SSO setup](/sonarqube-cloud/administering-sonarcloud/managing-enterprise/enterprise-security/sso/setup/terminate-setup.md): This page describes how to terminate your Single Sign-On (SSO) setup in SonarQube Cloud.
- [Editing SSO configuration](/sonarqube-cloud/administering-sonarcloud/managing-enterprise/enterprise-security/sso/editing-sso-configuration.md): After setup, editing your SSO configuration in SonarQube Cloud is straight-forward.
- [Editing SSO configuration (old method)](/sonarqube-cloud/administering-sonarcloud/managing-enterprise/enterprise-security/sso/editing-configuration-old-method.md): Editing your SSO configuration in SonarQube Cloud was recently improved using the SSO setup assistant. These pages outline the previous editing procedures (without the SSO setup assistant).
- [Introduction](/sonarqube-cloud/administering-sonarcloud/managing-enterprise/enterprise-security/sso/editing-configuration-old-method/introduction.md): This page explains the generic steps necessary to edit the SAML SSO configuration you established in SonarQube Cloud using the older method (without the SSO setup assistant).
- [With Okta](/sonarqube-cloud/administering-sonarcloud/managing-enterprise/enterprise-security/sso/editing-configuration-old-method/okta.md): This page explains how to edit the SAML SSO configuration you established in SonarQube Cloud with Okta and using the old method (without the SSO setup assistant).
- [With Microsoft Entra ID](/sonarqube-cloud/administering-sonarcloud/managing-enterprise/enterprise-security/sso/editing-configuration-old-method/microsoft-entra-id.md): This page explains how to edit the SAML SSO configuration you established in SonarQube Cloud with Microsoft Entra ID while using the old method (without the SSO setup assistant).
- [Deleting SSO configuration](/sonarqube-cloud/administering-sonarcloud/managing-enterprise/enterprise-security/sso/deleting-sso-configuration.md): As an enterprise admin, you can delete your enterprise’s SSO configuration in SonarQube Cloud either in the UI or via the Web API.
- [Troubleshooting SSO connection](/sonarqube-cloud/administering-sonarcloud/managing-enterprise/enterprise-security/sso/troubleshooting.md): Troubleshooting your SSO connection can be tricky. Here's a list of items to check in SonarQube Cloud and with your identity provider.
- [Adding organizations to your enterprise](/sonarqube-cloud/administering-sonarcloud/managing-enterprise/adding-organizations-to-your-enterprise.md): Adding or removing organizations to / from your enterprise.
- [Managing the enterprise-related permissions](/sonarqube-cloud/administering-sonarcloud/managing-enterprise/managing-the-enterprise-related-permissions.md): You must be an admin of the enterprise to be able to manage the permissions.
- [Managing the lines of code within your enterprise](/sonarqube-cloud/administering-sonarcloud/managing-enterprise/managing-the-lines-of-code-within-your-enterprise.md): You must be an enterprise admin to be able to manage the lines of code (LOC) limits within your enterprise.
- [Changing enterprise settings](/sonarqube-cloud/administering-sonarcloud/managing-enterprise/changing-enterprise-settings.md): You can rename your enterprise provided you're an enterprise admin.
- [Downgrading your enterprise](/sonarqube-cloud/administering-sonarcloud/managing-enterprise/downgrading-your-enterprise.md): How to downgrade an enterprise.
---
# Source: https://docs.sonarsource.com/sonarqube-server/2025.6/user-guide/issues/managing-jira-work-items.md
# Source: https://docs.sonarsource.com/sonarqube-server/user-guide/issues/managing-jira-work-items.md
# Managing Jira work items
### Prerequisites
Before you can start pushing SonarQube issues to Jira Cloud, you need to connect your SonarQube instance with your Jira Cloud instance and bind your SonarQube project to a Jira Cloud project. See:
* [jira-integration](https://docs.sonarsource.com/sonarqube-server/instance-administration/jira-integration "mention") on an instance level.
* [jira-integration](https://docs.sonarsource.com/sonarqube-server/project-administration/jira-integration "mention") on a project level.
### Permissions
To create or disconnect Jira work items from Sonar issues, you must be a project administrator or have the **Administer Issues** permission.
Go to *Your Project* > **Project Settings** > **Permissions** and select the **Administer Issues** or **Administer** checkbox for specific users and groups.
### Creating a Jira work item from a single SonarQube issue
You can create a Jira work item from a SonarQube issue or from the Issues page:
1. Click the **Push to Jira** button and choose a Jira work type, if more than two work types are available. The list of Jira work types depends on your Jira Cloud integration configuration and is configured by the project administrator. See [jira-integration](https://docs.sonarsource.com/sonarqube-server/project-administration/jira-integration "mention") for more details.
2. When the process is complete the button displays a Jira work item ID along with the status label.
3. A new Jira work item will be created in your Jira Cloud project and it will open in a new tab.
4. Click on the Jira work item ID to open it on the Jira’s website.
{% hint style="info" %}
If you are not seeing the **Push to Jira** button after properly setting your Jira Cloud integration, it might be due to unsupported mandatory fields present on all of the Jira work types. See [#mandatory-fields-without-a-default-value](https://docs.sonarsource.com/sonarqube-server/project-administration/jira-integration#mandatory-fields-without-a-default-value "mention") for more information.
{% endhint %}
On rare occasions, two or more concurrent Jira creation events might be triggered by multiple users simultaneously, resulting in two or more Jira work items being created at the same time.
### Contents of a Jira work item
When you create a Jira work item, it includes the following information:
* Title of the SonarQube issues
* SonarQube issue link
* Location of the issues
* File path
* Code lines
* Commit hash
* Date the issue was introduced
* Information about why this is an issue and how to fix it with the rule name and link.
* Impact on software quality and severity
* The reporter for the Jira work item is the default reporter set in SonarQube instance’s Jira Cloud integration.
### Disconnecting a Jira work item
You cannot delete a Jira work item from within SonarQube Server, but you can disconnect it by clicking on the close icon of the Jira button either within the SonarQube issue or on the Issues page. The connection with the Jira work item will be removed but the item will still exist in Jira Cloud.
You cannot push a SonarQube issue to an existing Jira work item, which means you can only create new Jira work items from SonarQube issues.
### Troubleshooting
* The **Push to Jira** button is not visible on the SonarQube issue page.\
**Solution**: After connecting your instance to a Jira instance you need to bind individual SonarQube projects to Jira Cloud projects. See project-level [jira-integration](https://docs.sonarsource.com/sonarqube-server/project-administration/jira-integration "mention") for more information.
### Related pages
* [jira-integration](https://docs.sonarsource.com/sonarqube-server/instance-administration/jira-integration "mention") on an instance level.
* [jira-integration](https://docs.sonarsource.com/sonarqube-server/project-administration/jira-integration "mention") on a project level.
### Managing a custom quality gate’s conditions
You can add or remove conditions. You can update the value of an existing condition. Remember that you define failing conditions: if one of the conditions is met, the quality gate fails. For more information about conditions, see the article about [#definition-based-on-conditions](https://docs.sonarsource.com/sonarqube-cloud/standards/introduction-to-quality-gates#definition-based-on-conditions "mention").
**To update a condition:**
1. Select the pen icon in the far right of the condition row. If there is no pen icon, select first the **Unlock editing** button, below the **Conditions** section.\
The **Update Condition** dialog opens.
2. Enter the new condition’s value and select **Update Condition**.
**To add a new condition:**
1. Select **Add Condition**. The **Add Condition** dialog opens.
2. In **Where?** select to which code, new or overall, the condition applies. New code is defined through the New Code Defintion (NCD). See the[about-new-code](https://docs.sonarsource.com/sonarqube-cloud/standards/about-new-code "mention") page for more information.
3. In **Quality Gate fails when**, select the metric to which the condition applies. For information about the metrics, see the [metric-definitions](https://docs.sonarsource.com/sonarqube-cloud/digging-deeper/metric-definitions "mention") page.
4. In **Value**, enter the condition’s value.
{% hint style="info" %}
Quality gate conditions related to severity currently use type severities. For more details, see the list of Issue management solution metrics in the [#issues](https://docs.sonarsource.com/sonarqube-cloud/digging-deeper/metric-definitions#issues "mention") table.
{% endhint %}
**To remove a condition:**
1. Select the dustbin icon in the far right of the condition row. The **Delete Condition** dialog opens.
2. Select **Delete**.
### Upgrading a quality gate for CaYC
We recommend configuring all your quality gates to prevent issues in new code. For more information, see the [#quality-gate-and-new-code](https://docs.sonarsource.com/sonarqube-cloud/standards/introduction-to-quality-gates#quality-gate-and-new-code "mention") article.
If your quality gate is not configured for CaYC, you can easily upgrade it as follows:
1. See [viewing-organizations](https://docs.sonarsource.com/sonarqube-cloud/getting-started/viewing-organizations "mention") to access your organization.
2. In organization’s navigation bar, select **Quality Gates**.
3. In the left panel, select the custom quality gate you want to upgrade.
4. In **You are a few conditions away from Clean as You Code**, select **Review and Update**. The **Update Quality Gate** dialog opens.
5. Review the proposed update and select **Update Quality Gate** to execute the update.
### Renaming a custom quality gate
1. See [viewing-organizations](https://docs.sonarsource.com/sonarqube-cloud/getting-started/viewing-organizations "mention") to access your organization.
2. In organization’s navigation bar, select **Quality Gates**.
3. In the left panel, select the custom quality gate you want to rename.
4. In the top right corner of your quality gate, select the More Actions button and then **Rename**. The **Rename Quality Gate** dialog opens.
5. Enter the new name and select **Rename**.
### Deleting a custom quality gate
1. See [viewing-organizations](https://docs.sonarsource.com/sonarqube-cloud/getting-started/viewing-organizations "mention") to access your organization.
2. In organization’s navigation bar, select **Quality Gates**.
3. In the left panel, select the custom quality gate you want to delete.
4. In the top right corner of your quality gate, select the More Actions button and then **Delete**.
5. Confirm the deletion.
### Related pages
* [introduction-to-quality-gates](https://docs.sonarsource.com/sonarqube-cloud/standards/managing-quality-gates/introduction-to-quality-gates "mention")
* [viewing-quality-gate](https://docs.sonarsource.com/sonarqube-cloud/standards/managing-quality-gates/viewing-quality-gate "mention")
* [changing-default-quality-gate](https://docs.sonarsource.com/sonarqube-cloud/standards/managing-quality-gates/changing-default-quality-gate "mention")
* [associating-projects-with-quality-gate](https://docs.sonarsource.com/sonarqube-cloud/standards/managing-quality-gates/associating-projects-with-quality-gate "mention")
* [notifications](https://docs.sonarsource.com/sonarqube-cloud/managing-your-account/notifications "mention")
* [quality-gates-for-ai-code](https://docs.sonarsource.com/sonarqube-cloud/standards/ai-code-assurance/quality-gates-for-ai-code "mention")
* [changing-quality-gate](https://docs.sonarsource.com/sonarqube-cloud/managing-your-projects/project-analysis/changing-quality-gate "mention")
---
# Source: https://docs.sonarsource.com/sonarqube-cloud/administering-sonarcloud/managing-enterprise.md
# Managing your enterprise
- [Retrieving and viewing your enterprise](/sonarqube-cloud/administering-sonarcloud/managing-enterprise/retrieving-and-viewing-your-enterprise.md): You can view the enterprises you’re an admin or a member of.
- [Creating your enterprise](/sonarqube-cloud/administering-sonarcloud/managing-enterprise/creating-your-enterprise.md): With the Enterprise license, you can group together SonarQube Cloud organizations from different DevOps platforms into an enterprise and benefit from many features.
- [Enterprise security](/sonarqube-cloud/administering-sonarcloud/managing-enterprise/enterprise-security.md): How to enhance your enterprise security with various security features.
- [IP allow lists](/sonarqube-cloud/administering-sonarcloud/managing-enterprise/enterprise-security/ip-allow-lists.md): How to restrict the IP allow list for SonarQube Cloud
- [Audit logs](/sonarqube-cloud/administering-sonarcloud/managing-enterprise/enterprise-security/audit-logs.md): The initial release of SonarQube Cloud's audit logs provides you with the essential data you need to meet your immediate compliance and security needs.
- [Single Sign-On](/sonarqube-cloud/administering-sonarcloud/managing-enterprise/enterprise-security/sso.md): This section explains the Single Sign-On (SSO) authentication solution in SonarQube Cloud and how to set it up.
- [About SSO authentication solution](/sonarqube-cloud/administering-sonarcloud/managing-enterprise/enterprise-security/sso/about.md): This page provides an overview of the SSO authentication solution in SonarQube Cloud.
- [Automatic group synchronization](/sonarqube-cloud/administering-sonarcloud/managing-enterprise/enterprise-security/sso/about/automatic-group-synchronization.md): This page describes the automatic group synchronization solution in SonarQube Cloud.
- [Setting up SSO](/sonarqube-cloud/administering-sonarcloud/managing-enterprise/enterprise-security/sso/setup.md): With the Enterprise plan, you can transition your SonarQube Cloud enterprise to Single Sign-On.
- [Step 1: Verify the user groups](/sonarqube-cloud/administering-sonarcloud/managing-enterprise/enterprise-security/sso/setup/verify-user-groups.md): Before configuring SSO for your SonarQube Cloud enterprise, you must ensure that the automatic group synchronization can take place properly.
- [Step 2: Configure SSO](/sonarqube-cloud/administering-sonarcloud/managing-enterprise/enterprise-security/sso/setup/configure-sso.md): The second step in configuring SSO for your SonarQube Cloud enterprise varies slightly, depending on your identity provider. If you use Okta or Microsoft Entra ID, go directly to the respective page.
- [Using the setup assistant (generic operation)](/sonarqube-cloud/administering-sonarcloud/managing-enterprise/enterprise-security/sso/setup/configure-sso/generic-operation.md): This page explains how to configure SSO with SonarQube Cloud’s setup assistant if you use another identity provider than Okta or Microsoft Entra ID.
- [SAML SSO with Okta](/sonarqube-cloud/administering-sonarcloud/managing-enterprise/enterprise-security/sso/setup/configure-sso/okta.md): This page explains how to setup SAML SSO with Okta and SonarQube Cloud's SSO setup assistant.
- [SAML SSO with Entra ID](/sonarqube-cloud/administering-sonarcloud/managing-enterprise/enterprise-security/sso/setup/configure-sso/microsoft-entra-id.md): This page explains how to configure SAML SSO in your enterprise with Microsoft Entra ID while using SonarQube Cloud's setup assistant.
- [Step 3: Invite users to sign in](/sonarqube-cloud/administering-sonarcloud/managing-enterprise/enterprise-security/sso/setup/inviting-users-to-sign-in.md): Once the SSO connection has been established, you can invite users to sign in to SonarQube Cloud with SSO by sending them the enterprise’s login URL.
- [Step 4: Terminate SSO setup](/sonarqube-cloud/administering-sonarcloud/managing-enterprise/enterprise-security/sso/setup/terminate-setup.md): This page describes how to terminate your Single Sign-On (SSO) setup in SonarQube Cloud.
- [Editing SSO configuration](/sonarqube-cloud/administering-sonarcloud/managing-enterprise/enterprise-security/sso/editing-sso-configuration.md): After setup, editing your SSO configuration in SonarQube Cloud is straight-forward.
- [Editing SSO configuration (old method)](/sonarqube-cloud/administering-sonarcloud/managing-enterprise/enterprise-security/sso/editing-configuration-old-method.md): Editing your SSO configuration in SonarQube Cloud was recently improved using the SSO setup assistant. These pages outline the previous editing procedures (without the SSO setup assistant).
- [Introduction](/sonarqube-cloud/administering-sonarcloud/managing-enterprise/enterprise-security/sso/editing-configuration-old-method/introduction.md): This page explains the generic steps necessary to edit the SAML SSO configuration you established in SonarQube Cloud using the older method (without the SSO setup assistant).
- [With Okta](/sonarqube-cloud/administering-sonarcloud/managing-enterprise/enterprise-security/sso/editing-configuration-old-method/okta.md): This page explains how to edit the SAML SSO configuration you established in SonarQube Cloud with Okta and using the old method (without the SSO setup assistant).
- [With Microsoft Entra ID](/sonarqube-cloud/administering-sonarcloud/managing-enterprise/enterprise-security/sso/editing-configuration-old-method/microsoft-entra-id.md): This page explains how to edit the SAML SSO configuration you established in SonarQube Cloud with Microsoft Entra ID while using the old method (without the SSO setup assistant).
- [Deleting SSO configuration](/sonarqube-cloud/administering-sonarcloud/managing-enterprise/enterprise-security/sso/deleting-sso-configuration.md): As an enterprise admin, you can delete your enterprise’s SSO configuration in SonarQube Cloud either in the UI or via the Web API.
- [Troubleshooting SSO connection](/sonarqube-cloud/administering-sonarcloud/managing-enterprise/enterprise-security/sso/troubleshooting.md): Troubleshooting your SSO connection can be tricky. Here's a list of items to check in SonarQube Cloud and with your identity provider.
- [Adding organizations to your enterprise](/sonarqube-cloud/administering-sonarcloud/managing-enterprise/adding-organizations-to-your-enterprise.md): Adding or removing organizations to / from your enterprise.
- [Managing the enterprise-related permissions](/sonarqube-cloud/administering-sonarcloud/managing-enterprise/managing-the-enterprise-related-permissions.md): You must be an admin of the enterprise to be able to manage the permissions.
- [Managing the lines of code within your enterprise](/sonarqube-cloud/administering-sonarcloud/managing-enterprise/managing-the-lines-of-code-within-your-enterprise.md): You must be an enterprise admin to be able to manage the lines of code (LOC) limits within your enterprise.
- [Changing enterprise settings](/sonarqube-cloud/administering-sonarcloud/managing-enterprise/changing-enterprise-settings.md): You can rename your enterprise provided you're an enterprise admin.
- [Downgrading your enterprise](/sonarqube-cloud/administering-sonarcloud/managing-enterprise/downgrading-your-enterprise.md): How to downgrade an enterprise.
---
# Source: https://docs.sonarsource.com/sonarqube-server/2025.6/user-guide/issues/managing-jira-work-items.md
# Source: https://docs.sonarsource.com/sonarqube-server/user-guide/issues/managing-jira-work-items.md
# Managing Jira work items
### Prerequisites
Before you can start pushing SonarQube issues to Jira Cloud, you need to connect your SonarQube instance with your Jira Cloud instance and bind your SonarQube project to a Jira Cloud project. See:
* [jira-integration](https://docs.sonarsource.com/sonarqube-server/instance-administration/jira-integration "mention") on an instance level.
* [jira-integration](https://docs.sonarsource.com/sonarqube-server/project-administration/jira-integration "mention") on a project level.
### Permissions
To create or disconnect Jira work items from Sonar issues, you must be a project administrator or have the **Administer Issues** permission.
Go to *Your Project* > **Project Settings** > **Permissions** and select the **Administer Issues** or **Administer** checkbox for specific users and groups.
### Creating a Jira work item from a single SonarQube issue
You can create a Jira work item from a SonarQube issue or from the Issues page:
1. Click the **Push to Jira** button and choose a Jira work type, if more than two work types are available. The list of Jira work types depends on your Jira Cloud integration configuration and is configured by the project administrator. See [jira-integration](https://docs.sonarsource.com/sonarqube-server/project-administration/jira-integration "mention") for more details.
2. When the process is complete the button displays a Jira work item ID along with the status label.
3. A new Jira work item will be created in your Jira Cloud project and it will open in a new tab.
4. Click on the Jira work item ID to open it on the Jira’s website.
{% hint style="info" %}
If you are not seeing the **Push to Jira** button after properly setting your Jira Cloud integration, it might be due to unsupported mandatory fields present on all of the Jira work types. See [#mandatory-fields-without-a-default-value](https://docs.sonarsource.com/sonarqube-server/project-administration/jira-integration#mandatory-fields-without-a-default-value "mention") for more information.
{% endhint %}
On rare occasions, two or more concurrent Jira creation events might be triggered by multiple users simultaneously, resulting in two or more Jira work items being created at the same time.
### Contents of a Jira work item
When you create a Jira work item, it includes the following information:
* Title of the SonarQube issues
* SonarQube issue link
* Location of the issues
* File path
* Code lines
* Commit hash
* Date the issue was introduced
* Information about why this is an issue and how to fix it with the rule name and link.
* Impact on software quality and severity
* The reporter for the Jira work item is the default reporter set in SonarQube instance’s Jira Cloud integration.
### Disconnecting a Jira work item
You cannot delete a Jira work item from within SonarQube Server, but you can disconnect it by clicking on the close icon of the Jira button either within the SonarQube issue or on the Issues page. The connection with the Jira work item will be removed but the item will still exist in Jira Cloud.
You cannot push a SonarQube issue to an existing Jira work item, which means you can only create new Jira work items from SonarQube issues.
### Troubleshooting
* The **Push to Jira** button is not visible on the SonarQube issue page.\
**Solution**: After connecting your instance to a Jira instance you need to bind individual SonarQube projects to Jira Cloud projects. See project-level [jira-integration](https://docs.sonarsource.com/sonarqube-server/project-administration/jira-integration "mention") for more information.
### Related pages
* [jira-integration](https://docs.sonarsource.com/sonarqube-server/instance-administration/jira-integration "mention") on an instance level.
* [jira-integration](https://docs.sonarsource.com/sonarqube-server/project-administration/jira-integration "mention") on a project level.
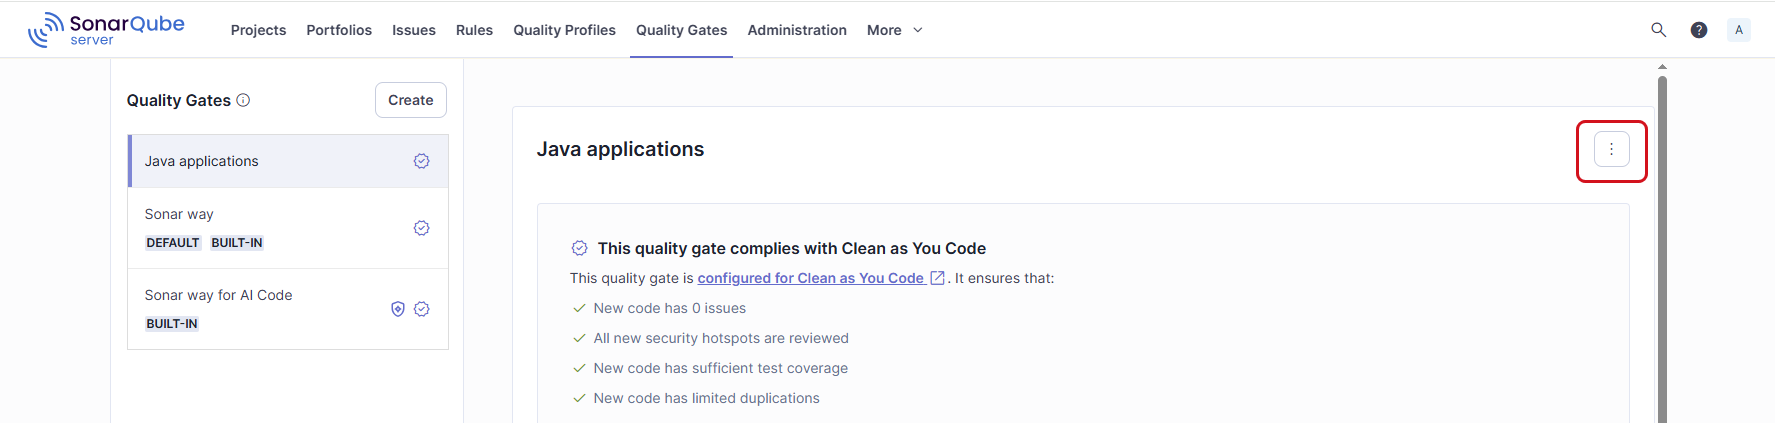
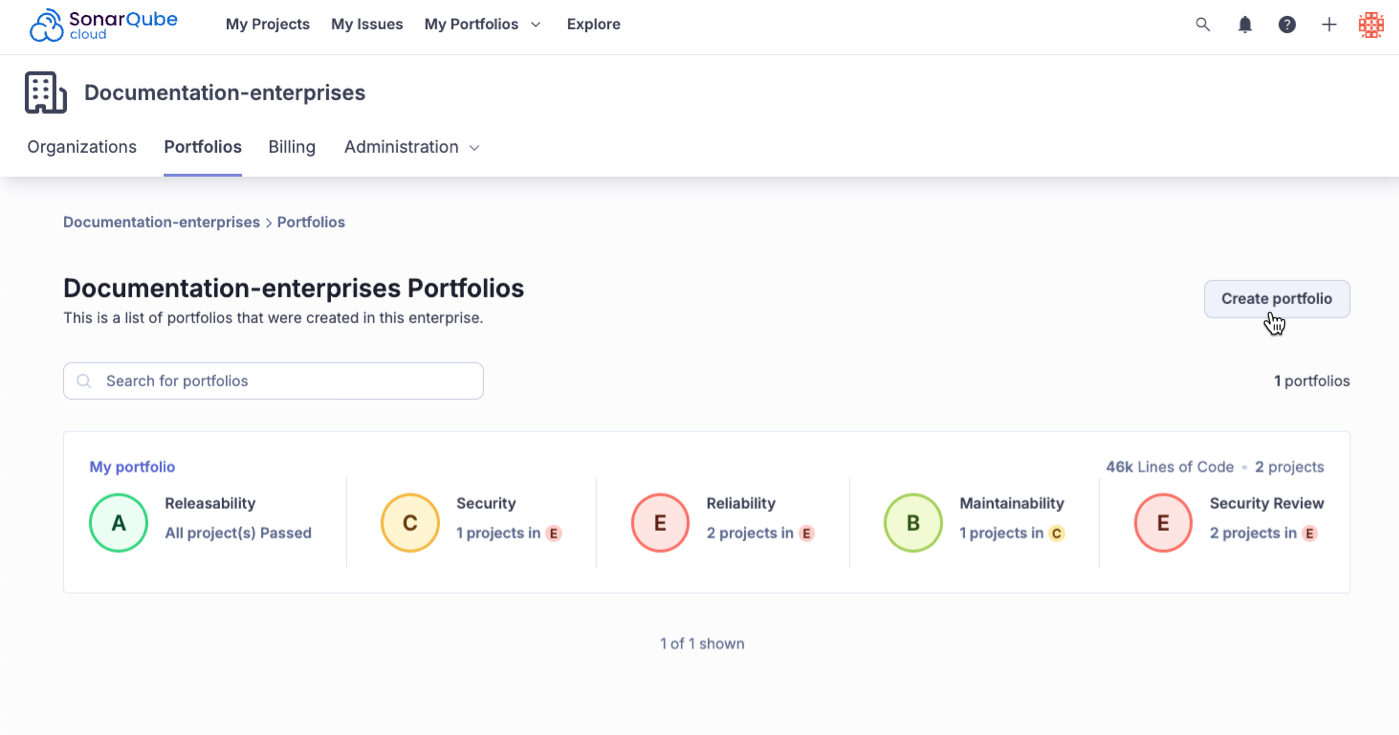 The portfolio creation process consists of the following steps:
1. **Add details**: Choose the enterprise where the portfolio will reside if you have permission to more than one enterprise. Then, enter the portfolio name and description.
2. **Add projects**: From the **How do you want to add projects?** dropdown menu choose projects either:
* **By name**: This option shows the list of organizations and projects associated with them. Select the projects and choose the project’s branch you want to include in the portfolio.
* **By tags**: Select existing tags by which you want to query projects and define the project branch to add to the portfolio. If you choose a branch other than the main branch, you need to specify the branch’s name.
* **By regular expression** (RegEx) using project keys: Write RegEx to query the project by project key and define the project branch to add to the portfolio. If you choose a branch other than the main branch, you need to specify the branch’s name.
* **By organization**: Select the organizations and define the project’s branch to include in the portfolio. If you choose a branch other than the main branch, you need to specify the branch’s name.
3. **Set permissions**: Add portfolio Administer, Edit, and View permissions to specific groups and users or apply a permission template.
4. **Review**: Take a final look at all the portfolio details and select **Complete** to finalize the process.
{% hint style="info" %}
Currently, you cannot mix and match portfolio creation methods. For example, mixing RegEx and Tags to generate a list of projects for a portfolio is not possible. You can only use one method.
{% endhint %}
Once the portfolio is created, it will be populated with ratings for Releasability, Security, Reliability, Maintainability, and Security Review.
{% hint style="info" %}
The maximum number of projects that you can add to your portfolio is 5,000.
{% endhint %}
#### Ensuring a reliable security report
To ensure a reliable security report, check that the relevant security rules are activated in your quality profiles for projects you have included in your portfolio. For instance, if no rule corresponding to a given OWASP category is activated in your quality profile, you won’t get Security issues or Security Hotspots linked to that specific category in the OWASP report. See [#checking-security-rules](https://docs.sonarsource.com/sonarqube-cloud/getting-started-with-enterprise/viewing-enterprise-reports/project-security-reports#checking-security-rules "mention") for more information.
### Defining a portfolio with regular expressions (RegEx)
You write RegEx against project keys included in your enterprise. A project key is not necessarily the same as a project name and, by default, it starts with the name of the organization that the project belongs to.
* To retrieve a project key, go to your project and select **Information** located in the left side bar.
* To change a project key, go to *Your Project* > **Administration** > **Update Key** and enter the new project key.
Following are examples of RegEx that may help you write your own expressions and retrieve matches against project keys.
Selects all projects with a key that includes `python`:
```regex
.*python.*
```
Selects all projects with a key that starts with `sonar`:
```regex
^sonar.*
```
Select all projects with a key that starts with either `docs` or `Docs`. Keep in mind that RegEx matches are case sensitive.
```regex
^[dD]ocs.*
```
Selects all projects with a key that ends with `-scanner`:
The portfolio creation process consists of the following steps:
1. **Add details**: Choose the enterprise where the portfolio will reside if you have permission to more than one enterprise. Then, enter the portfolio name and description.
2. **Add projects**: From the **How do you want to add projects?** dropdown menu choose projects either:
* **By name**: This option shows the list of organizations and projects associated with them. Select the projects and choose the project’s branch you want to include in the portfolio.
* **By tags**: Select existing tags by which you want to query projects and define the project branch to add to the portfolio. If you choose a branch other than the main branch, you need to specify the branch’s name.
* **By regular expression** (RegEx) using project keys: Write RegEx to query the project by project key and define the project branch to add to the portfolio. If you choose a branch other than the main branch, you need to specify the branch’s name.
* **By organization**: Select the organizations and define the project’s branch to include in the portfolio. If you choose a branch other than the main branch, you need to specify the branch’s name.
3. **Set permissions**: Add portfolio Administer, Edit, and View permissions to specific groups and users or apply a permission template.
4. **Review**: Take a final look at all the portfolio details and select **Complete** to finalize the process.
{% hint style="info" %}
Currently, you cannot mix and match portfolio creation methods. For example, mixing RegEx and Tags to generate a list of projects for a portfolio is not possible. You can only use one method.
{% endhint %}
Once the portfolio is created, it will be populated with ratings for Releasability, Security, Reliability, Maintainability, and Security Review.
{% hint style="info" %}
The maximum number of projects that you can add to your portfolio is 5,000.
{% endhint %}
#### Ensuring a reliable security report
To ensure a reliable security report, check that the relevant security rules are activated in your quality profiles for projects you have included in your portfolio. For instance, if no rule corresponding to a given OWASP category is activated in your quality profile, you won’t get Security issues or Security Hotspots linked to that specific category in the OWASP report. See [#checking-security-rules](https://docs.sonarsource.com/sonarqube-cloud/getting-started-with-enterprise/viewing-enterprise-reports/project-security-reports#checking-security-rules "mention") for more information.
### Defining a portfolio with regular expressions (RegEx)
You write RegEx against project keys included in your enterprise. A project key is not necessarily the same as a project name and, by default, it starts with the name of the organization that the project belongs to.
* To retrieve a project key, go to your project and select **Information** located in the left side bar.
* To change a project key, go to *Your Project* > **Administration** > **Update Key** and enter the new project key.
Following are examples of RegEx that may help you write your own expressions and retrieve matches against project keys.
Selects all projects with a key that includes `python`:
```regex
.*python.*
```
Selects all projects with a key that starts with `sonar`:
```regex
^sonar.*
```
Select all projects with a key that starts with either `docs` or `Docs`. Keep in mind that RegEx matches are case sensitive.
```regex
^[dD]ocs.*
```
Selects all projects with a key that ends with `-scanner`:
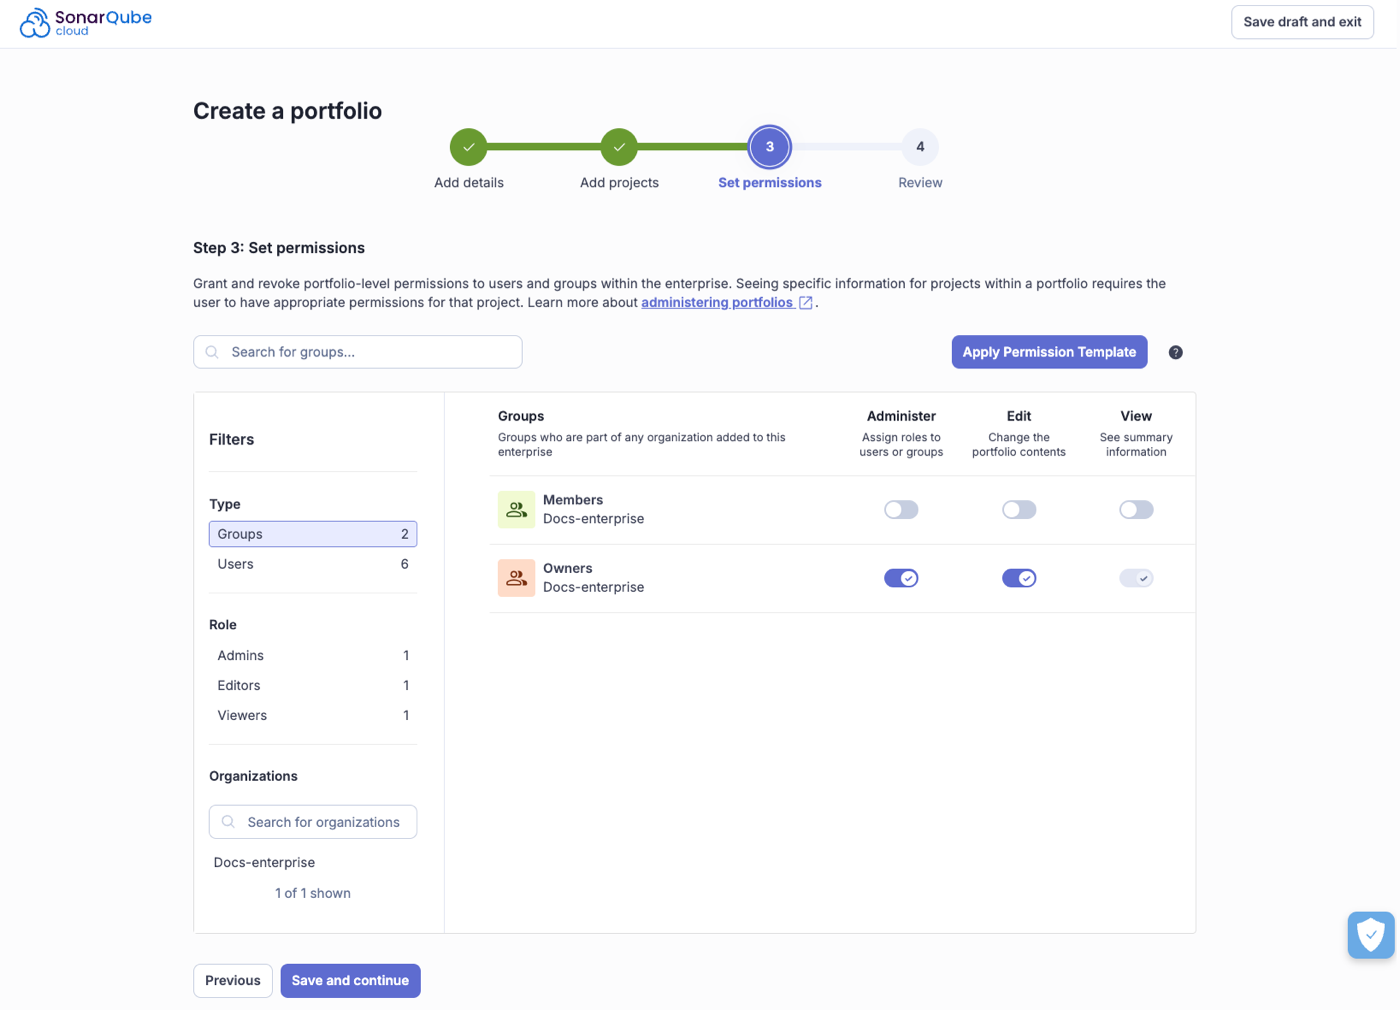
 Proceed as follows:
1. In the top navigation bar, go to **My Portfolios** and select your enterprise from the drop-down menu.
2. On the Portfolios home page, select the portfolio you want to edit.
3. Go to **Settings** > **Portfolio Definition**.
4. Select **Edit selection**.
5. From a list of organizations and projects to which you have permissions, select projects to include or exclude from the portfolio. Alternatively, use the search field to find projects by name.
6. If the selected project contains several long-lived branches, select the branch to be added. By default, the **main** branch is selected.
7. Select **Save**.
### Deleting a portfolio
With the Edit permission on a portfolio, you can remove it from the system.
1. In the top navigation bar, go to **My Portfolios** and select your enterprise from the drop-down menu.
2. Select the portfolio you want to remove.
3. Go to **Settings** > **Delete** portfolio.
### Portfolio recomputation
The following events will trigger the recalculation of a portfolio:
* When a project within the portfolio has a new analysis.
* If a project is removed from an organization within the enterprise.
* When an organization is removed from the enterprise.
For information on how ratings are calculated, see [metric-definitions](https://docs.sonarsource.com/sonarqube-cloud/digging-deeper/metric-definitions "mention") for more information.
### Related pages
* [introduction](https://docs.sonarsource.com/sonarqube-cloud/getting-started-with-enterprise/introduction "mention") to Getting started with Enterprise
* [viewing-portfolios](https://docs.sonarsource.com/sonarqube-cloud/getting-started-with-enterprise/viewing-enterprise-reports/viewing-portfolios "mention")
* [administering-portfolios](https://docs.sonarsource.com/sonarqube-cloud/getting-started-with-enterprise/administering-portfolios "mention")
---
# Source: https://docs.sonarsource.com/sonarqube-community-build/project-administration/maintaining-project/managing-project-history.md
# Source: https://docs.sonarsource.com/sonarqube-server/8.9/project-administration/managing-project-history.md
# Source: https://docs.sonarsource.com/sonarqube-server/9.8/project-administration/managing-project-history.md
# Source: https://docs.sonarsource.com/sonarqube-server/9.9/project-administration/managing-project-history.md
# Source: https://docs.sonarsource.com/sonarqube-server/10.0/project-administration/managing-project-history.md
# Source: https://docs.sonarsource.com/sonarqube-server/10.1/project-administration/managing-project-history.md
# Source: https://docs.sonarsource.com/sonarqube-server/10.2/project-administration/managing-project-history.md
# Source: https://docs.sonarsource.com/sonarqube-server/10.3/project-administration/managing-project-history.md
# Source: https://docs.sonarsource.com/sonarqube-server/10.4/project-administration/managing-project-history.md
# Source: https://docs.sonarsource.com/sonarqube-server/10.5/project-administration/managing-project-history.md
# Source: https://docs.sonarsource.com/sonarqube-server/10.6/project-administration/managing-project-history.md
# Source: https://docs.sonarsource.com/sonarqube-server/10.7/project-administration/managing-project-history.md
# Source: https://docs.sonarsource.com/sonarqube-server/10.8/project-administration/managing-project-history.md
# Source: https://docs.sonarsource.com/sonarqube-server/2025.2/project-administration/managing-project-history.md
# Source: https://docs.sonarsource.com/sonarqube-server/2025.3/project-administration/managing-project-history.md
# Source: https://docs.sonarsource.com/sonarqube-server/2025.5/project-administration/managing-project-history.md
# Source: https://docs.sonarsource.com/sonarqube-server/2025.1/project-administration/managing-project-history.md
# Source: https://docs.sonarsource.com/sonarqube-server/2025.4/project-administration/managing-project-history.md
# Source: https://docs.sonarsource.com/sonarqube-server/2025.6/project-administration/maintaining-project/managing-project-history.md
# Source: https://docs.sonarsource.com/sonarqube-server/project-administration/maintaining-project/managing-project-history.md
# Source: https://docs.sonarsource.com/sonarqube-cloud/digging-deeper/managing-project-history.md
# Managing project history
One of the most powerful features of SonarQube Cloud is that it shows you not just your project health today, but how it has changed over time. It does that by selectively keeping data from previous analyses (see the [housekeeping](https://docs.sonarsource.com/sonarqube-cloud/digging-deeper/housekeeping "mention") page). It doesn’t keep all previous analyses - that would bloat the database. Similarly, for the analyses it does keep, SonarQube Cloud doesn’t keep all the data. Once a project snapshot moves from the "last analysis", that is, the most recent, to being part of the project’s history, data below the project level is purged - again to keep from bloating the database.
Typically, these aren’t things you need to even think about; SonarQube Cloud just handles them for you, but occasionally, you may need to remove a bad snapshot from a project’s history or change the housekeeping algorithms.
### Managing history
Occasionally, you may need to manually delete a project snapshot, whether because the wrong quality profile was used, or because there was a problem with analysis, and so on. Note that the most recent snapshot (labeled "last snapshot") can never be deleted.
**Deleting snapshots**
{% hint style="info" %}
Deleting a snapshot is a 2-step process:
1. The snapshot must first be removed from the project history by selecting **Delete snapshot.** It won’t be displayed anymore on this **History** page but will still be present in the database.
2. The snapshot is actually deleted during the next project analysis.
{% endhint %}
At the project level, from the front page **Activity** list, choose **Show More** to see the full activity list.
For every snapshot, it is possible to manually:
* Add, rename or remove a version
* Add, rename or remove an event
* Delete the snapshot
---
# Source: https://docs.sonarsource.com/sonarqube-community-build/project-administration/setting-up-features/managing-project-tags.md
# Source: https://docs.sonarsource.com/sonarqube-server/2025.2/project-administration/managing-project-tags.md
# Source: https://docs.sonarsource.com/sonarqube-server/2025.3/project-administration/managing-project-tags.md
# Source: https://docs.sonarsource.com/sonarqube-server/2025.5/project-administration/managing-project-tags.md
# Source: https://docs.sonarsource.com/sonarqube-server/2025.4/project-administration/managing-project-tags.md
# Source: https://docs.sonarsource.com/sonarqube-server/2025.6/project-administration/setting-up-features/managing-project-tags.md
# Source: https://docs.sonarsource.com/sonarqube-server/project-administration/setting-up-features/managing-project-tags.md
# Managing project tags
To manage the tags of your projects:
1. Retrieve your project. See [retrieving-projects](https://docs.sonarsource.com/sonarqube-server/user-guide/viewing-projects/retrieving-projects "mention") for more details.
2. In the top right corner, select **Project Information**.
3. In the **Tags** section left panel, select the plus sign to assign a new tag to the project. A window pops up with the list of existing tags.
4. In the list, select the tag(s) you want to assign.
5. To create a new tag, enter it in the **Search for tags…** field, and select it in the list.
Proceed as follows:
1. In the top navigation bar, go to **My Portfolios** and select your enterprise from the drop-down menu.
2. On the Portfolios home page, select the portfolio you want to edit.
3. Go to **Settings** > **Portfolio Definition**.
4. Select **Edit selection**.
5. From a list of organizations and projects to which you have permissions, select projects to include or exclude from the portfolio. Alternatively, use the search field to find projects by name.
6. If the selected project contains several long-lived branches, select the branch to be added. By default, the **main** branch is selected.
7. Select **Save**.
### Deleting a portfolio
With the Edit permission on a portfolio, you can remove it from the system.
1. In the top navigation bar, go to **My Portfolios** and select your enterprise from the drop-down menu.
2. Select the portfolio you want to remove.
3. Go to **Settings** > **Delete** portfolio.
### Portfolio recomputation
The following events will trigger the recalculation of a portfolio:
* When a project within the portfolio has a new analysis.
* If a project is removed from an organization within the enterprise.
* When an organization is removed from the enterprise.
For information on how ratings are calculated, see [metric-definitions](https://docs.sonarsource.com/sonarqube-cloud/digging-deeper/metric-definitions "mention") for more information.
### Related pages
* [introduction](https://docs.sonarsource.com/sonarqube-cloud/getting-started-with-enterprise/introduction "mention") to Getting started with Enterprise
* [viewing-portfolios](https://docs.sonarsource.com/sonarqube-cloud/getting-started-with-enterprise/viewing-enterprise-reports/viewing-portfolios "mention")
* [administering-portfolios](https://docs.sonarsource.com/sonarqube-cloud/getting-started-with-enterprise/administering-portfolios "mention")
---
# Source: https://docs.sonarsource.com/sonarqube-community-build/project-administration/maintaining-project/managing-project-history.md
# Source: https://docs.sonarsource.com/sonarqube-server/8.9/project-administration/managing-project-history.md
# Source: https://docs.sonarsource.com/sonarqube-server/9.8/project-administration/managing-project-history.md
# Source: https://docs.sonarsource.com/sonarqube-server/9.9/project-administration/managing-project-history.md
# Source: https://docs.sonarsource.com/sonarqube-server/10.0/project-administration/managing-project-history.md
# Source: https://docs.sonarsource.com/sonarqube-server/10.1/project-administration/managing-project-history.md
# Source: https://docs.sonarsource.com/sonarqube-server/10.2/project-administration/managing-project-history.md
# Source: https://docs.sonarsource.com/sonarqube-server/10.3/project-administration/managing-project-history.md
# Source: https://docs.sonarsource.com/sonarqube-server/10.4/project-administration/managing-project-history.md
# Source: https://docs.sonarsource.com/sonarqube-server/10.5/project-administration/managing-project-history.md
# Source: https://docs.sonarsource.com/sonarqube-server/10.6/project-administration/managing-project-history.md
# Source: https://docs.sonarsource.com/sonarqube-server/10.7/project-administration/managing-project-history.md
# Source: https://docs.sonarsource.com/sonarqube-server/10.8/project-administration/managing-project-history.md
# Source: https://docs.sonarsource.com/sonarqube-server/2025.2/project-administration/managing-project-history.md
# Source: https://docs.sonarsource.com/sonarqube-server/2025.3/project-administration/managing-project-history.md
# Source: https://docs.sonarsource.com/sonarqube-server/2025.5/project-administration/managing-project-history.md
# Source: https://docs.sonarsource.com/sonarqube-server/2025.1/project-administration/managing-project-history.md
# Source: https://docs.sonarsource.com/sonarqube-server/2025.4/project-administration/managing-project-history.md
# Source: https://docs.sonarsource.com/sonarqube-server/2025.6/project-administration/maintaining-project/managing-project-history.md
# Source: https://docs.sonarsource.com/sonarqube-server/project-administration/maintaining-project/managing-project-history.md
# Source: https://docs.sonarsource.com/sonarqube-cloud/digging-deeper/managing-project-history.md
# Managing project history
One of the most powerful features of SonarQube Cloud is that it shows you not just your project health today, but how it has changed over time. It does that by selectively keeping data from previous analyses (see the [housekeeping](https://docs.sonarsource.com/sonarqube-cloud/digging-deeper/housekeeping "mention") page). It doesn’t keep all previous analyses - that would bloat the database. Similarly, for the analyses it does keep, SonarQube Cloud doesn’t keep all the data. Once a project snapshot moves from the "last analysis", that is, the most recent, to being part of the project’s history, data below the project level is purged - again to keep from bloating the database.
Typically, these aren’t things you need to even think about; SonarQube Cloud just handles them for you, but occasionally, you may need to remove a bad snapshot from a project’s history or change the housekeeping algorithms.
### Managing history
Occasionally, you may need to manually delete a project snapshot, whether because the wrong quality profile was used, or because there was a problem with analysis, and so on. Note that the most recent snapshot (labeled "last snapshot") can never be deleted.
**Deleting snapshots**
{% hint style="info" %}
Deleting a snapshot is a 2-step process:
1. The snapshot must first be removed from the project history by selecting **Delete snapshot.** It won’t be displayed anymore on this **History** page but will still be present in the database.
2. The snapshot is actually deleted during the next project analysis.
{% endhint %}
At the project level, from the front page **Activity** list, choose **Show More** to see the full activity list.
For every snapshot, it is possible to manually:
* Add, rename or remove a version
* Add, rename or remove an event
* Delete the snapshot
---
# Source: https://docs.sonarsource.com/sonarqube-community-build/project-administration/setting-up-features/managing-project-tags.md
# Source: https://docs.sonarsource.com/sonarqube-server/2025.2/project-administration/managing-project-tags.md
# Source: https://docs.sonarsource.com/sonarqube-server/2025.3/project-administration/managing-project-tags.md
# Source: https://docs.sonarsource.com/sonarqube-server/2025.5/project-administration/managing-project-tags.md
# Source: https://docs.sonarsource.com/sonarqube-server/2025.4/project-administration/managing-project-tags.md
# Source: https://docs.sonarsource.com/sonarqube-server/2025.6/project-administration/setting-up-features/managing-project-tags.md
# Source: https://docs.sonarsource.com/sonarqube-server/project-administration/setting-up-features/managing-project-tags.md
# Managing project tags
To manage the tags of your projects:
1. Retrieve your project. See [retrieving-projects](https://docs.sonarsource.com/sonarqube-server/user-guide/viewing-projects/retrieving-projects "mention") for more details.
2. In the top right corner, select **Project Information**.
3. In the **Tags** section left panel, select the plus sign to assign a new tag to the project. A window pops up with the list of existing tags.
4. In the list, select the tag(s) you want to assign.
5. To create a new tag, enter it in the **Search for tags…** field, and select it in the list.
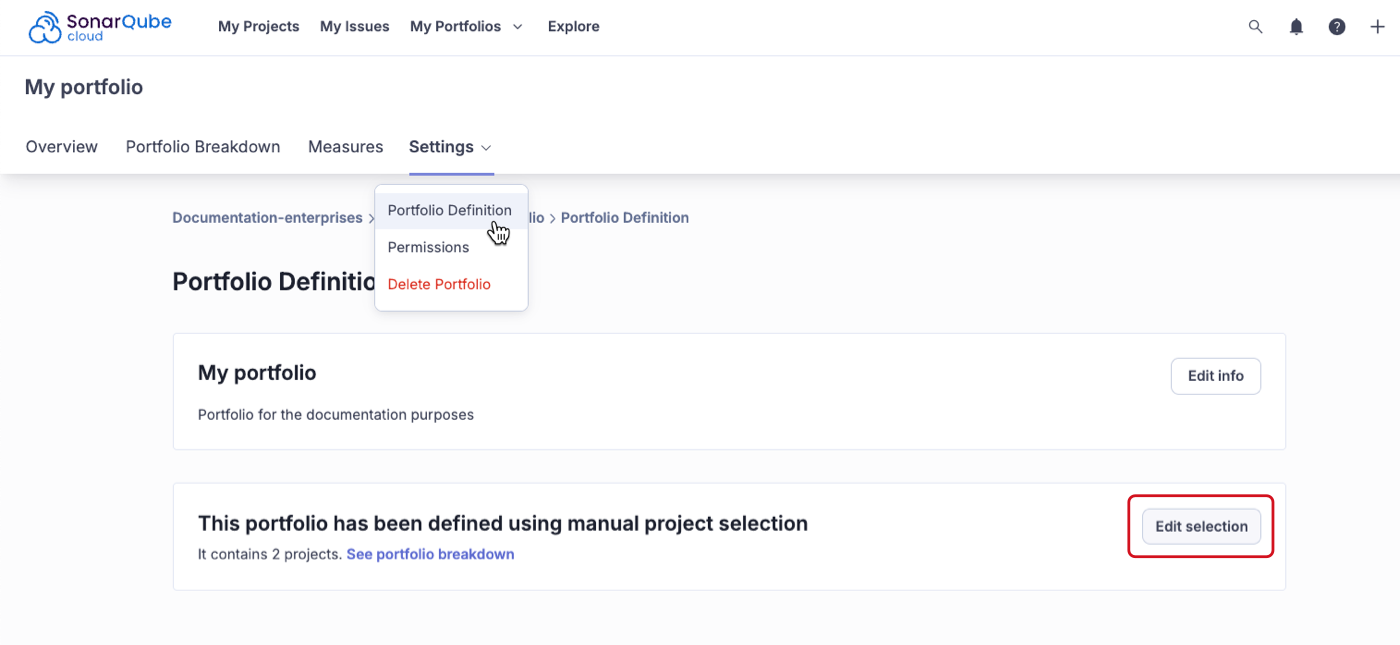 ---
# Source: https://docs.sonarsource.com/sonarqube-community-build/quality-standards-administration/managing-quality-gates.md
# Source: https://docs.sonarsource.com/sonarqube-server/2025.2/quality-standards-administration/managing-quality-gates.md
# Source: https://docs.sonarsource.com/sonarqube-server/2025.3/quality-standards-administration/managing-quality-gates.md
# Source: https://docs.sonarsource.com/sonarqube-server/2025.5/quality-standards-administration/managing-quality-gates.md
# Source: https://docs.sonarsource.com/sonarqube-server/2025.4/quality-standards-administration/managing-quality-gates.md
# Source: https://docs.sonarsource.com/sonarqube-server/2025.6/quality-standards-administration/managing-quality-gates.md
# Source: https://docs.sonarsource.com/sonarqube-server/quality-standards-administration/managing-quality-gates.md
# Source: https://docs.sonarsource.com/sonarqube-cloud/standards/managing-quality-gates.md
# Managing quality gates
{% content-ref url="managing-quality-gates/introduction" %}
[introduction](https://docs.sonarsource.com/sonarqube-cloud/standards/managing-quality-gates/introduction)
{% endcontent-ref %}
{% content-ref url="managing-quality-gates/introduction-to-quality-gates" %}
[introduction-to-quality-gates](https://docs.sonarsource.com/sonarqube-cloud/standards/managing-quality-gates/introduction-to-quality-gates)
{% endcontent-ref %}
{% content-ref url="managing-quality-gates/viewing-quality-gate" %}
[viewing-quality-gate](https://docs.sonarsource.com/sonarqube-cloud/standards/managing-quality-gates/viewing-quality-gate)
{% endcontent-ref %}
{% content-ref url="managing-quality-gates/managing-custom-quality-gates" %}
[managing-custom-quality-gates](https://docs.sonarsource.com/sonarqube-cloud/standards/managing-quality-gates/managing-custom-quality-gates)
{% endcontent-ref %}
{% content-ref url="managing-quality-gates/changing-default-quality-gate" %}
[changing-default-quality-gate](https://docs.sonarsource.com/sonarqube-cloud/standards/managing-quality-gates/changing-default-quality-gate)
{% endcontent-ref %}
{% content-ref url="managing-quality-gates/associating-projects-with-quality-gate" %}
[associating-projects-with-quality-gate](https://docs.sonarsource.com/sonarqube-cloud/standards/managing-quality-gates/associating-projects-with-quality-gate)
{% endcontent-ref %}
---
# Source: https://docs.sonarsource.com/sonarqube-community-build/quality-standards-administration/managing-quality-profiles.md
# Source: https://docs.sonarsource.com/sonarqube-server/2025.2/quality-standards-administration/managing-quality-profiles.md
# Source: https://docs.sonarsource.com/sonarqube-server/2025.3/quality-standards-administration/managing-quality-profiles.md
# Source: https://docs.sonarsource.com/sonarqube-server/2025.5/quality-standards-administration/managing-quality-profiles.md
# Source: https://docs.sonarsource.com/sonarqube-server/2025.4/quality-standards-administration/managing-quality-profiles.md
# Source: https://docs.sonarsource.com/sonarqube-server/2025.6/quality-standards-administration/managing-quality-profiles.md
# Source: https://docs.sonarsource.com/sonarqube-server/quality-standards-administration/managing-quality-profiles.md
# Source: https://docs.sonarsource.com/sonarqube-cloud/standards/managing-quality-profiles.md
# Managing quality profiles
{% content-ref url="managing-quality-profiles/introduction" %}
[introduction](https://docs.sonarsource.com/sonarqube-cloud/standards/managing-quality-profiles/introduction)
{% endcontent-ref %}
{% content-ref url="managing-quality-profiles/understanding-quality-profiles" %}
[understanding-quality-profiles](https://docs.sonarsource.com/sonarqube-cloud/standards/managing-quality-profiles/understanding-quality-profiles)
{% endcontent-ref %}
{% content-ref url="managing-quality-profiles/viewing-quality-profiles" %}
[viewing-quality-profiles](https://docs.sonarsource.com/sonarqube-cloud/standards/managing-quality-profiles/viewing-quality-profiles)
{% endcontent-ref %}
{% content-ref url="managing-quality-profiles/creating-a-quality-profile" %}
[creating-a-quality-profile](https://docs.sonarsource.com/sonarqube-cloud/standards/managing-quality-profiles/creating-a-quality-profile)
{% endcontent-ref %}
{% content-ref url="managing-quality-profiles/editing-a-custom-quality-profile" %}
[editing-a-custom-quality-profile](https://docs.sonarsource.com/sonarqube-cloud/standards/managing-quality-profiles/editing-a-custom-quality-profile)
{% endcontent-ref %}
{% content-ref url="managing-quality-profiles/associating-a-quality-profile-with-projects" %}
[associating-a-quality-profile-with-projects](https://docs.sonarsource.com/sonarqube-cloud/standards/managing-quality-profiles/associating-a-quality-profile-with-projects)
{% endcontent-ref %}
{% content-ref url="managing-quality-profiles/changing-default-quality-profile" %}
[changing-default-quality-profile](https://docs.sonarsource.com/sonarqube-cloud/standards/managing-quality-profiles/changing-default-quality-profile)
{% endcontent-ref %}
{% content-ref url="managing-quality-profiles/maintaining-your-custom-quality-profiles" %}
[maintaining-your-custom-quality-profiles](https://docs.sonarsource.com/sonarqube-cloud/standards/managing-quality-profiles/maintaining-your-custom-quality-profiles)
{% endcontent-ref %}
{% content-ref url="managing-quality-profiles/authorizing-other-users-to-manage-quality-profile" %}
[authorizing-other-users-to-manage-quality-profile](https://docs.sonarsource.com/sonarqube-cloud/standards/managing-quality-profiles/authorizing-other-users-to-manage-quality-profile)
{% endcontent-ref %}
---
# Source: https://docs.sonarsource.com/sonarqube-cloud/administering-sonarcloud/managing-subscription.md
# Managing your subscription
- [Introduction](/sonarqube-cloud/administering-sonarcloud/managing-subscription/introduction.md): The SonarQube Cloud subscription plans are: free, Team, or Enterprise.
- [Subscription plans](/sonarqube-cloud/administering-sonarcloud/managing-subscription/subscription-plans.md): SonarQube Cloud offers three subscription-based plans: Free, Team, and Enterprise, each with varying features and suitable for different team sizes.
- [Billing model](/sonarqube-cloud/administering-sonarcloud/managing-subscription/billing-model.md): In SonarQube Cloud each Team or Enterprise plan organization is billed separately. You can be billed monthly or yearly.
- [Signing up for a plan](/sonarqube-cloud/administering-sonarcloud/managing-subscription/signing-up-for-plan.md): Signing up for a SonarQube Cloud subscription happens at the organization level.
- [Changing your subscription plan](/sonarqube-cloud/administering-sonarcloud/managing-subscription/changing-plan.md): Changing your SonarQube Cloud plan is straight forward however, it depends on the move you're making (upgrade/downgrade) and if your on a monthly or yearly subscription billing schedule.
- [Updating billing or payment details](/sonarqube-cloud/administering-sonarcloud/managing-subscription/updating-billing-payment-details.md): SonarQube Cloud's monthly subscribers can directly update the billing and payment details of their organization. Read this page to learn about how to add, remove, or change your payment method.
- [Viewing billing or usage information](/sonarqube-cloud/administering-sonarcloud/managing-subscription/viewing-billing-and-usage.md): This page provides instructions on how to view billing and usage information for both SonarQube Cloud organizations and enterprises.
- [Viewing taxes and invoices](/sonarqube-cloud/administering-sonarcloud/managing-subscription/viewing-taxes-and-invoices.md): This page explains how to access monthly invoices for your SonarQube Cloud subscriptions, detailing the steps to view and download them from the customer portal.
---
# Source: https://docs.sonarsource.com/sonarqube-cloud/administering-sonarcloud/managing-enterprise/managing-the-enterprise-related-permissions.md
# Managing the enterprise-related permissions
### About the enterprise-related permissions
---
# Source: https://docs.sonarsource.com/sonarqube-community-build/quality-standards-administration/managing-quality-gates.md
# Source: https://docs.sonarsource.com/sonarqube-server/2025.2/quality-standards-administration/managing-quality-gates.md
# Source: https://docs.sonarsource.com/sonarqube-server/2025.3/quality-standards-administration/managing-quality-gates.md
# Source: https://docs.sonarsource.com/sonarqube-server/2025.5/quality-standards-administration/managing-quality-gates.md
# Source: https://docs.sonarsource.com/sonarqube-server/2025.4/quality-standards-administration/managing-quality-gates.md
# Source: https://docs.sonarsource.com/sonarqube-server/2025.6/quality-standards-administration/managing-quality-gates.md
# Source: https://docs.sonarsource.com/sonarqube-server/quality-standards-administration/managing-quality-gates.md
# Source: https://docs.sonarsource.com/sonarqube-cloud/standards/managing-quality-gates.md
# Managing quality gates
{% content-ref url="managing-quality-gates/introduction" %}
[introduction](https://docs.sonarsource.com/sonarqube-cloud/standards/managing-quality-gates/introduction)
{% endcontent-ref %}
{% content-ref url="managing-quality-gates/introduction-to-quality-gates" %}
[introduction-to-quality-gates](https://docs.sonarsource.com/sonarqube-cloud/standards/managing-quality-gates/introduction-to-quality-gates)
{% endcontent-ref %}
{% content-ref url="managing-quality-gates/viewing-quality-gate" %}
[viewing-quality-gate](https://docs.sonarsource.com/sonarqube-cloud/standards/managing-quality-gates/viewing-quality-gate)
{% endcontent-ref %}
{% content-ref url="managing-quality-gates/managing-custom-quality-gates" %}
[managing-custom-quality-gates](https://docs.sonarsource.com/sonarqube-cloud/standards/managing-quality-gates/managing-custom-quality-gates)
{% endcontent-ref %}
{% content-ref url="managing-quality-gates/changing-default-quality-gate" %}
[changing-default-quality-gate](https://docs.sonarsource.com/sonarqube-cloud/standards/managing-quality-gates/changing-default-quality-gate)
{% endcontent-ref %}
{% content-ref url="managing-quality-gates/associating-projects-with-quality-gate" %}
[associating-projects-with-quality-gate](https://docs.sonarsource.com/sonarqube-cloud/standards/managing-quality-gates/associating-projects-with-quality-gate)
{% endcontent-ref %}
---
# Source: https://docs.sonarsource.com/sonarqube-community-build/quality-standards-administration/managing-quality-profiles.md
# Source: https://docs.sonarsource.com/sonarqube-server/2025.2/quality-standards-administration/managing-quality-profiles.md
# Source: https://docs.sonarsource.com/sonarqube-server/2025.3/quality-standards-administration/managing-quality-profiles.md
# Source: https://docs.sonarsource.com/sonarqube-server/2025.5/quality-standards-administration/managing-quality-profiles.md
# Source: https://docs.sonarsource.com/sonarqube-server/2025.4/quality-standards-administration/managing-quality-profiles.md
# Source: https://docs.sonarsource.com/sonarqube-server/2025.6/quality-standards-administration/managing-quality-profiles.md
# Source: https://docs.sonarsource.com/sonarqube-server/quality-standards-administration/managing-quality-profiles.md
# Source: https://docs.sonarsource.com/sonarqube-cloud/standards/managing-quality-profiles.md
# Managing quality profiles
{% content-ref url="managing-quality-profiles/introduction" %}
[introduction](https://docs.sonarsource.com/sonarqube-cloud/standards/managing-quality-profiles/introduction)
{% endcontent-ref %}
{% content-ref url="managing-quality-profiles/understanding-quality-profiles" %}
[understanding-quality-profiles](https://docs.sonarsource.com/sonarqube-cloud/standards/managing-quality-profiles/understanding-quality-profiles)
{% endcontent-ref %}
{% content-ref url="managing-quality-profiles/viewing-quality-profiles" %}
[viewing-quality-profiles](https://docs.sonarsource.com/sonarqube-cloud/standards/managing-quality-profiles/viewing-quality-profiles)
{% endcontent-ref %}
{% content-ref url="managing-quality-profiles/creating-a-quality-profile" %}
[creating-a-quality-profile](https://docs.sonarsource.com/sonarqube-cloud/standards/managing-quality-profiles/creating-a-quality-profile)
{% endcontent-ref %}
{% content-ref url="managing-quality-profiles/editing-a-custom-quality-profile" %}
[editing-a-custom-quality-profile](https://docs.sonarsource.com/sonarqube-cloud/standards/managing-quality-profiles/editing-a-custom-quality-profile)
{% endcontent-ref %}
{% content-ref url="managing-quality-profiles/associating-a-quality-profile-with-projects" %}
[associating-a-quality-profile-with-projects](https://docs.sonarsource.com/sonarqube-cloud/standards/managing-quality-profiles/associating-a-quality-profile-with-projects)
{% endcontent-ref %}
{% content-ref url="managing-quality-profiles/changing-default-quality-profile" %}
[changing-default-quality-profile](https://docs.sonarsource.com/sonarqube-cloud/standards/managing-quality-profiles/changing-default-quality-profile)
{% endcontent-ref %}
{% content-ref url="managing-quality-profiles/maintaining-your-custom-quality-profiles" %}
[maintaining-your-custom-quality-profiles](https://docs.sonarsource.com/sonarqube-cloud/standards/managing-quality-profiles/maintaining-your-custom-quality-profiles)
{% endcontent-ref %}
{% content-ref url="managing-quality-profiles/authorizing-other-users-to-manage-quality-profile" %}
[authorizing-other-users-to-manage-quality-profile](https://docs.sonarsource.com/sonarqube-cloud/standards/managing-quality-profiles/authorizing-other-users-to-manage-quality-profile)
{% endcontent-ref %}
---
# Source: https://docs.sonarsource.com/sonarqube-cloud/administering-sonarcloud/managing-subscription.md
# Managing your subscription
- [Introduction](/sonarqube-cloud/administering-sonarcloud/managing-subscription/introduction.md): The SonarQube Cloud subscription plans are: free, Team, or Enterprise.
- [Subscription plans](/sonarqube-cloud/administering-sonarcloud/managing-subscription/subscription-plans.md): SonarQube Cloud offers three subscription-based plans: Free, Team, and Enterprise, each with varying features and suitable for different team sizes.
- [Billing model](/sonarqube-cloud/administering-sonarcloud/managing-subscription/billing-model.md): In SonarQube Cloud each Team or Enterprise plan organization is billed separately. You can be billed monthly or yearly.
- [Signing up for a plan](/sonarqube-cloud/administering-sonarcloud/managing-subscription/signing-up-for-plan.md): Signing up for a SonarQube Cloud subscription happens at the organization level.
- [Changing your subscription plan](/sonarqube-cloud/administering-sonarcloud/managing-subscription/changing-plan.md): Changing your SonarQube Cloud plan is straight forward however, it depends on the move you're making (upgrade/downgrade) and if your on a monthly or yearly subscription billing schedule.
- [Updating billing or payment details](/sonarqube-cloud/administering-sonarcloud/managing-subscription/updating-billing-payment-details.md): SonarQube Cloud's monthly subscribers can directly update the billing and payment details of their organization. Read this page to learn about how to add, remove, or change your payment method.
- [Viewing billing or usage information](/sonarqube-cloud/administering-sonarcloud/managing-subscription/viewing-billing-and-usage.md): This page provides instructions on how to view billing and usage information for both SonarQube Cloud organizations and enterprises.
- [Viewing taxes and invoices](/sonarqube-cloud/administering-sonarcloud/managing-subscription/viewing-taxes-and-invoices.md): This page explains how to access monthly invoices for your SonarQube Cloud subscriptions, detailing the steps to view and download them from the customer portal.
---
# Source: https://docs.sonarsource.com/sonarqube-cloud/administering-sonarcloud/managing-enterprise/managing-the-enterprise-related-permissions.md
# Managing the enterprise-related permissions
### About the enterprise-related permissions
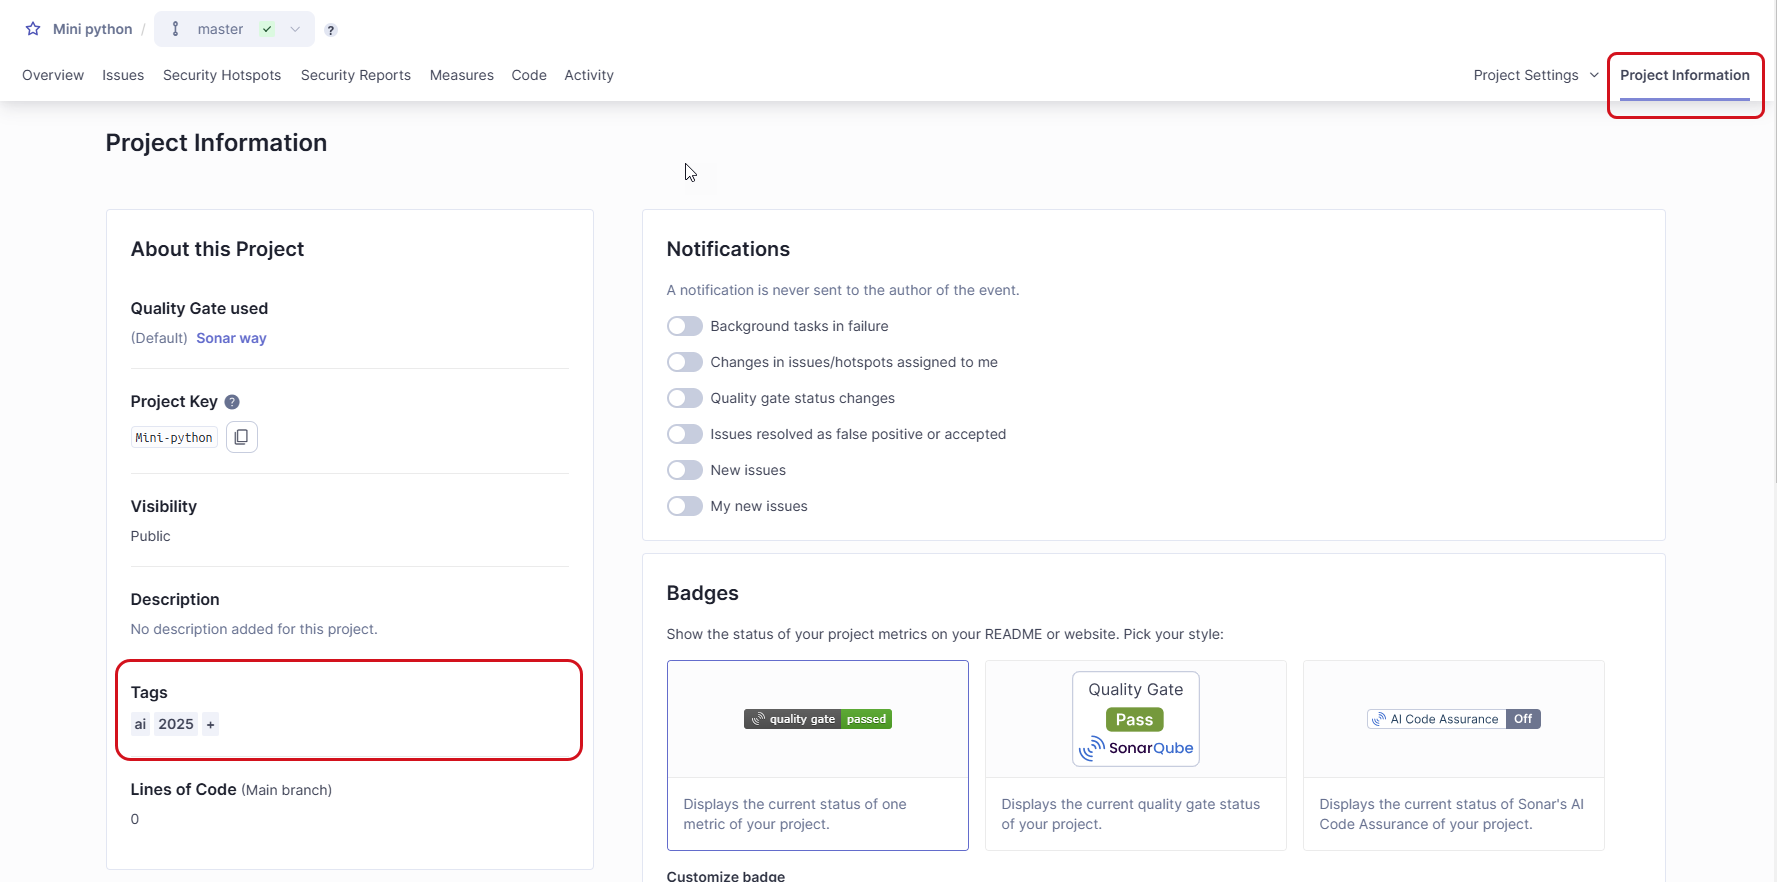
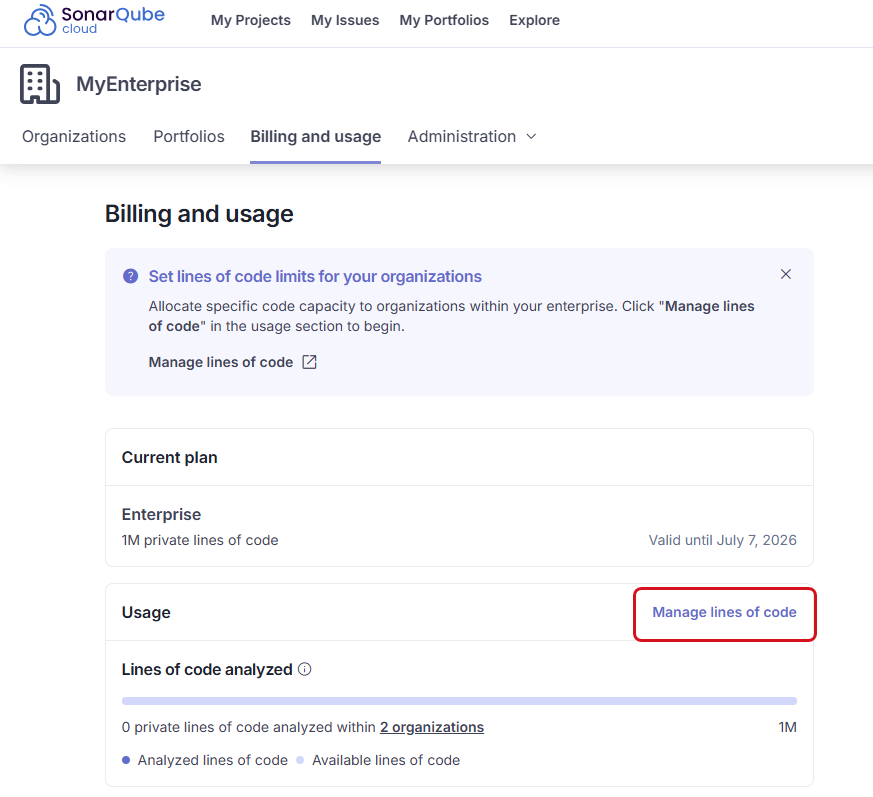
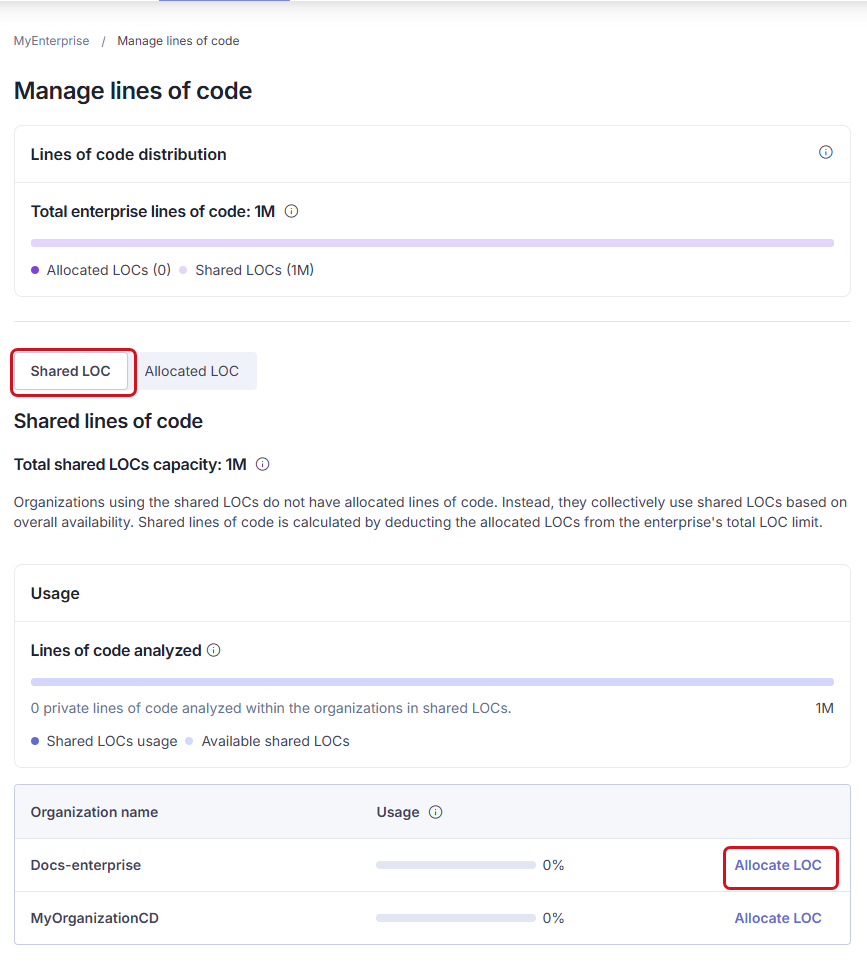
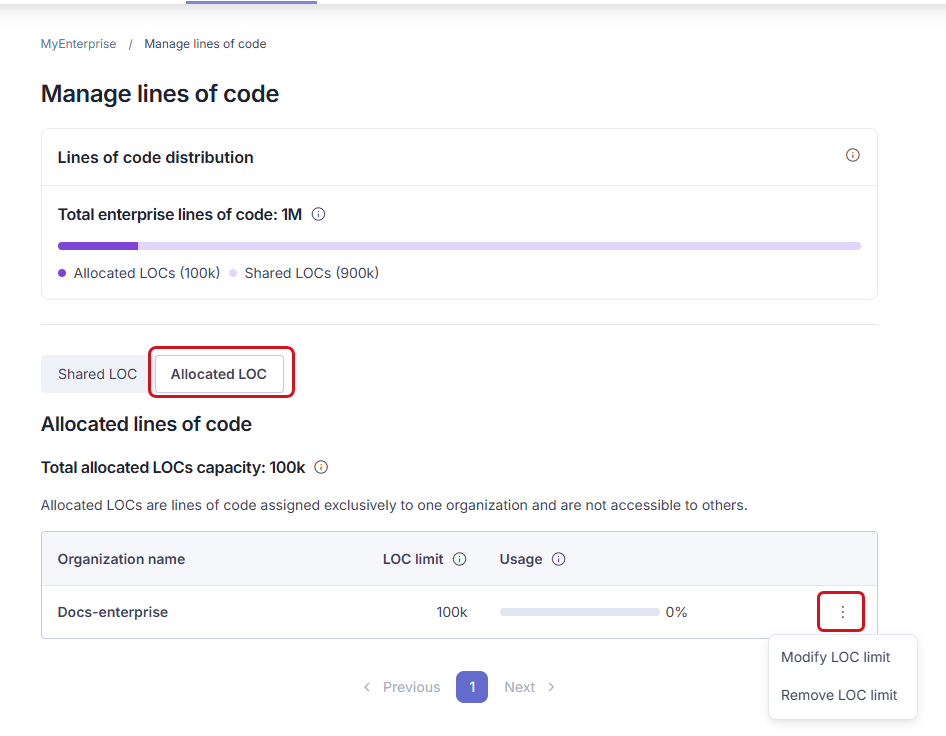 To disable forced authentication:
1. Go to **Administration** > **Configuration** > **General Settings** > **Security.**
2. Disable **Force user authentication**.
---
# Source: https://docs.sonarsource.com/sonarqube-community-build/user-guide/managing-your-account.md
# Source: https://docs.sonarsource.com/sonarqube-server/10.7/user-guide/managing-your-account.md
# Source: https://docs.sonarsource.com/sonarqube-server/10.8/user-guide/managing-your-account.md
# Source: https://docs.sonarsource.com/sonarqube-server/2025.2/user-guide/managing-your-account.md
# Source: https://docs.sonarsource.com/sonarqube-server/2025.3/user-guide/managing-your-account.md
# Source: https://docs.sonarsource.com/sonarqube-server/2025.5/user-guide/managing-your-account.md
# Source: https://docs.sonarsource.com/sonarqube-server/2025.1/user-guide/managing-your-account.md
# Source: https://docs.sonarsource.com/sonarqube-server/2025.4/user-guide/managing-your-account.md
# Source: https://docs.sonarsource.com/sonarqube-server/2025.6/user-guide/managing-your-account.md
# Source: https://docs.sonarsource.com/sonarqube-server/user-guide/managing-your-account.md
# Source: https://docs.sonarsource.com/sonarqube-cloud/managing-your-account.md
# Managing your account
{% content-ref url="managing-your-account/introduction" %}
[introduction](https://docs.sonarsource.com/sonarqube-cloud/managing-your-account/introduction)
{% endcontent-ref %}
{% content-ref url="managing-your-account/signing-in" %}
[signing-in](https://docs.sonarsource.com/sonarqube-cloud/managing-your-account/signing-in)
{% endcontent-ref %}
{% content-ref url="managing-your-account/managing-tokens" %}
[managing-tokens](https://docs.sonarsource.com/sonarqube-cloud/managing-your-account/managing-tokens)
{% endcontent-ref %}
{% content-ref url="managing-your-account/notifications" %}
[notifications](https://docs.sonarsource.com/sonarqube-cloud/managing-your-account/notifications)
{% endcontent-ref %}
{% content-ref url="managing-your-account/user-interface" %}
[user-interface](https://docs.sonarsource.com/sonarqube-cloud/managing-your-account/user-interface)
{% endcontent-ref %}
{% content-ref url="managing-your-account/deleting" %}
[deleting](https://docs.sonarsource.com/sonarqube-cloud/managing-your-account/deleting)
{% endcontent-ref %}
{% content-ref url="managing-your-account/leaving-organization" %}
[leaving-organization](https://docs.sonarsource.com/sonarqube-cloud/managing-your-account/leaving-organization)
{% endcontent-ref %}
---
# Source: https://docs.sonarsource.com/sonarqube-cloud/managing-your-projects/managing-your-project-as-developer.md
# Managing your project as a developer
This page explains various procedures you can perform on your project without being a project admin.
### Connecting your project to SonarQube for IDE
[SonarQube for IDE](https://www.sonarsource.com/products/sonarlint/) is a free IDE extension that integrates with SonarQube Cloud using connected mode. This way, SonarQube for IDE can catch issues immediately, right in the IDE, before you even commit them.
Check the SonarQube for IDE documentation for the details about setting up Connected Mode:
* [Connected mode](https://docs.sonarsource.com/sonarqube-for-intellij/connect-your-ide/connected-mode) for SonarQube for IntelliJ
* [Connected mode](https://docs.sonarsource.com/sonarqube-for-visual-studio/connect-your-ide/connected-mode) for SonarQube for Visual Studio
* [Connected mode](https://docs.sonarsource.com/sonarqube-for-vs-code/connect-your-ide/connected-mode) for SonarQube for VS Code
* [Connected mode](https://docs.sonarsource.com/sonarqube-for-eclipse/connect-your-ide/connected-mode) for SonarQube for Eclipse
### Generating a token for your project analysis
From the Team plan, see [scoped-organization-tokens](https://docs.sonarsource.com/sonarqube-cloud/administering-sonarcloud/managing-organization/scoped-organization-tokens "mention").
With the Free plan, see[managing-tokens](https://docs.sonarsource.com/sonarqube-cloud/managing-your-account/managing-tokens "mention").
### Subscribing to notifications on project events
You can choose to receive email notifications when specific events occur in your project. See [notifications](https://docs.sonarsource.com/sonarqube-cloud/managing-your-account/notifications "mention").
### Marking a project as favorite
Favorite projects are displayed on **My projects** page.
{% hint style="info" %}
When you create a project, it’s automatically marked as favorite.
{% endhint %}
To mark a project as a favorite:
1. Retrieve the project. See [retrieving-projects](https://docs.sonarsource.com/sonarqube-cloud/managing-your-projects/retrieving-projects "mention") for more information.
2. In the top of the left-side panel, select the star icon.
To disable forced authentication:
1. Go to **Administration** > **Configuration** > **General Settings** > **Security.**
2. Disable **Force user authentication**.
---
# Source: https://docs.sonarsource.com/sonarqube-community-build/user-guide/managing-your-account.md
# Source: https://docs.sonarsource.com/sonarqube-server/10.7/user-guide/managing-your-account.md
# Source: https://docs.sonarsource.com/sonarqube-server/10.8/user-guide/managing-your-account.md
# Source: https://docs.sonarsource.com/sonarqube-server/2025.2/user-guide/managing-your-account.md
# Source: https://docs.sonarsource.com/sonarqube-server/2025.3/user-guide/managing-your-account.md
# Source: https://docs.sonarsource.com/sonarqube-server/2025.5/user-guide/managing-your-account.md
# Source: https://docs.sonarsource.com/sonarqube-server/2025.1/user-guide/managing-your-account.md
# Source: https://docs.sonarsource.com/sonarqube-server/2025.4/user-guide/managing-your-account.md
# Source: https://docs.sonarsource.com/sonarqube-server/2025.6/user-guide/managing-your-account.md
# Source: https://docs.sonarsource.com/sonarqube-server/user-guide/managing-your-account.md
# Source: https://docs.sonarsource.com/sonarqube-cloud/managing-your-account.md
# Managing your account
{% content-ref url="managing-your-account/introduction" %}
[introduction](https://docs.sonarsource.com/sonarqube-cloud/managing-your-account/introduction)
{% endcontent-ref %}
{% content-ref url="managing-your-account/signing-in" %}
[signing-in](https://docs.sonarsource.com/sonarqube-cloud/managing-your-account/signing-in)
{% endcontent-ref %}
{% content-ref url="managing-your-account/managing-tokens" %}
[managing-tokens](https://docs.sonarsource.com/sonarqube-cloud/managing-your-account/managing-tokens)
{% endcontent-ref %}
{% content-ref url="managing-your-account/notifications" %}
[notifications](https://docs.sonarsource.com/sonarqube-cloud/managing-your-account/notifications)
{% endcontent-ref %}
{% content-ref url="managing-your-account/user-interface" %}
[user-interface](https://docs.sonarsource.com/sonarqube-cloud/managing-your-account/user-interface)
{% endcontent-ref %}
{% content-ref url="managing-your-account/deleting" %}
[deleting](https://docs.sonarsource.com/sonarqube-cloud/managing-your-account/deleting)
{% endcontent-ref %}
{% content-ref url="managing-your-account/leaving-organization" %}
[leaving-organization](https://docs.sonarsource.com/sonarqube-cloud/managing-your-account/leaving-organization)
{% endcontent-ref %}
---
# Source: https://docs.sonarsource.com/sonarqube-cloud/managing-your-projects/managing-your-project-as-developer.md
# Managing your project as a developer
This page explains various procedures you can perform on your project without being a project admin.
### Connecting your project to SonarQube for IDE
[SonarQube for IDE](https://www.sonarsource.com/products/sonarlint/) is a free IDE extension that integrates with SonarQube Cloud using connected mode. This way, SonarQube for IDE can catch issues immediately, right in the IDE, before you even commit them.
Check the SonarQube for IDE documentation for the details about setting up Connected Mode:
* [Connected mode](https://docs.sonarsource.com/sonarqube-for-intellij/connect-your-ide/connected-mode) for SonarQube for IntelliJ
* [Connected mode](https://docs.sonarsource.com/sonarqube-for-visual-studio/connect-your-ide/connected-mode) for SonarQube for Visual Studio
* [Connected mode](https://docs.sonarsource.com/sonarqube-for-vs-code/connect-your-ide/connected-mode) for SonarQube for VS Code
* [Connected mode](https://docs.sonarsource.com/sonarqube-for-eclipse/connect-your-ide/connected-mode) for SonarQube for Eclipse
### Generating a token for your project analysis
From the Team plan, see [scoped-organization-tokens](https://docs.sonarsource.com/sonarqube-cloud/administering-sonarcloud/managing-organization/scoped-organization-tokens "mention").
With the Free plan, see[managing-tokens](https://docs.sonarsource.com/sonarqube-cloud/managing-your-account/managing-tokens "mention").
### Subscribing to notifications on project events
You can choose to receive email notifications when specific events occur in your project. See [notifications](https://docs.sonarsource.com/sonarqube-cloud/managing-your-account/notifications "mention").
### Marking a project as favorite
Favorite projects are displayed on **My projects** page.
{% hint style="info" %}
When you create a project, it’s automatically marked as favorite.
{% endhint %}
To mark a project as a favorite:
1. Retrieve the project. See [retrieving-projects](https://docs.sonarsource.com/sonarqube-cloud/managing-your-projects/retrieving-projects "mention") for more information.
2. In the top of the left-side panel, select the star icon.
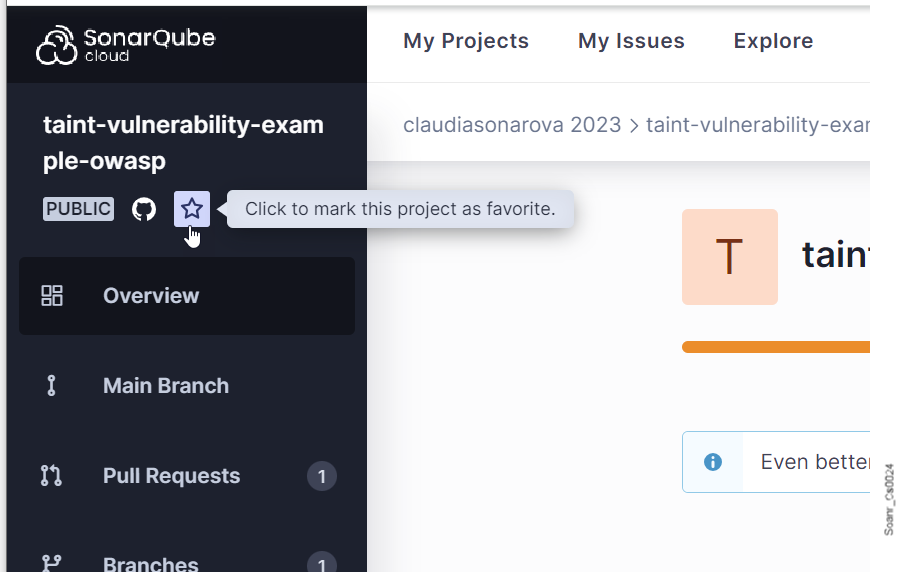 ### Using a project badge
If you have project access, you can include dynamic SonarQube Cloud badges on your web pages to display information about the project such as:
* The current value of specific metrics.
* The current quality gate status.
* The fact that you are using SonarQube Cloud.
* That your [ai-code-assurance](https://docs.sonarsource.com/sonarqube-cloud/ai-capabilities/ai-code-assurance "mention") has been analyzed, available for Team and Enterprise plans.
Markdown snippets and simple image URLs are provided to generate the badge code.
To generate the code of your dynamic project badge:
1. Retrieve the project. See [retrieving-projects](https://docs.sonarsource.com/sonarqube-cloud/managing-your-projects/retrieving-projects "mention") for more information.
2. In the left navigation bar, select **Information**.
3. In the **Badges** section:
1. Select the information type you want to display:
* Metric value
* Quality gate status
* SonarQube Cloud user
2. If you selected the metric value information type, select the metric in **Customize badge**.
3. In Code format, select **Markdown** (markdown snippet) or **Image URL** depending on how you want to include your badge.
4. Select the **Copy** button to copy the code of your badge.
### Using a project badge
If you have project access, you can include dynamic SonarQube Cloud badges on your web pages to display information about the project such as:
* The current value of specific metrics.
* The current quality gate status.
* The fact that you are using SonarQube Cloud.
* That your [ai-code-assurance](https://docs.sonarsource.com/sonarqube-cloud/ai-capabilities/ai-code-assurance "mention") has been analyzed, available for Team and Enterprise plans.
Markdown snippets and simple image URLs are provided to generate the badge code.
To generate the code of your dynamic project badge:
1. Retrieve the project. See [retrieving-projects](https://docs.sonarsource.com/sonarqube-cloud/managing-your-projects/retrieving-projects "mention") for more information.
2. In the left navigation bar, select **Information**.
3. In the **Badges** section:
1. Select the information type you want to display:
* Metric value
* Quality gate status
* SonarQube Cloud user
2. If you selected the metric value information type, select the metric in **Customize badge**.
3. In Code format, select **Markdown** (markdown snippet) or **Image URL** depending on how you want to include your badge.
4. Select the **Copy** button to copy the code of your badge.
 ---
# Source: https://docs.sonarsource.com/sonarqube-cloud/managing-your-projects.md
# Managing your project
{% content-ref url="managing-your-projects/retrieving-projects" %}
[retrieving-projects](https://docs.sonarsource.com/sonarqube-cloud/managing-your-projects/retrieving-projects)
{% endcontent-ref %}
{% content-ref url="managing-your-projects/issues" %}
[issues](https://docs.sonarsource.com/sonarqube-cloud/managing-your-projects/issues)
{% endcontent-ref %}
{% content-ref url="managing-your-projects/managing-your-project-as-developer" %}
[managing-your-project-as-developer](https://docs.sonarsource.com/sonarqube-cloud/managing-your-projects/managing-your-project-as-developer)
{% endcontent-ref %}
{% content-ref url="managing-your-projects/project-analysis" %}
[project-analysis](https://docs.sonarsource.com/sonarqube-cloud/managing-your-projects/project-analysis)
{% endcontent-ref %}
{% content-ref url="managing-your-projects/administering-your-projects" %}
[administering-your-projects](https://docs.sonarsource.com/sonarqube-cloud/managing-your-projects/administering-your-projects)
{% endcontent-ref %}
---
# Source: https://docs.sonarsource.com/sonarqube-community-build/user-guide/issues/managing.md
# Source: https://docs.sonarsource.com/sonarqube-server/10.6/user-guide/issues/managing.md
# Source: https://docs.sonarsource.com/sonarqube-server/10.7/user-guide/issues/managing.md
# Source: https://docs.sonarsource.com/sonarqube-server/10.8/user-guide/issues/managing.md
# Source: https://docs.sonarsource.com/sonarqube-server/2025.2/user-guide/issues/managing.md
# Source: https://docs.sonarsource.com/sonarqube-server/2025.3/user-guide/issues/managing.md
# Source: https://docs.sonarsource.com/sonarqube-server/2025.5/user-guide/issues/managing.md
# Source: https://docs.sonarsource.com/sonarqube-server/2025.1/user-guide/issues/managing.md
# Source: https://docs.sonarsource.com/sonarqube-server/2025.4/user-guide/issues/managing.md
# Source: https://docs.sonarsource.com/sonarqube-server/2025.6/user-guide/issues/managing.md
# Source: https://docs.sonarsource.com/sonarqube-server/user-guide/issues/managing.md
# Editing issues
In SonarQube Server, you can change the status of an issue in the following cases and provided you have the Administer Issues permission:
* If you want to fix the issue later, you can accept an issue. The issue status is then marked as **Accepted**.
* If you think the analysis is mistaken, you can mark it as **False positive**.
In addition, you can reassign an issue, tag an issue, and comment on an issue.
{% hint style="info" %}
* You can receive an email notification for issue-related events: see the [email](https://docs.sonarsource.com/sonarqube-server/user-guide/managing-your-account/subscribing-to-notifications/email "mention") page.
* You can manage external issues (issues detected by an external tool and imported into SonarQube Server) in the same way as internal issues. Be aware that managing an external issue within SonarQube Server has no impact on its state in the external tool. For example, when you mark an issue as **False positive** in SonarQube Server, it is not reflected in the external tool.
* As you edit issues, the related metrics, for example, number of issues taken into account, will update automatically; as will the quality gate status if it’s relevant.
{% endhint %}
### Accepting an issue
You may accept an issue if you
decide to fix the issue later provided you have the Administer Issues permission on your project.
Note that SonarQube Server ignores accepted issues in the quality reports and ratings of the code.
{% hint style="info" %}
You can add a comment to your issue change action. See [#commenting](#commenting "mention") for more information.
{% endhint %}
The procedure below explains how to accept a single issue. To accept several issues at once, see [#bulk-change](#bulk-change "mention").
To accept an issue:
1\. Retrieve the issue, it’s not necessary to open the detail view. See [retrieving](https://docs.sonarsource.com/sonarqube-server/user-guide/issues/retrieving "mention") for more information.
2\. In the issue card, select the **Open** issue status and select **Accept** in the contextual menu. A **Status change comment** box appears.
---
# Source: https://docs.sonarsource.com/sonarqube-cloud/managing-your-projects.md
# Managing your project
{% content-ref url="managing-your-projects/retrieving-projects" %}
[retrieving-projects](https://docs.sonarsource.com/sonarqube-cloud/managing-your-projects/retrieving-projects)
{% endcontent-ref %}
{% content-ref url="managing-your-projects/issues" %}
[issues](https://docs.sonarsource.com/sonarqube-cloud/managing-your-projects/issues)
{% endcontent-ref %}
{% content-ref url="managing-your-projects/managing-your-project-as-developer" %}
[managing-your-project-as-developer](https://docs.sonarsource.com/sonarqube-cloud/managing-your-projects/managing-your-project-as-developer)
{% endcontent-ref %}
{% content-ref url="managing-your-projects/project-analysis" %}
[project-analysis](https://docs.sonarsource.com/sonarqube-cloud/managing-your-projects/project-analysis)
{% endcontent-ref %}
{% content-ref url="managing-your-projects/administering-your-projects" %}
[administering-your-projects](https://docs.sonarsource.com/sonarqube-cloud/managing-your-projects/administering-your-projects)
{% endcontent-ref %}
---
# Source: https://docs.sonarsource.com/sonarqube-community-build/user-guide/issues/managing.md
# Source: https://docs.sonarsource.com/sonarqube-server/10.6/user-guide/issues/managing.md
# Source: https://docs.sonarsource.com/sonarqube-server/10.7/user-guide/issues/managing.md
# Source: https://docs.sonarsource.com/sonarqube-server/10.8/user-guide/issues/managing.md
# Source: https://docs.sonarsource.com/sonarqube-server/2025.2/user-guide/issues/managing.md
# Source: https://docs.sonarsource.com/sonarqube-server/2025.3/user-guide/issues/managing.md
# Source: https://docs.sonarsource.com/sonarqube-server/2025.5/user-guide/issues/managing.md
# Source: https://docs.sonarsource.com/sonarqube-server/2025.1/user-guide/issues/managing.md
# Source: https://docs.sonarsource.com/sonarqube-server/2025.4/user-guide/issues/managing.md
# Source: https://docs.sonarsource.com/sonarqube-server/2025.6/user-guide/issues/managing.md
# Source: https://docs.sonarsource.com/sonarqube-server/user-guide/issues/managing.md
# Editing issues
In SonarQube Server, you can change the status of an issue in the following cases and provided you have the Administer Issues permission:
* If you want to fix the issue later, you can accept an issue. The issue status is then marked as **Accepted**.
* If you think the analysis is mistaken, you can mark it as **False positive**.
In addition, you can reassign an issue, tag an issue, and comment on an issue.
{% hint style="info" %}
* You can receive an email notification for issue-related events: see the [email](https://docs.sonarsource.com/sonarqube-server/user-guide/managing-your-account/subscribing-to-notifications/email "mention") page.
* You can manage external issues (issues detected by an external tool and imported into SonarQube Server) in the same way as internal issues. Be aware that managing an external issue within SonarQube Server has no impact on its state in the external tool. For example, when you mark an issue as **False positive** in SonarQube Server, it is not reflected in the external tool.
* As you edit issues, the related metrics, for example, number of issues taken into account, will update automatically; as will the quality gate status if it’s relevant.
{% endhint %}
### Accepting an issue
You may accept an issue if you
decide to fix the issue later provided you have the Administer Issues permission on your project.
Note that SonarQube Server ignores accepted issues in the quality reports and ratings of the code.
{% hint style="info" %}
You can add a comment to your issue change action. See [#commenting](#commenting "mention") for more information.
{% endhint %}
The procedure below explains how to accept a single issue. To accept several issues at once, see [#bulk-change](#bulk-change "mention").
To accept an issue:
1\. Retrieve the issue, it’s not necessary to open the detail view. See [retrieving](https://docs.sonarsource.com/sonarqube-server/user-guide/issues/retrieving "mention") for more information.
2\. In the issue card, select the **Open** issue status and select **Accept** in the contextual menu. A **Status change comment** box appears.
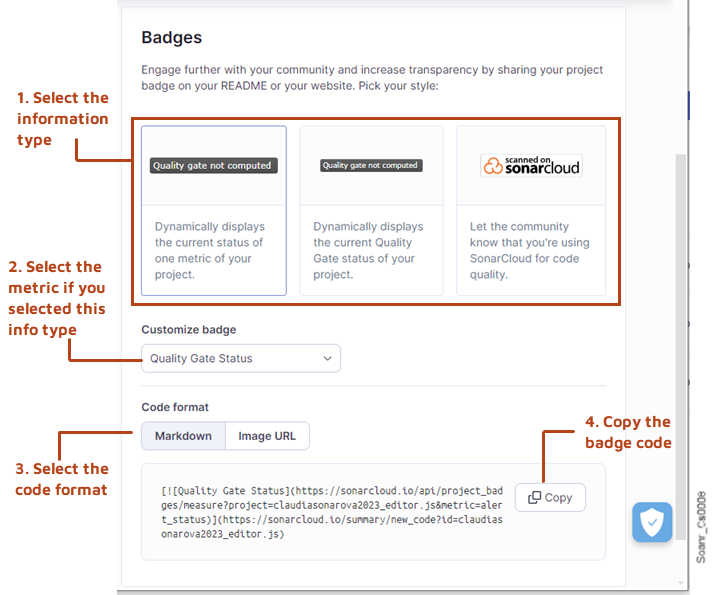 3\. Enter your change comment (optional) and select **Resolve**. The issue status is changed to **Accepted**.
### Marking an issue as False positive
If the analysis is mistaken, you can mark an issue as False positive provided you have the Administer Issues permission on your project. Note that SonarQube Server ignores False positive issues in the quality reports and ratings of the code.
{% hint style="info" %}
You can add a comment to your issue change action. See [#commenting](#commenting "mention") for more information.
{% endhint %}
The procedure below explains how to mark a single issue as False positive. To mark several issues at once, see [#bulk-change](#bulk-change "mention").
To mark an issue as False positive:
1. Retrieve the issue, it’s not necessary to open the detail view. See [retrieving](https://docs.sonarsource.com/sonarqube-server/user-guide/issues/retrieving "mention") for more information.
2. In the issue card, select the **Open** issue status and select **False positive** in the contextual menu. A **Status change comment** box appears.
3. Enter your change comment (optional) and select **Resolve**. The issue status is changed to **False positive**.
### Reopening an issue
You can reopen an Accepted issue (when it’s time to fix it) or a False positive issue (if it turns out to be a true positive).
The procedure below explains how to reopen a single issue. To reopen several issues at once, see [#bulk-change](#bulk-change "mention").
To reopen one or several issues:
1. Retrieve the issue, it’s not necessary to open the detail view. See [retrieving](https://docs.sonarsource.com/sonarqube-server/user-guide/issues/retrieving "mention") for more information.
2. In the issue card, select the **Accepted** or **False positive** issue status and select **Open** in the contextual menu. The issue status is reset to **Open**.
### Marking an issue as reviewed
To mark issues as reviewed, you may use the tagging feature: create the Reviewed tag and assign it to reviewed issues: see [#tagging](#tagging "mention"). This way, you can filter the reviewed issues by using the Tag filter.
### Assigning an issue
When possible, SonarQube Server assigns a default assignee at issue creation time (see [solution-overview](https://docs.sonarsource.com/sonarqube-server/user-guide/issues/solution-overview "mention") for more information). You can assign an unassigned issue to a user, reassign an issue to another user, or unassign an issue.
The procedure below explains how to assign a single issue. To assign several issues at once, see [#bulk-change](#bulk-change "mention").
To assign an issue:
1. Retrieve the issue, it’s not necessary to open the detail view. See [retrieving](https://docs.sonarsource.com/sonarqube-server/user-guide/issues/retrieving "mention") for more information. To filter the unassigned issues, select **Not assigned** in the **Assignee** filter.
2. In the issue card, click the assignee name or the **Not assigned** mention. The list of users to whom you can assign the issue appears.
3. In the list, select the new assignee (or select **Not assigned** in the list to unassign the issue).
### Customizing a software quality severity level
Issues inherit software quality severity levels from the rules that raised them. If you decide that a different level is more appropriate for a given issue, you can customize it. Keep in mind that changing the severity level may impact your quality gates.
The following table shows the severity levels of software qualities for [standard-experience](https://docs.sonarsource.com/sonarqube-server/instance-administration/analysis-functions/instance-mode/standard-experience "mention") and [mqr-mode](https://docs.sonarsource.com/sonarqube-server/instance-administration/analysis-functions/instance-mode/mqr-mode "mention").
{% tabs %}
{% tab title="MQR SEVERITY TYPES" %}
The table below lists the severity metrics used in Multi-Quality Rule mode.
| **Severity** | **Definition** |
| ------------ | ------------------------------------------------------------------------------------------------------------------------------------------------------------------------------------------------------------------------------------------------------------------------------ |
| Blocker | An issue that has a significant probability of severe unintended consequences on the application that should be fixed immediately. This includes bugs leading to production crashes and security flaws allowing attackers to extract sensitive data or execute malicious code. |
| High | An issue with a high impact on the application that should be fixed as soon as possible. |
| Medium | An issue with a medium impact. |
| Low | An issue with a low impact. |
| Info | There is no expected impact on the application. For informational purposes only. |
3\. Enter your change comment (optional) and select **Resolve**. The issue status is changed to **Accepted**.
### Marking an issue as False positive
If the analysis is mistaken, you can mark an issue as False positive provided you have the Administer Issues permission on your project. Note that SonarQube Server ignores False positive issues in the quality reports and ratings of the code.
{% hint style="info" %}
You can add a comment to your issue change action. See [#commenting](#commenting "mention") for more information.
{% endhint %}
The procedure below explains how to mark a single issue as False positive. To mark several issues at once, see [#bulk-change](#bulk-change "mention").
To mark an issue as False positive:
1. Retrieve the issue, it’s not necessary to open the detail view. See [retrieving](https://docs.sonarsource.com/sonarqube-server/user-guide/issues/retrieving "mention") for more information.
2. In the issue card, select the **Open** issue status and select **False positive** in the contextual menu. A **Status change comment** box appears.
3. Enter your change comment (optional) and select **Resolve**. The issue status is changed to **False positive**.
### Reopening an issue
You can reopen an Accepted issue (when it’s time to fix it) or a False positive issue (if it turns out to be a true positive).
The procedure below explains how to reopen a single issue. To reopen several issues at once, see [#bulk-change](#bulk-change "mention").
To reopen one or several issues:
1. Retrieve the issue, it’s not necessary to open the detail view. See [retrieving](https://docs.sonarsource.com/sonarqube-server/user-guide/issues/retrieving "mention") for more information.
2. In the issue card, select the **Accepted** or **False positive** issue status and select **Open** in the contextual menu. The issue status is reset to **Open**.
### Marking an issue as reviewed
To mark issues as reviewed, you may use the tagging feature: create the Reviewed tag and assign it to reviewed issues: see [#tagging](#tagging "mention"). This way, you can filter the reviewed issues by using the Tag filter.
### Assigning an issue
When possible, SonarQube Server assigns a default assignee at issue creation time (see [solution-overview](https://docs.sonarsource.com/sonarqube-server/user-guide/issues/solution-overview "mention") for more information). You can assign an unassigned issue to a user, reassign an issue to another user, or unassign an issue.
The procedure below explains how to assign a single issue. To assign several issues at once, see [#bulk-change](#bulk-change "mention").
To assign an issue:
1. Retrieve the issue, it’s not necessary to open the detail view. See [retrieving](https://docs.sonarsource.com/sonarqube-server/user-guide/issues/retrieving "mention") for more information. To filter the unassigned issues, select **Not assigned** in the **Assignee** filter.
2. In the issue card, click the assignee name or the **Not assigned** mention. The list of users to whom you can assign the issue appears.
3. In the list, select the new assignee (or select **Not assigned** in the list to unassign the issue).
### Customizing a software quality severity level
Issues inherit software quality severity levels from the rules that raised them. If you decide that a different level is more appropriate for a given issue, you can customize it. Keep in mind that changing the severity level may impact your quality gates.
The following table shows the severity levels of software qualities for [standard-experience](https://docs.sonarsource.com/sonarqube-server/instance-administration/analysis-functions/instance-mode/standard-experience "mention") and [mqr-mode](https://docs.sonarsource.com/sonarqube-server/instance-administration/analysis-functions/instance-mode/mqr-mode "mention").
{% tabs %}
{% tab title="MQR SEVERITY TYPES" %}
The table below lists the severity metrics used in Multi-Quality Rule mode.
| **Severity** | **Definition** |
| ------------ | ------------------------------------------------------------------------------------------------------------------------------------------------------------------------------------------------------------------------------------------------------------------------------ |
| Blocker | An issue that has a significant probability of severe unintended consequences on the application that should be fixed immediately. This includes bugs leading to production crashes and security flaws allowing attackers to extract sensitive data or execute malicious code. |
| High | An issue with a high impact on the application that should be fixed as soon as possible. |
| Medium | An issue with a medium impact. |
| Low | An issue with a low impact. |
| Info | There is no expected impact on the application. For informational purposes only. |
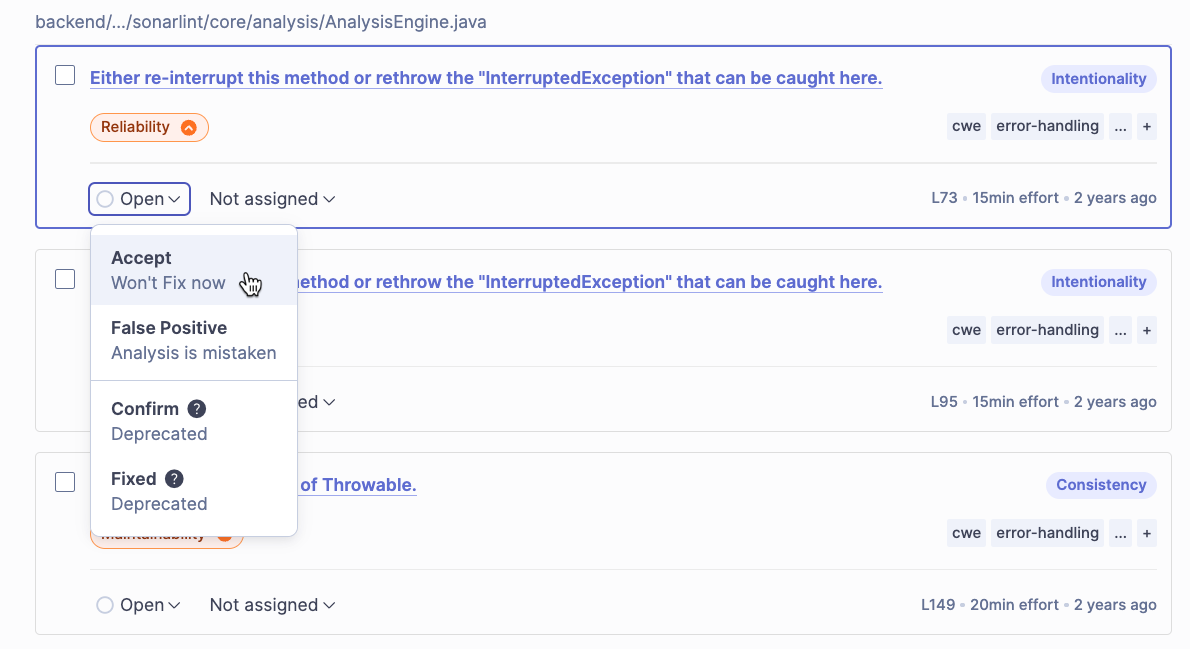 {% hint style="info" %}
Users with appropriate permissions are able to set a custom severity on a rule.
{% endhint %}
{% endtab %}
{% tab title="STANDARD EXPERIENCE SEVERITY TYPES" %}
The table below lists the severity metrics used in Standard Experience mode.
| **Severity** | Definition |
| ------------ | ------------------------------------------------------------------------------------------------------------------------------------------------------------------------------------------------------------------------------------------------------------------------------ |
| Blocker | An issue that has a significant probability of severe unintended consequences on the application that should be fixed immediately. This includes bugs leading to production crashes and security flaws allowing attackers to extract sensitive data or execute malicious code. |
| Critical | An issue with a critical impact on the application that should be fixed as soon as possible. |
| Major | An issue with a major impact on the application. |
| Minor | An issue with a minor impact on the application. |
| Info | There is no expected impact on the application. For informational purposes only. |
{% hint style="info" %}
Users with appropriate permissions are able to set a custom severity on a rule.
{% endhint %}
{% endtab %}
{% tab title="STANDARD EXPERIENCE SEVERITY TYPES" %}
The table below lists the severity metrics used in Standard Experience mode.
| **Severity** | Definition |
| ------------ | ------------------------------------------------------------------------------------------------------------------------------------------------------------------------------------------------------------------------------------------------------------------------------ |
| Blocker | An issue that has a significant probability of severe unintended consequences on the application that should be fixed immediately. This includes bugs leading to production crashes and security flaws allowing attackers to extract sensitive data or execute malicious code. |
| Critical | An issue with a critical impact on the application that should be fixed as soon as possible. |
| Major | An issue with a major impact on the application. |
| Minor | An issue with a minor impact on the application. |
| Info | There is no expected impact on the application. For informational purposes only. |
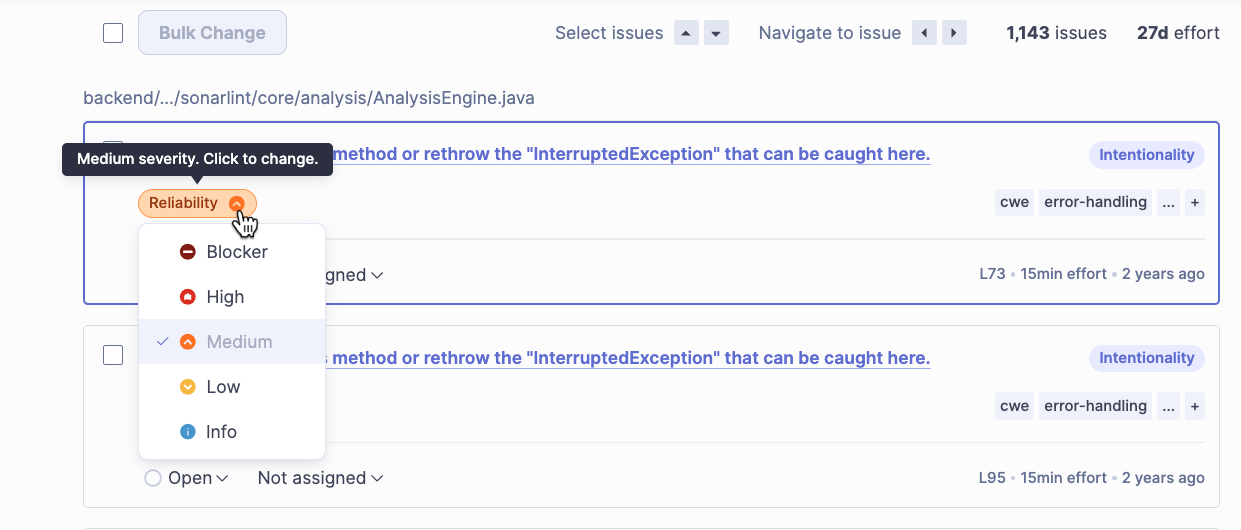 {% hint style="info" %}
Users with appropriate permissions are able to set a custom severity on a rule.
{% endhint %}
{% endtab %}
{% endtabs %}
To customize the issue severity level for **Software qualities impacted**:
1. Retrieve the issue you want to manage. See [retrieving](https://docs.sonarsource.com/sonarqube-server/user-guide/issues/retrieving "mention") for more information.
2. Select an issue from the search results list:
* For Standard Experience, select by issue type: **Bug**, **Vulnerability**, **Code Smells**.
* For Multi-Quality Rule Mode, select by issue quality: **Security**, **Reliability**, **Maintainability**.
3. Select the severity level you wish to apply from the drop-down list. You can also change the severity level from the issue’s details page.
### Tagging an issue
You can create tags and assign them to issues in order to retrieve issues more easily or to indicate a workflow step. For example, you can use a tag to mark an issue as reviewed. The figure below shows how tags are displayed in the issue item.
{% hint style="info" %}
Users with appropriate permissions are able to set a custom severity on a rule.
{% endhint %}
{% endtab %}
{% endtabs %}
To customize the issue severity level for **Software qualities impacted**:
1. Retrieve the issue you want to manage. See [retrieving](https://docs.sonarsource.com/sonarqube-server/user-guide/issues/retrieving "mention") for more information.
2. Select an issue from the search results list:
* For Standard Experience, select by issue type: **Bug**, **Vulnerability**, **Code Smells**.
* For Multi-Quality Rule Mode, select by issue quality: **Security**, **Reliability**, **Maintainability**.
3. Select the severity level you wish to apply from the drop-down list. You can also change the severity level from the issue’s details page.
### Tagging an issue
You can create tags and assign them to issues in order to retrieve issues more easily or to indicate a workflow step. For example, you can use a tag to mark an issue as reviewed. The figure below shows how tags are displayed in the issue item.
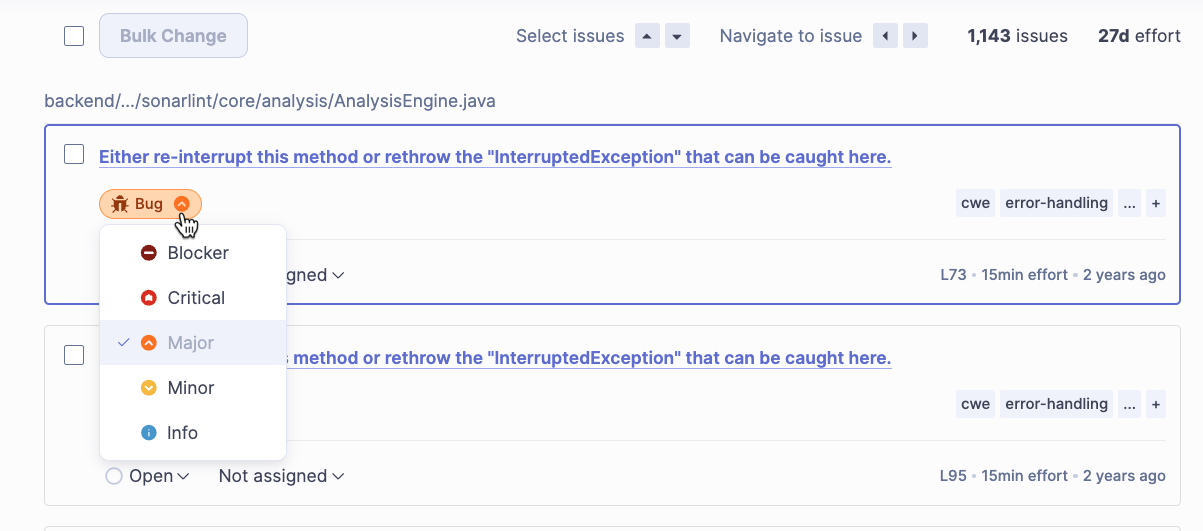 {% hint style="info" %}
Rules can also be tagged (In particular, [built-in-rule-tags](https://docs.sonarsource.com/sonarqube-server/user-guide/rules/built-in-rule-tags "mention") may be assigned to some rules and your Quality Standards administrator can assign custom ones). An issue inherits the tags assigned to the rule that raised the issue. You can remove the inherited tags.
{% endhint %}
The procedure below explains how to tag a single issue. To add or remove a tag to/from several issues at once, see [#bulk-change](#bulk-change "mention").
To manage the tags assigned to an issue:
1. Retrieve the issue you want to manage. See [retrieving](https://docs.sonarsource.com/sonarqube-server/user-guide/issues/retrieving "mention") for more information.
2. In the search results list or in the detail view, select in the **Tags** section if the issue. A dialog opens with the list of existing tags.
3. In the dialog, you can use the search field to search for an existing tag. To create a new tag, enter the new tag in the search field: the new tag will appear in the list of tags with a plus sign in front of it .
4. To assign or unassign a tag, select or clear the tag’s checkbox in the list.
5. Click anywhere outside the dialog to close the dialog.
{% hint style="info" %}
Rules can also be tagged (In particular, [built-in-rule-tags](https://docs.sonarsource.com/sonarqube-server/user-guide/rules/built-in-rule-tags "mention") may be assigned to some rules and your Quality Standards administrator can assign custom ones). An issue inherits the tags assigned to the rule that raised the issue. You can remove the inherited tags.
{% endhint %}
The procedure below explains how to tag a single issue. To add or remove a tag to/from several issues at once, see [#bulk-change](#bulk-change "mention").
To manage the tags assigned to an issue:
1. Retrieve the issue you want to manage. See [retrieving](https://docs.sonarsource.com/sonarqube-server/user-guide/issues/retrieving "mention") for more information.
2. In the search results list or in the detail view, select in the **Tags** section if the issue. A dialog opens with the list of existing tags.
3. In the dialog, you can use the search field to search for an existing tag. To create a new tag, enter the new tag in the search field: the new tag will appear in the list of tags with a plus sign in front of it .
4. To assign or unassign a tag, select or clear the tag’s checkbox in the list.
5. Click anywhere outside the dialog to close the dialog.
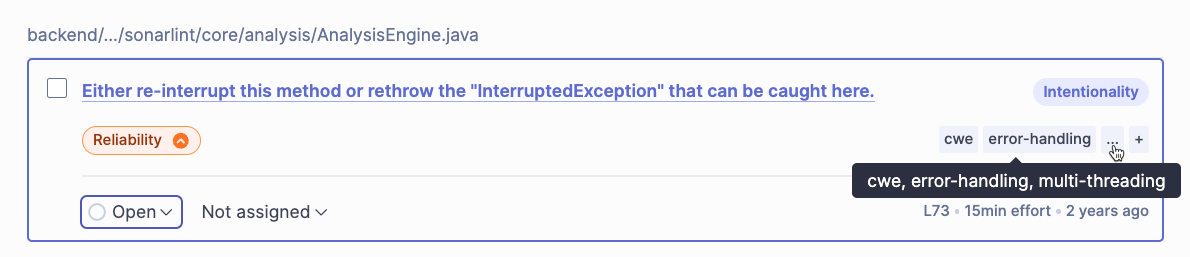 ### Commenting on an issue
When accepting an issue or marking an issue as **False positive**, you can add a comment. You can also add a comment to an issue anytime. These comments are visible from the **Activity** tab of the issue: see [#history-and-comments](https://docs.sonarsource.com/sonarqube-server/user-guide/reviewing#history-and-comments "mention").
By default, comments are shared between all users (it can be disabled at the global level).
To add a comment to an issue:
1. Retrieve the issue and open its detail view. See [retrieving](https://docs.sonarsource.com/sonarqube-server/user-guide/issues/retrieving "mention") for more information.
2. Open the **Activity** tab.
3. Select **Add a comment**. The "Add a comment" dialog box opens.
4. Enter your comment and select **Comment**.
5. Your comment is added to the **Activity** tab.
### Suppressing the issues on a given line
In most languages, you can use the `//NOSONAR` comment at the end of a line to suppress all issues on the line. This will suppress all issues - now and in the future - that might be raised on the line.
### Managing several issues in bulk
To manage several issues at once:
1\. In the list of filtered issues, select the issues you want to manage:
* To select one issue, select the issue check box.
* To select all issues, select the **Bulk change** check box. Issues you do not want included in your action can be individually unselected.
2\. Select the **Bulk change** button. The **Change issues** dialog opens.
### Commenting on an issue
When accepting an issue or marking an issue as **False positive**, you can add a comment. You can also add a comment to an issue anytime. These comments are visible from the **Activity** tab of the issue: see [#history-and-comments](https://docs.sonarsource.com/sonarqube-server/user-guide/reviewing#history-and-comments "mention").
By default, comments are shared between all users (it can be disabled at the global level).
To add a comment to an issue:
1. Retrieve the issue and open its detail view. See [retrieving](https://docs.sonarsource.com/sonarqube-server/user-guide/issues/retrieving "mention") for more information.
2. Open the **Activity** tab.
3. Select **Add a comment**. The "Add a comment" dialog box opens.
4. Enter your comment and select **Comment**.
5. Your comment is added to the **Activity** tab.
### Suppressing the issues on a given line
In most languages, you can use the `//NOSONAR` comment at the end of a line to suppress all issues on the line. This will suppress all issues - now and in the future - that might be raised on the line.
### Managing several issues in bulk
To manage several issues at once:
1\. In the list of filtered issues, select the issues you want to manage:
* To select one issue, select the issue check box.
* To select all issues, select the **Bulk change** check box. Issues you do not want included in your action can be individually unselected.
2\. Select the **Bulk change** button. The **Change issues** dialog opens.
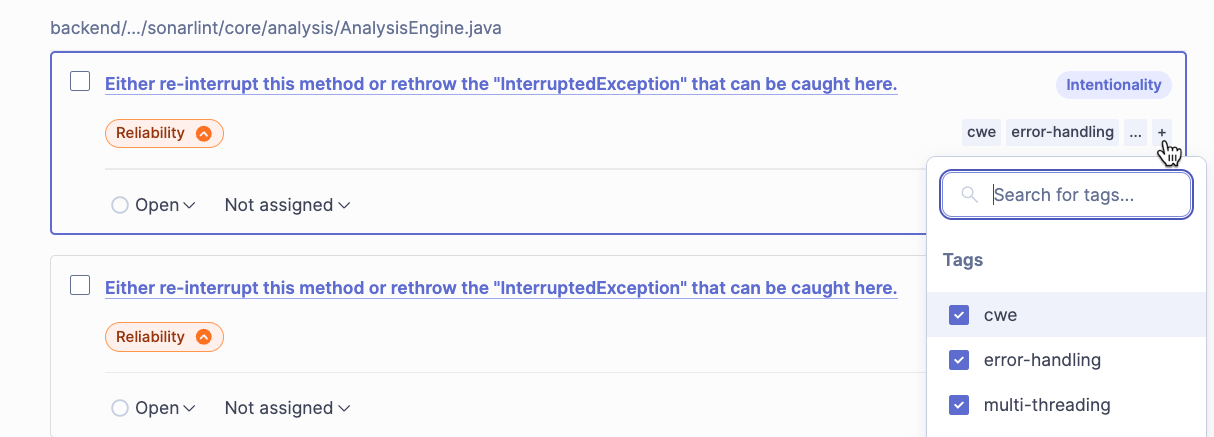
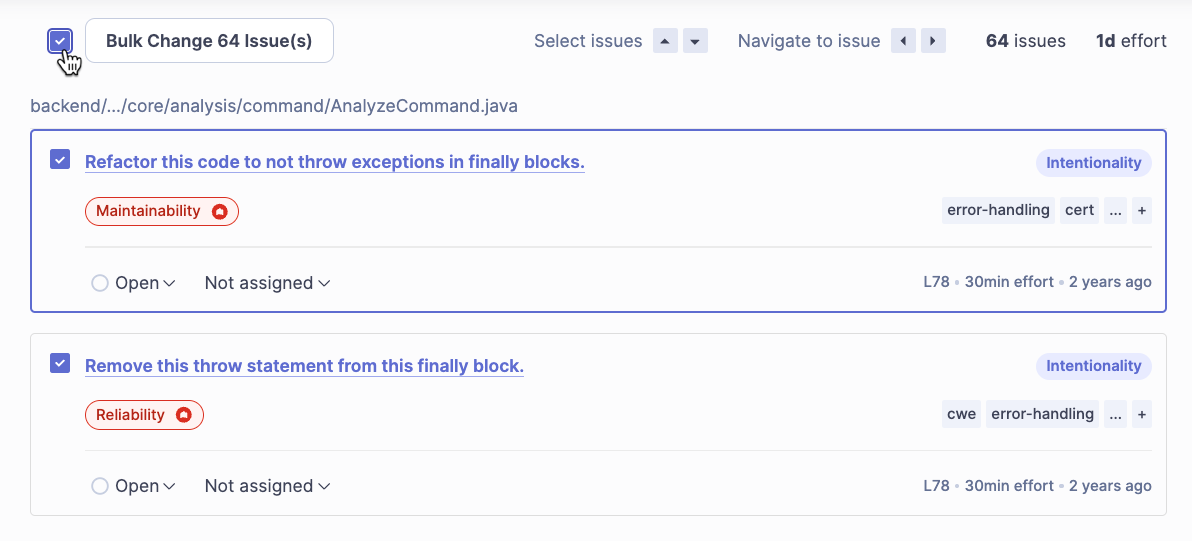 You can retrieve the metrics via the [web-api](https://docs.sonarsource.com/sonarqube-cloud/advanced-setup/web-api "mention") by using the metric key.
### Security
A list of security metrics used in the Sonar solution. See the [security-related-rules](https://docs.sonarsource.com/sonarqube-cloud/digging-deeper/security-related-rules "mention") page for more details.
You can retrieve the metrics via the [web-api](https://docs.sonarsource.com/sonarqube-cloud/advanced-setup/web-api "mention") by using the metric key.
### Security
A list of security metrics used in the Sonar solution. See the [security-related-rules](https://docs.sonarsource.com/sonarqube-cloud/digging-deeper/security-related-rules "mention") page for more details.
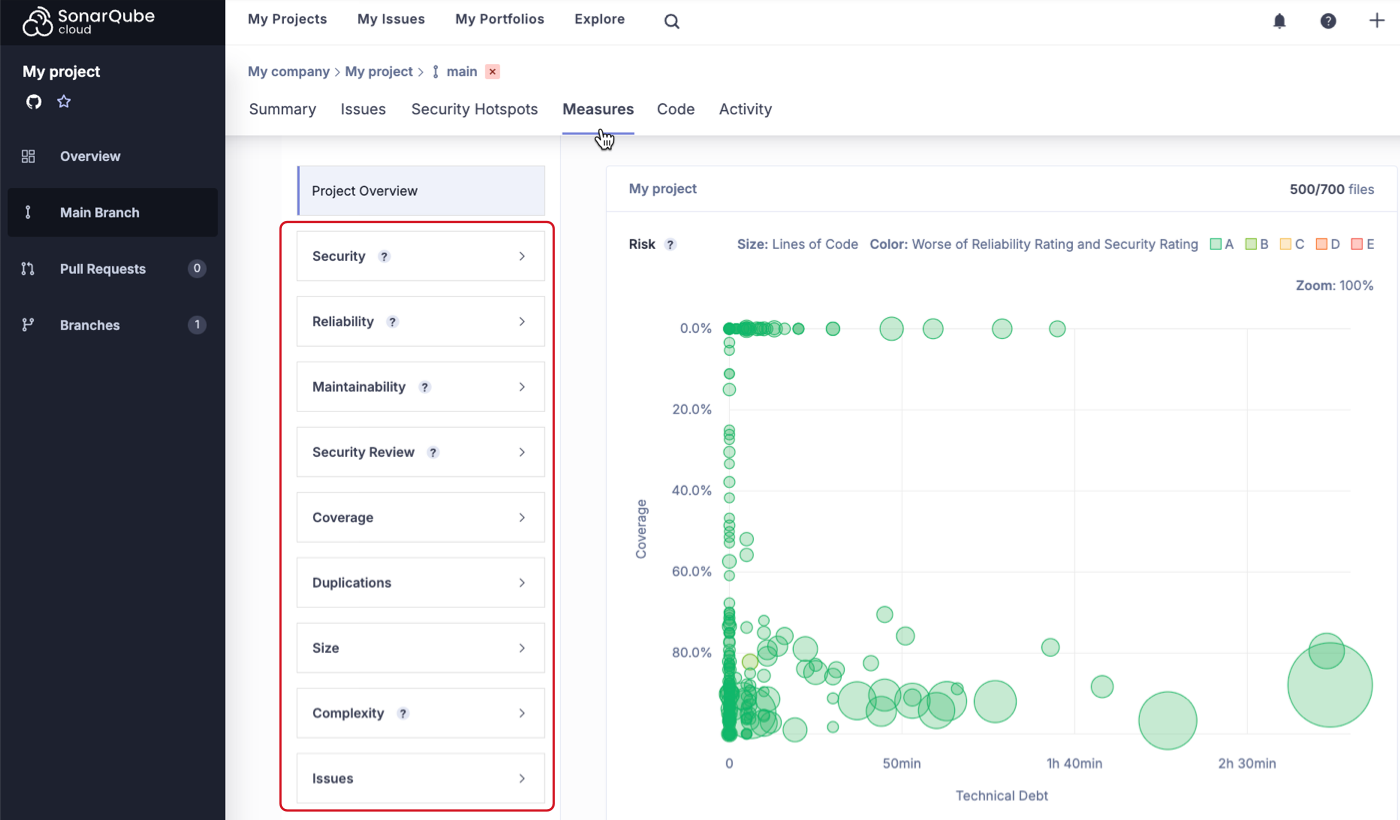

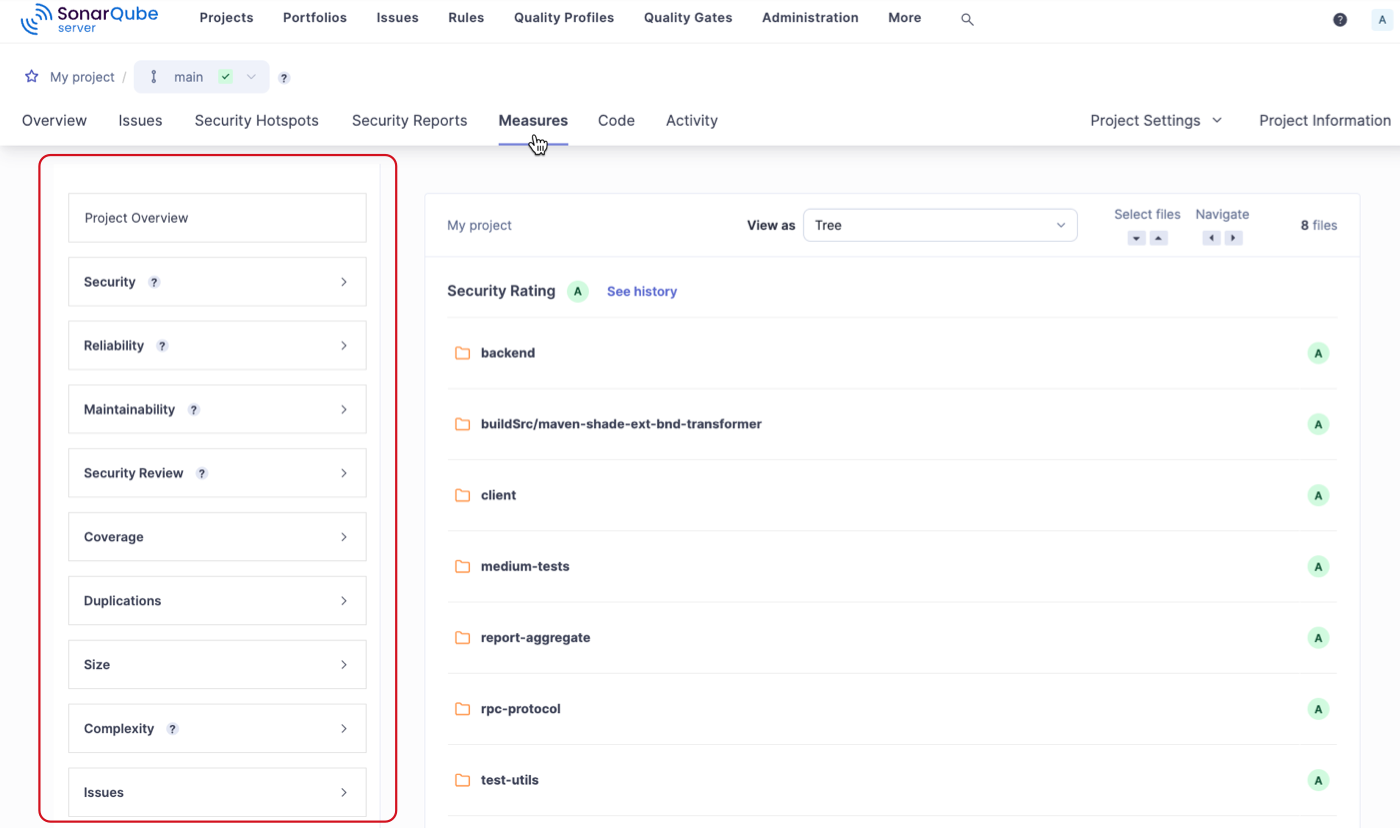

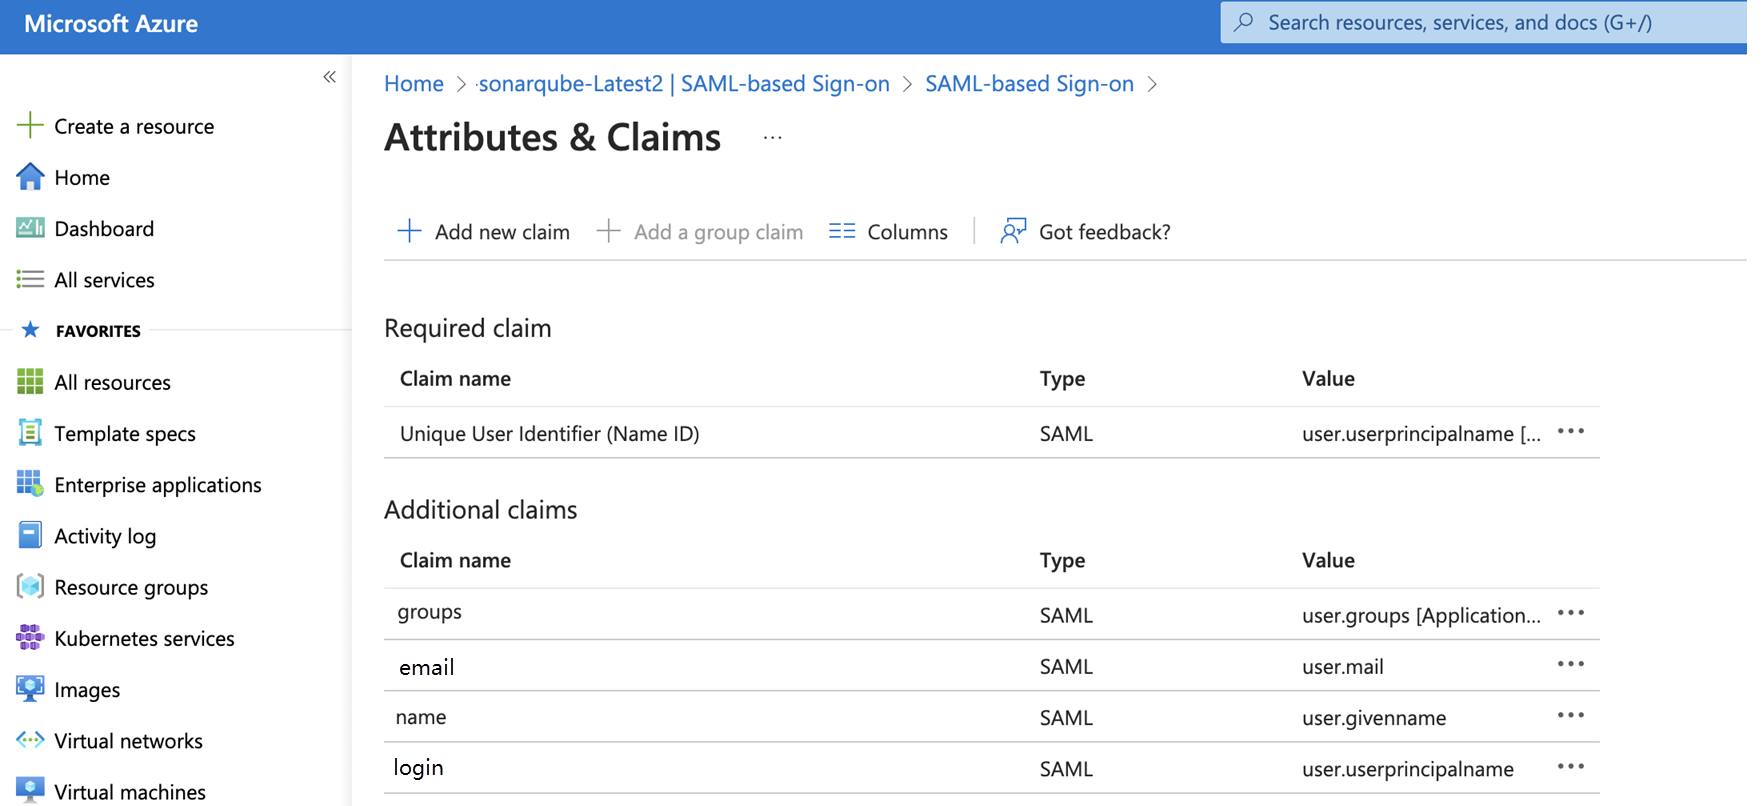 Select **Migrate configuration** to start the connected mode migration wizard. The wizard will do the following:
* Delete the existing .sonarlint settings folder.
* Note: this may cause source control changes.
* Write the settings files in the new location.
In addition, ***for C# and VB.NET projects only***, the migration wizard will attempt to do the following:
* Remove any entries that point to the SonarQube for Visual Studio-generated SonarLint.xml file.
* Remove any MSBuild properties that point to the SonarLint-generated ruleset.
SonarQube for Visual Studio will attempt to remove these settings from the project files themselves, and also from any .props or .targets files it finds.
SonarQube for Visual Studio will announce whether or not the migration was successful. If SonarLint cannot remove all of the settings automatically, it will do its best to identify any changes that must be made manually.
If your code is under source control, you can review the diff after the wizard has finished and see what was changed. Once complete, commiting the change to source control will complete the migration process.
#### If the wizard cannot make changes automatically
If the wizard cannot make changes automatically, use the logs to identify what was missed. Then, manually locate and remove the setting.
To manually remove the setting, you will need to:
1. delete the .sonarlint folder, and
2. remove the relevant settings from C# and VB.NET project files. See this page for more information about the settings that need to be removed.
Once complete, commit the change to source control to complete the process.
If you have problems with the migration, please open a thread in the [SonarQube for Visual Studio Community Forum](https://community.sonarsource.com/tags/c/sl/visual-studio/35/connected_mode) and tag it with the tags `connected_mode` and `migration`.
### Migrating from a legacy version
If you are upgrading from a legacy version of Sonarlint for Visual Studio (version 3.10 or earlier), the migration must be done manually. In addition to the deletion of all SonarLint-related folders, as described above in the **If the wizard cannot make changes automatically** article, you must delete the SonarQube folder from the project before binding again to SonarQube (Server, Cloud) or SonarQube Community Build.
### Notes for Tfvc users
If you are using Team Foundation Version Control **and** have C# or VB.NET projects in your solution, it’s possible that you will see some additional dialogs from Tfvc appearing when the migration finishes. If your solution does not contain C# or VB.NET projects or you are migrating to SonarQube for Visual Studio version 8.28 or newer, you will probably not see this warning and can disregard the rest of this section.
As described above, the settings files are no longer written to a source-controlled location. Instead, they are written under the per-user roaming folder (`%APPDATA%\SonarLint for Visual Studio`). However, the projects still need to reference the settings files that configure the Roslyn-based Sonar C# and VB.NET rules.
Tfvc will detect that these files are being referenced and may pop up one or more dialogs like the one below warning that files outside the workspace are being referenced and asking for confirmation that this is ok. Select **Add the item** to dismiss the dialog.
Select **Migrate configuration** to start the connected mode migration wizard. The wizard will do the following:
* Delete the existing .sonarlint settings folder.
* Note: this may cause source control changes.
* Write the settings files in the new location.
In addition, ***for C# and VB.NET projects only***, the migration wizard will attempt to do the following:
* Remove any entries that point to the SonarQube for Visual Studio-generated SonarLint.xml file.
* Remove any MSBuild properties that point to the SonarLint-generated ruleset.
SonarQube for Visual Studio will attempt to remove these settings from the project files themselves, and also from any .props or .targets files it finds.
SonarQube for Visual Studio will announce whether or not the migration was successful. If SonarLint cannot remove all of the settings automatically, it will do its best to identify any changes that must be made manually.
If your code is under source control, you can review the diff after the wizard has finished and see what was changed. Once complete, commiting the change to source control will complete the migration process.
#### If the wizard cannot make changes automatically
If the wizard cannot make changes automatically, use the logs to identify what was missed. Then, manually locate and remove the setting.
To manually remove the setting, you will need to:
1. delete the .sonarlint folder, and
2. remove the relevant settings from C# and VB.NET project files. See this page for more information about the settings that need to be removed.
Once complete, commit the change to source control to complete the process.
If you have problems with the migration, please open a thread in the [SonarQube for Visual Studio Community Forum](https://community.sonarsource.com/tags/c/sl/visual-studio/35/connected_mode) and tag it with the tags `connected_mode` and `migration`.
### Migrating from a legacy version
If you are upgrading from a legacy version of Sonarlint for Visual Studio (version 3.10 or earlier), the migration must be done manually. In addition to the deletion of all SonarLint-related folders, as described above in the **If the wizard cannot make changes automatically** article, you must delete the SonarQube folder from the project before binding again to SonarQube (Server, Cloud) or SonarQube Community Build.
### Notes for Tfvc users
If you are using Team Foundation Version Control **and** have C# or VB.NET projects in your solution, it’s possible that you will see some additional dialogs from Tfvc appearing when the migration finishes. If your solution does not contain C# or VB.NET projects or you are migrating to SonarQube for Visual Studio version 8.28 or newer, you will probably not see this warning and can disregard the rest of this section.
As described above, the settings files are no longer written to a source-controlled location. Instead, they are written under the per-user roaming folder (`%APPDATA%\SonarLint for Visual Studio`). However, the projects still need to reference the settings files that configure the Roslyn-based Sonar C# and VB.NET rules.
Tfvc will detect that these files are being referenced and may pop up one or more dialogs like the one below warning that files outside the workspace are being referenced and asking for confirmation that this is ok. Select **Add the item** to dismiss the dialog.
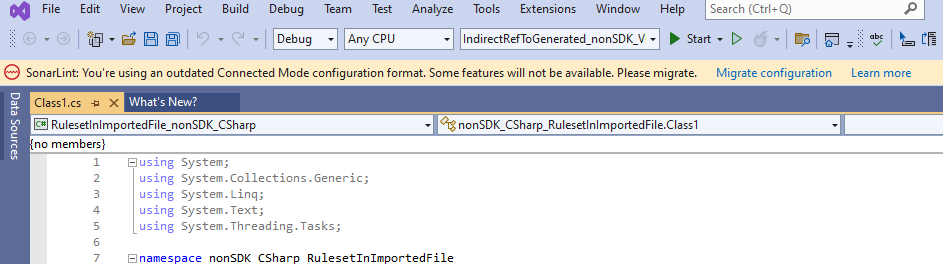 It is possible that multiple Visual Studio dialogs will appear, or that they will appear behind the migration wizard dialog. In that case, you might need to dismiss the wizard dialog before the Visual Studio dialogs can be closed. The wizard dialog can be closed by selecting Enter or Escape on your keyboard, or by using the mouse.
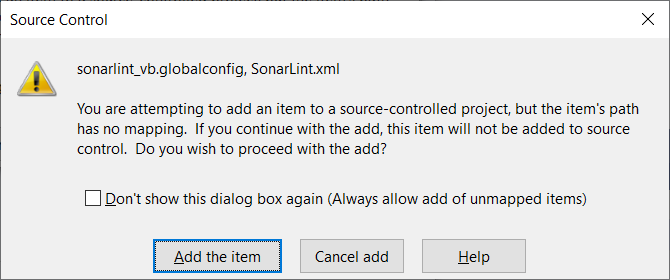 Once you have dismissed the Tfvc dialogs they should not appear again.
---
# Source: https://docs.sonarsource.com/sonarqube-cloud/administering-sonarcloud/managing-organization/manage-org-projects/migrate-projects-to-another-org.md
# Migrating projects
Once an organization is created on the SonarQube Cloud side, it is bound to its peer organization on the repository platform until one or the other is deleted. The SonarQube Cloud organization cannot be re-bound to another organization.
If you are migrating projects to another organization:
1. Create a new SonarQube Cloud organization and bind it to the new platform organization. See [setup-overview](https://docs.sonarsource.com/sonarqube-cloud/administering-sonarcloud/managing-organization/setup-overview "mention") for more information
2. Re-import the projects you want to analyze. See [setting-up-project](https://docs.sonarsource.com/sonarqube-cloud/managing-your-projects/administering-your-projects/setting-up-project "mention") for more information.
---
# Source: https://docs.sonarsource.com/sonarqube-server/10.6/user-guide/code-metrics/modifying-technical-debt-parameters.md
# Modifying technical-debt parameters
You can modify in the SonarQube UI at the global level some parameters related to the [metrics-definition](https://docs.sonarsource.com/sonarqube-server/10.6/user-guide/code-metrics/metrics-definition "mention") provided you have the Administer system permission. Alternatively, you can set the corresponding sonar property on the CI/CD host (see Analysis parameters).
### Changing the software development cost calculation
The development cost of one line of code is used in the Technical debt ratio calculation. To change the default value:
1. In the top navigation bar of SonarQube, select **Administration > Configuration > General settings > Technical Debt**.
2. In **Development cost**, change the values (in minutes).
The corresponding sonar property is `sonar.technicalDebt.developmentCost`.
### Changing the maintainability rating grid
To change the default Maintainability rating grid:
1. In the top navigation bar of SonarQube, select **Administration > Configuration > General settings > Technical Debt**.
2. In **Maintainability rating grid**, change the rating definition.
The corresponding sonar property is `sonar.technicalDebt.ratingGrid`.
---
# Source: https://docs.sonarsource.com/sonarqube-server/2025.3/quality-standards-administration/ai-code-assurance/monitor-projects-with-ai-code.md
# Source: https://docs.sonarsource.com/sonarqube-server/2025.5/quality-standards-administration/ai-code-assurance/monitor-projects-with-ai-code.md
# Source: https://docs.sonarsource.com/sonarqube-server/2025.1/instance-administration/analysis-functions/ai-code-assurance/monitor-projects-with-ai-code.md
# Source: https://docs.sonarsource.com/sonarqube-server/2025.4/quality-standards-administration/ai-code-assurance/monitor-projects-with-ai-code.md
# Source: https://docs.sonarsource.com/sonarqube-server/2025.6/quality-standards-administration/ai-code-assurance/monitor-projects-with-ai-code.md
# Source: https://docs.sonarsource.com/sonarqube-server/quality-standards-administration/ai-code-assurance/monitor-projects-with-ai-code.md
# Source: https://docs.sonarsource.com/sonarqube-cloud/standards/ai-code-assurance/monitor-projects-with-ai-code.md
# Monitor projects with AI code
Monitoring projects containing AI code is the final step in ensuring that your projects in SonarQube Cloud meet your AI Code Assurance standards.
Sonar’s AI Code Assurance helps you ensure security and code quality within projects containing AI-generated code. By utilizing project labels, custom quality gate certification and marking, and dynamic project badge publishing, you can maintain high standards and confidently assure the quality of your AI projects.
By now, you’ve likely completed the first two steps to qualify your projects as AI Code Assured:
1. [#label-projects-with-ai-code](https://docs.sonarsource.com/sonarqube-cloud/standards/overview#label-projects-with-ai-code "mention")
2. [#apply-a-quality-gate-for-ai-code-assurance](https://docs.sonarsource.com/sonarqube-cloud/standards/overview#apply-a-quality-gate-for-ai-code-assurance "mention")
You should be able to see your projects’ AI Code Assurance status on the **Projects** page and on each of the branch overview pages (**Overview**, **Main Branch**, **Pull Requests**, and **Branches**).
With those objectives in place, you can publish dynamic AI Code Assurance badges to your external websites to monitor projects.
### Understanding your AI Code Assurance labels
Your project **Overview** and **Project Information** pages show labels highlighting the state of AI Code Assurance. These labels provide a quick visual reference of your project’s state of AI Code Assurance status, including the state of containing AI-generated code and the status of your project’s quality gate.
#### Internal AI Code Assurance status
Here’s what each AI Code Assurance label represents, and what you can do to update the status.
: Defined by a Project Admin that the project contains AI-generated code.
* Go to **Project settings** > **AI-generated code** or use the API to activate and deactivate this label.
 **AI Code Assurance passed**: Your code *is passing the quality gate qualified for AI-generated code*.
* Run a new analysis to check your code against the quality gate.
 **AI Code Assurance failed**: Your code *is not passing the quality gate qualified for AI-generated code*.
* Address the issues in your code to meet the standards defined by your quality gate.
 **AI Code Assurance is on**: Your code *uses a quality gate qualified for AI-generated code* and the quality gate status has not been computed.
* Run a new analysis to update the status of your quality gate.
 **AI Code Assurance is off**: Your code is *not marked* as containing AI code or is *not using* a quality gate qualified for AI-generated code.
* Check that your project is marked as **Contains AI-Generated Code**,
* assign a quality gate qualified for AI-generated code,
* then run an analysis to update the quality gate status.
### Using the AI Code Assurance badge
To complete the final objective for AI Code Assurance, add a dynamic AI Code Assurance badge to monitor the current status of your AI Code Assured projects on your web pages. This badge works like other SonarQube external badges and can be used by any team member with project access.
See the documentation on [#using-project-badge](https://docs.sonarsource.com/sonarqube-cloud/managing-your-projects/managing-your-project-as-developer#using-project-badge "mention") for instructions on how to publish SonarQube badges externally.
#### External AI Code Assurance badges
Here’s what each AI Code Assurance badge represents, and what you should do to update the status.
![$AI Code Assurance \[sonar\] | Pass](https://2223713658-files.gitbook.io/~/files/v0/b/gitbook-x-prod.appspot.com/o/spaces%2FB4UT2GNiZKjtxFtcFAL7%2Fuploads%2Fgit-blob-f6accdfe0649afcd7fdfbf228000611c57ed1bf4%2Feb510566bfd00a317fb0b12d22ba75312a947283.svg?alt=media): Your code *is passing the quality gate qualified for AI-generated code*.
* Run a new analysis to check your code against the quality gate.
![$AI Code Assurance \[sonar\] | Fail](https://2223713658-files.gitbook.io/~/files/v0/b/gitbook-x-prod.appspot.com/o/spaces%2FB4UT2GNiZKjtxFtcFAL7%2Fuploads%2Fgit-blob-0dd716479df5fd525e80b1b631bcf2900254a481%2F175eb12b2229f37861dfa00e772b2d4ed85f387e.svg?alt=media): Your code *is not passing the quality gate qualified for AI-generated code*.
* Address the issues in your code to meet the standards defined by your quality gate.
![$AI Code Assurance \[sonar\] | On](https://2223713658-files.gitbook.io/~/files/v0/b/gitbook-x-prod.appspot.com/o/spaces%2FB4UT2GNiZKjtxFtcFAL7%2Fuploads%2Fgit-blob-fa10dba8ca8559ee9640a0f256cd8be492317080%2Fa27578006c1ca9edf322166ebcf63d17a6699a8d.svg?alt=media): Your code *is using a quality gate qualified for AI-generated code* and the quality gate status has not been computed.
* Run a new analysis to update the status of your quality gate.
![$AI Code Assurance \[sonar\] | Off](https://2223713658-files.gitbook.io/~/files/v0/b/gitbook-x-prod.appspot.com/o/spaces%2FB4UT2GNiZKjtxFtcFAL7%2Fuploads%2Fgit-blob-86f586a1a1a3cf56890b5bfa2d319dcef66926db%2F750bf1cc94f61c39fc41f300a20cf68e08889434.svg?alt=media): Your code is *not using* a quality gate qualified for AI-generated code.
* Assign a quality gate qualified for AI-generated code and run an analysis to update the quality gate status.
### Related pages
* SonarQube Cloud's [ai-capabilities](https://docs.sonarsource.com/sonarqube-cloud/ai-capabilities "mention")
* [overview](https://docs.sonarsource.com/sonarqube-cloud/standards/ai-code-assurance/overview "mention")
* Administering your [ai-features](https://docs.sonarsource.com/sonarqube-cloud/administering-sonarcloud/ai-features "mention") as an Organization Admin
* Learn how to[autodetect-ai-code](https://docs.sonarsource.com/sonarqube-cloud/administering-sonarcloud/ai-features/autodetect-ai-code "mention") in projects using GitHub and GitHub Copilot
* Quickly [enable-ai-codefix](https://docs.sonarsource.com/sonarqube-cloud/administering-sonarcloud/ai-features/enable-ai-codefix "mention") to get AI-generated fix suggestions
---
# Source: https://docs.sonarsource.com/sonarqube-server/2025.2/server-update-and-maintenance/maintenance/deprecations/monitoring-api-deprecation.md
# Source: https://docs.sonarsource.com/sonarqube-server/2025.3/server-update-and-maintenance/maintenance/deprecations/monitoring-api-deprecation.md
# Source: https://docs.sonarsource.com/sonarqube-server/2025.5/server-update-and-maintenance/maintenance/deprecations/monitoring-api-deprecation.md
# Source: https://docs.sonarsource.com/sonarqube-server/2025.4/server-update-and-maintenance/maintenance/deprecations/monitoring-api-deprecation.md
# Source: https://docs.sonarsource.com/sonarqube-server/2025.6/server-update-and-maintenance/maintenance/deprecations/monitoring-api-deprecation.md
# Source: https://docs.sonarsource.com/sonarqube-server/server-update-and-maintenance/maintenance/deprecations/monitoring-api-deprecation.md
# Monitoring API deprecation
If you use custom plugins based on the plugin API or consume SonarQube Server services through the [web-api](https://docs.sonarsource.com/sonarqube-server/extension-guide/web-api "mention") then you will have to manage the possible API deprecations. See also the [deprecation-policy](https://docs.sonarsource.com/sonarqube-server/server-update-and-maintenance/maintenance/deprecations/deprecation-policy "mention").
### Monitoring the deprecated Web API components
After an update, you can check if an authenticated client of your SonarQube Server instance uses deprecated Web API endpoints and parameters in order to anticipate their drop. To do so, browse the deprecation log as illustrated below.
Once you have dismissed the Tfvc dialogs they should not appear again.
---
# Source: https://docs.sonarsource.com/sonarqube-cloud/administering-sonarcloud/managing-organization/manage-org-projects/migrate-projects-to-another-org.md
# Migrating projects
Once an organization is created on the SonarQube Cloud side, it is bound to its peer organization on the repository platform until one or the other is deleted. The SonarQube Cloud organization cannot be re-bound to another organization.
If you are migrating projects to another organization:
1. Create a new SonarQube Cloud organization and bind it to the new platform organization. See [setup-overview](https://docs.sonarsource.com/sonarqube-cloud/administering-sonarcloud/managing-organization/setup-overview "mention") for more information
2. Re-import the projects you want to analyze. See [setting-up-project](https://docs.sonarsource.com/sonarqube-cloud/managing-your-projects/administering-your-projects/setting-up-project "mention") for more information.
---
# Source: https://docs.sonarsource.com/sonarqube-server/10.6/user-guide/code-metrics/modifying-technical-debt-parameters.md
# Modifying technical-debt parameters
You can modify in the SonarQube UI at the global level some parameters related to the [metrics-definition](https://docs.sonarsource.com/sonarqube-server/10.6/user-guide/code-metrics/metrics-definition "mention") provided you have the Administer system permission. Alternatively, you can set the corresponding sonar property on the CI/CD host (see Analysis parameters).
### Changing the software development cost calculation
The development cost of one line of code is used in the Technical debt ratio calculation. To change the default value:
1. In the top navigation bar of SonarQube, select **Administration > Configuration > General settings > Technical Debt**.
2. In **Development cost**, change the values (in minutes).
The corresponding sonar property is `sonar.technicalDebt.developmentCost`.
### Changing the maintainability rating grid
To change the default Maintainability rating grid:
1. In the top navigation bar of SonarQube, select **Administration > Configuration > General settings > Technical Debt**.
2. In **Maintainability rating grid**, change the rating definition.
The corresponding sonar property is `sonar.technicalDebt.ratingGrid`.
---
# Source: https://docs.sonarsource.com/sonarqube-server/2025.3/quality-standards-administration/ai-code-assurance/monitor-projects-with-ai-code.md
# Source: https://docs.sonarsource.com/sonarqube-server/2025.5/quality-standards-administration/ai-code-assurance/monitor-projects-with-ai-code.md
# Source: https://docs.sonarsource.com/sonarqube-server/2025.1/instance-administration/analysis-functions/ai-code-assurance/monitor-projects-with-ai-code.md
# Source: https://docs.sonarsource.com/sonarqube-server/2025.4/quality-standards-administration/ai-code-assurance/monitor-projects-with-ai-code.md
# Source: https://docs.sonarsource.com/sonarqube-server/2025.6/quality-standards-administration/ai-code-assurance/monitor-projects-with-ai-code.md
# Source: https://docs.sonarsource.com/sonarqube-server/quality-standards-administration/ai-code-assurance/monitor-projects-with-ai-code.md
# Source: https://docs.sonarsource.com/sonarqube-cloud/standards/ai-code-assurance/monitor-projects-with-ai-code.md
# Monitor projects with AI code
Monitoring projects containing AI code is the final step in ensuring that your projects in SonarQube Cloud meet your AI Code Assurance standards.
Sonar’s AI Code Assurance helps you ensure security and code quality within projects containing AI-generated code. By utilizing project labels, custom quality gate certification and marking, and dynamic project badge publishing, you can maintain high standards and confidently assure the quality of your AI projects.
By now, you’ve likely completed the first two steps to qualify your projects as AI Code Assured:
1. [#label-projects-with-ai-code](https://docs.sonarsource.com/sonarqube-cloud/standards/overview#label-projects-with-ai-code "mention")
2. [#apply-a-quality-gate-for-ai-code-assurance](https://docs.sonarsource.com/sonarqube-cloud/standards/overview#apply-a-quality-gate-for-ai-code-assurance "mention")
You should be able to see your projects’ AI Code Assurance status on the **Projects** page and on each of the branch overview pages (**Overview**, **Main Branch**, **Pull Requests**, and **Branches**).
With those objectives in place, you can publish dynamic AI Code Assurance badges to your external websites to monitor projects.
### Understanding your AI Code Assurance labels
Your project **Overview** and **Project Information** pages show labels highlighting the state of AI Code Assurance. These labels provide a quick visual reference of your project’s state of AI Code Assurance status, including the state of containing AI-generated code and the status of your project’s quality gate.
#### Internal AI Code Assurance status
Here’s what each AI Code Assurance label represents, and what you can do to update the status.
: Defined by a Project Admin that the project contains AI-generated code.
* Go to **Project settings** > **AI-generated code** or use the API to activate and deactivate this label.
 **AI Code Assurance passed**: Your code *is passing the quality gate qualified for AI-generated code*.
* Run a new analysis to check your code against the quality gate.
 **AI Code Assurance failed**: Your code *is not passing the quality gate qualified for AI-generated code*.
* Address the issues in your code to meet the standards defined by your quality gate.
 **AI Code Assurance is on**: Your code *uses a quality gate qualified for AI-generated code* and the quality gate status has not been computed.
* Run a new analysis to update the status of your quality gate.
 **AI Code Assurance is off**: Your code is *not marked* as containing AI code or is *not using* a quality gate qualified for AI-generated code.
* Check that your project is marked as **Contains AI-Generated Code**,
* assign a quality gate qualified for AI-generated code,
* then run an analysis to update the quality gate status.
### Using the AI Code Assurance badge
To complete the final objective for AI Code Assurance, add a dynamic AI Code Assurance badge to monitor the current status of your AI Code Assured projects on your web pages. This badge works like other SonarQube external badges and can be used by any team member with project access.
See the documentation on [#using-project-badge](https://docs.sonarsource.com/sonarqube-cloud/managing-your-projects/managing-your-project-as-developer#using-project-badge "mention") for instructions on how to publish SonarQube badges externally.
#### External AI Code Assurance badges
Here’s what each AI Code Assurance badge represents, and what you should do to update the status.
![$AI Code Assurance \[sonar\] | Pass](https://2223713658-files.gitbook.io/~/files/v0/b/gitbook-x-prod.appspot.com/o/spaces%2FB4UT2GNiZKjtxFtcFAL7%2Fuploads%2Fgit-blob-f6accdfe0649afcd7fdfbf228000611c57ed1bf4%2Feb510566bfd00a317fb0b12d22ba75312a947283.svg?alt=media): Your code *is passing the quality gate qualified for AI-generated code*.
* Run a new analysis to check your code against the quality gate.
![$AI Code Assurance \[sonar\] | Fail](https://2223713658-files.gitbook.io/~/files/v0/b/gitbook-x-prod.appspot.com/o/spaces%2FB4UT2GNiZKjtxFtcFAL7%2Fuploads%2Fgit-blob-0dd716479df5fd525e80b1b631bcf2900254a481%2F175eb12b2229f37861dfa00e772b2d4ed85f387e.svg?alt=media): Your code *is not passing the quality gate qualified for AI-generated code*.
* Address the issues in your code to meet the standards defined by your quality gate.
![$AI Code Assurance \[sonar\] | On](https://2223713658-files.gitbook.io/~/files/v0/b/gitbook-x-prod.appspot.com/o/spaces%2FB4UT2GNiZKjtxFtcFAL7%2Fuploads%2Fgit-blob-fa10dba8ca8559ee9640a0f256cd8be492317080%2Fa27578006c1ca9edf322166ebcf63d17a6699a8d.svg?alt=media): Your code *is using a quality gate qualified for AI-generated code* and the quality gate status has not been computed.
* Run a new analysis to update the status of your quality gate.
![$AI Code Assurance \[sonar\] | Off](https://2223713658-files.gitbook.io/~/files/v0/b/gitbook-x-prod.appspot.com/o/spaces%2FB4UT2GNiZKjtxFtcFAL7%2Fuploads%2Fgit-blob-86f586a1a1a3cf56890b5bfa2d319dcef66926db%2F750bf1cc94f61c39fc41f300a20cf68e08889434.svg?alt=media): Your code is *not using* a quality gate qualified for AI-generated code.
* Assign a quality gate qualified for AI-generated code and run an analysis to update the quality gate status.
### Related pages
* SonarQube Cloud's [ai-capabilities](https://docs.sonarsource.com/sonarqube-cloud/ai-capabilities "mention")
* [overview](https://docs.sonarsource.com/sonarqube-cloud/standards/ai-code-assurance/overview "mention")
* Administering your [ai-features](https://docs.sonarsource.com/sonarqube-cloud/administering-sonarcloud/ai-features "mention") as an Organization Admin
* Learn how to[autodetect-ai-code](https://docs.sonarsource.com/sonarqube-cloud/administering-sonarcloud/ai-features/autodetect-ai-code "mention") in projects using GitHub and GitHub Copilot
* Quickly [enable-ai-codefix](https://docs.sonarsource.com/sonarqube-cloud/administering-sonarcloud/ai-features/enable-ai-codefix "mention") to get AI-generated fix suggestions
---
# Source: https://docs.sonarsource.com/sonarqube-server/2025.2/server-update-and-maintenance/maintenance/deprecations/monitoring-api-deprecation.md
# Source: https://docs.sonarsource.com/sonarqube-server/2025.3/server-update-and-maintenance/maintenance/deprecations/monitoring-api-deprecation.md
# Source: https://docs.sonarsource.com/sonarqube-server/2025.5/server-update-and-maintenance/maintenance/deprecations/monitoring-api-deprecation.md
# Source: https://docs.sonarsource.com/sonarqube-server/2025.4/server-update-and-maintenance/maintenance/deprecations/monitoring-api-deprecation.md
# Source: https://docs.sonarsource.com/sonarqube-server/2025.6/server-update-and-maintenance/maintenance/deprecations/monitoring-api-deprecation.md
# Source: https://docs.sonarsource.com/sonarqube-server/server-update-and-maintenance/maintenance/deprecations/monitoring-api-deprecation.md
# Monitoring API deprecation
If you use custom plugins based on the plugin API or consume SonarQube Server services through the [web-api](https://docs.sonarsource.com/sonarqube-server/extension-guide/web-api "mention") then you will have to manage the possible API deprecations. See also the [deprecation-policy](https://docs.sonarsource.com/sonarqube-server/server-update-and-maintenance/maintenance/deprecations/deprecation-policy "mention").
### Monitoring the deprecated Web API components
After an update, you can check if an authenticated client of your SonarQube Server instance uses deprecated Web API endpoints and parameters in order to anticipate their drop. To do so, browse the deprecation log as illustrated below.
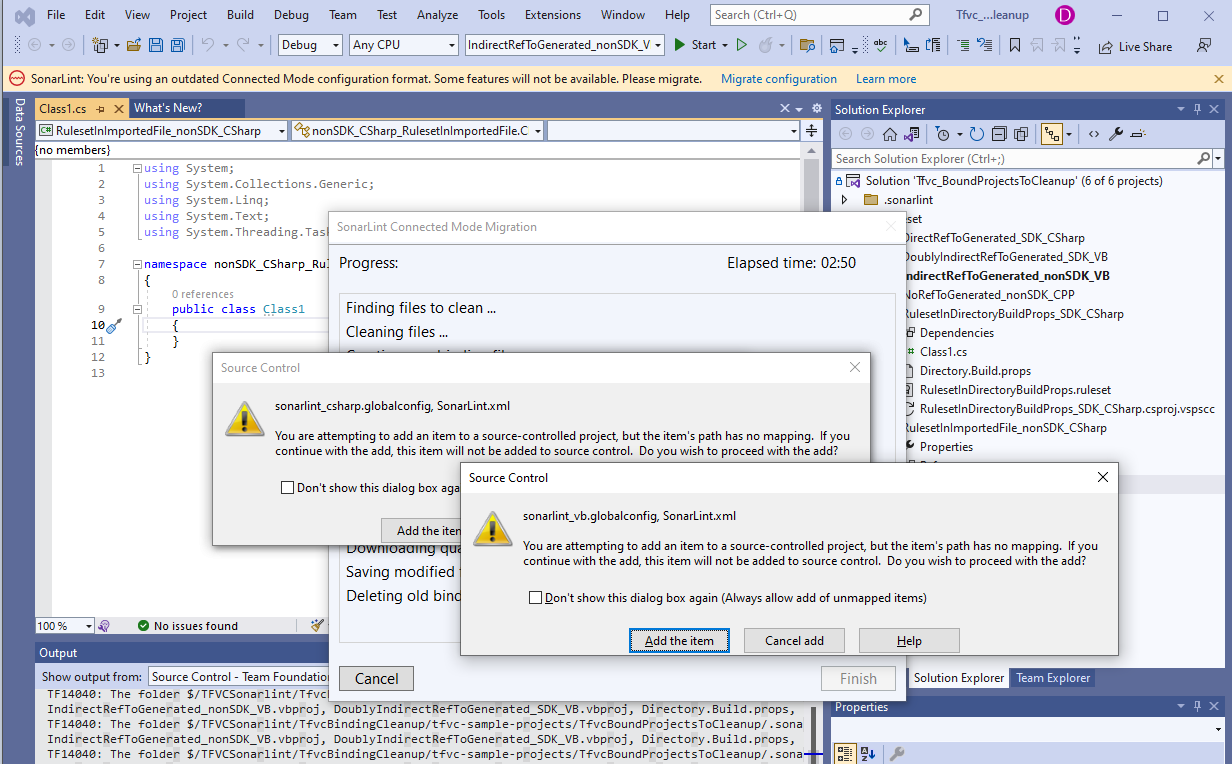 To download the deprecation log from the UI (with the **Administer System** permission):
1. In the top navigation bar of the SonarQube Server UI, select **Administration** > **System**.
2. In the top right corner of the **System Info** page, click **Download Logs** > **Deprecation Logs**.
{% hint style="info" %}
You can automate the retrieval of the deprecation log information by calling the Web API endpoint [`api/system/logs`](https://next.sonarqube.com/sonarqube/web_api/api/system/logs) with `deprecation` as the value of the `name` parameter.
{% endhint %}
### Monitoring the deprecated Plugin API components
Check the [Plugin API release notes](https://github.com/SonarSource/sonar-plugin-api/releases) for deprecation notes.
---
# Source: https://docs.sonarsource.com/sonarqube-server/10.6/user-guide/code-metrics/monitoring-metrics-through-web-api.md
# Monitoring metrics through Web API
Through the SonarQube Web API’s, you can retrieve code metric values and histories by using the [`/api/measures`](https://next.sonarqube.com/sonarqube/web_api/api/measures)\`\`endpoint. The metric keys are listed in the metric tables in [metrics-definition](https://docs.sonarsource.com/sonarqube-server/10.6/user-guide/code-metrics/metrics-definition "mention") or you can use the `/api/metrics` endpoint to retrieve them.
---
# Source: https://docs.sonarsource.com/sonarqube-server/10.6/user-guide/code-metrics/monitoring-portfolio-metrics.md
# Source: https://docs.sonarsource.com/sonarqube-server/10.7/user-guide/code-metrics/monitoring-portfolio-metrics.md
# Source: https://docs.sonarsource.com/sonarqube-server/10.8/user-guide/code-metrics/monitoring-portfolio-metrics.md
# Source: https://docs.sonarsource.com/sonarqube-server/2025.2/user-guide/code-metrics/monitoring-portfolio-metrics.md
# Source: https://docs.sonarsource.com/sonarqube-server/2025.3/user-guide/code-metrics/monitoring-portfolio-metrics.md
# Source: https://docs.sonarsource.com/sonarqube-server/2025.5/user-guide/code-metrics/monitoring-portfolio-metrics.md
# Source: https://docs.sonarsource.com/sonarqube-server/2025.1/user-guide/code-metrics/monitoring-portfolio-metrics.md
# Source: https://docs.sonarsource.com/sonarqube-server/2025.4/user-guide/code-metrics/monitoring-portfolio-metrics.md
# Source: https://docs.sonarsource.com/sonarqube-server/2025.6/user-guide/code-metrics/monitoring-portfolio-metrics.md
# Source: https://docs.sonarsource.com/sonarqube-server/user-guide/code-metrics/monitoring-portfolio-metrics.md
# Monitoring portfolio metrics
Portfolios are available starting in [*Enterprise Edition*](https://www.sonarsource.com/plans-and-pricing/enterprise/).
To view the values of all code metrics in your portfolio:
1. In the top navigation bar, click **Portfolios** and then click the portfolio you want to monitor.
2. In the portfolio navigation bar, click **Measures**.
To view the value history of one or several code metrics in your portfolio:
1\. In the top navigation bar, click **Portfolios** and then click the portfolio you want to monitor.
2\. In the portfolio navigation bar, click **Activity**. The number of issues is shown in a graph.
3\. To change the metrics shown, click **Issues** and select another metric category in the drop-down list.
To download the deprecation log from the UI (with the **Administer System** permission):
1. In the top navigation bar of the SonarQube Server UI, select **Administration** > **System**.
2. In the top right corner of the **System Info** page, click **Download Logs** > **Deprecation Logs**.
{% hint style="info" %}
You can automate the retrieval of the deprecation log information by calling the Web API endpoint [`api/system/logs`](https://next.sonarqube.com/sonarqube/web_api/api/system/logs) with `deprecation` as the value of the `name` parameter.
{% endhint %}
### Monitoring the deprecated Plugin API components
Check the [Plugin API release notes](https://github.com/SonarSource/sonar-plugin-api/releases) for deprecation notes.
---
# Source: https://docs.sonarsource.com/sonarqube-server/10.6/user-guide/code-metrics/monitoring-metrics-through-web-api.md
# Monitoring metrics through Web API
Through the SonarQube Web API’s, you can retrieve code metric values and histories by using the [`/api/measures`](https://next.sonarqube.com/sonarqube/web_api/api/measures)\`\`endpoint. The metric keys are listed in the metric tables in [metrics-definition](https://docs.sonarsource.com/sonarqube-server/10.6/user-guide/code-metrics/metrics-definition "mention") or you can use the `/api/metrics` endpoint to retrieve them.
---
# Source: https://docs.sonarsource.com/sonarqube-server/10.6/user-guide/code-metrics/monitoring-portfolio-metrics.md
# Source: https://docs.sonarsource.com/sonarqube-server/10.7/user-guide/code-metrics/monitoring-portfolio-metrics.md
# Source: https://docs.sonarsource.com/sonarqube-server/10.8/user-guide/code-metrics/monitoring-portfolio-metrics.md
# Source: https://docs.sonarsource.com/sonarqube-server/2025.2/user-guide/code-metrics/monitoring-portfolio-metrics.md
# Source: https://docs.sonarsource.com/sonarqube-server/2025.3/user-guide/code-metrics/monitoring-portfolio-metrics.md
# Source: https://docs.sonarsource.com/sonarqube-server/2025.5/user-guide/code-metrics/monitoring-portfolio-metrics.md
# Source: https://docs.sonarsource.com/sonarqube-server/2025.1/user-guide/code-metrics/monitoring-portfolio-metrics.md
# Source: https://docs.sonarsource.com/sonarqube-server/2025.4/user-guide/code-metrics/monitoring-portfolio-metrics.md
# Source: https://docs.sonarsource.com/sonarqube-server/2025.6/user-guide/code-metrics/monitoring-portfolio-metrics.md
# Source: https://docs.sonarsource.com/sonarqube-server/user-guide/code-metrics/monitoring-portfolio-metrics.md
# Monitoring portfolio metrics
Portfolios are available starting in [*Enterprise Edition*](https://www.sonarsource.com/plans-and-pricing/enterprise/).
To view the values of all code metrics in your portfolio:
1. In the top navigation bar, click **Portfolios** and then click the portfolio you want to monitor.
2. In the portfolio navigation bar, click **Measures**.
To view the value history of one or several code metrics in your portfolio:
1\. In the top navigation bar, click **Portfolios** and then click the portfolio you want to monitor.
2\. In the portfolio navigation bar, click **Activity**. The number of issues is shown in a graph.
3\. To change the metrics shown, click **Issues** and select another metric category in the drop-down list.
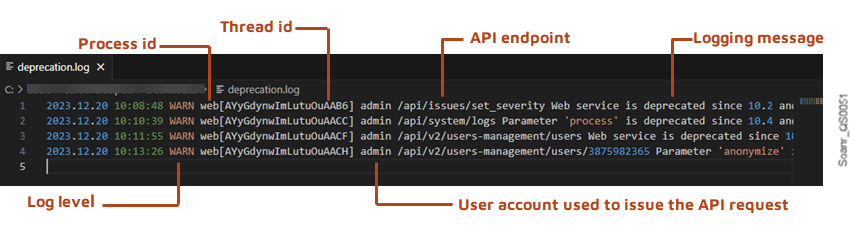 4\. Select **Custom** if you want to monitor other metrics: the **Add metric** drop-down list is displayed. Then, click **Add metric** and select in the drop-down list the metric(s) you want to monitor. A graph is displayed for each selected metric so that you can compare them.
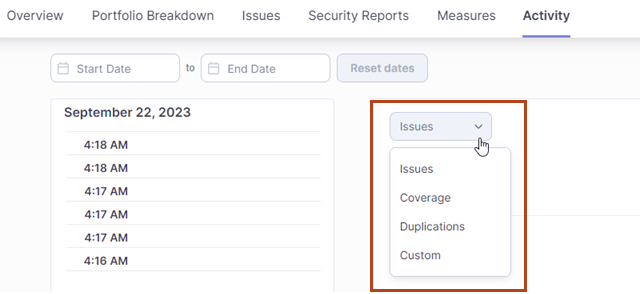 ---
# Source: https://docs.sonarsource.com/sonarqube-community-build/user-guide/code-metrics/monitoring-project-metrics.md
# Source: https://docs.sonarsource.com/sonarqube-server/10.6/user-guide/code-metrics/monitoring-project-metrics.md
# Source: https://docs.sonarsource.com/sonarqube-server/10.7/user-guide/code-metrics/monitoring-project-metrics.md
# Source: https://docs.sonarsource.com/sonarqube-server/10.8/user-guide/code-metrics/monitoring-project-metrics.md
# Source: https://docs.sonarsource.com/sonarqube-server/2025.2/user-guide/code-metrics/monitoring-project-metrics.md
# Source: https://docs.sonarsource.com/sonarqube-server/2025.3/user-guide/code-metrics/monitoring-project-metrics.md
# Source: https://docs.sonarsource.com/sonarqube-server/2025.5/user-guide/code-metrics/monitoring-project-metrics.md
# Source: https://docs.sonarsource.com/sonarqube-server/2025.1/user-guide/code-metrics/monitoring-project-metrics.md
# Source: https://docs.sonarsource.com/sonarqube-server/2025.4/user-guide/code-metrics/monitoring-project-metrics.md
# Source: https://docs.sonarsource.com/sonarqube-server/2025.6/user-guide/code-metrics/monitoring-project-metrics.md
# Source: https://docs.sonarsource.com/sonarqube-server/user-guide/code-metrics/monitoring-project-metrics.md
# Monitoring project metrics
You can view the values of all code metrics in your project and you can view the value history of one or several code metrics in your project.
### Viewing the values of all code metrics
1. In the top navigation bar, click **Projects** and then click the project you want to monitor.
2. In the project navigation bar, click **Measures**.
### Viewing the value history of one or several metrics
1\. In the top navigation bar, click **Projects** and then click the project you want to monitor.
2\. In the project navigation bar, select **Activity**. The left sidebar contains the list of code scans performed on your project.
3\. In **Filter events**, you can filter the scans list by event type. See **Event types** in [activity-and-history](https://docs.sonarsource.com/sonarqube-server/user-guide/viewing-projects/activity-and-history "mention") for more information.
4\. Issues are shown in the graph by default. To change the metrics shown, click **Issues** and select another metric category in the drop-down list.
---
# Source: https://docs.sonarsource.com/sonarqube-community-build/user-guide/code-metrics/monitoring-project-metrics.md
# Source: https://docs.sonarsource.com/sonarqube-server/10.6/user-guide/code-metrics/monitoring-project-metrics.md
# Source: https://docs.sonarsource.com/sonarqube-server/10.7/user-guide/code-metrics/monitoring-project-metrics.md
# Source: https://docs.sonarsource.com/sonarqube-server/10.8/user-guide/code-metrics/monitoring-project-metrics.md
# Source: https://docs.sonarsource.com/sonarqube-server/2025.2/user-guide/code-metrics/monitoring-project-metrics.md
# Source: https://docs.sonarsource.com/sonarqube-server/2025.3/user-guide/code-metrics/monitoring-project-metrics.md
# Source: https://docs.sonarsource.com/sonarqube-server/2025.5/user-guide/code-metrics/monitoring-project-metrics.md
# Source: https://docs.sonarsource.com/sonarqube-server/2025.1/user-guide/code-metrics/monitoring-project-metrics.md
# Source: https://docs.sonarsource.com/sonarqube-server/2025.4/user-guide/code-metrics/monitoring-project-metrics.md
# Source: https://docs.sonarsource.com/sonarqube-server/2025.6/user-guide/code-metrics/monitoring-project-metrics.md
# Source: https://docs.sonarsource.com/sonarqube-server/user-guide/code-metrics/monitoring-project-metrics.md
# Monitoring project metrics
You can view the values of all code metrics in your project and you can view the value history of one or several code metrics in your project.
### Viewing the values of all code metrics
1. In the top navigation bar, click **Projects** and then click the project you want to monitor.
2. In the project navigation bar, click **Measures**.
### Viewing the value history of one or several metrics
1\. In the top navigation bar, click **Projects** and then click the project you want to monitor.
2\. In the project navigation bar, select **Activity**. The left sidebar contains the list of code scans performed on your project.
3\. In **Filter events**, you can filter the scans list by event type. See **Event types** in [activity-and-history](https://docs.sonarsource.com/sonarqube-server/user-guide/viewing-projects/activity-and-history "mention") for more information.
4\. Issues are shown in the graph by default. To change the metrics shown, click **Issues** and select another metric category in the drop-down list.
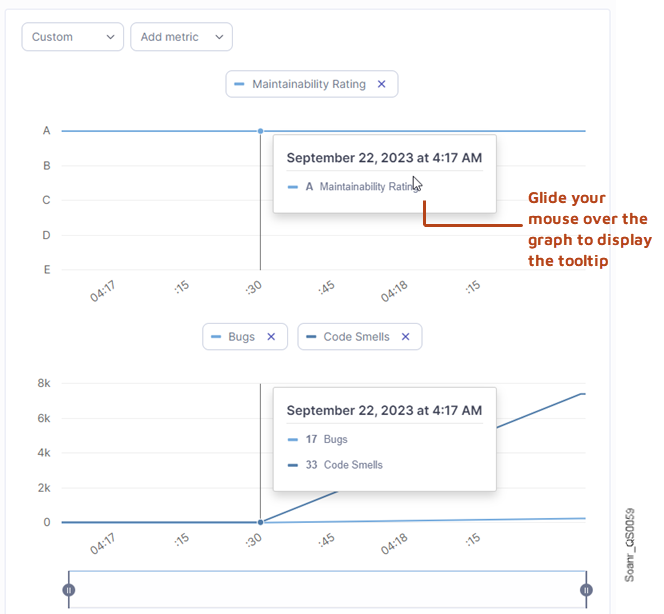 5\. Select **Custom** if you want to monitor other metrics: the **Add metric** drop-down list is displayed. Then, click **Add metric** and select in the drop-down list the metric(s) you want to monitor. The selected metrics are displayed in one or several graphs so that you can compare them.
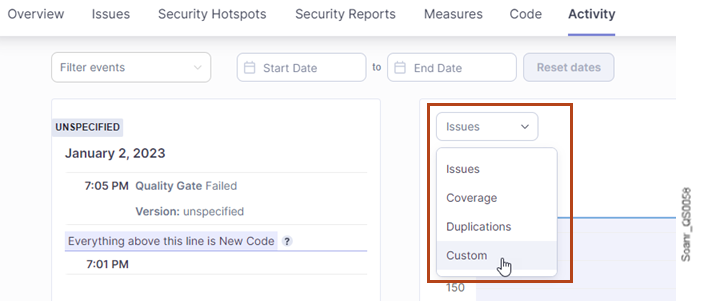 ---
# Source: https://docs.sonarsource.com/sonarqube-community-build/server-update-and-maintenance/monitoring.md
# Source: https://docs.sonarsource.com/sonarqube-server/8.9/instance-administration/monitoring.md
# Source: https://docs.sonarsource.com/sonarqube-server/9.8/instance-administration/monitoring.md
# Source: https://docs.sonarsource.com/sonarqube-server/9.9/instance-administration/monitoring.md
# Source: https://docs.sonarsource.com/sonarqube-server/10.0/instance-administration/monitoring.md
# Source: https://docs.sonarsource.com/sonarqube-server/10.1/instance-administration/monitoring.md
# Source: https://docs.sonarsource.com/sonarqube-server/10.2/instance-administration/monitoring.md
# Source: https://docs.sonarsource.com/sonarqube-server/10.3/instance-administration/monitoring.md
# Source: https://docs.sonarsource.com/sonarqube-server/10.4/instance-administration/monitoring.md
# Source: https://docs.sonarsource.com/sonarqube-server/10.5/instance-administration/monitoring.md
# Source: https://docs.sonarsource.com/sonarqube-server/10.6/instance-administration/monitoring.md
# Source: https://docs.sonarsource.com/sonarqube-server/10.7/server-upgrade-and-maintenance/monitoring.md
# Source: https://docs.sonarsource.com/sonarqube-server/10.8/server-upgrade-and-maintenance/monitoring.md
# Source: https://docs.sonarsource.com/sonarqube-server/2025.2/server-update-and-maintenance/monitoring.md
# Source: https://docs.sonarsource.com/sonarqube-server/2025.3/server-update-and-maintenance/data-center-edition/monitoring.md
# Source: https://docs.sonarsource.com/sonarqube-server/2025.3/server-update-and-maintenance/monitoring.md
# Source: https://docs.sonarsource.com/sonarqube-server/2025.5/server-update-and-maintenance/data-center-edition/monitoring.md
# Source: https://docs.sonarsource.com/sonarqube-server/2025.5/server-update-and-maintenance/monitoring.md
# Source: https://docs.sonarsource.com/sonarqube-server/2025.1/server-update-and-maintenance/monitoring.md
# Source: https://docs.sonarsource.com/sonarqube-server/2025.4/server-update-and-maintenance/data-center-edition/monitoring.md
# Source: https://docs.sonarsource.com/sonarqube-server/2025.4/server-update-and-maintenance/monitoring.md
# Source: https://docs.sonarsource.com/sonarqube-server/2025.6/server-update-and-maintenance/data-center-edition/monitoring.md
# Source: https://docs.sonarsource.com/sonarqube-server/2025.6/server-update-and-maintenance/monitoring.md
# Source: https://docs.sonarsource.com/sonarqube-server/server-update-and-maintenance/data-center-edition/monitoring.md
# Source: https://docs.sonarsource.com/sonarqube-server/server-update-and-maintenance/monitoring.md
# Monitoring
- [SonarQube Server instance](/sonarqube-server/server-update-and-maintenance/monitoring/instance.md): Monitoring your SonarQube Server instance is key to keeping it healthy and ensuring user satisfaction.
- [Lines of Code](/sonarqube-server/server-update-and-maintenance/monitoring/lines-of-code.md): SonarQube calculates the Lines of Code analyzed against the subscription’s limit defined by the license.
---
# Source: https://docs.sonarsource.com/sonarqube-server/2025.2/devops-platform-integration/azure-devops-integration/adding-analysis-to-pipeline/monorepo-projects.md
# Source: https://docs.sonarsource.com/sonarqube-server/2025.3/devops-platform-integration/azure-devops-integration/adding-analysis-to-pipeline/monorepo-projects.md
# Source: https://docs.sonarsource.com/sonarqube-server/2025.5/devops-platform-integration/azure-devops-integration/adding-analysis-to-pipeline/monorepo-projects.md
# Source: https://docs.sonarsource.com/sonarqube-server/2025.1/devops-platform-integration/azure-devops-integration/adding-analysis-to-pipeline/monorepo-projects.md
# Source: https://docs.sonarsource.com/sonarqube-server/2025.4/devops-platform-integration/azure-devops-integration/adding-analysis-to-pipeline/monorepo-projects.md
# Source: https://docs.sonarsource.com/sonarqube-server/2025.6/devops-platform-integration/azure-devops-integration/adding-analysis-to-pipeline/monorepo-projects.md
# Source: https://docs.sonarsource.com/sonarqube-server/devops-platform-integration/azure-devops-integration/adding-analysis-to-pipeline/monorepo-projects.md
# Source: https://docs.sonarsource.com/sonarqube-cloud/advanced-setup/ci-based-analysis/azure-pipelines/adding-analysis-to-build-pipeline/monorepo-projects.md
# Monorepo projects
You can add the SonarQube Cloud analysis to your Azure build pipeline for a monorepo.
Proceed as follows:
1. If not already done, import your monorepo to create the corresponding projects in SonarQube Cloud: see the [monorepo-support](https://docs.sonarsource.com/sonarqube-cloud/advanced-setup/monorepo-support "mention") page.
2. For each project, configure your [analysis-parameters](https://docs.sonarsource.com/sonarqube-cloud/advanced-setup/analysis-parameters "mention").
3. For each project, set up the integration features. See the [azure-devops](https://docs.sonarsource.com/sonarqube-cloud/managing-your-projects/administering-your-projects/devops-platform-integration/azure-devops "mention") page for more details.
4. Add the SonarQube Cloud analysis to your YAML pipeline. To do so, see the section corresponding to your project type and use the YAML file example below add analysis to a:
* [gradle-or-maven-project](https://docs.sonarsource.com/sonarqube-cloud/advanced-setup/ci-based-analysis/azure-pipelines/adding-analysis-to-build-pipeline/gradle-or-maven-project "mention")
* [dotnet-project](https://docs.sonarsource.com/sonarqube-cloud/advanced-setup/ci-based-analysis/azure-pipelines/adding-analysis-to-build-pipeline/dotnet-project "mention")
* [c-family-project](https://docs.sonarsource.com/sonarqube-cloud/advanced-setup/ci-based-analysis/azure-pipelines/adding-analysis-to-build-pipeline/c-family-project "mention")
* [js-ts-go-python-php](https://docs.sonarsource.com/sonarqube-cloud/advanced-setup/ci-based-analysis/azure-pipelines/adding-analysis-to-build-pipeline/js-ts-go-python-php "mention")
### Typical YAML file example for a monorepo analysis
```yaml
# Template pipeline that build 2 distinct .NET projects, living in 2 separate folders in the repo. We are analyzing them on SonarQube Cloud, each targets a specific SonarQube Cloud project.
trigger:
- main # or another name representing your main branch
pool:
vmImage: windows-latest
steps:
- task: VisualStudioTestPlatformInstaller@1
inputs:
packageFeedSelector: 'nugetOrg'
versionSelector: 'latestPreRelease'
- task: UseDotNet@2
inputs:
packageType: 'sdk'
version: '6.x'
includePreviewVersions: true
- task: NuGetToolInstaller@1
inputs:
versionSpec: '5.9.0'
checkLatest: true
- task: DotNetCoreCLI@2
inputs:
command: 'restore'
projects: '**/*.sln'
feedsToUse: 'select'
- task: SonarCloudPrepare@4
inputs:
SonarCloud: '
---
# Source: https://docs.sonarsource.com/sonarqube-community-build/server-update-and-maintenance/monitoring.md
# Source: https://docs.sonarsource.com/sonarqube-server/8.9/instance-administration/monitoring.md
# Source: https://docs.sonarsource.com/sonarqube-server/9.8/instance-administration/monitoring.md
# Source: https://docs.sonarsource.com/sonarqube-server/9.9/instance-administration/monitoring.md
# Source: https://docs.sonarsource.com/sonarqube-server/10.0/instance-administration/monitoring.md
# Source: https://docs.sonarsource.com/sonarqube-server/10.1/instance-administration/monitoring.md
# Source: https://docs.sonarsource.com/sonarqube-server/10.2/instance-administration/monitoring.md
# Source: https://docs.sonarsource.com/sonarqube-server/10.3/instance-administration/monitoring.md
# Source: https://docs.sonarsource.com/sonarqube-server/10.4/instance-administration/monitoring.md
# Source: https://docs.sonarsource.com/sonarqube-server/10.5/instance-administration/monitoring.md
# Source: https://docs.sonarsource.com/sonarqube-server/10.6/instance-administration/monitoring.md
# Source: https://docs.sonarsource.com/sonarqube-server/10.7/server-upgrade-and-maintenance/monitoring.md
# Source: https://docs.sonarsource.com/sonarqube-server/10.8/server-upgrade-and-maintenance/monitoring.md
# Source: https://docs.sonarsource.com/sonarqube-server/2025.2/server-update-and-maintenance/monitoring.md
# Source: https://docs.sonarsource.com/sonarqube-server/2025.3/server-update-and-maintenance/data-center-edition/monitoring.md
# Source: https://docs.sonarsource.com/sonarqube-server/2025.3/server-update-and-maintenance/monitoring.md
# Source: https://docs.sonarsource.com/sonarqube-server/2025.5/server-update-and-maintenance/data-center-edition/monitoring.md
# Source: https://docs.sonarsource.com/sonarqube-server/2025.5/server-update-and-maintenance/monitoring.md
# Source: https://docs.sonarsource.com/sonarqube-server/2025.1/server-update-and-maintenance/monitoring.md
# Source: https://docs.sonarsource.com/sonarqube-server/2025.4/server-update-and-maintenance/data-center-edition/monitoring.md
# Source: https://docs.sonarsource.com/sonarqube-server/2025.4/server-update-and-maintenance/monitoring.md
# Source: https://docs.sonarsource.com/sonarqube-server/2025.6/server-update-and-maintenance/data-center-edition/monitoring.md
# Source: https://docs.sonarsource.com/sonarqube-server/2025.6/server-update-and-maintenance/monitoring.md
# Source: https://docs.sonarsource.com/sonarqube-server/server-update-and-maintenance/data-center-edition/monitoring.md
# Source: https://docs.sonarsource.com/sonarqube-server/server-update-and-maintenance/monitoring.md
# Monitoring
- [SonarQube Server instance](/sonarqube-server/server-update-and-maintenance/monitoring/instance.md): Monitoring your SonarQube Server instance is key to keeping it healthy and ensuring user satisfaction.
- [Lines of Code](/sonarqube-server/server-update-and-maintenance/monitoring/lines-of-code.md): SonarQube calculates the Lines of Code analyzed against the subscription’s limit defined by the license.
---
# Source: https://docs.sonarsource.com/sonarqube-server/2025.2/devops-platform-integration/azure-devops-integration/adding-analysis-to-pipeline/monorepo-projects.md
# Source: https://docs.sonarsource.com/sonarqube-server/2025.3/devops-platform-integration/azure-devops-integration/adding-analysis-to-pipeline/monorepo-projects.md
# Source: https://docs.sonarsource.com/sonarqube-server/2025.5/devops-platform-integration/azure-devops-integration/adding-analysis-to-pipeline/monorepo-projects.md
# Source: https://docs.sonarsource.com/sonarqube-server/2025.1/devops-platform-integration/azure-devops-integration/adding-analysis-to-pipeline/monorepo-projects.md
# Source: https://docs.sonarsource.com/sonarqube-server/2025.4/devops-platform-integration/azure-devops-integration/adding-analysis-to-pipeline/monorepo-projects.md
# Source: https://docs.sonarsource.com/sonarqube-server/2025.6/devops-platform-integration/azure-devops-integration/adding-analysis-to-pipeline/monorepo-projects.md
# Source: https://docs.sonarsource.com/sonarqube-server/devops-platform-integration/azure-devops-integration/adding-analysis-to-pipeline/monorepo-projects.md
# Source: https://docs.sonarsource.com/sonarqube-cloud/advanced-setup/ci-based-analysis/azure-pipelines/adding-analysis-to-build-pipeline/monorepo-projects.md
# Monorepo projects
You can add the SonarQube Cloud analysis to your Azure build pipeline for a monorepo.
Proceed as follows:
1. If not already done, import your monorepo to create the corresponding projects in SonarQube Cloud: see the [monorepo-support](https://docs.sonarsource.com/sonarqube-cloud/advanced-setup/monorepo-support "mention") page.
2. For each project, configure your [analysis-parameters](https://docs.sonarsource.com/sonarqube-cloud/advanced-setup/analysis-parameters "mention").
3. For each project, set up the integration features. See the [azure-devops](https://docs.sonarsource.com/sonarqube-cloud/managing-your-projects/administering-your-projects/devops-platform-integration/azure-devops "mention") page for more details.
4. Add the SonarQube Cloud analysis to your YAML pipeline. To do so, see the section corresponding to your project type and use the YAML file example below add analysis to a:
* [gradle-or-maven-project](https://docs.sonarsource.com/sonarqube-cloud/advanced-setup/ci-based-analysis/azure-pipelines/adding-analysis-to-build-pipeline/gradle-or-maven-project "mention")
* [dotnet-project](https://docs.sonarsource.com/sonarqube-cloud/advanced-setup/ci-based-analysis/azure-pipelines/adding-analysis-to-build-pipeline/dotnet-project "mention")
* [c-family-project](https://docs.sonarsource.com/sonarqube-cloud/advanced-setup/ci-based-analysis/azure-pipelines/adding-analysis-to-build-pipeline/c-family-project "mention")
* [js-ts-go-python-php](https://docs.sonarsource.com/sonarqube-cloud/advanced-setup/ci-based-analysis/azure-pipelines/adding-analysis-to-build-pipeline/js-ts-go-python-php "mention")
### Typical YAML file example for a monorepo analysis
```yaml
# Template pipeline that build 2 distinct .NET projects, living in 2 separate folders in the repo. We are analyzing them on SonarQube Cloud, each targets a specific SonarQube Cloud project.
trigger:
- main # or another name representing your main branch
pool:
vmImage: windows-latest
steps:
- task: VisualStudioTestPlatformInstaller@1
inputs:
packageFeedSelector: 'nugetOrg'
versionSelector: 'latestPreRelease'
- task: UseDotNet@2
inputs:
packageType: 'sdk'
version: '6.x'
includePreviewVersions: true
- task: NuGetToolInstaller@1
inputs:
versionSpec: '5.9.0'
checkLatest: true
- task: DotNetCoreCLI@2
inputs:
command: 'restore'
projects: '**/*.sln'
feedsToUse: 'select'
- task: SonarCloudPrepare@4
inputs:
SonarCloud: ' 5. Once you’ve completed the project list, select the **Set up monorepo** button. The **Set up new code** page opens.
6. Select the New Code Definition (NCD) you want to apply by default to the SonarQube Cloud projects in the monorepo. More information about defining your NCD is on the [Defining new code](https://app.gitbook.com/s/eu7dHWcqP9Cr3eUAzwWg/project-administration/clean-as-you-code-settings/defining-new-code "mention") page.
7. Select the **Create projects** button.
{% hint style="info" %}
If you select a repository that is already bound to SonarQube Cloud, then this creates new projects as part of a monorepo setup and converts the existing project, which is bound to the selected repository, to the monorepo.
{% endhint %}
#### Step 2: Add the SonarQube Cloud analysis to your monorepo’s CI pipeline
To perform the configuration, follow the procedure for your CI service:
* [github-actions-for-sonarcloud](https://docs.sonarsource.com/sonarqube-cloud/advanced-setup/ci-based-analysis/github-actions-for-sonarcloud "mention")
* [bitbucket-pipelines-for-sonarcloud](https://docs.sonarsource.com/sonarqube-cloud/advanced-setup/ci-based-analysis/bitbucket-pipelines-for-sonarcloud "mention")
* [introduction](https://docs.sonarsource.com/sonarqube-cloud/advanced-setup/ci-based-analysis/azure-pipelines/introduction "mention") to Azure pipelines
* [gitlab-ci](https://docs.sonarsource.com/sonarqube-cloud/advanced-setup/ci-based-analysis/gitlab-ci "mention")
* [circleci](https://docs.sonarsource.com/sonarqube-cloud/advanced-setup/ci-based-analysis/circleci "mention")
* [other-cis](https://docs.sonarsource.com/sonarqube-cloud/advanced-setup/ci-based-analysis/other-cis "mention")
In the build procedure for each monorepo project, make sure to specify the SonarQube Cloud project key that you designated for it. This provides the binding between the project within the monorepo and the corresponding project in SonarQube Cloud. This enables SonarQube Cloud to correctly process the analysis results and to dispatch pull request decorations back to the DevOps platform for each project individually; see the [pull-request-analysis](https://docs.sonarsource.com/sonarqube-cloud/improving/pull-request-analysis "mention") page for information on decorating your pull request.
---
# Source: https://docs.sonarsource.com/sonarqube-server/10.5/devops-platform-integration/github-integration/monorepo.md
# If you're using a monorepo
In a monorepo setup, multiple SonarQube projects, each corresponding to a separate project within the monorepo, are all bound to the same GitHub repository. If the [setting-up-global-integration](https://docs.sonarsource.com/sonarqube-server/10.5/devops-platform-integration/github-integration/setting-up-global-integration "mention") has been properly set up, then you can easily import the projects managed in a GitHub monorepo from the SonarQube UI and thus, benefit from the integration features, such as the pull request decoration.
The monorepo feature is supported starting in the [Enterprise Edition](https://www.sonarsource.com/plans-and-pricing/enterprise/).
### Analysis setup roadmap
To manage the analysis of your projects in a monorepo:
1. Create the SonarQube projects related to your monorepo by importing the GitHub monorepo: see [monorepos](https://docs.sonarsource.com/sonarqube-server/10.5/project-administration/monorepos "mention").
2. Add the analysis to your GitHub Actions’ monorepo workflow: see below.
3. You can fail a job inside the monorepo workflow when the quality gate fails and/or prevent pull request merges when the quality gate fails: see [adding-sonarqube-analysis-to-your-workflow](https://docs.sonarsource.com/sonarqube-server/10.5/devops-platform-integration/github-integration/adding-sonarqube-analysis-to-your-workflow "mention").
### Adding the analysis to your monorepo workflow
To add the SonarQube analysis to your GitHub Actions’ monorepo workflow:
1. For each project in the monorepo, set the necessary analysis parameters: see [analysis-parameters](https://docs.sonarsource.com/sonarqube-server/10.5/analyzing-source-code/analysis-parameters "mention") and the respective SonarScanner page ([sonarscanner-for-gradle](https://docs.sonarsource.com/sonarqube-server/10.5/analyzing-source-code/scanners/sonarscanner-for-gradle "mention"), [sonarscanner-for-dotnet](https://docs.sonarsource.com/sonarqube-server/10.5/analyzing-source-code/scanners/sonarscanner-for-dotnet "mention"), [sonarscanner-for-maven](https://docs.sonarsource.com/sonarqube-server/10.5/analyzing-source-code/scanners/sonarscanner-for-maven "mention"), [sonarscanner](https://docs.sonarsource.com/sonarqube-server/10.5/analyzing-source-code/scanners/sonarscanner "mention")) for more information. The mandatory parameter is the `sonar.projectKey` property.
2. Set up the authentication to the SonarQube Server: see below.
3. Add a workflow file (`build.yml`) in the home directory of the monorepo: see below.
#### Setting up the authentication to the SonarQube Server
You have to create the Sonar tokens used to authenticate to the SonarQube Server during the analysis of the monorepo projects and store them securely in GitHub secrets. You can either use one single global-level token for the monorepo or use a project-level token for each project in the monorepo.
Note that the Sonar Host URL must be stored in a GitHub secret as described in **Creating your GitHub secrets** in [adding-sonarqube-analysis-to-your-workflow](https://docs.sonarsource.com/sonarqube-server/10.5/devops-platform-integration/github-integration/adding-sonarqube-analysis-to-your-workflow "mention").
Proceed as follows:
1. Generate the [generating-and-using-tokens](https://docs.sonarsource.com/sonarqube-server/10.5/user-guide/user-account/generating-and-using-tokens "mention")(s) in SonarQube:
* For project tokens, create a token for each project (you need the Administer permission on the project): Go to the **Security** page of your SonarQube account and create a **Project analysis token**.
* For a global token, ask your administrator (The procedure is similar but you need the global Administer system permission.).
2. In your GitHub repository, go to **Settings > Secrets**.
3. Select **New repository secret**.
4. In the **Name** field:
* If you use a global token: enter SONAR\_TOKEN.
* Otherwise: enter SONAR\_TOKEN\_1 (or another unique identifier within the monorepo) for the token of your first project in the monorepo.
5. In the **Value** field, enter the corresponding token value.
6. Select **Add secret**.
7. If you use project-level tokens, repeat steps 3 to 6 for each additional project in the monorepo.
#### Configuring the build.yml file
In the `build.yml` file of your monorepo:
* Define the paths to the projects.
* Add a job for each project in the monorepo.
See the file example below.
{% tabs %}
{% tab title="MAVEN" %}
```css-79elbk
name: Build
on:
push:
branches:
- master # main branch name
paths:
- 'PROJECT1_PATH/**' # monorepo projects paths from the monorepo root directory
- 'PROJECT2_PATH/**'
pull_request:
types: [opened, synchronize, reopened]
jobs:
sonarQubeScan1:
name: sonarQubeScan1
runs-on: ubuntu-latest
steps:
- uses: actions/checkout@v4
with:
fetch-depth: 0 # Shallow clones should be disabled for a better relevancy of analysis
- name: Set up JDK 17
uses: actions/setup-java@v1
with:
java-version: 17
- name: Cache SonarQube packages
uses: actions/cache@v1
with:
path: ~/.sonar/cache
key: ${{ runner.os }}-sonar
restore-keys: ${{ runner.os }}-sonar
- name: Cache Maven packages
uses: actions/cache@v1
with:
path: ~/.m2
key: ${{ runner.os }}-m2-${{ hashFiles('**/pom.xml') }}
restore-keys: ${{ runner.os }}-m2
- name: SonarQube Scan 1
env:
SONAR_TOKEN: ${{ secrets.SONAR_TOKEN_1 }} # analysis token associated to your project
SONAR_HOST_URL: ${{ secrets.SONAR_HOST_URL }}
run: |
cd PROJECT1_PATH/
mvn -B verify org.sonarsource.scanner.maven:sonar-maven-plugin:sonar -Dsonar.projectKey=SONAR_PROJECT1_KEY -Dsonar.projectName='SONAR_PROJECT1_NAME'
# Replace variables with project path, key and name
sonarQubeScan2:
name: sonarQubeScan2
runs-on: ubuntu-latest
steps:
- uses: actions/checkout@v4
with:
fetch-depth: 0 # Shallow clones should be disabled for a better relevancy of analysis
- name: Set up JDK 17
uses: actions/setup-java@v1
with:
java-version: 17
- name: Cache SonarQube packages
uses: actions/cache@v1
with:
path: ~/.sonar/cache
key: ${{ runner.os }}-sonar
restore-keys: ${{ runner.os }}-sonar
- name: Cache Maven packages
uses: actions/cache@v1
with:
path: ~/.m2
key: ${{ runner.os }}-m2-${{ hashFiles('**/pom.xml') }}
restore-keys: ${{ runner.os }}-m2
- name: SonarQube Scan 2
env:
SONAR_TOKEN: ${{ secrets.SONAR_TOKEN_2 }} # analysis token associated to your project
SONAR_HOST_URL: ${{ secrets.SONAR_HOST_URL }}
run: run: |
cd PROJECT2_PATH/
mvn -B verify org.sonarsource.scanner.maven:sonar-maven-plugin:sonar -Dsonar.projectKey=SONAR_PROJECT2_KEY -Dsonar.projectName='SONAR_PROJECT2_NAME'
# Replace variables with project path, key and name
# Add other scan jobs if you wish to scan more projects in the monorepo
```
{% endtab %}
{% tab title="GRADLE" %}
```css-79elbk
name: Build
on:
push:
branches:
- master # main branch name
paths:
- 'PROJECT1_PATH/**' # monorepo projects paths from the monorepo root directory
- 'PROJECT2_PATH/**'
pull_request:
types: [opened, synchronize, reopened]
jobs:
sonarQubeScan1:
name: sonarQube Scan 1
runs-on: ubuntu-latest
steps:
- uses: actions/checkout@v4
with:
fetch-depth: 0 # Shallow clones should be disabled for a better relevancy of analysis
- name: Set up JDK 17
uses: actions/setup-java@v1
with:
java-version: 17
- name: Cache SonarQube packages
uses: actions/cache@v1
with:
path: ~/.sonar/cache
key: ${{ runner.os }}-sonar
restore-keys: ${{ runner.os }}-sonar
- name: Cache Gradle packages
uses: actions/cache@v1
with:
path: ~/.gradle/caches
key: ${{ runner.os }}-gradle-${{ hashFiles('**/*.gradle') }}
restore-keys: ${{ runner.os }}-gradle
- name: sonarQube Scan 1
env:
SONAR_TOKEN: ${{ secrets.SONAR_TOKEN_1 }} # analysis token associated to your project
SONAR_HOST_URL: ${{ secrets.SONAR_HOST_URL }}
run: |
cd PROJECT1_PATH/
./gradlew build sonar --info
#Replace variable with the project path
sonarQubeScan2:
name: sonarQubeScan2
runs-on: ubuntu-latest
steps:
- uses: actions/checkout@v4
with:
fetch-depth: 0 # Shallow clones should be disabled for a better relevancy of analysis
- name: Set up JDK 17
uses: actions/setup-java@v1
with:
java-version: 17
- name: Cache SonarQube packages
uses: actions/cache@v1
with:
path: ~/.sonar/cache
key: ${{ runner.os }}-sonar
restore-keys: ${{ runner.os }}-sonar
- name: Cache Gradle packages
uses: actions/cache@v1
with:
path: ~/.gradle/caches
key: ${{ runner.os }}-gradle-${{ hashFiles('**/*.gradle') }}
restore-keys: ${{ runner.os }}-gradle
- name: sonarQube Scan 2
env:
SONAR_TOKEN: ${{ secrets.SONAR_TOKEN_2 }} # analysis token associated to your project
SONAR_HOST_URL: ${{ secrets.SONAR_HOST_URL }}
run: |
cd PROJECT2_PATH/
./gradlew build sonar --info
#Replace variable with the project path
# Add other scan jobs if you wish to scan more projects in the monorepo
```
{% endtab %}
{% tab title=".NET" %}
```css-79elbk
name: Build
on:
push:
branches:
- master # main branch name
paths:
- 'PROJECT1_PATH/**' # monorepo projects paths from the monorepo root directory
- 'PROJECT2_PATH/**'
pull_request:
types: [opened, synchronize, reopened]
jobs:
sonarQubeScan1:
name: sonarQube Scan 1
runs-on: windows-latest
steps:
- uses: actions/checkout@v4
with:
fetch-depth: 0 # Shallow clones should be disabled for a better relevancy of analysis
- name: Set up JDK 17
uses: actions/setup-java@v1
with:
java-version: 17
- name: Cache SonarQube packages
uses: actions/cache@v1
with:
path: ~\.sonar\cache
key: ${{ runner.os }}-sonar
restore-keys: ${{ runner.os }}-sonar
- name: Cache SonarQube scanner
id: cache-sonar-scanner
uses: actions/cache@v1
with:
path: .\.sonar\scanner
key: ${{ runner.os }}-sonar-scanner
restore-keys: ${{ runner.os }}-sonar-scanner
- name: Install SonarQube scanner
if: steps.cache-sonar-scanner.outputs.cache-hit != 'true'
shell: powershell
run: |
New-Item -Path .\.sonar\scanner -ItemType Directory
dotnet tool update dotnet-sonarscanner --tool-path .\.sonar\scanner
- name: sonarQube Scan 1
shell: powershell
run: |
.\.sonar\scanner\dotnet-sonarscanner begin /k:"SONAR_PROJECT1_KEY" /d:sonar.token="${{ secrets.SONAR_TOKEN_1 }}" /d:sonar.host.url="${{ secrets.SONAR_HOST_URL }}"
dotnet build PROJECT1_PATH\SLN_FILE.SLN
.\.sonar\scanner\dotnet-sonarscanner end /d:sonar.token="${{ secrets.SONAR_TOKEN_1 }}"
# Replace variables with the project key and the path to the project solution file
sonarQubeScan2:
name: sonarQube Scan 2
runs-on: windows-latest
steps:
- uses: actions/checkout@v4
with:
fetch-depth: 0 # Shallow clones should be disabled for a better relevancy of analysis
- name: Set up JDK 17
uses: actions/setup-java@v1
with:
java-version: 17
- name: Cache SonarQube packages
uses: actions/cache@v1
with:
path: ~\.sonar\cache
key: ${{ runner.os }}-sonar
restore-keys: ${{ runner.os }}-sonar
- name: Cache SonarQube scanner
id: cache-sonar-scanner
uses: actions/cache@v1
with:
path: .\.sonar\scanner
key: ${{ runner.os }}-sonar-scanner
restore-keys: ${{ runner.os }}-sonar-scanner
- name: Install SonarQube scanner
if: steps.cache-sonar-scanner.outputs.cache-hit != 'true'
shell: powershell
run: |
New-Item -Path .\.sonar\scanner -ItemType Directory
dotnet tool update dotnet-sonarscanner --tool-path .\.sonar\scanner
- name: sonarQube Scan 2
shell: powershell
run: |
.\.sonar\scanner\dotnet-sonarscanner begin /k:"SONAR_PROJECT2_KEY" /d:sonar.token="${{ secrets.SONAR_TOKEN_2 }}" /d:sonar.host.url="${{ secrets.SONAR_HOST_URL }}"
dotnet build PROJECT2_PATH\SLN_FILE.SLN
.\.sonar\scanner\dotnet-sonarscanner end /d:sonar.token="${{ secrets.SONAR_TOKEN_2 }}"
# Replace variables with the project key and the path to the project solution file
# Add other scan jobs if you wish to scan more projects in the monorepo
```
{% endtab %}
{% tab title="C, C++, OBJECTIVE-C" %}
```css-79elbk
name: Build
on:
push:
branches:
- master # main branch name
paths:
- 'PROJECT1_PATH/**' # monorepo projects paths from the monorepo root directory
- 'PROJECT2_PATH/**'
pull_request:
types: [opened, synchronize, reopened]
jobs:
sonarQubeScan1:
name: sonarQube Scan 1
runs-on: ubuntu-latest
env:
BUILD_WRAPPER_OUT_DIR: build_wrapper_output_directory # Directory where build-wrapper output will be placed
steps:
- uses: actions/checkout@v4
with:
fetch-depth: 0 # Shallow clones should be disabled for a better relevancy of analysis
- name: Install sonar-scanner and build-wrapper
env:
SONAR_HOST_URL: ${{secrets.SONAR_HOST_URL}}
uses: SonarSource/sonarqube-github-c-cpp@v1
- name: Run build-wrapper for project 1
run: |
build-wrapper-linux-x86-64 --out-dir ${{ env.BUILD_WRAPPER_OUT_DIR }}
5. Once you’ve completed the project list, select the **Set up monorepo** button. The **Set up new code** page opens.
6. Select the New Code Definition (NCD) you want to apply by default to the SonarQube Cloud projects in the monorepo. More information about defining your NCD is on the [Defining new code](https://app.gitbook.com/s/eu7dHWcqP9Cr3eUAzwWg/project-administration/clean-as-you-code-settings/defining-new-code "mention") page.
7. Select the **Create projects** button.
{% hint style="info" %}
If you select a repository that is already bound to SonarQube Cloud, then this creates new projects as part of a monorepo setup and converts the existing project, which is bound to the selected repository, to the monorepo.
{% endhint %}
#### Step 2: Add the SonarQube Cloud analysis to your monorepo’s CI pipeline
To perform the configuration, follow the procedure for your CI service:
* [github-actions-for-sonarcloud](https://docs.sonarsource.com/sonarqube-cloud/advanced-setup/ci-based-analysis/github-actions-for-sonarcloud "mention")
* [bitbucket-pipelines-for-sonarcloud](https://docs.sonarsource.com/sonarqube-cloud/advanced-setup/ci-based-analysis/bitbucket-pipelines-for-sonarcloud "mention")
* [introduction](https://docs.sonarsource.com/sonarqube-cloud/advanced-setup/ci-based-analysis/azure-pipelines/introduction "mention") to Azure pipelines
* [gitlab-ci](https://docs.sonarsource.com/sonarqube-cloud/advanced-setup/ci-based-analysis/gitlab-ci "mention")
* [circleci](https://docs.sonarsource.com/sonarqube-cloud/advanced-setup/ci-based-analysis/circleci "mention")
* [other-cis](https://docs.sonarsource.com/sonarqube-cloud/advanced-setup/ci-based-analysis/other-cis "mention")
In the build procedure for each monorepo project, make sure to specify the SonarQube Cloud project key that you designated for it. This provides the binding between the project within the monorepo and the corresponding project in SonarQube Cloud. This enables SonarQube Cloud to correctly process the analysis results and to dispatch pull request decorations back to the DevOps platform for each project individually; see the [pull-request-analysis](https://docs.sonarsource.com/sonarqube-cloud/improving/pull-request-analysis "mention") page for information on decorating your pull request.
---
# Source: https://docs.sonarsource.com/sonarqube-server/10.5/devops-platform-integration/github-integration/monorepo.md
# If you're using a monorepo
In a monorepo setup, multiple SonarQube projects, each corresponding to a separate project within the monorepo, are all bound to the same GitHub repository. If the [setting-up-global-integration](https://docs.sonarsource.com/sonarqube-server/10.5/devops-platform-integration/github-integration/setting-up-global-integration "mention") has been properly set up, then you can easily import the projects managed in a GitHub monorepo from the SonarQube UI and thus, benefit from the integration features, such as the pull request decoration.
The monorepo feature is supported starting in the [Enterprise Edition](https://www.sonarsource.com/plans-and-pricing/enterprise/).
### Analysis setup roadmap
To manage the analysis of your projects in a monorepo:
1. Create the SonarQube projects related to your monorepo by importing the GitHub monorepo: see [monorepos](https://docs.sonarsource.com/sonarqube-server/10.5/project-administration/monorepos "mention").
2. Add the analysis to your GitHub Actions’ monorepo workflow: see below.
3. You can fail a job inside the monorepo workflow when the quality gate fails and/or prevent pull request merges when the quality gate fails: see [adding-sonarqube-analysis-to-your-workflow](https://docs.sonarsource.com/sonarqube-server/10.5/devops-platform-integration/github-integration/adding-sonarqube-analysis-to-your-workflow "mention").
### Adding the analysis to your monorepo workflow
To add the SonarQube analysis to your GitHub Actions’ monorepo workflow:
1. For each project in the monorepo, set the necessary analysis parameters: see [analysis-parameters](https://docs.sonarsource.com/sonarqube-server/10.5/analyzing-source-code/analysis-parameters "mention") and the respective SonarScanner page ([sonarscanner-for-gradle](https://docs.sonarsource.com/sonarqube-server/10.5/analyzing-source-code/scanners/sonarscanner-for-gradle "mention"), [sonarscanner-for-dotnet](https://docs.sonarsource.com/sonarqube-server/10.5/analyzing-source-code/scanners/sonarscanner-for-dotnet "mention"), [sonarscanner-for-maven](https://docs.sonarsource.com/sonarqube-server/10.5/analyzing-source-code/scanners/sonarscanner-for-maven "mention"), [sonarscanner](https://docs.sonarsource.com/sonarqube-server/10.5/analyzing-source-code/scanners/sonarscanner "mention")) for more information. The mandatory parameter is the `sonar.projectKey` property.
2. Set up the authentication to the SonarQube Server: see below.
3. Add a workflow file (`build.yml`) in the home directory of the monorepo: see below.
#### Setting up the authentication to the SonarQube Server
You have to create the Sonar tokens used to authenticate to the SonarQube Server during the analysis of the monorepo projects and store them securely in GitHub secrets. You can either use one single global-level token for the monorepo or use a project-level token for each project in the monorepo.
Note that the Sonar Host URL must be stored in a GitHub secret as described in **Creating your GitHub secrets** in [adding-sonarqube-analysis-to-your-workflow](https://docs.sonarsource.com/sonarqube-server/10.5/devops-platform-integration/github-integration/adding-sonarqube-analysis-to-your-workflow "mention").
Proceed as follows:
1. Generate the [generating-and-using-tokens](https://docs.sonarsource.com/sonarqube-server/10.5/user-guide/user-account/generating-and-using-tokens "mention")(s) in SonarQube:
* For project tokens, create a token for each project (you need the Administer permission on the project): Go to the **Security** page of your SonarQube account and create a **Project analysis token**.
* For a global token, ask your administrator (The procedure is similar but you need the global Administer system permission.).
2. In your GitHub repository, go to **Settings > Secrets**.
3. Select **New repository secret**.
4. In the **Name** field:
* If you use a global token: enter SONAR\_TOKEN.
* Otherwise: enter SONAR\_TOKEN\_1 (or another unique identifier within the monorepo) for the token of your first project in the monorepo.
5. In the **Value** field, enter the corresponding token value.
6. Select **Add secret**.
7. If you use project-level tokens, repeat steps 3 to 6 for each additional project in the monorepo.
#### Configuring the build.yml file
In the `build.yml` file of your monorepo:
* Define the paths to the projects.
* Add a job for each project in the monorepo.
See the file example below.
{% tabs %}
{% tab title="MAVEN" %}
```css-79elbk
name: Build
on:
push:
branches:
- master # main branch name
paths:
- 'PROJECT1_PATH/**' # monorepo projects paths from the monorepo root directory
- 'PROJECT2_PATH/**'
pull_request:
types: [opened, synchronize, reopened]
jobs:
sonarQubeScan1:
name: sonarQubeScan1
runs-on: ubuntu-latest
steps:
- uses: actions/checkout@v4
with:
fetch-depth: 0 # Shallow clones should be disabled for a better relevancy of analysis
- name: Set up JDK 17
uses: actions/setup-java@v1
with:
java-version: 17
- name: Cache SonarQube packages
uses: actions/cache@v1
with:
path: ~/.sonar/cache
key: ${{ runner.os }}-sonar
restore-keys: ${{ runner.os }}-sonar
- name: Cache Maven packages
uses: actions/cache@v1
with:
path: ~/.m2
key: ${{ runner.os }}-m2-${{ hashFiles('**/pom.xml') }}
restore-keys: ${{ runner.os }}-m2
- name: SonarQube Scan 1
env:
SONAR_TOKEN: ${{ secrets.SONAR_TOKEN_1 }} # analysis token associated to your project
SONAR_HOST_URL: ${{ secrets.SONAR_HOST_URL }}
run: |
cd PROJECT1_PATH/
mvn -B verify org.sonarsource.scanner.maven:sonar-maven-plugin:sonar -Dsonar.projectKey=SONAR_PROJECT1_KEY -Dsonar.projectName='SONAR_PROJECT1_NAME'
# Replace variables with project path, key and name
sonarQubeScan2:
name: sonarQubeScan2
runs-on: ubuntu-latest
steps:
- uses: actions/checkout@v4
with:
fetch-depth: 0 # Shallow clones should be disabled for a better relevancy of analysis
- name: Set up JDK 17
uses: actions/setup-java@v1
with:
java-version: 17
- name: Cache SonarQube packages
uses: actions/cache@v1
with:
path: ~/.sonar/cache
key: ${{ runner.os }}-sonar
restore-keys: ${{ runner.os }}-sonar
- name: Cache Maven packages
uses: actions/cache@v1
with:
path: ~/.m2
key: ${{ runner.os }}-m2-${{ hashFiles('**/pom.xml') }}
restore-keys: ${{ runner.os }}-m2
- name: SonarQube Scan 2
env:
SONAR_TOKEN: ${{ secrets.SONAR_TOKEN_2 }} # analysis token associated to your project
SONAR_HOST_URL: ${{ secrets.SONAR_HOST_URL }}
run: run: |
cd PROJECT2_PATH/
mvn -B verify org.sonarsource.scanner.maven:sonar-maven-plugin:sonar -Dsonar.projectKey=SONAR_PROJECT2_KEY -Dsonar.projectName='SONAR_PROJECT2_NAME'
# Replace variables with project path, key and name
# Add other scan jobs if you wish to scan more projects in the monorepo
```
{% endtab %}
{% tab title="GRADLE" %}
```css-79elbk
name: Build
on:
push:
branches:
- master # main branch name
paths:
- 'PROJECT1_PATH/**' # monorepo projects paths from the monorepo root directory
- 'PROJECT2_PATH/**'
pull_request:
types: [opened, synchronize, reopened]
jobs:
sonarQubeScan1:
name: sonarQube Scan 1
runs-on: ubuntu-latest
steps:
- uses: actions/checkout@v4
with:
fetch-depth: 0 # Shallow clones should be disabled for a better relevancy of analysis
- name: Set up JDK 17
uses: actions/setup-java@v1
with:
java-version: 17
- name: Cache SonarQube packages
uses: actions/cache@v1
with:
path: ~/.sonar/cache
key: ${{ runner.os }}-sonar
restore-keys: ${{ runner.os }}-sonar
- name: Cache Gradle packages
uses: actions/cache@v1
with:
path: ~/.gradle/caches
key: ${{ runner.os }}-gradle-${{ hashFiles('**/*.gradle') }}
restore-keys: ${{ runner.os }}-gradle
- name: sonarQube Scan 1
env:
SONAR_TOKEN: ${{ secrets.SONAR_TOKEN_1 }} # analysis token associated to your project
SONAR_HOST_URL: ${{ secrets.SONAR_HOST_URL }}
run: |
cd PROJECT1_PATH/
./gradlew build sonar --info
#Replace variable with the project path
sonarQubeScan2:
name: sonarQubeScan2
runs-on: ubuntu-latest
steps:
- uses: actions/checkout@v4
with:
fetch-depth: 0 # Shallow clones should be disabled for a better relevancy of analysis
- name: Set up JDK 17
uses: actions/setup-java@v1
with:
java-version: 17
- name: Cache SonarQube packages
uses: actions/cache@v1
with:
path: ~/.sonar/cache
key: ${{ runner.os }}-sonar
restore-keys: ${{ runner.os }}-sonar
- name: Cache Gradle packages
uses: actions/cache@v1
with:
path: ~/.gradle/caches
key: ${{ runner.os }}-gradle-${{ hashFiles('**/*.gradle') }}
restore-keys: ${{ runner.os }}-gradle
- name: sonarQube Scan 2
env:
SONAR_TOKEN: ${{ secrets.SONAR_TOKEN_2 }} # analysis token associated to your project
SONAR_HOST_URL: ${{ secrets.SONAR_HOST_URL }}
run: |
cd PROJECT2_PATH/
./gradlew build sonar --info
#Replace variable with the project path
# Add other scan jobs if you wish to scan more projects in the monorepo
```
{% endtab %}
{% tab title=".NET" %}
```css-79elbk
name: Build
on:
push:
branches:
- master # main branch name
paths:
- 'PROJECT1_PATH/**' # monorepo projects paths from the monorepo root directory
- 'PROJECT2_PATH/**'
pull_request:
types: [opened, synchronize, reopened]
jobs:
sonarQubeScan1:
name: sonarQube Scan 1
runs-on: windows-latest
steps:
- uses: actions/checkout@v4
with:
fetch-depth: 0 # Shallow clones should be disabled for a better relevancy of analysis
- name: Set up JDK 17
uses: actions/setup-java@v1
with:
java-version: 17
- name: Cache SonarQube packages
uses: actions/cache@v1
with:
path: ~\.sonar\cache
key: ${{ runner.os }}-sonar
restore-keys: ${{ runner.os }}-sonar
- name: Cache SonarQube scanner
id: cache-sonar-scanner
uses: actions/cache@v1
with:
path: .\.sonar\scanner
key: ${{ runner.os }}-sonar-scanner
restore-keys: ${{ runner.os }}-sonar-scanner
- name: Install SonarQube scanner
if: steps.cache-sonar-scanner.outputs.cache-hit != 'true'
shell: powershell
run: |
New-Item -Path .\.sonar\scanner -ItemType Directory
dotnet tool update dotnet-sonarscanner --tool-path .\.sonar\scanner
- name: sonarQube Scan 1
shell: powershell
run: |
.\.sonar\scanner\dotnet-sonarscanner begin /k:"SONAR_PROJECT1_KEY" /d:sonar.token="${{ secrets.SONAR_TOKEN_1 }}" /d:sonar.host.url="${{ secrets.SONAR_HOST_URL }}"
dotnet build PROJECT1_PATH\SLN_FILE.SLN
.\.sonar\scanner\dotnet-sonarscanner end /d:sonar.token="${{ secrets.SONAR_TOKEN_1 }}"
# Replace variables with the project key and the path to the project solution file
sonarQubeScan2:
name: sonarQube Scan 2
runs-on: windows-latest
steps:
- uses: actions/checkout@v4
with:
fetch-depth: 0 # Shallow clones should be disabled for a better relevancy of analysis
- name: Set up JDK 17
uses: actions/setup-java@v1
with:
java-version: 17
- name: Cache SonarQube packages
uses: actions/cache@v1
with:
path: ~\.sonar\cache
key: ${{ runner.os }}-sonar
restore-keys: ${{ runner.os }}-sonar
- name: Cache SonarQube scanner
id: cache-sonar-scanner
uses: actions/cache@v1
with:
path: .\.sonar\scanner
key: ${{ runner.os }}-sonar-scanner
restore-keys: ${{ runner.os }}-sonar-scanner
- name: Install SonarQube scanner
if: steps.cache-sonar-scanner.outputs.cache-hit != 'true'
shell: powershell
run: |
New-Item -Path .\.sonar\scanner -ItemType Directory
dotnet tool update dotnet-sonarscanner --tool-path .\.sonar\scanner
- name: sonarQube Scan 2
shell: powershell
run: |
.\.sonar\scanner\dotnet-sonarscanner begin /k:"SONAR_PROJECT2_KEY" /d:sonar.token="${{ secrets.SONAR_TOKEN_2 }}" /d:sonar.host.url="${{ secrets.SONAR_HOST_URL }}"
dotnet build PROJECT2_PATH\SLN_FILE.SLN
.\.sonar\scanner\dotnet-sonarscanner end /d:sonar.token="${{ secrets.SONAR_TOKEN_2 }}"
# Replace variables with the project key and the path to the project solution file
# Add other scan jobs if you wish to scan more projects in the monorepo
```
{% endtab %}
{% tab title="C, C++, OBJECTIVE-C" %}
```css-79elbk
name: Build
on:
push:
branches:
- master # main branch name
paths:
- 'PROJECT1_PATH/**' # monorepo projects paths from the monorepo root directory
- 'PROJECT2_PATH/**'
pull_request:
types: [opened, synchronize, reopened]
jobs:
sonarQubeScan1:
name: sonarQube Scan 1
runs-on: ubuntu-latest
env:
BUILD_WRAPPER_OUT_DIR: build_wrapper_output_directory # Directory where build-wrapper output will be placed
steps:
- uses: actions/checkout@v4
with:
fetch-depth: 0 # Shallow clones should be disabled for a better relevancy of analysis
- name: Install sonar-scanner and build-wrapper
env:
SONAR_HOST_URL: ${{secrets.SONAR_HOST_URL}}
uses: SonarSource/sonarqube-github-c-cpp@v1
- name: Run build-wrapper for project 1
run: |
build-wrapper-linux-x86-64 --out-dir ${{ env.BUILD_WRAPPER_OUT_DIR }} 
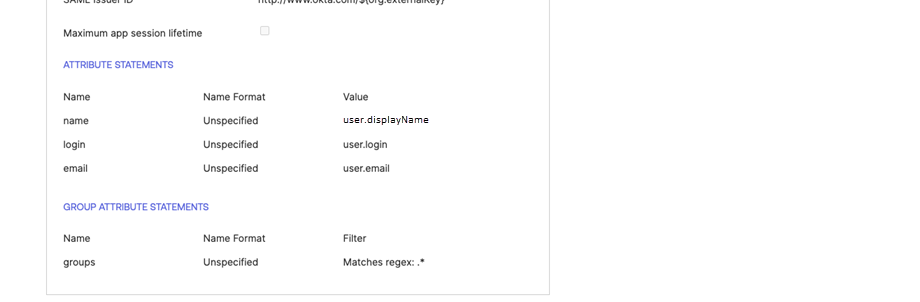
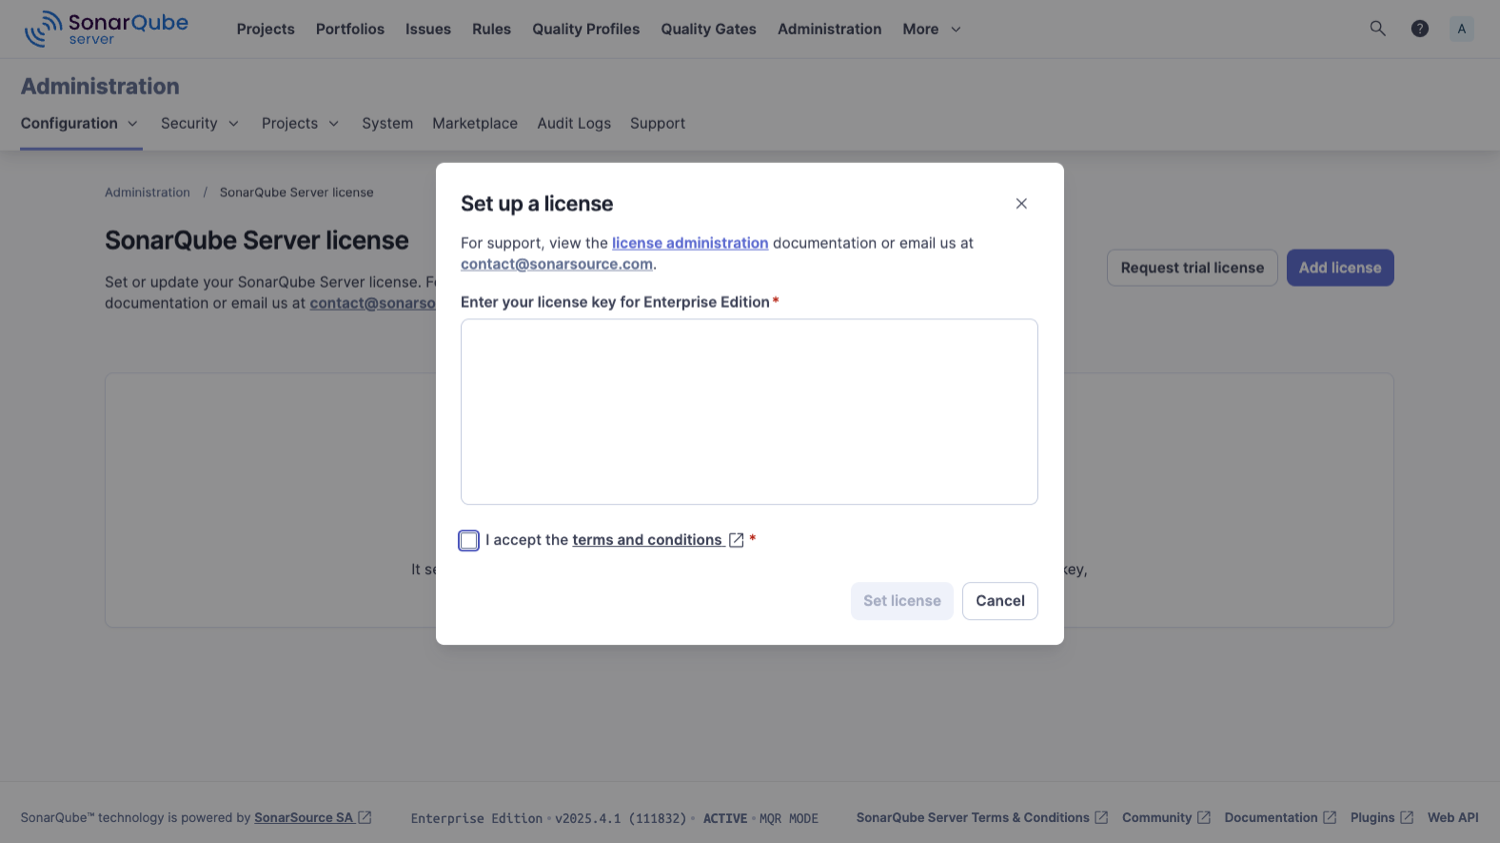
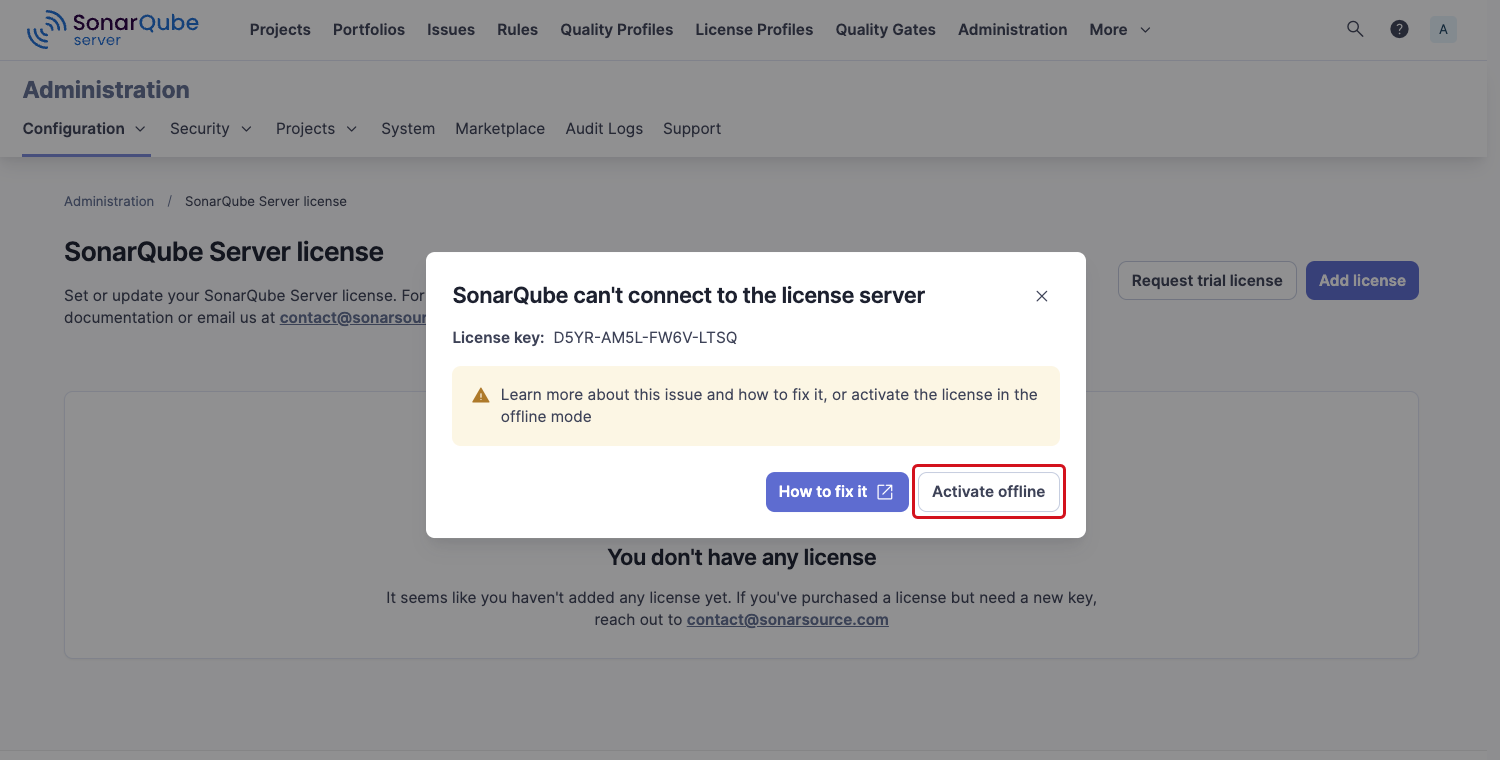
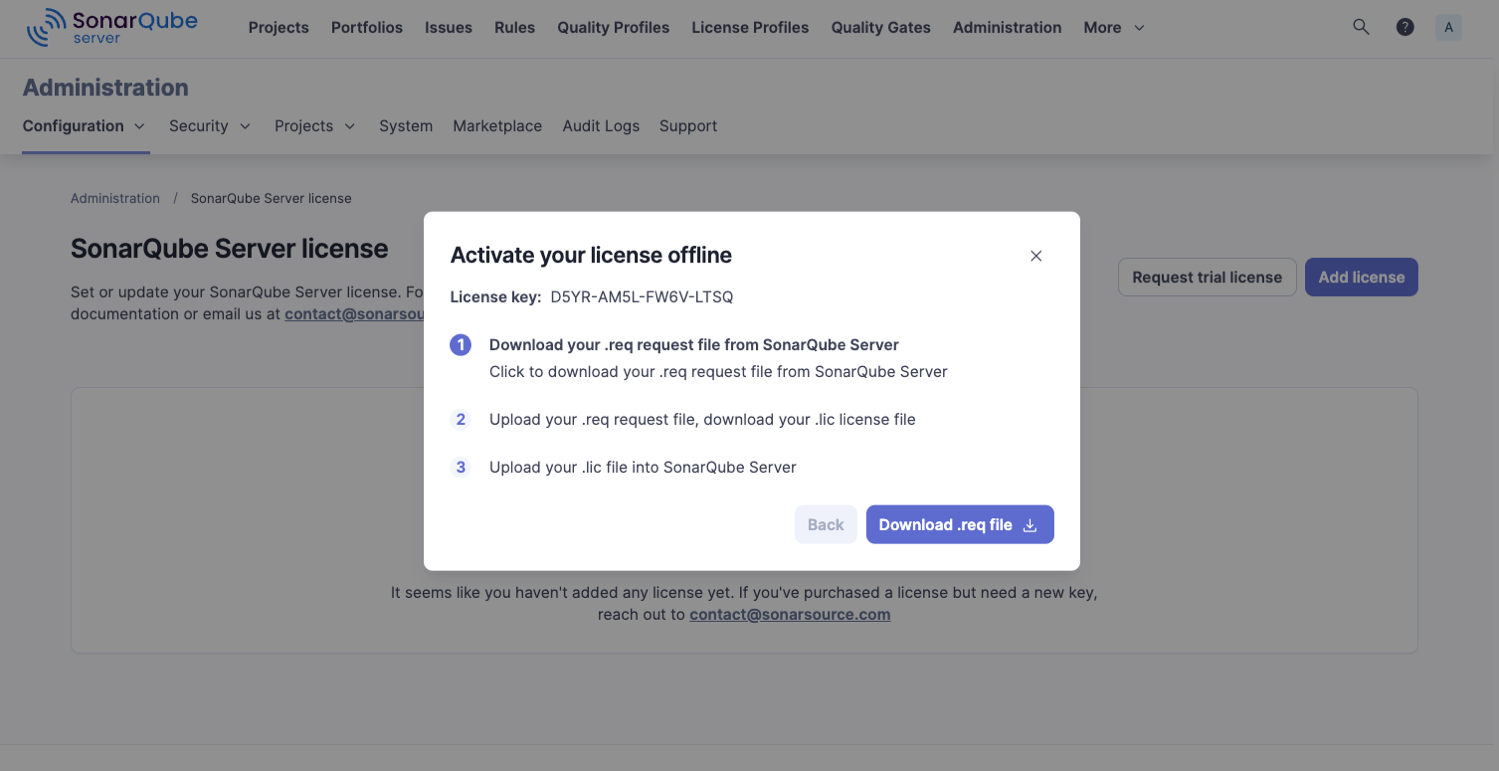
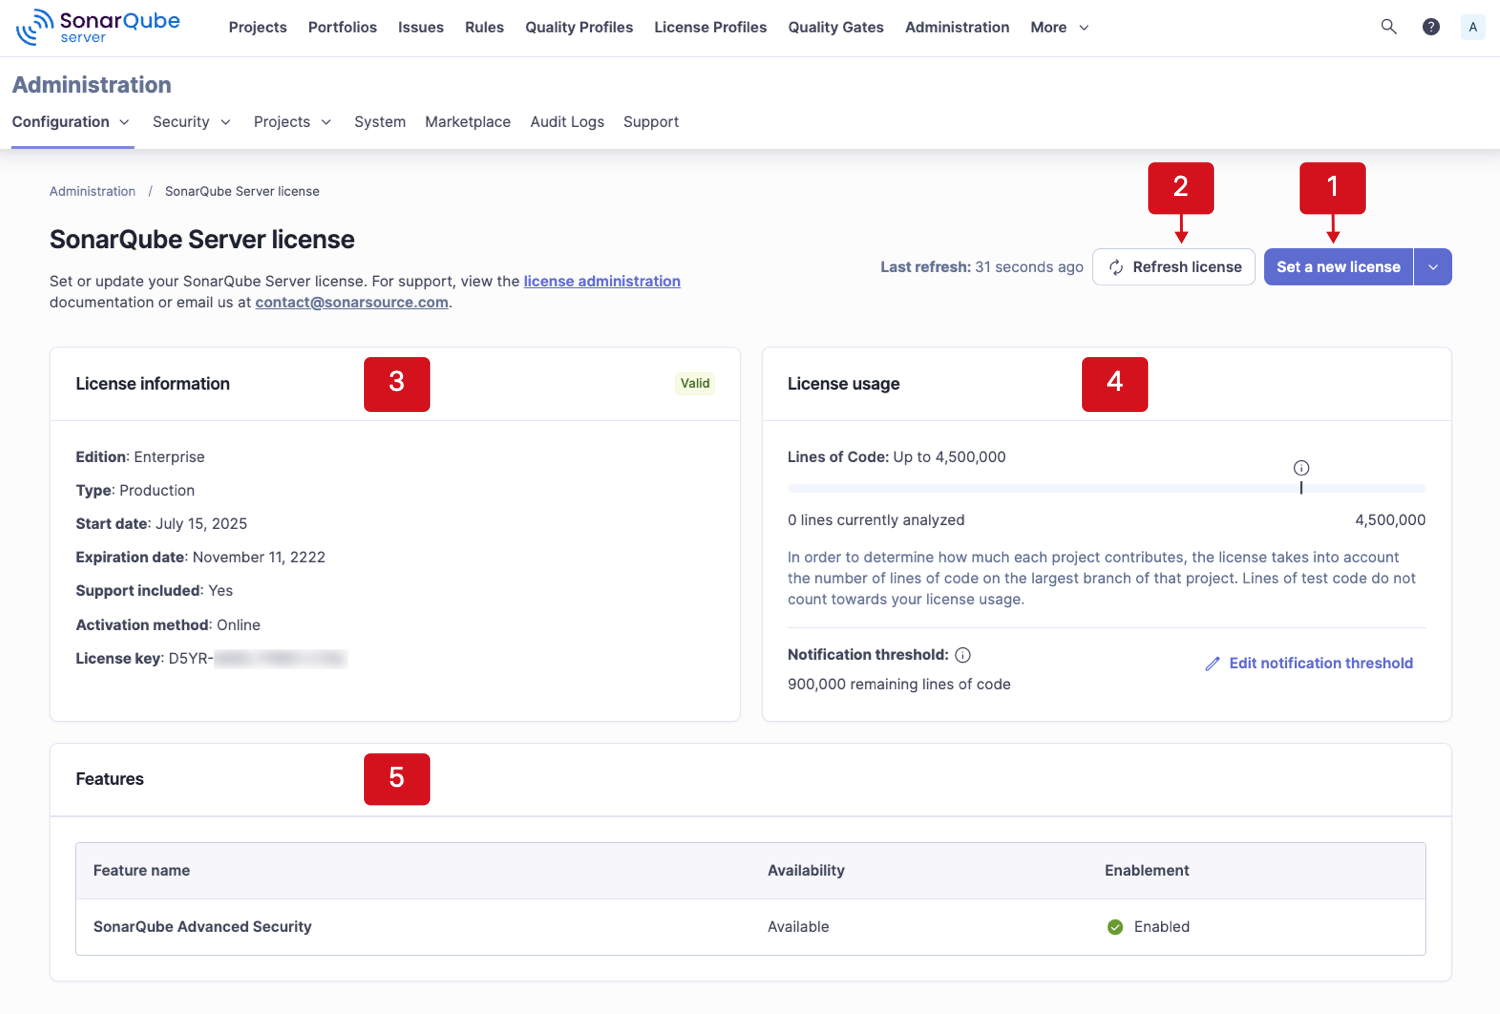 * Your existing[ Help Center](https://help.sonarsource.com/) account credentials are also valid for accessing the License user portal.
#### Checking the license status
* Your existing[ Help Center](https://help.sonarsource.com/) account credentials are also valid for accessing the License user portal.
#### Checking the license status

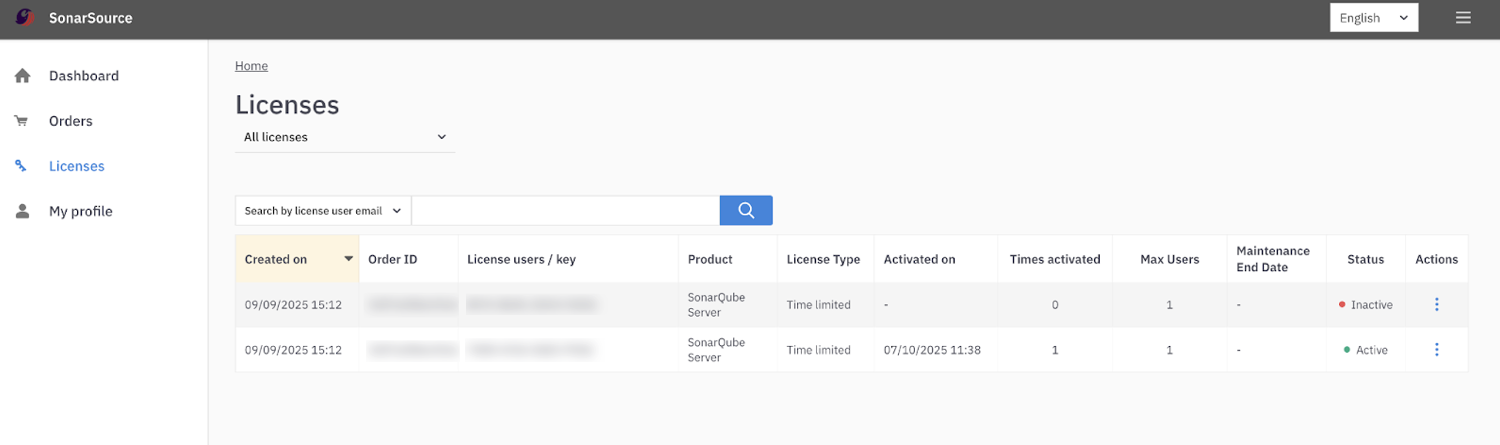
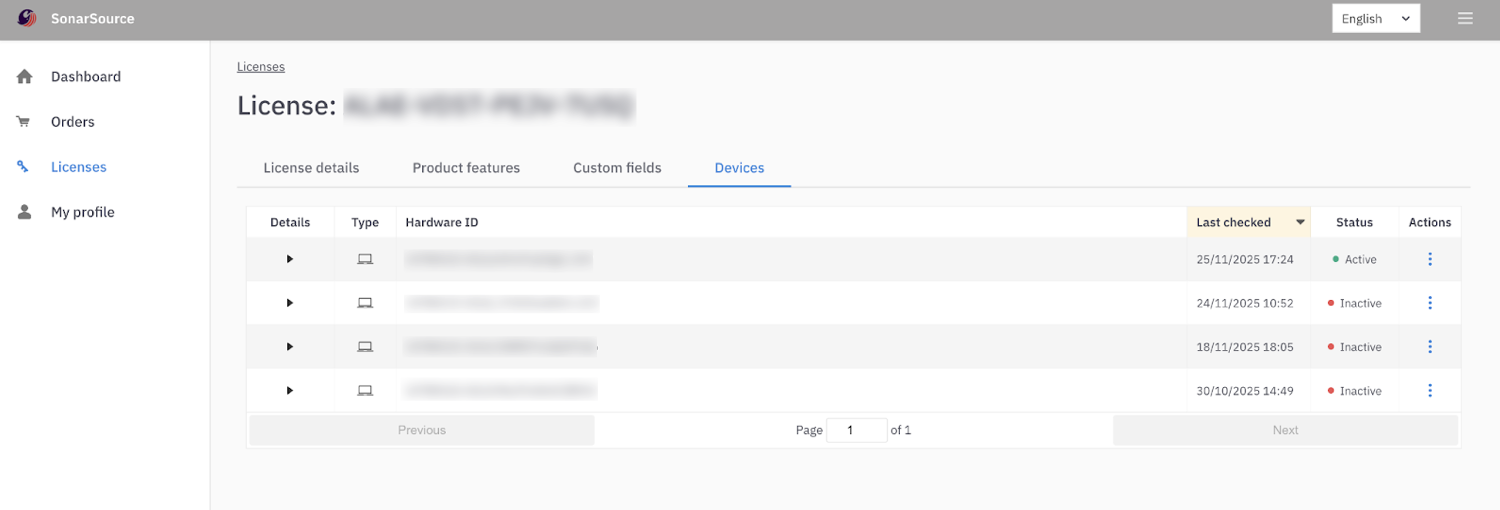
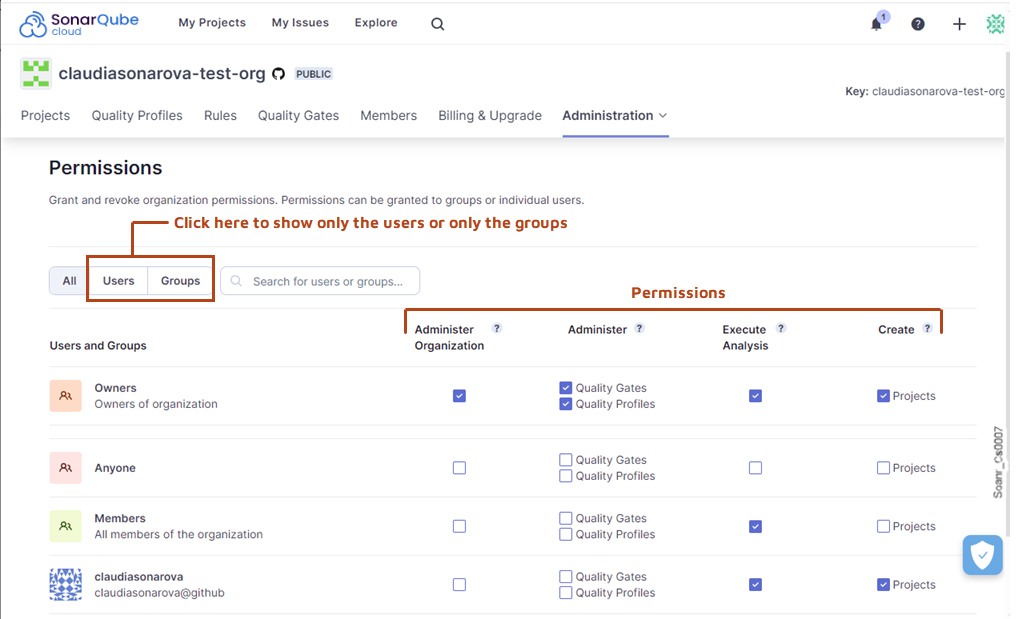 Once set, the new code definition is used to highlight new code throughout the SonarQube Cloud interface. It is used to:
* compute the result for the default quality gate (see below),
* display the new and overall code tabs in the main branch summary,
* and display metrics and other information using the new/old distinction.
### Quality gates
The quality gate is an indicator that tells you whether your code meets your quality and security requirements. A **failed** quality gate means that your code does not meet these requirements:
Once set, the new code definition is used to highlight new code throughout the SonarQube Cloud interface. It is used to:
* compute the result for the default quality gate (see below),
* display the new and overall code tabs in the main branch summary,
* and display metrics and other information using the new/old distinction.
### Quality gates
The quality gate is an indicator that tells you whether your code meets your quality and security requirements. A **failed** quality gate means that your code does not meet these requirements:

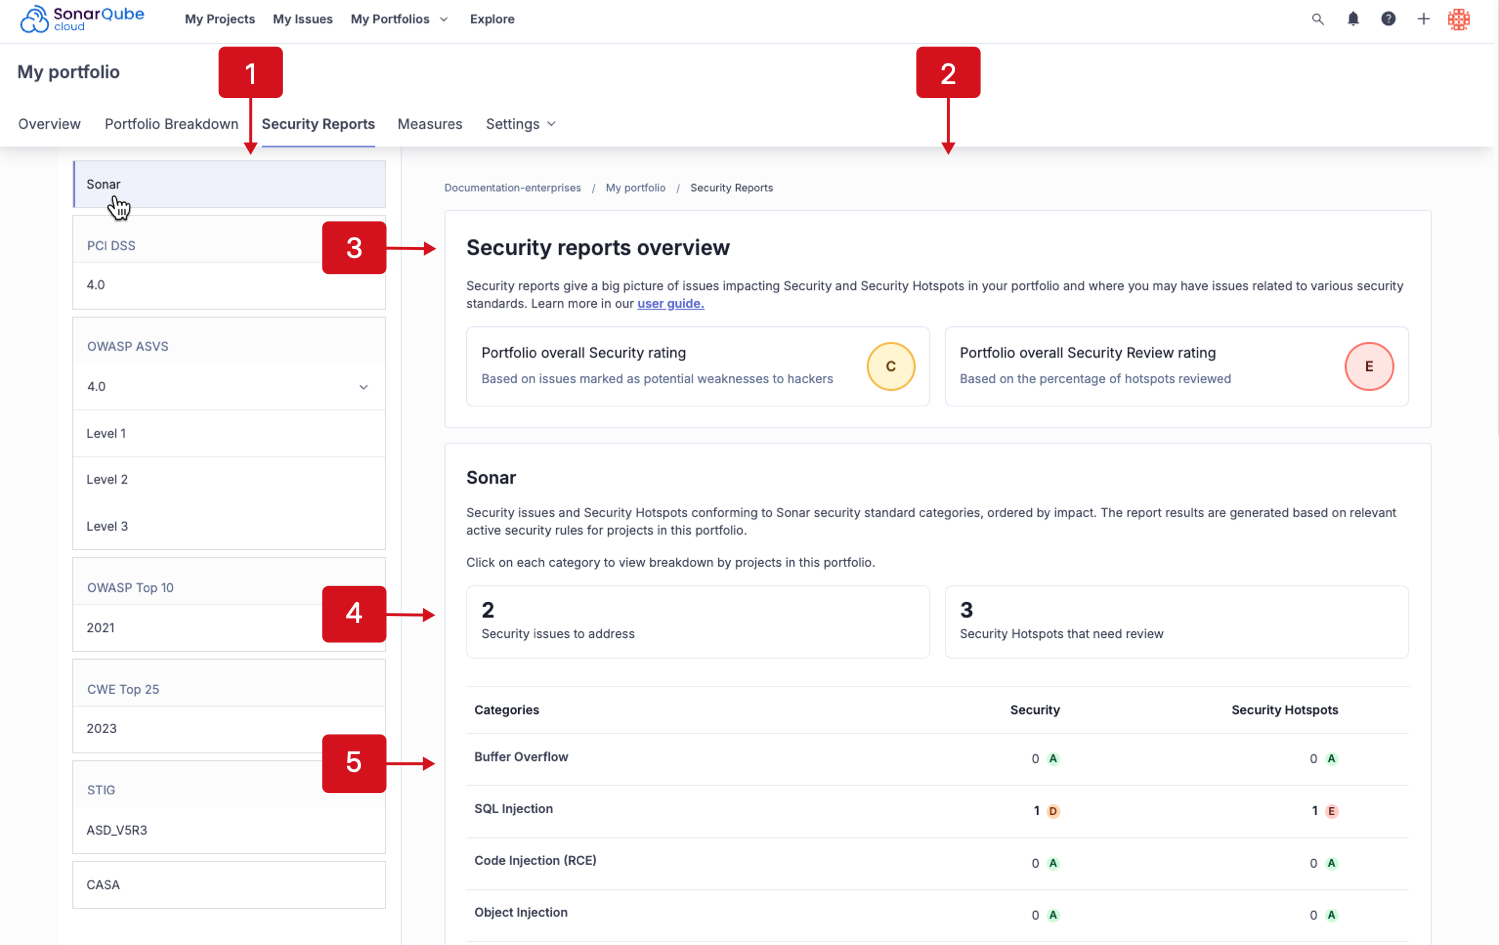


 For SonarQube connections, provide your **SonarQube Server URL** and **User Token**. For SonarCloud connections, provide your **Organization Key** and **User Token**. User Tokens should be generated on the SonarQube/SonarCloud side and pasted into the **User Token field**.
User Tokens can be generated using these pages:
* SonarQube - `https://
For SonarQube connections, provide your **SonarQube Server URL** and **User Token**. For SonarCloud connections, provide your **Organization Key** and **User Token**. User Tokens should be generated on the SonarQube/SonarCloud side and pasted into the **User Token field**.
User Tokens can be generated using these pages:
* SonarQube - `https:// Action buttons to edit/delete existing, or create additional connections will be revealed when hovering over each connection.
**Project binding v3.6-3.7**
Establish your SONARLINT CONNECTED MODE as described above.
Project Bindings can be configured either at the workspace level or in every workspace folder by modifying the `settings.json` file. Example:
```json
{
"sonarlint.connectedMode.project": {
"projectKey": "the-project-key"
}
}
```
If you plan to use multiple connections to different SonarQube servers and/or SonarQube Cloud organizations, simply give a unique `connectionId` to each entry and use them as reference in the binding. Example:
```json
// In project1/.vscode/settings.json
{
"sonarlint.connectedMode.project": {
"connectionId": "mySonar",
"projectKey": "the-project-key-on-sq"
}
}
// In project2/.vscode/settings.json
{
"sonarlint.connectedMode.project": {
"connectionId": "myOrgOnSonarCloud",
"projectKey": "the-project-key-on-sc"
}
}
```
#### SonarLint v3.5.4 and lower
Connection details should be configured in the VSCode user settings (user token, SonarQube Server URL, or SonarQube Cloud organization). For security reasons, the token should not be stored in SCM with workspace settings (why we suggest configuring in VSCode user settings).
Example for SonarQube Server:
```json
{
"sonarlint.connectedMode.connections.sonarqube": [
{
"serverUrl": "https://sonarqube.mycompany.com",
"token": "
Action buttons to edit/delete existing, or create additional connections will be revealed when hovering over each connection.
**Project binding v3.6-3.7**
Establish your SONARLINT CONNECTED MODE as described above.
Project Bindings can be configured either at the workspace level or in every workspace folder by modifying the `settings.json` file. Example:
```json
{
"sonarlint.connectedMode.project": {
"projectKey": "the-project-key"
}
}
```
If you plan to use multiple connections to different SonarQube servers and/or SonarQube Cloud organizations, simply give a unique `connectionId` to each entry and use them as reference in the binding. Example:
```json
// In project1/.vscode/settings.json
{
"sonarlint.connectedMode.project": {
"connectionId": "mySonar",
"projectKey": "the-project-key-on-sq"
}
}
// In project2/.vscode/settings.json
{
"sonarlint.connectedMode.project": {
"connectionId": "myOrgOnSonarCloud",
"projectKey": "the-project-key-on-sc"
}
}
```
#### SonarLint v3.5.4 and lower
Connection details should be configured in the VSCode user settings (user token, SonarQube Server URL, or SonarQube Cloud organization). For security reasons, the token should not be stored in SCM with workspace settings (why we suggest configuring in VSCode user settings).
Example for SonarQube Server:
```json
{
"sonarlint.connectedMode.connections.sonarqube": [
{
"serverUrl": "https://sonarqube.mycompany.com",
"token": "
 ### Disable pull request annotations
Using the default setup, SonarQube Server will add annotations on issues it detects in your Azure DevOps pull request (PR). It’s possible to completely remove the PR integration with Azure DevOps to remove these, but that’s not ideal if you want to keep reporting the quality gate status and analysis metrics to your PRs.\
\
To disable annotations from SonarQube Server on your Azure DevOps PRs:
1. First check if your Azure organization has already been integrated with SonarQube Server. See the [setting-up-integration-at-global-level](https://docs.sonarsource.com/sonarqube-server/2025.1/devops-platform-integration/azure-devops-integration/setting-up-integration-at-global-level "mention") page.
2. Next, retrieve your project and navigate to **Project Settings** > **General Settings** > **DevOps Platform Integration**.
3. Complete all of the required fields and deselect **Enable Inline Pull Request Annotations**.
4. Select **Save** to finish and if successful, you will see confirmation and configuration validation notifications.
### Related pages
* [azure-pipelines-integration-overview](https://docs.sonarsource.com/sonarqube-server/2025.1/devops-platform-integration/azure-devops-integration/azure-pipelines-integration-overview "mention")
* [setting-up-integration-at-global-level](https://docs.sonarsource.com/sonarqube-server/2025.1/devops-platform-integration/azure-devops-integration/setting-up-integration-at-global-level "mention")
* [creating-your-project](https://docs.sonarsource.com/sonarqube-server/2025.1/devops-platform-integration/azure-devops-integration/creating-your-project "mention")
* [troubleshooting-analysis](https://docs.sonarsource.com/sonarqube-server/2025.1/devops-platform-integration/azure-devops-integration/troubleshooting-analysis "mention")
---
# Source: https://docs.sonarsource.com/sonarqube-server/8.9/instance-administration/project-move.md
# Source: https://docs.sonarsource.com/sonarqube-server/9.8/instance-administration/project-move.md
# Source: https://docs.sonarsource.com/sonarqube-server/9.9/instance-administration/project-move.md
# Source: https://docs.sonarsource.com/sonarqube-server/10.0/instance-administration/project-move.md
# Source: https://docs.sonarsource.com/sonarqube-server/10.1/instance-administration/project-move.md
# Source: https://docs.sonarsource.com/sonarqube-server/10.2/instance-administration/project-move.md
# Source: https://docs.sonarsource.com/sonarqube-server/10.3/instance-administration/project-move.md
# Source: https://docs.sonarsource.com/sonarqube-server/10.4/instance-administration/project-move.md
# Source: https://docs.sonarsource.com/sonarqube-server/10.5/instance-administration/project-move.md
# Source: https://docs.sonarsource.com/sonarqube-server/10.6/instance-administration/project-move.md
# Source: https://docs.sonarsource.com/sonarqube-server/10.7/project-administration/project-move.md
# Source: https://docs.sonarsource.com/sonarqube-server/10.8/project-administration/project-move.md
# Source: https://docs.sonarsource.com/sonarqube-server/2025.2/project-administration/project-move.md
# Source: https://docs.sonarsource.com/sonarqube-server/2025.3/project-administration/project-move.md
# Source: https://docs.sonarsource.com/sonarqube-server/2025.5/project-administration/project-move.md
# Source: https://docs.sonarsource.com/sonarqube-server/2025.1/project-administration/project-move.md
# Source: https://docs.sonarsource.com/sonarqube-server/2025.4/project-administration/project-move.md
# Source: https://docs.sonarsource.com/sonarqube-server/2025.6/project-administration/maintaining-project/project-move.md
# Source: https://docs.sonarsource.com/sonarqube-server/project-administration/maintaining-project/project-move.md
# Project move
To use **Project Move**, you must have **Administer** permission rights on the project in the source instance and access to the file systems of both instances.
When you move a project from a source to a target instance, all project data are moved except:
* Source code
* Issue assignments
* Security reports
### When to use project move
**Project Move** can help you with the following situations:
* You want to create a central SonarQube Server instance at the enterprise level and you want to keep the history created on instances used previously at the team level.
* You want to consolidate your editions and move projects from a SonarQube Community Build instance to an [Enterprise Edition](https://www.sonarsource.com/plans-and-pricing/enterprise/) instance or above.
* Your company is acquiring another company that already has a central SonarQube Server instance.
* You are at a large company with several SonarQube Server instances and an application is transferred from one team to another.
### Prerequisites
* The project to be moved has never been analyzed on the target instance.
* The target instance must be [Enterprise Edition](https://www.sonarsource.com/plans-and-pricing/enterprise/) or above.
* The source instance can be a SonarQuber Server or a SonarQube Community Build instance.
* Both source and target instances must have:
* If your source instance is a SonarQube Server instance: the exact same SonarQube Server version.
* The same custom metrics.
* The same custom rules
* The target instance must have all the plugins of the source instance, with the same versions.\
If your source instance has plugins that aren’t in your target instance, either remove them and reanalyze your project or add them to your target instance.
### Preliminary step if moving from a SonarQube Community Build instance
If your source instance is a SonarQube Community Build instance, a preliminary step is necessary before performing Step 1 to Step 3 below:
* Create a new SonarQube Server Enterprise Edition of the same version as the target instance from the database of your SonarQube Community Build instance (no license is required). This Enterprise Edition instance becomes your source instance.
### Step 1: Export the source project to a ZIP file
On the source instance (if the source instance was originally a SonarQube Community Build instance, go directly to 3.):
1. Review the branches of the project by navigating to **Project Settings** > **Branches & Pull Requests** and enable **Keep when inactive** for each branch you want to keep. Note that pull requests are not saved when exporting a project.
2. Reanalyze the project one last time for each branch that has enabled the **Keep when inactive** option to ensure it is populated with data corresponding to your current SonarQube Server installation.
3. Navigate to the project and at the project level, choose **Project Settings** > **Import / Export**.
4. Click on the **Export** button to generate a ZIP file containing the settings and history of your project (but not the source code). Note that if you need to change the project’s key, you must do it before performing the export.
A zip file containing all project data is generated in a file named:
`
### Disable pull request annotations
Using the default setup, SonarQube Server will add annotations on issues it detects in your Azure DevOps pull request (PR). It’s possible to completely remove the PR integration with Azure DevOps to remove these, but that’s not ideal if you want to keep reporting the quality gate status and analysis metrics to your PRs.\
\
To disable annotations from SonarQube Server on your Azure DevOps PRs:
1. First check if your Azure organization has already been integrated with SonarQube Server. See the [setting-up-integration-at-global-level](https://docs.sonarsource.com/sonarqube-server/2025.1/devops-platform-integration/azure-devops-integration/setting-up-integration-at-global-level "mention") page.
2. Next, retrieve your project and navigate to **Project Settings** > **General Settings** > **DevOps Platform Integration**.
3. Complete all of the required fields and deselect **Enable Inline Pull Request Annotations**.
4. Select **Save** to finish and if successful, you will see confirmation and configuration validation notifications.
### Related pages
* [azure-pipelines-integration-overview](https://docs.sonarsource.com/sonarqube-server/2025.1/devops-platform-integration/azure-devops-integration/azure-pipelines-integration-overview "mention")
* [setting-up-integration-at-global-level](https://docs.sonarsource.com/sonarqube-server/2025.1/devops-platform-integration/azure-devops-integration/setting-up-integration-at-global-level "mention")
* [creating-your-project](https://docs.sonarsource.com/sonarqube-server/2025.1/devops-platform-integration/azure-devops-integration/creating-your-project "mention")
* [troubleshooting-analysis](https://docs.sonarsource.com/sonarqube-server/2025.1/devops-platform-integration/azure-devops-integration/troubleshooting-analysis "mention")
---
# Source: https://docs.sonarsource.com/sonarqube-server/8.9/instance-administration/project-move.md
# Source: https://docs.sonarsource.com/sonarqube-server/9.8/instance-administration/project-move.md
# Source: https://docs.sonarsource.com/sonarqube-server/9.9/instance-administration/project-move.md
# Source: https://docs.sonarsource.com/sonarqube-server/10.0/instance-administration/project-move.md
# Source: https://docs.sonarsource.com/sonarqube-server/10.1/instance-administration/project-move.md
# Source: https://docs.sonarsource.com/sonarqube-server/10.2/instance-administration/project-move.md
# Source: https://docs.sonarsource.com/sonarqube-server/10.3/instance-administration/project-move.md
# Source: https://docs.sonarsource.com/sonarqube-server/10.4/instance-administration/project-move.md
# Source: https://docs.sonarsource.com/sonarqube-server/10.5/instance-administration/project-move.md
# Source: https://docs.sonarsource.com/sonarqube-server/10.6/instance-administration/project-move.md
# Source: https://docs.sonarsource.com/sonarqube-server/10.7/project-administration/project-move.md
# Source: https://docs.sonarsource.com/sonarqube-server/10.8/project-administration/project-move.md
# Source: https://docs.sonarsource.com/sonarqube-server/2025.2/project-administration/project-move.md
# Source: https://docs.sonarsource.com/sonarqube-server/2025.3/project-administration/project-move.md
# Source: https://docs.sonarsource.com/sonarqube-server/2025.5/project-administration/project-move.md
# Source: https://docs.sonarsource.com/sonarqube-server/2025.1/project-administration/project-move.md
# Source: https://docs.sonarsource.com/sonarqube-server/2025.4/project-administration/project-move.md
# Source: https://docs.sonarsource.com/sonarqube-server/2025.6/project-administration/maintaining-project/project-move.md
# Source: https://docs.sonarsource.com/sonarqube-server/project-administration/maintaining-project/project-move.md
# Project move
To use **Project Move**, you must have **Administer** permission rights on the project in the source instance and access to the file systems of both instances.
When you move a project from a source to a target instance, all project data are moved except:
* Source code
* Issue assignments
* Security reports
### When to use project move
**Project Move** can help you with the following situations:
* You want to create a central SonarQube Server instance at the enterprise level and you want to keep the history created on instances used previously at the team level.
* You want to consolidate your editions and move projects from a SonarQube Community Build instance to an [Enterprise Edition](https://www.sonarsource.com/plans-and-pricing/enterprise/) instance or above.
* Your company is acquiring another company that already has a central SonarQube Server instance.
* You are at a large company with several SonarQube Server instances and an application is transferred from one team to another.
### Prerequisites
* The project to be moved has never been analyzed on the target instance.
* The target instance must be [Enterprise Edition](https://www.sonarsource.com/plans-and-pricing/enterprise/) or above.
* The source instance can be a SonarQuber Server or a SonarQube Community Build instance.
* Both source and target instances must have:
* If your source instance is a SonarQube Server instance: the exact same SonarQube Server version.
* The same custom metrics.
* The same custom rules
* The target instance must have all the plugins of the source instance, with the same versions.\
If your source instance has plugins that aren’t in your target instance, either remove them and reanalyze your project or add them to your target instance.
### Preliminary step if moving from a SonarQube Community Build instance
If your source instance is a SonarQube Community Build instance, a preliminary step is necessary before performing Step 1 to Step 3 below:
* Create a new SonarQube Server Enterprise Edition of the same version as the target instance from the database of your SonarQube Community Build instance (no license is required). This Enterprise Edition instance becomes your source instance.
### Step 1: Export the source project to a ZIP file
On the source instance (if the source instance was originally a SonarQube Community Build instance, go directly to 3.):
1. Review the branches of the project by navigating to **Project Settings** > **Branches & Pull Requests** and enable **Keep when inactive** for each branch you want to keep. Note that pull requests are not saved when exporting a project.
2. Reanalyze the project one last time for each branch that has enabled the **Keep when inactive** option to ensure it is populated with data corresponding to your current SonarQube Server installation.
3. Navigate to the project and at the project level, choose **Project Settings** > **Import / Export**.
4. Click on the **Export** button to generate a ZIP file containing the settings and history of your project (but not the source code). Note that if you need to change the project’s key, you must do it before performing the export.
A zip file containing all project data is generated in a file named:
`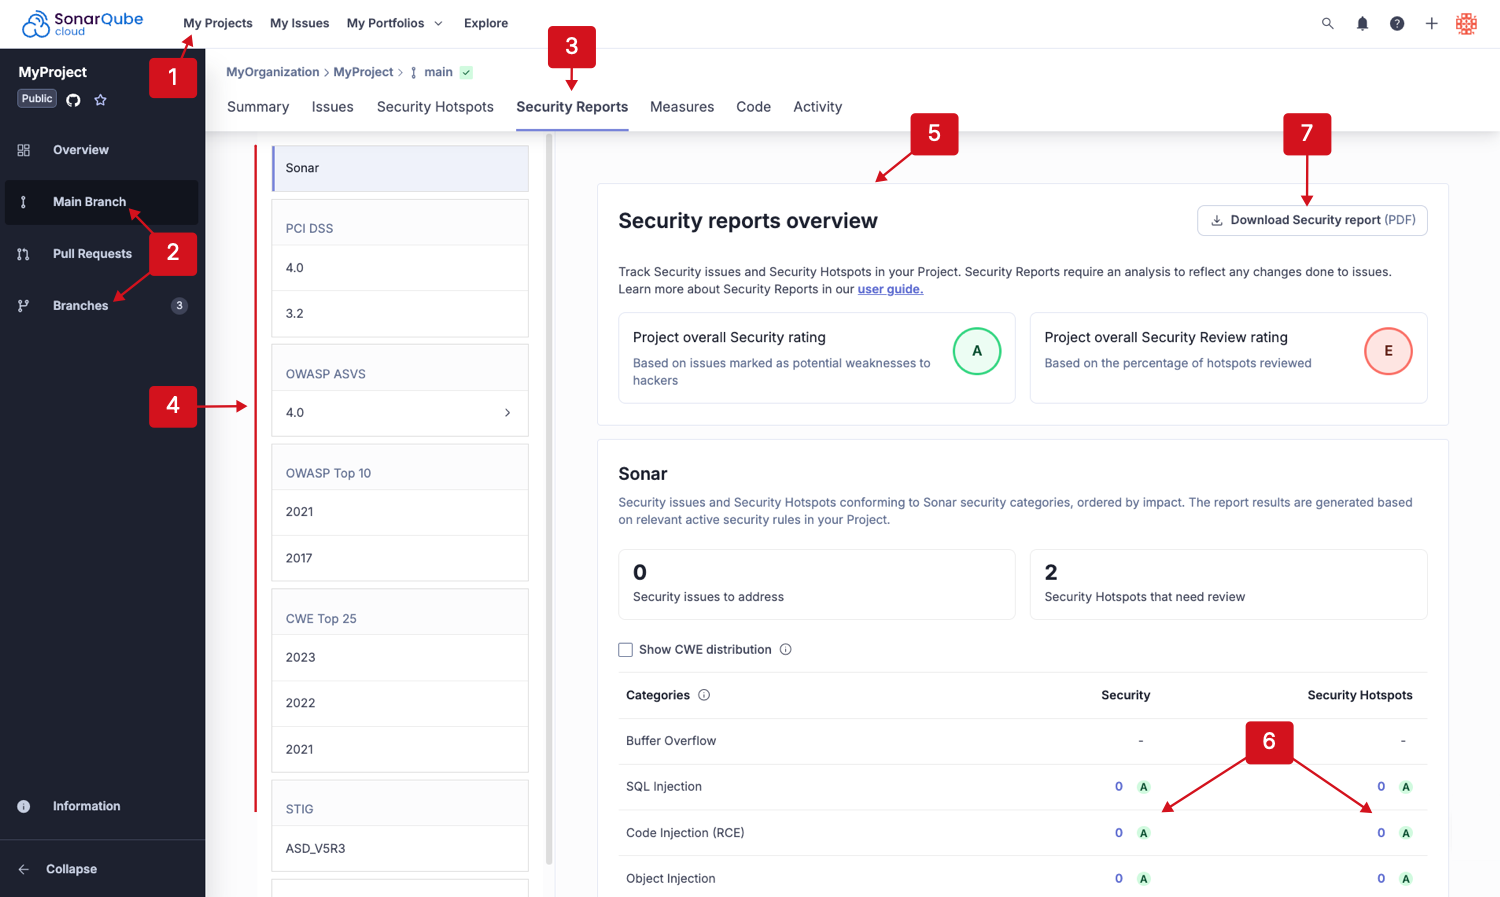 1. Retrieve a project by going to **My Projects** in the top navigation bar and selecting your project, and go to the **Information** page.
2. In **About This Project**, select a quality profile to open it.
3. Once on the **Quality Profiles** page, select the active **Security** rules from the **Software qualities** table’s **Active** column. The **Rules** page will open.
4. (image below) In the left-side panel of the **Rules** page, scroll to the **Security Category** and filter the results by specific standards to view the security categories covered by code review and analysis.
1. Retrieve a project by going to **My Projects** in the top navigation bar and selecting your project, and go to the **Information** page.
2. In **About This Project**, select a quality profile to open it.
3. Once on the **Quality Profiles** page, select the active **Security** rules from the **Software qualities** table’s **Active** column. The **Rules** page will open.
4. (image below) In the left-side panel of the **Rules** page, scroll to the **Security Category** and filter the results by specific standards to view the security categories covered by code review and analysis.
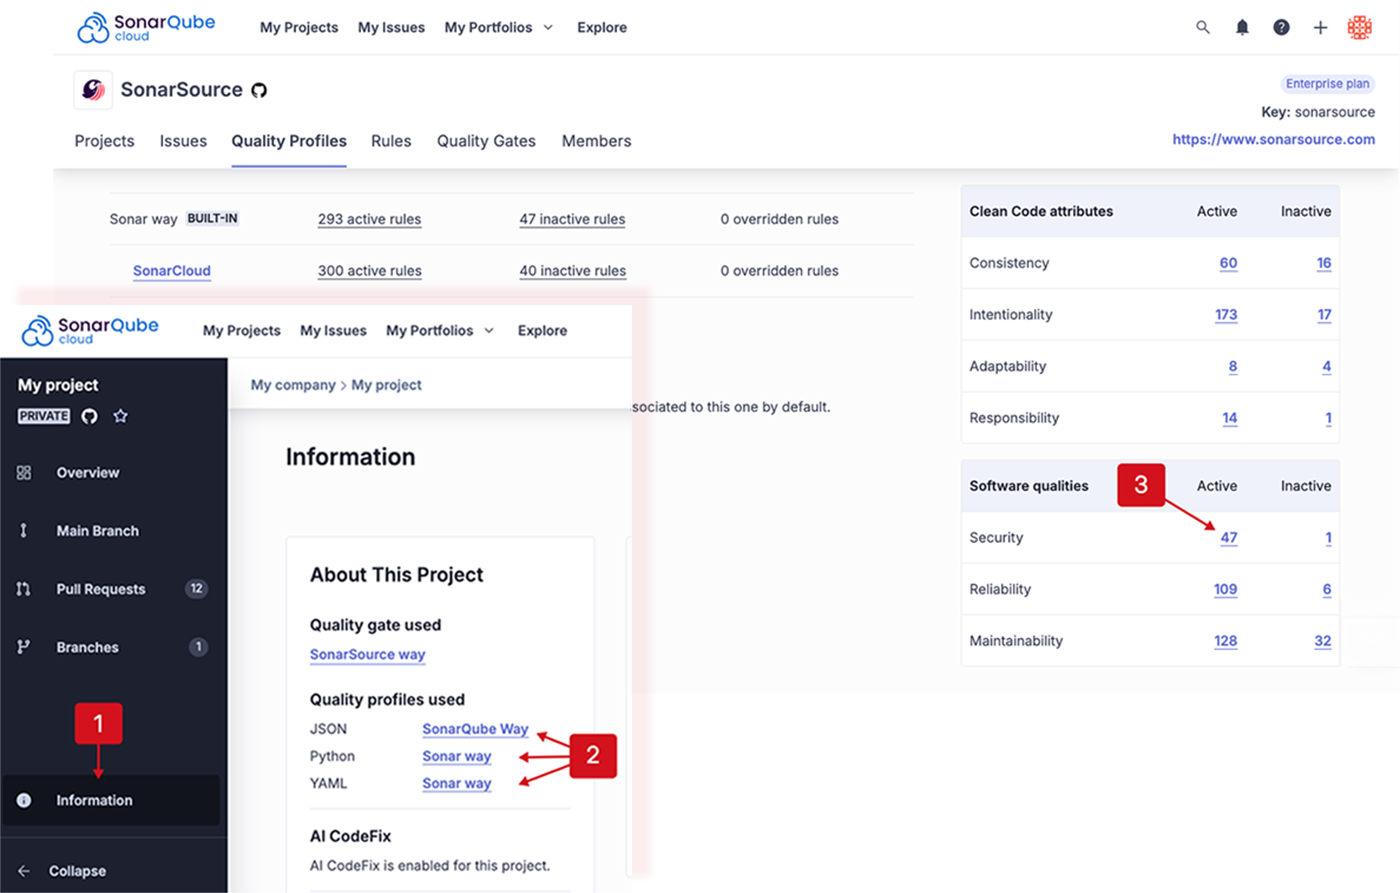
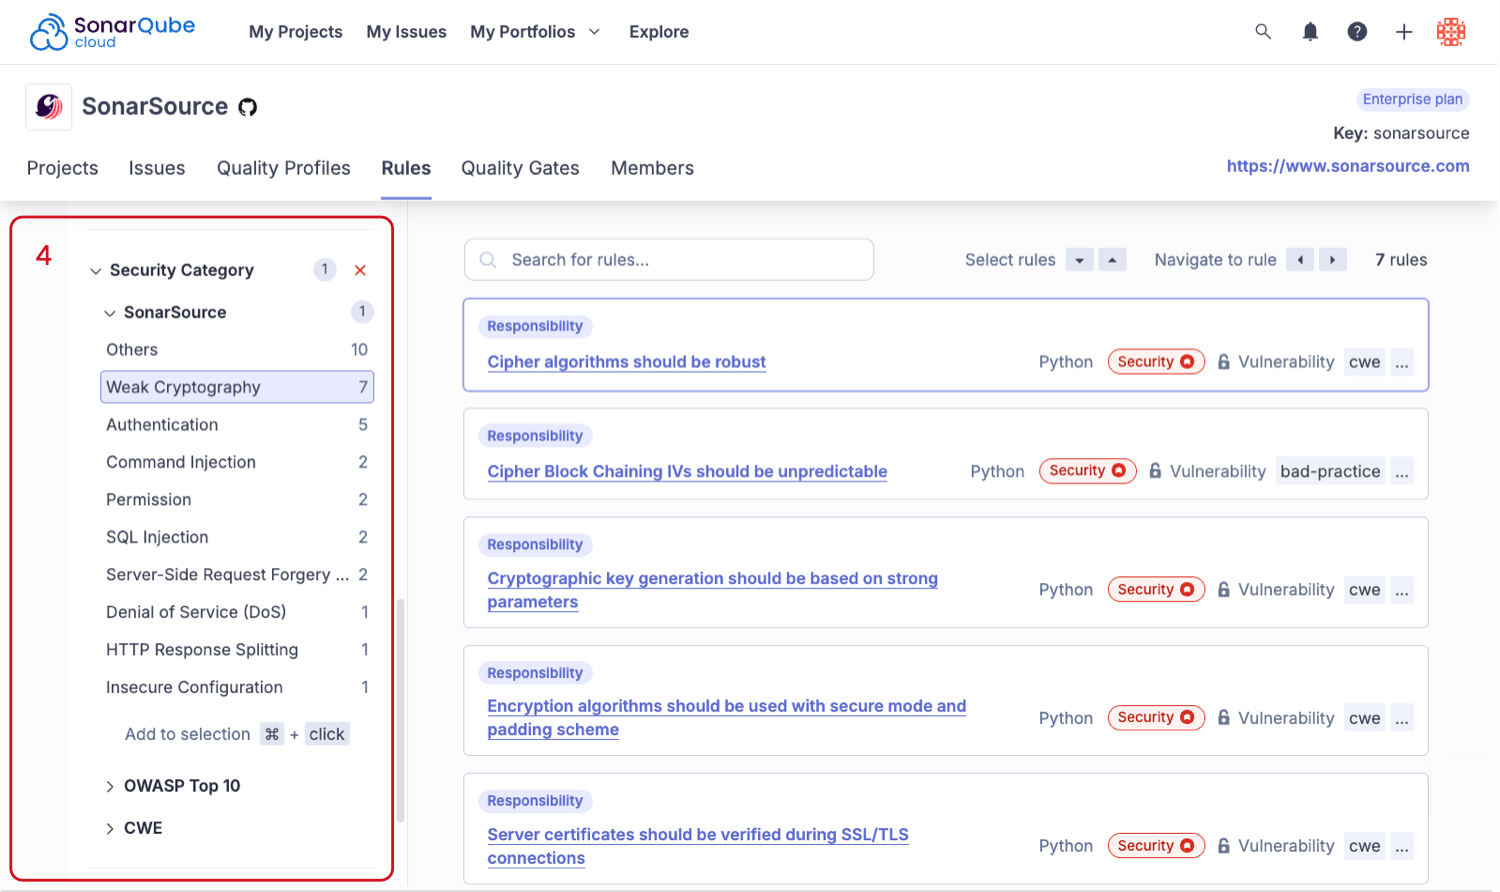
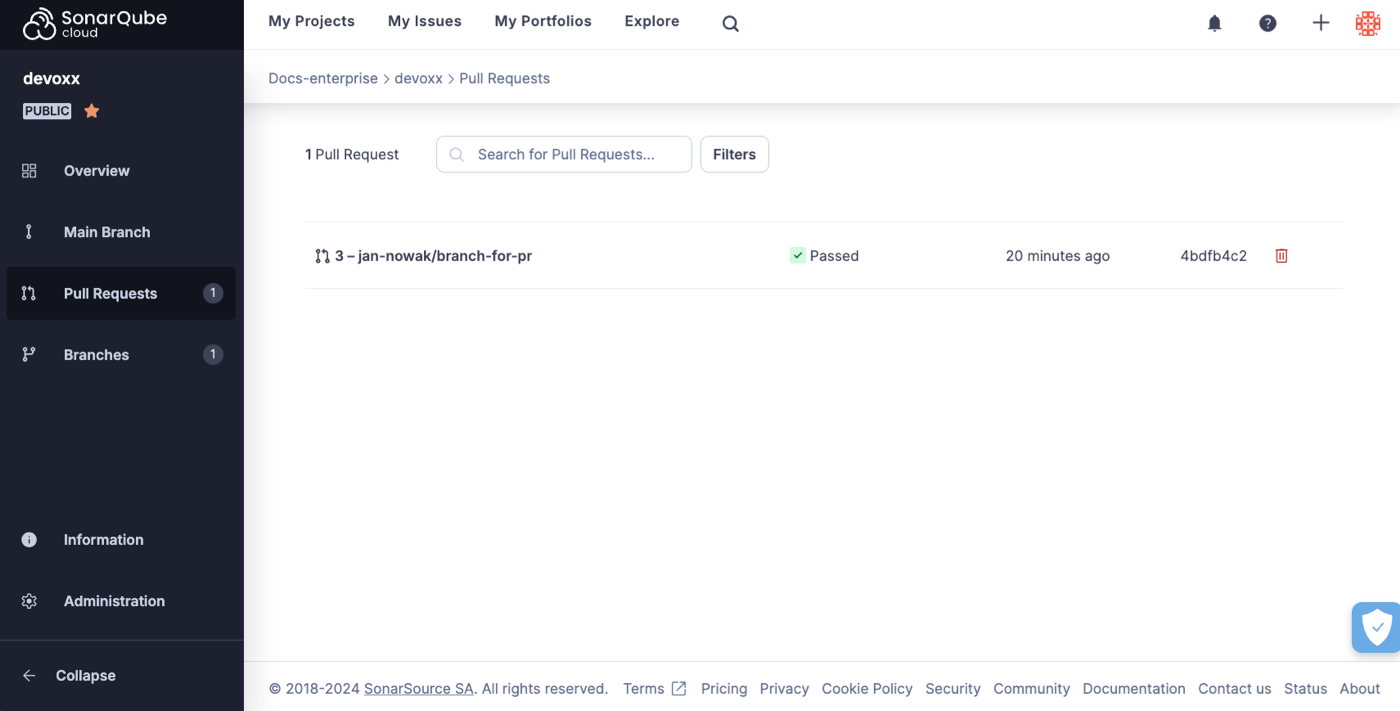 ### Pull request decoration
In addition to appearing in the SonarQube Cloud interface, the quality gate status and a summary of the results also appear in your DevOps platform interface (that is, in the pull request view of GitHub, Bitbucket Cloud, Azure DevOps or GitLab). This is referred to as pull request decoration. But, it is not just decorative! It also integrates with your DevOps platform to block the merge of the pull request if the quality gate fails. In this way, you can benefit from SonarQube Cloud code review and analysis without even leaving the environment of your DevOps platform.
A pull request decoration summary comment will look like this (it is similar on the supported platforms):
### Pull request decoration
In addition to appearing in the SonarQube Cloud interface, the quality gate status and a summary of the results also appear in your DevOps platform interface (that is, in the pull request view of GitHub, Bitbucket Cloud, Azure DevOps or GitLab). This is referred to as pull request decoration. But, it is not just decorative! It also integrates with your DevOps platform to block the merge of the pull request if the quality gate fails. In this way, you can benefit from SonarQube Cloud code review and analysis without even leaving the environment of your DevOps platform.
A pull request decoration summary comment will look like this (it is similar on the supported platforms):
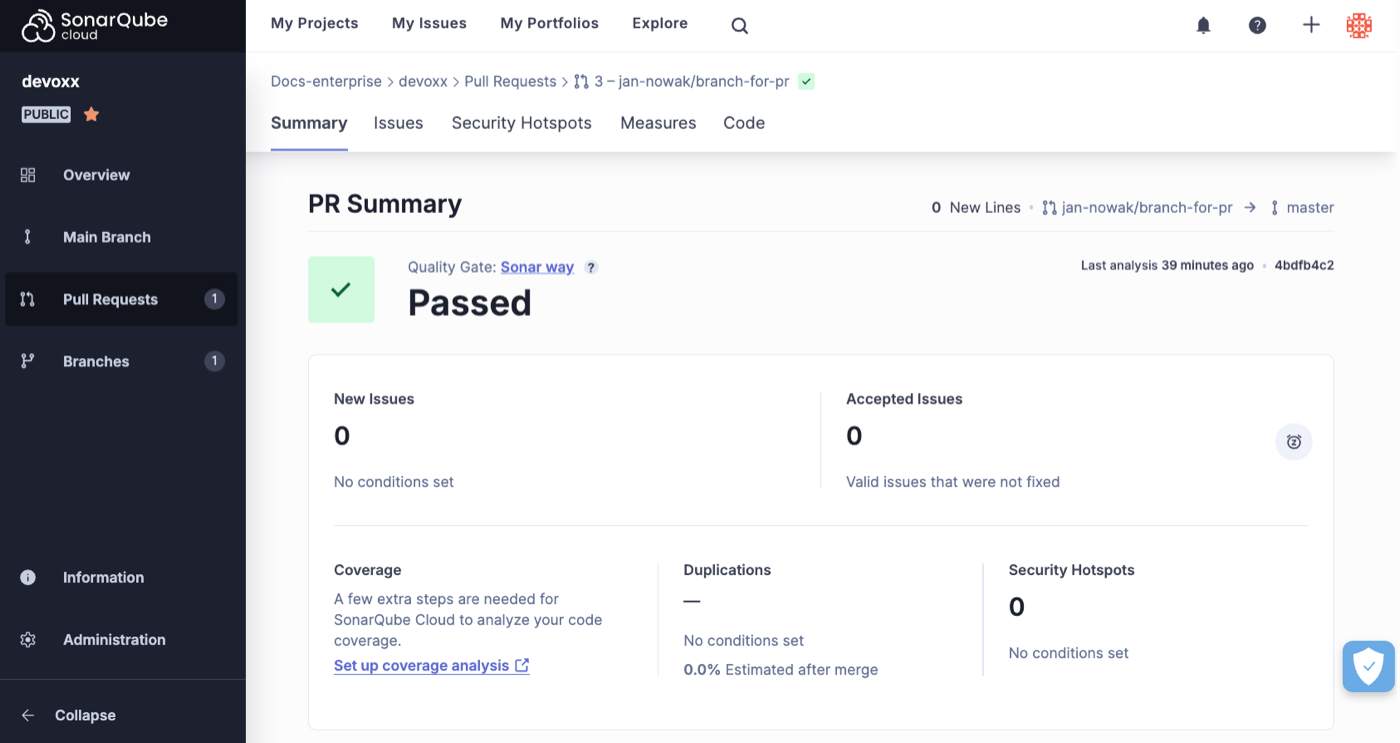 In addition, depending on your platform, issues may be reported as inline annotations. For more information, see [in-devops-platform](https://docs.sonarsource.com/sonarqube-cloud/managing-your-projects/issues/in-devops-platform "mention").
### Quality gate and metrics
Pull request analysis differs from main branch (and other long-lived branch) analysis in two important ways:
* Pull request analysis only reports issues that were introduced by the pull request itself. When SonarQube Cloud analyzes a pull request **P** for the merge of branch **B** into base branch **T** it scans the HEAD commit of **B** and compares the result with the most recent scan of **T**. Only issues that appear in **B** but not in **T** are reported in the analysis results. In cases where **T** includes new issues added since the most recent scan (in other words the scan is outdated) those additional issues will appear as part of the pull request analysis, even though they were not introduced by the pull request. Therefore, an up-to-date analysis of **T** is required to correctly detect which issues are new.
* The quality gate for the pull request is computed based on this analysis. The quality gate used is the one set at the project level, however, *only the conditions on new code within the quality gate are applied*.
{% hint style="info" %}
As outlined above, the scanner starts by analyzing the HEAD commit, the most recent commit in your current branch. If the head commit is not defined, it scans the remote branch and, if that is not available, the upstream branch.
{% endhint %}
Above you can see that on the **Summary** tab, the quality gate and the five quality metrics are displayed. In addition, the other tabs, **Issues**, **Measures**, and **Code** let you see more details about the analysis.
### Enabling pull request analysis
Pull request analysis is available on all supported repository providers. Of course, to see an analysis result, an analysis must be performed on the pull request. If you are using automatic analysis (which is only available on GitHub) then this happens without any further configuration on pull request creation and on every push to the pull request branch. If you are using build analysis then you must make sure that your build script is configured to build on pull request creation and push.
### Prerequisites for CI-based analysis
Before analyzing your pull requests, make sure that:
* The pull request source branch is checked out in CI/CD host’s local repository.
* The branch being targeted by the pull request is fetched and present in the local repository (This is usually done through the cloning of the remote repository by the CI pipeline).
* The local repository contains valid repository metadata (e.g. the `.git` folders have not been removed). See [verifying-code-checkout-step](https://docs.sonarsource.com/sonarqube-cloud/advanced-setup/scanner-environment/verifying-code-checkout-step "mention").
* The code in the local repository matches the code in the remote repository (e.g once a pull request is issued, no code is added to the local branch on the CI side before analysis).
### Existing pull requests on first automatic analysis
When a project is first imported into SonarQube Cloud and analyzed by automatic analysis the first analysis behaves differently from subsequent analyses. On the first analysis not only will the main branch be analyzed, but, also *the most recently active pull requests, up to a maximum of five*. The main branch and pull request results will appear on the [project overview](https://docs.sonarsource.com/sonarqube-cloud/improving/main-branch-analysis), as usual. Subsequent analyses will occur normally, on pushes to the main branch and on pushes to pull request branches.
### SonarQube Remediation agent
{% hint style="success" %}
The SonarQube Remediation Agent is a [Beta](https://docs.sonarsource.com/sonarqube-cloud/appendices/product-release-lifecycle#beta) feature available with Enterprise plan accounts. It is free during the beta phase and will be a paid feature when it moves to [General Availability](https://docs.sonarsource.com/sonarqube-cloud/appendices/product-release-lifecycle#general-availability). To learn more about the terms & conditions, please see our legal page about features in [Early Access](https://www.sonarsource.com/legal/early-access/).
If your SonarQube Cloud organization is not on an Enterprise plan, please see the [getting-started-with-enterprise](https://docs.sonarsource.com/sonarqube-cloud/getting-started-with-enterprise "mention") pages to get the process started.
{% endhint %}
The SonarQube Remediation agent can generate fix suggestions for certain types of issues found during a pull request analysis of your GitHub repository. AI-generated fix suggestions offered by the agent that are reviewed and accepted by users, can be included as new commits to the pull request before merging.
See the [sonarqube-remediation-agent](https://docs.sonarsource.com/sonarqube-cloud/administering-sonarcloud/ai-features/sonarqube-remediation-agent "mention") page for the full list of requirements and instructions to install and enable the agent. If your agent is already enabled and you're ready to engage, check out the [agents-in-your-github-pull-request](https://docs.sonarsource.com/sonarqube-cloud/managing-your-projects/issues/with-ai-features/agents-in-your-github-pull-request "mention") page to understand how the agent's behavior.
### Pull request analysis and SonarQube for IDE
The [connected-mode](https://docs.sonarsource.com/sonarqube-cloud/improving/connected-mode "mention") extension works well with pull request analysis. When running [SonarQube for IDE](https://www.sonarsource.com/products/sonarlint/), issues will be highlighted even before you create your pull request.
If SonarQube for IDE shows your code as clean, you can open a pull request and SonarQube Cloud will perform the pull request analysis to detect more complex issues that were not detectable by SonarQube for IDE.
In this way SonarQube for IDE together with pull request analysis give you two levels of protection to help keep your code clean.
### Incremental analysis
[incremental-analysis-mechanisms](https://docs.sonarsource.com/sonarqube-cloud/advanced-setup/incremental-analysis-mechanisms "mention") are used to shorten the pull request analysis.
---
# Source: https://docs.sonarsource.com/sonarqube-community-build/analyzing-source-code/test-coverage/python-test-coverage.md
# Source: https://docs.sonarsource.com/sonarqube-server/9.8/analyzing-source-code/test-coverage/python-test-coverage.md
# Source: https://docs.sonarsource.com/sonarqube-server/9.9/analyzing-source-code/test-coverage/python-test-coverage.md
# Source: https://docs.sonarsource.com/sonarqube-server/10.0/analyzing-source-code/test-coverage/python-test-coverage.md
# Source: https://docs.sonarsource.com/sonarqube-server/10.1/analyzing-source-code/test-coverage/python-test-coverage.md
# Source: https://docs.sonarsource.com/sonarqube-server/10.2/analyzing-source-code/test-coverage/python-test-coverage.md
# Source: https://docs.sonarsource.com/sonarqube-server/10.3/analyzing-source-code/test-coverage/python-test-coverage.md
# Source: https://docs.sonarsource.com/sonarqube-server/10.4/analyzing-source-code/test-coverage/python-test-coverage.md
# Source: https://docs.sonarsource.com/sonarqube-server/10.5/analyzing-source-code/test-coverage/python-test-coverage.md
# Source: https://docs.sonarsource.com/sonarqube-server/10.6/analyzing-source-code/test-coverage/python-test-coverage.md
# Source: https://docs.sonarsource.com/sonarqube-server/10.7/analyzing-source-code/test-coverage/python-test-coverage.md
# Source: https://docs.sonarsource.com/sonarqube-server/10.8/analyzing-source-code/test-coverage/python-test-coverage.md
# Source: https://docs.sonarsource.com/sonarqube-server/2025.2/analyzing-source-code/test-coverage/python-test-coverage.md
# Source: https://docs.sonarsource.com/sonarqube-server/2025.3/analyzing-source-code/test-coverage/python-test-coverage.md
# Source: https://docs.sonarsource.com/sonarqube-server/2025.5/analyzing-source-code/test-coverage/python-test-coverage.md
# Source: https://docs.sonarsource.com/sonarqube-server/2025.1/analyzing-source-code/test-coverage/python-test-coverage.md
# Source: https://docs.sonarsource.com/sonarqube-server/2025.4/analyzing-source-code/test-coverage/python-test-coverage.md
# Source: https://docs.sonarsource.com/sonarqube-server/2025.6/analyzing-source-code/test-coverage/python-test-coverage.md
# Source: https://docs.sonarsource.com/sonarqube-server/analyzing-source-code/test-coverage/python-test-coverage.md
# Source: https://docs.sonarsource.com/sonarqube-cloud/enriching/test-coverage/python-test-coverage.md
# Python test coverage
SonarQube Cloud supports the reporting of test coverage information as part of the analysis of your Python project.
However, SonarQube Cloud does not produce the coverage report itself. Instead, you must set up a third-party tool to produce the report as part of your build process. You then need to configure your analysis to tell the SonarScanner where the report is located so that it can pick it up and send it to SonarQube Cloud, where it will be displayed on your project dashboard along with the other analysis metrics.
### Use CI-based, not automatic analysis
Usually, when you import a new Python project, automatic analysis starts immediately. But, since coverage is not yet supported under automatic analysis, *you will need to use CI-based analysis instead*. This requires disabling automatic analysis. Here are the steps you need to follow:
**If you have not yet imported your python project**, just add an empty file called `sonar-project.properties` to the root of your repository, and *then* perform the import. SonarQube Cloud will assume that you want to set up a CI-based analysis and display the onboarding tutorial.
**If you have already imported your project**, then SonarQube Cloud has already run at least once using automatic analysis. Don’t worry, you can still convert your project to use a CI-based approach. Simply go to **Administration** > **Analysis Method** and switch **SonarQube Cloud Automatic Analysis** to **OFF**. Then, on the same screen, under **Supported analysis methods** find your preferred CI and select **Follow the tutorial**.
### Follow the tutorial
At this point, you should be in the onboarding tutorial specific to your CI. Follow the tutorial and when it asks, **What option best describes your build?**, choose **Other (for JS, TS, Go, Python, PHP, …)**. When you are done with the tutorial, you should have a functioning CI-based analysis setup for your Python project. The next step is to adjust it to get coverage working.
### Adjust your setup
To enable coverage you need to:
* Adjust your build process so that the coverage tool runs *before* the scanner report generation step runs.
* Make sure that the coverage tool writes its report file to a defined path in the build environment.
* Configure the scanning step of your build so that the scanner picks up the report file from that defined path.
### Add coverage to your build process
The details of setting up coverage within your build process depend on which tools you are using. In our example we use:
* Tox, to configure the tests
* Pytest, to execute the tests
* Coverage, (the Coverage.py tool,) to measure code coverage, and
* GitHub Actions, to perform the build.
In this example, we invoke `pytest` and use the `pytest-cov` plugin which, in turn, uses Coverage.py. Simply add the text below to the `tox.ini` file at the root of your project:
**`Tox.ini (Coverage.py and Pytest)`**
```ini
[tox]
envlist = py39
skipsdist = True
[testenv]
deps =
pytest
pytest-cov
commands = pytest --cov=my_project --cov-report=xml --cov-config=tox.ini --cov-branch
```
Alternatively, in this example, we start the test by invoking the Coverage.py tool (the command `coverage`) with the `pytest` invocation as an argument.
**`Alternative tox.ini (Coverage.py only)`**
```python
[tox]
envlist = py39
skipsdist = True
[testenv]
deps =
pytest
coverage
commands =
coverage run -m pytest
coverage xml
[coverage:run]
relative_files = True
source = my_project/
branch = True
```
Note that we specify `relative_files = True` in the `tox.ini` file to ensure that GitHub Actions will correctly parse your coverage results.
The following shows how to configure the GitHub Actions build file for your Python project so that it works in conjunction with the `tox.ini` configuration file described above to generate code coverage. Your `build.yml` file should look something like this:
**`.github/workflows/build.yml`**
```yaml
name: Build
on:
push:
branches:
- main
pull_request:
types: [opened, synchronize, reopened]
jobs:
sonarqube:
name: SonarQube Cloud
runs-on: ubuntu-latest
steps:
- uses: actions/checkout@v6
with:
fetch-depth: 0
- name: Setup Python
uses: actions/setup-python@v6
with:
python-version: ${{ matrix.python }}
- name: Install tox and any other packages
run: pip install tox
- name: Run tox
run: tox -e py
- name: SonarQube Scan
uses: SonarSource/sonarqube-scan-action@v7
env:
SONAR_TOKEN: ${{ secrets.SONAR_TOKEN }}
```
First of all, install all of your project dependencies and then invoke `tox` to run your tests and generate a coverage report file.
If, as here, you do not specify an output file, the scanner will look for report paths located under the default `.coverage-reports/*coverage-*.xml.`
If you are using a different package manager and/or a different testing tool these details will be different.
**The essential requirements are that the tool produces its report in the Cobertura XML format and writes it to a place from which the scanner can then pick it up.**
### Add the coverage analysis parameter
The next step is to add `sonar.python.coverage.reportPaths` to your analysis parameters. This parameter must be set to the path of the report file produced by your coverage tool. In this example, that path is set to the default produced by Coverage.py. It is set in the `sonar-project.properties` file, located in the project root:
**`sonar-project.properties`**
```properties
sonar.projectKey=
In addition, depending on your platform, issues may be reported as inline annotations. For more information, see [in-devops-platform](https://docs.sonarsource.com/sonarqube-cloud/managing-your-projects/issues/in-devops-platform "mention").
### Quality gate and metrics
Pull request analysis differs from main branch (and other long-lived branch) analysis in two important ways:
* Pull request analysis only reports issues that were introduced by the pull request itself. When SonarQube Cloud analyzes a pull request **P** for the merge of branch **B** into base branch **T** it scans the HEAD commit of **B** and compares the result with the most recent scan of **T**. Only issues that appear in **B** but not in **T** are reported in the analysis results. In cases where **T** includes new issues added since the most recent scan (in other words the scan is outdated) those additional issues will appear as part of the pull request analysis, even though they were not introduced by the pull request. Therefore, an up-to-date analysis of **T** is required to correctly detect which issues are new.
* The quality gate for the pull request is computed based on this analysis. The quality gate used is the one set at the project level, however, *only the conditions on new code within the quality gate are applied*.
{% hint style="info" %}
As outlined above, the scanner starts by analyzing the HEAD commit, the most recent commit in your current branch. If the head commit is not defined, it scans the remote branch and, if that is not available, the upstream branch.
{% endhint %}
Above you can see that on the **Summary** tab, the quality gate and the five quality metrics are displayed. In addition, the other tabs, **Issues**, **Measures**, and **Code** let you see more details about the analysis.
### Enabling pull request analysis
Pull request analysis is available on all supported repository providers. Of course, to see an analysis result, an analysis must be performed on the pull request. If you are using automatic analysis (which is only available on GitHub) then this happens without any further configuration on pull request creation and on every push to the pull request branch. If you are using build analysis then you must make sure that your build script is configured to build on pull request creation and push.
### Prerequisites for CI-based analysis
Before analyzing your pull requests, make sure that:
* The pull request source branch is checked out in CI/CD host’s local repository.
* The branch being targeted by the pull request is fetched and present in the local repository (This is usually done through the cloning of the remote repository by the CI pipeline).
* The local repository contains valid repository metadata (e.g. the `.git` folders have not been removed). See [verifying-code-checkout-step](https://docs.sonarsource.com/sonarqube-cloud/advanced-setup/scanner-environment/verifying-code-checkout-step "mention").
* The code in the local repository matches the code in the remote repository (e.g once a pull request is issued, no code is added to the local branch on the CI side before analysis).
### Existing pull requests on first automatic analysis
When a project is first imported into SonarQube Cloud and analyzed by automatic analysis the first analysis behaves differently from subsequent analyses. On the first analysis not only will the main branch be analyzed, but, also *the most recently active pull requests, up to a maximum of five*. The main branch and pull request results will appear on the [project overview](https://docs.sonarsource.com/sonarqube-cloud/improving/main-branch-analysis), as usual. Subsequent analyses will occur normally, on pushes to the main branch and on pushes to pull request branches.
### SonarQube Remediation agent
{% hint style="success" %}
The SonarQube Remediation Agent is a [Beta](https://docs.sonarsource.com/sonarqube-cloud/appendices/product-release-lifecycle#beta) feature available with Enterprise plan accounts. It is free during the beta phase and will be a paid feature when it moves to [General Availability](https://docs.sonarsource.com/sonarqube-cloud/appendices/product-release-lifecycle#general-availability). To learn more about the terms & conditions, please see our legal page about features in [Early Access](https://www.sonarsource.com/legal/early-access/).
If your SonarQube Cloud organization is not on an Enterprise plan, please see the [getting-started-with-enterprise](https://docs.sonarsource.com/sonarqube-cloud/getting-started-with-enterprise "mention") pages to get the process started.
{% endhint %}
The SonarQube Remediation agent can generate fix suggestions for certain types of issues found during a pull request analysis of your GitHub repository. AI-generated fix suggestions offered by the agent that are reviewed and accepted by users, can be included as new commits to the pull request before merging.
See the [sonarqube-remediation-agent](https://docs.sonarsource.com/sonarqube-cloud/administering-sonarcloud/ai-features/sonarqube-remediation-agent "mention") page for the full list of requirements and instructions to install and enable the agent. If your agent is already enabled and you're ready to engage, check out the [agents-in-your-github-pull-request](https://docs.sonarsource.com/sonarqube-cloud/managing-your-projects/issues/with-ai-features/agents-in-your-github-pull-request "mention") page to understand how the agent's behavior.
### Pull request analysis and SonarQube for IDE
The [connected-mode](https://docs.sonarsource.com/sonarqube-cloud/improving/connected-mode "mention") extension works well with pull request analysis. When running [SonarQube for IDE](https://www.sonarsource.com/products/sonarlint/), issues will be highlighted even before you create your pull request.
If SonarQube for IDE shows your code as clean, you can open a pull request and SonarQube Cloud will perform the pull request analysis to detect more complex issues that were not detectable by SonarQube for IDE.
In this way SonarQube for IDE together with pull request analysis give you two levels of protection to help keep your code clean.
### Incremental analysis
[incremental-analysis-mechanisms](https://docs.sonarsource.com/sonarqube-cloud/advanced-setup/incremental-analysis-mechanisms "mention") are used to shorten the pull request analysis.
---
# Source: https://docs.sonarsource.com/sonarqube-community-build/analyzing-source-code/test-coverage/python-test-coverage.md
# Source: https://docs.sonarsource.com/sonarqube-server/9.8/analyzing-source-code/test-coverage/python-test-coverage.md
# Source: https://docs.sonarsource.com/sonarqube-server/9.9/analyzing-source-code/test-coverage/python-test-coverage.md
# Source: https://docs.sonarsource.com/sonarqube-server/10.0/analyzing-source-code/test-coverage/python-test-coverage.md
# Source: https://docs.sonarsource.com/sonarqube-server/10.1/analyzing-source-code/test-coverage/python-test-coverage.md
# Source: https://docs.sonarsource.com/sonarqube-server/10.2/analyzing-source-code/test-coverage/python-test-coverage.md
# Source: https://docs.sonarsource.com/sonarqube-server/10.3/analyzing-source-code/test-coverage/python-test-coverage.md
# Source: https://docs.sonarsource.com/sonarqube-server/10.4/analyzing-source-code/test-coverage/python-test-coverage.md
# Source: https://docs.sonarsource.com/sonarqube-server/10.5/analyzing-source-code/test-coverage/python-test-coverage.md
# Source: https://docs.sonarsource.com/sonarqube-server/10.6/analyzing-source-code/test-coverage/python-test-coverage.md
# Source: https://docs.sonarsource.com/sonarqube-server/10.7/analyzing-source-code/test-coverage/python-test-coverage.md
# Source: https://docs.sonarsource.com/sonarqube-server/10.8/analyzing-source-code/test-coverage/python-test-coverage.md
# Source: https://docs.sonarsource.com/sonarqube-server/2025.2/analyzing-source-code/test-coverage/python-test-coverage.md
# Source: https://docs.sonarsource.com/sonarqube-server/2025.3/analyzing-source-code/test-coverage/python-test-coverage.md
# Source: https://docs.sonarsource.com/sonarqube-server/2025.5/analyzing-source-code/test-coverage/python-test-coverage.md
# Source: https://docs.sonarsource.com/sonarqube-server/2025.1/analyzing-source-code/test-coverage/python-test-coverage.md
# Source: https://docs.sonarsource.com/sonarqube-server/2025.4/analyzing-source-code/test-coverage/python-test-coverage.md
# Source: https://docs.sonarsource.com/sonarqube-server/2025.6/analyzing-source-code/test-coverage/python-test-coverage.md
# Source: https://docs.sonarsource.com/sonarqube-server/analyzing-source-code/test-coverage/python-test-coverage.md
# Source: https://docs.sonarsource.com/sonarqube-cloud/enriching/test-coverage/python-test-coverage.md
# Python test coverage
SonarQube Cloud supports the reporting of test coverage information as part of the analysis of your Python project.
However, SonarQube Cloud does not produce the coverage report itself. Instead, you must set up a third-party tool to produce the report as part of your build process. You then need to configure your analysis to tell the SonarScanner where the report is located so that it can pick it up and send it to SonarQube Cloud, where it will be displayed on your project dashboard along with the other analysis metrics.
### Use CI-based, not automatic analysis
Usually, when you import a new Python project, automatic analysis starts immediately. But, since coverage is not yet supported under automatic analysis, *you will need to use CI-based analysis instead*. This requires disabling automatic analysis. Here are the steps you need to follow:
**If you have not yet imported your python project**, just add an empty file called `sonar-project.properties` to the root of your repository, and *then* perform the import. SonarQube Cloud will assume that you want to set up a CI-based analysis and display the onboarding tutorial.
**If you have already imported your project**, then SonarQube Cloud has already run at least once using automatic analysis. Don’t worry, you can still convert your project to use a CI-based approach. Simply go to **Administration** > **Analysis Method** and switch **SonarQube Cloud Automatic Analysis** to **OFF**. Then, on the same screen, under **Supported analysis methods** find your preferred CI and select **Follow the tutorial**.
### Follow the tutorial
At this point, you should be in the onboarding tutorial specific to your CI. Follow the tutorial and when it asks, **What option best describes your build?**, choose **Other (for JS, TS, Go, Python, PHP, …)**. When you are done with the tutorial, you should have a functioning CI-based analysis setup for your Python project. The next step is to adjust it to get coverage working.
### Adjust your setup
To enable coverage you need to:
* Adjust your build process so that the coverage tool runs *before* the scanner report generation step runs.
* Make sure that the coverage tool writes its report file to a defined path in the build environment.
* Configure the scanning step of your build so that the scanner picks up the report file from that defined path.
### Add coverage to your build process
The details of setting up coverage within your build process depend on which tools you are using. In our example we use:
* Tox, to configure the tests
* Pytest, to execute the tests
* Coverage, (the Coverage.py tool,) to measure code coverage, and
* GitHub Actions, to perform the build.
In this example, we invoke `pytest` and use the `pytest-cov` plugin which, in turn, uses Coverage.py. Simply add the text below to the `tox.ini` file at the root of your project:
**`Tox.ini (Coverage.py and Pytest)`**
```ini
[tox]
envlist = py39
skipsdist = True
[testenv]
deps =
pytest
pytest-cov
commands = pytest --cov=my_project --cov-report=xml --cov-config=tox.ini --cov-branch
```
Alternatively, in this example, we start the test by invoking the Coverage.py tool (the command `coverage`) with the `pytest` invocation as an argument.
**`Alternative tox.ini (Coverage.py only)`**
```python
[tox]
envlist = py39
skipsdist = True
[testenv]
deps =
pytest
coverage
commands =
coverage run -m pytest
coverage xml
[coverage:run]
relative_files = True
source = my_project/
branch = True
```
Note that we specify `relative_files = True` in the `tox.ini` file to ensure that GitHub Actions will correctly parse your coverage results.
The following shows how to configure the GitHub Actions build file for your Python project so that it works in conjunction with the `tox.ini` configuration file described above to generate code coverage. Your `build.yml` file should look something like this:
**`.github/workflows/build.yml`**
```yaml
name: Build
on:
push:
branches:
- main
pull_request:
types: [opened, synchronize, reopened]
jobs:
sonarqube:
name: SonarQube Cloud
runs-on: ubuntu-latest
steps:
- uses: actions/checkout@v6
with:
fetch-depth: 0
- name: Setup Python
uses: actions/setup-python@v6
with:
python-version: ${{ matrix.python }}
- name: Install tox and any other packages
run: pip install tox
- name: Run tox
run: tox -e py
- name: SonarQube Scan
uses: SonarSource/sonarqube-scan-action@v7
env:
SONAR_TOKEN: ${{ secrets.SONAR_TOKEN }}
```
First of all, install all of your project dependencies and then invoke `tox` to run your tests and generate a coverage report file.
If, as here, you do not specify an output file, the scanner will look for report paths located under the default `.coverage-reports/*coverage-*.xml.`
If you are using a different package manager and/or a different testing tool these details will be different.
**The essential requirements are that the tool produces its report in the Cobertura XML format and writes it to a place from which the scanner can then pick it up.**
### Add the coverage analysis parameter
The next step is to add `sonar.python.coverage.reportPaths` to your analysis parameters. This parameter must be set to the path of the report file produced by your coverage tool. In this example, that path is set to the default produced by Coverage.py. It is set in the `sonar-project.properties` file, located in the project root:
**`sonar-project.properties`**
```properties
sonar.projectKey=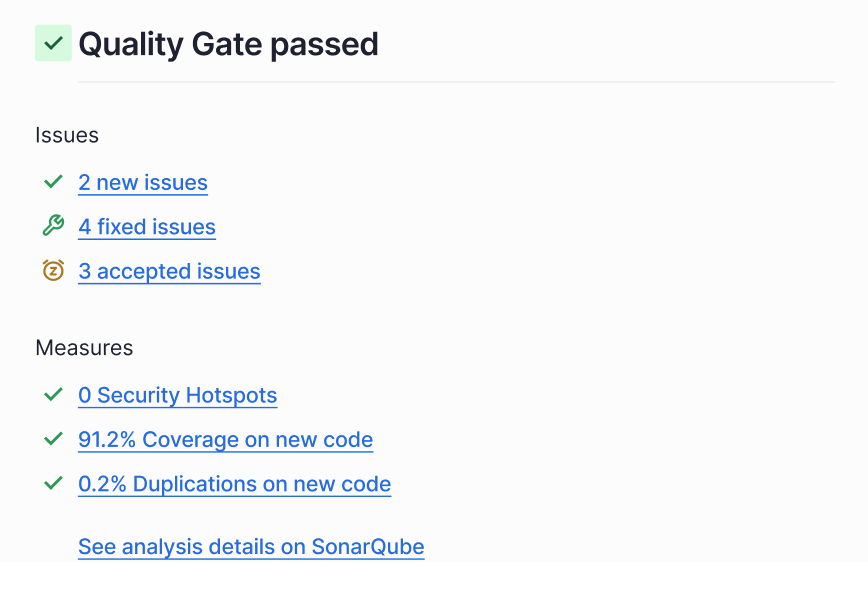 If you are using the [connected-mode](https://docs.sonarsource.com/sonarqube-cloud/improving/connected-mode "mention"), changes to your main branch quality gate will also appear as notifications in your IDE (this only works if you have configured SonarQube for IDE to connect to your SonarQube Cloud account).
### When is a quality gate not computed?
There are two main reasons why the quality gate may not be computed:
* You have performed only one analysis on your code (the quality gate is computed after the second analysis).
* No new code definition is set up for the project. This may only occur for projects created a long time ago since in the recent versions of SonarQube Server you cannot create a new project without setting up the new code definition.
If the quality gate has not been computed then the **Not computed** message is displayed in the place where the quality gate status usually appears as illustrated below.
If you are using the [connected-mode](https://docs.sonarsource.com/sonarqube-cloud/improving/connected-mode "mention"), changes to your main branch quality gate will also appear as notifications in your IDE (this only works if you have configured SonarQube for IDE to connect to your SonarQube Cloud account).
### When is a quality gate not computed?
There are two main reasons why the quality gate may not be computed:
* You have performed only one analysis on your code (the quality gate is computed after the second analysis).
* No new code definition is set up for the project. This may only occur for projects created a long time ago since in the recent versions of SonarQube Server you cannot create a new project without setting up the new code definition.
If the quality gate has not been computed then the **Not computed** message is displayed in the place where the quality gate status usually appears as illustrated below.
 For your [quality-gates](https://docs.sonarsource.com/sonarqube-server/2025.1/instance-administration/analysis-functions/quality-gates "mention") to fail when corresponding issues exist in the overall code, you must add a condition that checks whether any issues have been raised from prioritized rules. To add this condition go to **Quality Gates** > **Unlock editing** > **Add condition** > **On Overall Code** > **Issues from prioritized rules**. Once added, prioritized rules have a value of 0, so any issues found cause your quality gate to fail.
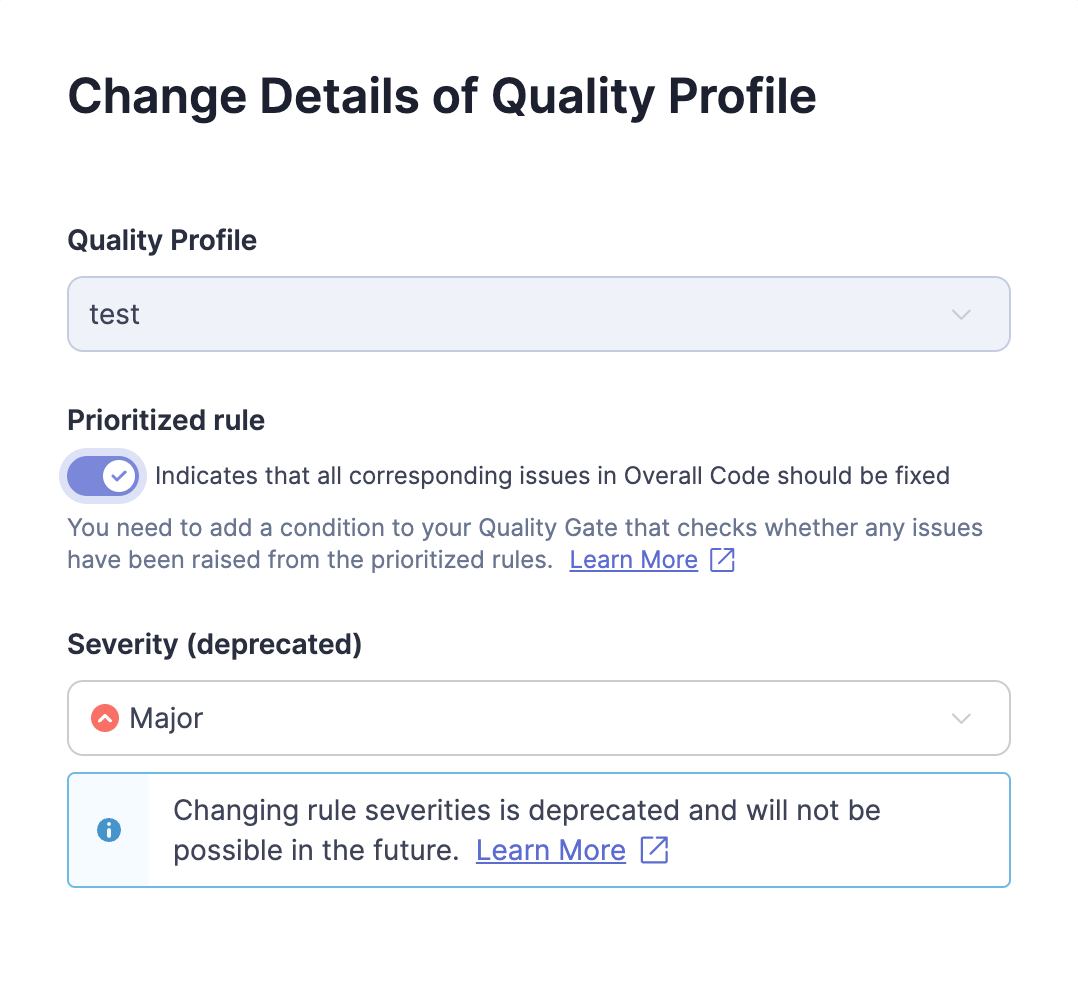 ### Quality profile permissions
By default, only users with the global **Administer Quality Profiles** permission can edit quality profiles. User permissions are defined at **Administration** > **Security** > **Global Permissions**.
SonarQube Server also allows users with the global **Administer Quality Profiles** permission to give an expert or group of experts permission to manage a specific profile. These experts only have permission for that specific profile.
Permissions can be granted to manage specific quality profiles on that profile’s page (**Quality Profiles >** ***profile name*****)** under **Permissions** by selecting **Grant permissions to more users**.
The permission to deactivate inherited rules in a child profile is managed at the level of the SonarQube Server instance. It is by default enabled. As a SonarQube Server Administrator, you can disable it in **Administration** > **Configuration** > **General Settings** > **Quality Profile** by unchecking the **Enable deactivation of inherited rules** option.
### Comparing two quality profiles
You can compare the activated rules between two quality profiles. This is especially useful when you’re using a quality profile copied from another profile because you won’t automatically inherit new rules added to the original quality profile.
To compare two profiles:
1. From the **Quality Profiles** page, select the name of the first profile you’d like to compare.
2. Select **Compare** from the menu.
3. Select the second profile you’d like to compare from the **Compare with** drop-down menu.
From here you can push rules between the two profiles using the buttons.
### Finding out what has changed in a quality profile
When SonarQube Server notices that an analysis was performed with a quality profile that is different in some way from the previous analysis, a *quality profile event* is added to the project’s event log. To see the changes in a profile, navigate to the profile (**Quality Profiles** > ***profile name***) and choose **Changelog**. This can help you understand how profile changes impact the issues raised in an analysis.
Additionally, users with the **Administer Quality Profile** privilege are notified by email each time a built-in profile is updated. These updates can be caused by updating SonarQube Server or updating third-party analyzers.
### Importing a quality profile from another SonarQube Server instance
To import a profile from another SonarQube Server instance, do the following:
1. From the source SonarQube Server instance, open the quality profile you want to use.
2. Select **Back up** from the menu. This exports the profile as an XML file.
3. From the target SonarQube Server instance, select the **Restore** button on the **Quality Profiles** main page.
4. Choose the XML file that you exported previously, and select **Restore**.
### Applying profiles to projects
One profile for each language is marked as the default. Barring any other intervention, all projects that use that language will be analyzed with that profile. To have a project analyzed by a non-default profile instead, start from **Quality Profiles**, and navigate to your target profile, then use the **Projects** part of the interface to manage which projects are explicitly assigned to that profile.
### Ensuring your quality profile has all relevant new rules
Each time a new SonarQube Server version is released, new rules are added. New rules won’t appear automatically in your profile unless you’re using a built-in profile or a profile extended from a built-in profile.
If you’re not using a built-in profile, you can compare your profile to the built-in profile to see which rules you’re missing.
Another option is to go to the **Rules** page in SonarQube Server and use the **Available Since** search facet to see what rules have been added to the platform since the day you upgraded.
Finally, the **Quality Profiles** main page shows recently added rules in the **Recently Added Rules** section on the right side of the page.
### Avoiding deprecated rules
The **Deprecated Rules** section of the **Quality Profiles** page has a pink background and is your first warning that a profile contains deprecated rules. This section gives the total number of instances of deprecated rule(s) that are currently active in each quality profile and provides a breakdown of deprecated rule(s) per profile. Selecting the **Deprecated Rules** section takes you either to the **Rules** page or to the relevant quality profile to investigate further.
Alternatively, you can perform a **Rules** search for the rules in a profile and use the **Status** rule search facet (in the left sidebar) to narrow the list to the ones that need attention.
### Security
The **Quality Profiles** page can be accessed by any user (even anonymous users). All users can view every aspect of any profile. That means anyone can see which rules are included in a profile, which rules have been left out, how a profile has changed over time, and compare the rules between any two profiles.
To create, edit, or delete a profile, a user must be granted the **Administer Quality Profiles** permission.
A project administrator can choose which profiles their project is associated with.
### Rule Severity in your Quality Profile
If you have the proper permissions, you can customize the severity of a rule in your quality profile, however, this will not change the recommended severity of the rule.
In MQR mode, a rule’s severity is defined by the impact of [software-qualities](https://docs.sonarsource.com/sonarqube-server/2025.1/user-guide/rules/software-qualities "mention"). A rule can impact multiple software qualities, and each software quality has its own severity.
---
# Source: https://docs.sonarsource.com/sonarqube-community-build/quality-standards-administration.md
# Source: https://docs.sonarsource.com/sonarqube-server/2025.2/quality-standards-administration.md
# Source: https://docs.sonarsource.com/sonarqube-server/2025.3/quality-standards-administration.md
# Source: https://docs.sonarsource.com/sonarqube-server/2025.5/quality-standards-administration.md
# Source: https://docs.sonarsource.com/sonarqube-server/2025.4/quality-standards-administration.md
# Source: https://docs.sonarsource.com/sonarqube-server/2025.6/quality-standards-administration.md
# Source: https://docs.sonarsource.com/sonarqube-server/quality-standards-administration.md
# Quality standards administration
- [Managing quality gates](/sonarqube-server/quality-standards-administration/managing-quality-gates.md): This section helps you understand how to view, manage, and change your quality gates in SonarQube Server.
- [Introduction](/sonarqube-server/quality-standards-administration/managing-quality-gates/introduction.md): Your introduction to understanding how to use quality gates in SonarQube Server.
- [Understanding quality gates](/sonarqube-server/quality-standards-administration/managing-quality-gates/introduction-to-quality-gates.md): SonarQube Server quality gates use sets of conditions to measure checks against your code during analysis. Depending on result, code passes or fails the quality gate.
- [Viewing a quality gate](/sonarqube-server/quality-standards-administration/managing-quality-gates/viewing-quality-gate.md): Any user can view the quality gates and their conditions defined in a SonarQube Server instance.
- [Managing custom quality gates](/sonarqube-server/quality-standards-administration/managing-quality-gates/managing-custom-quality-gates.md): You can create your own, custom quality gates in SonarQube Server. To manage custom quality gates, you must have the Administer Quality Gates permission.
- [Changing instance's default quality gate](/sonarqube-server/quality-standards-administration/managing-quality-gates/changing-default-quality-gate.md): A default quality gate is assigned in your SonarQube Server settings. This quality gate is automatically applied to new projects and can be modified at any time.
- [Associating a quality gate with projects](/sonarqube-server/quality-standards-administration/managing-quality-gates/associating-projects-with-quality-gate.md): The default quality gate is associated with all projects in the organization that are not explicitly associated with a quality gate.
- [Managing quality profiles](/sonarqube-server/quality-standards-administration/managing-quality-profiles.md): This section helps you understand how to view, manage, and change your quality profiles in SonarQube Server.
- [Introduction](/sonarqube-server/quality-standards-administration/managing-quality-profiles/introduction.md): Your introduction to understanding how to use quality profiles in SonarQube Server.
- [Understanding quality profiles](/sonarqube-server/quality-standards-administration/managing-quality-profiles/understanding-quality-profiles.md): Quality profiles are a key part of your SonarQube Server configuration because they are composed of a list of rules to check your code against.
- [Viewing quality profiles](/sonarqube-server/quality-standards-administration/managing-quality-profiles/viewing-quality-profiles.md): Any user can view and compare quality profiles in SonarQube Server.
- [Creating a quality profile](/sonarqube-server/quality-standards-administration/managing-quality-profiles/creating-a-quality-profile.md): The Sonar way quality profile is designed to be broadly suitable for most projects and you can use custom quality profiles to adjust your project as it progresses.
- [Editing a quality profile](/sonarqube-server/quality-standards-administration/managing-quality-profiles/editing-a-custom-quality-profile.md): To edit a quality profile in SonarQube Server, you need the Administer Quality Profiles permission or be authorized to manage this particular profile.
- [Associating with projects](/sonarqube-server/quality-standards-administration/managing-quality-profiles/associating-a-quality-profile-with-projects.md): By default, a SonarQube Server project is associated with each language’s default quality profile. You can also explicitly associate a quality profile with projects.
- [Changing default quality profile](/sonarqube-server/quality-standards-administration/managing-quality-profiles/changing-default-quality-profile.md): By default, the language’s BUILT-IN quality profile, Sonar way, is the profile assigned to projects not explicitly associated with another quality profile.
- [Maintaining quality profiles](/sonarqube-server/quality-standards-administration/managing-quality-profiles/maintaining-your-custom-quality-profiles.md): Maintaining your custom quality profile in SonarQube Server is important if it's not inherited from the Sonar way built-in profile.
- [Granting permissions to users](/sonarqube-server/quality-standards-administration/managing-quality-profiles/authorizing-other-users-to-manage-quality-profile.md): It is a simple process in SonarQube Server to assign the correct quality profile administration permission to users and groups.
- [Adding tags to a rule](/sonarqube-server/quality-standards-administration/managing-quality-profiles/adding-tags-to-rule.md): Tags are a way to categorize rules and issues.
- [Standards for AI Code Assurance](/sonarqube-server/quality-standards-administration/ai-code-assurance.md): SonarQube Server's AI Code Assurance features help you set appropriate standards for projects containing AI-generated code.
- [Set your AI standards](/sonarqube-server/quality-standards-administration/ai-code-assurance/overview.md): This section explains how to manage AI standards, including the use of tools for Sonar’s AI Code Assurance in your SonarQube Server project.
- [Quality gates for AI code](/sonarqube-server/quality-standards-administration/ai-code-assurance/quality-gates-for-ai-code.md): This page explains how to manage quality gates for AI Code Assurance for securing your SonarQube Server project.
- [Quality profiles for AI code](/sonarqube-server/quality-standards-administration/ai-code-assurance/quality-profiles-for-ai-code.md): This page explains how to manage quality profiles for AI Code Assurance for securing your SonarQube Server project.
- [Monitor projects with AI code](/sonarqube-server/quality-standards-administration/ai-code-assurance/monitor-projects-with-ai-code.md): This page explains the internal and external AI Code Assurance labels and badges you have to mark your SonarQube Server projects.
---
# Source: https://docs.sonarsource.com/sonarqube-community-build/instance-administration/analysis-functions/quality-standards.md
# Source: https://docs.sonarsource.com/sonarqube-server/2025.2/instance-administration/analysis-functions/quality-standards.md
# Source: https://docs.sonarsource.com/sonarqube-server/2025.3/instance-administration/analysis-functions/quality-standards.md
# Source: https://docs.sonarsource.com/sonarqube-server/2025.5/instance-administration/analysis-functions/quality-standards.md
# Source: https://docs.sonarsource.com/sonarqube-server/2025.4/instance-administration/analysis-functions/quality-standards.md
# Source: https://docs.sonarsource.com/sonarqube-server/2025.6/instance-administration/analysis-functions/quality-standards.md
# Source: https://docs.sonarsource.com/sonarqube-server/instance-administration/analysis-functions/quality-standards.md
# Source: https://docs.sonarsource.com/sonarqube-cloud/administering-sonarcloud/managing-organization/setting-config-at-org-level/quality-standards.md
# Managing quality standards
This page explains how to configure organization settings related to quality gates or quality profiles and requiring the Administer organization permission.
To manage the quality gates in your organization, see [introduction-to-quality-gates](https://docs.sonarsource.com/sonarqube-cloud/standards/managing-quality-gates/introduction-to-quality-gates "mention").
To manage the quality profiles in your organization, see [introduction](https://docs.sonarsource.com/sonarqube-cloud/standards/managing-quality-profiles/introduction "mention").
### Configuring the quality gate fudge factor of your organization
The quality gate fudge factor refers to a mechanism where conditions on duplication and coverage are ignored until the number of new lines is at least 20. This is used to avoid overly strict enforcement when dealing with small changes, as minor issues might disproportionately impact the overall quality gate status.
The fudge factor is enabled by default in your organization. This organization’s setting is applied to all new projects. Project administrators can override it for their project.
To enable or disable the quality gate fudge factor of your organization:
1. Retrieve your organization. See [viewing-organizations](https://docs.sonarsource.com/sonarqube-cloud/getting-started/viewing-organizations "mention") for more details.
2. Go to **Administration** > **Quality gate settings**.
3. Select or unselect **Ignore duplication and coverage on small changes**.
4. Select **Save**.
### Related pages
* [introduction-to-quality-gates](https://docs.sonarsource.com/sonarqube-cloud/standards/managing-quality-gates/introduction-to-quality-gates "mention")
* [understanding-quality-profiles](https://docs.sonarsource.com/sonarqube-cloud/standards/managing-quality-profiles/understanding-quality-profiles "mention")
* [changing-quality-gate](https://docs.sonarsource.com/sonarqube-cloud/managing-your-projects/project-analysis/changing-quality-gate "mention")
---
# Source: https://docs.sonarsource.com/sonarqube-mcp-server/quickstart-guide.md
# Source: https://docs.sonarsource.com/sonarqube-server/2025.5/quickstart-guide.md
# Source: https://docs.sonarsource.com/sonarqube-server/2025.6/quickstart-guide.md
# Source: https://docs.sonarsource.com/sonarqube-server/quickstart-guide.md
# Source: https://docs.sonarsource.com/sonarqube-cloud/quickstart-guide.md
# Quickstart guide
By completing this guide you will:
1. [Set up your SonarQube Cloud account](#set-up-your-sonarqube-cloud-account)
1. Set up your Organization
2. Upgrade to Enterprise
1. SSO via SAML
2. [Onboard projects](#onboard-your-projects)
3. [Configure CI analysis](#configure-your-ci-analysis)
4. [Integrate with SonarQube for IDE](#connect-with-sonarqube-for-ide)
5. [Review quality gates](#review-your-quality-gates)
1. Review pull/merge request analysis for failed quality gates.
2. Configure pull request decoration on your DevOps platform
### Set up your SonarQube Cloud account
We use an [organization-based structure](https://docs.sonarsource.com/sonarqube-cloud/administering-sonarcloud/about-sonarqube-cloud-solution/ressources-structure/organization) that mirrors the structure on your chosen DevOps platforms.
Create an organization based on:
* [GitHub](https://docs.sonarsource.com/sonarqube-cloud/administering-sonarcloud/managing-organization/creating-organization/importing-github-organization)
* [BitBucket Cloud](https://docs.sonarsource.com/sonarqube-cloud/administering-sonarcloud/managing-organization/creating-organization/importing-bitbucket-workspace)
* [GitLab](https://docs.sonarsource.com/sonarqube-cloud/administering-sonarcloud/managing-organization/creating-organization/importing-gitlab-group)
* [Azure DevOps](https://docs.sonarsource.com/sonarqube-cloud/administering-sonarcloud/managing-organization/creating-organization/importing-azure-devops-organization)
Consider upgrading to [Enterprise](https://docs.sonarsource.com/sonarqube-cloud/administering-sonarcloud/managing-subscription/subscription-plans) so you can begin [setting-up-sso](https://docs.sonarsource.com/sonarqube-cloud/getting-started-with-enterprise/setting-up-sso "mention").
### Onboard your projects
Import repositories from your DevOps platform to create projects:
* [GitHub](https://docs.sonarsource.com/sonarqube-cloud/getting-started/github)
* [Bitbucket Cloud](https://docs.sonarsource.com/sonarqube-cloud/getting-started/bitbucket-cloud)
* [GitLab](https://docs.sonarsource.com/sonarqube-cloud/getting-started/gitlab)
* [Azure DevOps](https://docs.sonarsource.com/sonarqube-cloud/getting-started/azure-devops)
### Configure your CI analysis
Set up analysis for your imported projects:
* [GitHub](https://docs.sonarsource.com/sonarqube-cloud/getting-started/github#set-up-your-analysis)
* [Bitbucket Cloud](https://docs.sonarsource.com/sonarqube-cloud/getting-started/bitbucket-cloud#set-up-your-analysis)
* [GitLab](https://docs.sonarsource.com/sonarqube-cloud/getting-started/gitlab#set-up-your-analysis)
* [Azure DevOps](https://docs.sonarsource.com/sonarqube-cloud/getting-started/azure-devops#set-up-your-analysis)
Now that you can review the [main branch’s analysis](https://docs.sonarsource.com/sonarqube-cloud/improving/main-branch-analysis) on any of your imported projects.
### Connect with SonarQube for IDE
Have your developers install [connected-mode](https://docs.sonarsource.com/sonarqube-cloud/improving/connected-mode "mention") to leverage the power of SonarQube in their IDE.
### Review your quality gates
The purpose of [quality-gates](https://docs.sonarsource.com/sonarqube-cloud/improving/quality-gates "mention") is to tell you whether your code is good enough to be pushed to the next step:
* For the main branch and other long-lived branches, the quality gate answers the question: "Can I release my code today?"
* For pull requests (and short-lived branches), the quality gate answers the question: "Can I merge this pull request?"
By setting up [pull-request-analysis](https://docs.sonarsource.com/sonarqube-cloud/improving/pull-request-analysis "mention"), you ensure pull requests are analyzed when they are opened and every time a change is pushed to the pull request branch. You can also configure [pull request decoration](https://docs.sonarsource.com/sonarqube-cloud/improving/pull-request-analysis#pull-request-decoration) to allow your developers to view the analysis from SonarQube Cloud directly on the PRs they submit.
By keeping an eye on the quality gates, the decision makers can quickly judge the status of code and decide what to do next.
### Develop with Sonar
Now that you have seen the benefits of using [SonarQube Cloud](https://docs.sonarsource.com/sonarqube-cloud/discovering-sonarcloud/what-sonarcloud-can-do) with your DevOPs platforms, managers and tech leads can check out the [security reports](https://docs.sonarsource.com/sonarqube-cloud/digging-deeper/security-reports) and [portfolios](https://docs.sonarsource.com/sonarqube-cloud/managing-portfolios) features to begin monitoring the security and releasability of projects.
---
# Source: https://docs.sonarsource.com/sonarqube-mcp-server/readme.md
# Source: https://docs.sonarsource.com/sonarqube-community-build/readme.md
# Source: https://docs.sonarsource.com/sonarqube-for-eclipse/readme.md
# Source: https://docs.sonarsource.com/sonarqube-for-visual-studio/readme.md
# Source: https://docs.sonarsource.com/sonarqube-for-intellij/readme.md
# Source: https://docs.sonarsource.com/sonarqube-for-vs-code/readme.md
# Source: https://docs.sonarsource.com/sonarqube-server/8.9/readme.md
# Source: https://docs.sonarsource.com/sonarqube-server/9.8/readme.md
# Source: https://docs.sonarsource.com/sonarqube-server/9.9/readme.md
# Source: https://docs.sonarsource.com/sonarqube-server/10.0/readme.md
# Source: https://docs.sonarsource.com/sonarqube-server/10.1/readme.md
# Source: https://docs.sonarsource.com/sonarqube-server/10.2/readme.md
# Source: https://docs.sonarsource.com/sonarqube-server/10.3/readme.md
# Source: https://docs.sonarsource.com/sonarqube-server/10.4/readme.md
# Source: https://docs.sonarsource.com/sonarqube-server/10.5/readme.md
# Source: https://docs.sonarsource.com/sonarqube-server/10.6/readme.md
# Source: https://docs.sonarsource.com/sonarqube-server/10.7/readme.md
# Source: https://docs.sonarsource.com/sonarqube-server/10.8/readme.md
# Source: https://docs.sonarsource.com/sonarqube-server/2025.2/readme.md
# Source: https://docs.sonarsource.com/sonarqube-server/2025.3/readme.md
# Source: https://docs.sonarsource.com/sonarqube-server/2025.5/readme.md
# Source: https://docs.sonarsource.com/sonarqube-server/2025.1/readme.md
# Source: https://docs.sonarsource.com/sonarqube-server/2025.4/readme.md
# Source: https://docs.sonarsource.com/sonarqube-server/2025.6/readme.md
# Source: https://docs.sonarsource.com/sonarqube-server/readme.md
# Source: https://docs.sonarsource.com/sonarqube-cloud/readme.md
# Homepage
### What is SonarQube Cloud?
SonarQube Cloud is an industry standard Software-as-a-Service (SaaS) automated code review and static analysis tool designed to detect coding issues in more than [30+ languages, frameworks, and IaC platforms](https://docs.sonarsource.com/sonarqube-cloud/advanced-setup/languages/overview). By integrating directly with your [CI pipeline](https://docs.sonarsource.com/sonarqube-cloud/advanced-setup/ci-based-analysis/overview-of-integrated-cis) or one of the supported [DevOps platforms](https://docs.sonarsource.com/sonarqube-cloud/getting-started/sign-up), your code is checked against an extensive set of rules that cover many attributes of code, such as maintainability, reliability, and security issues, on each merge/pull request.
SonarQube Cloud extends your DevOps experience by performing automated code checks within minutes. Please have a look at the Discovering SonarQube Cloud section to learn more about [what-sonarcloud-can-do](https://docs.sonarsource.com/sonarqube-cloud/discovering-sonarcloud/what-sonarcloud-can-do "mention"). For on-premise code repositories, see the SonarQube Server [Server 2025.4 LTA](https://app.gitbook.com/o/2ibCvzwZt86Nlk2zloB7/s/yDv2XwTC1xoOKBYeCK45/ "mention") documentation.
Additionally, you can explore [featured public projects](https://sonarcloud.io/explore/projects) on SonarQube Cloud and experience how other organizations leverage the platform to improve their code.
### Achieving high quality code
SonarQube sets high standards for all code that results in secure, reliable, and maintainable software that is essential to maintaining a healthy codebase. This applies to all code: source code, test code, infrastructure as code, glue code, scripts, and more.
All new code, whether added or recently modified, should adhere to quality standards. SonarQube achieves this by providing automated code reviews that alert you to potential issues within your new code. This helps you maintain high standards and focus on code quality, ultimately leading to a healthier codebase over time.
SonarQube Cloud comes with a built-in quality profile designed for each supported language, called the Sonar way profile. The Sonar way activates a set of rules that should be applicable to most projects and is a starting point to help you implement good practices in your organization.
### The SonarQube solution
SonarQube is designed to help you achieve a state of high quality code. By linking SonarQube for IDE with SonarQube Cloud or SonarQube Server, the automated code analysis and reviews are performed at every stage of the development process. We call this the SonarQube solution. This means your project settings, new code definitions, and the quality profiles managed in SonarQube Cloud are applied locally to an analysis in the IDE.
* [SonarQube for IDE](https://app.gitbook.com/o/2ibCvzwZt86Nlk2zloB7/s/6LPRABg3ubAJhpfR5K0Y/) brings automated code reviews directly into your development environment, helping you catch issues as you write code. By providing immediate feedback, it enables engineers to identify and fix problems before they even commit, ensuring cleaner, higher-quality code from the start.
* Then, [SonarQube Server](https://app.gitbook.com/s/yDv2XwTC1xoOKBYeCK45/analyzing-source-code/pull-request-analysis) and [SonarQube Cloud](https://docs.sonarsource.com/sonarqube-cloud/improving/pull-request-analysis) deliver powerful static code analysis by thoroughly reviewing each pull request before it’s merged. This proactive approach adds an essential layer of protection, ensuring code quality and preventing issues from entering your codebase.
* Finally, [SonarQube Server](https://app.gitbook.com/s/yDv2XwTC1xoOKBYeCK45/quality-standards-administration) and [SonarQube Cloud](https://docs.sonarsource.com/sonarqube-cloud/standards) seamlessly integrate into your CI/CD pipeline, analyzing code on every build. By leveraging quality profiles and quality gates, they automatically block code with issues from being released to production, ensuring only maintainable, reliable, and secure code makes it through.
The SonarQube solution helps you incorporate a proper methodology by helping engineers pay attention to new code. Focusing on writing high quality new code during development ensures that all code released for production will be incrementally improved over time.
### Connected Mode
Connected mode joins SonarQube Cloud with SonarQube for IDE to deliver the full SonarQube solution. While in connected mode, SonarQube Cloud sends notifications to SonarQube for IDE when a quality gate changes or a new issue is assigned to the user. Smart notifications can be enabled or disabled from the SonarQube for IDE UI while creating or editing the connection settings. In addition, SonarQube for IDE helps the engineer focus on writing high quality code by using the new code definition on the server.
Be sure to check out all of the [#connected-mode-benefits](https://docs.sonarsource.com/sonarqube-cloud/improving/connected-mode#connected-mode-benefits "mention").
### Getting started
Now that you’ve heard about how [SonarQube Cloud](https://www.sonarsource.com/products/sonarcloud/) can help you write high quality code, you are ready to try out SonarQube Cloud for yourself. After signing up for SonarQube Cloud using the login from your DevOps platform account (see [sign-up](https://docs.sonarsource.com/sonarqube-cloud/getting-started/sign-up "mention")), you can import your organizations and repositories to set up a [first analysis](https://docs.sonarsource.com/sonarqube-cloud/getting-started/first-analysis).
The [ci-based-analysis](https://docs.sonarsource.com/sonarqube-cloud/advanced-setup/ci-based-analysis "mention") pages explain how to connect your scanner to your CI pipeline and provides instructions for analyzing your project’s branches and pull requests.
Here's a page with everything you need to learn [what-sonarcloud-can-do](https://docs.sonarsource.com/sonarqube-cloud/discovering-sonarcloud/what-sonarcloud-can-do "mention").
### Learn more
Check out the entire suite of Sonar products on the main website: [SonarQube Server](https://www.sonarsource.com/products/sonarqube/), [SonarQube Cloud](https://www.sonarsource.com/products/sonarcloud/), and [SonarQube for IDE](https://www.sonarsource.com/products/sonarlint/).
Then, have a look at how to fix issues detected by SonarQube for [IntelliJ](https://app.gitbook.com/s/NvI4wotPmITyM0mnsmtp/using/fixing-issues), [Visual Studio](https://app.gitbook.com/s/5CSDwdOaYoOAGYNiRqgl/using/fixing-issues), [VS Code](https://app.gitbook.com/s/6LPRABg3ubAJhpfR5K0Y/using/fixing-issues), and [Eclipse](https://app.gitbook.com/s/kadXEH8HkykK7lKaDvVq/using/fixing-issues) when combined with managing your code issues in [SonarQube Server](https://app.gitbook.com/s/yDv2XwTC1xoOKBYeCK45/user-guide/issues/introduction) and [SonarQube Cloud](https://docs.sonarsource.com/sonarqube-cloud/managing-your-projects/issues/introduction), and browse a full list of [Sonar Rules and Rule Descriptions](http://rules.sonarsource.com/) available for static code analysis.
#### More getting started resources
* [sign-up](https://docs.sonarsource.com/sonarqube-cloud/getting-started/sign-up "mention")
* [advanced-setup](https://docs.sonarsource.com/sonarqube-cloud/advanced-setup "mention") and [automatic-analysis](https://docs.sonarsource.com/sonarqube-cloud/advanced-setup/automatic-analysis "mention")
* [managing-quality-profiles](https://docs.sonarsource.com/sonarqube-cloud/standards/managing-quality-profiles "mention")
* [managing-portfolios](https://docs.sonarsource.com/sonarqube-cloud/managing-portfolios "mention")
And if you need help, visit our [online community](https://community.sonarsource.com/c/sc/9) to search for answers and reach out with questions!
---
# Source: https://docs.sonarsource.com/sonarqube-cloud/administering-sonarcloud/managing-organization/manage-org-projects/manage-project-permissions/recovering-admin-access.md
# Restoring administrator access
If you lost administrator access to a project of your organization, you can restore it if you’re an organization admin:
* At the project level. This requires the Browse Project permission in case of a private project.
* By using the Projects Management page. This is only possible with an Enterprise plan.
* By using the API.
### At the project level
1. Retrieve your project. See [retrieving-projects](https://docs.sonarsource.com/sonarqube-cloud/managing-your-projects/retrieving-projects "mention") for more details.
2. In the left sidebar, select **Administration** > **Restore access**. The **Restore admin permissions** dialog opens.
3. Select the **Restore permissions** button. You are now granted the Administer and/or Browse permission for the project.
### By using the Projects Management page
This method is only possible with an Enterprise plan organization.
To restore administrator access to a project by using the Projects Management page:
1. Retrieve your organization. See [viewing-organizations](https://docs.sonarsource.com/sonarqube-cloud/getting-started/viewing-organizations "mention") for more details.
2. Go to **Administration** > **Projects Management**.
3. In the three-dot menu at the far right of the project line, select **Restore access**. You will then be granted the Administer and/or Browse permission for the project.
### By using the API
Use the [add\_user API endpoint](https://sonarcloud.io/web_api/api/permissions/add_user?deprecated=false) to grant an organization administrator `admin` permission to the project. To identify the project, you can use the `projectKey` (the `projectId` is optional).
### Related page
* [setting-permissions](https://docs.sonarsource.com/sonarqube-cloud/managing-your-projects/administering-your-projects/setting-permissions "mention")
---
# Source: https://docs.sonarsource.com/sonarqube-server/10.6/setup-and-upgrade/reference-architectures.md
# Source: https://docs.sonarsource.com/sonarqube-server/10.7/setup-and-upgrade/reference-architectures.md
# Source: https://docs.sonarsource.com/sonarqube-server/10.8/setup-and-upgrade/reference-architectures.md
# Source: https://docs.sonarsource.com/sonarqube-server/2025.2/setup-and-update/reference-architectures.md
# Source: https://docs.sonarsource.com/sonarqube-server/2025.3/server-installation/reference-architectures.md
# Source: https://docs.sonarsource.com/sonarqube-server/2025.5/server-installation/reference-architectures.md
# Source: https://docs.sonarsource.com/sonarqube-server/2025.1/setup-and-upgrade/reference-architectures.md
# Source: https://docs.sonarsource.com/sonarqube-server/2025.4/server-installation/reference-architectures.md
# Source: https://docs.sonarsource.com/sonarqube-server/2025.6/server-installation/reference-architectures.md
# Source: https://docs.sonarsource.com/sonarqube-server/server-installation/reference-architectures.md
# Reference architectures
- [Up to 10 M LOC](/sonarqube-server/server-installation/reference-architectures/up-to-10m-loc.md): This page describes the architecture of a SonarQube Server instance that will support up to 10 million lines of code under normal usage patterns in a non-high availability setup.
- [Up to 50 M LOC](/sonarqube-server/server-installation/reference-architectures/up-to-50m-loc.md): This architecture describes the setup of a SonarQube Server Enterprise Editon instance that will support up to 50 million lines of code.
---
# Source: https://docs.sonarsource.com/sonarqube-server/10.7/user-guide/viewing-reports/regulatory-reports.md
# Source: https://docs.sonarsource.com/sonarqube-server/10.8/user-guide/viewing-reports/regulatory-reports.md
# Source: https://docs.sonarsource.com/sonarqube-server/2025.2/user-guide/viewing-reports/regulatory-reports.md
# Source: https://docs.sonarsource.com/sonarqube-server/2025.3/user-guide/viewing-reports/regulatory-reports.md
# Source: https://docs.sonarsource.com/sonarqube-server/2025.5/user-guide/viewing-reports/regulatory-reports.md
# Source: https://docs.sonarsource.com/sonarqube-server/2025.1/user-guide/viewing-reports/regulatory-reports.md
# Source: https://docs.sonarsource.com/sonarqube-server/2025.4/user-guide/viewing-reports/regulatory-reports.md
# Source: https://docs.sonarsource.com/sonarqube-server/2025.6/user-guide/viewing-reports/regulatory-reports.md
# Source: https://docs.sonarsource.com/sonarqube-server/user-guide/viewing-reports/regulatory-reports.md
# Regulatory reports
Starting in [Enterprise](https://www.sonarsource.com/plans-and-pricing/enterprise/), you can download a regulatory report for any permanent branch of a project. A permanent branch is one that has been set to **Keep when inactive**, see [maintaining-the-branches-of-your-project](https://docs.sonarsource.com/sonarqube-server/project-administration/maintaining-project/maintaining-the-branches-of-your-project "mention") for details.
### Downloading regulatory reports
To download a regulatory report:
1. Retrieve your project. See [retrieving-projects](https://docs.sonarsource.com/sonarqube-server/user-guide/viewing-projects/retrieving-projects "mention") for more information.
2. On the Overview page, click **Downloadable reports** and select **Download Regulatory report (.zip)** from the drop down menu.
Alternatively:
1. Select **Project Information** from the project’s navigation bar.
2. In the **Regulatory Report** section, choose a project branch from the drop down menu.
3. Click **Download report**.
SonarQube generates the report for download, which may take a few minutes depending on the size of the project.
### Contents of the regulator report’s ZIP file
The reports are in a ZIP file containing a snapshot of the latest analysis of the selected branch and include TXT, CSV, and PDF files.
The PDF file includes:
* **Project overview**:
* Project details
* Quality gates information and status
* **Project rating** **overview** for:
* New code broken down by new issues, accepted issues, coverage, duplication, and security hotspots.
* Overall code broken down by security, reliability, maintainability (in [mqr-mode](https://docs.sonarsource.com/sonarqube-server/instance-administration/analysis-functions/instance-mode/mqr-mode "mention")) or vulnerabilities, bugs, and code smells (in [standard-experience](https://docs.sonarsource.com/sonarqube-server/instance-administration/analysis-functions/instance-mode/standard-experience "mention")), accepted issues, coverage, duplication, and security hotspots.
* **Distribution of issues in new code** showing open issues and breakdown by severity, based on security, reliability, maintainability (in [mqr-mode](https://docs.sonarsource.com/sonarqube-server/instance-administration/analysis-functions/instance-mode/mqr-mode "mention")) or vulnerabilities, bugs, and code smells (in [standard-experience](https://docs.sonarsource.com/sonarqube-server/instance-administration/analysis-functions/instance-mode/standard-experience "mention")).
* **Distribution of issues in overall code** showing open issues and breakdown by severity, based on security, reliability, maintainability (in [mqr-mode](https://docs.sonarsource.com/sonarqube-server/instance-administration/analysis-functions/instance-mode/mqr-mode "mention")) or vulnerabilities, bugs, and code smells (in [standard-experience](https://docs.sonarsource.com/sonarqube-server/instance-administration/analysis-functions/instance-mode/standard-experience "mention")).
* **Quality gate and quality profiles** information.
* **Files** lists all relevant files included in the ZIP file.
* **Definitions** lists all the definitions of terms related to the report.
Depending on the configuration of your SonarQube Server instance, the regulatory report is generated with metrics either from [standard-experience](https://docs.sonarsource.com/sonarqube-server/instance-administration/analysis-functions/instance-mode/standard-experience "mention") or [mqr-mode](https://docs.sonarsource.com/sonarqube-server/instance-administration/analysis-functions/instance-mode/mqr-mode "mention"). Some CSV files may contain metrics from both modes and they are marked accordingly.
### Related pages
* [security-reports](https://docs.sonarsource.com/sonarqube-server/user-guide/viewing-reports/security-reports "mention")
* [pdf-reports](https://docs.sonarsource.com/sonarqube-server/user-guide/viewing-reports/pdf-reports "mention")
* [portfolios](https://docs.sonarsource.com/sonarqube-server/user-guide/viewing-reports/portfolios "mention")
* [other-issues](https://docs.sonarsource.com/sonarqube-server/server-update-and-maintenance/troubleshooting/other-issues "mention")
---
# Source: https://docs.sonarsource.com/sonarqube-community-build/server-update-and-maintenance/maintenance/reindexing.md
# Source: https://docs.sonarsource.com/sonarqube-server/10.1/instance-administration/reindexing.md
# Source: https://docs.sonarsource.com/sonarqube-server/10.2/instance-administration/reindexing.md
# Source: https://docs.sonarsource.com/sonarqube-server/10.3/instance-administration/reindexing.md
# Source: https://docs.sonarsource.com/sonarqube-server/10.4/instance-administration/reindexing.md
# Source: https://docs.sonarsource.com/sonarqube-server/10.5/instance-administration/reindexing.md
# Source: https://docs.sonarsource.com/sonarqube-server/10.6/instance-administration/reindexing.md
# Source: https://docs.sonarsource.com/sonarqube-server/10.7/server-upgrade-and-maintenance/maintenance/reindexing.md
# Source: https://docs.sonarsource.com/sonarqube-server/10.8/server-upgrade-and-maintenance/maintenance/reindexing.md
# Source: https://docs.sonarsource.com/sonarqube-server/2025.2/server-update-and-maintenance/maintenance/reindexing.md
# Source: https://docs.sonarsource.com/sonarqube-server/2025.3/server-update-and-maintenance/maintenance/reindexing.md
# Source: https://docs.sonarsource.com/sonarqube-server/2025.5/server-update-and-maintenance/maintenance/reindexing.md
# Source: https://docs.sonarsource.com/sonarqube-server/2025.1/server-update-and-maintenance/maintenance/reindexing.md
# Source: https://docs.sonarsource.com/sonarqube-server/2025.4/server-update-and-maintenance/maintenance/reindexing.md
# Source: https://docs.sonarsource.com/sonarqube-server/2025.6/server-update-and-maintenance/maintenance/reindexing.md
# Source: https://docs.sonarsource.com/sonarqube-server/server-update-and-maintenance/maintenance/reindexing.md
# Reindexing
### Project, application, and portfolio availability
Most features are available during reindexing (for example, you can already analyze your projects), but some only become available when the process is complete:
* Project issues and security hotspots: Available, but some filters and the ability to add tags become available only when reindexing is complete.
* Security reports: Available when reindexing is complete.
* Applications and portfolios: Issues, security hotspots, and security reports become available once all their associated projects are reindexed.
* The global Issues page is unavailable until all projects are reindexed.
SonarQube Server uses analysis dates to determine which projects to prioritize during reindexing. Your projects with the most recent analysis dates are the first to become fully available in the UI.
Administrators can track the full reindexing progress:
* Within the banner displayed in SonarQube Server.
* In the [background-tasks](https://docs.sonarsource.com/sonarqube-server/analyzing-source-code/background-tasks "mention").
{% hint style="info" %}
If a project fails to reindex, see **Reindexing a single project** below.
{% endhint %}
### Running analyses during reindexing
Reindexing starts once SonarQube Server is up and running. You can run analyses on your projects on the CI side while indexes are being rebuilt. The processing of analysis results takes priority over reindexing tasks, so your SonarQube Server instance is effectively operational.
Administrators can check the progress of these analyses in **Administration** > **Projects** > **Background tasks**.
### Quality gate timeout
When calculating the quality gate of a project that is actively being indexed, SonarQube Server will finish indexing to allow computation to complete before returning quality gate status. If the indexing does not finish by the Quality Gate timeout setting, then the Quality Gate will time out.
### Forcing an Elasticsearch reindex
You can trigger a full Elasticsearch reindex. During the reindex, SonarQube Server will detect out-of-sync indices and correct them.
{% hint style="warning" %}
Full Elasticsearch reindex can be quite lengthy depending on the size of your instance.
{% endhint %}
#### ZIP file deployment
### Quality profile permissions
By default, only users with the global **Administer Quality Profiles** permission can edit quality profiles. User permissions are defined at **Administration** > **Security** > **Global Permissions**.
SonarQube Server also allows users with the global **Administer Quality Profiles** permission to give an expert or group of experts permission to manage a specific profile. These experts only have permission for that specific profile.
Permissions can be granted to manage specific quality profiles on that profile’s page (**Quality Profiles >** ***profile name*****)** under **Permissions** by selecting **Grant permissions to more users**.
The permission to deactivate inherited rules in a child profile is managed at the level of the SonarQube Server instance. It is by default enabled. As a SonarQube Server Administrator, you can disable it in **Administration** > **Configuration** > **General Settings** > **Quality Profile** by unchecking the **Enable deactivation of inherited rules** option.
### Comparing two quality profiles
You can compare the activated rules between two quality profiles. This is especially useful when you’re using a quality profile copied from another profile because you won’t automatically inherit new rules added to the original quality profile.
To compare two profiles:
1. From the **Quality Profiles** page, select the name of the first profile you’d like to compare.
2. Select **Compare** from the menu.
3. Select the second profile you’d like to compare from the **Compare with** drop-down menu.
From here you can push rules between the two profiles using the buttons.
### Finding out what has changed in a quality profile
When SonarQube Server notices that an analysis was performed with a quality profile that is different in some way from the previous analysis, a *quality profile event* is added to the project’s event log. To see the changes in a profile, navigate to the profile (**Quality Profiles** > ***profile name***) and choose **Changelog**. This can help you understand how profile changes impact the issues raised in an analysis.
Additionally, users with the **Administer Quality Profile** privilege are notified by email each time a built-in profile is updated. These updates can be caused by updating SonarQube Server or updating third-party analyzers.
### Importing a quality profile from another SonarQube Server instance
To import a profile from another SonarQube Server instance, do the following:
1. From the source SonarQube Server instance, open the quality profile you want to use.
2. Select **Back up** from the menu. This exports the profile as an XML file.
3. From the target SonarQube Server instance, select the **Restore** button on the **Quality Profiles** main page.
4. Choose the XML file that you exported previously, and select **Restore**.
### Applying profiles to projects
One profile for each language is marked as the default. Barring any other intervention, all projects that use that language will be analyzed with that profile. To have a project analyzed by a non-default profile instead, start from **Quality Profiles**, and navigate to your target profile, then use the **Projects** part of the interface to manage which projects are explicitly assigned to that profile.
### Ensuring your quality profile has all relevant new rules
Each time a new SonarQube Server version is released, new rules are added. New rules won’t appear automatically in your profile unless you’re using a built-in profile or a profile extended from a built-in profile.
If you’re not using a built-in profile, you can compare your profile to the built-in profile to see which rules you’re missing.
Another option is to go to the **Rules** page in SonarQube Server and use the **Available Since** search facet to see what rules have been added to the platform since the day you upgraded.
Finally, the **Quality Profiles** main page shows recently added rules in the **Recently Added Rules** section on the right side of the page.
### Avoiding deprecated rules
The **Deprecated Rules** section of the **Quality Profiles** page has a pink background and is your first warning that a profile contains deprecated rules. This section gives the total number of instances of deprecated rule(s) that are currently active in each quality profile and provides a breakdown of deprecated rule(s) per profile. Selecting the **Deprecated Rules** section takes you either to the **Rules** page or to the relevant quality profile to investigate further.
Alternatively, you can perform a **Rules** search for the rules in a profile and use the **Status** rule search facet (in the left sidebar) to narrow the list to the ones that need attention.
### Security
The **Quality Profiles** page can be accessed by any user (even anonymous users). All users can view every aspect of any profile. That means anyone can see which rules are included in a profile, which rules have been left out, how a profile has changed over time, and compare the rules between any two profiles.
To create, edit, or delete a profile, a user must be granted the **Administer Quality Profiles** permission.
A project administrator can choose which profiles their project is associated with.
### Rule Severity in your Quality Profile
If you have the proper permissions, you can customize the severity of a rule in your quality profile, however, this will not change the recommended severity of the rule.
In MQR mode, a rule’s severity is defined by the impact of [software-qualities](https://docs.sonarsource.com/sonarqube-server/2025.1/user-guide/rules/software-qualities "mention"). A rule can impact multiple software qualities, and each software quality has its own severity.
---
# Source: https://docs.sonarsource.com/sonarqube-community-build/quality-standards-administration.md
# Source: https://docs.sonarsource.com/sonarqube-server/2025.2/quality-standards-administration.md
# Source: https://docs.sonarsource.com/sonarqube-server/2025.3/quality-standards-administration.md
# Source: https://docs.sonarsource.com/sonarqube-server/2025.5/quality-standards-administration.md
# Source: https://docs.sonarsource.com/sonarqube-server/2025.4/quality-standards-administration.md
# Source: https://docs.sonarsource.com/sonarqube-server/2025.6/quality-standards-administration.md
# Source: https://docs.sonarsource.com/sonarqube-server/quality-standards-administration.md
# Quality standards administration
- [Managing quality gates](/sonarqube-server/quality-standards-administration/managing-quality-gates.md): This section helps you understand how to view, manage, and change your quality gates in SonarQube Server.
- [Introduction](/sonarqube-server/quality-standards-administration/managing-quality-gates/introduction.md): Your introduction to understanding how to use quality gates in SonarQube Server.
- [Understanding quality gates](/sonarqube-server/quality-standards-administration/managing-quality-gates/introduction-to-quality-gates.md): SonarQube Server quality gates use sets of conditions to measure checks against your code during analysis. Depending on result, code passes or fails the quality gate.
- [Viewing a quality gate](/sonarqube-server/quality-standards-administration/managing-quality-gates/viewing-quality-gate.md): Any user can view the quality gates and their conditions defined in a SonarQube Server instance.
- [Managing custom quality gates](/sonarqube-server/quality-standards-administration/managing-quality-gates/managing-custom-quality-gates.md): You can create your own, custom quality gates in SonarQube Server. To manage custom quality gates, you must have the Administer Quality Gates permission.
- [Changing instance's default quality gate](/sonarqube-server/quality-standards-administration/managing-quality-gates/changing-default-quality-gate.md): A default quality gate is assigned in your SonarQube Server settings. This quality gate is automatically applied to new projects and can be modified at any time.
- [Associating a quality gate with projects](/sonarqube-server/quality-standards-administration/managing-quality-gates/associating-projects-with-quality-gate.md): The default quality gate is associated with all projects in the organization that are not explicitly associated with a quality gate.
- [Managing quality profiles](/sonarqube-server/quality-standards-administration/managing-quality-profiles.md): This section helps you understand how to view, manage, and change your quality profiles in SonarQube Server.
- [Introduction](/sonarqube-server/quality-standards-administration/managing-quality-profiles/introduction.md): Your introduction to understanding how to use quality profiles in SonarQube Server.
- [Understanding quality profiles](/sonarqube-server/quality-standards-administration/managing-quality-profiles/understanding-quality-profiles.md): Quality profiles are a key part of your SonarQube Server configuration because they are composed of a list of rules to check your code against.
- [Viewing quality profiles](/sonarqube-server/quality-standards-administration/managing-quality-profiles/viewing-quality-profiles.md): Any user can view and compare quality profiles in SonarQube Server.
- [Creating a quality profile](/sonarqube-server/quality-standards-administration/managing-quality-profiles/creating-a-quality-profile.md): The Sonar way quality profile is designed to be broadly suitable for most projects and you can use custom quality profiles to adjust your project as it progresses.
- [Editing a quality profile](/sonarqube-server/quality-standards-administration/managing-quality-profiles/editing-a-custom-quality-profile.md): To edit a quality profile in SonarQube Server, you need the Administer Quality Profiles permission or be authorized to manage this particular profile.
- [Associating with projects](/sonarqube-server/quality-standards-administration/managing-quality-profiles/associating-a-quality-profile-with-projects.md): By default, a SonarQube Server project is associated with each language’s default quality profile. You can also explicitly associate a quality profile with projects.
- [Changing default quality profile](/sonarqube-server/quality-standards-administration/managing-quality-profiles/changing-default-quality-profile.md): By default, the language’s BUILT-IN quality profile, Sonar way, is the profile assigned to projects not explicitly associated with another quality profile.
- [Maintaining quality profiles](/sonarqube-server/quality-standards-administration/managing-quality-profiles/maintaining-your-custom-quality-profiles.md): Maintaining your custom quality profile in SonarQube Server is important if it's not inherited from the Sonar way built-in profile.
- [Granting permissions to users](/sonarqube-server/quality-standards-administration/managing-quality-profiles/authorizing-other-users-to-manage-quality-profile.md): It is a simple process in SonarQube Server to assign the correct quality profile administration permission to users and groups.
- [Adding tags to a rule](/sonarqube-server/quality-standards-administration/managing-quality-profiles/adding-tags-to-rule.md): Tags are a way to categorize rules and issues.
- [Standards for AI Code Assurance](/sonarqube-server/quality-standards-administration/ai-code-assurance.md): SonarQube Server's AI Code Assurance features help you set appropriate standards for projects containing AI-generated code.
- [Set your AI standards](/sonarqube-server/quality-standards-administration/ai-code-assurance/overview.md): This section explains how to manage AI standards, including the use of tools for Sonar’s AI Code Assurance in your SonarQube Server project.
- [Quality gates for AI code](/sonarqube-server/quality-standards-administration/ai-code-assurance/quality-gates-for-ai-code.md): This page explains how to manage quality gates for AI Code Assurance for securing your SonarQube Server project.
- [Quality profiles for AI code](/sonarqube-server/quality-standards-administration/ai-code-assurance/quality-profiles-for-ai-code.md): This page explains how to manage quality profiles for AI Code Assurance for securing your SonarQube Server project.
- [Monitor projects with AI code](/sonarqube-server/quality-standards-administration/ai-code-assurance/monitor-projects-with-ai-code.md): This page explains the internal and external AI Code Assurance labels and badges you have to mark your SonarQube Server projects.
---
# Source: https://docs.sonarsource.com/sonarqube-community-build/instance-administration/analysis-functions/quality-standards.md
# Source: https://docs.sonarsource.com/sonarqube-server/2025.2/instance-administration/analysis-functions/quality-standards.md
# Source: https://docs.sonarsource.com/sonarqube-server/2025.3/instance-administration/analysis-functions/quality-standards.md
# Source: https://docs.sonarsource.com/sonarqube-server/2025.5/instance-administration/analysis-functions/quality-standards.md
# Source: https://docs.sonarsource.com/sonarqube-server/2025.4/instance-administration/analysis-functions/quality-standards.md
# Source: https://docs.sonarsource.com/sonarqube-server/2025.6/instance-administration/analysis-functions/quality-standards.md
# Source: https://docs.sonarsource.com/sonarqube-server/instance-administration/analysis-functions/quality-standards.md
# Source: https://docs.sonarsource.com/sonarqube-cloud/administering-sonarcloud/managing-organization/setting-config-at-org-level/quality-standards.md
# Managing quality standards
This page explains how to configure organization settings related to quality gates or quality profiles and requiring the Administer organization permission.
To manage the quality gates in your organization, see [introduction-to-quality-gates](https://docs.sonarsource.com/sonarqube-cloud/standards/managing-quality-gates/introduction-to-quality-gates "mention").
To manage the quality profiles in your organization, see [introduction](https://docs.sonarsource.com/sonarqube-cloud/standards/managing-quality-profiles/introduction "mention").
### Configuring the quality gate fudge factor of your organization
The quality gate fudge factor refers to a mechanism where conditions on duplication and coverage are ignored until the number of new lines is at least 20. This is used to avoid overly strict enforcement when dealing with small changes, as minor issues might disproportionately impact the overall quality gate status.
The fudge factor is enabled by default in your organization. This organization’s setting is applied to all new projects. Project administrators can override it for their project.
To enable or disable the quality gate fudge factor of your organization:
1. Retrieve your organization. See [viewing-organizations](https://docs.sonarsource.com/sonarqube-cloud/getting-started/viewing-organizations "mention") for more details.
2. Go to **Administration** > **Quality gate settings**.
3. Select or unselect **Ignore duplication and coverage on small changes**.
4. Select **Save**.
### Related pages
* [introduction-to-quality-gates](https://docs.sonarsource.com/sonarqube-cloud/standards/managing-quality-gates/introduction-to-quality-gates "mention")
* [understanding-quality-profiles](https://docs.sonarsource.com/sonarqube-cloud/standards/managing-quality-profiles/understanding-quality-profiles "mention")
* [changing-quality-gate](https://docs.sonarsource.com/sonarqube-cloud/managing-your-projects/project-analysis/changing-quality-gate "mention")
---
# Source: https://docs.sonarsource.com/sonarqube-mcp-server/quickstart-guide.md
# Source: https://docs.sonarsource.com/sonarqube-server/2025.5/quickstart-guide.md
# Source: https://docs.sonarsource.com/sonarqube-server/2025.6/quickstart-guide.md
# Source: https://docs.sonarsource.com/sonarqube-server/quickstart-guide.md
# Source: https://docs.sonarsource.com/sonarqube-cloud/quickstart-guide.md
# Quickstart guide
By completing this guide you will:
1. [Set up your SonarQube Cloud account](#set-up-your-sonarqube-cloud-account)
1. Set up your Organization
2. Upgrade to Enterprise
1. SSO via SAML
2. [Onboard projects](#onboard-your-projects)
3. [Configure CI analysis](#configure-your-ci-analysis)
4. [Integrate with SonarQube for IDE](#connect-with-sonarqube-for-ide)
5. [Review quality gates](#review-your-quality-gates)
1. Review pull/merge request analysis for failed quality gates.
2. Configure pull request decoration on your DevOps platform
### Set up your SonarQube Cloud account
We use an [organization-based structure](https://docs.sonarsource.com/sonarqube-cloud/administering-sonarcloud/about-sonarqube-cloud-solution/ressources-structure/organization) that mirrors the structure on your chosen DevOps platforms.
Create an organization based on:
* [GitHub](https://docs.sonarsource.com/sonarqube-cloud/administering-sonarcloud/managing-organization/creating-organization/importing-github-organization)
* [BitBucket Cloud](https://docs.sonarsource.com/sonarqube-cloud/administering-sonarcloud/managing-organization/creating-organization/importing-bitbucket-workspace)
* [GitLab](https://docs.sonarsource.com/sonarqube-cloud/administering-sonarcloud/managing-organization/creating-organization/importing-gitlab-group)
* [Azure DevOps](https://docs.sonarsource.com/sonarqube-cloud/administering-sonarcloud/managing-organization/creating-organization/importing-azure-devops-organization)
Consider upgrading to [Enterprise](https://docs.sonarsource.com/sonarqube-cloud/administering-sonarcloud/managing-subscription/subscription-plans) so you can begin [setting-up-sso](https://docs.sonarsource.com/sonarqube-cloud/getting-started-with-enterprise/setting-up-sso "mention").
### Onboard your projects
Import repositories from your DevOps platform to create projects:
* [GitHub](https://docs.sonarsource.com/sonarqube-cloud/getting-started/github)
* [Bitbucket Cloud](https://docs.sonarsource.com/sonarqube-cloud/getting-started/bitbucket-cloud)
* [GitLab](https://docs.sonarsource.com/sonarqube-cloud/getting-started/gitlab)
* [Azure DevOps](https://docs.sonarsource.com/sonarqube-cloud/getting-started/azure-devops)
### Configure your CI analysis
Set up analysis for your imported projects:
* [GitHub](https://docs.sonarsource.com/sonarqube-cloud/getting-started/github#set-up-your-analysis)
* [Bitbucket Cloud](https://docs.sonarsource.com/sonarqube-cloud/getting-started/bitbucket-cloud#set-up-your-analysis)
* [GitLab](https://docs.sonarsource.com/sonarqube-cloud/getting-started/gitlab#set-up-your-analysis)
* [Azure DevOps](https://docs.sonarsource.com/sonarqube-cloud/getting-started/azure-devops#set-up-your-analysis)
Now that you can review the [main branch’s analysis](https://docs.sonarsource.com/sonarqube-cloud/improving/main-branch-analysis) on any of your imported projects.
### Connect with SonarQube for IDE
Have your developers install [connected-mode](https://docs.sonarsource.com/sonarqube-cloud/improving/connected-mode "mention") to leverage the power of SonarQube in their IDE.
### Review your quality gates
The purpose of [quality-gates](https://docs.sonarsource.com/sonarqube-cloud/improving/quality-gates "mention") is to tell you whether your code is good enough to be pushed to the next step:
* For the main branch and other long-lived branches, the quality gate answers the question: "Can I release my code today?"
* For pull requests (and short-lived branches), the quality gate answers the question: "Can I merge this pull request?"
By setting up [pull-request-analysis](https://docs.sonarsource.com/sonarqube-cloud/improving/pull-request-analysis "mention"), you ensure pull requests are analyzed when they are opened and every time a change is pushed to the pull request branch. You can also configure [pull request decoration](https://docs.sonarsource.com/sonarqube-cloud/improving/pull-request-analysis#pull-request-decoration) to allow your developers to view the analysis from SonarQube Cloud directly on the PRs they submit.
By keeping an eye on the quality gates, the decision makers can quickly judge the status of code and decide what to do next.
### Develop with Sonar
Now that you have seen the benefits of using [SonarQube Cloud](https://docs.sonarsource.com/sonarqube-cloud/discovering-sonarcloud/what-sonarcloud-can-do) with your DevOPs platforms, managers and tech leads can check out the [security reports](https://docs.sonarsource.com/sonarqube-cloud/digging-deeper/security-reports) and [portfolios](https://docs.sonarsource.com/sonarqube-cloud/managing-portfolios) features to begin monitoring the security and releasability of projects.
---
# Source: https://docs.sonarsource.com/sonarqube-mcp-server/readme.md
# Source: https://docs.sonarsource.com/sonarqube-community-build/readme.md
# Source: https://docs.sonarsource.com/sonarqube-for-eclipse/readme.md
# Source: https://docs.sonarsource.com/sonarqube-for-visual-studio/readme.md
# Source: https://docs.sonarsource.com/sonarqube-for-intellij/readme.md
# Source: https://docs.sonarsource.com/sonarqube-for-vs-code/readme.md
# Source: https://docs.sonarsource.com/sonarqube-server/8.9/readme.md
# Source: https://docs.sonarsource.com/sonarqube-server/9.8/readme.md
# Source: https://docs.sonarsource.com/sonarqube-server/9.9/readme.md
# Source: https://docs.sonarsource.com/sonarqube-server/10.0/readme.md
# Source: https://docs.sonarsource.com/sonarqube-server/10.1/readme.md
# Source: https://docs.sonarsource.com/sonarqube-server/10.2/readme.md
# Source: https://docs.sonarsource.com/sonarqube-server/10.3/readme.md
# Source: https://docs.sonarsource.com/sonarqube-server/10.4/readme.md
# Source: https://docs.sonarsource.com/sonarqube-server/10.5/readme.md
# Source: https://docs.sonarsource.com/sonarqube-server/10.6/readme.md
# Source: https://docs.sonarsource.com/sonarqube-server/10.7/readme.md
# Source: https://docs.sonarsource.com/sonarqube-server/10.8/readme.md
# Source: https://docs.sonarsource.com/sonarqube-server/2025.2/readme.md
# Source: https://docs.sonarsource.com/sonarqube-server/2025.3/readme.md
# Source: https://docs.sonarsource.com/sonarqube-server/2025.5/readme.md
# Source: https://docs.sonarsource.com/sonarqube-server/2025.1/readme.md
# Source: https://docs.sonarsource.com/sonarqube-server/2025.4/readme.md
# Source: https://docs.sonarsource.com/sonarqube-server/2025.6/readme.md
# Source: https://docs.sonarsource.com/sonarqube-server/readme.md
# Source: https://docs.sonarsource.com/sonarqube-cloud/readme.md
# Homepage
### What is SonarQube Cloud?
SonarQube Cloud is an industry standard Software-as-a-Service (SaaS) automated code review and static analysis tool designed to detect coding issues in more than [30+ languages, frameworks, and IaC platforms](https://docs.sonarsource.com/sonarqube-cloud/advanced-setup/languages/overview). By integrating directly with your [CI pipeline](https://docs.sonarsource.com/sonarqube-cloud/advanced-setup/ci-based-analysis/overview-of-integrated-cis) or one of the supported [DevOps platforms](https://docs.sonarsource.com/sonarqube-cloud/getting-started/sign-up), your code is checked against an extensive set of rules that cover many attributes of code, such as maintainability, reliability, and security issues, on each merge/pull request.
SonarQube Cloud extends your DevOps experience by performing automated code checks within minutes. Please have a look at the Discovering SonarQube Cloud section to learn more about [what-sonarcloud-can-do](https://docs.sonarsource.com/sonarqube-cloud/discovering-sonarcloud/what-sonarcloud-can-do "mention"). For on-premise code repositories, see the SonarQube Server [Server 2025.4 LTA](https://app.gitbook.com/o/2ibCvzwZt86Nlk2zloB7/s/yDv2XwTC1xoOKBYeCK45/ "mention") documentation.
Additionally, you can explore [featured public projects](https://sonarcloud.io/explore/projects) on SonarQube Cloud and experience how other organizations leverage the platform to improve their code.
### Achieving high quality code
SonarQube sets high standards for all code that results in secure, reliable, and maintainable software that is essential to maintaining a healthy codebase. This applies to all code: source code, test code, infrastructure as code, glue code, scripts, and more.
All new code, whether added or recently modified, should adhere to quality standards. SonarQube achieves this by providing automated code reviews that alert you to potential issues within your new code. This helps you maintain high standards and focus on code quality, ultimately leading to a healthier codebase over time.
SonarQube Cloud comes with a built-in quality profile designed for each supported language, called the Sonar way profile. The Sonar way activates a set of rules that should be applicable to most projects and is a starting point to help you implement good practices in your organization.
### The SonarQube solution
SonarQube is designed to help you achieve a state of high quality code. By linking SonarQube for IDE with SonarQube Cloud or SonarQube Server, the automated code analysis and reviews are performed at every stage of the development process. We call this the SonarQube solution. This means your project settings, new code definitions, and the quality profiles managed in SonarQube Cloud are applied locally to an analysis in the IDE.
* [SonarQube for IDE](https://app.gitbook.com/o/2ibCvzwZt86Nlk2zloB7/s/6LPRABg3ubAJhpfR5K0Y/) brings automated code reviews directly into your development environment, helping you catch issues as you write code. By providing immediate feedback, it enables engineers to identify and fix problems before they even commit, ensuring cleaner, higher-quality code from the start.
* Then, [SonarQube Server](https://app.gitbook.com/s/yDv2XwTC1xoOKBYeCK45/analyzing-source-code/pull-request-analysis) and [SonarQube Cloud](https://docs.sonarsource.com/sonarqube-cloud/improving/pull-request-analysis) deliver powerful static code analysis by thoroughly reviewing each pull request before it’s merged. This proactive approach adds an essential layer of protection, ensuring code quality and preventing issues from entering your codebase.
* Finally, [SonarQube Server](https://app.gitbook.com/s/yDv2XwTC1xoOKBYeCK45/quality-standards-administration) and [SonarQube Cloud](https://docs.sonarsource.com/sonarqube-cloud/standards) seamlessly integrate into your CI/CD pipeline, analyzing code on every build. By leveraging quality profiles and quality gates, they automatically block code with issues from being released to production, ensuring only maintainable, reliable, and secure code makes it through.
The SonarQube solution helps you incorporate a proper methodology by helping engineers pay attention to new code. Focusing on writing high quality new code during development ensures that all code released for production will be incrementally improved over time.
### Connected Mode
Connected mode joins SonarQube Cloud with SonarQube for IDE to deliver the full SonarQube solution. While in connected mode, SonarQube Cloud sends notifications to SonarQube for IDE when a quality gate changes or a new issue is assigned to the user. Smart notifications can be enabled or disabled from the SonarQube for IDE UI while creating or editing the connection settings. In addition, SonarQube for IDE helps the engineer focus on writing high quality code by using the new code definition on the server.
Be sure to check out all of the [#connected-mode-benefits](https://docs.sonarsource.com/sonarqube-cloud/improving/connected-mode#connected-mode-benefits "mention").
### Getting started
Now that you’ve heard about how [SonarQube Cloud](https://www.sonarsource.com/products/sonarcloud/) can help you write high quality code, you are ready to try out SonarQube Cloud for yourself. After signing up for SonarQube Cloud using the login from your DevOps platform account (see [sign-up](https://docs.sonarsource.com/sonarqube-cloud/getting-started/sign-up "mention")), you can import your organizations and repositories to set up a [first analysis](https://docs.sonarsource.com/sonarqube-cloud/getting-started/first-analysis).
The [ci-based-analysis](https://docs.sonarsource.com/sonarqube-cloud/advanced-setup/ci-based-analysis "mention") pages explain how to connect your scanner to your CI pipeline and provides instructions for analyzing your project’s branches and pull requests.
Here's a page with everything you need to learn [what-sonarcloud-can-do](https://docs.sonarsource.com/sonarqube-cloud/discovering-sonarcloud/what-sonarcloud-can-do "mention").
### Learn more
Check out the entire suite of Sonar products on the main website: [SonarQube Server](https://www.sonarsource.com/products/sonarqube/), [SonarQube Cloud](https://www.sonarsource.com/products/sonarcloud/), and [SonarQube for IDE](https://www.sonarsource.com/products/sonarlint/).
Then, have a look at how to fix issues detected by SonarQube for [IntelliJ](https://app.gitbook.com/s/NvI4wotPmITyM0mnsmtp/using/fixing-issues), [Visual Studio](https://app.gitbook.com/s/5CSDwdOaYoOAGYNiRqgl/using/fixing-issues), [VS Code](https://app.gitbook.com/s/6LPRABg3ubAJhpfR5K0Y/using/fixing-issues), and [Eclipse](https://app.gitbook.com/s/kadXEH8HkykK7lKaDvVq/using/fixing-issues) when combined with managing your code issues in [SonarQube Server](https://app.gitbook.com/s/yDv2XwTC1xoOKBYeCK45/user-guide/issues/introduction) and [SonarQube Cloud](https://docs.sonarsource.com/sonarqube-cloud/managing-your-projects/issues/introduction), and browse a full list of [Sonar Rules and Rule Descriptions](http://rules.sonarsource.com/) available for static code analysis.
#### More getting started resources
* [sign-up](https://docs.sonarsource.com/sonarqube-cloud/getting-started/sign-up "mention")
* [advanced-setup](https://docs.sonarsource.com/sonarqube-cloud/advanced-setup "mention") and [automatic-analysis](https://docs.sonarsource.com/sonarqube-cloud/advanced-setup/automatic-analysis "mention")
* [managing-quality-profiles](https://docs.sonarsource.com/sonarqube-cloud/standards/managing-quality-profiles "mention")
* [managing-portfolios](https://docs.sonarsource.com/sonarqube-cloud/managing-portfolios "mention")
And if you need help, visit our [online community](https://community.sonarsource.com/c/sc/9) to search for answers and reach out with questions!
---
# Source: https://docs.sonarsource.com/sonarqube-cloud/administering-sonarcloud/managing-organization/manage-org-projects/manage-project-permissions/recovering-admin-access.md
# Restoring administrator access
If you lost administrator access to a project of your organization, you can restore it if you’re an organization admin:
* At the project level. This requires the Browse Project permission in case of a private project.
* By using the Projects Management page. This is only possible with an Enterprise plan.
* By using the API.
### At the project level
1. Retrieve your project. See [retrieving-projects](https://docs.sonarsource.com/sonarqube-cloud/managing-your-projects/retrieving-projects "mention") for more details.
2. In the left sidebar, select **Administration** > **Restore access**. The **Restore admin permissions** dialog opens.
3. Select the **Restore permissions** button. You are now granted the Administer and/or Browse permission for the project.
### By using the Projects Management page
This method is only possible with an Enterprise plan organization.
To restore administrator access to a project by using the Projects Management page:
1. Retrieve your organization. See [viewing-organizations](https://docs.sonarsource.com/sonarqube-cloud/getting-started/viewing-organizations "mention") for more details.
2. Go to **Administration** > **Projects Management**.
3. In the three-dot menu at the far right of the project line, select **Restore access**. You will then be granted the Administer and/or Browse permission for the project.
### By using the API
Use the [add\_user API endpoint](https://sonarcloud.io/web_api/api/permissions/add_user?deprecated=false) to grant an organization administrator `admin` permission to the project. To identify the project, you can use the `projectKey` (the `projectId` is optional).
### Related page
* [setting-permissions](https://docs.sonarsource.com/sonarqube-cloud/managing-your-projects/administering-your-projects/setting-permissions "mention")
---
# Source: https://docs.sonarsource.com/sonarqube-server/10.6/setup-and-upgrade/reference-architectures.md
# Source: https://docs.sonarsource.com/sonarqube-server/10.7/setup-and-upgrade/reference-architectures.md
# Source: https://docs.sonarsource.com/sonarqube-server/10.8/setup-and-upgrade/reference-architectures.md
# Source: https://docs.sonarsource.com/sonarqube-server/2025.2/setup-and-update/reference-architectures.md
# Source: https://docs.sonarsource.com/sonarqube-server/2025.3/server-installation/reference-architectures.md
# Source: https://docs.sonarsource.com/sonarqube-server/2025.5/server-installation/reference-architectures.md
# Source: https://docs.sonarsource.com/sonarqube-server/2025.1/setup-and-upgrade/reference-architectures.md
# Source: https://docs.sonarsource.com/sonarqube-server/2025.4/server-installation/reference-architectures.md
# Source: https://docs.sonarsource.com/sonarqube-server/2025.6/server-installation/reference-architectures.md
# Source: https://docs.sonarsource.com/sonarqube-server/server-installation/reference-architectures.md
# Reference architectures
- [Up to 10 M LOC](/sonarqube-server/server-installation/reference-architectures/up-to-10m-loc.md): This page describes the architecture of a SonarQube Server instance that will support up to 10 million lines of code under normal usage patterns in a non-high availability setup.
- [Up to 50 M LOC](/sonarqube-server/server-installation/reference-architectures/up-to-50m-loc.md): This architecture describes the setup of a SonarQube Server Enterprise Editon instance that will support up to 50 million lines of code.
---
# Source: https://docs.sonarsource.com/sonarqube-server/10.7/user-guide/viewing-reports/regulatory-reports.md
# Source: https://docs.sonarsource.com/sonarqube-server/10.8/user-guide/viewing-reports/regulatory-reports.md
# Source: https://docs.sonarsource.com/sonarqube-server/2025.2/user-guide/viewing-reports/regulatory-reports.md
# Source: https://docs.sonarsource.com/sonarqube-server/2025.3/user-guide/viewing-reports/regulatory-reports.md
# Source: https://docs.sonarsource.com/sonarqube-server/2025.5/user-guide/viewing-reports/regulatory-reports.md
# Source: https://docs.sonarsource.com/sonarqube-server/2025.1/user-guide/viewing-reports/regulatory-reports.md
# Source: https://docs.sonarsource.com/sonarqube-server/2025.4/user-guide/viewing-reports/regulatory-reports.md
# Source: https://docs.sonarsource.com/sonarqube-server/2025.6/user-guide/viewing-reports/regulatory-reports.md
# Source: https://docs.sonarsource.com/sonarqube-server/user-guide/viewing-reports/regulatory-reports.md
# Regulatory reports
Starting in [Enterprise](https://www.sonarsource.com/plans-and-pricing/enterprise/), you can download a regulatory report for any permanent branch of a project. A permanent branch is one that has been set to **Keep when inactive**, see [maintaining-the-branches-of-your-project](https://docs.sonarsource.com/sonarqube-server/project-administration/maintaining-project/maintaining-the-branches-of-your-project "mention") for details.
### Downloading regulatory reports
To download a regulatory report:
1. Retrieve your project. See [retrieving-projects](https://docs.sonarsource.com/sonarqube-server/user-guide/viewing-projects/retrieving-projects "mention") for more information.
2. On the Overview page, click **Downloadable reports** and select **Download Regulatory report (.zip)** from the drop down menu.
Alternatively:
1. Select **Project Information** from the project’s navigation bar.
2. In the **Regulatory Report** section, choose a project branch from the drop down menu.
3. Click **Download report**.
SonarQube generates the report for download, which may take a few minutes depending on the size of the project.
### Contents of the regulator report’s ZIP file
The reports are in a ZIP file containing a snapshot of the latest analysis of the selected branch and include TXT, CSV, and PDF files.
The PDF file includes:
* **Project overview**:
* Project details
* Quality gates information and status
* **Project rating** **overview** for:
* New code broken down by new issues, accepted issues, coverage, duplication, and security hotspots.
* Overall code broken down by security, reliability, maintainability (in [mqr-mode](https://docs.sonarsource.com/sonarqube-server/instance-administration/analysis-functions/instance-mode/mqr-mode "mention")) or vulnerabilities, bugs, and code smells (in [standard-experience](https://docs.sonarsource.com/sonarqube-server/instance-administration/analysis-functions/instance-mode/standard-experience "mention")), accepted issues, coverage, duplication, and security hotspots.
* **Distribution of issues in new code** showing open issues and breakdown by severity, based on security, reliability, maintainability (in [mqr-mode](https://docs.sonarsource.com/sonarqube-server/instance-administration/analysis-functions/instance-mode/mqr-mode "mention")) or vulnerabilities, bugs, and code smells (in [standard-experience](https://docs.sonarsource.com/sonarqube-server/instance-administration/analysis-functions/instance-mode/standard-experience "mention")).
* **Distribution of issues in overall code** showing open issues and breakdown by severity, based on security, reliability, maintainability (in [mqr-mode](https://docs.sonarsource.com/sonarqube-server/instance-administration/analysis-functions/instance-mode/mqr-mode "mention")) or vulnerabilities, bugs, and code smells (in [standard-experience](https://docs.sonarsource.com/sonarqube-server/instance-administration/analysis-functions/instance-mode/standard-experience "mention")).
* **Quality gate and quality profiles** information.
* **Files** lists all relevant files included in the ZIP file.
* **Definitions** lists all the definitions of terms related to the report.
Depending on the configuration of your SonarQube Server instance, the regulatory report is generated with metrics either from [standard-experience](https://docs.sonarsource.com/sonarqube-server/instance-administration/analysis-functions/instance-mode/standard-experience "mention") or [mqr-mode](https://docs.sonarsource.com/sonarqube-server/instance-administration/analysis-functions/instance-mode/mqr-mode "mention"). Some CSV files may contain metrics from both modes and they are marked accordingly.
### Related pages
* [security-reports](https://docs.sonarsource.com/sonarqube-server/user-guide/viewing-reports/security-reports "mention")
* [pdf-reports](https://docs.sonarsource.com/sonarqube-server/user-guide/viewing-reports/pdf-reports "mention")
* [portfolios](https://docs.sonarsource.com/sonarqube-server/user-guide/viewing-reports/portfolios "mention")
* [other-issues](https://docs.sonarsource.com/sonarqube-server/server-update-and-maintenance/troubleshooting/other-issues "mention")
---
# Source: https://docs.sonarsource.com/sonarqube-community-build/server-update-and-maintenance/maintenance/reindexing.md
# Source: https://docs.sonarsource.com/sonarqube-server/10.1/instance-administration/reindexing.md
# Source: https://docs.sonarsource.com/sonarqube-server/10.2/instance-administration/reindexing.md
# Source: https://docs.sonarsource.com/sonarqube-server/10.3/instance-administration/reindexing.md
# Source: https://docs.sonarsource.com/sonarqube-server/10.4/instance-administration/reindexing.md
# Source: https://docs.sonarsource.com/sonarqube-server/10.5/instance-administration/reindexing.md
# Source: https://docs.sonarsource.com/sonarqube-server/10.6/instance-administration/reindexing.md
# Source: https://docs.sonarsource.com/sonarqube-server/10.7/server-upgrade-and-maintenance/maintenance/reindexing.md
# Source: https://docs.sonarsource.com/sonarqube-server/10.8/server-upgrade-and-maintenance/maintenance/reindexing.md
# Source: https://docs.sonarsource.com/sonarqube-server/2025.2/server-update-and-maintenance/maintenance/reindexing.md
# Source: https://docs.sonarsource.com/sonarqube-server/2025.3/server-update-and-maintenance/maintenance/reindexing.md
# Source: https://docs.sonarsource.com/sonarqube-server/2025.5/server-update-and-maintenance/maintenance/reindexing.md
# Source: https://docs.sonarsource.com/sonarqube-server/2025.1/server-update-and-maintenance/maintenance/reindexing.md
# Source: https://docs.sonarsource.com/sonarqube-server/2025.4/server-update-and-maintenance/maintenance/reindexing.md
# Source: https://docs.sonarsource.com/sonarqube-server/2025.6/server-update-and-maintenance/maintenance/reindexing.md
# Source: https://docs.sonarsource.com/sonarqube-server/server-update-and-maintenance/maintenance/reindexing.md
# Reindexing
### Project, application, and portfolio availability
Most features are available during reindexing (for example, you can already analyze your projects), but some only become available when the process is complete:
* Project issues and security hotspots: Available, but some filters and the ability to add tags become available only when reindexing is complete.
* Security reports: Available when reindexing is complete.
* Applications and portfolios: Issues, security hotspots, and security reports become available once all their associated projects are reindexed.
* The global Issues page is unavailable until all projects are reindexed.
SonarQube Server uses analysis dates to determine which projects to prioritize during reindexing. Your projects with the most recent analysis dates are the first to become fully available in the UI.
Administrators can track the full reindexing progress:
* Within the banner displayed in SonarQube Server.
* In the [background-tasks](https://docs.sonarsource.com/sonarqube-server/analyzing-source-code/background-tasks "mention").
{% hint style="info" %}
If a project fails to reindex, see **Reindexing a single project** below.
{% endhint %}
### Running analyses during reindexing
Reindexing starts once SonarQube Server is up and running. You can run analyses on your projects on the CI side while indexes are being rebuilt. The processing of analysis results takes priority over reindexing tasks, so your SonarQube Server instance is effectively operational.
Administrators can check the progress of these analyses in **Administration** > **Projects** > **Background tasks**.
### Quality gate timeout
When calculating the quality gate of a project that is actively being indexed, SonarQube Server will finish indexing to allow computation to complete before returning quality gate status. If the indexing does not finish by the Quality Gate timeout setting, then the Quality Gate will time out.
### Forcing an Elasticsearch reindex
You can trigger a full Elasticsearch reindex. During the reindex, SonarQube Server will detect out-of-sync indices and correct them.
{% hint style="warning" %}
Full Elasticsearch reindex can be quite lengthy depending on the size of your instance.
{% endhint %}
#### ZIP file deployment
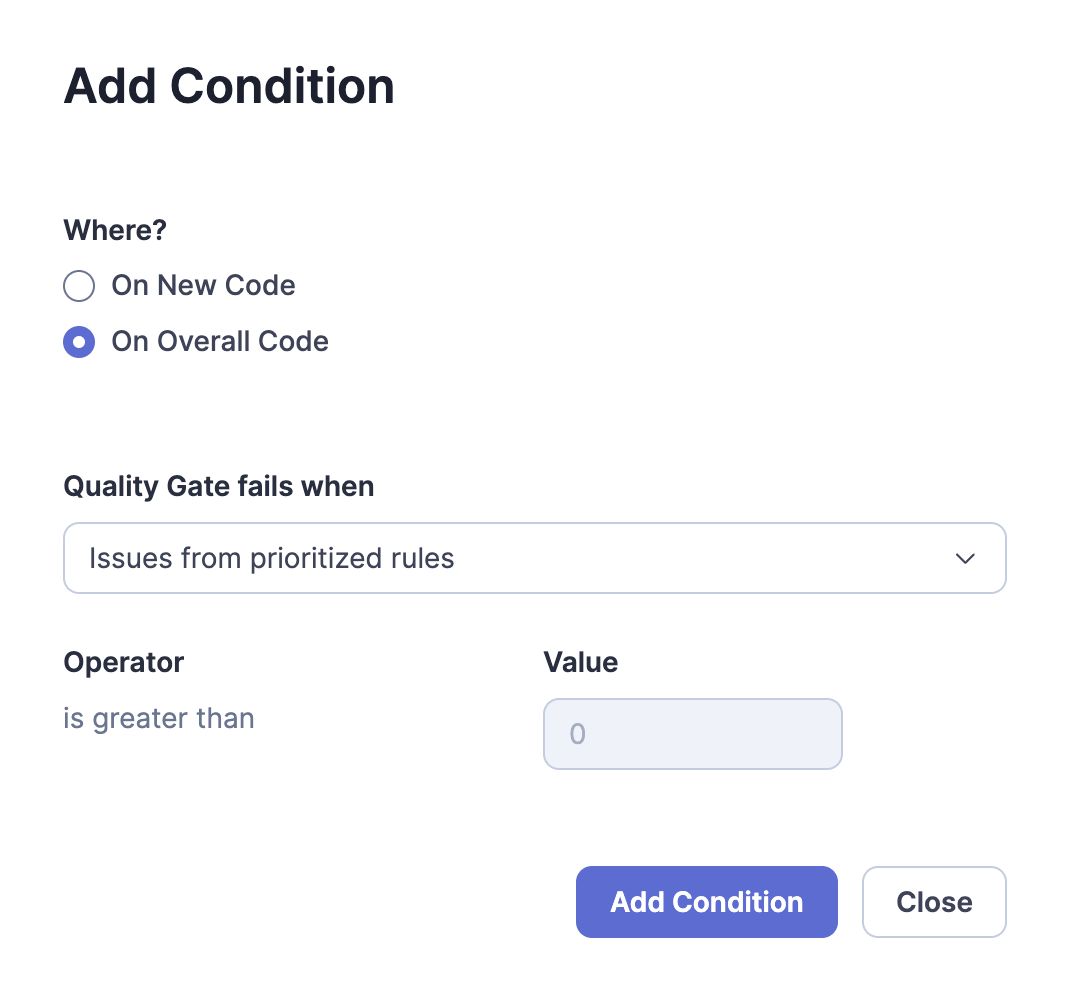
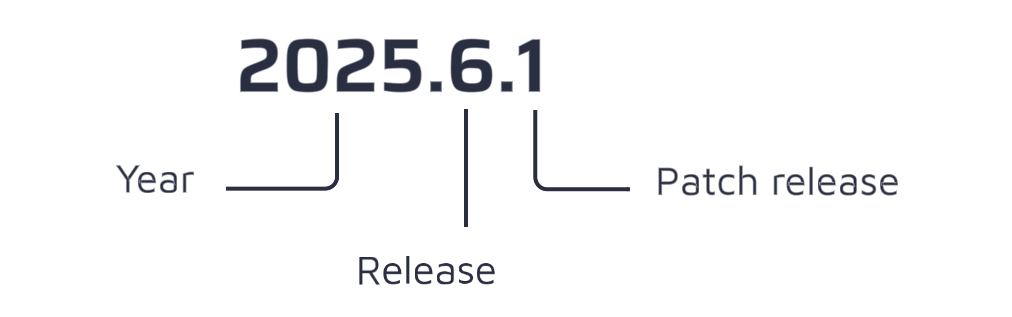
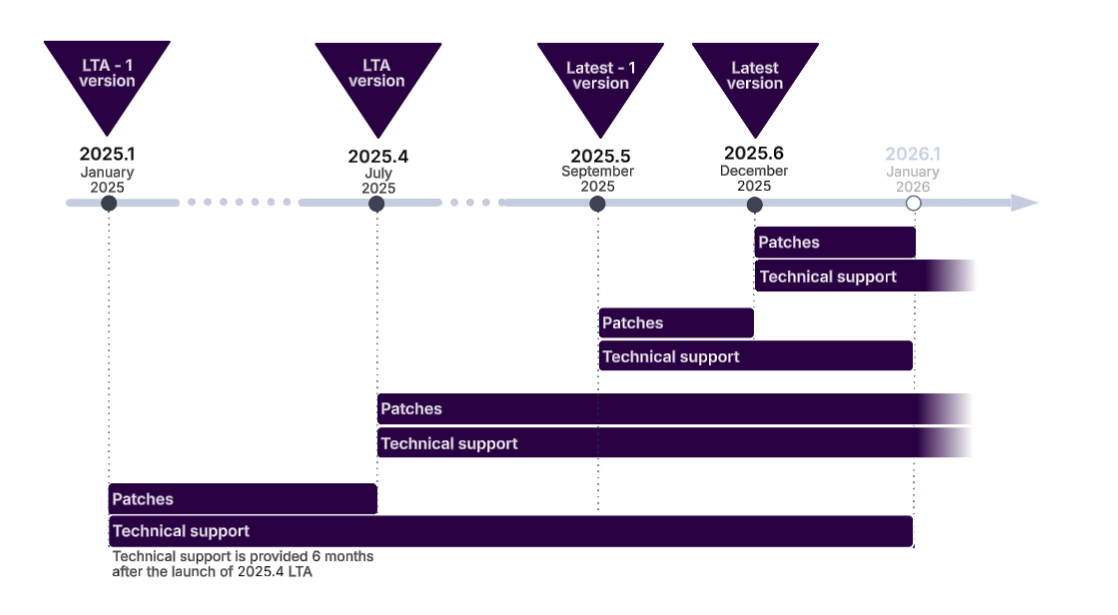
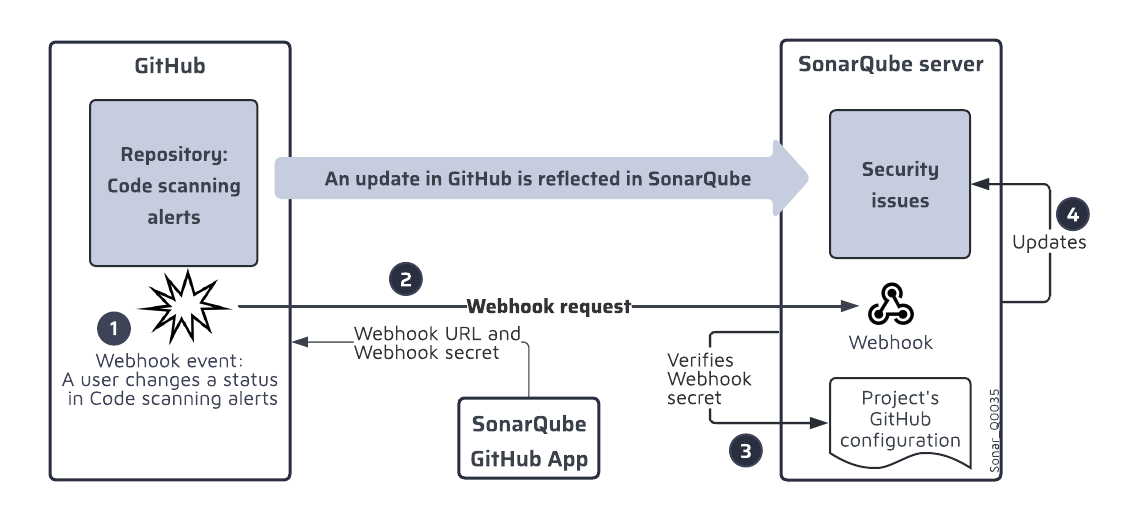 2. You can navigate through the different pages of the enterprise (The administration pages are restricted to the enterprise admins.):
* **Organizations**: This page lists the organizations belonging to the enterprise and of which you’re a member. It allows admins to add or remove organizations.
* **Billing**: This page shows the Lines of Code (LOC) consumption in your enterprise.
* **Portfolios.** See [viewing-portfolios](https://docs.sonarsource.com/sonarqube-cloud/getting-started-with-enterprise/viewing-enterprise-reports/viewing-portfolios "mention") for more information.
* **Administration**: This menu allows you to access administration settings related to your enterprise such as Single Sign-On authentication and enterprise-related permissions (see **Managing enterprise-related permissions**).
### Related pages
[creating-your-enterprise](https://docs.sonarsource.com/sonarqube-cloud/administering-sonarcloud/managing-enterprise/creating-your-enterprise "mention")\
[enterprise-security](https://docs.sonarsource.com/sonarqube-cloud/administering-sonarcloud/managing-enterprise/enterprise-security "mention")\
[adding-organizations-to-your-enterprise](https://docs.sonarsource.com/sonarqube-cloud/administering-sonarcloud/managing-enterprise/adding-organizations-to-your-enterprise "mention")\
[managing-the-enterprise-related-permissions](https://docs.sonarsource.com/sonarqube-cloud/administering-sonarcloud/managing-enterprise/managing-the-enterprise-related-permissions "mention")\
[managing-the-lines-of-code-within-your-enterprise](https://docs.sonarsource.com/sonarqube-cloud/administering-sonarcloud/managing-enterprise/managing-the-lines-of-code-within-your-enterprise "mention")\
[changing-enterprise-settings](https://docs.sonarsource.com/sonarqube-cloud/administering-sonarcloud/managing-enterprise/changing-enterprise-settings "mention")\
[downgrading-your-enterprise](https://docs.sonarsource.com/sonarqube-cloud/administering-sonarcloud/managing-enterprise/downgrading-your-enterprise "mention")
---
# Source: https://docs.sonarsource.com/sonarqube-community-build/user-guide/viewing-projects/retrieving-projects.md
# Source: https://docs.sonarsource.com/sonarqube-server/10.7/user-guide/viewing-projects/retrieving-projects.md
# Source: https://docs.sonarsource.com/sonarqube-server/10.8/user-guide/viewing-projects/retrieving-projects.md
# Source: https://docs.sonarsource.com/sonarqube-server/2025.2/user-guide/viewing-projects/retrieving-projects.md
# Source: https://docs.sonarsource.com/sonarqube-server/2025.3/user-guide/viewing-projects/retrieving-projects.md
# Source: https://docs.sonarsource.com/sonarqube-server/2025.5/user-guide/viewing-projects/retrieving-projects.md
# Source: https://docs.sonarsource.com/sonarqube-server/2025.1/user-guide/viewing-projects/retrieving-projects.md
# Source: https://docs.sonarsource.com/sonarqube-server/2025.4/user-guide/viewing-projects/retrieving-projects.md
# Source: https://docs.sonarsource.com/sonarqube-server/2025.6/user-guide/viewing-projects/retrieving-projects.md
# Source: https://docs.sonarsource.com/sonarqube-server/user-guide/viewing-projects/retrieving-projects.md
# Source: https://docs.sonarsource.com/sonarqube-cloud/managing-your-projects/retrieving-projects.md
# Retrieving projects
You can view any public project. You can view a private project of your organization provided you have the corresponding permission.
### Retrieving any public or private project
In the top right corner, select the magnifier icon. The **Search for projects…** box is displayed along with a list of pre-selected projects as illustrated below. the project name (1) is followed by the respective organization name (2). The yellow star (3) indicates that the project belongs to your favorite projects.
2. You can navigate through the different pages of the enterprise (The administration pages are restricted to the enterprise admins.):
* **Organizations**: This page lists the organizations belonging to the enterprise and of which you’re a member. It allows admins to add or remove organizations.
* **Billing**: This page shows the Lines of Code (LOC) consumption in your enterprise.
* **Portfolios.** See [viewing-portfolios](https://docs.sonarsource.com/sonarqube-cloud/getting-started-with-enterprise/viewing-enterprise-reports/viewing-portfolios "mention") for more information.
* **Administration**: This menu allows you to access administration settings related to your enterprise such as Single Sign-On authentication and enterprise-related permissions (see **Managing enterprise-related permissions**).
### Related pages
[creating-your-enterprise](https://docs.sonarsource.com/sonarqube-cloud/administering-sonarcloud/managing-enterprise/creating-your-enterprise "mention")\
[enterprise-security](https://docs.sonarsource.com/sonarqube-cloud/administering-sonarcloud/managing-enterprise/enterprise-security "mention")\
[adding-organizations-to-your-enterprise](https://docs.sonarsource.com/sonarqube-cloud/administering-sonarcloud/managing-enterprise/adding-organizations-to-your-enterprise "mention")\
[managing-the-enterprise-related-permissions](https://docs.sonarsource.com/sonarqube-cloud/administering-sonarcloud/managing-enterprise/managing-the-enterprise-related-permissions "mention")\
[managing-the-lines-of-code-within-your-enterprise](https://docs.sonarsource.com/sonarqube-cloud/administering-sonarcloud/managing-enterprise/managing-the-lines-of-code-within-your-enterprise "mention")\
[changing-enterprise-settings](https://docs.sonarsource.com/sonarqube-cloud/administering-sonarcloud/managing-enterprise/changing-enterprise-settings "mention")\
[downgrading-your-enterprise](https://docs.sonarsource.com/sonarqube-cloud/administering-sonarcloud/managing-enterprise/downgrading-your-enterprise "mention")
---
# Source: https://docs.sonarsource.com/sonarqube-community-build/user-guide/viewing-projects/retrieving-projects.md
# Source: https://docs.sonarsource.com/sonarqube-server/10.7/user-guide/viewing-projects/retrieving-projects.md
# Source: https://docs.sonarsource.com/sonarqube-server/10.8/user-guide/viewing-projects/retrieving-projects.md
# Source: https://docs.sonarsource.com/sonarqube-server/2025.2/user-guide/viewing-projects/retrieving-projects.md
# Source: https://docs.sonarsource.com/sonarqube-server/2025.3/user-guide/viewing-projects/retrieving-projects.md
# Source: https://docs.sonarsource.com/sonarqube-server/2025.5/user-guide/viewing-projects/retrieving-projects.md
# Source: https://docs.sonarsource.com/sonarqube-server/2025.1/user-guide/viewing-projects/retrieving-projects.md
# Source: https://docs.sonarsource.com/sonarqube-server/2025.4/user-guide/viewing-projects/retrieving-projects.md
# Source: https://docs.sonarsource.com/sonarqube-server/2025.6/user-guide/viewing-projects/retrieving-projects.md
# Source: https://docs.sonarsource.com/sonarqube-server/user-guide/viewing-projects/retrieving-projects.md
# Source: https://docs.sonarsource.com/sonarqube-cloud/managing-your-projects/retrieving-projects.md
# Retrieving projects
You can view any public project. You can view a private project of your organization provided you have the corresponding permission.
### Retrieving any public or private project
In the top right corner, select the magnifier icon. The **Search for projects…** box is displayed along with a list of pre-selected projects as illustrated below. the project name (1) is followed by the respective organization name (2). The yellow star (3) indicates that the project belongs to your favorite projects.
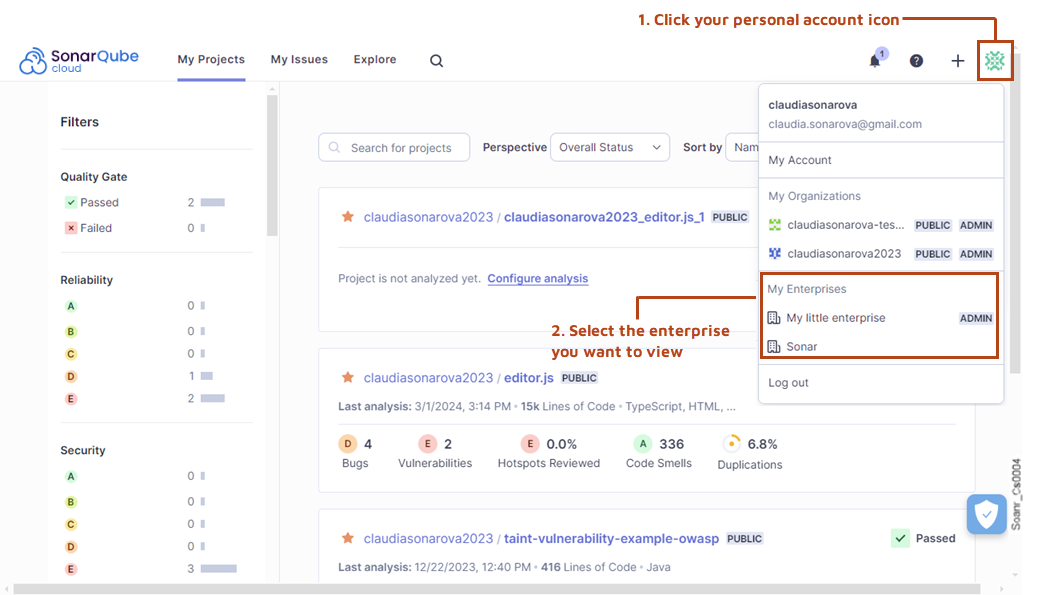
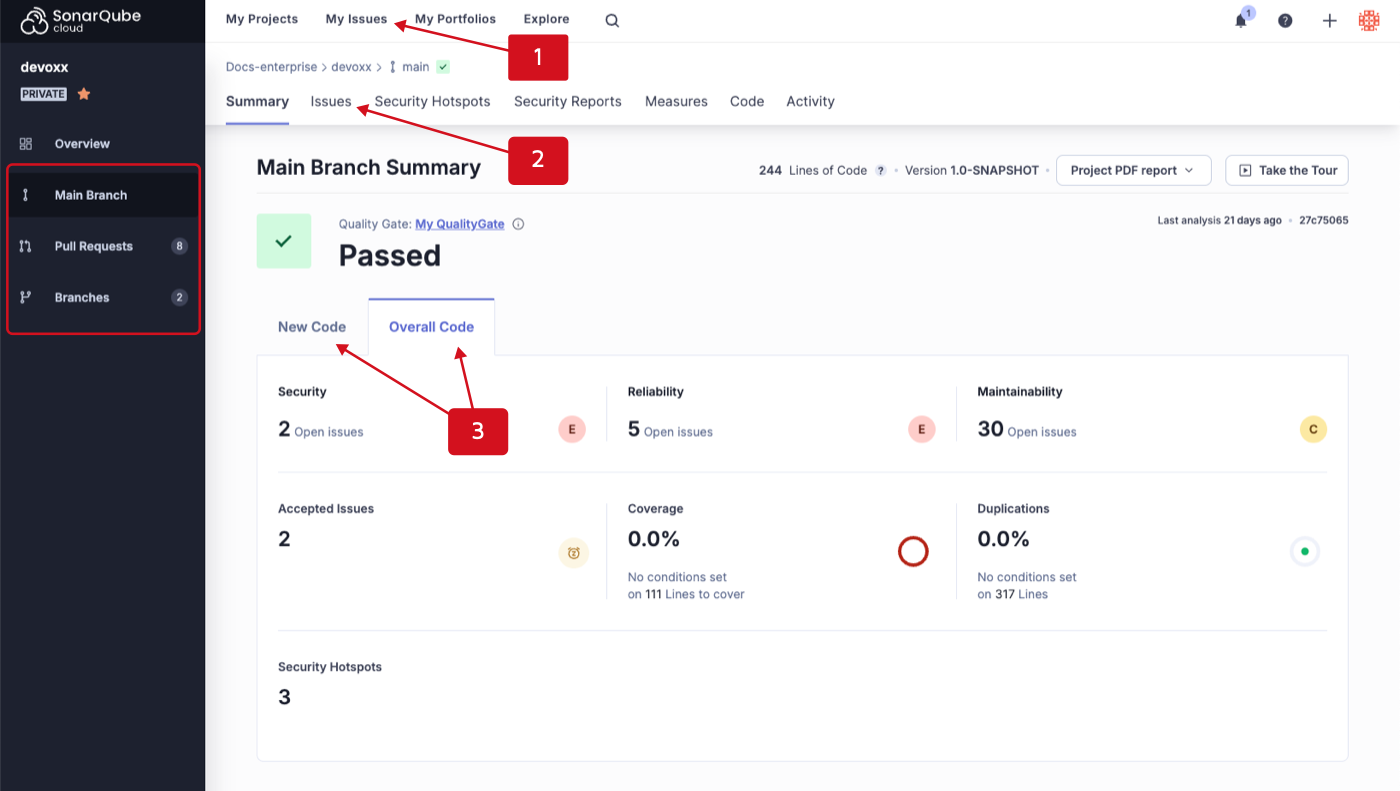 ### Filtering issues
The Issues page is divided into two sections:
1. Filters are located in the left sidebar. This is where you enter your search criteria.
2. A list of issues is in the right section of the page, where your search results are displayed.
### Filtering issues
The Issues page is divided into two sections:
1. Filters are located in the left sidebar. This is where you enter your search criteria.
2. A list of issues is in the right section of the page, where your search results are displayed.
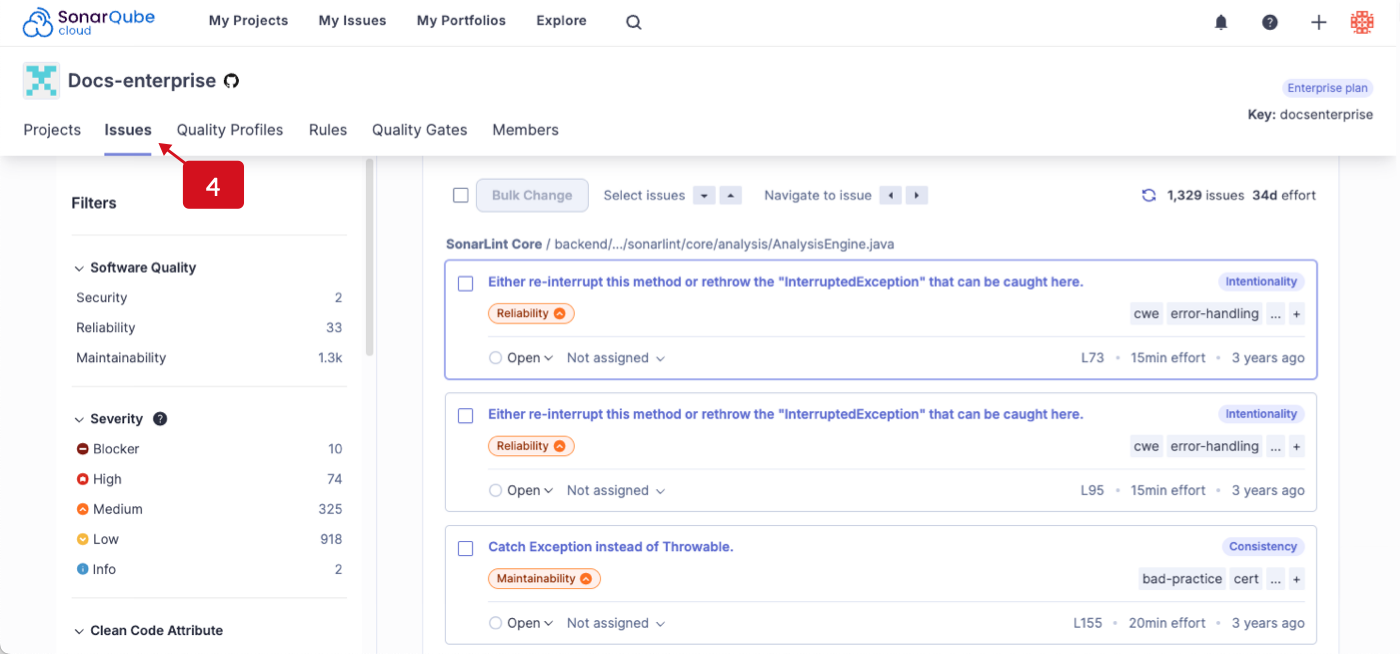 #### Issue card
Each issue card contains information that helps you identify the following:
1. Project name and the path to the code file.
2. The name of the rule that triggered the issue.
3. Impacted software quality and severity level.
4. Status of the issue.
5. Assignee
6. Coding attribute
7. Tags
8. Additional information: line number, estimated time effort to fix the issue, the amount of time that has passed since the introduction of the code, and type.
#### Issue card
Each issue card contains information that helps you identify the following:
1. Project name and the path to the code file.
2. The name of the rule that triggered the issue.
3. Impacted software quality and severity level.
4. Status of the issue.
5. Assignee
6. Coding attribute
7. Tags
8. Additional information: line number, estimated time effort to fix the issue, the amount of time that has passed since the introduction of the code, and type.
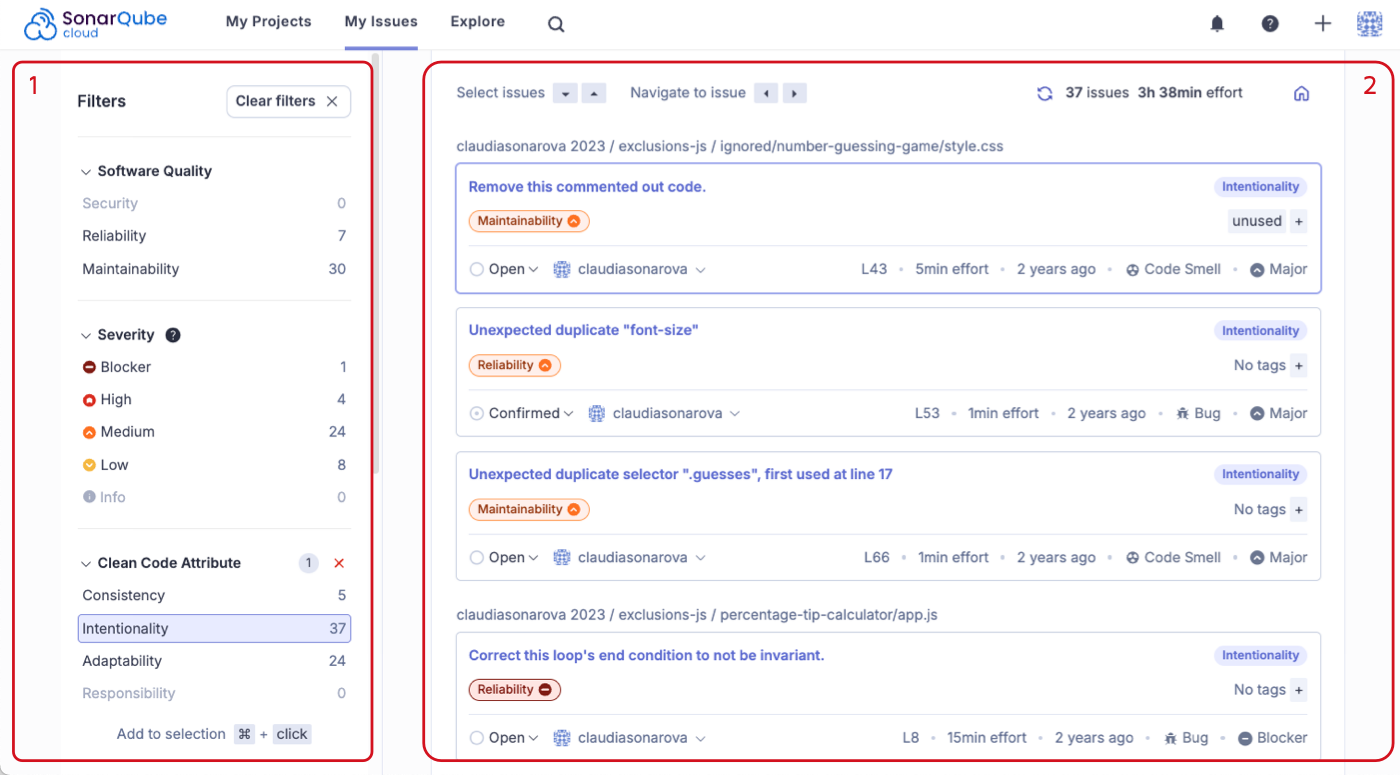
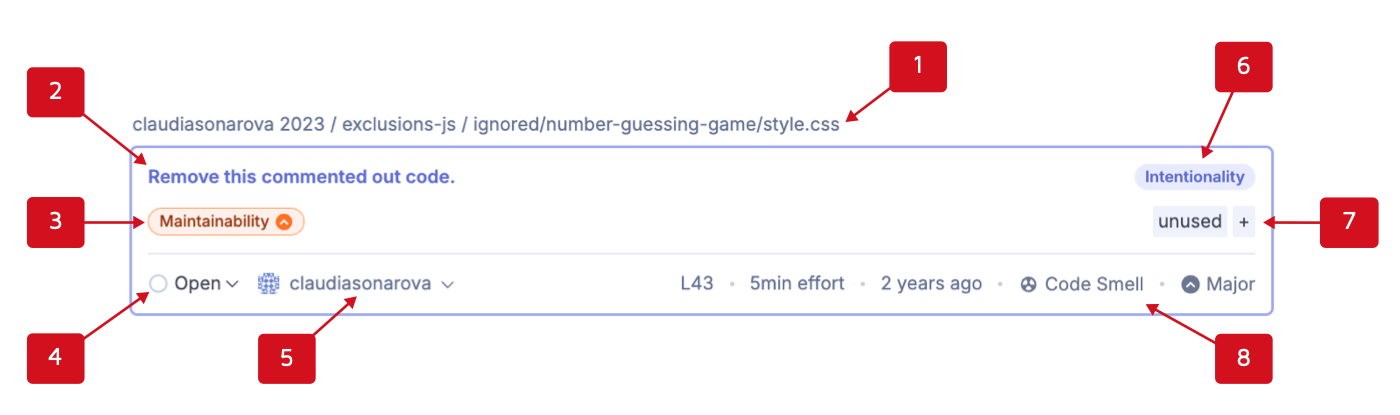 ---
# Source: https://docs.sonarsource.com/sonarqube-server/2025.3/advanced-security/reviewing-and-fixing-dependency-risks.md
# Source: https://docs.sonarsource.com/sonarqube-server/2025.5/advanced-security/reviewing-and-fixing-dependency-risks.md
# Source: https://docs.sonarsource.com/sonarqube-server/2025.4/advanced-security/reviewing-and-fixing-dependency-risks.md
# Source: https://docs.sonarsource.com/sonarqube-server/2025.6/advanced-security/reviewing-and-fixing-dependency-risks.md
# Source: https://docs.sonarsource.com/sonarqube-server/advanced-security/reviewing-and-fixing-dependency-risks.md
# Source: https://docs.sonarsource.com/sonarqube-cloud/advanced-security/reviewing-and-fixing-dependency-risks.md
# Reviewing and fixing dependency risks
Advanced Security is an add-on that requires a separate subscription to your SonarQube Cloud's [Enterprise plan](https://www.sonarsource.com/plans-and-pricing/#sonarqube-cloud-features).
SonarQube Cloud lets you manage dependency risks, mark them as safe, confirmed, or accepted, and assign them to other members of your team.
### Permissions
On private projects, and portfolios, the following permissions apply:
* **Browse**: access, browse, confirm dependency risks, change assignee.
* **Administer issues**: change risk severity, resolve risks as **Accepted** or **Safe**.
Anyone is allowed to browse dependency risks on public projects and portfolios.
Changing the status of a dependency risk requires the **Administer Issues** permission.
### Reviewing and fixing dependency risks
Navigate to the **Dependency Risks** tab of your project or portfolio.
Use **Filters** in the left side bar to narrow down the results. You can filter the results by:
* **Risk type**: Vulnerability, Malicious package, and Prohibited license
* **Risk severity**: Blocker, High, Medium, Low, or Info
* **Software quality**: Security, Maintainability
* **Dependency type**: Direct or Transitive
* **Dependency scope**: Production or Development
* **Package manager**: See [Analyzing project for dependencies](https://docs.sonarsource.com/sonarqube-cloud/advanced-security/analyzing-projects-for-dependencies-sca) for a list of supported package managers and languages.
* **Status**: Accepted, Confirmed, Open, Fixed, Safe
* **Assignee**: Type in the name of the person assigned and select it from the list.
From there, you can sort the list of results:
* by choosing the sorting criteria from the **Sort by** dropdown menu
* by vulnerability name by entering a vulnerability ID (such as CVE-2022-38392) into the search box
The following information is displayed for each dependency risk in the list:
---
# Source: https://docs.sonarsource.com/sonarqube-server/2025.3/advanced-security/reviewing-and-fixing-dependency-risks.md
# Source: https://docs.sonarsource.com/sonarqube-server/2025.5/advanced-security/reviewing-and-fixing-dependency-risks.md
# Source: https://docs.sonarsource.com/sonarqube-server/2025.4/advanced-security/reviewing-and-fixing-dependency-risks.md
# Source: https://docs.sonarsource.com/sonarqube-server/2025.6/advanced-security/reviewing-and-fixing-dependency-risks.md
# Source: https://docs.sonarsource.com/sonarqube-server/advanced-security/reviewing-and-fixing-dependency-risks.md
# Source: https://docs.sonarsource.com/sonarqube-cloud/advanced-security/reviewing-and-fixing-dependency-risks.md
# Reviewing and fixing dependency risks
Advanced Security is an add-on that requires a separate subscription to your SonarQube Cloud's [Enterprise plan](https://www.sonarsource.com/plans-and-pricing/#sonarqube-cloud-features).
SonarQube Cloud lets you manage dependency risks, mark them as safe, confirmed, or accepted, and assign them to other members of your team.
### Permissions
On private projects, and portfolios, the following permissions apply:
* **Browse**: access, browse, confirm dependency risks, change assignee.
* **Administer issues**: change risk severity, resolve risks as **Accepted** or **Safe**.
Anyone is allowed to browse dependency risks on public projects and portfolios.
Changing the status of a dependency risk requires the **Administer Issues** permission.
### Reviewing and fixing dependency risks
Navigate to the **Dependency Risks** tab of your project or portfolio.
Use **Filters** in the left side bar to narrow down the results. You can filter the results by:
* **Risk type**: Vulnerability, Malicious package, and Prohibited license
* **Risk severity**: Blocker, High, Medium, Low, or Info
* **Software quality**: Security, Maintainability
* **Dependency type**: Direct or Transitive
* **Dependency scope**: Production or Development
* **Package manager**: See [Analyzing project for dependencies](https://docs.sonarsource.com/sonarqube-cloud/advanced-security/analyzing-projects-for-dependencies-sca) for a list of supported package managers and languages.
* **Status**: Accepted, Confirmed, Open, Fixed, Safe
* **Assignee**: Type in the name of the person assigned and select it from the list.
From there, you can sort the list of results:
* by choosing the sorting criteria from the **Sort by** dropdown menu
* by vulnerability name by entering a vulnerability ID (such as CVE-2022-38392) into the search box
The following information is displayed for each dependency risk in the list:
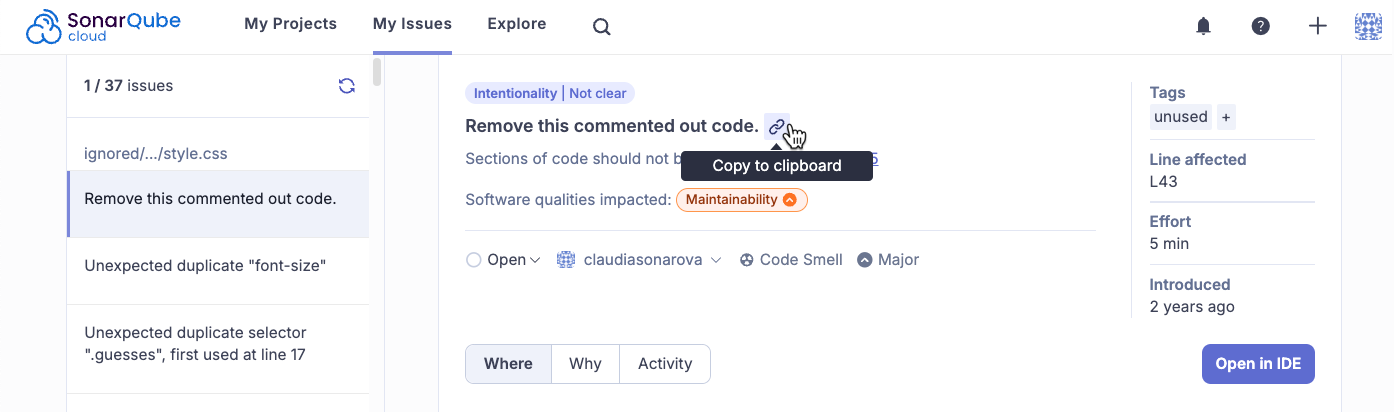


.png?alt=media)


.png?alt=media)


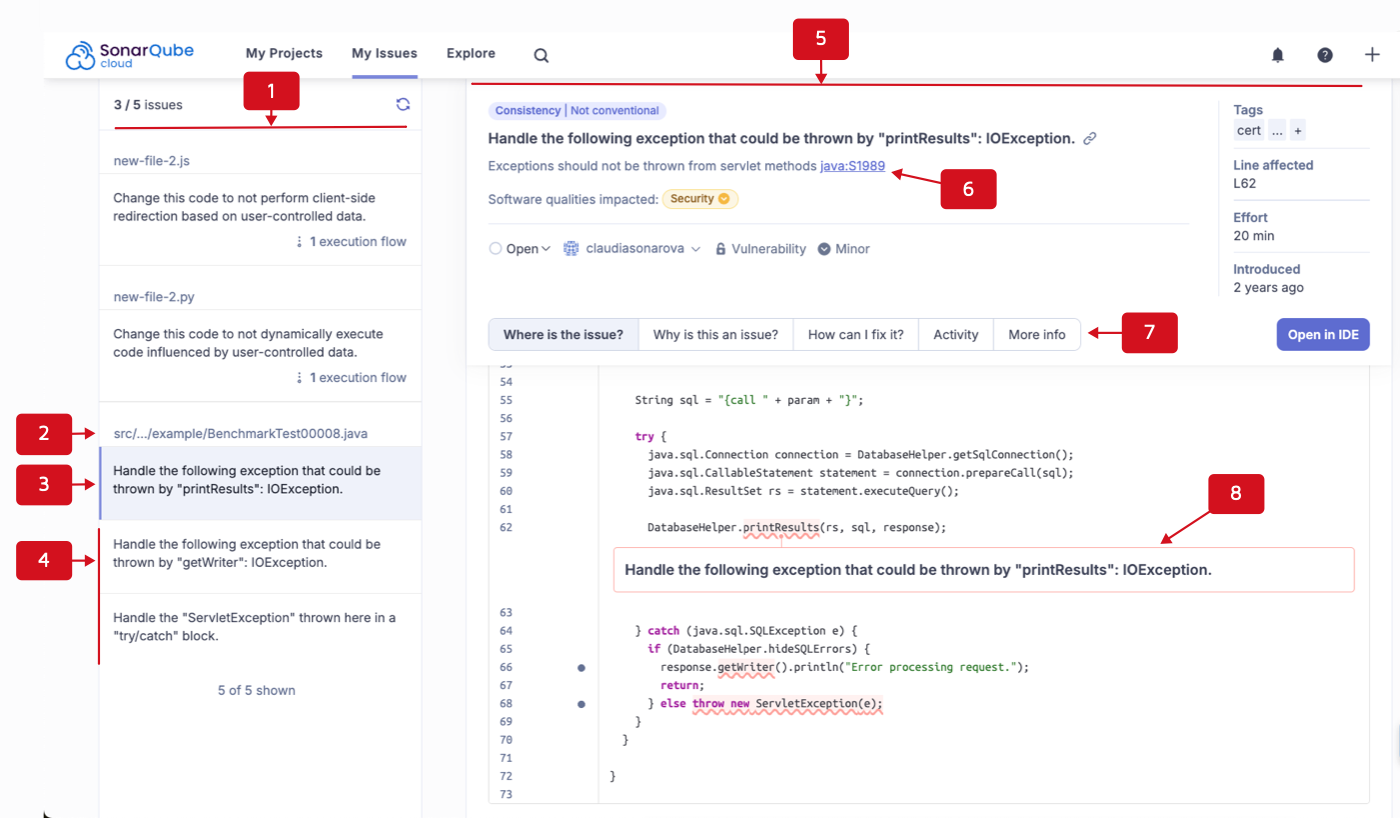 #### Execution flow
When the issue originates upstream, paths through the code (execution flows) are shown from the source to the sink (destination). In particular, for issues breaking a security-injection rule, there is a vulnerability when the inputs handled by your application are controlled by a user (potentially an attacker) and not validated or sanitized. In that case, SonarQube Cloud displays the execution flow from the sources (user-controlled inputs) to sinks (sensitive functions).
{% hint style="info" %}
Check out this [video](https://www.youtube.com/watch?v=17G-aZcuMKw) for an example of a security issue with an execution flow.
{% endhint %}
To navigate through the execution flow of an issue:
1. Retrieve the issue and open its detail view. See [retrieving](https://docs.sonarsource.com/sonarqube-cloud/managing-your-projects/issues/retrieving "mention") for more information. The execution flows are listed in the left sidebar.
2. To navigate to a location in the execution flow, select it in the list. You can also use the key combination indicated under the flow to navigate to the previous or next location in the flow.
#### Execution flow
When the issue originates upstream, paths through the code (execution flows) are shown from the source to the sink (destination). In particular, for issues breaking a security-injection rule, there is a vulnerability when the inputs handled by your application are controlled by a user (potentially an attacker) and not validated or sanitized. In that case, SonarQube Cloud displays the execution flow from the sources (user-controlled inputs) to sinks (sensitive functions).
{% hint style="info" %}
Check out this [video](https://www.youtube.com/watch?v=17G-aZcuMKw) for an example of a security issue with an execution flow.
{% endhint %}
To navigate through the execution flow of an issue:
1. Retrieve the issue and open its detail view. See [retrieving](https://docs.sonarsource.com/sonarqube-cloud/managing-your-projects/issues/retrieving "mention") for more information. The execution flows are listed in the left sidebar.
2. To navigate to a location in the execution flow, select it in the list. You can also use the key combination indicated under the flow to navigate to the previous or next location in the flow.
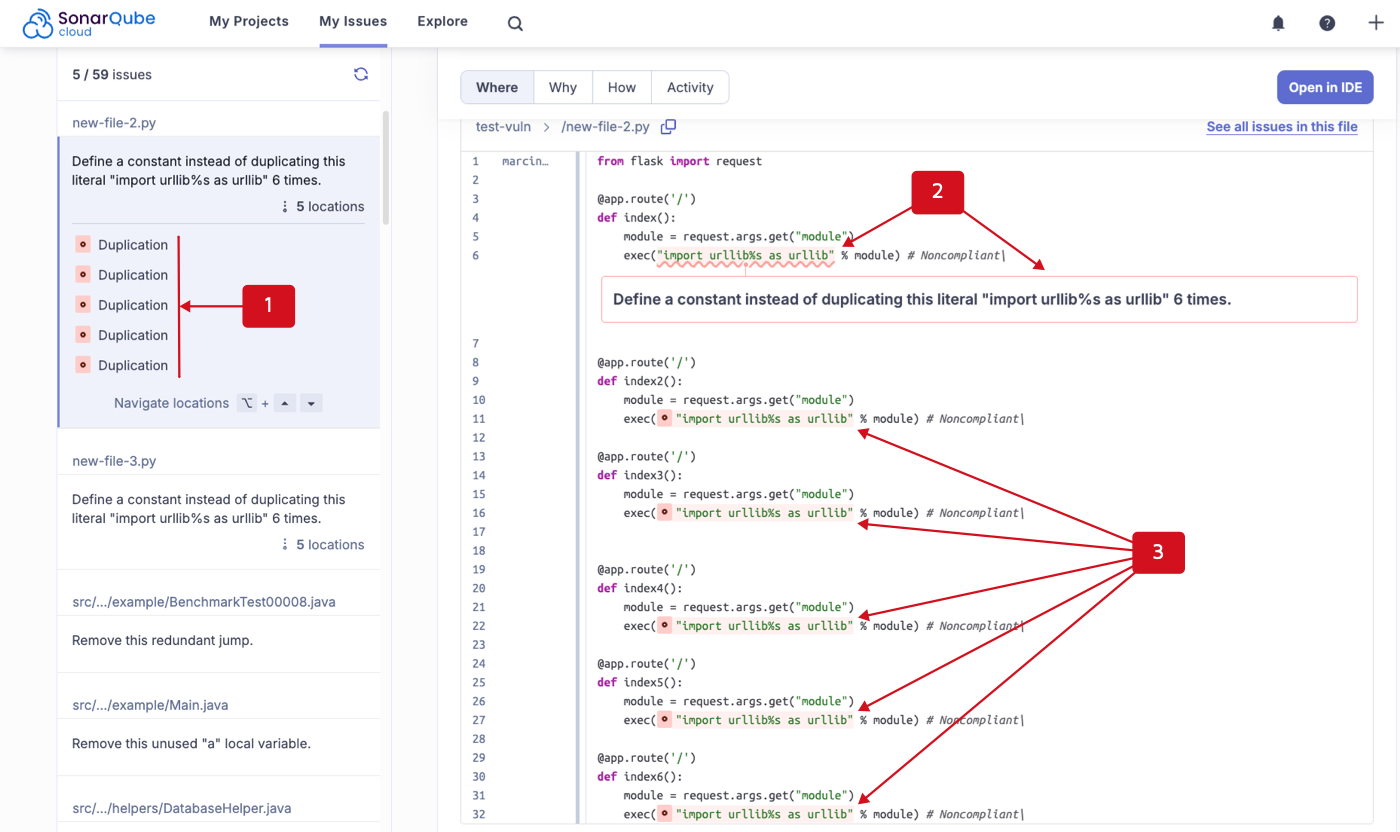 ### Management history and comments
1. Retrieve the issue and open its detail view. See [retrieving](https://docs.sonarsource.com/sonarqube-cloud/managing-your-projects/issues/retrieving "mention") for more information.
2. Open the **Activity** tab. The tab shows the number of comments added to the issue.
3. View the activities and comments or click **Add a comment** to leave a comment about the issue.
---
# Source: https://docs.sonarsource.com/sonarqube-community-build/server-update-and-maintenance/update/roadmap.md
# Source: https://docs.sonarsource.com/sonarqube-server/10.4/setup-and-upgrade/upgrade-the-server/roadmap.md
# Source: https://docs.sonarsource.com/sonarqube-server/10.5/setup-and-upgrade/upgrade-the-server/roadmap.md
# Source: https://docs.sonarsource.com/sonarqube-server/10.6/setup-and-upgrade/upgrade-the-server/roadmap.md
# Source: https://docs.sonarsource.com/sonarqube-server/10.7/server-upgrade-and-maintenance/upgrade/upgrade-the-server/roadmap.md
# Source: https://docs.sonarsource.com/sonarqube-server/10.8/server-upgrade-and-maintenance/upgrade/upgrade-the-server/roadmap.md
# Source: https://docs.sonarsource.com/sonarqube-server/2025.2/server-update-and-maintenance/upgrade/roadmap.md
# Source: https://docs.sonarsource.com/sonarqube-server/2025.3/server-update-and-maintenance/upgrade/roadmap.md
# Source: https://docs.sonarsource.com/sonarqube-server/2025.5/server-update-and-maintenance/update/roadmap.md
# Source: https://docs.sonarsource.com/sonarqube-server/2025.1/server-update-and-maintenance/update/roadmap.md
# Source: https://docs.sonarsource.com/sonarqube-server/2025.4/server-update-and-maintenance/update/roadmap.md
# Source: https://docs.sonarsource.com/sonarqube-server/2025.6/server-update-and-maintenance/update/roadmap.md
# Source: https://docs.sonarsource.com/sonarqube-server/server-update-and-maintenance/update/roadmap.md
# Overview
### Reasons to update immediately
In SonarQube Server, you need to perform an update in the following situations:
1. If you are on a version of SonarQube Server that is no longer active.
2. If you are on the latest version of SonarQube Server and there is a new update available.
3. If you are on the latest version or Long-Term-Active (LTA) for which there is a new patch version available (security and bug fixes).
### Update steps
Follow these steps to perform an update of your SonarQube Server:
1. Read [release-cycle-model](https://docs.sonarsource.com/sonarqube-server/server-update-and-maintenance/update/release-cycle-model "mention").
2. [determine-path](https://docs.sonarsource.com/sonarqube-server/server-update-and-maintenance/update/determine-path "mention").
3. Read the [#upgrade-notes](https://docs.sonarsource.com/sonarqube-server/release-notes#upgrade-notes "mention") between the SonarQube versions.
4. [pre-update-steps](https://docs.sonarsource.com/sonarqube-server/server-update-and-maintenance/update/pre-update-steps "mention").
5. Back up the SonarQube Server database.
6. [update](https://docs.sonarsource.com/sonarqube-server/server-update-and-maintenance/update/update "mention").
7. [post-update-steps](https://docs.sonarsource.com/sonarqube-server/server-update-and-maintenance/update/post-update-steps "mention").
Check out this video on how to ace your SonarQube Server update.
{% embed url="
### Management history and comments
1. Retrieve the issue and open its detail view. See [retrieving](https://docs.sonarsource.com/sonarqube-cloud/managing-your-projects/issues/retrieving "mention") for more information.
2. Open the **Activity** tab. The tab shows the number of comments added to the issue.
3. View the activities and comments or click **Add a comment** to leave a comment about the issue.
---
# Source: https://docs.sonarsource.com/sonarqube-community-build/server-update-and-maintenance/update/roadmap.md
# Source: https://docs.sonarsource.com/sonarqube-server/10.4/setup-and-upgrade/upgrade-the-server/roadmap.md
# Source: https://docs.sonarsource.com/sonarqube-server/10.5/setup-and-upgrade/upgrade-the-server/roadmap.md
# Source: https://docs.sonarsource.com/sonarqube-server/10.6/setup-and-upgrade/upgrade-the-server/roadmap.md
# Source: https://docs.sonarsource.com/sonarqube-server/10.7/server-upgrade-and-maintenance/upgrade/upgrade-the-server/roadmap.md
# Source: https://docs.sonarsource.com/sonarqube-server/10.8/server-upgrade-and-maintenance/upgrade/upgrade-the-server/roadmap.md
# Source: https://docs.sonarsource.com/sonarqube-server/2025.2/server-update-and-maintenance/upgrade/roadmap.md
# Source: https://docs.sonarsource.com/sonarqube-server/2025.3/server-update-and-maintenance/upgrade/roadmap.md
# Source: https://docs.sonarsource.com/sonarqube-server/2025.5/server-update-and-maintenance/update/roadmap.md
# Source: https://docs.sonarsource.com/sonarqube-server/2025.1/server-update-and-maintenance/update/roadmap.md
# Source: https://docs.sonarsource.com/sonarqube-server/2025.4/server-update-and-maintenance/update/roadmap.md
# Source: https://docs.sonarsource.com/sonarqube-server/2025.6/server-update-and-maintenance/update/roadmap.md
# Source: https://docs.sonarsource.com/sonarqube-server/server-update-and-maintenance/update/roadmap.md
# Overview
### Reasons to update immediately
In SonarQube Server, you need to perform an update in the following situations:
1. If you are on a version of SonarQube Server that is no longer active.
2. If you are on the latest version of SonarQube Server and there is a new update available.
3. If you are on the latest version or Long-Term-Active (LTA) for which there is a new patch version available (security and bug fixes).
### Update steps
Follow these steps to perform an update of your SonarQube Server:
1. Read [release-cycle-model](https://docs.sonarsource.com/sonarqube-server/server-update-and-maintenance/update/release-cycle-model "mention").
2. [determine-path](https://docs.sonarsource.com/sonarqube-server/server-update-and-maintenance/update/determine-path "mention").
3. Read the [#upgrade-notes](https://docs.sonarsource.com/sonarqube-server/release-notes#upgrade-notes "mention") between the SonarQube versions.
4. [pre-update-steps](https://docs.sonarsource.com/sonarqube-server/server-update-and-maintenance/update/pre-update-steps "mention").
5. Back up the SonarQube Server database.
6. [update](https://docs.sonarsource.com/sonarqube-server/server-update-and-maintenance/update/update "mention").
7. [post-update-steps](https://docs.sonarsource.com/sonarqube-server/server-update-and-maintenance/update/post-update-steps "mention").
Check out this video on how to ace your SonarQube Server update.
{% embed url="
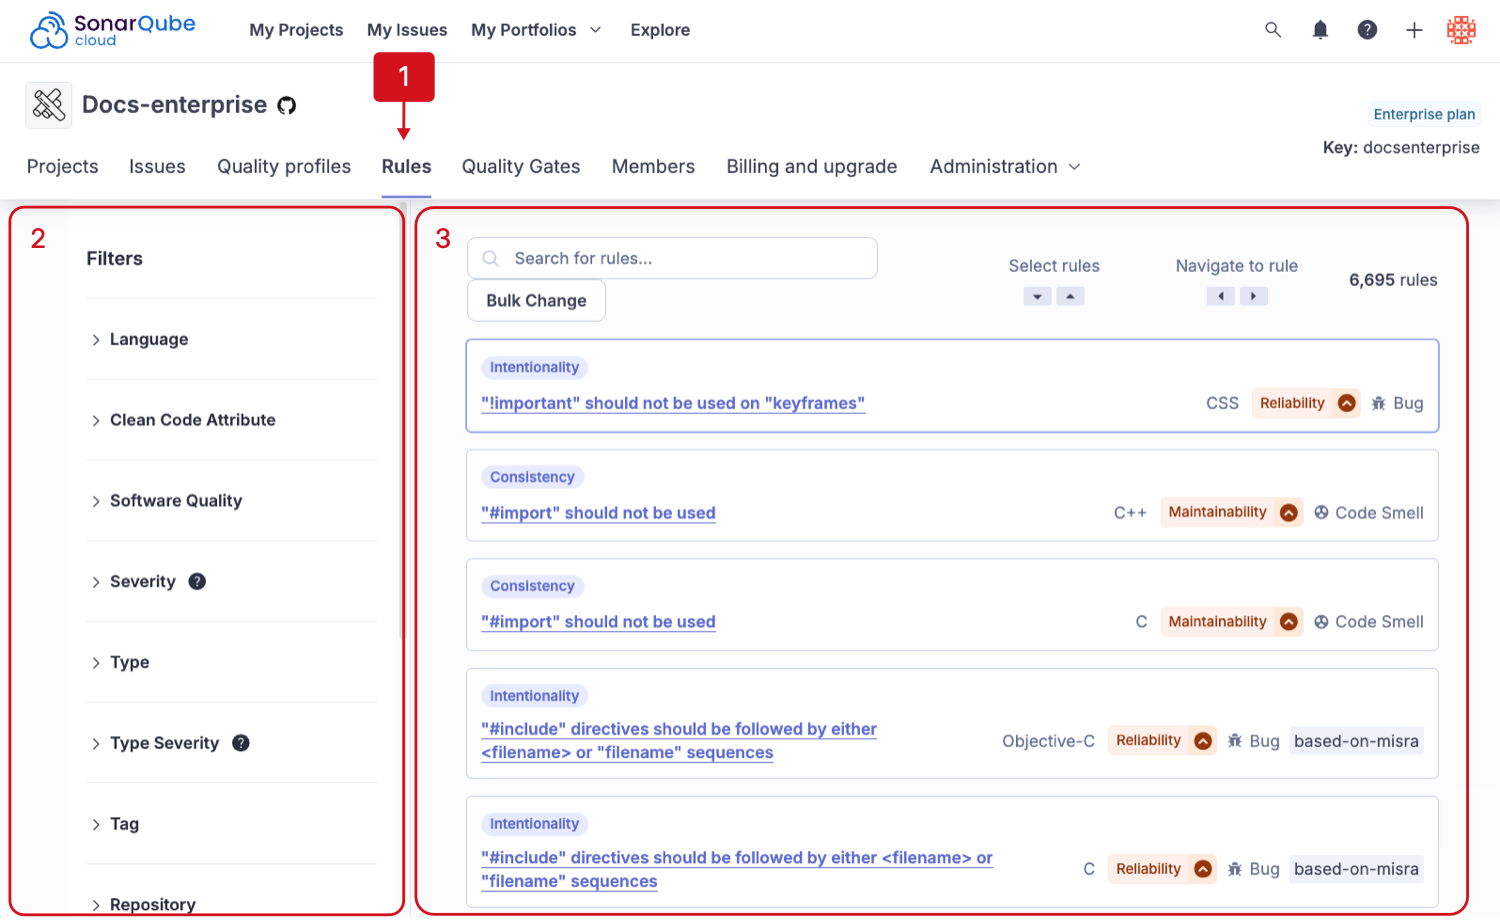
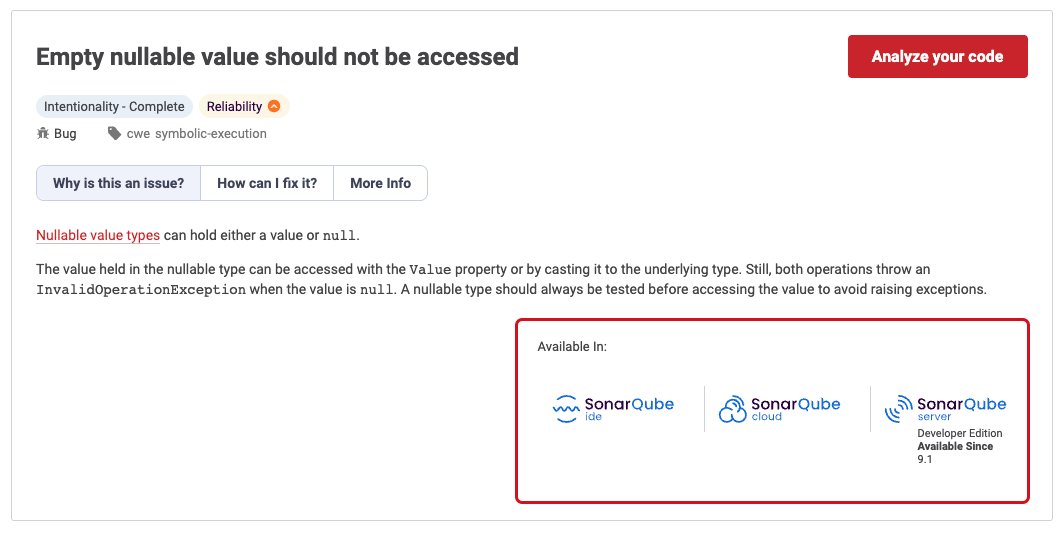
 ### Analyze changed files
{% hint style="success" %}
This is a SonarQube for IDE Labs feature. Update your SonarQube for VS Code installation to version 4.37 or newer, then sign up for IDE Labs to get early access to our newest features and help shape the future of SonarQube for IDE!
Open the **SONARQUBE FOR IDE LABS** panel from the right side of your **SONARQUBE** panel.
{% endhint %}
Navigate to the **SOURCE CONTROL** > **Changes** view container and select the **Analyze Changed Files with SonarQube** () icon to trigger an analysis on all files changed since the last commit to ensure fewer issues reach your remote repository. This is especially useful if automatic analysis is disabled for your development project. It can be your last check on changes you made before creating a pull request.
### Analyze C and C++ code
#### Prerequisites
To analyze C and C++ code, you need to satisfy both of these conditions:
1. **Generate a compilation database** and
2. be on one of the **Supported environments**
See below for details.
#### Generate a compilation database
[Compilation database](https://clang.llvm.org/docs/JSONCompilationDatabase.html) is a JSON file format introduced by the LLVM project. It contains the compile commands used to build a project. For instructions on how to generate a compilation database, choose the appropriate collapsible below. The preferred option is to use the build system.
{% hint style="info" %}
The C and C++ ecosystem is diverse. This documentation provides a general overview of how to set up your environment under common circumstances. If you need more assistance than we can provide here, please check if the compilation database is a feature in your extension, search the [SonarQube for VS Code Community forum](https://community.sonarsource.com/c/sl/vs-code/36) for details about your build system, and reach out with questions if you have any troubles.
{% endhint %}
### Analyze changed files
{% hint style="success" %}
This is a SonarQube for IDE Labs feature. Update your SonarQube for VS Code installation to version 4.37 or newer, then sign up for IDE Labs to get early access to our newest features and help shape the future of SonarQube for IDE!
Open the **SONARQUBE FOR IDE LABS** panel from the right side of your **SONARQUBE** panel.
{% endhint %}
Navigate to the **SOURCE CONTROL** > **Changes** view container and select the **Analyze Changed Files with SonarQube** () icon to trigger an analysis on all files changed since the last commit to ensure fewer issues reach your remote repository. This is especially useful if automatic analysis is disabled for your development project. It can be your last check on changes you made before creating a pull request.
### Analyze C and C++ code
#### Prerequisites
To analyze C and C++ code, you need to satisfy both of these conditions:
1. **Generate a compilation database** and
2. be on one of the **Supported environments**
See below for details.
#### Generate a compilation database
[Compilation database](https://clang.llvm.org/docs/JSONCompilationDatabase.html) is a JSON file format introduced by the LLVM project. It contains the compile commands used to build a project. For instructions on how to generate a compilation database, choose the appropriate collapsible below. The preferred option is to use the build system.
{% hint style="info" %}
The C and C++ ecosystem is diverse. This documentation provides a general overview of how to set up your environment under common circumstances. If you need more assistance than we can provide here, please check if the compilation database is a feature in your extension, search the [SonarQube for VS Code Community forum](https://community.sonarsource.com/c/sl/vs-code/36) for details about your build system, and reach out with questions if you have any troubles.
{% endhint %}
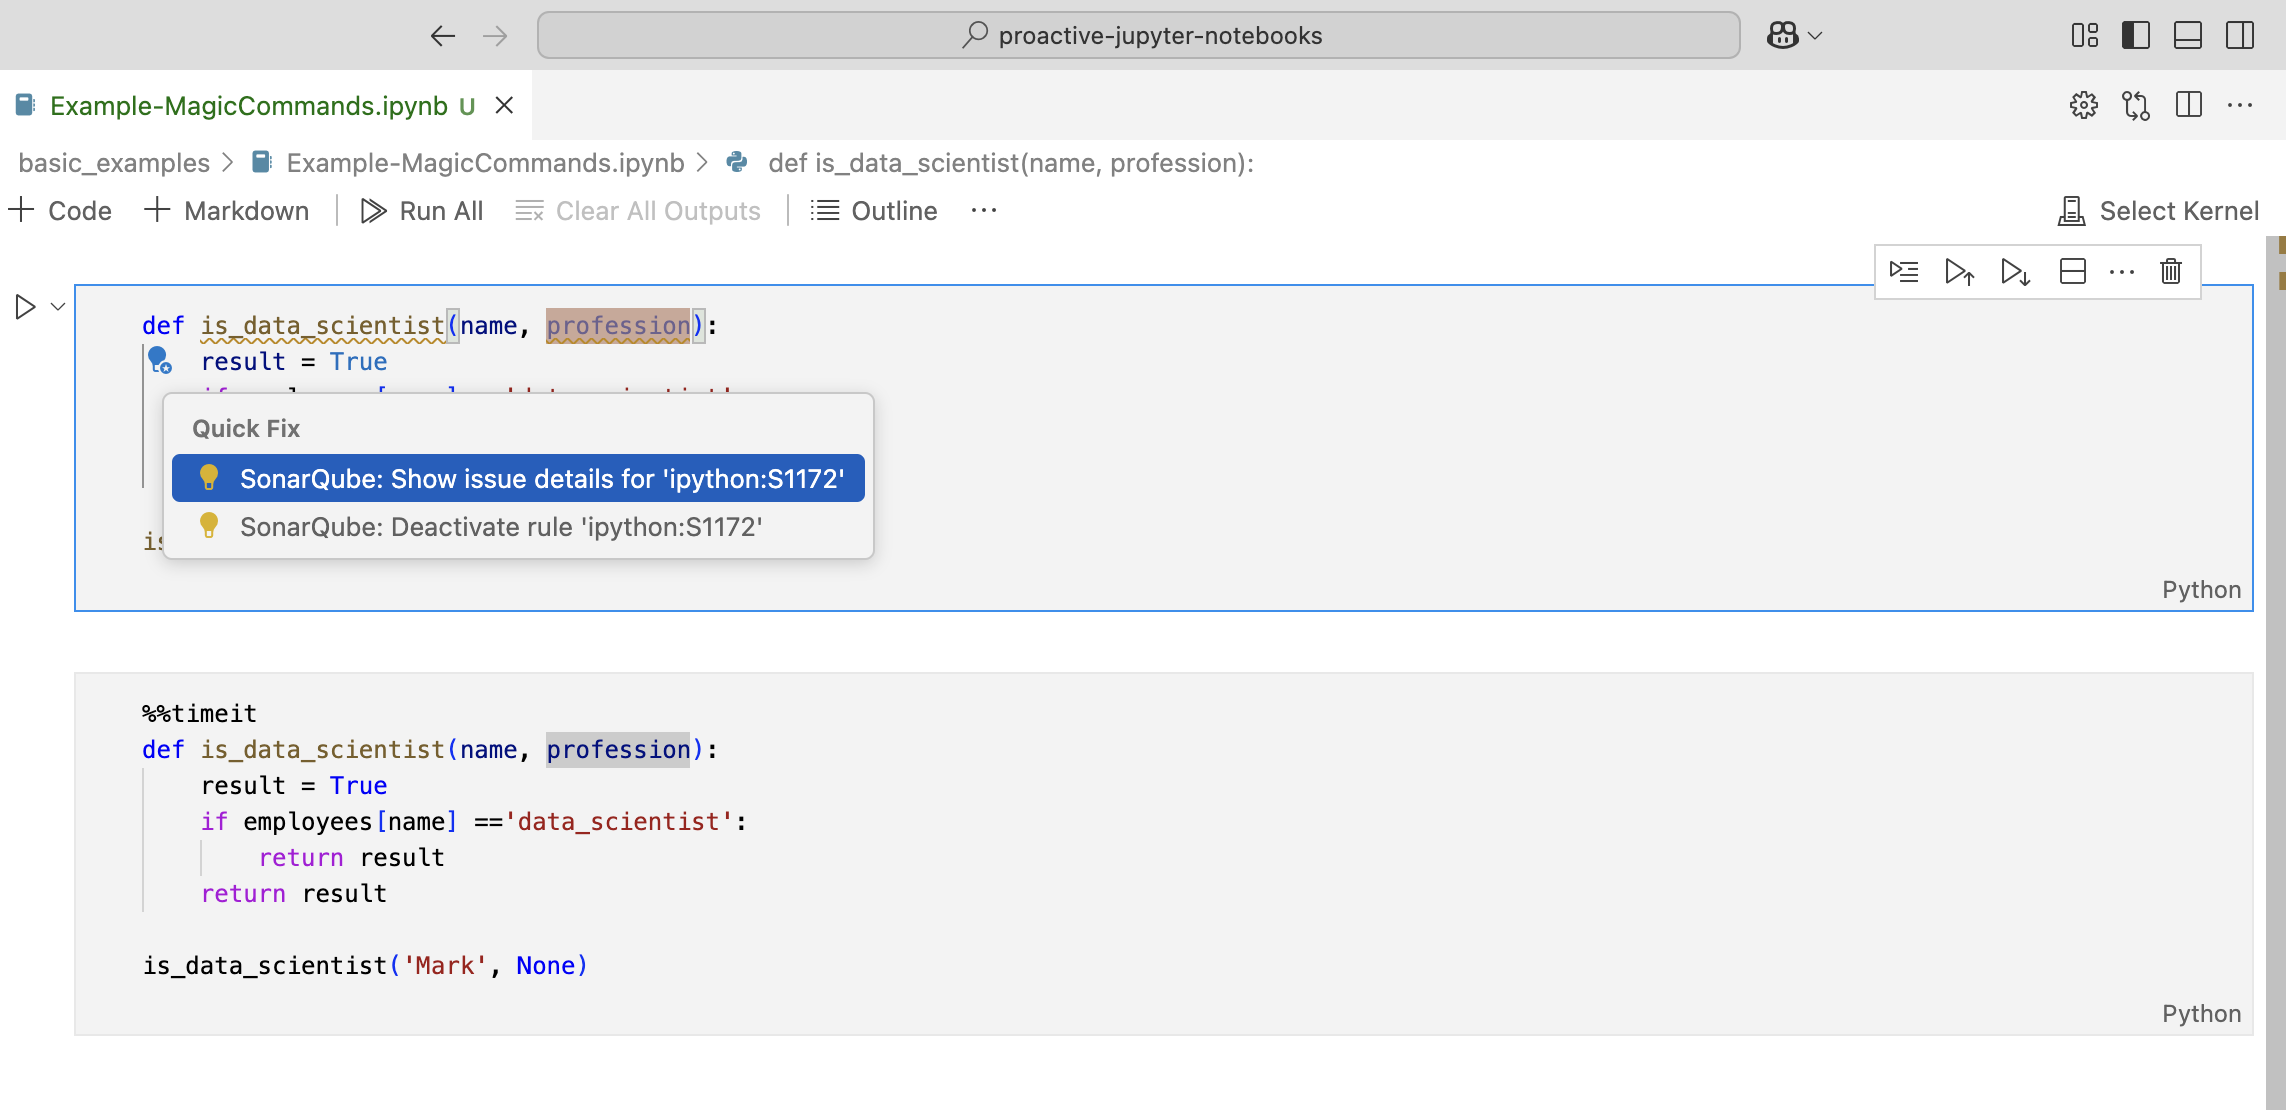
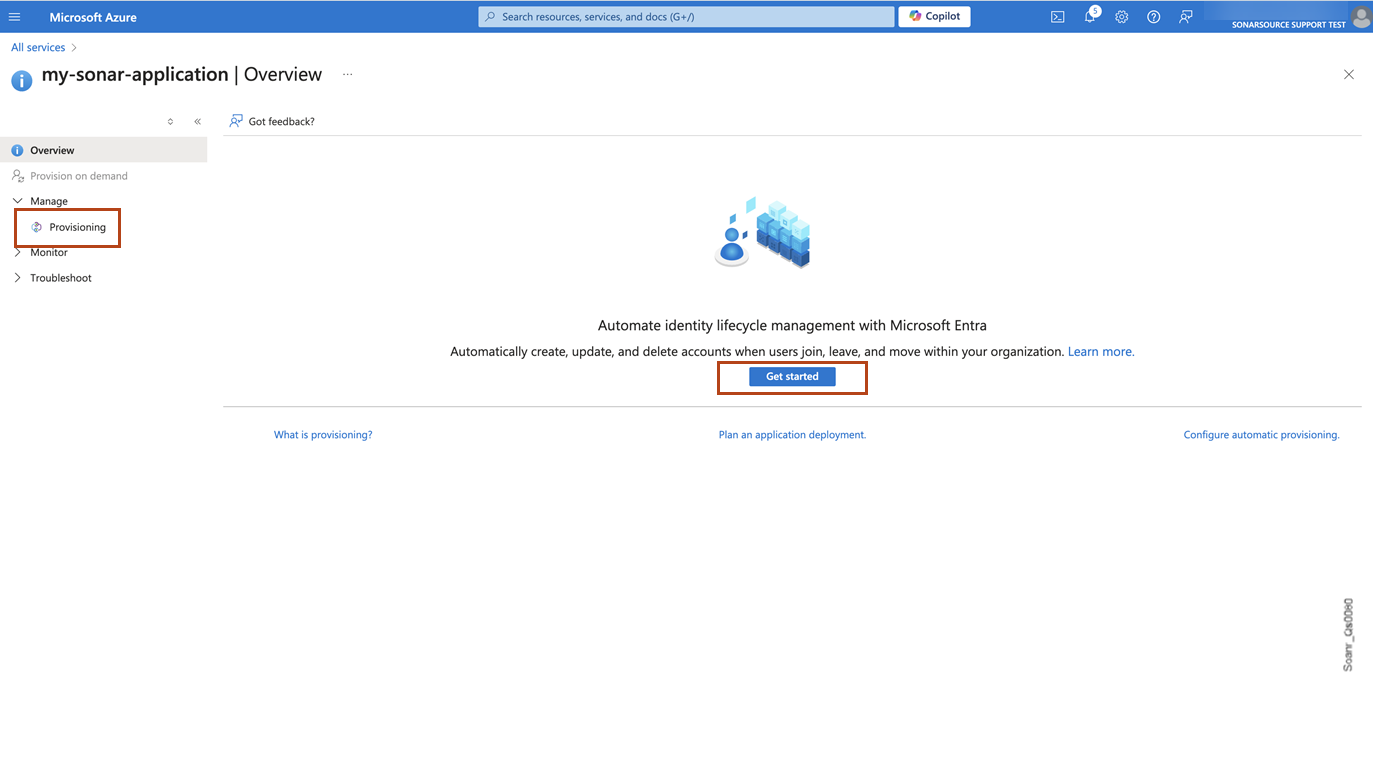
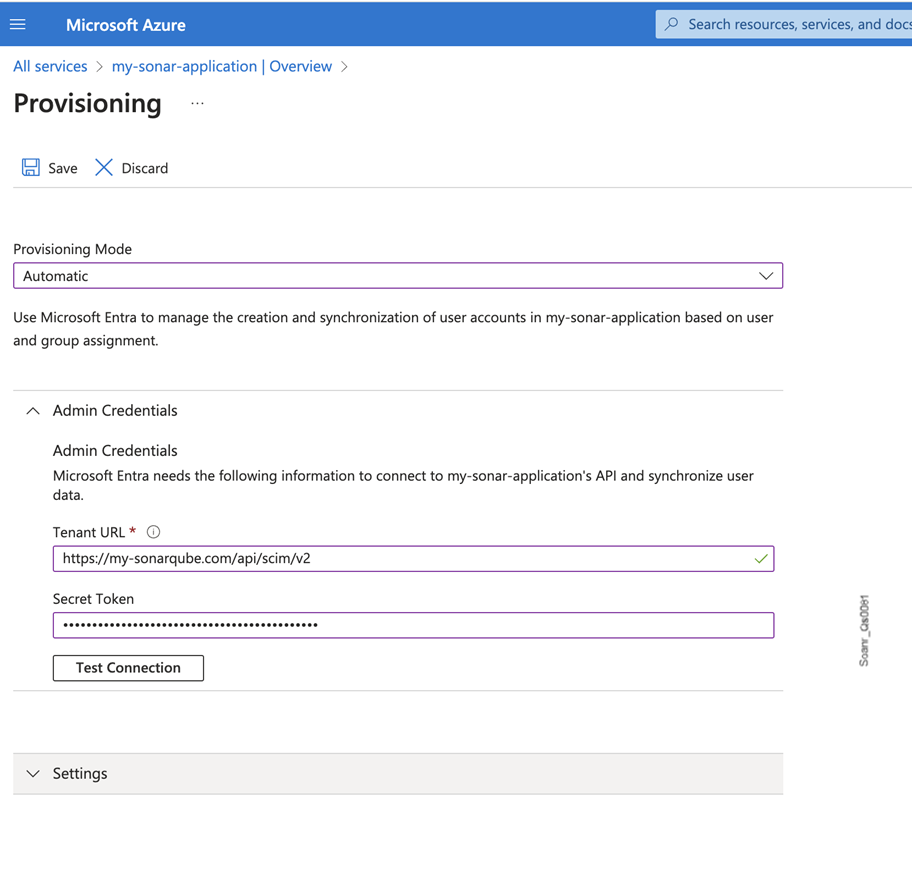
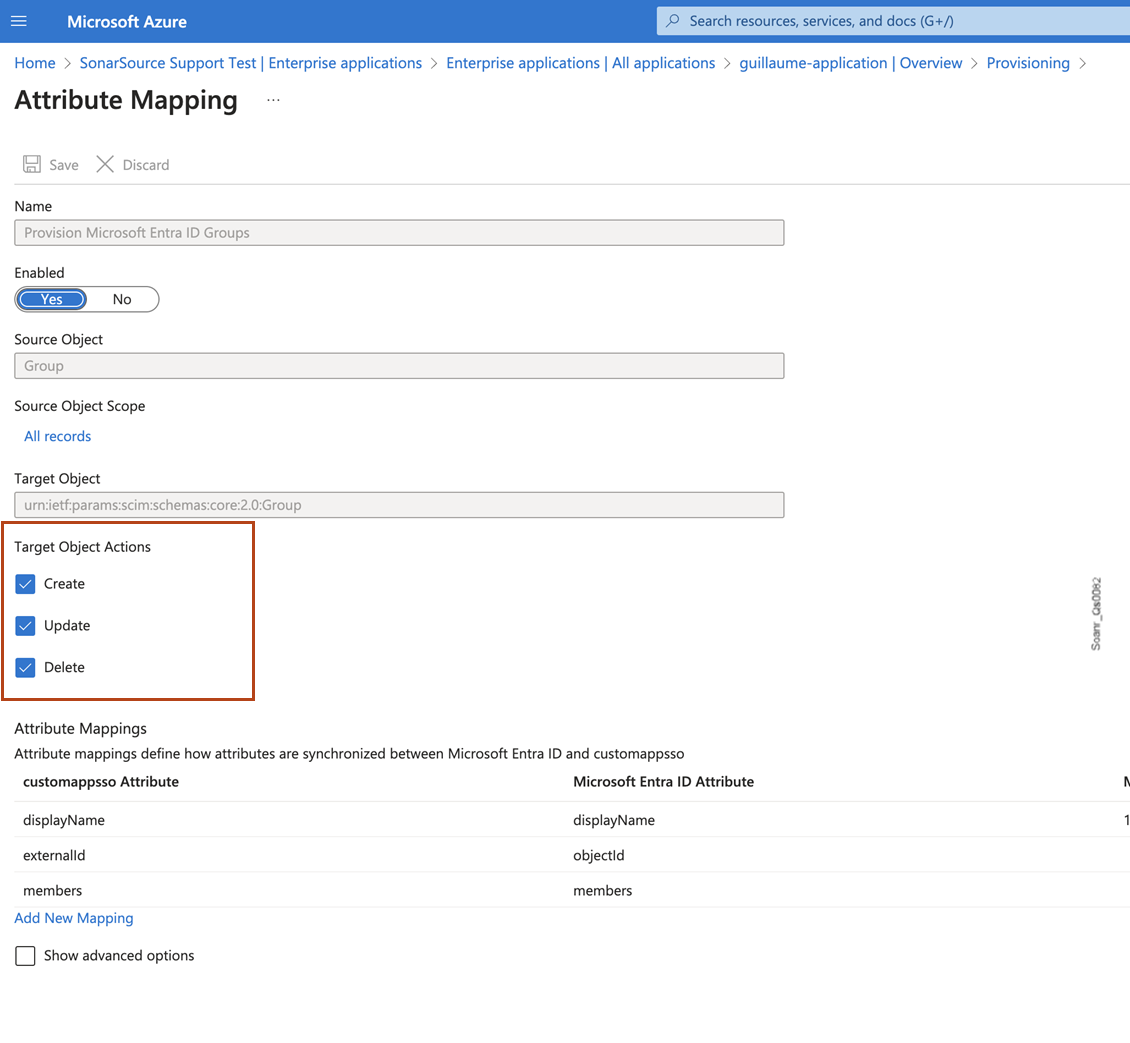

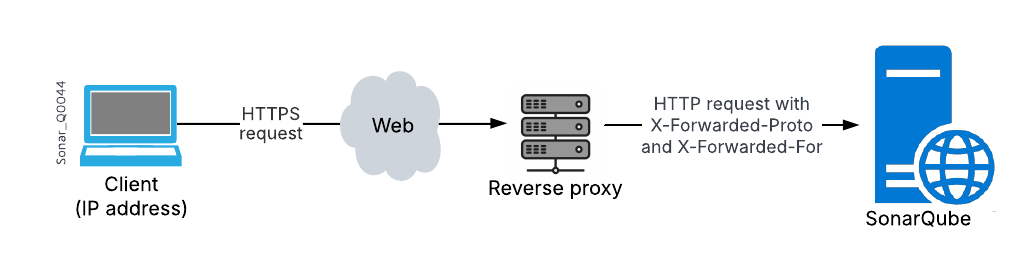
 * [OWASP Mobile Top 10 2024](https://owasp.org/www-project-mobile-top-10/)
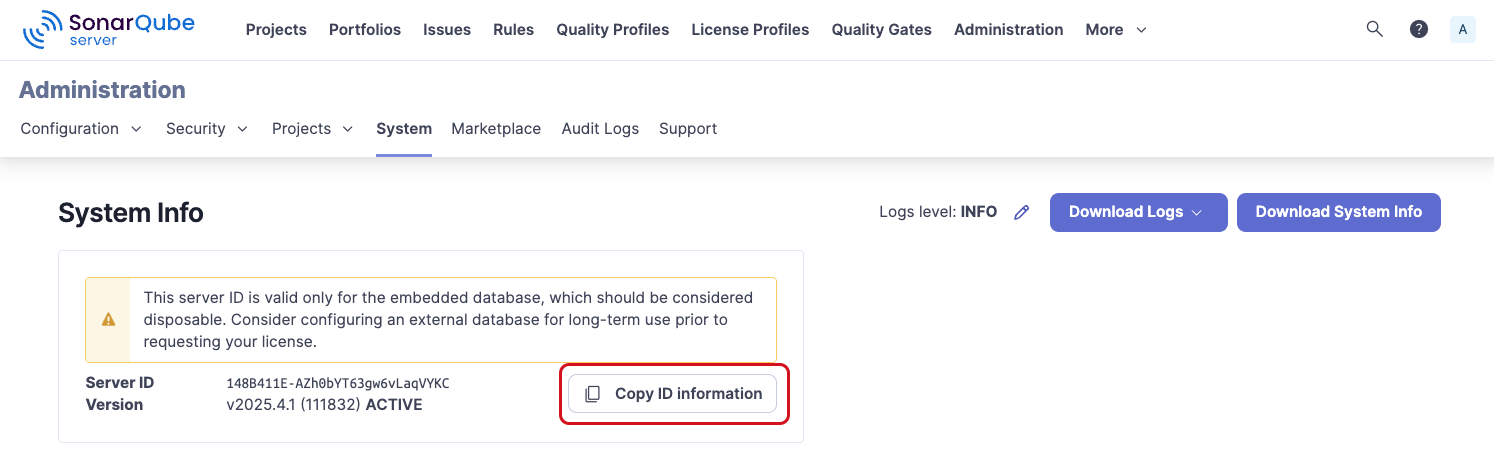
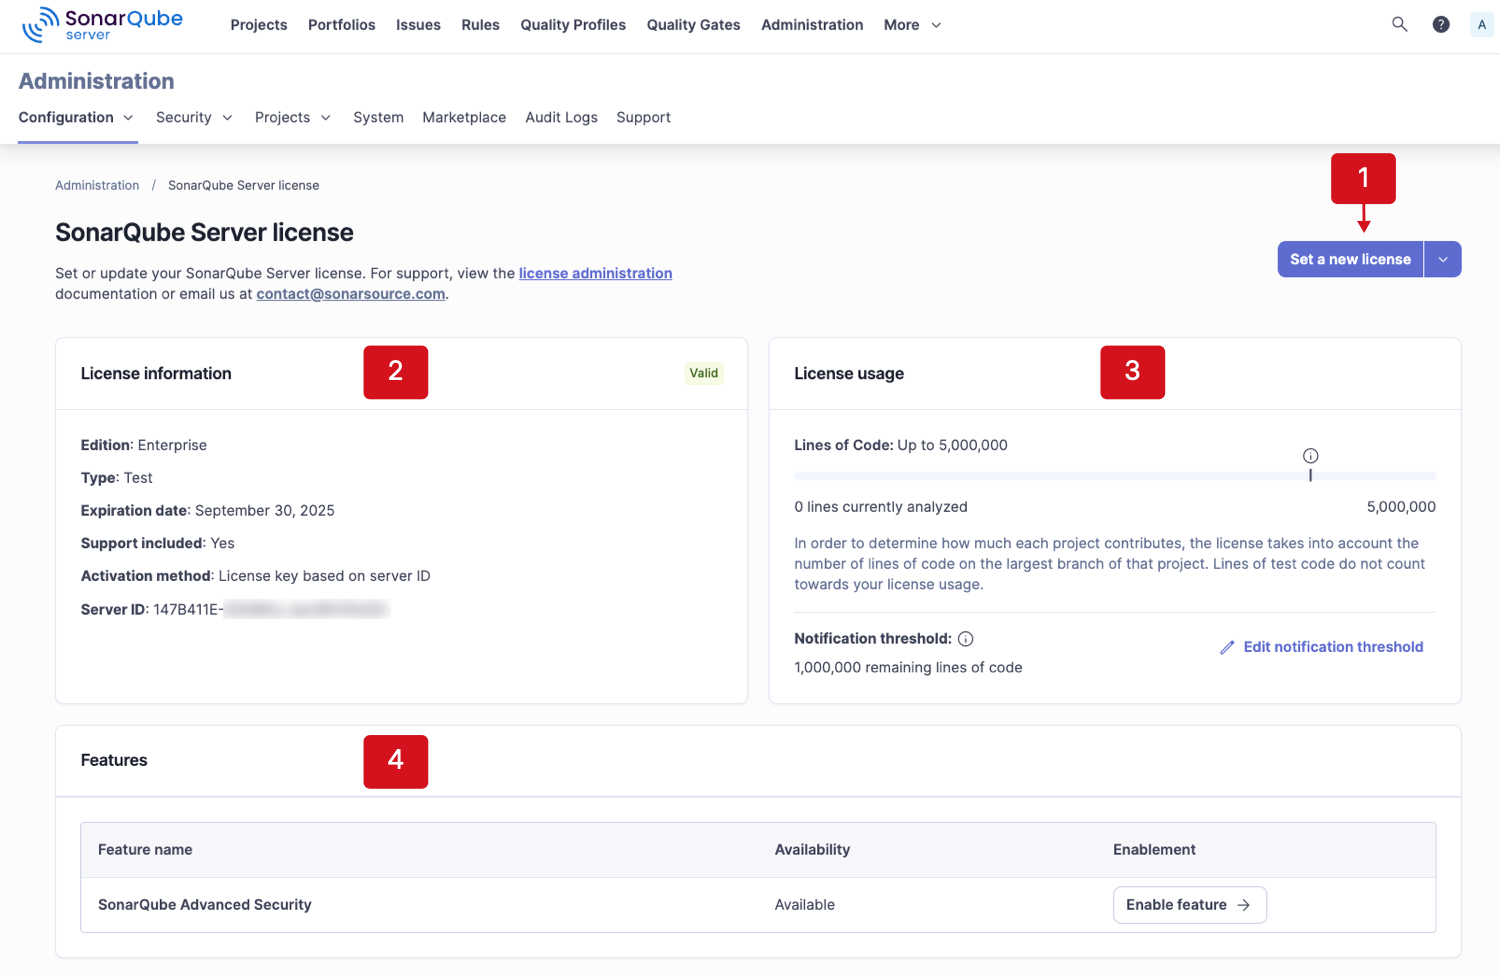
 4. Set the parameters:
* In **Region (optional)** field, make sure **Global** is selected (default value).
* In **SonarQube Cloud Token**, enter the token created in the first step.
* In **Service Connection Name**, enter a memorable name (You will need this name when configuring your Azure build pipelines).
5. Select **Save** to save your connection.
### Enabling the pull request analysis in your build pipeline
The Azure DevOps extension running in your Azure pipeline can automatically detect branches or pull requests being built (you don't need to pass them as parameters to the scanner).
To enable the pull request analysis in your Azure pipeline of code stored on Azure DevOps, you must configure a pull request trigger on the target branch (main development branch) as explained on the [azure-devops](https://docs.sonarsource.com/sonarqube-cloud/managing-your-projects/administering-your-projects/devops-platform-integration/azure-devops "mention") page. If your code is stored on GitHub or Bitbucket Cloud, open the expandable content below.
4. Set the parameters:
* In **Region (optional)** field, make sure **Global** is selected (default value).
* In **SonarQube Cloud Token**, enter the token created in the first step.
* In **Service Connection Name**, enter a memorable name (You will need this name when configuring your Azure build pipelines).
5. Select **Save** to save your connection.
### Enabling the pull request analysis in your build pipeline
The Azure DevOps extension running in your Azure pipeline can automatically detect branches or pull requests being built (you don't need to pass them as parameters to the scanner).
To enable the pull request analysis in your Azure pipeline of code stored on Azure DevOps, you must configure a pull request trigger on the target branch (main development branch) as explained on the [azure-devops](https://docs.sonarsource.com/sonarqube-cloud/managing-your-projects/administering-your-projects/devops-platform-integration/azure-devops "mention") page. If your code is stored on GitHub or Bitbucket Cloud, open the expandable content below.
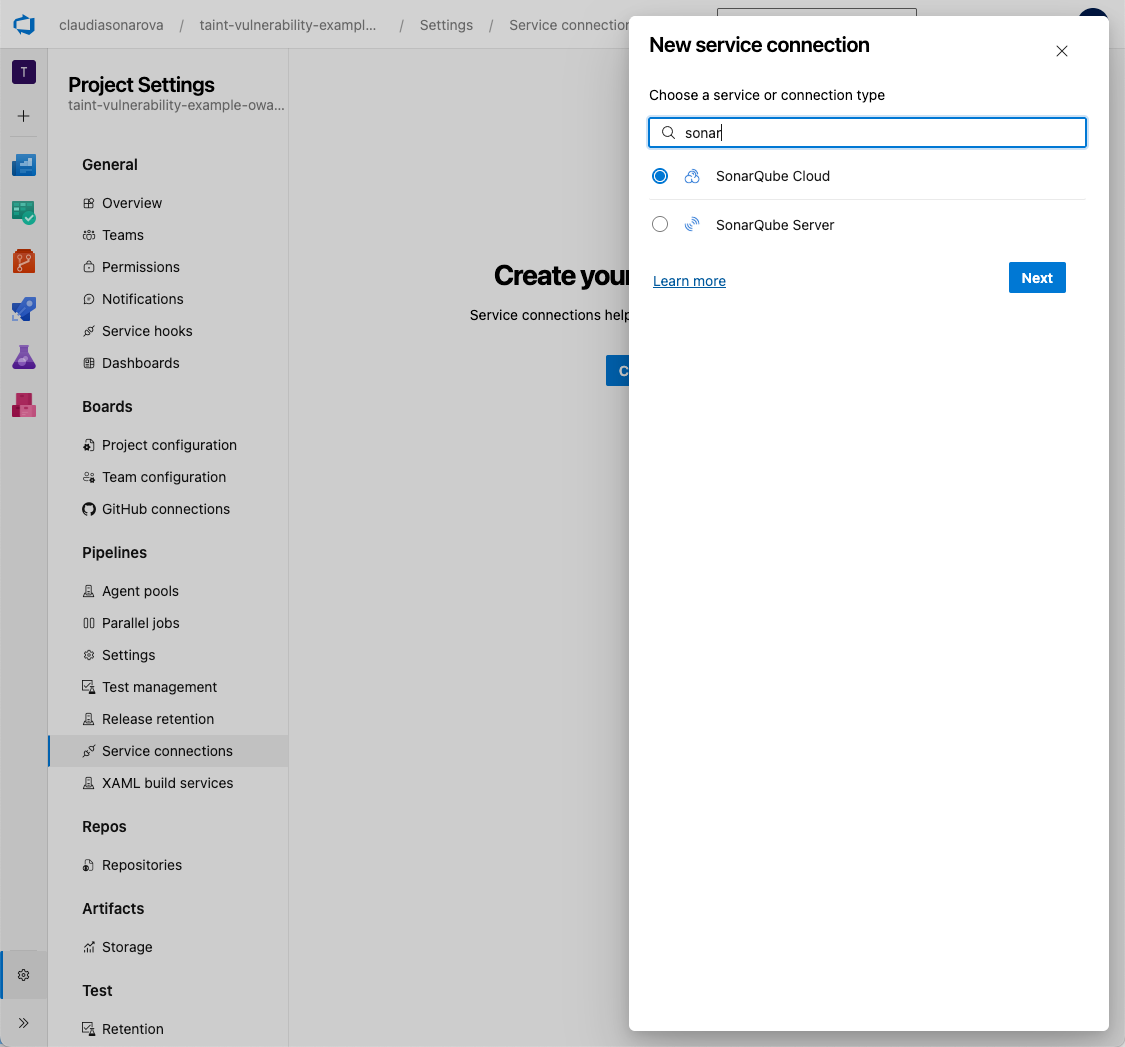 ---
# Source: https://docs.sonarsource.com/sonarqube-cloud/managing-your-projects/administering-your-projects/setting-up-project.md
# Creating and setting up your project
To set up your project on SonarQube Cloud:
1. Create your project: You can create projects by importing your DevOps platform repositories (see below) which automatically binds new projects to the respective repository. This binding has many advantages, see [binding-with-dop](https://docs.sonarsource.com/sonarqube-cloud/administering-sonarcloud/about-sonarqube-cloud-solution/ressources-structure/binding-with-dop "mention") for more details. Users will need the correct permission level to create new projects. You can also create projects manually however, manually created projects are unbound.
2. Set up project integration with your DevOps platform. See [introduction](https://docs.sonarsource.com/sonarqube-cloud/managing-your-projects/administering-your-projects/devops-platform-integration/introduction "mention") to DevOps platform for more details.
3. Set up user permissions for your project. See [setting-permissions](https://docs.sonarsource.com/sonarqube-cloud/managing-your-projects/administering-your-projects/setting-permissions "mention") for more information.
4. Set up project analysis. See the [project-analysis](https://docs.sonarsource.com/sonarqube-cloud/managing-your-projects/project-analysis "mention") pages for details.
### Importing one or several repositories to SonarQube Cloud
{% hint style="info" %}
Repository import is only possible if your SonarQube Cloud organization is bound to its corresponding DevOps platform organization (i.e. the DevOps platform organization has been imported to SonarQube Cloud). See [binding-with-dop](https://docs.sonarsource.com/sonarqube-cloud/administering-sonarcloud/about-sonarqube-cloud-solution/ressources-structure/binding-with-dop "mention") for more details.
{% endhint %}
1. On the top right of the SonarQube Cloud interface, select the ✚ (plus) menu and select **Analyze new project**. The **Analyze projects** page opens.
2. Select your organization.
3. Select the repositories you want to import.
4. Select the **Set up** button. The **Set up project for Clean as You Code** page opens.
5. Select the new code definition for your project, see [about-new-code](https://docs.sonarsource.com/sonarqube-cloud/standards/about-new-code "mention") for more details.
6. Select the **Create project** button. The project is created and the [automatic-analysis](https://docs.sonarsource.com/sonarqube-cloud/advanced-setup/automatic-analysis "mention") is started if supported.
{% hint style="info" %}
To import a monorepo, see [monorepo-support](https://docs.sonarsource.com/sonarqube-cloud/advanced-setup/monorepo-support "mention").
{% endhint %}
### Creating a project manually
1. On the top right of the SonarQube Cloud interface, select the ✚ (plus) menu and select **Analyze new project**. The **Analyze projects** page opens.
2. On the right of the page, select **create a project manually**.
3. Select the organization and enter the project name and key.
4. Click **Next**.
5. Select the new code definition for your project, see [about-new-code](https://docs.sonarsource.com/sonarqube-cloud/standards/about-new-code "mention").
6. Select the **Create project** button. The project is created. You must now set up your [overview-of-integrated-cis](https://docs.sonarsource.com/sonarqube-cloud/advanced-setup/ci-based-analysis/overview-of-integrated-cis "mention"). Automatic analysis is not supported for unbound projects.
By default, the visibility of newly created projects is set to private on [Free, Team and Enterprise](https://www.sonarsource.com/plans-and-pricing/#sonarqube-cloud-features) plans.
### Related pages
* [introduction](https://docs.sonarsource.com/sonarqube-cloud/managing-your-projects/administering-your-projects/devops-platform-integration/introduction "mention") Setting up the integration of your project with your DevOps platform
* [setting-permissions](https://docs.sonarsource.com/sonarqube-cloud/managing-your-projects/administering-your-projects/setting-permissions "mention") and visibility
* [changing-binding](https://docs.sonarsource.com/sonarqube-cloud/managing-your-projects/administering-your-projects/changing-binding "mention") and other parameters
* [customizing-info-page](https://docs.sonarsource.com/sonarqube-cloud/managing-your-projects/administering-your-projects/customizing-info-page "mention")
* [deleting-project](https://docs.sonarsource.com/sonarqube-cloud/managing-your-projects/administering-your-projects/deleting-project "mention")
* [importing-github-organization](https://docs.sonarsource.com/sonarqube-cloud/administering-sonarcloud/managing-organization/creating-organization/importing-github-organization "mention")
* [importing-bitbucket-workspace](https://docs.sonarsource.com/sonarqube-cloud/administering-sonarcloud/managing-organization/creating-organization/importing-bitbucket-workspace "mention")
* [importing-gitlab-group](https://docs.sonarsource.com/sonarqube-cloud/administering-sonarcloud/managing-organization/creating-organization/importing-gitlab-group "mention")
* [importing-azure-devops-organization](https://docs.sonarsource.com/sonarqube-cloud/administering-sonarcloud/managing-organization/creating-organization/importing-azure-devops-organization "mention")
---
# Source: https://docs.sonarsource.com/sonarqube-cloud/managing-your-projects/administering-your-projects/advanced-administration/setting-up-run-tasks-in-tfc.md
# Setting up run tasks in TFC
{% hint style="info" %}
Currently, SonarQube Cloud only supports GitHub and GitLab for use with the TFC integration.
{% endhint %}
The run task allows Terraform Cloud (TFC) to interact with SonarQube Cloud at a specific point in the TFC run lifecycle. It retrieves the status of the latest SonarQube Cloud scan results and communicates the pass/fail result to Terraform, blocking the TFC workflow if the quality gate has failed. This ensures that no infrastructure changes in Terraform can take place until all unreviewed hotspots or security vulnerabilities within the code analyzed by SonarQube Cloud have been reviewed and remedied.
The process for integrating SonarQube Cloud into your TFC workflow consists of the steps described below.
{% stepper %}
{% step %}
### Generate an HMAC key
You must generate the HMAC key which will be used to authenticate SonarQube Cloud to TFC.
To ensure the security of your integration, you must use a high-entropy secret key. Do not use human-readable passwords or phrases. According to [NIST SP 800-107](https://csrc.nist.gov/pubs/sp/800/107/r1/final), the key should be randomly generated and at least as long as the hash output (e.g., 32 bytes for SHA-256).
Below is a recommended command to generate a compliant key.
```bash
# Generates a 32-byte key in Hex format (secure for HMAC-SHA256)
openssl rand -hex 32
```
{% endstep %}
{% step %}
### Configure the run task integration in SonarQube Cloud
You must have administrator permissions for your organization to be able to configure the Terraform Cloud integration.
Proceed as follows:
1. In SonarQube Cloud, retrieve your project. For more information, see [retrieving-projects](https://docs.sonarsource.com/sonarqube-cloud/managing-your-projects/retrieving-projects "mention").
2. Go to **Administration** > **General settings** > **Integration.**
3. In **Terraform Cloud Run Task HMAC Key**, enter the HMAC key you generated in [#generate-an-hmac-key](#generate-an-hmac-key "mention") above.
---
# Source: https://docs.sonarsource.com/sonarqube-cloud/managing-your-projects/administering-your-projects/setting-up-project.md
# Creating and setting up your project
To set up your project on SonarQube Cloud:
1. Create your project: You can create projects by importing your DevOps platform repositories (see below) which automatically binds new projects to the respective repository. This binding has many advantages, see [binding-with-dop](https://docs.sonarsource.com/sonarqube-cloud/administering-sonarcloud/about-sonarqube-cloud-solution/ressources-structure/binding-with-dop "mention") for more details. Users will need the correct permission level to create new projects. You can also create projects manually however, manually created projects are unbound.
2. Set up project integration with your DevOps platform. See [introduction](https://docs.sonarsource.com/sonarqube-cloud/managing-your-projects/administering-your-projects/devops-platform-integration/introduction "mention") to DevOps platform for more details.
3. Set up user permissions for your project. See [setting-permissions](https://docs.sonarsource.com/sonarqube-cloud/managing-your-projects/administering-your-projects/setting-permissions "mention") for more information.
4. Set up project analysis. See the [project-analysis](https://docs.sonarsource.com/sonarqube-cloud/managing-your-projects/project-analysis "mention") pages for details.
### Importing one or several repositories to SonarQube Cloud
{% hint style="info" %}
Repository import is only possible if your SonarQube Cloud organization is bound to its corresponding DevOps platform organization (i.e. the DevOps platform organization has been imported to SonarQube Cloud). See [binding-with-dop](https://docs.sonarsource.com/sonarqube-cloud/administering-sonarcloud/about-sonarqube-cloud-solution/ressources-structure/binding-with-dop "mention") for more details.
{% endhint %}
1. On the top right of the SonarQube Cloud interface, select the ✚ (plus) menu and select **Analyze new project**. The **Analyze projects** page opens.
2. Select your organization.
3. Select the repositories you want to import.
4. Select the **Set up** button. The **Set up project for Clean as You Code** page opens.
5. Select the new code definition for your project, see [about-new-code](https://docs.sonarsource.com/sonarqube-cloud/standards/about-new-code "mention") for more details.
6. Select the **Create project** button. The project is created and the [automatic-analysis](https://docs.sonarsource.com/sonarqube-cloud/advanced-setup/automatic-analysis "mention") is started if supported.
{% hint style="info" %}
To import a monorepo, see [monorepo-support](https://docs.sonarsource.com/sonarqube-cloud/advanced-setup/monorepo-support "mention").
{% endhint %}
### Creating a project manually
1. On the top right of the SonarQube Cloud interface, select the ✚ (plus) menu and select **Analyze new project**. The **Analyze projects** page opens.
2. On the right of the page, select **create a project manually**.
3. Select the organization and enter the project name and key.
4. Click **Next**.
5. Select the new code definition for your project, see [about-new-code](https://docs.sonarsource.com/sonarqube-cloud/standards/about-new-code "mention").
6. Select the **Create project** button. The project is created. You must now set up your [overview-of-integrated-cis](https://docs.sonarsource.com/sonarqube-cloud/advanced-setup/ci-based-analysis/overview-of-integrated-cis "mention"). Automatic analysis is not supported for unbound projects.
By default, the visibility of newly created projects is set to private on [Free, Team and Enterprise](https://www.sonarsource.com/plans-and-pricing/#sonarqube-cloud-features) plans.
### Related pages
* [introduction](https://docs.sonarsource.com/sonarqube-cloud/managing-your-projects/administering-your-projects/devops-platform-integration/introduction "mention") Setting up the integration of your project with your DevOps platform
* [setting-permissions](https://docs.sonarsource.com/sonarqube-cloud/managing-your-projects/administering-your-projects/setting-permissions "mention") and visibility
* [changing-binding](https://docs.sonarsource.com/sonarqube-cloud/managing-your-projects/administering-your-projects/changing-binding "mention") and other parameters
* [customizing-info-page](https://docs.sonarsource.com/sonarqube-cloud/managing-your-projects/administering-your-projects/customizing-info-page "mention")
* [deleting-project](https://docs.sonarsource.com/sonarqube-cloud/managing-your-projects/administering-your-projects/deleting-project "mention")
* [importing-github-organization](https://docs.sonarsource.com/sonarqube-cloud/administering-sonarcloud/managing-organization/creating-organization/importing-github-organization "mention")
* [importing-bitbucket-workspace](https://docs.sonarsource.com/sonarqube-cloud/administering-sonarcloud/managing-organization/creating-organization/importing-bitbucket-workspace "mention")
* [importing-gitlab-group](https://docs.sonarsource.com/sonarqube-cloud/administering-sonarcloud/managing-organization/creating-organization/importing-gitlab-group "mention")
* [importing-azure-devops-organization](https://docs.sonarsource.com/sonarqube-cloud/administering-sonarcloud/managing-organization/creating-organization/importing-azure-devops-organization "mention")
---
# Source: https://docs.sonarsource.com/sonarqube-cloud/managing-your-projects/administering-your-projects/advanced-administration/setting-up-run-tasks-in-tfc.md
# Setting up run tasks in TFC
{% hint style="info" %}
Currently, SonarQube Cloud only supports GitHub and GitLab for use with the TFC integration.
{% endhint %}
The run task allows Terraform Cloud (TFC) to interact with SonarQube Cloud at a specific point in the TFC run lifecycle. It retrieves the status of the latest SonarQube Cloud scan results and communicates the pass/fail result to Terraform, blocking the TFC workflow if the quality gate has failed. This ensures that no infrastructure changes in Terraform can take place until all unreviewed hotspots or security vulnerabilities within the code analyzed by SonarQube Cloud have been reviewed and remedied.
The process for integrating SonarQube Cloud into your TFC workflow consists of the steps described below.
{% stepper %}
{% step %}
### Generate an HMAC key
You must generate the HMAC key which will be used to authenticate SonarQube Cloud to TFC.
To ensure the security of your integration, you must use a high-entropy secret key. Do not use human-readable passwords or phrases. According to [NIST SP 800-107](https://csrc.nist.gov/pubs/sp/800/107/r1/final), the key should be randomly generated and at least as long as the hash output (e.g., 32 bytes for SHA-256).
Below is a recommended command to generate a compliant key.
```bash
# Generates a 32-byte key in Hex format (secure for HMAC-SHA256)
openssl rand -hex 32
```
{% endstep %}
{% step %}
### Configure the run task integration in SonarQube Cloud
You must have administrator permissions for your organization to be able to configure the Terraform Cloud integration.
Proceed as follows:
1. In SonarQube Cloud, retrieve your project. For more information, see [retrieving-projects](https://docs.sonarsource.com/sonarqube-cloud/managing-your-projects/retrieving-projects "mention").
2. Go to **Administration** > **General settings** > **Integration.**
3. In **Terraform Cloud Run Task HMAC Key**, enter the HMAC key you generated in [#generate-an-hmac-key](#generate-an-hmac-key "mention") above.
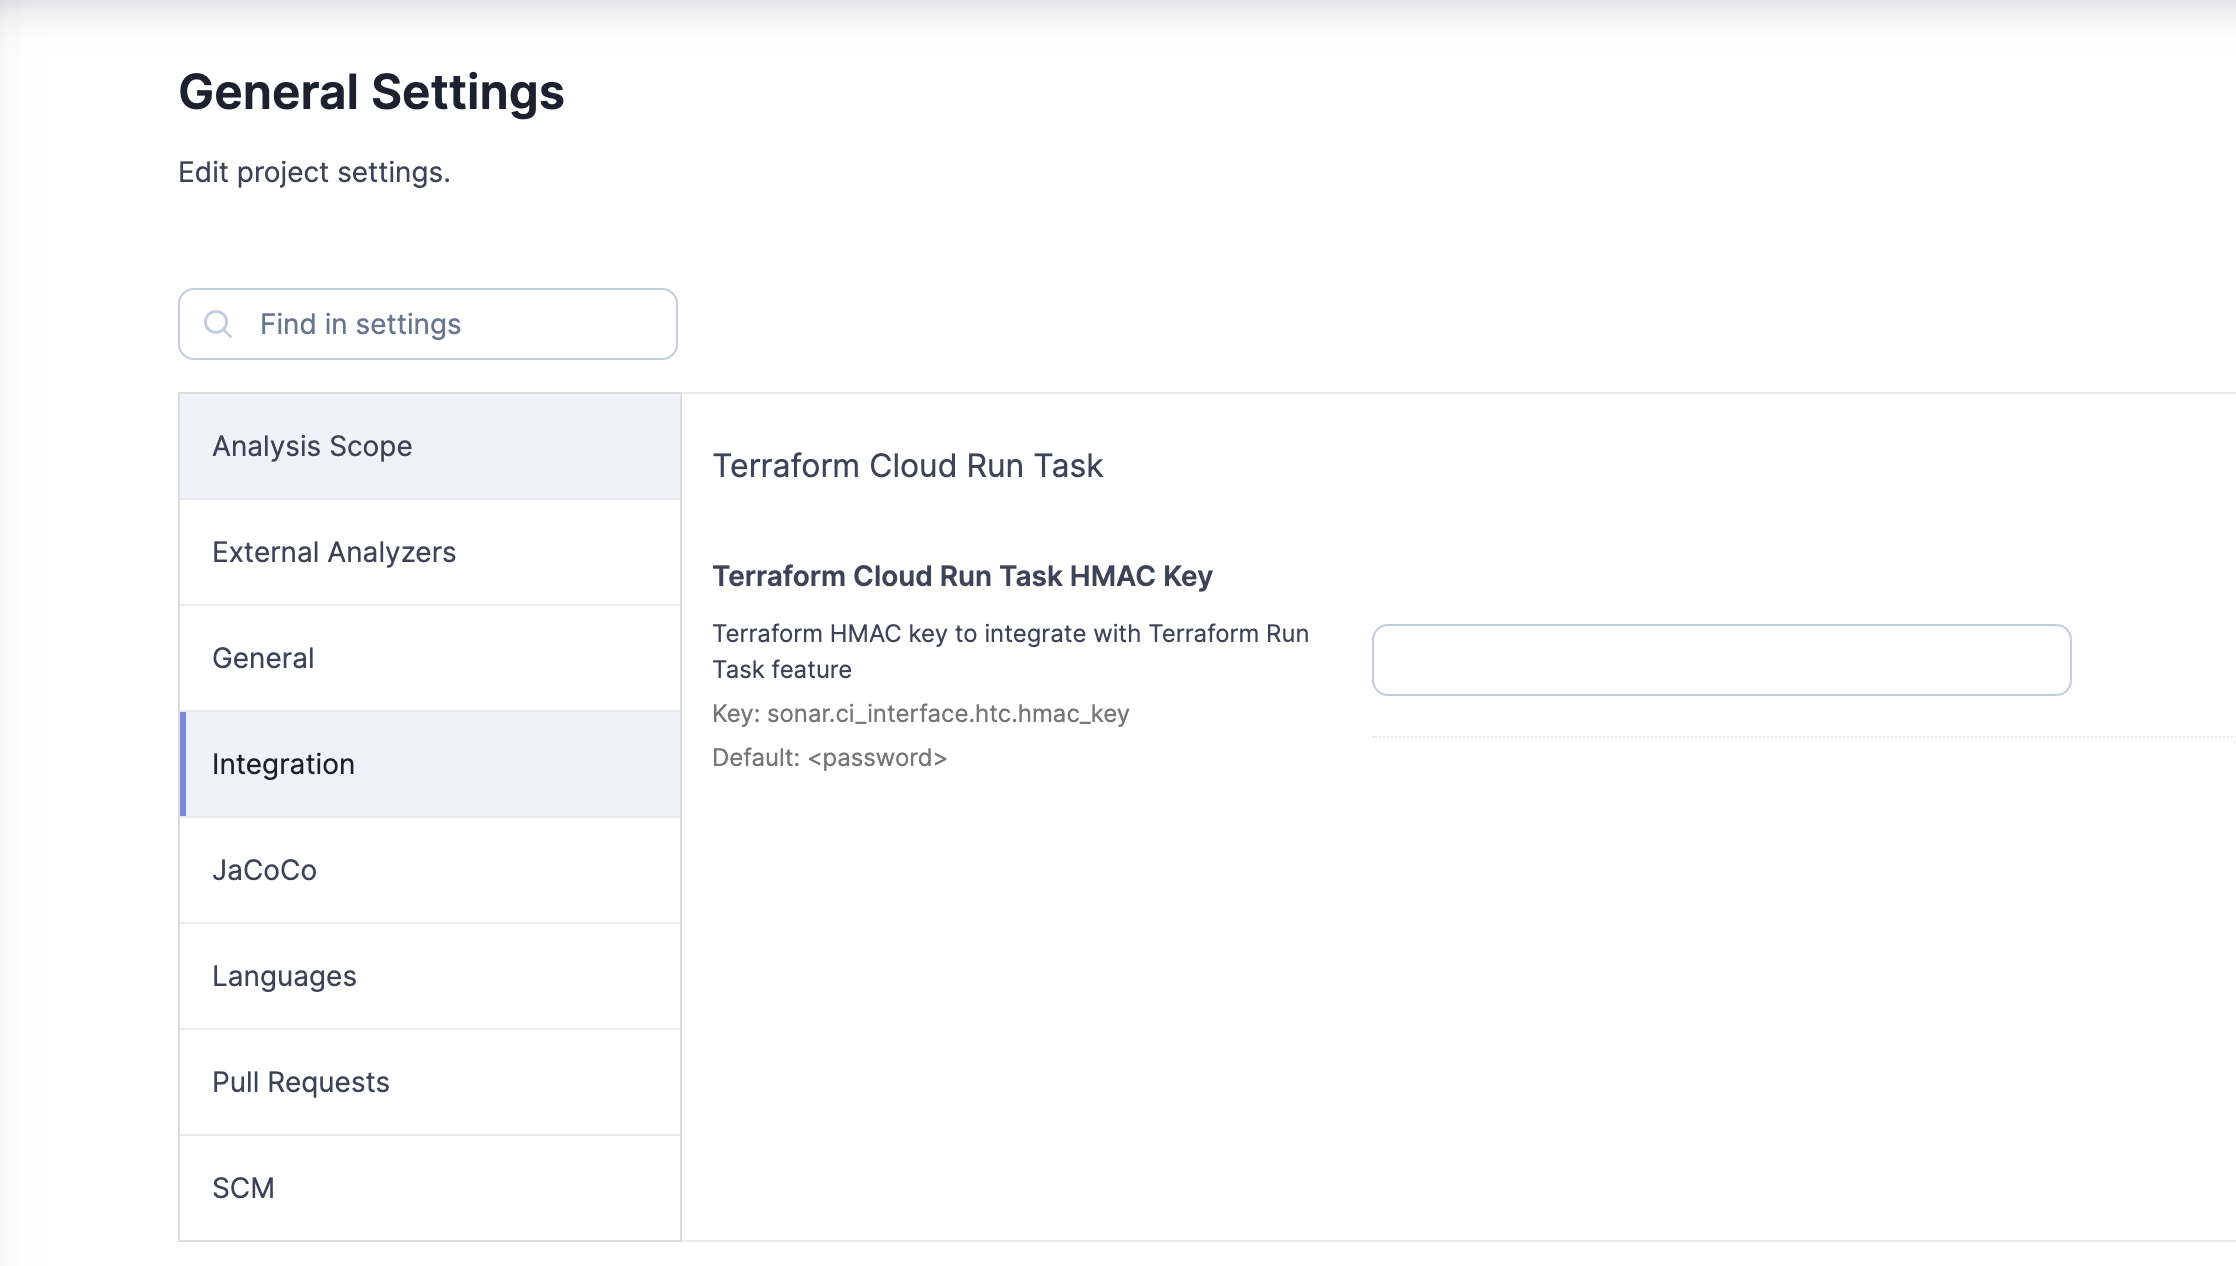 3. Select **Pre-plan** to indicate when Terraform Cloud should start the run task.
4. Select the Enforcement level **Mandatory**. If the task fails, the run will enter an errored state with a warning in the UI.
5. Click **Create** to complete the configuration of your run task.
{% endstep %}
{% endstepper %}
### Viewing the run task result
SonarQube Cloud will scan all Terraform plans on each push within your workspace.
If all goes well, you will receive a success message.
3. Select **Pre-plan** to indicate when Terraform Cloud should start the run task.
4. Select the Enforcement level **Mandatory**. If the task fails, the run will enter an errored state with a warning in the UI.
5. Click **Create** to complete the configuration of your run task.
{% endstep %}
{% endstepper %}
### Viewing the run task result
SonarQube Cloud will scan all Terraform plans on each push within your workspace.
If all goes well, you will receive a success message.
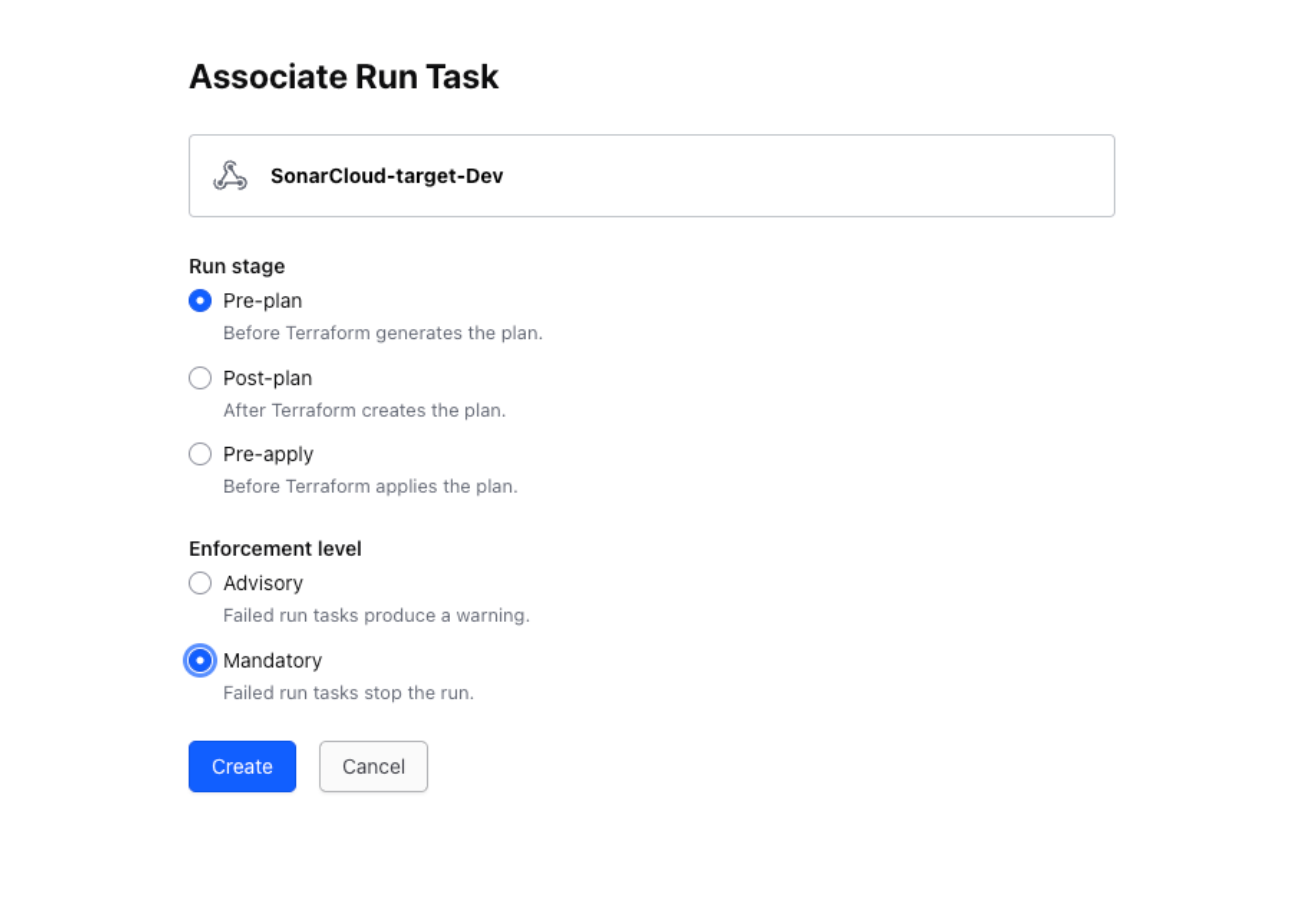 If the run task has failed, then you will received a failure message and you will need to go back to SonarQube Cloud and address whatever caused your quality gate to fail.
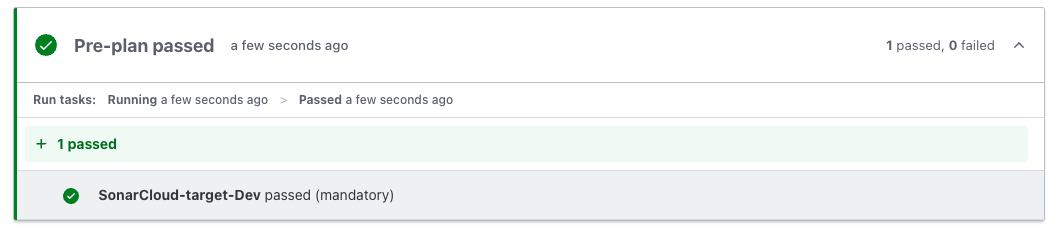 ---
# Source: https://docs.sonarsource.com/sonarqube-cloud/getting-started-with-enterprise/setting-up-sso.md
# Setting up SSO
With the [Enterprise plan](https://www.sonarsource.com/plans-and-pricing/#sonarqube-cloud-features), you can transition from the DevOps platform authentication mode to Single Sign On (SSO) with any identity provider (IdP) that supports SAML. SonarQube Cloud uses the Service Provider (SP) initiated SSO.
With SSO you benefit from:
* Increased security and a single source of truth for user authentication.
* [automatic-group-synchronization](https://docs.sonarsource.com/sonarqube-cloud/administering-sonarcloud/managing-enterprise/enterprise-security/sso/about/automatic-group-synchronization "mention").
* Just-in-Time user provisioning. When a user signs up with SonarQube Cloud with SSO for the first time, their SSO user account is automatically created in SonarQube Cloud.
SSO is set up for a given enterprise, see [setting-up-your-enterprise](https://docs.sonarsource.com/sonarqube-cloud/getting-started-with-enterprise/setting-up-your-enterprise "mention") for more information. At SSO login time, users select the enterprise they want to access.
For more information, see [about](https://docs.sonarsource.com/sonarqube-cloud/administering-sonarcloud/managing-enterprise/enterprise-security/sso/about "mention").
To set up SSO in your enterprise:
1. Verify the user groups of the enterprise’s organizations to ensure proper user onboarding through automatic group synchronization. For more information, see [automatic-group-synchronization](https://docs.sonarsource.com/sonarqube-cloud/administering-sonarcloud/managing-enterprise/enterprise-security/sso/about/automatic-group-synchronization "mention") for more details.
To do so, verify that:
* The user groups defined in your IdP service exist in the relevant organizations of your SonarQube Cloud enterprise (i.e. a group with the same (context-sensitive) name exists in the relevant organization(s)).
* The user groups in SonarQube Cloud have the correct permissions.
To manage the user groups in SonarQube Cloud, see [user-groups](https://docs.sonarsource.com/sonarqube-cloud/administering-sonarcloud/managing-organization/users-and-permissions/user-groups "mention").
For more information, see [verify-user-groups](https://docs.sonarsource.com/sonarqube-cloud/administering-sonarcloud/managing-enterprise/enterprise-security/sso/setup/verify-user-groups "mention").
2. Transition your enterprise to SSO [setup](https://docs.sonarsource.com/sonarqube-cloud/administering-sonarcloud/managing-enterprise/enterprise-security/sso/setup "mention") to Setting up Single Sign-On
3. Send the SSO login URL to [inviting-users-to-sign-in](https://docs.sonarsource.com/sonarqube-cloud/administering-sonarcloud/managing-enterprise/enterprise-security/sso/setup/inviting-users-to-sign-in "mention") to sign in to SonarQube Cloud with SSO. Once they have signed in, their SSO account is created in SonarQube Cloud and they have access to their organization(s) through the automatic group synchronization with the identity provider. They should:
* Check that they have access to their organization(s) and can perform their tasks as before.
* Generate their analysis tokens with their SSO account. (They can still use their DevOps platform service (DOP) account tokens to execute analysis as long as their DOP account still exists).
4\. Sign up with SonarQube Cloud by using the enterprise’s SSO log in URL. Your SSO account has been created.
5\. Sign in to SonarQube Cloud with your DOP account and grant your SSO account the Administer Enterprise permission. See [#manage-permissions](https://docs.sonarsource.com/sonarqube-cloud/administering-sonarcloud/managing-enterprise#manage-permissions "mention") for more information.
6\. Once the enterprise users have successfully transitioned to SSO, you can remove their DOP accounts from the organizations and the users can delete their DOP account. See [user-on-and-offboarding](https://docs.sonarsource.com/sonarqube-cloud/administering-sonarcloud/managing-organization/users-and-permissions/user-on-and-offboarding "mention") for more details. We recommend that you don’t remove the admin DOP accounts since, with a SSO account, you cannot bind a SonarQube Cloud organization with the corresponding DOP organization. See [onboarding-new-org](https://docs.sonarsource.com/sonarqube-cloud/getting-started-with-enterprise/onboarding-new-org "mention") for more information.
{% hint style="warning" %}
When created, SSO accounts will have no history. That means that comments on issues, favorite projects, etc., will not be transferred from the corresponding DOP account’s history.
{% endhint %}
### Related pages
* [setting-up-your-enterprise](https://docs.sonarsource.com/sonarqube-cloud/getting-started-with-enterprise/setting-up-your-enterprise "mention")\
View the different steps necessary to create and configure an enterprise.
* [viewing-billing-usage-info](https://docs.sonarsource.com/sonarqube-cloud/getting-started-with-enterprise/viewing-billing-usage-info "mention")
* [onboarding-new-org](https://docs.sonarsource.com/sonarqube-cloud/getting-started-with-enterprise/onboarding-new-org "mention")
---
# Source: https://docs.sonarsource.com/sonarqube-server/10.6/analyzing-source-code/branch-analysis/setting-up-the-branch-analysis.md
# Source: https://docs.sonarsource.com/sonarqube-server/10.7/analyzing-source-code/branch-analysis/setting-up-the-branch-analysis.md
# Source: https://docs.sonarsource.com/sonarqube-server/10.8/analyzing-source-code/branch-analysis/setting-up-the-branch-analysis.md
# Source: https://docs.sonarsource.com/sonarqube-server/2025.2/analyzing-source-code/branch-analysis/setting-up-the-branch-analysis.md
# Source: https://docs.sonarsource.com/sonarqube-server/2025.3/analyzing-source-code/branch-analysis/setting-up-the-branch-analysis.md
# Source: https://docs.sonarsource.com/sonarqube-server/2025.5/analyzing-source-code/branch-analysis/setting-up-the-branch-analysis.md
# Source: https://docs.sonarsource.com/sonarqube-server/2025.1/analyzing-source-code/branch-analysis/setting-up-the-branch-analysis.md
# Source: https://docs.sonarsource.com/sonarqube-server/2025.4/analyzing-source-code/branch-analysis/setting-up-the-branch-analysis.md
# Source: https://docs.sonarsource.com/sonarqube-server/2025.6/analyzing-source-code/branch-analysis/setting-up-the-branch-analysis.md
# Source: https://docs.sonarsource.com/sonarqube-server/analyzing-source-code/branch-analysis/setting-up-the-branch-analysis.md
# Setting up the branch analysis
To set up branch analysis:
1. Add the analysis step to your multi-branch CI pipeline. See the corresponding section of your CI tool in this documentation:
* [add-analysis-to-job](https://docs.sonarsource.com/sonarqube-server/analyzing-source-code/ci-integration/jenkins-integration/add-analysis-to-job "mention")
* [introduction](https://docs.sonarsource.com/sonarqube-server/devops-platform-integration/azure-devops-integration/adding-analysis-to-pipeline/introduction "mention")
* [bitbucket-cloud-integration](https://docs.sonarsource.com/sonarqube-server/devops-platform-integration/bitbucket-integration/bitbucket-cloud-integration "mention")
* [codemagic-integration](https://docs.sonarsource.com/sonarqube-server/analyzing-source-code/ci-integration/codemagic-integration "mention")
* [adding-analysis-to-github-actions-workflow](https://docs.sonarsource.com/sonarqube-server/devops-platform-integration/github-integration/adding-analysis-to-github-actions-workflow "mention")
* [adding-analysis-to-gitlab-ci-cd](https://docs.sonarsource.com/sonarqube-server/devops-platform-integration/gitlab-integration/adding-analysis-to-gitlab-ci-cd "mention")
2. Make sure the branch to be analyzed is properly checked out in the CI repository: see [verifying-code-checkout-step](https://docs.sonarsource.com/sonarqube-server/analyzing-source-code/scanners/scanner-environment/verifying-code-checkout-step "mention").
3. Make sure that the SonarScanner gets the branch name parameter (otherwise the analysis will be performed on the main branch): see **Setting up the branch name parameter** below.
4. Limit the analysis to the relevant branches: see **Limiting the analysis to the relevant branches** below.
5. Configure the Clean as You Code settings for the branches: see **Configuring the CaYC settings for branches** below.
### Setting up the branch name parameter
The SonarScanner can automatically detect the branch name parameters when running on the following CI services (you don’t need to perform any additional setup):
* Azure Pipelines
* Bitbucket Pipelines
* Cirrus CI
* Codemagic
* GitHub Actions
* GitLab CI/CD
* Jenkins (with the Branch Source plugin configured, see the [global-setup](https://docs.sonarsource.com/sonarqube-server/analyzing-source-code/ci-integration/jenkins-integration/global-setup "mention") page)
The table below shows the branch name parameter. See Analysis parameters for information about the setup of analysis parameters for the scanner.
| | |
| ------------------ | -------------------------------------- |
| **Parameter Name** | **Description** |
| sonar.branch.name | Name of the branch (visible in the UI) |
### Limiting the analysis to the relevant branches
You need to add a condition to your pipeline script to ensure that only the relevant branches are analyzed. For example, you wouldn’t want to run analysis on feature branches that won’t need analysis until they have pull requests.
In the following example, analysis would be limited to branches named `main` or `release/*`.
```css-79elbk
if [[ "$CI_BRANCH_NAME" == main ]] || [[ "$CI_BRANCH_NAME" == release/* ]]; then
./gradlew sonarqube
fi
```
### Configuring the CaYC settings for branches
See [about-new-code](https://docs.sonarsource.com/sonarqube-server/user-guide/about-new-code "mention") to learn how to implement this best practice.
The quality gate cannot be configured at the branch level, only at the project level. And ideally, all projects will use the same quality gate: see [introduction-to-quality-gates](https://docs.sonarsource.com/sonarqube-server/quality-standards-administration/managing-quality-gates/introduction-to-quality-gates "mention").
You can set a new code definition for each branch. This is especially helpful if you are likely to develop and release multiple versions from the branch. See the the [about-new-code](https://docs.sonarsource.com/sonarqube-server/user-guide/about-new-code "mention") page for more information.
{% hint style="info" %}
When using any new code period type other than Reference branch, we recommend completing your merges using the fast-forward option without a merge commit; examples include GitHub’s squash and merge or rebase and merge options. In this way, the blame for the merged commits will always have a more recent commit date.
{% endhint %}
---
# Source: https://docs.sonarsource.com/sonarqube-server/10.6/analyzing-source-code/pull-request-analysis/setting-up-the-pull-request-analysis.md
# Source: https://docs.sonarsource.com/sonarqube-server/10.7/analyzing-source-code/pull-request-analysis/setting-up-the-pull-request-analysis.md
# Source: https://docs.sonarsource.com/sonarqube-server/10.8/analyzing-source-code/pull-request-analysis/setting-up-the-pull-request-analysis.md
# Source: https://docs.sonarsource.com/sonarqube-server/2025.2/analyzing-source-code/pull-request-analysis/setting-up-the-pull-request-analysis.md
# Source: https://docs.sonarsource.com/sonarqube-server/2025.3/analyzing-source-code/pull-request-analysis/setting-up-the-pull-request-analysis.md
# Source: https://docs.sonarsource.com/sonarqube-server/2025.5/analyzing-source-code/pull-request-analysis/setting-up-the-pull-request-analysis.md
# Source: https://docs.sonarsource.com/sonarqube-server/2025.1/analyzing-source-code/pull-request-analysis/setting-up-the-pull-request-analysis.md
# Source: https://docs.sonarsource.com/sonarqube-server/2025.4/analyzing-source-code/pull-request-analysis/setting-up-the-pull-request-analysis.md
# Source: https://docs.sonarsource.com/sonarqube-server/2025.6/analyzing-source-code/pull-request-analysis/setting-up-the-pull-request-analysis.md
# Source: https://docs.sonarsource.com/sonarqube-server/analyzing-source-code/pull-request-analysis/setting-up-the-pull-request-analysis.md
# Setting up the pull request analysis
### Prerequisites
The pull request analysis must be integrated into a CI pipeline. For more information, see **Integration into your CI pipeline** on the [analysis-overview](https://docs.sonarsource.com/sonarqube-server/analyzing-source-code/analysis-overview "mention") page.
Before analyzing your pull requests, make sure that:
* The pull request source branch is checked out in the CI/CD host’s local repository.
* The branch being targeted by the pull request (target branch) is fetched in the CI/CD host’s local repository (This is usually done through the cloning of the remote repository by the CI pipeline).
* The CI/CD host’s local repository contains valid repository metadata (e.g. the `.git` folders have not been removed). Avoid any attempt at previewing the merge or actions involving your main branch.\
See [verifying-code-checkout-step](https://docs.sonarsource.com/sonarqube-server/analyzing-source-code/scanners/scanner-environment/verifying-code-checkout-step "mention").
* The code in the CI/CD host’s local repository matches the code in the remote repository (e.g once a pull request is issued, no code is added to the local branch on the CI side before analysis).
* If you use AWS CodeBuild, the `LOCAL_SOURCE_CACHE` feature must be disabled for accurate pull request analysis (otherwise, new code won’t be properly detected).
### Setting up the pull request analysis
1. Add the SonarQube Server analysis step to your pull request CI pipeline. See the corresponding section of your CI tool in this documentation:
* [add-analysis-to-job](https://docs.sonarsource.com/sonarqube-server/analyzing-source-code/ci-integration/jenkins-integration/add-analysis-to-job "mention")
* [introduction](https://docs.sonarsource.com/sonarqube-server/devops-platform-integration/azure-devops-integration/adding-analysis-to-pipeline/introduction "mention")
* [bitbucket-cloud-integration](https://docs.sonarsource.com/sonarqube-server/devops-platform-integration/bitbucket-integration/bitbucket-cloud-integration "mention")
* [codemagic-integration](https://docs.sonarsource.com/sonarqube-server/analyzing-source-code/ci-integration/codemagic-integration "mention")
* [adding-analysis-to-github-actions-workflow](https://docs.sonarsource.com/sonarqube-server/devops-platform-integration/github-integration/adding-analysis-to-github-actions-workflow "mention")
* [adding-analysis-to-gitlab-ci-cd](https://docs.sonarsource.com/sonarqube-server/devops-platform-integration/gitlab-integration/adding-analysis-to-gitlab-ci-cd "mention")
2. Make sure that the SonarScanner gets the pull request parameters required for the project analysis: see **Setting up the pull request parameters** below.
3. In addition, you can configure the pull request decoration: see **Configuring the quality gate status report** below.
### Setting up the pull request parameters
The SonarScanner can automatically detect the pull request parameters when running on the following CI services (you don’t need to perform any additional setup):
* Azure Pipelines
* Bitbucket Pipelines
* Cirrus CI
* Codemagic
* GitHub Actions
* GitLab CI/CD
* Jenkins (with the Branch Source plugin configured)
The table below lists the analysis parameters specific to the pull request analysis that are required by the SonarScanner. See Analysis parameters for information about the setup of analysis parameters for the scanner.
| **Parameter Name** | **Description** |
| ------------------------ | -------------------------------------------------------------------------------------------------------------------------------------------------------------------------------------------------- |
| sonar.pullrequest.key |
---
# Source: https://docs.sonarsource.com/sonarqube-cloud/getting-started-with-enterprise/setting-up-sso.md
# Setting up SSO
With the [Enterprise plan](https://www.sonarsource.com/plans-and-pricing/#sonarqube-cloud-features), you can transition from the DevOps platform authentication mode to Single Sign On (SSO) with any identity provider (IdP) that supports SAML. SonarQube Cloud uses the Service Provider (SP) initiated SSO.
With SSO you benefit from:
* Increased security and a single source of truth for user authentication.
* [automatic-group-synchronization](https://docs.sonarsource.com/sonarqube-cloud/administering-sonarcloud/managing-enterprise/enterprise-security/sso/about/automatic-group-synchronization "mention").
* Just-in-Time user provisioning. When a user signs up with SonarQube Cloud with SSO for the first time, their SSO user account is automatically created in SonarQube Cloud.
SSO is set up for a given enterprise, see [setting-up-your-enterprise](https://docs.sonarsource.com/sonarqube-cloud/getting-started-with-enterprise/setting-up-your-enterprise "mention") for more information. At SSO login time, users select the enterprise they want to access.
For more information, see [about](https://docs.sonarsource.com/sonarqube-cloud/administering-sonarcloud/managing-enterprise/enterprise-security/sso/about "mention").
To set up SSO in your enterprise:
1. Verify the user groups of the enterprise’s organizations to ensure proper user onboarding through automatic group synchronization. For more information, see [automatic-group-synchronization](https://docs.sonarsource.com/sonarqube-cloud/administering-sonarcloud/managing-enterprise/enterprise-security/sso/about/automatic-group-synchronization "mention") for more details.
To do so, verify that:
* The user groups defined in your IdP service exist in the relevant organizations of your SonarQube Cloud enterprise (i.e. a group with the same (context-sensitive) name exists in the relevant organization(s)).
* The user groups in SonarQube Cloud have the correct permissions.
To manage the user groups in SonarQube Cloud, see [user-groups](https://docs.sonarsource.com/sonarqube-cloud/administering-sonarcloud/managing-organization/users-and-permissions/user-groups "mention").
For more information, see [verify-user-groups](https://docs.sonarsource.com/sonarqube-cloud/administering-sonarcloud/managing-enterprise/enterprise-security/sso/setup/verify-user-groups "mention").
2. Transition your enterprise to SSO [setup](https://docs.sonarsource.com/sonarqube-cloud/administering-sonarcloud/managing-enterprise/enterprise-security/sso/setup "mention") to Setting up Single Sign-On
3. Send the SSO login URL to [inviting-users-to-sign-in](https://docs.sonarsource.com/sonarqube-cloud/administering-sonarcloud/managing-enterprise/enterprise-security/sso/setup/inviting-users-to-sign-in "mention") to sign in to SonarQube Cloud with SSO. Once they have signed in, their SSO account is created in SonarQube Cloud and they have access to their organization(s) through the automatic group synchronization with the identity provider. They should:
* Check that they have access to their organization(s) and can perform their tasks as before.
* Generate their analysis tokens with their SSO account. (They can still use their DevOps platform service (DOP) account tokens to execute analysis as long as their DOP account still exists).
4\. Sign up with SonarQube Cloud by using the enterprise’s SSO log in URL. Your SSO account has been created.
5\. Sign in to SonarQube Cloud with your DOP account and grant your SSO account the Administer Enterprise permission. See [#manage-permissions](https://docs.sonarsource.com/sonarqube-cloud/administering-sonarcloud/managing-enterprise#manage-permissions "mention") for more information.
6\. Once the enterprise users have successfully transitioned to SSO, you can remove their DOP accounts from the organizations and the users can delete their DOP account. See [user-on-and-offboarding](https://docs.sonarsource.com/sonarqube-cloud/administering-sonarcloud/managing-organization/users-and-permissions/user-on-and-offboarding "mention") for more details. We recommend that you don’t remove the admin DOP accounts since, with a SSO account, you cannot bind a SonarQube Cloud organization with the corresponding DOP organization. See [onboarding-new-org](https://docs.sonarsource.com/sonarqube-cloud/getting-started-with-enterprise/onboarding-new-org "mention") for more information.
{% hint style="warning" %}
When created, SSO accounts will have no history. That means that comments on issues, favorite projects, etc., will not be transferred from the corresponding DOP account’s history.
{% endhint %}
### Related pages
* [setting-up-your-enterprise](https://docs.sonarsource.com/sonarqube-cloud/getting-started-with-enterprise/setting-up-your-enterprise "mention")\
View the different steps necessary to create and configure an enterprise.
* [viewing-billing-usage-info](https://docs.sonarsource.com/sonarqube-cloud/getting-started-with-enterprise/viewing-billing-usage-info "mention")
* [onboarding-new-org](https://docs.sonarsource.com/sonarqube-cloud/getting-started-with-enterprise/onboarding-new-org "mention")
---
# Source: https://docs.sonarsource.com/sonarqube-server/10.6/analyzing-source-code/branch-analysis/setting-up-the-branch-analysis.md
# Source: https://docs.sonarsource.com/sonarqube-server/10.7/analyzing-source-code/branch-analysis/setting-up-the-branch-analysis.md
# Source: https://docs.sonarsource.com/sonarqube-server/10.8/analyzing-source-code/branch-analysis/setting-up-the-branch-analysis.md
# Source: https://docs.sonarsource.com/sonarqube-server/2025.2/analyzing-source-code/branch-analysis/setting-up-the-branch-analysis.md
# Source: https://docs.sonarsource.com/sonarqube-server/2025.3/analyzing-source-code/branch-analysis/setting-up-the-branch-analysis.md
# Source: https://docs.sonarsource.com/sonarqube-server/2025.5/analyzing-source-code/branch-analysis/setting-up-the-branch-analysis.md
# Source: https://docs.sonarsource.com/sonarqube-server/2025.1/analyzing-source-code/branch-analysis/setting-up-the-branch-analysis.md
# Source: https://docs.sonarsource.com/sonarqube-server/2025.4/analyzing-source-code/branch-analysis/setting-up-the-branch-analysis.md
# Source: https://docs.sonarsource.com/sonarqube-server/2025.6/analyzing-source-code/branch-analysis/setting-up-the-branch-analysis.md
# Source: https://docs.sonarsource.com/sonarqube-server/analyzing-source-code/branch-analysis/setting-up-the-branch-analysis.md
# Setting up the branch analysis
To set up branch analysis:
1. Add the analysis step to your multi-branch CI pipeline. See the corresponding section of your CI tool in this documentation:
* [add-analysis-to-job](https://docs.sonarsource.com/sonarqube-server/analyzing-source-code/ci-integration/jenkins-integration/add-analysis-to-job "mention")
* [introduction](https://docs.sonarsource.com/sonarqube-server/devops-platform-integration/azure-devops-integration/adding-analysis-to-pipeline/introduction "mention")
* [bitbucket-cloud-integration](https://docs.sonarsource.com/sonarqube-server/devops-platform-integration/bitbucket-integration/bitbucket-cloud-integration "mention")
* [codemagic-integration](https://docs.sonarsource.com/sonarqube-server/analyzing-source-code/ci-integration/codemagic-integration "mention")
* [adding-analysis-to-github-actions-workflow](https://docs.sonarsource.com/sonarqube-server/devops-platform-integration/github-integration/adding-analysis-to-github-actions-workflow "mention")
* [adding-analysis-to-gitlab-ci-cd](https://docs.sonarsource.com/sonarqube-server/devops-platform-integration/gitlab-integration/adding-analysis-to-gitlab-ci-cd "mention")
2. Make sure the branch to be analyzed is properly checked out in the CI repository: see [verifying-code-checkout-step](https://docs.sonarsource.com/sonarqube-server/analyzing-source-code/scanners/scanner-environment/verifying-code-checkout-step "mention").
3. Make sure that the SonarScanner gets the branch name parameter (otherwise the analysis will be performed on the main branch): see **Setting up the branch name parameter** below.
4. Limit the analysis to the relevant branches: see **Limiting the analysis to the relevant branches** below.
5. Configure the Clean as You Code settings for the branches: see **Configuring the CaYC settings for branches** below.
### Setting up the branch name parameter
The SonarScanner can automatically detect the branch name parameters when running on the following CI services (you don’t need to perform any additional setup):
* Azure Pipelines
* Bitbucket Pipelines
* Cirrus CI
* Codemagic
* GitHub Actions
* GitLab CI/CD
* Jenkins (with the Branch Source plugin configured, see the [global-setup](https://docs.sonarsource.com/sonarqube-server/analyzing-source-code/ci-integration/jenkins-integration/global-setup "mention") page)
The table below shows the branch name parameter. See Analysis parameters for information about the setup of analysis parameters for the scanner.
| | |
| ------------------ | -------------------------------------- |
| **Parameter Name** | **Description** |
| sonar.branch.name | Name of the branch (visible in the UI) |
### Limiting the analysis to the relevant branches
You need to add a condition to your pipeline script to ensure that only the relevant branches are analyzed. For example, you wouldn’t want to run analysis on feature branches that won’t need analysis until they have pull requests.
In the following example, analysis would be limited to branches named `main` or `release/*`.
```css-79elbk
if [[ "$CI_BRANCH_NAME" == main ]] || [[ "$CI_BRANCH_NAME" == release/* ]]; then
./gradlew sonarqube
fi
```
### Configuring the CaYC settings for branches
See [about-new-code](https://docs.sonarsource.com/sonarqube-server/user-guide/about-new-code "mention") to learn how to implement this best practice.
The quality gate cannot be configured at the branch level, only at the project level. And ideally, all projects will use the same quality gate: see [introduction-to-quality-gates](https://docs.sonarsource.com/sonarqube-server/quality-standards-administration/managing-quality-gates/introduction-to-quality-gates "mention").
You can set a new code definition for each branch. This is especially helpful if you are likely to develop and release multiple versions from the branch. See the the [about-new-code](https://docs.sonarsource.com/sonarqube-server/user-guide/about-new-code "mention") page for more information.
{% hint style="info" %}
When using any new code period type other than Reference branch, we recommend completing your merges using the fast-forward option without a merge commit; examples include GitHub’s squash and merge or rebase and merge options. In this way, the blame for the merged commits will always have a more recent commit date.
{% endhint %}
---
# Source: https://docs.sonarsource.com/sonarqube-server/10.6/analyzing-source-code/pull-request-analysis/setting-up-the-pull-request-analysis.md
# Source: https://docs.sonarsource.com/sonarqube-server/10.7/analyzing-source-code/pull-request-analysis/setting-up-the-pull-request-analysis.md
# Source: https://docs.sonarsource.com/sonarqube-server/10.8/analyzing-source-code/pull-request-analysis/setting-up-the-pull-request-analysis.md
# Source: https://docs.sonarsource.com/sonarqube-server/2025.2/analyzing-source-code/pull-request-analysis/setting-up-the-pull-request-analysis.md
# Source: https://docs.sonarsource.com/sonarqube-server/2025.3/analyzing-source-code/pull-request-analysis/setting-up-the-pull-request-analysis.md
# Source: https://docs.sonarsource.com/sonarqube-server/2025.5/analyzing-source-code/pull-request-analysis/setting-up-the-pull-request-analysis.md
# Source: https://docs.sonarsource.com/sonarqube-server/2025.1/analyzing-source-code/pull-request-analysis/setting-up-the-pull-request-analysis.md
# Source: https://docs.sonarsource.com/sonarqube-server/2025.4/analyzing-source-code/pull-request-analysis/setting-up-the-pull-request-analysis.md
# Source: https://docs.sonarsource.com/sonarqube-server/2025.6/analyzing-source-code/pull-request-analysis/setting-up-the-pull-request-analysis.md
# Source: https://docs.sonarsource.com/sonarqube-server/analyzing-source-code/pull-request-analysis/setting-up-the-pull-request-analysis.md
# Setting up the pull request analysis
### Prerequisites
The pull request analysis must be integrated into a CI pipeline. For more information, see **Integration into your CI pipeline** on the [analysis-overview](https://docs.sonarsource.com/sonarqube-server/analyzing-source-code/analysis-overview "mention") page.
Before analyzing your pull requests, make sure that:
* The pull request source branch is checked out in the CI/CD host’s local repository.
* The branch being targeted by the pull request (target branch) is fetched in the CI/CD host’s local repository (This is usually done through the cloning of the remote repository by the CI pipeline).
* The CI/CD host’s local repository contains valid repository metadata (e.g. the `.git` folders have not been removed). Avoid any attempt at previewing the merge or actions involving your main branch.\
See [verifying-code-checkout-step](https://docs.sonarsource.com/sonarqube-server/analyzing-source-code/scanners/scanner-environment/verifying-code-checkout-step "mention").
* The code in the CI/CD host’s local repository matches the code in the remote repository (e.g once a pull request is issued, no code is added to the local branch on the CI side before analysis).
* If you use AWS CodeBuild, the `LOCAL_SOURCE_CACHE` feature must be disabled for accurate pull request analysis (otherwise, new code won’t be properly detected).
### Setting up the pull request analysis
1. Add the SonarQube Server analysis step to your pull request CI pipeline. See the corresponding section of your CI tool in this documentation:
* [add-analysis-to-job](https://docs.sonarsource.com/sonarqube-server/analyzing-source-code/ci-integration/jenkins-integration/add-analysis-to-job "mention")
* [introduction](https://docs.sonarsource.com/sonarqube-server/devops-platform-integration/azure-devops-integration/adding-analysis-to-pipeline/introduction "mention")
* [bitbucket-cloud-integration](https://docs.sonarsource.com/sonarqube-server/devops-platform-integration/bitbucket-integration/bitbucket-cloud-integration "mention")
* [codemagic-integration](https://docs.sonarsource.com/sonarqube-server/analyzing-source-code/ci-integration/codemagic-integration "mention")
* [adding-analysis-to-github-actions-workflow](https://docs.sonarsource.com/sonarqube-server/devops-platform-integration/github-integration/adding-analysis-to-github-actions-workflow "mention")
* [adding-analysis-to-gitlab-ci-cd](https://docs.sonarsource.com/sonarqube-server/devops-platform-integration/gitlab-integration/adding-analysis-to-gitlab-ci-cd "mention")
2. Make sure that the SonarScanner gets the pull request parameters required for the project analysis: see **Setting up the pull request parameters** below.
3. In addition, you can configure the pull request decoration: see **Configuring the quality gate status report** below.
### Setting up the pull request parameters
The SonarScanner can automatically detect the pull request parameters when running on the following CI services (you don’t need to perform any additional setup):
* Azure Pipelines
* Bitbucket Pipelines
* Cirrus CI
* Codemagic
* GitHub Actions
* GitLab CI/CD
* Jenkins (with the Branch Source plugin configured)
The table below lists the analysis parameters specific to the pull request analysis that are required by the SonarScanner. See Analysis parameters for information about the setup of analysis parameters for the scanner.
| **Parameter Name** | **Description** |
| ------------------------ | -------------------------------------------------------------------------------------------------------------------------------------------------------------------------------------------------- |
| sonar.pullrequest.key | 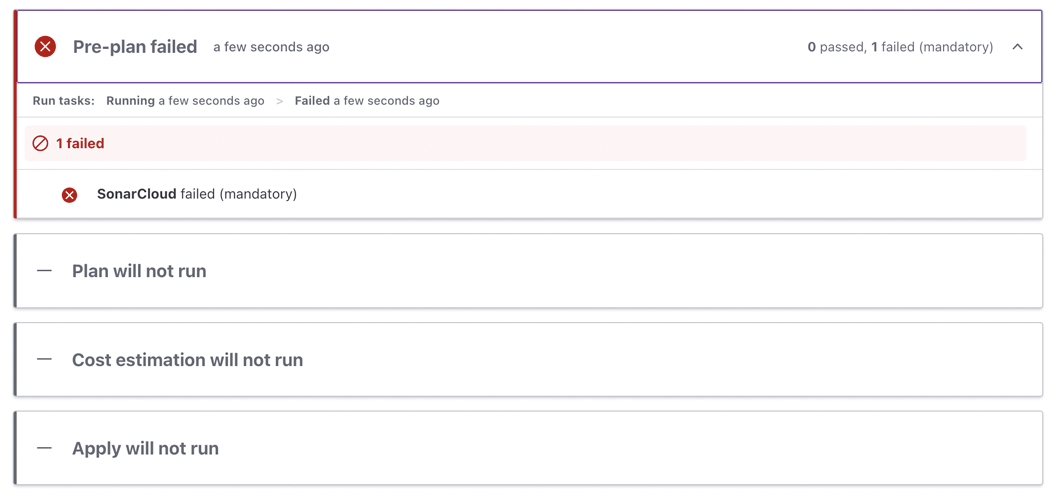
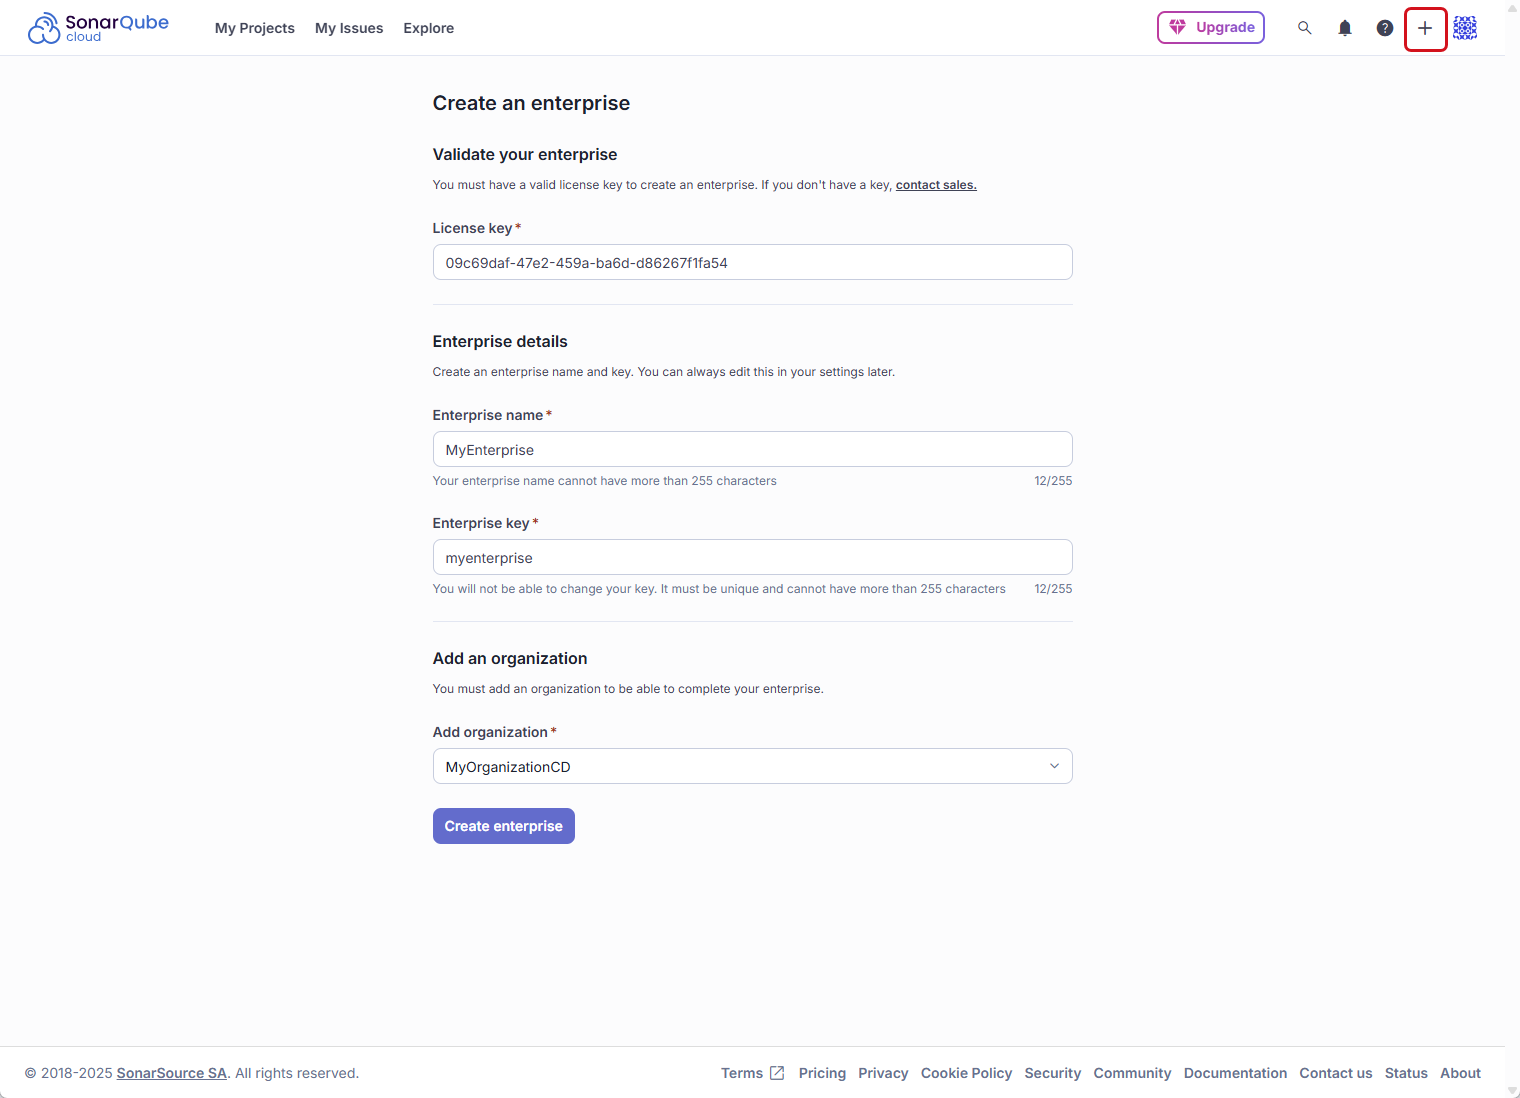 ### Step 3: Set the enterprise permissions of users
As an Enterprise Admin, you can grant the Administer Enterprise and Create Portfolios permissions. For more information, check out the [managing-the-enterprise-related-permissions](https://docs.sonarsource.com/sonarqube-cloud/administering-sonarcloud/managing-enterprise/managing-the-enterprise-related-permissions "mention") page.
To set the enterprise-related permissions of users, follow the instructions to [retrieving-and-viewing-your-enterprise](https://docs.sonarsource.com/sonarqube-cloud/administering-sonarcloud/managing-enterprise/retrieving-and-viewing-your-enterprise "mention"). Once inside of your enterprise:
1. Navigate to **Administration** > **Enterprise Permissions**.
2. If necessary, filter the list of users.
3. For each user, select or unselect the permissions in the table.
### Step 3: Set the enterprise permissions of users
As an Enterprise Admin, you can grant the Administer Enterprise and Create Portfolios permissions. For more information, check out the [managing-the-enterprise-related-permissions](https://docs.sonarsource.com/sonarqube-cloud/administering-sonarcloud/managing-enterprise/managing-the-enterprise-related-permissions "mention") page.
To set the enterprise-related permissions of users, follow the instructions to [retrieving-and-viewing-your-enterprise](https://docs.sonarsource.com/sonarqube-cloud/administering-sonarcloud/managing-enterprise/retrieving-and-viewing-your-enterprise "mention"). Once inside of your enterprise:
1. Navigate to **Administration** > **Enterprise Permissions**.
2. If necessary, filter the list of users.
3. For each user, select or unselect the permissions in the table.
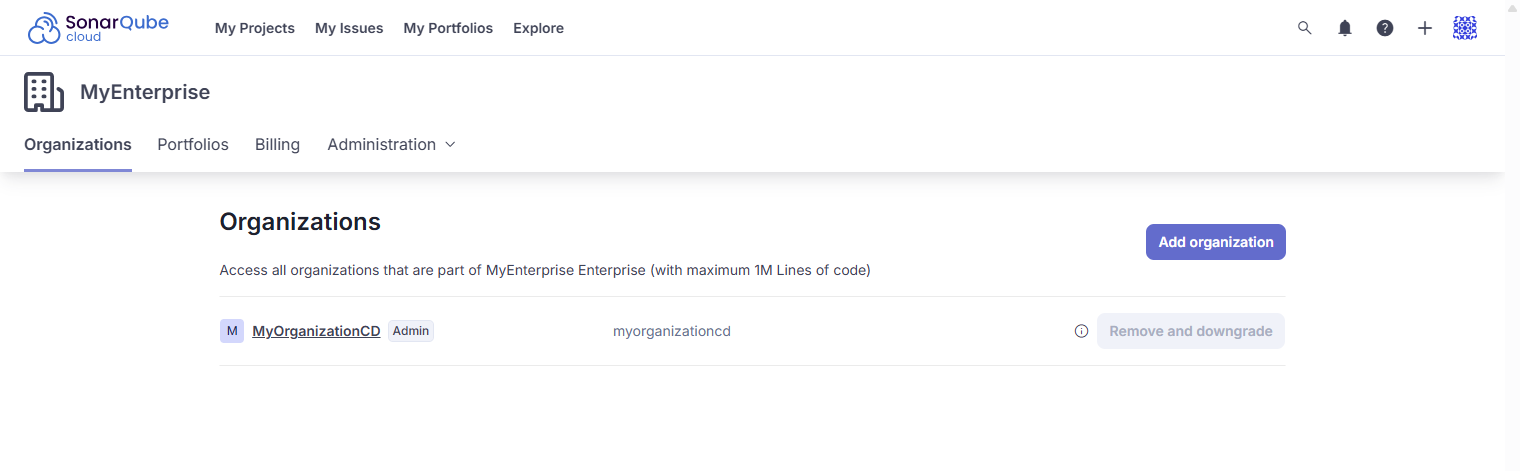 ### Step 4: Complete the enterprise onboarding
For each organization in your enterprise:
* If not already done, verify the group's default permissions on new projects. See the [templates](https://docs.sonarsource.com/sonarqube-cloud/administering-sonarcloud/managing-organization/manage-org-projects/manage-project-permissions/templates "mention") page for more information.
* You can set project configurations at the organization level. The details are outlined in the [setting-config-at-org-level](https://docs.sonarsource.com/sonarqube-cloud/administering-sonarcloud/managing-organization/setting-config-at-org-level "mention") pages.
By default, all organizations share the enterprise LOC limit. You can allocate an individual LOC limit to one or several organizations within your enterprise; please check the [managing-the-lines-of-code-within-your-enterprise](https://docs.sonarsource.com/sonarqube-cloud/administering-sonarcloud/managing-enterprise/managing-the-lines-of-code-within-your-enterprise "mention") page.
With the Enterprise license, you can now:
* Transition your enterprise to [Single Sign-On](https://docs.sonarsource.com/sonarqube-cloud/administering-sonarcloud/managing-enterprise/enterprise-security/sso).
* Restrict access to your SonarQube Cloud by configuring an [IP allow list](https://docs.sonarsource.com/sonarqube-cloud/administering-sonarcloud/managing-enterprise/enterprise-security/ip-allow-lists).
### Related pages
* [viewing-billing-usage-info](https://docs.sonarsource.com/sonarqube-cloud/getting-started-with-enterprise/viewing-billing-usage-info "mention")
* [setting-up-sso](https://docs.sonarsource.com/sonarqube-cloud/getting-started-with-enterprise/setting-up-sso "mention")
* [onboarding-new-org](https://docs.sonarsource.com/sonarqube-cloud/getting-started-with-enterprise/onboarding-new-org "mention")
* [managing-enterprise](https://docs.sonarsource.com/sonarqube-cloud/administering-sonarcloud/managing-enterprise "mention")
* [enterprise-security](https://docs.sonarsource.com/sonarqube-cloud/administering-sonarcloud/managing-enterprise/enterprise-security "mention")
---
# Source: https://docs.sonarsource.com/sonarqube-server/10.5/devops-platform-integration/github-integration/setting-up-your-projects.md
# Setting up your projects
For general information about project creation and import, see [creating-and-importing-projects](https://docs.sonarsource.com/sonarqube-server/10.5/project-administration/creating-and-importing-projects "mention").
### Reporting your quality gate status in GitHub
After [setting-up-global-integration](https://docs.sonarsource.com/sonarqube-server/10.5/devops-platform-integration/github-integration/setting-up-global-integration "mention"), SonarQube can report your quality gate status and analysis metrics directly to your GitHub branches and pull requests.
To do this, add a project from GitHub by doing one of the following:
* On the **Projects Overview** page, select **Add project** > **GitHub**, and follow the steps in SonarQube to analyze your project.
* Scan a project from a GitHub action. SonarQube will find a matching GitHub configuration.
SonarQube automatically sets the project settings required to show your quality gate in your branches and pull requests.
{% hint style="info" %}
To report your quality gate status in your branches and pull requests, a SonarQube analysis needs to be run on your code. You can find the additional parameters required for pull request analysis on the [pull-request-analysis](https://docs.sonarsource.com/sonarqube-server/10.5/analyzing-source-code/pull-request-analysis "mention") page.
{% endhint %}
If you’re creating your projects manually or adding quality gate reporting to an existing project, see the following section.
#### Reporting your quality gate status in manually created or existing projects
SonarQube can also report your quality gate status to GitHub pull requests and branches for existing and manually created projects. After you’ve created and installed your GitHub App and updated your global DevOps Platform Integration settings as shown in the **Importing your GitHub repositories into SonarQube** section above, set the following project settings at **Project Settings** > **General Settings** > **DevOps Platform Integration**:
* **Configuration name**: The configuration name that corresponds to your GitHub instance.
* **Repository identifier**: The path of your repository URL.
#### Showing your analysis summary under the GitHub Conversation tab
Make sure that for your project, **Enable analysis summary** under the **GitHub Conversation** tab in **Project settings > General settings > Pull Request Decoration** is on (default value). If it’s the case, your pull request analysis will be shown under both the **Conversation** and **Checks** tabs in GitHub. When off, your pull request analysis summary is only shown under the **Checks** tab.
---
# Source: https://docs.sonarsource.com/sonarqube-community-build/instance-administration/authentication/gitlab/setting-up.md
# Source: https://docs.sonarsource.com/sonarqube-server/10.7/instance-administration/authentication/gitlab/setting-up.md
# Source: https://docs.sonarsource.com/sonarqube-server/10.8/instance-administration/authentication/gitlab/setting-up.md
# Source: https://docs.sonarsource.com/sonarqube-server/2025.2/instance-administration/authentication/gitlab/setting-up.md
# Source: https://docs.sonarsource.com/sonarqube-server/2025.3/instance-administration/authentication/gitlab/setting-up.md
# Source: https://docs.sonarsource.com/sonarqube-server/2025.5/instance-administration/authentication/gitlab/setting-up.md
# Source: https://docs.sonarsource.com/sonarqube-server/2025.1/instance-administration/authentication/gitlab/setting-up.md
# Source: https://docs.sonarsource.com/sonarqube-server/2025.4/instance-administration/authentication/gitlab/setting-up.md
# Source: https://docs.sonarsource.com/sonarqube-server/2025.6/instance-administration/authentication/gitlab/setting-up.md
# Source: https://docs.sonarsource.com/sonarqube-server/instance-administration/authentication/gitlab/setting-up.md
# Setting up authentication
You can delegate in SonarQube Server the authentication to GitLab by using one of the following provisioning modes:
* Just-in-Time
* Automatic
You need the global Administer System permission in SonarQube Server to set up the authentication delegation.
{% hint style="info" %}
When you set up GitLab authentication and provisioning, existing manual users are not removed and you cannot edit their group membership or permissions anymore. For security reasons, we recommend that you deactivate them: see [deactivating-users](https://docs.sonarsource.com/sonarqube-server/instance-administration/user-management/deactivating-users "mention").
{% endhint %}
### Setup overview
SonarQube Server uses a GitLab OAuth 2 application to manage the authentication delegation to GitLab and the user or group synchronization. SonarQube Server uses a "GitLab Configuration" record to access the GitLab application.
### Step 4: Complete the enterprise onboarding
For each organization in your enterprise:
* If not already done, verify the group's default permissions on new projects. See the [templates](https://docs.sonarsource.com/sonarqube-cloud/administering-sonarcloud/managing-organization/manage-org-projects/manage-project-permissions/templates "mention") page for more information.
* You can set project configurations at the organization level. The details are outlined in the [setting-config-at-org-level](https://docs.sonarsource.com/sonarqube-cloud/administering-sonarcloud/managing-organization/setting-config-at-org-level "mention") pages.
By default, all organizations share the enterprise LOC limit. You can allocate an individual LOC limit to one or several organizations within your enterprise; please check the [managing-the-lines-of-code-within-your-enterprise](https://docs.sonarsource.com/sonarqube-cloud/administering-sonarcloud/managing-enterprise/managing-the-lines-of-code-within-your-enterprise "mention") page.
With the Enterprise license, you can now:
* Transition your enterprise to [Single Sign-On](https://docs.sonarsource.com/sonarqube-cloud/administering-sonarcloud/managing-enterprise/enterprise-security/sso).
* Restrict access to your SonarQube Cloud by configuring an [IP allow list](https://docs.sonarsource.com/sonarqube-cloud/administering-sonarcloud/managing-enterprise/enterprise-security/ip-allow-lists).
### Related pages
* [viewing-billing-usage-info](https://docs.sonarsource.com/sonarqube-cloud/getting-started-with-enterprise/viewing-billing-usage-info "mention")
* [setting-up-sso](https://docs.sonarsource.com/sonarqube-cloud/getting-started-with-enterprise/setting-up-sso "mention")
* [onboarding-new-org](https://docs.sonarsource.com/sonarqube-cloud/getting-started-with-enterprise/onboarding-new-org "mention")
* [managing-enterprise](https://docs.sonarsource.com/sonarqube-cloud/administering-sonarcloud/managing-enterprise "mention")
* [enterprise-security](https://docs.sonarsource.com/sonarqube-cloud/administering-sonarcloud/managing-enterprise/enterprise-security "mention")
---
# Source: https://docs.sonarsource.com/sonarqube-server/10.5/devops-platform-integration/github-integration/setting-up-your-projects.md
# Setting up your projects
For general information about project creation and import, see [creating-and-importing-projects](https://docs.sonarsource.com/sonarqube-server/10.5/project-administration/creating-and-importing-projects "mention").
### Reporting your quality gate status in GitHub
After [setting-up-global-integration](https://docs.sonarsource.com/sonarqube-server/10.5/devops-platform-integration/github-integration/setting-up-global-integration "mention"), SonarQube can report your quality gate status and analysis metrics directly to your GitHub branches and pull requests.
To do this, add a project from GitHub by doing one of the following:
* On the **Projects Overview** page, select **Add project** > **GitHub**, and follow the steps in SonarQube to analyze your project.
* Scan a project from a GitHub action. SonarQube will find a matching GitHub configuration.
SonarQube automatically sets the project settings required to show your quality gate in your branches and pull requests.
{% hint style="info" %}
To report your quality gate status in your branches and pull requests, a SonarQube analysis needs to be run on your code. You can find the additional parameters required for pull request analysis on the [pull-request-analysis](https://docs.sonarsource.com/sonarqube-server/10.5/analyzing-source-code/pull-request-analysis "mention") page.
{% endhint %}
If you’re creating your projects manually or adding quality gate reporting to an existing project, see the following section.
#### Reporting your quality gate status in manually created or existing projects
SonarQube can also report your quality gate status to GitHub pull requests and branches for existing and manually created projects. After you’ve created and installed your GitHub App and updated your global DevOps Platform Integration settings as shown in the **Importing your GitHub repositories into SonarQube** section above, set the following project settings at **Project Settings** > **General Settings** > **DevOps Platform Integration**:
* **Configuration name**: The configuration name that corresponds to your GitHub instance.
* **Repository identifier**: The path of your repository URL.
#### Showing your analysis summary under the GitHub Conversation tab
Make sure that for your project, **Enable analysis summary** under the **GitHub Conversation** tab in **Project settings > General settings > Pull Request Decoration** is on (default value). If it’s the case, your pull request analysis will be shown under both the **Conversation** and **Checks** tabs in GitHub. When off, your pull request analysis summary is only shown under the **Checks** tab.
---
# Source: https://docs.sonarsource.com/sonarqube-community-build/instance-administration/authentication/gitlab/setting-up.md
# Source: https://docs.sonarsource.com/sonarqube-server/10.7/instance-administration/authentication/gitlab/setting-up.md
# Source: https://docs.sonarsource.com/sonarqube-server/10.8/instance-administration/authentication/gitlab/setting-up.md
# Source: https://docs.sonarsource.com/sonarqube-server/2025.2/instance-administration/authentication/gitlab/setting-up.md
# Source: https://docs.sonarsource.com/sonarqube-server/2025.3/instance-administration/authentication/gitlab/setting-up.md
# Source: https://docs.sonarsource.com/sonarqube-server/2025.5/instance-administration/authentication/gitlab/setting-up.md
# Source: https://docs.sonarsource.com/sonarqube-server/2025.1/instance-administration/authentication/gitlab/setting-up.md
# Source: https://docs.sonarsource.com/sonarqube-server/2025.4/instance-administration/authentication/gitlab/setting-up.md
# Source: https://docs.sonarsource.com/sonarqube-server/2025.6/instance-administration/authentication/gitlab/setting-up.md
# Source: https://docs.sonarsource.com/sonarqube-server/instance-administration/authentication/gitlab/setting-up.md
# Setting up authentication
You can delegate in SonarQube Server the authentication to GitLab by using one of the following provisioning modes:
* Just-in-Time
* Automatic
You need the global Administer System permission in SonarQube Server to set up the authentication delegation.
{% hint style="info" %}
When you set up GitLab authentication and provisioning, existing manual users are not removed and you cannot edit their group membership or permissions anymore. For security reasons, we recommend that you deactivate them: see [deactivating-users](https://docs.sonarsource.com/sonarqube-server/instance-administration/user-management/deactivating-users "mention").
{% endhint %}
### Setup overview
SonarQube Server uses a GitLab OAuth 2 application to manage the authentication delegation to GitLab and the user or group synchronization. SonarQube Server uses a "GitLab Configuration" record to access the GitLab application.
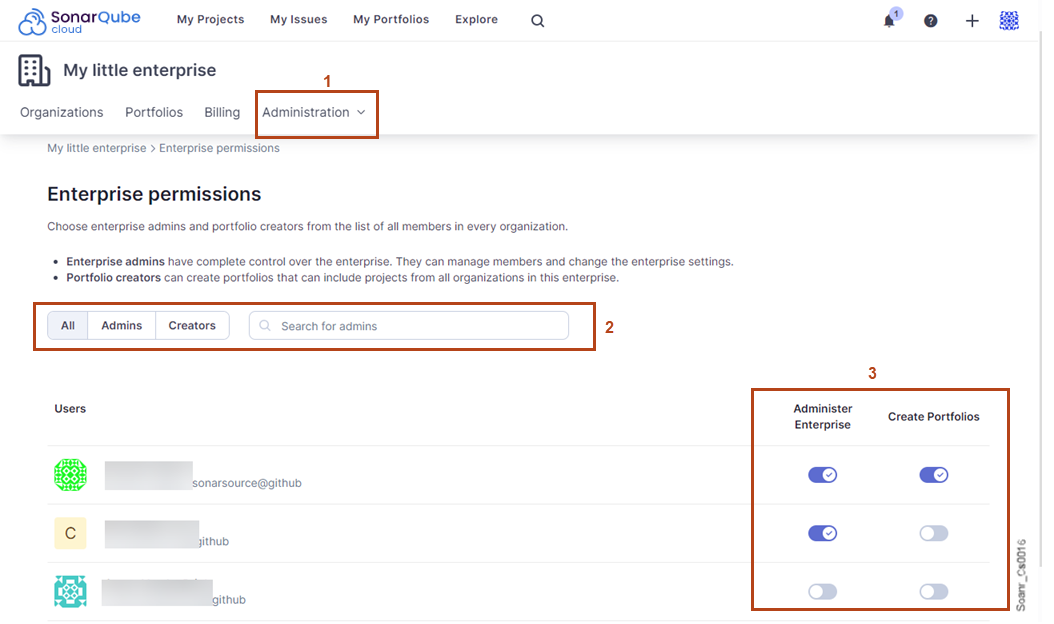 3. In the **Attributes & Claims** section of the page, configure the attributes used by SonarQube Server as described below. To add an attribute, select **Add new claim**.
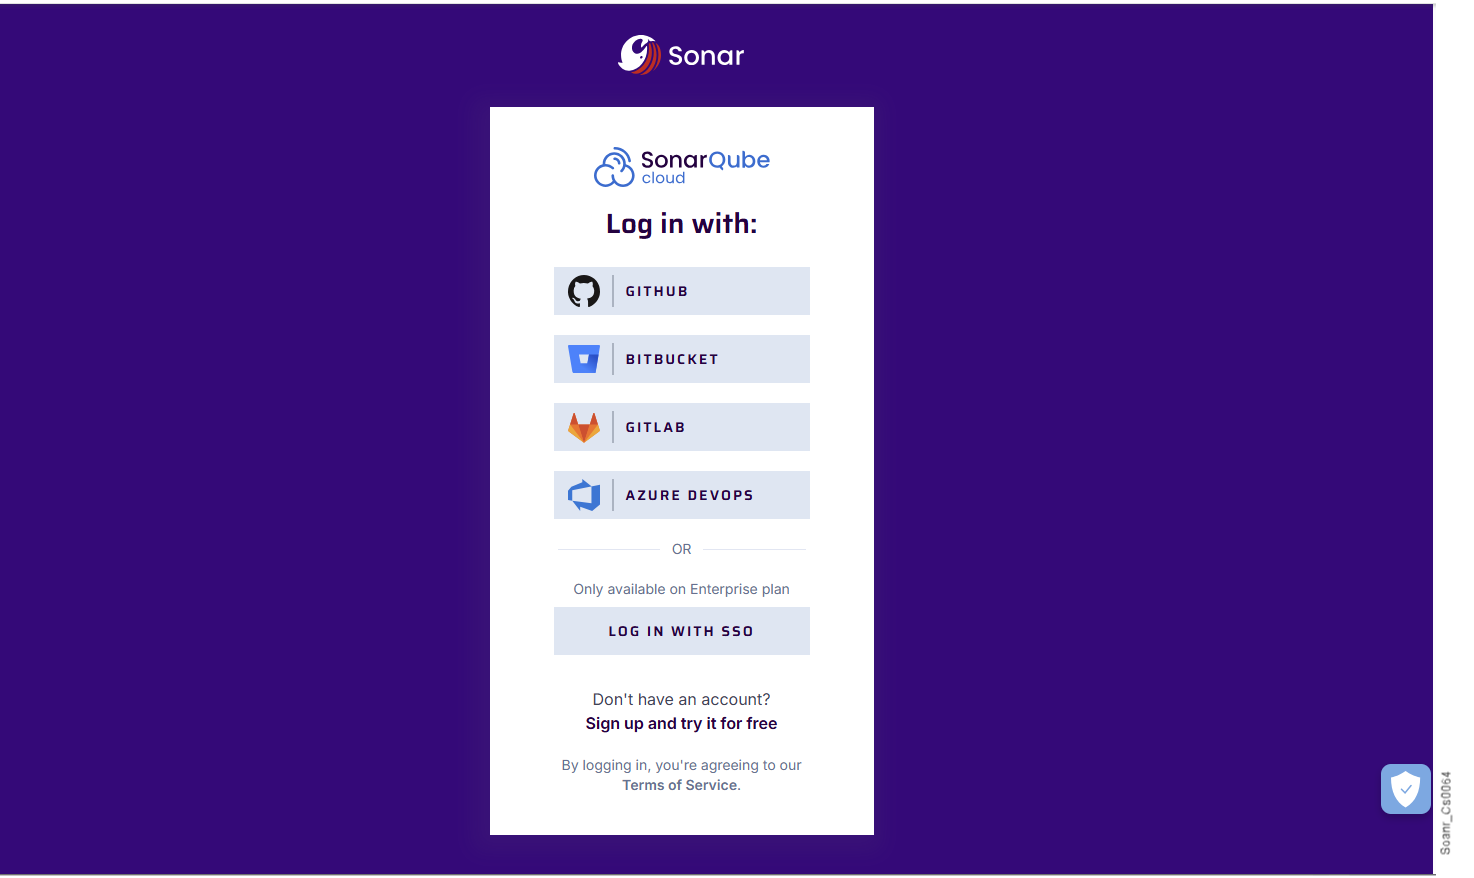
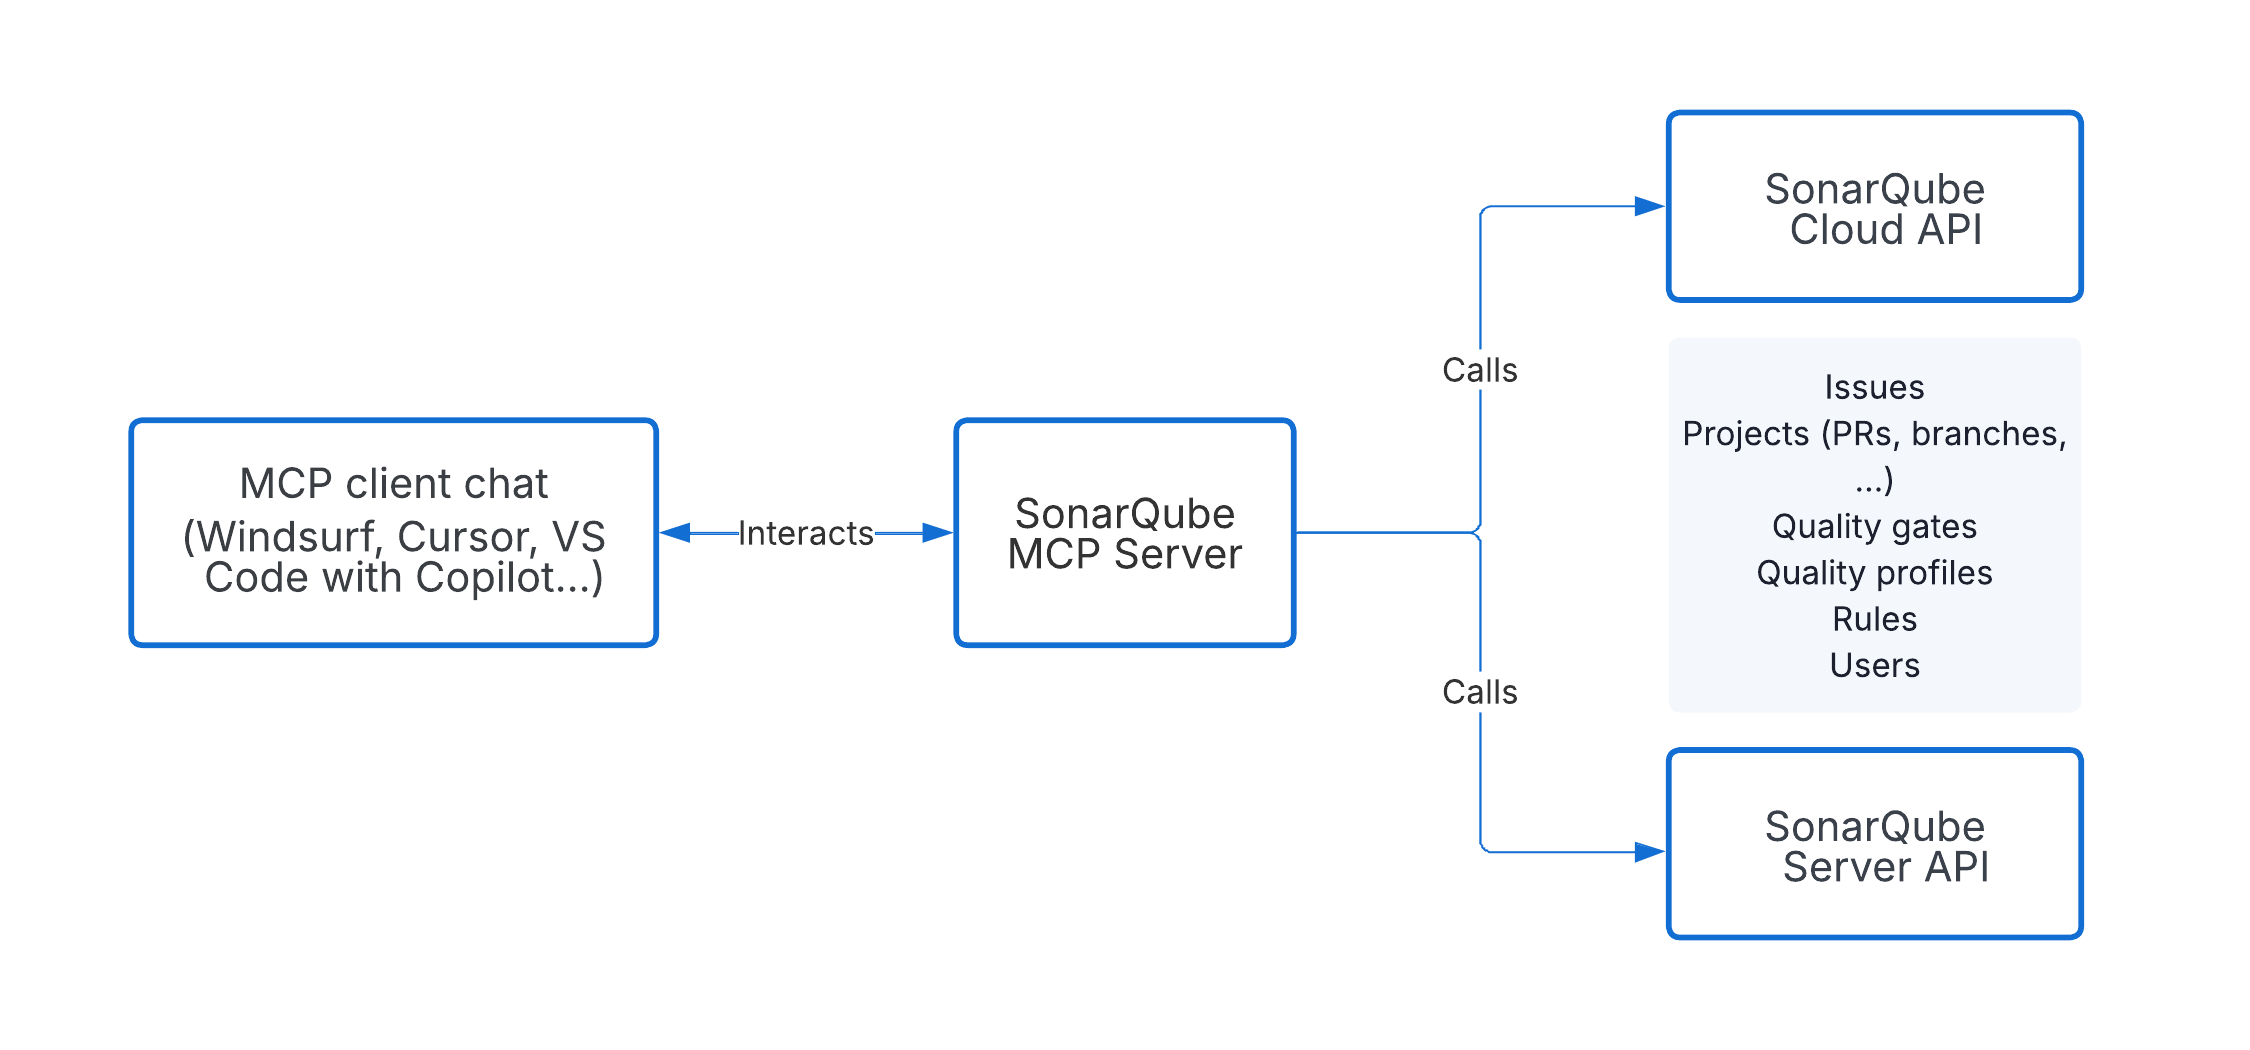
 Because the detection of taint vulnerabilities requires that you run in connected mode, any changes you make to the code must be analyzed by your instance of SonarQube (Server, Cloud). Here are two options to resolve taint vulnerabilities displayed by SonarQube for IDE:
* After you fix the taint vulnerability in your IDE, commit your code to the server and rerun the analysis on SonarQube (Server, Cloud). The new status (of the vulnerability) will be reflected in your IDE.
* Go to the issue in SonarQube (Server, Cloud) and mark it as **Accept** or **False positive**. The new status will be updated locally in less than one minute.
{% hint style="info" %}
When running in connected mode with SonarQube Server 10.4 or newer, **Won’t Fix** becomes **Accept**.
{% endhint %}
See the [fixing-issues](https://docs.sonarsource.com/sonarqube-for-vs-code/using/fixing-issues "mention") page for complete details about fixing issues, including [#fixing-taint-vulnerabilities](https://docs.sonarsource.com/sonarqube-for-vs-code/fixing-issues#fixing-taint-vulnerabilities "mention"), in SonarQube for VS Code.
---
# Source: https://docs.sonarsource.com/sonarqube-community-build/instance-administration/system-functions/telemetry.md
# Source: https://docs.sonarsource.com/sonarqube-server/9.8/instance-administration/telemetry.md
# Source: https://docs.sonarsource.com/sonarqube-server/9.9/instance-administration/telemetry.md
# Source: https://docs.sonarsource.com/sonarqube-server/10.0/instance-administration/telemetry.md
# Source: https://docs.sonarsource.com/sonarqube-server/10.1/instance-administration/telemetry.md
# Source: https://docs.sonarsource.com/sonarqube-server/10.2/instance-administration/telemetry.md
# Source: https://docs.sonarsource.com/sonarqube-server/10.3/instance-administration/telemetry.md
# Source: https://docs.sonarsource.com/sonarqube-server/10.4/instance-administration/telemetry.md
# Source: https://docs.sonarsource.com/sonarqube-server/10.5/instance-administration/telemetry.md
# Source: https://docs.sonarsource.com/sonarqube-server/10.6/instance-administration/telemetry.md
# Source: https://docs.sonarsource.com/sonarqube-server/10.7/instance-administration/system-functions/telemetry.md
# Source: https://docs.sonarsource.com/sonarqube-server/10.8/instance-administration/system-functions/telemetry.md
# Source: https://docs.sonarsource.com/sonarqube-server/2025.2/instance-administration/system-functions/telemetry.md
# Source: https://docs.sonarsource.com/sonarqube-server/2025.3/instance-administration/system-functions/telemetry.md
# Source: https://docs.sonarsource.com/sonarqube-server/2025.5/instance-administration/system-functions/telemetry.md
# Source: https://docs.sonarsource.com/sonarqube-server/2025.1/instance-administration/system-functions/telemetry.md
# Source: https://docs.sonarsource.com/sonarqube-server/2025.4/instance-administration/system-functions/telemetry.md
# Source: https://docs.sonarsource.com/sonarqube-server/2025.6/instance-administration/system-functions/telemetry.md
# Source: https://docs.sonarsource.com/sonarqube-server/instance-administration/system-functions/telemetry.md
# Telemetry
Your SonarQube Server installation sends telemetry data to Sonar daily. This data helps us understand how SonarQube Server is used, which in turn helps us improve our products.
### No personally identifiable information is sent.
The telemetry feature only sends anonymized, non-project-specific data related to which features of the product are being used.
Personal data, such as usernames or email addresses, is never sent. Neither is source code nor any project-specific data such as project name, repository, or author is ever sent. No IP addresses are ever sent.
The data is sent securely, held under restricted access, and not published outside of Sonar.
Protecting your privacy is important to us. If you have any concerns about telemetry data collection, please email us at `security@sonarsource.com`.
### What information is sent?
Every 24 hours, SonarQube Server sends a JSON payload and selected measure payloads to:
* `https://telemetry.sonarsource.com/sonarqube`
* `https://telemetry.sonarsource.com/sonarqube/metrics`
The data consists of anonymized information about:
* The SonarQube Server instance: version, license type, edition, database type, cloud usage and other information about the instance.
* Each project on the instance:
* A technical identifier that does not reveal any project-specific details.
* Project characteristics such as last analysis time, number of findings, and new code definition.
* Each user on the instance:
* A technical identifier that does not reveal any personal information about the user.
* Instance usage information, like last activity time and current status.
* Each quality gate on the instance:
* A technical identifier that does not reveal any project-specific details.
* A quality gate compliance status.
* Quality gate conditions.
* Each quality profile of the instance:
* A technical identifier that does not reveal any project-specific details.
* Quality profile characteristics such as language, if the default Sonar way quality profile is used or if the parent of the quality profile is Sonar way.
* Number of rules that are activated, deactivated, or overridden in the quality profile.
* Each branch on the instance:
* A technical identifier that does not reveal any branch-specific details.
* Branch characteristics, like its new code definition.
In addition to the payload, SonarQube Server also sends measures consisting of anonymized information about the usage of SonarQube Server for future product improvements. For example: the number of lines per language, AI code detection, installation data, user active status, and other anonymized data.
### Turning telemetry off
You can disable telemetry at any time by setting the `sonar.telemetry.enable = false` in `
Because the detection of taint vulnerabilities requires that you run in connected mode, any changes you make to the code must be analyzed by your instance of SonarQube (Server, Cloud). Here are two options to resolve taint vulnerabilities displayed by SonarQube for IDE:
* After you fix the taint vulnerability in your IDE, commit your code to the server and rerun the analysis on SonarQube (Server, Cloud). The new status (of the vulnerability) will be reflected in your IDE.
* Go to the issue in SonarQube (Server, Cloud) and mark it as **Accept** or **False positive**. The new status will be updated locally in less than one minute.
{% hint style="info" %}
When running in connected mode with SonarQube Server 10.4 or newer, **Won’t Fix** becomes **Accept**.
{% endhint %}
See the [fixing-issues](https://docs.sonarsource.com/sonarqube-for-vs-code/using/fixing-issues "mention") page for complete details about fixing issues, including [#fixing-taint-vulnerabilities](https://docs.sonarsource.com/sonarqube-for-vs-code/fixing-issues#fixing-taint-vulnerabilities "mention"), in SonarQube for VS Code.
---
# Source: https://docs.sonarsource.com/sonarqube-community-build/instance-administration/system-functions/telemetry.md
# Source: https://docs.sonarsource.com/sonarqube-server/9.8/instance-administration/telemetry.md
# Source: https://docs.sonarsource.com/sonarqube-server/9.9/instance-administration/telemetry.md
# Source: https://docs.sonarsource.com/sonarqube-server/10.0/instance-administration/telemetry.md
# Source: https://docs.sonarsource.com/sonarqube-server/10.1/instance-administration/telemetry.md
# Source: https://docs.sonarsource.com/sonarqube-server/10.2/instance-administration/telemetry.md
# Source: https://docs.sonarsource.com/sonarqube-server/10.3/instance-administration/telemetry.md
# Source: https://docs.sonarsource.com/sonarqube-server/10.4/instance-administration/telemetry.md
# Source: https://docs.sonarsource.com/sonarqube-server/10.5/instance-administration/telemetry.md
# Source: https://docs.sonarsource.com/sonarqube-server/10.6/instance-administration/telemetry.md
# Source: https://docs.sonarsource.com/sonarqube-server/10.7/instance-administration/system-functions/telemetry.md
# Source: https://docs.sonarsource.com/sonarqube-server/10.8/instance-administration/system-functions/telemetry.md
# Source: https://docs.sonarsource.com/sonarqube-server/2025.2/instance-administration/system-functions/telemetry.md
# Source: https://docs.sonarsource.com/sonarqube-server/2025.3/instance-administration/system-functions/telemetry.md
# Source: https://docs.sonarsource.com/sonarqube-server/2025.5/instance-administration/system-functions/telemetry.md
# Source: https://docs.sonarsource.com/sonarqube-server/2025.1/instance-administration/system-functions/telemetry.md
# Source: https://docs.sonarsource.com/sonarqube-server/2025.4/instance-administration/system-functions/telemetry.md
# Source: https://docs.sonarsource.com/sonarqube-server/2025.6/instance-administration/system-functions/telemetry.md
# Source: https://docs.sonarsource.com/sonarqube-server/instance-administration/system-functions/telemetry.md
# Telemetry
Your SonarQube Server installation sends telemetry data to Sonar daily. This data helps us understand how SonarQube Server is used, which in turn helps us improve our products.
### No personally identifiable information is sent.
The telemetry feature only sends anonymized, non-project-specific data related to which features of the product are being used.
Personal data, such as usernames or email addresses, is never sent. Neither is source code nor any project-specific data such as project name, repository, or author is ever sent. No IP addresses are ever sent.
The data is sent securely, held under restricted access, and not published outside of Sonar.
Protecting your privacy is important to us. If you have any concerns about telemetry data collection, please email us at `security@sonarsource.com`.
### What information is sent?
Every 24 hours, SonarQube Server sends a JSON payload and selected measure payloads to:
* `https://telemetry.sonarsource.com/sonarqube`
* `https://telemetry.sonarsource.com/sonarqube/metrics`
The data consists of anonymized information about:
* The SonarQube Server instance: version, license type, edition, database type, cloud usage and other information about the instance.
* Each project on the instance:
* A technical identifier that does not reveal any project-specific details.
* Project characteristics such as last analysis time, number of findings, and new code definition.
* Each user on the instance:
* A technical identifier that does not reveal any personal information about the user.
* Instance usage information, like last activity time and current status.
* Each quality gate on the instance:
* A technical identifier that does not reveal any project-specific details.
* A quality gate compliance status.
* Quality gate conditions.
* Each quality profile of the instance:
* A technical identifier that does not reveal any project-specific details.
* Quality profile characteristics such as language, if the default Sonar way quality profile is used or if the parent of the quality profile is Sonar way.
* Number of rules that are activated, deactivated, or overridden in the quality profile.
* Each branch on the instance:
* A technical identifier that does not reveal any branch-specific details.
* Branch characteristics, like its new code definition.
In addition to the payload, SonarQube Server also sends measures consisting of anonymized information about the usage of SonarQube Server for future product improvements. For example: the number of lines per language, AI code detection, installation data, user active status, and other anonymized data.
### Turning telemetry off
You can disable telemetry at any time by setting the `sonar.telemetry.enable = false` in ` 5. Once the failover is complete, open your SonarQube server instance and check the integrity of your data.
### Related pages
* [architecture-example](https://docs.sonarsource.com/sonarqube-server/server-installation/data-center-edition/on-kubernetes-or-openshift/setting-up-disaster-recovery/architecture-example "mention")
* [deploy-databases](https://docs.sonarsource.com/sonarqube-server/server-installation/data-center-edition/on-kubernetes-or-openshift/setting-up-disaster-recovery/deploy-databases "mention")
* [set-up-clusters-on-aks](https://docs.sonarsource.com/sonarqube-server/server-installation/data-center-edition/on-kubernetes-or-openshift/setting-up-disaster-recovery/set-up-clusters-on-aks "mention")
* [configure-azure-front-door](https://docs.sonarsource.com/sonarqube-server/server-installation/data-center-edition/on-kubernetes-or-openshift/setting-up-disaster-recovery/configure-azure-front-door "mention")
---
# Source: https://docs.sonarsource.com/sonarqube-server/10.4/setup-and-upgrade/upgrade-the-server/testing.md
# Source: https://docs.sonarsource.com/sonarqube-server/10.5/setup-and-upgrade/upgrade-the-server/testing.md
# Source: https://docs.sonarsource.com/sonarqube-server/10.6/setup-and-upgrade/upgrade-the-server/testing.md
# Source: https://docs.sonarsource.com/sonarqube-server/10.7/server-upgrade-and-maintenance/upgrade/upgrade-the-server/testing.md
# Source: https://docs.sonarsource.com/sonarqube-server/10.8/server-upgrade-and-maintenance/upgrade/upgrade-the-server/testing.md
# Testing the upgrade
We recommend testing your upgrade to:
* Make sure your infrastructure can run the upgrade.
* Get an idea of how long the upgrade will take.
* Gain a better understanding of the upgrade process and anticipate what you’ll need to do when performing the actual upgrade.
* Address any issues you encounter during the practice upgrade on the Sonar community.
To test your upgrade:
1. Create a staging environment using a recent backup of your production database. You want your staging environment to be as similar to your production instance as possible because the resources and time needed to upgrade depends on what’s stored in your database.
2. Use this staging environment to test the upgrade.
3. Observe how long it takes to back up and restore systems and complete the process.
---
# Source: https://docs.sonarsource.com/sonarqube-mcp-server/tools.md
# Tools
Note also the SONARQUBE\_TOOLSETS environment variable that accepts a comma-separated list of toolsets to enable. See the [#tool-enablement](https://docs.sonarsource.com/sonarqube-mcp-server/build-and-configure/environment-variables#tool-enablement "mention") article for a list of available toolsets.
### Analysis
| Tool | Type |
| --------------------------------------------------------------------------------------------------------------------------------------------------------------------------------------------------- | ---------------------------------------------------------------------------------------------------------------------------------------------------------------------------------------- |
| **analyze\_code\_snippet**: Analyze a file or code snippet with SonarQube analyzers to identify code quality and security issues. Specify the language of the snippet to improve analysis accuracy. |
5. Once the failover is complete, open your SonarQube server instance and check the integrity of your data.
### Related pages
* [architecture-example](https://docs.sonarsource.com/sonarqube-server/server-installation/data-center-edition/on-kubernetes-or-openshift/setting-up-disaster-recovery/architecture-example "mention")
* [deploy-databases](https://docs.sonarsource.com/sonarqube-server/server-installation/data-center-edition/on-kubernetes-or-openshift/setting-up-disaster-recovery/deploy-databases "mention")
* [set-up-clusters-on-aks](https://docs.sonarsource.com/sonarqube-server/server-installation/data-center-edition/on-kubernetes-or-openshift/setting-up-disaster-recovery/set-up-clusters-on-aks "mention")
* [configure-azure-front-door](https://docs.sonarsource.com/sonarqube-server/server-installation/data-center-edition/on-kubernetes-or-openshift/setting-up-disaster-recovery/configure-azure-front-door "mention")
---
# Source: https://docs.sonarsource.com/sonarqube-server/10.4/setup-and-upgrade/upgrade-the-server/testing.md
# Source: https://docs.sonarsource.com/sonarqube-server/10.5/setup-and-upgrade/upgrade-the-server/testing.md
# Source: https://docs.sonarsource.com/sonarqube-server/10.6/setup-and-upgrade/upgrade-the-server/testing.md
# Source: https://docs.sonarsource.com/sonarqube-server/10.7/server-upgrade-and-maintenance/upgrade/upgrade-the-server/testing.md
# Source: https://docs.sonarsource.com/sonarqube-server/10.8/server-upgrade-and-maintenance/upgrade/upgrade-the-server/testing.md
# Testing the upgrade
We recommend testing your upgrade to:
* Make sure your infrastructure can run the upgrade.
* Get an idea of how long the upgrade will take.
* Gain a better understanding of the upgrade process and anticipate what you’ll need to do when performing the actual upgrade.
* Address any issues you encounter during the practice upgrade on the Sonar community.
To test your upgrade:
1. Create a staging environment using a recent backup of your production database. You want your staging environment to be as similar to your production instance as possible because the resources and time needed to upgrade depends on what’s stored in your database.
2. Use this staging environment to test the upgrade.
3. Observe how long it takes to back up and restore systems and complete the process.
---
# Source: https://docs.sonarsource.com/sonarqube-mcp-server/tools.md
# Tools
Note also the SONARQUBE\_TOOLSETS environment variable that accepts a comma-separated list of toolsets to enable. See the [#tool-enablement](https://docs.sonarsource.com/sonarqube-mcp-server/build-and-configure/environment-variables#tool-enablement "mention") article for a list of available toolsets.
### Analysis
| Tool | Type |
| --------------------------------------------------------------------------------------------------------------------------------------------------------------------------------------------------- | ---------------------------------------------------------------------------------------------------------------------------------------------------------------------------------------- |
| **analyze\_code\_snippet**: Analyze a file or code snippet with SonarQube analyzers to identify code quality and security issues. Specify the language of the snippet to improve analysis accuracy. | 
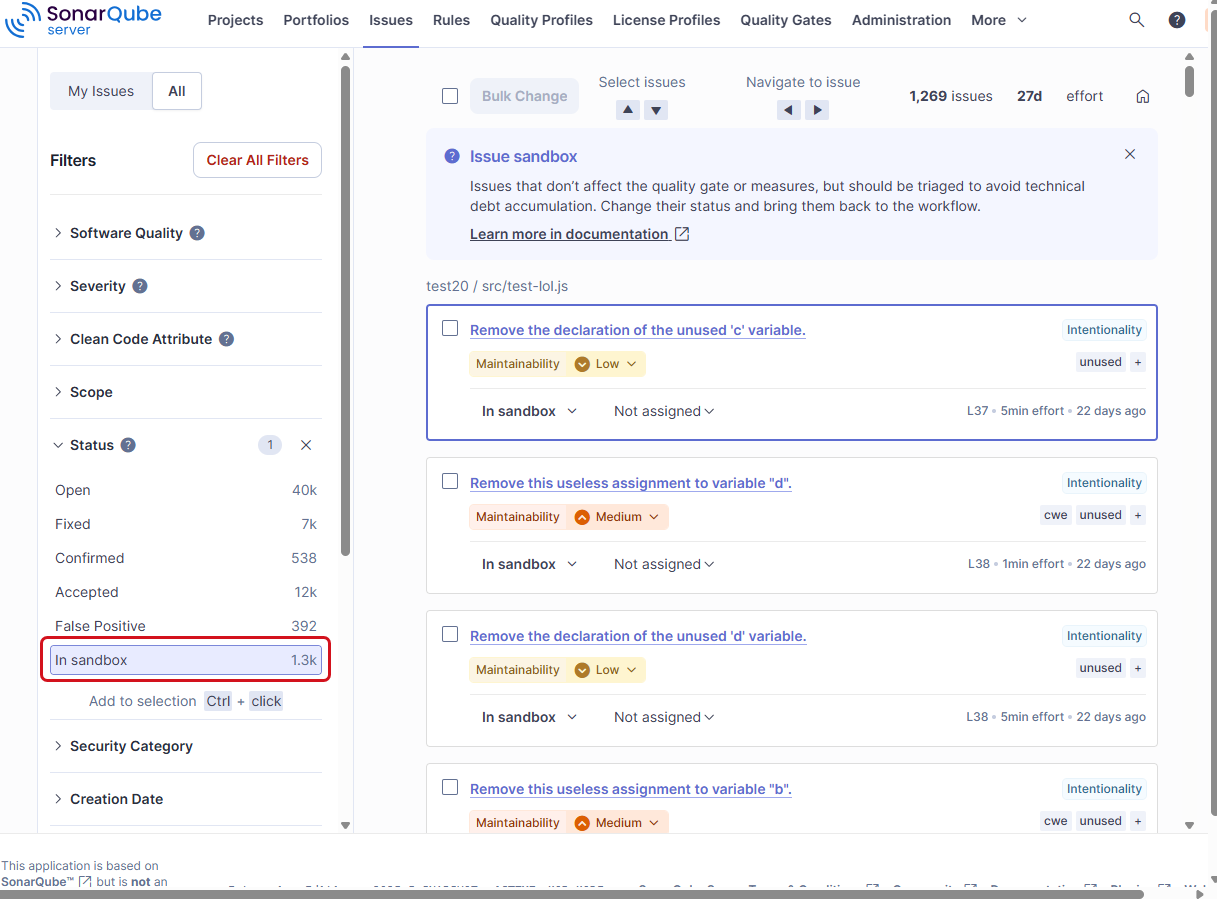

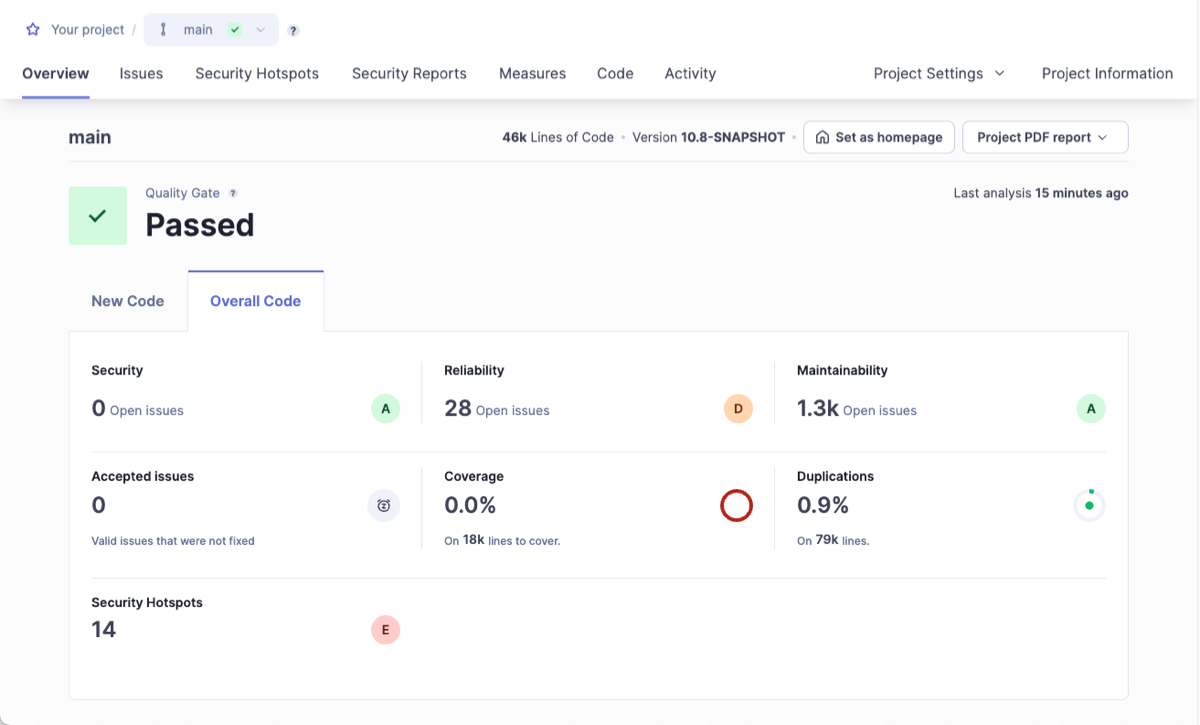 A user with the Administer Quality Profiles permission in the organization can create and edit any custom profile and change the default profile of a set. These users can also give other users permission to edit a given custom profile.
### Quality profile definition
In your organization, a quality profile:
* Relates to a given programming language.
* Is based on the set of coding rules supported for this language.
* Defines which rules of this set are active in the profile, it means which rules will be taken into account during the code analysis.
A custom quality profile may customize, for a given rule, configurable parameters. For example, rules that verify conditions against a threshold might allow customization of the threshold value. The customization applies only within the quality profile.
### Quality profile inheritance
The inheritance feature allows you to define a parent/child relationship between two quality profiles within the profile set of a language. This way, changes in the parent profile are dynamically reported to the child profile. Note that a child profile can only be a custom quality profile.
The figure below shows the Java’s profile set example with a custom profile inheriting from the built-in Sonar way profile.
A user with the Administer Quality Profiles permission in the organization can create and edit any custom profile and change the default profile of a set. These users can also give other users permission to edit a given custom profile.
### Quality profile definition
In your organization, a quality profile:
* Relates to a given programming language.
* Is based on the set of coding rules supported for this language.
* Defines which rules of this set are active in the profile, it means which rules will be taken into account during the code analysis.
A custom quality profile may customize, for a given rule, configurable parameters. For example, rules that verify conditions against a threshold might allow customization of the threshold value. The customization applies only within the quality profile.
### Quality profile inheritance
The inheritance feature allows you to define a parent/child relationship between two quality profiles within the profile set of a language. This way, changes in the parent profile are dynamically reported to the child profile. Note that a child profile can only be a custom quality profile.
The figure below shows the Java’s profile set example with a custom profile inheriting from the built-in Sonar way profile.
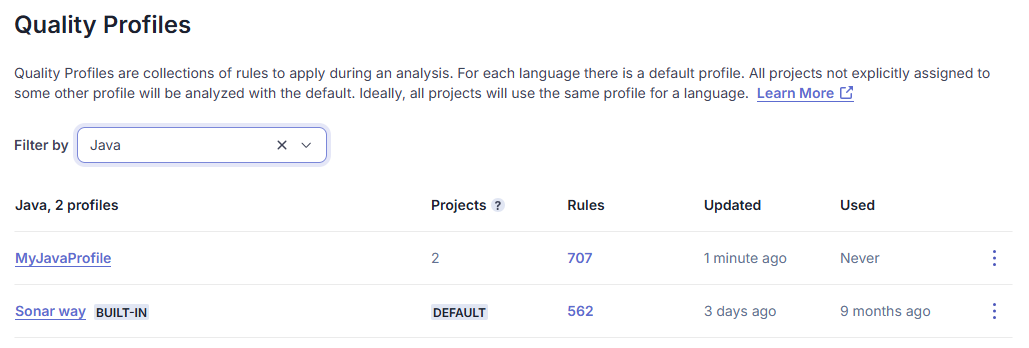
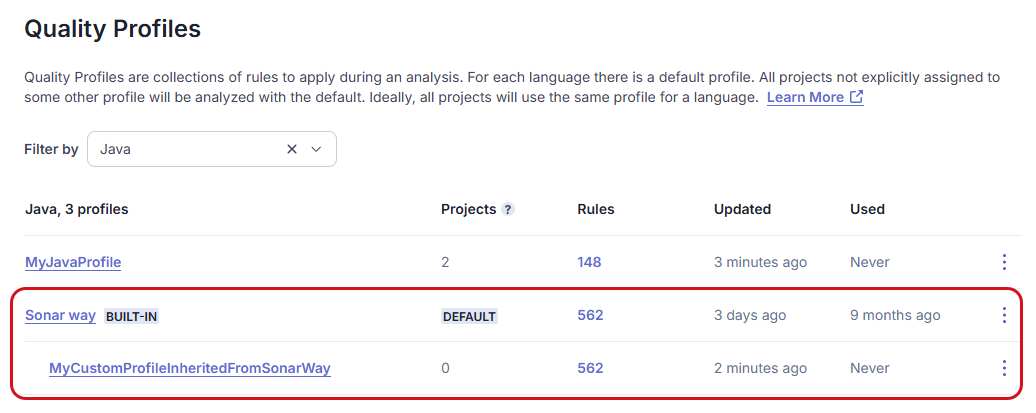
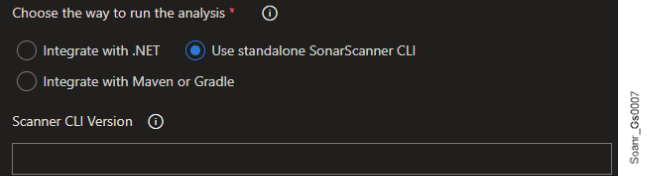
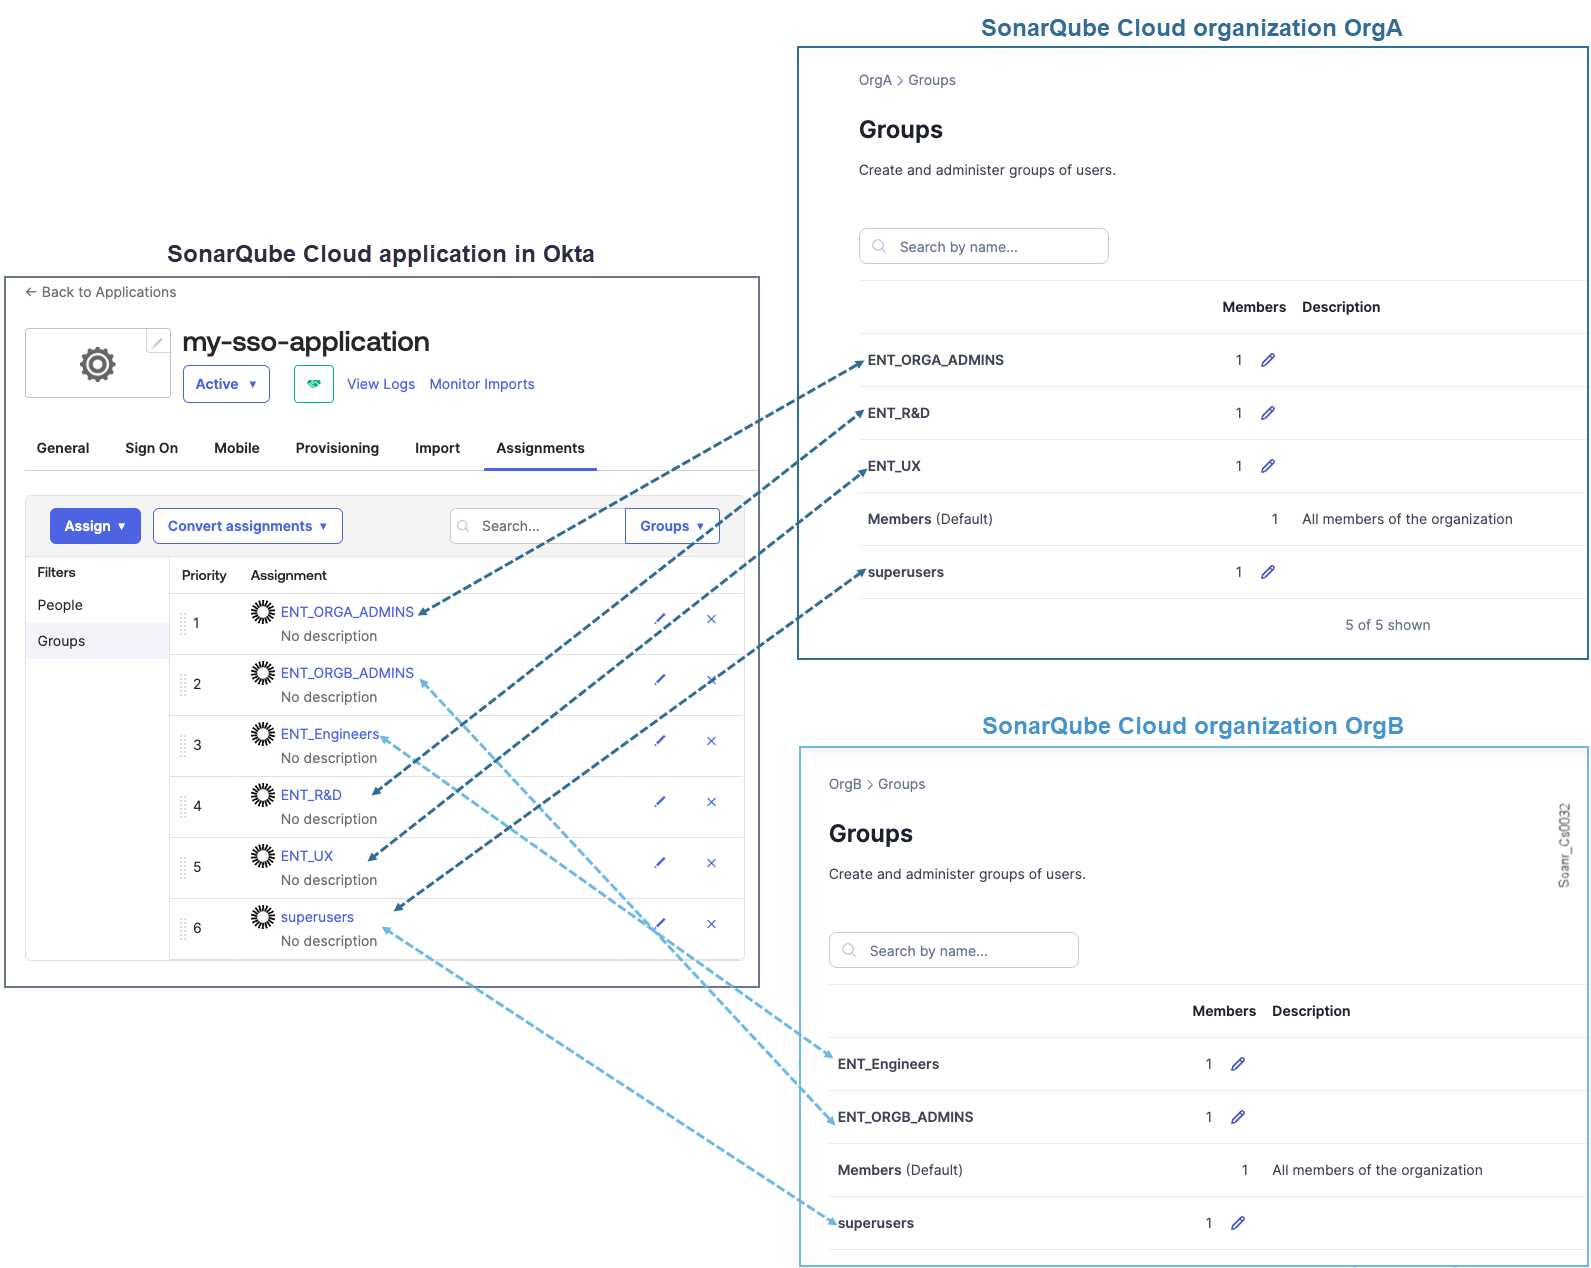 {% hint style="warning" %}
* Group synchronization doesn’t work with Microsoft Entra ID’s nested groups.
* Microsoft Entra ID’s SAML tokens have a limit regarding the number of groups a user can belong to (see the description of groups in the [Claims in SAML Token](https://learn.microsoft.com/en-us/entra/identity-platform/reference-saml-tokens#claims-in-saml-tokens) table). In such cases, you might need to reduce the number of groups the user is in.
{% endhint %}
### Related pages
[configure-sso](https://docs.sonarsource.com/sonarqube-cloud/administering-sonarcloud/managing-enterprise/enterprise-security/sso/setup/configure-sso "mention")\
[inviting-users-to-sign-in](https://docs.sonarsource.com/sonarqube-cloud/administering-sonarcloud/managing-enterprise/enterprise-security/sso/setup/inviting-users-to-sign-in "mention")\
[terminate-setup](https://docs.sonarsource.com/sonarqube-cloud/administering-sonarcloud/managing-enterprise/enterprise-security/sso/setup/terminate-setup "mention")\
[editing-sso-configuration](https://docs.sonarsource.com/sonarqube-cloud/administering-sonarcloud/managing-enterprise/enterprise-security/sso/editing-sso-configuration "mention")\
[deleting-sso-configuration](https://docs.sonarsource.com/sonarqube-cloud/administering-sonarcloud/managing-enterprise/enterprise-security/sso/deleting-sso-configuration "mention")
---
# Source: https://docs.sonarsource.com/sonarqube-community-build/project-administration/adjusting-analysis/setting-analysis-scope/verifying-analysis-scope.md
# Source: https://docs.sonarsource.com/sonarqube-server/2025.2/project-administration/setting-analysis-scope/verifying-analysis-scope.md
# Source: https://docs.sonarsource.com/sonarqube-server/2025.3/project-administration/setting-analysis-scope/verifying-analysis-scope.md
# Source: https://docs.sonarsource.com/sonarqube-server/2025.5/project-administration/setting-analysis-scope/verifying-analysis-scope.md
# Source: https://docs.sonarsource.com/sonarqube-server/2025.4/project-administration/setting-analysis-scope/verifying-analysis-scope.md
# Source: https://docs.sonarsource.com/sonarqube-server/2025.6/project-administration/adjusting-analysis/setting-analysis-scope/verifying-analysis-scope.md
# Source: https://docs.sonarsource.com/sonarqube-server/project-administration/adjusting-analysis/setting-analysis-scope/verifying-analysis-scope.md
# Source: https://docs.sonarsource.com/sonarqube-cloud/managing-your-projects/project-analysis/setting-analysis-scope/verifying-analysis-scope.md
# Verifying analysis scope
This section explains how to verify the configured properties and the properties read by the scanner to compute the project's analysis scope. See [introduction](https://docs.sonarsource.com/sonarqube-cloud/managing-your-projects/project-analysis/setting-analysis-scope/introduction "mention") to Setting analysis scope for more information.
### Verifying the analysis scope properties configured for the project
This procedure lets you view the properties configured in the different possible locations on the CI/CD host and in SonarQube Cloud UI for a given analysis run.
To verify the configured analysis properties for a project:
1. Run the project analysis.
2. The analysis debug logs show which source and test files are indexed for the analysis (the scanner logs out to the place it was invoked from).\
If the analysis fails with the error `File
{% hint style="warning" %}
* Group synchronization doesn’t work with Microsoft Entra ID’s nested groups.
* Microsoft Entra ID’s SAML tokens have a limit regarding the number of groups a user can belong to (see the description of groups in the [Claims in SAML Token](https://learn.microsoft.com/en-us/entra/identity-platform/reference-saml-tokens#claims-in-saml-tokens) table). In such cases, you might need to reduce the number of groups the user is in.
{% endhint %}
### Related pages
[configure-sso](https://docs.sonarsource.com/sonarqube-cloud/administering-sonarcloud/managing-enterprise/enterprise-security/sso/setup/configure-sso "mention")\
[inviting-users-to-sign-in](https://docs.sonarsource.com/sonarqube-cloud/administering-sonarcloud/managing-enterprise/enterprise-security/sso/setup/inviting-users-to-sign-in "mention")\
[terminate-setup](https://docs.sonarsource.com/sonarqube-cloud/administering-sonarcloud/managing-enterprise/enterprise-security/sso/setup/terminate-setup "mention")\
[editing-sso-configuration](https://docs.sonarsource.com/sonarqube-cloud/administering-sonarcloud/managing-enterprise/enterprise-security/sso/editing-sso-configuration "mention")\
[deleting-sso-configuration](https://docs.sonarsource.com/sonarqube-cloud/administering-sonarcloud/managing-enterprise/enterprise-security/sso/deleting-sso-configuration "mention")
---
# Source: https://docs.sonarsource.com/sonarqube-community-build/project-administration/adjusting-analysis/setting-analysis-scope/verifying-analysis-scope.md
# Source: https://docs.sonarsource.com/sonarqube-server/2025.2/project-administration/setting-analysis-scope/verifying-analysis-scope.md
# Source: https://docs.sonarsource.com/sonarqube-server/2025.3/project-administration/setting-analysis-scope/verifying-analysis-scope.md
# Source: https://docs.sonarsource.com/sonarqube-server/2025.5/project-administration/setting-analysis-scope/verifying-analysis-scope.md
# Source: https://docs.sonarsource.com/sonarqube-server/2025.4/project-administration/setting-analysis-scope/verifying-analysis-scope.md
# Source: https://docs.sonarsource.com/sonarqube-server/2025.6/project-administration/adjusting-analysis/setting-analysis-scope/verifying-analysis-scope.md
# Source: https://docs.sonarsource.com/sonarqube-server/project-administration/adjusting-analysis/setting-analysis-scope/verifying-analysis-scope.md
# Source: https://docs.sonarsource.com/sonarqube-cloud/managing-your-projects/project-analysis/setting-analysis-scope/verifying-analysis-scope.md
# Verifying analysis scope
This section explains how to verify the configured properties and the properties read by the scanner to compute the project's analysis scope. See [introduction](https://docs.sonarsource.com/sonarqube-cloud/managing-your-projects/project-analysis/setting-analysis-scope/introduction "mention") to Setting analysis scope for more information.
### Verifying the analysis scope properties configured for the project
This procedure lets you view the properties configured in the different possible locations on the CI/CD host and in SonarQube Cloud UI for a given analysis run.
To verify the configured analysis properties for a project:
1. Run the project analysis.
2. The analysis debug logs show which source and test files are indexed for the analysis (the scanner logs out to the place it was invoked from).\
If the analysis fails with the error `File 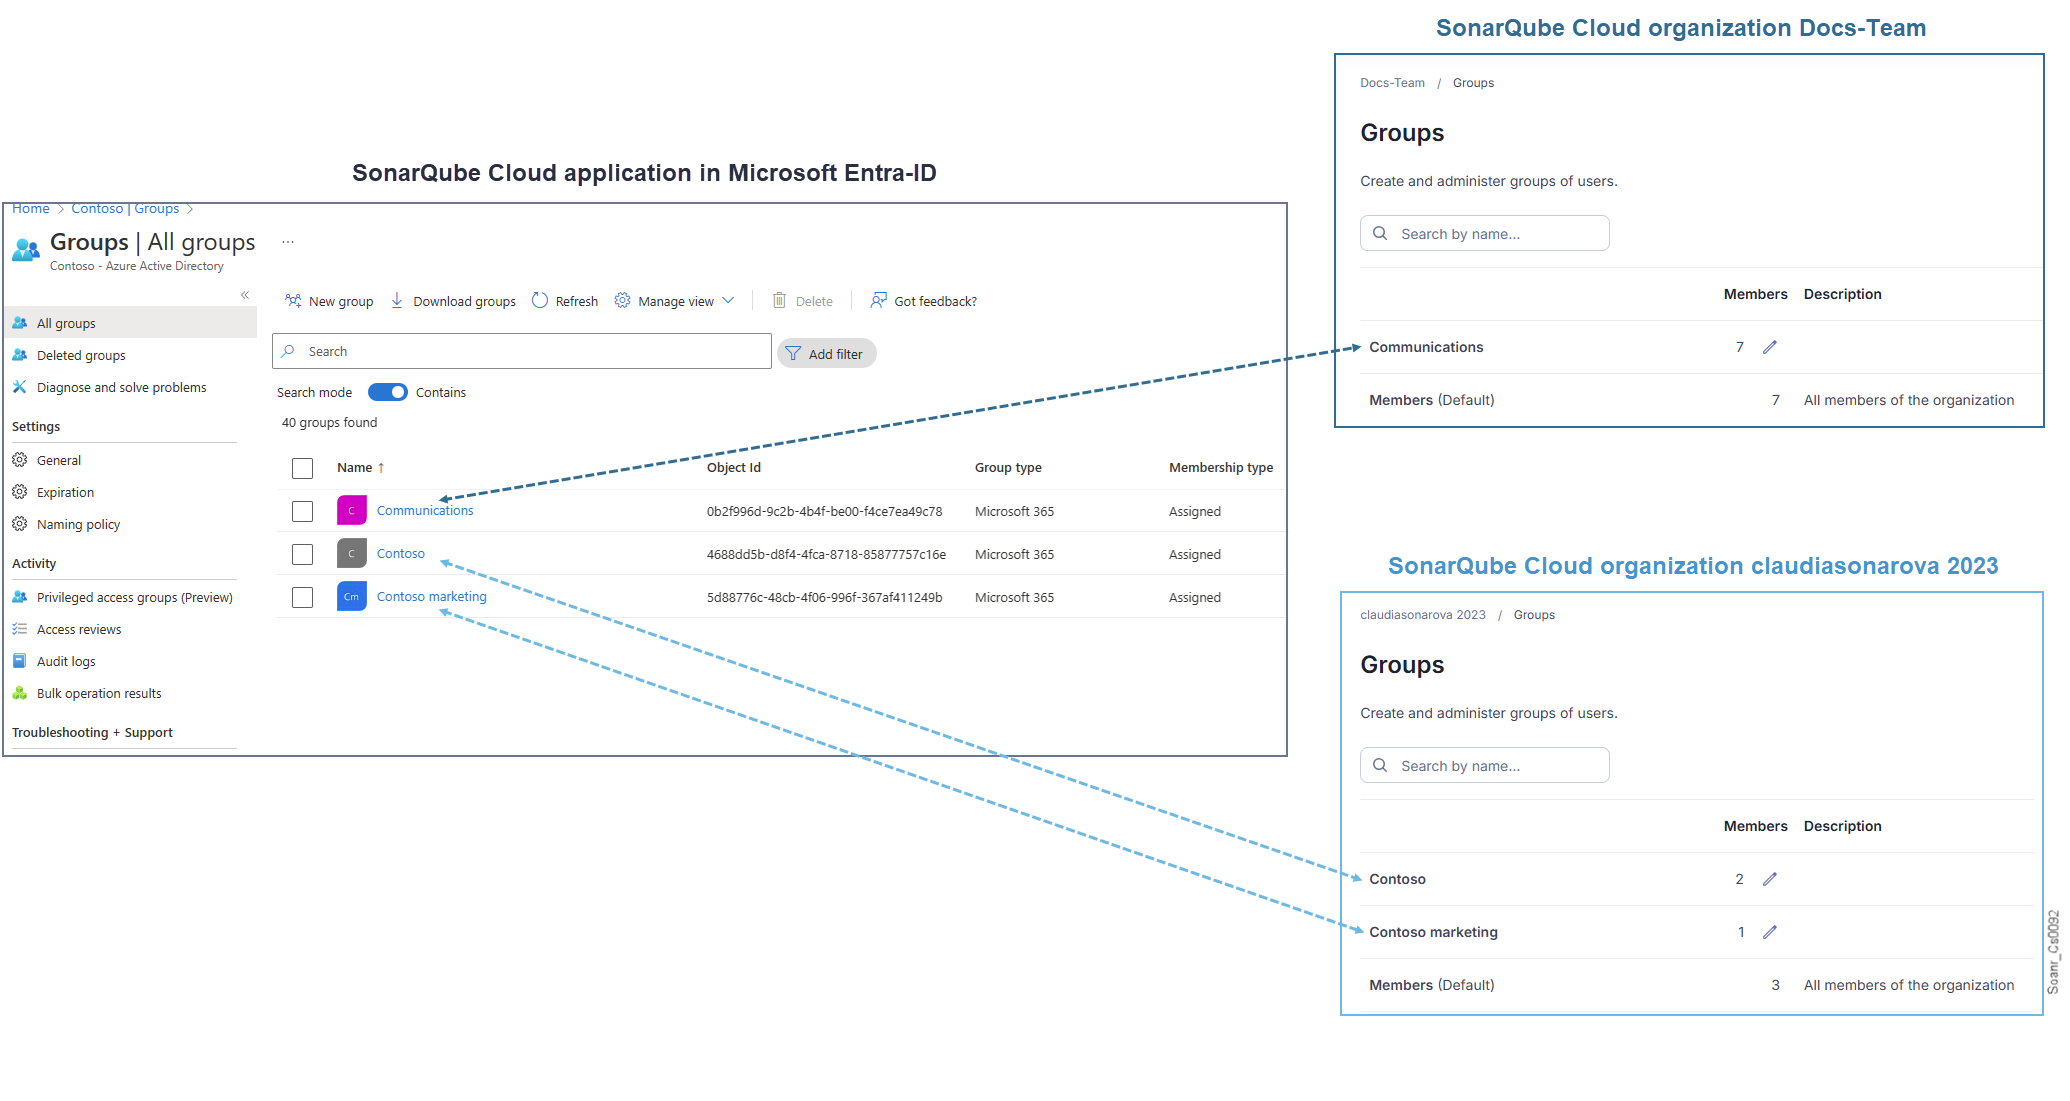 {% hint style="warning" %}
Any property set on the CI/CD host and identified by the scanner as a sonar property (that means, with a key starting with `sonar.`) will be listed as a scanner property even if the scanner does not know about it (in that case, the scanner will just ignore the property, and no error will be raised).
{% endhint %}
### Verifying the analysis scope properties read by the scanner
To know which properties the scanner processes during the analysis run:
* In analysis debug logs, search for the `Project configuration` section as illustrated below (The scanner logs out to the place it was invoked from). The section may show:
* `Excluded sources`: exclusion patterns processed by the scanner to compute the source files to be analyzed.
* `Included sources`**:** inclusion patterns processed by the scanner to compute the source files to be analyzed.
* `Excluded tests`: exclusion patterns processed by the scanner to compute the test files to be analyzed.
* `Included tests`**:** inclusion patterns processed by the scanner to compute the test files to be analyzed.
{% hint style="warning" %}
Any property set on the CI/CD host and identified by the scanner as a sonar property (that means, with a key starting with `sonar.`) will be listed as a scanner property even if the scanner does not know about it (in that case, the scanner will just ignore the property, and no error will be raised).
{% endhint %}
### Verifying the analysis scope properties read by the scanner
To know which properties the scanner processes during the analysis run:
* In analysis debug logs, search for the `Project configuration` section as illustrated below (The scanner logs out to the place it was invoked from). The section may show:
* `Excluded sources`: exclusion patterns processed by the scanner to compute the source files to be analyzed.
* `Included sources`**:** inclusion patterns processed by the scanner to compute the source files to be analyzed.
* `Excluded tests`: exclusion patterns processed by the scanner to compute the test files to be analyzed.
* `Included tests`**:** inclusion patterns processed by the scanner to compute the test files to be analyzed.
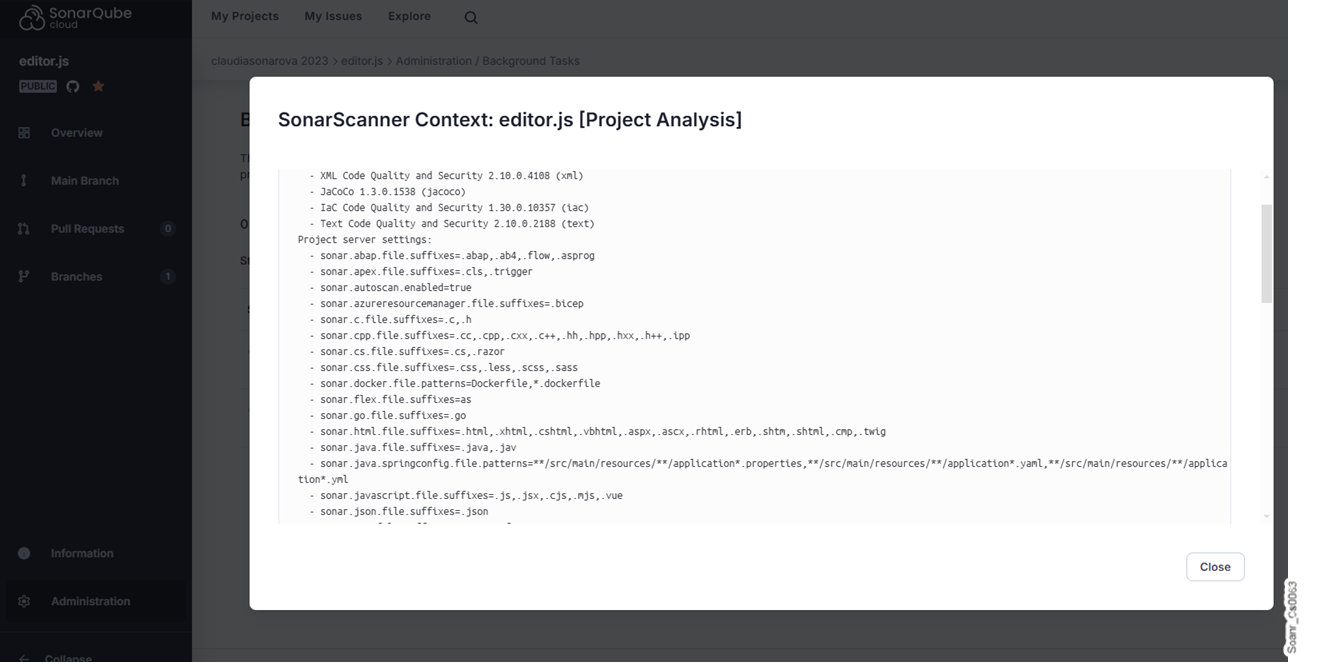 ### Related pages
* [setting-initial-scope](https://docs.sonarsource.com/sonarqube-cloud/managing-your-projects/project-analysis/setting-analysis-scope/setting-initial-scope "mention")
* [exclude-from-coverage-duplication](https://docs.sonarsource.com/sonarqube-cloud/managing-your-projects/project-analysis/setting-analysis-scope/exclude-from-coverage-duplication "mention")
* [excluding-files-based-on-patterns](https://docs.sonarsource.com/sonarqube-cloud/managing-your-projects/project-analysis/setting-analysis-scope/excluding-files-based-on-patterns "mention")
* [excluding-based-on-file-extension](https://docs.sonarsource.com/sonarqube-cloud/managing-your-projects/project-analysis/setting-analysis-scope/excluding-based-on-file-extension "mention")
* [advanced-exclusions](https://docs.sonarsource.com/sonarqube-cloud/managing-your-projects/project-analysis/setting-analysis-scope/advanced-exclusions "mention")
* [other-adjustments](https://docs.sonarsource.com/sonarqube-cloud/managing-your-projects/project-analysis/setting-analysis-scope/other-adjustments "mention")
---
# Source: https://docs.sonarsource.com/sonarqube-community-build/analyzing-source-code/scanners/scanner-environment/verifying-code-checkout-step.md
# Source: https://docs.sonarsource.com/sonarqube-server/10.6/analyzing-source-code/various-setups/verifying-code-checkout-step.md
# Source: https://docs.sonarsource.com/sonarqube-server/10.7/analyzing-source-code/scanners/scanner-environment/verifying-code-checkout-step.md
# Source: https://docs.sonarsource.com/sonarqube-server/10.8/analyzing-source-code/scanners/scanner-environment/verifying-code-checkout-step.md
# Source: https://docs.sonarsource.com/sonarqube-server/2025.2/analyzing-source-code/scanners/scanner-environment/verifying-code-checkout-step.md
# Source: https://docs.sonarsource.com/sonarqube-server/2025.3/analyzing-source-code/scanners/scanner-environment/verifying-code-checkout-step.md
# Source: https://docs.sonarsource.com/sonarqube-server/2025.5/analyzing-source-code/scanners/scanner-environment/verifying-code-checkout-step.md
# Source: https://docs.sonarsource.com/sonarqube-server/2025.1/analyzing-source-code/scanners/scanner-environment/verifying-code-checkout-step.md
# Source: https://docs.sonarsource.com/sonarqube-server/2025.4/analyzing-source-code/scanners/scanner-environment/verifying-code-checkout-step.md
# Source: https://docs.sonarsource.com/sonarqube-server/2025.6/analyzing-source-code/scanners/scanner-environment/verifying-code-checkout-step.md
# Source: https://docs.sonarsource.com/sonarqube-server/analyzing-source-code/scanners/scanner-environment/verifying-code-checkout-step.md
# Source: https://docs.sonarsource.com/sonarqube-cloud/advanced-setup/scanner-environment/verifying-code-checkout-step.md
# Checked-out code
The SonarScanners run on code that is checked out from the repository. During the checkout of a working copy (clone) of the code from the project repository, we recommend using the full depth. Indeed, the so-retrieved SCM metadata enables various features such as:
* New Code detection:
* On pull requests, not just the last commit but all the commits that are not on the target branch are considered. This requires a history long enough to find the common commit.
* On long-living branches, the New Code definition can be set in different ways but a longer history is always better.
* Blame information display and automatic issue assignment based on the blame information.
* [#issue-backdating-new-issues-raised-on-old-code](https://docs.sonarsource.com/sonarqube-cloud/managing-your-projects/issues/solution-overview#issue-backdating-new-issues-raised-on-old-code "mention")
In addition, we recommend cloning all the branches of the repository to avoid reference errors during the checkout.
With Git, this means using `fetch-depth: 0`. This disables shallow clones and fetches all branches.
{% hint style="warning" %}
* Avoid any attempt at performing actions on the cloned repository to make sure the repository contains valid repository metadata (e.g. the .git folders have not been removed).
* The code in the cloned repository matches the code in the original repository (e.g no code is added to the branch on the cloned repository before analysis).
{% endhint %}
---
# Source: https://docs.sonarsource.com/sonarqube-cloud/managing-your-projects/dashboards/viewing-and-managing-dashboards.md
# Viewing and managing dashboards
This feature is available in the [Enterprise](https://www.sonarsource.com/plans-and-pricing/sonarcloud/) plan.
### Retrieving dashboards
To retrieve **Dashboards**:
{% embed url="
### Related pages
* [setting-initial-scope](https://docs.sonarsource.com/sonarqube-cloud/managing-your-projects/project-analysis/setting-analysis-scope/setting-initial-scope "mention")
* [exclude-from-coverage-duplication](https://docs.sonarsource.com/sonarqube-cloud/managing-your-projects/project-analysis/setting-analysis-scope/exclude-from-coverage-duplication "mention")
* [excluding-files-based-on-patterns](https://docs.sonarsource.com/sonarqube-cloud/managing-your-projects/project-analysis/setting-analysis-scope/excluding-files-based-on-patterns "mention")
* [excluding-based-on-file-extension](https://docs.sonarsource.com/sonarqube-cloud/managing-your-projects/project-analysis/setting-analysis-scope/excluding-based-on-file-extension "mention")
* [advanced-exclusions](https://docs.sonarsource.com/sonarqube-cloud/managing-your-projects/project-analysis/setting-analysis-scope/advanced-exclusions "mention")
* [other-adjustments](https://docs.sonarsource.com/sonarqube-cloud/managing-your-projects/project-analysis/setting-analysis-scope/other-adjustments "mention")
---
# Source: https://docs.sonarsource.com/sonarqube-community-build/analyzing-source-code/scanners/scanner-environment/verifying-code-checkout-step.md
# Source: https://docs.sonarsource.com/sonarqube-server/10.6/analyzing-source-code/various-setups/verifying-code-checkout-step.md
# Source: https://docs.sonarsource.com/sonarqube-server/10.7/analyzing-source-code/scanners/scanner-environment/verifying-code-checkout-step.md
# Source: https://docs.sonarsource.com/sonarqube-server/10.8/analyzing-source-code/scanners/scanner-environment/verifying-code-checkout-step.md
# Source: https://docs.sonarsource.com/sonarqube-server/2025.2/analyzing-source-code/scanners/scanner-environment/verifying-code-checkout-step.md
# Source: https://docs.sonarsource.com/sonarqube-server/2025.3/analyzing-source-code/scanners/scanner-environment/verifying-code-checkout-step.md
# Source: https://docs.sonarsource.com/sonarqube-server/2025.5/analyzing-source-code/scanners/scanner-environment/verifying-code-checkout-step.md
# Source: https://docs.sonarsource.com/sonarqube-server/2025.1/analyzing-source-code/scanners/scanner-environment/verifying-code-checkout-step.md
# Source: https://docs.sonarsource.com/sonarqube-server/2025.4/analyzing-source-code/scanners/scanner-environment/verifying-code-checkout-step.md
# Source: https://docs.sonarsource.com/sonarqube-server/2025.6/analyzing-source-code/scanners/scanner-environment/verifying-code-checkout-step.md
# Source: https://docs.sonarsource.com/sonarqube-server/analyzing-source-code/scanners/scanner-environment/verifying-code-checkout-step.md
# Source: https://docs.sonarsource.com/sonarqube-cloud/advanced-setup/scanner-environment/verifying-code-checkout-step.md
# Checked-out code
The SonarScanners run on code that is checked out from the repository. During the checkout of a working copy (clone) of the code from the project repository, we recommend using the full depth. Indeed, the so-retrieved SCM metadata enables various features such as:
* New Code detection:
* On pull requests, not just the last commit but all the commits that are not on the target branch are considered. This requires a history long enough to find the common commit.
* On long-living branches, the New Code definition can be set in different ways but a longer history is always better.
* Blame information display and automatic issue assignment based on the blame information.
* [#issue-backdating-new-issues-raised-on-old-code](https://docs.sonarsource.com/sonarqube-cloud/managing-your-projects/issues/solution-overview#issue-backdating-new-issues-raised-on-old-code "mention")
In addition, we recommend cloning all the branches of the repository to avoid reference errors during the checkout.
With Git, this means using `fetch-depth: 0`. This disables shallow clones and fetches all branches.
{% hint style="warning" %}
* Avoid any attempt at performing actions on the cloned repository to make sure the repository contains valid repository metadata (e.g. the .git folders have not been removed).
* The code in the cloned repository matches the code in the original repository (e.g no code is added to the branch on the cloned repository before analysis).
{% endhint %}
---
# Source: https://docs.sonarsource.com/sonarqube-cloud/managing-your-projects/dashboards/viewing-and-managing-dashboards.md
# Viewing and managing dashboards
This feature is available in the [Enterprise](https://www.sonarsource.com/plans-and-pricing/sonarcloud/) plan.
### Retrieving dashboards
To retrieve **Dashboards**:
{% embed url="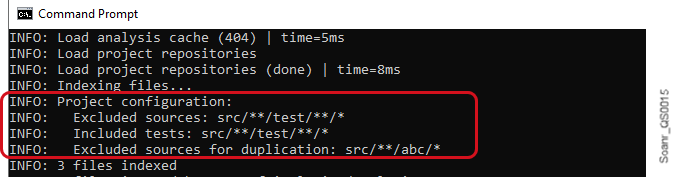
 * In the upper-right corner, the chart shows whether the data is applied to new or overall code.
* If enabled during widget creation, the widget displays the net change in the last 30 days. Click on it to investigate further on the Activity page.
#### Rating badge
A rating represents a single metric. It displays the current rating for a measure, for example, a security rating or reliability rating.
* In the upper-right corner, the chart shows whether the data is applied to new or overall code.
* If enabled during widget creation, the widget displays the net change in the last 30 days. Click on it to investigate further on the Activity page.
#### Rating badge
A rating represents a single metric. It displays the current rating for a measure, for example, a security rating or reliability rating.
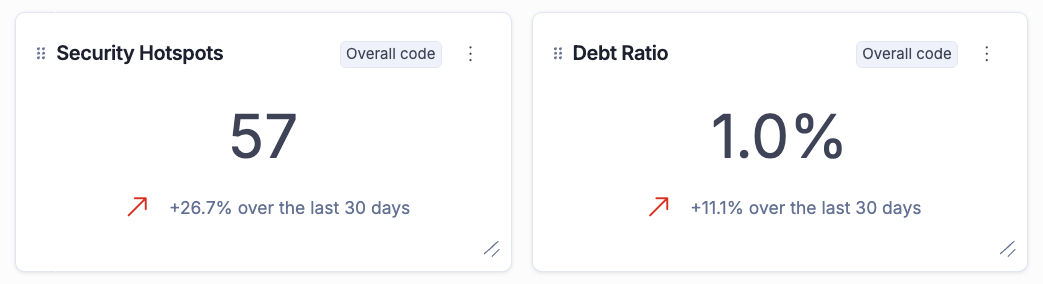 In the upper-right corner, the chart shows whether the data is applied to new or overall code.
#### Line chart
A line chart represents metrics that change over time, displaying historical data for a selected measure.
In the upper-right corner, the chart shows whether the data is applied to new or overall code.
#### Line chart
A line chart represents metrics that change over time, displaying historical data for a selected measure.
.png?alt=media) * Hover over the line to reveal a tooltip with additional information.
* In the upper-right corner, the chart shows that data is applied to overall code, which is the only option for line charts.
* If enabled during widget creation, the chart displays a legend.
#### Pie and donut charts
Pie and donut charts display information for multiple metrics.
* Hover over the line to reveal a tooltip with additional information.
* In the upper-right corner, the chart shows that data is applied to overall code, which is the only option for line charts.
* If enabled during widget creation, the chart displays a legend.
#### Pie and donut charts
Pie and donut charts display information for multiple metrics.
.png?alt=media)
 * Hover over a section of the pie or donut chart to reveal a tooltip with more information.
* Click on the pie or donut chart sections, or on the legend, to drill down into the metrics.
* In the upper-right corner, the chart shows whether the data is applied to new or overall code.
* If enabled during widget creation, the chart displays a legend.
See [#metrics](https://docs.sonarsource.com/sonarqube-cloud/managing-your-projects/creating-dashboards#metrics "mention") for more information about metrics and associated visualizations.
#### Missing a visualization or metric?
Your feedback is important to us. Submit your ideas for a visualization or metric that you would like to see in Dashboards through our [Portal card](https://portal.productboard.com/sonarsource/1-sonarqube-cloud/c/802-dashboards-improvements).
### Editing a dashboard
* Hover over a section of the pie or donut chart to reveal a tooltip with more information.
* Click on the pie or donut chart sections, or on the legend, to drill down into the metrics.
* In the upper-right corner, the chart shows whether the data is applied to new or overall code.
* If enabled during widget creation, the chart displays a legend.
See [#metrics](https://docs.sonarsource.com/sonarqube-cloud/managing-your-projects/creating-dashboards#metrics "mention") for more information about metrics and associated visualizations.
#### Missing a visualization or metric?
Your feedback is important to us. Submit your ideas for a visualization or metric that you would like to see in Dashboards through our [Portal card](https://portal.productboard.com/sonarsource/1-sonarqube-cloud/c/802-dashboards-improvements).
### Editing a dashboard
.png?alt=media)
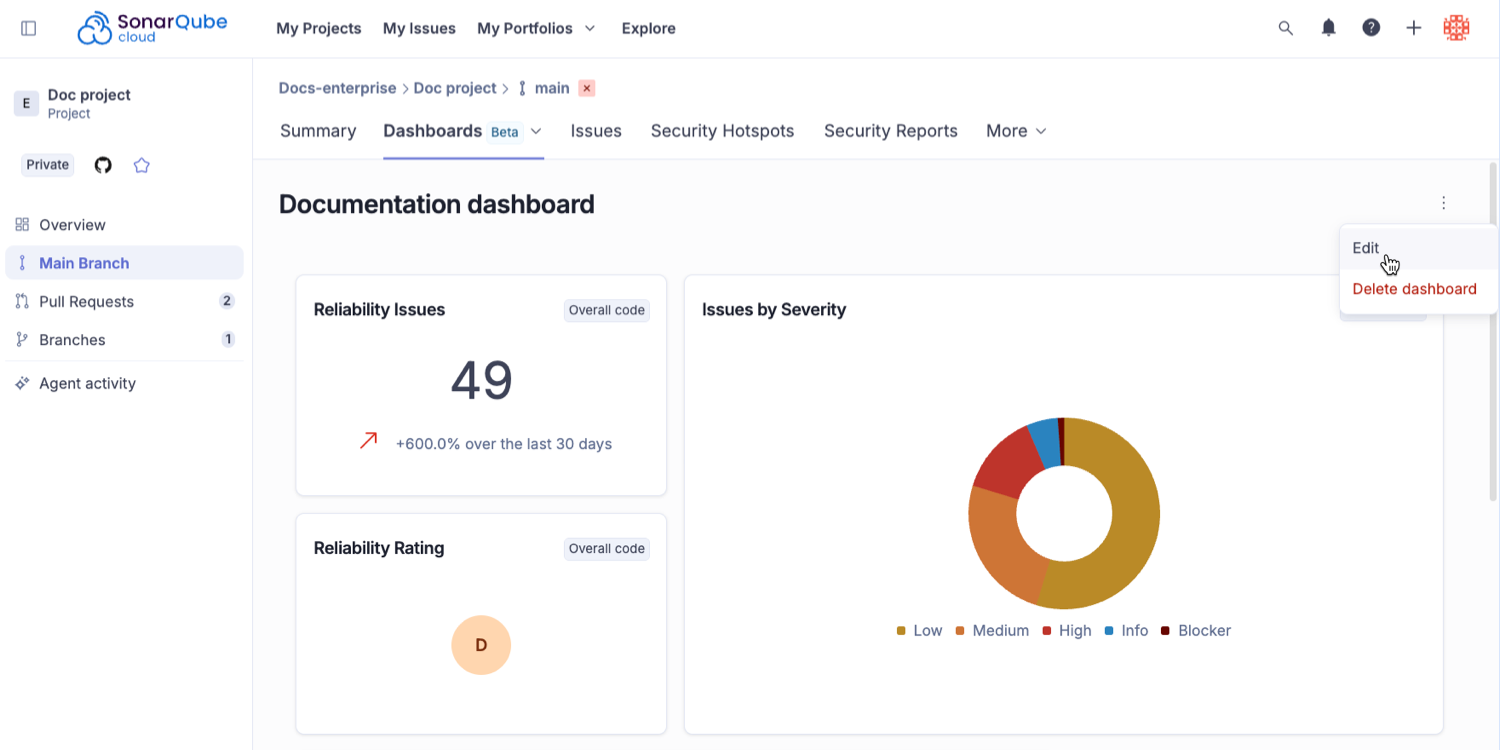
.png?alt=media)
 ### Viewing your enterprise’s billing and usage information
To view your enterprise’s billing and usage information, you must be an admin of the enterprise. Proceed as follows:
1. Retrieve your enterprise. See [retrieving-and-viewing-your-enterprise](https://docs.sonarsource.com/sonarqube-cloud/administering-sonarcloud/managing-enterprise/retrieving-and-viewing-your-enterprise "mention") for more details.
2. Select the **Billing and Usage** tab.
The dashboard shows:
1. The characteristics of your enterprise plan with the subscription status of the enterprise add-ons (add-ons require a separate subscription to your Enterprise license).
2. Usage information:
* An overview of the lines of code consumption. For more details, see [#loc-consumption](https://docs.sonarsource.com/sonarqube-cloud/managing-enterprise/managing-the-lines-of-code-within-your-enterprise#loc-consumption "mention").
### Viewing your enterprise’s billing and usage information
To view your enterprise’s billing and usage information, you must be an admin of the enterprise. Proceed as follows:
1. Retrieve your enterprise. See [retrieving-and-viewing-your-enterprise](https://docs.sonarsource.com/sonarqube-cloud/administering-sonarcloud/managing-enterprise/retrieving-and-viewing-your-enterprise "mention") for more details.
2. Select the **Billing and Usage** tab.
The dashboard shows:
1. The characteristics of your enterprise plan with the subscription status of the enterprise add-ons (add-ons require a separate subscription to your Enterprise license).
2. Usage information:
* An overview of the lines of code consumption. For more details, see [#loc-consumption](https://docs.sonarsource.com/sonarqube-cloud/managing-enterprise/managing-the-lines-of-code-within-your-enterprise#loc-consumption "mention").

.png?alt=media)

.png?alt=media)
.png?alt=media)
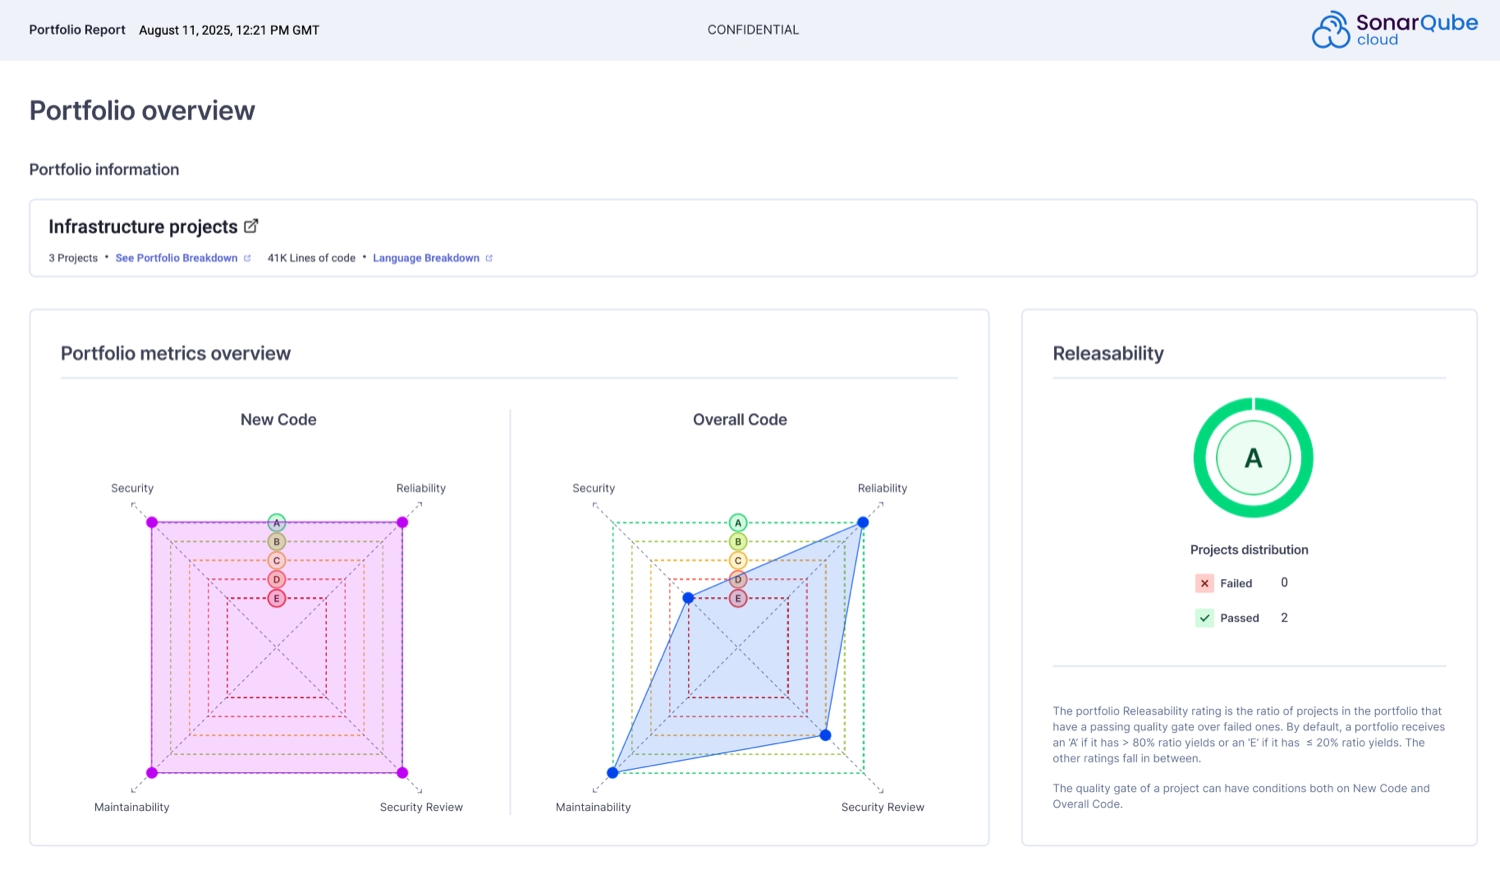 1. Click **My Portfolios** in the top navigation bar and select your enterprise
2. The **Portfolios** home page lists all the portfolios that belong to this organization. Use the search box to narrow down the results.
3. Here, you can review the portfolio’s overall code ratings, including the number of projects with the worst rating, see the number of Lines of Code analyzed, and see the number of projects included in the portfolio.
4. Click on the portfolio name to view more details.
See [managing-portfolios](https://docs.sonarsource.com/sonarqube-cloud/managing-portfolios "mention") for more information about how to create, edit, and delete portfolios.
### Portfolio metrics
The reliability, security vulnerabilities, security review, and maintainability ratings are calculated as the average of the ratings for all projects included in the portfolio.
SonarQube Cloud converts each project’s letter rating to a number, calculates an average number for the projects in the portfolio, and converts that average to a letter rating. Averages ending with .5 are rounded up, resulting in the "lower" of the two possible ratings, so an average of 2.5 would be rounded up to 3 and result in a "C" rating).
This gives a "problem density" measure for your portfolio’s four axes: reliability, security vulnerabilities, security review, and maintainability.
Rating conversion: E->5, D->4, C->3, B->2, A->1
A risk level is associated with each metric, except for the Releasability:
* **High**: if at least one project in the portfolio is rated E or D.
* **Medium**: if at least one project in the portfolio is rated C or B.
* **Low**: If all projects in the portfolio are rated A.
Each metric is calculated by SonarQube Cloud for New and Overall Code.
1. Click **My Portfolios** in the top navigation bar and select your enterprise
2. The **Portfolios** home page lists all the portfolios that belong to this organization. Use the search box to narrow down the results.
3. Here, you can review the portfolio’s overall code ratings, including the number of projects with the worst rating, see the number of Lines of Code analyzed, and see the number of projects included in the portfolio.
4. Click on the portfolio name to view more details.
See [managing-portfolios](https://docs.sonarsource.com/sonarqube-cloud/managing-portfolios "mention") for more information about how to create, edit, and delete portfolios.
### Portfolio metrics
The reliability, security vulnerabilities, security review, and maintainability ratings are calculated as the average of the ratings for all projects included in the portfolio.
SonarQube Cloud converts each project’s letter rating to a number, calculates an average number for the projects in the portfolio, and converts that average to a letter rating. Averages ending with .5 are rounded up, resulting in the "lower" of the two possible ratings, so an average of 2.5 would be rounded up to 3 and result in a "C" rating).
This gives a "problem density" measure for your portfolio’s four axes: reliability, security vulnerabilities, security review, and maintainability.
Rating conversion: E->5, D->4, C->3, B->2, A->1
A risk level is associated with each metric, except for the Releasability:
* **High**: if at least one project in the portfolio is rated E or D.
* **Medium**: if at least one project in the portfolio is rated C or B.
* **Low**: If all projects in the portfolio are rated A.
Each metric is calculated by SonarQube Cloud for New and Overall Code.
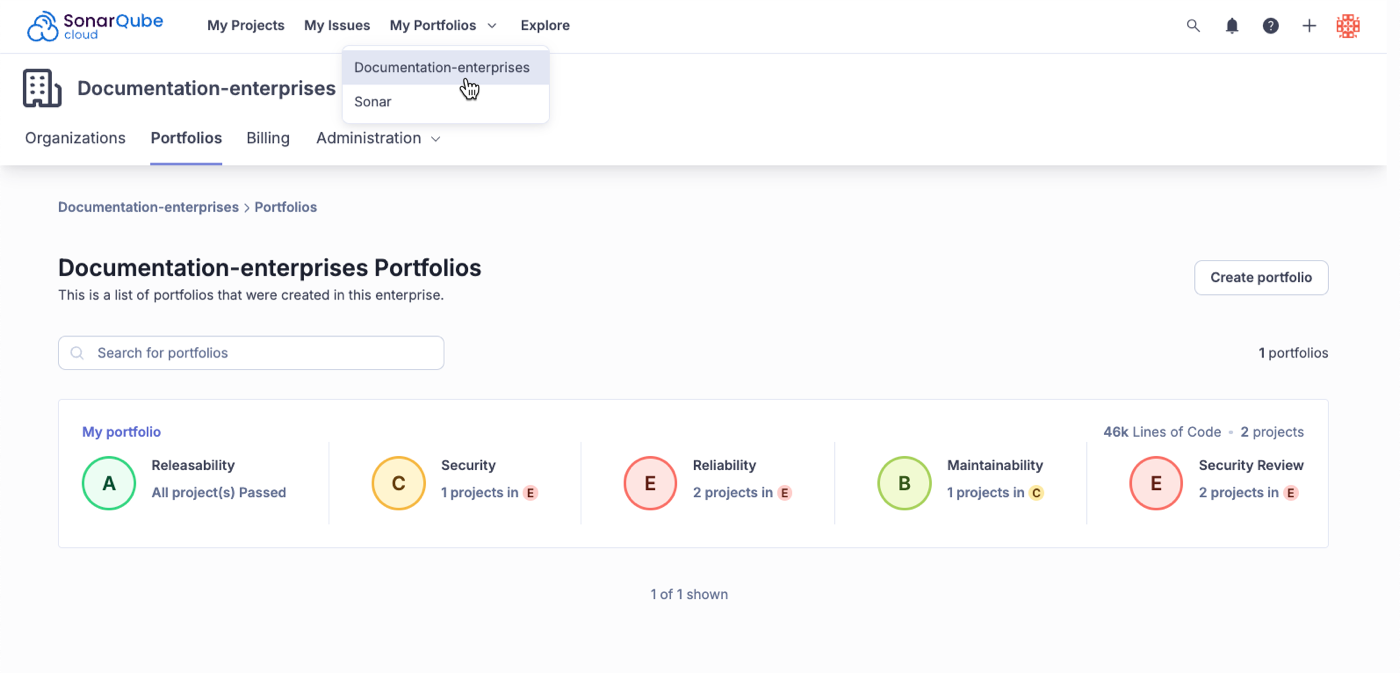
 ### Measures page
The Measures page provides an in-depth breakdown of metrics across your portfolio projects, helping you gain broader visibility. It includes:
* **Software quality rating breakdown**: View ratings breakdown across multiple projects at once.
* **Code coverage visibility**: Easily see code coverage at the portfolio level without manually aggregating project data.
* **Duplication insights**: View duplications by project in your portfolio to maintain high-quality, maintainable software. Note that his feature does not cover cross-project duplications.
* **Lines of Code (LOC) tracking**: Quickly understand LOC usage breakdown by language and by project.
See [metric-definitions](https://docs.sonarsource.com/sonarqube-cloud/digging-deeper/metric-definitions "mention") for more information about code metrics used in the Sonar solution.
### Related pages
* [managing-portfolios](https://docs.sonarsource.com/sonarqube-cloud/managing-portfolios "mention")
* [administering-portfolios](https://docs.sonarsource.com/sonarqube-cloud/getting-started-with-enterprise/administering-portfolios "mention")
* [portfolio-security-reports](https://docs.sonarsource.com/sonarqube-cloud/getting-started-with-enterprise/viewing-enterprise-reports/portfolio-security-reports "mention")
* [managing-enterprise](https://docs.sonarsource.com/sonarqube-cloud/administering-sonarcloud/managing-enterprise "mention")
* [viewing-portfolio-pdf-reports](https://docs.sonarsource.com/sonarqube-cloud/getting-started-with-enterprise/viewing-enterprise-reports/viewing-portfolio-pdf-reports "mention")
---
# Source: https://docs.sonarsource.com/sonarqube-community-build/user-guide/viewing-projects/viewing-project-information.md
# Source: https://docs.sonarsource.com/sonarqube-server/2025.2/user-guide/viewing-projects/viewing-project-information.md
# Source: https://docs.sonarsource.com/sonarqube-server/2025.3/user-guide/viewing-projects/viewing-project-information.md
# Source: https://docs.sonarsource.com/sonarqube-server/2025.5/user-guide/viewing-projects/viewing-project-information.md
# Source: https://docs.sonarsource.com/sonarqube-server/2025.4/user-guide/viewing-projects/viewing-project-information.md
# Source: https://docs.sonarsource.com/sonarqube-server/2025.6/user-guide/viewing-projects/viewing-project-information.md
# Source: https://docs.sonarsource.com/sonarqube-server/user-guide/viewing-projects/viewing-project-information.md
# Viewing project information
To view various project information such the project key, visibility, tags, or total lines of code consumed on your main branch; or project settings such as quality gate and quality profiles used for project analyis, AI Code Assurance or AI CodeFix status, proceed as follows:
1. Retrieve the project you wish to view. See the [retrieving-projects](https://docs.sonarsource.com/sonarqube-server/user-guide/viewing-projects/retrieving-projects "mention") page for more information.
2. In the top right corner, select **Project Information**.
### Measures page
The Measures page provides an in-depth breakdown of metrics across your portfolio projects, helping you gain broader visibility. It includes:
* **Software quality rating breakdown**: View ratings breakdown across multiple projects at once.
* **Code coverage visibility**: Easily see code coverage at the portfolio level without manually aggregating project data.
* **Duplication insights**: View duplications by project in your portfolio to maintain high-quality, maintainable software. Note that his feature does not cover cross-project duplications.
* **Lines of Code (LOC) tracking**: Quickly understand LOC usage breakdown by language and by project.
See [metric-definitions](https://docs.sonarsource.com/sonarqube-cloud/digging-deeper/metric-definitions "mention") for more information about code metrics used in the Sonar solution.
### Related pages
* [managing-portfolios](https://docs.sonarsource.com/sonarqube-cloud/managing-portfolios "mention")
* [administering-portfolios](https://docs.sonarsource.com/sonarqube-cloud/getting-started-with-enterprise/administering-portfolios "mention")
* [portfolio-security-reports](https://docs.sonarsource.com/sonarqube-cloud/getting-started-with-enterprise/viewing-enterprise-reports/portfolio-security-reports "mention")
* [managing-enterprise](https://docs.sonarsource.com/sonarqube-cloud/administering-sonarcloud/managing-enterprise "mention")
* [viewing-portfolio-pdf-reports](https://docs.sonarsource.com/sonarqube-cloud/getting-started-with-enterprise/viewing-enterprise-reports/viewing-portfolio-pdf-reports "mention")
---
# Source: https://docs.sonarsource.com/sonarqube-community-build/user-guide/viewing-projects/viewing-project-information.md
# Source: https://docs.sonarsource.com/sonarqube-server/2025.2/user-guide/viewing-projects/viewing-project-information.md
# Source: https://docs.sonarsource.com/sonarqube-server/2025.3/user-guide/viewing-projects/viewing-project-information.md
# Source: https://docs.sonarsource.com/sonarqube-server/2025.5/user-guide/viewing-projects/viewing-project-information.md
# Source: https://docs.sonarsource.com/sonarqube-server/2025.4/user-guide/viewing-projects/viewing-project-information.md
# Source: https://docs.sonarsource.com/sonarqube-server/2025.6/user-guide/viewing-projects/viewing-project-information.md
# Source: https://docs.sonarsource.com/sonarqube-server/user-guide/viewing-projects/viewing-project-information.md
# Viewing project information
To view various project information such the project key, visibility, tags, or total lines of code consumed on your main branch; or project settings such as quality gate and quality profiles used for project analyis, AI Code Assurance or AI CodeFix status, proceed as follows:
1. Retrieve the project you wish to view. See the [retrieving-projects](https://docs.sonarsource.com/sonarqube-server/user-guide/viewing-projects/retrieving-projects "mention") page for more information.
2. In the top right corner, select **Project Information**.
 ---
# Source: https://docs.sonarsource.com/sonarqube-cloud/getting-started-with-enterprise/viewing-enterprise-reports/viewing-project-regulatory-reports.md
# Viewing project regulatory reports
Starting in [Enterprise](https://www.sonarsource.com/plans-and-pricing/enterprise/), you can download a regulatory report for any long-lived branch of a project, typically the main branch. See [long-lived-branch-pattern](https://docs.sonarsource.com/sonarqube-cloud/managing-your-projects/project-analysis/long-lived-branch-pattern "mention") if the long-lived branch is other than main.
{% hint style="info" %}
Before you can view the Enterprise-level reports, your organization must be added to an enterprise. For more information, see [managing-enterprise](https://docs.sonarsource.com/sonarqube-cloud/administering-sonarcloud/managing-enterprise "mention").
{% endhint %}
### Downloading regulatory reports
To download a regulatory report:
1. Retrieve the project. See [retrieving-projects](https://docs.sonarsource.com/sonarqube-cloud/managing-your-projects/retrieving-projects "mention") for more details.
2. On the Branch Summary page, click **Downloadable reports** and select **Download Regulatory report (.zip)** from the drop down menu.
Alternatively:
1. Click **Information** in the left side navigation bar.
2. In the **Regulatory Report** section, choose a project branch from the drop down menu**.**
3. Click **Download report**.
SonarQube generates the report for download, which may take a few minutes depending on the size of the project.
### Contents of the regulatory report’s ZIP file
The reports are in a ZIP file containing a snapshot of the latest analysis of the selected branch and include TXT, CSV, and PDF files.
The PDF file includes:
* **Project overview**:
* Project details
* Quality gates information and status
* **Project rating** **overview** for:
* New code broken down by new issues, accepted issues, coverage, duplication, and security hotspots.
* Overall code broken down by security, reliability, maintainability, accepted issues, coverage, duplication, and security hotspots.
* **Distribution of issues in new code** showing open issues and breakdown by severity, based on security, reliability, maintainability.
* **Distribution of issues in overall code** showing open issues and breakdown by severity, based on security, reliability, maintainability.
* **Quality gate and quality profiles** information.
* **Files** lists all relevant files included in the ZIP file.
* **Definitions** lists all the definitions of terms related to the report.
The PDF regulatory report is generated with metrics from software qualities (security, reliability, maintainability). Some CSV files may contain metrics from both software qualities and rule types (vulnerabilities, bugs and code smells) and they are marked accordingly.
### Related pages
* [project-security-reports](https://docs.sonarsource.com/sonarqube-cloud/getting-started-with-enterprise/viewing-enterprise-reports/project-security-reports "mention")
* [project-pdf-reports](https://docs.sonarsource.com/sonarqube-cloud/getting-started-with-enterprise/viewing-enterprise-reports/project-pdf-reports "mention")
---
# Source: https://docs.sonarsource.com/sonarqube-community-build/user-guide/viewing-projects/viewing-project-structure.md
# Source: https://docs.sonarsource.com/sonarqube-server/10.7/user-guide/viewing-projects/viewing-project-structure.md
# Source: https://docs.sonarsource.com/sonarqube-server/10.8/user-guide/viewing-projects/viewing-project-structure.md
# Source: https://docs.sonarsource.com/sonarqube-server/2025.2/user-guide/viewing-projects/viewing-project-structure.md
# Source: https://docs.sonarsource.com/sonarqube-server/2025.3/user-guide/viewing-projects/viewing-project-structure.md
# Source: https://docs.sonarsource.com/sonarqube-server/2025.5/user-guide/viewing-projects/viewing-project-structure.md
# Source: https://docs.sonarsource.com/sonarqube-server/2025.1/user-guide/viewing-projects/viewing-project-structure.md
# Source: https://docs.sonarsource.com/sonarqube-server/2025.4/user-guide/viewing-projects/viewing-project-structure.md
# Source: https://docs.sonarsource.com/sonarqube-server/2025.6/user-guide/viewing-projects/viewing-project-structure.md
# Source: https://docs.sonarsource.com/sonarqube-server/user-guide/viewing-projects/viewing-project-structure.md
# Viewing project structure
You can view the project’s structure and code in SonarQube Server. For private projects, you need the **Browse** and **See Source Code** permission.
To view the structure and code of a project:
1. Retrieve your project. See [retrieving-projects](https://docs.sonarsource.com/sonarqube-server/user-guide/viewing-projects/retrieving-projects "mention") for more information.
2. In the project navigation bar, select **Code**. It takes you to an outline of your project structure.
3. Drill down to see files in a directory, and select a file to see its code.
{% hint style="info" %}
If your project is too large for easy exploration via drilling, the search feature on this page will help. While the global search in the main menu returns results from throughout the SonarQube Server instance, the localized search on the code page is restricted to files and directories in the current project.
{% endhint %}
---
# Source: https://docs.sonarsource.com/sonarqube-community-build/user-guide/viewing-projects.md
# Source: https://docs.sonarsource.com/sonarqube-server/10.7/user-guide/viewing-projects.md
# Source: https://docs.sonarsource.com/sonarqube-server/10.8/user-guide/viewing-projects.md
# Source: https://docs.sonarsource.com/sonarqube-server/2025.2/user-guide/viewing-projects.md
# Source: https://docs.sonarsource.com/sonarqube-server/2025.3/user-guide/viewing-projects.md
# Source: https://docs.sonarsource.com/sonarqube-server/2025.5/user-guide/viewing-projects.md
# Source: https://docs.sonarsource.com/sonarqube-server/2025.1/user-guide/viewing-projects.md
# Source: https://docs.sonarsource.com/sonarqube-server/2025.4/user-guide/viewing-projects.md
# Source: https://docs.sonarsource.com/sonarqube-server/2025.6/user-guide/viewing-projects.md
# Source: https://docs.sonarsource.com/sonarqube-server/user-guide/viewing-projects.md
# Viewing projects
{% content-ref url="viewing-projects/retrieving-projects" %}
[retrieving-projects](https://docs.sonarsource.com/sonarqube-server/user-guide/viewing-projects/retrieving-projects)
{% endcontent-ref %}
{% content-ref url="viewing-projects/project-overview" %}
[project-overview](https://docs.sonarsource.com/sonarqube-server/user-guide/viewing-projects/project-overview)
{% endcontent-ref %}
{% content-ref url="viewing-projects/activity-and-history" %}
[activity-and-history](https://docs.sonarsource.com/sonarqube-server/user-guide/viewing-projects/activity-and-history)
{% endcontent-ref %}
{% content-ref url="viewing-projects/viewing-project-structure" %}
[viewing-project-structure](https://docs.sonarsource.com/sonarqube-server/user-guide/viewing-projects/viewing-project-structure)
{% endcontent-ref %}
{% content-ref url="viewing-projects/viewing-project-information" %}
[viewing-project-information](https://docs.sonarsource.com/sonarqube-server/user-guide/viewing-projects/viewing-project-information)
{% endcontent-ref %}
---
# Source: https://docs.sonarsource.com/sonarqube-community-build/quality-standards-administration/managing-quality-gates/viewing-quality-gate.md
# Source: https://docs.sonarsource.com/sonarqube-server/2025.2/quality-standards-administration/managing-quality-gates/viewing-quality-gate.md
# Source: https://docs.sonarsource.com/sonarqube-server/2025.3/quality-standards-administration/managing-quality-gates/viewing-quality-gate.md
# Source: https://docs.sonarsource.com/sonarqube-server/2025.5/quality-standards-administration/managing-quality-gates/viewing-quality-gate.md
# Source: https://docs.sonarsource.com/sonarqube-server/2025.4/quality-standards-administration/managing-quality-gates/viewing-quality-gate.md
# Source: https://docs.sonarsource.com/sonarqube-server/2025.6/quality-standards-administration/managing-quality-gates/viewing-quality-gate.md
# Source: https://docs.sonarsource.com/sonarqube-server/quality-standards-administration/managing-quality-gates/viewing-quality-gate.md
# Source: https://docs.sonarsource.com/sonarqube-cloud/standards/managing-quality-gates/viewing-quality-gate.md
# Viewing a quality gate
Any user, even an ananymous user, can view the quality gates defined in a SonarQube Cloud instance. For information about quality gates, see [introduction-to-quality-gates](https://docs.sonarsource.com/sonarqube-cloud/standards/managing-quality-gates/introduction-to-quality-gates "mention").
To view the definition of a quality gate:
1. See [viewing-organizations](https://docs.sonarsource.com/sonarqube-cloud/getting-started/viewing-organizations "mention") to access your organization.
2. In the organization’s navigation bar, select **Quality Gates**.
3. In the left panel, select the quality gate you want to view. Its definition is displayed in the right panel. For information about the metrics used in the conditions, see the [metric-definitions](https://docs.sonarsource.com/sonarqube-cloud/digging-deeper/metric-definitions "mention") page.
4. To view the projects explicitly associated with this quality gate, navigate down to **Projects** in the right panel (Note that projects cannot be explicitly associated with the default quality gate). The **With** tab lists the associated projects. The **Without** tab lists the projects not associated with this quality gate. The **All** tab shows all projects.
The figure below shows the **Quality Gates** page:
1. The list of quality gates in your organization. Icons are used to indicate if a quality gate is qualified for Clean as You Code and/or AI Code Assurance.
2. The definition of the selected quality gate.
3. The projects associated with the selected project.
---
# Source: https://docs.sonarsource.com/sonarqube-cloud/getting-started-with-enterprise/viewing-enterprise-reports/viewing-project-regulatory-reports.md
# Viewing project regulatory reports
Starting in [Enterprise](https://www.sonarsource.com/plans-and-pricing/enterprise/), you can download a regulatory report for any long-lived branch of a project, typically the main branch. See [long-lived-branch-pattern](https://docs.sonarsource.com/sonarqube-cloud/managing-your-projects/project-analysis/long-lived-branch-pattern "mention") if the long-lived branch is other than main.
{% hint style="info" %}
Before you can view the Enterprise-level reports, your organization must be added to an enterprise. For more information, see [managing-enterprise](https://docs.sonarsource.com/sonarqube-cloud/administering-sonarcloud/managing-enterprise "mention").
{% endhint %}
### Downloading regulatory reports
To download a regulatory report:
1. Retrieve the project. See [retrieving-projects](https://docs.sonarsource.com/sonarqube-cloud/managing-your-projects/retrieving-projects "mention") for more details.
2. On the Branch Summary page, click **Downloadable reports** and select **Download Regulatory report (.zip)** from the drop down menu.
Alternatively:
1. Click **Information** in the left side navigation bar.
2. In the **Regulatory Report** section, choose a project branch from the drop down menu**.**
3. Click **Download report**.
SonarQube generates the report for download, which may take a few minutes depending on the size of the project.
### Contents of the regulatory report’s ZIP file
The reports are in a ZIP file containing a snapshot of the latest analysis of the selected branch and include TXT, CSV, and PDF files.
The PDF file includes:
* **Project overview**:
* Project details
* Quality gates information and status
* **Project rating** **overview** for:
* New code broken down by new issues, accepted issues, coverage, duplication, and security hotspots.
* Overall code broken down by security, reliability, maintainability, accepted issues, coverage, duplication, and security hotspots.
* **Distribution of issues in new code** showing open issues and breakdown by severity, based on security, reliability, maintainability.
* **Distribution of issues in overall code** showing open issues and breakdown by severity, based on security, reliability, maintainability.
* **Quality gate and quality profiles** information.
* **Files** lists all relevant files included in the ZIP file.
* **Definitions** lists all the definitions of terms related to the report.
The PDF regulatory report is generated with metrics from software qualities (security, reliability, maintainability). Some CSV files may contain metrics from both software qualities and rule types (vulnerabilities, bugs and code smells) and they are marked accordingly.
### Related pages
* [project-security-reports](https://docs.sonarsource.com/sonarqube-cloud/getting-started-with-enterprise/viewing-enterprise-reports/project-security-reports "mention")
* [project-pdf-reports](https://docs.sonarsource.com/sonarqube-cloud/getting-started-with-enterprise/viewing-enterprise-reports/project-pdf-reports "mention")
---
# Source: https://docs.sonarsource.com/sonarqube-community-build/user-guide/viewing-projects/viewing-project-structure.md
# Source: https://docs.sonarsource.com/sonarqube-server/10.7/user-guide/viewing-projects/viewing-project-structure.md
# Source: https://docs.sonarsource.com/sonarqube-server/10.8/user-guide/viewing-projects/viewing-project-structure.md
# Source: https://docs.sonarsource.com/sonarqube-server/2025.2/user-guide/viewing-projects/viewing-project-structure.md
# Source: https://docs.sonarsource.com/sonarqube-server/2025.3/user-guide/viewing-projects/viewing-project-structure.md
# Source: https://docs.sonarsource.com/sonarqube-server/2025.5/user-guide/viewing-projects/viewing-project-structure.md
# Source: https://docs.sonarsource.com/sonarqube-server/2025.1/user-guide/viewing-projects/viewing-project-structure.md
# Source: https://docs.sonarsource.com/sonarqube-server/2025.4/user-guide/viewing-projects/viewing-project-structure.md
# Source: https://docs.sonarsource.com/sonarqube-server/2025.6/user-guide/viewing-projects/viewing-project-structure.md
# Source: https://docs.sonarsource.com/sonarqube-server/user-guide/viewing-projects/viewing-project-structure.md
# Viewing project structure
You can view the project’s structure and code in SonarQube Server. For private projects, you need the **Browse** and **See Source Code** permission.
To view the structure and code of a project:
1. Retrieve your project. See [retrieving-projects](https://docs.sonarsource.com/sonarqube-server/user-guide/viewing-projects/retrieving-projects "mention") for more information.
2. In the project navigation bar, select **Code**. It takes you to an outline of your project structure.
3. Drill down to see files in a directory, and select a file to see its code.
{% hint style="info" %}
If your project is too large for easy exploration via drilling, the search feature on this page will help. While the global search in the main menu returns results from throughout the SonarQube Server instance, the localized search on the code page is restricted to files and directories in the current project.
{% endhint %}
---
# Source: https://docs.sonarsource.com/sonarqube-community-build/user-guide/viewing-projects.md
# Source: https://docs.sonarsource.com/sonarqube-server/10.7/user-guide/viewing-projects.md
# Source: https://docs.sonarsource.com/sonarqube-server/10.8/user-guide/viewing-projects.md
# Source: https://docs.sonarsource.com/sonarqube-server/2025.2/user-guide/viewing-projects.md
# Source: https://docs.sonarsource.com/sonarqube-server/2025.3/user-guide/viewing-projects.md
# Source: https://docs.sonarsource.com/sonarqube-server/2025.5/user-guide/viewing-projects.md
# Source: https://docs.sonarsource.com/sonarqube-server/2025.1/user-guide/viewing-projects.md
# Source: https://docs.sonarsource.com/sonarqube-server/2025.4/user-guide/viewing-projects.md
# Source: https://docs.sonarsource.com/sonarqube-server/2025.6/user-guide/viewing-projects.md
# Source: https://docs.sonarsource.com/sonarqube-server/user-guide/viewing-projects.md
# Viewing projects
{% content-ref url="viewing-projects/retrieving-projects" %}
[retrieving-projects](https://docs.sonarsource.com/sonarqube-server/user-guide/viewing-projects/retrieving-projects)
{% endcontent-ref %}
{% content-ref url="viewing-projects/project-overview" %}
[project-overview](https://docs.sonarsource.com/sonarqube-server/user-guide/viewing-projects/project-overview)
{% endcontent-ref %}
{% content-ref url="viewing-projects/activity-and-history" %}
[activity-and-history](https://docs.sonarsource.com/sonarqube-server/user-guide/viewing-projects/activity-and-history)
{% endcontent-ref %}
{% content-ref url="viewing-projects/viewing-project-structure" %}
[viewing-project-structure](https://docs.sonarsource.com/sonarqube-server/user-guide/viewing-projects/viewing-project-structure)
{% endcontent-ref %}
{% content-ref url="viewing-projects/viewing-project-information" %}
[viewing-project-information](https://docs.sonarsource.com/sonarqube-server/user-guide/viewing-projects/viewing-project-information)
{% endcontent-ref %}
---
# Source: https://docs.sonarsource.com/sonarqube-community-build/quality-standards-administration/managing-quality-gates/viewing-quality-gate.md
# Source: https://docs.sonarsource.com/sonarqube-server/2025.2/quality-standards-administration/managing-quality-gates/viewing-quality-gate.md
# Source: https://docs.sonarsource.com/sonarqube-server/2025.3/quality-standards-administration/managing-quality-gates/viewing-quality-gate.md
# Source: https://docs.sonarsource.com/sonarqube-server/2025.5/quality-standards-administration/managing-quality-gates/viewing-quality-gate.md
# Source: https://docs.sonarsource.com/sonarqube-server/2025.4/quality-standards-administration/managing-quality-gates/viewing-quality-gate.md
# Source: https://docs.sonarsource.com/sonarqube-server/2025.6/quality-standards-administration/managing-quality-gates/viewing-quality-gate.md
# Source: https://docs.sonarsource.com/sonarqube-server/quality-standards-administration/managing-quality-gates/viewing-quality-gate.md
# Source: https://docs.sonarsource.com/sonarqube-cloud/standards/managing-quality-gates/viewing-quality-gate.md
# Viewing a quality gate
Any user, even an ananymous user, can view the quality gates defined in a SonarQube Cloud instance. For information about quality gates, see [introduction-to-quality-gates](https://docs.sonarsource.com/sonarqube-cloud/standards/managing-quality-gates/introduction-to-quality-gates "mention").
To view the definition of a quality gate:
1. See [viewing-organizations](https://docs.sonarsource.com/sonarqube-cloud/getting-started/viewing-organizations "mention") to access your organization.
2. In the organization’s navigation bar, select **Quality Gates**.
3. In the left panel, select the quality gate you want to view. Its definition is displayed in the right panel. For information about the metrics used in the conditions, see the [metric-definitions](https://docs.sonarsource.com/sonarqube-cloud/digging-deeper/metric-definitions "mention") page.
4. To view the projects explicitly associated with this quality gate, navigate down to **Projects** in the right panel (Note that projects cannot be explicitly associated with the default quality gate). The **With** tab lists the associated projects. The **Without** tab lists the projects not associated with this quality gate. The **All** tab shows all projects.
The figure below shows the **Quality Gates** page:
1. The list of quality gates in your organization. Icons are used to indicate if a quality gate is qualified for Clean as You Code and/or AI Code Assurance.
2. The definition of the selected quality gate.
3. The projects associated with the selected project.
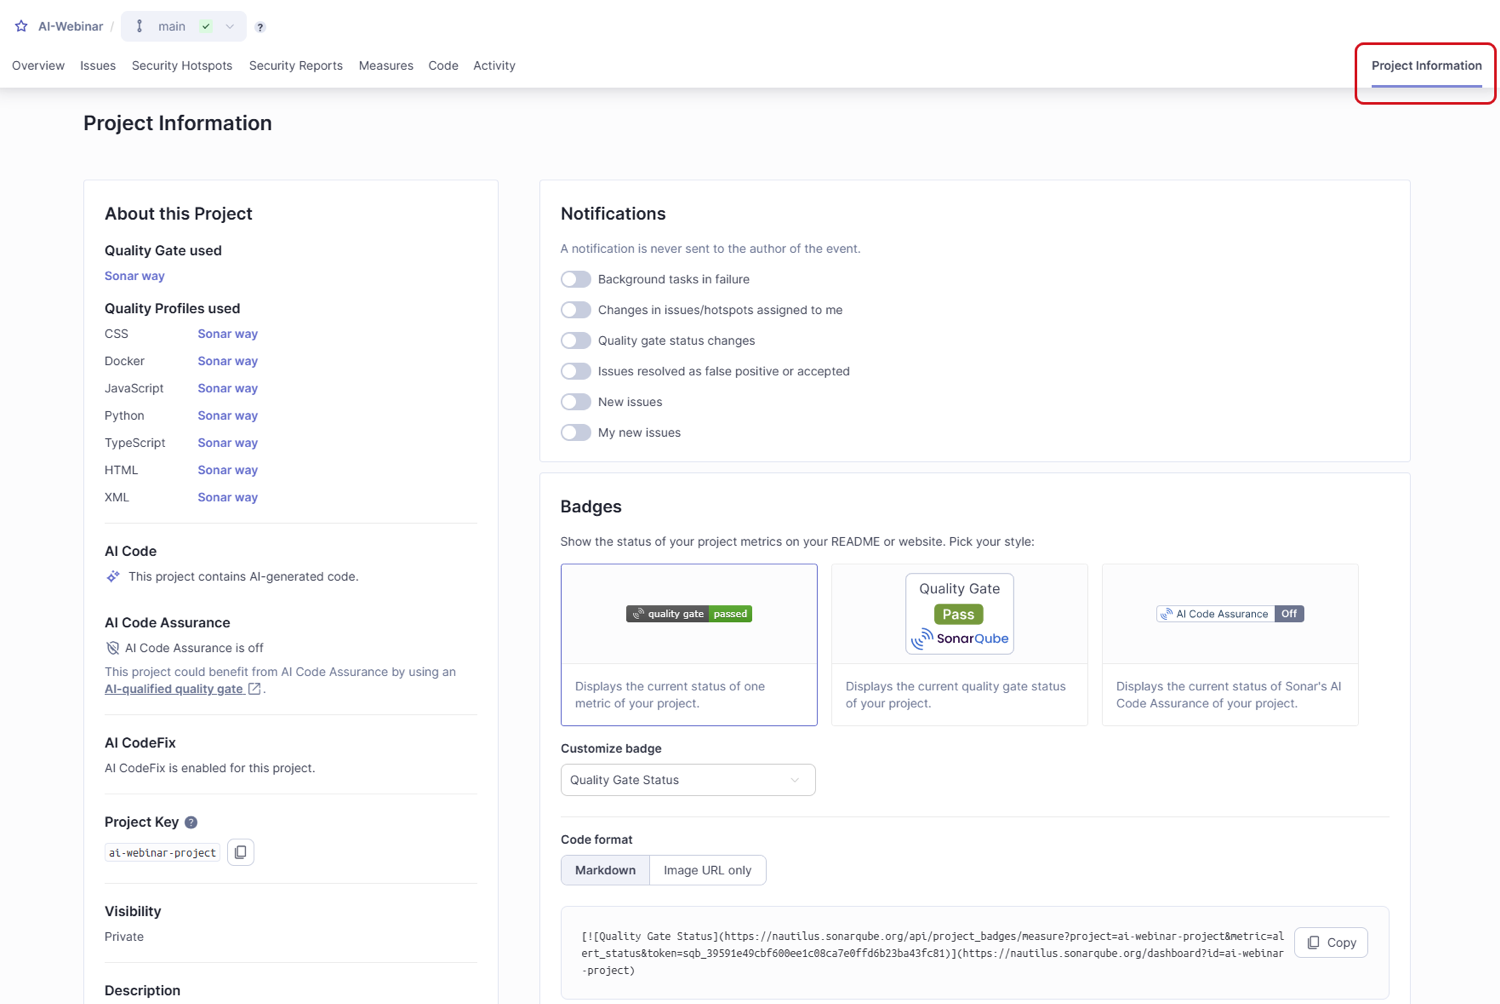 ### Related pages
* [introduction-to-quality-gates](https://docs.sonarsource.com/sonarqube-cloud/standards/managing-quality-gates/introduction-to-quality-gates "mention")
* [managing-custom-quality-gates](https://docs.sonarsource.com/sonarqube-cloud/standards/managing-quality-gates/managing-custom-quality-gates "mention")
* [changing-default-quality-gate](https://docs.sonarsource.com/sonarqube-cloud/standards/managing-quality-gates/changing-default-quality-gate "mention")
* [associating-projects-with-quality-gate](https://docs.sonarsource.com/sonarqube-cloud/standards/managing-quality-gates/associating-projects-with-quality-gate "mention")
* [notifications](https://docs.sonarsource.com/sonarqube-cloud/managing-your-account/notifications "mention")
* [quality-gates-for-ai-code](https://docs.sonarsource.com/sonarqube-cloud/standards/ai-code-assurance/quality-gates-for-ai-code "mention")
* [changing-quality-gate](https://docs.sonarsource.com/sonarqube-cloud/managing-your-projects/project-analysis/changing-quality-gate "mention")
---
# Source: https://docs.sonarsource.com/sonarqube-community-build/quality-standards-administration/managing-quality-profiles/viewing-quality-profiles.md
# Source: https://docs.sonarsource.com/sonarqube-server/2025.3/quality-standards-administration/managing-quality-profiles/viewing-quality-profiles.md
# Source: https://docs.sonarsource.com/sonarqube-server/2025.5/quality-standards-administration/managing-quality-profiles/viewing-quality-profiles.md
# Source: https://docs.sonarsource.com/sonarqube-server/2025.4/quality-standards-administration/managing-quality-profiles/viewing-quality-profiles.md
# Source: https://docs.sonarsource.com/sonarqube-server/2025.6/quality-standards-administration/managing-quality-profiles/viewing-quality-profiles.md
# Source: https://docs.sonarsource.com/sonarqube-server/quality-standards-administration/managing-quality-profiles/viewing-quality-profiles.md
# Source: https://docs.sonarsource.com/sonarqube-cloud/standards/managing-quality-profiles/viewing-quality-profiles.md
# Viewing quality profiles
For information about the how a quality profile works, see the [understanding-quality-profiles](https://docs.sonarsource.com/sonarqube-cloud/standards/managing-quality-profiles/understanding-quality-profiles "mention") page.
### Retrieving quality profiles
See [viewing-organizations](https://docs.sonarsource.com/sonarqube-cloud/getting-started/viewing-organizations "mention") to access your organization and navigate to **Quality Profiles**. The **Quality Profiles** page opens with:
1. On the left-hand side, you will see a list of profile sets by language. Quality profiles inherited from a parent profile are displayed under their parent and with a left indent.\
This list includes the following columns:
* The **Projects** column shows the count of projects associated with a quality profile. Alternatively, it displays **`DEFAULT`** when the profile is the language’s default (any profile not explicitly associated with a quality profile is associated with the organization’s default profile).
* The **Rules** column shows the total count of active rules within the profile. Additionally, if any of these active rules are deprecated, their number will also be indicated with a pink background.
* The **Updated** column shows when the quality profile was last updated.
* The **Used** column shows when the quality profile was last used during a project analysis.
2. On the right-hand side, you will see different sections with information relating to details associated with existing quality profiles:
* The **Deprecated Rules** section lists the quality profiles that contain deprecated rules.
* The **Recently Added Rules** section lists newly added rules and shows whether they are currently active in each profile.
* The **Stagnant Profiles** section lists the custom profiles that have not been updated for more than one year.
### Related pages
* [introduction-to-quality-gates](https://docs.sonarsource.com/sonarqube-cloud/standards/managing-quality-gates/introduction-to-quality-gates "mention")
* [managing-custom-quality-gates](https://docs.sonarsource.com/sonarqube-cloud/standards/managing-quality-gates/managing-custom-quality-gates "mention")
* [changing-default-quality-gate](https://docs.sonarsource.com/sonarqube-cloud/standards/managing-quality-gates/changing-default-quality-gate "mention")
* [associating-projects-with-quality-gate](https://docs.sonarsource.com/sonarqube-cloud/standards/managing-quality-gates/associating-projects-with-quality-gate "mention")
* [notifications](https://docs.sonarsource.com/sonarqube-cloud/managing-your-account/notifications "mention")
* [quality-gates-for-ai-code](https://docs.sonarsource.com/sonarqube-cloud/standards/ai-code-assurance/quality-gates-for-ai-code "mention")
* [changing-quality-gate](https://docs.sonarsource.com/sonarqube-cloud/managing-your-projects/project-analysis/changing-quality-gate "mention")
---
# Source: https://docs.sonarsource.com/sonarqube-community-build/quality-standards-administration/managing-quality-profiles/viewing-quality-profiles.md
# Source: https://docs.sonarsource.com/sonarqube-server/2025.3/quality-standards-administration/managing-quality-profiles/viewing-quality-profiles.md
# Source: https://docs.sonarsource.com/sonarqube-server/2025.5/quality-standards-administration/managing-quality-profiles/viewing-quality-profiles.md
# Source: https://docs.sonarsource.com/sonarqube-server/2025.4/quality-standards-administration/managing-quality-profiles/viewing-quality-profiles.md
# Source: https://docs.sonarsource.com/sonarqube-server/2025.6/quality-standards-administration/managing-quality-profiles/viewing-quality-profiles.md
# Source: https://docs.sonarsource.com/sonarqube-server/quality-standards-administration/managing-quality-profiles/viewing-quality-profiles.md
# Source: https://docs.sonarsource.com/sonarqube-cloud/standards/managing-quality-profiles/viewing-quality-profiles.md
# Viewing quality profiles
For information about the how a quality profile works, see the [understanding-quality-profiles](https://docs.sonarsource.com/sonarqube-cloud/standards/managing-quality-profiles/understanding-quality-profiles "mention") page.
### Retrieving quality profiles
See [viewing-organizations](https://docs.sonarsource.com/sonarqube-cloud/getting-started/viewing-organizations "mention") to access your organization and navigate to **Quality Profiles**. The **Quality Profiles** page opens with:
1. On the left-hand side, you will see a list of profile sets by language. Quality profiles inherited from a parent profile are displayed under their parent and with a left indent.\
This list includes the following columns:
* The **Projects** column shows the count of projects associated with a quality profile. Alternatively, it displays **`DEFAULT`** when the profile is the language’s default (any profile not explicitly associated with a quality profile is associated with the organization’s default profile).
* The **Rules** column shows the total count of active rules within the profile. Additionally, if any of these active rules are deprecated, their number will also be indicated with a pink background.
* The **Updated** column shows when the quality profile was last updated.
* The **Used** column shows when the quality profile was last used during a project analysis.
2. On the right-hand side, you will see different sections with information relating to details associated with existing quality profiles:
* The **Deprecated Rules** section lists the quality profiles that contain deprecated rules.
* The **Recently Added Rules** section lists newly added rules and shows whether they are currently active in each profile.
* The **Stagnant Profiles** section lists the custom profiles that have not been updated for more than one year.
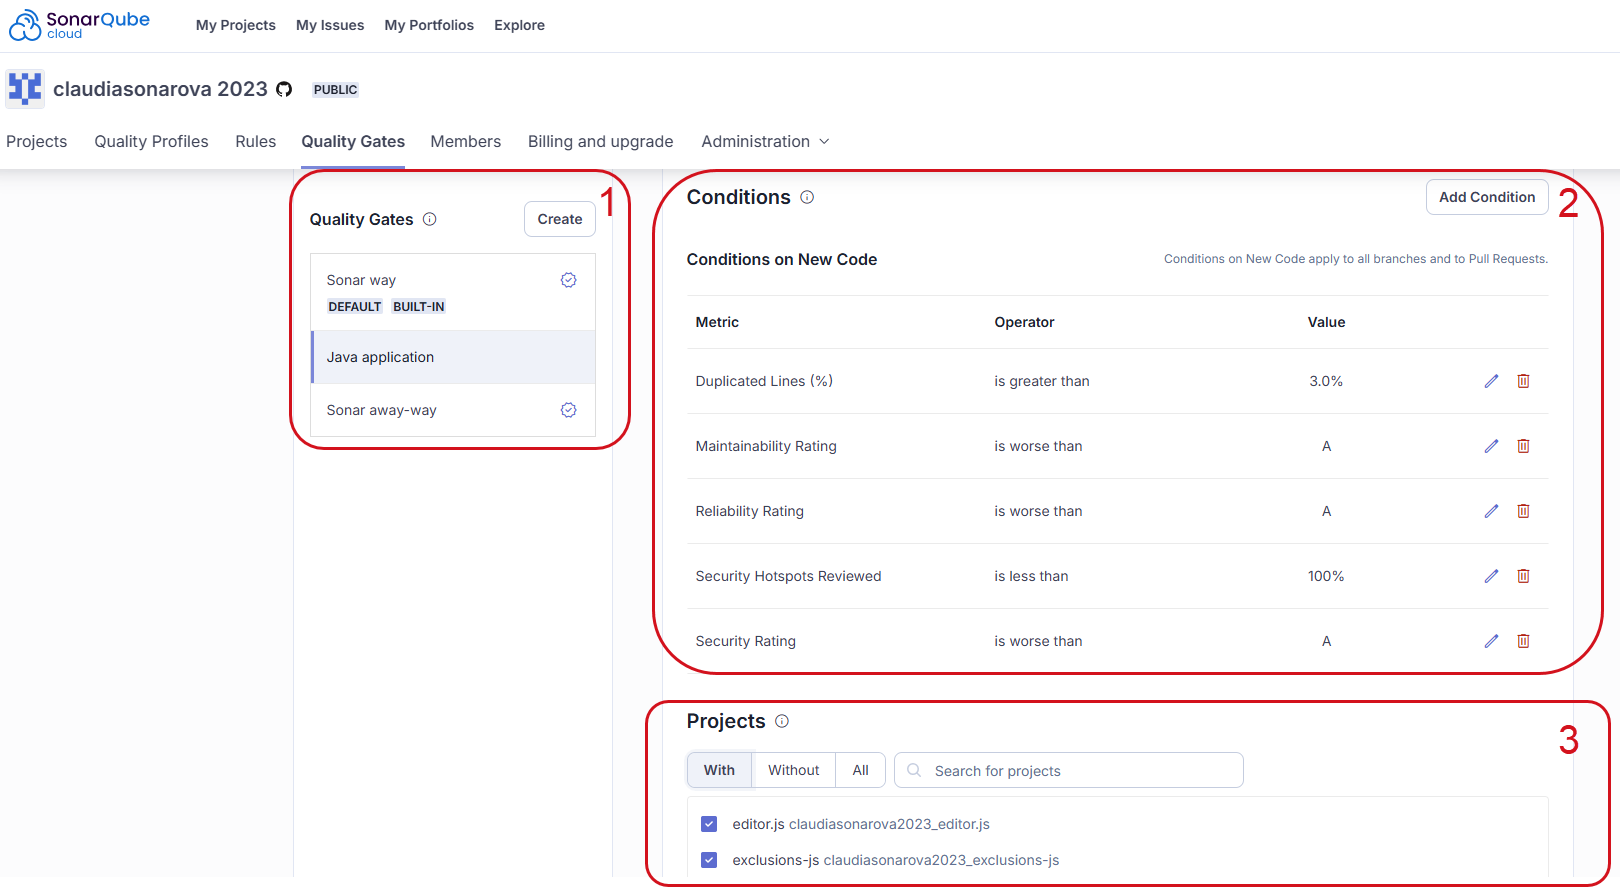 ### Viewing a quality profile
On the **Quality Profiles** page:
1. To view a specific language, select a language in **Filter by** at the top of the left-hand side list of quality profiles.
2. Select the quality profile you want to view. The quality profile is displayed as illustrated below.
### Viewing a quality profile
On the **Quality Profiles** page:
1. To view a specific language, select a language in **Filter by** at the top of the left-hand side list of quality profiles.
2. Select the quality profile you want to view. The quality profile is displayed as illustrated below.
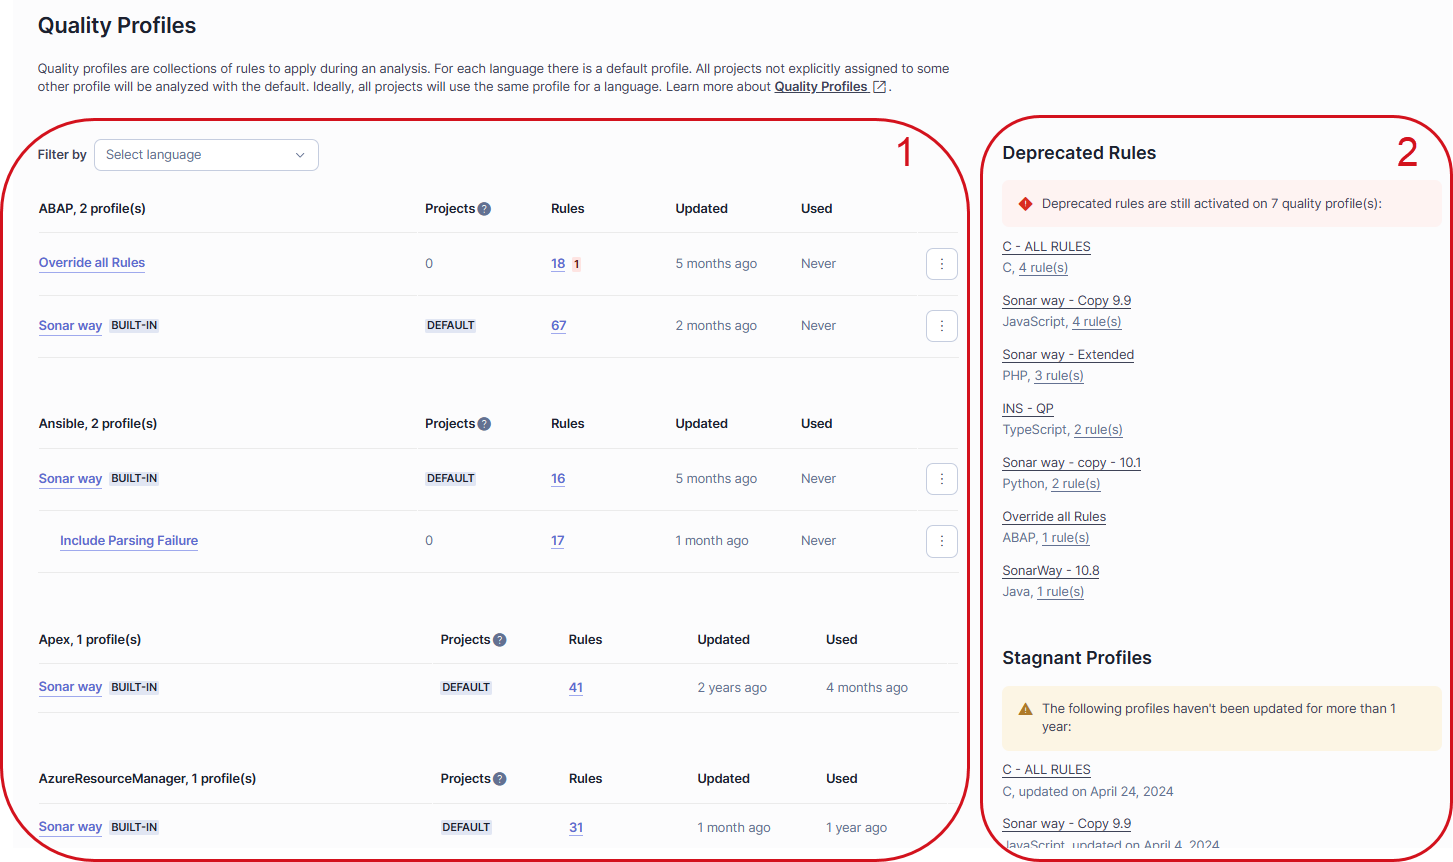 The quality profile page includes the following sections:
1. **Inheritance**: shows the quality profile with its possible parent(s) and / or children. For each profile, the number of active, inactive, and overridden rules in the profile is shown. Select a number to view the corresponding list of rules.
2. **Projects**: shows the projects explicitly associated with the quality profile.
3. **Rule breakdown**: shows statistics about active and inactive rules contained in the quality profile. Select a statistic to view the corresponding rules.
If you have the Administer Quality Profiles permission, you will also see a **Permissions** section under the **Projects** section. The **Permissions** section shows the users and groups authorized to manage this quality profile.
### Comparing quality profiles
You can compare quality profiles of the same language.
To compare one profile with another:
1. In the SonarQube UI, retrieve one of the quality profiles you want to compare (quality-profile-1).
2. In the top right corner of the quality profile page, select the three-dot button, and select **Compare** in the menu. The comparison page opens.
3. In **Compare with**, select the profile to be compared to (quality-profile-2). The comparison results are displayed on the page as illustrated below. The left column corresponds to quality-profile-1 and the right column to quality-profile-2. In the comparison results, you can select a rule to inspect it.
In the example shown below, the comparison reveals the following differences between the two example profiles: **My ABAP profile** and **Sonar way**.
1. In part 1, the first column shows that **My ABAP profile** includes one rule that **Sonar way** excludes. In the second column shows that **My ABAP profile** excludes two rules that **Sonar way** includes.
2. In part 2, one rule has a different configuration in **My ABAP profile** that it does in the **Sonar way**.
The quality profile page includes the following sections:
1. **Inheritance**: shows the quality profile with its possible parent(s) and / or children. For each profile, the number of active, inactive, and overridden rules in the profile is shown. Select a number to view the corresponding list of rules.
2. **Projects**: shows the projects explicitly associated with the quality profile.
3. **Rule breakdown**: shows statistics about active and inactive rules contained in the quality profile. Select a statistic to view the corresponding rules.
If you have the Administer Quality Profiles permission, you will also see a **Permissions** section under the **Projects** section. The **Permissions** section shows the users and groups authorized to manage this quality profile.
### Comparing quality profiles
You can compare quality profiles of the same language.
To compare one profile with another:
1. In the SonarQube UI, retrieve one of the quality profiles you want to compare (quality-profile-1).
2. In the top right corner of the quality profile page, select the three-dot button, and select **Compare** in the menu. The comparison page opens.
3. In **Compare with**, select the profile to be compared to (quality-profile-2). The comparison results are displayed on the page as illustrated below. The left column corresponds to quality-profile-1 and the right column to quality-profile-2. In the comparison results, you can select a rule to inspect it.
In the example shown below, the comparison reveals the following differences between the two example profiles: **My ABAP profile** and **Sonar way**.
1. In part 1, the first column shows that **My ABAP profile** includes one rule that **Sonar way** excludes. In the second column shows that **My ABAP profile** excludes two rules that **Sonar way** includes.
2. In part 2, one rule has a different configuration in **My ABAP profile** that it does in the **Sonar way**.
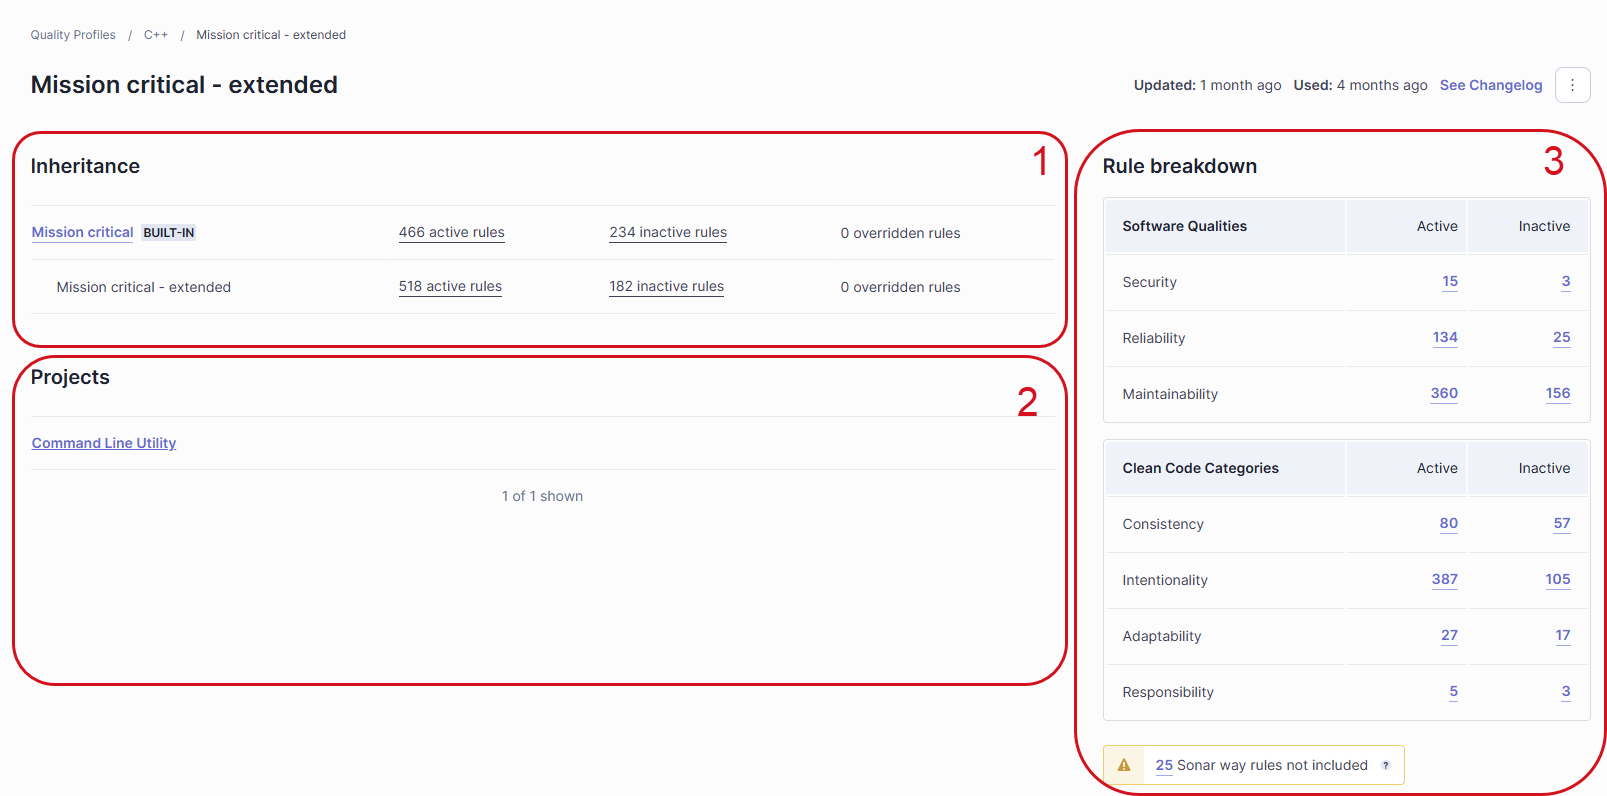
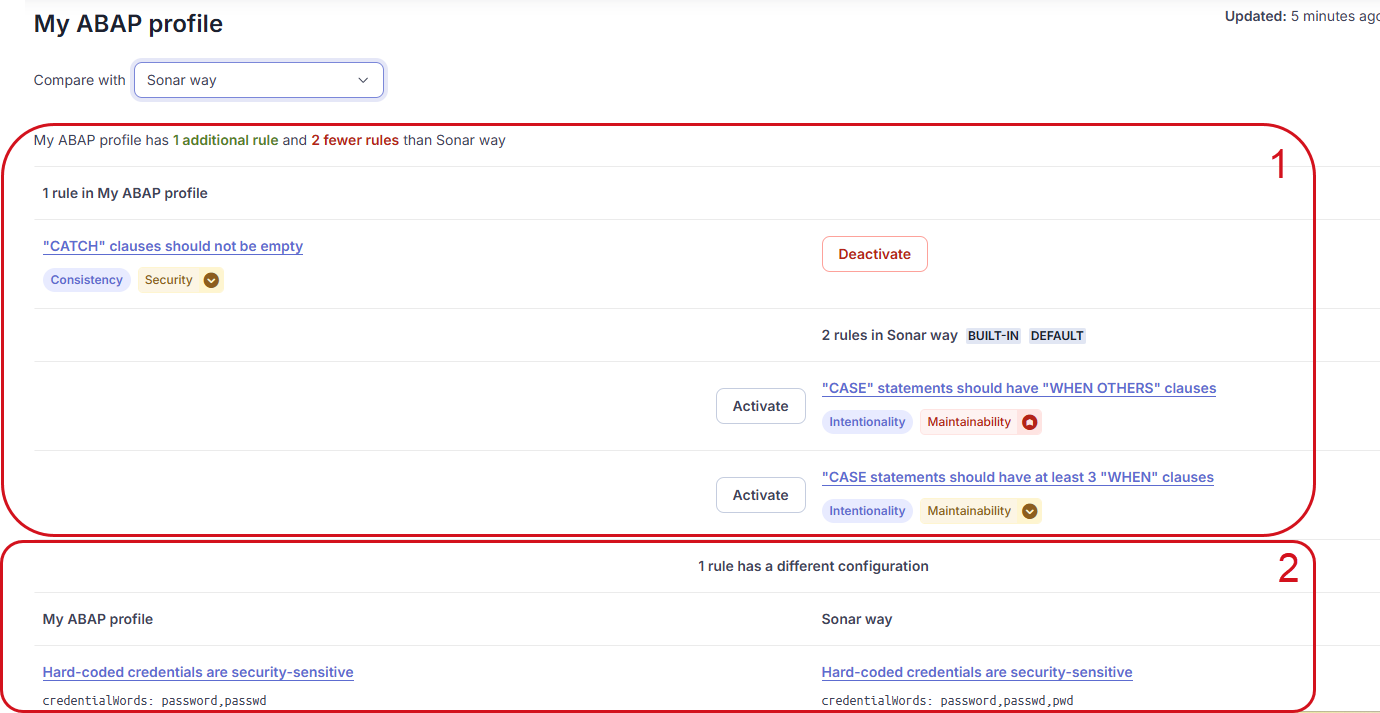
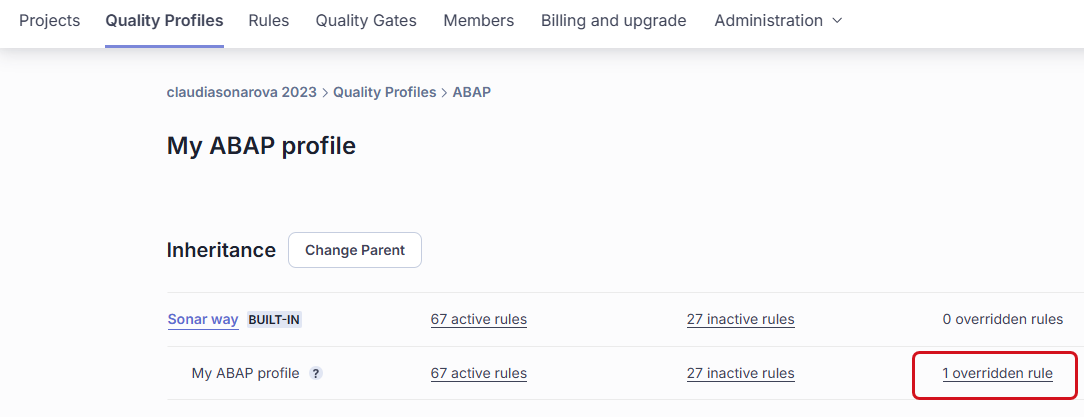
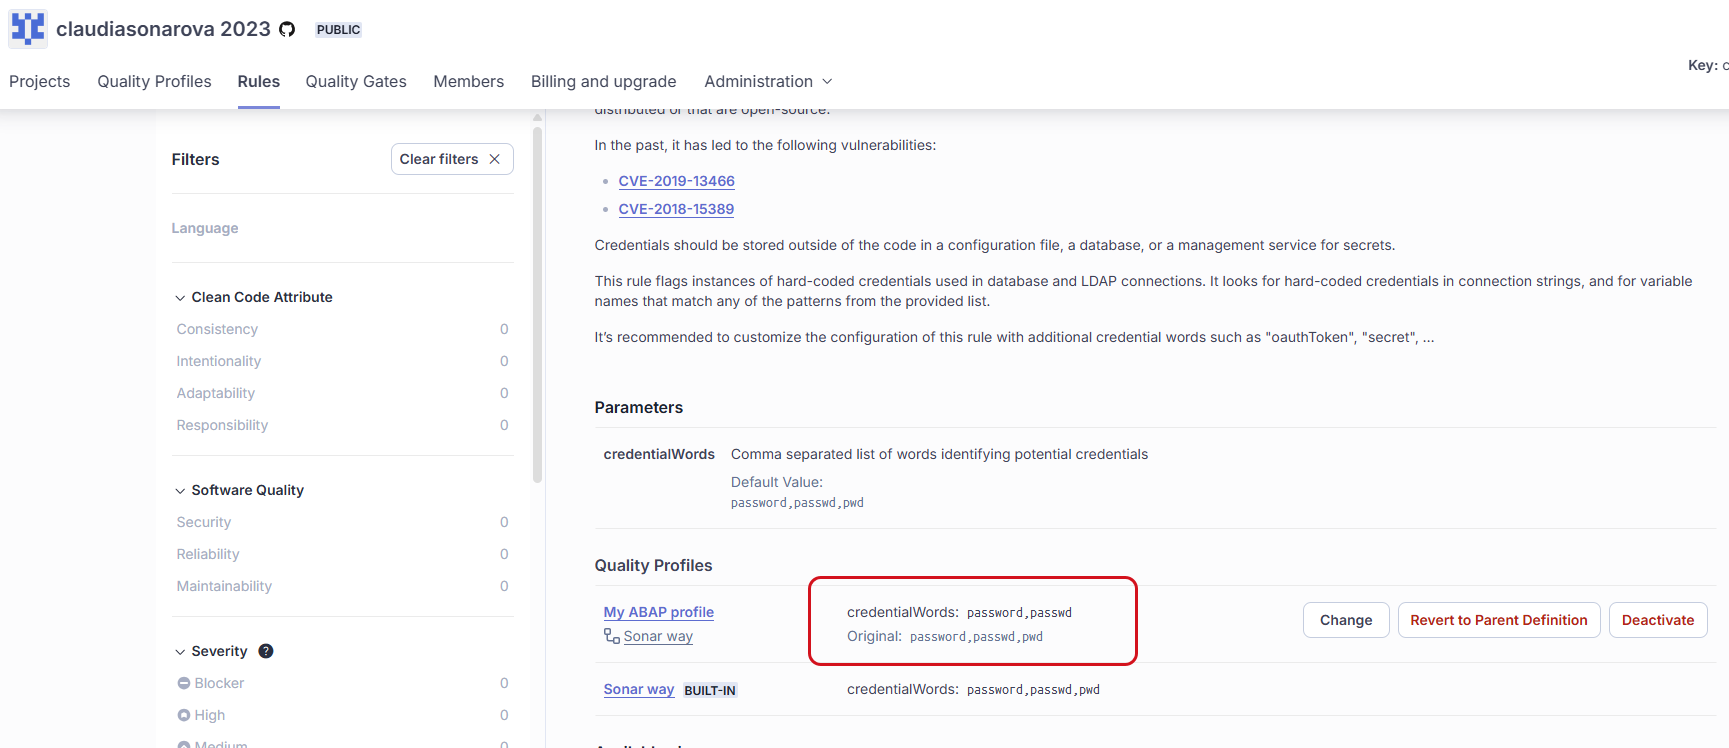 ---
# Source: https://docs.sonarsource.com/sonarqube-community-build/instance-administration/user-management/viewing-users.md
# Source: https://docs.sonarsource.com/sonarqube-server/10.7/instance-administration/user-management/viewing-users.md
# Source: https://docs.sonarsource.com/sonarqube-server/10.8/instance-administration/user-management/viewing-users.md
# Source: https://docs.sonarsource.com/sonarqube-server/2025.2/instance-administration/user-management/viewing-users.md
# Source: https://docs.sonarsource.com/sonarqube-server/2025.3/instance-administration/user-management/viewing-users.md
# Source: https://docs.sonarsource.com/sonarqube-server/2025.5/instance-administration/user-management/viewing-users.md
# Source: https://docs.sonarsource.com/sonarqube-server/2025.1/instance-administration/user-management/viewing-users.md
# Source: https://docs.sonarsource.com/sonarqube-server/2025.4/instance-administration/user-management/viewing-users.md
# Source: https://docs.sonarsource.com/sonarqube-server/2025.6/instance-administration/user-management/viewing-users.md
# Source: https://docs.sonarsource.com/sonarqube-server/instance-administration/user-management/viewing-users.md
# Viewing user accounts
To retrieve and view the user accounts existing in your SonarQube Server:
1. In the top navigation bar, go to **Administration > Security > Users**. The **Users** page opens.
2. Use the filter bar to filter the list of users.
---
# Source: https://docs.sonarsource.com/sonarqube-community-build/instance-administration/user-management/viewing-users.md
# Source: https://docs.sonarsource.com/sonarqube-server/10.7/instance-administration/user-management/viewing-users.md
# Source: https://docs.sonarsource.com/sonarqube-server/10.8/instance-administration/user-management/viewing-users.md
# Source: https://docs.sonarsource.com/sonarqube-server/2025.2/instance-administration/user-management/viewing-users.md
# Source: https://docs.sonarsource.com/sonarqube-server/2025.3/instance-administration/user-management/viewing-users.md
# Source: https://docs.sonarsource.com/sonarqube-server/2025.5/instance-administration/user-management/viewing-users.md
# Source: https://docs.sonarsource.com/sonarqube-server/2025.1/instance-administration/user-management/viewing-users.md
# Source: https://docs.sonarsource.com/sonarqube-server/2025.4/instance-administration/user-management/viewing-users.md
# Source: https://docs.sonarsource.com/sonarqube-server/2025.6/instance-administration/user-management/viewing-users.md
# Source: https://docs.sonarsource.com/sonarqube-server/instance-administration/user-management/viewing-users.md
# Viewing user accounts
To retrieve and view the user accounts existing in your SonarQube Server:
1. In the top navigation bar, go to **Administration > Security > Users**. The **Users** page opens.
2. Use the filter bar to filter the list of users.
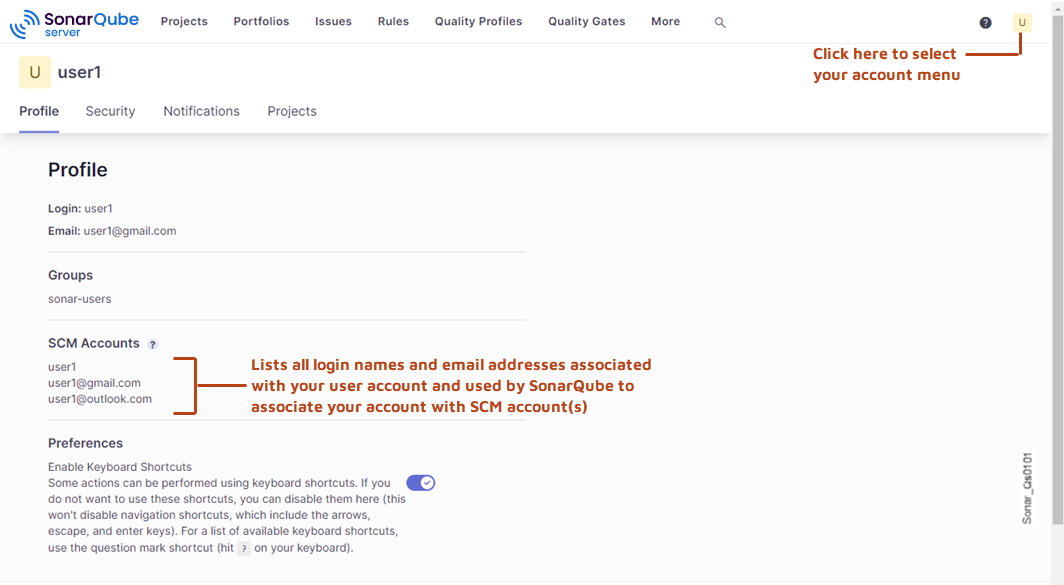 ### Authenticating to the Web API
Administrative web services are secured and require the user to have specific permissions.
To authenticate to the Web API, we recommend that you use the [bearer authentication scheme](https://swagger.io/docs/specification/v3_0/authentication/bearer-authentication/). With this scheme, a SonarQube Cloud token is used:
* The token is generated in SonarQube Cloud UI. See [managing-tokens](https://docs.sonarsource.com/sonarqube-cloud/managing-your-account/managing-tokens "mention").
* The token is provided through the `Authorization: Bearer
### Authenticating to the Web API
Administrative web services are secured and require the user to have specific permissions.
To authenticate to the Web API, we recommend that you use the [bearer authentication scheme](https://swagger.io/docs/specification/v3_0/authentication/bearer-authentication/). With this scheme, a SonarQube Cloud token is used:
* The token is generated in SonarQube Cloud UI. See [managing-tokens](https://docs.sonarsource.com/sonarqube-cloud/managing-your-account/managing-tokens "mention").
* The token is provided through the `Authorization: Bearer 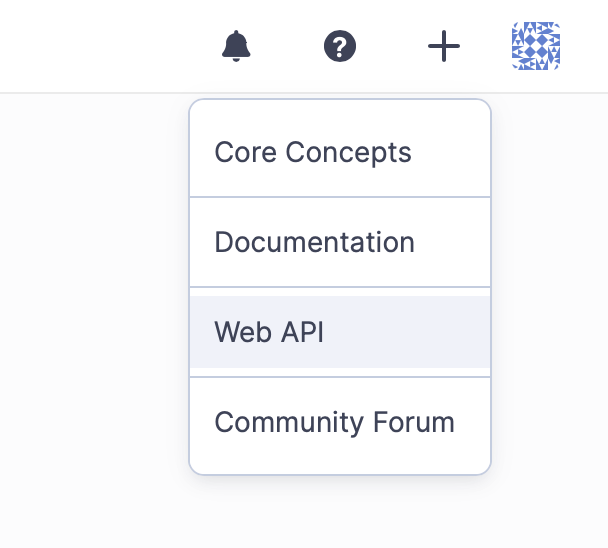
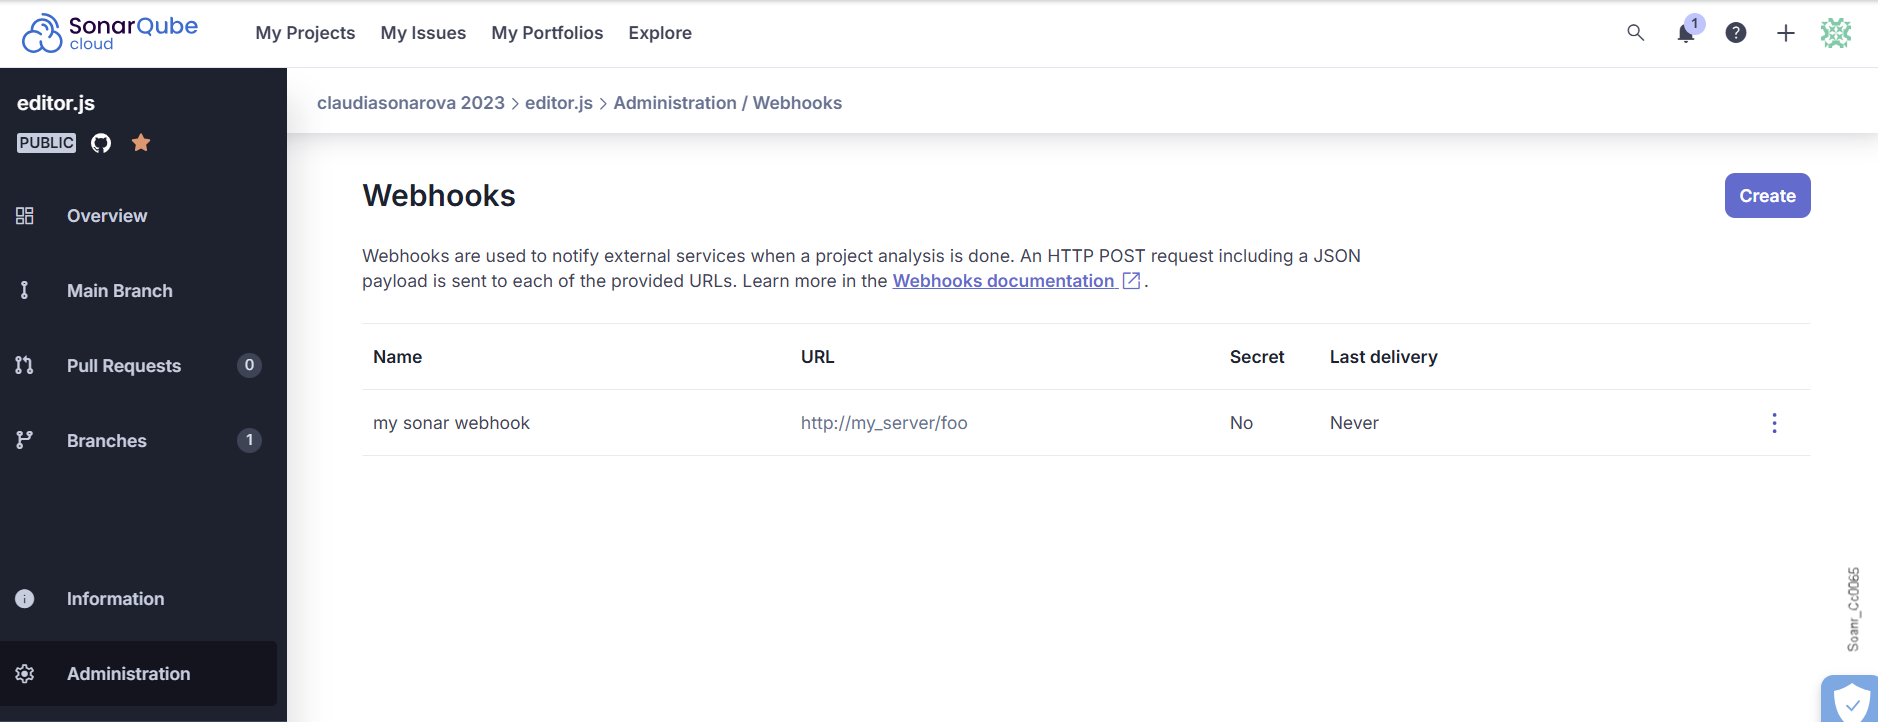
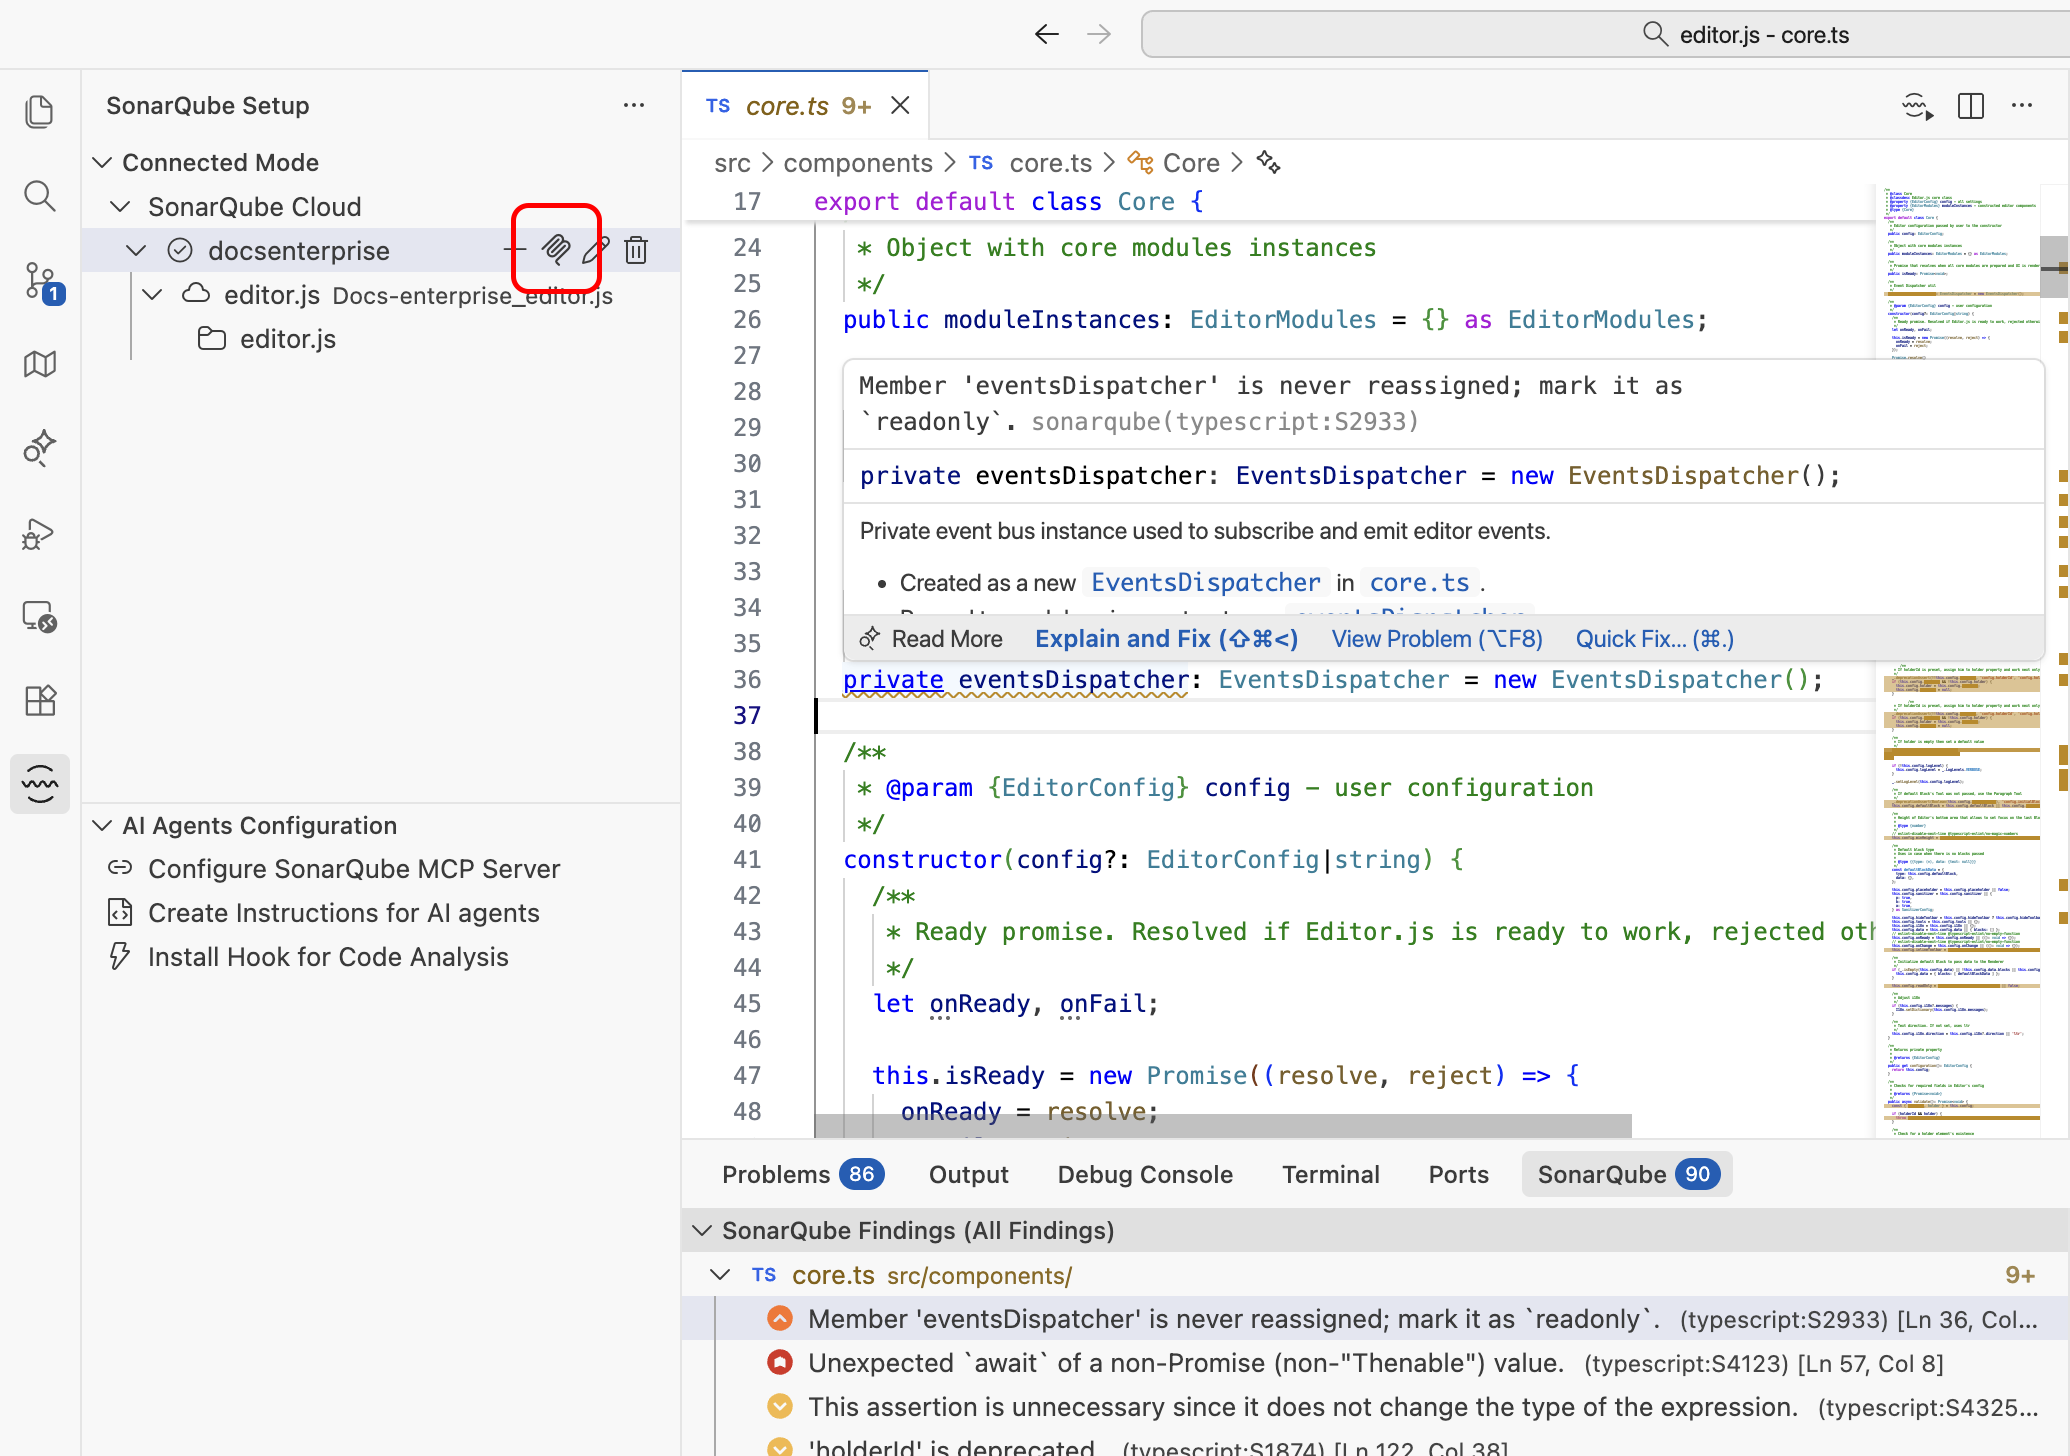