`\
\
Click on the name of the event source, and then click **Associate with event bus** and follow the prompts to associate the event source with an event bus. After the event source is associated with an event bus, Snyk can immediately start sending events, which you can use for any actions supported by EventBridge.
## Managing and deleting an EventBridge integration
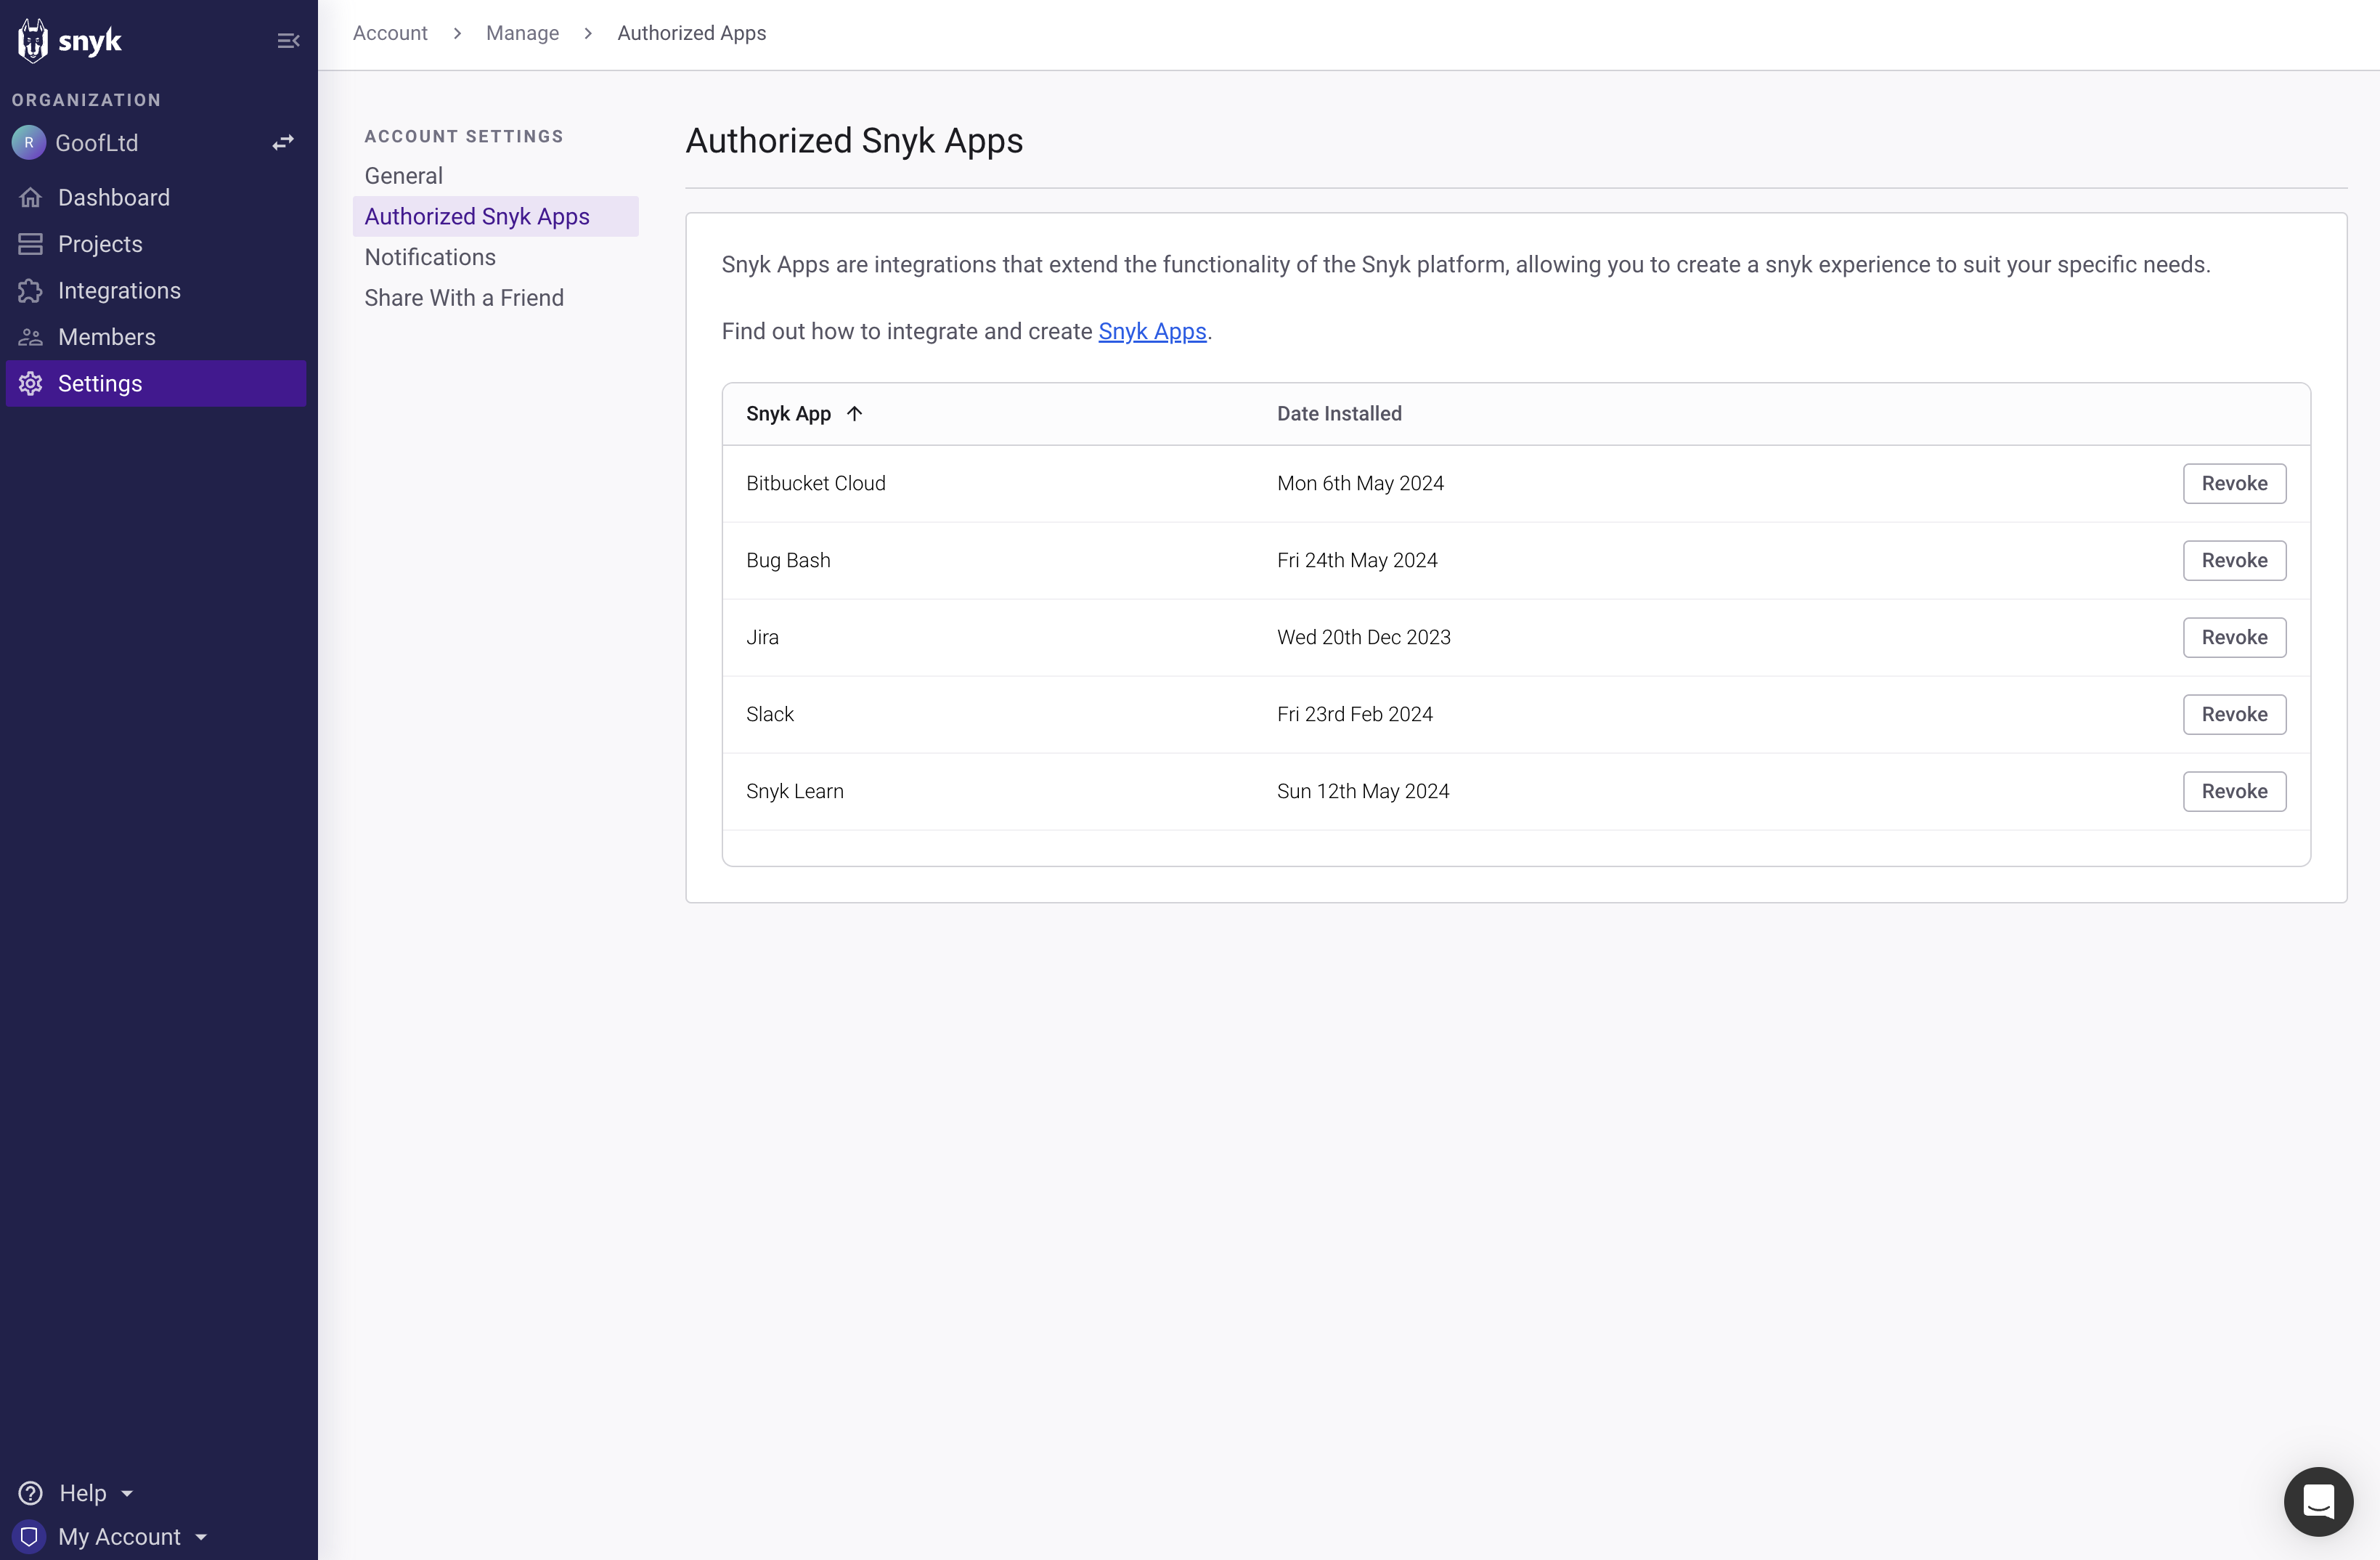
Navigate to the [EventBridge integration settings page](https://app.snyk.io/manage/integrations/aws-eventbridge) in the Snyk dashboard and click on the name of the integration you want to manage.
Select Amazon EventBridge integration
Remove integration
Snyk Code vulnerability window
Visual Studio Code Problems tab
Snyk Code editor window
Quick Fix menu
Ignore options with issue detail
Snyk IaC configuration issues window
Problems tab
Snyk IaC configuration issue
Quick Fix
Details panel for a Snyk IaC configuration issue
Vulnerabilities in npm package
Results screen showing the vulnerability count
Vulnerability from a CDN
Code actions
Snyk Open Source vulnerability window
Data filtered by default on critical and high-severity issues. Drill down to see the way that issues were introduced. Issues framework: categorized based on Exposure, Manage, Prevention, and Coverage. Data filtered based on assets, applications, and code owners (teams). Helps you to identify and take action on risk, coverage gaps, and association gaps. Asset class view Application and owner view Surface coverage gap Comparison and prioritization Images with different image tags grouped in sub-groups
Analysis and fix advice for a container Project
Filters for OS binaries and image layers
Recommendations for upgrading the base image
Result status Description Success/Passed No issues were discovered and the manifest file was not changed. Pending The PR Checks are still running. Failed/Issues found Security issues were identified in the pull request. In this scenario, you need to manually set the result status to Passed . Error Out-of-sync package.json and package.lock files, failure to find or to read the manifest file. Canceled The test limit has been reached.
{% hint style="info" %}
For false positive or false negative results, see [Troubleshooting PR Checks](https://docs.snyk.io/scan-with-snyk/pull-requests/pull-request-checks/troubleshoot-pr-checks).
{% endhint %}
## Example: fix dependency issues with PR checks
Consider the following end-to-end scenario, including specific actions such as triggering a Fix PR and marking a **Failed** result as **Passed**. You can take these actions in relation to the information provided by the PR Checks. This example shows taking the steps for a [GitHub integration](https://docs.snyk.io/developer-tools/scm-integrations/organization-level-integrations/github) as follows:
1. [Trigger a fix for an individual dependency](#trigger-a-fix-for-an-individual-dependency) to remediate that version's vulnerabilities.
2. [Open a Fix PR](#open-a-fix-pr) to open a pull request in GitHub.
3. [Analyze PR Checks results and set status](#analyze-pr-checks-result-and-set-status) to merge the pull request.
{% hint style="info" %}
Before you begin, check the [Prerequisites for automated PR Checks](https://docs.snyk.io/scan-with-snyk/pull-requests/configure-pull-request-checks#prerequisites-for-automated-pr-checks) to make sure you have Snyk configured and the role defined.
{% endhint %}
### Trigger a fix for an individual dependency
1. Log in to the Snyk Web UI.
2. Navigate to **Projects**.
3. Expand the target containing your Project.
4. Click a Project name to open it and select **package.json** to check for open-source and licensing issues.
5. In the **Issues** tab, find the dependency or specific vulnerability and, if a fix is available, click the **Upgrade to X.X.X** button at the bottom of the card and select **Fix this vulnerability**. For example, the jsonwebtoken can be upgraded from version 0.4.0 to version 5.0.0, fixing a number of vulnerabilities.
Updating a dependency to remediate the Authentication Bypass issue and others found in version 5.0.0.
Triggering a Fix PR for an individual issue in the dependencies project
PR Checks card in the Conversations tab, GitHub
Overview of PR Checks result
Marking PR Checks result as successful
To: Developers
Subject: Launching Snyk at \[Company name]
Hi all,
I’m excited to announce that we’re implementing Snyk at \[Company name]
\[optional: add personalized video, if desired]
Snyk will help us \[enter your goal(s)].
As part of the launch process, we’ll invite you to a short “Intro to Snyk” and Q\&A session to learn more about Snyk and the products we’re implementing. You’ll also have the opportunity to attend a developer training session and get access to Snyk Learn for self-paced tutorials to help you get started.
We’re looking forward to building secure applications together, with less frustration and interruption to your workflows for addressing security issues.
More info can be found at \[hyperlink to your internal resource page/wiki with more info].
Regards,
\_\_\_\_\_ \[Sender]
|
## Instant messaging template
| |
| ------------------------------------------------------------------------------------------------------------------------------------------------------------------------------------------------------------------------------------------------------------------------------------------------------------------------------------------------- |
| Snyk Dev-First Security Initiative: You’re invited to a brief “Intro to Snyk” and Q\&A session on \[insert date, time, Zoom info]. You’ll also have the opportunity to attend a developer training session on \[insert date/registration detail link] and get access to Snyk Learn \[hyperlink] for self-paced tutorials to help you get started. |
###
---
# Source: https://docs.snyk.io/implementation-and-setup/enterprise-implementation-guide/phase-6-rolling-out-the-prevention-stage/announcement-templates-for-prevention.md
# Announcement templates for prevention
This page provides example email and Slack message templates that you can use to introduce prevention tools to your teams.
## Introduce prevention features to your developers
It is important that your development teams understand what changes are being made that may affect their day-to-day work. Ensure they understand how the prevention tests work, to help avoid surprises from possible issues that could affect their deadlines.
{% hint style="info" %}
These examples are written based on the Snyk tests on the PR Checks feature, with the configuration set to fail only on High or Critical severity issues. If you are adding Snyk tests to your CI/CD pipelines, ensure that you tweak the messages.
{% endhint %}
Use the following template to communicate the Snyk rollout to the rest of the developers. Update the text in brackets with your details, and then send the message to the developers.
## Email template
| |
| ------------------------------------------------------------------------------------------------------------------------------------------------------------------------------------------------------------------------------------------------------------------------------------------------------------------------------------------------------------------------------------------------------------------------------------------------------------------------------------------------------------------------------------------------------------------------------------------------------------------------------------------------------------------------------------------------------------------------------------------------------------------------------------------------------------------------------------------------------------------------------------------------------------------------------------------------------------------------------------------------------------------------------------------------------------------------------------------------------------------------------------------------------------------------------------------------------------------------------------------------------------------------------------------------------------------------------------------------------------------------------------------- |
| To: Developers
Subject: Introducing Snyk tests to PRs \[Company name]
Hi all,
As part of our ongoing aim to improve our application security at \[Company name], we are preparing to start running Snyk tests against all new pull requests for any repository that has been imported into Snyk.
\[optional: add personalized video, if desired]
These checks will identify any new High or Critical severity issues that are part of the PR, with the aim of preventing any new significant issues from entering our repositories. At first, these checks will be optional, meaning you are not blocked from merging a PR if one of these vulnerabilities is detected.
In the future, this will be changing to a blocking check, so we would recommend you start remediating any new High or Critical issues that are detected in your PRs, so that you aren’t affected when the test is no longer optional.
This change will make a huge difference in improving our application security, and by gradually introducing this feature, we hope to avoid any interruptions to your workflow.
More info can be found at \[hyperlink to your internal resource page/wiki with more info].
Regards,
\_\_\_\_\_ \[Sender]
|
## Slack message template
| |
| ---------------------------------------------------------------------------------------------------------------------------------------------------------------------------------------------------------------------------------------------------------------------------------------------------------------------------------------------------------------------------------------------------------------------------------------------------------------------------------------------------------------------------------- |
| *Snyk Tests being introduced to our PRs: From \[date] we’ll be enabling a feature in Snyk so that all new PRs on repositories that have been imported to Snyk will be tested for new vulnerabilities. You’ll see the test will fail if any new High or Critical severity issues are found. Please fix these before merging if possible! For now, the tests are optional, so you can merge the PR even if the test fails, but in the future, we’ll be setting this to be a required check. Get in touch if you have any questions!* |
---
# Source: https://docs.snyk.io/integrations/snyk-studio-agentic-integrations/quickstart-guides-for-snyk-studio/antigravity-guide.md
# Antigravity guide
Add Snyk Studio to Google Antigravity to secure code generated with agentic workflows through a Large Language Model (LLM). This can be achieved in several ways. When you use it for the first time, Snyk Studio will ask for trust and trigger authentication if necessary.
### Install Antigravity
Visit the [Google Antigravity](https://antigravity.google/) website to download the correct version of the IDE.
### Install using the Snyk Studio plugin
{% hint style="warning" %}
The Snyk MCP server cannot be manually installed. Use the Snyk Security plugin in Google Antigravity.
{% endhint %}
* Click [this link](antigravity:extension/snyk-security.snyk-vulnerability-scanner) to open the Snyk Security plugin in Google Antigravity directly.
* Click **Install**.
If asked to trust the publisher, select **Trust Publisher & Install.**
Popup in Snyk Security plugin asking for trust verification
Modal prompting you to opt in to Secure at inception
Application Analytics Overview
Provides a list of all the available Groups that exist for the selected tenant.
|
| Issue severity | Provides a list with all available types of severity for an issue. The default setting provides information about issues with Critical and High severity. |
| Add filter
Asset type Asset classes Assets application Assets owner Asset risk factors Issues source You can add filters for a more customized data analysis.
Asset type - filter by the asset type (Container image, Repository) Asset classes - filter by the asset class (A, B, C, D) Assets application - filter by the application for which you want to see the assets Assets owner - filter by the repository owner of the analyzed assets Asset risk factors - filter by specific risk factors of the analyzed assets Issues source - filter by the source of the analyzed issues " %}
Application Analytics - filters and views
{% endembed %}
## Data categories The Coverage Section
" %}
Application Analytics Coverage view
{% endembed %}
### Issues
In the Issues section, you have information about the analyzed open issues.
* Open issues by category - This graphic provides a clear overview of the number of issues distributed by the issue source category (SAST, SCA, Container, and Secrets) and by the selected view (allowing to compare between asset classes, applications and owners).
* Open issues breakdown - This graphic provides information about the backlog of your open issues. The desired trend is a negative one, especially for higher asset classes or strategic applications. The selected view allows comparing asset classes, applications and owners.
You can choose to view the issues based on Asset Class, Application, or Owner. The focus of the presented information is changed based on your View by selection. When viewing by application or owner, only the top five (5) applications or owners with the most issues are displayed.
You can see more details about each graphic by hovering over the presented data. Extra controls are available on the right side of each graphic, allowing you to download it as an image.
The following video presents an overview of the Application Analytics Issues view from the Snyk Web UI.
{% embed url="" %}
Application Analytics Issues view
{% endembed %}
### Assets
In the Assets section, you have information about the analyzed assets.
* Risk factors breakdown **-** a funnel that shows the progression of risk factors on code repositories and container images. Each layer is divided according to the selected view, asset class, application, or owner. When viewing by application or owner, only the top five (5) applications or owners will be displayed according to the number of assets with risk factors.
* New assets introduced - allows tracking the inventory size over time. The trend only counts repositories and container images. When viewing by application or owner, only the top five (5) applications or owners with the most assets will be displayed.
You can choose to view the Assets section based on Asset Class, Application, or Owner. The focus of the presented information is changed based on your View by selection.
You can see more details about each graphic by hovering over the presented data. Extra controls are available on the right side of each graphic, allowing you to download it as an image.
The following video presents an overview of the Application Analytics Assets view from the Snyk Web UI.
{% embed url="" %}
Application Analytics Assets view
{% endembed %}
### Metadata completeness
The metadata completeness section provides information on the completeness of metadata from application context sources for your repositories.
* Repo metadata completeness - displays the availability of application context metadata across code repositories. For more information about context metadata, see [Application context for SCM Integrations](https://docs.snyk.io/developer-tools/scm-integrations/application-context-for-scm-integrations).
* Repository source distribution - provides information about the repositories distributed by the type of integration (SCM integrations, third-party integrations). When viewing by application or owner, only the top five (5) applications or owners with the most assets will be displayed.
The following video presents an overview of the Application Analytics Repository metadata completeness and source distribution view from the Snyk Web UI.
{% embed url="" %}
Analytics Repository metadata completeness and source distribution view
{% endembed %}
---
# Source: https://docs.snyk.io/developer-tools/scm-integrations/application-context-for-scm-integrations.md
# Application context for SCM integrations
## What is application context?
The application context for SCM integrations provides a comprehensive and interconnected overview of application assets. This context is crucial for assessing security risks and their potential implications, as it outlines the entire structure and components of the applications involved.
Use Application Context to integrate with Internal Developer Portals (IDPs) and service catalogs such as ServiceNow CMDB, Atlassian Compass, and others. These platforms allow Snyk to automate the collection of essential context, including asset type, ownership, and lifecycle.
The application context provides broader access to resources and services in an application. You can use it to:
* Prepare a comprehensive inventory of your application environment, ensuring it includes crucial metadata. This should encompass elements such as SCM topics and the associated developers.
* Gather relevant information to effectively assess and manage application security vulnerabilities and identify potential risks.
* Create a streamlined data flow by working cohesively with assets identified through Snyk Essentials SCM integrations
By leveraging Application context, you can achieve a deeper understanding of your application's security posture. After the integration is set, use the application context that can be leveraged across Snyk to classify repositories, set Asset policies, or filter reports.
These are the available integrations that you can set up for the application context:
* [Backstage file](#backstage-file-for-scm-integrations)
* [ServiceNow CMDB](#servicenow-cmdb-for-scm-integrations)
* [Atlassian Compass](#atlassian-compass)
* [Harness](#harness)
* [OpsLevel](#opslevel)
* [Datadog Service Catalog](#datadog-service-catalog)
{% hint style="info" %}
The Application Context integrations on this page work in conjunction with assets found through Snyk Essentials SCM integrations. If there is no Snyk Essentials SCM integration configured at the Group level on the Integrations page, then data will not populate from these integrations.
{% endhint %}
## Backstage file for SCM integrations
{% hint style="info" %}
**Release status**
The ackstage file integration is in Early Access and available with Snyk Enterprise plans.
{% endhint %}
Backstage is a service catalog that allows users to add metadata or annotations to their repositories, helping to organize and categorize the available resources for easier navigation and understanding. You can leverage your SCM integration to pull metadata associated with backstage catalog files into Snyk Essentials.
You can use the backstage catalog file for GitHub, GitLab, Azure DevOps, BitBucket Cloud, and BitBucket on-prem SCM integrations.
### Required parameters for the backstage file
* A configured SCM integration.
* The `catalog-info.yaml` file from your Project.
### Integration setup for the backstage file
1. Open the **Integrations** page.
2. Select an SCM integration.
3. Click the **Settings** option of the SCM integration.
4. Enable the **Add Backstage Catalog** option.
5. Optional - if the backstage catalog filename in your repository is not `catalog-info.yaml` you can change the default value in the backstage catalog filename field.
6. Select at least one attribute you want to add to Snyk Essentials.
{% hint style="info" %}
Snyk Essentials parses the fields of the detected file using the default field names unless an alternate field name is specified.
{% endhint %}
7. Click **Done**.
After you finish configuring the backstage catalog, Snyk Essentials starts enriching your repository assets with the data found in the backstage catalog .yaml file.
{% hint style="warning" %}
When you set up the catalog attributes, you must use the specific service-level attributes, for example `attribute.name.`
{% endhint %}
The following video presents an overview of the backstage file from the Snyk Web UI.
{% embed url="" %}
Application context with backstage Catalog for Snyk Essentials
{% endembed %}
## ServiceNow CMDB for SCM integrations
{% hint style="info" %}
**Release status**
The ServiceNow CMDB integration is in Early Access and available with Snyk Enterprise plans.
{% endhint %}
### Required parameters for ServiceNow CMDB .service-now.com`.
3. **Username** and **Password** - Credentials for your ServiceNow CMDB instance.
4. Add the **table name** for the CMDB configuration item class. Navigate to the [ServiceNow CMDB tables details](https://docs.servicenow.com/bundle/washingtondc-servicenow-platform/page/product/configuration-management/reference/cmdb-tables-details.html) page for the full list of names.
5. Add the **CMDB field to map Repo URL** - Add the URL of the repository.
{% hint style="info" %}
* The data gathered by Snyk from ServiceNow CMDB will be correlated with the Repository Assets.
* The ServiceNow CMDB integration uses basic authentication and suggests enabling the "Web service access only" option for Service Accounts.
{% endhint %}
### Integration setup for ServiceNow CMDB .service-now.com`
* Add the **Username** and the **Password**- the username and password to access the ServiceNow CMDB instance
* Add the **Table name** - select the configuration item class that Snyk Essentials should onboard. Use this format `cmdb_ci_`
* Add the **CMDB Field to map Repo URL** - the specific URL that is being referred to in the ServiceNow CMDB record.
* You can select one or more attributes related to repository assets and configure where Snyk Essentials can take this attribute in ServiceNow CMDB. Example:
* Category: application\_type
* Owner: business\_unit
* Click **Done**.
* When the connection is established, the status of the ServiceNow CMDB integration is changed to **Connected**.
{% hint style="warning" %}
When you set up the catalog attributes, you can customize the name of the attribute but must ensure that the same name is used in the catalog and in the Integration setup.
{% endhint %}
The following videos present an overview of the ServiceNow CMDB from the Snyk Web UI.
{% embed url="" %}
Application context with ServiceNow CMDB for Snyk Essentials - Part 1
{% endembed %}
{% embed url="" %}
Application context with ServiceNow CMDB for Snyk Essentials - Part 2
{% endembed %}
## Atlassian Compass
{% hint style="info" %}
**Release status**
The Atlassian Compass integration is in Early Access and available with Snyk Enterprise plans.
{% endhint %}
### Required Parameters for Atlassian Compass
1. Add your Atlassian Compass **Profile name**.
2. Add your Atlassian Compass **Instance URL**. You can use this format type: `https://.atlassian.net`.
3. Add your Atlassian Compass **Username**.
4. Add your Atlassian Compass instance **Token**. Navigate to the [Manage API tokens for your Atlassian account](https://support.atlassian.com/atlassian-account/docs/manage-api-tokens-for-your-atlassian-account/) page for more details about creating an Atlassian API token.
{% hint style="info" %}
The gathered data from Atlassian Compass will be correlated with the Repository Assets.
This feature is available only for the integration with Atlassian Compass.
{% endhint %}
### Integration setup for Atlassian Compass
1. Open the **Integrations** page.
2. Select the **App Context** tag and search for Atlassian Compass.
3. Click **Add**.
4. Add the **Profile name** - this is the name of your Atlassian Compass profile.
5. Add the **Instance URL** - this is the URL of the Atlassian Compass instance. Use this format type: `https://.atlassian.net`
6. Add the **Username** - this is the username to access the Atlassian Compass instance.
7. Add the **Token** - this is the API token to access the Atlassian Compass instance.
8. You can select one or more attributes related to repository assets that Snyk Essentials can pull from Atlassian Compass based on the [Component Data](https://developer.atlassian.com/cloud/compass/forge-graphql-toolkit/Interfaces/Component/):
* **Catalog Name** - Matches with name.
* **Category** - Identified when '`fields.definition.name`' equals tier.
* **Lifecycle** - Identified when '`fields.definition.name`' equals lifecycle.
* **Owner** - the `ownerId` (finding owner name from ownerId).
* **Application** - the `typeId` (all component types, Application, Service, Library, and so on receive an ID).
9. Click **Done**.
10. When the connection is established, the status of the Atlassian Compass integration is changed to **Connected**, and Snyk Essentials will start enriching repository assets with the data found in Atlassian Compass.
{% hint style="warning" %}
When you set up the catalog attributes, you must use the specific service-level attributes, for example `attribute.name.`
{% endhint %}
## Harness
{% hint style="info" %}
**Release status**
The Harness integration is in Early Access and available with Snyk Enterprise plans.
{% endhint %}
### Required Parameters for Harness
1. Add your Harness **Profile name**.
2. Add the **Host URL** of your Harness account. You can use this format type: `https://.harness.io`
3. Add the **API key** for your Harness instance. You can use the Harness [Add and manage your API keys](https://developer.harness.io/docs/platform/automation/api/add-and-manage-api-keys/) documentation page to manage your API key.
{% hint style="info" %}
This integration is focused on [Harness’s](https://developer.harness.io/docs/internal-developer-portal/catalog/software-catalog/) service catalog module and it is backed by the backstage catalog.
{% endhint %}
### Integration setup for Harness
1. Open the **Integrations** page.
2. Select the **App Context** tag and search for Harness.
3. Click **Add**.
4. Add the **Profile name** - this is the name of your Harness instance.
5. Add the **Host URL** of your Harness account.
6. Add the **API key** of your Harness instance.
7. Select at least one Harness software catalog [metadata](https://developer.harness.io/docs/internal-developer-portal/catalog/software-catalog#component-definition-yaml):
* Catalog name - If you select this metadata, it is mandatory to add the **Catalog name key**.
* Title - If you select this metadata, it is mandatory to add the **Title key**.
* Category - If you select this metadata, it is mandatory to add the **Category key**.
* Lifecycle - If you select this metadata, it is mandatory to add the **Lifecycle key**.
* Owner - If you select this metadata, it is mandatory to add the **Owner key**.
* Application - If you select this metadata, it is mandatory to add the **Application key**.
8. Click **Done**.
9. When the connection is established, the status of the Harness integration is changed to **Connected**, and Snyk Essentials will start enriching repository assets with the data found in Harness.
{% hint style="warning" %}
When you set up the catalog attributes, you can customize the name of the attribute but must ensure that the same name is used in the catalog and in the Integration setup.
{% endhint %}
## OpsLevel
{% hint style="info" %}
**Release status**
The OpsLevel integration is in Early Access and available with Snyk Enterprise plans.
{% endhint %}
### Required Parameters for OpsLevel
1. Add your OpsLevel **Profile name**.
2. Add the **Instance URL** of your OpsLevel account. You can use this format type: `https://.opslevel.com`
3. Add the **API Token** for your OpsLevel instance. To create an API Token in your OpsLevel account, use the instructions on the OpsLevel [Create an API token](https://docs.opslevel.com/docs/graphql#1-create-an-api-token) documentation page.
### Integration setup for OpsLevel
1. Open the **Integrations** page.
2. Select the **App Context** tag and search for OpsLevel.
3. Click **Add**.
4. Add the **Profile name** - this is the name of your OpsLevel instance.
5. Add the **Instance URL** of your OpsLevel account.
6. Add the **API Token** for your OpsLevel instance.
7. You can select one or more attributes related to repository assets that Snyk Essentials can pull from OpsLevel with the following mapping:
* Catalog name - Identified with `name` in OpsLevel.
* Category - Identified with `tier.name` in OpsLevel.
* Lifecycle - Identified with `lifecycle.name` in OpsLevel.
* Owner - Identified with `owner.name` in OpsLevel.
* Application - Identified with `product` in OpsLevel.
8. Click **Done**.
9. When the connection is established, the status of the OpsLevel integration is changed to **Connected**, and Snyk Essentials will start enriching repository assets with the data found in OpsLevel.
{% hint style="warning" %}
When you set up the catalog attributes, you must use the specific service-level attributes, for example `attribute.name.`
{% endhint %}
## Datadog Service Catalog
{% hint style="info" %}
**Release status**
The Datadog Service Catalog integration is in Early Access and available with Snyk Enterprise plans.
{% endhint %}
### Required Parameters for Datadog Service Catalog
1. Add your Datadog **Profile name**.
2. Add the **API key** for the Datadog instance. Your token should have the following scope permissions: `apm_service_catalog_read`.
3. Add the **Application Key** along with your organization's API key to grant users access to Datadog's programmatic API. For more details, access the [Datadog API and Application key](https://docs.datadoghq.com/account_management/api-app-keys/) documentation page.
### Integration setup for Datadog Service Catalog
1. Open the **Integrations** page.
2. Select the **App Context** tag and search for **Datadog Service Catalog**.
3. Click **Add**.
4. Add the **Profile name** - this is the name of your Datadog instance.
5. Add the **API key** for your Datadog instance.
6. Add the **Application key** for your Datadog instance.
7. Add the details of your **Datadog site**.
8. You can select one or more attributes related to repository assets that Snyk Essentials can pull from Datadog Service Catalog with the following mapping:
* Catalog name - If you select this metadata, it is mandatory to add the **Catalog name key**.
* Title - If you select this metadata, it is mandatory to add the **Title key**.
* Category - If you select this metadata, it is mandatory to add the **Category key**.
* Lifecycle - If you select this metadata, it is mandatory to add the **Lifecycle key**.
* Owner - If you select this metadata, it is mandatory to add the **Owner key**.
* Application - If you select this metadata, it is mandatory to add the **Application key**.
9. Click **Done**.
10. When the connection is established, the status of the Datadog Service Catalog integration is changed to **Connected**, and Snyk Essentials will start enriching repository assets collected by a Snyk Essentials SCM Integration with the data found in Datadog Service Catalog.
{% hint style="warning" %}
When you set up the catalog attributes, you can customize the name of the attribute but must ensure that the same name is used in the catalog and in the Integration setup.
{% endhint %}
---
# Source: https://docs.snyk.io/snyk-platform-administration/user-roles/custom-role-templates/application-security-engineer-role-template.md
# Application Security Engineer role template
This Organization-level role can add, move, and remove Projects and ignores, and can mark PR checks as successful.
## Group-level permissions
This template is for an Organization-level role and has no Group-level permissions.
## Organization-level permissions
To create this role, enable the following permissions in the relevant categories:
### Organization management
Permission Enabled? View Organization true Edit Organization false Remove Organization false
### Project management
Permission Enabled? View Project true Add Project true Edit Project true Edit Project status true Test Project true Move Project true Remove Project false View Project history true Edit Project integrations true Edit Project attributes true View Jira issues true Create Jira issues true Edit Project Tags true
### Project Ignore management
Permission Enabled? View Project Ignores true Create Project Ignores true Edit Project Ignores true Remove Project Ignores true
### Project pull request management
Permission Enabled? Create pull requests false Mark pull request checks as successful true
The remaining categories of permissions listed below should have all permissions within them set to disabled:
* Audit Log management
* Billing management
* Collection management
* Container Image management
* Entitlement management
* Integration management
* Kubernetes integration management
* Package management
* Reports management
* Service account management
* Snyk Apps management
* Snyk Cloud management
* Snyk Preview management
* User management
* Webhook management
---
# Source: https://docs.snyk.io/scan-with-snyk/snyk-container/how-snyk-container-works/application-vulnerabilities-in-snyk-container-and-snyk-open-source.md
# Application vulnerabilities in Snyk Container and Snyk Open Source
Snyk Container detects application vulnerabilities in your containers and overlaps Snyk Open Source capabilities.\
\
The results from a Snyk Container application vulnerability scan and a Snyk Open Source scan are generally the same, especially if Snyk is building a dependency graph from the same manifest files.\
\
However, results can vary significantly depending on the ecosystem and how the developer builds the application. An application in a container is a compiled application. So, in some ecosystems, Snyk Open Source can scan a more detailed manifest and thus build a more accurate dependency graph:
* `golang` Projects for Snyk Containers: Snyk does not have access to the list of dependencies as in Snyk Open Source. Therefore, Snyk Container reverse parses binaries, and the result differs slightly from Snyk Open Source.
* `npm` packages as Snyk Containers: Snyk can access the list of dependencies. The result is generally the same as that of Snyk Open Source. For details, see [Support for npm](https://docs.snyk.io/supported-languages/supported-languages-list/javascript#support-for-npm).
* `java` applications for Snyk Containers: In Open Source, it is possible to include unmanaged jars (see [Scan all unmanaged jar files](https://docs.snyk.io/developer-tools/snyk-cli/scan-and-maintain-projects-using-the-cli/scan-all-unmanaged-jar-files)). Thus the result is different from Snyk Container.
* With Snyk Container, the scan traverses all the jars Snyk finds in the image (see [Detect application vulnerabilities in container images](https://docs.snyk.io/scan-with-snyk/snyk-container/use-snyk-container/detect-application-vulnerabilities-in-container-images)). In addition, there are multiple ways to build a jar, and the method used affects how Snyk Container finds the dependencies.
* In Snyk Open Source, if there are multiple potential versions of a dependency, the package manager dependency resolution logic ensures that only one version is selected. However, in Snyk Container, unpacked jars may contain other versions of dependencies, and because they all exist in the container, they are all reported.
---
# Source: https://docs.snyk.io/scan-with-snyk/pull-requests/snyk-pull-or-merge-requests/customize-pr-templates/apply-a-custom-pr-template.md
# Apply a custom PR template
## Create and manage a custom PR template using the API
You can create a custom PR template using the API endpoint [Create or update pull request template for Group](https://docs.snyk.io/snyk-api/reference/pull-request-templates#post-groups-group_id-settings-pull_request_template). Send an API request that contains a JSON payload with the custom properties. This request configures a Group-level pull request template that will be used on any Organization or Project within that Group. The pull request template created using the Snyk API can be updated at any time, and all Projects in the Group are automatically updated with the latest changes.
API configuration of PR templates is available only at the Group level.
When a custom template is uploaded using an API request, all Snyk PRs in that Group adopt this format, effectively switching off the default Snyk template for the customizable properties. Strings are the only acceptable values; lists and numbers are not allowed.
If any customizable properties are missing from your custom template, Snyk reverts to the default values for these properties when opening a pull request.
The following properties are customizable using the API:
* `title` - customize the PR title
* `commit_message` - customize the PR commit message
* `description` - customize the PR description
You cannot customize the branch name for your PRs. The branch name of your PRs will use the Snyk default value.
You can retrieve the custom PR template for your Group using the endpoint [Get pull request template for Group](https://apidocs.snyk.io/?#get-/groups/-group_id-/settings/pull_request_template). This is useful if you want to consider changing your template, and in troubleshooting.
To delete the template, use the endpoint [Delete pull request template for group](https://docs.snyk.io/snyk-api/reference/pull-request-templates#delete-groups-group_id-settings-pull_request_template).
## Customize using a YAML PR template file
### Create the YAML file
Manually create the YAML template by using the [mustache](https://mustache.github.io) syntax for templating and add the file to your Project or repository.
When a custom template is uploaded to your Project, all PRs from Snyk for the Project adopt this format, effectively switching off the default Snyk template for the customized properties. Strings are the only acceptable values; lists and numbers are not allowed. If any customizable properties are missing from your template, Snyk reverts to the default values for these properties when opening a pull request.
#### YAML multiline operators
You can use YAML multiline operators. You can create a detailed description that spans several lines by following this format:
```yaml
description: |
This pull request comes from Snyk
For more information see the project page {{ snyk_project_url }}
If you have more questions reach out to a member of the security team
```
The pipe operator preserves new line characters. Use greater than, `>` , to join all the lines by a space with a new line at the end. To use a colon, you can either use multiline operators, `|` or `>`, or enclose the line in double quotes:
```yaml
commitMessage: "snyk: this is a security pull request"
```
#### Customizable properties for YAML
The following properties are customizable:
* `title` - customize the PR title
* `commitMessage` - customize the PR commit message
* `description` - customize the PR description
You cannot customize the branch name for your PRs. The branch name of your PRs will use the Snyk default value.
### Use the YAML custom PR template
You can manually upload the YAML file with the name `snyk_pull_request_template.yaml` to your Project (repository). The method varies based on the type of integration.
* GitHub/ GitHub Enterprise - `/.github/snyk_pull_request_template.yaml`
* GitLab - `/.gitlab/snyk_pull_request_template.yaml`
* Azure DevOps - `/.azuredevops/snyk_pull_request_template.yaml`
* Other (such as BitBucket) - `/.config/snyk_pull_request_template.yaml`
If you want to use a custom template for multiple repositories, add the YAML custom template file to each of these repositories.
## Broker configuration for fetching custom PR templates
If you use [Snyk Broker](https://docs.snyk.io/implementation-and-setup/enterprise-setup/snyk-broker), you must use a Broker at version 4.188.0 or higher and enable the Broker to fetch the custom PR templates using the `ACCEPT_CUSTOM_PR_TEMPLATES` environment variable.
To do this, you must remove `ACCEPT=/path/to/custom.json` and add the following environment variable to your Broker container or deployment:
```
ACCEPT_CUSTOM_PR_TEMPLATES=true
```
---
# Source: https://docs.snyk.io/implementation-and-setup/enterprise-implementation-guide/phase-2-configure-account/apply-security-and-license-policies.md
# Apply security and license policies
Policies define how Snyk behaves when identifying issues. Policies give you a quick and automated way to identify, prioritize, and triage issues. This saves valuable development time and allows developers to take more responsibility and ownership for security, reducing the “noise” level.
See [Policies](https://docs.snyk.io/manage-risk/policies) for more details.
## Security policies
Group administrators can define security policies, thus providing an automated way to identify certain issues or types of issues, and apply actions like changing the severity or ignoring the issue based on your conditions.
* Configure policies to increase priority or decrease it as needed.
* Create ignores where needed
See [Security policies](https://docs.snyk.io/manage-risk/policies/security-policies) for more details.
## License policies
Group administrators can set license policies to define Snyk behavior for treating license issues. For example, you can allow or disallow packages with certain license types, to avoid using packages containing incompatible licenses.
By default, Snyk determines the severity of licenses in the following way:
* High severity - licenses that definitely present issues for commercial software.
* Medium severity - licenses that have clauses that may be of concern and should be reviewed.
Configure policies to match your requirements.
See [Snyk License Compliance Management](https://docs.snyk.io/scan-with-snyk/snyk-open-source/scan-open-source-libraries-and-licenses/snyk-license-compliance-management) for more details.
## Asset policies
Policies can be created using the Policy Editor to:
* Notify user(s) using Slack or email when a condition is met
* create a Jira ticket
* Set classification using policy
* Set tags using policy
* Specify coverage policies, for example, scan not performed within a specified number of days
* For more information, navigate to the [Assets policies](https://docs.snyk.io/manage-risk/policies/assets-policies) page.
---
# Source: https://docs.snyk.io/snyk-api/reference/apps.md
# Apps
{% hint style="info" %}
This document uses the REST API. For more details, see the [Authentication for API](https://docs.snyk.io/snyk-api/authentication-for-api) page.
{% endhint %}
{% openapi src="" path="/self/apps" method="get" %}
[rest-spec.json](https://2533899886-files.gitbook.io/~/files/v0/b/gitbook-x-prod.appspot.com/o/spaces%2F-MdwVZ6HOZriajCf5nXH%2Fuploads%2Fgit-blob-42ebe7ebbe084db5ba66cf53a50453b68b5c9ab0%2Frest-spec.json?alt=media)
{% endopenapi %}
{% openapi src="" path="/self/apps/{app\_id}" method="delete" %}
[rest-spec.json](https://2533899886-files.gitbook.io/~/files/v0/b/gitbook-x-prod.appspot.com/o/spaces%2F-MdwVZ6HOZriajCf5nXH%2Fuploads%2Fgit-blob-42ebe7ebbe084db5ba66cf53a50453b68b5c9ab0%2Frest-spec.json?alt=media)
{% endopenapi %}
{% openapi src="" path="/self/apps/{app\_id}/sessions" method="get" %}
[rest-spec.json](https://2533899886-files.gitbook.io/~/files/v0/b/gitbook-x-prod.appspot.com/o/spaces%2F-MdwVZ6HOZriajCf5nXH%2Fuploads%2Fgit-blob-42ebe7ebbe084db5ba66cf53a50453b68b5c9ab0%2Frest-spec.json?alt=media)
{% endopenapi %}
{% openapi src="" path="/self/apps/{app\_id}/sessions/{session\_id}" method="delete" %}
[rest-spec.json](https://2533899886-files.gitbook.io/~/files/v0/b/gitbook-x-prod.appspot.com/o/spaces%2F-MdwVZ6HOZriajCf5nXH%2Fuploads%2Fgit-blob-42ebe7ebbe084db5ba66cf53a50453b68b5c9ab0%2Frest-spec.json?alt=media)
{% endopenapi %}
{% openapi src="" path="/self/apps/installs" method="get" %}
[rest-spec.json](https://2533899886-files.gitbook.io/~/files/v0/b/gitbook-x-prod.appspot.com/o/spaces%2F-MdwVZ6HOZriajCf5nXH%2Fuploads%2Fgit-blob-42ebe7ebbe084db5ba66cf53a50453b68b5c9ab0%2Frest-spec.json?alt=media)
{% endopenapi %}
{% openapi src="" path="/self/apps/installs/{install\_id}" method="delete" %}
[rest-spec.json](https://2533899886-files.gitbook.io/~/files/v0/b/gitbook-x-prod.appspot.com/o/spaces%2F-MdwVZ6HOZriajCf5nXH%2Fuploads%2Fgit-blob-42ebe7ebbe084db5ba66cf53a50453b68b5c9ab0%2Frest-spec.json?alt=media)
{% endopenapi %}
{% openapi src="" path="/orgs/{org\_id}/apps" method="post" %}
[rest-spec.json](https://2533899886-files.gitbook.io/~/files/v0/b/gitbook-x-prod.appspot.com/o/spaces%2F-MdwVZ6HOZriajCf5nXH%2Fuploads%2Fgit-blob-42ebe7ebbe084db5ba66cf53a50453b68b5c9ab0%2Frest-spec.json?alt=media)
{% endopenapi %}
{% openapi src="" path="/orgs/{org\_id}/apps" method="get" %}
[rest-spec.json](https://2533899886-files.gitbook.io/~/files/v0/b/gitbook-x-prod.appspot.com/o/spaces%2F-MdwVZ6HOZriajCf5nXH%2Fuploads%2Fgit-blob-42ebe7ebbe084db5ba66cf53a50453b68b5c9ab0%2Frest-spec.json?alt=media)
{% endopenapi %}
{% openapi src="" path="/orgs/{org\_id}/apps/{client\_id}" method="patch" %}
[rest-spec.json](https://2533899886-files.gitbook.io/~/files/v0/b/gitbook-x-prod.appspot.com/o/spaces%2F-MdwVZ6HOZriajCf5nXH%2Fuploads%2Fgit-blob-42ebe7ebbe084db5ba66cf53a50453b68b5c9ab0%2Frest-spec.json?alt=media)
{% endopenapi %}
{% openapi src="" path="/orgs/{org\_id}/apps/{client\_id}" method="get" %}
[rest-spec.json](https://2533899886-files.gitbook.io/~/files/v0/b/gitbook-x-prod.appspot.com/o/spaces%2F-MdwVZ6HOZriajCf5nXH%2Fuploads%2Fgit-blob-42ebe7ebbe084db5ba66cf53a50453b68b5c9ab0%2Frest-spec.json?alt=media)
{% endopenapi %}
{% openapi src="" path="/orgs/{org\_id}/apps/{client\_id}" method="delete" %}
[rest-spec.json](https://2533899886-files.gitbook.io/~/files/v0/b/gitbook-x-prod.appspot.com/o/spaces%2F-MdwVZ6HOZriajCf5nXH%2Fuploads%2Fgit-blob-42ebe7ebbe084db5ba66cf53a50453b68b5c9ab0%2Frest-spec.json?alt=media)
{% endopenapi %}
{% openapi src="" path="/orgs/{org\_id}/apps/{client\_id}/secrets" method="post" %}
[rest-spec.json](https://2533899886-files.gitbook.io/~/files/v0/b/gitbook-x-prod.appspot.com/o/spaces%2F-MdwVZ6HOZriajCf5nXH%2Fuploads%2Fgit-blob-42ebe7ebbe084db5ba66cf53a50453b68b5c9ab0%2Frest-spec.json?alt=media)
{% endopenapi %}
{% openapi src="" path="/orgs/{org\_id}/apps/installs" method="post" %}
[rest-spec.json](https://2533899886-files.gitbook.io/~/files/v0/b/gitbook-x-prod.appspot.com/o/spaces%2F-MdwVZ6HOZriajCf5nXH%2Fuploads%2Fgit-blob-42ebe7ebbe084db5ba66cf53a50453b68b5c9ab0%2Frest-spec.json?alt=media)
{% endopenapi %}
{% openapi src="" path="/orgs/{org\_id}/apps/installs" method="get" %}
[rest-spec.json](https://2533899886-files.gitbook.io/~/files/v0/b/gitbook-x-prod.appspot.com/o/spaces%2F-MdwVZ6HOZriajCf5nXH%2Fuploads%2Fgit-blob-42ebe7ebbe084db5ba66cf53a50453b68b5c9ab0%2Frest-spec.json?alt=media)
{% endopenapi %}
{% openapi src="" path="/orgs/{org\_id}/apps/installs/{install\_id}" method="delete" %}
[rest-spec.json](https://2533899886-files.gitbook.io/~/files/v0/b/gitbook-x-prod.appspot.com/o/spaces%2F-MdwVZ6HOZriajCf5nXH%2Fuploads%2Fgit-blob-42ebe7ebbe084db5ba66cf53a50453b68b5c9ab0%2Frest-spec.json?alt=media)
{% endopenapi %}
{% openapi src="" path="/orgs/{org\_id}/apps/installs/{install\_id}/secrets" method="post" %}
[rest-spec.json](https://2533899886-files.gitbook.io/~/files/v0/b/gitbook-x-prod.appspot.com/o/spaces%2F-MdwVZ6HOZriajCf5nXH%2Fuploads%2Fgit-blob-42ebe7ebbe084db5ba66cf53a50453b68b5c9ab0%2Frest-spec.json?alt=media)
{% endopenapi %}
{% openapi src="" path="/orgs/{org\_id}/apps/creations" method="post" %}
[rest-spec.json](https://2533899886-files.gitbook.io/~/files/v0/b/gitbook-x-prod.appspot.com/o/spaces%2F-MdwVZ6HOZriajCf5nXH%2Fuploads%2Fgit-blob-42ebe7ebbe084db5ba66cf53a50453b68b5c9ab0%2Frest-spec.json?alt=media)
{% endopenapi %}
{% openapi src="" path="/orgs/{org\_id}/apps/creations" method="get" %}
[rest-spec.json](https://2533899886-files.gitbook.io/~/files/v0/b/gitbook-x-prod.appspot.com/o/spaces%2F-MdwVZ6HOZriajCf5nXH%2Fuploads%2Fgit-blob-42ebe7ebbe084db5ba66cf53a50453b68b5c9ab0%2Frest-spec.json?alt=media)
{% endopenapi %}
{% openapi src="" path="/orgs/{org\_id}/apps/creations/{app\_id}" method="patch" %}
[rest-spec.json](https://2533899886-files.gitbook.io/~/files/v0/b/gitbook-x-prod.appspot.com/o/spaces%2F-MdwVZ6HOZriajCf5nXH%2Fuploads%2Fgit-blob-42ebe7ebbe084db5ba66cf53a50453b68b5c9ab0%2Frest-spec.json?alt=media)
{% endopenapi %}
{% openapi src="" path="/orgs/{org\_id}/apps/creations/{app\_id}" method="get" %}
[rest-spec.json](https://2533899886-files.gitbook.io/~/files/v0/b/gitbook-x-prod.appspot.com/o/spaces%2F-MdwVZ6HOZriajCf5nXH%2Fuploads%2Fgit-blob-42ebe7ebbe084db5ba66cf53a50453b68b5c9ab0%2Frest-spec.json?alt=media)
{% endopenapi %}
{% openapi src="" path="/orgs/{org\_id}/apps/creations/{app\_id}" method="delete" %}
[rest-spec.json](https://2533899886-files.gitbook.io/~/files/v0/b/gitbook-x-prod.appspot.com/o/spaces%2F-MdwVZ6HOZriajCf5nXH%2Fuploads%2Fgit-blob-42ebe7ebbe084db5ba66cf53a50453b68b5c9ab0%2Frest-spec.json?alt=media)
{% endopenapi %}
{% openapi src="" path="/orgs/{org\_id}/apps/creations/{app\_id}/secrets" method="post" %}
[rest-spec.json](https://2533899886-files.gitbook.io/~/files/v0/b/gitbook-x-prod.appspot.com/o/spaces%2F-MdwVZ6HOZriajCf5nXH%2Fuploads%2Fgit-blob-42ebe7ebbe084db5ba66cf53a50453b68b5c9ab0%2Frest-spec.json?alt=media)
{% endopenapi %}
{% openapi src="" path="/orgs/{org\_id}/app\_bots" method="get" %}
[rest-spec.json](https://2533899886-files.gitbook.io/~/files/v0/b/gitbook-x-prod.appspot.com/o/spaces%2F-MdwVZ6HOZriajCf5nXH%2Fuploads%2Fgit-blob-42ebe7ebbe084db5ba66cf53a50453b68b5c9ab0%2Frest-spec.json?alt=media)
{% endopenapi %}
{% openapi src="" path="/orgs/{org\_id}/app\_bots/{bot\_id}" method="delete" %}
[rest-spec.json](https://2533899886-files.gitbook.io/~/files/v0/b/gitbook-x-prod.appspot.com/o/spaces%2F-MdwVZ6HOZriajCf5nXH%2Fuploads%2Fgit-blob-42ebe7ebbe084db5ba66cf53a50453b68b5c9ab0%2Frest-spec.json?alt=media)
{% endopenapi %}
{% openapi src="" path="/groups/{group\_id}/apps/installs" method="post" %}
[rest-spec.json](https://2533899886-files.gitbook.io/~/files/v0/b/gitbook-x-prod.appspot.com/o/spaces%2F-MdwVZ6HOZriajCf5nXH%2Fuploads%2Fgit-blob-42ebe7ebbe084db5ba66cf53a50453b68b5c9ab0%2Frest-spec.json?alt=media)
{% endopenapi %}
{% openapi src="" path="/groups/{group\_id}/apps/installs" method="get" %}
[rest-spec.json](https://2533899886-files.gitbook.io/~/files/v0/b/gitbook-x-prod.appspot.com/o/spaces%2F-MdwVZ6HOZriajCf5nXH%2Fuploads%2Fgit-blob-42ebe7ebbe084db5ba66cf53a50453b68b5c9ab0%2Frest-spec.json?alt=media)
{% endopenapi %}
{% openapi src="" path="/groups/{group\_id}/apps/installs/{install\_id}" method="delete" %}
[rest-spec.json](https://2533899886-files.gitbook.io/~/files/v0/b/gitbook-x-prod.appspot.com/o/spaces%2F-MdwVZ6HOZriajCf5nXH%2Fuploads%2Fgit-blob-42ebe7ebbe084db5ba66cf53a50453b68b5c9ab0%2Frest-spec.json?alt=media)
{% endopenapi %}
{% openapi src="" path="/groups/{group\_id}/apps/installs/{install\_id}/secrets" method="post" %}
[rest-spec.json](https://2533899886-files.gitbook.io/~/files/v0/b/gitbook-x-prod.appspot.com/o/spaces%2F-MdwVZ6HOZriajCf5nXH%2Fuploads%2Fgit-blob-42ebe7ebbe084db5ba66cf53a50453b68b5c9ab0%2Frest-spec.json?alt=media)
{% endopenapi %}
---
# Source: https://docs.snyk.io/developer-tools/snyk-cli/scan-and-maintain-projects-using-the-cli/snyk-cli-for-iac/test-your-iac-files/arm-files.md
# ARM files
With Snyk Infrastructure as Code, you can test your configuration files using the CLI.
Snyk Infrastructure as Code for Azure Resource Manager (ARM) supports scanning JSON format files. You can also scan Bicep format files by converting the configuration files to JSON using the Bicep CLI. Snyk supports the ARM `languageversion` 1.0.
## Test for an issue on specified JSON files
Enter the following Snyk CLI command:
```
snyk iac test deploy.json
```
You can also specify multiple files by appending the file names after each other, for example:
```
snyk iac test file-1.json file-2.json
```
## Test for an issue on specified Bicep files
Be sure you have the [Bicep CLI installed](https://docs.microsoft.com/en-us/azure/azure-resource-manager/bicep/install).
After installing the Bicep CLI, **navigate** to the directory that contains your Bicep files and **convert** the relevant Bicep file to JSON by entering the following:
```
az bicep build -f deploy.bicep
```
You can then scan the newly created JSON file in the same way as any other file. Use the following Snyk CLI command:
```
snyk iac test deploy.json
```
---
# Source: https://docs.snyk.io/scan-with-snyk/snyk-open-source/manage-vulnerabilities/artifactory-gatekeeper-plugin.md
# Artifactory Gatekeeper Plugin
{% hint style="info" %}
**Feature availability**\
This feature is available only with Enterprise plans. For more information, see [plans and pricing](https://snyk.io/plans/).
{% endhint %}
With the Snyk plugin for Artifactory, you can scan your artifacts for open-source vulnerabilities and license issues.
After the plugin is installed, it runs in the background and can do the following automatically:
* Add vulnerability and license issue counts from Snyk as properties in an artifact
* Block developers from downloading packages with vulnerability and license issues according to a configured threshold
By scanning artifacts as part of your workflow and then displaying those test results directly from the Artifactory UI, the Snyk Artifactory Gatekeeper Plugin enables you to track and identify issues that are risks to your application security more quickly and to avoid using those artifacts in your Projects.
{% hint style="info" %}
This page refers to the Artifactory Plugin, an independent piece of software that is installed on the Artifactory machine and serves as a gatekeeper, blocking vulnerable packages from being downloaded from the Artifactory instance.
This plugin is separate from the [Artifactory Registry for Maven](https://docs.snyk.io/scan-with-snyk/snyk-open-source/package-repository-integrations/artifactory-package-repository-connection-setup/artifactory-registry-for-maven), a Snyk integration that allows configuring SCM scans to use custom package registries.
{% endhint %}
## Package managers supported by the Artifactory Plugin
* npm
* Maven (.jar files)
* Gradle (.jar files)
* sbt (.jar files)
* pip (PyPi)
* CocoaPods
* Ruby Gems
* Nuget
## Prerequisites for the Artifactory plugin
* Snyk Enterprise Account
* Artifactory Version 7.4.3 and higher
## Data exchanged between Artifactory and Snyk
Artifactory transmits the package name and version to the test endpoint at the Snyk API instance. In the header, the authorization token is transmitted.
If the Artifactory installation is configured to use a proxy, Snyk will automatically use it too. Potentially, there could be an issue if the proxy is an authenticated or Kerberos proxy, but a standard, unauthenticated, forwarding proxy should work if the Artifactory installation and its underlying JVM are configured correctly with a proxy.
Snyk calls [`https://api.snyk.io/v1/test`](https://api.snyk.io/v1/test) for the right packager manager with the right name and version.
## Installation of the Artifactory Plugin
1. Log in to your Snyk account.
2. Select **Settings** > **General** to locate, copy, and save the following:
1. Service account token or Organization API token
2. The Organization ID for any one of your organizations
3. Navigate to [the Snyk Artifactory plugin repo in GitHub](https://github.com/snyk/artifactory-snyk-security-plugin) and then to **Releases**.
4. From the most current release, expand the **Assets** section to download the artifactory-snyk-security-plugin-\.zip archive.
5. Extract the archive. It should have the following structure: `plugins (directory)` followed by
* `snykSecurityPlugin.groovy — plugin`
* `snykSecurityPlugin.properties — plugin configuration`
* `lib (directory)`
* `artifactory-snyk-security-core.jar - plugin library`
* `snykSecurityPlugin.version - plugin version`
6. Open `snykSecurityPlugin.properties` in a text editor.
1. Set the API Token and Organization ID from the earlier steps as `snyk.api.token` and `snyk.api.organization` respectively.
2. Configure the rest of the properties as needed or leave them as defaults. See the section [Plugin configuration](#plugin-configuration).
3. For a full list of properties, [view the properties file on GitHub](https://github.com/snyk/artifactory-snyk-security-plugin/blob/master/core/src/main/groovy/io/snyk/plugins/artifactory/snykSecurityPlugin.properties).
7. Place all the files under `$JFROG_HOME/artifactory/etc/artifactory/plugins`.
8. Restart your Artifactory server. Note that **Refresh now** or **Reload** is not sufficient. Artifactory must be restarted.
9. Log in to your Artifactory instance and navigate to the **System Logs** to check that Snyk has been installed successfully.
Successful installation of Snyk
Results of a scan
Parameter Default value Description snyk.api.tokenService account token or Organization API token snyk.api.organizationThe Organization ID for any one of your Snyk organizations snyk.api.urlhttps://api.snyk.io/v1/ Snyk API base URL snyk.scanner.test.continuouslyfalse Decides whether the plugin should periodically refresh vulnerability data from Snyk or filter access according to results obtained while the package was first requested. Without the continuous mode, new vulnerabilities aren't reported for a package that has already been allowed through the gatekeeper. snyk.scanner.frequency.hours168 Scan result expiry (continuous mode only). When the most recent scan was made within this time frame, filtering respects the previous result. Beyond that time, a new Snyk Test request is made. When this property is set to 0, the plugin triggers a test each time an artifact is accessed. snyk.scanner.vulnerability.thresholdlow Global threshold for vulnerability issues. Accepted values: "low", "medium", "high", "critical", "none" snyk.scanner.license.thresholdlow Global threshold for vulnerability issues. Accepted values: "low", "medium", "high", "critical", "none"
For a full list of properties, [view the properties file on GitHub](https://github.com/snyk/artifactory-snyk-security-plugin/blob/master/core/src/main/groovy/io/snyk/plugins/artifactory/snykSecurityPlugin.properties).
## Artifact properties
These are the properties set by the plugin on scanned artifacts. Artifact access is allowed or forbidden depending on the values of these properties.
Property Description snyk.test.timestampDate and time when the artifact wast last scanned by Snyk. snyk.issue.urlThis is the URL to the Snyk database and explanation of the vulnerability, including specific details about vulnerable versions, available upgrades, and Snyk patches. snyk.issue.vulnerabilitiesRegardless of the thresholds configured, this row displays vulnerability summary scan results. snyk.issue.vulnerabilities.forceDownloadWhen true, allows downloads for this artifact even when there are vulnerabilities. snyk.issue.vulnerabilities.forceDownload.infoUse this field to provide additional information about why the forceDownload is enabled. snyk.issue.licensesRegardless of the thresholds configured, this row displays license summary scan results. snyk.issue.licenses.forceDownloadWhen true, allows downloads for this artifact even when there are license issues. snyk.issue.licenses.forceDownload.infoUse this field to provide additional information about why the forceDownload is enabled.
## Troubleshooting for the Artifactory Gatekeeper Plugin
You can enable debug logs by modifying your `${ARTIFACTORY_HOME}/var/etc/artifactory/logback.xml`file and adding the following line:
```
Artifactory repository setup
Maven settings, choose Type
Pull request to test Artifactory integration
.artifactory.com/artifactory`.
The following fields are optional:
* `Port`: Omit if no port number is needed.
* `Basic auth`: Omit if no basic auth required.\
URL encode both username and password info to avoid errors that may prevent authentication.
* `Protocol`: Defaults to `https://`\
This should only be specified when no certificate is present and `http://` is required instead for your instance.
`ARTIFACTORY_URL` format with optional fields:\
`[http://][username:password@]hostname[:port]/artifactory`\
Example:\
`http://alice:mypassword@acme.com:8080/artifactory`
Optional. `RES_BODY_URL_SUB` - The URL of the Artifactory instance, including http\:// and without basic auth credentials. Required for npm and Yarn integrations only.\
Example:\
`http://acme.com/artifactory`
---
# Source: https://docs.snyk.io/implementation-and-setup/enterprise-setup/snyk-broker/classic-broker/install-and-configure-snyk-broker/artifactory-repository-install-and-configure-broker.md
# Artifactory Repository - prerequisites and steps to install and configure Broker
{% hint style="info" %}
**Feature availability**
Integration with Artifactory Repository is available only for Enterprise plans. For more information, see [plans and pricing](https://snyk.io/plans/).
{% endhint %}
Before installing, review the general instructions for the installation method you plan to use, [Helm](https://docs.snyk.io/implementation-and-setup/enterprise-setup/snyk-broker/classic-broker/install-and-configure-snyk-broker/install-and-configure-broker-using-helm) or [Docker](https://docs.snyk.io/implementation-and-setup/enterprise-setup/snyk-broker/classic-broker/install-and-configure-snyk-broker/install-and-configure-broker-using-docker).
The prerequisites follow.
Before installing the Snyk Artifactory Repository Broker, ask your Snyk account team to provide you with a Broker token or generate it from the Snyk Web UI.
You must have Docker or a way to run Docker Linux containers. Some Docker deployments for Windows run only Windows containers. Ensure that your deployment is capable of running Linux containers.
For convenience, instructions to obtain or generate the Broker token follow. When you are done, continue with the steps to install using [Docker](https://docs.snyk.io/implementation-and-setup/enterprise-setup/snyk-broker/classic-broker/install-and-configure-snyk-broker/artifactory-repository-install-and-configure-broker/artifactory-repository-install-and-configure-using-docker) or [Helm](https://docs.snyk.io/implementation-and-setup/enterprise-setup/snyk-broker/classic-broker/install-and-configure-snyk-broker/artifactory-repository-install-and-configure-broker/artifactory-repository-install-and-configure-using-helm).
## Obtain Broker token for Artifactory Repository setup
1. Navigate to **Settings** > **Add integrations** > **Package Repositories > Artifactory**.
2. Enter the URL of your Artifactory instance, this must end with /artifactory.
3. Enter your username and password.
4. Select **Save**.
Artifactoryrepository setup
\
-e ARTIFACTORY_URL=.artifactory.com/artifactory \
snyk/broker:artifactory
```
For an npm or Yarn integration, use the following command.
```
docker run --restart=always \
-p 8000:8000 \
-e BROKER_TOKEN=secret-broker-token \
-e ARTIFACTORY_URL=acme.com/artifactory \
-e RES_BODY_URL_SUB=http://acme.com/artifactory \
snyk/broker:artifactory
```
## Start the Broker Client container and verify the connection with Artifactory Repository
Paste the Broker Client configuration to start the Broker Client container.
You can check the status of the connection by refreshing the Artifactory Integration Settings page. When the connection is set up correctly, there is no connection error.
---
# Source: https://docs.snyk.io/implementation-and-setup/enterprise-setup/snyk-broker/classic-broker/install-and-configure-snyk-broker/artifactory-repository-install-and-configure-broker/artifactory-repository-install-and-configure-using-helm.md
# Artifactory Repository - install and configure using Helm
{% hint style="info" %}
**Feature availability**
Integration with Artifactory Repository is available only with Enterprise plans. For more information, see [plans and pricing](https://snyk.io/plans/).
{% endhint %}
Before installing, review the [prerequisites](https://docs.snyk.io/implementation-and-setup/enterprise-setup/snyk-broker/classic-broker/install-and-configure-snyk-broker/artifactory-repository-install-and-configure-broker) and the general instructions for installation using [Helm](https://docs.snyk.io/implementation-and-setup/enterprise-setup/snyk-broker/classic-broker/install-and-configure-snyk-broker/install-and-configure-broker-using-helm).
For information about non-brokered integration with Artifactory Repository see [Artifactory Repository setup](https://docs.snyk.io/scan-with-snyk/snyk-open-source/package-repository-integrations/artifactory-package-repository-connection-setup). For information about brokered integration with Artifactory Container Registry see [Snyk Broker -Container Registry Agent](https://docs.snyk.io/implementation-and-setup/enterprise-setup/snyk-broker/snyk-broker-container-registry-agent).
To use this chart, you must first add the Snyk Broker Helm Chart by adding the repo:
`helm repo add snyk-broker https://snyk.github.io/snyk-broker-helm/`
Then, run the following commands to install the Broker and customize the environment variables. For definitions of the environment variables see [Artifactory Repository - environment variables for Snyk Broker](https://docs.snyk.io/implementation-and-setup/enterprise-setup/snyk-broker/classic-broker/install-and-configure-snyk-broker/artifactory-repository-install-and-configure-broker/artifactory-repository-environment-variables-for-snyk-broker).
For `artifactoryUrl` values do not include `https://`
{% hint style="info" %}
**Multi-tenant settings for regions**\
When installing, you must add a command in your script to set the `brokerServerUrl`. This is the URL of the Broker server for the region where your data is hosted. For the commands and URLs to use, see [Broker URLs](https://docs.snyk.io/snyk-data-and-governance/regional-hosting-and-data-residency#broker-server-urls).
{% endhint %}
```
helm install snyk-broker-chart snyk-broker/snyk-broker \
--set scmType=artifactory \
--set brokerToken= \
--set brokerServerUrl=
--set artifactoryUrl= \
-n snyk-broker --create-namespace
```
You can pass any environment variable of your choice in the Helm command. For details, see [Custom additional options for Broker Helm Chart](https://docs.snyk.io/implementation-and-setup/enterprise-setup/snyk-broker/classic-broker/install-and-configure-snyk-broker/advanced-configuration-for-helm-chart-installation/custom-additional-options-for-broker-helm-chart-installation). Follow the instructions for [Advanced configuration for Helm Chart installation](https://docs.snyk.io/implementation-and-setup/enterprise-setup/snyk-broker/classic-broker/install-and-configure-snyk-broker/advanced-configuration-for-helm-chart-installation) to make configuration changes as needed.
You can verify that the Broker is running by looking at the settings for your brokered integration in the Snyk Web UI to see a confirmation message that you are connected. You can start importing Projects once you are connected.
---
# Source: https://docs.snyk.io/snyk-api/reference/asset.md
# Asset
{% hint style="info" %}
This document uses the REST API. For more details, see the [Authentication for API](https://docs.snyk.io/snyk-api/authentication-for-api) page.
{% endhint %}
{% openapi src="" path="/groups/{group\_id}/assets/{asset\_id}" method="patch" %}
[rest-spec.json](https://2533899886-files.gitbook.io/~/files/v0/b/gitbook-x-prod.appspot.com/o/spaces%2F-MdwVZ6HOZriajCf5nXH%2Fuploads%2Fgit-blob-42ebe7ebbe084db5ba66cf53a50453b68b5c9ab0%2Frest-spec.json?alt=media)
{% endopenapi %}
{% openapi src="" path="/groups/{group\_id}/assets/{asset\_id}" method="get" %}
[rest-spec.json](https://2533899886-files.gitbook.io/~/files/v0/b/gitbook-x-prod.appspot.com/o/spaces%2F-MdwVZ6HOZriajCf5nXH%2Fuploads%2Fgit-blob-42ebe7ebbe084db5ba66cf53a50453b68b5c9ab0%2Frest-spec.json?alt=media)
{% endopenapi %}
{% openapi src="" path="/groups/{group\_id}/assets/{asset\_id}/relationships/projects" method="get" %}
[rest-spec.json](https://2533899886-files.gitbook.io/~/files/v0/b/gitbook-x-prod.appspot.com/o/spaces%2F-MdwVZ6HOZriajCf5nXH%2Fuploads%2Fgit-blob-42ebe7ebbe084db5ba66cf53a50453b68b5c9ab0%2Frest-spec.json?alt=media)
{% endopenapi %}
{% openapi src="" path="/groups/{group\_id}/assets/{asset\_id}/relationships/assets" method="get" %}
[rest-spec.json](https://2533899886-files.gitbook.io/~/files/v0/b/gitbook-x-prod.appspot.com/o/spaces%2F-MdwVZ6HOZriajCf5nXH%2Fuploads%2Fgit-blob-42ebe7ebbe084db5ba66cf53a50453b68b5c9ab0%2Frest-spec.json?alt=media)
{% endopenapi %}
{% openapi src="" path="/groups/{group\_id}/assets/search" method="post" %}
[rest-spec.json](https://2533899886-files.gitbook.io/~/files/v0/b/gitbook-x-prod.appspot.com/o/spaces%2F-MdwVZ6HOZriajCf5nXH%2Fuploads%2Fgit-blob-42ebe7ebbe084db5ba66cf53a50453b68b5c9ab0%2Frest-spec.json?alt=media)
{% endopenapi %}
---
# Source: https://docs.snyk.io/manage-risk/prioritize-issues-for-fixing/assets-and-risk-factors.md
# Assets and risk factors
The capabilities of the SnykWeb UI Issues menu rely on understanding your application context to help you better prioritize your security issues. It does that by understanding how your application is configured and relying on that information to provide you with triage and prioritization of your assets and issues for the Snyk Essentials plan, and it also adds specific [risk factors](#risk-factors) and [evidence graph](https://docs.snyk.io/manage-risk/prioritize-issues-for-fixing/using-the-issues-ui/evidence-graph) information.
* [Assets](#assets) are analyzed using Snyk Issues, focusing on images, Kubernetes resources, and packages to understand how they all interact with each other.
* [Risk factors](#risk-factors) are analyzed using Snyk Issues and grouped into four main categories:
* [Deployed](https://docs.snyk.io/manage-risk/prioritize-issues-for-fixing/assets-and-risk-factors/risk-factor-deployed)
* [OS conditions](https://docs.snyk.io/manage-risk/prioritize-issues-for-fixing/assets-and-risk-factors/risk-factor-os-condition)
* [Public facing](https://docs.snyk.io/manage-risk/prioritize-issues-for-fixing/assets-and-risk-factors/risk-factor-public-facing)
## Assets
Snyk issues analyzes the assets described on this page.
### Images
Images are assets that represent a Docker image. Snyk Container performs security scans on the Docker images. Images can be mapped one to many with the Snyk Projects created by the scans performed by Snyk Container. Docker images have natural IDs, which are represented by SHAs. Snyk uses this natural ID to correlate the same images even if they are mapped to different Snyk Projects.
### Kubernetes resources
Kubernetes resources are assets that represent a Kubernetes object. The Kubernetes Connector collects resource information from the Kubernetes clusters.
Kubernetes resources do not map to the Snyk Projects. These are internal entities used to compute certain risk factors, further detailed on the rest of this page. These risk factors can be related to the packages and images.
### Packages
Packages are assets that represent a software package. Snyk Open Source and Snyk Code products perform security scans on files. These files represent the package manager declaration and the source code of a software package, respectively. A package is a representation of that software package.
Packages can be mapped one to one with the Snyk Projects created by the scans performed by Snyk Open Source and Snyk Code. All the issues identified by these products and attributed to these Projects will be mapped to the package entity.
The term Package is a very coarse abstraction. It does not have versions. It is a representation of the current state of the software package at a point in time. The point in time is determined by the time when the Snyk processing pipeline is completed and the state of Snyk Projects at that time.
Snyk Open Source uses the word package to refer to the third-party dependencies declared in the package dependency manifest. Snyk does not currently expose the granularity of the third-party dependencies. However, from the prioritization data model point of view, there is no distinction between third-party and first-party packages. These would be represented as a package object at that point in time.
## Risk factors
By understanding your images, packages, and Kubernetes resources as "application context", Snyk can compute the following risk factors:
* [Deployed](https://docs.snyk.io/manage-risk/prioritize-issues-for-fixing/assets-and-risk-factors/risk-factor-deployed)
* [OS condition](https://docs.snyk.io/manage-risk/prioritize-issues-for-fixing/assets-and-risk-factors/risk-factor-os-condition)
* [Public facing](https://docs.snyk.io/manage-risk/prioritize-issues-for-fixing/assets-and-risk-factors/risk-factor-public-facing)
You can enable and disable all of these "application context" risk factors through the Group **Settings**, on the **Issues** tab. If you choose to disable a risk factor, a provider selection, or the Kubernetes cluster mapping, Snyk will no longer compute them.
Depending on the integration options enabled for your application, risk factors are applied differently. You can [prioritize your integrations](https://docs.snyk.io/manage-risk/set-up-insights#prioritize-your-integrations) by customizing the available Insights options from the Group settings.
Risk factors are supported for stateful entities such as the following Kubernetes components: [StatefulSet](https://kubernetes.io/docs/concepts/workloads/controllers/statefulset/), [DaemonSet](https://kubernetes.io/docs/concepts/workloads/controllers/daemonset/), and [Deployment](https://kubernetes.io/docs/concepts/workloads/controllers/deployment/).
Group settings - Insights tab in the Group settings
Asset card - Assets Summary view
Asset card - Assets Summary view of a children asset
Asset card - Assets Related Projects view
Asset card - Assets Attributes view
Inventory menu - Controls column
Advanced Filters - Tags
Inventory menu - Labels column
` |
| Snyk Essentials detected a new repository created in the last 7 days. | `new repository` |
| Snyk Essentials found the code Project with the code owner. | `codeowners` |
In the Snyk web interface, you can filter assets by their labels using the **Advanced Filters** option. You can define filters based on highly specific criteria, such as a property of an asset, a condition, and a value.
* Filter by `labels`: This filter allows you to select a specific label.
Advanced Filters - By Labels
Inventory menu - Lock the value of a class
Set up SCM integration at the Organization level from the Actions column
" %}
Overview of asset policies
{% endembed %}
{% hint style="info" %}
[Manage assets](https://docs.snyk.io/manage-assets/manage-assets) and [assets policies](https://docs.snyk.io/manage-risk/policies/assets-policies) are interconnected. Before setting up any new policy, ensure you have reviewed and filtered your assets from the Inventory menu.
{% endhint %}
## Use Cases
You can create policies for organizing the assets, classifying them, and always being up to date with the latest information about an asset.\
Common use cases for policies include:
* [New asset notifications](https://docs.snyk.io/manage-risk/policies/assets-policies/use-cases-for-policies/notification-policy)
* [Asset classification](https://docs.snyk.io/manage-risk/policies/assets-policies/use-cases-for-policies/classification-policy)
* [Asset tagging](https://docs.snyk.io/manage-risk/policies/assets-policies/use-cases-for-policies/tagging-policy)
* [Coverage control](https://docs.snyk.io/manage-risk/policies/assets-policies/use-cases-for-policies/coverage-control-policy)
### New asset notifications
Notify members of the AppSec team when new assets meeting certain criteria are discovered. For example, you may send a Slack message to the infra team if new repository assets that leverage Terraform as a technology are detected by Snyk Essentials.
When setting up a notification action (email or Slack) for a policy, you can include a link to the relevant assets. Each notification will list all the assets impacted by the policy. You can view the assets individually, or you can see a summary of all the assets by clicking the **Click Here** option in the notification. The list of assets displayed in the email notification is automatically generated.
### Asset classification
Classify repository assets according to their business criticality from A (most critical) to D (least critical), based on asset properties such as name and tags. For example, you might indicate that any repositories that contain “customer-portal” in the name should be classified as A, given that the customer-portal app holds sensitive data.
### Asset tagging
Categorize and label repository assets with [asset tags](https://docs.snyk.io/manage-assets/assets-inventory-components#tags) to filter the asset inventory.
* **GitHub custom properties** - lists the GitHub custom properties associated with your GitHub repository as a tag
* **User-defined tags** are customizable, as you can define their logic through [Assets Policies](https://docs.snyk.io/manage-risk/policies/assets-policies). For example, you can set tags to label a repository that comes from a specific source, such as GitHub. Tags associated with assets are identified in the UI with the **Asset policy tags** name.
* **System tags** are automatically assigned by Snyk based on asset names or detected keywords (for example, `codeowners`).
### Security coverage
Monitor if your assets are scanned by the selected security products. You can select one or multiple security products and also specify a timeframe for when the last scan should have taken place.
---
# Source: https://docs.snyk.io/manage-risk/policies/assign-a-policy-to-an-organization.md
# Assign a policy to an Organization
When you create a policy, you can apply it to one Organization. You cannot directly apply an Organization to or remove an Organization from the default policy using the Policy Manager.
{% hint style="info" %}
Policies applied to Organizations are in effect when you run the `snyk test` or `snyk monitor` CLI commands.
{% endhint %}
## Apply a policy to an Organization
To apply a policy to an Organization, in the Organization selector panel, check the box for the Organization to which you want to apply the policy.
If an Organization has another policy applied, you can see that policy from the selector, and the policy indicator next to the Organization name will be gray.
Gray indicator - Organization has another policy applied
Yellow indicator - Organization already assigned to this policy
Gray and Yellow indicators - Policies applied to the Organizaiton and to be applied
Remove an Organization from a policy
Attribute selector panel
Project inheriting a policy
Project not inheriting a policy
Change policy order
" path="/orgs/{org\_id}/audit\_logs/search" method="get" %}
[rest-spec.json](https://2533899886-files.gitbook.io/~/files/v0/b/gitbook-x-prod.appspot.com/o/spaces%2F-MdwVZ6HOZriajCf5nXH%2Fuploads%2Fgit-blob-42ebe7ebbe084db5ba66cf53a50453b68b5c9ab0%2Frest-spec.json?alt=media)
{% endopenapi %}
{% openapi src="" path="/groups/{group\_id}/audit\_logs/search" method="get" %}
[rest-spec.json](https://2533899886-files.gitbook.io/~/files/v0/b/gitbook-x-prod.appspot.com/o/spaces%2F-MdwVZ6HOZriajCf5nXH%2Fuploads%2Fgit-blob-42ebe7ebbe084db5ba66cf53a50453b68b5c9ab0%2Frest-spec.json?alt=media)
{% endopenapi %}
---
# Source: https://docs.snyk.io/snyk-platform-administration/user-roles/custom-role-templates/auditor-role-template.md
# Auditor role template
This is a Group-level read-only role, meaning an Auditor can only view certain areas and functions in Snyk and cannot create PRs, Projects, and more.
This role can view issues, results of scans, and reports. An Auditor often verifies that there is a scan snapshot for a particular resource or Snyk Project. The Auditor may be external to the company.
## Group-level permissions
To create this role, enable the following permissions in the relevant categories:
### Group Management
Permission Enabled? View Groups true Edit Group details false View Group settings false Edit settings false View Group notification settings false Edit Group notification settings false
### Organization management
Permission Enabled? View Organizations true Edit Organizations false Remove Organizations false
### Snyk Essentials management
Permission Enabled? View Snyk Essentials true Edit Snyk Essentials false
### Audit Log management
Permission Enabled? View Audit Logs true
### Insights management
Permission Enabled? Access Insights true
### Reports management
Permission Enabled? View reports true
### Security and License Policies
Permission Enabled? View Policies true Create Policies false Edit Policies false Delete Policies false
### User management
Permission Enabled? View users true Invite users false Manage users false Add users false Provision users false User Leave false User Remove false
The remaining categories of permissions listed below should have all permissions within them set to disabled:
* IaC settings management
* Issue management
* Request access management
* Role management
* Service account management
* Snyk Apps management
* Snyk Preview management
* SSO settings management
* Tags management
## Organization-level permissions
To create this role, enable the following permissions in the relevant categories:
### Organization management
Permission Enabled? View Organization true Edit Organization false Remove Organization false
### Audit Log management
Permission Enabled? View audit logs true
### Collection management
Permission Enabled? View Collections true Create Collection false Edit Collections false Delete Collections false
### Container Image management
Permission Enabled? View container image true Create container image false Edit container image false
### Integration management
Permission Enabled? View integrations true Edit integrations false
### Project management
Permission Enabled? View Project true Add Project false Edit Project false Edit Project status false Test Project false Move Project false Remove Project false View Project history true Edit Project integrations false Edit Project attributes false View Jira issues true Create Jira issues false Edit Project Tags false
### Project Ignore management
Permission Enabled? View Project Ignores true Create Project Ignores false Edit Project Ignores false Remove Project Ignores false
### Reports management
Permission Enabled? View Organization reports true
### Snyk Cloud management
Permission Enabled? View environments false Create environments false Delete environments false Update environments false View scans true Create scans false View resources true View artifacts true Create artifacts false View Custom Rules false Create Custom Rules false Edit Custom Rules false Delete Custom Rules false
### Webhook management
Permission Enabled? View Outbound Webhooks true Create Outbound Webhooks false Remove Outbound Webhooks false
The remaining categories of permissions listed below should have all permissions within them set to disabled:
* Billing management
* Entitlement management
* Kubernetes Integration management
* Package management
* Project pull request management
* Service account management
* Snyk Apps management
* Snyk Preview management
* User management
---
# Source: https://docs.snyk.io/integrations/snyk-studio-agentic-integrations/quickstart-guides-for-snyk-studio/augment-code-guide.md
# Augment Code guide
Add Snyk Studio to Augment Code to secure code generated with agentic workflows through a Large Language Model (LLM). You can achieve this in several ways. When you use it for the first time, Snyk Studio asks for trust and, if necessary, trigger authentication.
## Prerequisites
* [Install the code assistant extension](https://www.augmentcode.com/)
* [Install the Snyk CLI](https://docs.snyk.io/developer-tools/snyk-cli/install-or-update-the-snyk-cli)
* [Install the Snyk MCP](#install-the-snyk-mcp-server-in-augment-code)
### Install Augment Code
Visit the [Augment Code](https://www.augmentcode.com/) website to download the correct version of the IDE plugin.
### Install the Snyk MCP Server in Augment Code
Install the Snyk MCP Server using the method that best suits your operating system and local development environment.
#### Install with Node.js and npx
* Name: Snyk
* Command: npx -y snyk\@latest mcp -t stdio
#### Install with pre-installed Snyk CLI
* Name: Snyk
* Command: /absolute/path/to/snyk mcp -t stdio
If the `snyk` command is not available, add it by following the instructions on the [Installing or updating the Snyk CLI](https://docs.snyk.io/developer-tools/snyk-cli/install-or-update-the-snyk-cli) page.
## Setting up the Snyk MCP Server
The MCP Server starts automatically. The following example shows a Snyk MCP Server that was successfully configured and started.
] []`
## Description
The `snyk auth` command authenticates your machine to associate the Snyk CLI with your Snyk account.
Running `$ snyk auth` opens a browser window with prompts to log in to your Snyk account and authenticate. No repository permissions are needed at this stage, only your email address.
When you have authenticated, you can start using the CLI; see [Getting started with the CLI](https://docs.snyk.io/snyk-cli/getting-started-with-the-cli)
**Note:** Beginning with version 1.1293, the Snyk CLI uses OAuth when authenticating through the browser.
OAuth provides improved security by issuing shorter-lived expiring authorizations with the convenience of automatic refresh.
Earlier versions of the Snyk CLI (< 1.1293) obtained a non-expiring API token through a legacy browser interaction.
The Snyk API token can still be used as a fallback option. You must explicitly add an option to enable it as follows: `snyk auth --auth-type=token`.
## Options
### `--auth-type=`
Specify the \ of authentication to use. Supported types are `oauth` (the default beginning with version 1.1293.0) AND `token`.
### `--client-secret=` and `--client-id=`
You can set the client secret, and the id can be set in order to use the OAuth2 Client Credentials Grant.
Both values must be provided together. They are only valid together with `--auth-type=oauth;`otherwise they will be ignored.
For information about how to get the `` and the ``, see [Service accounts using OAuth 2.0](https://docs.snyk.io/enterprise-setup/service-accounts/service-accounts-using-oauth-2.0#oauth-2.0-with-client-secret)
## Token value
In some environments and configurations, you must use the ``; see [Authenticate to use the CLI](https://docs.snyk.io/snyk-cli/authenticate-to-use-the-cli)
The value may be a user token or a service account token; see [Service accounts](https://docs.snyk.io/enterprise-setup/service-accounts)
In a CI/CD environment, use the `SNYK_TOKEN` environment variable; see [Configure the Snyk CLI](https://docs.snyk.io/snyk-cli/configure-the-snyk-cli)
After setting this environment variable, you can use CLI commands.
## Debug
Use the `-d` option to output the debug logs.
---
# Source: https://docs.snyk.io/scan-with-snyk/snyk-container/kubernetes-integration/install-the-snyk-controller/authenticate-to-private-container-registries.md
# Authenticate to private container registries
If you are using private container registries, you must create a `dockercfg.json` file that contains the credentials to the registry. Then you must create a secret, which must be called `snyk-monitor`.
The `dockercfg.json` file is necessary to allow the monitor to look up images in private registries. Usually, your credentials are in `$HOME/.docker/config.json`. However, the credentials must also be added to the `dockercfg.json` file. The Snyk Controller is not able to access these registries if the credentials are only stored in `$HOME/.docker/config.json`
The steps below explain how to authenticate to private container registries.
## Configure the dockercfg.json file
Create a file named `dockercfg.json`. Store your credentials in this file.
{% hint style="info" %}
Ensure the file containing your credentials is named `dockercfg.json`. This filename is required by the `snyk-monitor`.
{% endhint %}
{% hint style="info" %}
Ensure the formatting is correct, including new line characters and whitespace in the `dockercfg.json` file. Malformed files will result in authentication failures.
{% endhint %}
The locations where your cluster runs and where your registries run determine the combination of entries in your `dockercfg.json` file. The file can contain credentials for multiple registries.
If your credentials are already in `$HOME/.docker/config.json`, copy this information to the `dockercfg.json` file.
If the `auth` entry is empty in the `$HOME/.docker/config.json`, run the following command and paste the output to `auth` entry in `dockercfg.json`:
```
echo -n 'username:password' | base64
```
### Examples of dockercfg.json file configuration
#### For private registries other than Nexus
If your cluster does not run on `GKE`, or it runs on `GKE` and pulls images from other private registries, your`dockercfg.json` file must contain:
```json
{
"auths": {
"gcr.io": {
"auth": "BASE64-ENCODED-AUTH-DETAILS"
},
// Add other registries as necessary, for example:
".azurecr.io": {
"auth": "BASE64-ENCODED-AUTH-DETAILS"
}
}
}
```
#### For Nexus Repository
If you are using Nexus Repository\*\*,\*\* your `dockercfg.json` file must contain:
```json
{
"auths": {
"": {
"auth": "BASE64-ENCODED-AUTH-DETAILS"
},
}
}
```
#### For Artifactory Container Registry
If you are using Artifactory Container Registry to host multiple private repositories\*\*,\*\* your `dockercfg.json` file must contain:
```json
{
"auths": {
"": {
"auth": "BASE64-ENCODED-AUTH-DETAILS"
},
"": {
"auth": "BASE64-ENCODED-AUTH-DETAILS"
}
}
}
```
#### For GKE using GCR
If your cluster runs on `GKE` and you are using `GCR`, your`dockercfg.json` file must contain:
```json
{
"credHelpers": {
"us.gcr.io": "gcloud",
"asia.gcr.io": "gcloud",
"marketplace.gcr.io": "gcloud",
"gcr.io": "gcloud",
"eu.gcr.io": "gcloud",
"staging-k8s.gcr.io": "gcloud"
}
}
```
#### For GKE using Google Artifact Registry (GAR)
If your cluster runs on `GKE` and you are using `GAR`, your`dockercfg.json` file must contain:
```json
{
"auths": {
"northamerica-northeast2-docker.pkg.dev": {
"auth": ")" | base64"}
}
}
```
This method relies on creating a service account. See [Google Cloud service account key](https://cloud.google.com/artifact-registry/docs/docker/authentication#json-key). Ensure you have the raw key saved to a file.
#### For EKS using ECR
If your cluster runs on `EKS` and you are using `ECR`, add the following:
```json
{
"credsStore": "ecr-login"
}
```
To use this credential helper for a specific `ECR` registry, create a credHelpers section with the URI of your ECR registry:
```json
{
"credHelpers": {
"public.ecr.aws": "ecr-login",
".dkr.ecr..amazonaws.com": "ecr-login"
}
}
```
#### For AKS using ACR
If your cluster runs on `AKS` and you're using `ACR`, add the following:
```json
{
"credHelpers": {
"myregistry.azurecr.io": "acr-env"
}
}
```
{% hint style="info" %}
In addition, for clusters running on AKS and using ACR, see [Entra ID Workload Identity service account](https://azure.github.io/azure-workload-identity/docs/topics/service-account-labels-and-annotations.html#service-account). It is possible that you are required to configure labels and annotations on the `snyk-monitor` ServiceAccount.
{% endhint %}
You can configure different credential helpers for different registries.
## Create the Kubernetes secret
Create the secret in Kubernetes by running the following command:
{% code overflow="wrap" %}
```sh
kubectl create secret generic snyk-monitor -n snyk-monitor \
--from-file=./dockercfg.json \
--from-literal=integrationId=abcd1234-abcd-1234-abcd-1234abcd1234 \
--from-literal=serviceAccountApiToken=aabb1212-abab-1212-dcba-4321abcd4321
```
{% endcode %}
---
# Source: https://docs.snyk.io/developer-tools/snyk-cli/authenticate-to-use-the-cli.md
# Authenticate to use the CLI
To scan your projects, you must authenticate with Snyk.
Snyk supports the following protocols for authentication:
* OAuth 2.0 (Recommended)
* Personal Access Token
* Snyk API token (Legacy)
{% hint style="info" %}
If you are not in the system default environment, `SNYK-US-01`, use the [`snyk config environment`](https://docs.snyk.io/developer-tools/snyk-cli/commands/config-environment) command to set your environment before you run [`snyk auth`](https://docs.snyk.io/developer-tools/snyk-cli/commands/auth).
{% endhint %}
## How to authenticate to use the CLI locally
### Steps to authenticate using OAuth 2.0 protocol
When you are using the CLI locally, **Snyk recommends that you use the OAuth 2.0 protocol.** Follow these steps:
1. Run the `snyk auth` CLI command.
2. Log in if you are prompted to do so.
3. The next page asks for your authorization for the CLI to act on your behalf. Click **Grant app access**.
4. When you have authenticated successfully, a confirmation message appears. Close the browser window and return to the CLI in the terminal.
After authentication is granted, a pair of access and refresh tokens are stored locally for future use.
Multi-tenant users who do not belong to the `SNYK-US-01` region ( `https://api.snyk.io`) will be automatically redirected to the correct domain for the email with which the user authenticated. This redirect will not happen if users are expected to use a custom URL, such as in single-tenant company configurations.
If you have problems, see [OAuth 2.0 authentication does not work](https://docs.snyk.io/developer-tools/snyk-ide-plugins-and-extensions/troubleshooting-ides/how-to-set-environment-variables-by-operating-system-os-for-ides-and-cli-1).
{% hint style="info" %}
OAuth 2.0 tokens are not static. You cannot copy these tokens from your Snyk account page.
{% endhint %}
### Steps to authenticate using Personal Access Tokens
{% hint style="warning" %}
This method is inferior to the OAuth method.
{% endhint %}
{% hint style="warning" %}
The Personal Access Token (PAT) authentication is progressively rolled out to all Enterprise customers. To check if this feature is available for your Organization at this time, reach out to your Snyk account team.
{% endhint %}
When using this feature, ensure you generate and use a Personal Access Token (PAT). This feature is not compatible with Service Account tokens, and using them may result in unexpected behavior or errors.
{% hint style="info" %}
Whenever you use this feature in your IDE, ensure to also retrieve the PAT details from the Snyk Web UI. Contact Snyk Support to enable the PAT feature within your Snyk Web UI Organization.
{% endhint %}
Follow these steps to authenticate using your Snyk Personal Access Token:
1. Create your **Personal Access** **Token**. For details, see the [Authentication for API](https://docs.snyk.io/snyk-api/authentication-for-api) page.
2. Run the `snyk auth ` CLI command, supplying your Personal Access Token as a command arg.
3. After you successfully authenticate, the PAT is stored locally for future use.
All subsequent commands requiring Snyk authorization will use the configured PAT.
### Steps to retrieve the Snyk API token and use it to authenticate
{% hint style="warning" %}
This method is inferior to the OAuth 2.0 method.
{% endhint %}
Follow these steps to authenticate using your Snyk API token:
1. Run the`snyk auth --auth-type=token` CLI command.
2. Log in, if required.
3. The next page prompts you to authenticate your machine to associate the Snyk CLI or the IDE plugin with your account. Click **Authenticate**.
4. After you successfully authenticate, a confirmation message appears. Close the browser window and return to the CLI in the terminal.
After you complete the dialog, the API token is stored locally for future use.
All subsequent `test` commands will be authenticated automatically.
### Steps to authenticate using a known Snyk API token
You can copy your personal API token from your **General Account settings** (under your username) in the Snyk Web UI, and then configure your CLI to use it locally.
All CLI `test` commands can automatically recognize the environment variable `SNYK_TOKEN` and use it for authentication. For details, see [Environment variables for Snyk CLI](https://docs.snyk.io/developer-tools/snyk-cli/configure-the-snyk-cli/environment-variables-for-snyk-cli).
To use API token-based authentication, set the `SNYK_TOKEN` environment variable and run the `test` command, for example:\
`SNYK_TOKEN= snyk test`
Alternatively, you can export the environment variable to make it available for future `test` commands:\
`export SNYK_TOKEN=`\
`snyk test`
This form of authentication is particularly useful for CI/CD pipelines. See [How to authenticate to use the CLI in CI/CD pipelines](#how-to-authenticate-to-use-the-cli-in-ci-cd-pipelines).
You can also store the Snyk API token locally for later use by running the following CLI command:\
`snyk auth `
All subsequent test calls will be authenticated automatically. For more information, see the [Auth command help](https://docs.snyk.io/developer-tools/snyk-cli/commands/auth).
## How to authenticate to use the CLI in CI/CD pipelines
Free and Team plan users are more likely to use this method in a CI/CD pipeline than to use OAuth 2.0. Enterprise plan customers are advised to use a [**service account**](https://docs.snyk.io/implementation-and-setup/enterprise-setup/service-accounts) in a CI/CD pipeline. For details about when to use a PAT and when to use a service account token, see [Authentication for API](https://docs.snyk.io/snyk-api/authentication-for-api).
All CLI `test` commands can automatically recognize the environment variable `SNYK_TOKEN` and use it for authentication. For details, see [Environment variables for Snyk CLI](https://docs.snyk.io/developer-tools/snyk-cli/configure-the-snyk-cli/environment-variables-for-snyk-cli).
To use PAT-based authentication, set the `SNYK_TOKEN` environment variable and run the `test` command, for example:\
`SNYK_TOKEN= snyk test`
Alternatively, you can export the environment variable to make it available for future `test` commands:\
`export SNYK_TOKEN=`\
`snyk test`
You can also store the Snyk PAT locally for later use by running the following CLI command:\
`snyk auth `
All subsequent test calls will be authenticated automatically. For more information, see the [Auth command help](https://docs.snyk.io/developer-tools/snyk-cli/commands/auth).
---
# Source: https://docs.snyk.io/snyk-api/authentication-for-api.md
# Authentication for API
{% hint style="info" %}
**Feature Availability**
To use the Snyk API, you must be an Enterprise plan customer and have a token from Snyk.
{% endhint %}
{% hint style="warning" %}
Use the URL for your region when calling an API. See [API URLs](https://docs.snyk.io/rest-api/about-the-rest-api#api-urls).
{% endhint %}
Enterprise users have [access to a personal token under their profile](#how-to-obtain-your-personal-token) and to service account tokens. The personal API token is associated with your Snyk Account and not with a specific Organization. Service accounts are associated with an Organization or a Group. For more information, see [Service accounts](https://docs.snyk.io/implementation-and-setup/enterprise-setup/service-accounts).
* **Enterprise users should use a service account** to authenticate for any kind of automation. This includes, but is not limited to, CI/CD scanning with the CLI or build system plugins and any automation, including automation with the API.
* **Enterprise users should use the personal token** under their user profile for:
* Running the CLI locally on their machine; for details, see [Authenticate to use the CLI](https://docs.snyk.io/developer-tools/snyk-cli/authenticate-to-use-the-cli).
* Authenticating with the IDE manually
* Running API calls one time, for example, to test something
Note that for free and team plan users, the personal token does not have access to the API and may be used for authenticating to IDE, CLI, and CI/CD integrations only. For details, see [Obtain and use your API token](https://docs.snyk.io/discover-snyk/getting-started#obtain-and-use-your-snyk-api-token).
For additional information, see [Snyk API token permissions users can control](https://docs.snyk.io/snyk-api/authentication-for-api/snyk-api-token-permissions-users-can-control).
## How to obtain your personal token
You can find your personal API token in your personal [personal account settings](https://app.snyk.io/account) after you register with Snyk and log in. In the **key** field, **Click to show**. Then highlight and copy the API key.
If you want a new API token, select **Revoke & Regenerate.** This will make the previous API token invalid. For details, see [Revoke and regenerate a Snyk API token](https://docs.snyk.io/snyk-api/authentication-for-api/revoke-and-regenerate-a-snyk-api-token).
## Authenticating with a personal API token
When using the API directly, provide the API token in an `Authorization: token` header, as in the following example request, replacing `API_TOKEN` with your token
```bash
curl --request GET \
--url "https://api.snyk.io/rest/self?version=2024-06-10" \
--header "Content-Type: application/vnd.api+json" \
--header "Authorization: token API_TOKEN"
```
## Authenticating for Snyk Apps
If you are using the [Snyk Apps APIs](https://docs.snyk.io/snyk-api/using-specific-snyk-apis/snyk-apps-apis), provide the `access_token` in an `Authorization: bearer` header as follows:
```bash
curl --request GET \
--url "https://api.snyk.io/rest/self?version=2024-06-10" \
--header "Content-Type: application/vnd.api+json" \
--header "Authorization: bearer API_TOKEN"
```
Otherwise, a `401 Unauthorized` error will be returned.
---
# Source: https://docs.snyk.io/developer-tools/snyk-ide-plugins-and-extensions/eclipse-plugin/authentication-for-the-eclipse-plugin.md
# Authentication for the Eclipse plugin
To scan your Projects, you must authenticate with Snyk.
Snyk supports the following protocols for authentication:
* OAuth 2.0 (Recommended)
* Personal Access Token
* Snyk API token (Legacy)
Authentication methods available in the Snyk plugin in Eclipse
Snyk endpoint configuration
Additional information and finish
Authentication methods available in the Snyk plugin in Jetbrains IDEs
Snyk icon and connect and trust
API token screen; revoke; regenerate; click to show
Connect and trust workspace
Change authentication method
Set token manually
Snyk: Log out
Authentication methods available in the Snyk extension in Visual Studio
Snyk extension navigation
Trust project and scan
Snyk Settings navigation
.
If you have not received this email, look into your spam folder or reach out to your account executive.
This email contains two links**:**
1. **Log in and activate your existing account** - To be used if you already have an account and wish to apply your plan to it.
2. **Create and activate a new account** - To be used if you're entirely new to Snyk or want to start from scratch with a different user.
{% hint style="warning" %}
Once provisioning is complete, these links will become invalid and you will see an "Access denied" error page.
If you have not completed provisioning but still see this error, make sure someone else in your organization has not already completed the flow themselves, in case the welcome email has more recipients.
{% endhint %}
## Sign up - start from scratch
Clicking the sign-up link in your welcome email will take you to the sign-up page in the provisioning app.
{% hint style="warning" %}
The provisioning app is only accessible through a unique link, all other access is disabled and will show an error page.
{% endhint %}
Sign up page on provision.snyk.io
Available hosting regions
Available authentication methods
Email address input
Successful provisioning for SSO
Log in page on provision.snyk.io
Linking to an existing Tenant or creating a new one
Business name already in use error
User with the same email address already exists error
Plan activation error
Managing Automated Collections under Organization Settings
Project showing linked images
Integration settings page with integration URL
Select Change Report to display different reports
SLA Management Report - Edit SLA targets
SLA Filters within the filters picker
SLA Management Report - Open issues section
SLA Management Report - SLA Breakdown
SLA Management Report - Breached and at risk open issues
Resolved issues section
Snyk PCI-DSS v4.0.1 Report
PCI-DSS Readiness Trend
Attack Category Breakdown
Repositories tested during date range
Repository Test Adoption
Test Success Rate Trend
Repository Test Summary
Snyk generated pull requests report
Pull Request usage graph and table
Open vs Fixed issues graph and table
Projects/Orgs/Repository table for PRs of different status
Repository breakdown by PR type and PR status
The last commit date in the repository:
Active : Had commits in the last 3 months.Inactive : The last commits were made in the last 3 - 6 months.Dormant : No commits in the last 6 months.N/A : There are no commits detected by Snyk Essentials.Repository Coverage
Asset Class Breakdown
Repository freshness
Application Context Availability
Asset source breakdown
Create new view button in the Standard view filter
Options available for saved views
An Issues Detail report
Filtered Issues Detail report
Create view window
PR check performance and status report
Lst of error PR checks displayed by error message
PR scanning adoption view by Group
PR scanning performance view by Group
AWS Lambda function box
AWS Gateway POST method execution
AWS API Gateway POST request Mapping Template with code
AWS API Gateway POST method Resources, Action tab with Deploy API selected
AWS Gateway Deploy API to default stage
AWS Lambda function trigger configuration showing new endpoint
Choose Snyk, Add integration for Snyk
Organization ID on Snyk Organization settings page
Group settings page
CloudTrail Lake tile on Snyk integrations page
Integration name, AWS Account ID, Channel ARN
Snyk App authorization
/cloud_events/group_registrations?version=2023-01-25~experimental' \
--header 'Content-Type: application/vnd.api+json' \
--header 'Authorization: token ' \
--data-raw '{
"data": {
"type": "group_registration",
"attributes": {
"type": "aws-cloudtrail",
"name": "",
"config": {
"account_id": "",
"channel_arn": ""
}
}
}
}'
```
Be sure to replace each indicated placeholder value in the example appropriately:
* `` - the Snyk **Group ID** you used in the previous step as the **External ID**
* `` - your personal Snyk API token, which you can find in the Snyk dashboard under **Account settings**
* `` - a name for this integration
* `` - the AWS account ID for the AWS account form the previous step.
* `` - the **Channel ARN** generated in the previous step when you added the Snyk integration in the CloudTrail Lake console.
If the call is successful, the API response will include an `id` for the registration. You can use this ID to manage and delete the integration later.
## Remove an AWS CloudTrail Lake integration (single Organization)
Navigate to the [AWS CloudTrail Lake settings](https://app.snyk.io/manage/integrations/aws-cloudtrail) page and select the name of the integration you want to remove.
Select AWL CloudTrail Lake integration to remove
Remove integration button
order by eventTime desc
limit 10
```
Replace `` with the ID of the event data store that is associated with the Snyk integration in AWS CloudTrail Lake.
## Understanding the log data
There are three (3) key fields to note when using the Snyk audit log data in AWS CloudTrail Lake.
`eventdata.useridentity`
The event `useridentity` contains a field called `principalid`, which represents the Snyk user ID for the user associated with the audit event. You can use Snyk API v1 endpoint [Get organization level audit logs](https://docs.snyk.io/snyk-api/reference/audit-logs#orgs-org_id-audit_logs-search) to match the Snyk user ID with a user in your Organization.
`eventdata.eventname`
This represents the type of audit event, for example, `api.access` or `org.cloud_config.settings.edit`, and can be used to group or filter events.
`eventdata.additionaleventdata`
This field contains a raw JSON payload with more detailed information about the audit event. The content of the payload depends on the type of the event. For example, an API access event will include the accessed URL, while a settings change event will include before and after values for the changed setting.
---
# Source: https://docs.snyk.io/developer-tools/snyk-ci-cd-integrations/aws-codepipeline-integration-by-adding-a-snyk-scan-stage.md
# AWS CodePipeline integration with CodeBuild
This guide outlines the steps for setting up a [Snyk Open Source](https://snyk.io/product/open-source-security-management/) security scanning workflow for AWS CodePipeline using [AWS CodeBuild](https://aws.amazon.com/codebuild/). By using the Snyk CLI and the built-in capabilities of CodeBuild, you can build a configurable solution for running Snyk software composition analysis (SCA) scans in your CI/CD pipeline.
## Prerequisites
* An active AWS account with CodeBuild and CodePipeline services enabled
* A Snyk account with the Snyk CLI configured
* Familiarity with CodeBuild project configuration and environment variables
* Understanding of your existing CodePipeline stages and their desired interaction with Snyk
## Setup steps
### Set up CodeBuild
* Create a new CodeBuild project in your AWS account.
* Choose a compatible [base image](https://docs.aws.amazon.com/codebuild/latest/userguide/build-env-ref-available.html) for your project based on your programming language and dependencies.
* Review how to [authenticate the Snyk CLI with your account](https://docs.snyk.io/developer-tools/snyk-cli/authenticate-to-use-the-cli) and consider using an environment variable to store sensitive information such as your Snyk CLI token.
{% hint style="info" %}
The default Service role in AWS CodeBuild includes an IAM permission that allows the CodeBuild project to pull any secret from the AWS Secrets Manager that starts with `/CodeBuild/` in the name. Refer to the [Troubleshooting](#troubleshooting) section at the end of this guide for more information.
{% endhint %}
* Configure build commands:
* [Install the Snyk CLI](https://docs.snyk.io/developer-tools/snyk-cli/install-or-update-the-snyk-cli) using the commands appropriate for your operating system.
* Define a build command that executes the Snyk scan using the CLI.
* Define a build command that sends a snapshot of the project to Snyk for continuous monitoring (optional).
* Review the example `buildspec.yaml` that follows for more details:
```yaml
# buildspec.yaml
version: 0.2
phases:
build:
commands:
# install the latest Snyk CLI from GitHub Releases
- latest_version=$(curl -Is "https://github.com/snyk/cli/releases/latest" | grep "^location" | sed 's#.*tag/##g' | tr -d "\r")
- snyk_cli_dl_linux="https://github.com/snyk/cli/releases/download/${latest_version}/snyk-linux"
- curl -Lo /usr/local/bin/snyk $snyk_cli_dl_linux
- chmod +x /usr/local/bin/snyk
# authenticate the Snyk CLI
- snyk auth $SNYK_TOKEN
# perform a Snyk SCA scan; continue if vulnerabilities are found
- snyk test || true
# upload a snapshot of the project to Snyk for continuous monitoring
- snyk monitor
```
### Set up CodePipeline
For some [Open Source](https://snyk.io/product/open-source-security-management/) Projects, you must build the Project before testing it with the Snyk CLI. Review the Snyk [documentation](https://docs.snyk.io/developer-tools/snyk-cli/scan-and-maintain-projects-using-the-cli/snyk-cli-for-open-source/open-source-projects-that-must-be-built-before-testing-with-the-snyk-cli) to determine whether Snyk requires your Project to be built before running an Open Source scan; then follow the instructions in the corresponding section below:
#### Snyk requires a built Project
* Edit your existing CodePipeline or create a new one.
* Create a new stage to build your Project, or edit the existing build stage.
* Add the commands from the example `buildspec.yaml` to your build stage so that the Snyk scan occurs immediately after the Project is built.
{% hint style="info" %}
The Snyk Open Source scan must be in the same CodeBuild action as the build process to ensure that Snyk has access to the full build workspace.
{% endhint %}
#### Snyk does not require a built Project
* Edit your existing CodePipeline pipeline or create a new one.
* Add a new build stage after your source code acquisition stage.
* Select your newly created CodeBuild Project for this stage.
* Select SourceArtifact under Input artifacts to allow Snyk to scan the source code directly.
### Result handling
Using the [Snyk CLI](https://docs.snyk.io/developer-tools/snyk-cli/commands) in CodeBuild gives you full access to its functionality and options. To get started with basic result handling, you can follow these tips:
* The `snyk test` command produces a non-zero exit code when vulnerabilities are found. Consider adding `|| true` to the end of the command to circumvent this behavior.
* The [snyk-to-html](https://github.com/snyk/snyk-to-html) tool can be used to produce an HTML report of scan results by running a command similar to `snyk test --json | snyk-to-html -o snyk-results.html` . For more information, see the [`snyk-to-html`](https://docs.snyk.io/developer-tools/snyk-cli/scan-and-maintain-projects-using-the-cli/cli-tools/snyk-to-html) documentation.
* Consider the following CLI options for common usage patterns:
* [--org=\](https://docs.snyk.io/snyk-cli/commands/test#org-less-than-org_id-greater-than) - Specify the \ to run Snyk commands tied to a specific Snyk Organization.
* [--severity-threshold=\](https://docs.snyk.io/snyk-cli/commands/test#severity-threshold-less-than-low-or-medium-or-high-or-critical-greater-than) - Report vulnerabilities only at the specified level or higher.
* [--all-projects](https://docs.snyk.io/snyk-cli/commands/test#all-projects) - Auto-detect all Projects in the working directory.
* [--project-name=\](https://docs.snyk.io/snyk-cli/commands/monitor#project-name-less-than-project_name-greater-than) - Specify a custom Snyk Project name to the `snyk monitor` command.
### Test and validate
* Trigger a manual build in your CodePipeline to test the new CodeBuild integration.
* Verify that the Snyk scan executes successfully and outputs results as expected.
* Ensure your subsequent pipeline stages handle the scan output appropriately.
### Deployment
* When testing is complete, consider deploying the updated CodePipeline.
* Monitor your pipeline for successful Snyk scan execution and address any integration issues.
### Next Steps
Refer to the [Snyk CLI](https://docs.snyk.io/developer-tools/snyk-cli) documentation to incorporate additional security scans into your CI/CD pipeline.
## Conclusion
By following these steps and considerations, you can successfully integrate Snyk security scanning into your AWS CodePipeline pipelines.
## Troubleshooting
Question: How do I store the Snyk token in AWS Secrets Manager and use it in AWS CodeBuild?
If you use an AWS Secrets Manager environment variable, store your token in AWS Secrets Manager as plain text, and ensure that your AWS CodeBuild service role has the `secretsmanager:GetSecretValue` permission in IAM. Set the `value` of the environment variable in AWS CodeBuild to the `Secret name` in AWS Secrets Manager.
---
# Source: https://docs.snyk.io/scan-with-snyk/snyk-iac/cloud-platform-integrations/aws-integration/aws-integration-api.md
# AWS Integration: API
Before you can onboard an AWS account to Snyk via the API, you need access to the AWS account and associated credentials with permissions to create a read-only Identity and Access Management (IAM) role. See the prerequisites on the [AWS integration](https://docs.snyk.io/scan-with-snyk/snyk-iac/cloud-platform-integrations/aws-integration) page.
The steps follow to onboard an AWS account via the API:
1. [Download an infrastructure as code (IaC) template](https://docs.snyk.io/scan-with-snyk/snyk-iac/cloud-platform-integrations/aws-integration/aws-integration-api/step-1-download-iam-role-iac-template-api): to give Snyk permissions to scan your account.
2. [Create an AWS IAM role](https://docs.snyk.io/scan-with-snyk/snyk-iac/cloud-platform-integrations/aws-integration/aws-integration-api/step-2-create-the-snyk-iam-role-api): using the template you downloaded.
3. [Create and scan a Cloud Environment.](https://docs.snyk.io/scan-with-snyk/snyk-iac/cloud-platform-integrations/aws-integration/aws-integration-api/step-3-create-and-scan-a-cloud-environment-api)
When you have completed the steps, you will be able to do the following:
* View the cloud configuration issues Snyk finds. See [Manage cloud issues](https://docs.snyk.io/scan-with-snyk/snyk-iac/getting-started-with-cloud-scans/manage-cloud-issues).
* Prioritize your vulnerabilities with cloud context.
---
# Source: https://docs.snyk.io/scan-with-snyk/snyk-iac/cloud-platform-integrations/aws-integration/aws-integration-web-ui.md
# AWS Integration: Web UI
Before you can onboard an AWS account via the Web UI, you need access to the AWS account and associated credentials with permissions to create a read-only Identity and Access Management (IAM) role. See the prerequisites on the [AWS integration](https://docs.snyk.io/scan-with-snyk/snyk-iac/cloud-platform-integrations/aws-integration) page.
The steps follow to onboard an AWS account via the Web UI:
1. [Download an infrastructure as code (IaC) template](https://docs.snyk.io/scan-with-snyk/snyk-iac/cloud-platform-integrations/aws-integration/aws-integration-web-ui/step-1-download-iam-role-iac-template-web-ui) to give Snyk permissions to scan your account.
2. [Create an AWS IAM role](https://docs.snyk.io/scan-with-snyk/snyk-iac/cloud-platform-integrations/aws-integration/aws-integration-web-ui/step-2-create-the-snyk-iam-role) using the template you downloaded.
3. [Create and scan a Cloud Environment](https://docs.snyk.io/scan-with-snyk/snyk-iac/cloud-platform-integrations/aws-integration/aws-integration-web-ui/step-3-create-and-scan-a-cloud-environment-web-ui).
When you have completed the steps, you will be able to do the following:
* View the cloud configuration issues Snyk finds. See [Manage cloud issues](https://docs.snyk.io/scan-with-snyk/snyk-iac/getting-started-with-cloud-scans/manage-cloud-issues).
* Prioritize your vulnerabilities with cloud context.
---
# Source: https://docs.snyk.io/scan-with-snyk/snyk-iac/cloud-platform-integrations/aws-integration.md
# AWS integration
Snyk integrates with your [Amazon Web Services (AWS)](https://aws.amazon.com/) account to find issues in your cloud configurations and to generate cloud context to help you prioritize your vulnerabilities.
You can onboard an AWS account to Snyk using the following methods:
* [Snyk Web UI](https://docs.snyk.io/scan-with-snyk/snyk-iac/cloud-platform-integrations/aws-integration/aws-integration-web-ui)
* [Snyk API](https://docs.snyk.io/scan-with-snyk/snyk-iac/cloud-platform-integrations/aws-integration/aws-integration-api)
To set up an AWS integration, you need the following:
* A Snyk Enterprise [plan](https://snyk.io/plans/)
* A new Snyk Organization, with appropriate feature flags assigned by your Snyk contact
* A Snyk Group Administrator or Organization Administrator [role](https://docs.snyk.io/snyk-platform-administration/user-roles/pre-defined-roles)
* Access to an [AWS](https://aws.amazon.com/) account and associated credentials with permissions to create a read-only IAM role
* Access to the [Terraform CLI](https://www.terraform.io/downloads), [AWS CLI](https://aws.amazon.com/cli/), or [AWS Management Console](https://console.aws.amazon.com) to create the IAM role for Snyk via Terraform or AWS CloudFormation
* If you are using Terraform or the AWS CLI, ensure you configure it with your AWS credentials. See the instructions for [Terraform](https://registry.terraform.io/providers/hashicorp/aws/latest/docs#authentication-and-configuration) or the [AWS CLI](https://docs.aws.amazon.com/cli/latest/userguide/cli-configure-quickstart.html)
* API only: An Organization-level [service account](https://docs.snyk.io/implementation-and-setup/enterprise-setup/service-accounts) with an Org Admin role to use the Snyk API
* API only: An API client such as [curl](https://curl.se/), [HTTPie](https://httpie.io/), or [Postman](https://www.postman.com/)
---
# Source: https://docs.snyk.io/snyk-api/using-specific-snyk-apis/webhooks-apis/guides-to-webhooks/how-to-use-snyk-webhooks-to-connect-snyk-to-slack-with-aws-lambda/aws-lambda-setup-add-security-through-an-environment-variable.md
# AWS Lambda setup: add security through an environment variable
For security reasons the script that you created uses an environment variable: `hmac_verification` with a shared secret to validate the payload is coming from Snyk and has not been tampered with.
Follow these steps to add security through an environment variable:
1. Go to the **Configuration** tab in the AWS Lambda function.
2. Click **Environment variables**.
3. Add the new environment variable.
4. Use `hmac_verification` as your key.
5. Enter your preferred secret as the key value. Store this secret somewhere safe for use again later.
AWS Lambda function add environment variable interface
' // adjust
//customised messaging to Slack with issue information, modify as needed
async function messageSlack(
message,
snykProjectUrl,
snykProjectName,
snykIssuePackage,
snykIssueUrl,
snykIssueId,
severity,
snykIssuePriority
) {
//strings modified to avoid Axios/Slack errors
snykProjectUrl = snykProjectUrl.replace(/['"]+/g, '')
snykProjectName = snykProjectName.replace(/['"]+/g, '')
snykIssueUrl = snykIssueUrl.replace(/['"]+/g, '')
snykIssueId = snykIssueId.replace(/['"]+/g, '')
snykIssuePackage = snykIssuePackage.replace(/['"]+/g, '')
severity = severity.replace(/['"]+/g, '')
//construct message
let payload = {
text: `${message}`,
blocks: [
{
type: 'header',
text: {
type: 'plain_text',
text: `${message}`,
},
},
{
type: 'section',
text: {
type: 'mrkdwn',
text: `Snyk has found a new vulnerability in the project:\n*<${snykProjectUrl}|${snykProjectName}>*`,
},
},
{
type: 'divider',
},
{
type: 'section',
fields: [
{
type: 'mrkdwn',
text: `*Package name:*\n${snykIssuePackage}`,
},
{
type: 'mrkdwn',
text: `*Vulnerability:*\n<${snykIssueUrl}|${snykIssueId}>`,
},
{
type: 'mrkdwn',
text: `*Severity:*\n${severity}`,
},
{
type: 'mrkdwn',
text: `*Priority Score:*\n${snykIssuePriority}`,
},
],
},
{
type: 'actions',
elements: [
{
type: 'button',
text: {
type: 'plain_text',
text: 'View in Snyk',
},
style: 'primary',
url: snykProjectUrl,
value: 'browseUrl',
},
],
},
],
}
//send message
const res = await axios.post(slackWebhookUrl, payload)
const data = res.data
}
exports.handler = async (event) => {
// Securing integrity of payload, this can be moved to another Lambda function and called seperately for authentication
let response
const {hmac_verification, severity_threshold} = process.env
const hmac = crypto.createHmac('sha256', hmac_verification)
const buffer = JSON.stringify(event.body)
hmac.update(buffer, 'utf8')
const stored_signature = `sha256=${hmac.digest('hex')}`
let sent_signature = event.headers['x-hub-signature']
if (stored_signature !== sent_signature) {
console.log('Integrity of request compromised, aborting')
response = {
statusCode: 403,
body: JSON.stringify('Bad request'),
}
return response
}
// If integrity is ok, verify that the webhook actually contains the project object, iterate and filter
if (buffer.indexOf('project') !== -1 && buffer.indexOf('newIssues') !== -1) {
// Iterate through new issues
var len = buffer['newIssues'] ? buffer['newIssues'].length : 0
for (let x = 0; x < len; x++) {
// Get Severity
let severity = JSON.stringify(buffer['newIssues'][x]['issueData']['severity'])
// Filter
if (severity.includes('high') || severity.includes('critical')) {
let snykProjectName = JSON.stringify(buffer['project'].name)
let snykProjectUrl = JSON.stringify(buffer['project'].browseUrl)
let snykIssueUrl = JSON.stringify(buffer['newIssues'][x]['issueData'].url)
let snykIssueId = JSON.stringify(buffer['newIssues'][x].id)
let snykIssuePackage = JSON.stringify(buffer['newIssues'][x].pkgName)
let snykIssuePriority = JSON.stringify(buffer['newIssues'][x]['priority'].score)
let message = 'New Snyk Vulnerability'
// Send the result to Slack
await messageSlack(
message,
snykProjectUrl,
snykProjectName,
snykIssuePackage,
snykIssueUrl,
snykIssueId,
severity,
snykIssuePriority
)
}
}
}
//do nothing, or modify for any preferable action
else {
console.log('Valid webhook, but project missing or empty')
}
//respond to Snyk
response = {
statusCode: 200,
body: JSON.stringify('Success'),
}
return response
}
```
2. Use the following commands in your terminal:\
\- `cd /path/to/snyk/folder` (to navigate inside the folder where you stored the two files)\
\- `npm install` (to set up a package. json file)\
\- `cd ..` (to navigate back to previous folder)\
\- `zip -r snyk.zip /path/to/snyk/folder` (to zip snyk into a file which can be uploaded to AWS Lambda)
To create an AWS Lambda function, follow these steps:
1. Go to the AWS Console.
2. Navigate to Lambda.
3. Click **Create function**.
4. Choose **Node.js 16.x** for the **Runtime**.
5. Choose **X86\_64** for the **Architecture**.
6. If publishing the Lambda function through API Gateway, add or create a role with the default policy **AmazonAPIGatewayInvokeFullAccess** to interact with the AWS API Gateway.
7. Verify that the AWS Console screen shows these entries:
AWS Console with entries to create a Lambda function
AWS code source display
Search for Snyk integration
Create new Security Hub integration
Enter integration details
Snyk App authorization
Select integration to manage
Remove integration
Select group overview
Group Settings: SSO
Entra ID Default Directory
Add Enterprise application
Create your own application
Application name and integration
Set up single sign-on, Get started
Select SAML
Edit basic SAML configuration
Entity ID and Assertion Consumer Service URL
Login URL
Sign in URL in Snyk portal
Download SAML Certificate (Base 64)
Enter certificate and domains supported, set connection
Azure claim settings
Profile attributes section
```
2. Get your Azure Devops Token and Org:
* Create a Token if one does not exist, using this [guide](https://docs.microsoft.com/en-us/azure/devops/organizations/accounts/use-personal-access-tokens-to-authenticate?view=azure-devops\&tabs=preview-page).
**Note**: Make sure your token has read access to the repos.
* Find your Org name in Azure listed on the left pane on the [Azure DevOps site](https://dev.azure.com).
## Running the command
Consider the following levels of usage and options:
### Usage levels
* To get commits for all projects and their repos under my Org in Azure , only provide the Azure token and Azure Org:
```
snyk-scm-contributors-count azure-devops --token AZURE-TOKEN --org AZURE-ORG
```
* To get commits for some projects and their repos under my Org in Azure , provide the Azure token, Azure Org and the project key/s separated by a comma:
```
snyk-scm-contributors-count azure-devops --token AZURE-TOKEN --org AZURE-ORG --projectKeys Key1,Key2...
```
* To get commits for a specific repo under my Org in Azure , provide the Azure token, Azure Org, a project key and a repo name:
```
snyk-scm-contributors-count azure-devops --token AZURE-TOKEN --org AZURE-ORG --projectKeys Key1 --repo Repo1
```
### Options
* To get all the commits from Azure regardless of the repos that are already monitored by Snyk, add the `--skipSnykMonitoredRepos` flag.
You might have repos in Azure that are not monitored in Snyk; use this flag to skip checking for Snyk monitored repos and go directly to Azure to fetch the commits.
```
snyk-scm-contributors-count azure-devops --token AZURE-TOKEN --org AZURE-ORG --skipSnykMonitoredRepos
```
* To exclude some contributors from being counted in the commits, add an exclusion file with the emails to ignore (separated by a new line) and apply the `--exclusionFilePath` with the path to that file:
```
snyk-scm-contributors-count azure-devops --token AZURE-TOKEN --org AZURE-ORG --projectKeys Key1,Key2 --exclusionFilePath PATH_TO_FILE
```
* To set the output to json format: add the `--json` flag:
```
snyk-scm-contributors-count azure-devops --token AZURE-TOKEN --org AZURE-ORG --projectKeys Key1 --repo Repo1 --json
```
* To create an import file for your unmonitored repos: add the `--importConfDir` flag with a valid (writable) path to a folder in which the import files will be stored and add the `--importFileRepoType` flag (optional) with the repo types to add to the file (`all`/`private`/`public`, defaults to `all`). Note that these flags **can not** be set with the `--repo flag.`
```
snyk-scm-contributors-count azure-devops --token AZURE-TOKEN --org AZURE-ORG --importConfDir ValidPathToWritableFolder --importFileRepoType private/public/all
```
For more details about these flags, refer to the [Creating and using the import page](https://docs.snyk.io/developer-tools/snyk-cli/scan-and-maintain-projects-using-the-cli/cli-tools/snyk-scm-contributors-count/creating-and-using-the-import-file).
* To run in debug mode for verbose output, prefix the command with`DEBUG=snyk*`:
```
DEBUG=snyk* snyk-scm-contributors-count azure-devops --token AZURE-TOKEN --org AZURE-ORG --projectKeys Key1 --repo Repo1 --exclusionFilePath PATH_TO_FILE --skipSnykMonitoredRepos --json
```
---
# Source: https://docs.snyk.io/developer-tools/snyk-cli/scan-and-maintain-projects-using-the-cli/cli-tools/snyk-scm-contributors-count/scripts-for-scm-contributors-count/azure-devops/azure-flow-and-tech.md
# Azure - Flow and Tech
## Flow
1. Fetch the monitored projects from Snyk (if the `skipSnykMonitoredRepos` flag was **not set** and the `SNYK_TOKEN` was exported).
2. Fetch `one`/`some`/`all` the projects that the credentials have access to from SCM and create a projects list.
3. Fetch `one`/`all` repos under the fetched/provided Projects.
4. Remove the repos that are not monitored by Snyk (if the `skipSnykMonitoredRepos` flag was **not set** and the `SNYK_TOKEN` was exported) and create a Repo list.
5. Create an import file for unmonitored repos to use for easily importing repos into your Snyk account (if the `importConfDir` flag was set).
6. Fetch the commits for the fetched/provided repo/s and create a Contributors list.
7. Count the commits for the repo/s by the contributors.
8. Remove the contributors that were specified in the exclusion file (if `the exclusionFilePath` flag was set and a valid path to a text file was provided).
9. Print the results.
## Azure API endpoints used
* To get the Projects from Azure: `{Org}/_apis/projects`
* To get the list of the repo/s that correlate with the fetched/provided project list: `{Project}/_apis/git/repositories`
* To get the commits for the fetched/provided repo/s list:`{Project}/_apis/git/repositories/{Repo}/commits?$searchCriteria.fromDate={ThreeMonthsDate}`
---
# Source: https://docs.snyk.io/scan-with-snyk/snyk-iac/cloud-platform-integrations/azure-integration-for-cloud-configurations/azure-integration-api.md
# Azure Integration: API
To onboard an Azure subscription to Snyk via the API:
1. [Download an infrastructure as code (IaC) template or Bash script:](https://docs.snyk.io/scan-with-snyk/snyk-iac/cloud-platform-integrations/azure-integration-for-cloud-configurations/azure-integration-api/step-1-download-azure-app-registration-iac-template-or-script-api) to give Snyk permissions to scan your subscription.
2. [Create an Entra ID app registration:](https://docs.snyk.io/scan-with-snyk/snyk-iac/cloud-platform-integrations/azure-integration-for-cloud-configurations/azure-integration-api/step-2-create-the-entra-id-app-registration-api) using the template or script you downloaded.
3. [Create and scan a Cloud Environment.](https://docs.snyk.io/scan-with-snyk/snyk-iac/cloud-platform-integrations/azure-integration-for-cloud-configurations/azure-integration-api/step-3-create-and-scan-a-cloud-environment-for-azure-api)
When you have completed the steps, you will be able to do the following:
* View the cloud configuration issues Snyk finds. See [Manage cloud issues](https://docs.snyk.io/scan-with-snyk/snyk-iac/getting-started-with-cloud-scans/manage-cloud-issues).
* Prioritize your vulnerabilities with cloud context.
---
# Source: https://docs.snyk.io/scan-with-snyk/snyk-iac/cloud-platform-integrations/azure-integration-for-cloud-configurations.md
# Azure integration for cloud configurations
Snyk integrates with your [Microsoft Azure](https://azure.microsoft.com/en-us/) subscription to find issues in your cloud configurations and generate cloud context to help you prioritize your vulnerabilities.
You can onboard an Azure subscription to Snyk using the following methods:
* [Snyk Web UI](https://docs.snyk.io/scan-with-snyk/snyk-iac/cloud-platform-integrations/azure-integration-for-cloud-configurations/azure-integration-web-ui)
* [Snyk API](https://docs.snyk.io/scan-with-snyk/snyk-iac/cloud-platform-integrations/azure-integration-for-cloud-configurations/azure-integration-api)
## Prerequisites for Azure integration for cloud configurations
To add an Azure integration for cloud configurations, you need the following:
* A Snyk Business or Enterprise [plan](https://snyk.io/plans/)
* A new Snyk Organization with appropriate feature flags assigned by your Snyk contact
* A Snyk Group Administrator or Organization Administrator [role](https://docs.snyk.io/snyk-platform-administration/user-roles/pre-defined-roles)
* Access to a [Microsoft Azure](https://azure.microsoft.com/en-us/) subscription and associated credentials with permissions to create the following resources:
* [An Active Directory (AD) application registration](https://learn.microsoft.com/en-us/azure/active-directory/develop/app-objects-and-service-principals#application-registration)
* [A federated identity credential](https://learn.microsoft.com/en-us/azure/active-directory/develop/workload-identity-federation)\
If you are using Terraform to create this [resource](https://registry.terraform.io/providers/hashicorp/azuread/latest/docs/resources/application_federated_identity_credential#api-permissions), your user must have either the Application Administrator or Global Administrator directory role.
* [A service principal](https://learn.microsoft.com/en-us/azure/active-directory/develop/app-objects-and-service-principals#service-principal-object) with read-only permissions\
If you are .using Terraform to create this [resource](https://registry.terraform.io/providers/hashicorp/azuread/latest/docs/resources/service_principal), your user must have either the Application Administrator or Global Administrator directory role.
* Access to the [Terraform CLI](https://www.terraform.io/downloads) or Azure CLI ([locally](https://learn.microsoft.com/en-us/cli/azure/) or via the [Cloud Shell](https://portal.azure.com/#home)) to create the above resources via Terraform or Bash script\
If you are using Terraform or the Azure CLI locally, ensure you configure it with your Azure credentials. See the instructions for [Terraform](https://registry.terraform.io/providers/hashicorp/azuread/latest/docs#authenticating-to-azure-active-directory) or the [Azure CLI](https://learn.microsoft.com/en-us/cli/azure/authenticate-azure-cli).
* API only: An Organization-level [service account](https://docs.snyk.io/implementation-and-setup/enterprise-setup/service-accounts) with an Org Admin role to use the Snyk API
* API only: An API client such as [curl](https://curl.se/), [HTTPie](https://httpie.io/), or [Postman](https://www.postman.com/)
* API only, optional: [jq](https://stedolan.github.io/jq/), to unescape JSON containing the Terraform template or Bash script
---
# Source: https://docs.snyk.io/scan-with-snyk/snyk-iac/cloud-platform-integrations/azure-integration-for-cloud-configurations/azure-integration-web-ui.md
# Azure Integration: Web UI
The steps follow to onboard an Azure subscription to Snyk via the API:
1. [Download an infrastructure as code (IaC) template or Bash script:](https://docs.snyk.io/scan-with-snyk/snyk-iac/cloud-platform-integrations/azure-integration-for-cloud-configurations/azure-integration-web-ui/step-1-download-azure-app-registration-iac-template-or-script-web-ui) to give Snyk permissions to scan your subscription.
2. [Create an Entra ID app registration:](https://docs.snyk.io/scan-with-snyk/snyk-iac/cloud-platform-integrations/azure-integration-for-cloud-configurations/azure-integration-web-ui/step-2-create-the-entra-id-app-registration) using the template or script you downloaded.
3. [Create and scan a Cloud Environment.](https://docs.snyk.io/scan-with-snyk/snyk-iac/cloud-platform-integrations/azure-integration-for-cloud-configurations/azure-integration-web-ui/step-3-create-and-scan-a-cloud-environment-for-azure-web-ui)
When you have completed the steps, you will be able to do the following:
* View the cloud configuration issues Snyk finds. See [Manage cloud issues](https://docs.snyk.io/scan-with-snyk/snyk-iac/getting-started-with-cloud-scans/manage-cloud-issues).
* Prioritize your vulnerabilities with cloud context.
---
# Source: https://docs.snyk.io/developer-tools/snyk-ci-cd-integrations/azure-pipelines-integration.md
# Azure Pipelines integration using the Snyk Security Scan task
Snyk enables security across the Microsoft Azure ecosystem, including Azure Pipelines, by automatically finding and fixing application and container vulnerabilities.
The Snyk Security Scan task is available for all languages supported by Snyk and Azure DevOps.
{% hint style="info" %}
The Snyk Security Scan task supports Snyk Open Source, Snyk Container, and Snyk Code. If you plan to include other products in your pipeline, use the [Snyk CLI](https://docs.snyk.io/developer-tools/snyk-cli).
{% endhint %}
Ready-to-use tasks for Azure Pipelines can be inserted quickly and directly from the Azure interface, enabling you to customize and automate your pipelines with no extra coding. Among the tasks included is the Snyk task.
You can include the Snyk task in your pipeline to test for security vulnerabilities and open-source license issues as part of your routine work. In this way, you can test and monitor your application dependencies and container images for security vulnerabilities. When the testing is done you can review and work with results directly from the Azure Pipelines output, as well as from the Snyk interface.
For setup and use details, see the following pages:
* [How the Snyk Security Scan task works](https://docs.snyk.io/developer-tools/snyk-ci-cd-integrations/azure-pipelines-integration/how-the-snyk-security-scan-task-works)
* [Install the Snyk extension for your Azure pipelines](https://docs.snyk.io/developer-tools/snyk-ci-cd-integrations/azure-pipelines-integration/install-the-snyk-extension-for-your-azure-pipelines)
* [Add the Snyk Security Task to your pipelines](https://docs.snyk.io/developer-tools/snyk-ci-cd-integrations/azure-pipelines-integration/add-the-snyk-security-task-to-your-pipelines)
* [Snyk Security Scan task parameters and values](https://docs.snyk.io/developer-tools/snyk-ci-cd-integrations/azure-pipelines-integration/snyk-security-scan-task-parameters-and-values)
* [Custom API endpoints](https://docs.snyk.io/developer-tools/snyk-ci-cd-integrations/azure-pipelines-integration/regional-api-endpoints)
* [Example of a Snyk task to test a node.js (npm)-based application](https://docs.snyk.io/developer-tools/snyk-ci-cd-integrations/azure-pipelines-integration/example-of-a-snyk-task-to-test-a-node.js-npm-based-application)
* [Simple example of a Snyk task to test an application](https://docs.snyk.io/developer-tools/snyk-ci-cd-integrations/azure-pipelines-integration/simple-example-of-a-snyk-task-to-test-an-application)
* [Example of a Snyk task for a container image pipeline](https://docs.snyk.io/developer-tools/snyk-ci-cd-integrations/azure-pipelines-integration/example-of-a-snyk-task-for-a-container-image-pipeline)
* [Simple example of a Snyk task to test a container image](https://docs.snyk.io/developer-tools/snyk-ci-cd-integrations/azure-pipelines-integration/simple-example-of-a-snyk-task-to-test-a-container-image)
* [Example of a Snyk test to test application code](https://docs.snyk.io/developer-tools/snyk-ci-cd-integrations/azure-pipelines-integration/example-of-a-snyk-task-to-test-application-code)
* [Simple example of a Snyk task to run code test](https://docs.snyk.io/developer-tools/snyk-ci-cd-integrations/azure-pipelines-integration/simple-example-of-a-snyk-task-to-run-a-code-test)
---
# Source: https://docs.snyk.io/implementation-and-setup/enterprise-setup/snyk-broker/classic-broker/install-and-configure-snyk-broker/azure-repos-prerequisites-and-steps-to-install-and-configure-broker/azure-repos-environment-variables-for-snyk-broker.md
# Azure Repos - environment variables for Snyk Broker
The following environment variables are required to configure the Broker Client for Azure Repos:
* `BROKER_TOKEN` - the Snyk Broker token, obtained from your Azure Repos integration settings view (app.snyk.io).
* `BROKER_SERVER_URL` - the URL of the Broker server for the region in which your data is hosted. For the commands and URLs to use, see [Broker URLs](https://docs.snyk.io/snyk-data-and-governance/regional-hosting-and-data-residency#broker-server-urls).
* `AZURE_REPOS_TOKEN` - an Azure Repos personal access token. Refer to this [Guide](https://docs.microsoft.com/en-us/azure/devops/organizations/accounts/use-personal-access-tokens-to-authenticate?view=azure-devops\&tabs=preview-page) for how to get or create the token. Required scopes: ensure Custom defined is selected and under Code select `Read & write`.
* `AZURE_REPOS_ORG` - Organization name, which can be found on your Organization Overview page in Azure. For Azure Repos on-prem, the typical organization name is `tfs/Main.` If you have more than one Azure organization, you must deploy a Broker for each one
* `AZURE_REPOS_HOST` - the hostname of your Azure Repos Server deployment, such as `your.azure-server.domain.com`.
* `PORT` - the local port at which the Broker client accepts connections. Default is 8000.
* `BROKER_CLIENT_URL` - the full URL of the Broker client as it will be accessible to your Azure Repos' webhooks, such as `http://broker.url.example:8000.`This URL is required to access features such as PR Fixes or PR Checks.
* This must have http\:// and the port number.
* To configure the client with HTTPS, [additional settings are required](https://docs.snyk.io/implementation-and-setup/enterprise-setup/snyk-broker/https-for-broker-client-with-docker).
* `ACCEPT_IAC` - by default, some file types used by Infrastructure-as-Code (IaC) are not enabled. To grant the Broker access to IaC files in your repository, for example, Terraform, you can add an environment variable, `ACCEPT_IAC`, with any combination of `tf,yaml,yml,json,tpl`.
* `ACCEPT_CODE` - by default, Snyk Code will not load code snippets. To enable code snippets you can add an environment variable, `ACCEPT_CODE=true`.
* `ACCEPT_ESSENTIALS` - Enable Snyk Essentials to identify your application assets, monitor them, and prioritize the risks. You can enable it by adding an environment variable `ACCEPT_ESSENTIALS=true`.
---
# Source: https://docs.snyk.io/implementation-and-setup/enterprise-setup/snyk-broker/classic-broker/install-and-configure-snyk-broker/azure-repos-prerequisites-and-steps-to-install-and-configure-broker/azure-repos-install-and-configure-and-configure-using-helm.md
# Azure Repos - install and configure and configure using Helm
{% hint style="info" %}
**Feature availability**
Snyk Azure Repos are available only for Azure DevOps/TFS 2020 or above.
{% endhint %}
Before installing, review the [prerequisites](https://docs.snyk.io/implementation-and-setup/enterprise-setup/snyk-broker/classic-broker/install-and-configure-snyk-broker/azure-repos-prerequisites-and-steps-to-install-and-configure-broker) and the general instructions for installation using [Helm](https://docs.snyk.io/implementation-and-setup/enterprise-setup/snyk-broker/classic-broker/install-and-configure-snyk-broker/install-and-configure-broker-using-helm).
To use this chart, you must first add the Snyk Broker Helm Chart by adding the repo:
`helm repo add snyk-broker https://snyk.github.io/snyk-broker-helm/`
Then, run the following commands to install the Broker and customize the environment variables. Refer to [Azure Repos - environment variables for Snyk Broker](https://docs.snyk.io/implementation-and-setup/enterprise-setup/snyk-broker/classic-broker/install-and-configure-snyk-broker/azure-repos-prerequisites-and-steps-to-install-and-configure-broker/azure-repos-environment-variables-for-snyk-broker) for definitions of the environment variables.
For the variable `azureReposHost` the value does not include `https://`. If you have more than one Azure organization, you must deploy a Broker for each one.
Snyk Essentials is set by default to `false`. Enable it by setting the flag to `true`.
{% hint style="info" %}
**Multi-tenant settings for regions**\
When installing, you must add a command in your script to set the `brokerServerUrl`. This is the URL of the Broker server for the region where your data is hosted. For the commands and URLs to use, see [Broker URLs](https://docs.snyk.io/snyk-data-and-governance/regional-hosting-and-data-residency#broker-server-urls).
{% endhint %}
```
helm install snyk-broker-chart snyk-broker/snyk-broker \
--set scmType=azure-repos \
--set brokerToken= \
--set brokerServerUrl=
--set azureReposToken= \
--set azureReposOrg= \
--set azureReposHost= \
--set brokerClientUrl=: \
--set enableEssentials=true \
-n snyk-broker --create-namespace
```
You can pass any environment variable of your choice in the Helm command. For details, see [Custom additional options for Broker Helm Chart](https://docs.snyk.io/implementation-and-setup/enterprise-setup/snyk-broker/classic-broker/install-and-configure-snyk-broker/advanced-configuration-for-helm-chart-installation/custom-additional-options-for-broker-helm-chart-installation). Follow the instructions for [Advanced configuration for Helm Chart installation](https://docs.snyk.io/implementation-and-setup/enterprise-setup/snyk-broker/classic-broker/install-and-configure-snyk-broker/advanced-configuration-for-helm-chart-installation) to make configuration changes as needed.
You can verify that the Broker is running by looking at the settings for your brokered integration in the Snyk Web UI to see a confirmation message that you are connected. You can start importing Projects once you are connected.
---
# Source: https://docs.snyk.io/implementation-and-setup/enterprise-setup/snyk-broker/classic-broker/install-and-configure-snyk-broker/azure-repos-prerequisites-and-steps-to-install-and-configure-broker/azure-repos-install-and-configure-using-docker.md
# Azure Repos - install and configure using Docker
{% hint style="info" %}
**Feature availability**
Snyk Azure Repos are available only for Azure DevOps/TFS 2020 or above.
{% endhint %}
Before installing, review the [prerequisites](https://docs.snyk.io/implementation-and-setup/enterprise-setup/snyk-broker/classic-broker/install-and-configure-snyk-broker/azure-repos-prerequisites-and-steps-to-install-and-configure-broker) and the general instructions for installation using [Docker](https://docs.snyk.io/implementation-and-setup/enterprise-setup/snyk-broker/classic-broker/install-and-configure-snyk-broker/install-and-configure-broker-using-docker).
This integration is useful to ensure a secure connection with your on-premise or cloud Azure Repos deployment.
## Configure Broker to be used with Azure Repos
To use the Broker Client with [Azure](https://azure.microsoft.com/en-us/services/devops/), run `docker pull snyk/broker:azure-repos`. Refer to [Azure Repos - environment variables for Snyk Broker](https://docs.snyk.io/implementation-and-setup/enterprise-setup/snyk-broker/classic-broker/install-and-configure-snyk-broker/azure-repos-prerequisites-and-steps-to-install-and-configure-broker/azure-repos-environment-variables-for-snyk-broker) for definitions of the environment variables.
If necessary, go to the [Advanced configuration page](https://docs.snyk.io/implementation-and-setup/enterprise-setup/snyk-broker/classic-broker/install-and-configure-snyk-broker/advanced-configuration-for-snyk-broker-docker-installation) and make any configuration changes needed, such as providing the CA (Certificate Authority) to the Broker Client configuration if the Azure Repos instance is using a private certificate, and setting up [proxy support](https://docs.snyk.io/implementation-and-setup/enterprise-setup/snyk-broker/classic-broker/install-and-configure-snyk-broker/advanced-configuration-for-snyk-broker-docker-installation/proxy-support-with-docker).
## Docker run command to set up a Broker Client for Azure Repos
Copy the following command to set up a fully configured Broker Client to analyze Open Source, IaC, Container, Code files, and Snyk Essentials information for one Azure organization. Enable [Snyk Essentials](https://docs.snyk.io/scan-with-snyk/snyk-essentials) to identify your application assets, monitor them, and prioritize the risks.
{% hint style="info" %}
**Multi-tenant settings for regions**\
When installing, you must add a command in your script to set the `BROKER_SERVER_URL`. This is the URL of the Broker server for the region where your data is hosted. For the commands and URLs to use, see [Broker URLs](https://docs.snyk.io/snyk-data-and-governance/regional-hosting-and-data-residency#broker-server-urls).
{% endhint %}
Note that if you have more than one Azure organization, you must deploy a Broker for each one. Snyk Essentials is set by default to `false`. Enable it by setting the flag to `true`.
```bash
docker run --restart=always \
-p 8000:8000 \
-e BROKER_TOKEN= \
-e BROKER_SERVER_URL= \
-e AZURE_REPOS_TOKEN= \
-e AZURE_REPOS_ORG= \
-e AZURE_REPOS_HOST= \
-e PORT=8000 \
-e BROKER_CLIENT_URL= \
-e ACCEPT_IAC=tf,yaml,yml,json,tpl \
-e ACCEPT_CODE=true \
-e ACCEPT_ESSENTIALS=true \
snyk/broker:azure-repos
```
## Start the Broker Client container and verify the connection with Azure Repos
Paste the Broker Client configuration to start the Broker Client container.
Once the container is up, the Azure Repos Integrations page shows the connection to Azure Repos and you can `Add Projects.`
## Basic troubleshooting for Broker with Azure Repos
* Run `docker logs ` to look for any errors, where `container id` is the Azure Repos Broker container ID.
* Ensure relevant ports are exposed to Azure Repos.
* Make sure that file permissions for the local path to the `accept.json` file, as well as the `accept.json` file itself, are correct and accessible.
---
# Source: https://docs.snyk.io/implementation-and-setup/enterprise-setup/snyk-broker/classic-broker/install-and-configure-snyk-broker/azure-repos-prerequisites-and-steps-to-install-and-configure-broker.md
# Azure Repos - prerequisites and steps to install and configure Broker
{% hint style="info" %}
**Feature availability**
Snyk Azure Repos are available only for Azure DevOps/TFS 2020 or above.
{% endhint %}
Before installing, review the general instructions for the installation method you plan to use, [Helm](https://docs.snyk.io/implementation-and-setup/enterprise-setup/snyk-broker/classic-broker/install-and-configure-snyk-broker/install-and-configure-broker-using-helm) or [Docker](https://docs.snyk.io/implementation-and-setup/enterprise-setup/snyk-broker/classic-broker/install-and-configure-snyk-broker/install-and-configure-broker-using-docker).
Before installing the Snyk Azure Repos Broker, ask your Snyk account team to provide you with a Broker token.
You must have Docker or a way to run Docker Linux containers. Some Docker deployments for Windows run only Windows containers. Ensure that your deployment is capable of running Linux containers.
Continue with the steps to install using [Docker](https://docs.snyk.io/implementation-and-setup/enterprise-setup/snyk-broker/classic-broker/install-and-configure-snyk-broker/azure-repos-prerequisites-and-steps-to-install-and-configure-broker/azure-repos-install-and-configure-using-docker) or [Helm](https://docs.snyk.io/implementation-and-setup/enterprise-setup/snyk-broker/classic-broker/install-and-configure-snyk-broker/azure-repos-prerequisites-and-steps-to-install-and-configure-broker/azure-repos-install-and-configure-and-configure-using-helm).
---
# Source: https://docs.snyk.io/developer-tools/scm-integrations/organization-level-integrations/azure-repositories-tfs.md
# Azure Repositories (TFS)
{% hint style="info" %}
**Feature availability**\
Integration with Azure DevOps Server 2020 and above, also known as TFS, is available only with Enterprise plans. For more information, see [plans and pricing](https://snyk.io/plans/).
Snyk supports only Git. Snyk does not currently support integration with Team Foundation Version Control (TFVC).
{% endhint %}
### Prerequisites for Azure Repositories (TFS) integration
* [Snyk Organization Admin](https://docs.snyk.io/snyk-platform-administration/user-roles/pre-defined-roles) user role.
* An Azure project. If you do not have a project yet, create one in [Azure DevOps](https://docs.microsoft.com/en-us/azure/devops/user-guide/sign-up-invite-teammates?view=azure-devops) or set one up in an [on-premise Azure DevOps](https://docs.microsoft.com/en-us/azure/devops/organizations/projects/create-project?view=azure-devops) instance.
* The required Personal Access Token (PAT) access scopes. For details on the permissions required, see [Azure Repositories (TFS) permission requirements](https://docs.snyk.io/developer-tools/user-permissions-and-access-scopes#azure-repositories-tfs-permission-requirements).
### Azure Repositories (TFS) integration features
Snyk integrates with your Microsoft Azure Repository to let you import Projects and monitor the source code for your repositories. Snyk tests the Projects you have imported for known security vulnerabilities in the dependencies, testing at a frequency you control.
The Azure Repository integration lets you:
* Continuously perform security scanning across all the integrated repositories
* Detect vulnerabilities in your open-source components
* Provide automated fixes and upgrades
After the integration is configured, Snyk does the following:
1. Evaluates the items you selected and imports the ones that have the relevant manifest files in their root folder and all the subfolders at any level.
2. Communicates directly with your repository for each test it runs using the permissions you associated with your PAT, to determine exactly which code is currently pushed by the Snyk application and which dependencies are being used. Each dependency is tested against the Snyk vulnerability database to see if it contains any known vulnerabilities.
3. Notifies you by email or a dedicated Slack channel if vulnerabilities are found according to the preferences you configured, so that you can take immediate action to fix the issues.
### How to set up the Azure Repositories (TFS) integration
The process to connect Snyk with your Azure repositories includes the following steps:
1. Generate a unique Azure DevOps personal access token (PAT) for Snyk, based on a username and password combination, and configured with the specific permissions Snyk needs to access your Azure repositories. For more information, see [Configure a Personal Access Token (PAT)](#configure-a-personal-access-token-pat).
2. [Enable the integration through the Snyk Web UI](#integrate-using-the-snyk-web-ui).
3. [Select the Projects and repositories](#add-projects-to-snyk-for-azure-repos) you want to associate with Snyk for testing and monitoring.\
You can also enter custom file locations for any manifest files that are not located in the root folders of your repositories.
### Configure a Personal Access Token (PAT)
Generate and copy a unique PAT to use for Snyk. For more information on the PAT access scope requirements to enable in Azure, see [Azure Repositories (TFS) permission requirements](https://docs.snyk.io/developer-tools/user-permissions-and-access-scopes#azure-repositories-tfs-permission-requirements).
### Integrate using the Snyk Web UI
1. Log in to [your Snyk account](https://app.snyk.io) and navigate to **Integrations**.
2. On the **Azure Repos** tile, click the settings icon to open **Organization Settings** > **Integrations** > **Azure Repos** > **Account credentials**.
3. Pay special attention to the instructions given on the **Account Credentials** page. Depending on your plan, you may need to enter just the Azure DevOps Organization, or you may need to enter the entire URL.
* **Set your organization**: Enter the slug for your Organization only.\
For example, enter `your-azure-devops-org`
* **Set your host**: enter the entire url.\
For example, enter `https://dev.azure.com/your-azure-devops-org`\
Alternatively, you may enter a custom url that is publicly reachable
4. Click **Save**, and then enter the PAT that you generated.
5. Click **Save**.\
Snyk tests the connection values and the page reloads, displaying the Azure Repos integration information. A message to confirm that the details were updated appears at the top of the screen.
{% hint style="info" %}
If the connection to Azure fails, a notification will appear under the **Azure Repos** card title.
{% endhint %}
### Add Projects to Snyk for Azure Repos
Snyk tests and monitors Azure Repos by evaluating root folders and custom file locations for the [languages that Snyk supports](https://docs.snyk.io/supported-languages/supported-languages-package-managers-and-frameworks).
To add a default Project:
1. In Snyk, navigate to **Projects** > **Add projects**.
2. Choose the relevant repository or tool from which to import your projects.\
The available repositories for the integration you chose are displayed in a new window.
3. Select the repositories that you want Snyk to monitor for security and license issues.
4. To import all the repos for a specific Organization, check the **Organization**.
5. Click **Add selected repositories**.\
Snyk scans the entire file tree for dependency files and imports them to Snyk as Projects.
### Adding custom file locations and excluding folders
#### Add a custom file location
Use this procedure to add an Azure Repository dependency from a non-default path.
1. In Snyk, navigate to **Projects** > **Add projects** > **Azure repos** > **Settings**.
2. Open the **Add custom file location (optional)** list and **select a repository...** to configure a custom path.
3. In the text field, enter the `relative path for the manifest file location`.
{% hint style="warning" %}
The relative path field is case-sensitive.
{% endhint %}
#### Exclude folders from import
The optional **Exclude folders** field is case-sensitive. The pattern you enter is applied to all the Azure repositories.
### **Confirming the repository import**
After repositories are imported, a confirmation appears in green at the top of the screen. The selected files are marked with a unique icon and named by Organization and repository. You can filter to view only those Projects by selecting the Azure Repos filter option.
{% hint style="info" %}
The Azure Repository integration works like the other [Snyk SCM integrations](https://docs.snyk.io/developer-tools/scm-integrations/organization-level-integrations). To continue to monitor, fix, and manage your Projects, see the [Projects](https://docs.snyk.io/snyk-platform-administration/snyk-projects) documentation.
{% endhint %}
---
# Source: https://docs.snyk.io/scan-with-snyk/snyk-iac/detect-manually-created-resources/supported-resources/azure-resources.md
# Azure resources
Snyk IaC unmanaged resource scanning supports the following resources for Azure:
| **Resource** |
| ------------------------------------ |
| azurerm\_storage\_account |
| azurerm\_storage\_container |
| azurerm\_virtual\_network |
| azurerm\_route\_table |
| azurerm\_route |
| azurerm\_resource\_group |
| azurerm\_subnet |
| azurerm\_container\_registry |
| azurerm\_firewall |
| azurerm\_postgresql\_server |
| azurerm\_postgresql\_database |
| azurerm\_public\_ip |
| azurerm\_network\_security\_group |
| azurerm\_lb |
| azurerm\_lb\_rule |
| azurerm\_private\_dns\_zone |
| azurerm\_private\_dns\_a\_record |
| azurerm\_private\_dns\_aaaa\_record |
| azurerm\_private\_dns\_cname\_record |
| azurerm\_private\_dns\_ptr\_record |
| azurerm\_private\_dns\_mx\_record |
| azurerm\_private\_dns\_txt\_record |
| azurerm\_private\_dns\_srv\_record |
| azurerm\_image |
| azurerm\_ssh\_public\_key |
---
# Source: https://docs.snyk.io/implementation-and-setup/enterprise-setup/snyk-broker/classic-broker/install-and-configure-snyk-broker/advanced-configuration-for-snyk-broker-docker-installation/backend-requests-with-an-internal-certificate-for-docker.md
# Backend requests with an internal certificate for Docker
By default, the Broker Client establishes HTTPS connections to the backend system: GitHub, BitBucket, Jira, or other. If your backend system is serving an internal certificate (signed by your own certificate authority (CA)), you can provide the CA certificate to the Broker Client.
For example, if your CA certificate is at `./private/ca.cert.pem`, provide it to the Docker container by mounting the folder and using the `NODE_EXTRA_CA_CERT` environment variable. See the following example for Bitbucket:
```
docker run --restart=always \
-p 8000:8000 \
-e BROKER_TOKEN=secret-broker-token \
-e BITBUCKET_USERNAME=username \
-e BITBUCKET_PASSWORD=password \
-e BITBUCKET=your.bitbucket-server.domain.com \
-e BITBUCKET_API=your.bitbucket-server.domain.com/rest/api/1.0 \
-e PORT=8000 \
-e NODE_EXTRA_CA_CERTS=/private/ca.cert.pem \
-v /local/path/to/private:/private \
snyk/broker:bitbucket-server
```
Beginning with [Broker version 4.166.0 (2023-10-10)](https://github.com/snyk/broker/releases/tag/v4.166.0), the custom CA cert instruction is `NODE_EXTRA_CA_CERTS` and this must be set as shown in order to use a custom CA. The `CA_CERT` environment variable is no longer in use for this purpose.
Note that this completely replaces the default CA Certificate List for any requests made to your backend system, so this must be the complete chain required by the certificate used by the backend system.
It must be `PEM`-formatted; `DER` is not supported. Supported certificate types are:
* `TRUSTED CERTIFICATE`
* `X509 CERTIFICATE`
* `CERTIFICATE`
An example follows.
```
-----BEGIN CERTIFICATE-----
-----END CERTIFICATE----
-----BEGIN CERTIFICATE-----
-----END CERTIFICATE-----
-----BEGIN CERTIFICATE-----
-----END CERTIFICATE-----
```
---
# Source: https://docs.snyk.io/developer-tools/scm-integrations/application-context-for-scm-integrations/backstage-file-in-asset-inventory-use-case.md
# Backstage file in Asset Inventory - use case
After you finish configuring the [Backstage catalog](https://docs.snyk.io/developer-tools/scm-integrations/application-context-for-scm-integrations/..#backstage-file-for-scm-integrations), Snyk Essentials starts enriching your repository assets (the [All Assets](https://docs.snyk.io/manage-assets/manage-assets#inventory-menu) tab from the Inventory layout) with the data found in the backstage `catalog-info.yaml` file.
Use the backstage catalog to enrich the repository assets and to define the component entity. For this type of situation, a component is defined as a software component, like a service, repository, website, library, and so on.
Components have several attributes and most of them are optional:
* `spec.type` (mandatory) - represents the classification of the repository.
* `spec.owner` (mandatory) - represents the team owning the repository.
* `spec.lifecycle` - represents the lifecycle state of the component, for example `production`, `experimental`, `deprecated`.
* `spec.system` (optional) - represents a group of components that serve the same purpose. This concept is referred to as “Application”.
* `Metadata.name` (mandatory) - represents the name of the component.
* `Metadata.title` (optional) - represents the name of the component.
The backstage data is dynamic and may change over time:
* If new commits or updates are made to the `catalog-info.yaml` file, then Snyk Essentials updates the asset attribute for that specific repository asset.
* If the`catalog-info.yaml` file is removed from the repository, then Snyk Essentials deletes the asset attribute from that specific repository assets.
{% hint style="info" %}
You can use quotes (`""`) to escape keys that contain periods (`.`), for example`"`[`example.com`](http://example.com/)`".owner`.
{% endhint %}
## Inventory menu and the backstage file
Depending on the selection you made on the Integration configuration menu, only those selections are displayed in filters from the Inventory menu. For example, if you selected the Category attribute, then it will also be displayed in the filters list.
## Asset Summary tab and the backstage file
The Asset Summary tab shows the six backstage attributes that are configured in the Integrations page only if you choose to integrate with Backstage.
## Asset Attributes tab and the backstage file
In the Asset Attributes tab only the selected attributes should be added as metadata to the repository asset.
```
{
name:"spring.goof",
repositoryURL:"https://github.com/snyk/spring.goof.git",
context:[
{
name: "super-duper-component",
title: "Super Duper Component",
application: "super-duper-app",
lifecycle: "production",
owner: "super-duper-team",
category: "service",
source: "Backstage"
}]
}
```
## Policies filter and the backstage file
In the policy builder you can find only the attributes you have previously selected when configuring the backstage catalog file.
The following list describes all possible backstage attributes that you can choose from when you configure the backstage catalog file.
* **Application** - represents a group of components that serve the same purpose.
* **Owner** - specifies the team owning the repository.
* **Catalog name** - the metadata name.
* **Title** - a name to display for the entity instead of the property. It is an alternative to the metadata name, when the catalog name is too hard to read.
* **Category** - represents the classification of the repository. The Organization can choose any name or text.
* **Lifecycle** - specifies the lifecycle state of the component, for example production, experimental, deprecated.
---
# Source: https://docs.snyk.io/implementation-and-setup/enterprise-setup/snyk-broker/universal-broker/basic-steps-to-install-and-configure-universal-broker.md
# Basic steps to install and configure Universal Broker
{% hint style="info" %}
You can learn more about Universal Broker in the dedicated Snyk Learn course. Explore the advantages, configuration, architecture, and much more with [Snyk Learn: Universal Broker](https://learn.snyk.io/lesson/universal-broker/?ecosystem=general).
{% endhint %}
Follow these steps to install and configure your Universal Broker using the `snyk-broker-config` CLI tool. The tool guides you through the steps and indicates important points in the workflows.
## Install and set up the snyk-broker-config CLI tool
To install the tool, use `npm i -g snyk-broker-config`.
{% hint style="info" %}
The `snyk-broker-config` CLI tool is your primary guide for setting up and managing Snyk Broker connections. It is designed to walk you step-by-step through the process, asking for the required information for each integration type. This adaptive method guarantees that you receive the latest parameter requirements directly from the tool.
{% endhint %}
The basic process for configuring a new Universal Broker deployment is as follows:
1. Install the `snyk-broker-config` tool by running `npm i -g snyk-broker-config`
2. Create a Universal Broker new connection by following the create workflow `snyk-broker-config workflows connections create`
3. Integrate your new Universal Broker Connection by following the integrate workflow `snyk-broker-config workflows connections integrate`
### How to use the CLI for parameter discovery
Even if you are not running the full setup, the `snyk-broker-config` CLI tool can help you understand the required parameters. Use the interactive setup or the command line help.
* Interactive setup: Run `snyk-broker-config workflows connections create` and follow the prompts. The CLI asks for all required and optional parameters based on the integration type you select, such as GitLab, Artifactory, or Bitbucket Server.
* Command line help: Use the `--help` flag for any `snyk-broker-config` command to see available options and parameters. For instance, to see parameters specifically relevant for creating a GitLab connection type, use the following command:
```bash
snyk-broker-config workflows connections create --type gitlab --help
```
### Example of a connection workflow
A typical workflow for adding a new Broker connection using the CLI involves these steps:
1. Install the CLI:
```bash
npm install -g snyk-broker-config
```
2. Start the interactive workflow:
```bash
snyk-broker-config workflows connections create
```
The CLI will then guide you through the process, prompting for:
* Your Snyk API Token, required for authentication if you did not already export it as an environment variable.
* The Snyk Organization ID where the Broker connection is used.
* The specific type of integration you want to connect, such as `gitlab`, `artifactory`, `bitbucket-server`.
* All required and optional parameters, such as URLs, tokens, usernames, or passwords, are dynamically identified for your chosen integration type. Follow the on-screen instructions carefully.
The interactive workflow is the most straightforward way to ensure all necessary parameters are correctly provided for your Broker connection.
## Create your first connection
This returns an install ID, a client ID, and a client secret, which are all needed to interact with the Snyk platform.
* After you install, start the Universal Broker Create Connection workflow.
```
> snyk-broker-config workflows connections create
Using https;//api.snyk.io (or https://api.REGION.snyk.io)
Universal Broker Create Connection workflow
Enter your Snyk Token
```
* Type your Snyk API token and press Enter.
```
✓ Valid Snyk Token.
✓ Tenant Admin role confirmed.
Have you installed the Broker App against an Org? (Y/N)
```
* Type N and press Enter.
```
Enter Org ID to install Broker App. Must be in Tenant .
(Must be a valid uuid).
```
* Paste the Snyk Broker Admin Organization ID created in the prerequisites and press Enter.
The Broker App facilitates the secure connection and communication with the Broker server through OAuth.
```
App installed. Please store the following credentials securely:
- client id:
- ClientSecret:
You will need them to run your Broker Client.
Have you saved these credentials? (Y/N)
```
The tool displays the credentials for the Broker App just installed. Be sure to store these safely like any other credentials. This is the only time the client secret will be displayed. If you lose these credentials, you must either delete and recreate the Snyk Broker Admin Organization and start over, or use the API to reinstall Universal Broker manually.
* When you have saved your credentials, type Y and press Enter.
```
Helpful tip ! Set TENANT_ID, INSTALL_ID as environment values to avoid pasting
the values in for every command.
Now using Tenant ID and Install ID .
Do you want to create a new Deployment? (Y/N)
```
Snyk recommends that you set the `INSTALL_ID` as an environment variable to improve usability:
* `export INSTALL_ID=zzzz` (Linux/Mac)
* `set INSTALL_ID=zzzz` (Windows)
## Input connection parameters
This includes creating credentials references needed for your connections. Each deployment is limited to a maximum of 25 connections.
* In response to the prompt, type Y and press Enter.
```
Which Connection type do you want to create?
acr
artifactory
…
> github
…
```
* Select the connection type you want to create.
This example shows creating a GitHub connection. Creating all the other types of connection follows the same process. Each deployment is limited to 25 connections.
```
Enter a human-friendly name for your Connection.
```
* Enter a connection name to help you identify the connection, for example, github-connection-for-team-x.
```
Enter a human-friendly name for your Connection.
broker_client_url: Broker client url. Must be url.
```
* Enter your Broker\_client\_url. Snyk recommends using the default value. You can enter a different value, which is required for container integrations.
```
broker_client_url: Broker client url. Must be url.
github_token (Sensitive): No existing Credential Reference for this Connection type.
CreateNew
Env Var Name (e.g., MY_GITHUB_TOKEN). (Must be a valid envvar).
```
* Create the credential reference (not the actual credential value). Enter the name of the environment variable which will contain the actual credential value when the Broker client is running, for example, MY\_GITHUB\_TOKEN.
* Optionally, you can enter a comment to help you keep track of this connection.
```
Env Var Name (e.g. MY_GITHUB_TOKEN). (Must be a valid envvar).
Comment this is a demo broker connection.
```
When you run the Broker client container in a subsequent step, you must add the `-e MY_GITHUB_TOKEN=`. In a production setup, these values are mounted from the secrets vault.
```
Connection created with ID . Ready to configure integrations
to use this connection.
Connection Create workflow completed.
```
The connection is now created.
## Validate your connection (optional)
You can use the following workflow to display details about the connection.
```
> snyk-broker-config workflows connections get
```
* If you are prompted about whether the Broker app is installed, enter Y and then paste the install ID you saved previously.
Exporting the INSTALL\_ID avoids this optional step in your terminal session in the future. The deployment details follow.
```
Now using Deployment .
Selected Connection ID .
Ready to configure integrations to use this connection.
```
Details of the connection follow: `connection ID`; `connection type (broker_connection)`; `attributes: deployment_id, identifier, name, and secrets-primary and secondary`, each with the `status`, `encrypted`, `expires_at`, and `nonce`; `configuration required: broker-client-url` and `github_token values`; `type: github.`
```
Connection Detail Workflow completed.
```
## Integrate your connection with an Organization that will use the Universal Broker
```
> snyk-broker-config workflows connections integrate
Enter the OrgID you want to integrate.. (Must be a valid uuid).
```
* Enter the ID of the Organization where you want to use the newly created Broker connection.
```
Enter the OrgID you want to integrate.. (Must be a valid uuid).
Connection (type:github) integrated with .
Connection Integration Workflow completed
```
Your Organization is now integrated with your new Broker connection.
## Run the Broker client
```
docker run -d --restart=always \
-p 8000:8000 \
-e DEPLOYMENT_ID= \
-e CLIENT_ID= \
-e CLIENT_SECRET= \
-e MY_GITHUB_TOKEN= \
-e PORT=8000 \
snyk/broker:universal
```
When the Broker client has started, the connection is ready to use, in this case, to import repositories.
* To verify that your connection is configured, check that the integration tile on your **Organization Settings** > **Integrations** page is marked **Configured**.
## Integrate your connection with more Organizations
To integrate your connection with another Organization, run the `integrate` command again and enter the new Organization ID. Repeat as needed to connect with multiple Organizations.
```
> snyk-broker-config workflows connections integrate
```
Repeat the step for any Organization in your Tenant as needed, for as many integrations as you need.
---
# Source: https://docs.snyk.io/developer-tools/scm-integrations/organization-level-integrations/bitbucket-cloud-app.md
# Bitbucket Cloud App
The Bitbucket Cloud App is positioned to be the default Bitbucket Cloud integration
The Bitbucket Cloud App integration lets you connect your Snyk Organization to a Bitbucket Cloud Workspace and get all Snyk's core SCM integration features:
* Continuously perform security scanning across all the integrated repositories
* Detect vulnerabilities in your Open Source components
* Provide automated fixes and upgrades
* Provides developer teams with first-party visibility for security issues directly in the Bitbucket interface
{% hint style="info" %}
Snyk recommends using the Bitbucket Cloud App integration for smoother integration and to ensure long-term support.
If you are using the [Bitbucket Cloud API token integration](https://docs.snyk.io/developer-tools/scm-integrations/organization-level-integrations/bitbucket-cloud), see [Migrate a Bitbucket Cloud integration](https://docs.snyk.io/developer-tools/scm-integrations/bitbucket-cloud#migrate-to-the-bitbucket-cloud-app) for more information.
{% endhint %}
### Setting up a Bitbucket Cloud App
To give Snyk access to your Bitbucket account, you need to install the Snyk App on your Bitbucket Cloud workspace.
{% hint style="info" %}
To install the Snyk App on your Bitbucket Cloud workspace, you must have **Admin** permissions for the Workspace in Bitbucket.
{% endhint %}
1. In Snyk, navigate to **Integrations (Source control),** then **Bitbucket Cloud App** tile, and click **Connect** to install the Snyk Bitbucket Cloud App on your Bitbucket Cloud workspace.
2. In the new Bitbucket tab, select the relevant workspace to connect to your Snyk Organization from the list and [**Grant access** to let Snyk](https://docs.snyk.io/developer-tools/user-permissions-and-access-scopes#bitbucket-cloud-app-scopes):
* Read your account information
* Read and modify your repositories and their pull requests
* Read and modify your repositories' webhooks
Allow access for Snyk to Bitbucket Cloud
Allow Bitbucket Cloud access to your Snyk Organization
Bitbucket security insights with Snyk Bitbucket Cloud App
" %}
Set up Snyk security in Bitbucket Cloud
{% endembed %}
### Installing the Snyk App from Bitbucket Cloud
If you need to, you can also install the Snyk Bitbucket Cloud App integration while you are in Bitbucket Cloud.
In one of your Bitbucket Cloud workspaces, navigate to the **Security** tab in one of your repositories, click **Try now**, and follow the procedure.
Install the Snyk Bitbucket Cloud App from Bitbucket
Project-level security report
Fix pull request opened by Snyk
Automatic fix PR settings
BitBucket Cloud pull request page showing Snyk pull request
Snyk Security tab in Bitbucket Cloud
Create integration settings for a different Organization
```
2. Get your Bitbucket Cloud username (**not email**) and [app password](https://developer.atlassian.com/cloud/bitbucket/rest/intro/#authentication)
**Note**: Make sure your credentials have read access to the repos.
## Running the command
Consider the following levels of usage and options:
### Usage levels
* To get commits for all workspaces and their repos in Bitbucket Cloud, provide the Bitbucket Cloud user and app password:
```
snyk-scm-contributors-count bitbucket-cloud --user USERNAME --password APP_PASSWORD
```
* To get commits for some workspaces and their repos in Bitbucket Cloud, provide the Bitbucket Cloud user, Bitbucket Cloud app password, and a comma-separated list of workspaces:
```
snyk-scm-contributors-count bitbucket-cloud --user USERNAME --password APP_PASSWORD --workspaces Workspace1,Workspace2...
```
* To get commits for a specific repo in Bitbucket Cloud, provide the Bitbucket Cloud user, Bitbucket Cloud app password, a workspace, and a repo name:
```
snyk-scm-contributors-count bitbucket-cloud --user USERNAME --password APP_PASSWORD --workspaces Workspace1 --repo Repo1
```
### Options
* To get all the commits from Bitbucket Cloud regardless of the repos that are already monitored by Snyk, add the `--skipSnykMonitoredRepos` flag.\
You might have repos in Bitbucket Cloud that are not monitored in Snyk; use this flag to skip checking for Snyk monitored repos and go directly to Bitbucket Cloud to fetch the commits.
```
snyk-scm-contributors-count bitbucket-cloud --user USERNAME --password APP_PASSWORD --skipSnykMonitoredRepos
```
* To exclude some contributors from being counted in the commits , add an exclusion file with the emails to ignore (separated by a new line),and apply the `--exclusionFilePath` with the path to that file:
```
snyk-scm-contributors-count bitbucket-cloud --user USERNAME --password APP_PASSWORD --workspaces Workspace1,Workspace2 --exclusionFilePath PATH_TO_FILE
```
* To set the output to json format: add the `--json` flag:
```
snyk-scm-contributors-count bitbucket-cloud --user USERNAME --password APP_PASSWORD --workspaces Workspace1 --repo Repo1 --json
```
* To create an import file for your unmonitored repos, add the `--importConfDir` flag with a valid (writable) path to a folder in which the import files will be stored, and add the `--importFileRepoType` flag (optional) with the repo types to add to the file (`all`/`private`/`public`, defaults to `all`). Note that these flags **can not** be set with the `--repo` flag.
```
snyk-scm-contributors-count bitbucket-cloud --user USERNAME --password APP_PASSWORD --importConfDir ValidPathToFolder --importFileRepoType private/public/all
```
For more information about these flags, refer to this [Creating and using the import page](https://docs.snyk.io/developer-tools/snyk-cli/scan-and-maintain-projects-using-the-cli/cli-tools/snyk-scm-contributors-count/creating-and-using-the-import-file).
* To run in debug mode for verbose output, prefix with `DEBUG=snyk*`:
```
DEBUG=snyk* snyk-scm-contributors-count bitbucket-cloud --user USERNAME --password APP_PASSWORD --workspaces Workspace1 --repo Repo1 --exclusionFilePath PATH_TO_FILE --skipSnykMonitoredRepos --json
.
```
---
# Source: https://docs.snyk.io/developer-tools/snyk-cli/scan-and-maintain-projects-using-the-cli/cli-tools/snyk-scm-contributors-count/scripts-for-scm-contributors-count/bitbucket-cloud/bitbucket-cloud-flow-and-tech.md
# Bitbucket Cloud - Flow and Tech
## Flow
1. Fetch the monitored projects from Snyk (if the `skipSnykMonitoredRepos` flag was **not set** and the `SNYK_TOKEN` was exported).
2. Fetch `one`/`some`/`all` the workspaces that the credentials have access to from SCM and create a workspaces list.
3. Fetch `one`/`all` repos under the fetched/provided workspaces.
4. Remove the repos that are not monitored by Snyk (if the `skipSnykMonitoredRepos` flag was **not set** and the `SNYK_TOKEN` was exported) and create a Repo list.
5. Create an import file for unmonitored repos to use for easily importing repos into your Snyk account (if the `importConfDir` flag was set)
6. Fetch the commits for the fetched/provided repo/s and create a Contributors list.
7. Count the commits for the repo/s by the contributors.
8. Remove the contributors that were specified in the exclusion file (if `the exclusionFilePath` flag was set and a valid path to a text file was provided).
9. Print the results.
## Bitbucket Cloud API endpoints used
* To get the repositories from BB Cloud, if a workspace was **not** provided: `/api/2.0/repositories`
* To get the repositories from BB Cloud, if a workspace/s **was** provided: `/api/2.0/repositories/{Workspace}`
* To get the commits for the fetched/provided repo/s list:`/api/2.0/repositories/{Workspace}/{Repo}/commits`
---
# Source: https://docs.snyk.io/developer-tools/snyk-cli/scan-and-maintain-projects-using-the-cli/cli-tools/snyk-scm-contributors-count/scripts-for-scm-contributors-count/bitbucket-cloud.md
# Source: https://docs.snyk.io/developer-tools/scm-integrations/organization-level-integrations/bitbucket-cloud.md
# Bitbucket Cloud
{% hint style="info" %}
Snyk recommends installing or migrating to the [Bitbucket Cloud Application](https://docs.snyk.io/developer-tools/scm-integrations/organization-level-integrations/bitbucket-cloud-app) for smoother integration and to ensure long-term support.
{% endhint %}
The Bitbucket Cloud API token integration lets you:
* Continuously perform security scanning across all the integrated repositories
* Detect vulnerabilities in your open-source components
* Provide automated fixes and upgrades
### How to set up the Bitbucket Cloud Integration
{% hint style="info" %}
Admin permissions are required; however, Snyk's access is ultimately limited by the [permissions assigned to the API Token](https://support.atlassian.com/bitbucket-cloud/docs/create-an-api-token/).\
\
To improve security, the use of app passwords in Bitbucket Cloud is transitioning to API tokens. Existing integrations that use app passwords will continue to function temporarily until 9 June 2026.\
To ensure continued support and functionality, update your Bitbucket Cloud integration in Snyk to use an API token.
{% endhint %}
1. To give Snyk access to your Bitbucket account, set up a dedicated service account in Bitbucket with admin permissions. See the [Bitbucket documentation ](https://support.atlassian.com/bitbucket-cloud/docs/grant-access-to-a-workspace/)to learn more about adding users to a workspace.\
The newly created user must have **Admin** permissions to all the repositories you need to monitor with Snyk.
2. In Snyk, go to the **Integrations** page, open the **Bitbucket Cloud** card, and configure the **Account credentials**.
3. In BitBucket, under the Personal settings, select **Atlassian account settings** > **Security** > **Create and manage API tokens**.
4. Follow the Bitbucket procedure to set up an account with the following permissions:
* read:user:bitbucket
* read:workspace:bitbucket
* read:repository:bitbucket
See the [Bitbucket documentation ](https://support.atlassian.com/bitbucket-cloud/docs/create-an-api-token/)for more details about the procedure.
5. Enter the email and the [API key for the Bitbucket account](https://developer.atlassian.com/cloud/bitbucket/rest/intro/#api-tokens) you created, and **save** your changes.\
You can find your email under the Bitbucket **Personal settings.**\
Snyk connects to your Bitbucket Cloud account. When the connection succeeds, the confirmation message **Bitbucket Cloud settings successfully updated** appears.
### How to add Bitbucket repositories to Snyk
After you connect Snyk to your Bitbucket Cloud account, you can select repositories for Snyk to monitor.
1. In Snyk, go to **Integrations** > **Bitbucket Cloud** card, and click **Add your Bitbucket Cloud repositories to Snyk** to start importing repositories to Snyk.
2. Choose the repositories you want to import to Snyk and click **Add selected repositories**.
After you add the selected repositories, Snyk scans them for dependency files in the entire directory tree, that is, `package.json`, `pom.xml`, and so on, and imports them to Snyk as Projects.
The imported projects appear on your **Projects** page and are continuously checked for vulnerabilities.
### Bitbucket integration features
After the integration is in place, you will be able to use capabilities such as:
* [Project-level security reports](#project-level-security-reports)
* [Project monitoring and automatic fix pull requests](#project-monitoring-and-automatic-fix-pull-requests)
* [Pull request testing](#pull-request-tests)
#### Project-level security reports
Snyk produces advanced [security reports](https://docs.snyk.io/manage-risk/reporting/legacy-reports/legacy-reports-overview) that let you explore the vulnerabilities found in your repositories and fix them immediately by opening a fix pull request directly to your repository, with the required upgrades or patches.
The example that follows shows a Project-level security report.
An example of a Project-level security report
Example of an automatic fix Pull Request opened by Snyk
Configure Automatic fix PRs
Example of a Snyk pull request build check on the Bitbucket Cloud Pull Request page
Configuring the options for pull request Open Source Security & Licenses
Change the Projects filter to Group by none
Bulk delete the selected Projects
Remove the first-party Snyk Legacy interface app in Bitbucket
Project-level security report
Pull request opened by Snyk
Automatic fix PR settings
Configure PR Checks for your integration
= v1.0.0
## For users of `snyk/snyk-scan` >= v1.0.0 \
-e BROKER_SERVER_URL= \
-e BITBUCKET_USERNAME= \
-e BITBUCKET_PASSWORD= \
-e BITBUCKET= \
-e BITBUCKET_API= \
-e PORT=8000 \
-e BROKER_CLIENT_URL= \
-e ACCEPT_IAC=tf,yaml,yml,json,tpl \
-e ACCEPT_CODE=true \
-e ACCEPT_Essentials=true \
snyk/broker:bitbucket-server
```
{% hint style="info" %}
Snyk Essentials is set by default to **`false`**. Enable it by setting the flag to **`true`**.
{% endhint %}
## Configure Broker to be used with Bitbucket using an API token
The following explains how to configure Snyk Broker to use the Broker Client with a Bitbucket Server deployment using an API token.
To use the Snyk Broker Client with BitBucket, **run** `docker pull snyk/broker:bitbucket-server-bearer-auth`. For definitions of the environment variables, refer to [Bitbucket Server/Data Center - environment variables for Snyk Broker Basic Auth](https://docs.snyk.io/implementation-and-setup/enterprise-setup/snyk-broker/classic-broker/install-and-configure-snyk-broker/bitbucket-server-data-center-prerequisites-and-steps-to-install-and-configure-broker/bitbucket-server-data-center-environment-variables-for-snyk-broker-basic-auth) and [Bitbucket Server/Data Center - environment variables for Snyk Broker Personal Access Token (PAT)](https://docs.snyk.io/implementation-and-setup/enterprise-setup/snyk-broker/classic-broker/install-and-configure-snyk-broker/bitbucket-server-data-center-prerequisites-and-steps-to-install-and-configure-broker/bitbucket-server-data-center-environment-variables-for-snyk-broker-personal-access-token-pat).
If necessary, go to the [Advanced configuration page](https://docs.snyk.io/implementation-and-setup/enterprise-setup/snyk-broker/classic-broker/install-and-configure-snyk-broker/advanced-configuration-for-snyk-broker-docker-installation) and make any configuration changes needed, such as providing the CA (Certificate Authority) to the Broker Client configuration if the Bitbucket instance is using a private certificate, and setting up [proxy support](https://docs.snyk.io/implementation-and-setup/enterprise-setup/snyk-broker/classic-broker/install-and-configure-snyk-broker/advanced-configuration-for-snyk-broker-docker-installation/proxy-support-with-docker).
## Docker run command to set up a Broker Client for Bitbucket using a PAT
Copy the following command to set up a fully configured Broker Client to analyze Open Source, IaC, Container, Code files, and Snyk Essentials information. Enable Snyk Essentials to identify your application assets, monitor them, and prioritize the risks.
```bash
docker run --restart=always \
-p 8000:8000 \
-e BROKER_TOKEN= \
-e BITBUCKET_PAT= \
-e BITBUCKET= \
-e BITBUCKET_API= \
-e PORT=8000 \
-e BROKER_CLIENT_URL= \
-e ACCEPT_IAC=tf,yaml,yml,json,tpl \
-e ACCEPT_CODE=true \
-e ACCEPT_Essentials=true \
snyk/broker:bitbucket-server-bearer-auth
```
{% hint style="info" %}
Snyk Essentials is set by default to `false`. Enable it by setting the flag to `true`.
{% endhint %}
## Start the Broker Client container and verify the connection with Bitbucket
Paste the Broker Client configuration to start the Broker Client container.
Once the container is up, the Bitbucket Integrations page shows the connection to Bitbucket, and you can `Add Projects`
## Basic troubleshooting for Broker with BitBucket
* Run `docker logs ` to look for any errors, where `container id` is the Bitbucket Broker container ID.
* Ensure relevant ports are exposed to Bitbucket.
---
# Source: https://docs.snyk.io/implementation-and-setup/enterprise-setup/snyk-broker/classic-broker/install-and-configure-snyk-broker/bitbucket-server-data-center-prerequisites-and-steps-to-install-and-configure-broker/bitbucket-server-data-center-install-and-configure-using-helm.md
# Bitbucket Server/Data Center - install and configure using Helm
Before installing, review the [prerequisites](https://docs.snyk.io/implementation-and-setup/enterprise-setup/snyk-broker/classic-broker/install-and-configure-snyk-broker/bitbucket-server-data-center-prerequisites-and-steps-to-install-and-configure-broker) and the general instructions for installation using [Helm](https://docs.snyk.io/implementation-and-setup/enterprise-setup/snyk-broker/classic-broker/install-and-configure-snyk-broker/install-and-configure-broker-using-helm).
To use this chart, you must first add the Snyk Broker Helm Chart by adding the repo:
`helm repo add snyk-broker https://snyk.github.io/snyk-broker-helm/`
Then, run the following commands to install the Broker and customize the environment variables. For definitions of the environment variables, refer to [Bitbucket Server/Data Center - environment variables for Snyk Broker Basic Auth](https://docs.snyk.io/implementation-and-setup/enterprise-setup/snyk-broker/classic-broker/install-and-configure-snyk-broker/bitbucket-server-data-center-prerequisites-and-steps-to-install-and-configure-broker/bitbucket-server-data-center-environment-variables-for-snyk-broker-basic-auth) and [Bitbucket Server/Data Center - environment variables for Snyk Broker Personal Access Token (PAT)](https://docs.snyk.io/implementation-and-setup/enterprise-setup/snyk-broker/classic-broker/install-and-configure-snyk-broker/bitbucket-server-data-center-prerequisites-and-steps-to-install-and-configure-broker/bitbucket-server-data-center-environment-variables-for-snyk-broker-personal-access-token-pat).
For `bitbucket` and `bitbucketApi` values do not include `https://`
Snyk Essentials is set by default to `false`. Enable it by setting the flag to `true`.
{% hint style="info" %}
**Multi-tenant settings for regions**\
When installing, you must add a command in your script to set the `brokerServerUrl`. This is the URL of the Broker server for the region where your data is hosted. For the commands and URLs to use, see [Broker URLs](https://docs.snyk.io/snyk-data-and-governance/regional-hosting-and-data-residency#broker-server-urls).
{% endhint %}
Use the following command to configure Broker to be used with Bitbucket Server using Basic Auth:
```
helm install snyk-broker-chart snyk-broker/snyk-broker \
--set scmType=bitbucket-server \
--set brokerToken= \
--set brokerServerUrl=
--set bitbucketUsername= \
--set bitbucketPassword= \
--set bitbucket= \
--set bitbucketApi= \
--set brokerClientUrl=: \
--set enableEssentials=true \
-n snyk-broker --create-namespace
```
Use the following command to configure Broker to be used with Bitbucket Server using Bearer Auth (Personal Access Token):
```
helm install snyk-broker-chart snyk-broker/snyk-broker \
--set scmType=bitbucket-server-bearer-auth \
--set brokerToken= \
--set bitbucketPat= \
--set bitbucket= \
--set bitbucketApi= \
--set brokerClientUrl=: \
--set enableEssentials=true \
-n snyk-broker --create-namespace
```
You can pass any environment variable of your choice in the Helm command. For details, see [Custom additional options for Broker Helm Chart](https://docs.snyk.io/implementation-and-setup/enterprise-setup/snyk-broker/classic-broker/install-and-configure-snyk-broker/advanced-configuration-for-helm-chart-installation/custom-additional-options-for-broker-helm-chart-installation). Follow the instructions for [Advanced configuration for Helm Chart installation](https://docs.snyk.io/implementation-and-setup/enterprise-setup/snyk-broker/classic-broker/install-and-configure-snyk-broker/advanced-configuration-for-helm-chart-installation) to make configuration changes as needed.
You can verify that the Broker is running by looking at the settings for your brokered integration in the Snyk Web UI to see a confirmation message that you are connected. You can start importing Projects once you are connected.
---
# Source: https://docs.snyk.io/implementation-and-setup/enterprise-setup/snyk-broker/classic-broker/install-and-configure-snyk-broker/bitbucket-server-data-center-prerequisites-and-steps-to-install-and-configure-broker.md
# Bitbucket Server/Data Center - prerequisites and steps to install and configure Broker
{% hint style="info" %}
**Feature availability**
PR Checks for Bitbucket Server integrations require Bitbucket Server version 7.4 and above, or Bitbucket Data Center version 8 or above.\
\
When using a brokered connection, Snyk Broker version 4.206 and above is required.
{% endhint %}
Review the general instructions for the installation method you plan to use, [Helm](https://docs.snyk.io/implementation-and-setup/enterprise-setup/snyk-broker/classic-broker/install-and-configure-snyk-broker/install-and-configure-broker-using-helm) or [Docker](https://docs.snyk.io/implementation-and-setup/enterprise-setup/snyk-broker/classic-broker/install-and-configure-snyk-broker/install-and-configure-broker-using-docker).
Before installing the Bitbucket Server/Data Center Broker, ensure your Snyk account team provides you with a Broker token.
Docker or an equivalent method is required to run Docker Linux containers. Some Docker setups for Windows only support Windows containers. Ensure your deployment can run Linux containers.
After you meet all the prerequisites, you can continue with the steps to install using [Docker](https://docs.snyk.io/implementation-and-setup/enterprise-setup/snyk-broker/classic-broker/install-and-configure-snyk-broker/bitbucket-server-data-center-prerequisites-and-steps-to-install-and-configure-broker/bitbucket-server-data-center-install-and-configure-using-docker) or [Helm](https://docs.snyk.io/implementation-and-setup/enterprise-setup/snyk-broker/classic-broker/install-and-configure-snyk-broker/bitbucket-server-data-center-prerequisites-and-steps-to-install-and-configure-broker/bitbucket-server-data-center-install-and-configure-using-helm).
---
# Source: https://docs.snyk.io/developer-tools/snyk-cli/scan-and-maintain-projects-using-the-cli/cli-tools/snyk-scm-contributors-count/scripts-for-scm-contributors-count/bitbucket-server/bitbucket-server-examples.md
# Bitbucket Server - Examples
The following options are available for the `snyk-scm-contributors-count bitbucket-server` command:
```
--version Show version number [boolean]
--help Show help [boolean]
--token Bitbucket server token [required]
--url Bitbucket server base url e.g. (https://bitbucket.mycompany.com) [required]
--projectKeys [Optional] Bitbucket server project key to count contributors for
--repo [Optional] Specific repo to count only for
--exclusionFilePath [Optional] Exclusion list filepath
--json [Optional] JSON output, requiered when using the "consolidateResults" command
--skipSnykMonitoredRepos [Optional] Skip Snyk monitored repos and count contributors for all repos
--importConfDir [Optional] Generate an import file with the unmonitored repos: A path to a valid folder for the generated import files
--importFileRepoType [Optional] To be used with the importConfDir flag: Specify the type of repos to be added to the import file. Options: all/private/public. Default: all
```
## Before running the command
1. Export SNYK\_TOKEN (if you want to get the contributors ONLY for repos that are already monitored by Snyk):
* Make sure that your token has Group level access or use a service account's token that has Group level access. To learn more on how to create a service account, refer to [Service accounts](https://docs.snyk.io/implementation-and-setup/enterprise-setup/service-accounts).
* Copy the token value.
* Export the token in your environment:
```
export SNYK_TOKEN=
```
2. Get your Bitbucket Server token and URL:
* Create a Token if one does not exist, using this [guide](https://www.jetbrains.com/help/youtrack/standalone/integration-with-bitbucket-server.html#enable-youtrack-integration-bbserver).
**Note**: Make sure your token has read access to the repos.
* The URL is the actual URL of your Bitbucket Server instance, for example, .
## Running the command
Consider the following levels of usage and options:
### Usage levels
* To get commits for all projects and their repos in Bitbucket Server, provide the Bitbucket Server token and url:
```
snyk-scm-contributors-count bitbucket-server --token BITBUCKET-TOKEN --url BITBUCKET-URL
```
* To get commits for some projects and their repos in Bitbucket Server, provide the Bitbucket Server token, Bitbucket Server url ,and the projects, separated by a comma:
```
snyk-scm-contributors-count bitbucket-server --token BITBUCKET-TOKEN --url BITBUCKET-URL --projectKeys Key1,Key2...
```
* To get commits for a specific repo in Bitbucket Serve, provide your Bitbucket Server token, Bitbucket Server url, a project, and a repo name:
```
snyk-scm-contributors-count bitbucket-server --token BITBUCKET-TOKEN --url BITBUCKET-URL --projectKeys Key1 --repo Repo1
```
### Options
* To get all the commits from Bitbucket Server regardless of the repos that are already monitored by Snyk, add the `--skipSnykMonitoredRepos` flag.\
You might have repos in Bitbucket Server that are not monitored in Snyk,. Use this flag to skip checking for Snyk monitored repos and go directly to Bitbucket Server to fetch the commits.
```
snyk-scm-contributors-count bitbucket-server --token BITBUCKET-TOKEN --url BITBUCKET-URL --skipSnykMonitoredRepos
```
* To exclude some contributors from being counted in the commits, add an exclusion file with the emails to ignore(separated by a new line) and apply the `--exclusionFilePath` with the path to that file:
```
snyk-scm-contributors-count bitbucket-server --token BITBUCKET-TOKEN --url BITBUCKET-URL --projectKeys Key1,Key2 --exclusionFilePath PATH_TO_FILE
```
* To set the output to json format: add the `--json` flag:
```
snyk-scm-contributors-count bitbucket-server --token BITBUCKET-TOKEN --url BITBUCKET-URL --projectKeys Key1 --repo Repo1 --json
```
* To create an import file for me with my unmonitored repos, add the `--importConfDir` flag with a valid (writable) path to a folder in which the import files will be stored and add the `--importFileRepoType` flag (optional) with the repo types to add to the file (`all`/`private`/`public`, defaults to `all`). Note that these flags **can not** be set with the `--repo` flag.
```
snyk-scm-contributors-count bitbucket-server --token BITBUCKET-TOKEN --url BITBUCKET-URL --importConfDir ValidPathToFolder --importFileRepoType private/public/all
```
For more information about these flag, refer to [Creating and using the import file](https://docs.snyk.io/developer-tools/snyk-cli/scan-and-maintain-projects-using-the-cli/cli-tools/snyk-scm-contributors-count/creating-and-using-the-import-file).
* To run in debug mode for verbose output, add `DEBUG=snyk*` to the beginning of the command:
```
DEBUG=snyk* snyk-scm-contributors-count bitbucket-server --token BITBUCKET-TOKEN --url BITBUCKET-URL --projectKeys Key1 --repo Repo1 --exclusionFilePath PATH_TO_FILE --skipSnykMonitoredRepos --json
```
---
# Source: https://docs.snyk.io/developer-tools/snyk-cli/scan-and-maintain-projects-using-the-cli/cli-tools/snyk-scm-contributors-count/scripts-for-scm-contributors-count/bitbucket-server/bitbucket-server-flow-and-tech.md
# Bitbucket Server - Flow and Tech
## Flow The Code Analysis page
Component Description Header Includes the details of the imported repository with a link to the repository in the Git repository, the Project name, and the Projects tabs: Overview , History , and Settings . The Project Summary Information area Includes the dates of the repository import and the last test of the repository, the Retest now option for an on-demand test, the name of the user who imported the repository, the name of the Project owner, and the number of code files that were analyzed and not analyzed. See Retesting code repository Project filters Includes a set of pre-defined criteria for filtering the displayed issues. Vulnerability issues Includes the vulnerability issues that Snyk Code discovered in the imported repository. Data flow Displays the taint flow of the issue in the code. Fix analysis Provides additional details about the discovered vulnerability type, best practices for preventing this issue, and code examples of fixes. CWE The CWE (Common Weakness Enumeration) ID of the specific vulnerability type and a link to the CWE website, where this vulnerability type is described. See Example: CWE-22: Path Traversal . Open repository external link Quick access to the integrated Git repository for immediate remediation. Imported by The Git repository username who imported the analyzed repository. Project owner Identifies the lead for the Project in your Organization for administrative purposes only; it does not impact the Snyk Project itself. This is not a required field and is left blank by default. Environment The Environment attribute describes the software's context, ranging from client-side (Frontend) to server-side (Backend), private (Internal) to public (External), across platforms like Mobile, Cloud (SaaS), On-Premises, Hosted services, and Distributed systems. Business criticality When the Risk Score feature is enabled, the Business Criticality attribute automatically influences the score, scaling it to the most significant attribute level. See Risk Score . Lifecycle The Lifecycle attribute categorizes a Pro, Development, or Sandbox. Tags The Snyk Project tags feature enables the addition, removal, and use of custom metadata tags to organize and filter Projects, simplifying Project management and navigation. Analysis summary The number of code files analyzed in the repository and the percentage of the analyzed files out of the total repository code files. Repo breakdown Analyzed Files : Includes files that have been reviewed by Snyk Code, encompassing recognized extensions and programming languages.Unanalyzed Files: Consists of text files yet to be analyzed because of unsupported languages or extensions.Unknown : Files without recognized extensions, potentially including multimedia content (such as pictures and videos), binaries, proprietary format files, or any other formats that fall outside Snyk Code's scope of interest.
## Data flow
Data flow shows the location of the discovered issue in your source code and how it flows throughout your application. It shows the taint flow of the issue in the code, with a step-by-step visualization from the source to the sink, presenting the code lines of all the steps in the flow.
The source is the input point of the potential problem. This is a point in the application where a user or an external device can enter data, which will potentially violate the security of the application. For example, in an SQL Injection issue, the source will be a form or any other data input area filled by a user.
The sink is the operation in the code where the application executes the problem. This point must receive clean input, or it can be exploited. For example, in an SQL Injection issue, the sink will be the internal operation that instructs the DB to perform certain actions according to the received input.
Every issue discovered by Snyk Code has a data flow. If an issue has only one step, for example, in the case of hardcoded secrets, the source of the issue will be displayed on the Data flow page.
### View Data flow
1. Log in to the Snyk Web UI and select your [Group and Organization](https://docs.snyk.io/snyk-platform-administration/groups-and-organizations).
2. Navigate to the **Projects** and select the Target folder containing your repository's Projects.
3. Open **Code analysis** Project.
4. (Optional) [Search or filter for a specific vulnerability issue](https://docs.snyk.io/scan-with-snyk/snyk-code/manage-code-vulnerabilities/..#vulnerability-issues).
5. Select a vulnerability issue and navigate to **Full details** > **Data flow**.
6. As part of the Data flow analysis, you can take the following actions:
* View the taint flow of an issue in your code from source to sink. See [Data flow analysis example](#data-flow-analysis-example).
* [Open Data flow external link in the integrated Git repository](#open-data-flow-external-link).
* Ignore the open vulnerability issue using the **Ignore** button. See [Ignore issues](https://docs.snyk.io/manage-risk/prioritize-issues-for-fixing/ignore-issues).
### Data flow analysis example
In the following Path Traversal issue, the developer has not sanitized the input. This allows an attacker to perform a pass traversal attack to access any file in the file system, including sensitive data such as password files.
Data flow of a Path Traversal vulnerability issue
Vulnerability shown in the external source code
Fix analysis page for Path Traversal vulnerability
Fix analysis of a Path Traversal vulnerability issue
Source code external link in Fix analysis
Priority Score factor Description Severity Level The higher the severity level, the higher the security risk of the issue. Each severity level adds a different Score to the issue. The Score can be, at most, 500 points. Currently, Snyk Code does not use the Critical severity level. Fix analysis When an issue has a real-world fix example, it is marked as easier to fix, with a higher Priority Score. The Score can be, at most, 200 points. When Fix analysis is available, it is displayed in the Full Details panel of the issue on the Fix analysis tab. Issue occurrence in a Project The number of times a specific issue appears in the Code Analysis Project. The higher the frequency, the higher the risk and the Score. The Score can be, at most, 100 points. Issue occurrence in a File The number of times an issue appears in a specific file. The higher the frequency, the higher the risk and the Score. The Score can be, at most, 100 points. Community Projects The number of times an issue was fixed in external open-source Projects that Snyk examined. The Score can be, at most, 100 points. Project tags When an issue has a Project tag, it decreases the Priority Score by 100 points. This internal tag can be one of the following:
Test - The issue was found in a test file. Beta - The vulnerability type of the issue is in Beta status.
### Quantitative factors
* Severity scores from other SAST products where information is publicly available
* Severity scores from identifying similar vulnerabilities in the Snyk Vulnerability database
### Qualitative factors
* The severity of source, direct versus indirect
* Prevalence and impact of the sink
* Security team experience and research
* Customer feedback
## Example: CWE-22: Path Traversal
For CWE-22 Path Traversal, if the vulnerability occurs in a test, it is Low severity. If not, and it comes from a direct source, it is High severity. Otherwise, it is Low severity.
Decision flow chart for Priority Score CWE-22 Path Traversal
Decision flow chart for Priority Score CWE-601 Open Redirect
. This establishes a WebSocket connection, allowing communication with the Broker Server.
Thus you do not need to allow a Snyk IP address. Instead, you can allow the Broker Client IP/port.
### Outbound connection from the Broker Client
The Broker Client initiates the outbound connection to establish the WebSocket.
After the WebSocket connection initiated by the Broker Client is established, Snyk can send inbound requests to the Broker Client through the WebSocket.
Thus you do not need to allow inbound connections to the Broker Client from Snyk-specific IP addresses or other external IP addresses.
## Allowed requests
### Approved data list for Snyk Broker
The Broker Client maintains an approved data list for inbound and outbound requests. Only data on this approved list may be requested. This narrows the access permissions to the absolute minimum required for Snyk to monitor a repository.
### Inbound requests allowed
For Snyk Open Source, the following requests are allowed:
* Snyk.io is allowed to fetch and view only dependency manifest files and the `.snyk` policy file.
* No other source code is viewed, extracted, or modified.
* You may check in additional `.snyk` files to support the Snyk patch mechanism and for any ignore instructions that are included in your vulnerability policy.
Snyk Code needs access to the entire repository.
See [How Snyk handles your data](https://docs.snyk.io/snyk-data-and-governance/how-snyk-handles-your-data) for more details.
### Outbound requests allowed
When you configure your Broker Client setup, Git repository webhooks are set to enable automatic Snyk scans, triggered when your developers submit new pull requests or merge events.
Webhook notifications are delivered to Snyk through the Broker Client only for events relevant to Snyk actions: push to branch and open pull request, and only when the event data also shows a scan has occurred. For example, for Open Source, the event data must include a dependency manifest file or a `.snyk` policy file.
### Default approved data list and `accept.json` file
On occasion, you may need to [add and configure an `accept.json`](https://docs.snyk.io/implementation-and-setup/enterprise-setup/snyk-broker/classic-broker/snyk-broker-infrastructure-as-code-detection) file in your Broker deployment. Doing this will remove the ability to apply ACCEPT rules when starting the Broker.
---
# Source: https://docs.snyk.io/manage-risk/reporting/reporting-and-bi-integrations-snowflake-data-share/build-your-first-dashboard.md
# Build your first dashboard
This guide provides example queries to build out your first AppSec dashboard, based on key performance indicators (KPIs) and relevant use cases. These are organized by use case and explained in terms of business value and implementation considerations. While the provided queries offer a starting point, Snyk encourages you to customize them to suit your specific requirements.
See queries for the following use cases:
* [Open issues backlog](#open-issues-backlog) - reveal current AppSec risk that requires attention.
* [Aging](#aging) - track the exposure window of open issues.
* [Mean Time To Resolve (MTTR)](#mttr) - analyze the remediation velocity of engineering teams.
* [Service Level Agreement (SLA) ](#sla)- verify that issue remediation meets with your compliance requirements.
* [IDE & CLI test rates](#developers-ide-and-cli-test-usage-and-adoption) - measure the developer adoption of AppSec testing in the development stage.
* [CI/CD Pipelines test rates](#ci-cd-pipelines-test-usage-and-adoption) - measure the adoption of AppSec testing in CI/CD pipelines.
{% hint style="warning" %}
You must update the database and schema names in the example queries provided before execution.
{% endhint %}
## Open issues backlog
### Business value
AppSec teams need to understand the current exposure to risk. To do so, various aspects of the existing issues backlog are examined:
* The number of open issues.
* The number of high or critical-severity open issues.
* If there are available fixes for open issues.
For greater context, those figures are broken down into engineering teams, applications or any meaningful business structure that will make the results more concise and actionable. The following example queries allow this examination.
### Example query - SCA
This query returns open SCA issues backlog counters, distributed by fixability and grouped by Snyk Organization.
The results are based on:
* Open high or critical issues that were found by Snyk Open Source (SCA)
* Noise cancelling:
* Only issues of monitored projects
* No deleted issues
```sql
SELECT o.DISPLAY_NAME AS organization_display_name, -- Update based on the desired aggregation
COUNT_IF(ISSUE_SEVERITY='Critical' AND COMPUTED_FIXABILITY='Fixable') AS fixable_critical_issues,
COUNT_IF(ISSUE_SEVERITY='High'AND COMPUTED_FIXABILITY='Fixable') AS fixable_high_issues,
COUNT_IF(ISSUE_SEVERITY='Critical' AND COMPUTED_FIXABILITY='Partially Fixable') AS partially_fixable_critical_issues,
COUNT_IF(ISSUE_SEVERITY='High'AND COMPUTED_FIXABILITY='Partially Fixable') AS partially_fixable_high_issues,
COUNT_IF(ISSUE_SEVERITY='Critical' AND COMPUTED_FIXABILITY='No Fix Supported') AS unfixable_critical_issues,
COUNT_IF(ISSUE_SEVERITY='High'AND COMPUTED_FIXABILITY='No Fix Supported') AS unfixable_high_issues
FROM SNYK.SNYK.ISSUES__V_1_0 i
INNER JOIN SNYK.SNYK.PROJECTS__V_1_0 p ON i.PROJECT_PUBLIC_ID = p.PUBLIC_ID
INNER JOIN SNYK.SNYK.ORGS__V_1_0 o ON i.ORG_PUBLIC_ID = o.PUBLIC_ID
WHERE p.IS_MONITORED = TRUE -- include only monitored projects
AND i.DELETED_AT IS NULL -- remove deleted issues
AND ISSUE_STATUS = 'Open' -- include only open issues
AND i.PRODUCT_NAME = 'Snyk Open Source' -- include only Snyk Open Source
GROUP BY o.DISPLAY_NAME -- Update based on the desired aggregation
ORDER BY fixable_critical_issues DESC, fixable_high_issues DESC,
partially_fixable_critical_issues DESC, partially_fixable_high_issues DESC; -- Update based on the desired order
```
#### **Output format:**
Output of SQL query for SCA issues backlog counters
Output format of SQL query for open Snyk Code issues backlog counters
Output format of SQL query for average aging of critical issues
Output format of SQL query for MTTR per issue severity
Output format of SQL query for open issues counter per SLA status
Output format of SQL query for number of scans per Snyk environment
Output format of SQL query for number of tested repositories, total tests, and the test % success rate per Snyk Product
/"
```
Finally, you can check the contents of the bundle without extracting it by running:
```
tar -tf bundle.tar.gz
```
The output will be all the files included in the bundle:
```
/data.json
/lib/main.rego
/rules/MY_RULE/main.rego
/policy.wasm
/.manifest
```
You can now [run snyk iac test with your newly built custom bundle.](https://docs.snyk.io/scan-with-snyk/snyk-iac/current-iac-custom-rules/use-iac-custom-rules-with-cli)
---
# Source: https://docs.snyk.io/supported-languages/supported-languages-list/c-c++/c++-for-code-analysis.md
# C/C++ for code analysis
Refer to the [C/C++ details ](https://docs.snyk.io/supported-languages/supported-languages-list/c-c++)for supported frameworks, libraries, and features.
**Import your app through SCM**: Available\
**Test or monitor your app through CLI and IDE**: Available\
**Features**: Reports\
**Operating systems:** Linux, Windows (limited)\
**Embedded systems:** Linux\
**IDE:** No additional options are required. The Snyk plugin has views within the IDE for displaying results.\
**Feature:** Interfile analysis
{% hint style="warning" %}
If you use macros, your results may include false positives and false negatives.
{% endhint %}
---
# Source: https://docs.snyk.io/scan-with-snyk/snyk-code/snyk-code-security-rules/c-and-asp.net-rules.md
# C# and ASP.NET rules
Each rule includes the following information.
* **Rule Name**: The Snyk name of the rule.
* **CWE(s):** The [CWE numbers](https://cwe.mitre.org/) that are covered by this rule.
* **Security Categories**: The [OWASP Top 10 ](https://owasp.org/Top10/)(2021 edition) category to which the rule belongs to, if any, and if it is included in [SANS 25](https://www.sans.org/top25-software-errors/).
* **Autofixable**: Security rules that are autofixable by Snyk Agent Fix. This information is included only for the supported programming languages.
| Rule Name | CWE(s) | Security Categories | Autofixable |
| ----------------------------------------------------------------- | ---------------- | ---------------------- | ----------- |
| Anti-forgery token validation disabled | CWE-352 | Sans Top 25, OWASP:A01 | Yes |
| Debug Features Enabled | CWE-215 | None | Yes |
| Usage of BinaryFormatter | CWE-502 | Sans Top 25, OWASP:A08 | No |
| Cleartext Storage of Sensitive Information in a Cookie | CWE-315 | OWASP:A05 | No |
| Code Injection | CWE-94 | Sans Top 25, OWASP:A03 | No |
| Command Injection | CWE-78 | Sans Top 25, OWASP:A03 | No |
| Deserialization of Untrusted Data | CWE-502 | Sans Top 25, OWASP:A08 | Yes |
| Hardcoded Secret | CWE-547 | OWASP:A05 | No |
| Improper Neutralization of CRLF Sequences in HTTP Headers | CWE-113 | OWASP:A03 | No |
| Use of a Broken or Risky Cryptographic Algorithm | CWE-327 | OWASP:A02 | No |
| Use of Password Hash With Insufficient Computational Effort | CWE-916 | OWASP:A02 | Yes |
| Use of Insufficiently Random Values | CWE-330 | OWASP:A02 | No |
| Insecure Data Transmission | CWE-319 | OWASP:A02 | Yes |
| LDAP Injection | CWE-90 | OWASP:A03 | No |
| Log Forging | CWE-117 | OWASP:A09 | Yes |
| Use of Hardcoded Credentials | CWE-798 | Sans Top 25, OWASP:A07 | Yes |
| Open Redirect | CWE-601 | OWASP:A01 | No |
| Path Traversal | CWE-23 | OWASP:A01 | No |
| Exposure of Private Personal Information to an Unauthorized Actor | CWE-359 | OWASP:A01 | Yes |
| Regular expression injection | CWE-400, CWE-730 | None | No |
| Request Validation Disabled | CWE-554 | None | Yes |
| Information Exposure | CWE-200 | OWASP:A01 | No |
| SQL Injection | CWE-89 | Sans Top 25, OWASP:A03 | No |
| Server-Side Request Forgery (SSRF) | CWE-918 | Sans Top 25, OWASP:A10 | No |
| Inadequate Encryption Strength | CWE-326 | OWASP:A02 | No |
| Sensitive Cookie Without 'HttpOnly' Flag | CWE-1004 | OWASP:A05 | Yes |
| Sensitive Cookie in HTTPS Session Without 'Secure' Attribute | CWE-614 | OWASP:A05 | Yes |
| Cross-site Scripting (XSS) | CWE-79 | Sans Top 25, OWASP:A03 | No |
| XML External Entity (XXE) Injection | CWE-611 | OWASP:A05 | No |
| XAML Injection | CWE-611 | OWASP:A05 | No |
| XML Injection | CWE-91 | OWASP:A03 | No |
| XPath Injection | CWE-643 | OWASP:A03 | No |
| Arbitrary File Write via Archive Extraction (Zip Slip) | CWE-22 | Sans Top 25, OWASP:A01 | No |
---
# Source: https://docs.snyk.io/supported-languages/supported-languages-list/c-c++/c-c++-for-open-source.md
# C/C++ for open source
Refer to the [C/C++ details ](https://docs.snyk.io/supported-languages/supported-languages-list/c-c++)for supported package managers and features.
## Open source dependency management
Snyk features that support the management of open-source dependencies include the following:
Package managers / Features CLI support SCM support License scanning Fix PRs C/C++ ✔︎ ✔︎
For information about managing dependencies and licenses from your developer workflows through policy, see the following
* [Defining a secure open source policy](https://snyk.io/series/open-source-security/open-source-policy/)
* [Use Snyk security policies to prioritize fixes more efficiently](https://snyk.io/blog/snyk-security-policies/)
## Open source license compliance
To check compliance for open source licenses, see [Snyk License Compliance Management.](https://docs.snyk.io/scan-with-snyk/snyk-open-source/scan-open-source-libraries-and-licenses/snyk-license-compliance-management)
## IDE for C++ for open-source dependencies
IDE Under **Additional Parameters** in the IDE settings, enter the `--unmanaged` option to scan for C/C++ open source dependencies. Scan for dependencies">
---
# Source: https://docs.snyk.io/scan-with-snyk/snyk-code/snyk-code-security-rules/c-c++-rules.md
# C/C++ rules
Each rule includes the following information.
* **Rule Name**: The Snyk name of the rule.
* **CWE(s):** The [CWE numbers](https://cwe.mitre.org/) that are covered by this rule.
* **Security Categories**: The [OWASP Top 10 ](https://owasp.org/Top10/)(2021 edition) category to which the rule belongs to, if any, and if it is included in [SANS 25](https://www.sans.org/top25-software-errors/).
* **Autofixable**: Security rules that are autofixable by Snyk Agent Fix. This information is included only for the supported programming languages.
| Rule Name | CWE(s) | Security Categories | Autofixable |
| ------------------------------------------------------------------------ | ---------------- | ---------------------- | ----------- |
| Memory Allocation Of String Length | CWE-170 | None | Yes |
| Insecure Anonymous LDAP Binding | CWE-287 | Sans Top 25, OWASP:A07 | No |
| Buffer Overflow | CWE-122 | None | Yes |
| Division By Zero | CWE-369 | None | No |
| Missing Release of File Descriptor or Handle after Effective Lifetime | CWE-775 | None | Yes |
| Command Injection | CWE-78 | Sans Top 25, OWASP:A03 | No |
| Dereference of a NULL Pointer | CWE-476 | Sans Top 25 | No |
| Double Free | CWE-415 | None | Yes |
| Use of Externally-Controlled Format String | CWE-134 | None | Yes |
| Use of Hardcoded Cryptographic Key | CWE-321 | OWASP:A02 | No |
| Improper Null Termination | CWE-170 | None | No |
| Use of Password Hash With Insufficient Computational Effort | CWE-916 | OWASP:A02 | Yes |
| Integer Overflow | CWE-190 | Sans Top 25 | No |
| LDAP Injection | CWE-90 | OWASP:A03 | No |
| Missing Release of Memory after Effective Lifetime | CWE-401 | None | Yes |
| An optimizing compiler may remove memset non-zero leaving data in memory | CWE-1330 | None | No |
| Potential Negative Number Used as Index | CWE-125, CWE-787 | Sans Top 25 | No |
| Path Traversal | CWE-23 | OWASP:A01 | No |
| Exposure of Private Personal Information to an Unauthorized Actor | CWE-359 | OWASP:A01 | No |
| Size Used as Index | CWE-125, CWE-787 | Sans Top 25 | Yes |
| SQL Injection | CWE-89 | Sans Top 25, OWASP:A03 | No |
| Server-Side Request Forgery (SSRF) | CWE-918 | Sans Top 25, OWASP:A10 | No |
| Inadequate Encryption Strength | CWE-326 | OWASP:A02 | Yes |
| Potential buffer overflow from usage of unsafe function | CWE-122 | None | Yes |
| Use of Expired File Descriptor | CWE-910 | None | No |
| Use After Free | CWE-416 | Sans Top 25 | No |
| User Controlled Pointer | CWE-1285 | None | No |
| Authentication Bypass by Spoofing | CWE-290 | OWASP:A07 | No |
| Cross-site Scripting (XSS) | CWE-79 | Sans Top 25, OWASP:A03 | No |
| XML External Entity (XXE) Injection | CWE-611 | OWASP:A05 | No |
| XPath Injection | CWE-643 | OWASP:A03 | No |
---
# Source: https://docs.snyk.io/supported-languages/supported-languages-list/c-c++.md
# C/C++
## Applicability
C/C++ is supported for Snyk Open Source and Snyk Code.
Specific considerations apply for the [Snyk CLI for open-source C++ scans](https://docs.snyk.io/supported-languages/supported-languages-list/c-c++/snyk-cli-for-open-source-c++-scans). [Guidance for Snyk for C/C++](https://docs.snyk.io/supported-languages/supported-languages-list/c-c++/guidance-for-snyk-for-c-c++) is provided.
The following functions are available for C/C++:
* SCM import - available only for Snyk Code.
* Test or monitor your app through CLI and IDE
* Test your app's SBOM using `pkg:generic` or `pkg:conan`. For more information, see [Test an SBOM document for vulnerabilities](https://docs.snyk.io/snyk-api/using-specific-snyk-apis/sbom-apis/rest-api-endpoint-test-an-sbom-document-for-vulnerabilities).
* Test your app's packages using `pkg:generic` or `pkg:conan`. For more information, see [List issues for a package](https://docs.snyk.io/snyk-api/using-specific-snyk-apis/issues-list-issues-for-a-package).
## Package managers and supported file extensions
For Conan, Snyk supports [conan.io](https://conan.io/center) as a package registry.
No additional options are required for the Snyk IDE. You can display results within the IDE using the Snyk plugin views.
For C/C++ for Snyk Code, Snyk supports the following file formats: `.c`, `.cc`, `.cpp`, `.cxx`, `.h`, `.hpp`, `.hxx`.
## Frameworks and libraries
For C/C++, Snyk supports the following frameworks and libraries:
* argparse parser
* Asio Library
* Boost Library
* Botan LIbrary
* C Standard Library
* C++ Standard Library
* Curl library
* fstream framework
* grpc-cpp library
* HTTPlib framework
* JsonCpp library
* liboai framework
* libpq library
* libpqxx framework
* libsodium library
* LibTomCrypt framework
* libxml2 framework
* MySQL framework
* OpenSSL framework
* POSIX LIbrary
* pugixml library
* SQLite library
* WinHTTP framework
* Xerces libraries
## Features
For C/C++, Snyk supports the following features:
| Snyk Open Source | Snyk Code |
| -------------------------------------------------- | ------------------ |
| | Interfile analysis |
{% hint style="info" %}
The **Snyk FixPR** feature is not available for C/C++. This means that you will not be notified if the PR checks fail when the following conditions are met
* The **PR checks** feature is enabled and configured to **Only fail when the issues found have a fix available.**
* "**Fixed in" available** is set to **Yes.**
{% endhint %}
---
# Source: https://docs.snyk.io/snyk-api/api-end-of-life-eol-process-and-migration-guides/candidates-for-upcoming-api-end-of-life-cadences.md
# Candidates for upcoming API end-of-life cadences
This page contains the list of V1, non-GA REST, and older versions of GA REST endpoints that are potential candidates for future end-of-life cadences. To see which endpoints are end-of-life'd, see [API EOL endpoints and key dates](https://docs.snyk.io/snyk-api/api-end-of-life-eol-process-and-migration-guides/api-eol-endpoints-and-key-dates).
If an endpoint is listed in the table below, it does not guarantee that the endpoint will be included in the next end-of-life cadence. In addition, an endpoint can go straight into the next end-of-life cadence without having to be listed in the table below.
The endpoints in this list, and in any end-of-life cadence, must adhere to our end-of-life criteria, which require that the endpoints have:
* A GA REST equivalent or equivalents (except in the rare case where a V1 API does not have or need a GA REST equivalent)
* Functionality parity between V1 and GA REST (unless explicitly stated otherwise in the migration guide)
* A migration guide by our field specialists for ease of migration
Endpoints that are end-of-life'd do not appear in the list that follows, as the list is for future candidates for end-of-life, and can be found on the [API EOL endpoints and key dates](https://docs.snyk.io/snyk-api/api-end-of-life-eol-process-and-migration-guides/api-eol-endpoints-and-key-dates) page.
| Endpoint | Endpoint Type | Migration Guide | Date Added |
| -------- | ------------- | --------------- | ---------- |
| | | | |
| | | | |
| | | | |
---
# Source: https://docs.snyk.io/snyk-api/changelog.md
# Changelog
### 2025-11-05 - Updated 2026-01-09
#### GET - `/orgs/{org_id}/projects/{project_id}/sbom` - Updated
* added the new optional `query` request parameter `go-module-level`
### 2025-11-05 - Updated 2025-12-04
#### DELETE - `/tenants/{tenant_id}/brokers/connections/{connection_id}/orgs/{org_id}/integrations/{integration_id}` - Updated
* added the non-success response with the status `403`
#### POST - `/tenants/{tenant_id}/brokers/connections/{connection_id}/orgs/{org_id}/integration` - Updated
* added the non-success response with the status `403`
### 2025-11-05
#### GET - `/orgs/{org_id}/packages/{purl}/issues` - Updated
* for the `query` request parameter `limit`, the type/format was changed from `number`/ ``to `integer`/`` 
* for the `query` request parameter `offset`, the type/format was changed from `number`/ ``to `integer`/`` 
* for the `query` request parameter `limit`, the max was set to `1000.00` 
* for the `query` request parameter `limit`, the min was set to `1.00` 
* for the `query` request parameter `offset`, the min was set to `0.00` 
* api operation id `fetchIssuesPerPurl` removed and replaced with `getIssuesPerPurl`
* added the optional property `meta/match` to the response with the `200` status
#### POST - `/orgs/{org_id}/packages/issues` - Updated
* added the optional property `meta/packages` to the response with the `200` status
### 2025-09-28 - Updated 2025-11-13
#### POST - `/orgs/{org_id}/export` - Updated
* added the new optional request property `data/attributes/filters/empty_project_tags`
#### POST - `/groups/{group_id}/export` - Updated
* added the new optional request property `data/attributes/filters/empty_project_tags`
### 2025-09-28 - Updated 2025-11-13
#### GET - `/orgs/{org_id}/issues` - Updated
* added the optional property `data/items/attributes/coordinates/items/created_at` to the response with the `200` status
* added the optional property `data/items/attributes/coordinates/items/last_introduced_at` to the response with the `200` status
* added the optional property `data/items/attributes/coordinates/items/last_resolved_at` to the response with the `200` status
* added the optional property `data/items/attributes/coordinates/items/last_resolved_details` to the response with the `200` status
* added the optional property `data/items/attributes/coordinates/items/state` to the response with the `200` status
* added the optional property `data/items/attributes/coordinates/items/updated_at` to the response with the `200` status
#### GET - `/orgs/{org_id}/issues/{issue_id}` - Updated
* added the optional property `data/attributes/coordinates/items/created_at` to the response with the `200` status
* added the optional property `data/attributes/coordinates/items/last_introduced_at` to the response with the `200` status
* added the optional property `data/attributes/coordinates/items/last_resolved_at` to the response with the `200` status
* added the optional property `data/attributes/coordinates/items/last_resolved_details` to the response with the `200` status
* added the optional property `data/attributes/coordinates/items/state` to the response with the `200` status
* added the optional property `data/attributes/coordinates/items/updated_at` to the response with the `200` status
#### GET - `/groups/{group_id}/issues` - Updated
* added the optional property `data/items/attributes/coordinates/items/created_at` to the response with the `200` status
* added the optional property `data/items/attributes/coordinates/items/last_introduced_at` to the response with the `200` status
* added the optional property `data/items/attributes/coordinates/items/last_resolved_at` to the response with the `200` status
* added the optional property `data/items/attributes/coordinates/items/last_resolved_details` to the response with the `200` status
* added the optional property `data/items/attributes/coordinates/items/state` to the response with the `200` status
* added the optional property `data/items/attributes/coordinates/items/updated_at` to the response with the `200` status
#### GET - `/groups/{group_id}/issues/{issue_id}` - Updated
* added the optional property `data/attributes/coordinates/items/created_at` to the response with the `200` status
* added the optional property `data/attributes/coordinates/items/last_introduced_at` to the response with the `200` status
* added the optional property `data/attributes/coordinates/items/last_resolved_at` to the response with the `200` status
* added the optional property `data/attributes/coordinates/items/last_resolved_details` to the response with the `200` status
* added the optional property `data/attributes/coordinates/items/state` to the response with the `200` status
* added the optional property `data/attributes/coordinates/items/updated_at` to the response with the `200` status
### 2025-09-28 - Updated 2025-10-22
#### POST - `/orgs/{org_id}/export` - Updated
* added the new optional request property `data/attributes/url_expiration_seconds`
#### POST - `/groups/{group_id}/export` - Updated
* added the new optional request property `data/attributes/url_expiration_seconds`
## Changelog
#### 2025-09-28 - Updated 2025-10-14
**GET - `/orgs/{org_id}/issues` - Updated**
* the `data/items/attributes/coordinates/items/representations/items/oneOf[subschema #3]/cloud_resource/resource/name` response property`s maxLength was unset from` 256`for the response status`200\` 
**GET - `/orgs/{org_id}/issues/{issue_id}` - Updated**
* the `data/attributes/coordinates/items/representations/items/oneOf[subschema #3]/cloud_resource/resource/name` response property`s maxLength was unset from` 256`for the response status`200\` 
**GET - `/groups/{group_id}/issues` - Updated**
* the `data/items/attributes/coordinates/items/representations/items/oneOf[subschema #3]/cloud_resource/resource/name` response property`s maxLength was unset from` 256`for the response status`200\` 
**GET - `/groups/{group_id}/issues/{issue_id}` - Updated**
* the `data/attributes/coordinates/items/representations/items/oneOf[subschema #3]/cloud_resource/resource/name` response property`s maxLength was unset from` 256`for the response status`200\` 
#### 2025-09-28
**POST - `/orgs/{org_id}/policies` - Updated**
* added the new optional request property `data/attributes/source`
#### 2024-10-15 - Updated 2025-09-29
**POST - `/orgs/{org_id}/export` - Updated**
* added the new optional request property `data/attributes/filters/product_name`
* added the new optional request property `data/attributes/filters/project_tags`
* added the new optional request property `data/attributes/filters/project_type`
**POST - `/groups/{group_id}/export` - Updated**
* added the new optional request property `data/attributes/filters/product_name`
* added the new optional request property `data/attributes/filters/project_tags`
* added the new optional request property `data/attributes/filters/project_type`
### Changelog
**2024-10-15 - Updated 2025-09-08**
**POST - `/orgs/{org_id}/policies` - Updated**
* removed the `cancelled` enum value from the `data/attributes/review` response property for the response status `201`
**GET - `/orgs/{org_id}/policies` - Updated**
* removed the `cancelled` enum value from the `data/items/attributes/review` response property for the response status `200`
**PATCH - `/orgs/{org_id}/policies/{policy_id}` - Updated**
* removed the enum value `cancelled` of the request property `data/attributes/review` 
* removed the `cancelled` enum value from the `data/attributes/review` response property for the response status `200`
**GET - `/orgs/{org_id}/policies/{policy_id}` - Updated**
* removed the `cancelled` enum value from the `data/attributes/review` response property for the response status `200`
**2024-10-15 - Updated 2025-08-15**
**GET - `/orgs/{org_id}/policies` - Updated**
* added the new enum value `ignore-type` to the `query` request parameter `order_by`
* added the new enum value `requested-by` to the `query` request parameter `order_by`
**2024-10-15 - Updated 2025-08-14**
**PATCH - `/orgs/{org_id}/policies/{policy_id}` - Updated**
* added the new `cancelled` enum value to the request property `data/attributes/review`
**2024-10-15 - Updated 2025-08-06**
**POST - `/orgs/{org_id}/export` - Updated**
* removed the request property `data/attributes/destination` 
**POST - `/groups/{group_id}/export` - Updated**
* removed the request property `data/attributes/destination` 
**2024-10-15 - Updated 2025-07-07**
**POST - `/orgs/{org_id}/service_accounts` - Updated**
* added the new `access_token` enum value to the `data/attributes/auth_type` response property for the response status `201` 
* added the new optional request property `data/attributes/access_token_expires_at`
* added the new `access_token` enum value to the request property `data/attributes/auth_type`
* added the optional property `data/attributes/access_token` to the response with the `201` status
* added the optional property `data/attributes/access_token_expires_at` to the response with the `201` status
* added the optional property `data/attributes/created_at` to the response with the `201` status
**GET - `/orgs/{org_id}/service_accounts` - Updated**
* added the new `access_token` enum value to the `data/items/attributes/auth_type` response property for the response status `200` 
* added the optional property `data/items/attributes/access_token` to the response with the `200` status
* added the optional property `data/items/attributes/access_token_expires_at` to the response with the `200` status
* added the optional property `data/items/attributes/created_at` to the response with the `200` status
**PATCH - `/orgs/{org_id}/service_accounts/{serviceaccount_id}` - Updated**
* added the new `access_token` enum value to the `data/attributes/auth_type` response property for the response status `200` 
* added the optional property `data/attributes/access_token` to the response with the `200` status
* added the optional property `data/attributes/access_token_expires_at` to the response with the `200` status
* added the optional property `data/attributes/created_at` to the response with the `200` status
**GET - `/orgs/{org_id}/service_accounts/{serviceaccount_id}` - Updated**
* added the new `access_token` enum value to the `data/attributes/auth_type` response property for the response status `200` 
* added the optional property `data/attributes/access_token` to the response with the `200` status
* added the optional property `data/attributes/access_token_expires_at` to the response with the `200` status
* added the optional property `data/attributes/created_at` to the response with the `200` status
**POST - `/orgs/{org_id}/service_accounts/{serviceaccount_id}/secrets` - Updated**
* added the new `access_token` enum value to the `data/attributes/auth_type` response property for the response status `200` 
* added the optional property `data/attributes/access_token` to the response with the `200` status
* added the optional property `data/attributes/access_token_expires_at` to the response with the `200` status
* added the optional property `data/attributes/created_at` to the response with the `200` status
**GET - `/orgs/{org_id}/packages/{purl}/issues` - Updated**
* added `#/components/schemas/ResourcePathRepresentation, #/components/schemas/PackageRepresentation` to the `data/items/attributes/coordinates/items/representations/items/` response property `anyOf` list for the response status `200`
**POST - `/orgs/{org_id}/packages/issues` - Updated**
* added `#/components/schemas/ResourcePathRepresentation, #/components/schemas/PackageRepresentation` to the `data/items/attributes/coordinates/items/representations/items/` response property `anyOf` list for the response status `200`
**POST - `/groups/{group_id}/service_accounts` - Updated**
* added the new `access_token` enum value to the `data/attributes/auth_type` response property for the response status `201` 
* added the new optional request property `data/attributes/access_token_expires_at`
* added the new `access_token` enum value to the request property `data/attributes/auth_type`
* added the optional property `data/attributes/access_token` to the response with the `201` status
* added the optional property `data/attributes/access_token_expires_at` to the response with the `201` status
* added the optional property `data/attributes/created_at` to the response with the `201` status
**GET - `/groups/{group_id}/service_accounts` - Updated**
* added the new `access_token` enum value to the `data/items/attributes/auth_type` response property for the response status `200` 
* added the optional property `data/items/attributes/access_token` to the response with the `200` status
* added the optional property `data/items/attributes/access_token_expires_at` to the response with the `200` status
* added the optional property `data/items/attributes/created_at` to the response with the `200` status
* added the optional property `meta` to the response with the `200` status
**PATCH - `/groups/{group_id}/service_accounts/{serviceaccount_id}` - Updated**
* added the new `access_token` enum value to the `data/attributes/auth_type` response property for the response status `200` 
* added the optional property `data/attributes/access_token` to the response with the `200` status
* added the optional property `data/attributes/access_token_expires_at` to the response with the `200` status
* added the optional property `data/attributes/created_at` to the response with the `200` status
**GET - `/groups/{group_id}/service_accounts/{serviceaccount_id}` - Updated**
* added the new `access_token` enum value to the `data/attributes/auth_type` response property for the response status `200` 
* added the optional property `data/attributes/access_token` to the response with the `200` status
* added the optional property `data/attributes/access_token_expires_at` to the response with the `200` status
* added the optional property `data/attributes/created_at` to the response with the `200` status
**POST - `/groups/{group_id}/service_accounts/{serviceaccount_id}/secrets` - Updated**
* added the new `access_token` enum value to the `data/attributes/auth_type` response property for the response status `200` 
* added the optional property `data/attributes/access_token` to the response with the `200` status
* added the optional property `data/attributes/access_token_expires_at` to the response with the `200` status
* added the optional property `data/attributes/created_at` to the response with the `200` status
#### Changelog
**2024-10-15 - Updated 2025-06-12**
**GET - `/tenants` - Added**
* Get a list of all Tenants which the calling user is a member of
**PATCH - `/tenants/{tenant_id}` - Added**
* Update the details of a tenant
**Required permissions**
* `Edit Tenant Details (tenant.edit)`
**GET - `/tenants/{tenant_id}` - Added**
* Get the full details of a Tenant.
**Required permissions**
* `View Tenant Details (tenant.read)`
**POST - `/tenants/{tenant_id}/brokers/installs/{install_id}/deployments/{deployment_id}/connections/{connection_id}/bulk_migration` - Added**
* Performs bulk migration for integrations from legacy to universal broker
**Required permissions**
* `View Tenant Details (tenant.read)`
**GET - `/tenants/{tenant_id}/brokers/installs/{install_id}/deployments/{deployment_id}/connections/{connection_id}/bulk_migration` - Added**
* Lists organization IDs associated with a connection type to be bulk migrated to universal broker
**Required permissions**
* `View Tenant Details (tenant.read)`
**GET - `/orgs/{org_id}` - Updated**
* added the new optional `query` request parameter `expand`
* added the optional property `data/relationships` to the response with the `200` status
**GET - `/orgs/{org_id}/projects` - Updated**
* added the optional property `data/items/attributes/settings/auto_dependency_upgrade/is_inherited` to the response with the `200` status
**PATCH - `/orgs/{org_id}/projects/{project_id}` - Updated**
* added the optional property `data/attributes/settings/auto_dependency_upgrade/is_inherited` to the response with the `200` status
**GET - `/orgs/{org_id}/projects/{project_id}` - Updated**
* added the optional property `data/attributes/settings/auto_dependency_upgrade/is_inherited` to the response with the `200` status
**GET - `/orgs/{org_id}/packages/{purl}/issues` - Updated**
* removed `#/components/schemas/ResourcePathRepresentation, #/components/schemas/PackageRepresentation` from the `data/items/attributes/coordinates/items/representations/items/` response property `anyOf` list for the response status `200`
**POST - `/orgs/{org_id}/packages/issues` - Updated**
* removed `#/components/schemas/ResourcePathRepresentation, #/components/schemas/PackageRepresentation` from the `data/items/attributes/coordinates/items/representations/items/` response property `anyOf` list for the response status `200`
**2024-10-15 - Updated 2025-06-04**
**GET - `/groups/{group_id}/assets/{asset_id}` - Added**
* Get an Asset by its ID
**Required permissions**
* `View Groups (group.read)`
**GET - `/groups/{group_id}/assets/{asset_id}/relationships/projects` - Added**
* List asset projects with pagination
**Required permissions**
* `View Groups (group.read)`
**GET - `/groups/{group_id}/assets/{asset_id}/relationships/assets` - Added**
* List related assets with pagination
**Required permissions**
* `View Groups (group.read)`
**POST - `/groups/{group_id}/assets/search` - Added**
* List Assets with filters
**Required permissions**
* `View Groups (group.read)`
**2024-10-15 - Updated 2025-05-27**
**GET - `/orgs/{org_id}` - Updated**
* the response property `data` became optional for the status `200`
* the response property `jsonapi` became optional for the status `200`
* the response property `links` became optional for the status `200`
* removed the optional property `links/first` from the response with the `200` status
* removed the optional property `links/last` from the response with the `200` status
* removed the optional property `links/next` from the response with the `200` status
* removed the optional property `links/prev` from the response with the `200` status
* removed the optional property `links/related` from the response with the `200` status
* added the non-success response with the status `409`
* added the optional property `data/attributes/created_at` to the response with the `200` status
* added the optional property `data/attributes/updated_at` to the response with the `200` status
* the response property `data/attributes` became required for the status `200`
* the `data/type` response`s property pattern` ^\[a-z]\[a-z0-9]*(\_\[a-z]\[a-z0-9]*)\*$`was added for the status`200\`
**2024-10-15 - Updated 2025-05-20**
**GET - `/orgs/{org_id}/projects` - Updated**
* added the optional property `data/items/attributes/settings/pull_requests/is_enabled` to the response with the `200` status
**PATCH - `/orgs/{org_id}/projects/{project_id}` - Updated**
* added the optional property `data/attributes/settings/pull_requests/is_enabled` to the response with the `200` status
**GET - `/orgs/{org_id}/projects/{project_id}` - Updated**
* added the optional property `data/attributes/settings/pull_requests/is_enabled` to the response with the `200` status
**2024-10-15 - Updated 2025-05-15**
**GET - `/orgs/{org_id}/policies` - Updated**
* added the new optional `query` request parameter `order_by`
* added the new optional `query` request parameter `order_direction`
**2024-10-15 - Updated 2025-05-08**
**GET - `/orgs/{org_id}/packages/{purl}/issues` - Updated**
* added `#/components/schemas/ResourcePathRepresentation, #/components/schemas/PackageRepresentation` to the `data/items/attributes/coordinates/items/representations/items/` response property `anyOf` list for the response status `200`
**POST - `/orgs/{org_id}/packages/issues` - Updated**
* added `#/components/schemas/ResourcePathRepresentation, #/components/schemas/PackageRepresentation` to the `data/items/attributes/coordinates/items/representations/items/` response property `anyOf` list for the response status `200`
**2024-10-15 - Updated 2025-04-28**
**GET - `/orgs/{org_id}/packages/{purl}/issues` - Updated**
* removed `#/components/schemas/ResourcePathRepresentation, #/components/schemas/PackageRepresentation` from the `data/items/attributes/coordinates/items/representations/items/` response property `anyOf` list for the response status `200`
**POST - `/orgs/{org_id}/packages/issues` - Updated**
* removed `#/components/schemas/ResourcePathRepresentation, #/components/schemas/PackageRepresentation` from the `data/items/attributes/coordinates/items/representations/items/` response property `anyOf` list for the response status `200`
**GET - `/orgs/{org_id}/issues` - Updated**
* added the optional property `data/items/attributes/coordinates/items/representations/items/oneOf[subschema #4]/sourceLocation/commit_id` to the response with the `200` status
* added the optional property `data/items/attributes/key_asset` to the response with the `200` status
**GET - `/orgs/{org_id}/issues/{issue_id}` - Updated**
* added the optional property `data/attributes/coordinates/items/representations/items/oneOf[subschema #4]/sourceLocation/commit_id` to the response with the `200` status
* added the optional property `data/attributes/key_asset` to the response with the `200` status
**GET - `/groups/{group_id}/issues` - Updated**
* added the optional property `data/items/attributes/coordinates/items/representations/items/oneOf[subschema #4]/sourceLocation/commit_id` to the response with the `200` status
* added the optional property `data/items/attributes/key_asset` to the response with the `200` status
**GET - `/groups/{group_id}/issues/{issue_id}` - Updated**
* added the optional property `data/attributes/coordinates/items/representations/items/oneOf[subschema #4]/sourceLocation/commit_id` to the response with the `200` status
* added the optional property `data/attributes/key_asset` to the response with the `200` status
**2024-10-15 - Updated 2025-04-25**
**POST - `/tenants/{tenant_id}/brokers/installs/{install_id}/deployments` - Added**
* Creates a new Broker Deployment for an installation
**GET - `/tenants/{tenant_id}/brokers/installs/{install_id}/deployments` - Added**
* List Broker deployments for a given install ID
**PATCH - `/tenants/{tenant_id}/brokers/installs/{install_id}/deployments/{deployment_id}` - Added**
* Updates a Broker deployment for a given install ID
**DELETE - `/tenants/{tenant_id}/brokers/installs/{install_id}/deployments/{deployment_id}` - Added**
* Delete a Broker deployment for a given install ID
**POST - `/tenants/{tenant_id}/brokers/installs/{install_id}/deployments/{deployment_id}/credentials` - Added**
* Creates a new Deployment credential
**GET - `/tenants/{tenant_id}/brokers/installs/{install_id}/deployments/{deployment_id}/credentials` - Added**
* List Deployment credentials for a given deployment ID
**PATCH - `/tenants/{tenant_id}/brokers/installs/{install_id}/deployments/{deployment_id}/credentials/{credential_id}` - Added**
* Updates a Deployment credential for an deployment
**GET - `/tenants/{tenant_id}/brokers/installs/{install_id}/deployments/{deployment_id}/credentials/{credential_id}` - Added**
* Get all Deployment credential data for an deployment
**DELETE - `/tenants/{tenant_id}/brokers/installs/{install_id}/deployments/{deployment_id}/credentials/{credential_id}` - Added**
* Deletes an existing Deployment credential for an deployment
**POST - `/tenants/{tenant_id}/brokers/installs/{install_id}/deployments/{deployment_id}/contexts` - Added**
* Creates a new Broker Context
**GET - `/tenants/{tenant_id}/brokers/installs/{install_id}/deployments/{deployment_id}/contexts` - Added**
* List Deployment contexts for a given deployment ID
**POST - `/tenants/{tenant_id}/brokers/installs/{install_id}/deployments/{deployment_id}/connections` - Added**
* Creates a new Broker connection for an deployment
**GET - `/tenants/{tenant_id}/brokers/installs/{install_id}/deployments/{deployment_id}/connections` - Added**
* List all Broker connections for a given deployment
**DELETE - `/tenants/{tenant_id}/brokers/installs/{install_id}/deployments/{deployment_id}/connections` - Added**
* Deletes all existing Broker connections for an deployment
**PATCH - `/tenants/{tenant_id}/brokers/installs/{install_id}/deployments/{deployment_id}/connections/{connection_id}` - Added**
* Updates a Broker connection for an deployment
**GET - `/tenants/{tenant_id}/brokers/installs/{install_id}/deployments/{deployment_id}/connections/{connection_id}` - Added**
* Get all Broker connection data for an deployment
**DELETE - `/tenants/{tenant_id}/brokers/installs/{install_id}/deployments/{deployment_id}/connections/{connection_id}` - Added**
* Deletes an existing Broker connection for an deployment
**PATCH - `/tenants/{tenant_id}/brokers/installs/{install_id}/contexts/{context_id}` - Added**
* Updates a Broker Context for an deployment
**GET - `/tenants/{tenant_id}/brokers/installs/{install_id}/contexts/{context_id}` - Added**
* List Broker context for a given broker context ID
**DELETE - `/tenants/{tenant_id}/brokers/installs/{install_id}/contexts/{context_id}` - Added**
* Deletes an existing broker context
**DELETE - `/tenants/{tenant_id}/brokers/installs/{install_id}/contexts/{context_id}/integrations/{integration_id}` - Added**
* Deletes an existing Broker context association for an integration
**PATCH - `/tenants/{tenant_id}/brokers/installs/{install_id}/contexts/{context_id}/integration` - Added**
* Updates an integration to be associated with a Broker context
**GET - `/tenants/{tenant_id}/brokers/installs/{install_id}/connections/{connection_id}/contexts` - Added**
* List Broker contexts for a given broker connection ID
**GET - `/tenants/{tenant_id}/brokers/deployments` - Added**
* List Broker deployments for the tenant
**DELETE - `/tenants/{tenant_id}/brokers/connections/{connection_id}/orgs/{org_id}/integrations/{integration_id}` - Added**
* Deletes an existing Broker connection for an deployment
**POST - `/tenants/{tenant_id}/brokers/connections/{connection_id}/orgs/{org_id}/integration` - Added**
* Configures integrations to use the Broker connection for an deployment
**GET - `/tenants/{tenant_id}/brokers/connections/{connection_id}/integrations` - Added**
* Get all integrations using the Broker connection
**POST - `/orgs/{org_id}/policies` - Updated**
* the `data/attributes/action/data/reason` request property`s maxLength was set to` 10000\`
* the `data/attributes/name` request property`s maxLength was set to` 255\`
**PATCH - `/orgs/{org_id}/policies/{policy_id}` - Updated**
* the `data/attributes/action/data/reason` request property`s maxLength was set to` 10000\`
* the `data/attributes/name` request property`s maxLength was set to` 255\`
**GET - `/orgs/{org_id}/brokers/connections` - Added**
* List all Broker connections integrated with a given org
**2024-10-15 - Updated 2025-04-22**
**GET - `/orgs/{org_id}/policies` - Updated**
* added the new optional `query` request parameter `search`
**2024-10-15 - Updated 2025-04-02**
**POST - `/orgs/{org_id}/policies` - Updated**
* added the new optional request property `data/meta`
**2024-10-15 - Updated 2025-04-01**
**POST - `/orgs/{org_id}/memberships` - Updated**
* the request property `data` became required
* the request property `data/relationships` became required
* the request property `data/relationships/org/data` became required
* the request property `data/relationships/org/data/id` became required
* the request property `data/relationships/org/data/type` became required
* the request property `data/relationships/role/data` became required
* the request property `data/relationships/role/data/id` became required
* the request property `data/relationships/role/data/type` became required
* the request property `data/relationships/user/data` became required
* the request property `data/relationships/user/data/id` became required
* the request property `data/relationships/user/data/type` became required
* the request property `data/type` became required
**2024-10-15 - Updated 2025-03-19**
**PATCH - `/orgs/{org_id}/memberships/{membership_id}` - Updated**
* the request property `data` became required
**Changelog**
**2024-10-15 - Updated 2025-03-04**
**GET - `/orgs/{org_id}/packages/{purl}/issues` - Updated**
* added `#/components/schemas/ResourcePathRepresentation, #/components/schemas/PackageRepresentation` to the `data/items/attributes/coordinates/items/representations/items/` response property `anyOf` list for the response status `200`
**POST - `/orgs/{org_id}/packages/issues` - Updated**
* added `#/components/schemas/ResourcePathRepresentation, #/components/schemas/PackageRepresentation` to the `data/items/attributes/coordinates/items/representations/items/` response property `anyOf` list for the response status `200`
**2024-10-15 - Updated 2025-02-11**
**GET - `/orgs/{org_id}/packages/{purl}/issues` - Updated**
* removed `#/components/schemas/ResourcePathRepresentation, #/components/schemas/PackageRepresentation` from the `data/items/attributes/coordinates/items/representations/items/` response property `anyOf` list for the response status `200`
**POST - `/orgs/{org_id}/packages/issues` - Updated**
* removed `#/components/schemas/ResourcePathRepresentation, #/components/schemas/PackageRepresentation` from the `data/items/attributes/coordinates/items/representations/items/` response property `anyOf` list for the response status `200`
**2024-10-15 - Updated 2025-02-04**
**POST - `/orgs/{org_id}/policies` - Added**
* Create a new org-level policy.
*Org level Policy APIs Access Notice:* Access to our Org level Policy APIs is currently restricted via "snykCodeConsistentIgnores" feature flag and will result in a 403 Forbidden error without the flag enabled. Please contact your account representative for eligibility requirements.
**GET - `/orgs/{org_id}/policies` - Added**
* Get all policies for the requested organisation.
*Org level Policy APIs Access Notice:* Access to our Org level Policy APIs is currently restricted via "snykCodeConsistentIgnores" feature flag and will result in a 403 Forbidden error without the flag enabled. Please contact your account representative for eligibility requirements.
**PATCH - `/orgs/{org_id}/policies/{policy_id}` - Added**
* Update the org-level policy.
*Org level Policy APIs Access Notice:* Access to our Org level Policy APIs is currently restricted via "snykCodeConsistentIgnores" feature flag and will result in a 403 Forbidden error without the flag enabled. Please contact your account representative for eligibility requirements.
**GET - `/orgs/{org_id}/policies/{policy_id}` - Added**
* Get a specific org-level policy based on its ID.
*Org level Policy APIs Access Notice:* Access to our Org level Policy APIs is currently restricted via "snykCodeConsistentIgnores" feature flag and will result in a 403 Forbidden error without the flag enabled. Please contact your account representative for eligibility requirements.
**DELETE - `/orgs/{org_id}/policies/{policy_id}` - Added**
* Delete an existing org-level policy.
*Org level Policy APIs Access Notice:* Access to our Org level Policy APIs is currently restricted via "snykCodeConsistentIgnores" feature flag and will result in a 403 Forbidden error without the flag enabled. Please contact your account representative for eligibility requirements.
**2024-10-15 - Updated 2025-01-22**
**GET - `/orgs/{org_id}/packages/{purl}/issues` - Updated**
* added `#/components/schemas/ResourcePathRepresentation, #/components/schemas/PackageRepresentation` to the `data/items/attributes/coordinates/items/representations/items/` response property `anyOf` list for the response status `200`
**POST - `/orgs/{org_id}/packages/issues` - Updated**
* added `#/components/schemas/ResourcePathRepresentation, #/components/schemas/PackageRepresentation` to the `data/items/attributes/coordinates/items/representations/items/` response property `anyOf` list for the response status `200`
**2024-10-15 - Updated 2025-01-13**
**GET - `/orgs/{org_id}/issues` - Updated**
* added the optional property `data/items/attributes/exploit_details` to the response with the `200` status
* added the optional property `data/items/attributes/severities` to the response with the `200` status
**GET - `/orgs/{org_id}/issues/{issue_id}` - Updated**
* added the optional property `data/attributes/exploit_details` to the response with the `200` status
* added the optional property `data/attributes/severities` to the response with the `200` status
**GET - `/groups/{group_id}/issues` - Updated**
* added the optional property `data/items/attributes/exploit_details` to the response with the `200` status
* added the optional property `data/items/attributes/severities` to the response with the `200` status
**GET - `/groups/{group_id}/issues/{issue_id}` - Updated**
* added the optional property `data/attributes/exploit_details` to the response with the `200` status
* added the optional property `data/attributes/severities` to the response with the `200` status
**2024-10-15 - Updated 2025-01-07**
**GET - `/orgs/{org_id}/issues` - Updated**
* added `loaded_package` discriminator mapping keys to the `data/items/attributes/risk/factors/items/` response property for the response status `200`
* added `#/components/schemas/LoadedPackageRiskFactor` to the `data/items/attributes/risk/factors/items/` response property `oneOf` list for the response status `200`
**GET - `/orgs/{org_id}/issues/{issue_id}` - Updated**
* added `loaded_package` discriminator mapping keys to the `data/attributes/risk/factors/items/` response property for the response status `200`
* added `#/components/schemas/LoadedPackageRiskFactor` to the `data/attributes/risk/factors/items/` response property `oneOf` list for the response status `200`
**GET - `/groups/{group_id}/issues` - Updated**
* added `loaded_package` discriminator mapping keys to the `data/items/attributes/risk/factors/items/` response property for the response status `200`
* added `#/components/schemas/LoadedPackageRiskFactor` to the `data/items/attributes/risk/factors/items/` response property `oneOf` list for the response status `200`
**GET - `/groups/{group_id}/issues/{issue_id}` - Updated**
* added `loaded_package` discriminator mapping keys to the `data/attributes/risk/factors/items/` response property for the response status `200`
* added `#/components/schemas/LoadedPackageRiskFactor` to the `data/attributes/risk/factors/items/` response property `oneOf` list for the response status `200`
**2024-10-15 - Updated 2024-12-09**
**GET - `/orgs/{org_id}` - Updated**
* the response property `data` became optional for the status `200` 
* the response property `jsonapi` became optional for the status `200` 
* the response property `links` became optional for the status `200` 
* removed the optional property `links/first` from the response with the `200` status 
* removed the optional property `links/last` from the response with the `200` status 
* removed the optional property `links/next` from the response with the `200` status 
* removed the optional property `links/prev` from the response with the `200` status 
* removed the optional property `links/related` from the response with the `200` status 
* added the non-success response with the status `409`
* added the optional property `data/attributes/created_at` to the response with the `200` status
* added the optional property `data/attributes/updated_at` to the response with the `200` status
* the response property `data/attributes` became required for the status `200`
* the `data/type` response`s property pattern` ^\[a-z]\[a-z0-9]*(\_\[a-z]\[a-z0-9]*)\*$`was added for the status`200\`
**2024-10-15 - Updated 2024-11-28**
**GET - `/orgs/{org_id}/projects/{project_id}/sbom` - Updated**
* added the new optional `query` request parameter `exclude`
**2024-10-15 - Updated 2024-11-06**
**GET - `/orgs/{org_id}/packages/{purl}/issues` - Updated**
* removed `#/components/schemas/ResourcePathRepresentation, #/components/schemas/PackageRepresentation` from the `data/items/attributes/coordinates/items/representations/items/` response property `anyOf` list for the response status `200`
**POST - `/orgs/{org_id}/packages/issues` - Updated**
* removed `#/components/schemas/ResourcePathRepresentation, #/components/schemas/PackageRepresentation` from the `data/items/attributes/coordinates/items/representations/items/` response property `anyOf` list for the response status `200`
**2024-10-15 - Updated 2024-10-31**
**GET - `/orgs/{org_id}/packages/{purl}/issues` - Updated**
* added `#/components/schemas/ResourcePathRepresentation, #/components/schemas/PackageRepresentation` to the `data/items/attributes/coordinates/items/representations/items/` response property `anyOf` list for the response status `200`
**POST - `/orgs/{org_id}/packages/issues` - Updated**
* added `#/components/schemas/ResourcePathRepresentation, #/components/schemas/PackageRepresentation` to the `data/items/attributes/coordinates/items/representations/items/` response property `anyOf` list for the response status `200`
**2024-10-15 - Updated 2024-10-30**
**GET - `/orgs/{org_id}/issues` - Updated**
* added the new `function` enum value to the `data/items/attributes/coordinates/items/reachability` response property for the response status `200` 
* added the new `no-info` enum value to the `data/items/attributes/coordinates/items/reachability` response property for the response status `200` 
* added the new `not-applicable` enum value to the `data/items/attributes/coordinates/items/reachability` response property for the response status `200` 
* added the new `package` enum value to the `data/items/attributes/coordinates/items/reachability` response property for the response status `200` 
**GET - `/orgs/{org_id}/issues/{issue_id}` - Updated**
* added the new `function` enum value to the `data/attributes/coordinates/items/reachability` response property for the response status `200` 
* added the new `no-info` enum value to the `data/attributes/coordinates/items/reachability` response property for the response status `200` 
* added the new `not-applicable` enum value to the `data/attributes/coordinates/items/reachability` response property for the response status `200` 
* added the new `package` enum value to the `data/attributes/coordinates/items/reachability` response property for the response status `200` 
**GET - `/groups/{group_id}/issues` - Updated**
* added the new `function` enum value to the `data/items/attributes/coordinates/items/reachability` response property for the response status `200` 
* added the new `no-info` enum value to the `data/items/attributes/coordinates/items/reachability` response property for the response status `200` 
* added the new `not-applicable` enum value to the `data/items/attributes/coordinates/items/reachability` response property for the response status `200` 
* added the new `package` enum value to the `data/items/attributes/coordinates/items/reachability` response property for the response status `200` 
**GET - `/groups/{group_id}/issues/{issue_id}` - Updated**
* added the new `function` enum value to the `data/attributes/coordinates/items/reachability` response property for the response status `200` 
* added the new `no-info` enum value to the `data/attributes/coordinates/items/reachability` response property for the response status `200` 
* added the new `not-applicable` enum value to the `data/attributes/coordinates/items/reachability` response property for the response status `200` 
* added the new `package` enum value to the `data/attributes/coordinates/items/reachability` response property for the response status `200` 
**2024-10-15**
**Simplified API Versioning**
Going forward, Snyk will expose one API specification per version-date, rather than one for each stability. New versions of the Snyk API will only be published when necessitated by breaking changes. For newer versions, you should only specify the date for beta versions, i.e `2024-10-15` rather than `2024-10-15~beta`. It's important to note that existing versions won't be affected by these changes; this new approach only applies to upcoming new versions.
**2024-08-25 - Updated 2024-10-10**
**GET - `/self` - Updated**
* added `#/components/schemas/User20240422, #/components/schemas/ServiceAccount20240422` to the `data/attributes` response property `anyOf` list for the response status `200`
* removed `#/components/schemas/ServiceAccount` from the `data/attributes` response property `anyOf` list for the response status `200`
**GET - `/orgs/{org_id}/projects` - Updated**
* added `#/components/schemas/ProjectRelationshipsTarget20230215` to the `data/items/relationships/target` response property `oneOf` list for the response status `200`
* removed `#/components/schemas/ProjectRelationshipsTarget` from the `data/items/relationships/target` response property `oneOf` list for the response status `200`
**PATCH - `/orgs/{org_id}/projects/{project_id}` - Updated**
* added `#/components/schemas/ProjectRelationshipsTarget20230215` to the `data/relationships/target` response property `oneOf` list for the response status `200`
* removed `#/components/schemas/ProjectRelationshipsTarget` from the `data/relationships/target` response property `oneOf` list for the response status `200`
**GET - `/orgs/{org_id}/projects/{project_id}` - Updated**
* added `#/components/schemas/ProjectRelationshipsTarget20230215` to the `data/relationships/target` response property `oneOf` list for the response status `200`
* removed `#/components/schemas/ProjectRelationshipsTarget` from the `data/relationships/target` response property `oneOf` list for the response status `200`
**GET - `/orgs/{org_id}/packages/{purl}/issues` - Updated**
* removed the optional property `data/items/attributes/coordinates/items/representation` from the response with the `200` status 
* removed the optional property `data/items/attributes/key` from the response with the `200` status 
* removed the optional property `data/items/attributes/slots/exploit` from the response with the `200` status 
* added the optional property `data/items/attributes/severities/items/type` to the response with the `200` status
* added the optional property `data/items/attributes/severities/items/version` to the response with the `200` status
* added the optional property `data/items/attributes/slots/exploit_details` to the response with the `200` status
* added the required property `data/items/attributes/coordinates/items/representations` to the response with the `200` status
**POST - `/orgs/{org_id}/packages/issues` - Updated**
* removed the optional property `data/items/attributes/slots/exploit` from the response with the `200` status 
* added the optional property `data/items/attributes/severities/items/type` to the response with the `200` status
* added the optional property `data/items/attributes/severities/items/version` to the response with the `200` status
* added the optional property `data/items/attributes/slots/exploit_details` to the response with the `200` status
**GET - `/orgs/{org_id}/invites` - Updated**
* the `data/items/attributes/role` response`s property type/format changed from` string`/`uuid`to`string`/`` for status` 200\` 
* removed the `org_invitation` enum value from the `data/items/type` response property for the response status `200`
**2024-08-25 - Updated 2024-09-11**
**POST - `/orgs/{org_id}/apps` - Updated**
* added the new required request property `name` 
* added the new required request property `redirect_uris` 
* added the new required request property `scopes` 
* removed the request property `data` 
* added the new optional request property `access_token_ttl_seconds`
* added the new optional request property `context`
**GET - `/orgs/{org_id}/apps` - Updated**
* the `data/items/attributes/redirect_uris` response property`s minItems was decreased from` 1`to`0`for the response status`200\` 
* the response property `data/items/attributes/client_id` became required for the status `200`
* the response property `data/items/attributes/redirect_uris` became required for the status `200`
**PATCH - `/orgs/{org_id}/apps/{client_id}` - Updated**
* the `data/attributes/redirect_uris` response property`s minItems was decreased from` 1`to`0`for the response status`200\` 
* removed the request property `data` 
* added the new optional request property `access_token_ttl_seconds`
* added the new optional request property `name`
* added the new optional request property `redirect_uris`
* the response property `data/attributes/client_id` became required for the status `200`
* the response property `data/attributes/redirect_uris` became required for the status `200`
**GET - `/orgs/{org_id}/apps/{client_id}` - Updated**
* the `data/attributes/redirect_uris` response property`s minItems was decreased from` 1`to`0`for the response status`200\` 
* the response property `data/attributes/client_id` became required for the status `200`
* the response property `data/attributes/redirect_uris` became required for the status `200`
**2024-08-25 - Updated 2024-09-03**
**POST - `/groups/{group_id}/memberships` - Updated**
* the response property `data/relationships/group` became required for the status `201`
* the response property `data/relationships/group/data/attributes` became required for the status `201`
* the response property `data/relationships/group/data/attributes/name` became required for the status `201`
* the response property `data/relationships/group/data/id` became required for the status `201`
* the response property `data/relationships/role` became required for the status `201`
* the response property `data/relationships/role/data/attributes` became required for the status `201`
* the response property `data/relationships/role/data/attributes/name` became required for the status `201`
* the response property `data/relationships/role/data/id` became required for the status `201`
* the response property `data/relationships/user` became required for the status `201`
* the response property `data/relationships/user/data/attributes` became required for the status `201`
* the response property `data/relationships/user/data/attributes/email` became required for the status `201`
* the response property `data/relationships/user/data/attributes/name` became required for the status `201`
* the response property `data/relationships/user/data/attributes/username` became required for the status `201`
* the response property `data/relationships/user/data/id` became required for the status `201`
**GET - `/groups/{group_id}/memberships` - Updated**
* the response property `data/items/relationships/group` became required for the status `200`
* the response property `data/items/relationships/group/data/attributes` became required for the status `200`
* the response property `data/items/relationships/group/data/attributes/name` became required for the status `200`
* the response property `data/items/relationships/group/data/id` became required for the status `200`
* the response property `data/items/relationships/role` became required for the status `200`
* the response property `data/items/relationships/role/data/attributes` became required for the status `200`
* the response property `data/items/relationships/role/data/attributes/name` became required for the status `200`
* the response property `data/items/relationships/role/data/id` became required for the status `200`
* the response property `data/items/relationships/user` became required for the status `200`
* the response property `data/items/relationships/user/data/attributes` became required for the status `200`
* the response property `data/items/relationships/user/data/attributes/email` became required for the status `200`
* the response property `data/items/relationships/user/data/attributes/name` became required for the status `200`
* the response property `data/items/relationships/user/data/attributes/username` became required for the status `200`
* the response property `data/items/relationships/user/data/id` became required for the status `200`
**2024-08-25 - Updated 2024-08-30**
**POST - `/orgs/{org_id}/memberships` - Updated**
* the response property `data/relationships/org` became required for the status `201`
* the response property `data/relationships/org/data/attributes` became required for the status `201`
* the response property `data/relationships/org/data/attributes/name` became required for the status `201`
* the response property `data/relationships/org/data/id` became required for the status `201`
* the response property `data/relationships/role` became required for the status `201`
* the response property `data/relationships/role/data/attributes` became required for the status `201`
* the response property `data/relationships/role/data/attributes/name` became required for the status `201`
* the response property `data/relationships/role/data/id` became required for the status `201`
* the response property `data/relationships/user` became required for the status `201`
* the response property `data/relationships/user/data/attributes` became required for the status `201`
* the response property `data/relationships/user/data/attributes/email` became required for the status `201`
* the response property `data/relationships/user/data/attributes/name` became required for the status `201`
* the response property `data/relationships/user/data/attributes/username` became required for the status `201`
* the response property `data/relationships/user/data/id` became required for the status `201`
**GET - `/orgs/{org_id}/memberships` - Updated**
* the response property `data/items/relationships/org` became required for the status `200`
* the response property `data/items/relationships/org/data/attributes` became required for the status `200`
* the response property `data/items/relationships/org/data/attributes/name` became required for the status `200`
* the response property `data/items/relationships/org/data/id` became required for the status `200`
* the response property `data/items/relationships/role` became required for the status `200`
* the response property `data/items/relationships/role/data/attributes` became required for the status `200`
* the response property `data/items/relationships/role/data/attributes/name` became required for the status `200`
* the response property `data/items/relationships/role/data/id` became required for the status `200`
* the response property `data/items/relationships/user` became required for the status `200`
* the response property `data/items/relationships/user/data/attributes` became required for the status `200`
* the response property `data/items/relationships/user/data/attributes/email` became required for the status `200`
* the response property `data/items/relationships/user/data/attributes/name` became required for the status `200`
* the response property `data/items/relationships/user/data/attributes/username` became required for the status `200`
* the response property `data/items/relationships/user/data/id` became required for the status `200`
**2024-08-25**
**POST - `/orgs/{org_id}/memberships` - Added**
* Create a org membership for a user with role
**GET - `/orgs/{org_id}/memberships` - Added**
* Returns all memberships of the org
**PATCH - `/orgs/{org_id}/memberships/{membership_id}` - Added**
* Update a org membership for a user with role
**DELETE - `/orgs/{org_id}/memberships/{membership_id}` - Added**
* Remove a user\`s membership of the group.
**GET - `/groups/{group_id}/org_memberships` - Added**
* Get list of org memberships of a group user
**POST - `/groups/{group_id}/memberships` - Added**
* Create a group membership for a user with role
**GET - `/groups/{group_id}/memberships` - Added**
* Returns all memberships of the group
**PATCH - `/groups/{group_id}/memberships/{membership_id}` - Added**
* Update a role from a group membership
**DELETE - `/groups/{group_id}/memberships/{membership_id}` - Added**
* Deletes a membership from a group
**2024-08-22**
**GET - `/orgs/{org_id}/projects/{project_id}/sbom` - Updated**
* removed the required property `bomFormat` from the response with the `200` status 
* removed the required property `components` from the response with the `200` status 
* removed the required property `dependencies` from the response with the `200` status 
* removed the required property `dependencies` from the response with the `200` status 
* removed the required property `metadata` from the response with the `200` status 
* removed the required property `metadata` from the response with the `200` status 
* removed the required property `specVersion` from the response with the `200` status 
* removed the required property `version` from the response with the `200` status 
* removed the optional property `components` from the response with the `200` status 
* added the new enum value `cyclonedx1.5+json` to the `query` request parameter `format`
* added the new enum value `cyclonedx1.5+xml` to the `query` request parameter `format`
* added the new enum value `cyclonedx1.6+json` to the `query` request parameter `format`
* added the new enum value `cyclonedx1.6+xml` to the `query` request parameter `format`
**2024-08-15**
**GET - `/orgs/{org_id}/audit_logs/search` - Updated**
* for the `query` request parameter `size`, default value `100.00` was added 
**GET - `/groups/{group_id}/audit_logs/search` - Updated**
* for the `query` request parameter `size`, default value `100.00` was added 
**2024-06-21 - Updated 2024-06-27**
**POST - `/orgs/{org_id}/collections` - Updated**
* the `data/attributes/name` response property's maxLength was unset from `255` for the response status `201` 
* the `data/attributes/name` response property's minLength was decreased from `1` to `0` for the response status `201` 
* the `data/attributes/name` response's property pattern `^([a-zA-Z0-9 _\-\/:.])+$` was removed for the status `201`
**GET - `/orgs/{org_id}/collections` - Updated**
* the `data/items/attributes/name` response property's maxLength was unset from `255` for the response status `200` 
* the `data/items/attributes/name` response property's minLength was decreased from `1` to `0` for the response status `200` 
* the `data/items/attributes/name` response's property pattern `^([a-zA-Z0-9 _\-\/:.])+$` was removed for the status `200`
**PATCH - `/orgs/{org_id}/collections/{collection_id}` - Updated**
* the `data/attributes/name` response property's maxLength was unset from `255` for the response status `200` 
* the `data/attributes/name` response property's minLength was decreased from `1` to `0` for the response status `200` 
* the `data/attributes/name` response's property pattern `^([a-zA-Z0-9 _\-\/:.])+$` was removed for the status `200`
**GET - `/orgs/{org_id}/collections/{collection_id}` - Updated**
* the `data/attributes/name` response property's maxLength was unset from `255` for the response status `200` 
* the `data/attributes/name` response property's minLength was decreased from `1` to `0` for the response status `200` 
* the `data/attributes/name` response's property pattern `^([a-zA-Z0-9 _\-\/:.])+$` was removed for the status `200`
**2024-06-21 - Updated 2024-06-25**
**PATCH - `/orgs/{org_id}` - Updated**
* request property `data/type` was restricted to a list of enum values 
* the request property `data/attributes` became required 
* the request property `data/id` became required 
* the request property `data/type` became required 
* added the new `org` enum value to the `data/type` response property for the response status `200` 
* added the new `org` enum value to the request property `data/type`
* removed the pattern `^[a-z][a-z0-9]*(_[a-z][a-z0-9]*)*$` from the request property `data/type`
* the `data/type` response's property pattern `^[a-z][a-z0-9]*(_[a-z][a-z0-9]*)*$` was removed for the status `200`
**2024-06-21**
**POST - `/orgs/{org_id}/invites` - Updated**
* removed the request property `data/relationships` 
**2024-06-18**
**POST - `/groups/{group_id}/settings/pull_request_template` - Updated**
* removed the request property `data/attributes/branch_name` 
* removed the optional property `data/attributes/branch_name` from the response with the `201` status 
**GET - `/groups/{group_id}/settings/pull_request_template` - Updated**
* removed the optional property `data/attributes/branch_name` from the response with the `200` status 
**2024-06-06**
**GET - `/orgs/{org_id}/projects` - Updated**
* removed the optional property `data/items/attributes/settings/auto_dependency_upgrade/is_inherited` from the response with the `200` status 
**PATCH - `/orgs/{org_id}/projects/{project_id}` - Updated**
* removed the optional property `data/attributes/settings/auto_dependency_upgrade/is_inherited` from the response with the `200` status 
**GET - `/orgs/{org_id}/projects/{project_id}` - Updated**
* removed the optional property `data/attributes/settings/auto_dependency_upgrade/is_inherited` from the response with the `200` status 
**2024-05-23**
**DELETE - `/self/apps/installs/{install_id}` - Updated**
* api operation id `deleteUserAppInstallByID` removed and replaced with `deleteUserAppInstallById`
**DELETE - `/orgs/{org_id}/apps/installs/{install_id}` - Updated**
* api operation id `deleteAppOrgInstallByID` removed and replaced with `deleteAppOrgInstallById`
**DELETE - `/groups/{group_id}/apps/installs/{install_id}` - Updated**
* api operation id `deleteGroupAppInstallByID` removed and replaced with `deleteGroupAppInstallById`
**2024-05-08**
**POST - `/groups/{group_id}/settings/pull_request_template` - Added**
* Configures a group level pull request template that will be used on any org or project within that group
**GET - `/groups/{group_id}/settings/pull_request_template` - Added**
* Get your groups pull request template
**DELETE - `/groups/{group_id}/settings/pull_request_template` - Added**
* Delete your groups pull request template. This means Snyk pull requests will start to use the default template for this group.
**2024-04-29**
**GET - `/orgs/{org_id}/audit_logs/search` - Updated**
* deleted the `query` request parameter `event` 
* deleted the `query` request parameter `exclude_event` 
* added the new optional `query` request parameter `events`
* added the new optional `query` request parameter `exclude_events`
**GET - `/groups/{group_id}/audit_logs/search` - Updated**
* deleted the `query` request parameter `event` 
* deleted the `query` request parameter `exclude_event` 
* added the new optional `query` request parameter `events`
* added the new optional `query` request parameter `exclude_events`
**2024-04-22**
**GET - `/self` - Added**
* Retrieves information about the the user making the request.
**GET - `/orgs/{org_id}/projects` - Updated**
* added `#/components/schemas/Relationship, #/components/schemas/ProjectRelationshipsTarget` to the `data/items/relationships/target` response property `oneOf` list for the response status `200`
**PATCH - `/orgs/{org_id}/projects/{project_id}` - Updated**
* added `#/components/schemas/Relationship, #/components/schemas/ProjectRelationshipsTarget` to the `data/relationships/target` response property `oneOf` list for the response status `200`
**GET - `/orgs/{org_id}/projects/{project_id}` - Updated**
* added `#/components/schemas/Relationship, #/components/schemas/ProjectRelationshipsTarget` to the `data/relationships/target` response property `oneOf` list for the response status `200`
**2024-02-28**
**GET - `/orgs` - Updated**
* for the `query` request parameter `name`, the maxLength was set to `100` 
* for the `query` request parameter `slug`, the maxLength was set to `100` 
* added the pattern `^[\w.-]+$` to the `query` request parameter `slug` 
* added the optional property `data/items/attributes/access_requests_enabled` to the response with the `200` status
**PATCH - `/orgs/{org_id}` - Updated**
* added the optional property `data/attributes/access_requests_enabled` to the response with the `200` status
**GET - `/orgs/{org_id}` - Updated**
* added the optional property `data/attributes/access_requests_enabled` to the response with the `200` status
**GET - `/groups/{group_id}/orgs` - Added**
* Get a paginated list of all the organizations belonging to the group. By default, this endpoint returns the organizations in alphabetical order of their name.
**2024-02-21**
**GET - `/orgs/{org_id}/targets` - Added**
* Get a list of an organization\`s targets.
**GET - `/orgs/{org_id}/targets/{target_id}` - Added**
* Get a specified target for an organization.
**DELETE - `/orgs/{org_id}/targets/{target_id}` - Added**
* Delete the specified target.
**GET - `/orgs/{org_id}/projects` - Updated**
* removed `#/components/schemas/Relationship, #/components/schemas/ProjectRelationshipsTarget` from the `data/items/relationships/target` response property `oneOf` list for the response status `200`
**PATCH - `/orgs/{org_id}/projects/{project_id}` - Updated**
* removed `#/components/schemas/Relationship, #/components/schemas/ProjectRelationshipsTarget` from the `data/relationships/target` response property `oneOf` list for the response status `200`
**GET - `/orgs/{org_id}/projects/{project_id}` - Updated**
* removed `#/components/schemas/Relationship, #/components/schemas/ProjectRelationshipsTarget` from the `data/relationships/target` response property `oneOf` list for the response status `200`
**2024-01-23**
**GET - `/orgs/{org_id}/issues` - Added**
* Get a list of an organization\`s issues.
**GET - `/orgs/{org_id}/issues/{issue_id}` - Added**
* Get an issue
**GET - `/groups/{group_id}/issues` - Added**
* Get a list of a group\`s issues.
**GET - `/groups/{group_id}/issues/{issue_id}` - Added**
* Get an issue
**2024-01-04**
**POST - `/custom_base_images` - Updated**
* removed `#/components/schemas/VersioningSchemaDateType` from the `data/attributes/versioning_schema` request property `oneOf` list 
* removed `#/components/schemas/VersioningSchemaDateType` from the `data/attributes/versioning_schema` response property `oneOf` list for the response status `201`
**PATCH - `/custom_base_images/{custombaseimage_id}` - Updated**
* removed `#/components/schemas/VersioningSchemaDateType` from the `data/attributes/versioning_schema` request property `oneOf` list 
* removed `#/components/schemas/VersioningSchemaDateType` from the `data/attributes/versioning_schema` response property `oneOf` list for the response status `200`
**GET - `/custom_base_images/{custombaseimage_id}` - Updated**
* removed `#/components/schemas/VersioningSchemaDateType` from the `data/attributes/versioning_schema` response property `oneOf` list for the response status `200`
**2023-11-06**
**DELETE - `/orgs/{org_id}/projects/{project_id}` - Added**
* Delete one project in the organization by project ID.
**2023-11-03**
**GET - `/self/apps/{app_id}/sessions` - Added**
* Get a list of active OAuth sessions for the app.
**DELETE - `/self/apps/{app_id}/sessions/{session_id}` - Added**
* Revoke an active user app session.
**GET - `/self/apps/installs` - Added**
* Get a list of apps installed for an user.
**DELETE - `/self/apps/installs/{install_id}` - Added**
* Revoke access for an app by install ID.
**POST - `/orgs/{org_id}/apps` - Updated**
* added the new required request property `data` 
* removed the request property `access_token_ttl_seconds` 
* removed the request property `context` 
* removed the request property `name` 
* removed the request property `redirect_uris` 
* removed the request property `scopes` 
**GET - `/orgs/{org_id}/apps` - Updated**
* the response property `data/items/attributes/client_id` became optional for the status `200` 
* the response property `data/items/attributes/redirect_uris` became optional for the status `200` 
**PATCH - `/orgs/{org_id}/apps/{client_id}` - Updated**
* added the new required request property `data` 
* the response property `data/attributes/client_id` became optional for the status `200` 
* the response property `data/attributes/redirect_uris` became optional for the status `200` 
* removed the request property `access_token_ttl_seconds` 
* removed the request property `name` 
* removed the request property `redirect_uris` 
**GET - `/orgs/{org_id}/apps/{client_id}` - Updated**
* the response property `data/attributes/client_id` became optional for the status `200` 
* the response property `data/attributes/redirect_uris` became optional for the status `200` 
**POST - `/orgs/{org_id}/apps/installs` - Added**
* Install a Snyk Apps to this organization, the Snyk App must use unattended authentication eg client credentials.
**GET - `/orgs/{org_id}/apps/installs` - Added**
* Get a list of apps installed for an organization.
**DELETE - `/orgs/{org_id}/apps/installs/{install_id}` - Added**
* Revoke app authorization for an Snyk Organization with install ID.
**POST - `/orgs/{org_id}/apps/installs/{install_id}/secrets` - Added**
* Manage client secret for non-interactive Snyk App installations.
**POST - `/orgs/{org_id}/apps/creations` - Added**
* Create a new Snyk App for an organization.
**GET - `/orgs/{org_id}/apps/creations` - Added**
* Get a list of apps created by an organization.
**PATCH - `/orgs/{org_id}/apps/creations/{app_id}` - Added**
* Update app creation attributes with App ID.
**GET - `/orgs/{org_id}/apps/creations/{app_id}` - Added**
* Get a Snyk App by its App ID.
**DELETE - `/orgs/{org_id}/apps/creations/{app_id}` - Added**
* Delete an app by its App ID.
**POST - `/orgs/{org_id}/apps/creations/{app_id}/secrets` - Added**
* Manage client secret for the Snyk App.
**POST - `/groups/{group_id}/apps/installs` - Added**
* Install a Snyk Apps to this group, the Snyk App must use unattended authentication eg client credentials.
**GET - `/groups/{group_id}/apps/installs` - Added**
* Get a list of apps installed for a group.
**DELETE - `/groups/{group_id}/apps/installs/{install_id}` - Added**
* Revoke app authorization for an Snyk Group with install ID.
**POST - `/groups/{group_id}/apps/installs/{install_id}/secrets` - Added**
* Manage client secret for non-interactive Snyk App installations.
**2023-11-02**
**GET - `/orgs/{org_id}/container_images` - Added**
* List instances of container image
**GET - `/orgs/{org_id}/container_images/{image_id}` - Added**
* Get instance of container image
**GET - `/orgs/{org_id}/container_images/{image_id}/relationships/image_target_refs` - Added**
* List instances of image target references for a container image
**2023-09-13**
**GET - `/orgs/{org_id}/projects` - Updated**
* added `#/components/schemas/Relationship, #/components/schemas/ProjectRelationshipsTarget` to the `data/items/relationships/target` response property `oneOf` list for the response status `200`
**PATCH - `/orgs/{org_id}/projects/{project_id}` - Updated**
* added `#/components/schemas/Relationship, #/components/schemas/ProjectRelationshipsTarget` to the `data/relationships/target` response property `oneOf` list for the response status `200`
**GET - `/orgs/{org_id}/projects/{project_id}` - Updated**
* added `#/components/schemas/Relationship, #/components/schemas/ProjectRelationshipsTarget` to the `data/relationships/target` response property `oneOf` list for the response status `200`
**2023-09-12**
**GET - `/orgs/{org_id}/projects` - Updated**
* removed `#/components/schemas/Relationship, #/components/schemas/ProjectRelationshipsTarget` from the `data/items/relationships/target` response property `oneOf` list for the response status `200`
**PATCH - `/orgs/{org_id}/projects/{project_id}` - Updated**
* removed `#/components/schemas/Relationship, #/components/schemas/ProjectRelationshipsTarget` from the `data/relationships/target` response property `oneOf` list for the response status `200`
**GET - `/orgs/{org_id}/projects/{project_id}` - Updated**
* removed `#/components/schemas/Relationship, #/components/schemas/ProjectRelationshipsTarget` from the `data/relationships/target` response property `oneOf` list for the response status `200`
**POST - `/orgs/{org_id}/collections` - Added**
* Create a collection
**GET - `/orgs/{org_id}/collections` - Added**
* Return a list of organization\`s collections with issues counts and projects count.
**PATCH - `/orgs/{org_id}/collections/{collection_id}` - Added**
* Edit a collection
**GET - `/orgs/{org_id}/collections/{collection_id}` - Added**
* Get a collection
**DELETE - `/orgs/{org_id}/collections/{collection_id}` - Added**
* Delete a collection
**POST - `/orgs/{org_id}/collections/{collection_id}/relationships/projects` - Added**
* Add projects to a collection by specifying an array of project ids
**GET - `/orgs/{org_id}/collections/{collection_id}/relationships/projects` - Added**
* Return a list of organization\`s projects that are from the specified collection.
**DELETE - `/orgs/{org_id}/collections/{collection_id}/relationships/projects` - Added**
* Remove projects from a collection by specifying an array of project ids
**2023-09-11**
**PATCH - `/orgs/{org_id}/settings/sast` - Added**
* Enable/Disable the Snyk Code settings for an org
**GET - `/orgs/{org_id}/audit_logs/search` - Added**
* Search audit logs for an Organization. Supported event types:
* api.access
* org.app\_bot.create
* org.app.create
* org.app.delete
* org.app.edit
* org.cloud\_config.settings.edit
* org.collection.create
* org.collection.delete
* org.collection.edit
* org.create
* org.delete
* org.edit
* org.ignore\_policy.edit
* org.integration.create
* org.integration.delete
* org.integration.edit
* org.integration.settings.edit
* org.language\_settings.edit
* org.notification\_settings.edit
* org.org\_source.create
* org.org\_source.delete
* org.org\_source.edit
* org.policy.edit
* org.project\_filter.create
* org.project\_filter.delete
* org.project.add
* org.project.attributes.edit
* org.project.delete
* org.project.edit
* org.project.fix\_pr.auto\_open
* org.project.fix\_pr.manual\_open
* org.project.ignore.create
* org.project.ignore.delete
* org.project.ignore.edit
* org.project.monitor
* org.project.pr\_check.edit
* org.project.remove
* org.project.settings.delete
* org.project.settings.edit
* org.project.stop\_monitor
* org.project.tag.add
* org.project.tag.remove
* org.project.test
* org.request\_access\_settings.edit
* org.sast\_settings.edit
* org.service\_account.create
* org.service\_account.delete
* org.service\_account.edit
* org.settings.feature\_flag.edit
* org.target.create
* org.target.delete
* org.user.add
* org.user.invite
* org.user.invite.accept
* org.user.invite.revoke
* org.user.invite\_link.accept
* org.user.invite\_link.create
* org.user.invite\_link.revoke
* org.user.leave
* org.user.provision.accept
* org.user.provision.create
* org.user.provision.delete
* org.user.remove
* org.user.role.create
* org.user.role.delete
* org.user.role.details.edit
* org.user.role.edit
* org.user.role.permissions.edit
* org.webhook.add
* org.webhook.delete
* user.org.notification\_settings.edit
**GET - `/groups/{group_id}/audit_logs/search` - Added**
* Search audit logs for a Group. Some Organization level events are supported as well as the following Group level events:
* api.access
* group.cloud\_config.settings.edit
* group.create
* group.delete
* group.edit
* group.notification\_settings.edit
* group.org.add
* group.org.remove
* group.policy.create
* group.policy.delete
* group.policy.edit
* group.request\_access\_settings.edit
* group.role.create
* group.role.delete
* group.role.edit
* group.service\_account.create
* group.service\_account.delete
* group.service\_account.edit
* group.settings.edit
* group.settings.feature\_flag.edit
* group.sso.add
* group.sso.auth0\_connection.create
* group.sso.auth0\_connection.edit
* group.sso.create
* group.sso.delete
* group.sso.edit
* group.sso.membership.sync
* group.sso.remove
* group.tag.create
* group.tag.delete
* group.user.add
* group.user.remove
* group.user.role.edit
**2023-09-07**
**POST - `/orgs/{org_id}/service_accounts` - Added**
* Create a service account for an organization. The service account can be used to access the Snyk API.
**GET - `/orgs/{org_id}/service_accounts` - Added**
* Get all service accounts for an organization.
**PATCH - `/orgs/{org_id}/service_accounts/{serviceaccount_id}` - Added**
* Update the name of an organization-level service account by its ID.
**GET - `/orgs/{org_id}/service_accounts/{serviceaccount_id}` - Added**
* Get an organization-level service account by its ID.
**DELETE - `/orgs/{org_id}/service_accounts/{serviceaccount_id}` - Added**
* Delete a service account in an organization.
**POST - `/orgs/{org_id}/service_accounts/{serviceaccount_id}/secrets` - Added**
* Manage the client secret of an organization service account by the service account ID.
**POST - `/groups/{group_id}/service_accounts` - Added**
* Create a service account for a group. The service account can be used to access the Snyk API.
**GET - `/groups/{group_id}/service_accounts` - Added**
* Get all service accounts for a group.
**PATCH - `/groups/{group_id}/service_accounts/{serviceaccount_id}` - Added**
* Update the name of a group\`s service account by its ID.
**GET - `/groups/{group_id}/service_accounts/{serviceaccount_id}` - Added**
* Get a group-level service account by its ID.
**DELETE - `/groups/{group_id}/service_accounts/{serviceaccount_id}` - Added**
* Permanently delete a group-level service account by its ID.
**POST - `/groups/{group_id}/service_accounts/{serviceaccount_id}/secrets` - Added**
* Manage the client secret of a group service account by the service account ID.
**2023-08-28**
**GET - `/orgs/{org_id}/projects` - Updated**
* added the new optional `query` request parameter `names_start_with`
* added the new optional `query` request parameter `target_file`
* added the new optional `query` request parameter `target_reference`
* added the new optional `query` request parameter `target_runtime`
**PATCH - `/orgs/{org_id}/projects/{project_id}` - Updated**
* deleted the `query` request parameter `user_id` 
**2023-08-21**
**POST - `/orgs/{org_id}/packages/issues` - Updated**
* added the optional property `meta` to the response with the `200` status
**POST - `/custom_base_images` - Added**
* In order to create a custom base image, you first need to import your base images into Snyk. You can do this through the CLI, UI, or API.
This endpoint marks an image as a custom base image. This means that the image will get added to the pool of images from which Snyk can recommend base image upgrades.
Note, after the first image in a repository gets added, a versioning schema cannot be passed in this endpoint. To update the versioning schema, the PATCH endpoint must be used.
**GET - `/custom_base_images` - Added**
* Get a list of custom base images with support for ordering and filtering. Either the org\_id or group\_id parameters must be set to authorize successfully.
**PATCH - `/custom_base_images/{custombaseimage_id}` - Added**
* Updates a custom base image\`s attributes
**GET - `/custom_base_images/{custombaseimage_id}` - Added**
* Get a custom base image
**DELETE - `/custom_base_images/{custombaseimage_id}` - Added**
* Delete a custom base image resource. (the related container project is unaffected)
**2023-06-22**
**GET - `/orgs/{org_id}/settings/sast` - Added**
* Retrieves the SAST settings for an org
**2023-05-29**
**GET - `/orgs` - Added**
* Get a paginated list of organizations you have access to.
**PATCH - `/orgs/{org_id}` - Added**
* Update the details of an organization
**GET - `/orgs/{org_id}` - Added**
* Get the full details of an organization.
**2023-04-28**
**POST - `/orgs/{org_id}/invites` - Updated**
* added the new required request property `data` 
* the `data/attributes/role` response`s property type/format changed from` string`/`` to` string`/`uuid`for status`201\` 
* removed the request property `email` 
* removed the request property `role` 
* added the new `org_invitation` enum value to the `data/type` response property for the response status `201` 
**GET - `/orgs/{org_id}/invites` - Updated**
* the `data/items/attributes/role` response`s property type/format changed from` string`/`` to` string`/`uuid`for status`200\` 
* added the new `org_invitation` enum value to the `data/items/type` response property for the response status `200` 
**2023-04-17**
**POST - `/orgs/{org_id}/packages/issues` - Added**
* This endpoint is not available to all customers. If you are interested please contact support. Query issues for a batch of packages identified by Package URL (purl). Only direct vulnerabilities are returned, transitive vulnerabilities (from dependencies) are not returned because they can vary depending on context.
**2023-03-20**
**GET - `/orgs/{org_id}/projects/{project_id}/sbom` - Added**
* This endpoint lets you retrieve the SBOM document of a software project. It supports the following formats:
* CycloneDX version 1.4 in JSON (set `format` to `cyclonedx1.4+json`).
* CycloneDX version 1.4 in XML (set `format` to `cyclonedx1.4+xml`).
* SPDX version 2.3 in JSON (set `format` to `spdx2.3+json`).
By default it will respond with an empty JSON:API response.
**2023-02-15**
**GET - `/orgs/{org_id}/projects` - Added**
* List all Projects for an Org.
**PATCH - `/orgs/{org_id}/projects/{project_id}` - Added**
* Updates one project of the organization by project ID.
**GET - `/orgs/{org_id}/projects/{project_id}` - Added**
* Get one project of the organization by project ID.
**2022-12-14**
**POST - `/orgs/{org_id}/slack_app/{bot_id}` - Added**
* Create new Slack notification default settings for a given tenant.
**GET - `/orgs/{org_id}/slack_app/{bot_id}` - Added**
* Get Slack integration default notification settings for the provided tenant ID and bot ID.
**DELETE - `/orgs/{org_id}/slack_app/{bot_id}` - Added**
* Remove the given Slack App integration
**GET - `/orgs/{org_id}/slack_app/{bot_id}/projects` - Added**
* Slack notification settings overrides for projects. These settings overrides the default settings configured for the tenant.
**POST - `/orgs/{org_id}/slack_app/{bot_id}/projects/{project_id}` - Added**
* Create Slack settings override for a project.
**PATCH - `/orgs/{org_id}/slack_app/{bot_id}/projects/{project_id}` - Added**
* Update Slack notification settings for a project.
**DELETE - `/orgs/{org_id}/slack_app/{bot_id}/projects/{project_id}` - Added**
* Remove Slack settings override for a project.
**2022-11-14**
**GET - `/orgs/{org_id}/invites` - Added**
* List pending user invitations to an organization.
**DELETE - `/orgs/{org_id}/invites/{invite_id}` - Added**
* Cancel a pending user invitations to an organization.
**2022-11-07**
**GET - `/orgs/{org_id}/slack_app/{tenant_id}/channels` - Added**
* Requires the Snyk Slack App to be set up for this org, will retrieve a list of channels the Snyk Slack App can access. Note that it is currently only possible to page forwards through this collection, no prev links will be generated and the ending\_before parameter will not function.
**GET - `/orgs/{org_id}/slack_app/{tenant_id}/channels/{channel_id}` - Added**
* Requires the Snyk Slack App to be set up for this org. It will return the Slack channel name for the provided Slack channel ID.
**2022-09-15**
**GET - `/orgs/{org_id}/packages/{purl}/issues` - Added**
* Query issues for a specific package version identified by Package URL (purl). Snyk returns only direct vulnerabilities. Transitive vulnerabilities (from dependencies) are not returned because they can vary depending on context.
**2022-06-01**
**POST - `/orgs/{org_id}/invites` - Added**
* Invite a user to an organization with a role.
**2022-03-11**
**GET - `/self/apps` - Added**
* Get a list of apps that can act on your behalf.
**DELETE - `/self/apps/{app_id}` - Added**
* Revoke access for an app by app id
**POST - `/orgs/{org_id}/apps` - Added**
* Create a new app for an organization. Deprecated, use /orgs/{org\_id}/apps/creations instead.
**GET - `/orgs/{org_id}/apps` - Added**
* Get a list of apps created by an organization. Deprecated, use /orgs/{org\_id}/apps/creations instead.
**PATCH - `/orgs/{org_id}/apps/{client_id}` - Added**
* Update app attributes. Deprecated, use /orgs/{org\_id}/apps/creations/{app\_id} instead.
**GET - `/orgs/{org_id}/apps/{client_id}` - Added**
* Get an App by client id. Deprecated, use /orgs/{org\_id}/apps/creations/{app\_id} instead.
**DELETE - `/orgs/{org_id}/apps/{client_id}` - Added**
* Delete an app by app id. Deprecated, use /orgs/{org\_id}/apps/creations/{app\_id} instead.
**POST - `/orgs/{org_id}/apps/{client_id}/secrets` - Added**
* Manage client secrets for an app. Deprecated, use /orgs/{org\_id}/apps/creations/{app\_id}/secrets instead.
**GET - `/orgs/{org_id}/app_bots` - Added**
* Get a list of app bots authorized to an organization. Deprecated, use /orgs/{org\_id}/apps/installs instead.
**DELETE - `/orgs/{org_id}/app_bots/{bot_id}` - Added**
* Revoke app bot authorization. Deprecated, use /orgs/{org\_id}/apps/installs/{install\_id} instead.
**2021-12-09**
**PATCH - `/orgs/{org_id}/settings/iac` - Added**
* Update the Infrastructure as Code Settings for an org.
**GET - `/orgs/{org_id}/settings/iac` - Added**
* Get the Infrastructure as Code Settings for an org.
**PATCH - `/groups/{group_id}/settings/iac` - Added**
* Update the Infrastructure as Code Settings for a group.
**GET - `/groups/{group_id}/settings/iac` - Added**
* Get the Infrastructure as Code Settings for a group.
---
# Source: https://docs.snyk.io/implementation-and-setup/enterprise-setup/snyk-broker/classic-broker/install-and-configure-snyk-broker/advanced-configuration-for-snyk-broker-docker-installation/changing-the-auth-method-with-docker.md
# Changing the auth method with Docker
Each integration has an auth method set by default, with the exact method varying by service.
BitBucket Server and Data Center, for example, uses Basic Auth with a username and password in the `accept.json` file:
```json
{
"private": [
{
...,
"auth": {
"scheme": "basic",
"username": "${BITBUCKET_USERNAME}",
"password": "${BITBUCKET_PASSWORD}"
}
},
...
]
}
```
For Artifactory, the auth method is configured in the `.env` file by default:
```shell
# The URL to your artifactory
# If not using basic auth this will only be "/artifactory"
ARTIFACTORY_URL=:@/artifactory
```
For GitHub, the auth meth is part of the `origin` field in the `accept.json` file:
```json
{
"private": [
{
...,
"origin": "https://${GITHUB_TOKEN}@${GITHUB_API}"
},
...
]
}
```
You can override the authentication method. Valid values for `scheme` are `bearer`, `token`, and `basic`, which set the Authorization header to `Bearer`, `Token`, and `Basic` respectively. If a bearer token is preferred, the `accept.json` file can be configured as such:
```json
{
"private": [
{
...,
"auth": {
"scheme": "bearer",
"token": "${BEARER_TOKEN}"
}
},
...
]
}
```
Note that you must set this for every individual object in the `private` array.
If `scheme` is `bearer` or `token`, you must provide a `token`, and if `scheme` is `basic`, you must provide a `username` and `password`.
This overrides any other configured authentication method, for example, setting the token in the `origin` field, or in the `.env` file.
{% hint style="info" %}
Snyk Broker does not support authentication with mTLS method.
{% endhint %}
---
# Source: https://docs.snyk.io/implementation-and-setup/enterprise-setup/single-sign-on-sso-for-authentication-to-snyk/choose-a-provisioning-option.md
# Choose a provisioning option
{% hint style="warning" %}
Contact your Snyk account team or Snyk Support to turn on custom mapping once you have completed the setup steps.
{% endhint %}
Determine how new users in your company will get access to Snyk:
* [Open to all](#open-to-all)
* [Invitation required](#invitation-required)
* [Custom mapping](#custom-mapping)
## Open to all
With the Open option, all users have automatic access to Snyk by using SSO to log in. They will have access to all Organizations in your selected Group. Their accounts will all be provisioned with the same role, with two options:
* The **Org** **administrator** role allows all new users to manage other Org admins and collaborators, view Group reports, and work with Organizations within the Group as well as perform non-administrative tasks in the Organization.
* The **Org** **collaborator** role can perform non-administrative tasks in the Organization.
Let Snyk Support know whether new users will have the administrator role or the collaborator role for the Organization. The selected role applies for all users. For details, see [Pre-defined roles](https://docs.snyk.io/snyk-platform-administration/user-roles/pre-defined-roles).
## Invitation required
With the invitation required or Group Member option, admins can invite users or users can request access to an Organization.
There are two ways to invite users to Organizations. Invite members (see [Manage users in Organizations](https://docs.snyk.io/snyk-platform-administration/groups-and-organizations/organizations/manage-users-in-organizations)) or automate the process using the Snyk [API Invite users endpoint](https://docs.snyk.io/snyk-api/reference/organizations-v1#org-orgid-invite).
If users who have not been invited use SSO to log in, they will gain access to Snyk, but they will not see any Projects until an admin invites them or manually adds them to the applicable Organizations. You can provide a list of Organizations with the appropriate contact person so that new users can [request access](https://docs.snyk.io/snyk-platform-administration/groups-and-organizations/organizations/requests-for-access-to-an-organization).
## Custom mapping
{% hint style="info" %}
**Feature availability**\
Custom Mapping is available only for Enterprise plans. For more information, see [plans and pricing](https://snyk.io/plans/).
{% endhint %}
You can provision user accounts with customized rules using the [Custom Mapping Option](https://docs.snyk.io/implementation-and-setup/enterprise-setup/single-sign-on-sso-for-authentication-to-snyk/custom-mapping).
You can configure SSO differently for each of your different Groups. You can also map users to a specific Organization and role assignment based on information from the identity provider.
---
# Source: https://docs.snyk.io/implementation-and-setup/enterprise-setup/service-accounts/choose-a-service-account-type-to-use-with-snyk-apis.md
# Choose a service account type to use with Snyk APIs
For certain Snyk API calls you must authenticate using an Organization or Group service account.
For example, use a Group service account token to call Group API endpoints and Organization API endpoints for all Organizations in the Group.
The Snyk API uses the same roles as the Snyk Web UI applications. Each Snyk action requires a set of user permissions to be present. For details, see [User roles](https://docs.snyk.io/snyk-platform-administration/user-roles).
---
# Source: https://docs.snyk.io/implementation-and-setup/enterprise-implementation-guide/phase-1-discovery-and-planning/choose-rollout-integrations.md
# Source: https://docs.snyk.io/implementation-and-setup/team-implementation-guide/phase-1-discovery-and-planning/choose-rollout-integrations.md
# Choose rollout integrations
## **SDLC integration points**
Snyk offers many integrations that seamlessly integrate into every stage of the SDLC.
Many businesses typically roll out automated solutions first, then slowly introduce tools to enable the developers. In addition, gating features are gradually turned on over a period of time to minimize disruption.
{% hint style="info" %}
As using multiple integrations can result in duplicate reporting of issues, you do not initially need to implement more than one integration type. For example, you can start by importing everything with Git repositories, then later use the CI/CD view for fine-grained detail (potentially removing the source control integration if both views are not desired).
{% endhint %}
## Integration types
Below are typical early integrations.
### Source Code Management (SCM) integrations
Integrations with popular version control platforms like GitHub, GitLab, Azure Repos, and Bitbucket seamlessly integrate Snyk security checks into the code review process. This ensures that potential vulnerabilities are identified and addressed before the code is merged into the main branch. Important features include:
* Daily testing/monitoring of a specified branch (typically "development" branch),
* (optional) Pull Request/Merge Request checks against any branch of the repository.
* (optional) Automated dependency upgrades and automated security fix upgrades using pull requests.
Advantages:
* Visibility into repository security posture
* Automatic Scan on code change
* Immediate feedback on issues for the developer
* Onboarding of repositories can be configured using the UI
* Supports Cloud Repositories on the Team plan
For more details, see [Git repositories (SCMs)](https://docs.snyk.io/developer-tools/scm-integrations/organization-level-integrations).
{% hint style="info" %}
If you have a non-cloud-facing or your own instance of a Git SCM:
* Consider deploying a [Snyk Broker](https://docs.snyk.io/implementation-and-setup/enterprise-setup/snyk-broker) for Snyk to communicate with your repositories, which would also require a Snyk Enterprise Plan.
* Enterprise customers can enable and manage Snyk Broker using the API.
[Paid services](https://docs.snyk.io/snyk-data-and-governance/snyk-terms-of-support-and-services-glossary) can be engaged to assist in Broker deployments.
{% endhint %}
### Continuous Integration/Continuous Deployment (CI/CD) pipeline integrations
Integrating Snyk into CI/CD pipelines, such as Jenkins, Travis CI, or CircleCI, automates security checks during the build and deployment process. This ensures that vulnerabilities are detected early in the software development lifecycle and prevents their propagation into production. Typical features include:
* (Optional) Ability to passively monitor results during build and view results in Snyk
* (Optional) Ability to test and potentially break the build based on criteria you specified
* Integration can be achieved with specific Marketplace plugins or more generally, with the CLI as part of your pipeline script.
Advantages:
* Assess local code vulnerabilities
* Full control over testing (which tests to run, where in the build script)
* Can automate using CI/CD
For more details, see [Snyk CI/CD integrations](https://docs.snyk.io/developer-tools/snyk-ci-cd-integrations).
### Integrated Development Environment (IDE) integrations
IDE integrations like Visual Studio Code, IntelliJ IDEA, and Eclipse allow developers to access Snyk's security features directly within their coding environment. This enables real-time scanning and issue remediation as developers write code at the earliest possible stages.
For more details, see [Use Snyk in your IDE](https://docs.snyk.io/developer-tools/snyk-ide-plugins-and-extensions).
## Considerations for import strategies
Project Import Strategy Considerations Advantages Disadvantages CLI (automated CI/CD) Must be configured for each application within CI/CD. Can select what to test and when (i.e. which package managers, where in the process, which language to analyze. May need development effort for integration. It requires configuration per application. CLI (Run locally by user) User can use CLI to perform testing locally while working on an application, very configurable per scan type. Local use case Not meant for visibility or automation. Can require buildable code or dependencies to be installed (For example Gradle without Lockfile, Scala). Git Code Repository Integration Onboarding and daily monitoring: rapid vulnerability assessment across application portfolio. Continuous monitoring of repositories (even when you are not working on it). Centralized visibility for teams. Monitors specified branch Code does not need to be built. Can be initiated via UI Some languages/package managers have better resolution utilizing the CLI (Gradle without lockfile, Scala). Pull request (PR)/merge request (MR) scanning Immediate feedback on introduced issues on the PR/MR against any branch on repository. Configurable rules for pass/fail
## Additional considerations
### Infrastructure as Code
For Snyk Infrastructure as Code, it is common that your Terraform or YAML configuration files are held in your SCM, but they may be in a separate area or repository. As a result, consider if there are other areas you need to import. You may also want to integrate with Terraform Cloud (if applicable) to enable Snyk tests as part of your "Terraform run" processes.
For complex environments, modules, and highly templated implementations, utilizing the CLI on your Terraform Plan file may provide the best results.
### CR (Container Registries)
Snyk also integrates with various [Container Registries](https://docs.snyk.io/scan-with-snyk/snyk-container/container-registry-integrations) to enable you to import and monitor your containers for vulnerabilities. Snyk tests the containers you have imported for any known security vulnerabilities found at a frequency you control.
---
# Source: https://docs.snyk.io/developer-tools/snyk-ci-cd-integrations/snyk-ci-cd-integration-deployment-and-strategies/ci-cd-adoption-and-deployment.md
# CI/CD adoption and deployment
When deciding to use a Snyk integration, compare the advantages of source control management (SCM) integrations and CI/CD integrations.
## Typical stages in adopting CI/CD Integration
Developer teams typically adopt Snyk in the following stages (example commands are Snyk Open Source):
1. [Expose vulnerabilities](#stage-1-expose-vulnerabilities-snyk-monitor) (`snyk monitor`)
2. [Use Snyk as a gatekeeper](#stage-2-use-snyk-as-a-gatekeeper-snyk-test) (`snyk test`)
3. [Continuous monitoring](#stage-3-continuous-monitoring-snyk-test-and-snyk-monitor) (`snyk test` and `snyk monitor`)
### Stage 1: Expose vulnerabilities (`snyk monitor`)
A typical approach is to use Snyk results to expose vulnerabilities during the development process. This increases visibility of vulnerabilities among the members of your team.
When you first implement Snyk in your pipeline, Snyk recommends using only the `snyk monitor` command. If you use one of the Snyk CI plugins, Snyk recommends that you configure the plugin to NOT fail the build.
This is because all Projects have vulnerabilities, and after you set Snyk to fail the build, every build fails because of Snyk. This may cause problems with your team being quickly overwhelmed with failure messages.
Using `snyk monitor` to expose results provides information without disrupting processes.
For information about `snyk monitor`, see the [`monitor` command help](https://docs.snyk.io/developer-tools/snyk-cli/commands/monitor).
### Stage 2: Use Snyk as a gatekeeper (`snyk test`)
Using Snyk as a gatekeeper prevents the introduction of new vulnerabilities (sometimes referred to as "stopping the bleeding").
After your teams understand the vulnerabilities in their applications and develop a process for fixing them early in the development cycle, you can configure Snyk to fail your builds to prevent introducing vulnerabilities into your applications.
Add `snyk test` to your build or enable the fail functionality to make Snyk fail your builds, providing the results output to the console. Your developers or DevOps teams can use the results to decide whether to stop or continue the build.
For information about `snyk test`, see the [`test` command help](https://docs.snyk.io/developer-tools/snyk-cli/commands/test).
### Stage 3: Continuous monitoring (`snyk test` and `snyk monitor`)
After you configure Snyk to fail the build when vulnerabilities are detected, you can configure Snyk to send a snapshot of your Project's successful builds to Snyk for ongoing monitoring.
To do this, configure your pipeline to run `snyk monitor` if your `snyk test` returns a successful exit code.
## CI/CD deployment methods
{% hint style="info" %}
All of these methods provide the same results, as they all rely on the same Snyk engine. Thus, the same arguments or options apply regardless of the deployment method you select.
{% endhint %}
There are various ways to configure Snyk within your pipeline. Choose a method depending on your environment and preferences. You can expect all methods to lead to a successful run.
### **Use Snyk native plugins**
Snyk native plugins are available for most common CI/CD tools. You can use these plugins to set up and get started. The plugins include the most common parameters and options in the user interface.
### **Deploy the Snyk CLI using the npm method**
Follow steps similar to those for [installing the CLI](https://docs.snyk.io/developer-tools/snyk-cli/install-or-update-the-snyk-cli) locally. You must be able to run an npm command in the pipeline script. This method has the advantage of completely aligning with the CLI experience so that you can easily troubleshoot and configure.
### **Deploy the Snyk CLI binary version**
The advantage of the binary setup is that it has no dependency with the local environment. For example, binary setup is useful if you cannot run an npm command in your pipeline.
CLI binaries are available on the [CLI GitHub repository](https://github.com/snyk/cli/tags).
Snyk has Linux, Windows, and other versions.
### **Deploy a Snyk container**
You may also deploy Snyk in your pipeline using one of the Snyk images in [Docker Hub](https://hub.docker.com/r/snyk/snyk).
## Examples of Snyk CI/CD Integrations
This repository shows some examples of binary and npm integrations for various CI/CD tools: [CI/CD examples](https://github.com/snyk-labs/snyk-cicd-integration-examples).
---
# Source: https://docs.snyk.io/developer-tools/snyk-ci-cd-integrations/snyk-ci-cd-integration-deployment-and-strategies/ci-cd-setup.md
# CI/CD setup
## Prerequisites for CI/CD
To configure Snyk to run in a pipeline, retrieve key configuration inputs from your Snyk account.
### Target Organization
When you run Snyk in your CI/CD platform, you typically want to post the test results to Snyk for review and ongoing monitoring.
If you do not define a target Organization, Snyk uses the default Organization for your authentication token:
* For user accounts, this is the user's preferred Organization, configurable in the user's settings.
* For Organization service accounts, this is the Organization in which the account was created.
You can define the target Organization in the Snyk CLI by using the `--org` CLI option and either the `orgslugname` or the Organization ID:
* You can define the target Organization using its `orgslugname` as displayed in the address bar of the browser in the Snyk UI.
* Alternatively, you can define the target Organization using its Organization ID, found on the Organization settings page.
Organization ID
Snyk Orb for CircleCI
Snyk Orb information
A completed Learning Path with certificate
Assets Policy - Setting up filters for a classification policy
Assets Policy - Setting up actions for a classification policy
Assets Policy - Setting up multiple actions for a classification policy
Performs Static Application Security Testing (SAST) directly from the Snyk MCP. It analyzes an application's source code with a SAST scan to identify security vulnerabilities and weaknesses without executing the code.
Supported languages:
Apex, C/C++, Dart and Flutter, Elixir, Go, Groovy, Java and Kotlin, Javascript, .NET, PHP, Python, Ruby, Rust, Scala, Swift and Objective-C, Typescript, VB.NET
|
| `snyk_container_scan` | Scans container images for known vulnerabilities in OS packages and application dependencies. |
| `snyk_iac_scan` | Analyzes Infrastructure as Code (IaC) files for security misconfigurations.
Supports Terraform (.tf, .tf.json, plan files), Kubernetes (YAML, JSON), AWS CloudFormation (YAML, JSON), Azure Resource Manager (ARM JSON), and Serverless Framework.
|
| `snyk_logout` | Logs the Snyk MCP out of the current Snyk account by clearing the locally stored authentication token. |
| `snyk_sbom_scan` | Experimental command. Analyzes an existing SBOM file for known vulnerabilities in its open-source components. Requires components in SBOM to be identified using PackageURLs (purls). |
| `snyk_sca_scan` | Analyzes Projects for open-source vulnerabilities and license compliance issues by inspecting manifest files (for example package.json, pom.xml, requirements.txt) to understand dependencies and then queries the Snyk vulnerability database. |
| `snyk_send_feedback` | Can be used to send feedback to Snyk. |
| `snyk_trust` | Trusts a given folder to allow Snyk to scan it. |
| `snyk_version` | Displays the installed Snyk MCP version. |
### Optional: Adjust scan frequency
Snyk recommends you use Snyk Studio with the Secure at inception directives, but also provides a smart scan option that allows the LLM to determine when to call Snyk Studio. This option results in lower overall token usage and faster iterating, but it increases the risk of insecure code being added to your codebase. Expand the options below for instructions on adjusting directives at installation or after installation.
Adjust at install
To utilize smart-scan from install, add the following argument to the npx install command:
`npx -y snyk@latest mcp configure --tool=claude-cli --rule-type=smart-apply`
Adjust after install
The default ruleset frequency can be adjusted by editing the global `CLAUDE.md` file.
For reference, the following are the smart apply rules Snyk places in Claude's global rules file when prompted:
{% code overflow="wrap" %}
```
BEFORE declaring task complete: Run snyk_code_scan tool when a significant change has been made in first party code.
- This should only apply for Snyk-supported coding language
- If any security issues are found based on newly introduced or modified code or dependencies, attempt to fix the issues using the results context from Snyk.
- Rescan the code after fixing the issues to ensure that the issues were fixed and that there are no newly introduced issues.
- Repeat this process until no new issues are found.
```
{% endcode %}
### Alternate installation methods
Expand the relevant method below for installation instructions.
Install with Node.js and npx
Create or edit the MCP configuration file `~/.claude.json`.
If you have the Node.js `npx` executable installed in your environment, add the following JSON snippet to the file:
{
"mcpServers": {
"Snyk": {
"type": "stdio",
"command": "npx",
"args": ["-y", "snyk@latest", "mcp", "-t", "stdio"],
"env": {}
}
}
}
Install with Snyk CLI
Create or edit the MCP configuration file `~/.claude.json` .
If you have the Snyk CLI installed and accessible on your system path, include the following JSON snippet in the file. You might need to specify the full path to the Snyk executable CLI:
```
{
"mcpServers": {
"Snyk": {
"type": "stdio",
"command": "/absolute/path/to/snyk",
"args": ["mcp", "-t", "stdio"],
"env": {}
}
}
}
```
If the `snyk` command is not available, add it by following the instructions on the [Installing or updating the Snyk CLI](https://docs.snyk.io/developer-tools/snyk-cli/install-or-update-the-snyk-cli) page.
Install with Claude Code CLI commands
Run the Snyk MCP Server in `sse` transport mode using the Snyk CLI:
```
snyk mcp -t sse
```
Then run the Claude Code CLI for adding a new MCP server:
```
claude mcp add --transport sse snyk http://127.0.0.1:7695/sse
```
Watch this step-by-step [YouTube video](https://www.youtube.com/watch?v=qAcTPMXbfyU). showing how to configure the Snyk MCP Server with Claude Code CLI.
If the `snyk` command is not available, add it by following the instructions on the [Installing or updating the Snyk CLI](https://docs.snyk.io/developer-tools/snyk-cli/install-or-update-the-snyk-cli) page.
The following examples shows a Snyk MCP Server that was successfully configured and started.
### Authenticate the Snyk MCP Server
As a one-time setup, you need to authenticate and trust the current Project directory.
`: subcommand of [`config`](https://docs.snyk.io/developer-tools/snyk-cli/commands/config)
`set =`: subcommand of [`config`](https://docs.snyk.io/developer-tools/snyk-cli/commands/config)
`unset `: subcommand of [`config`](https://docs.snyk.io/developer-tools/snyk-cli/commands/config)
`clear`: subcommand of [`config`](https://docs.snyk.io/developer-tools/snyk-cli/commands/config)
`environment`: subcommand of [`config`](https://docs.snyk.io/developer-tools/snyk-cli/commands/config)
## Configure the Snyk CLI
You can use environment variables to configure the Snyk CLI and also set variables to configure the Snyk CLI to connect with the Snyk API. See [Configure the Snyk CLI](https://docs.snyk.io/developer-tools/snyk-cli/configure-the-snyk-cli).
## Debug
See [Debugging the Snyk CLI](https://docs.snyk.io/developer-tools/snyk-cli/debugging-the-snyk-cli) for detailed information about the `--d` option.
## Exit codes for CLI commands
Exit codes for the `test` commands are all the same. See the exit codes in the following help docs:
* [`snyk test` exit codes](https://docs.snyk.io/developer-tools/commands/test#exit-codes)
* [`snyk container test` exit codes](https://docs.snyk.io/developer-tools/commands/container-test#exit-codes)
* [`snyk iac test` exit codes](https://docs.snyk.io/developer-tools/commands/iac-test#exit-codes)
* [`snyk code test` exit codes](https://docs.snyk.io/developer-tools/commands/code-test#exit-codes)
Additional CLI commands have exit codes as listed in the following help docs:
* [`snyk monitor` exit codes](https://docs.snyk.io/developer-tools/commands/monitor#exit-codes)
* [`snyk container monitor` exit codes](https://docs.snyk.io/developer-tools/commands/container-monitor#exit-codes)
* [`snyk iac describe` exit codes](https://docs.snyk.io/developer-tools/commands/iac-describe#exit-codes)
* [`snyk iac update-exclude-policy` exit codes](https://docs.snyk.io/developer-tools/commands/iac-update-exclude-policy#exit-codes)
* [`snyk log4shell` exit codes](https://docs.snyk.io/developer-tools/commands/log4shell#exit-codes)
* [`snyk sbom` exit codes](https://docs.snyk.io/developer-tools/commands/sbom#exit-codes)
* [`snyk sbom test` exit codes](https://docs.snyk.io/developer-tools/commands/sbom-test#exit-codes)
* [`snyk container sbom` exit codes](https://docs.snyk.io/developer-tools/commands/container-sbom#exit-codes)
## Options for multiple commands
Lists of the options for Snyk CLI commands follow. Each option is followed by the command(s) to which the option applies. The commands are linked to their help docs. For details concerning each option, see the [help docs](https://docs.snyk.io/developer-tools/snyk-cli/commands).
`--all-projects`: [`test`](https://docs.snyk.io/developer-tools/snyk-cli/commands/test), [`monitor`](https://docs.snyk.io/developer-tools/snyk-cli/commands/monitor), [`sbom`](https://docs.snyk.io/developer-tools/snyk-cli/commands/sbom)
`--fail-fast`: [`test`](https://docs.snyk.io/developer-tools/snyk-cli/commands/test), [`monitor`](https://docs.snyk.io/developer-tools/snyk-cli/commands/monitor)
`--detection-depth=`: [`test`](https://docs.snyk.io/developer-tools/snyk-cli/commands/test), [`monitor`](https://docs.snyk.io/developer-tools/snyk-cli/commands/monitor), [`iac test`](https://docs.snyk.io/developer-tools/snyk-cli/commands/iac-test), [`sbom`](https://docs.snyk.io/developer-tools/snyk-cli/commands/sbom)
`--exclude=[,]...>`: [`test`](https://docs.snyk.io/developer-tools/snyk-cli/commands/test), [`monitor`](https://docs.snyk.io/developer-tools/snyk-cli/commands/monitor), [`sbom`](https://docs.snyk.io/developer-tools/snyk-cli/commands/sbom)
`--prune-repeated-subdependencies`, `-p`: [`test`](https://docs.snyk.io/developer-tools/snyk-cli/commands/test), [`monitor`](https://docs.snyk.io/developer-tools/snyk-cli/commands/monitor), [`sbom`](https://docs.snyk.io/developer-tools/snyk-cli/commands/sbom)
`--print-deps`: [`test`](https://docs.snyk.io/developer-tools/snyk-cli/commands/test), [`monitor`](https://docs.snyk.io/developer-tools/snyk-cli/commands/monitor), [`container test`](https://docs.snyk.io/developer-tools/snyk-cli/commands/container-test)
`--remote-repo-url=`: [`test`](https://docs.snyk.io/developer-tools/snyk-cli/commands/test), [`monitor`](https://docs.snyk.io/developer-tools/snyk-cli/commands/monitor), [`code test`](https://docs.snyk.io/developer-tools/snyk-cli/commands/code-test), [`iac test`](https://docs.snyk.io/developer-tools/snyk-cli/commands/iac-test)
`--dev`: [`test`](https://docs.snyk.io/developer-tools/snyk-cli/commands/test), [`monitor`](https://docs.snyk.io/developer-tools/snyk-cli/commands/monitor), [`sbom`](https://docs.snyk.io/developer-tools/snyk-cli/commands/sbom)
`--org=`: [`test`](https://docs.snyk.io/developer-tools/snyk-cli/commands/test), [`monitor`](https://docs.snyk.io/developer-tools/snyk-cli/commands/monitor), [`code test`](https://docs.snyk.io/developer-tools/snyk-cli/commands/code-test), [`container test`](https://docs.snyk.io/developer-tools/snyk-cli/commands/container-test), [`container monitor`](https://docs.snyk.io/developer-tools/snyk-cli/commands/container-monitor), [`iac test`](https://docs.snyk.io/developer-tools/snyk-cli/commands/iac-test), [`iac describe`](https://docs.snyk.io/developer-tools/snyk-cli/commands/iac-describe), [`sbom`](https://docs.snyk.io/developer-tools/snyk-cli/commands/sbom), [`container sbom`](https://docs.snyk.io/developer-tools/snyk-cli/commands/container-sbom), [`aibom`](https://docs.snyk.io/developer-tools/snyk-cli/commands/aibom)
`--file=`: [`test`](https://docs.snyk.io/developer-tools/snyk-cli/commands/test), [`monitor`](https://docs.snyk.io/developer-tools/snyk-cli/commands/monitor),[`sbom test`](https://docs.snyk.io/developer-tools/snyk-cli/commands/sbom-test)
`--file=`: [`container test`](https://docs.snyk.io/developer-tools/snyk-cli/commands/container-test), [`container monitor`](https://docs.snyk.io/developer-tools/snyk-cli/commands/container-monitor), [`sbom test`](https://docs.snyk.io/developer-tools/snyk-cli/commands/sbom-test)
`--package-manager=`: [`test`](https://docs.snyk.io/developer-tools/snyk-cli/commands/test), [`monitor`](https://docs.snyk.io/developer-tools/snyk-cli/commands/monitor)
`--unmanaged`: [`test`](https://docs.snyk.io/developer-tools/snyk-cli/commands/test), [`monitor`](https://docs.snyk.io/developer-tools/snyk-cli/commands/monitor). See also [Options for scanning using `--unmanaged`](#options-for-scanning-using-unmanaged) and the [`sbom`](https://docs.snyk.io/developer-tools/snyk-cli/commands/sbom) command help for another use of this option.
`--ignore-policy`: [`test`](https://docs.snyk.io/developer-tools/snyk-cli/commands/test), [`monitor`](https://docs.snyk.io/developer-tools/snyk-cli/commands/monitor), [`iac test`](https://docs.snyk.io/developer-tools/snyk-cli/commands/iac-test), [`iac describe`](https://docs.snyk.io/developer-tools/snyk-cli/commands/iac-describe)
`--trust-policies`: [`test`](https://docs.snyk.io/developer-tools/snyk-cli/commands/test), [`monitor`](https://docs.snyk.io/developer-tools/snyk-cli/commands/monitor)
`--show-vulnerable-paths=`: [`test`](https://docs.snyk.io/developer-tools/snyk-cli/commands/test)
`--project-name=`: [`test`](https://docs.snyk.io/developer-tools/snyk-cli/commands/test), [`monitor`](https://docs.snyk.io/developer-tools/snyk-cli/commands/monitor), [`container test`](https://docs.snyk.io/developer-tools/snyk-cli/commands/container-test), [`container monitor`](https://docs.snyk.io/developer-tools/snyk-cli/commands/container-monitor)
`--target-reference=`: [`test`](https://docs.snyk.io/developer-tools/snyk-cli/commands/test), [`monitor`](https://docs.snyk.io/developer-tools/snyk-cli/commands/monitor), [`iac test`](https://docs.snyk.io/developer-tools/snyk-cli/commands/iac-test), [`container monitor`](https://docs.snyk.io/developer-tools/snyk-cli/commands/container-monitor)
`--policy-path=`: [`test`](https://docs.snyk.io/developer-tools/snyk-cli/commands/test), [`monitor`](https://docs.snyk.io/developer-tools/snyk-cli/commands/monitor), [`container test`](https://docs.snyk.io/developer-tools/snyk-cli/commands/container-test), [`container monitor`](https://docs.snyk.io/developer-tools/snyk-cli/commands/container-monitor), [`iac test`](https://docs.snyk.io/developer-tools/snyk-cli/commands/iac-test), [`iac describe`](https://docs.snyk.io/developer-tools/snyk-cli/commands/iac-describe), [`ignore`](https://docs.snyk.io/developer-tools/snyk-cli/commands/ignore)
`--json`: [`test`](https://docs.snyk.io/developer-tools/snyk-cli/commands/test), [`monitor`](https://docs.snyk.io/developer-tools/snyk-cli/commands/monitor), [`code test`](https://docs.snyk.io/developer-tools/snyk-cli/commands/code-test), [`container test`](https://docs.snyk.io/developer-tools/snyk-cli/commands/container-test), [`container monitor`](https://docs.snyk.io/developer-tools/snyk-cli/commands/container-monitor), [`iac test`](https://docs.snyk.io/developer-tools/snyk-cli/commands/iac-test), [`iac describe`](https://docs.snyk.io/developer-tools/snyk-cli/commands/iac-describe), [`sbom test`](https://docs.snyk.io/developer-tools/snyk-cli/commands/sbom-test)
`--json-file-output=`: [`test`](https://docs.snyk.io/developer-tools/snyk-cli/commands/test), [`code test`](https://docs.snyk.io/developer-tools/snyk-cli/commands/code-test), [`container test`](https://docs.snyk.io/developer-tools/snyk-cli/commands/container-test), [`iac test`](https://docs.snyk.io/developer-tools/snyk-cli/commands/iac-test), [`sbom`](https://docs.snyk.io/developer-tools/snyk-cli/commands/sbom)
`--sarif`: [`test`](https://docs.snyk.io/developer-tools/snyk-cli/commands/test), [`code test`](https://docs.snyk.io/developer-tools/snyk-cli/commands/code-test), [`container test`](https://docs.snyk.io/developer-tools/snyk-cli/commands/container-test), [`iac test`](https://docs.snyk.io/developer-tools/snyk-cli/commands/iac-test)
`--sarif-file-output=`: [`test`](https://docs.snyk.io/developer-tools/snyk-cli/commands/test), [`code test`](https://docs.snyk.io/developer-tools/snyk-cli/commands/code-test), [`container test`](https://docs.snyk.io/developer-tools/snyk-cli/commands/container-test), [`iac test`](https://docs.snyk.io/developer-tools/snyk-cli/commands/iac-test)
`--severity-threshold=`: [`test`](https://docs.snyk.io/developer-tools/snyk-cli/commands/test), [`code test`](https://docs.snyk.io/developer-tools/snyk-cli/commands/code-test), [`container test`](https://docs.snyk.io/developer-tools/snyk-cli/commands/container-test), [`iac test`](https://docs.snyk.io/developer-tools/snyk-cli/commands/iac-test),[`sbom test`](https://docs.snyk.io/developer-tools/snyk-cli/commands/sbom-test)
`--fail-on=`: [`container test`](https://docs.snyk.io/developer-tools/snyk-cli/commands/container-test), [`test`](https://docs.snyk.io/developer-tools/snyk-cli/commands/test)
`--project-environment=[,]...>`: [`monitor`](https://docs.snyk.io/developer-tools/snyk-cli/commands/monitor), [`container monitor`](https://docs.snyk.io/developer-tools/snyk-cli/commands/container-monitor), [`iac test`](https://docs.snyk.io/developer-tools/snyk-cli/commands/iac-test)
`--project-lifecycle=[,]...>`: [`monitor`](https://docs.snyk.io/developer-tools/snyk-cli/commands/monitor), [`container monitor`](https://docs.snyk.io/developer-tools/snyk-cli/commands/container-monitor), [`iac test`](https://docs.snyk.io/developer-tools/snyk-cli/commands/iac-test)
`--project-business-criticality=[,]...>`: [`monitor`](https://docs.snyk.io/developer-tools/snyk-cli/commands/monitor), [`container monitor`](https://docs.snyk.io/developer-tools/snyk-cli/commands/container-monitor), [`iac test`](https://docs.snyk.io/developer-tools/snyk-cli/commands/iac-test)
`--project-tags=[,]...>`: [`monitor`](https://docs.snyk.io/developer-tools/snyk-cli/commands/monitor), [`container monitor`](https://docs.snyk.io/developer-tools/snyk-cli/commands/container-monitor), [`iac test`](https://docs.snyk.io/developer-tools/snyk-cli/commands/iac-test)
`--tags=[,]...>`: [`monitor`](https://docs.snyk.io/developer-tools/snyk-cli/commands/monitor), [`container monitor`](https://docs.snyk.io/developer-tools/snyk-cli/commands/container-monitor)
`--reachability=`: [`test`](https://docs.snyk.io/developer-tools/snyk-cli/commands/test),[`monitor`](https://docs.snyk.io/developer-tools/snyk-cli/commands/monitor), [`sbom test`](https://docs.snyk.io/developer-tools/snyk-cli/commands/sbom-test)
`--source-dir`: [`test`](https://docs.snyk.io/developer-tools/snyk-cli/commands/test),[`monitor`](https://docs.snyk.io/developer-tools/snyk-cli/commands/monitor), [`sbom test`](https://docs.snyk.io/developer-tools/snyk-cli/commands/sbom-test)
`--reachability-filter=`: [`test`](https://docs.snyk.io/developer-tools/snyk-cli/commands/test),[`monitor`](https://docs.snyk.io/developer-tools/snyk-cli/commands/monitor), [`sbom test`](https://docs.snyk.io/developer-tools/snyk-cli/commands/sbom-test)
## `snyk aibom` command options
`--html`\
`--json-file-output`: [snyk aibom](https://docs.snyk.io/developer-tools/snyk-cli/commands/aibom)
## `snyk auth` command options
`--auth-type=`\
`--client-secret=`\
`--client-id=`: [`snyk auth`](https://docs.snyk.io/developer-tools/snyk-cli/commands/auth)
## `snyk code test` command option
`--include-ignores`: [`code test`](https://docs.snyk.io/developer-tools/snyk-cli/commands/code-test)
`--report`: [`code test`](https://docs.snyk.io/developer-tools/snyk-cli/commands/code-test)
`--target-name=`: [`code test`](https://docs.snyk.io/developer-tools/snyk-cli/commands/code-test)
`--report`: [`code test`](https://docs.snyk.io/developer-tools/snyk-cli/commands/code-test)
`--target-name=`: [`code test`](https://docs.snyk.io/developer-tools/snyk-cli/commands/code-test)
## `snyk config environment` command option
`--no-check` [snyk config environment](https://docs.snyk.io/developer-tools/snyk-cli/commands/config-environment)
## `snyk container` command options
`--app-vulns`: [`container test`](https://docs.snyk.io/developer-tools/snyk-cli/commands/container-test), [`container monitor`](https://docs.snyk.io/developer-tools/snyk-cli/commands/container-monitor)
`--exclude-app-vulns`: [`container test`](https://docs.snyk.io/developer-tools/snyk-cli/commands/container-test), [`container monitor`](https://docs.snyk.io/developer-tools/snyk-cli/commands/container-monitor), [`container sbom`](https://docs.snyk.io/developer-tools/snyk-cli/commands/container-sbom)
`--nested-jars-depth`: [`container test`](https://docs.snyk.io/developer-tools/snyk-cli/commands/container-test), [`container monitor`](https://docs.snyk.io/developer-tools/snyk-cli/commands/container-monitor)
`--exclude-base-image-vulns`: [`container test`](https://docs.snyk.io/developer-tools/snyk-cli/commands/container-test), [`container monitor`](https://docs.snyk.io/developer-tools/snyk-cli/commands/container-monitor)
`--platform=`: [`container test`](https://docs.snyk.io/developer-tools/snyk-cli/commands/container-test), [`container monitor`](https://docs.snyk.io/developer-tools/snyk-cli/commands/container-monitor) ; [`container sbom`](https://docs.snyk.io/developer-tools/snyk-cli/commands/container-sbom)
`--username=`: [`container test`](https://docs.snyk.io/developer-tools/snyk-cli/commands/container-test), [`container monitor`](https://docs.snyk.io/developer-tools/snyk-cli/commands/container-monitor)
`--password=`: [`container test`](https://docs.snyk.io/developer-tools/snyk-cli/commands/container-test), [`container monitor`](https://docs.snyk.io/developer-tools/snyk-cli/commands/container-monitor)
## `snyk iac test` command options
`--scan=`: [`iac test`](https://docs.snyk.io/developer-tools/snyk-cli/commands/iac-test)
`--target-name=`: [`iac test`](https://docs.snyk.io/developer-tools/snyk-cli/commands/iac-test)
`--rules=`: [`iac test`](https://docs.snyk.io/developer-tools/snyk-cli/commands/iac-test)
`--var-file=`: [`iac test`](https://docs.snyk.io/developer-tools/snyk-cli/commands/iac-test)
`--report`: [`iac test`](https://docs.snyk.io/developer-tools/snyk-cli/commands/iac-test)
## `snyk iac describe` command options
`--from=[,...]`: [`iac describe`](https://docs.snyk.io/developer-tools/snyk-cli/commands/iac-describe)
`--to=`: [`iac describe`](https://docs.snyk.io/developer-tools/snyk-cli/commands/iac-describe)
`--service=[,`: [`iac describe`](https://docs.snyk.io/developer-tools/snyk-cli/commands/iac-describe)
`--quiet`: [`iac describe`](https://docs.snyk.io/developer-tools/snyk-cli/commands/iac-describe)
`--filter`: [`iac describe`](https://docs.snyk.io/developer-tools/snyk-cli/commands/iac-describe)
`--html`: [`iac describe`](https://docs.snyk.io/developer-tools/snyk-cli/commands/iac-describe)
`--html-file-output=`: [`iac-describe`](https://docs.snyk.io/developer-tools/snyk-cli/commands/iac-describe)
`--fetch-tfstate-headers`: [`iac describe`](https://docs.snyk.io/developer-tools/snyk-cli/commands/iac-describe)
`--tfc-token`: [`iac describe`](https://docs.snyk.io/developer-tools/snyk-cli/commands/iac-describe)
`--tfc-endpoint`: [`iac describe`](https://docs.snyk.io/developer-tools/snyk-cli/commands/iac-describe)
`--tf-provider-version`: [`iac describe`](https://docs.snyk.io/developer-tools/snyk-cli/commands/iac-describe)
`--strict`: [`iac describe`](https://docs.snyk.io/developer-tools/snyk-cli/commands/iac-describe)
`--deep`: [`iac describe`](https://docs.snyk.io/developer-tools/snyk-cli/commands/iac-describe)
`--tf-lockfile`: [`iac describe`](https://docs.snyk.io/developer-tools/snyk-cli/commands/iac-describe)
-`-config-dir`: [`iac describe`](https://docs.snyk.io/developer-tools/snyk-cli/commands/iac-describe)
## `snyk iac update-exclude-policy` command options
`--exclude-changed`: [`iac update-exclude-policy`](https://docs.snyk.io/developer-tools/snyk-cli/commands/iac-update-exclude-policy)
`--exclude-missing`: [`iac update-exclude-policy`](https://docs.snyk.io/developer-tools/snyk-cli/commands/iac-update-exclude-policy)
`--exclude-unmanaged`: [`iac update-exclude-policy`](https://docs.snyk.io/developer-tools/snyk-cli/commands/iac-update-exclude-policy)
## `snyk ignore` command options
`--id=`: [`ignore`](https://docs.snyk.io/developer-tools/snyk-cli/commands/ignore)
`--expiry=`: [`ignore`](https://docs.snyk.io/developer-tools/snyk-cli/commands/ignore)
`--reason=`: [`ignore`](https://docs.snyk.io/developer-tools/snyk-cli/commands/ignore)
`--path=`: [`ignore`](https://docs.snyk.io/developer-tools/snyk-cli/commands/ignore)
## `snyk sbom` and `snyk container sbom` command options
`--format=