# Smartcar
> ## Documentation Index
---
# Source: https://smartcar.com/docs/changelog/2022.md
> ## Documentation Index
> Fetch the complete documentation index at: https://smartcar.com/docs/llms.txt
> Use this file to discover all available pages before exploring further.
# 2022 Releases
## January 5, 2022
Smartcar is now compatible with Mercedes-Benz vehicles in the United States.
## February 23, 2022
The EV Battery and EV Charging status and control endpoints are now available for Lexus and Toyota vehicles in Canada and the United States.
## February 21, 2022
The Tire Pressure endpoint is now available for Lexus and Toyota vehicles in Canada and the United States.
## February 14, 2022
Smartcar is now compatible with Chrysler, Dodge, Jeep, and RAM vehicles in Canada.
## February 2, 2022
Brand-specific endpoints are now available for Cadillac, Chevrolet, and Tesla. A full list of the available endpoints is available in the API Reference.
```Node Node theme={null}
const amperage = vehicle.request('GET', 'tesla/charge/ammeter');
```
```Python Python theme={null}
amperage = vehicle.request("GET", "tesla/charge/ammeter")
```
```Java Java theme={null}
SmartcarVehicleRequest request = new SmartcarVehicleRequest.Builder()
.method("GET")
.path("tesla/charge/ammeter")
.build();
VehicleResponse amperage = vehicle.request(request);
```
```Ruby Ruby theme={null}
amperage = vehicle.request("GET", "tesla/charge/ammeter")
```
## March 7, 2022
Smartcar is now compatible with MINI vehicles in Canada, the United States, and our supported European countries.
## April 13, 2022
Smartcar's webhooks now have beta support for sending events in response to events that are generated by the vehicle itself. The initial release supports the following events on Ford, Tesla, and Toyota vehicles in Canada, the United States, and our supported European countries:
* `CHARGING_STARTED`
* `CHARGING_STOPPED`
* `CHARGING_COMPLETED`
Webhook events sent in response to vehicle events can be distinguished from schedule events based on the `eventName` property of the POST body. For example, the POST body for event based webhooks will have the following structure:
```json theme={null}
{
"version": "2.0",
"webhookId": "uuid",
"eventName": "eventBased",
"mode": "test|live",
"payload": {
"eventId": "uuid",
"vehicleId": "uuid",
"eventType": "CHARGING_STARTED|CHARGING_STOPPED|CHARGING_COMPLETED",
"eventTime": "ISO8601 Datetime"
}
}
```
## May 9, 2022
Smartcar is now compatible with Kia vehicles in our supported European countries.
## May 5, 2022
The API now returns more detailed errors for the following:
`UPSTREAM:RATE_LIMIT` - a request fails due to a vehicle rate limit.
`VEHICLE_STATE:NOT_CHARGING` - a vehicle is not charging (only applies to endpoints that return details about a specific charging session e.g. Charging Completion Time).
## June 29, 2022
Smartcar is now compatible with Peugeot and Opel vehicles in our supported European countries.
## June 22, 2022
The Tire Pressure endpoint is now available for BMW, MINI, and Tesla vehicles in Canada, the United States, and our supported European countries.
## June 15, 2022
The API now returns a more detailed VEHICLE\_STATE error whenever a charge request fails due to charger issues or charging schedules. Click the following link to learn more:
VEHICLE\_STATE:CHARGE\_FAULT
## June 8, 2022
Smartcar is now compatible with Nissan vehicles in our supported European countries.
## July 20, 2022
Smartcar is now compatible with Citroën, DS, and Vauxhall vehicles in our supported European countries.
## July 6, 2022
The following brand-specific endpoints are now available for Tesla vehicles in Canada, the United States, and our supported European countries:
* GET `/tesla/compass`
* GET `/tesla/speedometer`
## August 24, 2022
Smartcar is now compatible with Rivian vehicles in the United States.
## August 3, 2022
Smartcar is now compatible with Škoda vehicles in our supported European countries.
The EV Charging control endpoint is now available for Hyundai vehicles in the United States.
The EV Battery Capacity endpoint is now available in our supported European countries.
## September 22, 2022
The following brand-specific endpoint is now available for Tesla vehicles in Canada, the United States, and our supported European countries:
* `POST /tesla/charge/ammeter`
## November 30, 2022
Smartcar is now compatible with Kia vehicles in Canada and the United States.
## December 29, 2022
The Location endpoint is now available for Volkswagen ID series vehicles in our supported European countries.
---
# Source: https://smartcar.com/docs/changelog/2023.md
> ## Documentation Index
> Fetch the complete documentation index at: https://smartcar.com/docs/llms.txt
> Use this file to discover all available pages before exploring further.
# 2023 Releases
## January 6, 2023
Smartcar API v1.0 has been sunset and is no longer supported. If you are currently using v1.0 for API requests, webhooks, errors, or compatibility, we recommend switching to v2.0 as soon as possible.
## March 16, 2023
The API now returns a new code for the RATE\_LIMIT error type if your application tries to make a request to a vehicle too frequently. Click the following link to learn more:
[RATE\_LIMIT:VEHICLE](https://smartcar.com/docs/errors/v2.0/rate-limit/#vehicle)
## March 14, 2023
Smartcar has revamped the Connect flow UI and backend to improve error handling and optimize user conversion rates. Our updates fall into 3 categories: improving brand selection, expanding login methods, and establishing new error codes specific to Connect. These include:
1. Allowing a user to search for:
a. Brand aliases in Brand Select such as VW for Volkswagen
b. Unavailable brands that we plan to introduce in the future, which will display a message highlighting future compatibility with the chosen brand.
2. Expanding login method coverage to include phone numbers for certain brands. We now allow users to log in using email or phone number for the Connect flow starting with Kia and Mercedes-Benz. Stay tuned to our changelog for more brand updates.
3. Providing clearer errors for the Connect flow:
a. no\_vehicles for when the user does not have any vehicles tied to their account and they click to go back to the application
b. configuration\_error for when exiting Connect back to your app through an error page (see below).
c. server\_error which is thrown if there is not another Connect error specified.
More documentation on error handling can be found [here](https://smartcar.com/docs/integration-guide/test-your-integration/test-errors/#1-connect-errors).
## March 6, 2023
The disconnect endpoint now supports the use of management API token (MAT) for authorization purposes. Documentation can be found [here](https://smartcar.com/docs/api#delete-disconnect)
## May 10, 2023
Smartcar is now compatible with Infiniti vehicles in the United States.
## June 7, 2023
Smartcar is now compatible with Hyundai vehicles in Canada.
## June 5, 2023
Test mode supports the following email format with any password to generate an account with multiple vehicles:
`-vehicles@smartcar.com`
## July 26, 2023
The following brand-specific endpoints are now available for Tesla vehicles in Canada, the United States, and our supported European countries:
* GET `/tesla/charge/records`
* GET `/tesla/charge/records/billing`
## July 19, 2023
Smartcar is now compatible with Mercedes-Benz vehicles in our supported European countries.
## July 12, 2023
The following brand-specific endpoints are now available for Tesla vehicles in Canada, the United States, and our supported European countries:
* GET `/tesla/charge/schedule`
* POST ` /tesla/charge/schedule`
* GET `/tesla/climate/cabin`
* POST ` /tesla/climate/cabin`
* GET `/tesla/climate/defroster`
* POST ` /tesla/climate/defroster`
* GET `/tesla/climate/steering_wheel`
* POST ` /tesla/climate/steering_wheel`
## August 22, 2023
The following brand-specific endpoints are now available for Nissan vehicles in the United States:
* GET /nissan/charge/schedule
* PUT /nissan/charge/schedule
## August 17, 2023
The following endpoints are now available to manage vehicle connections:
* GET Vehicle Connections
* DELETE Vehicle Connections
## August 9, 2023
The following brand-specific endpoints are now available for Ford and Lincoln vehicles in Canada, the United States, and our supported European countries:
* GET ford/charge/schedule\_by\_location
* PUT ford/charge/schedule\_by\_location
* GET lincoln/charge/schedule\_by\_location
* PUT lincoln/charge/schedule\_by\_location
## September 21, 2023
Introducing Vehicle Management! With this initial release you're able to see and manage
vehicles connected to your applications from within the [Smartcar Dashboard](https://dashboard.smartcar.com/login).
Logos and brand names are for identification purposes only and do not
indicate endorsement of or affiliation with Smartcar.
## September 19, 2023
[Charge Records](/api-reference/bmw/get-charge-records) is now available as a make specific endpoint for BMW and MINI in Canada, the United States, and our supported European countries.
## September 06, 2023
Lock Status is now available as a Core endpoint and supported by the following makes:
* Tesla (Global)
* Ford (Global)
* Kia (Global)
* Jaguar (Global)
* Land Rover (Global)
* BMW (Global)
* MINI (Global)
* Lincoln (US)
* Toyota (US)
* Lexus (US)
In addition to the lock status of the vehicle, Smartcar will also return the open status of doors, sunroof, windows, based on what the vehicle supports.
## October 19, 2023
BMW and MINI EVs are now compatible with the following endpoints globally:
* [Get Charge Limit](/api-reference/evs/get-charge-limit)
* [Set Charge Limit](/api-reference/evs/set-charge-limit)
## October 5, 2023
Smartcar is now compatible with Hyundai in supported European countries.
## October 3, 2023
Smartcar is now compatible with Mazda and Porsche in supported European countries.
## November 15, 2023
Smartcar is now compatible with CUPRA in supported European countries.
---
# Source: https://smartcar.com/docs/changelog/2024.md
> ## Documentation Index
> Fetch the complete documentation index at: https://smartcar.com/docs/llms.txt
> Use this file to discover all available pages before exploring further.
# 2024 Releases
## Fetched At Header
A new [SC-Feched-At](https://smartcar.com/docs/api-reference/headers) header is now available. This new header highlights when Smartcar fetched the returned data from an OEM whereas `sc-data-age` indicates when the returned data was recorded by the vehicle.
## Connect Playground
The [Connect Playground](https://smartcar.com/docs/getting-started/dashboard/playground) is available, making it easier than ever to create your Connect URL and start requesting vehicle consent.
## Diagnostic Webhook
A new [Diagnostic Webhook](https://smartcar.com/docs/getting-started/tutorials/webhooks-diagnostic) is available in beta. This webhook delivers either [Diagnostic Trouble Code](https://smartcar.com/docs/api-reference/get-dtcs) events or [System Status](https://smartcar.com/docs/api-reference/get-system-status) changes.
## Diagnostic Trouble Codes
A new [Diagnostic Trouble Code](https://smartcar.com/docs/api-reference/get-dtcs) endpoint is available in beta. This endpoint returns a list of active Diagnostic Trouble Codes (DTCs) and the timestamp they last became active.
## Ford authentication update
Ford's authentication process has been updated to require the use of SDKs. Our [Connect SDKs](https://smartcar.com/docs/connect/connect-sdks) have been updated to redirect to Ford's site to handle the authentication process when the user logs in.
## System Status endpoint now in Beta
A new [System Status](https://smartcar.com/docs/api-reference/get-system-status) endpoint is available in beta. This endpoint returns a list of vehicle components and their health state for FCA and GM makes.
## Webhooks subscription status
The Smartcar Dashboard now indicates which webhooks a vehicle is subscribed to. From the Vehicles table, click into the three dot menu to view vehicle details. From here, navigate to the new Webhooks tab!
## Dynamic Webhooks now in Beta
[Dynamic Webhooks](/getting-started/tutorials/webhooks-dynamic) are now in beta for Enterprise customers! Please request access from the Webhooks tab on the Smartcar Dashboard!
## Multi-Factor Authentication in Dashboard
[Multi-Factor Authentication](/getting-started/dashboard/dashboard-mfa) is available to offer an additional layer of security for the Smartcar Dashboard.
## Support for MG in Europe
Support for the following endpoints are now available for the MG brand in Europe:
* [VIN](/api-reference/get-vin)
* [Odometer](/api-reference/get-odometer)
* [Lock Status](/api-reference/get-lock-status)
* [Lock/Unlock](/api-reference/control-lock-unlock)
* [Tire Pressure](/api-reference/get-tire-pressure)
* [GET Charge Limit](/api-reference/evs/get-charge-limit)
* [POST Charge Limit](/api-reference/evs/set-charge-limit)
* [Battery Level](/api-reference/evs/get-battery-level)
* [Battery Capacity](/api-reference/evs/get-battery-capacity)
## Support for Honda, Subaru, Acura, and more!
Smartcar is now compatible with the **Honda Prologue**, **Subaru Solterra** and the **Acura ZDX** in supported regions.
### Additional Releases
The following brands now support [Control Charge](/api-reference/evs/control-charge), [Battery Level](/api-reference/evs/get-battery-level), [Battery Capacity](/api-reference/evs/get-battery-capacity) and [Charge Status](/api-reference/evs/get-charge-status):
* Jeep, Fiat and Alfa Romeo (US, Canada and Europe)
* Chevrolet, Cadillac and GMC (US and Canada)
* RAM and Dodge (US and Canada)
* Porsche (US and Europe)
* Mazda (US and Europe)
* Renault (Europe)
* Nissan (Europe)
## Smartcar is now compatible with Dacia in Europe.
Support for the following endpoints are now available for the MG brand in Europe:
* [Vehicle Info](/api-reference/get-vehicle-info)
* [Location](/api-reference/get-location)
* [Control Charge](/api-reference/evs/control-charge)
* [State of Charge](/api-reference/evs/get-battery-level)
* [Charging Status](/api-reference/evs/get-charge-status)
## Connect Insights is now available!
* Each Connect flow launched for the previous two weeks is available in the Smartcar Dashboard with a variety of ways to search for specific Connect launches.
* Enterprise customers have access to funnel analysis so they can understand their conversion rates in the Connect flow.
## Test & Simulated modes are now one
Test and Simulated mode have been combined into a singular mode; Simulated.
If a simulated vehicle is enabled, we will return data following the selected trip. If the simulated vehicle doesn't support the requested endpoint, randomized data will be returned.
If no simulated vehicle is enabled for, we will return data as if a simulated vehicle with "Day Commute" was selected. If the simuday commute doesn't support the requested endpoint, randomized data will be returned.
## Support for Google authentication in Dashboard
The Smartcar Dashboard now supports Google authentication.
## User information for Tesla
The following endpoints are now available for Tesla:
* [Get User Info](/api-reference/tesla/get-user-info)
* [Get User access](/api-reference/tesla/get-user-access)
## Customize brands in Connect
You can now customize which bands show up in Connect from the [Dashboard](https://dashboard.smartcar.com/). Easily manage which brands your users can connect to based on engine type or endpoint.
## Get charge endpoint for Audi
The following Brand Specific Endpoint is now available for Audi:
* [Get Charge Status](/api-reference/audi/get-charge)
## Additional endpoints for Audi
The following endpoints are now available for Audi:
* [Get Charge Limit](/api-reference/evs/get-charge-limit)
* [Set Charge Limit](/api-reference/evs/set-charge-limit)
* [Control Charge](/api-reference/evs/control-charge)
* [Lock Status](/api-reference/get-lock-status)
## Service history
The following endpoint is now available for Ford, Lincoln, Toyota, Lexus, Mazda and Volkswagen (US) vehicles:
* [GET /service/history](/api-reference/get-service-records)
## Tesla alerts
The following make specific endpoint is now available for Tesla across all supported regions:
* [GET /tesla/alerts](/api-reference/tesla/get-alerts)
## Tesla charge battery and suggested user messages
The following make specific endpoints are now available for Tesla across all supported regions:
* [GET /tesla/charge](/api-reference/tesla/get-charge)
* [GET /tesla/battery](/api-reference/tesla/get-battery)
### Additional Releases
Suggested user messages are now included as part of API error responses for you to easily surface resolution steps to vehicle owners. See our [error documentation](/api-reference/api-errors) for more details.
## Country management for Smartcar Connect
Country Management is now available for Connect! Easily manage what countries are enabled for your application on Dashboard.
### Additional Releases
The `user` parameter is now available when [building the Connect URL](/connect/redirect-to-connect) to pass a unique identifier for a vehicle owner to track and aggregate analytics across their Connect sessions for your application.
## Organization access for teams
Organization access for Teams is now available on Dashboard. Check out our docs page on [Teams](/getting-started/dashboard/teams) for details.
### Additional Releases
The following endpoint is now available for Tesla vehicles globally:
* [Virtual Key Status](/api-reference/tesla/get-virtual-key-status)
## Subaru US
Smartcar is now compatible with Subaru in the US.
### Additional Releases
The following endpoints are now available for Tesla vehicles globally:
* [Control Charge Port](/api-reference/tesla/control-charge-port)
* [Control Frunk](/api-reference/tesla/control-frunk)
* [Control Trunk](/api-reference/tesla/control-trunk)
## Fuel endpoint for European brands
The [GET /fuel](/api-reference/get-fuel-tank) endpoint is now available for the following brands in supported European countries:
| | | | |
| ----------------------------- | ----------------------------- | ----------------------------- | ----------------------------- |
| Audi | Hyundai | Mercedes-Benz | Skoda |
| BMW | Jaguar | MINI | Vauxhall |
| Citroen | Kia | Opel | Volkswagen |
| DS | Land Rover | Peugeot | Volvo |
| Ford | Mazda | Renault | |
---
# Source: https://smartcar.com/docs/getting-started/Implementation-Checklist.md
> ## Documentation Index
> Fetch the complete documentation index at: https://smartcar.com/docs/llms.txt
> Use this file to discover all available pages before exploring further.
# Implementation Checklist
> Use this guide to track your progress through the Smartcar integration process, from initial setup to production launch.
## Phase 0: Pre-Kickoff
* **Tech Stack:** Identify technology stack for implementation and explore appropriate SDKs ([frontend](https://smartcar.com/docs/connect/connect-sdks) and [backend](https://smartcar.com/docs/api-reference/api-sdks)) and [getting started resources](https://smartcar.com/docs/getting-started/introduction).
* **Tesla Tenanting:** (*Enterprise Only*) Check in with your Solution Architect to ensure you have your Tesla Tenant set up enabling your org to have a [Virtual Key with your own brand name](https://smartcar.com/docs/help/oem-integrations/tesla/virtual-key-tesla#enterprise-plan).
* **Slack Channel**: (*Enterprise Only*) Smartcar will set up a [dedicated Slack channel](https://smartcar.com/docs/help/assist-ai-slack) for technical communications - ensure the relevant stakeholders are added.
## Phase 1: Application Setup & Security Foundation
* **Team Access:** [Invite relevant team members](https://smartcar.com/docs/getting-started/dashboard/teams#members) to your Smartcar Dashboard account.
* **Subscribe to Updates:** Ensure your team subscribes to [status.smartcar.com](https://status.smartcar.com), [brandreliability.smartcar.com](https://brandreliability.smartcar.com) and [product changelogs](https://smartcar.com/docs/changelog/latest) to stay informed on platform health and updates.
* **Environment Setup:** Create distinct **Test** and **Production** applications in the dashboard with clear naming conventions.
* **Credentials:** Capture and securely store your `Client ID`, `Client Secret`, and `Application Management Token`.
* **Secret Management:** Integrate your `Client Secret` into an enterprise secrets management system (e.g. AWS Secrets Manager, Vault). **Never commit secrets to version control.**
* **Connect Configuration:** Set each application’s Privacy Policy URL and Logo.
* **Redirect URIs:** Configure the Redirect URI for each application (ensure they are externally accessible).
* **Scope Definition:** [Define your Vehicle Access Configuration](https://smartcar.com/docs/getting-started/how-to/configure-permissions#how-to-configure-permissions-for-vehicle-data-collection) (OAuth scopes) based on the specific signals and commands your application requires.
* **Scope Minimization:** Strictly enforce **Scope Minimization** by requesting only the minimum necessary data permissions from the user.
* **Brand Select:** Confirm and specify which OEM Brands will be displayed to the user and if you want to automatically add any new brands as they become available.
* **Compatibility Check:** *(Enterprise Only)* Validate target vehicle compatibility using the [Region and Make Compatibility API](https://smartcar.com/docs/api-reference/compatibility/by-region-and-make).
## Phase 2: Connect Flow & Conversion Optimization
* **User Journey:** Determine how your application will funnel users into the Smartcar Connect flow.
* **Frontend Implementation:** Implement the frontend Connect flow to generate the authorization URL (using `link.getAuthUrl()`).
* **First Connection:** Onboard your first test vehicle and review its data in the Smartcar Dashboard.
* **Brand Select:** Assess and implement [**Brand Select**](https://smartcar.com/docs/connect/advanced-config/flows#bypassing-the-brand-selection-screen) functionality (if applicable) to skip the brand selection screen and accelerate the user flow.
* **Error Simulation:** Validate your application’s error handling by testing with [simulated error VINs ](https://smartcar.com/docs/errors/testing-errors#testing-errors)(e.g., using the `invalid_subscription` trigger).
## Phase 3: Core Implementation & Token Resilience
* **Architecture**: Design the backend architecture.
* **Webhook Endpoint:** Implement a [backend endpoint to receive webhook data](https://smartcar.com/docs/integrations/webhooks/receiving-webhooks) and error payloads.
* **Callback Endpoint:** Implement a backend endpoint to receive the authorization code at your [Redirect URI.](https://smartcar.com/docs/getting-started/tutorials/backend)
* **Token Exchange:** Implement the logic to [exchange](https://smartcar.com/docs/api-reference/authorization/overview#token-management) the authorization `code` for an `accessToken` (valid for 2 hours) and `refreshToken` (valid for 60 days). **This must be done server-side.**
* **Secure Storage:** [Securely store tokens](https://smartcar.com/docs/getting-started/how-to/get-an-access-token) in an **encrypted backend database**. Tokens must never be stored client-side.
* **Proactive Renewal:** Implement a service to exchange the `refreshToken` for a new token pair before the 60-day expiration window closes.
* **Atomic Token Rotation:** Implement **Atomic Token Rotation** logic to ensure new token pairs are persisted reliably, preventing race conditions that could invalidate single-use tokens.
* **Support Protocol:** Establish internal support protocols to handle questions from your vehicle owners (ensure your team acts as Tier 1 support before escalating to Smartcar).
## Phase 4: Operational Scale & Error Handling
* **Webhooks-First:** *(If migrating)* Shift data ingestion models from polling to a **Webhooks-First** architecture for real-time scalability.
* **Webhook Configuration:** Configure Webhook integrations in the Smartcar Dashboard (select triggers, set callback URI).
* **Payload Verification:** Implement the mandatory callback URI verification logic (responding to the `VERIFY` event with the challenge hash).
* **User Error Handling:** Map Connect errors (e.g. `no_vehicles`) to clear, actionable messages for your users.
* **Vehicle Error Handling:** Handle `VEHICLE_ERROR` events and trigger user notifications when specific vehicle owner actions are required to resolve the issue.
* **Re-authentication:** Implement resolution logic for `ACCOUNT_ISSUE` errors by prompting the user to re-authenticate via Smartcar Connect.
* **Rate Limiting:** Implement **Exponential Backoff** strategies for retrying API errors (429) and adhere to `Retry-After` headers.
## Phase 5: Production Readiness Review
* **Access Control:** Ensure all service-specific IAM roles adhere to the principle of least privilege.
* **Secret Management:** Verify all secrets are stored and accessed via a dedicated secrets manager.
* **Encryption:** Ensure data is encrypted at rest and in transit.
* **Vulnerability Scanning:** Confirm that dependency and vulnerability scans pass with zero critical/high issues.
* **Network Security:** Configure firewalls/security groups to block unauthorized ports and apply WAF rules where appropriate.
* **Logging:** Ensure structured logs are successfully ingested for staging and production environments, with configurable log levels.
* **Observability:** Configure a dashboard to capture essential metrics (Latency, Error Rate, Traffic).
* **Alerting:** Configure critical alerts to route to your on-call channels.
* **CI/CD:** Ensure a fully automated build and deployment pipeline is in place for all environments.
* **Infrastructure as Code (IaC)**: The service infrastructure is managed using IaC (e.g., Terraform, CDK).
* **Architecture Review Complete:** The service architecture has passed the formal review.
* **Service Runbook:** A complete runbook exists detailing: service owners, quick start, deployment, scaling, and incident response.
* **Tagging:** Tagging policy is applied to infrastructure.
* **Support Review:** Review the vehicle owner support approach again and ensure VO's are not channeled to Smartcar support directly and that Smartcar support is used as Tier 3
---
# Source: https://smartcar.com/docs/api-reference/about-brand-specific.md
> ## Documentation Index
> Fetch the complete documentation index at: https://smartcar.com/docs/llms.txt
> Use this file to discover all available pages before exploring further.
# Make Specific Endpoints
The Vehicles API v2.0 will be deprecated by **Q3 of 2026**. We recommend migrating to the [latest version](/api-reference/vehicles-api-intro) as soon as possible to ensure continued support and access to new features.
In cases where there are many differences in how each OEM provides the same data, Smartcar would provide you with a make-specific endpoint before making it widely available to all supported makes.
This allowed customers to take advantage of these endpoints and share feedback with Smartcar. Based on the feedback, we realized that these endpoints often required customers to write make-specific code, which is not ideal for a standardized API.
These endpoints will be deprecated along with API V2.0.
When using make specific endpoints, please ensure to specify the [make](/api-reference/makes) in lower case format. Using upper case letters will result in a PERMISSION error.
---
# Source: https://smartcar.com/docs/errors/connect-errors/access-denied.md
> ## Documentation Index
> Fetch the complete documentation index at: https://smartcar.com/docs/llms.txt
> Use this file to discover all available pages before exploring further.
# Access Denied
> This error occurs when a user denies your application access to the requested scope of permissions.
| Parameter | Required | Description |
| ------------------- | -------- | ---------------------------------- |
| `error` | `true` | `access_denied` |
| `error_description` | `true` | User denied access to application. |
```http Example redirect uri theme={null}
HTTP/1.1 302 Found
Location: https://example.com/home
?error=access_denied
&error_description=User+denied+access+to+application
```
## Testing
To test this error, launch Smartcar Connect in test mode and select “Deny access” on the permissions screen.
We recommend handling this error by re-prompting the user to authorize their vehicle and adding a message like in the example below.
---
# Source: https://smartcar.com/docs/help/accessing-support-center.md
> ## Documentation Index
> Fetch the complete documentation index at: https://smartcar.com/docs/llms.txt
> Use this file to discover all available pages before exploring further.
# Accessing the Smartcar Support Center
> The Smartcar Support Center provides helpful resources including a knowledge base, ticket submission form, AI chat assistant, and a ticket center to manage your requests.
This feature is available on paid plans.
You can access the Support Center in two ways:
### Option 1: Visit the Support Center directly
Go to [support.smartcar.com](https://support.smartcar.com). You’ll be redirected to the Smartcar Dashboard to log in with your Dashboard credentials.
### Option 2: From the Smartcar Dashboard
1. Log in at [dashboard.smartcar.com](https://dashboard.smartcar.com).
2. Click the **Help** icon in the bottom-left corner, or the **Help Hub** icon in the bottom-right.
3. Select the **Support Center** option to be redirected to the full Support Center.
***
For information about email, changelog, status, and brand reliability subscriptions, see [Subscribing to Smartcar Updates and Notifications](/help/smartcar-updates).
---
# Source: https://smartcar.com/docs/getting-started/tutorials/android.md
> ## Documentation Index
> Fetch the complete documentation index at: https://smartcar.com/docs/llms.txt
> Use this file to discover all available pages before exploring further.
# Android Tutorial
> In this tutorial, we will use the Android SDK to integrate Connect into your application.
Our frontend SDKs handle getting an authorization code representing a vehicle owner's consent for your application to interact with their vehicle
for the requested permissions. In order to make requests to a vehicle, please use one of our [backend SDKs](/api-reference/api-sdks).
For security, token exchanges and requests to vehicles **should not** be made client side.
# Overview
1. The Mobile Application launches a `Chrome Custom Tab` with Smartcar Connect to request access to a user’s vehicle.
On Connect, the user logs in with their vehicle credentials and grants the Application access to their vehicle.
2. The `Chrome Tab` is redirected to a specified `REDIRECT_URI` along with an authorization `code`.
This will be the custom scheme set on the application. The Smartcar Android receives the authorization `code` in a view listening
for the specified custom scheme URI, and passes it to the Mobile Application.
3. The Mobile Application sends the received authorization `code` to the Application’s backend service.
4. The Application sends a request to the Smartcar API. This request contains the authorization code along with the Application’s
`CLIENT_ID` and `CLIENT_SECRET`.
5. In response, Smartcar returns an `ACCESS_TOKEN` and a `REFRESH_TOKEN`.
6. Using the `ACCESS_TOKEN`, the Application can now send requests to the Smartcar API. It can access protected resources and send commands
to and from the user’s vehicle via the backend service.
# Prerequisites
* [Sign up](https://dashboard.smartcar.com/signup) for a Smartcar account.
* Make a note of your `CLIENT_ID` and `CLIENT_SECRET` from the **Configuration** section on the Dashboard.
* Add a custom scheme redirect URI to your application configuration.
* Add the `app_server` redirect URI from [Setup step 2.](/getting-started/tutorials/android#setup) to your application configuration.
For Android, we require the custom URI scheme to be in the format of `sc` + `clientId` + `://` + `hostname`.
For now, you can just set it to `sc` + `clientId` + `://exchange`.
Please see our [Connect Docs](/connect/dashboard-config#redirect-uris) for more information.
# Setup
1. Clone our repo and install the required dependencies:
```bash theme={null}
$git clone https://github.com/smartcar/getting-started-android-sdk.git
```
Do not “checkout from version control” with the Getting Started repo in Android Studio, as it will not open the proper module.
2. Open `getting-started-android-sdk/tutorial` in Android Studio as an existing project and build from existing sources.
Android Studio should automatically import the required dependencies and build gradle. We're setting `app_server` to `http://10.0.2.2:8000`
to pass the authorization `code` from the [Handle the Response](/getting-started/tutorials/android#handle-the-response) step later on in the tutorial to our backend.
```xml strings.xml theme={null}
sc[yourClientId][yourClientId]http://10.0.2.2:8000
```
# Build your Connect URL
1. Instantiate a `smartcarAuth` object in the `onCreate` function of the `MainActivity`.
```java MainActivity.java theme={null}
// TODO: Authorization Step 1a: Initialize the Smartcar object
private static String CLIENT_ID;
private static String REDIRECT_URI;
private static String[] SCOPE;
private SmartcarAuth smartcarAuth;
protected void onCreate(Bundle savedInstanceState) {
...
// TODO: Authorization Step 1b: Initialize the Smartcar object
CLIENT_ID = getString(R.string.client_id);
REDIRECT_URI = getString(R.string.smartcar_auth_scheme) + "://" + getString(R.string.smartcar_auth_host);
SCOPE = new String[]{"required:read_vehicle_info"};
smartcarAuth = new SmartcarAuth(
CLIENT_ID,
REDIRECT_URI,
SCOPE,
true,
new SmartcarCallback() {
// TODO: Authorization Step 3b: Receive an authorization code
}
);
}
```
The Android SDK does not support `simulated` mode at this time - only `test` and `live`.
Feel free to set `testMode` to `false` where you instantiate your `SmartcarAuth` object to
connect to a real vehicle.
2. The Android application will launch a Chrome Tab with Smartcar Connect to request access to a user’s vehicle.
On Connect, the user logs in with the username and password for their vehicle’s connected services account and grants the application access to their vehicle.
To launch Connect, we can use the `addClickHandler` function that our `smartcarAuth` object has access to.
```java MainActivity.java theme={null}
// TODO: Authorization Step 2: Launch Connect
smartcarAuth.addClickHandler(appContext, connectButton);
```
# Registering your Custom Scheme
Once a user has authorized the application to access their vehicle, the user is redirected to the `REDIRECT_URI` with an authorization `code` as a query parameter.
Android applications use custom URI schemes to intercept calls and launch the relevant application. This is defined within the `AndroidManifest`.
```xml AndroidManifest.xml theme={null}
```
# Handle the response
Using the Android SDK, the application can receive the code in the `SmartcarCallback` object passed into the `SmartcarAuth` object.
```java MainActivity.java theme={null}
smartcarAuth = new SmartcarAuth(
CLIENT_ID,
REDIRECT_URI,
SCOPE,
true,
new SmartcarCallback() {
// TODO: Authorization Step 3b: Receive an authorization code
@Override
public void handleResponse(final SmartcarResponse smartcarResponse) {
Log.i("MainActivity", smartcarResponse.getCode());
// TODO: Request Step 1: Obtain an access token
//TODO: Request Step 2: Get vehicle information
}
}
);
```
# Launching Connect
Build your application in Android Studio and click on the **Connect your vehicle** button.
This tutorial configures Connect to launch in `test` mode by default.
In `test` mode, any `username` and `password` is valid for each brand.
Smartcar showcases all the permissions your application is asking for - `read_vehicle_info` in this case.
Once you have logged in and accepted the permissions, you should see your authorization `code` printed to your console.
# Getting your first access token
After receiving the authorization `code`, your iOS application must exchange it for an `ACCESS_TOKEN`. To do so, we can send
the code to a backend service. Let’s assume our backend service contains an endpoint `/exchange` that receives an authorization `code` as a query parameter and exchanges it for an `ACCESS_TOKEN`.
```swift ViewController.swift theme={null}
// TODO: Obtain an access token
public void handleResponse(final SmartcarResponse smartcarResponse) {
Log.i("MainActivity", smartcarResponse.getCode());
final OkHttpClient client = new OkHttpClient();
// TODO: Request Step 1: Obtain and access token
// Request can not run on the Main Thread
// Main Thread is used for UI and therefore can not be blocked
new Thread(new Runnable() {
@Override
public void run() {
// send request to exchange the auth code for the access token
Request exchangeRequest = new Request.Builder()
.url(getString(R.string.app_server) + "/exchange?code=" + smartcarResponse.getCode())
.build();
try {
client.newCall(exchangeRequest).execute();
} catch (IOException e) {
e.printStackTrace();
}
}
}).start();
}
```
Notice that our backend service **does not** return the `ACCESS_TOKEN`.
This is by design. For security, our frontend should never have access
to the `ACCESS_TOKEN` and should always be stored in the backend.
# Getting data from a vehicle
Once the backend has the `ACCESS_TOKEN`, it can send requests to a vehicle using the Smartcar API. The Android app will
have to send a request to the backend service which in turn sends a request to Smartcar. We have to do this because
our frontend **does not** have the `ACCESS_TOKEN`.
Assuming our backend has a `/vehicle` endpoint that returns the information of a user’s vehicle, we can make this query in
our `completion callback` and start another `activity` to show the returned vehicle attributes.
```java MainActivity.java theme={null}
public void handleResponse(final SmartcarResponse smartcarResponse) {
...
// TODO: Request Step 2: Get vehicle information
// send request to retrieve the vehicle info
Request infoRequest = new Request.Builder()
.url(getString(R.string.app_server) + "/vehicle")
.build();
try {
Response response = client.newCall(infoRequest).execute();
String jsonBody = response.body().string();
JSONObject JObject = new JSONObject(jsonBody);
String make = JObject.getString("make");
String model = JObject.getString("model");
String year = JObject.getString("year");
Intent intent = new Intent(appContext, DisplayInfoActivity.class);
intent.putExtra("INFO", make + " " + model + " " + year);
startActivity(intent);
} catch (IOException e) {
e.printStackTrace();
} catch (JSONException e) {
e.printStackTrace();
}
}
```
# Setting up your backend
Now that our frontend is complete, we will need to create a backend service that contains the logic for the `/exchange` and `/vehicle` endpoints.
You can use any of our backend SDKs below to set up the service starting from the **Obtaining an Access Token** step.
When setting up the environment variables for your backend SDK, make sure to set `REDIRECT_URI` to the custom scheme
used for this tutorial i.e. `sc + "clientId" + ://exchange`.
---
# Source: https://smartcar.com/docs/api-reference/api-errors.md
> ## Documentation Index
> Fetch the complete documentation index at: https://smartcar.com/docs/llms.txt
> Use this file to discover all available pages before exploring further.
# Errors Overview
> A comprehensive breakout of all Smartcar errors.
# Connect Errors
| Error Type | Error Code | Description |
| -------------------- | -------------------------------------------------------------------- | ------------------------------------------------------------------------------------------------------------------------------- |
| Access Denied | [access\_denied](/errors/connect-errors/access-denied) | This error occurs when a user denies your application access to the requested scope of permissions. |
| Invalid Subscription | [invalid\_subscription](/errors/connect-errors/invalid-subscription) | This error occurs when a user’s vehicle is compatible but their connected services subscription is inactive or never activated. |
| Configuration Error | [configuration\_error](/errors/connect-errors/configuration-error) | This error occurs when the user has encountered an Error page in Connect and has chosen to return to your application. |
| No Vehicles | [no\_vehicles](/errors/connect-errors/no-vehicles) | This error occurs when a vehicle owner has a connected services account, but there are no vehicles associated with the account. |
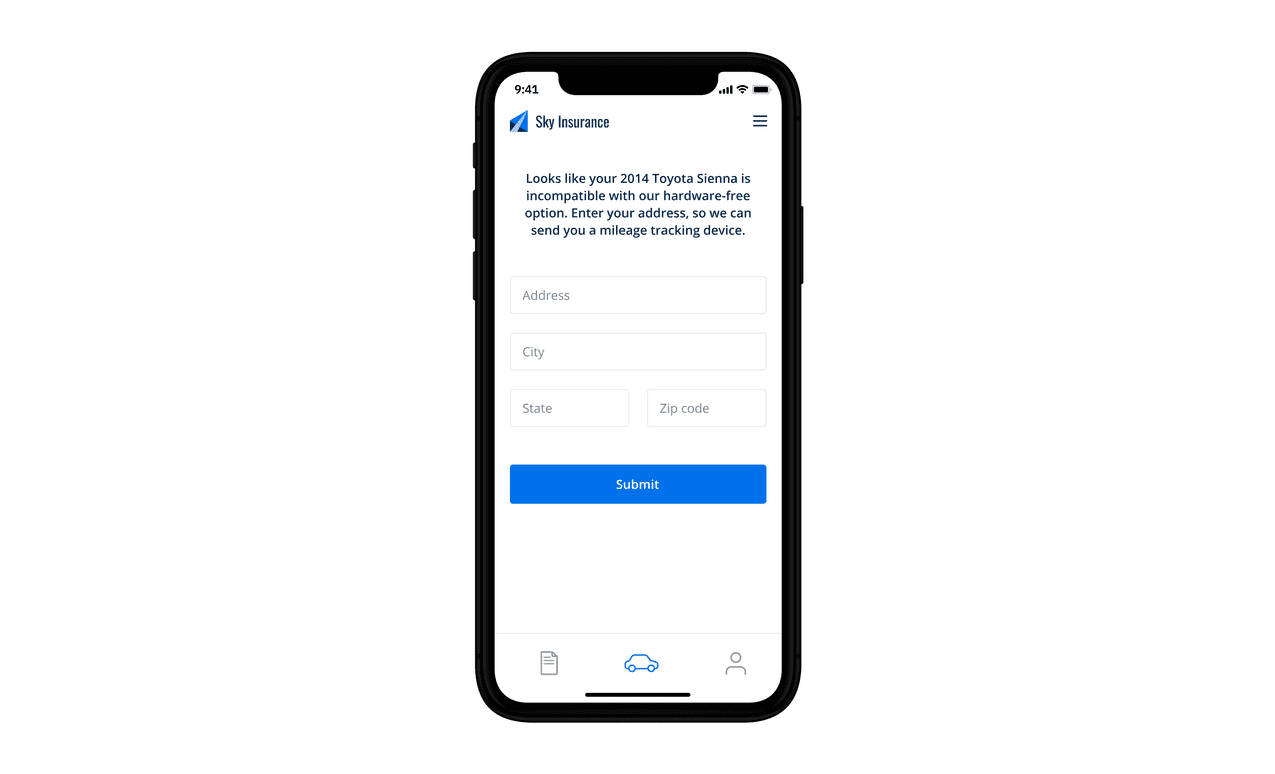
| Vehicle Incompatible | [vehicle\_incompatible](/errors/connect-errors/vehicle-incompatible) | This error occurs when a user tries to authorize an incompatible vehicle in Smartcar Connect. |
| Server Error | [server\_error](/errors/connect-errors/server-error) | If there is a server error, the user will return to your application. |
# API Errors
API errors are returned from requests made via Smartcar API.
Smartcar uses HTTP status codes to indicate success or failure of API requests. This includes:
* `2XX`: indicates success
* `4XX`: indicates an invalid request (e.g. a required parameter is missing from the request body)
* `5XX`: indicates Smartcar-related issues (e.g. a vehicle is not capable of fulfilling a request).
## Error Response
All Smartcar errors contain the following fields:
| Name | Type | Description |
| ----------- | ------ | ------------------------------------------------------------------------------------------------------------------------------------------------------------------------------------------------------------------------------------------------------------------------------------------------------------------------------------------------------------------------------------------------------------------------------------------------------------ |
| type | string | A unique identifier that groups codes into broad categories of errors |
| code | string | A short, descriptive identifier for the error that occurred |
| description | string | A short description of the code that provides additional information about the error. The description is always provided in English. |
| docURL | string | A link to Smartcar’s doc center guide for the given type and code |
| statusCode | number | The HTTP status code |
| requestId | string | Smartcar’s request ID |
| resolution | object | An object with at least one enumerated property named as "type" that specifies which action can be taken to resolve this error. There are three possible values for the property "type": `RETRY_LATER` - Retry the request at a later time; `REAUTHENTICATE` - Prompt the user to re-authenticate in Smartcar Connect; and `CONTACT_SUPPORT` - Contact Smartcar’s support team. This object could contain other properties depending on the "type" of error. |
| Error Type | Error Code | Status | Description |
| ---------------------------- | ----------------------------------------------------------------------------------------------------- | ------ | ------------------------------------------------------------------------------------------------------------------------------------------------------------------------------------------------------------- |
| `AUTHENTICATION` | [NULL](/errors/api-errors/authentication-errors#null) | 401 | Thrown when there is an issue with your authorization headers. |
| `BILLING` | [INVALID\_PLAN](/errors/api-errors/billing-errors#invalid-plan) | 430 | Thrown when limits have been reached based on your plan or if the feature is not available. |
| `BILLING` | [VEHICLE\_LIMIT](/errors/api-errors/billing-errors#vehicle-limit) | 430 | Thrown when limits have been reached based on your plan or if the feature is not available. |
| `BILLING` | [VEHICLE\_REQUEST\_LIMIT](/errors/api-errors/billing-errors#vehicle-request-limit) | 430 | Thrown when limits have been reached based on your plan or if the feature is not available. |
| `BILLING` | [ACCOUNT\_SUSPENDED](/errors/api-errors/billing-errors#account-suspended) | 430 | Thrown when limits have been reached based on your plan or if the feature is not available. |
| `COMPATIBILITY` | [MAKE\_NOT\_COMPATIBLE](/errors/api-errors/compatibility-errors#make-not-compatible) | 501 | Thrown when Smartcar does not support a make or feature for a vehicle. |
| `COMPATIBILITY` | [SMARTCAR\_NOT\_CAPABLE](/errors/api-errors/compatibility-errors#smartcar-not-capable) | 501 | Thrown when Smartcar does not support a make or feature for a vehicle. |
| `COMPATIBILITY` | [VEHICLE\_NOT\_CAPABLE](/errors/api-errors/compatibility-errors#vehicle-not-capable) | 501 | Thrown when Smartcar does not support a make or feature for a vehicle. |
| `CONNECTED_SERVICES_ACCOUNT` | [ACCOUNT\_ISSUE](/errors/api-errors/connected-services-account-errors#account-issue) | 400 | Thrown when there are issues with the user's connected service account. |
| `CONNECTED_SERVICES_ACCOUNT` | [AUTHENTICATION\_FAILED](/errors/api-errors/connected-services-account-errors#authentication-failed) | 400 | Thrown when there are issues with the user's connected service account. |
| `CONNECTED_SERVICES_ACCOUNT` | [NO\_VEHICLES](/errors/api-errors/connected-services-account-errors#no-vehicles) | 400 | Thrown when there are issues with the user's connected service account. |
| `CONNECTED_SERVICES_ACCOUNT` | [SUBSCRIPTION](/errors/api-errors/connected-services-account-errors#subscription) | 400 | Thrown when there are issues with the user's connected service account. |
| `CONNECTED_SERVICES_ACCOUNT` | [VEHICLE\_MISSING](/errors/api-errors/connected-services-account-errors#vehicle-missing) | 400 | Thrown when there are issues with the user's connected service account. |
| `CONNECTED_SERVICES_ACCOUNT` | [PERMISSION](/errors/api-errors/connected-services-account-errors#permission) | 400 | Thrown when there are permission issues with the user's connected service account. |
| `CONNECTED_SERVICES_ACCOUNT` | [VIRTUAL\_KEY\_REQUIRED](/errors/api-errors/connected-services-account-errors#virtual-key-required) | 400 | Thrown when a virtual key is required to complete the request. |
| `PERMISSION` | [NULL](/errors/api-errors/permission-errors#null) | 403 | Thrown when you make a requests to an endpoint associated with permissions not yet granted to your application. |
| `RATE_LIMIT` | [SMARTCAR\_API](/errors/api-errors/rate-limit-errors#smartcar-api) | 429 | Thrown when there is an issue with the frequency of your requests. |
| `RATE_LIMIT` | [VEHICLE](/errors/api-errors/rate-limit-errors#vehicle) | 429 | Thrown when there is an issue with the frequency of your requests. |
| `RESOURCE_NOT_FOUND` | [PATH](/api-reference/api-errors#resource-errors-path) | 404 | Thrown if the requested path does not exist. |
| `RESOURCE_NOT_FOUND` | [VERSION](/api-reference/api-errors#resource-errors-version) | 404 | Thrown if the requested path does not exist. |
| `SERVER` | [INTERNAL](/errors/api-errors/server-errors#internal) | 500 | Thrown when Smartcar runs into an unexpected issue and was unable to process the request. |
| `SERVER` | [MULTIPLE\_RECORDS\_FOUND](/errors/api-errors/server-errors#multiple-records-found) | 500 | Thrown when multiple records are found but only one was expected. |
| `SERVER` | [RECORD\_NOT\_FOUND](/errors/api-errors/server-errors#record-not-found) | 500 | Thrown when a required record could not be found. |
| `UPSTREAM` | [INVALID\_DATA](/errors/api-errors/upstream-errors#invalid-data) | 502 | Thrown when the OEM or vehicle failed to process the request. |
| `UPSTREAM` | [KNOWN\_ISSUE](/errors/api-errors/upstream-errors#known-issue) | 502 | Thrown when the OEM or vehicle failed to process the request. |
| `UPSTREAM` | [NO\_RESPONSE](/errors/api-errors/upstream-errors#no-response) | 502 | Thrown when the OEM or vehicle failed to process the request. |
| `UPSTREAM` | [RATE\_LIMIT](/errors/api-errors/upstream-errors#rate-limit) | 502 | Thrown when the OEM or vehicle failed to process the request. |
| `UPSTREAM` | [UNKNOWN\_ISSUE](/errors/api-errors/upstream-errors#unknown-issue) | 502 | Thrown when the OEM or vehicle failed to process the request. |
| `VALIDATION` | [NULL](/errors/api-errors/validation-errors#null) | 400 | Thrown if there is an issue with the format of the request or body. |
| `VALIDATION` | [PARAMETER](/errors/api-errors/validation-errors#parameter) | 400 | Thrown if there is an issue with the format of the request or body. |
| `VEHICLE_STATE` | [ASLEEP](/errors/api-errors/vehicle-state-errors#asleep) | 409 | Thrown when a request fails due to the state of a vehicle or logically cannot be completed—for example, you can't retrieve vehicle data because the vehicle is asleep and not responding to network requests. |
| `VEHICLE_STATE` | [CHARGING\_IN\_PROGRESS](/errors/api-errors/vehicle-state-errors#charging-in-progress) | 409 | Thrown when a request fails due to the state of a vehicle or logically cannot be completed—for example, you can't unlock the charge port while the vehicle is actively charging. |
| `VEHICLE_STATE` | [CHARGING\_PLUG\_NOT\_CONNECTED](/errors/api-errors/vehicle-state-errors#charging-plug-not-connected) | 409 | Thrown when a request fails due to the state of a vehicle or logically cannot be completed—for example, you can't start charging the vehicle if the cable is not plugged in. |
| `VEHICLE_STATE` | [DOOR\_OPEN](/errors/api-errors/vehicle-state-errors#door-open) | 409 | Thrown when a request fails due to the state of a vehicle or logically cannot be completed—for example, you can't lock the vehicle if a door is open. |
| `VEHICLE_STATE` | [FULLY\_CHARGED](/errors/api-errors/vehicle-state-errors#fully-charged) | 409 | Thrown when a request fails due to the state of a vehicle or logically cannot be completed—for example, you can't start charging because the battery is already fully charged. |
| `VEHICLE_STATE` | [NOT\_CHARGING](/errors/api-errors/vehicle-state-errors#not-charging) | 409 | Thrown when a request fails due to the state of a vehicle or logically cannot be completed—for example, you can't stop charging because the vehicle is not currently charging. |
| `VEHICLE_STATE` | [CHARGE\_FAULT](/errors/api-errors/vehicle-state-errors#charge-fault) | 409 | Thrown when a request fails due to the state of a vehicle or logically cannot be completed—for example, you can't start charging because the vehicle has detected a charging system fault. |
| `VEHICLE_STATE` | [HOOD\_OPEN](/errors/api-errors/vehicle-state-errors#hood-open) | 409 | Thrown when a request fails due to the state of a vehicle or logically cannot be completed—for example, you can't start the engine if the hood is open. |
| `VEHICLE_STATE` | [IGNITION\_ON](/errors/api-errors/vehicle-state-errors#ignition-on) | 409 | Thrown when a request fails due to the state of a vehicle or logically cannot be completed—for example, you can't perform certain remote actions while the ignition is on. |
| `VEHICLE_STATE` | [IN\_MOTION](/errors/api-errors/vehicle-state-errors#in-motion) | 409 | Thrown when a request fails due to the state of a vehicle or logically cannot be completed—for example, you can't lock the doors while the vehicle is in motion. |
| `VEHICLE_STATE` | [REMOTE\_ACCESS\_DISABLED](/errors/api-errors/vehicle-state-errors#remote-access-disabled) | 409 | Thrown when a request fails due to the state of a vehicle or logically cannot be completed—for example, you can't send remote commands because remote access is disabled in the vehicle settings. |
| `VEHICLE_STATE` | [TRUNK\_OPEN](/errors/api-errors/vehicle-state-errors#trunk-open) | 409 | Thrown when a request fails due to the state of a vehicle or logically cannot be completed—for example, you can't lock the vehicle if the trunk is open. |
| `VEHICLE_STATE` | [UNKNOWN](/errors/api-errors/vehicle-state-errors#unknown) | 409 | Thrown when a request fails due to the state of a vehicle or logically cannot be completed—for example, the vehicle reports an unknown state that prevents the requested action. |
| `VEHICLE_STATE` | [UNREACHABLE](/errors/api-errors/vehicle-state-errors#unreachable) | 409 | Thrown when a request fails due to the state of a vehicle or logically cannot be completed—for example, you can't send commands because the vehicle is offline or out of network range. |
| `VEHICLE_STATE` | [VEHICLE\_OFFLINE\_FOR\_SERVICE](/errors/api-errors/vehicle-state-errors#vehicle-offline-for-service) | 409 | Thrown when a request fails due to the state of a vehicle or logically cannot be completed—for example, you can't access vehicle data because the vehicle is offline for maintenance or service. |
---
# Source: https://smartcar.com/docs/help/api-limits.md
> ## Documentation Index
> Fetch the complete documentation index at: https://smartcar.com/docs/llms.txt
> Use this file to discover all available pages before exploring further.
# Smartcar Usage Limits
> Learn about limits you may encounter when using Smartcar.
## Overview
There are several types of limits that govern your use of Smartcar. The nature of telematics requires us to carefully manage vehicle connections and traffic to ensure the stability of our platform and those of our upstream providers.
There are two major types of limits - **Billing Limits** and **Operational Rate Limits**.
# Billing Limits
### [BILLING : VEHICLE\_REQUEST\_LIMIT](/errors/api-errors/billing-errors#vehicle-request-limit)
Your Smartcar plan specifies a maximum number of API calls you are permitted to make to each single vehicle in a given month. If you exceed this limit, you will receive the `VEHICLE_REQUEST_LIMIT` error.
For example: you have been allocated 500 API calls per vehicle per month, but you made the 501st call to a single vehicle during the billing period.
**This limit can be changed.** If you require more calls per vehicle per month, contact [support@smartcar.com](mailto:support@smartcar.com) or your Account Manager and we can work with you to understand your options.
### [BILLING : VEHICLE\_LIMIT](/errors/api-errors/billing-errors#vehicle-request-limit)
Your Smartcar plan specifies a maximum number of vehicles that you may have connected at any one time. This limit applies to vehicle connections, and is separate from the limit regarding the number of API calls to those vehicles. If you receive this error, you have exceeded your maximum number of connected vehicles.
**This limit can be changed.** Reach out to [support@smartcar.com](mailto:support@smartcar.com) or your Account Manager to discuss your options.
# Operational Rate Limits
### [RATE\_LIMIT : SMARTCAR\_API](/errors/api-errors/rate-limit-errors#smartcar-api)
Smartcar limits the total number of requests a single application can make over a given period of time to ensure platform stability for all customers. The Smartcar API Limit is defined as a "bucket" of requests that refills at a constant rate over time.
The default Smartcar API Limit is a **bucket of 120 requests that refills at a rate of 2 requests per minute.**
If you receive a `RATE_LIMIT:SMARTCAR_API` response, your application has exceeded this limit. You should implement an exponential backoff strategy when retrying requests.
**This limit can be changed.** Reach out to [support@smartcar.com](mailto:support@smartcar.com) or your Account Manager to discuss your options.
### [RATE\_LIMIT : VEHICLE](/errors/api-errors/rate-limit-errors#vehicle)
Sending telematics requests to a vehicle causes it to wake up from its sleep state and consume energy and data resources. Excessive requests to a single vehicle can result in:
* EV battery drain
* 12 volt battery drain
* `UPSTREAM:RATE_LIMIT` errors that prevent you from making requests for a longer period of time
Smartcar enforces a per-vehicle rate limit that governs the rate of requests to a single vehicle and mitigates these potential issues. These limits can differ based on the vehicle manufacturer and a number of other factors, and are set by Smartcar to ensure consistent and timely data can be retrieved from vehicles.
**This limit cannot be changed.** If you receive this response, refer to the `retry-after` header (returned as seconds) for when to retry the request.
### [UPSTREAM : RATE\_LIMIT](/errors/api-errors/upstream-errors#rate-limit)
Vehicle manufacturers sometimes impose rate limits on requests to vehicles. The Smartcar Vehicle Rate Limit will generally prevent those limits from being reached, but outside requests from other providers may cause the upstream limit to be exceeded. If the OEM upstream rate limit is exceeded, you will receive `UPSTREAM:RATE_LIMIT` from the Smartcar API for the affected vehicle until the limit is reset.
**This limit cannot be changed.** Smartcar cannot control rate limits imposed by our upstream providers. If you consistently receive this response for a single vehicle, reach out to [support@smartcar.com](mailto:support@smartcar.com) and we can investigate.
---
# Source: https://smartcar.com/docs/api-reference/api-sdks.md
> ## Documentation Index
> Fetch the complete documentation index at: https://smartcar.com/docs/llms.txt
> Use this file to discover all available pages before exploring further.
# SDKs
Our backend SDKs simplify the process of making calls to our Vehicle API.
While we provide a number of SDKs for popular languages, you do not need to use an SDK to integrate with our API.
Our APIs are just standard HTTP endpoints that can be reached with any HTTP library of your choice.
---
# Source: https://smartcar.com/docs/api-reference/application-permissions.md
> ## Documentation Index
> Fetch the complete documentation index at: https://smartcar.com/docs/llms.txt
> Use this file to discover all available pages before exploring further.
# Permissions
> Returns a list of the permissions that have been granted to your application in relation to this vehicle.
## Request
The vehicle id.
## Response
An array of [permissions](/api-reference/permissions).
Metadata about the current list of elements.
The total number of elements for the entire query (not just the given page).
The current start index of the returned list of elements.
```json Example Response theme={null}
{
"paging": {
"count": 25,
"offset": 10
},
"permissions": [
"read_vehicle_info"
]
}
```
---
# Source: https://smartcar.com/docs/getting-started/how-to/architecture-design.md
> ## Documentation Index
> Fetch the complete documentation index at: https://smartcar.com/docs/llms.txt
> Use this file to discover all available pages before exploring further.
# How to Design Your Backend Architecture for Smartcar
> Learn how to design your backend to integrate your application with Smartcar.
Designing your backend architecture for Smartcar integration ensures secure storage of credentials, reliable webhook handling, and a scalable implementation. This guide walks you through the essential database tables and backend endpoints you’ll need.
## What You'll Achieve
* Set up database tables to store vehicles, users, and tokens
* Create backend endpoints to handle OAuth and webhooks
* Understand the data flow between Smartcar and your backend
You’ll need tables to track users, vehicles, and Smartcar tokens. Here’s a recommended schema:
| Table | Purpose | Key Fields |
| ----------------- | ------------------------------------------------------------------------- | -------------------------------------------------------------------------------------------------------------------------------------------- |
| `users` | You probably already have this table to store your app's users | `id`, `email`, `name`, etc. |
| `smartcar_tokens` | Stores Smartcar access and refresh tokens pairs with user and vehicle IDs | `id`, `your_app_user_id`, `smartcar_vehicle_id`, `smartcar_access_token`, `smartcar_refresh_token`, `expires_at`, `created_at`, `updated_at` |
| `vehicles` | Stores connected vehicle information | `id`, `smartcar_user_id`, `your_app_user_id`, `make`, `model`, `year`, `created_at`, `updated_at` |
| `vehicle_data` | Stores data about your vehicles (i.e. odometer readings, location, etc.) | `id`, `smartcar_vehicle_id`, `created_at`, `data_type`, `data_value` |
| `webhook_logs` | Log incoming webhook events (optional) | `id`, `smartcar_vehicle_id`, `event_type`, `payload`, `received_at` |
Always encrypt tokens at rest and never expose them to the client.
Create a backend endpoint to handle the OAuth redirect from Smartcar and exchange the authorization code for tokens.
**Example: `/api/smartcar/callback`**
1. Receive the `code` and `state` query parameters from Smartcar.
2. Exchange the code for tokens using Smartcar’s token endpoint.
3. Store the tokens in your `tokens` table, linked to the user and vehicle.
```javascript theme={null}
POST https://auth.smartcar.com/oauth/token
Content-Type: application/x-www-form-urlencoded
client_id=YOUR_CLIENT_ID&client_secret=YOUR_CLIENT_SECRET&grant_type=authorization_code&code=AUTH_CODE&redirect_uri=YOUR_REDIRECT_URI
```
Set up an endpoint to receive webhook POST requests from Smartcar.
**Example: `/api/webhooks/smartcar`**
* Validate the webhook signature (see [Smartcar webhook docs](/integrations/webhooks)).
* Parse the event payload and update your database as needed.
* Log the event in `webhook_logs` for auditing and debugging.
Want a production-ready AWS implementation? Use the Webhook Receiver Recipe. It includes everything you need to get up and running so you can focus on business logic instead of infrastructure.
```javascript theme={null}
// Example Express.js handler
app.post('/api/webhooks/smartcar', async (req, res) => {
try {
// 1. Validate webhook signature
const isValid = await validateWebhookSignature(req);
if (!isValid) {
return res.status(401).send('Invalid signature');
}
// 2. Parse event and update database
const event = req.body;
await processWebhookEvent(event);
// 3. Respond with 200 OK
res.status(200).send('Received');
} catch (error) {
console.error('Error processing webhook:', error);
res.status(500).send('Error processing webhook');
}
});
```
* Restrict access to OAuth and webhook endpoints.
* Use HTTPS for all traffic.
* Never expose access or refresh tokens to the frontend.
***
## What’s Next
* [Set up Smartcar Connect](/getting-started/connect-vehicles)
* [Configure your webhook integration](/getting-started/integration-overview)
---
# Source: https://smartcar.com/docs/integrations/webhooks/best-practices/architecture.md
> ## Documentation Index
> Fetch the complete documentation index at: https://smartcar.com/docs/llms.txt
> Use this file to discover all available pages before exploring further.
# Architecture Patterns
> Design patterns for reliable webhook processing
The most critical pattern for reliable webhook handling is separating acknowledgment from processing.
## Decouple Receipt from Processing
**Return 200 immediately, process asynchronously.** This is the foundation of a reliable webhook integration.
Your endpoint receives the POST request from Smartcar
Write the raw payload to a queue, database, or object storage
Acknowledge receipt with a 200 status code (within 15 seconds)
A background worker processes the persisted payload
### Why This Matters
* **Prevents timeouts** from slow business logic
* **Allows retry of processing** without requesting redelivery
* **Enables processing updates** without losing historical events
* **Survives outages** in downstream systems
### Implementation Examples
```javascript Node.js (Express + AWS SQS) theme={null}
const express = require('express');
const AWS = require('aws-sdk');
const app = express();
const sqs = new AWS.SQS();
app.post('/webhooks/smartcar', async (req, res) => {
try {
// 1. Get the raw payload
const payload = req.body;
// 2. Queue for processing
await sqs.sendMessage({
QueueUrl: process.env.WEBHOOK_QUEUE_URL,
MessageBody: JSON.stringify(payload)
}).promise();
// 3. Return immediately
res.status(200).json({ status: 'received' });
} catch (error) {
console.error('Failed to queue webhook:', error);
res.status(500).json({ error: 'Internal error' });
}
});
// Separate worker processes the queue
async function processWebhook(payload) {
const { eventType } = payload;
if (eventType === 'VEHICLE_STATE') {
await updateVehicleState(payload);
} else if (eventType === 'VEHICLE_ERROR') {
await handleVehicleError(payload);
}
}
```
```python Python (Flask + Redis Queue) theme={null}
from flask import Flask, request
from rq import Queue
from redis import Redis
app = Flask(__name__)
redis_conn = Redis()
queue = Queue(connection=redis_conn)
@app.post("/webhooks/smartcar")
def webhook_handler():
# 1. Get the raw payload
payload = request.get_json()
# 2. Queue for processing
queue.enqueue(process_webhook, payload)
# 3. Return immediately
return {"status": "received"}, 200
def process_webhook(payload):
# This runs asynchronously in a worker
event_type = payload.get("eventType")
if event_type == "VEHICLE_STATE":
update_vehicle_state(payload)
elif event_type == "VEHICLE_ERROR":
handle_vehicle_error(payload)
```
```java Java (Spring Boot + RabbitMQ) theme={null}
@RestController
public class WebhookController {
@Autowired
private RabbitTemplate rabbitTemplate;
@PostMapping("/webhooks/smartcar")
public ResponseEntity> handleWebhook(
@RequestBody String payload
) {
// 1. Queue for processing
rabbitTemplate.convertAndSend(
"webhook-queue",
payload
);
// 2. Return immediately
return ResponseEntity.ok(
Map.of("status", "received")
);
}
}
@Component
public class WebhookProcessor {
@RabbitListener(queues = "webhook-queue")
public void processWebhook(String payload) {
// This runs asynchronously
JsonNode json = objectMapper.readTree(payload);
String eventType = json.get("eventType").asText();
if ("VEHICLE_STATE".equals(eventType)) {
updateVehicleState(json);
} else if ("VEHICLE_ERROR".equals(eventType)) {
handleVehicleError(json);
}
}
}
```
**Don't do this:** If you perform heavy processing before returning a response, your endpoint may timeout and Smartcar will retry, creating duplicate processing work.
```python Bad Example theme={null}
@app.post("/webhooks/smartcar")
def webhook_handler():
payload = request.get_json()
# DON'T DO THIS: These operations might take too long
update_database(payload)
call_external_api(payload)
send_notifications(payload)
# Might timeout before reaching this line
return {"status": "received"}, 200
```
***
## Production-Ready Pattern
For a complete serverless implementation, see the [Webhook Receiver Recipe](/getting-started/tutorials/webhook-receiver-recipe), which provides:
* API Gateway for HTTPS endpoint
* Lambda function for webhook receipt
* SQS queue for async processing
* Dead letter queue for failed messages
* CloudWatch monitoring and alerts
***
## Next Steps
Verify payload signatures
Implement idempotency
Understand retry policies
Deploy serverless infrastructure
---
# Source: https://smartcar.com/docs/help/assist-ai-slack.md
> ## Documentation Index
> Fetch the complete documentation index at: https://smartcar.com/docs/llms.txt
> Use this file to discover all available pages before exploring further.
# Assist AI features in Slack
> As part of our Enterprise Slack support offering, Smartcar includes access on select Enterprise plans to an AI-powered assistant that can help you get answers quickly, submit tickets, and navigate support resources—all without leaving your Slack workspace.
## 1. Ask a Question
In your dedicated Slack support channel, send a message with your question. The AI Agent will attempt to answer it based on Smartcar’s support documentation and past support interactions.
## 2. Submit a Support Ticket
If your question requires deeper support, simply click **"Create a Ticket"** at the bottom of the AI-generated response within the Slack channel. This will open a form to submit a formal, trackable support request.
## 3. View Open Tickets
To check the status of an existing ticket, navigate to the Slack thread where the ticket was created and click the **"View Ticket Info"** icon. This will display the current status and details of your support request.
## 4. Navigate to the Support Center
Need more detailed help? You can access your ticket by clicking the **ticket ID** that appears after submitting a request using the **"Create a Ticket"** option. Alternatively, from the **"View Ticket Info"** window, you can click the **ticket number** to be redirected to the Smartcar Developer Dashboard. If you're already logged into an active session, you'll be taken directly to the ticket details within the Support Center. Otherwise, you'll be prompted to log in first.
In the Support Center, you can:
* Browse our documentation
* Submit new support requests
* View and update your existing tickets
For step-by-step instructions on how to log into the Smartcar Support Center, please see the following article: [Accessing the Smartcar Support Center](/help/accessing-support-center)
---
# Source: https://smartcar.com/docs/api-reference/authorization/auth-code-exchange.md
> ## Documentation Index
> Fetch the complete documentation index at: https://smartcar.com/docs/llms.txt
> Use this file to discover all available pages before exploring further.
# Auth Code Exchange
> To interact with the Smartcar API, you will need to exchange your authorization code from the [Connect redirect](https://smartcar.com/docs/connect/handle-the-response) for an access token. Check the [overview](https://smartcar.com/docs/api-reference/authorization/overview) page for how to manage your tokens.
## Requesting Access Tokens
**Headers**
Must be set to `application/x-www-form-urlencoded`, matching the format of the request body.
A valid HTTP User Agent value. This value is typically included in the HTTP requests by the client that is making the request. You usually don't have to set this manually.
**Body**
The authorization code received in the handle response step.
This value must be set to `authorization_code`
The `redirect_uri` provided in the redirect to Connect step. This value is checked to match the URI sent when the user was directed to Connect.
If you launch Connect from a single-page or mobile application, `redirect_uri` **must** match the URI passed in your Connect URL, not the redirect for your backend.
```bash cURL theme={null}
curl https://auth.smartcar.com/oauth/token \
-X POST \
-H 'Authorization: Basic base64({client_id}:{client_secret})' \
-H 'Content-Type: application/x-www-form-urlencoded' \
-d 'grant_type=authorization_code&code=35a59c0b-745c-436c-a8a2-7758e718dcb8&redirect_uri=https://example.com/home'
```
```python Python SDK theme={null}
access = client.exchange_code('{code}')
```
```node Node SDK theme={null}
access = client.exchangeCode('{code}');;
```
```java Java SDK theme={null}
Auth access = authClient.exchangeCode("{code}");
```
```ruby Ruby SDK theme={null}
access = client.exchange_code("{code}")
```
## Response
---
# Source: https://smartcar.com/docs/errors/api-errors/authentication-errors.md
> ## Documentation Index
> Fetch the complete documentation index at: https://smartcar.com/docs/llms.txt
> Use this file to discover all available pages before exploring further.
# Authentication Errors
> Thrown when there is an issue with your authorization header.
# `NULL`
The authorization header is missing or malformed, or it contains invalid or expired authentication credentials (e.g. access token, client ID, client secret). Please check for missing parameters, spelling and casing mistakes, and other syntax issues.
```json theme={null}
{
"type": "AUTHENTICATION",
"code": null,
"description": "The authorization header is missing or malformed, or it contains invalid or expired authentication credentials. Please check for missing parameters, spelling and casing mistakes, and other syntax issues.",
"docURL": "https://smartcar.com/docs/errors/api-errors/authentication-errors",
"statusCode": 401,
"requestId": "5dea93a1-3f79-4246-90c5-89610a20471b",
"resolution": { "type": null }
}
```
### Suggested Resolution
You can resolve this error by referring to our API reference and ensuring that you pass all the parameters as specified. If you are certain that your request is well-formed, please try refreshing your access token.
### Troubleshooting Steps
Refer to our API reference and ensure that you use the correct authentication mechanism for your request
* Check constants like Bearer and Basic for spelling mistakes.
* If you make a request to a vehicle endpoint, verify that your access token grants you access to the correct vehicle. You can do so by making a request to the /vehicles endpoint and ensuring that the correct vehicle ID is included in the returned response.
* If you have refreshed your access token, make sure that it persists and that you use your new token to make your request.
---
# Source: https://smartcar.com/docs/getting-started/tutorials/backend.md
> ## Documentation Index
> Fetch the complete documentation index at: https://smartcar.com/docs/llms.txt
> Use this file to discover all available pages before exploring further.
# Backend SDK Tutorials
> In this tutorial, we will go over how to integrate Connect into your application and make requests to a vehicle using our backend SDKs.
# Overview
1. The Application redirects the user to Smartcar Connect to request access to the user’s vehicle. In Connect,
the user logs in with their vehicle credentials and grants the Application access to their vehicle.
2. The user’s browser is redirected to a specified `REDIRECT_URI`. The Application Server, which is listening
at the `REDIRECT_URI`, will retrieve the authorization code from query parameters sent to the `REDIRECT_URI`.
3. The Application sends a request to the Smartcar API. This request contains the authorization `code` along with
the Application’s `CLIENT_ID` and `CLIENT_SECRET`.
4. In response, Smartcar returns an `ACCESS_TOKEN` and a `REFRESH_TOKEN`.
5. Using the `ACCESS_TOKEN`, the Application can now send requests to the Smartcar API. It can access protected resources and send commands
to and from the user’s vehicle via the backend service.
# Prerequisites
* [Sign up](https://dashboard.smartcar.com/signup) for a Smartcar account.
* Make a note of your `CLIENT_ID` and `CLIENT_SECRET` from the **Configuration** section on the Dashboard.
* Add the following `REDIRECT_URI` to your application configuration: `http://localhost:8000/exchange`
# Setup
1. Clone the repo for the SDK you want to use and install the required dependencies:
```bash Node theme={null}
$ git clone https://github.com/smartcar/getting-started-express.git
$ cd getting-started-express/tutorial
$ npm install
```
```bash Python theme={null}
$ git clone https://github.com/smartcar/getting-started-python-sdk.git
$ cd getting-started-python-sdk/tutorial
$ pip install -r requirements.txt
```
```bash Java theme={null}
$ git clone https://github.com/smartcar/getting-started-java-sdk.git
$ cd getting-started-java-sdk/tutorial
$ gradlew build
```
```bash Ruby theme={null}
$ git clone https://github.com/smartcar/getting-started-ruby-sdk.git
$ cd getting-started-ruby-sdk/tutorial
$ bundle install
$ ruby app.rb
```
2. You will also have to set the following environment variables
If you've used one of our frontend SDKs to integrate connect, you'll want to set the
`SMARTCAR_REDIRECT_URI` environment variable to the URI you used for that application.
```bash theme={null}
$export SMARTCAR_CLIENT_ID=
$export SMARTCAR_CLIENT_SECRET=
$export SMARTCAR_REDIRECT_URI=http://localhost:8000/exchange
```
If you are using Windows, ensure you are appropriately setting environment variables for your shell.
Please refer to [this post](https://stackoverflow.com/questions/9249830/how-can-i-set-node-env-production-on-windows/9250168#9250168) which details how to set environment variables on Windows.
# Build your Connect URL
1. Instantiate a `Smartcar` object in the constructor of the App component.
```js index.js theme={null}
const client = new smartcar.AuthClient({
mode: 'simulated',
});
```
```python main.py theme={null}
client = smartcar.AuthClient(mode='simulated')
```
```java Main.java theme={null}
String mode = "simulated";
AuthClient client = new AuthClient.Builder()
.mode(mode)
.build();
```
```ruby index.rb theme={null}
@@client = Smartcar::AuthClient.new({
mode: 'simulated',
})
```
Feel free to set `mode` to `simulated` or `live` where you instantiate your `Smartcar` object to
connect to a simulated or real vehicle.
2. A Server-side rendered application will redirect to Smartcar Connect to request access to a user’s vehicle.
On Connect, the user logs in with the username and password for their vehicle’s connected services account
and grants the application access to their vehicle.
To launch Connect, we need to redirect the user to the appropriate URL. We can make use of the `AUTHORIZATION_URL`
function in our Smartcar object and redirect the user to the URL to launch the Connect flow.
```js index.js theme={null}
app.get('/login', function(req, res) {
const scope = ['read_vehicle_info'];
const authUrl = client.getAuthUrl(scope);
res.render('home', {
url: authUrl,
});
});
```
```python main.py theme={null}
@app.route('/login', methods=['GET'])
def login():
scope = ['read_vehicle_info']
auth_url = client.get_auth_url(scope)
return redirect(auth_url)
```
```java Main.java theme={null}
get("/login", (req, res) -> {
// TODO: Authorization Step 2: Launch Smartcar authentication dialog
String[] scope = {"read_odometer"};
String link = client.authUrlBuilder(scope).build();
res.redirect(link);
return null;
});
```
```ruby index.rb theme={null}
get "/login" do
redirect @@client.get_auth_url(['required:read_vehicle_info'])
end
```
# Handle the response
Once a user has authorized the application to access their vehicle, the user is redirected to the `REDIRECT_URI`
with an authorization `code` as a query parameter. In the previous section, we had set our `REDIRECT_URI` as `localhost:8000/exchange`.
Now, our server can be set up as follows to receive the authorization `code`.
```js index.js theme={null}
app.get('/exchange', function(req, res) {
const code = req.query.code;
console.log(code);
res.sendStatus(200);
});
```
```python main.py theme={null}
@app.route('/exchange', methods=['GET'])
def exchange():
code = request.args.get('code')
print(code)
return '', 200
```
```java Main.java theme={null}
get("/exchange", (req, res) -> {
String code = req.queryMap("code").value();
System.out.println(code);
return "";
});
```
```ruby index.rb theme={null}
get "/exchange" do
code = params[:code]
puts code
"OK"
end
```
# Launching Connect
Let’s try authenticating a vehicle! Restart your server, open up your browser and go to `http://localhost:8000/login`
```bash Node theme={null}
$node index.js
```
```bash Python theme={null}
$python main.py
```
```bash Java theme={null}
$./gradlew run
```
```bash Ruby theme={null}
$bundle exec ruby app.rb
```
This tutorial configures Connect to launch in `test` mode by default.
In `test` mode, any `username` and `password` is valid for each brand.
Smartcar showcases all the permissions your application is asking for - `read_vehicle_info` in this case.
Once you have logged in and accepted the permissions, you should see your authorization `code` printed to your console.
# Getting your first access token
If you've used one of our frontend SDKs to integrate Connect, this is where you'll need to fetch your access token.
In the previous section, we retrieved an authorization `code`. The application must exchange the code for an `ACCESS_TOKEN` to make a request.
After receiving the ACCESS\_TOKEN, the user can be redirected to the `/vehicle` route.
```js index.js theme={null}
// Global variable to save our access_token
let access;
app.get('/exchange', async function(req, res) {
const code = req.query.code;
// Access our global variable and store our access tokens.
// In a production app you'll want to store this in some
// kind of persistent storage
access = await client.exchangeCode(code);
res.redirect('/vehicle');
});
```
```python main.py theme={null}
# Global variable to save our access_token
access = None
@app.route('/exchange', methods=['GET'])
def exchange():
code = request.args.get('code')
# Access our global variable and store our access tokens.
# In a production app you'll want to store this in some
# kind of persistent storage
global access
access = client.exchange_code(code)
return redirect('/vehicle')
```
```java Main.java theme={null}
// Global variable to save our access_token
private static String access;
public static void main(String[] args) {
get("/exchange", (req, res) -> {
String code = req.queryMap("code").value();
Auth auth = client.exchangeCode(code);
// Access our global variable and store our access tokens.
// In a production app you'll want to store this in some kind of persistent storage
access = auth.getAccessToken();
res.redirect("/vehicle");
return null;
})
}
```
```ruby index.rb theme={null}
# Global variable to store the token
@@token = ''
get "/exchange" do
code = params[:code]
# Access our global variable and store our access tokens.
# In a production app you'll want to store this in
# some kind of persistent storage
@@token = @@client.exchange_code(code)[:access_token]
redirect '/vehicle'
end
```
# Getting data from a vehicle
1. Once the backend service or server-side application has the `ACCESS_TOKEN`, it can send requests to a vehicle using the Smartcar API.
First we'll need to fetch the `vehicle_id`s associated with the `ACCESS_TOKEN`, then fetch vehicle attributes for one of them. After
receiving the `vehicle_attributes` object, we can render it in a simple table on the page.
```js index.js theme={null}
app.get('/vehicle', async function(req, res) {
// Get the smartcar vehicleIds associated with the access_token
const { vehicles } = await smartcar.getVehicles(access.accessToken);
// Instantiate the first vehicle in the vehicle id list
const vehicle = new smartcar.Vehicle(vehicles[0], access.accessToken);
// Make a request to Smartcar API
const attributes = await vehicle.attributes();
res.render('vehicle', {
info: attributes,
});
});
```
```python main.py theme={null}
@app.route('/vehicle', methods=['GET'])
def get_vehicle():
# Access our global variable to retrieve our access tokens
global access
# Get the smartcar vehicleIds associated with the access_token
vehicles = smartcar.get_vehicles(access.access_token)
vehicle_ids = vehicles.vehicles
# Instantiate the first vehicle in the vehicle id list
vehicle = smartcar.Vehicle(vehicle_ids[0], access.access_token)
# Make a request to Smartcar API
attributes = vehicle.attributes()
return jsonify({
"make": attributes.make,
"model": attributes.model,
"year": attributes.year
})
'''
{
"make": "TESLA",
"model": "Model S",
"year": 2014
}
'''
```
```java Main.java theme={null}
get("/vehicle", (req, res) -> {
// Get the smartcar vehicleIds associated with the access_token
VehicleIds vehiclesResponse = Smartcar.getVehicles(access);
String[] vehicleIds = vehiclesResponse.getVehicleIds();
// Instantiate the first vehicle in the vehicle id list
Vehicle vehicle = new Vehicle(vehicleIds[0], access);
// Make a request to Smartcar API
VehicleAttributes attributes = vehicle.attributes();
System.out.println(gson.toJson(attributes));
// {
// "id": "36ab27d0-fd9d-4455-823a-ce30af709ffc",
// "make": "TESLA",
// "model": "Model S",
// "year": 2014
// }
res.type("application/json");
return gson.toJson(attributes);
})
```
```ruby index.rb theme={null}
get "/vehicle" do
code = params[:code]
# Get the smartcar vehicleIds associated with the access_token
vehicles = Smartcar::Vehicle.get_vehicle(token: @@token)
vehicle_ids = vehicles.vehicles
# Instantiate the first vehicle in the vehicle id list
vehicle = Smartcar::Vehicle.new(token: @@token, id: vehicle_ids.first)
# Get the vehicle_attributes object for vehicle
vehicle_attributes = vehicle.attributes
vehicle_attributes.slice(*%I(id make model year)).to_json
end
```
2. Restart your sever and head back to `http://localhost:8000/login` to go through Connect and make your first API request!
```bash Node theme={null}
$node index.js
```
```bash Python theme={null}
$python main.py
```
```bash Java theme={null}
$./gradlew run
```
```bash Ruby theme={null}
$bundle exec ruby app.rb
```
---
# Source: https://smartcar.com/docs/api-reference/batch.md
> ## Documentation Index
> Fetch the complete documentation index at: https://smartcar.com/docs/llms.txt
> Use this file to discover all available pages before exploring further.
# Batch
> Returns a list of responses from multiple Smartcar `GET` endpoints, all combined into a single request.
The Vehicles API v2.0 will be deprecated by **Q3 of 2026**. We recommend migrating to the [latest version](/api-reference/vehicles-api-intro) as soon as possible to ensure continued support and access to new features.
Each endpoint in the batch counts against your [request limit](/errors/api-errors/billing-errors) for a vehicle.
## Request
**Path**
**Body**
An array of requests to make.
The Smartcar endpoint to request data from.
## Response
The responses from Smartcar.
The headers for this response.
The unit system to use for the request.
The timestamp (ISO-8601 format) of when the returned data was recorded by the vehicle.
The HTTP response status code.
The Smartcar endpoint to request data from.
The response body of this request. The structure of this object will vary by endpoint. See the corresponding endpoint specification.
```json Example Response theme={null}
{
"responses": [
{
"path": "/odometer",
"body": {
"distance": 37829
},
"code": 200,
"headers": {
"sc-data-age": "2019-10-24T00:43:46.000Z",
"sc-unit-system": "metric"
}
},
{
"path": "/location",
"body": {
"latitude": 37.4292,
"longitude": 122.1381
},
"code": 200,
"headers": {
"sc-data-age": "2019-10-24T00:43:46.000Z"
}
}
]
}
```
---
# Source: https://smartcar.com/docs/help/beta.md
> ## Documentation Index
> Fetch the complete documentation index at: https://smartcar.com/docs/llms.txt
> Use this file to discover all available pages before exploring further.
# Beta
> Understand Smartcar's approach to features in beta.
Beta is an option that allows developers to test and integrate new Smartcar features before they are fully released. Beta refers to a phase where certain features are made available for testing and feedback prior to general availability. These features are functional but may still be under development or refinement.
## Benefits of Beta Features
Participating in beta allows developers to get a head start on integrating new features, a chance to influence the feature in development through feedback and help Smartcar ensure your app’s needs are met.
## Considerations for features in Beta
When working with beta features, keep in mind that features may change before final release. As such, extra caution is advised when using these features in production environments.
## How to Participate
If you would like to get involved in testing a beta features, contact your Account Manager or our Support team at [support@smartcar.com](mailto:support@smartcar.com) for guidance.
---
# Source: https://smartcar.com/docs/errors/api-errors/billing-errors.md
> ## Documentation Index
> Fetch the complete documentation index at: https://smartcar.com/docs/llms.txt
> Use this file to discover all available pages before exploring further.
# Billing Errors
> Thrown when limits have been reached based on your plan, or if the feature is not available.
# `VEHICLE_LIMIT`
You’ve reached the limit of vehicles in your plan. Please upgrade to unlock access to more vehicles.
```json VEHICLE_LIMIT theme={null}
{
"type": "BILLING",
"code": "VEHICLE_LIMIT",
"description": "You’ve reached the limit of vehicles in your plan. Please upgrade to unlock access to more vehicles.",
"docURL": "https://smartcar.com/docs/errors/api-errors/billing-errors#vehicle-limit",
"statusCode": 430,
"requestId": "5dea93a1-3f79-4246-90c5-89610a20471b",
"resolution": { "type": "CONTACT_SUPPORT" }
}
```
### Troubleshooting Steps
To resolve this error, please [contact us](mailto:support@smartcar.com) to upgrade your plan and increase your vehicle limit.
Please note that you won’t be able to make requests to additional vehicles until the end of the current billing period or until you have upgraded your plan.
# `INVALID_PLAN`
The feature you are trying to use is not included in your current pricing plan. Please visit our pricing page to learn more about our plans and features.
```json INVALID_PLAN theme={null}
{
"type": "BILLING",
"code": "INVALID_PLAN",
"description": "The feature you are trying to use is not included in your current pricing plan. Please visit our pricing page to learn more about our plans and features.",
"docURL": "https://smartcar.com/docs/errors/api-errors/billing-errors#invalid-plan",
"statusCode": 430,
"requestId": "5dea93a1-3f79-4246-90c5-89610a20471b",
"resolution": { "type": "CONTACT_SUPPORT" }
}
```
### Troubleshooting Steps
If you have checked our pricing page and believe that the feature you are trying to use is included in your plan,
please [contact us](mailto:support@smartcar.com) and we’ll be happy to assist you.
# `VEHICLE_REQUEST_LIMIT`
You have exceeded the number of API requests that are allowed for **this** vehicle in the current billing period.
Please log in to the [Smartcar dashboard](https://dashboard.smartcar.com/login) and visit the Billing tab to learn more.
```json VEHICLE_REQUEST_LIMIT theme={null}
{
"type": "BILLING",
"code": "VEHICLE_REQUEST_LIMIT",
"description": "You have exceeded the number of API requests that are allowed for this vehicle in the current billing period. Please log into the Smartcar dashboard and visit the Billing tab to learn more.",
"docURL": "https://smartcar.com/docs/errors/api-errors/billing-errors#vehicle-request-limit",
"statusCode": 430,
"requestId": "5dea93a1-3f79-4246-90c5-89610a20471b",
"resolution": { "type": "CONTACT_SUPPORT" }
}
```
### Troubleshooting Steps
To resolve this error, please [contact us](mailto:support@smartcar.com) to upgrade your plan and increase your vehicle limit.
Please note that you won’t be able to make additional requests to this vehicle until the end of the current billing period or until you have upgraded your plan.
# `ACCOUNT_SUSPENDED`
Your Smartcar account is past due and has been suspended.
Please reach out to our finance team to resolve this issue.
```json ACCOUNT_SUSPENDED theme={null}
{
"type": "BILLING",
"code": "ACCOUNT_SUSPENDED",
"description": "Your Smartcar account is past due and has been suspended. Please reach out to our finance team to resolve this issue.",
"docURL": "https://smartcar.com/docs/errors/api-errors/billing-errors#account-suspended",
"statusCode": 430,
"requestId": "5dea93a1-3f79-4246-90c5-89610a20882a",
"resolution": { "type": "FINANCE" }
}
```
### Troubleshooting Steps
To resolve this error, please [contact us](mailto:finance@smartcar.com) to pay past due invoices.
Please note that you won’t be able to make any requests until you have resolved this issue.
---
# Source: https://smartcar.com/docs/help/brand-quirks.md
> ## Documentation Index
> Fetch the complete documentation index at: https://smartcar.com/docs/llms.txt
> Use this file to discover all available pages before exploring further.
# Brand Quirks
> Brand specific quirks to keep in mind while building out your application.
## Acura
### Ignition On
Depending on model year, certain Acura vehicles do not return data when the ignition/engine is on.
### Sleep State
Most Acuras will go into a sleep state after about a week of inactivity,
## Audi
### Primary Key User
In order to have access to all vehicle functionality the account that connects to Smartcar will need to be flagged as a Key User by Audi.
## BMW/MINI
### CONNECTED\_SERVICES\_ACCOUNT - SUBSCRIPTION errors
Smartcar API will throw a CONNECTED\_SERVICES\_ACCOUNT - SUBSCRIPTION when the data we receive from the vehicle is older than a month as this normally indicates a subscription issue.
## BYD
### Concurrent login requirement
BYD accounts can only maintain one active session at a time. Vehicle owners should sign in with a dedicated BYD login for Smartcar that is separate from the credentials used in the BYD mobile app. If the same account signs into the OEM app after connecting through Smartcar, the Smartcar session will be revoked and require re-authentication.
If customers reach out about being logged out of their BYD mobile app, we recommend instructing users to create a secondary BYD account exclusively for your app.
## GM (Buick, Chevrolet, Cadillac, GMC)
### VEHICLE\_STATE - ASLEEP errors
After 3-4 days of no activity, GM vehicles will enter a deep sleep state at which point they will no longer respond to API requests to preserve their 12v battery. In order to get data from the vehicle again, the car will need to go through an ignition cycle.
### UPSTREAM - RATE\_LIMIT errors
In order to avoid hitting UPSTREAM - RATE\_LIMIT errors use batch requests and ping no more than once every 30 minutes. Use of the OEM app also counts towards the rate limit.
## Hyundai/Kia
### Telemetry Update Behavior
#### Pre-2025 Models (Gen 2 Navigation)
Hyundai/Kia vehicles have event-based logic that sends telemetry updates based on state changes such as:
* Every 10% of SoC while charging
* 5 minutes after ignition off
* Vehicle doors are left unlocked for 5 minutes
* After a command successfully completes
* Whenever charging stops
#### 2025+ Models (Gen 3 / CCnC Navigation)
Newer Hyundai/Kia models update more frequently, as often as every five minutes, including while the vehicle is driving.
## Nissan
### “Vehicle has been found” MyNISSAN notifications
Vehicle owners may receive a notification from the MyNISSAN app stating “Success! We found the location of your vehicle. Check the map for the location of your YYYY Model.” every time the location endpoint is hit.
The app appears to have an option to edit notifications, but as of Feb 2024 they are not available in the app. Notifications may need to be turned off at the iOS/Android level by the vehicle owner.
## PSA Group (Citroen, DS, Opel, Peugeot, Vauxhall)
### Requesting control\_charge permissions
If you request control\_charge permissions for PSA EVs, upon login owners will be presented with a PIN and MFA screen in Connect upon submitting their credentials. They will need to have set this up on their OEMs application in order to grant your application this permission.
## Polestar
### Stop charge command limitations
Smartcar cannot fulfill stop charge commands if the vehicle is below 40% state of charge due to limitations with the current Polestar APIs.
## Rivian
### MFA
If MFA is enabled the vehicle owner will need to re-authorize via Connect about every 2 weeks.
## Tesla
### Remote Access
It may take a few hours or up to a full day for the REMOTE\_ACCESS\_DISABLED errors to subside after remote access is enabled.
### Charge Billing Records
In order to retrieve charge billing records, the main Tesla account must connect the vehicle, as driver profiles do not have access to this data.
### Virtual Key
Tesla now requires virtual keys for 3rd-party applications in order to issue commands for the following models:
* All Cybertrucks, Model 3 and Model Y
* 2021+ Model S and X
Please see [Virtual Keys](/help/oem-integrations/tesla/virtual-key-tesla) for more information.
### Enterprise Tenant Configuration
For enterprise customers, Tesla tenant setup must occur **before** any customer-facing Tesla vehicles are onboarded. Configure this during initial implementation, coordinated with Smartcar.
Changing Tesla tenant configurations after vehicles are already connected will require all affected users to re-authenticate. See [OEM Migrations and Re-authentication](/connect/re-auth/oem-migrations) for guidance on handling this scenario.
## Volkswagen
### Control charge limits
Volkswagen limits charge commands to safeguard battery longevity based on environmental and system conditions. Excessive consecutive requests may result in being temporarily rate limited. To restore functionality, the vehicle must be driven again.
### CONNECTED\_SERVICES\_ACCOUNT errors on lock/unlock commands
In addition to verifying the VW account with the activation code, some cars will need to undergo the VW Ident Process before you can access remote lock/unlock functionality. This involves contacting the dealership to verify your ownership of the vehicle.
### Missing Subscription (European VWs)
Upon purchasing (or activating the free trial), VW needs to review the request. You will get an email confirmation once they've cleared everything on their side.
### Primary Driver Status
In order to fully interact with Smartcar, the credentials need to be flagged as the primary driver. You'll need to tap the "become primary driver" flow in the VW app. Depending on the model, this may require you to be in the car to interact with the infotainment system.
A vehicle owner can verify whether or not they are the primary driver by following the steps below:
1. Open the VW mobile app tap the profile icon in the bottom right
2. Go to **Vehicle Management**
3. If there’s an **Additional Users** section, tap their name to see whether it says **Primary User** or **Additional User**
## Volvo
### Lock/unlock commands
Volvo is an outlier regarding how unlock requests are processed. After initiating the request, after about 10 seconds you'll need to open the trunk (boot) to successfully complete the request. You'll know the car is ready to unlock the trunk as the hazard lights will flash. We recommend adding a notification for Volvos as part of the request loading animation to inform the user of this process.
### Phone number username
Smartcar Connect currently checks for an email format, as such phone number usernames cannot be used. The owner will need to add their email to their Volvo account via the web portal.
### Compatibility
Some models are not compatible because the device needs to be physically in the vehicle during authentication, which Connect doesn’t support at the moment:
* 2021+: XC40 Recharge
* 2022+: S90, S90 Recharge, V90, V90 Recharge, V90 Cross Country, XC60, XC60 Recharge, C40 Recharge
* 2023+: All models with the exception of the XC40
Even if the vehicle has been connected to and shows up in the Volvo app, if they go through Connect the account will present as if there are no vehicles on the account.
---
# Source: https://smartcar.com/docs/help/brand-subscriptions.md
> ## Documentation Index
> Fetch the complete documentation index at: https://smartcar.com/docs/llms.txt
> Use this file to discover all available pages before exploring further.
# Brand Subscription Information
> Below you can find the connected service name for each brand as well as any specific subscription packages needed to connect to the vehicle via Smartcar.
| Make | Region | Connected Service | Package | Subscription Cost |
| --------------------------- | --------------------------- | ------------------------------------------- | ------------------------------------------------- | ------------------------------------------------------------------------------------------------------------- |
| Acura | US, Canada | ACURALINK | Remote | 3 year free trial (2023 and Newer Models), 6 month free trial (2022 and Older Models). \$110/year thereafter. |
| Alfa Romeo | US, Europe | My Alfa Connect | My Car and My Remote | 3 - 5 years included. |
| Audi | US | myAudi | CARE | - |
| | Europe, Canada | Audi Connect | Remote | Free for three years after delivery of a new vehicle. \~£120/year thereafter. |
| BMW | All | BMW Connected | - | Free trial varies with model year. \~\$120/year thereafter. |
| Buick | US, Canada | OnStar | Remote Access | Free trial varies with model year. \$14.99/month for standalone Remote Access package. |
| BYD | Europe | BYD (Connected Services) | - | - |
| Cadillac | US, Canada | OnStar | Remote Access | Free trial varies with model year. \$14.99/month for standalone Remote Access package. |
| Chevrolet | US, Canada | OnStar | Remote Access | Free trial varies with model year. \$14.99/month for standalone Remote Access package. |
| Chrysler | US, Canada | Uconnect | Sirius XM Guardian (Remote Package) | 1 year free trial. \$12.99/month for the Remote Package thereafter. |
| Citroën | Europe | My Citroën | ë-remote services needed for remote commands | - |
| CUPRA | Europe | CUPRA CONNECT | Remote Access Services | 3 years free for the Born model, 1 year free for others. Price varies with region. |
| Dacia | Europe | My Dacia | - | |
| Dodge | US, Canada | Uconnect | Sirius XM Guardian (Remote Package) | 1 year free trial. \$12.99/month for the Remote Package thereafter. |
| DS | Europe | MyDS | E-TENSE Remote | - |
| Fiat | Europe | FIAT | My Car and My Remote | 6 month free trial. |
| | US | FIAT Connect | Assistance Package | 3 month free trial with select vehicles. \$14.99/month. |
| Ford | All | FordPass | - | - |
| GMC | US, Canada | OnStar | Remote Access | Free trial varies with model year. \$14.99/month for standalone Remote Access package. |
| Honda | US | HondaLink | EV Access for EV Data. Remote Access for Commands | EV Access 8 year trial. \$14.99/month for standalone Remote Access package. |
| Hyundai | All | Hyundai BlueLink | - | 3 year free trial for new vehicles. \$9.90/month per package thereafter. |
| | US | Hyundai BlueLink (2023 IONIQ 6 & all 2024+) | BlueLink+ | - |
| Infiniti | US | MyINFINITI | - | 1 year free trial. \$12.99/month thereafter. |
| Jaguar | All | Jaguar InControl | - | 3 year free trial. \~\$100/year thereafter. |
| Jeep | US, Canada | Uconnect | Sirius XM Guardian (Remote Package) | 1 year free trial. \$12.99/month for the Remote Package thereafter. |
| | US, Canada | Jeep Connect | Sirius XM Guardian (Remote Package) | 1 year free trial. \$12.99/month for the Remote Package thereafter. |
| Kia | US, Canada | Kia Access | Plus | 1 year free trial. \$149/year thereafter. |
| | Europe | Kia Connect | - | 7 year free trial starting on sale to the first owner. |
| Land Rover | All | Land Rover InControl | - | 3 year free trial. \~\$100/year thereafter. |
| Lexus | US, Canada | Lexus Enform | REMOTE | Free trial up to 3 years, varies with model year. \$80/year thereafter. |
| Lincoln | US | Lincoln Way | - | - |
| Mazda | US, Europe | MyMazda | - | 3 year free trial. \$10/month thereafter. |
| Mercedes | All | MeConnect | - | 1 year free trial. \~\$15/year there after. |
| Mini | All | Mini Connected | - | Free trial varies with model year. \~\$120/year thereafter. |
| Nissan | US | NissanConnect Services | - Convenience - Select (EV data) | Free trial varies with model year. $9.99 - $ 21.98/month thereafter. |
| | Europe | NissanConnect | - | Free trial varies with model year. \~£1.99/month thereafter. |
| Opel | Europe | myOpel | e-Remote services needed for remote commands | - |
| Peugeot | Europe | MYPEUGEOT | E-REMOTE CONTROL needed for remote commands | - |
| Polestar | All | Polestar | - | Included (no separate paid Remote package required). |
| Porsche | US, Europe | My Porsche | | 1 year free trial after initial purchase. \$299/year there after. |
| RAM | US, Canada | Uconnect | Sirius XM Guardian (Remote Package) | 1 year free trial. \$12.99/month for the Remote Package thereafter. |
| | US, Canada | Ram Connect | Sirius XM Guardian (Remote Package) | 1 year free trial. \$12.99/month for the Remote Package thereafter. |
| Renault | Europe | My Renault | - | - |
| Rivian | US | Rivian | - | - |
| Skoda | Europe | MySKODA | Care Connect | \~£36/year. |
| Subaru (excluding Solterra) | US | MySubaru | STARLINK Security Plus | 6-month free trial. \$4.95/month thereafter. |
| Subaru Solterra | US | Solterra Connect | Remote Connect | One-year trial included, \$8/month after trial. |
| Tesla | All | Tesla | - | - |
| Toyota | US, Canada | Toyota Connected Services | Remote Connect | 1 year free trial. \$80/year thereafter. |
| Vauxhall | Europe | myVauxhall | e-Remote services needed for remote commands | - |
| Volkswagen | US | Car-Net | Remote Access | - |
| | Europe (non-ID) 2018 - 2022 | Car-Net | - | - |
| | Europe (non-ID) ≤ 2023 | We Connect | - | - |
| | Europe (non-ID) 2024+ | VW Connect | - | - |
| | Europe (ID) Firmware \<3 | We Connect Start | - | - |
| | Europe (ID) Firmware v3+ | We Connect ID | - | - |
| Volvo | All | Volvo Cars | - | Free trial varies with model year. \~\$200/year thereafter. |
## Notes
### Audi
* Owners will need to ensure they're the Primary or Key user for the vehicle connected to their account in order to access all Smartcar functionality.
### Ford and Lincoln
* Owners that use a username to login to their connected services app will need to migrate to using their email address under account settings in their Ford Pass or Lincoln Way portal.
### OnStar
* Chevy Bolts MY 2020+ come with the **EV Mobile Command** service included for 5 years with the purchase of a new vehicle. Location data is not included in the package. Bolt owners will need to also subscribe to **Remote Access** to be able to get access to location data.
* For all other OnStar accounts, we require the modern **Remote Access** plan as our base subscription. This plan comes with the **Vehicle Status** feature set, which is what enables our remote access to data from cars.
More information can be found [in this PDF](https://my.chevrolet.com/content/dam/gmownercenter/gmna/dynamic/onstar/comparePlans/nbm/OC_Compare-Plans-Chevy.pdf).
* There are certain legacy OnStar accounts floating around with similar names. A good check on whether a customer has the correct plan or not is the ability to view vehicle information like fuel level, EV battery level, odometer, or tire pressure from within their vehicle’s mobile app.
### Nissan US
* Convenience features are included as part of the Premium package.
### Toyota
* The Remote Connect subscription is tied to the audio package purchased with the vehicle. Compatible audio package availability is determined based on the trim of the vehicle model and varies model year to model year.
Toyota provides PDFs for Remote Connect availability [here](https://www.toyota.com/connected-services/#:~:text=Learn%20about%20your%20Connected%20Services).
### Uconnect
* For all Uconnect accounts, we require the ability to interact with vehicle information through the Uconnect portal
* A Uconnect account may have access to Mopar, but not all Mopar accounts have access to Uconnect. If a user can see information in Mopar but not Uconnect, they'll need to reach out to Uconnect support to set up the right Uconnect plan for their vehicle.
* 2021+ Jeeps have their own connected service - Jeep Connect
* 2022+ Rams have their own connected service - Ram Connect
* 2022+ Jeep Wagoneers have their own connected service - Wagoneer Connect
* Canada has limited support listed [here](https://www.driveuconnect.ca/en/sirius-xm-guardian-vehicles)
### Volkswagen ID Series
* Model year 2021 and certain 2022 Volkswagen ID vehicles require an upgrade to vehicle software version 3 which will allow you to get location and odometer data. This is a requirement for both US and European vehicles.
### Volvo
The following models are not currently compatible with Smartcar:
* 2021+ : XC40 Recharge
* 2022+ : S90, S90 Recharge, V90, V90 Recharge, V90 Cross Country, XC60, XC60 Recharge
* 2023+ : All models with the exception of the XC40
---
# Source: https://smartcar.com/docs/api-reference/compatibility/by-region-and-make.md
> ## Documentation Index
> Fetch the complete documentation index at: https://smartcar.com/docs/llms.txt
> Use this file to discover all available pages before exploring further.
# By Region and Make
> Compatibility will vary by model, year, and trim. This API is for reference purposes only and it showcases vehicle makes and models that may be compatible with Smartcar and it does not guarantee that a specific vehicle will be compatible.
The Compatibility API is an Enterprise feature. Please [contact us](https://smartcar.com/pricing/) to upgrade your plan.
Compatibility by region and make allows developers to query the latest version of our Compatibility Matrix based on region, engine type, make, and permission.
## Request
**Headers**
**Query**
One of the following regions: `US`, `CA` or `EUROPE`
Queries for all engine types if none are specified.
A space-separated list of [makes](/api-reference/makes). This field is optional. If no make is specified, all makes will be returned.
A space-separated list of [permissions](/api-reference/permissions).
Queries for all permissions if none are specified.
```bash cURL theme={null}
curl --request GET \
--url 'https://api.smartcar.com/v2.0/compatibility/matrix?region=US&type=BEV&make=tesla&scope=read_battery%20read_charge' \
--header 'Authorization: Basic bXktY2xpZW50LWlkOm15LWNsaWVudC1zZWNyZXQ='
```
```javascript JavaScript theme={null}
const response = await fetch('https://api.smartcar.com/v2.0/compatibility/matrix?region=US&type=BEV&make=tesla&scope=read_battery%20read_charge', {
method: 'GET',
headers: {
'Authorization': 'Basic bXktY2xpZW50LWlkOm15LWNsaWVudC1zZWNyZXQ='
}
});
const data = await response.json();
```
```python Python theme={null}
import requests
url = "https://api.smartcar.com/v2.0/compatibility/matrix"
params = {
"region": "US",
"type": "BEV",
"make": "tesla",
"scope": "read_battery read_charge"
}
headers = {
"Authorization": "Basic bXktY2xpZW50LWlkOm15LWNsaWVudC1zZWNyZXQ="
}
response = requests.get(url, params=params, headers=headers)
data = response.json()
```
## Response
An array of models supported for the given `make`.
`model` for the given `make`.
The earliest model year supported by Smartcar.
The latest model year supported by Smartcar.
Engine type for the given `model`.
An array of endpoints supported for the given `model`.
An array of `permissions` supported for the given `model`.
```json Example Response theme={null}
{
"NISSAN": [
{
"model": "LEAF",
"startYear": 2018,
"endYear": 2022,
"type": "BEV",
"endpoints": [
"EV battery",
"EV charging status",
"Location",
"Lock & unlock",
"Odometer"
],
"permissions": [
"read_battery",
"read_charge",
"read_location",
"control_security",
"read_odometer"
]
}
],
"TESLA": [
{
"model": "3",
"startYear": 2017,
"endYear": 2023,
"type": "BEV",
"endpoints": [
"EV battery",
"EV charging status",
"EV start & stop charge",
"Location",
"Lock & unlock",
"Odometer",
"Tire pressure"
],
"permissions": [
"read_battery",
"read_charge",
"control_charge",
"read_location",
"control_security",
"read_odometer",
"read_tires"
]
}
]
}
```
---
# Source: https://smartcar.com/docs/api-reference/compatibility/by-vin.md
> ## Documentation Index
> Fetch the complete documentation index at: https://smartcar.com/docs/llms.txt
> Use this file to discover all available pages before exploring further.
# By VIN
> Compatibility will vary by model, year, and trim. This API is for reference purposes only and it showcases vehicle makes and models that may be compatible with Smartcar and it does not guarantee that a specific vehicle will be compatible.
The Compatibility API is an Enterprise feature. Please [contact us](https://smartcar.com/pricing/) to upgrade your plan.
Compatibility by VIN allows developers to determine if a specific vehicle could be compatible with Smartcar.
A vehicle is capable of a given feature if:
1. The vehicle supports the feature (e.g., a Ford Escape supports /fuel but a Mustang Mach-e does not)
2. Smartcar supports the feature for the vehicle's make
This endpoint only supports checking capabilities for vehicles sold in the United States. It **does not** support checking `capabilities` for VINs in Canada and Europe.
## Request
**Headers**
**Parameters**
The VIN (Vehicle Identification Number) of the vehicle.
A space-separated list of permissions.
An optional country code string according to ISO 3166-1 alpha-2.
## Response
`true` if the vehicle is likely compatible, `false` otherwise.
One of the reasons described below if compatible is `false`, `null` otherwise
The vehicle does not have the hardware required for internet connectivity
Smartcar is not yet compatible with the vehicle's make in the specified country
An array containing capability objects for the set of endpoints that the provided scope value can provide authorization for.
This array will be empty if `compatible` is `false`.
One of the permissions provided in the scope parameter
One of the endpoints that the permission authorizes access to
`true` if the vehicle is likely capable of this feature, `false` otherwise
One of the reasons described below if capable is `false`, `null` otherwise
The vehicle does not support this feature
Smartcar is not capable of supporting the given feature on the vehicle's make
```json Example Response theme={null}
{
"compatible": true,
"reason": null,
"capabilities": [
{
"capable": false,
"endpoint": "/engine/oil",
"permission": "read_engine_oil",
"reason": "SMARTCAR_NOT_CAPABLE"
},
{
"capable": true,
"endpoint": "/battery",
"permission": "read_battery",
"reason": null
},
{
"capable": true,
"endpoint": "/battery/capacity",
"permission": "read_battery",
"reason": null
},
{
"capable": true,
"endpoint": "/vin",
"permission": "read_vin",
"reason": null
}
]
}
```
A vehicle's compatibility depends on many factors such as its make, model, model year, trim, etc. The API optimizes returning false positives.
---
# Source: https://smartcar.com/docs/integrations/webhooks/callback-verification.md
> ## Documentation Index
> Fetch the complete documentation index at: https://smartcar.com/docs/llms.txt
> Use this file to discover all available pages before exploring further.
# Callback URI Verification
> Verify your webhook endpoint can receive deliveries
**This page covers initial endpoint verification.** For verifying webhook payload signatures from vehicles, see [Payload Verification](/integrations/webhooks/payload-verification).
When you create a webhook or update a callback URI in the Smartcar Dashboard, Smartcar sends a one-time `VERIFY` event to confirm your endpoint is ready. Your endpoint must respond correctly before Smartcar will deliver any vehicle data.
## The VERIFY Event
Smartcar sends a challenge request to your callback URI in this format:
```json Version 4.0 (NEW) theme={null}
{
"eventId": "52f6e0bb-1369-45da-a61c-9e67d092d6db",
"eventType": "VERIFY",
"data": {
"challenge": ""
},
"meta": {
"version": "4.0",
"webhookId": "5a8e5e38-1e12-4011-a36d-56f120053f9e",
"webhookName": "Example Webhook",
"deliveryId": "5d569643-3a47-4cd1-a3ec-db5fc1f6f03b",
"deliveredAt": "2025-07-31T19:38:42.332Z"
}
}
```
```json Version 2.0 theme={null}
{
"version": "2.0",
"webhookId": "",
"eventName": "verify",
"payload": {
"challenge": ""
}
}
```
## Required Response
Your endpoint must respond with:
1. **Status code**: `200 OK`
2. **Content-Type header**: `application/json`
3. **Response body**: A JSON object containing the HMAC-SHA256 hash of the challenge
### Generate the HMAC
Create an HMAC-SHA256 hash of the `challenge` string using your **Application Management Token** as the secret key:
Our [backend SDKs](/api-reference/api-sdks) have helper methods to generate the HMAC.
```js Node theme={null}
let hmac = smartcar.hashChallenge(
application_management_token,
payload.challenge
);
```
```python Python theme={null}
hmac = smartcar.hash_challenge(
application_management_token,
payload.challenge
)
```
```java Java theme={null}
String hmac = Smartcar.hashChallenge(
application_management_token,
payload.challenge
);
```
```ruby Ruby theme={null}
hmac = Smartcar.hash_challenge(
application_management_token,
payload.challenge
)
```
### Return the Response
Return the hex-encoded hash in your response body with the key `challenge`:
```json Response Body theme={null}
{
"challenge": "{HMAC-hex-string}"
}
```
If your endpoint fails to respond correctly within 15 seconds, Smartcar will not activate the webhook. You can retry verification from the Dashboard at any time.
***
## Verify webhook challenges inside the Dashboard
Use the Smartcar Dashboard to understand exactly what Smartcar expects before you enable webhooks in production. The **Verify webhook** modal shows a sample challenge string plus language-specific snippets so you can implement the same HMAC signature in your code.
Copy the challenge string from the modal and use the embedded snippets (Python, Node, Java, or Ruby) as references while you code the signature logic on your server. Run your handler locally or in staging so it is ready to answer Smartcar’s challenge.
Once your server is ready, click **Verify this webhook**. Smartcar sends the challenge payload to your callback URL, and your code responds with the signature it just produced.
The Response tab displays the HTTP status, the challenge Smartcar sent, the signature Smartcar expected, and the body your server returned. Use this side-by-side view to confirm success or adjust your implementation before retrying.
---
# Source: https://smartcar.com/docs/api-reference/signals/charge.md
> ## Documentation Index
> Fetch the complete documentation index at: https://smartcar.com/docs/llms.txt
> Use this file to discover all available pages before exploring further.
# Charge Signals
### Amperage
Signal code: `charge-amperage`
Current amperage flowing to the electric vehicle during a charging session, measured in amps.
```json Example theme={null}
{
"unit": "ampere",
"value": 32
}
```
### Max Amperage
Signal code: `charge-amperagemax`
The maximum available amps available to charge.
```json Example theme={null}
{
"unit": "ampere",
"value": 48
}
```
### Amperage Requested
Signal code: `charge-amperagerequested`
The requested amps to charge the vehicle.
```json Example theme={null}
{
"unit": "ampere",
"value": 32
}
```
### Charge Limits
Signal code: `charge-chargelimits`
Object containing the default (global) charge limit configuration and configurations based on location, and charge connector type
Array of charge limit configurations, each representing a different context (global, location-based, or connector-based).
The type of charge limit configuration. "global" applies universally, "location" is specific to a location, and "connector" is specific to a charging connector type.
**Possible values:** `GLOBAL`, `LOCATION`, `CONNECTOR`
The maximum state of charge (SoC) limit configured for this context, expressed as a percentage (0-100).
Additional context for location or connector-based charge limits. Null for global configurations.
Name of the location or charging station where this limit applies.
Street address of the location where this limit applies.
Geographic latitude coordinate of the location where this limit applies.
Geographic longitude coordinate of the location where this limit applies.
Type of charging connector where this limit applies (only used when type is "connector").
Maximum state of charge (SoC) limit currently being applied to the vehicle, expressed as a percentage (0-100). This field will contain a numeric value when the vehicle is plugged in and charging, indicating which of the configured charge limits is currently active. When the vehicle is not plugged in or the active limit cannot be determined, this field will be null.
The unit of measurement for the charge limits.
```json Example theme={null}
{
"values": [
{
"type": "global",
"limit": 80,
"condition": null
},
{
"type": "location",
"limit": 90,
"condition": {
"name": "Home",
"address": "123 Main St",
"latitude": 37.7749,
"longitude": -122.4194
}
}
],
"activeLimit": 100,
"unit": "percent"
}
```
### Charge Port Status Color
Signal code: `charge-chargeportstatuscolor`
Current status indicator color displayed on or around the vehicle's charging port.
**Possible values:** `GREEN`, `BLUE`, `ORANGE`, `ETC`
```json Example theme={null}
{
"value": "GREEN"
}
```
### Charge Rate
Signal code: `charge-chargerate`
Current rate at which range is being added to the vehicle during an active charging session
```json Example theme={null}
{
"unit": "km/h",
"value": 25
}
```
### Records
Signal code: `charge-chargerecords`
Collection of historical charging session data stored by the vehicle.
Array of individual charging session records, each representing a completed or ongoing charging event.
Unique OEM identifier assigned to the specific charging session.
Detailed breakdown of the charging session costs.
Three-letter currency code (e.g., "USD", "EUR") representing the monetary unit used for the charging session transaction.
Cost specifically for the electrical energy consumed during the charging session.
Additional non-energy related charges (e.g., connection fees, parking fees) associated with the charging session.
ISO-8601 timestamp marking when a charging session was completed or terminated.
Details about where the charging session took place.
Descriptive name of the charging location (e.g., "Home Charger", "Public Station 123").
Street address of the charging location.
Geographic latitude coordinate of the charging location.
Geographic longitude coordinate of the charging location.
ISO-8601 timestamp marking when a charging session was initiated.
Total amount of electrical energy delivered during the charging session, measured in kilowatt-hours (kWh).
Identifier for the type of charging connector used (e.g., "J1772", "CCS", "CHAdeMO").
Indicates whether the charging occurred at a public charging station (true) or private location (false).
Battery's state of charge (0-100%) at the end of the charging session.
Battery's state of charge (0-100%) at the start of the charging session.
```json Example theme={null}
{
"values": [
{
"id": "CHG123",
"cost": {
"currency": "USD",
"otherAmount": 2,
"energyAmount": 10.5
},
"endTime": "2023-10-15T08:00:00Z",
"location": {
"name": "Home Charger",
"address": "123 Main St",
"latitude": 37.7749,
"longitude": -122.4194
},
"startTime": "2023-10-15T00:00:00Z",
"energyAdded": 40.5,
"connectorType": "J1772",
"isPublicCharger": false,
"endStateOfCharge": 90,
"startStateOfCharge": 20
}
]
}
```
### Charge Timers
Signal code: `charge-chargetimers`
Object containing the default (global) charge timer configuration and configurations based on location, and charge connector type
Array of charging timer configurations, each defining either scheduled charging times or departure times.
The type of charging timer configuration. "global" applies universally, "location" is specific to a location, and "connector" is specific to a charging connector type.
**Possible values:** `GLOBAL`, `LOCATION`, `CONNECTOR`
Additional context for location or connector-based charging timers. Null for global configurations.
Name of the location or charging station where this timer configuration applies.
Street address of the location where this timer configuration applies.
Geographic latitude coordinate of the location where this timer configuration applies.
Geographic longitude coordinate of the location where this timer configuration applies.
Type of charging connector where this timer configuration applies (only used when type is "connector").
Array of time windows during which charging should occur, defined by start and end times on specific days.
The time when the charging window should end, in 24-hour format (HH:MM:SS).
List of days of the week when this charging schedule should be active.
The time when the charging window should begin, in 24-hour format (HH:MM:SS).
Array of target departure times when the vehicle should be charged and ready to use.
List of days of the week when this departure timer should be active.
The target time when the vehicle should be fully charged and ready, in 24-hour format (HH:MM:SS).
Indicates whether the vehicle manufacturer's smart charging optimization features are enabled for this timer configuration.
### Charger Phases
Signal code: `charge-chargerphases`
The number of phases available from the connected charger.
```json Example theme={null}
{
"value": 3
}
```
### Charging Connector Type
Signal code: `charge-chargingconnectortype`
Identifier for the type of charging connector/inlet equipped on the vehicle.
```json Example theme={null}
{
"value": "J1772"
}
```
### Detailed Charging Status
Signal code: `charge-detailedchargingstatus`
String value that provides detailed information about the current state of the charging process.
**Possible values:** `CHARGING`, `NOT_CHARGING`, `FULLY_CHARGED`
```json Example theme={null}
{
"value": "CHARGING"
}
```
### Energy Added
Signal code: `charge-energyadded`
Cumulative amount of electrical energy delivered to the vehicle during the current or most recent charging session, measured in kilowatt-hours (kWh).
```json Example theme={null}
{
"unit": "kWh",
"value": 25.5
}
```
### Fast Charger Type
Signal code: `charge-fastchargertype`
Identifier for the specific DC fast charging standard currently connected to the vehicle. Indicates the protocol being used for high-power charging
```json Example theme={null}
{
"value": "CCS"
}
```
### Is Charging
Signal code: `charge-ischarging`
Boolean indicator that shows whether the electric vehicle is actively receiving power from a charging station or outlet.
```json Example theme={null}
{
"value": true
}
```
### Is Charging Cable Connected
Signal code: `charge-ischargingcableconnected`
Boolean indicator that shows whether a charging cable is physically connected to the vehicle's charging port.
```json Example theme={null}
{
"value": true
}
```
### Is Charging Cable Latched
Signal code: `charge-ischargingcablelatched`
Boolean indicator that shows whether the charging cable is securely locked to the vehicle's charging port.
```json Example theme={null}
{
"value": true
}
```
### Is Charging Port Flap Open
Signal code: `charge-ischargingportflapopen`
Boolean indicator that shows whether the vehicle's charging port access door or flap is currently open.
```json Example theme={null}
{
"value": true
}
```
### Is Fast Charger Present
Signal code: `charge-isfastchargerpresent`
Boolean indicator that shows whether the vehicle is connected to a DC fast charging station.
```json Example theme={null}
{
"value": true
}
```
### Time To Complete
Signal code: `charge-timetocomplete`
Estimated time remaining until the charging session reaches the activeLimit in minutes.
```json Example theme={null}
{
"value": 45
}
```
### Voltage
Signal code: `charge-voltage`
Current voltage level being supplied to the electric vehicle during a charging session, measured in volts.
```json Example theme={null}
{
"unit": "volts",
"value": 240
}
```
### Wattage
Signal code: `charge-wattage`
Current power delivery rate to the electric vehicle during a charging session, measured in watts.
```json Example theme={null}
{
"unit": "watts",
"value": 250
}
```
---
# Source: https://smartcar.com/docs/api-reference/tesla/clear-pin-to-drive.md
> ## Documentation Index
> Fetch the complete documentation index at: https://smartcar.com/docs/llms.txt
> Use this file to discover all available pages before exploring further.
# Clear PIN to Drive
> Disables this feature on the vehicle and resets the PIN.
## Permission
`control_pin`
## Request
**Path**
```bash cURL theme={null}
curl "https://api.smartcar.com/v2.0/vehicles/{id}/{make}/pin" \
-H "Authorization: Bearer {token}" \
-X "DELETE" \
-H "Content-Type: application/json" \
```
```python Python theme={null}
pin = vehicle.request(
"DELETE",
"{make}/pin"
)
```
```js Node theme={null}
const pin = vehicle.request(
"DELETE",
"{make}/pin"
);
```
```java Java theme={null}
SmartcarVehicleRequest request = new SmartcarVehicleRequest.Builder()
.method("DELETE")
.path("{make}/pin")
.build();
VehicleResponse pin = vehicle.request(request);
```
```ruby Ruby theme={null}
pin = vehicle.request(
"DELETE",
"{make}/pin"
)
```
## Response
If the request is successful, Smartcar will return “success”.
If the request is successful, Smartcar will return a message.
```json Example Response theme={null}
{
"message": "Successfully sent request to vehicle",
"status": "success"
}
```
## Notes
* Call `POST` [PIN to Drive](/api-reference/tesla/set-pin-to-drive) in order to enable this feature and set the PIN
* Currently both owner and driver account types can clear a PIN for the vehicle and disable the feature via the API.
---
# Source: https://smartcar.com/docs/api-reference/signals/climate.md
> ## Documentation Index
> Fetch the complete documentation index at: https://smartcar.com/docs/llms.txt
> Use this file to discover all available pages before exploring further.
# Climate Signals
### External Temperature
Signal code: `climate-externaltemperature`
The current temperature measured outside the vehicle.
The unit of temperature measurement (celsius or fahrenheit)
The temperature value
```json Example theme={null}
{
"unit": "celsius",
"value": 22.5
}
```
### Internal Temperature
Signal code: `climate-internaltemperature`
The current temperature measured inside the vehicle's cabin.
The unit of temperature measurement (celsius or fahrenheit)
The temperature value
```json Example theme={null}
{
"unit": "celsius",
"value": 21.5
}
```
---
# Source: https://smartcar.com/docs/api-reference/signals/closure.md
> ## Documentation Index
> Fetch the complete documentation index at: https://smartcar.com/docs/llms.txt
> Use this file to discover all available pages before exploring further.
# Closure Signals
### Doors
Signal code: `closure-doors`
An object containing information about the vehicle's doors.
An array of objects containing information about the state of the vehicle's doors.
Represents the row position of a specific door, front to back (0 to Doors.rowCount-1).
Represents the column position of a specific door, left to right (0 to Door.ColumnCount-1).
Indicates if the door is open.
Indicates if the door is locked.
Indicates the total number of door rows present in the vehicle. This field, along with columnCount, provides information about the vehicle's door layout and the total number of doors available.
Indicates the total number of door columns present in the vehicle. This field, along with rowCount, provides information about the vehicle's door layout and the total number of doors available.
```json Example theme={null}
{
"values": [
{
"row": 0,
"column": 0,
"isOpen": false,
"isLocked": true
},
{
"row": 0,
"column": 1,
"isOpen": false,
"isLocked": true
}
],
"rowCount": 2,
"columnCount": 2
}
```
### Engine Cover
Signal code: `closure-enginecover`
An object containing information about the state of the vehicle's engine cover for ICE or PHEV vehicles.
Indicates if the trunk is open.
### Front Trunk
Signal code: `closure-fronttrunk`
An object containing information about the state of the vehicle's front trunk.
Indicates if the trunk is open.
Indicates if the trunk is locked.
### Is Locked
Signal code: `closure-islocked`
A boolean value indicating whether the vehicle's closures are currently locked.
### Rear Trunk
Signal code: `closure-reartrunk`
An object containing information about the state of the vehicle's rear trunk.
Indicates if the trunk is open.
Indicates if the trunk is locked.
### Sunroof
Signal code: `closure-sunroof`
An object containing information about the state of the vehicle's sunroof.
Indicates if the trunk is open.
### Windows
Signal code: `closure-windows`
An object containing information about the vehicle's windows.
An array of objects, where each object represents a specific window in the vehicle.
Represents the row position of a specific window, front to back (0 to Windows.rowCount-1).
Represents the column position of a specific window, left to right (0 to Windows.columnCount-1).
Indicates if the window is open.
Indicates the total number of window rows present in the vehicle. This field, along with columnCount, provides information about the vehicle's window layout and the total number of windows available.
Indicates the total number of window columns present in the vehicle. This field, along with rowCount, provides information about the vehicle's window layout and the total number of windows available.
```json Example theme={null}
{
"values": [
{
"row": 0,
"column": 0,
"isOpen": false
},
{
"row": 0,
"column": 1,
"isOpen": false
}
],
"rowCount": 2,
"columnCount": 2
}
```
---
# Source: https://smartcar.com/docs/api-reference/compatibility-api-intro.md
> ## Documentation Index
> Fetch the complete documentation index at: https://smartcar.com/docs/llms.txt
> Use this file to discover all available pages before exploring further.
# Compatibility API Overview
> The Compatibility API helps you determine if a specific vehicle is supported by Smartcar before launching the Connect flow. This allows you to provide a seamless user experience by verifying eligibility up front.
## What You Can Do
* Check if a vehicle is compatible by VIN
* Query supported makes and regions
## Authentication
The Compatibility API uses a bearer token, which you can obtain from your Smartcar Dashboard or via the OAuth2 flow.
## Base URL
```
https://api.smartcar.com/compatibility/v2.0
```
## Key Resources
* [Check Compatibility by VIN](/api-reference/compatibility/by-vin)
* [Check Compatibility by Region and Make](/api-reference/compatibility/by-region-and-make)
## Example Use Cases
* Pre-qualifying users before showing Smartcar Connect
* Displaying supported makes and models in your app
* Reducing user friction by avoiding unsupported vehicles
For more details on using the Compatibility API, see [Compatibility API Reference](/api-reference/compatibility/by-vin).
---
# Source: https://smartcar.com/docs/errors/api-errors/compatibility-errors.md
> ## Documentation Index
> Fetch the complete documentation index at: https://smartcar.com/docs/llms.txt
> Use this file to discover all available pages before exploring further.
# Compatibility Errors
> Thrown when Smartcar does not support a make, or feature for a vehicle.
# `MAKE_NOT_COMPATIBLE`
Smartcar is not yet compatible with this vehicle’s make in the country you specified.
```json theme={null}
{
"type": "COMPATIBILITY",
"code": "MAKE_NOT_COMPATIBLE",
"description": "Smartcar is not yet compatible with this vehicle’s make in the country you specified.",
"docURL": "https://smartcar.com/docs/errors/api-errors/compatibility-errors#make-not-compatible",
"statusCode": 501,
"requestId": "5dea93a1-3f79-4246-90c5-89610a20471b",
"resolution": { "type": null }
}
```
**Suggested User Messaging**
`` is not yet able to connect to your car brand.
# `PLATFORM_NOT_CAPABLE`
You're connected to the vehicle using an OEM integration that does not support this endpoint. This can be a result of the OEM migrating to a newer API or requiring vehicle owners to migrate to a new application they have released.
```json theme={null}
{
"type": "COMPATIBILITY",
"code": "PLATFORM_NOT_CAPABLE",
"description": "You're connected to the vehicle using an OEM integration that does not support this endpoint.",
"docURL": "https://smartcar.com/docs/errors/api-errors/compatibility-errors#platform-not-capable",
"statusCode": 501,
"requestId": "5dea93a1-3f79-4246-90c5-89610a20471b",
"resolution": { "type": "REAUTHENTICATE" }
}
```
**Troubleshooting Steps**
For Tesla vehicles please have the owner re-authenticate using the latest Tesla authorization flow.
# `SMARTCAR_NOT_CAPABLE`
Smartcar does not yet support this feature for this vehicle.
```json theme={null}
{
"type": "COMPATIBILITY",
"code": "SMARTCAR_NOT_CAPABLE",
"description": "Smartcar does not yet support this feature for this vehicle.",
"docURL": "https://smartcar.com/docs/errors/api-errors/compatibility-errors#smartcar-not-capable",
"statusCode": 501,
"requestId": "5dea93a1-3f79-4246-90c5-89610a20471b",
"resolution": { "type": null }
}
```
**Troubleshooting Steps**
Please check that the vehicles make and engine type support the feature you are trying to use.
Please contact us to learn when this feature will become available.
If you have a vehicle that supports this feature and would like to help out, check out Smartcar’s Research Fleet.
# `VEHICLE_NOT_CAPABLE`
This error occurs when a physical limitation makes the vehicle incapable of performing your request
(e.g. battery electric vehicles are incapable of responding to read fuel requests).
```json theme={null}
{
"type": "COMPATIBILITY",
"code": "VEHICLE_NOT_CAPABLE",
"description": "The vehicle is incapable of performing your request.",
"docURL": "https://smartcar.com/docs/errors/api-errors/compatibility-errors#vehicle-not-capable",
"statusCode": 501,
"requestId": "5dea93a1-3f79-4246-90c5-89610a20471b",
"resolution": { "type": null }
}
```
**Suggested User Messaging**
Your car is unable to perform this request.
---
# Source: https://smartcar.com/docs/errors/connect-errors/configuration-error.md
> ## Documentation Index
> Fetch the complete documentation index at: https://smartcar.com/docs/llms.txt
> Use this file to discover all available pages before exploring further.
# Configuration
> This error occurs when the user has encountered an Error page in Connect and has chosen to return to your application.
| Parameter | Required | Description |
| ------------------- | -------- | ----------------------------------------------------------------- |
| `error` | `true` | `configuration_error` |
| `error_description` | `true` | There has been an error in the configuration of your application. |
| `status_code` | `true` | The status code of the error encountered in Connect |
| `error_message` | `true` | The error message seen by the user |
```http Example redirect uri theme={null}
HTTP/1.1 302 Found
Location: https://example.com/callback
?error=configuration_error
&error_description=There%20has%20been%20an%20error%20in%20the%20configuration%20of%20your%20application.&status_code=400
&error_message=You%20have%20entered%20a%20test%20mode%20VIN.%20Please%20enter%20a%20VIN%20that%20belongs%20to%20a%20real%20vehicle.
```
On redirect, Connect will return the status code and message of the error that they encountered. This will be triggered if:
* A user tried to directly navigate to a page that is past their current step in Connect (i.e. going directly from the Preamble screen to the Permission Grants screen by directly going to connect.smartcar.com/grant).
* A user is trying to use Single Select in live mode with a test mode VIN or with a simulated VIN in a non-simulated mode.
* A user is trying to use Single Select with an invalid mock VIN.
* A validation error occurs when trying to check compatibility by VIN.
These cases will trigger the following error and give the user the ability to “Exit” Connect.
---
# Source: https://smartcar.com/docs/getting-started/configure-application.md
> ## Documentation Index
> Fetch the complete documentation index at: https://smartcar.com/docs/llms.txt
> Use this file to discover all available pages before exploring further.
# Configure Your Application
> Learn how to configure your Smartcar application, including setting up permissions and redirect URIs.
Once you have registered your application in the [Smartcar Dashboard](https://dashboard.smartcar.com), you can configure it to suit your business needs.
## Application Configuration Overview
Your application configuration includes several key components:
* **Application Name & Description**: A clear name and description help users understand what your application does.
* **Redirect URI**: The URL to which users will be redirected after they authorize your application. This must match the redirect URI you use in your OAuth flow.
* **Privacy Policy URL**: A link to your application's privacy policy that will be presented to users during the authorization process.
* **Vehicle Data**: Select the specific vehicle data signals your application will request access to. This determines the permissions your application will need from users.
#### What’s Next?
* [Connect your first vehicle](/getting-started/connect-vehicles).
* [Build your first integration](/getting-started/integration-overview).
---
# Source: https://smartcar.com/docs/getting-started/how-to/configure-permissions.md
> ## Documentation Index
> Fetch the complete documentation index at: https://smartcar.com/docs/llms.txt
> Use this file to discover all available pages before exploring further.
# How to Configure Permissions for Vehicle Data Collection
> Step-by-step guide to selecting signals, commands, and attributes in the Smartcar Dashboard and requesting the right permissions from vehicle owners.
To retrieve vehicle data through Smartcar, you must configure your application to request the correct permissions from vehicle owners. This guide walks you through the process using the Smartcar Dashboard.
Go to the [Smartcar Dashboard](https://dashboard.smartcar.com/configuration) and select your application. Navigate to the Configuration section and choose the Vehicle access tab.
Under the Signals, Commands, and Attributes tabs, select the specific vehicle data points and actions your application needs. Each selection corresponds to a permission that the vehicle owner must approve.
Signals: Dynamic vehicle data (e.g., battery level, odometer, location).
Commands: Actions your app can perform (e.g., lock/unlock, start charging).
Attributes: Static vehicle info (e.g., make, model, year).
Only select the permissions your application truly needs. This improves user trust and increases the likelihood of successful connections.
As you select signals, commands, and attributes, the Connect Preview on the right updates to show what the vehicle owner will see when connecting their vehicle. This preview lists the permissions your app is requesting and the vehicles that will be connected.
Once you are satisfied with your selections, click Publish to save your configuration. Your application will now request these permissions from vehicle owners during the Smartcar Connect flow.
## Dynamic Permissions
If your application needs to access different permissions based on user actions or vehicle types, you can leverage the `scope` parameter in the Smartcar Connect URL to dynamically request permissions at runtime. This allows you to tailor the permissions based on the specific vehicle or user context.
Keep in mind that any permissions you pass via the `scope` parameter will override the permissions configured in the Smartcar Dashboard for that specific connection.
### Notes
* If you need to change permissions later, you can return to this configuration page and update your selections. Vehicle owners will need to reauthorize your application to grant any new permissions.
* The permissions you select here will determine the data and actions available to your application. Make sure to choose only what is necessary for your use case.
***
## What’s Next
* [How to Connect Vehicles](/getting-started/connect-vehicles)
* [How to Manage API Tokens](/getting-started/how-to/manage-api-tokens)
* [API Reference: Permissions](/api-reference/permissions)
---
# Source: https://smartcar.com/docs/getting-started/dashboard/connect-insights.md
> ## Documentation Index
> Fetch the complete documentation index at: https://smartcar.com/docs/llms.txt
> Use this file to discover all available pages before exploring further.
# Connect Insights
> Connect Insights allows you to visualize your Connect conversion rate and identify where individual users are running into issues during onboarding.
## Conversion Rate
For Enterprise customers, the **Conversion Rate** gives you high-level insight into how users are progressing through the Connect Flow over the last two weeks.
## Session Details
Clicking into an event in the **Sessions Feed** will pull up more detailed
information for that specific user's session, allowing you to see where they
dropped off and highlighting issues they may have run into.
If you need to dial into a specific time frame or individual user, you can use
filters such as Date, VIN, User or Session ID to do so.
---
# Source: https://smartcar.com/docs/connect/connect-sdks.md
> ## Documentation Index
> Fetch the complete documentation index at: https://smartcar.com/docs/llms.txt
> Use this file to discover all available pages before exploring further.
# SDKs for Connect
> Our SDKs make integrating Smartcar fast and easy in different languages and frameworks.
For mobile or single page web apps, you can use one of our frontend SDKs. Please note that our frontend SDKs only handle
integrating Connect into your application. You will still need to use a [backend SDK](/api-reference/api-sdks) to manage tokens and make API requests to vehicles.
**Note:** In addition to using a frontend SDK to integrate with Smartcar Connect, a backend SDK is strongly recommended to securely manage tokens, receive data from Smartcar, and make API requests to issue commands to vehicles. The backend SDK facilitates authentication, token exchange, and all communication with Smartcar’s APIs.
For server-side rendered applications, you can use one of our backend SDKs:
Don't see an SDK for your language? No problem!
As long as you can build a URL and handle HTTP requests, you're good to go.
---
# Source: https://smartcar.com/docs/getting-started/connect-vehicles.md
> ## Documentation Index
> Fetch the complete documentation index at: https://smartcar.com/docs/llms.txt
> Use this file to discover all available pages before exploring further.
# Connect Vehicles
> Learn how to connect vehicles to your Smartcar application using Smartcar Connect.
Smartcar Connect is the starting point for connecting vehicles to your application. It uses Smartcar's patented and secure [OAuth 2.0](https://oauth.net/2/) flow to let vehicle owners grant your app access to their car data and control features.
### Prerequisites
Before you begin, make sure you have [configured](/getting-started/configure-application) your Smartcar application in the [Smartcar Dashboard](https://dashboard.smartcar.com/configuration). You will need:
* Your application's `Client ID` and `Client Secret`
* A valid `redirect_uri` for your application
* The vehicle data you want to access (e.g., odometer, location, etc.)
Direct your users to the Smartcar Connect URL. This can be done using the Smartcar SDK for your platform (web, iOS, or Android) or copying the URL from the [Smartcar Dashboard](https://dashboard.smartcar.com/configuration). The user will:
* Select their vehicle brand
* Log in with their connected services account
* Review and approve the requested permissions
After the user authorizes access, Smartcar will redirect them back to your application using the default `redirect_uri` you provided in your app configuration. The redirect will include an authorization `code` as a query parameter.
Your backend exchanges the authorization code for an access token and refresh token by making a request to [Smartcar’s token endpoint](/api-reference/authorization/auth-code-exchange). You’ll need your app’s `client_id`, `client_secret`, and the same `redirect_uri`.
```
POST https://auth.smartcar.com/oauth/token
Content-Type: application/x-www-form-urlencoded
client_id=YOUR_CLIENT_ID&client_secret=YOUR_CLIENT_SECRET&grant_type=authorization_code&code=AUTH_CODE&redirect_uri=YOUR_REDIRECT_URI
```
The response will include an `access_token` and a `refresh_token`.
Store the `access_token` and `refresh_token` securely in your application's database. These tokens are sensitive credentials that allow access to vehicle data and actions, so:
* Use encrypted storage or a secrets manager whenever possible.
* Never log tokens or expose them in client-side code.
* Associate tokens with the correct user and vehicle in your database for easy lookup and management. Here is a [recommended architecture structure](/getting-started/how-to/architecture-design).
* The `access_token` expires after two hours. You will need to use the `refresh_token` to obtain new access tokens when needed. The `refresh_token` expires after 60 days. If the `refresh_token` expires, the user will need to reauthorize your application.
Vehicle owners may occasionally need to re-authenticate due to OEM platform migrations, credential changes, or permission updates. Build your integration to handle these scenarios gracefully. See [Handle Re-authentication](/connect/re-auth/oem-migrations) for implementation guidance.
## What’s Next
* [Build your first integration](/getting-started/integration-overview).
* [See more about Smartcar Connect](/connect/what-is-connect)
* [Explore available API endpoints](/api-reference)
* [Learn about permissions and scopes](/api-reference/permissions)
---
# Source: https://smartcar.com/docs/errors/api-errors/connected-services-account-errors.md
> ## Documentation Index
> Fetch the complete documentation index at: https://smartcar.com/docs/llms.txt
> Use this file to discover all available pages before exploring further.
# Connected Services Account Errors
> Thrown when there are issues with the user's connected service account.
# `ACCOUNT_ISSUE`
Action needed in the user’s connected services account. The user needs to log in and complete an outstanding task in their connected services account.
Examples:
* The user needs to accept the connected services app’s Terms of Service.
* The user has created but not yet fully activated their connected services account.
* If you've received this error while testing with Vehicle Simulator, it likely means a simulation has not been started for the vehicle. Visit the Simulator tab in the Smartcar Dashboard to start a simulation for the vehicle.
```json theme={null}
{
"type": "CONNECTED_SERVICES_ACCOUNT",
"code": "ACCOUNT_ISSUE",
"description": "Action needed in the user’s connected services account. Please prompt the user to log into their connected services account and complete any outstanding tasks.",
"docURL": "https://smartcar.com/docs/errors/api-errors/connected-services-account-errors#account-issue",
"statusCode": 400,
"requestId": "5dea93a1-3f79-4246-90c5-89610a20471b",
"resolution": { "type": null },
"suggestedUserMessage": "Action required in your connected services account. Please log into your connected services app or web portal and complete any outstanding tasks (e.g. finish activating your account or accept the Terms of Service)."
}
```
### Suggested resolution
The user can resolve this error by logging into their connected services account and completing any outstanding tasks.
### Troubleshooting steps
* Prompt the user to log into their connected services account using the app or web portal.
* Prompt the user to try triggering an action on their car, e.g. locking the doors or flashing the lights.
* At this point, the app should prompt the user to complete their outstanding task.
### Suggested user message
> Action required in your connected services account. Please log into your connected services app or web portal and complete any outstanding tasks (e.g. finish activating your account or accept the Terms of Service).
***
# `AUTHENTICATION_FAILED`
Smartcar was unable to authenticate with the user’s connected services account. This error usually occurs when the user has updated their connected
services account credentials and not yet re-authenticated in Smartcar Connect. The user should re-authenticate using Smartcar Connect.
```json theme={null}
{
"type": "CONNECTED_SERVICES_ACCOUNT",
"code": "AUTHENTICATION_FAILED",
"description": "Smartcar was unable to authenticate with the user’s connected services account. Please prompt the user to re-authenticate using Smartcar Connect.",
"docURL": "https://smartcar.com/docs/errors/api-errors/connected-services-account-errors#authentication-failed",
"statusCode": 400,
"requestId": "5dea93a1-3f79-4246-90c5-89610a20471b",
"resolution": {
"type": "REAUTHENTICATE",
"url": "https://connect.smartcar.com/oauth/reauthenticate?response_type=vehicle_id&client_id=8229df9f-91a0-4ff0-a1ae-a1f38ee24d07&vehicle_id=sc4a1b01e5-0497-417c-a30e-6df6ba33ba46"
},
"suggestedUserMessage": "Your car got disconnected from . Please use this link to re-connect your car: ."
}
```
### Suggested resolution
Please provide the user with a link to Smartcar Connect Re-authentication and prompt them to re-connect their vehicle.
The resolution field contains a partially constructed URL for Smartcar Connect Re-authentication, please see the API reference for more detail.
### Suggested user message
> Your car got disconnected from \. Please use this link to re-connect your car: \.
***
# `NO_VEHICLES`
No vehicles found in the user’s connected services account. The user might not yet have added their vehicle to their account, or they might not yet have activated connected services for the vehicle.
```json theme={null}
{
"type": "CONNECTED_SERVICES_ACCOUNT",
"code": "NO_VEHICLES",
"description": "No vehicles found in the user’s connected services account. Please prompt the user to add their vehicle to their connected services account and re-authenticate using Smartcar Connect.",
"docURL": "https://smartcar.com/docs/errors/api-errors/connected-services-account-errors#no-vehicles",
"statusCode": 400,
"requestId": "5dea93a1-3f79-4246-90c5-89610a20471b",
"resolution": { "type": null },
"suggestedUserMessage": "Your car got disconnected from . Please use this link to re-connect your car: ."
}
```
### Suggested resolution
Please provide the user with a link to Smartcar Connect Re-authentication and prompt them to re-connect their vehicle.
The resolution field contains a partially constructed URL for Smartcar Connect Re-authentication, please see the API reference for more detail.
### Troubleshooting Steps
* Prompt the user to log into their connected services account using the app or web portal.
* Prompt the user to check whether there are any vehicles listed in their account.
* If there are no vehicles listed, prompt the user to add their vehicle.
* If there are one or more vehicles listed, this means that none of the vehicles have had their connected services activated. Prompt the user to activate connected services for at least one vehicle.
* Provide the user with a link to Smartcar Connect and prompt them to re-connect their vehicle.
### Suggested user message
> Your car got disconnected from \. Please use this link to re-connect your car: \.
***
# `PERMISSION`
This error occurs when a vehicle owner had initially granted Smartcar access to their OEM account, but has since revoked it via the OEM's management portal.
```json theme={null}
{
"type": "CONNECTED_SERVICES_ACCOUNT",
"code": "PERMISSION",
"description": "The vehicle owner has revoked Smartcar’s access to their OEM account.",
"docURL": "https://smartcar.com/docs/errors/api-errors/connected-services-account-errors#permission",
"statusCode": 400,
"requestId": "5dea93a1-3f79-4246-90c5-89610a20471b",
"resolution": {
"type" : "REAUTHENTICATE"
}
}
```
### Suggested resolution
For Tesla Owners:
* Prompt the vehicle owner to go through the Connect flow again or use our [reauthentication flow](/help/oem-integrations/tesla/developers#stand-alone-flow) to streamline the process.
***
# `SUBSCRIPTION`
The vehicle’s connected services subscription is inactive or does not support the requested API endpoint.
```json theme={null}
{
"type": "CONNECTED_SERVICES_ACCOUNT",
"code": "SUBSCRIPTION",
"description": "The vehicle’s connected services subscription is inactive or does not support the requested API endpoint.",
"docURL": "https://smartcar.com/docs/errors/api-errors/connected-services-account-errors#subscription",
"statusCode": 400,
"requestId": "5dea93a1-3f79-4246-90c5-89610a20471b",
"resolution": { "type": null },
"suggestedUserMessage": "Your car’s connected services subscription has either expired or it doesn’t support the necessary features to connect to . Please activate your subscription or contact us to upgrade your subscription."
}
```
### Suggested resolution
The user can resolve this error by logging into their connected services account and either (re-)activating their subscription or purchasing the required subscription package.
### Troubleshooting Steps
If you don’t know which subscription package the user needs to purchase, please contact our team for help.
### Suggested user message
> Your car’s connected services subscription has either expired or it doesn’t support the necessary features to connect to \. Please activate your subscription or contact us to upgrade your subscription.
***
# `VEHICLE_MISSING`
This vehicle is no longer associated with the user’s connected services account. The user might have removed it from their account.
The user needs to log into their connected services account and either re-add the vehicle or re-activate its subscription.
If you've received this error while testing with Vehicle Simulator, it likely means the simulated vehicle has not been found in your application. Visit the Simulator tab in the Smartcar Dashboard to create a simulated vehicle to test with.
```json theme={null}
{
"type": "CONNECTED_SERVICES_ACCOUNT",
"code": "VEHICLE_MISSING",
"description": "This vehicle is no longer associated with the user’s connected services account. Please prompt the user to re-add the vehicle to their account.",
"docURL": "https://smartcar.com/docs/errors/api-errors/connected-services-account-errors#vehicle-missing",
"statusCode": 400,
"requestId": "5dea93a1-3f79-4246-90c5-89610a20471b",
"resolution": { "type": null },
"suggestedUserMessage": "Your car’s connected services subscription has either expired or it doesn’t support the necessary features to connect to . Please activate your subscription or contact us to upgrade your subscription."
}
```
### Suggested resolution
The user can resolve this issue by logging into their connected services account and either re-adding the vehicle or re-activating its subscription.
If the user wishes to disconnect their vehicle from your app, please make a request to our Disconnect endpoint and refrain from making API requests to this vehicle in the future.
### Troubleshooting Steps
* Prompt the user to log into their connected services account using the app or web portal.
* Prompt the user to check whether the vehicle is listed under their account.
* If the vehicle is not listed, prompt the user to add the vehicle to their account.
* If the vehicle is listed, prompt the user to activate the vehicle’s connected services subscription.
### Suggested user message
> This car is no longer associated with your connected services account. Please log into your account and re-add this car.
***
# `VIRTUAL_KEY_REQUIRED`
The vehicle owner has granted your application access to the vehicle through Smartcar. However, additional steps are needed on the owners part in order to perform this specific request.
```json theme={null}
{
"type": "CONNECTED_SERVICES_ACCOUNT",
"code": "VIRTUAL_KEY_REQUIRED",
"description": "The vehicle owner needs to grant additional access to Smartcar in order to perform this request.",
"docURL": "https://smartcar.com/docs/errors/api-errors/connected-services-account-errors#virtual-key-required",
"statusCode": 400,
"requestId": "5dea93a1-3f79-4246-90c5-89610a20471b",
"resolution": {
"type" : "ACTION_REQUIRED",
"url" : "https://www.tesla.com/_ak/smartcar.com"
}
"suggestedUserMessage": "In order to perform this request you’ll need to add a Third-Party Virtual key to your vehicle. Please open this link on the phone with your Tesla App to complete this step."
}
```
### Suggested resolution
For Tesla Owners:
* The vehicle owner needs to add Smartcar’s Third-Party Virtual Key. As of late 2023, Tesla is starting to require virtual keys for Third-Party applications to perform commands.
* In order to issue commands, please prompt the vehicle owner to add Smartcar’s Third-Party virtual key: [https://www.tesla.com/\_ak/smartcar.com](https://www.tesla.com/_ak/smartcar.com)
### Troubleshooting steps
* Please direct the vehicle owner to add Smartcar’s [Third-Party Virtual Key (tesla.com)](https://www.tesla.com/_ak/smartcar.com) in order to allow your application to issue commands to the vehicle.
### Suggested user message
> In order to perform this request you’ll need to add a Third-Party Virtual key to your vehicle. Please open [this](https://www.tesla.com/_ak/smartcar.com) link on the phone with your Tesla App to complete this step.
---
# Source: https://smartcar.com/docs/api-reference/signals/connectivitysoftware.md
> ## Documentation Index
> Fetch the complete documentation index at: https://smartcar.com/docs/llms.txt
> Use this file to discover all available pages before exploring further.
# ConnectivitySoftware Signals
### Current Firmware Version
Signal code: `connectivitysoftware-currentfirmwareversion`
Current version number of the firmware installed on the vehicle's telematics control unit or connected hardware.
```json Example theme={null}
{
"value": "2024.4.5"
}
```
---
# Source: https://smartcar.com/docs/api-reference/signals/connectivitystatus.md
> ## Documentation Index
> Fetch the complete documentation index at: https://smartcar.com/docs/llms.txt
> Use this file to discover all available pages before exploring further.
# ConnectivityStatus Signals
### Is Asleep
Signal code: `connectivitystatus-isasleep`
Boolean indicator that shows whether the vehicle is in a low-power or sleep state.
```json Example theme={null}
{
"value": false
}
```
### Is Digital Key Paired
Signal code: `connectivitystatus-isdigitalkeypaired`
Boolean indicator that shows whether a digital key has been successfully paired with the vehicle.
```json Example theme={null}
{
"value": true
}
```
### Is Online
Signal code: `connectivitystatus-isonline`
Boolean indicator that shows the connectivity status of the vehicle.
```json Example theme={null}
{
"value": true
}
```
---
# Source: https://smartcar.com/docs/api-reference/tesla/control-charge-port.md
> ## Documentation Index
> Fetch the complete documentation index at: https://smartcar.com/docs/llms.txt
> Use this file to discover all available pages before exploring further.
# Charge Port
> Open or close the vehicle's charge port door.
## Permission
`control_charge`
## Request
**Path**
**Body**
Indicate whether to open or close the charge port door.
Options: `OPEN` or `CLOSE`
```bash cURL theme={null}
curl "https://api.smartcar.com/v2.0/vehicles/{id}/{make}/charge/charge_port_door" \
-H "Authorization: Bearer {token}" \
-X "POST" \
-H "Content-Type: application/json" \
-d '{"action" : "OPEN"}'
```
```python Python theme={null}
charge_port = vehicle.request(
"POST",
"{make}/charge/charge_port_door",
{"action" : "OPEN"}
)
```
```js Node theme={null}
const chargePort = vehicle.request(
"POST",
"{make}/charge/charge_port_door",
{"action" : "OPEN"}
);
```
```java Java theme={null}
SmartcarVehicleRequest request = new SmartcarVehicleRequest.Builder()
.method("POST")
.path("{make}/charge/charge_port_door")
.addBodyParameter("action" : "OPEN")
.build();
VehicleResponse chargePort = vehicle.request(request);
```
```ruby Ruby theme={null}
charge_port = vehicle.request(
"POST",
"{make}/charge/charge_port_door",
{"action" : "OPEN"}
)
```
## Response
If the request is successful, Smartcar will return “success”.
If the request is successful, Smartcar will return a message.
```json Example Response theme={null}
{
"message": "Successfully sent request to vehicle",
"status": "success"
}
```
---
# Source: https://smartcar.com/docs/api-reference/evs/control-charge.md
> ## Documentation Index
> Fetch the complete documentation index at: https://smartcar.com/docs/llms.txt
> Use this file to discover all available pages before exploring further.
# Start & Stop Charge
> Start or stop the vehicle charging.
2.0 is still the only supported version for sending remote commands. If you need to send commands, please continue using v2.0 until commands are supported in the latest version later this year.
## Permission
`control_charge`
## Request
**Path**
**Body**
`START` or `STOP` the vehicle charging.
## Response
If the request is successful, Smartcar will return “success”.
If the request is successful, Smartcar will return a message.
```json Example Response theme={null}
{
"message": "Successfully sent request to vehicle",
"status": "success"
}
```
## Notes
**BMW and MINI**
Vehicle needs to be on OS Version 8+
**Ford and Lincoln**
Issuing a start command while the vehicle has a schedule in place for its current charging location will result in the vehicle charging to 100%.
Please see [charge schedule by location](/api-reference/ford/set-charge-schedule-by-location) for details on setting a charge limit with preferred charging times
or clearing schedules.
**Nissan**
Currently only START charge commands are supported in the US. See [Set Charge Schedule](/api-reference/nissan/set-charge-schedule) for details on setting a charge schedule for Nissan vehicles.
**Chevrolet, GMC, Buick and Cadillac**
These vehicles require a minimum charge of 50% in order to be able to start or stop charging via the API.
---
# Source: https://smartcar.com/docs/api-reference/tesla/control-frunk.md
> ## Documentation Index
> Fetch the complete documentation index at: https://smartcar.com/docs/llms.txt
> Use this file to discover all available pages before exploring further.
# Frunk
> Open or close the frunk (front trunk) of the Tesla vehicle.
## Permission
`control_trunk`
## Request
**Path**
**Body**
Indicate whether to open or close the charge port door.
Options: `OPEN` or `CLOSE`
```bash cURL theme={null}
curl "https://api.smartcar.com/v2.0/vehicles/{id}/{make}/security/frunk" \
-H "Authorization: Bearer {token}" \
-X "POST" \
-H "Content-Type: application/json" \
-d '{"action" : "OPEN"}'
```
```python Python theme={null}
frunk = vehicle.request(
"POST",
"{make}/security/frunk",
{"action" : "OPEN"}
)
```
```js Node theme={null}
const frunk = vehicle.request(
"POST",
"{make}/security/frunk",
{"action" : "OPEN"}
);
```
```java Java theme={null}
SmartcarVehicleRequest request = new SmartcarVehicleRequest.Builder()
.method("POST")
.path("{make}/security/frunk")
.addBodyParameter("action" : "OPEN")
.build();
VehicleResponse frunk = vehicle.request(request);
```
```ruby Ruby theme={null}
frunk = vehicle.request(
"POST",
"{make}/security/frunk",
{"action" : "OPEN"}
)
```
## Response
If the request is successful, Smartcar will return “success”.
If the request is successful, Smartcar will return a message.
```json Example Response theme={null}
{
"message": "Successfully sent request to vehicle",
"status": "success"
}
```
---
# Source: https://smartcar.com/docs/api-reference/control-lock-unlock.md
> ## Documentation Index
> Fetch the complete documentation index at: https://smartcar.com/docs/llms.txt
> Use this file to discover all available pages before exploring further.
# Lock & Unlock
> Lock or unlock the vehicle.
2.0 is still the only supported version for sending remote commands. If you need to send commands, please continue using v2.0 until commands are supported in the latest version later this year.
## Permission
`control_security`
## Request
**Path**
**Body**
`LOCK` or `UNLOCK` the vehicle’s doors.
## Response
If the request is successful, Smartcar will return “success” (HTTP 200 status).
If the request is successful, Smartcar will return a message (HTTP 200 status).
```json Example Response theme={null}
{
"message": "Successfully sent request to vehicle",
"status": "success"
}
```
---
# Source: https://smartcar.com/docs/api-reference/tesla/control-trunk.md
> ## Documentation Index
> Fetch the complete documentation index at: https://smartcar.com/docs/llms.txt
> Use this file to discover all available pages before exploring further.
# Trunk
> Open or close the trunk of the Tesla vehicle.
## Permission
`control_trunk`
## Request
**Path**
**Body**
Indicate whether to open or close the charge port door.
Options: `OPEN` or `CLOSE`
```bash cURL theme={null}
curl "https://api.smartcar.com/v2.0/vehicles/{id}/{make}/security/trunk" \
-H "Authorization: Bearer {token}" \
-X "POST" \
-H "Content-Type: application/json" \
-d '{"action" : "OPEN"}'
```
```python Python theme={null}
trunk = vehicle.request(
"POST",
"{make}/security/trunk",
{"action" : "OPEN"}
)
```
```js Node theme={null}
const trunk = vehicle.request(
"POST",
"{make}/security/trunk",
{"action" : "OPEN"}
);
```
```java Java theme={null}
SmartcarVehicleRequest request = new SmartcarVehicleRequest.Builder()
.method("POST")
.path("{make}/security/trunk")
.addBodyParameter("action" : "OPEN")
.build();
VehicleResponse trunk = vehicle.request(request);
```
```ruby Ruby theme={null}
trunk = vehicle.request(
"POST",
"{make}/security/trunk",
{"action" : "OPEN"}
)
```
## Response
If the request is successful, Smartcar will return “success”.
If the request is successful, Smartcar will return a message.
```json Example Response theme={null}
{
"message": "Successfully sent request to vehicle",
"status": "success"
}
```
---
# Source: https://smartcar.com/docs/connect/advanced-config/country-flag.md
> ## Documentation Index
> Fetch the complete documentation index at: https://smartcar.com/docs/llms.txt
> Use this file to discover all available pages before exploring further.
# Country Selection
> By default Connect will launch based on the devices location impacting the brands that are available to the user e.g. Renault is only available in Europe.
You can override this behavior by passing a country feature flag in your Connect URL in the form `country:{country_code}`.
Your feature flag should contain the [two-character ISO country code](https://en.wikipedia.org/wiki/ISO_3166-1_alpha-2)
of the country that your user is located in.
Our SDKs provide ways for you to add this as part of the various `authUrlBuilder` or `getAuthUrl` methods.
```plaintext Connect URL w/ country feature flag theme={null}
https://connect.smartcar.com/oauth/authorize?
response_type=code
&client_id=8229df9f-91a0-4ff0-a1ae-a1f38ee24d07
&scope=read_odometer read_vehicle_info
&redirect_uri=https://example.com/home
&flags=country:GB
```
Alternatively, your users can manually change their country and language on Connect's preamble screen:
---
# Source: https://smartcar.com/docs/integrations/webhooks/creating-webhooks.md
> ## Documentation Index
> Fetch the complete documentation index at: https://smartcar.com/docs/llms.txt
> Use this file to discover all available pages before exploring further.
# Creating Webhooks
> Step-by-step guide to creating and configuring webhook integrations in the Smartcar Dashboard
Head over to the [Smartcar Dashboard](https://dashboard.smartcar.com/integrations) to set up your webhook integration. There are four main steps to create a webhook in Smartcar:
From the integrations page, start by creating a new integration and choosing webhook. For most use cases, webhooks are the recommended option.
Define **when** Smartcar should send you a webhook. This is the vehicle event or condition that causes data to be delivered.
**Example triggers:**
* Vehicle's battery percentage changes
* Vehicle is plugged in or unplugged
* Odometer changes
* Doors or windows open
* Vehicle location changes
After choosing a trigger, specify **what** vehicle data ("signals") should be included in the webhook payload. Browse the complete [Vehicle Signals catalog](/api-reference/signals/schema) to see all available data points.
**All selected signals are delivered in every webhook event**, not just the signals that triggered it. This ensures you always receive complete vehicle state data.
Your selection directly maps to the permissions that the vehicle owner granted your application during the connection process. Smartcar offers over 20 specific [permissions](https://smartcar.com/docs/api-reference/permissions) for granular control.
Enter the destination URL where Smartcar should send the data. This should be your application's endpoint to receive webhook payloads.
Your callback URI must handle the `"eventType": "VERIFY"` received in the request payload and respond with a `200` status code and a `{"challenge": "{HMAC}"}` body.
**Optional: Separate Error Callback URI**
You can optionally configure a separate callback URI specifically for `VEHICLE_ERROR` events. If not specified, all events (`VEHICLE_STATE` and `VEHICLE_ERROR`) will be sent to the same callback URI.
**Resources:**
* [Callback Verification Guide](/integrations/webhooks/callback-verification) - Learn how to verify your endpoint
* [Webhook Receiver Recipe](/getting-started/tutorials/webhook-receiver-recipe) - Deploy a pre-built, verified receiver
* [Receiving Webhooks](/integrations/webhooks/receiving-webhooks) - Build your own receiver from scratch
***
## Next Steps
After creating your webhook, you'll need to subscribe vehicles to start receiving data.
Learn how to subscribe vehicles using auto-enrollment, the Dashboard, or the API
Learn how to handle incoming webhook deliveries
Complete reference of webhook events and payloads
Secure your webhook endpoint with verification
Understand retry policies and delivery guarantees
---
# Source: https://smartcar.com/docs/connect/dashboard-config.md
> ## Documentation Index
> Fetch the complete documentation index at: https://smartcar.com/docs/llms.txt
> Use this file to discover all available pages before exploring further.
# Dashboard Configuration
## Registration
To get started, register your application with Smartcar by navigating to our [dashboard](https://dashboard.smartcar.com/login).
After registration, your application will be assigned a `CLIENT_ID` and a `CLIENT_SECRET`. The `CLIENT_SECRET` must be kept safe and used only in exchanges between your application’s server and Smartcar’s authorization server.
## Redirect URIs
To authorize with Smartcar, you’ll need to provide one or more redirect URIs. The user will be redirected to the specified URI upon authorization. On redirect, the URI will contain an authorization `code` query parameter that must be exchanged with Smartcar’s authorization server for an `ACCESS_TOKEN`.
The first redirect URI you add to your application is automatically set as the default. If you do not specify a `redirect_uri` in your Connect URL, Smartcar will use this default URI. You can add multiple URIs and set any of them as the default in the Smartcar Dashboard.
The redirect URIs must match one of the following formats:
| Protocol | Format | Example |
| -------------- | ---------------------------------------------------------------------------------------- | ------------------------------------------------------------------------------ |
| HTTP | a localhost URI with protocol `http://` | `http://localhost:8000` |
| HTTPS | a URI with protocol `https://` | `https://myapplication.com` |
| JavaScript SDK | `https://javascript-sdk.smartcar.com/v2/redirect?app_origin={localhost-or-HTTPS-origin}` | `https://javascript-sdk.smartcar.com/v2/redirect?app_origin=https://myapp.com` |
| Custom-scheme | `sc{clientId}://{hostname-with-optional-path-component-or-TLD}` | `sc4a1b01e5-0497-417c-a30e-6df6ba33ba46://callback` |
HTTP is allowed only for testing purposes on localhost
### Javascript SDK
The JavaScript SDK redirect is used along with the JavaScript SDK library. For more details and examples on the redirect usage, see the [SDK documentation](https://github.com/smartcar/javascript-sdk).
### Custom-scheme
Custom-scheme URIs are used for mobile applications. They must begin with `sc{clientId}` and can have an optional path or TLD. See the OAuth reference on redirect URIs.
---
# Source: https://smartcar.com/docs/getting-started/dashboard/dashboard-mfa.md
> ## Documentation Index
> Fetch the complete documentation index at: https://smartcar.com/docs/llms.txt
> Use this file to discover all available pages before exploring further.
# Dashboard Multi-Factor Authentication (MFA)
## Configuring Multi-Factor Authentication
From the settings gear, you can access User Security, which supports Multi-Factor Authentication (MFA). Enable MFA and scan with your preferred authenticator app such as Google Authenticator or 1Password.
Once enabled, each following login will require the use of your authenticator app to provide a unique code for login.
MFA can be disabled for your user at any time, though the authenticator app will be required to disable MFA.
---
# Source: https://smartcar.com/docs/api-reference/management/delete-vehicle-connections.md
> ## Documentation Index
> Fetch the complete documentation index at: https://smartcar.com/docs/llms.txt
> Use this file to discover all available pages before exploring further.
# Vehicle Connections
> Deletes all vehicle connections associated with a Smartcar user ID or a specific vehicle.
## Request
**Header**
In the format `Basic base64(default:{application_management_token})`. You can find your `application_management_token` under
your Application Configuration in the Smartcar Dashboard.
**Query**
You can delete connections in three ways:
* Provide a `vehicle_id` to remove all connections for that vehicle across all users.
* Provide a `user_id` to remove all vehicles linked to that user.
* Provide both a `vehicle_id` and `user_id` to remove only that vehicle for that specific user.
```bash cURL theme={null}
curl -X DELETE "https://management.smartcar.com/v2.0/management/connections/?user_id=UUID12345&vehicle_id=UUID67890" \
-H "Authorization: Basic $(echo -n "default:$SMARTCAR_APP_MANAGEMENT_TOKEN" | base64)"
```
```python Python theme={null}
import os
import base64
import requests
user_id = "UUID12345"
vehicle_id = "UUID67890"
token = os.getenv("SMARTCAR_APP_MANAGEMENT_TOKEN")
auth_header = base64.b64encode(f"default:{token}".encode()).decode()
headers = {
"Authorization": f"Basic {auth_header}",
"Content-Type": "application/json",
}
url = (
"https://management.smartcar.com/v2.0/management/connections/"
f"?user_id={user_id}&vehicle_id={vehicle_id}"
)
response = requests.delete(url, headers=headers)
```
```javascript Node theme={null}
const basicAuth = Buffer.from(`default:${process.env.SMARTCAR_APP_MANAGEMENT_TOKEN}`).toString('base64');
const disconnectResponse = await fetch(
`https://management.smartcar.com/v2.0/management/connections/?user_id=${smartcar_user_id}&vehicle_id=${smartcar_vehicle_id}`,
{
method: 'DELETE',
headers: {
'Authorization': `Basic ${basicAuth}`,
'Content-Type': 'application/json',
},
}
);
```
```java Java theme={null}
import java.net.HttpURLConnection;
import java.net.URL;
import java.util.Base64;
String userId = "UUID12345";
String vehicleId = "UUID67890";
String token = System.getenv("SMARTCAR_APP_MANAGEMENT_TOKEN");
String auth = Base64.getEncoder().encodeToString(("default:" + token).getBytes());
URL url = new URL("https://management.smartcar.com/v2.0/management/connections/?user_id=" + userId + "&vehicle_id=" + vehicleId);
HttpURLConnection conn = (HttpURLConnection) url.openConnection();
conn.setRequestMethod("DELETE");
conn.setRequestProperty("Authorization", "Basic " + auth);
conn.setRequestProperty("Content-Type", "application/json");
int responseCode = conn.getResponseCode();
```
```ruby Ruby theme={null}
require 'net/http'
require 'uri'
require 'base64'
user_id = "UUID12345"
vehicle_id = "UUID67890"
token = ENV['SMARTCAR_APP_MANAGEMENT_TOKEN']
auth = Base64.strict_encode64("default:#{token}")
uri = URI("https://management.smartcar.com/v2.0/management/connections/?user_id=#{user_id}&vehicle_id=#{vehicle_id}")
request = Net::HTTP::Delete.new(uri)
request['Authorization'] = "Basic #{auth}"
request['Content-Type'] = 'application/json'
response = Net::HTTP.start(uri.hostname, uri.port, use_ssl: true) do |http|
http.request(request)
end
puts response.body
```
```json Response theme={null}
{
"connections": [
{
"userId": "",
"vehicleId": ""
}
]
}
```
## Response
An array of connections
ID of the user that authorized the deleted connection (UUID v4)
ID of the vehicle disconnected (UUID v4)
---
# Source: https://smartcar.com/docs/api-reference/webhooks/delivery-behavior.md
> ## Documentation Index
> Fetch the complete documentation index at: https://smartcar.com/docs/llms.txt
> Use this file to discover all available pages before exploring further.
# Delivery Behavior
> HTTP delivery mechanics, retry policies, timeouts, and ordering guarantees
Understanding how Smartcar delivers webhook events helps you build a reliable integration. This page covers the technical details of webhook delivery, including HTTP semantics, retry behavior, and timing expectations.
## HTTP Request Format
### Request Method
All webhook deliveries use `HTTP POST` requests sent to your configured callback URI.
### Request Headers
Smartcar includes the following headers with every webhook delivery:
Always set to `application/json`. All webhook payloads are JSON-encoded.
HMAC-SHA256 signature for payload verification. See [Payload Verification](/integrations/webhooks/payload-verification) for details on how to validate this signature.
Identifies requests as coming from Smartcar. Format: `Smartcar/{version}`.
### Request Body
The request body contains a JSON payload matching one of the event types documented in [Event Reference](/api-reference/webhooks/events/overview).
All requests include:
* Valid JSON formatting
* UTF-8 encoding
* Content-Length header matching the payload size
## Expected Response
### Success Response
Your webhook endpoint must return a **2xx status code** (200, 201, 202, 204, etc.) within the timeout window to acknowledge successful receipt. Any 2xx response is treated as success.
```http HTTP Response theme={null}
HTTP/1.1 200 OK
Content-Type: application/json
{}
```
```python Python theme={null}
@app.post("/webhooks/smartcar")
def handle_webhook(request):
# Persist payload first
save_to_queue(request.body)
# Return 200 immediately
return {"status": "received"}, 200
```
```javascript Node.js theme={null}
app.post('/webhooks/smartcar', (req, res) => {
// Persist payload first
saveToQueue(req.body);
// Return 200 immediately
res.status(200).json({ status: 'received' });
});
```
```java Java theme={null}
@PostMapping("/webhooks/smartcar")
public ResponseEntity> handleWebhook(@RequestBody String payload) {
// Persist payload first
saveToQueue(payload);
// Return 200 immediately
return ResponseEntity.ok(Map.of("status", "received"));
}
```
**Any 2xx status code is accepted.** You can return 200, 201, 202, 204, or any other 2xx response. Smartcar treats all 2xx codes as successful delivery.
**Response body is ignored.** Smartcar only checks the HTTP status code. You can return an empty body or a simple acknowledgment object.
### Response Timeout
**Your endpoint must respond within 15 seconds.** Requests that exceed this timeout are treated as delivery failures, even if your server eventually responds with a 200 status.
**Decouple receiving from processing.** Persist the webhook payload to a queue or database immediately, return `200 OK`, then process the data asynchronously. This prevents timeouts from long-running business logic.
### Failed Responses
Any of the following are considered delivery failures and will trigger retries:
* Non-2xx HTTP status codes (including 3xx redirects, 4xx client errors, 5xx server errors)
* Connection timeouts (> 15 seconds)
* Connection refused or DNS resolution failures
* TLS/SSL handshake failures
* Network errors or connection resets
## Retry Behavior
### Retry Policy
When a delivery fails, Smartcar automatically retries up to **3 times** using an **exponential backoff** strategy with an initial delay of 25 seconds:
| Attempt | Wait Time | Total Elapsed |
| ------------- | ----------- | -------------------- |
| 1st (initial) | 0s | 0s |
| 2nd | 25 seconds | 25 seconds |
| 3rd | 50 seconds | 1 minute 15 seconds |
| 4th (final) | 100 seconds | 2 minutes 55 seconds |
If all 4 delivery attempts fail, the payload is permanently dropped. Future events will still be attempted as long as the webhook remains active.
### What Triggers Retries
Retries occur for:
* Non-2xx HTTP status codes (3xx, 4xx, 5xx)
* Request timeouts (> 15 seconds)
* Network errors (connection refused, DNS failures, etc.)
* TLS/SSL errors
### What Doesn't Trigger Retries
Once your endpoint returns any 2xx status code, Smartcar considers the delivery successful and will not retry, even if:
* Your processing logic fails later
* You detect the payload is invalid
* Your database write fails after responding
**Always validate before responding.** If you return a 2xx status code and then discover the payload is invalid, you cannot trigger a retry. The delivery is considered complete.
### Retry Identification
Each delivery attempt receives a unique `deliveryId`, but the `eventId` remains the same across all retry attempts. Use the `eventId` to identify retries of the same event:
```json theme={null}
{
"eventId": "f7c0f3e6-4c9d-4f0e-8e5d-6e7f8a9b0c1d", // Same across all retries
// ... event data ...
"meta": {
"deliveryId": "5d569643-3a47-4cd1-a3ec-db5fc1f6f03b", // Different for each attempt
"deliveredAt": 1678901234567
}
}
```
If the first delivery fails and Smartcar retries, the payload will have:
* **Same `eventId`**: `f7c0f3e6-4c9d-4f0e-8e5d-6e7f8a9b0c1d`
* **New `deliveryId`**: `a1b2c3d4-e5f6-7890-abcd-ef1234567890`
* **Updated `deliveredAt`**: timestamp of the retry attempt
Use `eventId` for deduplication, not `deliveryId`. The `eventId` uniquely identifies the webhook event, while `deliveryId` only identifies the specific delivery attempt.
See [Idempotency & Deduplication](/integrations/webhooks/best-practices#implement-idempotency) for best practices on handling retries.
## Concurrent Deliveries
### Multiple Events for the Same Vehicle
Smartcar can deliver **multiple events for the same vehicle simultaneously**. This most commonly occurs when a vehicle is in a partial error state and triggers both:
* A `VEHICLE_STATE` event with signal data
* A `VEHICLE_ERROR` event with error details
Your webhook endpoint must handle concurrent requests for the same vehicle. Design your processing logic to be thread-safe and avoid race conditions.
```python Python - Thread-Safe Processing theme={null}
from threading import Lock
vehicle_locks = {}
@app.post("/webhooks/smartcar")
def handle_webhook(request):
payload = request.json
vehicle_id = payload['data']['vehicle']['id']
# Get or create a lock for this vehicle
if vehicle_id not in vehicle_locks:
vehicle_locks[vehicle_id] = Lock()
# Process with vehicle-specific lock
with vehicle_locks[vehicle_id]:
process_payload(payload)
return {"status": "received"}, 200
```
```javascript Node.js - Async Queue theme={null}
const async = require('async');
const vehicleQueues = {};
app.post('/webhooks/smartcar', (req, res) => {
const vehicleId = req.body.data.vehicle.id;
// Create queue for this vehicle if it doesn't exist
if (!vehicleQueues[vehicleId]) {
vehicleQueues[vehicleId] = async.queue(processPayload, 1);
}
// Add to vehicle-specific queue
vehicleQueues[vehicleId].push(req.body);
// Return 200 immediately
res.status(200).json({ status: 'received' });
});
```
### Cross-Vehicle Concurrency
Events for **different vehicles** can and will be delivered concurrently. If you have 1,000 vehicles subscribed to a webhook, you may receive events for multiple vehicles at the same time.
Your infrastructure should be able to handle concurrent requests proportional to your fleet size.
## Event Batching
### Single vs Multiple Deliveries
**One event per delivery.** Each webhook request contains a single event (either `VEHICLE_STATE` or `VEHICLE_ERROR`).
However, the number of deliveries depends on how the vehicle reports changes:
If a vehicle reports 3 signal changes at the same time (e.g., during a single vehicle data poll), Smartcar delivers **one `VEHICLE_STATE` event** containing all changed signals:
```json theme={null}
{
"eventType": "VEHICLE_STATE",
"data": {
"triggers": ["Charge.IsCharging", "TractionBattery.StateOfCharge", "TractionBattery.Range"],
"signals": {
"Charge.IsCharging": { "value": true, ... },
"TractionBattery.StateOfCharge": { "value": 85, ... },
"TractionBattery.Range": { "value": 250, ... }
}
}
}
```
If a vehicle reports the same 3 signals as separate changes in quick succession, Smartcar delivers **three separate `VEHICLE_STATE` events**:
**Delivery 1:**
```json theme={null}
{
"eventType": "VEHICLE_STATE",
"data": {
"triggers": ["Charge.IsCharging"],
"signals": { "Charge.IsCharging": { "value": true, ... }, ... }
}
}
```
**Delivery 2:**
```json theme={null}
{
"eventType": "VEHICLE_STATE",
"data": {
"triggers": ["TractionBattery.StateOfCharge"],
"signals": { "TractionBattery.StateOfCharge": { "value": 85, ... }, ... }
}
}
```
**Delivery 3:**
```json theme={null}
{
"eventType": "VEHICLE_STATE",
"data": {
"triggers": ["TractionBattery.Range"],
"signals": { "TractionBattery.Range": { "value": 250, ... }, ... }
}
}
```
**The behavior depends on the vehicle manufacturer.** Some OEMs batch updates, while others stream individual changes. Your integration should handle both patterns.
## Payload Size Limits
The maximum webhook payload size is **50 KB**. This limit applies to the entire JSON payload.
Most webhook payloads are well under this limit. A typical `VEHICLE_STATE` event with 10-20 signals usually under 5 KB, depending on the signals.
If you're approaching this limit, consider:
* Reducing the number of signals in your webhook subscription
* Splitting data across multiple webhooks with different signal sets
## Delivery Logs & Monitoring
### Dashboard Logs
View delivery attempt history in the [Smartcar Dashboard](https://dashboard.smartcar.com) under the **Logs** tab. The logs show:
* **Successful deliveries**: Events that received a 2xx response
* **Failed deliveries**: Events that failed after all retry attempts
* **Individual retry attempts**: Each attempt with timestamp, status code, and response time
* **Signal names**: The signals that were included in the webhook payload
Use the dashboard logs to:
* Debug delivery failures
* Monitor webhook health
* Track which signals triggered events
* Verify retry behavior
### Delivery Metrics
Track key metrics to ensure webhook reliability:
* **Success rate**: Percentage of events delivered successfully on first attempt
* **Retry rate**: Percentage of events requiring retries
* **Average response time**: How quickly your endpoint responds
* **Failure patterns**: Common error codes or failure reasons
Set up monitoring alerts for:
* Success rate drops below 95%
* Average response time exceeds 5 seconds
* Consecutive failures for the same vehicle
## Webhook Lifecycle
### Disabling Webhooks
When you disable a webhook in the Smartcar Dashboard:
* Smartcar **stops monitoring** subscribed vehicles for changes
* Smartcar **stops attempting deliveries** immediately
* No events are queued or stored while the webhook is disabled
### Re-enabling Webhooks
When you re-enable a webhook:
* Smartcar **resumes monitoring** subscribed vehicles for changes
* The next event will include a `FIRST_DELIVERY` trigger with current signal values
* **Not supported:** Events that occurred while disabled are not retroactively delivered
**No event history while disabled.** Smartcar does not queue events during the disabled period. When you re-enable, you'll receive current state, not historical changes.
## Delivery Guarantees
### At-Least-Once Delivery
Smartcar guarantees **at-least-once delivery** for all webhook events. This means:
* **Guaranteed:** You will receive every event at least once (unless all retry attempts fail)
* **Expected:** You may receive the same event multiple times
* **Not guaranteed:** Events are not delivered in order (see below)
### Ordering
**Events are not guaranteed to be delivered in order.** Due to network conditions, retry behavior, and distributed systems, events may arrive out of sequence.
For example:
1. Vehicle's state of charge changes from 50% → 60% at 10:00 AM
2. Vehicle's state of charge changes from 60% → 70% at 10:05 AM
3. You might receive the 70% event before the 60% event
**Use timestamps to establish order.** Each signal includes `meta.oemUpdatedAt` and `meta.fetchedAt` timestamps. Compare these values to determine the actual sequence of events:
```javascript theme={null}
function isNewerThan(signalA, signalB) {
return signalA.meta.oemUpdatedAt > signalB.meta.oemUpdatedAt;
}
```
### Duplicate Prevention
While Smartcar delivers each event at least once, duplicates can occur due to:
* **Retry attempts**: If your endpoint doesn't return a 2xx response within 15 seconds, Smartcar will retry the same event, resulting in duplicate deliveries
* **Network issues**: Temporary connectivity problems may cause duplicate sends
* **Distributed systems**: Race conditions in distributed infrastructure
**Most duplicates are caused by slow or failed responses.** If your endpoint takes longer than 15 seconds to respond or returns a non-2xx status code, Smartcar will retry the delivery. Always return a 2xx response quickly to minimize duplicates.
#### Rare Edge Case: Multiple Deliveries During Confirmation
In extremely rare circumstances, you may receive multiple deliveries for the same error **even when responding quickly**. This can occur when:
1. Smartcar detects a vehicle error (e.g., expired authorization)
2. A webhook delivery is initiated to your endpoint
3. **While confirming delivery**, the same error is detected again (e.g., another API request encounters the same expired authorization)
4. This triggers a second, independent delivery with a **different `eventId`**
**Key characteristics:**
* Happens during a narrow time window (typically milliseconds to seconds)
* Results in **different `eventId` values** for what is logically the same error condition
* Each delivery is a legitimate, distinct event from Smartcar's perspective
* Most common with `VEHICLE_ERROR` events when multiple operations encounter the same error state
**How to handle this:**
If your application is sensitive to duplicate error notifications (e.g., sending user alerts), implement additional deduplication. Use a combination of `userId`, `vehicleId`, error `code`, and a time window (2-5 minutes) in addition to standard `eventId` deduplication.
**This edge case is rare in practice.** Most applications won't need special handling beyond standard `eventId` deduplication.
Always implement idempotent processing using the unique `eventId` for standard deduplication. See [Reliability Best Practices](/integrations/webhooks/best-practices/reliability#implement-idempotency) for implementation patterns.
## Latency & Timing
### Understanding Webhook Latency
Webhook delivery latency consists of two components:
**1. Detection Latency** - Time for Smartcar to detect a vehicle data change
* Depends on the vehicle manufacturer's integration and data reporting frequency
* Varies significantly by OEM (from seconds to minutes)
* Outside of Smartcar's control
**2. Delivery Latency** - Time from detection to HTTP delivery
* Smartcar delivers webhooks within seconds of detecting a change
* Actual delivery time depends on network conditions and your endpoint's location
**Total end-to-end latency** = Detection latency (OEM-dependent) + Delivery latency (typically seconds)
The detection latency varies by manufacturer and is the primary factor in total webhook latency. Once Smartcar detects a change, delivery occurs quickly.
### Delivery Latency
Webhook deliveries typically occur within **seconds** of the triggering event. Latency depends on:
* **Vehicle OEM latency**: Time for the vehicle manufacturer to report data to Smartcar
* **Change detection**: Time for Smartcar to detect a signal value change
* **Network latency**: Time to deliver the HTTP request to your endpoint
Most deliveries complete within 1-5 seconds of Smartcar detecting a change, but OEM latency can vary significantly by manufacturer.
### Event Freshness
Each signal includes two timestamps to help you understand data freshness:
* **`meta.oemUpdatedAt`**: When the vehicle manufacturer recorded the value (Unix timestamp in milliseconds)
* **`meta.fetchedAt`**: When Smartcar retrieved the value from the OEM (Unix timestamp in milliseconds)
The difference between these timestamps indicates how fresh the data is from the vehicle's perspective.
## Network Requirements
### HTTPS & SSL
All webhook endpoints must:
* Use HTTPS (not HTTP)
* Have a valid SSL/TLS certificate
* Support TLS 1.2 or higher
Self-signed certificates and internal corporate CAs are not supported.
### Public Internet Access
Your webhook endpoint must be accessible from the public internet. Smartcar cannot deliver to:
* `localhost` or `127.0.0.1`
* Private IP addresses (10.x.x.x, 192.168.x.x, 172.16-31.x.x)
* Internal corporate networks without public DNS
### IP Addresses
Smartcar sends webhook requests from **public IPv4 addresses** that may change over time. We do not publish a static list of IP addresses.
**Avoid IP-based firewall rules.** Instead of allowlisting specific IP addresses, use signature verification to authenticate webhook requests. See [Payload Verification](/integrations/webhooks/payload-verification).
### Firewall Configuration
If you must use firewall rules:
* Allow inbound HTTPS (port 443) from any IP
* Use signature verification for authentication
* Monitor for delivery failures that might indicate blocked IPs
## Error Handling
### Temporary vs Permanent Failures
**Temporary failures** (worth retrying):
* 500, 502, 503, 504 status codes
* Connection timeouts
* Temporary DNS failures
* Network blips
**Permanent failures** (not worth retrying):
* 400, 401, 403, 404, 405 status codes
* Invalid SSL certificates
* DNS resolution failures for non-existent domains
Smartcar retries both types, but you should fix permanent failures quickly to avoid dropped events.
### Monitoring Delivery Health
Monitor your webhook delivery success rate in the [Smartcar Dashboard](https://dashboard.smartcar.com) **Logs** tab. High failure rates may indicate:
* Your endpoint is down or unreachable
* Responses are too slow (> 15 seconds)
* Your endpoint is rejecting requests (4xx errors)
* SSL certificate issues
Set up alerts for:
* Delivery success rate drops below 95%
* Average response time exceeds 5 seconds
* Consecutive delivery failures (3+)
## Best Practices
To build a reliable webhook integration, follow these essential practices:
1. **Respond Quickly** - Return `200 OK` within 200ms. Queue the payload and process asynchronously to avoid timeouts.
2. **Validate Signatures** - Always verify the `SC-Signature` header before processing payloads to ensure authenticity.
3. **Handle Duplicates** - Use `eventId` to detect and skip duplicate deliveries due to retries or network issues.
4. **Use Timestamps** - Compare `meta.oemUpdatedAt` values to establish correct event ordering, as events may arrive out of sequence.
5. **Monitor Failures** - Track delivery success rates and set up alerts for anomalies or consecutive failures.
6. **Test Error Cases** - Verify your retry and error handling logic with test scenarios during development.
For detailed implementation guidance, see our comprehensive [Best Practices Guide](/integrations/webhooks/best-practices/overview).
***
## Related Resources
Complete reference for all webhook event types and payloads
How to verify webhook signatures for security
Handle duplicate deliveries and ensure idempotent processing
Step-by-step guide to implementing a webhook endpoint
---
# Source: https://smartcar.com/docs/getting-started/how-to/detect-charging-session.md
> ## Documentation Index
> Fetch the complete documentation index at: https://smartcar.com/docs/llms.txt
> Use this file to discover all available pages before exploring further.
# How to Detect and Process Charging Sessions with Webhooks
> Learn how to use Smartcar webhooks to detect when a vehicle starts and ends charging, and how to process charging session data.
Smartcar webhooks make it easy to detect and process vehicle charging sessions in real time. This guide explains how to configure your webhook, handle charging events, and process charging session data in your backend.
In the [Smartcar Dashboard](https://dashboard.smartcar.com/integrations), create or edit a webhook integration. Under Triggers, select the following events:
Charge.IsCharging
Charge.IsChargingCableConnected
These signals will act as triggers for detecting when a vehicle starts and stops charging and when it is plugged in or unplugged. Whenever these signals change, Smartcar will send a webhook event to your configured endpoint.
Next, you'll configure your **data**. This is the information you want to receive in your webhook payload every time you receive a webhook event. Triggers are included by default, but you can also add additional signals to the data payload, such as:
Charge.StateOfCharge (included as a trigger)
Charge.ChargingCurrent (included as a trigger)
Charge.ActiveLimit
Charge.Amperage
Charge.Voltage
Charge.Wattage
Charge.EnergyAdded
Charge.TimeToComplete
TractionBattery.Range
TractionBattery.NominalCapacity
Location.PreciseLocation
These data signals will be delivered for every webhook event, allowing you to track the state of charge and other relevant metrics while the vehicle is charging.
Next, provide your webhook URL where Smartcar will send the events. Make sure your endpoint is publicly accessible and can handle POST requests. You can choose to auto enroll all your vehicles to this webhook or manually subscribe vehicles later (you can do this from the Dashboard). For this guide, select "don't subscribe any vehicles".
Now it is time to save and verify your webhook.
Smartcar will send a verification request to your endpoint, which you must respond to with a 200 OK status code to complete the setup (see [Webhook Verification guide](/integrations/webhooks/callback-verification)).
Once verified, you will start to receive vehicle data for the vehicles you have subscribed to this webhook. For this guide, we chose not to auto subscribe vehicles, so let's head over to the [Smartcar Dashboard](https://dashboard.smartcar.com/vehicles) to manually subscribe a vehicle to your webhook.
Select a vehicle from your list of connected vehicles and click on the three dots action menu to the right of the row and click subscribe. Select your newly created webhook from the options and click subscribe.
At this point, your webhook is fully configured to receive charging events from the subscribed vehicle. Now let's handle the incoming webhook events in your backend.
Every webhook will include an `eventId` and an `eventType` field. The `eventType` will indicate the type of event that occurred, such as `VEHICLE_STATE` or `VEHICLE_ERROR`.
Your handler should gracefully handle both event types. For `VEHICLE_STATE` events, you will receive the updated vehicle data. For `VEHICLE_ERROR` events, you may want to log the error.
For `VEHICLE_STATE` events, you will receive the data in a `data` property of the payload. There will also be an array of signals under a `triggers` property that caused the event to be sent. Lastly, you will also receive a `meta` property with additional context about the event, such as the webhook ID, name, delivery ID, delivery timestamp, etc.
### How to track charging sessions
When a vehicle starts charging, you will receive a webhook event with the `eventType` of `VEHICLE_STATE` and the `Charge.IsCharging` signal set to `true`. When the vehicle stops charging, you will receive another event with `Charge.IsCharging` set to `false`. You can use these events to track the start and end of each charging session.
Example event payload:
```json theme={null}
{
"eventId": "a7738a15-7ee2-40b3-9815-823d146230cd",
"eventType": "VEHICLE_STATE",
"data": {
"user": {
"id": "deee49b6-d638-4be4-82dc-121ea613eed9"
},
"vehicle": {
"id": "829e30ab-5a13-40b5-9f8a-8538af86ed95",
"make": "Tesla",
"model": "Model 3",
"year": 2020
},
"signals": [
{
"code": "charge-ischarging",
"name": "IsCharging",
"group": "Charge",
"body": {
"value": true
},
"status": {
"value": "SUCCESS"
},
"meta": {
"oemUpdatedAt": 1754365413366,
"retrievedAt": 1754365413366
}
}
],
"triggers": [
{
"type": "SIGNAL_UPDATED",
"signal": {
"code": "charge-ischarging",
"name": "IsCharging",
"group": "Charge"
}
}
],
"meta": {
"webhookId": "f1c2d3e4-5678-90ab-cdef-1234567890ab",
"webhookName": "My Charging Webhook",
"deliveryId": "b1c2d3e4-5678-90ab-cdef-1234567890ab",
"deliveryTimestamp": "2024-08-04T17:00:00Z",
"mode": "LIVE",
"signalCount": 1
}
}
}
```
Tip: Always validate the webhook signature to ensure the request is from Smartcar.
***
## What’s Next
* [How to Configure Permissions](/getting-started/how-to/configure-permissions)
* [How to Manage API Tokens](/getting-started/how-to/manage-api-tokens)
* [API Reference: Webhooks](/api-reference/webhooks/subscribe-webhook)
---
# Source: https://smartcar.com/docs/help/oem-integrations/tesla/developers.md
> ## Documentation Index
> Fetch the complete documentation index at: https://smartcar.com/docs/llms.txt
> Use this file to discover all available pages before exploring further.
# Tesla Permission Info
> This page has information regarding Smartcar's upgraded Tesla integration.
## Updating access with Tesla
You can use either of the following URLs to prompt users for more Tesla
permissions in the event you need additional access from the
vehicle owner due to:
* A [PERMISSION](/errors/api-errors/permission-errors) error from API
* A [CONNECTED\_SERVICES\_ACCOUNT:PERMISSION](/errors/api-errors/connected-services-account-errors#permission) error from API
* Needing access to an endpoint out of scope for your existing permissions
If one or more of the Smartcar scopes you pass map to a new Tesla permission(s)
for the account, the user will be prompted to update access after they log in
with Tesla.
This flow sends a new authorization code to your callback URI in order to fetch a new access and refresh token.
```
https://connect.smartcar.com/oauth/{path}?
response_type=code
&make=TESLA
&client_id=8229df9f-91a0-4ff0-a1ae-a1f38ee24d07
&scope=read_odometer control_security
&redirect_uri=https://example.com
```
| name | type | required | description |
| --------------- | --------------- | -------- | ---------------------------------------------------------------------------------------------------------------------------------------------------------------------------------------------------------------------------------------------------------------------------------------------------------------------- |
| `response_type` | `string` | true | This should be set to `code`. |
| `make` | `string` | true | Specifies the brand to update access to. Currently, the only make available for this flow is `TESLA`. |
| `client_id` | `string` | true | The application’s unique identifier. This is available on the credentials tab of the Smartcar Dashboard. |
| `scope` | `[permissions]` | true | A space-separated list of permissions that your application is requesting access to. The valid permission names can be found in the [permissions](/api-reference/permissions) section. When reauthenticating, the user will be required to grant the corresponding OEM permissions before being able to exit the flow. |
| `redirect_uri` | `string` | true | Required if using the `/authorize` route for Smartcar to return an authorization code. |
This flow **will not** send back an authorization code to fetch a new
refresh and access token, or redirect the user back to your application.
Continue to use the access and refresh tokens you have on file for
associated vehicles.
```
https://connect.smartcar.com/oauth/reauthenticate?
response_type=vehicle_id
&make=TESLA
&client_id=8229df9f-91a0-4ff0-a1ae-a1f38ee24d07
&scope=read_odometer control_security
```
| name | type | required | description |
| --------------- | --------------- | -------- | ---------------------------------------------------------------------------------------------------------------------------------------------------------------------------------------------------------------------------------------------------------------------------------------------------------------------- |
| `response_type` | `string` | true | This should be set to `vehicle_id` . |
| `make` | `string` | true | Specifies the brand to revoke access to. Currently, the only make available for this flow is `TESLA`. |
| `client_id` | `string` | true | The application’s unique identifier. This is available on the credentials tab of the Smartcar Dashboard. |
| `scope` | `[permissions]` | true | A space-separated list of permissions that your application is requesting access to. The valid permission names can be found in the [permissions](/api-reference/permissions) section. When reauthenticating, the user will be required to grant the corresponding OEM permissions before being able to exit the flow. |
## Requiring Tesla Permissions
To ensure users select the necessary permissions with Tesla before
being able to connect their vehicle via Smartcar, please append the `required:`
prefix to Smartcar scopes in your Connect URL e.g. `required:read_location`.
As a result if they do not select the necessary permissions with Tesla, they will see the
following screen and be prompted to return to Tesla to update their permissions.
## Permission Mappings
Tesla provides a limited set of permissions. To ensure vehicle data is shared only with explicit consent, Smartcar has mapped Tesla’s permissions into its existing more granular options. For example, granting access to “vehicle commands” in a Tesla account allows an application to start or stop charging, lock or unlock doors, enable or disable Sentry Mode, and more. Smartcar separates these permissions so that applications must request access to control charging separately from access to vehicle security, control navigation, etc. Smartcar does not use or share vehicle data beyond the permissions listed in this table. An application with the ability to control the charge status of a vehicle, does not have access to control other aspects of the car unless explictly requested and granted by a vehicle owner.
| Smartcar Permission | Tesla Permission |
| ---------------------------- | --------------------------------------------------- |
| `control_charge` | Vehicle Charge Management (vehicle\_charging\_cmds) |
| `control_climate` | Vehicle Commands (vehicle\_cmds) |
| `control_navigation` | Vehicle Commands (vehicle\_cmds) |
| `control_pin` | Vehicle Commands (vehicle\_cmds) |
| `control_security` | Vehicle Commands (vehicle\_cmds) |
| `control_trunk` | Vehicle Commands (vehicle\_cmds) |
| `read_battery` | Vehicle Information (vehicle\_device\_data) |
| `read_charge_records` | Vehicle Charge Management (vehicle\_charging\_cmds) |
| `read_charge` | Vehicle Information (vehicle\_device\_data) |
| `read_climate` | Vehicle Information (vehicle\_device\_data) |
| `read_compass` | Vehicle Information (vehicle\_device\_data) |
| `read_engine_oil` | Vehicle Information (vehicle\_device\_data) |
| `read_extended_vehicle_info` | Vehicle Information (vehicle\_device\_data) |
| `read_fuel` | Vehicle Information (vehicle\_device\_data) |
| `read_location` | Vehicle Location (vehicle\_location) |
| `read_odometer` | Vehicle Information (vehicle\_device\_data) |
| `read_security` | Vehicle Information (vehicle\_device\_data) |
| `read_speedometer` | Vehicle Information (vehicle\_device\_data) |
| `read_thermometer` | Vehicle Information (vehicle\_device\_data) |
| `read_tires` | Vehicle Information (vehicle\_device\_data) |
| `read_user_profile` | Profile Information (user\_data) |
| `read_vehicle_info` | Vehicle Information (vehicle\_device\_data) |
| `read_vin` | Vehicle Information (vehicle\_device\_data) |
---
# Source: https://smartcar.com/docs/help/diagnostic-systems.md
> ## Documentation Index
> Fetch the complete documentation index at: https://smartcar.com/docs/llms.txt
> Use this file to discover all available pages before exploring further.
# Diagnostic Systems
> To support our System Status endpoint, reference the below list of unified systems.
The [System Status](https://smartcar.com/docs/api-reference/get-system-status) endpoint returns a list of systems reported by any given vehicle, as well as their current state which may be "OK" or "ALERT".
## System IDs
| | |
| --------------------------------- | --------------------------------------------------------- |
| `SYSTEM_ABS` | Antilock Braking Systems |
| `SYSTEM_ACTIVE_SAFETY` | Active Safety Systems |
| `SYSTEM_AIRBAG` | Airbag Systems |
| `SYSTEM_BRAKE_FLUID` | Brake Fluid Level |
| `SYSTEM_DRIVER_ASSISTANCE` | Driver Assistance Systems |
| `SYSTEM_EMISSIONS` | Emissions Systems |
| `SYSTEM_ABS` | Antilock Braking Systems |
| `SYSTEM_ENGINE` | Engine Systems |
| `SYSTEM_EV_BATTERY_CONDITIONING` | EV Battery Conditioning Systems |
| `SYSTEM_EV_CHARGING` | EV Charging Systems |
| `SYSTEM_EV_DRIVE_UNIT` | EV Drive Unit Systems |
| `SYSTEM_EV_HV_BATTERY` | EV High-Voltage Battery Systems |
| `SYSTEM_LIGHTING` | Lighting Systems |
| `SYSTEM_MIL` | Malfunction Indiciator Lamp Systems (Check Engine Lights) |
| `SYSTEM_OIL_LIFE` | Oil Life Systems |
| `SYSTEM_OIL_PRESSURE` | Oil Pressure Systems |
| `SYSTEM_OIL_TEMPERATURE` | Oil Temperature Systems |
| `SYSTEM_TELEMATICS` | Telematics Systems |
| `SYSTEM_TIRE_PRESSURE` | Tire Pressure Systems |
| `SYSTEM_TIRE_PRESSURE_MONITORING` | Tire Pressure MonitoringSystems |
| `SYSTEM_TRANSMISSION` | Transmission Systems |
| `SYSTEM_WASHER_FLUID` | Washer Fluid Systems |
| `SYSTEM_WATER_IN_FUEL` | Water in Fuel Detection Systems |
---
# Source: https://smartcar.com/docs/api-reference/signals/diagnostics.md
> ## Documentation Index
> Fetch the complete documentation index at: https://smartcar.com/docs/llms.txt
> Use this file to discover all available pages before exploring further.
# Diagnostics Signals
### ABS
Signal code: `diagnostics-abs`
A diagnostic category representing the Anti-lock Braking System (ABS).
A ENUM indicating the current operational condition of the related system. (ALERT, OK)
**Possible values:** `ALERT`, `OK`
A description of the system's status, if provided by the OEM.
```json Example theme={null}
{
"status": "OK",
"description": "ABS system functioning normally"
}
```
### Active Safety
Signal code: `diagnostics-activesafety`
Encompasses the vehicle's advanced safety technologies designed to prevent or mitigate potential accidents.
A ENUM indicating the current operational condition of the related system. (ALERT, OK)
**Possible values:** `ALERT`, `OK`
A description of the system's status, if provided by the OEM.
### Airbag
Signal code: `diagnostics-airbag`
The system that monitors the vehicle's airbag readiness and functionality.
A ENUM indicating the current operational condition of the related system. (ALERT, OK)
**Possible values:** `ALERT`, `OK`
A description of the system's status, if provided by the OEM.
### Brake Fluid
Signal code: `diagnostics-brakefluid`
The system that monitors the vehicle's brake fluid condition and levels.
A ENUM indicating the current operational condition of the related system. (ALERT, OK)
**Possible values:** `ALERT`, `OK`
A description of the system's status, if provided by the OEM.
### DTCCount
Signal code: `diagnostics-dtccount`
The total number of active Diagnostic Trouble Codes (DTCs) currently present in the vehicle's systems.
```json Example theme={null}
{
"unit": "count",
"value": 2
}
```
### DTCList
Signal code: `diagnostics-dtclist`
An array containing detailed information about each active Diagnostic Trouble Code (DTC) in the vehicle.
Array of Diagnostic Trouble Code (DTC) entries.
The specific alphanumeric code identifying a particular diagnostic trouble code (DTC).
The precise date and time when the specific diagnostic trouble code (DTC) was first detected or logged by the vehicle's onboard diagnostic system.
```json Example theme={null}
{
"values": [
{
"code": "P0300",
"timestamp": "2023-10-15T08:00:00Z"
},
{
"code": "P0171",
"timestamp": "2023-10-15T08:00:00Z"
}
]
}
```
### Driver Assistance
Signal code: `diagnostics-driverassistance`
The system that monitors the vehicle's advanced driver assistance technologies.
A ENUM indicating the current operational condition of the related system. (ALERT, OK)
**Possible values:** `ALERT`, `OK`
A description of the system's status, if provided by the OEM.
### EVBattery Conditioning
Signal code: `diagnostics-evbatteryconditioning`
The system that monitors the electric vehicle's high-voltage battery thermal management and conditioning.
A ENUM indicating the current operational condition of the related system. (ALERT, OK)
**Possible values:** `ALERT`, `OK`
A description of the system's status, if provided by the OEM.
### EVCharging
Signal code: `diagnostics-evcharging`
The system that monitors the electric vehicle's charging processes and infrastructure.
A ENUM indicating the current operational condition of the related system. (ALERT, OK)
**Possible values:** `ALERT`, `OK`
A description of the system's status, if provided by the OEM.
### EVDrive Unit
Signal code: `diagnostics-evdriveunit`
The system that monitors the electric vehicle's drive unit performance and functionality.
A ENUM indicating the current operational condition of the related system. (ALERT, OK)
**Possible values:** `ALERT`, `OK`
A description of the system's status, if provided by the OEM.
### EVHVBattery
Signal code: `diagnostics-evhvbattery`
The system that monitors the electric vehicle's high-voltage battery health and performance.
A ENUM indicating the current operational condition of the related system. (ALERT, OK)
**Possible values:** `ALERT`, `OK`
A description of the system's status, if provided by the OEM.
### Emissions
Signal code: `diagnostics-emissions`
The system that monitors the vehicle's exhaust emissions and pollution control mechanisms.
A ENUM indicating the current operational condition of the related system. (ALERT, OK)
**Possible values:** `ALERT`, `OK`
A description of the system's status, if provided by the OEM.
### Lighting
Signal code: `diagnostics-lighting`
The system that monitors the vehicle's exterior and interior lighting functionality.
A ENUM indicating the current operational condition of the related system. (ALERT, OK)
**Possible values:** `ALERT`, `OK`
A description of the system's status, if provided by the OEM.
### MIL
Signal code: `diagnostics-mil`
The system that monitors the vehicle's Malfunction Indicator Lamp (MIL) status.
A ENUM indicating the current operational condition of the related system. (ALERT, OK)
**Possible values:** `ALERT`, `OK`
A description of the system's status, if provided by the OEM.
### Oil Life
Signal code: `diagnostics-oillife`
The system that monitors the vehicle's engine oil condition and remaining useful life.
A ENUM indicating the current operational condition of the related system. (ALERT, OK)
**Possible values:** `ALERT`, `OK`
A description of the system's status, if provided by the OEM.
### Oil Pressure
Signal code: `diagnostics-oilpressure`
The system that monitors the vehicle's engine oil pressure and lubrication system performance.
A ENUM indicating the current operational condition of the related system. (ALERT, OK)
**Possible values:** `ALERT`, `OK`
A description of the system's status, if provided by the OEM.
### Oil Temperature
Signal code: `diagnostics-oiltemperature`
The system that monitors the vehicle's engine oil temperature and thermal conditions.
A ENUM indicating the current operational condition of the related system. (ALERT, OK)
**Possible values:** `ALERT`, `OK`
A description of the system's status, if provided by the OEM.
### Telematics
Signal code: `diagnostics-telematics`
The system that monitors a vehicle's connectivity
A ENUM indicating the current operational condition of the related system. (ALERT, OK)
**Possible values:** `ALERT`, `OK`
A description of the system's status, if provided by the OEM.
### Tire Pressure
Signal code: `diagnostics-tirepressure`
The system that monitors tire pressure levels
A ENUM indicating the current operational condition of the related system. (ALERT, OK)
**Possible values:** `ALERT`, `OK`
A description of the system's status, if provided by the OEM.
### Tire Pressure Monitoring
Signal code: `diagnostics-tirepressuremonitoring`
The status of the tire pressure monitoring system.
A ENUM indicating the current operational condition of the related system. (ALERT, OK)
**Possible values:** `ALERT`, `OK`
A description of the system's status, if provided by the OEM.
### Transmission
Signal code: `diagnostics-transmission`
The system that monitors the vehicle's transmission
A ENUM indicating the current operational condition of the related system. (ALERT, OK)
**Possible values:** `ALERT`, `OK`
A description of the system's status, if provided by the OEM.
### Washer Fluid
Signal code: `diagnostics-washerfluid`
The system that monitors the vehicle's washer fluid reservoir
A ENUM indicating the current operational condition of the related system. (ALERT, OK)
**Possible values:** `ALERT`, `OK`
A description of the system's status, if provided by the OEM.
### Water In Fuel
Signal code: `diagnostics-waterinfuel`
The system that monitors the presence of water in the vehicle's fuel system
A ENUM indicating the current operational condition of the related system. (ALERT, OK)
**Possible values:** `ALERT`, `OK`
A description of the system's status, if provided by the OEM.
---
# Source: https://smartcar.com/docs/help/oem-integrations/bmw/energy-integration.md
> ## Documentation Index
> Fetch the complete documentation index at: https://smartcar.com/docs/llms.txt
> Use this file to discover all available pages before exploring further.
# BMW Energy APIs for European Markets
> Access charging data and remote charge control for BMW and MINI EVs in Europe through Smartcar's BMW Energy API integration.
Smartcar's integration with BMW's Energy API gives you access to charging data and remote charge control for BMW and MINI electric vehicles across Europe. This integration is designed for energy providers building smart charging, demand response, and fleet management solutions.
## Capabilities
With this integration, you can:
* **Monitor charging status** — Get visibility into charging state, energy flow, and battery level.
* **Control AC charging** — Remotely start and stop AC charging sessions.
* **Build smart charging solutions** — Support use cases like dynamic load balancing, demand response, off-peak optimization, and charge cost tracking.
## Supported Data
The BMW Energy integration provides charging and battery data through Smartcar's standardized signal schema.
| Data Category | Available Data |
| ------------------- | --------------------------------------------------------------------------------- |
| Charging | Connector type, cable connection status, charging state, detailed charging status |
| Charging Parameters | Charge timers, charge limits, time to complete, charging wattage |
| Battery | State of charge (SOC), remaining electric range, nominal capacity |
| Location | High-precision GPS position (when vehicle is within Geofence) |
### Smartcar Signals
* [`Charge.ChargingConnectorType`](/api-reference/signals/charge#charging-connector-type)
* [`Charge.IsChargingCableConnected`](/api-reference/signals/charge#is-charging-cable-connected)
* [`Charge.IsCharging`](/api-reference/signals/charge#is-charging)
* [`Charge.DetailedChargingStatus`](/api-reference/signals/charge#detailed-charging-status)
* [`Charge.ChargeTimers`](/api-reference/signals/charge#charge-timers)
* [`Charge.ChargeLimits`](/api-reference/signals/charge#charge-limits)
* [`Charge.TimeToComplete`](/api-reference/signals/charge#time-to-complete)
* [`Charge.Wattage`](/api-reference/signals/charge#wattage)
* [`TractionBattery.StateOfCharge`](/api-reference/signals/tractionbattery#state-of-charge)
* [`TractionBattery.Range`](/api-reference/signals/tractionbattery#range)
* [`TractionBattery.NominalCapacity`](/api-reference/signals/tractionbattery#nominal-capacities)
* [`Location.PreciseLocation`](/api-reference/signals/location#location)
### Commands
* [Start Charge](/api-reference/evs/control-charge)
* [Stop Charge](/api-reference/evs/control-charge)
## Coverage
### Supported Vehicles
This integration supports all Battery Electric Vehicles (BEV) and Plug-in Hybrid Electric Vehicles (PHEV) from BMW and MINI.
### Supported Markets
The integration is available in 17 European markets: Austria, Belgium, Denmark, Finland, France, Germany, Great Britain, Ireland, Italy, Luxembourg, Netherlands, Norway, Poland, Portugal, Spain, Sweden, and Switzerland.
## Geofence restriction
Data and commands are only available when the vehicle is within approximately 200 meters of the consented address. Data streaming from BMW to Smartcar and from Smartcar to your app automatically stops when the vehicle exits the Geofence.
When vehicle owners grant consent, they specify a single address where managed charging will occur. This Geofence defines where data streaming and charge commands are available. This design ensures data privacy and compliance with BMW's requirements.
## Consent Flow
Vehicle owners grant consent through the BMW Connected Drive Portal as part of the Smartcar Connect flow. During this process, they:
1. Log in with their BMW ID
2. Select the vehicle(s) to connect
3. Specify the address where managed charging will occur
4. Accept BMW's terms for data sharing
## Limitations
Keep these constraints in mind when building your integration.
* **Charging-only scope** — This integration focuses on charging and battery data. Broader vehicle data (odometer, tire pressure, etc.) is not available through the Energy API.
* **Geofence-restricted** — Data and commands only work within the \~200m Geofence radius.
* **AC charging only** — Remote charge control is limited to AC charging sessions.
* **No public charging data** — Data from public charging sessions is not supported.
* **No cross-border data** — Cross-border data streaming is not currently supported.
* **Charge stop rate limit** — BMW enforces a rolling 30-day limit of 80 charge stop commands per vehicle.
If you have any questions about these limitations or need additional capabilities, please our support team. We're continuously working with BMW to expand the integration's features and coverage.
---
# Source: https://smartcar.com/docs/help/oem-integrations/tesla/faqs.md
# Source: https://smartcar.com/docs/help/faqs.md
> ## Documentation Index
> Fetch the complete documentation index at: https://smartcar.com/docs/llms.txt
> Use this file to discover all available pages before exploring further.
# Frequently Asked Questions (FAQs)
Below you'll find answers to some of the most frequently asked questions about Smartcar.
Smartcar does not build applications ourselves. Rather, we provide the building blocks that our customers need in order to build applications for a variety of use cases.
Yes. For instance, if you own a VW, you will need to have Car-Net activated in the US or WeConnect in Europe. You can read more about connected service subscriptions [here](/help/brand-subscriptions).
Take a look at our [Global Compatibility page](https://smartcar.com/global/) for the latest information on where Smartcar works.
Smartcar is always expanding and working hard to ensure supported countries are stable and reliable. If your country is not currently supported, but you think we'll be a good fit for your use case, [schedule a demo](https://smartcar.com/demo/) and let's see how we can help you!
[Smartcar Connect](/connect/what-is-connect) is available in English, Danish, German, Spanish (Spain), Spanish (Latin America), French, Italian, Dutch, Norwegian, and Swedish providing vehicle owners a native experience as they onboard vehicles to your platform.
Smartcar will always try to pull the latest data point from any given vehicle. Each API response includes an [sc-data-age header](https://smartcar.com/docs/api#response-headers) that will contain the timestamp of when that data was last saved.
Although each OEM saves data at different times, the data age header should not be older than the last time the vehicle was used.
For a list of compatible vehicles, visit [our website](https://smartcar.com/product/compatible-vehicles/).
Smartcar is compatible with **161 million vehicles** across the US, Canada and Europe.
**United States**
Smartcar is compatible with **29 car brands** in the United States.
**Europe**
Smartcar is compatible with **19 car brands** in Europe.
**Canada**
Smartcar is compatible with **21 car brands** in Canada.
**If your make isn't supported...**
We work hard to ensure that supported brands are stable and reliable, which takes time. If you don't see your make on our [compatibility page](https://smartcar.com/product/compatible-vehicles/) but you would like it to be, reach out to [support@smartcar.com](mailto:support@smartcar.com) to see how you can help speed up the process!
**If we support your make, but not your model...**
We might just need to do some additional testing. Sign up to our [research fleet](https://smartcar.com/research-fleet) and we'll reach out to see what we can do for you!
**If we support your make, model, but not your year...**
The majority of automakers only started adding internet connectivity to their cars around 2014. If you're able to access your car through a smartphone application and believe it should be supported, reach out to us and we'll be happy to take a look.
While on-board diagnostics dongles are versatile and useful for tracking and diagnostics of many kinds, they are far from ideal when it comes to mileage verification.
They can be inaccurate, inconvenient, expensive and unreliable.Smartcar is only one example of a pure software alternative that uses API technology to offer the perfect
mileage verification solution to auto insurance companies. Compared with traditional OBD-II devices, our API is accurate, cost efficient and tamper-resistant.
You can read more about why using our API is a great choice on our [blog](https://smartcar.com/blog/obd-mileage-verification/).
In the event that we receive a response from the OEM after the connection is closed, we will show the error code and error type we would have responded with on the Dashboard if the connection had been kept open.
---
# Source: https://smartcar.com/docs/help/feature-request.md
> ## Documentation Index
> Fetch the complete documentation index at: https://smartcar.com/docs/llms.txt
> Use this file to discover all available pages before exploring further.
# Submit a Feature Request
## Help Us Improve Smartcar!
Your feedback shapes our future. Have an idea or improvement you’d love to see? Submit your suggestions using the form below, and let us know how we can better serve your needs.
If you have trouble seeing the form below, please visit [this link](https://smartcarapi.notion.site/215f1477e9d380538219cb34866b8540?pvs=105) to submit your feature request.
---
# Source: https://smartcar.com/docs/connect/advanced-config/flows.md
> ## Documentation Index
> Fetch the complete documentation index at: https://smartcar.com/docs/llms.txt
> Use this file to discover all available pages before exploring further.
# Connect Flows
> Connect can be launched with three different workflows (default, single select, and single select with VIN). Depending on your use case and what information you have about the vehicle ahead of a launching Connect, you may be able to leverage one of these flows for a more streamlined Connect experience.
When you launch Connect, users will be able to select the brand of their vehicle from a list before they enter their credentials and grant access to your application.
In some cases you may only want to connect to a single vehicle, even if there are more than one on your user's connected services account. Smartcar provides two ways for you to do this:
* Single Select
* Single Select with VIN
### Single Select
Limits the user's selection on the permissions screen to a single car if there are multiple vehicles on their connected services account. Notice that check-boxes turn into radio buttons, and the call to action wording changes slightly.
To enable Single Select, you can pass `single_select=true` as URL parameter when launching Smartcar Connect.
### Single Select with VIN
In addition, if you know the user’s VIN ahead of time you can pass this over to us in the connect URL. In doing so:
1. Smartcar decodes the VIN to get the brand and send the user to the appropriate login form directly
2. If the owner has more than one vehicle on their connected services account, we’ll only show the VIN that was passed to us on the permission grant screen.
To enable Single Select with VIN, you can pass `single_select=true` and `single_select_vin=:vin` as URL parameters when launching Smartcar Connect.
### Brand Select
Instead of having users go through the brand selector screen, you can pass us a brand in the Connect URL and send the user to the appropriate login form directly.
To enable Brand Select, you can pass `make` as URL parameter when launching Connect. For example, `make=TESLA`
---
# Source: https://smartcar.com/docs/help/frequencies.md
> ## Documentation Index
> Fetch the complete documentation index at: https://smartcar.com/docs/llms.txt
> Use this file to discover all available pages before exploring further.
# Data Freshness Frequencies
> Smartcar's goal is to provide as close to real-time data as possible based on available technologies and capabilities from OEMs. Although real-time is not yet available across all OEMs outside of commercial fleets, Smartcar continues to improve these frequencies as platforms and technologies evolve.
## Understanding Real Vehicle Data Freshness Frequencies
At Smartcar, we are committed to transparency about our data. When we report data freshness, we're referring to actual data retrieved directly from vehicles, not cached information. Cached data can be returned instantly.
### What Does The Table Data Mean
* **True Vehicle Freshness**: A frequency range of 30 minutes means how often the vehicle can safely provide new data without side effects. Even if we attempt to fetch it every 5 seconds, the data won't change for 30 minutes.
* **Data Delivery**: Rather than polling our API to determine when the data has changed, create a [Webhook](/integrations/webhooks/overview) and Smartcar will send you data as frequently as it changes. It provides both the convenience of immediate notifications AND the reliability of truly fresh vehicle data.
### Why This Matters
**Honest Reporting**: We publish actual vehicle data freshness rates rather than platform latency rates that can be misleading. Developers need to understand the true age of the data they're receiving to build reliable applications. When you come across promises of data "every minute" for a brand we show as 30 minutes, this often means you're repeatedly receiving the same cached information at that frequency, not retrieving fresh data from the vehicle.
***
The values below indicate a range of how quickly you can expect to see fresh data and not how frequent you can receive data from Smartcar. i.e. You may request/receive odometer every three minutes from Smartcar, but its value won't change until it is refreshed by the OEM.
**Data Frequency**: This indicates the frequency at which you receive vehicle data updates that Smartcar delivers to you via webhooks. This frequency can vary based on the vehicle make, the data type (such as location, odometer, or battery), and how frequently the vehicle is driven. In general, you can expect updates to arrive anywhere from every few minutes to once every few hours. While our slowest data rates for all OEMs is an hour, for many vehicles (including the fastest), when the vehicle is idle or "asleep", no updates will be provided since no change has occurred.
Smartcar automatically adjusts polling frequency based on vehicle status to balance timely updates with efficient resource use. While we aim to provide near real-time data when possible, exact timing depends on factors outside of Smartcar's control, such as OEM behavior and vehicle connectivity.
| Make | Region | Data Frequency Range (in min) |
| ------------- | ---------- | ----------------------------- |
| ACURA | US, Canada | 30-60 |
| ALFA ROMEO | Global | 5-10 |
| AUDI | Global | 3-5 |
| BMW | Global | 5-10 |
| BUICK | US, Canada | 30-45 |
| BYD | Europe | 1-3 |
| CADILLAC | US, Canada | 30-45 |
| CHEVROLET | US, Canada | 30-45 |
| CHRYSLER | Global | 5-10 |
| CITROEN | Europe | 5-10 |
| CUPRA | Europe | 5-10 |
| DACIA | Europe | 30-60 |
| DODGE | Global | 5-10 |
| DS | Europe | 5-10 |
| FIAT | Global | 5-10 |
| FORD | Global | 5-10 |
| GMC | US, Canada | 30-45 |
| HONDA | US, Canada | 15-30 |
| HYUNDAI | Global | 5 |
| INFINITI | US | 5-10 |
| JAGUAR | Global | 15-30 |
| JEEP | Global | 5-10 |
| KIA | Global | 5 |
| LAND ROVER | Global | 15-30 |
| LEXUS | US | 5-10 |
| LINCOLN | Global | 5-10 |
| MAZDA | Global | 5-10 |
| MERCEDES BENZ | Global | 5-10 |
| MG | Europe | 30-60 |
| MINI | Global | 30-60 |
| NISSAN | Europe | 5-10 |
| NISSAN | US | 5-10 |
| OPEL | Europe | 5-10 |
| PEUGEOT | Europe | 5-10 |
| POLESTAR | Global | 1-3 |
| PORSCHE | Europe | 30-60 |
| RAM | Global | 5-10 |
| RENAULT | Europe | 30-60 |
| RIVIAN | Global | 3-5 |
| SKODA | Europe | 30-60 |
| SUBARU | US | 5-10 |
| TESLA\* | Global | 1 sec - 5 min |
| TOYOTA | US | 30-60 |
| VAUXHALL | Europe | 5-10 |
| VOLKSWAGEN | Europe | 5-10 |
| VOLKSWAGEN\* | US | 1-3 |
| VOLVO | Global | 1-3 |
## Notes
### \* Tesla
For Tesla vehicles capable of streaming, 3 minutes is the average of how often the data is refreshed. Depending on the data point and how often it changes, you may see data refreshed faster. For vehicles that do not support streaming, Smartcar fetches data from the vehicle every 5 minutes when the vehicle is awake.
### \* Volkswagen US
For Volkswagen vehicles in the US, 3 minutes is the average of how often the data is refreshed. For EVs, you may see data refreshed faster when the vehicle is plugged in.
{/*| -----------------------| */}
{/*| - | */}
{/*| 3 (US/CA/EUR) | */}
{/*| 1 (US), 1 (CA) | */}
{/*| 3 (US), 3 (CA) | */}
{/*| 3 (EUR) | */}
{/*| 3 (US), 3 (CA) | */}
{/*| - | */}
{/*| 1 (CA) | */}
{/*| 1 (CA) | */}
{/*| 1 (US/CA/EUR) | */}
{/*| 1 (US), 1 (CA), 3 (EUR)| */}
{/*| 1 (US), 2 (CA) | */}
{/*| 3 (US/CA/EUR) | */}
{/*| - | */}
{/*| 1 (EUR) | */}
{/*| 3 (EUR) | */}
{/*| 1 (US/EUR) | */}
{/*| 1 (EUR) | */}
{/*| 1 (EUR) | */}
{/*| 1 (US/CA), 2 (EUR) | */}
{/*| 1 (EUR) | */}
{/*| 3 (US) | */}
---
# Source: https://smartcar.com/docs/api-reference/tesla/get-alerts.md
> ## Documentation Index
> Fetch the complete documentation index at: https://smartcar.com/docs/llms.txt
> Use this file to discover all available pages before exploring further.
# Alerts
> Returns recent alerts from the vehicle.
## Permission
`read_alerts`
```bash cURL theme={null}
curl "https://api.smartcar.com/v2.0/vehicles/{id}/{make}/alerts" \
-H "Authorization: Bearer {token}" \
-X "GET"
```
```python Python theme={null}
alerts = vehicle.request(
"GET",
"{make}/alerts"
)
```
```js Node theme={null}
const alerts = await vehicle.request(
"GET",
"{make}/alerts"
);
```
```java Java theme={null}
SmartcarVehicleRequest request = new SmartcarVehicleRequest.Builder()
.method("GET")
.path("{make}/alerts")
.build();
VehicleResponse alerts =vehicle.request(request);
```
```ruby Ruby theme={null}
alerts = vehicle.request(
"GET",
"{make}/alerts"
)
```
## Request
**Path**
## Response
The name of the alert.
Date and time of the alert.
Indicates recipients of the alert.
Additional context related to the alert.
```json Example Response theme={null}
{
"alerts" : [
{
"name": "Name_Of_The_Alert",
"dateTime": "2022-07-10T16:20:00.000Z",
"audience": [
"service-fix",
"customer"
],
"userText": "additional description text"
}
]
}
```
---
# Source: https://smartcar.com/docs/getting-started/how-to/get-an-access-token.md
> ## Documentation Index
> Fetch the complete documentation index at: https://smartcar.com/docs/llms.txt
> Use this file to discover all available pages before exploring further.
# How to Get an API Access Token
> Learn how to obtain your first Smartcar API access token by exchanging an authorization code.
To make requests to the Smartcar API, you first need to obtain an access token. This guide walks you through the process of getting the authorization code and exchanging it for an access token for the first time.
Direct your user to the Smartcar Connect URL. The user will:
* Select their vehicle brand
* Log in with their connected services account
* Approve the requested permissions
After successful authorization, Smartcar will redirect the user to your application's `redirect_uri` with an authorization `code` as a query parameter.
Your application should listen for requests to the `redirect_uri`. When Smartcar redirects the user, extract the `code` parameter from the query string.
Example redirect:
```
https://your-app.com/callback?code=AUTH_CODE&state=STATE
```
Use the authorization code to request an access token and refresh token from [Smartcar’s OAuth token endpoint](/api-reference/authorization/auth-code-exchange).
Here is an example using the Smartcar Node.js SDK:
```javascript theme={null}
const smartcar = require('smartcar'); //Smartcar backend Node SDK
smartcar.OAuth.getToken({
client_id: 'YOUR_CLIENT_ID',
client_secret: 'YOUR_CLIENT_SECRET',
grant_type: 'authorization_code',
code: 'AUTH_CODE', //extracted from the URL query parameter
redirect_uri: 'YOUR_REDIRECT_URI'
});
```
The response will include an `access_token`, an `expires_in` field, and a `refresh_token`. Store these securely in your backend database.
The `access_token` expires after two hours, and the `refresh_token` expires after 60 days.
***
## What’s Next
* [How to Manage API Tokens](/getting-started/how-to/manage-api-tokens)
* [Refreshing API Access Tokens](/api-reference/authorization/refreshing-access-token)
---
# Source: https://smartcar.com/docs/api-reference/evs/get-battery-level.md
> ## Documentation Index
> Fetch the complete documentation index at: https://smartcar.com/docs/llms.txt
> Use this file to discover all available pages before exploring further.
# Battery Level
> Returns the state of charge and the remaining range of an electric vehicle's high voltage battery.
## Permission
`read_battery`
The Vehicles API v2.0 will be deprecated by **Q3 of 2026**. We recommend migrating to the [latest version](/api-reference/vehicles-api-intro) as soon as possible to ensure continued support and access to new features.
This endpoint is only available for BEVs and PHEVs.
## Request
**Path**
## Response
The EV's state of charge as a percentage.
The estimated remaining distance the vehicle can travel powered by its high voltage battery.
```json Example Response theme={null}
{
"percentRemaining": 0.3,
"range": 40.5
}
```
---
# Source: https://smartcar.com/docs/api-reference/tesla/get-battery.md
> ## Documentation Index
> Fetch the complete documentation index at: https://smartcar.com/docs/llms.txt
> Use this file to discover all available pages before exploring further.
# Tesla: Battery Status
> Returns all battery related data for a Tesla vehicle.
The following fields are not supported for streaming vehicles:
* TeslaBatteryPercentRemainingUsable
* TeslaBatteryMaxRangeChargeCounter
## Permission
`read_battery`
```bash cURL theme={null}
curl "https://api.smartcar.com/v2.0/vehicles/{id}/{make}/battery" \
-H "Authorization: Bearer {token}" \
-X "GET"
```
```python Python theme={null}
battery = vehicle.request(
"GET",
"{make}/battery"
)
```
```js Node theme={null}
const battery = await vehicle.request(
"GET",
"{make}/battery"
);
```
```java Java theme={null}
SmartcarVehicleRequest request = new SmartcarVehicleRequest.Builder()
.method("GET")
.path("{make}/battery")
.build();
VehicleResponse battery = vehicle.request(request);
```
```ruby Ruby theme={null}
battery = vehicle.request(
"GET",
"{make}/battery"
)
```
## Request
**Path**
## Response
The EV’s state of charge as a percentage.
The distance the vehicle can travel powered by it’s high voltage battery.
Indicates if the battery heater is on.
The estimated remaining distance the vehicle can travel powered by it’s high voltage battery as determined by Tesla.
The ideal remaining distance the vehicle can travel powered by it’s high voltage battery as determined by Tesla.
The EV’s useable state of charge as a percentage as reported by Tesla.
The number of times the vehicle has been charged to 100% as reported by Tesla.
Indicates if there is enough power to heat the battery.
```json Example Response theme={null}
{
"heaterOn": null,
"maxRangeChargeCounter" : null,
"notEnoughPowerToHeat" : true,
"percentRemaining": 0.3,
"percentRemainingUsable" : 0.29,
"range": 40.5,
"rangeEstimated": 39.01,
"rangeIdeal" : 40.5
}
```
---
# Source: https://smartcar.com/docs/api-reference/tesla/get-cabin.md
> ## Documentation Index
> Fetch the complete documentation index at: https://smartcar.com/docs/llms.txt
> Use this file to discover all available pages before exploring further.
# Cabin Climate
> Returns the current state and target temperature setting of a vehicle's cabin climate system.
## Permission
`read_climate`
## Request
**Path**
```bash cURL theme={null}
curl "https://api.smartcar.com/v2.0/vehicles/{id}/{make}/climate/cabin" \
-H "Authorization: Bearer {token}" \
-X "GET"
```
```python Python theme={null}
cabin = vehicle.request(
"GET",
"{make}/climate/cabin"
)
```
```js Node theme={null}
const chargeCompletion = await vehicle.request(
"GET",
"{make}/climate/cabin"
);
```
```java Java theme={null}
SmartcarVehicleRequest request = new SmartcarVehicleRequest.Builder()
.method("GET")
.path("{make}/climate/cabin")
.build();
VehicleResponse chargeCompletion = vehicle.request(request);
```
```ruby Ruby theme={null}
chargeCompletion = vehicle.request(
"GET",
"{make}/climate/cabin"
)
```
## Response
The current state of the climate cabin system.
The target temperature setting of the vehicle when the climate system is on (in Celsius by default or in Fahrenheit using the sc-unit-system).
```json Example Response theme={null}
{
"status": "ON",
"temperature": 20
}
```
---
# Source: https://smartcar.com/docs/api-reference/tesla/get-charge-completion-time.md
# Source: https://smartcar.com/docs/api-reference/gm/get-charge-completion-time.md
> ## Documentation Index
> Fetch the complete documentation index at: https://smartcar.com/docs/llms.txt
> Use this file to discover all available pages before exploring further.
# Charge Completion Time
> When the vehicle is charging, returns the date and time the vehicle expects to "complete" this charging session. When the vehicle is not charging, this endpoint results in a vehicle state error.
This endpoint is currently available for `cadillac` and `chevrolet`.
## Permission
`read_charge`
## Request
`vehicle_id` of the vehicle you are making the request to.
The make to pass in the URL.
## Response
An ISO8601 formatted datetime (`YYYY-MM-DDTHH:mm:ss.SSSZ`) for the time at which the vehicle expects to complete this charging session.
```json Example Response theme={null}
{
"time": "2022-01-13T22:52:55.358Z"
}
```
---
# Source: https://smartcar.com/docs/api-reference/evs/get-charge-limit.md
> ## Documentation Index
> Fetch the complete documentation index at: https://smartcar.com/docs/llms.txt
> Use this file to discover all available pages before exploring further.
# Charge Limit
> Returns the charge limit configuration for the vehicle.
The Vehicles API v2.0 will be deprecated by **Q3 of 2026**. We recommend migrating to the [latest version](/api-reference/vehicles-api-intro) as soon as possible to ensure continued support and access to new features.
## Permission
`read_charge`
## Request
**Path**
## Response
The level at which the vehicle will stop charging and be considered fully charged as a percentage.
```json Example Response theme={null}
{
"limit": 0.8,
}
```
## Notes
This endpoint will return a [`CHARGING_PLUG_NOT_CONNECTED`](/errors/api-errors/vehicle-state-errors#charging-plug-not-connected)
error if the OEM is unable to provide a charge limit unless the vehicle is plugged in.
**Ford and Lincoln**
If a vehicle starts charging as a result of a [start charge](/api-reference/evs/control-charge) request, this endpoint will always return `1` if the charging location has a schedule in place.
For the vehicle to respect its charge limit, please set one along with preferred charge times or clear the schedule through the [charge schedule by location](/api-reference/ford/set-charge-schedule-by-location) endpoint.
**BMW and MINI**
Vehicle needs to be on OS Version 8+
---
# Source: https://smartcar.com/docs/api-reference/tesla/get-charge-records-billing.md
> ## Documentation Index
> Fetch the complete documentation index at: https://smartcar.com/docs/llms.txt
> Use this file to discover all available pages before exploring further.
# Charge Billing Records
> Returns information about charging sessions for Tesla vehicles at public Tesla chargers including cost and charging site.
## Permission
`read_charge_records`
## Request
**Path**
**Query**
Date of the first record to return in YYYY-MM-DD format.
Defaults to 30 days prior or when the owner first granted your application access, whichever is shorter.
Date of the final record to return in YYYY-MM-DD format. Defaults to the date of the request.
The page number to fetch from Tesla where page 1 contains the most recent records.
```bash cURL theme={null}
curl "https://api.smartcar.com/v2.0/vehicles/{id}/{make}/charge/records/billing?page=12&startDate=2023-08-24" \
-H "Authorization: Bearer {token}" \
-X "GET" \
-H "Content-Type: application/json" \
```
```python Python theme={null}
billing = vehicle.request(
"GET",
"{make}/charge/records/billing?startDate=2023-08-24&page=12"
)
```
```js Node theme={null}
const billing = vehicle.request(
"GET",
"{make}/charge/records/billing?startDate=2023-08-24&page=12"
);
```
```java Java theme={null}
SmartcarVehicleRequest request =
new SmartcarVehicleRequest.Builder()
.method("GET")
.path("ford/charge/schedule_by_location")
.addQueryParameter("startDate", "2023-08-24")
.addQueryParameter("page", "12")
.build();
VehicleResponse billing = vehicle.request(request);
```
```ruby Ruby theme={null}
billing = vehicle.request(
"GET",
"{make}/charge/records/billing?startDate=2023-08-24&page=12"
)
```
## Response
An array of billing records for the vehicle associated with charging at public Tesla charging stations.
Can be empty if the specified page does not contain any records for the vehicle.
This **does not** mean that subsequent pages will also contain no records. Please check the `hasMoreData` field for confirmation instead.
The date and time of charging session start, formatted in ISO 8601 standard.
The date and time of charging session end, formatted in ISO 8601 standard.
Energy consumed in the charging session.
A cost breakout of the charging session.
The currency code for the fees.
Fess associated with charging the vehicle.
Fees associated with the session other than charging the vehicle e.g. parking.
The name of the charging site.
Tesla’s id for this charging session.
Indicates if there are any more records to fetch from Tesla for this vehicle. **Does not** guarantee a non-empty list for the next page when `true`.
```json Example Response theme={null}
{
"records": [
{
"chargeEnd": "2022-07-10T16:20:00.000Z",
"chargeStart": "2022-07-10T15:40:00.000Z",
"energyConsumed": 44.10293884
"cost": {
"currency": "USD",
"energy": "41",
"other": "41"
},
"location": "Los Gatos, CA",
"recordId": "GF220075000028-3-1682903685"
}
],
"hasMoreData" : false
}
```
---
# Source: https://smartcar.com/docs/api-reference/bmw/get-charge-records.md
> ## Documentation Index
> Fetch the complete documentation index at: https://smartcar.com/docs/llms.txt
> Use this file to discover all available pages before exploring further.
# Charge Records
> Returns data associated with completed charging sessions for a vehicle. Limited to the last 30 days or when the owner first granted your application access, which ever is shorter.
This endpoint is currently available for `bmw` and `mini`
## Permission
`read_charge_records`
## Request
**Path**
**Query**
Date of the first record to return in YYYY-MM-DD format.
Defaults to 30 days prior or when the owner first granted your application access, whichever is shorter.
Date of the final record to return in YYYY-MM-DD format. Defaults to the date of the request.
## Response
An array of charge records for the vehicle.
The start date of the charging record, formatted in ISO 8601 standard
The end date of the charging record, formatted in ISO 8601 standard
Location of the charge session.
The amount of energy consumed during the charging session.
Indicates whether the charging location is public or not.
The remaining battery soc at the start of the charging session.
The remaining battery soc at the end of the charging session.
The type of charger used for the session.
```json Example Response theme={null}
{
"records": [
{
"chargeStart" : "2023-03-08T12:54:44Z",
"chargeEnd" : "2023-03-08T14:14:44Z",
"location": "Cockfosters Road, Barnet, EN4 0",
"energy" : 34.22998046875,
"isPublic" : true,
"startPercentRemaining" : 0.57,
"endPercentRemaining" : 1,
"chargingType" : "DC"
}
]
}
```
---
# Source: https://smartcar.com/docs/api-reference/ford/get-charge-schedule-by-location.md
> ## Documentation Index
> Fetch the complete documentation index at: https://smartcar.com/docs/llms.txt
> Use this file to discover all available pages before exploring further.
# Charge Schedule by Location
> Returns all saved charging locations for a vehicle and their associated charging limits, schedules and configurations.
## Permission
`read_charge_locations`
## Request
**Path**
```bash cURL theme={null}
curl "https://api.smartcar.com/v2.0/vehicles/{id}/{make}/charge/schedule_by_location" \
-H "Authorization: Bearer {token}" \
-X "GET"
```
```python Python theme={null}
chargeScheduleByLocation = vehicle.request(
"GET",
"{make}/charge/schedule_by_location"
)
```
```js Node theme={null}
const chargeScheduleByLocation = await vehicle.request(
"GET",
"{make}/charge/schedule_by_location"
);
```
```java Java theme={null}
SmartcarVehicleRequest request = new SmartcarVehicleRequest.Builder()
.method("GET")
.path("{make}/charge/schedule_by_location")
.build();
VehicleResponse getChargeScheduleByLocation = vehicle.request(request)
```
```ruby Ruby theme={null}
chargeScheduleByLocation = vehicle.request(
"GET",
"{make}/charge/schedule_by_location"
)
```
## Response
An array of charging locations. Empty if none are currently set on the vehicle.
The maximum charge limit for the vehicle at the location as a percent.
The latitude and longitude of the charging location.
The longitude of the charging location.
The latitude of the charging location.
The weekday and weekend charging schedules for the vehicle at the location.
The charging schedule for the vehicle on weekdays (Monday - Friday).
The exact hour a vehicle should start charging in HH:00 e.g. 17:00.
The exact hour a vehicle should stop charging in HH:00 e.g. 21:00.
The charging schedule for the vehicle on weekends (Saturday - Sunday).
The exact hour a vehicle should start charging in HH:00 e.g. 17:00.
The exact hour a vehicle should stop charging in HH:00 e.g. 21:00.
```json Example Response theme={null}
{
"chargingLocations": [
{
"chargeLimit": 0.8,
"chargingSchedules": {
"weekday": [
{
"end": "17:00",
"start": "09:00"
}
],
"weekend": [
{
"end": "17:00",
"start": "09:00"
}
]
},
"location": {
"latitude": 48.8566,
"longitude": 2.3522
}
}
]
}
```
## Example Schedule States
```json theme={null}
{
"chargingLocations": [
{
"chargeLimit": 0.8,
"chargingSchedules": {
"weekday": [],
"weekend": []
},
"location": {
"latitude": 48.8566,
"longitude": 2.3522
}
}
]
}
```
```json theme={null}
{
"chargingLocations": [
{
"chargeLimit": 0.8,
"chargingSchedules": {
"weekday": [
{
"end": "17:00",
"start": "09:00"
}
],
"weekend": []
},
"location": {
"latitude": 48.8566,
"longitude": 2.3522
}
}
]
}
```
```json theme={null}
{
"chargingLocation" : {
"chargeLimit": 0.9,
"chargingSchedules": {
"weekday": [],
"weekend": [
{
"start": "16:00",
"end": "07:00"
}
]
}
}
}
```
---
# Source: https://smartcar.com/docs/api-reference/tesla/get-charge-schedule.md
# Source: https://smartcar.com/docs/api-reference/nissan/get-charge-schedule.md
> ## Documentation Index
> Fetch the complete documentation index at: https://smartcar.com/docs/llms.txt
> Use this file to discover all available pages before exploring further.
# Charge Schedule
> Returns the charging schedule of a vehicle. The response contains the start time and departure time of the vehicle's charging schedule.
This endpoint is currently available for `nissan` EVs on the `MyNISSAN` platform.
## Permission
`read_charge`
## Request
**Path**
## Response
An array of charge schedules. Maximum of 3 schedules, empty if no schedules are set.
HH:mm in UTC for a schedule start time.
HH:mm in UTC for a schedule end time.
An array of days the schedule applies to.
```json Example Response theme={null}
{
"chargeSchedules": [
{
"end": "2020-01-01T02:00:00.000Z",
"start": "2020-01-01T01:00:00.000Z",
"days": [
"MONDAY",
"WEDNESDAY",
"FRIDAY"
]
}
]
}
```
---
# Source: https://smartcar.com/docs/api-reference/evs/get-charge-status.md
> ## Documentation Index
> Fetch the complete documentation index at: https://smartcar.com/docs/llms.txt
> Use this file to discover all available pages before exploring further.
# Charge Status
> Returns the charge status for the vehicle.
The Vehicles API v2.0 will be deprecated by **Q3 of 2026**. We recommend migrating to the [latest version](/api-reference/vehicles-api-intro) as soon as possible to ensure continued support and access to new features.
## Permission
`read_charge`
## Request
**Path**
## Response
Indicates whether a charging cable is currently plugged into the vehicle’s charge port.
Returns the current charge status of a vehicle. A vehicle can be `FULLY_CHARGED` at less than 100% SoC if its [Charge Limit](/api-reference/evs/get-charge-limit) is less than `1`.
```json Example Response theme={null}
{
"isPluggedIn": true,
"state": "FULLY_CHARGED"
}
```
---
# Source: https://smartcar.com/docs/api-reference/tesla/get-charge-voltmeter.md
# Source: https://smartcar.com/docs/api-reference/gm/get-charge-voltmeter.md
> ## Documentation Index
> Fetch the complete documentation index at: https://smartcar.com/docs/llms.txt
> Use this file to discover all available pages before exploring further.
# Voltage
> When the vehicle is plugged in, returns the charging voltage measured by the vehicle. When the vehicle is not plugged in, this endpoint results in a vehicle state error.
This endpoint is currently available for `cadillac` and `chevrolet`.
## Permission
`read_charge`
## Request
## Response
The potential difference measured by the vehicle in volts (V).
```json Example Response theme={null}
{
"voltage": 240
}
```
---
# Source: https://smartcar.com/docs/api-reference/tesla/get-charge-wattmeter.md
> ## Documentation Index
> Fetch the complete documentation index at: https://smartcar.com/docs/llms.txt
> Use this file to discover all available pages before exploring further.
# Wattage
> When the vehicle is charging, returns the instant charging wattage as measured by the vehicle. When the vehicle is not charging, this endpoint results in a vehicle state error.
## Permission
`read_charge`
## Request
**Path**
```bash cURL theme={null}
curl "https://api.smartcar.com/v2.0/vehicles/{id}/{make}/charge/wattmeter" \
-H "Authorization: Bearer {token}" \
-X "GET"
```
```python Python theme={null}
wattmeter = vehicle.request(
"GET",
"{make}/charge/wattmeter"
)
```
```js Node theme={null}
const wattmeter = await vehicle.request(
"GET",
"{make}/charge/wattmeter"
);
```
```java Java theme={null}
SmartcarVehicleRequest request = new SmartcarVehicleRequest.Builder()
.method("GET")
.path("{make}/charge/wattmeter")
.build();
VehicleResponse wattmeter = vehicle.request(request);
```
```ruby Ruby theme={null}
wattmeter = vehicle.request(
"GET",
"{make}/charge/wattmeter"
)
```
## Response
The instant power measured by the vehicle (in kilowatts).
```json Example Response theme={null}
{
"wattage": 3.5
}
```
---
# Source: https://smartcar.com/docs/api-reference/tesla/get-charge.md
# Source: https://smartcar.com/docs/api-reference/audi/get-charge.md
> ## Documentation Index
> Fetch the complete documentation index at: https://smartcar.com/docs/llms.txt
> Use this file to discover all available pages before exploring further.
# Audi: Charge Status
> Returns all charging related data for an Audi vehicle.
## Permission
`read_charge`
```bash cURL theme={null}
curl "https://api.smartcar.com/v2.0/vehicles/{id}/{make}/charge" \
-H "Authorization: Bearer {token}" \
-X "GET"
```
```python Python theme={null}
charge = vehicle.request(
"GET",
"{make}/charge"
)
```
```js Node theme={null}
const charge = await vehicle.request(
"GET",
"{make}/charge"
);
```
```java Java theme={null}
SmartcarVehicleRequest request = new SmartcarVehicleRequest.Builder()
.method("GET")
.path("{make}/charge")
.build();
VehicleResponse charge = vehicle.request(request);
```
```ruby Ruby theme={null}
charge = vehicle.request(
"GET",
"{make}/charge"
)
```
## Request
**Path**
## Response
Indicates the charging status of the vehicle
Indicates if the vehicle is plugged in
The instant power measured by the vehicle (in kilowatts).
The rate of range added in the charging session (in kilometers added / hour).
Indicates the type of charger.
The indicator light color of the connector.
Indicates if the charge port latch status.
An ISO8601 formatted datetime (YYYY-MM-DDTHH:mm:ss.SSSZ) for the time at which the vehicle expects to complete this charging session.
Indicates if the vehicle is set to charge on a timer. One of `manual` or `timer`.
Indicates the level at which the vehicle will stop charging and be considered fully charged as a percentage.
When plugged in indicates if the charging station is able to provide power to the vehicle.
```json Example Response theme={null}
{
"chargingStatus": "CHARGING",
"isPluggedIn": null,
"chargeRate": 21,
"chargeType": "ac",
"chargePortColor": "green",
"chargePortLatch": "locked",
"completionTime": "2022-01-13T22:52:55.358Z",
"chargeMode": "manual",
"socLimit": 0.8,
"externalPowerStatus": "active",
"wattage" : 1.5
}
```
---
# Source: https://smartcar.com/docs/api-reference/tesla/get-compass-heading.md
> ## Documentation Index
> Fetch the complete documentation index at: https://smartcar.com/docs/llms.txt
> Use this file to discover all available pages before exploring further.
# Compass
> Returns the current compass heading and direction of the vehicle.
## Permission
`read_compass`
## Request
**Path**
```bash cURL theme={null}
curl "https://api.smartcar.com/v2.0/vehicles/{id}/{make}/compass" \
-H "Authorization: Bearer {token}" \
-X "GET"
```
```python Python theme={null}
compass = vehicle.request(
"GET",
"{make}/compass"
)
```
```js Node theme={null}
const compass = await vehicle.request(
"GET",
"{make}/compass"
);
```
```java Java theme={null}
SmartcarVehicleRequest request = new SmartcarVehicleRequest.Builder()
.method("GET")
.path("{make}/compass")
.build();
VehicleResponse compass = vehicle.request(request);
```
```ruby Ruby theme={null}
compass = vehicle.request(
"GET",
"{make}/compass"
)
```
## Response
The current direction of the vehicle.
The current compass heading of the vehicle (in degrees).
```json Example Response theme={null}
{
"direction": "SW",
"heading": 185
}
```
---
# Source: https://smartcar.com/docs/api-reference/tesla/get-defroster.md
> ## Documentation Index
> Fetch the complete documentation index at: https://smartcar.com/docs/llms.txt
> Use this file to discover all available pages before exploring further.
# Defroster
> Returns the current state of a vehicle's front and rear defroster.
## Permission
`read_climate`
```bash cURL theme={null}
curl "https://api.smartcar.com/v2.0/vehicles/{id}/{make}/climate/defroster" \
-H "Authorization: Bearer {token}" \
-X "GET"
```
```python Python theme={null}
defroster = vehicle.request(
"GET",
"{make}/climate/defroster"
)
```
```js Node theme={null}
const defroster = await vehicle.request(
"GET",
"{make}/climate/defroster"
);
```
```java Java theme={null}
SmartcarVehicleRequest request = new SmartcarVehicleRequest.Builder()
.method("GET")
.path("{make}/climate/defroster")
.build();
VehicleResponse defroster = vehicle.request(request);
```
```ruby Ruby theme={null}
defroster = vehicle.request(
"GET",
"{make}/climate/defroster"
)
```
## Request
**Path**
## Response
The current state of the front defroster.
The current state of the rear defroster.
```json Example Response theme={null}
{
"frontStatus": "ON",
"rearStatus": "OFF"
}
```
---
# Source: https://smartcar.com/docs/api-reference/get-dtcs.md
> ## Documentation Index
> Fetch the complete documentation index at: https://smartcar.com/docs/llms.txt
> Use this file to discover all available pages before exploring further.
# Diagnostic Trouble Codes
> Provides a list of active Diagnostic Trouble Codes (DTCs) reported by the vehicle. Currently supporting GM brands including Chevrolet and GMC.
The Vehicles API v2.0 will be deprecated by **Q3 of 2026**. We recommend migrating to the [latest version](/api-reference/vehicles-api-intro) as soon as possible to ensure continued support and access to new features.
## Permission
`read_diagnostics`
```bash cURL theme={null}
curl "https://api.smartcar.com/v2.0/vehicles/{id}/diagnostics/dtcs" \
-H "Authorization: Bearer {token}" \
-X "GET"
```
```python Python theme={null}
diagnostic_trouble_codes = vehicle.diagnostic_trouble_codes()
```
```js Node theme={null}
const diagnosticTroubleCodes = await vehicle.diagnosticTroubleCodes();
```
```java Java theme={null}
VehicleDiagnosticTroubleCodes diagnosticTroubleCodes = vehicle.diagnosticTroubleCodes();
```
```ruby Ruby theme={null}
diagnostic_trouble_codes = vehicle.diagnostic_trouble_codes
```
## Request
**Path**
## Response
Array of active diagnostic trouble codes.
The Diagnostic Trouble Code reported by the vehicle.
The date and time the trouble code last became active.
```json Example Response theme={null}
{
"activeCodes": [
{
"code": "P302D",
"timestamp": "2024-09-05T14:48:00.000Z"
},
{
"code": "xxxxx",
"timestamp": null
}
...
]
}
```
---
# Source: https://smartcar.com/docs/api-reference/get-engine-oil-life.md
> ## Documentation Index
> Fetch the complete documentation index at: https://smartcar.com/docs/llms.txt
> Use this file to discover all available pages before exploring further.
# Oil Life
> Returns the remaining life span of a vehicle’s engine oil.
The Vehicles API v2.0 will be deprecated by **Q3 of 2026**. We recommend migrating to the [latest version](/api-reference/vehicles-api-intro) as soon as possible to ensure continued support and access to new features.
## Permission
`read_engine_oil`
## Request
**Path**
## Response
The engine oil’s remaining life span based on the current quality of the oil as a percentage.
`1` indicates the oil was changed recently and `0` indicates the oil should be changed immediately.
It is not a representation of how much oil is left in the vehicle.
```json Example Response theme={null}
{
"lifeRemaining": 0.35
}
```
---
# Source: https://smartcar.com/docs/api-reference/tesla/get-ext-vehicle-info.md
> ## Documentation Index
> Fetch the complete documentation index at: https://smartcar.com/docs/llms.txt
> Use this file to discover all available pages before exploring further.
# Extended Vehicle Info
> Returns detailed configuration information for a vehicle.
## Permission
`read_extended_vehicle_info`
## Request
**Path**
```bash cURL theme={null}
curl "https://api.smartcar.com/v2.0/vehicles/{id}/{make}/attributes" \
-H "Authorization: Bearer {token}" \
-X "GET"
```
```python Python theme={null}
attributes = vehicle.request(
"GET",
"{make}/attributes"
)
```
```js Node theme={null}
const attributes = await vehicle.request(
"GET",
"{make}/attributes"
);
```
```java Java theme={null}
SmartcarVehicleRequest request = new SmartcarVehicleRequest.Builder()
.method("GET")
.path("{make}/attributes")
.build();
VehicleResponse attributes = vehicle.request(request);
```
```ruby Ruby theme={null}
attributes = vehicle.request(
"GET",
"{make}/attributes"
)
```
## Response
A vehicle ID (UUID v4).
The manufacturer of the vehicle.
The model of the vehicle.
The model year.
Vehicle's current firmware.
Indicates the Tesla's trim.
Efficiency package.
Performance package.
Vehicle's nickname.
Driver Assist version.
Indicates `true` if the vehicle is currently at the home address set in the vehicle. `False` indicates the vehicle is not at home or home location is not set. This value is `null` if `atHome` status could not be determined.
This field comes back as `null` if the vehicle is not capable of supporting Tesla's Telemetry API (streaming).
Sentry Mode status and availability.
Does the vehicle support Sentry Mode.
Is Sentry Mode currently enabled for a vehicle.
Descriptors of the vehicle's interior and exterior.
Exterior color.
Exterior trim.
Interior trim.
Descriptors of the vehicle's wheel.
Style of the wheel.
Diameter of the wheel.
Details on the vehicle's drive unit(s).
Rear drive unit.
Front drive unit.
```json Example Response theme={null}
{
"driveUnit": {
"front": "PM216MOSFET",
"rear": "NoneOrSmall"
},
"driverAssistVersion": "TeslaAP3",
"efficiencyPackage": "MY2021",
"firmwareVersion": "2022.8.10.12 0ce482dac45d",
"id": "36ab27d0-fd9d-4455-823a-ce30af709ffc",
"make": "TESLA",
"model": "Model S",
"nickname": "Tommy",
"performancePackage": "Base",
"sentryMode": {
"available": false,
"enabled": true
},
"style": {
"exteriorColor": "SolidBlack",
"exteriorTrim": "Black",
"interiorTrim": "Black2"
},
"trimBadging": "74d",
"wheel": {
"diameter": 482.6,
"style": "Apollo"
},
"year": 2022,
"atHome": true
}
```
---
# Source: https://smartcar.com/docs/api-reference/tesla/get-exterior-temperature.md
> ## Documentation Index
> Fetch the complete documentation index at: https://smartcar.com/docs/llms.txt
> Use this file to discover all available pages before exploring further.
# Exterior Temperature
> Returns the vehicle’s last known exterior thermometer reading. See our [climate setting](/docs/api-reference/tesla/get-cabin) endpoints for managing a cabin temperature.
## Permission
`read_thermometer`
## Request
**Path**
```bash cURL theme={null}
curl "https://api.smartcar.com/v2.0/vehicles/{id}/{make}/thermometer/exterior" \
-H "Authorization: Bearer {token}" \
-X "GET"
```
```python Python theme={null}
temperature = vehicle.request(
"GET",
"{make}/thermometer/exterior"
)
```
```js Node theme={null}
const temperature = await vehicle.request(
"GET",
"{make}/thermometer/exterior"
);
```
```java Java theme={null}
SmartcarVehicleRequest request = new SmartcarVehicleRequest.Builder()
.method("GET")
.path("{make}/thermometer/exterior")
.build();
VehicleResponse temperature = vehicle.request(request);
```
```ruby Ruby theme={null}
temperature = vehicle.request(
"GET",
"{make}/thermometer/exterior"
)
```
## Response
The current exterior temperature of the vehicle.
```json Example Response theme={null}
{
"temperature": 33.42
}
```
---
# Source: https://smartcar.com/docs/api-reference/get-fuel-tank.md
> ## Documentation Index
> Fetch the complete documentation index at: https://smartcar.com/docs/llms.txt
> Use this file to discover all available pages before exploring further.
# Fuel Tank
> Returns the status of the fuel remaining in the vehicle’s fuel tank.
The Vehicles API v2.0 will be deprecated by **Q3 of 2026**. We recommend migrating to the [latest version](/api-reference/vehicles-api-intro) as soon as possible to ensure continued support and access to new features.
## Permission
`read_fuel`
This endpoint may return `null` values for vehicles sold in Europe. Please see the [Notes](/api-reference/get-fuel-tank#notes) section for details.
## Request
**Path**
## Response
The remaining level of fuel in the tank as a percentage.
The amount of fuel in the tank.
The estimated remaining distance the car can travel.
```json Example Response theme={null}
{
"amountRemaining": 53.2,
"percentRemaining": 0.3,
"range": 40.5
}
```
## Notes
The table below indicates values Smartcar attempts to retrieve from vehicles sold in Europe.
| | `range` | `percentRemaining` | `amountRemaining` |
| ------------------------------------ | ------- | ------------------ | ----------------- |
| Audi | ✅ | ✅ | |
| BMW, MINI | ✅ | ✅ | ✅ |
| Citroen, DS, Opel, Peugeot, Vauxhall | ✅ | | ✅ |
| Ford | ✅ | ✅ | |
| Hyundai | ✅ | | ✅ |
| Jaguar, Land Rover | ✅ | ✅ | |
| Kia | ✅ | ✅ | |
| Mazda | ✅ | ✅ | |
| Mercedes | ✅ | ✅ | |
| Renault | ✅ | | ✅ |
| Skoda, Volkswagen | ✅ | ✅ | |
| Volvo | ✅ | ✅ | ✅ |
---
# Source: https://smartcar.com/docs/api-reference/tesla/get-interior-temperature.md
> ## Documentation Index
> Fetch the complete documentation index at: https://smartcar.com/docs/llms.txt
> Use this file to discover all available pages before exploring further.
# Interior Temperature
> Returns the vehicle’s last known interior thermometer reading. See our [climate setting](/docs/api-reference/tesla/get-cabin) endpoints for managing a cabin temperature.
## Permission
`read_thermometer`
## Request
**Path**
```bash cURL theme={null}
curl "https://api.smartcar.com/v2.0/vehicles/{id}/{make}/thermometer/interior" \
-H "Authorization: Bearer {token}" \
-X "GET"
```
```python Python theme={null}
temperature = vehicle.request(
"GET",
"{make}/thermometer/interior"
)
```
```js Node theme={null}
const temperature = await vehicle.request(
"GET",
"{make}/thermometer/interior"
);
```
```java Java theme={null}
SmartcarVehicleRequest request = new SmartcarVehicleRequest.Builder()
.method("GET")
.path("{make}/thermometer/interior")
.build();
VehicleResponse temperature = vehicle.request(request);
```
```ruby Ruby theme={null}
temperature = vehicle.request(
"GET",
"{make}/thermometer/interior"
)
```
## Response
The current interior temperature of the vehicle.
```json Example Response theme={null}
{
"temperature": 25.64
}
```
---
# Source: https://smartcar.com/docs/api-reference/get-location.md
> ## Documentation Index
> Fetch the complete documentation index at: https://smartcar.com/docs/llms.txt
> Use this file to discover all available pages before exploring further.
# Location
> Returns the vehicle's last known location.
The Vehicles API v2.0 will be deprecated by **Q3 of 2026**. We recommend migrating to the [latest version](/api-reference/vehicles-api-intro) as soon as possible to ensure continued support and access to new features.
## Permission
`read_location`
## Request
**Path**
## Response
The latitude in degrees.
The longitude in degrees.
```json Example Response theme={null}
{
"latitude": 37.4292,
"longitude": 122.1381
}
```
---
# Source: https://smartcar.com/docs/api-reference/get-lock-status.md
> ## Documentation Index
> Fetch the complete documentation index at: https://smartcar.com/docs/llms.txt
> Use this file to discover all available pages before exploring further.
# Lock Status
> Returns the lock status for a vehicle and the open status of its doors, windows, storage units, sunroof and charging port where available.
The Vehicles API v2.0 will be deprecated by **Q3 of 2026**. We recommend migrating to the [latest version](/api-reference/vehicles-api-intro) as soon as possible to ensure continued support and access to new features.
## Permission
`read_security`
## Request
**Path**
## Response
Indicates the current lock status of the vehicle as reported by the OEM.
An array of the open status of the vehicle's doors.
The location of the door.
Indicates the current state of the vehicle's door.
`UNKNOWN` indicates the vehicle supports this status, but did not provide a valid status for the request
An array of the open status of the vehicle's windows.
The location of the window.
Indicates the current state of the vehicle's window.
`UNKNOWN` indicates the vehicle supports this status, but did not provide a valid status for the request
An array of the open status of the vehicle's sunroofs.
The location of the sunroof.
Indicates the current state of the vehicle's sunroof.
`UNKNOWN` indicates the vehicle supports this status, but did not provide a valid status for the request
An array of the open status of the vehicle's storages.
For internal combustion and plug-in hybrid vehicles front refers to the engine hood.
For battery vehicles, this will be the front trunk.
The location of the storage.
Indicates the current state of the vehicle's storage.
`UNKNOWN` indicates the vehicle supports this status, but did not provide a valid status for the request
An array of the open status of the vehicle's charging port.
The location of the charging port.
Indicates the current state of the vehicle's charging port.
`UNKNOWN` indicates the vehicle supports this status, but did not provide a valid status for the request
```json Example Response theme={null}
{
"isLocked" : false,
"doors" : [
{"type": "frontLeft" , "status" : "CLOSED"},
{"type": "frontRight" , "status" : "OPEN"},
{"type": "backRight" , "status" : "CLOSED"},
{"type": "backLeft" , "status" : "CLOSED"}
],
"windows" : [
{"type": "frontLeft" , "status" : "CLOSED"},
{"type": "frontRight" , "status" : "CLOSED"},
{"type": "backRight" , "status" : "UNKNOWN"},
{"type": "backLeft" , "status" : "CLOSED"}
],
"sunroof" : [
{"type": "sunroof" , "status" : "CLOSED"}
],
"storage" : [
{"type": "rear" , "status" : "UNKNOWN"},
{"type": "front" , "status" : "CLOSED"}
],
"chargingPort" : [
{"type" : "chargingPort", "status" : "CLOSED" }
]
}
```
# Notes
* The open status array(s) will be empty if a vehicle has partial support.
* The request will error if `lockStatus` can not be retrieved from the vehicle or the brand is not supported.
---
# Source: https://smartcar.com/docs/api-reference/tesla/get-migration-status.md
> ## Documentation Index
> Fetch the complete documentation index at: https://smartcar.com/docs/llms.txt
> Use this file to discover all available pages before exploring further.
# Migration Status
> Indicates if the vehicle needs to migrate to Tesla's new API. See [Tesla - What's New](https://smartcar.com/docs/help/oem-integrations/tesla/whats-new) for more details.
## Permission
`read_vehicle_info`
## Request
**Path**
```bash cURL theme={null}
curl "https://api.smartcar.com/v2.0/vehicles/{id}/{make}/migration" \
-H "Authorization: Bearer {token}" \
-X "GET"
```
```python Python theme={null}
status = vehicle.request(
"GET",
"{make}/migration"
)
```
```js Node theme={null}
const status = await vehicle.request(
"GET",
"{make}/migration"
);
```
```java Java theme={null}
SmartcarVehicleRequest request = new SmartcarVehicleRequest.Builder()
.method("GET")
.path("{make}/migration")
.build();
VehicleResponse status = vehicle.request(request);
```
```ruby Ruby theme={null}
status = vehicle.request(
"GET",
"{make}/migration"
)
```
## Response
Set to `false` if the vehicle is connected to Smartcar via Tesla's new integration. See [Tesla - What's New](/help/oem-integrations/tesla/whats-new) for more details.
```json Example Response theme={null}
{
"requiresMigration": false
}
```
---
# Source: https://smartcar.com/docs/api-reference/get-nominal-capacity.md
> ## Documentation Index
> Fetch the complete documentation index at: https://smartcar.com/docs/llms.txt
> Use this file to discover all available pages before exploring further.
# Battery Capacity
> Returns a list of nominal rated battery capacities for a vehicle.
The Vehicles API v2.0 will be deprecated by **Q3 of 2026**. We recommend migrating to the [latest version](/api-reference/vehicles-api-intro) as soon as possible to ensure continued support and access to new features.
This endpoint is only available for US and European based vehicles. Please refer to [this page](/api-reference/evs/get-battery-capacity) if you need battery capacity for Canadian based vehicles for the time being.
## Permission
`read_battery`
## Request
**Path**
```bash cURL theme={null}
curl "https://api.smartcar.com/v2.0/vehicles/{id}/battery/nominal_capacity" \
-H "Authorization: Bearer {token}" \
-X "GET"
```
## Response
An array of capacities Objects.
The rated nominal capacity for the vehicle's battery.
A description of the uniqueness for the nominal capacity and engine type of the vehicle in the form `{ENGINE_TYPE}:{TRIM}`, for example `"BEV:Extended Range"`.
Engine type can be one of `BEV` or `PHEV`.
The rated nominal capacity for the vehicle's battery.
Indicates if this capacity was determined by a user or Smartcar.
Options are `USER_SELECTED` or `SMARTCAR`.
A URL that will launch the flow for a vehicle owner to specify the correct
battery capacity for a vehicle. **Please ensure you append a
redirect URI** for us to send a response to once the user exits the flow.
Please see [this article](/connect/user-selected-batcap) on how to handle the URL callback.
```json Response Example theme={null}
{
"availableCapacities": [
{
"capacity" : 70.9,
"description" : null
},
{
"capacity" : 80.9,
"description" : null
},
{
"capacity" : 90.9,
"description" : "BEV:Extended Range"
}
],
"capacity": {
"nominal" : 80.9,
"source": "USER_SELECTED"
},
"url" : "https://connect.smartcar.com/battery-capacity?vehicle_id=36ab27d0-fd9d-4455-823a-ce30af709ffc&client_id=8229df9f-91a0-4ff0-a1ae-a1f38ee24d07&token=90abecb6-e7ab-4b85-864a-e1c8bf67f2ad&response_type=vehicle_id&redirect_uri="
}
```
### Case 1: Smartcar has determined the battery capacity
```json Single capacity theme={null}
{
"availableCapacities": [
{
"capacity" : 70.9,
"description" : null
}
],
"capacity": {
"nominal" : 70.9,
"source": "SMARTCAR"
},
"url" : null
}
```
### Case 2: Unable to determine the battery capacity
```json Multiple capacities theme={null}
{
"availableCapacities": [
{
"capacity" : 70.9,
"description" : null
},
{
"capacity" : 80.9,
"description" : null
},
{
"capacity" : 90.9,
"description" : "BEV:Extended Range"
}
],
"capacity": null,
"url" : "https://connect.smartcar.com/battery-capacity?vehicle_id=36ab27d0-fd9d-4455-823a-ce30af709ffc&client_id=8229df9f-91a0-4ff0-a1ae-a1f38ee24d07&token=90abecb6-e7ab-4b85-864a-e1c8bf67f2ad&response_type=vehicle_id&redirect_uri="
}
```
### Case 3: User selected battery capacity
Smartcar will sometimes return an `availableCapacities` object along side a Connect URL you can use to prompt users to select the battery capacity of their vehicle. This can occur when an accurate match could not be found, or vehicle owners purchased extension packs, or software upgrades specific to their vehicle.
When you redirect a vehicle owner to this Smartcar Connect url, they can select the battery capacity of their vehicle for cases where the battery capacity cannot be accurately determined.
When a user selects an option, Smartcar will return this value with `USER_SELECTED` as the source.
```json Multiple capacities theme={null}
{
"availableCapacities": [
{
"capacity": 70.9,
"description": null
},
{
"capacity": 80.9,
"description": null
},
{
"capacity": 90.9,
"description": "BEV:Extended Range"
}
],
"capacity": {
"nominal": 80.9,
"source": "USER_SELECTED"
},
"url": "https://connect.smartcar.com/battery-capacity?vehicle_id=36ab27d0-fd9d-4455-823a-ce30af709ffc&client_id=8229df9f-91a0-4ff0-a1ae-a1f38ee24d07&token=90abecb6-e7ab-4b85-864a-e1c8bf67f2ad&response_type=vehicle_id&redirect_uri="
}
```
---
# Source: https://smartcar.com/docs/api-reference/get-odometer.md
> ## Documentation Index
> Fetch the complete documentation index at: https://smartcar.com/docs/llms.txt
> Use this file to discover all available pages before exploring further.
# Odometer
> Returns the vehicle’s last known odometer reading.
The Vehicles API v2.0 will be deprecated by **Q3 of 2026**. We recommend migrating to the [latest version](/api-reference/vehicles-api-intro) as soon as possible to ensure continued support and access to new features.
## Permission
`read_odometer`
## Request
**Path**
## Response
The current odometer of the vehicle.
```json Example Response theme={null}
{
"distance": 104.32
}
```
---
# Source: https://smartcar.com/docs/api-reference/get-service-records.md
> ## Documentation Index
> Fetch the complete documentation index at: https://smartcar.com/docs/llms.txt
> Use this file to discover all available pages before exploring further.
# Service History
> Retrieve service records tracked by the vehicle's dealer or manually added by the vehicle owner. Currently supporting Ford, Lincoln, Toyota, Lexus, Mazda and Volkswagen (US)
The Vehicles API v2.0 will be deprecated by **Q3 of 2026**. We recommend migrating to the [latest version](/api-reference/vehicles-api-intro) as soon as possible to ensure continued support and access to new features.
## Permission
`read_service_history`
```bash cURL theme={null}
curl "https://api.smartcar.com/v2.0/vehicles/{id}/service/history" \
-H "Authorization: Bearer {token}" \
-X "GET"
```
```python Python theme={null}
service = vehicle.request(
"GET",
"service/history"
)
```
```js Node theme={null}
const service = await vehicle.request(
"GET",
"service/history"
);
```
```java Java theme={null}
SmartcarVehicleRequest request = new SmartcarVehicleRequest.Builder()
.method("GET")
.path("service/history")
.build();
VehicleResponse service =vehicle.request(request);
```
```ruby Ruby theme={null}
Service = vehicle.request(
"GET",
"service/history"
)
```
## Request
**Path**
## Response
A unique identifier of the service record.
The date and time the vehicle was serviced
The odometer of the vehicle at time of service in kilometers.
The unique identifier of the tasks completed as part of the service event.
Tasks completed as part of the service event. Note that not all makes provide service tasks.
Additional service details.
Indicates if the service event was completed by a dealership or manually entered by the vehicle owner.
An overview of service costs.
The total cost of the service event. Note that not all makes provide service cost.
Identifies the currency used for service cost.
```json Example Response theme={null}
{
"serviceId": null,
"odometerDistance": 46047.22,
"serviceDate": "2023-06-28T22:21:41.583Z",
"serviceTasks": [
{
"taskId": "3262",
"taskDescription": "Service Task 0"
},
{
"taskId": "3041",
"taskDescription": null
},
{
"taskId": null,
"taskDescription": null
}
],
"serviceDetails": [
{
"type": "Service Details Type 0",
"value": "Service Details Value 0"
},
{
"type": "Service Details Type 1",
"value": null
}
],
"serviceCost": {
"totalCost": null,
"currency": null
}
}
```
---
# Source: https://smartcar.com/docs/api-reference/get-signal.md
> ## Documentation Index
> Fetch the complete documentation index at: https://smartcar.com/docs/llms.txt
> Use this file to discover all available pages before exploring further.
# Signal
> Get a specific Signal for a Vehicle.
## OpenAPI
````yaml get /vehicles/{vehicleId}/signals/{signalCode}
openapi: 3.0.3
info:
title: Smartcar Vehicle Data API
version: 1.0.0
description: |
API for returning signal and attribute signals
servers:
- url: https://vehicle.api.smartcar.com/v3
description: Smartcar Vehicle APIs
security: []
paths:
/vehicles/{vehicleId}/signals/{signalCode}:
get:
summary: GET signal
operationId: getSignal
parameters:
- in: path
name: vehicleId
required: true
description: The unique identifier for the vehicle.
schema:
type: string
- in: path
name: signalCode
required: true
description: The unique identifier for the signal.
schema:
type: string
responses:
'200':
description: Individual signal details
content:
application/json:
schema:
$ref: '#/components/schemas/SignalResource'
'400':
$ref: '#/components/responses/BadRequest'
'401':
$ref: '#/components/responses/Unauthorized'
'403':
$ref: '#/components/responses/Forbidden'
'404':
$ref: '#/components/responses/NotFound'
'500':
$ref: '#/components/responses/InternalError'
security:
- bearerAuth: []
components:
schemas:
SignalResource:
type: object
properties:
id:
type: string
description: |
The unique human readable identifier for the signal.
type:
type: string
enum:
- signal
attributes:
$ref: '#/components/schemas/SignalAttributes'
meta:
type: object
allOf:
- $ref: '#/components/schemas/DateMetaData'
links:
type: object
allOf:
- $ref: '#/components/schemas/SelfLink'
- type: object
properties:
values:
type: string
description: URL to the values for this signal
vehicle:
type: string
description: URL to the vehicle associated with this signal
SignalAttributes:
type: object
properties:
code:
type: string
description: |
The unique identifier for the data point.
name:
type: string
description: |
The name of the datapoint, which is a human-readable identifier.
group:
type: string
description: |
The group to which the data point belongs, used for categorization.
status:
$ref: '#/components/schemas/SignalStatus'
body:
type: object
description: |
The body of the signal or attribute
oneOf:
- $ref: '#/components/schemas/UnitValue'
- $ref: '#/components/schemas/SingleValue'
- $ref: '#/components/schemas/AdditionalValues'
- $ref: '#/components/schemas/ValuesArrayType'
- $ref: '#/components/schemas/ObjectValue'
example:
code: charge-voltage
name: Voltage
group: Charge
status:
value: SUCCESS
body:
unit: volts
value: 85
DateMetaData:
type: object
properties:
retrievedAt:
type: integer
format: int64
description: |
epoch time of the last retrieval of this data point
oemUpdatedAt:
type: integer
format: int64
description: |
The epoch time of the last update of this data point by the OEM
example:
retrievedAt: 1696156800
oemUpdatedAt: 1696156799
SelfLink:
type: object
properties:
self:
type: string
description: |
The URL to access the current resource.
ErrorResponse:
type: object
properties:
errors:
type: array
items:
type: object
properties:
links:
type: object
properties:
about:
type: string
status:
type: string
code:
type: string
title:
type: string
detail:
type: string
SignalStatus:
type: object
properties:
value:
type: string
description: >
The state of the signal, indicating whether it is active, inactive,
or in an error state.
enum:
- SUCCESS
- ERROR
- UNAVAILABLE
error:
$ref: '#/components/schemas/SignalError'
example:
value: ERROR
error:
type: SignalError
code: SIGNAL_NOT_FOUND
description: The requested signal does not exist.
resolution:
type: REAUTHENTICATE
UnitValue:
type: object
properties:
unit:
type: string
enum:
- volts
- ampere
- watts
- percentage
- degrees
- kilometers
- liters
- kilowatt-hours
- kilowatts
- bar
- seconds
- minutes
- hours
- degrees-celsius
description: |
The unit of measurement related to the value
value:
type: number
description: |
The numerical value of the signal.
SingleValue:
type: object
properties:
value:
description: >
The value of the signal, which can be a number, string, or other
data type.
oneOf:
- type: number
- type: string
- type: boolean
AdditionalValues:
type: object
allOf:
- anyOf:
- $ref: '#/components/schemas/UnitValue'
- $ref: '#/components/schemas/SingleValue'
- $ref: '#/components/schemas/ObjectValue'
- type: object
properties:
type:
type: string
description: >
The type of additional values, which can be used to categorize
the data.
additionalValues:
type: array
items:
anyOf:
- $ref: '#/components/schemas/UnitValue'
- $ref: '#/components/schemas/SingleValue'
- $ref: '#/components/schemas/ObjectValue'
description: >
Represents a selected value from a set of possible values housed in
"additional values"
ValuesArrayType:
type: object
properties:
values:
type: array
items:
type: object
ObjectValue:
type: object
additionalProperties: true
SignalError:
type: object
properties:
type:
type: string
description: |
The type of error that occurred, indicating the nature of the issue.
code:
type: string
description: >
A code representing the specific error, used for error handling and
debugging.
description:
type: string
description: |
A human-readable message describing the error.
resolution:
type: object
properties:
type:
type: string
description: Describes types of actions to be take to resolve an error state
example:
type: CONNECTED_SERVICES_ACCOUNT
code: AUTHENTICATION_FAILED
message: The authentication for the connected services account failed.
resolution:
type: REAUTHENTICATE
responses:
BadRequest:
description: 400 Bad Request
content:
application/json:
schema:
$ref: '#/components/schemas/ErrorResponse'
example:
errors:
- status: '400'
code: bad_request
title: Bad Request
detail: >-
The request could not be understood by the server due to
malformed syntax.
Unauthorized:
description: 401 Unauthorized
content:
application/json:
schema:
$ref: '#/components/schemas/ErrorResponse'
example:
errors:
- status: '401'
code: unauthorized
title: Unauthorized
detail: The Authorization token is missing or invalid.
Forbidden:
description: 403 Forbidden
content:
application/json:
schema:
$ref: '#/components/schemas/ErrorResponse'
example:
errors:
- status: '403'
code: forbidden
title: Forbidden
detail: You do not have permission to access this resource.
NotFound:
description: 404 Not Found
content:
application/json:
schema:
$ref: '#/components/schemas/ErrorResponse'
example:
errors:
- status: '404'
code: not_found
title: Not Found
detail: The requested resource could not be found.
InternalError:
description: 500 Internal Server Error
content:
application/json:
schema:
$ref: '#/components/schemas/ErrorResponse'
example:
errors:
- status: '500'
code: internal_error
title: Internal Server Error
detail: An unexpected error occurred on the server.
securitySchemes:
bearerAuth:
type: http
scheme: bearer
bearerFormat: JWT
````
---
# Source: https://smartcar.com/docs/api-reference/get-signals.md
> ## Documentation Index
> Fetch the complete documentation index at: https://smartcar.com/docs/llms.txt
> Use this file to discover all available pages before exploring further.
# Signals
> Get all available Signals for a Vehicle
## OpenAPI
````yaml get /vehicles/{vehicleId}/signals
openapi: 3.0.3
info:
title: Smartcar Vehicle Data API
version: 1.0.0
description: |
API for returning signal and attribute signals
servers:
- url: https://vehicle.api.smartcar.com/v3
description: Smartcar Vehicle APIs
security: []
paths:
/vehicles/{vehicleId}/signals:
get:
summary: GET signals
operationId: getVehicleSignals
parameters:
- in: path
name: vehicleId
required: true
description: The unique identifier for the vehicle.
schema:
type: string
responses:
'200':
description: List of signals for the vehicle
content:
application/json:
schema:
$ref: '#/components/schemas/SignalsResponse'
'400':
$ref: '#/components/responses/BadRequest'
'401':
$ref: '#/components/responses/Unauthorized'
'403':
$ref: '#/components/responses/Forbidden'
'404':
$ref: '#/components/responses/NotFound'
'500':
$ref: '#/components/responses/InternalError'
security:
- bearerAuth: []
components:
schemas:
SignalsResponse:
type: object
properties:
data:
type: array
items:
$ref: '#/components/schemas/SignalResource'
meta:
type: object
allOf:
- $ref: '#/components/schemas/PagingMetaData'
links:
type: object
allOf:
- $ref: '#/components/schemas/SelfLink'
- $ref: '#/components/schemas/PagingLinks'
included:
type: object
properties:
vehicle:
$ref: '#/components/schemas/VehicleResource'
SignalResource:
type: object
properties:
id:
type: string
description: |
The unique human readable identifier for the signal.
type:
type: string
enum:
- signal
attributes:
$ref: '#/components/schemas/SignalAttributes'
meta:
type: object
allOf:
- $ref: '#/components/schemas/DateMetaData'
links:
type: object
allOf:
- $ref: '#/components/schemas/SelfLink'
- type: object
properties:
values:
type: string
description: URL to the values for this signal
vehicle:
type: string
description: URL to the vehicle associated with this signal
PagingMetaData:
type: object
properties:
page:
type: integer
description: |
The current page number of the paginated results.
pageSize:
type: integer
description: |
The number of items returned per page.
totalCount:
type: integer
description: |
The total number of items available across all pages.
example:
page: 1
pageSize: 10
totalCount: 5
SelfLink:
type: object
properties:
self:
type: string
description: |
The URL to access the current resource.
PagingLinks:
type: object
properties:
self:
type: string
description: |
The URL to access the current page of results.
first:
type: string
description: |
The URL to access the first page of results.
previous:
type: string
description: |
The URL to access the previous page of results.
next:
type: string
description: |
The URL to access the next page of results.
last:
type: string
description: |
The URL to access the last page of results.
example:
self: /vehicles/vehicle123/signals?page=1&pageSize=10
first: /vehicles/vehicle123/signals?page=1&pageSize=10
previous: null
next: /vehicles/vehicle123/signals?page=2&pageSize=10
last: /vehicles/vehicle123/signals?page=5&pageSize=10
VehicleResource:
type: object
properties:
id:
type: string
description: |
The unique identifier for the vehicle.
type:
type: string
enum:
- vehicle
attributes:
$ref: '#/components/schemas/VehicleAttributes'
links:
type: object
allOf:
- $ref: '#/components/schemas/SelfLink'
ErrorResponse:
type: object
properties:
errors:
type: array
items:
type: object
properties:
links:
type: object
properties:
about:
type: string
status:
type: string
code:
type: string
title:
type: string
detail:
type: string
SignalAttributes:
type: object
properties:
code:
type: string
description: |
The unique identifier for the data point.
name:
type: string
description: |
The name of the datapoint, which is a human-readable identifier.
group:
type: string
description: |
The group to which the data point belongs, used for categorization.
status:
$ref: '#/components/schemas/SignalStatus'
body:
type: object
description: |
The body of the signal or attribute
oneOf:
- $ref: '#/components/schemas/UnitValue'
- $ref: '#/components/schemas/SingleValue'
- $ref: '#/components/schemas/AdditionalValues'
- $ref: '#/components/schemas/ValuesArrayType'
- $ref: '#/components/schemas/ObjectValue'
example:
code: charge-voltage
name: Voltage
group: Charge
status:
value: SUCCESS
body:
unit: volts
value: 85
DateMetaData:
type: object
properties:
retrievedAt:
type: integer
format: int64
description: |
epoch time of the last retrieval of this data point
oemUpdatedAt:
type: integer
format: int64
description: |
The epoch time of the last update of this data point by the OEM
example:
retrievedAt: 1696156800
oemUpdatedAt: 1696156799
VehicleAttributes:
type: object
properties:
make:
type: string
model:
type: string
year:
type: integer
SignalStatus:
type: object
properties:
value:
type: string
description: >
The state of the signal, indicating whether it is active, inactive,
or in an error state.
enum:
- SUCCESS
- ERROR
- UNAVAILABLE
error:
$ref: '#/components/schemas/SignalError'
example:
value: ERROR
error:
type: SignalError
code: SIGNAL_NOT_FOUND
description: The requested signal does not exist.
resolution:
type: REAUTHENTICATE
UnitValue:
type: object
properties:
unit:
type: string
enum:
- volts
- ampere
- watts
- percentage
- degrees
- kilometers
- liters
- kilowatt-hours
- kilowatts
- bar
- seconds
- minutes
- hours
- degrees-celsius
description: |
The unit of measurement related to the value
value:
type: number
description: |
The numerical value of the signal.
SingleValue:
type: object
properties:
value:
description: >
The value of the signal, which can be a number, string, or other
data type.
oneOf:
- type: number
- type: string
- type: boolean
AdditionalValues:
type: object
allOf:
- anyOf:
- $ref: '#/components/schemas/UnitValue'
- $ref: '#/components/schemas/SingleValue'
- $ref: '#/components/schemas/ObjectValue'
- type: object
properties:
type:
type: string
description: >
The type of additional values, which can be used to categorize
the data.
additionalValues:
type: array
items:
anyOf:
- $ref: '#/components/schemas/UnitValue'
- $ref: '#/components/schemas/SingleValue'
- $ref: '#/components/schemas/ObjectValue'
description: >
Represents a selected value from a set of possible values housed in
"additional values"
ValuesArrayType:
type: object
properties:
values:
type: array
items:
type: object
ObjectValue:
type: object
additionalProperties: true
SignalError:
type: object
properties:
type:
type: string
description: |
The type of error that occurred, indicating the nature of the issue.
code:
type: string
description: >
A code representing the specific error, used for error handling and
debugging.
description:
type: string
description: |
A human-readable message describing the error.
resolution:
type: object
properties:
type:
type: string
description: Describes types of actions to be take to resolve an error state
example:
type: CONNECTED_SERVICES_ACCOUNT
code: AUTHENTICATION_FAILED
message: The authentication for the connected services account failed.
resolution:
type: REAUTHENTICATE
responses:
BadRequest:
description: 400 Bad Request
content:
application/json:
schema:
$ref: '#/components/schemas/ErrorResponse'
example:
errors:
- status: '400'
code: bad_request
title: Bad Request
detail: >-
The request could not be understood by the server due to
malformed syntax.
Unauthorized:
description: 401 Unauthorized
content:
application/json:
schema:
$ref: '#/components/schemas/ErrorResponse'
example:
errors:
- status: '401'
code: unauthorized
title: Unauthorized
detail: The Authorization token is missing or invalid.
Forbidden:
description: 403 Forbidden
content:
application/json:
schema:
$ref: '#/components/schemas/ErrorResponse'
example:
errors:
- status: '403'
code: forbidden
title: Forbidden
detail: You do not have permission to access this resource.
NotFound:
description: 404 Not Found
content:
application/json:
schema:
$ref: '#/components/schemas/ErrorResponse'
example:
errors:
- status: '404'
code: not_found
title: Not Found
detail: The requested resource could not be found.
InternalError:
description: 500 Internal Server Error
content:
application/json:
schema:
$ref: '#/components/schemas/ErrorResponse'
example:
errors:
- status: '500'
code: internal_error
title: Internal Server Error
detail: An unexpected error occurred on the server.
securitySchemes:
bearerAuth:
type: http
scheme: bearer
bearerFormat: JWT
````
---
# Source: https://smartcar.com/docs/api-reference/tesla/get-speedometer.md
> ## Documentation Index
> Fetch the complete documentation index at: https://smartcar.com/docs/llms.txt
> Use this file to discover all available pages before exploring further.
# Speed
> Returns the current speed of the vehicle.
## Permission
`read_speedometer`
## Request
**Path**
```bash cURL theme={null}
curl "https://api.smartcar.com/v2.0/vehicles/{id}/{make}/speedometer" \
-H "Authorization: Bearer {token}" \
-X "GET"
```
```python Python theme={null}
speed = vehicle.request(
"GET",
"{make}/speedometer"
)
```
```js Node theme={null}
const speed = await vehicle.request(
"GET",
"{make}/speedometer"
);
```
```java Java theme={null}
SmartcarVehicleRequest request = new SmartcarVehicleRequest.Builder()
.method("GET")
.path("{make}/speedometer")
.build();
VehicleResponse speed = vehicle.request(request);
```
```ruby Ruby theme={null}
speed = vehicle.request(
"GET",
"{make}/speedometer"
)
```
## Response
The current speed of the vehicle.
```json Example Response theme={null}
{
"speed": 84.32
}
```
---
# Source: https://smartcar.com/docs/api-reference/tesla/get-steering-heater.md
> ## Documentation Index
> Fetch the complete documentation index at: https://smartcar.com/docs/llms.txt
> Use this file to discover all available pages before exploring further.
# Steering Heater
> Returns the current state of a vehicle's steering wheel heater system.
## Permission
`read_climate`
## Request
**Path**
```bash cURL theme={null}
curl "https://api.smartcar.com/v2.0/vehicles/{id}/{make}/climate/steering_wheel" \
-H "Authorization: Bearer {token}" \
-X "GET"
```
```python Python theme={null}
steering_wheel = vehicle.request(
"GET",
"{make}/climate/steering_wheel"
)
```
```js Node theme={null}
const steeringWheel = await vehicle.request(
"GET",
"{make}/climate/steering_wheel"
);
```
```java Java theme={null}
SmartcarVehicleRequest request = new SmartcarVehicleRequest.Builder()
.method("GET")
.path("{make}/climate/steering_wheel")
.build();
VehicleResponse steeringWheel = vehicle.request(request);
```
```ruby Ruby theme={null}
steering_wheel = vehicle.request(
"GET",
"{make}/climate/steering_wheel"
)
```
## Response
The current state of the steering wheel heater system. `UNAVAILABLE` indicates the vehicle is not equipped with a steering wheel heater.
```json Example Response theme={null}
{
"status": "ON",
}
```
---
# Source: https://smartcar.com/docs/api-reference/get-system-status.md
> ## Documentation Index
> Fetch the complete documentation index at: https://smartcar.com/docs/llms.txt
> Use this file to discover all available pages before exploring further.
# System Status
> Provides a list of vehicle systems and their current health status. Currently supporting FCA and GM brands including RAM, Jeep, Chrysler, Dodge, Fiat, Alfa Romeo, Buick, Cadillac, Chevrolet and GMC. See [Diagnostic Systems](/docs/help/diagnostic-systems) for a complete list of Smartcar System IDs.
The Vehicles API v2.0 will be deprecated by **Q3 of 2026**. We recommend migrating to the [latest version](/api-reference/vehicles-api-intro) as soon as possible to ensure continued support and access to new features.
## Permission
`read_diagnostics`
```bash cURL theme={null}
curl "https://api.smartcar.com/v2.0/vehicles/{id}/diagnostics/system_status" \\
-H "Authorization: Bearer {token}" \\
-X "GET"
```
```python Python theme={null}
diagnostic_system_status = vehicle.diagnostic_system_status()
```
```js Node theme={null}
const diagnosticSystemStatus = await vehicle.diagnosticSystemStatus();
```
```java Java theme={null}
VehicleDiagnosticSystemStatus diagnosticSystemStatus = vehicle.diagnosticSystemStatus();
```
```ruby Ruby theme={null}
diagnostic_system_status = vehicle.diagnostic_system_status
```
## Request
**Path**
## Response
An overview of systems reported by the vehicle.
The unique identifier of a system reported by the vehicle.
The status of a vehicle, expected as "OK" or "ALERT".
A plain-text description of the status, if available.
```json Example Response theme={null}
{
"systems": [
{
// System ID from Smartcar unified system definition list
"systemId": "SYSTEM_TPMS",
"status": "ALERT",
"description": "Left rear tire sensor battery low"
},
{
"systemId": "SYSTEM_AIRBAG",
"status": "OK",
"description": null
},
{
"systemId": "SYSTEM_MIL",
"status": "OK",
"description": null
},
...
]
}
```
---
# Source: https://smartcar.com/docs/api-reference/get-tire-pressure.md
> ## Documentation Index
> Fetch the complete documentation index at: https://smartcar.com/docs/llms.txt
> Use this file to discover all available pages before exploring further.
# Tire Pressure
> Returns the air pressure of each of the vehicle’s tires.
The Vehicles API v2.0 will be deprecated by **Q3 of 2026**. We recommend migrating to the [latest version](/api-reference/vehicles-api-intro) as soon as possible to ensure continued support and access to new features.
## Permission
`read_tires`
## Request
**Path**
## Response
The current air pressure of the front left tire.
The current air pressure of the front right tire.
The current air pressure of the back left tire.
The current air pressure of the back right tire.
```json Example Response theme={null}
{
"backLeft": 219.3,
"backRight": 219.3,
"frontLeft": 219.3,
"frontRight": 219.3
}
```
---
# Source: https://smartcar.com/docs/api-reference/tesla/get-user-access.md
> ## Documentation Index
> Fetch the complete documentation index at: https://smartcar.com/docs/llms.txt
> Use this file to discover all available pages before exploring further.
# User Access
> Returns the account type and permissions for the connected Tesla account.
```bash cURL theme={null}
curl "https://api.smartcar.com/v2.0/vehicles/{id}/{make}/user/access" \
-H "Authorization: Bearer {token}" \
-X "GET"
```
```python Python theme={null}
access = vehicle.request(
"GET",
"{make}/user/access"
)
```
```js Node theme={null}
const access = await vehicle.request(
"GET",
"{make}/user/access"
);
```
```java Java theme={null}
SmartcarVehicleRequest request = new SmartcarVehicleRequest.Builder()
.method("GET")
.path("{make}/user/access")
.build();
VehicleResponse access =vehicle.request(request);
```
```ruby Ruby theme={null}
access = vehicle.request(
"GET",
"{make}/user/access"
)
```
## Request
**Path**
## Response
Returns the type of Tesla account connected. Can be either `OWNER` or `DRIVER`. Please see our [Tesla FAQs](/help/oem-integrations/tesla/faqs) for details on the differences between account types.
Returns a list of permissions granted by the user with their Tesla account. Please see [this page](/help/oem-integrations/tesla/developers#permission-mappings) on the mapping from Smartcar permissions to Tesla's.
```json Example Response theme={null}
{
"accessType": "OWNER",
"permissions" : ["vehicle_cmds", "vehicle_device_data"]
}
```
## Notes
* If you're receiving a [SERVER:INTERNAL](/errors/api-errors/server-errors#internal) error please have the user reconnect their vehicle.
---
# Source: https://smartcar.com/docs/api-reference/tesla/get-user-info.md
> ## Documentation Index
> Fetch the complete documentation index at: https://smartcar.com/docs/llms.txt
> Use this file to discover all available pages before exploring further.
# User Info
> Returns the email associated with the connected Tesla account.
## Permission
`read_user_profile`
```bash cURL theme={null}
curl "https://api.smartcar.com/v2.0/vehicles/{id}/{make}/user/info" \
-H "Authorization: Bearer {token}" \
-X "GET"
```
```python Python theme={null}
info = vehicle.request(
"GET",
"{make}/user/info"
)
```
```js Node theme={null}
const info = await vehicle.request(
"GET",
"{make}/user/info"
);
```
```java Java theme={null}
SmartcarVehicleRequest request = new SmartcarVehicleRequest.Builder()
.method("GET")
.path("{make}/user/info")
.build();
VehicleResponse info =vehicle.request(request);
```
```ruby Ruby theme={null}
info = vehicle.request(
"GET",
"{make}/user/info"
)
```
## Request
**Path**
## Response
The email associated with the connected Tesla account.
```json Example Response theme={null}
{
"email" : "api@smartcar.com"
}
```
---
# Source: https://smartcar.com/docs/api-reference/management/get-vehicle-connections.md
> ## Documentation Index
> Fetch the complete documentation index at: https://smartcar.com/docs/llms.txt
> Use this file to discover all available pages before exploring further.
# Vehicle Connections
> Returns a paged list of all vehicles that are connected to the application associated with the management API token used, sorted in descending order by connection date.
## Request
**Header**
In the format `Basic base64(default:{application_management_token})`. You can find your `application_management_token` under
your Application Configuration in the Smartcar Dashboard.
**Query**
Number of connections to return per page. `Max: 100`
Used for accessing pages other than the first page. Each page returned has a cursor value
that can be passed here to fetch the “next” page.
Filter for connections created by the provider user ID.
Filter for connections to the provided vehicle ID.
Filter for connections by either `live`, `simulated`, or the deprecated `test` mode.
```bash cURL theme={null}
curl -X GET "https://management.smartcar.com/v2.0/management/connections" \
-H "Authorization: Basic $(echo -n "default:$SMARTCAR_APP_MANAGEMENT_TOKEN" | base64)" \
-H "Content-Type: application/json"
```
```python Python theme={null}
import os
import base64
import requests
token = os.getenv("SMARTCAR_APP_MANAGEMENT_TOKEN")
auth_header = base64.b64encode(f"default:{token}".encode()).decode()
headers = {
"Authorization": f"Basic {auth_header}",
"Content-Type": "application/json"
}
response = requests.get(
"https://management.smartcar.com/v2.0/management/connections",
headers=headers
)
```
```javascript Node theme={null}
const basicAuth = Buffer.from(`default:${process.env.SMARTCAR_APP_MANAGEMENT_TOKEN}`).toString('base64');
const response = await fetch(
"https://management.smartcar.com/v2.0/management/connections",
{
method: 'GET',
headers: {
'Authorization': `Basic ${basicAuth}`,
'Content-Type': 'application/json'
}
}
);
```
```java Java theme={null}
import java.net.HttpURLConnection;
import java.net.URL;
import java.util.Base64;
String token = System.getenv("SMARTCAR_APP_MANAGEMENT_TOKEN");
String auth = Base64.getEncoder().encodeToString(("default:" + token).getBytes());
URL url = new URL("https://management.smartcar.com/v2.0/management/connections");
HttpURLConnection conn = (HttpURLConnection) url.openConnection();
conn.setRequestMethod("GET");
conn.setRequestProperty("Authorization", "Basic " + auth);
conn.setRequestProperty("Content-Type", "application/json");
int responseCode = conn.getResponseCode();
```
```ruby Ruby theme={null}
require 'net/http'
require 'uri'
require 'base64'
token = ENV['SMARTCAR_APP_MANAGEMENT_TOKEN']
auth = Base64.strict_encode64("default:#{token}")
uri = URI("https://management.smartcar.com/v2.0/management/connections")
request = Net::HTTP::Get.new(uri)
request['Authorization'] = "Basic #{auth}"
request['Content-Type'] = 'application/json'
response = Net::HTTP.start(uri.hostname, uri.port, use_ssl: true) do |http|
http.request(request)
end
```
## Response
An array of connections
ID of the user that authorized this connection (UUID v4).
ID of the vehicle connected (UUID v4).
Time at which the connection was created in UTC.
Vehicle mode: live, simulated, or test (deprecated).
Metadata about the current query
The cursor parameter that should be used to fetch the next page of results.
This field will be null if there are no more pages.
---
# Source: https://smartcar.com/docs/api-reference/get-vehicle-info.md
> ## Documentation Index
> Fetch the complete documentation index at: https://smartcar.com/docs/llms.txt
> Use this file to discover all available pages before exploring further.
# Vehicle Attributes
> Returns a single vehicle object, containing identifying information.
The Vehicles API v2.0 will be deprecated by **Q3 of 2026**. We recommend migrating to the [latest version](/api-reference/vehicles-api-intro) as soon as possible to ensure continued support and access to new features.
## Permission
`read_vehicle_info`
## Request
**Path**
## Response
The ID for the vehicle.
The manufacturer of the vehicle.
The model of the vehicle.
The model year.
```json Example Response theme={null}
{
"id": "36ab27d0-fd9d-4455-823a-ce30af709ffc",
"make": "TESLA",
"model": "Model S",
"year": "2014"
}
```
---
# Source: https://smartcar.com/docs/api-reference/tesla/get-vehicle-status.md
> ## Documentation Index
> Fetch the complete documentation index at: https://smartcar.com/docs/llms.txt
> Use this file to discover all available pages before exploring further.
# Vehicle Status
> Returns the status for the vehicle.
## Permission
`read_extended_vehicle_info`
## Request
**Path**
```bash cURL theme={null}
curl "https://api.smartcar.com/v2.0/vehicles/{id}/{make}/status" \
-H "Authorization: Bearer {token}" \
-X "GET"
```
```python Python theme={null}
status = vehicle.request(
"GET",
"{make}/status"
)
```
```js Node theme={null}
const status = await vehicle.request(
"GET",
"{make}/status"
);
```
```java Java theme={null}
SmartcarVehicleRequest request = new SmartcarVehicleRequest.Builder()
.method("GET")
.path("{make}/status")
.build();
VehicleResponse status = vehicle.request(request);
```
```ruby Ruby theme={null}
status = vehicle.request(
"GET",
"{make}/status"
)
```
## Response
The current status of the vehicle. If the vehicle is asleep, this request will not wake the vehicle.
Indicates if the vehicle is in service mode.
Indicates the current gear shift position.
```json Example Response theme={null}
{
"status": "ASLEEP",
"inService": true,
"gear": "DRIVE"
}
```
---
# Source: https://smartcar.com/docs/api-reference/get-vehicle.md
> ## Documentation Index
> Fetch the complete documentation index at: https://smartcar.com/docs/llms.txt
> Use this file to discover all available pages before exploring further.
# Vehicle
> Get details for a single Vehicle.
## OpenAPI
````yaml get /vehicles/{vehicleId}
openapi: 3.0.3
info:
title: Smartcar Vehicle Data API
version: 1.0.0
description: |
API for returning signal and attribute signals
servers:
- url: https://vehicle.api.smartcar.com/v3
description: Smartcar Vehicle APIs
security: []
paths:
/vehicles/{vehicleId}:
get:
summary: GET vehicle
operationId: getVehicle
parameters:
- in: path
name: vehicleId
required: true
schema:
type: string
responses:
'200':
description: List of data associated with the vehicle
content:
application/json:
schema:
$ref: '#/components/schemas/VehicleResource'
'400':
$ref: '#/components/responses/BadRequest'
'401':
$ref: '#/components/responses/Unauthorized'
'403':
$ref: '#/components/responses/Forbidden'
'404':
$ref: '#/components/responses/NotFound'
'500':
$ref: '#/components/responses/InternalError'
security:
- bearerAuth: []
components:
schemas:
VehicleResource:
type: object
properties:
id:
type: string
description: |
The unique identifier for the vehicle.
type:
type: string
enum:
- vehicle
attributes:
$ref: '#/components/schemas/VehicleAttributes'
links:
type: object
allOf:
- $ref: '#/components/schemas/SelfLink'
VehicleAttributes:
type: object
properties:
make:
type: string
model:
type: string
year:
type: integer
SelfLink:
type: object
properties:
self:
type: string
description: |
The URL to access the current resource.
ErrorResponse:
type: object
properties:
errors:
type: array
items:
type: object
properties:
links:
type: object
properties:
about:
type: string
status:
type: string
code:
type: string
title:
type: string
detail:
type: string
responses:
BadRequest:
description: 400 Bad Request
content:
application/json:
schema:
$ref: '#/components/schemas/ErrorResponse'
example:
errors:
- status: '400'
code: bad_request
title: Bad Request
detail: >-
The request could not be understood by the server due to
malformed syntax.
Unauthorized:
description: 401 Unauthorized
content:
application/json:
schema:
$ref: '#/components/schemas/ErrorResponse'
example:
errors:
- status: '401'
code: unauthorized
title: Unauthorized
detail: The Authorization token is missing or invalid.
Forbidden:
description: 403 Forbidden
content:
application/json:
schema:
$ref: '#/components/schemas/ErrorResponse'
example:
errors:
- status: '403'
code: forbidden
title: Forbidden
detail: You do not have permission to access this resource.
NotFound:
description: 404 Not Found
content:
application/json:
schema:
$ref: '#/components/schemas/ErrorResponse'
example:
errors:
- status: '404'
code: not_found
title: Not Found
detail: The requested resource could not be found.
InternalError:
description: 500 Internal Server Error
content:
application/json:
schema:
$ref: '#/components/schemas/ErrorResponse'
example:
errors:
- status: '500'
code: internal_error
title: Internal Server Error
detail: An unexpected error occurred on the server.
securitySchemes:
bearerAuth:
type: http
scheme: bearer
bearerFormat: JWT
````
---
# Source: https://smartcar.com/docs/api-reference/get-vin.md
> ## Documentation Index
> Fetch the complete documentation index at: https://smartcar.com/docs/llms.txt
> Use this file to discover all available pages before exploring further.
# VIN
> Returns the vehicle’s manufacturer identifier.
The Vehicles API v2.0 will be deprecated by **Q3 of 2026**. We recommend migrating to the [latest version](/api-reference/vehicles-api-intro) as soon as possible to ensure continued support and access to new features.
## Permission
`read_vin`
## Request
**Path**
## Response
The manufacturer unique identifier.
```json Example Response theme={null}
{
"vin": "5YJSA1CN5DFP00101"
}
```
---
# Source: https://smartcar.com/docs/api-reference/tesla/get-virtual-key-status.md
> ## Documentation Index
> Fetch the complete documentation index at: https://smartcar.com/docs/llms.txt
> Use this file to discover all available pages before exploring further.
# Virtual Key Status
> Indicates if a vehicle has the appropriate virtual key installed. See [Tesla - What's New](https://smartcar.com/docs/help/oem-integrations/tesla/whats-new#if-your-application-issues-commands) for more details on Tesla's virtual key requirements.
## Permission
`read_vehicle_info`
## Request
**Path**
```bash cURL theme={null}
curl "https://api.smartcar.com/v2.0/vehicles/{id}/{make}/virtual_key" \
-H "Authorization: Bearer {token}" \
-X "GET"
```
```python Python theme={null}
virtual_key = vehicle.request(
"GET",
"{make}/virtual_key"
)
```
```js Node theme={null}
const virtualKey = await vehicle.request(
"GET",
"{make}/virtual_key"
);
```
```java Java theme={null}
SmartcarVehicleRequest request = new SmartcarVehicleRequest.Builder()
.method("GET")
.path("{make}/virtual_key")
.build();
VehicleResponse virtualKey = vehicle.request(request);
```
```ruby Ruby theme={null}
virtual_key = vehicle.request(
"GET",
"{make}/virtual_key"
)
```
## Response
Returns `true` if the vehicle has the appropriate Virtual Key installed. See [Tesla - What's New](/help/oem-integrations/tesla/whats-new#if-your-application-issues-commands) for more details on Tesla's virtual key requirements.
```json Example Response theme={null}
{
"isPaired": true
}
```
## Notes
* This endpoint will throw a [COMPATIBILITY:PLATFORM\_NOT\_CAPABLE](/errors/api-errors/compatibility-errors#platform-not-capable) error if a vehicle is connected to your application via Tesla's legacy integration.
* This endpoint will throw a [CONNECTED\_SERVICES\_ACCOUNT:VEHICLE\_MISSING](/errors/api-errors/compatibility-errors#vehicle-missing) error if the Tesla account connected to Smartcar is **not** the Owner of the vehicle. See our [FAQs](/help/oem-integrations/tesla/faqs#can-owner-and-driver-accounts-authorize-access-with-smartcar-through-connect) for more information on Owner and Driver account types.
---
# Source: https://smartcar.com/docs/connect/re-auth/handle-response.md
> ## Documentation Index
> Fetch the complete documentation index at: https://smartcar.com/docs/llms.txt
> Use this file to discover all available pages before exploring further.
# Handle the Response
> If the re-auth is successful, the redirect to your application will contain a vehicle ID. In the case of an error, we'll provide an error and description as parameters instead.
## Success
Unique identifier for a vehicle on Smartcar’s platform.
```http Success theme={null}
HTTP/1.1 302 Found
Location: https://example.com/home?
vehicle_id=sc4a1b01e5-0497-417c-a30e-6df6ba33ba46
&state=0facda3319
```
## Error
For a detailed description of these errors, please see our [errors page](/api-reference/api-errors).
The type of error
A detailed description of what caused the error
```http Error theme={null}
HTTP/1.1 302 Found
Location: https://example.com/home?
error=access_denied
&error_description=User+denied+access+to+application.
&state=0facda3319
```
---
# Source: https://smartcar.com/docs/connect/handle-the-response.md
> ## Documentation Index
> Fetch the complete documentation index at: https://smartcar.com/docs/llms.txt
> Use this file to discover all available pages before exploring further.
# Handle the Response
> Upon successfully accepting the permissions, Smartcar will redirect the user back to your application using the specified `REDIRECT_URI`, along with an authorization code as a query parameter. In the case of an error, we'll provide an error and description as parameters instead.
## Success
An authorization code used to obtain your initial `ACCESS_TOKEN`. The auth `code` expires after **10 minutes**.
```http Success theme={null}
HTTP/1.1 302 Found
Location: https://example.com/home?
code=90abecb6-e7ab-4b85-864a-e1c8bf67f2ad
&state=0facda3319
```
## Error
For a detailed description of these errors, please see our [errors page](/api-reference/api-errors).
The type of error
A detailed description of what caused the error
```http Error theme={null}
HTTP/1.1 302 Found
Location: https://example.com/home?
error=access_denied
&error_description=User+denied+access+to+application.
&state=0facda3319
```
In addition to the error code and description, Smartcar will return the following parameters when a
user tries to authorize an incompatible vehicle in Connect.
Can be returned for errors where the vehicle is incompatible.
The manufacturer of the vehicle.
The model of the vehicle.
The year of production of the vehicle.
---
# Source: https://smartcar.com/docs/api-reference/headers.md
> ## Documentation Index
> Fetch the complete documentation index at: https://smartcar.com/docs/llms.txt
> Use this file to discover all available pages before exploring further.
# Headers
Smartcar uses the following headers for requests and responses.
## Request
Smartcar supports both `metric` and `imperial` unit systems of measurement.
```bash Request Headers theme={null}
SC-Unit-System: metric
```
## Response
Indicates the timestamp (ISO-8601 format) of when the returned data was recorded by the vehicle.
Indicates the timestamp (ISO-8601 format) of when Smartcar fetched the data from the OEM.
Indicates whether the unit system used in the returned data is `imperial` or `metric`.
Each response from Smartcar's API has a unique request identifier. If you need to contact us about a specific request, providing the request identifier will ensure the fastest possible resolution.
```bash Response Headers theme={null}
SC-Data-Age: 2018-06-20T01:33:37.078Z
SC-Fetched-At: 2018-06-20T01:48:37.078Z
SC-Unit-System: metric
SC-Request-Id: 26c14915-0c26-43c5-8e42-9edfc2a66a0f
```
---
# Source: https://smartcar.com/docs/help/how-to-submit-ticket.md
> ## Documentation Index
> Fetch the complete documentation index at: https://smartcar.com/docs/llms.txt
> Use this file to discover all available pages before exploring further.
> Learn how to submit a support ticket through the Smartcar Support Center, including step-by-step instructions and eligibility details based on your plan.
# How to Submit a Ticket in the Support Center
For information on how to access the Smartcar Support Center, please visit the following article: [Accessing the Smartcar Support Center](/help/accessing-support-center)
***
### **How to Submit a Support Ticket**
**1. Select "Submit a Ticket"**\
Once in the Support Center, click **"Submit a Ticket"** at the top right corner of the page to begin creating your ticket.
**2. Fill Out the Ticket Form**\
Provide details such as:
* Subject
* Description
* Please include as much relevant context as possible such as Session IDs, Vehicle IDs, screenshots, etc.
* The Smartcar Component affected
* The issue type
**3. Submit Your Ticket**\
Click **Submit**, and your request will be sent to our Support team.
**4. Track Your Request**\
You can view and track the status of your tickets under **"My Tickets"** in the Support Center.
**5. Update or Close a Request**\
Select the ticket you'd like to update or close from the **"My Tickets"** view. Once you're on the ticket page:
* Click **"Reply"** at the bottom left to add more information or request a status update.
* Click **"Close Ticket"** at the bottom right to mark the request as **Closed - Resolved** if you no longer need assistance.
***
### **Who can submit tickets?**
Ticket submission is available to users on **Build** and **Custom** **Enterprise** plans.
**Free plan users** can access the Docs Center and AI Agent within the Dashboard for assistance but do not have access to submit tickets.
---
# Source: https://smartcar.com/docs/api-reference/signals/hvac.md
> ## Documentation Index
> Fetch the complete documentation index at: https://smartcar.com/docs/llms.txt
> Use this file to discover all available pages before exploring further.
# HVAC Signals
### Cabin Target Temperature
Signal code: `hvac-cabintargettemperature`
The target temperature set for the vehicle's cabin.
The temperature unit (e.g., celsius, fahrenheit)
The target temperature value
```json Example theme={null}
{
"unit": "celsius",
"value": 22
}
```
### Is Cabin HVACActive
Signal code: `hvac-iscabinhvacactive`
A boolean value indicating if the cabin HVAC system is active.
```json Example theme={null}
{
"value": true
}
```
### Is Front Defroster Active
Signal code: `hvac-isfrontdefrosteractive`
A boolean value indicating if the front windshield defroster is active.
```json Example theme={null}
{
"value": false
}
```
### Is Rear Defroster Active
Signal code: `hvac-isreardefrosteractive`
A boolean value indicating if the rear windshield defroster is active.
```json Example theme={null}
{
"value": false
}
```
### Is Steering Heater Active
Signal code: `hvac-issteeringheateractive`
A boolean value indicating if the steering wheel heater is active.
```json Example theme={null}
{
"value": true
}
```
---
# Source: https://smartcar.com/docs/getting-started/integration-overview.md
> ## Documentation Index
> Fetch the complete documentation index at: https://smartcar.com/docs/llms.txt
> Use this file to discover all available pages before exploring further.
# Integrate with Smartcar To Receive Vehicle Data
> Welcome to the integration phase of your Smartcar journey! After configuring your application and connecting vehicles, the next crucial step is to integrate your systems with Smartcar to receive vehicle data.
## Choosing Webhooks or the REST API
Understanding the differences between webhooks and the REST API will help you choose the right integration method for your use case.
### When to Use Webhooks
**[Webhooks](/integrations/webhooks/overview) are the recommended approach** for applications that need real-time or frequently updated vehicle data. Use webhooks when:
* You need real-time notifications when vehicle data changes
* You're monitoring vehicle data continuously (e.g., fleet tracking, charging monitoring)
* You're building applications that react to vehicle events (e.g., alerts, automation)
* You need to scale to monitor many vehicles efficiently
* You want to avoid rate limits and reduce server load
**Advantages of webhooks:**
* **Require less effort and resources** - no polling the API repeatedly
* **Scale better** - Scale effortlessly to monitor thousands of vehicles, with no complex polling logic to maintain
* **Near real-time updates** - receive data within seconds of changes being detected
* **Avoid rate limits** - Smartcar pushes data to you instead of you calling the API
* **More reliable** - no missed updates due to polling intervals
* **Automatic optimizations** - Smartcar continuously optimizes data retrieval, and your application benefits immediately without code changes
**Quick Start**: Deploy a production-ready webhook receiver in minutes with our [Webhook Receiver Recipe](/getting-started/tutorials/webhook-receiver-recipe) - a complete AWS serverless solution that implements best practices for you.
Learn more about [Webhooks](/integrations/webhooks/overview).
### When to Use the REST API
The Vehicles API is designed for **infrequent data retrieval and command execution**. Use the API when:
* You need vehicle data only once or occasionally (e.g., user profile display)
* You're issuing commands to vehicles (lock/unlock, start/stop charging)
* You're exploring available signals or testing your integration
* You have a small number of vehicles and don't need continuous monitoring
The Vehicles API is designed primarily for exploration and non-frequent data retrieval. This API is not designed for continuous polling or real-time monitoring. Data is typically updated once every 24 hours unless the vehicle is actively subscribed to a webhook, which enables more frequent updates. For most use cases, you should avoid polling the Vehicles API at high frequency leverage [webhooks](/integrations/webhooks/overview) instead.
Learn more about the [Vehicles API](/api-reference/vehicles-api-intro).
**Do not poll the Vehicles API for real-time monitoring.** The API is not designed for continuous polling. Frequent polling will:
* Consume your API rate limit quota quickly
* Put unnecessary load on your servers and Smartcar's infrastructure
* Provide stale data (updated only every 24 hours without webhook subscriptions)
* Not scale as your fleet grows
Use webhooks instead for any use case requiring frequent or real-time data.
***
## CSVs (coming soon)
This integration will help you receive vehicle data in a CSV file where you can integrate analyze using your existing tools and workflows.
With CSV integrations, you will be able to:
* Receive vehicle data from Smartcar at a specified cadence (e.g., weekly, monthly)
* Choose the data fields you want to include in the CSV export (e.g., vehicle info, location, odometer, battery level)
* Have CSV files automatically delivered to your preferred destination, such as an SFTP server, cloud storage bucket, etc.
* Easily import Smartcar data into your analytics, reporting, or business intelligence tools
This solution is ideal for customers who need scheduled, automated data exports for compliance, reporting, or integration with legacy systems.
CSV integration is coming soon! If you are interested in early access or have specific requirements, please reach out to [support@smartcar.com](mailto:support@smartcar.com).
---
# Source: https://smartcar.com/docs/api-reference/signals/internalcombustionengine.md
> ## Documentation Index
> Fetch the complete documentation index at: https://smartcar.com/docs/llms.txt
> Use this file to discover all available pages before exploring further.
# InternalCombustionEngine Signals
### Amount Remaining
Signal code: `internalcombustionengine-amountremaining`
The quantity of fuel remaining in the vehicle's tank
The unit of measurement for the fuel amount (e.g., liters, gallons)
The quantity value of remaining fuel
```json Example theme={null}
{
"unit": "liters",
"value": 45.5
}
```
### Fuel Level
Signal code: `internalcombustionengine-fuellevel`
The current amount of fuel in the vehicle's tank, expressed as a percentage (0 - 100)
The unit for fuel level (always percent)
The fuel level as a percentage between 0 and 100
```json Example theme={null}
{
"unit": "percent",
"value": 75
}
```
### Oil Life
Signal code: `internalcombustionengine-oillife`
The engine oil’s remaining life span based on the current quality of the oil, expressed as a percentage. 100 indicates the oil was changed recently and 0 indicates the oil should be changed immediately. It is not a representation of how much oil is left in the vehicle.
The unit for oil life (always percent)
The oil life remaining as a percentage between 0 and 100
```json Example theme={null}
{
"unit": "percent",
"value": 85
}
```
### Range
Signal code: `internalcombustionengine-range`
The estimated driving distance possible with the current amount of fuel
The unit for range measurement (e.g., kilometers, miles)
The estimated driving distance value
```json Example theme={null}
{
"unit": "kilometers",
"value": 450
}
```
---
# Source: https://smartcar.com/docs/api-reference/intro.md
> ## Documentation Index
> Fetch the complete documentation index at: https://smartcar.com/docs/llms.txt
> Use this file to discover all available pages before exploring further.
# Smartcar APIs
> Here you'll find everything you need to integrate with Smartcar via REST APIs. Learn how to connect and manage Smartcar's Vehicles API, Management API, and Compatibility API through a simple interface.
Welcome to the Smartcar API Reference! Here you’ll find everything you need to integrate with Smartcar and build applications that can reach to millions of vehicles.
Smartcar provides three main APIs, each designed for a specific part of your integration:
## Vehicles API
The **Vehicles API** lets you access standardized vehicle data and send commands to connected vehicles. Use this API to:
* Retrieve signals such as battery level, odometer, location, and more
* Issue commands like lock/unlock or start/stop charging
* Access vehicle attributes and diagnostic information
All requests to the Vehicles API require an access token obtained via the [OAuth2 authorization flow](/getting-started/how-to/get-an-access-token).
The Vehicles API is designed primarily for exploration and non-frequent data retrieval. This API is not designed for continuous polling or real-time monitoring. Data is typically updated once every 24 hours unless the vehicle is actively subscribed to a webhook, which enables more frequent updates. For most use cases, you should avoid polling the Vehicles API at high frequency leverage [webhooks](/integrations/webhooks/overview) instead.
* [Vehicles API Reference](/api-reference/vehicles-api-intro)
* [Standard Signal Schema](/api-reference/signals/schema)
* [Permissions](/api-reference/permissions)
## Management API
The **Management API** allows you to manage vehicle connections at the application level. Use this API to:
* List all vehicles connected to your application
* Remove (disconnect) vehicles
* Unsubscribe vehicles from a webhook
The Management API uses a separate management token for authentication, which you can find in your [Smartcar Dashboard](https://dashboard.smartcar.com/).
* [Management API Reference](/api-reference/management/get-vehicle-connections)
* [Delete Vehicle Connections](/api-reference/management/delete-vehicle-connections)
* [Unsubscribe Webhook](/api-reference/webhooks/unsubscribe-webhook)
## Compatibility API
The **Compatibility API** helps you determine if a specific vehicle is supported by Smartcar before launching the Connect flow. Use this API to:
* Query supported makes and regions
This API is useful for improving user experience by verifying eligibility up front.
* [Compatibility by VIN](/api-reference/compatibility/by-vin)
* [Compatibility by Region and Make](/api-reference/compatibility/by-region-and-make)
***
Easily connect a vehicle and make API requests using our starter app.
Get a feel for the API using our Postman collection.
---
# Source: https://smartcar.com/docs/getting-started/introduction.md
> ## Documentation Index
> Fetch the complete documentation index at: https://smartcar.com/docs/llms.txt
> Use this file to discover all available pages before exploring further.
# Getting Started with Smartcar
> Welcome to Smartcar's Developer Documentation! Here, you'll learn how to integrate your application with over 40 OEM brands, securely connect to vehicles, and receive the dynamic vehicle data you need, delivered directly to your systems.
Learn how to configure your first application and connect a vehicle in under 10 minutes.Explore the complete catalog of vehicle data points (signals) you can access.Solve common implementation challenges with step-by-step instructions.
Learn how to use our patented consent management authorization flow, to connect vehicles to your application.
Visit our Help Center for FAQs, troubleshooting tips, and to contact support.
Dive deep into our Smartcar integrations and learn how to connect with various services.Connect with other developers, share ideas, and get help.
Learn how to connect your app to Smartcar so you can access [vehicle data signals](/api-reference/signals/schema) like odometer, location, battery level, issue vehicle commands, and more. In this guide, you'll register your app, walk through the Smartcar Connect flow, and configure a webhook to receive data.
By the end of this guide, you’ll have a working setup with access to a vehicle’s data through Smartcar’s platform.
## Prerequisites
Before you begin, you’ll need:
* A [Smartcar Account](https://dashboard.smartcar.com)
* Your Application ID and Secret (found in the [Smartcar Dashboard](https://dashboard.smartcar.com/configuration))
* An application with a redirect URI (e.g. a local development server or staging environment)
1. Log in or sign up via the [Smartcar Dashboard](https://dashboard.smartcar.com)
2. Fill in your app name, description, and redirect URI in the configuration page of the dashboard.
3. Copy your `Client ID` and `Client Secret` in a safe location. These credentials identify your app during the authorization process. **Do not commit your client secret to version control**.
4. Select the data you want to access from vehicles by choosing the data signals (e.g. `odometer`, `location`, etc.).
The necessary permissions will be derived from these signals and presented to your users.
[Smartcar Connect](/connect) is an OAuth 2.0 consent flow that lets your users link their vehicles securely.
The vehicle access tab in the Smartcar Dashboard will generate a Connect URL for you. You can also generate the URL programmatically using one of our SDKs.
```javascript theme={null}
const link = new Smartcar.AuthClient({ //Smartcar frontend SDK
clientId: 'YOUR_CLIENT_ID',
redirectUri: 'YOUR_REDIRECT_URI',
scope: ['read_vehicle_info', 'read_odometer'], // add other scopes as needed
mode: 'live', // use 'simulated' for testing with simulated vehicles
});
window.location.href = link.getAuthUrl();
```
This will take your user to the Smartcar Connect screen to authorize access.
After the user grants access, Smartcar redirects back to your app with an authorization code. This is where the redirect URI you configured earlier comes into play.
Use this code in your backend to exchange for access and refresh tokens:
```javascript theme={null}
const smartcar = require('smartcar'); //Smartcar backend SDK
const client = new smartcar.AuthClient({
clientId: 'YOUR_CLIENT_ID',
clientSecret: 'YOUR_CLIENT_SECRET',
redirectUri: 'YOUR_REDIRECT_URI',
mode: 'live', //use 'simulated' for testing with simulated vehicles
});
const access = await client.exchangeCode('AUTHORIZATION_CODE_FROM_QUERY');
```
You’ll receive:
* `accessToken`: used to make API calls
* `refreshToken`: used to obtain new access tokens
Our recommended method is to use webhooks, allowing you to choose triggers (e.g. location changes, battery state of charge changes) and the data to be sent upon those triggers.
**Quick Start**: Deploy a production-ready webhook receiver in minutes with our [Webhook Receiver Recipe](/getting-started/tutorials/webhook-receiver-recipe) - a complete AWS serverless solution.
#### What’s Next?
* [Learn how to configure your application](/getting-started/configure-application).
* [Connect your first vehicle](/getting-started/connect-vehicles).
* [Build your first integration](/getting-started/integration-overview).
Need help? Visit our Support Portal or contact us at [support@smartcar.com](mailto:support@smartcar.com).
Let’s get building!
---
# Source: https://smartcar.com/docs/errors/connect-errors/invalid-subscription.md
> ## Documentation Index
> Fetch the complete documentation index at: https://smartcar.com/docs/llms.txt
> Use this file to discover all available pages before exploring further.
# Invalid Subscription
> This error occurs when a user’s vehicle is compatible but their connected services subscription is inactive because either it has expired or it has never been activated.
| Parameter | Required | Description | |
| ------------------ | -------- | ------------------------------------------------------------ | - |
| error | true | invalid\_subscription | |
| error\_description | true | User does not have an active connected vehicle subscription. | |
```http Example redirect uri theme={null}
HTTP/1.1 302 Found
Location: https://example.com/callback
?error=invalid_subscription
&error_description=User%20does%20not%20have%20an%20active%20connected%20vehicle%20subscription
```
Smartcar will direct the user to the connected services website to (re-)activate their subscription. However, a user may choose to return back to your application instead, like in the example below.
## Testing
To test this error, launch Smartcar Connect in test mode and log in with the email [smartcar@invalid-subscription.com](mailto:smartcar@invalid-subscription.com) and any password. If you use Single Select, please see the table below for a simulated VIN.
| Email | VIN |
| ----------------------------------------------------------------------------- | ----------------- |
| [smartcar@invalid-subscription.com](mailto:smartcar@invalid-subscription.com) | 0SCAUDI0155C49A95 |
In the event of an `AUTHENTICATION_FAILED`, the user will need to be prompted to re-connect their vehicle. Smartcar Connect Re-authentication makes the process of re-authenticating a user much more seamless. In addition, the `AUTHENTICATION_FAILED` error provides a partially constructed URL for the re-authentication flow inside the resolution object.
---
# Source: https://smartcar.com/docs/getting-started/tutorials/ios.md
> ## Documentation Index
> Fetch the complete documentation index at: https://smartcar.com/docs/llms.txt
> Use this file to discover all available pages before exploring further.
# iOS Tutorial
> In this tutorial, we will use the iOS SDK to integrate Connect into your application.
Our frontend SDKs handle getting an authorization code representing a vehicle owner's consent for your application to interact with their vehicle
for the requested permissions. In order to make requests to a vehicle, please use one of our [backend SDKs](/api-reference/api-sdks).
For security, token exchanges and requests to vehicles **should not** be made client side.
# Overview
1. The Mobile Application launches a `SafariView` with Smartcar Connect to request access to a user’s vehicle.
On Connect, the user logs in with their vehicle credentials and grants the Application access to their vehicle.
2. The `SafariView` is redirected to a specified `REDIRECT_URI` along with an authorization `code`.
This will be the custom scheme set on the application. The Smartcar iOS SDK receives the authorization `code` in a view listening
for the specified custom scheme URI, and passes it to the Mobile Application.
3. The Mobile Application sends the received authorization `code` to the Application’s back-end service.
4. The Application sends a request to the Smartcar API. This request contains the authorization code along with the Application’s
`CLIENT_ID` and `CLIENT_SECRET`.
5. In response, Smartcar returns an `ACCESS_TOKEN` and a `REFRESH_TOKEN`.
6. Using the `ACCESS_TOKEN`, the Application can now send requests to the Smartcar API. It can access protected resources and send commands
to and from the user’s vehicle via the backend service.
# Prerequisites
* [Sign up](https://dashboard.smartcar.com/signup) for a Smartcar account.
* Make a note of your `CLIENT_ID` and `CLIENT_SECRET` from the **Configuration** section on the Dashboard.
* Add a custom scheme redirect URI to your application configuration.
* Add the `appServer` redirect URI from [step 2](/getting-started/tutorials/ios/#setup) below to your application configuration.
For iOS, we require the custom URI scheme to be in the format of `sc` + `clientId` + `://` + `hostname`.
For now, you can just set it to `sc` + `clientId` + `://exchange`.
Please see our [Connect Docs](/connect/dashboard-config#redirect-uris) for more information.
# Setup
1. Clone our repo and install the required dependencies:
```bash theme={null}
$git clone https://github.com/smartcar/getting-started-ios-sdk.git
$cd getting-started-ios-sdk/tutorial
$pod install
$open getting-started-ios-sdk.xcworkspace
```
2. Set the following constants in `Constants.swift`. We're setting `appServer` to `http://localhost:8000` to pass the authorization `code` from
the [Handle the Response](/getting-started/tutorials/ios#handle-the-response) step later on in the tutorial to our backend.
```swift Constants.swift theme={null}
struct Constants {
static let clientId = "";
static let appServer = "http://localhost:8000";
}
```
# Build your Connect URL
Instantiate a `SmartcarAuth` object in the `viewdidLoad` function of the `ViewController`.
The iOS application will launch a `WebView` with Connect to request access to a user’s vehicle.
On Connect, the user logs in with the username and password for their vehicle’s connected services account
and grants the application access to their vehicle.
To launch Connect, we can use the `launchAuthFlow` function that our `SmartcarAuth` object has access to. We can place
this within the `connectPressed` action function.
```swift ViewController.swift theme={null}
let appDelegate = UIApplication.shared.delegate as! AppDelegate
func completionHandler(code: String?, state: String?, virtualKeyUrl: String?, err: AuthorizationError?,) -> Void {
// Receive authorization code
}
appDelegate.smartcar = SmartcarAuth(
clientId: "afb0b7d3-807f-4c61-9b04-352e91fe3134",
redirectUri: "scafb0b7d3-807f-4c61-9b04-352e91fe3134://exchange",
scope: ["read_vin", "read_vehicle_info", "read_odometer"],
mode: SCMode.simulated, //use SCMode.live to connect to a real vehicles
completionHandler: completionHandler
)
let smartcar = appDelegate.smartcar
// Generate a Connect URL
let authUrl = smartcar.authUrlBuilder().build()
// Pass in the generated Connect URL and a UIViewController
smartcar.launchAuthFlow(url: authUrl, viewController: viewController)
```
# Registering your Custom Scheme
Once a user has authorized the application to access their vehicle, the user is redirected to the `REDIRECT_URI` with an authorization code as a query parameter.
iOS applications use custom URI schemes to intercept calls and launch the relevant application. This is defined within the `Info.plist`.
1. Open up `Info.plist` and click on the grey arrow next to **URL types**.
2. Next, click on the grey arrow next to the `Item 0` dictionary and `URL Schemes` array.
3. Finally, set your `Item 0` string to the redirect URI you set up in the [Prerequisites](/getting-started/tutorials/ios#prerequisites) section (i.e. 'sc' + clientId).
# Handle the response
1. The iOS application will now receive the request in the `application:(_:open:options:)` function within the AppDelegate.
```swift AppDelegate.swift theme={null}
func application(_ application: UIApplication, open url: URL, options: [UIApplicationOpenURLOptionsKey : Any] = [:]) -> Bool {
{/* TODO: Authorization Step 3a: Receive the authorization code */}
window!.rootViewController?.presentedViewController?.dismiss(animated: true , completion: nil)
smartcar!.handleCallback(with: url)
return true
}
```
2. Using the iOS SDK, the application can receive the code in the `completion callback` passed into the `SmartcarAuth` object.
```swift AppDelegate.swift theme={null}
func completion(err: Error?, code: String?, state: String?) -> Any {
{/* TODO: Authorization Step 3b: Receive the authorization code */}
print(code!);
{/* prints out the authorization code */}
}
```
# Launching Connect
Build your application in XCode and click on the **Connect your vehicle** button.
This tutorial configures Connect to launch in `test` mode by default.
In `test` mode, any `username` and `password` is valid for each brand.
Smartcar showcases all the permissions your application is asking for - `read_vehicle_info` in this case.
Once you have logged in and accepted the permissions, you should see your authorization `code` printed to your console.
# Getting your first Access Token
After receiving the authorization `code`, your iOS application must exchange it for an `ACCESS_TOKEN`. To do so, we can send
the code to a backend service. Let’s assume our backend service contains an endpoint `/exchange` that receives an authorization `code` as a query parameter and exchanges it for an `ACCESS_TOKEN`.
```swift ViewController.swift theme={null}
// TODO: Obtain an access token
Alamofire.request("\(Constants.appServer)/exchange?code=\(code!)", method: .get)
.responseJSON {_ in}
```
Notice that our backend service **does not** return the `ACCESS_TOKEN`.
This is by design. For security, our frontend should never have access
to the `ACCESS_TOKEN` and should always be stored in the backend.
# Getting data from a vehicle
Once the backend has the `ACCESS_TOKEN`, it can send requests to a vehicle using the Smartcar API. The iOS app will
have to send a request to the backend service which in turn sends a request to Smartcar. We have to do this because
our frontend **does not** have the `ACCESS_TOKEN`.
Assuming our backend has a `/vehicle` endpoint that returns the information of a user’s vehicle, we can make this query in
our `completion callback` and segue into another `view` to show the returned vehicle attributes
```swift ViewController.swift theme={null}
func completion(err: Error?, code: String?, state: String?) -> Any {
// send request to exchange auth code for access token
Alamofire.request("\(Constants.appServer)/exchange?code=\(code!)", method: .get).responseJSON {_ in
// TODO: Request Step 2: Get vehicle information
// send request to retrieve the vehicle info
Alamofire.request("\(Constants.appServer)/vehicle", method: .get).responseJSON { response in
print(response.result.value!)
if let result = response.result.value {
let JSON = result as! NSDictionary
let make = JSON.object(forKey: "make")! as! String
let model = JSON.object(forKey: "model")! as! String
let year = String(JSON.object(forKey: "year")! as! Int)
let vehicle = "\(year) \(make) \(model)"
self.vehicleText = vehicle
self.performSegue(withIdentifier: "displayVehicleInfo", sender: self)
}
}
}
return ""
}
```
# Setting up your backend
Now that our frontend is complete, we will need to create a backend service that contains the logic for the `/exchange` and `/vehicle` endpoints.
You can use any of our backend SDKs below to set up the service starting from the **Obtaining an Access Token** step.
When setting up the environment variables for your backend SDK, make sure to set `REDIRECT_URI` to the custom scheme
used for this tutorial i.e. `sc + "clientId" + ://exchange`.
---
# Source: https://smartcar.com/docs/changelog/latest.md
> ## Documentation Index
> Fetch the complete documentation index at: https://smartcar.com/docs/llms.txt
> Use this file to discover all available pages before exploring further.
# Latest Releases
> Learn about Smartcar's latest product updates and improvements
[Subscribe to changelog updates](https://sta26.share.hsforms.com/2CCbdweFdSOeE5B58UvjVlw) and receive email notifications for new releases and updates.
## Charging signal CONNECTOR replaced with CHARGING\_TYPE is now live
The charging signal change [announced on January 12th](#upcoming-change-charging-signal-connector-to-charging_type) is now live. The `CONNECTOR` type has been replaced with `CHARGING_TYPE` in the following signals:
* Charge.ChargeLimits
* Charge.ChargeRecords
* Charge.ChargeTimers
These signals now return the charging current type (`AC` or `DC`) instead of a connector hardware type. If your integration parses any of these signals and still references the `CONNECTOR` type, update your code to use `CHARGING_TYPE` and parse the `chargingType` field.
For full details on the change, see the [original announcement](#upcoming-change-charging-signal-connector-to-charging_type) below.
## Send Destination now available for Volkswagen
You can now use the Smartcar API to send destinations to Volkswagen vehicles in the United States.
With the Send Destination command, your application can route a destination directly to a driver's built-in navigation screen. This unlocks new workflows:
* Fleet management: Route drivers to their next pickup, delivery, or service location
* Car sharing and rentals: Send return location addresses when a rental period is ending
* Repair and maintenance: Direct customers to your nearest service center when maintenance is needed
* Charging networks: Guide EV drivers to available chargers when battery is low
**Get started**: Request the `control_navigation` permission during the Smartcar Connect flow and call [Send Destination](/api-reference/send-destination-to-vehicle).
## Ruby SDK and Java SDK Updated to Support Version 3 of the Vehicles API
The [Ruby SDK](https://github.com/smartcar/ruby-sdk) and [Java SDK](https://github.com/smartcar/java-sdk) have been updated to support [Version 3 of the Vehicles API](/api-reference/vehicles-api-intro).
Both SDKs now include three new methods:
* `get_vehicle` - Retrieve vehicle information
* `get_signal` - Get a specific signal for a vehicle
* `get_signals` - Get all available signals for a vehicle
These new methods provide easier access to vehicle data through the latest API version, enabling developers to work with Smartcar's expanded signal catalog and improved data delivery capabilities.
**Get started**: Update to the latest SDK version and explore the new methods in the [Ruby SDK](https://github.com/smartcar/ruby-sdk) and [Java SDK](https://github.com/smartcar/java-sdk) documentation.
## Volvo Cars Partner Integration now available!
Smartcar is excited to announce a partnership with Volvo Cars, providing access to vehicles across the United States and Europe.
**What's new:**
* Access charging, battery, location, and odometer data through Smartcar signals
* Use the updated consent flow through Volvo's official portal
Learn more in the [Volvo integration updates](/help/oem-integrations/volvo/whats-new).
## Upcoming change: Charging signal `CONNECTOR` to `CHARGING_TYPE`
On January 28th, 2026, we're updating three charging-related signals. This is a breaking change that may require updates to your integration.
**Affected signals:**
* `Charge.ChargeLimits`
* `Charge.ChargeRecords`
* `Charge.ChargeTimers`
**What's changing:**
In all three signals, the `CONNECTOR` type is being replaced with `CHARGING_TYPE`. Instead of returning a connector hardware type (e.g., `J1772`), these signals will now return the charging current type (`AC` or `DC`).
**Before (current format):**
```json theme={null}
{
"type": "CONNECTOR",
"condition": {
"connectorType": "J1772"
}
}
```
**After (new format):**
```json theme={null}
{
"type": "CHARGING_TYPE",
"condition": {
"chargingType": "AC"
}
}
```
Other types such as `GLOBAL` and `LOCATION` remain unchanged.
**Why we're making this change:**
OEMs report connector hardware types inconsistently--some return proprietary strings, others return nothing at all. In contrast, AC vs. DC charging type is more widely provided across manufacturers.
This change gives you more consistent, actionable data. Rather than maintaining a mapping of connector type strings, you can rely on a simple AC or DC value to determine whether the vehicle is on Level 1/2 charging or DC fast charging.
**What you need to do:**
If your integration parses any of these signals and handles the `CONNECTOR` type, update your code to:
* Expect `CHARGING_TYPE` instead of `CONNECTOR`
* Parse `chargingType` (values: `AC` or `DC`) instead of `connectorType`
**Timeline:**
* Now -> January 27th, 2026: Current format remains in place
* January 28th, 2026: New format goes live
**Questions?**
Reach out to your Smartcar account manager or [contact support](https://smartcar.com/contact).
## Mercedes-Benz Partner Integration Now Available in Europe!
We're excited to announce that Mercedes-Benz is now available on Smartcar! Connect Mercedes-Benz electric vehicles (BEV and PHEV) to access vehicle data and enable smart charging capabilities.
**What's new:**
* Mercedes-Benz BEV and PHEV vehicles can now connect through Smartcar
* Enhanced connect flow with VIN verification for Mercedes vehicles
* Support for key vehicle data signals including battery level, charge status, and location
**Important notes:**
* Currently, only Battery Electric Vehicles (BEV) and Plug-in Hybrid Electric Vehicles (PHEV) are supported with this integration.
* Need support for other Mercedes vehicle types? [Contact us](https://smartcar.com/contact) to discuss your requirements.
Check out the [Mercedes-Benz integration guide](/help/oem-integrations/mercedes/whats-new) for more details.
## Vehicle data in Dashboard Coming Soon!
Vehicle data will be available in your Smartcar Dashboard. This feature is now rolling out to some customers and will be available to all customers over the next few weeks.
If you are interested in this feature or have any questions, please reach out to your Smartcar account manager or contact our support team.
## Dashboard updates: API logs, timezone controls, and more!
We've added more visibility into production usage in the Dashboard so you can monitor API requests and webhook delivery health in one place.
**What's new:**
* **API V3 call tracking**: See which API V3 endpoints are being called directly in the Dashboard to monitor migration progress
* **Active vehicle counter**: Track how many vehicles are actively delivering webhooks successfully to spot delivery gaps faster
* **Timezone customization**: Set your preferred timezone in the Dashboard so charts and tables align with your operations
**Get started**: Check out these updates in the [Smartcar Dashboard](https://dashboard.smartcar.com/).
## BMW Charging API now live across Europe
We've partnered with BMW to bring their new Charging API to Europe, giving energy providers privacy-first access to BMW EVs for smart charging, grid optimization, and home energy management.
This integration is now available in select European markets. Reach out to your Smartcar team to enable BMW Charging for your app or learn more in the [partnership announcement](https://smartcar.com/blog/smartcar-and-bmw-partnership).
## Improved Webhook Logs in Dashboard
We've significantly improved the webhook logging experience in the Smartcar Dashboard, making it easier to monitor and debug webhook deliveries.
**What's New:**
* **Delivery-focused logging**: Each log row now represents a single webhook delivery, providing a clearer view of your webhook activity
* **Detailed inspection**: Click "View logs" on any delivery to inspect the signal or endpoint items included in that delivery and their individual statuses
* **Faster performance**: Reduced latency in both Webhook Logs and the webhook deliveries over time chart for a more responsive experience
**Where to Find It:**
You can view your webhook logs in two locations:
* **Logs > Webhooks** in the main navigation
* **Vehicles > \[Selected vehicle] > Webhooks** for vehicle-specific logs
**Get started**: Head to the [Smartcar Dashboard](https://dashboard.smartcar.com/logs?tab=webhooks) to explore the improved webhook logs.
## Python SDK and Node SDK Updated to Support Version 3 of the Vehicles API
The [Python SDK](https://github.com/smartcar/python-sdk) and [Node SDK](https://github.com/smartcar/node-sdk) have been updated to support [Version 3 of the Vehicles API](/api-reference/vehicles-api-intro).
Both SDKs now include three new methods:
* `get_vehicle` - Retrieve vehicle information
* `get_signal` - Get a specific signal for a vehicle
* `get_signals` - Get all available signals for a vehicle
These new methods provide easier access to vehicle data through the latest API version, enabling developers to work with Smartcar's expanded signal catalog and improved data delivery capabilities.
**Get started**: Update to the latest SDK version and explore the new methods in the [Python SDK](https://github.com/smartcar/python-sdk) and [Node SDK](https://github.com/smartcar/node-sdk) documentation.
## Polestar and BYD are now available on Smartcar!
We're excited to bring compatibility for Polestar and BYD, expanding the number of brands on the platform to 45!
To enroll vehicles from these brands, make sure you have them enabled for your application in the [Dashboard](https://dashboard.smartcar.com/configuration?tab=oem-brands).
Once enabled, you can direct vehicle owners to connect their Polestar and BYD vehicles through the Smartcar Connect flow.
For a list of data points supported for these brands, see the [compatibility matrix](https://smartcar.com/product/compatible-vehicles).
See important note about [BYD's login requirement](/help/brand-quirks#byd).
## Upcoming Change to Webhook Payload Structure
Webhook `VEHICLE_STATE` payloads are being updated to include a `status` value for all signals. Previously, a `status` value was only passed for signals with errors.
Example Payload:
```json theme={null}
{
"code": "location-preciselocation",
"name": "PreciseLocation",
"group": "Location",
"body": {
"latitude": 37.386051,
"longitude": -122.083855
},
"status": {
"value": "SUCCESS"
}
},
```
This change will go live on November 17, 2025, at 11:00AM Pacific Time. Please ensure your webhook receiver is prepared to handle deliveries in this format.
## Extended Expiration Times for Vehicle Refresh Tokens
Starting November 12, 2025, Vehicle Refresh Tokens will expire 10 minutes after they are used to generate a new token set. This is an extension from the previous expiration time of 1 minute.
For more information about access tokens, see [Refreshing Access Tokens](/api-reference/authorization/refreshing-access-token)
## Verifying webhooks just got a lot easier!
When you verify a webhook, you’ll see a guided modal with a sample challenge string, copy-ready SDK snippets (Python, Node, Java, Ruby), and inline instructions for hashing the `application_management_token` plus challenge.
When your server responds with your webhook verification, you'll see the response that Smartcar received compared to the expected hash output.
If the verification fails, the new response tab surfaces the HTTP status, challenge string, expected hash output, and the payload Smartcar received so you can immediately compare and retry. This feedback loop removes trial-and-error, shortens onboarding for new teams, and ensures your webhook endpoint is producing the correct `SC-Signature` before you start ingesting production signals.
**Get started**
* Head to the [Smartcar Dashboard](https://dashboard.smartcar.com/integrations) and select your webhook integration to launch the verifier.
* Follow the updated [Payload verification guide](/integrations/webhooks/payload-verification) to reproduce the same HMAC calculation server-side.
* After verification succeeds, wire up your [webhook receiver tutorial](/getting-started/tutorials/webhook-receiver-recipe) or call the [webhook overview](/integrations/webhooks/overview) docs for deployment best practices.
## TypeScript Webhook Recipe Now Available
Deploy production-ready webhook receivers in minutes with our new [TypeScript Webhook Recipe](https://github.com/smartcar/typescript-webhook-recipe)! This AWS serverless template provides everything you need to handle Smartcar webhooks at scale:
* **Complete Infrastructure**: Lambda + API Gateway + SQS with AWS CDK
* **Built-in Validation**: Automatic webhook verification and payload validation
* **Error Handling**: Dead letter queues and retry logic for reliability
* **Production Ready**: CloudWatch monitoring, IAM security, and auto-scaling
* **Developer Friendly**: TypeScript types and comprehensive documentation
The recipe eliminates the complexity of building webhook infrastructure from scratch, letting you focus on your business logic. Perfect for new webhook implementations or teams wanting to deploy quickly without infrastructure overhead.
**Get started**: [Webhook Receiver Recipe Documentation](/getting-started/tutorials/webhook-receiver-recipe) | [GitHub Repository](https://github.com/smartcar/typescript-webhook-recipe)
## Battery Capacity Selection in the Smartcar Connect Flow
When you request the `read_battery` permission and Smartcar detects multiple possible battery capacity matches for a vehicle, users will now be automatically prompted to select their battery capacity during the Connect flow.
This streamlined experience eliminates the need for developers to prompt users or source the battery capacity selection from other sources. This step ensures that battery capacity data is available immediately after vehicle connection if Smartcar is not able to identify it.
Read more about the [User Selected Battery Capacity](/connect/user-selected-batcap).
## Smartcar Partners with Mercedes-Benz Connectivity Services GmbH!
We are excited to announce our partnership with Mercedes-Benz Connectivity Services GmbH, expanding seamless access to connected vehicle data for developers and businesses across Europe.
This integration enables developers to build innovative applications using data from Mercedes-Benz vehicles, including popular models such as the A-Class, C-Class, E-Class, S-Class, GLA, GLC, and more.
With this partnership, Smartcar customers can leverage secure, reliable, and real-time access to vehicle data for a wide range of use cases, from fleet management to mobility services.
Read more about this partnership and its impact in our [blog post](https://smartcar.com/blog/smartcar-partners-with-mercedes-benz-connectivity-services-gmbh).
## Introducing the new Smartcar Platform!
We are excited to announce the launch of the new Smartcar Platform, designed to provide a more reliable and efficient way to access vehicle data. With our new [webhook integration](/integrations/webhooks/overview) and [API](/api-reference/intro), developers can now receive vehicle data at higher frequencies and with improved reliability.
For all use cases, Smartcar can deliver data as it detects changes based on our new standardized Signal Schema while avoiding unnecessary polling. With over 80 signals available, developers can access a wide range of vehicle data to build innovative applications.
Getting started with Smartcar is now even easier. [Configure](/getting-started/configure-application) your app, [Connect](/getting-started/connect-vehicles) vehicles, and start receiving data via [webhooks](/integrations/webhooks/overview) in just a few minutes.
To get started with the new webhooks, check out our [Getting Started guide](/getting-started/introduction) and [Webhook integration overview](/integrations/webhooks/overview).
These new features are now available to all new customers. Existing customers can reach out to their account manager or contact our support team at [support@smartcar.com](mailto:support@smartcar.com)
## Smartcar Partners with Ford in Europe!
Smartcar is thrilled to announce our partnership with Ford in Europe, enabling developers to access vehicle data from millions of Ford vehicles across the continent.
This upcoming integration will give developers seamless access to vehicle data from models including the Mustang Mach‑E®, E‑Transit™, Puma, Fiesta, and Kuga.
Read more about this exciting partnership in our [blog post](https://smartcar.com/blog/smartcar-partners-with-ford-to-expand-access-to-connected-vehicle-apis?utm_source=docs\&utm_medium=changelog).
## Rivian Commands Now Available!
You can now use the Smartcar API to send commands—such as lock, unlock, and start/stop charge—to Rivian vehicles!
When requesting command permissions (like `control_security` or `control_charge`), Rivian owners will be prompted to pair their phone with their vehicle. After successful pairing, your application will be able to issue commands to the connected Rivian.
For step-by-step instructions, see our [Rivian Bluetooth Pairing guide](/connect/other-actions/rivian-bluetooth-pairing).
> **Note:** Read data permissions (such as `read_location` or `read_charge`) do not require Bluetooth pairing.
>
> Smartcar mobile SDKs for iOS and Android are required for Bluetooth pairing.
## Hyundai Lock and Unlock now available!
You can now lock and unlock Hyundai vehicles using the same standard Smartcar API. This new feature enables remote control of vehicle doors for supported Hyundai models, making it easier to build secure and convenient experiences for your users.
For more details on how to use this capability, see our [API reference](/api-reference/control-lock-unlock).
## Webhook Logs Now Available in Dashboard
You can now view logs for your webhooks directly in the Smartcar Dashboard, alongside your API request logs. This update gives you greater visibility into webhook deliveries, making it easier to monitor, debug, and ensure successful integrations.
To see your webhook logs in action, head over to the [Smartcar Dashboard](https://dashboard.smartcar.com/logs?tab=webhooks).
## New Dashboard Overview Page
Our new Dashboard overview page offers a comprehensive snapshot of your application's performance at a glance. Now, you can quickly visualize:
* Total vehicle connections
* New connections in the last 7 days
* Request trends over time
* Conversion rates
* Top five vehicle brands connected to your application
This update is designed to help you monitor key metrics effortlessly.
## Virtual Keys installation Is Now Supported in Connect
Smartcar now provides detailed steps for adding and managing Virtual Keys during the connection flow. Virtual Keys are required for third-party applications to issue commands to Tesla vehicles and are the preferred method for accessing data.
For more details, visit the [Virtual Key documentation](/help/oem-integrations/tesla/virtual-key-tesla).
## atHome signal is now available!
Smartcar now supports a new vehicle signal `atHome` that returns true or false if a vehicle is at the configured home location. This signal is currently available for Tesla vehicles capable of streaming via [this endpoint](/api-reference/tesla/get-ext-vehicle-info).
## Our New Support Features Are Live!
We’re excited to share that our new support experience is now available. These updates are designed to make it easier and faster to get the help you need through self-service tools, AI-powered assistance, and improved visibility into your support history.
**Customer Support Portal** *(Available to paid customers via the Smartcar Dashboard)*
Your new central hub for all support-related needs:
* Browse the **Knowledge Base** for helpful articles, guides, and troubleshooting tips
* Submit new support requests through a user-friendly form
* View and update **open tickets**, track past communications, and receive timely updates
* Get help fast with our **AI-powered chat agent**, available 24/7
**Enhanced Slack Support** *(For eligible plans)*
Our upgraded Slack support includes:
* AI-powered answers to common questions directly in your Slack channel
* Ability to create and track support tickets without leaving Slack
* One-click access to the Customer Support Portal
* Real-time updates and faster response workflows
For more information about what’s included in your current plan, please reach out to your account manager or contact us at [**support@smartcar.com**](mailto:support@smartcar.com).
For step-by-step instructions on how to use the new features, check out our documentation [here](https://smartcar.com/docs/help/accessing-support-center).
## Support for Single Sign-on (SSO)
Single Sign-On (SSO) is now available for teams on an Enterprise plan. To get
started, reach out to your account manager to have it enabled. For
implementation details and setup instructions, check out our [SSO
documentation](/getting-started/dashboard/single-sign-on).
## User Selected Battery Capacity
Developers can now redirect vehicle owners to a Smartcar Connect url where they can select the [battery capacity](/api-reference/get-nominal-capacity) of their vehicle for cases where the battery capacity cannot be accurately determined. This can occur when vehicle owners purchase extension packs, or software upgrades specific to their vehicle. When a user selects an option, Smartcar will return this value with `USER_SELECTED` as the source.
## Diagnostics Webhooks, DTSs, and System Status
Smartcar now provides Diagnostic Webhooks, DTCs, and System Status vehicle data for an [initial set of brands](https://smartcar.com/product/compatible-vehicles) with more brands added in the future.
## Support for Simplified Chinese
Vehicle owners can now select Simplified Chinese as they go through the Smartcar Connect flow to connect their cars.
## Tesla Telemetry API
Smartcar natively supports Tesla's Telemetry API as the default mechanism for retrieving data from Tesla vehicles out of the box and without any configuration from developers. Tesla's Telemetry API is the most efficient and effective way of gathering data from Tesla vehicles. It allows vehicles to stream data directly to Smartcar, eliminating the need to poll Tesla servers. This prevents unnecessary vehicle wakes and battery drain.
## Smartcar MFA
When a vehicle owner attempts to login to their OEM Connected Services Account and they do not have MFA enabled, Smartcar customers can enable this feature to enforce MFA verification for extra security. If you don't see this option in the Smartcar dashboard, contact [support@smartcar.com](mailto:support@smartcar.com) to get access to this feature.
## New Billing page in Dashboard
This new page provides more visibility and the ability to update your billing information, view past invoices, and view your plan features and available upgrade options.
---
# Source: https://smartcar.com/docs/api-reference/signals/location.md
> ## Documentation Index
> Fetch the complete documentation index at: https://smartcar.com/docs/llms.txt
> Use this file to discover all available pages before exploring further.
# Location Signals
### IsAtHome
Signal code: `location-isathome`
A boolean indicating if the vehicle is at home. Vehicle owners can set their home location in their OEM application.
Boolean indicating if the vehicle is at the configured home location
```json Example theme={null}
{
"value": true
}
```
### Location
Signal code: `location-preciselocation`
An object containing information about a vehicle's precise location.
The precise angular heading of the vehicle.
The vehicle's current geographic latitude coordinate.
A cardinal or intercardinal direction representing the vehicle's current heading or orientation.
**Possible values:** `N`, `NE`, `E`, `SE`, `S`, `SW`, `W`, `NW`
The vehicle's current geographic longitude coordinate.
Indicates whether the location-related fields are expected to update in real time or when the vehicle is parked.
**Possible values:** `LAST_PARKED`, `CURRENT`
```json Example theme={null}
{
"heading": 45.5,
"latitude": 37.7749,
"longitude": -122.4194,
"direction": "NE",
"locationType": "CURRENT"
}
```
---
# Source: https://smartcar.com/docs/api-reference/signals/lowvoltagebattery.md
> ## Documentation Index
> Fetch the complete documentation index at: https://smartcar.com/docs/llms.txt
> Use this file to discover all available pages before exploring further.
# LowVoltageBattery Signals
### State Of Charge
Signal code: `lowvoltagebattery-stateofcharge`
Indicates the current charge level of the low voltage battery as a percentage (0 - 100)
The unit for state of charge (always percent)
The battery charge level as a percentage between 0 and 100
```json Example theme={null}
{
"unit": "percent",
"value": 95
}
```
### Status
Signal code: `lowvoltagebattery-status`
Represents the current operational status of the low voltage battery. (GOOD, WARN, BAD)
The operational status of the battery
**Possible values:** `GOOD`, `WARN`, `BAD`
```json Example theme={null}
{
"value": "GOOD"
}
```
---
# Source: https://smartcar.com/docs/getting-started/how-to/manage-api-tokens.md
> ## Documentation Index
> Fetch the complete documentation index at: https://smartcar.com/docs/llms.txt
> Use this file to discover all available pages before exploring further.
# How to Manage API Access Tokens and Refresh Tokens
> Best practices for securely storing, refreshing, and rotating Smartcar API tokens.
This guide explains how to store, refresh, and rotate tokens using the Smartcar API.
API Access Token vs. Application Management Token
API Access Token: Used to access vehicle data and issue commands on behalf of a vehicle owner. These tokens are obtained through the OAuth flow after a user connects their vehicle and are required for all Smartcar API requests involving vehicle data.
Application Management Token: Used to manage your Smartcar application itself (e.g., configuring webhooks or managing your vehicles). This token is found in the Smartcar Dashboard and is not used for accessing vehicle data or making API requests on behalf of users.
Always use the correct token type for your use case: API access tokens for vehicle data, and management tokens for application configuration.
* Store both the `access_token` and `refresh_token` in your backend database, never in client-side code.
* Encrypt tokens at rest and restrict access to only necessary backend services.
* Associate tokens with the correct user and vehicle for easy lookup and management.
* Use the `access_token` as a Bearer token in the `Authorization` header for all API requests.
```javascript theme={null}
GET https://vehicle.api.smartcar.com/v3/vehicles/{vehicleId}
Authorization: Bearer ACCESS_TOKEN
```
* If the access token is valid, the API will return the requested data.
* If an API request returns a 401 Unauthorized error, the access token may have expired.
* In this case, use the refresh token to obtain a new access token.
* Make a POST request to the Smartcar OAuth token endpoint with `grant_type=refresh_token`.
```javascript theme={null}
POST https://auth.smartcar.com/oauth/token?client_id=YOUR_CLIENT_ID&client_secret=YOUR_CLIENT_SECRET&grant_type=refresh_token&refresh_token=YOUR_REFRESH_TOKEN
Content-Type: application/x-www-form-urlencoded
```
* Store the new `access_token` and `refresh_token` in your database, replacing the old values.
* Always update both tokens after a refresh to maintain security.
***
## Additional Resources
* [Smartcar API Reference](/api-reference)
* [How to Design Your Backend](/getting-started/how-to/architecture-design)
---
# Source: https://smartcar.com/docs/api-reference/management-api-intro.md
> ## Documentation Index
> Fetch the complete documentation index at: https://smartcar.com/docs/llms.txt
> Use this file to discover all available pages before exploring further.
# Management API Overview
> The Management API allows you to manage vehicle connections and webhook subscriptions at the application level. It is designed for administrative tasks that go beyond individual vehicle data access.
## What You Can Do
* List all vehicles connected to your application
* Remove (disconnect) vehicles from your app
* Manage webhook subscriptions (subscribe/unsubscribe vehicles)
## Authentication
The Management API uses a management token, which you can generate in your [Smartcar Dashboard](https://dashboard.smartcar.com/).
## Base URL
```
https://api.smartcar.com/management/v2.0
```
## Key Resources
* [Get Vehicle Connections](/api-reference/management/get-vehicle-connections)
* [Delete Vehicle Connections](/api-reference/management/delete-vehicle-connections)
* [Webhook Management](/api-reference/webhooks/unsubscribe-webhook)
## Example Use Cases
* Removing vehicles when a user deletes their account
* Managing webhook event delivery
* Auditing connected vehicles for compliance
For more details on using the Management API, see [Management API Reference](/api-reference/management/get-vehicle-connections).
---
# Source: https://smartcar.com/docs/connect/advanced-config/modes.md
> ## Documentation Index
> Fetch the complete documentation index at: https://smartcar.com/docs/llms.txt
> Use this file to discover all available pages before exploring further.
# Modes
> Connect can be launched in different modes depending on whether you want to interact with real vehicles or test your integration.
If no mode is specified, Connect will launch in `live` mode by default.
| Mode | Description |
| --------- | --------------------------------------------------------------------------------------------------------------------- |
| live | Launches Connect in live mode allowing a user to log in with a real connected services account. |
| simulated | Launches Connect in simulated mode allowing developers to connect to vehicles created on Dashboard via the Simulator. |
---
# Source: https://smartcar.com/docs/integrations/webhooks/best-practices/monitoring.md
> ## Documentation Index
> Fetch the complete documentation index at: https://smartcar.com/docs/llms.txt
> Use this file to discover all available pages before exploring further.
# Monitoring & Observability
> Track webhook performance and detect issues early
Comprehensive logging and monitoring help you debug issues, track performance, and maintain reliability.
## Log Key Events
Track every stage of webhook processing for complete observability.
### What to Log
```json theme={null}
{
"timestamp": "2025-01-15T10:30:45Z",
"event": "webhook.received",
"eventId": "abc123",
"eventType": "VEHICLE_STATE",
"vehicleId": "def456",
"deliveryId": "ghi789"
}
```
```json theme={null}
{
"timestamp": "2025-01-15T10:30:45Z",
"event": "signature.verified",
"eventId": "abc123",
"valid": true
}
```
```json theme={null}
{
"timestamp": "2025-01-15T10:30:46Z",
"event": "processing.started",
"eventId": "abc123",
"eventType": "VEHICLE_STATE"
}
```
```json theme={null}
{
"timestamp": "2025-01-15T10:30:47Z",
"event": "processing.failed",
"eventId": "abc123",
"error": "Database connection timeout",
"stackTrace": "..."
}
```
***
## Critical Metrics
Monitor these metrics and set up alerts:
| Metric | What It Measures | Alert Threshold |
| ----------------------------------- | ----------------------------- | -------------------------------------- |
| **Signature verification failures** | Invalid or spoofed requests | > 5 in 5 minutes |
| **Processing error rate** | Code or infrastructure issues | > 5% of events |
| **Queue depth** | Processing backlog | > 1000 messages |
| **Response time** | Endpoint performance | > 10 seconds (approaching 15s timeout) |
| **Duplicate processing** | Idempotency check hits | Track for debugging |
| **VEHICLE\_ERROR rate** | Signal retrieval issues | > 10% of vehicles |
***
## Implementation Examples
```javascript Node.js (Winston) theme={null}
const winston = require('winston');
const logger = winston.createLogger({
format: winston.format.json(),
transports: [new winston.transports.Console()]
});
app.post('/webhooks/smartcar', async (req, res) => {
const payload = req.body;
const { eventId, eventType, vehicleId } = payload;
// Log receipt
logger.info('webhook.received', {
eventId,
eventType,
vehicleId
});
// Verify signature
const isValid = verifySignature(req.rawBody, req.headers['sc-signature']);
logger.info('signature.verified', { eventId, valid: isValid });
if (!isValid) {
logger.warn('signature.failed', {
eventId,
sourceIp: req.ip
});
return res.status(401).json({ error: 'Invalid signature' });
}
// Queue and return
await queue.add(payload);
res.status(200).json({ status: 'received' });
});
async function processWebhook(payload) {
const { eventId } = payload;
const startTime = Date.now();
logger.info('processing.started', { eventId });
try {
await updateVehicleData(payload);
logger.info('processing.completed', {
eventId,
durationMs: Date.now() - startTime
});
} catch (error) {
logger.error('processing.failed', {
eventId,
error: error.message,
stack: error.stack
});
throw error;
}
}
```
```python Python (Structured Logging) theme={null}
import structlog
logger = structlog.get_logger()
@app.post("/webhooks/smartcar")
def webhook_handler():
payload = request.get_json()
event_id = payload.get("eventId")
# Log receipt
logger.info("webhook.received",
event_id=event_id,
event_type=payload.get("eventType"),
vehicle_id=payload.get("vehicleId")
)
# Verify signature
is_valid = verify_signature(request.data, request.headers.get('SC-Signature'))
logger.info("signature.verified",
event_id=event_id,
valid=is_valid
)
if not is_valid:
logger.warning("signature.failed",
event_id=event_id,
source_ip=request.remote_addr
)
return {"error": "Invalid signature"}, 401
# Queue and return
queue.enqueue(process_webhook, payload)
return {"status": "received"}, 200
def process_webhook(payload):
event_id = payload.get("eventId")
logger.info("processing.started", event_id=event_id)
try:
update_vehicle_data(payload)
logger.info("processing.completed",
event_id=event_id,
duration_ms=duration
)
except Exception as e:
logger.error("processing.failed",
event_id=event_id,
error=str(e),
exc_info=True
)
raise
```
***
## Next Steps
Track error notifications and resolution
Implement idempotency
Test your monitoring setup
---
# Source: https://smartcar.com/docs/api-reference/signals/motion.md
> ## Documentation Index
> Fetch the complete documentation index at: https://smartcar.com/docs/llms.txt
> Use this file to discover all available pages before exploring further.
# Motion Signals
### Current Speed
Signal code: `motion-currentspeed`
The vehicle's current driving speed, or 0 if it is not currently driving.
The unit of speed measurement (e.g., kph, mph)
The current speed value
```json Example theme={null}
{
"unit": "kph",
"value": 65
}
```
---
# Source: https://smartcar.com/docs/help/my-smartcar.md
> ## Documentation Index
> Fetch the complete documentation index at: https://smartcar.com/docs/llms.txt
> Use this file to discover all available pages before exploring further.
# mySmartcar
> With [mySmartcar](https://my.smartcar.com/login), you can see which apps are connected to your vehicle and manage their permissions anytime.
## Log in
Log into [mySmartcar](https://my.smartcar.com/login) by providing your preferred email address. A 6-digit code will be sent to you by email, which will grant access to mySmartcar.
## Connect your OEM account
Now press "Connect your Car" and follow the on-screen prompts to pair your Connected Services account with mySmartcar.
## Review and manages connected apps
Once your OEM account is connected, Smartcar will provide a list of each application connected via Smartcar to your Connected Services account. Here you can see when the app was first granted access and the permissions requested.
Should you wish to disconnect an application, click "Revoke Access" and confirm to remove access to your vehicle's data for that application.
---
# Source: https://smartcar.com/docs/errors/connect-errors/no-vehicles.md
> ## Documentation Index
> Fetch the complete documentation index at: https://smartcar.com/docs/llms.txt
> Use this file to discover all available pages before exploring further.
# No Vehicles
> This error occurs when a vehicle owner has a connected services account, but there are no vehicles associated with the account.
| Parameter | Required | Description | |
| ------------------ | -------- | ------------------------------------------------------------ | - |
| error | true | no\_vehicles | |
| error\_description | true | User does not have an active connected vehicle subscription. | |
```http Example redirect uri theme={null}
HTTP/1.1 302 Found
Location: https://example.com/callback
?error=no_vehicles&error_description=No%20vehicles%20found.%20Please%20add%20vehicles%20to%20your%20account%20and%20try%20again.
```
The error is triggered when a user logs into their connected services account and is shown to have no vehicles listed like in the example below for BMW.
The user has the option to add vehicles or return to your application.
---
# Source: https://smartcar.com/docs/api-reference/signals/odometer.md
> ## Documentation Index
> Fetch the complete documentation index at: https://smartcar.com/docs/llms.txt
> Use this file to discover all available pages before exploring further.
# Odometer Signals
### Traveled Distance
Signal code: `odometer-traveleddistance`
The total distance the vehicle has traveled since its initial use
The unit for distance measurement (e.g., kilometers, miles)
The total distance traveled
```json Example theme={null}
{
"unit": "kilometers",
"value": 50000
}
```
---
# Source: https://smartcar.com/docs/errors/connect-errors/oem-login-cancelled.md
> ## Documentation Index
> Fetch the complete documentation index at: https://smartcar.com/docs/llms.txt
> Use this file to discover all available pages before exploring further.
# OEM Login Cancelled
> This error occurs when a user went to authorize directly with the OEM but exited the flow for some reason.
| Parameter | Required | Description |
| ------------------- | -------- | ---------------------------------------------------- |
| `error` | `true` | `oem_cancelled_login` |
| `error_description` | `true` | The user did not complete authorization with the OEM |
```http Example redirect uri theme={null}
HTTP/1.1 302 Found
Location: https://example.com/callback
?error=oem_cancelled_login
&the%20user%20did%20not%20complete%20authorization%20with%20the%20OEM
```
---
# Source: https://smartcar.com/docs/connect/re-auth/oem-migrations.md
> ## Documentation Index
> Fetch the complete documentation index at: https://smartcar.com/docs/llms.txt
> Use this file to discover all available pages before exploring further.
# OEM Migrations and Re-authentication
> Understanding when and why vehicle owners need to re-authenticate due to OEM infrastructure changes and migrations.
## Overview
As automakers evolve their connected services infrastructure, Smartcar occasionally needs to migrate integrations to newer OEM APIs or authentication systems. These migrations ensure your application maintains access to the latest features, improved reliability, and continued compatibility with OEM platforms. Smartcar does this work on your behalf to minimize disruption.
**Important**: Some OEM migrations will require vehicle owners to re-authenticate through Smartcar Connect. This is a necessary step to maintain secure access to vehicle data.
Re-authentication requirements are an inevitable part of working with automotive APIs. Ensuring your application can gracefully manage [re-atuthentication](/connect/re-auth/redirect-to-connect) will help minimize disruption to your users.
## When Re-authentication Is Required
Vehicle owners may need to re-authenticate in several scenarios:
### Common Scenarios
Re-authentication may be required when:
* Vehicle owners change their OEM account credentials
* Connected services subscriptions are renewed or modified
* Vehicle owners revoke and re-grant access through OEM portals
### OEM Infrastructure Changes
When an automaker upgrades their API infrastructure or releases a new connected services platform, existing connections may need to be re-established. Examples include:
* **New APIs**: When OEMs annouce a new API platform for third-parties requiring all connected vehicles to re-authenticate
* **OEM Platform Updates**: When OEMs periodically update their authentication systems invalidating existing tokens forcing re-authentication
* **OEM Migrations**: When accounts or platforms are migrated between regions or systems deprecating legacy platforms
## Migration Communication
When a migration requiring re-authentication is necessary, Smartcar will:
1. **Notify you in advance** via email and your dedicated Slack channel
2. **Provide migration timelines** so you can plan communications with your users
3. **Offer technical support** throughout the migration process
4. **Provide documentation** outlining required actions (if any)
## Implementation Best Practices
### Plan for Re-authentication
Build your application with the expectation that re-authentication will be needed:
```javascript theme={null}
// Example: Handle authentication errors gracefully
try {
const response = await vehicle.odometer();
} catch (error) {
if (error.type === 'AUTHENTICATION' ||
error.statusCode === 'CONNECTED_SERVICES_ACCOUNT:AUTHENTICATION_FAILED') {
// Prompt user to re-authenticate
const reauthUrl = error.resolution?.url;
redirectToReauth(reauthUrl);
}
}
```
### Monitor for Authentication Errors
Watch for authentication-related errors in your API responses:
* `AUTHENTICATION_FAILED`: Indicates credentials are invalid or expired
* `PERMISSION` errors: May require permission updates through re-authentication
* API errors with `resolution.url`: Often include a pre-built re-authentication URL
See our [error documentation](/errors/api-errors/connected-services-account-errors) for complete details.
### Use Webhooks for Proactive Detection
Subscribe to [webhooks](/integrations/webhooks/overview) to detect authentication issues before users report them:
```json theme={null}
{
"eventId": "5a537912-9ad3-424b-ba33-65a1704567e9",
"eventType": "VEHICLE_ERROR",
"vehicleId": "123e4567-e89b-12d3-a456-426614174000",
"data": {
"user": {
"id": "93b3ea96-ca37-43a9-9073-f4334719iok7"
},
"vehicle": {
"id": "123e4567-e89b-12d3-a456-426614174000",
"make": "TESLA",
"model": "Model 3",
"year": 2020
},
"errors": [
{
"type": "CONNECTED_SERVICES_ACCOUNT",
"code": "AUTHENTICATION_FAILED",
"description": "Smartcar was unable to authenticate with the user’s connected services account. Please prompt the user to re-authenticate using Smartcar Connect.",
"docURL": "https://smartcar.com/docs/errors/api-errors/connected-services-account-errors#authentication-failed",
"statusCode": 400,
"requestId": "5dea93a1-3f79-4246-90c5-89610a20471b",
"resolution": {
"type": "REAUTHENTICATE",
"url": "https://connect.smartcar.com/oauth/reauthenticate?response_type=vehicle_id&client_id=8229df9f-91a0-4ff0-a1ae-a1f38ee24d07&vehicle_id=sc4a1b01e5-0497-417c-a30e-6df6ba33ba46"
},
"suggestedUserMessage": "Your car got disconnected from . Please use this link to re-connect your car: ."
}
]
},
"meta": {
"version": "4.0",
"deliveryId": "48b25f8f-9fea-42e1-9085-81043682cbb8",
"deliveredAt": 1761896351529,
"webhookId": "123e4567-e89b-12d3-a456-426614174000",
"webhookName": "Your Webhook's Name",
"mode": "LIVE"
}
}
```
### Implement Streamlined Re-authentication
Use Smartcar's [re-authentication flow](/connect/re-auth/redirect-to-connect) to make the process seamless:
* Pre-populate the vehicle ID to skip vehicle selection
* Use the error's `resolution.url` field when available
* Provide clear messaging about why re-authentication is needed
### Communicate Proactively
When a migration is announced:
1. **Email users ahead of time** explaining the need and benefits
2. **Show in-app notifications** with clear calls-to-action
3. **Provide support resources** for users who have questions
4. **Track re-authentication completion** to follow up with users who haven't completed the process
### Example User Communication
**Subject**: Action Required: Reconnect Your \[Vehicle Make] to \[Your App Name]
Hi \[User Name],
\[Your App Name] lost connection to your \[Vehicle Make]. Your action is needed to continue receiving \[Your app's benefits].
**Why is this needed?**
Connections to \[Vehicle Make] may expire from time to time. To maintain secure access to your vehicle data, you need to reconnect your vehicle.
**What you need to do:**
1. Click the button below to reconnect your vehicle
2. Log in with your \[Vehicle Make] account credentials
3. Approve the connection
\[Reconnect My Vehicle Button]
This process takes less than a minute. Your vehicle data and preferences will not be affected.
If you have questions, reply to this email or contact our support team.
Thank you,
The \[Your App Name] Team
## Frequently Asked Questions
No. Smartcar handles many OEM updates transparently without requiring user action. Re-authentication is only required when the changes are not compatible with the current integration. Smartcar does its best to minimize re-authentication related to OEM platform changes.
Smartcar provides advance notice for planned migrations, typically several weeks to months depending on the scope. In rare cases where OEMs make unexpected changes, we'll communicate as soon as possible.
API requests will continue to fail with authentication errors until re-authentication is completed. The vehicle connection will remain in your system, but no data can be retrieved.
Yes. The sooner re-authentication occurs, the sooner you and your users can leverage new features or resolve downtime.
This depends on the migration. In some cases, existing connections will remain valid. In other cases, existing tokens will expire and re-authentication is required to resolve re-establish a connection. Smartcar will specify this in migration communication.
## Need Help?
If you have questions about an upcoming migration or need assistance implementing re-authentication flows:
* Contact [support@smartcar.com](mailto:support@smartcar.com)
* Visit our [Support Center](/help/accessing-support-center)
* Check the [Changelog](/changelog/latest) for migration announcements
For enterprise customers, coordinate Tesla tenant setup and other OEM-specific configurations with your Solutions Architect before going live with customer-facing vehicles.
---
# Source: https://smartcar.com/docs/integrations/webhooks/overview.md
# Source: https://smartcar.com/docs/integrations/webhooks/best-practices/overview.md
# Source: https://smartcar.com/docs/getting-started/dashboard/overview.md
# Source: https://smartcar.com/docs/api-reference/webhooks/events/overview.md
# Source: https://smartcar.com/docs/api-reference/authorization/overview.md
> ## Documentation Index
> Fetch the complete documentation index at: https://smartcar.com/docs/llms.txt
> Use this file to discover all available pages before exploring further.
# Overview
> Understand how to manage access and refresh tokens to maintain persistent access to vehicles.
Smartcar uses OAuth 2.0 access tokens to secure API requests. Managing these tokens correctly is critical for ensuring your application can reliably interact with vehicles.
* **Access Tokens**: Short-lived tokens (2 hours) used to authorize requests to the Smartcar API.
* **Refresh Tokens**: Long-lived tokens (60 days) used to obtain new access tokens without requiring the user to re-authenticate.
## Token Management
* **[Auth Code Exchange](/api-reference/authorization/auth-code-exchange)**: The initial exchange of an authorization code for your first access and refresh token pair.
* **[Access Tokens Refresh](/api-reference/authorization/refreshing-access-token)**: How to get a new token set when the current one expires.
When you use a refresh token, you receive a **new refresh token** in the response. You must save this new refresh token for future use, as the old one is invalidated.
## Storing access tokens
### Default and Brand Select Connect Flow
By default tokens are scoped to the user's connected services account.
This means that if there are multiple vehicles
on the account - and they are selected at the time of authorization, the access token is valid for all those vehicle Ids.
To manage this, we recommend using the [Smartcar User Id](/api-reference/user) to link tokens to your corresponding user id. The diagram below
will also allow multiple users to connect to vehicles on the same account.
### Single Select Connect Flow
When using the Single Select flow, tokens are strictly scoped to the vehicle that was authorized for that Connect session.
This means that if a user connects multiple vehicles under the same connected services account, each vehicle id will be tied
to its own set of tokens.
## Token expiry
Access tokens are valid for 2 hours, while refresh tokens are valid for 60 days. You can use the corresponding refresh token to fetch a new token pair
once an access token has expired.
In order to maintain access to a vehicle without having a user go through Connect again, you'll want to make sure the refresh token never expires.
Whenever you fetch a new token pair, we will return a **new access and refresh token**.
Prior to expiry, access tokens will remain valid until their expiry when fetching a new token pair. Refresh tokens on the other hand are invalidated
1 minute after they're used.
To avoid common 401 Authentication errors, please ensure you are **persisting both the access and refresh token** we return whenever you fetch a new pair.
In addition to any logic that checks access token expiry when making an API request, we strongly recommend having another job that periodically
checks for refresh tokens that are close to expiry and refreshes them.
---
# Source: https://smartcar.com/docs/integrations/webhooks/payload-verification.md
> ## Documentation Index
> Fetch the complete documentation index at: https://smartcar.com/docs/llms.txt
> Use this file to discover all available pages before exploring further.
# Payload Verification
> Verify webhook payloads are authentic using signature verification
**This page covers verifying ongoing webhook payloads.** For initial endpoint verification when creating a webhook, see [Callback URI Verification](/integrations/webhooks/callback-verification).
Always verify that webhook payloads actually came from Smartcar before processing them. Every webhook includes an `SC-Signature` header containing an HMAC-SHA256 signature of the payload.
## Why Verification Matters
Without signature verification:
* Anyone could send fake webhook payloads to your endpoint
* Malicious actors could inject false vehicle data
* You have no guarantee the payload came from Smartcar
Signature verification ensures:
* The payload was sent by Smartcar
* The payload wasn't tampered with in transit
* You can safely process the data
***
## How Signature Verification Works
1. Smartcar creates an HMAC-SHA256 hash of the raw request body using your **Application Management Token** as the secret key
2. The hash is sent in the `SC-Signature` header
3. You recreate the hash using the same secret and compare it to the received signature
4. If they match, the payload is authentic and unmodified
***
## Quick Implementation
Use our SDKs for automatic signature verification:
Our [backend SDKs](/api-reference/api-sdks) have helper methods that return `true` if the payload is valid.
```js Node.js theme={null}
smartcar.verifyPayload(
application_management_token,
sc_signature_header,
raw_webhook_body
);
```
```python Python theme={null}
Smartcar.verify_payload(
application_management_token,
sc_signature_header,
raw_webhook_body
)
```
```java Java theme={null}
Smartcar.verifyPayload(
application_management_token,
sc_signature_header,
raw_webhook_body
);
```
```ruby Ruby theme={null}
Smartcar.verify_payload(
application_management_token,
sc_signature_header,
raw_webhook_body
)
```
***
## Manual Implementation
If you're not using an SDK, implement signature verification manually:
```javascript Node.js theme={null}
const crypto = require('crypto');
function verifyWebhookSignature(payload, signature, managementToken) {
// Create HMAC hash of the raw body
const hmac = crypto
.createHmac('sha256', managementToken)
.update(payload)
.digest('hex');
// Securely compare (prevents timing attacks)
return crypto.timingSafeEqual(
Buffer.from(hmac),
Buffer.from(signature)
);
}
// Important: Use raw body parser
app.post('/webhooks/smartcar',
express.raw({ type: 'application/json' }),
(req, res) => {
// Get the signature from headers
const signature = req.headers['sc-signature'];
// Get the raw body
const rawBody = req.body.toString();
// Verify signature
if (!verifyWebhookSignature(rawBody, signature, MANAGEMENT_TOKEN)) {
return res.status(401).json({ error: 'Invalid signature' });
}
// Now safe to process
const payload = JSON.parse(rawBody);
processWebhook(payload);
res.status(200).json({ status: 'received' });
}
);
```
```python Python theme={null}
import hmac
import hashlib
def verify_webhook_signature(payload, signature, management_token):
"""Verify the SC-Signature header matches the payload"""
# Create HMAC hash of the raw body
expected = hmac.new(
management_token.encode(),
payload.encode(),
hashlib.sha256
).hexdigest()
# Securely compare (prevents timing attacks)
return hmac.compare_digest(expected, signature)
@app.post('/webhooks/smartcar')
def webhook_handler():
# Get the signature from headers
signature = request.headers.get('SC-Signature')
# Get the raw body (BEFORE parsing as JSON)
raw_body = request.data.decode('utf-8')
# Verify signature
if not verify_webhook_signature(raw_body, signature, MANAGEMENT_TOKEN):
return {"error": "Invalid signature"}, 401
# Now safe to process
payload = request.get_json()
process_webhook(payload)
return {"status": "received"}, 200
```
```java Java theme={null}
import javax.crypto.Mac;
import javax.crypto.spec.SecretKeySpec;
import java.security.MessageDigest;
public class WebhookVerification {
public static boolean verifySignature(
String payload,
String signature,
String managementToken
) throws Exception {
// Create HMAC-SHA256
Mac hmac = Mac.getInstance("HmacSHA256");
SecretKeySpec secretKey = new SecretKeySpec(
managementToken.getBytes(),
"HmacSHA256"
);
hmac.init(secretKey);
// Generate hash
byte[] hash = hmac.doFinal(payload.getBytes());
String expected = bytesToHex(hash);
// Securely compare
return MessageDigest.isEqual(
expected.getBytes(),
signature.getBytes()
);
}
private static String bytesToHex(byte[] bytes) {
StringBuilder result = new StringBuilder();
for (byte b : bytes) {
result.append(String.format("%02x", b));
}
return result.toString();
}
}
@PostMapping("/webhooks/smartcar")
public ResponseEntity handleWebhook(
@RequestBody String rawBody,
@RequestHeader("SC-Signature") String signature
) {
// Verify signature
if (!WebhookVerification.verifySignature(rawBody, signature, MANAGEMENT_TOKEN)) {
return ResponseEntity.status(401).body(Map.of("error", "Invalid signature"));
}
// Now safe to process
processWebhook(rawBody);
return ResponseEntity.ok(Map.of("status", "received"));
}
```
```ruby Ruby theme={null}
require 'openssl'
def verify_webhook_signature(payload, signature, management_token)
# Create HMAC hash of the raw body
expected = OpenSSL::HMAC.hexdigest(
'SHA256',
management_token,
payload
)
# Securely compare
Rack::Utils.secure_compare(expected, signature)
end
post '/webhooks/smartcar' do
# Get the signature from headers
signature = request.env['HTTP_SC_SIGNATURE']
# Get the raw body
raw_body = request.body.read
# Verify signature
unless verify_webhook_signature(raw_body, signature, MANAGEMENT_TOKEN)
halt 401, { error: 'Invalid signature' }.to_json
end
# Now safe to process
payload = JSON.parse(raw_body)
process_webhook(payload)
status 200
{ status: 'received' }.to_json
end
```
**Critical:** You must verify the signature against the **raw request body** before parsing it as JSON. Many frameworks automatically parse JSON, which can alter the body and break signature verification.
***
## Best Practices
Never skip signature verification, even in development. It's your only guarantee that payloads are authentic.
Verify against the raw request body before JSON parsing. Parsed JSON may have different whitespace/ordering that breaks verification.
Return `401 Unauthorized` for invalid signatures. Don't process the payload or return `200`.
Store your Application Management Token securely (environment variables, secrets manager). Never commit it to source control.
***
## Next Steps
Complete security best practices guide
Understand webhook event structures
Build your webhook endpoint
Learn about retries and timeouts
---
# Source: https://smartcar.com/docs/errors/api-errors/permission-errors.md
> ## Documentation Index
> Fetch the complete documentation index at: https://smartcar.com/docs/llms.txt
> Use this file to discover all available pages before exploring further.
# Permission Errors
> Thrown when Smartcar does not support a make or feature for a vehicle.
# `NULL`
Your application has insufficient permissions to access the requested resource. Please prompt the user to re-authenticate using Smartcar Connect.
If you receive this error while testing with Vehicle Simulator, it is likely because the simulated vehicle has not yet been connected to your application, or your application doesn't have access to the requested permission.
Visit the Simulator documentation to learn how to connect the vehicle to your application.
```json theme={null}
{
"type": "PERMISSION",
"code": null,
"description": "Your application has insufficient permissions to access the requested resource. Please prompt the user to re-authenticate using Smartcar Connect.",
"docURL": "https://smartcar.com/docs/errors/api-errors/permission-errors#null",
"statusCode": 403,
"requestId": "5dea93a1-3f79-4246-90c5-89610a20471b",
"resolution": { "type": "REAUTHENTICATE" }
}
```
### Suggested Resolution
You can resolve this error by ensuring that the scope parameter contains all the permissions that your application requires and prompting the user to re-authenticate using Smartcar Connect.
### Troubleshooting Steps
* Ensure that the scope parameter contains all the permissions that your application requires.
* Ensure that you spell all permission names in the scope parameter correctly.
* Prompt the user to re-authenticate using Smartcar Connect.
---
# Source: https://smartcar.com/docs/api-reference/permissions.md
> ## Documentation Index
> Fetch the complete documentation index at: https://smartcar.com/docs/llms.txt
> Use this file to discover all available pages before exploring further.
# Permissions
> In order to use an endpoint or webhook, you'll need to request the associated permissions from your user in [Connect](/docs/connect/what-is-connect).
When requesting permissions, it's crucial to only ask for the data that is absolutely necessary for your application's functionality. Avoid collecting additional permissions "just in case" you might need them later. This practice not only protects vehicle owners' privacy but also increases the likelihood of users granting consent during the Connect flow. Users are more likely to trust and authorize applications that clearly demonstrate respect for their privacy by requesting minimal, purposeful access to their vehicle data.
## Vehicle Access
Smartcar's **Vehicle Access** configuration page (Dashboard → Configuration → Vehicle Access) lets you select the *vehicle data* (signals) and *commands* without needing to know which individual permission is needed for a given signal. Based on the signals you choose, Smartcar automatically determines the minimum set of OAuth permissions required and surfaces them during the Connect flow.
**Signals vs Permissions**: Permissions (e.g. `read_location`, `control_security`) are OAuth scopes requested from the user. Signals are the granular data points (e.g. state of charge, tire pressure) defined in the Signal Schema. Vehicle Access starts from signals and derives the needed permissions for you.
### Why use Vehicle Access?
* Enforces least-privilege automatically
* Reduces guesswork mapping data needs to permissions
* Prevents over-requesting and improves user trust
* Keeps configuration centralized in the Dashboard
### How it works
1. You open the Vehicle Access page in the Dashboard.
2. You search or browse for the signals you need (see the Signal Schema for structure and definitions).
3. Smartcar instantly computes the required permissions for those signals.
4. You save the configuration; the derived permissions are locked in for subsequent Connect authorizations.
5. During Connect, Smartcar presents only those permissions—no need to manually maintain a scope list.
Updating Vehicle Access changes the permissions requested in **future** Connect authorizations. Existing refresh/access tokens retain previously granted scopes until the user re-authenticates.
Passing the `scope` parameter in the Connect URL overrides the permissions derived from Vehicle Access for that authorization. This allows you to request different permissions for specific Connect flows without changing your overall Vehicle Access configuration.
### Example
Selecting signals for battery state of charge, charging status, and odometer will automatically derive permissions such as `read_battery`, `read_charge`, and \`read\_odometer. You don't need to add those manually.
## Read Permissions
Permissions prefixed with `read_` allow your application to get data from a vehicle as part of `GET` requests.
| | |
| ---------------------------- | ---------------------------------------------------------------------------------------------------------------------- |
| `read_alerts` | Read alerts from the vehicle |
| `read_battery` | Read an EV's high voltage battery data |
| `read_charge` | Read charging data |
| `read_charge_locations` | Access previous charging locations and their associated charging configurations |
| `read_charge_records` | Read charge records and associated billing information |
| `read_charge_events` | Receive notifications for events associated with charging |
| `read_climate` | Read the status and settings of the vehicle's climate control system |
| `read_compass` | Read the compass direction the vehicle is facing |
| `read_diagnostics` | Read a vehicle's system status and/or Diagnostic Trouble Codes |
| `read_engine_oil` | Read vehicle engine oil health |
| `read_extended_vehicle_info` | Read vehicle configuration information from a vehicle |
| `read_fuel` | Read fuel tank level |
| `read_location` | Access the vehicle's location |
| `read_odometer` | Retrieve total distance traveled |
| `read_security` | Read the lock status of doors, windows, charging port, etc. |
| `read_service_history` | Read a vehicle's dealer service history |
| `read_speedometer` | Read a vehicle's speed |
| `read_thermometer` | Read temperatures from inside and outside the vehicle |
| `read_tires` | Read a vehicle's tire status |
| `read_user_profile` | Read the information associated with a user's connected services account profile such as their email and phone number. |
| `read_vehicle_info` | Know make, model, and year |
| `read_vin` | Read VIN |
## Control Permissions
Permissions prefixed with `control_` allow your application to issue commands or apply settings to a vehicle as part of `POST` or `PUT` requests.
| | |
| -------------------- | ------------------------------------------------------------------- |
| `control_charge` | Control a vehicle's charge state |
| `control_climate` | Set the status and settings of the vehicle's climate control system |
| `control_navigation` | Send commands to the vehicle's navigation system |
| `control_security` | Lock or unlock the vehicle |
| `control_pin` | Modify a PIN and enable the PIN to Drive feature for the vehicle. |
| `control_trunk` | Open a vehicle's trunk or frunk |
---
# Source: https://smartcar.com/docs/errors/api-errors/rate-limit-errors.md
> ## Documentation Index
> Fetch the complete documentation index at: https://smartcar.com/docs/llms.txt
> Use this file to discover all available pages before exploring further.
# Rate Limit Errors
> Thrown when there is an issue with the frequency of your requests.
# `SMARTCAR_API`
Your application has exceeded its rate limit. Please retry your request in a few minutes.
```json theme={null}
{
"type": "RATE_LIMIT",
"code": "SMARTCAR_API",
"description": "Your application has exceeded its rate limit. Please retry your request in a few minutes.",
"docURL": "https://smartcar.com/docs/errors/api-errors/rate-limit-errors#smartcar-api",
"statusCode": 429,
"requestId": "5dea93a1-3f79-4246-90c5-89610a20471b",
"resolution": { "type": "RETRY_LATER" },
"suggestedUserMessage": "Your vehicle is temporarily unable to connect to . Please be patient while we’re working to resolve this issue."
}
```
### Suggested resolution
You can resolve this error by refraining from making API requests for a certain period of time.
If your application automatically retries requests for certain errors, please disable automatic retries or implement a backoff period to retry certain requests less frequently.
### Troubleshooting steps
If you believe that you received this error by mistake and your application didn’t actually exceed its rate limit, please contact us and we’ll be happy to assist you.
### Suggested user message
> Your car is temporarily unable to connect to \. Please be patient while we’re working to resolve this issue.
***
# `VEHICLE`
You have reached the throttling rate limit for this vehicle. Please see the `retry-after` header (seconds) for when to retry the request.
This limit is in place to prevent excessive vehicle requests that could:
* Lead to 12v battery drain.
* Trigger UPSTREAM:RATE\_LIMIT errors that prevent you from making requests for a longer period of time.
```json theme={null}
{
"type": "RATE_LIMIT",
"code": "VEHICLE",
"description": "You have reached the throttling rate limit for this vehicle. Please see the retry-after header for when to retry the request.",
"docURL": "https://smartcar.com/docs/errors/api-errors/rate-limit-errors#vehicle",
"statusCode": 429,
"requestId": "5dea93a1-3f79-4246-90c5-89610a20471b",
"resolution": { "type": "RETRY_LATER" },
"suggestedUserMessage": "Your vehicle is temporarily unable to connect to . Please be patient while we’re working to resolve this issue."
}
```
### Suggested resolution
You can resolve this error by refraining from making API requests. Please see the retry-after header for when to try again. If your application automatically retries requests for certain errors, please disable them for this one.
### Suggested user message
> Your car is temporarily unable to connect to \. Please be patient while we’re working to resolve this issue.
***
---
# Source: https://smartcar.com/docs/getting-started/tutorials/react.md
> ## Documentation Index
> Fetch the complete documentation index at: https://smartcar.com/docs/llms.txt
> Use this file to discover all available pages before exploring further.
# React Tutorial
> In this tutorial, we will use the JavaScript SDK to integrate Connect into your application.
Our frontend SDKs handle getting an authorization code representing a vehicle owner's consent for your application to interact with their vehicle
for the requested permissions. In order to make requests to a vehicle, please use one of our [backend SDKs](/api-reference/api-sdks).
For security, token exchanges and requests to vehicles **should not** be made client side.
# Overview
1. The Single-Page Application launches a pop-up window with Smartcar Connect to request access to a user’s vehicle.
It does so by using the Smartcar JavaScript SDK. On Connect, the user logs in with the username and password for
their vehicle’s connected services account and grants the Application access to their vehicle.
2. The user’s browser is redirected to a specified Smartcar-hosted `REDIRECT_URI` - the Smartcar JavaScript SDK redirect page.
3. The Smartcar JavaScript SDK redirect page will receive an authorization `code` as a query parameter. The redirect page will then
send the code to the Single-Page Application’s `onComplete` callback using the `postMessage` web API. **This step is handled entirely
by the JavaScript SDK.**
4. The Single-Page Application sends the received authorization `code` to the Application’s backend service.
5. The Application sends a request to the Smartcar API. This request contains the authorization code along with the Application’s
`CLIENT_ID` and `CLIENT_SECRET`.
6. In response, Smartcar returns an `ACCESS_TOKEN` and a `REFRESH_TOKEN`.
7. Using the `ACCESS_TOKEN`, the Application can now send requests to the Smartcar API. It can access protected resources and send commands
to and from the user’s vehicle via the backend service.
# Prerequisites
* [Sign up](https://dashboard.smartcar.com/signup) for a Smartcar account.
* Make a note of your `CLIENT_ID` and `CLIENT_SECRET` from the **Configuration** section on the Dashboard.
* Add the special JavaScript SDK redirect URI to your application configuration.
* Add the `REACT_APP_SERVER` redirect URI from [Setup step 2.](/getting-started/tutorials/react#setup) to your application configuration.
To use the JavaScript SDK, we require the special redirect URI to provide a simpler flow to retrieve authorization codes.
For this tutorial you can use the following:
`https://javascript-sdk.smartcar.com/v2/redirect?app_origin=http://localhost:3000`
# Setup
1. Clone our repo and install the required dependencies:
```bash theme={null}
$git clone https://github.com/smartcar/getting-started-javascript-sdk-react.git
$cd getting-started-javascript-sdk-react/tutorial
$npm install
```
2. Set the following environment variables. We will be setting up a server later for our React front-end to communicate with.
For now, let’s assume our server is listening on `http://localhost:8000`.
```bash theme={null}
$export REACT_APP_CLIENT_ID=
$export REACT_APP_REDIRECT_URI= https://javascript-sdk.smartcar.com/v2/redirect?app_origin=http://localhost:3000
$export REACT_APP_SERVER=http://localhost:8000
```
Note: If you are using Windows, ensure you are appropriately setting environment variables for your shell.
Please refer to this post which details how to set environment variables on Windows.
# Build your Connect URL
1. Instantiate a `Smartcar` object in the `constructor` of the App component.
```js App.jsx theme={null}
constructor(props) {
...
// TODO: Authorization Step 1: Initialize the Smartcar object
this.smartcar = new Smartcar({
clientId: process.env.REACT_APP_CLIENT_ID,
redirectUri: process.env.REACT_APP_REDIRECT_URI,
scope: ['required:read_vehicle_info'],
mode: 'test',
onComplete: this.onComplete,
});
}
```
2. A single-page application will launch a pop-up window with Smartcar Connect to request access to a user’s vehicle.
On Connect, the user logs in with the username and password for their vehicle’s connected services account and grants
the application access to their vehicle.
To launch Connect, we can use the `openDialog` function that our `Smartcar` object has access to. We can place this is
an `onClick` handler of an HTML button.
```js App.jsx theme={null}
authorize() {
// TODO: Authorization Step 2a: Launch Connect
this.smartcar.openDialog({forcePrompt: true});
}
render() {
// TODO: Authorization Step 2b: Render the Connect component
return ;
}
```
# Handle the response
1. Once a user has authorized the application to access their vehicle, the user is redirected to the `redirect_uri` with an
authorization code as a query parameter and the pop-up dialog is closed. Using the JavaScript SDK, the frontend can
receive this `code` in the `onComplete` callback passed into the `Smartcar` object.
```js App.jsx theme={null}
onComplete(err, code, status) {
//TODO: Authorization Step 3: Receive the authorization code
console.log(code);
//prints out the authorization code
};
```
# Launching Connect
Restart your server, open up your browser and go to `http://localhost:3000/login`. You should be reciderect to Smartcar Connect.
This tutorial configures Connect to launch in `test` mode by default.
In `test` mode, any `username` and `password` is valid for each brand.
Smartcar showcases all the permissions your application is asking for - `read_vehicle_info` in this case.
Once you have logged in and accepted the permissions, you should see your authorization `code` printed to your console.
# Getting your first access token
After receiving the authorization code, the React application must exchange it for an `ACCESS_TOKEN`. To do so, we can send
the code to the backend service which we will implement in a bit. Until then, let’s assume our backend service contains
an endpoint `/exchange` that receives an authorization code as a query parameter and exchanges it for an `ACCESS_TOKEN`.
We can add this logic in our `onComplete` callback
```js App.jsx theme={null}
onComplete(err, code, status) {
// TODO: Request Step 1: Obtain an access token
return axios
.get(`${process.env.REACT_APP_SERVER}/exchange?code=${code}`);
}
```
# Getting data from a vehicle
Once the back-end has the `ACCESS_TOKEN`, it can send requests to a vehicle using the Smartcar API. The React app will
have to send a request to the backend service which in turn sends a request to Smartcar. We have to do this because
our frontend does not have the `ACCESS_TOKEN`.
Assuming our backend has a `/vehicle` endpoint that returns the information of a user’s vehicle, we can make this query in
our `completion callback` and and set the state of the React app with the returned vehicle attributes.
```js App.jsx theme={null}
onComplete(err, code, status) {
// TODO: Request Step 2a: Get vehicle information
return axios
.get(`${process.env.REACT_APP_SERVER}/exchange?code=${code}`)
.then(_ => {
return axios.get(`${process.env.REACT_APP_SERVER}/vehicle`);
})
.then(res => {
this.setState({vehicle: res.data});
});
}
```
Now that we have the vehicle attributes, we can render a simple Vehicle component that shows the vehicle attributes in a table.
```js App.jsx theme={null}
render() {
// TODO: Request Step 2b: Get vehicle information
return Object.keys(this.state.vehicle).length !== 0 ? (
) : (
);
}
```
# Setting up your backend
Now that our frontend is complete, we will need to create a backend service that contains the logic for the `/exchange` and `/vehicle` endpoints.
You can use any of our backend SDKs below to set up the service starting from the **Obtaining an access token** step.
When setting up the environment variables for your backend SDK, make sure to set `REDIRECT_URI` to the custom scheme
used for this tutorial i.e. `https://javascript-sdk.smartcar.com/v2/redirect?app_origin=http://localhost:3000`.
---
# Source: https://smartcar.com/docs/integrations/webhooks/receiving-webhooks.md
> ## Documentation Index
> Fetch the complete documentation index at: https://smartcar.com/docs/llms.txt
> Use this file to discover all available pages before exploring further.
# Receiving Webhooks
> Set up an endpoint to receive and parse webhook payloads from Smartcar
Learn how to build a basic webhook endpoint that receives, parses, and acknowledges Smartcar webhook deliveries.
**Want to skip the manual setup?**
Deploy a production-ready webhook receiver to AWS in minutes with our [Webhook Receiver Recipe](/getting-started/tutorials/webhook-receiver-recipe). It includes complete serverless infrastructure (Lambda + API Gateway + SQS), built-in signature verification, automatic error handling, and TypeScript type safety.
**Perfect for:** New implementations, AWS environments, or teams wanting to deploy quickly without infrastructure overhead.
## Basic Requirements
Your webhook endpoint must meet these requirements:
* **Accept POST requests** - Smartcar sends all webhooks as HTTP POST requests
* **Return 2xx status code** - Any status code from 200-299 acknowledges successful receipt
* **Use HTTPS** - Your endpoint must use HTTPS with a valid SSL certificate
* **Respond within 15 seconds** - Return a status code before the timeout window
* **Publicly accessible** - Your endpoint must be accessible from the public internet
***
## Quick Start Examples
Here are minimal webhook receivers that handle the required `VERIFY` event and acknowledge all other events:
```javascript Node.js (Express) theme={null}
const express = require('express');
const smartcar = require('smartcar');
const app = express();
app.use(express.json());
app.post('/webhooks/smartcar', (req, res) => {
const { eventType, data } = req.body;
// Handle VERIFY event (required)
if (eventType === 'VERIFY') {
const hmac = smartcar.hashChallenge(
process.env.SMARTCAR_MANAGEMENT_TOKEN,
data.challenge
);
return res.status(200).json({ challenge: hmac });
}
// Log other events
console.log('Received webhook:', eventType);
// Acknowledge receipt
res.status(200).json({ status: 'received' });
// Process asynchronously (recommended)
// processWebhook(req.body);
});
app.listen(3000);
```
```python Python (Flask) theme={null}
from flask import Flask, request, jsonify
import smartcar
import os
app = Flask(__name__)
@app.post('/webhooks/smartcar')
def webhook_handler():
payload = request.get_json()
event_type = payload.get('eventType')
# Handle VERIFY event (required)
if event_type == 'VERIFY':
hmac = smartcar.hash_challenge(
os.environ['SMARTCAR_MANAGEMENT_TOKEN'],
payload['data']['challenge']
)
return jsonify({"challenge": hmac}), 200
# Log other events
print(f"Received webhook: {event_type}")
# Acknowledge receipt
return jsonify({"status": "received"}), 200
# Process asynchronously (recommended)
# process_webhook(payload)
if __name__ == '__main__':
app.run(port=3000)
```
```java Java (Spring Boot) theme={null}
import com.smartcar.sdk.Webhook;
import org.springframework.web.bind.annotation.*;
import org.springframework.http.ResponseEntity;
import java.util.Map;
@RestController
public class WebhookController {
@PostMapping("/webhooks/smartcar")
public ResponseEntity> handleWebhook(
@RequestBody Map payload
) {
String eventType = (String) payload.get("eventType");
// Handle VERIFY event (required)
if ("VERIFY".equals(eventType)) {
Map data = (Map) payload.get("data");
String challenge = (String) data.get("challenge");
String hmac = Webhook.hashChallenge(
System.getenv("SMARTCAR_MANAGEMENT_TOKEN"),
challenge
);
return ResponseEntity.ok(Map.of("challenge", hmac));
}
// Log other events
System.out.println("Received webhook: " + eventType);
// Acknowledge receipt
return ResponseEntity.ok(Map.of("status", "received"));
// Process asynchronously (recommended)
// processWebhook(payload);
}
}
```
```ruby Ruby (Sinatra) theme={null}
require 'sinatra'
require 'smartcar'
require 'json'
post '/webhooks/smartcar' do
payload = JSON.parse(request.body.read)
event_type = payload['eventType']
# Handle VERIFY event (required)
if event_type == 'VERIFY'
hmac = Smartcar.hash_challenge(
ENV['SMARTCAR_MANAGEMENT_TOKEN'],
payload['data']['challenge']
)
status 200
content_type :json
return { challenge: hmac }.to_json
end
# Log other events
puts "Received webhook: #{event_type}"
# Acknowledge receipt
status 200
content_type :json
{ status: 'received' }.to_json
# Process asynchronously (recommended)
# process_webhook(payload)
end
```
**VERIFY event required** - Your endpoint must successfully respond to the `VERIFY` event before Smartcar delivers any vehicle data. See [Callback Verification](/integrations/webhooks/callback-verification) for detailed instructions and troubleshooting.
**Best practice:** Return 200 immediately and process the webhook asynchronously. See [Architecture Best Practices](/integrations/webhooks/best-practices/architecture) for the queue-based pattern.
**Any 2xx works:** You can return 200, 201, 202, 204, or any other 2xx status code. Smartcar treats all 2xx responses as successful delivery.
***
## What Happens After Verification
After your endpoint successfully responds to the `VERIFY` event, Smartcar will begin delivering `VEHICLE_STATE` and `VEHICLE_ERROR` events for [subscribed vehicles](/integrations/webhooks/subscribing-vehicles).
**Understanding payloads:** For detailed payload structure, field definitions, and event-specific schemas, see the [Event Reference Overview](/api-reference/webhooks/events/overview).
***
## Next Steps
**Complete the VERIFY challenge first** - Your endpoint must successfully respond to the `VERIFY` event before Smartcar delivers any vehicle data. See [Handling the VERIFY Event](#handling-the-verify-event) above.
Once your endpoint is verified and receiving webhooks, continue implementing your integration with these guides:
Verify all payloads are authentic using the SC-Signature header
Understand VEHICLE\_STATE, VEHICLE\_ERROR, and VERIFY event structures
Implement idempotency, queuing, monitoring, and error handling
Learn about retry policies, timeouts, and ordering guarantees
***
## FAQ
Your endpoint must successfully respond to the `VERIFY` event before Smartcar delivers any `VEHICLE_STATE` or `VEHICLE_ERROR` events. Check the Dashboard to confirm your webhook shows "Verified" status.
Use [ngrok](https://ngrok.com) or similar to expose your local server:
```bash theme={null}
ngrok http 3000
```
Then use the ngrok URL in Dashboard as your callback URI.
Note that you will have to re-verify the webhook after changing the callback URI.
Always verify the `SC-Signature` header to ensure payloads are authentic. See [Payload Verification](/integrations/webhooks/payload-verification).
No. Return 200 immediately and process asynchronously using a queue. This prevents timeouts and retry storms. See [Architecture Best Practices](/integrations/webhooks/best-practices/architecture).
---
# Source: https://smartcar.com/docs/connect/redirect-to-connect.md
# Source: https://smartcar.com/docs/connect/re-auth/redirect-to-connect.md
> ## Documentation Index
> Fetch the complete documentation index at: https://smartcar.com/docs/llms.txt
> Use this file to discover all available pages before exploring further.
# Redirect to Connect
There will be times when a user updates credentials to their connected services account. When this happens, the user will need to go through Connect
again to update your authorization through Smartcar.
You can do this with a streamlined Connect flow using a special re-auth URL with the parameters below.
Re-authentication is also required when OEMs migrate to new API platforms. See [OEM Migrations and Re-authentication](/connect/re-auth/oem-migrations) to understand when and why these migrations occur, and how to prepare your implementation.
The [`AUTHENTICATION_FAILED`](/errors/api-errors/connected-services-account-errors#authentication-failed) API error contains a partially constructed re-authentication URL in the `resolution.url` field.
The application’s unique identifier.
The URI a user will be redirected to after authorization. This value **must** match one of the redirect URIs set in the credentials tab of the dashboard.
The first redirect URI you add to your application is automatically set as the default. If you do not specify a `redirect_uri` in your Connect URL, Smartcar will use this default URI. You can add multiple URIs and set any of them as the default in the Smartcar Dashboard.
This value must be set to `vehicle_id`.
The id of the vehicle you are reauthenticating.
An optional value included as a query parameter in the redirect\_uri back to your application. This value is often used to identify a user and/or prevent cross-site request forgery
Specify a unique identifier for the vehicle owner to track and aggregate analytics across Connect sessions for each vehicle owner on Dashboard.
Note: Use the `state` parameter in order to identify the user at your callback URI when receiving an authorization or error code after the user exits the Connect flow.
```http Connect URL Example theme={null}
HTTP/1.1 302 Found
Location: https://connect.smartcar.com/oauth/reauthenticate?
response_type=vehicle_id
&client_id=8229df9f-91a0-4ff0-a1ae-a1f38ee24d07
&vehicle_id=sc4a1b01e5-0497-417c-a30e-6df6ba33ba46
&redirect_uri=https://example.com/home
&state=0facda3319
```
---
# Source: https://smartcar.com/docs/api-reference/authorization/refreshing-access-token.md
> ## Documentation Index
> Fetch the complete documentation index at: https://smartcar.com/docs/llms.txt
> Use this file to discover all available pages before exploring further.
# Refreshing Access Tokens
> Your access token will expire **2 hours** after it is issued. When this happens, your application can retrieve a new one by using the corresponding `refresh_token` without requiring the user to re-authenticate.
A refresh token is invalidated 10 minutes after use. If your first attempt at refreshing tokens fails, ensure you retry within 10 minutes.
Please ensure you're persisting **both the newly minted access and refresh token**. Failure to do so will require the user to authenticate again after the access token has expired.
## Request
**Headers**
Must be set to `application/x-www-form-urlencoded`, matching the format of the request body.
A valid HTTP User Agent value. This value is typically included in the HTTP requests by the client that is making the request. You usually don't have to set this manually.
**Body**
This value must be set to `refresh_token`
The refresh token received in the response with the access token from an [auth code exchange](/api-reference/authorization/auth-code-exchange)
or prior token refresh.
**Response**
---
# Source: https://smartcar.com/docs/help/reliability-and-freshness.md
> ## Documentation Index
> Fetch the complete documentation index at: https://smartcar.com/docs/llms.txt
> Use this file to discover all available pages before exploring further.
# Reliability
> When making requests to vehicles, there is variation in how often data is updated and how many requests it can process in a given period. The tables below indicate the performance for each of Smartcar supported brands in each region.
**Data Reliability**
This ranking represents how reliably the vehicle or OEM processes data requests. A rank of 1 indicates the highest reliability.
**Command Reliability**
This ranking measures the effectiveness with which the vehicle or OEM handles command requests. A score of 1 reflects the most reliable command execution. N/A means there is not enough data to provide a score.
***
## United States
|
|
| -------------------------------------- | ------------------------------------------------- | ---------------------------------------------------- |
| ALFA ROMEO | 1 | N/A |
| AUDI | 1 | 1 |
| BMW | 1 | 1 |
| BYD | 1 | N/A |
| CITROEN | 1 | 1 |
| CUPRA | 1 | 1 |
| DACIA | 1 | 1 |
| DS | 1 | N/A |
| FIAT | 1 | 1 |
| FORD | 2 | 3 |
| HYUNDAI | 1 | 2 |
| JAGUAR | 1 | 3 |
| JEEP | 1 | N/A |
| KIA | 1 | 1 |
| LAND ROVER | 1 | N/A |
| MAZDA | 1 | 1 |
| MERCEDES BENZ | 1 | 1 |
| MG | 1 | 1 |
| MINI | 1 | 1 |
| NISSAN | 1 | 3 |
| OPEL | 1 | 1 |
| PEUGEOT | 1 | 1 |
| PORSCHE | 1 | 3 |
| POLESTAR | 1 | N/A |
| RENAULT | 1 | 1 |
| SKODA | 1 | 1 |
| TESLA | 1 | 2 |
| VAUXHALL | 1 | N/A |
| VOLKSWAGEN | 1 | 2 |
| VOLVO | 1 | 1 |
Last Updated: November 12, 2025
---
# Source: https://smartcar.com/docs/integrations/webhooks/best-practices/reliability.md
> ## Documentation Index
> Fetch the complete documentation index at: https://smartcar.com/docs/llms.txt
> Use this file to discover all available pages before exploring further.
# Reliability
> Build resilient webhook processing that handles retries and out-of-order delivery
Design your webhook integration to handle the realities of distributed systems: retries, out-of-order delivery, and duplicate events.
## Implement Idempotency
Use the `eventId` field to ensure you process each event exactly once, even if Smartcar retries delivery or you reprocess from your queue.
### Why Idempotency Matters
* Smartcar retries failed deliveries with the same `eventId`
* Your queue worker might process the same message multiple times
* Prevents duplicate database updates or notifications
* Enables safe reprocessing of historical events
### Implementation Strategies
```python theme={null}
import redis
redis_client = redis.Redis()
def process_webhook(payload):
event_id = payload.get("eventId")
# Check if already processed
if redis_client.exists(f"processed:{event_id}"):
print(f"Already processed {event_id}, skipping")
return
# Process the event
process_vehicle_data(payload)
# Mark as processed (expires after 7 days)
redis_client.setex(
f"processed:{event_id}",
time=604800, # 7 days
value="1"
)
```
```javascript theme={null}
const processWebhook = async (payload) => {
const { eventId } = payload;
// Check if already processed
const existing = await dynamodb.get({
TableName: 'ProcessedEvents',
Key: { eventId }
}).promise();
if (existing.Item) {
console.log(`Already processed ${eventId}, skipping`);
return;
}
// Process the event
await processVehicleData(payload);
// Mark as processed with TTL
await dynamodb.put({
TableName: 'ProcessedEvents',
Item: {
eventId,
processedAt: new Date().toISOString(),
ttl: Math.floor(Date.now() / 1000) + 604800 // 7 days
}
}).promise();
};
```
```python theme={null}
def process_webhook(payload):
event_id = payload.get("eventId")
# Use unique constraint to prevent duplicates
try:
db.execute(
"INSERT INTO processed_events (event_id, processed_at) VALUES (%s, NOW())",
(event_id,)
)
except IntegrityError:
# Already processed
print(f"Already processed {event_id}, skipping")
return
# Process the event
process_vehicle_data(payload)
```
```sql theme={null}
-- Table schema
CREATE TABLE processed_events (
event_id VARCHAR(255) PRIMARY KEY,
processed_at TIMESTAMP NOT NULL
);
-- Add TTL-style cleanup (run periodically)
DELETE FROM processed_events
WHERE processed_at < NOW() - INTERVAL '7 days';
```
**Retention period:** Store processed `eventId` values for at least 7 days to handle all retries and late reprocessing scenarios.
***
## Handle Out-of-Order Delivery
Webhook events are delivered **concurrently** and may arrive out of order. Never assume events arrive in chronological sequence.
### Use Timestamps for Freshness
Always check if incoming data is newer than your current stored state:
```python theme={null}
def update_vehicle_state(payload):
vehicle_id = payload.get("vehicleId")
delivered_at = payload["meta"]["deliveredAt"]
# Get current stored state
current = db.get_vehicle_state(vehicle_id)
# Only update if this event is newer
if current and current.updated_at > delivered_at:
print(f"Ignoring older event for {vehicle_id}")
return
# Safe to update
db.update_vehicle_state(vehicle_id, payload["data"], delivered_at)
```
### Why Order Matters
Events sent at different times may experience different network latencies, causing them to arrive out of sequence.
If an older event fails initially and is retried later, it might arrive after newer events that succeeded on first attempt.
Smartcar delivers events concurrently for performance. Events sent milliseconds apart might arrive in reverse order.
### Timestamp-Based Updates
```python Python theme={null}
def update_signal_value(vehicle_id, signal_path, value, timestamp):
"""Update signal only if timestamp is newer"""
with db.transaction():
current = db.query(
"SELECT value, updated_at FROM signals WHERE vehicle_id = %s AND path = %s",
(vehicle_id, signal_path)
)
if current and current['updated_at'] >= timestamp:
# Existing value is newer or same age
return False
# Update with newer value
db.execute(
"INSERT INTO signals (vehicle_id, path, value, updated_at) VALUES (%s, %s, %s, %s) ON CONFLICT (vehicle_id, path) DO UPDATE SET value = EXCLUDED.value, updated_at = EXCLUDED.updated_at WHERE signals.updated_at < EXCLUDED.updated_at",
(vehicle_id, signal_path, value, timestamp)
)
return True
```
```javascript Node.js theme={null}
async function updateSignalValue(vehicleId, signalPath, value, timestamp) {
// Conditional update: only if timestamp is newer
const result = await db.query(`
UPDATE signals
SET value = $1, updated_at = $2
WHERE vehicle_id = $3
AND path = $4
AND (updated_at < $2 OR updated_at IS NULL)
RETURNING *
`, [value, timestamp, vehicleId, signalPath]);
return result.rowCount > 0;
}
```
***
## Handle Retries Gracefully
Smartcar automatically retries failed deliveries up to 3 times with exponential backoff.
### Retry Identification
Each delivery attempt receives a unique `deliveryId`, but the `eventId` remains constant:
```json theme={null}
{
"eventId": "abc-123", // Same across all retries
"meta": {
"deliveryId": "xyz-789", // Unique per attempt
"deliveredAt": "2025-01-15T10:30:45Z"
}
}
```
### Processing Strategy
Use idempotency check to skip already-processed events
Perform your business logic
Store the eventId to prevent reprocessing
Acknowledge successful processing
**Don't trigger retries manually.** If you return a 2xx status code and then discover an issue, you cannot ask Smartcar to retry. The delivery is considered successful.
***
## Transactional Processing
Ensure database updates and idempotency tracking happen atomically:
```javascript Node.js (PostgreSQL) theme={null}
async function processWebhook(payload) {
const { eventId } = payload;
const client = await pool.connect();
try {
await client.query('BEGIN');
// Try to insert processed event
const result = await client.query(
`INSERT INTO processed_events (event_id, processed_at)
VALUES ($1, NOW())
ON CONFLICT (event_id) DO NOTHING
RETURNING event_id`,
[eventId]
);
if (result.rowCount === 0) {
// Already processed
await client.query('ROLLBACK');
return;
}
// Process within same transaction
await updateVehicleData(client, payload);
await sendNotifications(client, payload);
await client.query('COMMIT');
} catch (error) {
await client.query('ROLLBACK');
throw error;
} finally {
client.release();
}
}
```
```python Python (PostgreSQL) theme={null}
def process_webhook(payload):
event_id = payload.get("eventId")
with db.transaction():
# Check and mark as processed in one transaction
result = db.execute(
"""
INSERT INTO processed_events (event_id, processed_at)
VALUES (%s, NOW())
ON CONFLICT (event_id) DO NOTHING
RETURNING event_id
""",
(event_id,)
)
if not result:
# Already processed in another transaction
return
# Process within same transaction
update_vehicle_data(payload)
send_notifications(payload)
# Both updates committed together
```
***
## Recovery Strategies
### Dead Letter Queue
Route persistently failing events to a dead letter queue for manual investigation:
```javascript theme={null}
async function processWebhook(payload) {
const maxRetries = 3;
let retryCount = 0;
while (retryCount < maxRetries) {
try {
await doProcessing(payload);
return; // Success
} catch (error) {
retryCount++;
if (retryCount >= maxRetries) {
// Move to DLQ
await dlq.send({
payload,
error: error.message,
attempts: retryCount
});
} else {
// Wait before retry
await sleep(Math.pow(2, retryCount) * 1000);
}
}
}
}
```
### Circuit Breaker
Stop processing if downstream dependencies are failing:
```python theme={null}
class CircuitBreaker:
def __init__(self, failure_threshold=5):
self.failure_count = 0
self.failure_threshold = failure_threshold
self.is_open = False
self.last_failure_time = None
def call(self, func, *args):
if self.is_open:
# Check if we should try again
if time.time() - self.last_failure_time > 60:
self.is_open = False
self.failure_count = 0
else:
raise Exception("Circuit breaker is open")
try:
result = func(*args)
self.failure_count = 0
return result
except Exception as e:
self.failure_count += 1
self.last_failure_time = time.time()
if self.failure_count >= self.failure_threshold:
self.is_open = True
raise e
# Usage
breaker = CircuitBreaker()
def process_webhook(payload):
try:
breaker.call(update_database, payload)
except Exception:
# Return 503 to trigger Smartcar retry later
return {"error": "Service unavailable"}, 503
```
***
## Next Steps
Track idempotency hits and processing failures
Handle error notifications and resolution tracking
Understanding retry policies
Test retry scenarios
---
# Source: https://smartcar.com/docs/help/research-fleet.md
> ## Documentation Index
> Fetch the complete documentation index at: https://smartcar.com/docs/llms.txt
> Use this file to discover all available pages before exploring further.
# Join the Research Fleet
Smartcar is the easiest way to integrate apps with cars, funded by [a16z](https://a16z.com/), [NEA](https://www.nea.com/) and [Energize Capital](https://www.energizecap.com/).\
We enable companies like [Uber](https://smartcar.com/blog/uber), [Lyft](https://smartcar.com/blog/lyft), [Emulate](https://smartcar.com/blog/emulate), [Bluewave](https://smartcar.com/blog/bluwave-ai), [Neowatt](https://smartcar.com/blog/revenue-for-energy-retailers), and [more](https://smartcar.com/customers) to monitor a car's battery state of charge, verify mileage, manage EV charging, and much more.
We are always expanding to new makes and models of cars and we'd love your help!
## What are we asking for?
Building and maintaining our APIs is a complex endeavor. Smartcar operates a research fleet of vehicles across brands, models, and geographies to ensure we can provide the best product possible. **This is where you come in**. We'd like your help with understanding real-world vehicle behaviors with your car and improve the quality of our platform. Understanding things like:
* Does your car’s odometer update in real-time?
* What's the amount of fuel/battery your car has remaining?
* What data and remote actions are available for your specific car's brand, model, year?
## Perks of being part of the Research Fleet
* 💰 You will receive \$250 for the 6 months that your car is part of the fleet
* 🧥 Smartcar swag
* 🙋 Assistance setting up your car's connected services
## Sign up
## FAQs
The Smartcar team will schedule a check to be sent to your preferred address if your car is verified to be eligible for the Smartcar Research Fleet.
Smartcar will use your vehicle to retrieve and verify key data points such as your odometer and fuel tank/battery level. The team will inform you of all data and actions they will retrieve from your vehicle and the schedule at which they will be performing the verification. No action will be perfomed remotely without your permission.
You may opt-out at any point without any explanation. We simply ask that you give us a heads up that you no longer wish to participate by reaching out to [support@smartcar.com](mailto:support@smartcar.com).
---
# Source: https://smartcar.com/docs/errors/api-errors/resource-not-found-errors.md
> ## Documentation Index
> Fetch the complete documentation index at: https://smartcar.com/docs/llms.txt
> Use this file to discover all available pages before exploring further.
# Resource Not Found
> Thrown when the incorrect API version is used or when the endpoint URL is incorrect.
# `PATH`
The requested resource does not exist. Please check the URL and try again.
```json theme={null}
{
"type": "RESOURCE_NOT_FOUND",
"code": "PATH",
"description": "The requested resource does not exist. Please check the URL and try again.",
"docURL": "https://smartcar.com/docs/errors/api-errors/resource-errors#pathh",
"statusCode": 404,
"requestId": "5dea93a1-3f79-4246-90c5-89610a20471b",
"resolution": { "type": null },
"suggestedUserMessage": "Your vehicle is temporarily unable to connect to . Please be patient while we’re working to resolve this issue."
}
```
### Suggested Resolution
You can resolve this error by referring to our API reference and ensuring that you use the correct URL for your request.
### Troubleshooting Steps
* Ensure that you spell all static parts of the URL correctly.
* Ensure that you use the correct URL path parameters (e.g. vehicle ID).
* Ensure that you use the correct HTTP method.
***
# `VERSION`
The requested resource does not exist. Your request either does not specify a version number or it specifies a version number that is not supported by this resource.
```json theme={null}
{
"type": "RESOURCE_NOT_FOUND",
"code": "VERSION",
"description": "The requested resource does not exist. Please check your specified version number and try again.",
"docURL": "https://smartcar.com/docs/errors/api-errors/resource-errors#version",
"statusCode": 404,
"requestId": "5dea93a1-3f79-4246-90c5-89610a20471b",
"resolution": { "type": null },
"suggestedUserMessage": "Your vehicle is temporarily unable to connect to . Please be patient while we’re working to resolve this issue."
}
```
### Suggested Resolution
You can resolve this error by referring to our API reference and ensuring that you specify v2.0 in the URL path (e.g. `https://api.smartcar.com/v2.0/vehicles`). Version 1 has been sunset and is no longer supported.
---
# Source: https://smartcar.com/docs/integrations/webhooks/responses.md
# Webhook Response Payloads
> Receive a seamless data stream from your vehicles via webhooks with optimized vehicle updates, ensuring you always have the most current information available for all of your vehicles.
## Vehicle State
When a vehicle is first subscribed to a webhook, Smartcar will send an initial payload that attempts to get all the signals you're subscribed to for that vehicle with a `VEHICLE_STATE` type. Subsequent events will contain a payload with the same event type but only the relevant signals based on your webhook configuration. (i.e, when a signal changes, on a schedule, etc.)
Vehicle state payloads will contain the following object types for the `triggers` array:
* `SIGNAL_UPDATED`: indicates that a signal value has changed since the last payload was sent. The `signal` object will contain the `code` of the signal that was updated.
* `FIRST_DELIVERY`: indicates that this is the first payload sent for this vehicle. This trigger will only be present in the initial payload sent when a vehicle is first subscribed to a webhook, unsubscribed and then resubscribed to your webhook, or if your application is not responding with a 200 status code, we will attempt to deliver this webhook again.
If you request a signal as part of your webhook payload data that the vehicle is not capable of, Smartcar will still include it in the `VEHICLE_STATE` payload, but the signal will contain an error object instead of data as shown in the example below.
```json theme={null}
{
"eventId": "5a537912-9ad3-424b-ba33-65a1704567e9",
"eventType": "VEHICLE_STATE",
"data": {
"user": {
"id": "93b3ea96-ca37-43a9-9073-f4334712dbc7"
},
"vehicle": {
"id": "123e4567-e89b-12d3-a456-426614174000",
"make": "Test Make",
"model": "Test Model",
"year": 2020
},
"signals": [
{
"code": "location-preciselocation",
"name": "PreciseLocation",
"group": "Location",
"body": {
"latitude": 37.7749,
"longitude": -122.4194
},
"status": {
"value": "SUCCESS"
},
"meta": {
"retrievedAt": 1758668712404,
"oemUpdatedAt": 1758668712404
}
},
{
"code": "location-isathome",
"name": "IsAtHome",
"group": "Location",
"status": {
"error": {
"code": "VEHICLE_NOT_CAPABLE",
"type": "COMPATIBILITY"
},
"value": "ERROR"
}
},
{
"code": "tractionbattery-stateofcharge",
"name": "StateOfCharge",
"group": "TractionBattery",
"body": {
"unit": "percent",
"value": 75
},
"status": {
"value": "SUCCESS"
},
"meta": {
"retrievedAt": 1758668712404,
"oemUpdatedAt": 1758668712404
}
}
]
},
"triggers": [
{
"type": "SIGNAL_UPDATED",
"signal": {
"name": "StateOfCharge",
"group": "TractionBattery",
"code": "tractionbattery-stateofcharge"
}
}
],
"meta": {
"version": "4.0",
"deliveryId": "48b25f8f-9fea-42e1-9085-81043682cbb8",
"deliveredAt": 1761896351529,
"webhookId": "123e4567-e89b-12d3-a456-426614174000",
"webhookName": "My First Webhook",
"signalCount": 3,
"mode": "LIVE"
}
}
```
For each signal, you will have a `meta` object that contains the following fields:
* `retrievedAt`: The timestamp (in milliseconds since epoch) of when the data was retrieved from the vehicle by Smartcar.
* `oemUpdatedAt`: The timestamp (in milliseconds since epoch) of when the data was last recorder by the vehicle.
You'll also see a `code` with the unique signal code that can be used to retrieve that signal from the API by calling the [`GET` Signal endpoint](/api-reference/get-signal).
The `name` and `group` fields correspond to the signal's name and group respectively as defined in the [Signal Schema](/api-reference/signals/schema).
## Vehicle connection or compatibility issues
There may be times when Smartcar is unable to get vehicle data because there is
an issue with our connection to the vehicle that requires vehicle owner
interaction, or because the subscribed vehicle does not support some of the signals you have configured.
Smartcar will allow you to subscribe any vehicle to your webhook. When processing
the initial payload, we will report compatibility issues to your error callback
URI. For example, if a vehicle is not capable of the `nickname` signal we would
send data for other signals as normal, but send the following payload for the `nickname` signal instead.
When either of these happens, we'll send a `VEHICLE_ERROR` payload to your vehicle error callback URI. If you don't specify a callback URI for errors, Smartcar will send them to the same vehicle data callback URI.
For a list of possible errors, please refer to the [API Errors](/errors/api-errors) section.
```json theme={null}
{
"eventId": "5a537912-9ad3-424b-ba33-65a1704567e9",
"eventType": "VEHICLE_ERROR",
"data": {
"user": {
"id": "93b3ea96-ca37-43a9-9073-f4334719iok7"
},
"errors": [
{
"type": "COMPATIBILITY",
"code": "VEHICLE_NOT_CAPABLE",
"state": "ERROR",
"description": "The vehicle is incapable of performing your request.",
"suggestedUserMessage": "Your car is unable to perform this request.",
"docURL": "https://smartcar.com/docs/errors/api-errors/compatibility-errors#vehicle-not-capable",
"resolution": {
"type": "CONTACT_SUPPORT"
},
"signals": [
{
"code": "location-preciselocation",
"name": "PreciseLocation",
"group": "Location"
},
{
"code": "tractionbattery-stateofcharge",
"name": "StateOfCharge",
"group": "TractionBattery"
}
]
}
],
"vehicle": {
"id": "123e4567-e89b-12d3-a456-426614174000",
"make": "TESLA",
"model": "Model 3",
"year": 2020
}
},
"meta": {
"version": "4.0",
"deliveryId": "48b25f8f-9fea-42e1-9085-81043682cbb8",
"deliveredAt": 1761896351529,
"webhookId": "123e4567-e89b-12d3-a456-426614174000",
"webhookName": "Bad Webhook",
"mode": "LIVE"
}
}
```
While a vehicle is in one of these states, you may be unable to receive data from the
vehicle until the owner has taken the necessary steps to re-establish
the connection.
Upon resolution of the issue, Smartcar will send another payload to your error callback URI with `state`
set to `RESOLVED`. If you don't specify a callback URI for errors, Smartcar will send them to the same vehicle data callback URI.
---
# Source: https://smartcar.com/docs/errors/connect-errors/returned-to-application.md
> ## Documentation Index
> Fetch the complete documentation index at: https://smartcar.com/docs/llms.txt
> Use this file to discover all available pages before exploring further.
# User returned to application
> This error occurs when a user leaves the Connect flow after hitting **Back to application** before granting your application access to their vehicle.
| Parameter | Required | Description |
| ------------------- | -------- | --------------------------------------------------------------- |
| `error` | `true` | `user_manually_returned_to_application` |
| `error_description` | `true` | The user exited Connect before granting your application access |
There are cases where a user may wish to exit Connect before granting your application access to their vehicle. In these cases, if the user hits **Back to application** instead of closing out the window, Smartcar will return this error to your callback URI. Below are places in the Connect flow users can return to your application.
---
# Source: https://smartcar.com/docs/connect/other-actions/rivian-bluetooth-pairing.md
> ## Documentation Index
> Fetch the complete documentation index at: https://smartcar.com/docs/llms.txt
> Use this file to discover all available pages before exploring further.
# Rivian Bluetooth Pairing
> To support vehicle commands such as lock/unlock or start/stop charge, Rivian requires a mobile device to be paired via Bluetooth with the vehicle.
If permissions for commands are requested in your Connect URL (i.e. `control_security`, `control_charge`), Rivian owners will be prompted to pair their phone to the vehicle to complete the connection. After successful login, users will see a list of vehicles within their Rivian account to pair to. It is important that the mobile phone has Bluetooth enabled at this time.
After selecting the vehicle, the user will be prompted to tap “Set up now” on the Rivian vehicle’s display and follow any on-screen prompts to connect.
Once setup is complete, the application will be able to issue commands to the Rivian vehicle.
Should Bluetooth be disabled or the Rivian display prompts not followed, the Bluetooth connection will not be established and the vehicle will not be connected to your application.
## Notes
* Rivian vehicles must be paired via Bluetooth to support commands. Data permissions (i.e. `read_location`, `read_charge`) do not require Bluetooth pairing.
* The following commands are supported for Rivian vehicles: lock/unlock, start/stop charge, and set charge limit.
* If a user has multiple Rivian vehicles, they will be prompted to pair each vehicle that they wish to connect to your application.
* At least one vehicle must be paired via Bluetooth to complete the pairing process before the user can continue with the Connect flow and connect their Rivian to your application.
* If there are multiple drivers associated with a Rivian account and both drivers want to connect to your application, each driver must pair their mobile device to the vehicle via Bluetooth.
* There is a limit of four devices that can be paired to a Rivian vehicle at one time. If a user has already paired four devices to their Rivian, they will need to unpair one of the existing devices from the vehicle before they can pair their mobile device and complete the connection to your application.
* Smartcar mobile SDKs for iOS and Android are required to pair the vehicle via Bluetooth.
---
# Source: https://smartcar.com/docs/api-reference/signals/schema.md
> ## Documentation Index
> Fetch the complete documentation index at: https://smartcar.com/docs/llms.txt
> Use this file to discover all available pages before exploring further.
# Smartcar Signals & Attributes Overview
> Smartcar's standard list of vehicle signals and attributes across all compatible OEMs.
Below are the list of signals and attributes supported by Smartcar.
## Attributes
Attributes are static vehicle data that typically does not change in value.
* [Surveillance](/api-reference/signals/surveillance)
* [VehicleIdentification](/api-reference/signals/vehicleidentification)
* [Wheel](/api-reference/signals/wheel)
## Signals
With Smartcar you can configure your application to receive a webhook when the value of any of these signals change. Some change more frequently than others.
Below you will find the signal groups and their respective signals. Each signal has a code that you can use to [request the latest value](/api-reference/get-the-values-for-an-individual-signal) for that signal.
* [Charge](/api-reference/signals/charge)
* [Climate](/api-reference/signals/climate)
* [Closure](/api-reference/signals/closure)
* [ConnectivitySoftware](/api-reference/signals/connectivitysoftware)
* [ConnectivityStatus](/api-reference/signals/connectivitystatus)
* [Diagnostics](/api-reference/signals/diagnostics)
* [HVAC](/api-reference/signals/hvac)
* [InternalCombustionEngine](/api-reference/signals/internalcombustionengine)
* [Location](/api-reference/signals/location)
* [LowVoltageBattery](/api-reference/signals/lowvoltagebattery)
* [Motion](/api-reference/signals/motion)
* [Odometer](/api-reference/signals/odometer)
* [Service](/api-reference/signals/service)
* [Surveillance](/api-reference/signals/surveillance)
* [TractionBattery](/api-reference/signals/tractionbattery)
* [Transmission](/api-reference/signals/transmission)
* [VehicleIdentification](/api-reference/signals/vehicleidentification)
* [VehicleUserAccount](/api-reference/signals/vehicleuseraccount)
* [Wheel](/api-reference/signals/wheel)
***
## Next Steps
Now that you know what vehicle data is available, learn how to receive it in your application:
Real-time vehicle data pushed to your application
Request vehicle data on-demand via HTTP requests
Compare webhooks vs REST API to choose the right approach
See which vehicles support specific signals
---
# Source: https://smartcar.com/docs/integrations/webhooks/best-practices/security.md
> ## Documentation Index
> Fetch the complete documentation index at: https://smartcar.com/docs/llms.txt
> Use this file to discover all available pages before exploring further.
# Security
> Protect your webhook endpoint from spoofed and malicious requests
Always verify that webhook payloads actually came from Smartcar before processing them.
## Verify Payload Signatures
Every webhook payload includes an `SC-Signature` header containing an HMAC-SHA256 signature. **Always verify this signature** before processing the payload.
### How It Works
1. Smartcar creates an HMAC-SHA256 hash of the payload using your Application Management Token as the secret key
2. The hash is sent in the `SC-Signature` header
3. You recreate the hash using the same secret and compare it to the received signature
4. If they match, the payload is authentic
### Implementation
```javascript Node.js theme={null}
const crypto = require('crypto');
function verifySignature(payload, signature, managementToken) {
// Create HMAC hash
const hmac = crypto
.createHmac('sha256', managementToken)
.update(payload)
.digest('hex');
// Use timingSafeEqual to prevent timing attacks
return crypto.timingSafeEqual(
Buffer.from(hmac),
Buffer.from(signature)
);
}
app.post('/webhooks/smartcar', express.raw({ type: 'application/json' }), (req, res) => {
// Get signature from header
const signature = req.headers['sc-signature'];
// Get raw body
const rawBody = req.body.toString();
// Verify before processing
if (!verifySignature(rawBody, signature, MANAGEMENT_TOKEN)) {
return res.status(401).json({ error: 'Invalid signature' });
}
// Safe to process
const payload = JSON.parse(rawBody);
processWebhook(payload);
res.status(200).json({ status: 'received' });
});
```
```python Python theme={null}
import hmac
import hashlib
def verify_signature(payload, signature, management_token):
"""Verify webhook payload authenticity"""
expected = hmac.new(
management_token.encode(),
payload.encode(),
hashlib.sha256
).hexdigest()
# Use compare_digest to prevent timing attacks
return hmac.compare_digest(expected, signature)
@app.post("/webhooks/smartcar")
def webhook_handler():
# Get signature from header
signature = request.headers.get('SC-Signature')
# Get raw body (before JSON parsing)
raw_body = request.data.decode('utf-8')
# Verify before processing
if not verify_signature(raw_body, signature, MANAGEMENT_TOKEN):
return {"error": "Invalid signature"}, 401
# Safe to process
payload = request.get_json()
process_webhook(payload)
return {"status": "received"}, 200
```
```java Java theme={null}
import javax.crypto.Mac;
import javax.crypto.spec.SecretKeySpec;
import java.security.MessageDigest;
public class WebhookSecurity {
public static boolean verifySignature(
String payload,
String signature,
String managementToken
) throws Exception {
// Create HMAC
Mac hmac = Mac.getInstance("HmacSHA256");
SecretKeySpec secretKey = new SecretKeySpec(
managementToken.getBytes(),
"HmacSHA256"
);
hmac.init(secretKey);
// Generate hash
byte[] hash = hmac.doFinal(payload.getBytes());
String expected = bytesToHex(hash);
// Compare securely
return MessageDigest.isEqual(
expected.getBytes(),
signature.getBytes()
);
}
private static String bytesToHex(byte[] bytes) {
StringBuilder result = new StringBuilder();
for (byte b : bytes) {
result.append(String.format("%02x", b));
}
return result.toString();
}
}
```
**Critical:** You must verify the signature against the raw request body, **before** parsing it as JSON. Many frameworks automatically parse JSON, which can alter the body and break signature verification.
***
## Why Signature Verification Matters
Without verification, anyone could send fake webhook payloads to your endpoint. Signature verification proves the payload came from Smartcar.
While signatures don't prevent replays alone, combining them with `eventId` deduplication creates a complete defense.
If the payload is tampered with in transit, the signature won't match, alerting you to the modification.
Many security standards and regulations require verification of external data sources.
***
## Additional Security Measures
### Use HTTPS Only
Smartcar only delivers webhooks to HTTPS endpoints with valid SSL certificates.
**Required:** Your callback URL must use HTTPS with a valid, trusted SSL certificate. Self-signed certificates are not supported.
### Restrict Access by IP (Optional)
While Smartcar doesn't publish a fixed IP range (addresses may change), you can add an extra layer of security by:
1. Logging all webhook source IPs
2. Alerting on unusual source addresses
3. Rate limiting by IP to prevent abuse
**Don't rely on IP filtering alone.** Signature verification is the primary security mechanism. IP-based restrictions should be supplementary.
### Rotate Management Tokens Periodically
Your Application Management Token is used to verify webhook signatures. Rotate it periodically for security:
Create a new Application Management Token in the Dashboard
Deploy code that accepts either the old or new token temporarily
Once deployed, switch Dashboard to use the new token
After confirming all webhooks use the new token, remove old token support
### Monitor Failed Verifications
Track and alert on signature verification failures:
```python theme={null}
@app.post("/webhooks/smartcar")
def webhook_handler():
signature = request.headers.get('SC-Signature')
raw_body = request.data.decode('utf-8')
if not verify_signature(raw_body, signature, MANAGEMENT_TOKEN):
# Log the failure
logger.warning(
"Invalid webhook signature",
extra={
"source_ip": request.remote_addr,
"signature": signature,
"payload_size": len(raw_body)
}
)
# Alert if threshold exceeded
if recent_failures_count() > 10:
send_security_alert("High rate of invalid webhook signatures")
return {"error": "Invalid signature"}, 401
```
***
## Using SDK Helpers
Smartcar's SDKs provide built-in methods for signature verification:
```javascript Node.js SDK theme={null}
const smartcar = require('smartcar');
// Verify signature
const isValid = smartcar.verifyPayload(
managementToken,
signature,
rawBody
);
```
```python Python SDK theme={null}
import smartcar
# Verify signature
is_valid = smartcar.verify_payload(
management_token,
signature,
raw_body
)
```
```java Java SDK theme={null}
import com.smartcar.sdk.Smartcar;
// Verify signature
boolean isValid = Smartcar.verifyPayload(
managementToken,
signature,
rawBody
);
```
***
## Next Steps
Complete implementation details
Implement idempotency
Track verification failures
Design secure webhook handlers
---
# Source: https://smartcar.com/docs/api-reference/send-destination-to-vehicle.md
> ## Documentation Index
> Fetch the complete documentation index at: https://smartcar.com/docs/llms.txt
> Use this file to discover all available pages before exploring further.
# Send Destination
> Send destination coordinates to the vehicle's navigation system.
2.0 is still the only supported version for sending remote commands. If you need to send commands, please continue using v2.0 until commands are supported in the latest version later this year.
## Permission
`control_navigation`
## Request
**Path**
**Body**
The latitude of the location you wish to set the vehicle's navigation to.
The longitude of the location you wish to set the vehicle's navigation to.
## Response
If the request is successful, Smartcar will return “success” (HTTP 200 status).
If the request is successful, Smartcar will return a message (HTTP 200 status).
```json Example Response theme={null}
{
"message": "Successfully sent request to vehicle",
"status": "success"
}
```
---
# Source: https://smartcar.com/docs/errors/connect-errors/server-error.md
> ## Documentation Index
> Fetch the complete documentation index at: https://smartcar.com/docs/llms.txt
> Use this file to discover all available pages before exploring further.
# Server
> If there is a server error, the user will return to your application.
| Parameter | Required | Description |
| ------------------ | -------- | ------------------------------------------ |
| error | true | server\_error |
| error\_description | true | Unexpected server error. Please try again. |
```http Example redirect uri theme={null}
HTTP/1.1 302 Found
Location: https://example.com/callback
?error=configuration_error
&error_description=There%20has%20been%20an%20error%20in%20the%20configuration%20of%20your%20application.&status_code=400
&error_message=You%20have%20entered%20a%20test%20mode%20VIN.%20Please%20enter%20a%20VIN%20that%20belongs%20to%20a%20real%20vehicle.
```
We only show the “Exit” button if a redirect URI is available. If there is a failure before the validation of the redirect URI, we are unable to include the “Exit” button on the Error page. In those cases, we would not be able to report the `status_code` and `error_message` back to the developer, but they will still be available on screen in the Error page.
---
# Source: https://smartcar.com/docs/errors/api-errors/server-errors.md
> ## Documentation Index
> Fetch the complete documentation index at: https://smartcar.com/docs/llms.txt
> Use this file to discover all available pages before exploring further.
# Server Errors
> Thrown when Smartcar runs into an unexpected issue and was unable to process the request.
# `INTERNAL`
An internal Smartcar error has occurred. Our team has been notified and is working to resolve this issue.
```json theme={null}
{
"type": "SERVER",
"code": "INTERNAL",
"description": "An internal Smartcar error has occurred. Our team has been notified and is working to resolve this issue.",
"docURL": "https://smartcar.com/docs/errors/api-errors/server-errors#internal",
"statusCode": 500,
"requestId": "5dea93a1-3f79-4246-90c5-89610a20471b",
"resolution": { "type": "RETRY_LATER" },
"suggestedUserMessage": "Your car is temporarily unable to connect to . Please be patient while we’re working to resolve this issue."
}
```
### Suggested Resolution
Please contact us to learn more about the error and our steps to resolve it.
### Suggested User Message
> Your car is temporarily unable to connect to \. Please be patient while we’re working to resolve this issue.
***
# `RECORD_NOT_FOUND`
Smartcar is unable to locate a battery capacity record for this vehicle. Depending on the make of the vehicle, battery capacity may depend on upstream sources to fulfil a request if it is not directly provided by the OEM.
If you’re seeing this error then the OEM doesn’t provide all the data we aim to provide in our response and we were unable to locate this information from other sources.
```json theme={null}
{
"type": "SERVER",
"code": "RECORD_NOT_FOUND",
"description": "Smartcar was unable to locate a battery capacity record for this vehicle.",
"docURL": "https://smartcar.com/docs/errors/api-errors/server-errors#record-not-found",
"statusCode": 500,
"requestId": "5dea93a1-3f79-4246-90c5-89610a20471b",
"resolution": { "type": "CONTACT_SUPPORT" },
"suggestedUserMessage": "Your car is temporarily unable to connect to . Please be patient while we’re working to resolve this issue."
}
```
### Suggested Resolution
Please reach out to support to see if we are able to update capacity data for the vehicle.
### Suggested User Message
> Your car is temporarily unable to connect to \. Please be patient while we’re working to resolve this issue.
***
# `MULTIPLE_RECORDS_FOUND`
Smartcar is unable to locate a battery capacity record for this vehicle. Depending on the make of the vehicle, battery capacity may depend on upstream sources to fulfil a request if it is not directly provided by the OEM.
If you’re seeing this error then the OEM doesn’t provide all the data we aim to provide in our response and we were unable to find a specific match. Please see the error response `detail` field for possible matches.
```json theme={null}
{
"statusCode": 500,
"type": "SERVER",
"code": "MULTIPLE_RECORDS_FOUND",
"description": "Smartcar found multiple battery capacity records for this vehicle.",
"docURL": "https://smartcar.com/docs/errors/api-errors/server-errors#multiple-records-found",
"resolution": {
"type": "CONTACT_SUPPORT"
},
"suggestedUserMessage": "Your car is temporarily unable to connect to . Please be patient while we’re working to resolve this issue.",
"detail": [
{
"capacities": [83.9, 83.9, 70.2]
}
],
"requestId": "9c8dd6fa-f9d7-4d18-9fdd-2255f6cd8613"
}
```
### Suggested Resolution
For battery capacity errors please check the detail field of the error response for a list of possible options and reach out support if you need us to update the capacity value for a specific vehicle.
### Suggested User Message
> Your car is temporarily unable to connect to \. Please be patient while we’re working to resolve this issue.
---
# Source: https://smartcar.com/docs/api-reference/signals/service.md
> ## Documentation Index
> Fetch the complete documentation index at: https://smartcar.com/docs/llms.txt
> Use this file to discover all available pages before exploring further.
# Service Signals
### Is In Service
Signal code: `service-isinservice`
A boolean that Indicates if the vehicle is currently in service
Boolean indicating if the vehicle is in service
```json Example theme={null}
{
"value": false
}
```
### Records
Signal code: `service-records`
An array containing records of service that has been performed on the vehicle.
An array of service records.
A unique identifier for the service record.
The monetary amount billed by the service provider for the service.
The numerical portion of the amount.
The currency for the amount.
The timestamp of when the service occurred.
An array containing information about tasks performed as part of the service.
A unique identifier for the task.
A description of the task that was performed.
An array containing additional details about the service.
A unique identifier for the additional detail item.
A text string describing the additional detail item.
The vehicle's odometer at the time of the service.
```json Example theme={null}
{
"values": [
{
"id": "SVC-2024-001",
"cost": {
"amount": 150,
"currency": "USD"
},
"time": "2024-01-15T14:30:00Z",
"tasks": [
{
"id": "TSK-001",
"description": "Oil Change"
}
],
"details": [
{
"id": "DTL-001",
"description": "5W-30 Synthetic Oil Used"
}
],
"odometer": 50000
}
]
}
```
---
# Source: https://smartcar.com/docs/api-reference/tesla/set-cabin.md
> ## Documentation Index
> Fetch the complete documentation index at: https://smartcar.com/docs/llms.txt
> Use this file to discover all available pages before exploring further.
# Cabin Climate
> Set the temperature and control the cabin climate system for a vehicle.
## Permission
`control_climate`
## Request
**Path**
**Body**
Indicate whether to start or stop the cabin climate control system, or set the temperature.
If starting or stopping the system, `temperature` is optional and will use the vehicle's current setting by default.
Use `SET` to set the `temperature` without changing the climate systems status.
Indicate what temperature to set (in Celsius by default or in Fahrenheit using the sc-unit-system).
If the provided temperature is out of the bounds allowed by the vehicle's climate control system,
the request will fail with the upper and lower limits in the error response message.
```bash cURL theme={null}
curl "https://api.smartcar.com/v2.0/vehicles/{id}/{make}/climate/cabin" \
-H "Authorization: Bearer {token}" \
-X "POST" \
-H "Content-Type: application/json" \
-d '{"action": "SET", "temperature": 20}'
```
```python Python theme={null}
set_climate_cabin = vehicle.request(
"POST",
"{make}/climate/cabin",
{
"action": "SET",
"temperature": 18
}
)
```
```js Node theme={null}
const vehicleStopCabin = vehicle.request(
"POST",
"{make}/climate/cabin",
{"action": "STOP"}
);
```
```java Java theme={null}
SmartcarVehicleRequest request = new SmartcarVehicleRequest.Builder()
.method("POST")
.path("{make}/climate/cabin")
.addBodyParameter("action", "START")
.build();
VehicleResponse startClimateCabin = vehicle.request(request);
```
```ruby Ruby theme={null}
setChargeScheduleByLocation = vehicle.request(
"POST",
"{make}/climate/cabin",
{"action" : "START"}
)
```
## Response
If the request is successful, Smartcar will return `"success"` (HTTP 200 status) containing the current state of the climate cabin system.
The target temperature setting of the vehicle when the climate system is on (in Celsius by default or in Fahrenheit using the sc-unit-system).
```json Example Response theme={null}
{
"status": "ON",
"temperature": 24
}
```
---
# Source: https://smartcar.com/docs/api-reference/tesla/set-charge-ammeter.md
> ## Documentation Index
> Fetch the complete documentation index at: https://smartcar.com/docs/llms.txt
> Use this file to discover all available pages before exploring further.
# Amperage
> Set the amperage drawn by the vehicle from the EVSE for the current charging session. If the vehicle is not plugged in, this endpoint results in a vehicle state error.
## Permission
`control_charge`
## Request
**Path**
**Body**
The target amperage to be drawn by the vehicle from the charging point (in amperes). If the value passed is greater than what is supported by the charger, it will be set to the maximum.
```bash cURL theme={null}
curl "https://api.smartcar.com/v2.0/vehicles/{id}/{make}/charge/ammeter" \
-H "Authorization: Bearer {token}" \
-X "POST" \
-H "Content-Type: application/json" \
-d '{"amperage": 48}'
```
```python Python theme={null}
ammeter = vehicle.request(
"POST",
"{make}/charge/ammeter",
{"amperage": 48}
)
```
```js Node theme={null}
const ammeter = vehicle.request(
"POST",
"{make}/charge/ammeter",
{"amperage": 48}
);
```
```java Java theme={null}
SmartcarVehicleRequest request = new SmartcarVehicleRequest.Builder()
.method("POST")
.path("{make}/charge/ammeter")
.addBodyParameter("amperage": 48)
.build();
VehicleResponse ammeter = vehicle.request(request);
```
```ruby Ruby theme={null}
ammeter = vehicle.request(
"POST",
"{make}/charge/ammeter",
{"amperage": 48}
)
```
## Response
If the request is successful, Smartcar will return “success” (HTTP 200 status). If the amperage passed was greater than what is supported by the charger, it will be set to the maximum which will be shown here.
If the request is successful, Smartcar will return a message (HTTP 200 status) containing the amperage set to be drawn from the vehicle.
```json Example Response theme={null}
{
"message": "Successfully sent the following amperage: 48",
"status": "success"
}
```
---
# Source: https://smartcar.com/docs/api-reference/evs/set-charge-limit.md
> ## Documentation Index
> Fetch the complete documentation index at: https://smartcar.com/docs/llms.txt
> Use this file to discover all available pages before exploring further.
# Charge Limit
> Set the charge limit of an electric vehicle.
2.0 is still the only supported version for sending remote commands. If you need to send commands, please continue using v2.0 until commands are supported in the latest version later this year.
## Permission
`control_charge`
## Request
**Path**
**Body**
The level at which the vehicle should stop charging and be considered fully charged.
Cannot be less than `0.5`, or greater than `1`.
## Response
If the request is successful, Smartcar will return “success” (HTTP 200 status).
If the request is successful, Smartcar will return a message (HTTP 200 status).
## Notes
This endpoint will return a [`CHARGING_PLUG_NOT_CONNECTED`](/errors/api-errors/vehicle-state-errors#charging-plug-not-connected) error if
the OEM is unable to set a charge limit while the vehicle is unpluged.
**Ford and Lincoln**
If a vehicle starts charging as a result of a [start charge](/api-reference/evs/control-charge) request it will always charge to 100%
if the charging location has a schedule in place.
For the vehicle to respect its charge limit, please set one along with preferred charge
times or clear the schedule through the [charge schedule by location](/api-reference/ford/set-charge-schedule-by-location) endpoint.
**BMW and MINI**
Vehicle needs to be on OS Version 8+
```json Example Response theme={null}
{
"message": "Successfully sent request to vehicle",
"status": "success"
}
```
---
# Source: https://smartcar.com/docs/api-reference/ford/set-charge-schedule-by-location.md
> ## Documentation Index
> Fetch the complete documentation index at: https://smartcar.com/docs/llms.txt
> Use this file to discover all available pages before exploring further.
# Charge Schedule by Location
> Set all schedules for the specified charging location.
## Permission
`control_charge`
## Request
In order to set a schedule, you must use a location from the [`GET Charge Schedule by Location`](/api-reference/ford/get-charge-schedule-by-location) endpoint.
If the location you want to manage is not in the response, the vehicle owner has not charged at that location within the last 90 days and it has been
removed from their app's saved charging location list.
**Path**
**Query**
The longitude of a charging location from [`GET Charge Schedule by Location`](/api-reference/ford/get-charge-schedule-by-location)
The latitude of a charging location from [`GET Charge Schedule by Location`](/api-reference/ford/get-charge-schedule-by-location)
**Body**
The maximum charge limit for the vehicle at the location as a percent between `0.5` and `1`.
The weekday and weekend charging schedules for the vehicle at the location.
The charging schedule for the vehicle on weekdays (Monday - Friday).
The exact hour a vehicle should start charging in HH:00 e.g. 17:00.
The exact hour a vehicle should stop charging in HH:00 e.g. 21:00.
The charging schedule for the vehicle on weekends (Saturday - Sunday).
The exact hour a vehicle should start charging in HH:00 e.g. 17:00.
The exact hour a vehicle should stop charging in HH:00 e.g. 21:00.
```bash cURL theme={null}
curl "https://api.smartcar.com/v2.0/vehicles/{id}/{make}/charge/schedule_by_location?longitude=2.3522&latitude=48.8566" \
-H "Authorization: Bearer {token}" \
-X "PUT" \
-H "Content-Type: application/json" \
-d '{chargingLocation:{"chargeLimit": 0.9, "chargingWindows": {"weekday": [{"start": "09:00", "end": "17:00"}], "weekend": [{"start": "09:00", "end": "17:00"}]}}}'
```
```python Python theme={null}
setChargeScheduleByLocation = vehicle.request(
"PUT",
"{make}/charge/schedule_by_location?longitude=2.3522&latitude=48.8566",
{
"chargingLocation" : {
"chargeLimit": 0.9,
"chargingWindows": {
"weekday": [
{
"start": "09:00",
"end": "10:00"
}
],
"weekend": [
{
"start": "09:00",
"end": "10:00"
}
]
}
}
}
)
```
```js Node theme={null}
const setChargeScheduleByLocation = vehicle.request(
"PUT",
"{make}/charge/schedule_by_location?longitude=2.3522&latitude=48.8566",
{
"chargingLocation" : {
"chargeLimit": 0.9,
"chargingWindows": {
"weekday": [
{
"start": "09:00",
"end": "10:00"
}
],
"weekend": [
{
"start": "09:00",
"end": "10:00"
}
]
}
}
}
);
```
```java Java theme={null}
JsonArrayBuilder weekday = Json.createArrayBuilder().add(
Json.createObjectBuilder().add("start", "05:00").add("end", "07:00"));
JsonArrayBuilder weekend = Json.createArrayBuilder().add(
Json.createObjectBuilder().add("start", "06:00").add("end", "07:00"));
JsonObject chargingWindows = Json.createObjectBuilder()
.add("weekday", weekday)
.add("weekend", weekend)
.build();
JsonObject chargingLocation = Json.createObjectBuilder()
.add("chargeLimit", 1.0)
.add("chargingWindows", chargingWindows)
.build();
SmartcarVehicleRequest request =
new SmartcarVehicleRequest.Builder()
.method("PUT")
.path("ford/charge/schedule_by_location")
.addQueryParameter("latitude", "37.749008")
.addQueryParameter("longitude", "-122.46981")
.addBodyParameter("chargingLocation", chargingLocation)
.build();
VehicleResponse chargeSched = vehicle.request(request);
```
```ruby Ruby theme={null}
setChargeScheduleByLocation = vehicle.request(
"PUT",
"{make}/charge/schedule_by_location?longitude=2.3522&latitude=48.8566",
{
"chargingLocation" : {
"chargeLimit": 0.9,
"chargingWindows": {
"weekday": [
{
"start": "09:00",
"end": "10:00"
}
],
"weekend": [
{
"start": "09:00",
"end": "10:00"
}
]
}
}
}
)
```
## Response
If the request is successful, Smartcar will return a message.
If the request is successful, Smartcar will return `success`.
```json Example Response theme={null}
{
"message": "Successfully sent request to vehicle",
"status": "success"
}
```
## Example Request Bodies
```json theme={null}
{
"chargingLocation" : {
"chargeLimit": 0.9,
"chargingWindows": {
"weekday": [
{
"start": "17:00",
"end": "06:00"
}
],
"weekend": [
{
"start": "16:00",
"end": "07:00"
}
]
}
}
}
```
```json theme={null}
{
"chargingLocation" : {
"chargeLimit": 0.9,
"chargingWindows": {
"weekday": [
{
"start": "17:00",
"end": "06:00"
}
],
"weekend": []
}
}
}
```
```json theme={null}
{
"chargingLocation" : {
"chargeLimit": 0.9,
"chargingWindows": {
"weekday": [],
"weekend": [
{
"start": "16:00",
"end": "07:00"
}
]
}
}
}
```
```json theme={null}
{
"chargingLocation" : {
"chargeLimit": 0.9,
"chargingWindows": {
"weekday": [],
"weekend": []
}
}
}
```
---
# Source: https://smartcar.com/docs/api-reference/tesla/set-charge-schedule.md
# Source: https://smartcar.com/docs/api-reference/nissan/set-charge-schedule.md
> ## Documentation Index
> Fetch the complete documentation index at: https://smartcar.com/docs/llms.txt
> Use this file to discover all available pages before exploring further.
# Charge Schedule
> Sets the charging schedule for a vehicle.
This endpoint is currently available for `nissan` EVs on the `MyNISSAN` platform
## Permission
`control_charge`
## Request
**Path**
**Body**
An array of charge schedules. A maximum of 3 schedules can be set.
HH:mm in UTC for a schedule start time.
HH:mm in UTC for a schedule start time.
An array of days for the schedule to be applied.
Options: `MONDAY` `TUESDAY` `WEDNESDAY` `THURSDAY` `FRIDAY` `SATURDAY` `SUNDAY`
```bash cURL theme={null}
curl "https://api.smartcar.com/v2.0/vehicles/{id}/{make}/charge/schedule" \
-H "Authorization: Bearer {token}" \
-X "PUT" \
-H "Content-Type: application/json" \
-d '{
"chargeSchedules": [
{
"start": "08:00",
"end": "12:00",
"days": ["MONDAY", "WEDNESDAY", "FRIDAY"]
},
{
"start": "14:00",
"end": "18:00",
"days": ["TUESDAY", "THURSDAY", "SATURDAY"]
}
]
}'
```
```python Python theme={null}
charge_schedule = vehicle.request("PUT", "{make}/charge/schedule", {
"chargeSchedules": [
{
"start": "08:00",
"end": "12:00",
"days": ["MONDAY", "WEDNESDAY", "FRIDAY"]
},
{
"start": "14:00",
"end": "18:00",
"days": ["TUESDAY", "THURSDAY", "SATURDAY"]
}
]
})
```
```js Node theme={null}
const chargeSchedule = vehicle.request("PUT", "{make}/charge/schedule", {
"chargeSchedules": [
{
"start": "08:00",
"end": "12:00",
"days": ["MONDAY", "WEDNESDAY", "FRIDAY"]
},
{
"start": "14:00",
"end": "18:00",
"days": ["TUESDAY", "THURSDAY", "SATURDAY"]
}
]
});
```
```java Java theme={null}
SmartcarVehicleRequest request = new SmartcarVehicleRequest.Builder()
.method("PUT")
.path("{make}/charge/schedule")
.addBodyParameter("chargeSchedules", [
{
"start": "08:00",
"end": "12:00",
"days": ["MONDAY", "WEDNESDAY", "FRIDAY"]
},
{
"start": "14:00",
"end": "18:00",
"days": ["TUESDAY", "THURSDAY", "SATURDAY"]
}
])
.build();
ChargeSchedule chargeSchedule = vehicle.request(request);
```
```ruby Ruby theme={null}
charge_schedule = vehicle.request("PUT", "{make}/charge/schedule", {
"chargeSchedules": [
{
"start": "08:00",
"end": "12:00",
"days": ["MONDAY", "WEDNESDAY", "FRIDAY"]
},
{
"start": "14:00",
"end": "18:00",
"days": ["TUESDAY", "THURSDAY", "SATURDAY"]
}
]
})
```
## Response
If the request is successful, Smartcar will return a message.
If the request is successful, Smartcar will return `success`.
```json Example Response theme={null}
{
"message": "Successfully sent request to vehicle",
"status": "success"
}
```
---
# Source: https://smartcar.com/docs/api-reference/tesla/set-defroster.md
> ## Documentation Index
> Fetch the complete documentation index at: https://smartcar.com/docs/llms.txt
> Use this file to discover all available pages before exploring further.
# Defroster
> Start or stop the front and rear defroster for a vehicle.
## Permission
`control_climate`
## Request
**Path**
**Body**
Indicate whether to start or stop defrosting the vehicle.
Options: `START` or `STOP`
```bash cURL theme={null}
curl "https://api.smartcar.com/v2.0/vehicles/{id}/{make}/climate/defroster" \
-H "Authorization: Bearer {token}" \
-X "POST" \
-H "Content-Type: application/json" \
-d '{"action" : "STOP"}'
```
```python Python theme={null}
defroster = vehicle.request(
"POST",
"{make}/climate/defroster",
{"action" : "STOP"}
)
```
```js Node theme={null}
const defroster = vehicle.request(
"POST",
"{make}/climate/defroster",
{"action" : "STOP"}
);
```
```java Java theme={null}
SmartcarVehicleRequest request = new SmartcarVehicleRequest.Builder()
.method("POST")
.path("{make}/climate/defroster")
.addBodyParameter("action" : "STOP")
.build();
VehicleResponse defroster = vehicle.request(request);
```
```ruby Ruby theme={null}
defroster = vehicle.request(
"POST",
"{make}/climate/defroster",
{"action" : "STOP"}
)
```
## Response
If the request is successful, Smartcar will return `status` containing the action sent to the
climate defroster system of the vehicle.
```json Example Response theme={null}
{
"status": "START"
}
```
---
# Source: https://smartcar.com/docs/api-reference/tesla/set-pin-to-drive.md
> ## Documentation Index
> Fetch the complete documentation index at: https://smartcar.com/docs/llms.txt
> Use this file to discover all available pages before exploring further.
# Set PIN to Drive
> Enables this feature on the vehicle and sets the PIN needed in order to drive it.
## Permission
`control_pin`
## Request
**Path**
**Body**
A four digit numeric PIN
```bash cURL theme={null}
curl "https://api.smartcar.com/v2.0/vehicles/{id}/{make}/pin" \
-H "Authorization: Bearer {token}" \
-X "POST" \
-H "Content-Type: application/json" \
-d '{"pin" : "1234"}'
```
```python Python theme={null}
pin = vehicle.request(
"POST",
"{make}/pin",
{"pin" : "1234"}
)
```
```js Node theme={null}
const pin = vehicle.request(
"POST",
"{make}/pin",
{"pin" : "1234"}
);
```
```java Java theme={null}
SmartcarVehicleRequest request = new SmartcarVehicleRequest.Builder()
.method("POST")
.path("{make}/pin")
.addBodyParameter("pin" : "1234")
.build();
VehicleResponse pin = vehicle.request(request);
```
```ruby Ruby theme={null}
pin = vehicle.request(
"POST",
"{make}/pin",
{"pin" : "1234"}
)
```
## Response
If the request is successful, Smartcar will return “success”.
If the request is successful, Smartcar will return a message.
```json Example Response theme={null}
{
"message": "Successfully sent request to vehicle",
"status": "success"
}
```
## Notes
* Calling this endpoint will override an existing PIN on the vehicle.
* Call `DELETE` [PIN to Drive](/api-reference/tesla/clear-pin-to-drive) in order to enable this feature and set the PIN
* Currently both owner and driver account types can set a PIN for the vehicle and enable the feature via the API.
* Only account owners can disable this feature from the Tesla app.
---
# Source: https://smartcar.com/docs/api-reference/tesla/set-steering-heater.md
> ## Documentation Index
> Fetch the complete documentation index at: https://smartcar.com/docs/llms.txt
> Use this file to discover all available pages before exploring further.
# Steering Heater
> Start or stop heating a vehicle's steering wheel.
## Permission
`control_climate`
## Request
**Path**
**Body**
Indicate whether to start or stop heating the vehicle's steering wheel.
Options: `START` or `STOP`
```bash cURL theme={null}
curl "https://api.smartcar.com/v2.0/vehicles/{id}/{make}/climate/steering_wheel" \
-H "Authorization: Bearer {token}" \
-X "POST" \
-H "Content-Type: application/json" \
-d '{"action" : "STOP"}'
```
```python Python theme={null}
steering_wheel = vehicle.request(
"POST",
"{make}/climate/steering_wheel",
{"action" : "STOP"}
)
```
```js Node theme={null}
const steeringWheel = vehicle.request(
"POST",
"{make}/climate/steering_wheel",
{"action" : "STOP"}
);
```
```java Java theme={null}
SmartcarVehicleRequest request = new SmartcarVehicleRequest.Builder()
.method("POST")
.path("{make}/climate/steering_wheel")
.addBodyParameter("action" : "STOP")
.build();
VehicleResponse steeringWheel = vehicle.request(request);
```
```ruby Ruby theme={null}
steering_wheel = vehicle.request(
"POST",
"{make}/climate/steering_wheel",
{"action" : "STOP"}
)
```
## Response
If the request is successful, Smartcar will return status containing the action sent to the vehicle.
`UNAVAILABLE` indicates the vehicle is not equipped with a steering wheel heater.
```json Example Response theme={null}
{
"status": "START",
}
```
---
# Source: https://smartcar.com/docs/getting-started/dashboard/simulator.md
> ## Documentation Index
> Fetch the complete documentation index at: https://smartcar.com/docs/llms.txt
> Use this file to discover all available pages before exploring further.
# Vehicle Simulator
Before launching your integration, we recommend using Smartcar’s Vehicle Simulator to test your application on a simulated vehicle. With the Simulator, you can choose the vehicle's region, make, model and year as well as the vehicle state to test with. Watch your simulated vehicle travel in real-time from the Smartcar Dashboard as you test API requests from your application with realistic vehicle data responses.
## 1. Create a simulated vehicle
#### Create a simulated vehicle
Begin by logging into the Smartcar Dashboard and navigating to the Simulator tab. Choose your region and select a Smartcar-compatible vehicle using the Make, Model, and Year dropdowns. Or, use the VIN search feature to create a simulated vehicle of the same Make, Model and Year as the VIN entered, as long as the vehicle is compatible with Smartcar. Please note the VIN search is only available for US-based VINs at this time.
#### Review the vehicle capabilities
Confirm the vehicle's supported capabilities includes those you wish to test.
#### Select a vehicle state
Select from one of three available vehicle states for your simulated vehicle. The states vary in duration from 8 to 24 hours and include driving, charging, and parked vehicle states for a wide range of test scenarios.
## 2. Connect your app to the simulated vehicle
Once you've selected a vehicle and state, you are ready to connect the simulated vehicle to your application for testing.
Grab the simulated vehicle credentials
On the simulation screen, you will find a Connect Credentials button that will open a modal containing the simulated vehicle's credentials. You will need these to connect your app and vehicle using Smartcar Connect.
#### Launch Smartcar Connect in simulated mode
When launching Smartcar Connect, pass in the query parameter mode=simulated to enable simulated mode and ensure you can connect to your newly created simulated vehicle. Smartcar's SDKs provide a convenient option to facilitate this:
```js Node theme={null}
const client = new smartcar.AuthClient({
clientId: CLIENT_ID,
clientSecret: CLIENT_SECRET,
redirectUri: REDIRECT_URI,
mode: "simulated",
});
```
```python Python theme={null}
client = smartcar.AuthClient(
client_id=CLIENT_ID,
client_secret=CLIENT_SECRET,
redirect_uri=REDIRECT_URI,
mode="simulated"
)
```
```java Java theme={null}
AuthClient authClient = new AuthClient.Builder()
.clientId(CLIENT_ID)
.clientSecret(CLIENT_SECRET)
.redirectUri(REDIRECT_URI)
.mode("simulated")
.build();
```
```ruby Ruby theme={null}
client = Smartcar::AuthClient.new({
client_id: CLIENT_ID,
client_secret: CLIENT_SECRET,
redirect_uri: REDIRECT_URI,
mode: "simulated"
})
```
#### Log into a connected services account
After launching Smartcar Connect, select the brand that matches your simulated vehicle and enter the credentials pulled from the Smartcar Dashboard simulation screen on the brand login page. You will then be prompted to grant access to your selected permissions.
Upon completing the Smartcar Connect flow, return to the Smartcar Dashboard. It may take up to a minute to reflect that your vehicle is now connected. Once connected, the vehicle ID will appear next to the vehicle's VIN near the top of the simulation screen.
## 3. Start the simulation and begin testing
Once the vehicle is connected to your application, you are ready to start the simulation and begin making API requests to the simulated vehicle.
### Start the simulation
In the Smartcar Dashboard on the simulation screen for your selected simulated vehicle, start the simulation by pressing the Play button. You have the option to pause, resume or restart the simulation at any time. Additional controls you have over the simulation:
#### Control the simulation speed
You can control the simulation's speed in case you would like to test the vehicle at various stages at a faster or slower pace.
#### Change the simulation stage
Once the simulation has started, you can jump to any stage of the simulation in the event you would like to test the vehicle in a particular state.
#### Set the API response latency
Control the response latency of any API requests you make to the simulated vehicle.
`Ideal` - API responses are returned immediately upon request.
`Realistic` - API responses are delayed a certain amount of time based on average API response latency statistics that Smartcar has gathered for each supported brand.
A breakdown of estimated response latencies can be viewed by clicking on the ‘View latencies’ link directly underneath the Request Latency dropdown in the Dashboard. Please note latency estimates may not be available for all brands. In these cases, the Realistic setting will return immediate responses -- same as Ideal.
#### Change the vehicle state
You can select a different vehicle state for your simulated vehicle at any time. Select the Edit icon in the `Trip type` card on the simulation screen.
### Send an API request to the simulated vehicle
The Smartcar API will return realistic data matching the current state of the simulated vehicle as displayed on the simulation screen. Note that if you've selected Realistic API response latency, the data returned to your application may appear somewhat delayed.
---
# Source: https://smartcar.com/docs/getting-started/dashboard/single-sign-on.md
> ## Documentation Index
> Fetch the complete documentation index at: https://smartcar.com/docs/llms.txt
> Use this file to discover all available pages before exploring further.
# Single Sign-on (SSO)
> Smartcar offers SSO through your identity provider (IdP) for Enterprise customers.
## About SSO with Smartcar
Our Dashboard supports SSO integrations with popular identity providers
including:
* Okta
* Microsoft Azure AD
* Google Workspace
* OneLogin
* Ping Identity
* ADFS
* Custom SAML 2.0 providers
To set up SSO for your organization's Dashboard accounts, you'll need to:
1. Be an Owner for an existing Team on an Enterprise plan
2. Verify your domain
3. Configure your identity provider
The following section will guide you through each step of this process.
## Setting up SSO
On Dashboard navigate to **Team settings > Security** and select **Enable SSO**
You’ll be redirected to start the SSO configuration process.
Depending on your DNS provider, you'll receive instructions on how to verify your domain.
Once your domain is verified, you’ll be able to select your Identity Provider
(IdP).
You'll be provided a guide on how to get set up based on your IdP.
Once you’ve got everything configured, you’ll be prompted to test SSO.
If you exit the flow at any time before finalizing your configuration, you
can jump back in from Dashboard.
## Disabling SSO
If you have SSO configured, the Team Owner can disable it from **Team
settings > Security**.
Disabling SSO will require you to go through the whole setup process
again.
## Inviting team members with SSO enabled
Once enabled, you’ll need to add members to your team through your identity
provider. Invites via the Dashboard will be disabled while SSO is enabled.
When a newly added member has signed in via SSO, they will have the Viewer role
by default. Other team members with the appropriate role can promote these
members as needed.
If a user creates a Dashboard account with their email prior to being added
to your IdP, they will be added to their own Team initially. When they are
added to your IdP they will be able to switch Teams in Dashboard.
## A note on aliased emails
If members of your team have Dashboard accounts using email aliases prior to
enabling SSO e.g. [rover+thebest@dog.com](mailto:rover+thebest@dog.com), once SSO is enabled for your Team and
they’re added to your IdP, their login will be tied to their non-aliased email
address e.g. [rover@dog.com](mailto:rover@dog.com).
SSO is only available on the **Enterprise** plan, please reach out to your Account Manager for more details.
---
# Source: https://smartcar.com/docs/help/smartcar-updates.md
> ## Documentation Index
> Fetch the complete documentation index at: https://smartcar.com/docs/llms.txt
> Use this file to discover all available pages before exploring further.
# Subscribing to Smartcar Updates and Notifications
> Sign up for product announcements, marketing emails, changelog alerts, and status notifications so you can stay up to date with Smartcar.
Stay informed about Smartcar's latest updates, maintenance windows, and platform status by subscribing to our communication channels.
### Product Updates and Marketing Emails
Subscribe to receive product announcements, feature releases, and other important updates:
1. Visit the [Smartcar Marketing Preferences](https://smartcar.com/newsletter) page.
2. Enter your email address.
3. Select your communication preferences.
4. Click **Subscribe** to receive updates.
### Changelog Updates
Stay up to date with the latest product changes and improvements:
* Visit the [Smartcar Changelog](/changelog/latest) to view recent updates.
* Subscribe to changelog notifications through your Smartcar Dashboard settings.
### Smartcar Status Page
Monitor the real-time status of the Smartcar platform and subscribe to incident notifications:
1. Visit [status.smartcar.com](https://status.smartcar.com).
2. Click **Subscribe to Updates** in the top-right corner.
3. Choose your preferred notification method:
* **Email** - Receive notifications via email
* **SMS** - Get text message alerts (mobile number required)
* **Webhook** - Integrate status updates into your systems
* **Slack** - Receive notifications in your Slack workspace
* **RSS** - Subscribe via RSS feed
4. Select which components you want to monitor.
5. Choose the types of incidents you want to be notified about (e.g., all incidents or only major outages).
### Brand Reliability Status Page
Monitor the status of individual vehicle brands and their APIs:
1. Visit [brandreliability.smartcar.com](https://brandreliability.smartcar.com).
2. Click **Subscribe to Updates** in the top-right corner.
3. Choose your preferred notification method (Email, SMS, Webhook, Slack, or RSS).
4. Select specific vehicle brands you want to monitor or choose "All Components" for comprehensive coverage.
5. Configure your notification preferences for different incident types.
By subscribing to these channels, you'll receive proactive notifications about planned maintenance, service disruptions, and platform updates that may affect your integration.
---
# Source: https://smartcar.com/docs/api-reference/webhooks/subscribe-webhook.md
> ## Documentation Index
> Fetch the complete documentation index at: https://smartcar.com/docs/llms.txt
> Use this file to discover all available pages before exploring further.
# Subscribe
> Subscribe a vehicle to a webhook.
## Request
**Path**
The webhook id you are subscribing the vehicle to. This can be found in Dashboard under Webhooks.
## Response
The [vehicle id](/api-reference/all-vehicles) of the vehicle you are making a request to.
The webhook id you are subscribing the vehicle to.
```json ResponseExample theme={null}
{
"vehicleId": "dc6ea99e-57d1-4e41-b129-27e7eb58713e",
"webhookId": "9b6ae692-60cc-4b3e-89d8-71e7549cf805"
}
```
---
# Source: https://smartcar.com/docs/integrations/webhooks/subscribing-vehicles.md
> ## Documentation Index
> Fetch the complete documentation index at: https://smartcar.com/docs/llms.txt
> Use this file to discover all available pages before exploring further.
# Subscribing Vehicles
> Learn how to subscribe and unsubscribe vehicles to webhooks using auto-enrollment, the Dashboard, or the API
Once you've [created a webhook](/integrations/webhooks/creating-webhooks), you need to subscribe vehicles to it before they'll start receiving data. Smartcar offers three methods to manage vehicle subscriptions: automatic enrollment, Dashboard management, and programmatic API control.
Data will only be sent after your webhook has been verified. See [Callback Verification](/integrations/webhooks/callback-verification) for details.
***
## Subscription Methods
Automatic subscription for all connected vehicles
Manual subscription through the Smartcar Dashboard
Programmatic subscription via REST API
***
## Method 1: Auto-Enrollment (Recommended for Production)
The simplest way to manage subscriptions is to enable auto-enrollment when creating your webhook. This automatically subscribes all vehicles connected to your application.
**All vehicles will be subscribed immediately.** When you enable auto-enrollment, all currently connected vehicles will be subscribed to the webhook right away. Only enable this feature when you're ready to receive data for all vehicles in your application.
### How It Works
When auto-enrollment is enabled:
* **Existing vehicles** are immediately subscribed to the webhook
* **New connections** are automatically subscribed when users connect vehicles
* **No manual management** required for individual vehicles
### Enable Auto-Enrollment
Go to the [Smartcar Dashboard](https://dashboard.smartcar.com/integrations) and create or edit a webhook
Check the "Automatically subscribe all vehicles" option during webhook creation
Complete webhook creation - all vehicles will be subscribed automatically
**Best for:** Production deployments where all connected vehicles should receive webhook data
***
## Method 2: Dashboard Management
For selective subscription, you can manually subscribe individual vehicles through the Dashboard.
### Subscribe via Dashboard
Navigate to [Vehicles](https://dashboard.smartcar.com/vehicles) in the Dashboard
Click on the vehicle you want to subscribe
In the vehicle details, find the "Webhook Subscriptions" section
Click "Subscribe" to add the vehicle to a webhook, or "Unsubscribe" to remove it
**Best for:** Testing and development, selective vehicle management, or gradual rollouts
***
## Method 3: API Subscription
For programmatic control, use the subscribe and unsubscribe API endpoints.
* [Subscribe Endpoint](/api-reference/webhooks/subscribe-webhook) - Full API reference for subscribing vehicles
* [Unsubscribe Endpoint](/api-reference/webhooks/unsubscribe-webhook) - Full API reference for unsubscribing vehicles
**Best for:** Testing and development, dynamic subscription management, custom business logic, or bulk operations
**Best for:** Dynamic subscription management, custom business logic, or bulk operations
***
## Common Questions
Yes! You can enable auto-enrollment for most vehicles and use the API or Dashboard for exceptions. However, be aware that auto-enrollment will automatically subscribe new vehicles.
The vehicle immediately stops receiving webhook deliveries. You can re-subscribe at any time, and a new first payload will be sent.
You can view all vehicle subscriptions in the [Dashboard](https://dashboard.smartcar.com/vehicles) or use the [Management API](/api-reference/management/get-vehicle-connections) to programmatically list subscriptions.
No, you can subscribe as many vehicles as are connected to your application. Webhooks scale automatically to handle your fleet size.
Not necessarily. You can use one webhook for all vehicles and handle signal availability differences using the `VEHICLE_ERROR` events for unsupported signals.
***
## Next Steps
Requirements for building your webhook endpoint
Understand all types of available payloads
Learn about retry policies and guarantees
Ensure your endpoint passes Smartcar's verification challenge
---
# Source: https://smartcar.com/docs/api-reference/signals/surveillance.md
> ## Documentation Index
> Fetch the complete documentation index at: https://smartcar.com/docs/llms.txt
> Use this file to discover all available pages before exploring further.
# Surveillance Signals & Attributes
## Signals
### Is Enabled
Signal code: `surveillance-isenabled`
Indicates if the surveillance system is enabled
Boolean indicating if surveillance is active
```json Example theme={null}
{
"value": true
}
```
## Attributes
### Brand
Signal code: `surveillance-brand`
Indicates the brand of surveillance available on the vehicle e.g. for Tesla this would be Sentry Mode
The brand name or type of surveillance system
```json Example theme={null}
{
"value": "Sentry Mode"
}
```
---
# Source: https://smartcar.com/docs/getting-started/dashboard/teams.md
> ## Documentation Index
> Fetch the complete documentation index at: https://smartcar.com/docs/llms.txt
> Use this file to discover all available pages before exploring further.
# Team Settings
> Your Smartcar Team is the central hub for managing your applications, vehicles, members, security settings, and billing information.
Your Smartcar Team allows you to collaborate with other members and manage your applications in one place.
## Members
You can add team members to your Smartcar account on any plan for free.
Team members can be added to your Smartcar account by navigating to the **Settings** tab in the Dashboard and selecting **Members** under the **Team** section.
## Roles and Permissions
Team members can be added on any plan. Specific roles are available on our [Enterprise plan](https://smartcar.com/pricing).
| | Owner | Admin | Editor | Viewer |
| ----------------------------- | ----------------------------------- | ----------------------------------- | ------------------------------------ | ------------------------------------ |
| Manage billing | ✅ | | | |
| View billing | ✅ | | | |
| Delete applications | ✅ | | | |
| Modify team settings | ✅ | | | |
| Remove team members | ✅ | ✅ | | |
| Modify team members | ✅ | ✅ | | |
| Create applications | ✅ | ✅ | | |
| Modify applications | ✅ | ✅ | ✅ | |
| View applications | ✅ | ✅ | ✅ | ✅ |
| View team members | ✅ | ✅ | ✅ | ✅ |
Editors and Viewers can be limited to specific applications.
## Roles
### Owner
Owners have full control and access to the team. They're able to add and remove members, create and modify applications, edit billing information and more.
A team **can** have multiple Owners, but **must** have at least one.
### Admin
Admins have similar access to Owners but can't edit or view billing information.
### Editor
Editors have similar access to Admins but are limited to specific applications. They're unable to manage team members, view the team's billing information, create applications, or delete applications they're allowed to access.
### Viewer
Viewers have similar permissions to Editors but only have read-only access to applications they've been invited to.
---
# Source: https://smartcar.com/docs/connect/other-actions/tesla-virtual-key.md
> ## Documentation Index
> Fetch the complete documentation index at: https://smartcar.com/docs/llms.txt
> Use this file to discover all available pages before exploring further.
# Tesla Virtual Keys
> To support vehicle commands such as lock/unlock or start/stop charge, and benefit from faster data frequencies, Tesla requires a Virtual Key to be added to the vehicle.
For more information about Virtual Keys, please visit the [Virtual Key page](/help/oem-integrations/tesla/virtual-key-tesla).
### Vehicle Owners adding a Virtual Key
Smartcar Connect will present Tesla vehicle owners a prompt to install the Tesla Virtual Key after granting access and prior to redirecting them back to your application.
When users open the virtual key link, depending on their device, they will be redirected to the Tesla app or prompted to scan a QR code.
On mobile devices, they will be redirected to the Tesla app and prompted to add the Virtual Key
On Desktop, they will be prompted to scan the QR code which in turn opens up the Tesla app and prompts them to add a Virtual Key
Virtual Key status can be checked at any time from the Tesla infotainment screen under Settings > Locks.
Smartcar will automatically determine which Tesla vehicles require a Virtual Key and prompt users to add it only for those vehicles. If a user has multiple Tesla vehicles, they will be prompted to add a Virtual Key for each vehicle that requires it. At least one vehicle must complete the pairing process before the user can continue with the Connect flow and connect their Tesla to your application.
### 2020 and Earlier Model S/X with Streaming Support
For 2020 and earlier Model S and X vehicles that support streaming (via a software update), Smartcar Connect handles this differently:
* These vehicles **do not require Virtual Key installation**
* During the Connect flow, users are prompted about enabling streaming via an in-vehicle toggle
* Users can request email instructions on how to enable the streaming setting in their vehicle's infotainment screen
* Once the streaming toggle is enabled in the vehicle, data will be refreshed more frequently
* Without streaming enabled, data is refreshed every 5 minutes while the vehicle is awake
---
# Source: https://smartcar.com/docs/errors/testing-errors.md
> ## Documentation Index
> Fetch the complete documentation index at: https://smartcar.com/docs/llms.txt
> Use this file to discover all available pages before exploring further.
# Testing Errors
> By launching Connect in [simulated mode](/docs/connect/advanced-config/modes), you're able to test your application against certain errors.
## Testing Connect Errors
You can use the following emails to test a subset of Connect errors:
| Error | Email | VIN |
| ---------------------- | ----------------------------------------------------------------------------- | ----------------- |
| `invalid_subscription` | [smartcar@invalid-subscription.com](mailto:smartcar@invalid-subscription.com) | 0SCAUDI0155C49A95 |
| `vehicle_incompatible` | [smartcar@vehicle-incompatible.com](mailto:smartcar@vehicle-incompatible.com) | 0SCAUDI012FE3B132 |
Visit the [Connect Errors](/api-reference/api-errors#connect-errors) page for more details.
## Testing API Errors
You can use use the following emails to test these API error types:
* `COMPATIBILITY`
* `CONNECTED_SERVICES_ACCOUNT`
* `UPSTREAM`
* `VEHICLE_STATE`
| Type | Code | Email | VIN |
| ---------------------------- | ----------------------------- | ---------------------------------------------------------------------------------------------------------------------------------------- | ----------------- |
| `COMPATIBILITY` | `MAKE_NOT_COMPATIBLE` | [COMPATIBILITY.MAKE\_NOT\_COMPATIBLE@smartcar.com](mailto:COMPATIBILITY.MAKE_NOT_COMPATIBLE@smartcar.com) | 0SCLR000270BE6600 |
| `COMPATIBILITY` | `SMARTCAR_NOT_CAPABLE` | [COMPATIBILITY.SMARTCAR\_NOT\_CAPABLE@smartcar.com](mailto:COMPATIBILITY.SMARTCAR_NOT_CAPABLE@smartcar.com) | 0SCLR0002DC18F57F |
| `COMPATIBILITY` | `VEHICLE_NOT_CAPABLE` | [COMPATIBILITY.VEHICLE\_NOT\_CAPABLE@smartcar.com](mailto:COMPATIBILITY.VEHICLE_NOT_CAPABLE@smartcar.com) | 0SCLR00024C7CDF7A |
| `CONNECTED_SERVICES_ACCOUNT` | `ACCOUNT_ISSUE` | [CONNECTED\_SERVICES\_ACCOUNT.ACCOUNT\_ISSUE@smartcar.com](mailto:CONNECTED_SERVICES_ACCOUNT.ACCOUNT_ISSUE@smartcar.com) | 0SCLR00026BAAA136 |
| `CONNECTED_SERVICES_ACCOUNT` | `AUTHENTICATION_FAILED` | [CONNECTED\_SERVICES\_ACCOUNT.AUTHENTICATION\_FAILED@smartcar.com](mailto:CONNECTED_SERVICES_ACCOUNT.AUTHENTICATION_FAILED@smartcar.com) | 0SCLR00021D803C7B |
| `CONNECTED_SERVICES_ACCOUNT` | `NO_VEHICLES` | [CONNECTED\_SERVICES\_ACCOUNT.NO\_VEHICLES@smartcar.com](mailto:CONNECTED_SERVICES_ACCOUNT.NO_VEHICLES@smartcar.com) | 0SCLR00027671837B |
| `CONNECTED_SERVICES_ACCOUNT` | `SUBSCRIPTION` | [CONNECTED\_SERVICES\_ACCOUNT.SUBSCRIPTION@smartcar.com](mailto:CONNECTED_SERVICES_ACCOUNT.SUBSCRIPTION@smartcar.com) | 0SCLR0002B9BAF29F |
| `CONNECTED_SERVICES_ACCOUNT` | `VEHICLE_MISSING` | [CONNECTED\_SERVICES\_ACCOUNT.VEHICLE\_MISSING@smartcar.com](mailto:CONNECTED_SERVICES_ACCOUNT.VEHICLE_MISSING@smartcar.com) | 0SCLR00024E29EEBD |
| `UPSTREAM` | `INVALID_DATA` | [UPSTREAM.INVALID\_DATA@smartcar.com](mailto:UPSTREAM.INVALID_DATA@smartcar.com) | 0SCLR000298A0A649 |
| `UPSTREAM` | `KNOWN_ISSUE` | [UPSTREAM.KNOWN\_ISSUE@smartcar.com](mailto:UPSTREAM.KNOWN_ISSUE@smartcar.com) | 0SCLR0002A8760B72 |
| `UPSTREAM` | `NO_RESPONSE` | [UPSTREAM.NO\_RESPONSE@smartcar.com](mailto:UPSTREAM.NO_RESPONSE@smartcar.com) | 0SCLR0002C23E43AB |
| `UPSTREAM` | `UNKNOWN_ISSUE` | [UPSTREAM.UNKNOWN\_ISSUE@smartcar.com](mailto:UPSTREAM.UNKNOWN_ISSUE@smartcar.com) | 0SCLR0002D4878901 |
| `VEHICLE_STATE` | `ASLEEP` | [VEHICLE\_STATE.ASLEEP@smartcar.com](mailto:VEHICLE_STATE.ASLEEP@smartcar.com) | 0SCLR0002E8896323 |
| `VEHICLE_STATE` | `CHARGING_IN_PROGRESS` | [VEHICLE\_STATE.CHARGING\_IN\_PROGRESS@smartcar.com](mailto:VEHICLE_STATE.CHARGING_IN_PROGRESS@smartcar.com) | 0SCLR000221F1E672 |
| `VEHICLE_STATE` | `CHARGING_PLUG_NOT_CONNECTED` | [VEHICLE\_STATE.CHARGING\_PLUG\_NOT\_CONNECTED@smartcar.com](mailto:VEHICLE_STATE.CHARGING_PLUG_NOT_CONNECTED@smartcar.com) | 0SCLR0002CBFC7C21 |
| `VEHICLE_STATE` | `DOOR_OPEN` | [VEHICLE\_STATE.DOOR\_OPEN@smartcar.com](mailto:VEHICLE_STATE.DOOR_OPEN@smartcar.com) | 0SCLR0002F8BD90B8 |
| `VEHICLE_STATE` | `FULLY_CHARGED` | [VEHICLE\_STATE.FULLY\_CHARGED@smartcar.com](mailto:VEHICLE_STATE.FULLY_CHARGED@smartcar.com) | 0SCLR00029CD9D894 |
| `VEHICLE_STATE` | `HOOD_OPEN` | [VEHICLE\_STATE.HOOD\_OPEN@smartcar.com](mailto:VEHICLE_STATE.HOOD_OPEN@smartcar.com) | 0SCLR000219CD4A2C |
| `VEHICLE_STATE` | `IGNITION_ON` | [VEHICLE\_STATE.IGNITION\_ON@smartcar.com](mailto:VEHICLE_STATE.IGNITION_ON@smartcar.com) | 0SCLR00021D49E58A |
| `VEHICLE_STATE` | `IN_MOTION` | [VEHICLE\_STATE.IN\_MOTION@smartcar.com](mailto:VEHICLE_STATE.IN_MOTION@smartcar.com) | 0SCLR00024F6EE640 |
| `VEHICLE_STATE` | `REMOTE_ACCESS_DISABLED` | [VEHICLE\_STATE.REMOTE\_ACCESS\_DISABLED@smartcar.com](mailto:VEHICLE_STATE.REMOTE_ACCESS_DISABLED@smartcar.com) | 0SCLR0002588A5CC1 |
| `VEHICLE_STATE` | `TRUNK_OPEN` | [VEHICLE\_STATE.TRUNK\_OPEN@smartcar.com](mailto:VEHICLE_STATE.TRUNK_OPEN@smartcar.com) | 0SCLR00023C607FDB |
| `VEHICLE_STATE` | `UNKNOWN` | [VEHICLE\_STATE.UNKNOWN@smartcar.com](mailto:VEHICLE_STATE.UNKNOWN@smartcar.com) | 0SCLR0002E6CC0314 |
| `VEHICLE_STATE` | `UNREACHABLE` | [VEHICLE\_STATE.UNREACHABLE@smartcar.com](mailto:VEHICLE_STATE.UNREACHABLE@smartcar.com) | 0SCLR000247EBF067 |
| `VEHICLE_STATE` | `VEHICLE_OFFLINE_FOR_SERVICE` | [VEHICLE\_STATE.VEHICLE\_OFFLINE\_FOR\_SERVICE@smartcar.com](mailto:VEHICLE_STATE.VEHICLE_OFFLINE_FOR_SERVICE@smartcar.com) | 0SCLR0002AF1D71A1 |
---
# Source: https://smartcar.com/docs/integrations/webhooks/best-practices/testing.md
> ## Documentation Index
> Fetch the complete documentation index at: https://smartcar.com/docs/llms.txt
> Use this file to discover all available pages before exploring further.
# Testing
> Test your webhook integration before going to production
Thoroughly test your webhook integration to catch issues before they affect users.
## Test in Development
Use the Smartcar Dashboard to trigger test webhook deliveries.
Use ngrok or similar to expose your local server:
```bash theme={null}
ngrok http 3000
```
This creates a public HTTPS URL that forwards to your local development server.
In the Smartcar Dashboard, set your ngrok URL as the callback URI (e.g., `https://abc123.ngrok.io/webhooks/smartcar`)
Complete the VERIFY challenge to activate the webhook
Use the Dashboard to send test `VEHICLE_STATE` and `VEHICLE_ERROR` events to your endpoint
Check logs to confirm:
* Signature verification works
* Payload is queued successfully
* Processing logic executes correctly
* Idempotency prevents duplicates
***
## Next Steps
Once testing is complete, prepare for production deployment:
Set up production monitoring and alerts
Review security best practices for production
Deploy production-ready AWS infrastructure
Understand production retry and timeout policies
---
# Source: https://smartcar.com/docs/api-reference/signals/tractionbattery.md
> ## Documentation Index
> Fetch the complete documentation index at: https://smartcar.com/docs/llms.txt
> Use this file to discover all available pages before exploring further.
# TractionBattery Signals
### Is Heater Active
Signal code: `tractionbattery-isheateractive`
A boolean flag indicating whether the high voltage battery's heating system is currently operating.
### Max Range Charge Counter
Signal code: `tractionbattery-maxrangechargecounter`
A counter tracking the number of times the vehicle has been charged to its maximum range capacity.
### Nominal Capacities
Signal code: `tractionbattery-nominalcapacity`
An object containing the gross battery capacity and a list of multiple available gross capacity configurations for the high voltage battery.
Identifies the origin or method used to determine the battery's gross capacity.
**Possible values:** `SMARTCAR`, `USER_SELECTED`
The total gross energy storage capacity of the high voltage battery, typically measured in kilowatt-hours (kWh). This value represents the nominal rated battery capacity for a vehicle.
An array of available battery capacity configurations for the vehicle.
The battery capacity value in kilowatt-hours (kWh).
A description of the uniqueness for the nominal capacity and engine type of the vehicle in the form {ENGINE_TYPE}:{TRIM}, for example "BEV:Extended Range".
The unit of measurement for the battery capacity.
```json Example theme={null}
{
"source": "SMARTCAR",
"capacity": 73.5,
"availableCapacities": [
{
"capacity": 73.5,
"description": "BEV:Extended Range"
},
{
"capacity": 80.9,
"description": null
}
],
"unit": "kWh"
}
```
### Range
Signal code: `tractionbattery-range`
Returns the most accurate real world estimate that is available. Estimated > Ideal > Rated.
**Possible values:** `DEFAULT`
**Possible values:** `IDEAL_CONDITIONS`, `ESTIMATED`, `RATED`
```json Example theme={null}
{
"unit": "kilometers",
"value": 350
}
```
### State Of Charge
Signal code: `tractionbattery-stateofcharge`
The current charge level of the high voltage battery, expressed as a percentage (0 - 100).
```json Example theme={null}
{
"unit": "percent",
"value": 75
}
```
---
# Source: https://smartcar.com/docs/api-reference/signals/transmission.md
> ## Documentation Index
> Fetch the complete documentation index at: https://smartcar.com/docs/llms.txt
> Use this file to discover all available pages before exploring further.
# Transmission Signals
### Gear State
Signal code: `transmission-gearstate`
The current gear selection of the vehicle's transmission.
The current gear selection of the vehicle's transmission.
**Possible values:** `PARK`, `DRIVE`, `REVERSE`, `NEUTRAL`
### Drive Mode
Signal code: `transmission-drivemode`
Represents the current drive mode selected in the vehicle's transmission system
The standardized drive mode value
The display name for the drive mode as shown by the OEM
```json Example theme={null}
{
"canonical": "NORMAL",
"oemDisplayName": "everyday"
}
```
---
# Source: https://smartcar.com/docs/api-reference/webhooks/unsubscribe-webhook.md
> ## Documentation Index
> Fetch the complete documentation index at: https://smartcar.com/docs/llms.txt
> Use this file to discover all available pages before exploring further.
# Unsubscribe
> Unsubscribe a vehicle from a webhook.
## Request
**Header**
In the format `Bearer {application_management_token}`. You can find your `application_management_token` under
your Application Configuration in Dashboard.
**Path**
The [webhook id](/api-reference/management/get-vehicle-connections) you are unsubscribing the vehicle from.
## Response
Status of the request.
```json Example Response theme={null}
{
"status": "success"
}
```
---
# Source: https://smartcar.com/docs/errors/api-errors/upstream-errors.md
> ## Documentation Index
> Fetch the complete documentation index at: https://smartcar.com/docs/llms.txt
> Use this file to discover all available pages before exploring further.
# Upstream Errors
> Thrown when the OEM servers or vehicle failed to process the request.
Check Smartcar Reliability & Status
For upt-to-date information on Smartcar's platform and brand reliability, visit our:
# `INVALID_DATA`
One of Smartcar’s upstream sources provided data that is malformed, invalid, or logically invalid (e.g. 65535 psi for tire pressure).
```json theme={null}
{
"type": "UPSTREAM",
"code": "INVALID_DATA",
"description": "Smartcar received invalid data from an upstream source. Please retry your request at a later time.",
"docURL": "https://smartcar.com/docs/errors/api-errors/upstream-errors#invalid-data",
"statusCode": 502,
"requestId": "5dea93a1-3f79-4246-90c5-89610a20471b",
"resolution": { "type": "RETRY_LATER" },
"suggestedUserMessage": "Your car is temporarily unable to connect to . Please be patient while we’re working to resolve this issue."
}
```
### Suggested resolution
You can resolve this error by retrying your request at a later time.
### Suggested user message
> Your car is temporarily unable to connect to \. Please be patient while we’re working to resolve this issue.
***
# `KNOWN_ISSUE`
Smartcar received an error from an upstream source. This error usually occurs when an upstream source experiences an error that we have previously investigated and categorized as a known issue.
```json theme={null}
{
"type": "UPSTREAM",
"code": "KNOWN_ISSUE",
"description": "Smartcar received an error from an upstream source. Please retry your request at a later time.",
"docURL": "https://smartcar.com/docs/errors/api-errors/upstream-errors#known-issue",
"statusCode": 502,
"requestId": "5dea93a1-3f79-4246-90c5-89610a20471b",
"resolution": { "type": "RETRY_LATER" },
"suggestedUserMessage": "Your car is temporarily unable to connect to . Please be patient while we’re working to resolve this issue."
}
```
### Suggested resolution
You can resolve this error by retrying your request at a later time.
### Suggested user message
> Your car is temporarily unable to connect to \. Please be patient while we’re working to resolve this issue.
***
# `NO_RESPONSE`
One of Smartcar’s upstream sources failed to respond. This error usually occurs when one of Smartcar’s upstream sources is experiencing issues and is currently unavailable.
This error can also occur when a specific vehicle in located in an area with weak cellular reception and fails to respond to your request in a timely manner.
```json theme={null}
{
"type": "UPSTREAM",
"code": "NO_RESPONSE",
"description": "One of Smartcar’s upstream sources failed to respond. Please retry your request at a later time.",
"docURL": "https://smartcar.com/docs/errors/api-errors/upstream-errors#no-response",
"statusCode": 502,
"requestId": "5dea93a1-3f79-4246-90c5-89610a20471b",
"resolution": { "type": "RETRY_LATER" },
"suggestedUserMessage": "Your car is temporarily unable to connect to . Please be patient while we’re working to resolve this issue."
}
```
### Suggested resolution
You can resolve this error by retrying your request at a later time.
### Suggested user message
> Your car is temporarily unable to connect to \. Please be patient while we’re working to resolve this issue.
***
# `RATE_LIMIT`
Your application’s requests have exceeded this vehicle’s rate limit.
```json theme={null}
{
"type": "UPSTREAM",
"code": "NO_RESPONSE",
"description": "One of Smartcar’s upstream sources failed to respond. Please retry your request at a later time.",
"docURL": "https://smartcar.com/docs/errors/api-errors/upstream-errors#rate-limit",
"statusCode": 502,
"requestId": "5dea93a1-3f79-4246-90c5-89610a20471b",
"resolution": { "type": "RETRY_LATER" },
"suggestedUserMessage": "Your car is temporarily unable to connect to . Please be patient while we’re working to resolve this issue."
}
```
### Suggested resolution
You can resolve this error by refraining from making API requests to this specific vehicle for a period of time.
If your application automatically retries requests, please disable automatic retries or implement a backoff period to retry less frequently.
### Suggested user message
> Your car is temporarily unable to connect to \. Please be patient while we’re working to resolve this issue.
***
# `UNKNOWN_ISSUE`
Smartcar received an unknown error from an upstream source. This error usually occurs when one of Smartcar’s upstream sources experiences an error that we have not yet investigated or mitigated.
There are several reasons why we might not have investigated this error yet:
* The feature or vehicle make is still in beta.
* This error does not occur very frequently.
* This is the first time we have received this error.
```json theme={null}
{
"type": "UPSTREAM",
"code": "UNKNOWN_ISSUE",
"description": "Smartcar received an unknown error from an upstream source. Please retry your request at a later time and contact us if the issue persists.",
"docURL": "https://smartcar.com/docs/errors/api-errors/upstream-errors#unknown-issue",
"statusCode": 502,
"requestId": "5dea93a1-3f79-4246-90c5-89610a20471b",
"resolution": { "type": "RETRY_LATER" },
"suggestedUserMessage": "Your car is temporarily unable to connect to . Please be patient while we’re working to resolve this issue."
}
```
### Suggested resolution
Given the broad range of situations that can cause this error, you might or might not be able to resolve this error by retrying your request at a later time.
If you retry your request and the issue persists, please contact us to help you mitigate this error.
### Suggested user message
> Your car is temporarily unable to connect to \. Please be patient while we’re working to resolve this issue.
***
---
# Source: https://smartcar.com/docs/connect/user-selected-batcap.md
> ## Documentation Index
> Fetch the complete documentation index at: https://smartcar.com/docs/llms.txt
> Use this file to discover all available pages before exploring further.
# User Selected Battery Capacity
> This flow can be launched using the URL provided by the [battery capacity](/docs/api-reference/get-nominal-capacity) endpoint.
## Automatic Battery Capacity Selection
When you request the `read_battery` permission, users will automatically be prompted to select their vehicle's battery capacity during the Smartcar Connect flow if we cannot determine the specific capacity for their vehicle(s). This ensures accurate battery information for your application is readily available.
For users that skip the selection prompt or were connected prior to September 18th, 2025, you can still launch the battery capacity selection flow manually using the URL provided by the [GET /battery/nominal\_capacity](/api-reference/get-nominal-capacity) endpoint.
### Append your redirect URI
Smartcar will provide a URL with the following parameters from the [GET
/battery/nominal\_capacity](/api-reference/get-nominal-capacity) endpoint:
```http theme={null}
https://connect.smartcar.com/battery-capacity
?vehicle_id=36ab27d0-fd9d-4455-823a-ce30af709ffc
&client_id=8229df9f-91a0-4ff0-a1ae-a1f38ee24d07
&token=90abecb6-e7ab-4b85-864a-e1c8bf67f2ad
&response_type=vehicle_id
&redirect_uri=
```
The Smartcar vehicle Id.
The `client_id` from the Smartcar Dashboard for your application.
Must be set to `vehicle_id`.
The URI you would like the response sent to after a user exits the
flow.
**NOTE:** this is the only parameter that will **not** be prepopulated as
part of the API response. You **must** append it in order to launch the
flow successfully and receive confirmation the user has exited the flow.
A token to validate that the URL was provided from a [battery capacity](/api-reference/get-nominal-capacity)
response for your application. The token is valid for 30 days. If a token is not provided or is no longer valid,
the user will be directed to re-auth prior to selecting their capacity.
## Response
### Success
After the user selects a capacity and completes the flow, Smartcar will send
the following to your redirect URI:
```http Success theme={null}
https://example.com/home
?vehicle_id=36ab27d0-fd9d-4455-823a-ce30af709ffc
&selected_capacity=80.9
&reason=battery_capacity
```
Upon receiving a success response, you can access the `selected_capacity` by calling the GET
[/battery/nominal\_capacity](/api-reference/get-nominal-capacity) endpoint to
view the selection in the `capacity.nominal` field.
### Error
When you redirect the user to select a battery capacity and they select "I don't know the battery capacity", Smartcar will send the
following to your redirect URI:
```http Error theme={null}
https://example.com/home
?error=battery_capacity_no_selection
&error_description=user did not know battery capacity
&vehicle_id=36ab27d0-fd9d-4455-823a-ce30af709ffc
```
## Flow Example
---
# Source: https://smartcar.com/docs/api-reference/user-vehicles.md
> ## Documentation Index
> Fetch the complete documentation index at: https://smartcar.com/docs/llms.txt
> Use this file to discover all available pages before exploring further.
# User Vehicles
> Returns a paged list of all vehicles connected to the application for the current authorized `user`.
This endpoint is under a different path while we complete the transition to v3.0. You can safely continue using this endpoint, but please be aware that it may be deprecated in the future.
## Request
**Query**
The number of vehicles to return per page. `Max: 50`
The index to start the `vehicles` list at.
## Response
Metadata about the current list of elements.
The total number of elements for the entire query (not just the given page).
The current start index of the returned list of elements.
An array of vehicle IDs.
```json Example Response theme={null}
{
"paging": {
"count": 25,
"offset": 10
},
"vehicles": [
"36ab27d0-fd9d-4455-823a-ce30af709ffc"
]
}
```
---
# Source: https://smartcar.com/docs/api-reference/user.md
> ## Documentation Index
> Fetch the complete documentation index at: https://smartcar.com/docs/llms.txt
> Use this file to discover all available pages before exploring further.
# User
> Returns the ID of the vehicle owner who granted access to your application.
This endpoint is under a different path while we complete the transition to v3.0. You can safely continue using this endpoint, but please be aware that it may be deprecated in the future.
This should be used as the static unique identifier for storing the access token and refresh token pair in your database.
Note: A single user can own multiple vehicles, and multiple users can own the same vehicle.
When using Single Select for Connect, a single user with multiple vehicles
will have a 1:1 (`access_token`:`vehicle_id`) mapping.
## Response
A user ID (UUID v4).
```json Example Response theme={null}
{
"id": "e0514ef4-5226-11e8-8c13-8f6e8f02e27e"
}
```
---
# Source: https://smartcar.com/docs/getting-started/using-vs-with-postman.md
> ## Documentation Index
> Fetch the complete documentation index at: https://smartcar.com/docs/llms.txt
> Use this file to discover all available pages before exploring further.
# Testing with Postman
> In this tutorial we'll go over how to use Vehicle Simulator to test out Smartcar using Postman.
## What is Postman?
Postman is a collaboration platform for API development. Postman's features simplify each step of building an API and streamline collaboration so you can create better APIs - faster.
You’ll need a few things to start making API calls with Smartcar and Postman:
* [A Postman Account](https://identity.getpostman.com/signup?continue=https%3A%2F%2Fgo.postman.co%2Fbuild)
* [Smartcar’s Postman Collection](https://www.postman.com/smartcar/smartcar-api/collection/qk7g8v2/smartcar-api-v3?action=share\&creator=33621094)
* [A Smartcar Developer Account](https://dashboard.smartcar.com/signup)
## Configuring the Connect flow in Postman
1. Install the latest [Postman app](https://www.postman.com/downloads/) and log in
2. Import the [Smartcar collection](https://www.postman.com/smartcar/smartcar-api/collection/qk7g8v2/smartcar-api-v3?action=share\&creator=33621094) into your local Postman workspace. Hit Import.
3. Click Link, paste in [the link](https://www.postman.com/smartcar/smartcar-api/collection/qk7g8v2/smartcar-api-v3?action=share\&creator=33621094) to the collection and hit Continue.
4. On the next screen, hit Import.
## Smartcar Application Configuration
If you haven’t already signed up for a Smartcar Developer account, you can do so from this [**sign-up link**](https://dashboard.smartcar.com/signup).
* Grab your **Client ID** and **Client Secret** from the Configuration page after you sign in, and copy them to someplace secure. You’ll need those tokens a little later in this setup.
* Under the Credentials tab for your application, you’ll need to add the following Redirect URIs. This will ensure that Smartcar Connect exits successfully with both Postman’s Native and Web clients.
```
https://oauth.pstmn.io/v1/browser-callback
http://localhost:8000/exchange
```
Through the Connect flow, you’re able to get consent from vehicle owners to connect their vehicle to your application. Postman provides an easy way to manage OAuth 2.0 flows under the Authorization tab of a Collection. Set up the Configuration Options for either a live or simulated vehicle.
**Live Vehicle**
| Parameter | Description |
| ---------------- | ----------------------------------------------------------------------------------------------------------------- |
| Auth URL | `https://connect.smartcar.com/oauth/authorize?approval_prompt=force` |
| Access Token URL | `https://auth.smartcar.com/oauth/token` |
| Client ID | `client_id` from your Dashboard |
| Client Secret | `client_secret` from your Dashboard |
| Scope | A space-separated list of [permissions](/api-reference/permissions) that your application is requesting access to |
**Simulated Vehicle**
| Parameter | Description |
| ---------------- | ----------------------------------------------------------------------------------------------------------------- |
| Auth URL | `https://connect.smartcar.com/oauth/authorize?approval_prompt=force&mode=simulated` |
| Access Token URL | `https://auth.smartcar.com/oauth/token` |
| Client ID | `client_id` from your Dashboard |
| Client Secret | `client_secret` from your Dashboard |
| Scope | A space-separated list of [permissions](/api-reference/permissions) that your application is requesting access to |
## Setting up a Simulated Vehicle
Under the Simulator tab on Dashboard, hit Add Vehicle. Note that you may already have a pre-created simulated vehicle available, if so skip to **Connecting to a vehicle** below.
Select a region and MMY for your vehicle, then hit Search by MMY
After selecting Use Vehicle, you’ll want to select a state for the vehicle. After that, you’ll get a set of credentials to use in the Connect flow.
Before proceeding to the next step, you’ll want to start the simulation in the Smartcar Dashboard.
## Connecting to a vehicle
If configured correctly, when you click **Get New Access Token** in Postman, you should see the first screen of the Connect flow.
Before hitting Continue, make sure to select a country from the dropdown appropriate to the region you selected for your simulated vehicle.
Continue through the Connect flow, select the brand of your simulated vehicle and enter in the credentials you were issued for your simulated vehicle.
After accepting the permissions you’ll be met with the following screen:
Hit Use Token. You should see Access Token under Current Token populate with the access\_token from the popup. Using this access\_token you can make API requests to Smartcar's API.
Access tokens are only valid for two hours. If you want to make API requests after it has expired, you'll need to generate a
new one by stepping through the Connect Flow again, or through a [token refresh](/api-reference/authorization/refreshing-access-token).
## Making an API request
Thanks to Postman, requests in the collection will inherit the `access_token` from the OAuth 2.0 Authorization flow we went through in the steps above.
In order to make API requests, we’ll need to first get a Smartcar `vehicle Id`. A `vehicle Id` is a unique identifier for a vehicle on Smartcar’s platform.
This can be done with the `All Vehicles` request. Making this request will assign the `vehicle Id` to the `{{vehicle_id}}` variable for other requests in the Collection.
Now that you've got a vehicle Id, you can make a request to other endpoints. Hitting Vehicle Info, we can see the MMY of the vehicle.
Checking `EV Battery Level`, we can see the response matches the vehicle state on the simulator
## Troubleshooting
* Check that you’re launching Connect in simulated mode
* If you’re still running into an error make sure you’ve selected a country that matches the region you selected for your simulated vehicle.
* Check that the vehicle you’ve created supports the endpoint. Select View Estimated Latencies to see a list of endpoints supported for the vehicle.
* If you’re still running into the error, check that you’ve requested the appropriate permission in the scope parameter of the Connect URL.
You can always check the `/permissions` endpoint to see what endpoints you have access to.
---
# Source: https://smartcar.com/docs/api-reference/v2-overview.md
> ## Documentation Index
> Fetch the complete documentation index at: https://smartcar.com/docs/llms.txt
> Use this file to discover all available pages before exploring further.
# Vehicles API v2.0 Overview
> Overview of the Smartcar Vehicles API v2.0 and deprecation notice.
The Vehicles API v2.0 will be deprecated by **Q3 of 2026**. We recommend migrating to the [latest version](/api-reference/vehicles-api-intro) as soon as possible to ensure continued support and access to new features.
2.0 is still the only supported version for sending remote commands. If you need to send commands, please continue using v2.0 until commands are supported in the latest version later this year.
The Smartcar Vehicles API v2.0 is the previous version of our core API for accessing standardized vehicle data and current version for sending remote commands. It allows developers to:
* Retrieve real-time vehicle signals (e.g., battery level, odometer, fuel, tire pressure)
* Send remote commands (lock/unlock, start/stop charging, etc.)
All requests to v2.0 require an OAuth2 access token, which is obtained by having the vehicle owner authorize your app via [Smartcar Connect](/connect/what-is-connect).
## Base URL
```
https://api.smartcar.com/v2.0
```
For this API, the latency response times may vary per vehicle make and model. For more information, see [OEM Latency](/help/oem-latency).
---
# Source: https://smartcar.com/docs/errors/api-errors/validation-errors.md
> ## Documentation Index
> Fetch the complete documentation index at: https://smartcar.com/docs/llms.txt
> Use this file to discover all available pages before exploring further.
# Validation Errors
> Thrown if there is an issue with the format of the request or body.
# `NULL`
Request invalid or malformed. Please check for missing parameters, spelling and casing mistakes, and other syntax issues.
```json theme={null}
{
"type": "VALIDATION",
"code": null,
"description": "Request invalid or malformed. Please check for missing parameters, spelling and casing mistakes, and other syntax issues.",
"docURL": "https://smartcar.com/docs/errors/api-errors/validation-errors#null",
"statusCode": 400,
"requestId": "5dea93a1-3f79-4246-90c5-89610a20471b",
"resolution": { "type": null },
"suggestedUserMessage": "Your car is temporarily unable to connect to . Please be patient while we’re working to resolve this issue."
}
```
### Suggested resolution
You can resolve this error by referring to our API reference and ensuring that you pass all the parameters as specified.
### Troubleshooting Steps
* Ensure that you spell and case all parameters correctly.
* Ensure that your request has the correct content-type (i.e. application/json or application/x-www-form-urlencoded).
* Ensure that your request has the correct URL and HTTP method.
### Suggested user message
> Your car is temporarily unable to connect to \. Please be patient while we’re working to resolve this issue.
***
# `PARAMETER`
Your request is formatted correctly, but one or more of the provided parameters is incorrect.
```json theme={null}
{
"type": "VALIDATION",
"code": null,
"description": "Your request is formatted correctly, but one or more of the provided parameters is incorrect.",
"docURL": "https://smartcar.com/docs/errors/api-errors/validation-errors#parameter",
"statusCode": 400,
"requestId": "5dea93a1-3f79-4246-90c5-89610a20471b",
"resolution": { "type": null },
"suggestedUserMessage": "Your car is temporarily unable to connect to . Please be patient while we’re working to resolve this issue."
}
```
### Suggested resolution
You can resolve this error by referring to our API reference and ensuring that you pass all the parameters as specified.
For Ford or Lincoln vehicles:
* Please check the coordinates provided for setting a charge schedule are associated with a saved charging location for this vehicle.
### Suggested user message
> Your car is temporarily unable to connect to \. Please be patient while we’re working to resolve this issue.
---
# Source: https://smartcar.com/docs/api-reference/webhooks/events/vehicle-error.md
> ## Documentation Index
> Fetch the complete documentation index at: https://smartcar.com/docs/llms.txt
> Use this file to discover all available pages before exploring further.
# VEHICLE_ERROR Event
> Error notifications and resolution tracking for signal retrieval issues
Triggered when Smartcar encounters an error while attempting to retrieve signal data from a vehicle. This event helps you monitor data availability, understand missing or stale signal data and provide an event to trigger a user action to resolve the issue.
## When This Event Fires
The `VEHICLE_ERROR` event fires when:
* Smartcar detects an error while retrieving signal data
* The vehicle manufacturer's API returns an error
* The vehicle is offline or unreachable
* Authentication, permission, or compatibility errors occur
**Resolution notifications**: When an error condition is resolved (e.g., vehicle comes back online), Smartcar sends another `VEHICLE_ERROR` event with `state` set to `"RESOLVED"`. This enables automatic recovery workflows.
***
## Error Categories
Errors are categorized by type and include specific error codes:
Issues with the user's account with the vehicle manufacturer.
| Type | Code | Description |
| ---------------------------- | ----------------------- | ----------------------------------------------- |
| `CONNECTED_SERVICES_ACCOUNT` | `ACCOUNT_ISSUE` | General account problem |
| `CONNECTED_SERVICES_ACCOUNT` | `AUTHENTICATION_FAILED` | Authentication credentials are invalid |
| `CONNECTED_SERVICES_ACCOUNT` | `PERMISSION` | User lacks necessary permissions |
| `CONNECTED_SERVICES_ACCOUNT` | `SUBSCRIPTION` | Required subscription is inactive or expired |
| `CONNECTED_SERVICES_ACCOUNT` | `VIRTUAL_KEY_REQUIRED` | Vehicle requires a virtual key to be configured |
Issues with the vehicle's connectivity or state.
| Type | Code | Description |
| --------------- | ------------------------ | ---------------------------------------- |
| `VEHICLE_STATE` | `REMOTE_ACCESS_DISABLED` | Remote access is disabled on the vehicle |
| `VEHICLE_STATE` | `ASLEEP` | Vehicle is in sleep mode |
| `VEHICLE_STATE` | `UNREACHABLE` | Vehicle is not connected to the internet |
Issues with signal availability for the specific vehicle.
| Type | Code | Description |
| --------------- | ---------------------- | ------------------------------------------------ |
| `COMPATIBILITY` | `MAKE_NOT_COMPATIBLE` | Vehicle manufacturer doesn't support this signal |
| `COMPATIBILITY` | `SMARTCAR_NOT_CAPABLE` | Smartcar cannot retrieve this signal yet |
| `COMPATIBILITY` | `VEHICLE_NOT_CAPABLE` | This specific vehicle doesn't support the signal |
Issues with granted permissions.
| Type | Code | Description |
| ------------ | ------ | --------------------------------------- |
| `PERMISSION` | `null` | Required permission not granted by user |
***
## Payload Structure
Unique identifier for this event. Use this for idempotency to prevent duplicate processing.
Always `"VEHICLE_ERROR"` for this event type.
Smartcar vehicle ID for the vehicle this event relates to.
Container for event data.
Information about the user who connected the vehicle.
Smartcar user ID
Vehicle information
Smartcar vehicle ID
Vehicle manufacturer (e.g., `"TESLA"`, `"FORD"`, `"BMW"`)
Vehicle model (e.g., `"Model 3"`, `"Mustang Mach-E"`)
Vehicle model year
Array of error objects. Multiple errors may occur simultaneously.
Error category: `CONNECTED_SERVICES_ACCOUNT`, `VEHICLE_STATE`, `COMPATIBILITY`, or `PERMISSION`
Specific error code (see error categories above)
Error state: `"ERROR"` when error is active, `"RESOLVED"` when the issue has been fixed
Technical description of the error for logging and debugging
User-friendly error message suitable for display to end users. Use this in your application UI.
Link to detailed error documentation. Useful for linking users to troubleshooting guides.
Suggested resolution steps
Resolution category: `RETRY_LATER`, `CONTACT_SUPPORT`, `USER_ACTION_REQUIRED`, etc.
Array of signal objects that were affected by this error.
Kebab-case signal identifier (e.g., `"location-preciselocation"`)
Human-readable signal name (e.g., `"PreciseLocation"`)
Signal category (e.g., `"Location"`, `"TractionBattery"`)
Webhook delivery metadata. See [Event Reference Overview](/api-reference/webhooks/events/overview#common-fields) for complete `meta` object schema.
## Example Payloads
Delivered when an error occurs.
```json theme={null}
{
"eventId": "5a537912-9ad3-424b-ba33-65a1704567e9",
"eventType": "VEHICLE_ERROR",
"vehicleId": "123e4567-e89b-12d3-a456-426614174000",
"data": {
"user": {
"id": "93b3ea96-ca37-43a9-9073-f4334719iok7"
},
"vehicle": {
"id": "123e4567-e89b-12d3-a456-426614174000",
"make": "TESLA",
"model": "Model 3",
"year": 2020
},
"errors": [
{
"type": "COMPATIBILITY",
"code": "VEHICLE_NOT_CAPABLE",
"state": "ERROR",
"description": "The vehicle is incapable of performing your request.",
"suggestedUserMessage": "Your car is unable to perform this request.",
"docURL": "https://smartcar.com/docs/errors/api-errors/compatibility-errors#vehicle-not-capable",
"resolution": {
"type": "CONTACT_SUPPORT"
},
"signals": [
{
"code": "location-preciselocation",
"name": "PreciseLocation",
"group": "Location"
},
{
"code": "tractionbattery-stateofcharge",
"name": "StateOfCharge",
"group": "TractionBattery"
}
]
}
]
},
"meta": {
"version": "4.0",
"deliveryId": "48b25f8f-9fea-42e1-9085-81043682cbb8",
"deliveredAt": 1761896351529,
"webhookId": "123e4567-e89b-12d3-a456-426614174000",
"webhookName": "Battery Monitoring",
"mode": "LIVE"
}
}
```
Delivered when an error condition is resolved.
```json theme={null}
{
"eventId": "8d9e0f1a-2b3c-4d5e-6f7a-8b9c0d1e2f3a",
"eventType": "VEHICLE_ERROR",
"vehicleId": "123e4567-e89b-12d3-a456-426614174000",
"data": {
"user": {
"id": "93b3ea96-ca37-43a9-9073-f4334719iok7"
},
"vehicle": {
"id": "123e4567-e89b-12d3-a456-426614174000",
"make": "TESLA",
"model": "Model 3",
"year": 2020
},
"errors": [
{
"type": "VEHICLE_STATE",
"code": "UNREACHABLE",
"state": "RESOLVED",
"description": "The vehicle is now reachable.",
"signals": [
{
"code": "location-preciselocation",
"name": "PreciseLocation",
"group": "Location"
}
]
}
]
},
"meta": {
"version": "4.0",
"deliveryId": "9f8e7d6c-5b4a-3c2b-1d0e-9f8e7d6c5b4a",
"deliveredAt": 1761898351529,
"webhookId": "123e4567-e89b-12d3-a456-426614174000",
"webhookName": "Battery Monitoring",
"mode": "LIVE"
}
}
```
***
## Common Error Scenarios
| Scenario | Type | Code | Recommended Action |
| --------------------------------------- | ---------------------------- | --------------------- | ----------------------------------------------- |
| Vehicle offline | `VEHICLE_STATE` | `UNREACHABLE` | Retry later; notify user if persistent |
| User revoked permissions | `CONNECTED_SERVICES_ACCOUNT` | `PERMISSION` | Prompt user to re-authenticate |
| Connected services subscription expired | `CONNECTED_SERVICES_ACCOUNT` | `SUBSCRIPTION` | Direct user to renew manufacturer subscription |
| Signal not supported | `COMPATIBILITY` | `VEHICLE_NOT_CAPABLE` | Remove signal from webhook or handle gracefully |
| Vehicle asleep | `VEHICLE_STATE` | `ASLEEP` | Retry later; avoid waking vehicle unnecessarily |
***
## Processing VEHICLE\_ERROR Events
### Basic Handler
```javascript theme={null}
function handleVehicleError(payload) {
const { vehicleId, data } = payload;
const { errors } = data;
errors.forEach(error => {
if (error.state === 'ERROR') {
// New error
logError(vehicleId, error);
notifyUser(vehicleId, error.suggestedUserMessage);
// Take action based on error type
if (error.resolution.type === 'RETRY_LATER') {
scheduleRetry(vehicleId, error.signals);
} else if (error.resolution.type === 'USER_ACTION_REQUIRED') {
sendUserNotification(vehicleId, error);
}
} else if (error.state === 'RESOLVED') {
// Error resolved
logResolution(vehicleId, error);
clearErrorState(vehicleId, error.code);
notifyUser(vehicleId, 'Issue resolved, data is now available');
}
});
}
```
### Best Practices
Monitor both `ERROR` and `RESOLVED` states to implement automatic recovery workflows.
```javascript theme={null}
async function trackErrorState(payload) {
const { vehicleId, data } = payload;
for (const error of data.errors) {
if (error.state === 'ERROR') {
await db.errors.insert({
vehicleId,
errorType: error.type,
errorCode: error.code,
affectedSignals: error.signals.map(s => s.code),
detectedAt: new Date()
});
} else if (error.state === 'RESOLVED') {
await db.errors.update(
{ vehicleId, errorCode: error.code },
{ resolvedAt: new Date(), status: 'resolved' }
);
}
}
}
```
Display the user-friendly message to vehicle owners instead of technical error descriptions.
```javascript theme={null}
function notifyVehicleOwner(error, userId) {
const message = error.suggestedUserMessage ||
'We encountered an issue retrieving data from your vehicle.';
sendNotification(userId, {
title: 'Vehicle Data Unavailable',
body: message,
link: error.docURL // Link to troubleshooting docs
});
}
```
Some errors (ASLEEP, UNREACHABLE) are transient. Implement exponential backoff retries.
```javascript theme={null}
const TRANSIENT_ERROR_CODES = ['ASLEEP', 'UNREACHABLE'];
function shouldRetry(error) {
return TRANSIENT_ERROR_CODES.includes(error.code);
}
async function handleTransientError(vehicleId, error) {
const retryDelays = [60000, 300000, 900000]; // 1m, 5m, 15m
for (const delay of retryDelays) {
await sleep(delay);
try {
// Attempt to fetch data again
const data = await smartcar.fetchSignals(vehicleId, error.signals);
return data; // Success
} catch (err) {
// Still failing, continue retrying
}
}
// All retries failed
notifyUser(vehicleId, 'Unable to reach vehicle after multiple attempts');
}
```
A single `VEHICLE_ERROR` event can contain multiple errors affecting different signals.
```javascript theme={null}
function categorizeErrors(errors) {
const categorized = {
transient: [],
userAction: [],
permanent: []
};
errors.forEach(error => {
if (['ASLEEP', 'UNREACHABLE'].includes(error.code)) {
categorized.transient.push(error);
} else if (error.resolution.type === 'USER_ACTION_REQUIRED') {
categorized.userAction.push(error);
} else {
categorized.permanent.push(error);
}
});
return categorized;
}
```
When errors occur, show stale data with a clear indication that it's not current.
```javascript theme={null}
function displayVehicleData(vehicleId, hasActiveErrors) {
const data = getLastKnownData(vehicleId);
return {
...data,
isStale: hasActiveErrors,
staleSince: getLastSuccessfulFetch(vehicleId),
errorMessage: 'Unable to retrieve current data. Showing last known values.'
};
}
```
***
## Error Resolution Tracking
When an error condition is resolved, Smartcar sends a `VEHICLE_ERROR` event with `state: "RESOLVED"`:
```javascript theme={null}
function handleErrorResolution(payload) {
const { vehicleId, data } = payload;
data.errors.forEach(error => {
if (error.state === 'RESOLVED') {
console.log(`Error resolved for ${vehicleId}: ${error.code}`);
// Clear error flags
clearVehicleError(vehicleId, error.code);
// Resume data collection
resumeDataCollection(vehicleId, error.signals);
// Notify user
notifyUser(vehicleId, 'Your vehicle is now connected and data is available');
}
});
}
```
**Automatic recovery**: Use `state: "RESOLVED"` events to automatically resume normal operations without manual intervention.
***
## Next Steps
Complete error code documentation
Learn about successful signal deliveries
Implement idempotency and retry handling
Understand retry policies
---
# Source: https://smartcar.com/docs/errors/connect-errors/vehicle-incompatible.md
> ## Documentation Index
> Fetch the complete documentation index at: https://smartcar.com/docs/llms.txt
> Use this file to discover all available pages before exploring further.
# Vehicle Incompatible
> This error occurs when a user tries to authorize an incompatible vehicle in Smartcar Connect.
| Parameter | Required | Description |
| ------------------- | -------- | ------------------------------------- |
| `error` | `true` | `vehicle_incompatible` |
| `error_description` | `true` | The user’s vehicle is not compatible. |
| `make` | `false` | The manufacturer of the vehicle. |
| `vin` | `false` | The VIN of the vehicle. |
In order to be compatible, a vehicle must:
* Have the hardware required for internet connectivity
* Belong to the makes and models Smartcar is compatible with
* Be capable of the required permissions that your application is requesting access to
* If the user’s vehicle is incompatible, Smartcar will let the user know and offer them to share their vehicle’s VIN, make, model, and year with your application.
This error is triggered when a user selects an unsupported make, or selects "I don't see my brand..." and then hits "Back to application"
We recommend that your application provides a flow for incompatible vehicles like in the example below.
Note: This error will never occur if your application uses the Compatibility API. The Compatibility API verifies the compatibility of a vehicle before the user enters Smartcar Connect.
To test this error, launch Smartcar Connect in test mode and log in with the email [smartcar@vehicle-incompatible.com](mailto:smartcar@vehicle-incompatible.com) and any password.
If you use Single Select, please see the table below for a simulated VIN.
| Email | VIN |
| ----------------------------------------------------------------------------- | ----------------- |
| [smartcar@vehicle-incompatible.com](mailto:smartcar@vehicle-incompatible.com) | 0SCAUDI012FE3B132 |
---
# Source: https://smartcar.com/docs/help/vehicle-simulator.md
> ## Documentation Index
> Fetch the complete documentation index at: https://smartcar.com/docs/llms.txt
> Use this file to discover all available pages before exploring further.
# Vehicle Simulator
> Learn about what to expect from Vehicle Simulator and how it compares to Live mode.
Vehicle Simulator allows you to test your application in realistic scenarios with a simulated Smartcar-compatible vehicle. Simulator responds to API requests just like a real vehicle. You can choose a simulated trip for your vehicle to take, and track it over time.
You can use the simulator for initial testing before you have a real vehicle to connect, or as part of an end-to-end testing suite.
## Creating a Simulated Vehicle
Simulated vehicles are managed in the Smartcar Dashboard.
Select "Add a vehicle" and select a vehicle by Make, Model, and Year, or provide a VIN for a US-based vehicle that you want to simulate. You'll be able to preview the API endpoints that are supported for the vehicle model you select.
Once you create your simulated vehicle, you'll select a simulated trip profile that the vehicle will follow. This profile can run automatically over time, or you can manually select a stage of the trip for the vehicle in the Dashboard.
## Connecting a Simulated Vehicle
Simulated vehicles generate a special set of credentials that mimic what a real-world vehicle owner would have. You'll use these credentials to establish a vehicle connection through the same Smartcar Connect flow that you will use for live vehicles.
In order for Connect to know you're using credentials generated from Vehicle Simulator, you'll need to pass `mode=simulated` in the [Connect URL](/connect/redirect-to-connect).
Please ensure you're passing or changing the country flag for Connect based on the region you've created your vehicle for.
Failure to do so will result in an invalid credential error on login. You can read more about country selection for Connect [here](/connect/advanced-config/country-flag).
You can set `mode` in the auth client builder to `simulated`.
You'll need to pass `mode=simulated` in the Connect URL
## Making requests to a Simulated Vehicle
Once your simulated vehicle is connected, you can make API requests to it just as you would a real vehicle.
Supported endpoints for the simulated vehicle will send responses with simulated data - unsupported endpoints will return errors just as they would with a real vehicle.
You can also send commands to simulated vehicles, like start/stop charge or lock/unlock doors. These requests will send responses that mimic that of a real vehicle, but the vehicle state will continue to reflect the simulated trip that was selected.
## Expected Responses
### Data
| Permission | Request Method / Path | Example Response |
| ------------------- | --------------------- | ------------------------------------------------------------------------------------------- |
| `read_engine_oil` | GET /engine/oil | `{ lifeRemaining: 0.35 }` |
| `read_battery` | GET /battery | `{ percentRemaining: 0.3, range: 40.5 }` |
| `read_battery` | GET /battery/capacity | `{ capacity: 28 }` |
| `read_charge` | GET /charge | `{ isPluggedIn: true, state: 'FULLY_CHARGED' }` |
| `read_charge` | GET /charge/limit | `{ limit: 1 }` |
| `read_fuel` | GET /fuel | `{ amountRemaining: 53.2, percentRemaining: 0.3, range: 40.5 }` |
| `read_location` | GET /location | `{ latitude: 37.4292, longitude: 122.1382 }` |
| `read_odometer` | GET /odometer | `{ distance: 104.32 }` |
| `read_tires` | GET /tires/pressure | `{ backLeft: 219.3, backRight: 219.3, frontLeft: 219.3, frontRight: 219.3 }` |
| `read_vehicle_info` | GET / | `{ id: 36ab27d0-fd9d-4455-823a-ce30af709ffc, make: "TESLA", model: "Model S", year: 2014 }` |
| `read_vin` | GET /vin | `{ vin: 1234A67Q90F2T4567 }` |
### Commands
Below are the various action requests that can be made to simulated vehicles, and what responses to expect based on the simulated vehicle's current state or simulator support.
Not listed here are the standard API errors that will be returned if the vehicle does not support the capability or the application has not been granted permission.
| Permission | Request (method / path) | Action request | Vehicle state | Response |
| ------------------ | ----------------------- | -------------- | --------------------------------- | -------------------------------------------------------------- |
| `control_security` | POST /security | `LOCK` | Parked / Charging | `{ status: "success" }` |
| `control_security` | POST /security | `UNLOCK` | Parked / Charging | `{ status: "success" }` |
| `control_security` | POST /security | `LOCK` | Driving | `{ type: VEHICLE_STATE, code: IN_MOTION }` |
| `control_security` | POST /security | `UNLOCK` | Driving | `{ type: VEHICLE_STATE, code: IN_MOTION }` |
| `control_charge` | POST /charge | `START` | Charging | `{ status: "success" }` |
| `control_charge` | POST /charge | `STOP` | Charging | `{ status: "success" }` |
| `control_charge` | POST /charge | `STOP` | Parked / Driving (not plugged in) | `{ type: VEHICLE_STATE, code: CHARGING_PLUG_NOT_CONNECTED }` |
| `control_charge` | POST /charge | `START` | Parked / Driving (not plugged in) | `{ type: VEHICLE_STATE, code: CHARGING_PLUG_NOT_CONNECTED }` |
| `control_charge` | POST /charge-limit | `` | Charging | `{ "type": "COMPATIBILITY", "code": "SMARTCAR_NOT_CAPABLE", }` |
| `control_charge` | POST /charge-limit | `` | Parked / Driving (not plugged in) | `{ type: VEHICLE_STATE, code: CHARGING_PLUG_NOT_CONNECTED }` |
### Errors
| Event | Error response | Suggested resolution |
| ------------------------------------------------------------------------------------------------------------------- | ---------------------------------------------------------------------------------- | ----------------------------------------------------------------------------------------------------------------------------------------------------------------------------------------------------------------------------------------------------------------------------------------- |
| Making an API request to a simulated vehicle before connecting the vehicle to your application via Smartcar Connect | `{ type: "PERMISSION", statusCode: 403, resolution: "REAUTHENTICATE" }` | Locate the 'Connect Credentials' button at the top of the simulation screen in the Smartcar Dashboard for your simulated vehicle. There you will find the credentials necessary to connect the vehicle to your application as well as instructions for doing so through Smartcar Connect. |
| Making an API request to a simulated vehicle before a simulation has been started on Dashboard | `{ type: "CONNECTED_SERVICES_ACCOUNT", code: "ACCOUNT_ISSUE", statusCode: 400 }` | Open the Simulator tab in the Smartcar Dashboard and navigate to your target vehicle. If you haven't yet selected a vehicle state, do so now, and then start the simulation using the 'Play' button on the simulation screen. |
| Making an API request to a simulated vehicle that is not associated with your application | `{ type: "CONNECTED_SERVICES_ACCOUNT", code: "VEHICLE_MISSING", statusCode: 400 }` | Ensure the simulated vehicle you are making requests to has been created in the Simulator within your Smartcar Dashboard. |
## Mode Comparison
| Feature | Simulator | Live | |
| ------------------------------------ | ------------------------------------- | -------------------------------- | - |
| Single Select | ✅ | ✅ | |
| Brand Select | ✅ | ✅ | |
| Compatibility API\* | ✅ | ✅ | |
| `control_security` | ✅ | ✅ | |
| `control_charge` | ✅ | ✅ | |
| Make-Specific Endpoints | ❌ | ✅ | |
| Scheduled Webhooks | ❌ | ✅ | |
| Event Based Webhooks\*\* | ❌ | ✅ | |
\*When a real VIN is used either through `VIN@smartcar` for `test` mode, or generating a simulated vehicle with a real VIN.
0SC and 1SC prefixed VINs will not work.
\*\*For supported brands - Toyota, Ford and Tesla.
## FAQs
Access and refresh tokens behave as they do in `live` mode:
* Access Tokens are valid for 2 hours
* Refresh Tokens are valid for 60 days.
* Using a refresh token to fetch an new access/refresh token pair will invalidate the refresh token that you used.
**Reusing simulated vehicle credentials**
If you use the same simulated credentials for multiple Connect flow sessions, we'll issue a new set of tokens each time.
This will not invalidate any existing tokens from previous logins so you'll be able to keep them refreshed in parallel without impacting the validity of the others.
The number of simulated vehicles that can be created depends on your Smartcar plan tier. Please see [here](https://smartcar.com/pricing#plans) for more information.
* Please check that you have launched Connect with the `mode=simulated` parameter
* Please check that you are passing the country feature flag for the region you've set up your vehicle with.
Please see [Country Selection](/connect/advanced-config/country-flag)for Connect for more information.
---
# Source: https://smartcar.com/docs/errors/api-errors/vehicle-state-errors.md
> ## Documentation Index
> Fetch the complete documentation index at: https://smartcar.com/docs/llms.txt
> Use this file to discover all available pages before exploring further.
# Vehicle State Errors
> Thrown when a request fails due to the state of a vehicle or logically cannot be completed e.g. you can't start a vehicle charging if it's not plugged in.
# `ASLEEP`
The vehicle is in a sleep state and temporarily unable to perform your request. Either the vehicle has been inactive for a certain period of time (time periods vary between makes and models) or the user has manually triggered the vehicle’s sleep state.
```json theme={null}
{
"type": "VEHICLE_STATE",
"code": "ASLEEP",
"description": "The vehicle is in a sleep state and temporarily unable to perform your request.",
"docURL": "https://smartcar.com/docs/errors/api-errors/vehicle-state-errors#asleep",
"statusCode": 409,
"requestId": "5dea93a1-3f79-4246-90c5-89610a20471b",
"resolution": { "type": null },
"suggestedUserMessage": "Your vehicle is in a sleep state. This request was not sent to preserve battery life. "
}
```
### Suggested resolution
The vehicle is in a sleep state and temporarily unable to perform your request.
### Troubleshooting Steps
* Prompt the user to start the vehicle’s engine (required) and to drive the vehicle for a short distance (optional).
* Wait for a few minutes and retry your request.
* Ensure that the vehicle’s 12-volt battery is sufficiently charged.
### Suggested user message
> Your car is temporarily unable to connect to \. To re-establish the connection, please start your car and take it for a short drive.
***
# `CHARGING_IN_PROGRESS`
The vehicle is currently charging and unable to perform your request. This error usually occurs when you make a request to the start charge endpoint while the vehicle is already charging.
```json theme={null}
{
"type": "VEHICLE_STATE",
"code": "CHARGING_IN_PROGRESS",
"description": "The vehicle is currently charging and unable to perform your request.",
"docURL": "https://smartcar.com/docs/errors/api-errors/vehicle-state-errors#charging-in-progress",
"statusCode": 409,
"requestId": "5dea93a1-3f79-4246-90c5-89610a20471b",
"resolution": { "type": null },
"suggestedUserMessage": "Your vehicle is already charging."
}
```
### Suggested resolution
You usually don’t need to resolve this error. If you believe that this error should not have occurred, please follow the troubleshooting steps below.
### Troubleshooting Steps
* Prompt the user to stop charging their vehicle and/or unplug the charger.
* Wait for a few minutes and retry your request.
### Suggested user message
> Your car is already charging.
***
# `CHARGING_PLUG_CONNECTED`
The vehicle is connected to an EV charger and unable to perform your request.
```json theme={null}
{
"type": "VEHICLE_STATE",
"code": "CHARGING_PLUG_CONNECTED",
"description": "The vehicle is connected to an EV charger and unable to perform your request.",
"docURL": "https://smartcar.com/docs/errors/api-errors/vehicle-state-errors#charging-plug-connected",
"statusCode": 409,
"requestId": "5dea93a1-3f79-4246-90c5-89610a20471b",
"resolution": { "type": null },
"suggestedUserMessage": "We’re unable to issue the command because the vehicle is currently plugged in."
}
```
### Suggested resolution
The user can resolve this error by unplugging the vehicle.
### Suggested user message
> We're unable to issue the command because the vehicle is currently plugged in. Please ensure that you have unplugged the vehicle from an EV charger.
***
# `CHARGING_PLUG_NOT_CONNECTED`
The vehicle is not connected to an EV charger and unable to perform your request. This error usually occurs when you make a request to the start charge endpoint
but the vehicle’s charge port does not have an EV charger plugged into it.
If testing an electric vehicle with Vehicle Simulator, you will receive this error when attempting a start or stop charge request while the vehicle is in a parked
or driving state (not charging).
```json theme={null}
{
"type": "VEHICLE_STATE",
"code": "CHARGING_PLUG_NOT_CONNECTED",
"description": "The vehicle is not connected to an EV charger and unable to perform your request.",
"docURL": "https://smartcar.com/docs/errors/api-errors/vehicle-state-errors#charging-plug-not-connected",
"statusCode": 409,
"requestId": "5dea93a1-3f79-4246-90c5-89610a20471b",
"resolution": { "type": null },
"suggestedUserMessage": "Your vehicle is not plugged in."
}
```
### Suggested resolution
The user can resolve this error by plugging an EV charger into the vehicle’s charge port.
### Troubleshooting Steps
* Prompt the user to plug an EV charger into the vehicle’s charge port.
* If this doesn’t resolve the issue, prompt the user to ensure that the EV charger is connected to a working power source, that it isn’t faulty, and that it is compatible with the user’s vehicle. For example, prompt the user to try out other EV chargers and to check the vehicle’s owner manual for a list of compatible chargers.
### Suggested user message
> Your car isn’t able to start charging. Please ensure that you have plugged an EV charger into your car’s charge port.
***
# `DOOR_OPEN`
The vehicle could not perform your request because one or more of its doors are open. This error usually occurs when you make a request to the lock endpoint while one or more of the vehicle’s doors stand open.
```json theme={null}
{
"type": "VEHICLE_STATE",
"code": "DOOR_OPEN",
"description": "The vehicle could not perform your request because one or more of its doors are open.",
"docURL": "https://smartcar.com/docs/errors/api-errors/vehicle-state-errors#door-open",
"statusCode": 409,
"requestId": "5dea93a1-3f79-4246-90c5-89610a20471b",
"resolution": { "type": null },
"suggestedUserMessage": "Your vehicle was unable to lock. Please ensure that all doors and the trunk are fully closed."
}
```
### Suggested resolution
The user can resolve this error by fully closing all of the vehicle’s doors and the trunk.
### Troubleshooting Steps
* Prompt the user to ensure that there is nothing preventing the doors from fully closing and/or locking properly.
* Prompt the user to ensure that the vehicle’s trunk is fully closed.
### Suggested user message
> Your car was unable to lock. Please ensure that all doors and the trunk are fully closed.
***
# `FULLY_CHARGED`
The vehicle is unable to perform your request because its EV battery is fully charged. This error usually occurs when you make a request to the start charge endpoint while the vehicle is already fully charged.
```json theme={null}
{
"type": "VEHICLE_STATE",
"code": "FULLY_CHARGED",
"description": "The vehicle is unable to perform your request because its EV battery is fully charged.",
"docURL": "https://smartcar.com/docs/errors/api-errors/vehicle-state-errors#fully-charged",
"statusCode": 409,
"requestId": "5dea93a1-3f79-4246-90c5-89610a20471b",
"resolution": { "type": null },
"suggestedUserMessage": "Your vehicle is already fully charged."
}
```
### Suggested user message
> Your car is already fully charged.
***
# `NOT_CHARGING`
The vehicle is unable to perform your request because it is not currently charging. This error usually occurs when you request information about a vehicle’s charge session while the battery is not charging.
```json theme={null}
{
"type": "VEHICLE_STATE",
"code": "NOT_CHARGING",
"description": "The vehicle is unable to perform your request because it is not currently charging.",
"docURL": "https://smartcar.com/docs/errors/api-errors/vehicle-state-errors#not-charging",
"statusCode": 409,
"requestId": "5dea93a1-3f79-4246-90c5-89610a20471b",
"resolution": { "type": null },
"suggestedUserMessage": "Please ensure that you have plugged an EV charger into your car’s charge port and the vehicle is charging."
}
```
### Suggested resolution
You can resolve this error by having the user start a charge session or by sending a start charge request if the vehicle supports that capability.
### Troubleshooting Steps
* Prompt the user to start charging their vehicle.
* Wait for a few minutes and retry your request.
### Suggested user message
> Please ensure that you have plugged an EV charger into your car’s charge port and the vehicle is charging.
***
# `CHARGE_FAULT`
The vehicle is connected to an EV charger but cannot perform the request because:
* the charger is not providing any current
* there is a conflict with another charging schedule
```json theme={null}
{
"type": "VEHICLE_STATE",
"code": "CHARGE_FAULT",
"description": "The vehicle is connected to an EV charger but cannot perform the request because 1) the charger is not providing any current, or 2) there is a conflict with another charging schedule.",
"docURL": "https://smartcar.com/docs/errors/api-errors/vehicle-state-errors#charge-fault",
"statusCode": 409,
"requestId": "5dea93a1-3f79-4246-90c5-89610a20471b",
"resolution": { "type": null },
"suggestedUserMessage": "Your vehicle is unable to start or stop charging because of a conflict with the vehicle's charging schedule."
}
```
### Suggested resolution
The user can resolve this error by:
* Disabling any schedules that control when the charger can supply current and charge the vehicle.
* Ensuring that the charging cable is securely connected to the vehicle.
* Disabling any charge schedules on the vehicle’s infotainment system or connected service application.
* Disabling any departure timers on the vehicle’s infotainment system or connected service application.
* Removing the vehicle from other charge scheduling services.
### Troubleshooting Steps
* Prompt the user to start charging their vehicle.
* Wait for a few minutes and retry your request.
### Suggested user message
> Your car is unable to start or stop charging because of a conflict with your vehicle’s charging schedule. Please check that:
>
> * You have disabled any schedules that control when your charger is able to supply current to and charge the vehicle.
> * The charging cable is securely connected to your vehicle.
> * You have disabled any charge schedules on your vehicle’s infotainment system or connected service application.
> * You have disabled any departure timers on your vehicle’s infotainment system or connected service application.
> * Your vehicle is not connected to any other charge scheduling services.
***
# `HOOD_OPEN`
The vehicle is unable to perform your request because its hood is open. This error usually occurs when you make a request to the lock endpoint while the vehicle’s hood stands open.
```json theme={null}
{
"type": "VEHICLE_STATE",
"code": "HOOD_OPEN",
"description": "The vehicle is unable to perform your request because its hood is open.",
"docURL": "https://smartcar.com/docs/errors/api-errors/vehicle-state-errors#hood-open",
"statusCode": 409,
"requestId": "5dea93a1-3f79-4246-90c5-89610a20471b",
"resolution": { "type": null },
"suggestedUserMessage": "Your vehicle was unable to lock. Please ensure that the vehicle's hood is fully closed."
}
```
### Suggested resolution
The user can resolve this error by ensuring that the vehicle’s hood is fully closed.
### Suggested user message
> Your car was unable to lock. Please ensure that your car’s hood is fully closed.
***
# `IGNITION_ON`
The vehicle was unable to perform your request because its engine is running. Depending on the vehicle’s make and model, this error can occur for a variety of API endpoints.
```json theme={null}
{
"type": "VEHICLE_STATE",
"code": "IGNITION_ON",
"description": "The vehicle was unable to perform your request because its engine is running.",
"docURL": "https://smartcar.com/docs/errors/api-errors/vehicle-state-errors#ignition-on",
"statusCode": 409,
"requestId": "5dea93a1-3f79-4246-90c5-89610a20471b",
"resolution": { "type": null },
"suggestedUserMessage": "Your vehicle is currently running."
}
```
### Suggested resolution
The user can resolve this error by turning off their vehicle. You can also resolve this error by retrying your request at a later time.
### Suggested user message
> Your car is temporarily unable to connect to \ because its engine is running. To re-establish the connection, please turn off your car’s engine.
***
# `IN_MOTION`
The vehicle is currently in motion and unable to perform your request. Depending on the vehicle’s make and model, this error can occur for a variety of API endpoints. The lock/unlock endpoint is a common example.
If testing with Vehicle Simulator, you will receive this error when attempting a lock/unlock request while the vehicle is in a driving state along the simulation.
```json theme={null}
{
"type": "VEHICLE_STATE",
"code": "IN_MOTION",
"description": "The vehicle is currently in motion and unable to perform your request.",
"docURL": "https://smartcar.com/docs/errors/api-errors/vehicle-state-errors#in-motion",
"statusCode": 409,
"requestId": "5dea93a1-3f79-4246-90c5-89610a20471b",
"resolution": { "type": null },
"suggestedUserMessage": "Your vehicle is unable to perform the request while in motion."
}
```
### Suggested resolution
The user can resolve this error by parking their car and turning off the engine. You can also resolve this error by retrying your request at a later time.
### Suggested user message
> Your car is in motion and temporarily unable to connect to \. To re-establish the connection, please park your car and turn off its engine.
***
# `REMOTE_ACCESS_DISABLED`
The vehicle is unable to perform your request because the user has disabled remote access for connected services.
```json theme={null}
{
"type": "VEHICLE_STATE",
"code": "REMOTE_ACCESS_DISABLED",
"description": "The vehicle is unable to perform your request because the user has disabled remote access for connected services.",
"docURL": "https://smartcar.com/docs/errors/api-errors/vehicle-state-errors#remote-access-disabled",
"statusCode": 409,
"requestId": "5dea93a1-3f79-4246-90c5-89610a20471b",
"resolution": { "type": null },
"suggestedUserMessage": "Your vehicle is unable to perform the request as remote access is disabled or unavailable."
}
```
### Suggested resolution
The user can resolve this error by re-enabling remote access inside their vehicle. If the user is unsure how to enable remote access for connected services, prompt them to refer to their vehicle’s owner manual for more details.
### Suggested user message
> Your car is temporarily unable to connect to \. To re-establish the connection, please make sure that remote access for connected services is enabled inside your car. Please refer to your car’s owner manual for more details.
***
# `TRUNK_OPEN`
The vehicle is unable to perform your request because its trunk is open. This error usually occurs when you make a request to the lock endpoint while the vehicle’s trunk and/or front trunk are open.
```json theme={null}
{
"type": "VEHICLE_STATE",
"code": "TRUNK_OPEN",
"description": "The vehicle is unable to perform your request because its trunk is open.",
"docURL": "https://smartcar.com/docs/errors/api-errors/vehicle-state-errors#trunk-open",
"statusCode": 409,
"requestId": "5dea93a1-3f79-4246-90c5-89610a20471b",
"resolution": { "type": null },
"suggestedUserMessage": "Your vehicle was unable to open the trunk because it is already open."
}
```
### Suggested resolution
The user can resolve this error by closing the vehicle’s trunk and/or front trunk.
### Suggested user message
> Your car was unable to lock. Please ensure that your car’s trunk (and front trunk) is closed.
***
# `UNKNOWN`
The vehicle was unable to perform your request due to an unknown issue. This error occurs when the vehicle is in a state that makes it unable to perform your request, and we are unable to determine which state the vehicle is in.
If testing an electric vehicle with Vehicle Simulator, you will receive this error when attempting a stop charge request while the vehicle is in a charging state.
```json theme={null}
{
"type": "VEHICLE_STATE",
"code": "UNKNOWN",
"description": "The vehicle was unable to perform your request due to an unknown issue.",
"docURL": "https://smartcar.com/docs/errors/api-errors/vehicle-state-errors#unknown",
"statusCode": 409,
"requestId": "5dea93a1-3f79-4246-90c5-89610a20471b",
"resolution": { "type": "RETRY_LATER" },
"suggestedUserMessage": "Your vehicle is temporarily unable to connect due to an unknown issue. Please be patient while we’re working to resolve this issue."
}
```
### Suggested resolution
Please retry your request at a later time.
### Suggested user message
> Your car is temporarily unable to connect to \. Please be patient while we’re working to resolve this issue.
***
# `UNREACHABLE`
The vehicle was unable to perform your request because it is currently unreachable. This error usually occurs when the vehicle is in a location with poor cellular reception (e.g. a parking garage or underground parking).
If testing with Vehicle Simulator, you will receive this error when attempting a lock/unlock or start/stop charge request while the simulation is paused or completed.
```json theme={null}
{
"type": "VEHICLE_STATE",
"code": "UNREACHABLE",
"description": "The vehicle was unable to perform your request because it is currently unreachable.",
"docURL": "https://smartcar.com/docs/errors/api-errors/vehicle-state-errors#unreachable",
"statusCode": 409,
"requestId": "5dea93a1-3f79-4246-90c5-89610a20471b",
"resolution": { "type": null },
"suggestedUserMessage": "Your vehicle is currently unreachable. Ensure the vehicle has adequate mobile coverage."
}
```
### Suggested resolution
The user can resolve this error by moving the vehicle to a location with better cellular reception. You can also resolve this error by retrying your request at a later time.
### Suggested user message
> Your car is temporarily unable to connect to \. To re-establish the connection, please move your car to a location with a better cell phone signal.
***
# `VEHICLE_OFFLINE_FOR_SERVICE`
The vehicle was unable to perform your request because it is currently in service mode. Service mode temporarily limits or disables the vehicle’s remote capabilities.
```json theme={null}
{
"type": "VEHICLE_STATE",
"code": "VEHICLE_OFFLINE_FOR_SERVICE",
"description": "The vehicle was unable to perform your request because it is currently in service mode.",
"docURL": "https://smartcar.com/docs/errors/api-errors/vehicle-state-errors#vehicle-offline-for-service",
"statusCode": 409,
"requestId": "5dea93a1-3f79-4246-90c5-89610a20471b",
"resolution": { "type": null },
"suggestedUserMessage": "Your vehicle is in service mode and temporarily unable to perform this task."
}
```
### Suggested resolution
Please retry your request at a later time.
### Suggested user message
> Your car is in service mode and temporarily unable to connect to \. Please try again later.
***
# `LOW_BATTERY`
The vehicle was unable to perform your request because the 12v or high voltage battery is too low.
```json theme={null}
{
"type": "VEHICLE_STATE",
"code": "LOW_BATTERY",
"description": "The vehicle was unable to perform your request because the 12v or high voltage battery is too low.",
"docURL": "https://smartcar.com/docs/errors/api-errors/vehicle-state-errors#low-battery",
"statusCode": 409,
"requestId": "5dea93a1-3f79-4246-90c5-89610a20471b",
"resolution": { "type": "RETRY_LATER" },
"suggestedUserMessage": "Your vehicle battery is too low to perform this task."
}
```
### Suggested resolution
Please retry your request at a later time.
* For EVs ensure that the battery is topped up to at least 60% SoC.
* Ensure that the vehicle’s 12-volt battery is sufficiently charged. Taking the vehicle on a short drive can help.
### Suggested user message
> \ was unable to connect to your car because its battery is too low. Please ensure the battery is charged and try again later.
***
---
# Source: https://smartcar.com/docs/api-reference/webhooks/events/vehicle-state.md
> ## Documentation Index
> Fetch the complete documentation index at: https://smartcar.com/docs/llms.txt
> Use this file to discover all available pages before exploring further.
# VEHICLE_STATE Event
> Signal data delivery when trigger conditions are met
Triggered when one or more signals you've configured as triggers change their value. This event delivers the updated signal data for all subscribed signals in the payload.
**All Configured Signals Are Always Included**
Every `VEHICLE_STATE` event contains **all** signals you configured in your webhook subscription, regardless of which signal(s) triggered the event. This ensures you always have complete vehicle state data.
Example: If your webhook subscribes to 10 signals but only 1 trigger changes, you'll receive all 10 signals in the payload.
## When This Event Fires
The `VEHICLE_STATE` event fires when Smartcar detects a signal value change for any trigger signal configured in your webhook.
### Trigger Configuration
You configure which signals should trigger this event through the Smartcar Dashboard when creating or editing a webhook. For example:
**Triggers:**
* `TractionBattery.StateOfCharge` (code: `tractionbattery-stateofcharge`)
* `Charge.IsCharging` (code: `charge-ischarging`)
* `Location.PreciseLocation` (code: `location-preciselocation`)
**Subscribed Signals:**
* `TractionBattery.StateOfCharge`
* `Charge.IsCharging`
* `Location.PreciseLocation`
* `Charge.Voltage`
* `Odometer.TraveledDistance`
If any of the trigger signals change, a `VEHICLE_STATE` event is delivered containing **all five subscribed signals**.
***
## Identifying Which Triggers Fired
The webhook payload includes a `triggers` field that specifies which trigger signal(s) changed to prompt this delivery. This helps you identify what caused the event without comparing all signal values.
### Trigger Types
When a monitored trigger signal changes value, the `triggers` array contains the signal(s) that changed.
```json theme={null}
{
"triggers": [
{
"code": "tractionbattery-stateofcharge",
"name": "StateOfCharge",
"group": "TractionBattery"
}
]
}
```
If multiple triggers change simultaneously, all will be included in the array.
When a webhook subscription is first created, a `FIRST_DELIVERY` trigger is sent to provide the initial state of the vehicle.
```json theme={null}
{
"triggers": [
{
"code": "FIRST_DELIVERY"
}
]
}
```
This initial delivery:
* Occurs after vehicle subscription to a webhook
* Contains all subscribed signals at their current values
* Does not indicate any signal value changes
* Helps establish baseline state for your application
**When FIRST\_DELIVERY is sent again:**
* When a vehicle is unsubscribed and then resubscribed to your webhook
* If your endpoint fails to respond with a 2xx status code, Smartcar will retry delivery with the same `FIRST_DELIVERY` trigger
Use the `triggers` field to determine the delivery reason. Check for `"code": "FIRST_DELIVERY"` to identify initial state deliveries versus change-triggered deliveries.
***
## Payload Structure
Unique identifier for this event. Use this for idempotency to prevent duplicate processing.
Always `"VEHICLE_STATE"` for this event type.
Smartcar vehicle ID for the vehicle this event relates to.
Container for event data.
Information about the user who connected the vehicle.
Smartcar user ID
Vehicle information
Smartcar vehicle ID
Vehicle manufacturer (e.g., `"TESLA"`, `"FORD"`, `"BMW"`)
Vehicle model (e.g., `"Model 3"`, `"Mustang Mach-E"`)
Vehicle model year
Array of trigger signal objects that changed to prompt this delivery. Helps identify which configured triggers actually fired.
Kebab-case signal identifier (e.g., `"tractionbattery-stateofcharge"`) or `"FIRST_DELIVERY"` for initial deliveries
Human-readable signal name (e.g., `"StateOfCharge"`)
Signal category (e.g., `"TractionBattery"`)
Array of signal objects containing data for **all** signals configured in your webhook subscription. This array always includes every subscribed signal, even if only one trigger changed to fire this event.
Kebab-case signal identifier (e.g., `"tractionbattery-stateofcharge"`)
Human-readable signal name (e.g., `"StateOfCharge"`)
Signal category (e.g., `"TractionBattery"`, `"Charge"`, `"Location"`)
Signal-specific data structure. See [Signals Reference](/api-reference/signals/schema) for complete schemas.
Each signal type has a unique body structure. Common examples:
* Battery state of charge: `{ "unit": "percent", "value": 78 }`
* Charging status: `{ "value": true }`
* Location: `{ "latitude": 37.4292, "longitude": -122.1381 }`
Signal metadata with timestamp information
Unix timestamp (milliseconds) when the vehicle manufacturer last updated this signal
Unix timestamp (milliseconds) when Smartcar retrieved this signal from the vehicle manufacturer
Webhook delivery metadata. See [Event Reference Overview](/api-reference/webhooks/events/overview#common-fields) for complete `meta` object schema.
Number of signals included in this `VEHICLE_STATE` event. Only present for `VEHICLE_STATE` events.
***
## Example Payloads
Delivered when a configured trigger signal changes value.
```json theme={null}
{
"eventId": "550e8400-e29b-41d4-a716-446655440000",
"eventType": "VEHICLE_STATE",
"vehicleId": "9af13248-3b73-4c9d-9a4b-d937ce6bc8e2",
"data": {
"user": {
"id": "93b3ea96-ca37-43a9-9073-f4334719iok7"
},
"vehicle": {
"id": "9af13248-3b73-4c9d-9a4b-d937ce6bc8e2",
"make": "TESLA",
"model": "Model 3",
"year": 2020
},
"triggers": [
{
"code": "tractionbattery-stateofcharge",
"name": "StateOfCharge",
"group": "TractionBattery"
}
],
"signals": [
{
"code": "tractionbattery-stateofcharge",
"name": "StateOfCharge",
"group": "TractionBattery",
"body": {
"unit": "percent",
"value": 78
},
"meta": {
"oemUpdatedAt": 1731940328000,
"fetchedAt": 1731940330000
}
},
{
"code": "charge-ischarging",
"name": "IsCharging",
"group": "Charge",
"body": {
"value": true
},
"meta": {
"oemUpdatedAt": 1731940328000,
"fetchedAt": 1731940330000
}
},
{
"code": "charge-voltage",
"name": "Voltage",
"group": "Charge",
"body": {
"unit": "volts",
"value": 240
},
"meta": {
"oemUpdatedAt": 1731940328000,
"fetchedAt": 1731940330000
}
}
]
},
"meta": {
"version": "4.0",
"deliveryId": "48b25f8f-9fea-42e1-9085-81043682cbb8",
"deliveredAt": 1731940328000,
"webhookId": "abde94ff-d57d-43b9-8d09-6020db2d977a",
"webhookName": "Battery Monitoring",
"signalCount": 3,
"mode": "LIVE"
}
}
```
Delivered immediately after webhook subscription creation to provide initial vehicle state.
```json theme={null}
{
"eventId": "7c8d9e10-f2a3-4b5c-6d7e-8f9a0b1c2d3e",
"eventType": "VEHICLE_STATE",
"vehicleId": "9af13248-3b73-4c9d-9a4b-d937ce6bc8e2",
"data": {
"user": {
"id": "93b3ea96-ca37-43a9-9073-f4334719iok7"
},
"vehicle": {
"id": "9af13248-3b73-4c9d-9a4b-d937ce6bc8e2",
"make": "TESLA",
"model": "Model 3",
"year": 2020
},
"triggers": [
{
"code": "FIRST_DELIVERY"
}
],
"signals": [
{
"code": "tractionbattery-stateofcharge",
"name": "StateOfCharge",
"group": "TractionBattery",
"body": {
"unit": "percent",
"value": 65
},
"meta": {
"oemUpdatedAt": 1731926100000,
"fetchedAt": 1731926102000
}
},
{
"code": "charge-ischarging",
"name": "IsCharging",
"group": "Charge",
"body": {
"value": false
},
"meta": {
"oemUpdatedAt": 1731926100000,
"fetchedAt": 1731926102000
}
},
{
"code": "charge-voltage",
"name": "Voltage",
"group": "Charge",
"body": {
"unit": "volts",
"value": 0
},
"meta": {
"oemUpdatedAt": 1731926100000,
"fetchedAt": 1731926102000
}
}
]
},
"meta": {
"version": "4.0",
"deliveryId": "1a2b3c4d-5e6f-7a8b-9c0d-1e2f3a4b5c6d",
"deliveredAt": 1731926100000,
"webhookId": "abde94ff-d57d-43b9-8d09-6020db2d977a",
"webhookName": "Battery Monitoring",
"signalCount": 3,
"mode": "LIVE"
}
}
```
***
## Signal Reference
The `signals` array contains data structured according to the [Signals Schema Reference](/api-reference/signals/schema). Each signal type has a specific shape:
Battery charging status and metrics
State of charge and battery health
GPS coordinates and location data
Distance traveled
Fuel level for ICE vehicles
Complete signal catalog
***
## Signal-Level Errors
Individual signals within a `VEHICLE_STATE` payload can contain errors if the vehicle doesn't support that signal or if retrieval fails. When this occurs, the signal will have a `status` object with error details instead of a `body` with data:
```json Signal with Error theme={null}
{
"code": "location-isathome",
"name": "IsAtHome",
"group": "Location",
"status": {
"error": {
"code": "VEHICLE_NOT_CAPABLE",
"type": "COMPATIBILITY"
},
"value": "ERROR"
}
}
```
**Partial data delivery**: When some signals succeed and others fail, you'll receive a `VEHICLE_STATE` event with successful signals containing `body` data and failed signals containing `status` errors. This allows you to process available data even when some signals are unavailable.
For complete error handling, see the [VEHICLE\_ERROR Event](/api-reference/webhooks/events/vehicle-error) documentation.
***
## Processing VEHICLE\_STATE Events
### Basic Handler
```javascript theme={null}
function handleVehicleState(payload) {
const { vehicleId, data } = payload;
const { signals, triggers } = data;
// Check if this is first delivery
const isFirstDelivery = triggers.some(t => t.code === 'FIRST_DELIVERY');
// Process each signal
signals.forEach(signal => {
if (signal.body) {
// Signal has data
console.log(`${signal.name}: ${JSON.stringify(signal.body)}`);
updateDatabase(vehicleId, signal.code, signal.body);
} else if (signal.status) {
// Signal has error
console.error(`${signal.name} error: ${signal.status.error.code}`);
handleSignalError(vehicleId, signal);
}
});
}
```
### Best Practices
Always check if you've already processed an `eventId` before updating your database. Retries will have the same `eventId` but different `deliveryId`.
```javascript theme={null}
async function processWebhook(payload) {
const { eventId } = payload;
// Check if already processed
if (await isProcessed(eventId)) {
console.log(`Already processed ${eventId}`);
return;
}
// Process the event
await handleVehicleState(payload);
// Mark as processed
await markProcessed(eventId);
}
```
Use `signals[].meta.oemUpdatedAt` to determine if incoming data is newer than your stored state. Events can arrive out of order.
```javascript theme={null}
function shouldUpdate(currentData, newSignal) {
if (!currentData) return true;
return newSignal.meta.oemUpdatedAt > currentData.timestamp;
}
```
Some signals may succeed while others fail. Process available data and log errors for unavailable signals.
```javascript theme={null}
signals.forEach(signal => {
if (signal.body) {
updateVehicleData(signal);
} else if (signal.status) {
logSignalUnavailable(signal);
// Don't block processing of other signals
}
});
```
Use the `triggers` field to identify initial state deliveries vs. actual signal changes.
```javascript theme={null}
const isFirstDelivery = payload.data.triggers.some(
t => t.code === 'FIRST_DELIVERY'
);
if (isFirstDelivery) {
// Initialize vehicle state
initializeVehicle(payload.data);
} else {
// Update changed signals
updateVehicleState(payload.data);
}
```
***
## Next Steps
Handle error notifications
Complete signal schemas and data structures
Implement idempotency and ordering
Understand retry policies
---
# Source: https://smartcar.com/docs/api-reference/signals/vehicleidentification.md
> ## Documentation Index
> Fetch the complete documentation index at: https://smartcar.com/docs/llms.txt
> Use this file to discover all available pages before exploring further.
# VehicleIdentification Signals & Attributes
## Signals
### Nickname
Signal code: `vehicleidentification-nickname`
Name personally assigned by the vehicle by the owner.
## Attributes
### Exterior Color
Signal code: `vehicleidentification-exteriorcolor`
The exterior paint color of the vehicle as specified by the manufacturer.
### VIN
Signal code: `vehicleidentification-vin`
Vehicle Identification Number - A unique 17-character alphanumeric code assigned to each vehicle that serves as its identifier. Contains encoded information about the vehicle's manufacturer, model, features, and production details.
---
# Source: https://smartcar.com/docs/api-reference/vehicles-api-intro.md
> ## Documentation Index
> Fetch the complete documentation index at: https://smartcar.com/docs/llms.txt
> Use this file to discover all available pages before exploring further.
# Vehicles API Overview
> The Vehicles API is Smartcar’s core API for accessing standardized vehicle data and sending remote commands to connected vehicles. It enables you to build applications that interact with a wide range of makes and models through a single, unified interface.
## What You Can Do
* Retrieve last known vehicle signals (e.g., battery level, odometer, fuel, tire pressure)
* Access vehicle attributes (make, model, year, VIN, etc.)
* Send remote commands (lock/unlock, start/stop charging, etc.)
The Vehicles API is designed primarily for exploration and non-frequent data retrieval. This API is not designed for continuous polling or real-time monitoring. Data is typically updated once every 24 hours unless the vehicle is actively subscribed to a webhook, which enables more frequent updates. For most use cases, you should avoid polling the Vehicles API at high frequency leverage [webhooks](/integrations/webhooks/overview) instead.
## Authentication
All requests require an OAuth2 access token, which is obtained by having the vehicle owner authorize your app via [Smartcar Connect](/connect/what-is-connect).
* Learn how to get an access token in our [Getting Started guide](/getting-started/how-to/get-an-access-token).
* Learn more about the [Auth Token Exchange](/api-reference/authorization/auth-code-exchange) process.
## Base URL
```
https://vehicle.api.smartcar.com/v3
```
## Key Resources
* [Signal Schema](/api-reference/signals/schema)
* [Permissions](/api-reference/permissions)
* [Error Codes](/api-reference/api-errors)
## Example Use Cases
* Fleet management and telematics
* Insurance and mileage tracking
* EV charging and energy management
* Car sharing and rental platforms
For a step-by-step guide to integrating with the Vehicles API, see [Getting Started](/getting-started/introduction).
---
# Source: https://smartcar.com/docs/api-reference/signals/vehicleuseraccount.md
> ## Documentation Index
> Fetch the complete documentation index at: https://smartcar.com/docs/llms.txt
> Use this file to discover all available pages before exploring further.
# VehicleUserAccount Signals
### Permissions
Signal code: `vehicleuseraccount-permissions`
Permissions granted by the connecting account with the OEM. These may be different than your application's Smartcar permissions as they can be managed directly with the OEM.
An array containing permissions granted by the connecting account with the OEM.
```json Example theme={null}
{
"values": [
"vehicle_cmds",
"vehicle_device_data"
]
}
```
### Role
Signal code: `vehicleuseraccount-role`
Indicates the access level to the vehicle for the connecting account as defined by the OEM. While the OEM representation may vary, these can be thought of as "secondary" and "primary" accounts where "secondary" accounts may have more limited access than an "primary" account. "secondary" accounts are granted access to vehicle by "primary" accounts.
```json Example theme={null}
{
"value": "Driver"
}
```
---
# Source: https://smartcar.com/docs/api-reference/webhooks/events/verify.md
> ## Documentation Index
> Fetch the complete documentation index at: https://smartcar.com/docs/llms.txt
> Use this file to discover all available pages before exploring further.
# VERIFY Event
> One-time challenge to verify your webhook endpoint
A one-time event sent when you first create a webhook to verify that Smartcar can successfully deliver payloads to your callback URL.
**Required Before Data Delivery**
Your endpoint must successfully respond to the `VERIFY` event before Smartcar will deliver any `VEHICLE_STATE` or `VEHICLE_ERROR` events. This confirms your endpoint is configured correctly and ready to receive webhooks.
## When This Event Fires
The `VERIFY` event fires once when you:
* Create a new webhook in the Smartcar Dashboard
* Update the callback URL of an existing webhook
* Click "Verify this webhook" in the Dashboard
***
## Payload Structure
```json Version 4.0 (Current) theme={null}
{
"eventId": "52f6e0bb-1369-45da-a61c-9e67d092d6db",
"eventType": "VERIFY",
"data": {
"challenge": "3a5c8f72-e6d9-4b1a-9f2e-8c7d6a5b4e3f"
},
"meta": {
"version": "4.0",
"webhookId": "5a8e5e38-1e12-4011-a36d-56f120053f9e",
"webhookName": "Example Webhook",
"deliveryId": "5d569643-3a47-4cd1-a3ec-db5fc1f6f03b",
"deliveredAt": 1761896351529
}
}
```
```json Version 2.0 (Legacy) theme={null}
{
"version": "2.0",
"webhookId": "5a8e5e38-1e12-4011-a36d-56f120053f9e",
"eventName": "verify",
"payload": {
"challenge": "3a5c8f72-e6d9-4b1a-9f2e-8c7d6a5b4e3f"
}
}
```
### Payload Fields
Unique identifier for this verification event.
Always `"VERIFY"` for this event type.
Container for the challenge.
Random string that must be hashed with your Application Management Token and returned in your response.
Webhook delivery metadata. See [Event Reference Overview](/api-reference/webhooks/events/overview#common-fields) for the complete `meta` object schema.
***
## Required Response
Your endpoint must respond with:
1. **Status code**: `200 OK`
2. **Content-Type header**: `application/json`
3. **Response body**: JSON object with the HMAC-SHA256 hash
```json Response Body theme={null}
{
"challenge": "a3f5c8e9d2b4a1f6e8c7d9a5b3e1f2c4d6a8b9c1e3f5a7b9c2d4e6f8a1b3c5d7"
}
```
### Generate the HMAC
Create an HMAC-SHA256 hash of the `challenge` string using your **Application Management Token** as the secret key, then hex-encode the result:
Our [backend SDKs](/api-reference/api-sdks) have helper methods to generate the HMAC automatically.
```python Python theme={null}
import smartcar
hmac = smartcar.hash_challenge(
application_management_token,
challenge
)
# Return in response body
return {"challenge": hmac}, 200
```
```javascript Node.js theme={null}
const smartcar = require('smartcar');
const hmac = smartcar.hashChallenge(
application_management_token,
challenge
);
// Return in response body
res.status(200).json({ challenge: hmac });
```
```java Java theme={null}
import com.smartcar.sdk.Smartcar;
String hmac = Smartcar.hashChallenge(
application_management_token,
challenge
);
// Return in response body
return ResponseEntity.ok(Map.of("challenge", hmac));
```
```ruby Ruby theme={null}
require 'smartcar'
hmac = Smartcar.hash_challenge(
application_management_token,
challenge
)
# Return in response body
{ challenge: hmac }
```
***
## Complete Handler Example
Here's a complete webhook handler that responds to the `VERIFY` event:
```javascript Node.js (Express) theme={null}
const express = require('express');
const smartcar = require('smartcar');
const app = express();
app.use(express.json());
app.post('/webhooks/smartcar', (req, res) => {
const { eventType, data } = req.body;
if (eventType === 'VERIFY') {
// Generate HMAC challenge response
const hmac = smartcar.hashChallenge(
process.env.SMARTCAR_MANAGEMENT_TOKEN,
data.challenge
);
return res.status(200).json({ challenge: hmac });
}
// Handle other event types...
res.status(200).json({ status: 'received' });
});
```
```python Python (Flask) theme={null}
from flask import Flask, request, jsonify
import smartcar
import os
app = Flask(__name__)
@app.post('/webhooks/smartcar')
def webhook_handler():
payload = request.get_json()
event_type = payload.get('eventType')
if event_type == 'VERIFY':
# Generate HMAC challenge response
hmac = smartcar.hash_challenge(
os.environ['SMARTCAR_MANAGEMENT_TOKEN'],
payload['data']['challenge']
)
return jsonify({"challenge": hmac}), 200
# Handle other event types...
return jsonify({"status": "received"}), 200
```
```java Java (Spring Boot) theme={null}
@RestController
public class WebhookController {
@Value("${smartcar.management.token}")
private String managementToken;
@PostMapping("/webhooks/smartcar")
public ResponseEntity handleWebhook(@RequestBody Map payload) {
String eventType = (String) payload.get("eventType");
if ("VERIFY".equals(eventType)) {
// Generate HMAC challenge response
Map data = (Map) payload.get("data");
String challenge = (String) data.get("challenge");
String hmac = Smartcar.hashChallenge(managementToken, challenge);
return ResponseEntity.ok(Map.of("challenge", hmac));
}
// Handle other event types...
return ResponseEntity.ok(Map.of("status", "received"));
}
}
```
```ruby Ruby (Sinatra) theme={null}
require 'sinatra'
require 'json'
require 'smartcar'
post '/webhooks/smartcar' do
payload = JSON.parse(request.body.read)
event_type = payload['eventType']
if event_type == 'VERIFY'
# Generate HMAC challenge response
hmac = Smartcar.hash_challenge(
ENV['SMARTCAR_MANAGEMENT_TOKEN'],
payload['data']['challenge']
)
status 200
content_type :json
return { challenge: hmac }.to_json
end
# Handle other event types...
status 200
content_type :json
{ status: 'received' }.to_json
end
```
***
## Troubleshooting
**Common causes:**
* Wrong Application Management Token used
* HMAC not hex-encoded
* Response body doesn't match `{ "challenge": "..." }` format
* Endpoint returns non-200 status code
* Response takes longer than 15 seconds
**Solution:** Use the Dashboard's verification modal to see the expected challenge and response. Compare your implementation against the provided code snippets.
Use [ngrok](https://ngrok.com) or similar to expose your local server:
```bash theme={null}
ngrok http 3000
```
Then use the ngrok URL as your callback URI in the Dashboard. The Dashboard will send a real `VERIFY` event to your local endpoint.
Yes! You can click "Verify this webhook" in the Dashboard at any time to send a new `VERIFY` event to your endpoint.
Yes, your production webhook endpoint should always handle the `VERIFY` event type, even after initial verification. This allows you to re-verify from the Dashboard if needed.
**Timeout Requirement**
Your endpoint must respond to the `VERIFY` event within **15 seconds**. If verification times out, Smartcar will not activate the webhook.
***
## Next Steps
After successfully responding to the `VERIFY` event, your webhook is activated and will begin receiving vehicle data.
Learn about signal data deliveries
Handle error notifications
Complete step-by-step implementation
Build a complete webhook handler
---
# Source: https://smartcar.com/docs/help/oem-integrations/tesla/virtual-key-tesla.md
> ## Documentation Index
> Fetch the complete documentation index at: https://smartcar.com/docs/llms.txt
> Use this file to discover all available pages before exploring further.
# Virtual Keys
> This page has information regarding the use of Virtual Keys for Tesla vehicles.
## What is a Virtual Key?
A Virtual Key is a digital access method required by Tesla for third-party
applications to issue commands to Tesla vehicles and the preferred method for accessing data.
Please see [this
section](/help/oem-integrations/tesla/developers#adding-a-virtual-key)
for more information.
### Adding the Virtual Key
Smartcar handles this step on your behalf in the Connect flow. You can get started with the default Smartcar Virtual Key with no configurations required.
If you're on an **Enterprise** plan, please reach out to your Account Manager or
Solutions Architect for information on setting up a custom Virtual Key with your own brand name.
## Where can I find my Virtual Key?
Although Smartcar handles this step on your behalf, the Virtual Key URL for your application is sent back along with the authorization code after a user completes the Connect flow. You can redirect users to this URL if they need to add the Virtual Key again.
### Vehicle Owners adding a Virtual Key
Smartcar Connect will present Tesla vehicle owners a prompt to install the Tesla Virtual Key after granting access and prior to redirecting them back to your application.
The Virtual Key is a URL in the form:
```
https://www.tesla.com/_ak/smartcar.com
```
```
https://www.tesla.com/_ak/{{custom_subdomain}}.app.car
```
After prompting your users to open the link, depending on their device, they will be redirected to the Tesla app or prompted to scan a QR code.
Adding a Virtual Key will need to be done after a user has granted your application access to their Tesla account in the Connect flow.
Please see our [FAQs](/help/oem-integrations/tesla/faqs#can-owner-and-driver-accounts-authorize-access-with-smartcar-through-connect) for details on adding a virtual key for accounts with multiple vehicles and different account types.
On mobile devices, they will be redirected to the Tesla app and prompted to add the Virtual Key
On Desktop, they will be prompted to scan the QR code which in turn opens up the Tesla app and prompts them to add a Virtual Key
Virtual Key status can be checked at any time from the Tesla infotainment screen under Settings, Locks.
## Do all vehicles need a virtual key?
2020 and earlier Model S and X **do not** require a virtual key installation. However, to enable streaming data access (faster, more frequent updates), owners can enable streaming by toggling a setting within the vehicle.
### Enabling Streaming for 2020 and Earlier Model S/X
For 2020 or earlier Model S or X that supports streaming (requires a software update), users can enable streaming without installing a Virtual Key:
1. During the Smartcar Connect flow, drivers will be prompted about enabling streaming for their vehicle
2. Drivers can choose to receive email instructions on how to enable the streaming toggle in their vehicle
3. Access the streaming settings from the Tesla infotainment screen
4. Toggle the streaming setting on to enable faster data updates
Once streaming is enabled via the vehicle toggle, data will be refreshed more frequently without requiring Virtual Key installation for these modals. If streaming toggle is not enabled, data for these older models is refreshed every 5 minutes while the vehicle is awake.
## What if a streaming capable vehicle does not have a virtual key installed?
If a vehicle is streaming capable via virtual key and does not yet have a virtual key installed,
requests to the vehicle will be limited to 1 request every 8 hours for data. These requests **will
not** wake the vehicle.
---
# Source: https://smartcar.com/docs/getting-started/tutorials/webhook-receiver-recipe.md
> ## Documentation Index
> Fetch the complete documentation index at: https://smartcar.com/docs/llms.txt
> Use this file to discover all available pages before exploring further.
# Webhook Receiver Recipe
> Deploy a production-ready AWS serverless webhook receiver in minutes using our complete TypeScript template with built-in validation, error handling, and scalability.
**Quick Start**: Deploy a complete webhook receiver to AWS in under 10 minutes with our battle-tested TypeScript recipe. Perfect for production workloads and new webhook implementations.
## Overview
The Webhook Receiver Recipe is a production-ready, AWS-based webhook receiver template that helps developers quickly implement robust webhook handling for Smartcar integrations. This TypeScript recipe provides a deployable starting point that makes adding custom business logic easy, eliminating much of the complexity of building webhook infrastructure from scratch.
* **Repository**: [`smartcar/typescript-webhook-recipe`](https://github.com/smartcar/typescript-webhook-recipe)
* **Deployment Target**: AWS (Lambda + API Gateway + SQS)
* **Language**: TypeScript/Node.js v22+
* **Infrastructure**: AWS CDK (Infrastructure as Code)
## What You Get
### Complete Serverless Architecture
* **API Gateway**: Public HTTPS endpoint for webhook delivery
* **Lambda Functions**: Serverless processing with automatic scaling
* **SQS Queues**: Asynchronous message processing with built-in retry logic
* **Dead Letter Queues**: Error handling and failed message recovery
* **CloudWatch**: Comprehensive logging and monitoring
### Production-Ready Features
* **Webhook Verification**: Automatic payload signature validation
* **Error Handling**: Graceful failure handling with retries
* **Scalability**: Automatic scaling to handle traffic spikes
* **Security**: IAM roles with least-privilege access
* **Monitoring**: Built-in CloudWatch logging
* **Type Safety**: Full TypeScript support with Smartcar types
### Infrastructure as Code
* Complete AWS CDK setup for repeatable deployments
* Environment-specific configurations (development, staging, production)
* Easy customization and extension
## When to Use This Recipe
**Perfect for:**
* New webhook receiver implementations
* Teams using AWS as your cloud provider
* Production workloads requiring reliability and scale
* Teams wanting to deploy quickly without infrastructure complexity
* TypeScript/Node.js projects
## Architecture Overview
The recipe provides a complete serverless webhook receiver infrastructure on AWS. The diagram below shows the data flow from Smartcar webhooks through your deployment:
```mermaid theme={null}
graph TD
A[Smartcar Webhooks] -->|HTTPS POST| B[API Gateway]
B --> C[Receiver Lambda]
C -->|Validate & Queue| D[SQS Queue]
D --> E[Processor Lambda]
E -->|Process Signals| F[Your Business Logic]
E -->|Failed Processing| G[Dead Letter Queue]
G --> H[Manual Review/Retry]
style A fill:#FFB84D,stroke:#E69500,stroke-width:2px,color:#000
style B fill:#FF9900,stroke:#CC7A00,stroke-width:2px,color:#000
style C fill:#FF9900,stroke:#CC7A00,stroke-width:2px,color:#000
style D fill:#FF9900,stroke:#CC7A00,stroke-width:2px,color:#000
style E fill:#FF9900,stroke:#CC7A00,stroke-width:2px,color:#000
style F fill:#d3d3d3,stroke:#666,stroke-width:2px,color:#000
style G fill:#FF9900,stroke:#CC7A00,stroke-width:2px,color:#000
style H fill:#d3d3d3,stroke:#666,stroke-width:2px,color:#000
```
**Orange components** are provided by the recipe and deployed automatically. **Gray components** represent external systems where your custom business logic would live.
### Key Components
1. **Receiver Lambda**: Validates incoming webhooks and queues them for processing
2. **SQS Queue**: Decouples receiving from processing for reliability
3. **Processor Lambda**: Processes webhook payloads and executes business logic
4. **Dead Letter Queue**: Captures failed messages for investigation
5. **CloudWatch**: Monitoring, logging, and alerting
## Quick Start
### Prerequisites
* AWS Account with CLI configured
* Node.js v22+ installed
* Git
* **Smartcar Application** configured in the [Dashboard](https://dashboard.smartcar.com/)
* You'll need your **Application Management Token** (found in Dashboard → Configuration)
* Learn how to [configure your application](/getting-started/configure-application)
### Deployment Steps
```bash theme={null}
git clone https://github.com/smartcar/typescript-webhook-recipe.git
cd typescript-webhook-recipe
```
```bash theme={null}
make build
```
The recipe uses AWS CDK for infrastructure deployment. First, create a secret to store your Application Management Token, then deploy the stack.
```bash theme={null}
# Step 1: Create the secret for your Application Management Token
make create-secret appName=your-app-name amt=your_smartcar_application_management_token
# Step 2: Deploy the infrastructure
make deploy appName=your-app-name
# Note the ApiEndpointUrl from the output
# Example: https://abc123.execute-api.us-east-1.amazonaws.com/prod/
```
Use the same `appName` value for both commands. This name will be used to identify your CloudFormation stack and associated resources.
For detailed deployment instructions including environment-specific configuration, see the [GitHub repository README](https://github.com/smartcar/typescript-webhook-recipe#usage).
Now that your receiver is deployed, configure the webhook integration in Smartcar Dashboard:
1. Go to your [Smartcar Dashboard](https://dashboard.smartcar.com/integrations)
2. Click **+ Add Integration** and select **Webhooks**
3. Configure your webhook:
* **Webhook URL**: Use the deployed URL from the previous step
* **Trigger**: Choose when to send webhooks (e.g., "State of charge changes")
* **Signals**: Select the vehicle data you want to receive (e.g., battery level, location, odometer)
4. Click **Save** - Smartcar will automatically verify your endpoint
The recipe automatically handles webhook verification. If verification fails, check CloudWatch logs for errors.
For detailed webhook configuration guidance, see [Webhooks Setup](/integrations/webhooks/overview).
Depending on your webhook configuration, you may need to manually subscribe vehicles:
* **Auto-subscribe enabled**: New vehicle connections will automatically start sending webhook data
* **Manual subscription**: Use the [Subscribe endpoint](/api-reference/webhooks/subscribe-webhook) or Dashboard to subscribe specific vehicles
Learn more about [subscribing vehicles to webhooks](/integrations/webhooks/overview#subscribing-vehicles-to-a-webhook).
The deployment typically takes 2-3 minutes. The recipe will output your webhook URL and other important configuration details upon completion.
## Customizing Your Webhook Processor
The recipe includes a sample processor that logs webhook data. To implement your business logic:
```typescript src/lambdas/sqs/index.ts theme={null}
import { Logger } from '@aws-lambda-powertools/logger';
import { getSignalByCode, Signals, type TractionBatteryStateOfCharge } from "@smartcar/signals";
import type { WebhookDataPayload } from '@smartcar/webhooks';
import { parseEnvelope } from '@smartcar/webhooks';
import { Context, SQSEvent, SQSHandler } from 'aws-lambda';
const logger = new Logger();
export const processor: SQSHandler = async (
event: SQSEvent,
context: Context
) => {
const batchItemFailures: { itemIdentifier: string }[] = [];
for (const record of event.Records) {
try {
const eventBody: WebhookDataPayload = parseEnvelope(record.body);
const signals: Signals = eventBody.data.signals as Signals;
const { errors } = eventBody.data;
// Example: Process signals data
if (signals && signals.length > 0) {
const stateOfChargeSignal: TractionBatteryStateOfCharge | undefined =
getSignalByCode(signals, 'tractionbattery-stateofcharge');
if (stateOfChargeSignal) {
logger.info('State of Charge Signal', stateOfChargeSignal.body);
// Replace with your business logic
if (stateOfChargeSignal.body.value < 50) {
logger.info('Battery below 50% - get charged!');
}
}
}
// Handle errors in webhook payload
if (errors && errors.length > 0) {
logger.warn('Errors in webhook payload', { errors });
}
} catch (err) {
logger.error('Error during processing', { error: err, record });
batchItemFailures.push({ itemIdentifier: record.messageId });
}
}
return { batchItemFailures };
};
```
```typescript External API Integration theme={null}
// Example: Send data to external service
async function sendToExternalAPI(payload: WebhookPayload) {
const response = await fetch('https://your-api.com/webhook-data', {
method: 'POST',
headers: {
'Content-Type': 'application/json',
'Authorization': `Bearer ${process.env.API_TOKEN}`
},
body: JSON.stringify(payload)
});
if (!response.ok) {
throw new Error(`API call failed: ${response.statusText}`);
}
}
```
## Configuration Options
The recipe uses AWS CDK for infrastructure configuration. You can customize various aspects by modifying the CDK stack configuration in `lib/webhook-receiver-stack.ts`.
### Common Configuration Options
Use these CDK properties (not environment variables) to tune the stack. Their camelCase names match the props in `lib/webhook-receiver-stack.ts`.
| Configuration | Description | Example |
| ------------------- | --------------------------------------- | ---------------------------------------------------------------------------------------------------------------------------------------------------- |
| `logLevel` | Logging verbosity for Lambda functions | [See example](https://github.com/smartcar/typescript-webhook-recipe/blob/61485696ed459ee21ed5aa9d967373f5ecee651f/lib/webhook-receiver-stack.ts#L46) |
| `memorySize` | Lambda function memory allocation in MB | [See example](https://github.com/smartcar/typescript-webhook-recipe/blob/61485696ed459ee21ed5aa9d967373f5ecee651f/lib/webhook-receiver-stack.ts#L41) |
| `visibilityTimeout` | SQS message visibility timeout | [See example](https://github.com/smartcar/typescript-webhook-recipe/blob/61485696ed459ee21ed5aa9d967373f5ecee651f/lib/webhook-receiver-stack.ts#L29) |
| `maxReceiveCount` | Max retries before dead letter queue | [See example](https://github.com/smartcar/typescript-webhook-recipe/blob/61485696ed459ee21ed5aa9d967373f5ecee651f/lib/webhook-receiver-stack.ts#L30) |
For environment-specific configurations (dev, staging, production), you'll define these in your CDK code rather than using environment variables. This allows you to manage infrastructure differences across environments programmatically.
See the [GitHub repository](https://github.com/smartcar/typescript-webhook-recipe) for detailed configuration examples.
## Monitoring and Troubleshooting
### CloudWatch Logging
The recipe includes built-in CloudWatch logging for debugging and monitoring. You can:
* View Lambda execution logs
* Track webhook deliveries and failures
* Monitor SQS queue metrics
CloudWatch alarms are not included by default. You can add custom alarms on top of CloudWatch metrics based on your monitoring needs.
### Common Issues
* Check that your Smartcar Application Management Token is correct
* Verify the webhook URL matches your deployed endpoint
* Check CloudWatch logs for verification errors
* Review CloudWatch logs for processing errors
* Check if external services (databases, APIs) are accessible
* Verify IAM permissions for Lambda functions
* Consider increasing Lambda memory allocation in CDK configuration
* Optimize external API calls and database queries
* Check for cold start issues in Lambda functions
### Debugging Commands
```bash theme={null}
# Monitor queue depths
aws sqs get-queue-attributes --queue-url --attribute-names ApproximateNumberOfMessages
# Redrive messages from dead letter queue
aws sqs receive-message --queue-url --max-number-of-messages 10
```
## Next Steps
After deploying your webhook receiver:
1. **Test Your Integration**: Use the [Smartcar Dashboard](https://dashboard.smartcar.com/) to test webhook delivery
2. **Monitor Performance**: Set up CloudWatch alarms for error rates and queue depths
3. **Scale as Needed**: Adjust Lambda memory and SQS settings based on usage patterns
4. **Add Features**: Extend the processor logic for your specific use cases
## Support and Contributing
* **Issues**: Report bugs or request features in the [GitHub repository](https://github.com/smartcar/typescript-webhook-recipe/issues)
* **Discussions**: Ask questions in [GitHub Discussions](https://github.com/smartcar/typescript-webhook-recipe/discussions)
* **Documentation**: Full setup and customization details in the [repository README](https://github.com/smartcar/typescript-webhook-recipe#readme)
***
View the complete source code and documentation
Understand webhook payload structures
---
# Source: https://smartcar.com/docs/integrations/webhooks/webhook-receiver.md
# Building a Webhook Receiver
> Webhook payloads are sent from Smartcar to your receiving server. Your receiver must respond properly to ensure payloads are delivered without delay.
**Looking for a quick start?** Our [Webhook Receiver Recipe](/getting-started/tutorials/webhook-receiver-recipe) provides a production-ready AWS serverless webhook receiver that you can deploy in minutes. Perfect for new implementations!
## How Webhooks are Sent
Webhook payloads are sent as HTTP requests to the `Vehicle data callback URI` you defined when you set up the webhook.
The HTTP request body consists of a JSON payload. Webhook payloads will be one of `VEHICLE_STATE` or `VEHICLE_ERROR` as defined in [Response Payloads](/integrations/webhooks/responses).
Optionally, you may configure a separate `Vehicle error callback URI` for `VEHICLE_ERROR` payloads. If this is not defined, all payloads will be sent to the primary URI.
## Verifying Your Receiver Endpoint
Before you can receive vehicle data, Smartcar will send a verification payload to your `Vehicle data callback URI` to validate that your receiver is reachable and responding appropriately.
Please see [Callback URI Verification](/integrations/webhooks/callback-verification) for details on how to correctly respond to this request.
## Responding to Webhook Deliveries
Smartcar expects your webhook receiver to return an HTTP `200` response within 15 seconds of each delivery. Any other status code, or responses that exceed this 15-second timeout, are treated as errors and the delivery will be marked unsuccessful.
Smartcar will attempt to re-deliver unsuccessful requests up to three times, with exponential backoff. If a timely `200` response code is not received for all attempts, the payload is dropped. Future deliveries will still be attempted as long as the webhook is active.
As a best practice, you should decouple webhook receiving and payload processing. If your receiver does not respond because of a processing issue, Smartcar will consider the payload undelivered and will send it again. Persist the payload first, then run any signal processing logic as a separate step.
## Verifying Payloads
We recommend that you verify the payloads you receive to ensure they are legitimate and complete. Smartcar cryptographically signs each payload using a signature that can only be decoded with your Application Management Token. See [Payload verification](/integrations/webhooks/payload-verification) for details.
## Networking Considerations
* Webhook receivers must be accessible from the public internet so Smartcar can resolve your receiver URI.
* Receiver URIs must use HTTPS with a valid SSL certificate.
* Internal corporate network addresses or custom SSL certificates are not supported.
* Smartcar sends webhook payloads from public IPv4 addresses, which may change over time. Be careful when defining firewall rules.
## Webhook Best Practices
The recipe uses SQS to separate webhook receipt from processing. This ensures:
* Fast response times (\< 200ms) from your server to Smartcar
* No timeouts from long-running business logic
* Reliable delivery even during processing failures
Every webhook is cryptographically verified using HMAC-SHA256:
* Confirms payloads come from Smartcar
* Prevents replay attacks and tampering
* Rejects invalid requests before processing
Built-in retry mechanisms handle transient failures:
* Automatic retries for failed processing (up to 3 times)
* 30-second visibility timeout between retries
* Dead letter queue for manual investigation of persistent failures
The receiver lambda responds within milliseconds:
* Acknowledges receipt immediately
* Prevents Smartcar from retrying unnecessarily
* Queues payload for asynchronous processing
CloudWatch integration provides observability:
* Track delivery success rates
* Monitor queue depths and processing times
* Alert on error rate thresholds
* Debug issues with comprehensive logging
Serverless architecture handles traffic variability:
* Lambda auto-scales with webhook volume
* No capacity planning required
* Pay only for actual usage
* Handles traffic spikes seamlessly
IAM policies enforce security best practices:
* Each Lambda has minimal required permissions
* No hardcoded credentials
* AWS manages encryption at rest and in transit
* Secrets stored securely in AWS Secrets Manager
## Recommended Webhook Receiver Pattern
This pattern is provides a complete serverless webhook receiver infrastructure on AWS. The diagram below shows the data flow from Smartcar webhooks through your deployment:
```mermaid theme={null}
graph TD
A[Smartcar Webhooks] -->|HTTPS POST| B[API Gateway]
B --> C[Receiver Serverless Function]
C -->|Validate & Queue| D[Queue]
D --> E[Processor Serverless Function]
E -->|Process Signals| F[Your Business Logic]
E -->|Failed Processing| G[Dead Letter Queue]
G --> H[Manual Review/Retry]
style A fill:#FFB84D,stroke:#E69500,stroke-width:2px,color:#000
style B fill:#FF9900,stroke:#CC7A00,stroke-width:2px,color:#000
style C fill:#FF9900,stroke:#CC7A00,stroke-width:2px,color:#000
style D fill:#FF9900,stroke:#CC7A00,stroke-width:2px,color:#000
style E fill:#FF9900,stroke:#CC7A00,stroke-width:2px,color:#000
style F fill:#d3d3d3,stroke:#666,stroke-width:2px,color:#000
style G fill:#FF9900,stroke:#CC7A00,stroke-width:2px,color:#000
style H fill:#d3d3d3,stroke:#666,stroke-width:2px,color:#000
```
**Orange components** are provided by the recipe and deployed automatically. **Gray components** represent external systems where your custom business logic would live.
---
# Source: https://smartcar.com/docs/help/what-is-a-connected-car.md
> ## Documentation Index
> Fetch the complete documentation index at: https://smartcar.com/docs/llms.txt
> Use this file to discover all available pages before exploring further.
# What is a Connected Car?
> Learn about how to build applications that connect to millions of vehicles around the world.
Connected cars are vehicles that have in-built cellular modems. Most vehicles manufactured after 2015 have been shipping with this connectivity, or "embedded telematics." This essentially makes cars "smart" allowing them to communicate with the Internet. Take a look at this blog post for an in depth primer.
---
# Source: https://smartcar.com/docs/connect/what-is-connect.md
> ## Documentation Index
> Fetch the complete documentation index at: https://smartcar.com/docs/llms.txt
> Use this file to discover all available pages before exploring further.
# What is Connect?
Smartcar Connect is the fastest and most transparent way to collect user consent. Before you can make API requests to a car, your customer needs to link the vehicle to your app. It’s a simple process for your users to enroll their vehicles:
1. Select the car brand
2. Sign in
3. Give consent
From your app, you'll [redirect your users to Connect](/connect/redirect-to-connect), and [handle the response](/connect/handle-the-response) once the user completes or exits the Connect flow. You'll receive a `code` that you'll use to [exchange](/api-reference/authorization/auth-code-exchange) for an access token to start making requests to their vehicle(s).
We have designed Connect in compliance with the OAuth2 authorization protocol, safely handling all user information.
Connect comes with robust configurations to fit your needs and frontend [SDKs](/connect/connect-sdks) for faster integration.
---
# Source: https://smartcar.com/docs/help/what-is-smartcar.md
> ## Documentation Index
> Fetch the complete documentation index at: https://smartcar.com/docs/llms.txt
> Use this file to discover all available pages before exploring further.
# What is Smartcar?
> Learn about how to build applications that connect to millions of vehicles around the world.
The Smartcar platform allows mobility businesses to easily connect with their customers’ cars. Whether you need to track a vehicle’s location,
verify its mileage, share a virtual key, start charging an EV, monitor a car’s fuel tank level, inspect the tire pressure, or check the engine
oil life, Smartcar lets you do so with a single API request.
Take a look at the video below for a quick overview of how Smartcar works.
---
# Source: https://smartcar.com/docs/help/oem-integrations/vw/whats-new.md
# Source: https://smartcar.com/docs/help/oem-integrations/volvo/whats-new.md
# Source: https://smartcar.com/docs/help/oem-integrations/tesla/whats-new.md
# Source: https://smartcar.com/docs/help/oem-integrations/mercedes/whats-new.md
> ## Documentation Index
> Fetch the complete documentation index at: https://smartcar.com/docs/llms.txt
> Use this file to discover all available pages before exploring further.
# Important Updates
> Updates regarding the Mercedes-Benz Smartcar Integration.
## December 15th, 2025
Smartcar is excited to announce the availability of the Mercedes-Benz Connectivity Services partner integration. This integration enables developers to connect Mercedes-Benz electric vehicles in Europe and access vehicle data for smart charging, energy management, and mobility applications.
### VIN Verification in Connect Flow
When connecting a Mercedes-Benz vehicle through Smartcar Connect, vehicle owners will be prompted to enter their Vehicle Identification Number (VIN) as part of the authentication process. This additional verification step is a requirement from Mercedes to enroll a vehicle.
The VIN can be found in various places such as the Mercedes mobile app, Mercedes web portal, the vehicle's registration documents, insurance papers, or on the vehicle itself (typically on the driver's side dashboard or door jamb).
### Supported Vehicle Types
Currently, the Mercedes-Benz integration supports the following powertrain types for **new connections**:
* **BEV (Battery Electric Vehicles)** - Fully electric Mercedes-Benz vehicles
* **PHEV (Plug-in Hybrid Electric Vehicles)** - Mercedes-Benz plug-in hybrid vehicles
### Need Support for Other Vehicle Types?
**Existing Connections**: If you have existing connections to Mercedes-Benz vehicles with other powertrain types (such as traditional internal combustion engine vehicles), these connections will continue to work, but re-authentication is not supported at this time. If your application requires support for Mercedes-Benz vehicles with other powertrain types, please [contact our team](mailto:support@smartcar.com) to discuss your specific requirements. We're continuously working with Mercedes to expand compatibility across different vehicle types and would love to hear about your use case.
### Supported Smartcar Signals:
* [Charge.IsChargingCableConnected](/api-reference/signals/charge#is-charging-cable-connected)
* [Charge.IsCharging](/api-reference/signals/charge#is-charging)
* [Charge.DetailedChargingStatus](/api-reference/signals/charge#detailed-charging-status)
* [Charge.ChargeTimers](/api-reference/signals/charge#charge-timers)
* [Charge.ChargeLimits](/api-reference/signals/charge#charge-limits)
* [Charge.TimeToComplete](/api-reference/signals/charge#time-to-complete)
* [Charge.Wattage](/api-reference/signals/charge#wattage)
* [TractionBattery.StateOfCharge](/api-reference/signals/tractionbattery#state-of-charge)
* [TractionBattery.Range](/api-reference/signals/tractionbattery#range)
* [TractionBattery.NominalCapacity](/api-reference/signals/tractionbattery#nominal-capacities)
* [Location.PreciseLocation](/api-reference/signals/location#location)
* [Odometer.TraveledDistance](/api-reference/signals/odometer#traveled-distance)
### Smartcar Legacy API v2 Endpoints Supported:
* [/odometer](/api-reference/get-odometer)
* [/location](/api-reference/get-location)
* [/battery](/api-reference/evs/get-battery-level)
* [/battery/capacity](/api-reference/get-nominal-capacity)
* [/charge](/api-reference/evs/get-charge-limit)
### Supported Commands:
* [Charge Start](/api-reference/evs/control-charge)
* [Charge Stop](/api-reference/evs/control-charge)
### Notes
This Mercedes-Benz integration is automatically enabled for your application when connecting vehicles out of Europe.
* Supported European markets: Reach customers in Austria, Belgium, Denmark, Finland, France, Germany, Great Britain, Ireland, Italy, Luxembourg, Netherlands, Norway, Poland, Portugal, Spain, Sweden, and Switzerland
* As part of this integration, drivers will be asked to enter their Vehicle Identification Number (VIN) during the new consent authentication flow. We recommend preparing your customer guidance and support content accordingly
* If charge control permissions are requested by the connecting application only EQA, EQB, EQE and EQS vehicles are compatible
* Only EQ models support control charge at this time. For EQE and EQS models, if the state of charge is lower than 20%, stop commands are rejected by Mercedes. For all other EQ models, if the state of charge is below 50%, stopping the charging process is rejected by Mercedes and the car will continue to charge until it reaches at least 50% for vehicle reliability reasons,
For more information about compatible vehicle data and features, see the [compatibility matrix](https://smartcar.com/product/compatible-vehicles).
---
# Source: https://smartcar.com/docs/api-reference/signals/wheel.md
> ## Documentation Index
> Fetch the complete documentation index at: https://smartcar.com/docs/llms.txt
> Use this file to discover all available pages before exploring further.
# Wheel Signals & Attributes
## Signals
### Tires
Signal code: `wheel-tires`
An array of objects, where each object represents a specific wheel on the vehicle.
An array of objects containing information about the vehicle's wheels.
Represents the row position of a specific wheel, front to back (0 to Wheels.rowCount-1).
Represents the column position of a specific wheel, left to right (0 to Wheels.columnCount-1).
Indicates the current tire pressure of the wheel.
Indicates the total number of wheel rows present in the vehicle. This signal, along with WheelColumnCount, provides information about the vehicle's wheel layout and the total number of wheels available.
Indicates the total number of wheel columns present in the vehicle. This signal, along with WheelRowCount, provides information about the vehicle's wheel layout and the total number of wheels available.
## Attributes
### Style
Signal code: `wheel-style`
Wheel style of the vehicle.
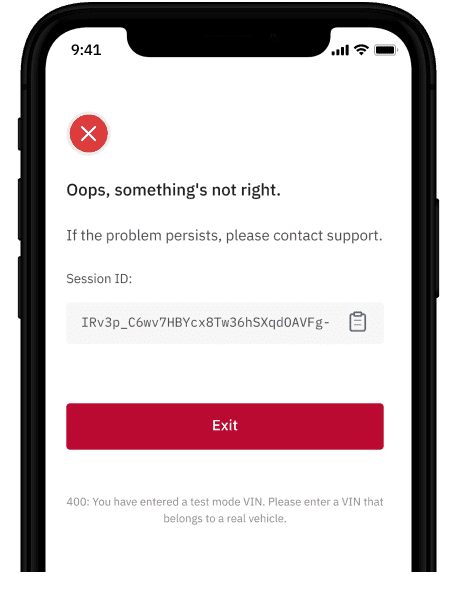 c. server\_error which is thrown if there is not another Connect error specified.
More documentation on error handling can be found [here](https://smartcar.com/docs/integration-guide/test-your-integration/test-errors/#1-connect-errors).
## March 6, 2023
The disconnect endpoint now supports the use of management API token (MAT) for authorization purposes. Documentation can be found [here](https://smartcar.com/docs/api#delete-disconnect)
## May 10, 2023
Smartcar is now compatible with Infiniti vehicles in the United States.
## June 7, 2023
Smartcar is now compatible with Hyundai vehicles in Canada.
## June 5, 2023
Test mode supports the following email format with any password to generate an account with multiple vehicles:
`
c. server\_error which is thrown if there is not another Connect error specified.
More documentation on error handling can be found [here](https://smartcar.com/docs/integration-guide/test-your-integration/test-errors/#1-connect-errors).
## March 6, 2023
The disconnect endpoint now supports the use of management API token (MAT) for authorization purposes. Documentation can be found [here](https://smartcar.com/docs/api#delete-disconnect)
## May 10, 2023
Smartcar is now compatible with Infiniti vehicles in the United States.
## June 7, 2023
Smartcar is now compatible with Hyundai vehicles in Canada.
## June 5, 2023
Test mode supports the following email format with any password to generate an account with multiple vehicles:
`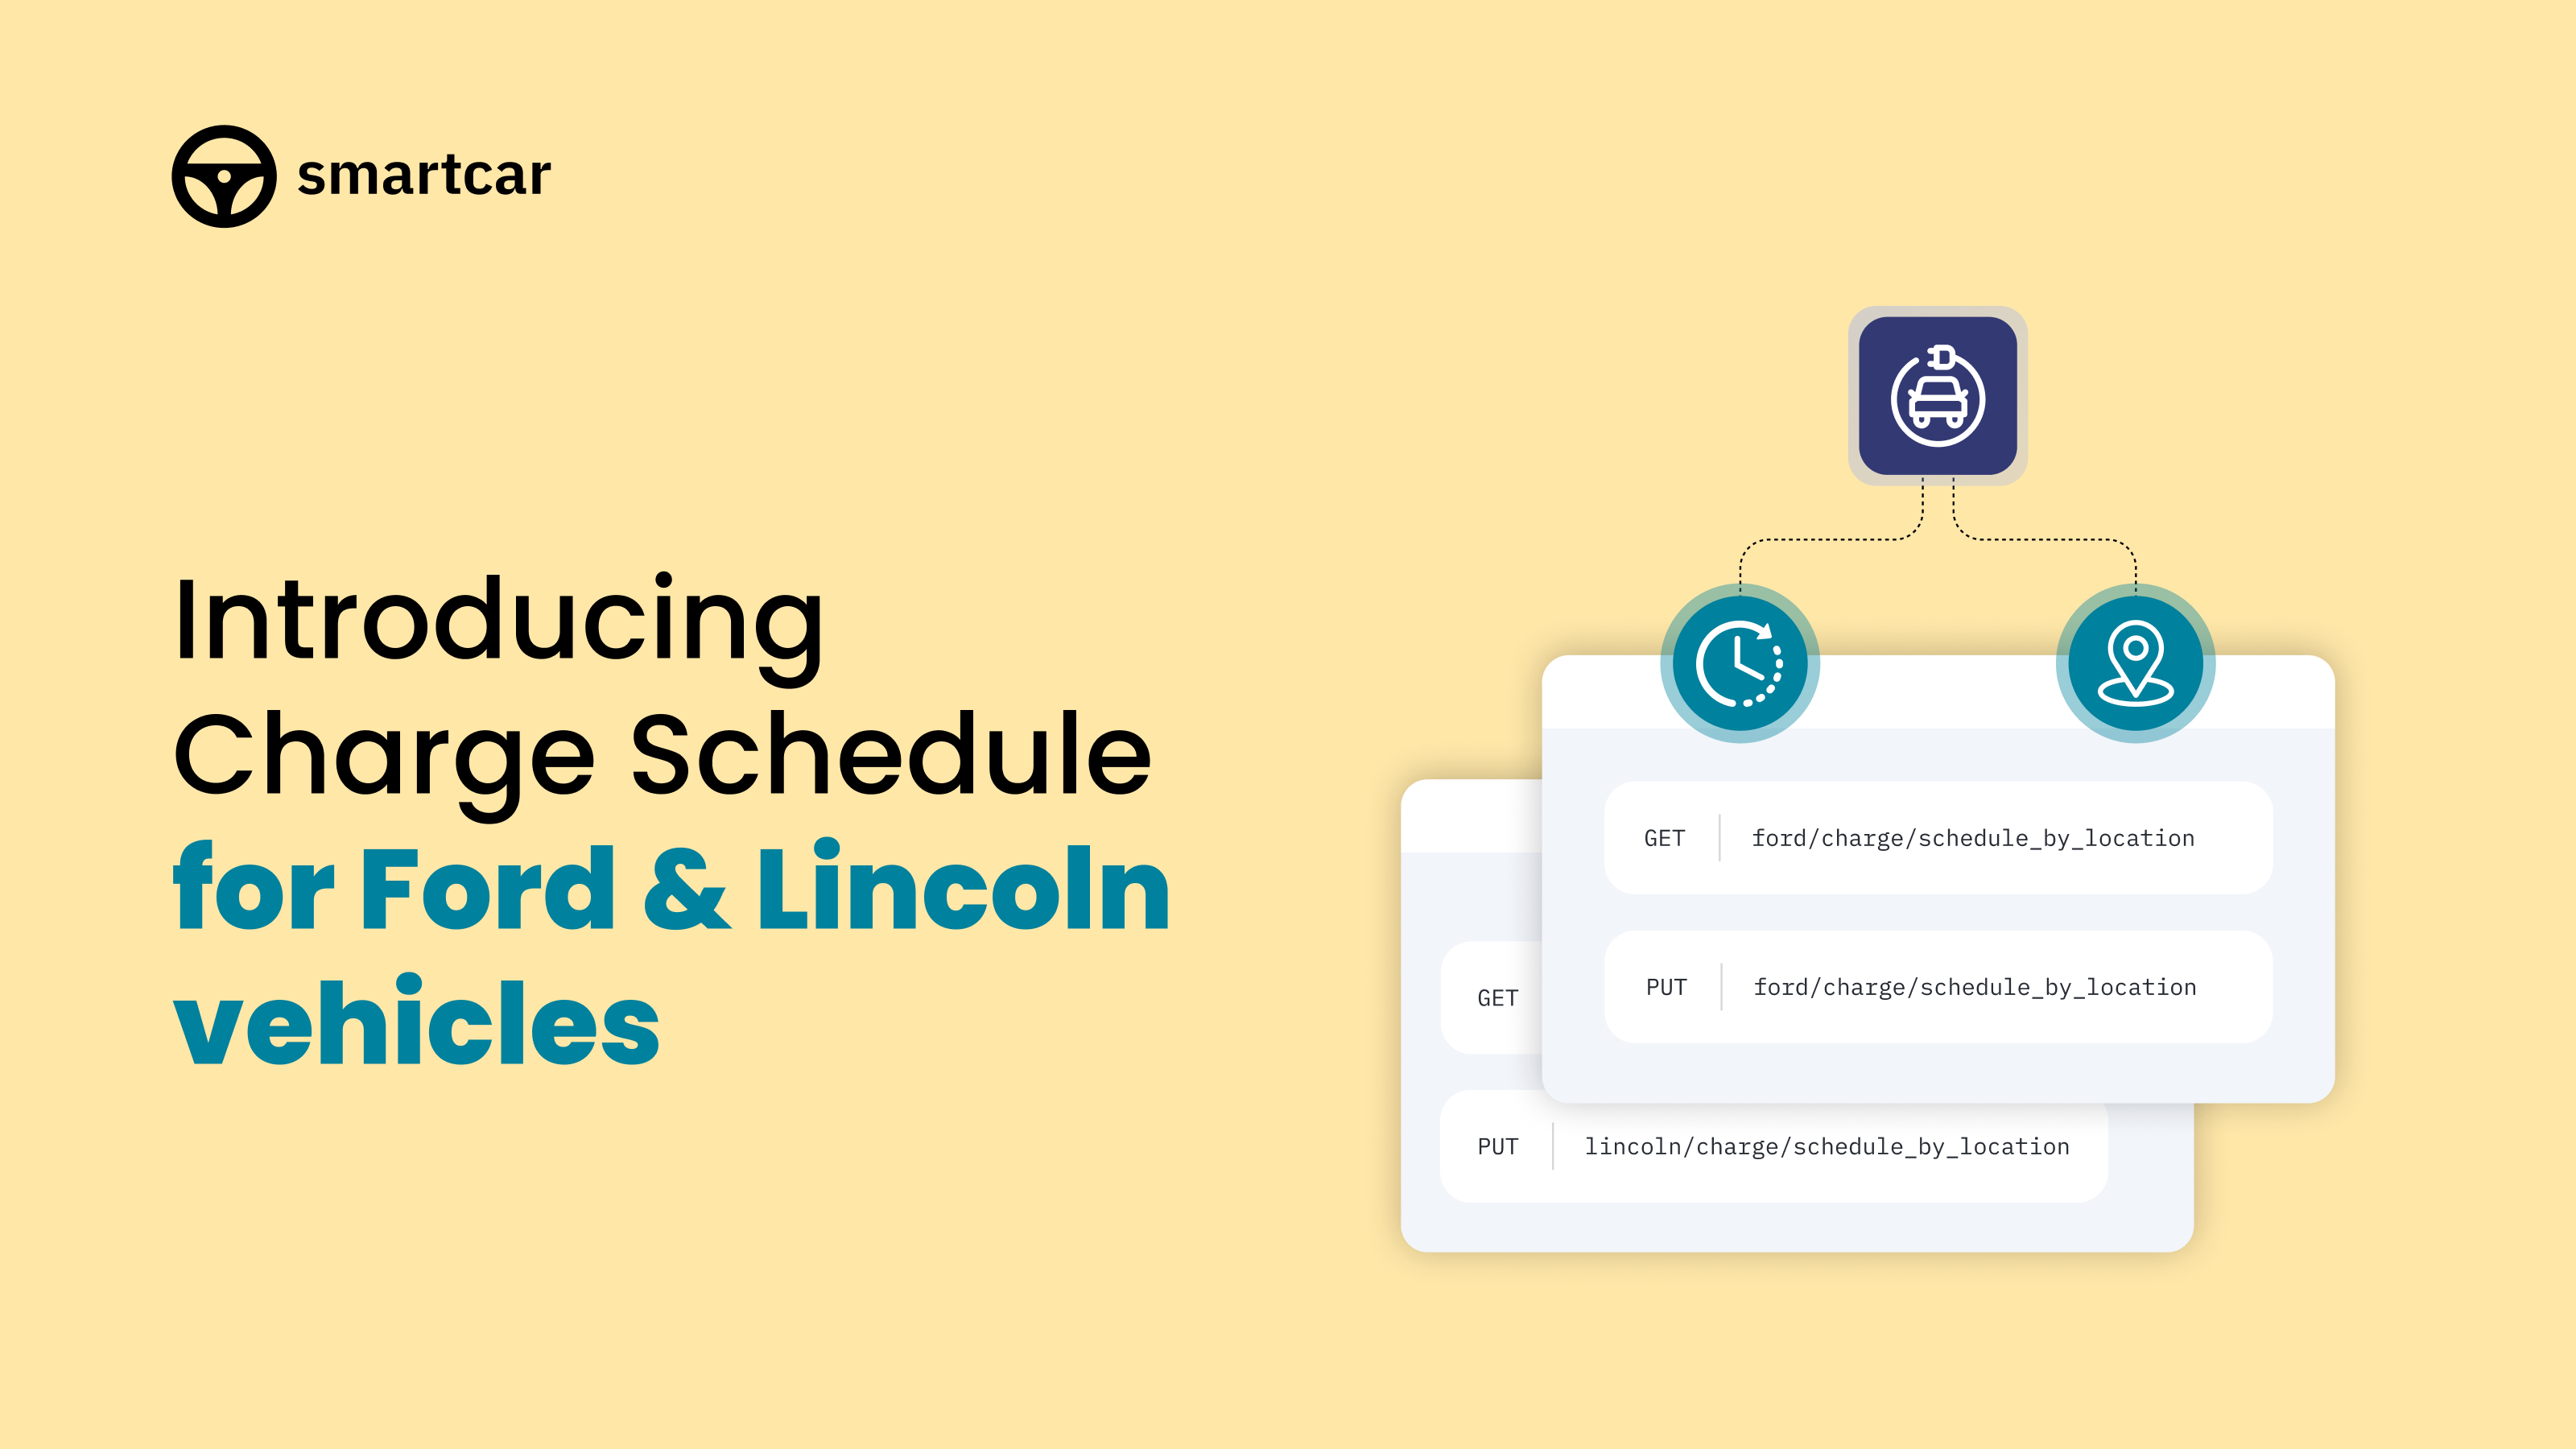 The following brand-specific endpoints are now available for Ford and Lincoln vehicles in Canada, the United States, and our supported European countries:
* GET ford/charge/schedule\_by\_location
* PUT ford/charge/schedule\_by\_location
* GET lincoln/charge/schedule\_by\_location
* PUT lincoln/charge/schedule\_by\_location
## September 21, 2023
Introducing Vehicle Management! With this initial release you're able to see and manage
vehicles connected to your applications from within the [Smartcar Dashboard](https://dashboard.smartcar.com/login).
The following brand-specific endpoints are now available for Ford and Lincoln vehicles in Canada, the United States, and our supported European countries:
* GET ford/charge/schedule\_by\_location
* PUT ford/charge/schedule\_by\_location
* GET lincoln/charge/schedule\_by\_location
* PUT lincoln/charge/schedule\_by\_location
## September 21, 2023
Introducing Vehicle Management! With this initial release you're able to see and manage
vehicles connected to your applications from within the [Smartcar Dashboard](https://dashboard.smartcar.com/login).
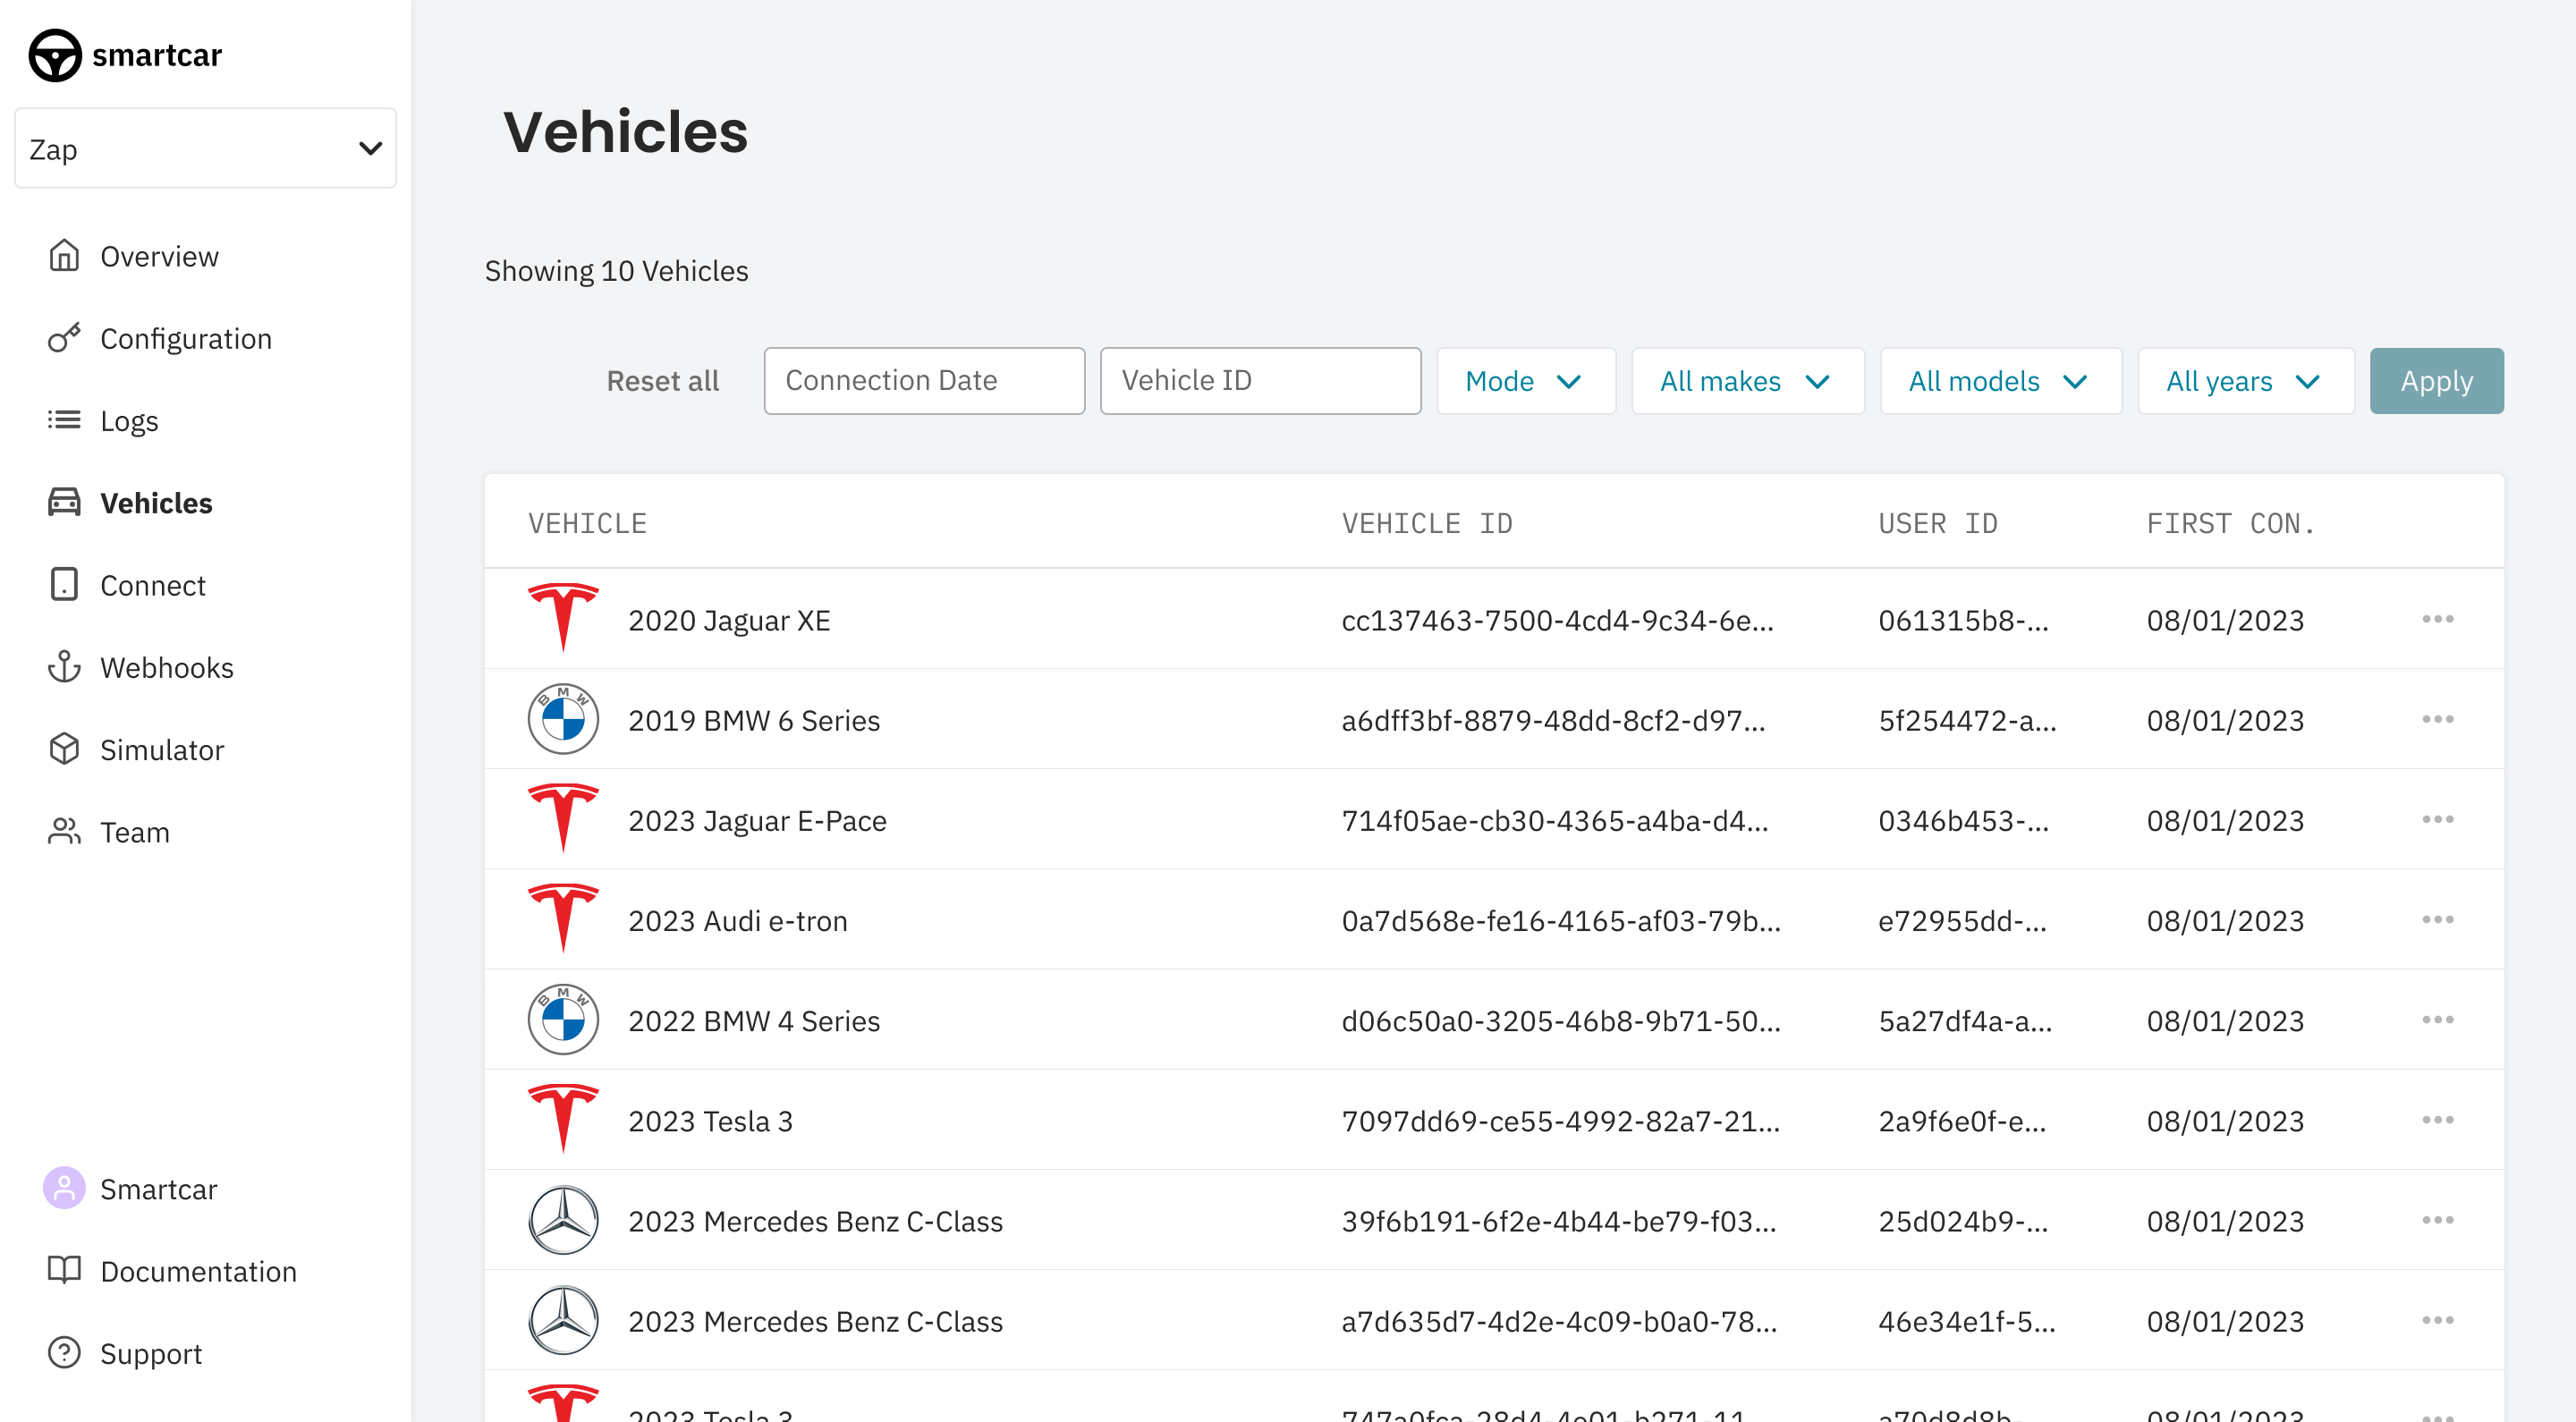
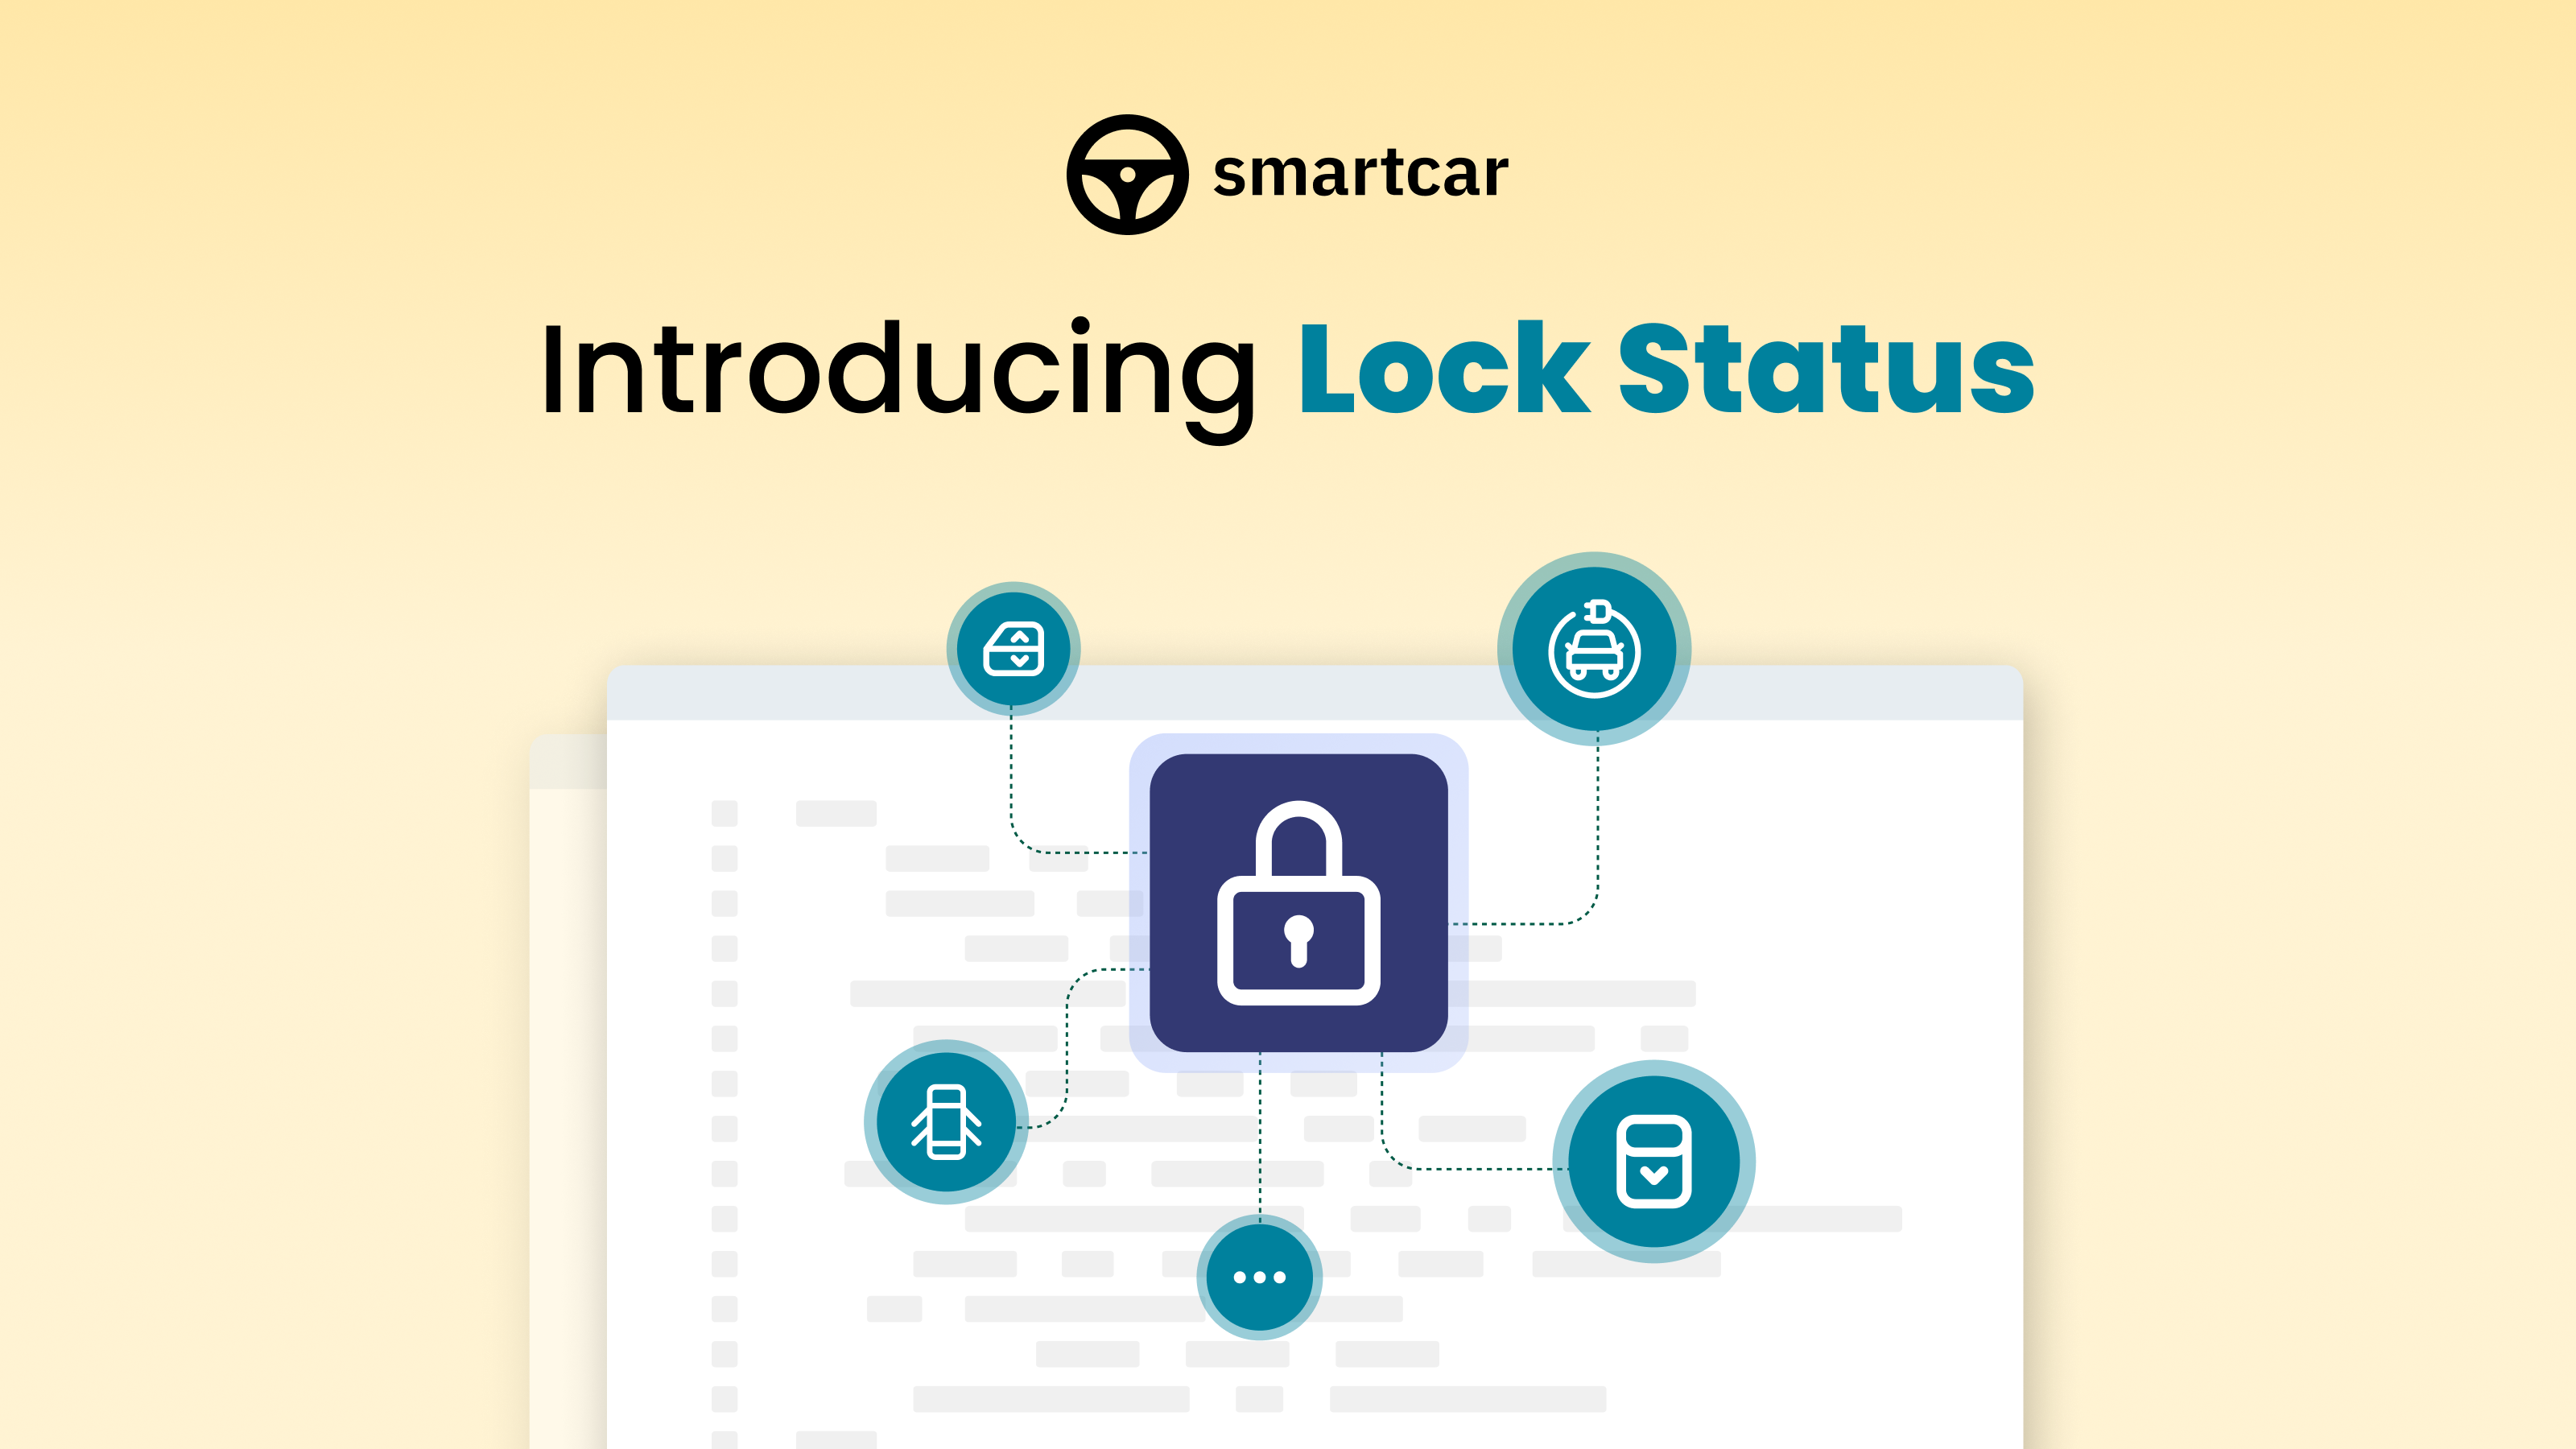 Lock Status is now available as a Core endpoint and supported by the following makes:
* Tesla (Global)
* Ford (Global)
* Kia (Global)
* Jaguar (Global)
* Land Rover (Global)
* BMW (Global)
* MINI (Global)
* Lincoln (US)
* Toyota (US)
* Lexus (US)
In addition to the lock status of the vehicle, Smartcar will also return the open status of doors, sunroof, windows, based on what the vehicle supports.
## October 19, 2023
Lock Status is now available as a Core endpoint and supported by the following makes:
* Tesla (Global)
* Ford (Global)
* Kia (Global)
* Jaguar (Global)
* Land Rover (Global)
* BMW (Global)
* MINI (Global)
* Lincoln (US)
* Toyota (US)
* Lexus (US)
In addition to the lock status of the vehicle, Smartcar will also return the open status of doors, sunroof, windows, based on what the vehicle supports.
## October 19, 2023
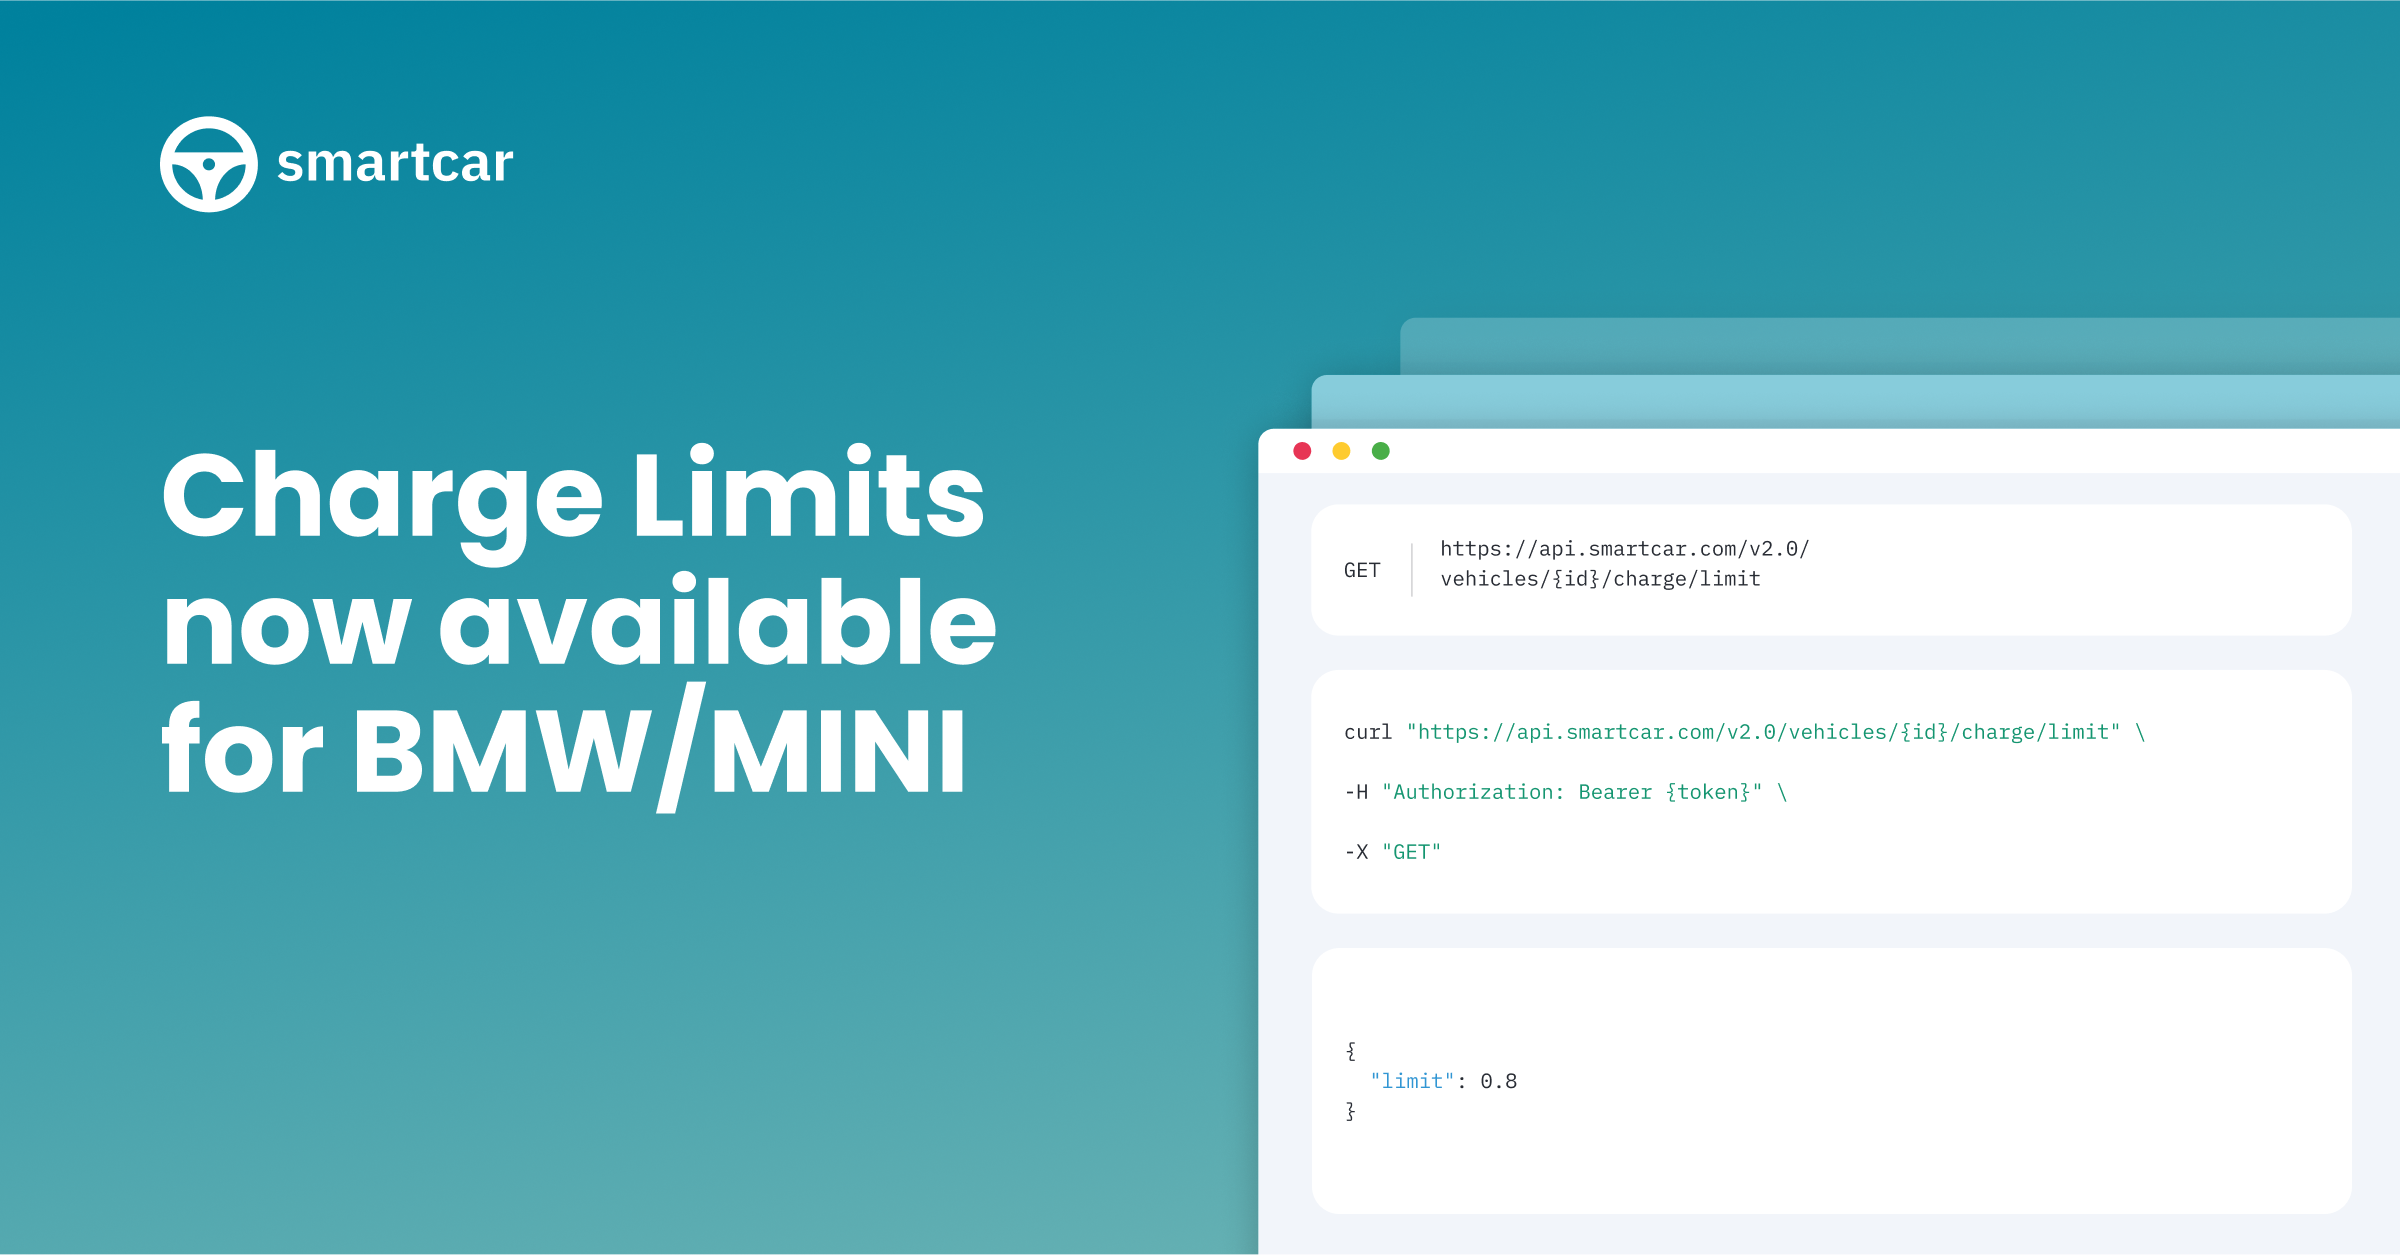 BMW and MINI EVs are now compatible with the following endpoints globally:
* [Get Charge Limit](/api-reference/evs/get-charge-limit)
* [Set Charge Limit](/api-reference/evs/set-charge-limit)
## October 5, 2023
BMW and MINI EVs are now compatible with the following endpoints globally:
* [Get Charge Limit](/api-reference/evs/get-charge-limit)
* [Set Charge Limit](/api-reference/evs/set-charge-limit)
## October 5, 2023
 Smartcar is now compatible with Hyundai in supported European countries.
## October 3, 2023
Smartcar is now compatible with Hyundai in supported European countries.
## October 3, 2023
 Smartcar is now compatible with Mazda and Porsche in supported European countries.
## November 15, 2023
Smartcar is now compatible with Mazda and Porsche in supported European countries.
## November 15, 2023
 Smartcar is now compatible with CUPRA in supported European countries.
---
# Source: https://smartcar.com/docs/changelog/2024.md
> ## Documentation Index
> Fetch the complete documentation index at: https://smartcar.com/docs/llms.txt
> Use this file to discover all available pages before exploring further.
# 2024 Releases
Smartcar is now compatible with CUPRA in supported European countries.
---
# Source: https://smartcar.com/docs/changelog/2024.md
> ## Documentation Index
> Fetch the complete documentation index at: https://smartcar.com/docs/llms.txt
> Use this file to discover all available pages before exploring further.
# 2024 Releases
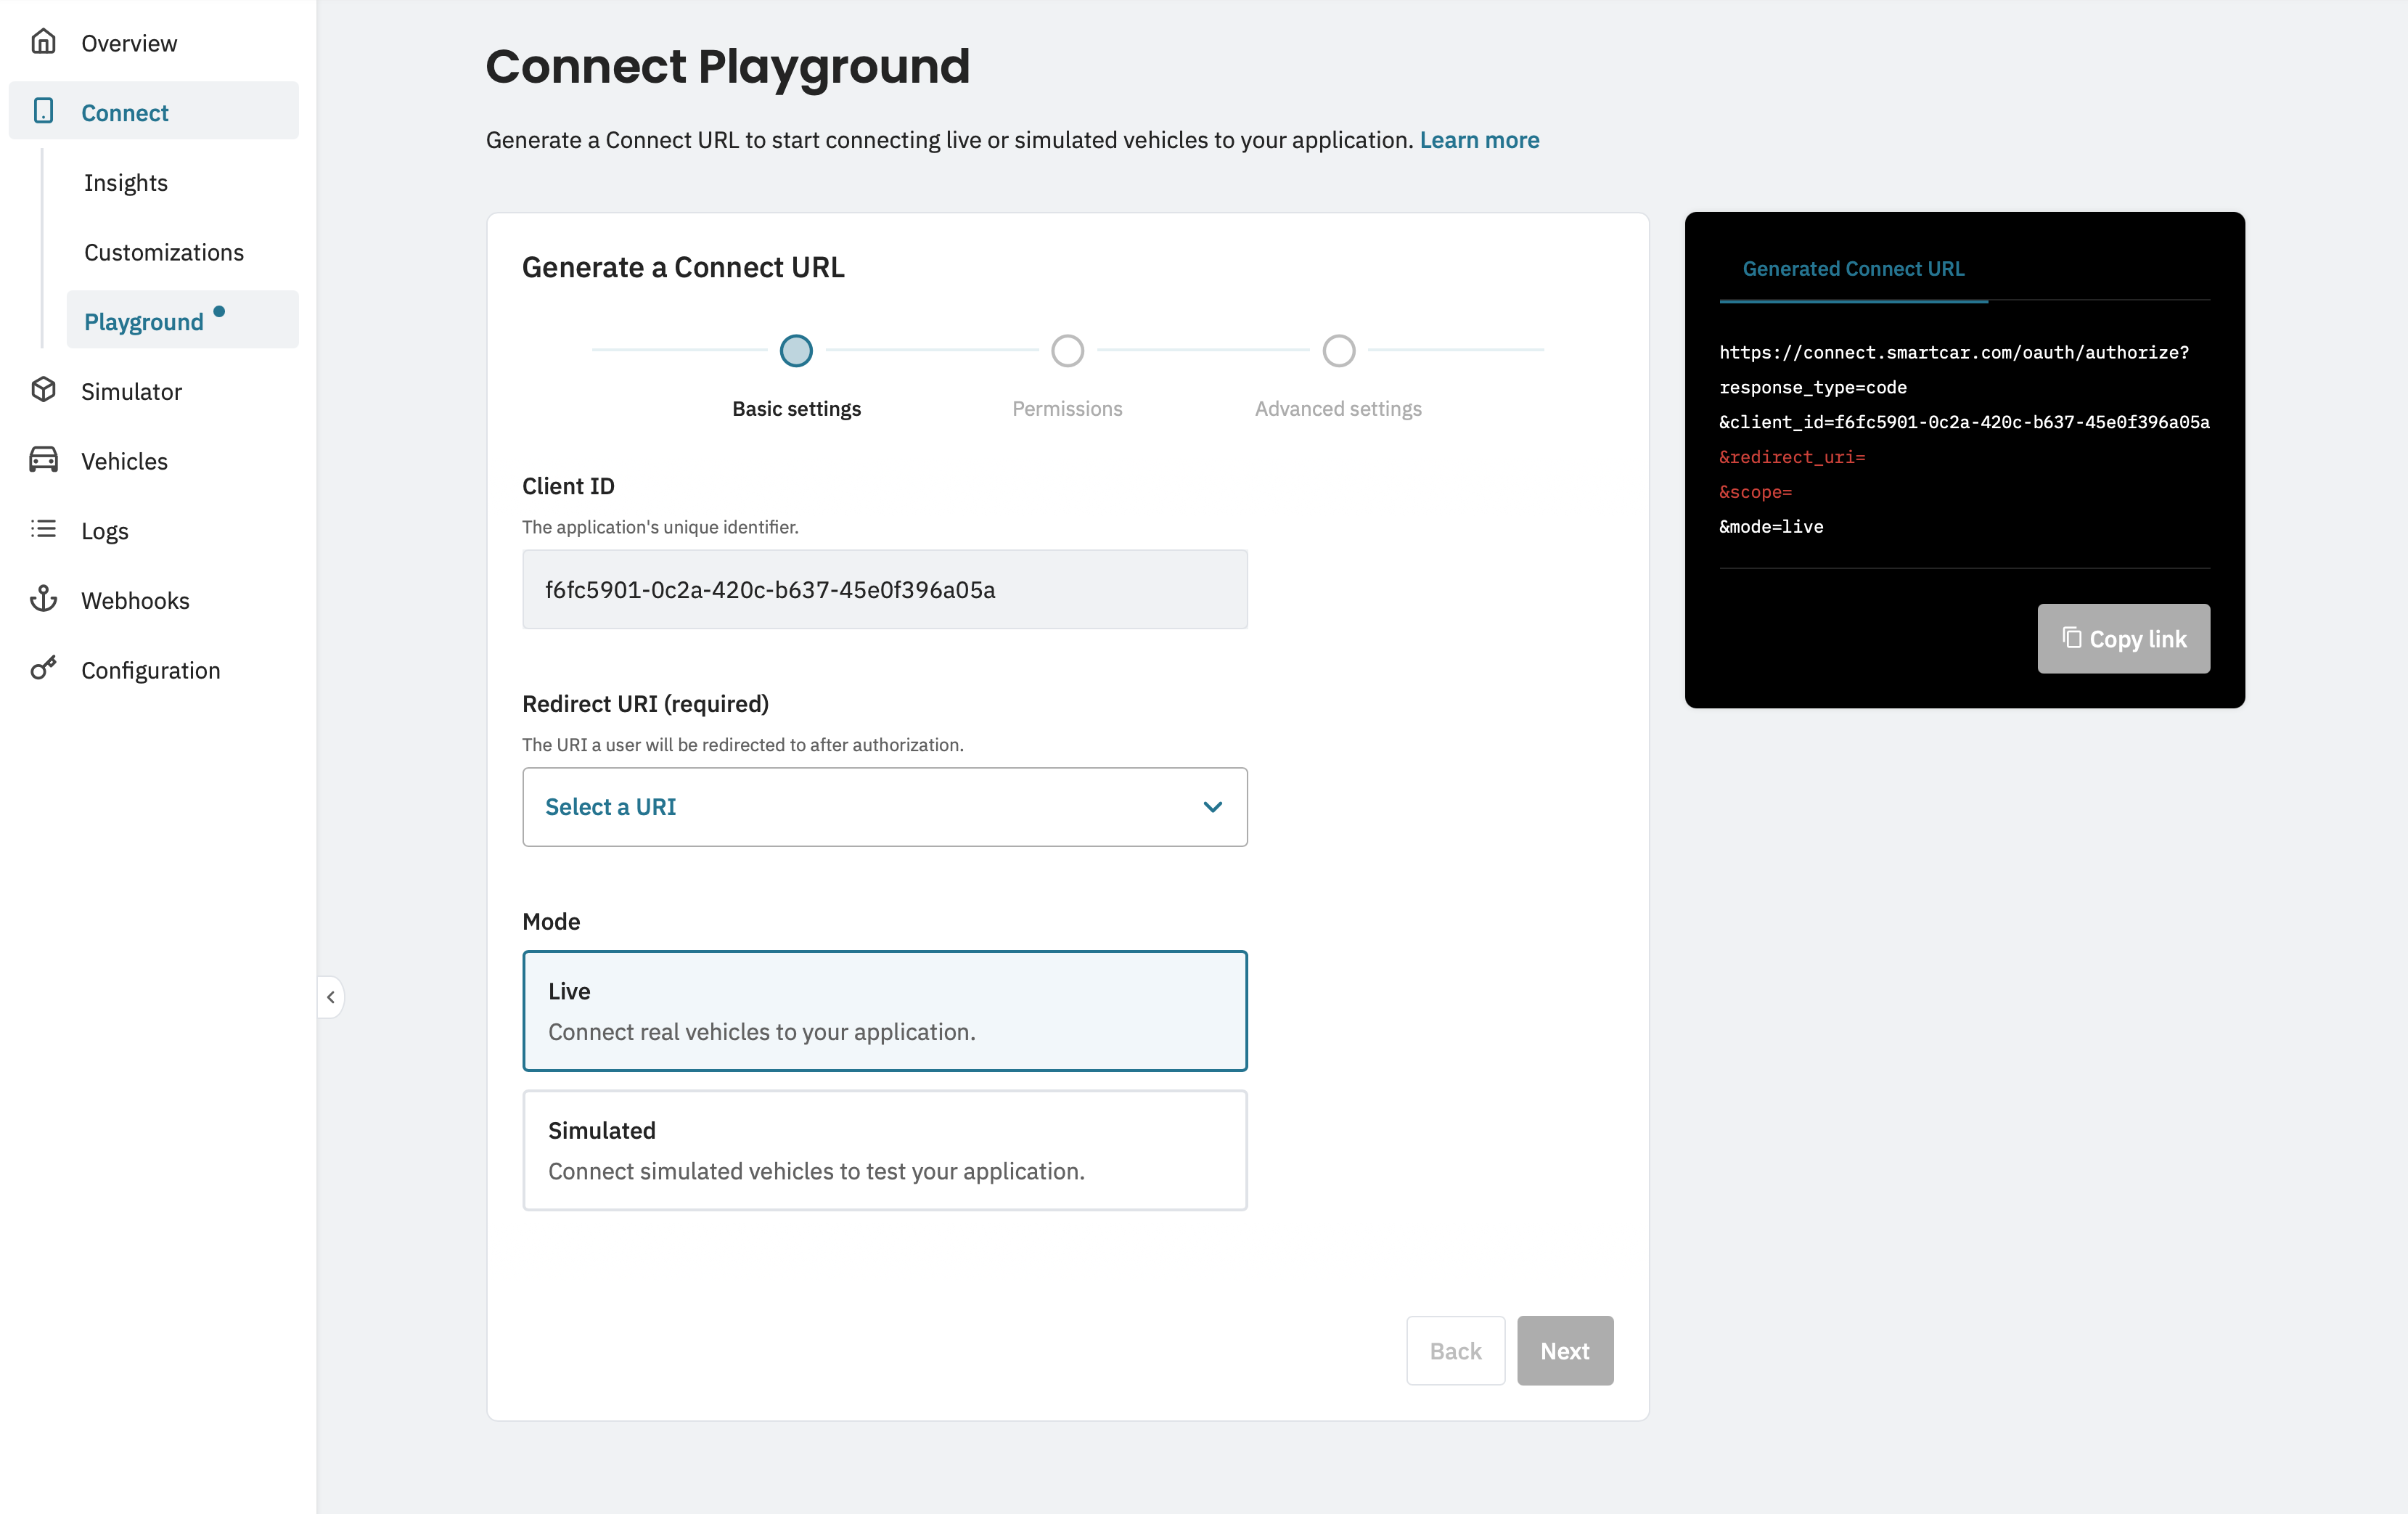 The [Connect Playground](https://smartcar.com/docs/getting-started/dashboard/playground) is available, making it easier than ever to create your Connect URL and start requesting vehicle consent.
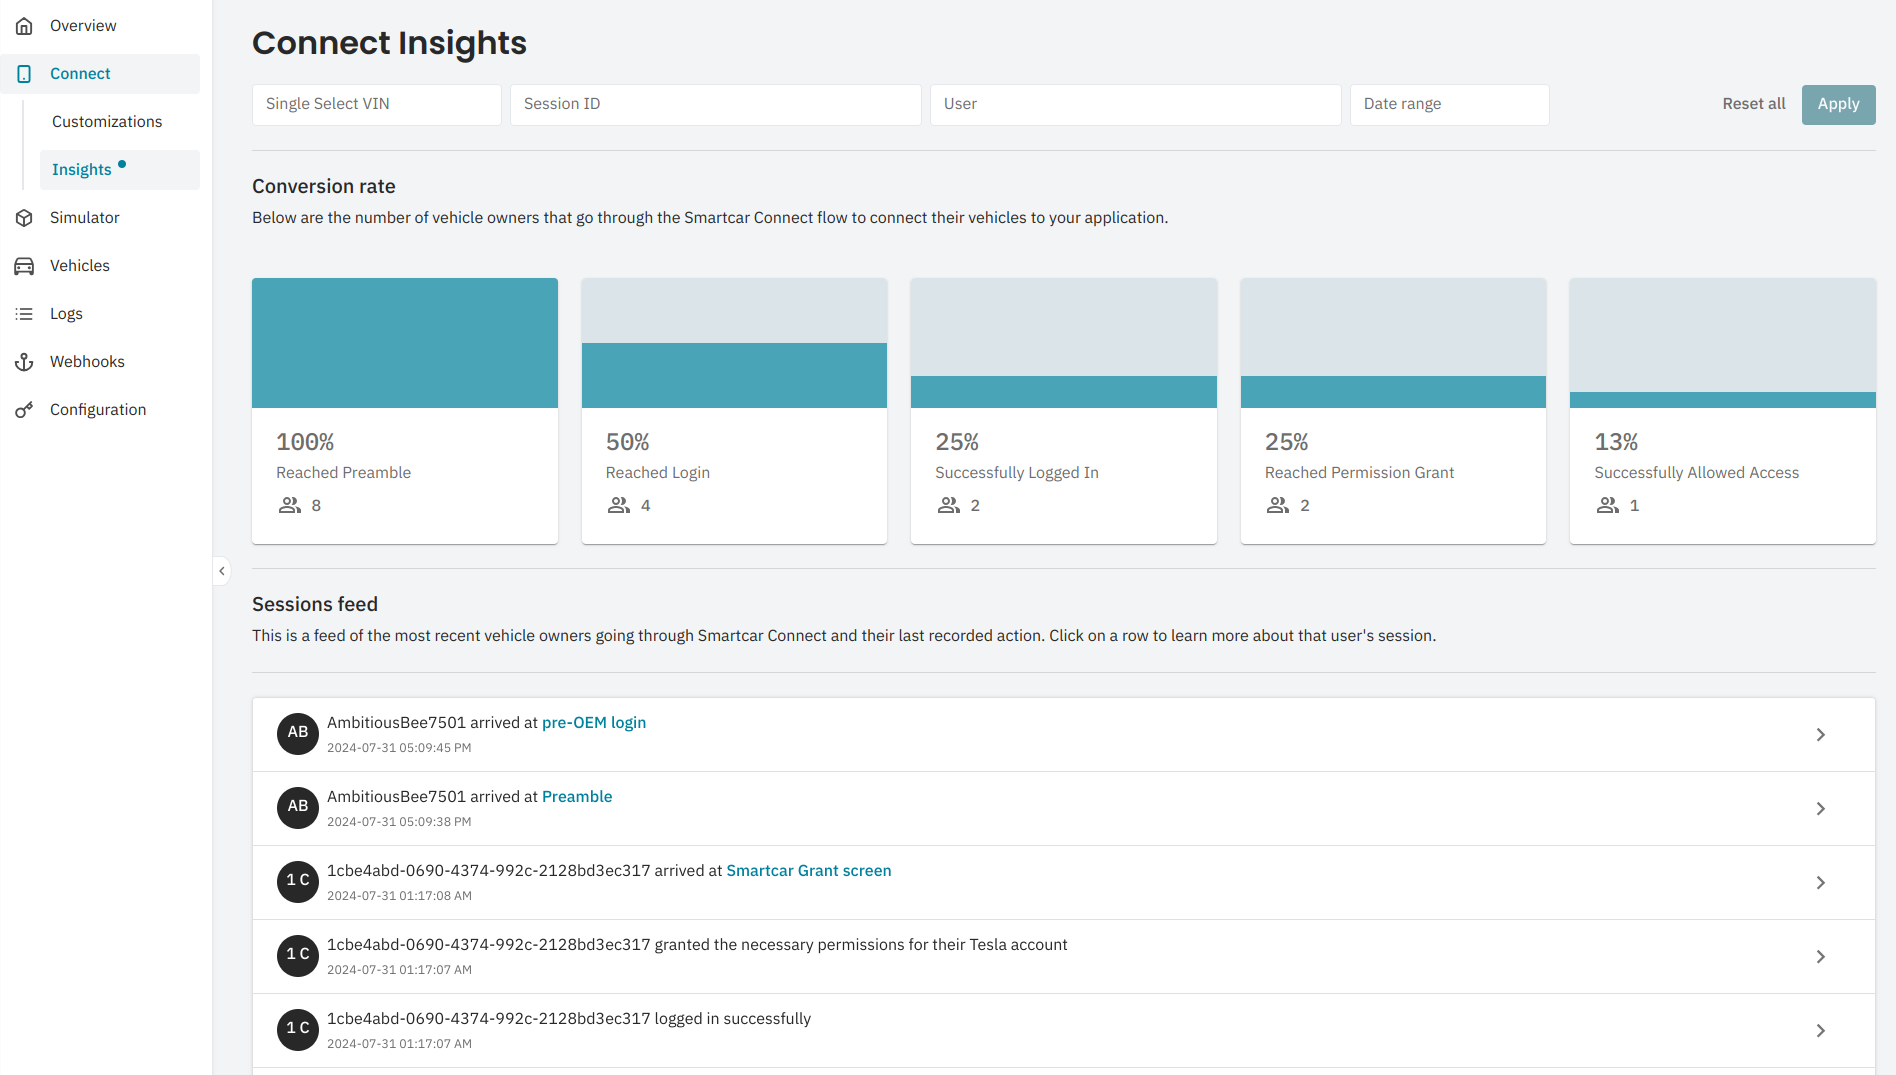 * Each Connect flow launched for the previous two weeks is available in the Smartcar Dashboard with a variety of ways to search for specific Connect launches.
* Enterprise customers have access to funnel analysis so they can understand their conversion rates in the Connect flow.
* Each Connect flow launched for the previous two weeks is available in the Smartcar Dashboard with a variety of ways to search for specific Connect launches.
* Enterprise customers have access to funnel analysis so they can understand their conversion rates in the Connect flow.
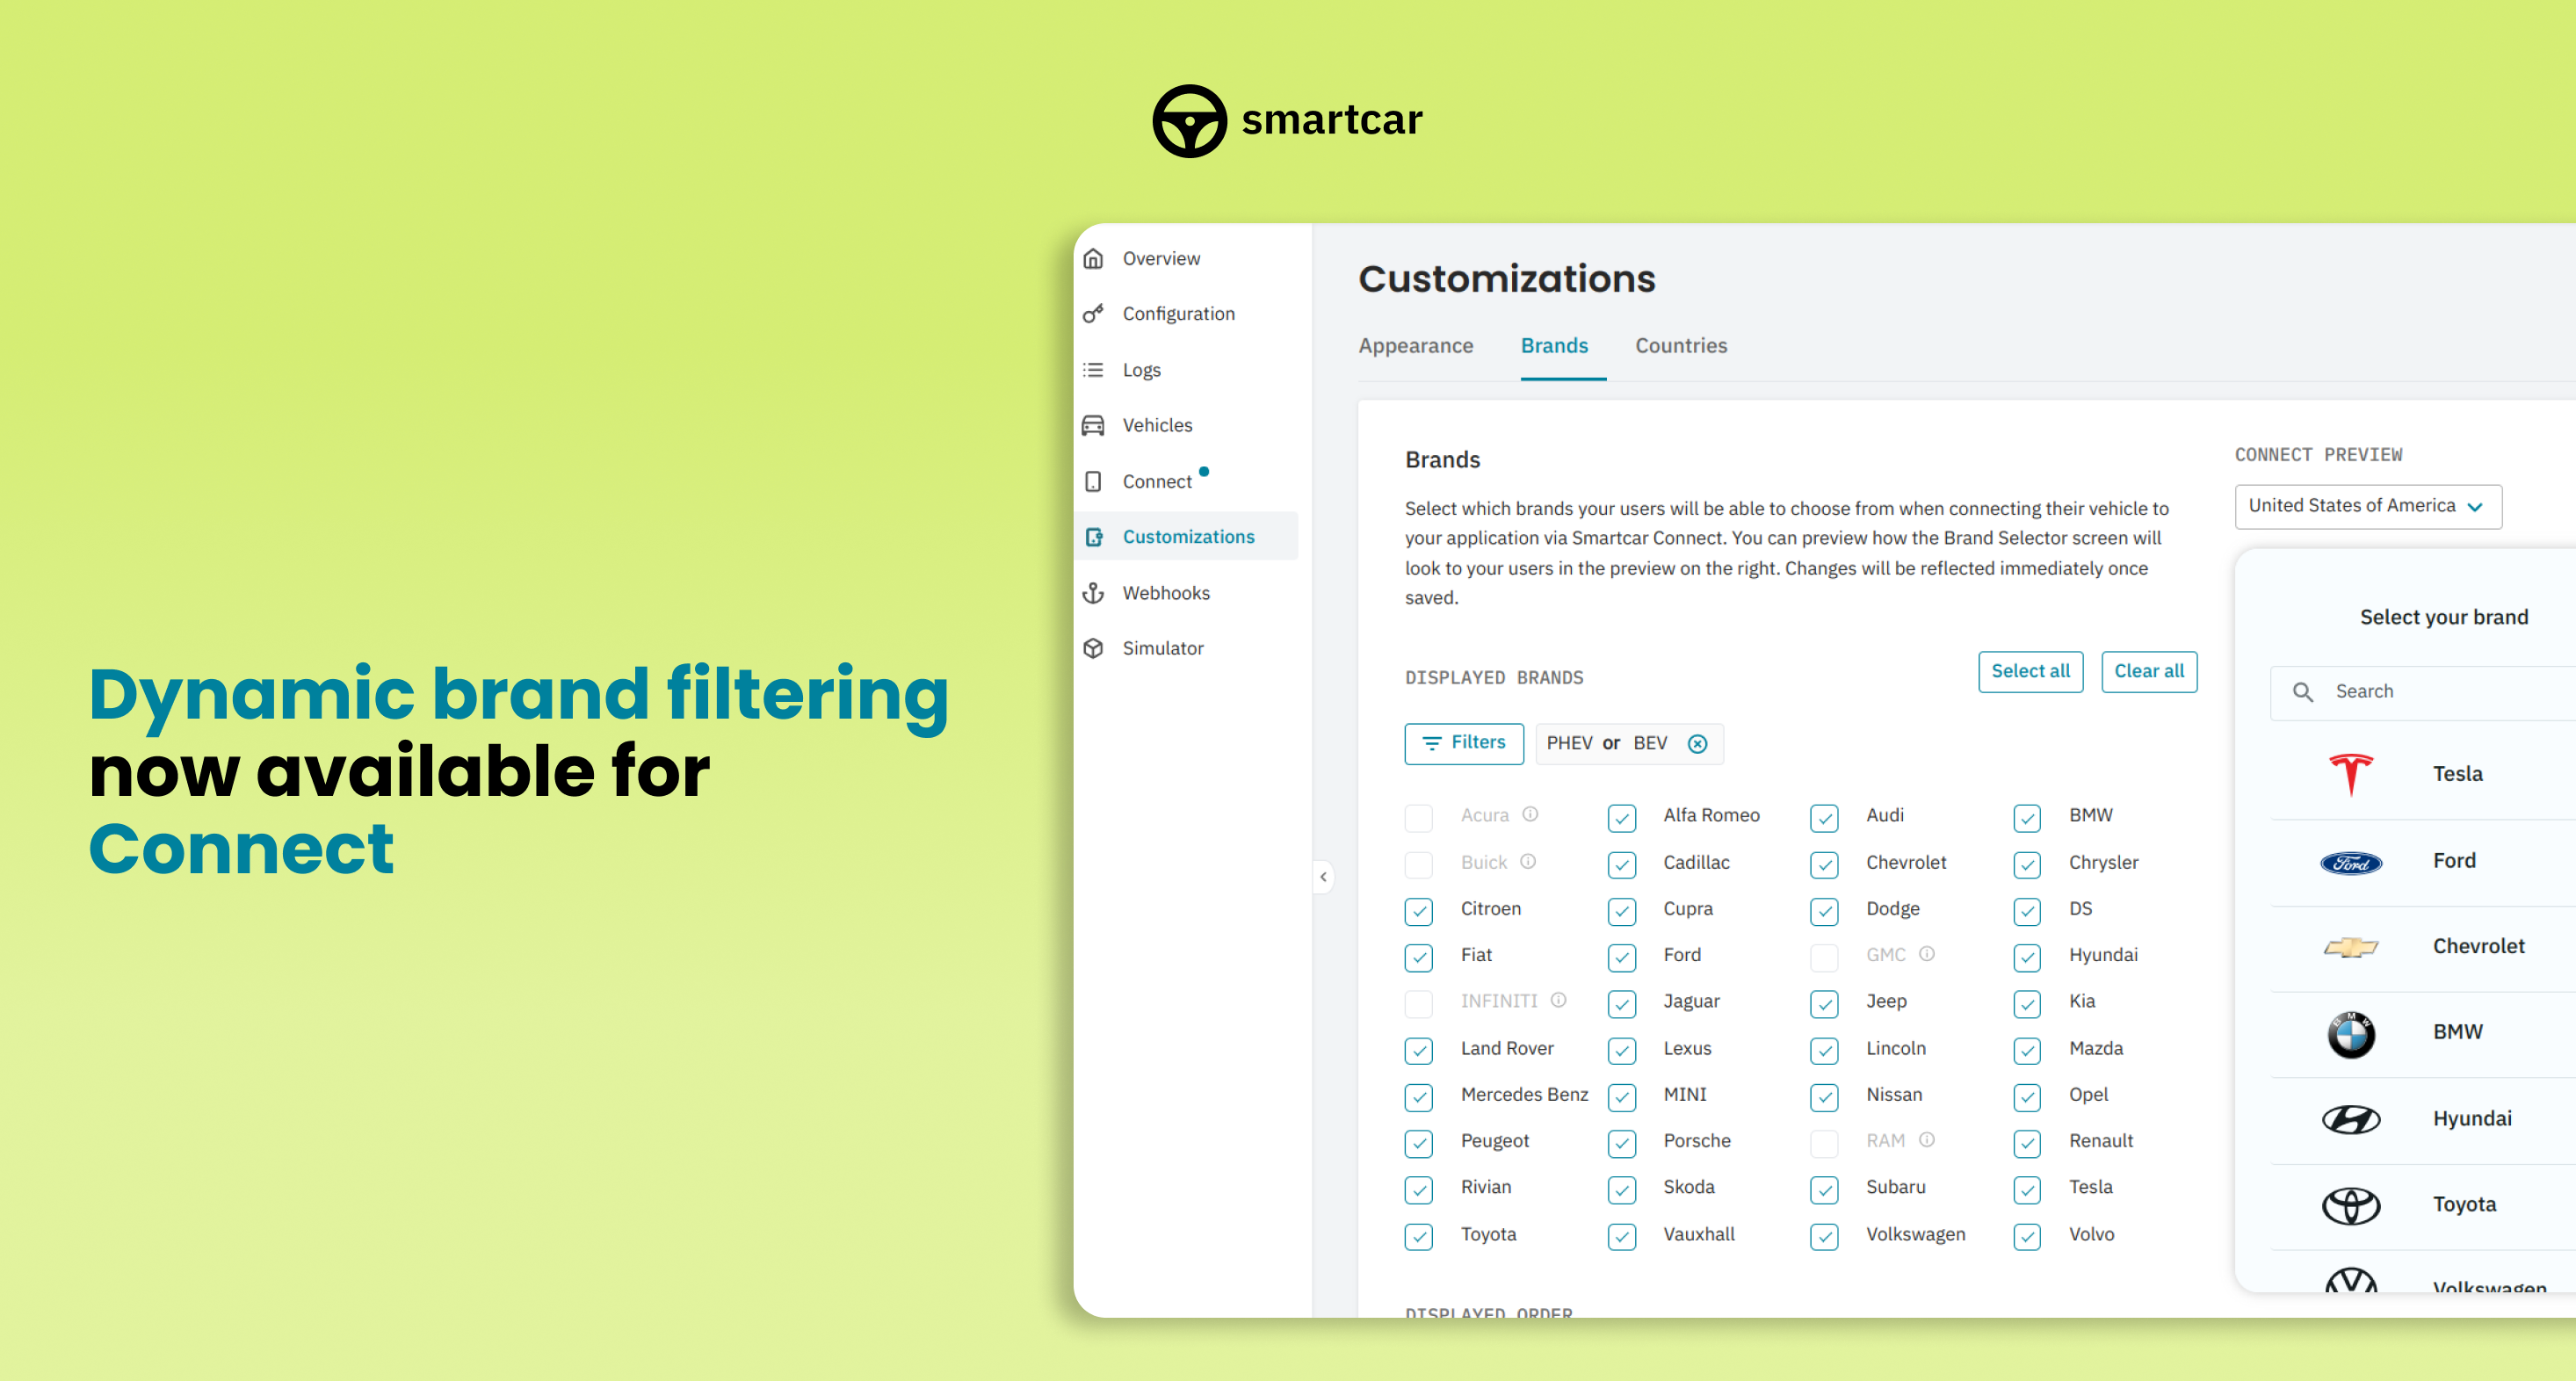 You can now customize which bands show up in Connect from the [Dashboard](https://dashboard.smartcar.com/). Easily manage which brands your users can connect to based on engine type or endpoint.
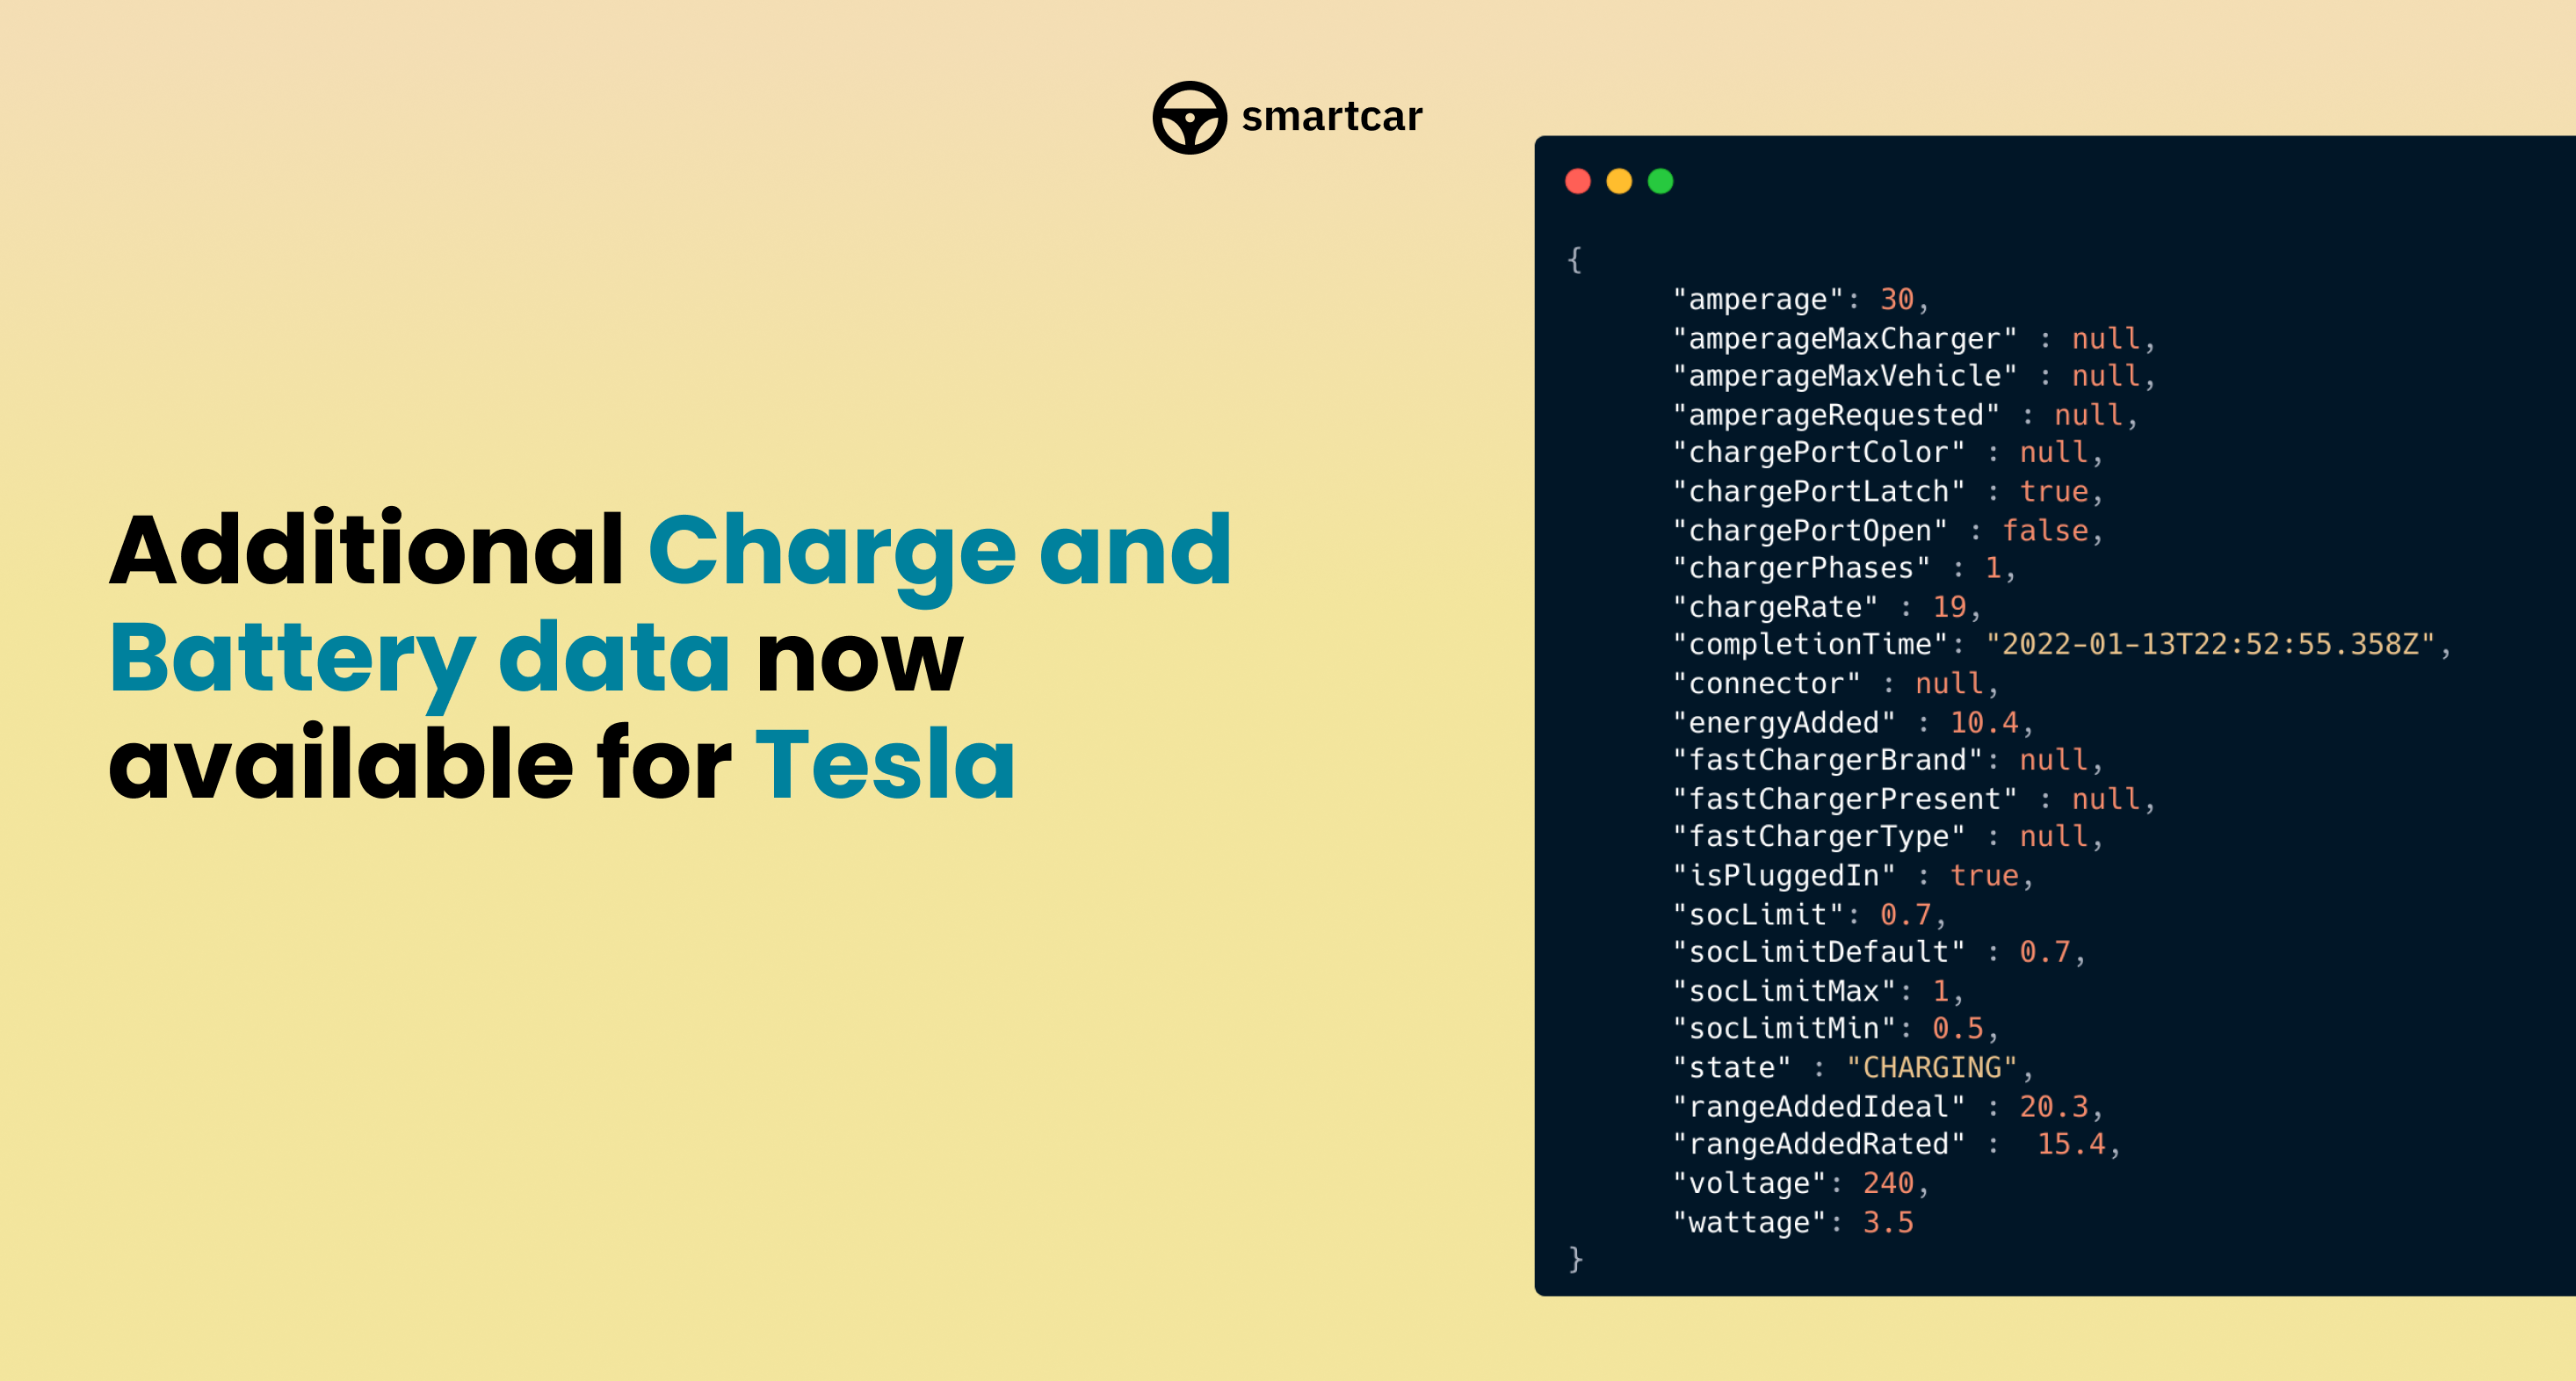 The following make specific endpoints are now available for Tesla across all supported regions:
* [GET /tesla/charge](/api-reference/tesla/get-charge)
* [GET /tesla/battery](/api-reference/tesla/get-battery)
### Additional Releases
Suggested user messages are now included as part of API error responses for you to easily surface resolution steps to vehicle owners. See our [error documentation](/api-reference/api-errors) for more details.
The following make specific endpoints are now available for Tesla across all supported regions:
* [GET /tesla/charge](/api-reference/tesla/get-charge)
* [GET /tesla/battery](/api-reference/tesla/get-battery)
### Additional Releases
Suggested user messages are now included as part of API error responses for you to easily surface resolution steps to vehicle owners. See our [error documentation](/api-reference/api-errors) for more details.
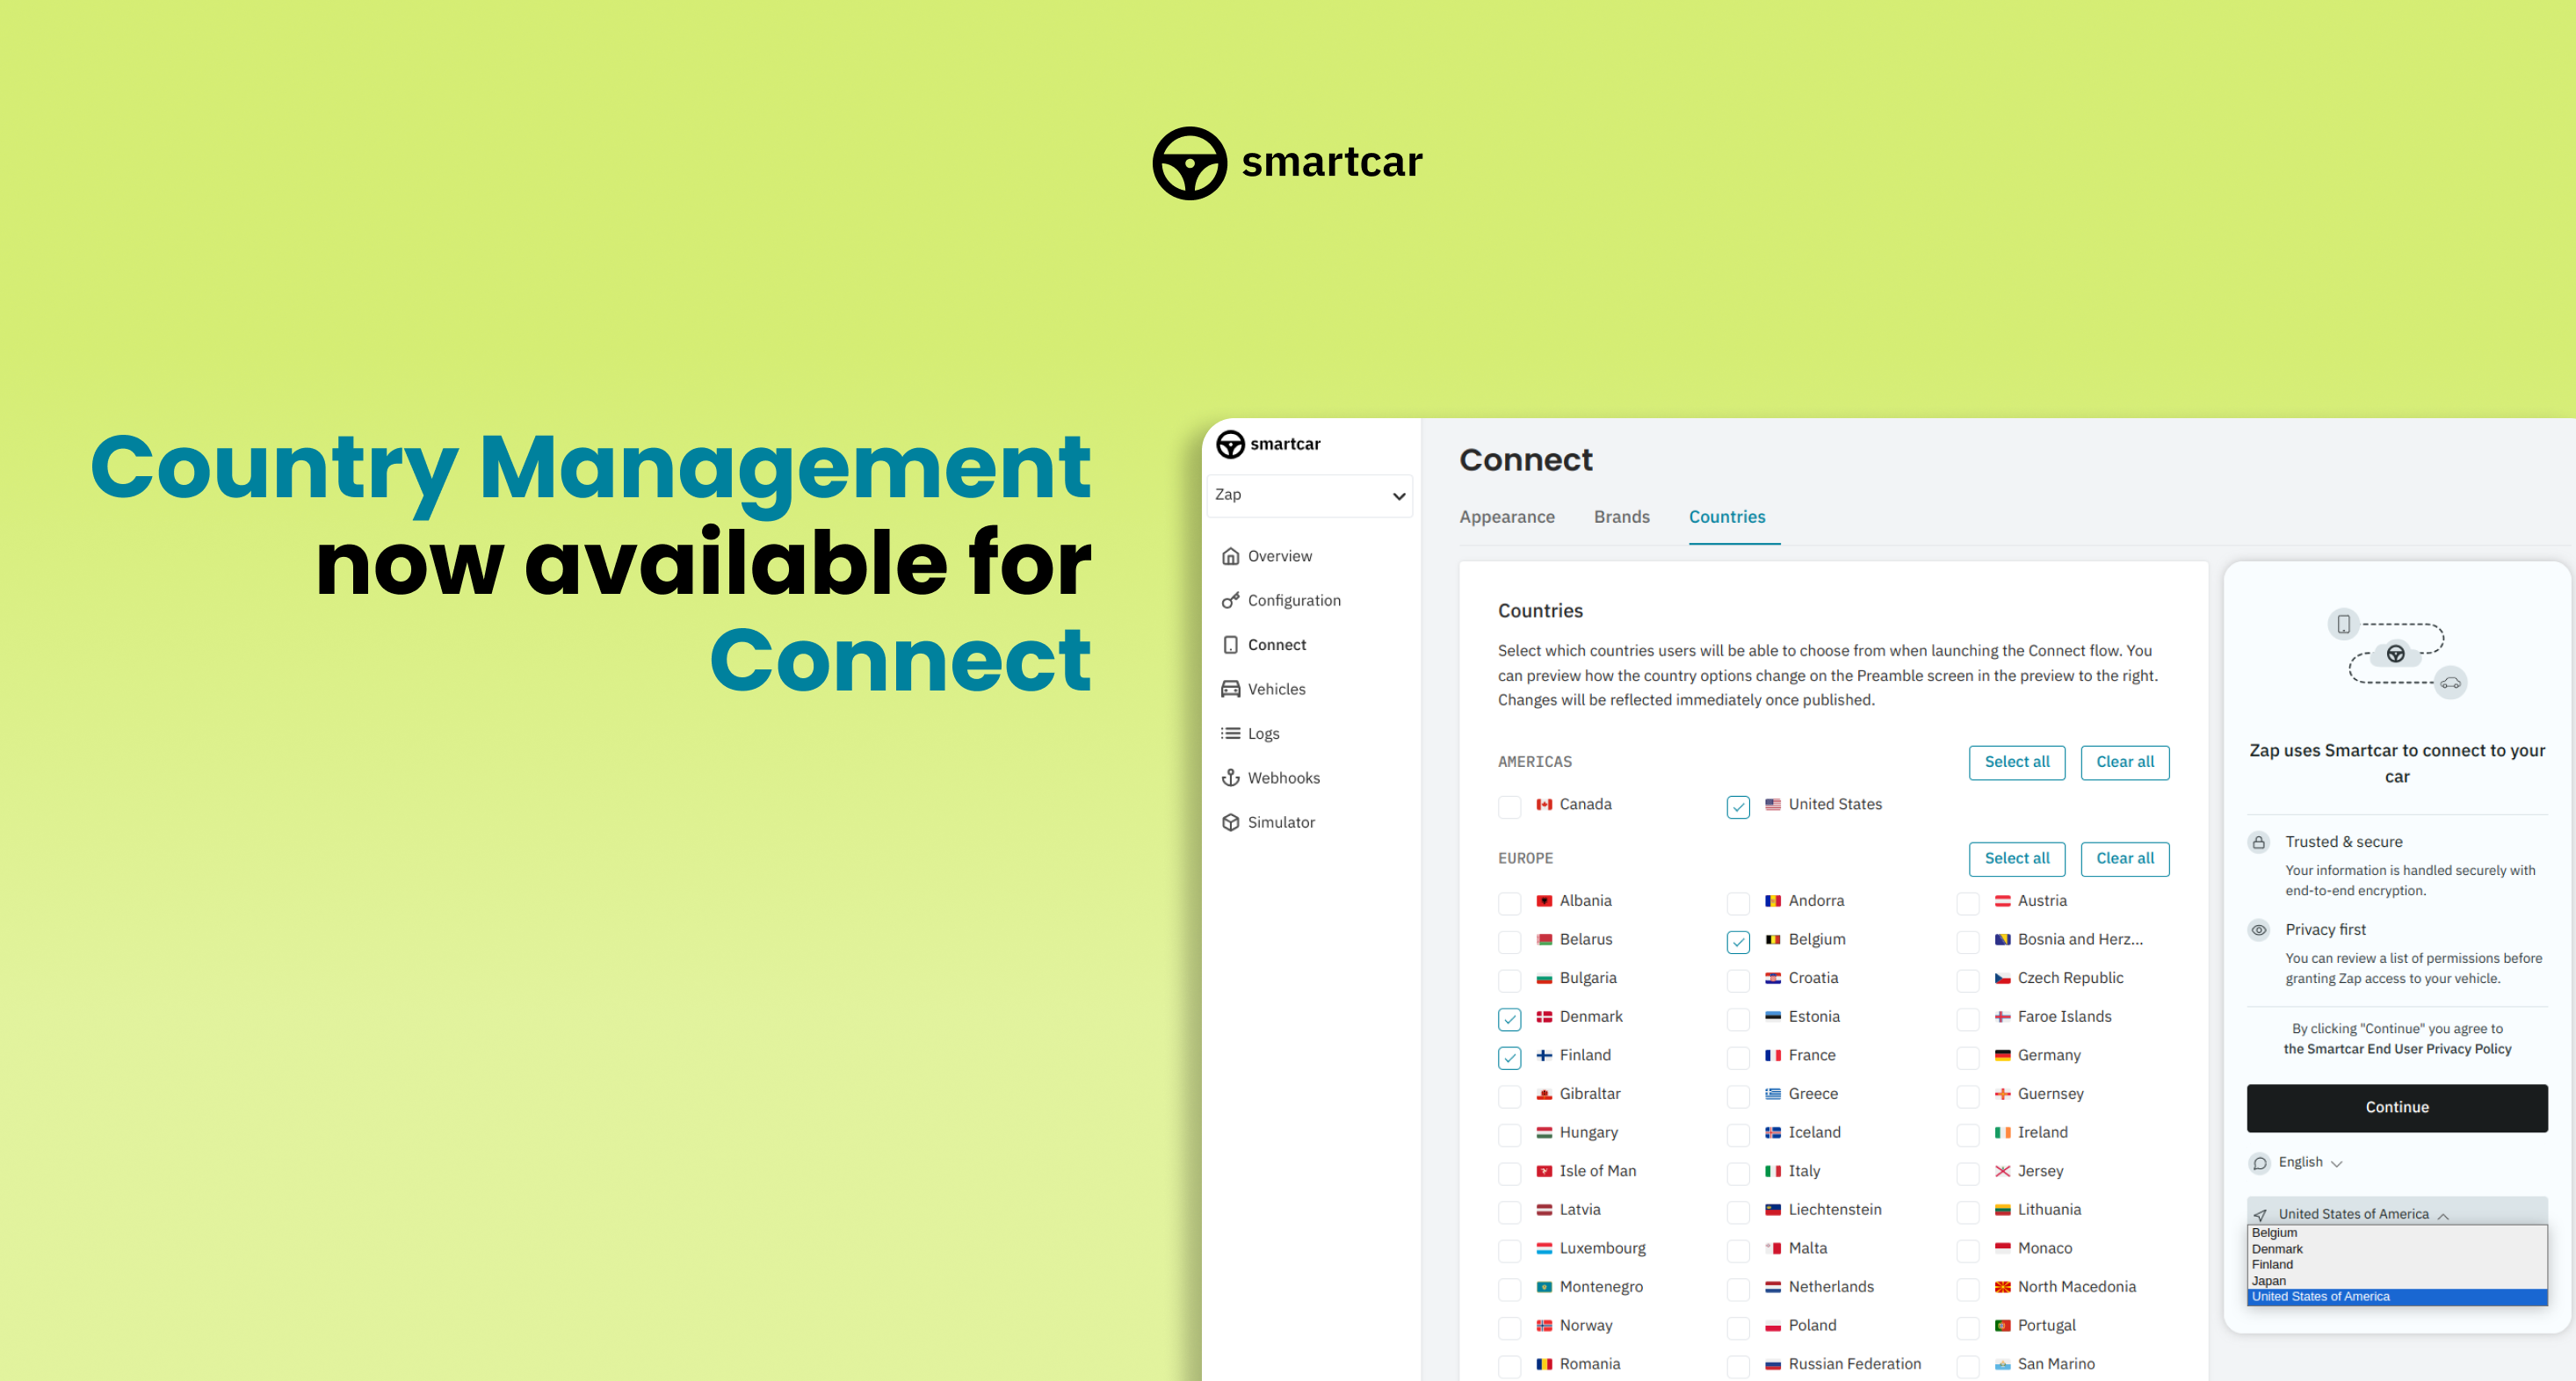 Country Management is now available for Connect! Easily manage what countries are enabled for your application on Dashboard.
### Additional Releases
The `user` parameter is now available when [building the Connect URL](/connect/redirect-to-connect) to pass a unique identifier for a vehicle owner to track and aggregate analytics across their Connect sessions for your application.
Country Management is now available for Connect! Easily manage what countries are enabled for your application on Dashboard.
### Additional Releases
The `user` parameter is now available when [building the Connect URL](/connect/redirect-to-connect) to pass a unique identifier for a vehicle owner to track and aggregate analytics across their Connect sessions for your application.
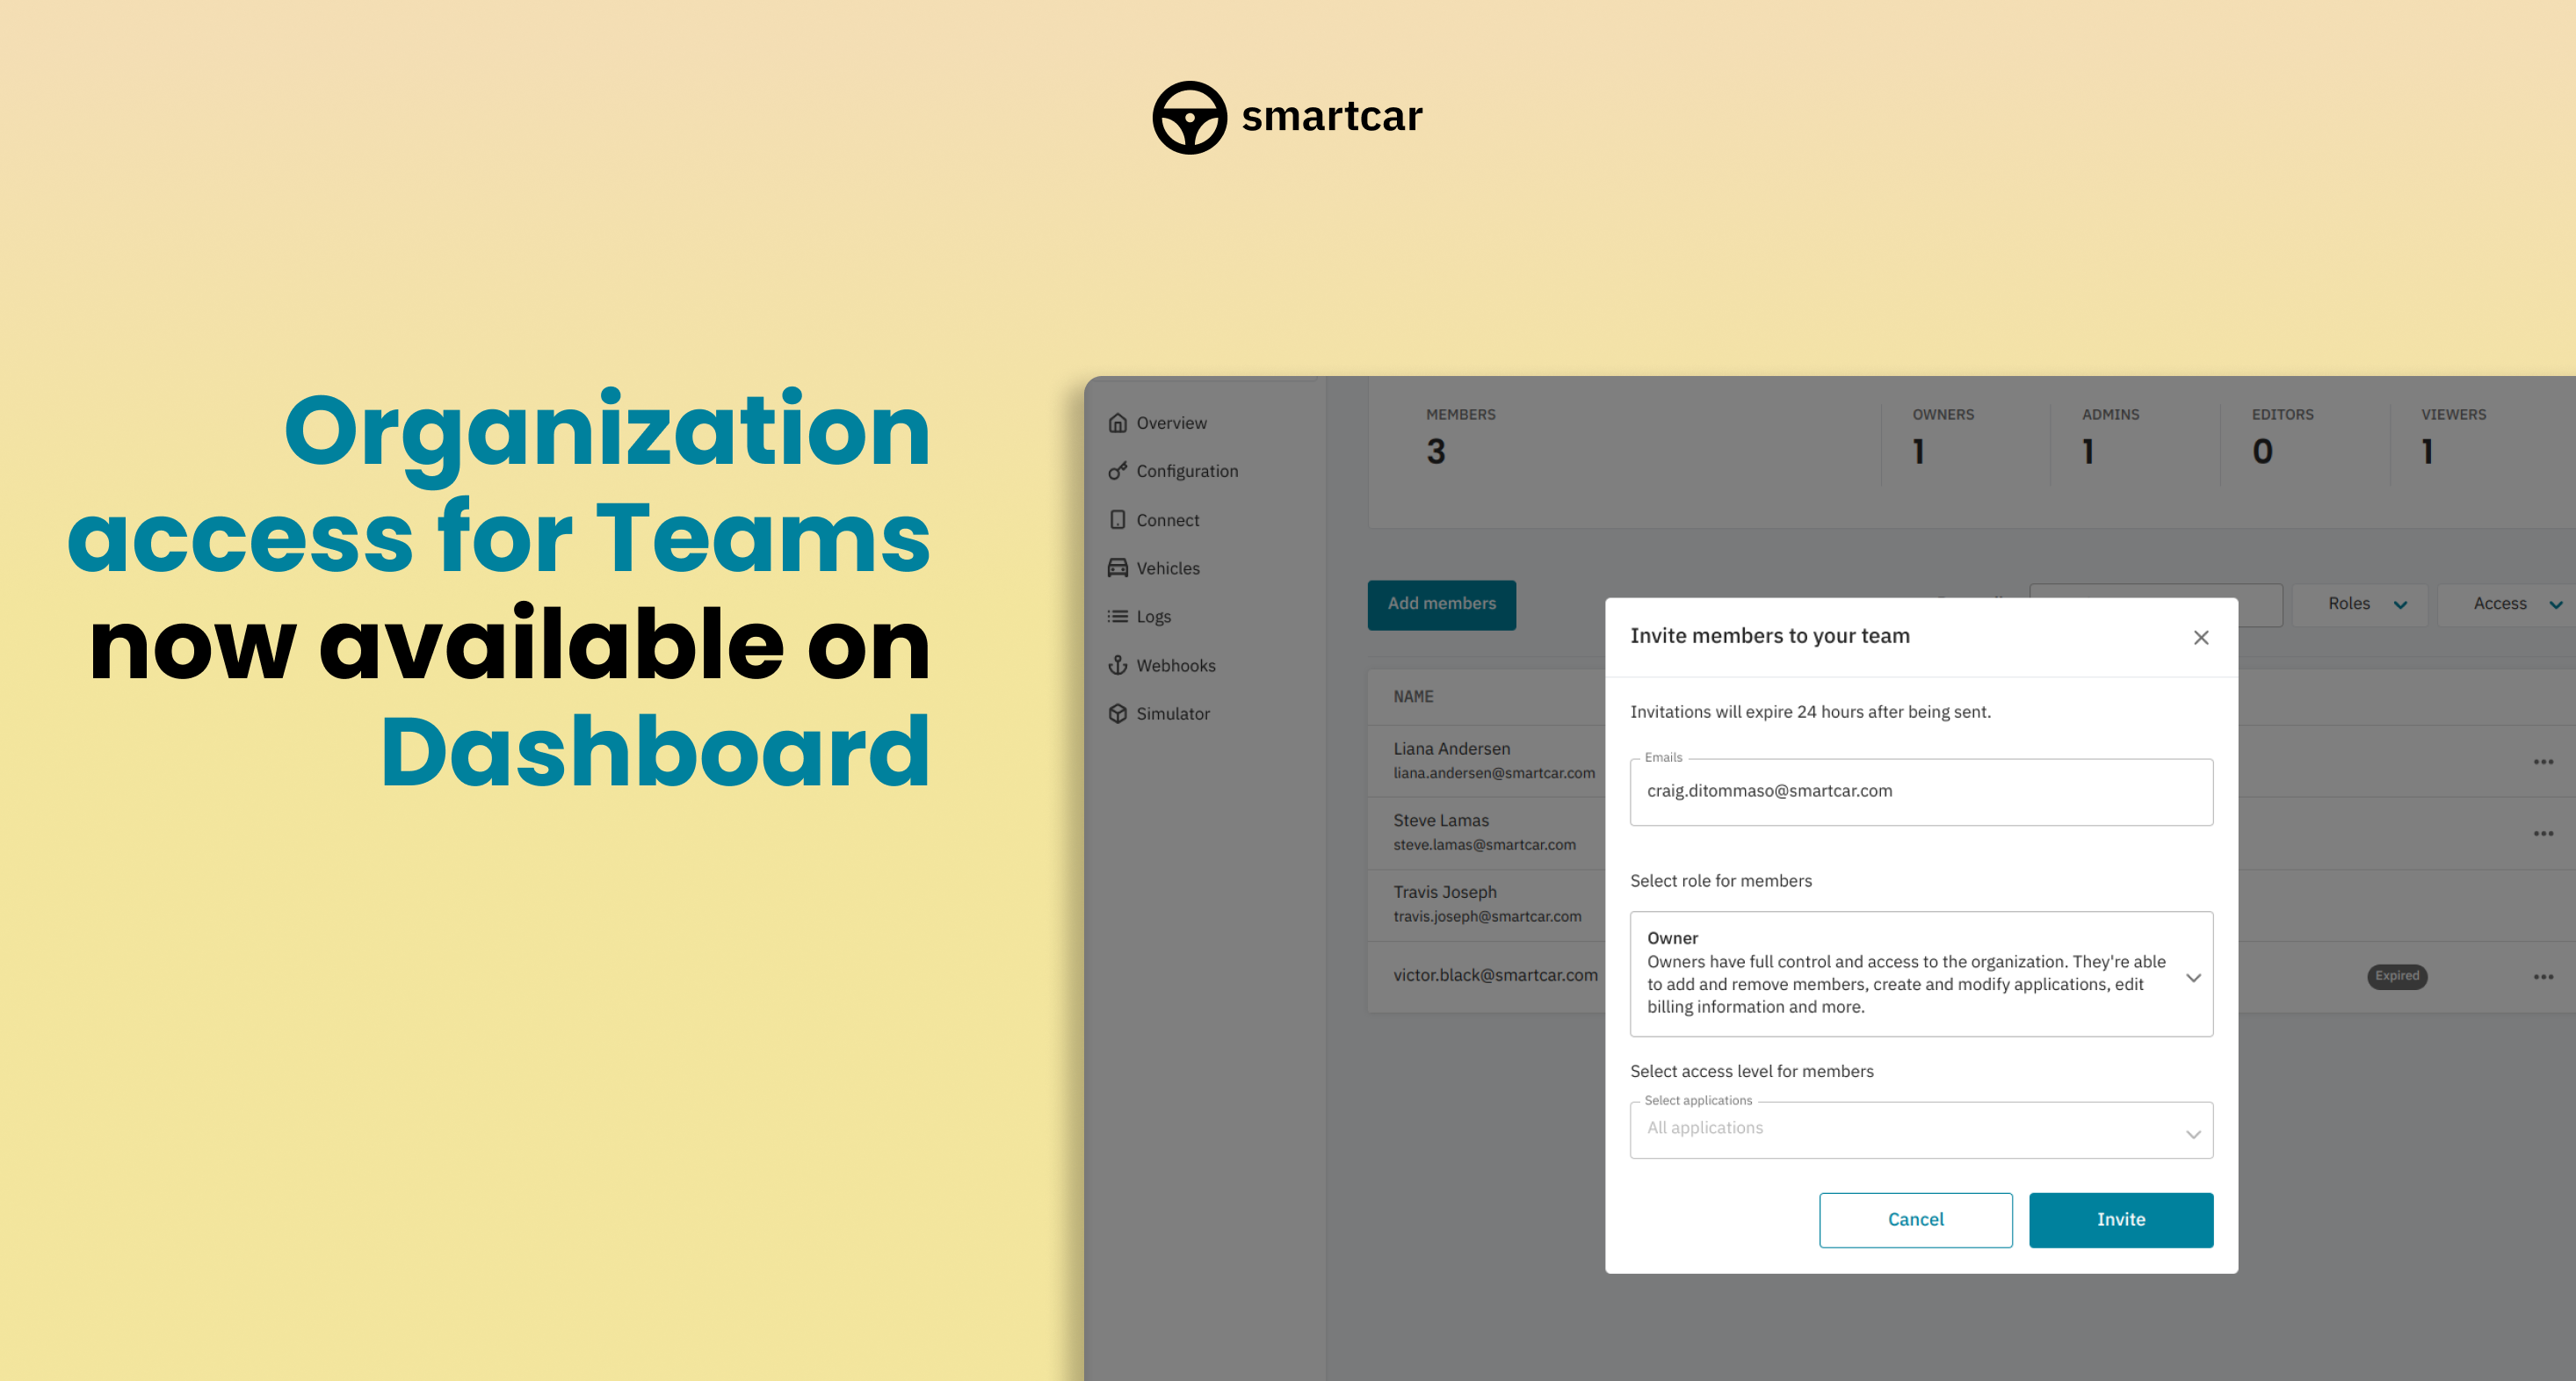 Organization access for Teams is now available on Dashboard. Check out our docs page on [Teams](/getting-started/dashboard/teams) for details.
### Additional Releases
The following endpoint is now available for Tesla vehicles globally:
* [Virtual Key Status](/api-reference/tesla/get-virtual-key-status)
Organization access for Teams is now available on Dashboard. Check out our docs page on [Teams](/getting-started/dashboard/teams) for details.
### Additional Releases
The following endpoint is now available for Tesla vehicles globally:
* [Virtual Key Status](/api-reference/tesla/get-virtual-key-status)
 Smartcar is now compatible with Subaru in the US.
### Additional Releases
The following endpoints are now available for Tesla vehicles globally:
* [Control Charge Port](/api-reference/tesla/control-charge-port)
* [Control Frunk](/api-reference/tesla/control-frunk)
* [Control Trunk](/api-reference/tesla/control-trunk)
Smartcar is now compatible with Subaru in the US.
### Additional Releases
The following endpoints are now available for Tesla vehicles globally:
* [Control Charge Port](/api-reference/tesla/control-charge-port)
* [Control Frunk](/api-reference/tesla/control-frunk)
* [Control Trunk](/api-reference/tesla/control-trunk)
 The [GET /fuel](/api-reference/get-fuel-tank) endpoint is now available for the following brands in supported European countries:
| | | | |
| ----------------------------- | ----------------------------- | ----------------------------- | ----------------------------- |
| Audi | Hyundai | Mercedes-Benz | Skoda |
| BMW | Jaguar | MINI | Vauxhall |
| Citroen | Kia | Opel | Volkswagen |
| DS | Land Rover | Peugeot | Volvo |
| Ford | Mazda | Renault | |
The [GET /fuel](/api-reference/get-fuel-tank) endpoint is now available for the following brands in supported European countries:
| | | | |
| ----------------------------- | ----------------------------- | ----------------------------- | ----------------------------- |
| Audi | Hyundai | Mercedes-Benz | Skoda |
| BMW | Jaguar | MINI | Vauxhall |
| Citroen | Kia | Opel | Volkswagen |
| DS | Land Rover | Peugeot | Volvo |
| Ford | Mazda | Renault | |
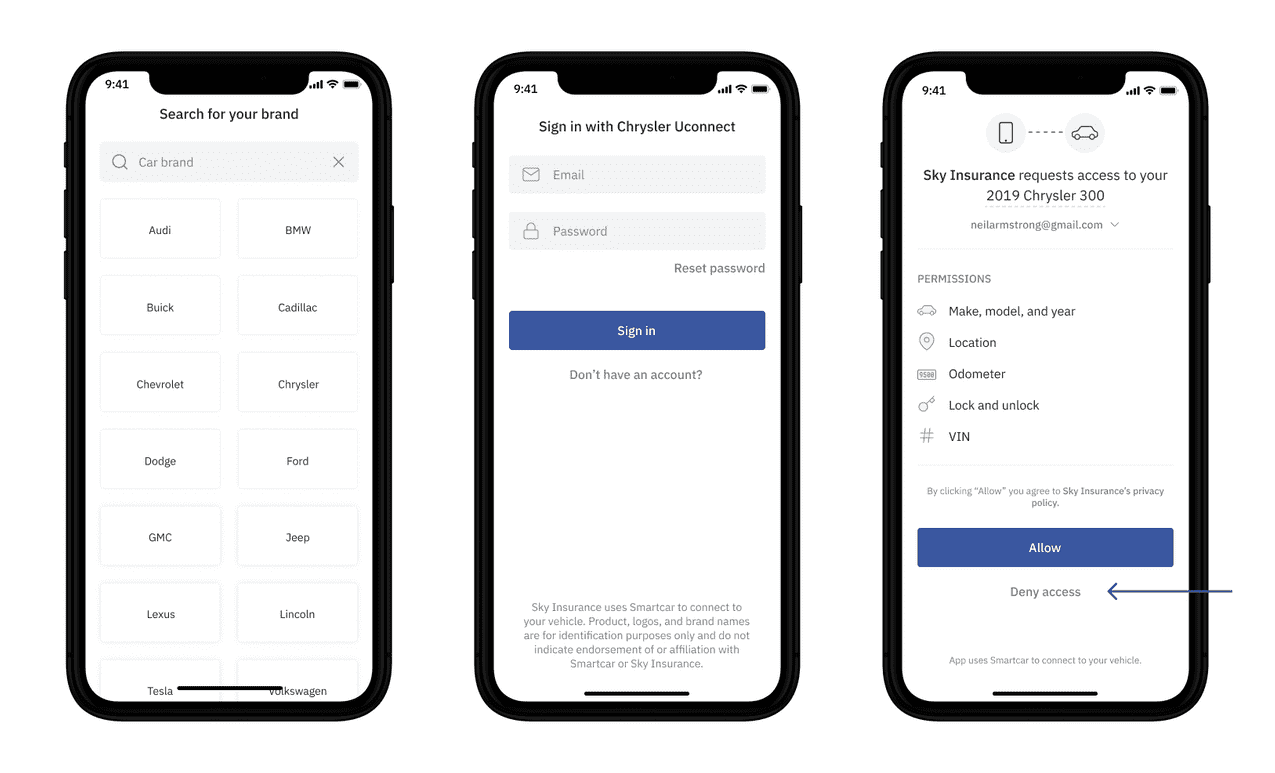 We recommend handling this error by re-prompting the user to authorize their vehicle and adding a message like in the example below.
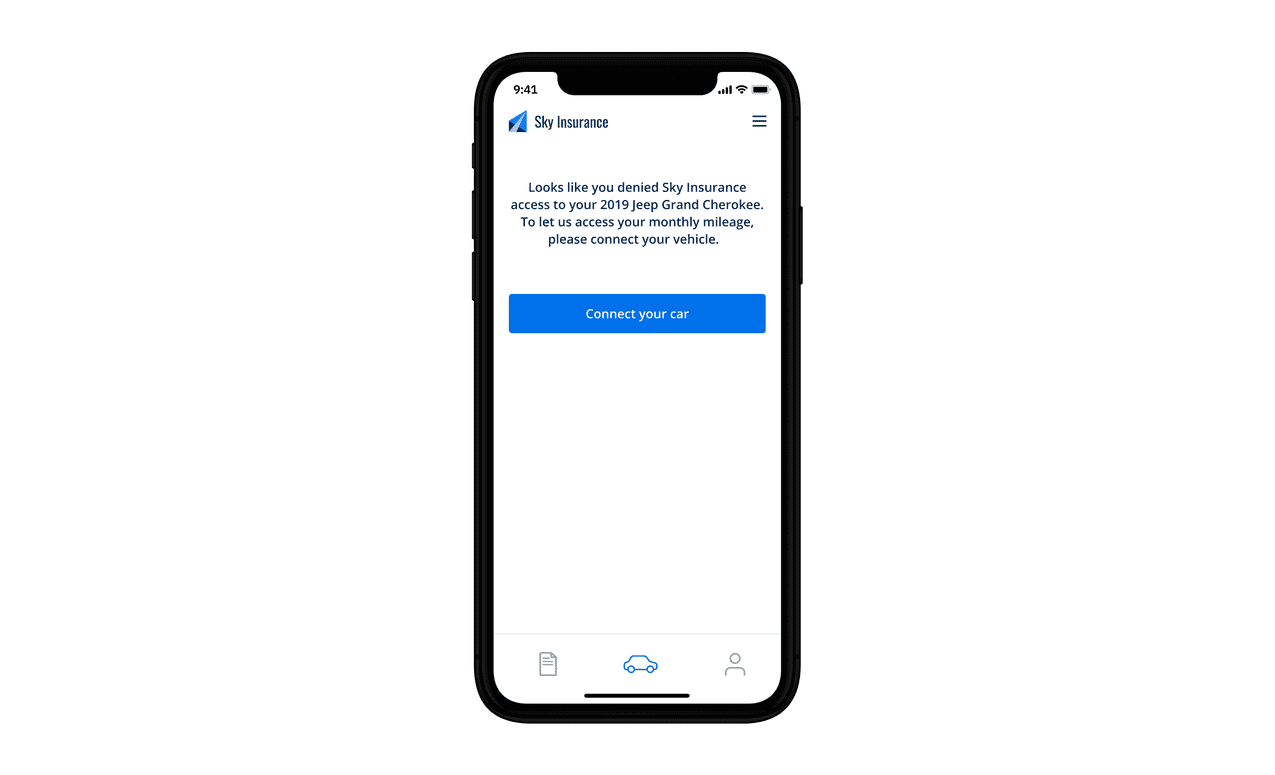 ---
# Source: https://smartcar.com/docs/help/accessing-support-center.md
> ## Documentation Index
> Fetch the complete documentation index at: https://smartcar.com/docs/llms.txt
> Use this file to discover all available pages before exploring further.
# Accessing the Smartcar Support Center
> The Smartcar Support Center provides helpful resources including a knowledge base, ticket submission form, AI chat assistant, and a ticket center to manage your requests.
---
# Source: https://smartcar.com/docs/help/accessing-support-center.md
> ## Documentation Index
> Fetch the complete documentation index at: https://smartcar.com/docs/llms.txt
> Use this file to discover all available pages before exploring further.
# Accessing the Smartcar Support Center
> The Smartcar Support Center provides helpful resources including a knowledge base, ticket submission form, AI chat assistant, and a ticket center to manage your requests.
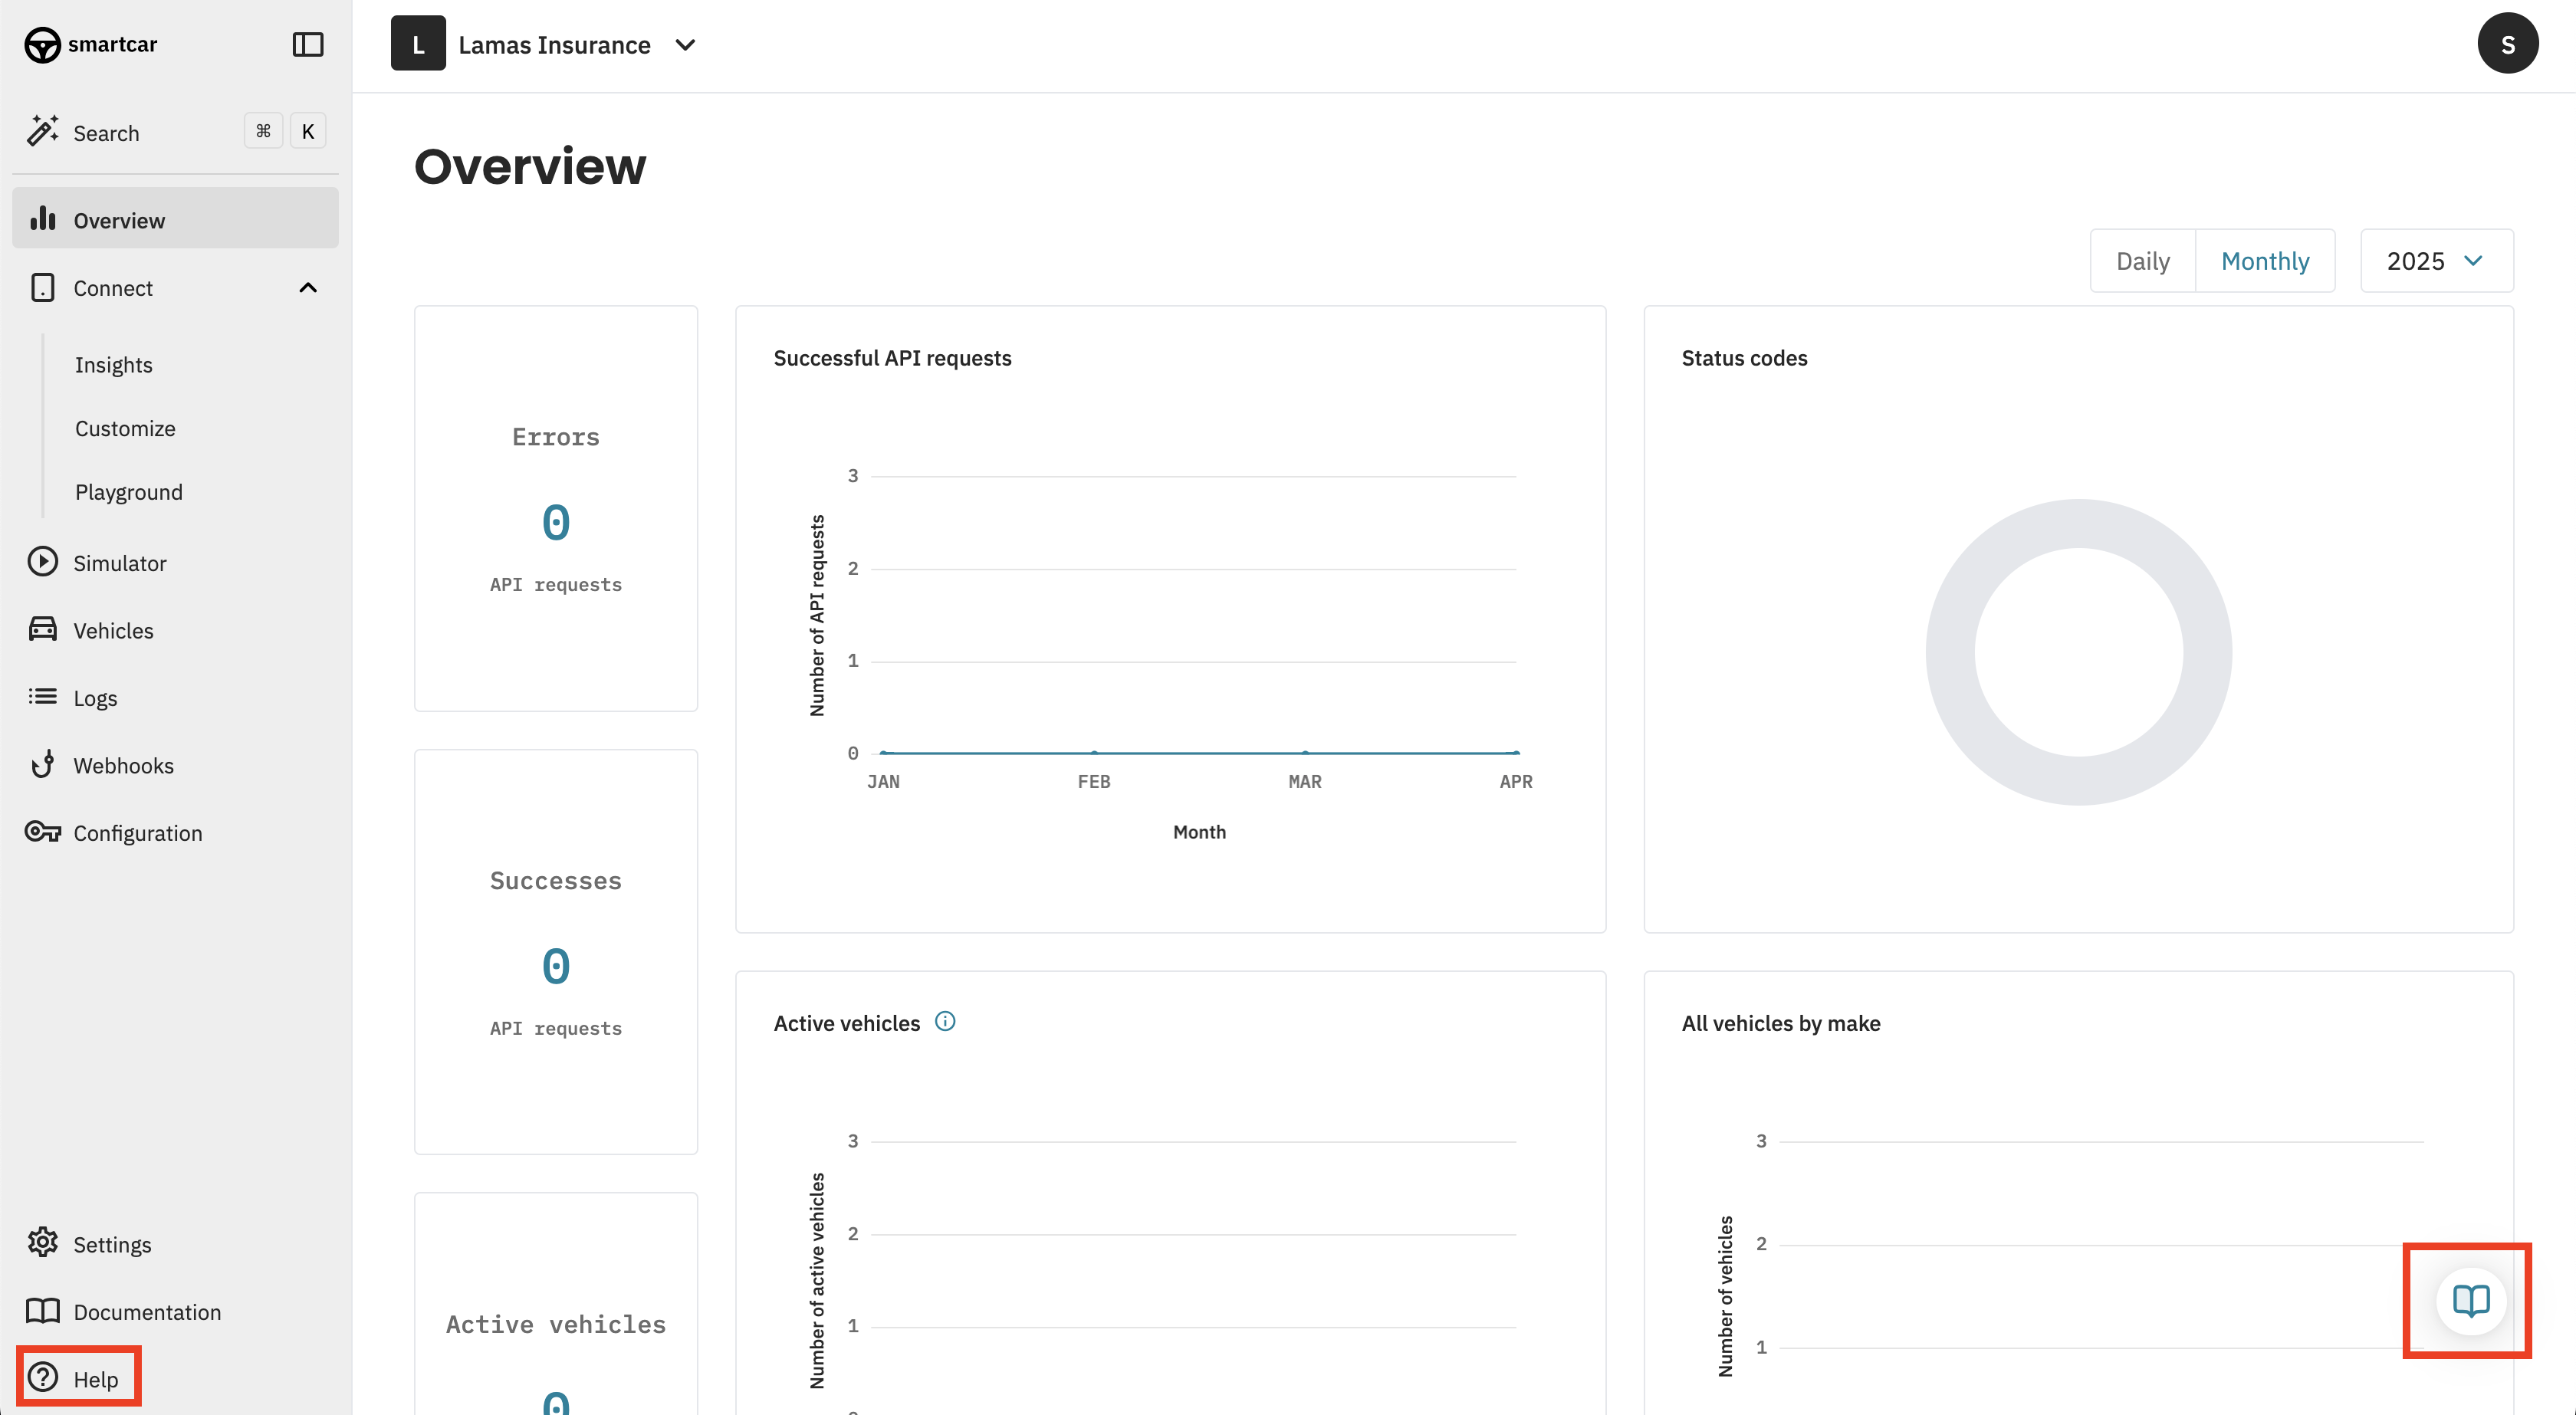 3. Select the **Support Center** option to be redirected to the full Support Center.
 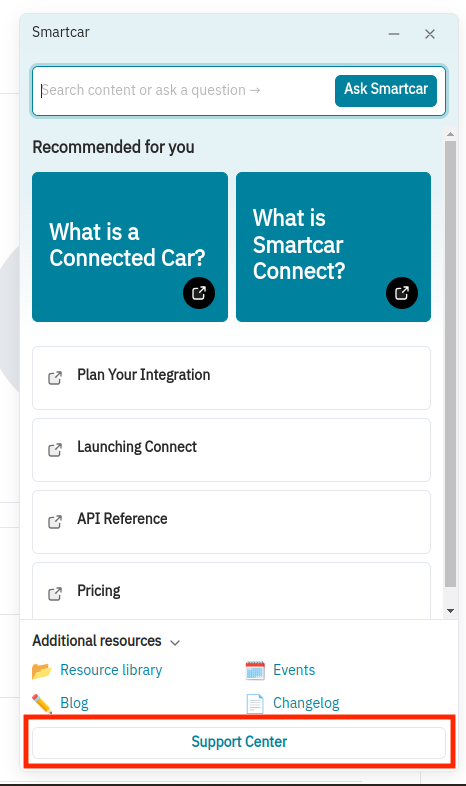 ***
For information about email, changelog, status, and brand reliability subscriptions, see [Subscribing to Smartcar Updates and Notifications](/help/smartcar-updates).
---
# Source: https://smartcar.com/docs/getting-started/tutorials/android.md
> ## Documentation Index
> Fetch the complete documentation index at: https://smartcar.com/docs/llms.txt
> Use this file to discover all available pages before exploring further.
# Android Tutorial
> In this tutorial, we will use the Android SDK to integrate Connect into your application.
***
For information about email, changelog, status, and brand reliability subscriptions, see [Subscribing to Smartcar Updates and Notifications](/help/smartcar-updates).
---
# Source: https://smartcar.com/docs/getting-started/tutorials/android.md
> ## Documentation Index
> Fetch the complete documentation index at: https://smartcar.com/docs/llms.txt
> Use this file to discover all available pages before exploring further.
# Android Tutorial
> In this tutorial, we will use the Android SDK to integrate Connect into your application.
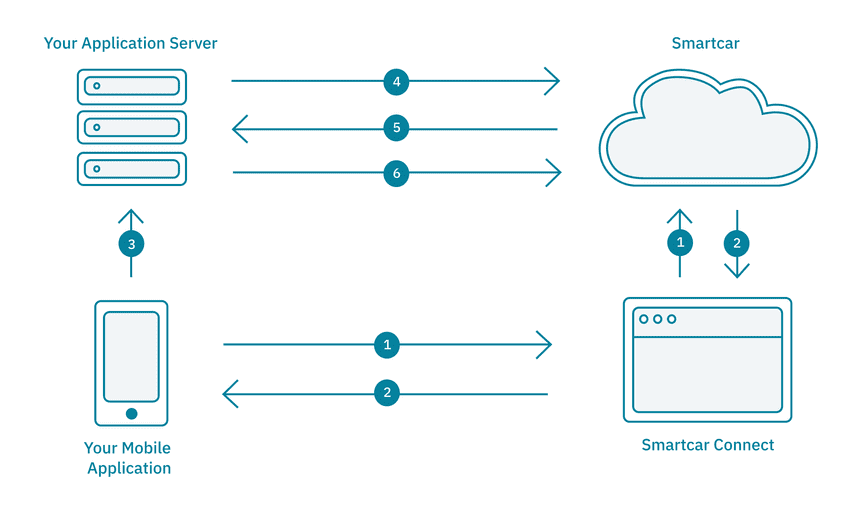
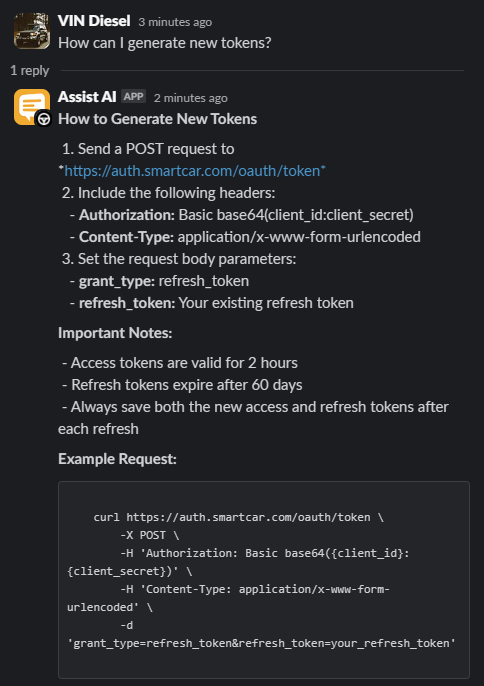 ## 2. Submit a Support Ticket
If your question requires deeper support, simply click **"Create a Ticket"** at the bottom of the AI-generated response within the Slack channel. This will open a form to submit a formal, trackable support request.
## 2. Submit a Support Ticket
If your question requires deeper support, simply click **"Create a Ticket"** at the bottom of the AI-generated response within the Slack channel. This will open a form to submit a formal, trackable support request. 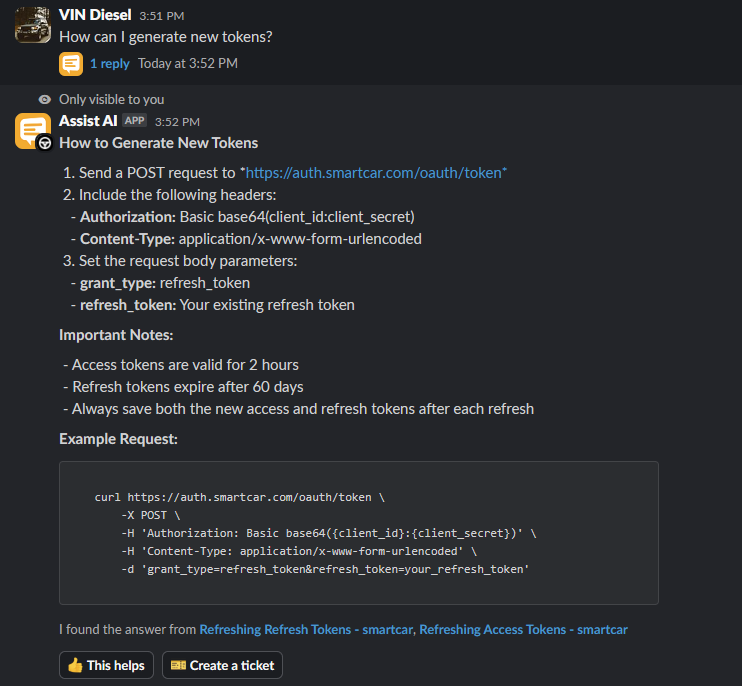
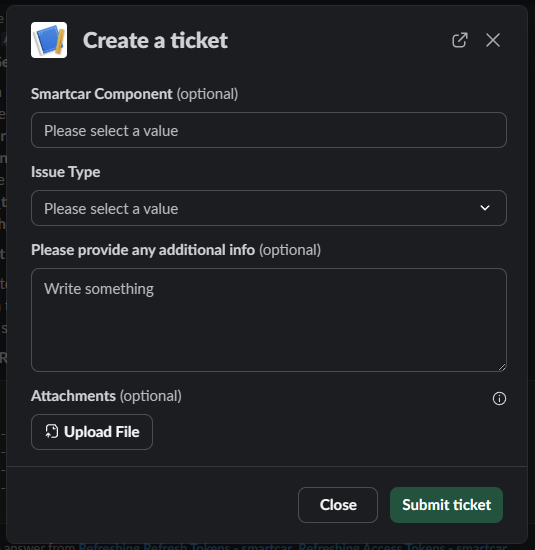 ## 3. View Open Tickets
To check the status of an existing ticket, navigate to the Slack thread where the ticket was created and click the **"View Ticket Info"** icon. This will display the current status and details of your support request.
## 3. View Open Tickets
To check the status of an existing ticket, navigate to the Slack thread where the ticket was created and click the **"View Ticket Info"** icon. This will display the current status and details of your support request. 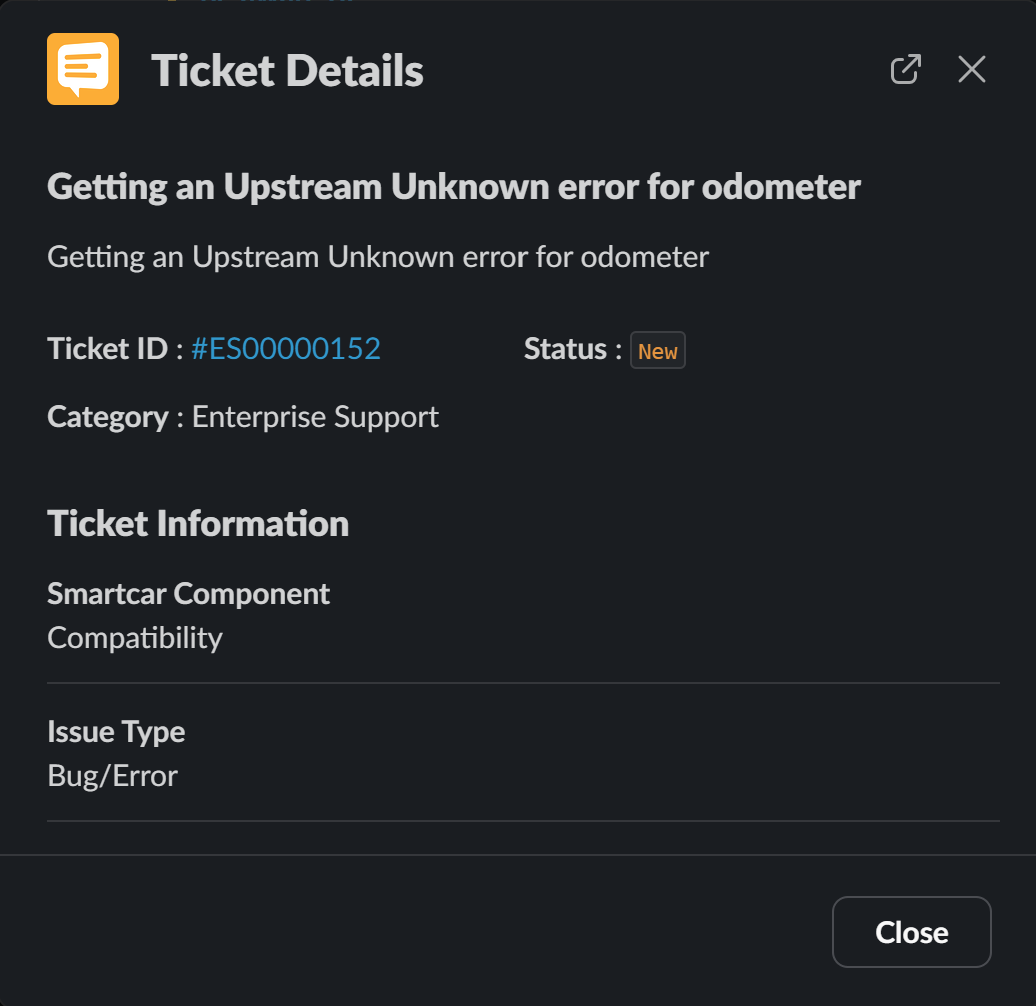 ## 4. Navigate to the Support Center
Need more detailed help? You can access your ticket by clicking the **ticket ID** that appears after submitting a request using the **"Create a Ticket"** option. Alternatively, from the **"View Ticket Info"** window, you can click the **ticket number** to be redirected to the Smartcar Developer Dashboard. If you're already logged into an active session, you'll be taken directly to the ticket details within the Support Center. Otherwise, you'll be prompted to log in first.
In the Support Center, you can:
* Browse our documentation
* Submit new support requests
* View and update your existing tickets
For step-by-step instructions on how to log into the Smartcar Support Center, please see the following article: [Accessing the Smartcar Support Center](/help/accessing-support-center)
---
# Source: https://smartcar.com/docs/api-reference/authorization/auth-code-exchange.md
> ## Documentation Index
> Fetch the complete documentation index at: https://smartcar.com/docs/llms.txt
> Use this file to discover all available pages before exploring further.
# Auth Code Exchange
> To interact with the Smartcar API, you will need to exchange your authorization code from the [Connect redirect](https://smartcar.com/docs/connect/handle-the-response) for an access token. Check the [overview](https://smartcar.com/docs/api-reference/authorization/overview) page for how to manage your tokens.
## Requesting Access Tokens
**Headers**
## 4. Navigate to the Support Center
Need more detailed help? You can access your ticket by clicking the **ticket ID** that appears after submitting a request using the **"Create a Ticket"** option. Alternatively, from the **"View Ticket Info"** window, you can click the **ticket number** to be redirected to the Smartcar Developer Dashboard. If you're already logged into an active session, you'll be taken directly to the ticket details within the Support Center. Otherwise, you'll be prompted to log in first.
In the Support Center, you can:
* Browse our documentation
* Submit new support requests
* View and update your existing tickets
For step-by-step instructions on how to log into the Smartcar Support Center, please see the following article: [Accessing the Smartcar Support Center](/help/accessing-support-center)
---
# Source: https://smartcar.com/docs/api-reference/authorization/auth-code-exchange.md
> ## Documentation Index
> Fetch the complete documentation index at: https://smartcar.com/docs/llms.txt
> Use this file to discover all available pages before exploring further.
# Auth Code Exchange
> To interact with the Smartcar API, you will need to exchange your authorization code from the [Connect redirect](https://smartcar.com/docs/connect/handle-the-response) for an access token. Check the [overview](https://smartcar.com/docs/api-reference/authorization/overview) page for how to manage your tokens.
## Requesting Access Tokens
**Headers**
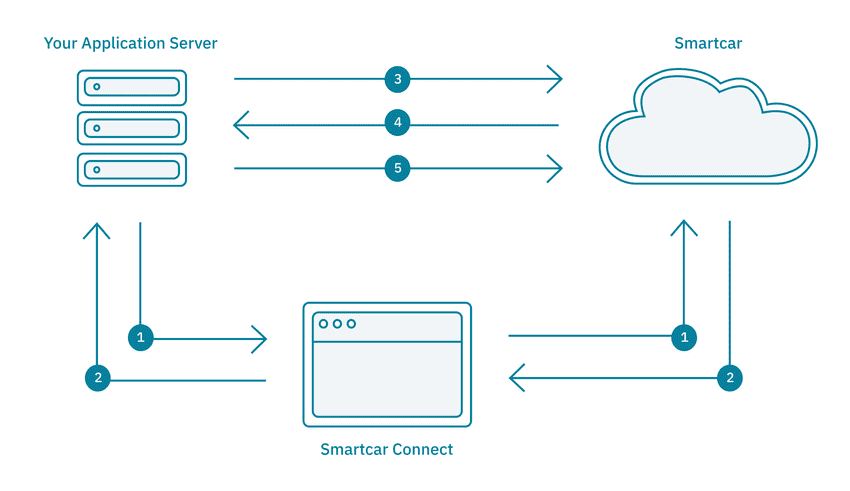
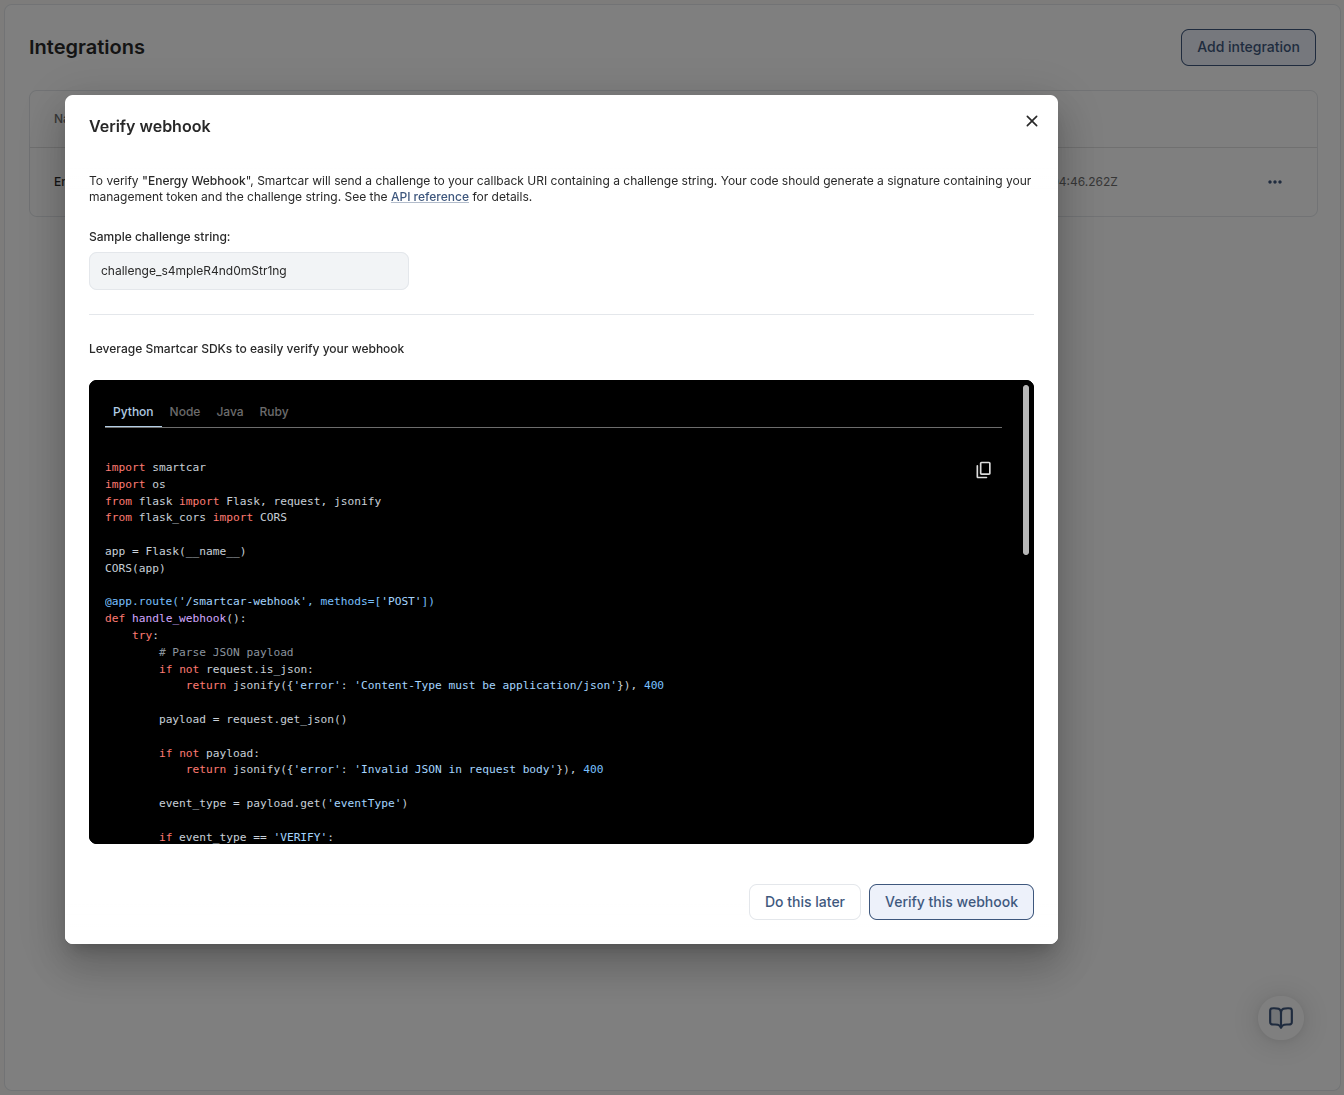
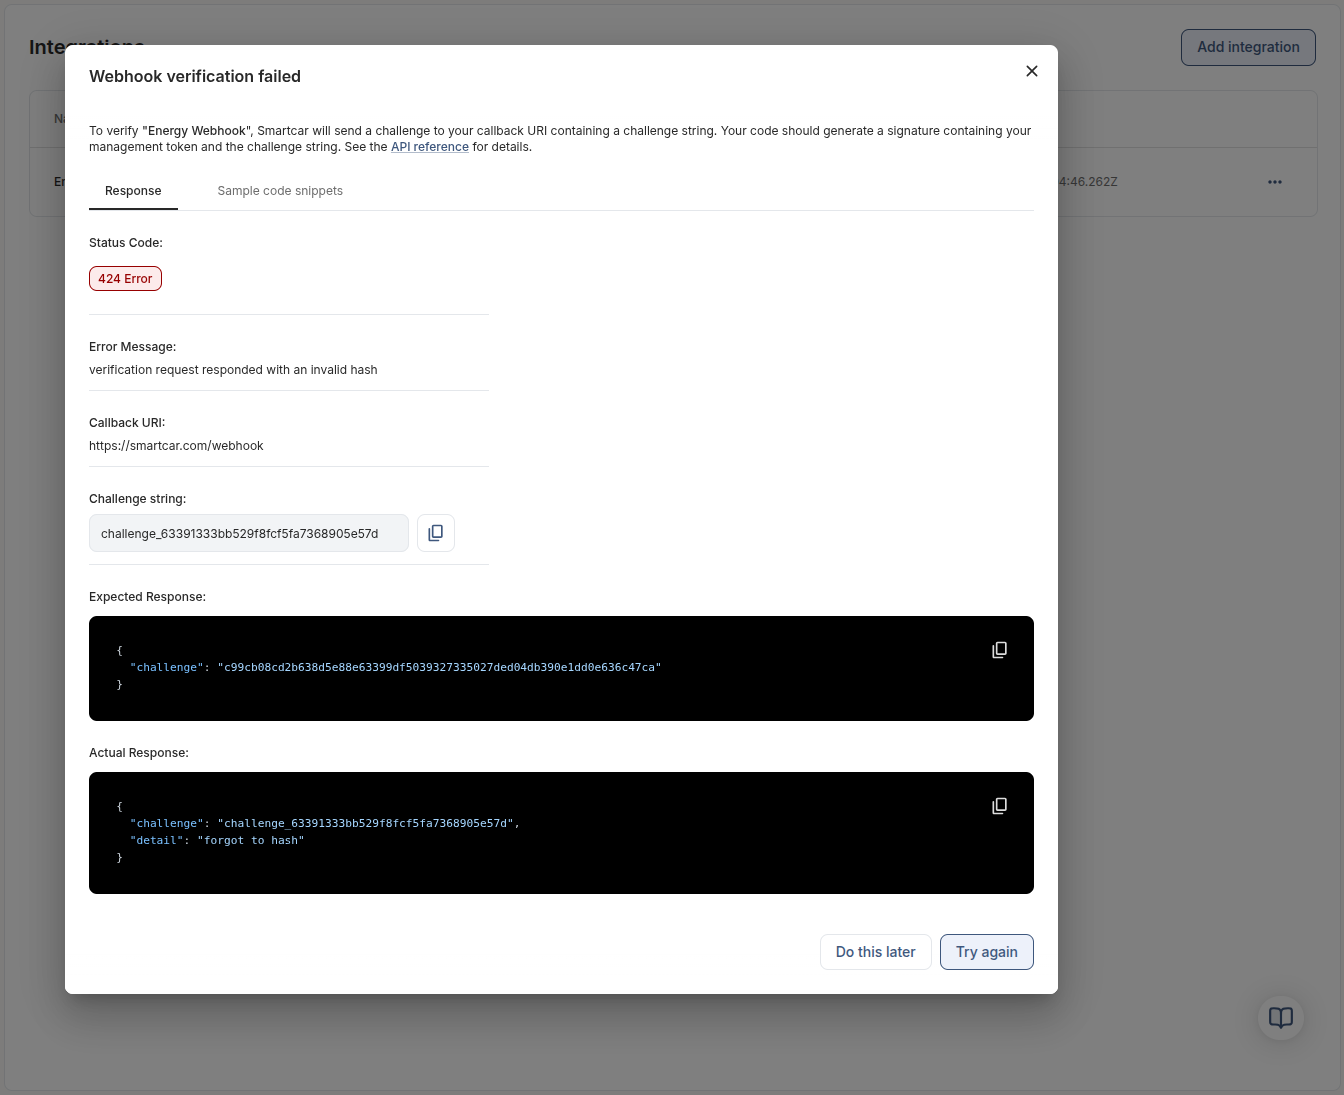 ---
# Source: https://smartcar.com/docs/api-reference/signals/charge.md
> ## Documentation Index
> Fetch the complete documentation index at: https://smartcar.com/docs/llms.txt
> Use this file to discover all available pages before exploring further.
# Charge Signals
### Amperage
Signal code: `charge-amperage`
Current amperage flowing to the electric vehicle during a charging session, measured in amps.
---
# Source: https://smartcar.com/docs/api-reference/signals/charge.md
> ## Documentation Index
> Fetch the complete documentation index at: https://smartcar.com/docs/llms.txt
> Use this file to discover all available pages before exploring further.
# Charge Signals
### Amperage
Signal code: `charge-amperage`
Current amperage flowing to the electric vehicle during a charging session, measured in amps.
 ---
# Source: https://smartcar.com/docs/getting-started/configure-application.md
> ## Documentation Index
> Fetch the complete documentation index at: https://smartcar.com/docs/llms.txt
> Use this file to discover all available pages before exploring further.
# Configure Your Application
> Learn how to configure your Smartcar application, including setting up permissions and redirect URIs.
Once you have registered your application in the [Smartcar Dashboard](https://dashboard.smartcar.com), you can configure it to suit your business needs.
## Application Configuration Overview
Your application configuration includes several key components:
* **Application Name & Description**: A clear name and description help users understand what your application does.
* **Redirect URI**: The URL to which users will be redirected after they authorize your application. This must match the redirect URI you use in your OAuth flow.
* **Privacy Policy URL**: A link to your application's privacy policy that will be presented to users during the authorization process.
* **Vehicle Data**: Select the specific vehicle data signals your application will request access to. This determines the permissions your application will need from users.
---
# Source: https://smartcar.com/docs/getting-started/configure-application.md
> ## Documentation Index
> Fetch the complete documentation index at: https://smartcar.com/docs/llms.txt
> Use this file to discover all available pages before exploring further.
# Configure Your Application
> Learn how to configure your Smartcar application, including setting up permissions and redirect URIs.
Once you have registered your application in the [Smartcar Dashboard](https://dashboard.smartcar.com), you can configure it to suit your business needs.
## Application Configuration Overview
Your application configuration includes several key components:
* **Application Name & Description**: A clear name and description help users understand what your application does.
* **Redirect URI**: The URL to which users will be redirected after they authorize your application. This must match the redirect URI you use in your OAuth flow.
* **Privacy Policy URL**: A link to your application's privacy policy that will be presented to users during the authorization process.
* **Vehicle Data**: Select the specific vehicle data signals your application will request access to. This determines the permissions your application will need from users.
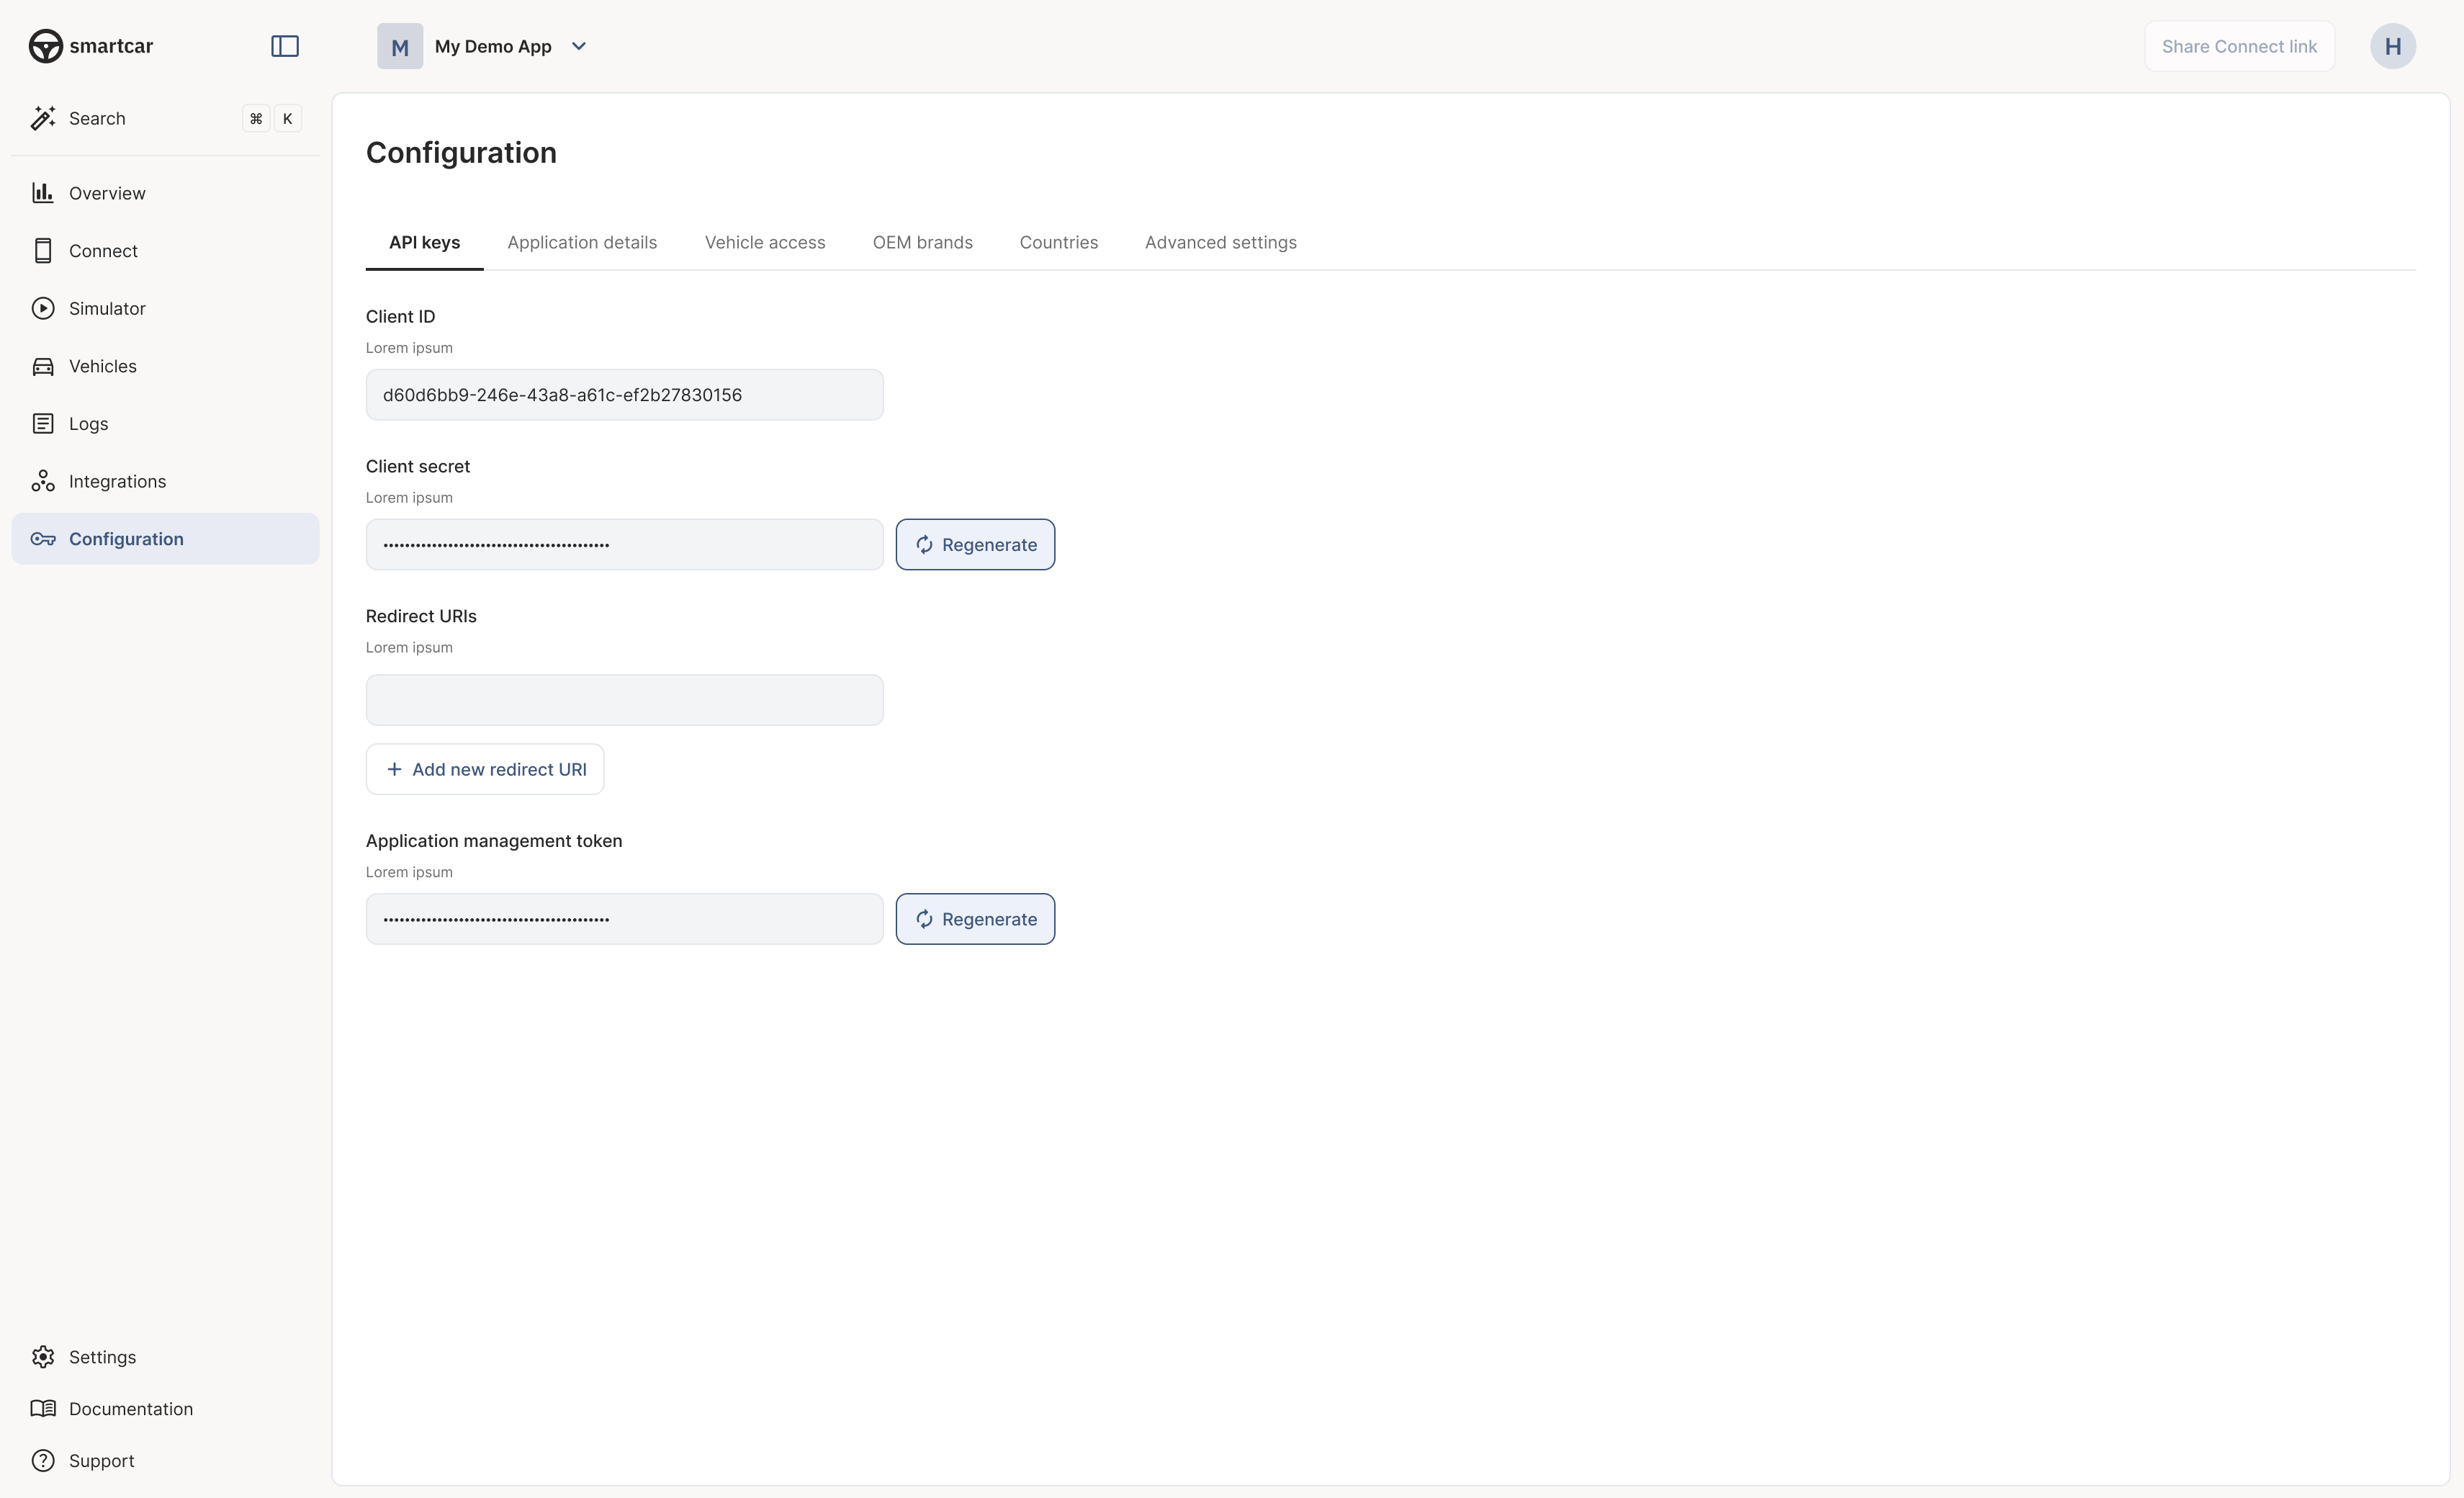 #### What’s Next?
* [Connect your first vehicle](/getting-started/connect-vehicles).
* [Build your first integration](/getting-started/integration-overview).
---
# Source: https://smartcar.com/docs/getting-started/how-to/configure-permissions.md
> ## Documentation Index
> Fetch the complete documentation index at: https://smartcar.com/docs/llms.txt
> Use this file to discover all available pages before exploring further.
# How to Configure Permissions for Vehicle Data Collection
> Step-by-step guide to selecting signals, commands, and attributes in the Smartcar Dashboard and requesting the right permissions from vehicle owners.
To retrieve vehicle data through Smartcar, you must configure your application to request the correct permissions from vehicle owners. This guide walks you through the process using the Smartcar Dashboard.
#### What’s Next?
* [Connect your first vehicle](/getting-started/connect-vehicles).
* [Build your first integration](/getting-started/integration-overview).
---
# Source: https://smartcar.com/docs/getting-started/how-to/configure-permissions.md
> ## Documentation Index
> Fetch the complete documentation index at: https://smartcar.com/docs/llms.txt
> Use this file to discover all available pages before exploring further.
# How to Configure Permissions for Vehicle Data Collection
> Step-by-step guide to selecting signals, commands, and attributes in the Smartcar Dashboard and requesting the right permissions from vehicle owners.
To retrieve vehicle data through Smartcar, you must configure your application to request the correct permissions from vehicle owners. This guide walks you through the process using the Smartcar Dashboard.
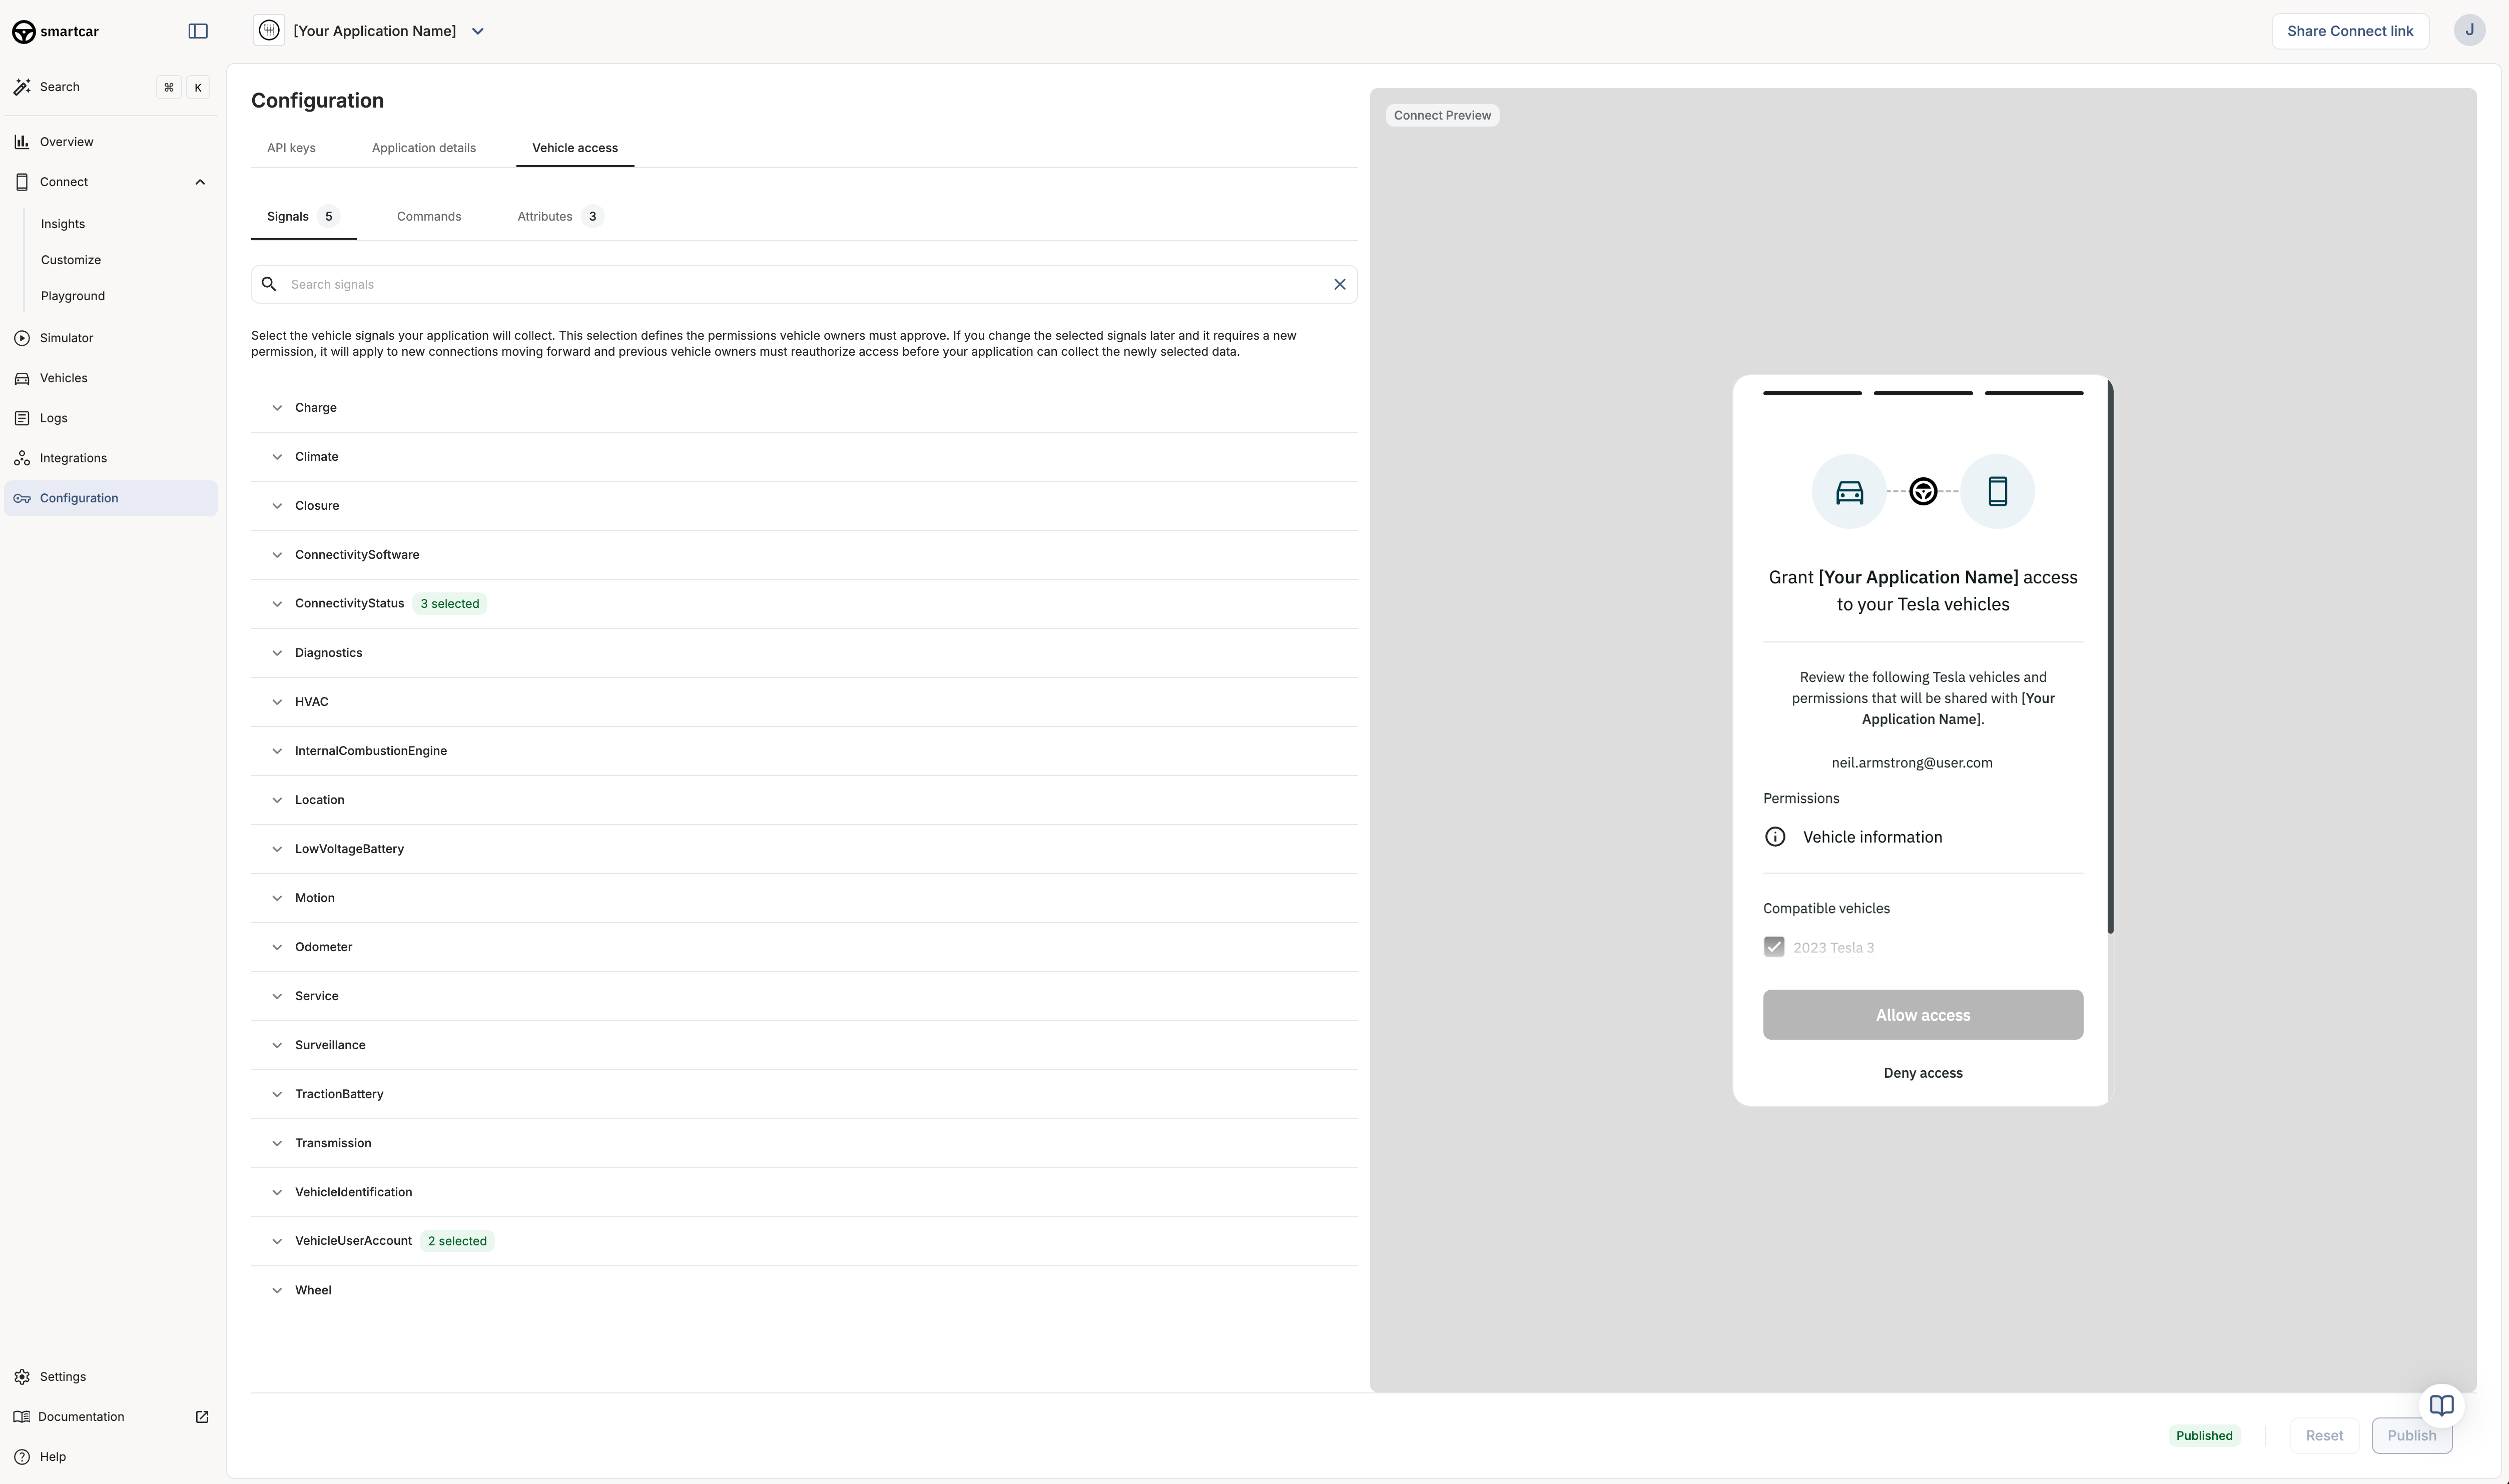
 ## Session Details
Clicking into an event in the **Sessions Feed** will pull up more detailed
information for that specific user's session, allowing you to see where they
dropped off and highlighting issues they may have run into.
If you need to dial into a specific time frame or individual user, you can use
filters such as Date, VIN, User or Session ID to do so.
## Session Details
Clicking into an event in the **Sessions Feed** will pull up more detailed
information for that specific user's session, allowing you to see where they
dropped off and highlighting issues they may have run into.
If you need to dial into a specific time frame or individual user, you can use
filters such as Date, VIN, User or Session ID to do so.
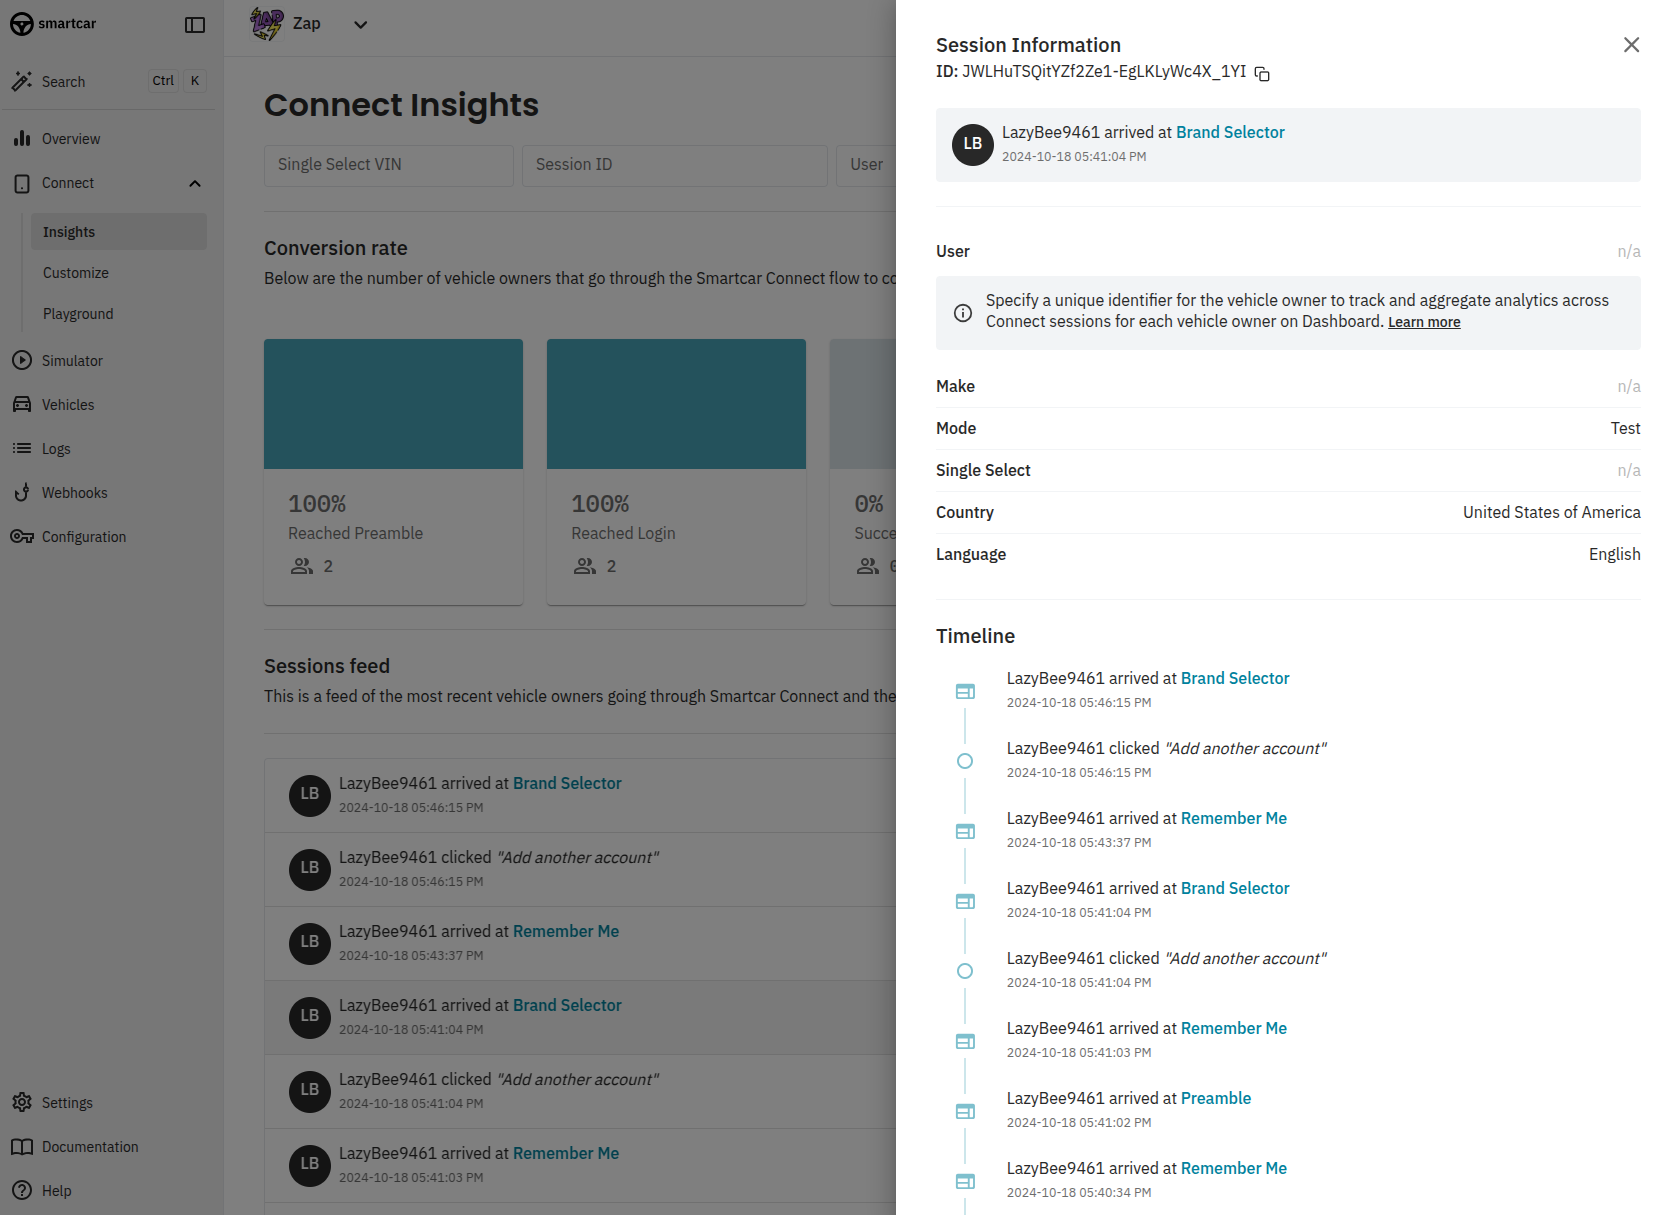 ---
# Source: https://smartcar.com/docs/connect/connect-sdks.md
> ## Documentation Index
> Fetch the complete documentation index at: https://smartcar.com/docs/llms.txt
> Use this file to discover all available pages before exploring further.
# SDKs for Connect
> Our SDKs make integrating Smartcar fast and easy in different languages and frameworks.
For mobile or single page web apps, you can use one of our frontend SDKs. Please note that our frontend SDKs only handle
integrating Connect into your application. You will still need to use a [backend SDK](/api-reference/api-sdks) to manage tokens and make API requests to vehicles.
---
# Source: https://smartcar.com/docs/connect/connect-sdks.md
> ## Documentation Index
> Fetch the complete documentation index at: https://smartcar.com/docs/llms.txt
> Use this file to discover all available pages before exploring further.
# SDKs for Connect
> Our SDKs make integrating Smartcar fast and easy in different languages and frameworks.
For mobile or single page web apps, you can use one of our frontend SDKs. Please note that our frontend SDKs only handle
integrating Connect into your application. You will still need to use a [backend SDK](/api-reference/api-sdks) to manage tokens and make API requests to vehicles.
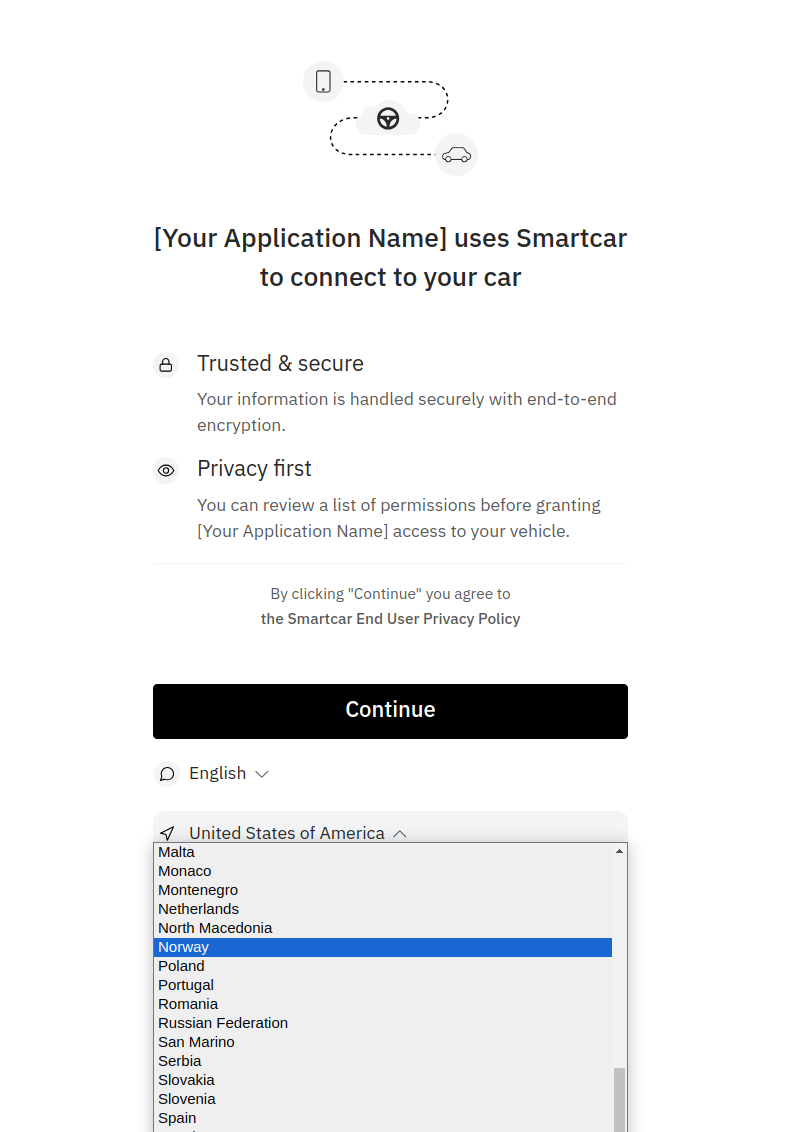 ---
# Source: https://smartcar.com/docs/integrations/webhooks/creating-webhooks.md
> ## Documentation Index
> Fetch the complete documentation index at: https://smartcar.com/docs/llms.txt
> Use this file to discover all available pages before exploring further.
# Creating Webhooks
> Step-by-step guide to creating and configuring webhook integrations in the Smartcar Dashboard
Head over to the [Smartcar Dashboard](https://dashboard.smartcar.com/integrations) to set up your webhook integration. There are four main steps to create a webhook in Smartcar:
---
# Source: https://smartcar.com/docs/integrations/webhooks/creating-webhooks.md
> ## Documentation Index
> Fetch the complete documentation index at: https://smartcar.com/docs/llms.txt
> Use this file to discover all available pages before exploring further.
# Creating Webhooks
> Step-by-step guide to creating and configuring webhook integrations in the Smartcar Dashboard
Head over to the [Smartcar Dashboard](https://dashboard.smartcar.com/integrations) to set up your webhook integration. There are four main steps to create a webhook in Smartcar:
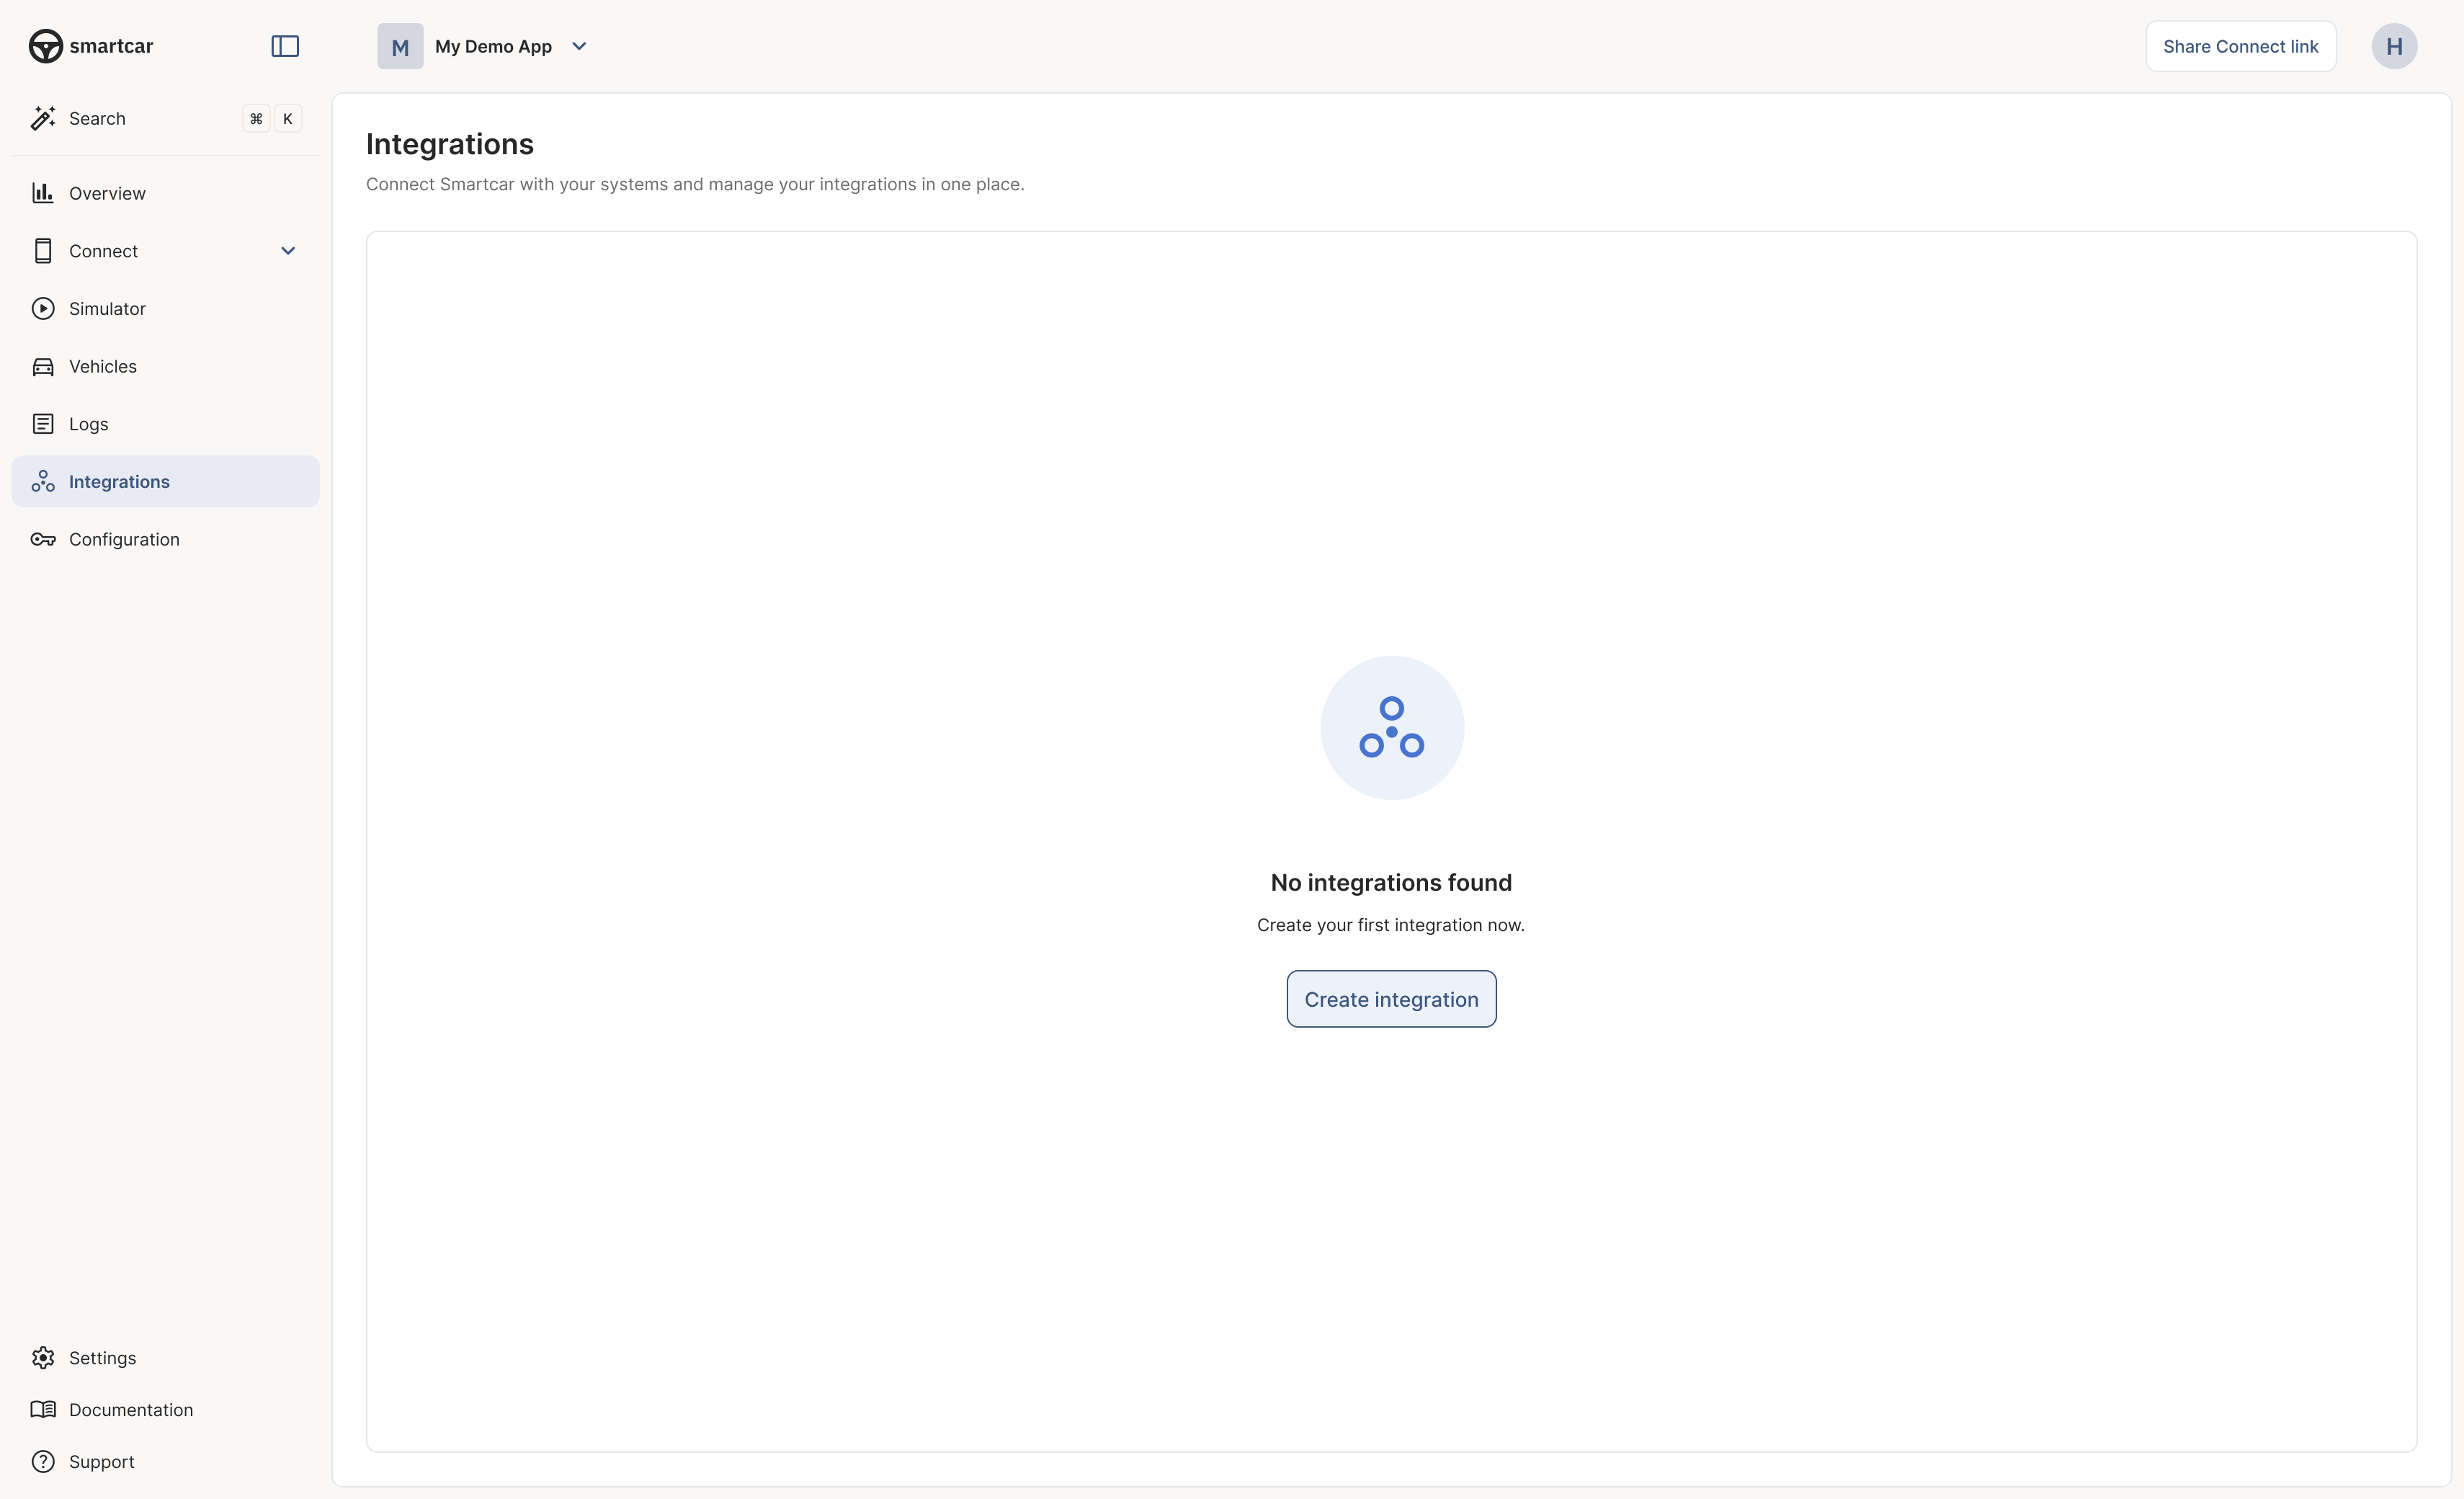
 ---
# Source: https://smartcar.com/docs/api-reference/management/delete-vehicle-connections.md
> ## Documentation Index
> Fetch the complete documentation index at: https://smartcar.com/docs/llms.txt
> Use this file to discover all available pages before exploring further.
# Vehicle Connections
> Deletes all vehicle connections associated with a Smartcar user ID or a specific vehicle.
## Request
**Header**
---
# Source: https://smartcar.com/docs/api-reference/management/delete-vehicle-connections.md
> ## Documentation Index
> Fetch the complete documentation index at: https://smartcar.com/docs/llms.txt
> Use this file to discover all available pages before exploring further.
# Vehicle Connections
> Deletes all vehicle connections associated with a Smartcar user ID or a specific vehicle.
## Request
**Header**
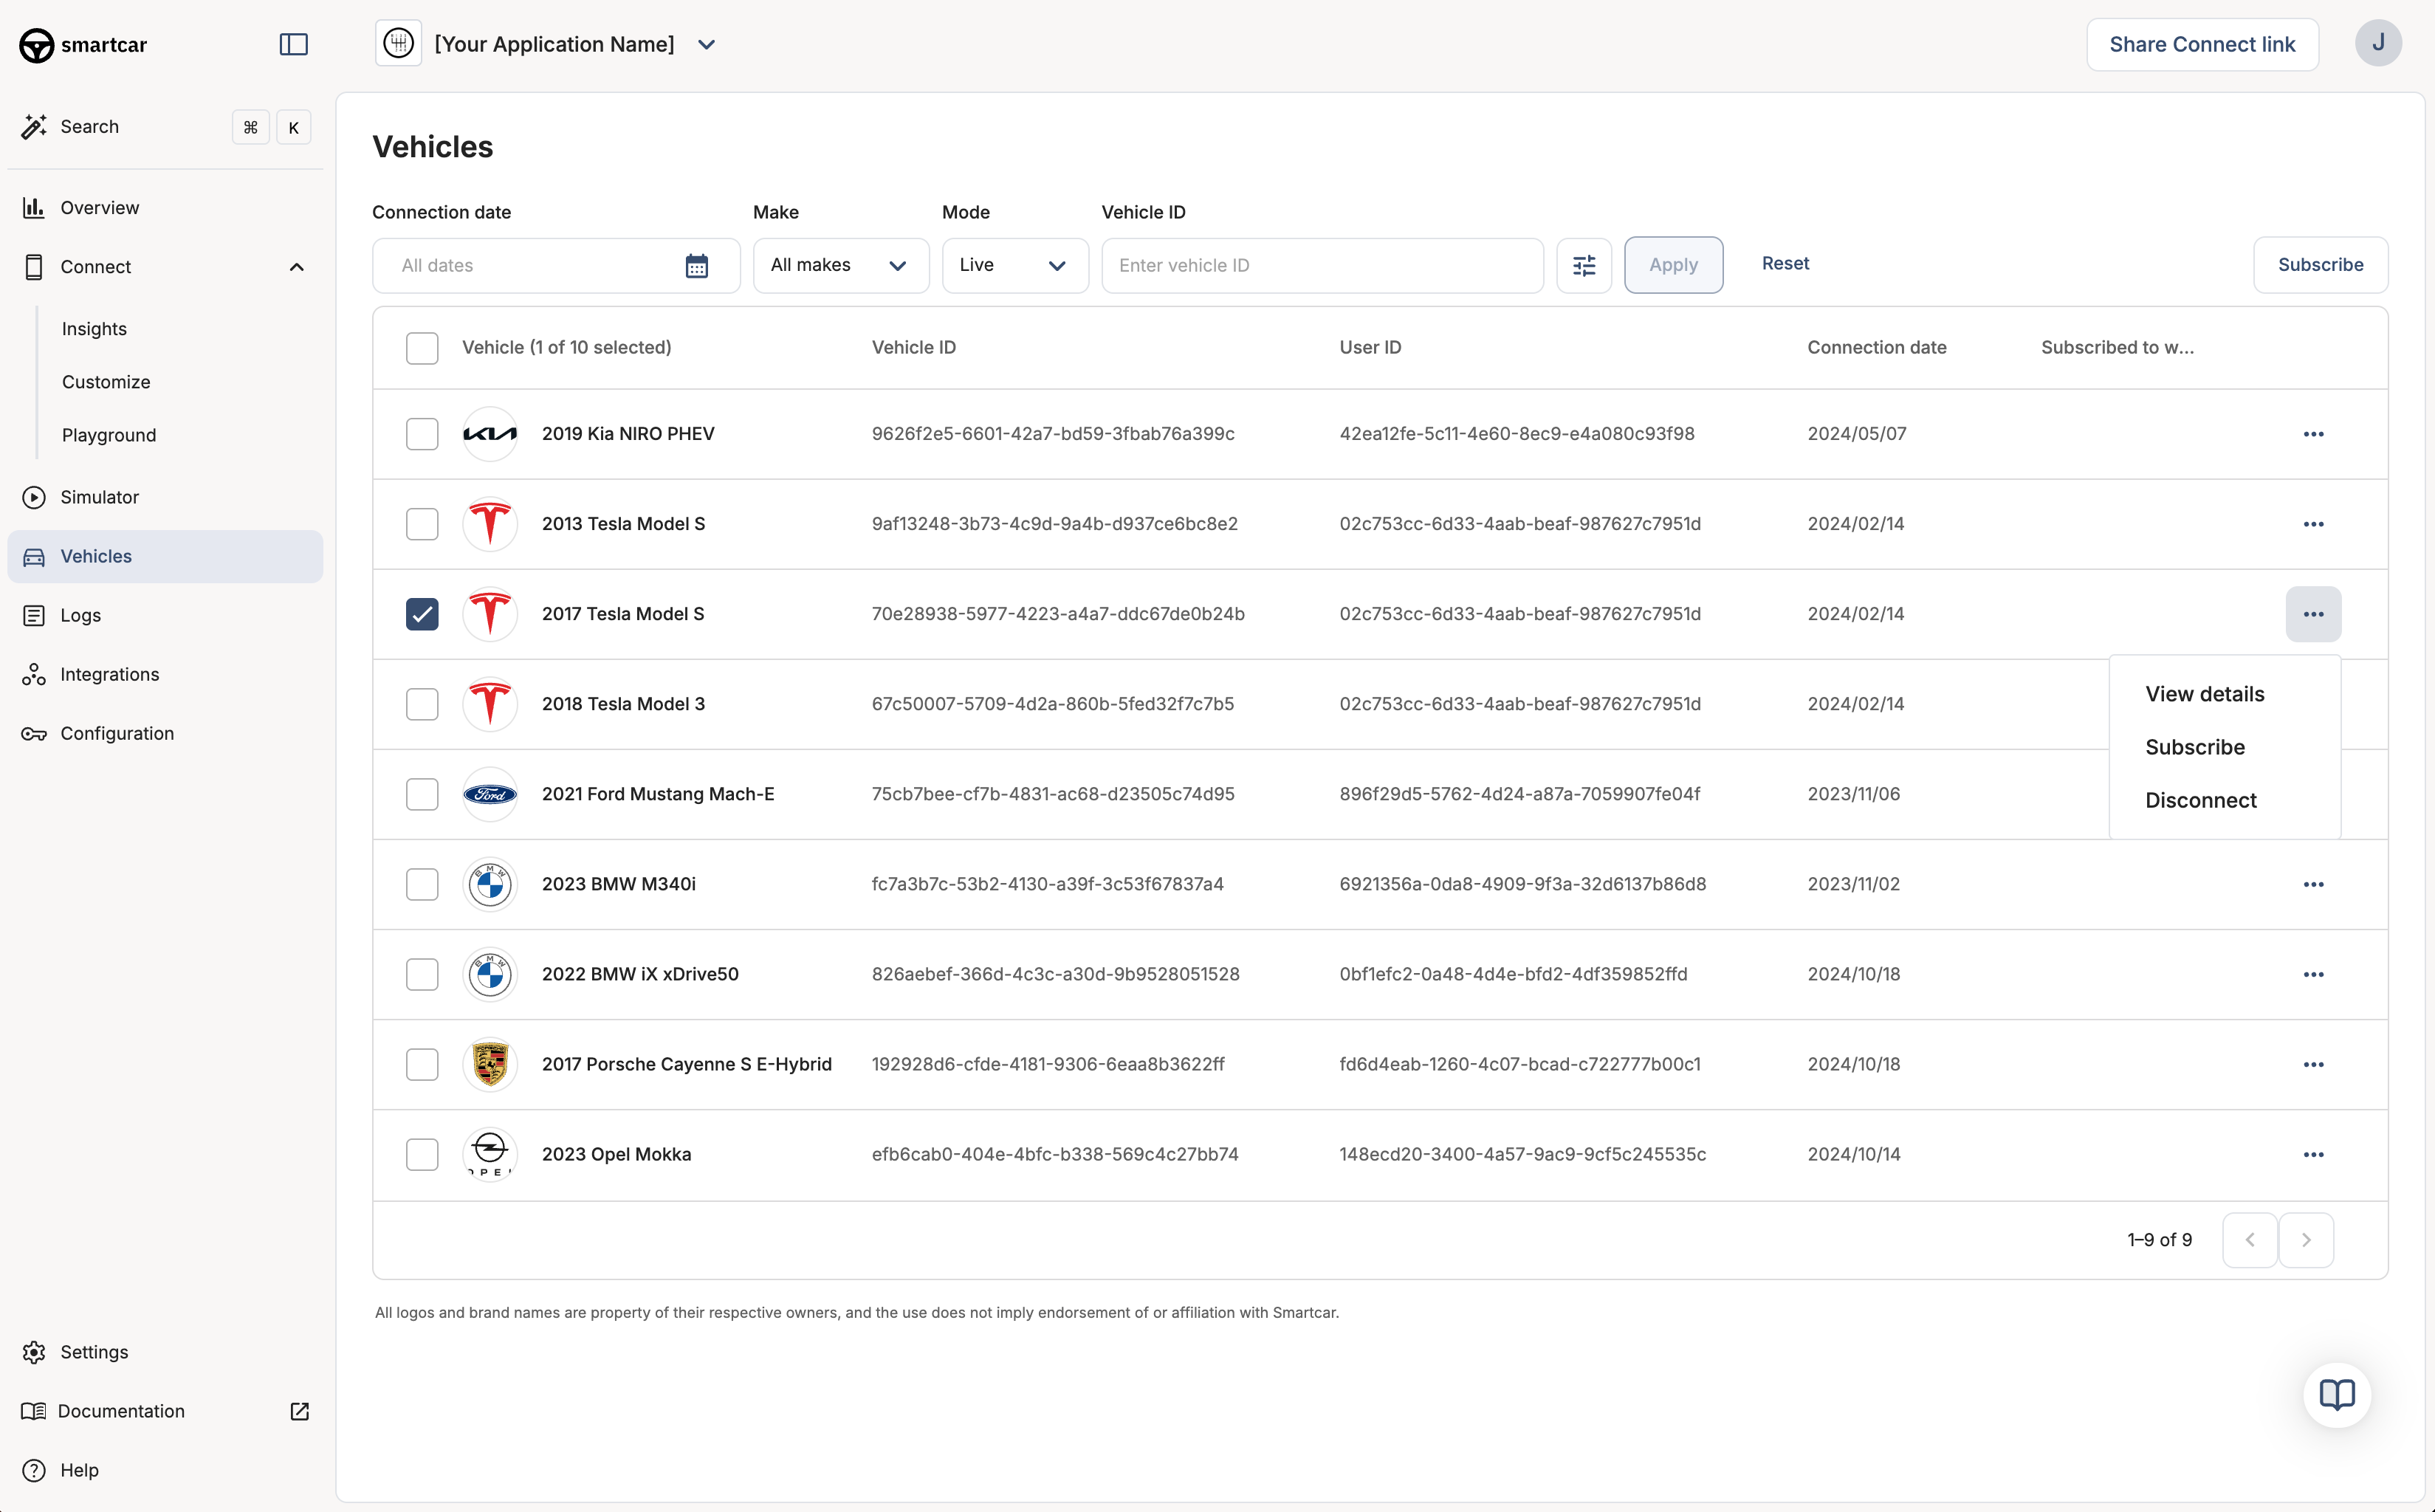
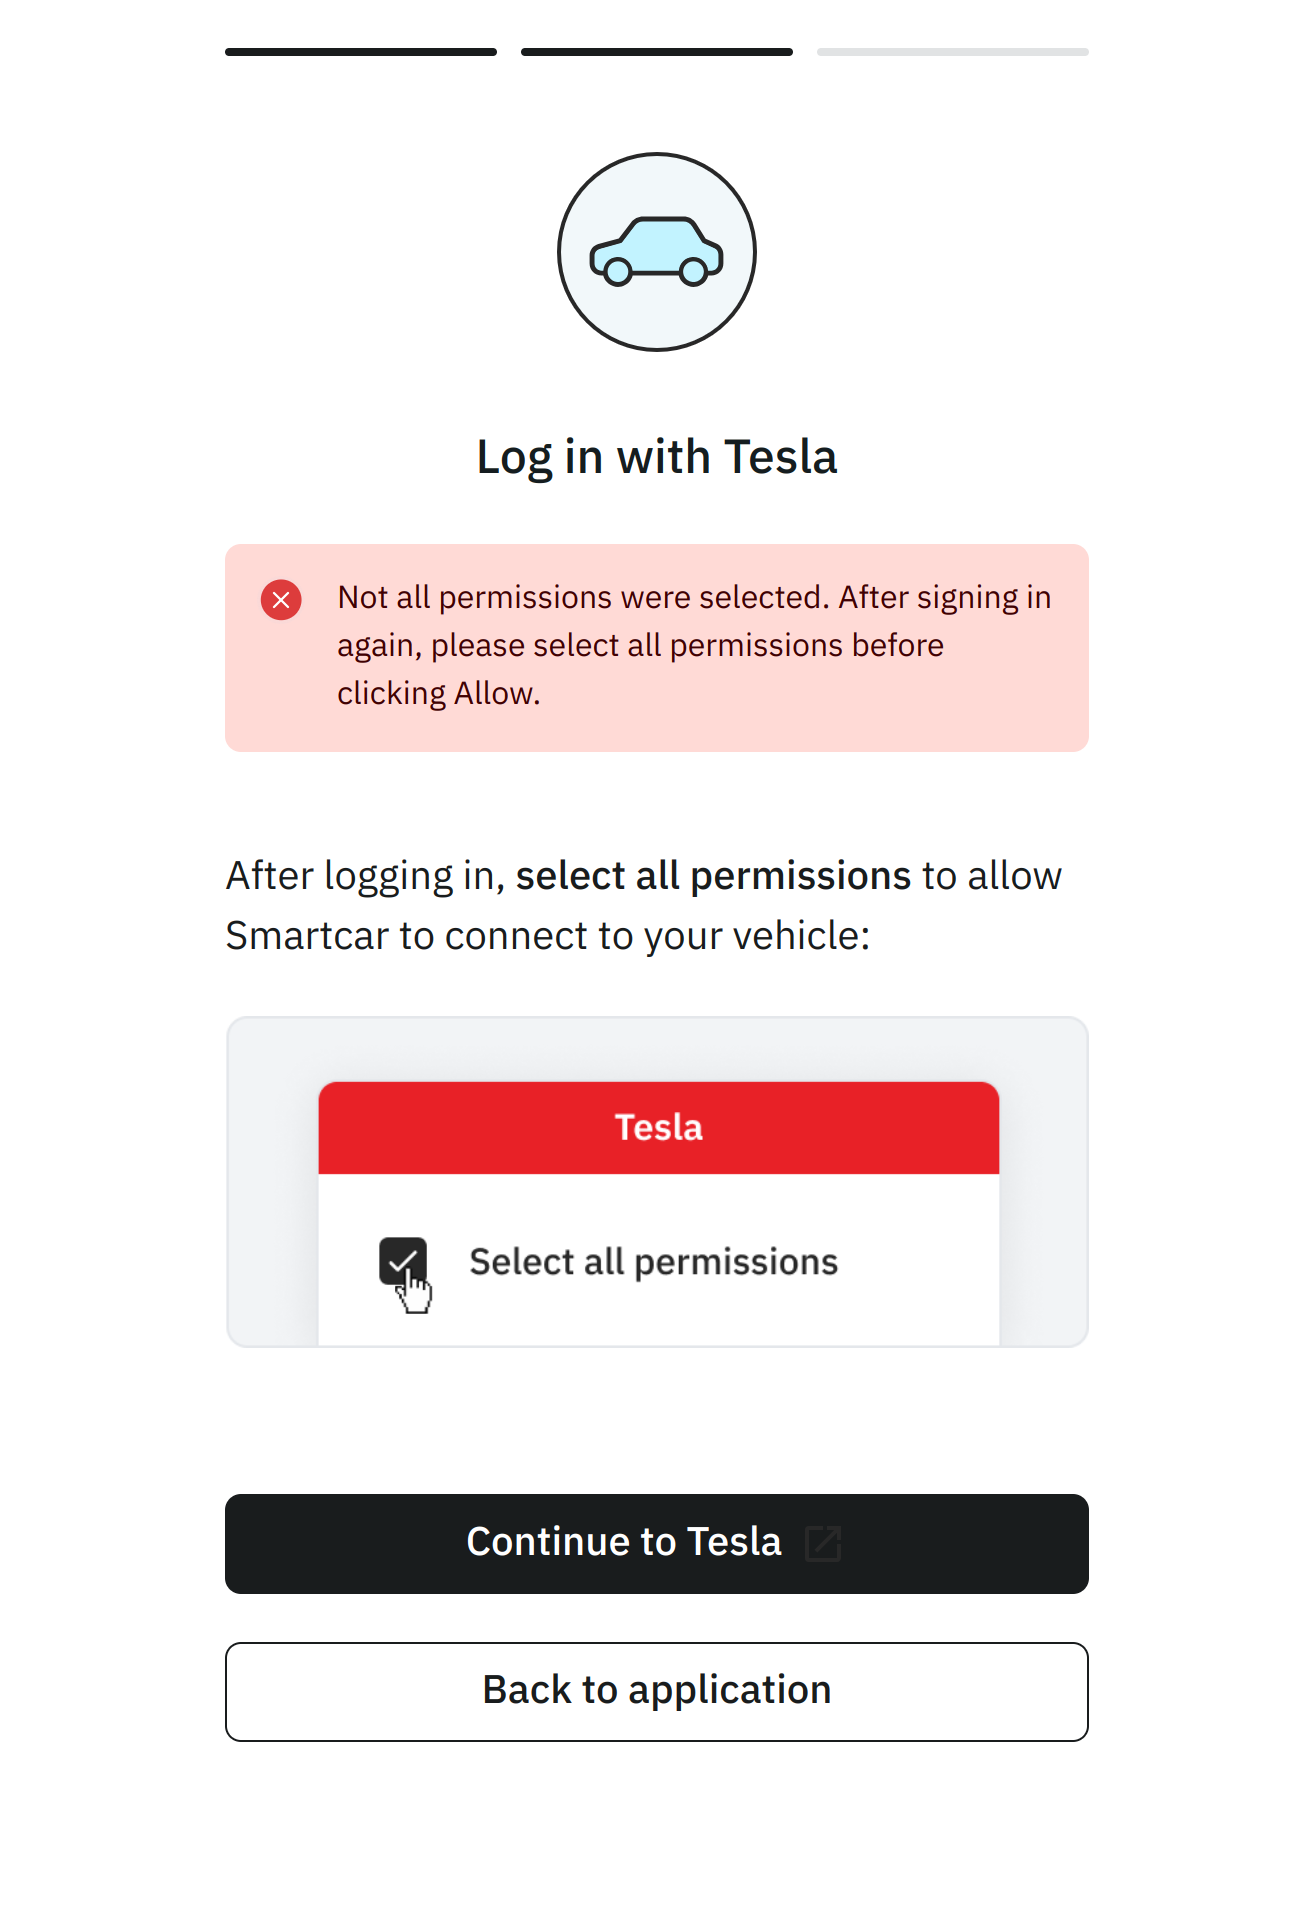 ## Permission Mappings
Tesla provides a limited set of permissions. To ensure vehicle data is shared only with explicit consent, Smartcar has mapped Tesla’s permissions into its existing more granular options. For example, granting access to “vehicle commands” in a Tesla account allows an application to start or stop charging, lock or unlock doors, enable or disable Sentry Mode, and more. Smartcar separates these permissions so that applications must request access to control charging separately from access to vehicle security, control navigation, etc. Smartcar does not use or share vehicle data beyond the permissions listed in this table. An application with the ability to control the charge status of a vehicle, does not have access to control other aspects of the car unless explictly requested and granted by a vehicle owner.
| Smartcar Permission | Tesla Permission |
| ---------------------------- | --------------------------------------------------- |
| `control_charge` | Vehicle Charge Management (vehicle\_charging\_cmds) |
| `control_climate` | Vehicle Commands (vehicle\_cmds) |
| `control_navigation` | Vehicle Commands (vehicle\_cmds) |
| `control_pin` | Vehicle Commands (vehicle\_cmds) |
| `control_security` | Vehicle Commands (vehicle\_cmds) |
| `control_trunk` | Vehicle Commands (vehicle\_cmds) |
| `read_battery` | Vehicle Information (vehicle\_device\_data) |
| `read_charge_records` | Vehicle Charge Management (vehicle\_charging\_cmds) |
| `read_charge` | Vehicle Information (vehicle\_device\_data) |
| `read_climate` | Vehicle Information (vehicle\_device\_data) |
| `read_compass` | Vehicle Information (vehicle\_device\_data) |
| `read_engine_oil` | Vehicle Information (vehicle\_device\_data) |
| `read_extended_vehicle_info` | Vehicle Information (vehicle\_device\_data) |
| `read_fuel` | Vehicle Information (vehicle\_device\_data) |
| `read_location` | Vehicle Location (vehicle\_location) |
| `read_odometer` | Vehicle Information (vehicle\_device\_data) |
| `read_security` | Vehicle Information (vehicle\_device\_data) |
| `read_speedometer` | Vehicle Information (vehicle\_device\_data) |
| `read_thermometer` | Vehicle Information (vehicle\_device\_data) |
| `read_tires` | Vehicle Information (vehicle\_device\_data) |
| `read_user_profile` | Profile Information (user\_data) |
| `read_vehicle_info` | Vehicle Information (vehicle\_device\_data) |
| `read_vin` | Vehicle Information (vehicle\_device\_data) |
---
# Source: https://smartcar.com/docs/help/diagnostic-systems.md
> ## Documentation Index
> Fetch the complete documentation index at: https://smartcar.com/docs/llms.txt
> Use this file to discover all available pages before exploring further.
# Diagnostic Systems
> To support our System Status endpoint, reference the below list of unified systems.
The [System Status](https://smartcar.com/docs/api-reference/get-system-status) endpoint returns a list of systems reported by any given vehicle, as well as their current state which may be "OK" or "ALERT".
## System IDs
| | |
| --------------------------------- | --------------------------------------------------------- |
| `SYSTEM_ABS` | Antilock Braking Systems |
| `SYSTEM_ACTIVE_SAFETY` | Active Safety Systems |
| `SYSTEM_AIRBAG` | Airbag Systems |
| `SYSTEM_BRAKE_FLUID` | Brake Fluid Level |
| `SYSTEM_DRIVER_ASSISTANCE` | Driver Assistance Systems |
| `SYSTEM_EMISSIONS` | Emissions Systems |
| `SYSTEM_ABS` | Antilock Braking Systems |
| `SYSTEM_ENGINE` | Engine Systems |
| `SYSTEM_EV_BATTERY_CONDITIONING` | EV Battery Conditioning Systems |
| `SYSTEM_EV_CHARGING` | EV Charging Systems |
| `SYSTEM_EV_DRIVE_UNIT` | EV Drive Unit Systems |
| `SYSTEM_EV_HV_BATTERY` | EV High-Voltage Battery Systems |
| `SYSTEM_LIGHTING` | Lighting Systems |
| `SYSTEM_MIL` | Malfunction Indiciator Lamp Systems (Check Engine Lights) |
| `SYSTEM_OIL_LIFE` | Oil Life Systems |
| `SYSTEM_OIL_PRESSURE` | Oil Pressure Systems |
| `SYSTEM_OIL_TEMPERATURE` | Oil Temperature Systems |
| `SYSTEM_TELEMATICS` | Telematics Systems |
| `SYSTEM_TIRE_PRESSURE` | Tire Pressure Systems |
| `SYSTEM_TIRE_PRESSURE_MONITORING` | Tire Pressure MonitoringSystems |
| `SYSTEM_TRANSMISSION` | Transmission Systems |
| `SYSTEM_WASHER_FLUID` | Washer Fluid Systems |
| `SYSTEM_WATER_IN_FUEL` | Water in Fuel Detection Systems |
---
# Source: https://smartcar.com/docs/api-reference/signals/diagnostics.md
> ## Documentation Index
> Fetch the complete documentation index at: https://smartcar.com/docs/llms.txt
> Use this file to discover all available pages before exploring further.
# Diagnostics Signals
### ABS
Signal code: `diagnostics-abs`
A diagnostic category representing the Anti-lock Braking System (ABS).
## Permission Mappings
Tesla provides a limited set of permissions. To ensure vehicle data is shared only with explicit consent, Smartcar has mapped Tesla’s permissions into its existing more granular options. For example, granting access to “vehicle commands” in a Tesla account allows an application to start or stop charging, lock or unlock doors, enable or disable Sentry Mode, and more. Smartcar separates these permissions so that applications must request access to control charging separately from access to vehicle security, control navigation, etc. Smartcar does not use or share vehicle data beyond the permissions listed in this table. An application with the ability to control the charge status of a vehicle, does not have access to control other aspects of the car unless explictly requested and granted by a vehicle owner.
| Smartcar Permission | Tesla Permission |
| ---------------------------- | --------------------------------------------------- |
| `control_charge` | Vehicle Charge Management (vehicle\_charging\_cmds) |
| `control_climate` | Vehicle Commands (vehicle\_cmds) |
| `control_navigation` | Vehicle Commands (vehicle\_cmds) |
| `control_pin` | Vehicle Commands (vehicle\_cmds) |
| `control_security` | Vehicle Commands (vehicle\_cmds) |
| `control_trunk` | Vehicle Commands (vehicle\_cmds) |
| `read_battery` | Vehicle Information (vehicle\_device\_data) |
| `read_charge_records` | Vehicle Charge Management (vehicle\_charging\_cmds) |
| `read_charge` | Vehicle Information (vehicle\_device\_data) |
| `read_climate` | Vehicle Information (vehicle\_device\_data) |
| `read_compass` | Vehicle Information (vehicle\_device\_data) |
| `read_engine_oil` | Vehicle Information (vehicle\_device\_data) |
| `read_extended_vehicle_info` | Vehicle Information (vehicle\_device\_data) |
| `read_fuel` | Vehicle Information (vehicle\_device\_data) |
| `read_location` | Vehicle Location (vehicle\_location) |
| `read_odometer` | Vehicle Information (vehicle\_device\_data) |
| `read_security` | Vehicle Information (vehicle\_device\_data) |
| `read_speedometer` | Vehicle Information (vehicle\_device\_data) |
| `read_thermometer` | Vehicle Information (vehicle\_device\_data) |
| `read_tires` | Vehicle Information (vehicle\_device\_data) |
| `read_user_profile` | Profile Information (user\_data) |
| `read_vehicle_info` | Vehicle Information (vehicle\_device\_data) |
| `read_vin` | Vehicle Information (vehicle\_device\_data) |
---
# Source: https://smartcar.com/docs/help/diagnostic-systems.md
> ## Documentation Index
> Fetch the complete documentation index at: https://smartcar.com/docs/llms.txt
> Use this file to discover all available pages before exploring further.
# Diagnostic Systems
> To support our System Status endpoint, reference the below list of unified systems.
The [System Status](https://smartcar.com/docs/api-reference/get-system-status) endpoint returns a list of systems reported by any given vehicle, as well as their current state which may be "OK" or "ALERT".
## System IDs
| | |
| --------------------------------- | --------------------------------------------------------- |
| `SYSTEM_ABS` | Antilock Braking Systems |
| `SYSTEM_ACTIVE_SAFETY` | Active Safety Systems |
| `SYSTEM_AIRBAG` | Airbag Systems |
| `SYSTEM_BRAKE_FLUID` | Brake Fluid Level |
| `SYSTEM_DRIVER_ASSISTANCE` | Driver Assistance Systems |
| `SYSTEM_EMISSIONS` | Emissions Systems |
| `SYSTEM_ABS` | Antilock Braking Systems |
| `SYSTEM_ENGINE` | Engine Systems |
| `SYSTEM_EV_BATTERY_CONDITIONING` | EV Battery Conditioning Systems |
| `SYSTEM_EV_CHARGING` | EV Charging Systems |
| `SYSTEM_EV_DRIVE_UNIT` | EV Drive Unit Systems |
| `SYSTEM_EV_HV_BATTERY` | EV High-Voltage Battery Systems |
| `SYSTEM_LIGHTING` | Lighting Systems |
| `SYSTEM_MIL` | Malfunction Indiciator Lamp Systems (Check Engine Lights) |
| `SYSTEM_OIL_LIFE` | Oil Life Systems |
| `SYSTEM_OIL_PRESSURE` | Oil Pressure Systems |
| `SYSTEM_OIL_TEMPERATURE` | Oil Temperature Systems |
| `SYSTEM_TELEMATICS` | Telematics Systems |
| `SYSTEM_TIRE_PRESSURE` | Tire Pressure Systems |
| `SYSTEM_TIRE_PRESSURE_MONITORING` | Tire Pressure MonitoringSystems |
| `SYSTEM_TRANSMISSION` | Transmission Systems |
| `SYSTEM_WASHER_FLUID` | Washer Fluid Systems |
| `SYSTEM_WATER_IN_FUEL` | Water in Fuel Detection Systems |
---
# Source: https://smartcar.com/docs/api-reference/signals/diagnostics.md
> ## Documentation Index
> Fetch the complete documentation index at: https://smartcar.com/docs/llms.txt
> Use this file to discover all available pages before exploring further.
# Diagnostics Signals
### ABS
Signal code: `diagnostics-abs`
A diagnostic category representing the Anti-lock Braking System (ABS).
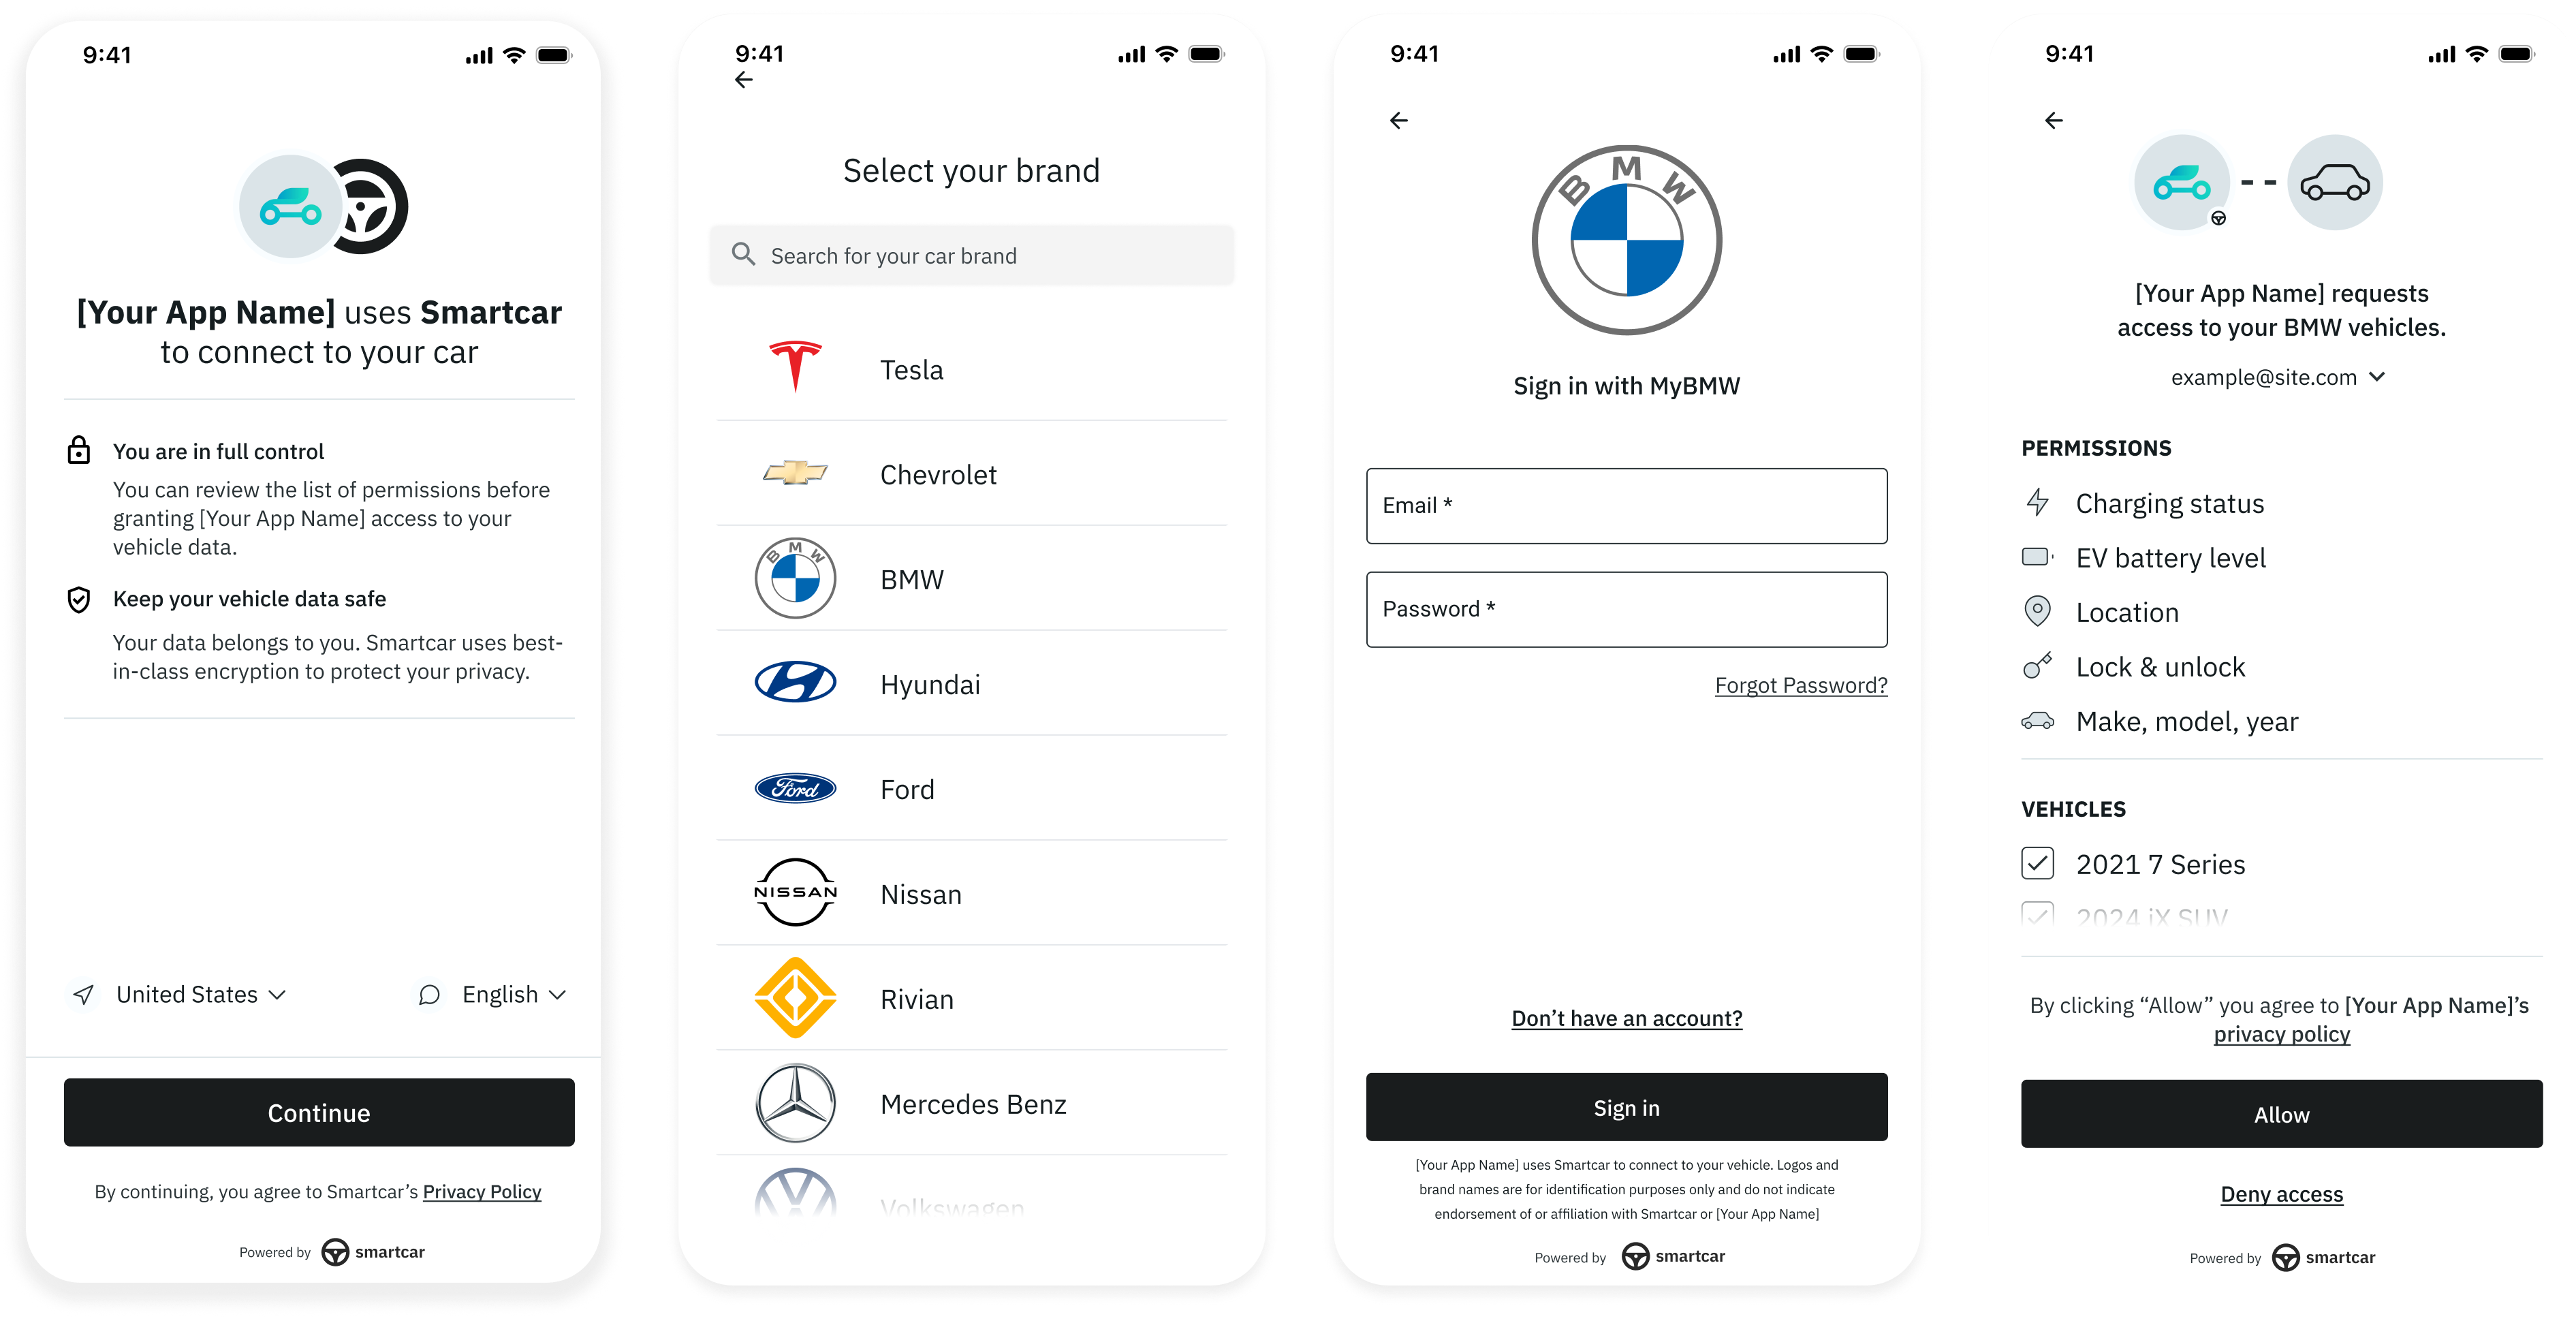
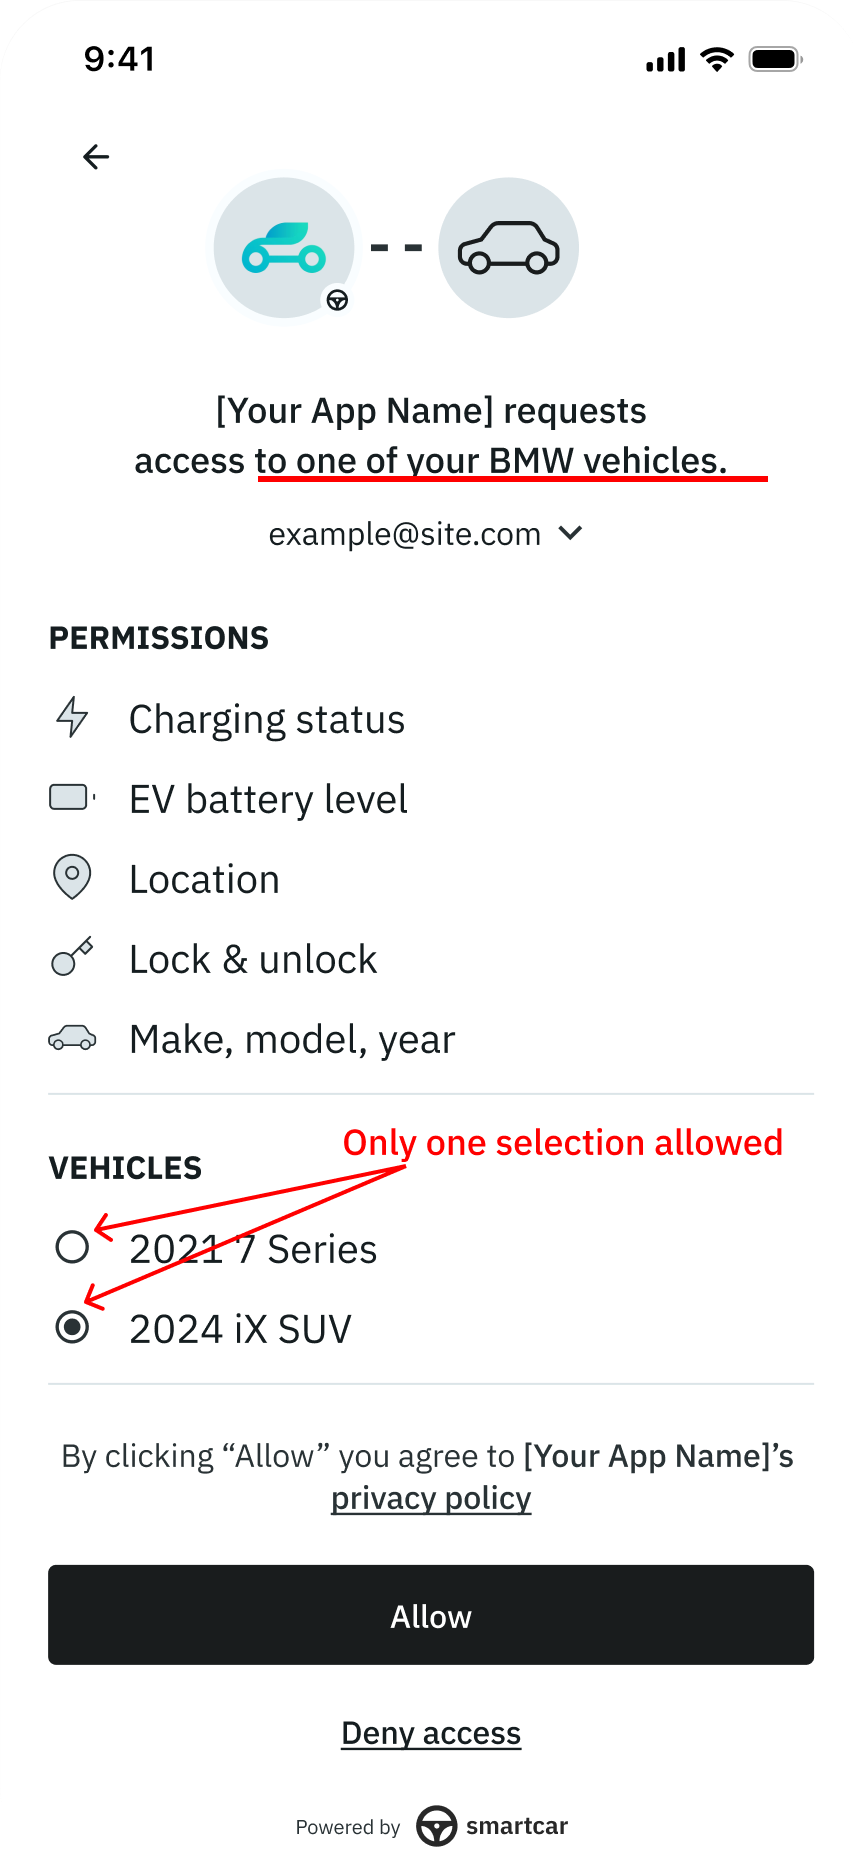 To enable Single Select, you can pass `single_select=true` as URL parameter when launching Smartcar Connect.
### Single Select with VIN
In addition, if you know the user’s VIN ahead of time you can pass this over to us in the connect URL. In doing so:
1. Smartcar decodes the VIN to get the brand and send the user to the appropriate login form directly
2. If the owner has more than one vehicle on their connected services account, we’ll only show the VIN that was passed to us on the permission grant screen.
To enable Single Select, you can pass `single_select=true` as URL parameter when launching Smartcar Connect.
### Single Select with VIN
In addition, if you know the user’s VIN ahead of time you can pass this over to us in the connect URL. In doing so:
1. Smartcar decodes the VIN to get the brand and send the user to the appropriate login form directly
2. If the owner has more than one vehicle on their connected services account, we’ll only show the VIN that was passed to us on the permission grant screen.
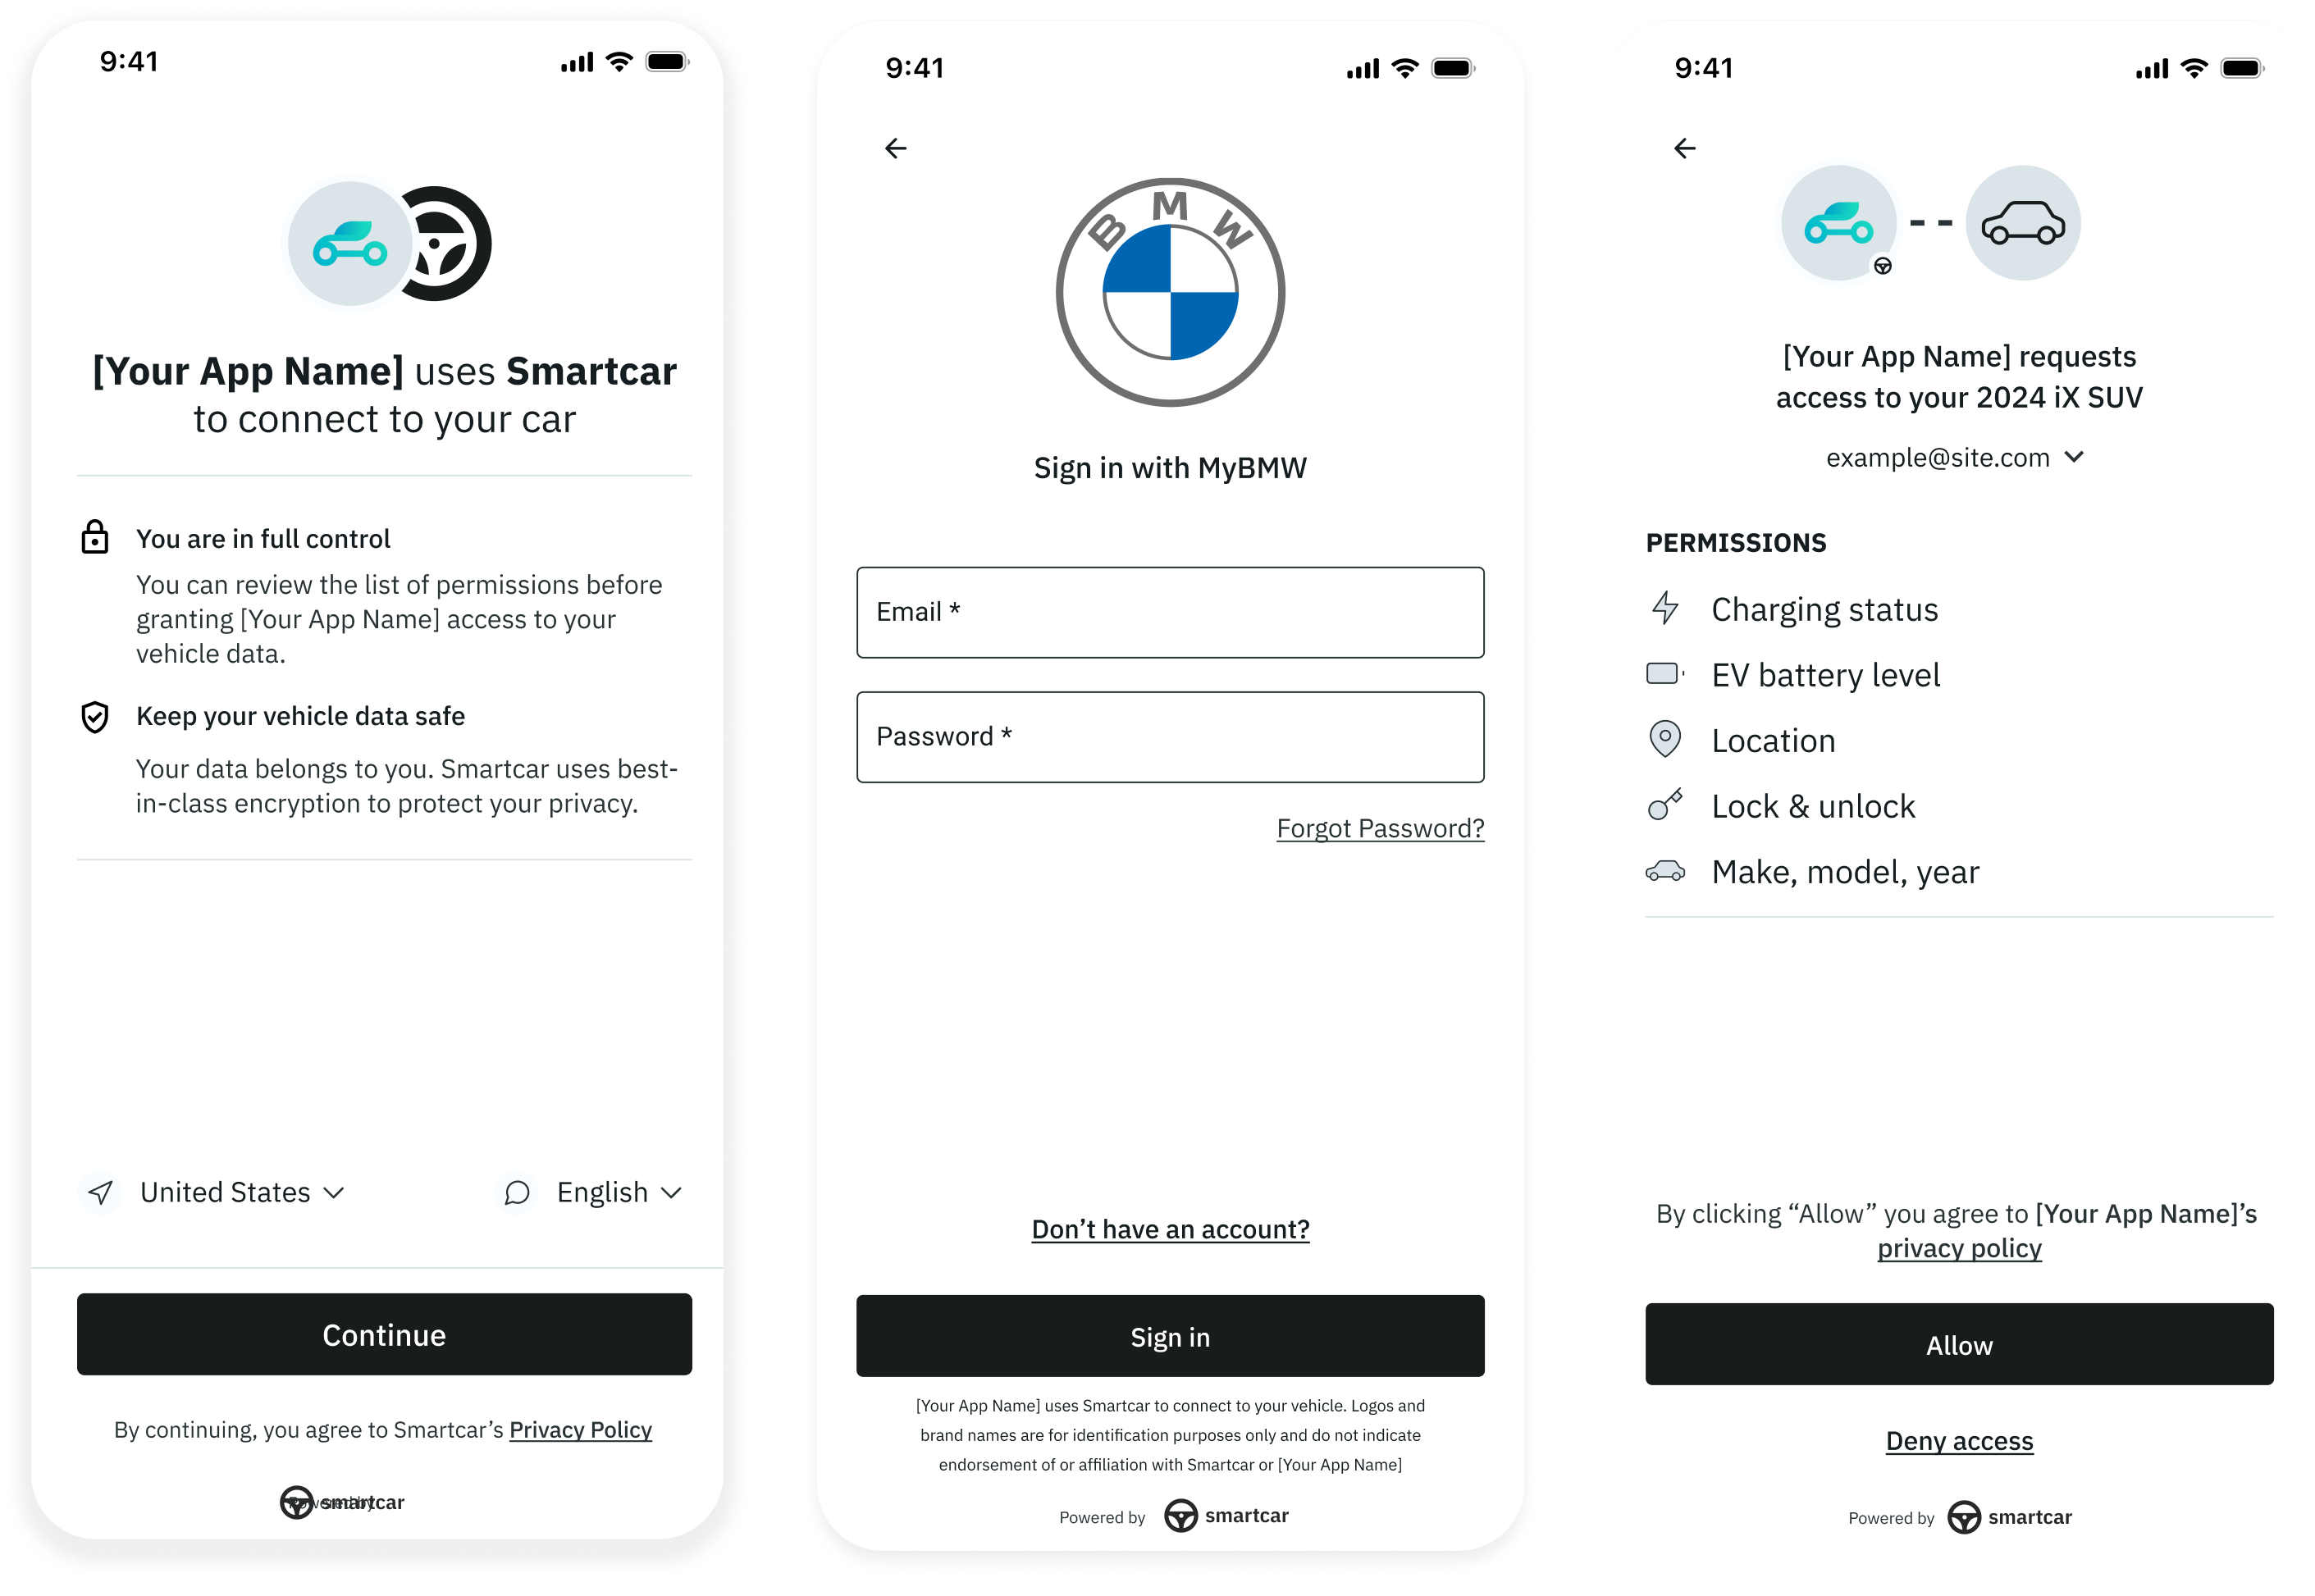 To enable Single Select with VIN, you can pass `single_select=true` and `single_select_vin=:vin` as URL parameters when launching Smartcar Connect.
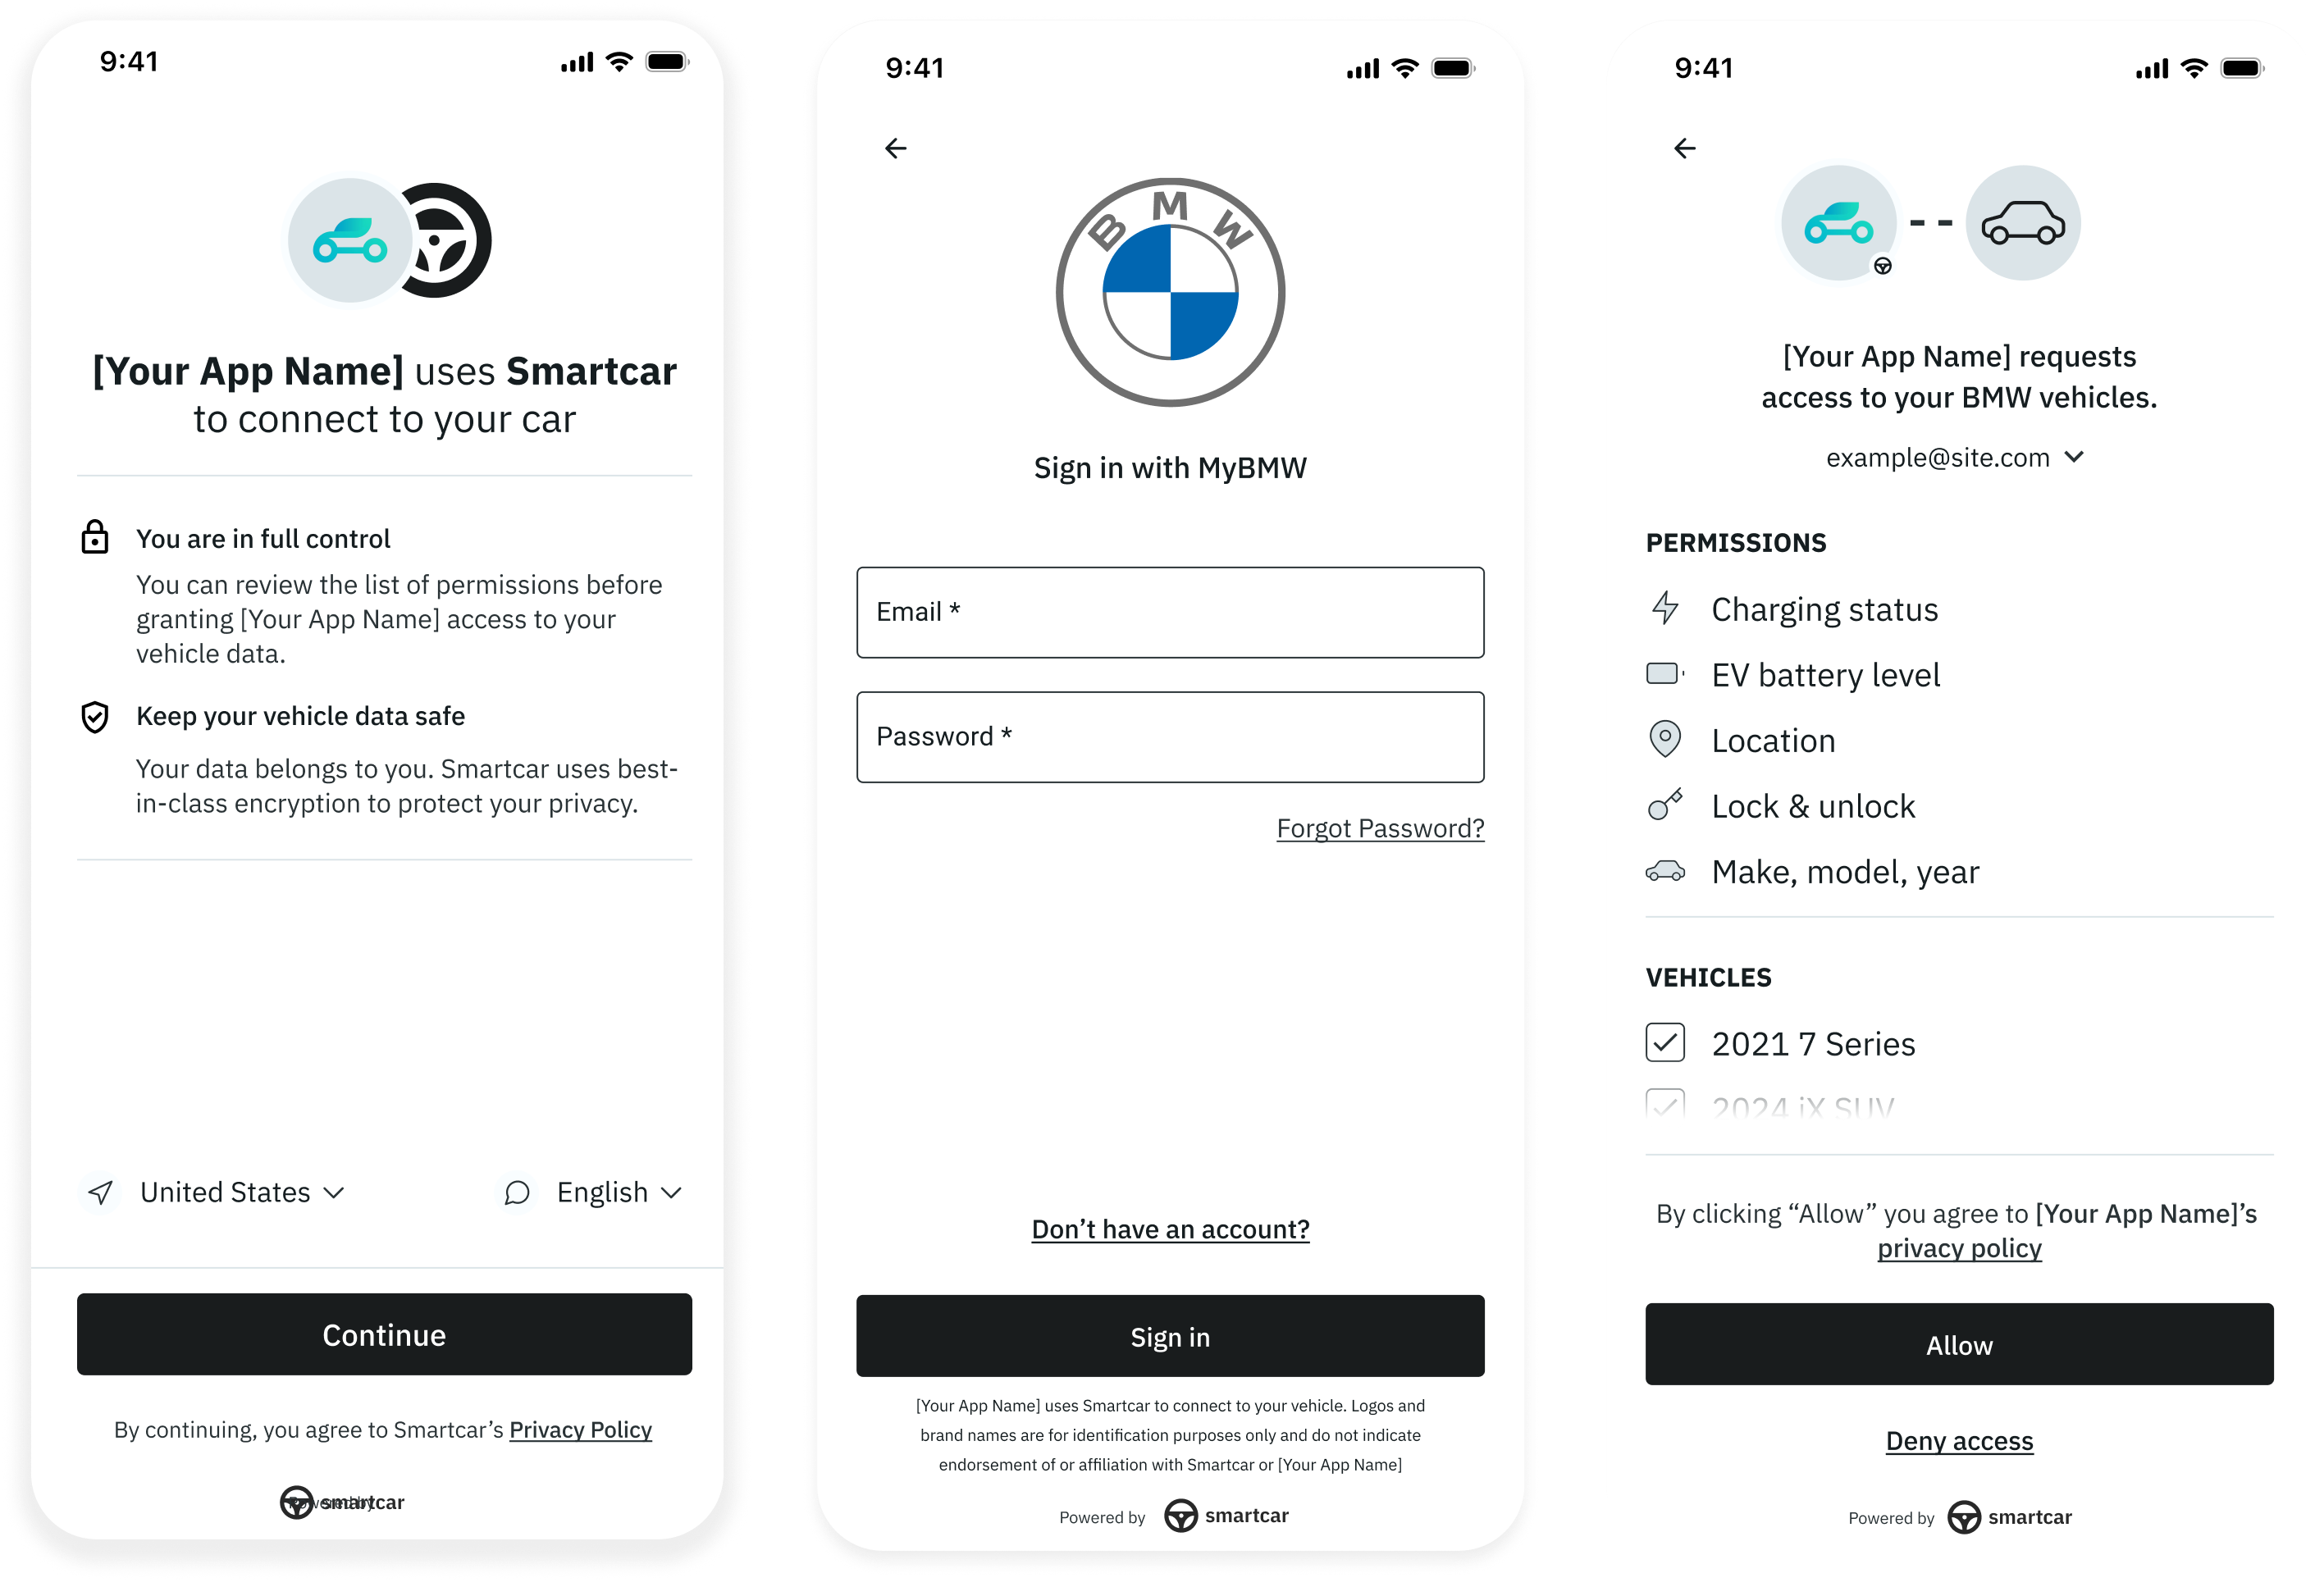 To enable Brand Select, you can pass `make` as URL parameter when launching Connect. For example, `make=TESLA`
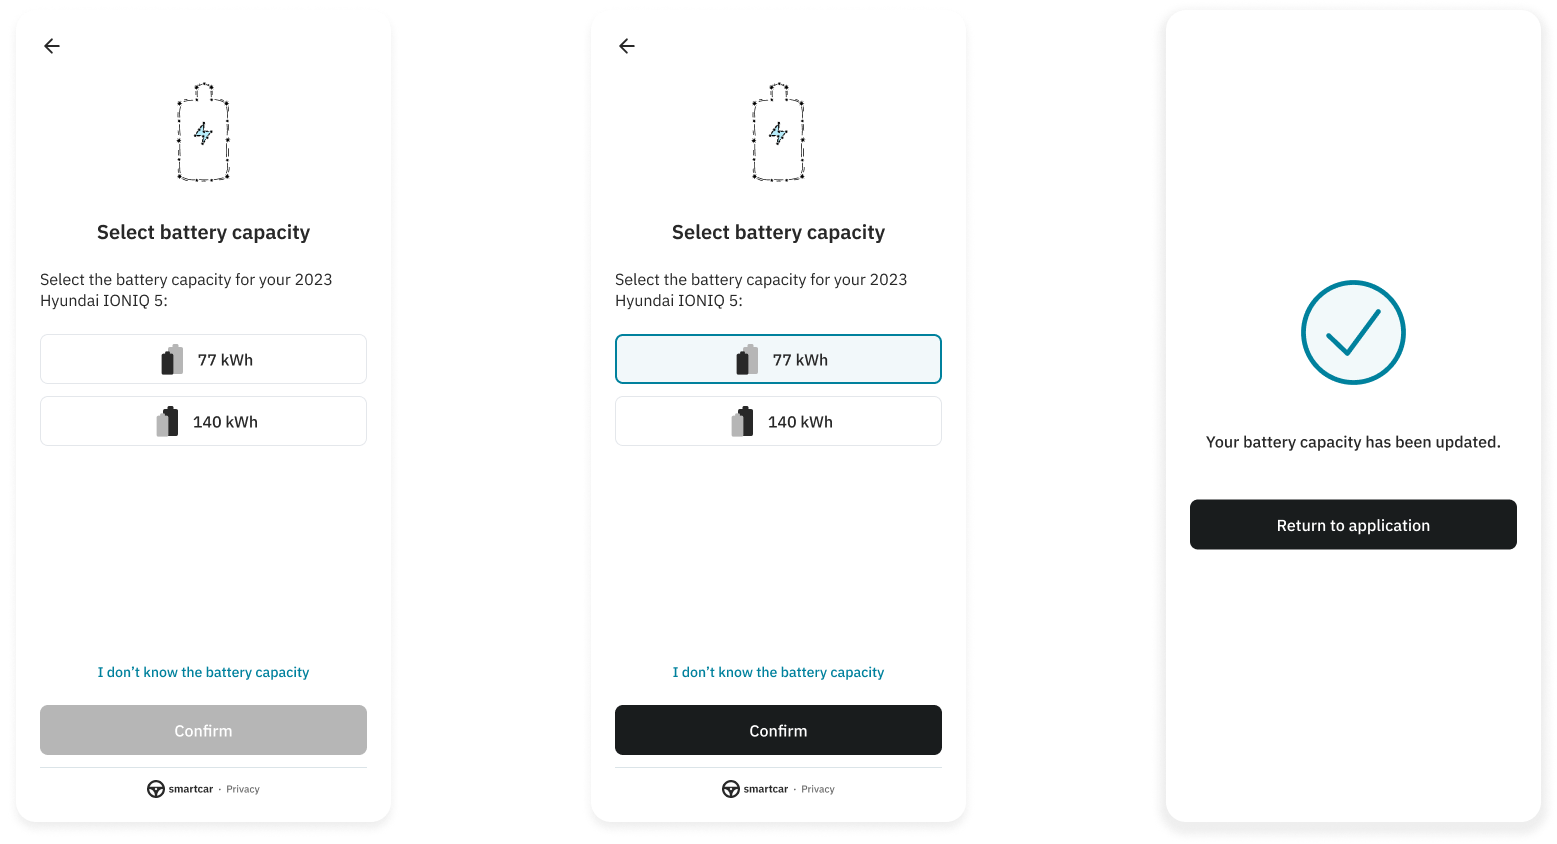 When a user selects an option, Smartcar will return this value with `USER_SELECTED` as the source.
```json Multiple capacities theme={null}
{
"availableCapacities": [
{
"capacity": 70.9,
"description": null
},
{
"capacity": 80.9,
"description": null
},
{
"capacity": 90.9,
"description": "BEV:Extended Range"
}
],
"capacity": {
"nominal": 80.9,
"source": "USER_SELECTED"
},
"url": "https://connect.smartcar.com/battery-capacity?vehicle_id=36ab27d0-fd9d-4455-823a-ce30af709ffc&client_id=8229df9f-91a0-4ff0-a1ae-a1f38ee24d07&token=90abecb6-e7ab-4b85-864a-e1c8bf67f2ad&response_type=vehicle_id&redirect_uri="
}
```
---
# Source: https://smartcar.com/docs/api-reference/get-odometer.md
> ## Documentation Index
> Fetch the complete documentation index at: https://smartcar.com/docs/llms.txt
> Use this file to discover all available pages before exploring further.
# Odometer
> Returns the vehicle’s last known odometer reading.
When a user selects an option, Smartcar will return this value with `USER_SELECTED` as the source.
```json Multiple capacities theme={null}
{
"availableCapacities": [
{
"capacity": 70.9,
"description": null
},
{
"capacity": 80.9,
"description": null
},
{
"capacity": 90.9,
"description": "BEV:Extended Range"
}
],
"capacity": {
"nominal": 80.9,
"source": "USER_SELECTED"
},
"url": "https://connect.smartcar.com/battery-capacity?vehicle_id=36ab27d0-fd9d-4455-823a-ce30af709ffc&client_id=8229df9f-91a0-4ff0-a1ae-a1f38ee24d07&token=90abecb6-e7ab-4b85-864a-e1c8bf67f2ad&response_type=vehicle_id&redirect_uri="
}
```
---
# Source: https://smartcar.com/docs/api-reference/get-odometer.md
> ## Documentation Index
> Fetch the complete documentation index at: https://smartcar.com/docs/llms.txt
> Use this file to discover all available pages before exploring further.
# Odometer
> Returns the vehicle’s last known odometer reading.
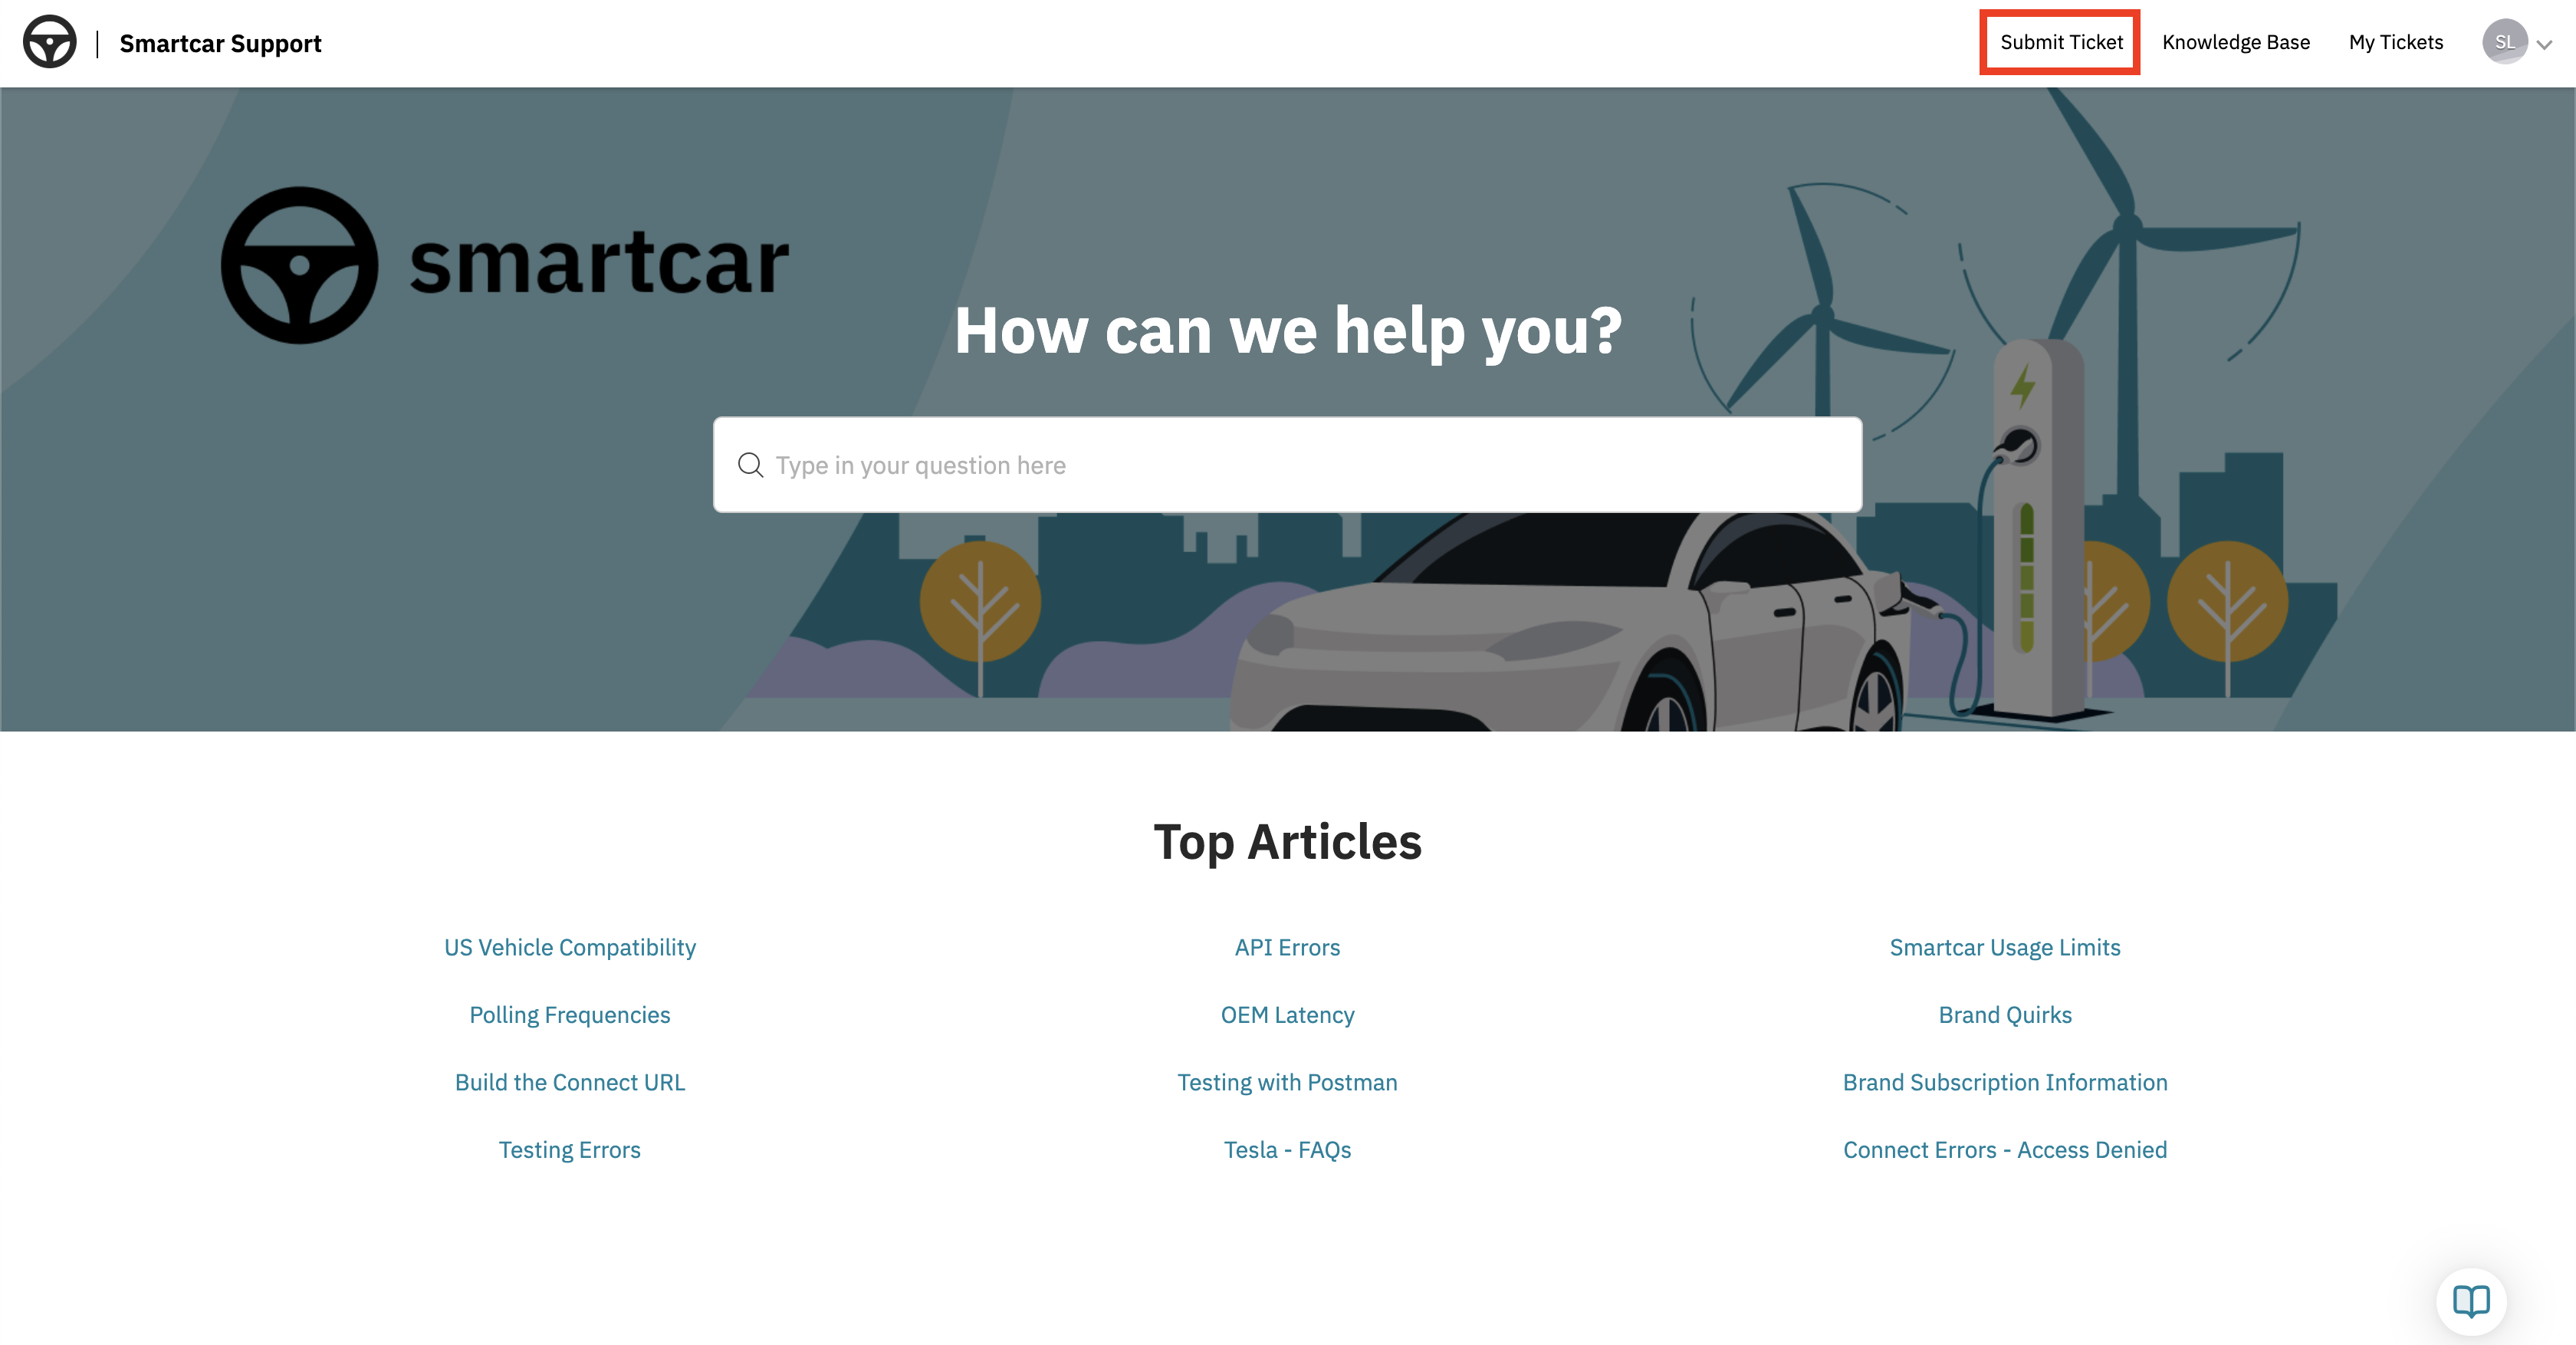 **2. Fill Out the Ticket Form**\
Provide details such as:
* Subject
* Description
* Please include as much relevant context as possible such as Session IDs, Vehicle IDs, screenshots, etc.
* The Smartcar Component affected
* The issue type
**2. Fill Out the Ticket Form**\
Provide details such as:
* Subject
* Description
* Please include as much relevant context as possible such as Session IDs, Vehicle IDs, screenshots, etc.
* The Smartcar Component affected
* The issue type
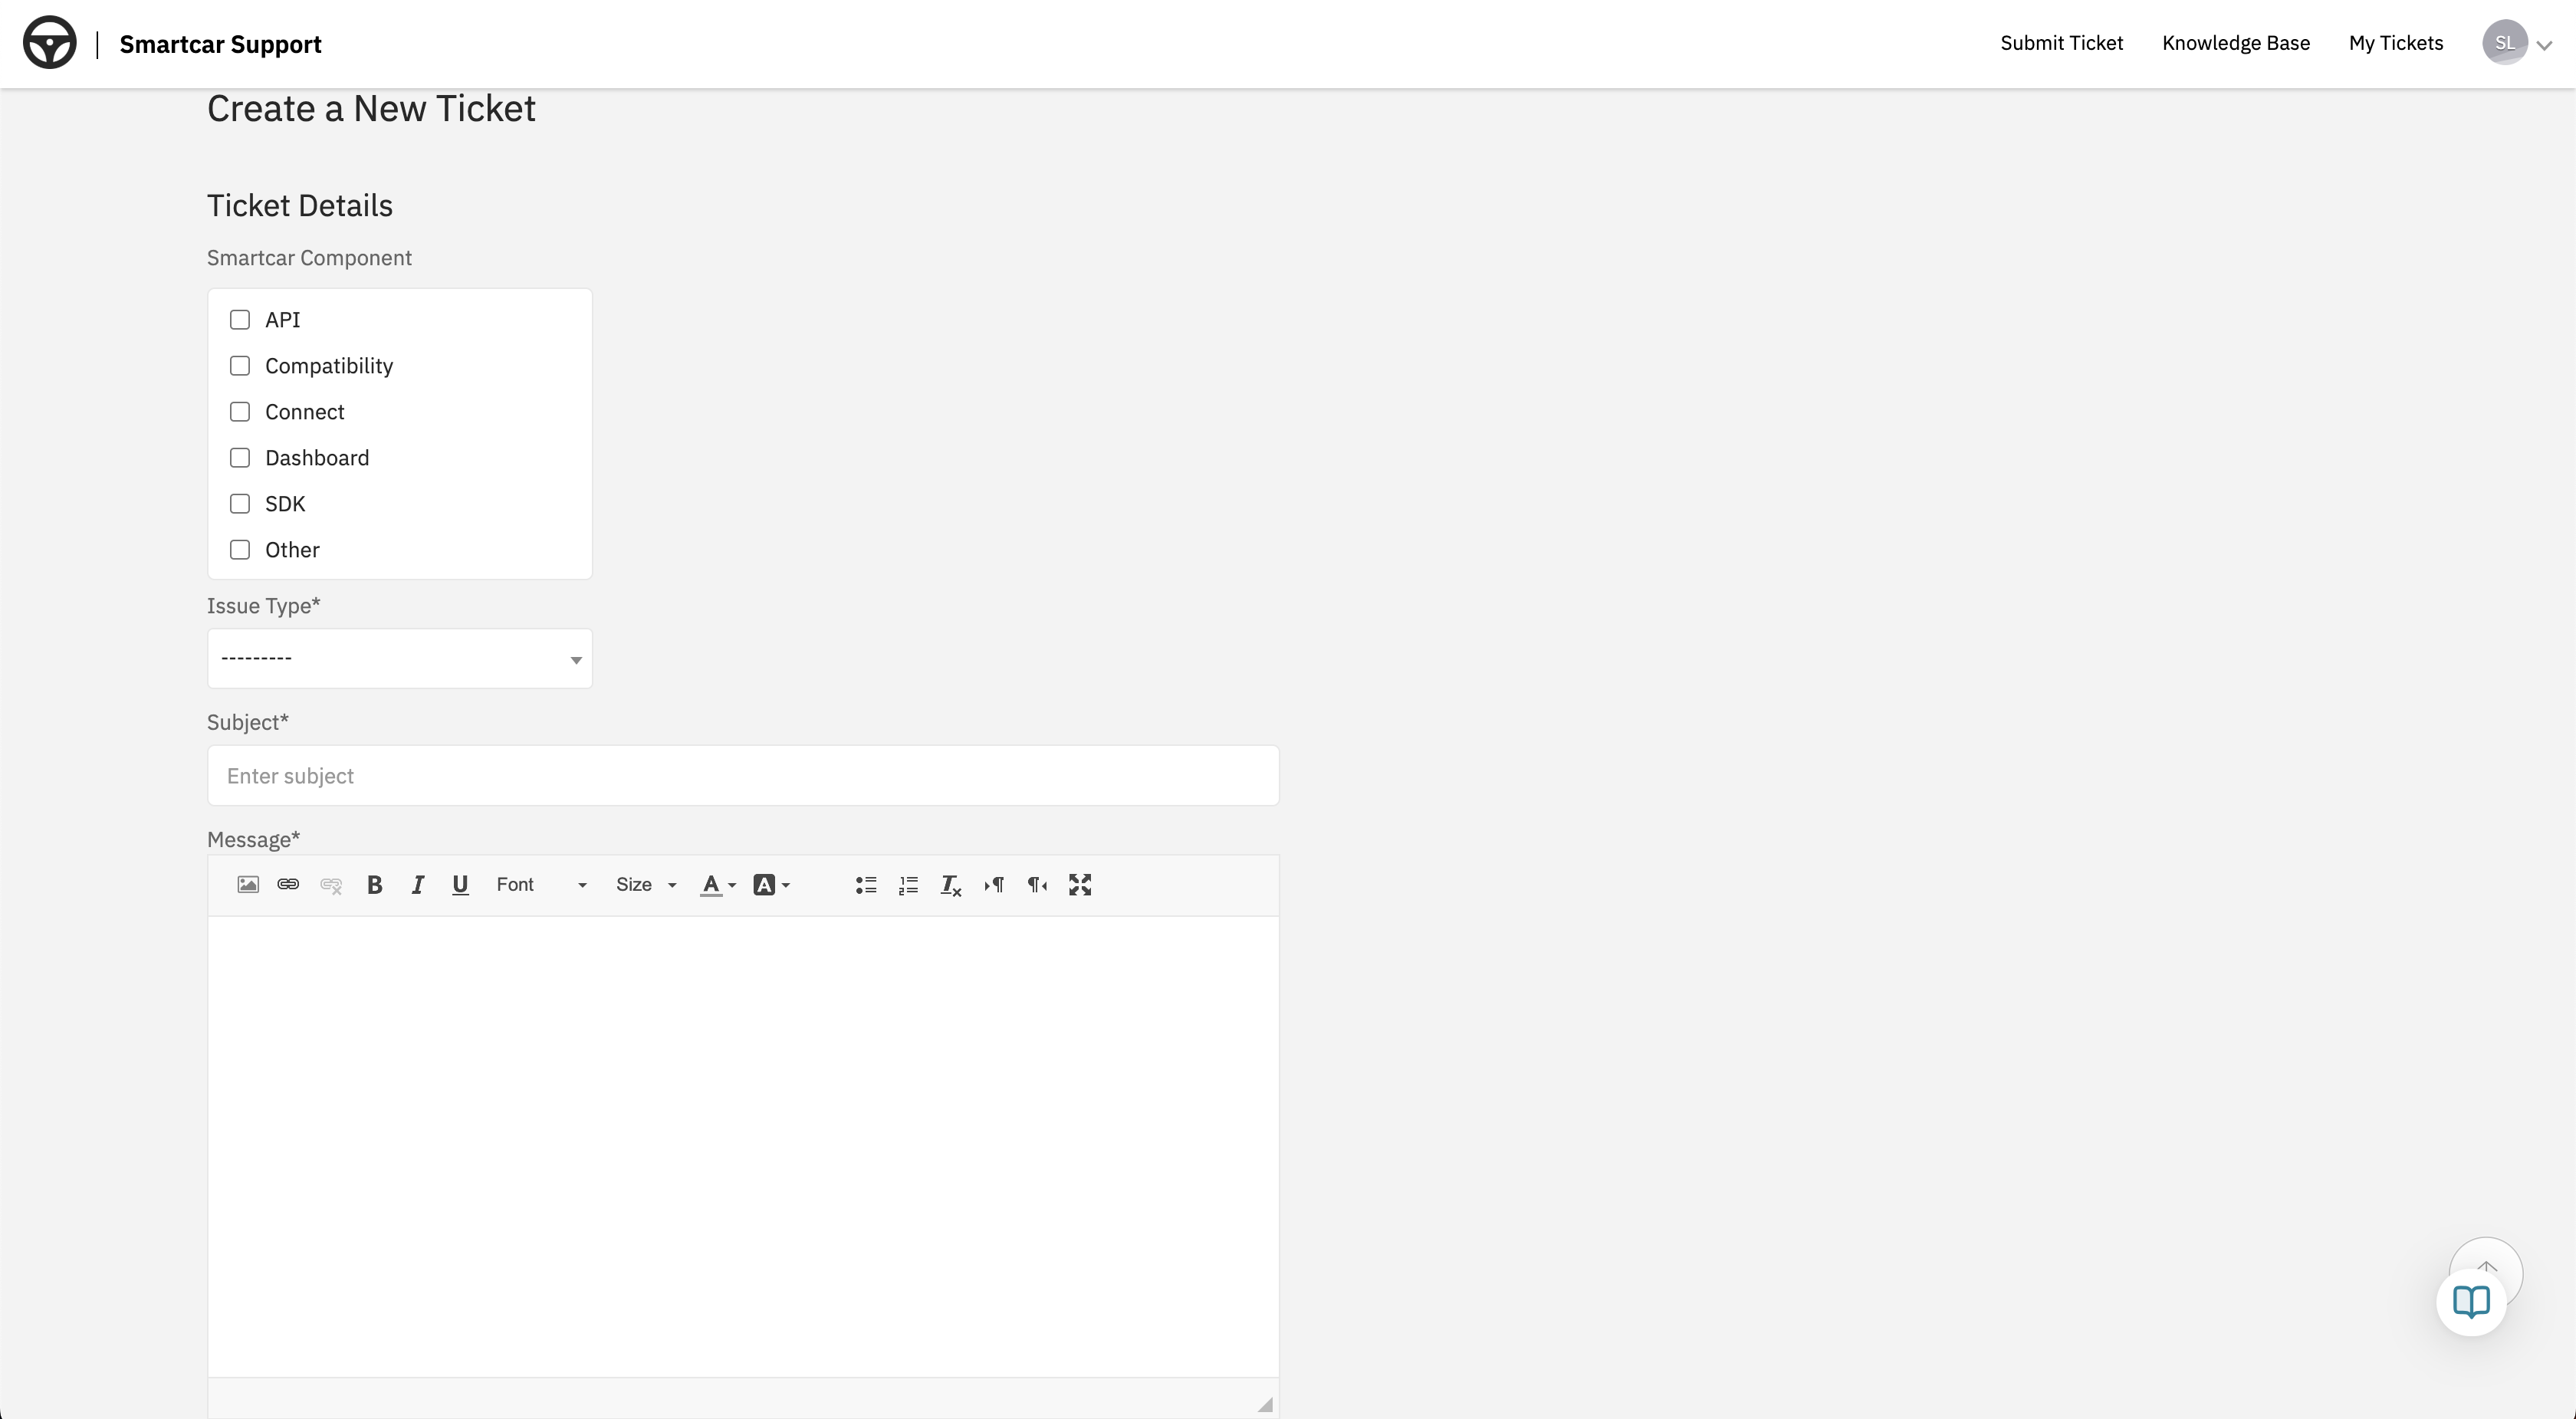 **3. Submit Your Ticket**\
Click **Submit**, and your request will be sent to our Support team.
**4. Track Your Request**\
You can view and track the status of your tickets under **"My Tickets"** in the Support Center.
**3. Submit Your Ticket**\
Click **Submit**, and your request will be sent to our Support team.
**4. Track Your Request**\
You can view and track the status of your tickets under **"My Tickets"** in the Support Center. 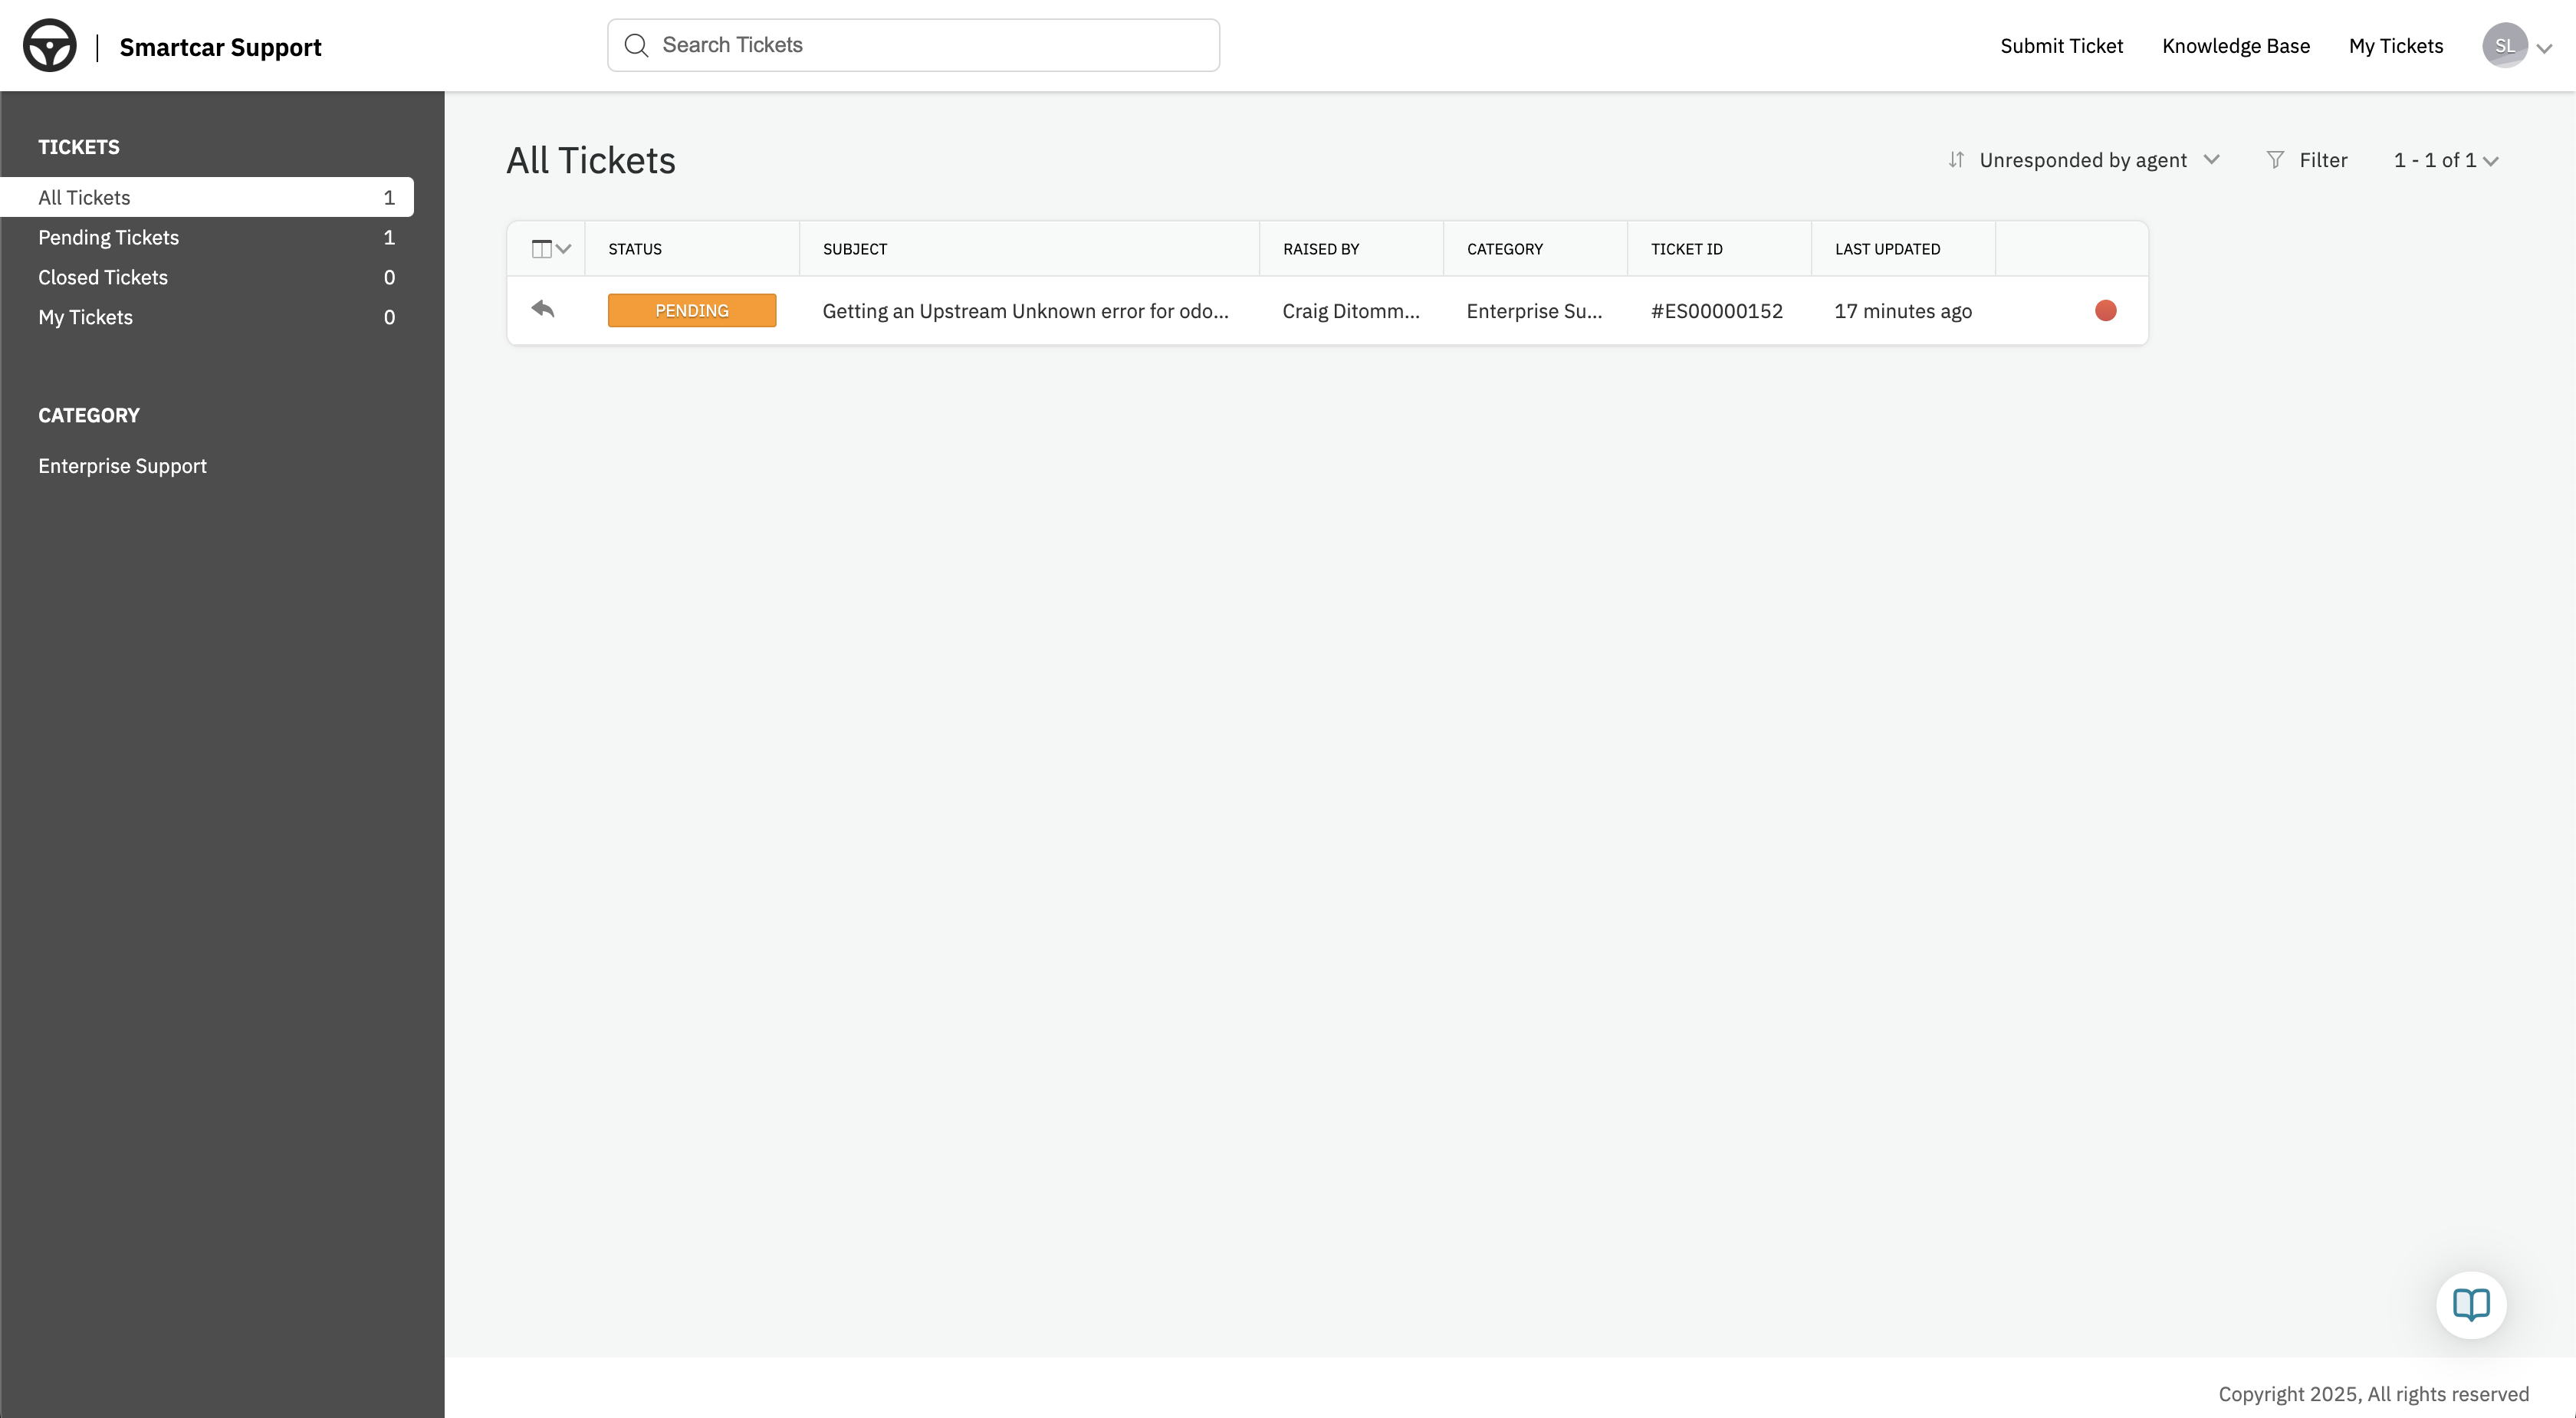 **5. Update or Close a Request**\
Select the ticket you'd like to update or close from the **"My Tickets"** view. Once you're on the ticket page:
* Click **"Reply"** at the bottom left to add more information or request a status update.
* Click **"Close Ticket"** at the bottom right to mark the request as **Closed - Resolved** if you no longer need assistance.
**5. Update or Close a Request**\
Select the ticket you'd like to update or close from the **"My Tickets"** view. Once you're on the ticket page:
* Click **"Reply"** at the bottom left to add more information or request a status update.
* Click **"Close Ticket"** at the bottom right to mark the request as **Closed - Resolved** if you no longer need assistance. 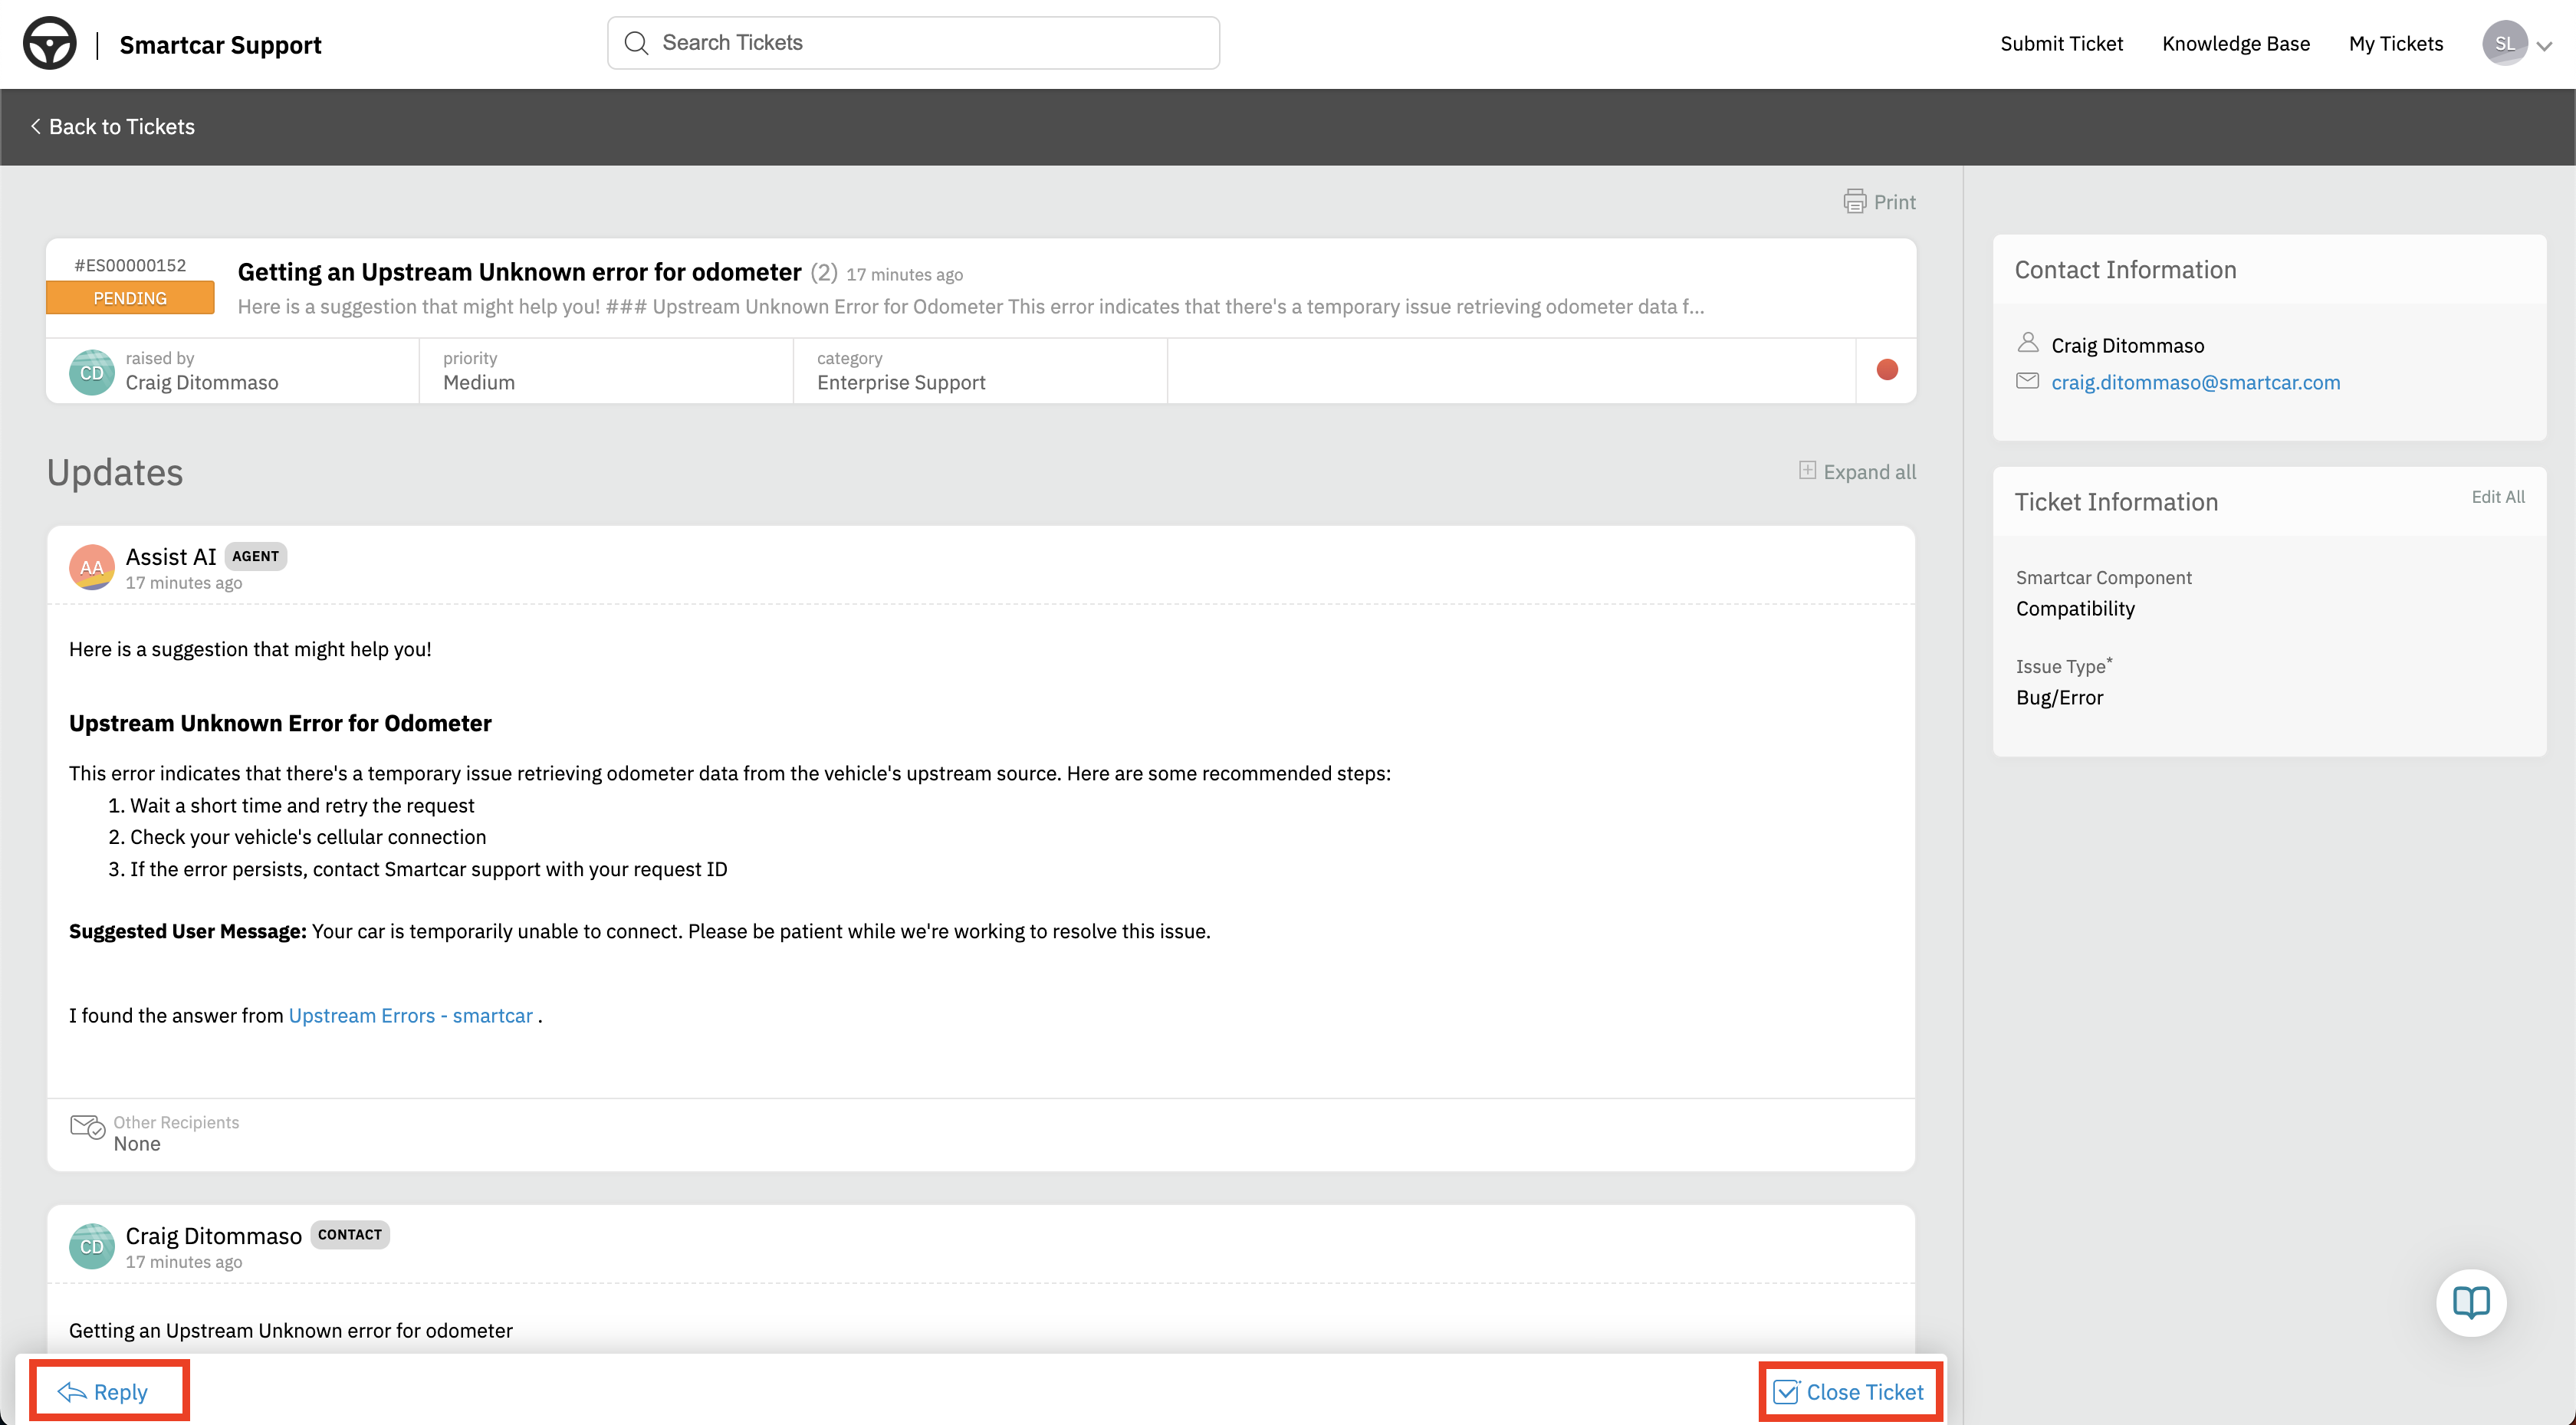 ***
### **Who can submit tickets?**
Ticket submission is available to users on **Build** and **Custom** **Enterprise** plans.
**Free plan users** can access the Docs Center and AI Agent within the Dashboard for assistance but do not have access to submit tickets.
---
# Source: https://smartcar.com/docs/api-reference/signals/hvac.md
> ## Documentation Index
> Fetch the complete documentation index at: https://smartcar.com/docs/llms.txt
> Use this file to discover all available pages before exploring further.
# HVAC Signals
### Cabin Target Temperature
Signal code: `hvac-cabintargettemperature`
The target temperature set for the vehicle's cabin.
***
### **Who can submit tickets?**
Ticket submission is available to users on **Build** and **Custom** **Enterprise** plans.
**Free plan users** can access the Docs Center and AI Agent within the Dashboard for assistance but do not have access to submit tickets.
---
# Source: https://smartcar.com/docs/api-reference/signals/hvac.md
> ## Documentation Index
> Fetch the complete documentation index at: https://smartcar.com/docs/llms.txt
> Use this file to discover all available pages before exploring further.
# HVAC Signals
### Cabin Target Temperature
Signal code: `hvac-cabintargettemperature`
The target temperature set for the vehicle's cabin.
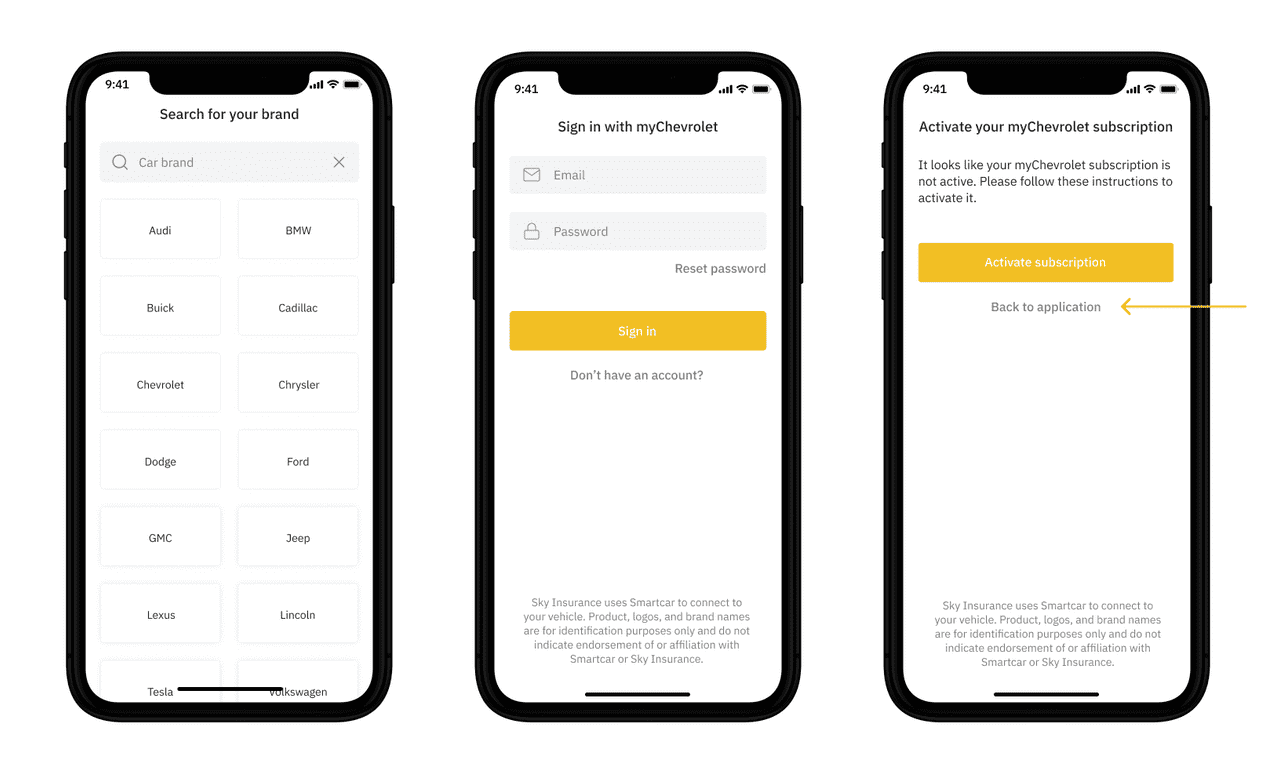 ## Testing
To test this error, launch Smartcar Connect in test mode and log in with the email [smartcar@invalid-subscription.com](mailto:smartcar@invalid-subscription.com) and any password. If you use Single Select, please see the table below for a simulated VIN.
| Email | VIN |
| ----------------------------------------------------------------------------- | ----------------- |
| [smartcar@invalid-subscription.com](mailto:smartcar@invalid-subscription.com) | 0SCAUDI0155C49A95 |
In the event of an `AUTHENTICATION_FAILED`, the user will need to be prompted to re-connect their vehicle. Smartcar Connect Re-authentication makes the process of re-authenticating a user much more seamless. In addition, the `AUTHENTICATION_FAILED` error provides a partially constructed URL for the re-authentication flow inside the resolution object.
---
# Source: https://smartcar.com/docs/getting-started/tutorials/ios.md
> ## Documentation Index
> Fetch the complete documentation index at: https://smartcar.com/docs/llms.txt
> Use this file to discover all available pages before exploring further.
# iOS Tutorial
> In this tutorial, we will use the iOS SDK to integrate Connect into your application.
## Testing
To test this error, launch Smartcar Connect in test mode and log in with the email [smartcar@invalid-subscription.com](mailto:smartcar@invalid-subscription.com) and any password. If you use Single Select, please see the table below for a simulated VIN.
| Email | VIN |
| ----------------------------------------------------------------------------- | ----------------- |
| [smartcar@invalid-subscription.com](mailto:smartcar@invalid-subscription.com) | 0SCAUDI0155C49A95 |
In the event of an `AUTHENTICATION_FAILED`, the user will need to be prompted to re-connect their vehicle. Smartcar Connect Re-authentication makes the process of re-authenticating a user much more seamless. In addition, the `AUTHENTICATION_FAILED` error provides a partially constructed URL for the re-authentication flow inside the resolution object.
---
# Source: https://smartcar.com/docs/getting-started/tutorials/ios.md
> ## Documentation Index
> Fetch the complete documentation index at: https://smartcar.com/docs/llms.txt
> Use this file to discover all available pages before exploring further.
# iOS Tutorial
> In this tutorial, we will use the iOS SDK to integrate Connect into your application.


 Smartcar is excited to announce a partnership with Volvo Cars, providing access to vehicles across the United States and Europe.
**What's new:**
* Access charging, battery, location, and odometer data through Smartcar signals
* Use the updated consent flow through Volvo's official portal
Learn more in the [Volvo integration updates](/help/oem-integrations/volvo/whats-new).
Smartcar is excited to announce a partnership with Volvo Cars, providing access to vehicles across the United States and Europe.
**What's new:**
* Access charging, battery, location, and odometer data through Smartcar signals
* Use the updated consent flow through Volvo's official portal
Learn more in the [Volvo integration updates](/help/oem-integrations/volvo/whats-new).
 We're excited to announce that Mercedes-Benz is now available on Smartcar! Connect Mercedes-Benz electric vehicles (BEV and PHEV) to access vehicle data and enable smart charging capabilities.
**What's new:**
* Mercedes-Benz BEV and PHEV vehicles can now connect through Smartcar
* Enhanced connect flow with VIN verification for Mercedes vehicles
* Support for key vehicle data signals including battery level, charge status, and location
**Important notes:**
* Currently, only Battery Electric Vehicles (BEV) and Plug-in Hybrid Electric Vehicles (PHEV) are supported with this integration.
* Need support for other Mercedes vehicle types? [Contact us](https://smartcar.com/contact) to discuss your requirements.
Check out the [Mercedes-Benz integration guide](/help/oem-integrations/mercedes/whats-new) for more details.
We're excited to announce that Mercedes-Benz is now available on Smartcar! Connect Mercedes-Benz electric vehicles (BEV and PHEV) to access vehicle data and enable smart charging capabilities.
**What's new:**
* Mercedes-Benz BEV and PHEV vehicles can now connect through Smartcar
* Enhanced connect flow with VIN verification for Mercedes vehicles
* Support for key vehicle data signals including battery level, charge status, and location
**Important notes:**
* Currently, only Battery Electric Vehicles (BEV) and Plug-in Hybrid Electric Vehicles (PHEV) are supported with this integration.
* Need support for other Mercedes vehicle types? [Contact us](https://smartcar.com/contact) to discuss your requirements.
Check out the [Mercedes-Benz integration guide](/help/oem-integrations/mercedes/whats-new) for more details.
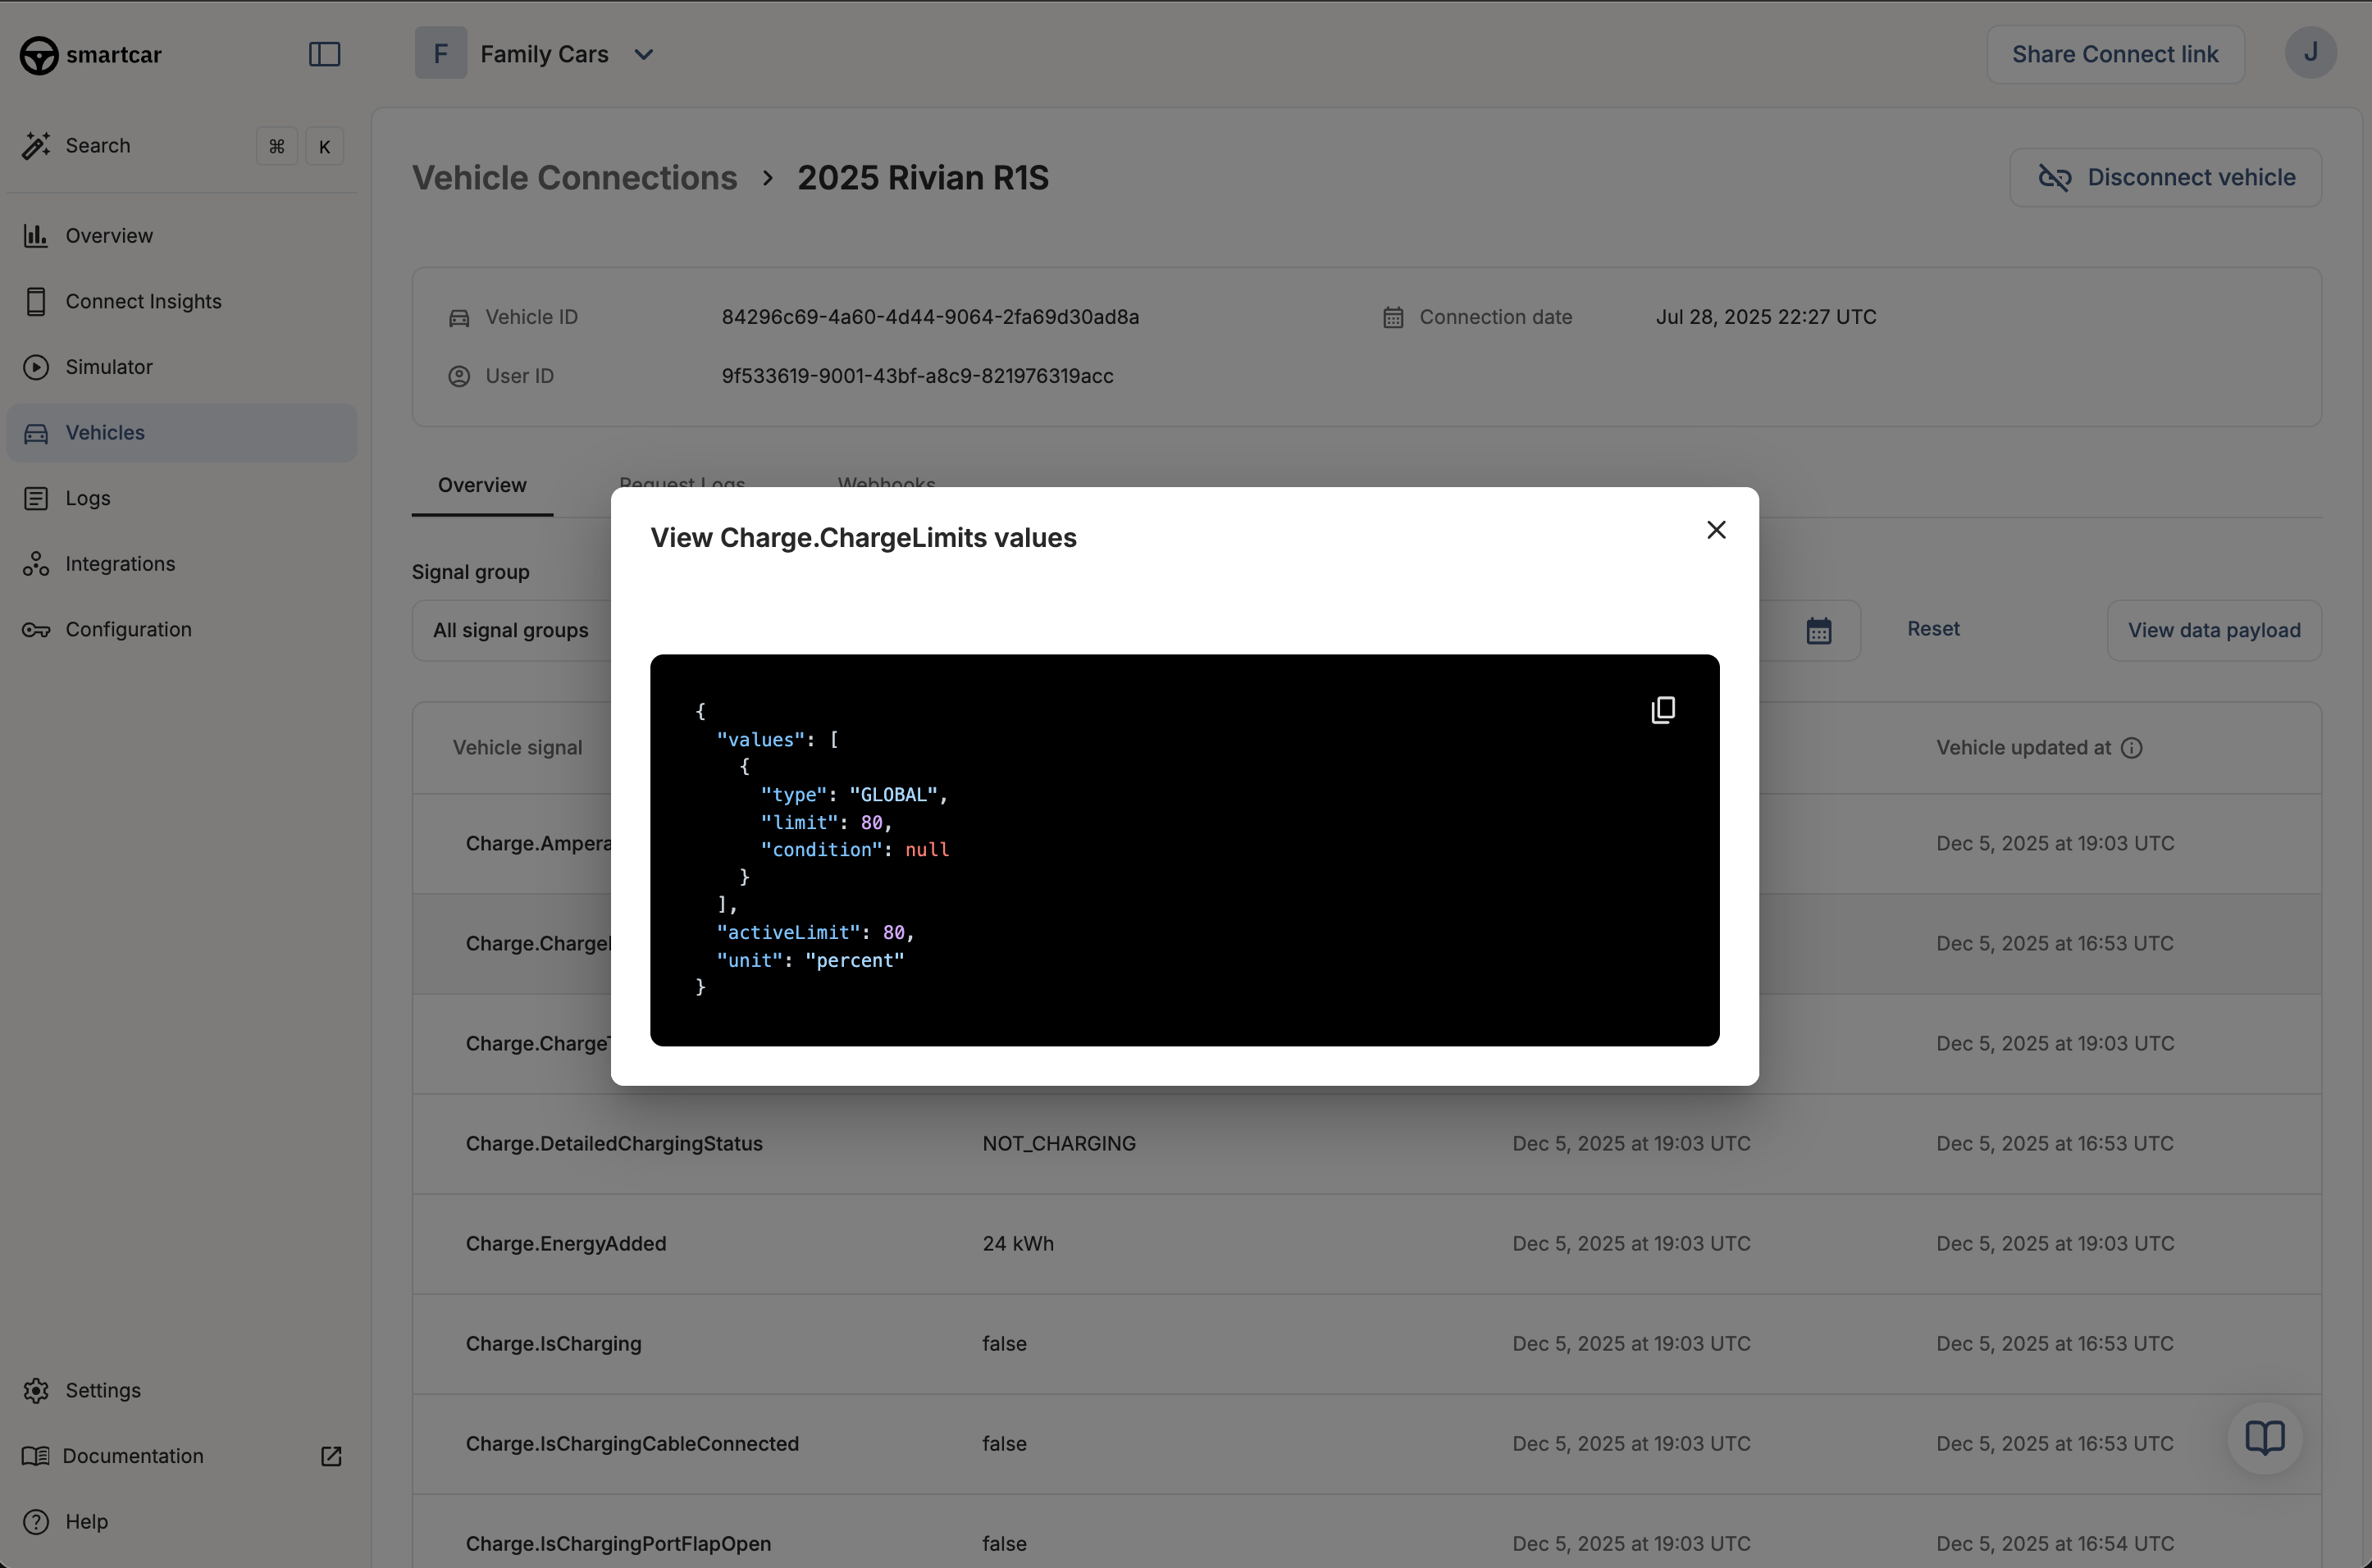 Vehicle data will be available in your Smartcar Dashboard. This feature is now rolling out to some customers and will be available to all customers over the next few weeks.
If you are interested in this feature or have any questions, please reach out to your Smartcar account manager or contact our support team.
Vehicle data will be available in your Smartcar Dashboard. This feature is now rolling out to some customers and will be available to all customers over the next few weeks.
If you are interested in this feature or have any questions, please reach out to your Smartcar account manager or contact our support team.
 We've partnered with BMW to bring their new Charging API to Europe, giving energy providers privacy-first access to BMW EVs for smart charging, grid optimization, and home energy management.
This integration is now available in select European markets. Reach out to your Smartcar team to enable BMW Charging for your app or learn more in the [partnership announcement](https://smartcar.com/blog/smartcar-and-bmw-partnership).
We've partnered with BMW to bring their new Charging API to Europe, giving energy providers privacy-first access to BMW EVs for smart charging, grid optimization, and home energy management.
This integration is now available in select European markets. Reach out to your Smartcar team to enable BMW Charging for your app or learn more in the [partnership announcement](https://smartcar.com/blog/smartcar-and-bmw-partnership).
 We're excited to bring compatibility for Polestar and BYD, expanding the number of brands on the platform to 45!
To enroll vehicles from these brands, make sure you have them enabled for your application in the [Dashboard](https://dashboard.smartcar.com/configuration?tab=oem-brands).
Once enabled, you can direct vehicle owners to connect their Polestar and BYD vehicles through the Smartcar Connect flow.
For a list of data points supported for these brands, see the [compatibility matrix](https://smartcar.com/product/compatible-vehicles).
See important note about [BYD's login requirement](/help/brand-quirks#byd).
We're excited to bring compatibility for Polestar and BYD, expanding the number of brands on the platform to 45!
To enroll vehicles from these brands, make sure you have them enabled for your application in the [Dashboard](https://dashboard.smartcar.com/configuration?tab=oem-brands).
Once enabled, you can direct vehicle owners to connect their Polestar and BYD vehicles through the Smartcar Connect flow.
For a list of data points supported for these brands, see the [compatibility matrix](https://smartcar.com/product/compatible-vehicles).
See important note about [BYD's login requirement](/help/brand-quirks#byd).
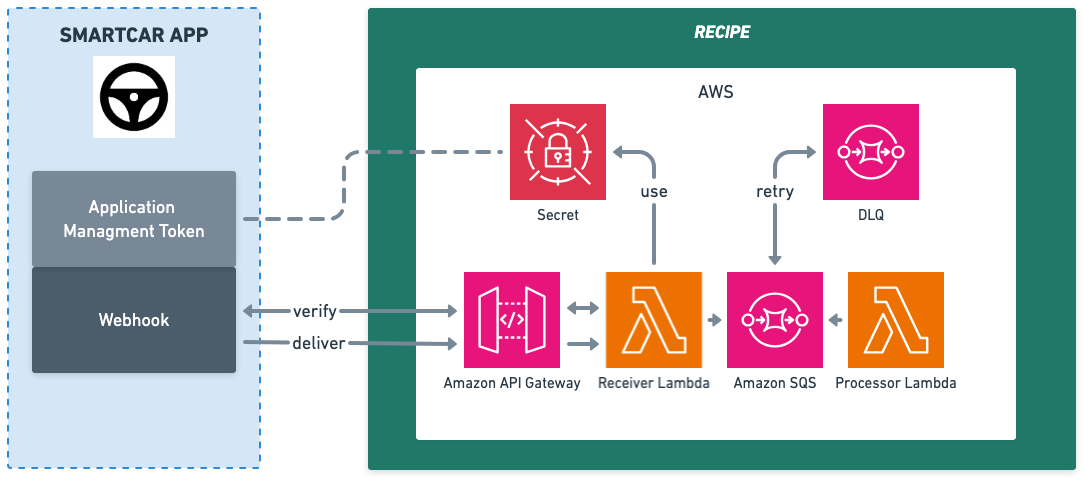 Deploy production-ready webhook receivers in minutes with our new [TypeScript Webhook Recipe](https://github.com/smartcar/typescript-webhook-recipe)! This AWS serverless template provides everything you need to handle Smartcar webhooks at scale:
* **Complete Infrastructure**: Lambda + API Gateway + SQS with AWS CDK
* **Built-in Validation**: Automatic webhook verification and payload validation
* **Error Handling**: Dead letter queues and retry logic for reliability
* **Production Ready**: CloudWatch monitoring, IAM security, and auto-scaling
* **Developer Friendly**: TypeScript types and comprehensive documentation
The recipe eliminates the complexity of building webhook infrastructure from scratch, letting you focus on your business logic. Perfect for new webhook implementations or teams wanting to deploy quickly without infrastructure overhead.
**Get started**: [Webhook Receiver Recipe Documentation](/getting-started/tutorials/webhook-receiver-recipe) | [GitHub Repository](https://github.com/smartcar/typescript-webhook-recipe)
Deploy production-ready webhook receivers in minutes with our new [TypeScript Webhook Recipe](https://github.com/smartcar/typescript-webhook-recipe)! This AWS serverless template provides everything you need to handle Smartcar webhooks at scale:
* **Complete Infrastructure**: Lambda + API Gateway + SQS with AWS CDK
* **Built-in Validation**: Automatic webhook verification and payload validation
* **Error Handling**: Dead letter queues and retry logic for reliability
* **Production Ready**: CloudWatch monitoring, IAM security, and auto-scaling
* **Developer Friendly**: TypeScript types and comprehensive documentation
The recipe eliminates the complexity of building webhook infrastructure from scratch, letting you focus on your business logic. Perfect for new webhook implementations or teams wanting to deploy quickly without infrastructure overhead.
**Get started**: [Webhook Receiver Recipe Documentation](/getting-started/tutorials/webhook-receiver-recipe) | [GitHub Repository](https://github.com/smartcar/typescript-webhook-recipe)
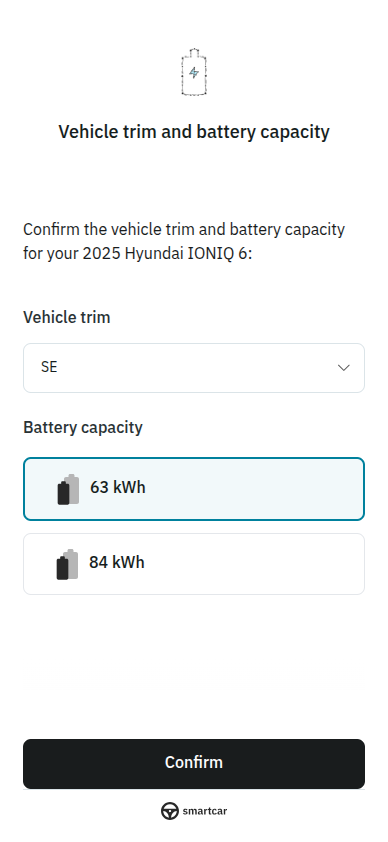 When you request the `read_battery` permission and Smartcar detects multiple possible battery capacity matches for a vehicle, users will now be automatically prompted to select their battery capacity during the Connect flow.
This streamlined experience eliminates the need for developers to prompt users or source the battery capacity selection from other sources. This step ensures that battery capacity data is available immediately after vehicle connection if Smartcar is not able to identify it.
Read more about the [User Selected Battery Capacity](/connect/user-selected-batcap).
When you request the `read_battery` permission and Smartcar detects multiple possible battery capacity matches for a vehicle, users will now be automatically prompted to select their battery capacity during the Connect flow.
This streamlined experience eliminates the need for developers to prompt users or source the battery capacity selection from other sources. This step ensures that battery capacity data is available immediately after vehicle connection if Smartcar is not able to identify it.
Read more about the [User Selected Battery Capacity](/connect/user-selected-batcap).
 We are excited to announce the launch of the new Smartcar Platform, designed to provide a more reliable and efficient way to access vehicle data. With our new [webhook integration](/integrations/webhooks/overview) and [API](/api-reference/intro), developers can now receive vehicle data at higher frequencies and with improved reliability.
For all use cases, Smartcar can deliver data as it detects changes based on our new standardized Signal Schema while avoiding unnecessary polling. With over 80 signals available, developers can access a wide range of vehicle data to build innovative applications.
Getting started with Smartcar is now even easier. [Configure](/getting-started/configure-application) your app, [Connect](/getting-started/connect-vehicles) vehicles, and start receiving data via [webhooks](/integrations/webhooks/overview) in just a few minutes.
To get started with the new webhooks, check out our [Getting Started guide](/getting-started/introduction) and [Webhook integration overview](/integrations/webhooks/overview).
These new features are now available to all new customers. Existing customers can reach out to their account manager or contact our support team at [support@smartcar.com](mailto:support@smartcar.com)
We are excited to announce the launch of the new Smartcar Platform, designed to provide a more reliable and efficient way to access vehicle data. With our new [webhook integration](/integrations/webhooks/overview) and [API](/api-reference/intro), developers can now receive vehicle data at higher frequencies and with improved reliability.
For all use cases, Smartcar can deliver data as it detects changes based on our new standardized Signal Schema while avoiding unnecessary polling. With over 80 signals available, developers can access a wide range of vehicle data to build innovative applications.
Getting started with Smartcar is now even easier. [Configure](/getting-started/configure-application) your app, [Connect](/getting-started/connect-vehicles) vehicles, and start receiving data via [webhooks](/integrations/webhooks/overview) in just a few minutes.
To get started with the new webhooks, check out our [Getting Started guide](/getting-started/introduction) and [Webhook integration overview](/integrations/webhooks/overview).
These new features are now available to all new customers. Existing customers can reach out to their account manager or contact our support team at [support@smartcar.com](mailto:support@smartcar.com)
 Smartcar is thrilled to announce our partnership with Ford in Europe, enabling developers to access vehicle data from millions of Ford vehicles across the continent.
This upcoming integration will give developers seamless access to vehicle data from models including the Mustang Mach‑E®, E‑Transit™, Puma, Fiesta, and Kuga.
Read more about this exciting partnership in our [blog post](https://smartcar.com/blog/smartcar-partners-with-ford-to-expand-access-to-connected-vehicle-apis?utm_source=docs\&utm_medium=changelog).
Smartcar is thrilled to announce our partnership with Ford in Europe, enabling developers to access vehicle data from millions of Ford vehicles across the continent.
This upcoming integration will give developers seamless access to vehicle data from models including the Mustang Mach‑E®, E‑Transit™, Puma, Fiesta, and Kuga.
Read more about this exciting partnership in our [blog post](https://smartcar.com/blog/smartcar-partners-with-ford-to-expand-access-to-connected-vehicle-apis?utm_source=docs\&utm_medium=changelog).
 You can now use the Smartcar API to send commands—such as lock, unlock, and start/stop charge—to Rivian vehicles!
When requesting command permissions (like `control_security` or `control_charge`), Rivian owners will be prompted to pair their phone with their vehicle. After successful pairing, your application will be able to issue commands to the connected Rivian.
For step-by-step instructions, see our [Rivian Bluetooth Pairing guide](/connect/other-actions/rivian-bluetooth-pairing).
> **Note:** Read data permissions (such as `read_location` or `read_charge`) do not require Bluetooth pairing.
>
> Smartcar mobile SDKs for iOS and Android are required for Bluetooth pairing.
You can now use the Smartcar API to send commands—such as lock, unlock, and start/stop charge—to Rivian vehicles!
When requesting command permissions (like `control_security` or `control_charge`), Rivian owners will be prompted to pair their phone with their vehicle. After successful pairing, your application will be able to issue commands to the connected Rivian.
For step-by-step instructions, see our [Rivian Bluetooth Pairing guide](/connect/other-actions/rivian-bluetooth-pairing).
> **Note:** Read data permissions (such as `read_location` or `read_charge`) do not require Bluetooth pairing.
>
> Smartcar mobile SDKs for iOS and Android are required for Bluetooth pairing.
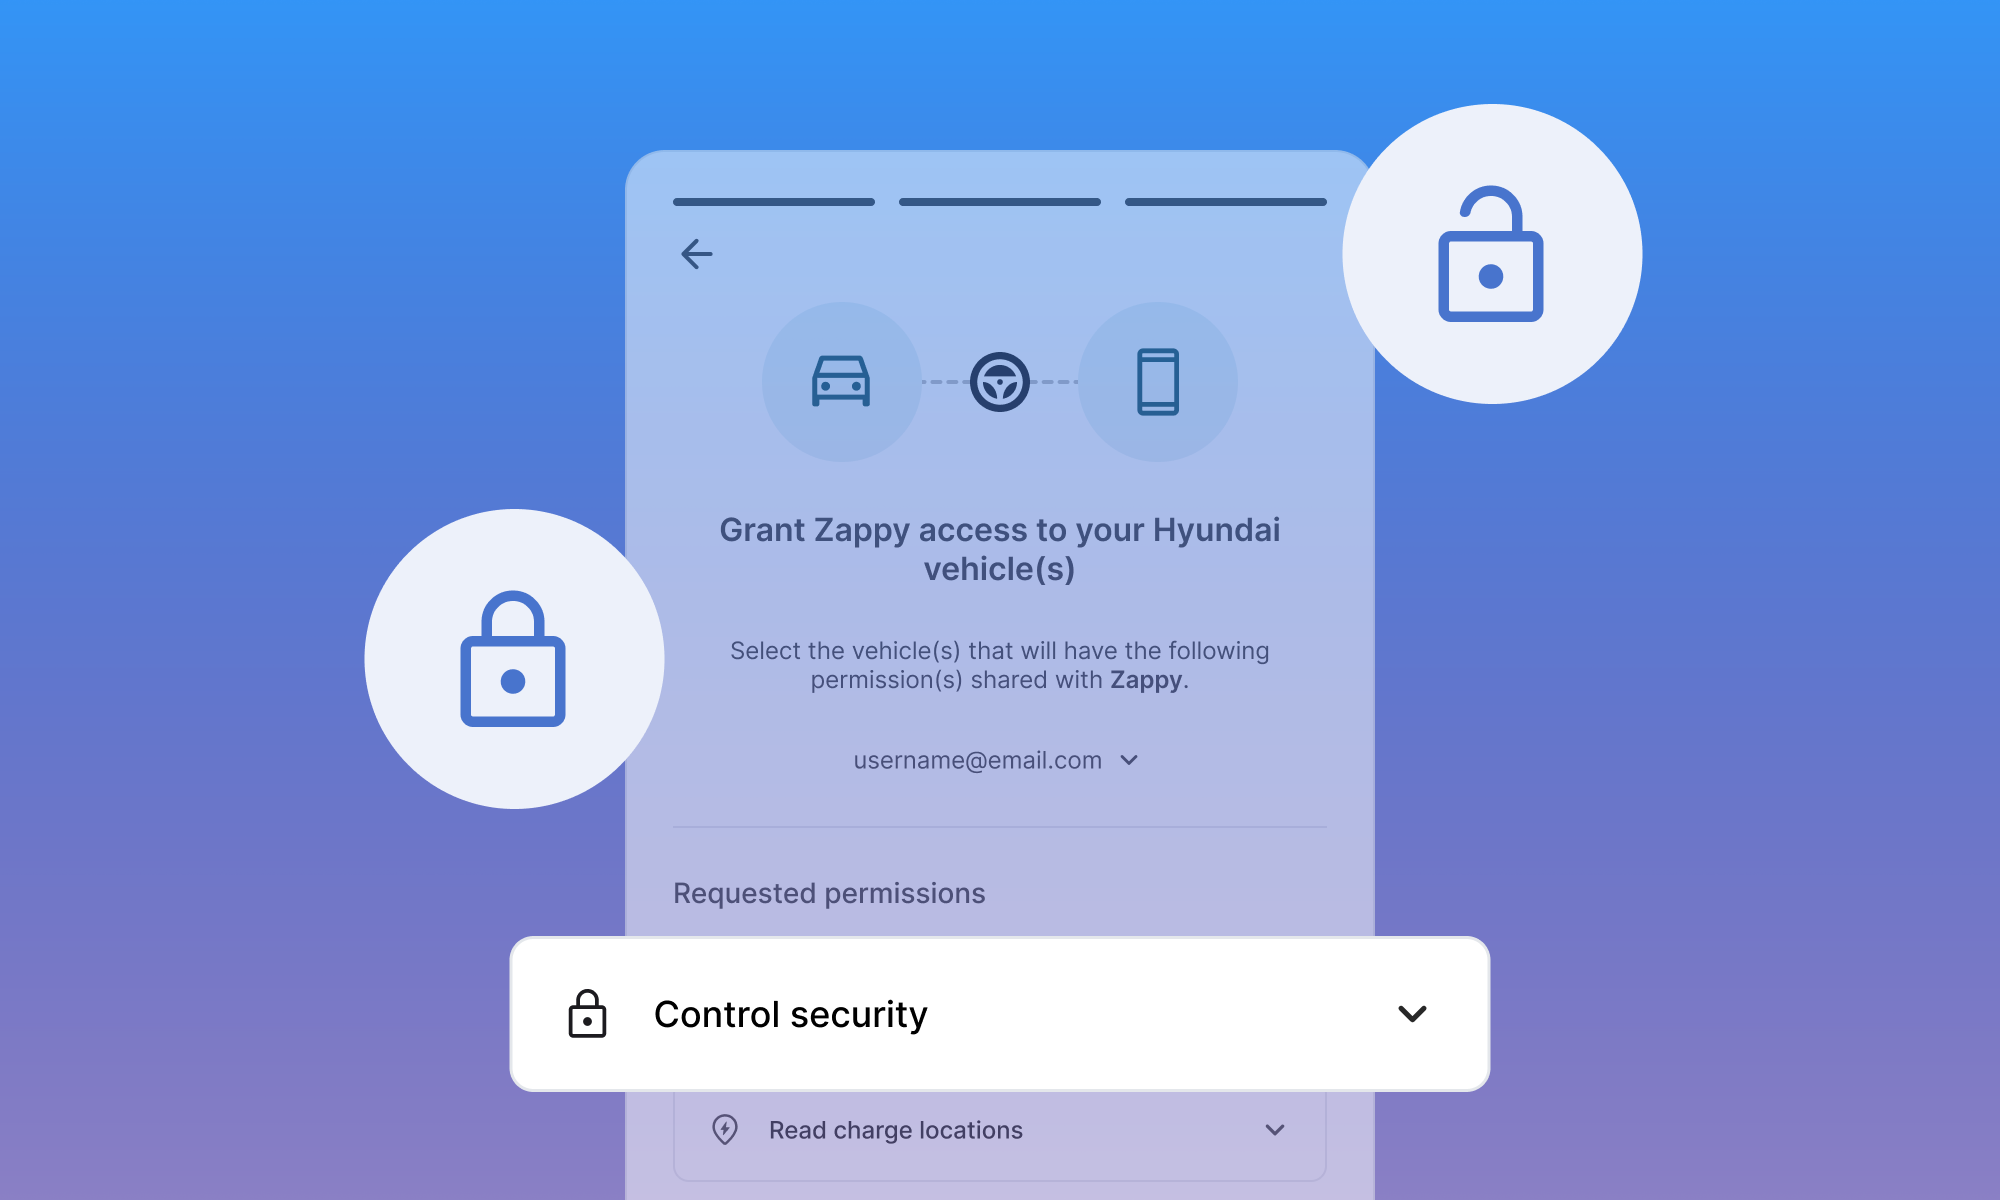 You can now lock and unlock Hyundai vehicles using the same standard Smartcar API. This new feature enables remote control of vehicle doors for supported Hyundai models, making it easier to build secure and convenient experiences for your users.
For more details on how to use this capability, see our [API reference](/api-reference/control-lock-unlock).
## Webhook Logs Now Available in Dashboard
You can now view logs for your webhooks directly in the Smartcar Dashboard, alongside your API request logs. This update gives you greater visibility into webhook deliveries, making it easier to monitor, debug, and ensure successful integrations.
To see your webhook logs in action, head over to the [Smartcar Dashboard](https://dashboard.smartcar.com/logs?tab=webhooks).
You can now lock and unlock Hyundai vehicles using the same standard Smartcar API. This new feature enables remote control of vehicle doors for supported Hyundai models, making it easier to build secure and convenient experiences for your users.
For more details on how to use this capability, see our [API reference](/api-reference/control-lock-unlock).
## Webhook Logs Now Available in Dashboard
You can now view logs for your webhooks directly in the Smartcar Dashboard, alongside your API request logs. This update gives you greater visibility into webhook deliveries, making it easier to monitor, debug, and ensure successful integrations.
To see your webhook logs in action, head over to the [Smartcar Dashboard](https://dashboard.smartcar.com/logs?tab=webhooks).
 Our new Dashboard overview page offers a comprehensive snapshot of your application's performance at a glance. Now, you can quickly visualize:
* Total vehicle connections
* New connections in the last 7 days
* Request trends over time
* Conversion rates
* Top five vehicle brands connected to your application
This update is designed to help you monitor key metrics effortlessly.
Our new Dashboard overview page offers a comprehensive snapshot of your application's performance at a glance. Now, you can quickly visualize:
* Total vehicle connections
* New connections in the last 7 days
* Request trends over time
* Conversion rates
* Top five vehicle brands connected to your application
This update is designed to help you monitor key metrics effortlessly.
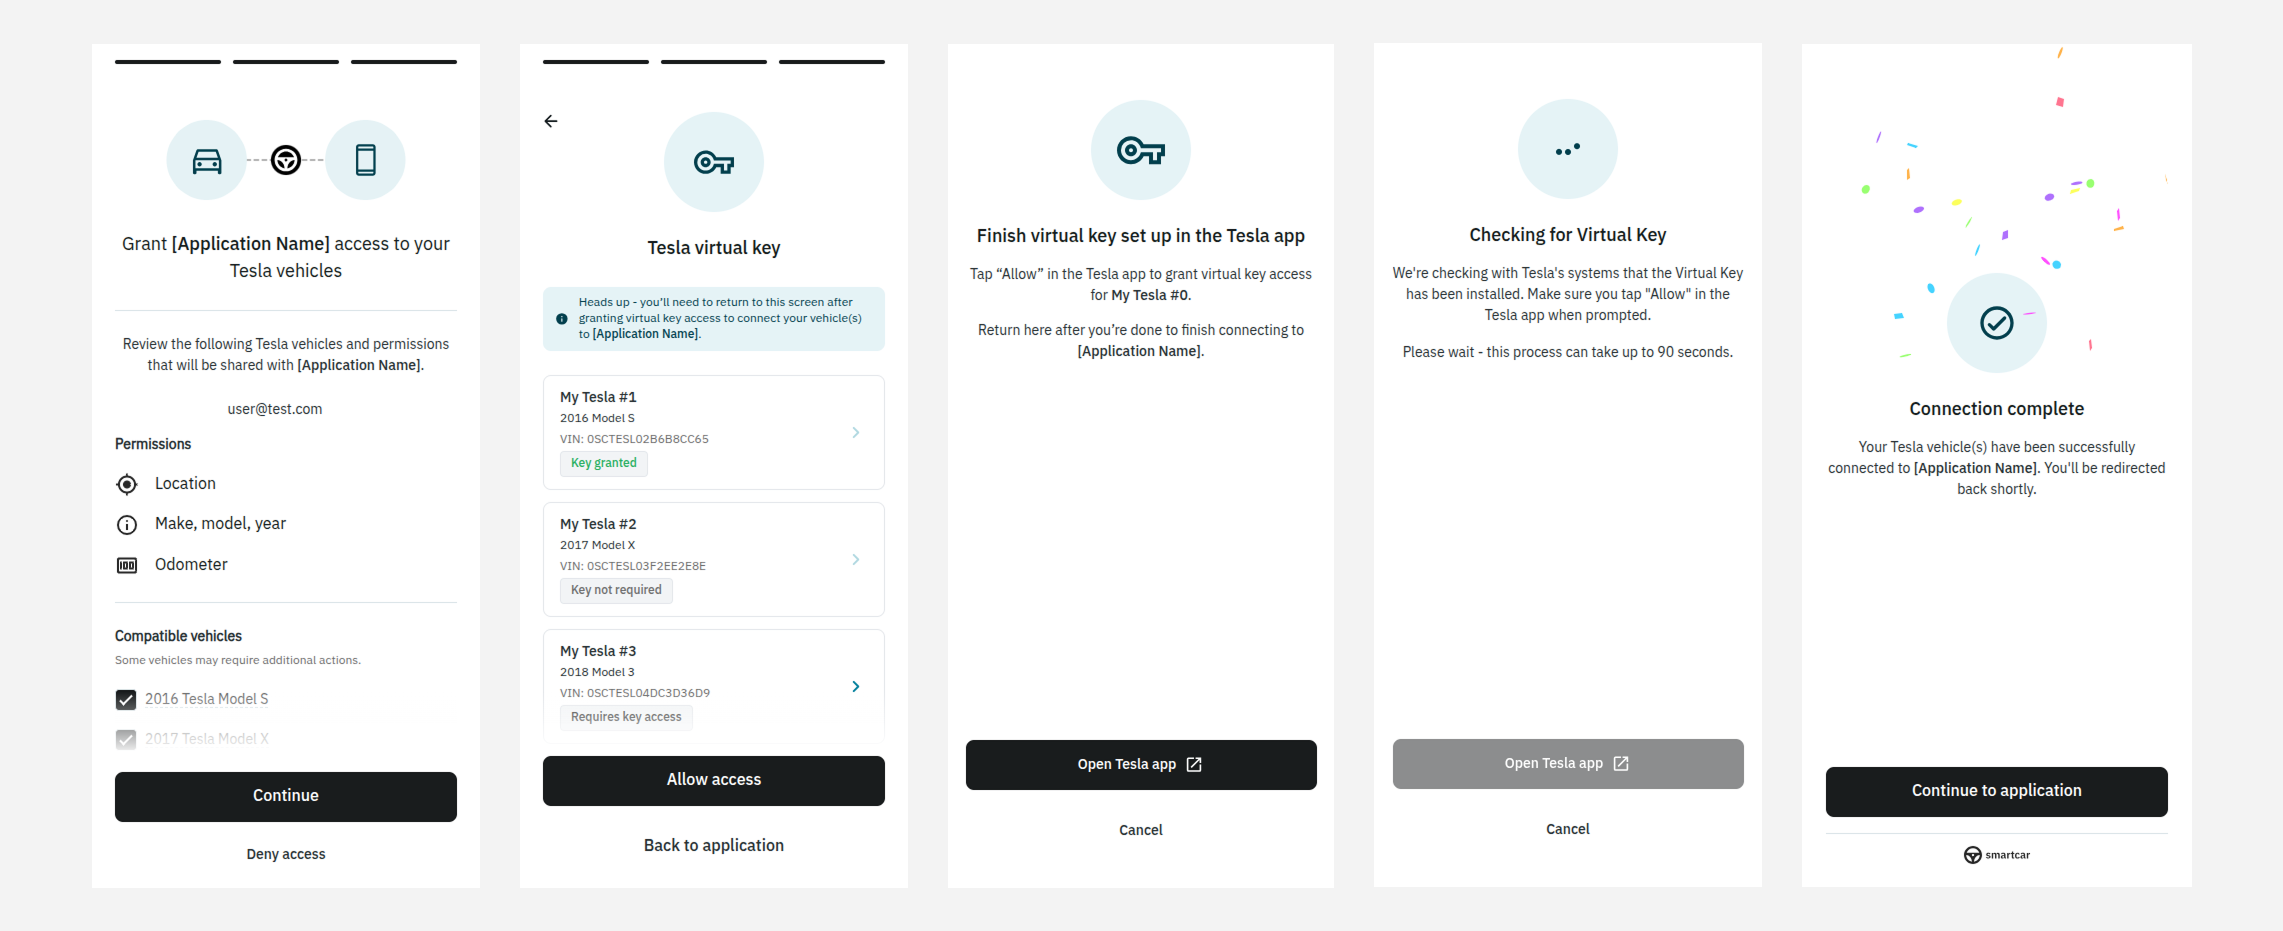 For more details, visit the [Virtual Key documentation](/help/oem-integrations/tesla/virtual-key-tesla).
 Smartcar now supports a new vehicle signal `atHome` that returns true or false if a vehicle is at the configured home location. This signal is currently available for Tesla vehicles capable of streaming via [this endpoint](/api-reference/tesla/get-ext-vehicle-info).
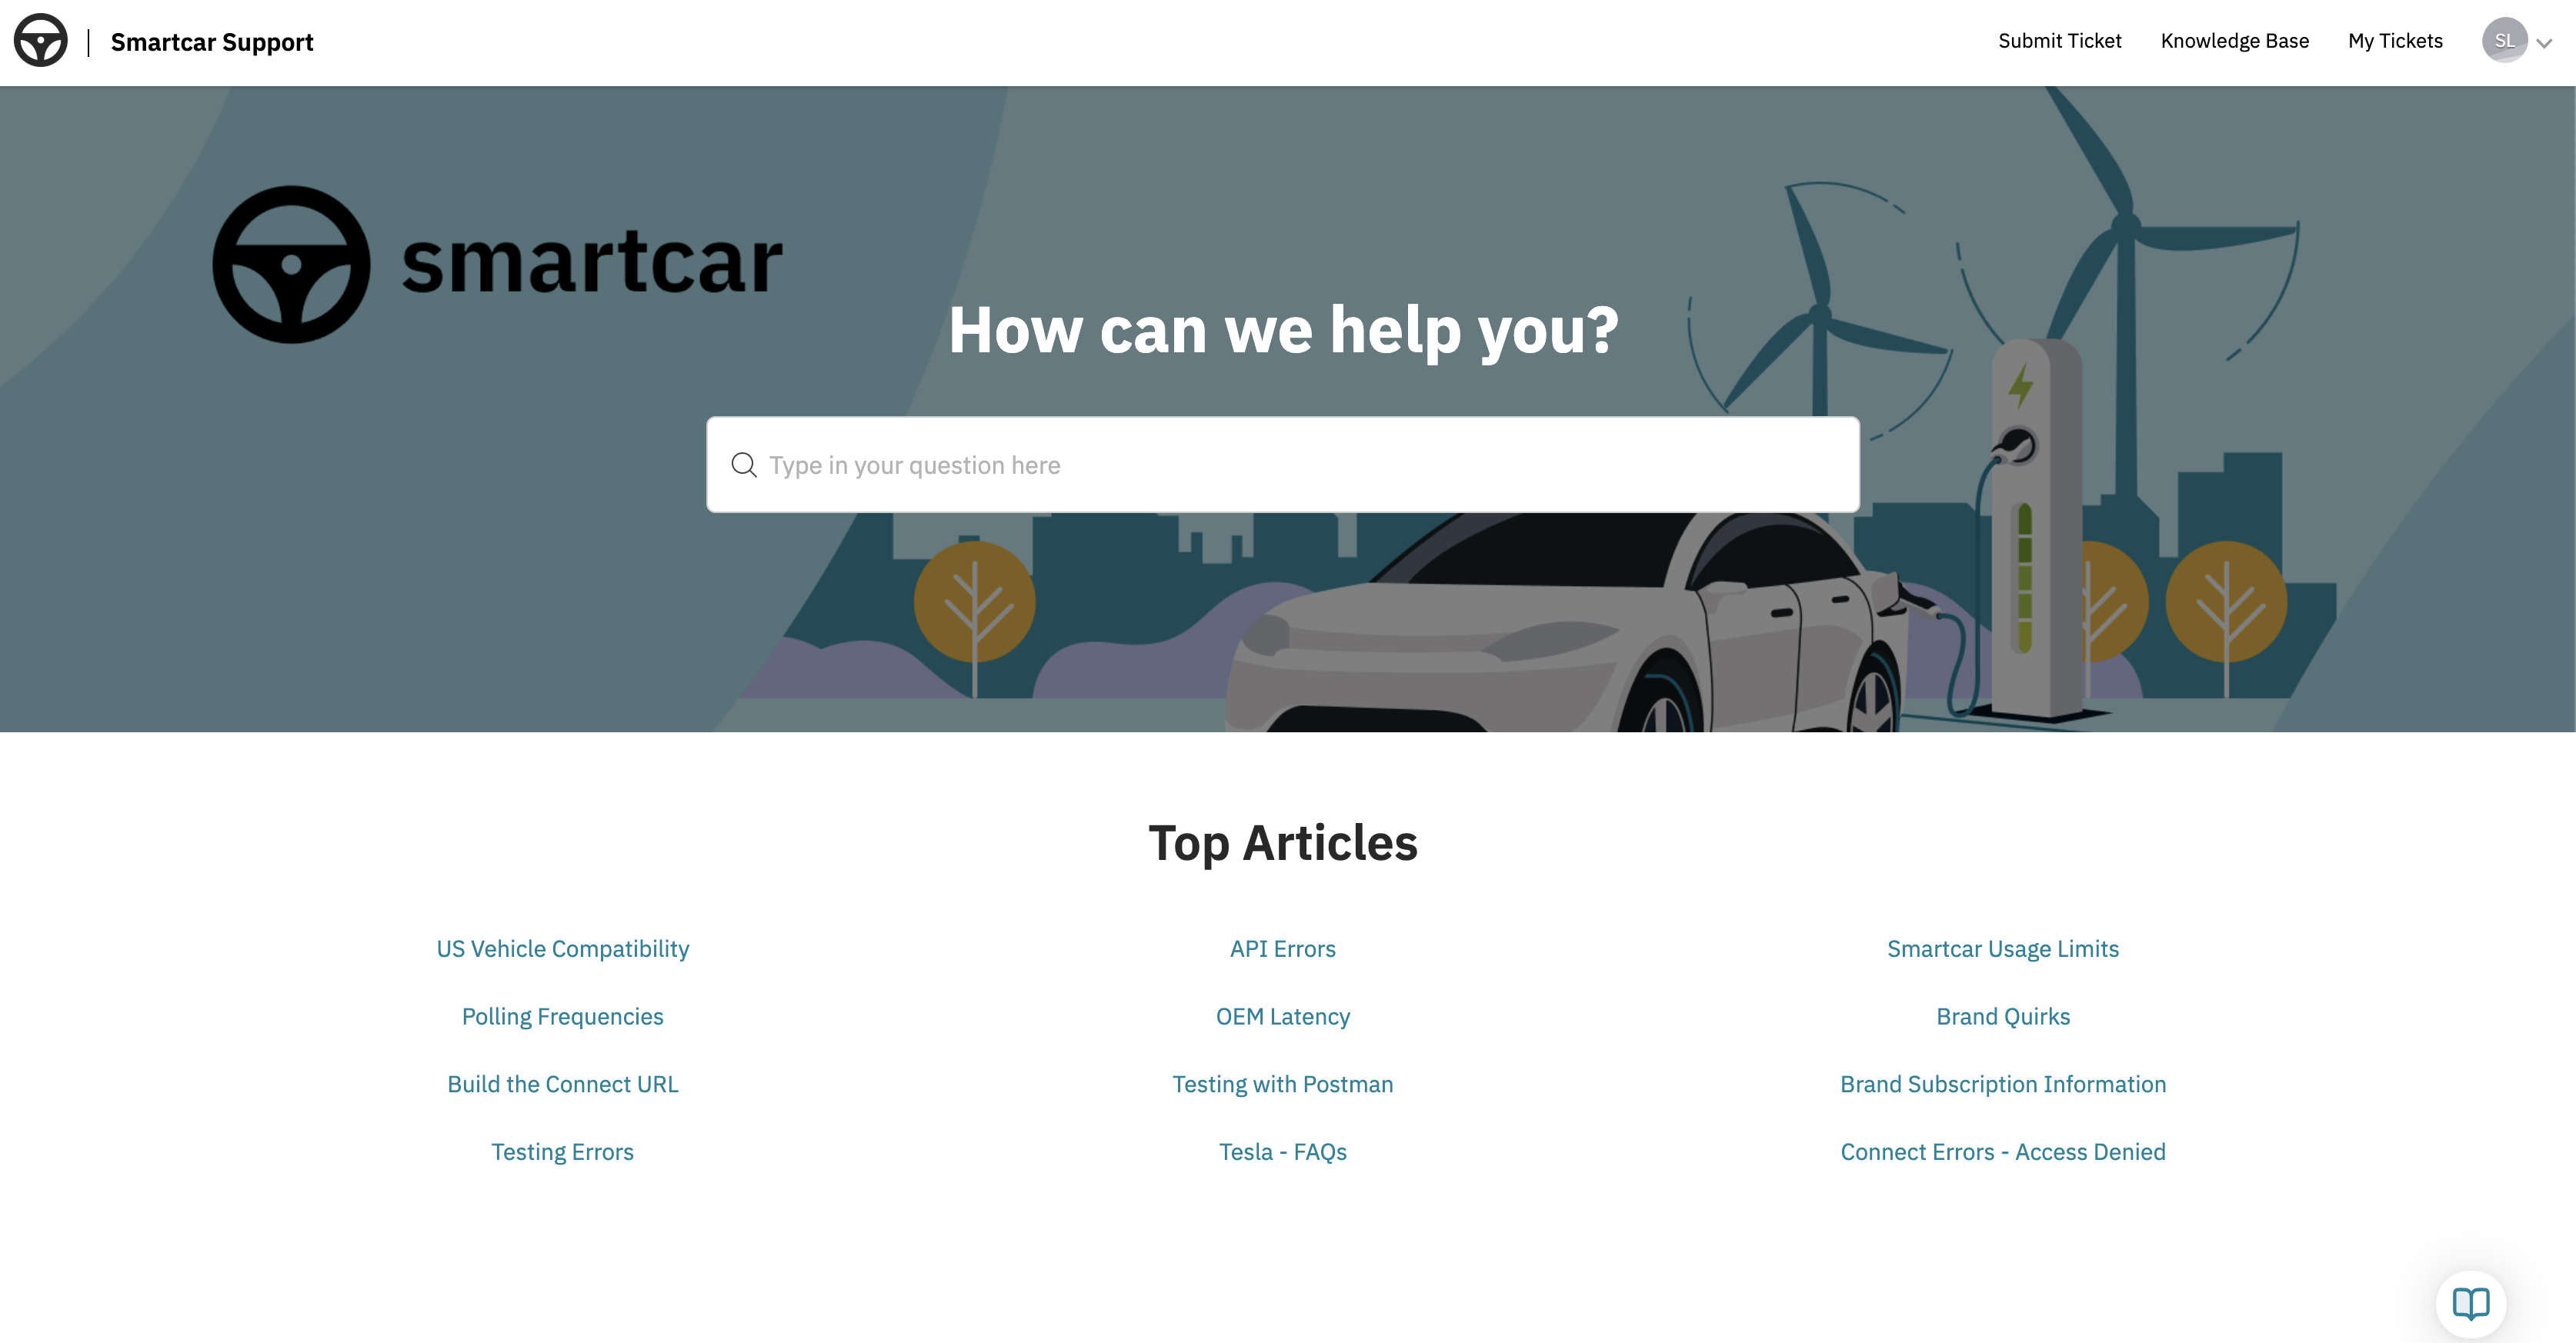 We’re excited to share that our new support experience is now available. These updates are designed to make it easier and faster to get the help you need through self-service tools, AI-powered assistance, and improved visibility into your support history.
**Customer Support Portal** *(Available to paid customers via the Smartcar Dashboard)*
Your new central hub for all support-related needs:
* Browse the **Knowledge Base** for helpful articles, guides, and troubleshooting tips
* Submit new support requests through a user-friendly form
* View and update **open tickets**, track past communications, and receive timely updates
* Get help fast with our **AI-powered chat agent**, available 24/7
**Enhanced Slack Support** *(For eligible plans)*
Our upgraded Slack support includes:
* AI-powered answers to common questions directly in your Slack channel
* Ability to create and track support tickets without leaving Slack
* One-click access to the Customer Support Portal
* Real-time updates and faster response workflows
For more information about what’s included in your current plan, please reach out to your account manager or contact us at [**support@smartcar.com**](mailto:support@smartcar.com).
For step-by-step instructions on how to use the new features, check out our documentation [here](https://smartcar.com/docs/help/accessing-support-center).
We’re excited to share that our new support experience is now available. These updates are designed to make it easier and faster to get the help you need through self-service tools, AI-powered assistance, and improved visibility into your support history.
**Customer Support Portal** *(Available to paid customers via the Smartcar Dashboard)*
Your new central hub for all support-related needs:
* Browse the **Knowledge Base** for helpful articles, guides, and troubleshooting tips
* Submit new support requests through a user-friendly form
* View and update **open tickets**, track past communications, and receive timely updates
* Get help fast with our **AI-powered chat agent**, available 24/7
**Enhanced Slack Support** *(For eligible plans)*
Our upgraded Slack support includes:
* AI-powered answers to common questions directly in your Slack channel
* Ability to create and track support tickets without leaving Slack
* One-click access to the Customer Support Portal
* Real-time updates and faster response workflows
For more information about what’s included in your current plan, please reach out to your account manager or contact us at [**support@smartcar.com**](mailto:support@smartcar.com).
For step-by-step instructions on how to use the new features, check out our documentation [here](https://smartcar.com/docs/help/accessing-support-center).
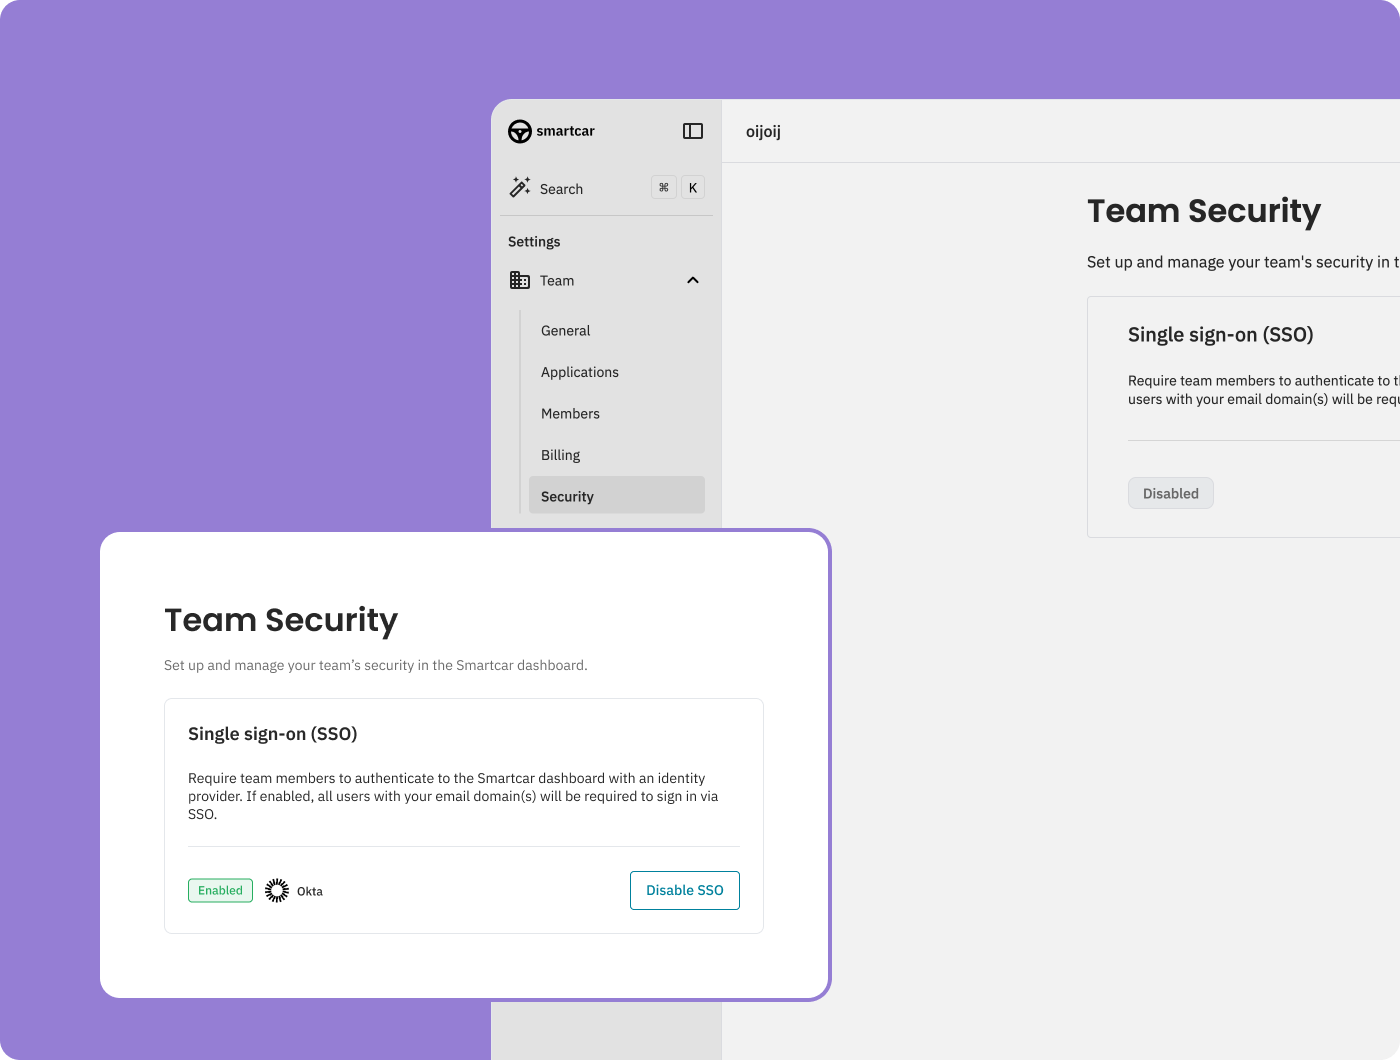 Single Sign-On (SSO) is now available for teams on an Enterprise plan. To get
started, reach out to your account manager to have it enabled. For
implementation details and setup instructions, check out our [SSO
documentation](/getting-started/dashboard/single-sign-on).
Single Sign-On (SSO) is now available for teams on an Enterprise plan. To get
started, reach out to your account manager to have it enabled. For
implementation details and setup instructions, check out our [SSO
documentation](/getting-started/dashboard/single-sign-on).
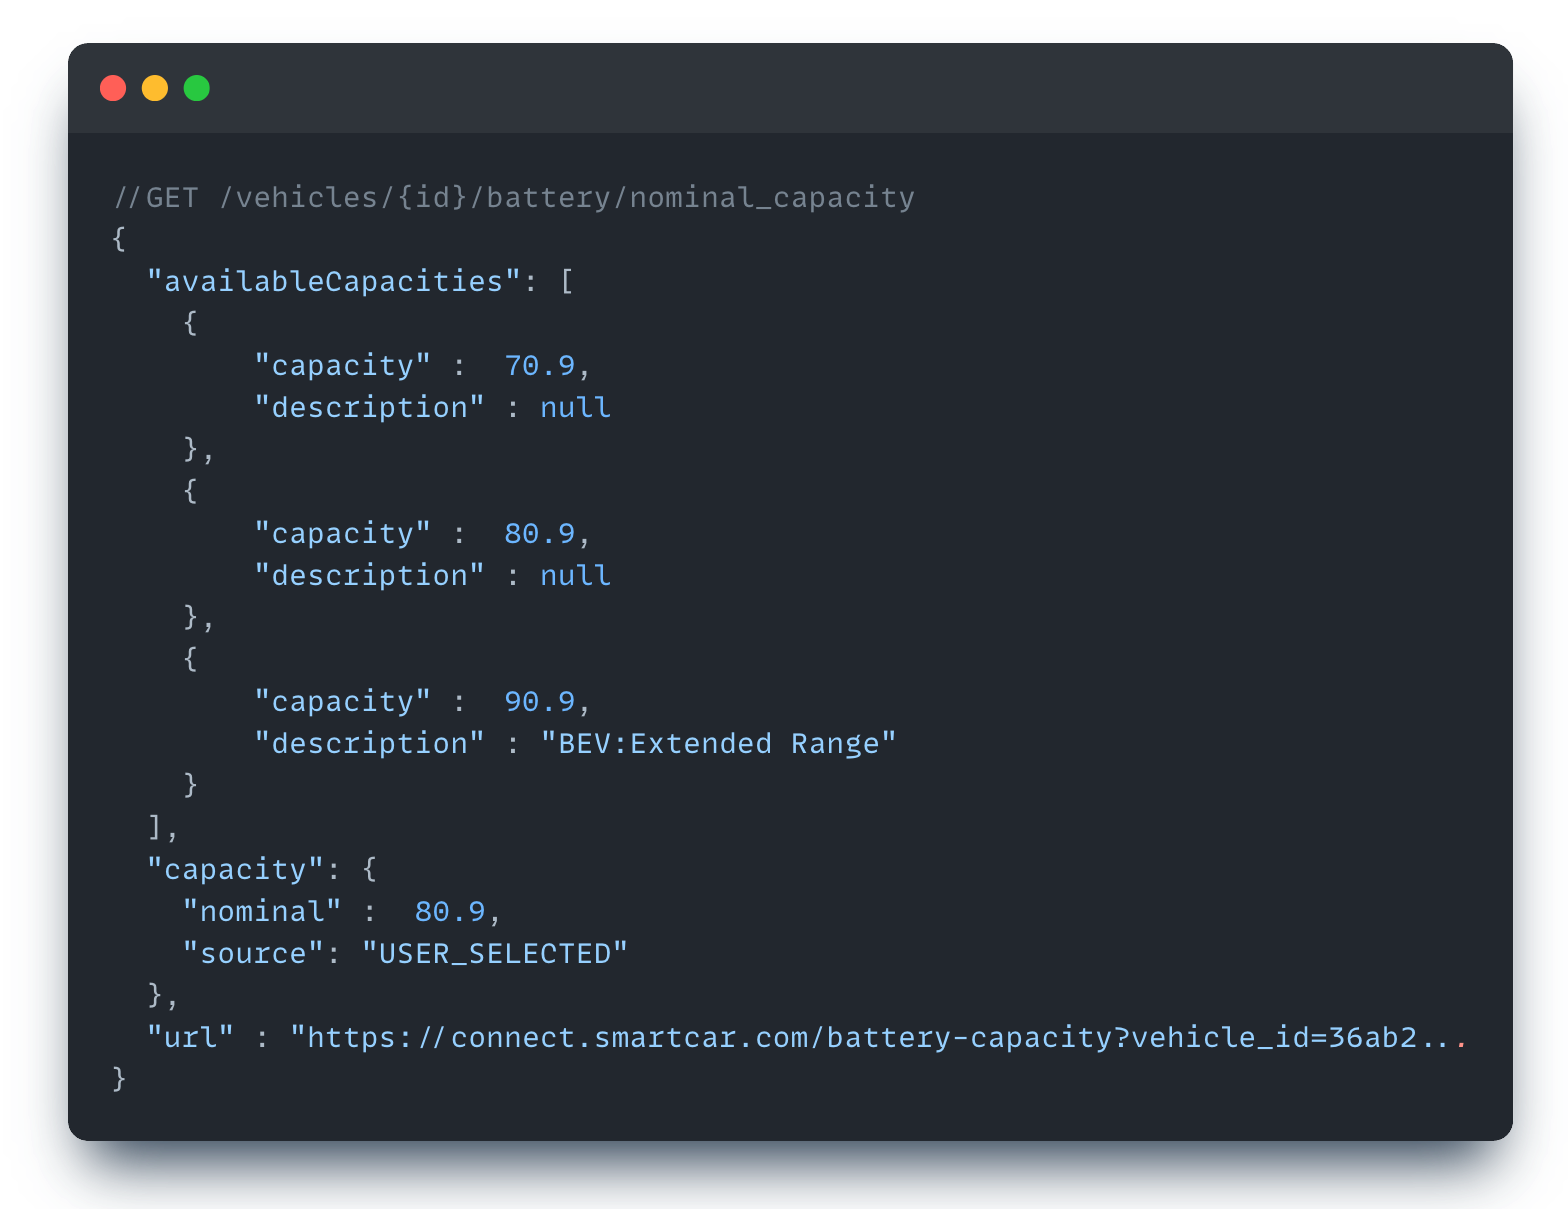 Developers can now redirect vehicle owners to a Smartcar Connect url where they can select the [battery capacity](/api-reference/get-nominal-capacity) of their vehicle for cases where the battery capacity cannot be accurately determined. This can occur when vehicle owners purchase extension packs, or software upgrades specific to their vehicle. When a user selects an option, Smartcar will return this value with `USER_SELECTED` as the source.
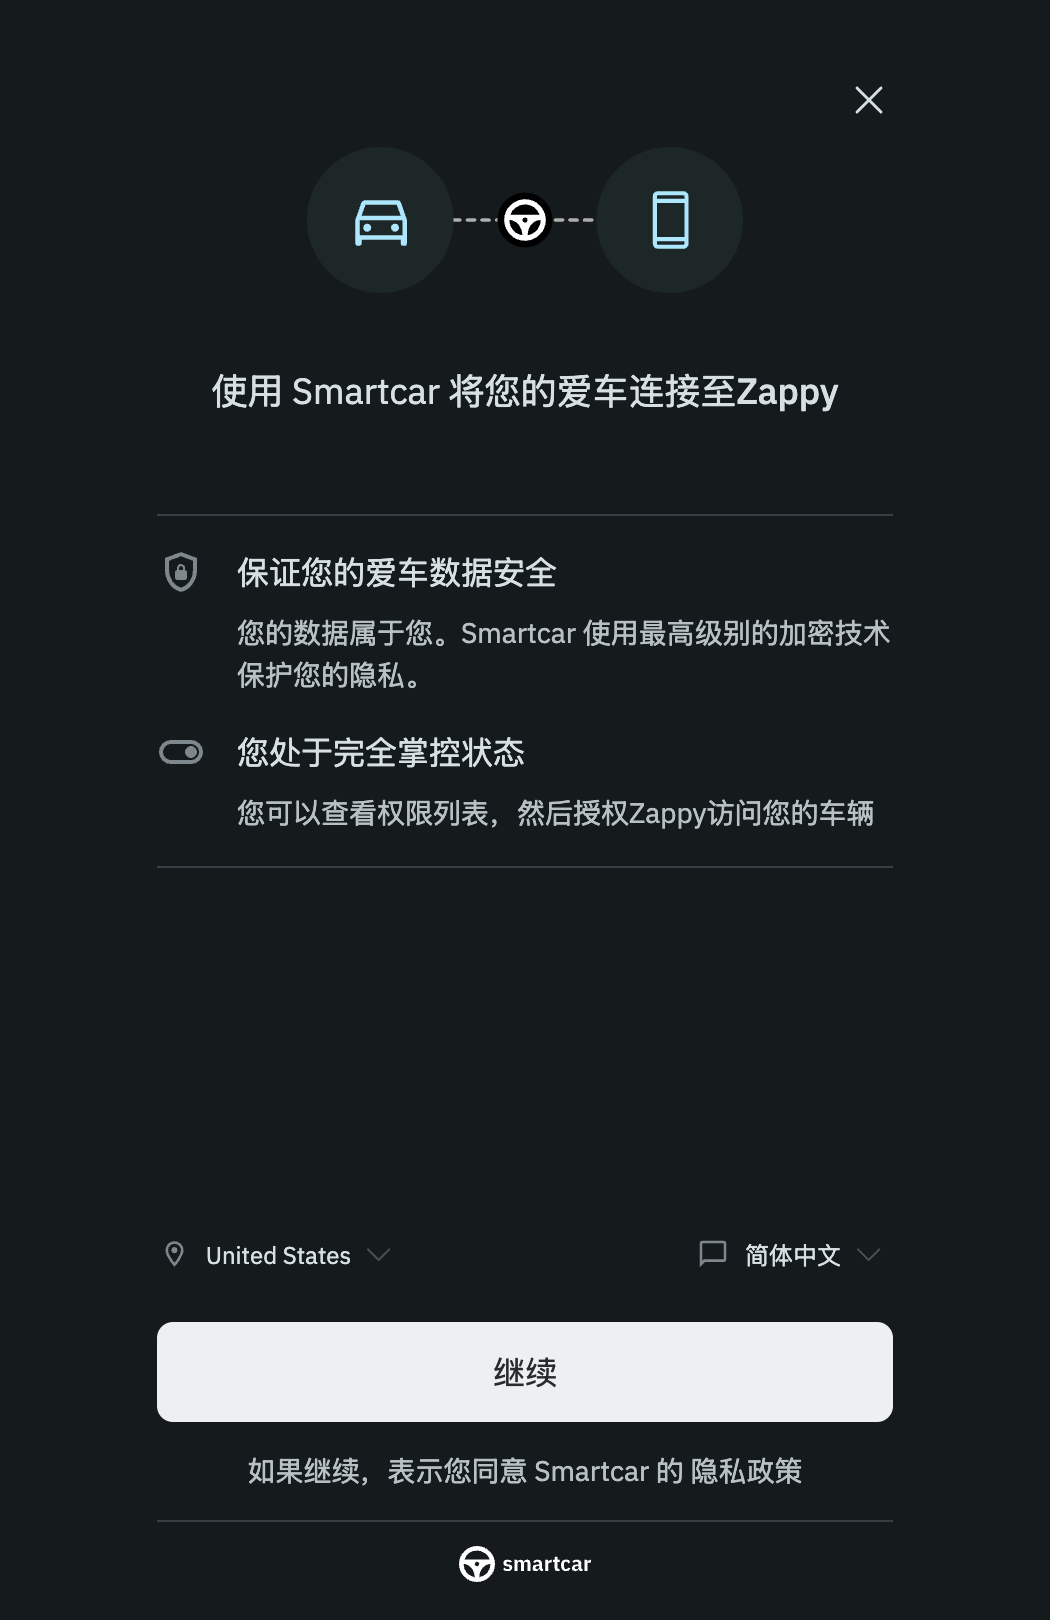 Vehicle owners can now select Simplified Chinese as they go through the Smartcar Connect flow to connect their cars.
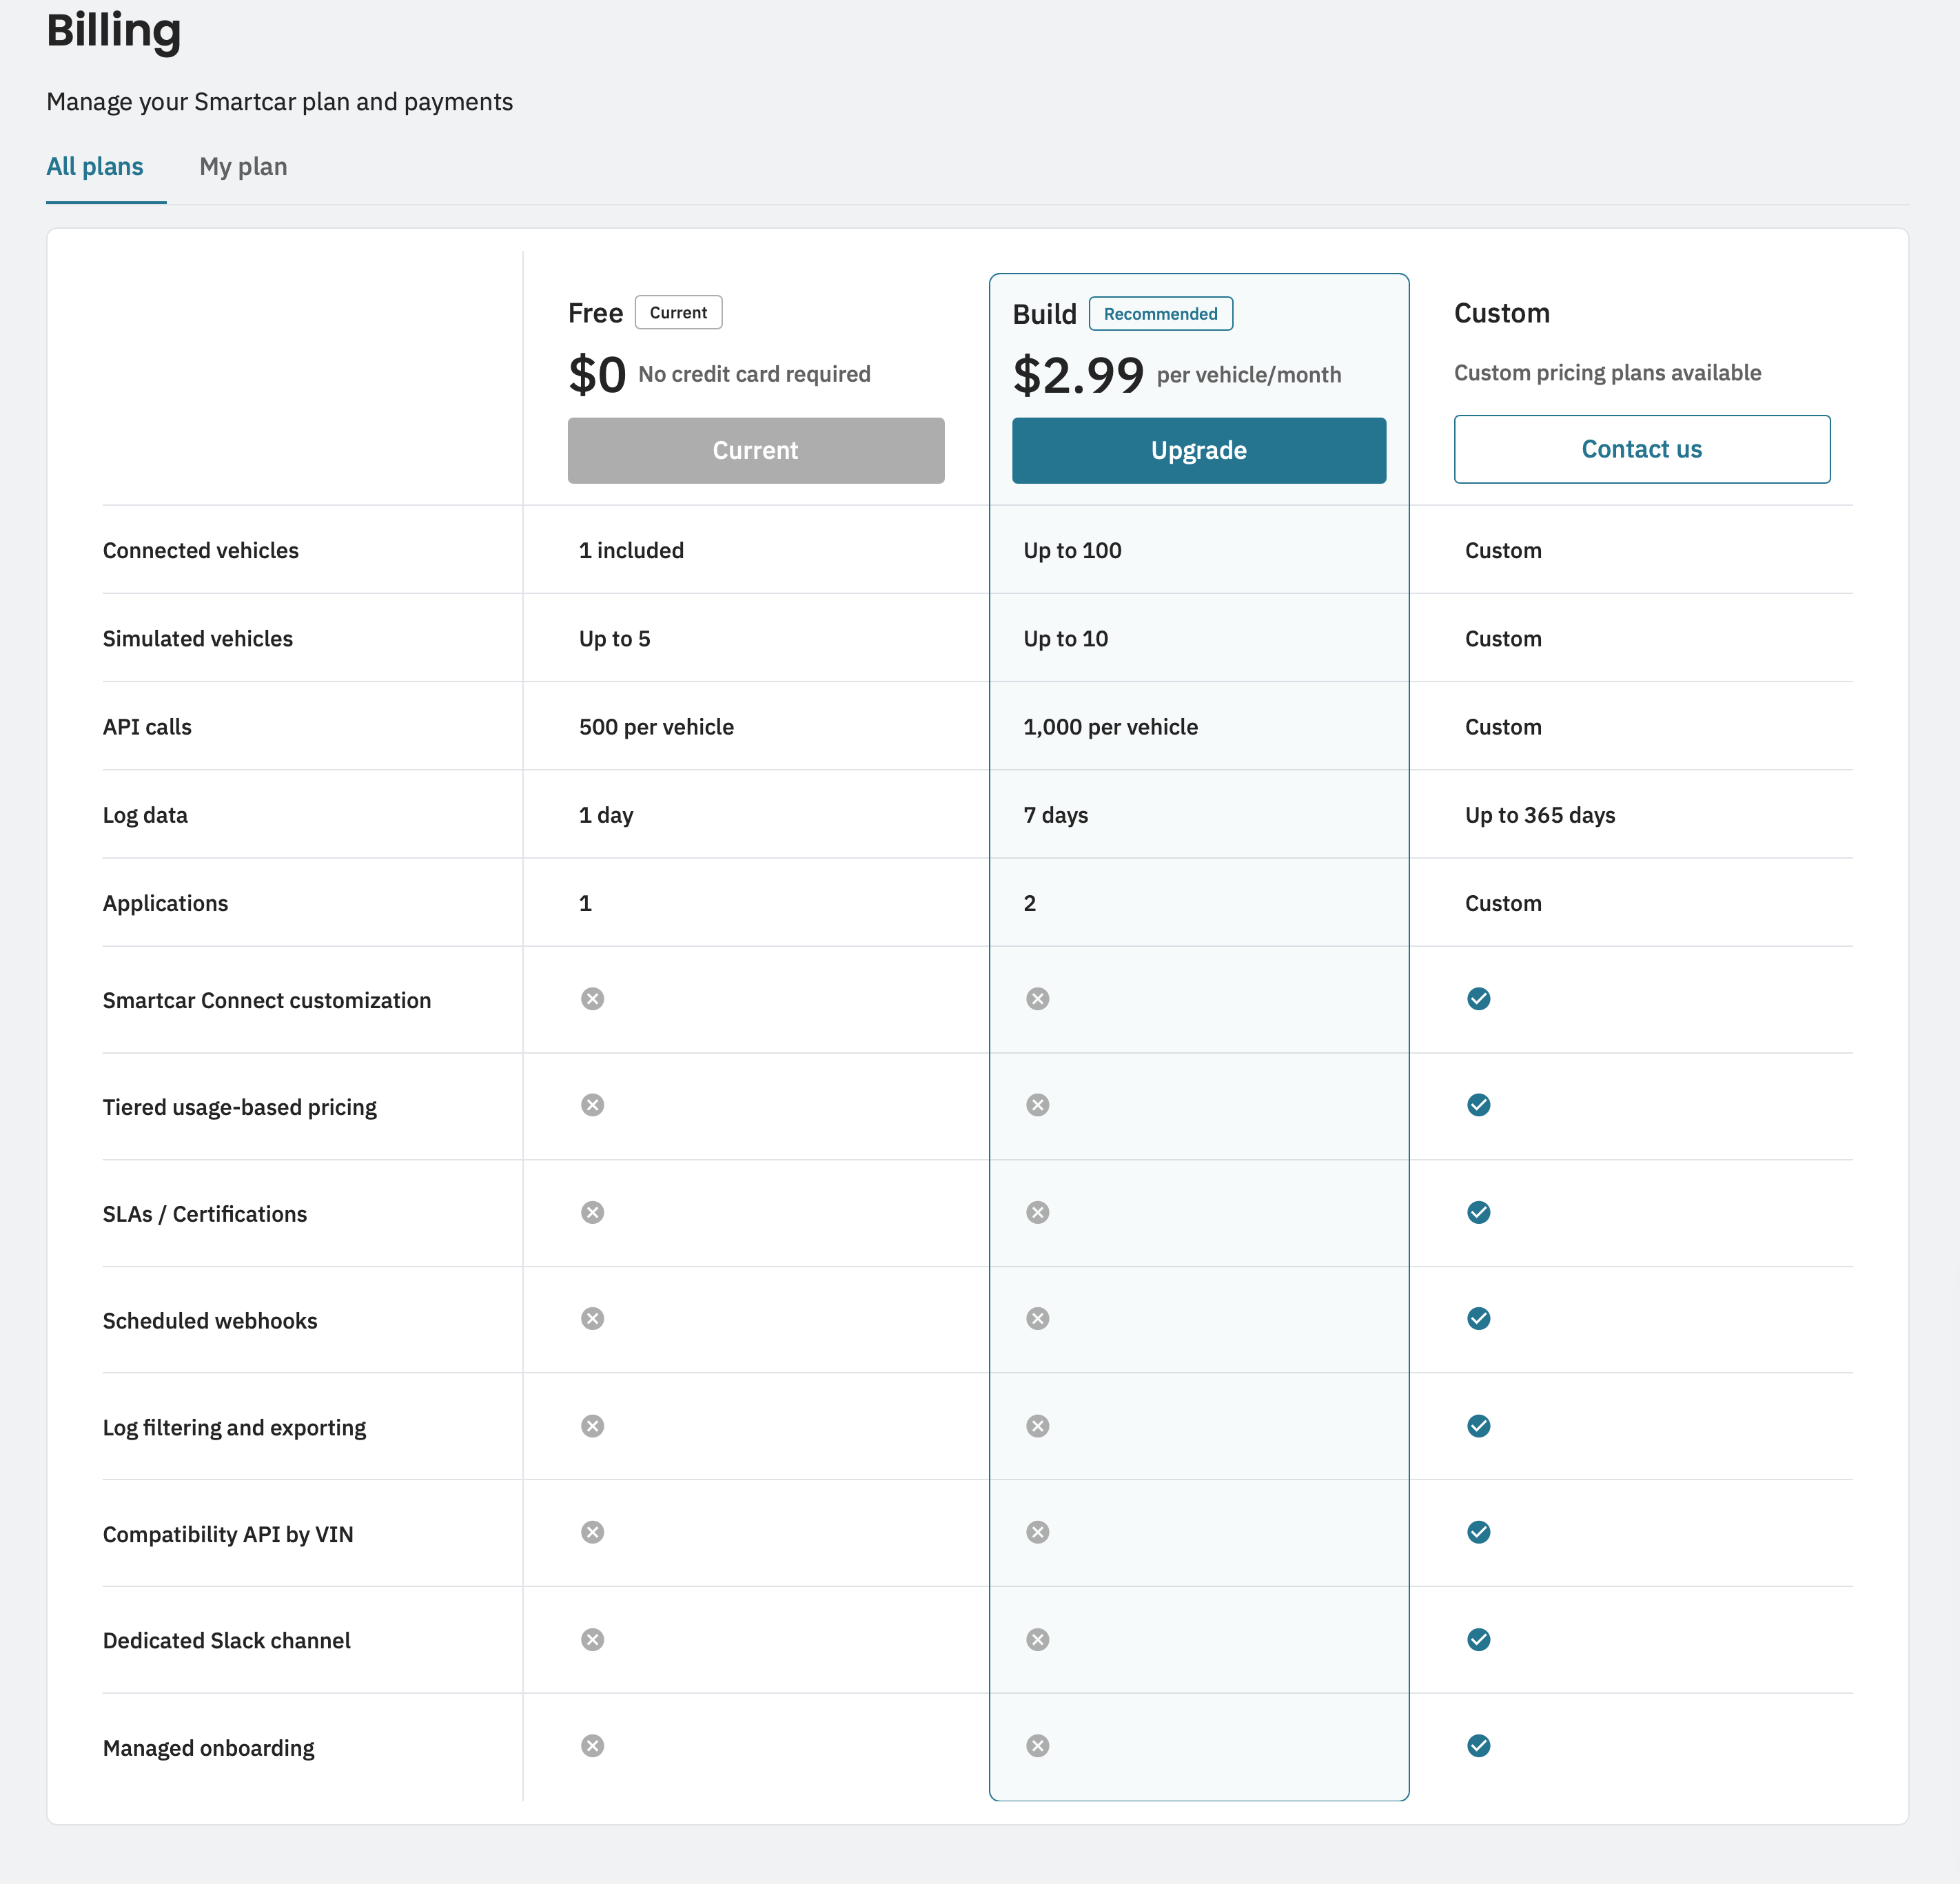 This new page provides more visibility and the ability to update your billing information, view past invoices, and view your plan features and available upgrade options.
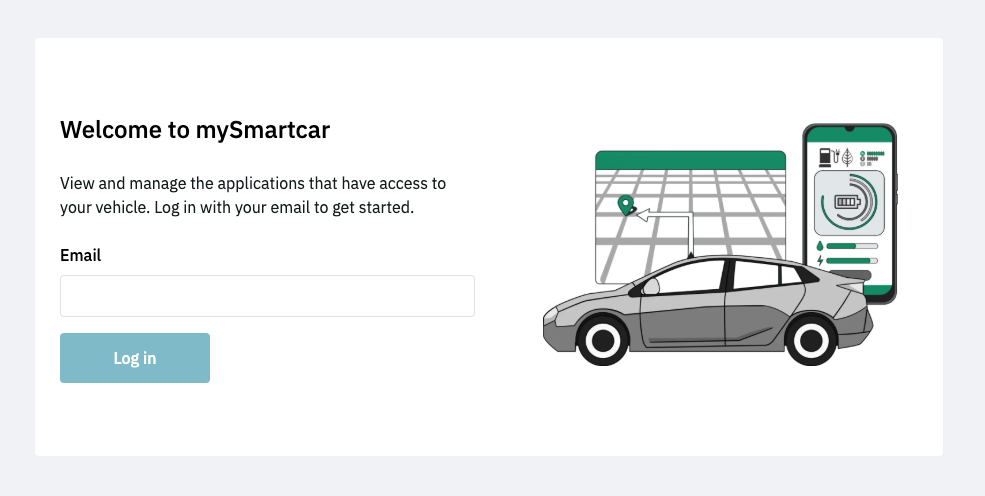 ## Connect your OEM account
Now press "Connect your Car" and follow the on-screen prompts to pair your Connected Services account with mySmartcar.
## Connect your OEM account
Now press "Connect your Car" and follow the on-screen prompts to pair your Connected Services account with mySmartcar.
 ## Review and manages connected apps
Once your OEM account is connected, Smartcar will provide a list of each application connected via Smartcar to your Connected Services account. Here you can see when the app was first granted access and the permissions requested.
Should you wish to disconnect an application, click "Revoke Access" and confirm to remove access to your vehicle's data for that application.
## Review and manages connected apps
Once your OEM account is connected, Smartcar will provide a list of each application connected via Smartcar to your Connected Services account. Here you can see when the app was first granted access and the permissions requested.
Should you wish to disconnect an application, click "Revoke Access" and confirm to remove access to your vehicle's data for that application.
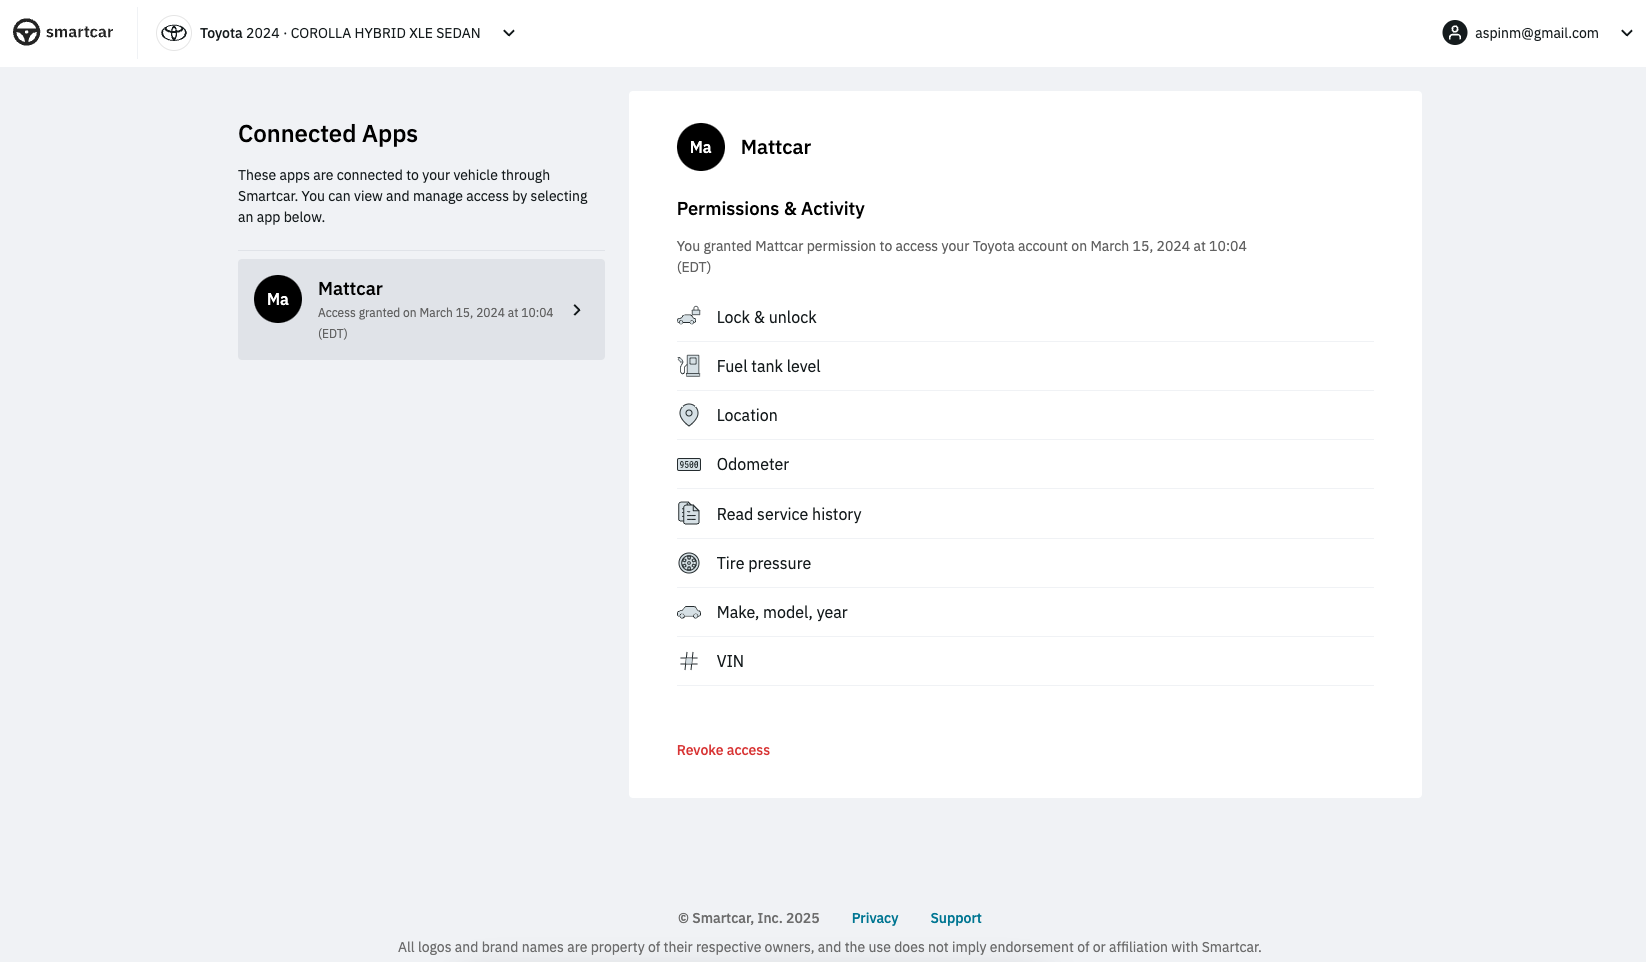 ---
# Source: https://smartcar.com/docs/errors/connect-errors/no-vehicles.md
> ## Documentation Index
> Fetch the complete documentation index at: https://smartcar.com/docs/llms.txt
> Use this file to discover all available pages before exploring further.
# No Vehicles
> This error occurs when a vehicle owner has a connected services account, but there are no vehicles associated with the account.
| Parameter | Required | Description | |
| ------------------ | -------- | ------------------------------------------------------------ | - |
| error | true | no\_vehicles | |
| error\_description | true | User does not have an active connected vehicle subscription. | |
```http Example redirect uri theme={null}
HTTP/1.1 302 Found
Location: https://example.com/callback
?error=no_vehicles&error_description=No%20vehicles%20found.%20Please%20add%20vehicles%20to%20your%20account%20and%20try%20again.
```
The error is triggered when a user logs into their connected services account and is shown to have no vehicles listed like in the example below for BMW.
---
# Source: https://smartcar.com/docs/errors/connect-errors/no-vehicles.md
> ## Documentation Index
> Fetch the complete documentation index at: https://smartcar.com/docs/llms.txt
> Use this file to discover all available pages before exploring further.
# No Vehicles
> This error occurs when a vehicle owner has a connected services account, but there are no vehicles associated with the account.
| Parameter | Required | Description | |
| ------------------ | -------- | ------------------------------------------------------------ | - |
| error | true | no\_vehicles | |
| error\_description | true | User does not have an active connected vehicle subscription. | |
```http Example redirect uri theme={null}
HTTP/1.1 302 Found
Location: https://example.com/callback
?error=no_vehicles&error_description=No%20vehicles%20found.%20Please%20add%20vehicles%20to%20your%20account%20and%20try%20again.
```
The error is triggered when a user logs into their connected services account and is shown to have no vehicles listed like in the example below for BMW.
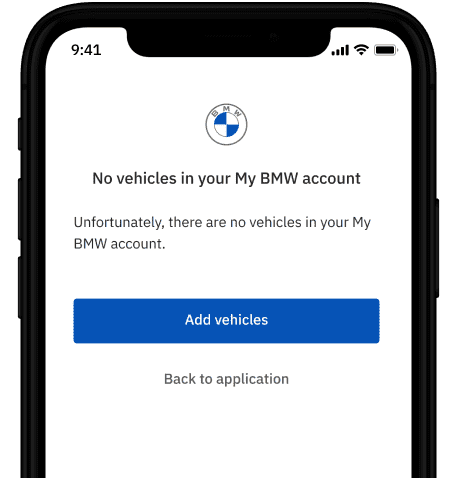 The user has the option to add vehicles or return to your application.
---
# Source: https://smartcar.com/docs/api-reference/signals/odometer.md
> ## Documentation Index
> Fetch the complete documentation index at: https://smartcar.com/docs/llms.txt
> Use this file to discover all available pages before exploring further.
# Odometer Signals
### Traveled Distance
Signal code: `odometer-traveleddistance`
The total distance the vehicle has traveled since its initial use
The user has the option to add vehicles or return to your application.
---
# Source: https://smartcar.com/docs/api-reference/signals/odometer.md
> ## Documentation Index
> Fetch the complete documentation index at: https://smartcar.com/docs/llms.txt
> Use this file to discover all available pages before exploring further.
# Odometer Signals
### Traveled Distance
Signal code: `odometer-traveleddistance`
The total distance the vehicle has traveled since its initial use
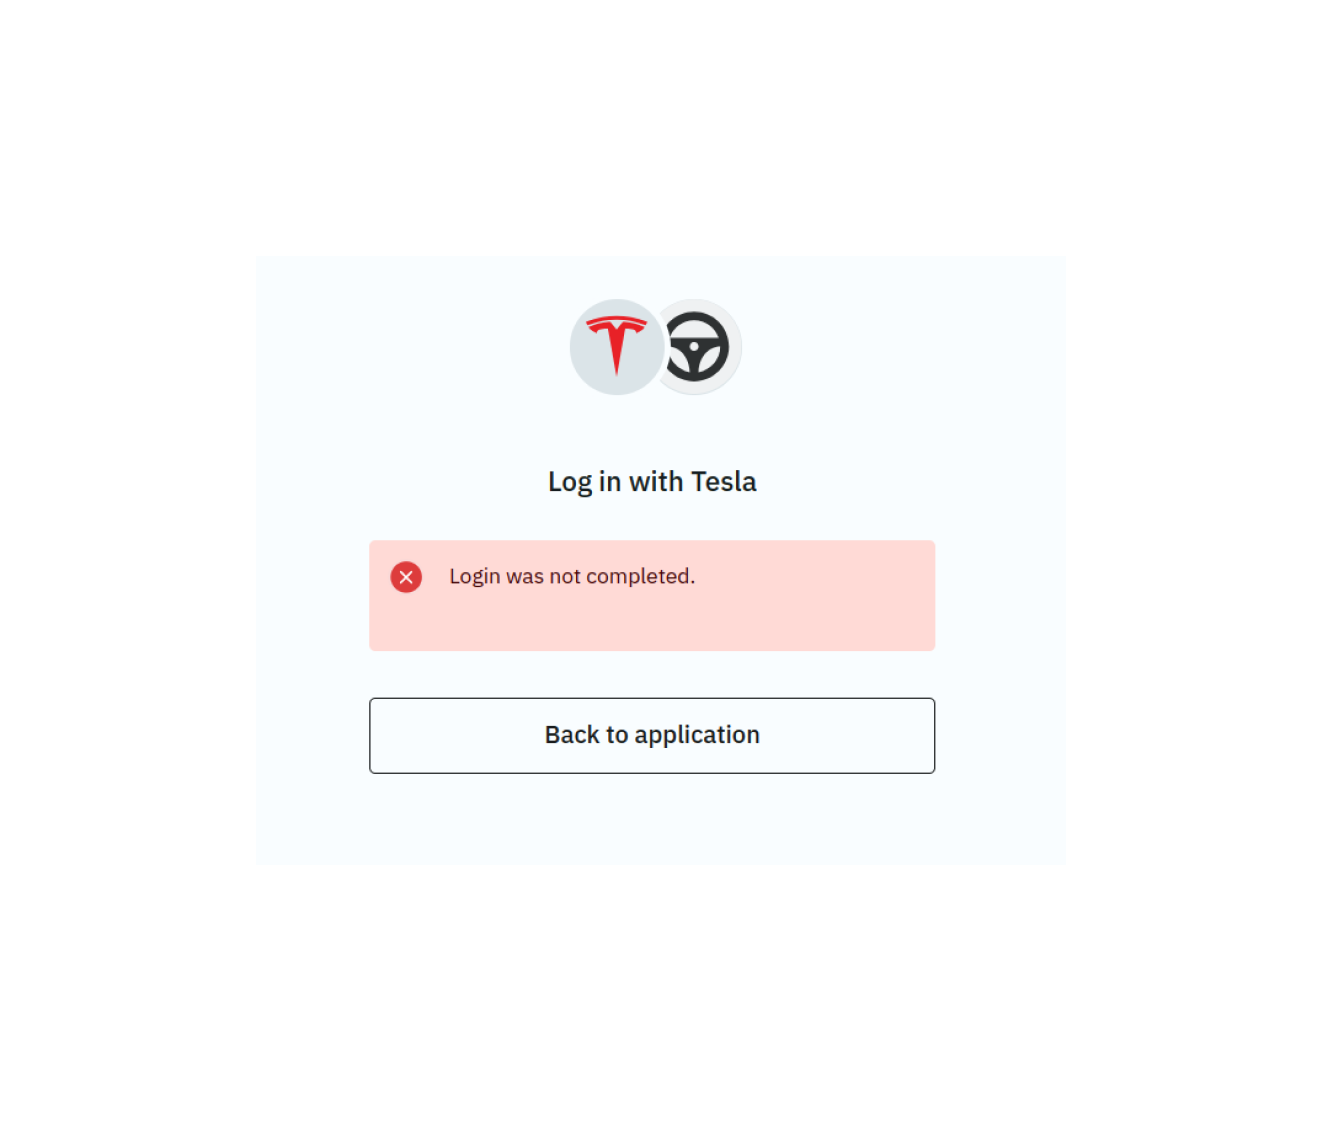 ---
# Source: https://smartcar.com/docs/connect/re-auth/oem-migrations.md
> ## Documentation Index
> Fetch the complete documentation index at: https://smartcar.com/docs/llms.txt
> Use this file to discover all available pages before exploring further.
# OEM Migrations and Re-authentication
> Understanding when and why vehicle owners need to re-authenticate due to OEM infrastructure changes and migrations.
## Overview
As automakers evolve their connected services infrastructure, Smartcar occasionally needs to migrate integrations to newer OEM APIs or authentication systems. These migrations ensure your application maintains access to the latest features, improved reliability, and continued compatibility with OEM platforms. Smartcar does this work on your behalf to minimize disruption.
**Important**: Some OEM migrations will require vehicle owners to re-authenticate through Smartcar Connect. This is a necessary step to maintain secure access to vehicle data.
---
# Source: https://smartcar.com/docs/connect/re-auth/oem-migrations.md
> ## Documentation Index
> Fetch the complete documentation index at: https://smartcar.com/docs/llms.txt
> Use this file to discover all available pages before exploring further.
# OEM Migrations and Re-authentication
> Understanding when and why vehicle owners need to re-authenticate due to OEM infrastructure changes and migrations.
## Overview
As automakers evolve their connected services infrastructure, Smartcar occasionally needs to migrate integrations to newer OEM APIs or authentication systems. These migrations ensure your application maintains access to the latest features, improved reliability, and continued compatibility with OEM platforms. Smartcar does this work on your behalf to minimize disruption.
**Important**: Some OEM migrations will require vehicle owners to re-authenticate through Smartcar Connect. This is a necessary step to maintain secure access to vehicle data.
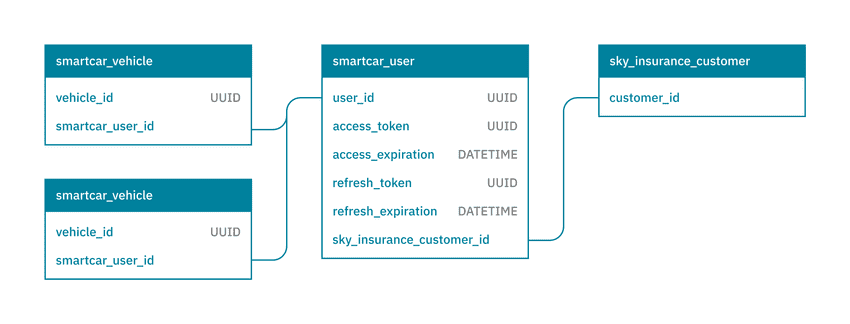 ### Single Select Connect Flow
When using the Single Select flow, tokens are strictly scoped to the vehicle that was authorized for that Connect session.
This means that if a user connects multiple vehicles under the same connected services account, each vehicle id will be tied
to its own set of tokens.
### Single Select Connect Flow
When using the Single Select flow, tokens are strictly scoped to the vehicle that was authorized for that Connect session.
This means that if a user connects multiple vehicles under the same connected services account, each vehicle id will be tied
to its own set of tokens.
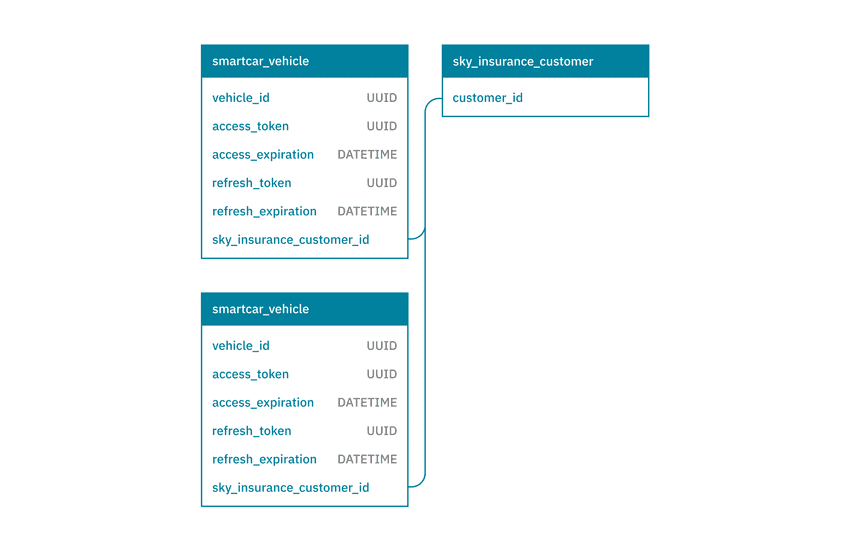 ## Token expiry
Access tokens are valid for 2 hours, while refresh tokens are valid for 60 days. You can use the corresponding refresh token to fetch a new token pair
once an access token has expired.
In order to maintain access to a vehicle without having a user go through Connect again, you'll want to make sure the refresh token never expires.
Whenever you fetch a new token pair, we will return a **new access and refresh token**.
Prior to expiry, access tokens will remain valid until their expiry when fetching a new token pair. Refresh tokens on the other hand are invalidated
1 minute after they're used.
To avoid common 401 Authentication errors, please ensure you are **persisting both the access and refresh token** we return whenever you fetch a new pair.
## Token expiry
Access tokens are valid for 2 hours, while refresh tokens are valid for 60 days. You can use the corresponding refresh token to fetch a new token pair
once an access token has expired.
In order to maintain access to a vehicle without having a user go through Connect again, you'll want to make sure the refresh token never expires.
Whenever you fetch a new token pair, we will return a **new access and refresh token**.
Prior to expiry, access tokens will remain valid until their expiry when fetching a new token pair. Refresh tokens on the other hand are invalidated
1 minute after they're used.
To avoid common 401 Authentication errors, please ensure you are **persisting both the access and refresh token** we return whenever you fetch a new pair.

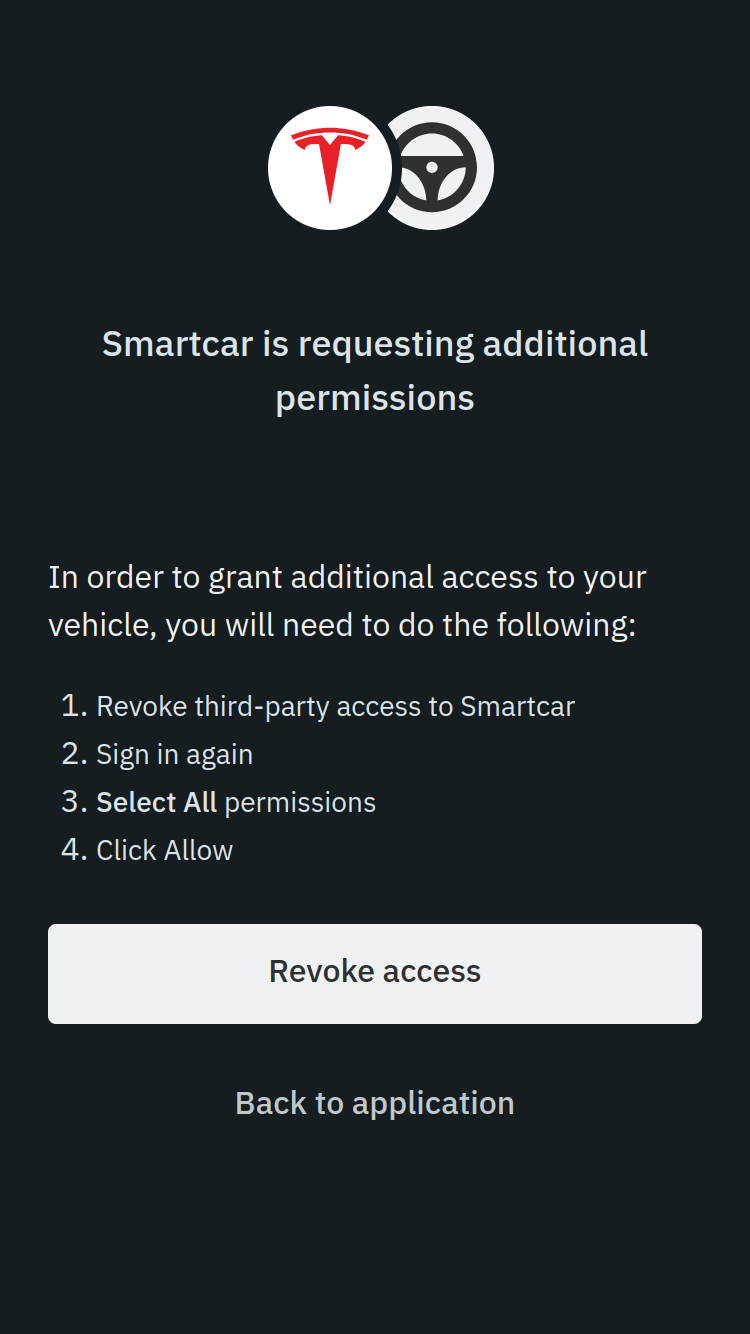
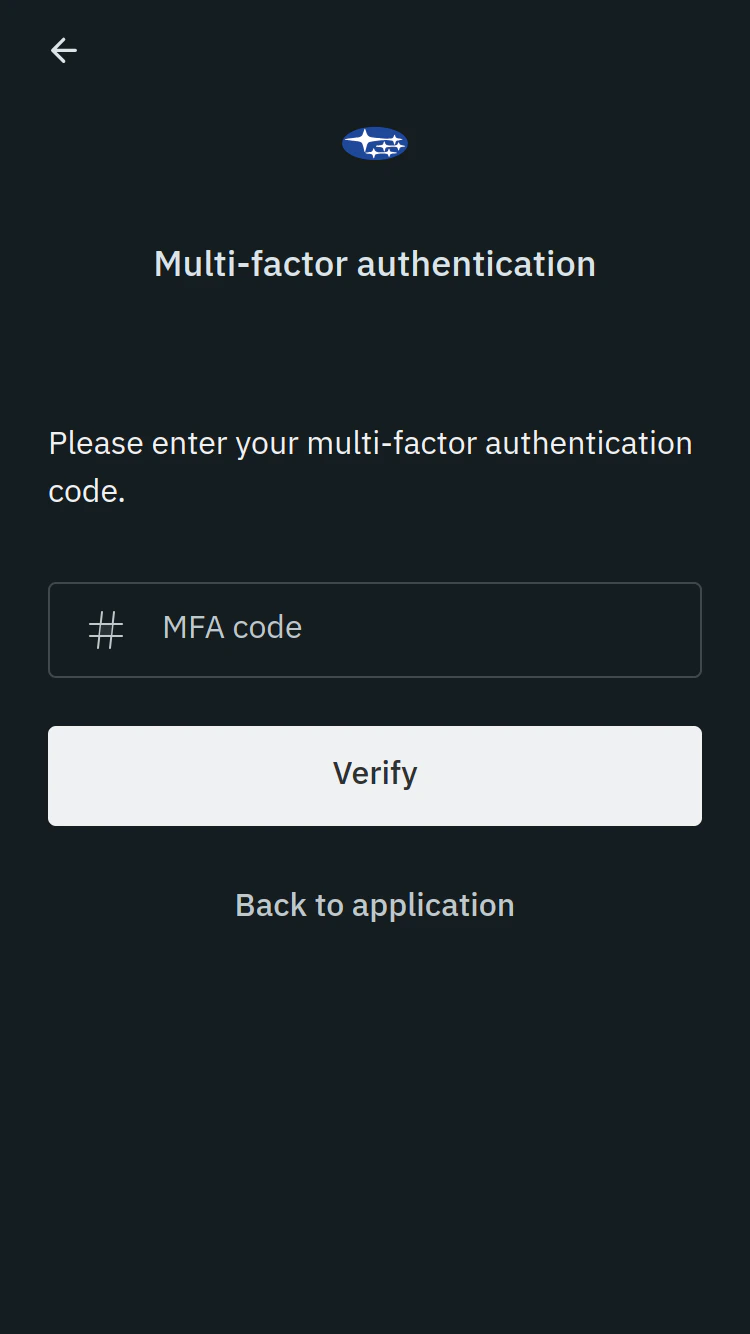
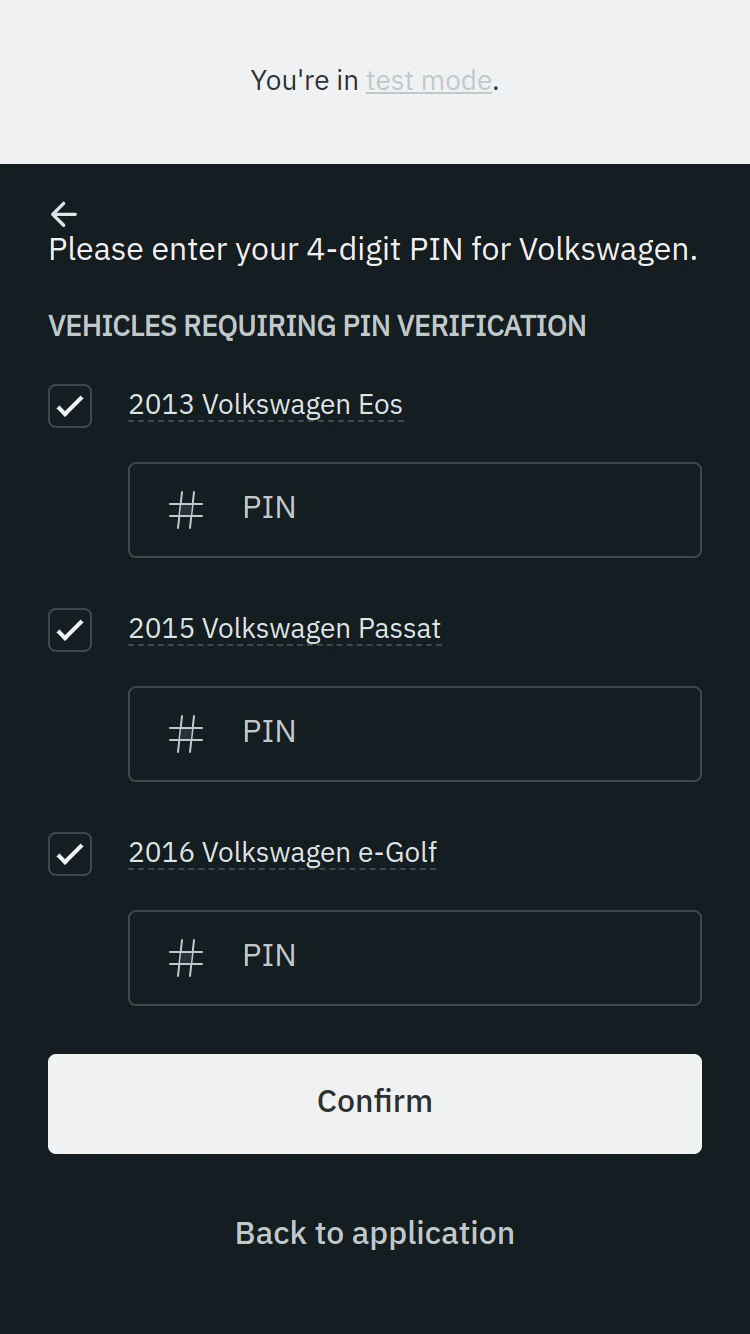
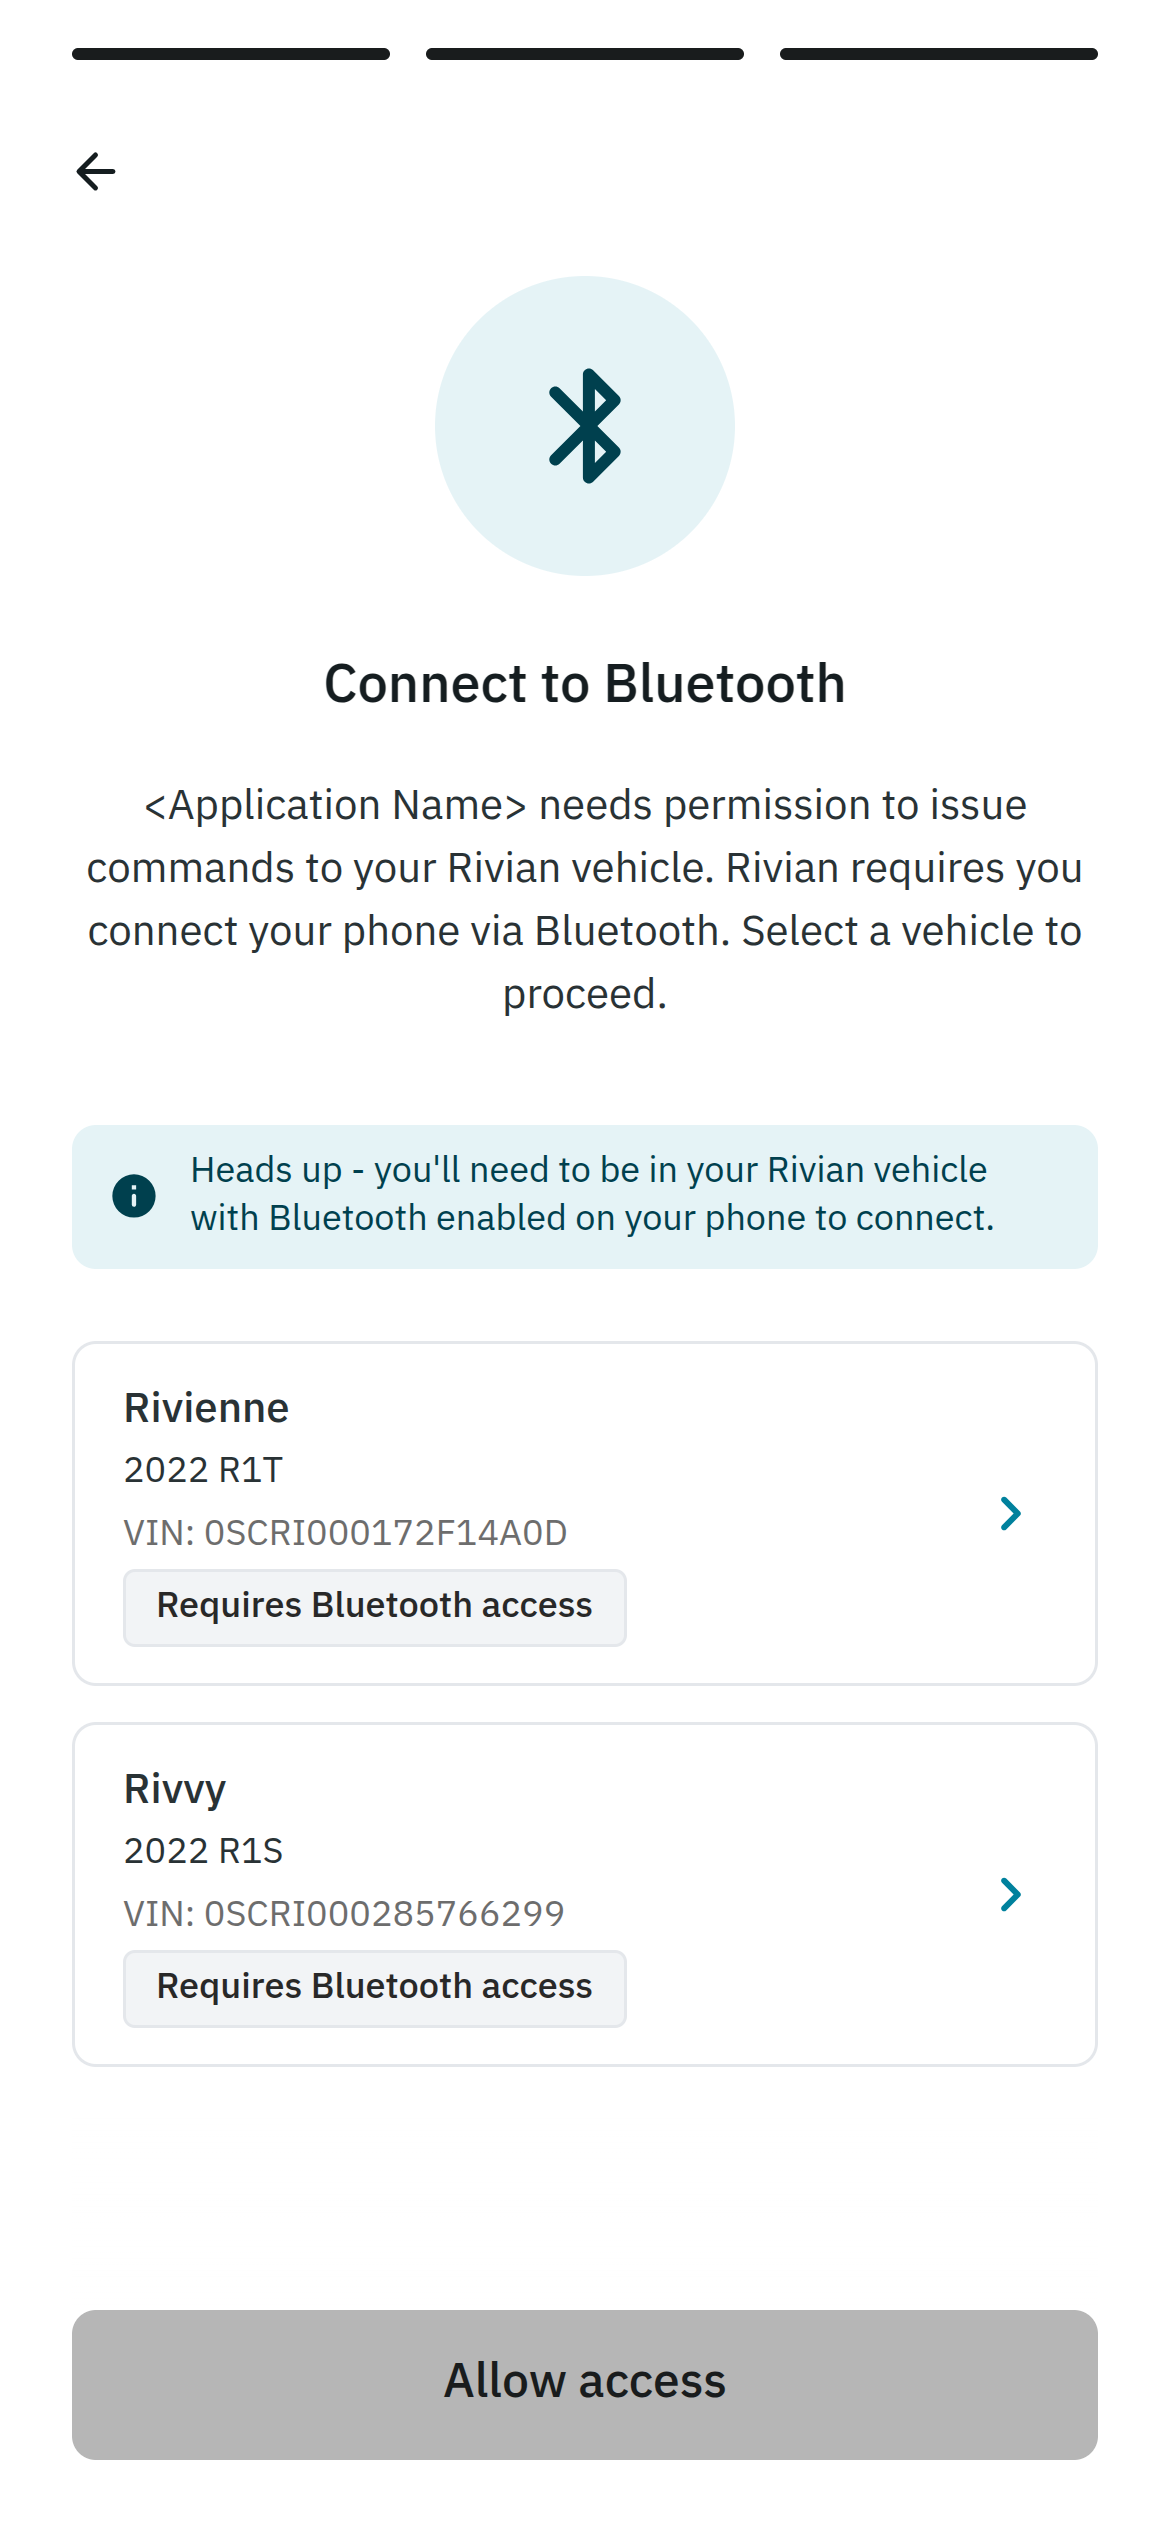 After selecting the vehicle, the user will be prompted to tap “Set up now” on the Rivian vehicle’s display and follow any on-screen prompts to connect.
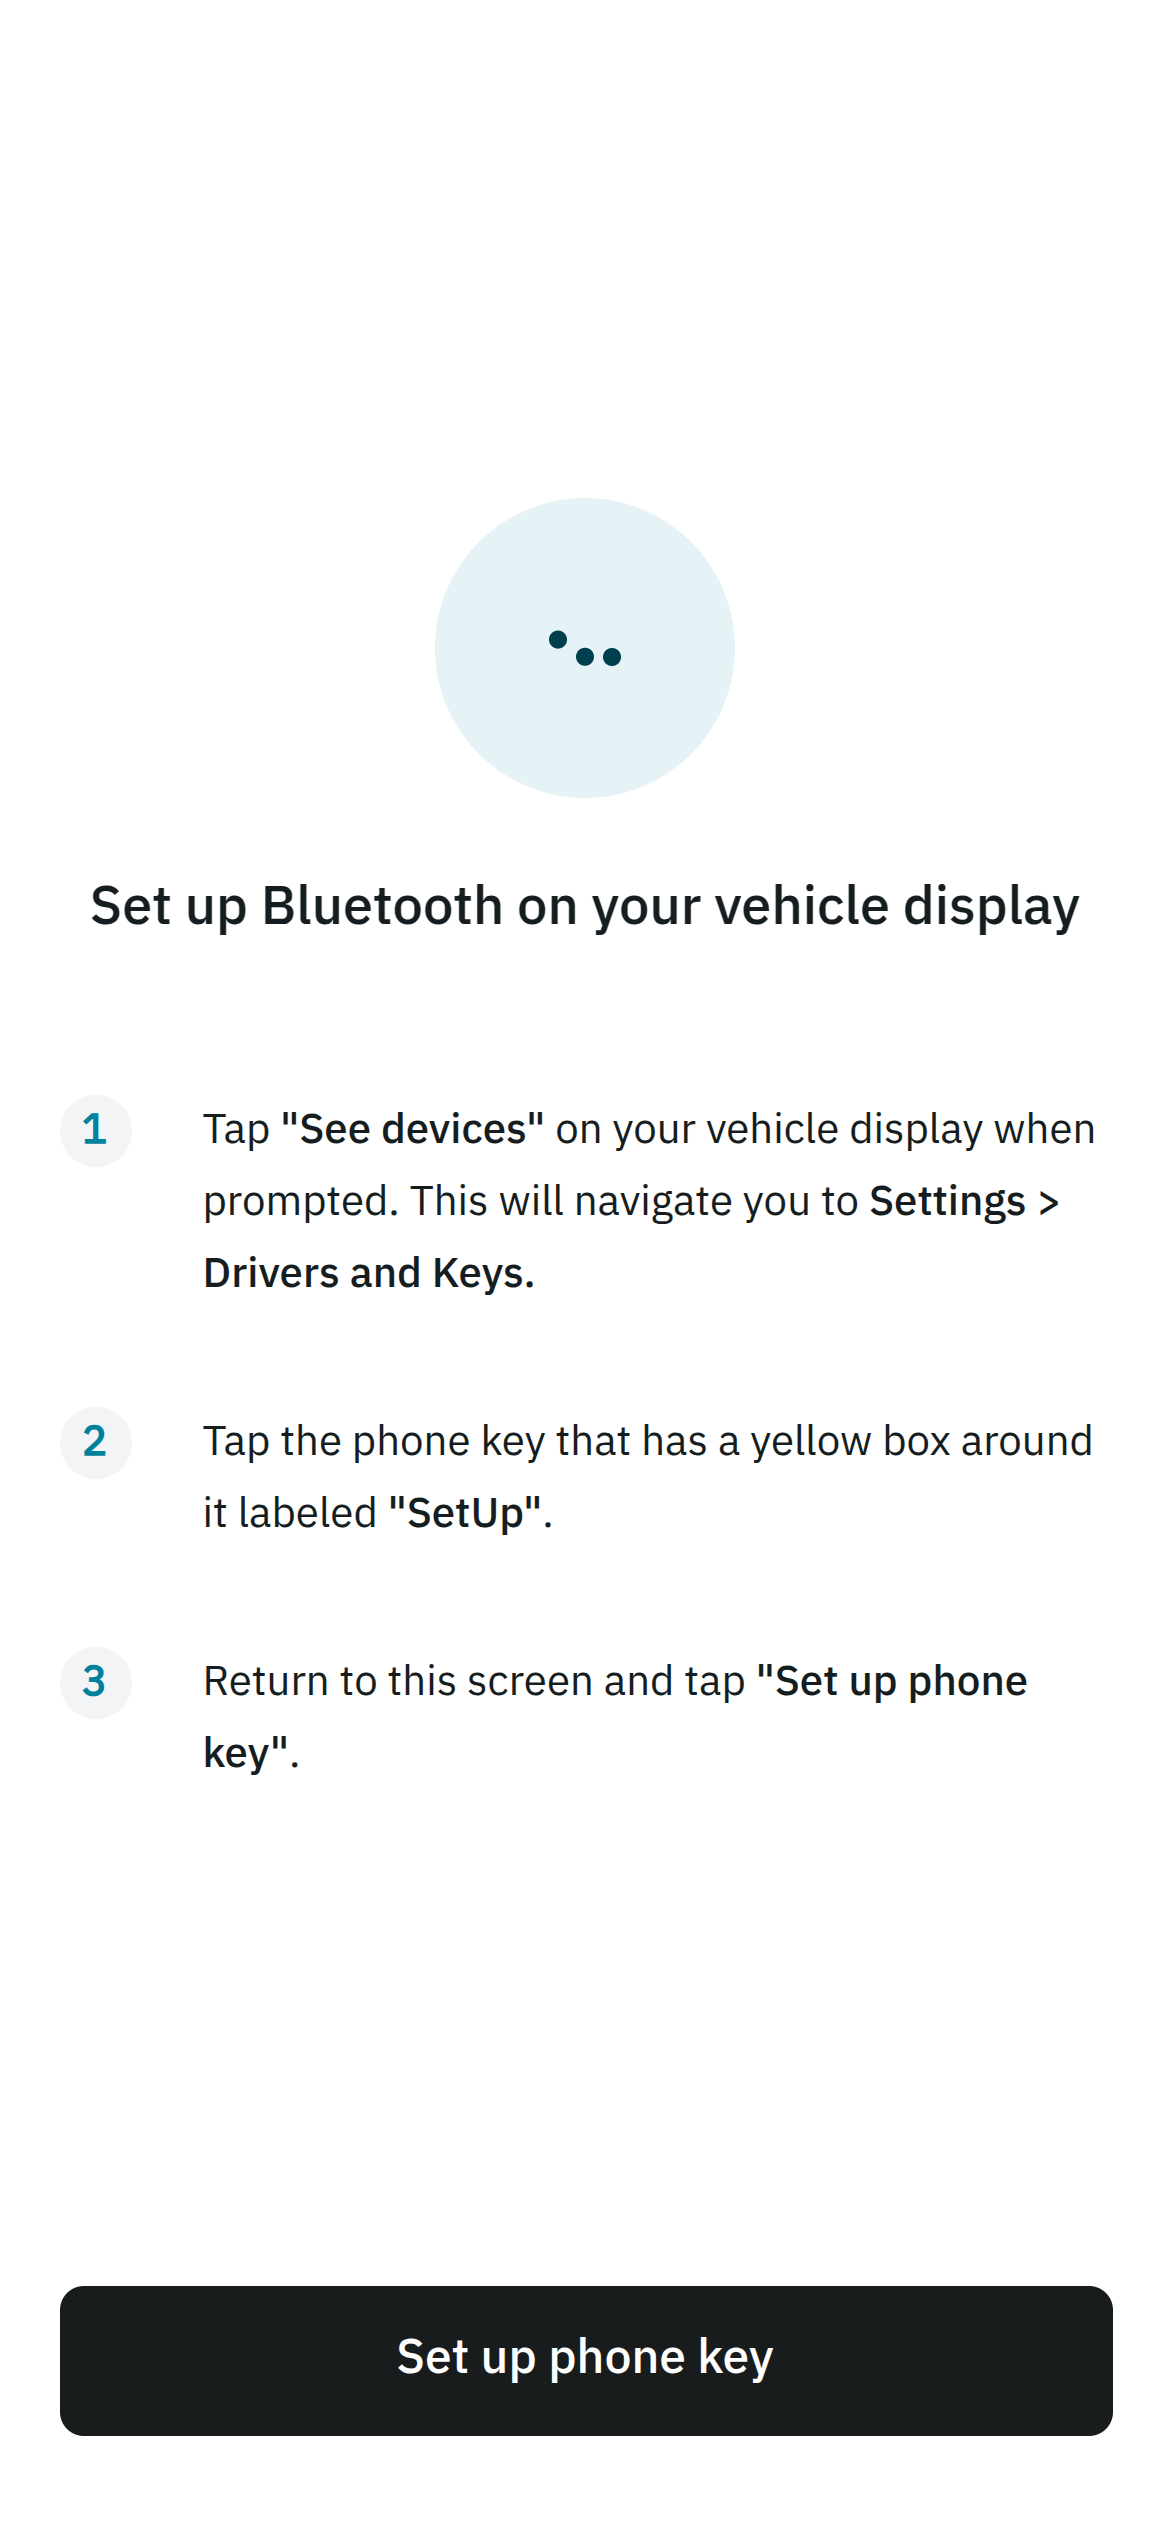 Once setup is complete, the application will be able to issue commands to the Rivian vehicle.
 Should Bluetooth be disabled or the Rivian display prompts not followed, the Bluetooth connection will not be established and the vehicle will not be connected to your application.
 ## Notes
* Rivian vehicles must be paired via Bluetooth to support commands. Data permissions (i.e. `read_location`, `read_charge`) do not require Bluetooth pairing.
* The following commands are supported for Rivian vehicles: lock/unlock, start/stop charge, and set charge limit.
* If a user has multiple Rivian vehicles, they will be prompted to pair each vehicle that they wish to connect to your application.
* At least one vehicle must be paired via Bluetooth to complete the pairing process before the user can continue with the Connect flow and connect their Rivian to your application.
* If there are multiple drivers associated with a Rivian account and both drivers want to connect to your application, each driver must pair their mobile device to the vehicle via Bluetooth.
* There is a limit of four devices that can be paired to a Rivian vehicle at one time. If a user has already paired four devices to their Rivian, they will need to unpair one of the existing devices from the vehicle before they can pair their mobile device and complete the connection to your application.
* Smartcar mobile SDKs for iOS and Android are required to pair the vehicle via Bluetooth.
---
# Source: https://smartcar.com/docs/api-reference/signals/schema.md
> ## Documentation Index
> Fetch the complete documentation index at: https://smartcar.com/docs/llms.txt
> Use this file to discover all available pages before exploring further.
# Smartcar Signals & Attributes Overview
> Smartcar's standard list of vehicle signals and attributes across all compatible OEMs.
Below are the list of signals and attributes supported by Smartcar.
## Attributes
Attributes are static vehicle data that typically does not change in value.
* [Surveillance](/api-reference/signals/surveillance)
* [VehicleIdentification](/api-reference/signals/vehicleidentification)
* [Wheel](/api-reference/signals/wheel)
## Signals
With Smartcar you can configure your application to receive a webhook when the value of any of these signals change. Some change more frequently than others.
Below you will find the signal groups and their respective signals. Each signal has a code that you can use to [request the latest value](/api-reference/get-the-values-for-an-individual-signal) for that signal.
* [Charge](/api-reference/signals/charge)
* [Climate](/api-reference/signals/climate)
* [Closure](/api-reference/signals/closure)
* [ConnectivitySoftware](/api-reference/signals/connectivitysoftware)
* [ConnectivityStatus](/api-reference/signals/connectivitystatus)
* [Diagnostics](/api-reference/signals/diagnostics)
* [HVAC](/api-reference/signals/hvac)
* [InternalCombustionEngine](/api-reference/signals/internalcombustionengine)
* [Location](/api-reference/signals/location)
* [LowVoltageBattery](/api-reference/signals/lowvoltagebattery)
* [Motion](/api-reference/signals/motion)
* [Odometer](/api-reference/signals/odometer)
* [Service](/api-reference/signals/service)
* [Surveillance](/api-reference/signals/surveillance)
* [TractionBattery](/api-reference/signals/tractionbattery)
* [Transmission](/api-reference/signals/transmission)
* [VehicleIdentification](/api-reference/signals/vehicleidentification)
* [VehicleUserAccount](/api-reference/signals/vehicleuseraccount)
* [Wheel](/api-reference/signals/wheel)
***
## Next Steps
Now that you know what vehicle data is available, learn how to receive it in your application:
## Notes
* Rivian vehicles must be paired via Bluetooth to support commands. Data permissions (i.e. `read_location`, `read_charge`) do not require Bluetooth pairing.
* The following commands are supported for Rivian vehicles: lock/unlock, start/stop charge, and set charge limit.
* If a user has multiple Rivian vehicles, they will be prompted to pair each vehicle that they wish to connect to your application.
* At least one vehicle must be paired via Bluetooth to complete the pairing process before the user can continue with the Connect flow and connect their Rivian to your application.
* If there are multiple drivers associated with a Rivian account and both drivers want to connect to your application, each driver must pair their mobile device to the vehicle via Bluetooth.
* There is a limit of four devices that can be paired to a Rivian vehicle at one time. If a user has already paired four devices to their Rivian, they will need to unpair one of the existing devices from the vehicle before they can pair their mobile device and complete the connection to your application.
* Smartcar mobile SDKs for iOS and Android are required to pair the vehicle via Bluetooth.
---
# Source: https://smartcar.com/docs/api-reference/signals/schema.md
> ## Documentation Index
> Fetch the complete documentation index at: https://smartcar.com/docs/llms.txt
> Use this file to discover all available pages before exploring further.
# Smartcar Signals & Attributes Overview
> Smartcar's standard list of vehicle signals and attributes across all compatible OEMs.
Below are the list of signals and attributes supported by Smartcar.
## Attributes
Attributes are static vehicle data that typically does not change in value.
* [Surveillance](/api-reference/signals/surveillance)
* [VehicleIdentification](/api-reference/signals/vehicleidentification)
* [Wheel](/api-reference/signals/wheel)
## Signals
With Smartcar you can configure your application to receive a webhook when the value of any of these signals change. Some change more frequently than others.
Below you will find the signal groups and their respective signals. Each signal has a code that you can use to [request the latest value](/api-reference/get-the-values-for-an-individual-signal) for that signal.
* [Charge](/api-reference/signals/charge)
* [Climate](/api-reference/signals/climate)
* [Closure](/api-reference/signals/closure)
* [ConnectivitySoftware](/api-reference/signals/connectivitysoftware)
* [ConnectivityStatus](/api-reference/signals/connectivitystatus)
* [Diagnostics](/api-reference/signals/diagnostics)
* [HVAC](/api-reference/signals/hvac)
* [InternalCombustionEngine](/api-reference/signals/internalcombustionengine)
* [Location](/api-reference/signals/location)
* [LowVoltageBattery](/api-reference/signals/lowvoltagebattery)
* [Motion](/api-reference/signals/motion)
* [Odometer](/api-reference/signals/odometer)
* [Service](/api-reference/signals/service)
* [Surveillance](/api-reference/signals/surveillance)
* [TractionBattery](/api-reference/signals/tractionbattery)
* [Transmission](/api-reference/signals/transmission)
* [VehicleIdentification](/api-reference/signals/vehicleidentification)
* [VehicleUserAccount](/api-reference/signals/vehicleuseraccount)
* [Wheel](/api-reference/signals/wheel)
***
## Next Steps
Now that you know what vehicle data is available, learn how to receive it in your application:
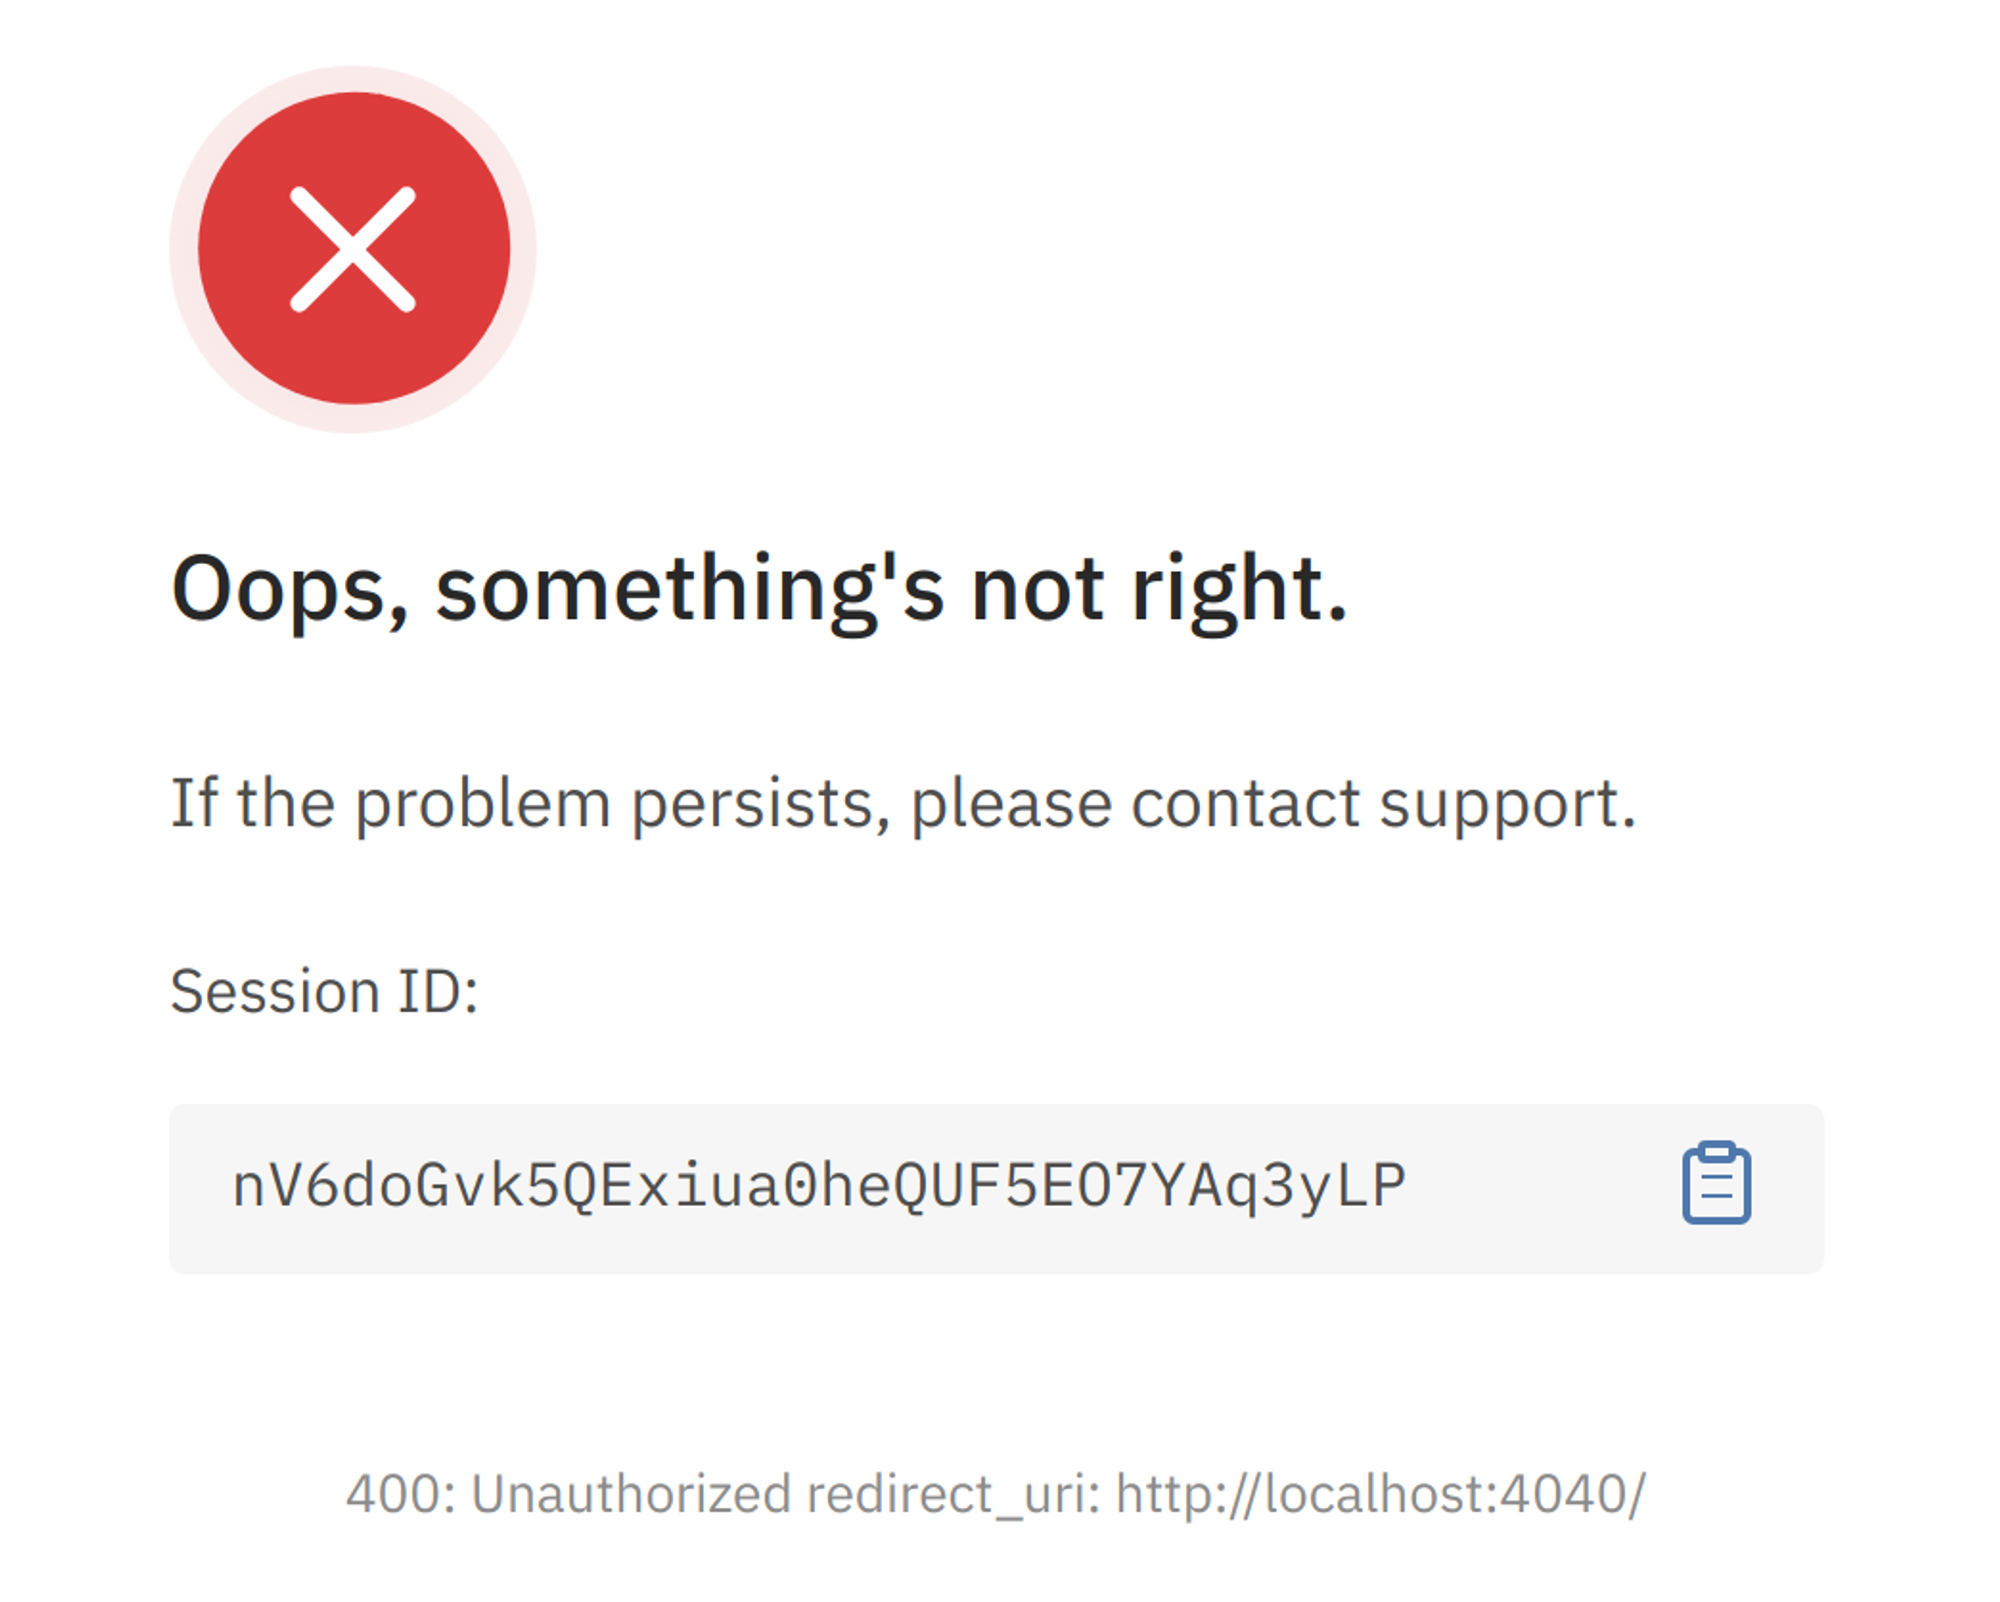 ---
# Source: https://smartcar.com/docs/errors/api-errors/server-errors.md
> ## Documentation Index
> Fetch the complete documentation index at: https://smartcar.com/docs/llms.txt
> Use this file to discover all available pages before exploring further.
# Server Errors
> Thrown when Smartcar runs into an unexpected issue and was unable to process the request.
# `INTERNAL`
An internal Smartcar error has occurred. Our team has been notified and is working to resolve this issue.
```json theme={null}
{
"type": "SERVER",
"code": "INTERNAL",
"description": "An internal Smartcar error has occurred. Our team has been notified and is working to resolve this issue.",
"docURL": "https://smartcar.com/docs/errors/api-errors/server-errors#internal",
"statusCode": 500,
"requestId": "5dea93a1-3f79-4246-90c5-89610a20471b",
"resolution": { "type": "RETRY_LATER" },
"suggestedUserMessage": "Your car is temporarily unable to connect to
---
# Source: https://smartcar.com/docs/errors/api-errors/server-errors.md
> ## Documentation Index
> Fetch the complete documentation index at: https://smartcar.com/docs/llms.txt
> Use this file to discover all available pages before exploring further.
# Server Errors
> Thrown when Smartcar runs into an unexpected issue and was unable to process the request.
# `INTERNAL`
An internal Smartcar error has occurred. Our team has been notified and is working to resolve this issue.
```json theme={null}
{
"type": "SERVER",
"code": "INTERNAL",
"description": "An internal Smartcar error has occurred. Our team has been notified and is working to resolve this issue.",
"docURL": "https://smartcar.com/docs/errors/api-errors/server-errors#internal",
"statusCode": 500,
"requestId": "5dea93a1-3f79-4246-90c5-89610a20471b",
"resolution": { "type": "RETRY_LATER" },
"suggestedUserMessage": "Your car is temporarily unable to connect to 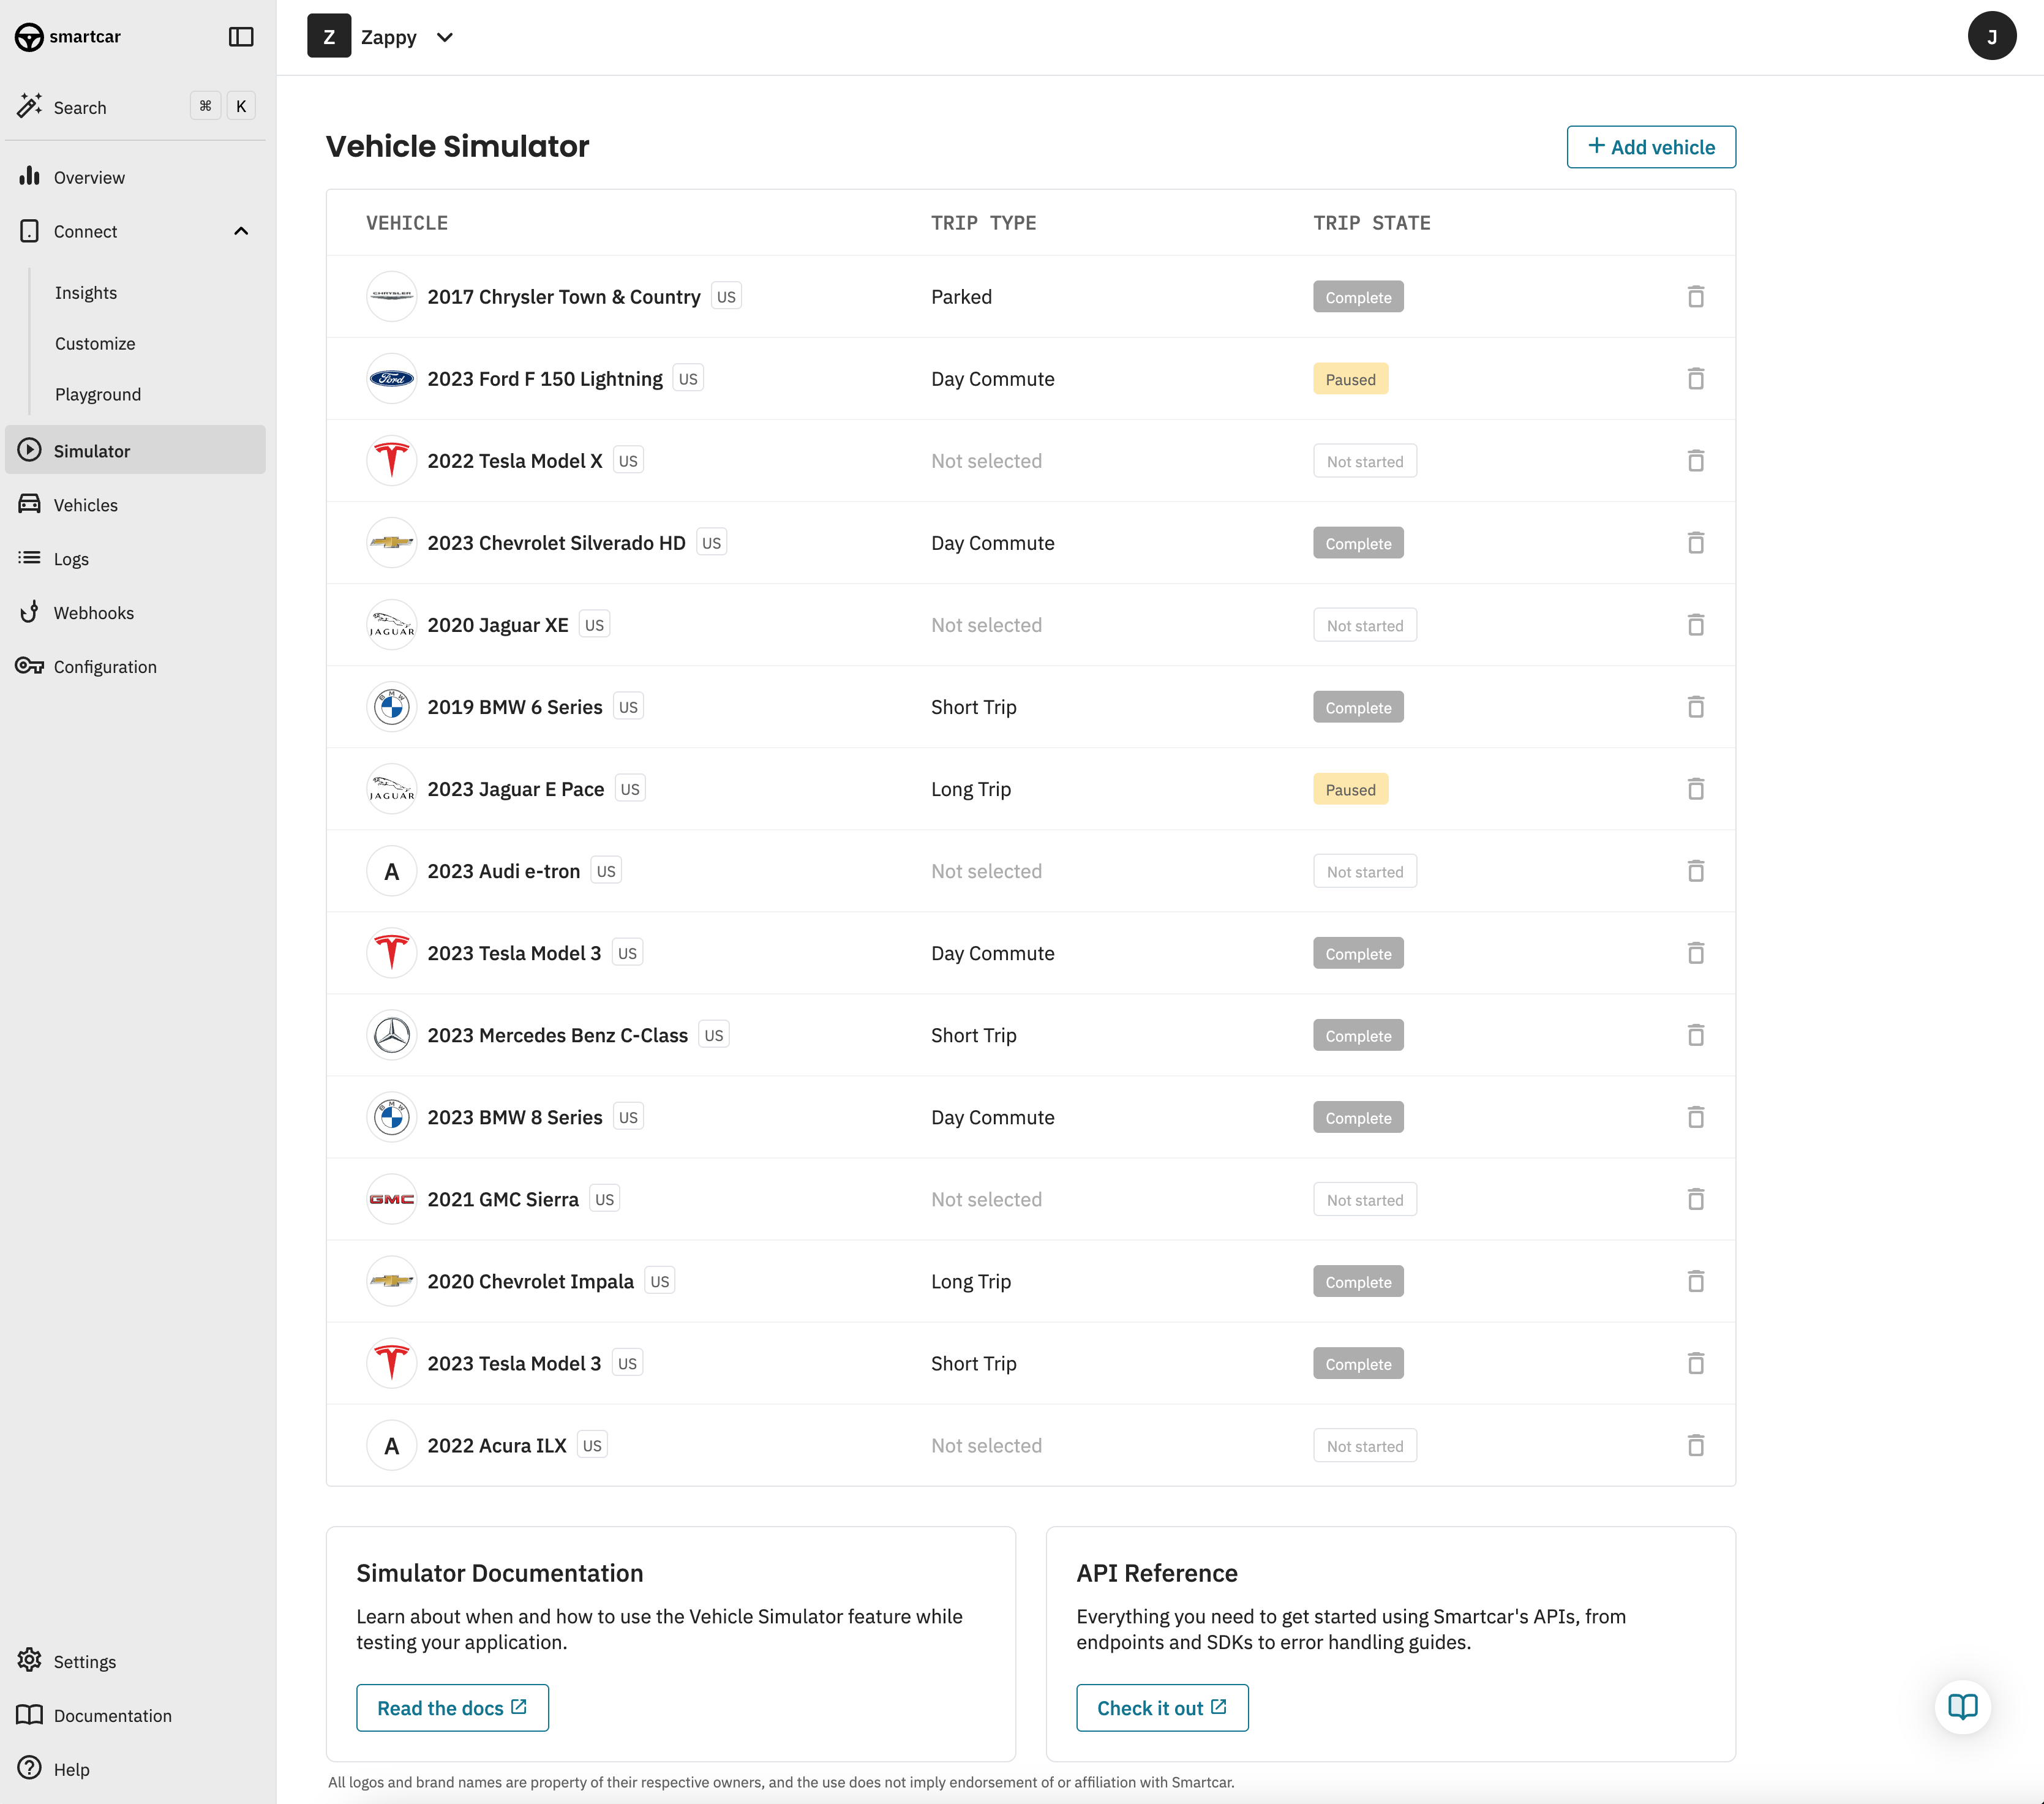 ## 1. Create a simulated vehicle
#### Create a simulated vehicle
Begin by logging into the Smartcar Dashboard and navigating to the Simulator tab. Choose your region and select a Smartcar-compatible vehicle using the Make, Model, and Year dropdowns. Or, use the VIN search feature to create a simulated vehicle of the same Make, Model and Year as the VIN entered, as long as the vehicle is compatible with Smartcar. Please note the VIN search is only available for US-based VINs at this time.
#### Review the vehicle capabilities
Confirm the vehicle's supported capabilities includes those you wish to test.
#### Select a vehicle state
Select from one of three available vehicle states for your simulated vehicle. The states vary in duration from 8 to 24 hours and include driving, charging, and parked vehicle states for a wide range of test scenarios.
## 2. Connect your app to the simulated vehicle
Once you've selected a vehicle and state, you are ready to connect the simulated vehicle to your application for testing.
Grab the simulated vehicle credentials
On the simulation screen, you will find a Connect Credentials button that will open a modal containing the simulated vehicle's credentials. You will need these to connect your app and vehicle using Smartcar Connect.
#### Launch Smartcar Connect in simulated mode
When launching Smartcar Connect, pass in the query parameter mode=simulated to enable simulated mode and ensure you can connect to your newly created simulated vehicle. Smartcar's SDKs provide a convenient option to facilitate this:
## 1. Create a simulated vehicle
#### Create a simulated vehicle
Begin by logging into the Smartcar Dashboard and navigating to the Simulator tab. Choose your region and select a Smartcar-compatible vehicle using the Make, Model, and Year dropdowns. Or, use the VIN search feature to create a simulated vehicle of the same Make, Model and Year as the VIN entered, as long as the vehicle is compatible with Smartcar. Please note the VIN search is only available for US-based VINs at this time.
#### Review the vehicle capabilities
Confirm the vehicle's supported capabilities includes those you wish to test.
#### Select a vehicle state
Select from one of three available vehicle states for your simulated vehicle. The states vary in duration from 8 to 24 hours and include driving, charging, and parked vehicle states for a wide range of test scenarios.
## 2. Connect your app to the simulated vehicle
Once you've selected a vehicle and state, you are ready to connect the simulated vehicle to your application for testing.
Grab the simulated vehicle credentials
On the simulation screen, you will find a Connect Credentials button that will open a modal containing the simulated vehicle's credentials. You will need these to connect your app and vehicle using Smartcar Connect.
#### Launch Smartcar Connect in simulated mode
When launching Smartcar Connect, pass in the query parameter mode=simulated to enable simulated mode and ensure you can connect to your newly created simulated vehicle. Smartcar's SDKs provide a convenient option to facilitate this:
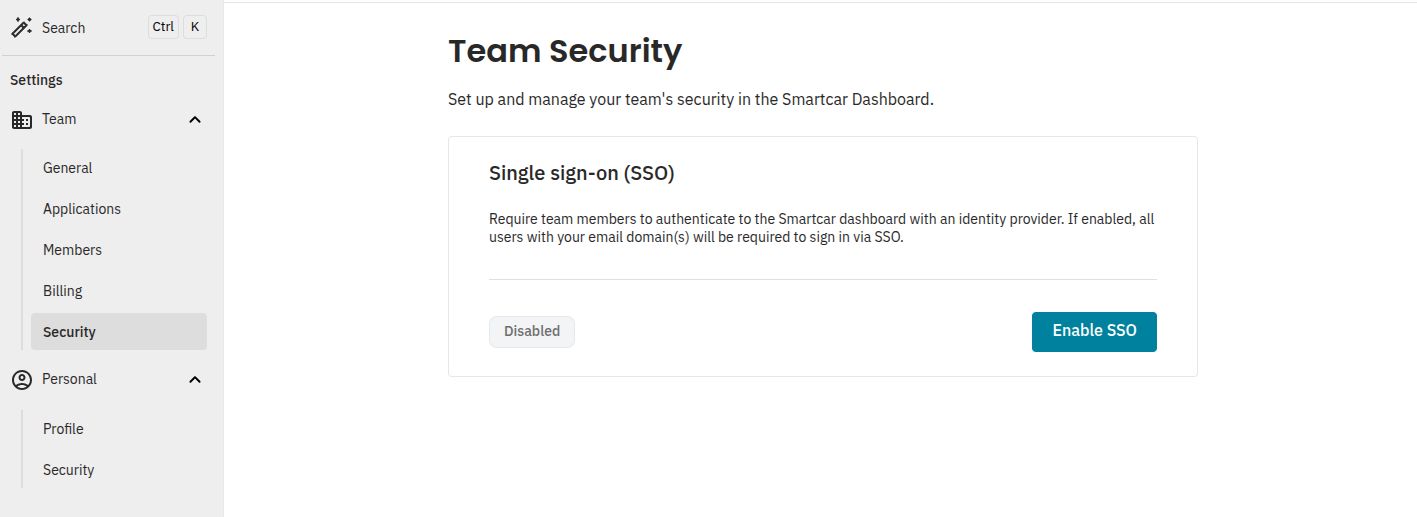 You’ll be redirected to start the SSO configuration process.
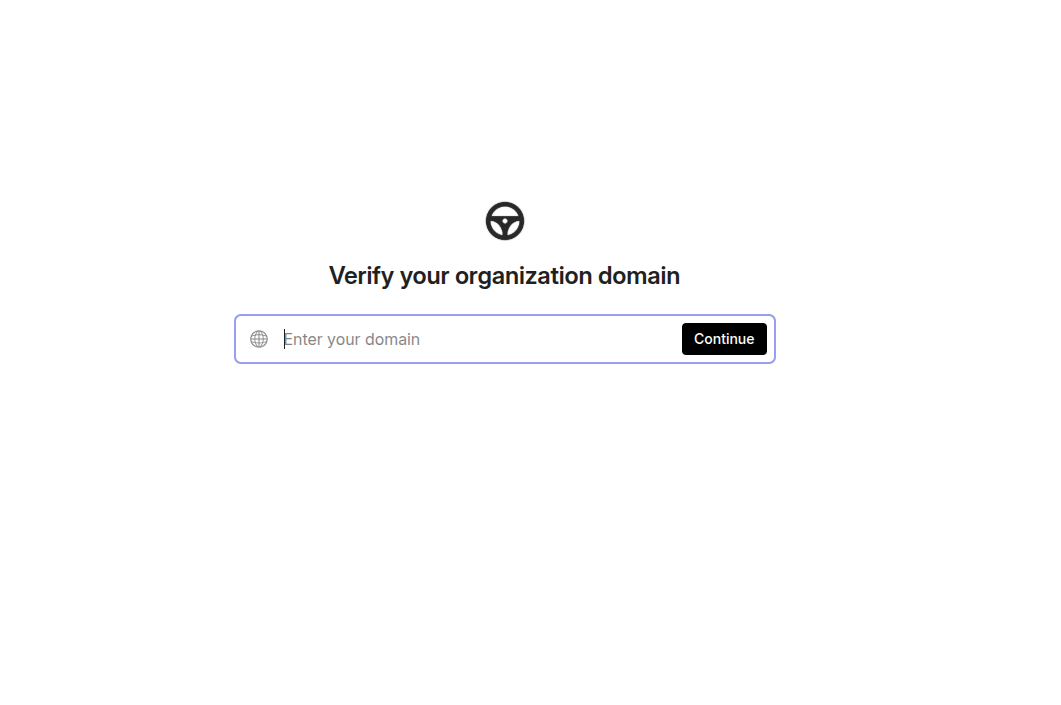 Depending on your DNS provider, you'll receive instructions on how to verify your domain.
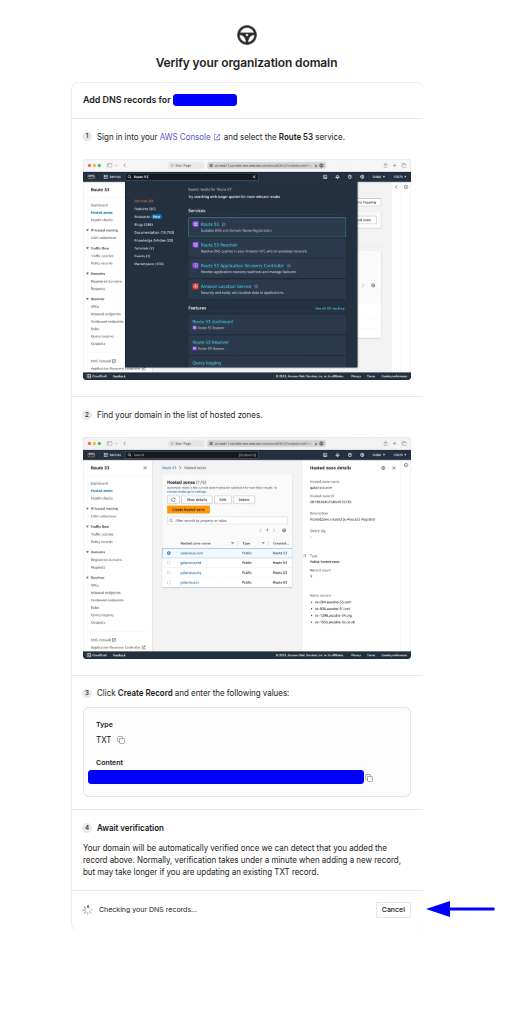 Once your domain is verified, you’ll be able to select your Identity Provider
(IdP).
Once your domain is verified, you’ll be able to select your Identity Provider
(IdP).
 You'll be provided a guide on how to get set up based on your IdP.
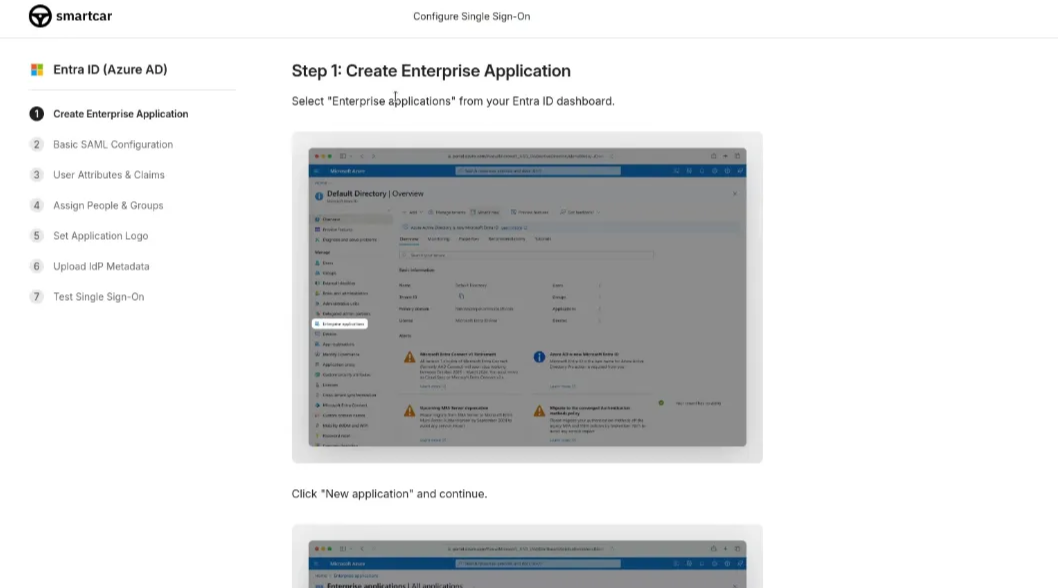 Once you’ve got everything configured, you’ll be prompted to test SSO.
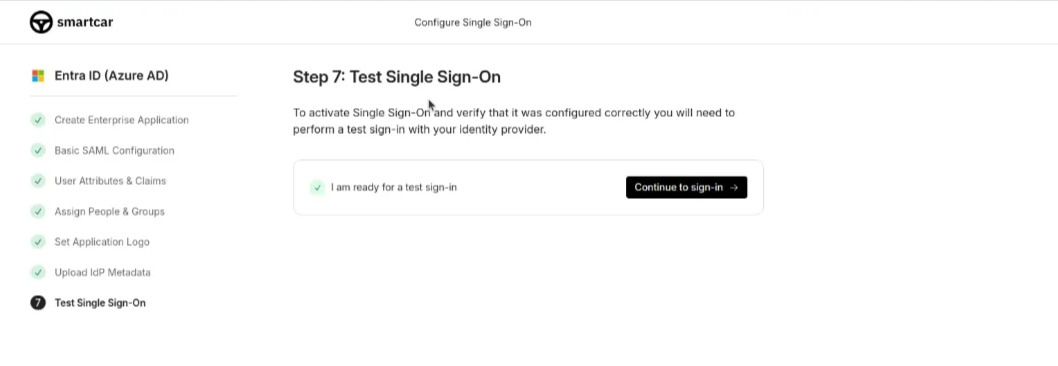
 ## Disabling SSO
If you have SSO configured, the Team Owner can disable it from **Team
settings > Security**.
## Disabling SSO
If you have SSO configured, the Team Owner can disable it from **Team
settings > Security**.
 When a newly added member has signed in via SSO, they will have the Viewer role
by default. Other team members with the appropriate role can promote these
members as needed.
When a newly added member has signed in via SSO, they will have the Viewer role
by default. Other team members with the appropriate role can promote these
members as needed.
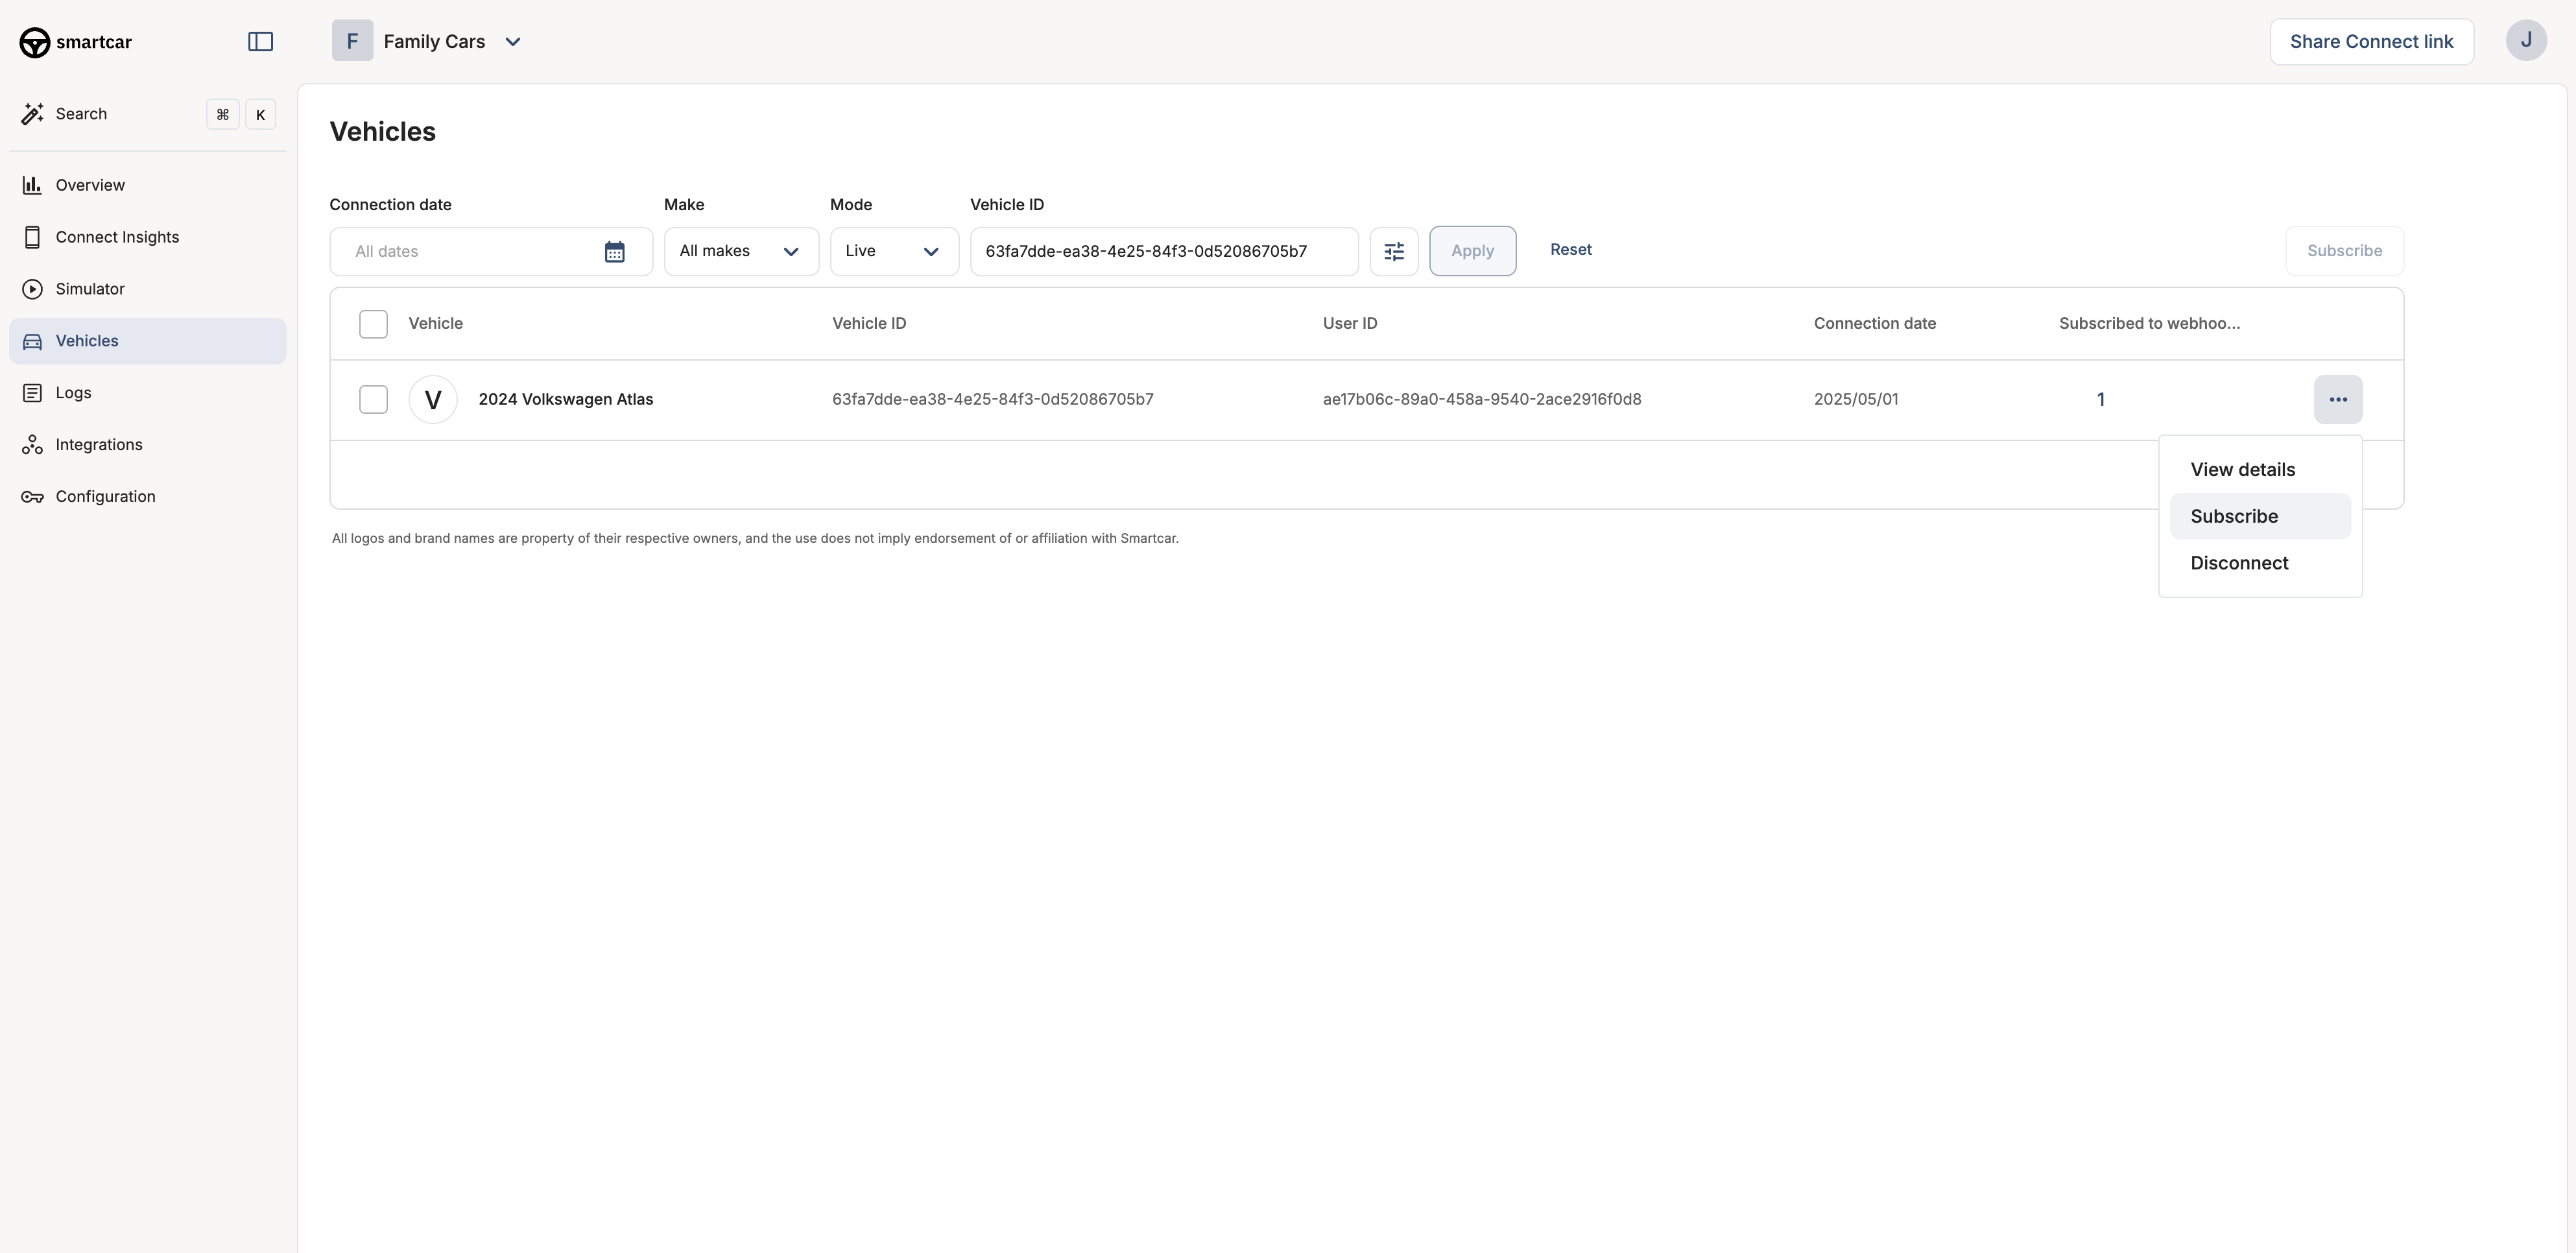
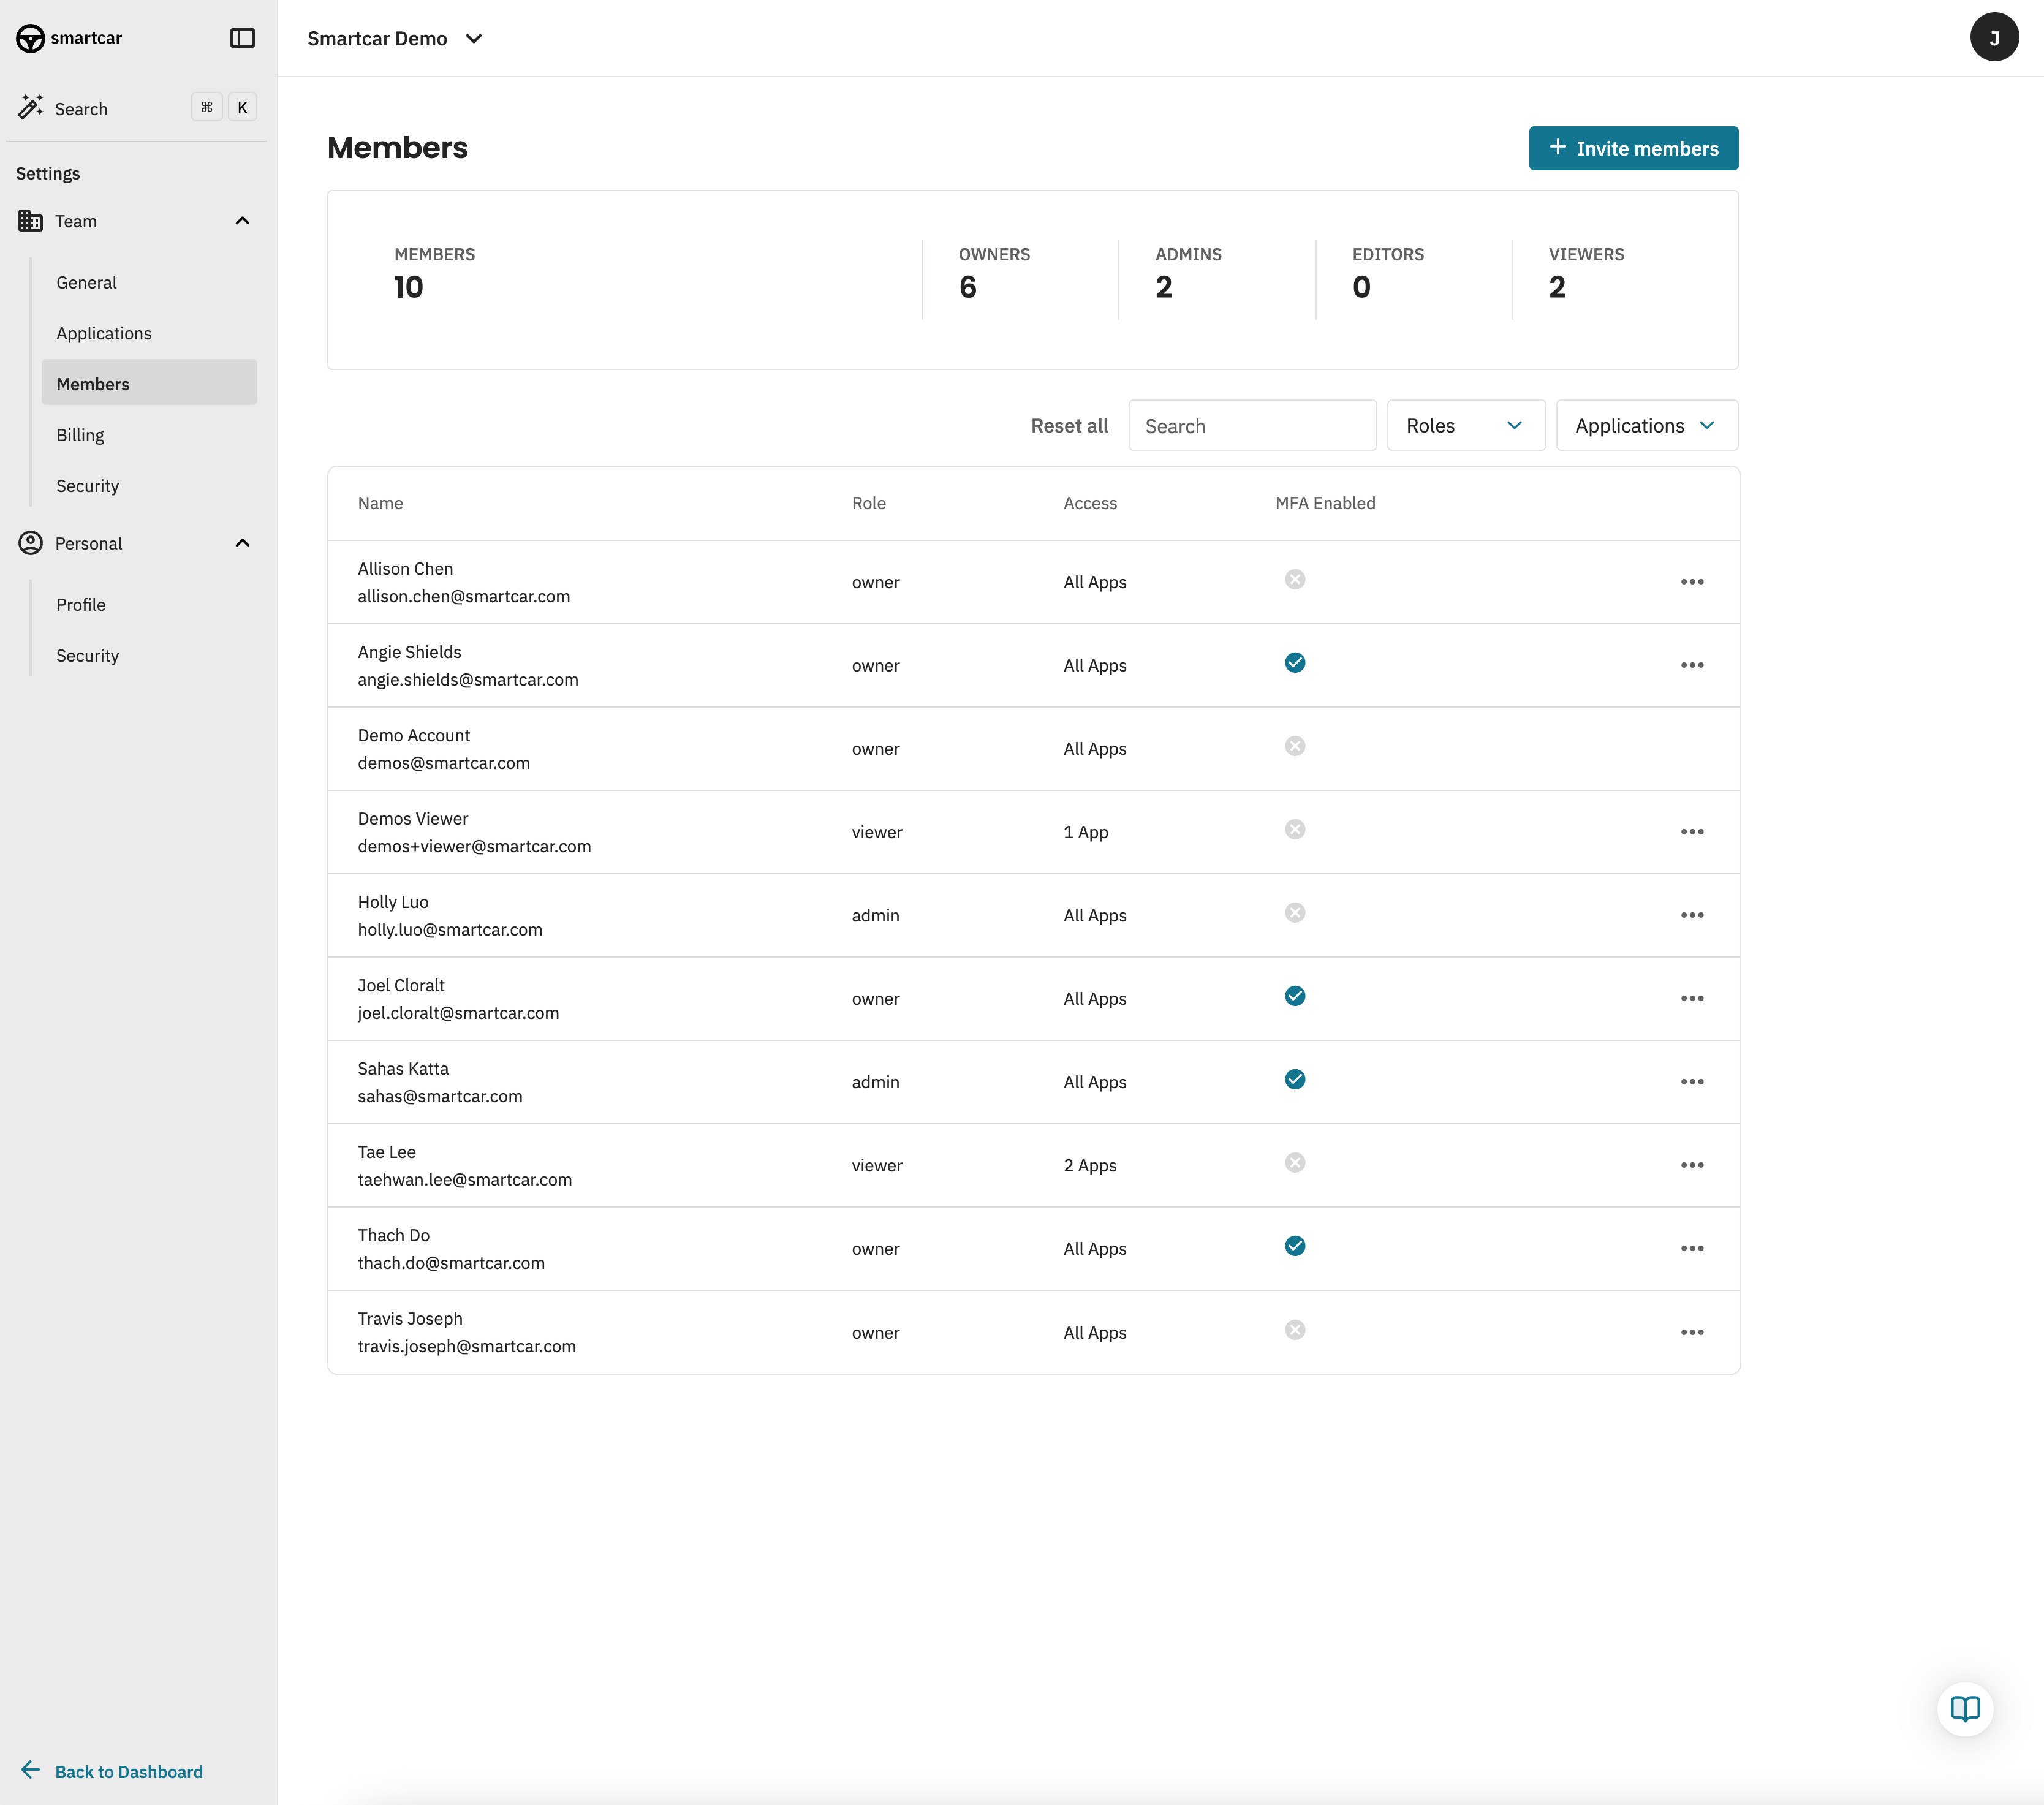 ## Roles and Permissions
Team members can be added on any plan. Specific roles are available on our [Enterprise plan](https://smartcar.com/pricing).
| | Owner | Admin | Editor | Viewer |
| ----------------------------- | ----------------------------------- | ----------------------------------- | ------------------------------------ | ------------------------------------ |
| Manage billing | ✅ | | | |
| View billing | ✅ | | | |
| Delete applications | ✅ | | | |
| Modify team settings | ✅ | | | |
| Remove team members | ✅ | ✅ | | |
| Modify team members | ✅ | ✅ | | |
| Create applications | ✅ | ✅ | | |
| Modify applications | ✅ | ✅ | ✅ | |
| View applications | ✅ | ✅ | ✅ | ✅ |
| View team members | ✅ | ✅ | ✅ | ✅ |
## Roles and Permissions
Team members can be added on any plan. Specific roles are available on our [Enterprise plan](https://smartcar.com/pricing).
| | Owner | Admin | Editor | Viewer |
| ----------------------------- | ----------------------------------- | ----------------------------------- | ------------------------------------ | ------------------------------------ |
| Manage billing | ✅ | | | |
| View billing | ✅ | | | |
| Delete applications | ✅ | | | |
| Modify team settings | ✅ | | | |
| Remove team members | ✅ | ✅ | | |
| Modify team members | ✅ | ✅ | | |
| Create applications | ✅ | ✅ | | |
| Modify applications | ✅ | ✅ | ✅ | |
| View applications | ✅ | ✅ | ✅ | ✅ |
| View team members | ✅ | ✅ | ✅ | ✅ |
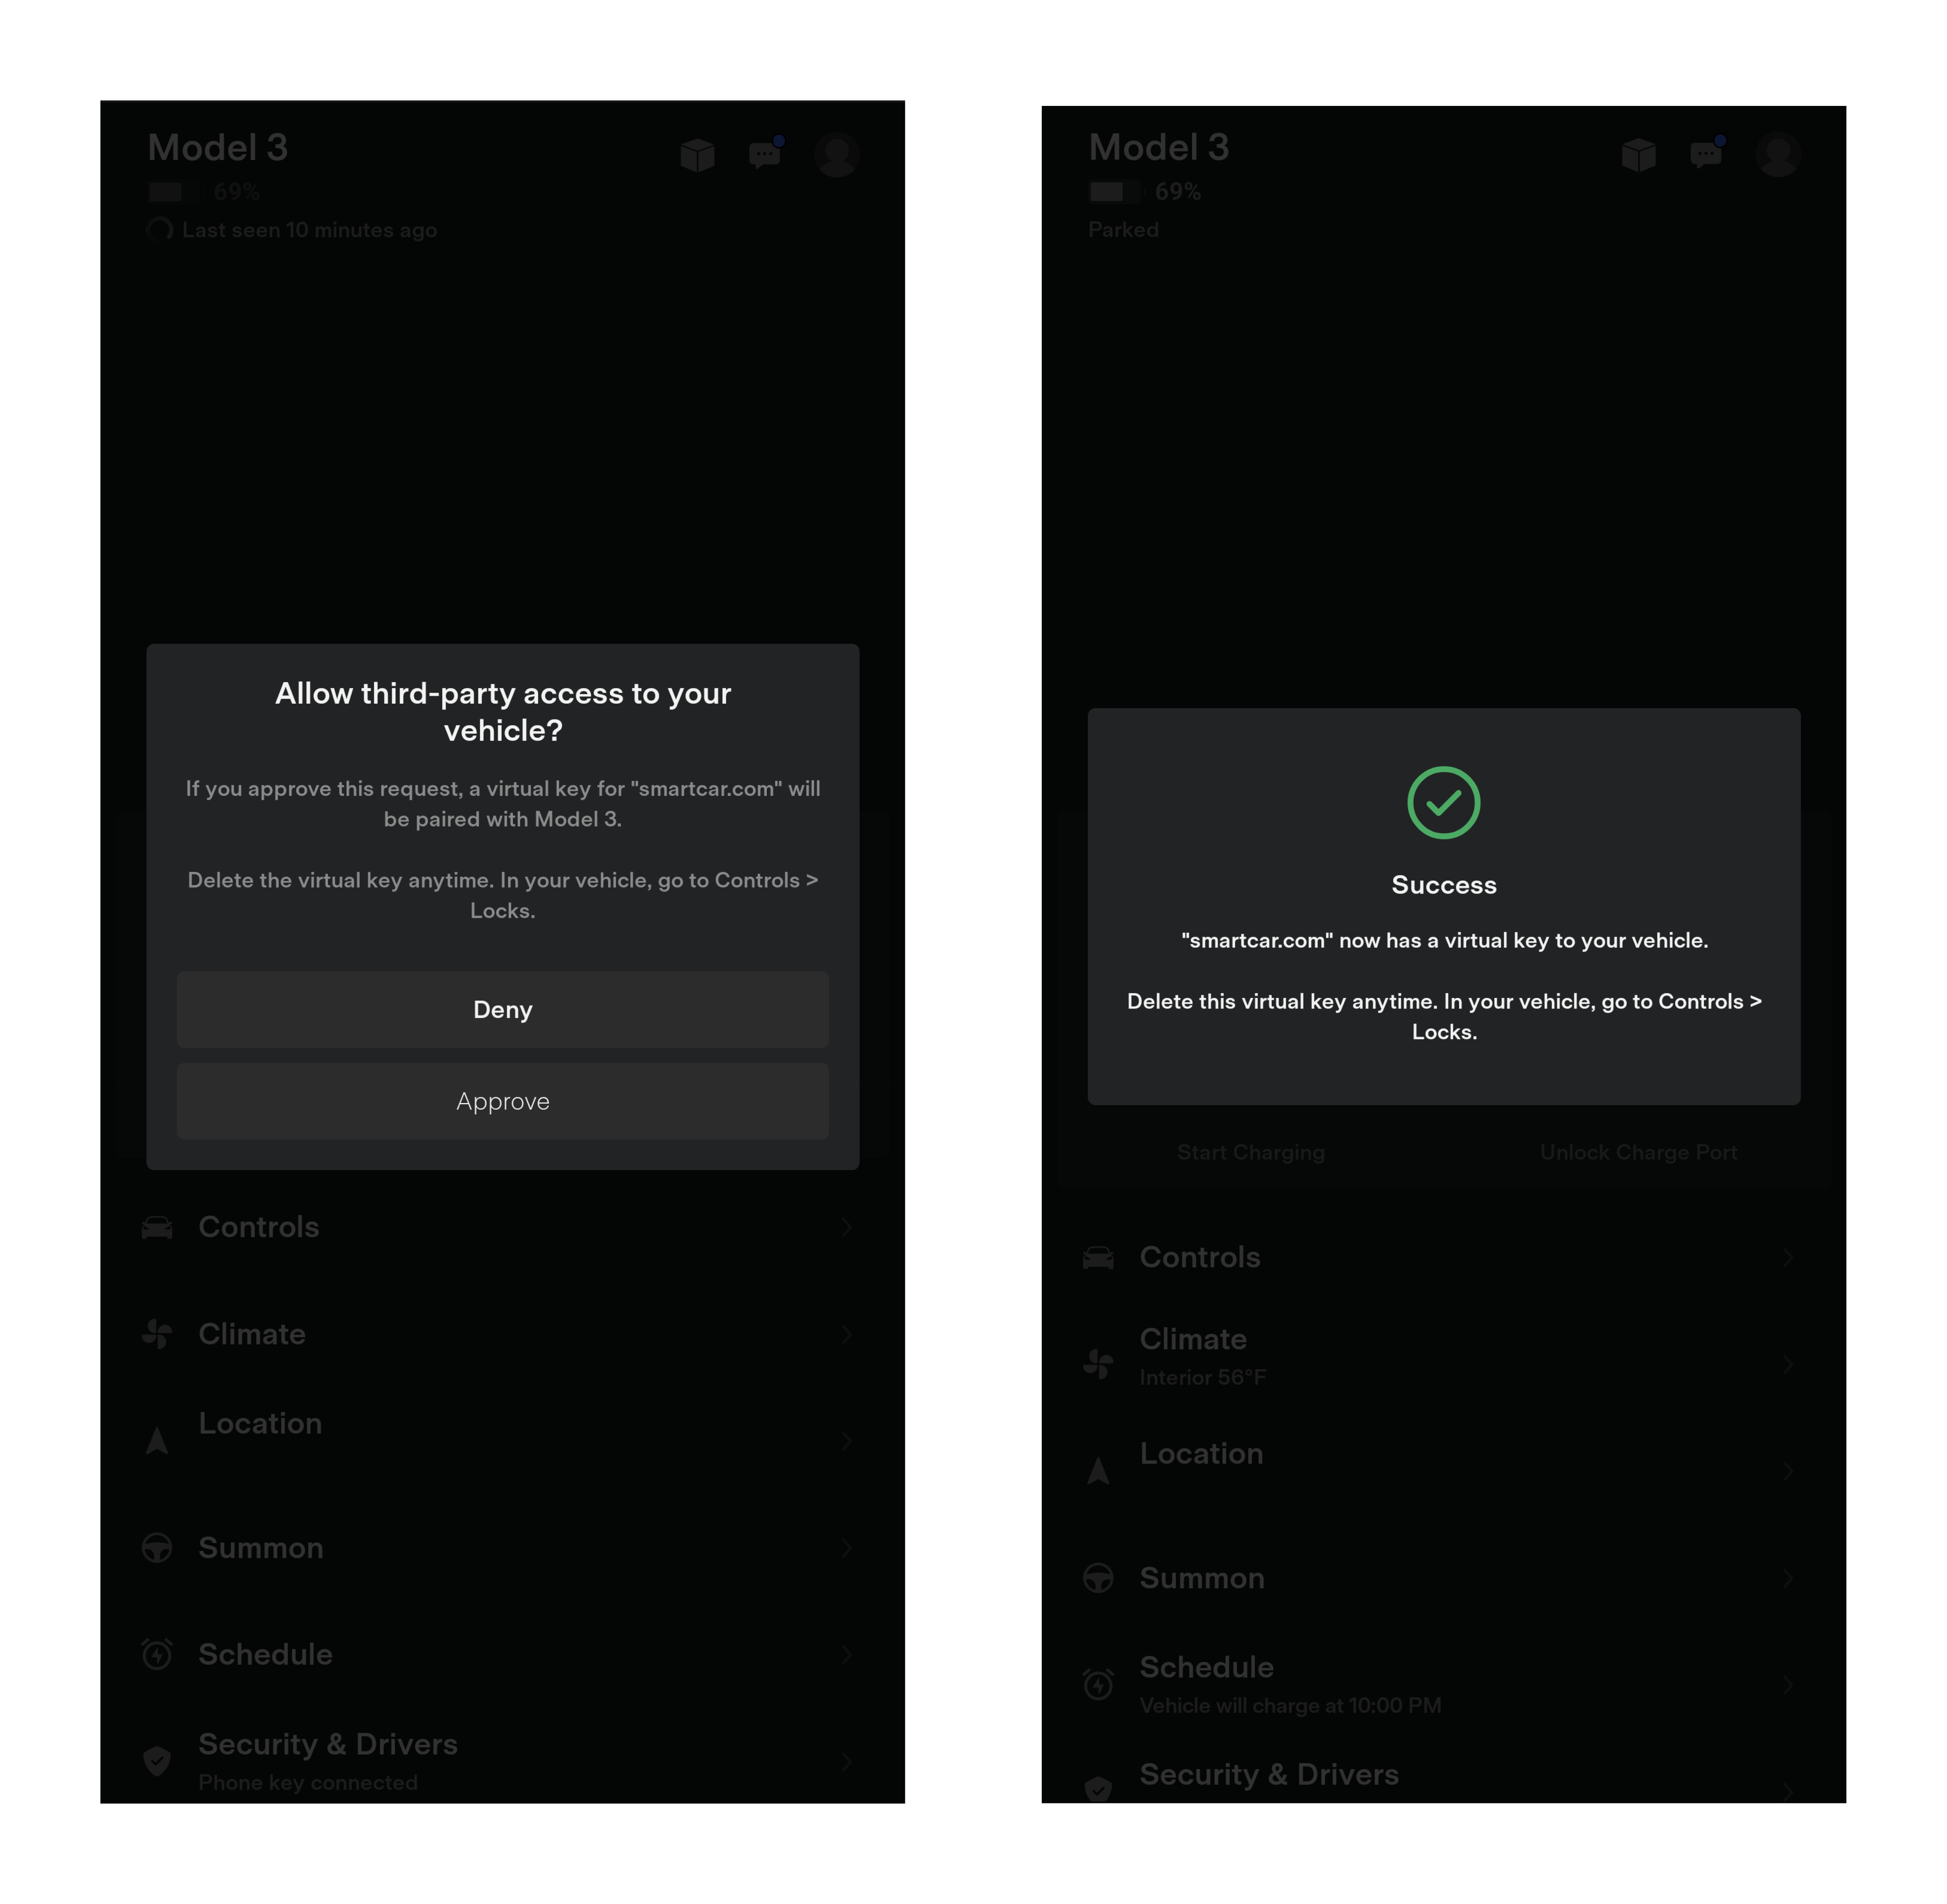

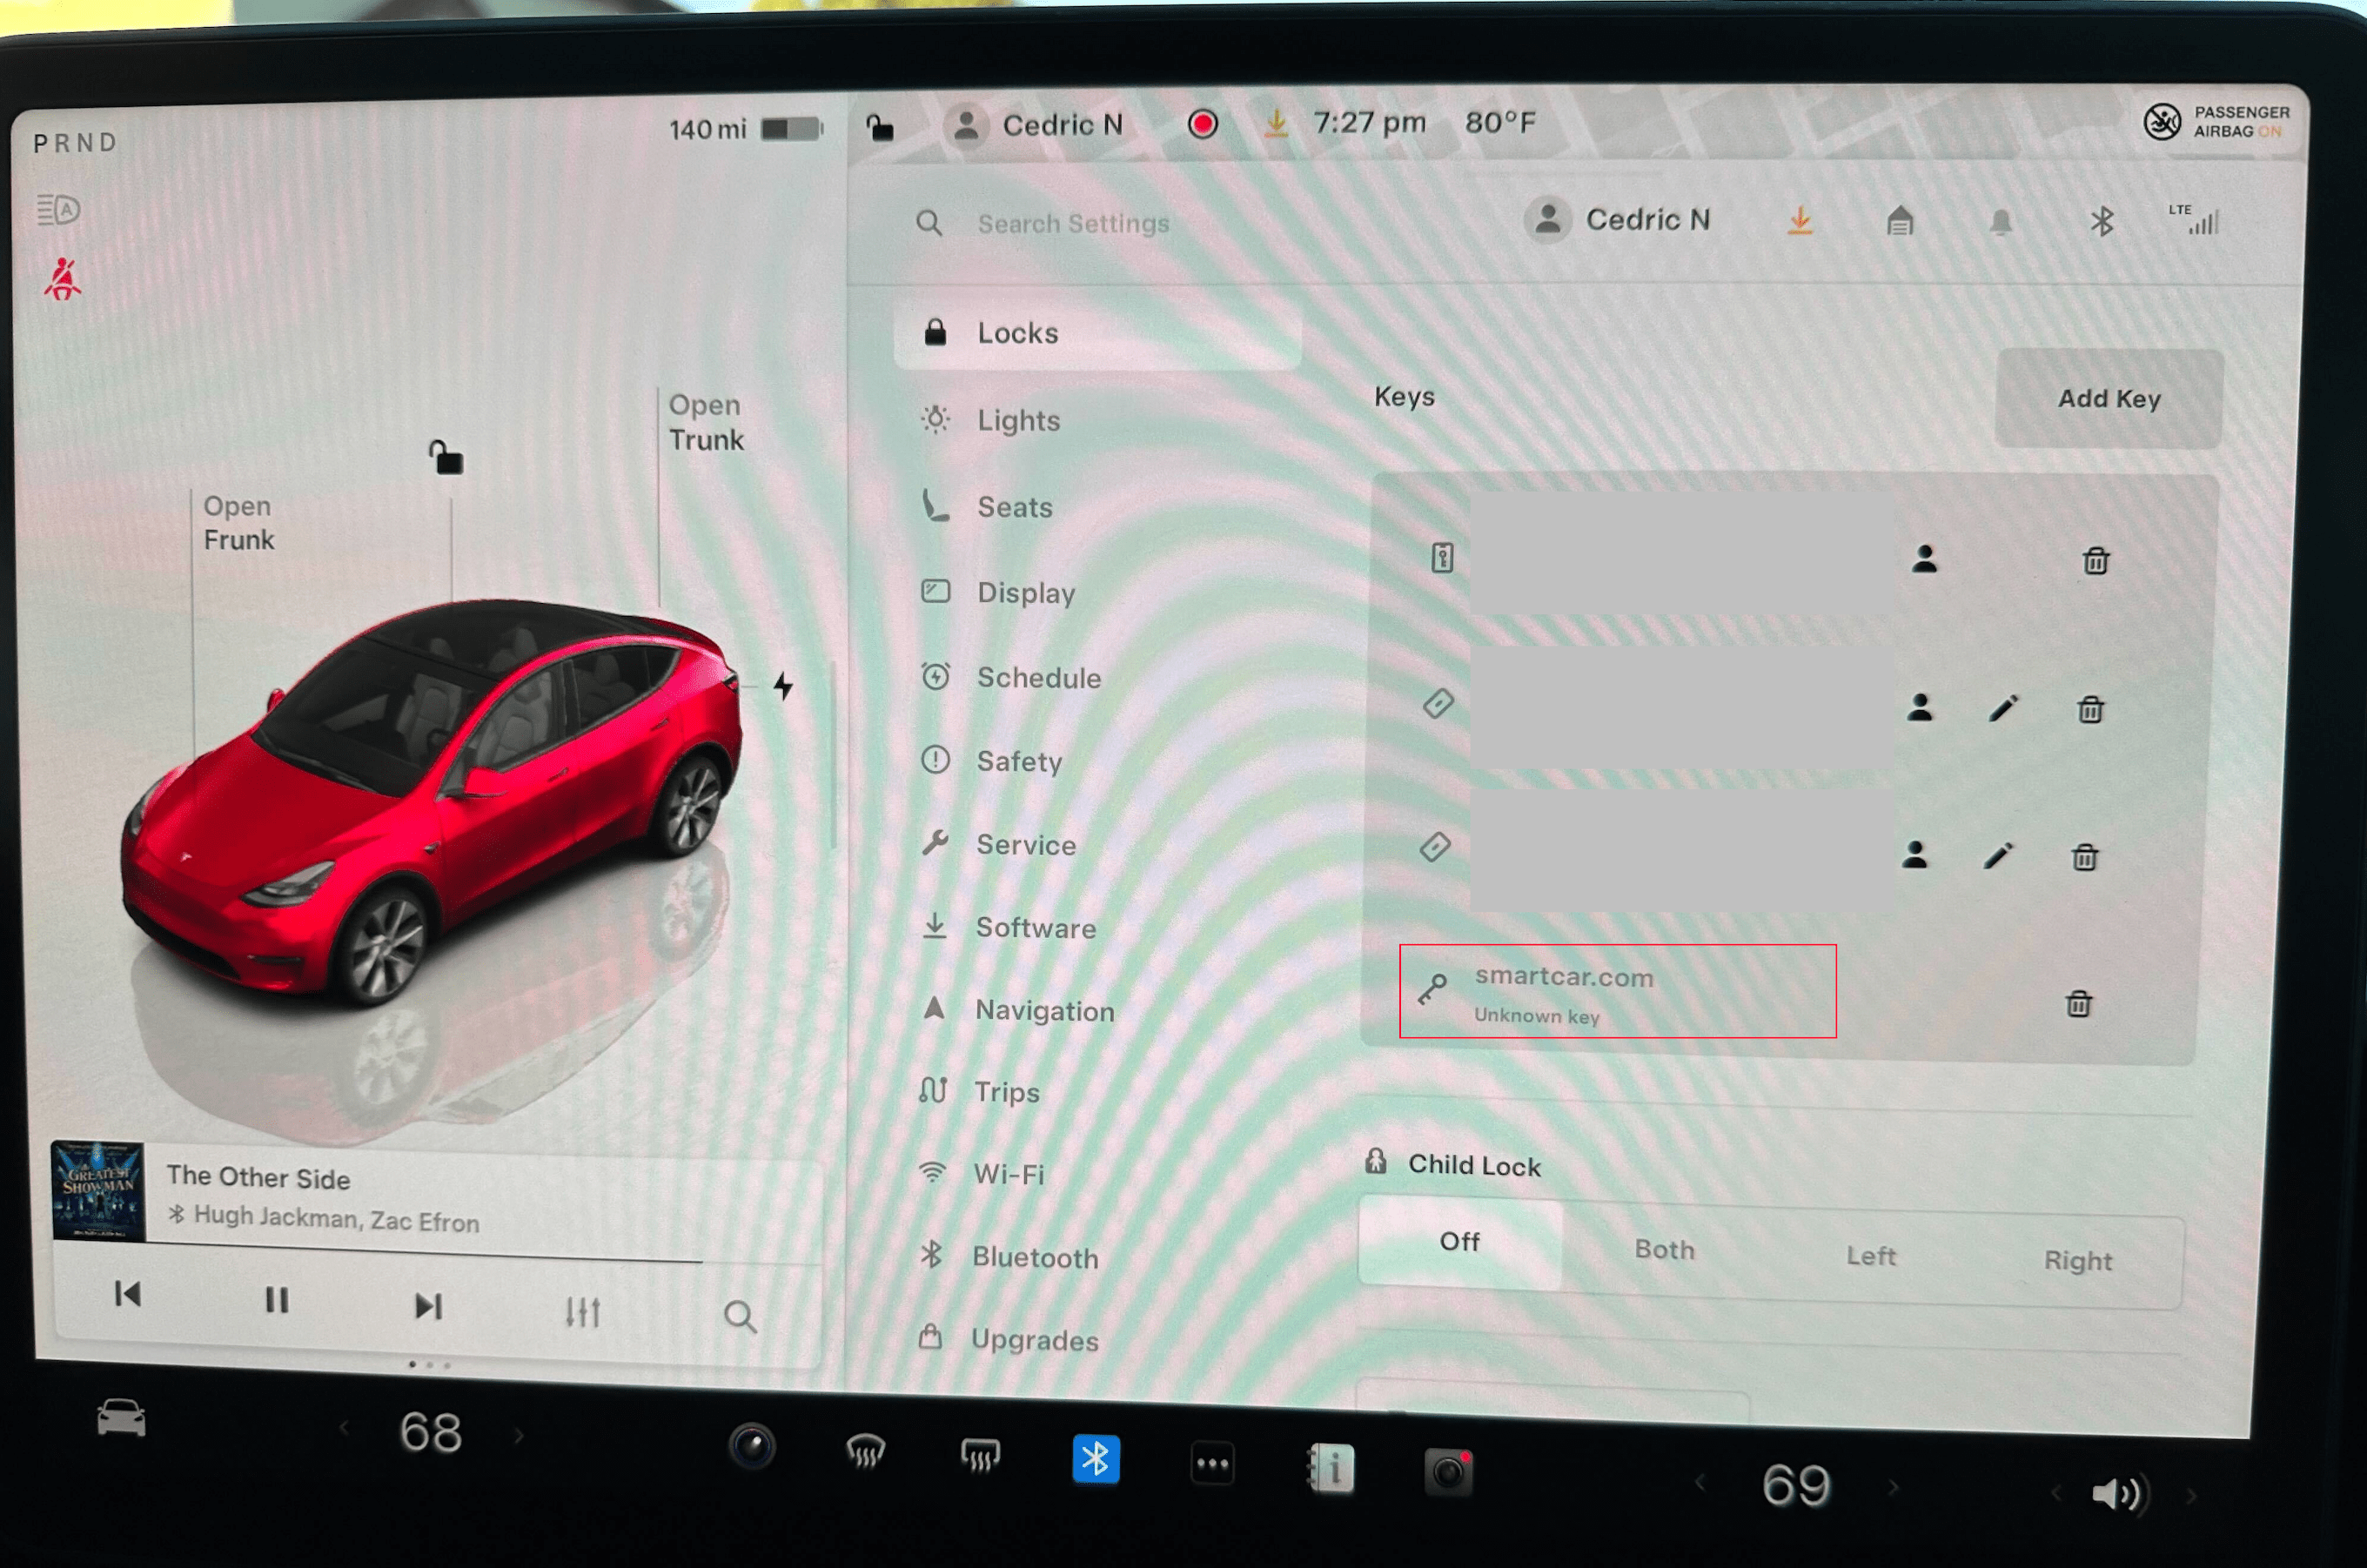 Smartcar will automatically determine which Tesla vehicles require a Virtual Key and prompt users to add it only for those vehicles. If a user has multiple Tesla vehicles, they will be prompted to add a Virtual Key for each vehicle that requires it. At least one vehicle must complete the pairing process before the user can continue with the Connect flow and connect their Tesla to your application.
### 2020 and Earlier Model S/X with Streaming Support
For 2020 and earlier Model S and X vehicles that support streaming (via a software update), Smartcar Connect handles this differently:
* These vehicles **do not require Virtual Key installation**
* During the Connect flow, users are prompted about enabling streaming via an in-vehicle toggle
* Users can request email instructions on how to enable the streaming setting in their vehicle's infotainment screen
* Once the streaming toggle is enabled in the vehicle, data will be refreshed more frequently
* Without streaming enabled, data is refreshed every 5 minutes while the vehicle is awake
---
# Source: https://smartcar.com/docs/errors/testing-errors.md
> ## Documentation Index
> Fetch the complete documentation index at: https://smartcar.com/docs/llms.txt
> Use this file to discover all available pages before exploring further.
# Testing Errors
> By launching Connect in [simulated mode](/docs/connect/advanced-config/modes), you're able to test your application against certain errors.
## Testing Connect Errors
You can use the following emails to test a subset of Connect errors:
| Error | Email | VIN |
| ---------------------- | ----------------------------------------------------------------------------- | ----------------- |
| `invalid_subscription` | [smartcar@invalid-subscription.com](mailto:smartcar@invalid-subscription.com) | 0SCAUDI0155C49A95 |
| `vehicle_incompatible` | [smartcar@vehicle-incompatible.com](mailto:smartcar@vehicle-incompatible.com) | 0SCAUDI012FE3B132 |
Visit the [Connect Errors](/api-reference/api-errors#connect-errors) page for more details.
## Testing API Errors
You can use use the following emails to test these API error types:
* `COMPATIBILITY`
* `CONNECTED_SERVICES_ACCOUNT`
* `UPSTREAM`
* `VEHICLE_STATE`
| Type | Code | Email | VIN |
| ---------------------------- | ----------------------------- | ---------------------------------------------------------------------------------------------------------------------------------------- | ----------------- |
| `COMPATIBILITY` | `MAKE_NOT_COMPATIBLE` | [COMPATIBILITY.MAKE\_NOT\_COMPATIBLE@smartcar.com](mailto:COMPATIBILITY.MAKE_NOT_COMPATIBLE@smartcar.com) | 0SCLR000270BE6600 |
| `COMPATIBILITY` | `SMARTCAR_NOT_CAPABLE` | [COMPATIBILITY.SMARTCAR\_NOT\_CAPABLE@smartcar.com](mailto:COMPATIBILITY.SMARTCAR_NOT_CAPABLE@smartcar.com) | 0SCLR0002DC18F57F |
| `COMPATIBILITY` | `VEHICLE_NOT_CAPABLE` | [COMPATIBILITY.VEHICLE\_NOT\_CAPABLE@smartcar.com](mailto:COMPATIBILITY.VEHICLE_NOT_CAPABLE@smartcar.com) | 0SCLR00024C7CDF7A |
| `CONNECTED_SERVICES_ACCOUNT` | `ACCOUNT_ISSUE` | [CONNECTED\_SERVICES\_ACCOUNT.ACCOUNT\_ISSUE@smartcar.com](mailto:CONNECTED_SERVICES_ACCOUNT.ACCOUNT_ISSUE@smartcar.com) | 0SCLR00026BAAA136 |
| `CONNECTED_SERVICES_ACCOUNT` | `AUTHENTICATION_FAILED` | [CONNECTED\_SERVICES\_ACCOUNT.AUTHENTICATION\_FAILED@smartcar.com](mailto:CONNECTED_SERVICES_ACCOUNT.AUTHENTICATION_FAILED@smartcar.com) | 0SCLR00021D803C7B |
| `CONNECTED_SERVICES_ACCOUNT` | `NO_VEHICLES` | [CONNECTED\_SERVICES\_ACCOUNT.NO\_VEHICLES@smartcar.com](mailto:CONNECTED_SERVICES_ACCOUNT.NO_VEHICLES@smartcar.com) | 0SCLR00027671837B |
| `CONNECTED_SERVICES_ACCOUNT` | `SUBSCRIPTION` | [CONNECTED\_SERVICES\_ACCOUNT.SUBSCRIPTION@smartcar.com](mailto:CONNECTED_SERVICES_ACCOUNT.SUBSCRIPTION@smartcar.com) | 0SCLR0002B9BAF29F |
| `CONNECTED_SERVICES_ACCOUNT` | `VEHICLE_MISSING` | [CONNECTED\_SERVICES\_ACCOUNT.VEHICLE\_MISSING@smartcar.com](mailto:CONNECTED_SERVICES_ACCOUNT.VEHICLE_MISSING@smartcar.com) | 0SCLR00024E29EEBD |
| `UPSTREAM` | `INVALID_DATA` | [UPSTREAM.INVALID\_DATA@smartcar.com](mailto:UPSTREAM.INVALID_DATA@smartcar.com) | 0SCLR000298A0A649 |
| `UPSTREAM` | `KNOWN_ISSUE` | [UPSTREAM.KNOWN\_ISSUE@smartcar.com](mailto:UPSTREAM.KNOWN_ISSUE@smartcar.com) | 0SCLR0002A8760B72 |
| `UPSTREAM` | `NO_RESPONSE` | [UPSTREAM.NO\_RESPONSE@smartcar.com](mailto:UPSTREAM.NO_RESPONSE@smartcar.com) | 0SCLR0002C23E43AB |
| `UPSTREAM` | `UNKNOWN_ISSUE` | [UPSTREAM.UNKNOWN\_ISSUE@smartcar.com](mailto:UPSTREAM.UNKNOWN_ISSUE@smartcar.com) | 0SCLR0002D4878901 |
| `VEHICLE_STATE` | `ASLEEP` | [VEHICLE\_STATE.ASLEEP@smartcar.com](mailto:VEHICLE_STATE.ASLEEP@smartcar.com) | 0SCLR0002E8896323 |
| `VEHICLE_STATE` | `CHARGING_IN_PROGRESS` | [VEHICLE\_STATE.CHARGING\_IN\_PROGRESS@smartcar.com](mailto:VEHICLE_STATE.CHARGING_IN_PROGRESS@smartcar.com) | 0SCLR000221F1E672 |
| `VEHICLE_STATE` | `CHARGING_PLUG_NOT_CONNECTED` | [VEHICLE\_STATE.CHARGING\_PLUG\_NOT\_CONNECTED@smartcar.com](mailto:VEHICLE_STATE.CHARGING_PLUG_NOT_CONNECTED@smartcar.com) | 0SCLR0002CBFC7C21 |
| `VEHICLE_STATE` | `DOOR_OPEN` | [VEHICLE\_STATE.DOOR\_OPEN@smartcar.com](mailto:VEHICLE_STATE.DOOR_OPEN@smartcar.com) | 0SCLR0002F8BD90B8 |
| `VEHICLE_STATE` | `FULLY_CHARGED` | [VEHICLE\_STATE.FULLY\_CHARGED@smartcar.com](mailto:VEHICLE_STATE.FULLY_CHARGED@smartcar.com) | 0SCLR00029CD9D894 |
| `VEHICLE_STATE` | `HOOD_OPEN` | [VEHICLE\_STATE.HOOD\_OPEN@smartcar.com](mailto:VEHICLE_STATE.HOOD_OPEN@smartcar.com) | 0SCLR000219CD4A2C |
| `VEHICLE_STATE` | `IGNITION_ON` | [VEHICLE\_STATE.IGNITION\_ON@smartcar.com](mailto:VEHICLE_STATE.IGNITION_ON@smartcar.com) | 0SCLR00021D49E58A |
| `VEHICLE_STATE` | `IN_MOTION` | [VEHICLE\_STATE.IN\_MOTION@smartcar.com](mailto:VEHICLE_STATE.IN_MOTION@smartcar.com) | 0SCLR00024F6EE640 |
| `VEHICLE_STATE` | `REMOTE_ACCESS_DISABLED` | [VEHICLE\_STATE.REMOTE\_ACCESS\_DISABLED@smartcar.com](mailto:VEHICLE_STATE.REMOTE_ACCESS_DISABLED@smartcar.com) | 0SCLR0002588A5CC1 |
| `VEHICLE_STATE` | `TRUNK_OPEN` | [VEHICLE\_STATE.TRUNK\_OPEN@smartcar.com](mailto:VEHICLE_STATE.TRUNK_OPEN@smartcar.com) | 0SCLR00023C607FDB |
| `VEHICLE_STATE` | `UNKNOWN` | [VEHICLE\_STATE.UNKNOWN@smartcar.com](mailto:VEHICLE_STATE.UNKNOWN@smartcar.com) | 0SCLR0002E6CC0314 |
| `VEHICLE_STATE` | `UNREACHABLE` | [VEHICLE\_STATE.UNREACHABLE@smartcar.com](mailto:VEHICLE_STATE.UNREACHABLE@smartcar.com) | 0SCLR000247EBF067 |
| `VEHICLE_STATE` | `VEHICLE_OFFLINE_FOR_SERVICE` | [VEHICLE\_STATE.VEHICLE\_OFFLINE\_FOR\_SERVICE@smartcar.com](mailto:VEHICLE_STATE.VEHICLE_OFFLINE_FOR_SERVICE@smartcar.com) | 0SCLR0002AF1D71A1 |
---
# Source: https://smartcar.com/docs/integrations/webhooks/best-practices/testing.md
> ## Documentation Index
> Fetch the complete documentation index at: https://smartcar.com/docs/llms.txt
> Use this file to discover all available pages before exploring further.
# Testing
> Test your webhook integration before going to production
Thoroughly test your webhook integration to catch issues before they affect users.
## Test in Development
Use the Smartcar Dashboard to trigger test webhook deliveries.
Smartcar will automatically determine which Tesla vehicles require a Virtual Key and prompt users to add it only for those vehicles. If a user has multiple Tesla vehicles, they will be prompted to add a Virtual Key for each vehicle that requires it. At least one vehicle must complete the pairing process before the user can continue with the Connect flow and connect their Tesla to your application.
### 2020 and Earlier Model S/X with Streaming Support
For 2020 and earlier Model S and X vehicles that support streaming (via a software update), Smartcar Connect handles this differently:
* These vehicles **do not require Virtual Key installation**
* During the Connect flow, users are prompted about enabling streaming via an in-vehicle toggle
* Users can request email instructions on how to enable the streaming setting in their vehicle's infotainment screen
* Once the streaming toggle is enabled in the vehicle, data will be refreshed more frequently
* Without streaming enabled, data is refreshed every 5 minutes while the vehicle is awake
---
# Source: https://smartcar.com/docs/errors/testing-errors.md
> ## Documentation Index
> Fetch the complete documentation index at: https://smartcar.com/docs/llms.txt
> Use this file to discover all available pages before exploring further.
# Testing Errors
> By launching Connect in [simulated mode](/docs/connect/advanced-config/modes), you're able to test your application against certain errors.
## Testing Connect Errors
You can use the following emails to test a subset of Connect errors:
| Error | Email | VIN |
| ---------------------- | ----------------------------------------------------------------------------- | ----------------- |
| `invalid_subscription` | [smartcar@invalid-subscription.com](mailto:smartcar@invalid-subscription.com) | 0SCAUDI0155C49A95 |
| `vehicle_incompatible` | [smartcar@vehicle-incompatible.com](mailto:smartcar@vehicle-incompatible.com) | 0SCAUDI012FE3B132 |
Visit the [Connect Errors](/api-reference/api-errors#connect-errors) page for more details.
## Testing API Errors
You can use use the following emails to test these API error types:
* `COMPATIBILITY`
* `CONNECTED_SERVICES_ACCOUNT`
* `UPSTREAM`
* `VEHICLE_STATE`
| Type | Code | Email | VIN |
| ---------------------------- | ----------------------------- | ---------------------------------------------------------------------------------------------------------------------------------------- | ----------------- |
| `COMPATIBILITY` | `MAKE_NOT_COMPATIBLE` | [COMPATIBILITY.MAKE\_NOT\_COMPATIBLE@smartcar.com](mailto:COMPATIBILITY.MAKE_NOT_COMPATIBLE@smartcar.com) | 0SCLR000270BE6600 |
| `COMPATIBILITY` | `SMARTCAR_NOT_CAPABLE` | [COMPATIBILITY.SMARTCAR\_NOT\_CAPABLE@smartcar.com](mailto:COMPATIBILITY.SMARTCAR_NOT_CAPABLE@smartcar.com) | 0SCLR0002DC18F57F |
| `COMPATIBILITY` | `VEHICLE_NOT_CAPABLE` | [COMPATIBILITY.VEHICLE\_NOT\_CAPABLE@smartcar.com](mailto:COMPATIBILITY.VEHICLE_NOT_CAPABLE@smartcar.com) | 0SCLR00024C7CDF7A |
| `CONNECTED_SERVICES_ACCOUNT` | `ACCOUNT_ISSUE` | [CONNECTED\_SERVICES\_ACCOUNT.ACCOUNT\_ISSUE@smartcar.com](mailto:CONNECTED_SERVICES_ACCOUNT.ACCOUNT_ISSUE@smartcar.com) | 0SCLR00026BAAA136 |
| `CONNECTED_SERVICES_ACCOUNT` | `AUTHENTICATION_FAILED` | [CONNECTED\_SERVICES\_ACCOUNT.AUTHENTICATION\_FAILED@smartcar.com](mailto:CONNECTED_SERVICES_ACCOUNT.AUTHENTICATION_FAILED@smartcar.com) | 0SCLR00021D803C7B |
| `CONNECTED_SERVICES_ACCOUNT` | `NO_VEHICLES` | [CONNECTED\_SERVICES\_ACCOUNT.NO\_VEHICLES@smartcar.com](mailto:CONNECTED_SERVICES_ACCOUNT.NO_VEHICLES@smartcar.com) | 0SCLR00027671837B |
| `CONNECTED_SERVICES_ACCOUNT` | `SUBSCRIPTION` | [CONNECTED\_SERVICES\_ACCOUNT.SUBSCRIPTION@smartcar.com](mailto:CONNECTED_SERVICES_ACCOUNT.SUBSCRIPTION@smartcar.com) | 0SCLR0002B9BAF29F |
| `CONNECTED_SERVICES_ACCOUNT` | `VEHICLE_MISSING` | [CONNECTED\_SERVICES\_ACCOUNT.VEHICLE\_MISSING@smartcar.com](mailto:CONNECTED_SERVICES_ACCOUNT.VEHICLE_MISSING@smartcar.com) | 0SCLR00024E29EEBD |
| `UPSTREAM` | `INVALID_DATA` | [UPSTREAM.INVALID\_DATA@smartcar.com](mailto:UPSTREAM.INVALID_DATA@smartcar.com) | 0SCLR000298A0A649 |
| `UPSTREAM` | `KNOWN_ISSUE` | [UPSTREAM.KNOWN\_ISSUE@smartcar.com](mailto:UPSTREAM.KNOWN_ISSUE@smartcar.com) | 0SCLR0002A8760B72 |
| `UPSTREAM` | `NO_RESPONSE` | [UPSTREAM.NO\_RESPONSE@smartcar.com](mailto:UPSTREAM.NO_RESPONSE@smartcar.com) | 0SCLR0002C23E43AB |
| `UPSTREAM` | `UNKNOWN_ISSUE` | [UPSTREAM.UNKNOWN\_ISSUE@smartcar.com](mailto:UPSTREAM.UNKNOWN_ISSUE@smartcar.com) | 0SCLR0002D4878901 |
| `VEHICLE_STATE` | `ASLEEP` | [VEHICLE\_STATE.ASLEEP@smartcar.com](mailto:VEHICLE_STATE.ASLEEP@smartcar.com) | 0SCLR0002E8896323 |
| `VEHICLE_STATE` | `CHARGING_IN_PROGRESS` | [VEHICLE\_STATE.CHARGING\_IN\_PROGRESS@smartcar.com](mailto:VEHICLE_STATE.CHARGING_IN_PROGRESS@smartcar.com) | 0SCLR000221F1E672 |
| `VEHICLE_STATE` | `CHARGING_PLUG_NOT_CONNECTED` | [VEHICLE\_STATE.CHARGING\_PLUG\_NOT\_CONNECTED@smartcar.com](mailto:VEHICLE_STATE.CHARGING_PLUG_NOT_CONNECTED@smartcar.com) | 0SCLR0002CBFC7C21 |
| `VEHICLE_STATE` | `DOOR_OPEN` | [VEHICLE\_STATE.DOOR\_OPEN@smartcar.com](mailto:VEHICLE_STATE.DOOR_OPEN@smartcar.com) | 0SCLR0002F8BD90B8 |
| `VEHICLE_STATE` | `FULLY_CHARGED` | [VEHICLE\_STATE.FULLY\_CHARGED@smartcar.com](mailto:VEHICLE_STATE.FULLY_CHARGED@smartcar.com) | 0SCLR00029CD9D894 |
| `VEHICLE_STATE` | `HOOD_OPEN` | [VEHICLE\_STATE.HOOD\_OPEN@smartcar.com](mailto:VEHICLE_STATE.HOOD_OPEN@smartcar.com) | 0SCLR000219CD4A2C |
| `VEHICLE_STATE` | `IGNITION_ON` | [VEHICLE\_STATE.IGNITION\_ON@smartcar.com](mailto:VEHICLE_STATE.IGNITION_ON@smartcar.com) | 0SCLR00021D49E58A |
| `VEHICLE_STATE` | `IN_MOTION` | [VEHICLE\_STATE.IN\_MOTION@smartcar.com](mailto:VEHICLE_STATE.IN_MOTION@smartcar.com) | 0SCLR00024F6EE640 |
| `VEHICLE_STATE` | `REMOTE_ACCESS_DISABLED` | [VEHICLE\_STATE.REMOTE\_ACCESS\_DISABLED@smartcar.com](mailto:VEHICLE_STATE.REMOTE_ACCESS_DISABLED@smartcar.com) | 0SCLR0002588A5CC1 |
| `VEHICLE_STATE` | `TRUNK_OPEN` | [VEHICLE\_STATE.TRUNK\_OPEN@smartcar.com](mailto:VEHICLE_STATE.TRUNK_OPEN@smartcar.com) | 0SCLR00023C607FDB |
| `VEHICLE_STATE` | `UNKNOWN` | [VEHICLE\_STATE.UNKNOWN@smartcar.com](mailto:VEHICLE_STATE.UNKNOWN@smartcar.com) | 0SCLR0002E6CC0314 |
| `VEHICLE_STATE` | `UNREACHABLE` | [VEHICLE\_STATE.UNREACHABLE@smartcar.com](mailto:VEHICLE_STATE.UNREACHABLE@smartcar.com) | 0SCLR000247EBF067 |
| `VEHICLE_STATE` | `VEHICLE_OFFLINE_FOR_SERVICE` | [VEHICLE\_STATE.VEHICLE\_OFFLINE\_FOR\_SERVICE@smartcar.com](mailto:VEHICLE_STATE.VEHICLE_OFFLINE_FOR_SERVICE@smartcar.com) | 0SCLR0002AF1D71A1 |
---
# Source: https://smartcar.com/docs/integrations/webhooks/best-practices/testing.md
> ## Documentation Index
> Fetch the complete documentation index at: https://smartcar.com/docs/llms.txt
> Use this file to discover all available pages before exploring further.
# Testing
> Test your webhook integration before going to production
Thoroughly test your webhook integration to catch issues before they affect users.
## Test in Development
Use the Smartcar Dashboard to trigger test webhook deliveries.
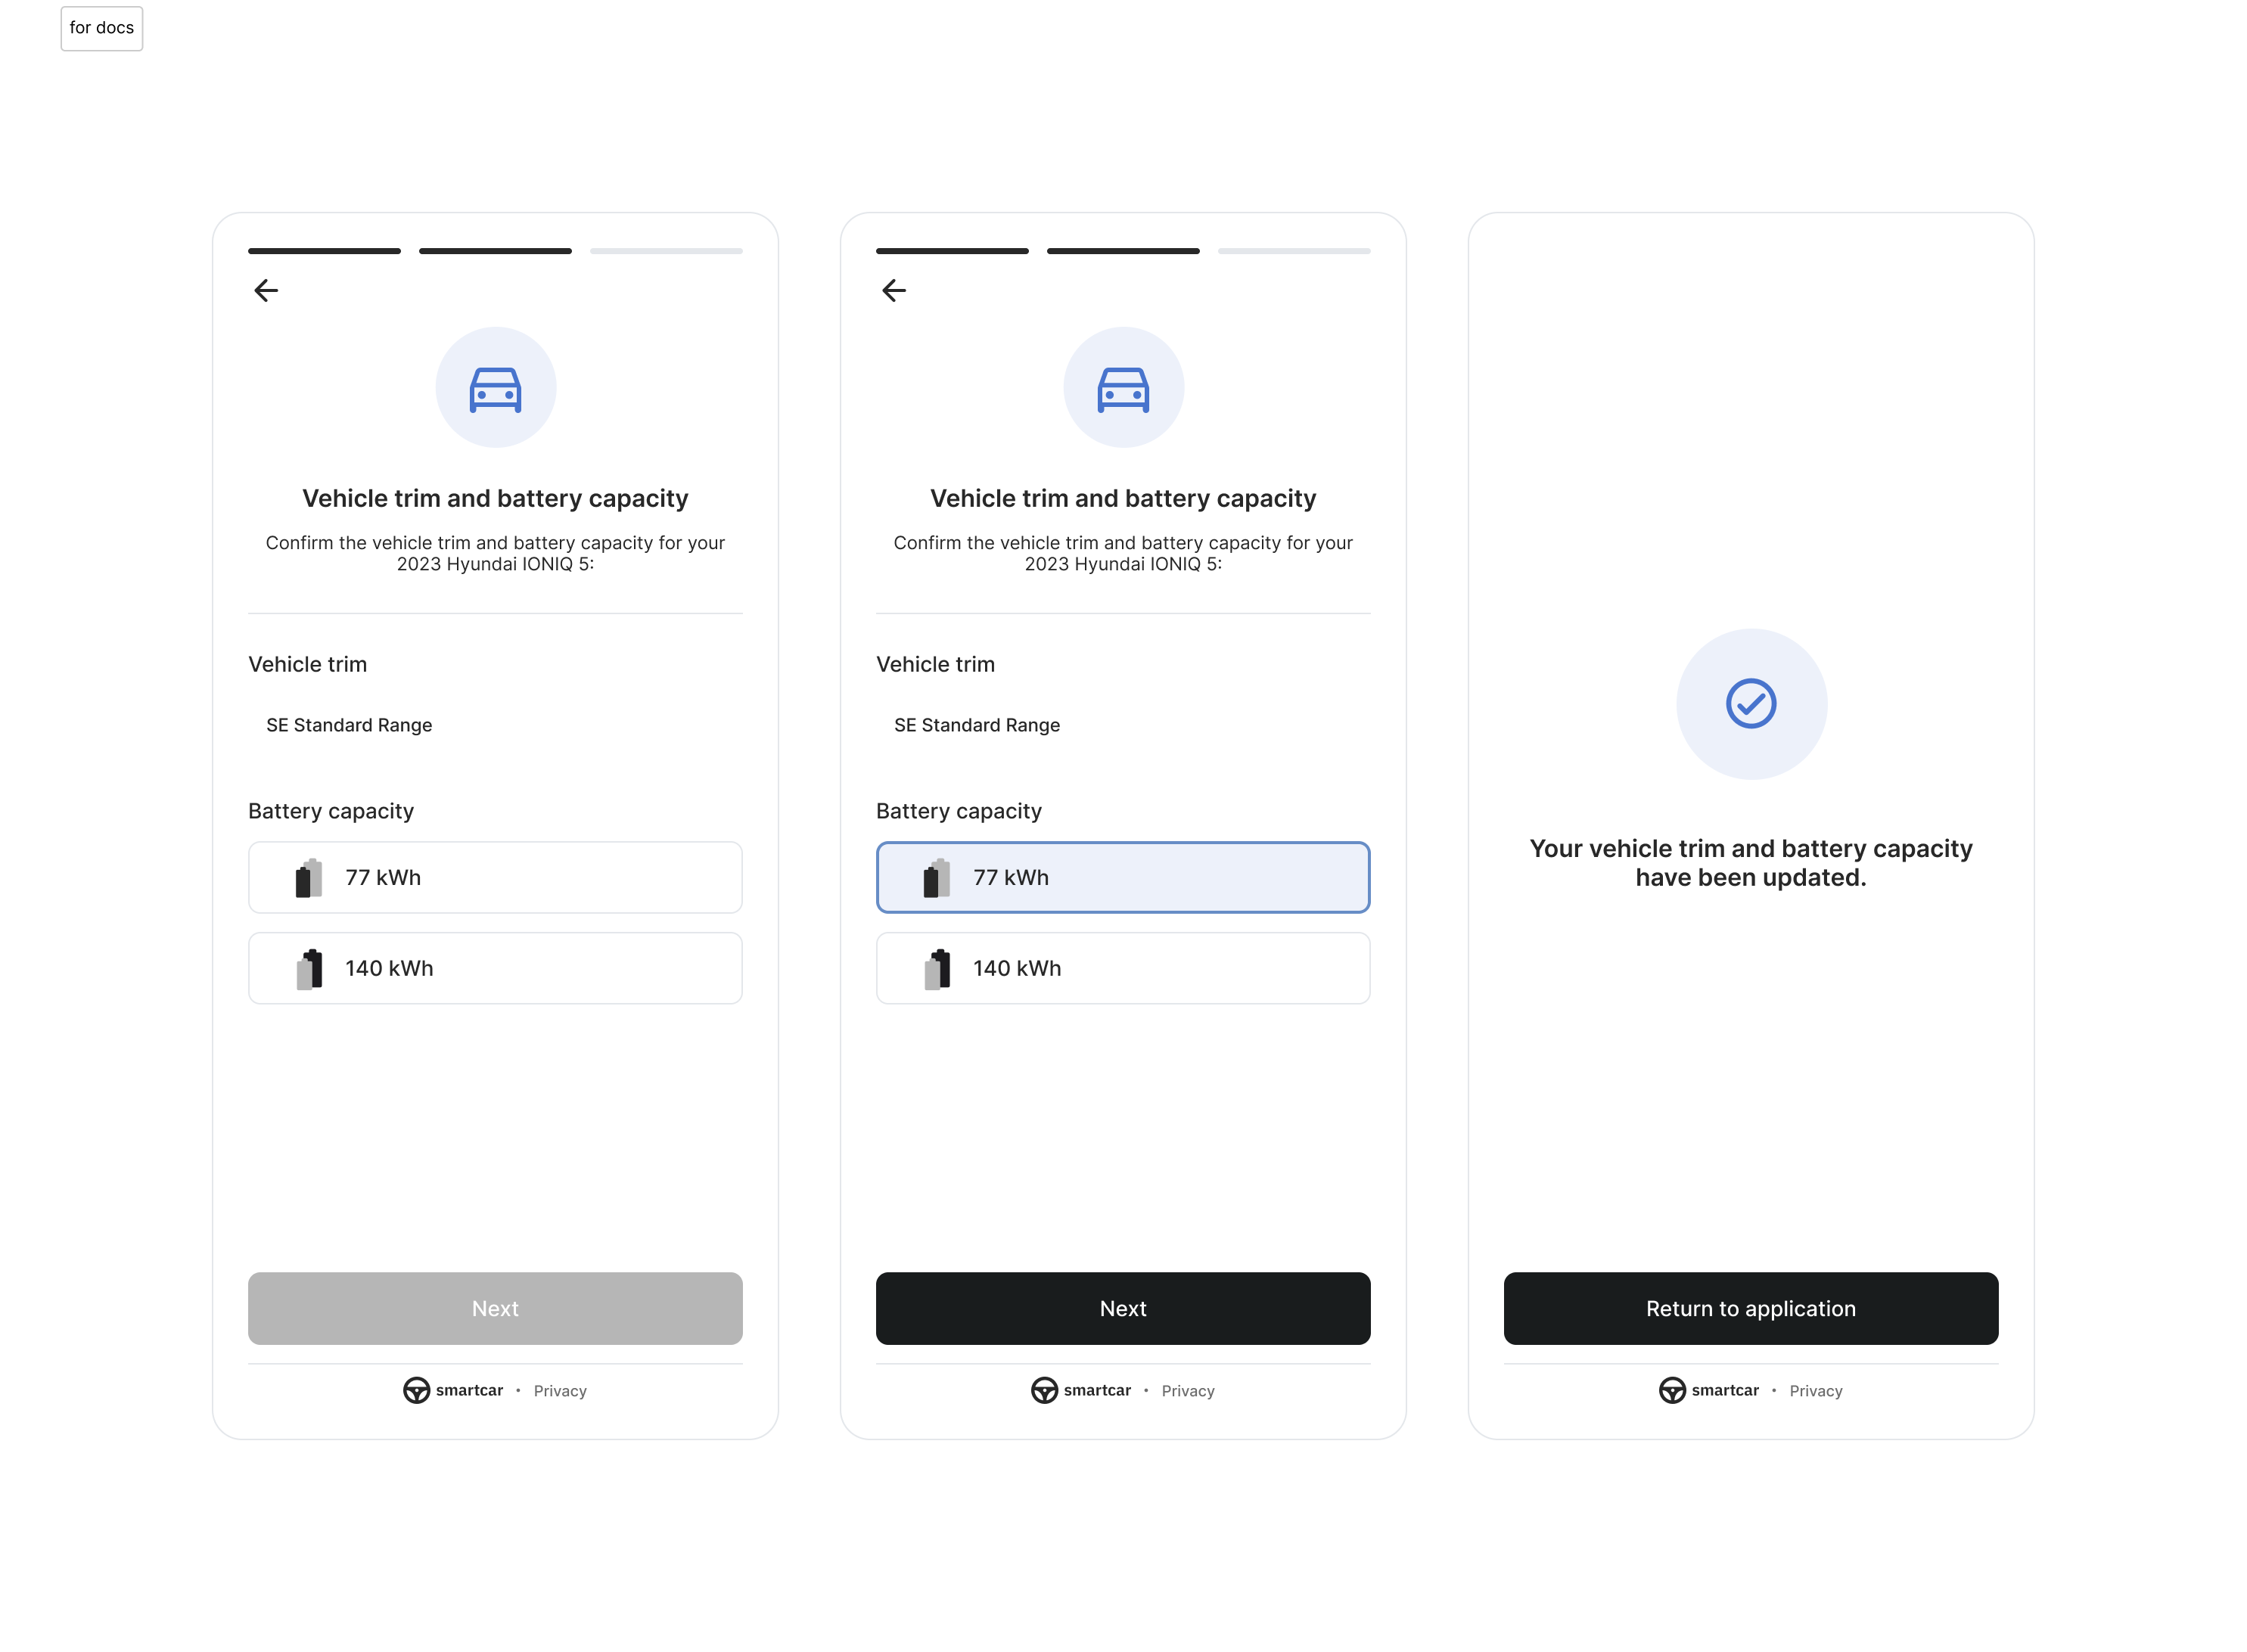 ---
# Source: https://smartcar.com/docs/api-reference/user-vehicles.md
> ## Documentation Index
> Fetch the complete documentation index at: https://smartcar.com/docs/llms.txt
> Use this file to discover all available pages before exploring further.
# User Vehicles
> Returns a paged list of all vehicles connected to the application for the current authorized `user`.
---
# Source: https://smartcar.com/docs/api-reference/user-vehicles.md
> ## Documentation Index
> Fetch the complete documentation index at: https://smartcar.com/docs/llms.txt
> Use this file to discover all available pages before exploring further.
# User Vehicles
> Returns a paged list of all vehicles connected to the application for the current authorized `user`.
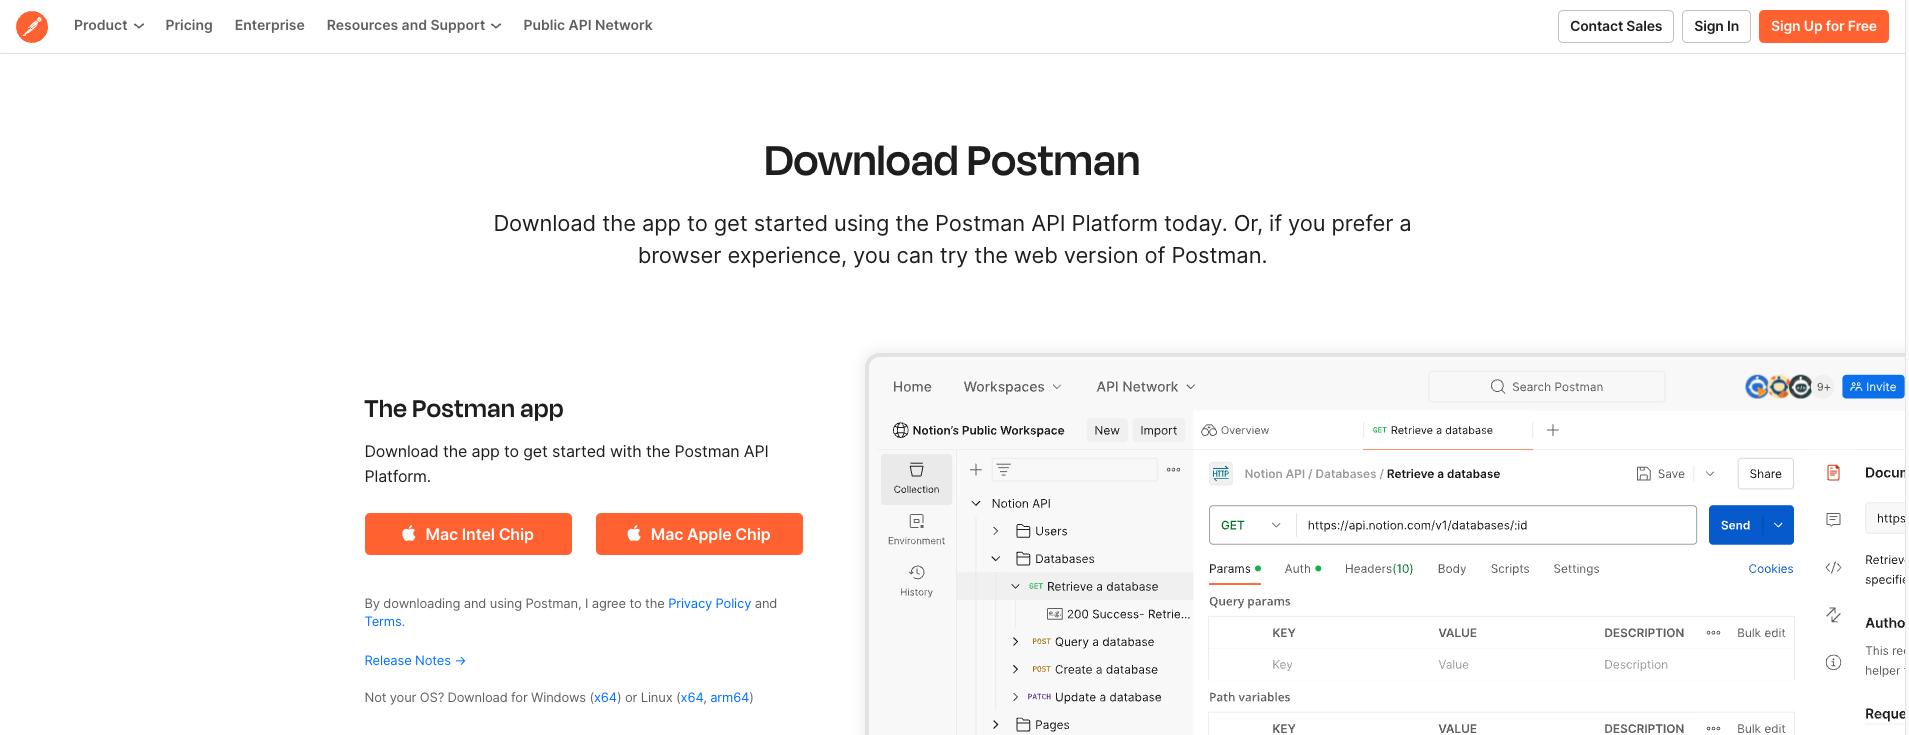
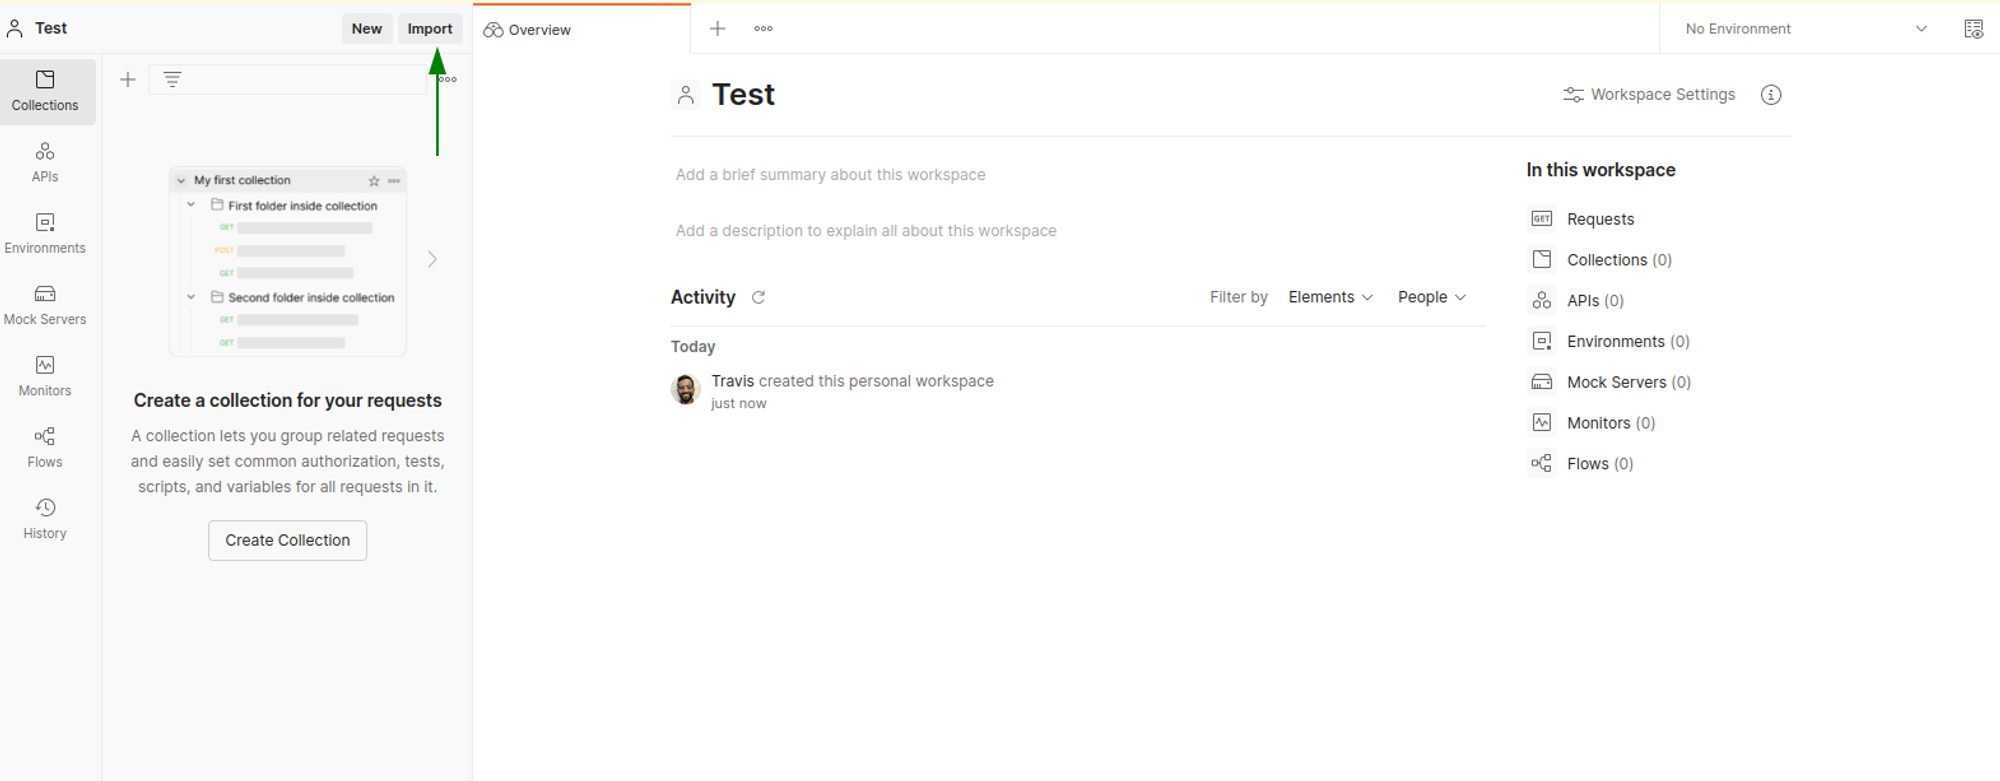

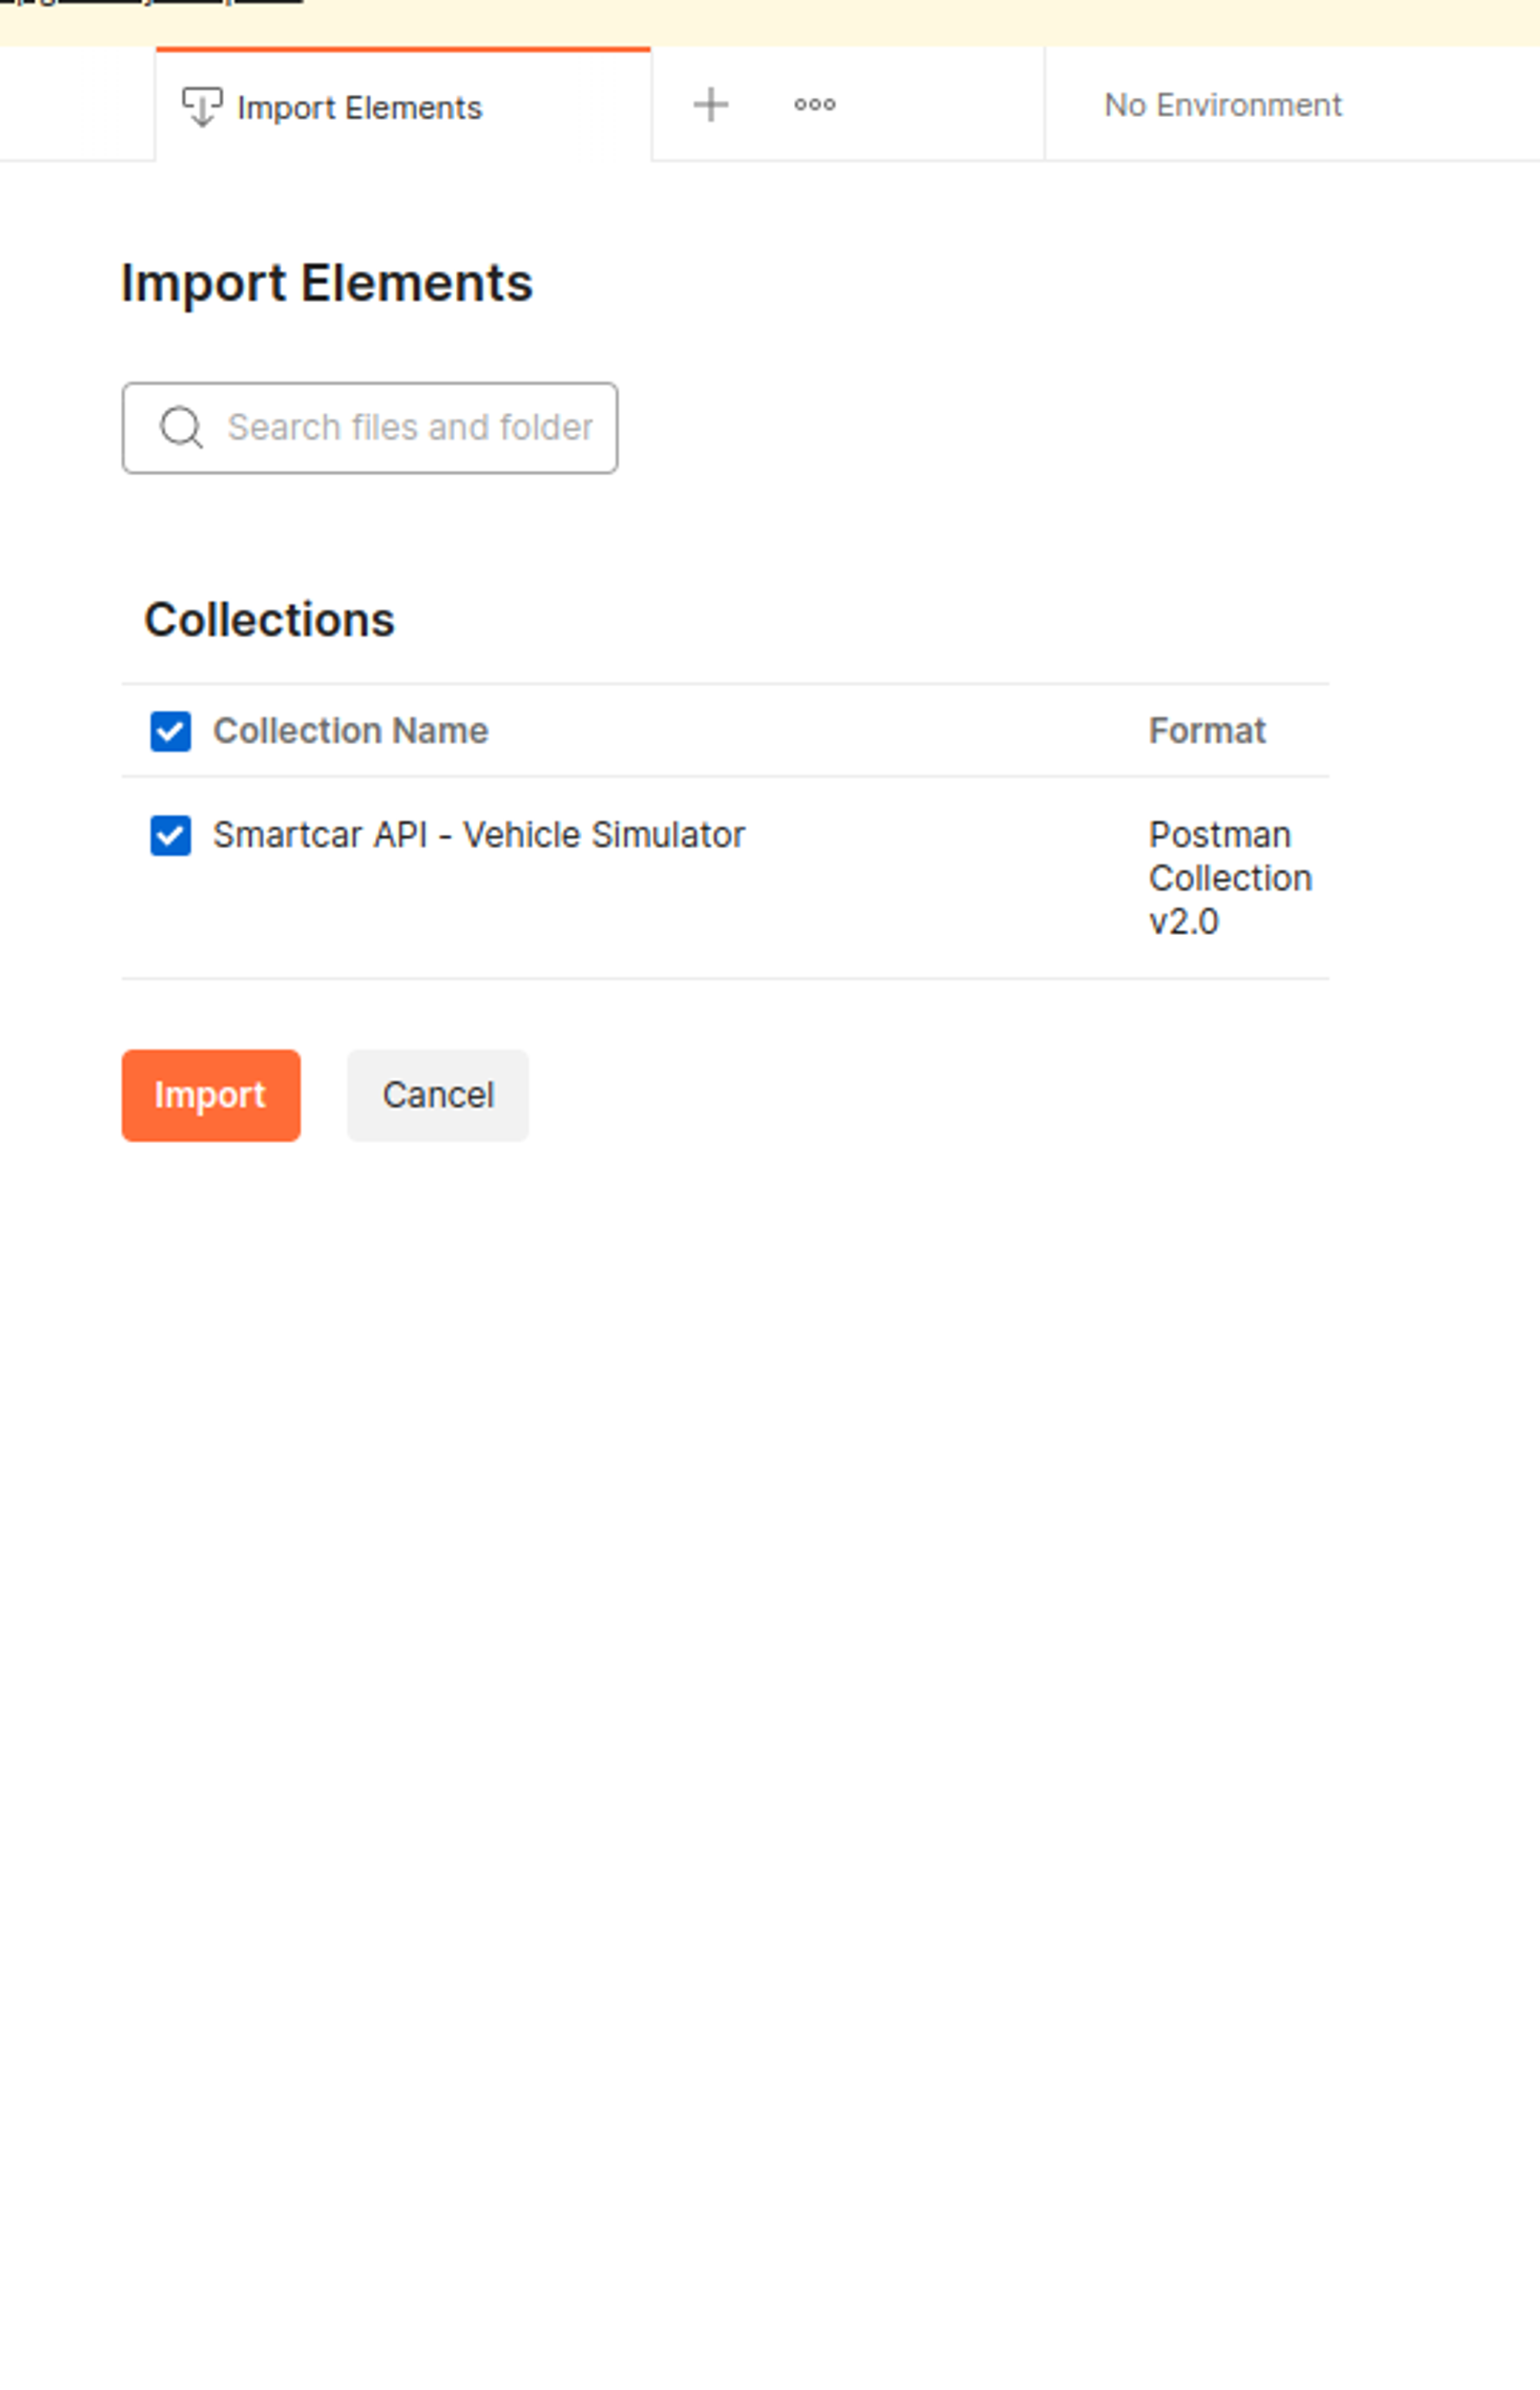
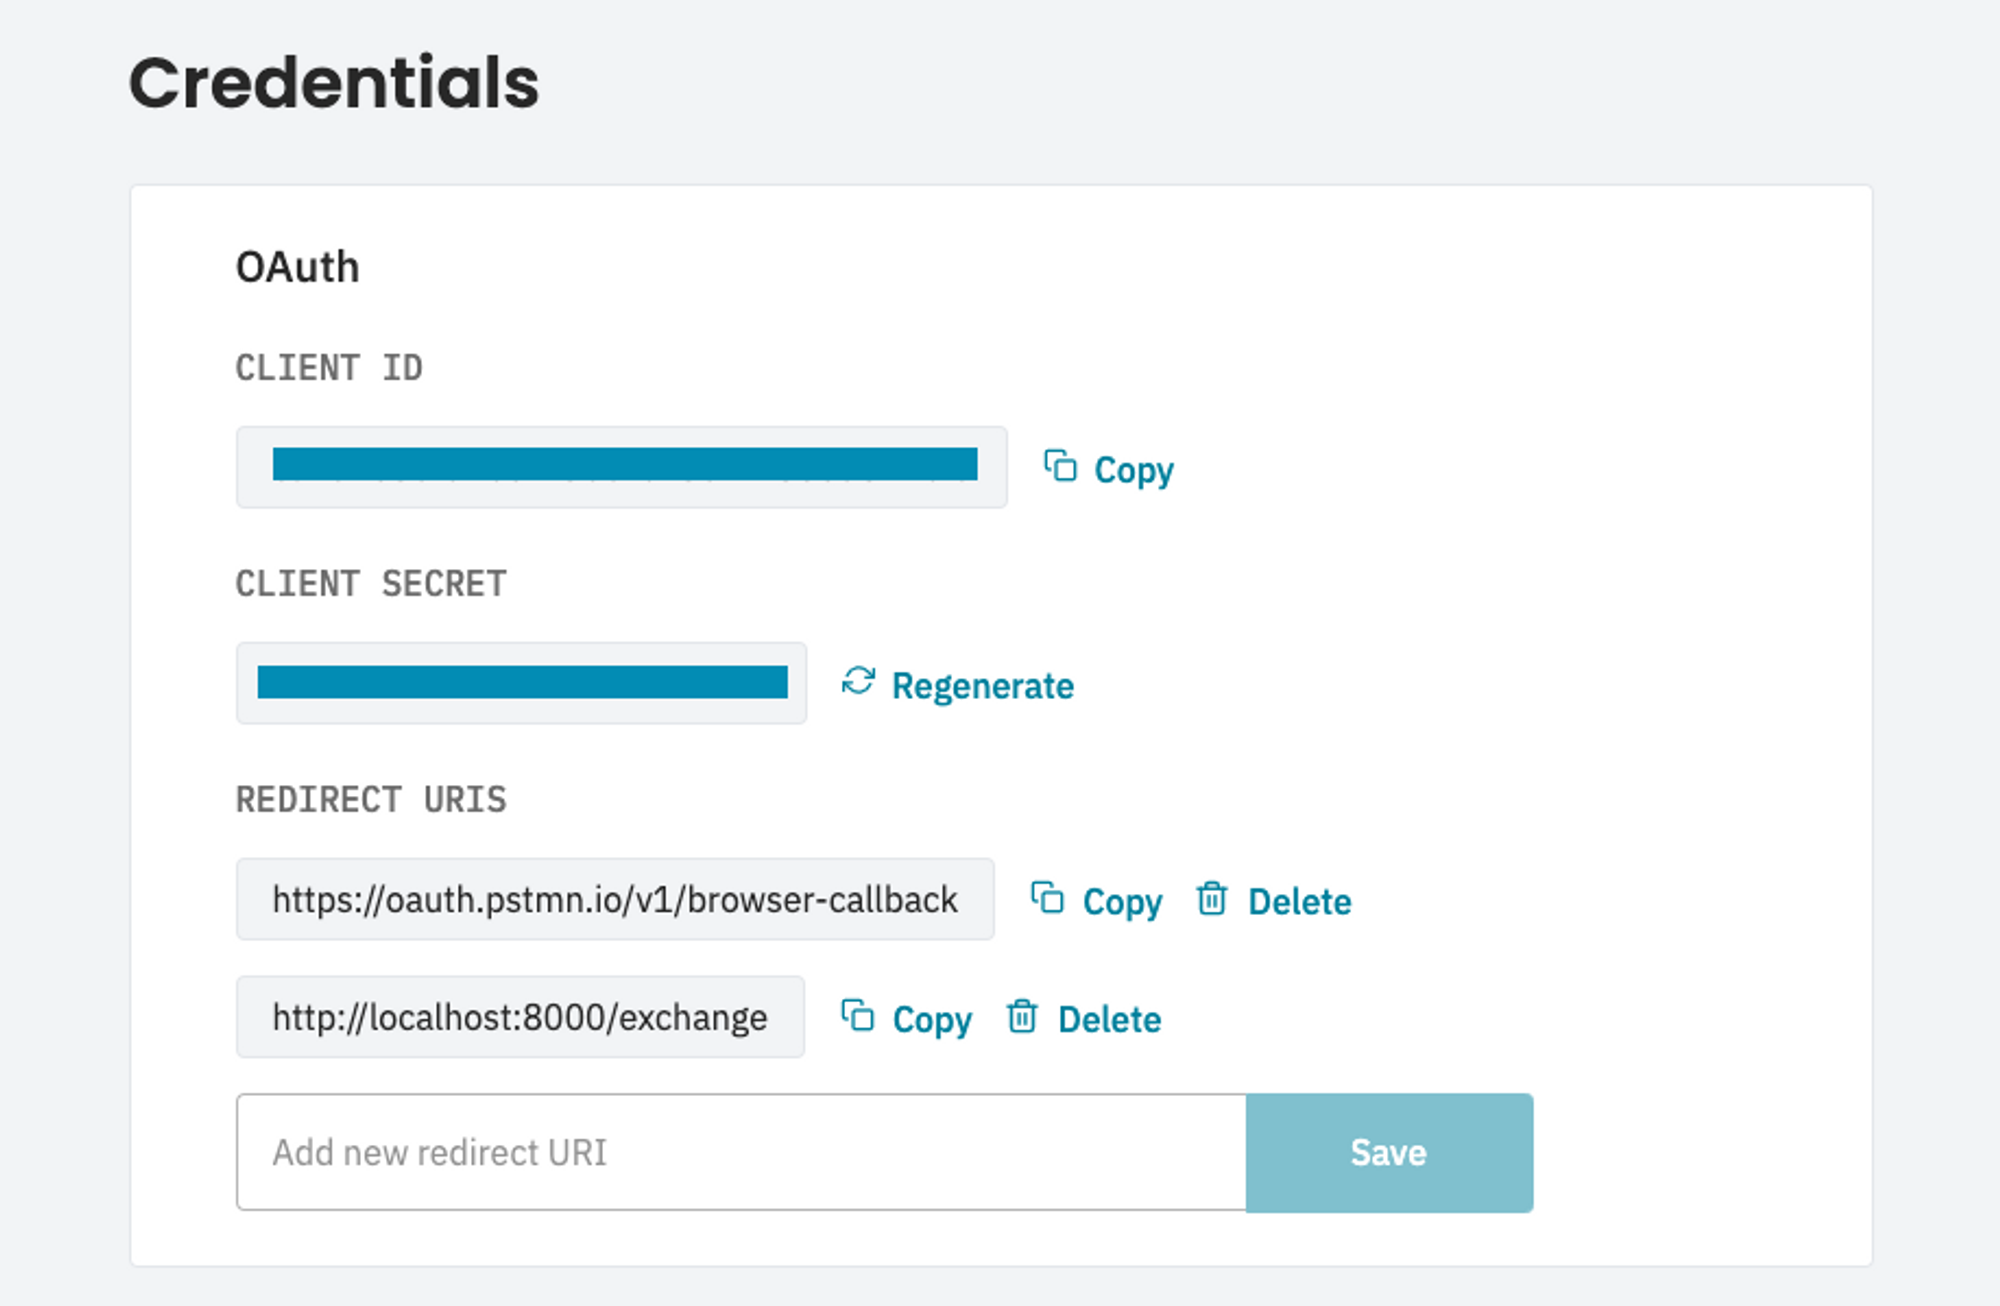 Through the Connect flow, you’re able to get consent from vehicle owners to connect their vehicle to your application. Postman provides an easy way to manage OAuth 2.0 flows under the Authorization tab of a Collection. Set up the Configuration Options for either a live or simulated vehicle.
 **Live Vehicle**
| Parameter | Description |
| ---------------- | ----------------------------------------------------------------------------------------------------------------- |
| Auth URL | `https://connect.smartcar.com/oauth/authorize?approval_prompt=force` |
| Access Token URL | `https://auth.smartcar.com/oauth/token` |
| Client ID | `client_id` from your Dashboard |
| Client Secret | `client_secret` from your Dashboard |
| Scope | A space-separated list of [permissions](/api-reference/permissions) that your application is requesting access to |
**Simulated Vehicle**
| Parameter | Description |
| ---------------- | ----------------------------------------------------------------------------------------------------------------- |
| Auth URL | `https://connect.smartcar.com/oauth/authorize?approval_prompt=force&mode=simulated` |
| Access Token URL | `https://auth.smartcar.com/oauth/token` |
| Client ID | `client_id` from your Dashboard |
| Client Secret | `client_secret` from your Dashboard |
| Scope | A space-separated list of [permissions](/api-reference/permissions) that your application is requesting access to |
## Setting up a Simulated Vehicle
Under the Simulator tab on Dashboard, hit Add Vehicle. Note that you may already have a pre-created simulated vehicle available, if so skip to **Connecting to a vehicle** below.
**Live Vehicle**
| Parameter | Description |
| ---------------- | ----------------------------------------------------------------------------------------------------------------- |
| Auth URL | `https://connect.smartcar.com/oauth/authorize?approval_prompt=force` |
| Access Token URL | `https://auth.smartcar.com/oauth/token` |
| Client ID | `client_id` from your Dashboard |
| Client Secret | `client_secret` from your Dashboard |
| Scope | A space-separated list of [permissions](/api-reference/permissions) that your application is requesting access to |
**Simulated Vehicle**
| Parameter | Description |
| ---------------- | ----------------------------------------------------------------------------------------------------------------- |
| Auth URL | `https://connect.smartcar.com/oauth/authorize?approval_prompt=force&mode=simulated` |
| Access Token URL | `https://auth.smartcar.com/oauth/token` |
| Client ID | `client_id` from your Dashboard |
| Client Secret | `client_secret` from your Dashboard |
| Scope | A space-separated list of [permissions](/api-reference/permissions) that your application is requesting access to |
## Setting up a Simulated Vehicle
Under the Simulator tab on Dashboard, hit Add Vehicle. Note that you may already have a pre-created simulated vehicle available, if so skip to **Connecting to a vehicle** below.
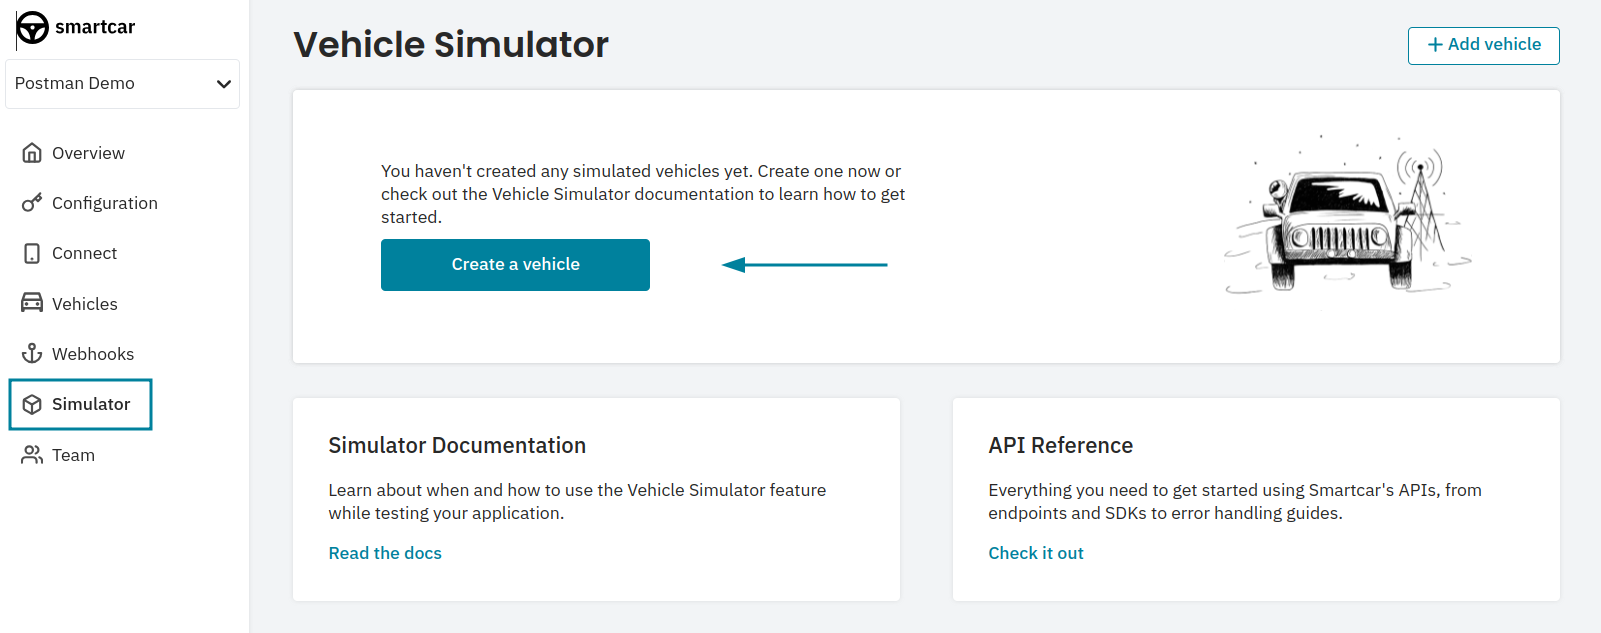 Select a region and MMY for your vehicle, then hit Search by MMY
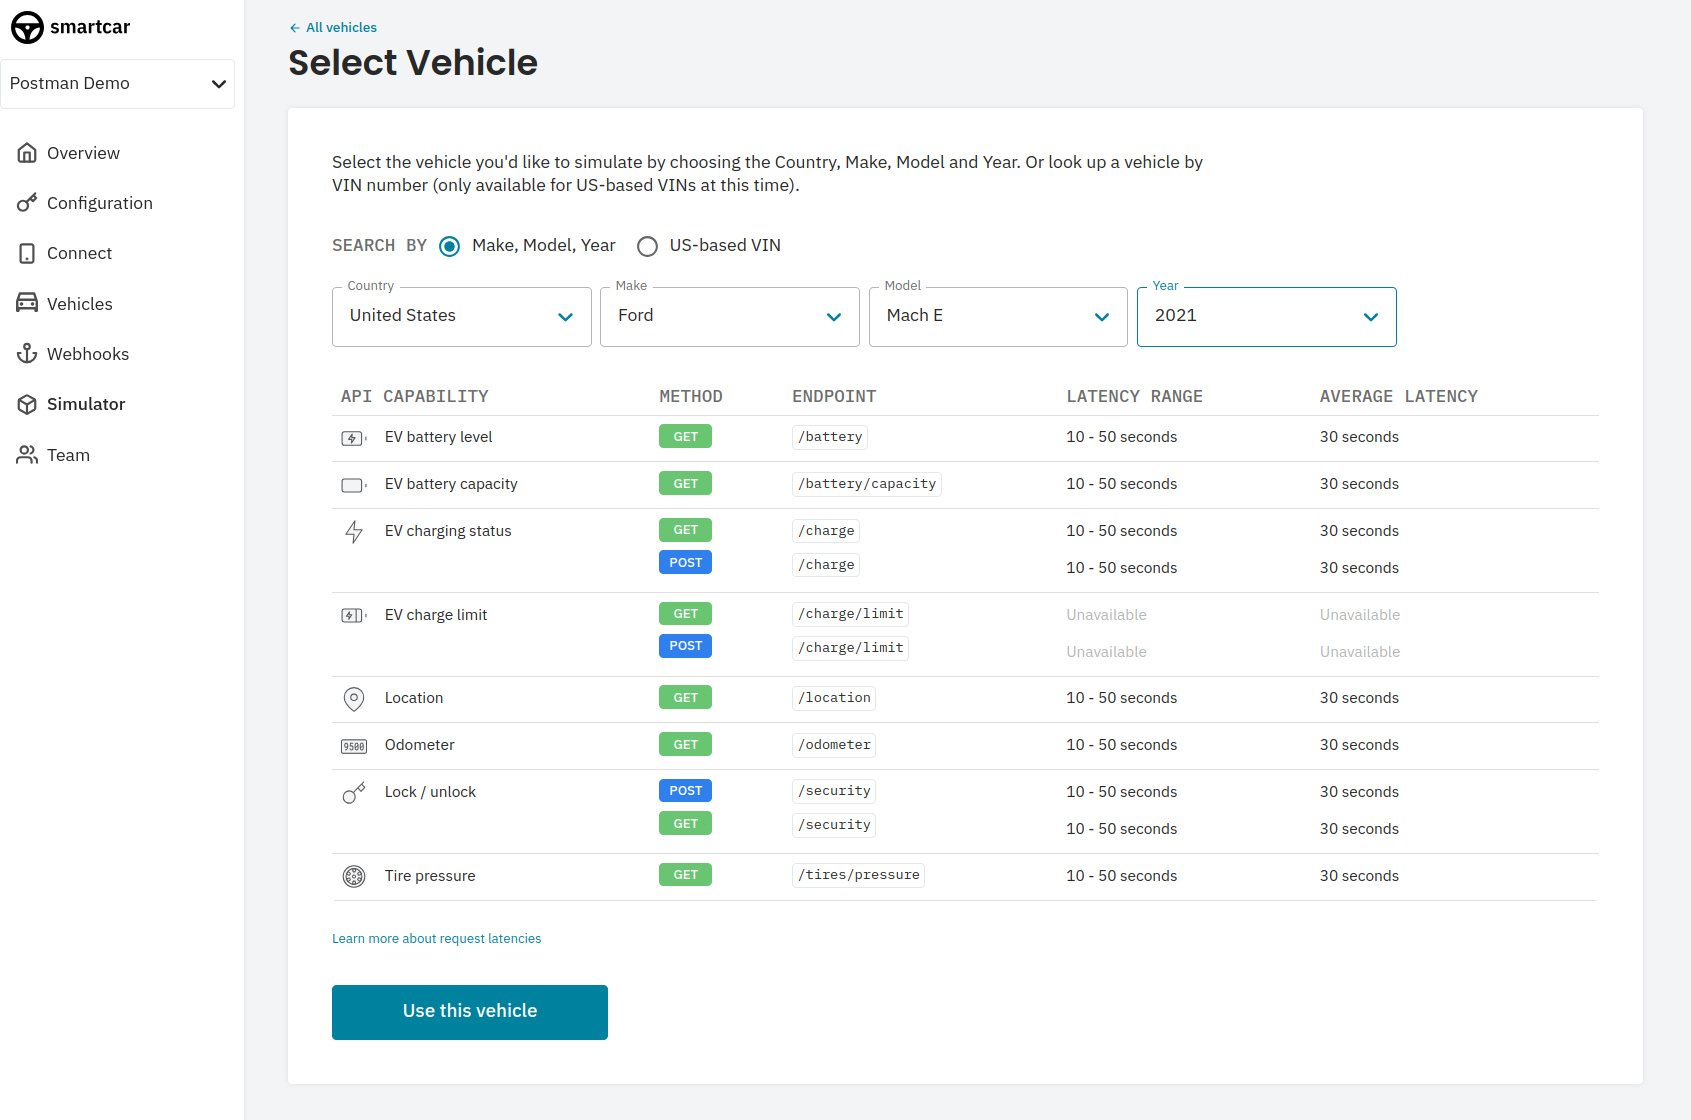 After selecting Use Vehicle, you’ll want to select a state for the vehicle. After that, you’ll get a set of credentials to use in the Connect flow.
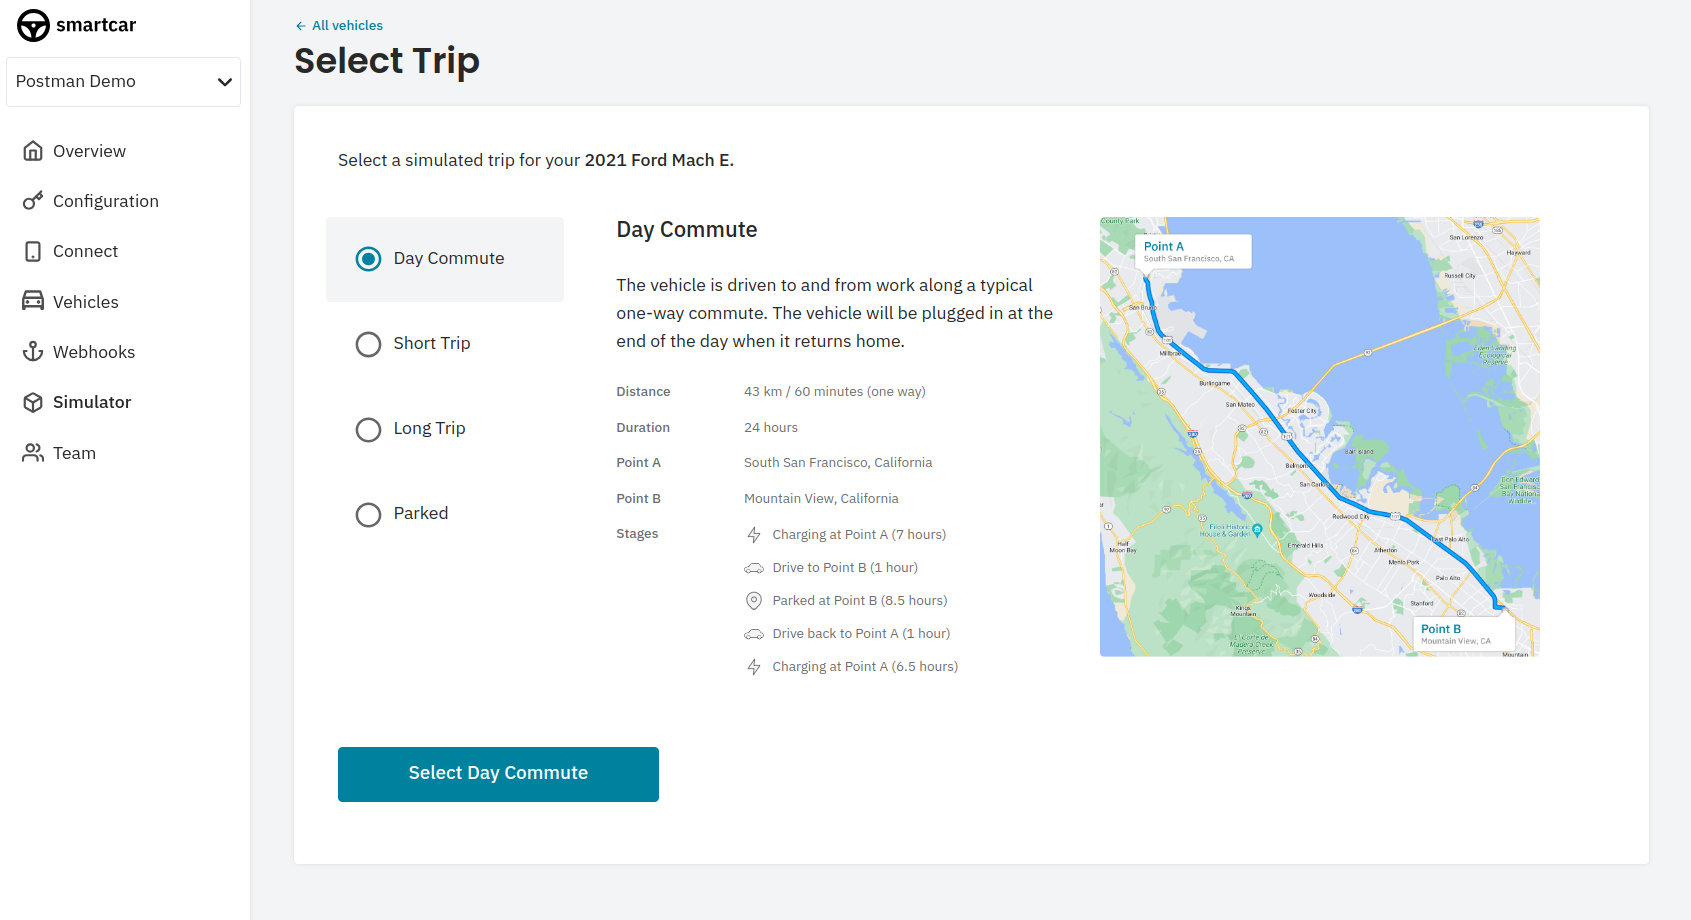
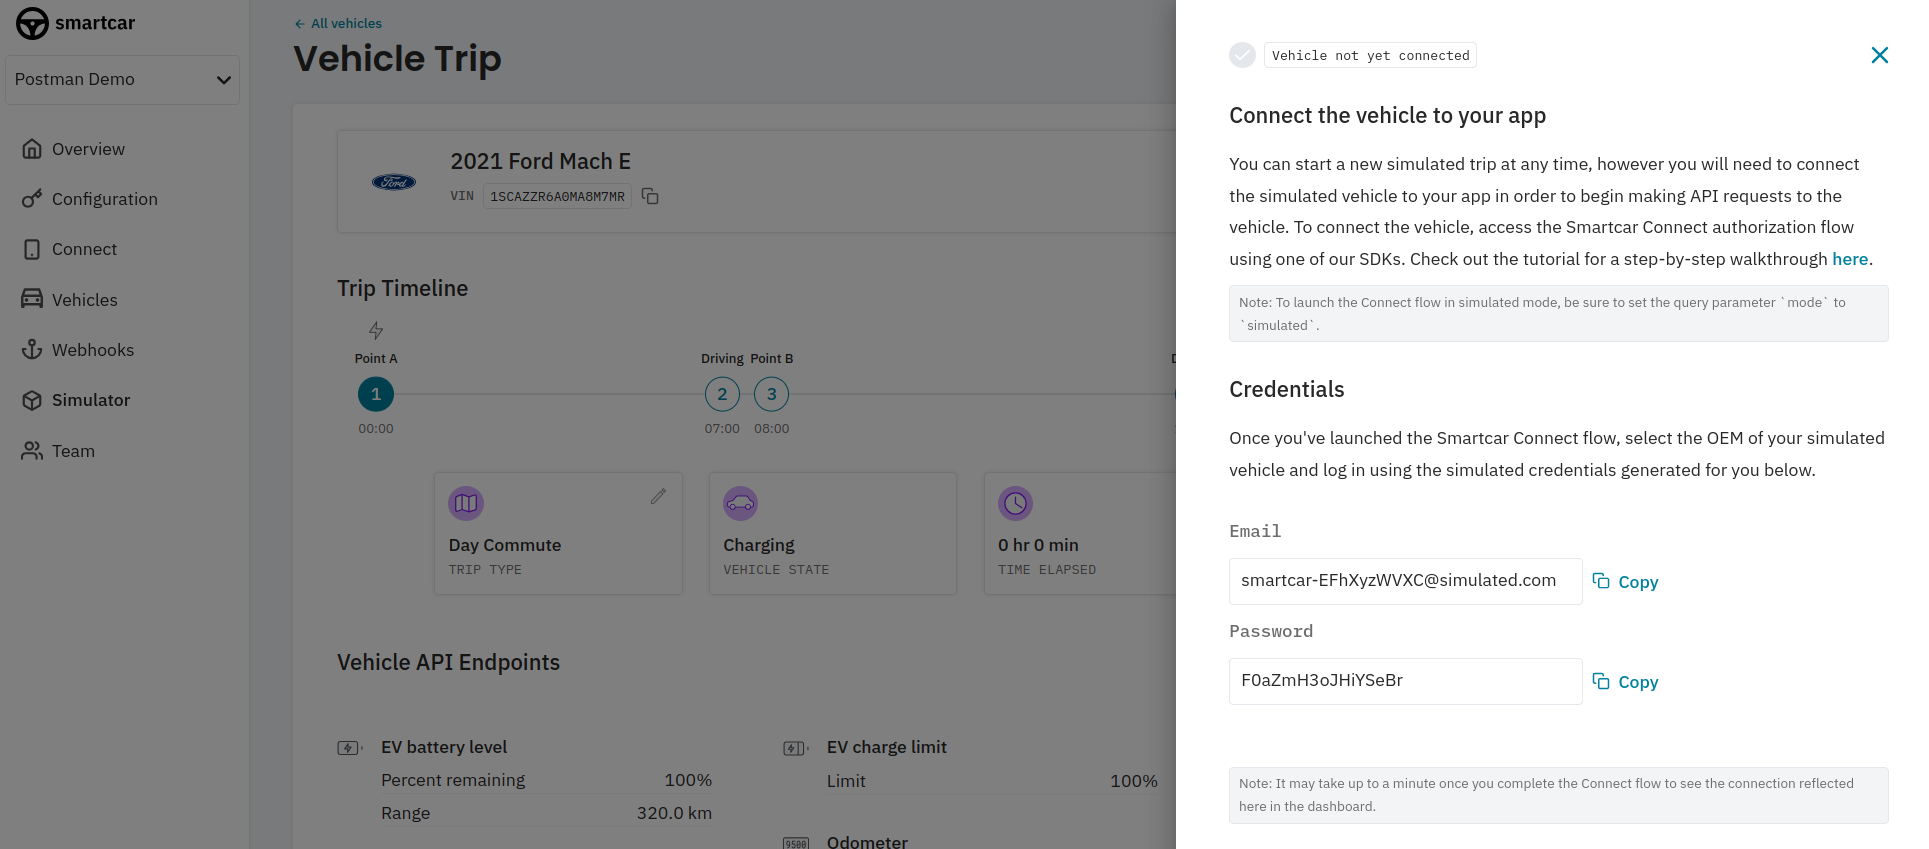 Before proceeding to the next step, you’ll want to start the simulation in the Smartcar Dashboard.
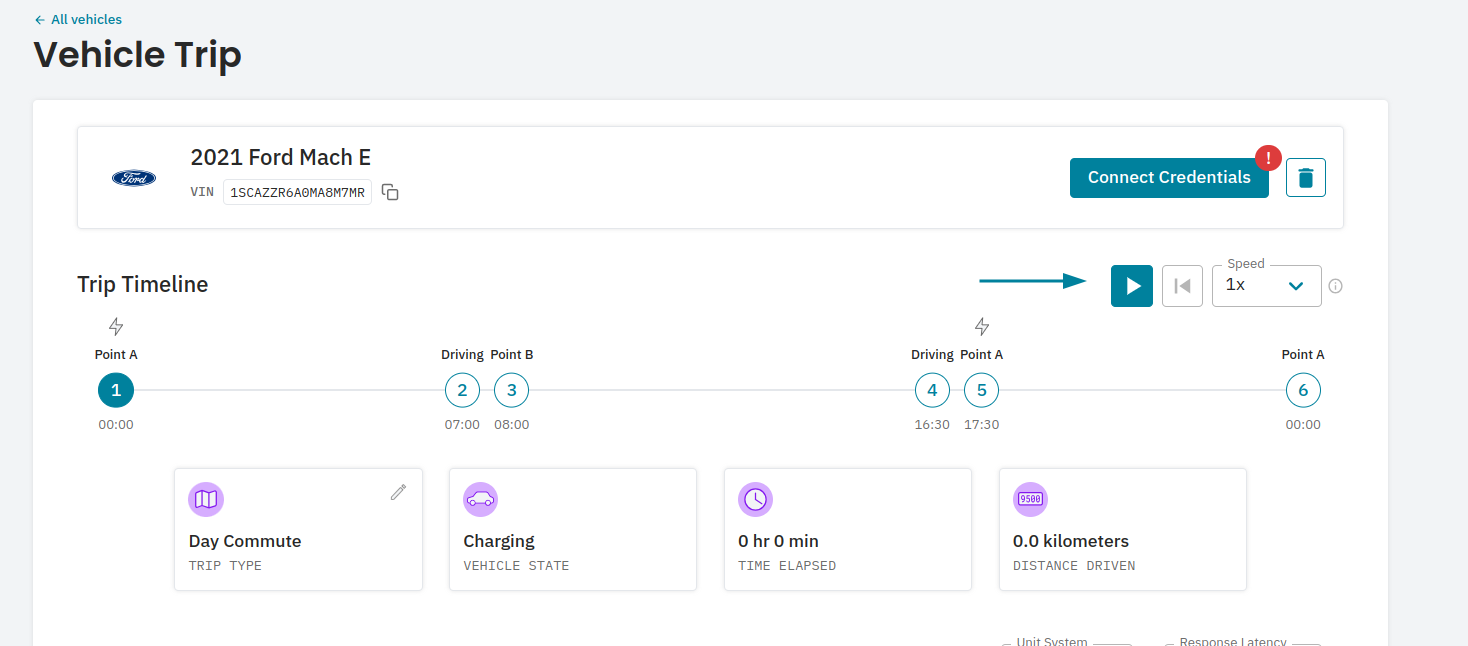 ## Connecting to a vehicle
If configured correctly, when you click **Get New Access Token** in Postman, you should see the first screen of the Connect flow.
## Connecting to a vehicle
If configured correctly, when you click **Get New Access Token** in Postman, you should see the first screen of the Connect flow.
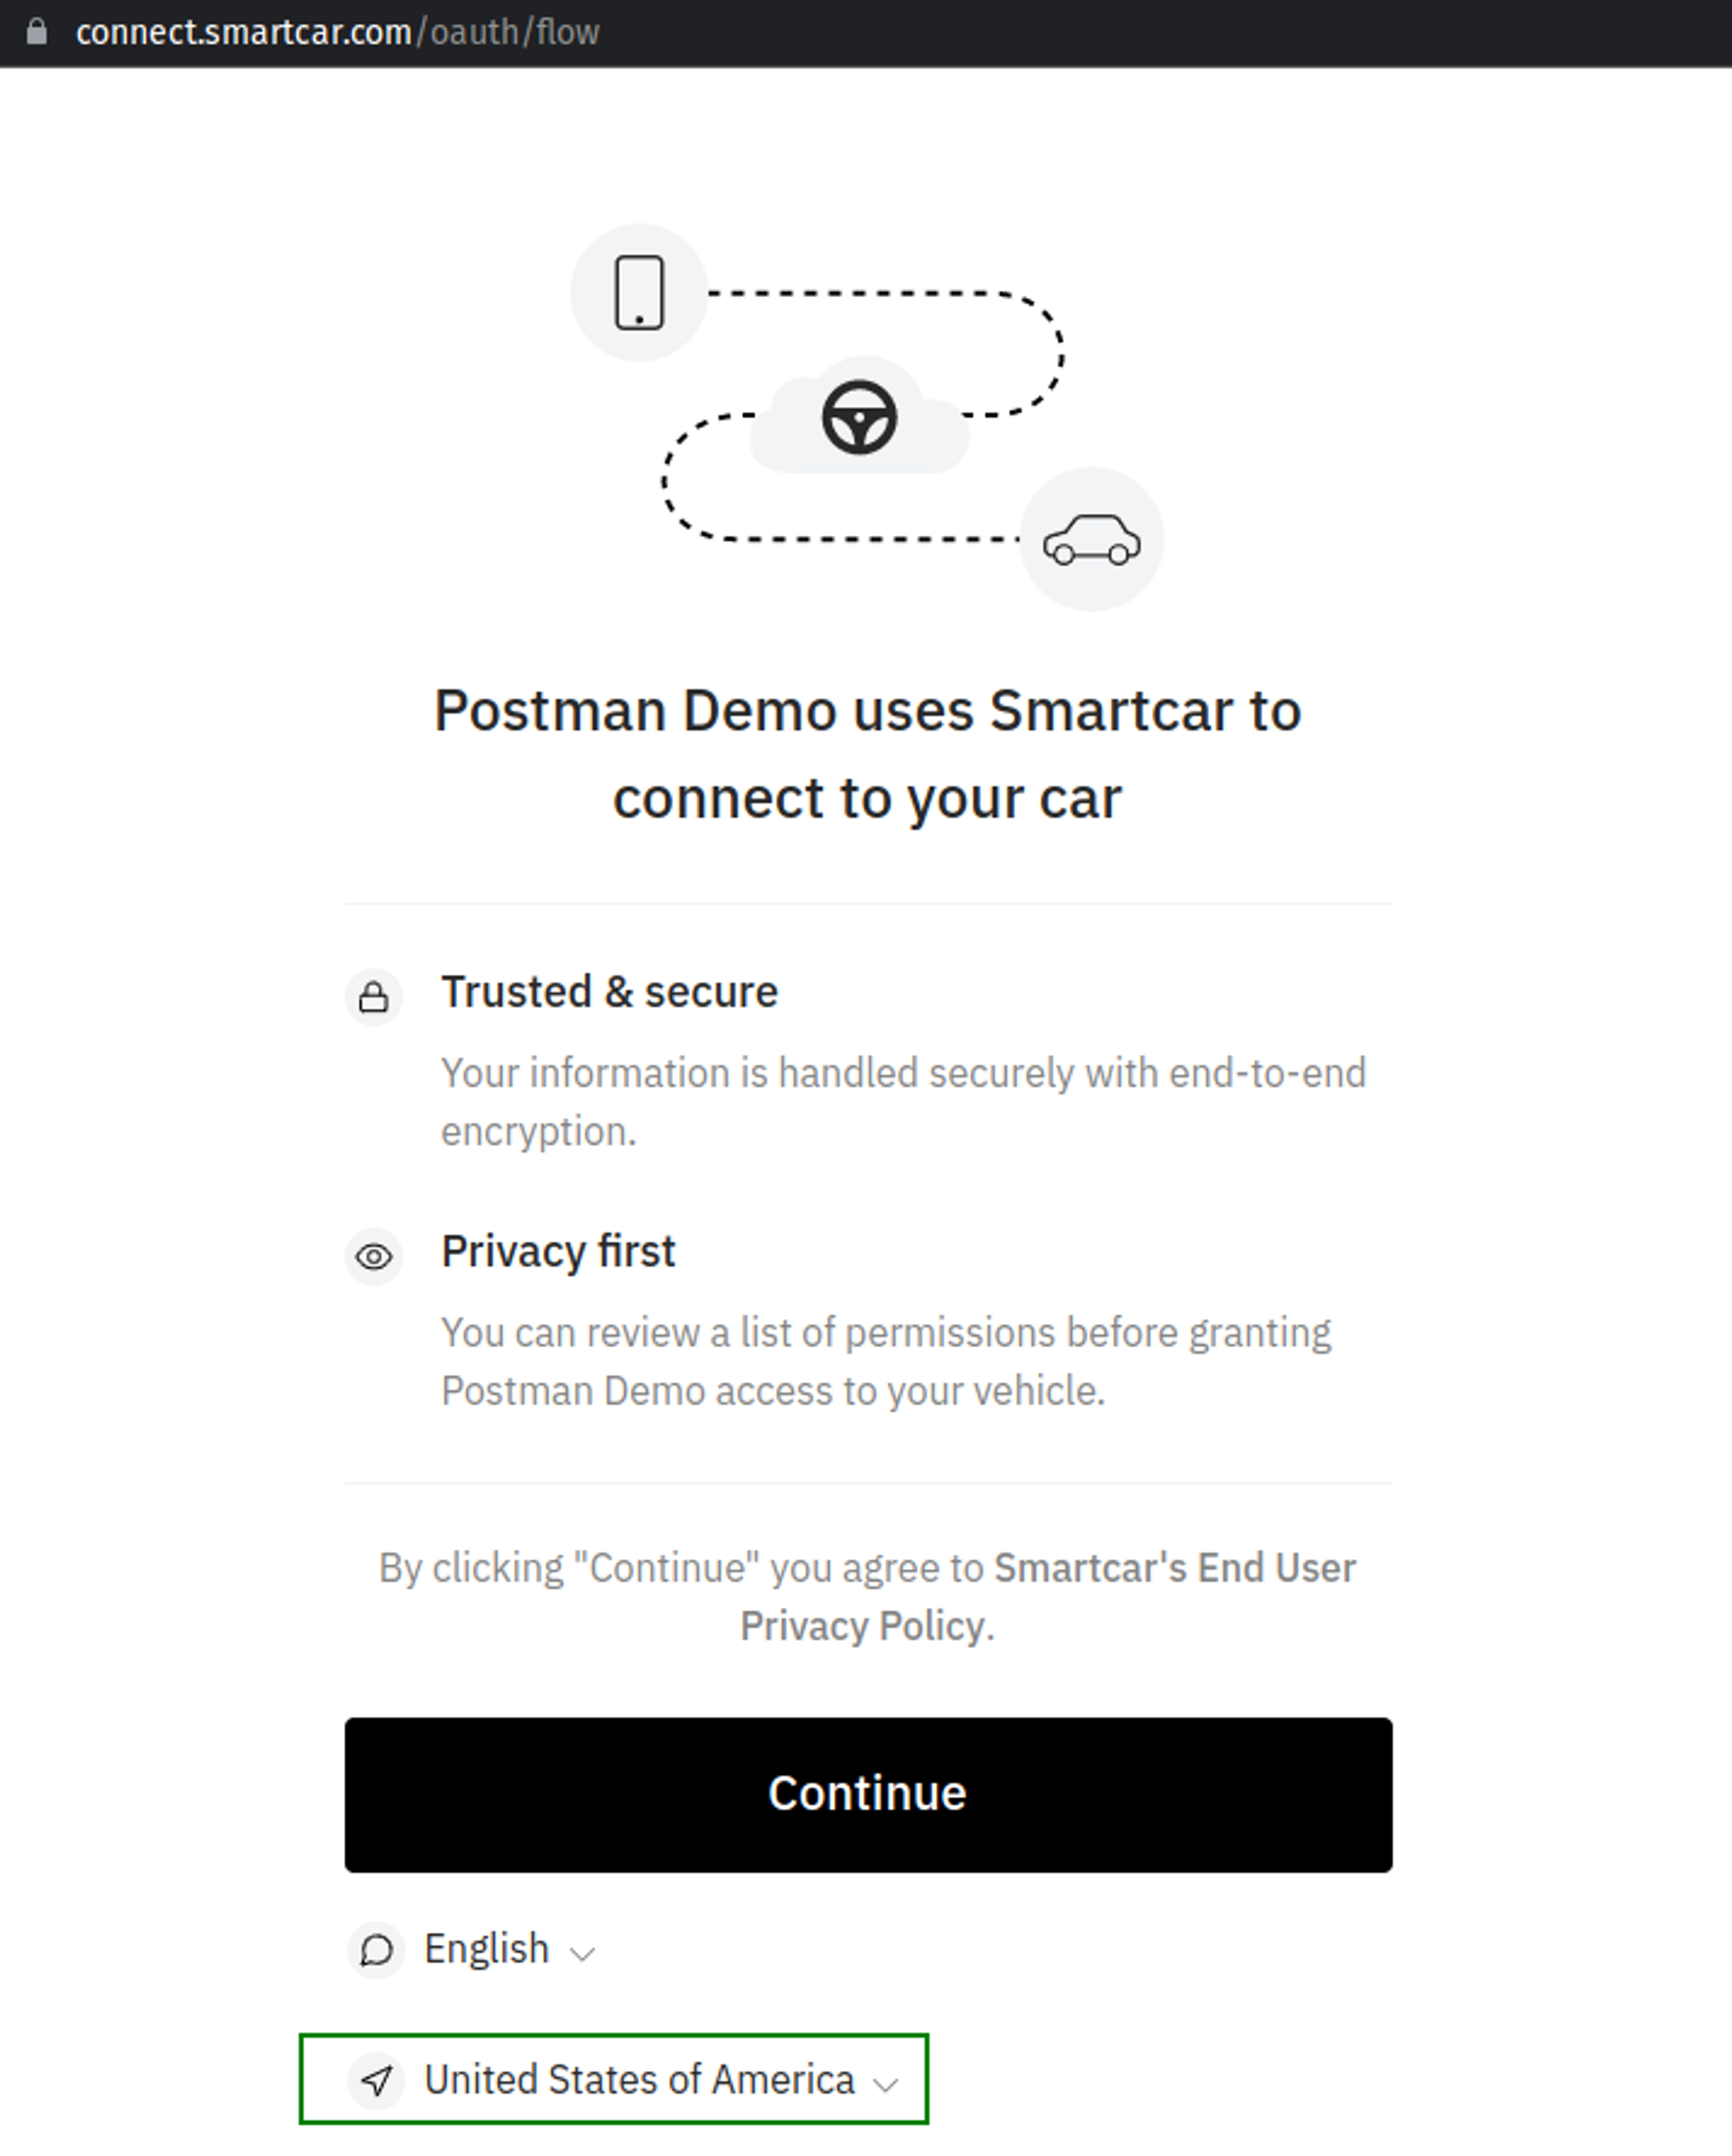 Continue through the Connect flow, select the brand of your simulated vehicle and enter in the credentials you were issued for your simulated vehicle.
After accepting the permissions you’ll be met with the following screen:
Continue through the Connect flow, select the brand of your simulated vehicle and enter in the credentials you were issued for your simulated vehicle.
After accepting the permissions you’ll be met with the following screen:
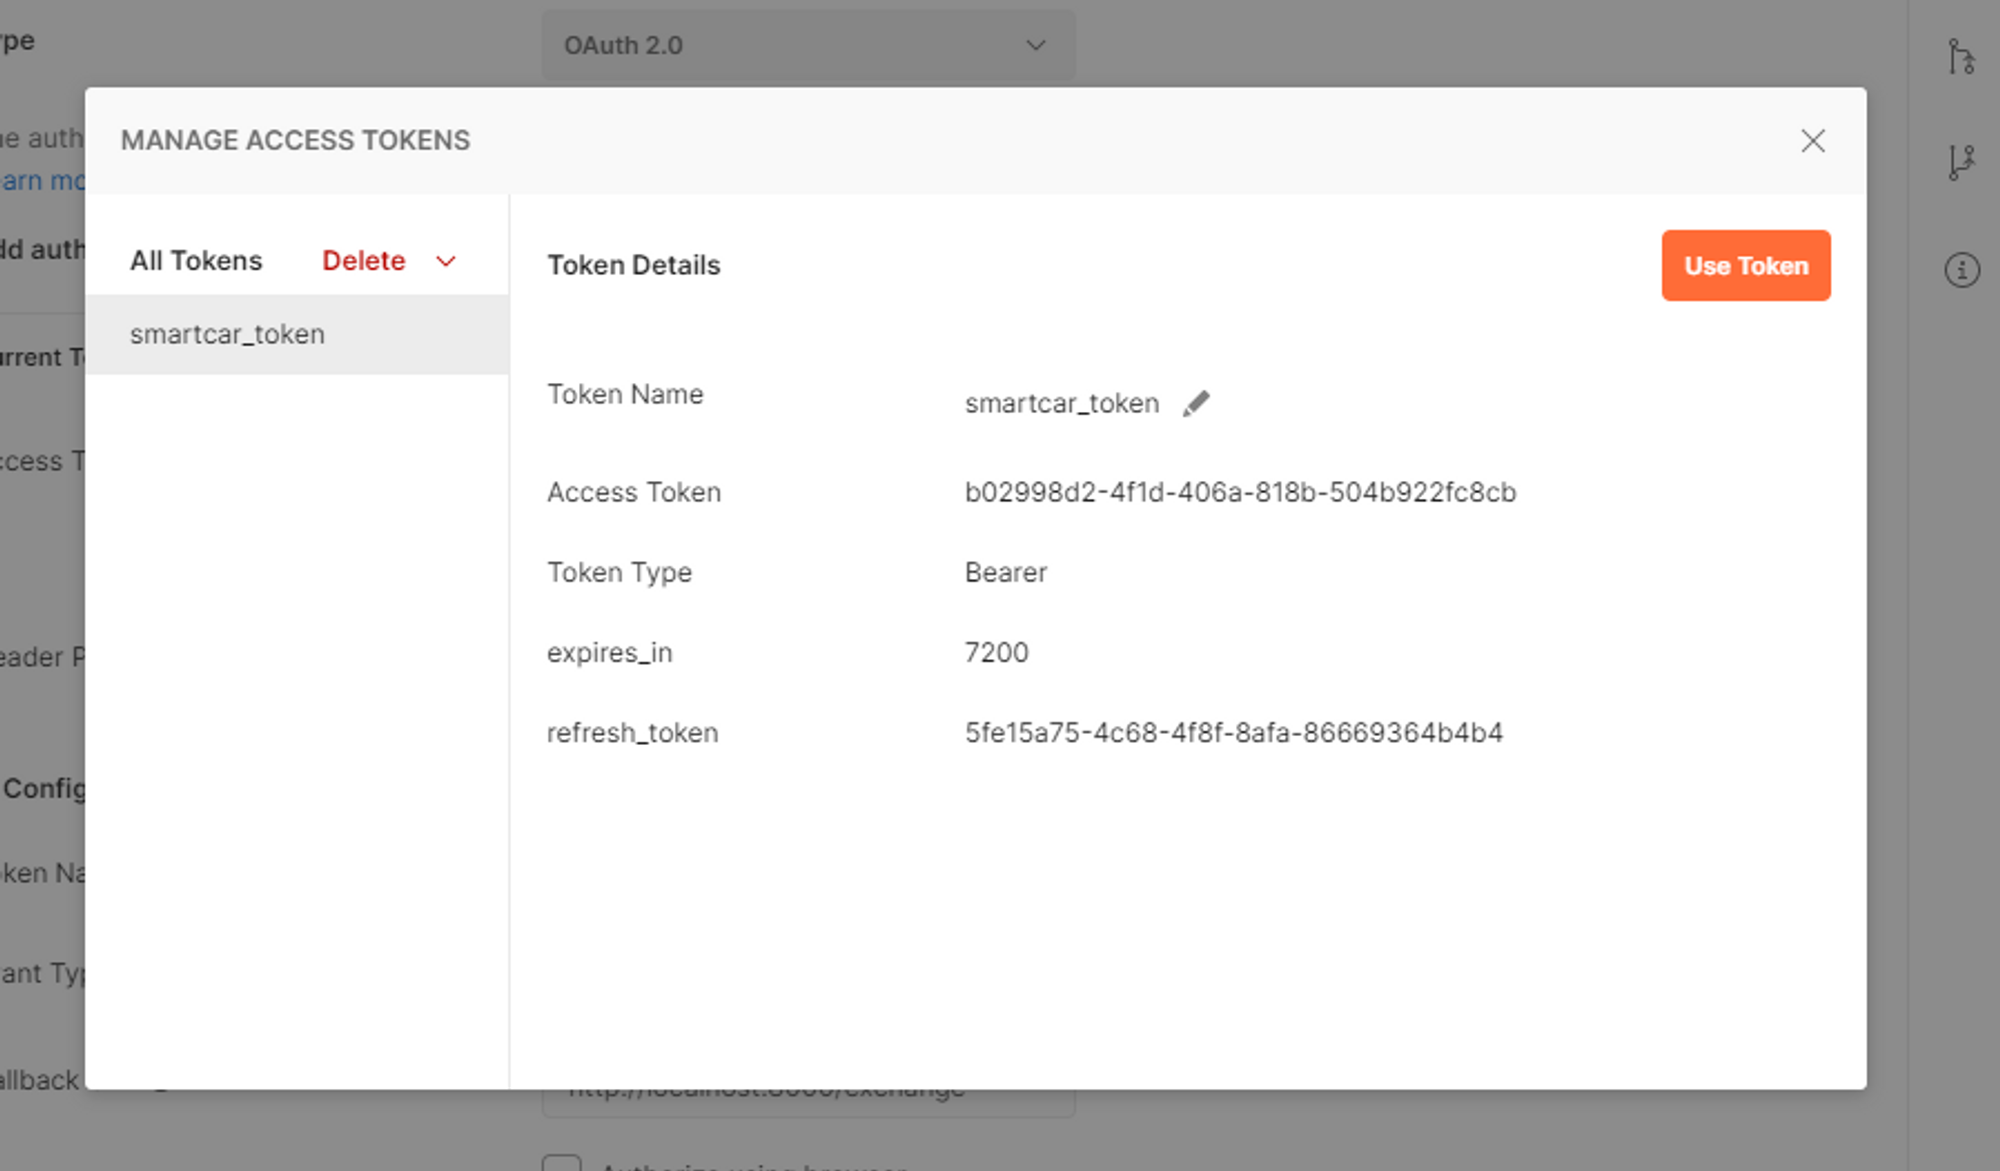 Hit Use Token. You should see Access Token under Current Token populate with the access\_token from the popup. Using this access\_token you can make API requests to Smartcar's API.
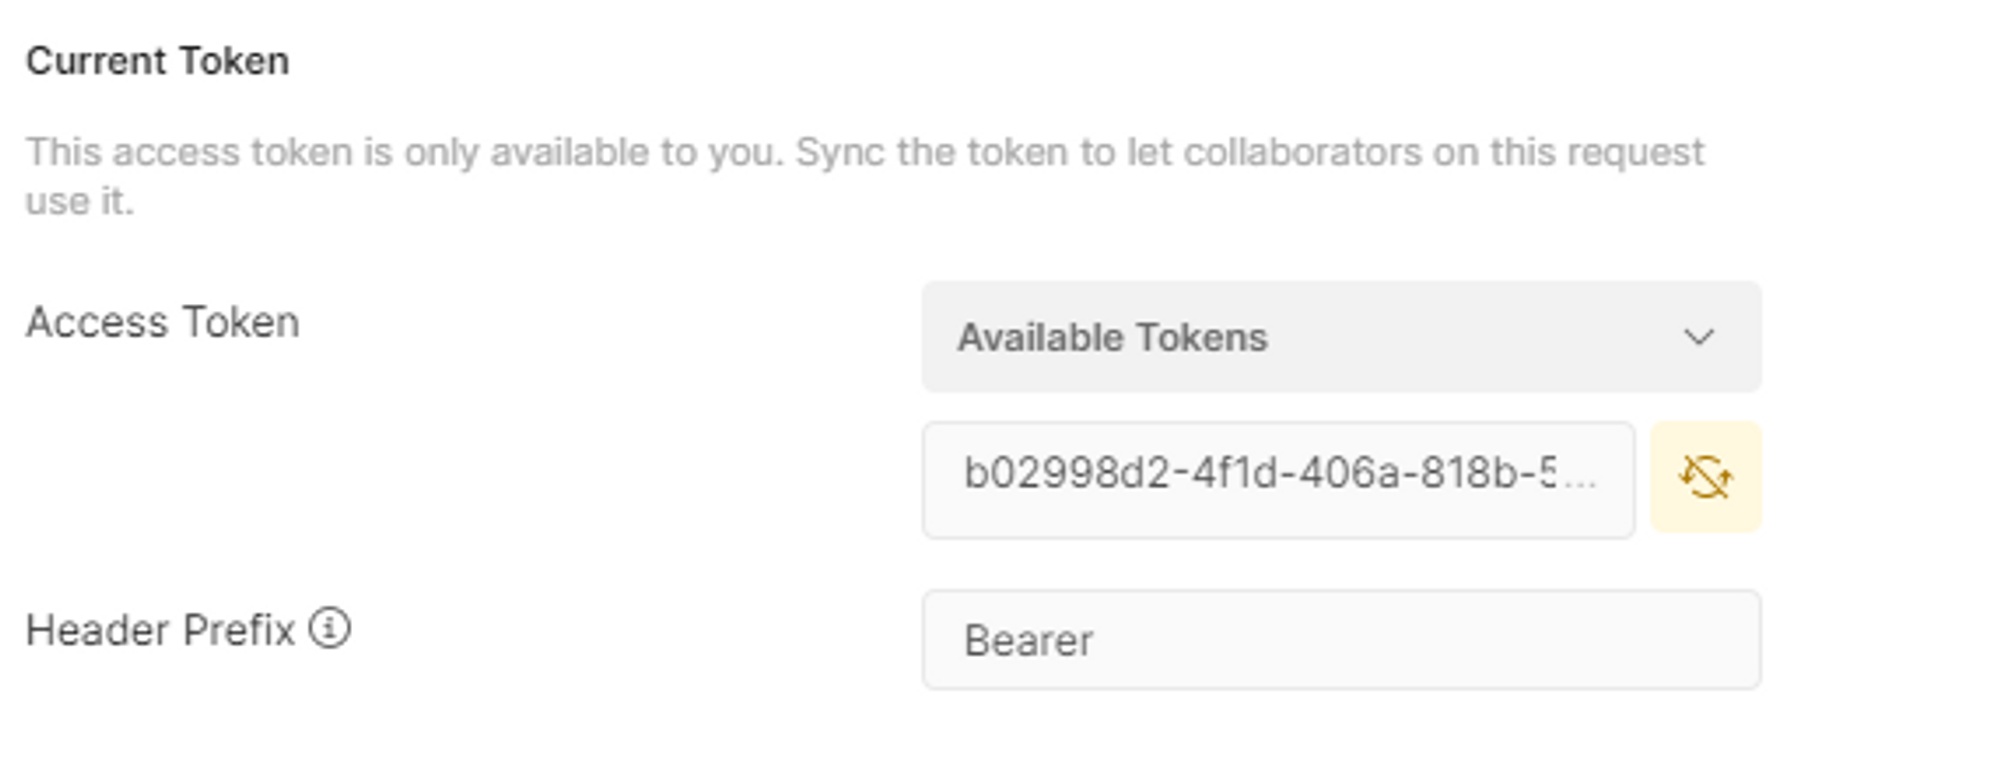
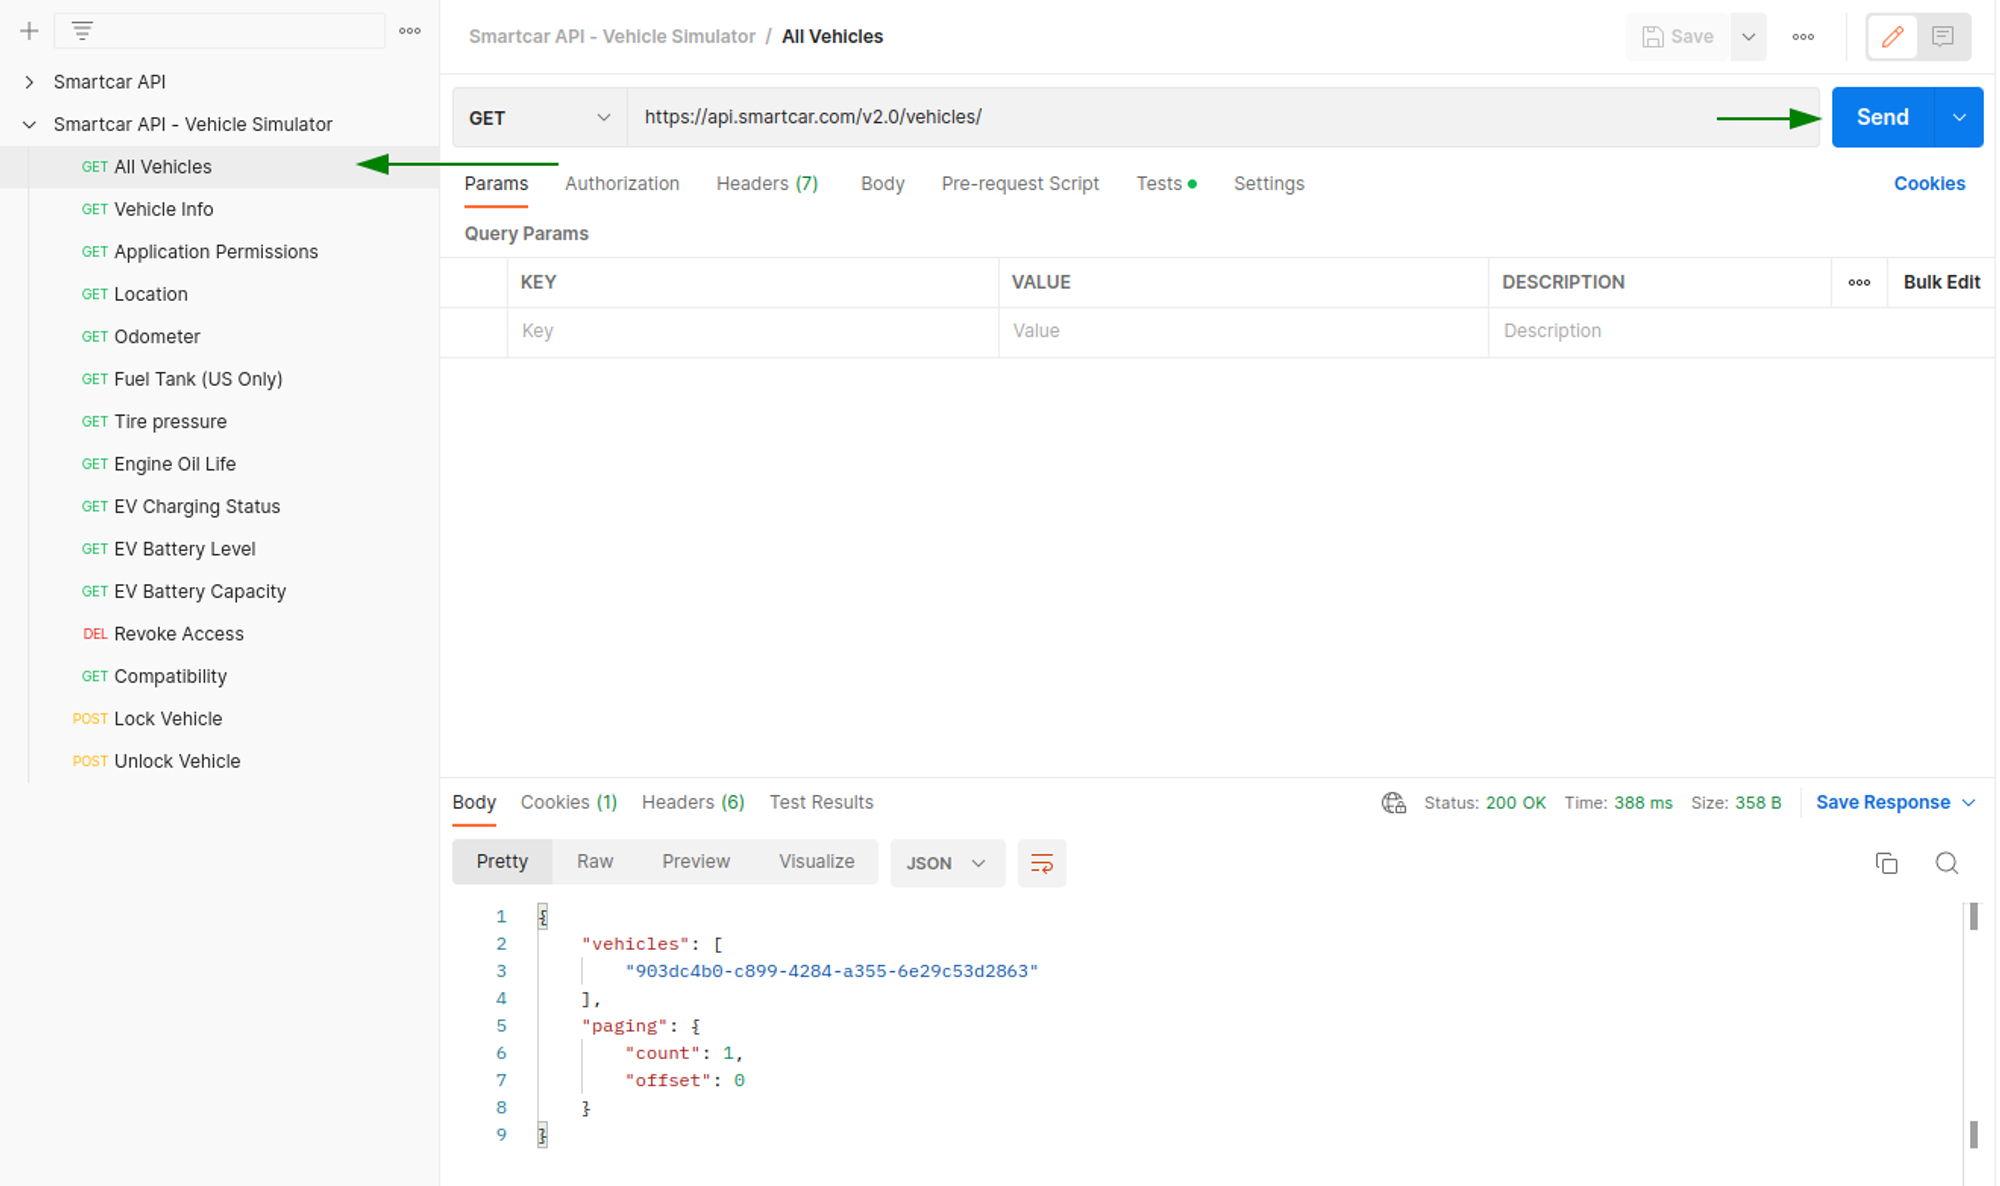
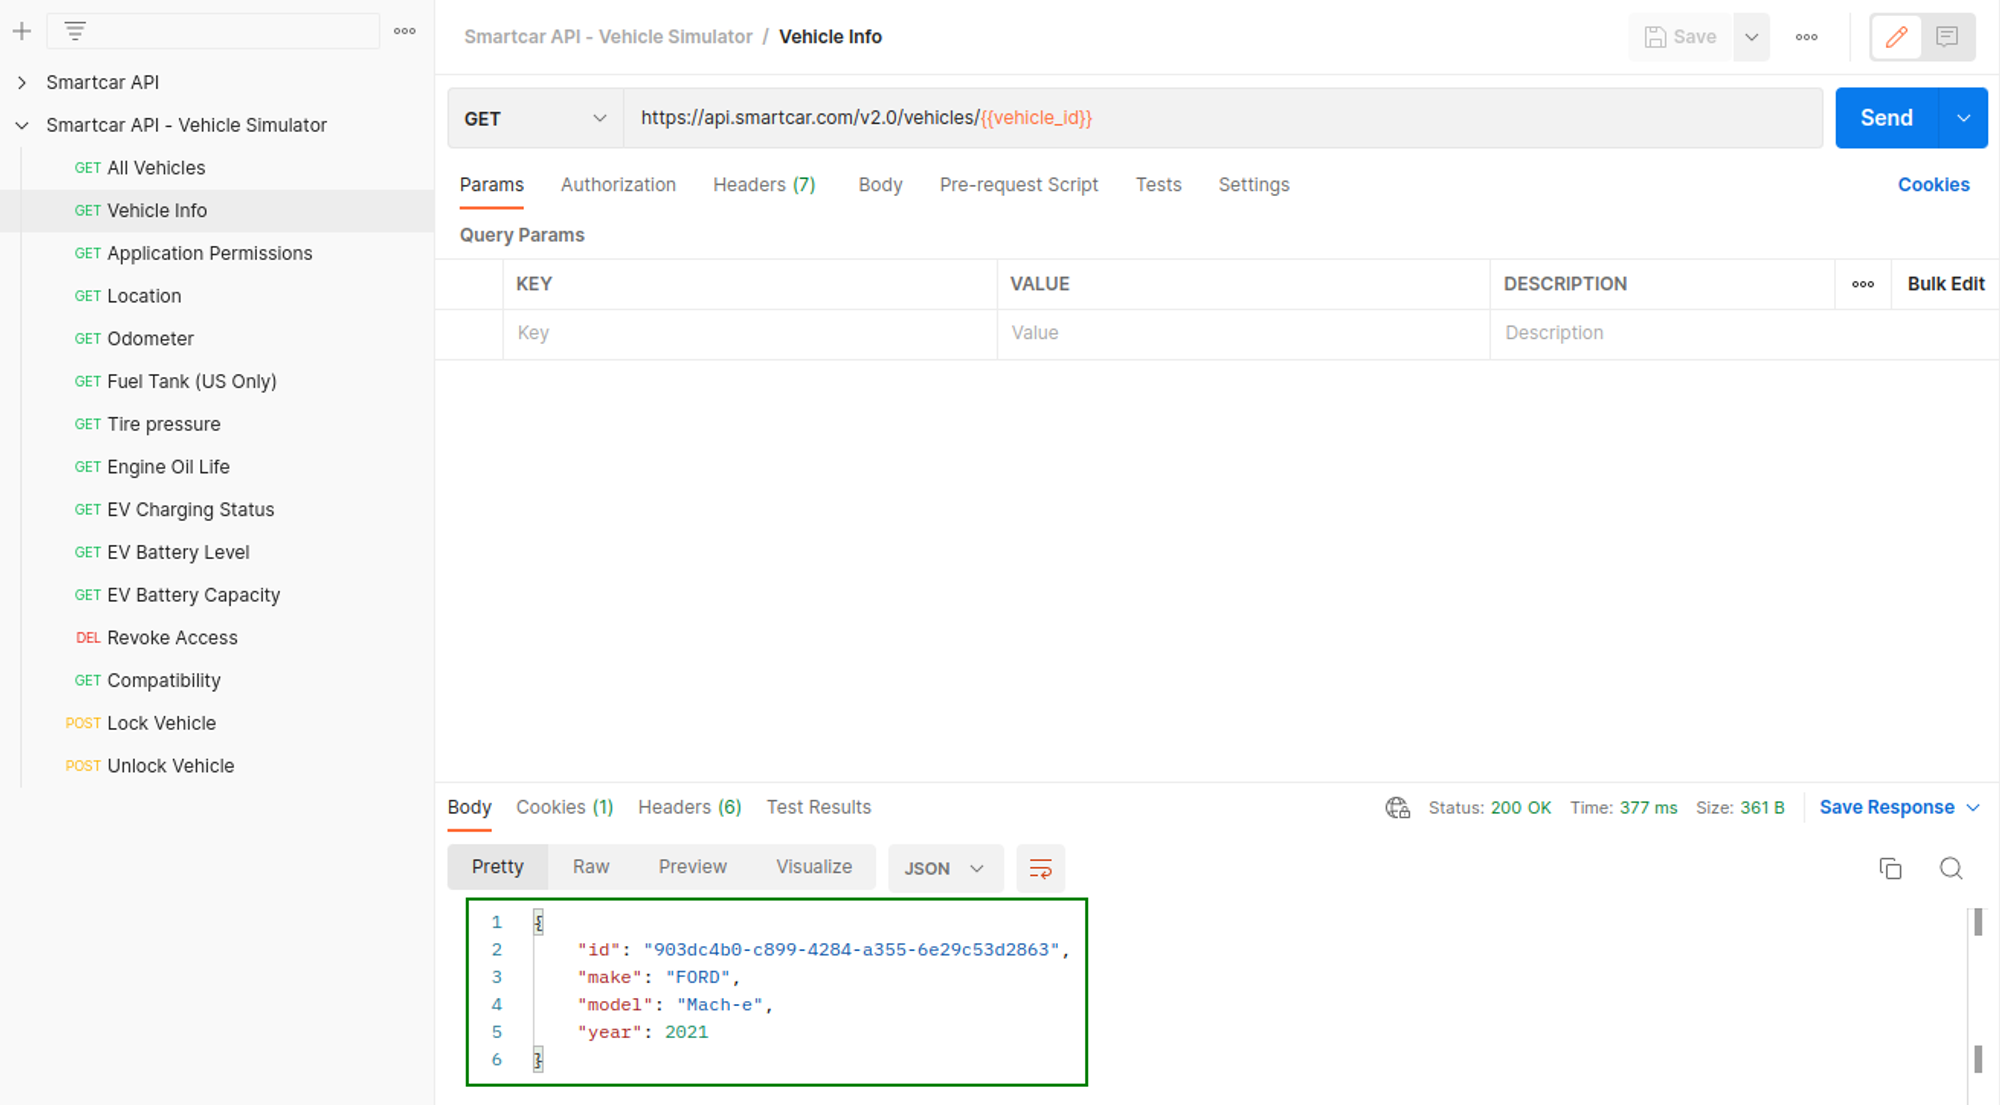
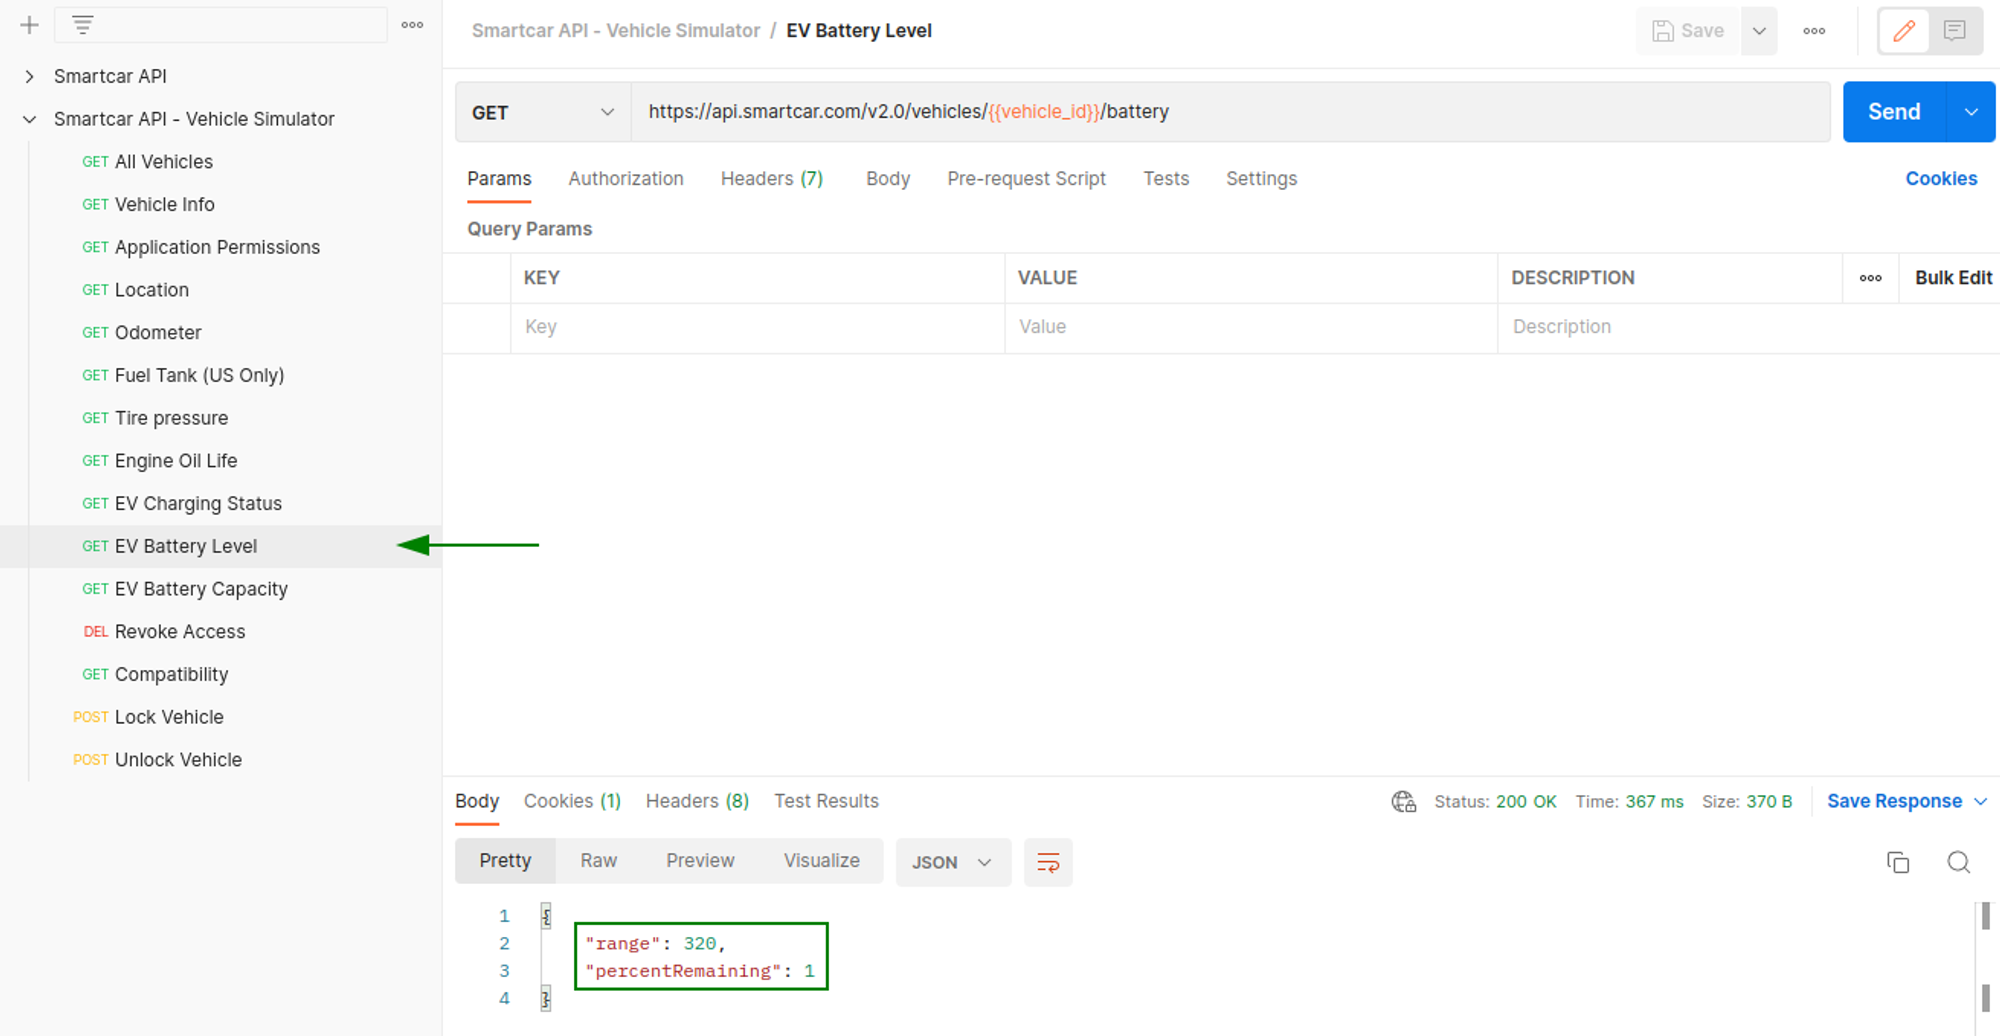
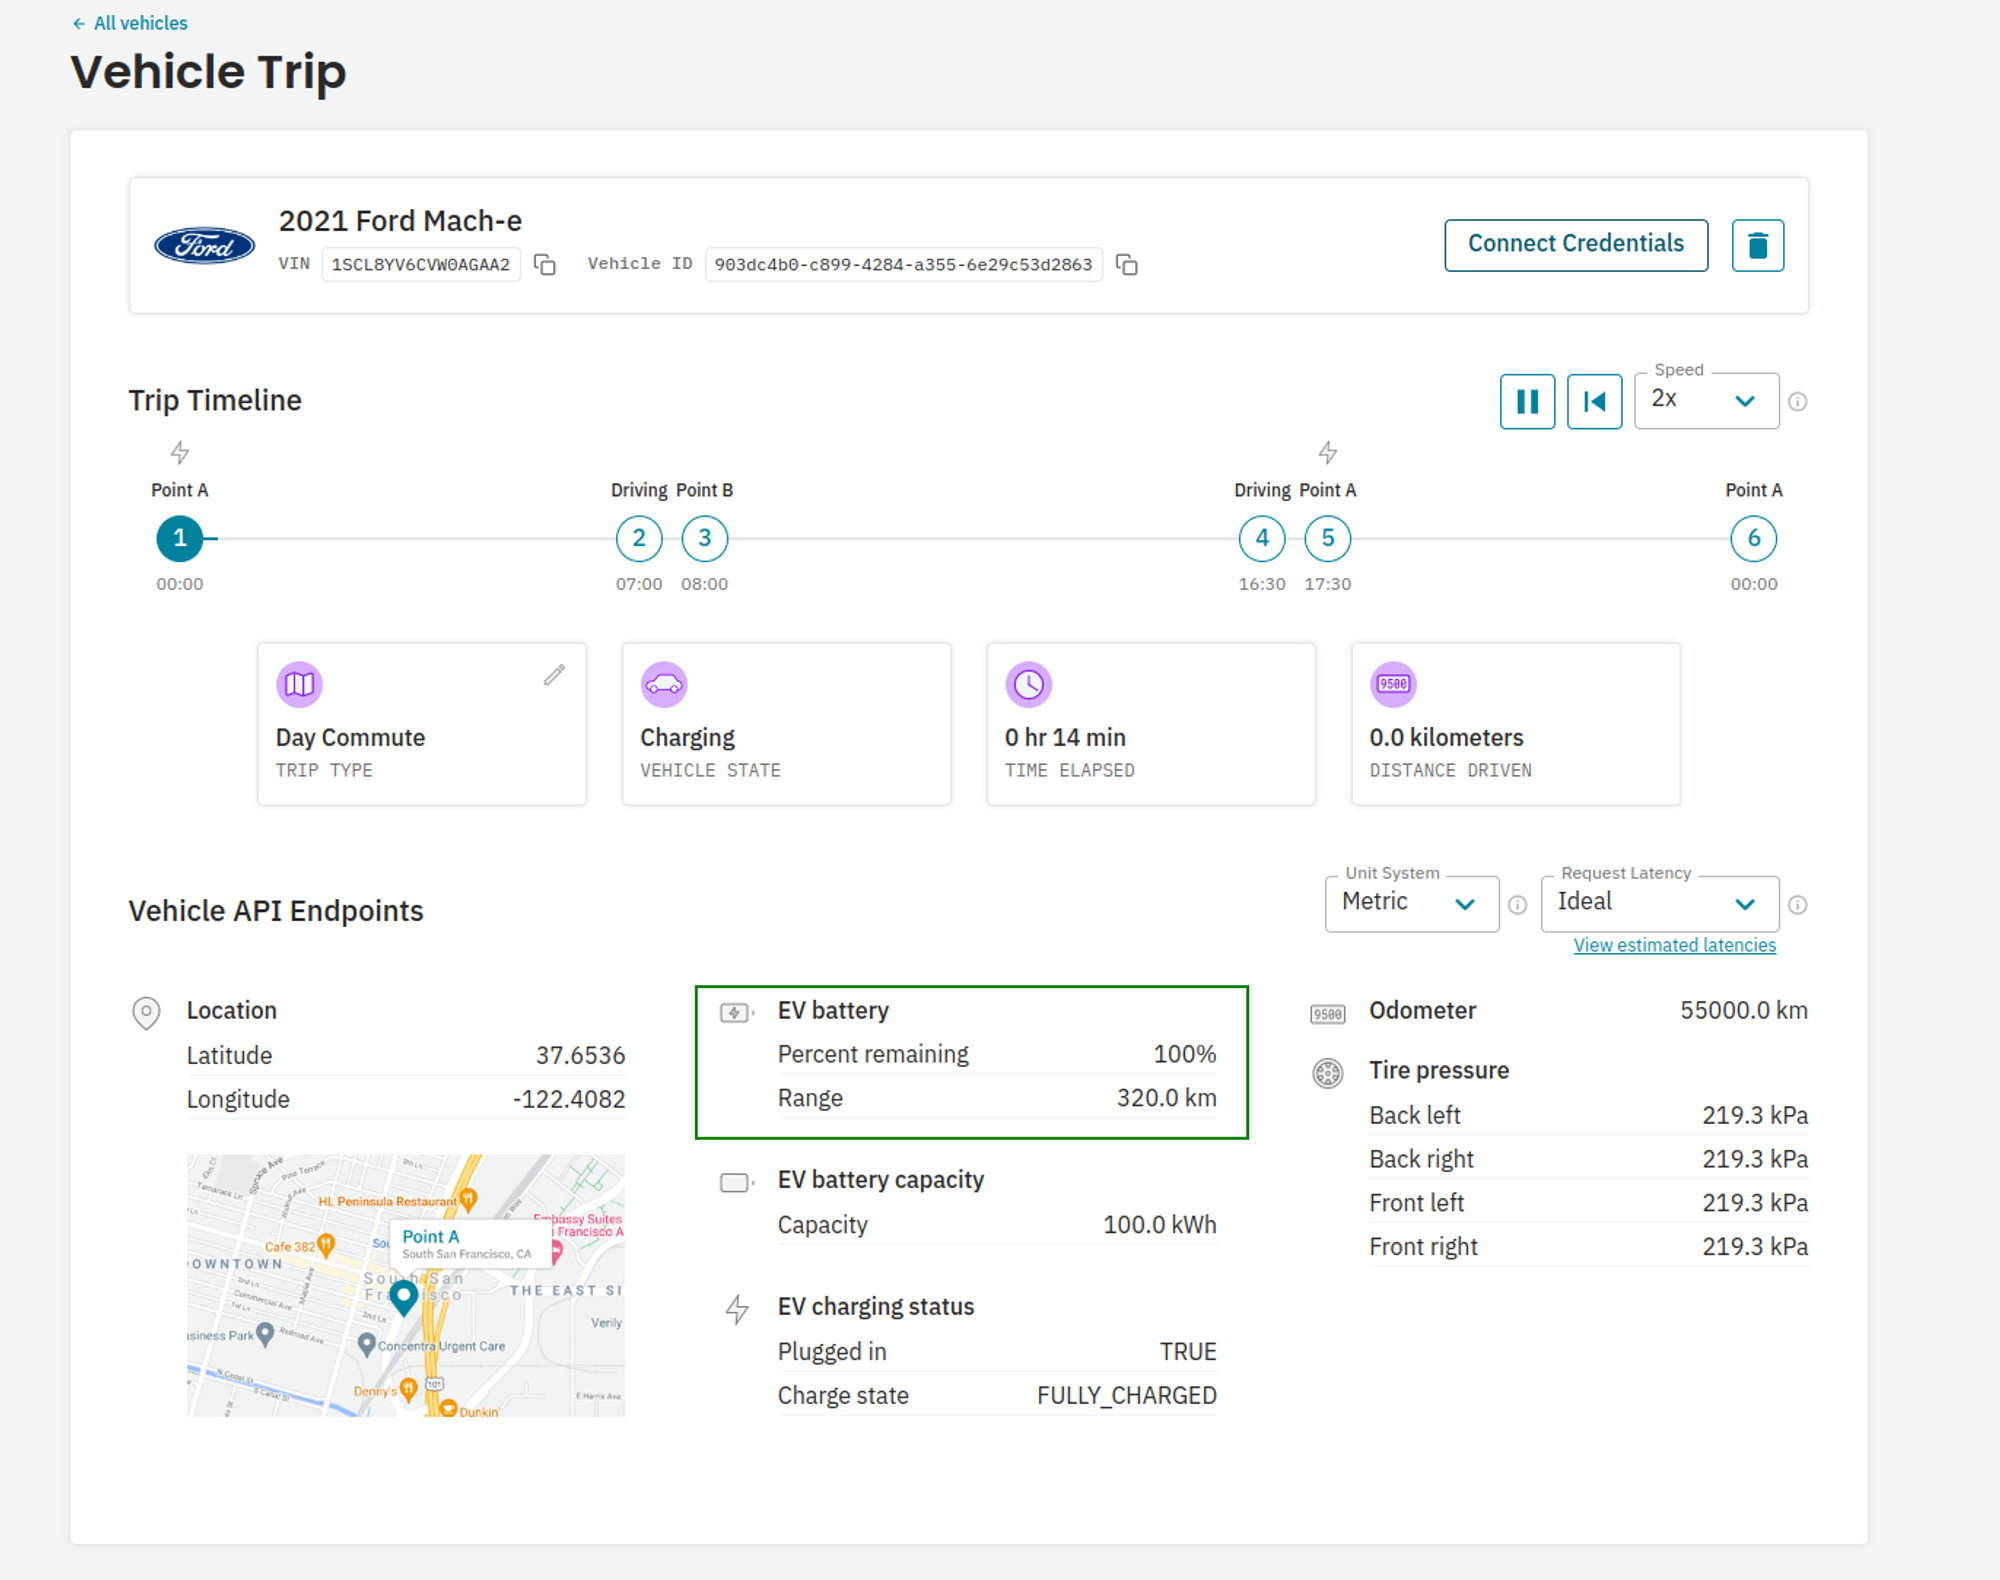
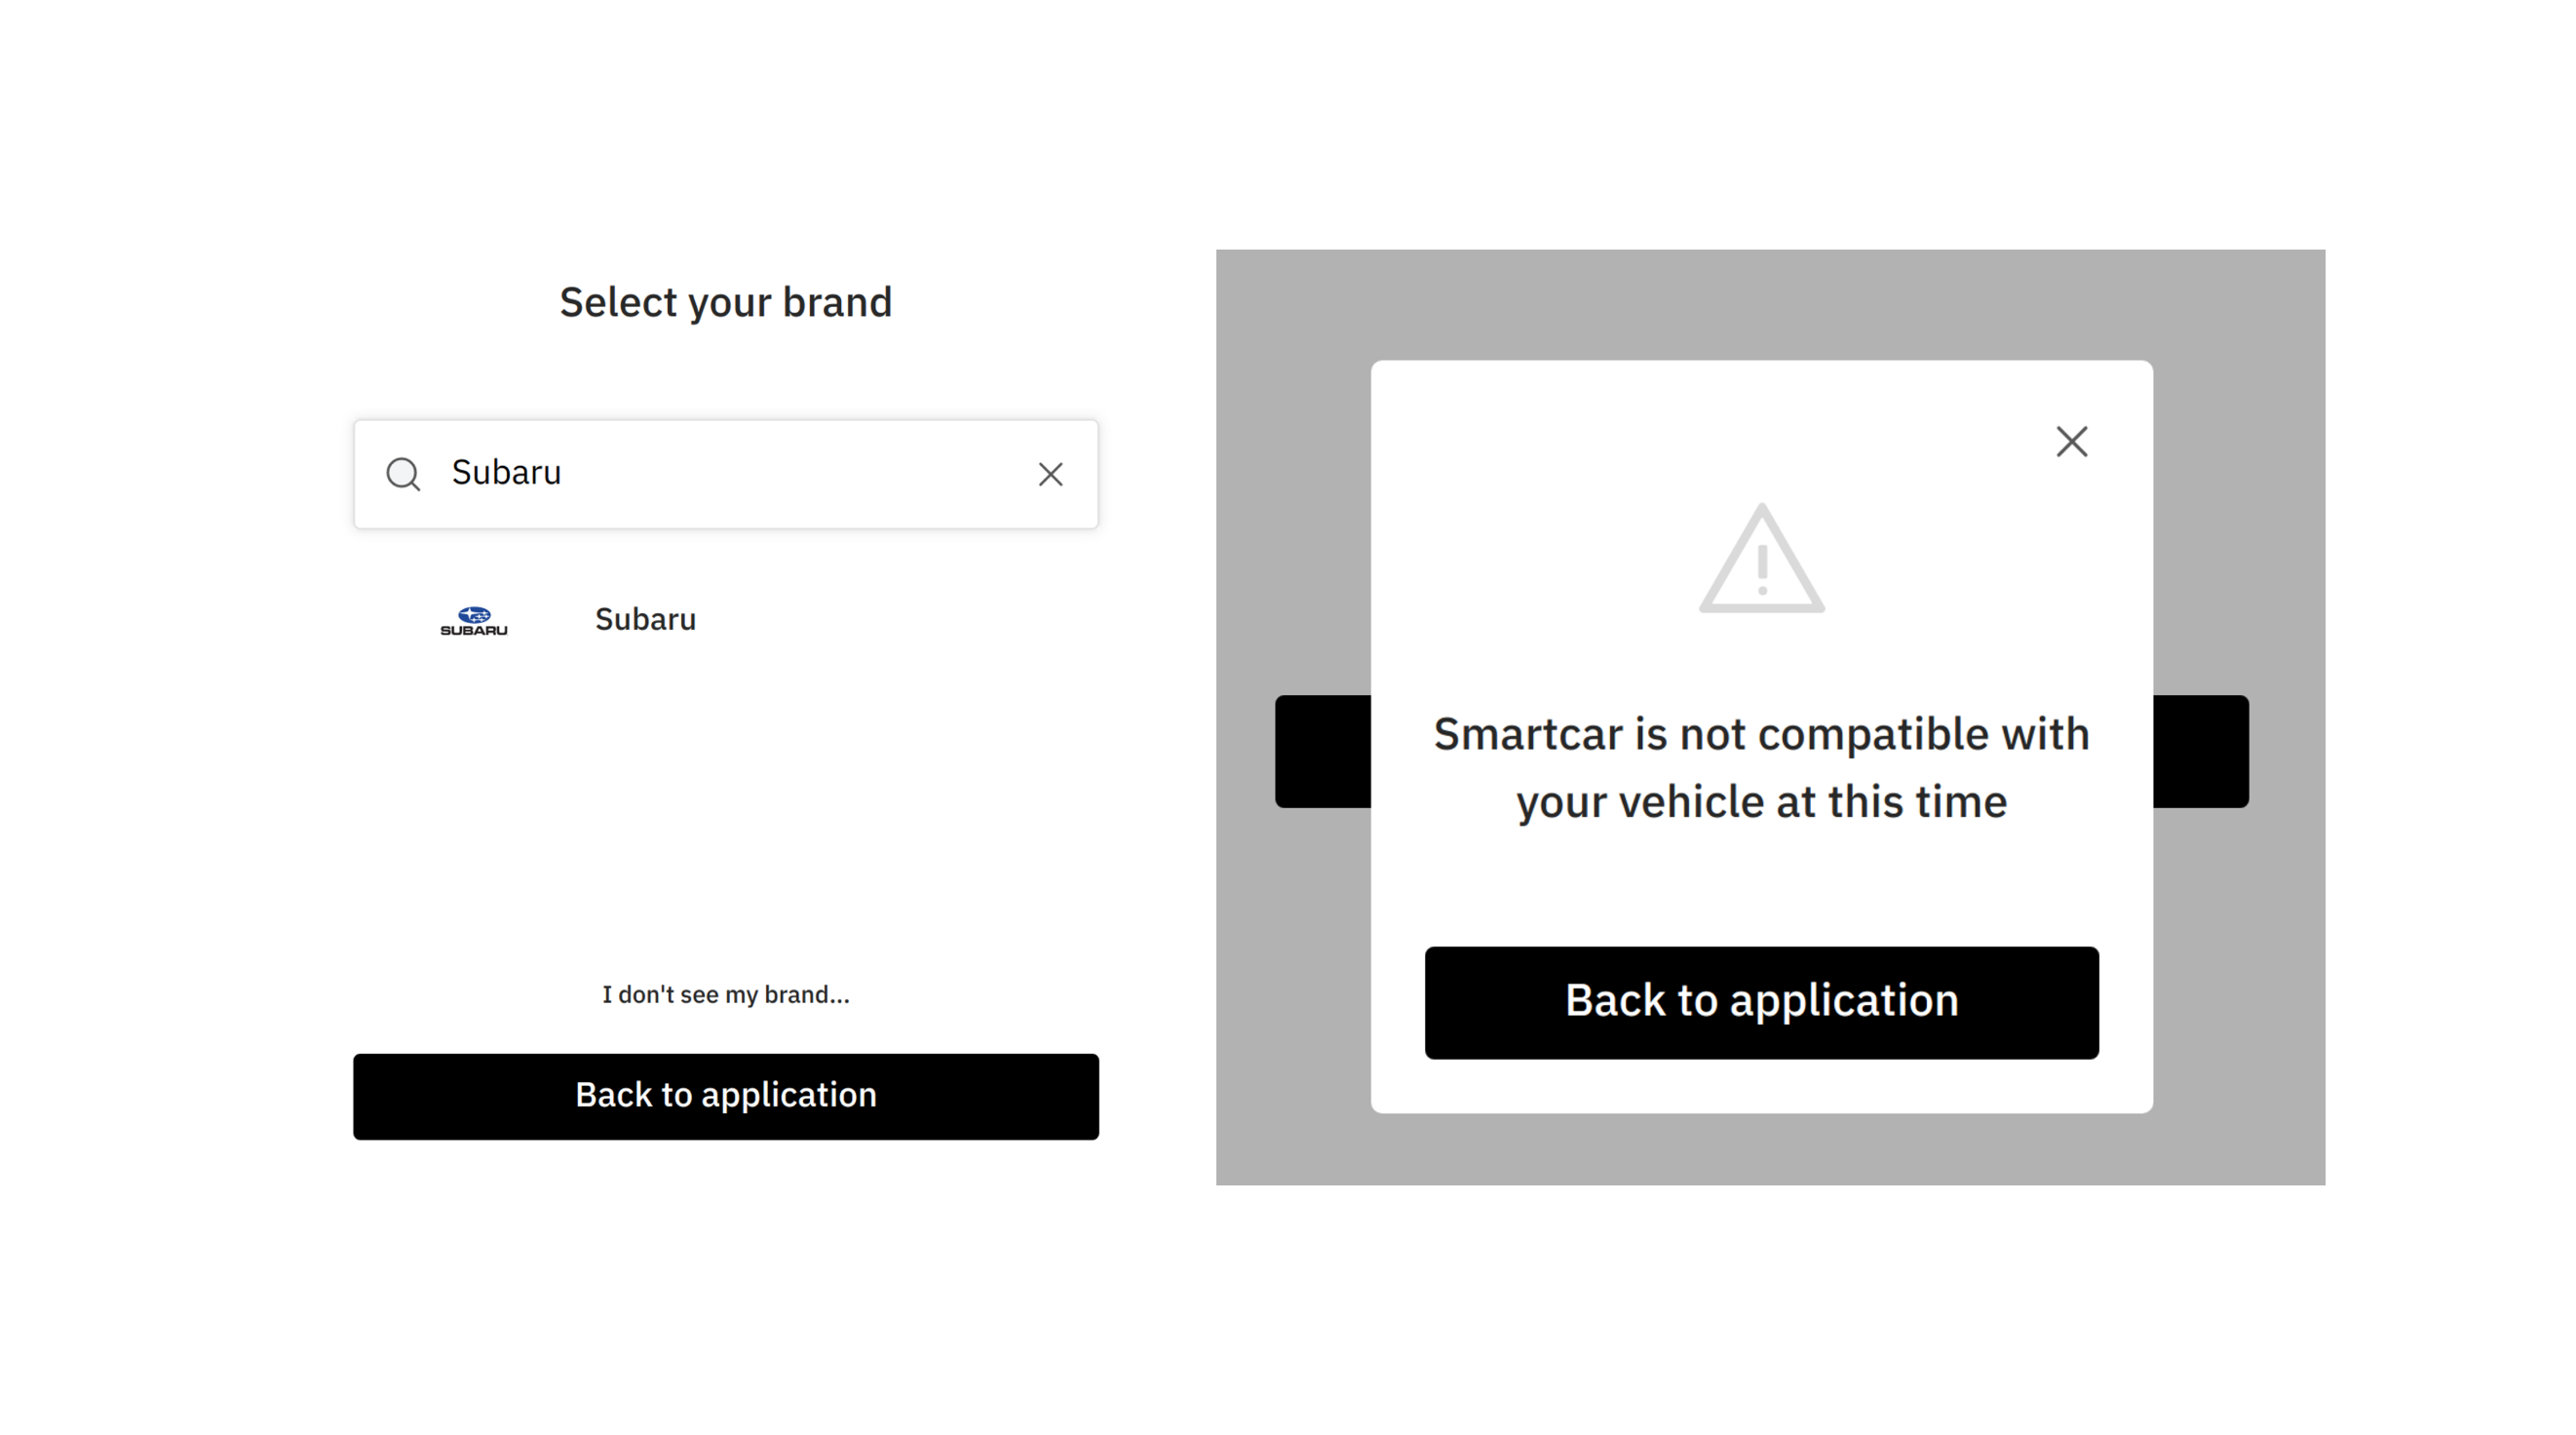 We recommend that your application provides a flow for incompatible vehicles like in the example below.