# Replit > ## Documentation Index --- # Source: https://docs.replit.com/cloud-services/deployments/about-deployments.md > ## Documentation Index > Fetch the complete documentation index at: https://docs.replit.com/llms.txt > Use this file to discover all available pages before exploring further. # Overview > Share your Replit Apps with the world in just a few clicks. export const YouTubeEmbed = ({videoId, title = "YouTube video", startAt}) => { if (!videoId) { return null; } let url = "https://www.youtube.com/embed/" + videoId; if (startAt) { url = url + "?start=" + startAt; } return ; }; Publishing lets you share your Replit App with the world using a simplified process. The action of making your app live is called "Publishing." This page describes the different types of deployments available. ## What is Publishing? Publishing is a feature that saves a **snapshot** of your Replit App to the cloud, where everyone can interact with it. A snapshot captures the current state of the files in your Replit App. When you publish your Replit App, you create a **published app**. A published app is a running instance of your app on Replit's cloud infrastructure. This makes the app reliably available on the internet, separate from the version in your workspace. Replit's infrastructure is backed by Google Cloud Platform (GCP). All published apps are hosted in the United States. Publishing includes tools to monitor your published app status and view web analytics. Replit offers the following deployment types: Automatically adjusts resources based on your app's usage. Provides an affordable way to host websites that don't change based on user input. Provides a consistent amount of computing resources for your app to run continuously. Runs your app at scheduled times that you choose. ## Getting started Follow the steps below to publish your Replit App: 1. From your Replit App workspace, select Publish icon **Publish** at the top. 2. In the **Publishing** tab, select your publishing option. 3. If **Add a payment method** appears, follow the prompts to add a payment method. Replit automatically selects the best publishing option for your app based on the project type and your needs. However, to choose a different deployment type, consider the following information. ## 
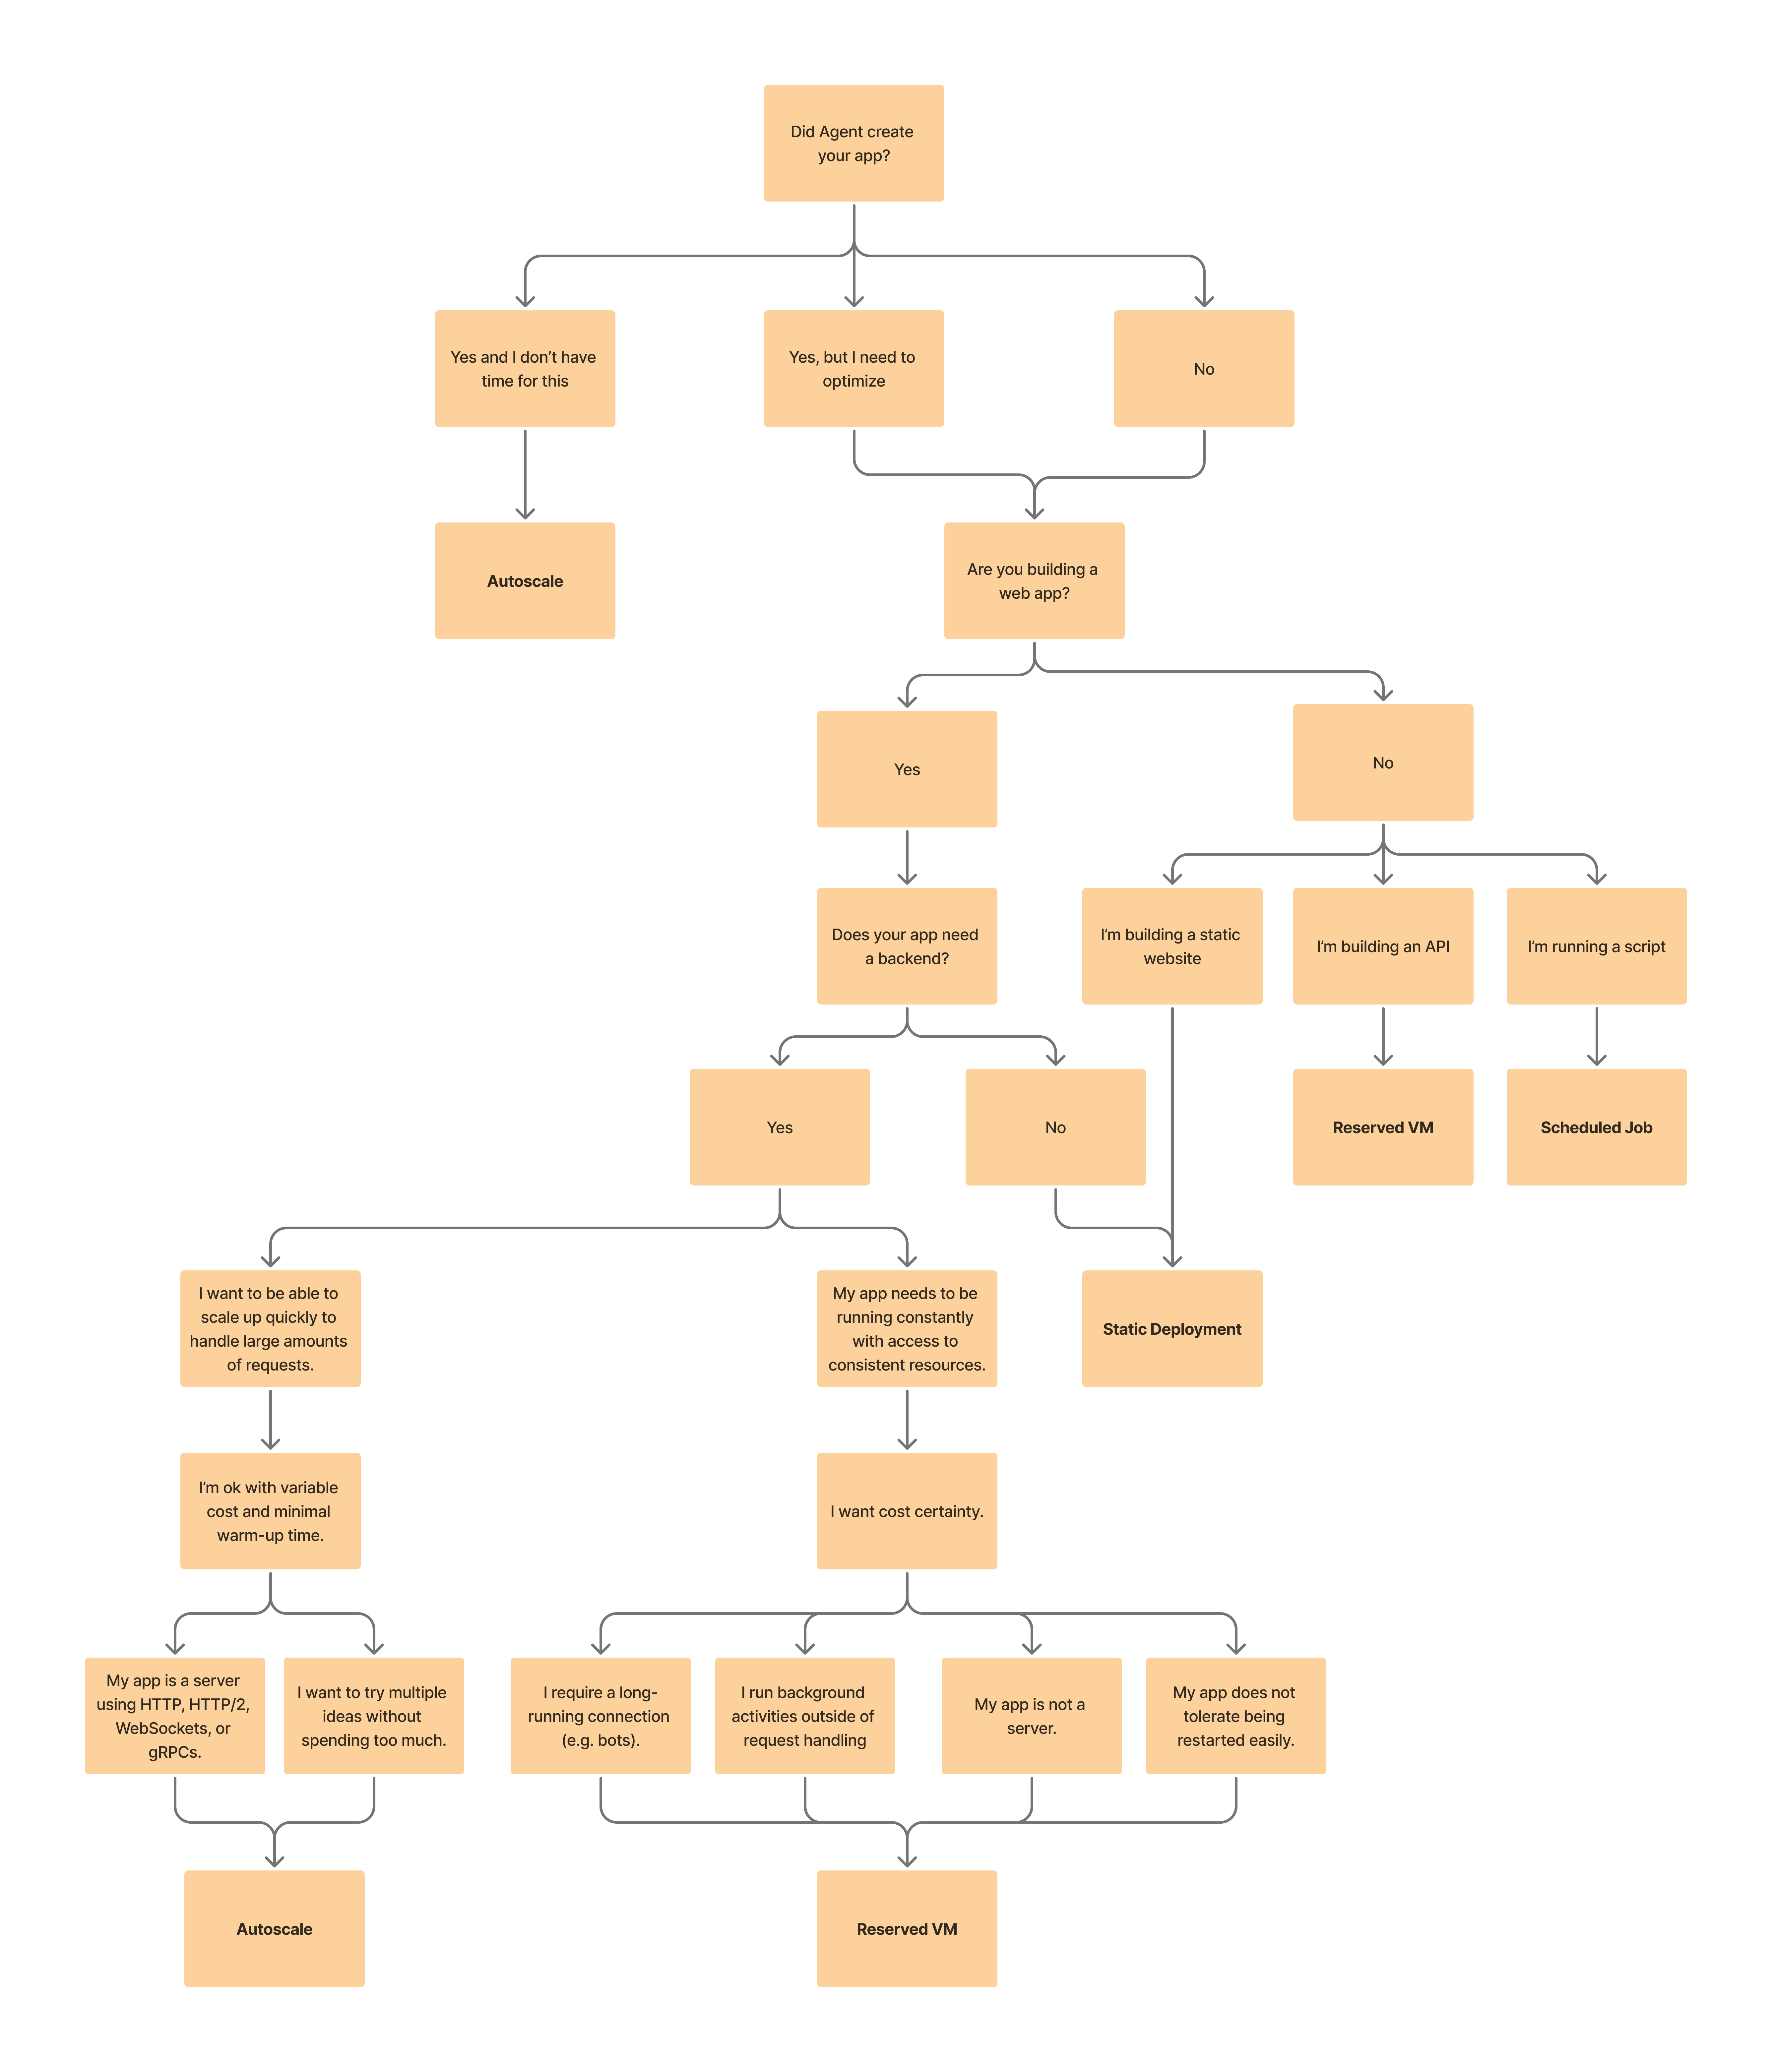
Choosing the right publishing option The following video explains how to choose the right publishing option for your app: Use the following decision tree featured in the video to help you choose: ## Key features Publishing offers the following convenient features: * **Multiple publishing options**: Select or update a deployment type that meets your needs in a few clicks. * **Custom domains**: Serve your app from your web domain. * **Analytics**: Track visitor data and other metrics for your published app. * **Monitoring tools**: View your published app status and configuration. * **Access controls**: Control who can see your app with a single click. Available only for **Teams** members. * **Badge settings**: Core users can manage the "Made with Replit" badge in Publishing settings. If you published an app while on the Starter plan that include the badge, it may take a couple minutes to update your app to remove the badge after you upgrade. * **Feedback collection**: Enable feedback on your published app to gather insights from your users. ## How it works When you publish your Replit App, Replit creates a snapshot of your app's files and dependencies. This snapshot is then sent to Replit's cloud infrastructure, where it runs as a separate instance of your app. To update your published app with the latest changes, publish again to create a fresh snapshot. Avoid saving and relying on data written to a published app's filesystem. To store data, use a storage or database option such as Replit's [Storage and Database](/category/storage-and-databases) offerings. ## Use cases The following examples show different types of published apps. ### Autoscale deployment: Typing speed assessment app Let the cloud scale up resources when users take typing tests and reduce them when not in use. ### Static deployment: Solar system simulation Learn about the planets in a solar system visualization app on the web. This visualization renders in the browser and doesn't transfer any user input to a server. ### Reserved VM deployment: Discord bot Run a Discord bot that helps you moderate and onboard members. It's always online to chat with users and respond to commands with predictable pricing and performance. ### Scheduled deployment: Home automation triggers Schedule API calls to start and stop your smart home devices at specific times and days. ## Next steps To learn more about Replit Publishing, see the following resources: * [Autoscale Deployment](/cloud-services/deployments/autoscale-deployments/): Learn how to set up applications that scale with traffic * [Static Deployment](/cloud-services/deployments/static-deployments/): Discover how to publish static websites quickly and efficiently * [Reserved VM Deployment](/cloud-services/deployments/reserved-vm-deployments/): Explore dedicated VM options for specialized use cases * [Scheduled Deployment](/cloud-services/deployments/scheduled-deployments/): Set up recurring tasks with simple scheduling * [Custom Domains](/cloud-services/deployments/custom-domains/): Connect your published app to a custom domain --- # Source: https://docs.replit.com/billing/about-usage-based-billing.md > ## Documentation Index > Fetch the complete documentation index at: https://docs.replit.com/llms.txt > Use this file to discover all available pages before exploring further. # Publishing and Database Billing > Learn how Replit bills for publishing and databases, including outbound data transfer, compute units, requests, and PostgreSQL usage metrics. There are three types of usage-based billing for publishing: 1. Outbound Data Transfer 2. Autoscale Compute Units 3. Requests You can view your usage in your account [here](https://replit.com/account#resource-usage). Billing occurs monthly or once your accumulated costs exceed your monthly credits. Replit Core and Teams users receive monthly allowances for these resources. If you need additional credits beyond your monthly subscription allowance, you can purchase credit packs on your billing page. See [Managing Your Spend](/billing/managing-spend) for more information about credit packs. # Publishing ## 1. Publishing Outbound Data Transfer This type of usage is billed per byte with Replit Core users receiving a monthly allowance. Only egress (outgoing) data is counted against this allowance, potentially leading to overages. In contrast, ingress (incoming) data is always free. | Subscription | Allowance | | ------------ | --------- | | Replit Core | 100 GiB | The allowances apply to [Static](/cloud-services/deployments/static-deployments), [Autoscale](/cloud-services/deployments/autoscale-deployments), [Reserved VM](/cloud-services/deployments/reserved-vm-deployments) and [Scheduled](/cloud-services/deployments/scheduled-deployments) deployments. See the [pricing page](https://www.replit.com/pricing) for the current price of outbound data transfer. *** ## 2. Compute Units Autoscale Deployments are billed based on Compute Units, which take into account both CPU and RAM usage over time. Overages are billed based on Compute Units. The granularity of the billing is down to each individual compute unit. See the [pricing page](https://www.replit.com/pricing) for the current price of compute units. Here is a breakdown of how RAM and CPU seconds for an Autoscale Deployment translate into Compute Units: | Resource | Compute Units | | ------------ | ------------- | | 1 RAM Second | 2 Units | | 1 CPU Second | 18 Units | Static Deployments don't consume Compute Units. Their billing is solely for Outbound Data Transfers beyond a [specified amount](#). [Learn more about Autoscale Deployments](/cloud-services/deployments/autoscale-deployments). *** ## 3. Requests Autoscale Deployments also consider the number of requests made. See the [pricing page](https://www.replit.com/pricing) for the current price of requests. # Databases Replit only charges for usage of [production databases](/cloud-services/storage-and-databases/production-databases) -- development databases are always free and included with every Replit App. For details on development databases, see [Development Database](/cloud-services/storage-and-databases/sql-database). Replit PostgreSQL is fully managed and serverless, providing effortless high availability and zero maintenance. Billing for production databases is based on actual usage, which can lead to significant cost savings. Production PostgreSQL databases are billed by two usage metrics: * **[Compute Time](#compute-time)**: The amount of compute resources consumed per hour. * **[Data Storage](#data-storage)**: The total volume of data (including historical data) stored. You can view your current resource usage, including production database usage, in your account [here](https://replit.com/account#resource-usage). ## Compute Time Compute time is determined by number of hours your database remains active during a given billing period. Databases are considered active when they receive requests and for an additional 5-minute period after the last request. If a database remains idle for 5 minutes, it will be suspended and enter an inactive state. ## Data Storage Data storage is the total volume of data stored across all databases in your account, measured in gibibytes (GiB). Storage is calculated as the maximum amount of storage used per month. Each PostgreSQL database consumes 33MB of storage, even if it doesn't contain any data. This is the default storage footprint of the Postgres server. The total storage limit for each database is 10 gibibytes (GiB). # Additional Notes If there's an issue with your payment method, we'll notify you. Continuous payment failures might lead to the suspension of your published apps. If this happens, please [contact support](https://replit.com/help) and update your payment details to regain access to our services. --- # Source: https://docs.replit.com/legal-and-security-info/abuse-report.md > ## Documentation Index > Fetch the complete documentation index at: https://docs.replit.com/llms.txt > Use this file to discover all available pages before exploring further. # Reporting Abuse on Replit > At Replit, we strive to maintain a safe and welcoming environment for all our users. If you encounter abusive, harmful, or inappropriate content, we encourage you to report it immediately. We have established multiple channels to address various types of concerns efficiently. Here's how you can help ## 1. Use the On-Site reporting feature Use the on-site reporting feature for a quick and direct way to report content that violates our [Community Standards](https://blog.replit.com/community-standards). This method ensures that your report is immediately sent to our staff members for review. Here's how to use it: * Navigate to the content you wish to report. * Look for a report button or link. This is usually located near the content itself, such as under a post or within a user's profile options. * Select the report button or link and describe the nature of the abusive content. * Submit your report. Our team will review it as soon as possible and take appropriate action. For more detailed instructions on using the reporting feature, please read [How to Make Reports](./trust-and-safety.md#how-to-make-reports). ## 2. Report Abuse via email If you come across phishing attempts or suspect a piece of content is designed to deceive or harm others by pretending to be something it's not, please report it directly to our dedicated email address for abuse reports: * **Email**: `abuse@replit.com` * **Subject**: Briefly describe the issue (e.g., "Phishing Attempt Detected"). * **Body**: Include detailed information about the phishing attempt, such as URLs, user account names involved, and a description of the content. Attach any relevant screenshots if possible. ### Additional Resources For cybersecurity organizations looking to report phishing detections via automation, we invite you to contact us for potential partnership opportunities. Please reach out to the abuse team at [abuse@replit.com](mailto:abuse@replit.com) to discuss further. ## 3. Issue DMCA Takedown Requests For copyright holders or their authorized representatives, Replit respects your intellectual property rights and follows the Digital Millennium Copyright Act (DMCA) procedures to address your concerns. For detailed instructions on copyright claims on Replit, please read [Copyright claims and takedown requests](./copyright-claims-takedown-requests). ## 4. Report Security vulnerabilities If you've discovered a security vulnerability within Replit, we highly value your contribution to our community's safety and encourage you to report it to us. Please read our [Security](./security) documentation for instructions on disclosing potential vulnerabilities. --- # Source: https://docs.replit.com/legal-and-security-info/account-inactivity.md > ## Documentation Index > Fetch the complete documentation index at: https://docs.replit.com/llms.txt > Use this file to discover all available pages before exploring further. # Account Inactivity > Learn about Replit's account inactivity policy, when accounts may be terminated, and how paid subscriptions affect account status. A free Replit account provides access to most Replit features and products. An account is kept active by user actions, including logging in and interacting with the Replit Workspace. An inactive Replit account is one that has not been used within a **1-year** period, meaning the user has not logged in to the account during that period. Replit reserves the right to terminate inactive Replit accounts and delete associated user data. Replit will delete Replit Apps associated with inactive free accounts. Replit accounts under a paid subscription plan are not subject to termination due to account inactivity. --- # Source: https://docs.replit.com/additional-resources/add-a-made-with-replit-badge-to-your-app.md # Add a Replit Badge to your app > Add, customize, and embed a Replit Badge in your Replit App to showcase your project and link back to your cover page. The Replit Badge allows you to showcase that you built your app on Replit. When added to your Replit App, it links back to your App's cover page so visitors can learn more about your creations. ## Features The Replit Badge enhances your app with official Replit branding while providing easy navigation back to your project. * **Simple integration**: Add the badge to any app with a single line of code * **Customizable appearance**: Choose from multiple themes and positions * **Flexible implementation**: Use the script tag or custom HTML/CSS options * **Markdown support**: Embed badges in your GitHub repository and other Markdown files ## Usage ### Adding the badge You can add a Badge to any Replit App with an index page. Websites created with the official HTML template have this Badge added by default. 
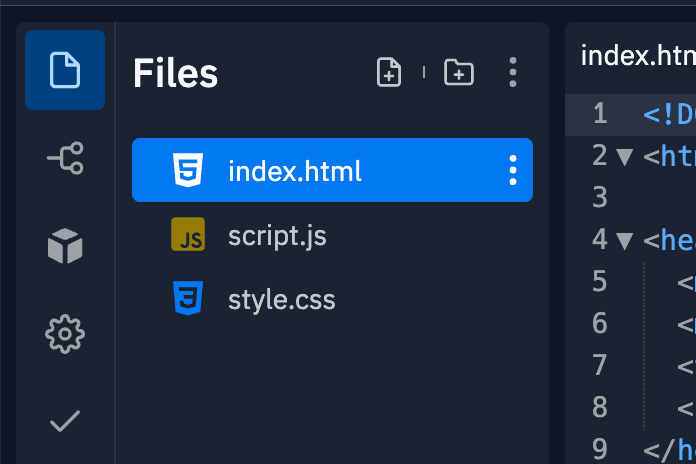
1. **Locate your index.html file**\ Go to your Replit App's file browser and find `index.html` File browser showing index.html file 2. **Add the badge script**\ Add the following code before the closing `` tag: ```html theme={null} ``` HTML code example showing badge script ### Testing your badge 1. **Run your app**\ Run your Replit App, then select **Open in a new tab** Open in a new tab button 2. **View the badge**\ Your Badge should appear in the lower right corner. This is what visitors to your page will see. Badge Preview 3. **Test the link**\ Select your Badge to verify it links back to the Replit App's cover page ### Customizing your badge You can change the color of your Badge by modifying the `theme` attribute with any of these colors: dark, light, red, orange, yellow, lime, green, teal, blue, blurple, purple, magenta, or pink. ```html theme={null} ``` You can change the position of your Badge by modifying the `position` attribute with one of these values: `top-left`, `top-right`, `bottom-left`, or `bottom-right`. ```html theme={null} ``` If the position isn't changing, check the browser console for more information—you may have specified an invalid position. If the Badge was added by default and you want to remove it, delete the script from `index.html`: ```html theme={null} ``` ### Advanced options If the default configurations don't meet your needs, you can create custom badges with standard HTML and CSS. Badges are hosted on `https://replit.com/badge`, allowing you to embed them as images and further style them with CSS. ```html theme={null} Replit Badge ``` You can also use additional options not available in the script: **Custom caption** (maximum 30 characters): ``` https://replit.com/badge?caption=Amazing%20Badges ``` ![Amazing Replit Badge](https://replit.com/badge?caption=Amazing%20Badges) **Smaller variant**: ``` https://replit.com/badge?caption=Amazing%20Badges&variant=small ``` ![Amazing small Replit Badge](https://replit.com/badge?caption=Amazing%20Badges\&variant=small) You can showcase your Replit Badge by embedding it in your repository README. This Markdown snippet combines a link and image to redirect users to your Replit App: ``` [![Try with Replit Badge](https://replit.com/badge?caption=Try%20with%20Replit)](https://replit.com/) ``` Try selecting this: [![Try with Replit Badge](https://replit.com/badge?caption=Try%20with%20Replit)](https://replit.com/) Share your feedback about this feature in the Community! --- # Source: https://docs.replit.com/tutorials/advanced-ai-features.md # Advanced AI features > Learn when and how to use Dynamic Intelligence (High Power) and Web Search to maximize Agent's capabilities for complex builds and accessing current information. export const AuthorCard = ({img = "https://replit.com/cdn-cgi/image/width=256,quality=80,format=auto/https://storage.googleapis.com/replit/images/1730840970400_e885f16578bbbb227adbfeb7b979be34.jpeg", href = "https://youtube.com/@mattpalmer", name = "Matt Palmer", role = "Head of Developer Relations"}) => { return
{name}

{name}

{role}

; }; export const AiPrompt = ({children}) => { return
{children}
; }; export const HighPowerCostMultiple = '5x'; export const AdvancedModelOutputPrice = '$75'; export const AdvancedModelInputPrice = '$15'; export const AgentCheckpointCost = '$0.25'; Agent has two advanced features that can significantly improve your development workflow: High Power mode (part of Dynamic Intelligence) and Web Search. While High Power upgrades Agent's AI model for complex tasks, Web Search lets Agent access current information from the internet. Use them independently or together for the best results. Here's how to use them strategically while managing costs. Agent performing web search to gather current information for app development ## What each feature does **High Power mode** - Upgrades Agent to our most advanced AI model for maximum capability through Dynamic Intelligence. **Web Search** lets Agent access current information from the internet, overcoming knowledge cutoffs. ## When to use what | Feature | Perfect for | Skip for | Cost | | :------------------ | :----------------------------------------------------------- | :------------------------------ | :------------------------------- | | **High Power mode** | Large codebases, critical business logic, complex algorithms | Basic features, quick fixes | {HighPowerCostMultiple} the cost | | **Web Search** | Latest packages, current docs, real-time data | Well-known tech, static content | Standard pricing | ## High Power mode High Power upgrades Agent to our most advanced AI model. It costs about 5× more but handles complex tasks that standard Agent might struggle with. **Reserve it for:** * Analyzing large codebases (500+ files) * Building complex recommendation engines * Financial or healthcare apps requiring high accuracy * Advanced data processing pipelines The extra cost is usually worth it when precision matters more than speed. ## Web Search Web Search lets Agent research current information while helping you build. It's particularly valuable for discovering the latest tools and best practices. **Use it when you need:** * The newest React animation libraries * Current API documentation * Latest security best practices * Real-time market data for your app **Example:** Research the best animation libraries for smooth transitions. Implement the most practical one into my application. ## Combining features The real power comes from using these features together. For complex projects, try combining both: Help me build an app that pixelates images and allows exporting them to vector graphics. Do research on the best libraries for image canvas manipulation, vectorization, and exporting. Create the app in a scalable, maintainable way. *Enable: High Power + Web Search* This gives you: 1. **Web Search** finds the best current libraries 2. **High Power** ensures accurate implementation and solid architecture ## Smart cost management * **Plan first**: Agent's initial planning is free, so review the approach before implementing * **Be selective**: Use Web Search for research, High Power for critical tasks * **Test and learn**: Try different combinations to see what works for your workflow * **Monitor value**: Compare results with and without features ## Common scenarios **Building an MVP?** Web Search gives you current best practices with solid architecture. **Modernizing legacy code?**\ High Power can analyze large codebases and plan migrations effectively. **Learning new tech?** Web Search finds current tutorials and helps you understand concepts. **Mission-critical system?** Use both features for research and maximum accuracy. ## Getting started 1. **Pick a moderately complex task** in your current project 2. **Try High Power** on something that stumped standard Agent 3. **Use Web Search** when you need current information 4. **Experiment with combinations** as you get comfortable Start small, measure the value, and gradually use these features for your most challenging builds. ## Learn more * [Dynamic Intelligence](/replitai/dynamic-intelligence) - Complete guide to High Power * [Web Search](/replitai/web-search) - Full documentation on Web Search capabilities * [Agent billing](/billing/ai-billing#agent-billing) - Pricing and cost management --- # Source: https://docs.replit.com/replitai/agent.md > ## Documentation Index > Fetch the complete documentation index at: https://docs.replit.com/llms.txt > Use this file to discover all available pages before exploring further. # Replit Agent > Replit Agent uses AI to set up and create apps from scratch. Describe your app in everyday language, and it can set up and create your Replit App in minutes. export const YouTubeEmbed = ({videoId, title = "YouTube video", startAt}) => { if (!videoId) { return null; } let url = "https://www.youtube.com/embed/" + videoId; if (startAt) { url = url + "?start=" + startAt; } return ; }; export const TeamsCredits = '$40'; export const CoreCredits = '$25'; Agent uses powerful AI technology to transform your ideas into applications and seamlessly add new features by describing what you want. **New with Agent 3** - Extended autonomous builds with minimal supervision, App Testing for self-validation, Fast and Full build modes, and Agents & Automations for building your own autonomous systems. ## Features Agent uses powerful AI technology to create your apps, leveraging industry-leading models to deliver the best results. Chat with Agent in your Replit App to receive the following support: * Create full-stack apps from scratch * Add advanced features and integrate complex APIs * Design, create, and modify database structures * Streamline environment setup and dependency management ## Creating Apps When starting a new project on Replit, you have two options on the homepage: * **App**: Build full-stack applications, websites with backends, AI-powered apps, and more * **Design**: Create slides, static websites, prototypes, and visual designs (see [Design Mode](/replitai/design-mode)) Replit homepage showing App and Design tabs for creating new projects This section covers building Apps with Agent. ### Stack selection When you type your prompt in the App tab, Agent automatically suggests an app type based on your description: * **Web App**: Most common—full-stack web applications with frontend and backend * **Data App**: Data-focused applications with visualization and analysis * **Other types**: Agent may suggest other specialized technology stacks based on your needs After auto-classification, you can change the App type using a dropdown if the suggested one doesn't match your vision. Most projects are classified as Web Apps. If you're unsure, start with the Replit-suggested App type. ### Build modes After entering your prompt, you have two key choices which affect how Agent builds your app: #### Fast build vs. full build Choose your build speed based on your needs. Select the ⚡ lightning bolt icon in the prompt box to enable Fast build, or leave it off for Full build. | Mode | Duration | Best For | | -------------- | ------------- | ----------------------------------------------------------- | | **Fast** | \~3-5 minutes | Quick prototypes, lightweight apps | | **Full build** | 10+ minutes | Complex apps, comprehensive features, hands-off development | **Key differences:** * **Fast build**: Select the ⚡ icon in the prompt box. Agent works quickly to create a working version. Great for rapid prototyping and when you want to stay engaged with the build process. * **Full build**: Leave the ⚡ icon unselected. Agent uses more autonomy from the first build and tests its own work. Results in more polished, comprehensive applications but takes longer. **Web Apps only**: Fast is currently only available for Web Apps. #### Build vs. Plan Choose when Agent starts building: * **Build**: Agent immediately starts building your app based on your prompt * **Plan**: Agent creates an initial plan that you can review and iterate on before building begins **When to use Plan mode:** * You want to refine requirements before committing to a build * You're exploring different approaches to a complex problem * You need to align on scope with stakeholders before development Learn more about [Plan Mode](/replitai/plan-mode) for collaborative planning workflows. ## Autonomous Features (New in Agent 3) Agent 3 introduces powerful autonomous capabilities that enable extended, self-supervised development with minimal human intervention. **Core and Teams only**: Autonomous mode features require a Core or Teams subscription. ### App Testing **Automated browser testing** - Agent tests itself using an actual browser, navigating through your application like a real user would. **Key capabilities:** * **Real user simulation**: Agent clicks through your app, testing functionality and user workflows * **Automatic issue detection**: Identifies problems and fixes them during development * **Visual feedback**: Provides video replays of testing sessions for review * **Intelligent timing**: Agent decides when testing would be most valuable **Usage**: Toggle "App testing" in the Agent Tools panel. When enabled, Agent intelligently decides when testing adds the most value. Agent Tools interface showing App testing toggle enabled with description Learn more about [App Testing](/replitai/app-testing) capabilities and troubleshooting. ### Max Autonomy (Beta) **Extended autonomous development** - Agent works for much longer periods with minimal supervision. Learn more about [Autonomy Level settings](/replitai/autonomy-level) and how to choose the right level for your project. **Key benefits:** * **Extended work sessions**: Agent can work much longer without requiring input * **Longer-tasklist handling**: Creates much longer task lists to complete more functionality * **Reduced supervision**: Agent will supervise itself, so you don't have to (runs up to 200 minutes) **Usage**: Turn on "Max autonomy" in the Agent Tools panel under the Autonomy Level based on your comfort level with autonomous development. This feature is currently in Beta. Agent Tools interface showing Max autonomy toggle enabled with Beta label ### Agents & Automations **Beyond traditional apps** - Build intelligent agents, chatbots, and automated workflows that interact with external services. Agents & Automations is currently in beta. Your automation must be deployed to function with external triggers like Slack or Telegram. **Supported use cases:** * **Slack Agents**: Intelligent Slackbots for research, Q\&A, and task automation * **Telegram Bots**: Customer service, scheduling, and entertainment bots * **Timed Automations**: Scheduled workflows for reports, summaries, and monitoring **Getting started**: Select "Agents & Automations" from the Replit homepage app type selector to begin building automated systems. Replit homepage showing Agents & Automations selection with Beta label and prompt input area Learn more about [Agents & Automations](/replitai/agents-and-automations) use cases and setup. ## Usage You can access Agent in your Replit App workspace by selecting the Agent tool. From the **Create a new App** screen, select the **Replit Agent** tab to enter a description of the app you want as shown in the following animation: animation showing Agent in the Create a new App screen If viewing a Replit App started by Agent, you can locate the Agent tool in your workspace in one of the following locations: From the left tool dock, select Agent icon **Agent** as shown in the following animation: animation showing Agent selection from the dock From the **Search bar**: 1. Select the magnifying glass icon magnifying glass at the top to open the search tool 2. Type "Agent" to locate the Agent tool and select it from the results From the Agent tool, you can perform the following actions: * **Chat**: Describe your app or feature in the text area and respond to Agent's follow-up questions * **Add detailed requests**: Upload files or import content from URLs to give Agent more information * **Manage conversations**: Select **New chat** or select previous conversations from the menu icon menu icon to start or resume a conversation * **Track usage**: Select the usage icon usage icon at the top right to view your billing page * **Reverse changes**: Undo changes made by Agent by selecting rollback icon **Rollback to here** ### Chat prompts Agent chat interface with Make, test, iterate header and build options To communicate your request to Agent, enter a **prompt** in the text area. A prompt is a natural language instruction that describes the task you want Agent to perform. In addition to text, you can include the following data in your prompt: * **File attachments**: Drag a file into the text area or select the Paperclip icon paperclip icon * **Web content**: Include text data from a webpage by entering a URL and selecting **Copy page content** * **Webpage screenshots**: Include a screenshot of a webpage by entering a URL and selecting **Take screenshot** Agent operates in three distinct modes to support different types of work: * **Build mode** (default): Agent writes code, modifies files, and implements features directly in your project * **Plan mode**: Brainstorm ideas, plan development work, and collaborate on project architecture without modifying code. Learn more about [Plan mode](/replitai/plan-mode) * **Edit mode**: Make targeted changes to specific files or code sections with precise control **All Agent interactions are billable** - whether Agent responds with text guidance or makes code changes, there is always a charge, though smaller requests cost less. ### Checkpoints Agent checkpoint with interactive map and rollback options A **checkpoint** is a comprehensive snapshot of your Replit App that captures completed work from Agent, including workspace contents, AI conversation context, and connected databases. Agent creates checkpoints when it finishes implementing your request, ensuring you only pay for completed functionality. #### How checkpoints work with effort-based pricing Agent's new effort-based pricing creates checkpoints that reflect the actual work performed: * **One checkpoint per request**: Agent bundles all work for your request into a single, meaningful checkpoint * **Variable pricing**: Simple changes cost less, while complex builds cost more based on the effort required * **Transparent costs**: Each checkpoint shows exactly what you're paying for that completed work * **No intermediate billing**: You're not charged for Agent's thinking or planning process Each checkpoint lets you perform the following actions: * **Rollback**: Undo changes made by Agent and return to the state of the previous checkpoint, including workspace contents and AI memory; connected databases can also be restored when selected * **Track usage**: Hover over the usage icon usage icon in a checkpoint to view the amount billed for that checkpoint For comprehensive details about what checkpoints capture and how rollbacks work across your entire development environment, see [Checkpoints and Rollbacks](/replitai/checkpoints-and-rollbacks). Agent uses effort-based pricing where you pay based on the complexity and scope of your request. Simple changes typically cost less than complex builds. Learn more about [Agent billing](/billing/ai-billing#agent-billing). ### Progress tab The **Progress** tab shows a record of Agent's actions in real-time. Access it through the Tools dock or search bar to monitor Agent's progress and navigate directly to relevant files. **Key features:** * **Real-time updates**: Monitor Agent's progress with live activity feed * **Chronological history**: Review Agent's activities to understand changes and troubleshoot issues * **File navigation**: Click links to jump directly to files Agent is working on ## Getting the most from Agent ### Best practices for prompts * **Be specific**: Describe exactly what you want your app to do * **Provide context**: Include relevant files, URLs, or examples * **Start simple**: Begin with basic functionality and add complexity gradually * **Use examples**: Show Agent similar apps or features you want to emulate * **Choose your mode thoughtfully**: Consider your timeline, certainty about requirements, and development style ### Managing costs effectively * **Start with free planning**: Review Agent's implementation plan before approving work * **Use simple requests**: Break complex projects into smaller, focused tasks * **Set spending limits**: Configure [usage alerts and budgets](/billing/managing-spend) to control costs * **Monitor usage**: Track checkpoint costs to understand pricing patterns ## Next steps Ready to start building with Agent? Here's how to begin: 1. **Create your first app**: Use the [Create with AI quickstart](/getting-started/quickstarts/ask-ai/) 2. **Choose your build mode**: Select Fast for quick iterations or full build for comprehensive development 3. **Learn effective prompting**: Follow our [vibe coding guide](/tutorials/how-to-vibe-code) 4. **Set up billing controls**: Configure [spending management](/billing/managing-spend) 5. **Explore Agent 3 features**: Try [App Testing](/replitai/app-testing) for self-validation, [Autonomy Level](/replitai/autonomy-level) for customized workflows, and [Agents & Automations](/replitai/agents-and-automations) for building intelligent systems Learn more about [Agent pricing](/billing/ai-billing#agent-billing) or explore other [Replit AI tools](/category/replit-ai). --- # Source: https://docs.replit.com/replitai/agents-and-automations.md > ## Documentation Index > Fetch the complete documentation index at: https://docs.replit.com/llms.txt > Use this file to discover all available pages before exploring further. # Agents & Automations > Build intelligent agents, chatbots, and automated workflows using Replit Agent. Create Slackbots, Telegram bots, scheduled automations, and more. export const AiPrompt = ({children}) => { return
{children}
; }; Replit homepage showing Agents & Automations selection with Beta label and prompt input area **Beta Feature**: Agents & Automations is currently in beta. Features and functionality may change. Some limitations apply, and not all use cases are fully supported yet. ## Features ### Supported use cases **Currently available:** * **Slack Agent** - Create intelligent Slackbots that can answer questions, integrate with APIs, and automate tasks * **Telegram Agent** - Build Telegram bots for customer service, scheduling, entertainment, and more * **Timed Automation** - Set up scheduled workflows that run automatically at specified times **Coming soon:** * **Custom webhook triggers**: Respond to any external event or API call using a webhook URL * **Additional pre-built triggers**: Discord, WhatsApp, and more ### Additional functionality * **Rich integrations**: Connect with Outlook, Spotify, Notion, Linear, GitHub, and more * **Testing environment**: Test your agents and visualize workflows before deployment * **Cloud deployment**: Automatically configured for 24/7 availability with Autoscale or Scheduled deployments ## How to get started ### Step 1: Select Agents & Automations From the Replit homepage after logging in, **select "Agents & Automations"** from the app type selector on the homepage. Replit homepage showing Agents & Automations selection with Beta label and prompt input area ### Step 2: Choose your trigger type Next, you'll see a trigger type selector. Choose from the supported options: * **Slack** - Create intelligent Slackbots that integrate with your workspace * **Telegram** - Build Telegram bots for various use cases * **Timed Automation** - Set up scheduled workflows that run automatically ### Step 3: Enter your prompt **Enter your prompt** describing what you want your agent to do. ### Step 4: Let Agent build your automation Agent will create your automation based on your prompt and selected trigger type, including all necessary integrations and deployment configuration. Agent testing environment showing a StockReporter automation with workflow visualization and testing interface Once your project is created, you'll find a dedicated **Agents & Automations pane** in your workspace: * **Location**: Opens under the preview area in your workspace * **Functions**: * View and interact with your agent * Test chatbot functionality before deployment * Visualize automation workflows * Monitor logs and debug issues * **Testing**: Chat with your agent directly in the pane to test responses and behavior ### Deployment Requirement **Deployment Required**: Your agent or automation must be deployed to function with external triggers like Slack, Telegram, or scheduled automations. The testing pane works for development and testing, but live triggers require deployment. Agent will automatically prompt you to deploy your project when it's ready. Choose the appropriate deployment type: * **Autoscale deployments** - For chatbots and event-driven workflows * **Scheduled deployments** - For time-based automations ## Supported use cases and examples ### Slack Agent examples **Research assistant with Perplexity integration** Create an AI Slackbot assistant that can answer research questions using the Perplexity API. When someone asks a question in the #research channel, it should search for current information and provide comprehensive answers with sources. **Codebase Q\&A with GitHub integration** Create an AI Slackbot that can answer questions about my codebase using a GitHub integration. It should be able to explain functions, find files, and help with debugging by analyzing our repository. **Email assistant with Outlook integration** Create an AI Slackbot that can answer questions about my Outlook emails. It should help me find specific emails, summarize conversations, and provide quick responses to common email queries. ### Telegram Agent examples **Business assistant with calendar scheduling** Create an AI business assistant that can schedule emails on my Outlook calendar. Users should be able to request meeting times and the bot will find available slots and send calendar invites. **Music recommendation bot with Spotify** Make a fun AI chatbot that can return a Spotify song for any message I send describing the vibe I want. It should understand mood descriptions and suggest perfect tracks. **Fictional character bot** Make an AI bot that is a fictional character - specifically Sherlock Holmes. It should respond to messages in character, solve puzzles, and engage in detective-style conversations. ### Timed Automation examples **Daily Linear task summary** Send me an email every morning summarizing my new tasks from Linear. Include task priorities, due dates, and project context to help me plan my day. **Email digest automation** Send me an email every 6hrs with a summary of all my emails. Group them by importance and highlight any urgent messages that need immediate attention. **Weekly competitor analysis** Every week at 8am on Monday, send me a summary of any news about my competitors using web search. Focus on product updates, funding news, and market developments. ## Next steps **Quick start ideas:** * **Slack**: Build a research assistant or codebase Q\&A bot * **Telegram**: Create a scheduling assistant or entertainment bot * **Timed**: Set up daily summaries or weekly reports Want to be notified when new triggers become available? Follow [@Replit](https://twitter.com/replit) for the latest updates on Agents & Automations. Learn more about [Replit Agent](/replitai/agent) and other [Agent 3 autonomous features](/replitai/agent#autonomous-features-new-in-agent-3), or explore additional [AI-powered features](/category/replit-ai). --- # Source: https://docs.replit.com/billing/ai-billing.md > ## Documentation Index > Fetch the complete documentation index at: https://docs.replit.com/llms.txt > Use this file to discover all available pages before exploring further. # Replit AI Billing > Learn how billing and credits work for Replit AI features including Agent usage, checkpoints, and managing your spend. export const AgentCheckpointCost = '$0.25'; export const TeamsCredits = '$40'; export const CoreCredits = '$25'; export const NewUserFreeAgentCheckpoints = '10'; Replit AI features use usage-based billing to charge you based on what you build and how much you use our AI-powered tools. This ensures you only pay for the value you receive from Agent. ## Getting started **All subscribers** receive one-time free Agent checkpoints. Additional monthly credits automatically apply to AI usage: * **Core subscribers**: {CoreCredits} per month * **Teams subscribers**: {TeamsCredits} per user per month These credits cover Agent and other Replit cloud services like published apps, storage, and databases. ## Agent billing Replit Agent interface showing chat and checkpoint system Replit Agent uses **effort-based pricing** that scales with the complexity of your request. You pay based on the actual work Agent performs, ensuring fair pricing whether you're making small tweaks or building complex features. This same pricing applies to all Agent usage, including Plan Mode conversations. **All Agent interactions are billable** - whether Agent responds with text guidance or makes code changes, there is always a charge, though smaller requests cost less. ### How effort-based pricing works When you chat with Agent in "Build Mode", it creates **checkpoints** that capture completed work on your request: * **Simple requests** (like bug fixes or small changes) typically cost less than the previous {AgentCheckpointCost} fixed price * **Complex builds** (like full features or integrations) are bundled into one checkpoint that may cost more than {AgentCheckpointCost} but reflect the total effort involved * **One checkpoint per request** eliminates intermediate checkpoints and reduces billing noise * **Transparent pricing** shows you exactly what you're paying for each completed task A checkpoint occurs when Agent completes work on your request and implements the requested functionality in your code. It's important to note, that in cases where the Agent performed work by answering a question or request, but didn't make code changes (e.g. in Plan Mode), there is still a charge associated with that work, even if there's not a checkpoint shown. Checkpoints are generally only shown to the user when there are code changes completed. For detailed information about what checkpoints capture and how they work, see [Checkpoints and Rollbacks](/replitai/checkpoints-and-rollbacks). To understand the cost of sample apps, check out our simple [interactive demo](https://agent-pricing.replit.app/). Replit Agent pricing demo ### Track your usage You can monitor your Agent spending in real-time: 1. **Agent tab**: View costs for individual checkpoints by hovering over the usage icon 2. **Usage dashboard**: See detailed billing information for the current period 3. **Account settings**: Set up alerts and budgets to control spending Usage data can take up to 30 minutes to appear on your usage dashboard. ## Managing your spend Take control of your AI spending with Replit's built-in budget tools: * **Usage alerts**: Get notified when you reach spending thresholds * **Budget limits**: Set hard caps to prevent unexpected charges * **Real-time tracking**: Monitor costs as you build * **Credit packs**: Purchase additional credits with discounts on larger purchases. See [Managing Your Spend](/billing/managing-spend) for details. Configure email notifications when you reach custom spending amounts View detailed breakdowns of your AI and cloud service costs ## Next steps Ready to start building with AI? Here's how to get the most value from your credits: * **Try Agent first**: Use your free checkpoints to explore Agent's capabilities * **Start small**: Begin with simple requests to understand effort-based pricing * **Use Fast mode**: Leverage [Fast mode](/replitai/fast-mode) for quick, targeted edits * **Set up alerts**: Configure spending notifications before you exceed your credits Learn more about [Replit's AI tools](/category/replit-ai) or explore our [pricing plans](https://replit.com/pricing). --- # Source: https://docs.replit.com/getting-started/quickstarts/ai-slack-channel-summarizer.md # Create a Slack channel summarizer > Build a Slack bot that summarizes channel activity using GPT-4. Learn how to integrate AI with Slack's API. Turn your Slack conversations into concise summaries with AI. This guide shows you how to create a bot that summarizes channel activity using GPT-4. ## Features Summarize Slack channel activity for any time period Generate intelligent, context-aware summaries using OpenAI's GPT-4 ## Create your summarizer 1. Sign in to Replit 2. Navigate to the [AI Slack summary template](https://replit.com/@replit-matt/Slack-Channel-Summary-Bot) 3. Select **+ Use Template** in the upper-right corner 4. Follow the prompts to create your Replit App 1. Go to the [Slack Apps page](https://api.slack.com/apps) 2. Select **Create an App** 3. Choose **From an app manifest** 4. Select your workspace from the dropdown 5. Replace the manifest content with the [manifest.json](https://replit.com/@replit-matt/Slack-Channel-Summary-Bot#assets/manifest.json) file 6. Review the configuration and select **Create** 7. Select **Install the App** You may need administrator approval to install the app depending on your organization's settings. Add the following secrets to your Replit App's **Secrets** tab: 1. **SLACK\_BOT\_TOKEN** * Navigate to Settings > Install App in your Slack App * Copy the **Bot User OAuth Token** 2. **SLACK\_SIGNING\_SECRET** * Go to Settings > Basic Information * Copy the **Signing Secret** from App Credentials 3. **SLACK\_APP\_TOKEN** * Go to Settings > Basic Information * Under App-Level Tokens, select **Generate Token and Scopes** * Add a token name and select permissions * Copy the generated token 4. **OPENAI\_API\_KEY** * Get your API key from OpenAI's platform 1. Select **Publish** in the Workspace header 2. Choose **Reserved VM Deployments** 3. Select **Set up your published app** 4. Select **Publish** ## Using your summarizer Add your bot to a channel and send it a direct message with the following command: ```bash theme={null} /summarize-channel #channel-name duration ``` For example, to summarize the last 24 hours of activity in #general: ```bash theme={null} /summarize-channel #general 24 ``` ## Customization options Customize your summaries by modifying the prompt to focus on specific keywords or topics. Extend functionality by connecting with additional platforms and services. Customize the format and content of Slack alert messages. Configure different summarization intervals for channels or topics. --- # Source: https://docs.replit.com/billing/teams-billing/analytics-dashboard.md > ## Documentation Index > Fetch the complete documentation index at: https://docs.replit.com/llms.txt > Use this file to discover all available pages before exploring further. # Analytics Dashboard > View activity, resource usage, published apps, and costs with the Enterprise Analytics Dashboard. The Analytics Dashboard is available exclusively for Enterprise customers. The Analytics Dashboard gives Enterprise admins comprehensive visibility into their organization's Replit usage. See engagement metrics, spending breakdowns, and published app performance from a centralized interface. Analytics Dashboard showing overview metrics including active members, published apps, and app views, with usage data grouped by member ## Features ### Activity monitoring See how your organization engages with Replit: * View active members and their contribution patterns * See collaboration activity across teams * Identify usage trends over time ### Resource usage tracking View spending by member and app: * See resource consumption broken down by team member * View usage patterns across individual apps * Identify high-consumption apps and members Analytics Dashboard showing usage and traffic data grouped by app, with columns for app name, creator, last edited, days online, unique viewers, and resource usage ### Publishing oversight See your organization's published app activity: * View total published apps with public vs. private access breakdowns * See publishing frequency, app views, and remix activity * Review days online, unique viewers, and resource usage per app ### Cost management View resource consumption and costs across your organization: * See spending breakdowns by member, team, or app * Compare costs against budgets and allocations * Export usage reports for internal accounting ## Accessing the dashboard To open the Analytics Dashboard: 1. Go to [replit.com](https://replit.com) and sign in to your Enterprise account. 2. Select **Analytics** from the left navigation on the home page. Contact your dedicated account manager for help using your Analytics Dashboard. --- # Source: https://docs.replit.com/replit-app/app-embed.md # Replit App Embed > Embedding a Replit App in your website or documentation allows you to display a read-only view of your code, meaning viewers can see but not edit the code. This feature is particularly useful for showcasing examples, tutorials, or code snippets directly within your content. ### Running and deploying To interact with the Replit App, such as running the code and seeing its output, users must fork it. Forking creates a personal copy of the Replit App in their workspace, where they can run and edit the code. For a more integrated experience, you can deploy your Replit App and use an iframe to embed the deployed application from `replit.app` directly into your site. ### How to embed a Replit App To embed a public Replit App, append the `?embed=true` query parameter to the Replit App's URL. This modification converts the URL into an embeddable link. Below is an example demonstrating how to embed a Replit App using an iframe in HTML: ```html theme={null} ``` Replace `YOUR Replit App LINK` with the actual link to your Replit App, for example, `https://replit.com/@user/repl-name.` Here's an example of an embedded Replit App: ``` Example with a light theme: ; }; Autonomy Level lets you customize how independently Agent works on your project and how frequently it reviews its own code. Available in Agent Tools, this setting helps you balance speed, accuracy, and control based on your specific needs and project type. **New with Agent 3** - Autonomy Level gives you granular control over Agent's autonomy level, from hands-on guidance to extended autonomous development with comprehensive code review. Autonomy Level settings in Agent Tools showing four levels: Low, Med, High, and Max Autonomy ## Features Autonomy Level offers four distinct levels of Agent behavior, each designed for different use cases and workflows: * **Low autonomy**: Minimal code review with hands-on control, similar to Agent v2 * **Medium autonomy**: Targeted code review on Agent's recent changes with improved accuracy (recommended for legacy projects & imports) * **High autonomy**: Comprehensive code review on every change with broader context analysis (recommended for all new projects) * **Max autonomy**: (Beta) Extended autonomous development with detailed task planning and execution ## Usage Access Autonomy Level setting through Agent's tools interface when working on any project. The setting applies to your current conversation and affects how Agent approaches subsequent tasks. 1. Open Agent in your project workspace 2. Look for the Agent tools dropdown in the bottom right of the input box 3. Locate Autonomy Level control 4. Select your preferred autonomy level ### Autonomy Levels #### Low **Best for**: Simple prompts and when you want maximum control over changes. * No AI code review on Agent's work * Most hands-on experience requiring your guidance * Fastest execution for straightforward tasks * Most similar to the Agent v2 experience #### Medium (Default for existing projects) **Best for**: Balanced workflows where you want some quality assurance without extended wait times. * AI code review on specific changes Agent just made * Helps improve code accuracy and catch common mistakes * Moderate execution time with quality improvements * Good balance of speed and reliability #### High (Default for new projects) **Best for**: Complex projects where code quality is critical and you want thorough analysis. * AI code review on every change Agent makes * Reviews adjacent files to find interconnected issues * Longer execution time but higher code quality * Works best on projects created with Agent v3 * May not work as well for imported existing projects or pre-Agent v3 projects with technical debt #### Max Autonomy (Beta) **Best for**: Extremely detailed prompts where you want Agent to work extensively with minimal supervision. * Same code review frequency as High autonomy * Agent creates more detailed task lists autonomously * Finds and executes adjacent tasks without user input * Can work for extended periods (up to 200 minutes) ### Choosing the Right Level Consider these factors when selecting your autonomy level: * **Project history**: New Agent v3 projects work better with higher autonomy than imported legacy projects * **Time constraints**: Lower autonomy provides faster results for simple changes * **Code quality**: Higher autonomy offers more thorough review and error detection ### Tips for Effective Use * **Start conservative**: Begin with **Medium** or **High** autonomy and adjust based on results * **Match complexity**: Use **High/Max autonomy** for complex prompts, **Low/Medium** for quick fixes * **Consider project age**: Older projects typically work better with **Medium** autonomy * **Adjust as needed**: You can change autonomy levels prompt-to-prompt based on task requirements Learn more about other [Agent features](/replitai/agent) and [App Testing](/replitai/app-testing). --- # Source: https://docs.replit.com/cloud-services/deployments/autoscale-deployments.md > ## Documentation Index > Fetch the complete documentation index at: https://docs.replit.com/llms.txt > Use this file to discover all available pages before exploring further. # Autoscale Deployments > Autoscale Deployments publish your Replit App to cloud servers that adjust automatically to handle your app's traffic and workload. Autoscale Deployments run on cloud computing resources that scale up and down to efficiently handle the network traffic and workload of your Replit App. When your app is busy, autoscaling adds servers to manage the load. When your app is idle, it reduces the number to as low as zero to save you money. Autoscale Deployments are ideal for the following use cases: * Web applications that handle variable workloads and traffic such as ecommerce sites * APIs and services Autoscale Deployment ## Features Autoscale Deployment include the following features: * **Automatic resource scaling**: Automatically adjusts resources based on traffic patterns to optimize costs. * **Custom domains**: Configure a custom domain or use a `.replit.app` URL to access your app. * **Configurable limits**: Set the maximum number of instances your published app can scale to. * **Flexible machine power**: Choose the CPU and RAM configuration that meets your app's needs. * **Monitoring**: View logs and monitor your published app's status. ## Usage You can access Autoscale Deployment in the Publishing workspace tool. From the left **Tool dock**: 1. Select All tools icon **All tools** to see a list of workspace tools. 2. Select Publishing icon **Publishing**. 3. Select the **Autoscale** option and then select **Set up your published app**. From the **Search bar**: 1. Select the magnifying glass icon magnifying glass at the top to open the search tool 2. Type "Publishing" to locate the tool and select it from the results. 3. Select the **Autoscale** option and then select **Set up your published app**. Autoscale publishing options ## Machine power Select **Edit** to view and set the machine power options. Use the sliders to select the CPU and RAM configuration for each published app server instance. View the **compute unit** cost for the configuration in the **Total per machine** row. A compute unit is a measurement of cloud computing resources based on the memory and CPU configuration of the machine. To learn more about calculating the cost based on Compute Units, see [Compute Units](/billing/about-usage-based-billing#2-compute-units). screenshot of the machine power configuration ## Max number of machines Use the slider to adjust the maximum number of machines. This number is the upper limit of server instances the autoscaling feature can assign when it determines your app is busy. The bottom row shows the equivalent compute units, calculated by the following formula: `Number of machines * compute units per machine` screenshot of the max number of machines configuration ## Next steps * [Published App Monitoring](/cloud-services/deployments/monitoring-a-deployment/): Learn how to view logs and monitor your published app. * [Publishing costs](/billing/deployment-pricing): View the costs associated with publishing. * [Pricing](https://replit.com/pricing/): View the pricing and allowances for each plan type. * [Usage Allowances](/billing/about-usage-based-billing/): Learn about scheduled deployment usage limits and billing units. --- # Source: https://docs.replit.com/extensions/api/background.md # Background Script API > Learn how to use background scripts to run persistent code in your Replit extension from startup until the workspace closes. Background scripts are loaded when the Replit App opens. They remain permanently loaded until the extension is uninstalled or you close the workspace. Background scripts are written in a "background page", which is an "invisible" iFrame context that renders no UI. You can add a background page to your extension by adding the following field to your [Manifest](/extensions/api/manifest) file: ```json theme={null} { "background": { "page": "/path/to/background.html" } } ``` The path points to a page in your extension bundle. We load it as an invisible iframe element; if you render any UI elements, they will not be visible to users. (To render UI, you want to create tools instead). Here's an example extension that makes use of the background script: --- # Source: https://docs.replit.com/category/billing.md > ## Documentation Index > Fetch the complete documentation index at: https://docs.replit.com/llms.txt > Use this file to discover all available pages before exploring further. # Billing > Replit's billing system helps you optimize your spending on the platform. export const AgentCheckpointCost = '$0.25'; export const TeamsCredits = '$40'; export const CoreCredits = '$25'; The Teams plan is being replaced by the new Pro plan. These changes will take effect on February 20th, 2026. [Learn more about what's changing](https://blog.replit.com/pro-plan). Replit's billing system is designed to keep things simple and predictable. When you subscribe to a Replit plan, you receive monthly credits that are included in your subscription fee. Limited daily Agent and monthly cloud credits {CoreCredits} in monthly credits to cover your development needs {TeamsCredits} per user per month for collaborative development This means your usage up to your monthly credit allowance is covered by your subscription—no additional charges. Only when you exceed your monthly credits will you be charged for additional usage. These credits cover all your usage across Replit's platform, including AI features like Agent, publishing, database operations, and more. Your subscription credits reset each month, giving you a fresh allowance to build and publish your projects. Beyond the credit system, Replit provides comprehensive billing tools to help you monitor your spending patterns, set monthly budget limits, and receive alerts when you reach spending thresholds. You can configure alerts and budget limits to prevent unexpected charges and give yourself time to increase your budget if needed for uninterrupted access to your projects. ## Getting started Access Replit's billing features through the tools described in the following sections to take control of your spending and optimize your development workflow. ### Account billing page Review your plan details, payment information, usage alerts, and budget settings all in one place. 1. Select your profile icon in the top right corner to access the dropdown menu. 2. Select gear icon **Account**. 3. Select credit card icon **Billing** from the left navigation bar to view your current plan, current month usage, alert settings, and budget limit. You should see a screen that resembles the following screenshot: billing settings screen ### Usage dashboard Track detailed resource consumption and costs for the current billing period, organized by service category. Use this dashboard to understand how your credits are being used and identify optimization opportunities. From the home screen, select usage icon **Usage** from the left navigation bar. You should see a screen that resembles the following screenshot: sample Usage screen ### Invoices Review past usage and payments for subscriptions and usage-based charges to track your development costs over time. 1. From the home screen, select usage icon **Usage** from the left navigation bar. 2. Select **See previous invoices** in the **Resource usage** section, which opens a page on Replit's third-party provider. You should see a screen that resembles the following screenshot: sample Invoices screen ## Key features * **Credits included**: Starter plan users receive limited daily Agent credits (up to a monthly cap) and monthly cloud credits. Paid plans include monthly credits ({CoreCredits} for Core, {TeamsCredits} per user for Teams) that cover usage up to your plan's allowance * **Credit packs available**: Purchase additional credits on our Core and Teams plans, with discounts on larger packs. See [Managing Your Spend](/billing/managing-spend) for details * **AI features included**: Use Agent within your credit allowance * **Real-time usage tracking**: Monitor your current plan and usage in the **Billing** section of the Account page * **Smart alerts and budgets**: Set custom alerts and budget limits to manage costs and prevent unexpected charges. See [Managing Your Spend](/billing/managing-spend) for more information * **Detailed usage insights**: Track resource consumption and costs for the current billing period in your **Usage** dashboard * **Complete invoice history**: View and download current and past costs from the invoice portal linked from the **Usage** dashboard ## Use cases The following examples show how to use Replit's billing features to maintain control over your development costs while building and scaling your projects. ### Protect your budget when your app scales When your autoscale deployment experiences sudden growth, use these features to maintain cost control: * Create a usage alert to notify you when your spending reaches your custom threshold * Set a budget limit to suspend your app when you reach the cap * If you reach your monthly limit, increase your budget and restart the app to restore availability ### Track and optimize your development costs Use data from the **Usage** and **Invoice** pages to make informed decisions about your development spending: * Streamline expense reporting with export-ready invoices * Download or view itemized reports for accounting and budget planning * Identify cost optimization opportunities by reviewing usage trends across different services ## Next steps To learn more about Replit's billing and plans, explore these resources: * [Starter Plan](/billing/plans/starter-plan) - Learn about Starter Plan features and limitations * [Pricing plans](https://replit.com/pricing) - Compare plans and features to find the right fit for your projects * [AI Billing](/billing/ai-billing): Learn how Replit charges for Agent usage * [Publishing and Database Billing](/billing/about-usage-based-billing): Learn about compute units, data transfer, and database costs * [Replit Teams](/category/teams/) - Learn about the Teams plan, which includes AI-powered collaborative coding and team management --- # Source: https://docs.replit.com/category/bounties.md > ## Documentation Index > Fetch the complete documentation index at: https://docs.replit.com/llms.txt > Use this file to discover all available pages before exploring further. # Bounties > Learn how to earn Cycles by completing coding tasks or post your own Bounties to get help with development projects on Replit. The Bounties program is deprecated. Replit is no longer accepting applications for Bounty Hunter. Bounties on Replit allow you to request and pay for coding tasks or project work using Cycles. Create a Bounty for tasks like product development or API integration. Posting Bounties on Replit is easy and similar to freelancing platforms. Create and award tasks to Bounty Hunters. Access helpful templates and resources to enhance your Bounty Hunting experience. Check out the templates for creating your Bounties and communicating expectations clearly. Learn more about what Bounties are and how they work with our FAQ section. --- # Source: https://docs.replit.com/additional-resources/bounties/bounty-hunting.md > ## Documentation Index > Fetch the complete documentation index at: https://docs.replit.com/llms.txt > Use this file to discover all available pages before exploring further. # Earning with Replit Bounties > Bounties on Replit allow you to request and pay for coding tasks or project work using a platform-specific currency called Cycles. When you have a specific need—such as developing a new product, needing coding help for a personal project, or requiring API integration—you can create a Bounty. This acts as a job posting that other members, known as Bounty Hunters, can accept to complete the specified task. The Bounties program is deprecated. Replit is no longer accepting applications for Bounty Hunter. If you're interested in building projects and earning Cycles while doing it, you're in for a treat with Bounties. ## Browse Bounties Each posted Bounty includes a reward in Cycles for successful completion and a description of the work they need. Pick a Bounty ## Apply to work on a Bounty Once you find a Bounty you're interested in, select the "Apply to Work" button in the upper-right corner. ### Tips for Applying The best Bounty applications explain to the Poster why you're a good fit for the job and include examples of your past work. Here are some additional tips for creating a quality application: Here are some other tips on how to create a quality application: * Add links to your GitHub, LinkedIn, Twitter, or other social profiles to your Replit account. These links will also appear in your Bounty applications. * Consider using a professional headshot as your Replit profile picture. * If you'd like to start your Bounty application with a greeting, you can say something like `Hello [username]...` or `Hello, my name is [your first name]...` * Include links to relevant projects in your application, such as a Replit App, GitHub repo, or hosted project. * Describe the initial 1-2 milestones you plan to accomplish once accepted. This shows the Bounty Poster that you understand their problem and the technical requirements. * If possible, provide time estimates for completing certain parts of the Bounty after you're accepted. Here's an example application for a Bounty to create a space invaders game: Apply a Bounty ## Do the work If the Bounty Poster selects your application, you'll see the "Accepted" badge on your application: Time to Do the Work! Now it's time to do the work! Communicate with the Bounty Poster early and often - make sure you're both clear on requirements and expectations. ## Deliver the work When you've completed your work, return to the Bounty page and select "Submit Work." Add a description of the work (pro-tip: relate it to the acceptance criteria outlined in the Bounty) and link to the Replit App where you've written the code. Submit a Solution The Poster will review your work and may request changes. If these changes are within the scope of the original Bounty, simply make the updates in the Replit App and submit again. Once the Poster accepts your work, you're awarded your well-earned Cycles. --- # Source: https://docs.replit.com/additional-resources/bounties/bounty-templates.md > ## Documentation Index > Fetch the complete documentation index at: https://docs.replit.com/llms.txt > Use this file to discover all available pages before exploring further. # Bounty Templates > Learn how to communicate effectively during bounty projects with templates for both bounty hunters and posters to use throughout the process. ## Communication Expectations Effective communication is vital throughout the bounty posting and hunting process. To help with this, we've provided templates that you can use to maintain professionalism and ensure everyone's expectations align. Keep in mind that these templates are starting points and can be adjusted to suit your specific needs. ## Bounty Hunter ### Upon Acceptance After accepting a bounty, it's important to reach out to the Poster within 24 hours via email or Discord. ``` Hello there, I'm very excited to begin working on this Bounty. I am located in . I usually work between the hours of and the best way to reach me is by email. I just wanted to take a moment to check in and outline my approach. - - - - Please let me know if you have any questions. I look forward to working with you. Best, Your Name ``` ### Check-ins To ensure a smooth and successful Bounty experience, it is important to maintain regular communication with the Bounty Poster. This includes providing updates on progress every few days, as well as addressing any roadblocks, pain points, or questions that may arise. Lack of visibility into the progress of the project is a common cause of dissatisfaction among Bounty Posters. Keeping them informed will help to mitigate this issue and maintain a positive working relationship. #### What to say when giving a status update: ``` I wanted to check-in and give you an update on my progress. Everything is going well, and I am still on target to meet by . Please reach out if you have any questions or need further information about this Bounty. ``` #### What to say when you need to change the timeline: ``` I wanted to give you an update on my timeline. has taken longer than I expected due to reasons. I have been able to determine next steps, but wanted to let you know my date has changed to . I have solved any current roadblocks and am on track to complete the Bounty. ``` ### Upon Submission Congratulations on successfully completing the Bounty! It is now important to promptly follow up with the bounty poster to allow them to review the completed work. This will provide an opportunity for them to provide feedback or request any necessary changes. Following up quickly will help ensure a smooth process and timely completion of the project. ``` Hi there, I have submitted the completed Bounty at . Please let me know if you request changes or have any questions about the submission. It has been a pleasure working with you. ``` ### Changes are Requested If the Bounty Poster requests any changes, it is important to respond within 24 hours to acknowledge receipt of their feedback. During this response, it is crucial to discuss a plan for the next steps and a timeline for implementing the suggested updates. It is important to approach any requested changes in a constructive manner. To assist with this process, the following are the two templates you can personalize Example: ``` Thank you for . I value your feedback as it helps me become a better Bounty Hunter. I will have a revised version of this project ready for you to review by . One solution to the input you mentioned is . Does this sound like an ideal solution for your Bounty? If so, I can have an updated version for you by . ``` Example: ``` I know you are concerned about . Including may be an ideal solution. I am open to revisions and willing to make changes to improve the quality of your work. If this solution works for you, I can get you an updated version by . ``` ## Poster ### Upon Acceptance Once you accept a Bounty Hunter for your Bounty, you should reach out to them within 24 hours via email or Discord. Feel free to use this template if you are not sure how to start. ``` Hi , I am excited to work with you on this Bounty. You seem like a great fit for this project. Here is a little bit about me . I would like to chat with you soon to review requirements and set milestones. Please let me know if you have any questions about the Bounty as you get started. ``` ### Check-ins Open and consistent communication with the Bounty Hunter is crucial, especially if the project is complex or has multiple milestones. This will help ensure that the project stays on track and is completed within the agreed-upon timeframe. Here are a few examples of what you can say to stay in touch with your Bounty Hunter: ``` Hi, I wanted to check in and see how the Bounty was going. Do you have any questions about the requirements? I am happy to chat if you need further guidance. ``` ``` Hello, How is the Bounty going? Do you think you are still on track to complete it by ? Do you have any part of it completed that you can send to me as a sample? Please let me know if you have any questions. ``` ### Upon Submission Once your Bounty Hunter submits the Bounty, we recommend you review the submission within three days. If you’re happy with the submission, feel free to press the `Accept` button to complete the Bounty and release the Cycles to the Bounty Hunter. Send them a thank you or acknowledgment that the work has been received and the Cycles released. ``` Hi, Just received your submission. It looks great. Thank you for all your hard work on this. ``` ### Changes Requested You can request changes on your Bounty's Discussion tab. It is important that the changes you request are within the scope of the original project. Give clear expectations of what needs to be changed and ensure the Bounty Hunter has the correct resources or access to test projects if needed. ``` Hello, Thanks for your submission! Would you be up for changing the following: . ``` --- # Source: https://docs.replit.com/tutorials/build-a-notion-powered-website.md > ## Documentation Index > Fetch the complete documentation index at: https://docs.replit.com/llms.txt > Use this file to discover all available pages before exploring further. # Build a Notion-powered website > Learn how to build a website that uses Notion as a Content Management System (CMS) with Replit Agent. export const YouTubeEmbed = ({videoId, title = "YouTube video", startAt}) => { if (!videoId) { return null; } let url = "https://www.youtube.com/embed/" + videoId; if (startAt) { url = url + "?start=" + startAt; } return ; }; ## Build a Notion-powered blog with Replit Agent Notion is a powerful tool for organizing information, and it excels as a Content Management System (CMS). By integrating Notion with Replit, you can manage your website's content—like blog posts, portfolio items, or product listings—directly from your Notion workspace. Replit, powered by [Replit Agent](/replitai/agent), handles the coding, hosting, and deployment, letting you go from idea to a published application quickly. Effective prompting is key to guiding Agent; for a comprehensive guide, see [Efficient prompting with Replit AI](/tutorials/effective-prompting) and [How to vibe code effectively](/tutorials/how-to-vibe-code). This tutorial guides you through building a minimalistic blog that pulls its posts from a Notion table. You will: * Use Replit Agent to generate the initial application * Connect your Replit app to a Notion database * Learn to guide the AI and troubleshoot common issues using effective prompting techniques * Publish your blog for the world to see Screenshot of the final Notion-powered blog application with minimalist design The tutorial will follow largely from the video above, but with some additional context and steps to help you understand the process. ## Prerequisites To follow this tutorial, you'll need: * A Replit account * A Notion account * Familiarity with basic Replit Agent interactions. If you're new to Agent, check out the [Replit Agent documentation](/replitai/agent). ## Step 1: Prepare your Notion database Before prompting Agent, set up your content source in Notion. This involves thinking procedurally about what your blog needs, similar to planning a product. 1. In Notion, go to **Settings & members** (usually in the top-left sidebar). 2. Navigate to **Connections** (previously "Integrations"). 3. Select **Develop or manage integrations**. 4. Select **+ New integration**. Notion developer portal showing the New integration button 5. Name your integration (e.g., "My Replit Blog Integration"). 6. Associate it with your desired workspace. Notion integration configuration screen with name and workspace selection 7. For "Integration type," choose **Internal Integration**. 8. Select **Submit**. 9. Copy your **Internal Integration Secret** (token) and save it securely. This is your Notion API key. Notion integration secrets page showing the integration token 10. Under **Capabilities**, ensure "Read content" is enabled. For this tutorial, reading is sufficient. If you later want to write data to Notion, enable "Insert content" and "Update content." Create a new integration for each project to manage permissions granularly. This is a security best practice. For more detailed instructions, refer to [Notion's official documentation on creating an integration](https://developers.notion.com/docs/create-a-notion-integration). You can directly access Notion's integrations dashboard at [notion.so/my-integrations](https://notion.so/my-integrations). 1. Create a new page in Notion for your blog content. 2. On this page, add a new **Table** database. 3. Name your table (e.g., "Blog Posts"). 4. Define columns for your posts. **Specify** these clearly in your mind, as you'll soon tell Agent about them: * `Title` (Text, default title property) * `Body` (Text, for main post content) * `Slug` (Text, for URL-friendly identifiers) * `PublishedDate` (Date, or use "Created time" / "Last edited time") * `ReadingTime` (Text or Number, e.g., "5 min read") * `Description` (Text, short summary for previews) Notion database configured with columns for blog posts 5. Add a few sample posts. You can use Notion's AI features to help generate content! 1. Open the Notion page containing your database. 2. Click the **•••** (three dots) menu in the top-right corner. Notion connections menu showing how to add your integration to the page 3. Select **+ Add connections**. 4. Search for and select the integration you created (e.g., "My Replit Blog Integration"). Notion page showing the three dots menu to add integrations 5. Confirm the connection. This allows Replit (via the integration token) to access this page and its database. ## Step 2: Prompt Replit Agent With Notion set up, let's get Replit Agent to build our blog's foundation. **Plan before you prompt**: a clear outline of features leads to more focused prompts. Navigate to the Replit homepage and open **Agent**. Provide Agent with a detailed prompt. **Simplify** your language, but be **specific** about requirements, constraints, and desired outputs. Here's an example: ```text theme={null} Help me create a hyper-minimalistic blog using Notion as a CMS. The blog should pull posts from a Notion page. The table on the Notion page has the following columns: Title, Body, Slug, PublishedDate, ReadingTime, Description. You should generate a slug for each post based on its title if the Slug column is empty. Make the blog theme black with white text. Keep it extremely minimal. The posts should be listed on the homepage, and clicking a post should navigate to a page displaying the full post content. ``` For more tips on writing effective prompts, see our guide on [Efficient prompting with Replit AI](/tutorials/effective-prompting). You can also **show** Agent what you mean by providing a URL to scrape for initial styling or content ideas (e.g., your personal portfolio) by adding: `Scrape the content of [URL] for initial design inspiration and placeholder text.` Agent will generate a plan. Review it to ensure it aligns with your expectations, then approve it. This is your first **checkpoint** in the AI-assisted building process. Agent will then generate a visual preview. Check if the basic layout and styling are heading in the right direction. Refinements will come later. ## Step 3: Connect Replit to Notion with Secrets Agent will likely need your Notion integration details to fetch data. Typically, you'll need: 1. `NOTION_API_KEY`: Your Internal Integration Secret from Step 1. 2. `NOTION_DATABASE_ID`: The ID of your Notion database. **How to find your Notion Database ID:** * Open your Notion page with the database in a browser. * The URL might be `https://www.notion.so/your-workspace/PAGE_TITLE-PAGE_ID?v=DATABASE_VIEW_ID`. The `PAGE_ID` is often the database ID if the database is the page's main element. * **More reliably**: Click the **•••** menu on your database view, select **Copy link to view**, and paste it. The link `https://www.notion.so/your-workspace/DATABASE_ID?v=VIEW_ID` contains the `DATABASE_ID` before `?v=`. Go to the **Secrets** tool (🔒 icon) in your Replit Workspace. Add these: * Key: `NOTION_API_KEY`, Value: `[Your_Notion_Integration_Secret]` * Key: `NOTION_DATABASE_ID`, Value: `[Your_Notion_Database_ID]` Replit Secrets tool with Notion API key and Database ID added Agent should automatically use these secrets and attempt to connect. The app will likely restart. ## Step 4: Debugging and refining with Agent Building with AI is iterative. Expect errors or imperfections. This is where guiding the AI effectively—often called "vibe coding"—is key. For a deeper dive into this skill, check out our tutorial on [How to vibe code effectively](/tutorials/how-to-vibe-code). **Master context** by providing only relevant information for each debugging step. Keep the **Console** in your Replit Workspace open. It provides valuable error messages and logs. Replit Console showing error messages while debugging the Notion integration Here are common scenarios and how to address them by **debugging methodically**: ### Scenario 1: "Failed to load posts" or property errors #### Symptom The app runs but doesn't display posts. Console errors might mention "Could not find sort property with name ID created\_time" or other column mismatches. #### Cause Agent might assume column names or properties (e.g., `created_time` for sorting) that don't exist or are named differently in your Notion database. #### Troubleshooting 1. **Verify Notion Database**: Ensure column names in your database exactly match Agent's expectations or your prompt. If Agent seeks `created_time` and you have `PublishedDate`, it's a mismatch. 2. **Prompt Agent with error (Debug principle)**: Copy the *exact* console error and **select** relevant code snippets if you've identified them. Provide this focused context to Agent: ```text theme={null} There's an error fetching posts. Console: "Could not find sort property with name ID created_time". My Notion database uses 'PublishedDate'. Please use this for sorting/fetching. Here's the suspected code from `services/notion.js`: [code snippet] ``` 3. **Iterate (Experiment principle)**: If Agent's fix fails, provide more specifics. "Posts still not loading. Error persists. Show me the code for fetching/sorting Notion posts." If you added a column like `created_time` in Notion as a quick fix, you can later ask Agent: "Remove reliance on 'created\_time', use 'PublishedDate' instead." Remember to use Agent's **Checkpoints** to save working states. ### Scenario 2: Incorrect data display or formatting #### Symptom Data appears, but incorrectly (e.g., reading time wrong on homepage but right on post page; Markdown rendering issues). #### Troubleshooting 1. **Be specific (Specify principle)**: Describe the issue and location clearly: ```text theme={null} On the homepage, post reading time is incorrect, but it's correct on individual post pages. Also, display 'PublishedDate' on the homepage for each post summary. ``` 2. **Markdown issues (Show principle)**: If Notion "Body" Markdown renders incorrectly (e.g., extra spaces, formatting errors): * Inspect raw content in Notion; its formatting can introduce subtle characters. * Prompt Agent clearly. You can even **show** an example: ```text theme={null} Markdown rendering issue: In post X, bold text like '**this**' appears as ' ** this **' and fails to render. Ensure Markdown parsing handles such cases or trims whitespace. Example of correct rendering for bold: **This is bold**. ``` * Testing with known good Markdown (e.g., from ChatGPT pasted into Notion) can isolate if the issue is source data or rendering logic. ### General debugging flow 1. **Observe**: Note the error or incorrect behavior. 2. **High-level prompt (Simplify)**: Describe the problem to Agent clearly. 3. **Check Console/DevTools (Debug)**: Look for detailed errors. 4. **Iterate & provide context (Select, Show)**: If Agent's fix fails, provide more context (error message, relevant code, your goal, attempts made). 5. **Incremental changes (Checkpoint)**: Ask Agent to fix one thing at a time. Use **Checkpoints** in Agent to save progress. 6. **Rollback**: If prompts worsen things, roll back to a working **Checkpoint** and try a new approach. Don't hesitate to examine Agent-generated code. Even without expertise in the language, you can often spot logical issues or understand data flow, helping you write better prompts. Files like `notionService.js` usually handle Notion API calls. ## Step 5: Further enhancements Once core functionality works, ask Agent to add features. Use positive, direct language (**Instruct** principle). Here are ideas: Ask Agent: "Implement post caching and prefetching from Notion for a super-fast site." This reduces Notion API calls and speeds up page loads. Ask Agent: "Add a hover effect to homepage blog post links." or "Improve post typography for readability." Small visual tweaks significantly improve user experience. You can **show** Agent examples of styles you like. Consider how often to fetch new Notion data. For simple blogs, on page load or server restart might be enough. For dynamic content, ask Agent: "Explore options to auto-refresh Notion posts hourly." This might involve background polling (adds complexity but keeps content current). ## Step 6: Publish your website Happy with your site? Time to share it! 1. Select **Publish** in the Replit Workspace (top right). 2. Review publishing settings (project name, tier). For more details, see [About Deployments](/cloud-services/deployments/about-deployments). 3. Select **Publish**. Replit publishing interface showing how to publish your Notion-powered website Replit builds, bundles, and publishes your app to a public URL. ## What you've learned By following this tutorial, you've learned to: * Set up Notion as a CMS with an integration and structured database * Prompt Replit Agent to build a web app connected to Notion, applying principles like **planning, specifying, and simplifying** * Securely manage API keys using Replit Secrets * Iteratively debug and refine an AI-generated app using techniques like **providing context, showing examples, and using checkpoints** * Publish your Notion-powered website on Replit For detailed information about checkpoints and rollbacks, see [Checkpoints and Rollbacks](/replitai/checkpoints-and-rollbacks). Building with AI like Replit Agent is collaborative. Procedural thinking, clear instructions, and methodical debugging are crucial for turning ideas into reality, fast. ## Next steps Continue developing your Notion-powered website: Try adding diverse content from Notion: image galleries, embedded videos, or categorized items. Explore Notion's formulas, rollups, and relations for complex data structures. Work with Agent to display this rich data on your Replit site. Enhance your app by merging Notion data with other [Replit AI](/category/replit-ai) tools or [Agent integrations](/replitai/integrations). For example, use Replit Auth for private content or OpenAI for AI-generated summaries from Notion data within your app. Happy building! We can't wait to see what you create. --- # Source: https://docs.replit.com/tutorials/build-and-launch-a-mobile-app.md > ## Documentation Index > Fetch the complete documentation index at: https://docs.replit.com/llms.txt > Use this file to discover all available pages before exploring further. # Build and launch a mobile app > Build a native iOS app with Agent, test it on your phone with Expo Go, and publish through TestFlight to the App Store. ## What you’ll do In this tutorial, you’ll: * Create a mobile app from a prompt with Agent * Preview it locally on your phone with Expo Go * Publish to Expo Go so anyone can access your app * Promote to TestFlight for beta testing * Submit to the App Store for public release Apple sets the requirements for TestFlight and App Store submissions. You’ll use App Store Connect to manage testing and releases. ## What you’ll need * A Replit account with access to mobile apps * A phone with Expo Go installed * An Apple Developer Program membership (required by Apple for TestFlight and the App Store) ## Part 1: Build your app with Agent On the Replit home screen, describe what you want to build, then select **Mobile app** as the app type. Agent scaffolds your project and builds your first version. Keep the chat open to follow progress and request changes. ## Part 2: Test on your phone with Expo Go Expo Go runs a native preview of your app on your device. Install Expo Go on your iPhone or Android device. In your Workspace, select **Preview on mobile device** to display a QR code. Scan the QR code with your phone to open a native preview in Expo Go. Mobile app running in the Replit Workspace preview with the Preview on device panel and QR code If your preview looks out of date, refresh in Expo Go. On your device, shake your phone to open the developer menu, then select **Refresh**. ## Part 3: Publish to Expo Go Publishing to Expo Go makes your app available to anyone with the Expo Go app installed. This is the fastest way to share your app for feedback without going through Apple's review process. Open the publishing pane and select **Publish**. This deploys your app and backend to Replit's infrastructure. After publishing, anyone with Expo Go can open your app using the shareable link. No Apple Developer account is required at this stage. Use Expo Go publishing to quickly share prototypes, gather early feedback, and iterate before committing to the App Store process. ## Part 4: Promote to TestFlight After publishing to Expo Go, you can promote your app to TestFlight for more formal beta testing. TestFlight requires an Apple Developer account but provides a native app experience without Expo Go. ### Apple publishing prerequisites Apple requires specific accounts and configurations before you can publish. Complete these steps before attempting to submit. #### Join the Apple Developer Program You need an Apple Developer Program membership to publish to TestFlight and submit to the App Store. Apple requires two-factor authentication on your Apple Account. #### Individual vs. organization enrollment * **Individual accounts**: Publish under your legal name as the seller. * **Organization accounts**: Publish under the organization name as the seller. Apple requires a D‑U‑N‑S Number for organizations, which can take time to obtain. #### Typical enrollment steps 1. Sign in at `https://developer.apple.com/programs/enroll/` 2. Complete identity verification 3. Accept the Apple Developer Program license agreement 4. Pay the annual fee set by Apple 5. Wait for Apple approval (time varies by account type) ### Understand TestFlight vs. the App Store TestFlight is Apple’s beta testing system. The App Store is the public marketplace where anyone can download your app. | Aspect | TestFlight | App Store | | ------------------ | ------------------------------------------------- | ---------------------------------------- | | **Audience** | Invited testers (up to 10,000 external testers) | Public | | **Purpose** | Beta testing and feedback | Public release | | **Review** | First build of a version goes through beta review | Every submission goes through App Review | | **Build lifetime** | Expires after 90 days | Permanent until you remove it | TestFlight is the fastest way to catch crashes, performance issues, and device-specific problems before launch. With your app already published to Expo Go, open the publishing pane in your Workspace. Select **Publish to App Store** to promote your app to TestFlight. Sign in with your Apple Developer account when prompted. Replit builds a native app in the cloud and submits it to TestFlight. The first build of a version typically requires a TestFlight beta review. After approval, you can usually push additional builds to testers faster. ### Enable external testing To share your TestFlight build with other people, configure external testing in App Store Connect: 1. In App Store Connect, open your app. 2. Go to **TestFlight**, then **External Testing**. 3. Create a testing group and add your build. 4. Submit for Beta App Review (required by Apple for external testers). 5. Share the public TestFlight link after approval. ## Part 5: Submit to the App Store When your build is ready for release, submit it through App Store Connect: 1. In App Store Connect, open your app. 2. Go to the **App Store** tab. 3. Fill out required metadata (description, screenshots, category, pricing, and privacy details). 4. Select your TestFlight build to promote. 5. Submit for review. ### Complete your App Store Connect listing Replit creates your app listing in App Store Connect, but you still need to complete required metadata before Apple will accept a submission. The following fields are commonly required: * **App name and subtitle** * **Category** (primary, optional secondary) * **Pricing and availability** (free or paid, and regions) * **Privacy policy URL** (publicly accessible) * **App Privacy details** (data collection “nutrition labels”) * **Screenshots** (required) * **Support URL** (required) * **App Review contact information** (required) If your app requires sign-in, add demo credentials for App Review in App Store Connect so Apple can test your app. ### Privacy requirements Apple requires you to: * Provide a public **privacy policy URL** * Declare your **App Privacy** data practices (including third-party SDKs and services you use) If you use third-party services (analytics, payments, crash reporting, ads), review their privacy disclosures and include them in your App Privacy answers. ### Screenshots Screenshots are required and strongly influence conversion on the App Store. Use real screenshots from your app. Make sure screenshots match the current build you’re submitting. ### Common rejection reasons | Issue | How to avoid it | | --------------------------------- | ----------------------------------------------------------- | | Crashes or obvious bugs | Test on TestFlight first and fix issues before submission | | Missing privacy policy | Add a public privacy policy URL before submission | | Screenshots don’t match the app | Upload screenshots from the current build | | Reviewers can’t access the app | Provide demo credentials and instructions in review notes | | Incomplete or placeholder content | Remove “coming soon” flows and incomplete screens | | Permission prompts lack context | Explain why you need camera, location, or other permissions | ### Timelines to expect | Stage | Typical duration | | ------------------------------------------------- | ----------------------------------------------------------------- | | Apple Developer Program approval | Varies (often 1–2 days for individuals; longer for organizations) | | Build processing in App Store Connect | Often 10–15 minutes | | TestFlight beta review (first build of a version) | Often about a day | | App Store review | Often 1–2 days | ### Updating your app after launch * **UI and content updates**: Publish again to ship updates quickly. * **Native changes** (for example, app icons or permissions): Submit a new App Store build. ## Checklist Use this checklist to verify you're ready for each stage. **Before you publish to Expo Go:** * You can run the app on a real device via Expo Go * Your app has no obvious crashes or broken flows **Before you promote to TestFlight:** * Your app is published and running on Replit * You have an Apple Developer Program membership * You know whether your Apple account is individual or organization **Before you submit to the App Store:** * App Store Connect metadata is complete (name, category, regions, and support URL) * Privacy policy URL is public and accurate * App Privacy details are complete (including third-party services) * Screenshots are uploaded and match the submitted build * App Review contact info is set * Demo credentials are provided (if your app requires sign-in) ## Next steps * Learn how mobile apps work on Replit: [Native Mobile Apps](/replitai/building-mobile-apps) * Learn how Agent works: [Agent](/replitai/agent) * Build on your phone: [Replit Mobile App](/platforms/mobile-app) * Learn more about Expo: [Expo docs](https://docs.expo.dev/) --- # Source: https://docs.replit.com/getting-started/quickstarts/build-in-chatgpt.md > ## Documentation Index > Fetch the complete documentation index at: https://docs.replit.com/llms.txt > Use this file to discover all available pages before exploring further. # Replit App in ChatGPT > Learn how to build a Replit App directly from ChatGPT. ⏰ *Estimated time: 5 minutes* Learn how to build Replit Apps directly from ChatGPT using the Replit integration. This integration brings Replit's development environment into your ChatGPT workflow, letting you: * Create full-stack applications from natural language descriptions * Bootstrap projects without leaving ChatGPT * Seamlessly transition to Replit for further development ## ChatGPT Apps Replit is the fastest way to turn your ideas into a live app, and now you can do it without leaving ChatGPT. Apps in ChatGPT let you connect external tools and services directly into the conversation. Instead of switching between tabs or copying context around, you can ask ChatGPT to take action inside the tools you already use. The Replit app allows you to create and bootstrap real applications directly from ChatGPT, with the code living in your Replit Workspace. Follow the steps below to build your first Replit App in ChatGPT, or try it now by clicking the button below. Build an app with Replit directly in ChatGPT Start a new conversation or continue an existing one in ChatGPT. In the chat input, describe your app idea and mention `@Replit` to invoke the Replit app. Example prompt: ```text theme={null} Create a beautiful app to split my restaurant bill @Replit ``` ChatGPT conversation with a prompt to create a bill splitting app using @Replit ChatGPT will use the Replit app to create your project. You'll see the app being generated in real-time. ChatGPT planning the app structure ChatGPT executing and building the app in Replit Once the project is created, open it in Replit to edit, run, and publish your app. The completed bill splitting app in Replit This workflow is especially powerful for prototyping: you can go from idea to runnable app in minutes, then iterate using normal Replit tooling. ## Next steps Now that you've built your first app in ChatGPT, explore more possibilities: * **[Replit in ChatGPT](/platforms/chatgpt)**: Learn about all features, billing, troubleshooting, and advanced usage * **[Replit Agent](/replitai/agent)**: Continue building and refining your app with Agent in the Workspace * **[Fast mode](/replitai/fast-mode)**: Make targeted improvements with AI-powered code assistance * **[Publish your app](/category/replit-deployments)**: Share your creation with the world --- # Source: https://docs.replit.com/getting-started/quickstarts/build-with-ai.md # Create a file converter with AI > Build a file conversion app in 15 minutes using Replit's AI tools. Learn how to use Agent and Assistant to create apps through natural language. export const AiPrompt = ({children}) => { return
{children}
; }; Learn how to replace line-by-line coding with AI-powered conversations. This guide shows you how to effectively communicate your vision and leverage Replit's AI tools to bring your ideas to life. ## What you'll learn Use Agent and Assistant effectively for different development tasks Learn the art of describing your vision to AI tools Discover how to provide context and specifications effectively Build and publish a working app in just 15 minutes You'll need a Replit account and Core subscription to access Agent. * [View the finished template](https://replit.com/@matt/msftmd-Office-Markdown-Converter?v=1\&utm_source=matt\&utm_medium=youtube\&utm_campaign=msftmd-app) * [Try the live demo](https://msftmd.replit.app/) ; }; Design Mode creates interactive front-end designs and websites in under 2 minutes. Powered by Gemini 3, it delivers better design quality than ever before on Replit, and in less time. **New: Powered by Gemini 3** - Design Mode uses Google's latest Gemini 3 model, delivering superior visual quality and faster results than ever before on Replit. Experience the best-looking designs we've ever produced. ## What is Design Mode? Design Mode is built for two primary use cases: ### 1. Visual design & rapid prototyping **Perfect for:** PMs, designers, and product teams Create beautiful interactive front-end prototypes to speed up product development and improve handoff between product, design, and engineering. Show stakeholders clickable demos instead of static mockups or lengthy PRDs. ### 2. Simple websites & landing pages **Perfect for:** Entrepreneurs, local businesses, professionals who need a personal site Build beautiful, professional websites in under 2 minutes. Deploy on a custom domain and iterate quickly without technical complexity. ## Why Design Mode? Design Mode addresses key pain points that made Replit too slow or not good enough for rapid visual work: * **Faster first results**: Get to your first visual checkpoint in under 2 minutes (previously \~10 minutes for full apps) * **Faster iteration**: Make visual changes instantly without rebuilding backend logic * **Better design quality**: Built with Gemini 3 for superior visual output—better looking than previous Replit designs and competitive with dedicated design tools * **Purpose-built for visuals**: No backend overhead means rapid prototyping that was previously too slow on Replit ## Key capabilities * **Under 2 minutes**: Go from prompt to live interactive design * **Powered by Gemini 3**: Optimized for speed and superior visual quality * **Instant deployment**: Publish as a static site with zero build time * **Quick iteration**: Make visual changes without backend complexity * **One-click conversion**: Upgrade to a full app when you need backend functionality Design Mode creates front-end only designs—no backend, databases, or integrations. If you request functionality (like login), Agent will mock up the visuals without building the backend, keeping you focused on fast design iteration. ## Getting started Navigate to the Replit homepage and select the **Design** tab. Replit homepage showing App and Design tabs with text input for creating designs Enter a description of what you want to create. Be specific about visual style, layout, and content. Example prompts: * "Create a modern landing page for a fitness app with a hero section, features, and pricing" * "Design a portfolio site with a project gallery and contact form" * "Build a personal website for a local bakery with menu and contact info" Agent creates your interactive design in under 2 minutes, focusing on visual quality and user experience. No backend functionality is built—just beautiful front-end design. Make visual changes instantly by chatting with Agent or using Visual Editor. Refine colors, layouts, content, and styles without backend rebuild delays. If you request functionality (like login or a database), Agent will mock up the visuals and show a **"Convert to App"** button. Click it to add backend capabilities to your design in the same Repl. You can also start converting your app by pressing the "Design" text that appears on the top of the Agent pane. Convert to App button shown by Agent when functionality is requested **Core and Teams only**: Converting a Design to a full app (graduating from Design to Build) requires a Core or Teams subscription. Starter users can create and deploy Designs but cannot convert them to full apps with backend functionality. ### What's included vs. not included in Design Mode **Included:** * Beautiful, responsive UI components (JavaScript, HTML, CSS) * Professional styling and visual polish * Fast-loading static pages * Mock visuals for any feature (e.g., login screens without actual authentication) **Not included (front-end only):** * Backend logic, APIs, or server-side processing * Databases or data storage * Functional user authentication * Server-side functionality When you ask for functionality, Agent will mock up the visuals (e.g., a login screen) and show a **"Convert to App"** button to upgrade when you're ready. ## Sharing and deploying designs ### Deploying and sharing Deploy your design instantly as a static site: 1. Click **Deploy** in your workspace 2. Your design deploys in seconds 3. Share the URL with stakeholders, users, or on social media Designs use [static deployments](/cloud-services/deployments/static-deployments)—extremely fast and cost-effective. If you convert to a full app with backend features, you'll need to switch to autoscale deployments. Perfect for user testing, stakeholder presentations, and gathering feedback before investing in full development. ## Common use cases **For PMs and designers (rapid prototyping)** * Create clickable prototypes to speed up product development and handoff * Replace lengthy PRDs with interactive demos that align teams faster * Test concepts with users before committing to backend development * Build live, code-based prototypes for user testing **For entrepreneurs and businesses (simple websites)** * Launch personal websites, portfolios, and business sites in under 2 minutes * Create landing pages for products, campaigns, and launches * Build beautiful, professional sites with superior design quality * Deploy on custom domains without technical complexity ## Tips for best results **Effective prompting** * Be specific about visual style, colors, and layout * Mention the type of site (landing page, portfolio, dashboard, etc.) * Attach design references, Figma files, or screenshots to your prompt **Iterating quickly** * Use [Visual Editor](/replitai/visual-editor) for instant visual edits (colors, spacing, text) * Chat with Agent for layout or content changes—no backend rebuild needed * Iterate rapidly without waiting for backend processing **Starting from existing designs** * Import from Figma, Lovable, or Bolt using [Replit Import](/replit-app/import-to-replit) * Attach screenshots to recreate existing designs * Reference design systems or component libraries in your prompts ## Design Mode vs. App Mode Design Mode and App Mode serve different purposes: **Design Mode (Design tab):** * Selected from the homepage as "Design" * Creates front-end only designs in under 2 minutes * No backend infrastructure—visuals only * Built with Gemini 3 for superior design quality * Purpose-built for rapid prototyping and simple websites * Uses static deployments only until converted to an App **App Mode (App tab):** * Selected from the homepage as "App" * Builds full-stack applications with frontend and backend * Includes access to databases, APIs, and integrations * Choose between Fast (\~3-5 mins) or full build (10+ mins) * Complete application development workflow Choose Design Mode when you want the fastest path to beautiful visuals without backend complexity. Choose App Mode when you need backend functionality, databases, or server-side logic. ## FAQ Use Design Mode (Design tab) when you want to: * Create quick visual prototypes or clickable demos in under 2 minutes * Build simple static websites (landing pages, portfolios, business sites) * Share designs for feedback before backend development * Iterate rapidly on visuals without backend delays Build a full app (App tab) when you know you need: * Backend logic and APIs from the start * Database storage * User authentication * Server-side functionality ## Next steps Ready to start creating beautiful designs in under 2 minutes? Here's how to begin: 1. **Create your first design**: Visit the [Replit homepage](https://replit.com) and select the **Design** tab 2. **Learn effective prompting**: Follow our [vibe coding guide](/tutorials/how-to-vibe-code) for best results 3. **Deploy and share**: Use [static deployments](/cloud-services/deployments/static-deployments) to publish instantly 4. **Convert when ready**: Click "Convert to App" when you need backend functionality Learn more about [Agent](/replitai/agent) and other [Replit AI tools](/category/replit-ai). --- # Source: https://docs.replit.com/tutorials/design-vs-build-mode.md > ## Documentation Index > Fetch the complete documentation index at: https://docs.replit.com/llms.txt > Use this file to discover all available pages before exploring further. # Design vs. App Mode > Learn the difference between Design and App modes in Replit, and when to use each for your projects. Replit offers two ways to create apps: **Design Mode** and **App Mode**. The best part? You can use them together—start with a beautiful design, refine it, then convert to a fully functional app when you're ready. ## What is Design Mode? [Design Mode](/replitai/design-mode) lets you create beautiful, interactive websites and app designs in just a few minutes. Simply describe your idea and Replit builds it for you. Design Mode is perfect for: * **Testing your ideas quickly**: Visualize your app's design before building functionality * **Creating polished websites**: Landing pages, portfolios, restaurant menus, event pages * **Fine-tuning your design**: Adjust colors, layouts, and content instantly Design Mode apps look and feel like real apps, but they don't store data or connect to external services yet. When you're happy with how everything looks, you can convert your design into a full app with one click. The steps below show you how. ## What is App Mode? App Mode creates real, working applications that can save data, let people sign in, and connect to other services. Use App Mode when your app needs to: * **User accounts**: Let people create accounts and log in * **Save information**: Store data like orders, messages, or user preferences * **Connect to other services**: Process payments, send emails, or pull in data from other apps * **Handle complex tasks**: Run an online store, manage bookings, or power a dashboard ## See the difference in action This comparison shows the same restaurant menu built in both modes using an identical prompt. Switch between tabs to see what each mode created: ## Using both modes together **Design Mode and App Mode are built to work together**. You don't have to choose one or the other. You can start with design and evolve into a full app. Start in Design Mode to quickly visualize your idea. Focus on how your app looks and feels—the layout, colors, buttons, and user experience. Use the [Visual Editor](/replitai/visual-editor) to click directly on elements and adjust them, or chat with Agent to describe changes you want. The changes will appear immediately. When you're happy with your design and ready to add real functionality, click the **Design** button on the top left, then click **"Convert to App"** in the menu. Agent will add the ability to save data, handle user accounts, and connect to services—all while keeping your design intact. Once your app is built, publish it so anyone can access it online. Replit handles all the technical infrastructure so your app works reliably for your audience. ## When to use each mode * You want to see your idea quickly * You're creating a simple website * You want to test different designs * Speed is your priority * You know exactly what you need * Your app must save data from day one * People need to log in * You're connecting to other services **Not sure which to pick?** Start with Design Mode. It's faster, and you can always convert to App Mode later. Your work is never wasted—it carries over when you upgrade. ## Key differences | Feature | Design Mode | App Mode | | -------------------------- | --------------------------- | ---------------------------------- | | **Speed** | A few minutes | About 10 minutes for complete apps | | **Data storage** | Visual only (no saving) | Saves and retrieves real data | | **User accounts** | Shows what login looks like | Actual login functionality | | **Connecting to services** | Not available | Payments, emails, external data | | **Hosting** | Simple static hosting | Scales with your audience | ## Next steps Learn more about creating designs Make visual changes with clicks Explore what Agent can build for you Learn the complete workflow --- # Source: https://docs.replit.com/platforms/desktop-app.md > ## Documentation Index > Fetch the complete documentation index at: https://docs.replit.com/llms.txt > Use this file to discover all available pages before exploring further. # Replit Desktop App > The Replit Desktop App for macOS, Windows, and Linux lets you create apps using all Replit's tools in a focused coding environment. The Replit Desktop App is a native application that brings the complete Replit experience to your desktop. Create, run, and publish your apps in a focused coding environment without the distractions of a web browser. ## What is the Replit Desktop App The Replit Desktop App is a full-featured development environment packaged as a standalone application for macOS, Windows, and Linux. You can access all the same workspace tools as the web version, allowing you to create your app in a dedicated, distraction-free environment optimized for desktop development. ## Getting started Follow these steps to install the Replit Desktop App and create a Replit App. ### Install the app To install the app compatible with your operating system, follow these steps: 1. Navigate to the desktop app download page 2. After downloading, open the file and follow the installation instructions 3. Open the app and log in with your existing Replit account The macOS and Windows desktop apps automatically update when you launch them. You must manually update the Linux desktop app. ### Create an app After logging into your Replit account, follow these steps to create a new Replit App: 1. In the desktop app, select **Create App**. 2. The desktop app opens a new browser tab on Replit.com titled **Create a new App**. 3. Follow the prompts to create your new Replit App in the browser. Take note of the Replit App name. 4. Switch to the desktop and select the app you created from the **Recent** list. Alternatively, locate the app by typing the name in the **Search Apps** field. ### Open an existing app To open an existing Replit App in the Replit Desktop app, follow these steps: 1. Select the Replit icon in the top left. 2. Select the app you want to open from the list. Alternatively, locate the app by typing the name in the **Search Apps** field. ## Features * **[Replit AI](/category/replit-ai)**: Agent and AI-powered tools for building apps * **[Replit Workspace](/category/replit-workspace)**: Full-featured development environment * **[Publishing](/category/replit-deployments)**: Share and deploy your apps **Focused environment:** Create your app without the distractions of working from a web browser. **Complete toolset:** Access the same tools as the web version to create, run, and publish your app. **Customizable workspace:** Arrange tools on your screen and use keyboard shortcuts to maximize productivity. ## Next steps * **[Replit AI](/category/replit-ai)**: Learn more about Agent and AI-powered tools * **[Replit Workspace](/category/replit-workspace)**: Explore the full development environment * **[Publishing](/category/replit-deployments)**: Share and deploy your apps * [Introducing the Replit Desktop App](https://blog.replit.com/desktop-app): Read the Replit Desktop App announcement on the Replit blog --- # Source: https://docs.replit.com/extensions/development/devtools.md # Extension Devtools > Learn how to use Replit's Extension Devtools to manage metadata, file handlers, and tools while developing your extension. # Developing your Extension In every extension Replit App, you will see a button labeled **Extension Devtools** in the top-right corner of the workspace. Devtools button If you do not see this button, make sure your Replit App is [configured to be an Extension](/replit-app/configuration/). ## Developer Tools The Extension Devtools pane makes it easy to edit your Extension's metadata and manage [Tools](/extensions/basics/key-concepts#tool-extension-ui) and [File Handlers](/extensions/basics/key-concepts#file-handler-file-editors-and-icons). Devtools ### Extension Metadata Click the **Edit** button in the top-right corner of your Extension preview to edit it. See [docs on the manifest file](/extensions/api/manifest). Extension preview ### File Handlers Click the "+" Icon next to **File Handlers** or click **New File Handler**. You will then be prompted to fill out the necessary information for the file handler. See [Type Definition](/extensions/api/manifest#filehandler). To preview a file handler in action, click the **Open** button on the right side of an existing file handler. ### Tools Click the "+" Icon next to **Tools** or click **New Tool**. You will then be prompted to fill out the necessary information for the new tool. See [Type Definition](/extensions/api/manifest#tool). To preview a tool in action, click the **Open** button on the right side of an existing tool. --- # Source: https://docs.replit.com/replitai/mcp/directory.md > ## Documentation Index > Fetch the complete documentation index at: https://docs.replit.com/llms.txt > Use this file to discover all available pages before exploring further. # MCP directory > Browse featured Model Context Protocol servers that connect Replit Agent to your tools. Use this directory to explore servers that expose specialized tools, data sources, or workflows through the Model Context Protocol (MCP). Every listing includes a short summary and a Replit badge so you can decide which servers to wire up for your builders. This is not an exhaustive list, you can [add any remote MCP server](/replitai/mcp/overview#add-an-mcp-server) and use it with the Replit Agent. Click the **Add to Replit** badge to install any server. You'll be prompted to authorize the connection in your Replit workspace. ## Featured servers
Server Description Install
Atlassian Project management and team collaboration tools. Add to Replit
Amplitude Product analytics and user behavior insights. Add to Replit
Linear Create and update issues directly from Agent. Add to Replit
Miro Collaborative AI-powered visual platform for planning and design. Add to Replit
Notion Sync docs, notes, and project trackers into Agent context. Add to Replit
PostHog Product analytics, session replay, and feature flags. Add to Replit
Sentry Error tracking and performance monitoring. Add to Replit
Stripe Payment processing and financial infrastructure. Add to Replit
--- # Source: https://docs.replit.com/getting-started/quickstarts/discord-bot.md # Create a Discord bot > Build a fun Discord bot that tells jokes. Learn how to use the Discord API and publish your bot on Replit. Learn how to create an interactive Discord bot. This guide shows you how to build and publish a bot that responds to commands with jokes. ## What you'll learn Build interactive bot features Handle user interactions Host your bot 24/7 Manage bot tokens securely ## Create your bot Sign in to Replit and fork the [Discord bot template](https://replit.com/@replit-matt/Discord-Python-Quickstart?v=1#main.py). Select **+ Use Template** and follow the prompts to create your Replit App. 1. Go to the [Discord Developer Portal](https://discord.com/developers/applications) 2. Navigate to your application's Bot section 3. Under Build-A-Bot, select **Reset Token** 4. Copy the token Keep your bot token secret! Never share it or commit it to version control. Add your bot token to your Replit App: 1. Open the Secrets tab 2. Create a new secret named `DISCORD_BOT_TOKEN` 3. Paste your bot token as the value Use Replit Secrets to securely store sensitive information like API tokens. ## Publish your bot 1. Select **Publish** in the workspace header 2. Choose **Reserved VM** deployment 3. Select **Publish** 1. Invite your bot to a server 2. Try the `/tell-me-a-joke` command 3. Verify the bot responds correctly Reserved VM deployments ensure your bot stays online continuously. ## Customization options * Add new commands - Create custom responses - Handle different events * Add moderation tools - Create games - Integrate with APIs ## Next steps Add persistent storage Track bot performance Add more interactions ## Related guides Build a Slack integration Create apps using Agent Want to learn more about bot development? Check out our [publishing documentation](/category/replit-deployments). --- # Source: https://docs.replit.com/cloud-services/deployments/domain-purchasing.md > ## Documentation Index > Fetch the complete documentation index at: https://docs.replit.com/llms.txt > Use this file to discover all available pages before exploring further. # Domain Purchasing > Purchase and connect domains for your Replit published apps directly within the platform to make your apps accessible with custom URLs. Turn your apps into live, professional websites with custom domain names. Domain Purchasing lets you search, buy, and connect domains for your Replit published apps—all from within the platform. Go from published app to professional web presence in minutes. That means you can buy a site, like `my-app.com`, and have it automatically point to your app. Domain search interface showing available domains with extensions like .com and .ai Domain Purchasing is available as an early beta feature. We're eager to hear your feedback on how we can improve the experience! ## Features Domain Purchasing streamlines the process of giving your apps professional web addresses. Instead of juggling multiple services, you can complete your entire web presence setup within Replit. Domain management interface showing purchased domains and their connection status Key capabilities include: * **Domain search and availability**: Check domain availability across popular extensions like `.com`, `.ai`, and more * **One-click purchasing**: Buy domains directly through Replit using your account's default payment method * **Automatic configuration**: Your domain instantly points to your Replit app without manual DNS setup * **WHOIS privacy protection**: Your personal information stays private in public domain records—included by default with every domain purchase * **Custom DNS records**: Add custom A, TXT, and MX records to configure email providers and other services * **Instant publishing**: Your app becomes accessible at your custom domain immediately after purchase * **Automatic renewals**: Domains renew automatically so your apps stay published without interruption ## Usage ### Purchasing domains 1. Publish your app and navigate to the Publish icon **Publishing** tab 2. Select the **Domains** tab 3. Choose **Buy a domain** to start the search process 4. Enter your desired domain name in the search bar 5. Review available options across different extensions 6. Select your preferred domain and complete the purchase When you purchase a domain, it automatically configures to point to your Replit app. Your app becomes accessible at the custom domain instantly, with no additional setup required. You will be billed for the domain purchase through your Replit account, deducted from your account balance then applied to your usage. ### Managing purchased domains Your domains integrate seamlessly with your published apps: * **Automatic renewals**: Domains renew automatically to keep your apps published * **Integrated billing**: Domain costs appear on your Replit billing alongside other services * **Transfer support**: Move domains between Replit accounts or to external registrars when needed ### Custom DNS records For domains purchased through Replit, you can add custom DNS records to configure additional services like email providers. The following DNS record types are supported: * **A records**: Point your domain or subdomain to a specific IP address * **TXT records**: Add text-based verification records for services like email authentication (SPF, DKIM, DMARC) * **MX records**: MX (Mail Exchange) records tell email servers where to deliver email for your domain. Setting up MX records allows you to use your custom domain for email addresses like `hello@yourdomain.com`. To manage DNS records for your purchased domain: 1. Navigate to the **Domains** tab in your Publishing Publish icon 2. Find the domain you want to configure 3. Select the **Edit** pencil icon icon 4. Choose **Add DNS Record** 5. Enter the record type, name, value, and TTL as required by your service provider This short video walks through finding the management page for your domain DNS records: