 You can see the [PlanetScale airbyte-source README](https://github.com/planetscale/airbyte-source/blob/main/README.md) for more details on these options.
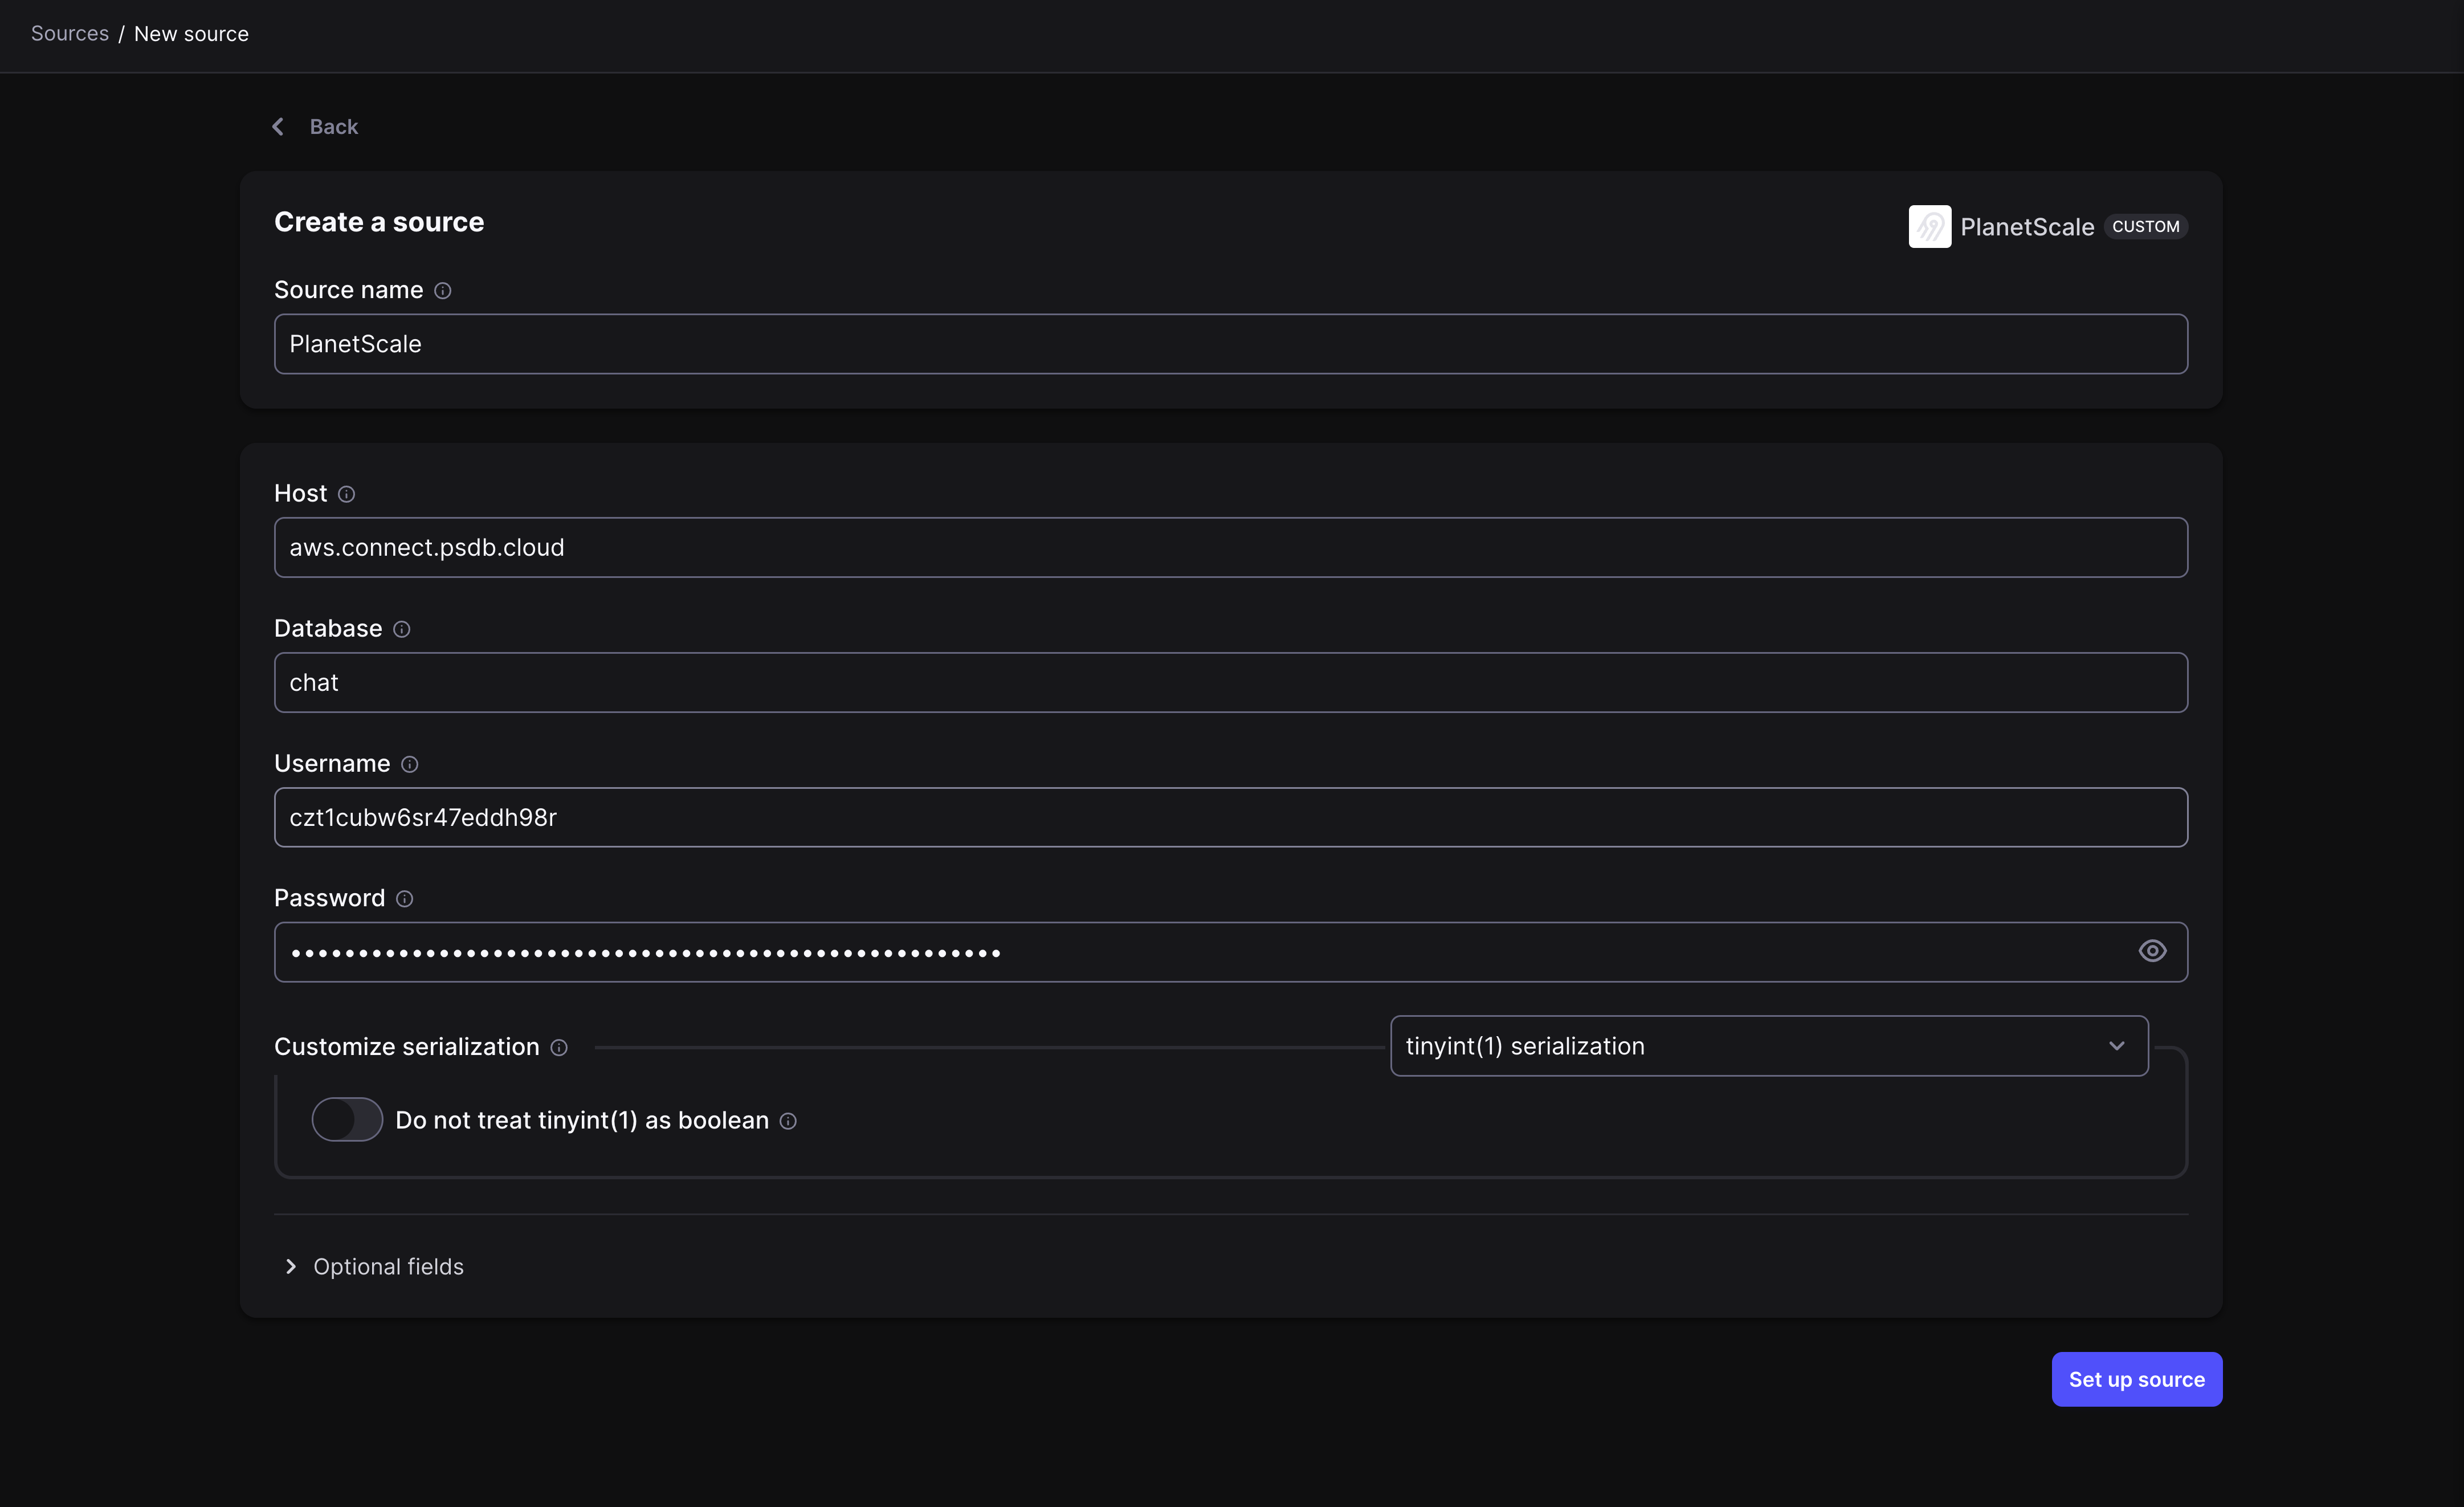
 ### Fill in PlanetScale connection information
You're now ready to connect your PlanetScale database to Airbyte.
You can see the [PlanetScale airbyte-source README](https://github.com/planetscale/airbyte-source/blob/main/README.md) for more details on these options.
### Fill in PlanetScale connection information
You're now ready to connect your PlanetScale database to Airbyte.
You can see the [PlanetScale airbyte-source README](https://github.com/planetscale/airbyte-source/blob/main/README.md) for more details on these options.
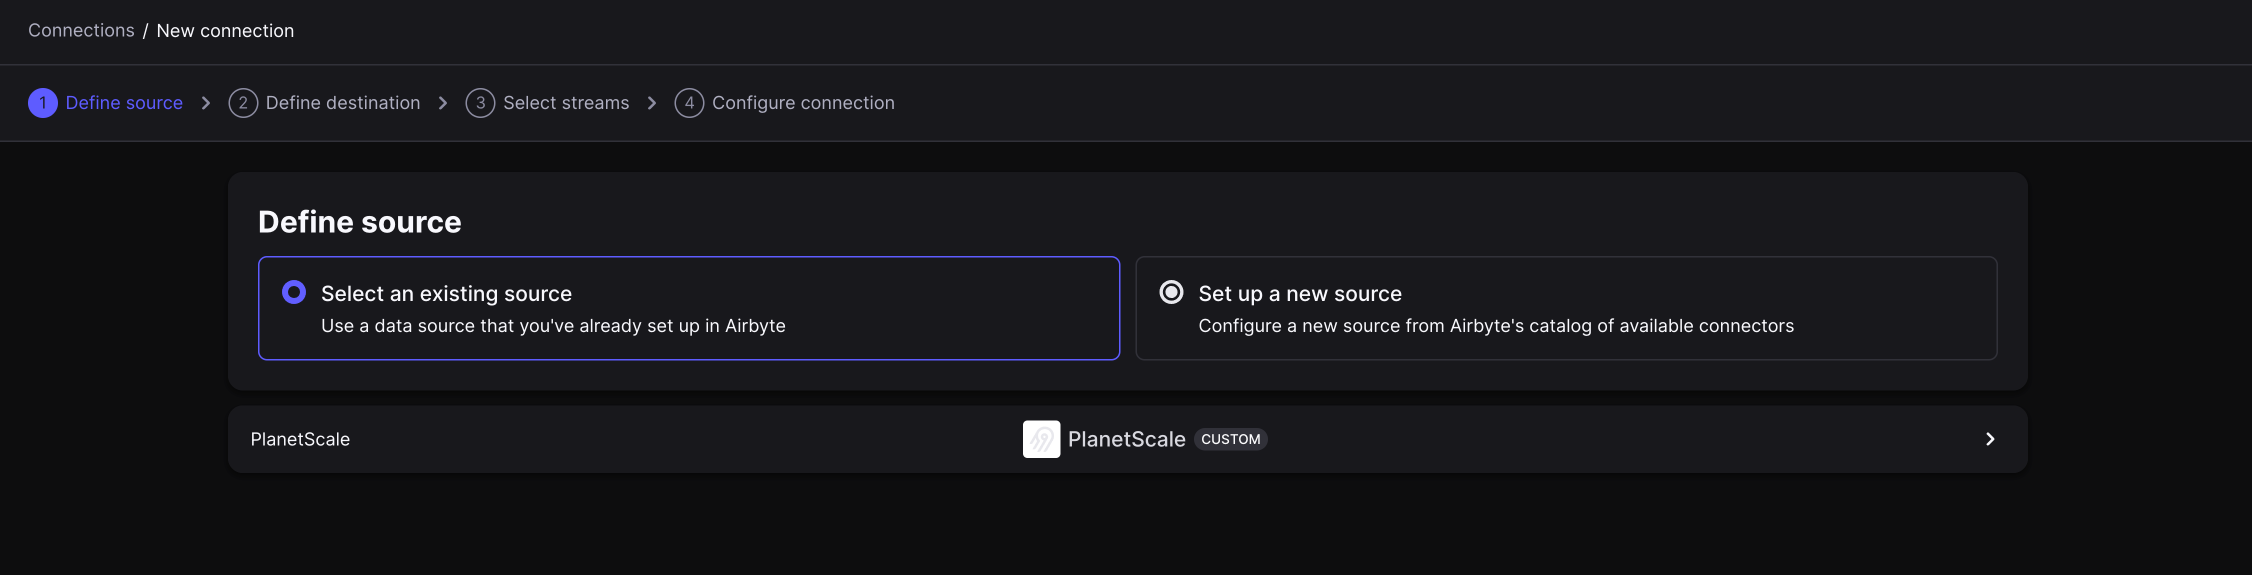
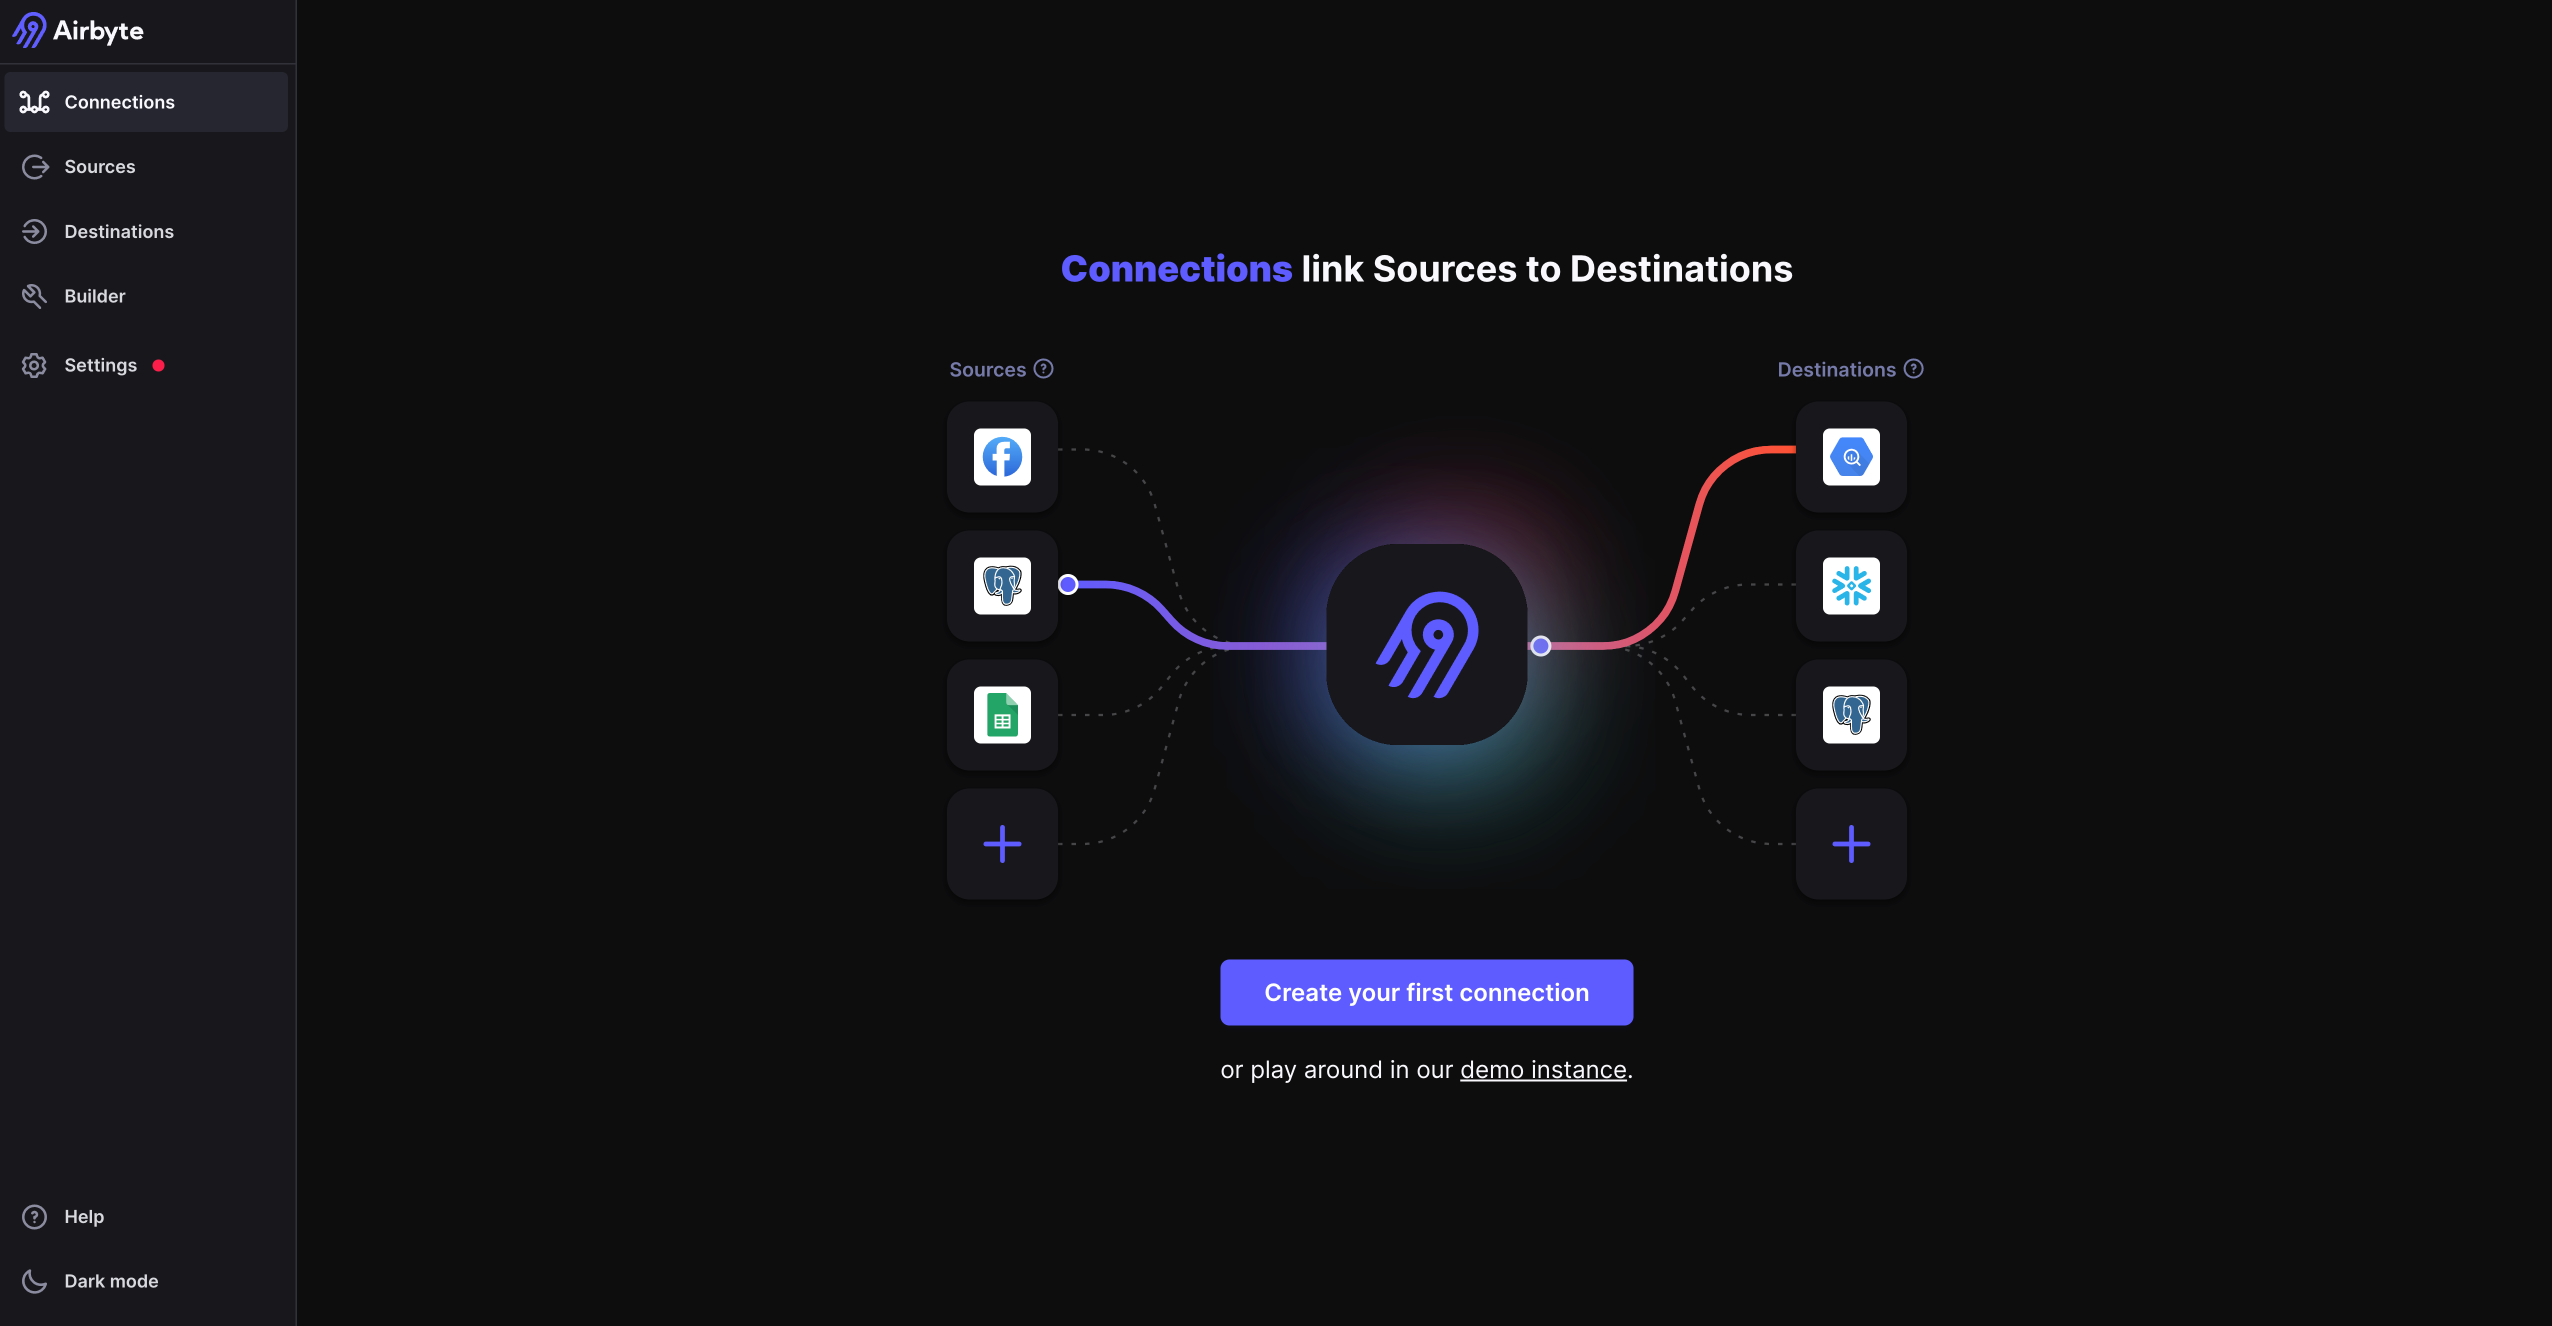 Click the button to set up a connection.
Otherwise, click "**New Connection**" in the top right corner.
From here, follow these steps:
Click the button to set up a connection.
Otherwise, click "**New Connection**" in the top right corner.
From here, follow these steps:

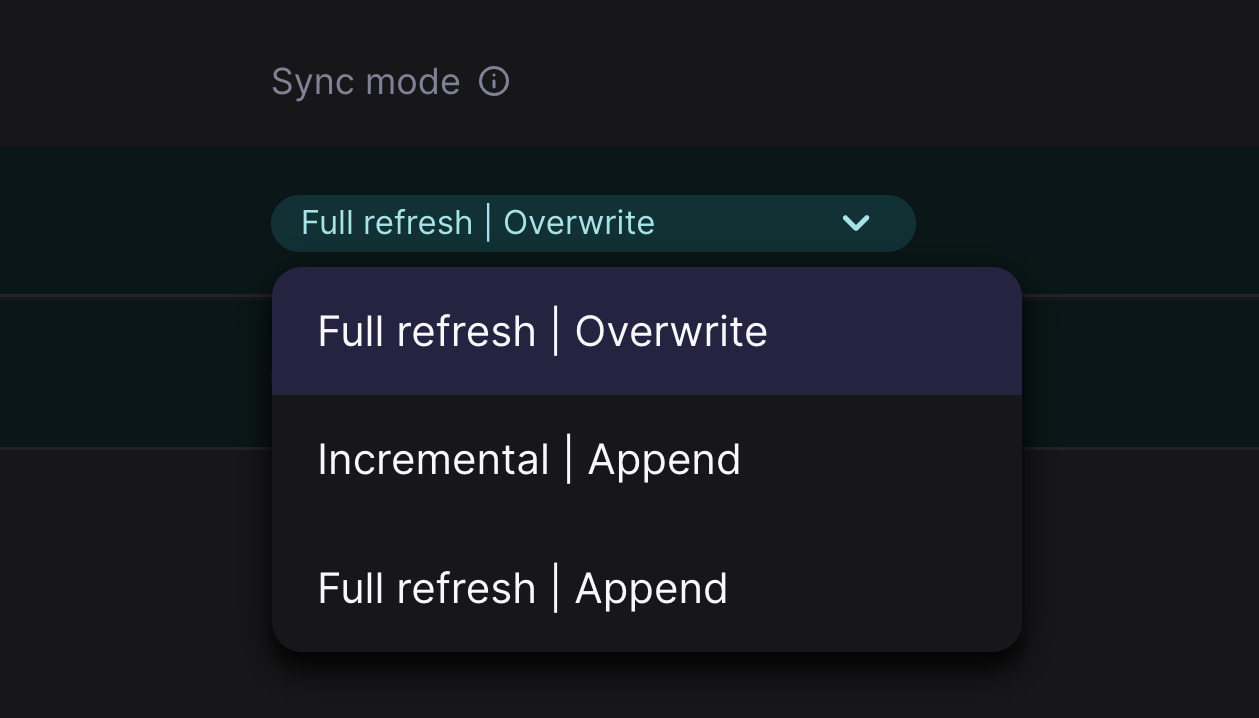 * **Incremental** — Incremental sync pulls *only* the data that has been modified/added since the last sync. We use [Vitess VStream](https://vitess.io/docs/concepts/vstream/) to track the stopping point of the previous sync and only pull any changes since then.
* **Full refresh** — Full refresh pulls *all* data at every scheduled sync frequency.
* **Incremental** — Incremental sync pulls *only* the data that has been modified/added since the last sync. We use [Vitess VStream](https://vitess.io/docs/concepts/vstream/) to track the stopping point of the previous sync and only pull any changes since then.
* **Full refresh** — Full refresh pulls *all* data at every scheduled sync frequency.
 ## Need help?
Get help from [the PlanetScale Support team](https://support.planetscale.com/), or join our [GitHub discussion board](https://github.com/planetscale/discussion/discussions) to see how others are using PlanetScale.
---
> To find navigation and other pages in this documentation, fetch the llms.txt file at: https://planetscale.com/llms.txt
---
# Source: https://planetscale.com/docs/vitess/imports/amazon-aurora-migration-guide.md
# Amazon Aurora migration guide
## Overview
This document will demonstrate how to migrate a database from Amazon Aurora (MySQL compatible) to PlanetScale.
## Need help?
Get help from [the PlanetScale Support team](https://support.planetscale.com/), or join our [GitHub discussion board](https://github.com/planetscale/discussion/discussions) to see how others are using PlanetScale.
---
> To find navigation and other pages in this documentation, fetch the llms.txt file at: https://planetscale.com/llms.txt
---
# Source: https://planetscale.com/docs/vitess/imports/amazon-aurora-migration-guide.md
# Amazon Aurora migration guide
## Overview
This document will demonstrate how to migrate a database from Amazon Aurora (MySQL compatible) to PlanetScale.
 ## Step 1: Configure server settings
Your Aurora database needs specific server settings configured before you can import. Follow these steps to configure GTID mode, binlog format, and sql\_mode.
### Check your current parameter group
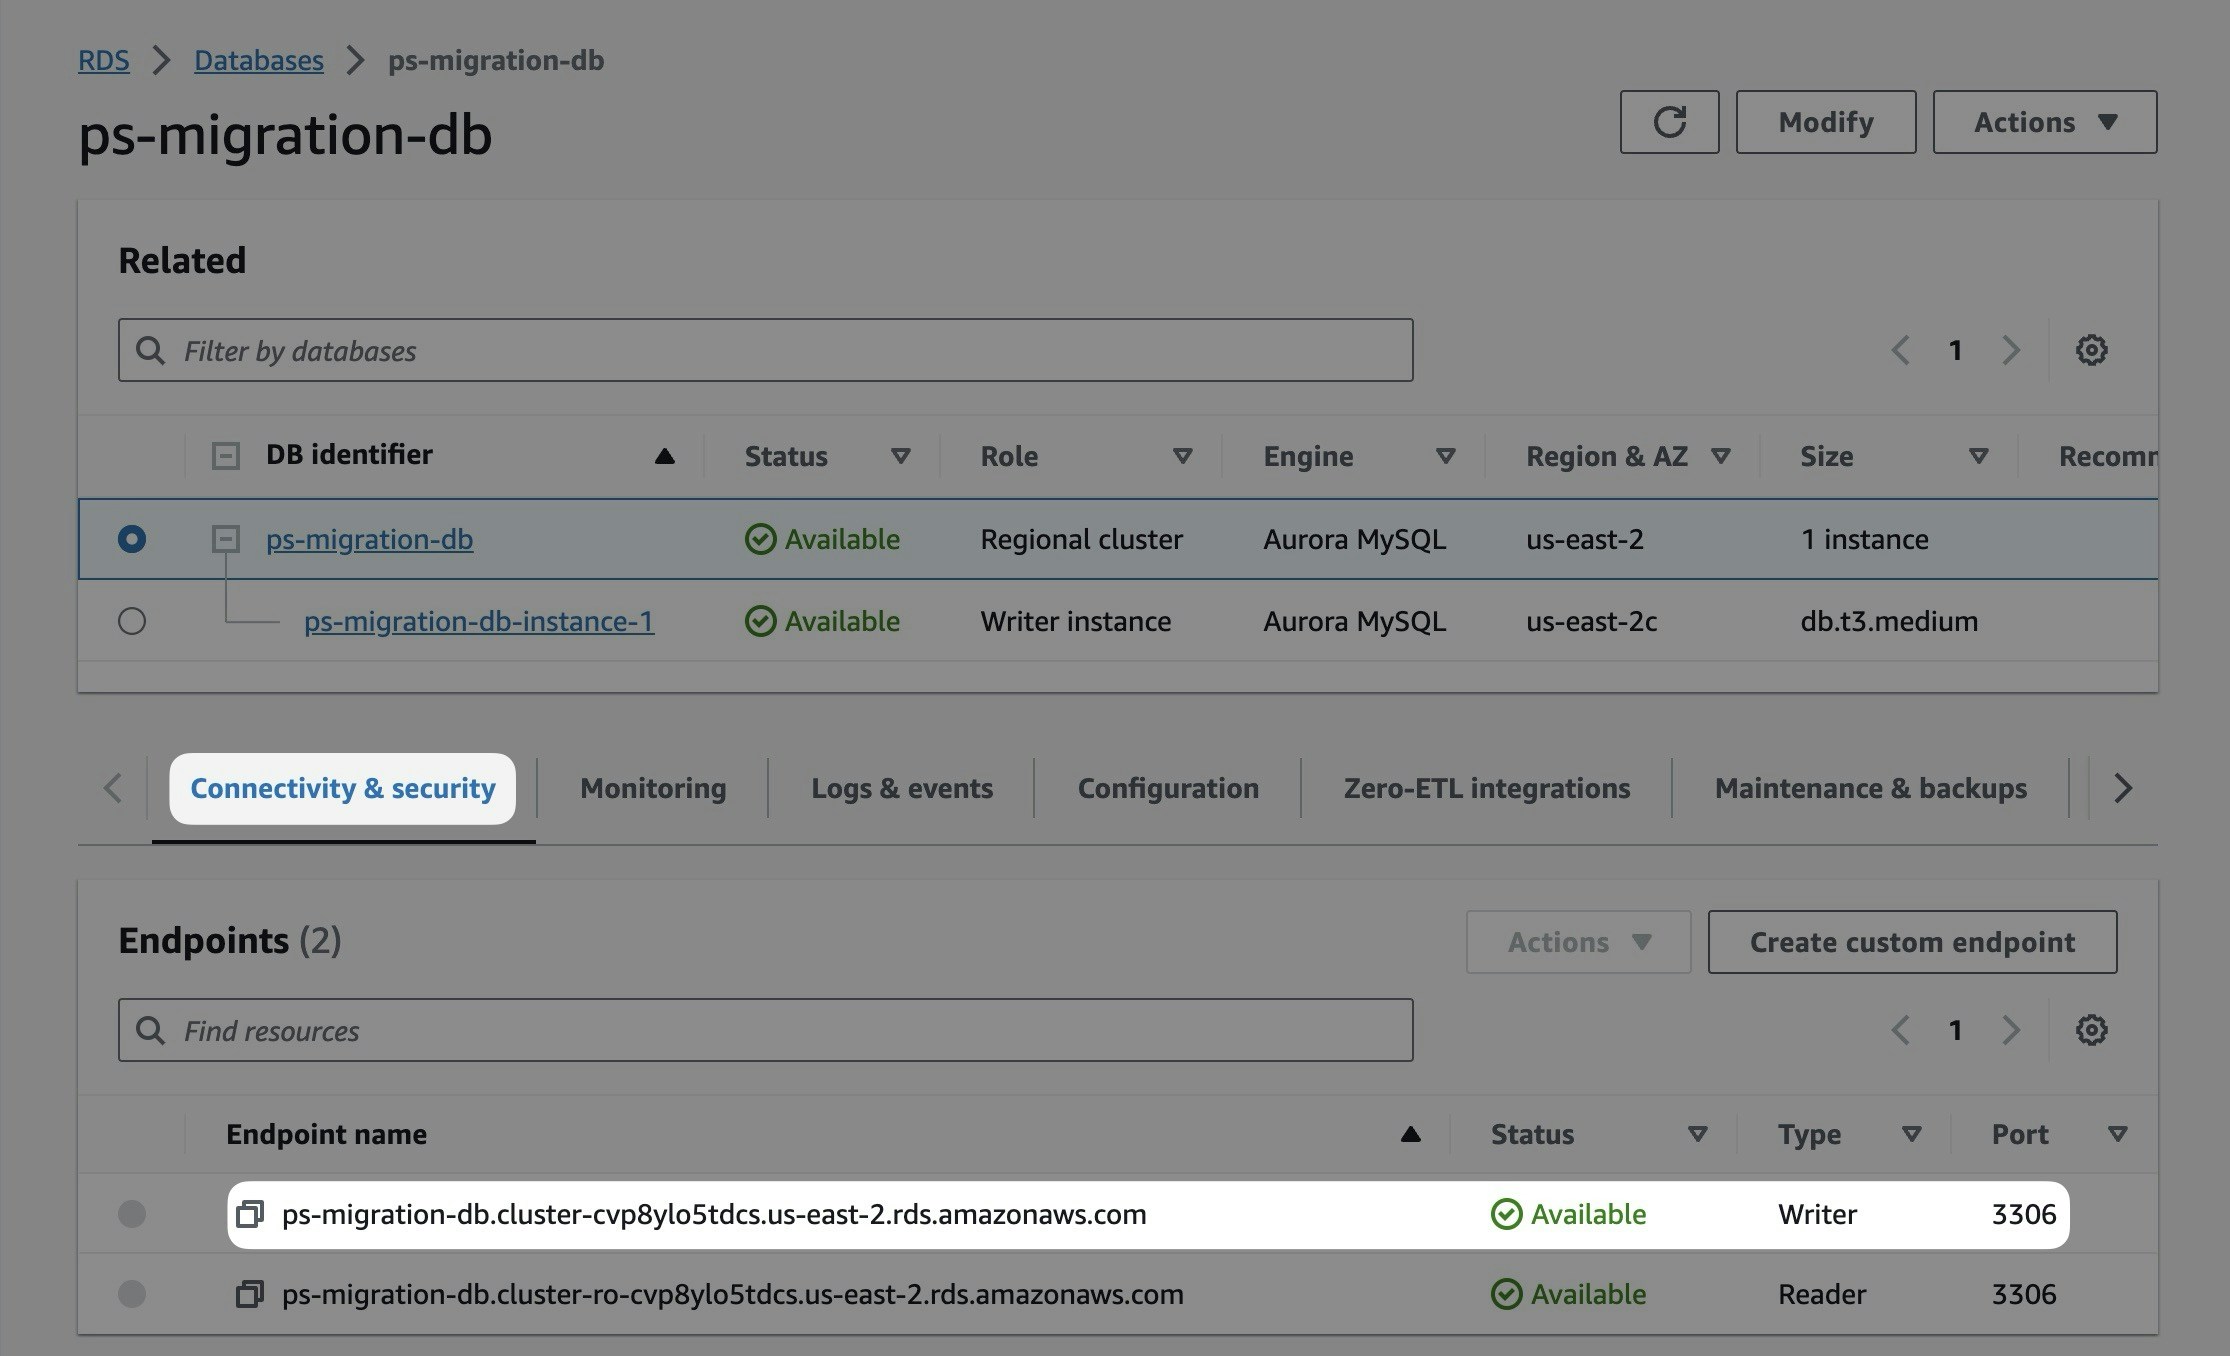
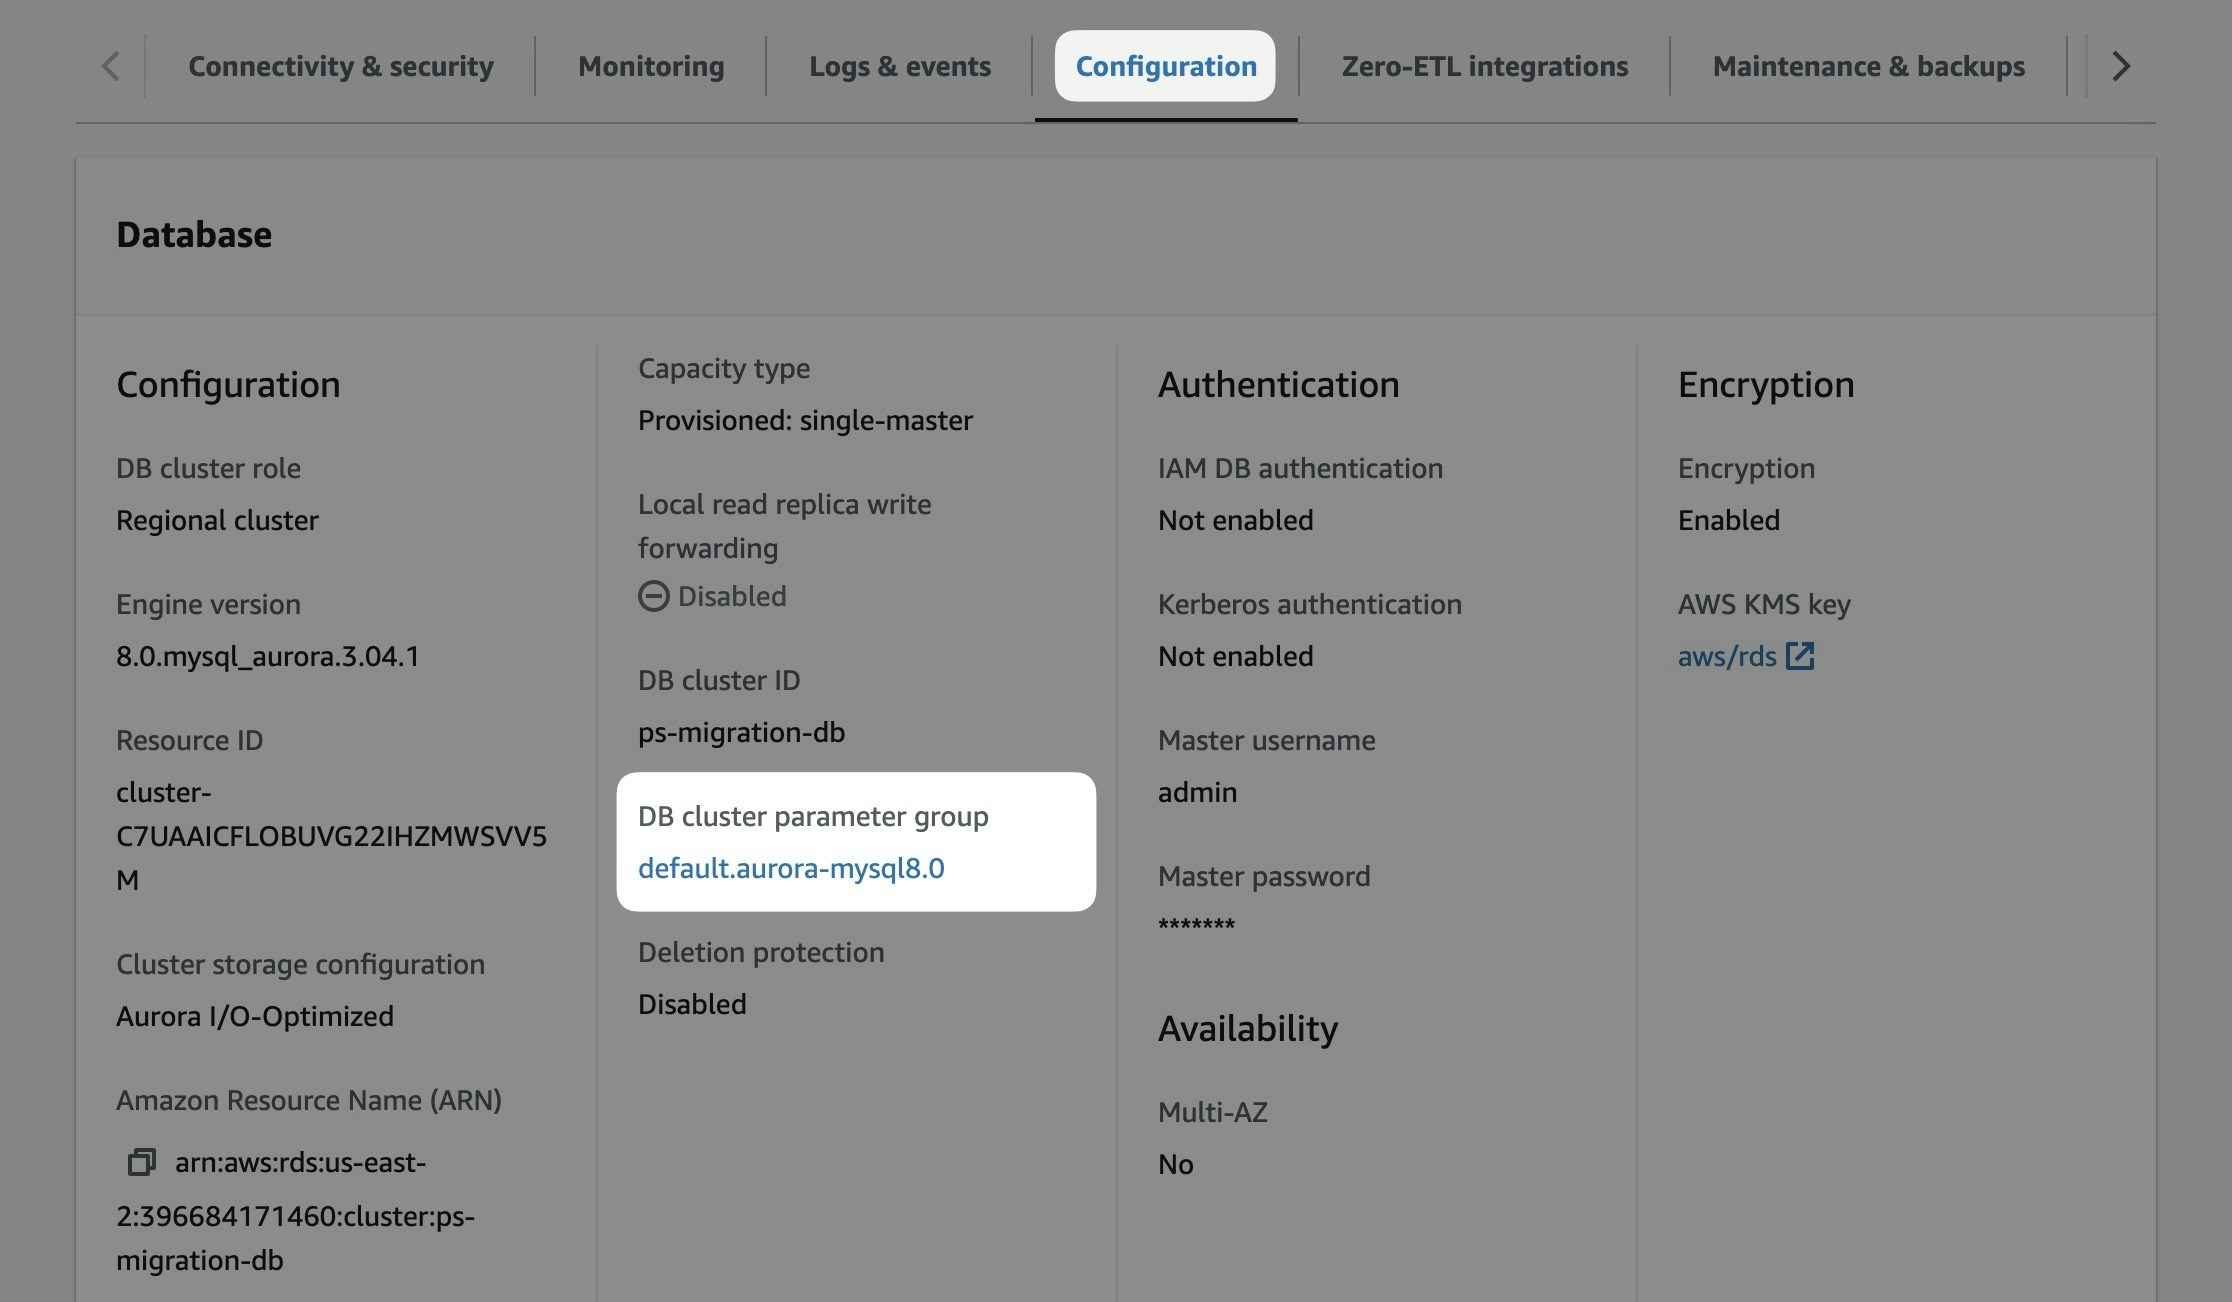
Your Amazon Aurora database is either using the default DB cluster parameter group (e.g., default.aurora-mysql8.0) or a custom one. You can view it in the "**Configuration**" tab of your regional database cluster (not reader or writer instances).
## Step 1: Configure server settings
Your Aurora database needs specific server settings configured before you can import. Follow these steps to configure GTID mode, binlog format, and sql\_mode.
### Check your current parameter group
Your Amazon Aurora database is either using the default DB cluster parameter group (e.g., default.aurora-mysql8.0) or a custom one. You can view it in the "**Configuration**" tab of your regional database cluster (not reader or writer instances).
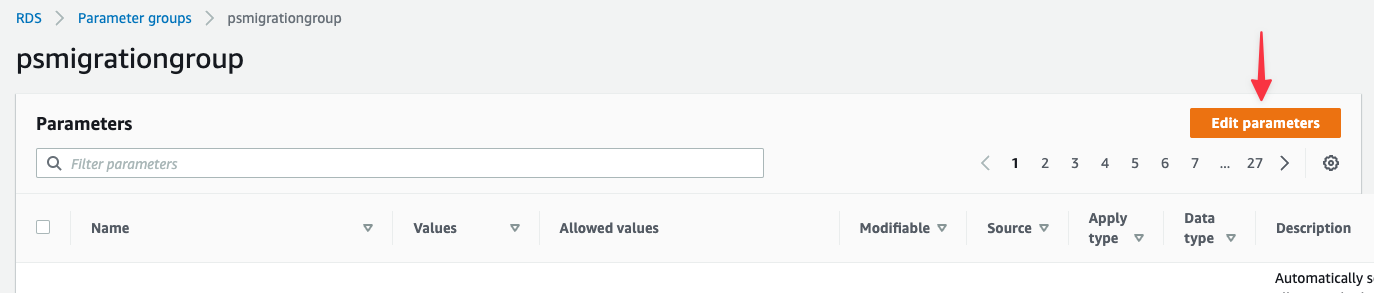
 ### Configure the parameter group
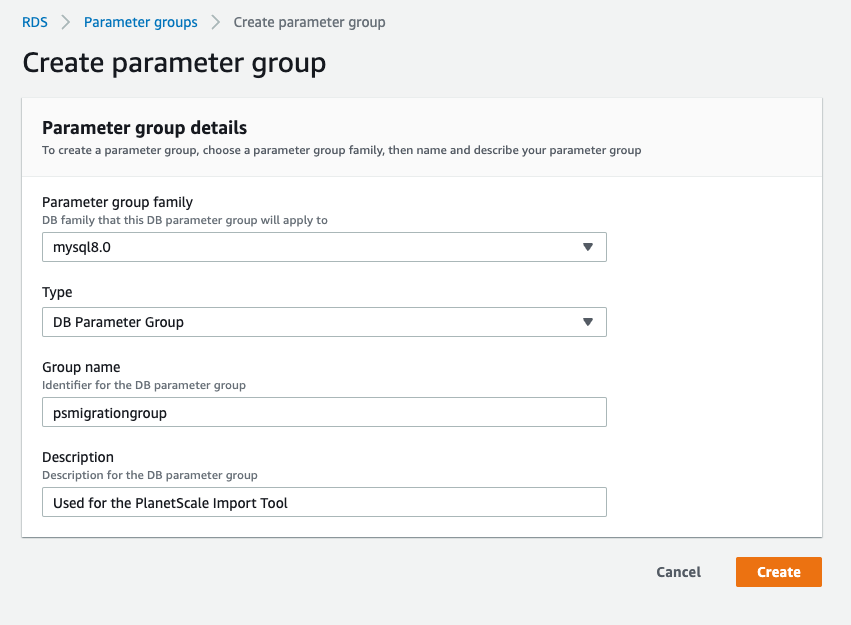
 Specify the **Parameter group family**, **Type**, **Group name**, and **Description**. All fields are required.
* Parameter group family: aurora-mysql8.0
* Type: DB Cluster Parameter Group (Note: Not "DB Parameter Group" type)
* Group name: psmigrationgroup (or your choice)
* Description: Parameter group for PlanetScale migration
You'll be brought back to the list of available parameter groups when you save.
Specify the **Parameter group family**, **Type**, **Group name**, and **Description**. All fields are required.
* Parameter group family: aurora-mysql8.0
* Type: DB Cluster Parameter Group (Note: Not "DB Parameter Group" type)
* Group name: psmigrationgroup (or your choice)
* Description: Parameter group for PlanetScale migration
You'll be brought back to the list of available parameter groups when you save.
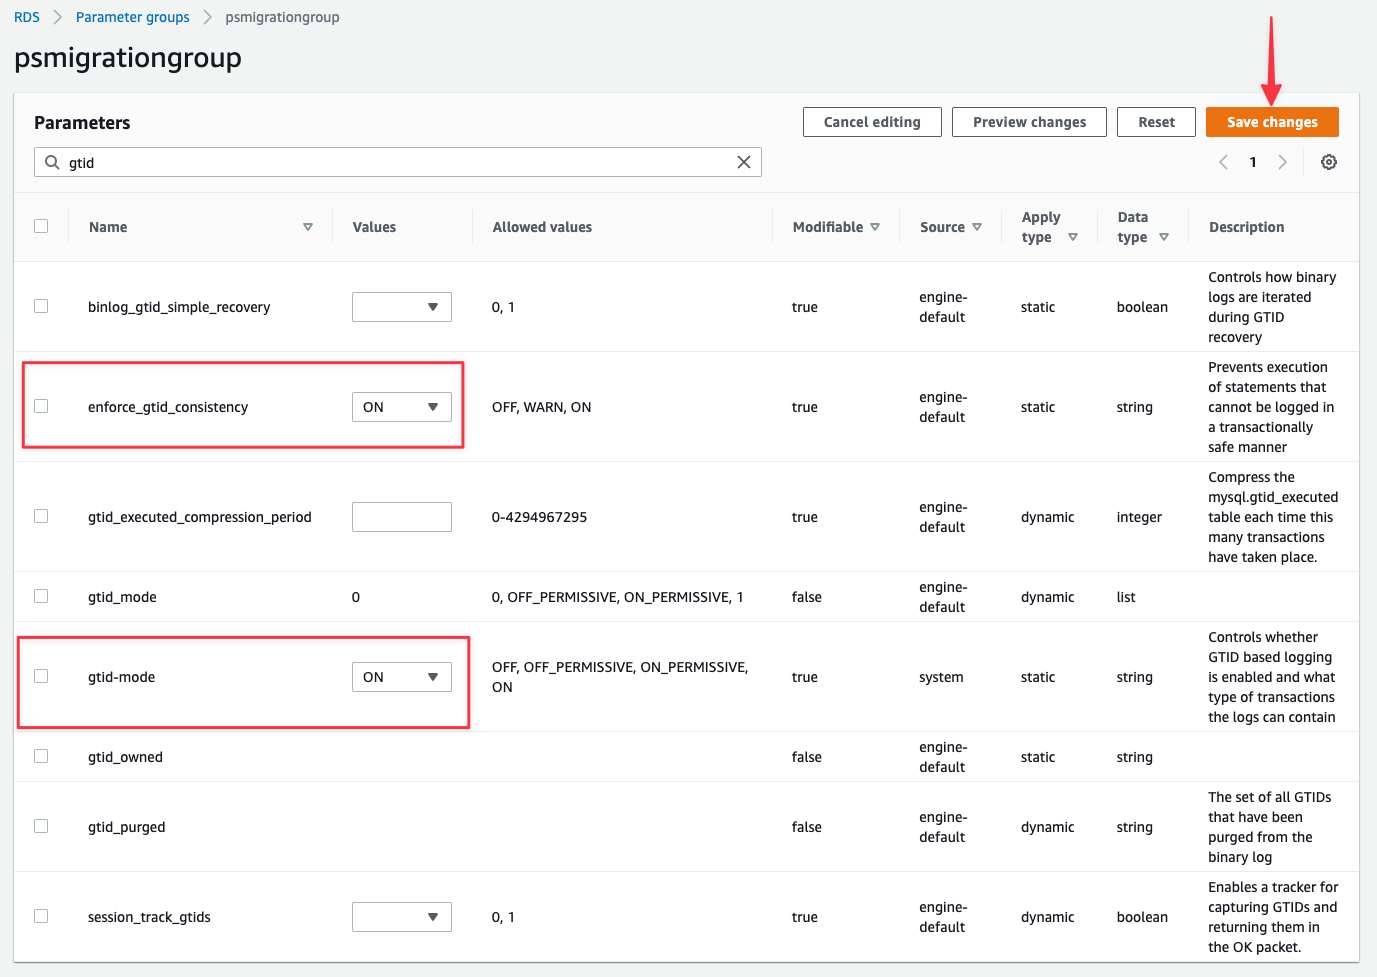
 Search for "**gtid**" and update:
* gtid-mode: ON
* enforce\_gtid\_consistency: ON
Search for "**sql\_mode**" and update:
* sql\_mode: NO\_ZERO\_IN\_DATE,NO\_ZERO\_DATE,ONLY\_FULL\_GROUP\_BY
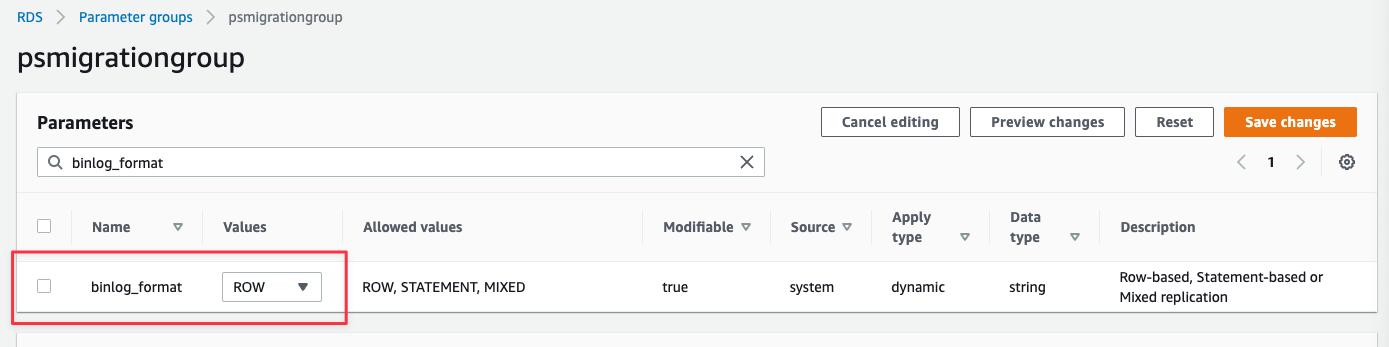
Search for "**binlog\_format**" and update:
* binlog\_format: ROW
Click "**Save changes**".
Search for "**gtid**" and update:
* gtid-mode: ON
* enforce\_gtid\_consistency: ON
Search for "**sql\_mode**" and update:
* sql\_mode: NO\_ZERO\_IN\_DATE,NO\_ZERO\_DATE,ONLY\_FULL\_GROUP\_BY
Search for "**binlog\_format**" and update:
* binlog\_format: ROW
Click "**Save changes**".
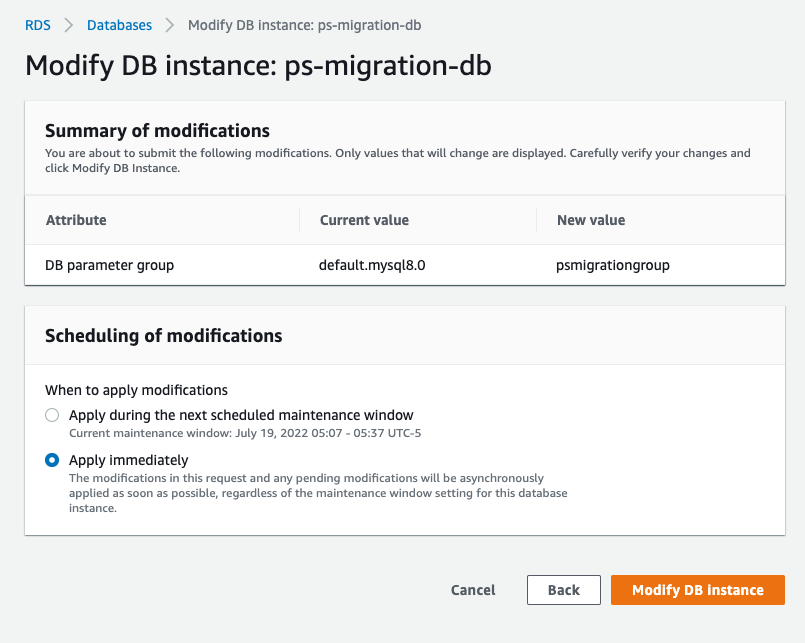
 Choose when to apply:
* **Apply during the next scheduled maintenance window** - Applied during maintenance window
* **Apply immediately** - Applied now, but requires manual reboot
Click "**Modify DB instance**".
Choose when to apply:
* **Apply during the next scheduled maintenance window** - Applied during maintenance window
* **Apply immediately** - Applied now, but requires manual reboot
Click "**Modify DB instance**".
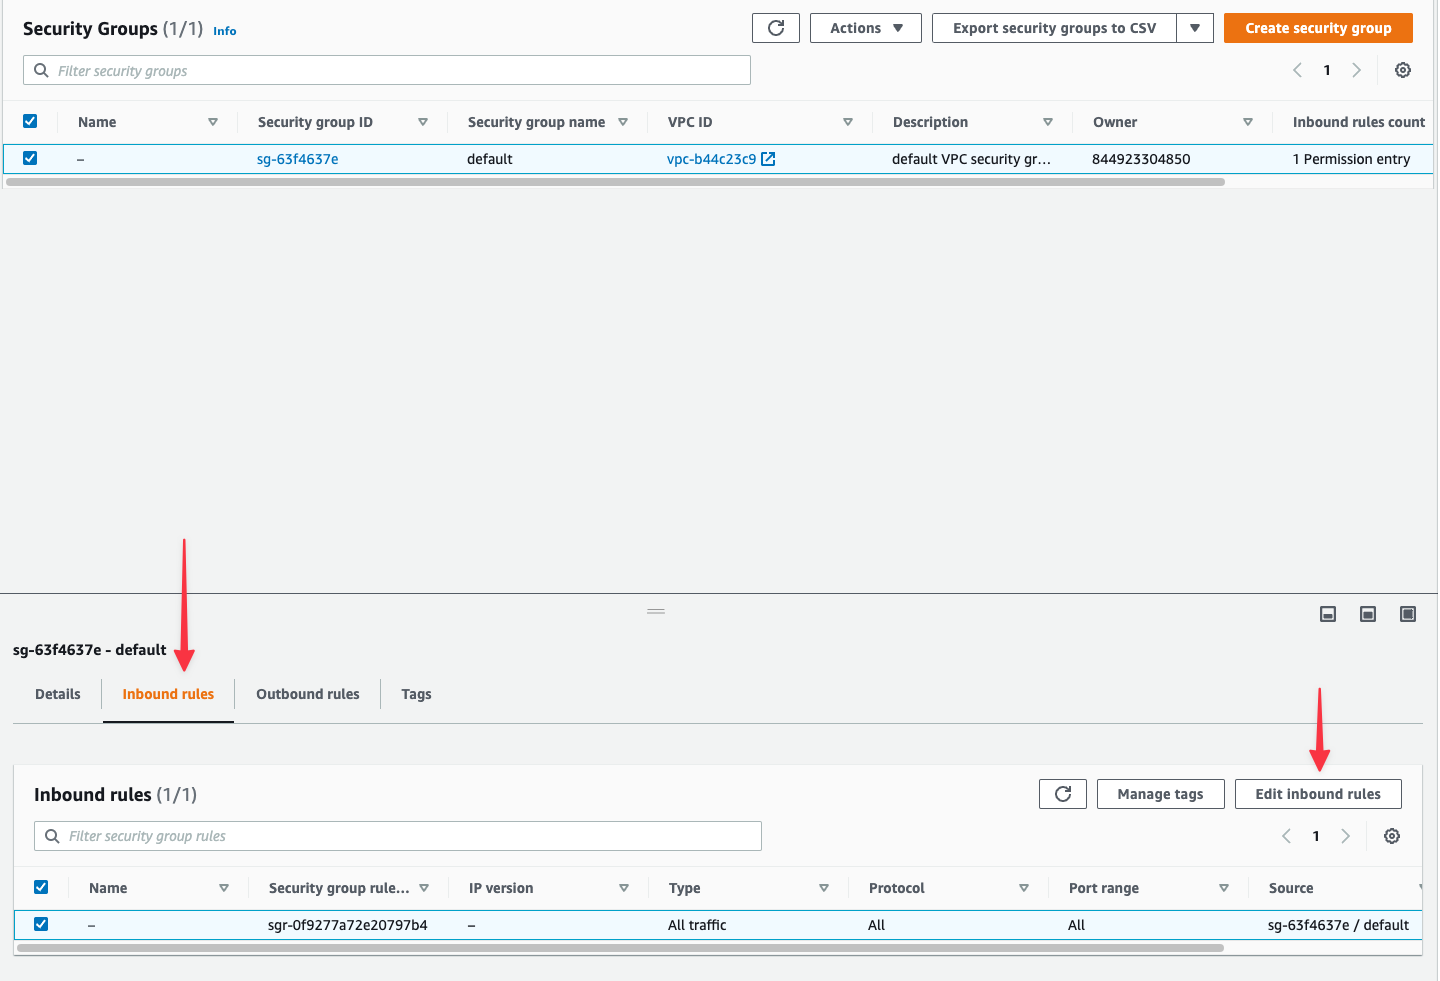
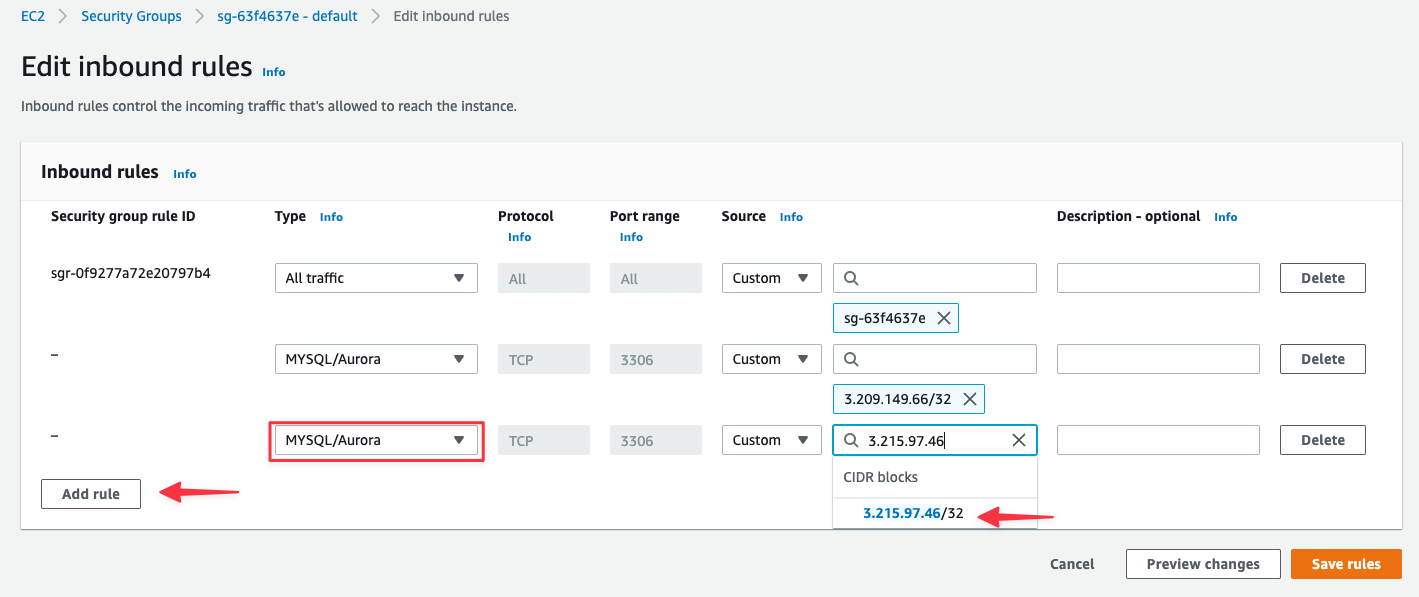
 3. Select "**Inbound rules**" tab, then "**Edit inbound rules**"
 4. Click "**Add rule**"
5. **Type**: Select `MYSQL/Aurora`
6. **Source**: Enter the first PlanetScale IP address (AWS will format it as `x.x.x.x/32`)
7. Repeat for each IP address in your region
8. Click "**Save rules**"
4. Click "**Add rule**"
5. **Type**: Select `MYSQL/Aurora`
6. **Source**: Enter the first PlanetScale IP address (AWS will format it as `x.x.x.x/32`)
7. Repeat for each IP address in your region
8. Click "**Save rules**"
 ## Importing your database
Now that your Aurora database is configured, follow the [Database Imports guide](/docs/vitess/imports/database-imports) to complete your import.
When filling out the connection form in the import workflow, use:
* **Host name** - Your Aurora cluster endpoint address (from Prerequisites)
* **Port** - 3306 (or your custom port)
* **Database name** - The exact database name to import
* **Username** - `migration_user`
* **Password** - The password you set in Step 5
* **SSL verification mode** - Select based on your Aurora SSL configuration
The Database Imports guide will walk you through:
* Creating your PlanetScale database
* Connecting to your Aurora database
* Validating your configuration
* Selecting tables to import
* Monitoring the import progress
* Switching traffic and completing the import
## Need help?
Get help from [the PlanetScale Support team](https://support.planetscale.com/), or join our [GitHub discussion board](https://github.com/planetscale/discussion/discussions) to see how others are using PlanetScale.
---
> To find navigation and other pages in this documentation, fetch the llms.txt file at: https://planetscale.com/llms.txt
---
# Source: https://planetscale.com/docs/vitess/monitoring/anomalies.md
# Source: https://planetscale.com/docs/postgres/monitoring/anomalies.md
# Anomalies
> Anomalies are defined as periods with a substantially elevated percentage of slow-running queries.
## Overview
PlanetScale Insights continuously analyzes your query performance to establish a baseline for expected performance. When a high enough percentage of queries are running more slowly than the baseline expectation, we call this an anomaly.
## Using the Anomalies graph
The graph shown under the Anomalies tab shows the percentage of queries executing slower than the 97.7th (2-sigma) percentile baseline on the y-axis and the period of time on the x-axis. The "expected" line shows the percent of queries that are statistically expected in a database with uniform query performance over time. Slight deviations from the expected value are normal. Only substantial and sustained deviations from the expected value are considered an anomaly.
## Importing your database
Now that your Aurora database is configured, follow the [Database Imports guide](/docs/vitess/imports/database-imports) to complete your import.
When filling out the connection form in the import workflow, use:
* **Host name** - Your Aurora cluster endpoint address (from Prerequisites)
* **Port** - 3306 (or your custom port)
* **Database name** - The exact database name to import
* **Username** - `migration_user`
* **Password** - The password you set in Step 5
* **SSL verification mode** - Select based on your Aurora SSL configuration
The Database Imports guide will walk you through:
* Creating your PlanetScale database
* Connecting to your Aurora database
* Validating your configuration
* Selecting tables to import
* Monitoring the import progress
* Switching traffic and completing the import
## Need help?
Get help from [the PlanetScale Support team](https://support.planetscale.com/), or join our [GitHub discussion board](https://github.com/planetscale/discussion/discussions) to see how others are using PlanetScale.
---
> To find navigation and other pages in this documentation, fetch the llms.txt file at: https://planetscale.com/llms.txt
---
# Source: https://planetscale.com/docs/vitess/monitoring/anomalies.md
# Source: https://planetscale.com/docs/postgres/monitoring/anomalies.md
# Anomalies
> Anomalies are defined as periods with a substantially elevated percentage of slow-running queries.
## Overview
PlanetScale Insights continuously analyzes your query performance to establish a baseline for expected performance. When a high enough percentage of queries are running more slowly than the baseline expectation, we call this an anomaly.
## Using the Anomalies graph
The graph shown under the Anomalies tab shows the percentage of queries executing slower than the 97.7th (2-sigma) percentile baseline on the y-axis and the period of time on the x-axis. The "expected" line shows the percent of queries that are statistically expected in a database with uniform query performance over time. Slight deviations from the expected value are normal. Only substantial and sustained deviations from the expected value are considered an anomaly.
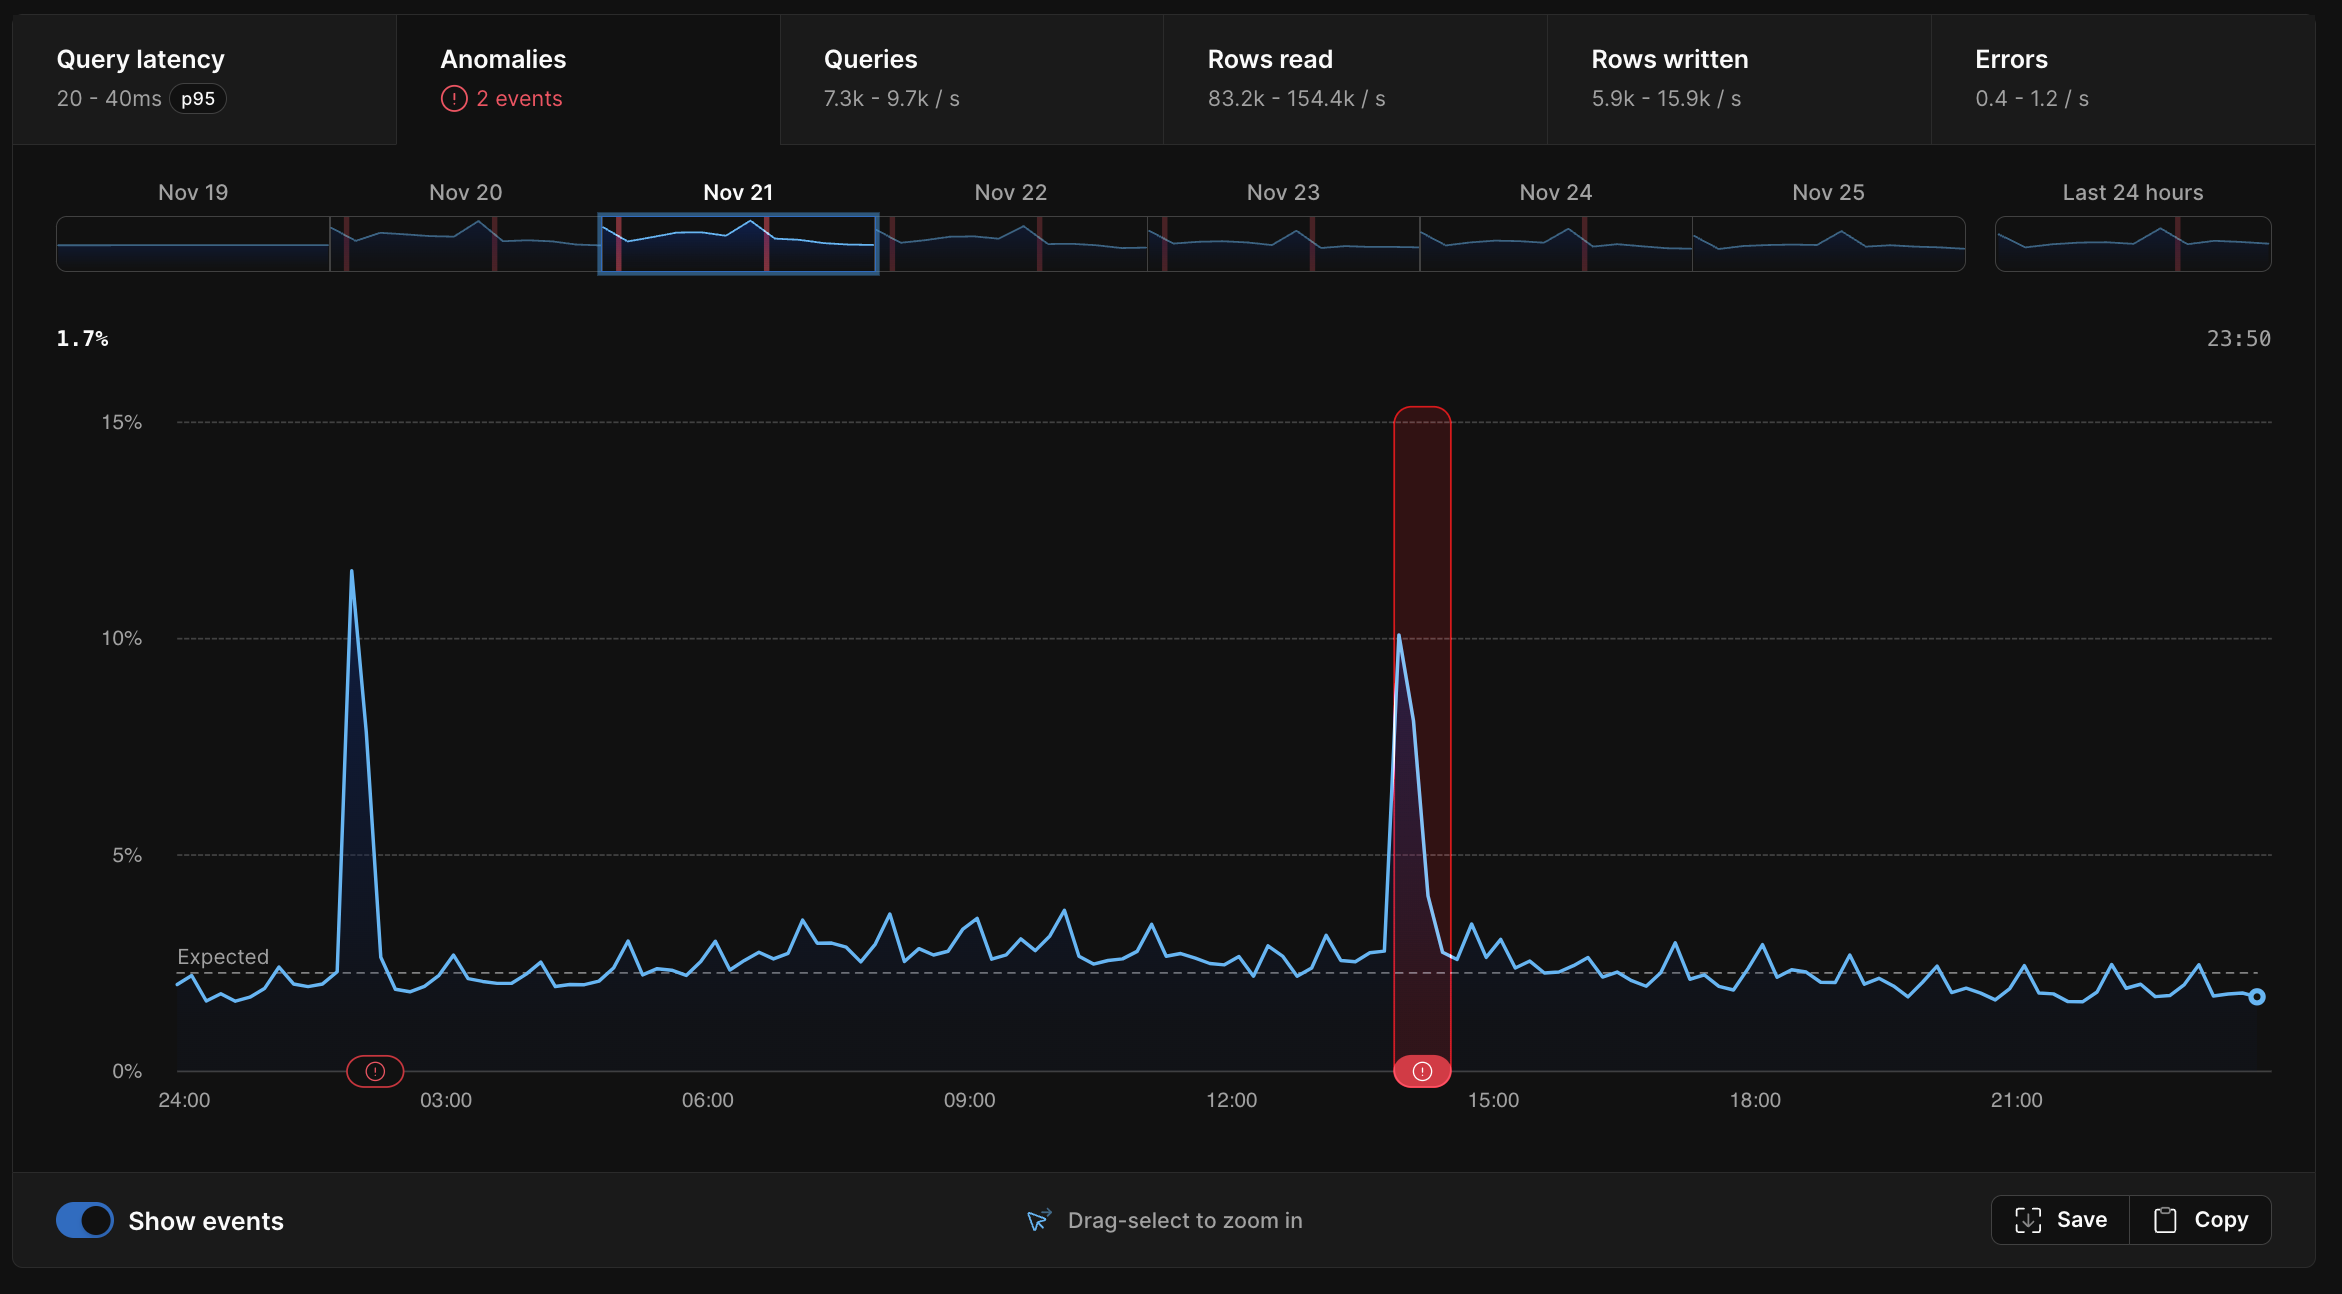 Any periods where your database was unhealthy will be highlighted with a red icon representing a performance anomaly. Each anomaly on the graph is clickable. Clicking on it will pull up more details about it in the table below the graph, such as: duration, percentage of increase, and when the anomaly occurred. We also overlay any deploy requests that happened during that period over the anomaly graph.
On top of this, we also surface any impact to the following:
* The query that triggered the anomaly
* CPU utilization
* Memory
* IOPS
* Queries per second
* Rows written per second
* Rows read per second
* Errors per second
## Anomalies vs query latency
You may notice a correlation between some areas in the query latency graph and the anomalies graph. Conversely, in some cases, you may see a spike in query latency, but no corresponding anomaly.
Increased query latency *can* be indicative of an anomaly, but not always. Query latency may increase and decrease in ways that don't always indicate an actual problem with your database.
For example, you may run a weekly report that consists of a few slow-running queries. These queries are always slow. Every week, you'll see a spike on your query latency graph during the time that your weekly report is generated, but not on your anomaly violations graph. The queries are running at their *expected* latency, so this is not considered an anomaly.
## What should I do if my database has an anomaly?
The purpose of the Anomalies tab is to show you relevant information so you can determine what caused an anomaly and correct the issue.
Let's look at an example scenario. You deploy a feature in your application that contains a new query. This query is slow, running frequently, and is hogging database resources. This new slow query is running so often that it's slowing down the rest of your database. Because your other queries are now running slower than expected, an anomaly is triggered.
In this case, we will surface the new slow-running query so that you can find ways to optimize it to free up some of the resources it's using. Adding an index will often solve the problem. You can test this by adding the index, creating a deploy request, and deploying it. If it's successful, you'll quickly see the anomaly end.
On the other hand, an anomaly does not necessarily mean you need to take any action. One common example where you may see an anomaly is in the case of large active-running backups. In this case, we will tell you that a backup was running during the time of the anomaly.
Any periods where your database was unhealthy will be highlighted with a red icon representing a performance anomaly. Each anomaly on the graph is clickable. Clicking on it will pull up more details about it in the table below the graph, such as: duration, percentage of increase, and when the anomaly occurred. We also overlay any deploy requests that happened during that period over the anomaly graph.
On top of this, we also surface any impact to the following:
* The query that triggered the anomaly
* CPU utilization
* Memory
* IOPS
* Queries per second
* Rows written per second
* Rows read per second
* Errors per second
## Anomalies vs query latency
You may notice a correlation between some areas in the query latency graph and the anomalies graph. Conversely, in some cases, you may see a spike in query latency, but no corresponding anomaly.
Increased query latency *can* be indicative of an anomaly, but not always. Query latency may increase and decrease in ways that don't always indicate an actual problem with your database.
For example, you may run a weekly report that consists of a few slow-running queries. These queries are always slow. Every week, you'll see a spike on your query latency graph during the time that your weekly report is generated, but not on your anomaly violations graph. The queries are running at their *expected* latency, so this is not considered an anomaly.
## What should I do if my database has an anomaly?
The purpose of the Anomalies tab is to show you relevant information so you can determine what caused an anomaly and correct the issue.
Let's look at an example scenario. You deploy a feature in your application that contains a new query. This query is slow, running frequently, and is hogging database resources. This new slow query is running so often that it's slowing down the rest of your database. Because your other queries are now running slower than expected, an anomaly is triggered.
In this case, we will surface the new slow-running query so that you can find ways to optimize it to free up some of the resources it's using. Adding an index will often solve the problem. You can test this by adding the index, creating a deploy request, and deploying it. If it's successful, you'll quickly see the anomaly end.
On the other hand, an anomaly does not necessarily mean you need to take any action. One common example where you may see an anomaly is in the case of large active-running backups. In this case, we will tell you that a backup was running during the time of the anomaly.
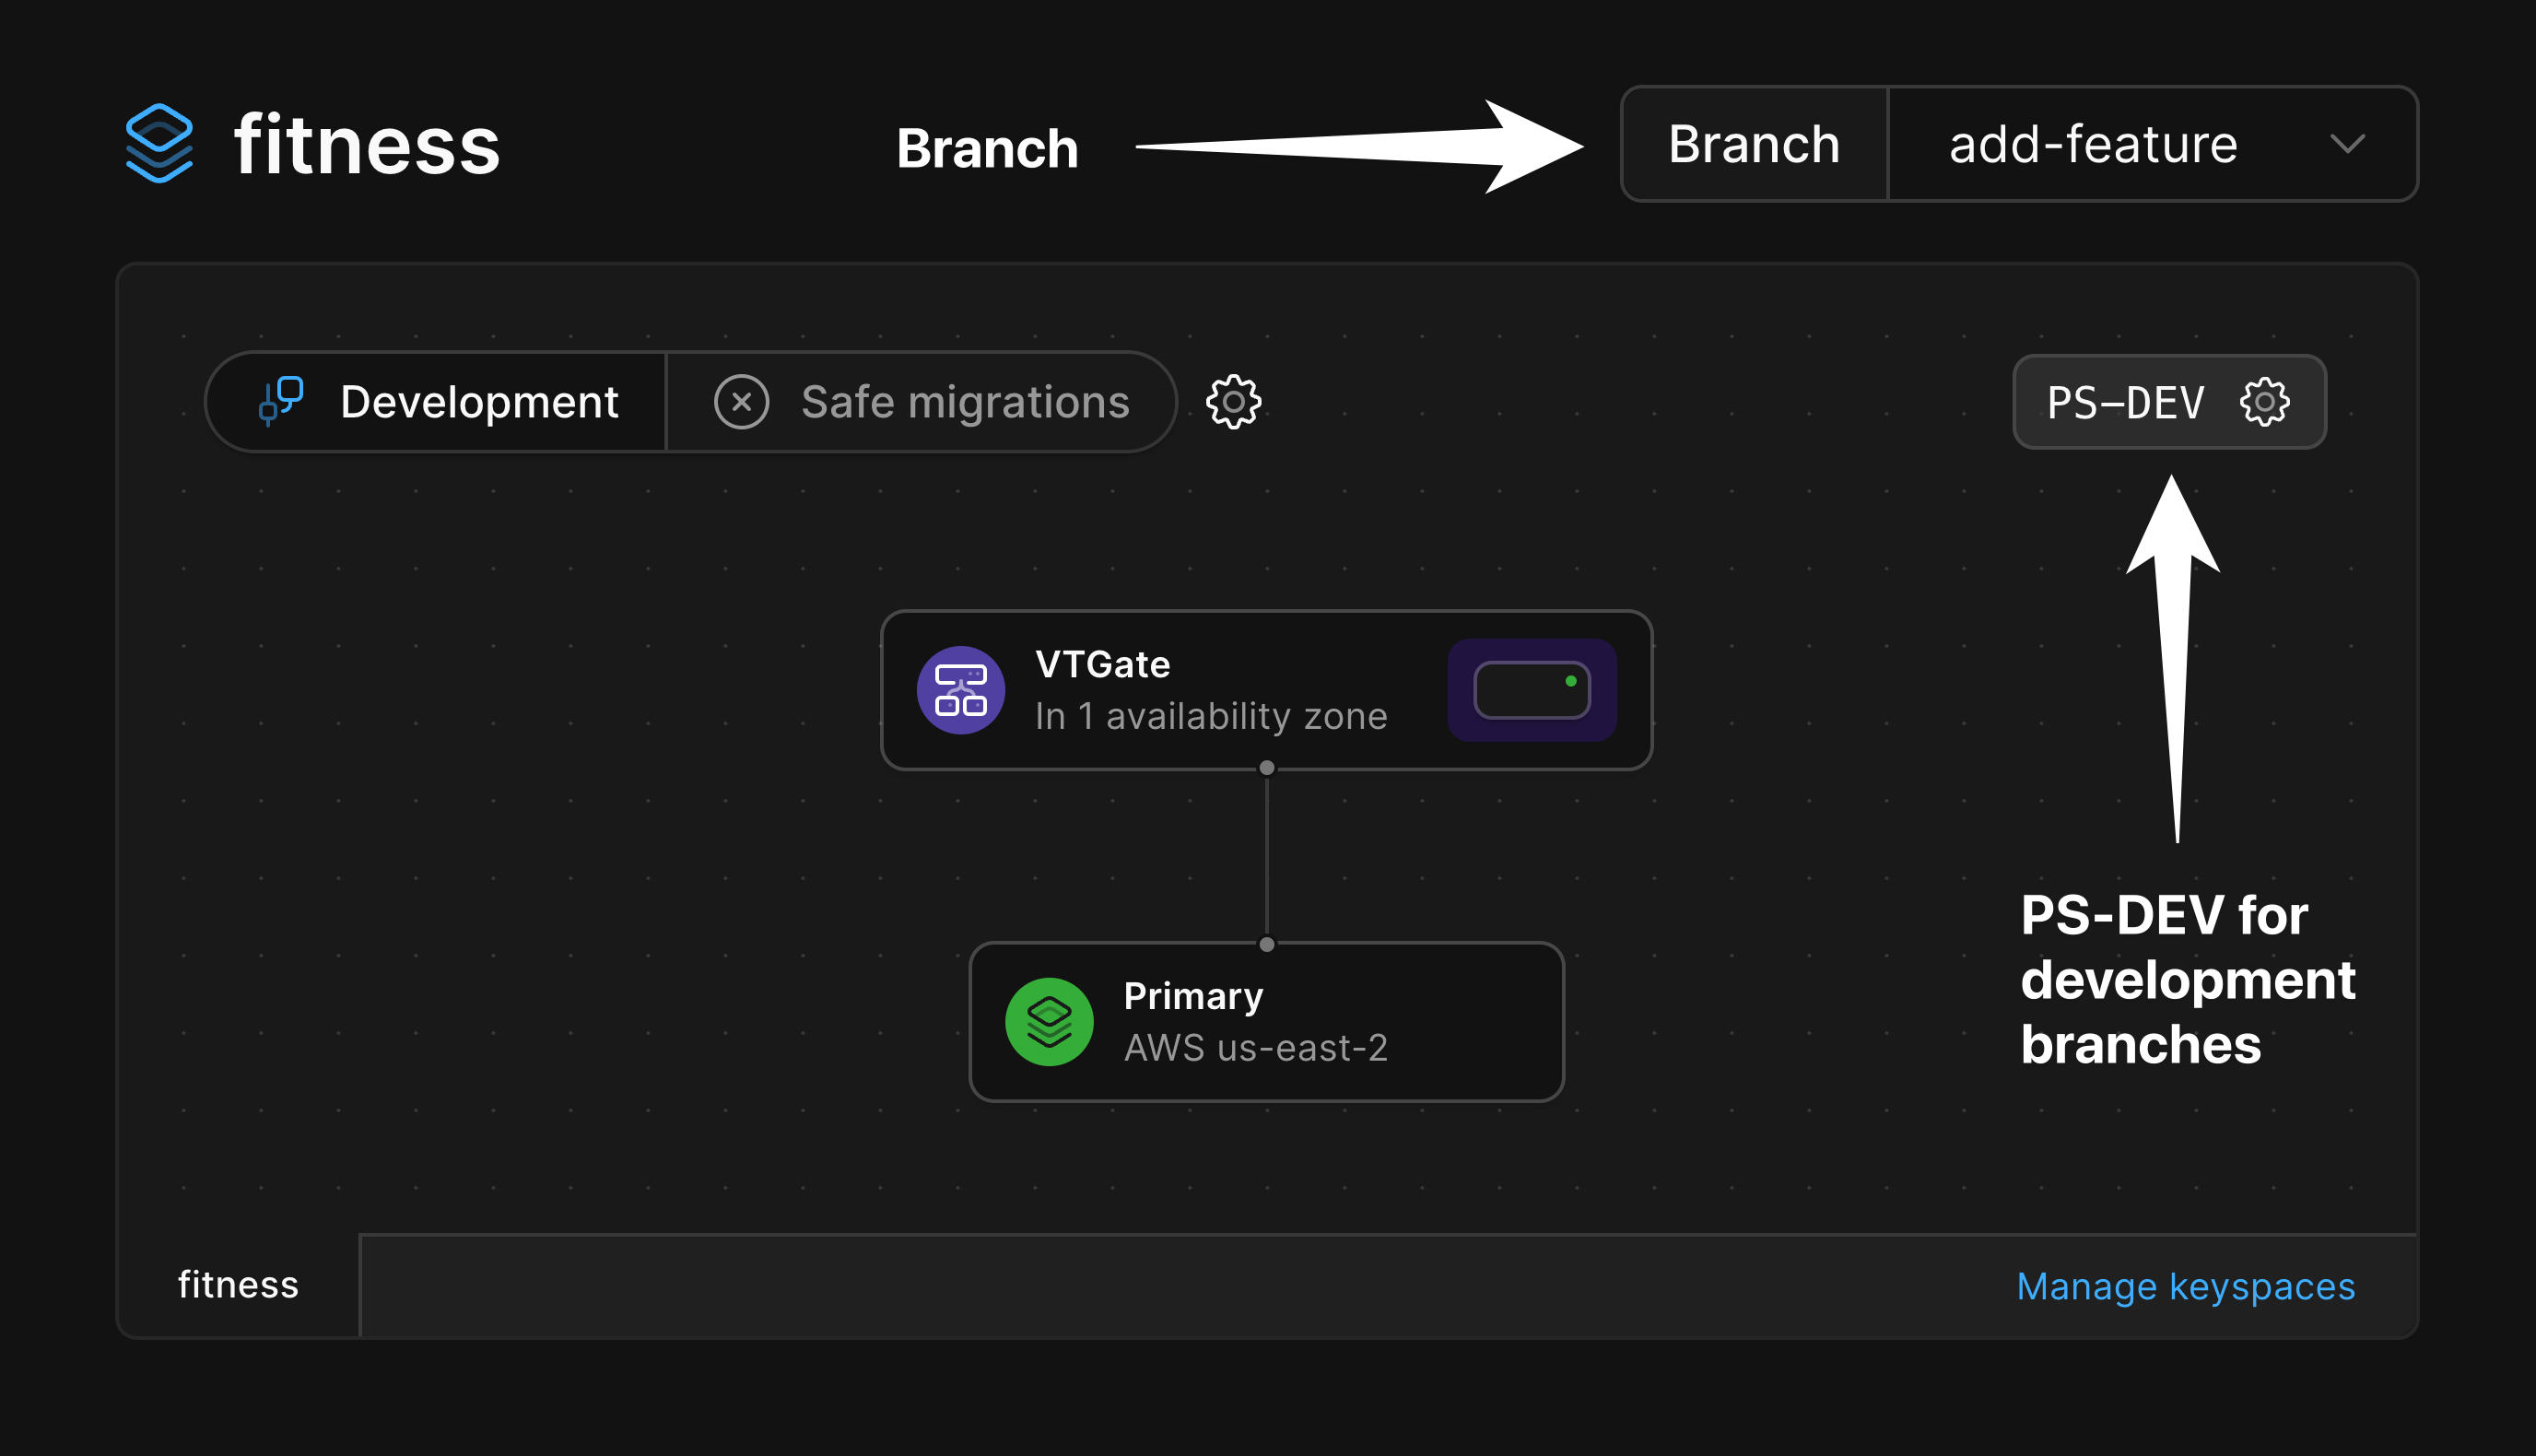
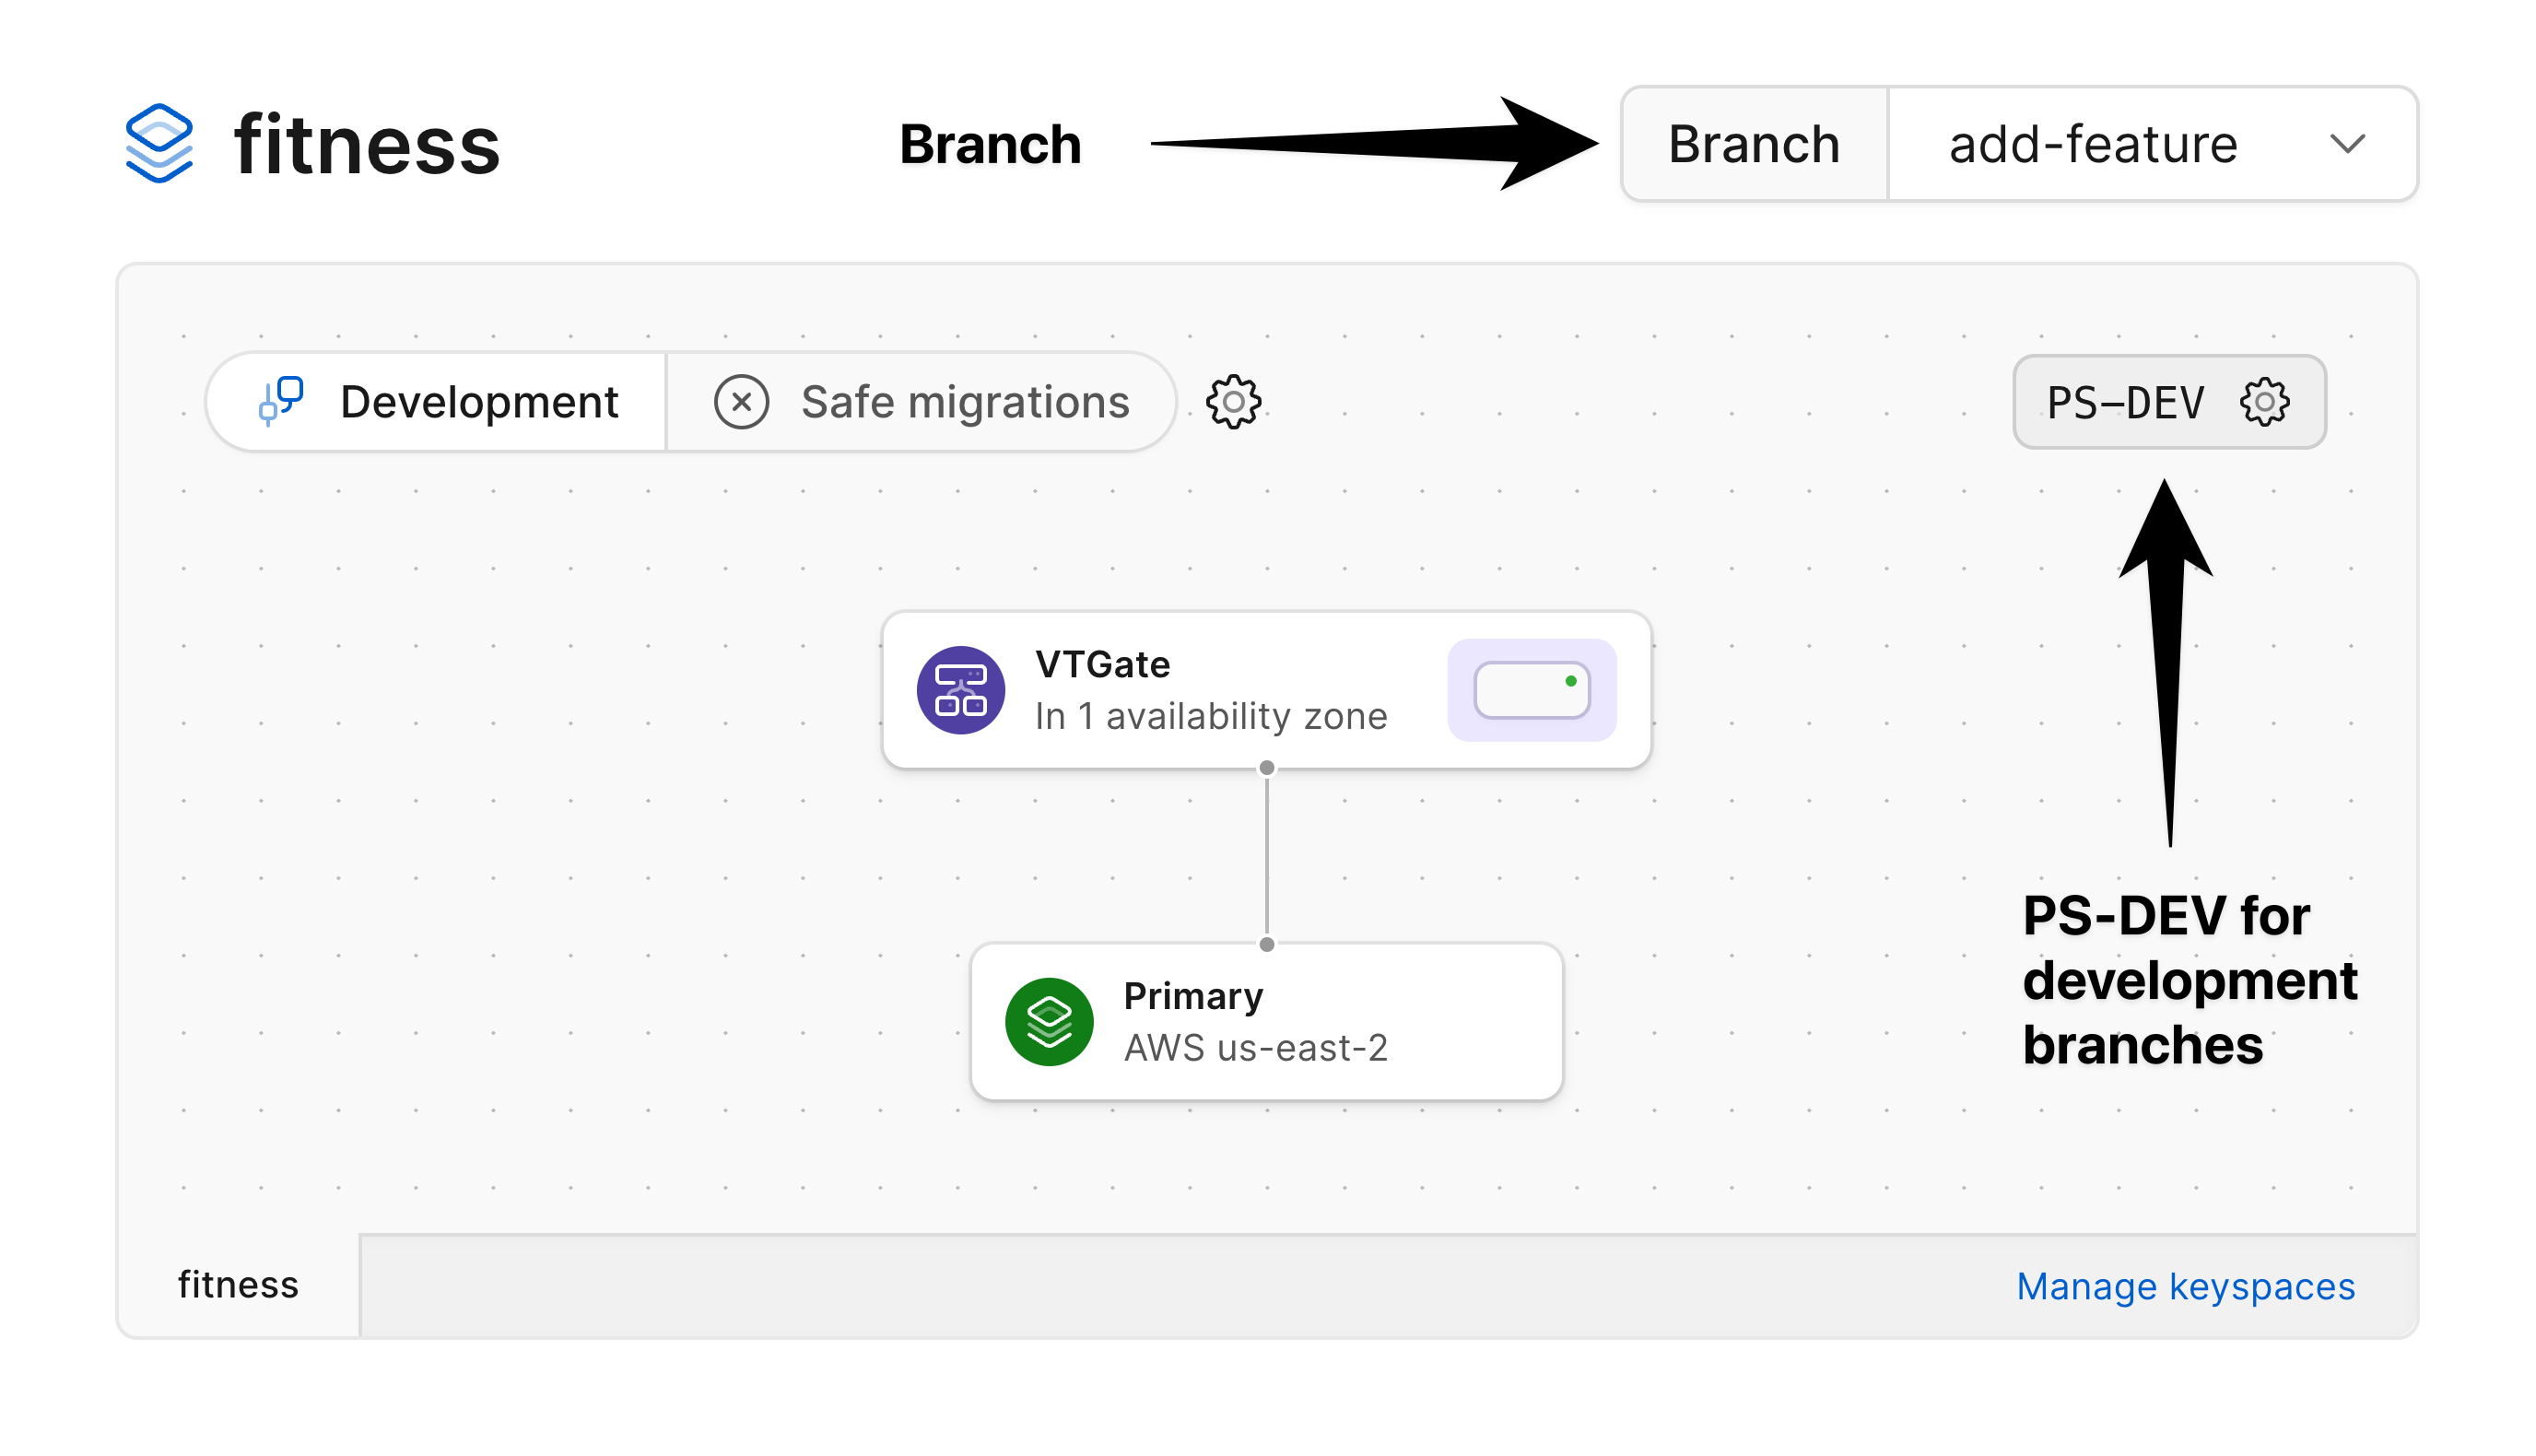
 By default, the architecture diagram will show the architecture for the keyspace corresponding to your default branch.
Here's how you can tell what keyspace and branch you are viewing the diagram of:
By default, the architecture diagram will show the architecture for the keyspace corresponding to your default branch.
Here's how you can tell what keyspace and branch you are viewing the diagram of:
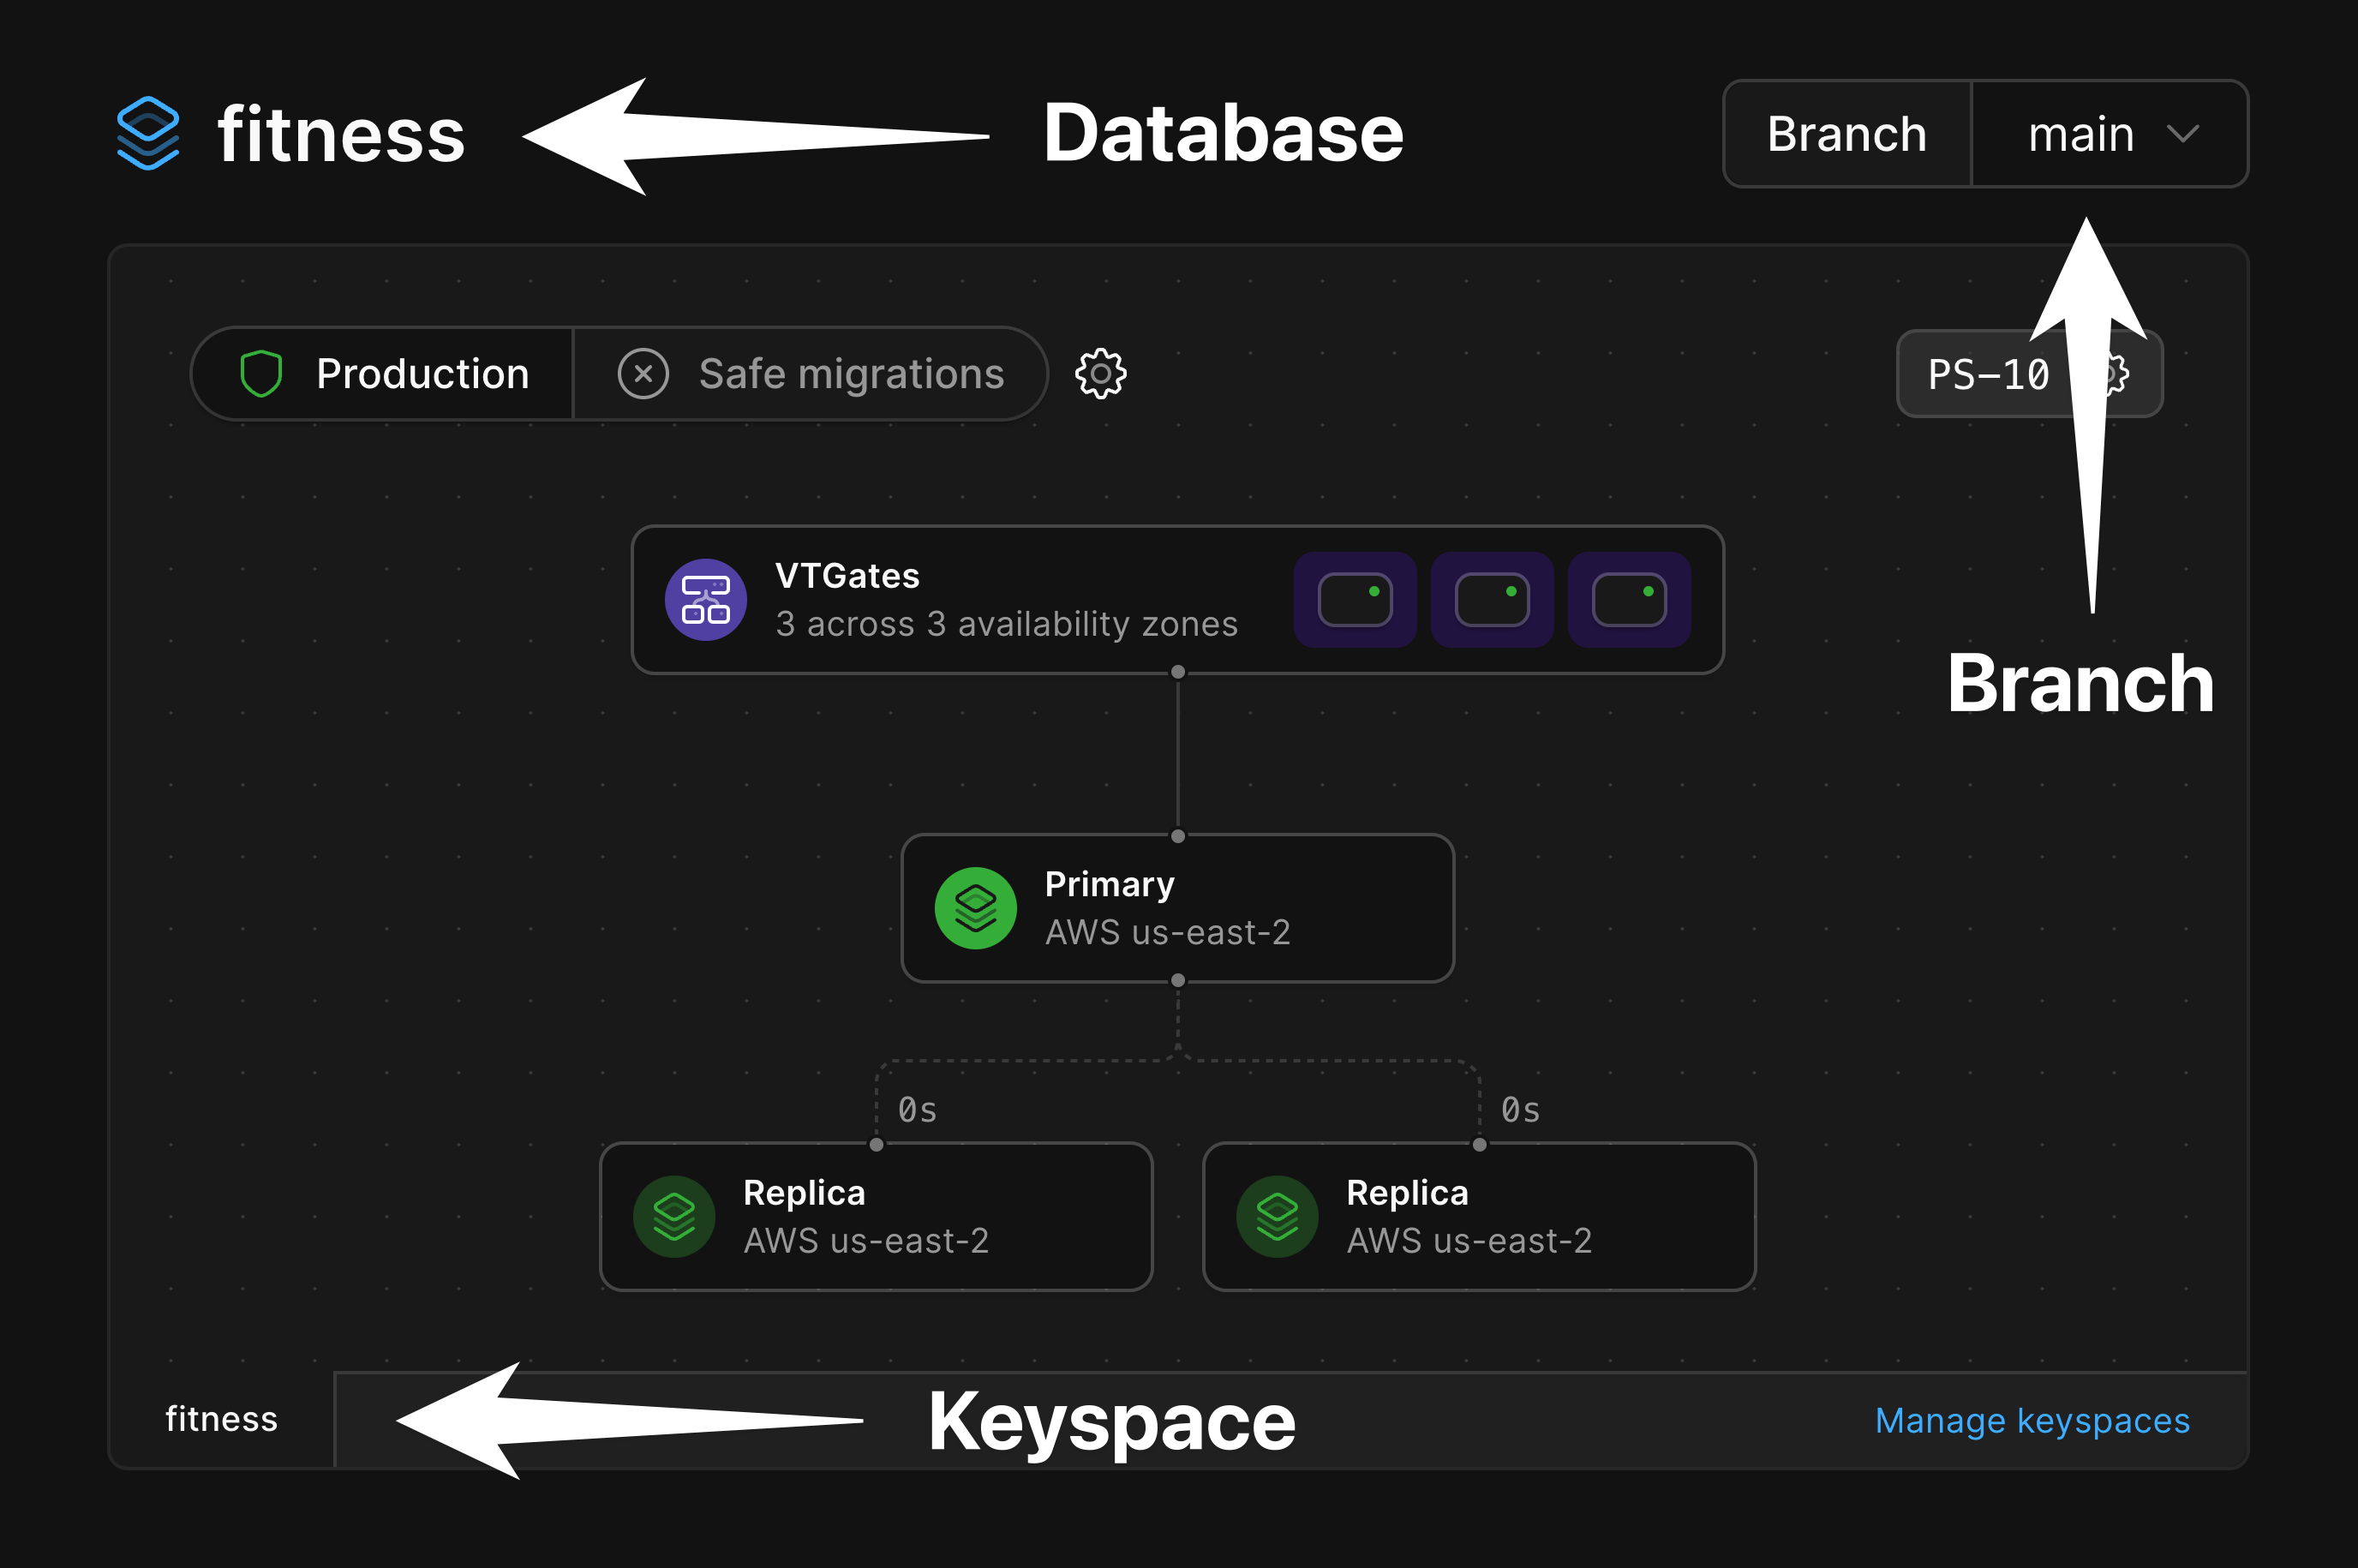
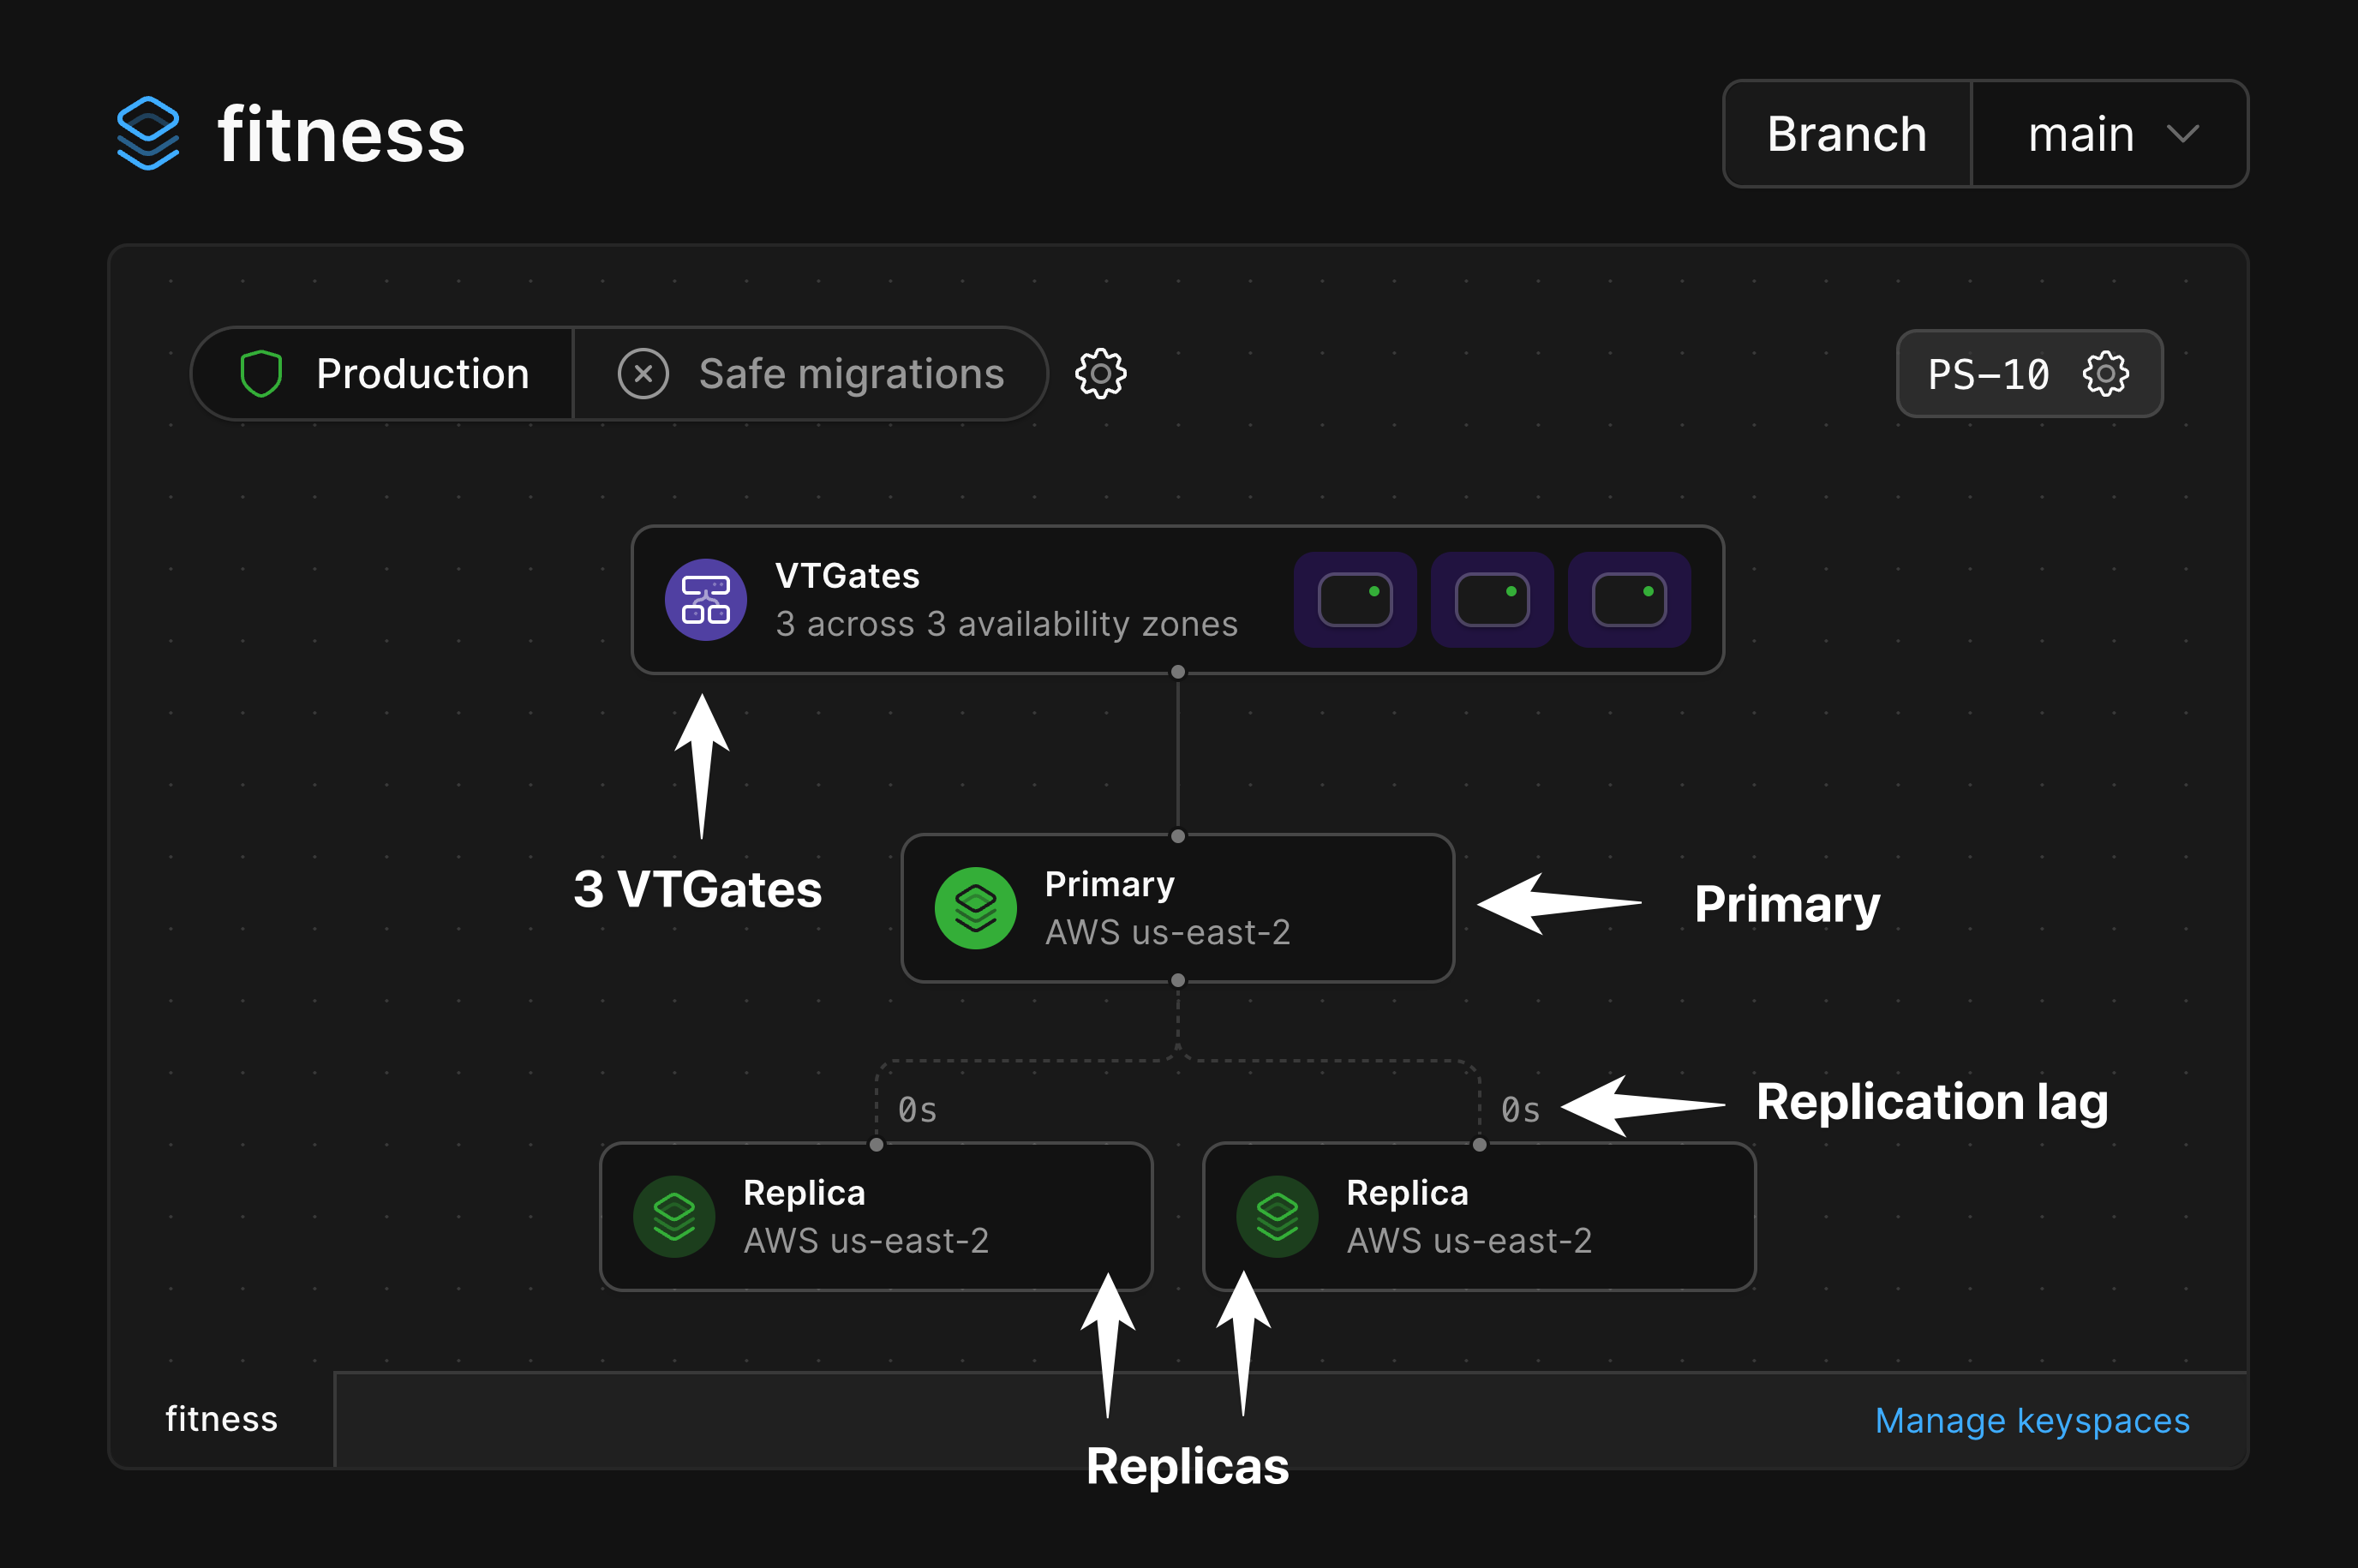
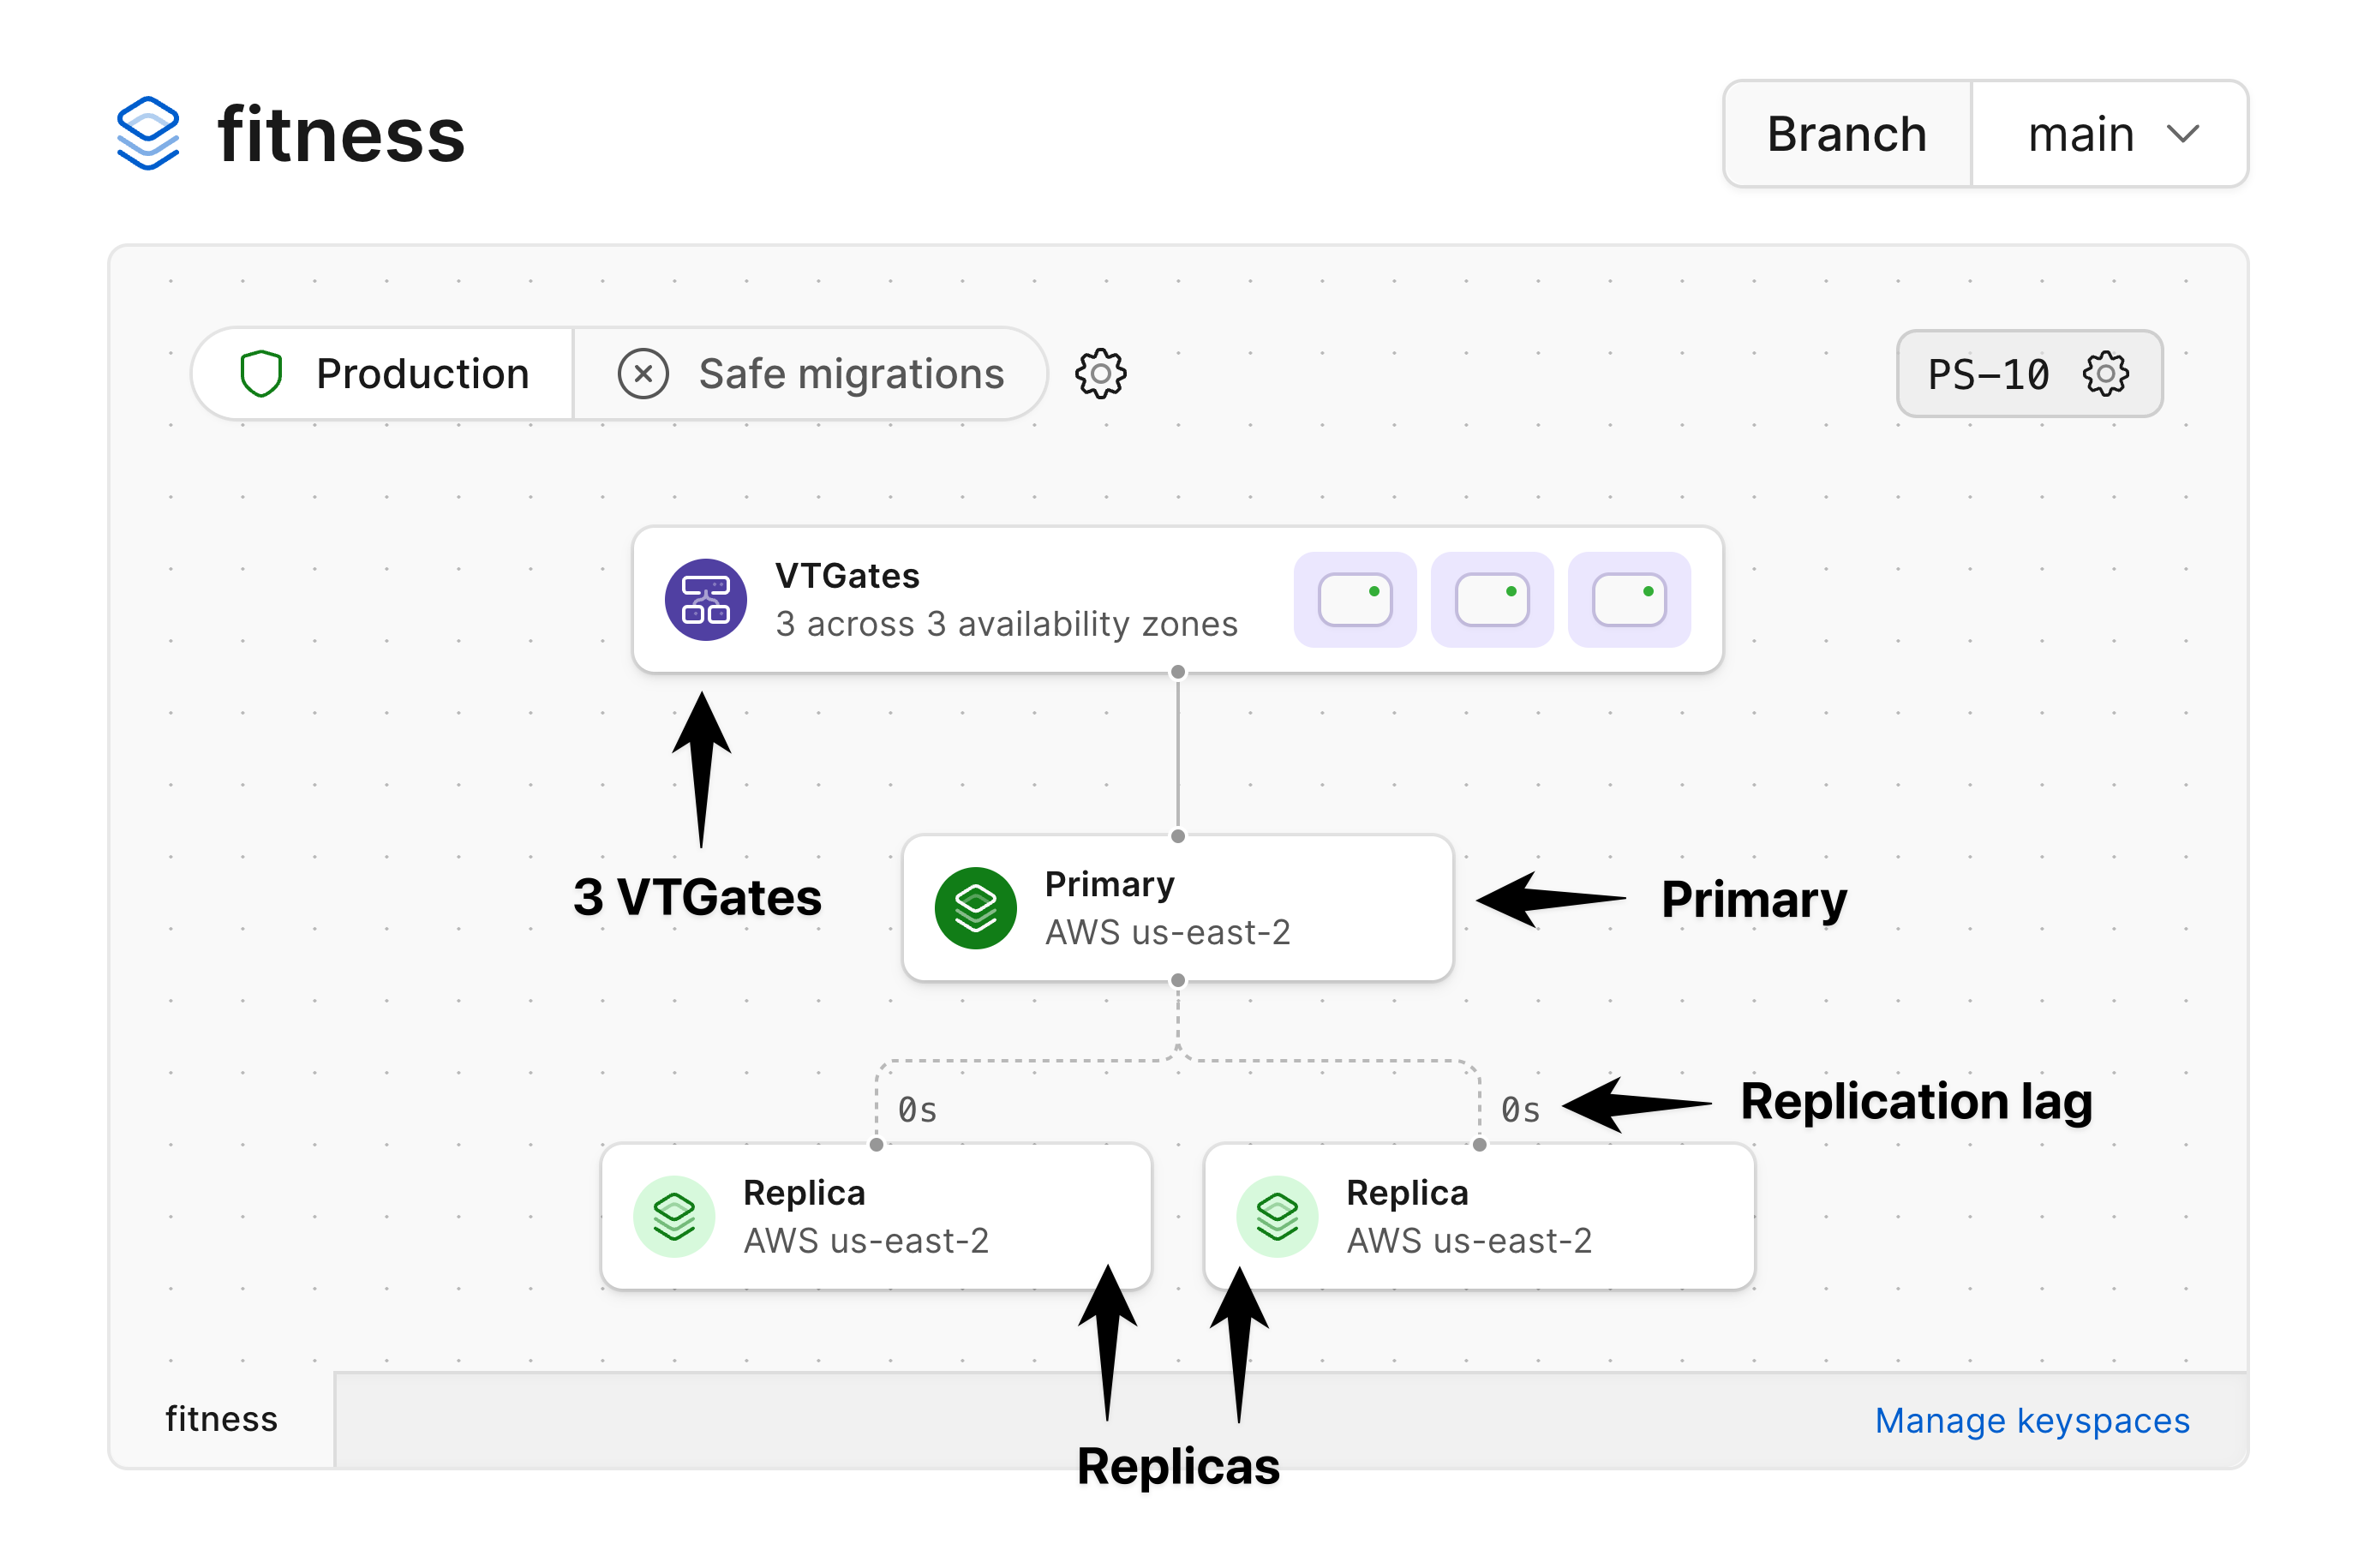
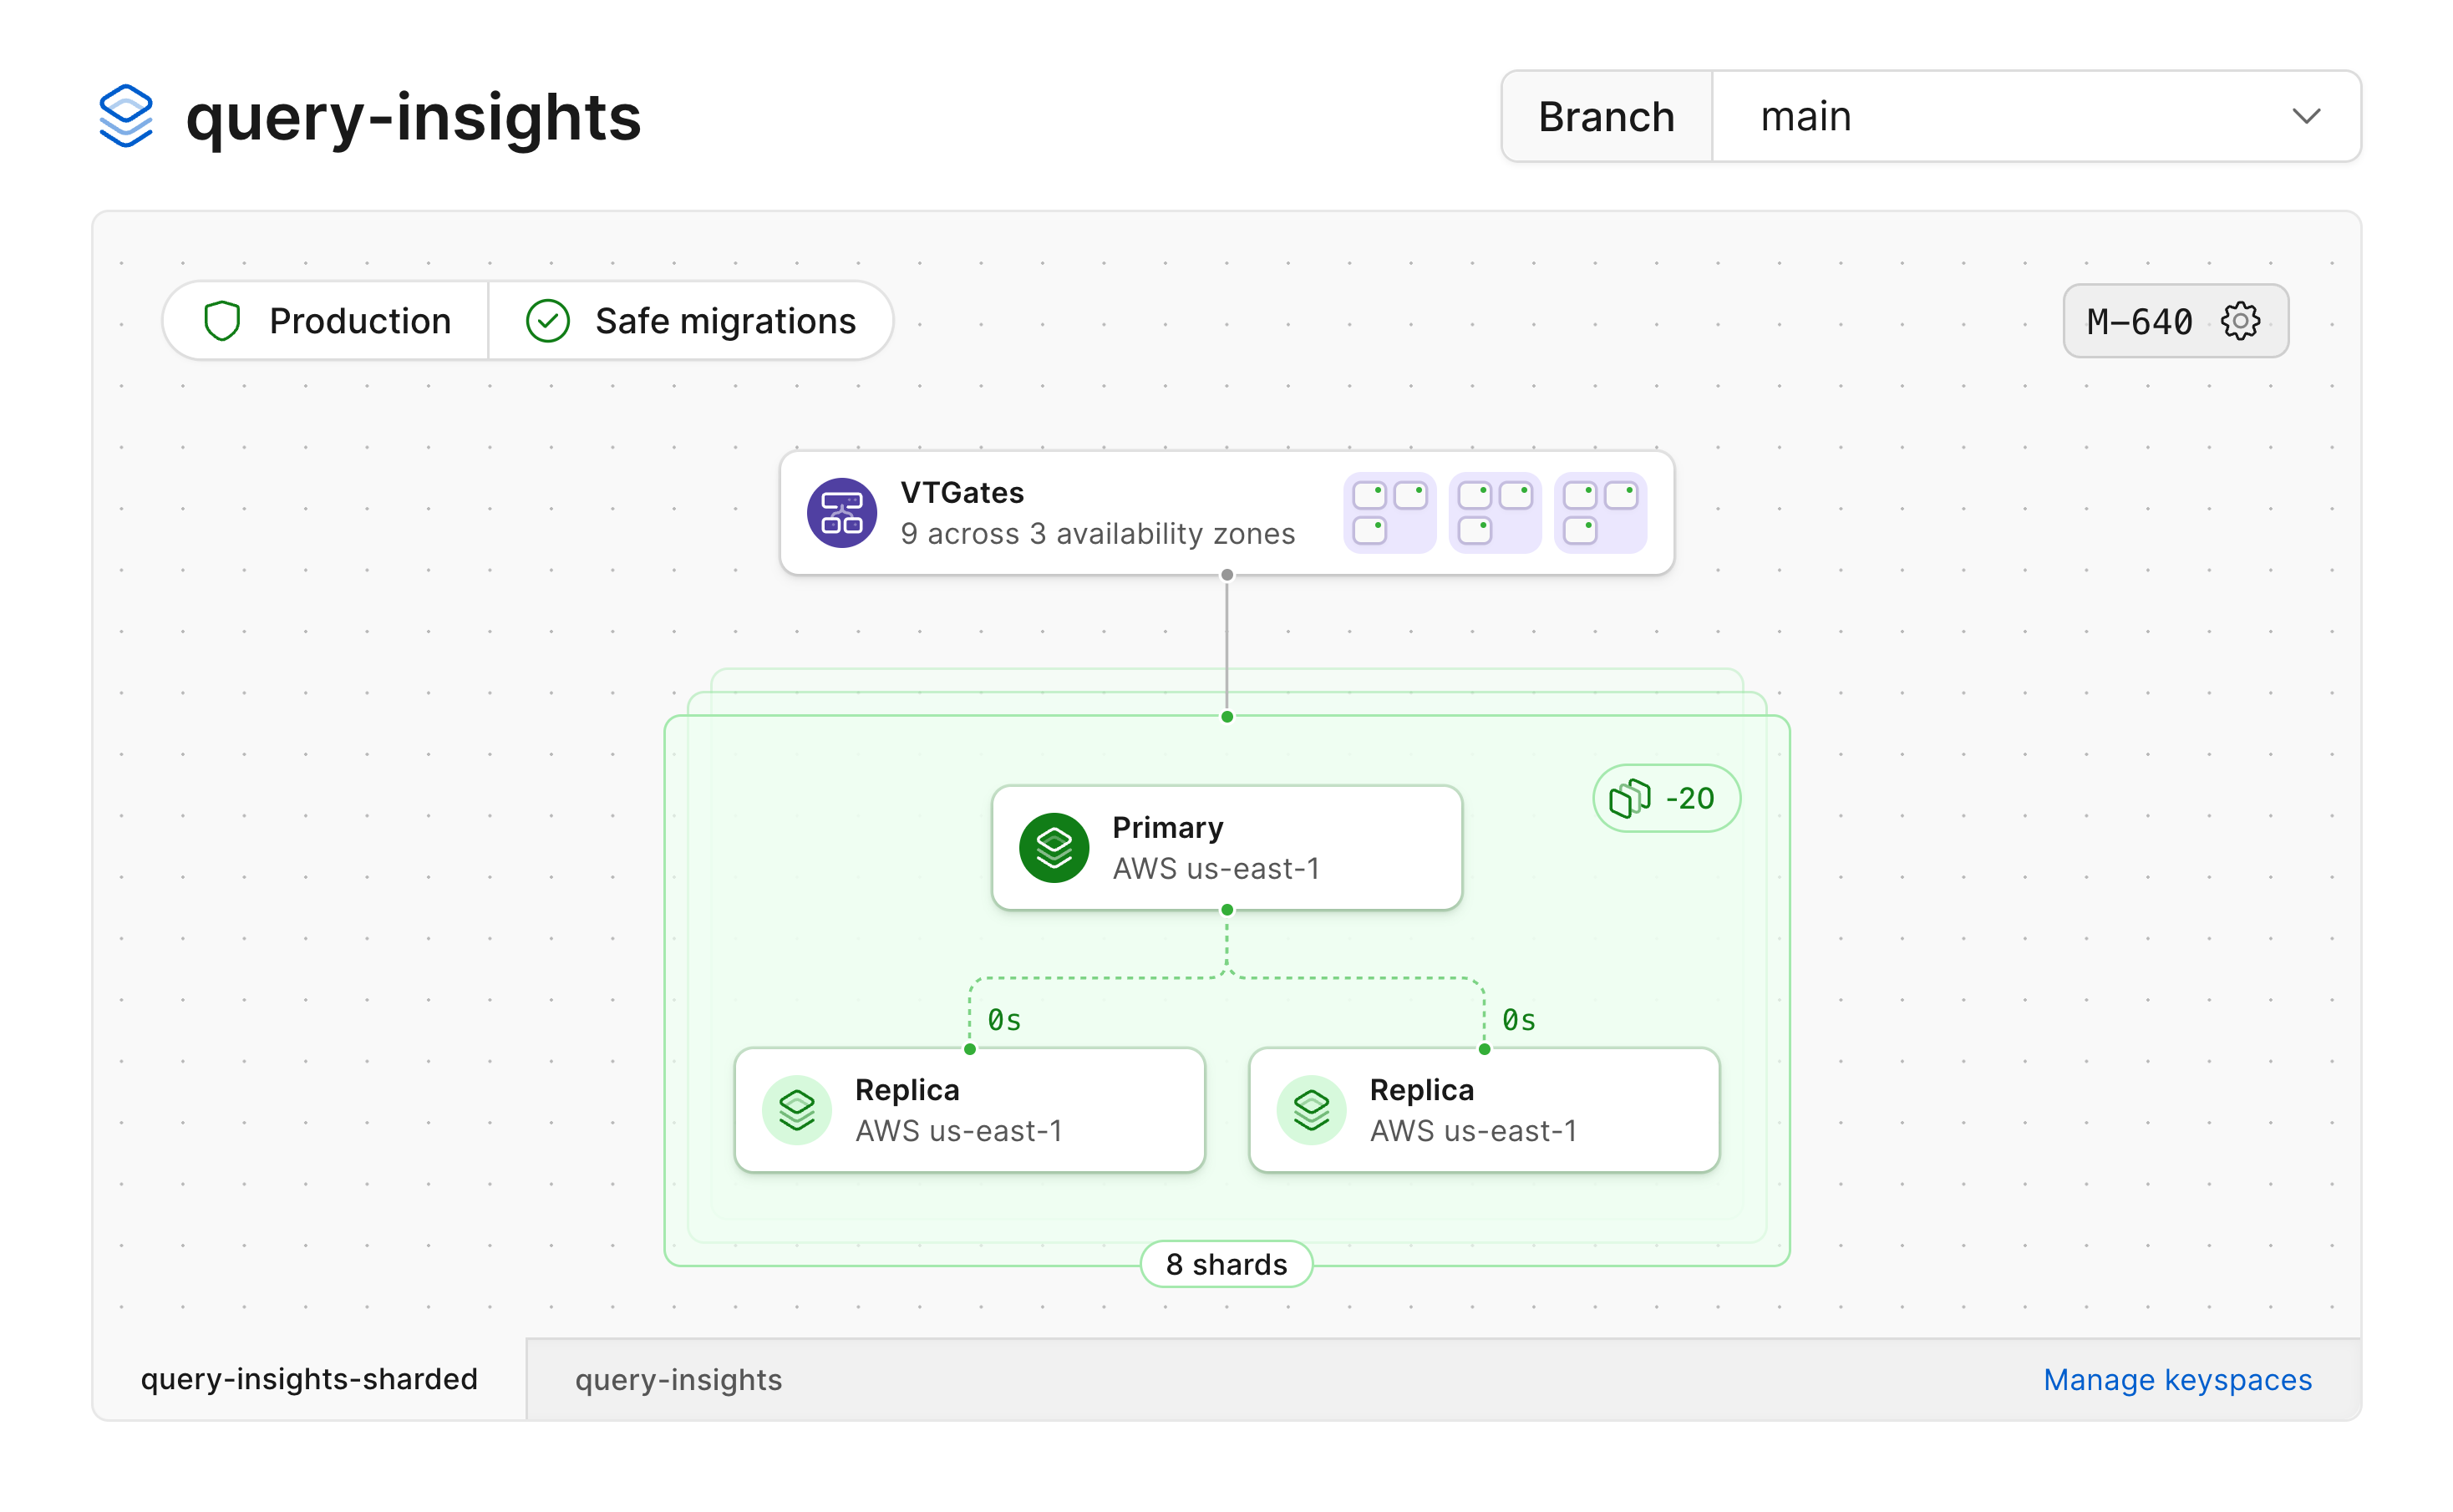
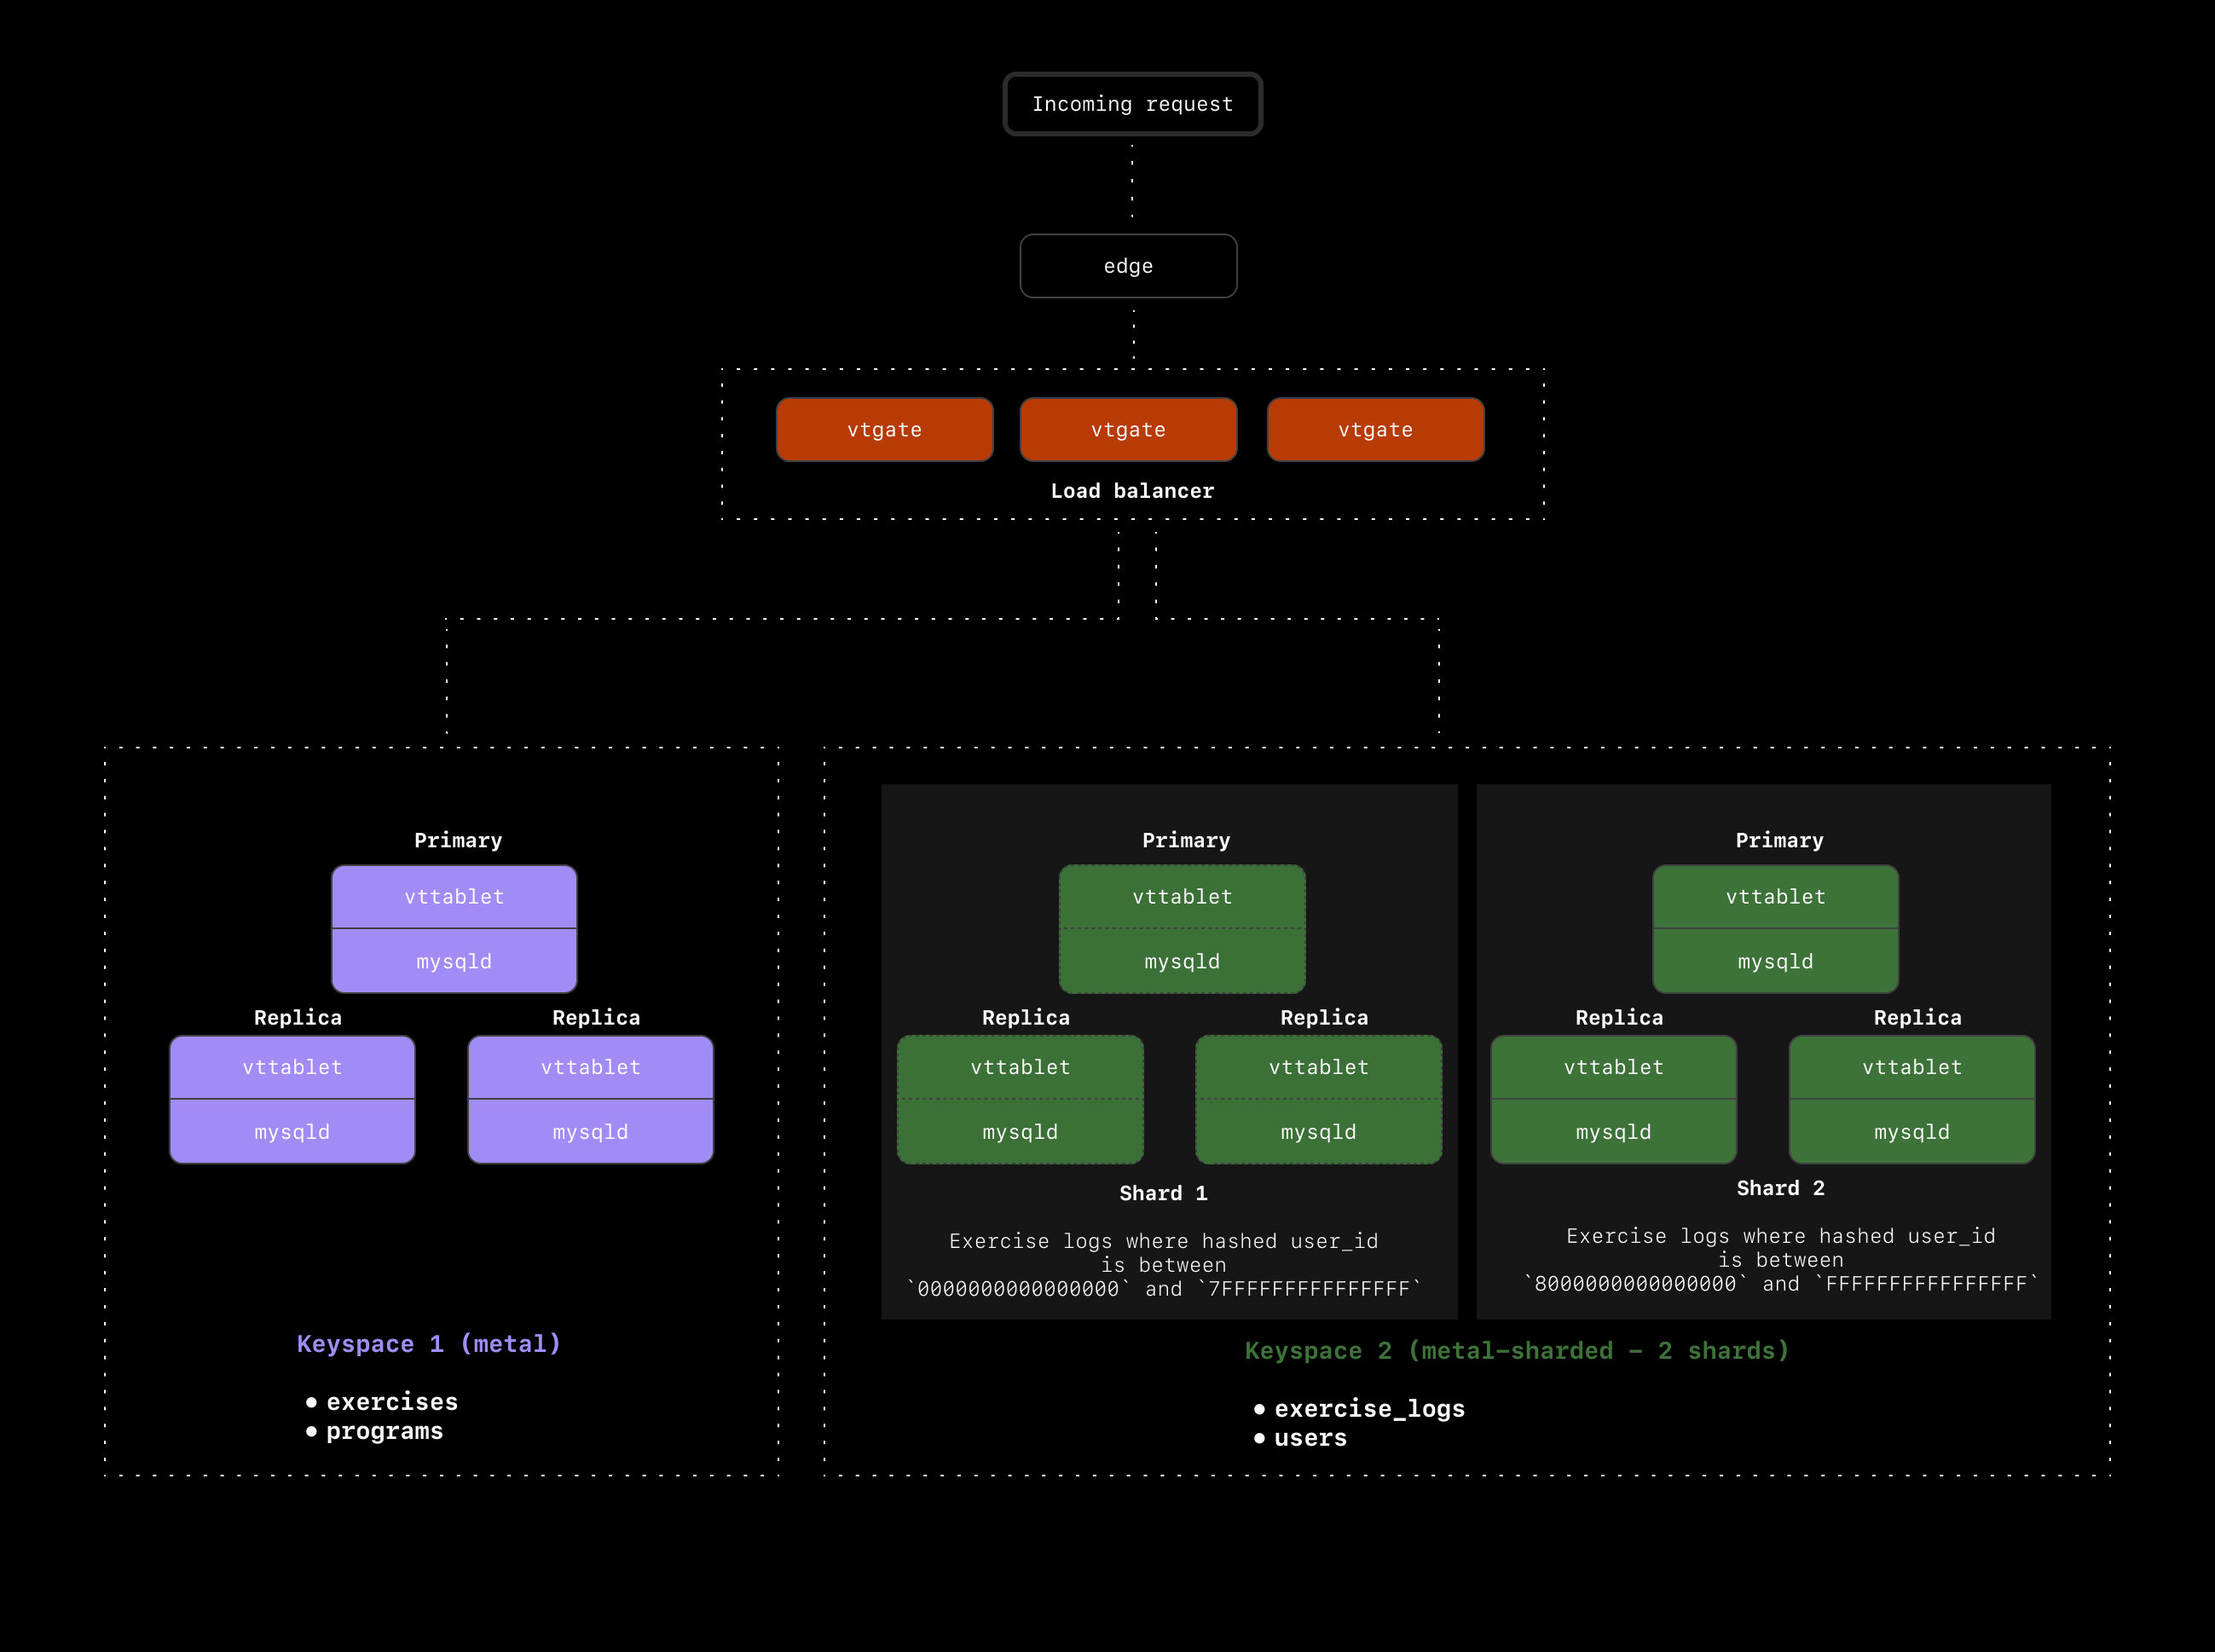
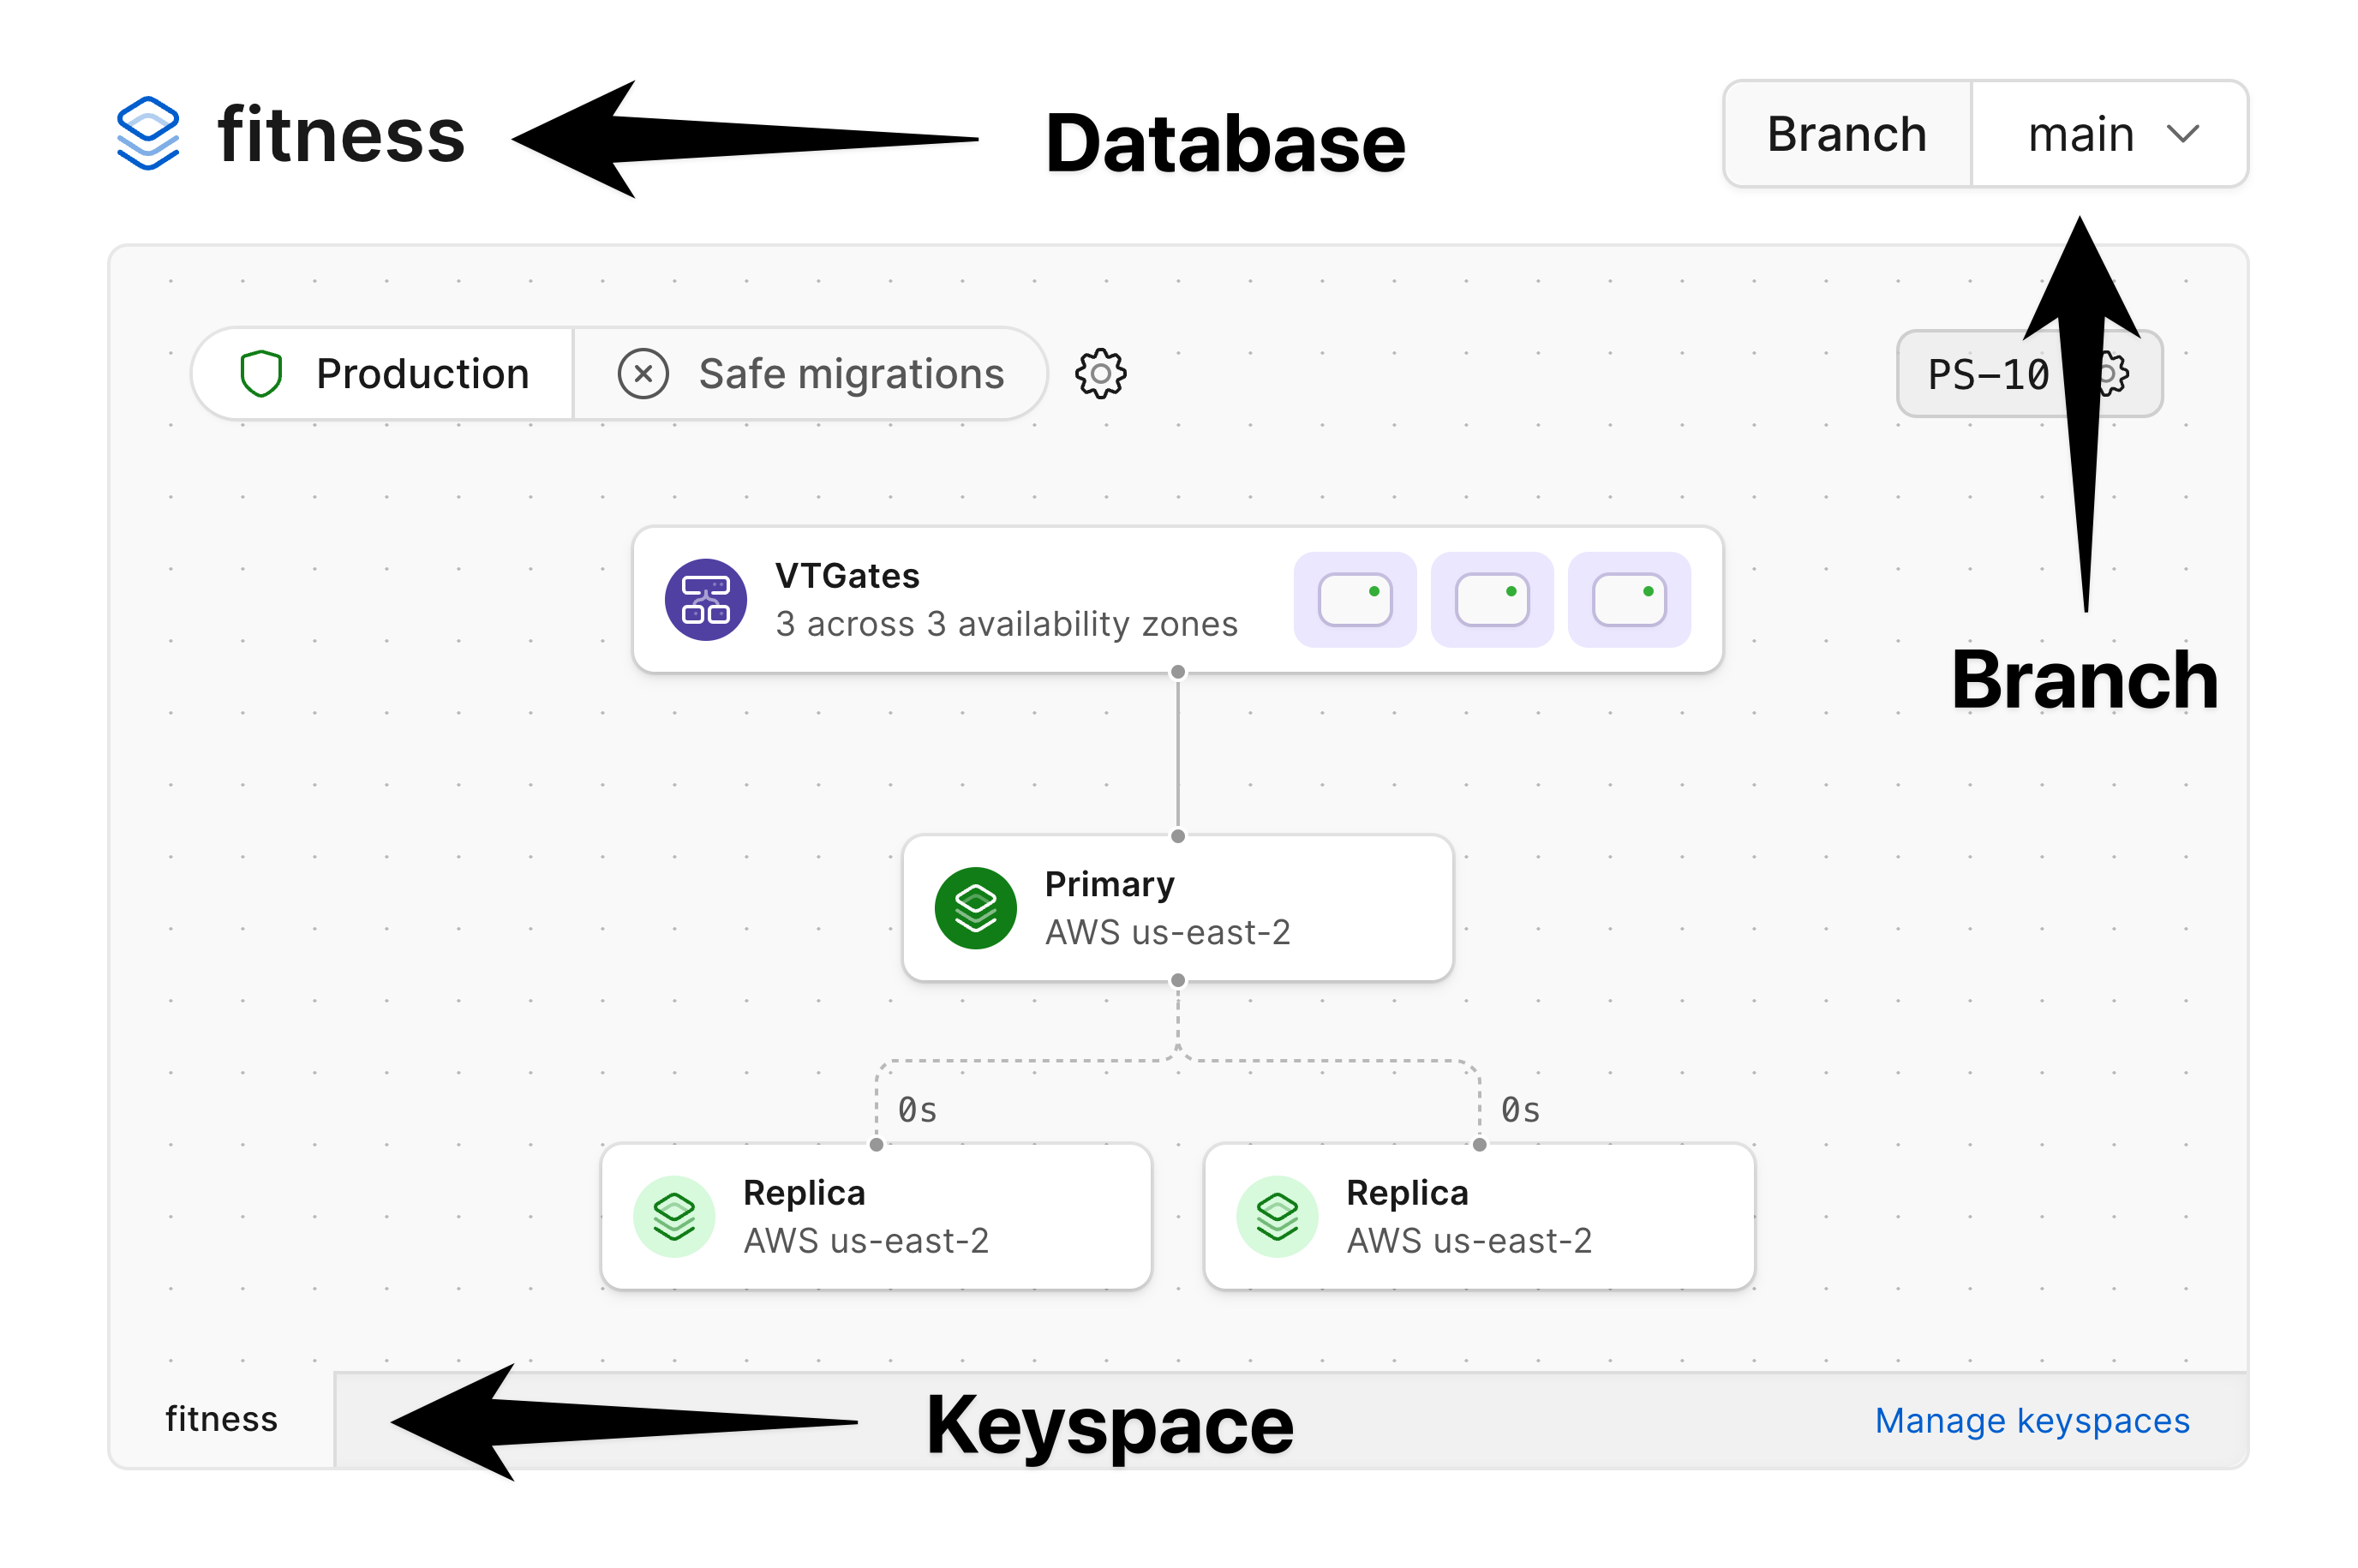 ### Production branches
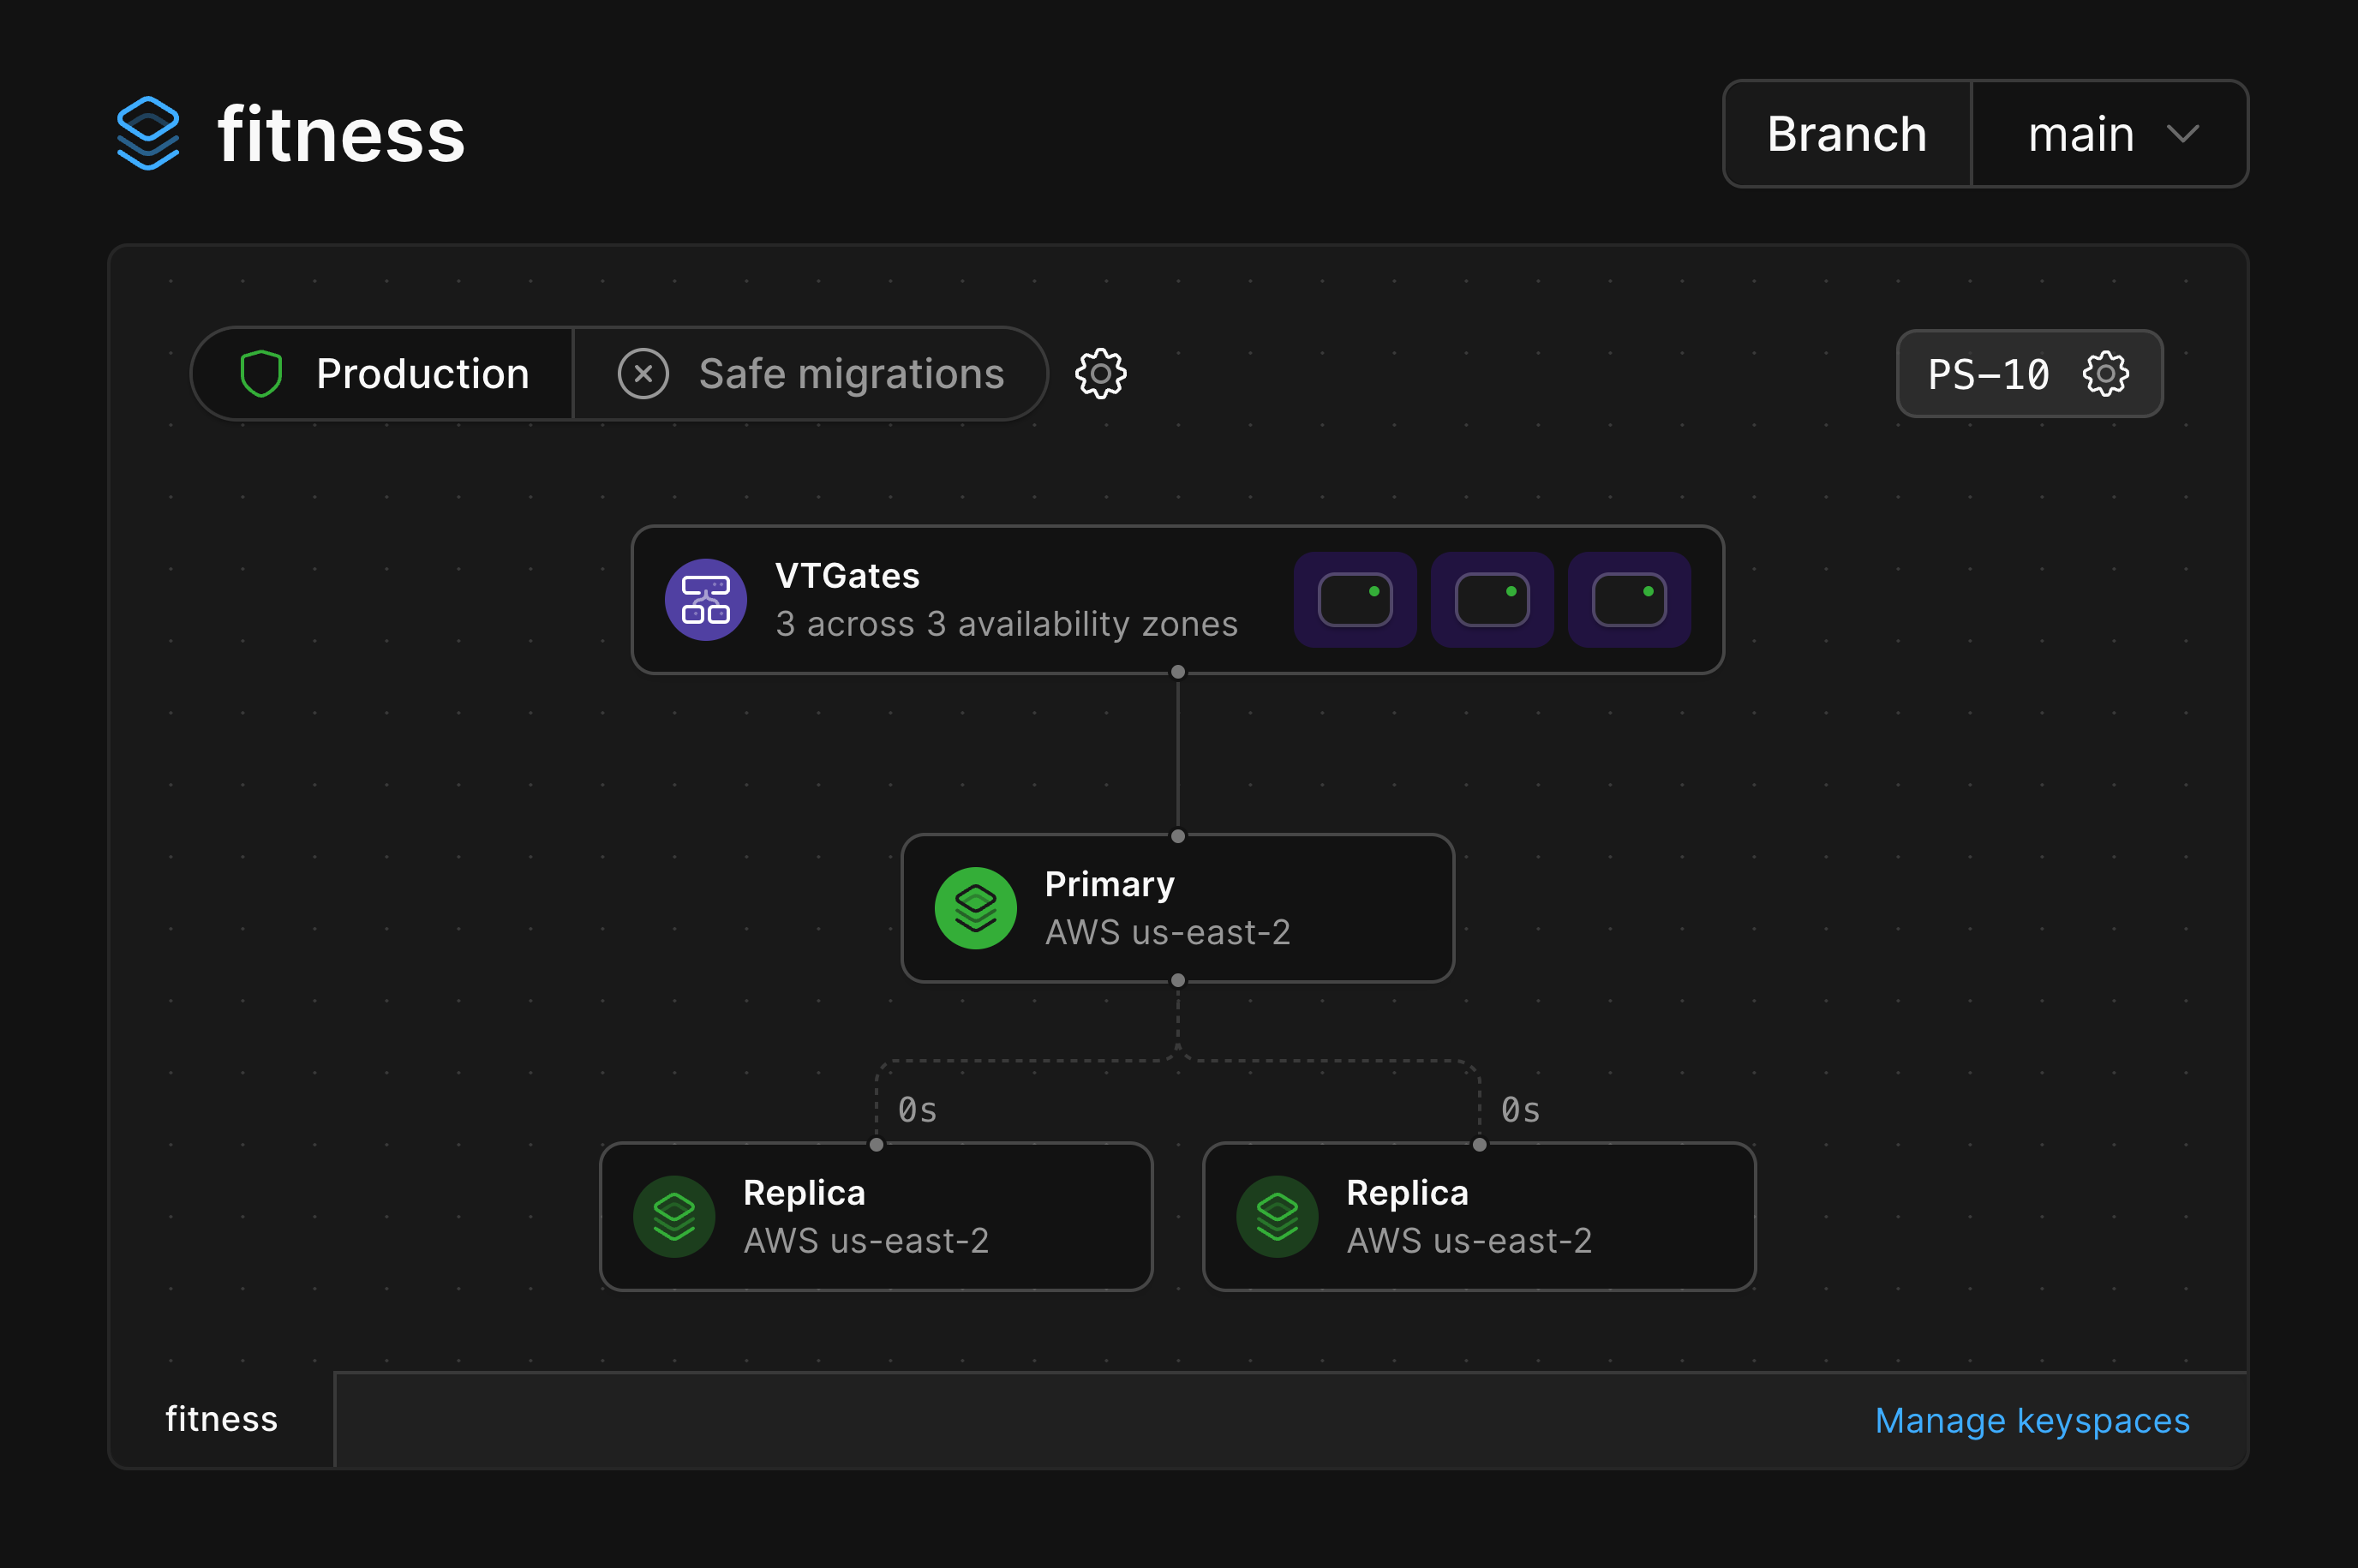
Production branches are designed for production workloads, and as such are given enough resources to ensure high availability.
By default, every production branch has a single primary MySQL instance and two replicas.
Each primary also comes with 3 [VTGates](/docs/vitess/terminology#vtgate) across 3 availability zones, which act as proxies for your MySQL instances.
These are all pictured in the diagram for a production branch:
### Production branches
Production branches are designed for production workloads, and as such are given enough resources to ensure high availability.
By default, every production branch has a single primary MySQL instance and two replicas.
Each primary also comes with 3 [VTGates](/docs/vitess/terminology#vtgate) across 3 availability zones, which act as proxies for your MySQL instances.
These are all pictured in the diagram for a production branch:
 Generally, the application connecting to this database need not be aware of these various components.
One exception to this is if you are specifically trying to [send queries to a replica](/docs/vitess/scaling/replicas#how-to-query-replicas).
### Development branches
Development branches are specced to enable the development and testing of new features and are not designed for production workloads.
When a new development branch is created, a single MySQL node is created along with a VTGate that handles connections to that node.
This is reflected in the diagram of a development branch.
Generally, the application connecting to this database need not be aware of these various components.
One exception to this is if you are specifically trying to [send queries to a replica](/docs/vitess/scaling/replicas#how-to-query-replicas).
### Development branches
Development branches are specced to enable the development and testing of new features and are not designed for production workloads.
When a new development branch is created, a single MySQL node is created along with a VTGate that handles connections to that node.
This is reflected in the diagram of a development branch.
 When you promote a development branch to production status, PlanetScale automatically adds additional replicas and VTGates deployed across multiple availability zones in a given region.
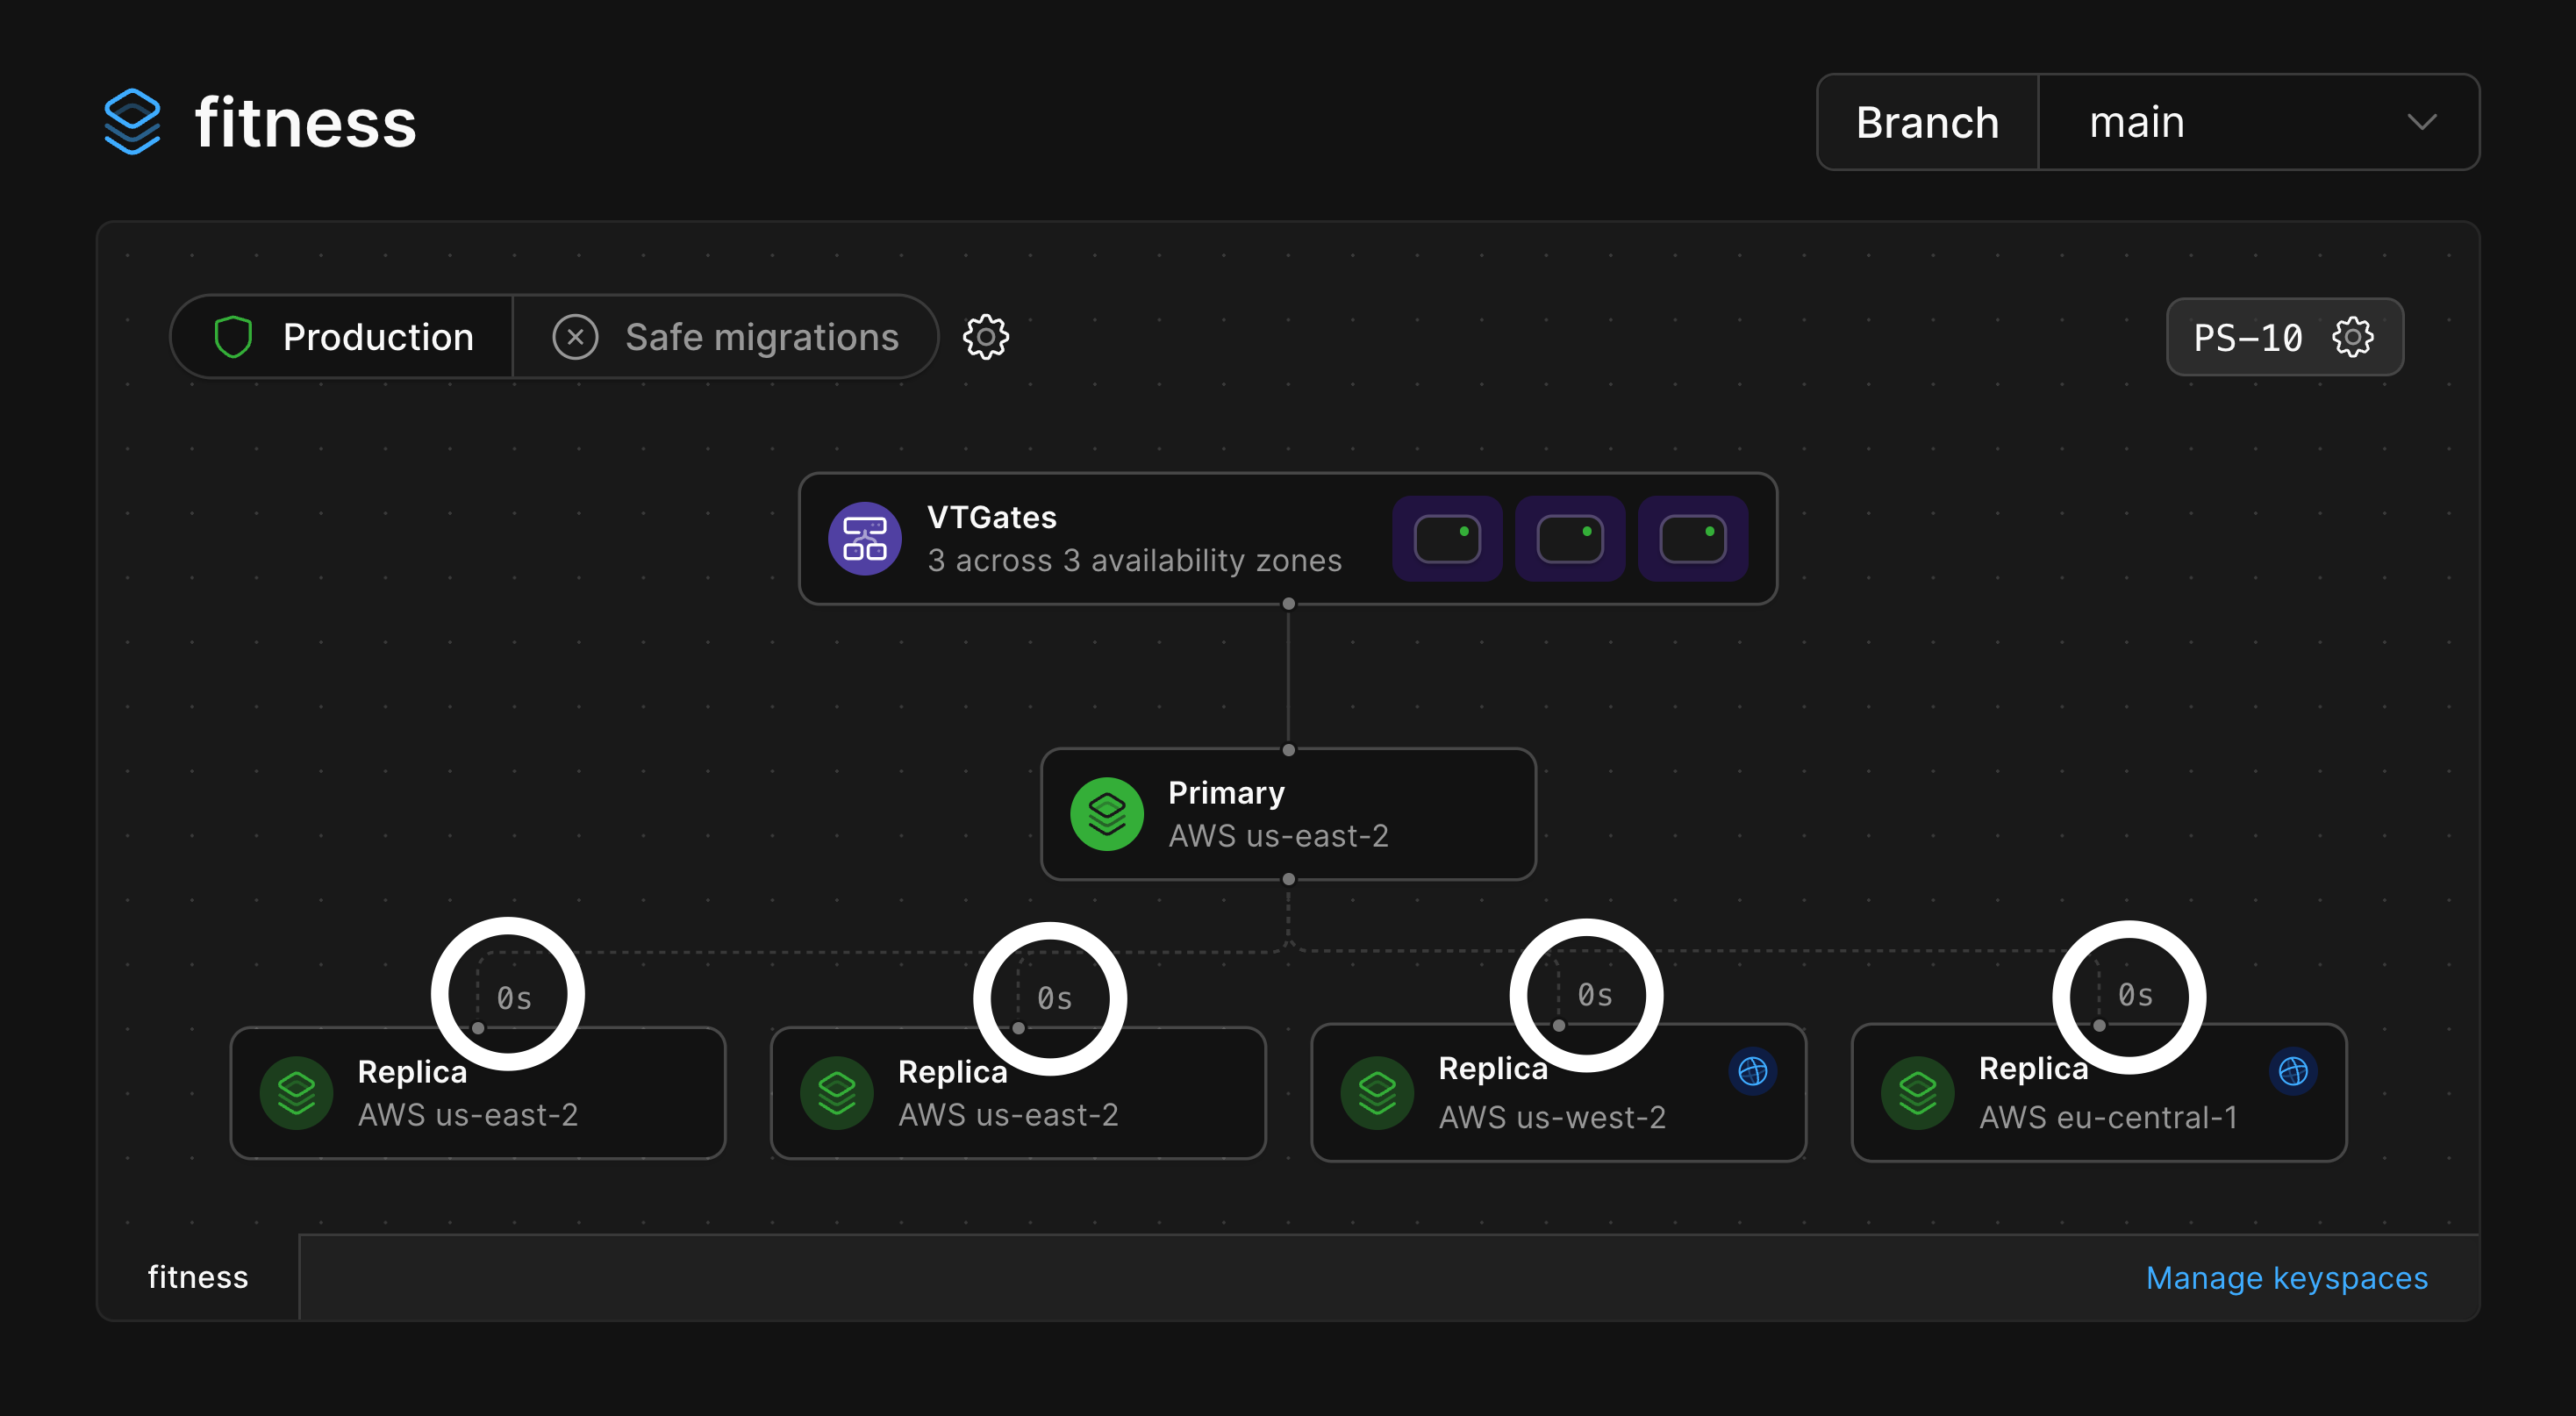
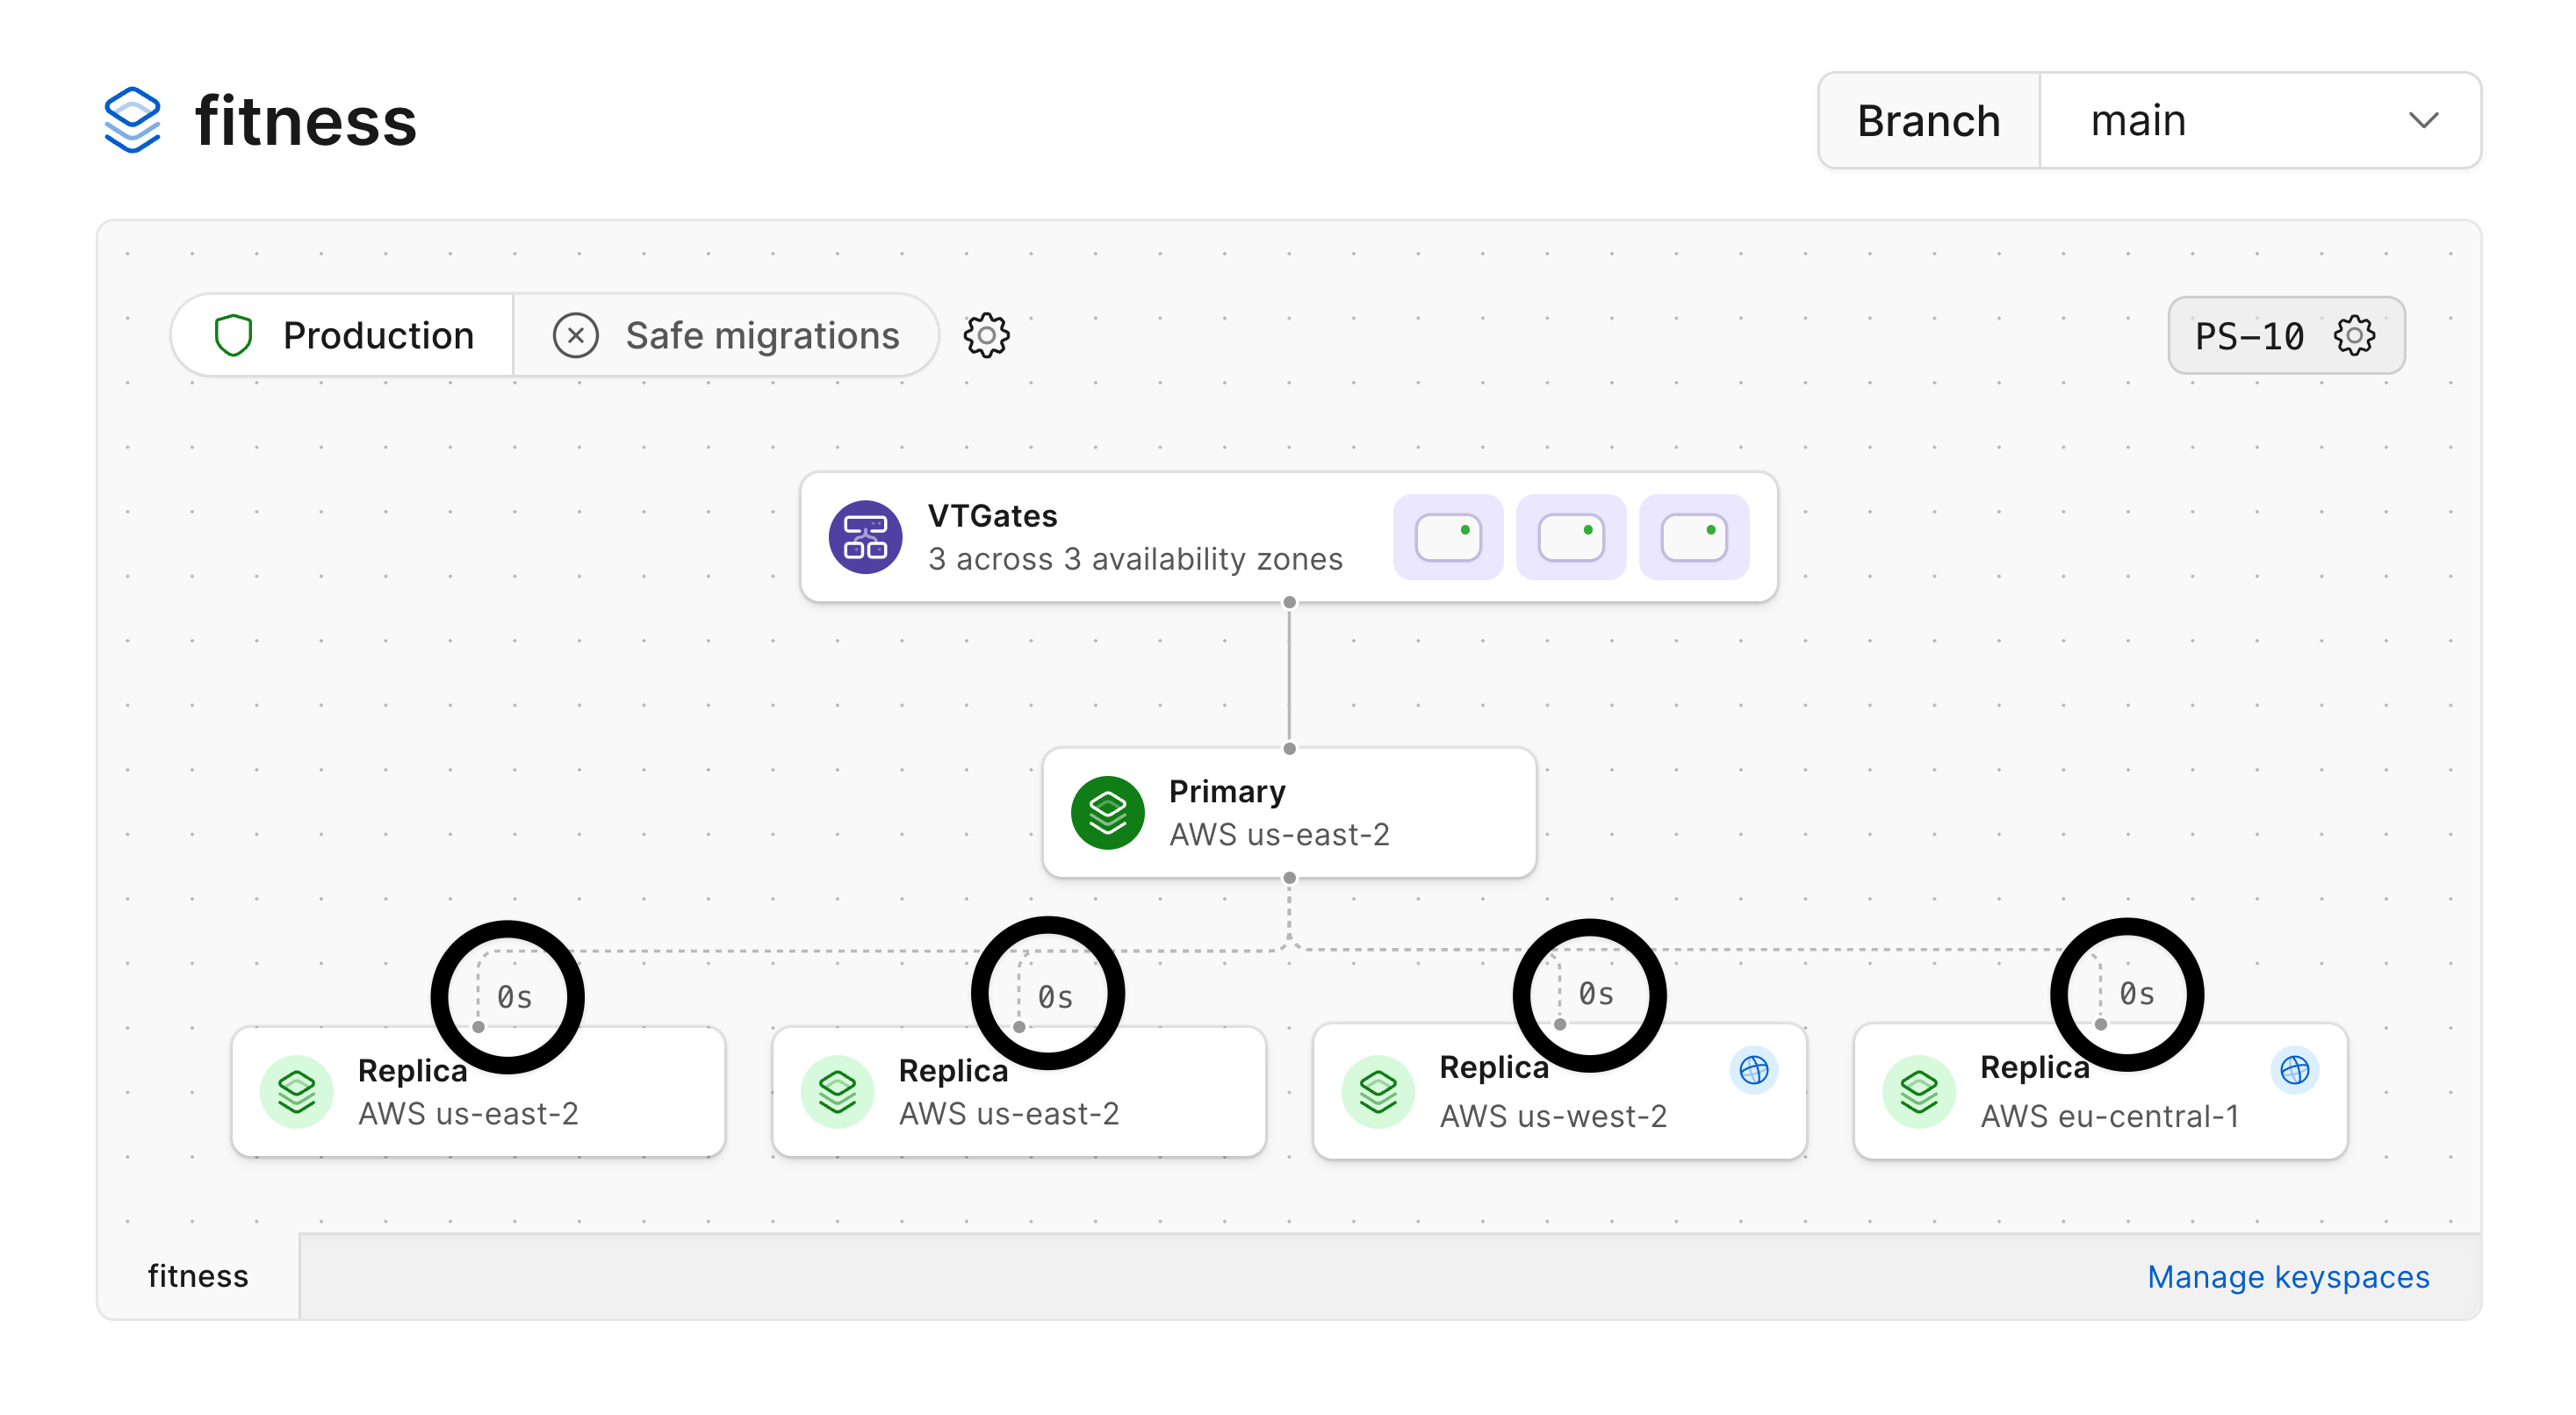
### Read-only regions
The primary of your database is the only node that can accept writes, and it resides in a single region.
You can add [read-only regions](/docs/vitess/scaling/read-only-regions) to a branch which adds replicas in another region and can be used to serve read traffic.
This can help reduce read latency for application servers that are distributed around the world.
Below, you can see our database has the primary and two replicas in `us-east-2` with read-only replicas added in both `us-west-2` and `eu-central-1`.
When you promote a development branch to production status, PlanetScale automatically adds additional replicas and VTGates deployed across multiple availability zones in a given region.
### Read-only regions
The primary of your database is the only node that can accept writes, and it resides in a single region.
You can add [read-only regions](/docs/vitess/scaling/read-only-regions) to a branch which adds replicas in another region and can be used to serve read traffic.
This can help reduce read latency for application servers that are distributed around the world.
Below, you can see our database has the primary and two replicas in `us-east-2` with read-only replicas added in both `us-west-2` and `eu-central-1`.
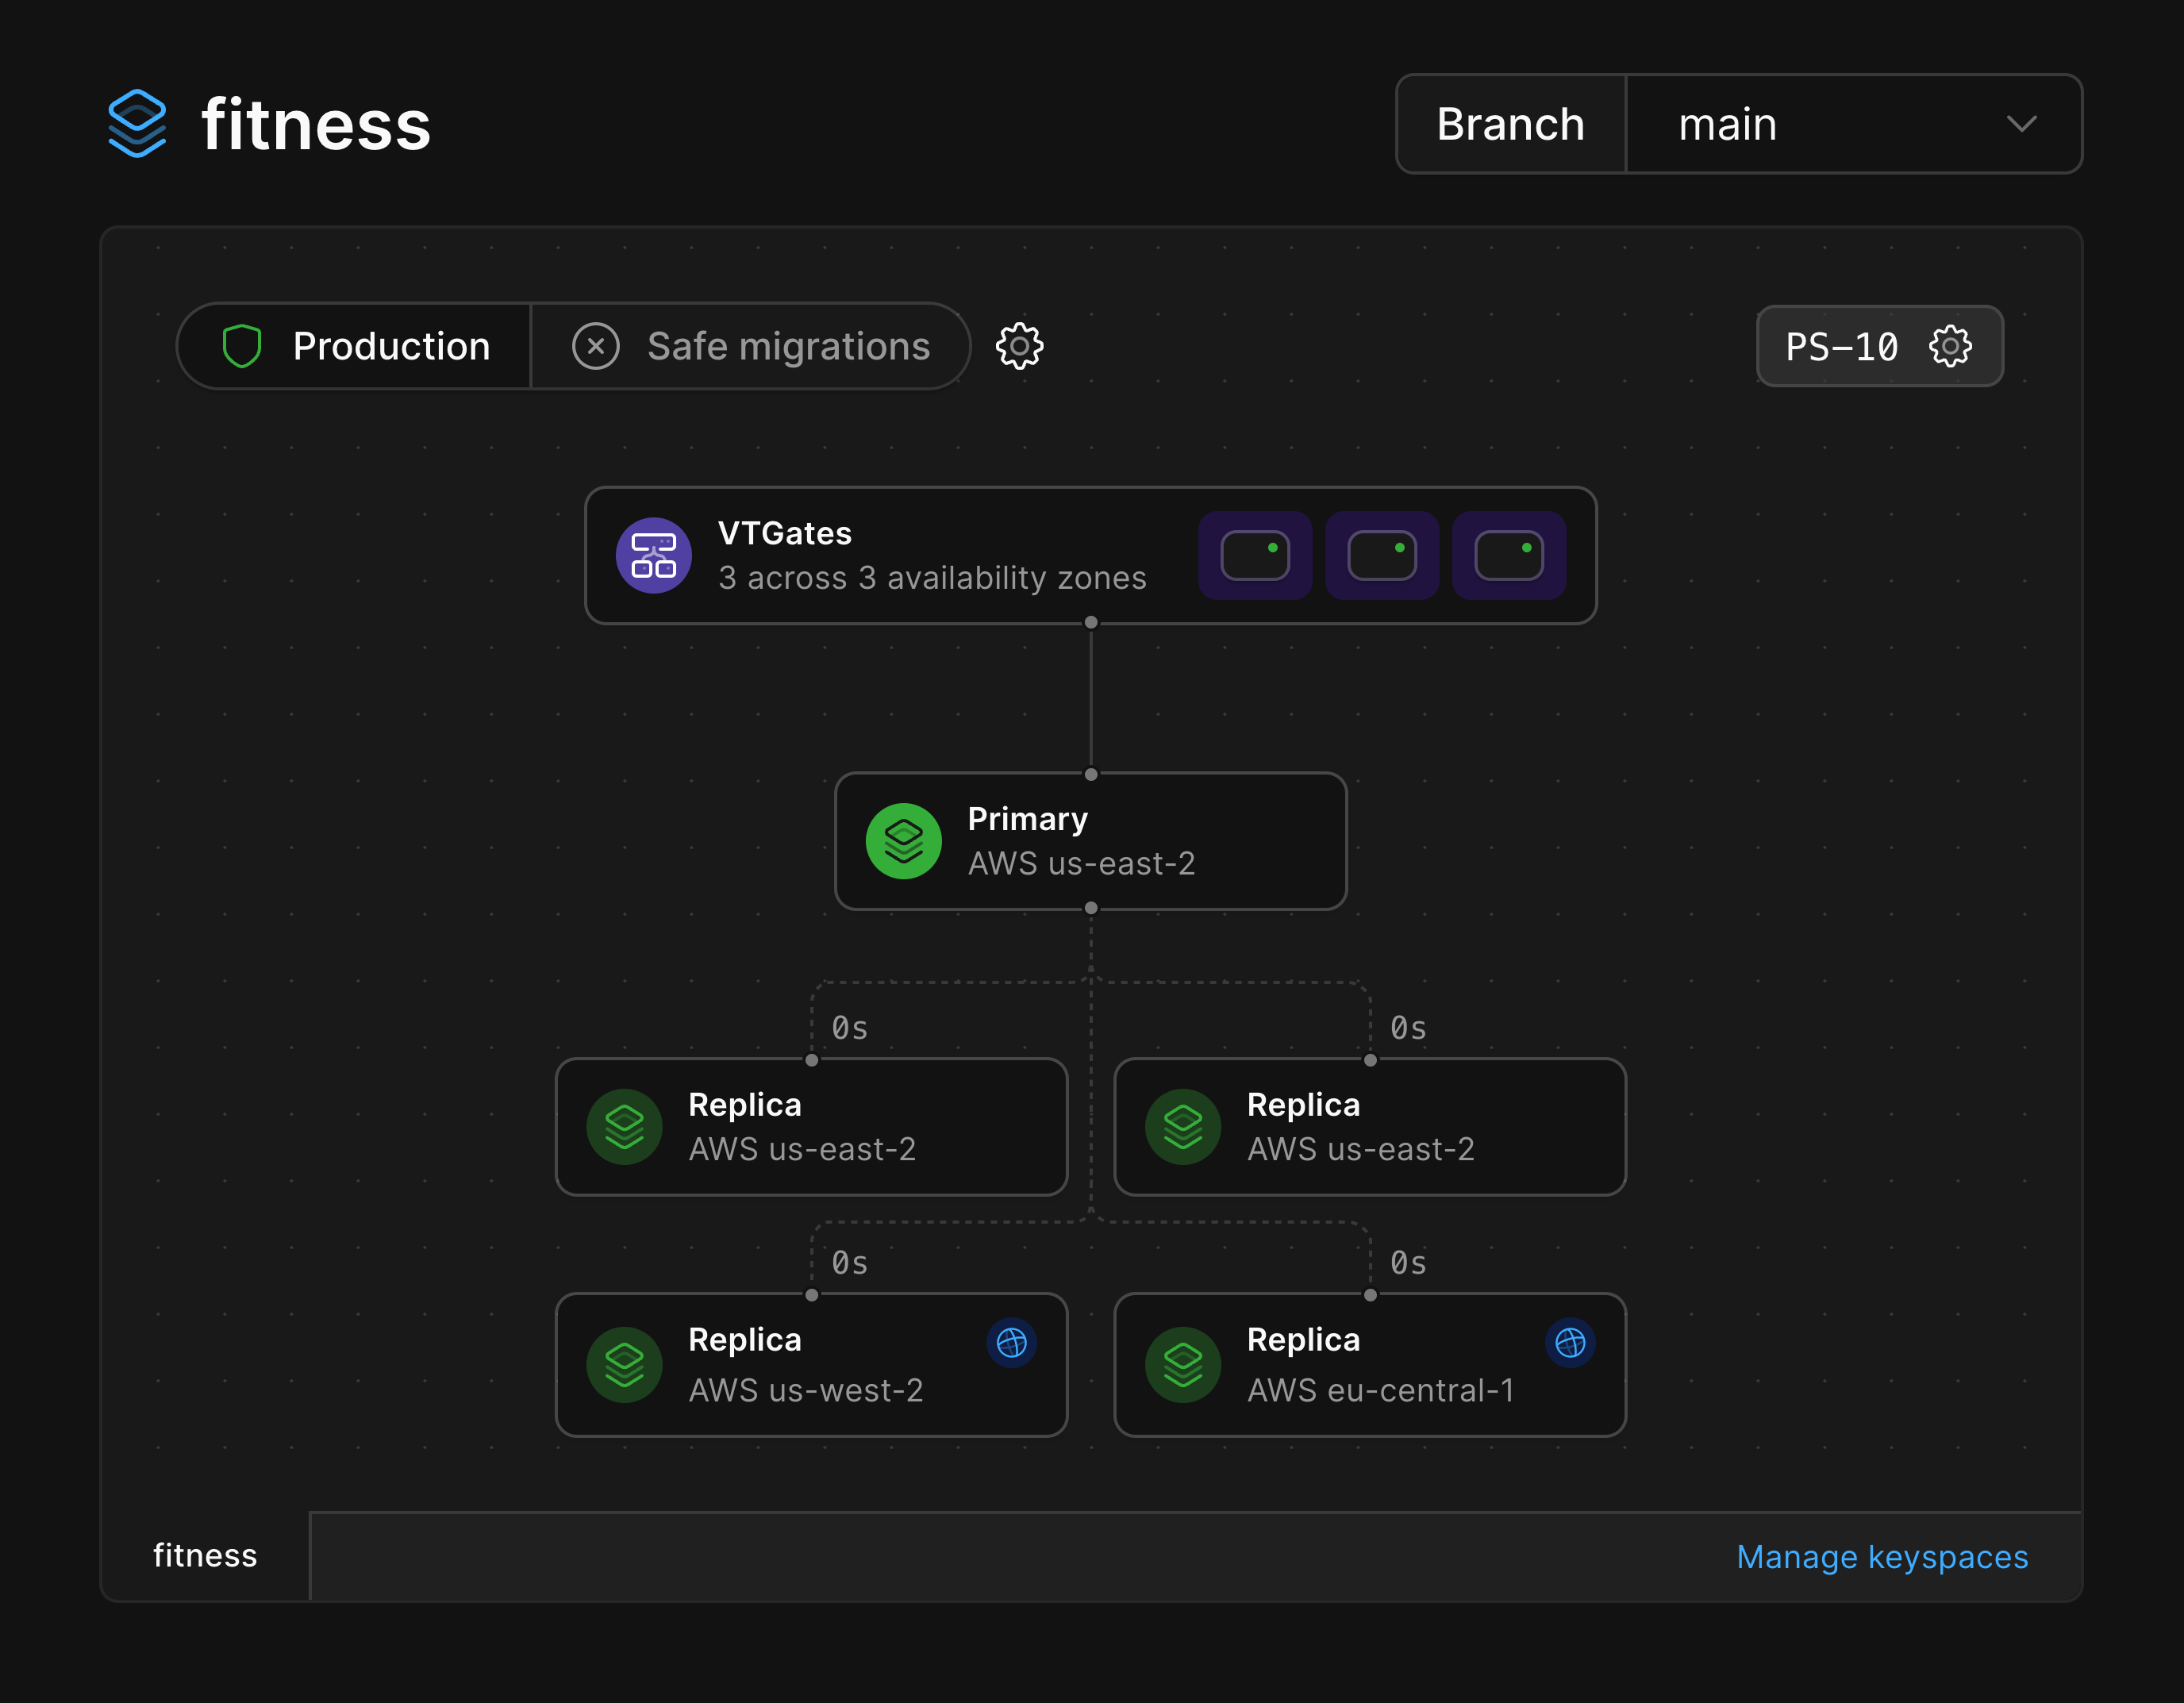
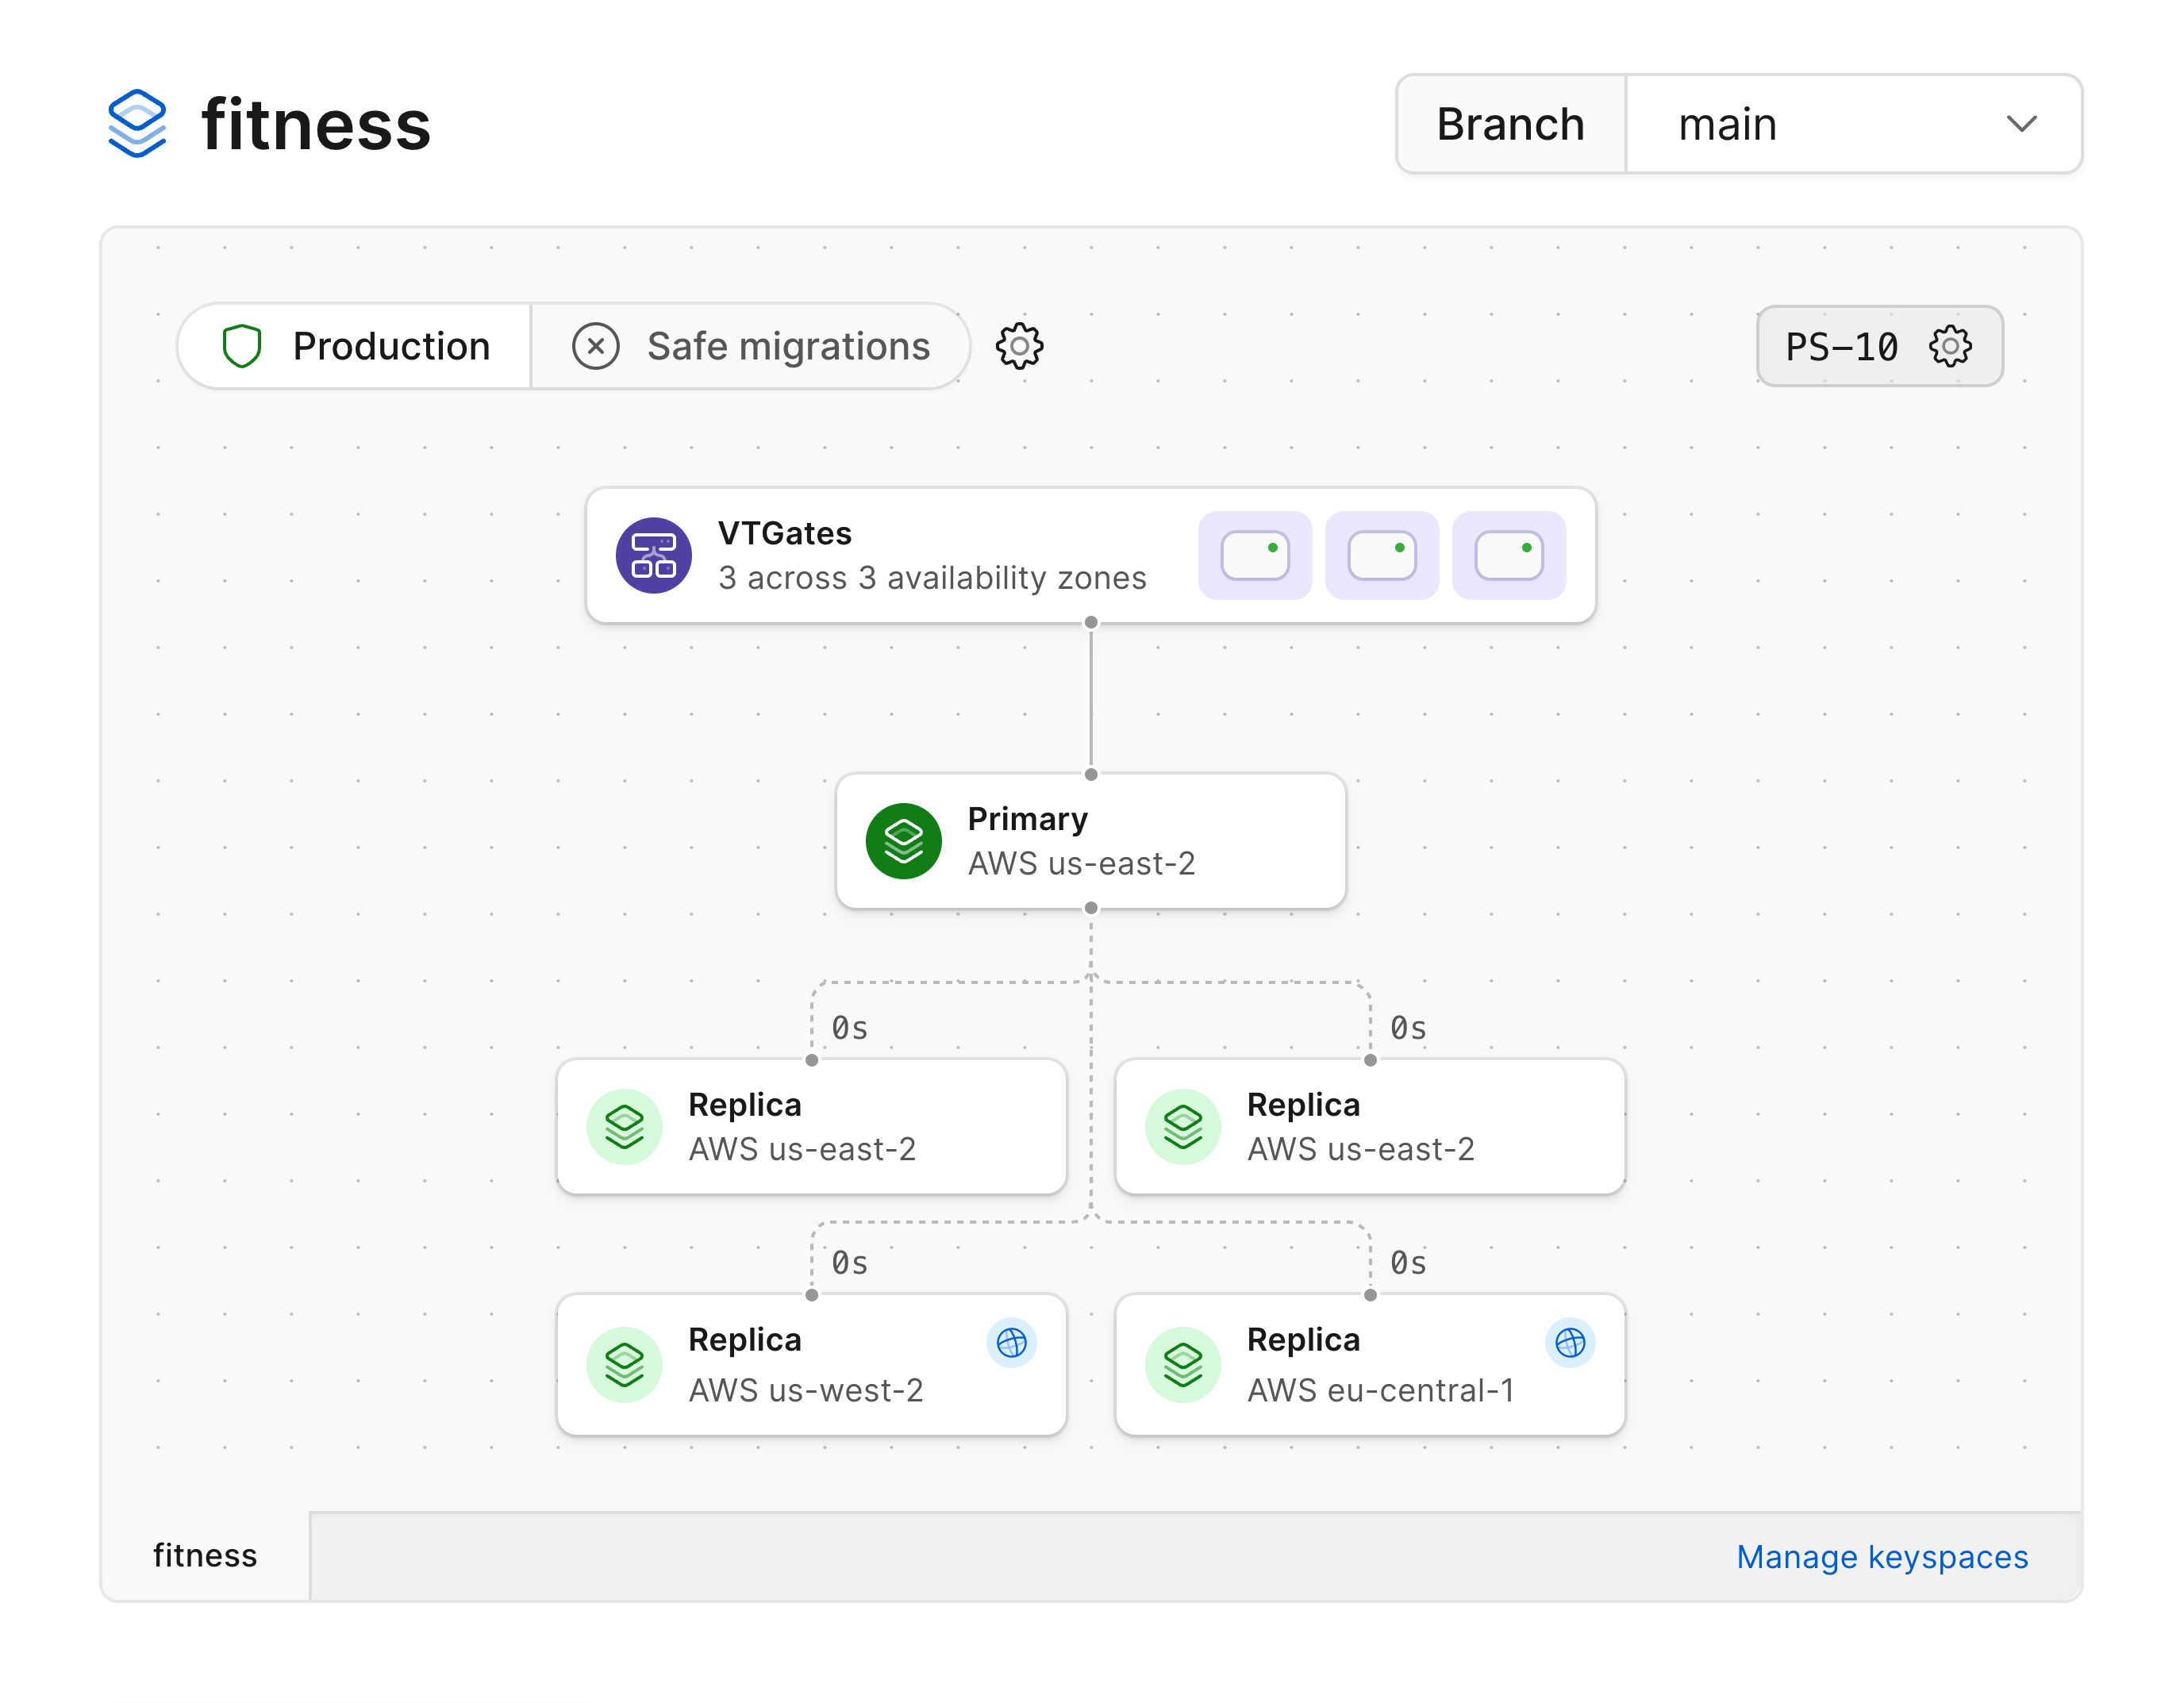 The read-only replicas can be identified by the blue globe icon.
## Infrastructure metrics
Each element within the infrastructure diagram for PlanetScale database branches can be selected to display additional metrics related to that element.
These metrics are displayed in expandable cards that present themselves when an element is selected.
By default, the cards display metrics from the last 6 hours but can be adjusted if additional data is needed.
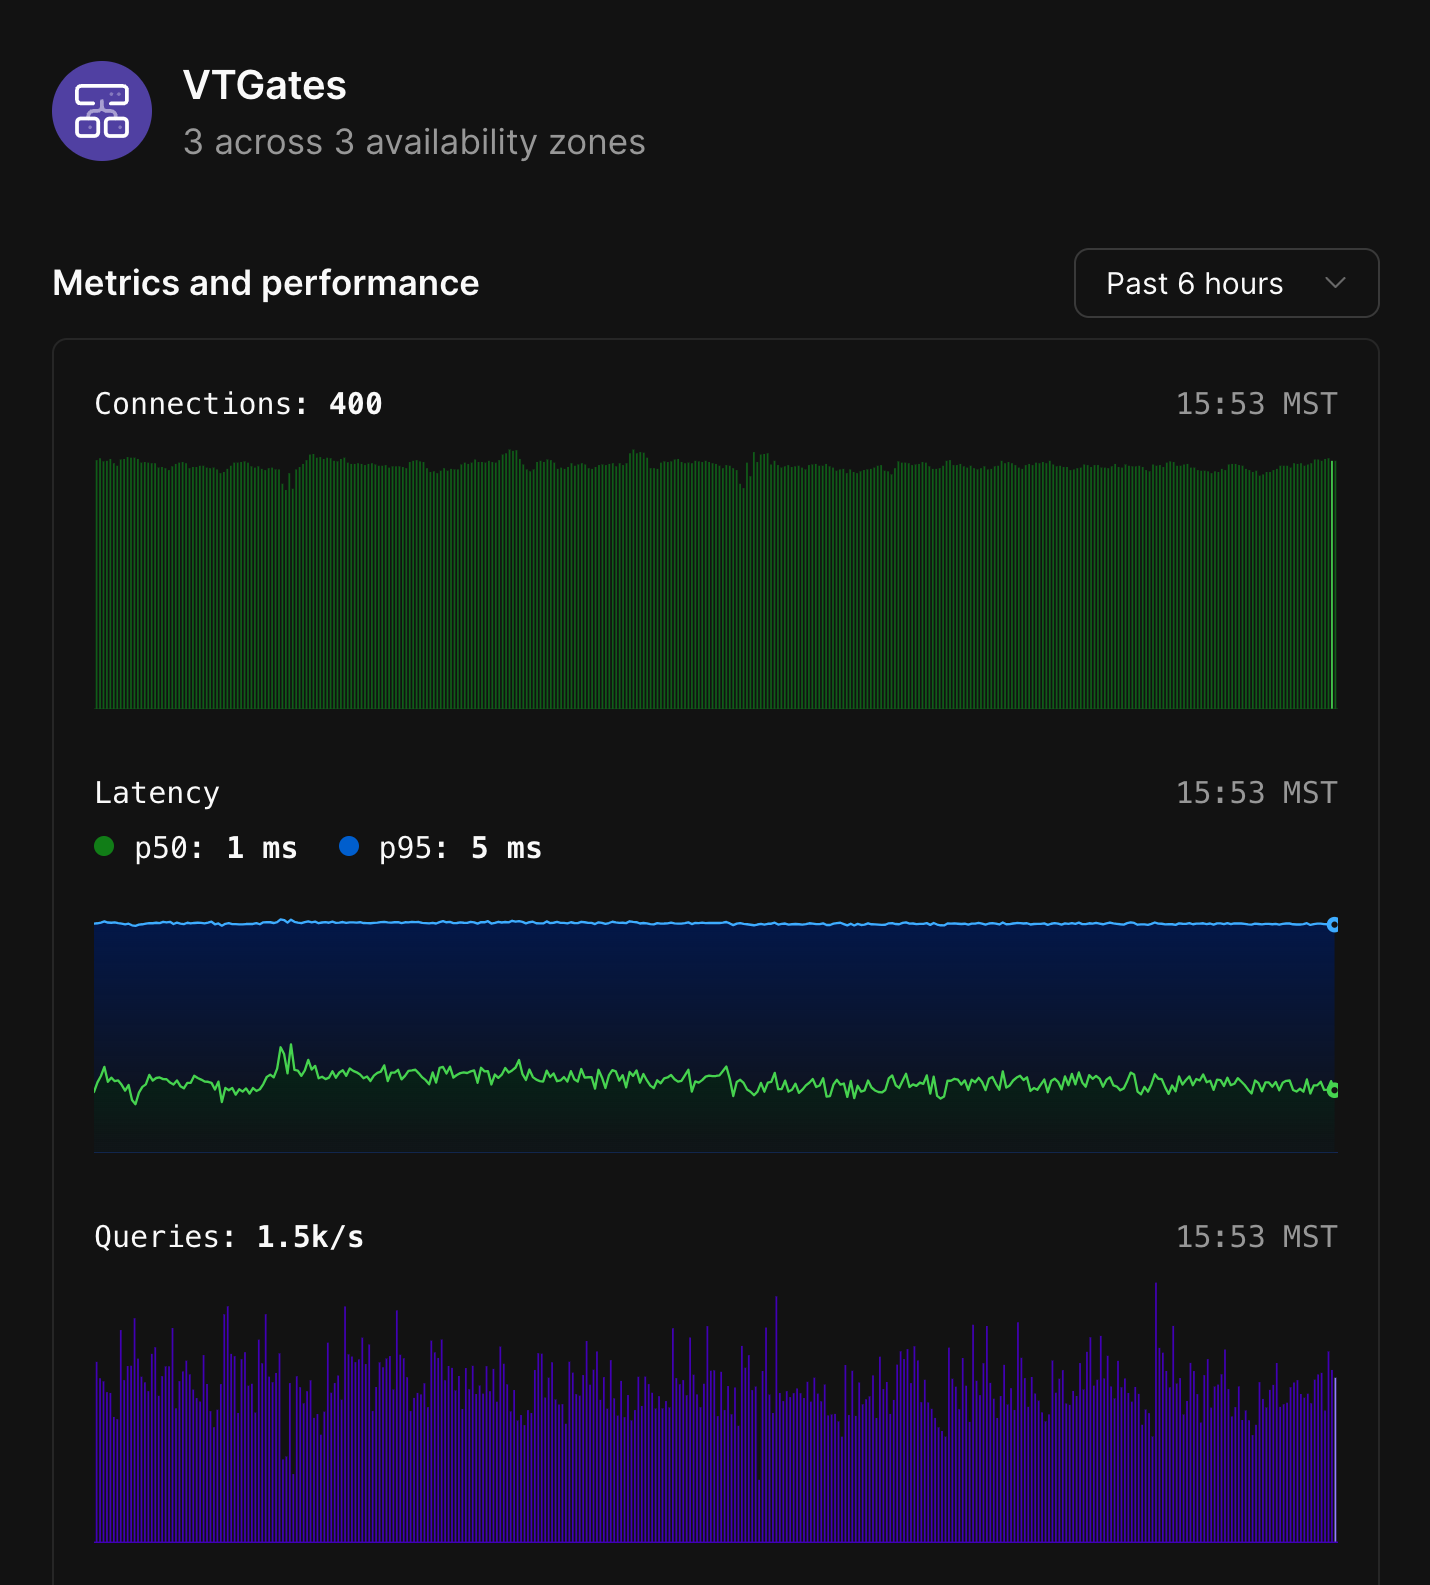
### VTGates
The VTGate node displays the total number of VTGates that exist for a given branch, as well as the number of availability zones in which they live.
Selecting the VTGates node will show the following metrics:
* Number of connections.
* Latency.
* Queries received.
* CPU.
* Memory consumption.
The read-only replicas can be identified by the blue globe icon.
## Infrastructure metrics
Each element within the infrastructure diagram for PlanetScale database branches can be selected to display additional metrics related to that element.
These metrics are displayed in expandable cards that present themselves when an element is selected.
By default, the cards display metrics from the last 6 hours but can be adjusted if additional data is needed.
### VTGates
The VTGate node displays the total number of VTGates that exist for a given branch, as well as the number of availability zones in which they live.
Selecting the VTGates node will show the following metrics:
* Number of connections.
* Latency.
* Queries received.
* CPU.
* Memory consumption.
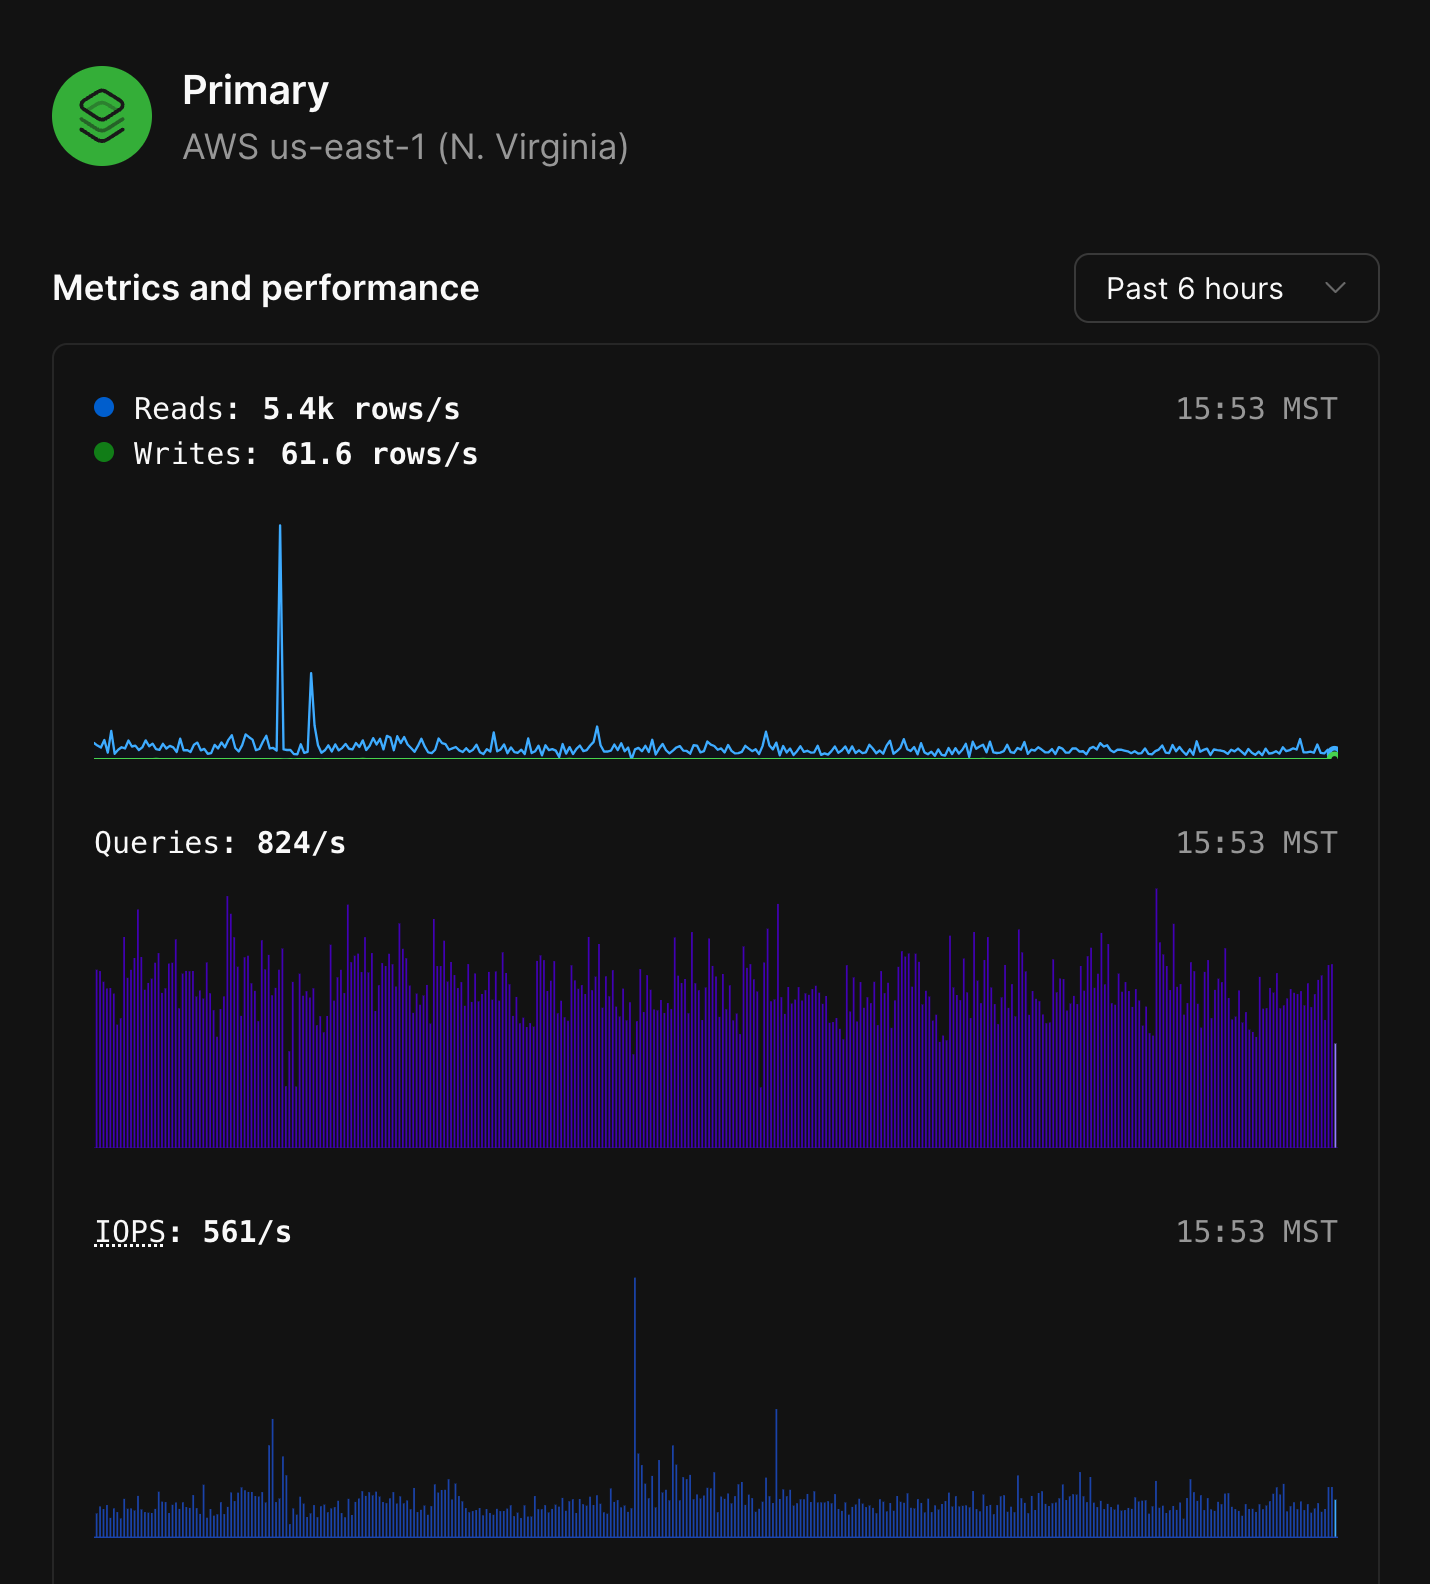
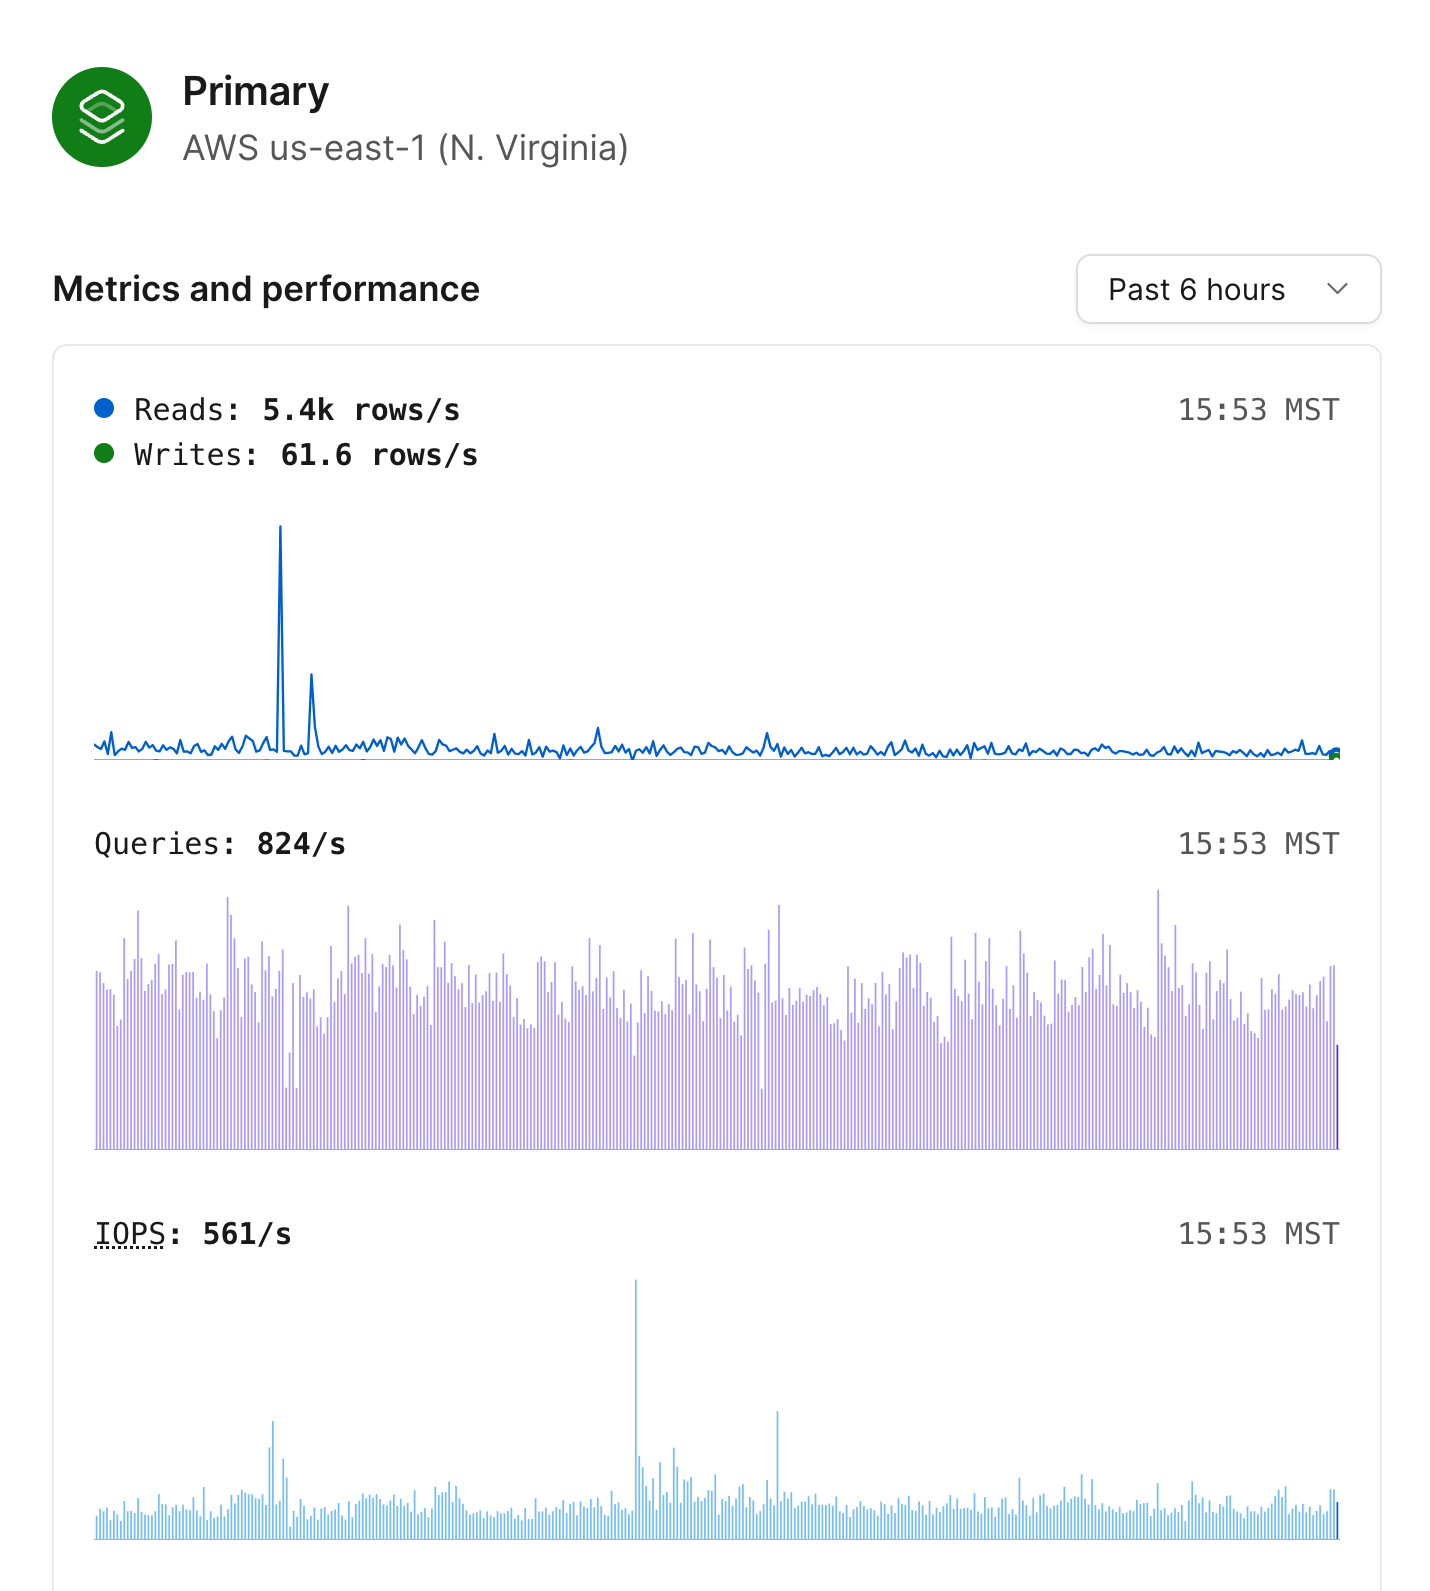
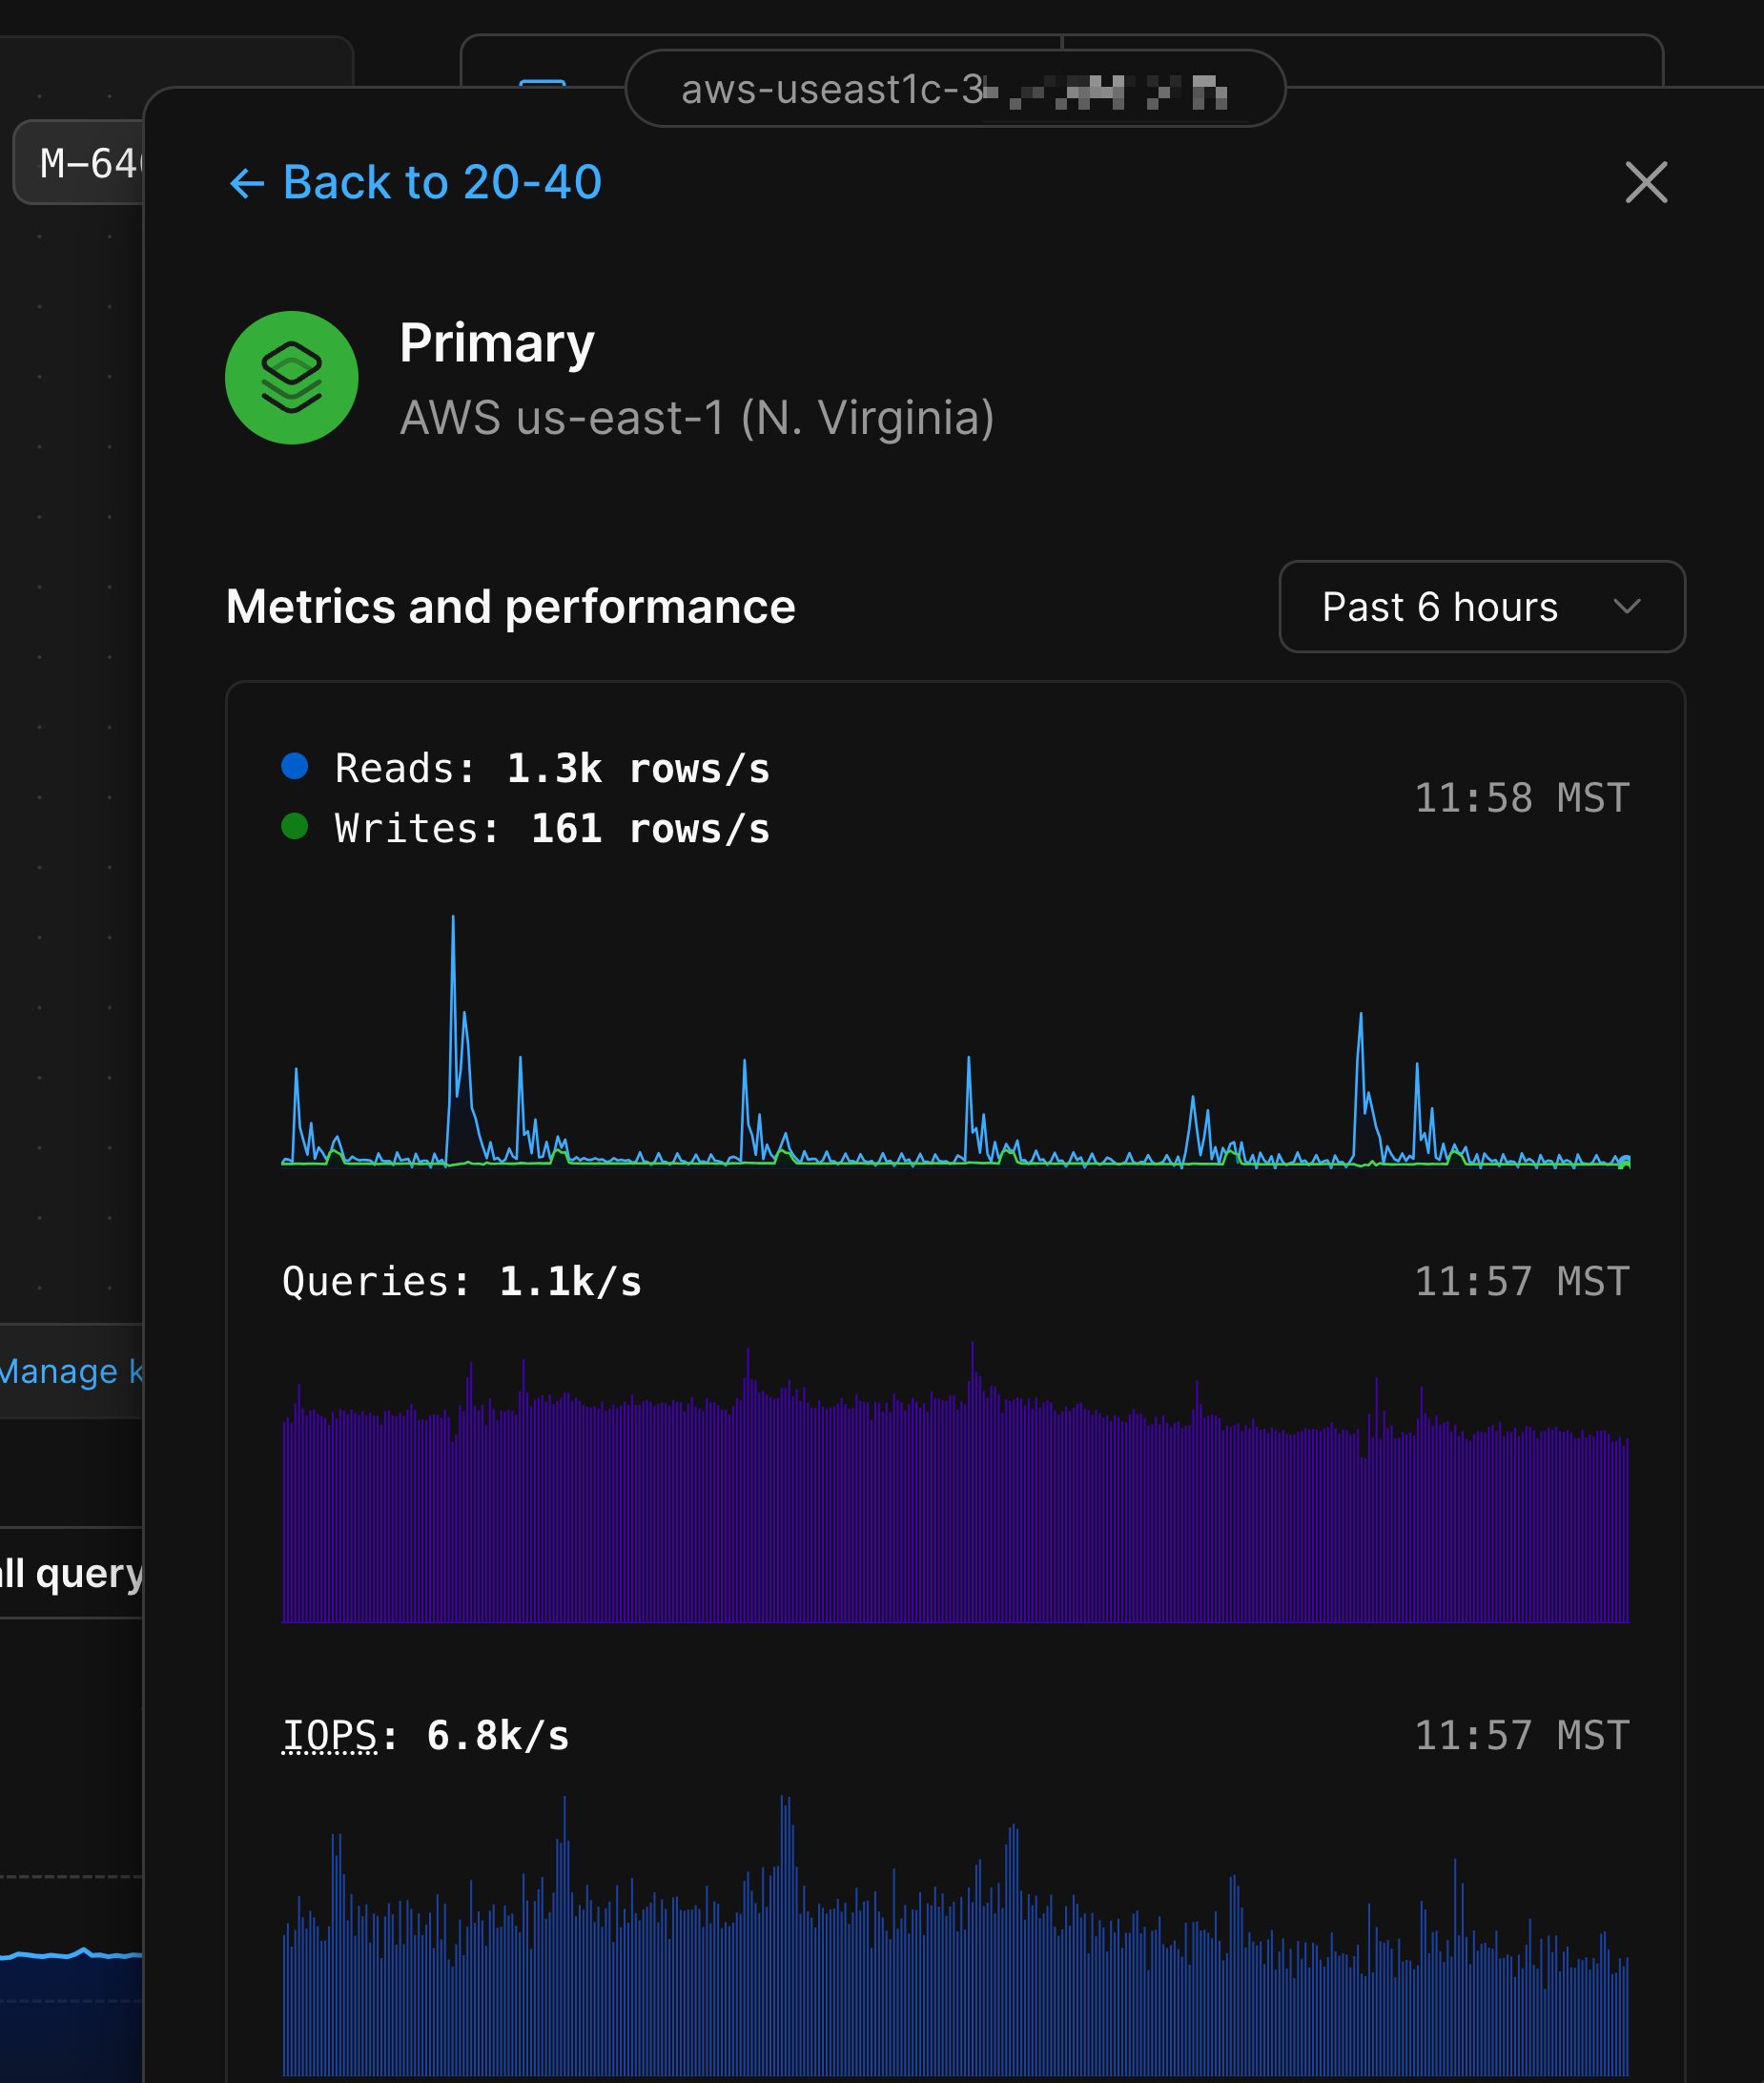
 ### MySQL nodes
Each MySQL node in the diagram will display whether it is the primary node or a replica, along with the region where that node is deployed to.
Clicking any of the MySQL nodes will display the following metrics:
* Database reads and writes for that node.
* Queries served.
* IOPS.
* CPU and Memory utilization.
* Storage utilization over the past week.
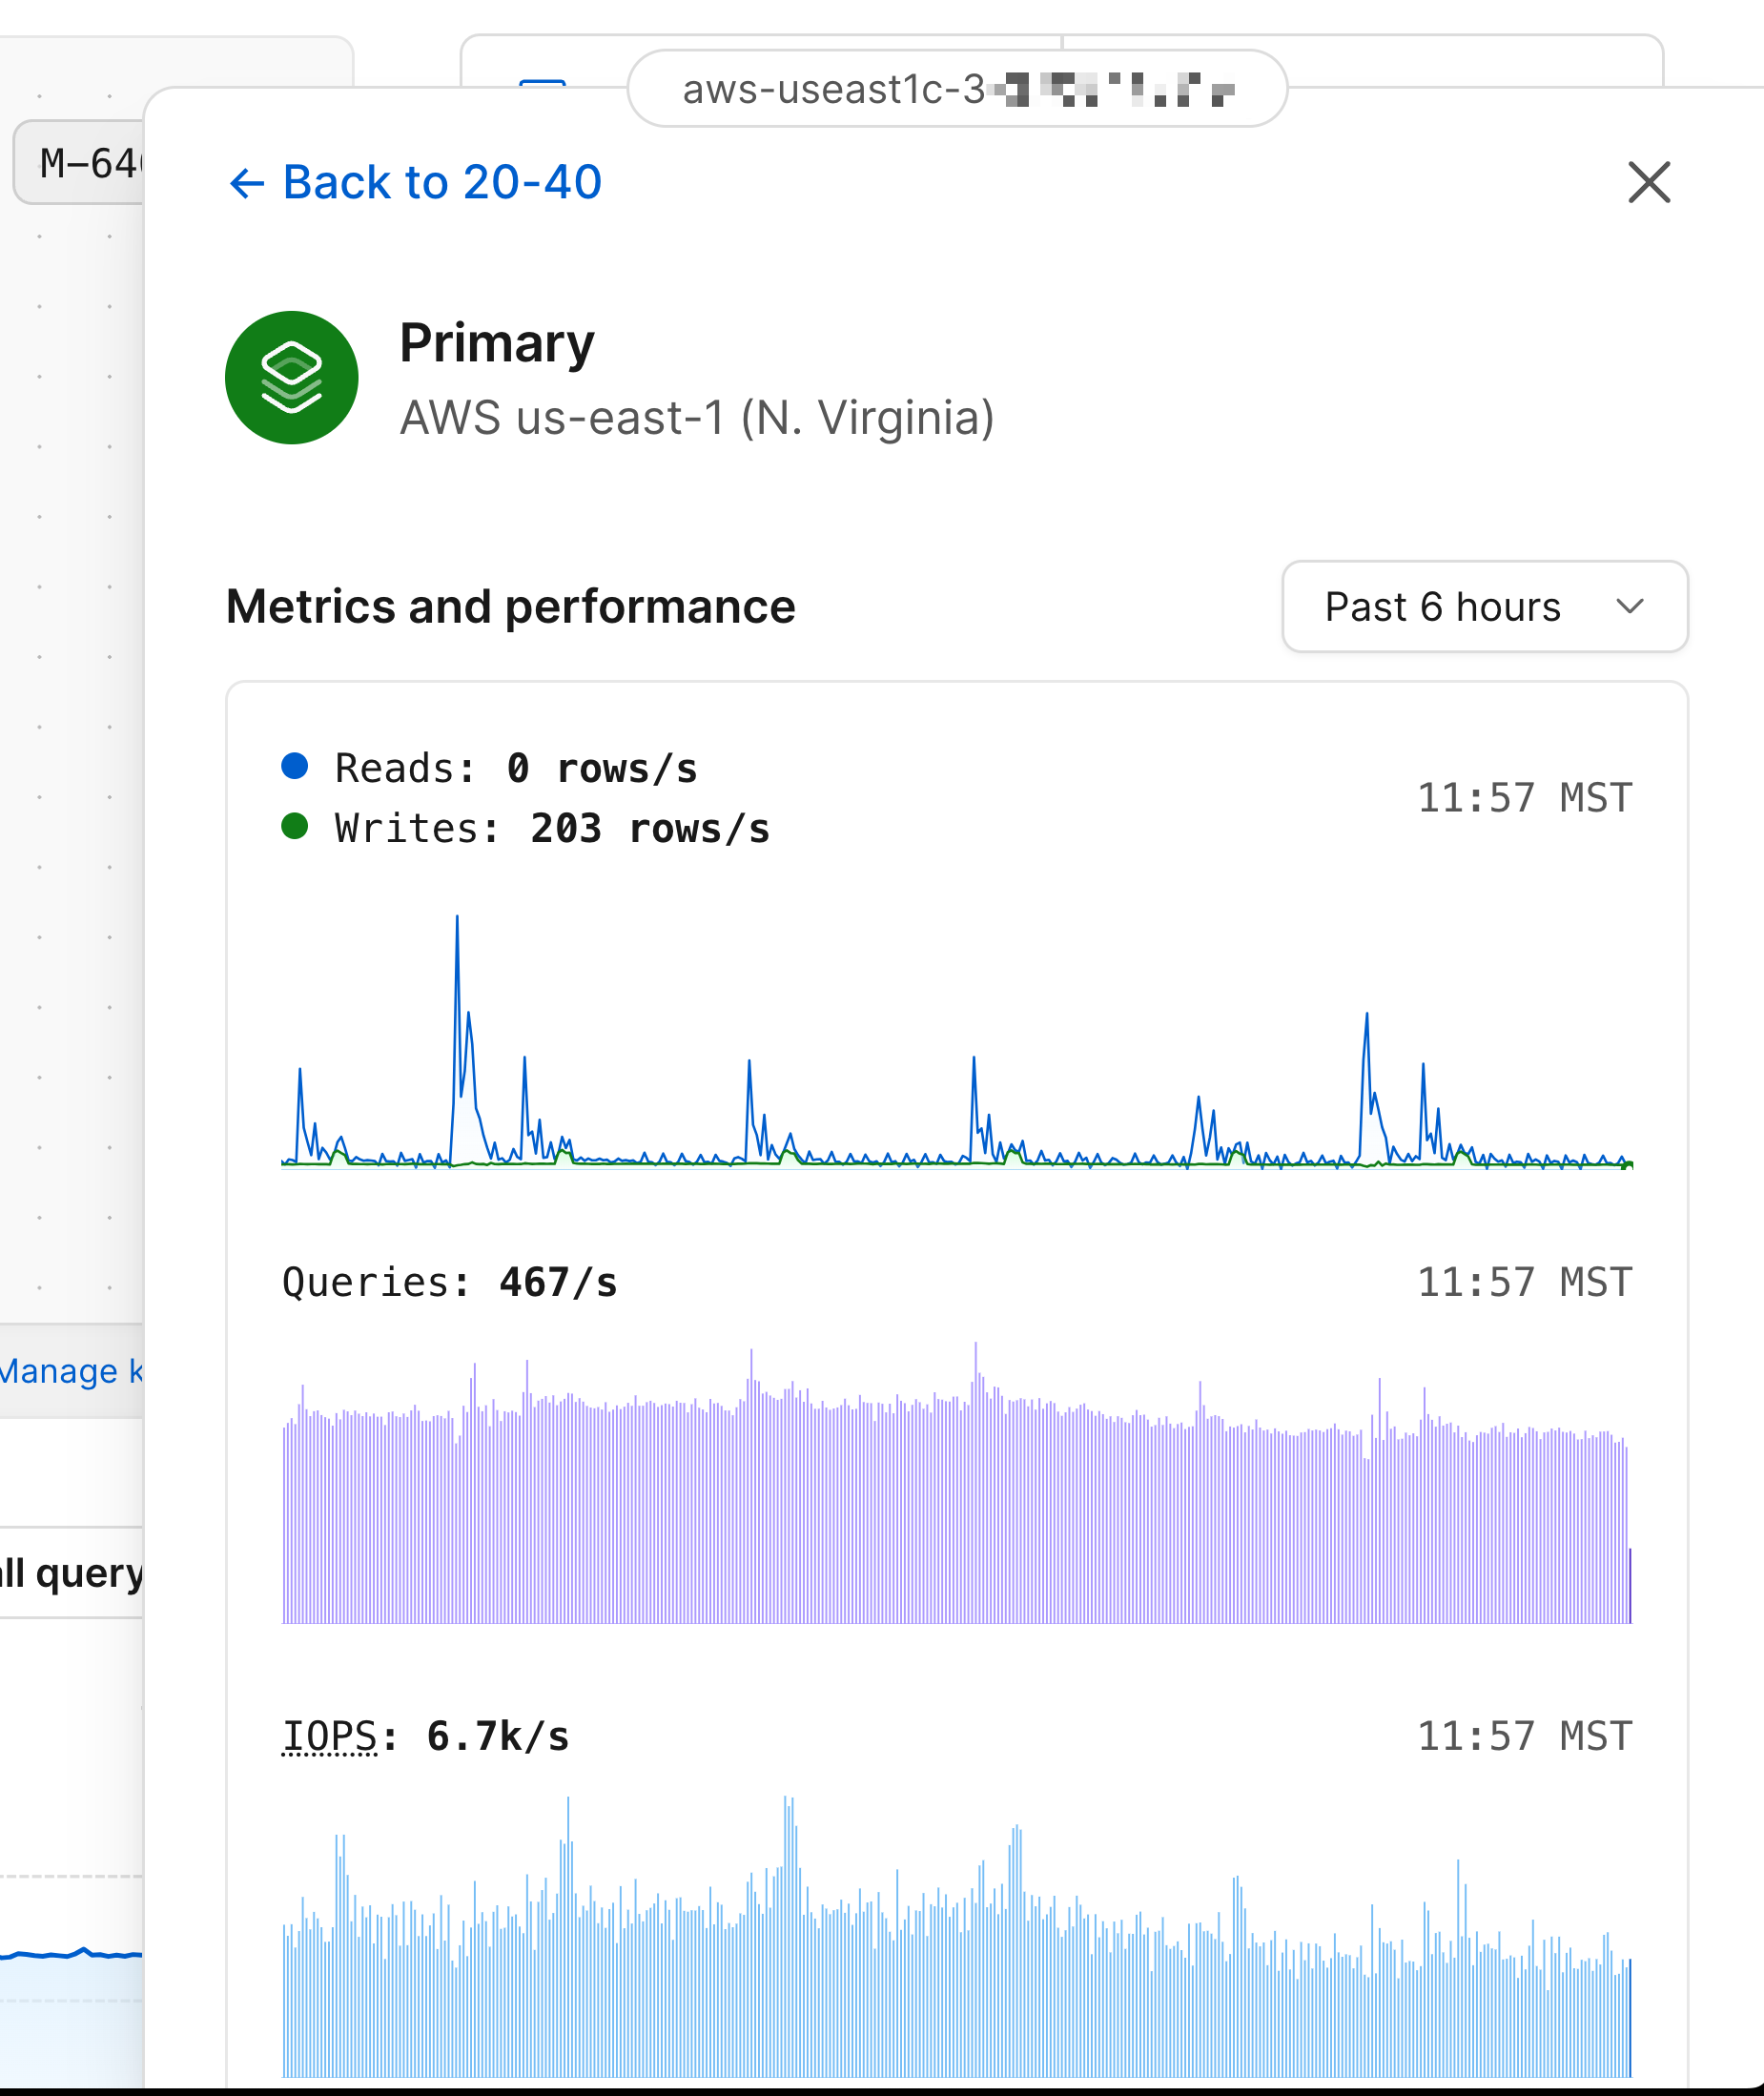
### MySQL nodes
Each MySQL node in the diagram will display whether it is the primary node or a replica, along with the region where that node is deployed to.
Clicking any of the MySQL nodes will display the following metrics:
* Database reads and writes for that node.
* Queries served.
* IOPS.
* CPU and Memory utilization.
* Storage utilization over the past week.
 Selecting a replica will display the replication lag in addition to the other metrics.
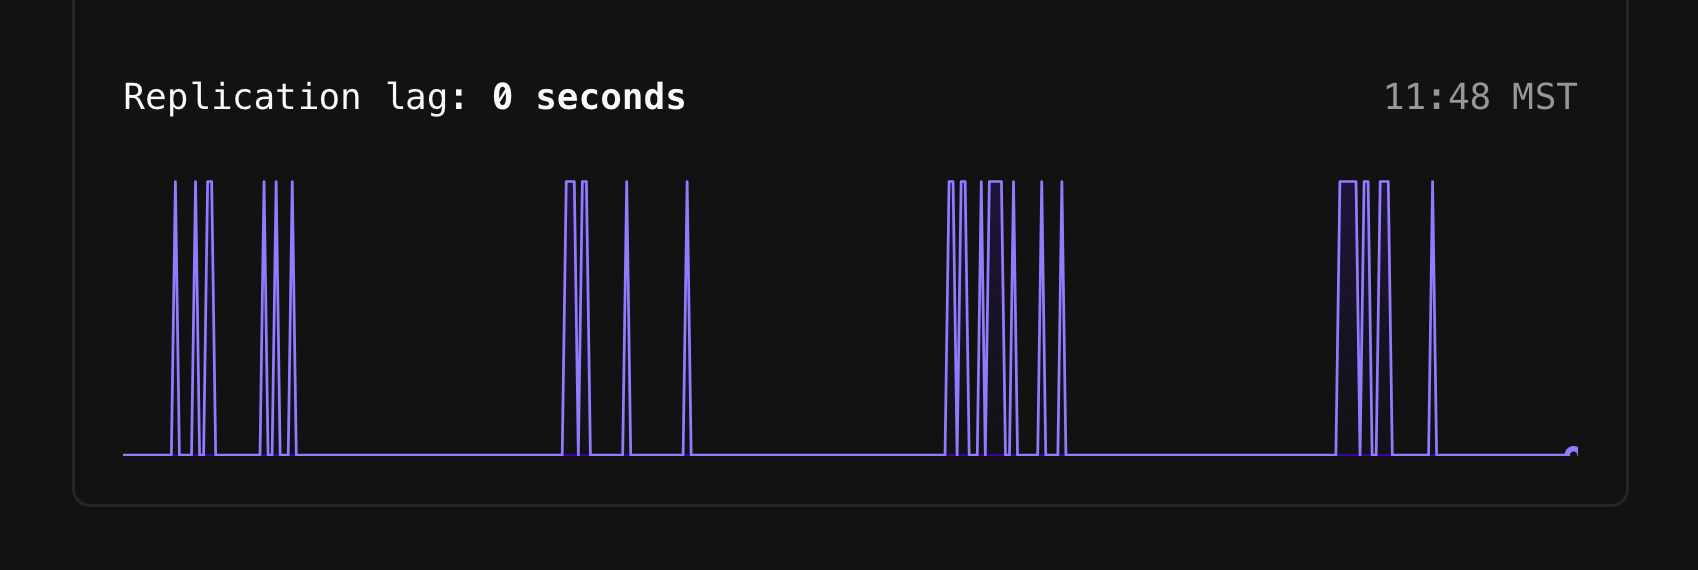
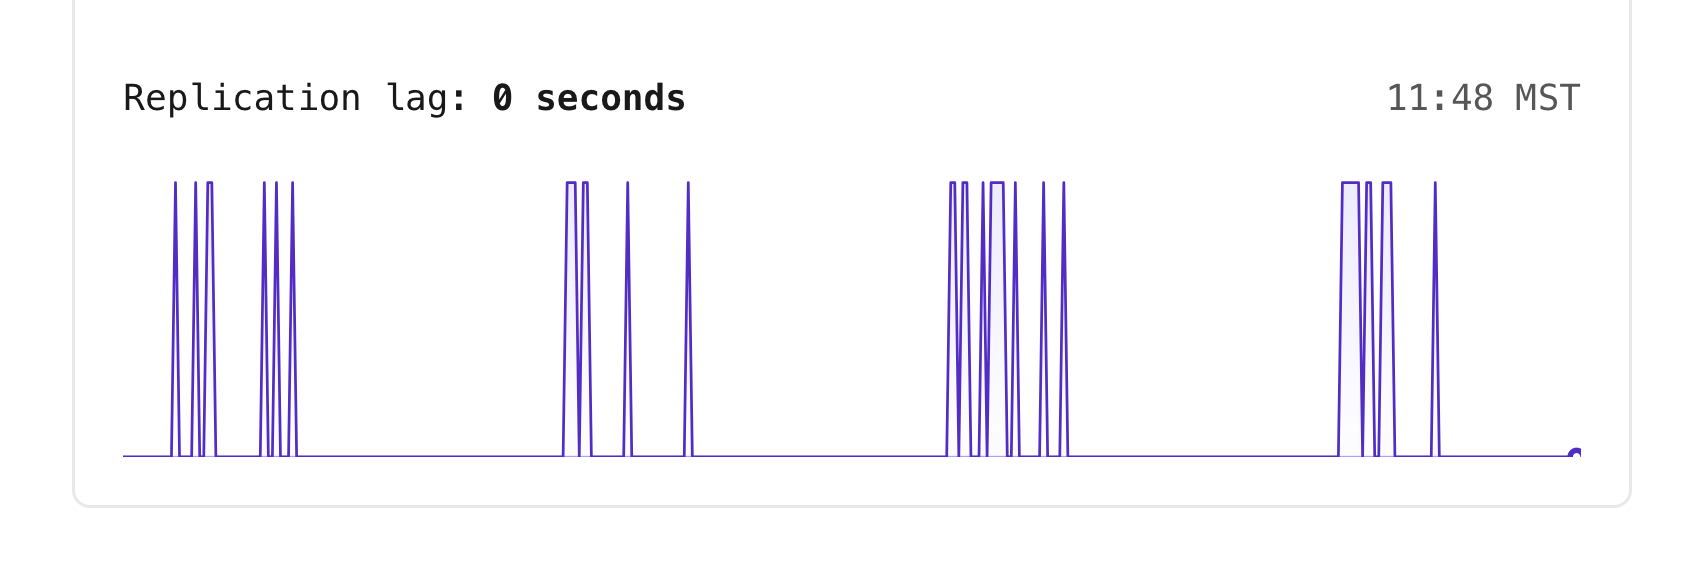 ### Replication lag at a glance
Within the infrastructure diagram, you'll also notice that there is a number near the connection points for each replica.
These numbers are a way to read the replication lag between the Primary node and that given node at a glance.
### Replication lag at a glance
Within the infrastructure diagram, you'll also notice that there is a number near the connection points for each replica.
These numbers are a way to read the replication lag between the Primary node and that given node at a glance.
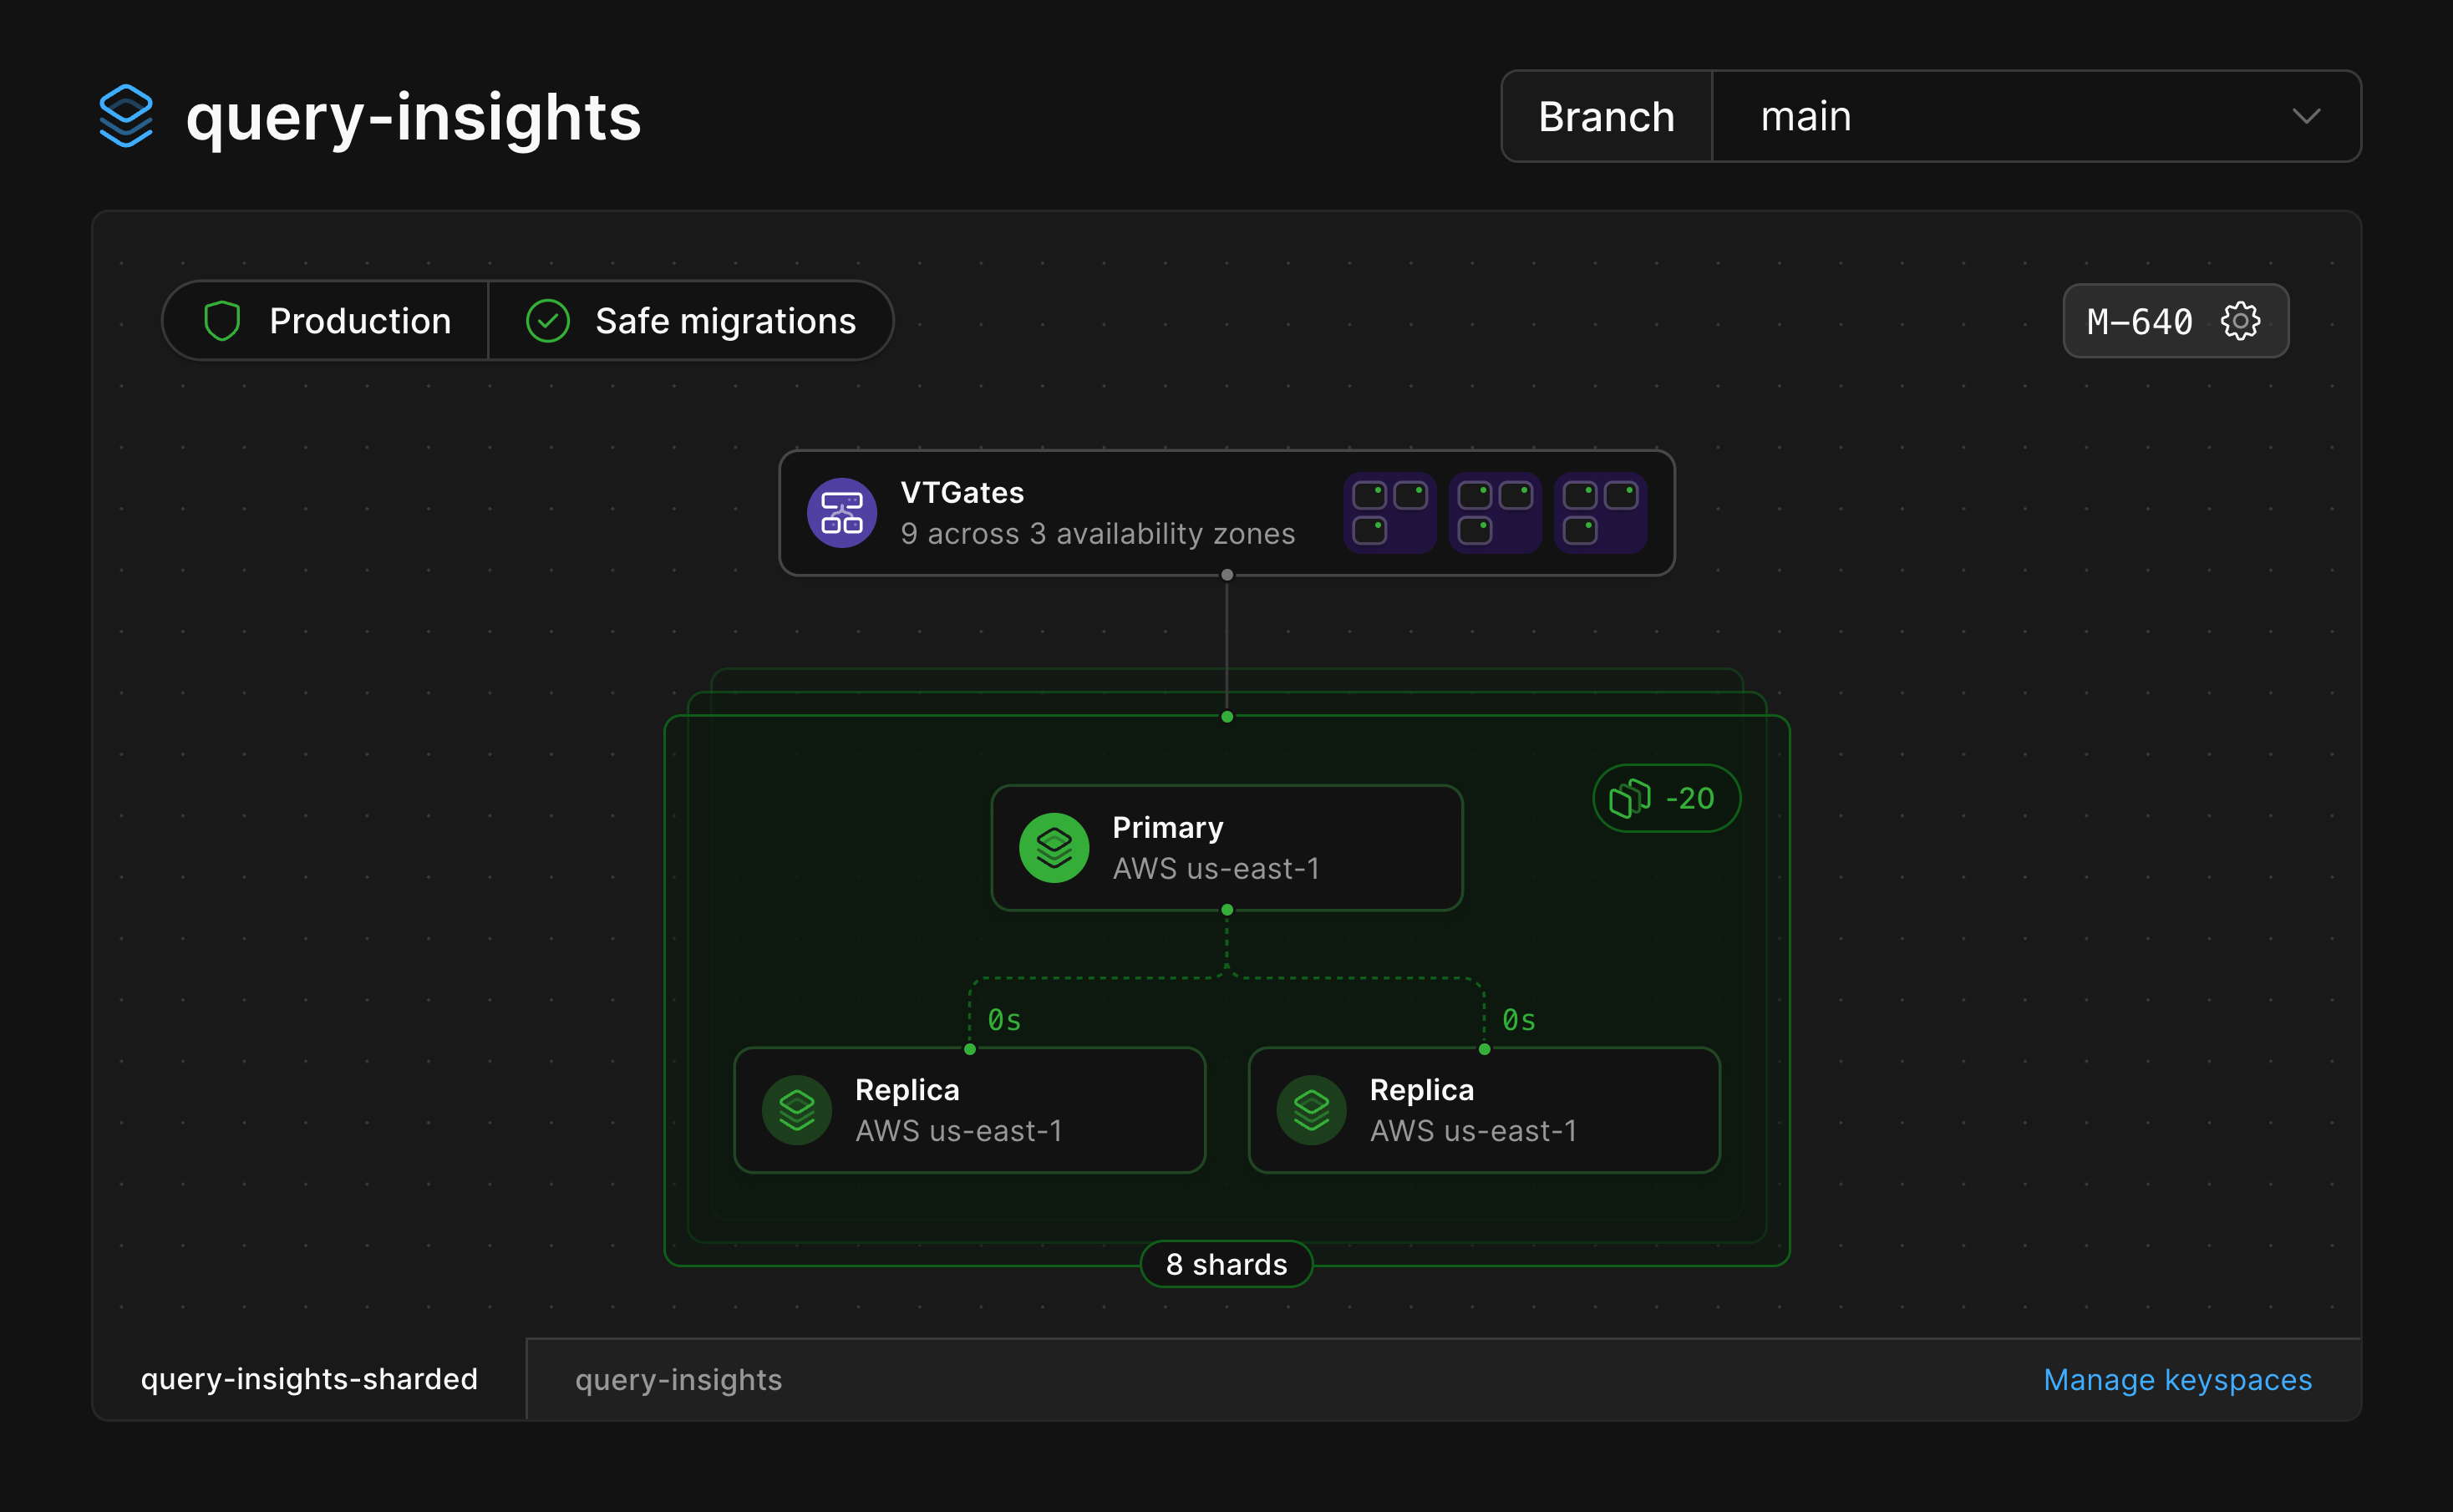
 ### Database shards
If your database is [sharded](/docs/vitess/sharding), the infrastructure diagram will represent that as a green stack of shards.
### Database shards
If your database is [sharded](/docs/vitess/sharding), the infrastructure diagram will represent that as a green stack of shards.
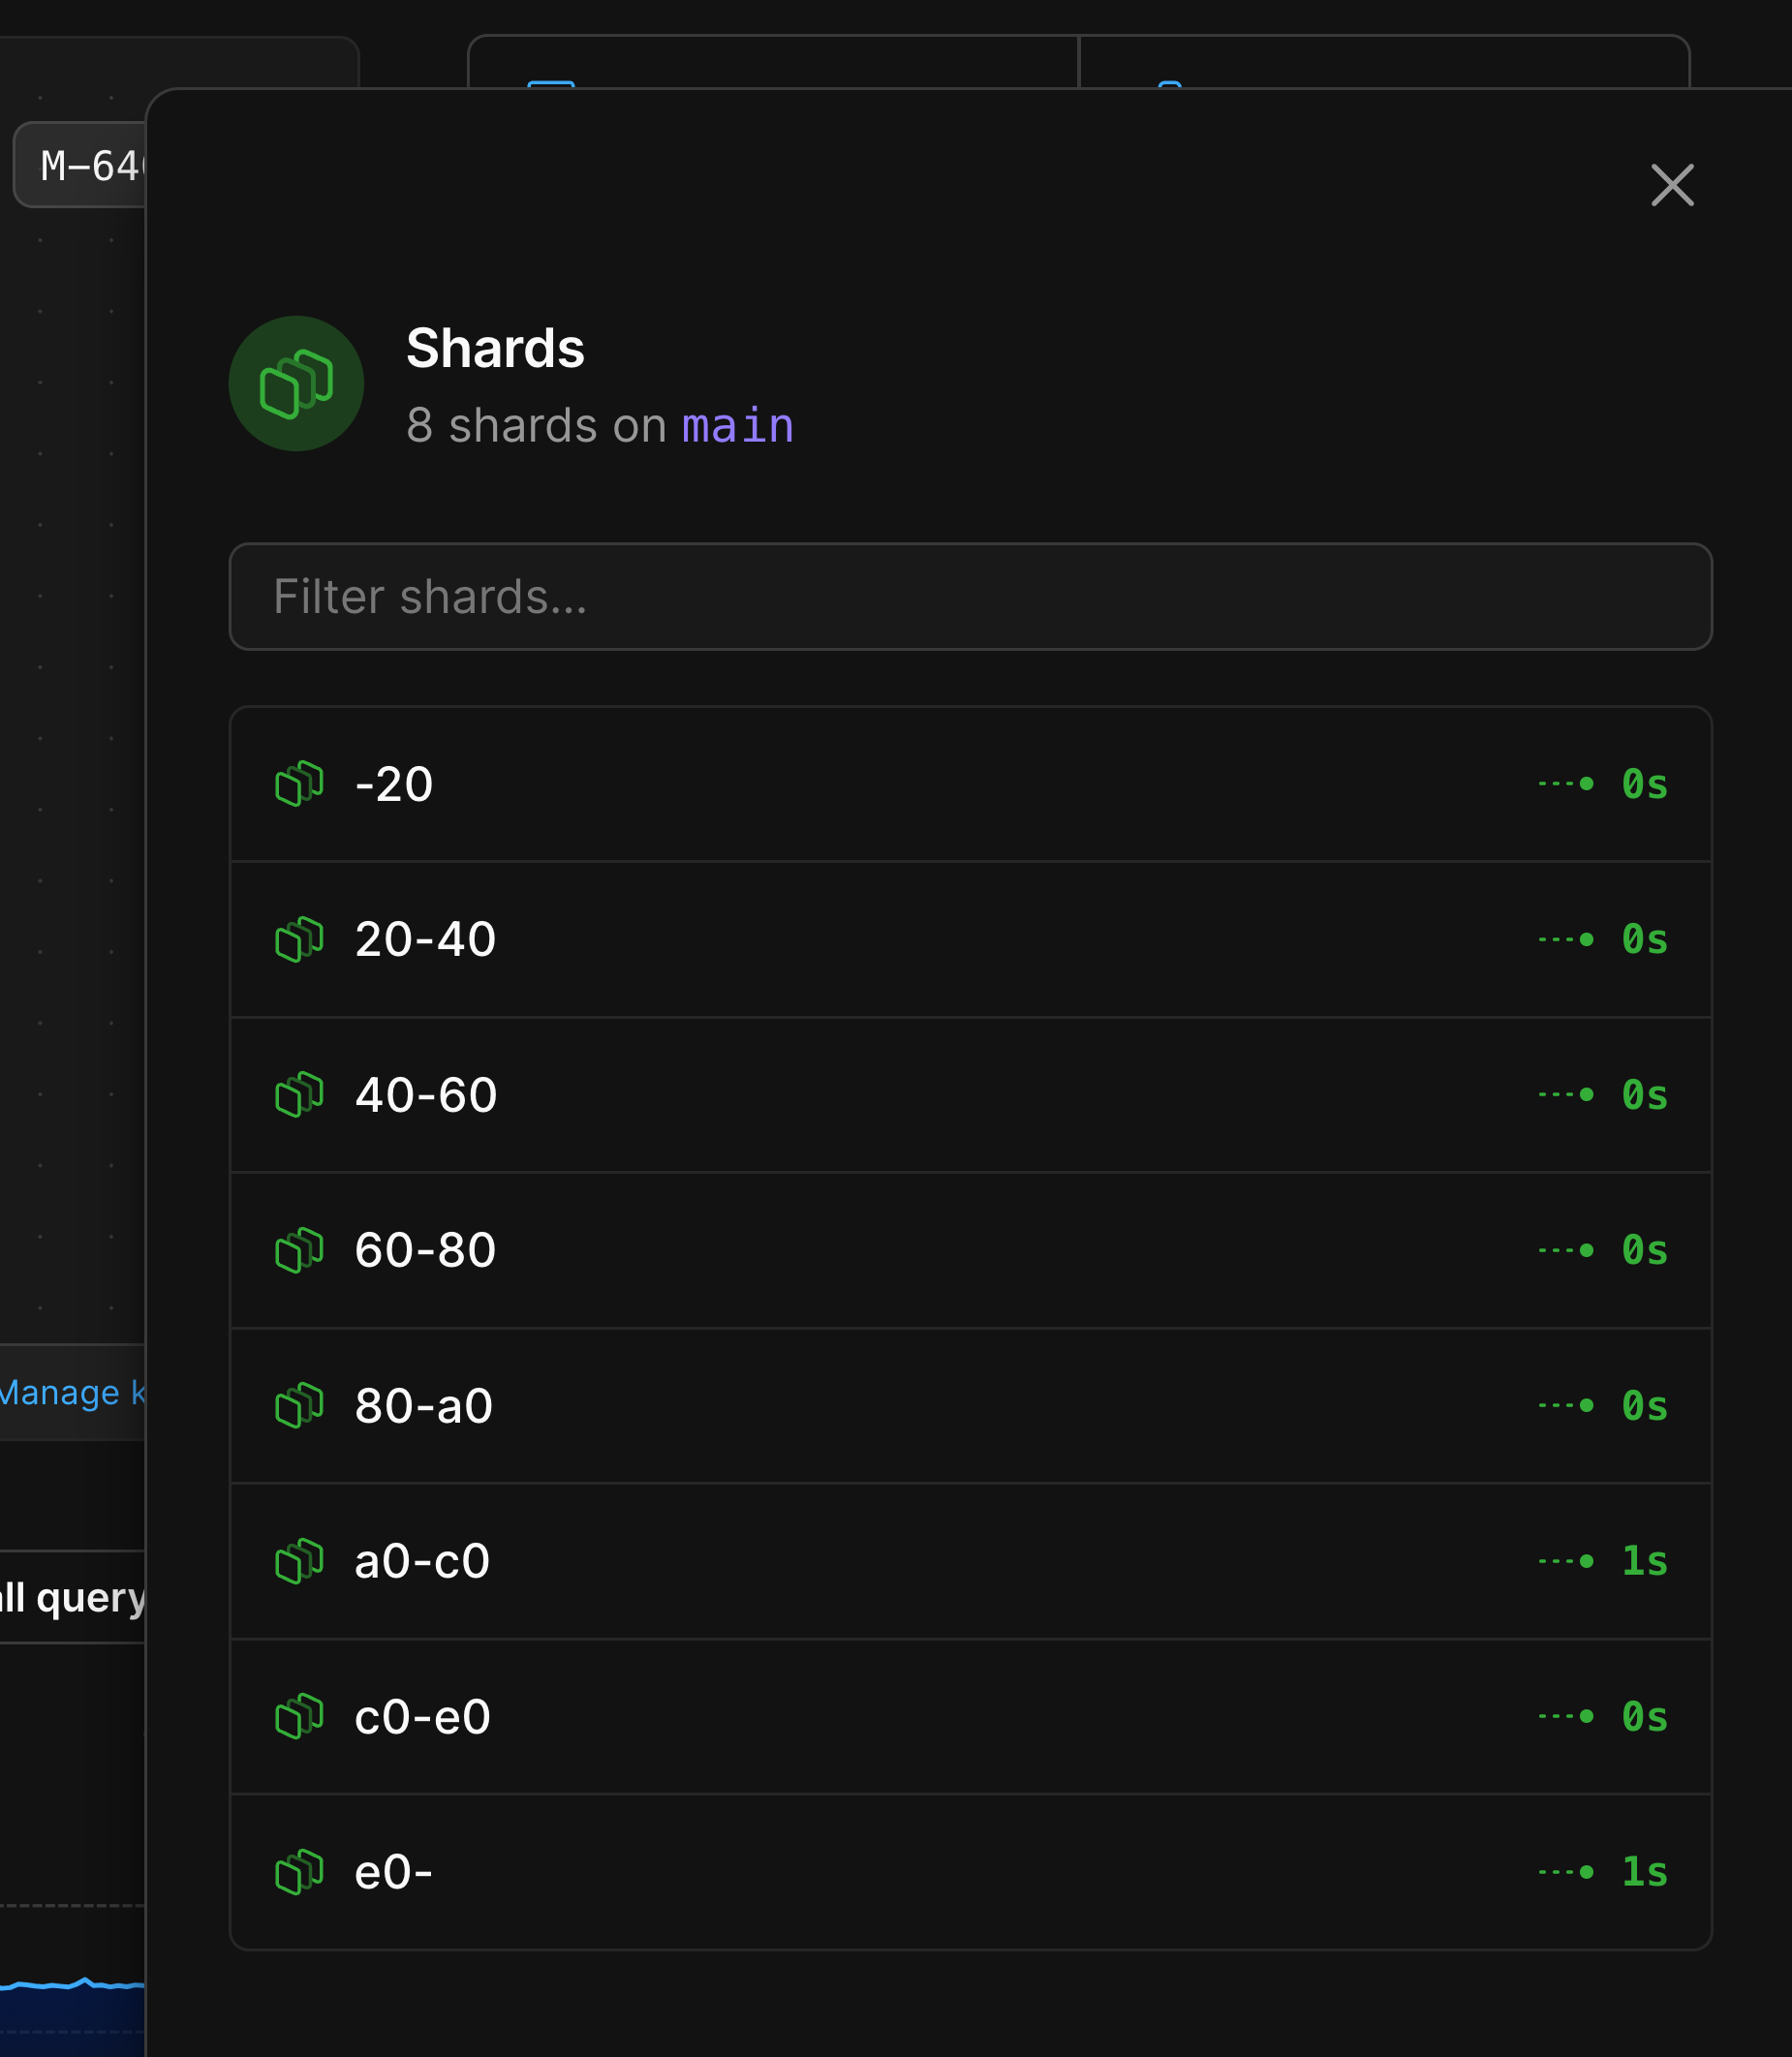
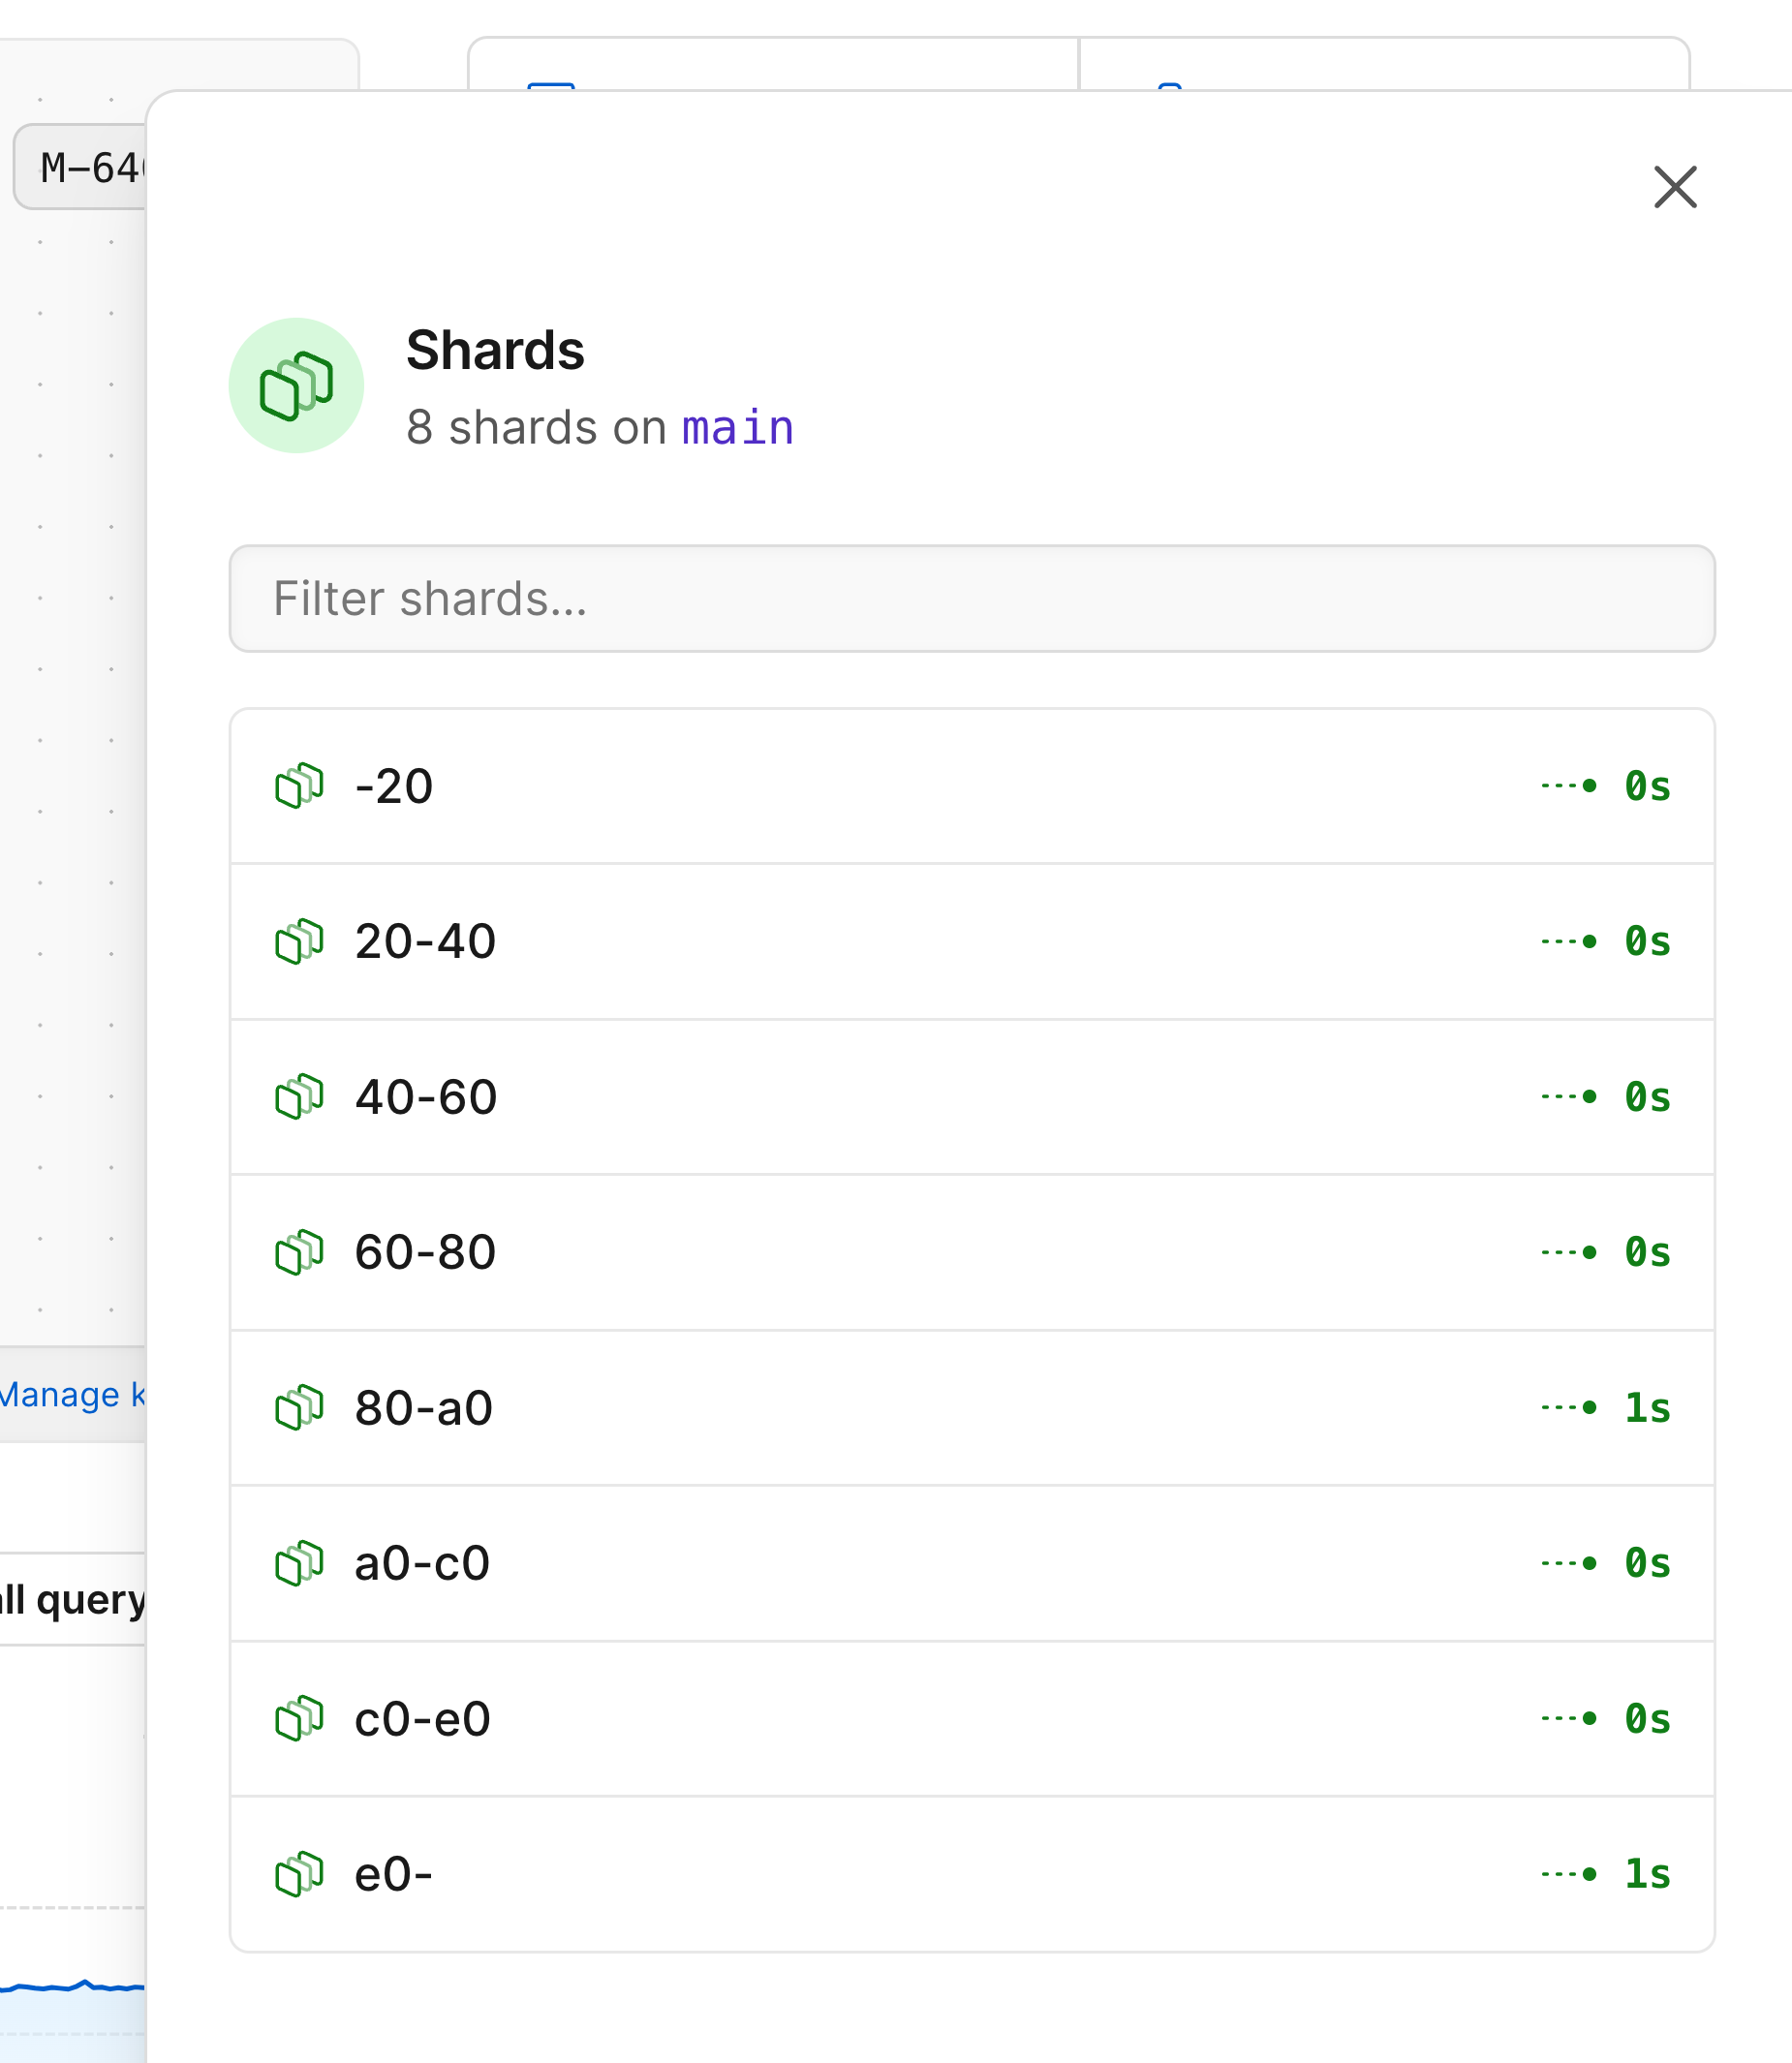
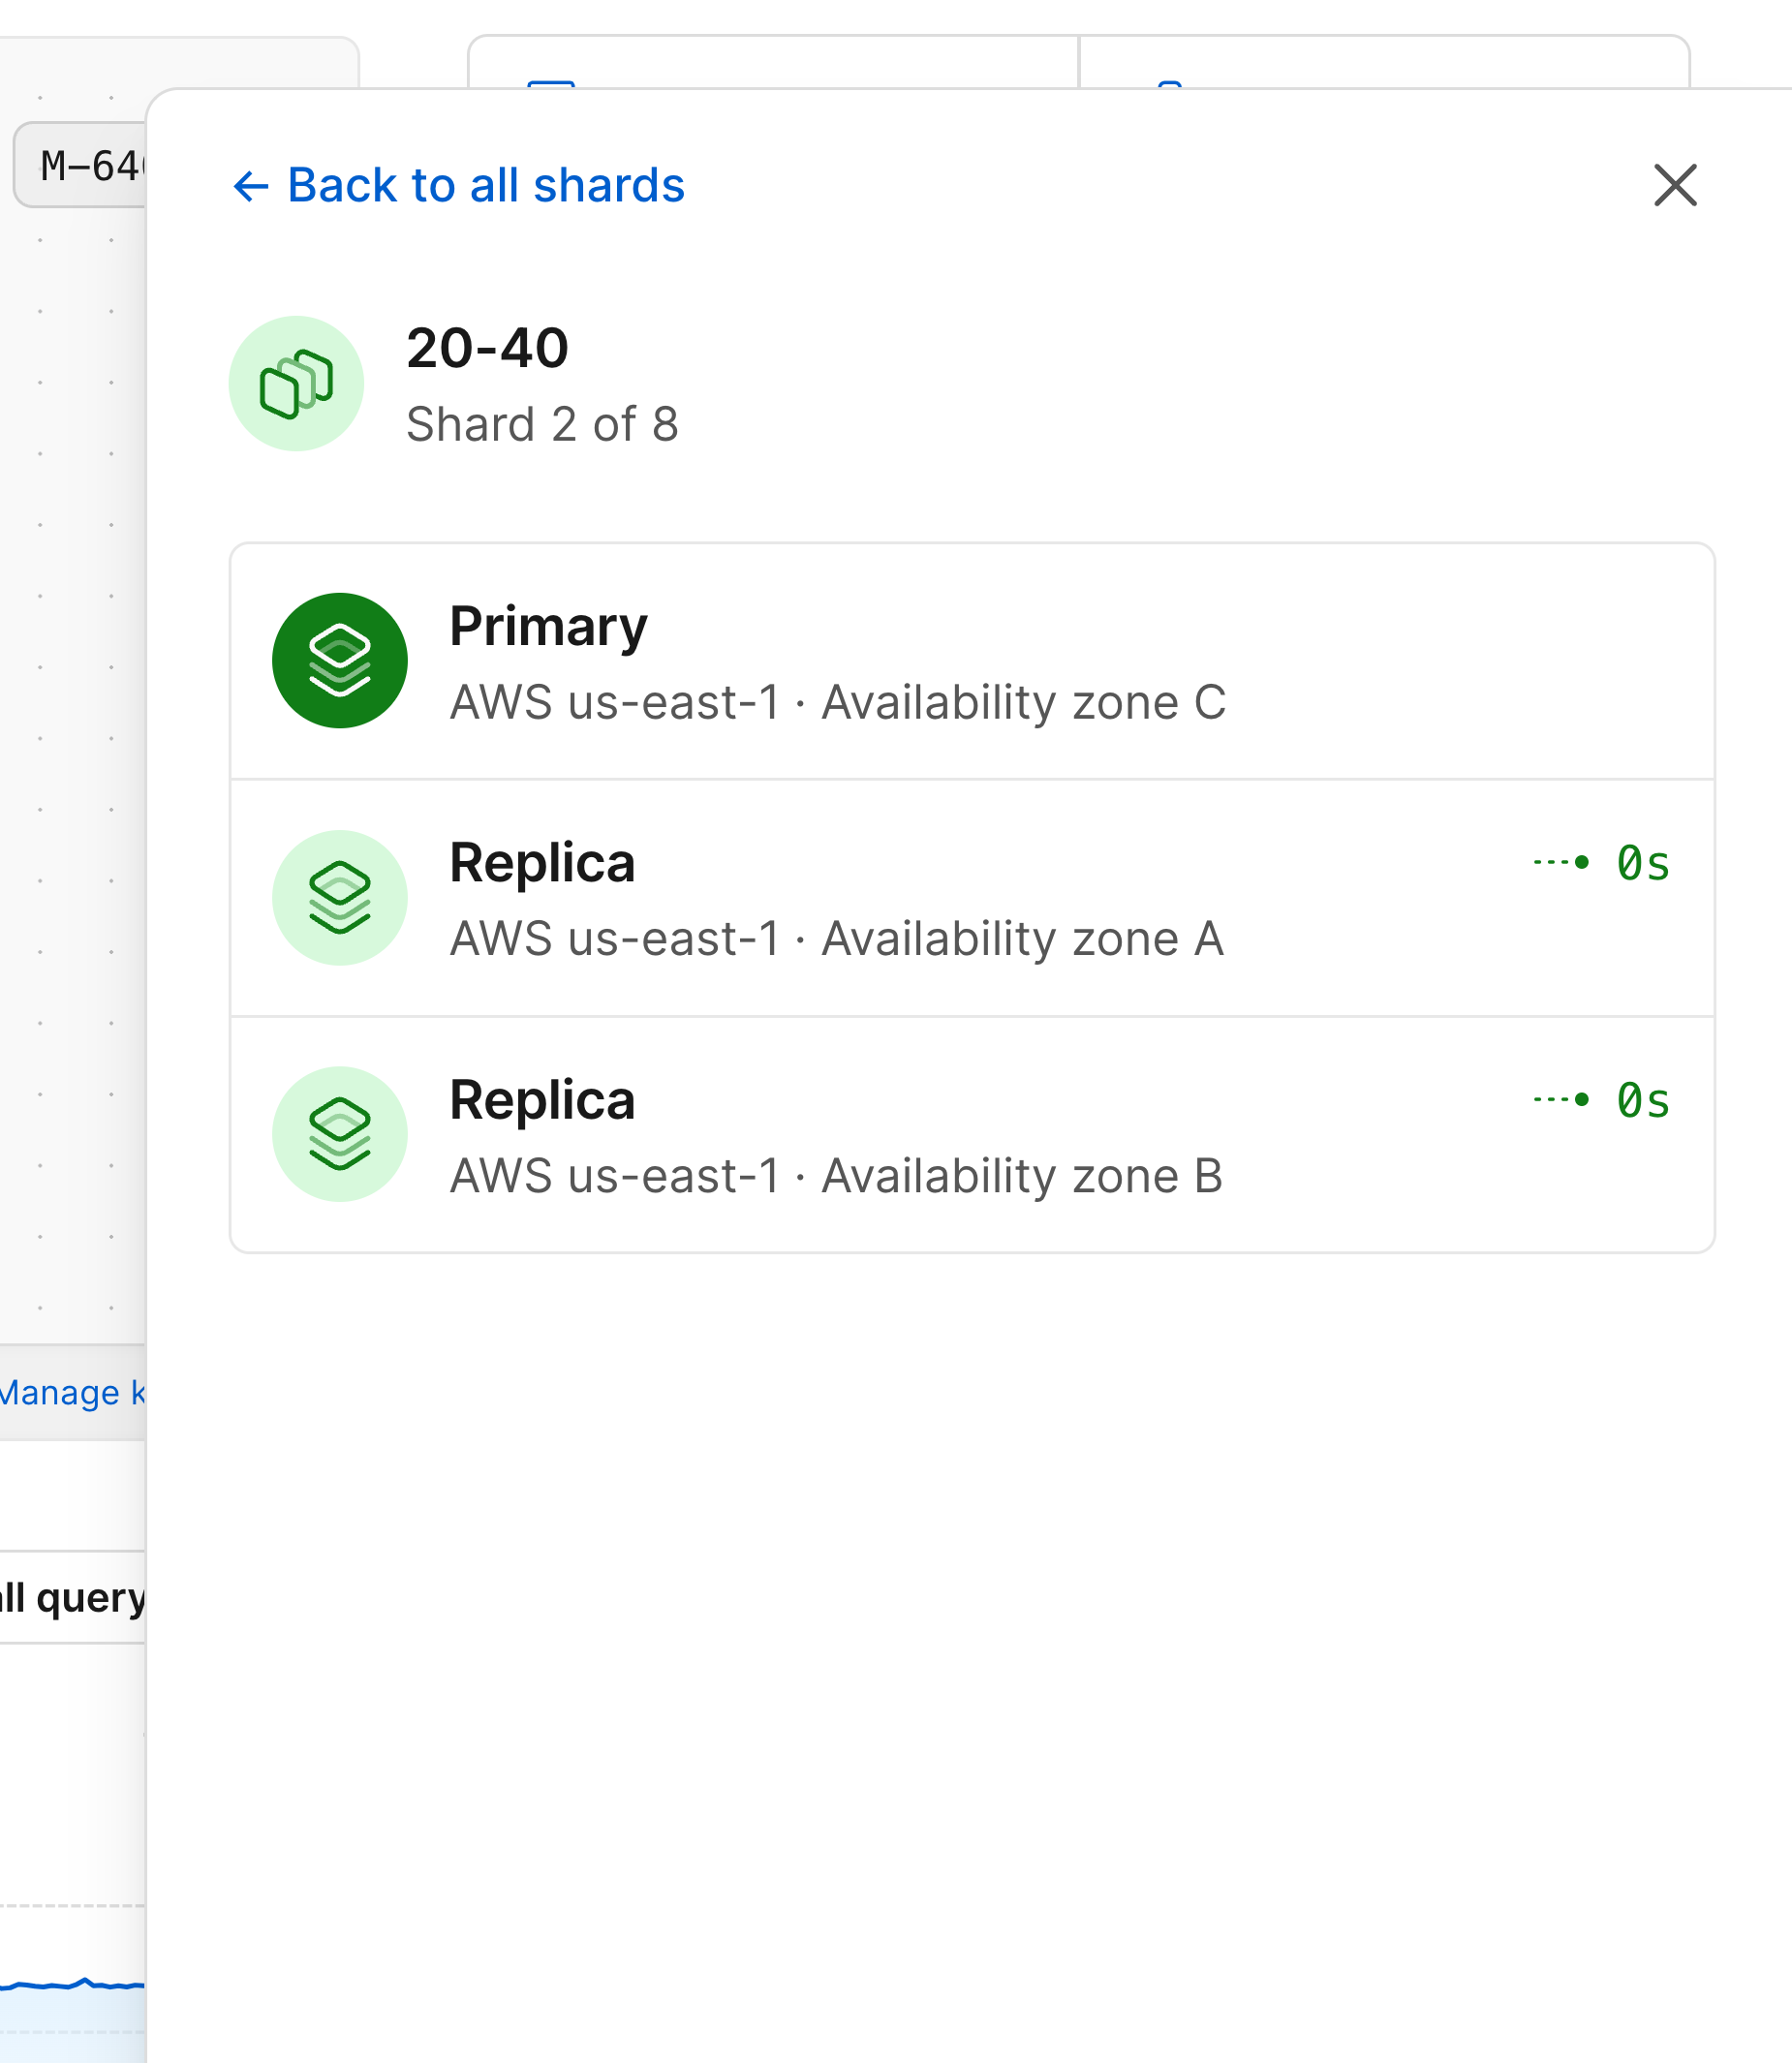
 Selecting the stack from the diagram will open a card displaying all of the shards belonging to that keyspace.
 After selecting a shard, you'll be able to choose to look at metrics for either that shard's primary or one of its replicas.
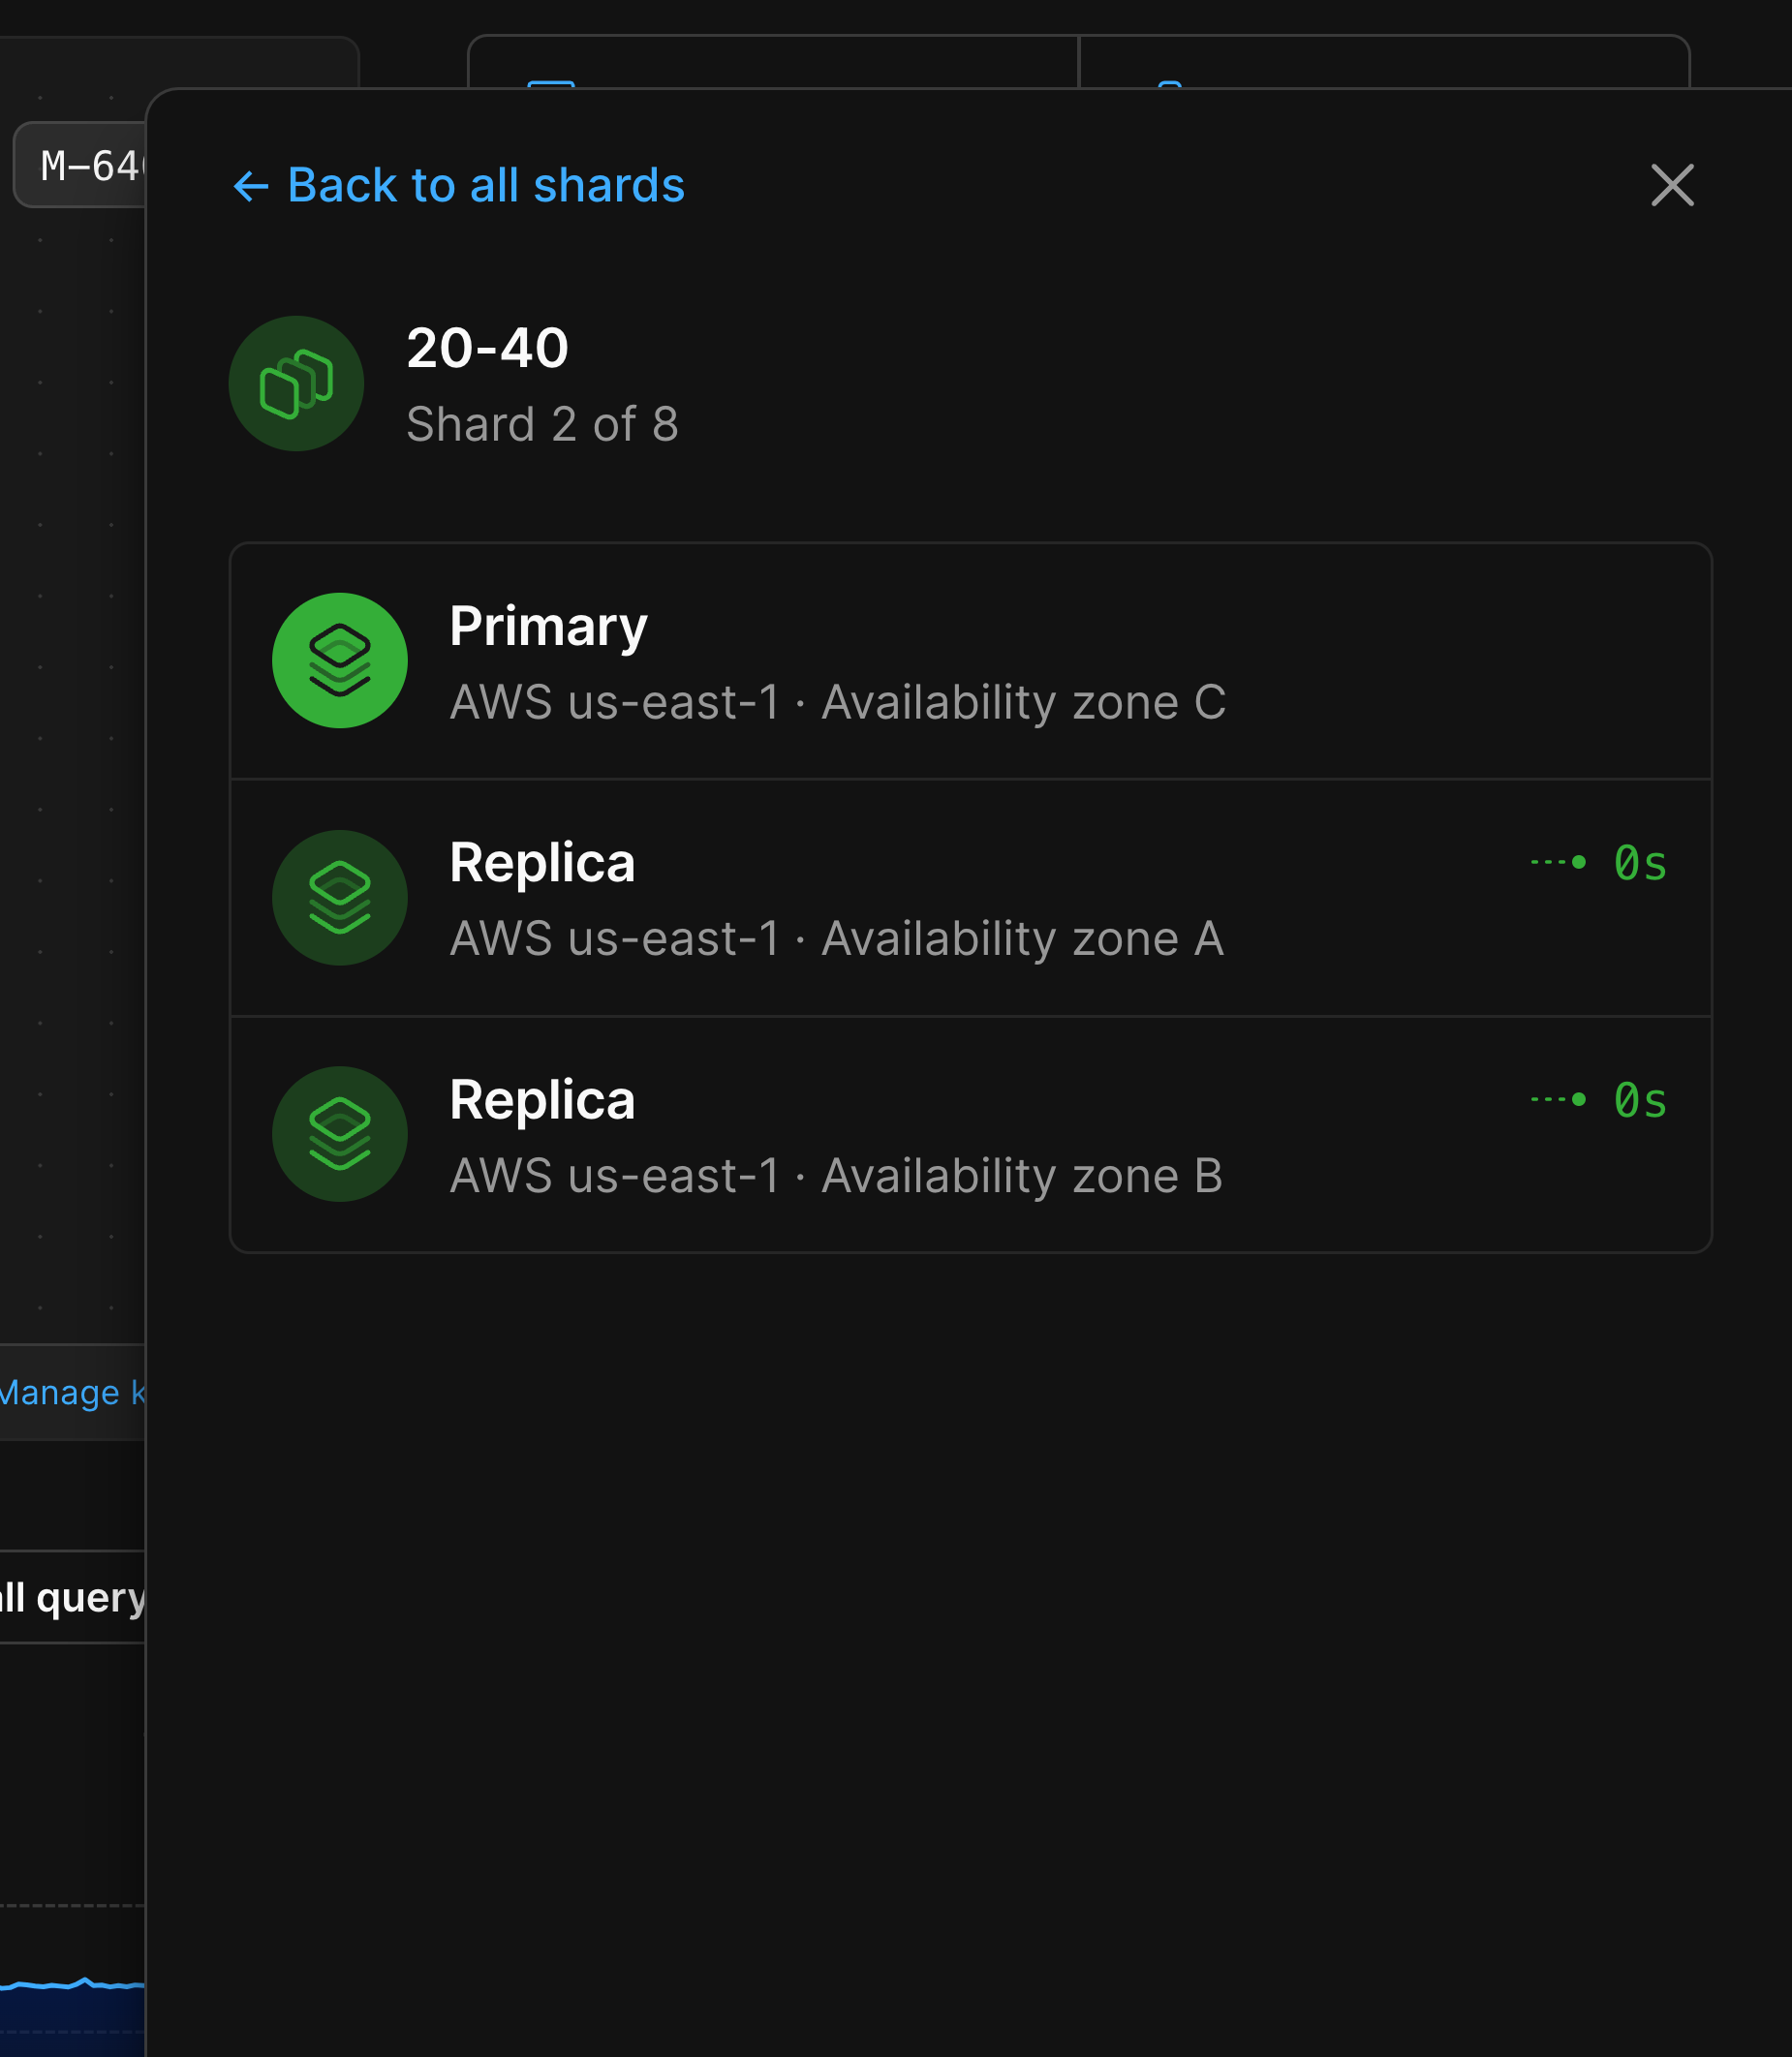
 Selecting one will show you the metrics for that specific node in your database architecture.
 ### Resizing
You can use the [Clusters page](/docs/vitess/cluster-configuration) menu to resize your keyspaces.
When a resize is in progress, this will be indicated at the top of the diagram.
### Resizing
You can use the [Clusters page](/docs/vitess/cluster-configuration) menu to resize your keyspaces.
When a resize is in progress, this will be indicated at the top of the diagram.
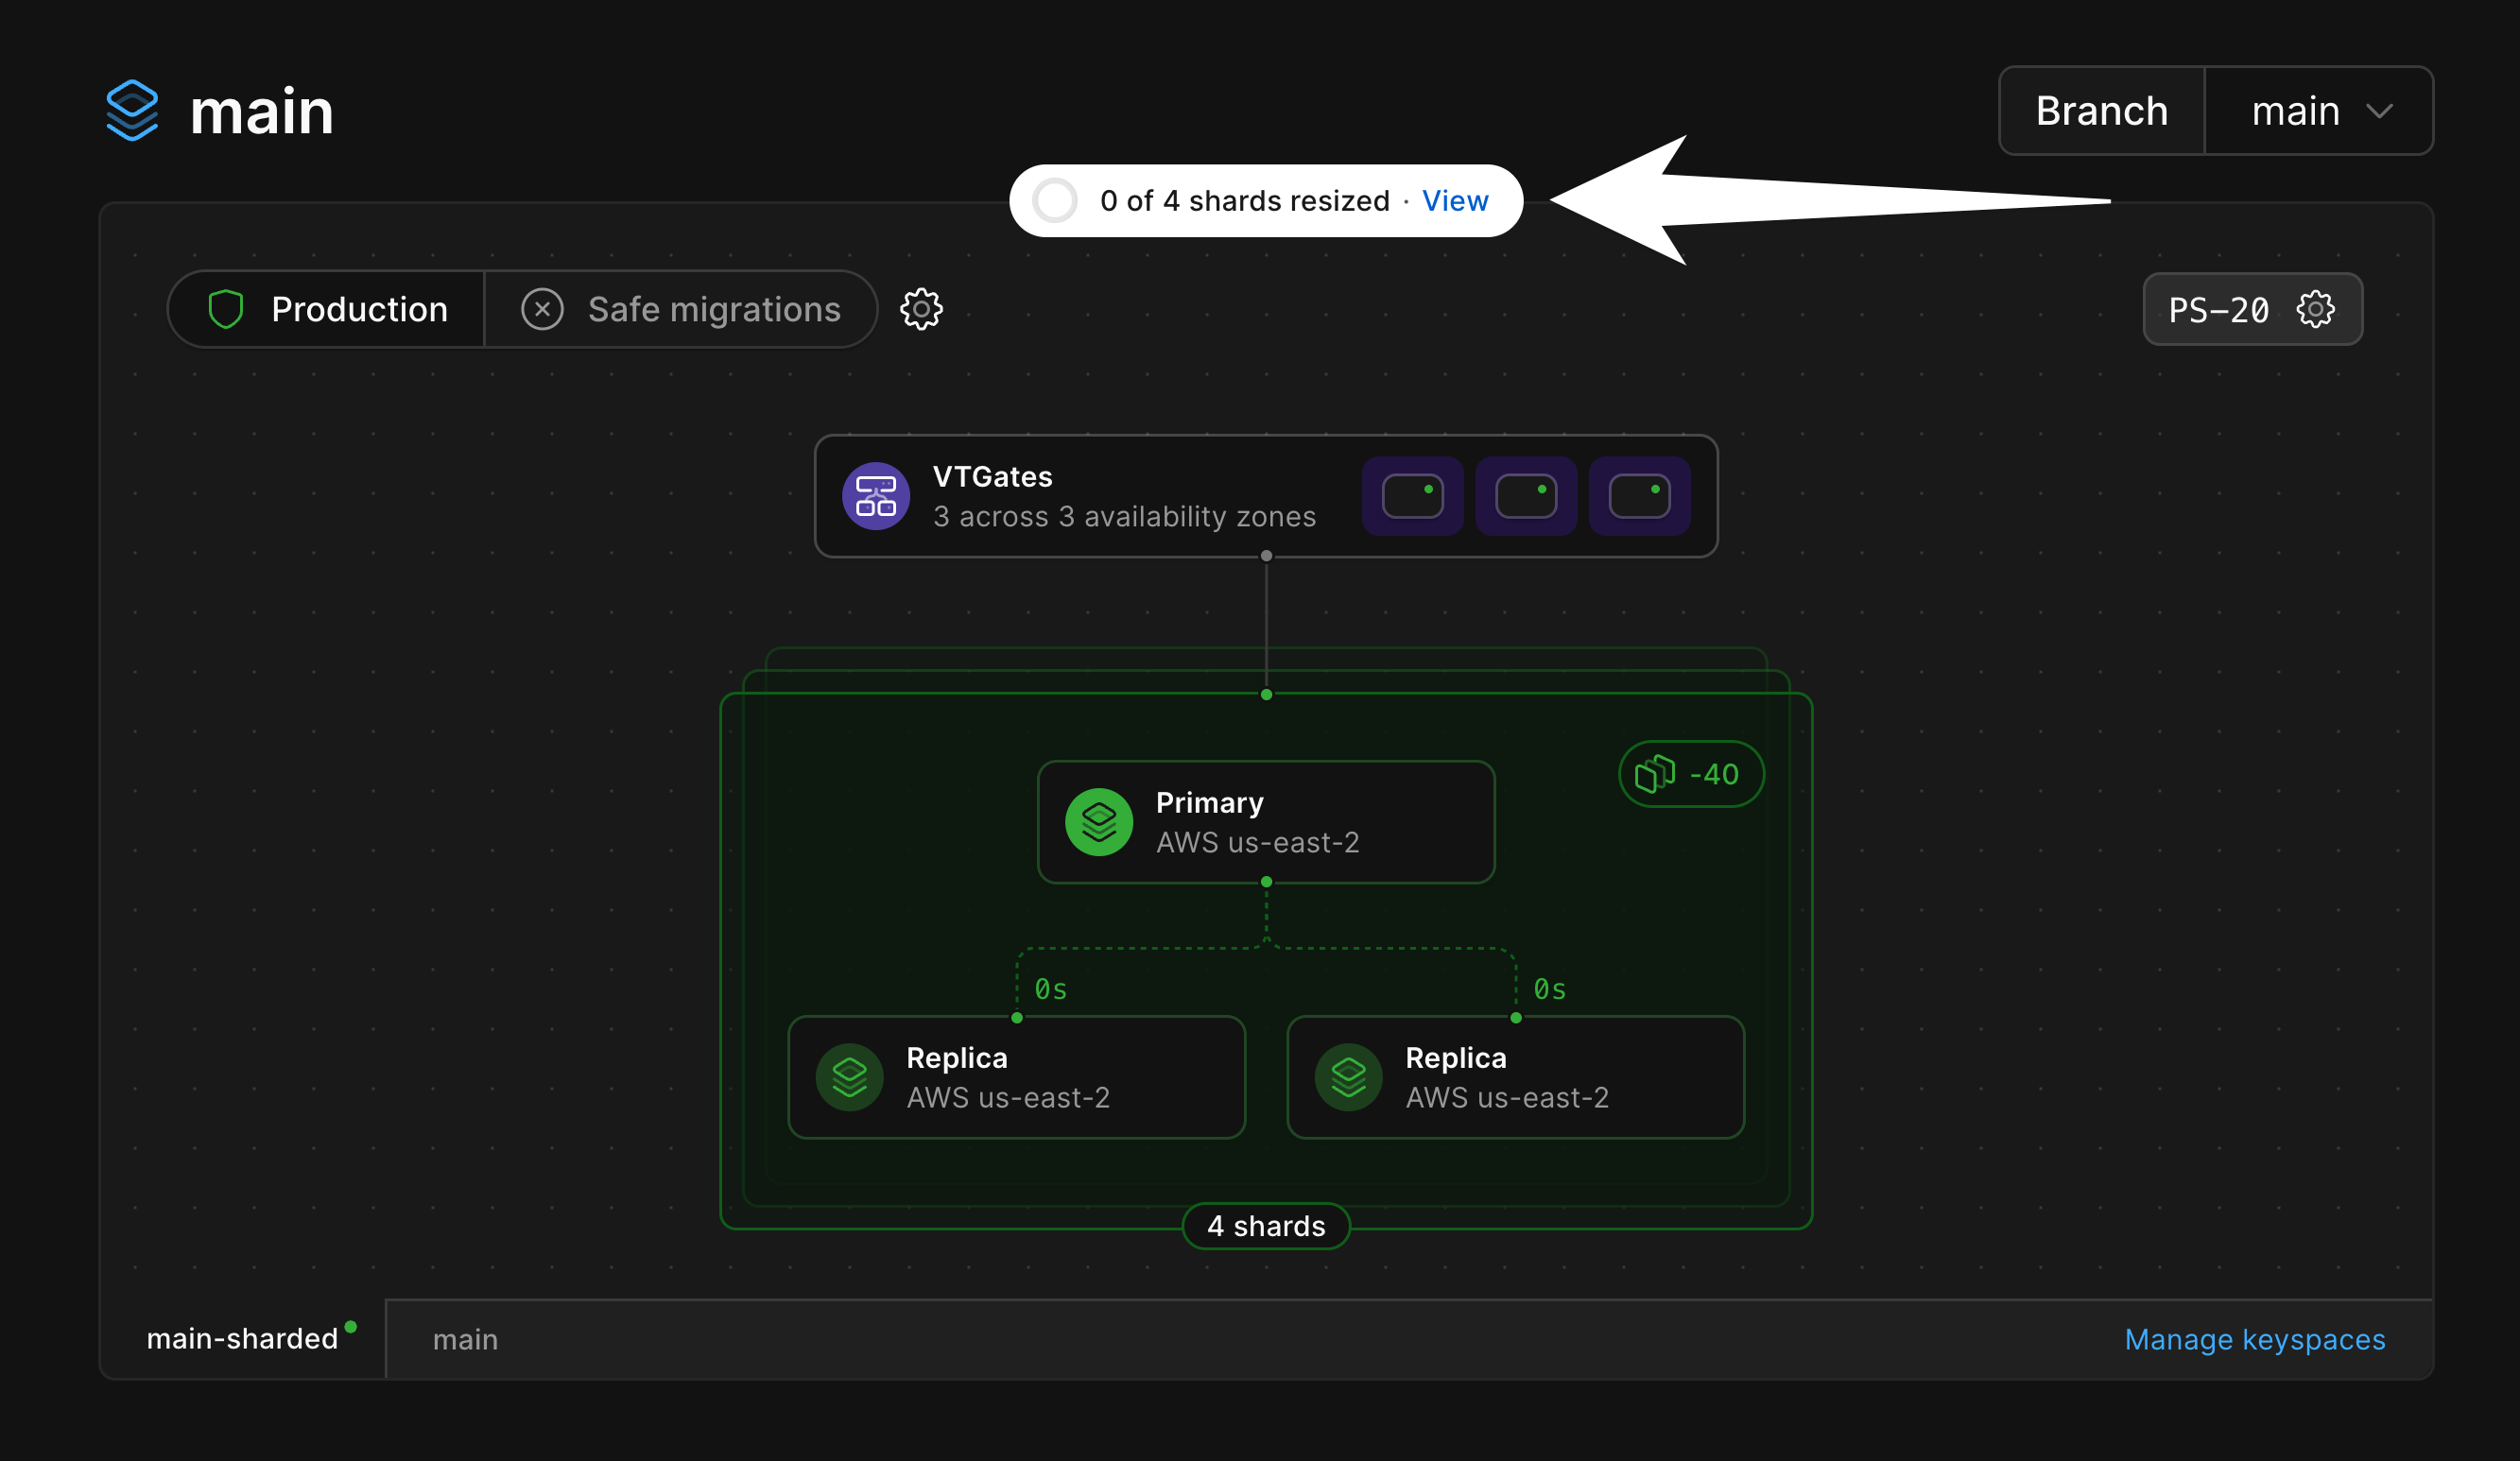
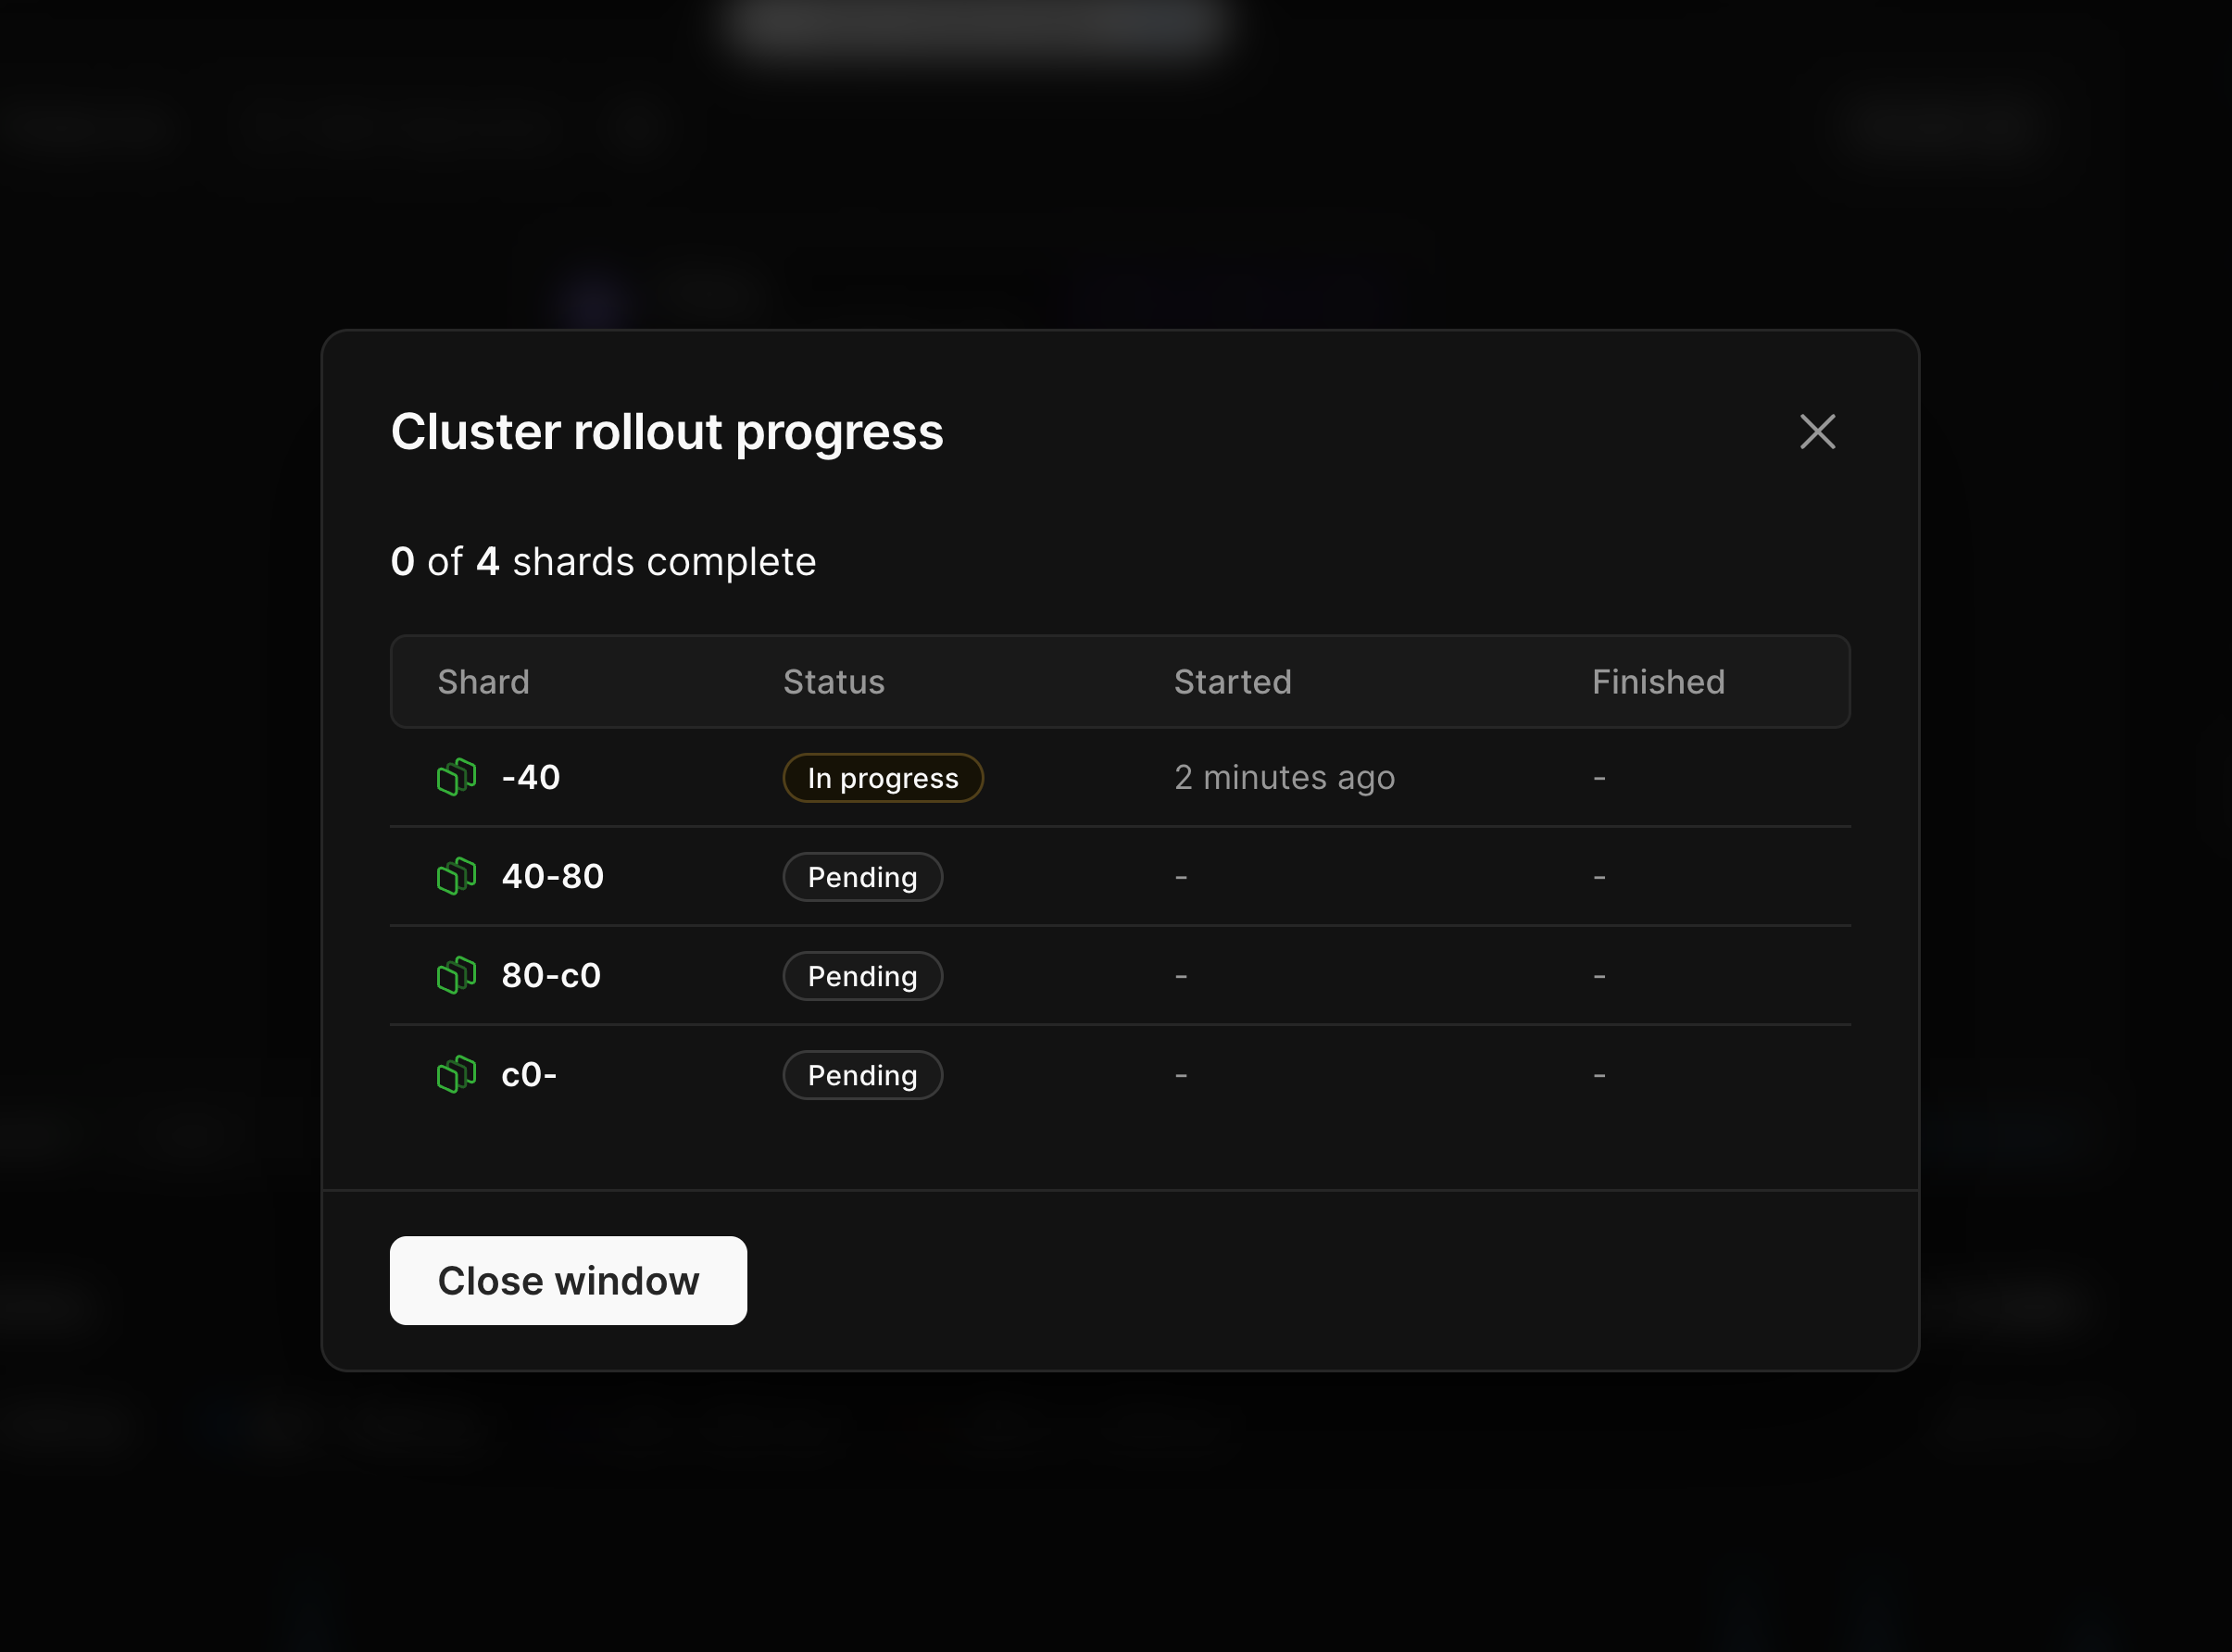
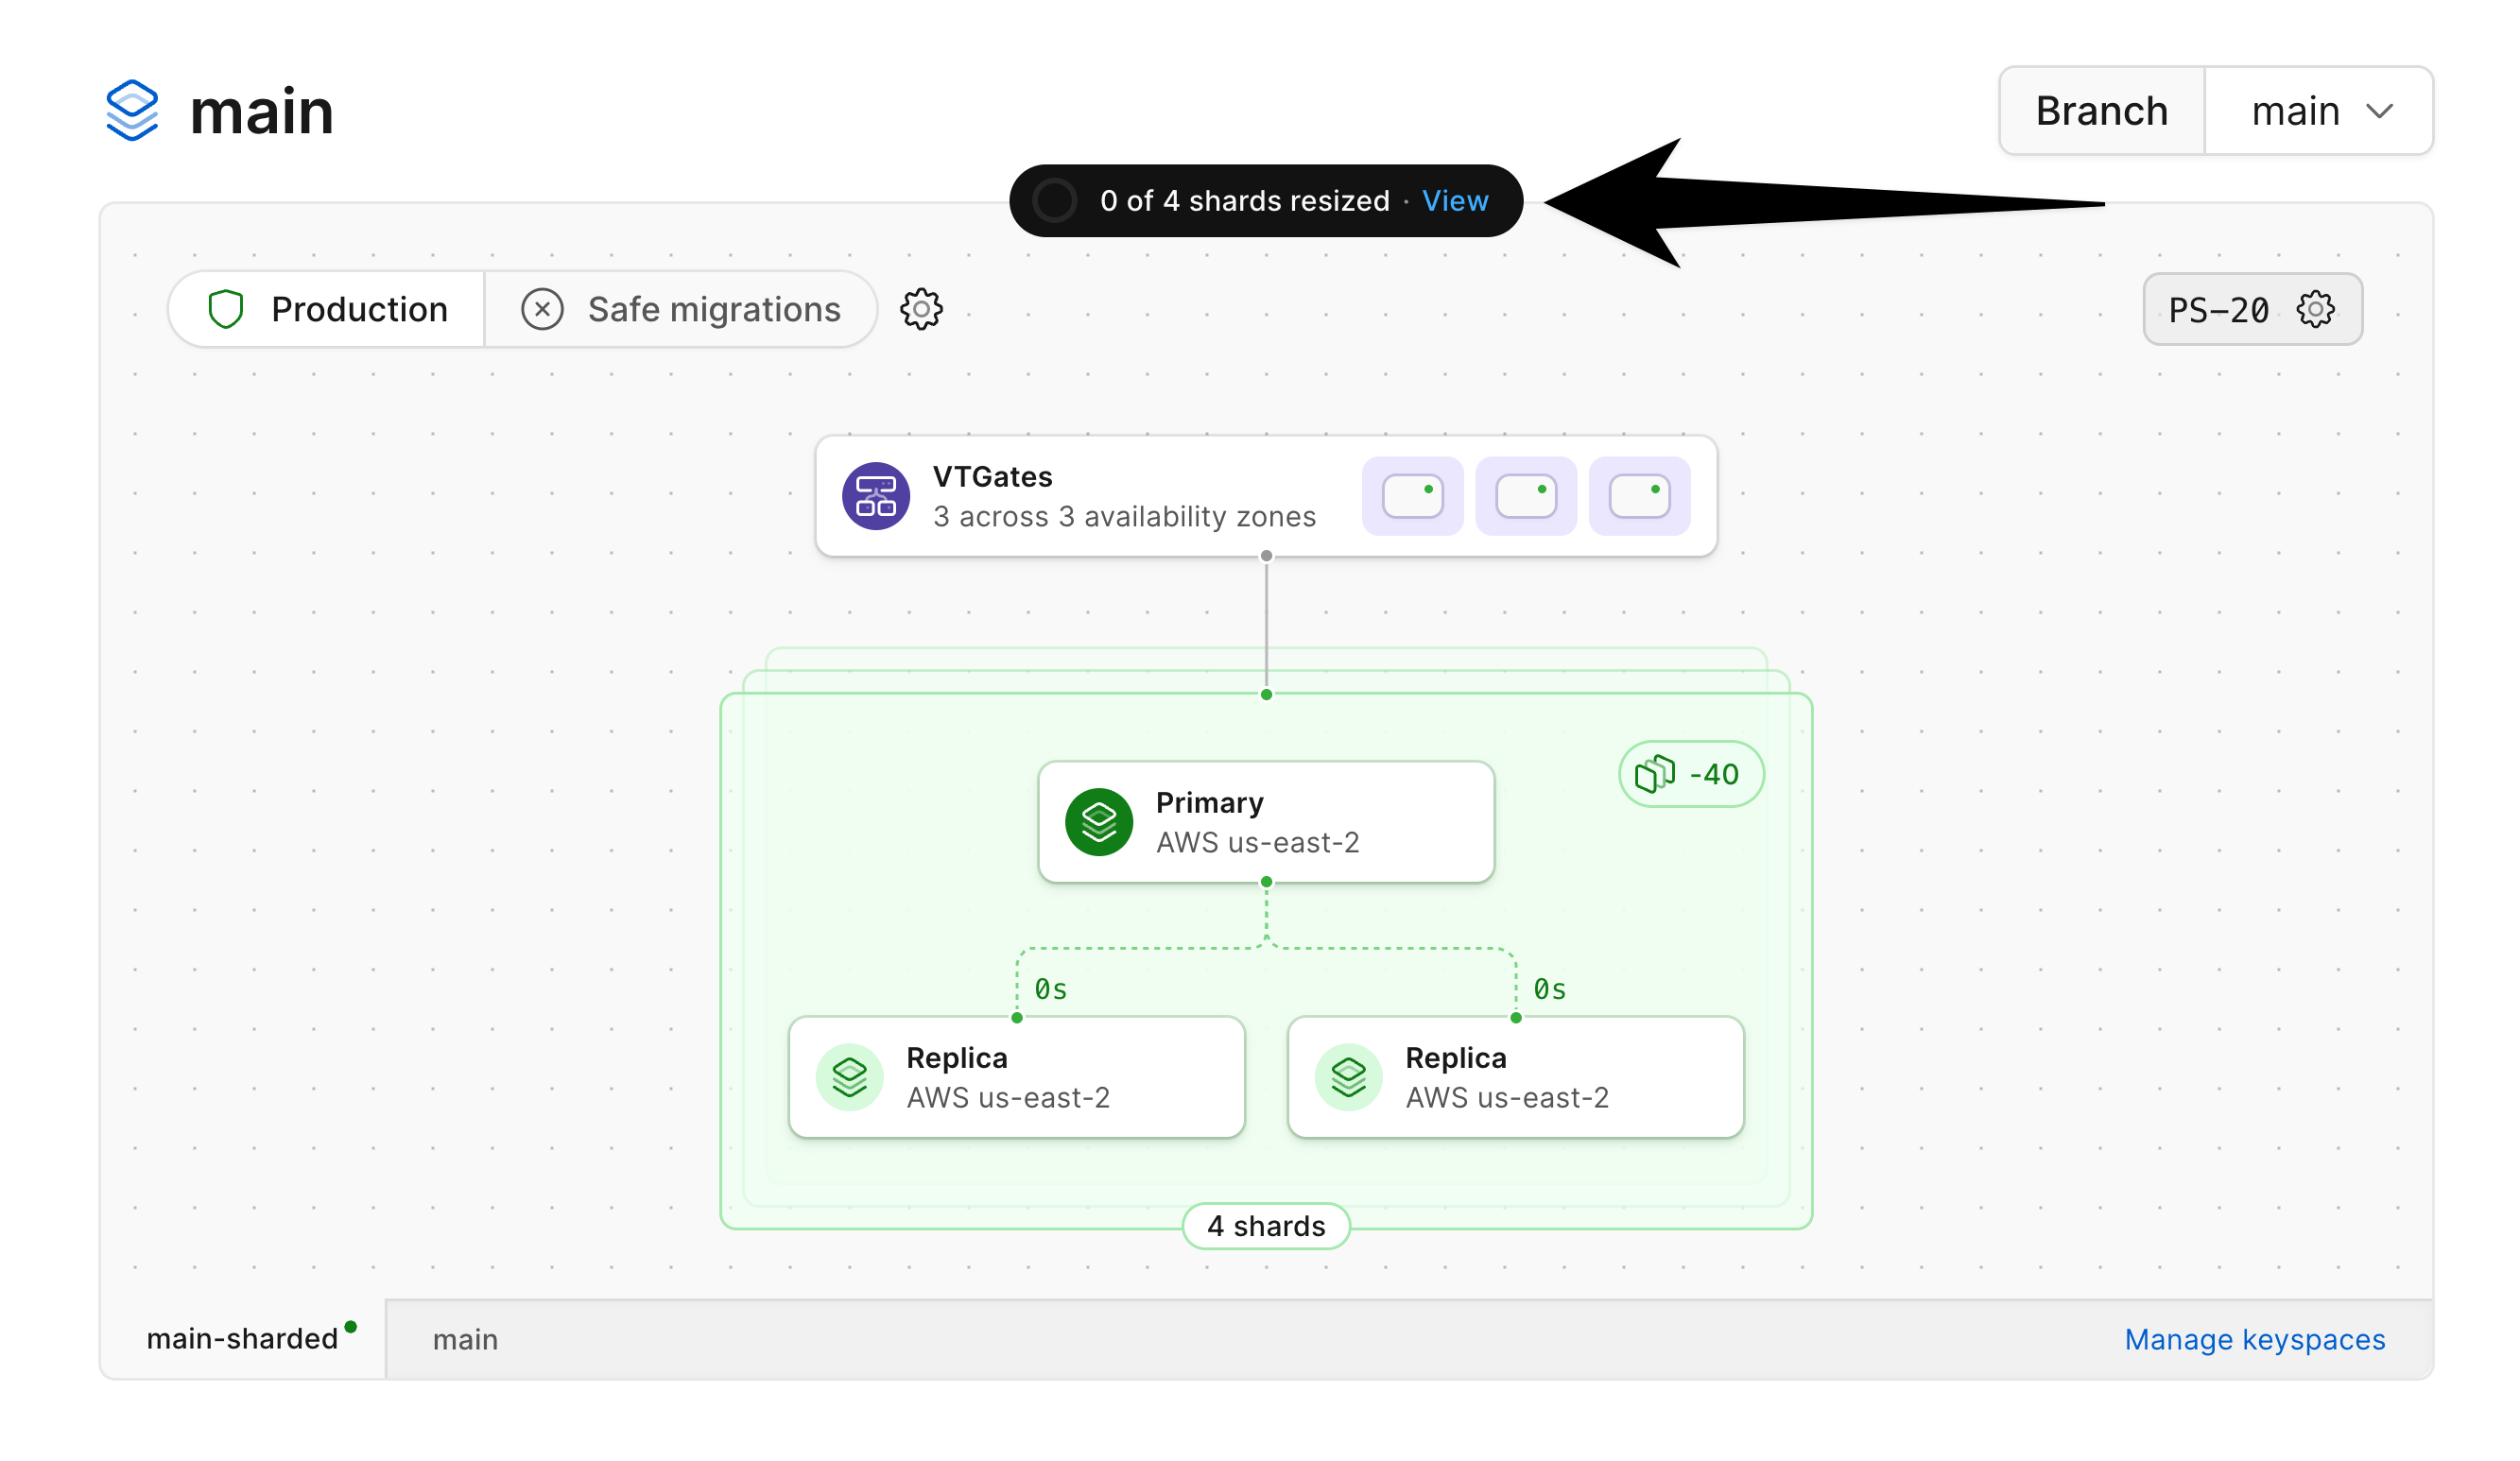 Click on "**View**" to see the status for each shard being resized:
 ## Need help?
Get help from [the PlanetScale Support team](https://support.planetscale.com/), or join our [GitHub discussion board](https://github.com/planetscale/discussion/discussions) to see how others are using PlanetScale.
---
> To find navigation and other pages in this documentation, fetch the llms.txt file at: https://planetscale.com/llms.txt
---
# Source: https://planetscale.com/docs/vitess/audit-log.md
# Source: https://planetscale.com/docs/security/audit-log.md
# Source: https://planetscale.com/docs/cli/audit-log.md
# PlanetScale CLI commands: audit log
## Getting Started
Make sure to first [set up your PlanetScale developer environment](/docs/cli/planetscale-environment-setup). Once you've installed the `pscale` CLI, you can interact with PlanetScale and manage your databases straight from the command line.
## The `audit log` command
Lists all [audit logs](/docs/security/audit-log) in an organization. The user running the command must have [Organization-level permissions](/docs/security/access-control), specifically `list_organization_audit_logs`.
**Usage:**
```bash theme={null}
pscale audit-log
## Need help?
Get help from [the PlanetScale Support team](https://support.planetscale.com/), or join our [GitHub discussion board](https://github.com/planetscale/discussion/discussions) to see how others are using PlanetScale.
---
> To find navigation and other pages in this documentation, fetch the llms.txt file at: https://planetscale.com/llms.txt
---
# Source: https://planetscale.com/docs/vitess/audit-log.md
# Source: https://planetscale.com/docs/security/audit-log.md
# Source: https://planetscale.com/docs/cli/audit-log.md
# PlanetScale CLI commands: audit log
## Getting Started
Make sure to first [set up your PlanetScale developer environment](/docs/cli/planetscale-environment-setup). Once you've installed the `pscale` CLI, you can interact with PlanetScale and manage your databases straight from the command line.
## The `audit log` command
Lists all [audit logs](/docs/security/audit-log) in an organization. The user running the command must have [Organization-level permissions](/docs/security/access-control), specifically `list_organization_audit_logs`.
**Usage:**
```bash theme={null}
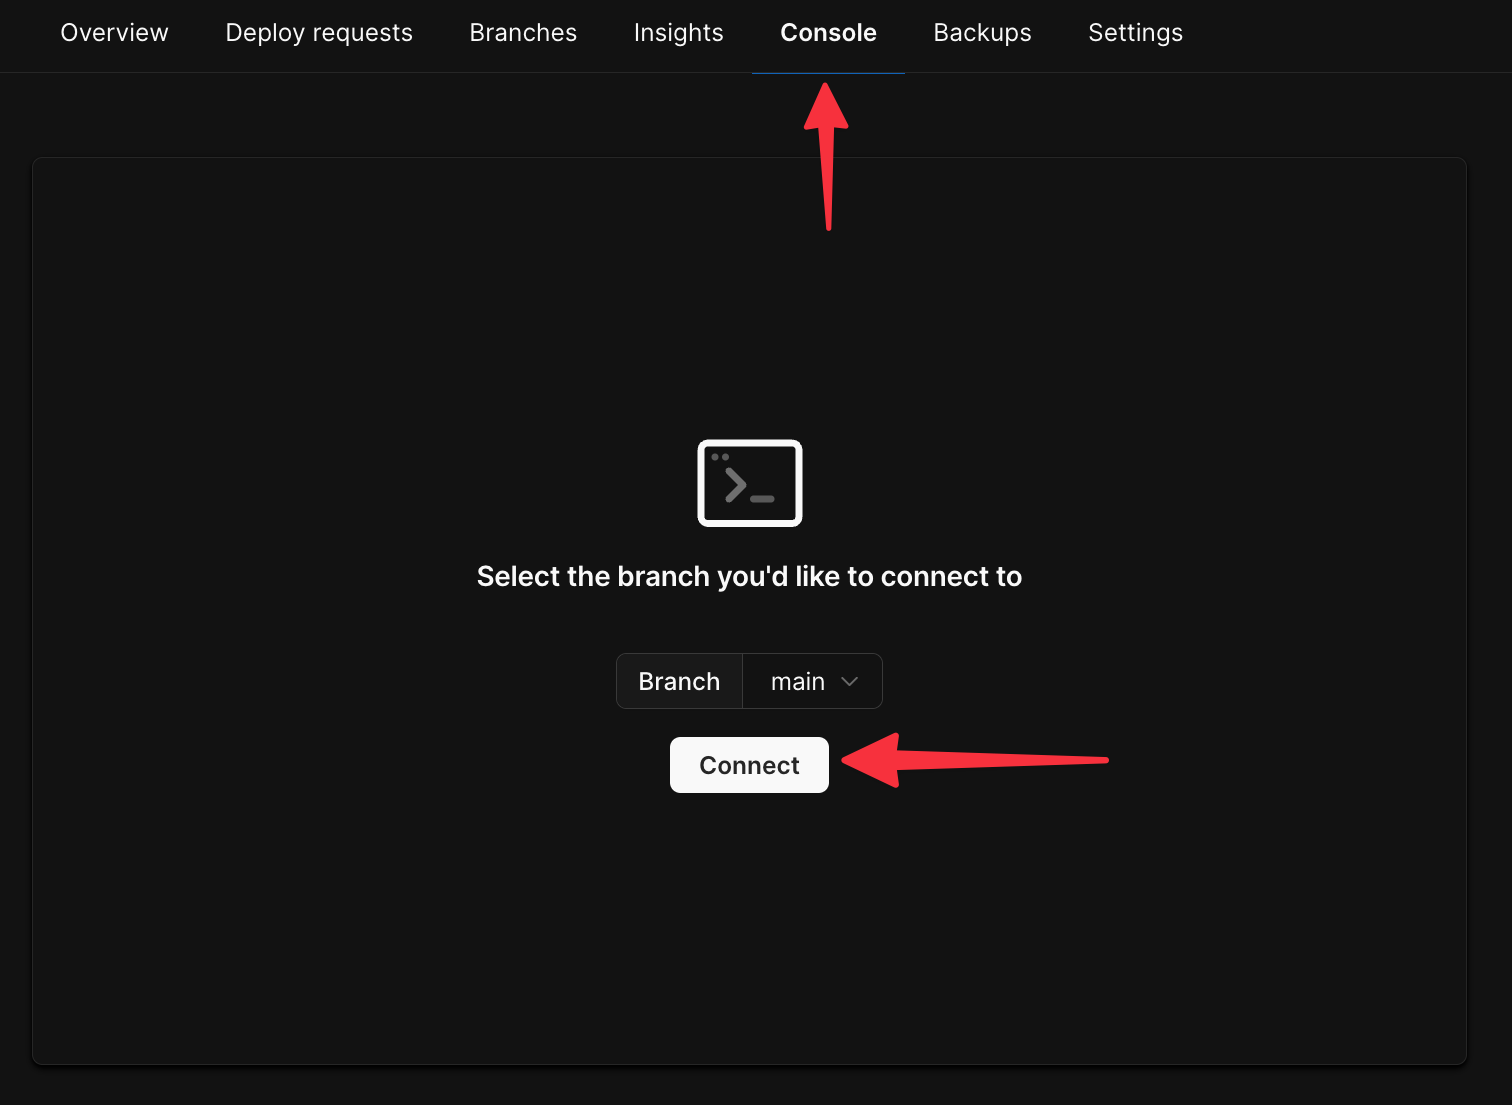
pscale audit-log  Once the database is created and ready, navigate to your dashboard and click the "Connect" button.
 From here, follow the instructions to create a new default role. This role will act as your admin role, with the highest level of privileges.
Though you may use this one for your migration, we recommend you use a separate role with lesser privileges for your migration and general database connections.
To create a new role, navigate to the [Role management page](/docs/postgres/connecting/roles) in your database settings. Click "New role" and give the role a memorable name. By default, `pg_read_all_data` and `pg_write_all_data` are enabled. In addition to these, enable `pg_create_subscription` and `postgres`, and then create the role.
From here, follow the instructions to create a new default role. This role will act as your admin role, with the highest level of privileges.
Though you may use this one for your migration, we recommend you use a separate role with lesser privileges for your migration and general database connections.
To create a new role, navigate to the [Role management page](/docs/postgres/connecting/roles) in your database settings. Click "New role" and give the role a memorable name. By default, `pg_read_all_data` and `pg_write_all_data` are enabled. In addition to these, enable `pg_create_subscription` and `postgres`, and then create the role.
 Copy the password and all other connection credentials into environment variables for later use:
```bash theme={null}
PLANETSCALE_USERNAME=pscale_api_XXXXXXXXXX.XXXXXXXXXX
PLANETSCALE_PASSWORD=pscale_pw_XXXXXXXXXXXXXXXXXXXXXXX
PLANETSCALE_HOST=XXXX.pg.psdb.cloud
PLANETSCALE_DBNAME=postgres
```
We also recommend that you increase `max_worker_processes` for the duration of the migration, in order to speed up data copying. Go to the "Parameters" tab of the "Clusters" page:
Copy the password and all other connection credentials into environment variables for later use:
```bash theme={null}
PLANETSCALE_USERNAME=pscale_api_XXXXXXXXXX.XXXXXXXXXX
PLANETSCALE_PASSWORD=pscale_pw_XXXXXXXXXXXXXXXXXXXXXXX
PLANETSCALE_HOST=XXXX.pg.psdb.cloud
PLANETSCALE_DBNAME=postgres
```
We also recommend that you increase `max_worker_processes` for the duration of the migration, in order to speed up data copying. Go to the "Parameters" tab of the "Clusters" page:
 On this page, increase this value from the default of `4` to `10` or more:
 You can decrease these values after the migration is complete.
## 2. Configure disk size on PlanetScale
If you are importing into a database backed by network-attached storage, you must configure your disk in advance to ensure your database will fit.
Though we support disk autoscaling for these, AWS and GCP limit how frequently disks can be resized.
If you don't ensure your disk is large enough for the import in advance, it will not be able to resize fast enough for a large data import.
To configure this, navigate to "Clusters" and then the "Storage" tab:
You can decrease these values after the migration is complete.
## 2. Configure disk size on PlanetScale
If you are importing into a database backed by network-attached storage, you must configure your disk in advance to ensure your database will fit.
Though we support disk autoscaling for these, AWS and GCP limit how frequently disks can be resized.
If you don't ensure your disk is large enough for the import in advance, it will not be able to resize fast enough for a large data import.
To configure this, navigate to "Clusters" and then the "Storage" tab:
 On this page, adjust the "Minimum disk size."
You should set this value to at least 150% of the size of the database you are migrating.
For example, if the database you are importing is 330 GB, you should set your minimum disk size to at least 500 GB.
The 50% overhead is to account for:
1. Data growth during the import process and
2. Table and index bloat that can occur during the import process.
This can be later mitigated with careful [VACUUMing](https://www.postgresql.org/docs/current/sql-vacuum.html) or using an extension like [pg\_squeeze](https://planetscale.com/docs/postgres/extensions/pg_squeeze), but is difficult to avoid during the migration itself.
When ready, queue and apply the changes.
You can check the "Changes" tab to see the status of the resize:
On this page, adjust the "Minimum disk size."
You should set this value to at least 150% of the size of the database you are migrating.
For example, if the database you are importing is 330 GB, you should set your minimum disk size to at least 500 GB.
The 50% overhead is to account for:
1. Data growth during the import process and
2. Table and index bloat that can occur during the import process.
This can be later mitigated with careful [VACUUMing](https://www.postgresql.org/docs/current/sql-vacuum.html) or using an extension like [pg\_squeeze](https://planetscale.com/docs/postgres/extensions/pg_squeeze), but is difficult to avoid during the migration itself.
When ready, queue and apply the changes.
You can check the "Changes" tab to see the status of the resize:
 Wait for it to indicate completion.
If you are importing to a Metal database, you must choose a disk size when first creating your database.
You should launch your cluster with a disk size at least 50% larger than the storage used by your current source database (150% of the existing total).
As an example, if you need to import a 330 GB database onto a PlanetScale `M-160` there are three storage sizes available:
Wait for it to indicate completion.
If you are importing to a Metal database, you must choose a disk size when first creating your database.
You should launch your cluster with a disk size at least 50% larger than the storage used by your current source database (150% of the existing total).
As an example, if you need to import a 330 GB database onto a PlanetScale `M-160` there are three storage sizes available:
 You should use the largest, 1.25TB option during the import.
After importing and cleaning up table bloat, you may be able to downsize to the 468 GB option.
Resizing is a no-downtime operation that can be performed on the [Clusters](https://planetscale.com/docs/postgres/cluster-configuration) page.
## 3. Prepare the Aurora database
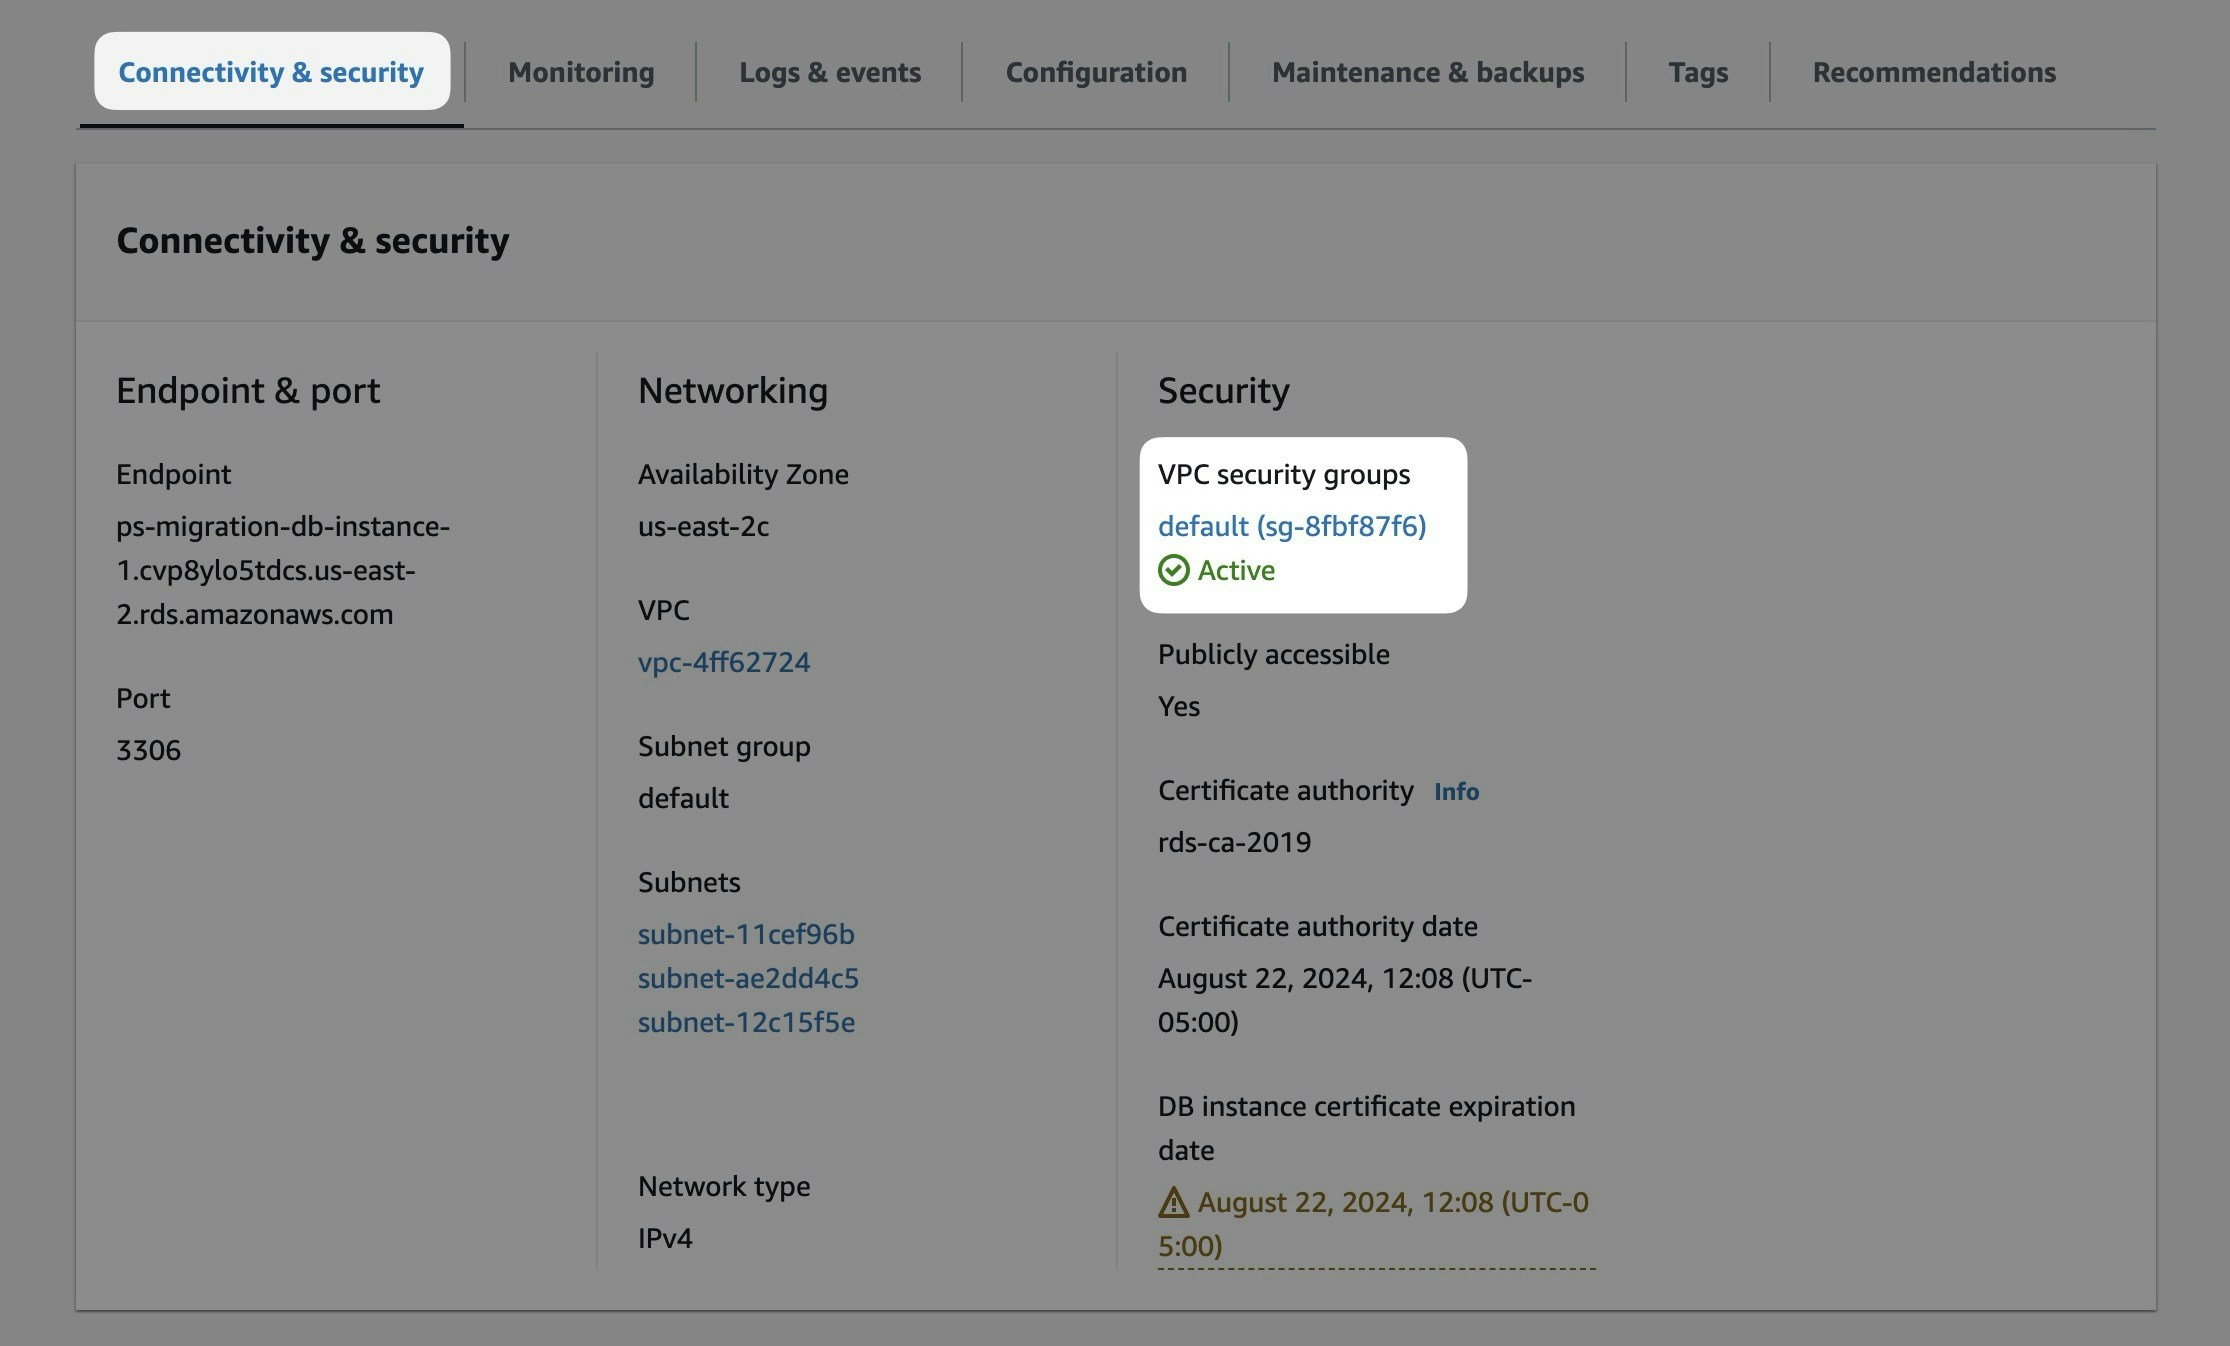
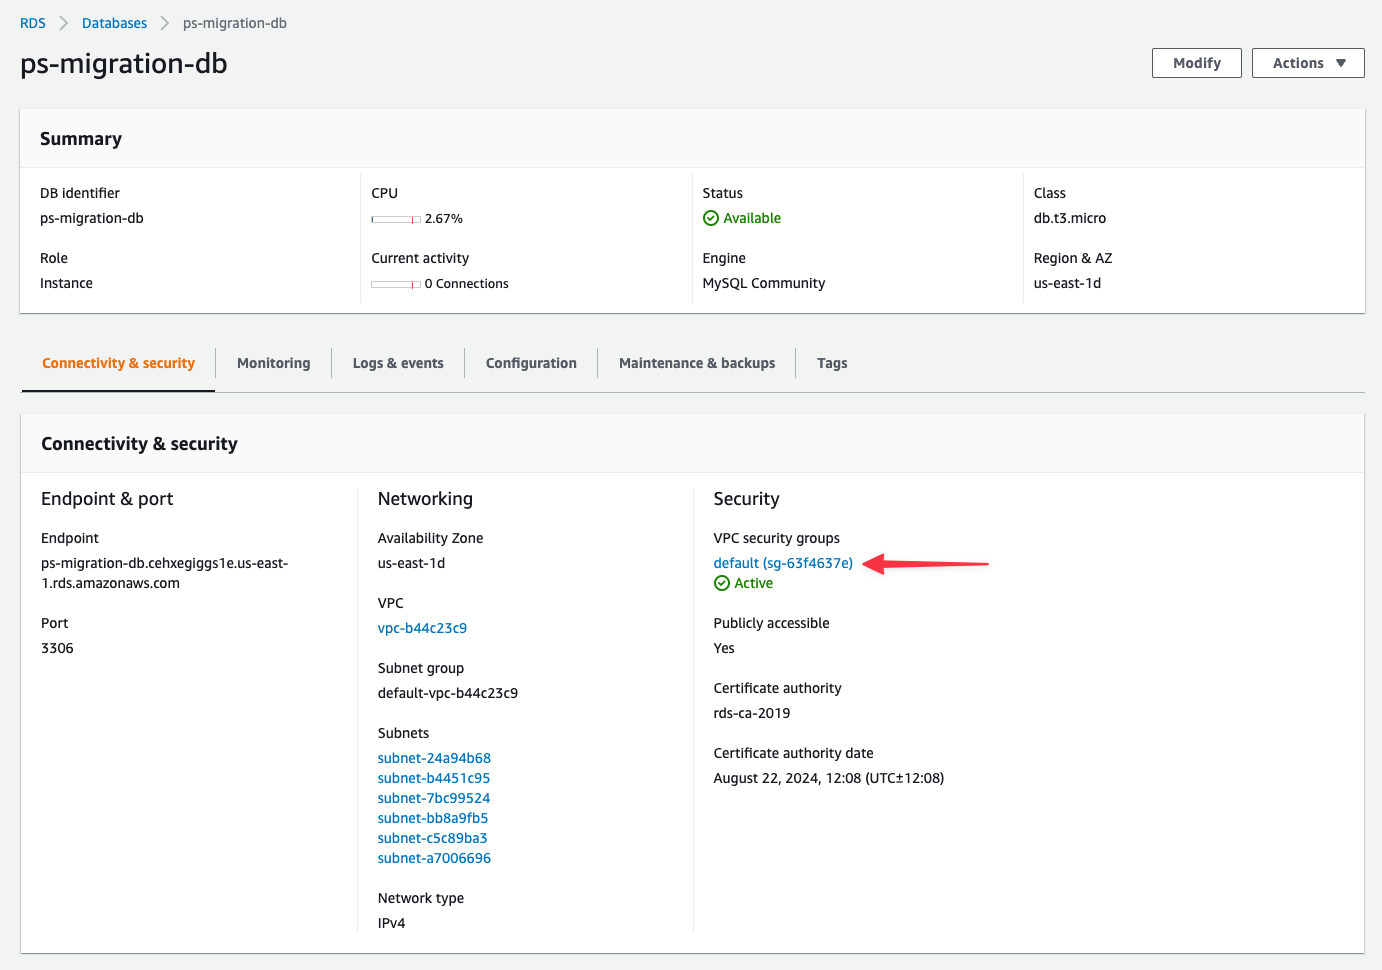
For PlanetScale to import your database, it needs to be publicly accessible. You can check this in your AWS dashboard.
In the writer instance of your database cluster, go to the “Connectivity & security” tab, and under “Security” you will see if your database is publicly accessible. If it says “No,” you will need to change it to be publicly accessible through the “Modify” button. If this is an issue, you cannot do this, or you have questions, please [contact support](https://planetscale.com/contact?initial=support) to explore your migration options.
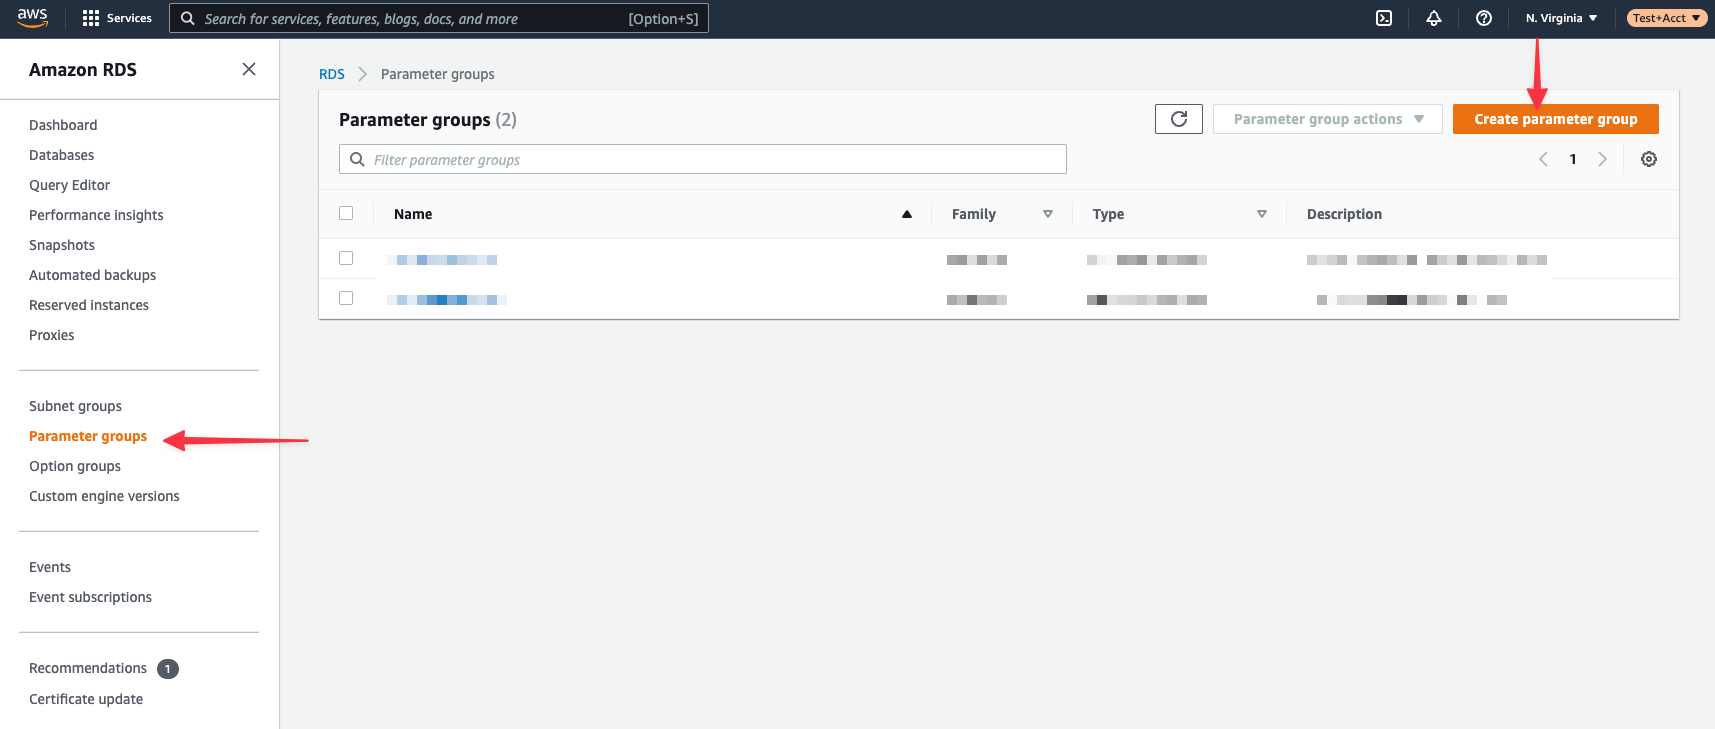
You will also need to change some parameters and ensure that logical replication is enabled. If you don't already have a parameter group for your Aurora cluster, create one from the "Parameter groups" page in the AWS console:
You should use the largest, 1.25TB option during the import.
After importing and cleaning up table bloat, you may be able to downsize to the 468 GB option.
Resizing is a no-downtime operation that can be performed on the [Clusters](https://planetscale.com/docs/postgres/cluster-configuration) page.
## 3. Prepare the Aurora database
For PlanetScale to import your database, it needs to be publicly accessible. You can check this in your AWS dashboard.
In the writer instance of your database cluster, go to the “Connectivity & security” tab, and under “Security” you will see if your database is publicly accessible. If it says “No,” you will need to change it to be publicly accessible through the “Modify” button. If this is an issue, you cannot do this, or you have questions, please [contact support](https://planetscale.com/contact?initial=support) to explore your migration options.
You will also need to change some parameters and ensure that logical replication is enabled. If you don't already have a parameter group for your Aurora cluster, create one from the "Parameter groups" page in the AWS console:
 From here, click the button to create a new group. Choose whichever name and description you want. Set the `Engine type` to `Aurora Postgres` and the `Parameter family group` to the version that matches your Aurora Postgres database. Set the `Type` to `DB Cluster Parameter Group`.
 If you already have a custom parameter group for your cluster, you can use the existing one instead. The two key parameters you need to update are adding `pglogical` to `shared_preload_libraries` and setting `rds.logical_replication` to `1`:

 Once these are set, you need to make sure your Aurora database is configured to use them. Navigate to your Aurora database in the AWS console, click the "Modify" button, and then ensure your database is using the parameter group:
 When you go to save the changes, select the option to either apply immediately or during your next maintenance window. The changes may take time to propagate. You can confirm that the `wal_level` is set to `logical` by running `SHOW wal_level;` on your Aurora database:
```sql theme={null}
postgres=> SHOW wal_level;
wal_level
-----------
logical
```
If you see a result other than `logical`, then it is not configured correctly. If you are having trouble getting the settings to propagate, you can try restarting the Aurora instance, though that will cause a period of downtime.
## 4. Copy schema from Aurora to PlanetScale
Before we begin migrating data, we first must copy the schema from Aurora to PlanetScale. We do this as a distinct set of steps using `pg_dump`.
When you go to save the changes, select the option to either apply immediately or during your next maintenance window. The changes may take time to propagate. You can confirm that the `wal_level` is set to `logical` by running `SHOW wal_level;` on your Aurora database:
```sql theme={null}
postgres=> SHOW wal_level;
wal_level
-----------
logical
```
If you see a result other than `logical`, then it is not configured correctly. If you are having trouble getting the settings to propagate, you can try restarting the Aurora instance, though that will cause a period of downtime.
## 4. Copy schema from Aurora to PlanetScale
Before we begin migrating data, we first must copy the schema from Aurora to PlanetScale. We do this as a distinct set of steps using `pg_dump`.
 This means that every time we run the above query, we're doing cross-keyspace `JOIN`s. In this case, we'll see a massive hit to performance, and application speed will feel slow to the end user.
Now that we have a good grasp on what we'd like to avoid, let's come up with some solutions. The main thing we need to solve is how to avoid cross-keyspace / cross-shard joins between `exercise_logs`, `users`, and `exercises`.
### The `users` table
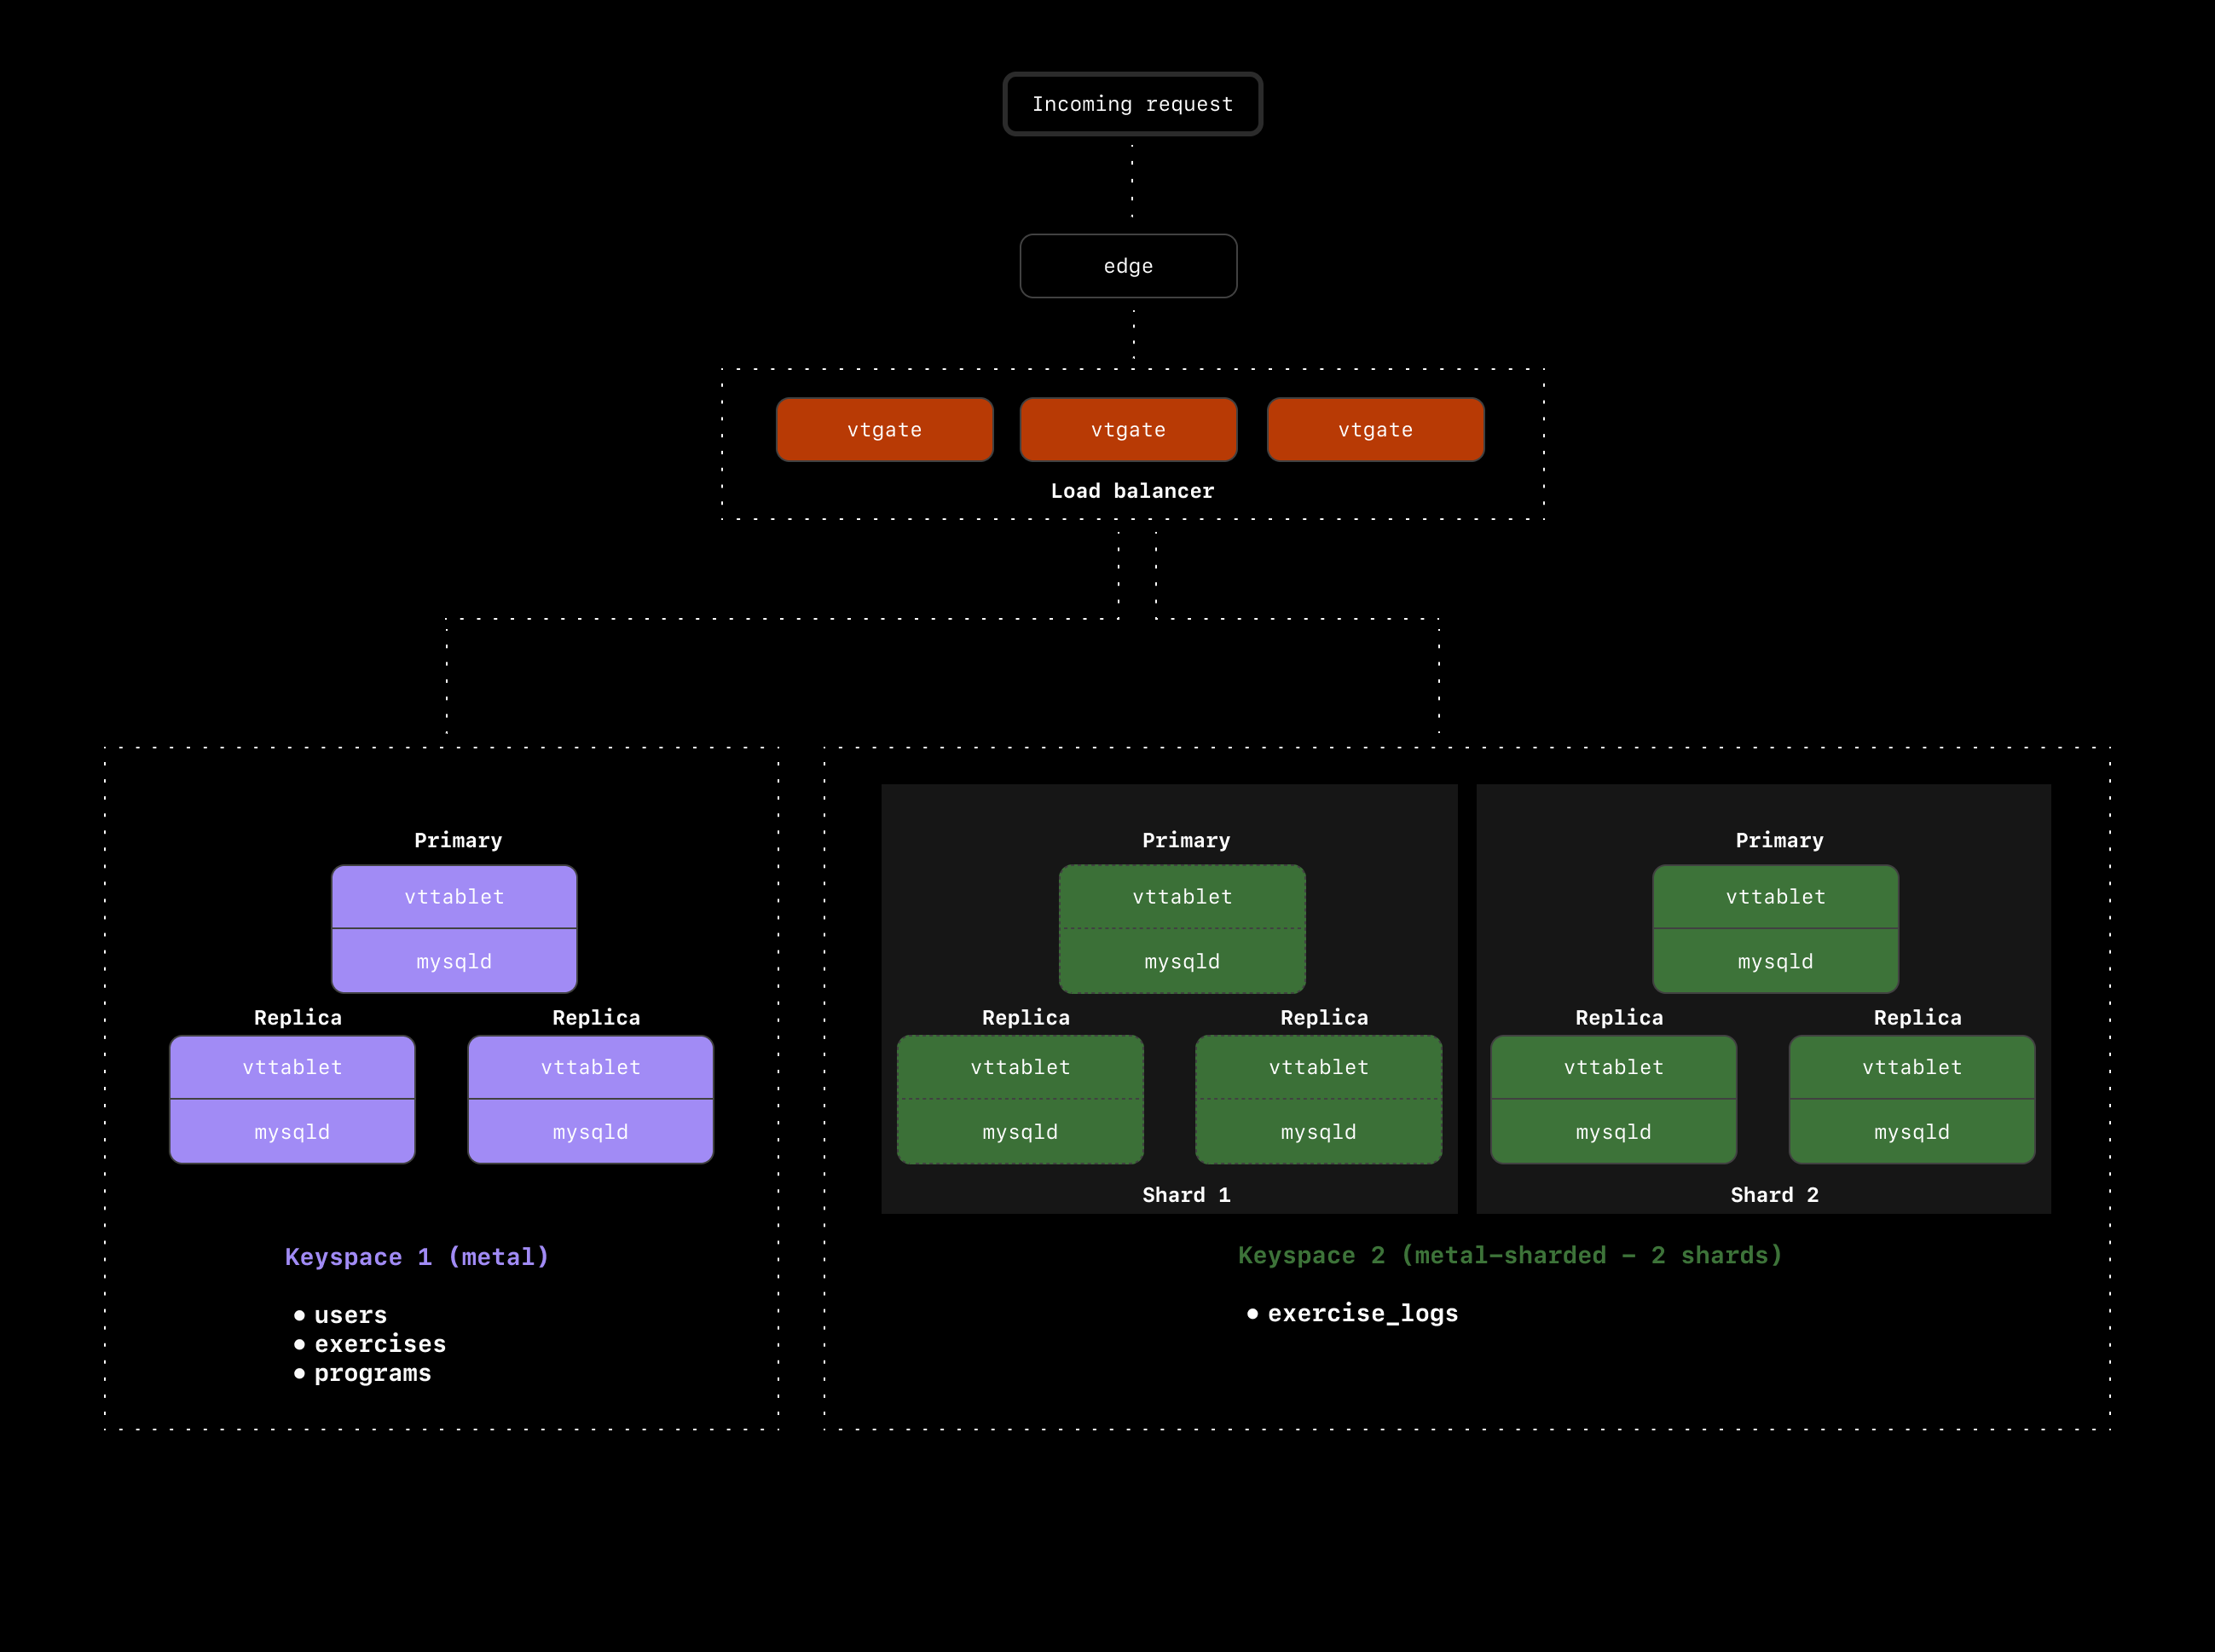
Let's start by looking at the `users` table. We already know we're using `exercise_logs.user_id` as the primary Vindex, so all exercise logs for a particular user will end up on the same shard. However, when we join that `user_id` on the `users` table, we have to jump back over to the `metal` keyspace to access the `users` table.
To avoid this, we should move the `users` table to the `metal-sharded` keyspace and shard that as well. We'll need to choose a primary Vindex for `users` in order to shard it. Because we sharded `exercise_logs` on the `user_id`, we now have a great option for the `users` primary vindex: `users.id`. Hashing on `users.id` will guarantee that for every user, both their user record and exercise logs all end up on the same shard.
Our cluster now looks like this:
This means that every time we run the above query, we're doing cross-keyspace `JOIN`s. In this case, we'll see a massive hit to performance, and application speed will feel slow to the end user.
Now that we have a good grasp on what we'd like to avoid, let's come up with some solutions. The main thing we need to solve is how to avoid cross-keyspace / cross-shard joins between `exercise_logs`, `users`, and `exercises`.
### The `users` table
Let's start by looking at the `users` table. We already know we're using `exercise_logs.user_id` as the primary Vindex, so all exercise logs for a particular user will end up on the same shard. However, when we join that `user_id` on the `users` table, we have to jump back over to the `metal` keyspace to access the `users` table.
To avoid this, we should move the `users` table to the `metal-sharded` keyspace and shard that as well. We'll need to choose a primary Vindex for `users` in order to shard it. Because we sharded `exercise_logs` on the `user_id`, we now have a great option for the `users` primary vindex: `users.id`. Hashing on `users.id` will guarantee that for every user, both their user record and exercise logs all end up on the same shard.
Our cluster now looks like this:
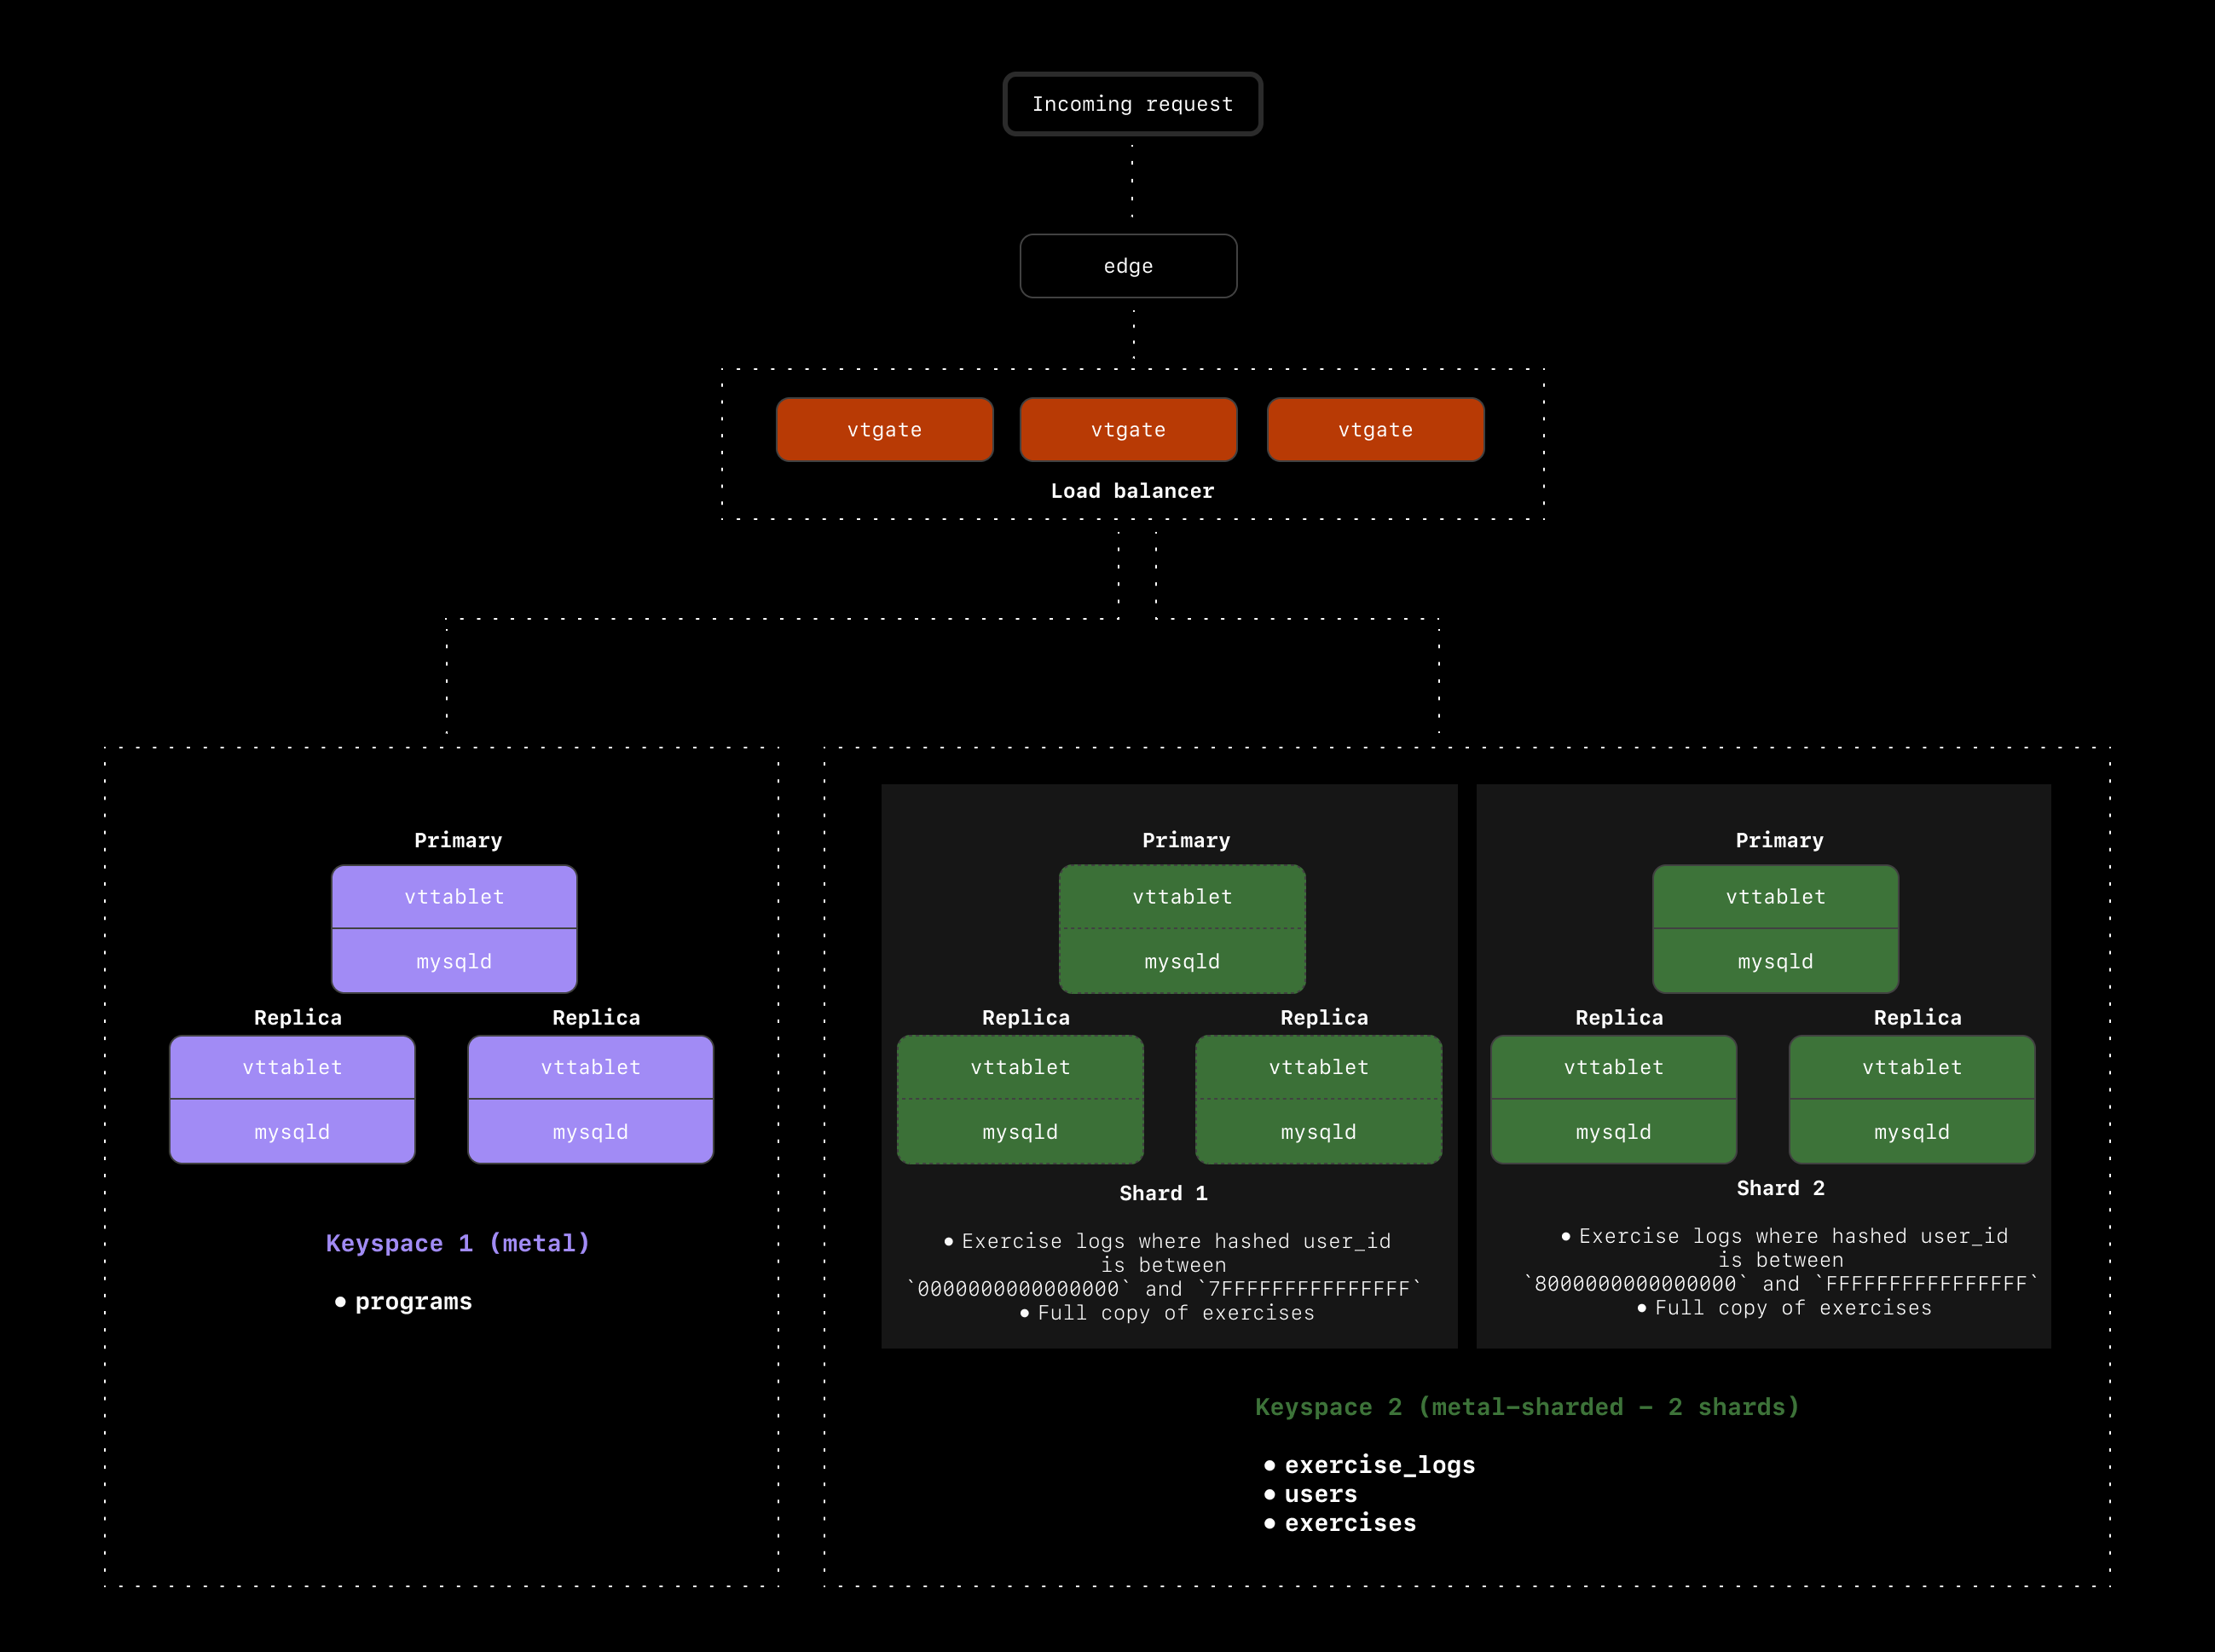
 ### The `exercises` table
The final table we need to deal with is the `exercises` table. This is a very small table with only 200 records. Users are not allowed to modify this table, so we have a predictable and slow growth rate with this one. Let's say we expect it to never exceed 1000 records.
We could shard this table, but given that each record here could be associated with any user or any exercise log, we don't have a great path to ensure there won't be any cross-shard queries.
An alternative option in this case is to use a [reference table](https://vitess.io/docs/api/reference/vreplication/reference_tables/) to make a copy of this table on every shard. This way, any time you want to join `exercise_logs` to the `exercises` table, the entire table already exists on the same shard as the exercise log.
Reference tables can be extremely useful in scenarios like this where the table is small and not frequently updated. If, however, this table frequently modified, this could be a poor solution. Every time a record is updated in the table, it must be updated across all shards as well. This is not a problem in our scenario, but keep this tradeoff in mind when choosing to use reference tables.
## A look at our final cluster setup
Here is a recap of what we've chosen for our `metal` database cluster:
* Sharded `exercise_logs` and `users`
* Used `exercise_logs.user_id` as the primary Vindex for `exercise_logs`
* Used `users.id` as the primary Vindex for `users`
* Used a reference table to copy `exercises` to every shard in our `sharded-metal` keyspace
### The `exercises` table
The final table we need to deal with is the `exercises` table. This is a very small table with only 200 records. Users are not allowed to modify this table, so we have a predictable and slow growth rate with this one. Let's say we expect it to never exceed 1000 records.
We could shard this table, but given that each record here could be associated with any user or any exercise log, we don't have a great path to ensure there won't be any cross-shard queries.
An alternative option in this case is to use a [reference table](https://vitess.io/docs/api/reference/vreplication/reference_tables/) to make a copy of this table on every shard. This way, any time you want to join `exercise_logs` to the `exercises` table, the entire table already exists on the same shard as the exercise log.
Reference tables can be extremely useful in scenarios like this where the table is small and not frequently updated. If, however, this table frequently modified, this could be a poor solution. Every time a record is updated in the table, it must be updated across all shards as well. This is not a problem in our scenario, but keep this tradeoff in mind when choosing to use reference tables.
## A look at our final cluster setup
Here is a recap of what we've chosen for our `metal` database cluster:
* Sharded `exercise_logs` and `users`
* Used `exercise_logs.user_id` as the primary Vindex for `exercise_logs`
* Used `users.id` as the primary Vindex for `users`
* Used a reference table to copy `exercises` to every shard in our `sharded-metal` keyspace
 With this setup, running our most common query does not involve any cross-keyspace or cross-shard queries:
```sql theme={null}
SELECT exercise_log.\*, users.name AS user_name, users.email, exercises.name AS exercise_name
FROM exercise_log
JOIN users ON exercise_log.user_id = users.id
JOIN exercises ON exercise_log.exercise_id = exercises.id
WHERE exercise_log.user_id = 5
AND DATE(exercise_log.created_at) = CURDATE();
```
## What next?
This was a simple example meant to get you thinking about how to design your sharding scheme. You likely have several commonly executed queries. It's of course nearly impossible to optimize for every single query, so what you want to do is optimize for the **most common** queries with the goal of avoiding cross-shard and cross-keyspace queries.
If you're on the PlanetScale Enterprise Support plan, we do some of this query analysis alongside you to come up with the best sharding scheme for your database. You can learn more about that process in our [Proof of concept documentation](/docs/proof-of-concept).
If you'd like more information about our Enterprise Support, don't hesitate to [reach out](https://planetscale.com/contact).
## Need help?
Get help from [the PlanetScale Support team](https://support.planetscale.com/), or join our [GitHub discussion board](https://github.com/planetscale/discussion/discussions) to see how others are using PlanetScale.
---
> To find navigation and other pages in this documentation, fetch the llms.txt file at: https://planetscale.com/llms.txt
---
# Source: https://planetscale.com/docs/vitess/tutorials/aws-lambda-connection-strings.md
# AWS Lambda connection strings
> In this guide, you'll learn how to properly store and use PlanetScale MySQL connection strings for use in AWS Lambda Functions.
## Introduction
We'll use a [pre-built NodeJS](https://github.com/planetscale/aws-connection-strings-example) app for this example, but you can follow along using your own application as well.
## Prerequisites
* An AWS account
* A [PlanetScale account](https://auth.planetscale.com/sign-up)
## Set up the database
With this setup, running our most common query does not involve any cross-keyspace or cross-shard queries:
```sql theme={null}
SELECT exercise_log.\*, users.name AS user_name, users.email, exercises.name AS exercise_name
FROM exercise_log
JOIN users ON exercise_log.user_id = users.id
JOIN exercises ON exercise_log.exercise_id = exercises.id
WHERE exercise_log.user_id = 5
AND DATE(exercise_log.created_at) = CURDATE();
```
## What next?
This was a simple example meant to get you thinking about how to design your sharding scheme. You likely have several commonly executed queries. It's of course nearly impossible to optimize for every single query, so what you want to do is optimize for the **most common** queries with the goal of avoiding cross-shard and cross-keyspace queries.
If you're on the PlanetScale Enterprise Support plan, we do some of this query analysis alongside you to come up with the best sharding scheme for your database. You can learn more about that process in our [Proof of concept documentation](/docs/proof-of-concept).
If you'd like more information about our Enterprise Support, don't hesitate to [reach out](https://planetscale.com/contact).
## Need help?
Get help from [the PlanetScale Support team](https://support.planetscale.com/), or join our [GitHub discussion board](https://github.com/planetscale/discussion/discussions) to see how others are using PlanetScale.
---
> To find navigation and other pages in this documentation, fetch the llms.txt file at: https://planetscale.com/llms.txt
---
# Source: https://planetscale.com/docs/vitess/tutorials/aws-lambda-connection-strings.md
# AWS Lambda connection strings
> In this guide, you'll learn how to properly store and use PlanetScale MySQL connection strings for use in AWS Lambda Functions.
## Introduction
We'll use a [pre-built NodeJS](https://github.com/planetscale/aws-connection-strings-example) app for this example, but you can follow along using your own application as well.
## Prerequisites
* An AWS account
* A [PlanetScale account](https://auth.planetscale.com/sign-up)
## Set up the database
 Create a simple table & insert some data using the following script:
```sql theme={null}
CREATE TABLE Tasks(
Id int PRIMARY KEY AUTO_INCREMENT,
Name varchar(100),
IsDone bit
);
INSERT INTO Tasks (Name) VALUES ('Clean the kitchen');
INSERT INTO Tasks (Name) VALUES ('Fold the laundry');
INSERT INTO Tasks (Name) VALUES ('Watch the sportsball game');
```
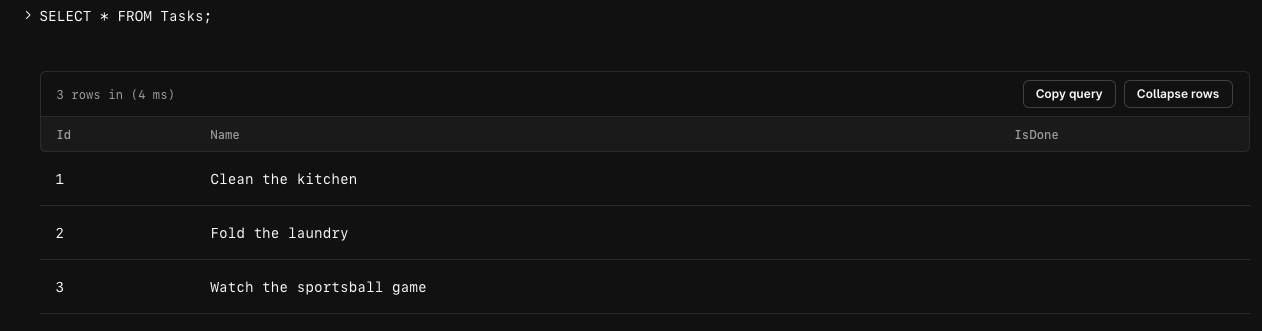
You may run `SELECT * FROM Tasks` to ensure the data was properly added from the console.
Create a simple table & insert some data using the following script:
```sql theme={null}
CREATE TABLE Tasks(
Id int PRIMARY KEY AUTO_INCREMENT,
Name varchar(100),
IsDone bit
);
INSERT INTO Tasks (Name) VALUES ('Clean the kitchen');
INSERT INTO Tasks (Name) VALUES ('Fold the laundry');
INSERT INTO Tasks (Name) VALUES ('Watch the sportsball game');
```
You may run `SELECT * FROM Tasks` to ensure the data was properly added from the console.
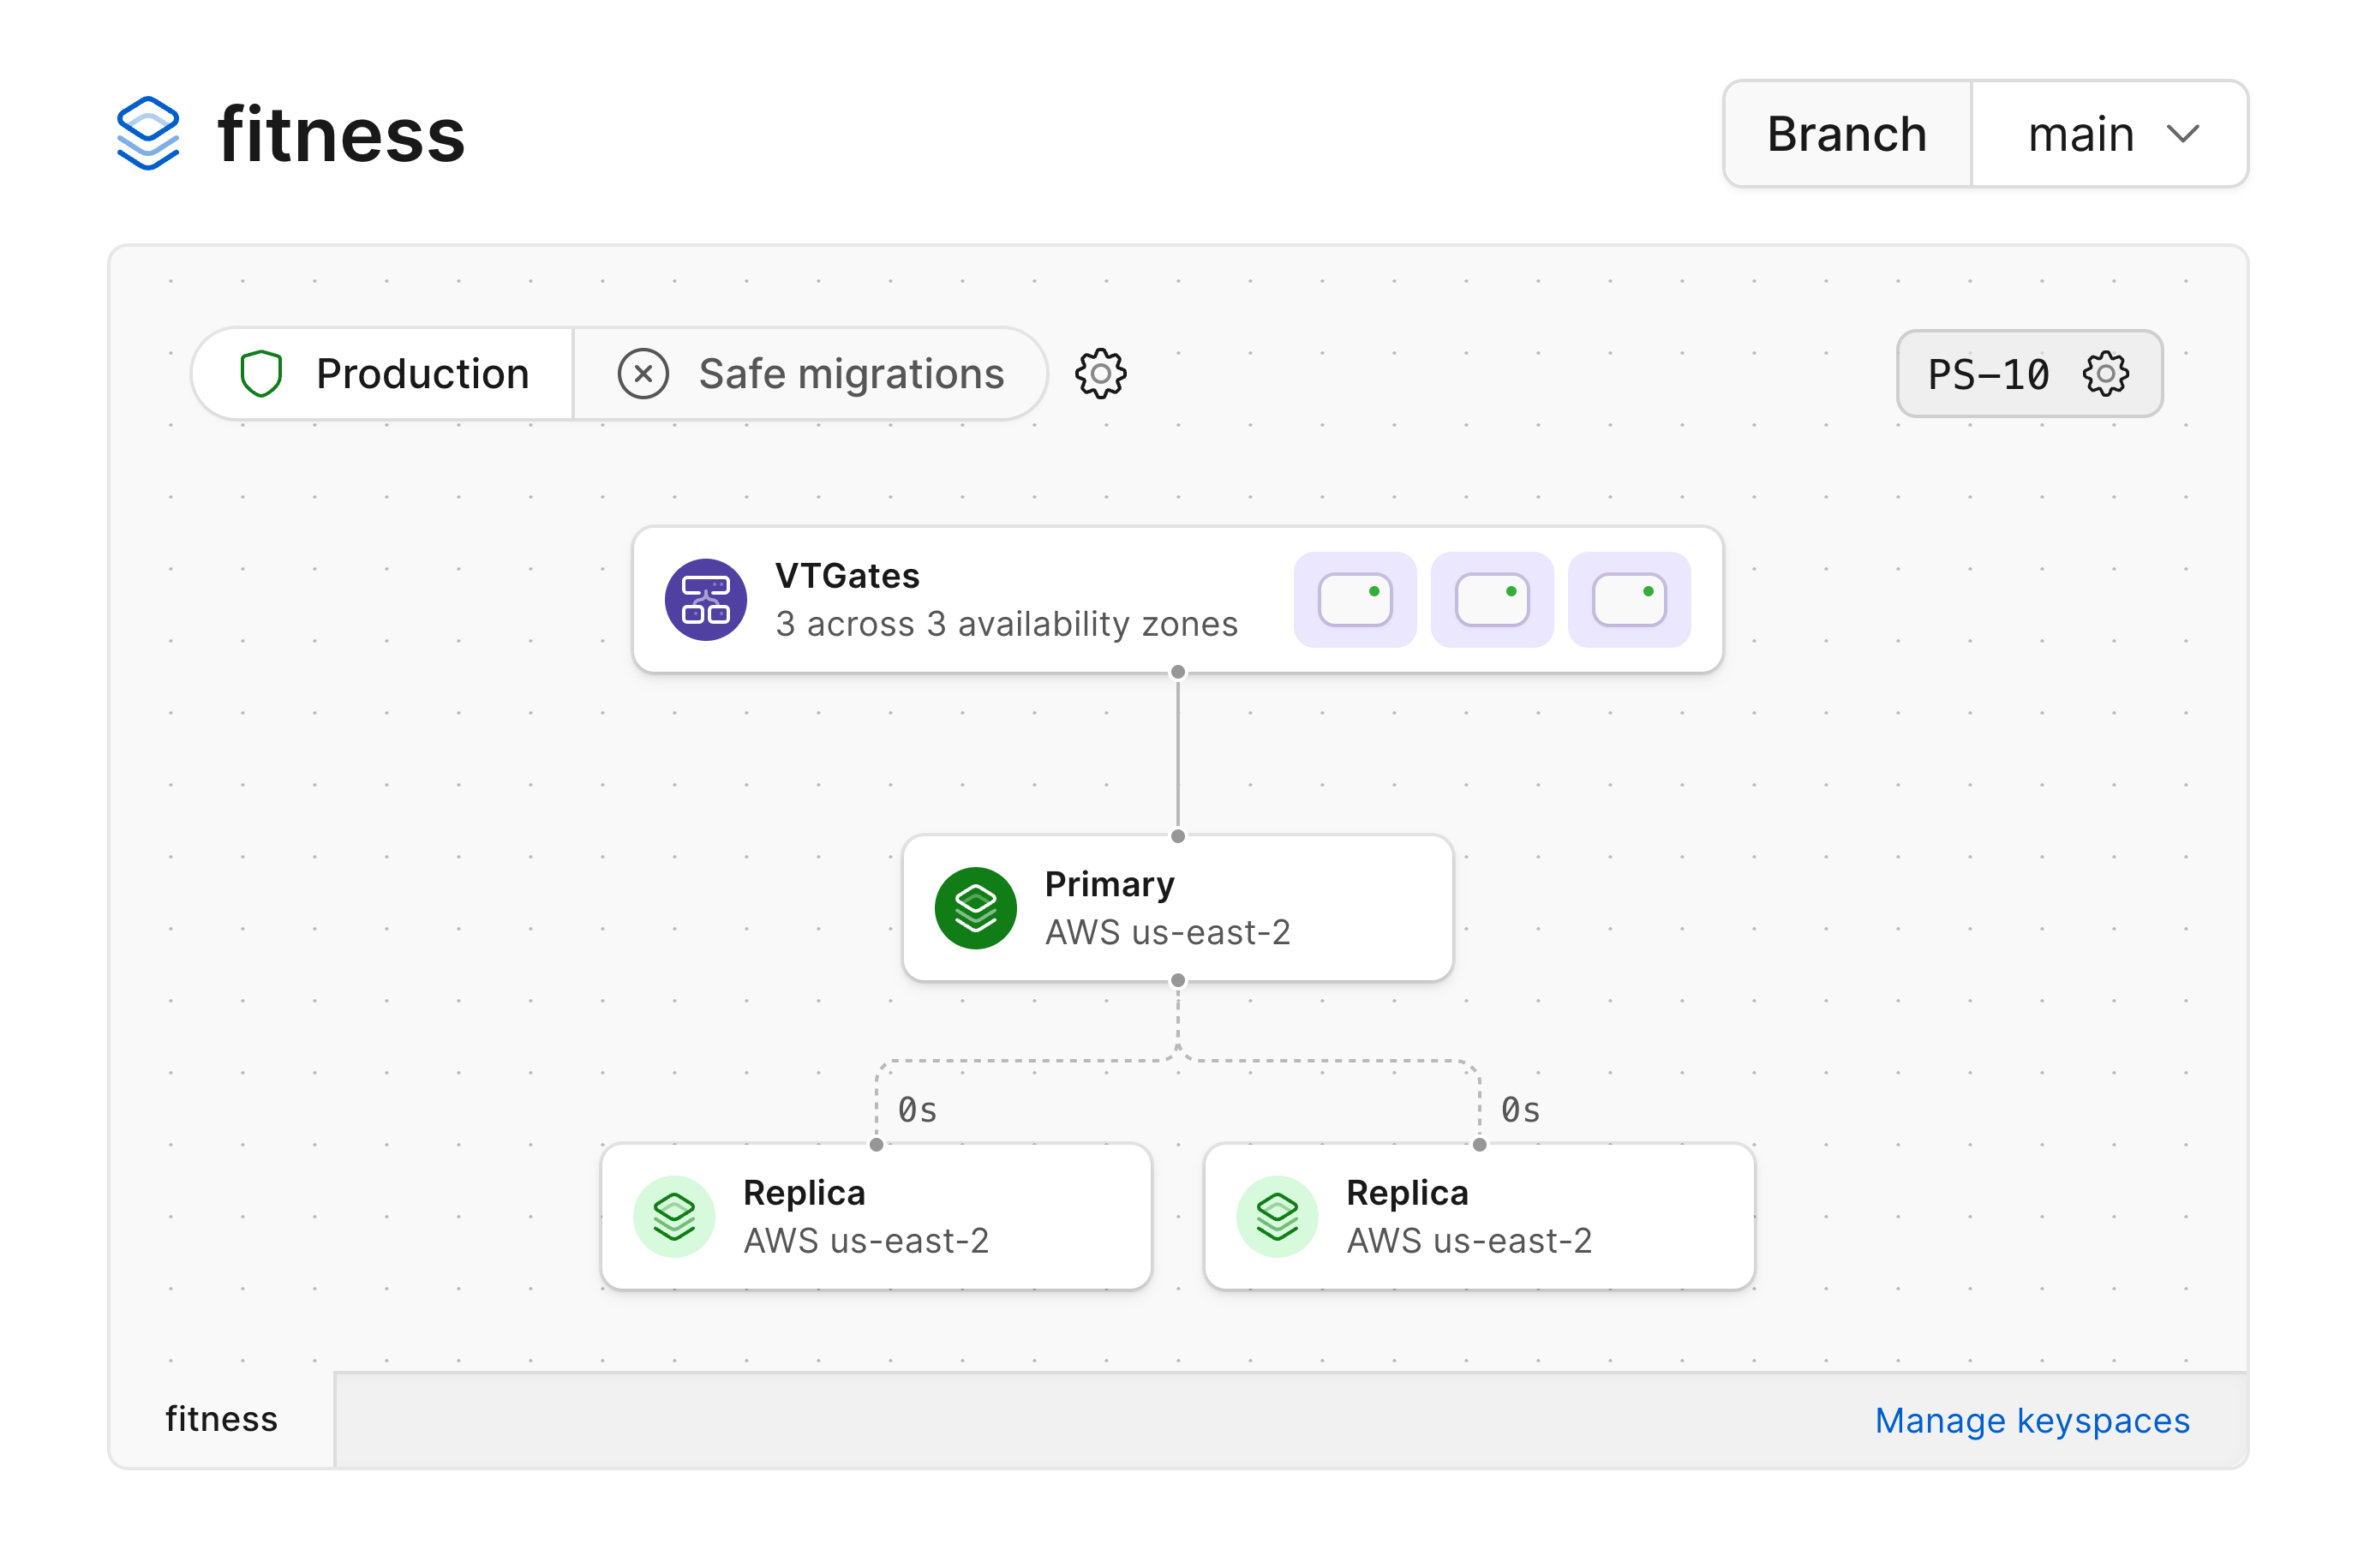
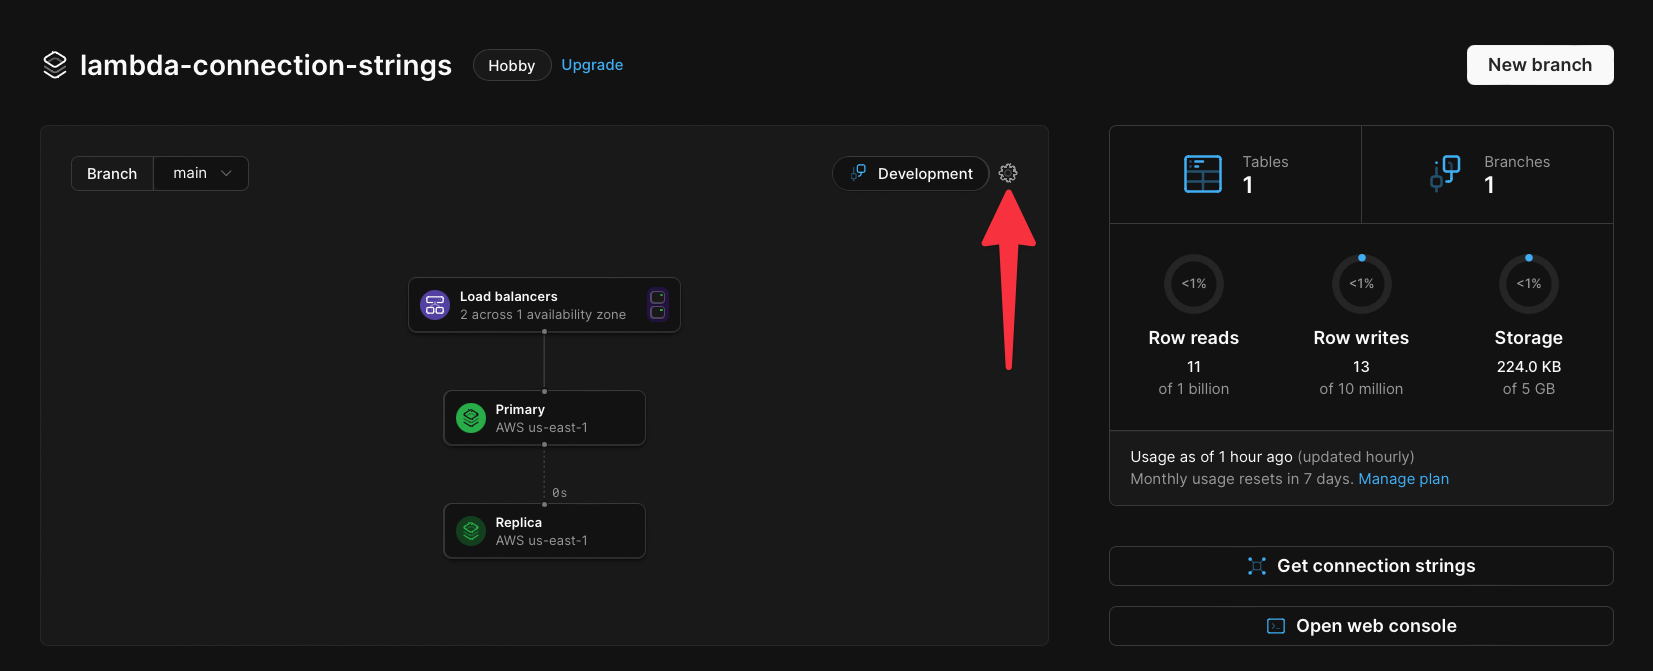
 Now we need to enable [**safe migrations**](/docs/vitess/schema-changes/safe-migrations) on the **main** branch. Click the **Dashboard** tab, then click the **cog** icon in the upper right of the infrastructure card.
 Toggle on the "**Enable safe migrations**" option and click the "**Enable safe migrations**" button.
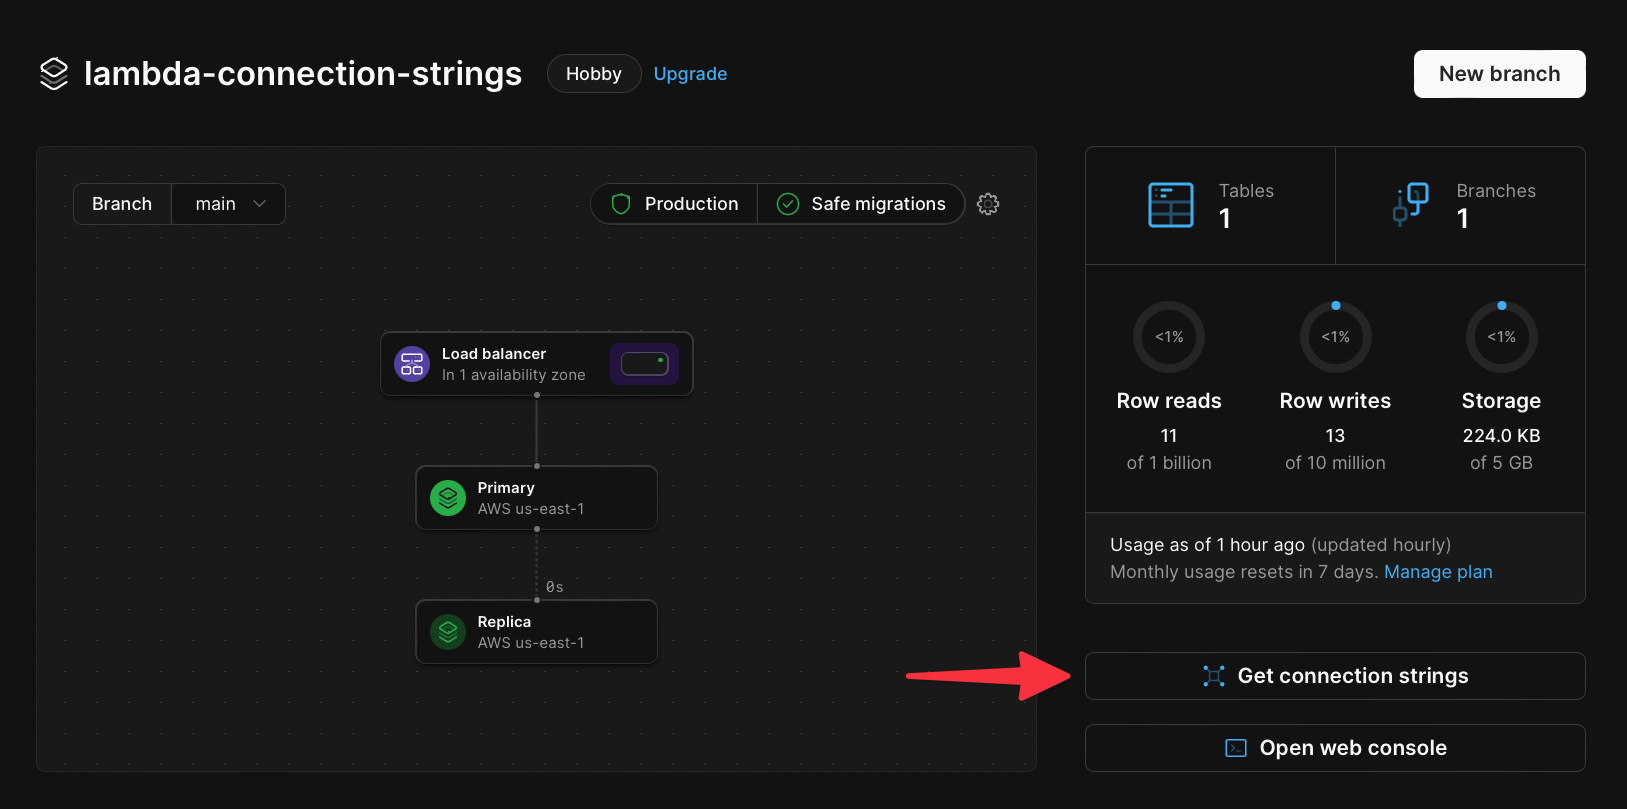
 Before moving on from the PlanetScale dashboard, grab the connection details to be used in the next step. Click on the **Connect** button to go to the Connect page. Enter a name for your password, and click the **Create password** button to generate a new password.
 In the **Select your language or framework** section, select **Node.js** and note the details in the `.env` section of the guide. These details will be required to connect to the database.
## Configure the Lambda function
Secrets in AWS Lambda functions, which include database connection strings, are often stored as environment variables with the Lambda function. We’ll be uploading a sample NodeJS app that has been provided and storing the connection string from the previous section as an environment variable to test.
Start by cloning the following Git repository:
```bash theme={null}
git clone https://github.com/planetscale/aws-connection-strings-example.git
```
Log into the AWS Console, use the universal search to search for ‘**Lambda**’, and select it from the list of services.
In the **Select your language or framework** section, select **Node.js** and note the details in the `.env` section of the guide. These details will be required to connect to the database.
## Configure the Lambda function
Secrets in AWS Lambda functions, which include database connection strings, are often stored as environment variables with the Lambda function. We’ll be uploading a sample NodeJS app that has been provided and storing the connection string from the previous section as an environment variable to test.
Start by cloning the following Git repository:
```bash theme={null}
git clone https://github.com/planetscale/aws-connection-strings-example.git
```
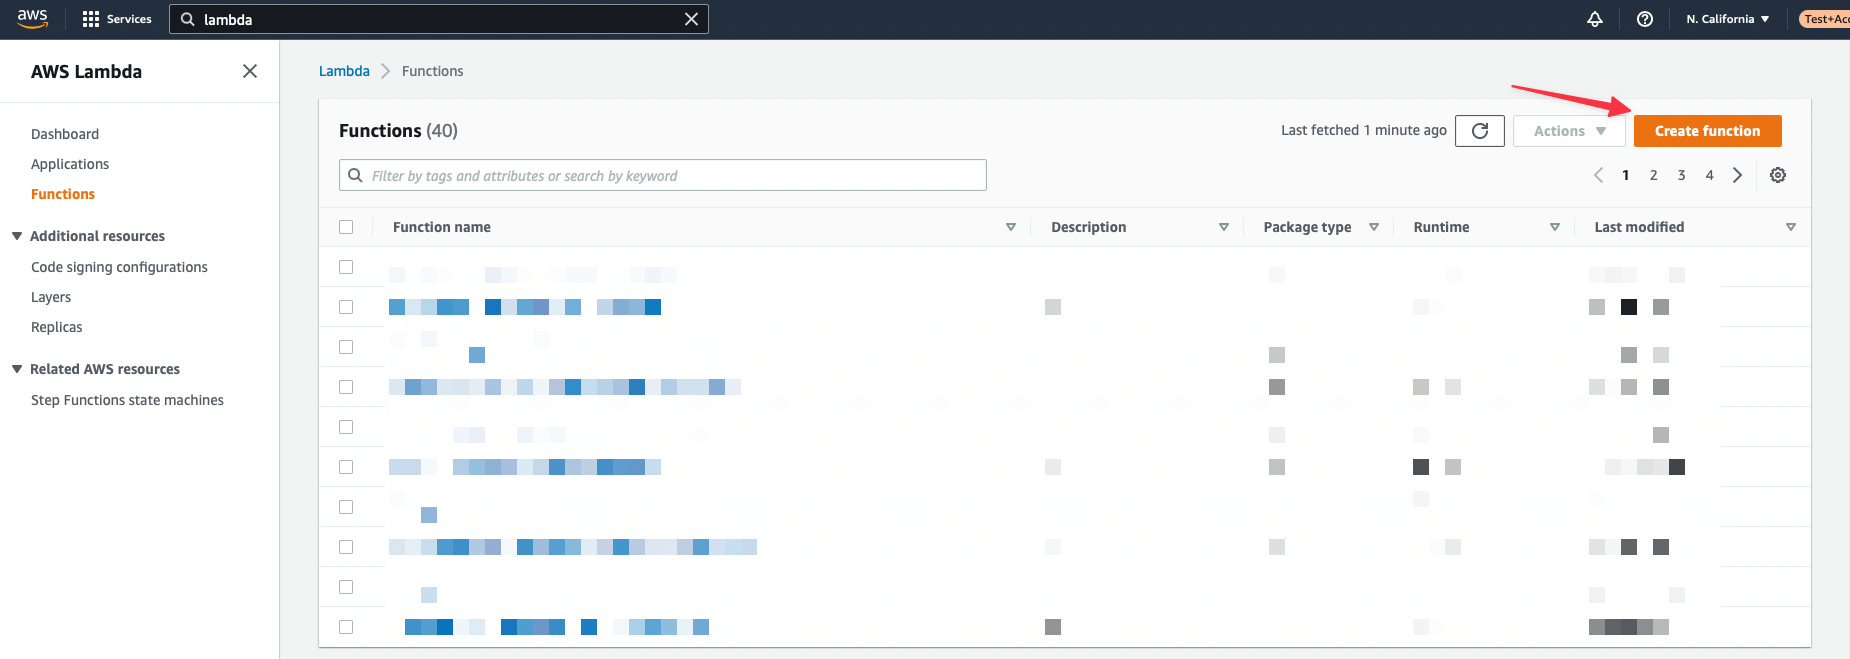
Log into the AWS Console, use the universal search to search for ‘**Lambda**’, and select it from the list of services.
 Create a new function using the **Create function** button in the upper right of the console.
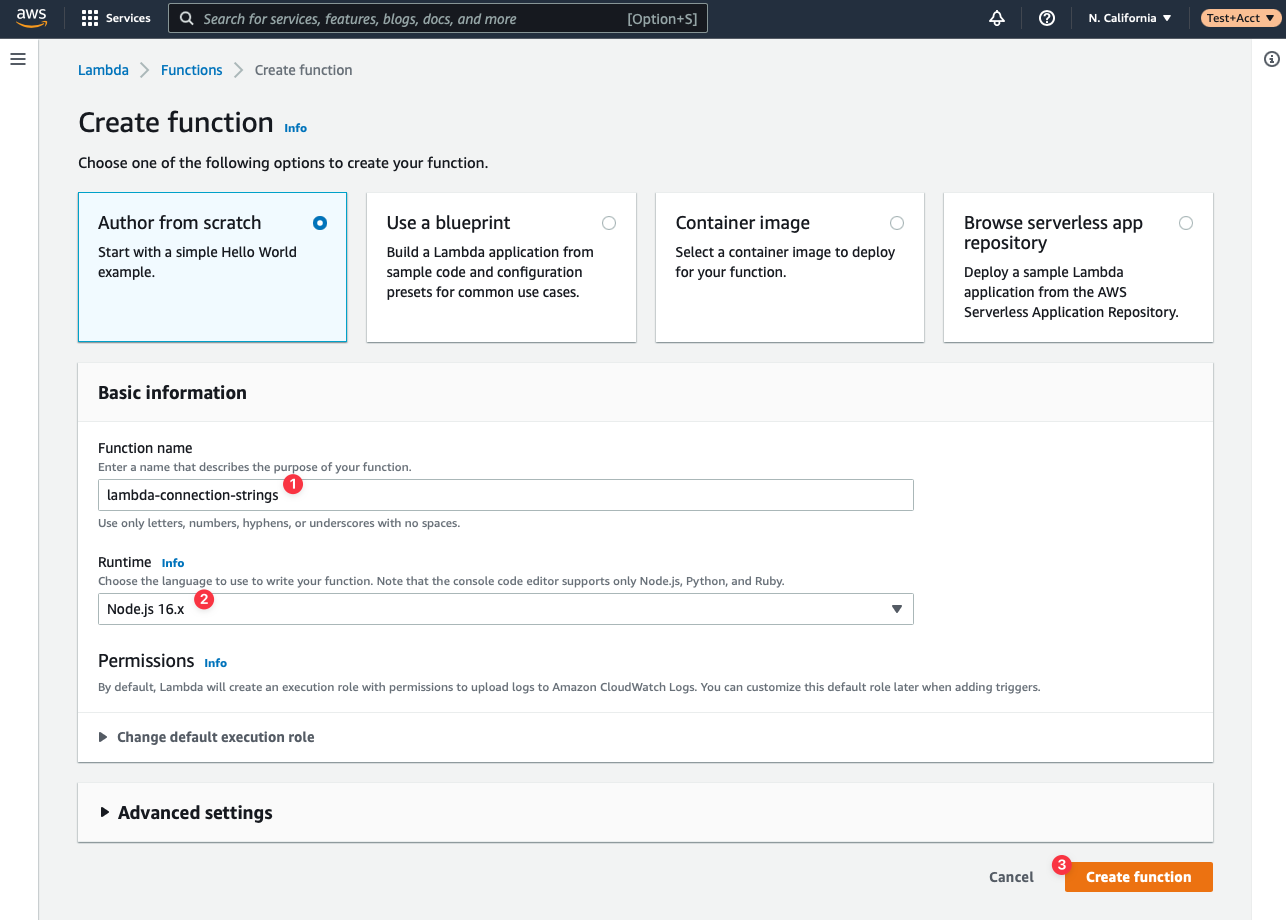
 Name your function **lambda-connection-strings** (or any other name that suits you) and select **NodeJS** under **Runtime**. The other fields can be left as default. Click **Create function** to finish the initial setup of your Lambda.
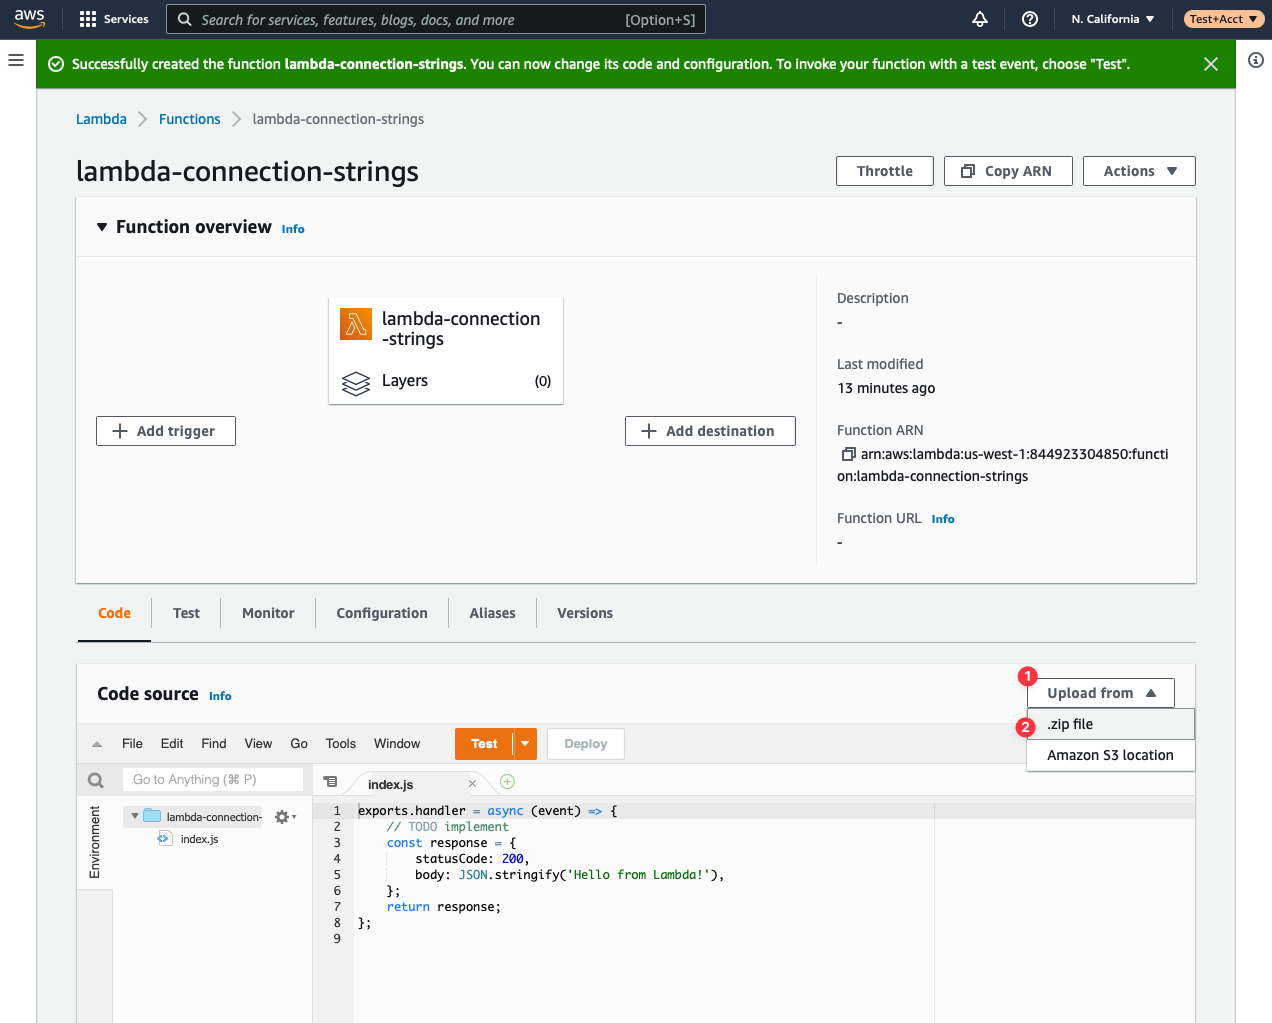
 On the next view, about halfway down the page you’ll see a section called **Code source**. Click the **Upload from** button, then **.zip file**.
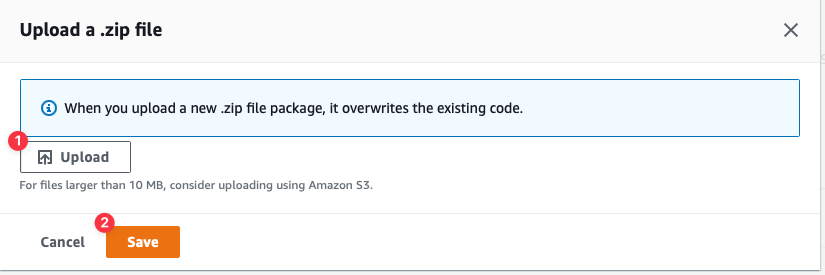
 Click the **Upload** button which will display a file browser. Select the **aws-connection-strings-example.zip** file from the **dist** folder of the provided repository. Click **Save** once it’s been selected.
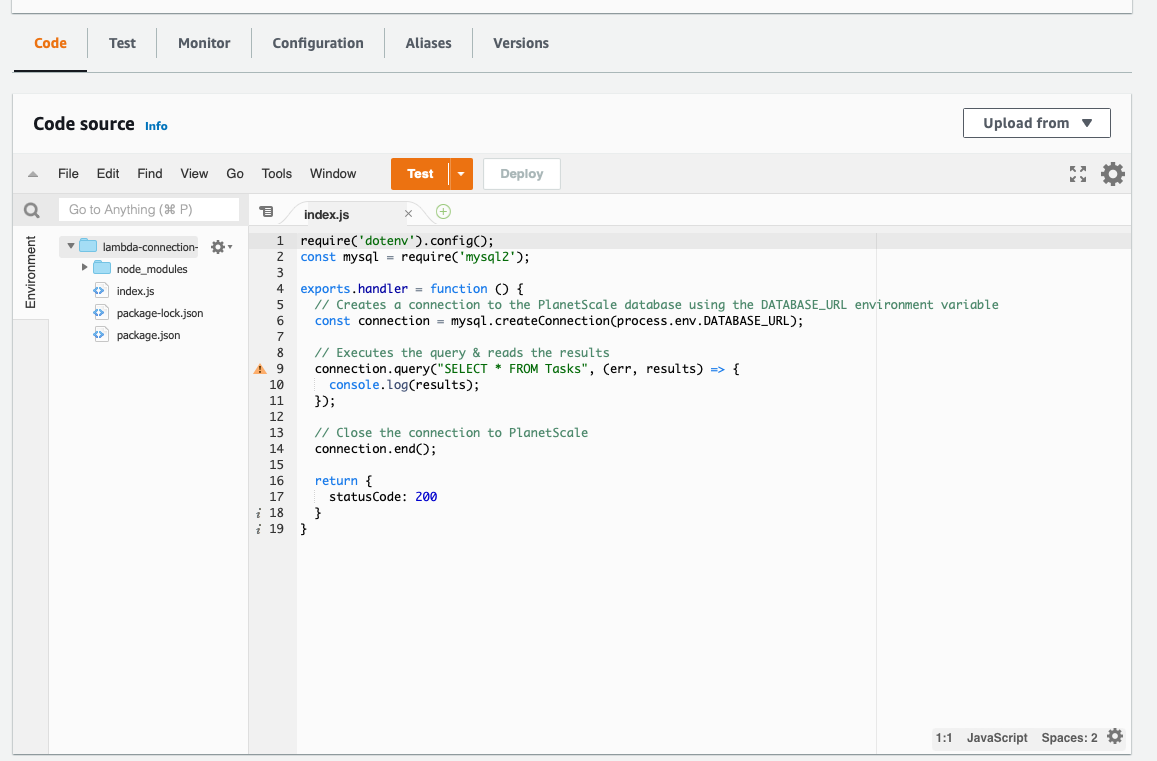
 The contents of the code editor under **Code source** should have updated to show the code stored in the zip file.
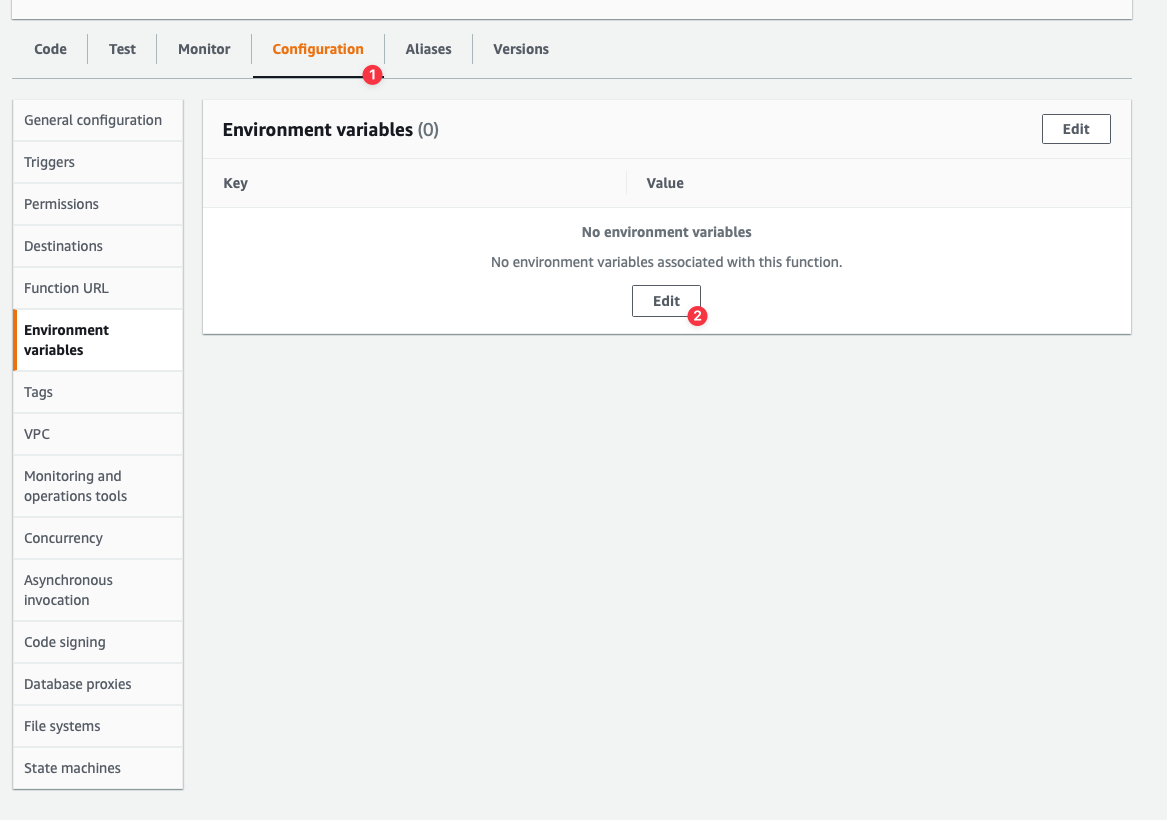
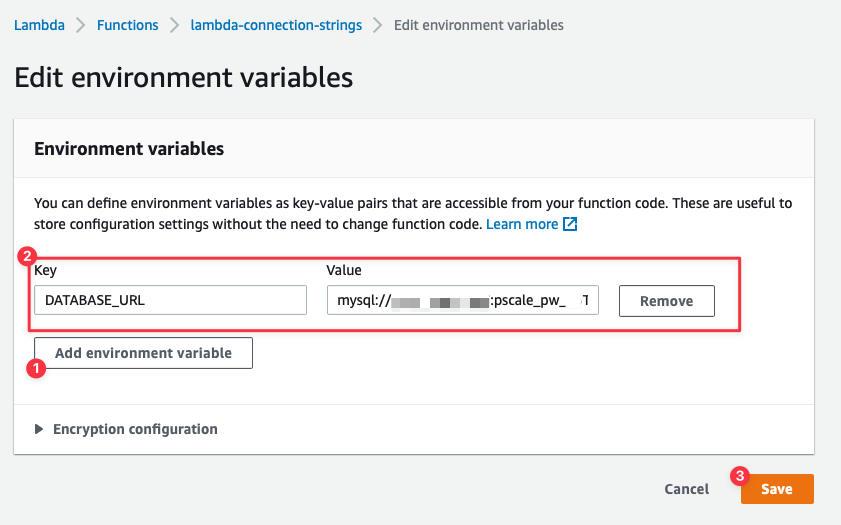
 ### Configure environment variables
Next, you need to set the PlanetScale `DATABASE_URL` environment variable that you copied earlier. Select the **Configuration** tab, and click **Edit**.
### Configure environment variables
Next, you need to set the PlanetScale `DATABASE_URL` environment variable that you copied earlier. Select the **Configuration** tab, and click **Edit**.
 You’ll be presented with a view to add or update environment variables. Click **Add environment variable** and the view will update with a row to add an environment variable. Set the **Key** field to **DATABASE\_URL** and the **Value** to the connection string taken from the previous section. Click **Save** once finished.
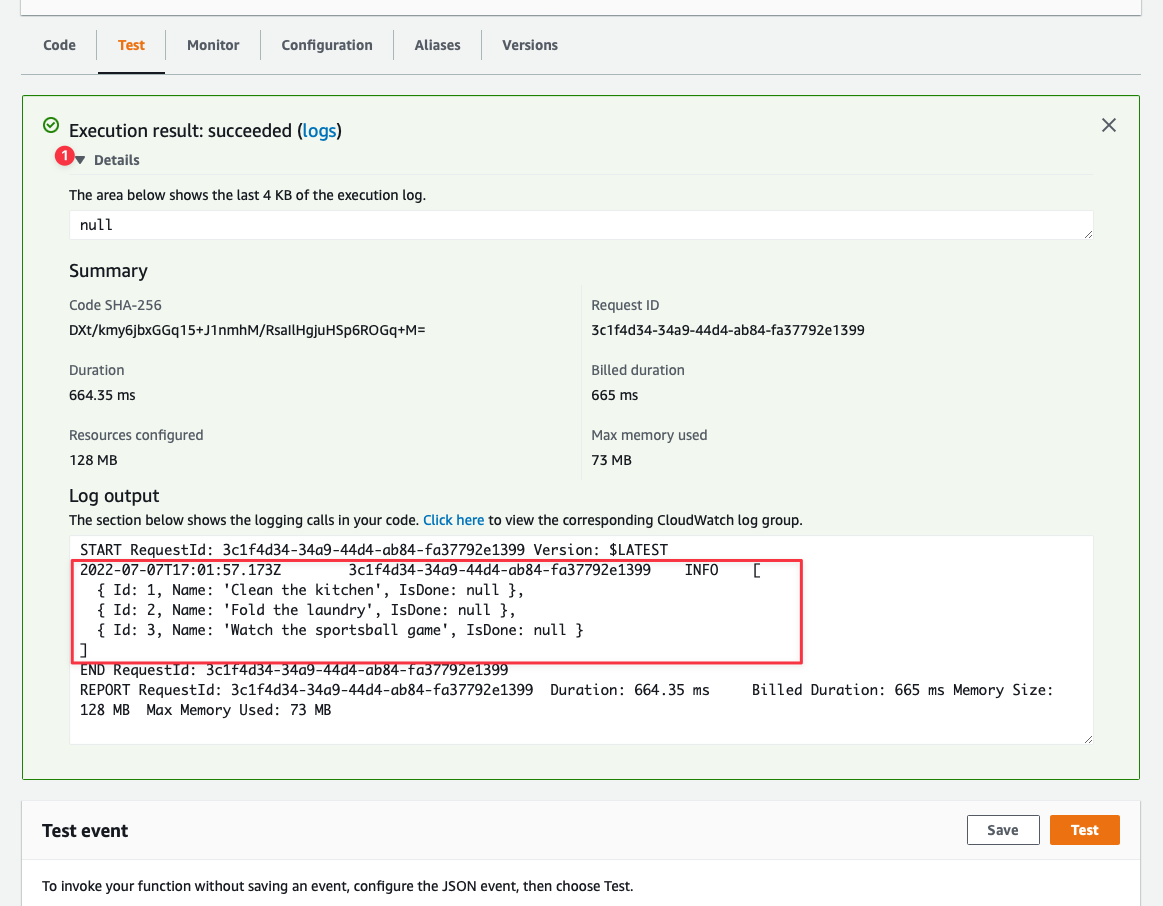
 Finally, test the function by selecting the **Test** tab, and then clicking the **Test** button.
 An **Execution results** box will display above the **Test event** section. If the box is green, it likely means everything executed as expected. Click the dropdown next to **Details** to see the results of the query. Since the results of the query were logged out to the console, they will be displayed in the **Log output** section.
 ## Need help?
Get help from [the PlanetScale Support team](https://support.planetscale.com/), or join our [GitHub discussion board](https://github.com/planetscale/discussion/discussions) to see how others are using PlanetScale.
---
> To find navigation and other pages in this documentation, fetch the llms.txt file at: https://planetscale.com/llms.txt
---
# Source: https://planetscale.com/docs/postgres/connecting/private-connections/aws-privatelink.md
# Connect privately with AWS PrivateLink
> When you use AWS PrivateLink, your network traffic between your VPC and PlanetScale stays within the AWS network, without traversing the public internet.
[AWS PrivateLink](https://aws.amazon.com/privatelink/) is a highly available, scalable technology that enables you to privately connect your VPC to supported AWS services, VPC endpoint services, and AWS Marketplace partner services.
### When to use AWS PrivateLink
By default, PlanetScale Postgres databases use secure connections over the public internet with industry-standard TLS encryption. This approach is secure and meets the needs of most customers. However, you may want to consider AWS PrivateLink if:
* **Compliance requirements**: Your organization has stronger regulatory or compliance mandates that require database connections to avoid the public internet entirely
* **Enhanced security posture**: You want an additional layer of network isolation for sensitive data workloads
* **Network architecture**: Your existing AWS infrastructure is designed around private connectivity patterns
* **Reduced network latency**: AWS PrivateLink can help reduce latency by avoiding the extra network hop through a [NAT gateway](https://docs.aws.amazon.com/vpc/latest/userguide/vpc-nat-gateway.html) that's typically required for outbound internet connections from private subnets. While this latency difference is often minimal (typically single-digit milliseconds), it may be noticeable if you're migrating from a database that was previously hosted directly within your VPC
AWS PrivateLink provides these security and compliance benefits by ensuring your database traffic never leaves the AWS backbone network.
## Need help?
Get help from [the PlanetScale Support team](https://support.planetscale.com/), or join our [GitHub discussion board](https://github.com/planetscale/discussion/discussions) to see how others are using PlanetScale.
---
> To find navigation and other pages in this documentation, fetch the llms.txt file at: https://planetscale.com/llms.txt
---
# Source: https://planetscale.com/docs/postgres/connecting/private-connections/aws-privatelink.md
# Connect privately with AWS PrivateLink
> When you use AWS PrivateLink, your network traffic between your VPC and PlanetScale stays within the AWS network, without traversing the public internet.
[AWS PrivateLink](https://aws.amazon.com/privatelink/) is a highly available, scalable technology that enables you to privately connect your VPC to supported AWS services, VPC endpoint services, and AWS Marketplace partner services.
### When to use AWS PrivateLink
By default, PlanetScale Postgres databases use secure connections over the public internet with industry-standard TLS encryption. This approach is secure and meets the needs of most customers. However, you may want to consider AWS PrivateLink if:
* **Compliance requirements**: Your organization has stronger regulatory or compliance mandates that require database connections to avoid the public internet entirely
* **Enhanced security posture**: You want an additional layer of network isolation for sensitive data workloads
* **Network architecture**: Your existing AWS infrastructure is designed around private connectivity patterns
* **Reduced network latency**: AWS PrivateLink can help reduce latency by avoiding the extra network hop through a [NAT gateway](https://docs.aws.amazon.com/vpc/latest/userguide/vpc-nat-gateway.html) that's typically required for outbound internet connections from private subnets. While this latency difference is often minimal (typically single-digit milliseconds), it may be noticeable if you're migrating from a database that was previously hosted directly within your VPC
AWS PrivateLink provides these security and compliance benefits by ensuring your database traffic never leaves the AWS backbone network.
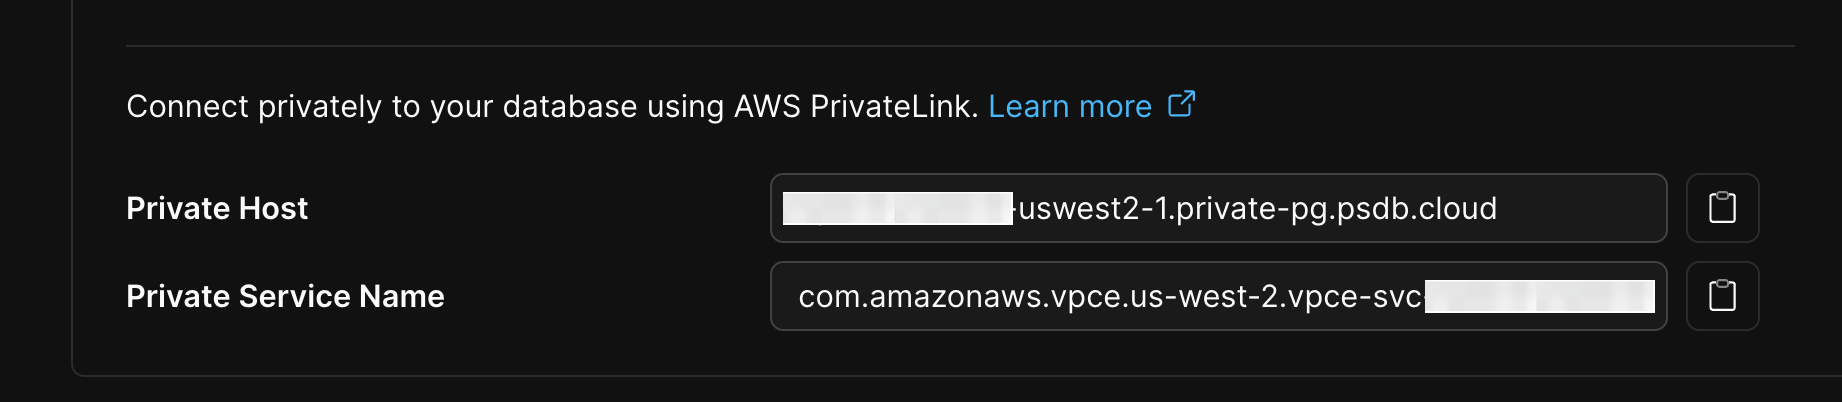 Save these two attributes for your records and the rest of the configuration.
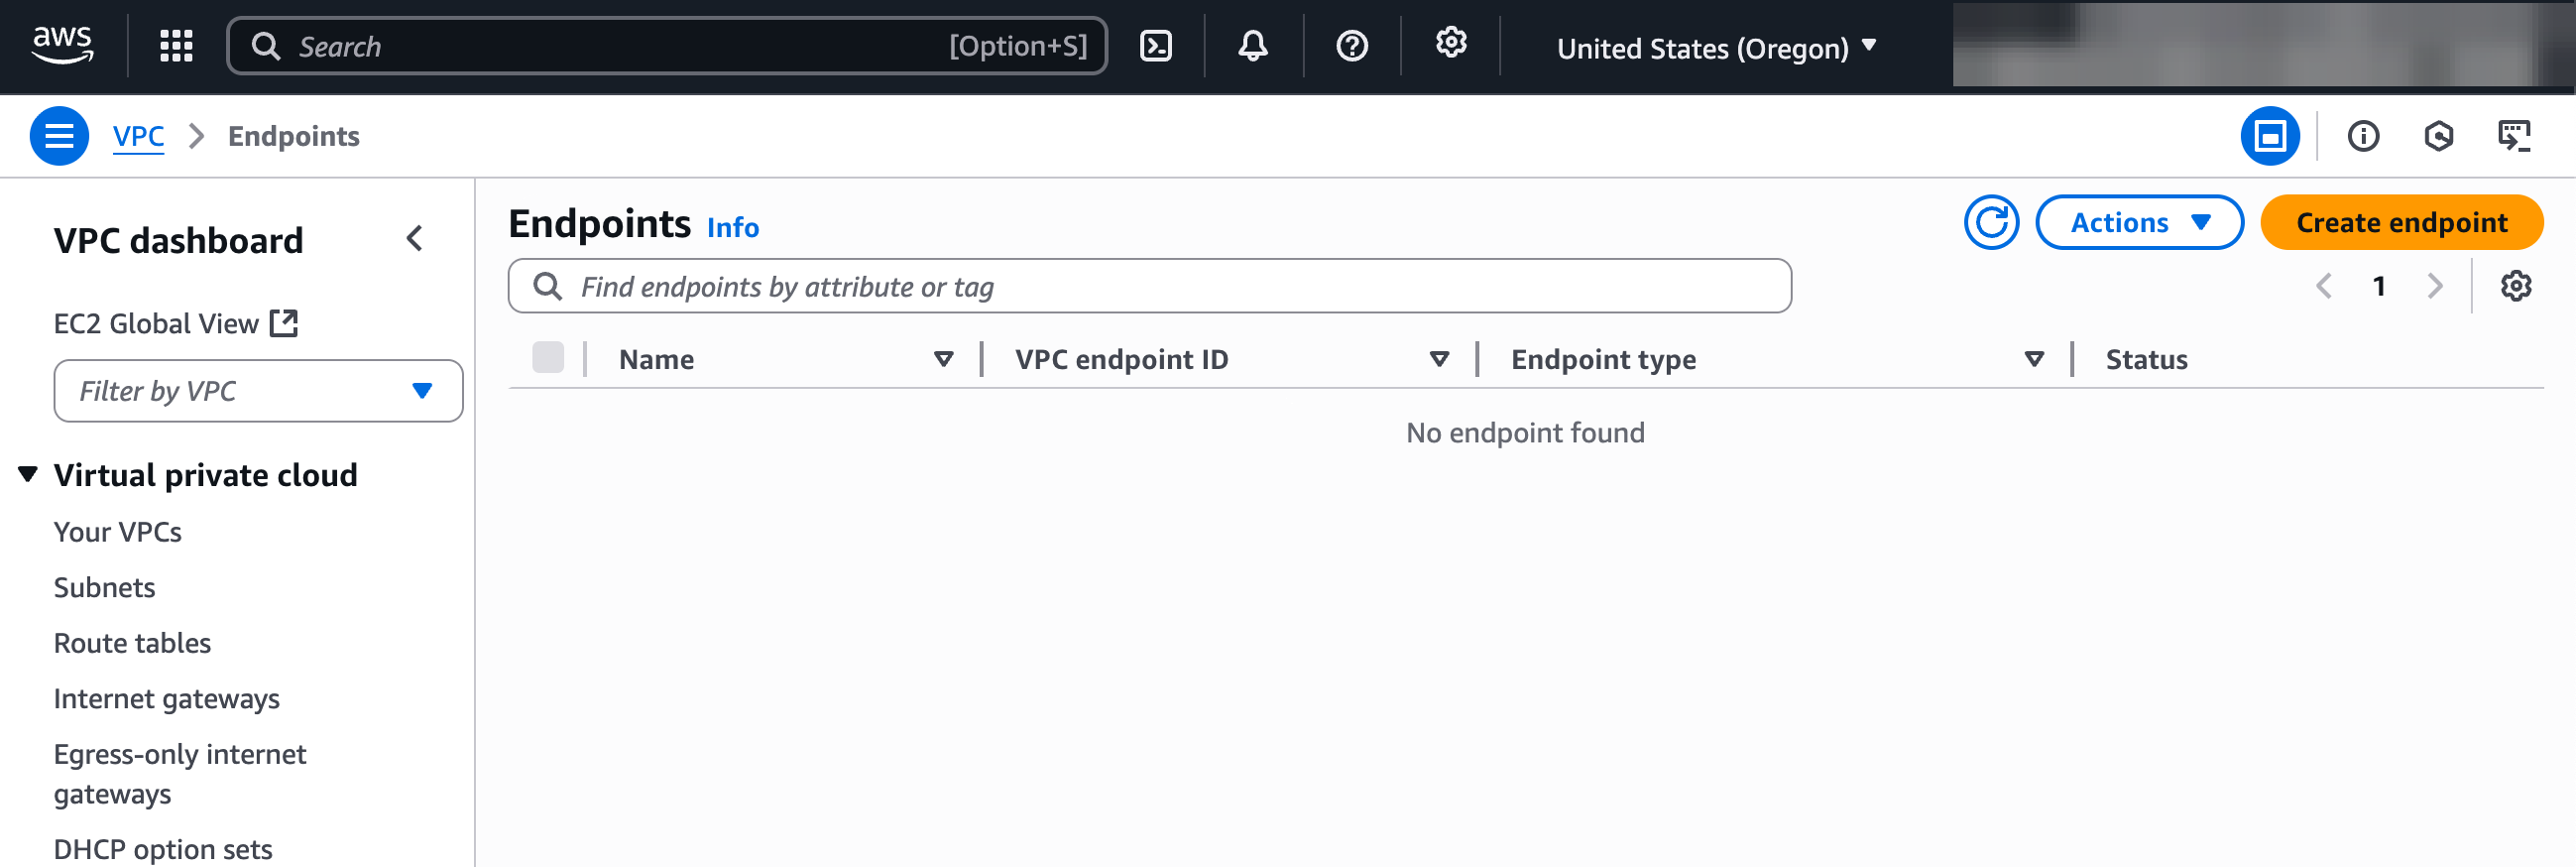
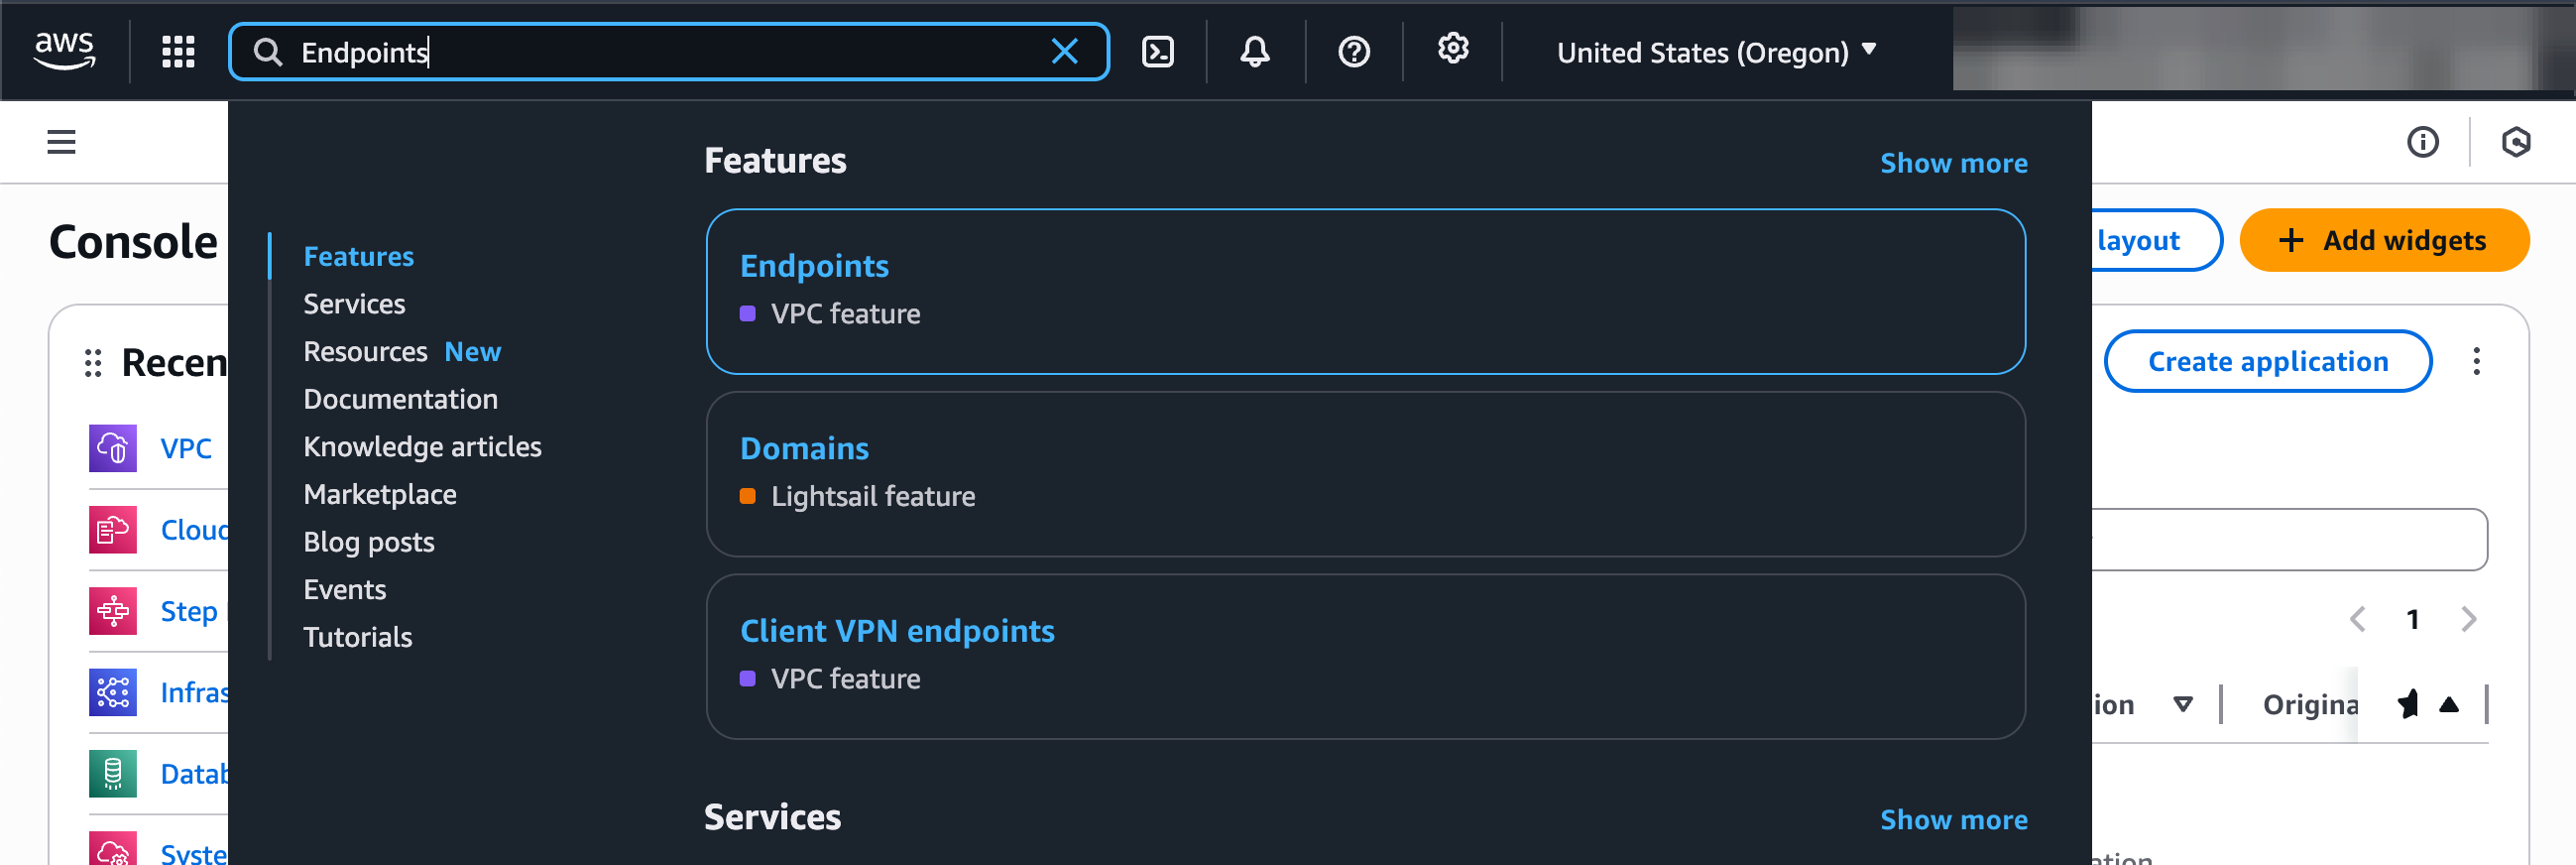 3. **Create a new endpoint**: Click "**Create Endpoint**".
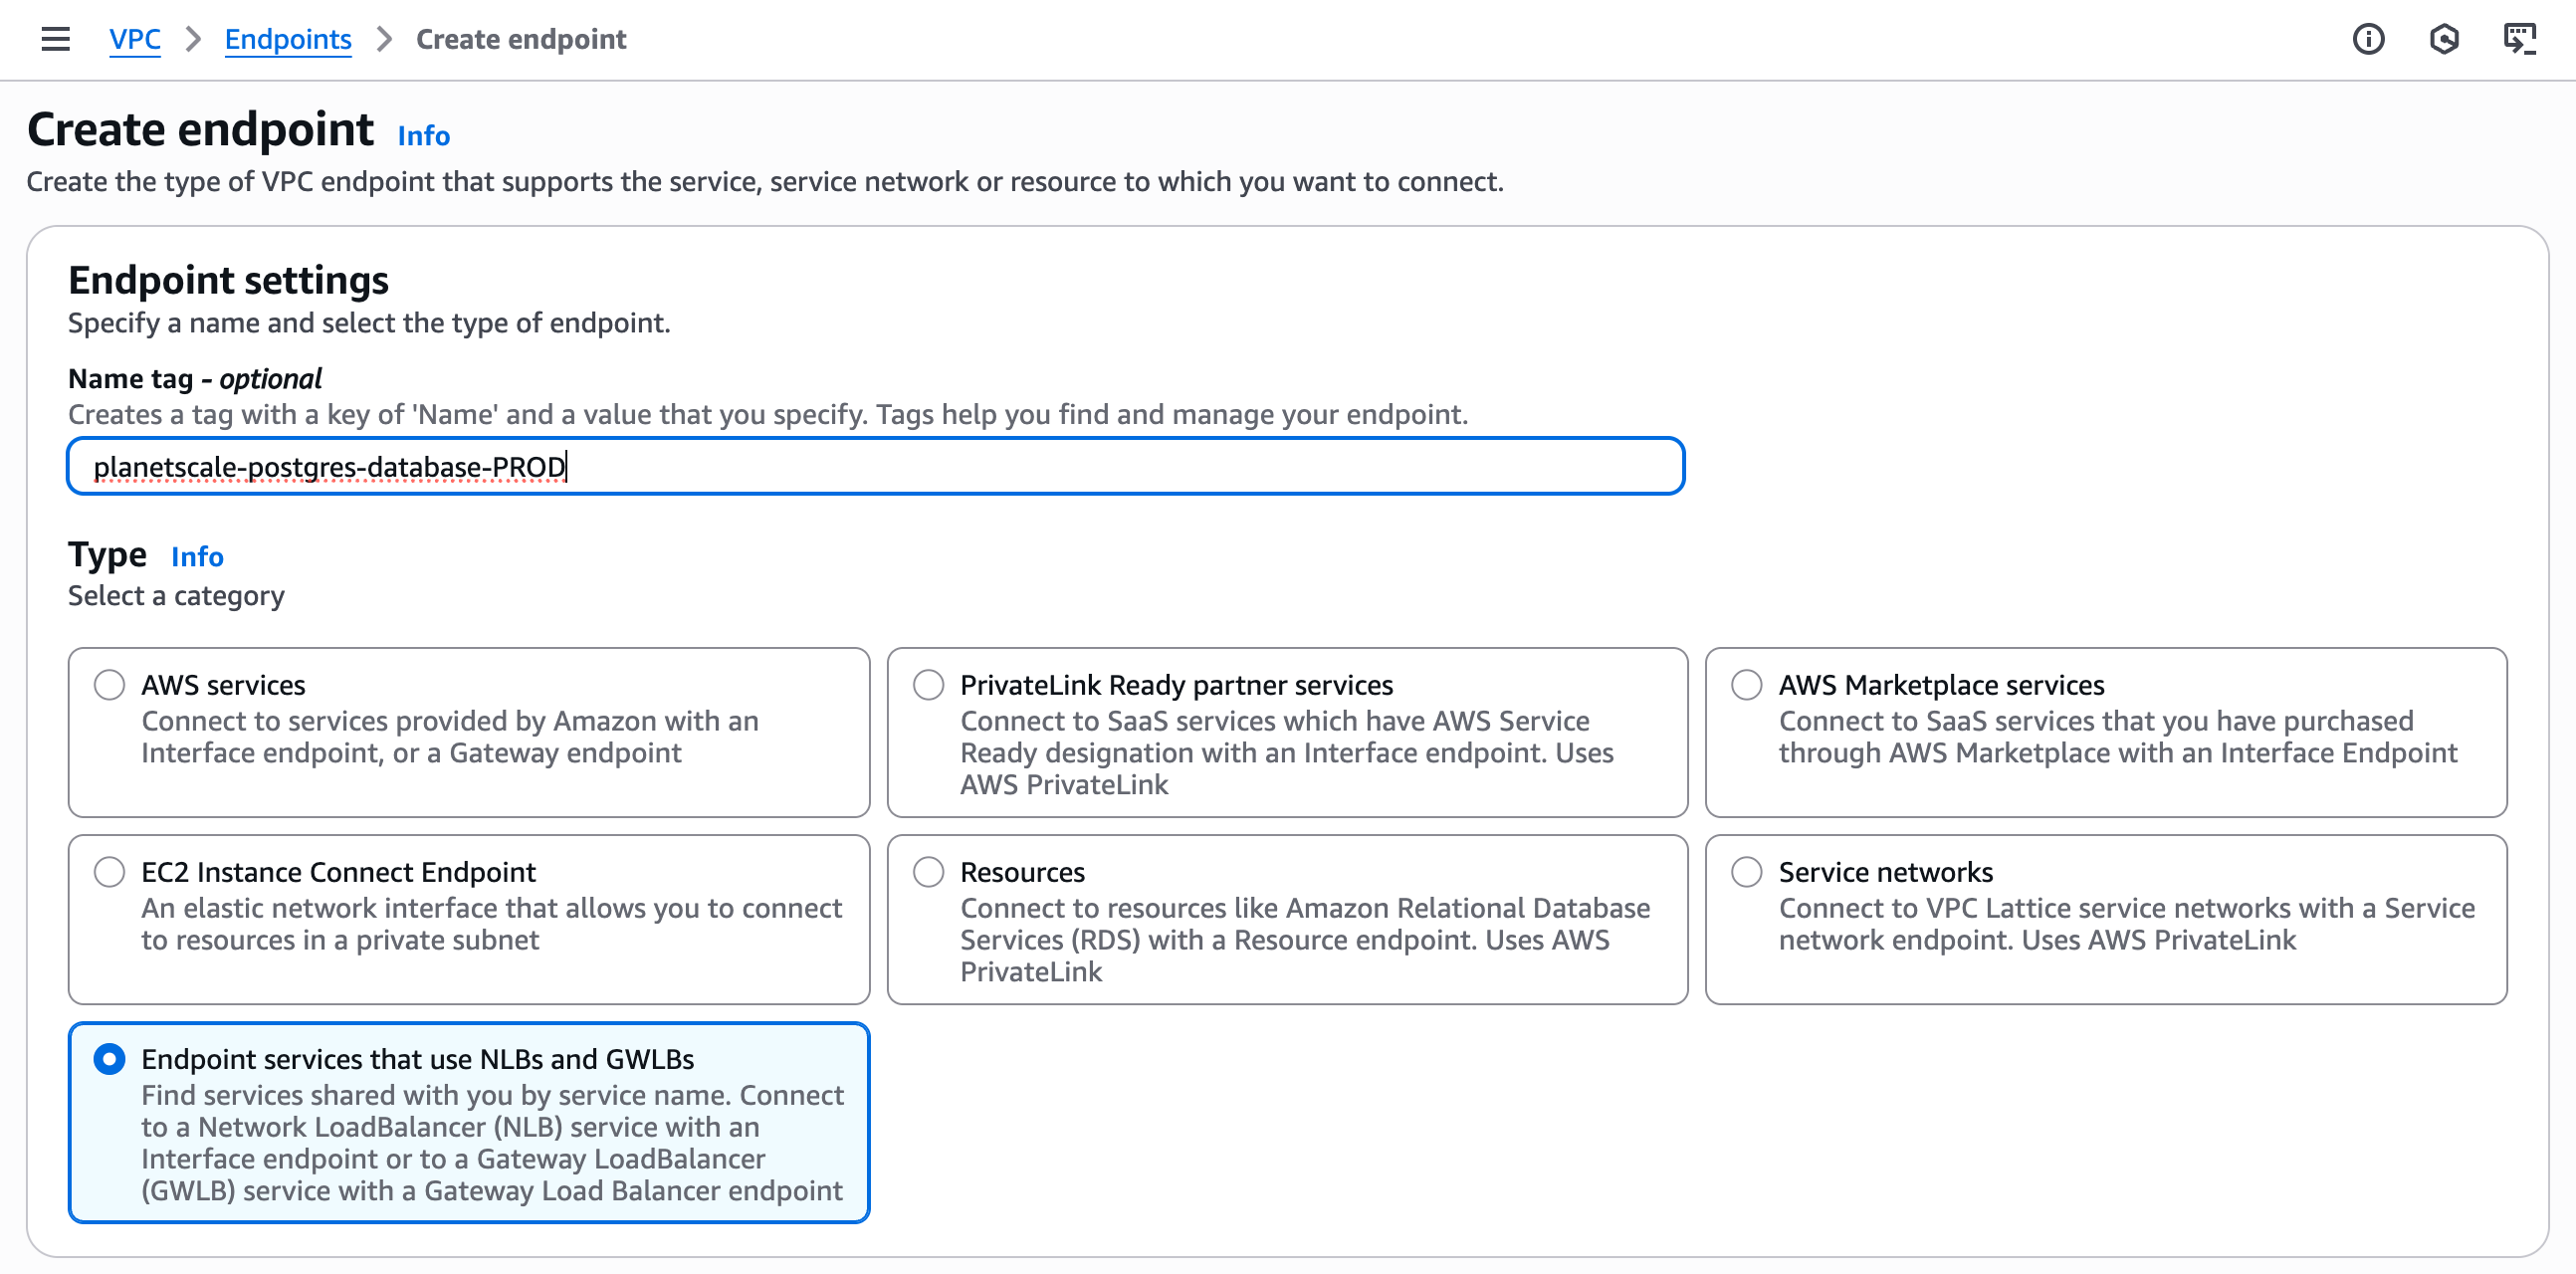
 4. **Select endpoint type**: Choose "Endpoint services that use NLBs and GWLBs".
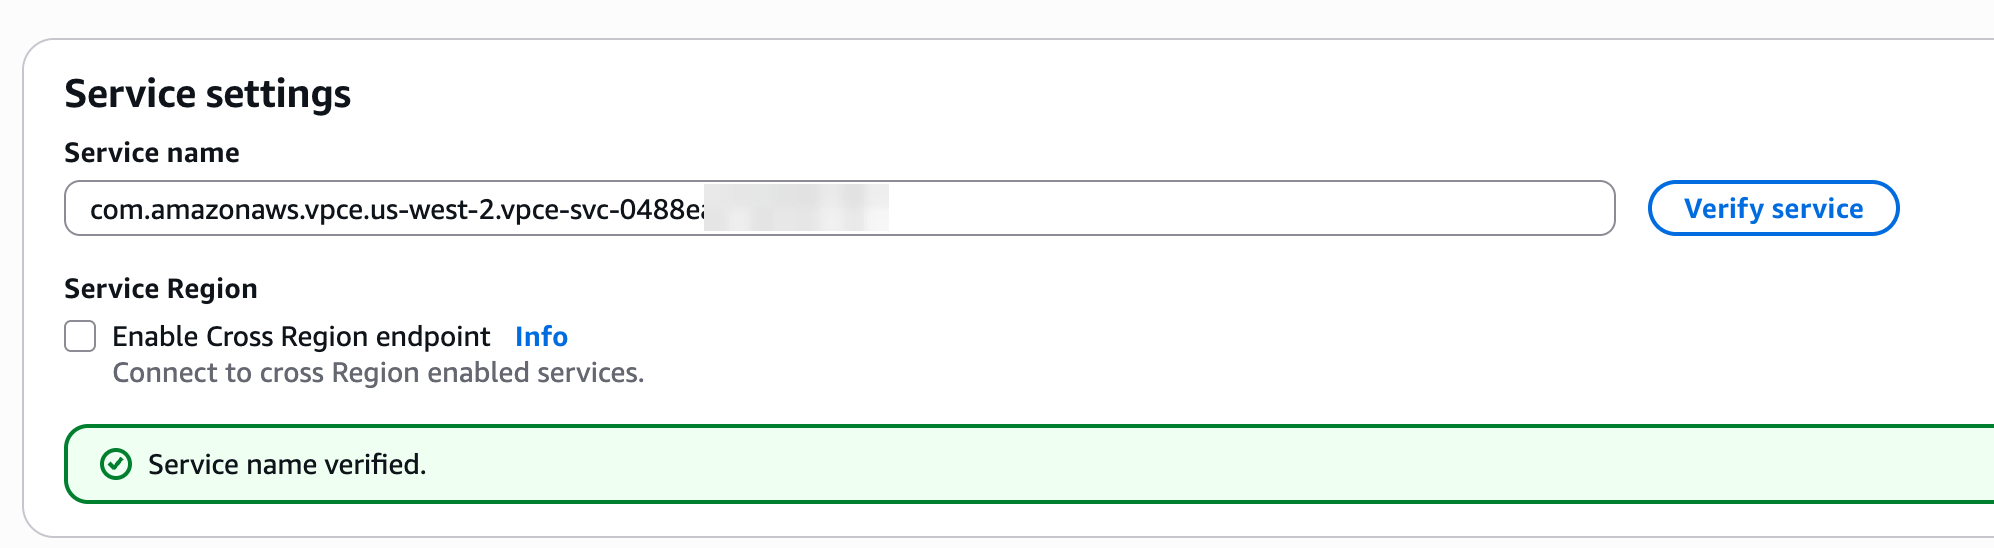
 5. **Enter service name**: Enter in the "Service name" text box the `Private Service Name` retrieved from the PlanetScale dashboard. Click "**Verify service**" to confirm the service exists.
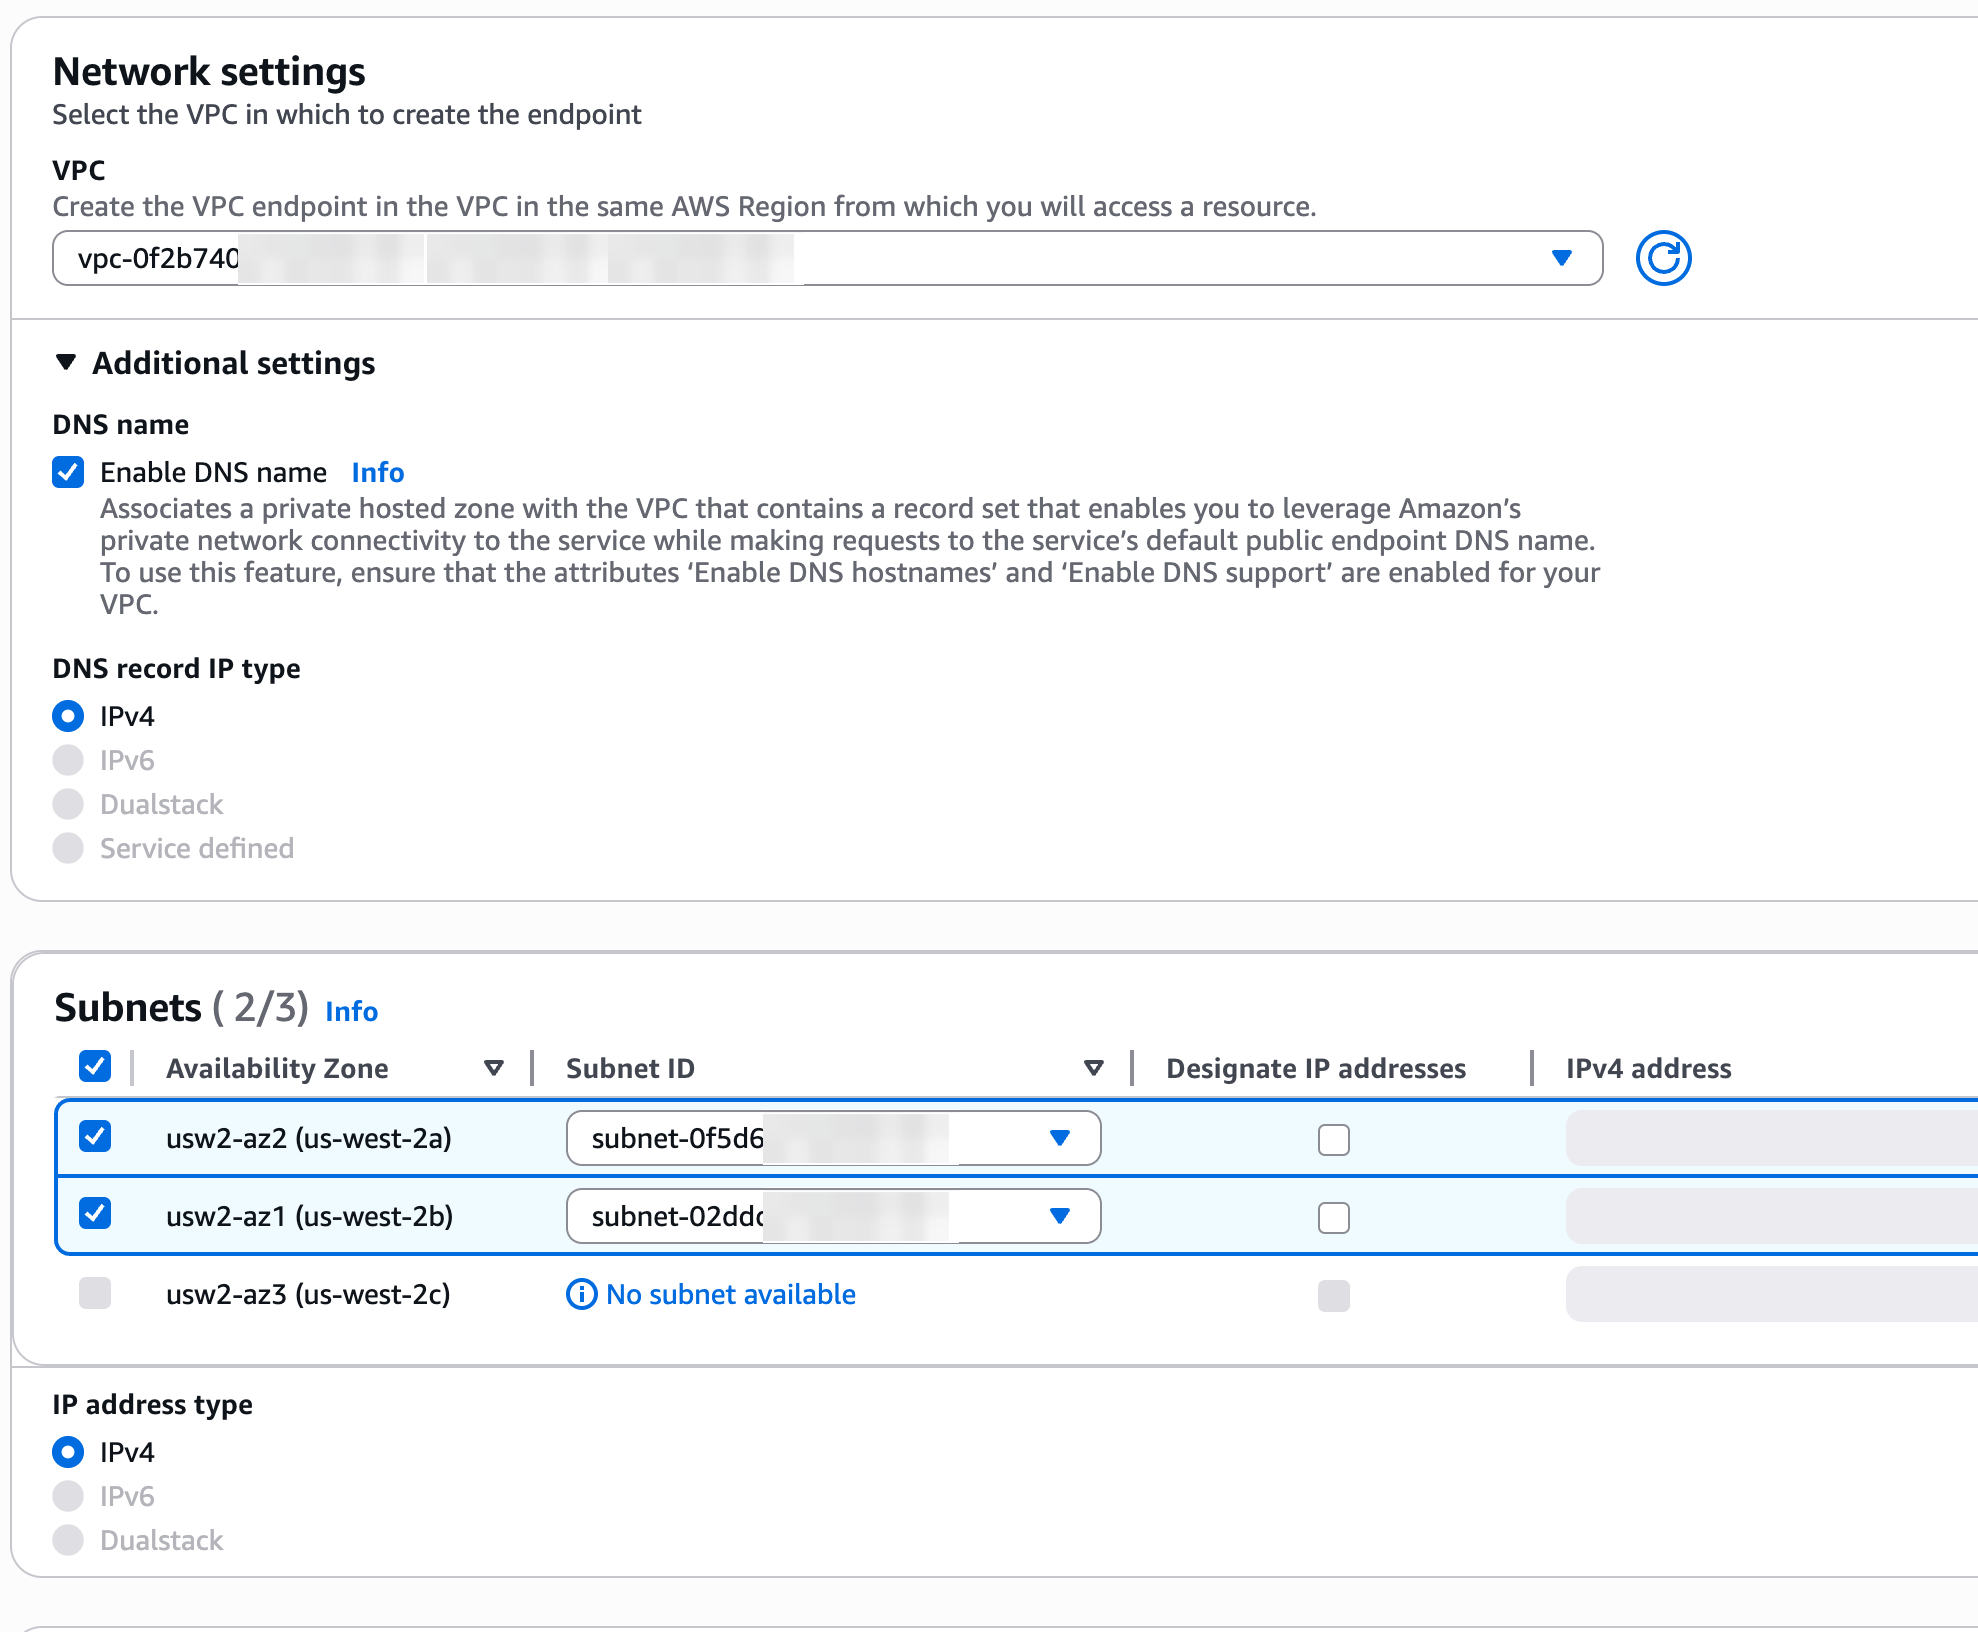
 6. **Configure VPCs**: Choose the VPC that should have access to the PlanetScale service endpoint.
7. **Enable DNS names**: Click the "Additional settings" dropdown arrow to reveal DNS configuration options, and select the "**Enable DNS name**" checkbox.
8. **Configure Subnets**: Choose the subnets that should have endpoint interfaces for the PlanetScale service endpoint. It is recommended that you select at least 2. You should select subnets that your application servers have access to.
6. **Configure VPCs**: Choose the VPC that should have access to the PlanetScale service endpoint.
7. **Enable DNS names**: Click the "Additional settings" dropdown arrow to reveal DNS configuration options, and select the "**Enable DNS name**" checkbox.
8. **Configure Subnets**: Choose the subnets that should have endpoint interfaces for the PlanetScale service endpoint. It is recommended that you select at least 2. You should select subnets that your application servers have access to.
 9. **Configure security groups**: Choose the appropriate security group to control which resources can send traffic to the PlanetScale service endpoint. Use the one created earlier if you created one for this purpose.
 10. **Create the endpoint**: Click "**Create endpoint**" and wait for the VPC endpoint status to show "Available" (this may take several minutes).
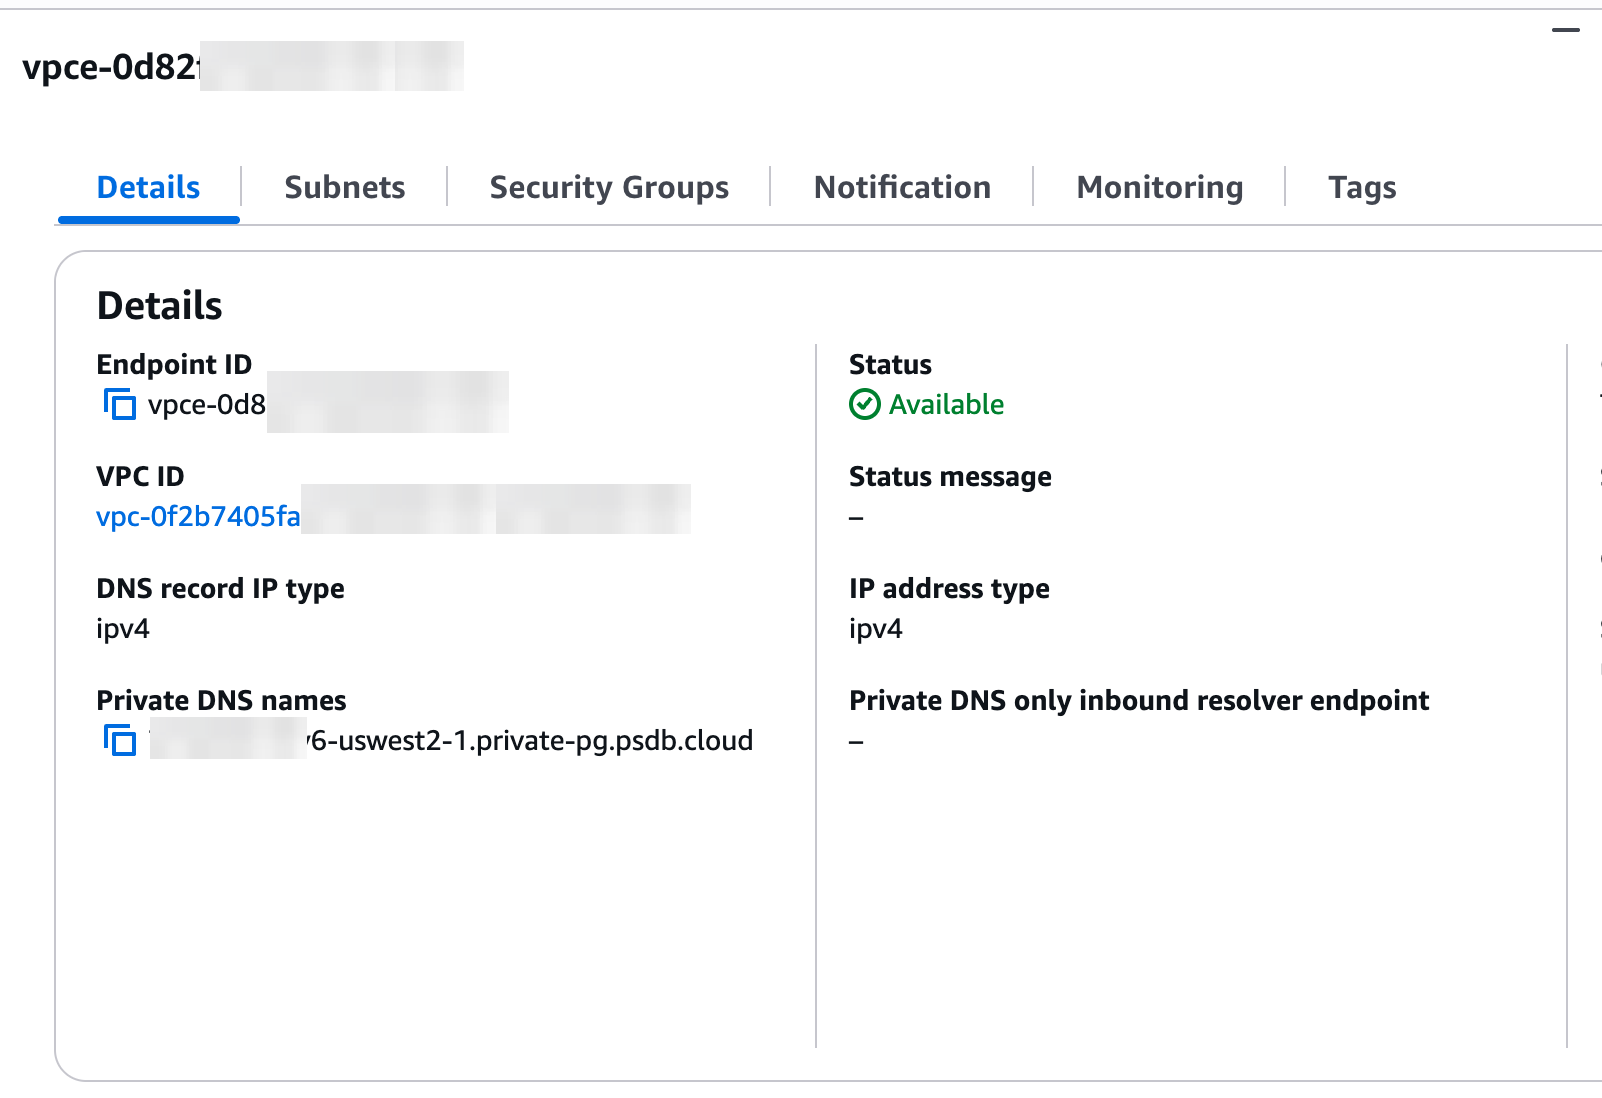 ## Verifying your VPC endpoint connectivity
1. **Confirm endpoint status**: In the AWS Console, verify that your endpoint's status shows "Available".
2. **Test DNS resolution**: From an EC2 instance in your configured VPC, run a DNS lookup to confirm resolution to your VPC's IP range. Use the `Private Host` you recorded earlier from the PlanetScale dashboard:
```bash theme={null}
dig +short
## Verifying your VPC endpoint connectivity
1. **Confirm endpoint status**: In the AWS Console, verify that your endpoint's status shows "Available".
2. **Test DNS resolution**: From an EC2 instance in your configured VPC, run a DNS lookup to confirm resolution to your VPC's IP range. Use the `Private Host` you recorded earlier from the PlanetScale dashboard:
```bash theme={null}
dig +short 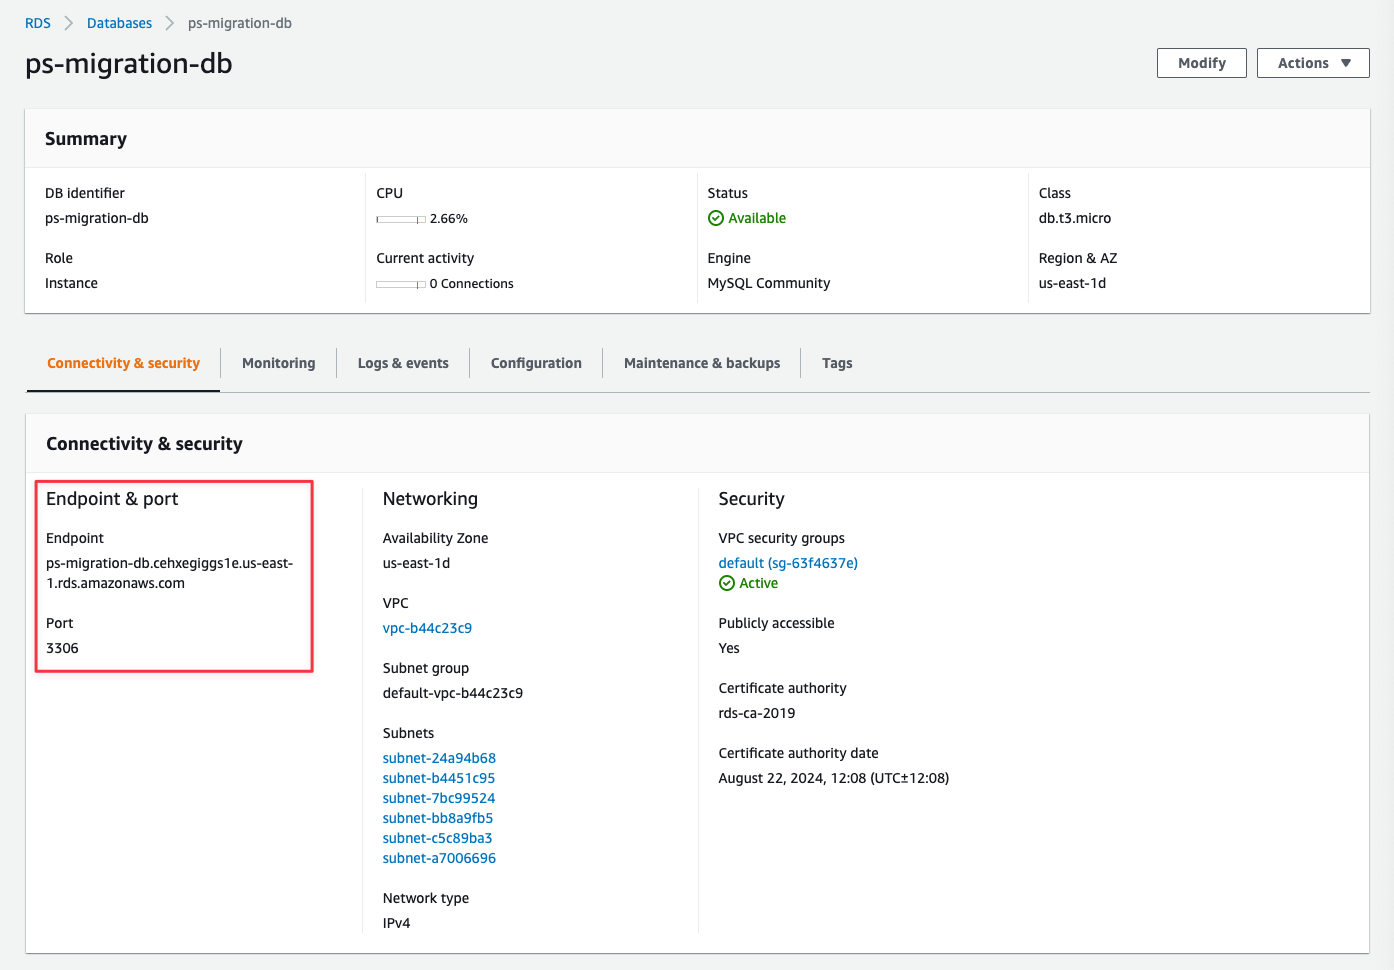 ## Step 1: Configure server settings
Your RDS database needs specific server settings configured before you can import. Follow these steps to configure GTID mode, binlog format, and sql\_mode.
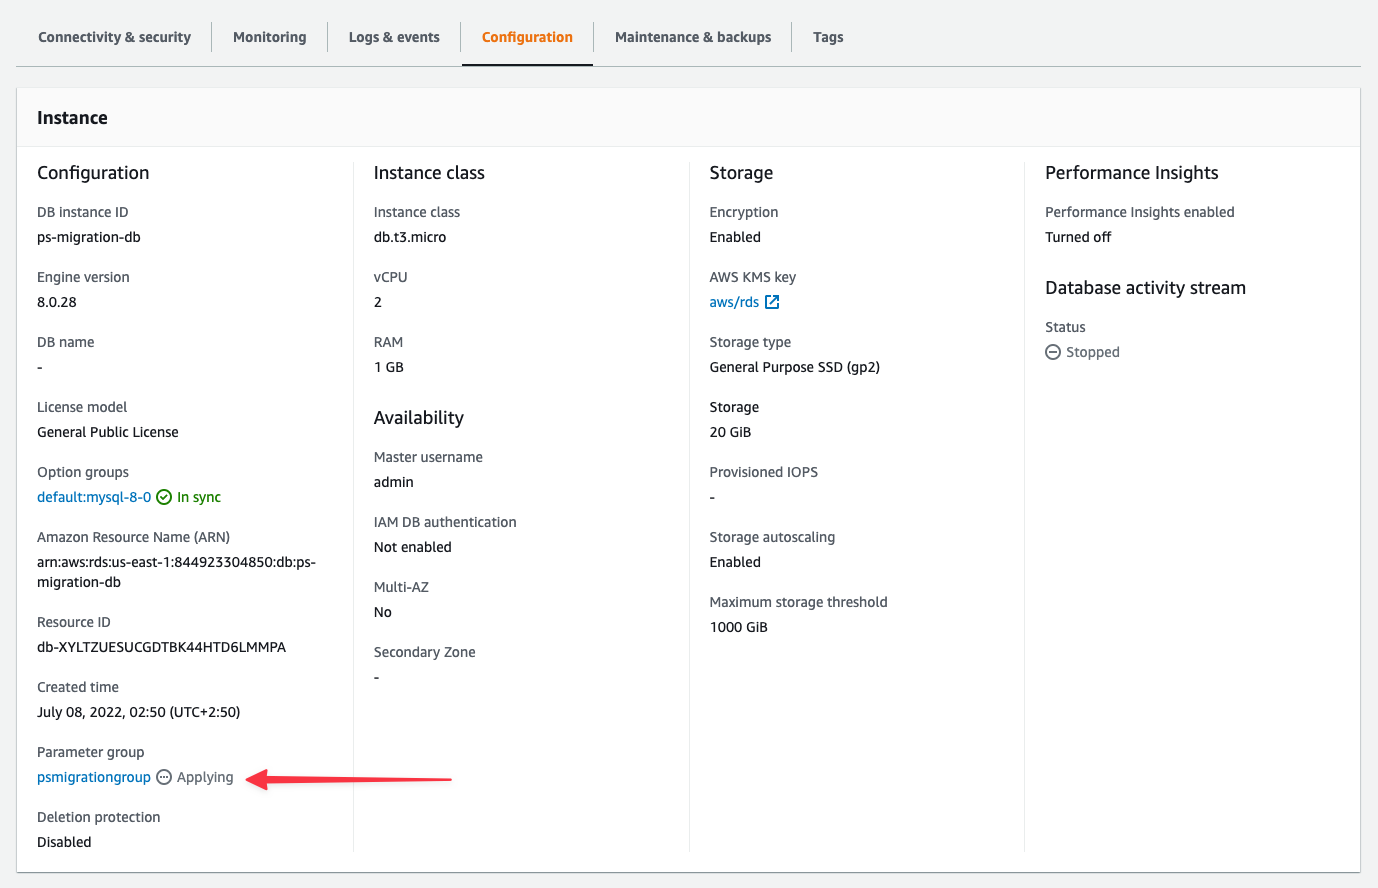
### Check your current parameter group
Your Amazon RDS database is either using the default DB parameter group (e.g., default.mysql8.0) or a custom one. You can view it in the "**Configuration**" tab of your database instance.
## Step 1: Configure server settings
Your RDS database needs specific server settings configured before you can import. Follow these steps to configure GTID mode, binlog format, and sql\_mode.
### Check your current parameter group
Your Amazon RDS database is either using the default DB parameter group (e.g., default.mysql8.0) or a custom one. You can view it in the "**Configuration**" tab of your database instance.
 ### Configure the parameter group
Specify the **Parameter group family**, **Type**, **Group name**, and **Description**. All fields are required.
* Parameter group family: mysql8.0 (or your MySQL version)
* Type: DB Parameter Group (Note: Not "DB Cluster Parameter Group" type)
* Group name: psmigrationgroup (or your choice)
* Description: Parameter group for PlanetScale migration
### Configure the parameter group
Specify the **Parameter group family**, **Type**, **Group name**, and **Description**. All fields are required.
* Parameter group family: mysql8.0 (or your MySQL version)
* Type: DB Parameter Group (Note: Not "DB Cluster Parameter Group" type)
* Group name: psmigrationgroup (or your choice)
* Description: Parameter group for PlanetScale migration
 You'll be brought back to the list of available parameter groups when you save.
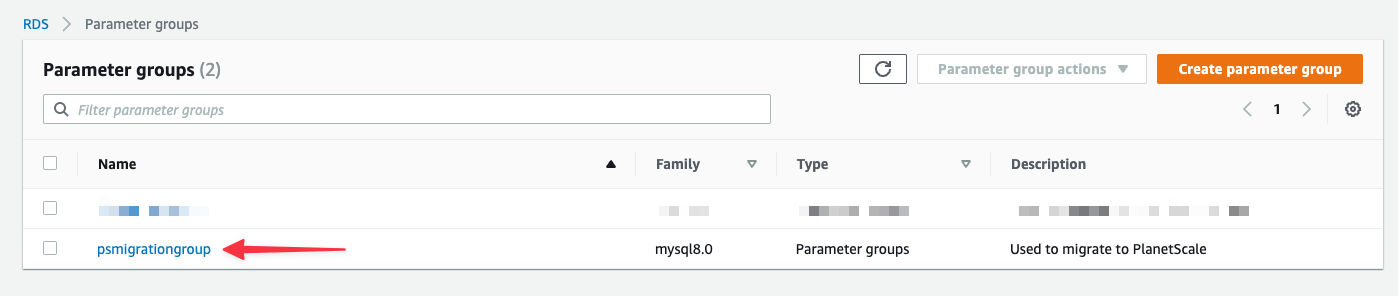 Click "**Edit parameters**" to unlock editing.
Search for "**binlog\_format**" and update:
* binlog\_format: ROW
Click "**Edit parameters**" to unlock editing.
Search for "**binlog\_format**" and update:
* binlog\_format: ROW
 Search for "**gtid**" and update:
* gtid-mode: ON
* enforce\_gtid\_consistency: ON
Search for "**sql\_mode**" and update:
* sql\_mode: NO\_ZERO\_IN\_DATE,NO\_ZERO\_DATE,ONLY\_FULL\_GROUP\_BY
Search for "**gtid**" and update:
* gtid-mode: ON
* enforce\_gtid\_consistency: ON
Search for "**sql\_mode**" and update:
* sql\_mode: NO\_ZERO\_IN\_DATE,NO\_ZERO\_DATE,ONLY\_FULL\_GROUP\_BY
 Click "**Save changes**".
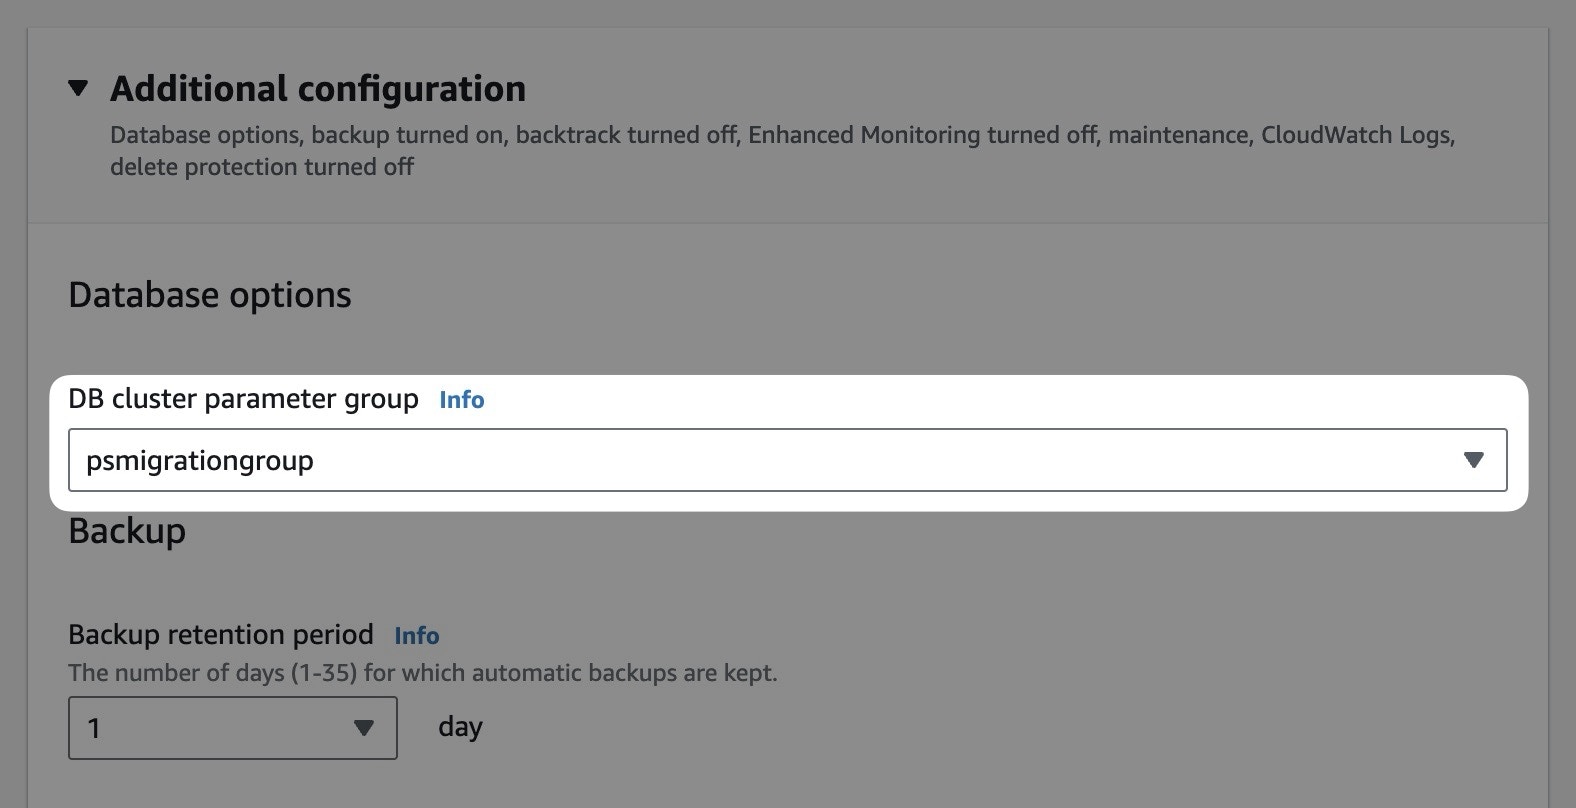
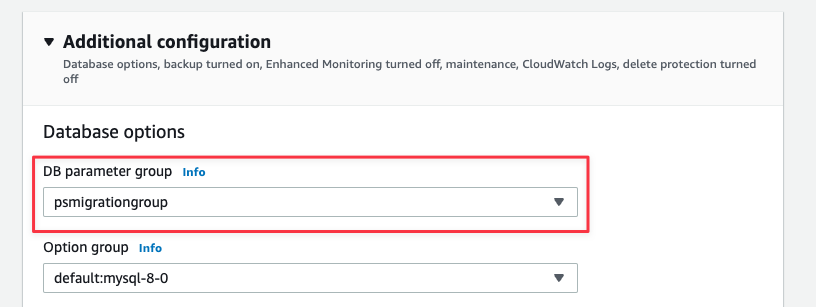
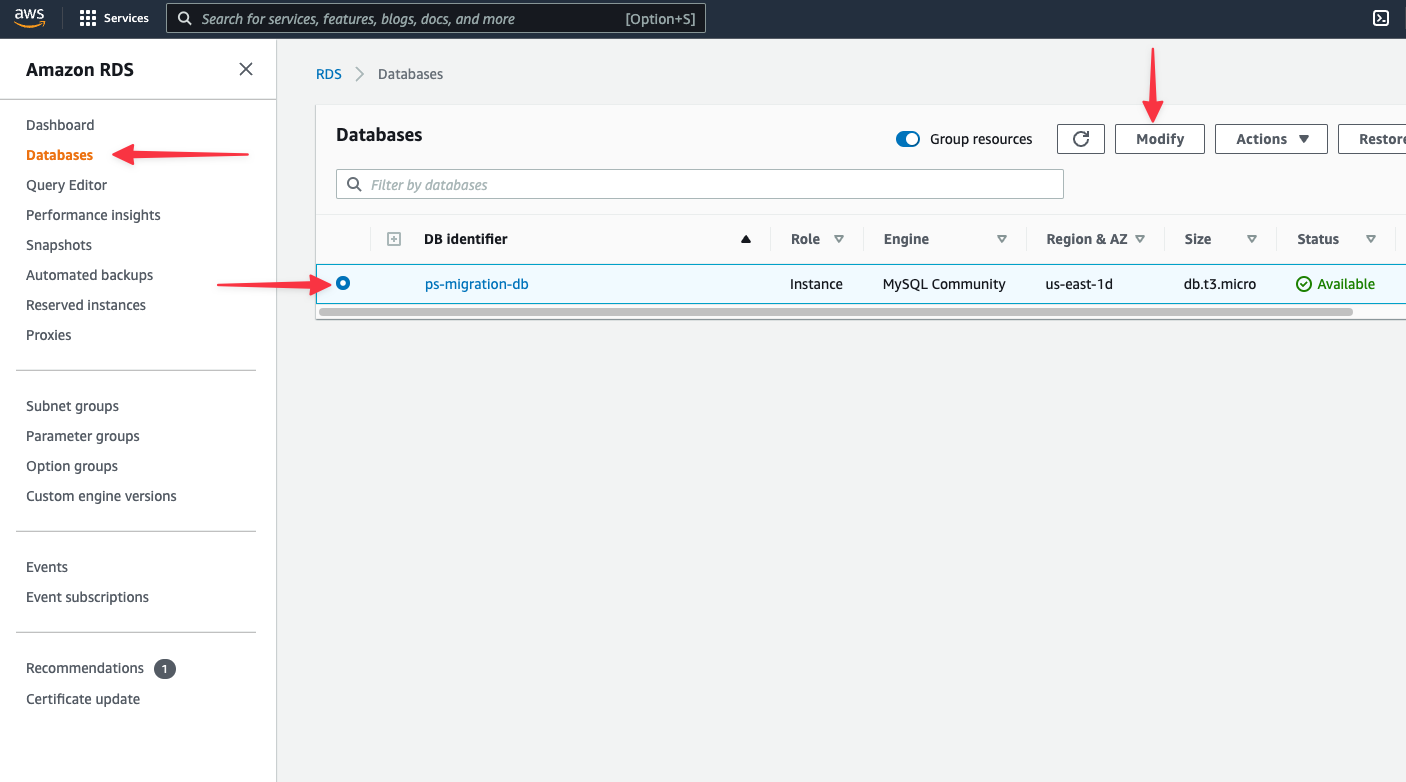 Scroll to **Additional configuration** section. Update the **DB parameter group** to your new parameter group. Click "**Continue**".
 Choose when to apply:
* **Apply during the next scheduled maintenance window** - Applied during maintenance window
* **Apply immediately** - Applied now, but requires manual reboot
Choose when to apply:
* **Apply during the next scheduled maintenance window** - Applied during maintenance window
* **Apply immediately** - Applied now, but requires manual reboot
 Click "**Modify DB instance**".
 Select "**Inbound rules**" tab, then "**Edit inbound rules**".
Click "**Add rule**", then:
* **Type**: Select `MYSQL/Aurora`
* **Source**: Enter the first PlanetScale IP address (AWS will format it as `x.x.x.x/32`)
Repeat for each IP address in your region, then click "**Save rules**".
## Importing your database
Now that your RDS database is configured, follow the [Database Imports guide](/docs/vitess/imports/database-imports) to complete your import.
When filling out the connection form in the import workflow, use:
* **Host name** - Your RDS endpoint address (from Prerequisites)
* **Port** - 3306 (or your custom port)
* **Database name** - The exact database name to import
* **Username** - `migration_user`
* **Password** - The password you set in Step 5
* **SSL verification mode** - Select based on your RDS SSL configuration
The Database Imports guide will walk you through:
* Creating your PlanetScale database
* Connecting to your RDS database
* Validating your configuration
* Selecting tables to import
* Monitoring the import progress
* Switching traffic and completing the import
## Need help?
Get help from [the PlanetScale Support team](https://support.planetscale.com/), or join our [GitHub discussion board](https://github.com/planetscale/discussion/discussions) to see how others are using PlanetScale.
---
> To find navigation and other pages in this documentation, fetch the llms.txt file at: https://planetscale.com/llms.txt
---
# Source: https://planetscale.com/docs/vitess/managed/aws.md
# PlanetScale Managed on AWS overview
> PlanetScale Managed on Amazon Web Services (AWS) is a single-tenant deployment of PlanetScale in your AWS organization within an isolated AWS Organizations member account.
## Overview
In this configuration, you can use the same API, CLI, and web interface that PlanetScale offers, with the benefit of running entirely in an AWS Organizations member account that you own and PlanetScale manages for you.
## Architecture
The PlanetScale data plane is deployed inside of a PlanetScale-controlled AWS Organizations member account in your AWS organization.
The Vitess cluster will run within this member account, orchestrated via Kubernetes.
We distribute components of the cluster across three AWS availability zones within your selected region to ensure high availability.
You can deploy PlanetScale Managed to any AWS region with at least three availability zones, including those not supported by the PlanetScale self-serve product.
Backups, part of the data plane, are stored in S3 inside the same member account.
PlanetScale Managed uses isolated Amazon Elastic Compute Cloud (Amazon EC2) instances as part of the deployment.
Select "**Inbound rules**" tab, then "**Edit inbound rules**".
Click "**Add rule**", then:
* **Type**: Select `MYSQL/Aurora`
* **Source**: Enter the first PlanetScale IP address (AWS will format it as `x.x.x.x/32`)
Repeat for each IP address in your region, then click "**Save rules**".
## Importing your database
Now that your RDS database is configured, follow the [Database Imports guide](/docs/vitess/imports/database-imports) to complete your import.
When filling out the connection form in the import workflow, use:
* **Host name** - Your RDS endpoint address (from Prerequisites)
* **Port** - 3306 (or your custom port)
* **Database name** - The exact database name to import
* **Username** - `migration_user`
* **Password** - The password you set in Step 5
* **SSL verification mode** - Select based on your RDS SSL configuration
The Database Imports guide will walk you through:
* Creating your PlanetScale database
* Connecting to your RDS database
* Validating your configuration
* Selecting tables to import
* Monitoring the import progress
* Switching traffic and completing the import
## Need help?
Get help from [the PlanetScale Support team](https://support.planetscale.com/), or join our [GitHub discussion board](https://github.com/planetscale/discussion/discussions) to see how others are using PlanetScale.
---
> To find navigation and other pages in this documentation, fetch the llms.txt file at: https://planetscale.com/llms.txt
---
# Source: https://planetscale.com/docs/vitess/managed/aws.md
# PlanetScale Managed on AWS overview
> PlanetScale Managed on Amazon Web Services (AWS) is a single-tenant deployment of PlanetScale in your AWS organization within an isolated AWS Organizations member account.
## Overview
In this configuration, you can use the same API, CLI, and web interface that PlanetScale offers, with the benefit of running entirely in an AWS Organizations member account that you own and PlanetScale manages for you.
## Architecture
The PlanetScale data plane is deployed inside of a PlanetScale-controlled AWS Organizations member account in your AWS organization.
The Vitess cluster will run within this member account, orchestrated via Kubernetes.
We distribute components of the cluster across three AWS availability zones within your selected region to ensure high availability.
You can deploy PlanetScale Managed to any AWS region with at least three availability zones, including those not supported by the PlanetScale self-serve product.
Backups, part of the data plane, are stored in S3 inside the same member account.
PlanetScale Managed uses isolated Amazon Elastic Compute Cloud (Amazon EC2) instances as part of the deployment.
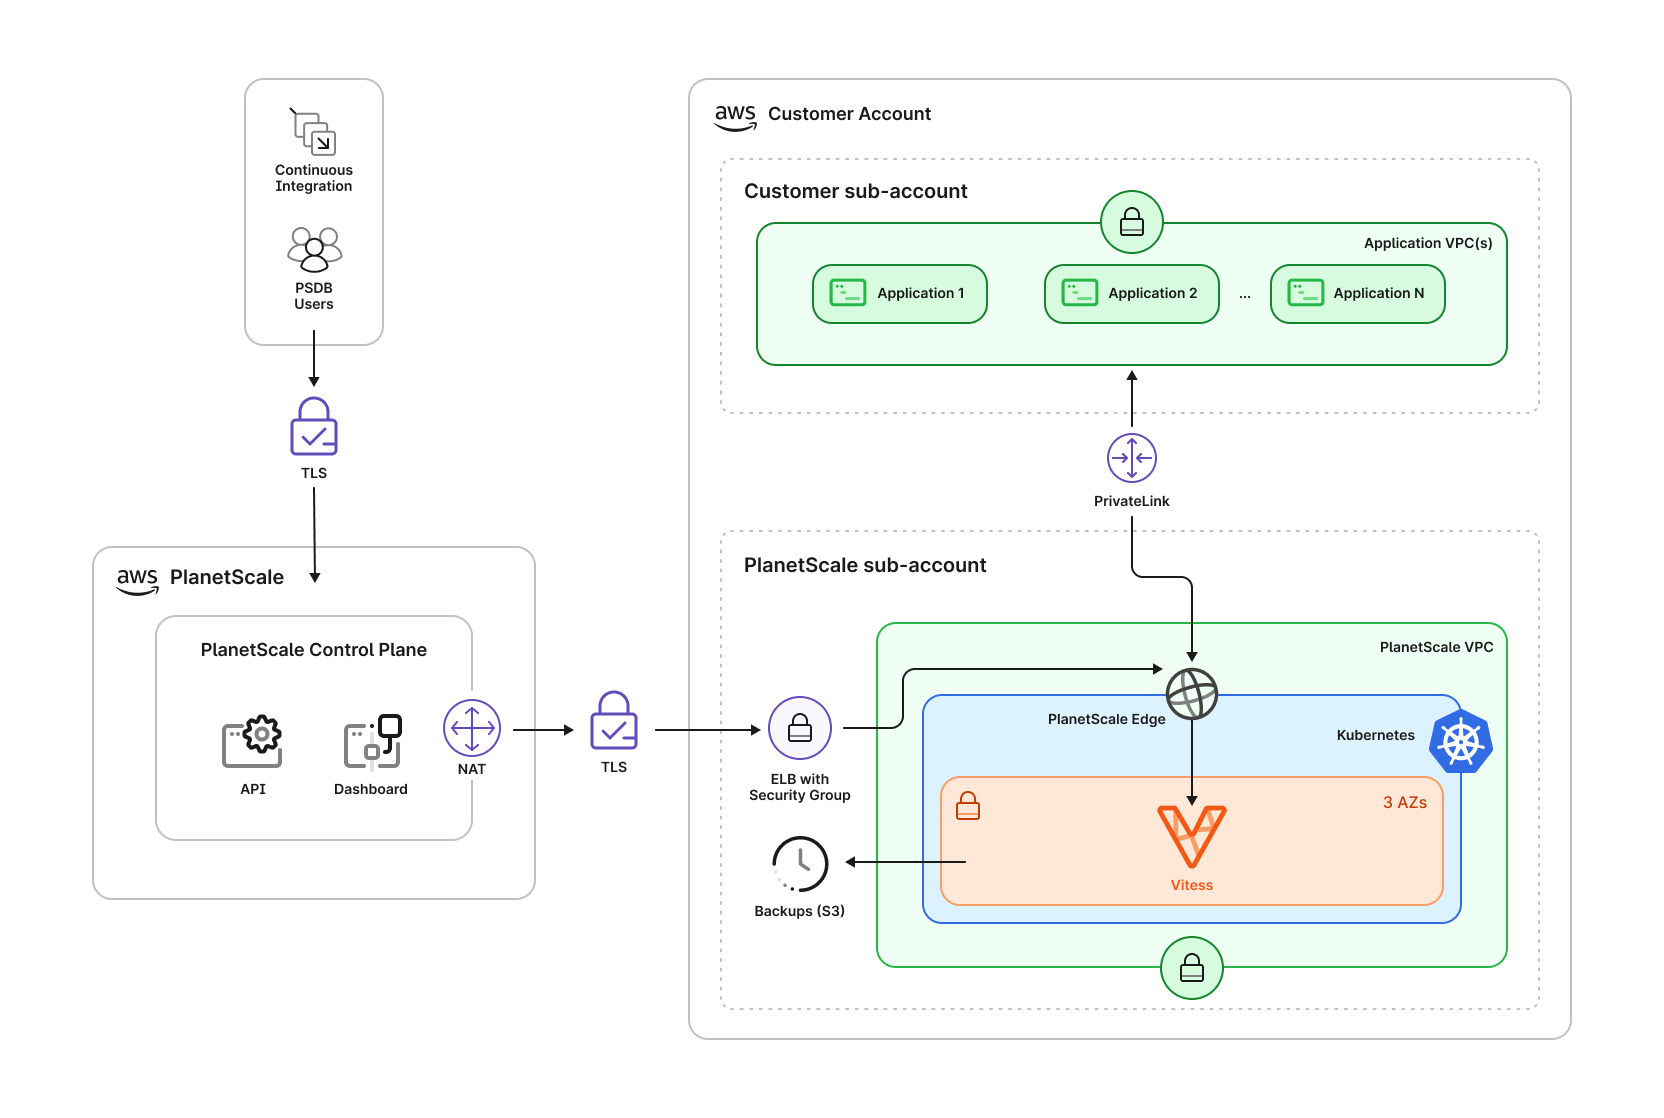 Your database lives entirely inside a dedicated AWS Organizations member account within your AWS organization.
PlanetScale will not have access to other member accounts nor your organization-level settings within AWS.
Outside of your AWS organization, we run the PlanetScale control plane, which includes the PlanetScale API and web application, including the dashboard you see at `app.planetscale.com`.
The Vitess cluster running inside Kubernetes is composed of a number of Vitess Components.
All incoming queries are received by one of the **VTGates**, which then routes them to the appropriate **VTTablet**.
The VTGates, VTTablets, and MySQL instances are distributed across 3 availability zones.
Your database lives entirely inside a dedicated AWS Organizations member account within your AWS organization.
PlanetScale will not have access to other member accounts nor your organization-level settings within AWS.
Outside of your AWS organization, we run the PlanetScale control plane, which includes the PlanetScale API and web application, including the dashboard you see at `app.planetscale.com`.
The Vitess cluster running inside Kubernetes is composed of a number of Vitess Components.
All incoming queries are received by one of the **VTGates**, which then routes them to the appropriate **VTTablet**.
The VTGates, VTTablets, and MySQL instances are distributed across 3 availability zones.
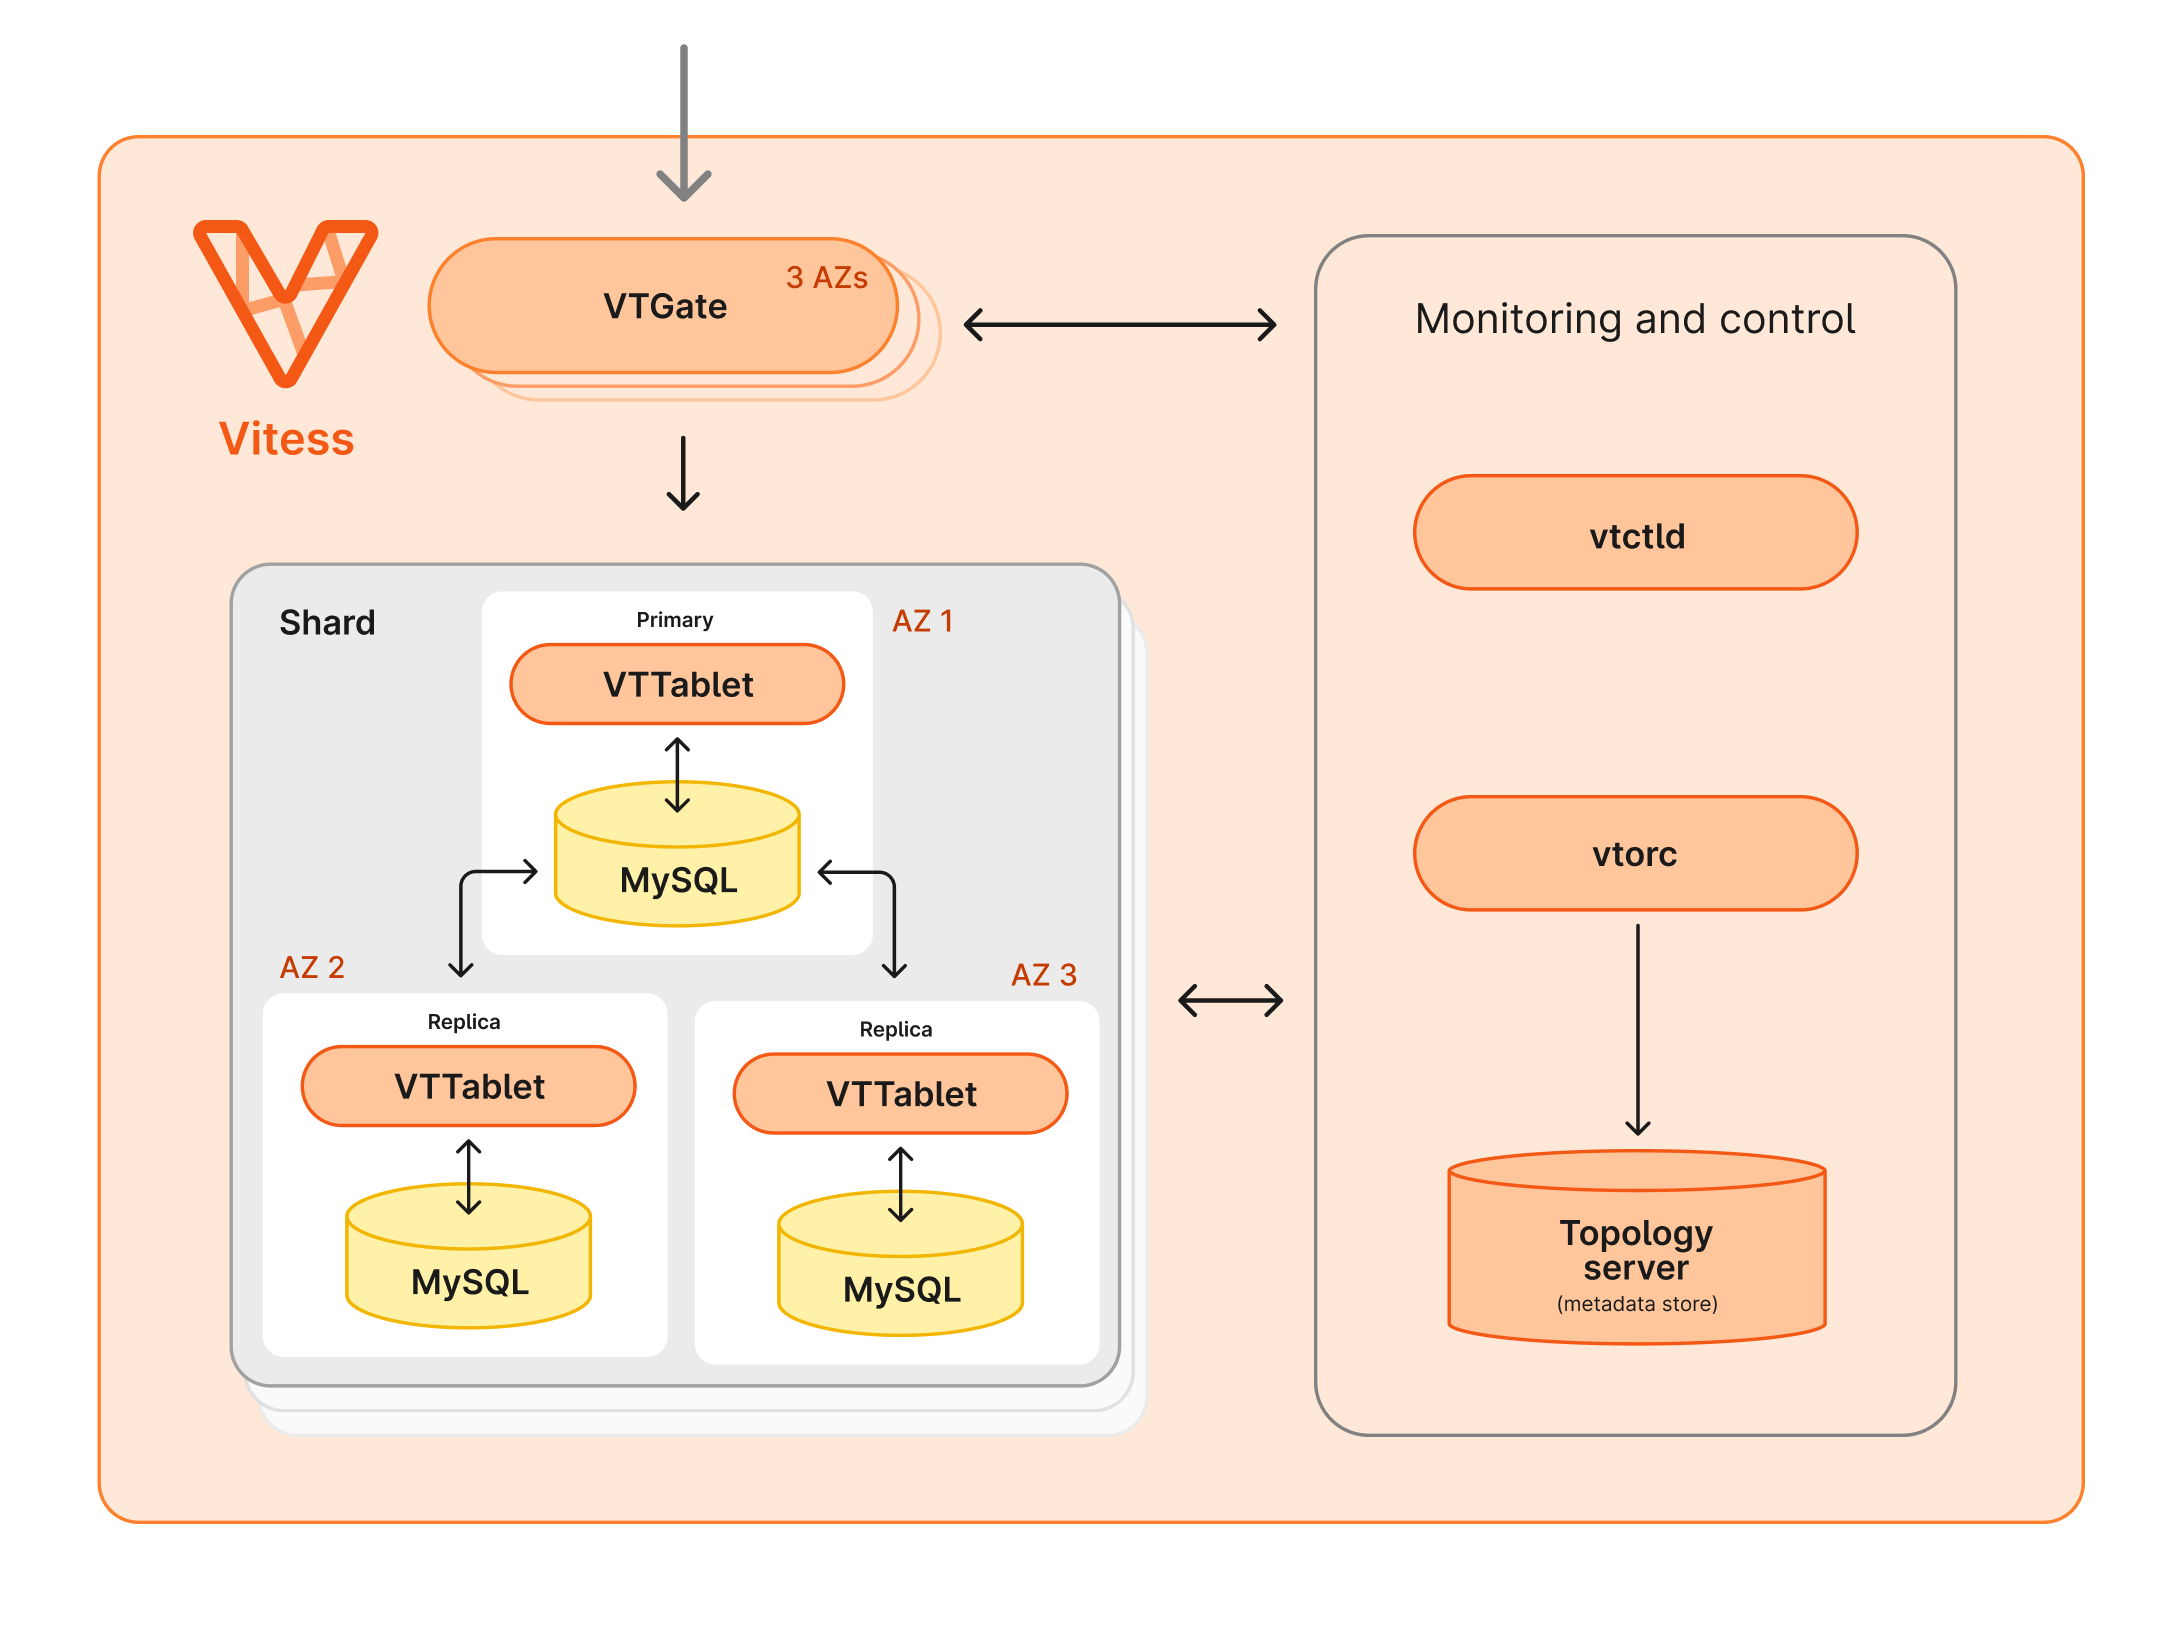 Several additional required Vitess components are run in the Kubernetes cluster as well.
The topology server keeps track of cluster configuration.
**VTOrc** monitors cluster health and handles repairs, including managing automatic failover in case of an issue with a primary.
**vtctld** along with the client **vtctl** can be used to make changes to the cluster configuration and run workflows.
## Security and compliance
PlanetScale Managed is an excellent option for organizations with specific security and compliance requirements.
You own the AWS organization and member account that PlanetScale is deployed within an isolated architecture. This differs from when your PlanetScale database is deployed within our AWS organizations.
Several additional required Vitess components are run in the Kubernetes cluster as well.
The topology server keeps track of cluster configuration.
**VTOrc** monitors cluster health and handles repairs, including managing automatic failover in case of an issue with a primary.
**vtctld** along with the client **vtctl** can be used to make changes to the cluster configuration and run workflows.
## Security and compliance
PlanetScale Managed is an excellent option for organizations with specific security and compliance requirements.
You own the AWS organization and member account that PlanetScale is deployed within an isolated architecture. This differs from when your PlanetScale database is deployed within our AWS organizations.
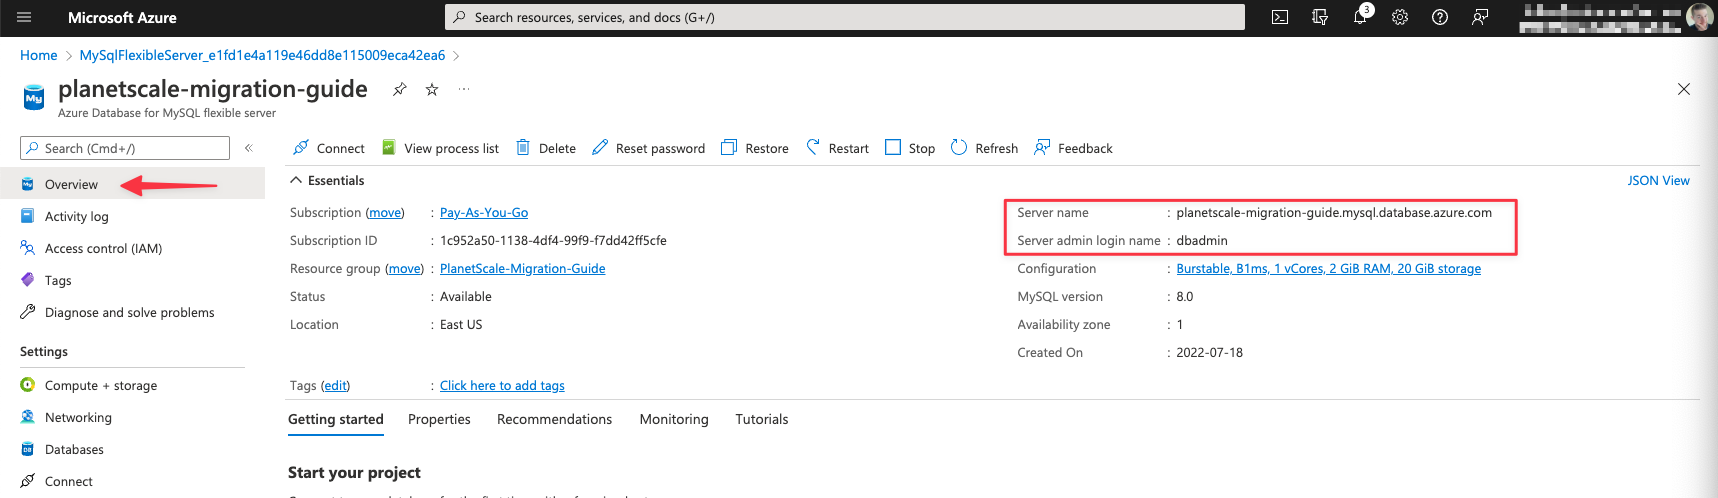 The server admin password is the same password you set when initially creating the database instance.
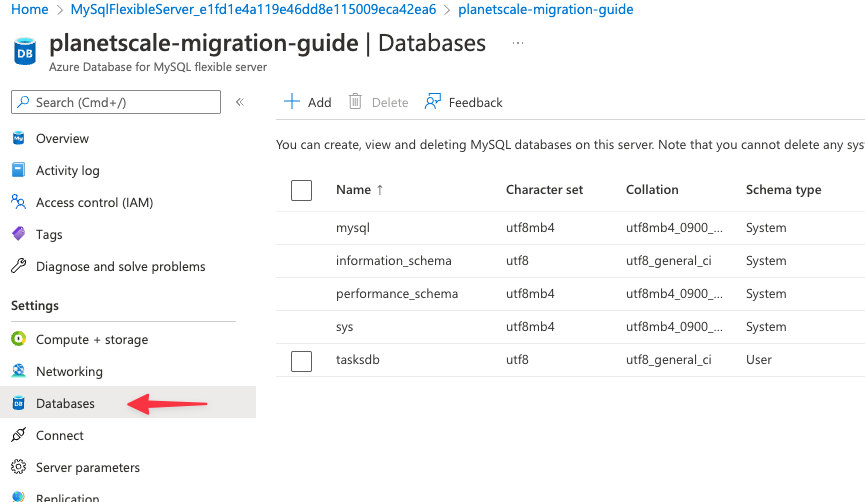
To view your available databases, select the **Databases** tab from the sidebar.
The server admin password is the same password you set when initially creating the database instance.
To view your available databases, select the **Databases** tab from the sidebar.
 ## Configure firewall rules
In order for PlanetScale to connect to your Azure database, you must allow traffic into the database through the associated security group. The specific IP addresses you will need to allow depend on the region you plan to host your PlanetScale database. Check the [Import tool public IP addresses page](/docs/vitess/imports/import-tool-migration-addresses) to determine the IP addresses to allow before continuing. This guide will use the **AWS us-east-1 (North Virginia)** region so we’ll allow the following addresses:
```
3.209.149.66
3.215.97.46
34.193.111.15
23.23.187.137
52.6.141.108
52.70.2.89
50.17.188.76
52.2.251.189
52.72.234.74
35.174.68.24
52.5.253.172
54.156.81.4
34.200.24.255
35.174.79.154
44.199.177.24
```
To allow traffic into your Azure database, navigate to the “**Networking**” section from the sidebar and locate the **Firewall rules** section. There are already a series of inputs allowing you to add entries into the Firewall rules, each of which will permit network traffic from that IP address. Add a new entry for each address required, then click “Save” from the toolbar.
## Configure firewall rules
In order for PlanetScale to connect to your Azure database, you must allow traffic into the database through the associated security group. The specific IP addresses you will need to allow depend on the region you plan to host your PlanetScale database. Check the [Import tool public IP addresses page](/docs/vitess/imports/import-tool-migration-addresses) to determine the IP addresses to allow before continuing. This guide will use the **AWS us-east-1 (North Virginia)** region so we’ll allow the following addresses:
```
3.209.149.66
3.215.97.46
34.193.111.15
23.23.187.137
52.6.141.108
52.70.2.89
50.17.188.76
52.2.251.189
52.72.234.74
35.174.68.24
52.5.253.172
54.156.81.4
34.200.24.255
35.174.79.154
44.199.177.24
```
To allow traffic into your Azure database, navigate to the “**Networking**” section from the sidebar and locate the **Firewall rules** section. There are already a series of inputs allowing you to add entries into the Firewall rules, each of which will permit network traffic from that IP address. Add a new entry for each address required, then click “Save” from the toolbar.
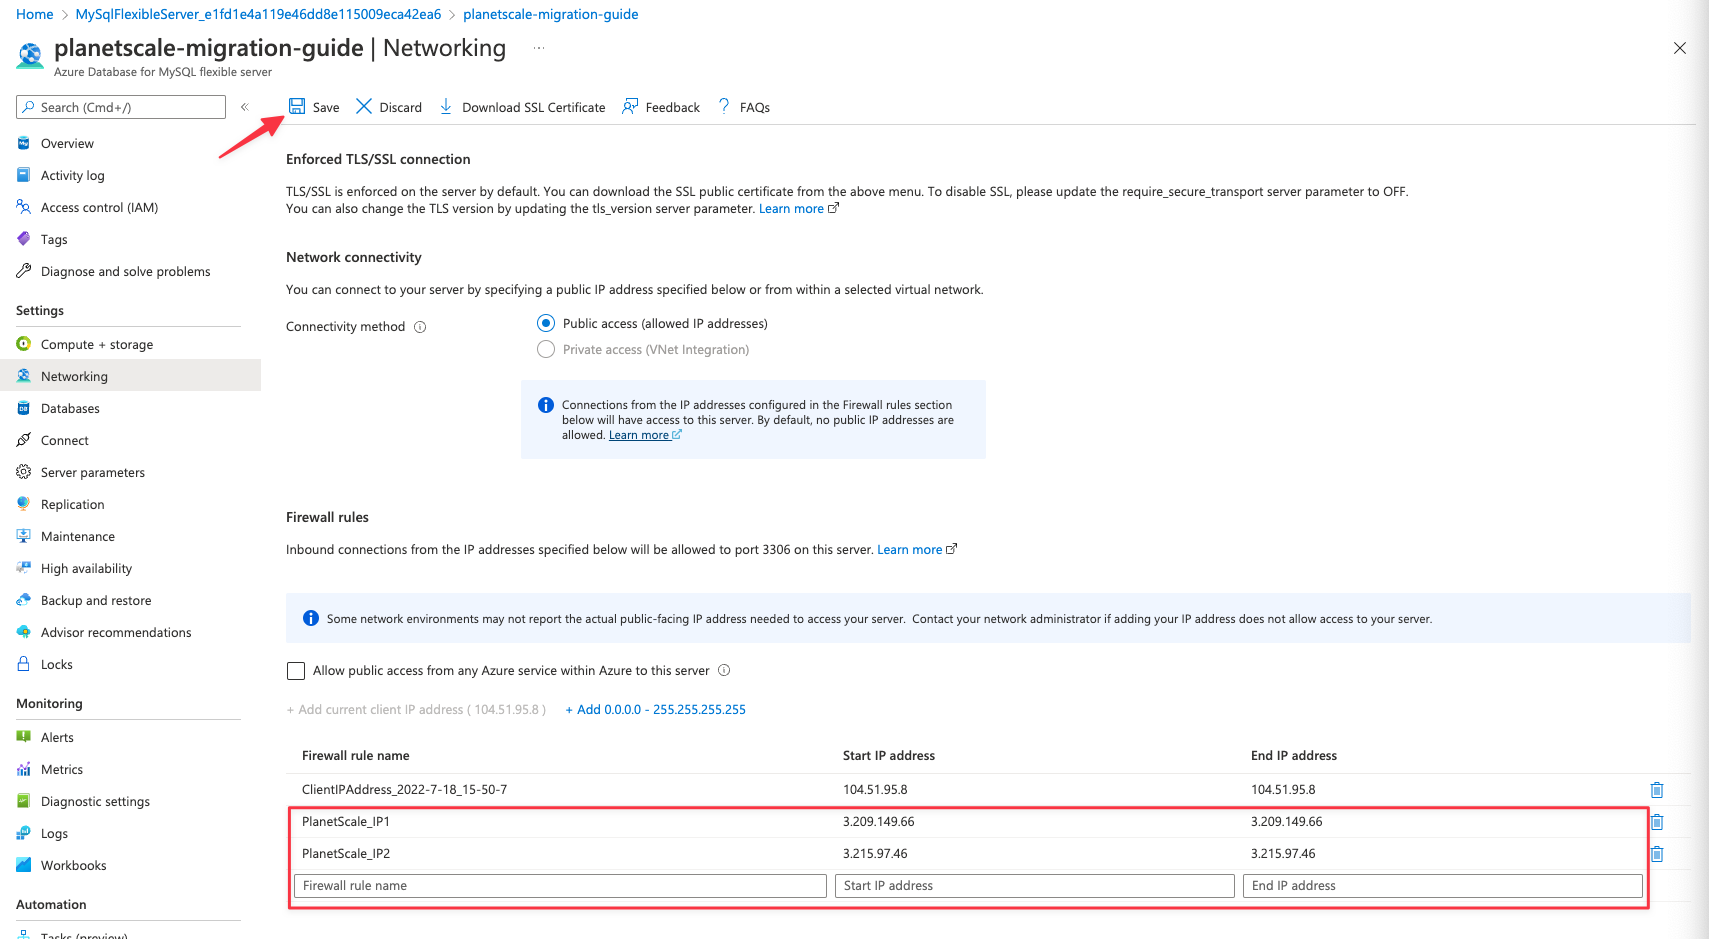 ## Configure MySQL server settings
There are three settings that need to be configured before you can import your database:
* gtid\_mode
* enforce\_gtid\_consistency
* binlog\_row\_image
To access these settings in Azure, select “**Server parameters**” from the sidebar and enter “**gtid**” in the search bar. Set both “**enforce\_gtid\_consistency**” and “**gtid\_mode**” to “**ON**”. Next, search for “**binlog\_row\_image**” and set to “**full**”. Click “**Save**”.
## Configure MySQL server settings
There are three settings that need to be configured before you can import your database:
* gtid\_mode
* enforce\_gtid\_consistency
* binlog\_row\_image
To access these settings in Azure, select “**Server parameters**” from the sidebar and enter “**gtid**” in the search bar. Set both “**enforce\_gtid\_consistency**” and “**gtid\_mode**” to “**ON**”. Next, search for “**binlog\_row\_image**” and set to “**full**”. Click “**Save**”.
 ## Import your database
Now that your Azure Database for MySQL is configured and ready, follow the [Database Imports guide](/docs/vitess/imports/database-imports) to complete your import.
When filling out the connection form in the import workflow, use the following information:
* **Host name** - Your Azure server name (from Prerequisites)
* **Port** - 3306 (default for Azure MySQL)
* **Database name** - The exact database name to import
* **Username** - Your server admin login name
* **Password** - Your server admin password
* **SSL verification mode** - Select "**Verify Identity**" (Verify certificate and hostname)
The Database Imports guide will walk you through:
* Creating your PlanetScale database
* Connecting to your Azure MySQL database
* Validating your configuration
* Selecting tables to import
* Monitoring the import progress
* Switching traffic and completing the import
## Need help?
Get help from [the PlanetScale Support team](https://support.planetscale.com/), or join our [GitHub discussion board](https://github.com/planetscale/discussion/discussions) to see how others are using PlanetScale.
---
> To find navigation and other pages in this documentation, fetch the llms.txt file at: https://planetscale.com/llms.txt
---
# Source: https://planetscale.com/docs/vitess/managed/gcp/back-up-and-restore.md
# Source: https://planetscale.com/docs/vitess/managed/aws/back-up-and-restore.md
# Back up and restore in AWS
> PlanetScale Managed backup and restore functions like the hosted PlanetScale product. For more info, see [how to create, schedule, and restore backups for your PlanetScale databases](/docs/vitess/backups).
To learn more about the backup and restore access levels, see the [database level permissions documentation](/docs/security/access-control#database-level-permissions).
By default, databases are automatically backed up once per day to an S3 bucket in the customer's AWS Organizations member account. This default can be adjusted when working with PlanetScale Support. Configuring and validating additional backup frequencies is the customer's responsibility.
During the initial provisioning process, PlanetScale applies an S3 configuration to ensure that backups are encrypted at rest on Amazon S3.
## Need help?
Get help from [the PlanetScale Support team](https://support.planetscale.com/), or join our [GitHub discussion board](https://github.com/planetscale/discussion/discussions) to see how others are using PlanetScale.
---
> To find navigation and other pages in this documentation, fetch the llms.txt file at: https://planetscale.com/llms.txt
---
# Source: https://planetscale.com/docs/cli/backup.md
# PlanetScale CLI commands: backup
## Getting Started
Make sure to first [set up your PlanetScale developer environment](/docs/cli/planetscale-environment-setup). Once you've installed the `pscale` CLI, you can interact with PlanetScale and manage your databases straight from the command line.
## The `backup` command
This command allows you to create, list, show, and delete [branch backups](/docs/vitess/backups).
**Usage:**
```bash theme={null}
pscale backup
## Import your database
Now that your Azure Database for MySQL is configured and ready, follow the [Database Imports guide](/docs/vitess/imports/database-imports) to complete your import.
When filling out the connection form in the import workflow, use the following information:
* **Host name** - Your Azure server name (from Prerequisites)
* **Port** - 3306 (default for Azure MySQL)
* **Database name** - The exact database name to import
* **Username** - Your server admin login name
* **Password** - Your server admin password
* **SSL verification mode** - Select "**Verify Identity**" (Verify certificate and hostname)
The Database Imports guide will walk you through:
* Creating your PlanetScale database
* Connecting to your Azure MySQL database
* Validating your configuration
* Selecting tables to import
* Monitoring the import progress
* Switching traffic and completing the import
## Need help?
Get help from [the PlanetScale Support team](https://support.planetscale.com/), or join our [GitHub discussion board](https://github.com/planetscale/discussion/discussions) to see how others are using PlanetScale.
---
> To find navigation and other pages in this documentation, fetch the llms.txt file at: https://planetscale.com/llms.txt
---
# Source: https://planetscale.com/docs/vitess/managed/gcp/back-up-and-restore.md
# Source: https://planetscale.com/docs/vitess/managed/aws/back-up-and-restore.md
# Back up and restore in AWS
> PlanetScale Managed backup and restore functions like the hosted PlanetScale product. For more info, see [how to create, schedule, and restore backups for your PlanetScale databases](/docs/vitess/backups).
To learn more about the backup and restore access levels, see the [database level permissions documentation](/docs/security/access-control#database-level-permissions).
By default, databases are automatically backed up once per day to an S3 bucket in the customer's AWS Organizations member account. This default can be adjusted when working with PlanetScale Support. Configuring and validating additional backup frequencies is the customer's responsibility.
During the initial provisioning process, PlanetScale applies an S3 configuration to ensure that backups are encrypted at rest on Amazon S3.
## Need help?
Get help from [the PlanetScale Support team](https://support.planetscale.com/), or join our [GitHub discussion board](https://github.com/planetscale/discussion/discussions) to see how others are using PlanetScale.
---
> To find navigation and other pages in this documentation, fetch the llms.txt file at: https://planetscale.com/llms.txt
---
# Source: https://planetscale.com/docs/cli/backup.md
# PlanetScale CLI commands: backup
## Getting Started
Make sure to first [set up your PlanetScale developer environment](/docs/cli/planetscale-environment-setup). Once you've installed the `pscale` CLI, you can interact with PlanetScale and manage your databases straight from the command line.
## The `backup` command
This command allows you to create, list, show, and delete [branch backups](/docs/vitess/backups).
**Usage:**
```bash theme={null}
pscale backup  PlanetScale databases are designed for developers and developer workflows. Deploy a fully managed database cluster with the reliability of MySQL (our databases run on MySQL 8) and the scale of open source Vitess in just minutes.
Deploy, branch, and query your database directly from the UI, download our [CLI](https://github.com/planetscale/cli#installation) and run commands there, or automate your deployments using our [GitHub Actions](/docs/vitess/integrations/github-actions) and [API](/docs/api/reference/getting-started-with-planetscale-api).
Built-in connection pooling means you’ll never run into connection limits for your database.
## PlanetScale branching
The PlanetScale branching feature allows you to treat your databases like code by creating a branch of your production database schema to serve as an isolated development environment.
PlanetScale provides two types of database branches: **development** and **production**.
Development branches provide isolated copies of your database schema where you can make changes, experiment, or run CI against. Instantly branch your production database to create a staging environment for testing out your schema changes.
Production branches are highly available databases intended for production traffic. They include an additional replica for high availability and are automatically backed up daily.
Branches can also have [safe migrations](/docs/vitess/schema-changes/safe-migrations) enabled for zero-downtime schema migrations, protection against accidental schema changes, and enhanced team collaboration through [deploy requests](/docs/vitess/schema-changes/deploy-requests).
We also offer a [Data Branching®](/docs/vitess/schema-changes/data-branching) feature, which allows you to create an isolated replica of your database for development that includes both the schema **and** data.
Learn more about [database branching](/docs/vitess/schema-changes/branching).
## Non-blocking schema changes
PlanetScale makes it safe to deploy schema changes to production and easy to automate schema management as a part of your CI/CD process. Schema changes to production branches with safe migrations enabled are applied online and protect against changes that block databases, lock individual tables, or slow down production during the migration.
Use a development branch to apply schema changes and view the schema diff in the UI or the CLI. Once you’re satisfied with your schema changes, you can open a deploy request.
Learn more about [non-blocking schema changes](/docs/vitess/schema-changes).
## Deploy requests
PlanetScale databases are designed for developers and developer workflows. Deploy a fully managed database cluster with the reliability of MySQL (our databases run on MySQL 8) and the scale of open source Vitess in just minutes.
Deploy, branch, and query your database directly from the UI, download our [CLI](https://github.com/planetscale/cli#installation) and run commands there, or automate your deployments using our [GitHub Actions](/docs/vitess/integrations/github-actions) and [API](/docs/api/reference/getting-started-with-planetscale-api).
Built-in connection pooling means you’ll never run into connection limits for your database.
## PlanetScale branching
The PlanetScale branching feature allows you to treat your databases like code by creating a branch of your production database schema to serve as an isolated development environment.
PlanetScale provides two types of database branches: **development** and **production**.
Development branches provide isolated copies of your database schema where you can make changes, experiment, or run CI against. Instantly branch your production database to create a staging environment for testing out your schema changes.
Production branches are highly available databases intended for production traffic. They include an additional replica for high availability and are automatically backed up daily.
Branches can also have [safe migrations](/docs/vitess/schema-changes/safe-migrations) enabled for zero-downtime schema migrations, protection against accidental schema changes, and enhanced team collaboration through [deploy requests](/docs/vitess/schema-changes/deploy-requests).
We also offer a [Data Branching®](/docs/vitess/schema-changes/data-branching) feature, which allows you to create an isolated replica of your database for development that includes both the schema **and** data.
Learn more about [database branching](/docs/vitess/schema-changes/branching).
## Non-blocking schema changes
PlanetScale makes it safe to deploy schema changes to production and easy to automate schema management as a part of your CI/CD process. Schema changes to production branches with safe migrations enabled are applied online and protect against changes that block databases, lock individual tables, or slow down production during the migration.
Use a development branch to apply schema changes and view the schema diff in the UI or the CLI. Once you’re satisfied with your schema changes, you can open a deploy request.
Learn more about [non-blocking schema changes](/docs/vitess/schema-changes).
## Deploy requests
 ## Canceling your plan
Deleting a database will end its plan and prorate the plan fee on your current invoice. You can delete a database from its settings page.
## Why do I see a pre-authorization charge on my card?
If you added a new billing method to your account or created a new database afterwards, you may see a temporary hold on your credit card. This is a pre-authorization that we use to verify that your card is valid, but you will not be charged the amount. This pre-authorization is automatically cancelled after verification, but it may take a few days for your bank to update your account statement to show this cancellation.
## Need help?
Get help from [the PlanetScale Support team](https://support.planetscale.com/), or join our [GitHub discussion board](https://github.com/planetscale/discussion/discussions) to see how others are using PlanetScale.
---
> To find navigation and other pages in this documentation, fetch the llms.txt file at: https://planetscale.com/llms.txt
---
# Source: https://planetscale.com/docs/cli/branch.md
# PlanetScale CLI commands: branch
## Getting Started
Make sure to first [set up your PlanetScale developer environment](/docs/cli/planetscale-environment-setup). Once you've installed the `pscale` CLI, you can interact with PlanetScale and manage your databases straight from the command line.
## The `branch` command
This command allows you to create, delete, diff, and manage [branches](/docs/vitess/schema-changes/branching).
**Usage:**
```bash theme={null}
pscale branch
## Canceling your plan
Deleting a database will end its plan and prorate the plan fee on your current invoice. You can delete a database from its settings page.
## Why do I see a pre-authorization charge on my card?
If you added a new billing method to your account or created a new database afterwards, you may see a temporary hold on your credit card. This is a pre-authorization that we use to verify that your card is valid, but you will not be charged the amount. This pre-authorization is automatically cancelled after verification, but it may take a few days for your bank to update your account statement to show this cancellation.
## Need help?
Get help from [the PlanetScale Support team](https://support.planetscale.com/), or join our [GitHub discussion board](https://github.com/planetscale/discussion/discussions) to see how others are using PlanetScale.
---
> To find navigation and other pages in this documentation, fetch the llms.txt file at: https://planetscale.com/llms.txt
---
# Source: https://planetscale.com/docs/cli/branch.md
# PlanetScale CLI commands: branch
## Getting Started
Make sure to first [set up your PlanetScale developer environment](/docs/cli/planetscale-environment-setup). Once you've installed the `pscale` CLI, you can interact with PlanetScale and manage your databases straight from the command line.
## The `branch` command
This command allows you to create, delete, diff, and manage [branches](/docs/vitess/schema-changes/branching).
**Usage:**
```bash theme={null}
pscale branch PlanetScale API
© 2025 PlanetScale, Inc. version: v1 x-copyright: '© 2025 PlanetScale, Inc.' servers: - url: https://api.planetscale.com/v1 security: - ApiKeyHeader: - Authorization tags: - name: Backups description: |2 Resources for managing database branch backups. - name: Branch changes description: |2 Resources for managing cluster changes. - name: Cluster extensions description: |2 Resources for managing cluster extension configuration. - name: Branch log signatures description: |2 Resources for retrieving branch log access signatures. - name: Cluster parameters description: |2 Resources for managing cluster configuration parameters. - name: Database branch keyspaces description: |2 Resources for managing keyspaces. - name: Database branch passwords description: |2 Resources for managing database branch passwords. - name: Database Postgres IP restrictions description: |2 Resources for managing Postgres IP restriction entries for databases. Note: This endpoint is only available for PostgreSQL databases. For MySQL databases, use the Database Branch Passwords endpoint. - name: Databases description: |2 Resources for managing databases within an organization. - name: Keyspace VSchemas description: |2 Resources for managing VSchemas within a keyspace. - name: OAuth applications description: |2 Resources for managing OAuth applications. - name: OAuth tokens description: |2 Resources for managing OAuth tokens. - name: Organization members description: |2 Resources for managing organization members and their roles. - name: Organizations description: |2 Resources for managing organizations. - name: Bouncer resizes description: |2 Resources for managing Postgres bouncer resize requests. - name: Bouncers description: |2 Resources for managing postgres bouncers. - name: Roles description: |2 Resources for managing role credentials. - name: Query Insights reports description: |2 Resources for downloading query insights data. - name: Service tokens description: |2 API endpoints for managing service tokens within an organization. - name: Users description: |2 Resources for managing users. - name: Workflows description: |2 API endpoints for managing workflows. - name: Deploy requests description: |2 Resources for managing deploy requests. - name: Webhooks description: |2 Resources for managing database webhooks. - name: Invoices description: |2 Resources for managing invoices. - name: Organization teams description: |2 Resources for managing teams within an organization. Teams allow you to group members and grant them access to specific databases. Note: Teams managed through SSO/directory services cannot be modified via API. paths: /organizations/{organization}/databases/{database}/branches/{branch}/bouncers/{bouncer}/resizes: delete: tags: - Bouncer resizes summary: Cancel a resize request description: >- ### Authorization A service token or OAuth token must have at least one of the following access or scopes in order to use this API endpoint: **Service Token Accesses** `write_database` **OAuth Scopes** | Resource | Scopes | | :------- | :---------- | | Organization | `write_databases` | | Database | `write_database` | operationId: cancel_bouncer_resize_request parameters: - name: organization in: path required: true description: The name of the organization that owns this resource schema: type: string - name: database in: path required: true description: The name of the database that owns this resource schema: type: string - name: branch in: path required: true description: The name of the branch that owns this resource schema: type: string - name: bouncer in: path required: true description: The name of the bouncer schema: type: string responses: '204': description: Cancels a resize request headers: {} '401': description: Unauthorized '403': description: Forbidden '404': description: Not Found '500': description: Internal Server Error components: securitySchemes: ApiKeyHeader: type: apiKey in: header name: Authorization ```` --- > To find navigation and other pages in this documentation, fetch the llms.txt file at: https://planetscale.com/llms.txt --- # Source: https://planetscale.com/docs/api/reference/cancel_branch_change_request.md # Cancel a change request > ### Authorization A service token or OAuth token must have at least one of the following access or scopes in order to use this API endpoint: **Service Token Accesses** `write_database` **OAuth Scopes** | Resource | Scopes | | :------- | :---------- | | Organization | `write_databases` | | Database | `write_database` | ## OpenAPI ````yaml delete /organizations/{organization}/databases/{database}/branches/{branch}/resizes openapi: 3.0.1 info: title: PlanetScale API description: |-PlanetScale API
© 2025 PlanetScale, Inc. version: v1 x-copyright: '© 2025 PlanetScale, Inc.' servers: - url: https://api.planetscale.com/v1 security: - ApiKeyHeader: - Authorization tags: - name: Backups description: |2 Resources for managing database branch backups. - name: Branch changes description: |2 Resources for managing cluster changes. - name: Cluster extensions description: |2 Resources for managing cluster extension configuration. - name: Branch log signatures description: |2 Resources for retrieving branch log access signatures. - name: Cluster parameters description: |2 Resources for managing cluster configuration parameters. - name: Database branch keyspaces description: |2 Resources for managing keyspaces. - name: Database branch passwords description: |2 Resources for managing database branch passwords. - name: Database Postgres IP restrictions description: |2 Resources for managing Postgres IP restriction entries for databases. Note: This endpoint is only available for PostgreSQL databases. For MySQL databases, use the Database Branch Passwords endpoint. - name: Databases description: |2 Resources for managing databases within an organization. - name: Keyspace VSchemas description: |2 Resources for managing VSchemas within a keyspace. - name: OAuth applications description: |2 Resources for managing OAuth applications. - name: OAuth tokens description: |2 Resources for managing OAuth tokens. - name: Organization members description: |2 Resources for managing organization members and their roles. - name: Organizations description: |2 Resources for managing organizations. - name: Bouncer resizes description: |2 Resources for managing Postgres bouncer resize requests. - name: Bouncers description: |2 Resources for managing postgres bouncers. - name: Roles description: |2 Resources for managing role credentials. - name: Query Insights reports description: |2 Resources for downloading query insights data. - name: Service tokens description: |2 API endpoints for managing service tokens within an organization. - name: Users description: |2 Resources for managing users. - name: Workflows description: |2 API endpoints for managing workflows. - name: Deploy requests description: |2 Resources for managing deploy requests. - name: Webhooks description: |2 Resources for managing database webhooks. - name: Invoices description: |2 Resources for managing invoices. - name: Organization teams description: |2 Resources for managing teams within an organization. Teams allow you to group members and grant them access to specific databases. Note: Teams managed through SSO/directory services cannot be modified via API. paths: /organizations/{organization}/databases/{database}/branches/{branch}/resizes: delete: tags: - Branch changes summary: Cancel a change request description: >- ### Authorization A service token or OAuth token must have at least one of the following access or scopes in order to use this API endpoint: **Service Token Accesses** `write_database` **OAuth Scopes** | Resource | Scopes | | :------- | :---------- | | Organization | `write_databases` | | Database | `write_database` | operationId: cancel_branch_change_request parameters: - name: organization in: path required: true description: The name of the organization that owns this resource schema: type: string - name: database in: path required: true description: The name of the database that owns this resource schema: type: string - name: branch in: path required: true description: The name of the branch that owns this resource schema: type: string responses: '204': description: Cancels a change request headers: {} '401': description: Unauthorized '403': description: Forbidden '404': description: Not Found '500': description: Internal Server Error components: securitySchemes: ApiKeyHeader: type: apiKey in: header name: Authorization ```` --- > To find navigation and other pages in this documentation, fetch the llms.txt file at: https://planetscale.com/llms.txt --- # Source: https://planetscale.com/docs/api/reference/cancel_deploy_request.md # Cancel a queued deploy request > ### Authorization A service token or OAuth token must have at least one of the following access or scopes in order to use this API endpoint: **Service Token Accesses** `read_deploy_request`, `create_deploy_request` **OAuth Scopes** | Resource | Scopes | | :------- | :---------- | | Organization | `deploy_deploy_requests` | | Database | `deploy_deploy_requests` | ## OpenAPI ````yaml post /organizations/{organization}/databases/{database}/deploy-requests/{number}/cancel openapi: 3.0.1 info: title: PlanetScale API description: |-PlanetScale API
© 2025 PlanetScale, Inc. version: v1 x-copyright: '© 2025 PlanetScale, Inc.' servers: - url: https://api.planetscale.com/v1 security: - ApiKeyHeader: - Authorization tags: - name: Backups description: |2 Resources for managing database branch backups. - name: Branch changes description: |2 Resources for managing cluster changes. - name: Cluster extensions description: |2 Resources for managing cluster extension configuration. - name: Branch log signatures description: |2 Resources for retrieving branch log access signatures. - name: Cluster parameters description: |2 Resources for managing cluster configuration parameters. - name: Database branch keyspaces description: |2 Resources for managing keyspaces. - name: Database branch passwords description: |2 Resources for managing database branch passwords. - name: Database Postgres IP restrictions description: |2 Resources for managing Postgres IP restriction entries for databases. Note: This endpoint is only available for PostgreSQL databases. For MySQL databases, use the Database Branch Passwords endpoint. - name: Databases description: |2 Resources for managing databases within an organization. - name: Keyspace VSchemas description: |2 Resources for managing VSchemas within a keyspace. - name: OAuth applications description: |2 Resources for managing OAuth applications. - name: OAuth tokens description: |2 Resources for managing OAuth tokens. - name: Organization members description: |2 Resources for managing organization members and their roles. - name: Organizations description: |2 Resources for managing organizations. - name: Bouncer resizes description: |2 Resources for managing Postgres bouncer resize requests. - name: Bouncers description: |2 Resources for managing postgres bouncers. - name: Roles description: |2 Resources for managing role credentials. - name: Query Insights reports description: |2 Resources for downloading query insights data. - name: Service tokens description: |2 API endpoints for managing service tokens within an organization. - name: Users description: |2 Resources for managing users. - name: Workflows description: |2 API endpoints for managing workflows. - name: Deploy requests description: |2 Resources for managing deploy requests. - name: Webhooks description: |2 Resources for managing database webhooks. - name: Invoices description: |2 Resources for managing invoices. - name: Organization teams description: |2 Resources for managing teams within an organization. Teams allow you to group members and grant them access to specific databases. Note: Teams managed through SSO/directory services cannot be modified via API. paths: /organizations/{organization}/databases/{database}/deploy-requests/{number}/cancel: post: tags: - Deploy requests summary: Cancel a queued deploy request description: >- ### Authorization A service token or OAuth token must have at least one of the following access or scopes in order to use this API endpoint: **Service Token Accesses** `read_deploy_request`, `create_deploy_request` **OAuth Scopes** | Resource | Scopes | | :------- | :---------- | | Organization | `deploy_deploy_requests` | | Database | `deploy_deploy_requests` | operationId: cancel_deploy_request parameters: - name: organization in: path required: true description: The name of the deploy request's organization schema: type: string - name: database in: path required: true description: The name of the deploy request's database schema: type: string - name: number in: path required: true description: The number of the deploy request schema: type: integer responses: '200': description: Returns the deploy request whose deployment was canceled headers: {} content: application/json: schema: type: object properties: id: type: string description: The ID of the deploy request number: type: integer description: The number of the deploy request actor: type: object properties: id: type: string description: The ID of the actor display_name: type: string description: The name of the actor avatar_url: type: string description: The URL of the actor's avatar additionalProperties: false required: - id - display_name - avatar_url closed_by: type: object properties: id: type: string description: The ID of the actor display_name: type: string description: The name of the actor avatar_url: type: string description: The URL of the actor's avatar additionalProperties: false required: - id - display_name - avatar_url branch: type: string description: The name of the branch the deploy request was created from branch_id: type: string description: The ID of the branch the deploy request was created from branch_deleted: type: boolean description: Whether or not the deploy request branch was deleted branch_deleted_by: type: object properties: id: type: string description: The ID of the actor display_name: type: string description: The name of the actor avatar_url: type: string description: The URL of the actor's avatar additionalProperties: false required: - id - display_name - avatar_url branch_deleted_at: type: string description: When the deploy request branch was deleted into_branch: type: string description: >- The name of the branch the deploy request will be merged into into_branch_sharded: type: boolean description: >- Whether or not the branch the deploy request will be merged into is sharded into_branch_shard_count: type: integer description: >- The number of shards the branch the deploy request will be merged into has approved: type: boolean description: Whether or not the deploy request is approved state: type: string enum: - open - closed description: Whether the deploy request is open or closed deployment_state: type: string enum: - pending - ready - no_changes - queued - submitting - in_progress - pending_cutover - in_progress_vschema - in_progress_cancel - in_progress_cutover - complete - complete_cancel - complete_error - complete_pending_revert - in_progress_revert - in_progress_revert_vschema - complete_revert - complete_revert_error - cancelled - error description: The deployment state of the deploy request deployment: type: object properties: id: type: string description: The ID of the deployment auto_cutover: type: boolean description: >- Whether or not to automatically cutover once deployment is finished auto_delete_branch: type: boolean description: >- Whether or not to automatically delete the head branch once deployment is finished created_at: type: string description: When the deployment was created cutover_at: type: string description: When the cutover for the deployment was initiated cutover_expiring: type: boolean description: Whether or not the deployment cutover will expire soon deploy_check_errors: type: string description: Deploy check errors for the deployment finished_at: type: string description: When the deployment was finished queued_at: type: string description: When the deployment was queued ready_to_cutover_at: type: string description: When the deployment was ready for cutover started_at: type: string description: When the deployment was started state: type: string enum: - pending - ready - no_changes - queued - submitting - in_progress - pending_cutover - in_progress_vschema - in_progress_cancel - in_progress_cutover - complete - complete_cancel - complete_error - complete_pending_revert - in_progress_revert - in_progress_revert_vschema - complete_revert - complete_revert_error - cancelled - error description: The state the deployment is in submitted_at: type: string description: When the deployment was submitted updated_at: type: string description: When the deployment was last updated into_branch: type: string description: >- The name of the base branch the deployment will be merged into deploy_request_number: type: integer description: >- The number of the deploy request associated with this deployment deployable: type: boolean description: Whether the deployment is deployable preceding_deployments: items: type: object additionalProperties: true type: array description: The deployments ahead of this one in the queue deploy_operations: type: array items: type: object properties: id: type: string description: The ID for the deploy operation state: type: string enum: - pending - queued - in_progress - complete - cancelled - error description: The state of the deploy operation keyspace_name: type: string description: The keyspace modified by the deploy operation table_name: type: string description: >- The name of the table modifed by the deploy operation operation_name: type: string description: The operation name of the deploy operation eta_seconds: type: number description: >- The estimated seconds until completion for the deploy operation progress_percentage: type: number description: The percent completion for the deploy operation deploy_error_docs_url: type: string description: >- A link to documentation explaining the deploy error, if present ddl_statement: type: string description: The DDL statement for the deploy operation syntax_highlighted_ddl: type: string description: >- A syntax-highlighted DDL statement for the deploy operation created_at: type: string description: When the deploy operation was created updated_at: type: string description: When the deploy operation was last updated throttled_at: type: string description: When the deploy operation was last throttled can_drop_data: type: boolean description: >- Whether or not the deploy operation is capable of dropping data table_locked: type: boolean description: >- Whether or not the table modified by the deploy operation is currently locked table_recently_used: type: boolean description: >- Whether or not the table modified by the deploy operation was recently used table_recently_used_at: type: string description: >- When the table modified by the deploy operation was last used removed_foreign_key_names: items: type: string type: array description: Names of foreign keys removed by this operation deploy_errors: type: string description: Deploy errors for the deploy operation additionalProperties: false required: - id - state - keyspace_name - table_name - operation_name - eta_seconds - progress_percentage - deploy_error_docs_url - ddl_statement - syntax_highlighted_ddl - created_at - updated_at - throttled_at - can_drop_data - table_locked - table_recently_used - table_recently_used_at - removed_foreign_key_names - deploy_errors deploy_operation_summaries: type: array items: type: object properties: id: type: string description: The ID for the deploy operation summary created_at: type: string description: When the deploy operation summary was created deploy_errors: type: string description: Deploy errors for the deploy operation summary ddl_statement: type: string description: >- The DDL statement for the deploy operation summary eta_seconds: type: integer description: >- The estimated seconds until completion for the deploy operation summary keyspace_name: type: string description: >- The keyspace modified by the deploy operation summary operation_name: type: string description: >- The operation name of the deploy operation summary progress_percentage: type: number description: >- The percent completion for the deploy operation summary state: type: string enum: - pending - in_progress - complete - cancelled - error description: The state of the deploy operation summary syntax_highlighted_ddl: type: string description: >- A syntax-highlighted DDL statement for the deploy operation summary table_name: type: string description: >- The name of the table modifed by the deploy operation summary table_recently_used_at: type: string description: >- When the table modified by the deploy operation summary was last used throttled_at: type: string description: >- When the deploy operation summary was last throttled removed_foreign_key_names: items: type: string type: array description: >- Names of foreign keys removed by this operation summary shard_count: type: integer description: >- The number of shards in the keyspace modified by the deploy operation summary shard_names: items: type: string type: array description: >- Names of shards in the keyspace modified by the deploy operation summary can_drop_data: type: boolean description: >- Whether or not the deploy operation summary is capable of dropping data table_recently_used: type: boolean description: >- Whether or not the table modified by the deploy operation summary was recently used sharded: type: boolean description: >- Whether or not the keyspace modified by the deploy operation summary is sharded operations: type: array items: type: object properties: id: type: string description: The ID for the deploy operation shard: type: string description: >- The shard the deploy operation is being performed on state: type: string enum: - pending - queued - in_progress - complete - cancelled - error description: The state of the deploy operation progress_percentage: type: number description: >- The percent completion for the deploy operation eta_seconds: type: integer description: >- The estimated seconds until completion for the deploy operation additionalProperties: false required: - id - shard - state - progress_percentage - eta_seconds additionalProperties: false required: - id - created_at - deploy_errors - ddl_statement - eta_seconds - keyspace_name - operation_name - progress_percentage - state - syntax_highlighted_ddl - table_name - table_recently_used_at - throttled_at - removed_foreign_key_names - shard_count - shard_names - can_drop_data - table_recently_used - sharded - operations lint_errors: items: type: object additionalProperties: true type: array description: >- Schema lint errors preventing the deployment from completing sequential_diff_dependencies: items: type: object additionalProperties: true type: array description: The schema dependencies that must be satisfied lookup_vindex_operations: items: type: object additionalProperties: true type: array description: Lookup Vitess index operations throttler_configurations: items: type: object additionalProperties: true type: array description: Deployment throttling configurations deployment_revert_request: type: object additionalProperties: true description: >- The request to revert the schema operations in this deployment actor: type: object properties: id: type: string description: The ID of the actor display_name: type: string description: The name of the actor avatar_url: type: string description: The URL of the actor's avatar additionalProperties: false required: - id - display_name - avatar_url cutover_actor: type: object properties: id: type: string description: The ID of the actor display_name: type: string description: The name of the actor avatar_url: type: string description: The URL of the actor's avatar additionalProperties: false required: - id - display_name - avatar_url cancelled_actor: type: object properties: id: type: string description: The ID of the actor display_name: type: string description: The name of the actor avatar_url: type: string description: The URL of the actor's avatar additionalProperties: false required: - id - display_name - avatar_url schema_last_updated_at: type: string description: When the schema was last updated for the deployment table_locked: type: boolean description: Whether or not the deployment has a table locked locked_table_name: type: string description: The name of he table that is locked by the deployment instant_ddl: type: boolean description: >- Whether or not the deployment is an instant DDL deployment instant_ddl_eligible: type: boolean description: >- Whether or not the deployment is eligible for instant DDL additionalProperties: false required: - id - auto_cutover - auto_delete_branch - created_at - cutover_at - cutover_expiring - deploy_check_errors - finished_at - queued_at - ready_to_cutover_at - started_at - state - submitted_at - updated_at - into_branch - deploy_request_number - deployable - preceding_deployments - deploy_operations - deploy_operation_summaries - lint_errors - sequential_diff_dependencies - lookup_vindex_operations - throttler_configurations - deployment_revert_request - actor - cutover_actor - cancelled_actor - schema_last_updated_at - table_locked - locked_table_name - instant_ddl - instant_ddl_eligible num_comments: type: integer description: The number of comments on the deploy request html_url: type: string description: The PlanetScale app address for the deploy request notes: type: string description: Notes on the deploy request html_body: type: string description: The HTML body of the deploy request created_at: type: string description: When the deploy request was created updated_at: type: string description: When the deploy request was last updated closed_at: type: string description: When the deploy request was closed deployed_at: type: string description: When the deploy request was deployed additionalProperties: false required: - id - number - actor - closed_by - branch - branch_id - branch_deleted - branch_deleted_by - branch_deleted_at - into_branch - into_branch_sharded - into_branch_shard_count - approved - state - deployment_state - deployment - num_comments - html_url - notes - html_body - created_at - updated_at - closed_at - deployed_at '401': description: Unauthorized '403': description: Forbidden '404': description: Not Found '500': description: Internal Server Error components: securitySchemes: ApiKeyHeader: type: apiKey in: header name: Authorization ```` --- > To find navigation and other pages in this documentation, fetch the llms.txt file at: https://planetscale.com/llms.txt --- # Source: https://planetscale.com/docs/cli.md # PlanetScale CLI To interact with PlanetScale and manage your databases, you can use the `pscale` CLI to do the following: * Create, delete and list your databases and branches * Open a secure MySQL shell instance * Manage your deploy requests * ...and more!PlanetScale API
© 2025 PlanetScale, Inc. version: v1 x-copyright: '© 2025 PlanetScale, Inc.' servers: - url: https://api.planetscale.com/v1 security: - ApiKeyHeader: - Authorization tags: - name: Backups description: |2 Resources for managing database branch backups. - name: Branch changes description: |2 Resources for managing cluster changes. - name: Cluster extensions description: |2 Resources for managing cluster extension configuration. - name: Branch log signatures description: |2 Resources for retrieving branch log access signatures. - name: Cluster parameters description: |2 Resources for managing cluster configuration parameters. - name: Database branch keyspaces description: |2 Resources for managing keyspaces. - name: Database branch passwords description: |2 Resources for managing database branch passwords. - name: Database Postgres IP restrictions description: |2 Resources for managing Postgres IP restriction entries for databases. Note: This endpoint is only available for PostgreSQL databases. For MySQL databases, use the Database Branch Passwords endpoint. - name: Databases description: |2 Resources for managing databases within an organization. - name: Keyspace VSchemas description: |2 Resources for managing VSchemas within a keyspace. - name: OAuth applications description: |2 Resources for managing OAuth applications. - name: OAuth tokens description: |2 Resources for managing OAuth tokens. - name: Organization members description: |2 Resources for managing organization members and their roles. - name: Organizations description: |2 Resources for managing organizations. - name: Bouncer resizes description: |2 Resources for managing Postgres bouncer resize requests. - name: Bouncers description: |2 Resources for managing postgres bouncers. - name: Roles description: |2 Resources for managing role credentials. - name: Query Insights reports description: |2 Resources for downloading query insights data. - name: Service tokens description: |2 API endpoints for managing service tokens within an organization. - name: Users description: |2 Resources for managing users. - name: Workflows description: |2 API endpoints for managing workflows. - name: Deploy requests description: |2 Resources for managing deploy requests. - name: Webhooks description: |2 Resources for managing database webhooks. - name: Invoices description: |2 Resources for managing invoices. - name: Organization teams description: |2 Resources for managing teams within an organization. Teams allow you to group members and grant them access to specific databases. Note: Teams managed through SSO/directory services cannot be modified via API. paths: /organizations/{organization}/databases/{database}/deploy-requests/{number}: patch: tags: - Deploy requests summary: Close a deploy request description: >- ### Authorization A service token or OAuth token must have at least one of the following access or scopes in order to use this API endpoint: **Service Token Accesses** `read_deploy_request` **OAuth Scopes** | Resource | Scopes | | :------- | :---------- | | Organization | `write_deploy_requests` | | Database | `write_deploy_requests` | operationId: close_deploy_request parameters: - name: organization in: path required: true description: The name of the deploy request's organization schema: type: string - name: database in: path required: true description: The name of the deploy request's database schema: type: string - name: number in: path required: true description: The number of the deploy request schema: type: integer requestBody: content: application/json: schema: type: object properties: state: type: string enum: - closed description: The deploy request will be updated to this state additionalProperties: false responses: '200': description: Returns the updated deploy request headers: {} content: application/json: schema: type: object properties: id: type: string description: The ID of the deploy request number: type: integer description: The number of the deploy request actor: type: object properties: id: type: string description: The ID of the actor display_name: type: string description: The name of the actor avatar_url: type: string description: The URL of the actor's avatar additionalProperties: false required: - id - display_name - avatar_url closed_by: type: object properties: id: type: string description: The ID of the actor display_name: type: string description: The name of the actor avatar_url: type: string description: The URL of the actor's avatar additionalProperties: false required: - id - display_name - avatar_url branch: type: string description: The name of the branch the deploy request was created from branch_id: type: string description: The ID of the branch the deploy request was created from branch_deleted: type: boolean description: Whether or not the deploy request branch was deleted branch_deleted_by: type: object properties: id: type: string description: The ID of the actor display_name: type: string description: The name of the actor avatar_url: type: string description: The URL of the actor's avatar additionalProperties: false required: - id - display_name - avatar_url branch_deleted_at: type: string description: When the deploy request branch was deleted into_branch: type: string description: >- The name of the branch the deploy request will be merged into into_branch_sharded: type: boolean description: >- Whether or not the branch the deploy request will be merged into is sharded into_branch_shard_count: type: integer description: >- The number of shards the branch the deploy request will be merged into has approved: type: boolean description: Whether or not the deploy request is approved state: type: string enum: - open - closed description: Whether the deploy request is open or closed deployment_state: type: string enum: - pending - ready - no_changes - queued - submitting - in_progress - pending_cutover - in_progress_vschema - in_progress_cancel - in_progress_cutover - complete - complete_cancel - complete_error - complete_pending_revert - in_progress_revert - in_progress_revert_vschema - complete_revert - complete_revert_error - cancelled - error description: The deployment state of the deploy request deployment: type: object properties: id: type: string description: The ID of the deployment auto_cutover: type: boolean description: >- Whether or not to automatically cutover once deployment is finished auto_delete_branch: type: boolean description: >- Whether or not to automatically delete the head branch once deployment is finished created_at: type: string description: When the deployment was created cutover_at: type: string description: When the cutover for the deployment was initiated cutover_expiring: type: boolean description: Whether or not the deployment cutover will expire soon deploy_check_errors: type: string description: Deploy check errors for the deployment finished_at: type: string description: When the deployment was finished queued_at: type: string description: When the deployment was queued ready_to_cutover_at: type: string description: When the deployment was ready for cutover started_at: type: string description: When the deployment was started state: type: string enum: - pending - ready - no_changes - queued - submitting - in_progress - pending_cutover - in_progress_vschema - in_progress_cancel - in_progress_cutover - complete - complete_cancel - complete_error - complete_pending_revert - in_progress_revert - in_progress_revert_vschema - complete_revert - complete_revert_error - cancelled - error description: The state the deployment is in submitted_at: type: string description: When the deployment was submitted updated_at: type: string description: When the deployment was last updated into_branch: type: string description: >- The name of the base branch the deployment will be merged into deploy_request_number: type: integer description: >- The number of the deploy request associated with this deployment deployable: type: boolean description: Whether the deployment is deployable preceding_deployments: items: type: object additionalProperties: true type: array description: The deployments ahead of this one in the queue deploy_operations: type: array items: type: object properties: id: type: string description: The ID for the deploy operation state: type: string enum: - pending - queued - in_progress - complete - cancelled - error description: The state of the deploy operation keyspace_name: type: string description: The keyspace modified by the deploy operation table_name: type: string description: >- The name of the table modifed by the deploy operation operation_name: type: string description: The operation name of the deploy operation eta_seconds: type: number description: >- The estimated seconds until completion for the deploy operation progress_percentage: type: number description: The percent completion for the deploy operation deploy_error_docs_url: type: string description: >- A link to documentation explaining the deploy error, if present ddl_statement: type: string description: The DDL statement for the deploy operation syntax_highlighted_ddl: type: string description: >- A syntax-highlighted DDL statement for the deploy operation created_at: type: string description: When the deploy operation was created updated_at: type: string description: When the deploy operation was last updated throttled_at: type: string description: When the deploy operation was last throttled can_drop_data: type: boolean description: >- Whether or not the deploy operation is capable of dropping data table_locked: type: boolean description: >- Whether or not the table modified by the deploy operation is currently locked table_recently_used: type: boolean description: >- Whether or not the table modified by the deploy operation was recently used table_recently_used_at: type: string description: >- When the table modified by the deploy operation was last used removed_foreign_key_names: items: type: string type: array description: Names of foreign keys removed by this operation deploy_errors: type: string description: Deploy errors for the deploy operation additionalProperties: false required: - id - state - keyspace_name - table_name - operation_name - eta_seconds - progress_percentage - deploy_error_docs_url - ddl_statement - syntax_highlighted_ddl - created_at - updated_at - throttled_at - can_drop_data - table_locked - table_recently_used - table_recently_used_at - removed_foreign_key_names - deploy_errors deploy_operation_summaries: type: array items: type: object properties: id: type: string description: The ID for the deploy operation summary created_at: type: string description: When the deploy operation summary was created deploy_errors: type: string description: Deploy errors for the deploy operation summary ddl_statement: type: string description: >- The DDL statement for the deploy operation summary eta_seconds: type: integer description: >- The estimated seconds until completion for the deploy operation summary keyspace_name: type: string description: >- The keyspace modified by the deploy operation summary operation_name: type: string description: >- The operation name of the deploy operation summary progress_percentage: type: number description: >- The percent completion for the deploy operation summary state: type: string enum: - pending - in_progress - complete - cancelled - error description: The state of the deploy operation summary syntax_highlighted_ddl: type: string description: >- A syntax-highlighted DDL statement for the deploy operation summary table_name: type: string description: >- The name of the table modifed by the deploy operation summary table_recently_used_at: type: string description: >- When the table modified by the deploy operation summary was last used throttled_at: type: string description: >- When the deploy operation summary was last throttled removed_foreign_key_names: items: type: string type: array description: >- Names of foreign keys removed by this operation summary shard_count: type: integer description: >- The number of shards in the keyspace modified by the deploy operation summary shard_names: items: type: string type: array description: >- Names of shards in the keyspace modified by the deploy operation summary can_drop_data: type: boolean description: >- Whether or not the deploy operation summary is capable of dropping data table_recently_used: type: boolean description: >- Whether or not the table modified by the deploy operation summary was recently used sharded: type: boolean description: >- Whether or not the keyspace modified by the deploy operation summary is sharded operations: type: array items: type: object properties: id: type: string description: The ID for the deploy operation shard: type: string description: >- The shard the deploy operation is being performed on state: type: string enum: - pending - queued - in_progress - complete - cancelled - error description: The state of the deploy operation progress_percentage: type: number description: >- The percent completion for the deploy operation eta_seconds: type: integer description: >- The estimated seconds until completion for the deploy operation additionalProperties: false required: - id - shard - state - progress_percentage - eta_seconds additionalProperties: false required: - id - created_at - deploy_errors - ddl_statement - eta_seconds - keyspace_name - operation_name - progress_percentage - state - syntax_highlighted_ddl - table_name - table_recently_used_at - throttled_at - removed_foreign_key_names - shard_count - shard_names - can_drop_data - table_recently_used - sharded - operations lint_errors: items: type: object additionalProperties: true type: array description: >- Schema lint errors preventing the deployment from completing sequential_diff_dependencies: items: type: object additionalProperties: true type: array description: The schema dependencies that must be satisfied lookup_vindex_operations: items: type: object additionalProperties: true type: array description: Lookup Vitess index operations throttler_configurations: items: type: object additionalProperties: true type: array description: Deployment throttling configurations deployment_revert_request: type: object additionalProperties: true description: >- The request to revert the schema operations in this deployment actor: type: object properties: id: type: string description: The ID of the actor display_name: type: string description: The name of the actor avatar_url: type: string description: The URL of the actor's avatar additionalProperties: false required: - id - display_name - avatar_url cutover_actor: type: object properties: id: type: string description: The ID of the actor display_name: type: string description: The name of the actor avatar_url: type: string description: The URL of the actor's avatar additionalProperties: false required: - id - display_name - avatar_url cancelled_actor: type: object properties: id: type: string description: The ID of the actor display_name: type: string description: The name of the actor avatar_url: type: string description: The URL of the actor's avatar additionalProperties: false required: - id - display_name - avatar_url schema_last_updated_at: type: string description: When the schema was last updated for the deployment table_locked: type: boolean description: Whether or not the deployment has a table locked locked_table_name: type: string description: The name of he table that is locked by the deployment instant_ddl: type: boolean description: >- Whether or not the deployment is an instant DDL deployment instant_ddl_eligible: type: boolean description: >- Whether or not the deployment is eligible for instant DDL additionalProperties: false required: - id - auto_cutover - auto_delete_branch - created_at - cutover_at - cutover_expiring - deploy_check_errors - finished_at - queued_at - ready_to_cutover_at - started_at - state - submitted_at - updated_at - into_branch - deploy_request_number - deployable - preceding_deployments - deploy_operations - deploy_operation_summaries - lint_errors - sequential_diff_dependencies - lookup_vindex_operations - throttler_configurations - deployment_revert_request - actor - cutover_actor - cancelled_actor - schema_last_updated_at - table_locked - locked_table_name - instant_ddl - instant_ddl_eligible num_comments: type: integer description: The number of comments on the deploy request html_url: type: string description: The PlanetScale app address for the deploy request notes: type: string description: Notes on the deploy request html_body: type: string description: The HTML body of the deploy request created_at: type: string description: When the deploy request was created updated_at: type: string description: When the deploy request was last updated closed_at: type: string description: When the deploy request was closed deployed_at: type: string description: When the deploy request was deployed additionalProperties: false required: - id - number - actor - closed_by - branch - branch_id - branch_deleted - branch_deleted_by - branch_deleted_at - into_branch - into_branch_sharded - into_branch_shard_count - approved - state - deployment_state - deployment - num_comments - html_url - notes - html_body - created_at - updated_at - closed_at - deployed_at '401': description: Unauthorized '403': description: Forbidden '404': description: Not Found '500': description: Internal Server Error components: securitySchemes: ApiKeyHeader: type: apiKey in: header name: Authorization ```` --- > To find navigation and other pages in this documentation, fetch the llms.txt file at: https://planetscale.com/llms.txt --- # Source: https://planetscale.com/docs/vitess/managed/gcp/security-and-access/cloud-accounts-and-contents.md # Source: https://planetscale.com/docs/vitess/managed/aws/security-and-access/cloud-accounts-and-contents.md # Cloud accounts and contents ## Cloud accounts PlanetScale is not responsible for the general configuration of services shared across the cloud organization in which the AWS Organizations member account or GCP project is provisioned. The customer is solely responsible for managing account access outside that granted to PlanetScale. ## Content restrictions The data stored in PlanetScale Managed databases is contained entirely in the customer's AWS Organizations member account or GCP project. Customers are responsible for all content that is stored in the databases they have created. ## Need help? Get help from [the PlanetScale Support team](https://support.planetscale.com/), or join our [GitHub discussion board](https://github.com/planetscale/discussion/discussions) to see how others are using PlanetScale. --- > To find navigation and other pages in this documentation, fetch the llms.txt file at: https://planetscale.com/llms.txt --- # Source: https://planetscale.com/docs/vitess/tutorials/cloudflare-workers.md # Source: https://planetscale.com/docs/vitess/integrations/cloudflare-workers.md # Cloudflare Workers database integration ## Introduction [Cloudflare Workers database integration](https://developers.cloudflare.com/workers/learning/integrations/databases/#planetscale) is designed to connect your Cloudflare Workers to data sources automatically by generating connection strings and storing them in the worker's secrets. This article will utilize a sample repository that is a preconfigured Cloudflare Worker you can use to deploy to your Cloudflare account. ## Prerequisites * [NodeJS](https://nodejs.org) installed * A [PlanetScale account](https://auth.planetscale.com/sign-up) * The [PlanetScale CLI](https://github.com/planetscale/cli) * A [Cloudflare account](https://www.cloudflare.com) ## Set up the database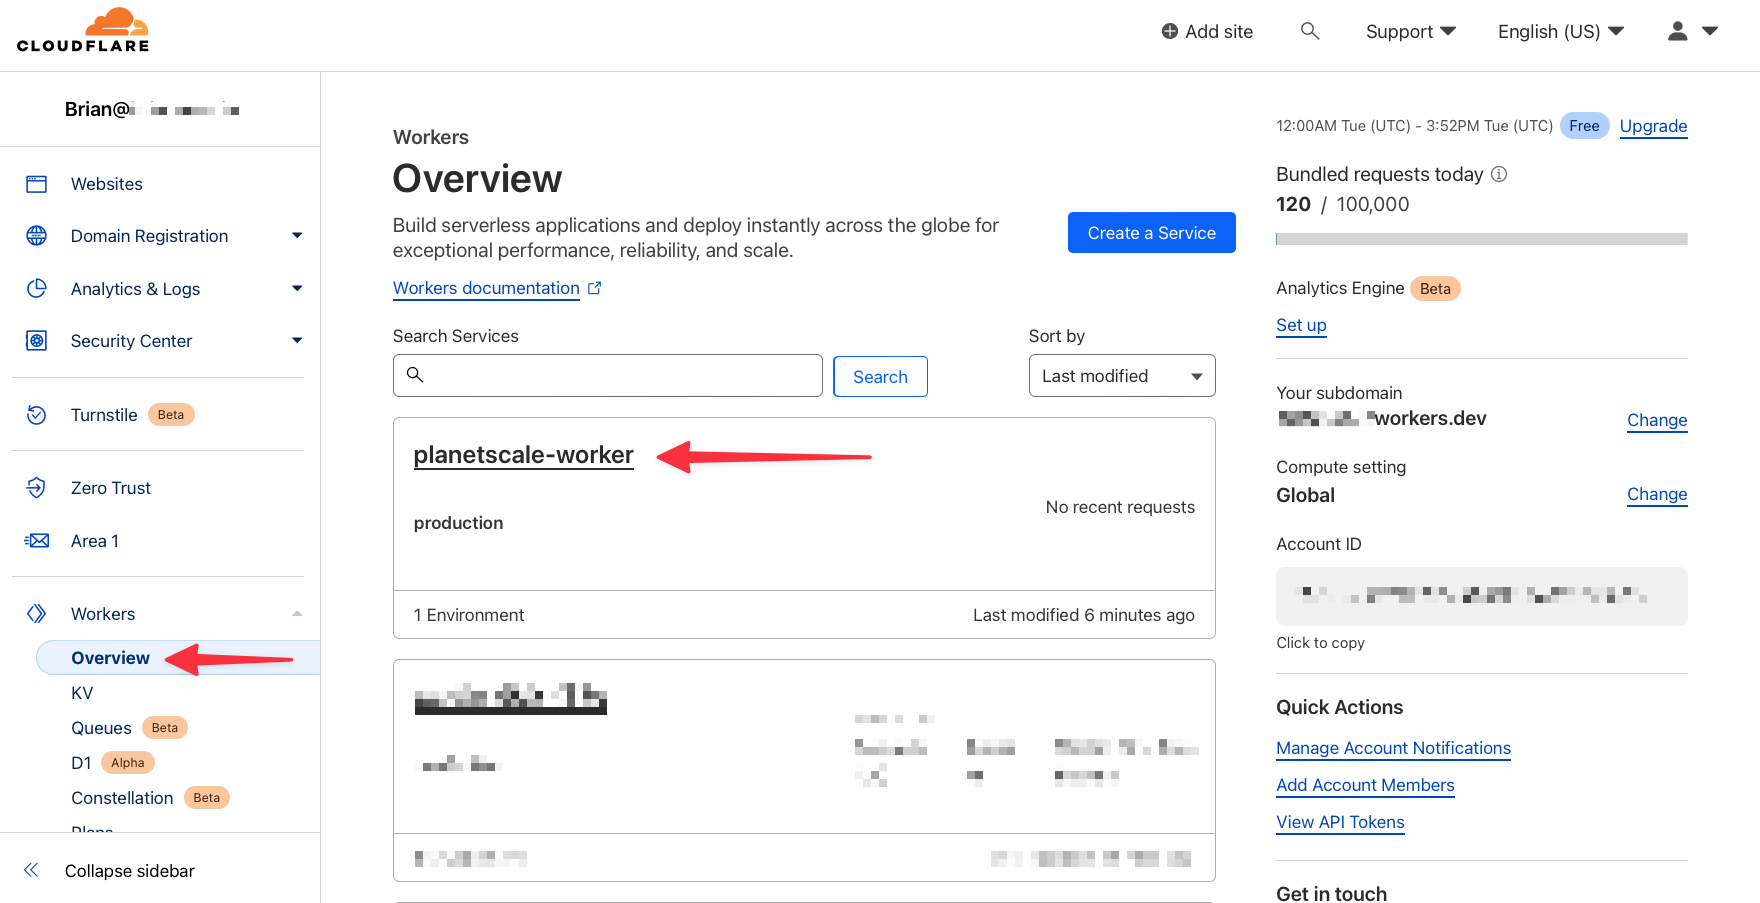
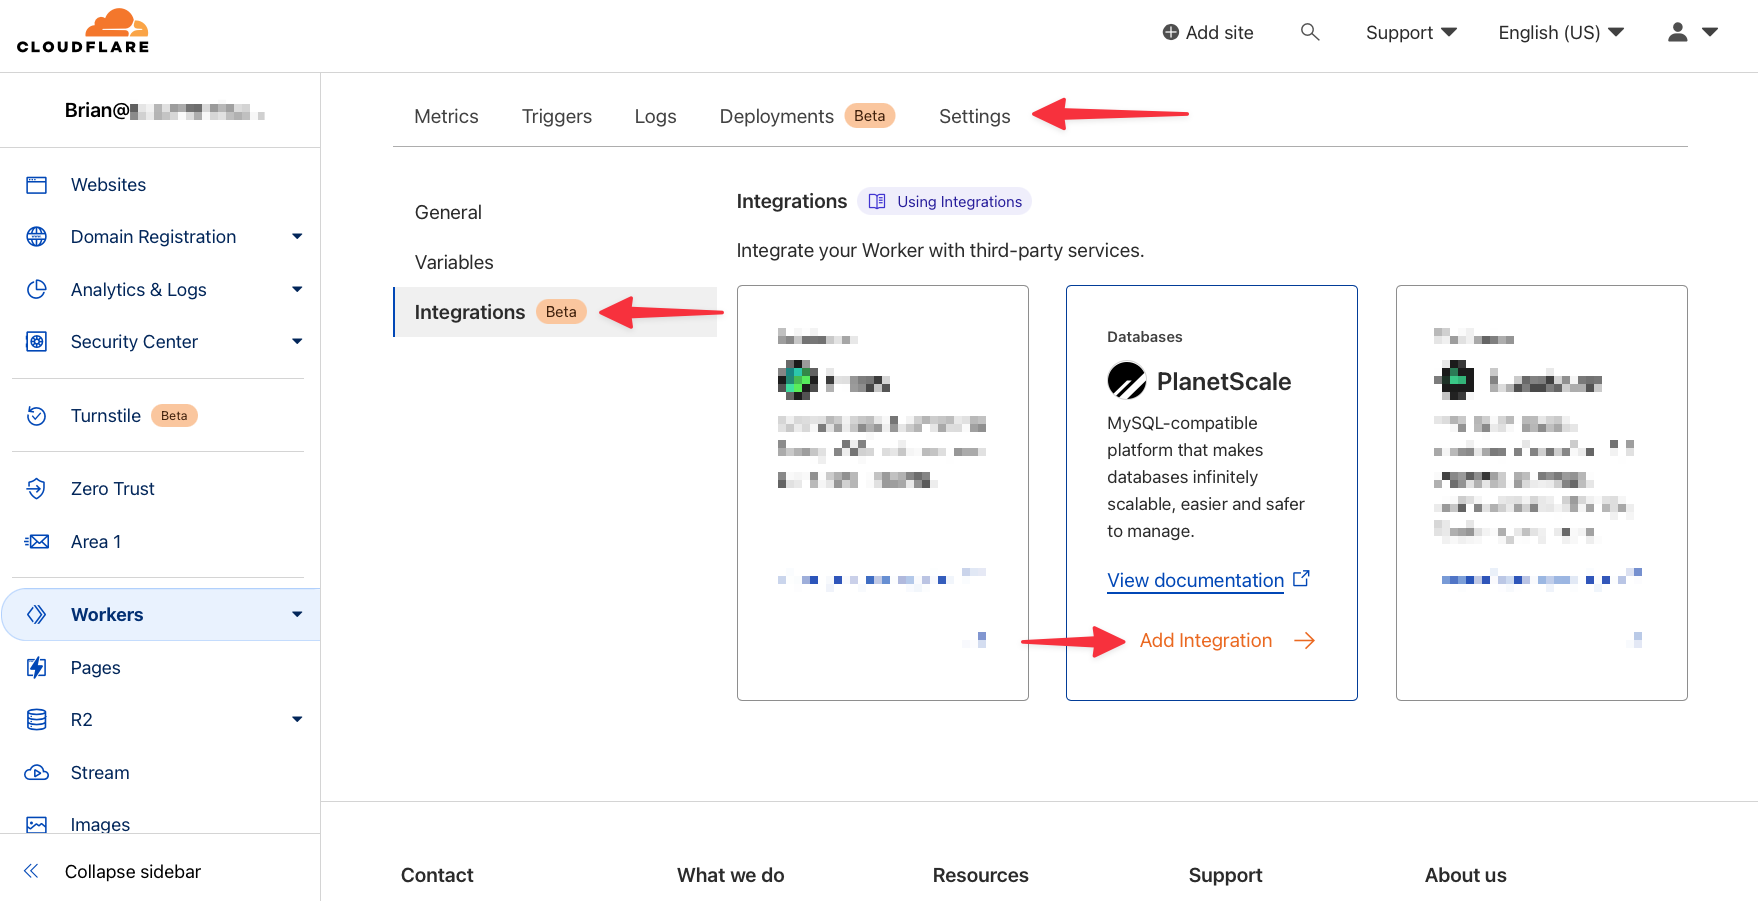
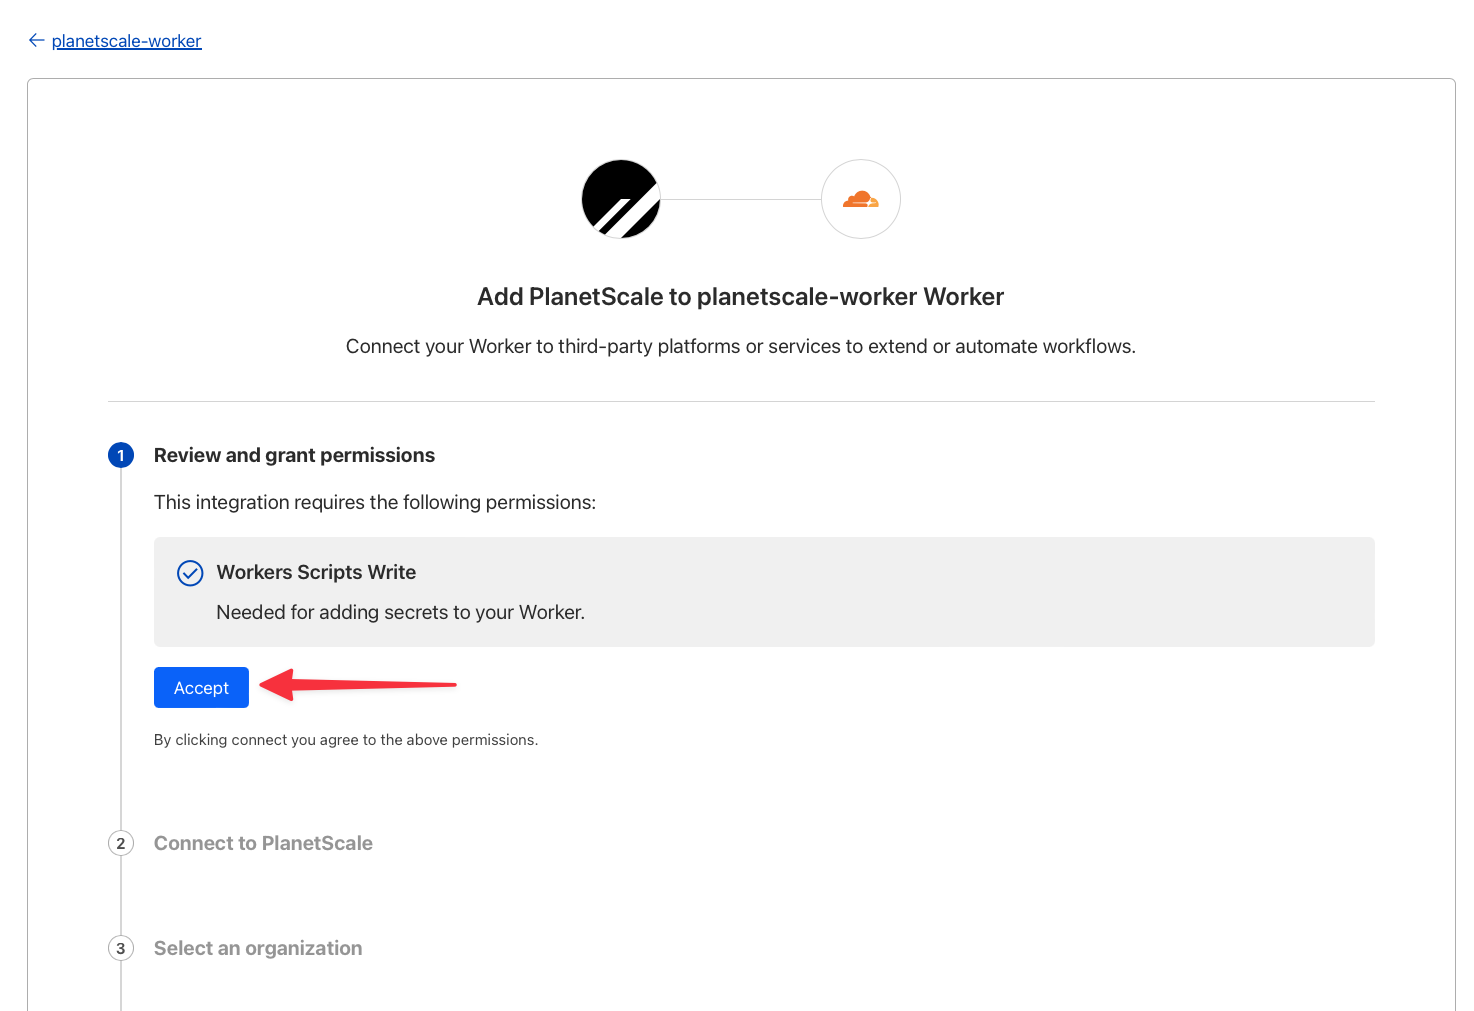
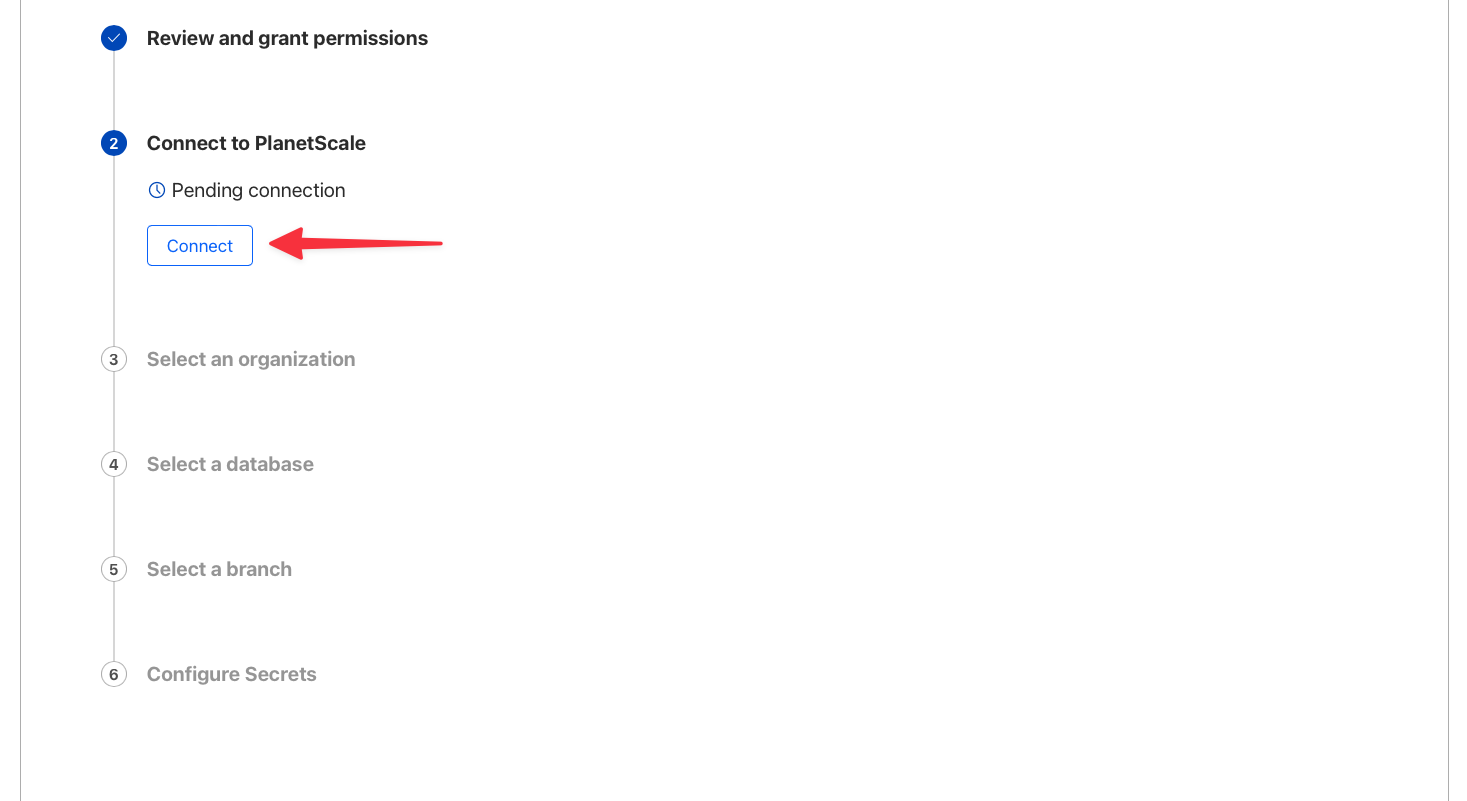
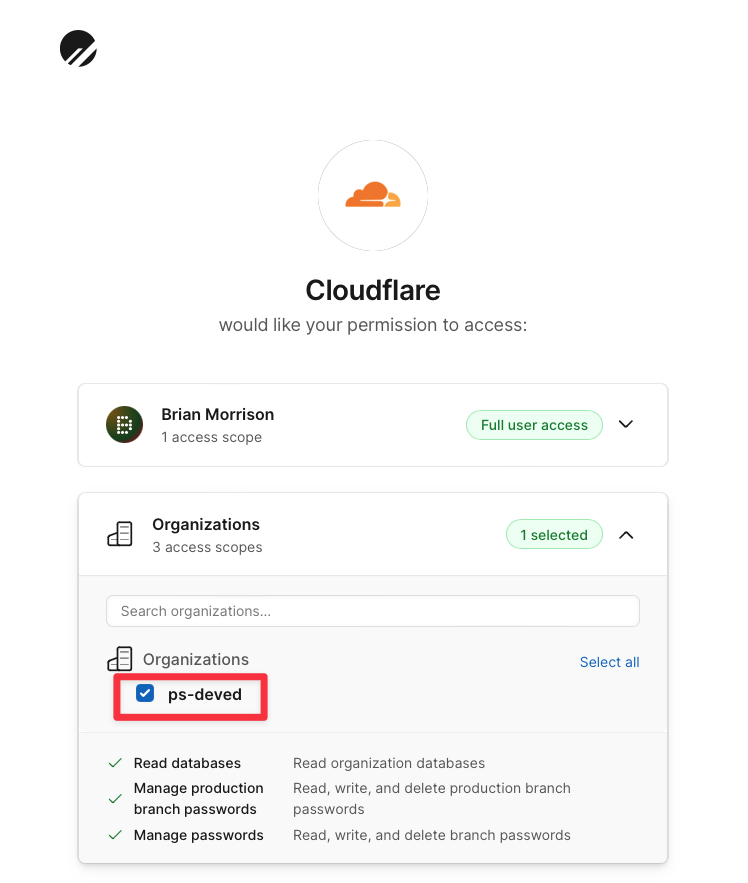
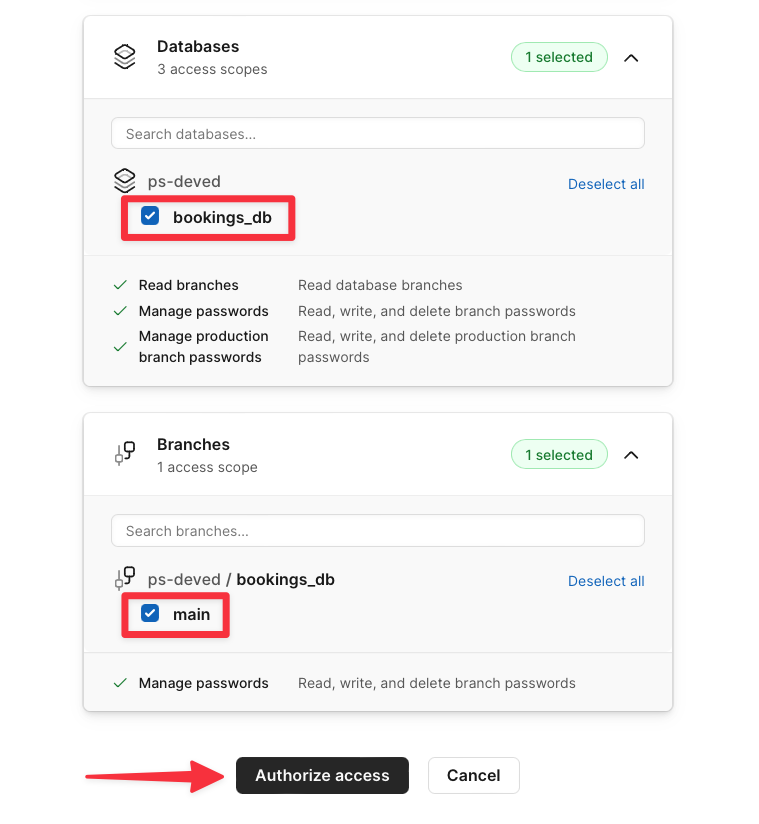

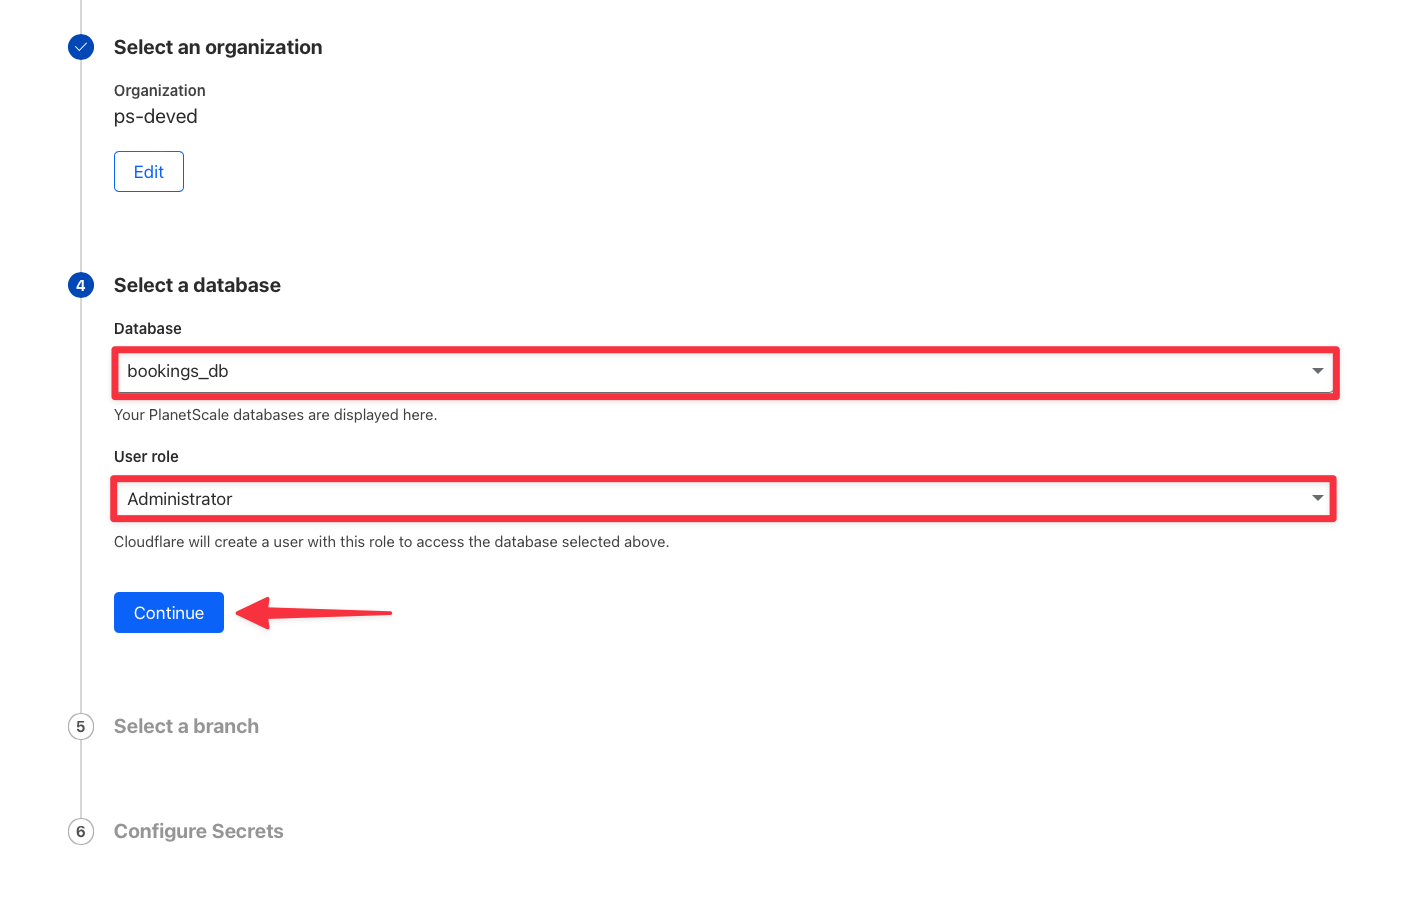
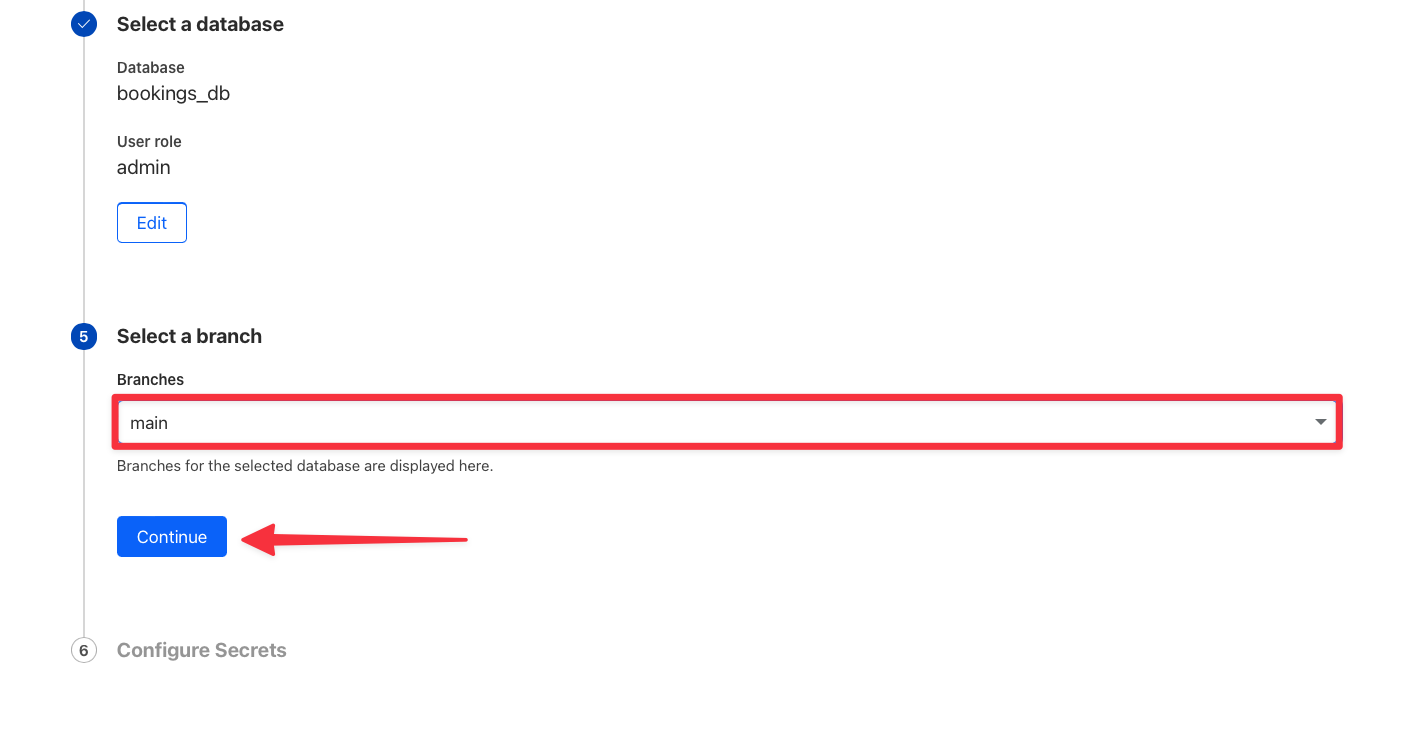
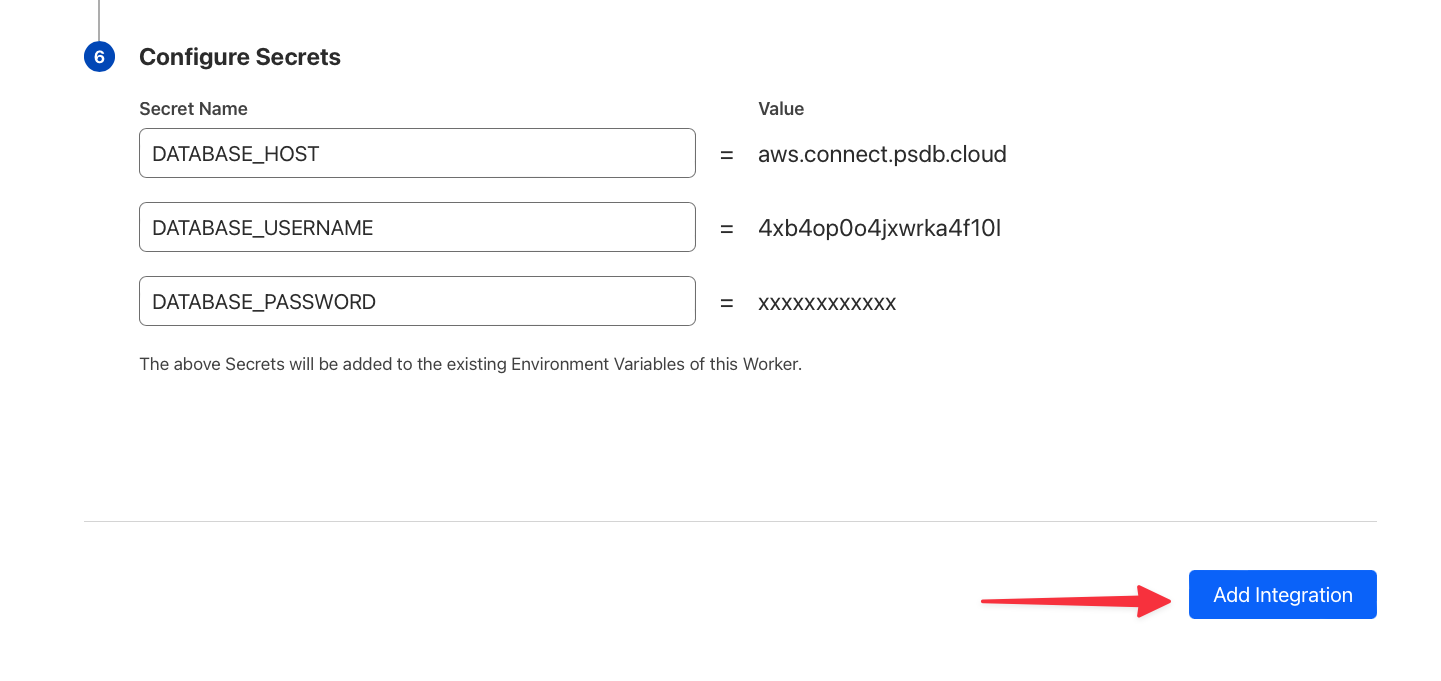
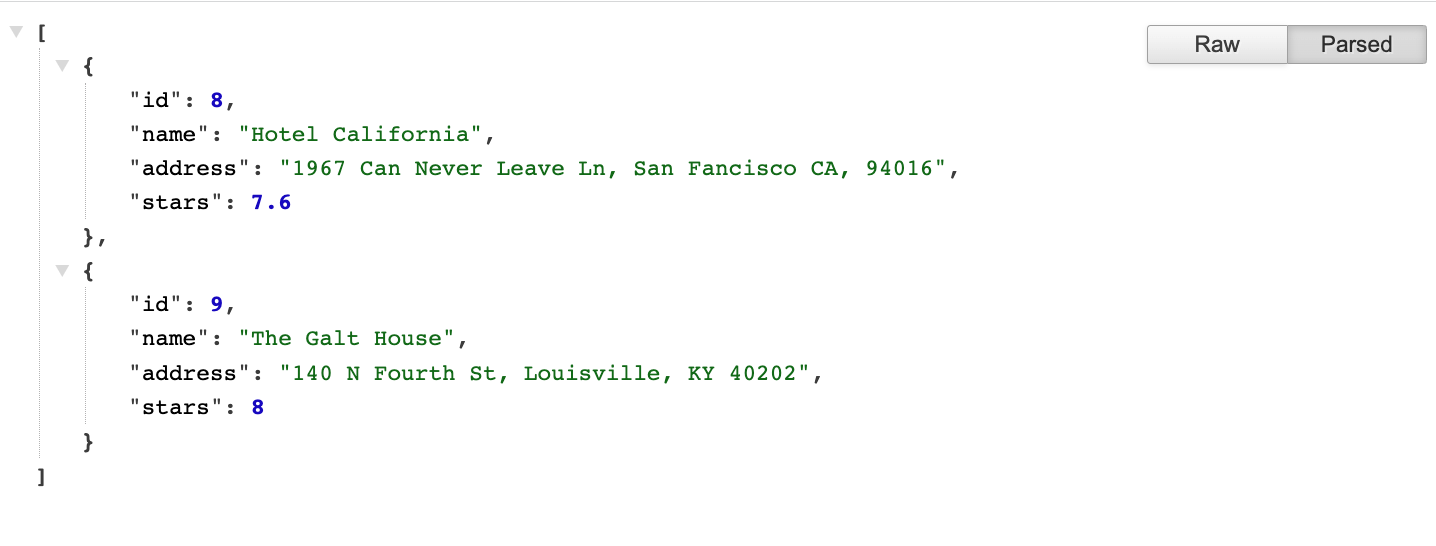 Once the integration is configured, you can also run the project on your computer using:
```bash theme={null}
npx wrangler dev
```
This will automatically use the secrets defined in Cloudflare to run the Worker on your computer.
### Test other database operations (optional)
To test other database operations that are mapped to HTTP methods, you may use the provided `tests.http` file which is designed to work with the [VSCode REST client plugin](https://marketplace.visualstudio.com/items?itemName=humao.rest-client). The file is preconfigured to work with the local environment, or you can change the `@host` variable to match the URL provided in the Cloudflare dashboard that cooresponds with your Worker project.
| Method | Operation |
| :---------- | :------------------------ |
| GET / | Get a list of all hotels. |
| POST / | Create a hotel. |
| PUT /:id | Update a hotel. |
| DELETE /:id | Delete a hotel. |
## What's next?
Once you're done with development, it is highly recommended that [safe migrations](/docs/vitess/schema-changes/safe-migrations) be turned on for your `main` production branch to protect from accidental schema changes and enable zero-downtime deployments.
When you're ready to make more schema changes, you'll [create a new branch](/docs/vitess/schema-changes/branching) off of your production branch. Branching your database creates an isolated copy of your production schema so that you can easily test schema changes in development. Once you're happy with the changes, you'll open a [deploy request](/docs/vitess/schema-changes/deploy-requests). This will generate a diff showing the changes that will be deployed, making it easy for your team to review.
Learn more about how PlanetScale allows you to make [non-blocking schema changes](/docs/vitess/schema-changes) to your database tables without locking or causing downtime for production databases.
## Need help?
Get help from [the PlanetScale Support team](https://support.planetscale.com/), or join our [GitHub discussion board](https://github.com/planetscale/discussion/discussions) to see how others are using PlanetScale.
---
> To find navigation and other pages in this documentation, fetch the llms.txt file at: https://planetscale.com/llms.txt
---
# Source: https://planetscale.com/docs/vitess/scaling/cluster-configuration.md
# Source: https://planetscale.com/docs/vitess/cluster-configuration.md
# Source: https://planetscale.com/docs/postgres/cluster-configuration.md
# Cluster configuration
The Clusters page in your PlanetScale dashboard allows you to monitor your cluster utilization and configure cluster settings for each branch in your database. You can:
* Adjust the cluster size and instance type ([Metal](/docs/metal) vs network-attached storage)
* Configure the number of replicas
* Monitor cluster utilization with real-time graphs
* Configure storage settings including:
* Disk size configuration
* Autoscaling settings and thresholds
* Storage limits
* IOPS configuration
* Bandwidth settings
* Modify PostgreSQL [parameters](/docs/postgres/cluster-configuration/parameters)
* Manage PostgreSQL [extensions](/docs/postgres/extensions)
* View and track configuration changes
These settings may only be changed by a [database administrator or organization administrator](/docs/security/access-control).
## Adjusting cluster size
To adjust your cluster size:
Once the integration is configured, you can also run the project on your computer using:
```bash theme={null}
npx wrangler dev
```
This will automatically use the secrets defined in Cloudflare to run the Worker on your computer.
### Test other database operations (optional)
To test other database operations that are mapped to HTTP methods, you may use the provided `tests.http` file which is designed to work with the [VSCode REST client plugin](https://marketplace.visualstudio.com/items?itemName=humao.rest-client). The file is preconfigured to work with the local environment, or you can change the `@host` variable to match the URL provided in the Cloudflare dashboard that cooresponds with your Worker project.
| Method | Operation |
| :---------- | :------------------------ |
| GET / | Get a list of all hotels. |
| POST / | Create a hotel. |
| PUT /:id | Update a hotel. |
| DELETE /:id | Delete a hotel. |
## What's next?
Once you're done with development, it is highly recommended that [safe migrations](/docs/vitess/schema-changes/safe-migrations) be turned on for your `main` production branch to protect from accidental schema changes and enable zero-downtime deployments.
When you're ready to make more schema changes, you'll [create a new branch](/docs/vitess/schema-changes/branching) off of your production branch. Branching your database creates an isolated copy of your production schema so that you can easily test schema changes in development. Once you're happy with the changes, you'll open a [deploy request](/docs/vitess/schema-changes/deploy-requests). This will generate a diff showing the changes that will be deployed, making it easy for your team to review.
Learn more about how PlanetScale allows you to make [non-blocking schema changes](/docs/vitess/schema-changes) to your database tables without locking or causing downtime for production databases.
## Need help?
Get help from [the PlanetScale Support team](https://support.planetscale.com/), or join our [GitHub discussion board](https://github.com/planetscale/discussion/discussions) to see how others are using PlanetScale.
---
> To find navigation and other pages in this documentation, fetch the llms.txt file at: https://planetscale.com/llms.txt
---
# Source: https://planetscale.com/docs/vitess/scaling/cluster-configuration.md
# Source: https://planetscale.com/docs/vitess/cluster-configuration.md
# Source: https://planetscale.com/docs/postgres/cluster-configuration.md
# Cluster configuration
The Clusters page in your PlanetScale dashboard allows you to monitor your cluster utilization and configure cluster settings for each branch in your database. You can:
* Adjust the cluster size and instance type ([Metal](/docs/metal) vs network-attached storage)
* Configure the number of replicas
* Monitor cluster utilization with real-time graphs
* Configure storage settings including:
* Disk size configuration
* Autoscaling settings and thresholds
* Storage limits
* IOPS configuration
* Bandwidth settings
* Modify PostgreSQL [parameters](/docs/postgres/cluster-configuration/parameters)
* Manage PostgreSQL [extensions](/docs/postgres/extensions)
* View and track configuration changes
These settings may only be changed by a [database administrator or organization administrator](/docs/security/access-control).
## Adjusting cluster size
To adjust your cluster size:
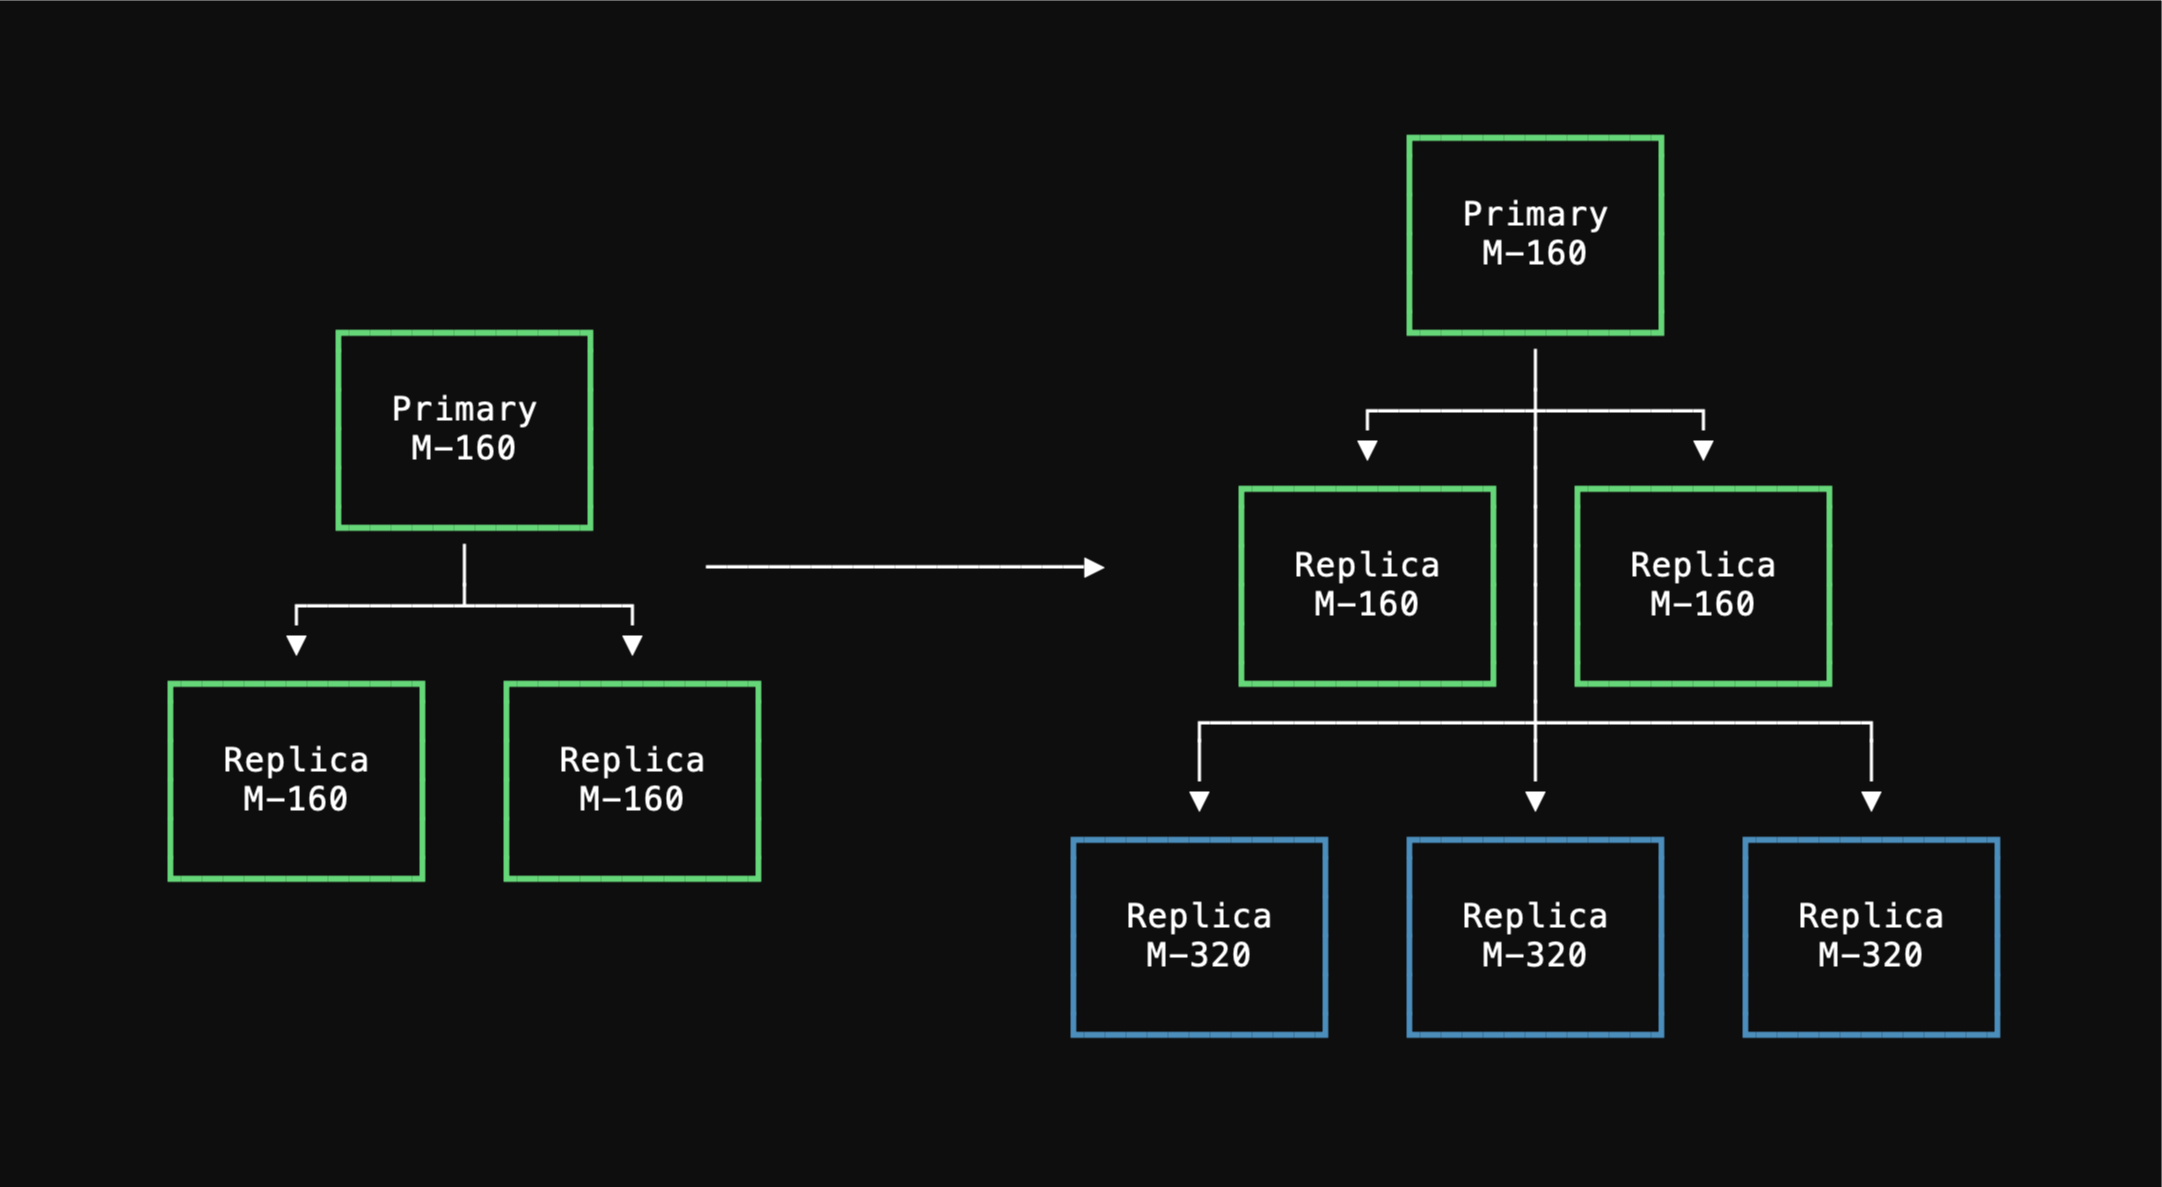 Once these new `M-320` replicas are sufficiently caught up, the operator transitions primaryship to the one of the new `M-320` nodes.
After this, the old `M-160` replicas are decommissioned, using the new ones for all replica traffic.
During each node replacement, the connections to the decommissioned node will be terminated.
Your clients will need to establish new connections with the new nodes.
Once these new `M-320` replicas are sufficiently caught up, the operator transitions primaryship to the one of the new `M-320` nodes.
After this, the old `M-160` replicas are decommissioned, using the new ones for all replica traffic.
During each node replacement, the connections to the decommissioned node will be terminated.
Your clients will need to establish new connections with the new nodes.
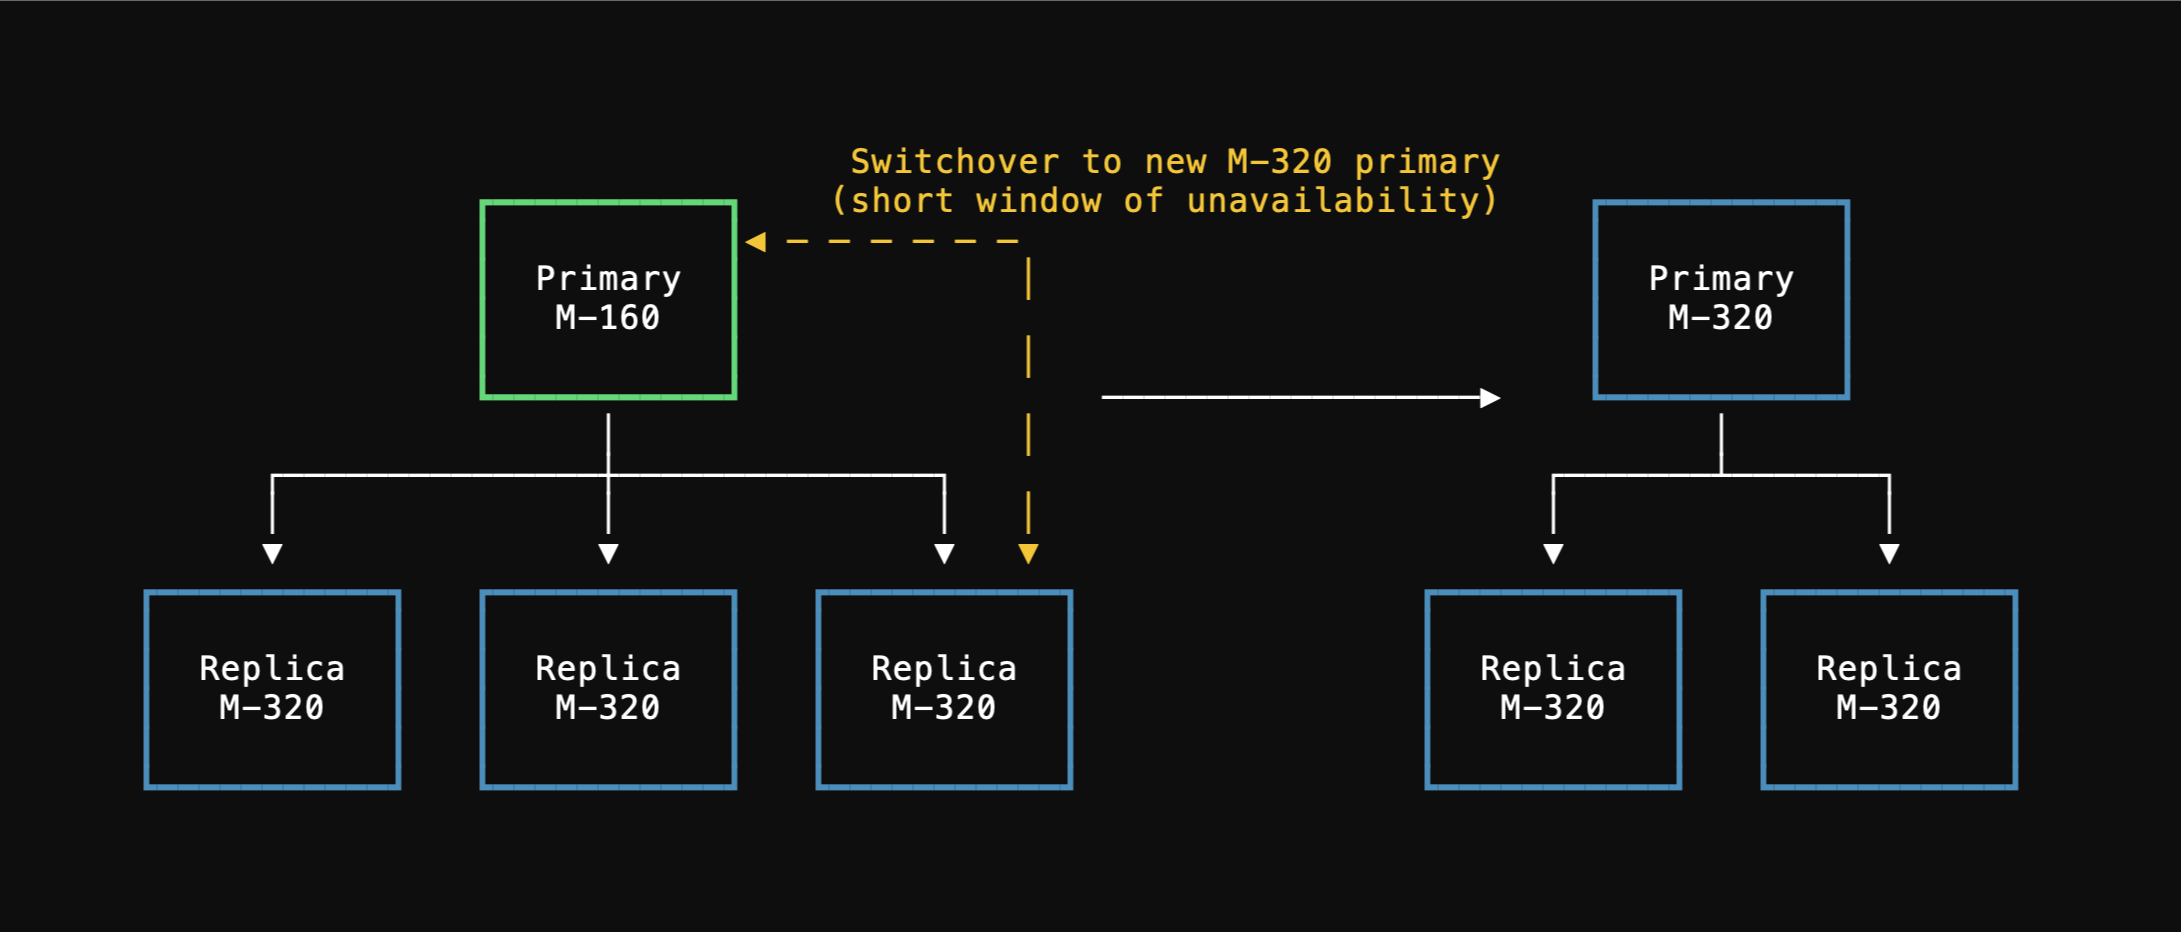 During the primary cutover all database connections will be terminated.
Normally a primary promotion proceeds in a fast and orderly manner in less than 5 seconds.
In cases where the operator is not able to quickly and cleanly shutdown the primary due to unresponsive user queries or transactions, the the operator will failover to a replica after a timeout of 30 seconds.
For all the steps leading up to the node replacement, your existing M-160 database cluster remains fully functional.
Due to the way this works, it's important for your application to have connection retry logic.
## Managing replicas
[Replicas](/docs/postgres/scaling/replicas) provide read scalability and high availability for your PostgreSQL database. Each production branch (excluding single node) comes with 2 replicas by default.
During the primary cutover all database connections will be terminated.
Normally a primary promotion proceeds in a fast and orderly manner in less than 5 seconds.
In cases where the operator is not able to quickly and cleanly shutdown the primary due to unresponsive user queries or transactions, the the operator will failover to a replica after a timeout of 30 seconds.
For all the steps leading up to the node replacement, your existing M-160 database cluster remains fully functional.
Due to the way this works, it's important for your application to have connection retry logic.
## Managing replicas
[Replicas](/docs/postgres/scaling/replicas) provide read scalability and high availability for your PostgreSQL database. Each production branch (excluding single node) comes with 2 replicas by default.
PlanetScale API
© 2025 PlanetScale, Inc. version: v1 x-copyright: '© 2025 PlanetScale, Inc.' servers: - url: https://api.planetscale.com/v1 security: - ApiKeyHeader: - Authorization tags: - name: Backups description: |2 Resources for managing database branch backups. - name: Branch changes description: |2 Resources for managing cluster changes. - name: Cluster extensions description: |2 Resources for managing cluster extension configuration. - name: Branch log signatures description: |2 Resources for retrieving branch log access signatures. - name: Cluster parameters description: |2 Resources for managing cluster configuration parameters. - name: Database branch keyspaces description: |2 Resources for managing keyspaces. - name: Database branch passwords description: |2 Resources for managing database branch passwords. - name: Database Postgres IP restrictions description: |2 Resources for managing Postgres IP restriction entries for databases. Note: This endpoint is only available for PostgreSQL databases. For MySQL databases, use the Database Branch Passwords endpoint. - name: Databases description: |2 Resources for managing databases within an organization. - name: Keyspace VSchemas description: |2 Resources for managing VSchemas within a keyspace. - name: OAuth applications description: |2 Resources for managing OAuth applications. - name: OAuth tokens description: |2 Resources for managing OAuth tokens. - name: Organization members description: |2 Resources for managing organization members and their roles. - name: Organizations description: |2 Resources for managing organizations. - name: Bouncer resizes description: |2 Resources for managing Postgres bouncer resize requests. - name: Bouncers description: |2 Resources for managing postgres bouncers. - name: Roles description: |2 Resources for managing role credentials. - name: Query Insights reports description: |2 Resources for downloading query insights data. - name: Service tokens description: |2 API endpoints for managing service tokens within an organization. - name: Users description: |2 Resources for managing users. - name: Workflows description: |2 API endpoints for managing workflows. - name: Deploy requests description: |2 Resources for managing deploy requests. - name: Webhooks description: |2 Resources for managing database webhooks. - name: Invoices description: |2 Resources for managing invoices. - name: Organization teams description: |2 Resources for managing teams within an organization. Teams allow you to group members and grant them access to specific databases. Note: Teams managed through SSO/directory services cannot be modified via API. paths: /organizations/{organization}/databases/{database}/deploy-requests/{number}/complete-deploy: post: tags: - Deploy requests summary: Complete an errored deploy description: >- ### Authorization A service token or OAuth token must have at least one of the following access or scopes in order to use this API endpoint: **Service Token Accesses** `read_deploy_request`, `create_deploy_request` **OAuth Scopes** | Resource | Scopes | | :------- | :---------- | | Organization | `deploy_deploy_requests` | | Database | `deploy_deploy_requests` | operationId: complete_errored_deploy parameters: - name: organization in: path required: true description: The name of the deploy request's organization schema: type: string - name: database in: path required: true description: The name of the deploy request's database schema: type: string - name: number in: path required: true description: The number of the deploy request schema: type: integer responses: '200': description: Returns the completed deploy request headers: {} content: application/json: schema: type: object properties: id: type: string description: The ID of the deploy request number: type: integer description: The number of the deploy request actor: type: object properties: id: type: string description: The ID of the actor display_name: type: string description: The name of the actor avatar_url: type: string description: The URL of the actor's avatar additionalProperties: false required: - id - display_name - avatar_url closed_by: type: object properties: id: type: string description: The ID of the actor display_name: type: string description: The name of the actor avatar_url: type: string description: The URL of the actor's avatar additionalProperties: false required: - id - display_name - avatar_url branch: type: string description: The name of the branch the deploy request was created from branch_id: type: string description: The ID of the branch the deploy request was created from branch_deleted: type: boolean description: Whether or not the deploy request branch was deleted branch_deleted_by: type: object properties: id: type: string description: The ID of the actor display_name: type: string description: The name of the actor avatar_url: type: string description: The URL of the actor's avatar additionalProperties: false required: - id - display_name - avatar_url branch_deleted_at: type: string description: When the deploy request branch was deleted into_branch: type: string description: >- The name of the branch the deploy request will be merged into into_branch_sharded: type: boolean description: >- Whether or not the branch the deploy request will be merged into is sharded into_branch_shard_count: type: integer description: >- The number of shards the branch the deploy request will be merged into has approved: type: boolean description: Whether or not the deploy request is approved state: type: string enum: - open - closed description: Whether the deploy request is open or closed deployment_state: type: string enum: - pending - ready - no_changes - queued - submitting - in_progress - pending_cutover - in_progress_vschema - in_progress_cancel - in_progress_cutover - complete - complete_cancel - complete_error - complete_pending_revert - in_progress_revert - in_progress_revert_vschema - complete_revert - complete_revert_error - cancelled - error description: The deployment state of the deploy request deployment: type: object properties: id: type: string description: The ID of the deployment auto_cutover: type: boolean description: >- Whether or not to automatically cutover once deployment is finished auto_delete_branch: type: boolean description: >- Whether or not to automatically delete the head branch once deployment is finished created_at: type: string description: When the deployment was created cutover_at: type: string description: When the cutover for the deployment was initiated cutover_expiring: type: boolean description: Whether or not the deployment cutover will expire soon deploy_check_errors: type: string description: Deploy check errors for the deployment finished_at: type: string description: When the deployment was finished queued_at: type: string description: When the deployment was queued ready_to_cutover_at: type: string description: When the deployment was ready for cutover started_at: type: string description: When the deployment was started state: type: string enum: - pending - ready - no_changes - queued - submitting - in_progress - pending_cutover - in_progress_vschema - in_progress_cancel - in_progress_cutover - complete - complete_cancel - complete_error - complete_pending_revert - in_progress_revert - in_progress_revert_vschema - complete_revert - complete_revert_error - cancelled - error description: The state the deployment is in submitted_at: type: string description: When the deployment was submitted updated_at: type: string description: When the deployment was last updated into_branch: type: string description: >- The name of the base branch the deployment will be merged into deploy_request_number: type: integer description: >- The number of the deploy request associated with this deployment deployable: type: boolean description: Whether the deployment is deployable preceding_deployments: items: type: object additionalProperties: true type: array description: The deployments ahead of this one in the queue deploy_operations: type: array items: type: object properties: id: type: string description: The ID for the deploy operation state: type: string enum: - pending - queued - in_progress - complete - cancelled - error description: The state of the deploy operation keyspace_name: type: string description: The keyspace modified by the deploy operation table_name: type: string description: >- The name of the table modifed by the deploy operation operation_name: type: string description: The operation name of the deploy operation eta_seconds: type: number description: >- The estimated seconds until completion for the deploy operation progress_percentage: type: number description: The percent completion for the deploy operation deploy_error_docs_url: type: string description: >- A link to documentation explaining the deploy error, if present ddl_statement: type: string description: The DDL statement for the deploy operation syntax_highlighted_ddl: type: string description: >- A syntax-highlighted DDL statement for the deploy operation created_at: type: string description: When the deploy operation was created updated_at: type: string description: When the deploy operation was last updated throttled_at: type: string description: When the deploy operation was last throttled can_drop_data: type: boolean description: >- Whether or not the deploy operation is capable of dropping data table_locked: type: boolean description: >- Whether or not the table modified by the deploy operation is currently locked table_recently_used: type: boolean description: >- Whether or not the table modified by the deploy operation was recently used table_recently_used_at: type: string description: >- When the table modified by the deploy operation was last used removed_foreign_key_names: items: type: string type: array description: Names of foreign keys removed by this operation deploy_errors: type: string description: Deploy errors for the deploy operation additionalProperties: false required: - id - state - keyspace_name - table_name - operation_name - eta_seconds - progress_percentage - deploy_error_docs_url - ddl_statement - syntax_highlighted_ddl - created_at - updated_at - throttled_at - can_drop_data - table_locked - table_recently_used - table_recently_used_at - removed_foreign_key_names - deploy_errors deploy_operation_summaries: type: array items: type: object properties: id: type: string description: The ID for the deploy operation summary created_at: type: string description: When the deploy operation summary was created deploy_errors: type: string description: Deploy errors for the deploy operation summary ddl_statement: type: string description: >- The DDL statement for the deploy operation summary eta_seconds: type: integer description: >- The estimated seconds until completion for the deploy operation summary keyspace_name: type: string description: >- The keyspace modified by the deploy operation summary operation_name: type: string description: >- The operation name of the deploy operation summary progress_percentage: type: number description: >- The percent completion for the deploy operation summary state: type: string enum: - pending - in_progress - complete - cancelled - error description: The state of the deploy operation summary syntax_highlighted_ddl: type: string description: >- A syntax-highlighted DDL statement for the deploy operation summary table_name: type: string description: >- The name of the table modifed by the deploy operation summary table_recently_used_at: type: string description: >- When the table modified by the deploy operation summary was last used throttled_at: type: string description: >- When the deploy operation summary was last throttled removed_foreign_key_names: items: type: string type: array description: >- Names of foreign keys removed by this operation summary shard_count: type: integer description: >- The number of shards in the keyspace modified by the deploy operation summary shard_names: items: type: string type: array description: >- Names of shards in the keyspace modified by the deploy operation summary can_drop_data: type: boolean description: >- Whether or not the deploy operation summary is capable of dropping data table_recently_used: type: boolean description: >- Whether or not the table modified by the deploy operation summary was recently used sharded: type: boolean description: >- Whether or not the keyspace modified by the deploy operation summary is sharded operations: type: array items: type: object properties: id: type: string description: The ID for the deploy operation shard: type: string description: >- The shard the deploy operation is being performed on state: type: string enum: - pending - queued - in_progress - complete - cancelled - error description: The state of the deploy operation progress_percentage: type: number description: >- The percent completion for the deploy operation eta_seconds: type: integer description: >- The estimated seconds until completion for the deploy operation additionalProperties: false required: - id - shard - state - progress_percentage - eta_seconds additionalProperties: false required: - id - created_at - deploy_errors - ddl_statement - eta_seconds - keyspace_name - operation_name - progress_percentage - state - syntax_highlighted_ddl - table_name - table_recently_used_at - throttled_at - removed_foreign_key_names - shard_count - shard_names - can_drop_data - table_recently_used - sharded - operations lint_errors: items: type: object additionalProperties: true type: array description: >- Schema lint errors preventing the deployment from completing sequential_diff_dependencies: items: type: object additionalProperties: true type: array description: The schema dependencies that must be satisfied lookup_vindex_operations: items: type: object additionalProperties: true type: array description: Lookup Vitess index operations throttler_configurations: items: type: object additionalProperties: true type: array description: Deployment throttling configurations deployment_revert_request: type: object additionalProperties: true description: >- The request to revert the schema operations in this deployment actor: type: object properties: id: type: string description: The ID of the actor display_name: type: string description: The name of the actor avatar_url: type: string description: The URL of the actor's avatar additionalProperties: false required: - id - display_name - avatar_url cutover_actor: type: object properties: id: type: string description: The ID of the actor display_name: type: string description: The name of the actor avatar_url: type: string description: The URL of the actor's avatar additionalProperties: false required: - id - display_name - avatar_url cancelled_actor: type: object properties: id: type: string description: The ID of the actor display_name: type: string description: The name of the actor avatar_url: type: string description: The URL of the actor's avatar additionalProperties: false required: - id - display_name - avatar_url schema_last_updated_at: type: string description: When the schema was last updated for the deployment table_locked: type: boolean description: Whether or not the deployment has a table locked locked_table_name: type: string description: The name of he table that is locked by the deployment instant_ddl: type: boolean description: >- Whether or not the deployment is an instant DDL deployment instant_ddl_eligible: type: boolean description: >- Whether or not the deployment is eligible for instant DDL additionalProperties: false required: - id - auto_cutover - auto_delete_branch - created_at - cutover_at - cutover_expiring - deploy_check_errors - finished_at - queued_at - ready_to_cutover_at - started_at - state - submitted_at - updated_at - into_branch - deploy_request_number - deployable - preceding_deployments - deploy_operations - deploy_operation_summaries - lint_errors - sequential_diff_dependencies - lookup_vindex_operations - throttler_configurations - deployment_revert_request - actor - cutover_actor - cancelled_actor - schema_last_updated_at - table_locked - locked_table_name - instant_ddl - instant_ddl_eligible num_comments: type: integer description: The number of comments on the deploy request html_url: type: string description: The PlanetScale app address for the deploy request notes: type: string description: Notes on the deploy request html_body: type: string description: The HTML body of the deploy request created_at: type: string description: When the deploy request was created updated_at: type: string description: When the deploy request was last updated closed_at: type: string description: When the deploy request was closed deployed_at: type: string description: When the deploy request was deployed additionalProperties: false required: - id - number - actor - closed_by - branch - branch_id - branch_deleted - branch_deleted_by - branch_deleted_at - into_branch - into_branch_sharded - into_branch_shard_count - approved - state - deployment_state - deployment - num_comments - html_url - notes - html_body - created_at - updated_at - closed_at - deployed_at '401': description: Unauthorized '403': description: Forbidden '404': description: Not Found '500': description: Internal Server Error components: securitySchemes: ApiKeyHeader: type: apiKey in: header name: Authorization ```` --- > To find navigation and other pages in this documentation, fetch the llms.txt file at: https://planetscale.com/llms.txt --- # Source: https://planetscale.com/docs/api/reference/complete_gated_deploy_request.md # Complete a gated deploy request > ### Authorization A service token or OAuth token must have at least one of the following access or scopes in order to use this API endpoint: **Service Token Accesses** `read_deploy_request`, `create_deploy_request` **OAuth Scopes** | Resource | Scopes | | :------- | :---------- | | Organization | `deploy_deploy_requests` | | Database | `deploy_deploy_requests` | ## OpenAPI ````yaml post /organizations/{organization}/databases/{database}/deploy-requests/{number}/apply-deploy openapi: 3.0.1 info: title: PlanetScale API description: |-PlanetScale API
© 2025 PlanetScale, Inc. version: v1 x-copyright: '© 2025 PlanetScale, Inc.' servers: - url: https://api.planetscale.com/v1 security: - ApiKeyHeader: - Authorization tags: - name: Backups description: |2 Resources for managing database branch backups. - name: Branch changes description: |2 Resources for managing cluster changes. - name: Cluster extensions description: |2 Resources for managing cluster extension configuration. - name: Branch log signatures description: |2 Resources for retrieving branch log access signatures. - name: Cluster parameters description: |2 Resources for managing cluster configuration parameters. - name: Database branch keyspaces description: |2 Resources for managing keyspaces. - name: Database branch passwords description: |2 Resources for managing database branch passwords. - name: Database Postgres IP restrictions description: |2 Resources for managing Postgres IP restriction entries for databases. Note: This endpoint is only available for PostgreSQL databases. For MySQL databases, use the Database Branch Passwords endpoint. - name: Databases description: |2 Resources for managing databases within an organization. - name: Keyspace VSchemas description: |2 Resources for managing VSchemas within a keyspace. - name: OAuth applications description: |2 Resources for managing OAuth applications. - name: OAuth tokens description: |2 Resources for managing OAuth tokens. - name: Organization members description: |2 Resources for managing organization members and their roles. - name: Organizations description: |2 Resources for managing organizations. - name: Bouncer resizes description: |2 Resources for managing Postgres bouncer resize requests. - name: Bouncers description: |2 Resources for managing postgres bouncers. - name: Roles description: |2 Resources for managing role credentials. - name: Query Insights reports description: |2 Resources for downloading query insights data. - name: Service tokens description: |2 API endpoints for managing service tokens within an organization. - name: Users description: |2 Resources for managing users. - name: Workflows description: |2 API endpoints for managing workflows. - name: Deploy requests description: |2 Resources for managing deploy requests. - name: Webhooks description: |2 Resources for managing database webhooks. - name: Invoices description: |2 Resources for managing invoices. - name: Organization teams description: |2 Resources for managing teams within an organization. Teams allow you to group members and grant them access to specific databases. Note: Teams managed through SSO/directory services cannot be modified via API. paths: /organizations/{organization}/databases/{database}/deploy-requests/{number}/apply-deploy: post: tags: - Deploy requests summary: Complete a gated deploy request description: >- ### Authorization A service token or OAuth token must have at least one of the following access or scopes in order to use this API endpoint: **Service Token Accesses** `read_deploy_request`, `create_deploy_request` **OAuth Scopes** | Resource | Scopes | | :------- | :---------- | | Organization | `deploy_deploy_requests` | | Database | `deploy_deploy_requests` | operationId: complete_gated_deploy_request parameters: - name: organization in: path required: true description: The name of the deploy request's organization schema: type: string - name: database in: path required: true description: The name of the deploy request's database schema: type: string - name: number in: path required: true description: The number of the deploy request schema: type: integer responses: '200': description: Returns the deploy request whose deployment has been completed headers: {} content: application/json: schema: type: object properties: id: type: string description: The ID of the deploy request number: type: integer description: The number of the deploy request actor: type: object properties: id: type: string description: The ID of the actor display_name: type: string description: The name of the actor avatar_url: type: string description: The URL of the actor's avatar additionalProperties: false required: - id - display_name - avatar_url closed_by: type: object properties: id: type: string description: The ID of the actor display_name: type: string description: The name of the actor avatar_url: type: string description: The URL of the actor's avatar additionalProperties: false required: - id - display_name - avatar_url branch: type: string description: The name of the branch the deploy request was created from branch_id: type: string description: The ID of the branch the deploy request was created from branch_deleted: type: boolean description: Whether or not the deploy request branch was deleted branch_deleted_by: type: object properties: id: type: string description: The ID of the actor display_name: type: string description: The name of the actor avatar_url: type: string description: The URL of the actor's avatar additionalProperties: false required: - id - display_name - avatar_url branch_deleted_at: type: string description: When the deploy request branch was deleted into_branch: type: string description: >- The name of the branch the deploy request will be merged into into_branch_sharded: type: boolean description: >- Whether or not the branch the deploy request will be merged into is sharded into_branch_shard_count: type: integer description: >- The number of shards the branch the deploy request will be merged into has approved: type: boolean description: Whether or not the deploy request is approved state: type: string enum: - open - closed description: Whether the deploy request is open or closed deployment_state: type: string enum: - pending - ready - no_changes - queued - submitting - in_progress - pending_cutover - in_progress_vschema - in_progress_cancel - in_progress_cutover - complete - complete_cancel - complete_error - complete_pending_revert - in_progress_revert - in_progress_revert_vschema - complete_revert - complete_revert_error - cancelled - error description: The deployment state of the deploy request deployment: type: object properties: id: type: string description: The ID of the deployment auto_cutover: type: boolean description: >- Whether or not to automatically cutover once deployment is finished auto_delete_branch: type: boolean description: >- Whether or not to automatically delete the head branch once deployment is finished created_at: type: string description: When the deployment was created cutover_at: type: string description: When the cutover for the deployment was initiated cutover_expiring: type: boolean description: Whether or not the deployment cutover will expire soon deploy_check_errors: type: string description: Deploy check errors for the deployment finished_at: type: string description: When the deployment was finished queued_at: type: string description: When the deployment was queued ready_to_cutover_at: type: string description: When the deployment was ready for cutover started_at: type: string description: When the deployment was started state: type: string enum: - pending - ready - no_changes - queued - submitting - in_progress - pending_cutover - in_progress_vschema - in_progress_cancel - in_progress_cutover - complete - complete_cancel - complete_error - complete_pending_revert - in_progress_revert - in_progress_revert_vschema - complete_revert - complete_revert_error - cancelled - error description: The state the deployment is in submitted_at: type: string description: When the deployment was submitted updated_at: type: string description: When the deployment was last updated into_branch: type: string description: >- The name of the base branch the deployment will be merged into deploy_request_number: type: integer description: >- The number of the deploy request associated with this deployment deployable: type: boolean description: Whether the deployment is deployable preceding_deployments: items: type: object additionalProperties: true type: array description: The deployments ahead of this one in the queue deploy_operations: type: array items: type: object properties: id: type: string description: The ID for the deploy operation state: type: string enum: - pending - queued - in_progress - complete - cancelled - error description: The state of the deploy operation keyspace_name: type: string description: The keyspace modified by the deploy operation table_name: type: string description: >- The name of the table modifed by the deploy operation operation_name: type: string description: The operation name of the deploy operation eta_seconds: type: number description: >- The estimated seconds until completion for the deploy operation progress_percentage: type: number description: The percent completion for the deploy operation deploy_error_docs_url: type: string description: >- A link to documentation explaining the deploy error, if present ddl_statement: type: string description: The DDL statement for the deploy operation syntax_highlighted_ddl: type: string description: >- A syntax-highlighted DDL statement for the deploy operation created_at: type: string description: When the deploy operation was created updated_at: type: string description: When the deploy operation was last updated throttled_at: type: string description: When the deploy operation was last throttled can_drop_data: type: boolean description: >- Whether or not the deploy operation is capable of dropping data table_locked: type: boolean description: >- Whether or not the table modified by the deploy operation is currently locked table_recently_used: type: boolean description: >- Whether or not the table modified by the deploy operation was recently used table_recently_used_at: type: string description: >- When the table modified by the deploy operation was last used removed_foreign_key_names: items: type: string type: array description: Names of foreign keys removed by this operation deploy_errors: type: string description: Deploy errors for the deploy operation additionalProperties: false required: - id - state - keyspace_name - table_name - operation_name - eta_seconds - progress_percentage - deploy_error_docs_url - ddl_statement - syntax_highlighted_ddl - created_at - updated_at - throttled_at - can_drop_data - table_locked - table_recently_used - table_recently_used_at - removed_foreign_key_names - deploy_errors deploy_operation_summaries: type: array items: type: object properties: id: type: string description: The ID for the deploy operation summary created_at: type: string description: When the deploy operation summary was created deploy_errors: type: string description: Deploy errors for the deploy operation summary ddl_statement: type: string description: >- The DDL statement for the deploy operation summary eta_seconds: type: integer description: >- The estimated seconds until completion for the deploy operation summary keyspace_name: type: string description: >- The keyspace modified by the deploy operation summary operation_name: type: string description: >- The operation name of the deploy operation summary progress_percentage: type: number description: >- The percent completion for the deploy operation summary state: type: string enum: - pending - in_progress - complete - cancelled - error description: The state of the deploy operation summary syntax_highlighted_ddl: type: string description: >- A syntax-highlighted DDL statement for the deploy operation summary table_name: type: string description: >- The name of the table modifed by the deploy operation summary table_recently_used_at: type: string description: >- When the table modified by the deploy operation summary was last used throttled_at: type: string description: >- When the deploy operation summary was last throttled removed_foreign_key_names: items: type: string type: array description: >- Names of foreign keys removed by this operation summary shard_count: type: integer description: >- The number of shards in the keyspace modified by the deploy operation summary shard_names: items: type: string type: array description: >- Names of shards in the keyspace modified by the deploy operation summary can_drop_data: type: boolean description: >- Whether or not the deploy operation summary is capable of dropping data table_recently_used: type: boolean description: >- Whether or not the table modified by the deploy operation summary was recently used sharded: type: boolean description: >- Whether or not the keyspace modified by the deploy operation summary is sharded operations: type: array items: type: object properties: id: type: string description: The ID for the deploy operation shard: type: string description: >- The shard the deploy operation is being performed on state: type: string enum: - pending - queued - in_progress - complete - cancelled - error description: The state of the deploy operation progress_percentage: type: number description: >- The percent completion for the deploy operation eta_seconds: type: integer description: >- The estimated seconds until completion for the deploy operation additionalProperties: false required: - id - shard - state - progress_percentage - eta_seconds additionalProperties: false required: - id - created_at - deploy_errors - ddl_statement - eta_seconds - keyspace_name - operation_name - progress_percentage - state - syntax_highlighted_ddl - table_name - table_recently_used_at - throttled_at - removed_foreign_key_names - shard_count - shard_names - can_drop_data - table_recently_used - sharded - operations lint_errors: items: type: object additionalProperties: true type: array description: >- Schema lint errors preventing the deployment from completing sequential_diff_dependencies: items: type: object additionalProperties: true type: array description: The schema dependencies that must be satisfied lookup_vindex_operations: items: type: object additionalProperties: true type: array description: Lookup Vitess index operations throttler_configurations: items: type: object additionalProperties: true type: array description: Deployment throttling configurations deployment_revert_request: type: object additionalProperties: true description: >- The request to revert the schema operations in this deployment actor: type: object properties: id: type: string description: The ID of the actor display_name: type: string description: The name of the actor avatar_url: type: string description: The URL of the actor's avatar additionalProperties: false required: - id - display_name - avatar_url cutover_actor: type: object properties: id: type: string description: The ID of the actor display_name: type: string description: The name of the actor avatar_url: type: string description: The URL of the actor's avatar additionalProperties: false required: - id - display_name - avatar_url cancelled_actor: type: object properties: id: type: string description: The ID of the actor display_name: type: string description: The name of the actor avatar_url: type: string description: The URL of the actor's avatar additionalProperties: false required: - id - display_name - avatar_url schema_last_updated_at: type: string description: When the schema was last updated for the deployment table_locked: type: boolean description: Whether or not the deployment has a table locked locked_table_name: type: string description: The name of he table that is locked by the deployment instant_ddl: type: boolean description: >- Whether or not the deployment is an instant DDL deployment instant_ddl_eligible: type: boolean description: >- Whether or not the deployment is eligible for instant DDL additionalProperties: false required: - id - auto_cutover - auto_delete_branch - created_at - cutover_at - cutover_expiring - deploy_check_errors - finished_at - queued_at - ready_to_cutover_at - started_at - state - submitted_at - updated_at - into_branch - deploy_request_number - deployable - preceding_deployments - deploy_operations - deploy_operation_summaries - lint_errors - sequential_diff_dependencies - lookup_vindex_operations - throttler_configurations - deployment_revert_request - actor - cutover_actor - cancelled_actor - schema_last_updated_at - table_locked - locked_table_name - instant_ddl - instant_ddl_eligible num_comments: type: integer description: The number of comments on the deploy request html_url: type: string description: The PlanetScale app address for the deploy request notes: type: string description: Notes on the deploy request html_body: type: string description: The HTML body of the deploy request created_at: type: string description: When the deploy request was created updated_at: type: string description: When the deploy request was last updated closed_at: type: string description: When the deploy request was closed deployed_at: type: string description: When the deploy request was deployed additionalProperties: false required: - id - number - actor - closed_by - branch - branch_id - branch_deleted - branch_deleted_by - branch_deleted_at - into_branch - into_branch_sharded - into_branch_shard_count - approved - state - deployment_state - deployment - num_comments - html_url - notes - html_body - created_at - updated_at - closed_at - deployed_at '401': description: Unauthorized '403': description: Forbidden '404': description: Not Found '500': description: Internal Server Error components: securitySchemes: ApiKeyHeader: type: apiKey in: header name: Authorization ```` --- > To find navigation and other pages in this documentation, fetch the llms.txt file at: https://planetscale.com/llms.txt --- # Source: https://planetscale.com/docs/api/reference/complete_revert.md # Complete a revert > ### Authorization A service token or OAuth token must have at least one of the following access or scopes in order to use this API endpoint: **Service Token Accesses** `read_deploy_request`, `create_deploy_request` **OAuth Scopes** | Resource | Scopes | | :------- | :---------- | | Organization | `deploy_deploy_requests` | | Database | `deploy_deploy_requests` | ## OpenAPI ````yaml post /organizations/{organization}/databases/{database}/deploy-requests/{number}/revert openapi: 3.0.1 info: title: PlanetScale API description: |-PlanetScale API
© 2025 PlanetScale, Inc. version: v1 x-copyright: '© 2025 PlanetScale, Inc.' servers: - url: https://api.planetscale.com/v1 security: - ApiKeyHeader: - Authorization tags: - name: Backups description: |2 Resources for managing database branch backups. - name: Branch changes description: |2 Resources for managing cluster changes. - name: Cluster extensions description: |2 Resources for managing cluster extension configuration. - name: Branch log signatures description: |2 Resources for retrieving branch log access signatures. - name: Cluster parameters description: |2 Resources for managing cluster configuration parameters. - name: Database branch keyspaces description: |2 Resources for managing keyspaces. - name: Database branch passwords description: |2 Resources for managing database branch passwords. - name: Database Postgres IP restrictions description: |2 Resources for managing Postgres IP restriction entries for databases. Note: This endpoint is only available for PostgreSQL databases. For MySQL databases, use the Database Branch Passwords endpoint. - name: Databases description: |2 Resources for managing databases within an organization. - name: Keyspace VSchemas description: |2 Resources for managing VSchemas within a keyspace. - name: OAuth applications description: |2 Resources for managing OAuth applications. - name: OAuth tokens description: |2 Resources for managing OAuth tokens. - name: Organization members description: |2 Resources for managing organization members and their roles. - name: Organizations description: |2 Resources for managing organizations. - name: Bouncer resizes description: |2 Resources for managing Postgres bouncer resize requests. - name: Bouncers description: |2 Resources for managing postgres bouncers. - name: Roles description: |2 Resources for managing role credentials. - name: Query Insights reports description: |2 Resources for downloading query insights data. - name: Service tokens description: |2 API endpoints for managing service tokens within an organization. - name: Users description: |2 Resources for managing users. - name: Workflows description: |2 API endpoints for managing workflows. - name: Deploy requests description: |2 Resources for managing deploy requests. - name: Webhooks description: |2 Resources for managing database webhooks. - name: Invoices description: |2 Resources for managing invoices. - name: Organization teams description: |2 Resources for managing teams within an organization. Teams allow you to group members and grant them access to specific databases. Note: Teams managed through SSO/directory services cannot be modified via API. paths: /organizations/{organization}/databases/{database}/deploy-requests/{number}/revert: post: tags: - Deploy requests summary: Complete a revert description: >- ### Authorization A service token or OAuth token must have at least one of the following access or scopes in order to use this API endpoint: **Service Token Accesses** `read_deploy_request`, `create_deploy_request` **OAuth Scopes** | Resource | Scopes | | :------- | :---------- | | Organization | `deploy_deploy_requests` | | Database | `deploy_deploy_requests` | operationId: complete_revert parameters: - name: organization in: path required: true description: The name of the deploy request's organization schema: type: string - name: database in: path required: true description: The name of the deploy request's database schema: type: string - name: number in: path required: true description: The number of the deploy request schema: type: integer responses: '200': description: Returns the deploy request that was reverted headers: {} content: application/json: schema: type: object properties: id: type: string description: The ID of the deploy request number: type: integer description: The number of the deploy request actor: type: object properties: id: type: string description: The ID of the actor display_name: type: string description: The name of the actor avatar_url: type: string description: The URL of the actor's avatar additionalProperties: false required: - id - display_name - avatar_url closed_by: type: object properties: id: type: string description: The ID of the actor display_name: type: string description: The name of the actor avatar_url: type: string description: The URL of the actor's avatar additionalProperties: false required: - id - display_name - avatar_url branch: type: string description: The name of the branch the deploy request was created from branch_id: type: string description: The ID of the branch the deploy request was created from branch_deleted: type: boolean description: Whether or not the deploy request branch was deleted branch_deleted_by: type: object properties: id: type: string description: The ID of the actor display_name: type: string description: The name of the actor avatar_url: type: string description: The URL of the actor's avatar additionalProperties: false required: - id - display_name - avatar_url branch_deleted_at: type: string description: When the deploy request branch was deleted into_branch: type: string description: >- The name of the branch the deploy request will be merged into into_branch_sharded: type: boolean description: >- Whether or not the branch the deploy request will be merged into is sharded into_branch_shard_count: type: integer description: >- The number of shards the branch the deploy request will be merged into has approved: type: boolean description: Whether or not the deploy request is approved state: type: string enum: - open - closed description: Whether the deploy request is open or closed deployment_state: type: string enum: - pending - ready - no_changes - queued - submitting - in_progress - pending_cutover - in_progress_vschema - in_progress_cancel - in_progress_cutover - complete - complete_cancel - complete_error - complete_pending_revert - in_progress_revert - in_progress_revert_vschema - complete_revert - complete_revert_error - cancelled - error description: The deployment state of the deploy request deployment: type: object properties: id: type: string description: The ID of the deployment auto_cutover: type: boolean description: >- Whether or not to automatically cutover once deployment is finished auto_delete_branch: type: boolean description: >- Whether or not to automatically delete the head branch once deployment is finished created_at: type: string description: When the deployment was created cutover_at: type: string description: When the cutover for the deployment was initiated cutover_expiring: type: boolean description: Whether or not the deployment cutover will expire soon deploy_check_errors: type: string description: Deploy check errors for the deployment finished_at: type: string description: When the deployment was finished queued_at: type: string description: When the deployment was queued ready_to_cutover_at: type: string description: When the deployment was ready for cutover started_at: type: string description: When the deployment was started state: type: string enum: - pending - ready - no_changes - queued - submitting - in_progress - pending_cutover - in_progress_vschema - in_progress_cancel - in_progress_cutover - complete - complete_cancel - complete_error - complete_pending_revert - in_progress_revert - in_progress_revert_vschema - complete_revert - complete_revert_error - cancelled - error description: The state the deployment is in submitted_at: type: string description: When the deployment was submitted updated_at: type: string description: When the deployment was last updated into_branch: type: string description: >- The name of the base branch the deployment will be merged into deploy_request_number: type: integer description: >- The number of the deploy request associated with this deployment deployable: type: boolean description: Whether the deployment is deployable preceding_deployments: items: type: object additionalProperties: true type: array description: The deployments ahead of this one in the queue deploy_operations: type: array items: type: object properties: id: type: string description: The ID for the deploy operation state: type: string enum: - pending - queued - in_progress - complete - cancelled - error description: The state of the deploy operation keyspace_name: type: string description: The keyspace modified by the deploy operation table_name: type: string description: >- The name of the table modifed by the deploy operation operation_name: type: string description: The operation name of the deploy operation eta_seconds: type: number description: >- The estimated seconds until completion for the deploy operation progress_percentage: type: number description: The percent completion for the deploy operation deploy_error_docs_url: type: string description: >- A link to documentation explaining the deploy error, if present ddl_statement: type: string description: The DDL statement for the deploy operation syntax_highlighted_ddl: type: string description: >- A syntax-highlighted DDL statement for the deploy operation created_at: type: string description: When the deploy operation was created updated_at: type: string description: When the deploy operation was last updated throttled_at: type: string description: When the deploy operation was last throttled can_drop_data: type: boolean description: >- Whether or not the deploy operation is capable of dropping data table_locked: type: boolean description: >- Whether or not the table modified by the deploy operation is currently locked table_recently_used: type: boolean description: >- Whether or not the table modified by the deploy operation was recently used table_recently_used_at: type: string description: >- When the table modified by the deploy operation was last used removed_foreign_key_names: items: type: string type: array description: Names of foreign keys removed by this operation deploy_errors: type: string description: Deploy errors for the deploy operation additionalProperties: false required: - id - state - keyspace_name - table_name - operation_name - eta_seconds - progress_percentage - deploy_error_docs_url - ddl_statement - syntax_highlighted_ddl - created_at - updated_at - throttled_at - can_drop_data - table_locked - table_recently_used - table_recently_used_at - removed_foreign_key_names - deploy_errors deploy_operation_summaries: type: array items: type: object properties: id: type: string description: The ID for the deploy operation summary created_at: type: string description: When the deploy operation summary was created deploy_errors: type: string description: Deploy errors for the deploy operation summary ddl_statement: type: string description: >- The DDL statement for the deploy operation summary eta_seconds: type: integer description: >- The estimated seconds until completion for the deploy operation summary keyspace_name: type: string description: >- The keyspace modified by the deploy operation summary operation_name: type: string description: >- The operation name of the deploy operation summary progress_percentage: type: number description: >- The percent completion for the deploy operation summary state: type: string enum: - pending - in_progress - complete - cancelled - error description: The state of the deploy operation summary syntax_highlighted_ddl: type: string description: >- A syntax-highlighted DDL statement for the deploy operation summary table_name: type: string description: >- The name of the table modifed by the deploy operation summary table_recently_used_at: type: string description: >- When the table modified by the deploy operation summary was last used throttled_at: type: string description: >- When the deploy operation summary was last throttled removed_foreign_key_names: items: type: string type: array description: >- Names of foreign keys removed by this operation summary shard_count: type: integer description: >- The number of shards in the keyspace modified by the deploy operation summary shard_names: items: type: string type: array description: >- Names of shards in the keyspace modified by the deploy operation summary can_drop_data: type: boolean description: >- Whether or not the deploy operation summary is capable of dropping data table_recently_used: type: boolean description: >- Whether or not the table modified by the deploy operation summary was recently used sharded: type: boolean description: >- Whether or not the keyspace modified by the deploy operation summary is sharded operations: type: array items: type: object properties: id: type: string description: The ID for the deploy operation shard: type: string description: >- The shard the deploy operation is being performed on state: type: string enum: - pending - queued - in_progress - complete - cancelled - error description: The state of the deploy operation progress_percentage: type: number description: >- The percent completion for the deploy operation eta_seconds: type: integer description: >- The estimated seconds until completion for the deploy operation additionalProperties: false required: - id - shard - state - progress_percentage - eta_seconds additionalProperties: false required: - id - created_at - deploy_errors - ddl_statement - eta_seconds - keyspace_name - operation_name - progress_percentage - state - syntax_highlighted_ddl - table_name - table_recently_used_at - throttled_at - removed_foreign_key_names - shard_count - shard_names - can_drop_data - table_recently_used - sharded - operations lint_errors: items: type: object additionalProperties: true type: array description: >- Schema lint errors preventing the deployment from completing sequential_diff_dependencies: items: type: object additionalProperties: true type: array description: The schema dependencies that must be satisfied lookup_vindex_operations: items: type: object additionalProperties: true type: array description: Lookup Vitess index operations throttler_configurations: items: type: object additionalProperties: true type: array description: Deployment throttling configurations deployment_revert_request: type: object additionalProperties: true description: >- The request to revert the schema operations in this deployment actor: type: object properties: id: type: string description: The ID of the actor display_name: type: string description: The name of the actor avatar_url: type: string description: The URL of the actor's avatar additionalProperties: false required: - id - display_name - avatar_url cutover_actor: type: object properties: id: type: string description: The ID of the actor display_name: type: string description: The name of the actor avatar_url: type: string description: The URL of the actor's avatar additionalProperties: false required: - id - display_name - avatar_url cancelled_actor: type: object properties: id: type: string description: The ID of the actor display_name: type: string description: The name of the actor avatar_url: type: string description: The URL of the actor's avatar additionalProperties: false required: - id - display_name - avatar_url schema_last_updated_at: type: string description: When the schema was last updated for the deployment table_locked: type: boolean description: Whether or not the deployment has a table locked locked_table_name: type: string description: The name of he table that is locked by the deployment instant_ddl: type: boolean description: >- Whether or not the deployment is an instant DDL deployment instant_ddl_eligible: type: boolean description: >- Whether or not the deployment is eligible for instant DDL additionalProperties: false required: - id - auto_cutover - auto_delete_branch - created_at - cutover_at - cutover_expiring - deploy_check_errors - finished_at - queued_at - ready_to_cutover_at - started_at - state - submitted_at - updated_at - into_branch - deploy_request_number - deployable - preceding_deployments - deploy_operations - deploy_operation_summaries - lint_errors - sequential_diff_dependencies - lookup_vindex_operations - throttler_configurations - deployment_revert_request - actor - cutover_actor - cancelled_actor - schema_last_updated_at - table_locked - locked_table_name - instant_ddl - instant_ddl_eligible num_comments: type: integer description: The number of comments on the deploy request html_url: type: string description: The PlanetScale app address for the deploy request notes: type: string description: Notes on the deploy request html_body: type: string description: The HTML body of the deploy request created_at: type: string description: When the deploy request was created updated_at: type: string description: When the deploy request was last updated closed_at: type: string description: When the deploy request was closed deployed_at: type: string description: When the deploy request was deployed additionalProperties: false required: - id - number - actor - closed_by - branch - branch_id - branch_deleted - branch_deleted_by - branch_deleted_at - into_branch - into_branch_sharded - into_branch_shard_count - approved - state - deployment_state - deployment - num_comments - html_url - notes - html_body - created_at - updated_at - closed_at - deployed_at '401': description: Unauthorized '403': description: Forbidden '404': description: Not Found '500': description: Internal Server Error components: securitySchemes: ApiKeyHeader: type: apiKey in: header name: Authorization ```` --- > To find navigation and other pages in this documentation, fetch the llms.txt file at: https://planetscale.com/llms.txt --- # Source: https://planetscale.com/docs/cli/completion.md # PlanetScale CLI commands: completion ## Getting Started Make sure to first [set up your PlanetScale developer environment](/docs/cli/planetscale-environment-setup). Once you've installed the `pscale` CLI, you can interact with PlanetScale and manage your databases straight from the command line. ## The `completion` command This command allows you to generate a completion script for the specified shell. **Usage:** ```bash theme={null} pscale completion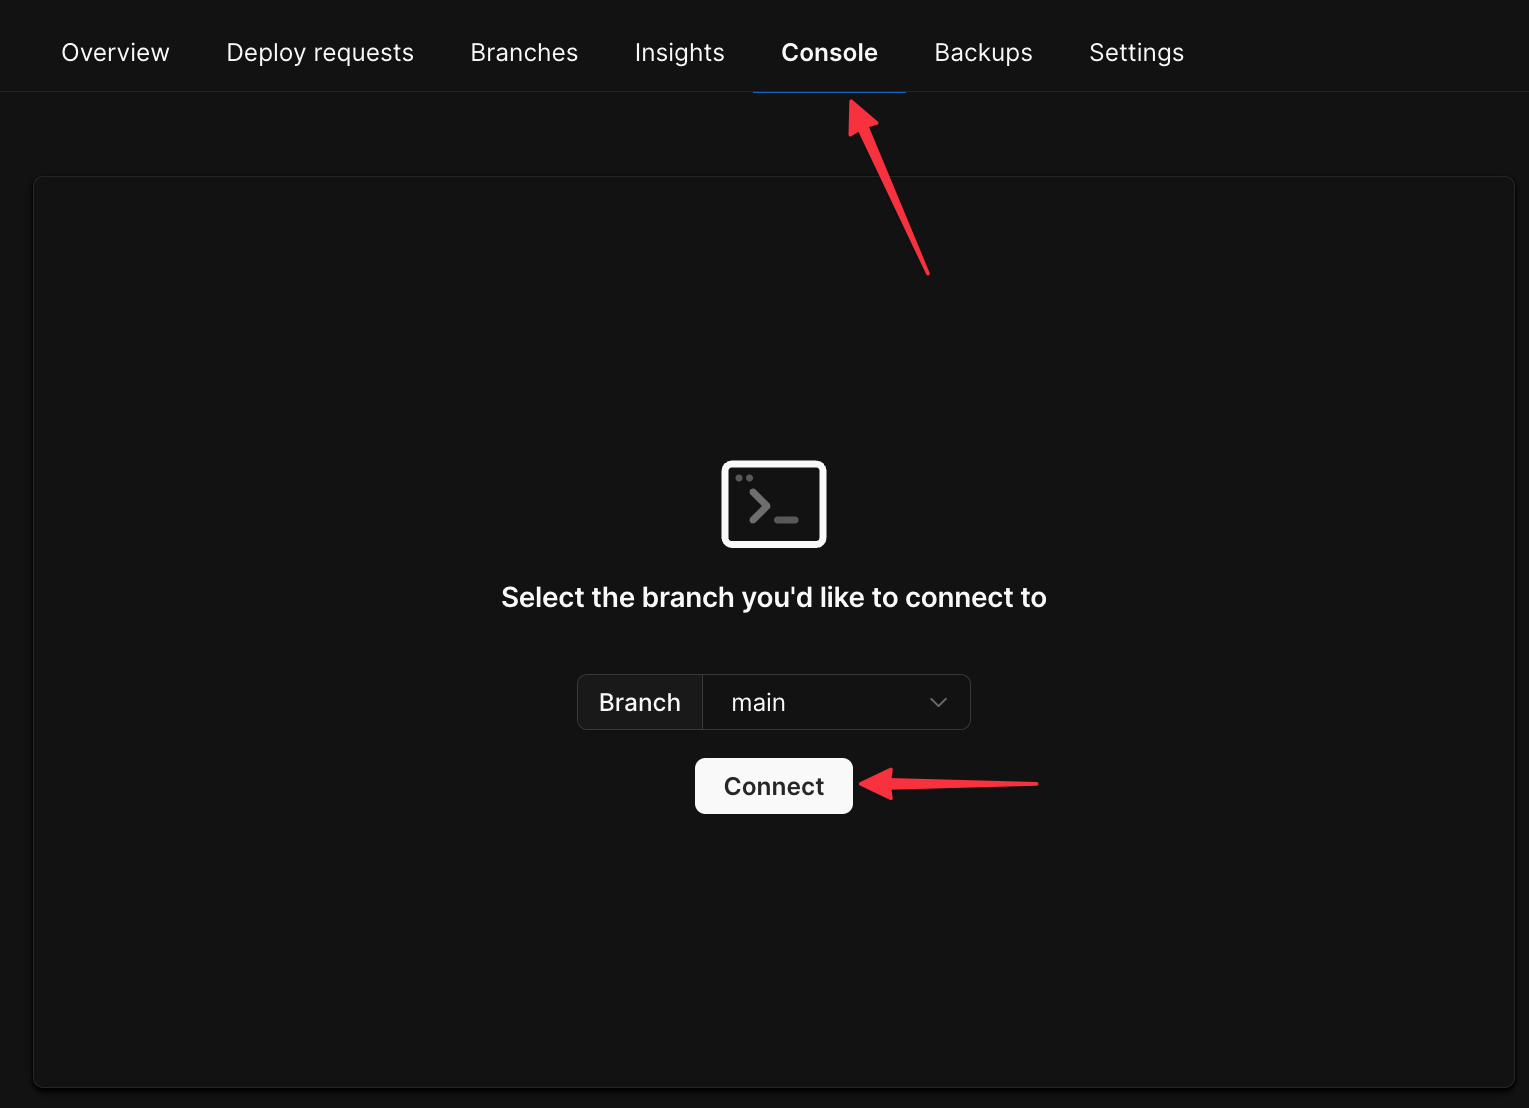 Run the following two commands to create a sample table and insert some data:
```sql theme={null}
CREATE TABLE `products` (
`id` int PRIMARY KEY AUTO_INCREMENT,
`name` varchar(100) NOT NULL,
`price` int NOT NULL
);
INSERT INTO `products` (name, price) VALUES
('Cyberfreak 2076', 40),
('Destination 2: Shining Decline', 20),
('Edge Properties 3', 15);
```
Finally, head to the **"Dashboard"** tab and click **"Connect"**.
Run the following two commands to create a sample table and insert some data:
```sql theme={null}
CREATE TABLE `products` (
`id` int PRIMARY KEY AUTO_INCREMENT,
`name` varchar(100) NOT NULL,
`price` int NOT NULL
);
INSERT INTO `products` (name, price) VALUES
('Cyberfreak 2076', 40),
('Destination 2: Shining Decline', 20),
('Edge Properties 3', 15);
```
Finally, head to the **"Dashboard"** tab and click **"Connect"**.
 On the following page, click **"Create password"** to generate a new password for your database. Then click **Go** in the **Select your language or framework** section, and copy the contents of the `.env` file. You'll need it for the next section.
## Run the demo project
Start by opening a terminal on your workstation and clone the sample repository provided.
```bash theme={null}
git clone https://github.com/planetscale/golang-example-gin.git
```
Open the project in VS Code and add a new file in the root of the project named `.env`, Populate the file with the contents taken from the Connect modal in the previous section.
```sql theme={null}
DSN=****************:************@tcp(us-east.connect.psdb.cloud)/products_db?tls=true&interpolateParams=true
```
Now open an integrated terminal in VS Code and run the project using the following commands:
```bash theme={null}
go mod tidy
go run .
```
The terminal should update with the following output.
On the following page, click **"Create password"** to generate a new password for your database. Then click **Go** in the **Select your language or framework** section, and copy the contents of the `.env` file. You'll need it for the next section.
## Run the demo project
Start by opening a terminal on your workstation and clone the sample repository provided.
```bash theme={null}
git clone https://github.com/planetscale/golang-example-gin.git
```
Open the project in VS Code and add a new file in the root of the project named `.env`, Populate the file with the contents taken from the Connect modal in the previous section.
```sql theme={null}
DSN=****************:************@tcp(us-east.connect.psdb.cloud)/products_db?tls=true&interpolateParams=true
```
Now open an integrated terminal in VS Code and run the project using the following commands:
```bash theme={null}
go mod tidy
go run .
```
The terminal should update with the following output.
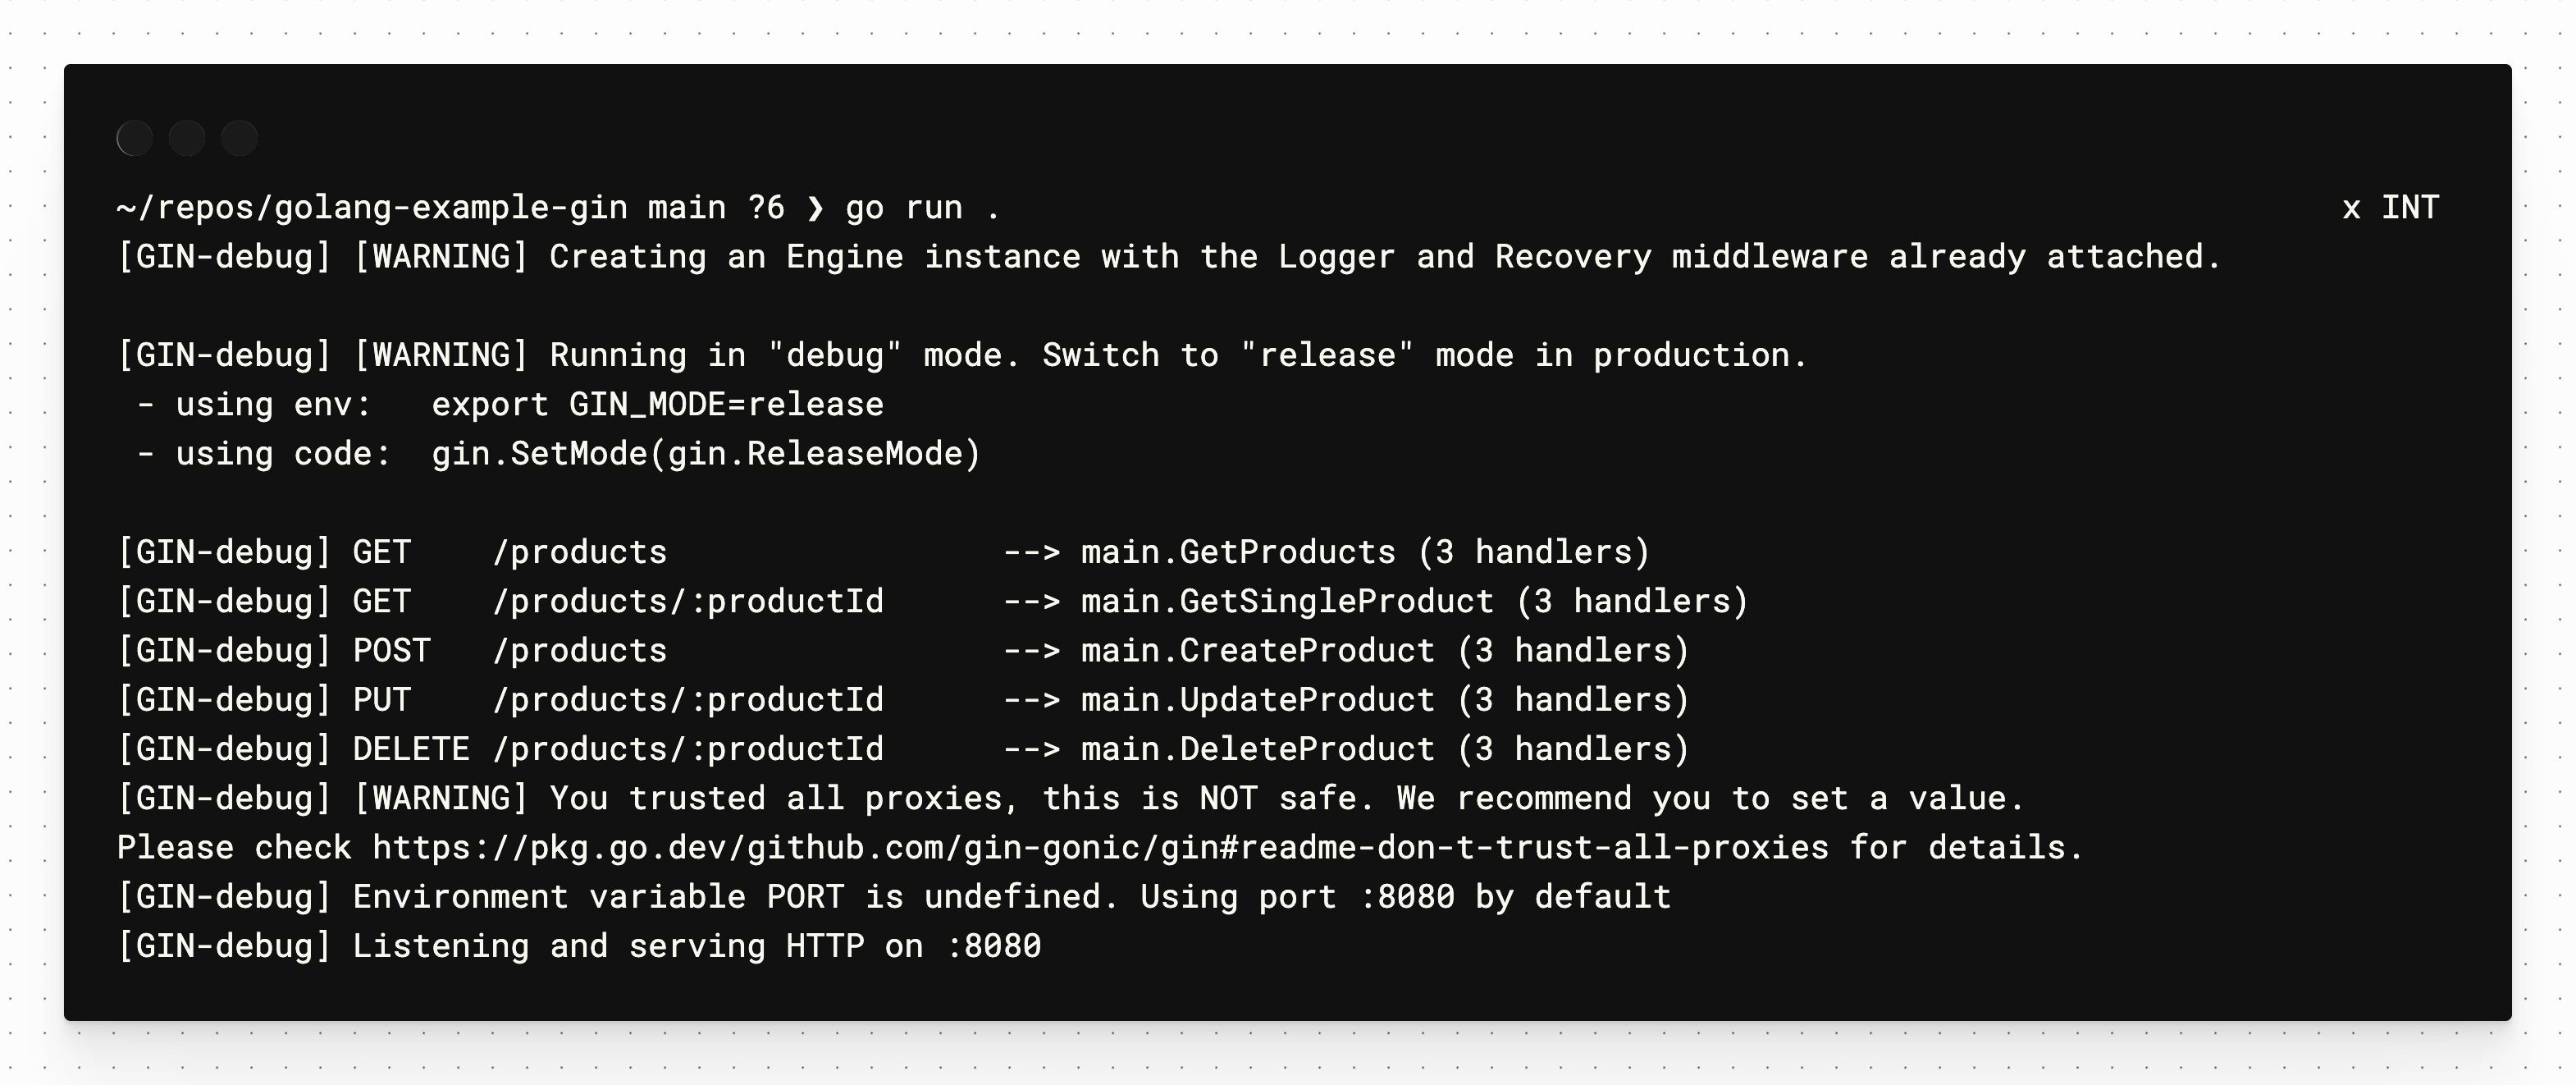 ## Exploring the code
Now that the project is running, let’s explore the code to see how everything works. All of the code is stored in `main.go`, with each of the core SQL operations mapped by HTTP method in the `main` function:
| HTTP Method Name | Query Type |
| :--------------- | :--------- |
| get | SELECT |
| post | INSERT |
| put | UPDATE |
| delete | DELETE |
```go theme={null}
func main() {
// Load in the `.env` file
err := godotenv.Load()
if err != nil {
log.Fatal("failed to load env", err)
}
// Open a connection to the database
db, err = sql.Open("mysql", os.Getenv("DSN"))
if err != nil {
log.Fatal("failed to open db connection", err)
}
// Build router & define routes
router := gin.Default()
router.GET("/products", GetProducts)
router.GET("/products/:productId", GetSingleProduct)
router.POST("/products", CreateProduct)
router.PUT("/products/:productId", UpdateProduct)
router.DELETE("/products/:productId", DeleteProduct)
// Run the router
router.Run()
}
```
Open the `tests.http` file, which contains HTTP requests that can be sent to test the API. Running the `get {{hostname}}/products` test is the equivalent of running `SELECT * FROM products` in SQL and returning the results as JSON.
This is the `GetProducts` function defined in `main.go`. Notice how the `query` variable is the `SELECT` statement, which is passed into `db.Query` before being scanned into a slice of `Product` structs.
```go expandable theme={null}
func GetProducts(c *gin.Context) {
query := "SELECT * FROM products"
res, err := db.Query(query)
defer res.Close()
if err != nil {
log.Fatal("(GetProducts) db.Query", err)
}
products := []Product{}
for res.Next() {
var product Product
err := res.Scan(&product.Id, &product.Name, &product.Price)
if err != nil {
log.Fatal("(GetProducts) res.Scan", err)
}
products = append(products, product)
}
c.JSON(http.StatusOK, products)
}
```
To pass parameters into queries, you may use a `?` as a placeholder for the parameter. For example, `GetSingleProduct` uses a query with a `WHERE` clause that is passed into the `db.QueryRow` function along with the query string.
```go expandable theme={null}
func GetSingleProduct(c *gin.Context) {
productId := c.Param("productId")
productId = strings.ReplaceAll(productId, "/", "")
productIdInt, err := strconv.Atoi(productId)
if err != nil {
log.Fatal("(GetSingleProduct) strconv.Atoi", err)
}
var product Product
// `?` is a placeholder for the parameter
query := `SELECT * FROM products WHERE id = ?`
// `productIdInt` is passed in with the query
err = db.QueryRow(query, productIdInt).Scan(&product.Id, &product.Name, &product.Price)
if err != nil {
log.Fatal("(GetSingleProduct) db.Exec", err)
}
c.JSON(http.StatusOK, product)
}
```
Parameters in queries are populated in the order they are passed into the respective `db` function, as demonstrated in `CreateProduct`.
```go expandable theme={null}
func CreateProduct(c *gin.Context) {
var newProduct Product
err := c.BindJSON(&newProduct)
if err != nil {
log.Fatal("(CreateProduct) c.BindJSON", err)
}
// This query has multiple `?` parameter placeholders
query := `INSERT INTO products (name, price) VALUES (?, ?)`
// The `Exec` function takes in a query, as well as the values for
// the parameters in the order they are defined
res, err := db.Exec(query, newProduct.Name, newProduct.Price)
if err != nil {
log.Fatal("(CreateProduct) db.Exec", err)
}
newProduct.Id, err = res.LastInsertId()
if err != nil {
log.Fatal("(CreateProduct) res.LastInsertId", err)
}
c.JSON(http.StatusOK, newProduct)
}
```
## Need help?
Get help from [the PlanetScale Support team](https://support.planetscale.com/), or join our [GitHub discussion board](https://github.com/planetscale/discussion/discussions) to see how others are using PlanetScale.
---
> To find navigation and other pages in this documentation, fetch the llms.txt file at: https://planetscale.com/llms.txt
---
# Source: https://planetscale.com/docs/vitess/tutorials/connect-go-gorm-app.md
# Connect a Go application using GORM to PlanetScale
## Introduction
In this tutorial, you'll learn how to connect a Go application to a PlanetScale MySQL database using a sample Go starter app with GORM.
## Exploring the code
Now that the project is running, let’s explore the code to see how everything works. All of the code is stored in `main.go`, with each of the core SQL operations mapped by HTTP method in the `main` function:
| HTTP Method Name | Query Type |
| :--------------- | :--------- |
| get | SELECT |
| post | INSERT |
| put | UPDATE |
| delete | DELETE |
```go theme={null}
func main() {
// Load in the `.env` file
err := godotenv.Load()
if err != nil {
log.Fatal("failed to load env", err)
}
// Open a connection to the database
db, err = sql.Open("mysql", os.Getenv("DSN"))
if err != nil {
log.Fatal("failed to open db connection", err)
}
// Build router & define routes
router := gin.Default()
router.GET("/products", GetProducts)
router.GET("/products/:productId", GetSingleProduct)
router.POST("/products", CreateProduct)
router.PUT("/products/:productId", UpdateProduct)
router.DELETE("/products/:productId", DeleteProduct)
// Run the router
router.Run()
}
```
Open the `tests.http` file, which contains HTTP requests that can be sent to test the API. Running the `get {{hostname}}/products` test is the equivalent of running `SELECT * FROM products` in SQL and returning the results as JSON.
This is the `GetProducts` function defined in `main.go`. Notice how the `query` variable is the `SELECT` statement, which is passed into `db.Query` before being scanned into a slice of `Product` structs.
```go expandable theme={null}
func GetProducts(c *gin.Context) {
query := "SELECT * FROM products"
res, err := db.Query(query)
defer res.Close()
if err != nil {
log.Fatal("(GetProducts) db.Query", err)
}
products := []Product{}
for res.Next() {
var product Product
err := res.Scan(&product.Id, &product.Name, &product.Price)
if err != nil {
log.Fatal("(GetProducts) res.Scan", err)
}
products = append(products, product)
}
c.JSON(http.StatusOK, products)
}
```
To pass parameters into queries, you may use a `?` as a placeholder for the parameter. For example, `GetSingleProduct` uses a query with a `WHERE` clause that is passed into the `db.QueryRow` function along with the query string.
```go expandable theme={null}
func GetSingleProduct(c *gin.Context) {
productId := c.Param("productId")
productId = strings.ReplaceAll(productId, "/", "")
productIdInt, err := strconv.Atoi(productId)
if err != nil {
log.Fatal("(GetSingleProduct) strconv.Atoi", err)
}
var product Product
// `?` is a placeholder for the parameter
query := `SELECT * FROM products WHERE id = ?`
// `productIdInt` is passed in with the query
err = db.QueryRow(query, productIdInt).Scan(&product.Id, &product.Name, &product.Price)
if err != nil {
log.Fatal("(GetSingleProduct) db.Exec", err)
}
c.JSON(http.StatusOK, product)
}
```
Parameters in queries are populated in the order they are passed into the respective `db` function, as demonstrated in `CreateProduct`.
```go expandable theme={null}
func CreateProduct(c *gin.Context) {
var newProduct Product
err := c.BindJSON(&newProduct)
if err != nil {
log.Fatal("(CreateProduct) c.BindJSON", err)
}
// This query has multiple `?` parameter placeholders
query := `INSERT INTO products (name, price) VALUES (?, ?)`
// The `Exec` function takes in a query, as well as the values for
// the parameters in the order they are defined
res, err := db.Exec(query, newProduct.Name, newProduct.Price)
if err != nil {
log.Fatal("(CreateProduct) db.Exec", err)
}
newProduct.Id, err = res.LastInsertId()
if err != nil {
log.Fatal("(CreateProduct) res.LastInsertId", err)
}
c.JSON(http.StatusOK, newProduct)
}
```
## Need help?
Get help from [the PlanetScale Support team](https://support.planetscale.com/), or join our [GitHub discussion board](https://github.com/planetscale/discussion/discussions) to see how others are using PlanetScale.
---
> To find navigation and other pages in this documentation, fetch the llms.txt file at: https://planetscale.com/llms.txt
---
# Source: https://planetscale.com/docs/vitess/tutorials/connect-go-gorm-app.md
# Connect a Go application using GORM to PlanetScale
## Introduction
In this tutorial, you'll learn how to connect a Go application to a PlanetScale MySQL database using a sample Go starter app with GORM.
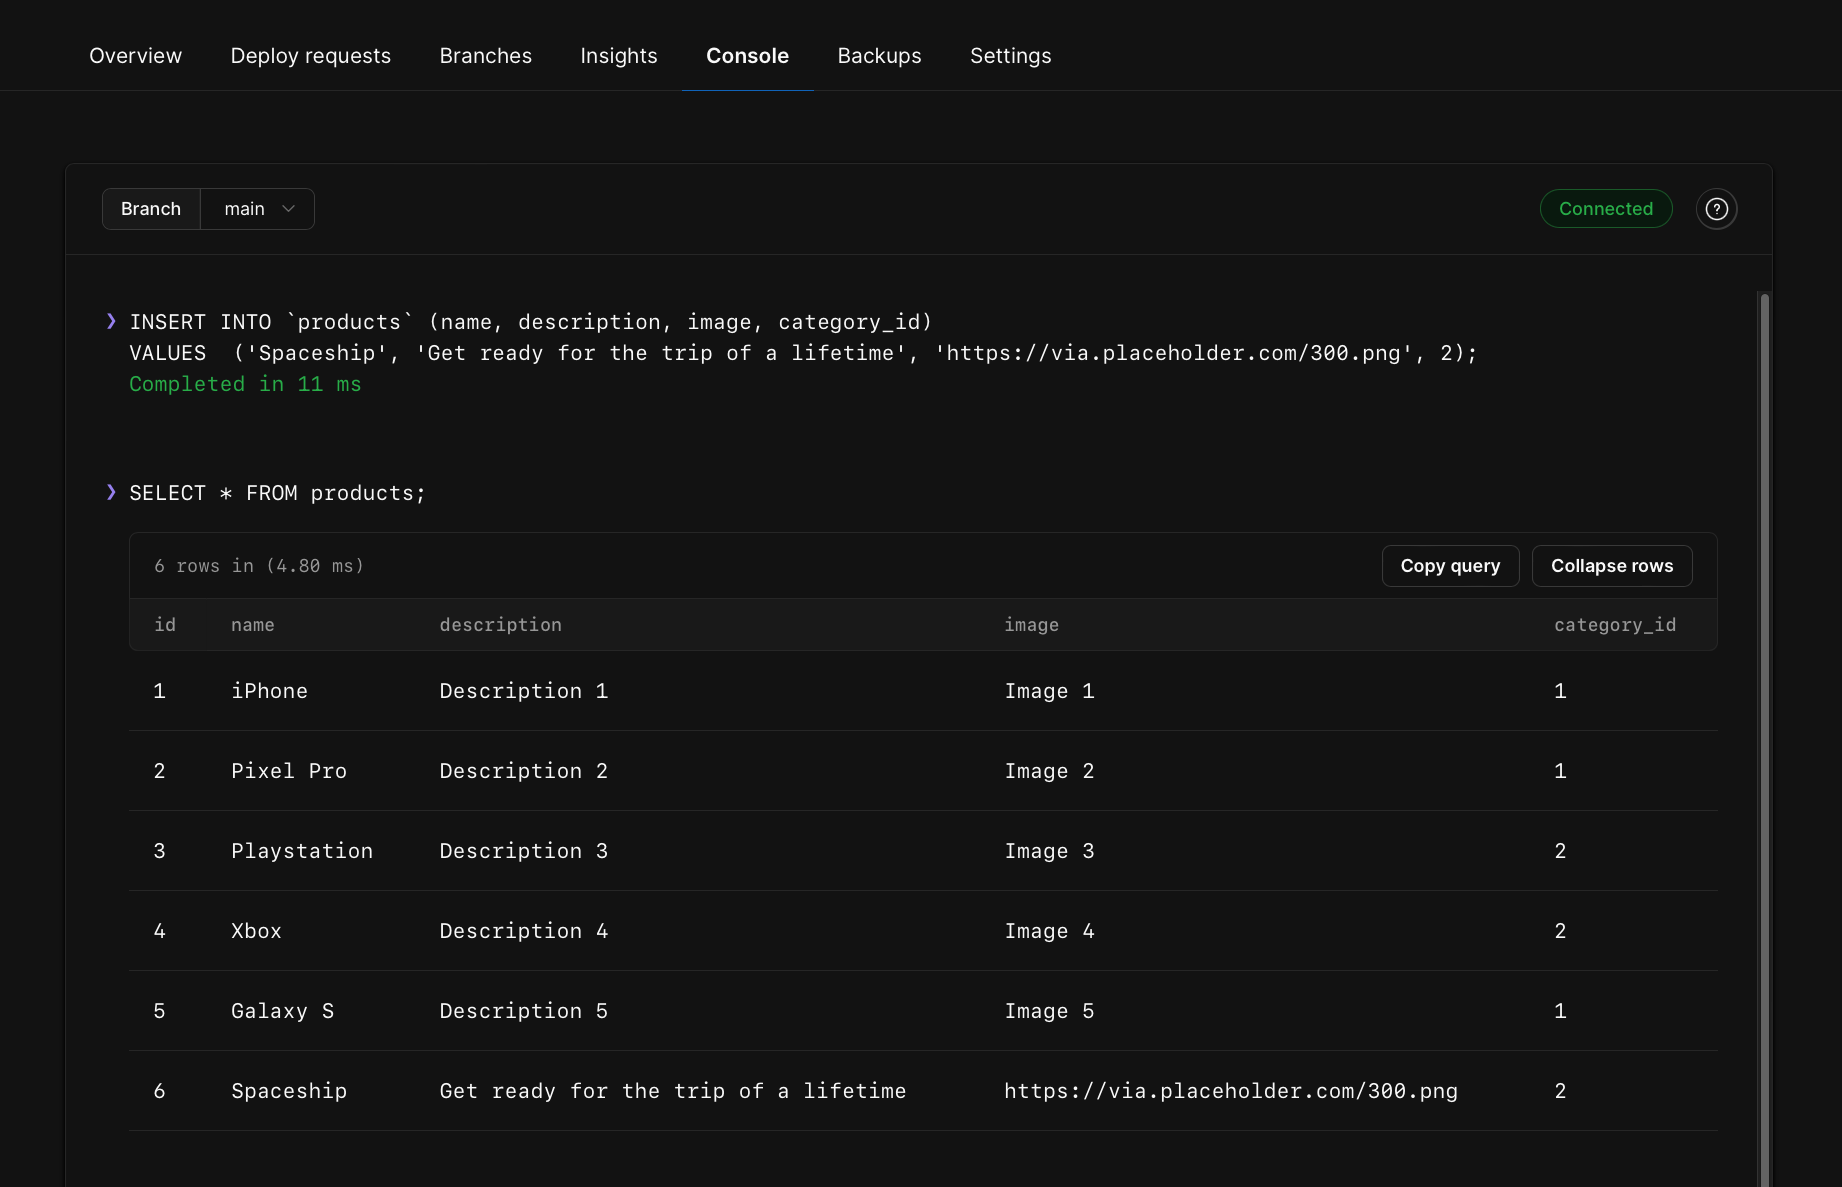
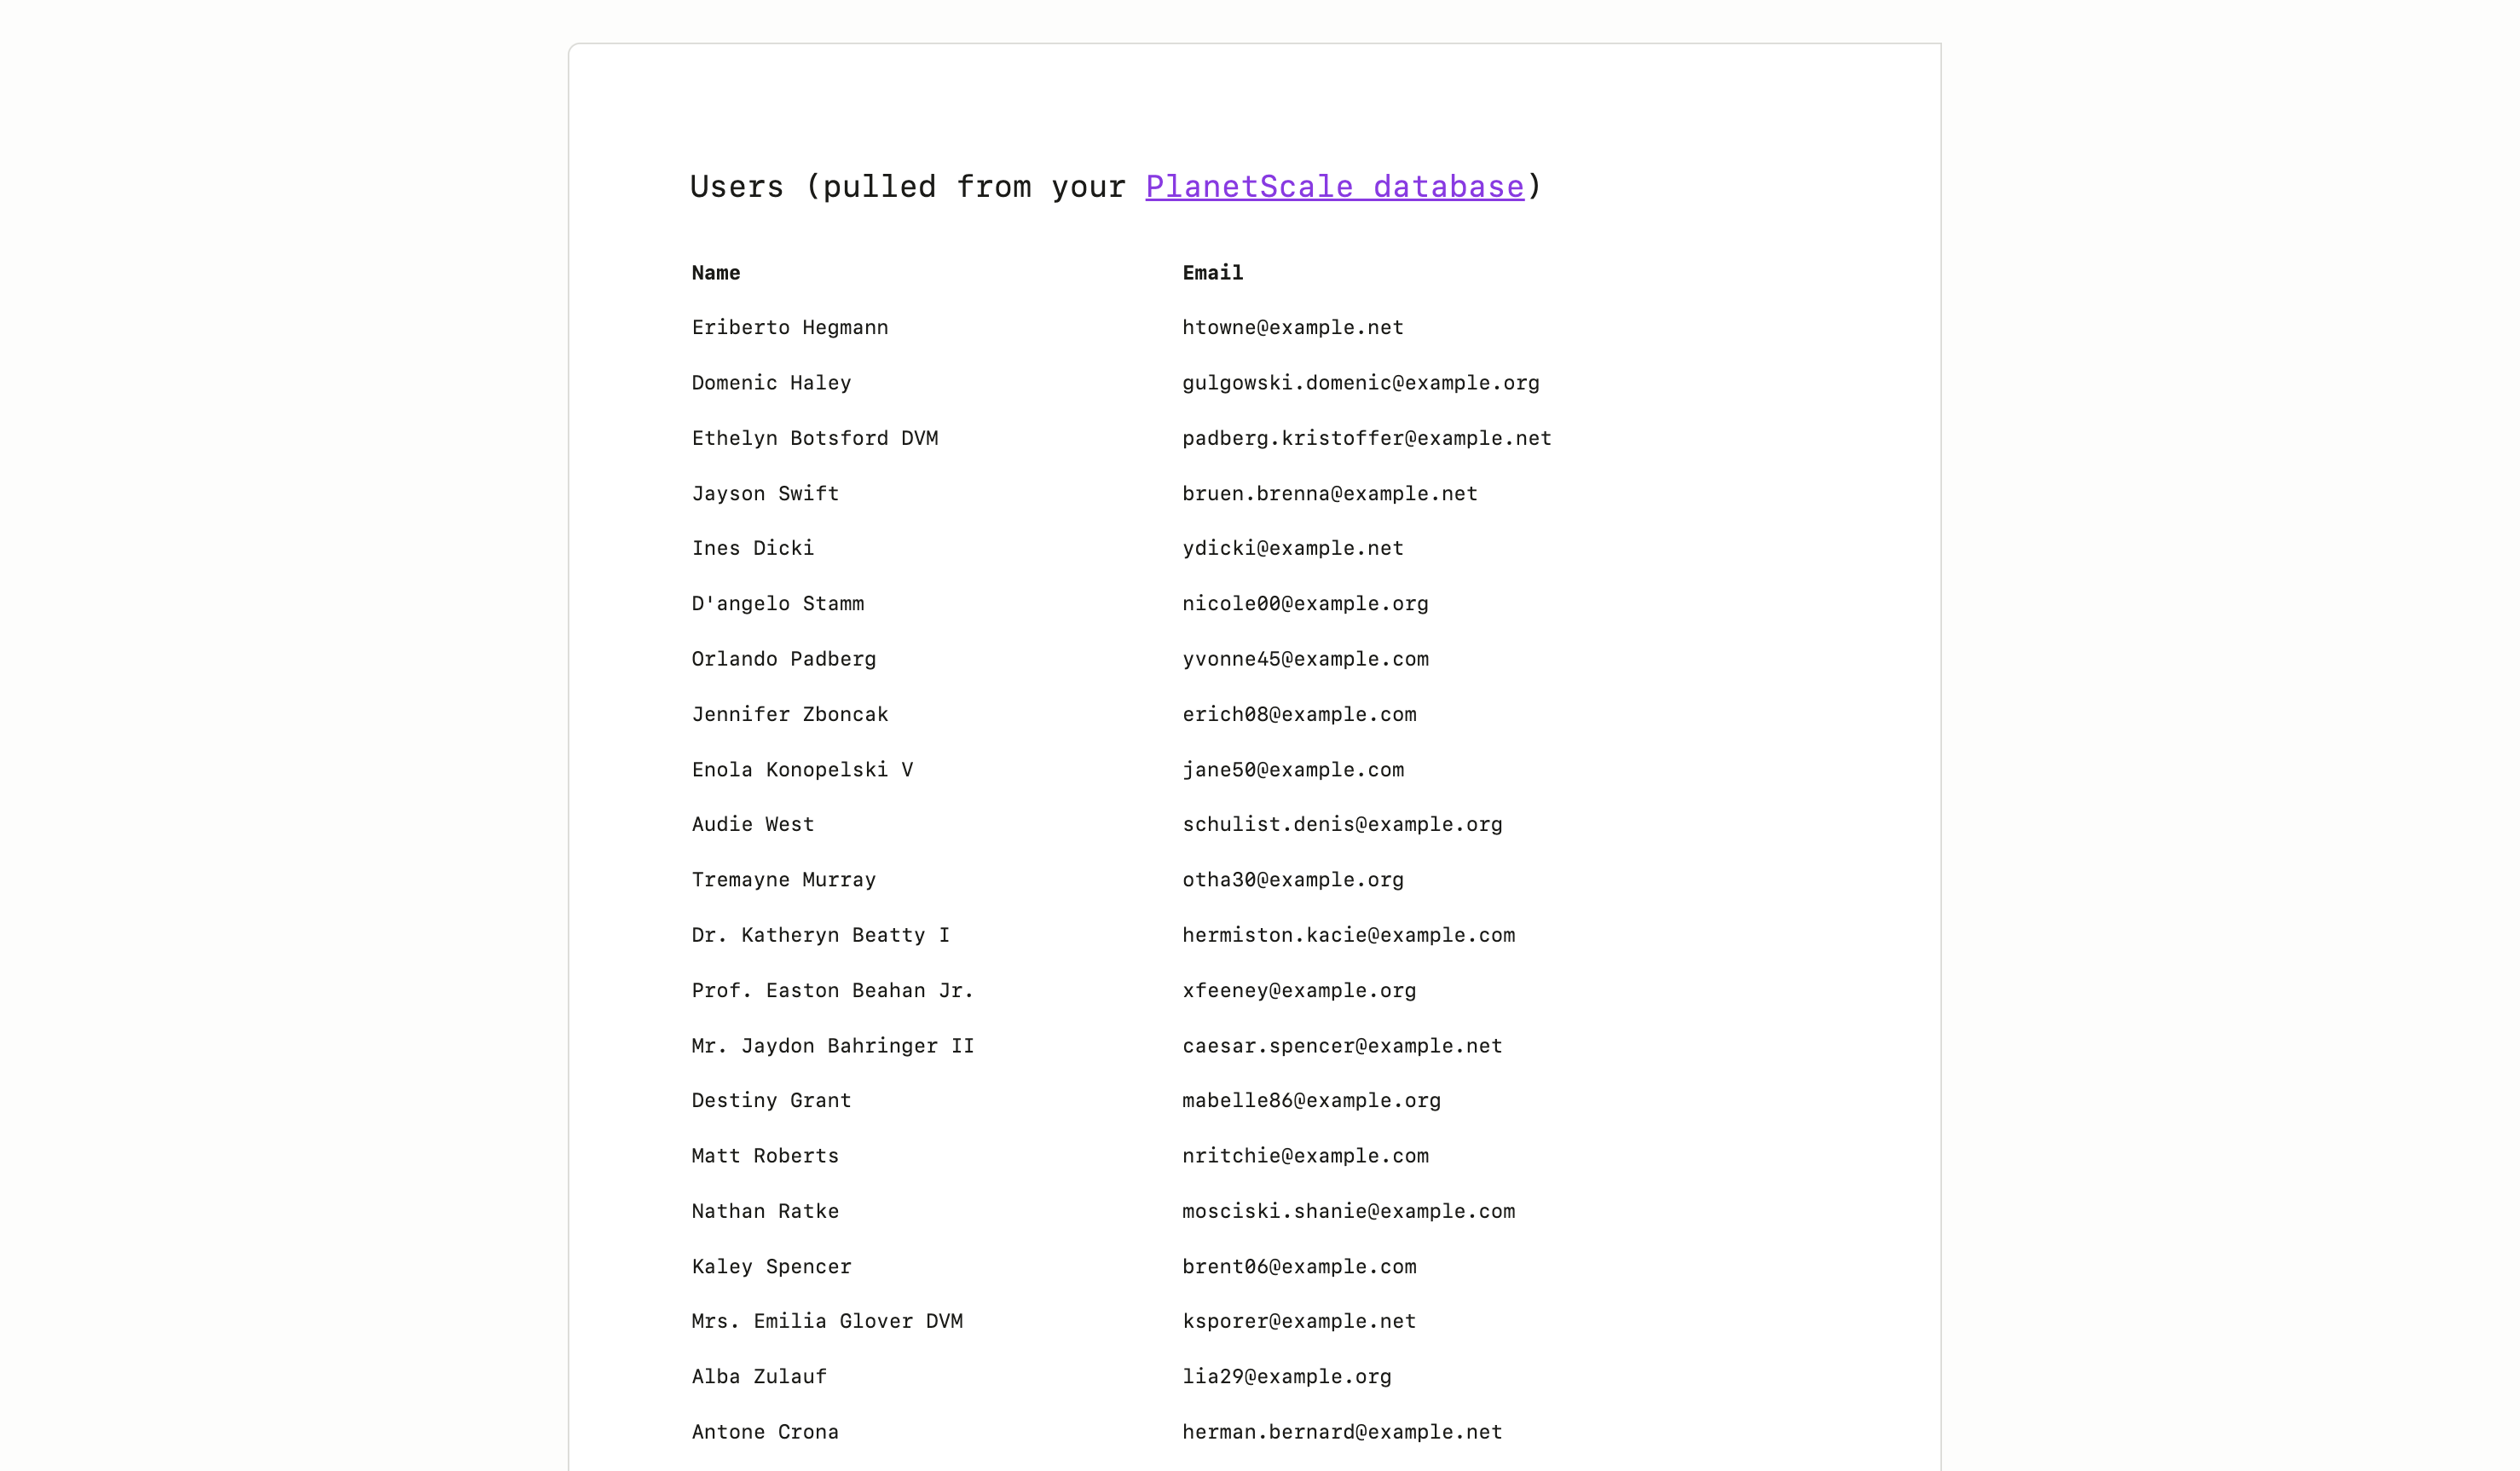 ## Add data manually
If you want to continue to play around with adding data on the fly, you have a few options:
* PlanetScale [dashboard console](/docs/vitess/web-console)
* [Laravel Tinker](hhttps://laravel.com/docs/12.x/artisan#tinker)
* [PlanetScale CLI shell](/docs/cli/shell)
* Your favorite MySQL client (for a list of tested MySQL clients, review our article on [how to connect MySQL GUI applications](/docs/vitess/tutorials/connect-mysql-gui))
The first option is covered below.
### Add data in PlanetScale dashboard console
PlanetScale has a [built-in console](/docs/vitess/web-console) where you can run MySQL commands against your branches.
By default, web console access to production branches is disabled to prevent accidental deletion. From your database's dashboard page, click on the "**Settings**" tab, check the box labelled "**Allow web console access to production branches**", and click "**Save database settings**".
To access it, click "**Console**" > select your branch > "**Connect**".
From here, you can run MySQL queries and DDL against your database branch.
## Add data manually
If you want to continue to play around with adding data on the fly, you have a few options:
* PlanetScale [dashboard console](/docs/vitess/web-console)
* [Laravel Tinker](hhttps://laravel.com/docs/12.x/artisan#tinker)
* [PlanetScale CLI shell](/docs/cli/shell)
* Your favorite MySQL client (for a list of tested MySQL clients, review our article on [how to connect MySQL GUI applications](/docs/vitess/tutorials/connect-mysql-gui))
The first option is covered below.
### Add data in PlanetScale dashboard console
PlanetScale has a [built-in console](/docs/vitess/web-console) where you can run MySQL commands against your branches.
By default, web console access to production branches is disabled to prevent accidental deletion. From your database's dashboard page, click on the "**Settings**" tab, check the box labelled "**Allow web console access to production branches**", and click "**Save database settings**".
To access it, click "**Console**" > select your branch > "**Connect**".
From here, you can run MySQL queries and DDL against your database branch.
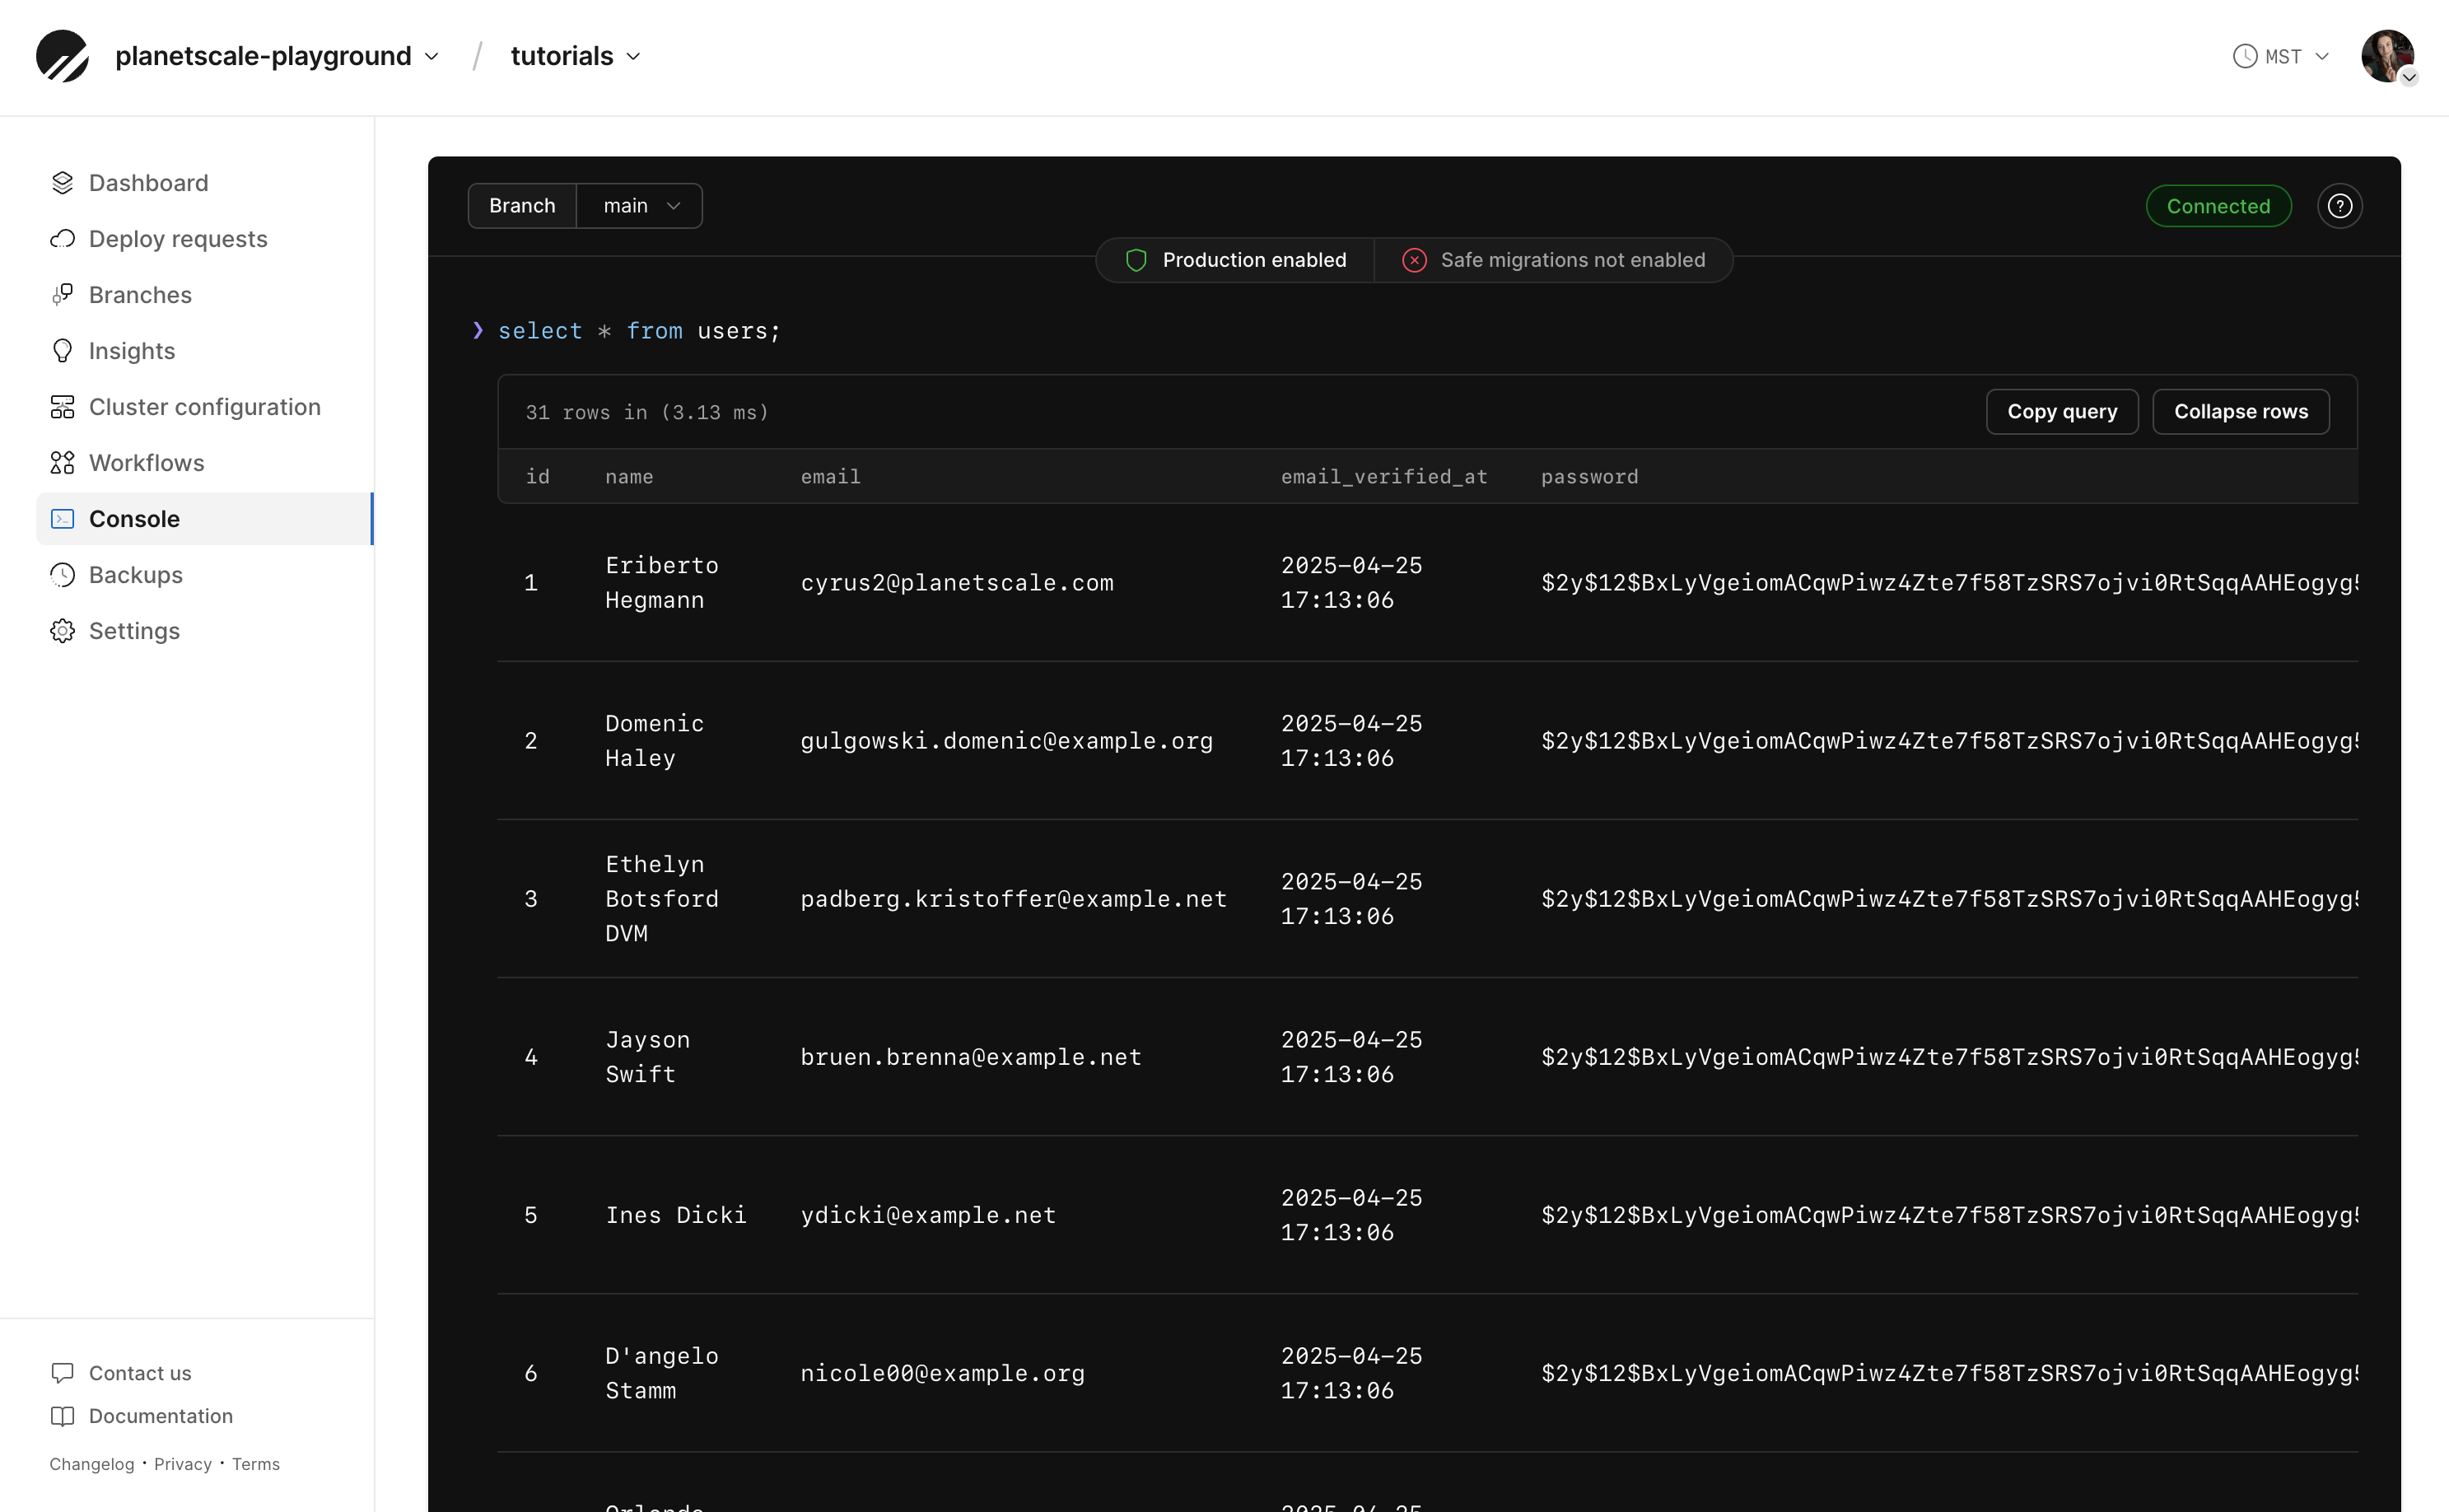
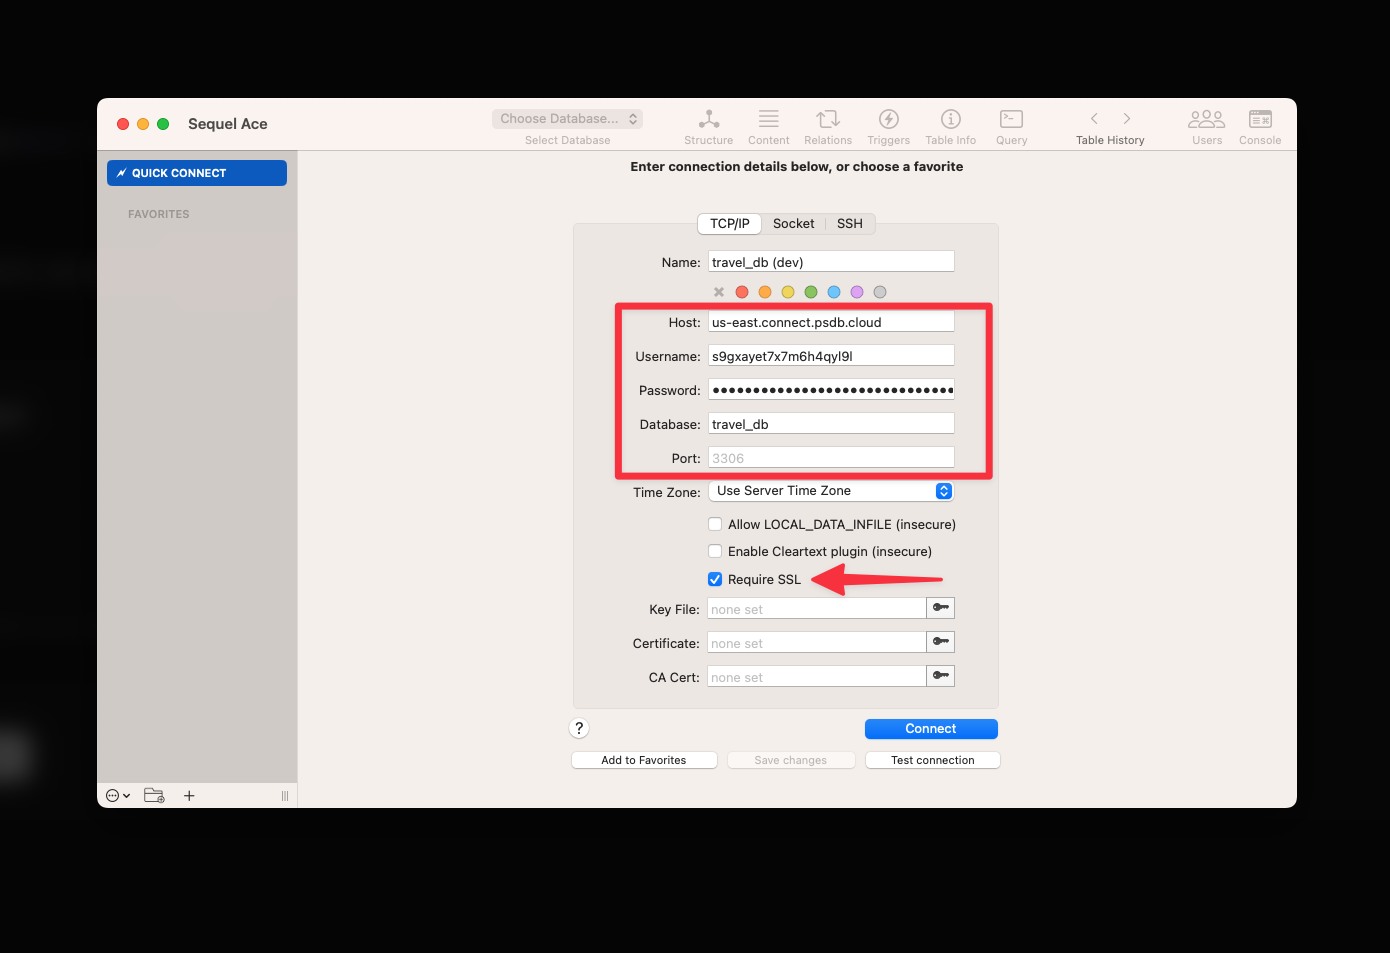 If the connection is successful, you should be able to query your database and perform other [supported operations](/docs/vitess/troubleshooting/mysql-compatibility).
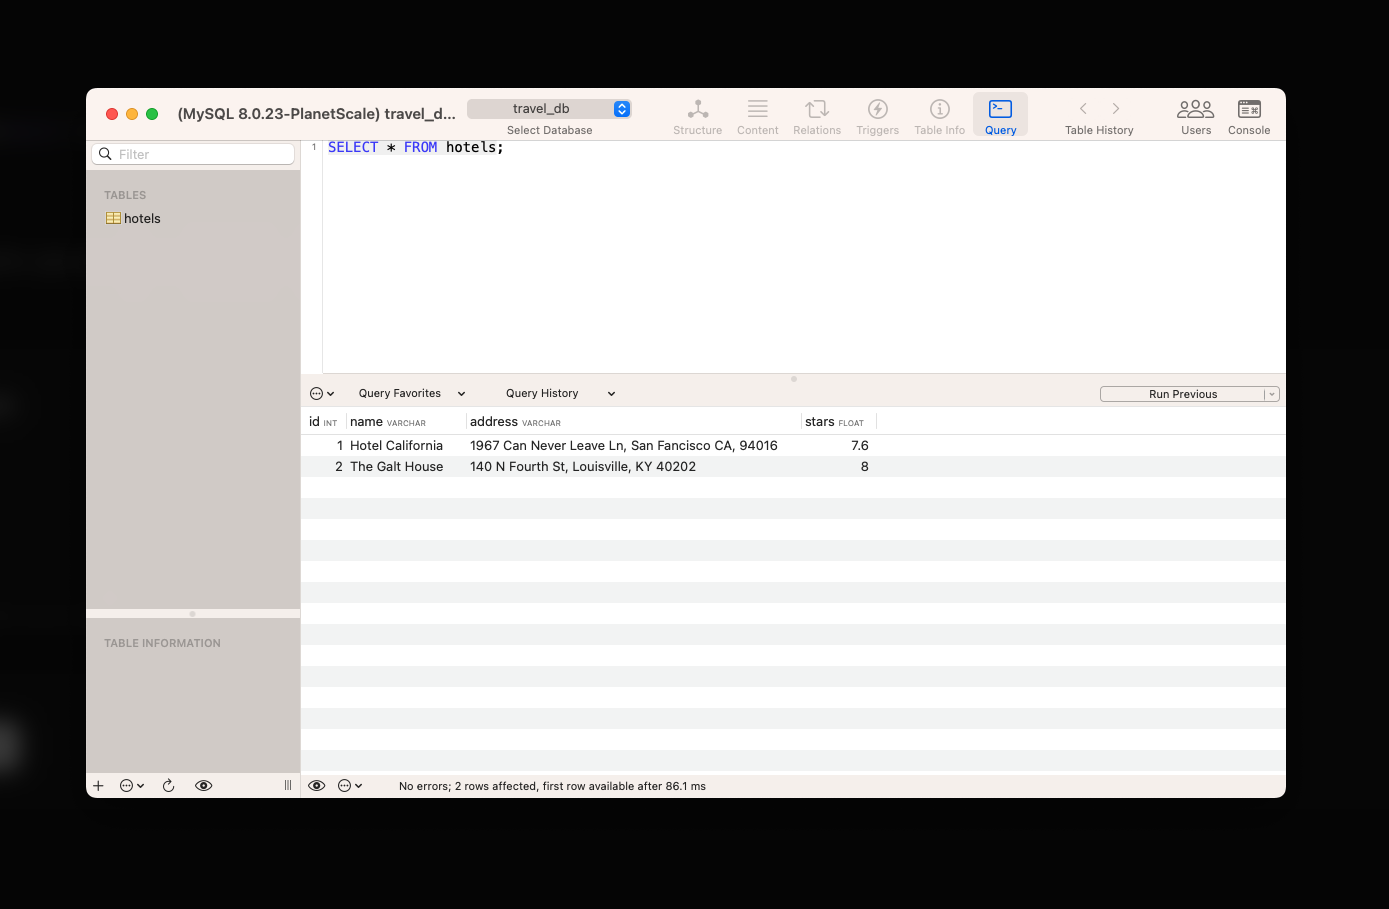 ## Caveats
While many standard MySQL statements are supported, there are a few caveats worth calling out:
## Caveats
While many standard MySQL statements are supported, there are a few caveats worth calling out:
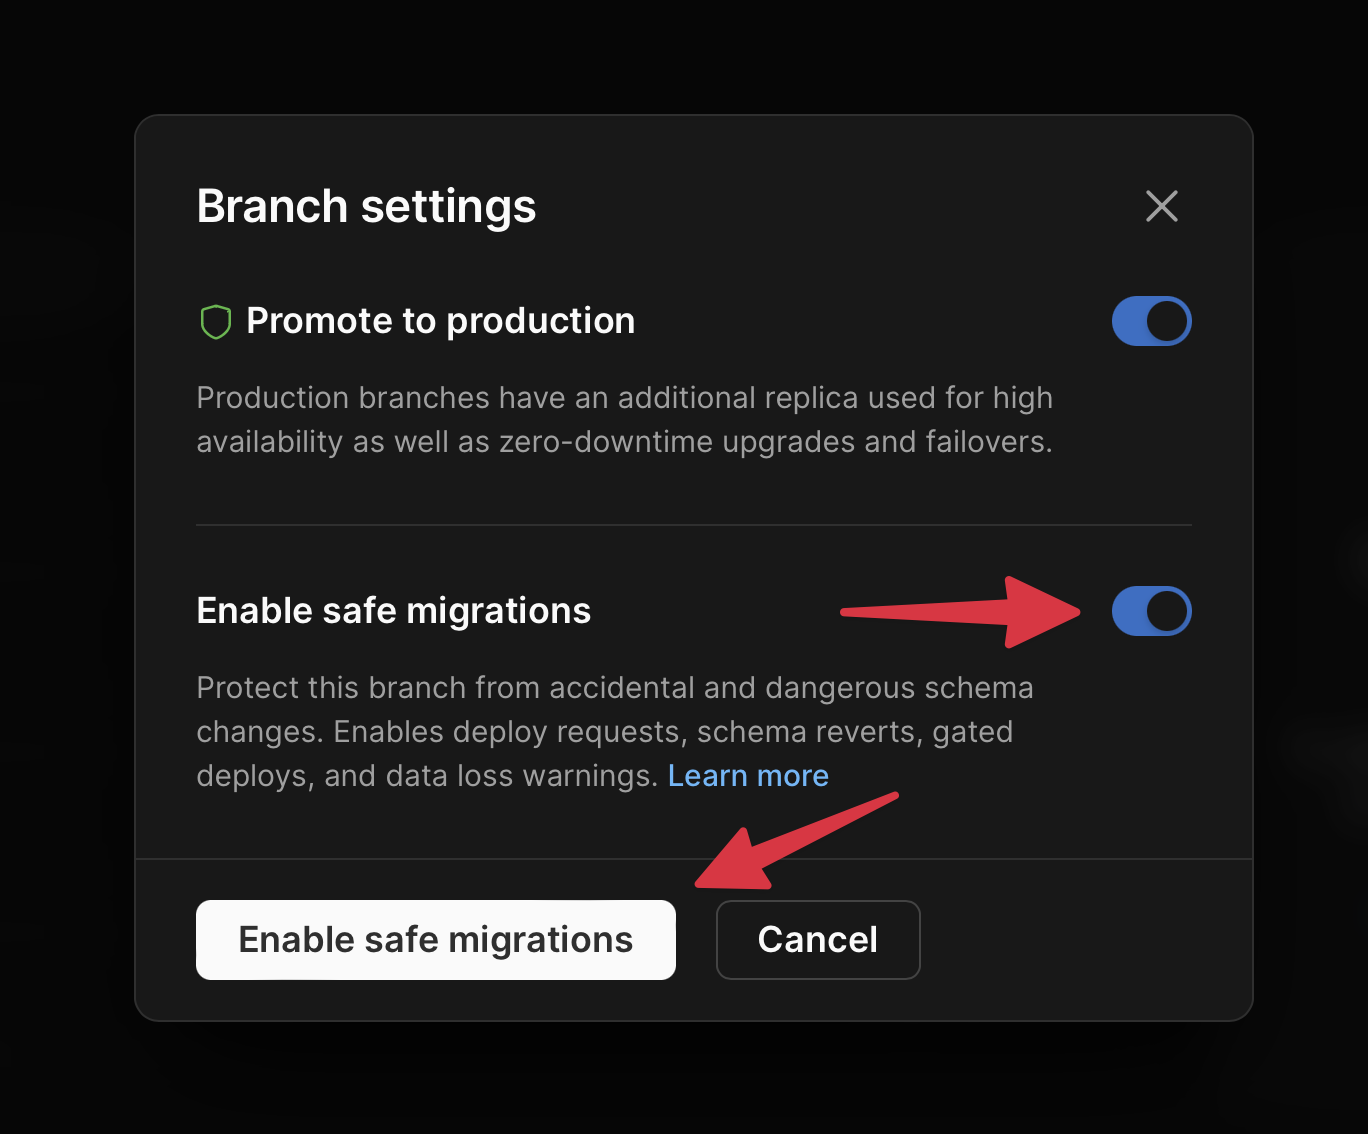 ### Deploy to Vercel
If you'd like to deploy to Vercel, check out our [Deploy to Vercel documentation](/docs/vitess/tutorials/deploy-to-vercel).
### Deploy to Netlify
If you'd like to deploy to Netlify, check out our [Deploy to Netlify documentation](/docs/vitess/tutorials/deploy-to-netlify).
### Deploy to Vercel
If you'd like to deploy to Vercel, check out our [Deploy to Vercel documentation](/docs/vitess/tutorials/deploy-to-vercel).
### Deploy to Netlify
If you'd like to deploy to Netlify, check out our [Deploy to Netlify documentation](/docs/vitess/tutorials/deploy-to-netlify).
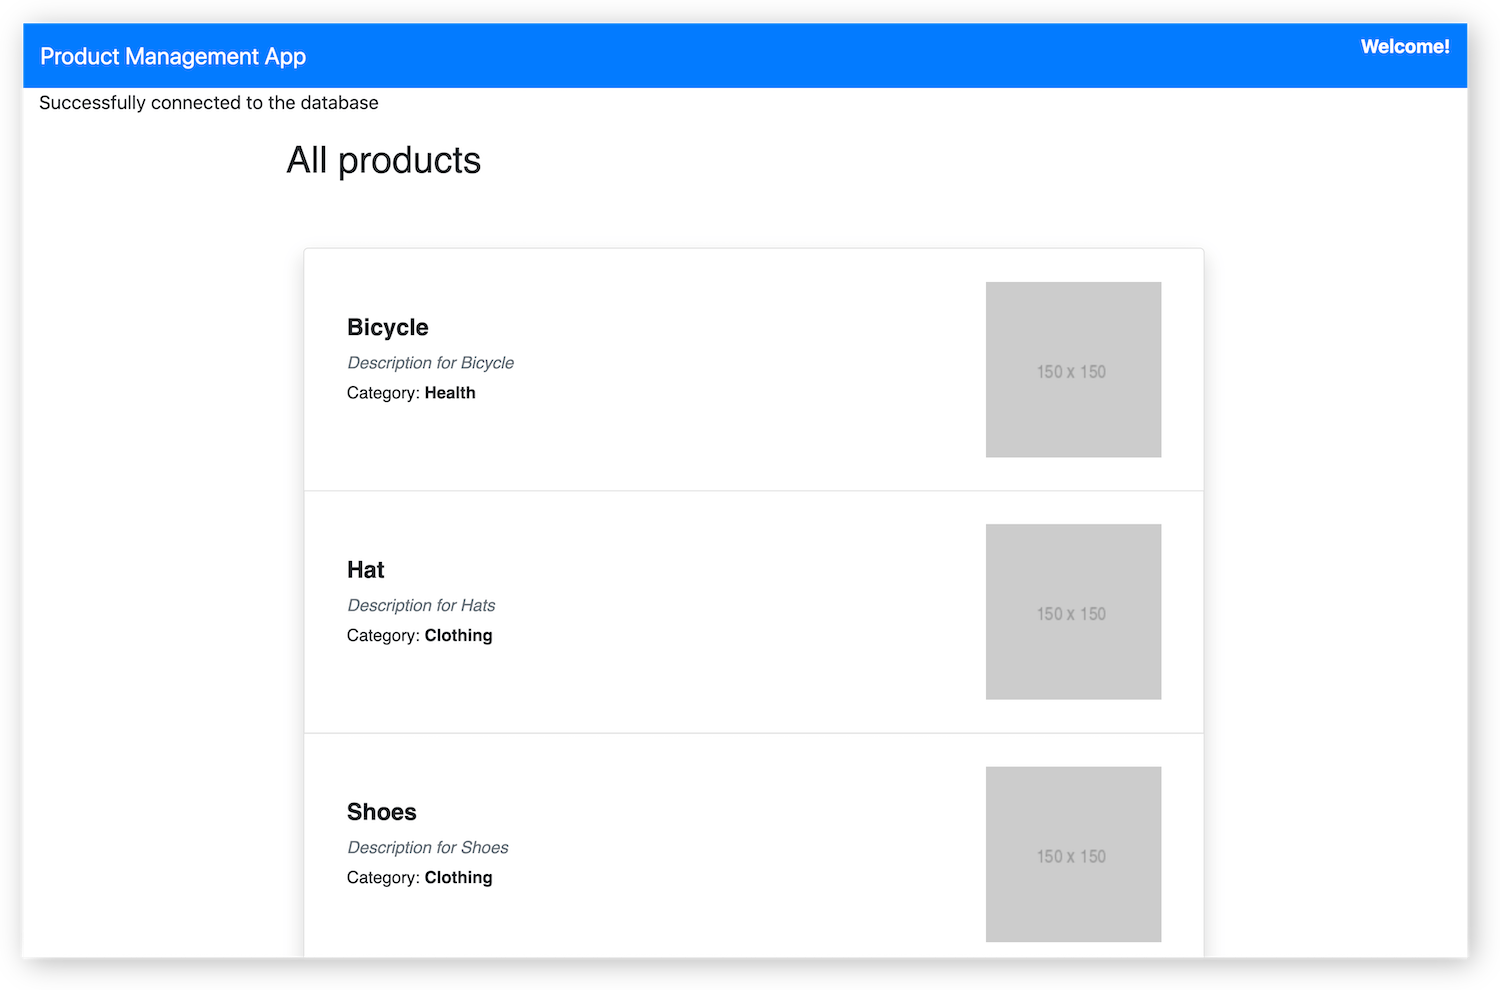
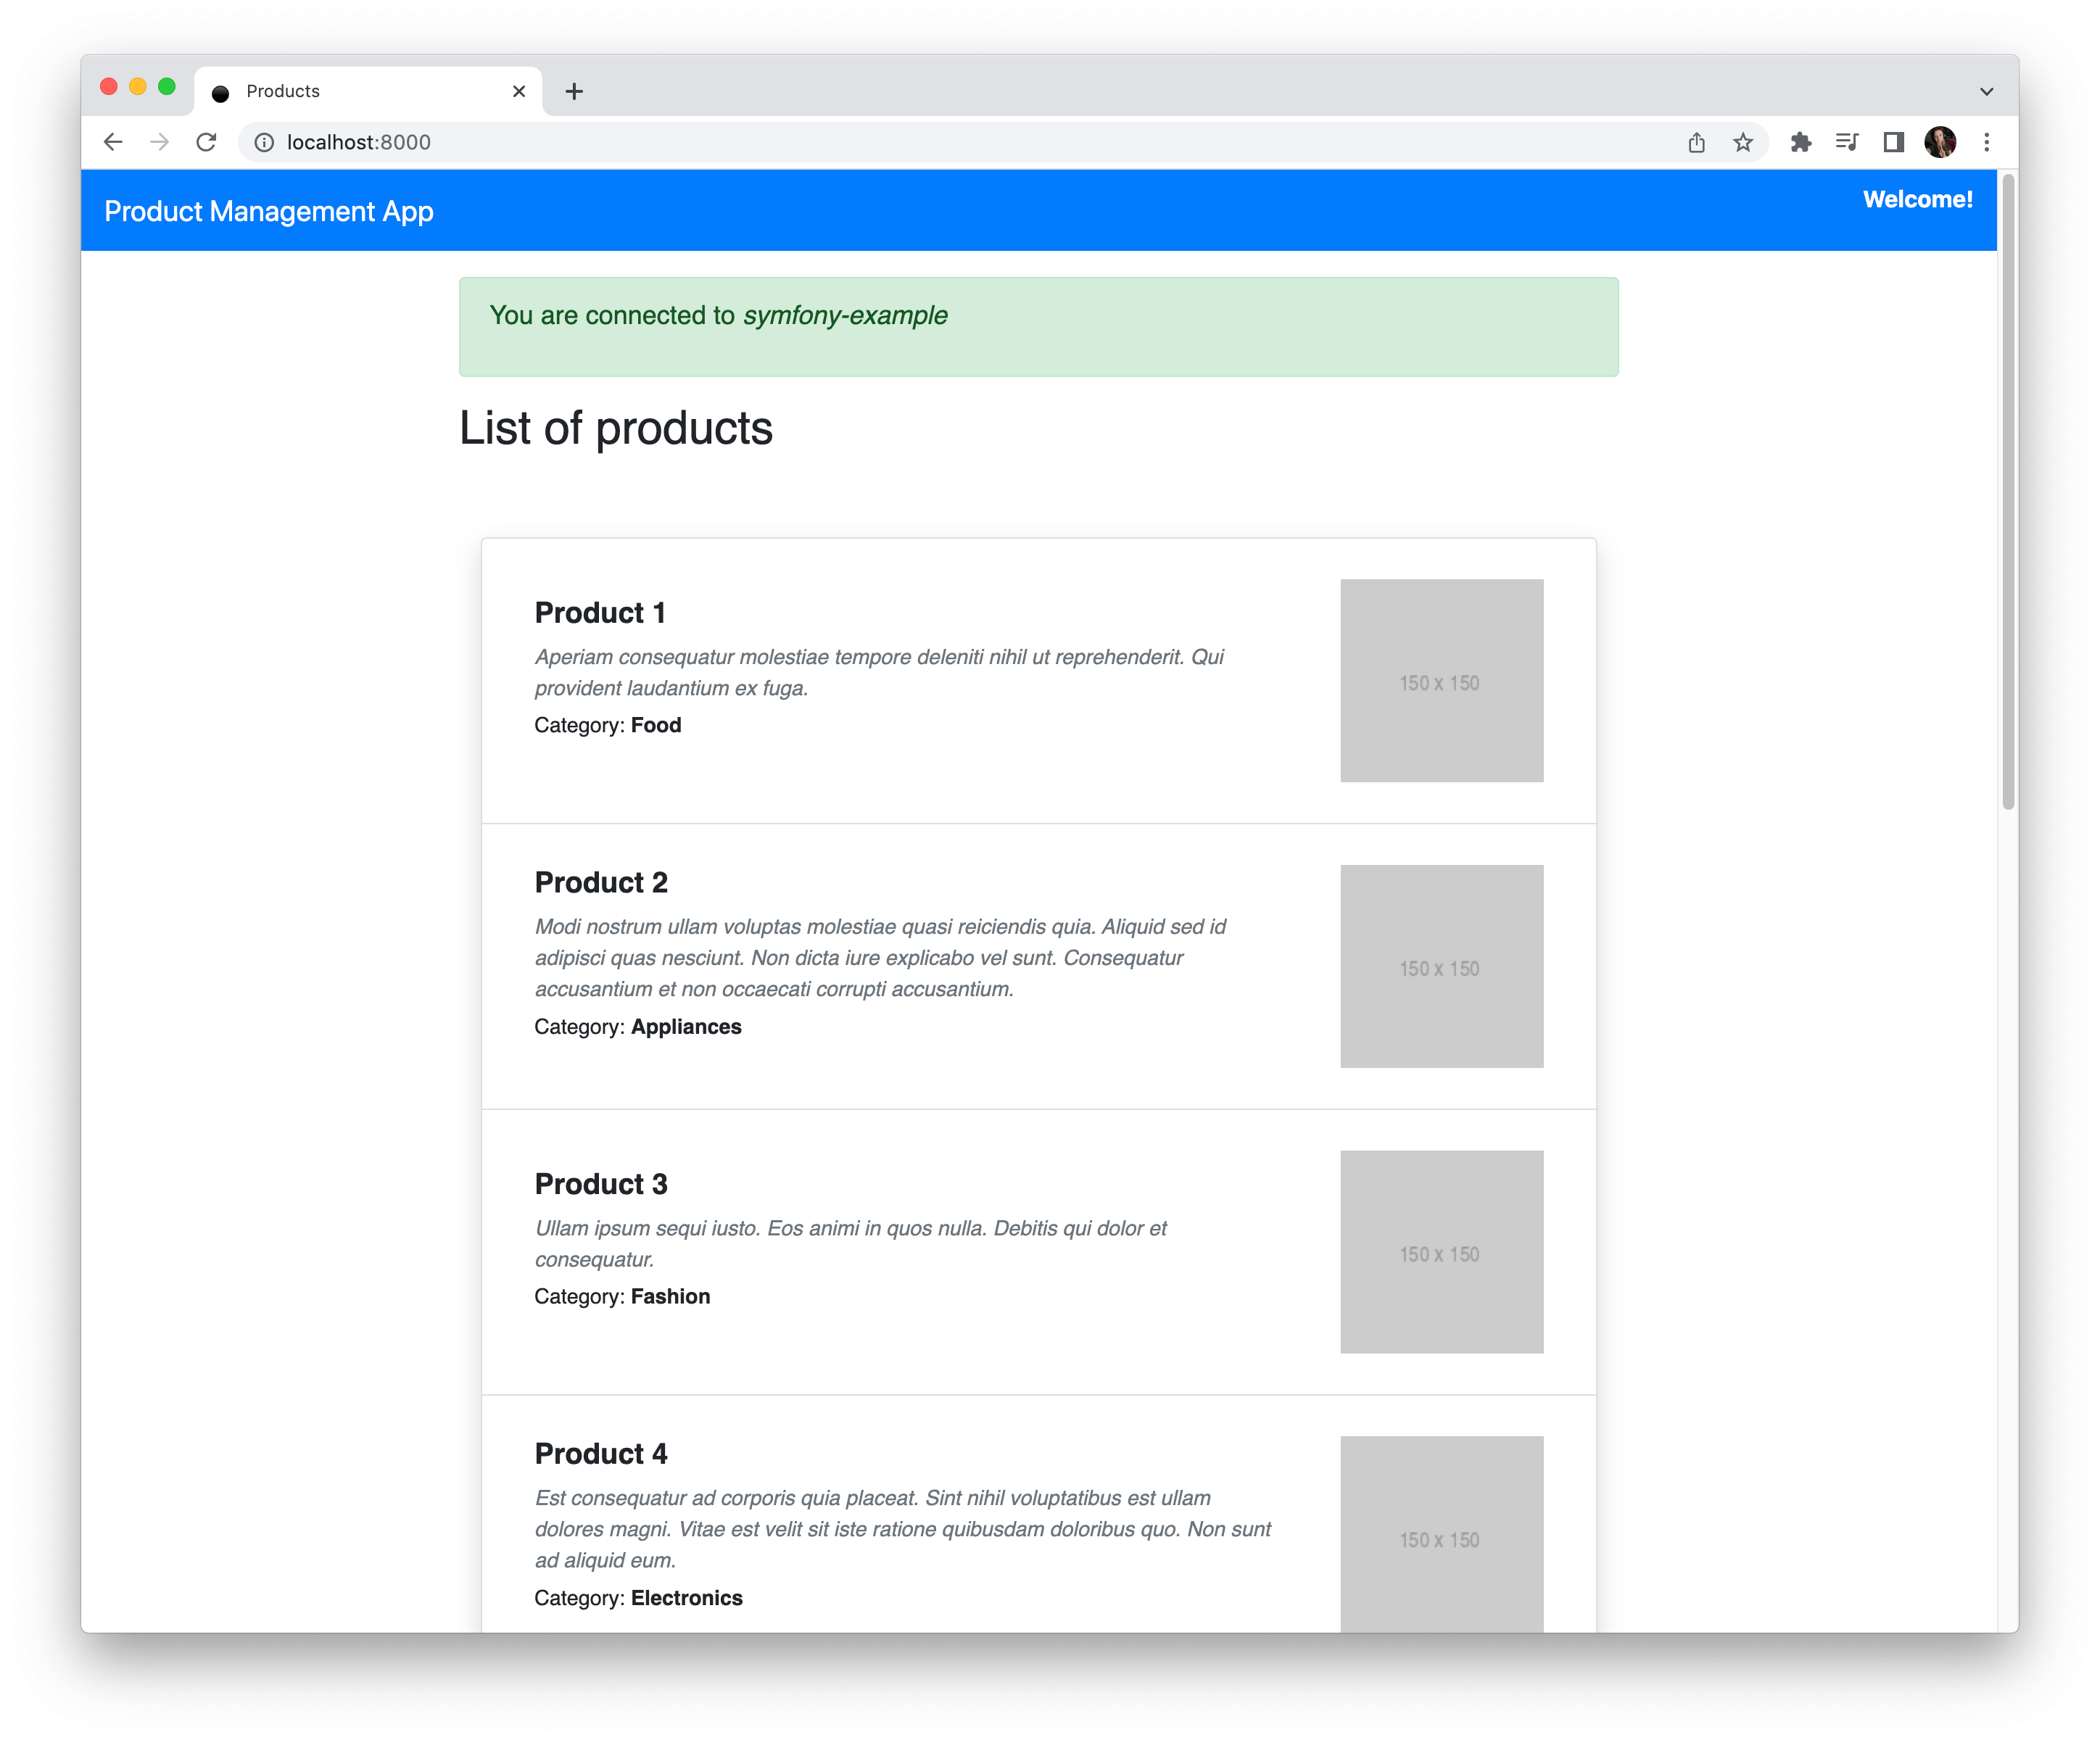 ## Add data manually
If you want to continue to play around with adding data on the fly, you have a few options:
* PlanetScale CLI shell
* PlanetScale dashboard console
* Your favorite MySQL client (for a list of tested MySQL clients, review our article on [how to connect MySQL GUI applications](/docs/vitess/tutorials/connect-mysql-gui))
The first two options are covered below.
### Add data with PlanetScale CLI
You can use the PlanetScale CLI to open a MySQL shell to interact with your database.
You may need to [install the MySQL command line client](/docs/cli/planetscale-environment-setup) if you haven't already.
Run the following command in your terminal:
```bash theme={null}
pscale shell
## Add data manually
If you want to continue to play around with adding data on the fly, you have a few options:
* PlanetScale CLI shell
* PlanetScale dashboard console
* Your favorite MySQL client (for a list of tested MySQL clients, review our article on [how to connect MySQL GUI applications](/docs/vitess/tutorials/connect-mysql-gui))
The first two options are covered below.
### Add data with PlanetScale CLI
You can use the PlanetScale CLI to open a MySQL shell to interact with your database.
You may need to [install the MySQL command line client](/docs/cli/planetscale-environment-setup) if you haven't already.
Run the following command in your terminal:
```bash theme={null}
pscale shell 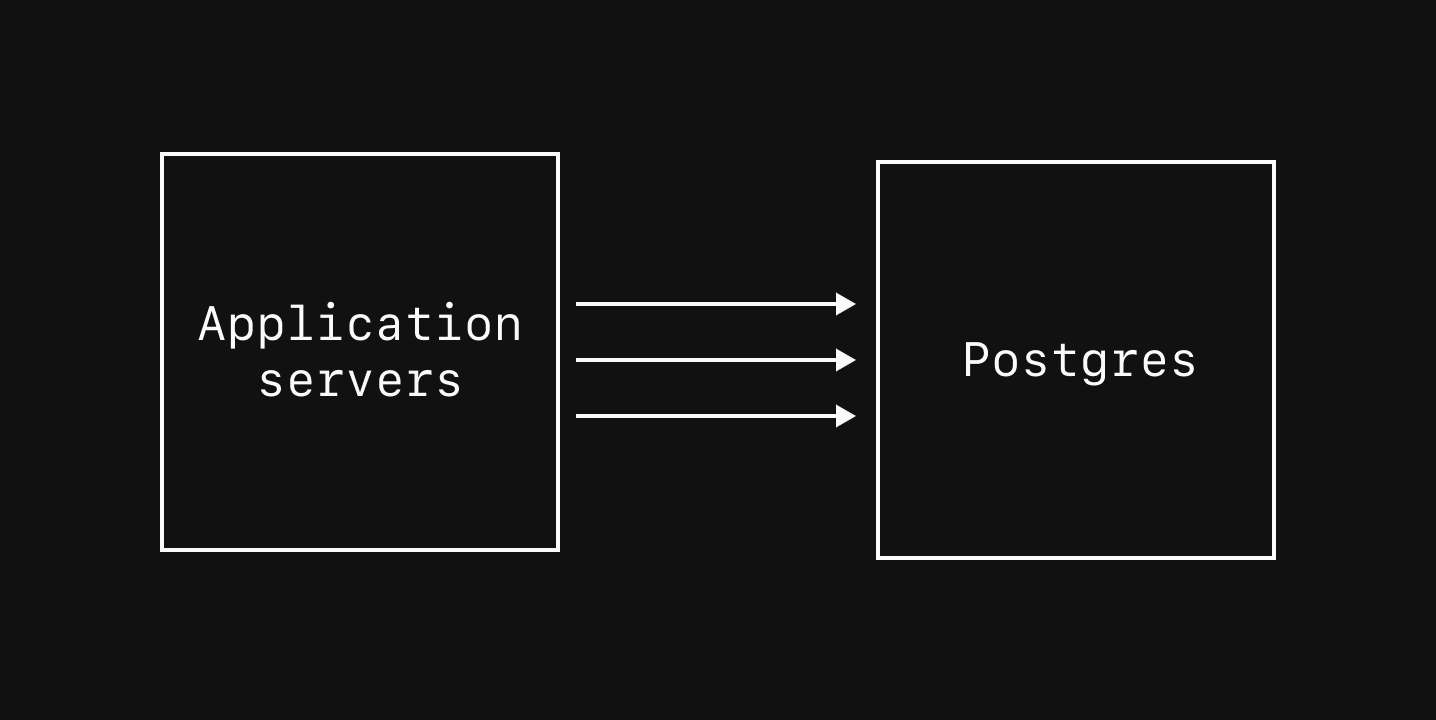 However, these connections are considered *heavy-weight* since each one consumes significant resources. Direct connections are recommended only for specific scenarios:
1. Administrative tasks, like creating new databases/schemas, manual DDL commands, and installing extensions.
2. Long-running operations like `VACUUM`s and large analytical queries that are executed infrequently.
3. Importing data during a migration or other bulk-loading operations.
4. When you need features like `SET`, pub/sub, and other features not provided by PgBouncer pooled connections.
Because having too many direct connections degrades performance, PlanetScale sets `max_connections` to a conservative default value that varies depending on cluster size. To find this value, navigate to the "Clusters" page and select the "Parameters" tab.
However, these connections are considered *heavy-weight* since each one consumes significant resources. Direct connections are recommended only for specific scenarios:
1. Administrative tasks, like creating new databases/schemas, manual DDL commands, and installing extensions.
2. Long-running operations like `VACUUM`s and large analytical queries that are executed infrequently.
3. Importing data during a migration or other bulk-loading operations.
4. When you need features like `SET`, pub/sub, and other features not provided by PgBouncer pooled connections.
Because having too many direct connections degrades performance, PlanetScale sets `max_connections` to a conservative default value that varies depending on cluster size. To find this value, navigate to the "Clusters" page and select the "Parameters" tab.
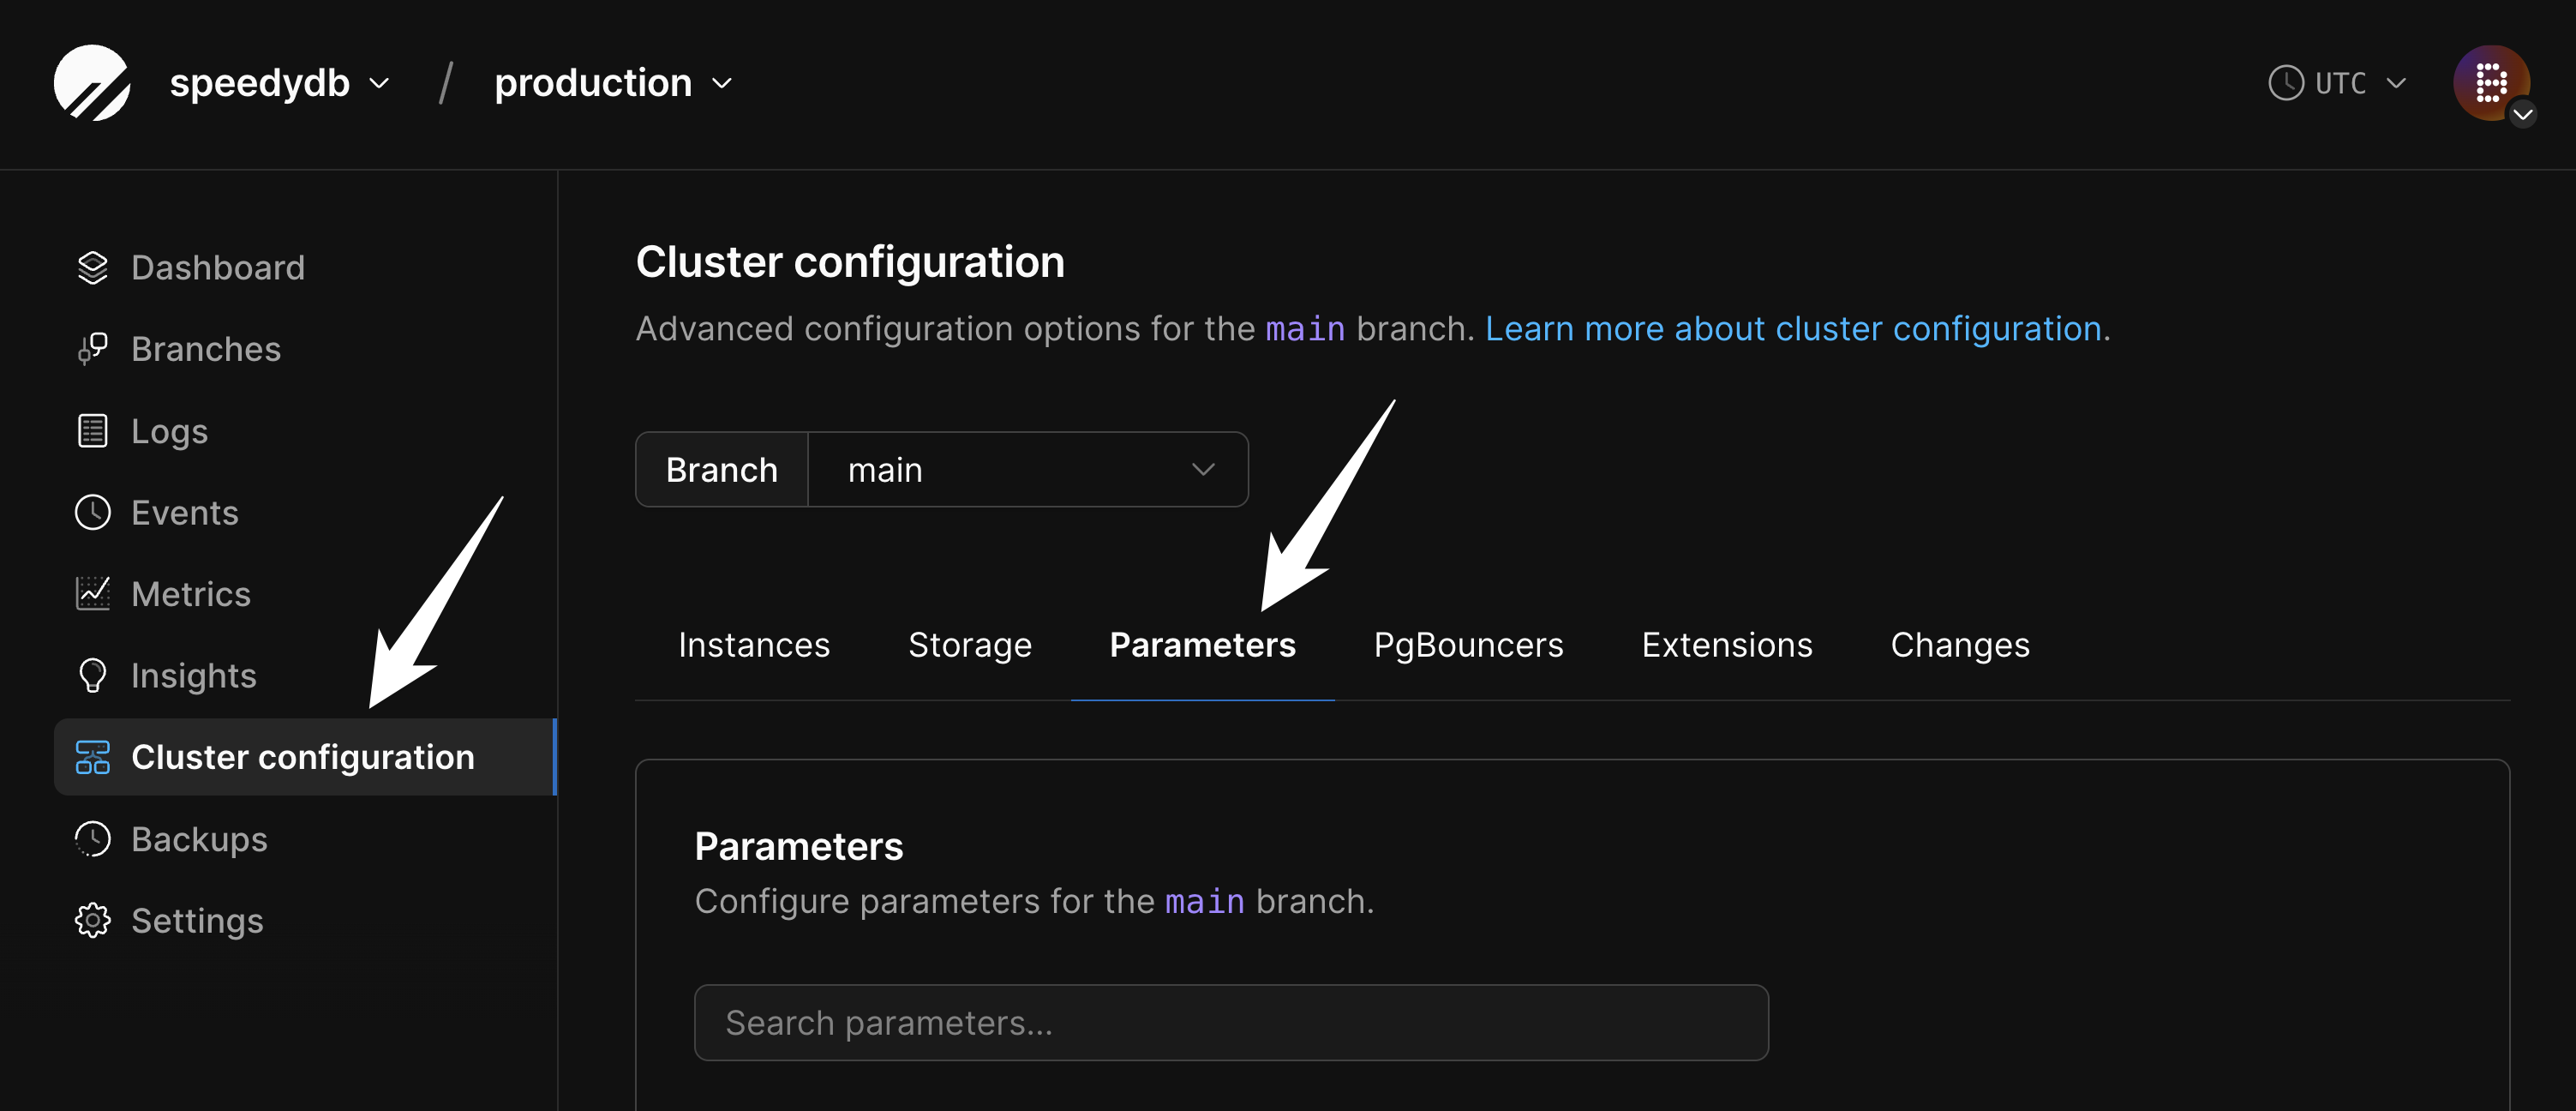 Search for `max_connections` to view the current configured value. This can be increased if necessary, though doing so requires careful consideration as increasing direct connections can negatively impact performance.
When the `max_connections` limit is reached, error messages like the following will appear:
```
FATAL: sorry, too many clients already
```
Or variations such as:
```
FATAL: remaining connection slots are reserved for non-replication superuser connections
```
For application connections outside of the specific use cases listed above, PgBouncer should be used instead.
## Direct replica connections
The main purpose for the default [Replicas](/docs/postgres/scaling/replicas) in a cluster is to maintain [high-availability](/docs/postgres/operations-philosophy), but they can also be used to handle read traffic. Since replicas are read-only, they are only capable of serving `SELECT` queries. All write traffic (`INSERT`, `UPDATE`, etc) must be sent to the primary.
Search for `max_connections` to view the current configured value. This can be increased if necessary, though doing so requires careful consideration as increasing direct connections can negatively impact performance.
When the `max_connections` limit is reached, error messages like the following will appear:
```
FATAL: sorry, too many clients already
```
Or variations such as:
```
FATAL: remaining connection slots are reserved for non-replication superuser connections
```
For application connections outside of the specific use cases listed above, PgBouncer should be used instead.
## Direct replica connections
The main purpose for the default [Replicas](/docs/postgres/scaling/replicas) in a cluster is to maintain [high-availability](/docs/postgres/operations-philosophy), but they can also be used to handle read traffic. Since replicas are read-only, they are only capable of serving `SELECT` queries. All write traffic (`INSERT`, `UPDATE`, etc) must be sent to the primary.
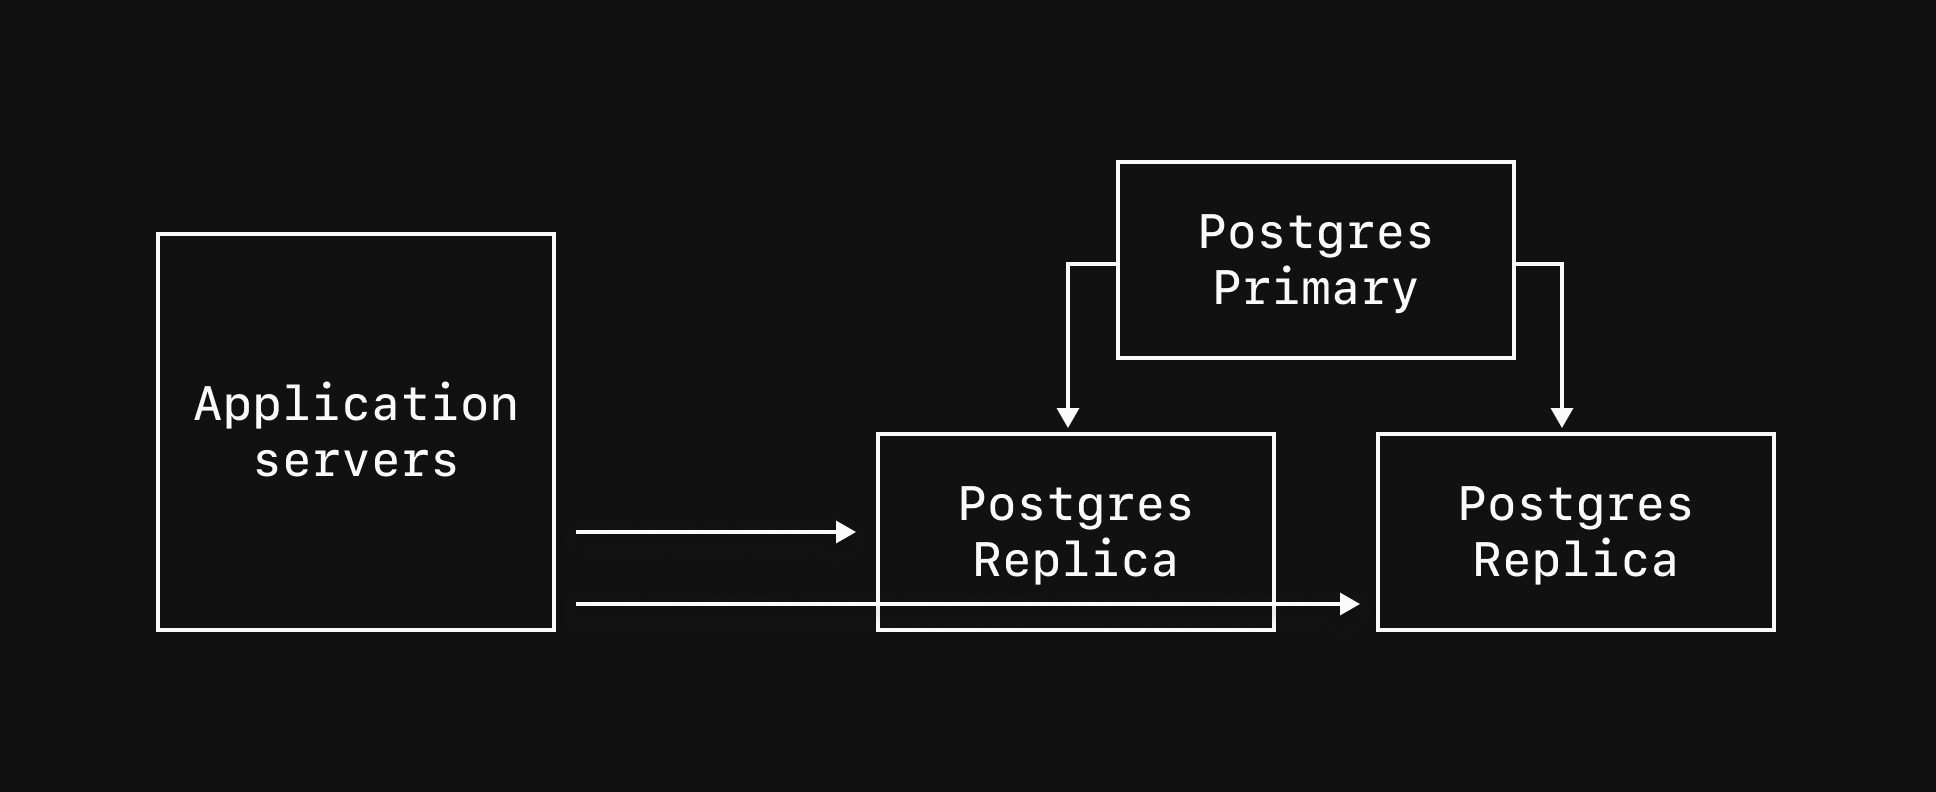 Replicas always experience some level of replication lag — the delay between data arriving at the primary and being replicated to a replica. Frequently, replication lag is measured in milliseconds, but it can grow to multiple seconds, especially when the server is experiencing high write traffic or network issues.
Because of these factors, queries should only be sent to replicas if they meet the following criteria: (A) they are read-only and (B) they can tolerate being slightly out-of-sync with the data on the primary. For reads that cannot tolerate this lag, send them to the primary.
To connect to a replica, append `|replica` to your credential username and use port `5432`. For example:
```bash theme={null}
psql 'host=xxxxxxxxxx-useast1-1.horizon.psdb.cloud \
port=5432 \
user=postgres.xxxxxxxxxx|replica \
password=pscale_pw_xxxxxxxxxxxxxxxxxx \
dbname=my_database \
sslnegotiation=direct \
sslmode=verify-full \
sslrootcert=system'
```
Learn more about replicas and when to use them in the [database replicas documentation](/docs/postgres/scaling/replicas).
## PgBouncer connections
PgBouncer provides connection pooling for your Postgres database, allowing applications to scale beyond the constraints of direct connections. Connections from application servers should be made via PgBouncer whenever possible. PlanetScale provides three types of PgBouncer instances:
### Local PgBouncer
Replicas always experience some level of replication lag — the delay between data arriving at the primary and being replicated to a replica. Frequently, replication lag is measured in milliseconds, but it can grow to multiple seconds, especially when the server is experiencing high write traffic or network issues.
Because of these factors, queries should only be sent to replicas if they meet the following criteria: (A) they are read-only and (B) they can tolerate being slightly out-of-sync with the data on the primary. For reads that cannot tolerate this lag, send them to the primary.
To connect to a replica, append `|replica` to your credential username and use port `5432`. For example:
```bash theme={null}
psql 'host=xxxxxxxxxx-useast1-1.horizon.psdb.cloud \
port=5432 \
user=postgres.xxxxxxxxxx|replica \
password=pscale_pw_xxxxxxxxxxxxxxxxxx \
dbname=my_database \
sslnegotiation=direct \
sslmode=verify-full \
sslrootcert=system'
```
Learn more about replicas and when to use them in the [database replicas documentation](/docs/postgres/scaling/replicas).
## PgBouncer connections
PgBouncer provides connection pooling for your Postgres database, allowing applications to scale beyond the constraints of direct connections. Connections from application servers should be made via PgBouncer whenever possible. PlanetScale provides three types of PgBouncer instances:
### Local PgBouncer
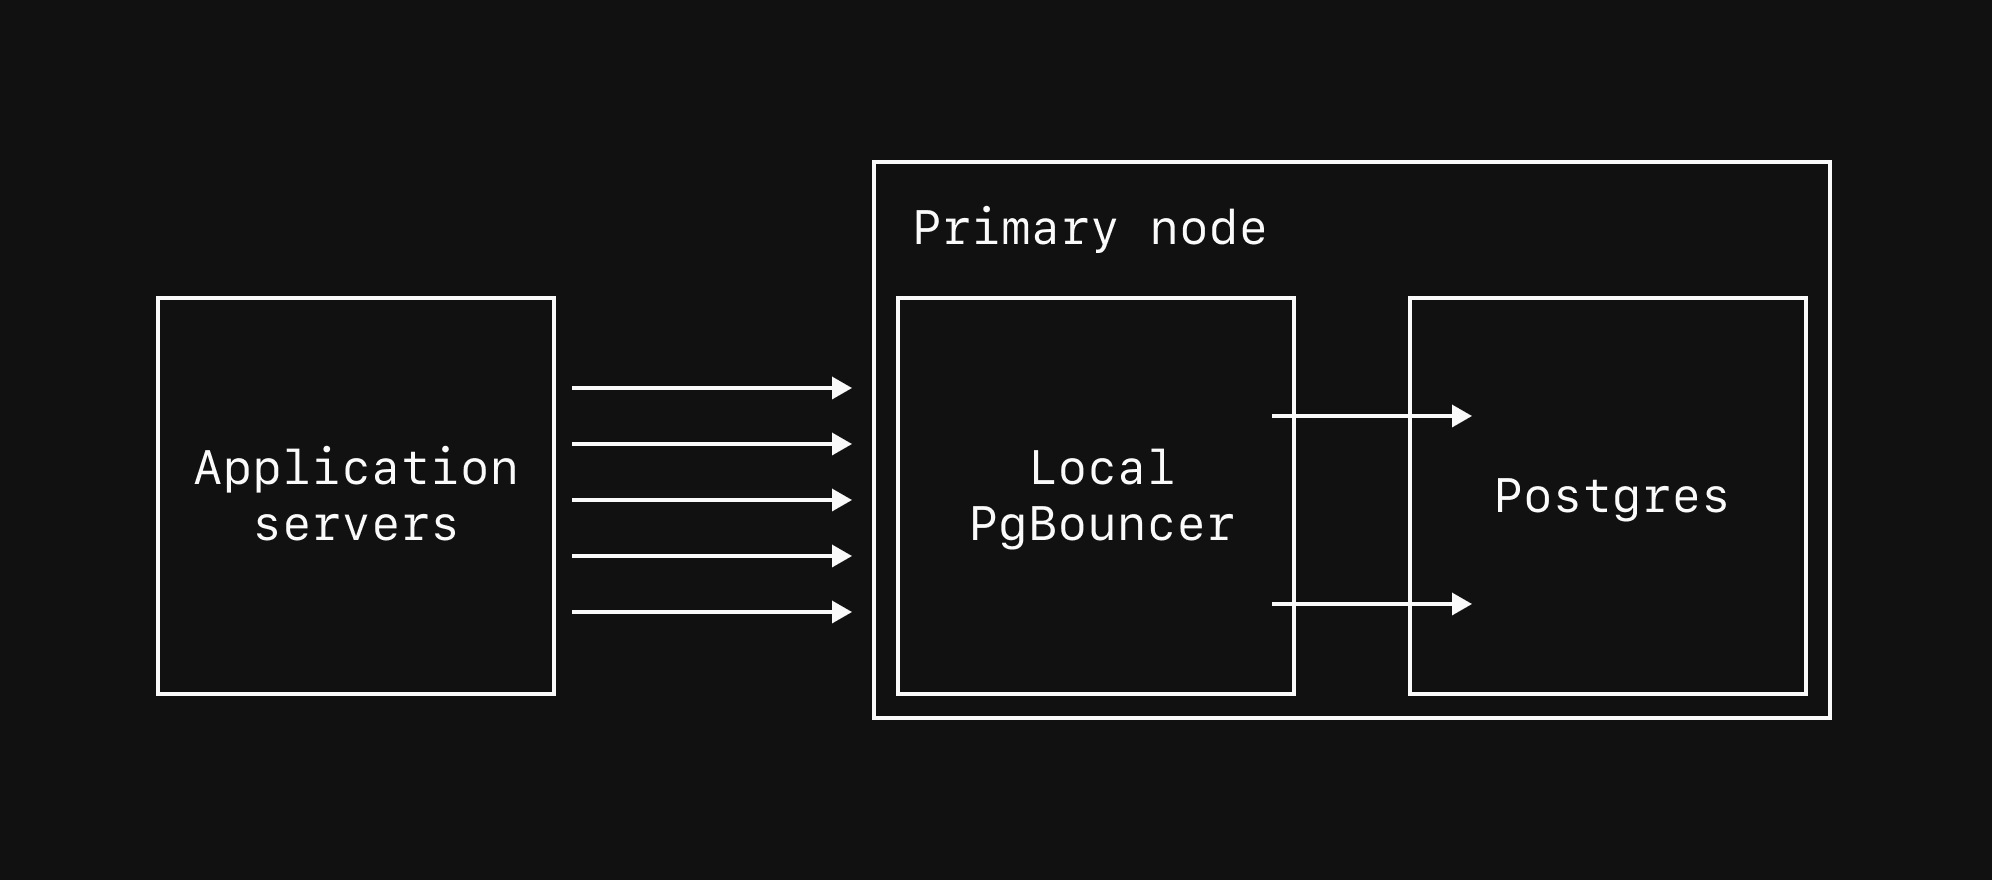 All PlanetScale Postgres databases include a local PgBouncer instance running on the same host node as the Postgres primary. This is recommended for all application connections to the primary. To connect via the local PgBouncer, use the same credentials as a direct connection but change the port from `5432` to `6432`.
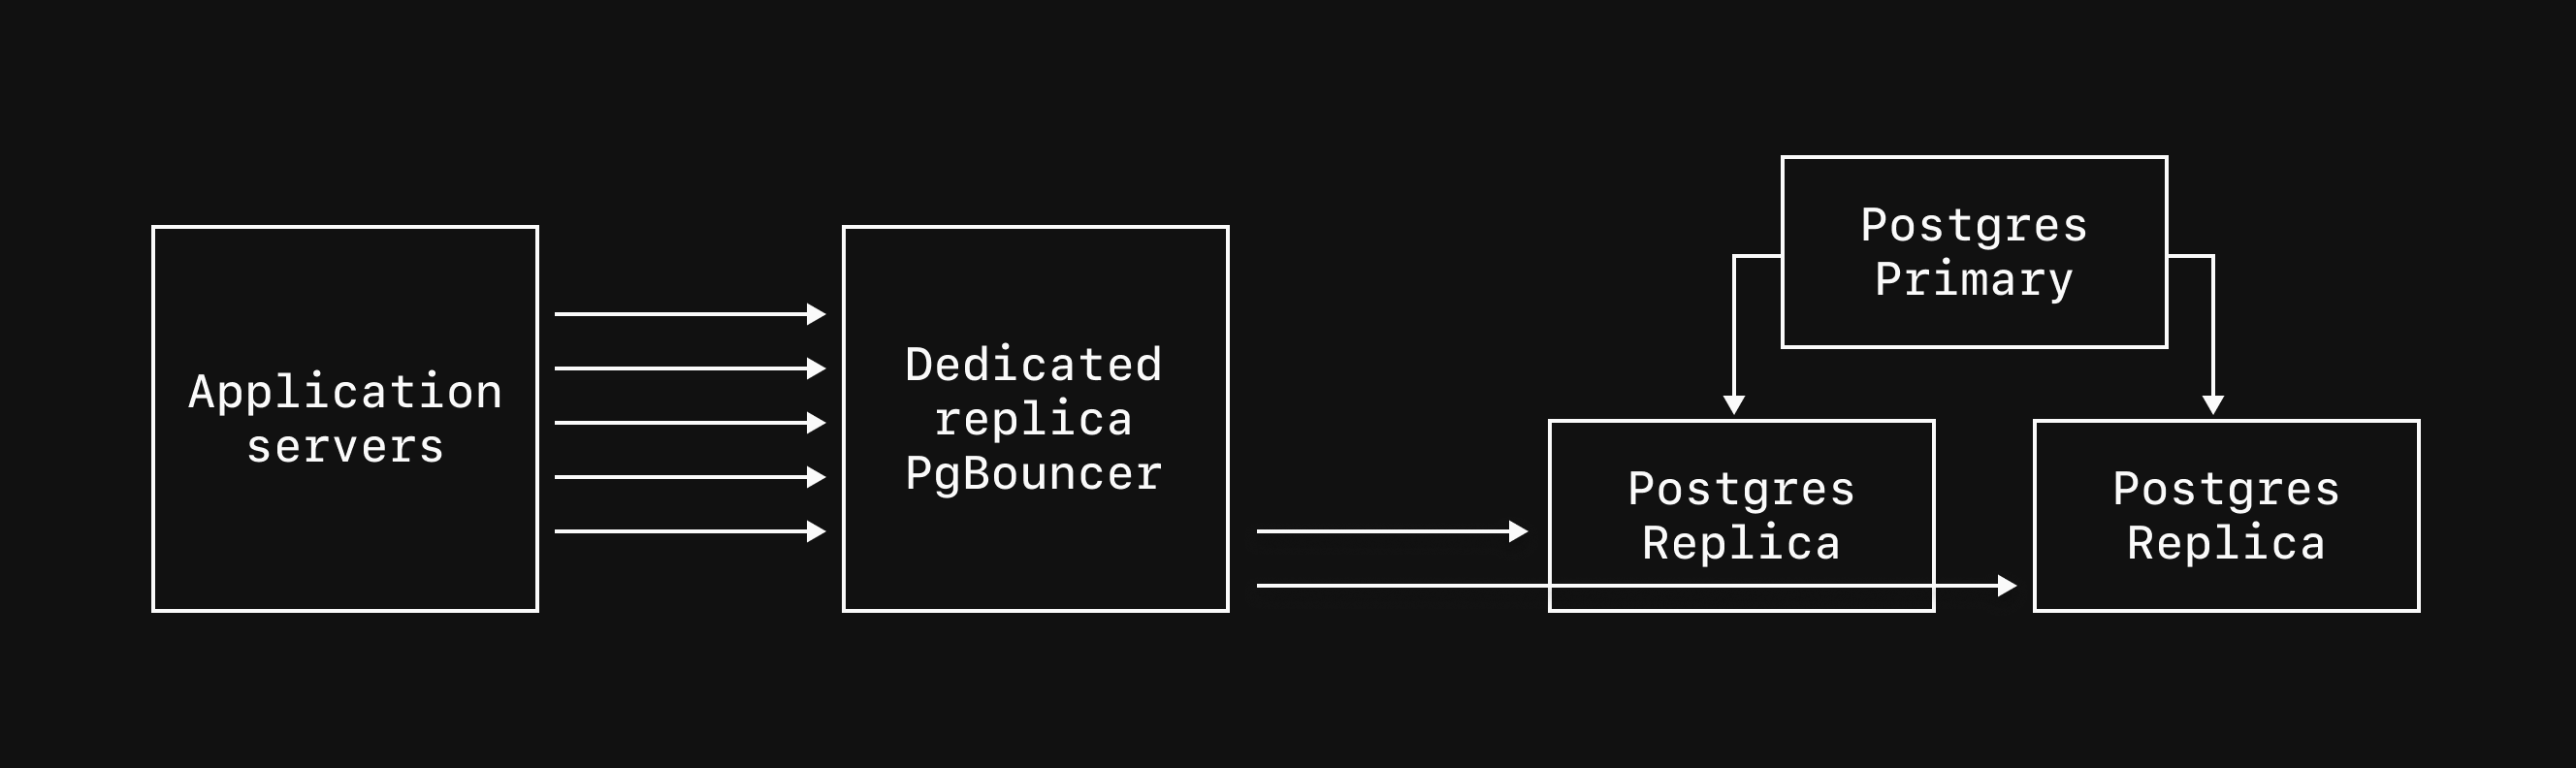 [Dedicated replica PgBouncers](/docs/postgres/connecting/pgbouncer#dedicated-replica-pgbouncers) run on nodes separate from the Postgres instances and pool connections to your replicas. These are useful for read-heavy workloads that send significant read traffic to replicas.
### Dedicated primary PgBouncers
[Dedicated replica PgBouncers](/docs/postgres/connecting/pgbouncer#dedicated-replica-pgbouncers) run on nodes separate from the Postgres instances and pool connections to your replicas. These are useful for read-heavy workloads that send significant read traffic to replicas.
### Dedicated primary PgBouncers
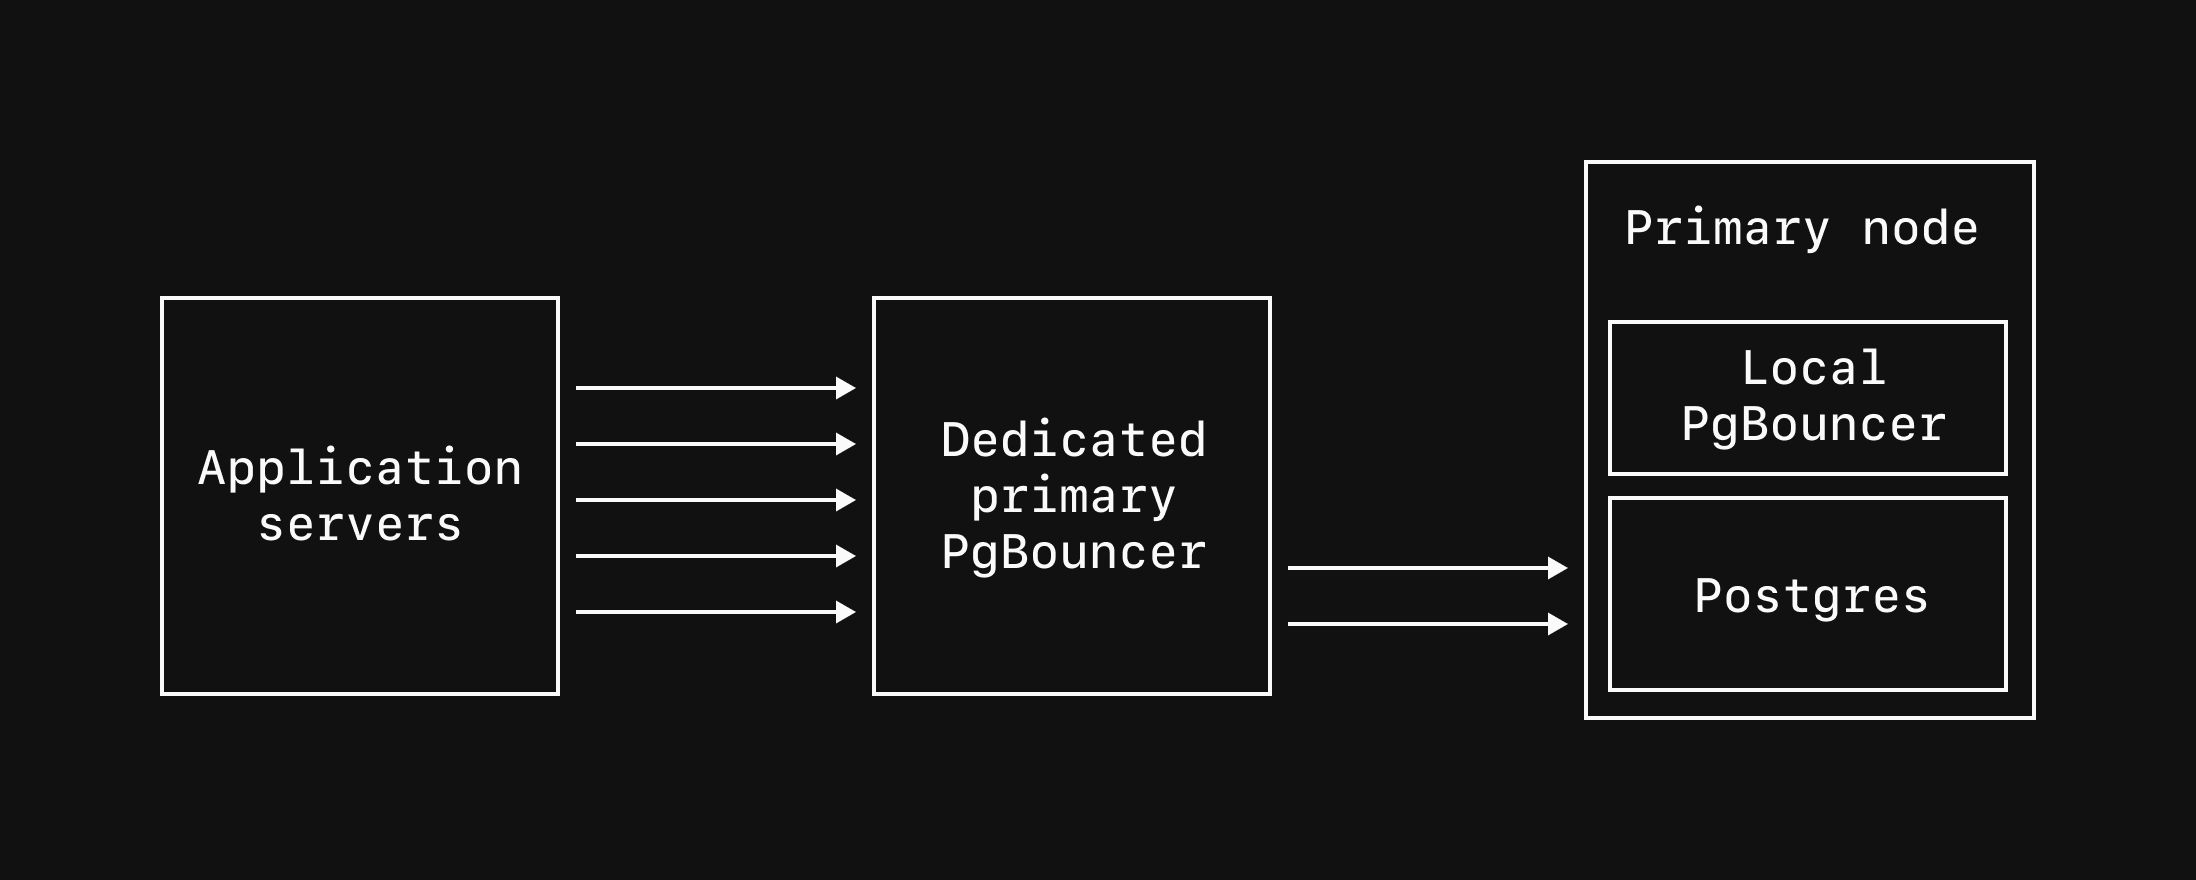 [Dedicated primary PgBouncers](/docs/postgres/connecting/pgbouncer#dedicated-primary-pgbouncers) provide connection pooling for your primary database on nodes separate from the Postgres servers. Connections through dedicated PgBouncers persist through cluster resizes, upgrades, and most failover scenarios, providing improved high availability.
## Connecting to dedicated PgBouncers
Connect to replica or primary PgBouncers via port `6432` and append the name of the PgBouncer to your username. For example, if your PgBouncer is named `read-bouncer`, the connection username should be `postgres.xxxxxxxxxx|read-bouncer`.
```bash theme={null}
psql 'host=xxxxxxxxxx-useast1-1.horizon.psdb.cloud \
port=6432 \
user=postgres.xxxxxxxxxx|read-bouncer \
password=pscale_pw_xxxxxxxxxxxxxxxxxx \
dbname=my_database \
sslnegotiation=direct \
sslmode=verify-full \
sslrootcert=system'
```
Learn more about [creating, configuring, and connecting to PgBouncers](/docs/postgres/connecting/pgbouncer).
---
> To find navigation and other pages in this documentation, fetch the llms.txt file at: https://planetscale.com/llms.txt
---
# Source: https://planetscale.com/docs/vitess/security/connection-strings.md
# Source: https://planetscale.com/docs/vitess/connecting/connection-strings.md
# Connection strings
## Creating a password
[Dedicated primary PgBouncers](/docs/postgres/connecting/pgbouncer#dedicated-primary-pgbouncers) provide connection pooling for your primary database on nodes separate from the Postgres servers. Connections through dedicated PgBouncers persist through cluster resizes, upgrades, and most failover scenarios, providing improved high availability.
## Connecting to dedicated PgBouncers
Connect to replica or primary PgBouncers via port `6432` and append the name of the PgBouncer to your username. For example, if your PgBouncer is named `read-bouncer`, the connection username should be `postgres.xxxxxxxxxx|read-bouncer`.
```bash theme={null}
psql 'host=xxxxxxxxxx-useast1-1.horizon.psdb.cloud \
port=6432 \
user=postgres.xxxxxxxxxx|read-bouncer \
password=pscale_pw_xxxxxxxxxxxxxxxxxx \
dbname=my_database \
sslnegotiation=direct \
sslmode=verify-full \
sslrootcert=system'
```
Learn more about [creating, configuring, and connecting to PgBouncers](/docs/postgres/connecting/pgbouncer).
---
> To find navigation and other pages in this documentation, fetch the llms.txt file at: https://planetscale.com/llms.txt
---
# Source: https://planetscale.com/docs/vitess/security/connection-strings.md
# Source: https://planetscale.com/docs/vitess/connecting/connection-strings.md
# Connection strings
## Creating a password
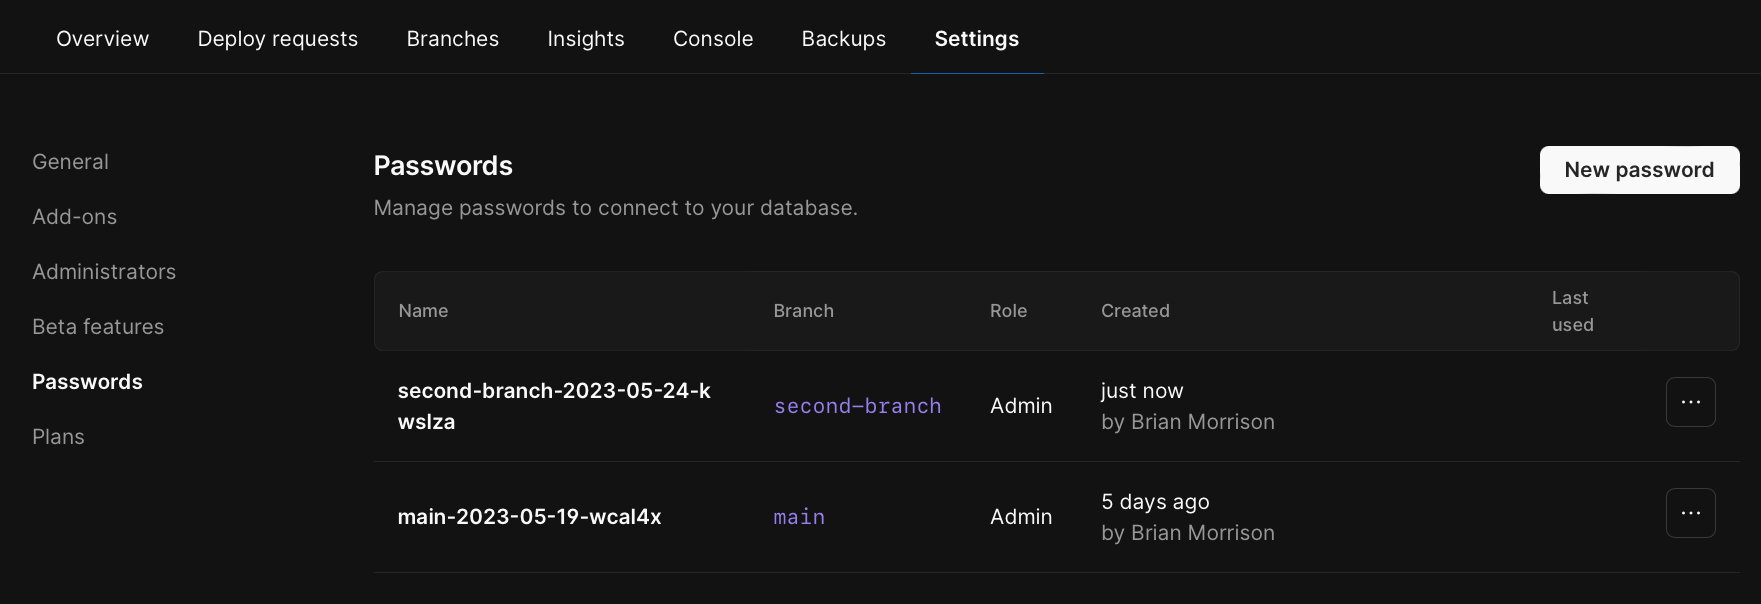 Clicking on the `...` icon on the row for your password allows you rename or delete the password.
## Renaming a password
Since the **username & password** pair is unique, the only metadata you can edit is the `display name` of the password.
## Deleting a password
Deleting a password will invalidate the username & password pair and **disconnect any active clients using this password**.
Clicking on the `...` icon on the row for your password allows you rename or delete the password.
## Renaming a password
Since the **username & password** pair is unique, the only metadata you can edit is the `display name` of the password.
## Deleting a password
Deleting a password will invalidate the username & password pair and **disconnect any active clients using this password**.
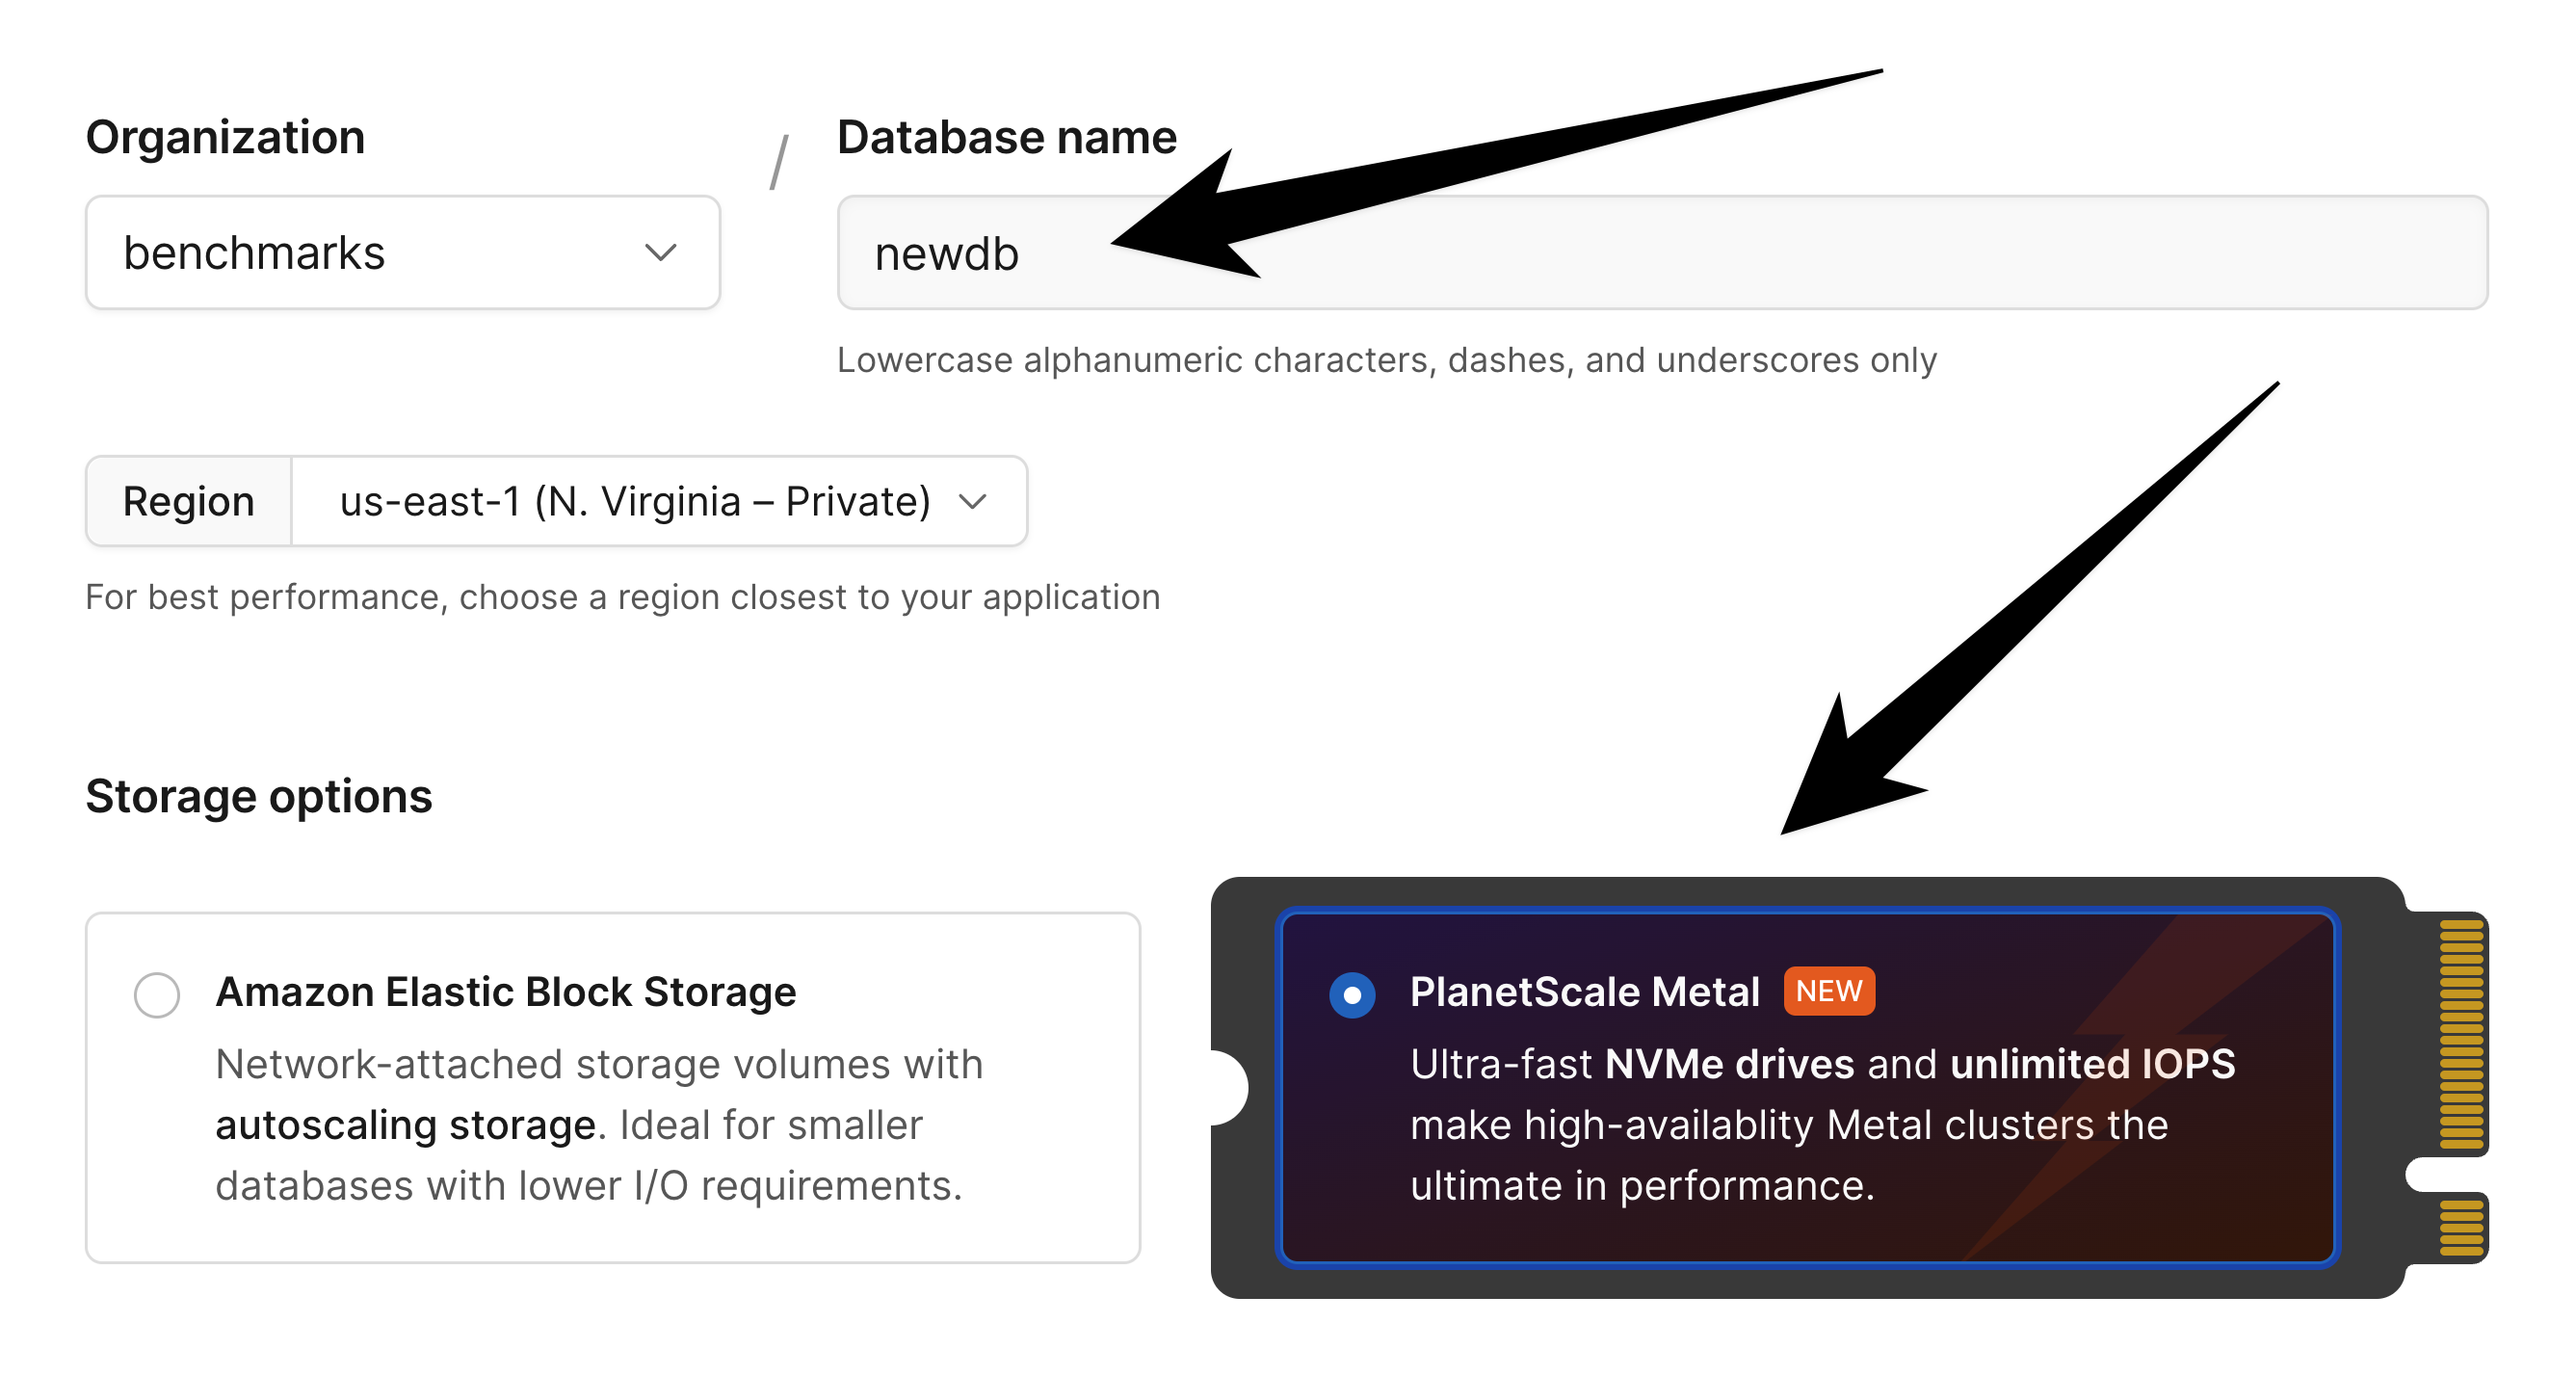
 This brings up a set of options to choose from for the size of your Metal database.
Start by choosing the vCPU and RAM combination that best suits your needs, then use the dropdown to select the drive size for the instance.
This brings up a set of options to choose from for the size of your Metal database.
Start by choosing the vCPU and RAM combination that best suits your needs, then use the dropdown to select the drive size for the instance.
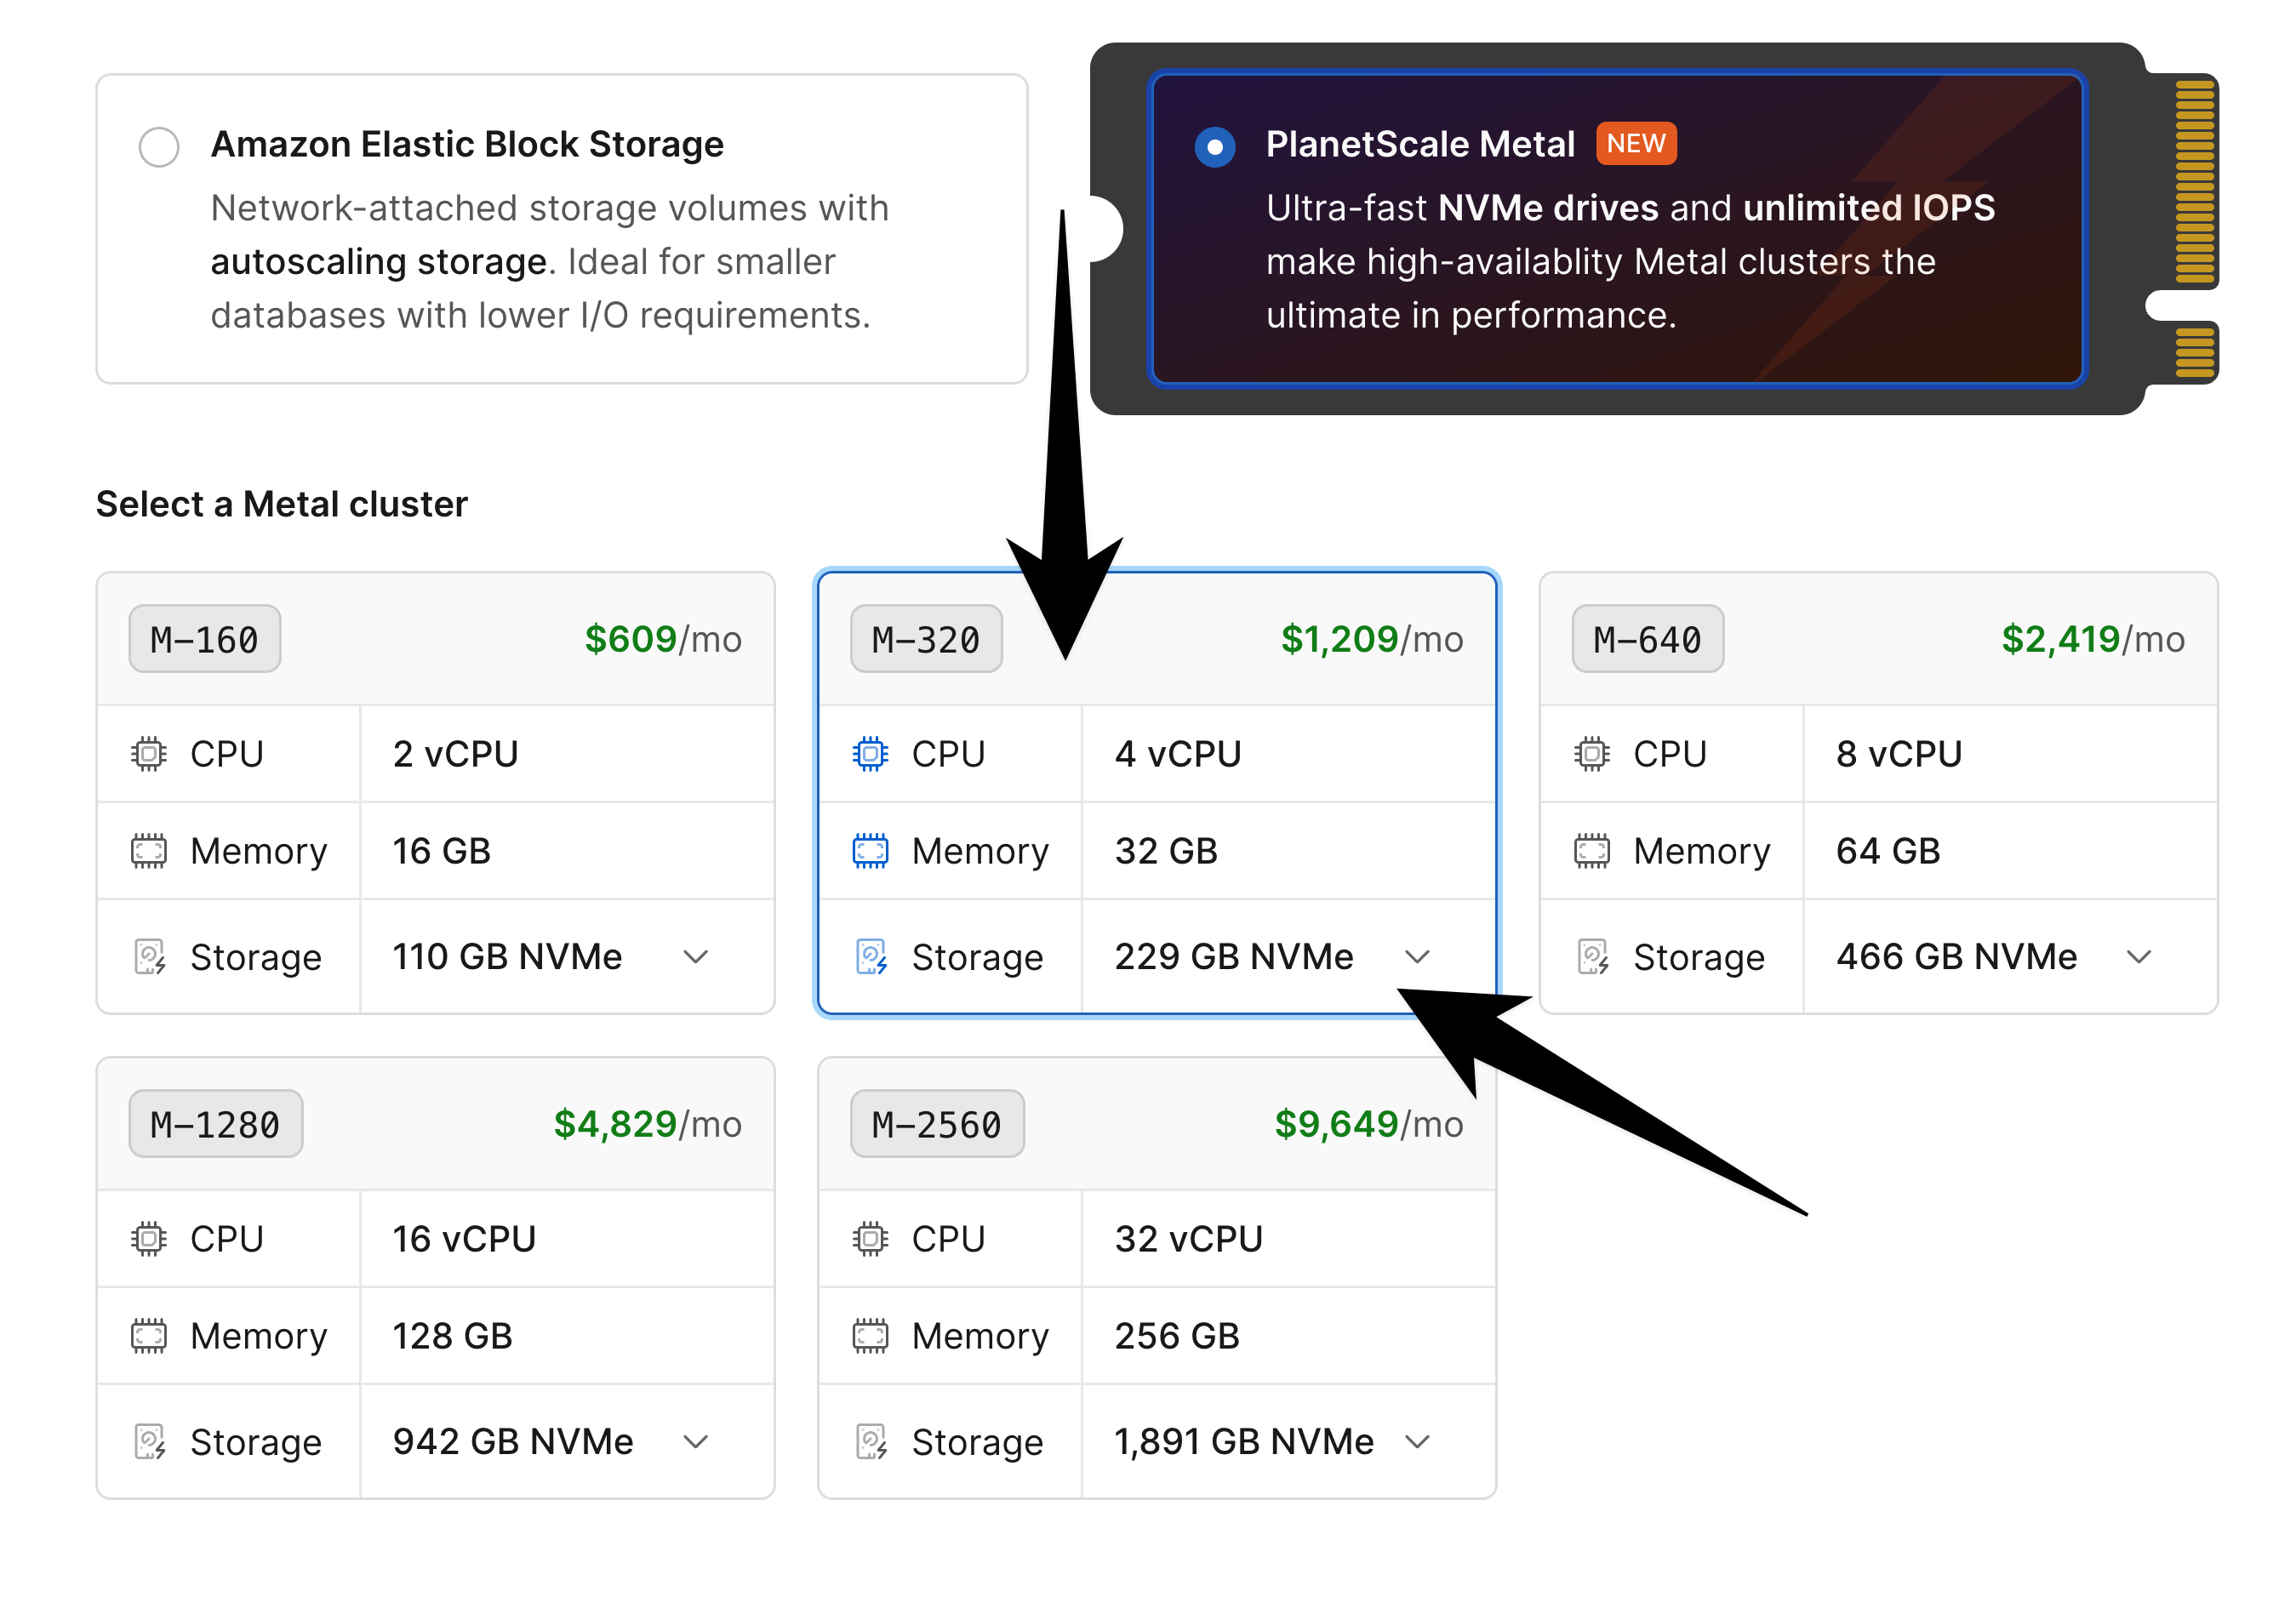
 As opposed to [network-attached storage](/docs/plans/planetscale-skus#network-attached-storage) databases, [Metal](/docs/plans/planetscale-skus#metal) databases do not autoscale their storage size.
Therefore, it's important to make a good size choice from the start.
If you are starting a new project from scratch on a Metal database and you do not expect massive initial growth, it is likely best to choose the smallest drive possible.
If you intend to migrate an existing database into this in the near future, ensure that your drive will fit all of the data while also allowing room for further growth.
When ready, click "Create database."
After database initialization completes, you can begin using the database.
## Upgrading an existing database to Metal
You can also upgrade an existing keyspace in your database to Metal.
This is a no-downtime operation.
To do this, select your database, and then click on the "**Clusters**" in the navigation pane on the left side of the dashboard.
From here, you should choose the keyspace that you want to upgrade.
Click on the cluster size drop-down and scroll down to the Metal instance types.
As opposed to [network-attached storage](/docs/plans/planetscale-skus#network-attached-storage) databases, [Metal](/docs/plans/planetscale-skus#metal) databases do not autoscale their storage size.
Therefore, it's important to make a good size choice from the start.
If you are starting a new project from scratch on a Metal database and you do not expect massive initial growth, it is likely best to choose the smallest drive possible.
If you intend to migrate an existing database into this in the near future, ensure that your drive will fit all of the data while also allowing room for further growth.
When ready, click "Create database."
After database initialization completes, you can begin using the database.
## Upgrading an existing database to Metal
You can also upgrade an existing keyspace in your database to Metal.
This is a no-downtime operation.
To do this, select your database, and then click on the "**Clusters**" in the navigation pane on the left side of the dashboard.
From here, you should choose the keyspace that you want to upgrade.
Click on the cluster size drop-down and scroll down to the Metal instance types.
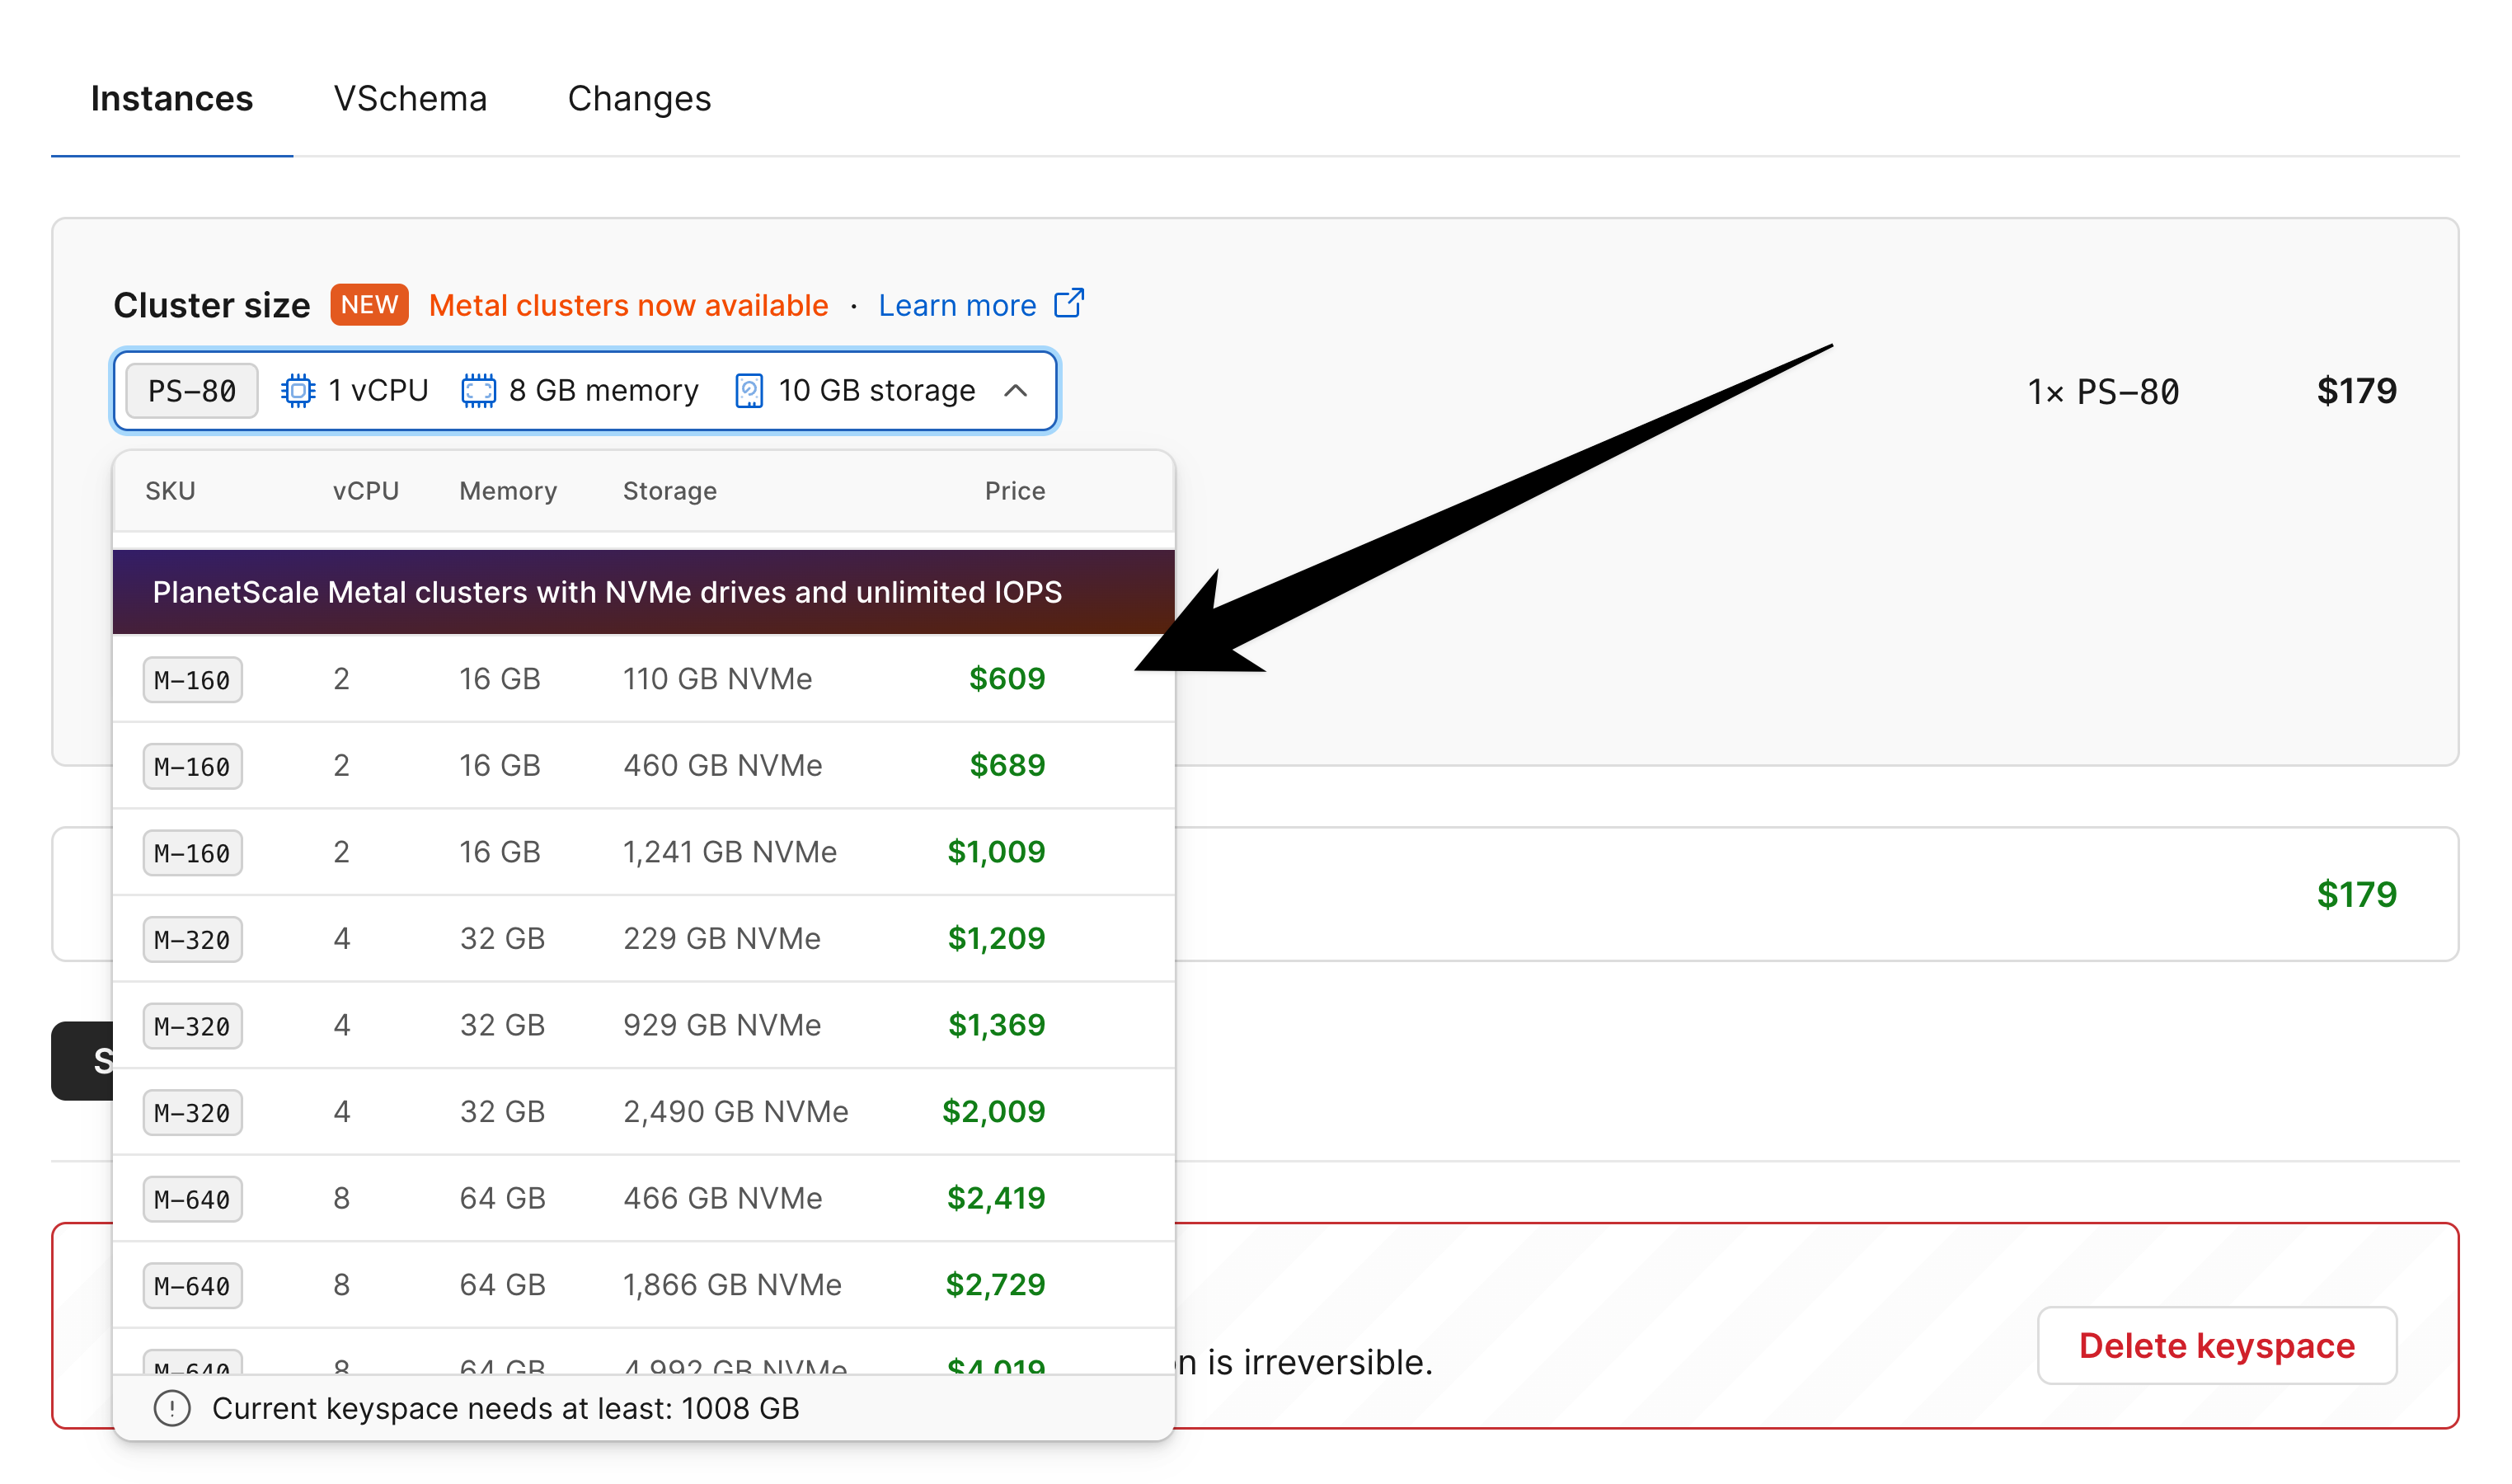
 Select the desired compute and storage combination, and then click "Save changes."
Keep in mind that this is not an immediate operation.
If you have a large database, it may take a while for the upgrade to complete since behind the scenes, your entire database needs to be migrated to the new NVMe drives.
Ensure that you upgrade well before reaching max drive capacity.
We recommend upgrading at no later than 75% in most cases, and even earlier than that if you are growing quickly.
## Monitoring Metal storage
Select the desired compute and storage combination, and then click "Save changes."
Keep in mind that this is not an immediate operation.
If you have a large database, it may take a while for the upgrade to complete since behind the scenes, your entire database needs to be migrated to the new NVMe drives.
Ensure that you upgrade well before reaching max drive capacity.
We recommend upgrading at no later than 75% in most cases, and even earlier than that if you are growing quickly.
## Monitoring Metal storage

 You should make a habit of regularly logging in and checking the health of your database, keep an eye on this number.
If PlanetScale detects that you have only 6GiB or less of available storage, it will cause your database to reject writes, preferring to keep the database available rather than cause a total system failure due to running out of storage.
This is a safety measure put in place to protect your data.
You should upgrade to a larger instance long before reaching this point.
You can upgrade to a larger Metal instance / drive using the same set of steps described above.
Additionally, operations such as deploy requests may not run if you do not have enough storage.
The exception to this is if you are performing an [instant deployment](/docs/vitess/schema-changes/deploy-requests#instant-deployments).
Deploying online schema changes with VReplication requires that we [make a copy of the affected tables](/docs/vitess/schema-changes/how-online-schema-change-tools-work#initializing-the-ghost-table-schema).
If you are nearing max capacity or making a change on a very large table, you risk not having enough storage to begin the online schema change.
We will let you know that there is not enough space to create a deploy request in these cases.
It is critical to upgrade your instance storage size well before you are nearing max capacity.
We will sent you email notices when your database storage reaches the following thresholds: 60%, 75%, 85%, 90%, 95%.
We will also email you when we estimate that your storage will run out in 1 week and 24 hours, based on recent usage trends.
The exact point at which you should upgrade depends on your data growth rate, drive size, and other factors.
We recommend upgrading no later than at 75% capacity, and even before that in some cases of fast growth.
Upgrading to a larger drive takes time, as it requires copying your database to new drives, so it's important to upgrade well before hitting max capacity.
## Need help?
Get help from [the PlanetScale Support team](https://support.planetscale.com/), or join our [GitHub discussion board](https://github.com/planetscale/discussion/discussions) to see how others are using PlanetScale.
---
> To find navigation and other pages in this documentation, fetch the llms.txt file at: https://planetscale.com/llms.txt
---
# Source: https://planetscale.com/docs/api/reference/create_backup.md
# Create a backup
>
### Authorization
A service token or OAuth token must have at least one of the following access or scopes in order to use this API endpoint:
**Service Token Accesses**
`write_backups`
**OAuth Scopes**
| Resource | Scopes |
| :------- | :---------- |
| Organization | `write_backups` |
| Database | `write_backups` |
| Branch | `write_backups` |
## OpenAPI
````yaml post /organizations/{organization}/databases/{database}/branches/{branch}/backups
openapi: 3.0.1
info:
title: PlanetScale API
description: |-
You should make a habit of regularly logging in and checking the health of your database, keep an eye on this number.
If PlanetScale detects that you have only 6GiB or less of available storage, it will cause your database to reject writes, preferring to keep the database available rather than cause a total system failure due to running out of storage.
This is a safety measure put in place to protect your data.
You should upgrade to a larger instance long before reaching this point.
You can upgrade to a larger Metal instance / drive using the same set of steps described above.
Additionally, operations such as deploy requests may not run if you do not have enough storage.
The exception to this is if you are performing an [instant deployment](/docs/vitess/schema-changes/deploy-requests#instant-deployments).
Deploying online schema changes with VReplication requires that we [make a copy of the affected tables](/docs/vitess/schema-changes/how-online-schema-change-tools-work#initializing-the-ghost-table-schema).
If you are nearing max capacity or making a change on a very large table, you risk not having enough storage to begin the online schema change.
We will let you know that there is not enough space to create a deploy request in these cases.
It is critical to upgrade your instance storage size well before you are nearing max capacity.
We will sent you email notices when your database storage reaches the following thresholds: 60%, 75%, 85%, 90%, 95%.
We will also email you when we estimate that your storage will run out in 1 week and 24 hours, based on recent usage trends.
The exact point at which you should upgrade depends on your data growth rate, drive size, and other factors.
We recommend upgrading no later than at 75% capacity, and even before that in some cases of fast growth.
Upgrading to a larger drive takes time, as it requires copying your database to new drives, so it's important to upgrade well before hitting max capacity.
## Need help?
Get help from [the PlanetScale Support team](https://support.planetscale.com/), or join our [GitHub discussion board](https://github.com/planetscale/discussion/discussions) to see how others are using PlanetScale.
---
> To find navigation and other pages in this documentation, fetch the llms.txt file at: https://planetscale.com/llms.txt
---
# Source: https://planetscale.com/docs/api/reference/create_backup.md
# Create a backup
>
### Authorization
A service token or OAuth token must have at least one of the following access or scopes in order to use this API endpoint:
**Service Token Accesses**
`write_backups`
**OAuth Scopes**
| Resource | Scopes |
| :------- | :---------- |
| Organization | `write_backups` |
| Database | `write_backups` |
| Branch | `write_backups` |
## OpenAPI
````yaml post /organizations/{organization}/databases/{database}/branches/{branch}/backups
openapi: 3.0.1
info:
title: PlanetScale API
description: |-
PlanetScale API
© 2025 PlanetScale, Inc. version: v1 x-copyright: '© 2025 PlanetScale, Inc.' servers: - url: https://api.planetscale.com/v1 security: - ApiKeyHeader: - Authorization tags: - name: Backups description: |2 Resources for managing database branch backups. - name: Branch changes description: |2 Resources for managing cluster changes. - name: Cluster extensions description: |2 Resources for managing cluster extension configuration. - name: Branch log signatures description: |2 Resources for retrieving branch log access signatures. - name: Cluster parameters description: |2 Resources for managing cluster configuration parameters. - name: Database branch keyspaces description: |2 Resources for managing keyspaces. - name: Database branch passwords description: |2 Resources for managing database branch passwords. - name: Database Postgres IP restrictions description: |2 Resources for managing Postgres IP restriction entries for databases. Note: This endpoint is only available for PostgreSQL databases. For MySQL databases, use the Database Branch Passwords endpoint. - name: Databases description: |2 Resources for managing databases within an organization. - name: Keyspace VSchemas description: |2 Resources for managing VSchemas within a keyspace. - name: OAuth applications description: |2 Resources for managing OAuth applications. - name: OAuth tokens description: |2 Resources for managing OAuth tokens. - name: Organization members description: |2 Resources for managing organization members and their roles. - name: Organizations description: |2 Resources for managing organizations. - name: Bouncer resizes description: |2 Resources for managing Postgres bouncer resize requests. - name: Bouncers description: |2 Resources for managing postgres bouncers. - name: Roles description: |2 Resources for managing role credentials. - name: Query Insights reports description: |2 Resources for downloading query insights data. - name: Service tokens description: |2 API endpoints for managing service tokens within an organization. - name: Users description: |2 Resources for managing users. - name: Workflows description: |2 API endpoints for managing workflows. - name: Deploy requests description: |2 Resources for managing deploy requests. - name: Webhooks description: |2 Resources for managing database webhooks. - name: Invoices description: |2 Resources for managing invoices. - name: Organization teams description: |2 Resources for managing teams within an organization. Teams allow you to group members and grant them access to specific databases. Note: Teams managed through SSO/directory services cannot be modified via API. paths: /organizations/{organization}/databases/{database}/branches/{branch}/backups: post: tags: - Backups summary: Create a backup description: >- ### Authorization A service token or OAuth token must have at least one of the following access or scopes in order to use this API endpoint: **Service Token Accesses** `write_backups` **OAuth Scopes** | Resource | Scopes | | :------- | :---------- | | Organization | `write_backups` | | Database | `write_backups` | | Branch | `write_backups` | operationId: create_backup parameters: - name: organization in: path required: true description: The name of the organization the branch belongs to schema: type: string - name: database in: path required: true description: The name of the database the branch belongs to schema: type: string - name: branch in: path required: true description: The name of the branch schema: type: string requestBody: content: application/json: schema: type: object properties: name: type: string description: Name for the backup retention_unit: type: string enum: - hour - day - week - month - year description: Unit for the retention period of the backup retention_value: type: integer description: >- Value between `1` and `1000` for the retention period of the backup (i.e retention_value `6` and retention_unit `hour` means 6 hours) emergency: type: boolean description: >- Whether the backup is an immediate backup that may affect database performance. Emergency backups are only supported for PostgreSQL databases. additionalProperties: false responses: '201': description: Returns the created database branch backup headers: {} content: application/json: schema: type: object properties: id: type: string description: The ID of the backup name: type: string description: The name of the backup state: type: string enum: - pending - running - success - failed - canceled - ignored description: The current state of the backup size: type: integer description: The size of the backup in bytes estimated_storage_cost: type: number description: The estimated storage cost of the backup created_at: type: string description: When the backup was created updated_at: type: string description: When the backup was last updated started_at: type: string description: When the backup started expires_at: type: string description: When the backup expires completed_at: type: string description: When the backup completed deleted_at: type: string description: When the backup was deleted pvc_size: type: integer description: Size of the PVC used for the backup protected: type: boolean description: Whether or not the backup is protected from deletion required: type: boolean description: Whether or not the backup policy is required restored_branches: type: array items: type: object properties: id: type: string description: The ID for the resource name: type: string description: The name for the resource created_at: type: string description: When the resource was created updated_at: type: string description: When the resource was last updated deleted_at: type: string description: When the resource was deleted, if deleted additionalProperties: false required: - id - name - created_at - updated_at - deleted_at actor: type: object properties: id: type: string description: The ID of the actor display_name: type: string description: The name of the actor avatar_url: type: string description: The URL of the actor's avatar additionalProperties: false required: - id - display_name - avatar_url backup_policy: type: object properties: id: type: string description: The ID of the backup policy name: type: string description: The name of the backup policy target: type: string enum: - production - development description: >- Whether the policy is for production or development branches retention_value: type: integer description: >- A number value for the retention period of the backup policy retention_unit: type: string description: The unit for the retention period of the backup policy frequency_value: type: integer description: A number value for the frequency of the backup policy frequency_unit: type: string description: The unit for the frequency of the backup policy schedule_time: type: string description: >- The time of day that the backup is scheduled, in HH:MM format schedule_day: type: integer description: >- Day of the week that the backup is scheduled. 0 is Sunday, 6 is Saturday schedule_week: type: integer description: >- Week of the month that the backup is scheduled. 0 is the first week, 3 is the fourth week created_at: type: string description: When the backup policy was created updated_at: type: string description: When the backup policy was last updated last_ran_at: type: string description: When the backup was last run next_run_at: type: string description: When the backup will next run required: type: boolean description: Whether the policy is a required system backup additionalProperties: false required: - id - name - target - retention_value - retention_unit - frequency_value - frequency_unit - schedule_time - schedule_day - schedule_week - created_at - updated_at - last_ran_at - next_run_at - required schema_snapshot: type: object properties: id: type: string description: The ID of the schema snapshot name: type: string description: The name of the schema snapshot created_at: type: string description: When the schema snapshot was created updated_at: type: string description: When the schema snapshot was last updated linted_at: type: string description: When the schema snapshot was last linted url: type: string description: The URL to the schema snapshot in the PlanetScale app additionalProperties: false required: - id - name - created_at - updated_at - linted_at - url database_branch: type: object properties: id: type: string description: The ID for the resource name: type: string description: The name for the resource created_at: type: string description: When the resource was created updated_at: type: string description: When the resource was last updated deleted_at: type: string description: When the resource was deleted, if deleted additionalProperties: false required: - id - name - created_at - updated_at - deleted_at additionalProperties: false required: - id - name - state - size - estimated_storage_cost - created_at - updated_at - started_at - expires_at - completed_at - deleted_at - pvc_size - protected - required - restored_branches - actor - backup_policy - schema_snapshot - database_branch '401': description: Unauthorized '403': description: Forbidden '404': description: Not Found '500': description: Internal Server Error components: securitySchemes: ApiKeyHeader: type: apiKey in: header name: Authorization ```` --- > To find navigation and other pages in this documentation, fetch the llms.txt file at: https://planetscale.com/llms.txt --- # Source: https://planetscale.com/docs/api/reference/create_bouncer.md # Create a bouncer > ### Authorization A service token or OAuth token must have at least one of the following access or scopes in order to use this API endpoint: **Service Token Accesses** `write_database` **OAuth Scopes** | Resource | Scopes | | :------- | :---------- | | Organization | `write_databases` | | Database | `write_database` | ## OpenAPI ````yaml post /organizations/{organization}/databases/{database}/branches/{branch}/bouncers openapi: 3.0.1 info: title: PlanetScale API description: |-PlanetScale API
© 2025 PlanetScale, Inc. version: v1 x-copyright: '© 2025 PlanetScale, Inc.' servers: - url: https://api.planetscale.com/v1 security: - ApiKeyHeader: - Authorization tags: - name: Backups description: |2 Resources for managing database branch backups. - name: Branch changes description: |2 Resources for managing cluster changes. - name: Cluster extensions description: |2 Resources for managing cluster extension configuration. - name: Branch log signatures description: |2 Resources for retrieving branch log access signatures. - name: Cluster parameters description: |2 Resources for managing cluster configuration parameters. - name: Database branch keyspaces description: |2 Resources for managing keyspaces. - name: Database branch passwords description: |2 Resources for managing database branch passwords. - name: Database Postgres IP restrictions description: |2 Resources for managing Postgres IP restriction entries for databases. Note: This endpoint is only available for PostgreSQL databases. For MySQL databases, use the Database Branch Passwords endpoint. - name: Databases description: |2 Resources for managing databases within an organization. - name: Keyspace VSchemas description: |2 Resources for managing VSchemas within a keyspace. - name: OAuth applications description: |2 Resources for managing OAuth applications. - name: OAuth tokens description: |2 Resources for managing OAuth tokens. - name: Organization members description: |2 Resources for managing organization members and their roles. - name: Organizations description: |2 Resources for managing organizations. - name: Bouncer resizes description: |2 Resources for managing Postgres bouncer resize requests. - name: Bouncers description: |2 Resources for managing postgres bouncers. - name: Roles description: |2 Resources for managing role credentials. - name: Query Insights reports description: |2 Resources for downloading query insights data. - name: Service tokens description: |2 API endpoints for managing service tokens within an organization. - name: Users description: |2 Resources for managing users. - name: Workflows description: |2 API endpoints for managing workflows. - name: Deploy requests description: |2 Resources for managing deploy requests. - name: Webhooks description: |2 Resources for managing database webhooks. - name: Invoices description: |2 Resources for managing invoices. - name: Organization teams description: |2 Resources for managing teams within an organization. Teams allow you to group members and grant them access to specific databases. Note: Teams managed through SSO/directory services cannot be modified via API. paths: /organizations/{organization}/databases/{database}/branches/{branch}/bouncers: post: tags: - Bouncers summary: Create a bouncer description: >- ### Authorization A service token or OAuth token must have at least one of the following access or scopes in order to use this API endpoint: **Service Token Accesses** `write_database` **OAuth Scopes** | Resource | Scopes | | :------- | :---------- | | Organization | `write_databases` | | Database | `write_database` | operationId: create_bouncer parameters: - name: organization in: path required: true description: The name of the organization that owns this resource schema: type: string - name: database in: path required: true description: The name of the database that owns this resource schema: type: string - name: branch in: path required: true description: The name of the branch that owns this resource schema: type: string requestBody: content: application/json: schema: type: object properties: name: type: string description: The bouncer name target: type: string description: The type of server the bouncer targets bouncer_size: type: string description: The size SKU for the bouncer replicas_per_cell: type: integer description: The number of replica servers per cell additionalProperties: false responses: '200': description: Returns the new bouncer headers: {} content: application/json: schema: type: object properties: id: type: string description: The ID of the bouncer name: type: string description: The name of the bouncer sku: type: object properties: name: type: string description: The name of the Postgres bouncer SKU display_name: type: string description: The display name cpu: type: string description: The CPU allocation ram: type: integer description: The amount of memory in bytes sort_order: type: integer description: The sort order of the Postgres bouncer SKU additionalProperties: false required: - name - display_name - cpu - ram - sort_order target: type: string enum: - primary - replica - replica_az_affinity description: The instance type the bouncer targets replicas_per_cell: type: integer description: The count of replicas in each cell created_at: type: string description: When the bouncer was created updated_at: type: string description: When the bouncer was updated deleted_at: type: string description: When the bouncer was deleted actor: type: object properties: id: type: string description: The ID of the actor display_name: type: string description: The name of the actor avatar_url: type: string description: The URL of the actor's avatar additionalProperties: false required: - id - display_name - avatar_url branch: type: object properties: id: type: string description: The ID for the resource name: type: string description: The name for the resource created_at: type: string description: When the resource was created updated_at: type: string description: When the resource was last updated deleted_at: type: string description: When the resource was deleted, if deleted additionalProperties: false required: - id - name - created_at - updated_at - deleted_at parameters: type: array items: type: object properties: id: type: string description: The ID of the parameter namespace: type: string enum: - pgbouncer description: The namespace of the parameter name: type: string description: The name of the parameter display_name: type: string description: The display name of the parameter category: type: string description: The category of the parameter description: type: string description: The description of the parameter parameter_type: type: string enum: - array - boolean - bytes - float - integer - internal - seconds - select - string - time description: The type of the parameter default_value: type: string description: The default value of the parameter value: type: string description: The configured value of the parameter required: type: boolean description: Whether the parameter is required created_at: type: string description: When the parameter was created updated_at: type: string description: When the parameter was last updated restart: type: boolean description: True if processes require a server restart on change max: type: number description: The maximum value of the parameter min: type: number description: The minimum value of the parameter step: type: number description: The step change of the parameter url: type: string description: The URL of the parameter options: items: type: string type: array description: Valid options for the parameter value actor: type: object properties: id: type: string description: The ID of the actor display_name: type: string description: The name of the actor avatar_url: type: string description: The URL of the actor's avatar additionalProperties: false required: - id - display_name - avatar_url additionalProperties: false required: - id - namespace - name - display_name - category - description - parameter_type - default_value - value - required - created_at - updated_at - restart - max - min - step - url - options - actor additionalProperties: false required: - id - name - sku - target - replicas_per_cell - created_at - updated_at - deleted_at - actor - branch - parameters '401': description: Unauthorized '403': description: Forbidden '404': description: Not Found '500': description: Internal Server Error components: securitySchemes: ApiKeyHeader: type: apiKey in: header name: Authorization ```` --- > To find navigation and other pages in this documentation, fetch the llms.txt file at: https://planetscale.com/llms.txt --- # Source: https://planetscale.com/docs/api/reference/create_branch.md # Create a branch > ### Authorization A service token or OAuth token must have at least one of the following access or scopes in order to use this API endpoint: **Service Token Accesses** `create_branch`, `restore_production_branch_backup`, `restore_backup` **OAuth Scopes** | Resource | Scopes | | :------- | :---------- | | Organization | `write_branches`, `restore_production_branch_backups`, `restore_backups` | | Database | `write_branches`, `restore_production_branch_backups`, `restore_backups` | | Branch | `restore_backups` | ## OpenAPI ````yaml post /organizations/{organization}/databases/{database}/branches openapi: 3.0.1 info: title: PlanetScale API description: |-PlanetScale API
© 2025 PlanetScale, Inc. version: v1 x-copyright: '© 2025 PlanetScale, Inc.' servers: - url: https://api.planetscale.com/v1 security: - ApiKeyHeader: - Authorization tags: - name: Backups description: |2 Resources for managing database branch backups. - name: Branch changes description: |2 Resources for managing cluster changes. - name: Cluster extensions description: |2 Resources for managing cluster extension configuration. - name: Branch log signatures description: |2 Resources for retrieving branch log access signatures. - name: Cluster parameters description: |2 Resources for managing cluster configuration parameters. - name: Database branch keyspaces description: |2 Resources for managing keyspaces. - name: Database branch passwords description: |2 Resources for managing database branch passwords. - name: Database Postgres IP restrictions description: |2 Resources for managing Postgres IP restriction entries for databases. Note: This endpoint is only available for PostgreSQL databases. For MySQL databases, use the Database Branch Passwords endpoint. - name: Databases description: |2 Resources for managing databases within an organization. - name: Keyspace VSchemas description: |2 Resources for managing VSchemas within a keyspace. - name: OAuth applications description: |2 Resources for managing OAuth applications. - name: OAuth tokens description: |2 Resources for managing OAuth tokens. - name: Organization members description: |2 Resources for managing organization members and their roles. - name: Organizations description: |2 Resources for managing organizations. - name: Bouncer resizes description: |2 Resources for managing Postgres bouncer resize requests. - name: Bouncers description: |2 Resources for managing postgres bouncers. - name: Roles description: |2 Resources for managing role credentials. - name: Query Insights reports description: |2 Resources for downloading query insights data. - name: Service tokens description: |2 API endpoints for managing service tokens within an organization. - name: Users description: |2 Resources for managing users. - name: Workflows description: |2 API endpoints for managing workflows. - name: Deploy requests description: |2 Resources for managing deploy requests. - name: Webhooks description: |2 Resources for managing database webhooks. - name: Invoices description: |2 Resources for managing invoices. - name: Organization teams description: |2 Resources for managing teams within an organization. Teams allow you to group members and grant them access to specific databases. Note: Teams managed through SSO/directory services cannot be modified via API. paths: /organizations/{organization}/databases/{database}/branches: post: tags: - Database branches summary: Create a branch description: >- ### Authorization A service token or OAuth token must have at least one of the following access or scopes in order to use this API endpoint: **Service Token Accesses** `create_branch`, `restore_production_branch_backup`, `restore_backup` **OAuth Scopes** | Resource | Scopes | | :------- | :---------- | | Organization | `write_branches`, `restore_production_branch_backups`, `restore_backups` | | Database | `write_branches`, `restore_production_branch_backups`, `restore_backups` | | Branch | `restore_backups` | operationId: create_branch parameters: - name: organization in: path required: true description: The name of the organization the branch belongs to schema: type: string - name: database in: path required: true description: The name of the database the branch belongs to schema: type: string requestBody: content: application/json: schema: type: object properties: name: type: string description: The name of the branch to create parent_branch: type: string description: Parent branch backup_id: type: string description: >- If provided, restores the backup's schema and data to the new branch. Must have `restore_production_branch_backup(s)` or `restore_backup(s)` access to do this. region: type: string description: >- The region to create the branch in. If not provided, the branch will be created in the default region for its database. restore_point: type: string description: >- Restore from a point-in-time recovery timestamp (e.g. 2023-01-01T00:00:00Z). Available only for PostgreSQL databases. seed_data: type: string enum: - last_successful_backup description: >- If provided, restores the last successful backup's schema and data to the new branch. Must have `restore_production_branch_backup(s)` or `restore_backup(s)` access to do this, in addition to Data Branching™ being enabled for the branch. cluster_size: type: string description: >- The database cluster size is required if a backup_id is provided. Options: PS_10, PS_20, PS_40, ..., PS_2800 major_version: type: string description: >- For PostgreSQL databases, the PostgreSQL major version to use for the branch. Defaults to the major version of the parent branch if it exists or the database's default branch major version. Ignored for branches restored from backups. additionalProperties: false required: - name - parent_branch responses: '201': description: Returns the created branch headers: {} content: application/json: schema: type: object properties: id: type: string description: The ID of the branch name: type: string description: The name of the branch created_at: type: string description: When the branch was created updated_at: type: string description: When the branch was last updated deleted_at: type: string description: When the branch was deleted restore_checklist_completed_at: type: string description: >- When a user last marked a backup restore checklist as completed schema_last_updated_at: type: string description: When the schema for the branch was last updated kind: type: string enum: - mysql - postgresql description: The kind of branch mysql_address: type: string description: The MySQL address for the branch mysql_edge_address: type: string description: The address of the MySQL provider for the branch state: type: string enum: - pending - sleep_in_progress - sleeping - awakening - ready description: The current state of the branch direct_vtgate: type: boolean description: >- True if the branch allows passwords to connect directly to a vtgate, bypassing load balancers vtgate_size: type: string description: The size of the vtgate cluster for the branch vtgate_count: type: integer description: The number of vtgate instances in the branch cluster_name: type: string description: The SKU representing the branch's cluster size cluster_iops: type: integer description: IOPS for the cluster ready: type: boolean description: Whether or not the branch is ready to serve queries schema_ready: type: boolean description: Whether or not the schema is ready for queries metal: type: boolean description: Whether or not this is a metal database production: type: boolean description: Whether or not the branch is a production branch safe_migrations: type: boolean description: Whether or not the branch has safe migrations enabled sharded: type: boolean description: Whether or not the branch is sharded shard_count: type: integer description: The number of shards in the branch stale_schema: type: boolean description: Whether or not the branch has a stale schema actor: type: object properties: id: type: string description: The ID of the actor display_name: type: string description: The name of the actor avatar_url: type: string description: The URL of the actor's avatar additionalProperties: false required: - id - display_name - avatar_url restored_from_branch: type: object properties: id: type: string description: The ID for the resource name: type: string description: The name for the resource created_at: type: string description: When the resource was created updated_at: type: string description: When the resource was last updated deleted_at: type: string description: When the resource was deleted, if deleted additionalProperties: false required: - id - name - created_at - updated_at - deleted_at private_edge_connectivity: type: boolean description: True if private connections are enabled has_replicas: type: boolean description: True if the branch has replica servers has_read_only_replicas: type: boolean description: True if the branch has read-only replica servers html_url: type: string description: Planetscale app URL for the branch url: type: string description: Planetscale API URL for the branch region: type: object properties: id: type: string description: The ID of the region provider: type: string description: Provider for the region (ex. AWS) enabled: type: boolean description: Whether or not the region is currently active public_ip_addresses: items: type: string type: array description: Public IP addresses for the region display_name: type: string description: Name of the region location: type: string description: Location of the region slug: type: string description: The slug of the region current_default: type: boolean description: >- True if the region is the default for new branch creation additionalProperties: false required: - id - provider - enabled - public_ip_addresses - display_name - location - slug - current_default parent_branch: type: string description: >- The name of the parent branch from which the branch was created additionalProperties: false required: - id - name - created_at - updated_at - deleted_at - restore_checklist_completed_at - schema_last_updated_at - kind - mysql_address - mysql_edge_address - state - direct_vtgate - vtgate_size - vtgate_count - cluster_name - cluster_iops - ready - schema_ready - metal - production - safe_migrations - sharded - shard_count - stale_schema - actor - restored_from_branch - private_edge_connectivity - has_replicas - has_read_only_replicas - html_url - url - region - parent_branch '401': description: Unauthorized '403': description: Forbidden '404': description: Not Found '500': description: Internal Server Error components: securitySchemes: ApiKeyHeader: type: apiKey in: header name: Authorization ```` --- > To find navigation and other pages in this documentation, fetch the llms.txt file at: https://planetscale.com/llms.txt --- # Source: https://planetscale.com/docs/api/reference/create_database.md # Create a database > ### Authorization A service token or OAuth token must have at least one of the following access or scopes in order to use this API endpoint: **Service Token Accesses** `create_databases` **OAuth Scopes** | Resource | Scopes | | :------- | :---------- | | Organization | `create_databases` | ## OpenAPI ````yaml post /organizations/{organization}/databases openapi: 3.0.1 info: title: PlanetScale API description: |-PlanetScale API
© 2025 PlanetScale, Inc. version: v1 x-copyright: '© 2025 PlanetScale, Inc.' servers: - url: https://api.planetscale.com/v1 security: - ApiKeyHeader: - Authorization tags: - name: Backups description: |2 Resources for managing database branch backups. - name: Branch changes description: |2 Resources for managing cluster changes. - name: Cluster extensions description: |2 Resources for managing cluster extension configuration. - name: Branch log signatures description: |2 Resources for retrieving branch log access signatures. - name: Cluster parameters description: |2 Resources for managing cluster configuration parameters. - name: Database branch keyspaces description: |2 Resources for managing keyspaces. - name: Database branch passwords description: |2 Resources for managing database branch passwords. - name: Database Postgres IP restrictions description: |2 Resources for managing Postgres IP restriction entries for databases. Note: This endpoint is only available for PostgreSQL databases. For MySQL databases, use the Database Branch Passwords endpoint. - name: Databases description: |2 Resources for managing databases within an organization. - name: Keyspace VSchemas description: |2 Resources for managing VSchemas within a keyspace. - name: OAuth applications description: |2 Resources for managing OAuth applications. - name: OAuth tokens description: |2 Resources for managing OAuth tokens. - name: Organization members description: |2 Resources for managing organization members and their roles. - name: Organizations description: |2 Resources for managing organizations. - name: Bouncer resizes description: |2 Resources for managing Postgres bouncer resize requests. - name: Bouncers description: |2 Resources for managing postgres bouncers. - name: Roles description: |2 Resources for managing role credentials. - name: Query Insights reports description: |2 Resources for downloading query insights data. - name: Service tokens description: |2 API endpoints for managing service tokens within an organization. - name: Users description: |2 Resources for managing users. - name: Workflows description: |2 API endpoints for managing workflows. - name: Deploy requests description: |2 Resources for managing deploy requests. - name: Webhooks description: |2 Resources for managing database webhooks. - name: Invoices description: |2 Resources for managing invoices. - name: Organization teams description: |2 Resources for managing teams within an organization. Teams allow you to group members and grant them access to specific databases. Note: Teams managed through SSO/directory services cannot be modified via API. paths: /organizations/{organization}/databases: post: tags: - Databases summary: Create a database description: >- ### Authorization A service token or OAuth token must have at least one of the following access or scopes in order to use this API endpoint: **Service Token Accesses** `create_databases` **OAuth Scopes** | Resource | Scopes | | :------- | :---------- | | Organization | `create_databases` | operationId: create_database parameters: - name: organization in: path required: true description: The name of the organization the database belongs to schema: type: string requestBody: content: application/json: schema: type: object properties: name: type: string description: Name of the database region: type: string description: >- The region the database will be deployed in. If left blank, defaults to the organization's default region. cluster_size: type: string description: >- The database cluster size name (e.g., 'PS_10', 'PS_80'). Use the 'List available cluster sizes' endpoint to get available options for your organization. /v1/organizations/:organization/cluster-size-skus replicas: type: integer description: >- The number of replicas for the database. 0 for non-HA, 2+ for HA. kind: type: string enum: - mysql - postgresql description: The kind of database to create. major_version: type: string description: >- For PostgreSQL databases, the PostgreSQL major version to use for the database. Defaults to the latest available major version. additionalProperties: false required: - name - cluster_size responses: '201': description: Returns the created database headers: {} content: application/json: schema: type: object properties: id: type: string description: The ID of the database url: type: string description: The URL to the database API endpoint branches_url: type: string description: The URL to retrieve this database's branches via the API branches_count: type: integer description: The total number of database branches open_schema_recommendations_count: type: integer description: The total number of schema recommendations development_branches_count: type: integer description: The total number of database development branches production_branches_count: type: integer description: The total number of database production branches issues_count: type: integer description: The total number of ongoing issues within a database multiple_admins_required_for_deletion: type: boolean description: If the database requires multiple admins for deletion ready: type: boolean description: If the database is ready to be used at_backup_restore_branches_limit: type: boolean description: >- If the database has reached its backup restored branch limit at_development_branch_usage_limit: type: boolean description: If the database has reached its development branch limit data_import: type: object properties: state: type: string description: State of the data import import_check_errors: type: string description: Errors encountered during the import check started_at: type: string description: When the import started finished_at: type: string description: When the import finished data_source: type: object properties: hostname: type: string description: Hostname of the data source port: type: integer description: Port of the data source database: type: string description: Database name of the data source additionalProperties: false required: - hostname - port - database additionalProperties: false required: - state - import_check_errors - started_at - finished_at - data_source region: type: object properties: id: type: string description: The ID of the region provider: type: string description: Provider for the region (ex. AWS) enabled: type: boolean description: Whether or not the region is currently active public_ip_addresses: items: type: string type: array description: Public IP addresses for the region display_name: type: string description: Name of the region location: type: string description: Location of the region slug: type: string description: The slug of the region current_default: type: boolean description: >- True if the region is the default for new branch creation additionalProperties: false required: - id - provider - enabled - public_ip_addresses - display_name - location - slug - current_default html_url: type: string description: The URL to see this database's branches in the web UI name: type: string description: Name of the database state: type: string enum: - pending - importing - sleep_in_progress - sleeping - awakening - import_ready - ready description: State of the database sharded: type: boolean description: If the database is sharded default_branch_shard_count: type: integer description: Number of shards in the default branch default_branch_read_only_regions_count: type: integer description: Number of read only regions in the default branch default_branch_table_count: type: integer description: Number of tables in the default branch schema default_branch: type: string description: The default branch for the database require_approval_for_deploy: type: boolean description: >- Whether an approval is required to deploy schema changes to this database resizing: type: boolean description: True if a branch is currently resizing resize_queued: type: boolean description: True if a branch has a queued resize request allow_data_branching: type: boolean description: >- Whether seeding branches with data is enabled for all branches foreign_keys_enabled: type: boolean description: Whether foreign key constraints are enabled automatic_migrations: type: boolean description: >- Whether to automatically manage Rails migrations during deploy requests restrict_branch_region: type: boolean description: Whether to restrict branch creation to one region insights_raw_queries: type: boolean description: Whether raw SQL queries are collected plan: type: string description: The database plan insights_enabled: type: boolean description: True if query insights is enabled for the database production_branch_web_console: type: boolean description: Whether web console is enabled for production branches migration_table_name: type: string description: Table name to use for copying schema migration data migration_framework: type: string description: Framework used for applying migrations created_at: type: string description: When the database was created updated_at: type: string description: When the database was last updated schema_last_updated_at: type: string description: When the default branch schema was last changed. kind: type: string enum: - mysql - postgresql description: The kind of database additionalProperties: false required: - id - url - branches_url - branches_count - open_schema_recommendations_count - development_branches_count - production_branches_count - issues_count - multiple_admins_required_for_deletion - ready - at_backup_restore_branches_limit - at_development_branch_usage_limit - data_import - region - html_url - name - state - sharded - default_branch_shard_count - default_branch_read_only_regions_count - default_branch_table_count - default_branch - require_approval_for_deploy - resizing - resize_queued - allow_data_branching - foreign_keys_enabled - automatic_migrations - restrict_branch_region - insights_raw_queries - plan - insights_enabled - production_branch_web_console - migration_table_name - migration_framework - created_at - updated_at - schema_last_updated_at - kind '401': description: Unauthorized '403': description: Forbidden '404': description: Not Found '500': description: Internal Server Error components: securitySchemes: ApiKeyHeader: type: apiKey in: header name: Authorization ```` --- > To find navigation and other pages in this documentation, fetch the llms.txt file at: https://planetscale.com/llms.txt --- # Source: https://planetscale.com/docs/api/reference/create_database_postgres_cidr.md # Create an IP restriction entry > ### Authorization A OAuth token must have at least one of the following scopes in order to use this API endpoint: **OAuth Scopes** | Resource | Scopes | | :------- | :---------- | | Organization | `write_databases` | | Database | `write_database` | ## OpenAPI ````yaml post /organizations/{organization}/databases/{database}/cidrs openapi: 3.0.1 info: title: PlanetScale API description: |-PlanetScale API
© 2025 PlanetScale, Inc. version: v1 x-copyright: '© 2025 PlanetScale, Inc.' servers: - url: https://api.planetscale.com/v1 security: - ApiKeyHeader: - Authorization tags: - name: Backups description: |2 Resources for managing database branch backups. - name: Branch changes description: |2 Resources for managing cluster changes. - name: Cluster extensions description: |2 Resources for managing cluster extension configuration. - name: Branch log signatures description: |2 Resources for retrieving branch log access signatures. - name: Cluster parameters description: |2 Resources for managing cluster configuration parameters. - name: Database branch keyspaces description: |2 Resources for managing keyspaces. - name: Database branch passwords description: |2 Resources for managing database branch passwords. - name: Database Postgres IP restrictions description: |2 Resources for managing Postgres IP restriction entries for databases. Note: This endpoint is only available for PostgreSQL databases. For MySQL databases, use the Database Branch Passwords endpoint. - name: Databases description: |2 Resources for managing databases within an organization. - name: Keyspace VSchemas description: |2 Resources for managing VSchemas within a keyspace. - name: OAuth applications description: |2 Resources for managing OAuth applications. - name: OAuth tokens description: |2 Resources for managing OAuth tokens. - name: Organization members description: |2 Resources for managing organization members and their roles. - name: Organizations description: |2 Resources for managing organizations. - name: Bouncer resizes description: |2 Resources for managing Postgres bouncer resize requests. - name: Bouncers description: |2 Resources for managing postgres bouncers. - name: Roles description: |2 Resources for managing role credentials. - name: Query Insights reports description: |2 Resources for downloading query insights data. - name: Service tokens description: |2 API endpoints for managing service tokens within an organization. - name: Users description: |2 Resources for managing users. - name: Workflows description: |2 API endpoints for managing workflows. - name: Deploy requests description: |2 Resources for managing deploy requests. - name: Webhooks description: |2 Resources for managing database webhooks. - name: Invoices description: |2 Resources for managing invoices. - name: Organization teams description: |2 Resources for managing teams within an organization. Teams allow you to group members and grant them access to specific databases. Note: Teams managed through SSO/directory services cannot be modified via API. paths: /organizations/{organization}/databases/{database}/cidrs: post: tags: - Database Postgres IP restrictions summary: Create an IP restriction entry description: >- ### Authorization A OAuth token must have at least one of the following scopes in order to use this API endpoint: **OAuth Scopes** | Resource | Scopes | | :------- | :---------- | | Organization | `write_databases` | | Database | `write_database` | operationId: create_database_postgres_cidr parameters: - name: organization in: path required: true description: The name of the organization the database belongs to schema: type: string - name: database in: path required: true description: The name of the database schema: type: string requestBody: content: application/json: schema: type: object properties: schema: type: string description: >- The PostgreSQL schema to restrict access to. Leave empty or omit to allow access to all schemas. role: type: string description: >- The PostgreSQL role to restrict access to. Leave empty or omit to allow access for all roles. cidrs: type: array items: type: string description: >- List of IPv4 CIDR ranges (e.g., ['192.168.1.0/24', '192.168.1.1/32']). Must contain at least one valid IPv4 address or range. additionalProperties: false required: - cidrs responses: '201': description: Returns the created IP restriction entry headers: {} content: application/json: schema: type: object properties: id: type: string description: The ID of the IP allowlist entry schema: type: string description: The schema name to restrict access to (optional) role: type: string description: The role to restrict access to (optional) cidrs: items: type: string type: array description: List of CIDR ranges created_at: type: string description: When the entry was created updated_at: type: string description: When the entry was updated deleted_at: type: string description: When the entry was deleted actor: type: object properties: id: type: string description: The ID of the actor display_name: type: string description: The name of the actor avatar_url: type: string description: The URL of the actor's avatar additionalProperties: false required: - id - display_name - avatar_url additionalProperties: false required: - id - schema - role - cidrs - created_at - updated_at - deleted_at - actor '401': description: Unauthorized '403': description: Forbidden '404': description: Not Found '422': description: Unprocessable Entity - Invalid parameters or validation errors '500': description: Internal Server Error components: securitySchemes: ApiKeyHeader: type: apiKey in: header name: Authorization ```` --- > To find navigation and other pages in this documentation, fetch the llms.txt file at: https://planetscale.com/llms.txt --- # Source: https://planetscale.com/docs/api/reference/create_deploy_request.md # Create a deploy request > ### Authorization A service token or OAuth token must have at least one of the following access or scopes in order to use this API endpoint: **Service Token Accesses** `read_deploy_request`, `create_deploy_requests` **OAuth Scopes** | Resource | Scopes | | :------- | :---------- | | Organization | `write_deploy_requests` | | Database | `write_deploy_requests` | ## OpenAPI ````yaml post /organizations/{organization}/databases/{database}/deploy-requests openapi: 3.0.1 info: title: PlanetScale API description: |-PlanetScale API
© 2025 PlanetScale, Inc. version: v1 x-copyright: '© 2025 PlanetScale, Inc.' servers: - url: https://api.planetscale.com/v1 security: - ApiKeyHeader: - Authorization tags: - name: Backups description: |2 Resources for managing database branch backups. - name: Branch changes description: |2 Resources for managing cluster changes. - name: Cluster extensions description: |2 Resources for managing cluster extension configuration. - name: Branch log signatures description: |2 Resources for retrieving branch log access signatures. - name: Cluster parameters description: |2 Resources for managing cluster configuration parameters. - name: Database branch keyspaces description: |2 Resources for managing keyspaces. - name: Database branch passwords description: |2 Resources for managing database branch passwords. - name: Database Postgres IP restrictions description: |2 Resources for managing Postgres IP restriction entries for databases. Note: This endpoint is only available for PostgreSQL databases. For MySQL databases, use the Database Branch Passwords endpoint. - name: Databases description: |2 Resources for managing databases within an organization. - name: Keyspace VSchemas description: |2 Resources for managing VSchemas within a keyspace. - name: OAuth applications description: |2 Resources for managing OAuth applications. - name: OAuth tokens description: |2 Resources for managing OAuth tokens. - name: Organization members description: |2 Resources for managing organization members and their roles. - name: Organizations description: |2 Resources for managing organizations. - name: Bouncer resizes description: |2 Resources for managing Postgres bouncer resize requests. - name: Bouncers description: |2 Resources for managing postgres bouncers. - name: Roles description: |2 Resources for managing role credentials. - name: Query Insights reports description: |2 Resources for downloading query insights data. - name: Service tokens description: |2 API endpoints for managing service tokens within an organization. - name: Users description: |2 Resources for managing users. - name: Workflows description: |2 API endpoints for managing workflows. - name: Deploy requests description: |2 Resources for managing deploy requests. - name: Webhooks description: |2 Resources for managing database webhooks. - name: Invoices description: |2 Resources for managing invoices. - name: Organization teams description: |2 Resources for managing teams within an organization. Teams allow you to group members and grant them access to specific databases. Note: Teams managed through SSO/directory services cannot be modified via API. paths: /organizations/{organization}/databases/{database}/deploy-requests: post: tags: - Deploy requests summary: Create a deploy request description: >- ### Authorization A service token or OAuth token must have at least one of the following access or scopes in order to use this API endpoint: **Service Token Accesses** `read_deploy_request`, `create_deploy_requests` **OAuth Scopes** | Resource | Scopes | | :------- | :---------- | | Organization | `write_deploy_requests` | | Database | `write_deploy_requests` | operationId: create_deploy_request parameters: - name: organization in: path required: true description: The name of the deploy request's organization schema: type: string - name: database in: path required: true description: The name of the deploy request's database schema: type: string requestBody: content: application/json: schema: type: object properties: branch: type: string description: The name of the branch the deploy request is created from into_branch: type: string description: >- The name of the branch the deploy request will be merged into notes: type: string description: Notes about the deploy request auto_cutover: type: boolean description: >- Whether or not to enable auto_cutover for the deploy request. When enabled, will auto cutover to the new schema as soon as it is ready. auto_delete_branch: type: boolean description: >- Whether or not to enable auto_delete_branch for the deploy request. When enabled, will delete the branch once the DR successfully completes. additionalProperties: false required: - branch - into_branch responses: '201': description: Returns the created deploy request headers: {} content: application/json: schema: type: object properties: id: type: string description: The ID of the deploy request number: type: integer description: The number of the deploy request actor: type: object properties: id: type: string description: The ID of the actor display_name: type: string description: The name of the actor avatar_url: type: string description: The URL of the actor's avatar additionalProperties: false required: - id - display_name - avatar_url closed_by: type: object properties: id: type: string description: The ID of the actor display_name: type: string description: The name of the actor avatar_url: type: string description: The URL of the actor's avatar additionalProperties: false required: - id - display_name - avatar_url branch: type: string description: The name of the branch the deploy request was created from branch_id: type: string description: The ID of the branch the deploy request was created from branch_deleted: type: boolean description: Whether or not the deploy request branch was deleted branch_deleted_by: type: object properties: id: type: string description: The ID of the actor display_name: type: string description: The name of the actor avatar_url: type: string description: The URL of the actor's avatar additionalProperties: false required: - id - display_name - avatar_url branch_deleted_at: type: string description: When the deploy request branch was deleted into_branch: type: string description: >- The name of the branch the deploy request will be merged into into_branch_sharded: type: boolean description: >- Whether or not the branch the deploy request will be merged into is sharded into_branch_shard_count: type: integer description: >- The number of shards the branch the deploy request will be merged into has approved: type: boolean description: Whether or not the deploy request is approved state: type: string enum: - open - closed description: Whether the deploy request is open or closed deployment_state: type: string enum: - pending - ready - no_changes - queued - submitting - in_progress - pending_cutover - in_progress_vschema - in_progress_cancel - in_progress_cutover - complete - complete_cancel - complete_error - complete_pending_revert - in_progress_revert - in_progress_revert_vschema - complete_revert - complete_revert_error - cancelled - error description: The deployment state of the deploy request deployment: type: object properties: id: type: string description: The ID of the deployment auto_cutover: type: boolean description: >- Whether or not to automatically cutover once deployment is finished auto_delete_branch: type: boolean description: >- Whether or not to automatically delete the head branch once deployment is finished created_at: type: string description: When the deployment was created cutover_at: type: string description: When the cutover for the deployment was initiated cutover_expiring: type: boolean description: Whether or not the deployment cutover will expire soon deploy_check_errors: type: string description: Deploy check errors for the deployment finished_at: type: string description: When the deployment was finished queued_at: type: string description: When the deployment was queued ready_to_cutover_at: type: string description: When the deployment was ready for cutover started_at: type: string description: When the deployment was started state: type: string enum: - pending - ready - no_changes - queued - submitting - in_progress - pending_cutover - in_progress_vschema - in_progress_cancel - in_progress_cutover - complete - complete_cancel - complete_error - complete_pending_revert - in_progress_revert - in_progress_revert_vschema - complete_revert - complete_revert_error - cancelled - error description: The state the deployment is in submitted_at: type: string description: When the deployment was submitted updated_at: type: string description: When the deployment was last updated into_branch: type: string description: >- The name of the base branch the deployment will be merged into deploy_request_number: type: integer description: >- The number of the deploy request associated with this deployment deployable: type: boolean description: Whether the deployment is deployable preceding_deployments: items: type: object additionalProperties: true type: array description: The deployments ahead of this one in the queue deploy_operations: type: array items: type: object properties: id: type: string description: The ID for the deploy operation state: type: string enum: - pending - queued - in_progress - complete - cancelled - error description: The state of the deploy operation keyspace_name: type: string description: The keyspace modified by the deploy operation table_name: type: string description: >- The name of the table modifed by the deploy operation operation_name: type: string description: The operation name of the deploy operation eta_seconds: type: number description: >- The estimated seconds until completion for the deploy operation progress_percentage: type: number description: The percent completion for the deploy operation deploy_error_docs_url: type: string description: >- A link to documentation explaining the deploy error, if present ddl_statement: type: string description: The DDL statement for the deploy operation syntax_highlighted_ddl: type: string description: >- A syntax-highlighted DDL statement for the deploy operation created_at: type: string description: When the deploy operation was created updated_at: type: string description: When the deploy operation was last updated throttled_at: type: string description: When the deploy operation was last throttled can_drop_data: type: boolean description: >- Whether or not the deploy operation is capable of dropping data table_locked: type: boolean description: >- Whether or not the table modified by the deploy operation is currently locked table_recently_used: type: boolean description: >- Whether or not the table modified by the deploy operation was recently used table_recently_used_at: type: string description: >- When the table modified by the deploy operation was last used removed_foreign_key_names: items: type: string type: array description: Names of foreign keys removed by this operation deploy_errors: type: string description: Deploy errors for the deploy operation additionalProperties: false required: - id - state - keyspace_name - table_name - operation_name - eta_seconds - progress_percentage - deploy_error_docs_url - ddl_statement - syntax_highlighted_ddl - created_at - updated_at - throttled_at - can_drop_data - table_locked - table_recently_used - table_recently_used_at - removed_foreign_key_names - deploy_errors deploy_operation_summaries: type: array items: type: object properties: id: type: string description: The ID for the deploy operation summary created_at: type: string description: When the deploy operation summary was created deploy_errors: type: string description: Deploy errors for the deploy operation summary ddl_statement: type: string description: >- The DDL statement for the deploy operation summary eta_seconds: type: integer description: >- The estimated seconds until completion for the deploy operation summary keyspace_name: type: string description: >- The keyspace modified by the deploy operation summary operation_name: type: string description: >- The operation name of the deploy operation summary progress_percentage: type: number description: >- The percent completion for the deploy operation summary state: type: string enum: - pending - in_progress - complete - cancelled - error description: The state of the deploy operation summary syntax_highlighted_ddl: type: string description: >- A syntax-highlighted DDL statement for the deploy operation summary table_name: type: string description: >- The name of the table modifed by the deploy operation summary table_recently_used_at: type: string description: >- When the table modified by the deploy operation summary was last used throttled_at: type: string description: >- When the deploy operation summary was last throttled removed_foreign_key_names: items: type: string type: array description: >- Names of foreign keys removed by this operation summary shard_count: type: integer description: >- The number of shards in the keyspace modified by the deploy operation summary shard_names: items: type: string type: array description: >- Names of shards in the keyspace modified by the deploy operation summary can_drop_data: type: boolean description: >- Whether or not the deploy operation summary is capable of dropping data table_recently_used: type: boolean description: >- Whether or not the table modified by the deploy operation summary was recently used sharded: type: boolean description: >- Whether or not the keyspace modified by the deploy operation summary is sharded operations: type: array items: type: object properties: id: type: string description: The ID for the deploy operation shard: type: string description: >- The shard the deploy operation is being performed on state: type: string enum: - pending - queued - in_progress - complete - cancelled - error description: The state of the deploy operation progress_percentage: type: number description: >- The percent completion for the deploy operation eta_seconds: type: integer description: >- The estimated seconds until completion for the deploy operation additionalProperties: false required: - id - shard - state - progress_percentage - eta_seconds additionalProperties: false required: - id - created_at - deploy_errors - ddl_statement - eta_seconds - keyspace_name - operation_name - progress_percentage - state - syntax_highlighted_ddl - table_name - table_recently_used_at - throttled_at - removed_foreign_key_names - shard_count - shard_names - can_drop_data - table_recently_used - sharded - operations lint_errors: items: type: object additionalProperties: true type: array description: >- Schema lint errors preventing the deployment from completing sequential_diff_dependencies: items: type: object additionalProperties: true type: array description: The schema dependencies that must be satisfied lookup_vindex_operations: items: type: object additionalProperties: true type: array description: Lookup Vitess index operations throttler_configurations: items: type: object additionalProperties: true type: array description: Deployment throttling configurations deployment_revert_request: type: object additionalProperties: true description: >- The request to revert the schema operations in this deployment actor: type: object properties: id: type: string description: The ID of the actor display_name: type: string description: The name of the actor avatar_url: type: string description: The URL of the actor's avatar additionalProperties: false required: - id - display_name - avatar_url cutover_actor: type: object properties: id: type: string description: The ID of the actor display_name: type: string description: The name of the actor avatar_url: type: string description: The URL of the actor's avatar additionalProperties: false required: - id - display_name - avatar_url cancelled_actor: type: object properties: id: type: string description: The ID of the actor display_name: type: string description: The name of the actor avatar_url: type: string description: The URL of the actor's avatar additionalProperties: false required: - id - display_name - avatar_url schema_last_updated_at: type: string description: When the schema was last updated for the deployment table_locked: type: boolean description: Whether or not the deployment has a table locked locked_table_name: type: string description: The name of he table that is locked by the deployment instant_ddl: type: boolean description: >- Whether or not the deployment is an instant DDL deployment instant_ddl_eligible: type: boolean description: >- Whether or not the deployment is eligible for instant DDL additionalProperties: false required: - id - auto_cutover - auto_delete_branch - created_at - cutover_at - cutover_expiring - deploy_check_errors - finished_at - queued_at - ready_to_cutover_at - started_at - state - submitted_at - updated_at - into_branch - deploy_request_number - deployable - preceding_deployments - deploy_operations - deploy_operation_summaries - lint_errors - sequential_diff_dependencies - lookup_vindex_operations - throttler_configurations - deployment_revert_request - actor - cutover_actor - cancelled_actor - schema_last_updated_at - table_locked - locked_table_name - instant_ddl - instant_ddl_eligible num_comments: type: integer description: The number of comments on the deploy request html_url: type: string description: The PlanetScale app address for the deploy request notes: type: string description: Notes on the deploy request html_body: type: string description: The HTML body of the deploy request created_at: type: string description: When the deploy request was created updated_at: type: string description: When the deploy request was last updated closed_at: type: string description: When the deploy request was closed deployed_at: type: string description: When the deploy request was deployed additionalProperties: false required: - id - number - actor - closed_by - branch - branch_id - branch_deleted - branch_deleted_by - branch_deleted_at - into_branch - into_branch_sharded - into_branch_shard_count - approved - state - deployment_state - deployment - num_comments - html_url - notes - html_body - created_at - updated_at - closed_at - deployed_at '401': description: Unauthorized '403': description: Forbidden '404': description: Not Found '500': description: Internal Server Error components: securitySchemes: ApiKeyHeader: type: apiKey in: header name: Authorization ```` --- > To find navigation and other pages in this documentation, fetch the llms.txt file at: https://planetscale.com/llms.txt --- # Source: https://planetscale.com/docs/api/reference/create_keyspace.md # Create a keyspace > ### Authorization A service token must have at least one of the following access in order to use this API endpoint: **Service Token Accesses** `create_branch` ## OpenAPI ````yaml post /organizations/{organization}/databases/{database}/branches/{branch}/keyspaces openapi: 3.0.1 info: title: PlanetScale API description: |-PlanetScale API
© 2025 PlanetScale, Inc. version: v1 x-copyright: '© 2025 PlanetScale, Inc.' servers: - url: https://api.planetscale.com/v1 security: - ApiKeyHeader: - Authorization tags: - name: Backups description: |2 Resources for managing database branch backups. - name: Branch changes description: |2 Resources for managing cluster changes. - name: Cluster extensions description: |2 Resources for managing cluster extension configuration. - name: Branch log signatures description: |2 Resources for retrieving branch log access signatures. - name: Cluster parameters description: |2 Resources for managing cluster configuration parameters. - name: Database branch keyspaces description: |2 Resources for managing keyspaces. - name: Database branch passwords description: |2 Resources for managing database branch passwords. - name: Database Postgres IP restrictions description: |2 Resources for managing Postgres IP restriction entries for databases. Note: This endpoint is only available for PostgreSQL databases. For MySQL databases, use the Database Branch Passwords endpoint. - name: Databases description: |2 Resources for managing databases within an organization. - name: Keyspace VSchemas description: |2 Resources for managing VSchemas within a keyspace. - name: OAuth applications description: |2 Resources for managing OAuth applications. - name: OAuth tokens description: |2 Resources for managing OAuth tokens. - name: Organization members description: |2 Resources for managing organization members and their roles. - name: Organizations description: |2 Resources for managing organizations. - name: Bouncer resizes description: |2 Resources for managing Postgres bouncer resize requests. - name: Bouncers description: |2 Resources for managing postgres bouncers. - name: Roles description: |2 Resources for managing role credentials. - name: Query Insights reports description: |2 Resources for downloading query insights data. - name: Service tokens description: |2 API endpoints for managing service tokens within an organization. - name: Users description: |2 Resources for managing users. - name: Workflows description: |2 API endpoints for managing workflows. - name: Deploy requests description: |2 Resources for managing deploy requests. - name: Webhooks description: |2 Resources for managing database webhooks. - name: Invoices description: |2 Resources for managing invoices. - name: Organization teams description: |2 Resources for managing teams within an organization. Teams allow you to group members and grant them access to specific databases. Note: Teams managed through SSO/directory services cannot be modified via API. paths: /organizations/{organization}/databases/{database}/branches/{branch}/keyspaces: post: tags: - Database branch keyspaces summary: Create a keyspace description: >+ ### Authorization A service token must have at least one of the following access in order to use this API endpoint: **Service Token Accesses** `create_branch` operationId: create_keyspace parameters: - name: organization in: path required: true description: The name of the organization the branch belongs to schema: type: string - name: database in: path required: true description: The name of the database the branch belongs to schema: type: string - name: branch in: path required: true description: The name of the branch schema: type: string requestBody: content: application/json: schema: type: object properties: name: type: string description: The name of the keyspace cluster_size: type: string description: >- The database cluster size name (e.g., 'PS_10', 'PS_80'). Use the 'List available cluster sizes' endpoint to get available options for your organization. /v1/organizations/:organization/cluster-size-skus extra_replicas: type: integer description: >- The number of additional replicas beyond the included default shards: type: integer description: 'The number of shards. Default: 1' additionalProperties: false required: - name - cluster_size responses: '200': description: Returns a created keyspace headers: {} content: application/json: schema: type: object properties: id: type: string description: The ID of the keyspace name: type: string description: Name of the keyspace shards: type: integer description: The number of keyspace shards sharded: type: boolean description: If the keyspace is sharded replicas: type: integer description: Total number of replicas in the keyspace extra_replicas: type: integer description: Number of extra replicas in the keyspace created_at: type: string description: When the keyspace was created updated_at: type: string description: When the keyspace was last updated cluster_name: type: string description: The SKU representing the keyspace cluster size cluster_display_name: type: string description: The SKU representing the keyspace cluster size for display resizing: type: boolean description: Is the keyspace currently resizing resize_pending: type: boolean description: Is the keyspace awaiting a resize ready: type: boolean description: Is the keyspace provisioned and serving traffic metal: type: boolean description: Is the keyspace running on metal instances default: type: boolean description: Is this the default keyspace for the branch imported: type: boolean description: Is this keyspace used in an import vector_pool_allocation: type: number description: >- Percentage of buffer pool memory allocated to vector indexes replication_durability_constraints: type: object properties: strategy: type: string enum: - available - lag - always description: The replication durability strategy additionalProperties: false required: - strategy vreplication_flags: type: object properties: optimize_inserts: type: boolean description: Enable optimized inserts allow_no_blob_binlog_row_image: type: boolean description: Allow no blob binlog row image vplayer_batching: type: boolean description: Enable VPlayer batching additionalProperties: false required: - optimize_inserts - allow_no_blob_binlog_row_image - vplayer_batching additionalProperties: false required: - id - name - shards - sharded - replicas - extra_replicas - created_at - updated_at - cluster_name - cluster_display_name - resizing - resize_pending - ready - metal - default - imported - vector_pool_allocation - replication_durability_constraints - vreplication_flags '401': description: Unauthorized '403': description: Forbidden '404': description: Not Found '500': description: Internal Server Error components: securitySchemes: ApiKeyHeader: type: apiKey in: header name: Authorization ```` --- > To find navigation and other pages in this documentation, fetch the llms.txt file at: https://planetscale.com/llms.txt --- # Source: https://planetscale.com/docs/api/reference/create_oauth_token.md # Create or renew an OAuth token > Create an OAuth token from an authorization grant code, or refresh an OAuth token from a refresh token ### Authorization A service token must have at least one of the following access in order to use this API endpoint: **Service Token Accesses** `write_oauth_tokens` ## OpenAPI ````yaml post /organizations/{organization}/oauth-applications/{id}/token openapi: 3.0.1 info: title: PlanetScale API description: |-PlanetScale API
© 2025 PlanetScale, Inc. version: v1 x-copyright: '© 2025 PlanetScale, Inc.' servers: - url: https://api.planetscale.com/v1 security: - ApiKeyHeader: - Authorization tags: - name: Backups description: |2 Resources for managing database branch backups. - name: Branch changes description: |2 Resources for managing cluster changes. - name: Cluster extensions description: |2 Resources for managing cluster extension configuration. - name: Branch log signatures description: |2 Resources for retrieving branch log access signatures. - name: Cluster parameters description: |2 Resources for managing cluster configuration parameters. - name: Database branch keyspaces description: |2 Resources for managing keyspaces. - name: Database branch passwords description: |2 Resources for managing database branch passwords. - name: Database Postgres IP restrictions description: |2 Resources for managing Postgres IP restriction entries for databases. Note: This endpoint is only available for PostgreSQL databases. For MySQL databases, use the Database Branch Passwords endpoint. - name: Databases description: |2 Resources for managing databases within an organization. - name: Keyspace VSchemas description: |2 Resources for managing VSchemas within a keyspace. - name: OAuth applications description: |2 Resources for managing OAuth applications. - name: OAuth tokens description: |2 Resources for managing OAuth tokens. - name: Organization members description: |2 Resources for managing organization members and their roles. - name: Organizations description: |2 Resources for managing organizations. - name: Bouncer resizes description: |2 Resources for managing Postgres bouncer resize requests. - name: Bouncers description: |2 Resources for managing postgres bouncers. - name: Roles description: |2 Resources for managing role credentials. - name: Query Insights reports description: |2 Resources for downloading query insights data. - name: Service tokens description: |2 API endpoints for managing service tokens within an organization. - name: Users description: |2 Resources for managing users. - name: Workflows description: |2 API endpoints for managing workflows. - name: Deploy requests description: |2 Resources for managing deploy requests. - name: Webhooks description: |2 Resources for managing database webhooks. - name: Invoices description: |2 Resources for managing invoices. - name: Organization teams description: |2 Resources for managing teams within an organization. Teams allow you to group members and grant them access to specific databases. Note: Teams managed through SSO/directory services cannot be modified via API. paths: /organizations/{organization}/oauth-applications/{id}/token: post: tags: - OAuth tokens summary: Create or renew an OAuth token description: >+ Create an OAuth token from an authorization grant code, or refresh an OAuth token from a refresh token ### Authorization A service token must have at least one of the following access in order to use this API endpoint: **Service Token Accesses** `write_oauth_tokens` operationId: create_oauth_token parameters: - name: organization in: path required: true description: The name of the organization the OAuth application belongs to schema: type: string - name: id in: path required: true description: The ID of the OAuth application schema: type: string requestBody: content: application/json: schema: type: object properties: client_id: type: string description: The OAuth application's client ID client_secret: type: string description: The OAuth application's client secret grant_type: type: string enum: - authorization_code - refresh_token description: >- Whether an OAuth grant code or a refresh token is being exchanged for an OAuth token code: type: string description: >- The OAuth grant code provided to your OAuth application's redirect URI. Required when grant_type is authorization_code redirect_uri: type: string description: >- The OAuth application's redirect URI. Required when grant_type is authorization_code refresh_token: type: string description: >- The refresh token from the original OAuth token grant. Required when grant_type is refresh_token additionalProperties: false required: - client_id - client_secret - grant_type responses: '200': description: Returns the created OAuth token headers: {} content: application/json: schema: type: object properties: id: type: string description: The ID of the service token name: type: string description: The name of the service token display_name: type: string description: The display name of the service token token: type: string description: The plaintext token. Available only after create. plain_text_refresh_token: type: string description: The plaintext refresh token. Available only after create. avatar_url: type: string description: The image source for the avatar of the service token created_at: type: string description: When the service token was created updated_at: type: string description: When the service token was last updated expires_at: type: string description: When the service token will expire last_used_at: type: string description: When the service token was last used actor_id: type: string description: >- The ID of the actor on whose behalf the service token was created actor_display_name: type: string description: >- The name of the actor on whose behalf the service token was created actor_type: type: string description: >- The type of the actor on whose behalf the service token was created service_token_accesses: type: array items: type: object properties: id: type: string description: The ID of the service token access access: type: string description: The name of the service token access description: type: string description: The description of the service token access resource_name: type: string description: >- The name of the resource the service token access gives access to resource_id: type: string description: >- The ID of the resource the service token access gives access to resource_type: type: string description: >- The type of the resource the service token access gives access to resource: type: object properties: id: type: string description: The ID for the resource name: type: string description: The name for the resource created_at: type: string description: When the resource was created updated_at: type: string description: When the resource was last updated deleted_at: type: string description: When the resource was deleted, if deleted additionalProperties: false required: - id - name - created_at - updated_at - deleted_at additionalProperties: false required: - id - access - description - resource_name - resource_id - resource_type - resource oauth_accesses_by_resource: type: object properties: database: type: object properties: databases: type: array items: type: object properties: name: type: string description: >- the name of the database the token has access to id: type: string description: >- the id of the database the token has access to organization: type: string description: the name of the database's organization url: type: string description: the planetscale app url for the database additionalProperties: false required: - name - id - organization - url accesses: type: array items: type: object properties: name: type: string description: The name of the access scope description: type: string description: The scope description additionalProperties: false required: - name - description additionalProperties: false required: - databases - accesses organization: type: object properties: organizations: type: array items: type: object properties: name: type: string description: the name of the organization id: type: string description: the id of the organization url: type: string description: the planetscale app url for the organization additionalProperties: false required: - name - id - url accesses: type: array items: type: object properties: name: type: string description: The name of the access scope description: type: string description: The scope description additionalProperties: false required: - name - description additionalProperties: false required: - organizations - accesses branch: type: object properties: branches: type: array items: type: object properties: name: type: string description: the name of the branch id: type: string description: the id of the branch database: type: string description: >- the name of the database the branch belongs to organization: type: string description: >- the name of the organization the branch belongs to url: type: string description: the planetscale app url for the branch additionalProperties: false required: - name - id - database - organization - url accesses: type: array items: type: object properties: name: type: string description: The name of the access scope description: type: string description: The scope description additionalProperties: false required: - name - description additionalProperties: false required: - branches - accesses user: type: object properties: users: type: array items: type: object properties: name: type: string description: the name of the user id: type: string description: the id of the user additionalProperties: false required: - name - id accesses: type: array items: type: object properties: name: type: string description: The name of the access scope description: type: string description: The scope description additionalProperties: false required: - name - description additionalProperties: false required: - users - accesses additionalProperties: false required: - database - organization - branch - user additionalProperties: false required: - id - name - display_name - token - plain_text_refresh_token - avatar_url - created_at - updated_at - expires_at - last_used_at - actor_id - actor_display_name - actor_type - service_token_accesses - oauth_accesses_by_resource '403': description: Forbidden '404': description: Not Found '422': description: Unprocessable Entity '500': description: Internal Server Error components: securitySchemes: ApiKeyHeader: type: apiKey in: header name: Authorization ```` --- > To find navigation and other pages in this documentation, fetch the llms.txt file at: https://planetscale.com/llms.txt --- # Source: https://planetscale.com/docs/api/reference/create_organization_team.md # Create an organization team > ### Authorization A service token or OAuth token must have at least one of the following access or scopes in order to use this API endpoint: **Service Token Accesses** `write_teams` **OAuth Scopes** | Resource | Scopes | | :------- | :---------- | | Organization | `write_organization` | ## OpenAPI ````yaml post /organizations/{organization}/teams openapi: 3.0.1 info: title: PlanetScale API description: |-PlanetScale API
© 2025 PlanetScale, Inc. version: v1 x-copyright: '© 2025 PlanetScale, Inc.' servers: - url: https://api.planetscale.com/v1 security: - ApiKeyHeader: - Authorization tags: - name: Backups description: |2 Resources for managing database branch backups. - name: Branch changes description: |2 Resources for managing cluster changes. - name: Cluster extensions description: |2 Resources for managing cluster extension configuration. - name: Branch log signatures description: |2 Resources for retrieving branch log access signatures. - name: Cluster parameters description: |2 Resources for managing cluster configuration parameters. - name: Database branch keyspaces description: |2 Resources for managing keyspaces. - name: Database branch passwords description: |2 Resources for managing database branch passwords. - name: Database Postgres IP restrictions description: |2 Resources for managing Postgres IP restriction entries for databases. Note: This endpoint is only available for PostgreSQL databases. For MySQL databases, use the Database Branch Passwords endpoint. - name: Databases description: |2 Resources for managing databases within an organization. - name: Keyspace VSchemas description: |2 Resources for managing VSchemas within a keyspace. - name: OAuth applications description: |2 Resources for managing OAuth applications. - name: OAuth tokens description: |2 Resources for managing OAuth tokens. - name: Organization members description: |2 Resources for managing organization members and their roles. - name: Organizations description: |2 Resources for managing organizations. - name: Bouncer resizes description: |2 Resources for managing Postgres bouncer resize requests. - name: Bouncers description: |2 Resources for managing postgres bouncers. - name: Roles description: |2 Resources for managing role credentials. - name: Query Insights reports description: |2 Resources for downloading query insights data. - name: Service tokens description: |2 API endpoints for managing service tokens within an organization. - name: Users description: |2 Resources for managing users. - name: Workflows description: |2 API endpoints for managing workflows. - name: Deploy requests description: |2 Resources for managing deploy requests. - name: Webhooks description: |2 Resources for managing database webhooks. - name: Invoices description: |2 Resources for managing invoices. - name: Organization teams description: |2 Resources for managing teams within an organization. Teams allow you to group members and grant them access to specific databases. Note: Teams managed through SSO/directory services cannot be modified via API. paths: /organizations/{organization}/teams: post: tags: - Organization teams summary: Create an organization team description: >- ### Authorization A service token or OAuth token must have at least one of the following access or scopes in order to use this API endpoint: **Service Token Accesses** `write_teams` **OAuth Scopes** | Resource | Scopes | | :------- | :---------- | | Organization | `write_organization` | operationId: create_organization_team parameters: - name: organization in: path required: true description: The name of the organization schema: type: string requestBody: content: application/json: schema: type: object properties: name: type: string description: The name of the team description: type: string description: A description of the team's purpose additionalProperties: false required: - name responses: '200': description: Returns the created team headers: {} content: application/json: schema: type: object properties: id: type: string description: The ID of the team display_name: type: string description: The display name of the team creator: type: object properties: id: type: string description: The ID of the actor display_name: type: string description: The name of the actor avatar_url: type: string description: The URL of the actor's avatar additionalProperties: false required: - id - display_name - avatar_url members: type: array items: type: object properties: id: type: string description: The ID of the user display_name: type: string description: The display name of the user name: type: string description: The name of the user email: type: string description: The email of the user avatar_url: type: string description: The URL source of the user's avatar created_at: type: string description: When the user was created updated_at: type: string description: When the user was last updated two_factor_auth_configured: type: boolean description: >- Whether or not the user has configured two factor authentication default_organization: type: object properties: id: type: string description: The ID for the resource name: type: string description: The name for the resource created_at: type: string description: When the resource was created updated_at: type: string description: When the resource was last updated deleted_at: type: string description: When the resource was deleted, if deleted additionalProperties: false required: - id - name - created_at - updated_at - deleted_at sso: type: boolean description: Whether or not the user is managed by SSO managed: type: boolean description: >- Whether or not the user is managed by an authentication provider directory_managed: type: boolean description: >- Whether or not the user is managed by a SSO directory email_verified: type: boolean description: Whether or not the user is verified by email additionalProperties: false required: - id - display_name - name - email - avatar_url - created_at - updated_at - two_factor_auth_configured - default_organization - sso - managed - directory_managed - email_verified databases: type: array items: type: object properties: id: type: string description: The ID of the database name: type: string description: The name of the database url: type: string description: The URL to the database API endpoint branches_url: type: string description: >- The URL to retrieve this database's branches via the API additionalProperties: false required: - id - name - url - branches_url name: type: string description: The name of the team slug: type: string description: The slug of the team created_at: type: string description: When the team was created updated_at: type: string description: When the team was last updated description: type: string description: The description of the team managed: type: boolean description: Whether the team is managed through SSO/directory services additionalProperties: false required: - id - display_name - creator - members - databases - name - slug - created_at - updated_at - description - managed '400': description: Bad Request - Invalid operation or parameters '401': description: Unauthorized '403': description: Forbidden '404': description: Not Found '422': description: Unprocessable Entity - Validation errors or SSO-managed teams '500': description: Internal Server Error components: securitySchemes: ApiKeyHeader: type: apiKey in: header name: Authorization ```` --- > To find navigation and other pages in this documentation, fetch the llms.txt file at: https://planetscale.com/llms.txt --- # Source: https://planetscale.com/docs/api/reference/create_password.md # Create a password > ### Authorization A service token or OAuth token must have at least one of the following access or scopes in order to use this API endpoint: **Service Token Accesses** `connect_production_branch`, `connect_branch` **OAuth Scopes** | Resource | Scopes | | :------- | :---------- | | Organization | `manage_passwords`, `manage_production_branch_passwords` | | Database | `manage_passwords`, `manage_production_branch_passwords` | | Branch | `manage_passwords` | ## OpenAPI ````yaml post /organizations/{organization}/databases/{database}/branches/{branch}/passwords openapi: 3.0.1 info: title: PlanetScale API description: |-PlanetScale API
© 2025 PlanetScale, Inc. version: v1 x-copyright: '© 2025 PlanetScale, Inc.' servers: - url: https://api.planetscale.com/v1 security: - ApiKeyHeader: - Authorization tags: - name: Backups description: |2 Resources for managing database branch backups. - name: Branch changes description: |2 Resources for managing cluster changes. - name: Cluster extensions description: |2 Resources for managing cluster extension configuration. - name: Branch log signatures description: |2 Resources for retrieving branch log access signatures. - name: Cluster parameters description: |2 Resources for managing cluster configuration parameters. - name: Database branch keyspaces description: |2 Resources for managing keyspaces. - name: Database branch passwords description: |2 Resources for managing database branch passwords. - name: Database Postgres IP restrictions description: |2 Resources for managing Postgres IP restriction entries for databases. Note: This endpoint is only available for PostgreSQL databases. For MySQL databases, use the Database Branch Passwords endpoint. - name: Databases description: |2 Resources for managing databases within an organization. - name: Keyspace VSchemas description: |2 Resources for managing VSchemas within a keyspace. - name: OAuth applications description: |2 Resources for managing OAuth applications. - name: OAuth tokens description: |2 Resources for managing OAuth tokens. - name: Organization members description: |2 Resources for managing organization members and their roles. - name: Organizations description: |2 Resources for managing organizations. - name: Bouncer resizes description: |2 Resources for managing Postgres bouncer resize requests. - name: Bouncers description: |2 Resources for managing postgres bouncers. - name: Roles description: |2 Resources for managing role credentials. - name: Query Insights reports description: |2 Resources for downloading query insights data. - name: Service tokens description: |2 API endpoints for managing service tokens within an organization. - name: Users description: |2 Resources for managing users. - name: Workflows description: |2 API endpoints for managing workflows. - name: Deploy requests description: |2 Resources for managing deploy requests. - name: Webhooks description: |2 Resources for managing database webhooks. - name: Invoices description: |2 Resources for managing invoices. - name: Organization teams description: |2 Resources for managing teams within an organization. Teams allow you to group members and grant them access to specific databases. Note: Teams managed through SSO/directory services cannot be modified via API. paths: /organizations/{organization}/databases/{database}/branches/{branch}/passwords: post: tags: - Database branch passwords summary: Create a password description: >- ### Authorization A service token or OAuth token must have at least one of the following access or scopes in order to use this API endpoint: **Service Token Accesses** `connect_production_branch`, `connect_branch` **OAuth Scopes** | Resource | Scopes | | :------- | :---------- | | Organization | `manage_passwords`, `manage_production_branch_passwords` | | Database | `manage_passwords`, `manage_production_branch_passwords` | | Branch | `manage_passwords` | operationId: create_password parameters: - name: organization in: path required: true description: The name of the organization the password belongs to schema: type: string - name: database in: path required: true description: The name of the database the password belongs to schema: type: string - name: branch in: path required: true description: The name of the branch the password belongs to schema: type: string requestBody: content: application/json: schema: type: object properties: name: type: string description: Optional name of the password role: type: string enum: - reader - writer - admin - readwriter description: The database role of the password (i.e. admin) replica: type: boolean description: Whether the password is for a read replica ttl: type: integer description: >- Time to live (in seconds) for the password. The password will be invalid when TTL has passed cidrs: items: type: string type: array description: >- List of IP addresses or CIDR ranges that can use this password direct_vtgate: type: boolean description: Whether the password connects directly to a VTGate additionalProperties: false responses: '201': description: Returns the new credentials headers: {} content: application/json: schema: type: object properties: id: type: string description: The ID for the password name: type: string description: The display name for the password role: type: string enum: - reader - writer - admin - readwriter description: The role for the password cidrs: items: type: string type: array description: >- List of IP addresses or CIDR ranges that can use this password created_at: type: string description: When the password was created deleted_at: type: string description: When the password was deleted expires_at: type: string description: When the password will expire last_used_at: type: string description: When the password was last used to execute a query expired: type: boolean description: True if the credentials are expired direct_vtgate: type: boolean description: >- True if the credentials connect directly to a vtgate, bypassing load balancers direct_vtgate_addresses: items: type: string type: array description: >- The list of hosts in each availability zone providing direct access to a vtgate ttl_seconds: type: integer description: >- Time to live (in seconds) for the password. The password will be invalid when TTL has passed access_host_url: type: string description: The host URL for the password access_host_regional_url: type: string description: The regional host URL access_host_regional_urls: items: type: string type: array description: The read-only replica host URLs actor: type: object properties: id: type: string description: The ID of the actor display_name: type: string description: The name of the actor avatar_url: type: string description: The URL of the actor's avatar additionalProperties: false required: - id - display_name - avatar_url region: type: object properties: id: type: string description: The ID of the region provider: type: string description: Provider for the region (ex. AWS) enabled: type: boolean description: Whether or not the region is currently active public_ip_addresses: items: type: string type: array description: Public IP addresses for the region display_name: type: string description: Name of the region location: type: string description: Location of the region slug: type: string description: The slug of the region current_default: type: boolean description: >- True if the region is the default for new branch creation additionalProperties: false required: - id - provider - enabled - public_ip_addresses - display_name - location - slug - current_default username: type: string description: The username for the password plain_text: type: string description: The plain text password, available only after create replica: type: boolean description: Whether or not the password is for a read replica renewable: type: boolean description: Whether or not the password can be renewed database_branch: type: object properties: name: type: string description: The name for the branch id: type: string description: The ID for the branch production: type: boolean description: Whether or not the branch is a production branch mysql_edge_address: type: string description: The address of the MySQL provider for the branch private_edge_connectivity: type: boolean description: True if private connectivity is enabled additionalProperties: false required: - name - id - production - mysql_edge_address - private_edge_connectivity additionalProperties: false required: - id - name - role - cidrs - created_at - deleted_at - expires_at - last_used_at - expired - direct_vtgate - direct_vtgate_addresses - ttl_seconds - access_host_url - access_host_regional_url - access_host_regional_urls - actor - region - username - plain_text - replica - renewable - database_branch '401': description: Unauthorized '403': description: Forbidden '404': description: Not Found '422': description: Unprocessable Content '500': description: Internal Server Error components: securitySchemes: ApiKeyHeader: type: apiKey in: header name: Authorization ```` --- > To find navigation and other pages in this documentation, fetch the llms.txt file at: https://planetscale.com/llms.txt --- # Source: https://planetscale.com/docs/api/reference/create_query_patterns_report.md # Create a new query patterns report > ### Authorization A service token or OAuth token must have at least one of the following access or scopes in order to use this API endpoint: **Service Token Accesses** `read_branch` **OAuth Scopes** | Resource | Scopes | | :------- | :---------- | | Organization | `read_branches` | | Database | `read_branches` | | Branch | `read_branch` | ## OpenAPI ````yaml post /organizations/{organization}/databases/{database}/branches/{branch}/query-patterns openapi: 3.0.1 info: title: PlanetScale API description: |-PlanetScale API
© 2025 PlanetScale, Inc. version: v1 x-copyright: '© 2025 PlanetScale, Inc.' servers: - url: https://api.planetscale.com/v1 security: - ApiKeyHeader: - Authorization tags: - name: Backups description: |2 Resources for managing database branch backups. - name: Branch changes description: |2 Resources for managing cluster changes. - name: Cluster extensions description: |2 Resources for managing cluster extension configuration. - name: Branch log signatures description: |2 Resources for retrieving branch log access signatures. - name: Cluster parameters description: |2 Resources for managing cluster configuration parameters. - name: Database branch keyspaces description: |2 Resources for managing keyspaces. - name: Database branch passwords description: |2 Resources for managing database branch passwords. - name: Database Postgres IP restrictions description: |2 Resources for managing Postgres IP restriction entries for databases. Note: This endpoint is only available for PostgreSQL databases. For MySQL databases, use the Database Branch Passwords endpoint. - name: Databases description: |2 Resources for managing databases within an organization. - name: Keyspace VSchemas description: |2 Resources for managing VSchemas within a keyspace. - name: OAuth applications description: |2 Resources for managing OAuth applications. - name: OAuth tokens description: |2 Resources for managing OAuth tokens. - name: Organization members description: |2 Resources for managing organization members and their roles. - name: Organizations description: |2 Resources for managing organizations. - name: Bouncer resizes description: |2 Resources for managing Postgres bouncer resize requests. - name: Bouncers description: |2 Resources for managing postgres bouncers. - name: Roles description: |2 Resources for managing role credentials. - name: Query Insights reports description: |2 Resources for downloading query insights data. - name: Service tokens description: |2 API endpoints for managing service tokens within an organization. - name: Users description: |2 Resources for managing users. - name: Workflows description: |2 API endpoints for managing workflows. - name: Deploy requests description: |2 Resources for managing deploy requests. - name: Webhooks description: |2 Resources for managing database webhooks. - name: Invoices description: |2 Resources for managing invoices. - name: Organization teams description: |2 Resources for managing teams within an organization. Teams allow you to group members and grant them access to specific databases. Note: Teams managed through SSO/directory services cannot be modified via API. paths: /organizations/{organization}/databases/{database}/branches/{branch}/query-patterns: post: tags: - Query Insights reports summary: Create a new query patterns report description: >- ### Authorization A service token or OAuth token must have at least one of the following access or scopes in order to use this API endpoint: **Service Token Accesses** `read_branch` **OAuth Scopes** | Resource | Scopes | | :------- | :---------- | | Organization | `read_branches` | | Database | `read_branches` | | Branch | `read_branch` | operationId: create_query_patterns_report parameters: - name: organization in: path required: true description: The name of the organization the branch belongs to schema: type: string - name: database in: path required: true description: The name of the database the branch belongs to schema: type: string - name: branch in: path required: true description: The name of the branch schema: type: string responses: '201': description: The created query patterns download headers: {} content: application/json: schema: type: object properties: id: type: string description: The ID of the query patterns download state: type: string enum: - pending - completed - failed description: The state of the download created_at: type: string description: When the download was created finished_at: type: string description: When the download was finished url: type: string description: The URL to access the query patterns download download_url: type: string description: The URL to download the query patterns file actor: type: object properties: id: type: string description: The ID of the actor display_name: type: string description: The name of the actor avatar_url: type: string description: The URL of the actor's avatar additionalProperties: false required: - id - display_name - avatar_url additionalProperties: false required: - id - state - created_at - finished_at - url - download_url - actor '401': description: Unauthorized '403': description: Forbidden '404': description: Not Found '500': description: Internal Server Error components: securitySchemes: ApiKeyHeader: type: apiKey in: header name: Authorization ```` --- > To find navigation and other pages in this documentation, fetch the llms.txt file at: https://planetscale.com/llms.txt --- # Source: https://planetscale.com/docs/api/reference/create_role.md # Create role credentials > ### Authorization A service token or OAuth token must have at least one of the following access or scopes in order to use this API endpoint: **Service Token Accesses** `create_production_branch_password`, `create_branch_password` **OAuth Scopes** | Resource | Scopes | | :------- | :---------- | | Organization | `manage_passwords`, `manage_production_branch_passwords` | | Database | `manage_passwords`, `manage_production_branch_passwords` | | Branch | `manage_passwords` | ## OpenAPI ````yaml post /organizations/{organization}/databases/{database}/branches/{branch}/roles openapi: 3.0.1 info: title: PlanetScale API description: |-PlanetScale API
© 2025 PlanetScale, Inc. version: v1 x-copyright: '© 2025 PlanetScale, Inc.' servers: - url: https://api.planetscale.com/v1 security: - ApiKeyHeader: - Authorization tags: - name: Backups description: |2 Resources for managing database branch backups. - name: Branch changes description: |2 Resources for managing cluster changes. - name: Cluster extensions description: |2 Resources for managing cluster extension configuration. - name: Branch log signatures description: |2 Resources for retrieving branch log access signatures. - name: Cluster parameters description: |2 Resources for managing cluster configuration parameters. - name: Database branch keyspaces description: |2 Resources for managing keyspaces. - name: Database branch passwords description: |2 Resources for managing database branch passwords. - name: Database Postgres IP restrictions description: |2 Resources for managing Postgres IP restriction entries for databases. Note: This endpoint is only available for PostgreSQL databases. For MySQL databases, use the Database Branch Passwords endpoint. - name: Databases description: |2 Resources for managing databases within an organization. - name: Keyspace VSchemas description: |2 Resources for managing VSchemas within a keyspace. - name: OAuth applications description: |2 Resources for managing OAuth applications. - name: OAuth tokens description: |2 Resources for managing OAuth tokens. - name: Organization members description: |2 Resources for managing organization members and their roles. - name: Organizations description: |2 Resources for managing organizations. - name: Bouncer resizes description: |2 Resources for managing Postgres bouncer resize requests. - name: Bouncers description: |2 Resources for managing postgres bouncers. - name: Roles description: |2 Resources for managing role credentials. - name: Query Insights reports description: |2 Resources for downloading query insights data. - name: Service tokens description: |2 API endpoints for managing service tokens within an organization. - name: Users description: |2 Resources for managing users. - name: Workflows description: |2 API endpoints for managing workflows. - name: Deploy requests description: |2 Resources for managing deploy requests. - name: Webhooks description: |2 Resources for managing database webhooks. - name: Invoices description: |2 Resources for managing invoices. - name: Organization teams description: |2 Resources for managing teams within an organization. Teams allow you to group members and grant them access to specific databases. Note: Teams managed through SSO/directory services cannot be modified via API. paths: /organizations/{organization}/databases/{database}/branches/{branch}/roles: post: tags: - Roles summary: Create role credentials description: >- ### Authorization A service token or OAuth token must have at least one of the following access or scopes in order to use this API endpoint: **Service Token Accesses** `create_production_branch_password`, `create_branch_password` **OAuth Scopes** | Resource | Scopes | | :------- | :---------- | | Organization | `manage_passwords`, `manage_production_branch_passwords` | | Database | `manage_passwords`, `manage_production_branch_passwords` | | Branch | `manage_passwords` | operationId: create_role parameters: - name: organization in: path required: true description: The name of the organization that owns this resource schema: type: string - name: database in: path required: true description: The name of the database that owns this resource schema: type: string - name: branch in: path required: true description: The name of the branch that owns this resource schema: type: string requestBody: content: application/json: schema: type: object properties: name: type: string description: The name of the role ttl: type: integer description: Time to live in seconds inherited_roles: type: array items: type: string enum: - pscale_managed - pg_checkpoint - pg_create_subscription - pg_maintain - pg_monitor - pg_read_all_data - pg_read_all_settings - pg_read_all_stats - pg_signal_backend - pg_stat_scan_tables - pg_use_reserved_connections - pg_write_all_data - postgres description: Roles to inherit from additionalProperties: false responses: '200': description: Returns the new credentials headers: {} content: application/json: schema: type: object properties: id: type: string description: The ID of the role name: type: string description: The name of the role access_host_url: type: string description: The database connection string private_access_host_url: type: string description: The database connection string for private connections private_connection_service_name: type: string description: The service name to set up private connectivity username: type: string description: The database user name password: type: string description: The plain text password, available only after create database_name: type: string description: The database name created_at: type: string description: When the role was created updated_at: type: string description: When the role was updated deleted_at: type: string description: When the role was deleted expires_at: type: string description: When the role expires dropped_at: type: string description: When the role was dropped disabled_at: type: string description: When the role was disabled drop_failed: type: string description: Error message available when dropping the role fails expired: type: boolean description: True if the credentials are expired default: type: boolean description: Whether the role is the default postgres user ttl: type: integer description: Number of seconds before the credentials expire inherited_roles: items: type: string enum: - pscale_managed - pg_checkpoint - pg_create_subscription - pg_maintain - pg_monitor - pg_read_all_data - pg_read_all_settings - pg_read_all_stats - pg_signal_backend - pg_stat_scan_tables - pg_use_reserved_connections - pg_write_all_data - postgres type: array description: Database roles these credentials inherit branch: type: object properties: id: type: string description: The ID for the resource name: type: string description: The name for the resource created_at: type: string description: When the resource was created updated_at: type: string description: When the resource was last updated deleted_at: type: string description: When the resource was deleted, if deleted additionalProperties: false required: - id - name - created_at - updated_at - deleted_at actor: type: object properties: id: type: string description: The ID of the actor display_name: type: string description: The name of the actor avatar_url: type: string description: The URL of the actor's avatar additionalProperties: false required: - id - display_name - avatar_url additionalProperties: false required: - id - name - access_host_url - private_access_host_url - private_connection_service_name - username - password - database_name - created_at - updated_at - deleted_at - expires_at - dropped_at - disabled_at - drop_failed - expired - default - ttl - inherited_roles - branch - actor '401': description: Unauthorized '403': description: Forbidden '404': description: Not Found '500': description: Internal Server Error components: securitySchemes: ApiKeyHeader: type: apiKey in: header name: Authorization ```` --- > To find navigation and other pages in this documentation, fetch the llms.txt file at: https://planetscale.com/llms.txt --- # Source: https://planetscale.com/docs/api/reference/create_service_token.md # Create a service token > Create a new service token for the organization. ### Authorization A service token must have at least one of the following access in order to use this API endpoint: **Service Token Accesses** `write_service_tokens` ## OpenAPI ````yaml post /organizations/{organization}/service-tokens openapi: 3.0.1 info: title: PlanetScale API description: |-PlanetScale API
© 2025 PlanetScale, Inc. version: v1 x-copyright: '© 2025 PlanetScale, Inc.' servers: - url: https://api.planetscale.com/v1 security: - ApiKeyHeader: - Authorization tags: - name: Backups description: |2 Resources for managing database branch backups. - name: Branch changes description: |2 Resources for managing cluster changes. - name: Cluster extensions description: |2 Resources for managing cluster extension configuration. - name: Branch log signatures description: |2 Resources for retrieving branch log access signatures. - name: Cluster parameters description: |2 Resources for managing cluster configuration parameters. - name: Database branch keyspaces description: |2 Resources for managing keyspaces. - name: Database branch passwords description: |2 Resources for managing database branch passwords. - name: Database Postgres IP restrictions description: |2 Resources for managing Postgres IP restriction entries for databases. Note: This endpoint is only available for PostgreSQL databases. For MySQL databases, use the Database Branch Passwords endpoint. - name: Databases description: |2 Resources for managing databases within an organization. - name: Keyspace VSchemas description: |2 Resources for managing VSchemas within a keyspace. - name: OAuth applications description: |2 Resources for managing OAuth applications. - name: OAuth tokens description: |2 Resources for managing OAuth tokens. - name: Organization members description: |2 Resources for managing organization members and their roles. - name: Organizations description: |2 Resources for managing organizations. - name: Bouncer resizes description: |2 Resources for managing Postgres bouncer resize requests. - name: Bouncers description: |2 Resources for managing postgres bouncers. - name: Roles description: |2 Resources for managing role credentials. - name: Query Insights reports description: |2 Resources for downloading query insights data. - name: Service tokens description: |2 API endpoints for managing service tokens within an organization. - name: Users description: |2 Resources for managing users. - name: Workflows description: |2 API endpoints for managing workflows. - name: Deploy requests description: |2 Resources for managing deploy requests. - name: Webhooks description: |2 Resources for managing database webhooks. - name: Invoices description: |2 Resources for managing invoices. - name: Organization teams description: |2 Resources for managing teams within an organization. Teams allow you to group members and grant them access to specific databases. Note: Teams managed through SSO/directory services cannot be modified via API. paths: /organizations/{organization}/service-tokens: post: tags: - Service tokens summary: Create a service token description: >+ Create a new service token for the organization. ### Authorization A service token must have at least one of the following access in order to use this API endpoint: **Service Token Accesses** `write_service_tokens` operationId: create_service_token parameters: - name: organization in: path required: true description: The name of the organization schema: type: string requestBody: content: application/json: schema: type: object properties: name: type: string description: The name of the service token additionalProperties: false responses: '200': description: Returns the created service token with the plaintext token headers: {} content: application/json: schema: type: object properties: id: type: string description: The ID of the service token name: type: string description: The name of the service token display_name: type: string description: The display name of the service token token: type: string description: The plaintext token. Available only after create. plain_text_refresh_token: type: string description: The plaintext refresh token. Available only after create. avatar_url: type: string description: The image source for the avatar of the service token created_at: type: string description: When the service token was created updated_at: type: string description: When the service token was last updated expires_at: type: string description: When the service token will expire last_used_at: type: string description: When the service token was last used actor_id: type: string description: >- The ID of the actor on whose behalf the service token was created actor_display_name: type: string description: >- The name of the actor on whose behalf the service token was created actor_type: type: string description: >- The type of the actor on whose behalf the service token was created service_token_accesses: type: array items: type: object properties: id: type: string description: The ID of the service token access access: type: string description: The name of the service token access description: type: string description: The description of the service token access resource_name: type: string description: >- The name of the resource the service token access gives access to resource_id: type: string description: >- The ID of the resource the service token access gives access to resource_type: type: string description: >- The type of the resource the service token access gives access to resource: type: object properties: id: type: string description: The ID for the resource name: type: string description: The name for the resource created_at: type: string description: When the resource was created updated_at: type: string description: When the resource was last updated deleted_at: type: string description: When the resource was deleted, if deleted additionalProperties: false required: - id - name - created_at - updated_at - deleted_at additionalProperties: false required: - id - access - description - resource_name - resource_id - resource_type - resource oauth_accesses_by_resource: type: object properties: database: type: object properties: databases: type: array items: type: object properties: name: type: string description: >- the name of the database the token has access to id: type: string description: >- the id of the database the token has access to organization: type: string description: the name of the database's organization url: type: string description: the planetscale app url for the database additionalProperties: false required: - name - id - organization - url accesses: type: array items: type: object properties: name: type: string description: The name of the access scope description: type: string description: The scope description additionalProperties: false required: - name - description additionalProperties: false required: - databases - accesses organization: type: object properties: organizations: type: array items: type: object properties: name: type: string description: the name of the organization id: type: string description: the id of the organization url: type: string description: the planetscale app url for the organization additionalProperties: false required: - name - id - url accesses: type: array items: type: object properties: name: type: string description: The name of the access scope description: type: string description: The scope description additionalProperties: false required: - name - description additionalProperties: false required: - organizations - accesses branch: type: object properties: branches: type: array items: type: object properties: name: type: string description: the name of the branch id: type: string description: the id of the branch database: type: string description: >- the name of the database the branch belongs to organization: type: string description: >- the name of the organization the branch belongs to url: type: string description: the planetscale app url for the branch additionalProperties: false required: - name - id - database - organization - url accesses: type: array items: type: object properties: name: type: string description: The name of the access scope description: type: string description: The scope description additionalProperties: false required: - name - description additionalProperties: false required: - branches - accesses user: type: object properties: users: type: array items: type: object properties: name: type: string description: the name of the user id: type: string description: the id of the user additionalProperties: false required: - name - id accesses: type: array items: type: object properties: name: type: string description: The name of the access scope description: type: string description: The scope description additionalProperties: false required: - name - description additionalProperties: false required: - users - accesses additionalProperties: false required: - database - organization - branch - user additionalProperties: false required: - id - name - display_name - token - plain_text_refresh_token - avatar_url - created_at - updated_at - expires_at - last_used_at - actor_id - actor_display_name - actor_type - service_token_accesses - oauth_accesses_by_resource '401': description: Unauthorized '403': description: Forbidden '404': description: Not Found '500': description: Internal Server Error components: securitySchemes: ApiKeyHeader: type: apiKey in: header name: Authorization ```` --- > To find navigation and other pages in this documentation, fetch the llms.txt file at: https://planetscale.com/llms.txt --- # Source: https://planetscale.com/docs/api/reference/create_webhook.md # Create a webhook > ### Authorization A service token or OAuth token must have at least one of the following access or scopes in order to use this API endpoint: **Service Token Accesses** `write_database` **OAuth Scopes** | Resource | Scopes | | :------- | :---------- | | Organization | `write_databases` | | Database | `write_database` | ## OpenAPI ````yaml post /organizations/{organization}/databases/{database}/webhooks openapi: 3.0.1 info: title: PlanetScale API description: |-PlanetScale API
© 2025 PlanetScale, Inc. version: v1 x-copyright: '© 2025 PlanetScale, Inc.' servers: - url: https://api.planetscale.com/v1 security: - ApiKeyHeader: - Authorization tags: - name: Backups description: |2 Resources for managing database branch backups. - name: Branch changes description: |2 Resources for managing cluster changes. - name: Cluster extensions description: |2 Resources for managing cluster extension configuration. - name: Branch log signatures description: |2 Resources for retrieving branch log access signatures. - name: Cluster parameters description: |2 Resources for managing cluster configuration parameters. - name: Database branch keyspaces description: |2 Resources for managing keyspaces. - name: Database branch passwords description: |2 Resources for managing database branch passwords. - name: Database Postgres IP restrictions description: |2 Resources for managing Postgres IP restriction entries for databases. Note: This endpoint is only available for PostgreSQL databases. For MySQL databases, use the Database Branch Passwords endpoint. - name: Databases description: |2 Resources for managing databases within an organization. - name: Keyspace VSchemas description: |2 Resources for managing VSchemas within a keyspace. - name: OAuth applications description: |2 Resources for managing OAuth applications. - name: OAuth tokens description: |2 Resources for managing OAuth tokens. - name: Organization members description: |2 Resources for managing organization members and their roles. - name: Organizations description: |2 Resources for managing organizations. - name: Bouncer resizes description: |2 Resources for managing Postgres bouncer resize requests. - name: Bouncers description: |2 Resources for managing postgres bouncers. - name: Roles description: |2 Resources for managing role credentials. - name: Query Insights reports description: |2 Resources for downloading query insights data. - name: Service tokens description: |2 API endpoints for managing service tokens within an organization. - name: Users description: |2 Resources for managing users. - name: Workflows description: |2 API endpoints for managing workflows. - name: Deploy requests description: |2 Resources for managing deploy requests. - name: Webhooks description: |2 Resources for managing database webhooks. - name: Invoices description: |2 Resources for managing invoices. - name: Organization teams description: |2 Resources for managing teams within an organization. Teams allow you to group members and grant them access to specific databases. Note: Teams managed through SSO/directory services cannot be modified via API. paths: /organizations/{organization}/databases/{database}/webhooks: post: tags: - Webhooks summary: Create a webhook description: >- ### Authorization A service token or OAuth token must have at least one of the following access or scopes in order to use this API endpoint: **Service Token Accesses** `write_database` **OAuth Scopes** | Resource | Scopes | | :------- | :---------- | | Organization | `write_databases` | | Database | `write_database` | operationId: create_webhook parameters: - name: organization in: path required: true description: The name of the organization schema: type: string - name: database in: path required: true description: The name of the database schema: type: string requestBody: content: application/json: schema: type: object properties: url: type: string description: The URL the webhook will send events to enabled: type: boolean description: Whether the webhook should be enabled events: type: array items: type: string description: The events this webhook should subscribe to additionalProperties: false required: - url responses: '201': description: Returns the created webhook headers: {} content: application/json: schema: type: object properties: id: type: string description: The ID of the webhook url: type: string description: The URL the webhook will send events to secret: type: string description: The secret used to sign the webhook payloads enabled: type: boolean description: Whether the webhook is enabled last_sent_result: type: string description: The last result sent by the webhook last_sent_success: type: boolean description: Whether the last sent was successful last_sent_at: type: string description: When the last event was sent created_at: type: string description: When the webhook was created updated_at: type: string description: When the webhook was updated events: items: type: string enum: - branch.ready - branch.anomaly - branch.primary_promoted - branch.schema_recommendation - branch.sleeping - branch.start_maintenance - cluster.storage - database.access_request - deploy_request.closed - deploy_request.errored - deploy_request.in_progress - deploy_request.opened - deploy_request.pending_cutover - deploy_request.queued - deploy_request.reverted - deploy_request.schema_applied - keyspace.storage - webhook.test type: array description: The events this webhook subscribes to additionalProperties: false required: - id - url - secret - enabled - last_sent_result - last_sent_success - last_sent_at - created_at - updated_at - events '401': description: Unauthorized '403': description: Forbidden '404': description: Not Found '500': description: Internal Server Error components: securitySchemes: ApiKeyHeader: type: apiKey in: header name: Authorization ```` --- > To find navigation and other pages in this documentation, fetch the llms.txt file at: https://planetscale.com/llms.txt --- # Source: https://planetscale.com/docs/api/reference/create_workflow.md # Create a workflow > ## OpenAPI ````yaml post /organizations/{organization}/databases/{database}/workflows openapi: 3.0.1 info: title: PlanetScale API description: |-PlanetScale API
© 2025 PlanetScale, Inc. version: v1 x-copyright: '© 2025 PlanetScale, Inc.' servers: - url: https://api.planetscale.com/v1 security: - ApiKeyHeader: - Authorization tags: - name: Backups description: |2 Resources for managing database branch backups. - name: Branch changes description: |2 Resources for managing cluster changes. - name: Cluster extensions description: |2 Resources for managing cluster extension configuration. - name: Branch log signatures description: |2 Resources for retrieving branch log access signatures. - name: Cluster parameters description: |2 Resources for managing cluster configuration parameters. - name: Database branch keyspaces description: |2 Resources for managing keyspaces. - name: Database branch passwords description: |2 Resources for managing database branch passwords. - name: Database Postgres IP restrictions description: |2 Resources for managing Postgres IP restriction entries for databases. Note: This endpoint is only available for PostgreSQL databases. For MySQL databases, use the Database Branch Passwords endpoint. - name: Databases description: |2 Resources for managing databases within an organization. - name: Keyspace VSchemas description: |2 Resources for managing VSchemas within a keyspace. - name: OAuth applications description: |2 Resources for managing OAuth applications. - name: OAuth tokens description: |2 Resources for managing OAuth tokens. - name: Organization members description: |2 Resources for managing organization members and their roles. - name: Organizations description: |2 Resources for managing organizations. - name: Bouncer resizes description: |2 Resources for managing Postgres bouncer resize requests. - name: Bouncers description: |2 Resources for managing postgres bouncers. - name: Roles description: |2 Resources for managing role credentials. - name: Query Insights reports description: |2 Resources for downloading query insights data. - name: Service tokens description: |2 API endpoints for managing service tokens within an organization. - name: Users description: |2 Resources for managing users. - name: Workflows description: |2 API endpoints for managing workflows. - name: Deploy requests description: |2 Resources for managing deploy requests. - name: Webhooks description: |2 Resources for managing database webhooks. - name: Invoices description: |2 Resources for managing invoices. - name: Organization teams description: |2 Resources for managing teams within an organization. Teams allow you to group members and grant them access to specific databases. Note: Teams managed through SSO/directory services cannot be modified via API. paths: /organizations/{organization}/databases/{database}/workflows: post: tags: - Workflows summary: Create a workflow description: |+ operationId: create_workflow parameters: - name: organization in: path required: true description: The name of the organization the workflow belongs to schema: type: string - name: database in: path required: true description: The name of the database the workflow belongs to schema: type: string requestBody: content: application/json: schema: type: object properties: name: type: string description: Name the workflow source_keyspace: type: string description: Name of the source keyspace target_keyspace: type: string description: Name of the target keyspace global_keyspace: type: string description: Name of the global sequence keyspace defer_secondary_keys: type: boolean description: Defer secondary keys on_ddl: type: string enum: - IGNORE - STOP - EXEC - EXEC_IGNORE description: The behavior when DDL changes during the workflow tables: type: array items: type: string description: List of tables to move additionalProperties: false required: - name - source_keyspace - target_keyspace - tables responses: '201': description: Returns the workflow headers: {} content: application/json: schema: type: object properties: id: type: string description: The ID of the workflow name: type: string description: The name of the workflow number: type: integer description: The sequence number of the workflow state: type: string enum: - pending - copying - running - stopped - verifying_data - verified_data - switching_replicas - switched_replicas - switching_primaries - switched_primaries - reversing_traffic - reversing_traffic_for_cancel - cutting_over - cutover - reversed_cutover - completed - cancelling - cancelled - error description: The state of the workflow created_at: type: string description: When the workflow was created updated_at: type: string description: When the workflow was last updated started_at: type: string description: When the workflow was started completed_at: type: string description: When the workflow was completed cancelled_at: type: string description: When the workflow was cancelled reversed_at: type: string description: When the workflow was reversed retried_at: type: string description: When the workflow was retried data_copy_completed_at: type: string description: When the data copy was completed cutover_at: type: string description: When the cutover was completed replicas_switched: type: boolean description: Whether or not the replicas have been switched primaries_switched: type: boolean description: Whether or not the primaries have been switched switch_replicas_at: type: string description: When the replicas were switched switch_primaries_at: type: string description: When the primaries were switched verify_data_at: type: string description: When the data was verified workflow_type: type: string enum: - move_tables description: The type of the workflow workflow_subtype: type: string description: The subtype of the workflow defer_secondary_keys: type: boolean description: Whether or not secondary keys are deferred on_ddl: type: string enum: - IGNORE - STOP - EXEC - EXEC_IGNORE description: The behavior when DDL changes during the workflow workflow_errors: type: string description: The errors that occurred during the workflow may_retry: type: boolean description: Whether or not the workflow may be retried may_restart: type: boolean description: Whether or not the workflow may be restarted verified_data_stale: type: boolean description: Whether or not the verified data is stale sequence_tables_applied: type: boolean description: Whether or not sequence tables have been created actor: type: object properties: id: type: string description: The ID of the actor display_name: type: string description: The name of the actor avatar_url: type: string description: The URL of the actor's avatar additionalProperties: false required: - id - display_name - avatar_url verify_data_by: type: object properties: id: type: string description: The ID of the actor display_name: type: string description: The name of the actor avatar_url: type: string description: The URL of the actor's avatar additionalProperties: false required: - id - display_name - avatar_url reversed_by: type: object properties: id: type: string description: The ID of the actor display_name: type: string description: The name of the actor avatar_url: type: string description: The URL of the actor's avatar additionalProperties: false required: - id - display_name - avatar_url switch_replicas_by: type: object properties: id: type: string description: The ID of the actor display_name: type: string description: The name of the actor avatar_url: type: string description: The URL of the actor's avatar additionalProperties: false required: - id - display_name - avatar_url switch_primaries_by: type: object properties: id: type: string description: The ID of the actor display_name: type: string description: The name of the actor avatar_url: type: string description: The URL of the actor's avatar additionalProperties: false required: - id - display_name - avatar_url cancelled_by: type: object properties: id: type: string description: The ID of the actor display_name: type: string description: The name of the actor avatar_url: type: string description: The URL of the actor's avatar additionalProperties: false required: - id - display_name - avatar_url completed_by: type: object properties: id: type: string description: The ID of the actor display_name: type: string description: The name of the actor avatar_url: type: string description: The URL of the actor's avatar additionalProperties: false required: - id - display_name - avatar_url retried_by: type: object properties: id: type: string description: The ID of the actor display_name: type: string description: The name of the actor avatar_url: type: string description: The URL of the actor's avatar additionalProperties: false required: - id - display_name - avatar_url cutover_by: type: object properties: id: type: string description: The ID of the actor display_name: type: string description: The name of the actor avatar_url: type: string description: The URL of the actor's avatar additionalProperties: false required: - id - display_name - avatar_url reversed_cutover_by: type: object properties: id: type: string description: The ID of the actor display_name: type: string description: The name of the actor avatar_url: type: string description: The URL of the actor's avatar additionalProperties: false required: - id - display_name - avatar_url branch: type: object properties: id: type: string description: The ID for the resource name: type: string description: The name for the resource created_at: type: string description: When the resource was created updated_at: type: string description: When the resource was last updated deleted_at: type: string description: When the resource was deleted, if deleted additionalProperties: false required: - id - name - created_at - updated_at - deleted_at source_keyspace: type: object properties: id: type: string description: The ID for the resource name: type: string description: The name for the resource created_at: type: string description: When the resource was created updated_at: type: string description: When the resource was last updated deleted_at: type: string description: When the resource was deleted, if deleted additionalProperties: false required: - id - name - created_at - updated_at - deleted_at target_keyspace: type: object properties: id: type: string description: The ID for the resource name: type: string description: The name for the resource created_at: type: string description: When the resource was created updated_at: type: string description: When the resource was last updated deleted_at: type: string description: When the resource was deleted, if deleted additionalProperties: false required: - id - name - created_at - updated_at - deleted_at global_keyspace: type: object properties: id: type: string description: The ID for the resource name: type: string description: The name for the resource created_at: type: string description: When the resource was created updated_at: type: string description: When the resource was last updated deleted_at: type: string description: When the resource was deleted, if deleted additionalProperties: false required: - id - name - created_at - updated_at - deleted_at additionalProperties: false required: - id - name - number - state - created_at - updated_at - started_at - completed_at - cancelled_at - reversed_at - retried_at - data_copy_completed_at - cutover_at - replicas_switched - primaries_switched - switch_replicas_at - switch_primaries_at - verify_data_at - workflow_type - workflow_subtype - defer_secondary_keys - on_ddl - workflow_errors - may_retry - may_restart - verified_data_stale - sequence_tables_applied - actor - verify_data_by - reversed_by - switch_replicas_by - switch_primaries_by - cancelled_by - completed_by - retried_by - cutover_by - reversed_cutover_by - branch - source_keyspace - target_keyspace - global_keyspace '401': description: Unauthorized '403': description: Forbidden '404': description: Not Found '500': description: Internal Server Error components: securitySchemes: ApiKeyHeader: type: apiKey in: header name: Authorization ```` --- > To find navigation and other pages in this documentation, fetch the llms.txt file at: https://planetscale.com/llms.txt --- # Source: https://planetscale.com/docs/postgres/dashboard.md # PlanetScale Postgres database dashboard > When you navigate to a database in your PlanetScale organization, you'll see a comprehensive view of your cluster health, performance metrics, and management options. You can filter this view by [branch](/docs/postgres/branching) by selecting from the branch dropdown at the top. From the dashboard you can review: * Your cluster's topology diagram * Real-time performance metrics * Summary and statistics * Connection management * Branch-specific views and controls ## Cluster topology The cluster topology diagram provides a visual representation of your PostgreSQL database infrastructure, including: * **Primary node**: The main database instance that handles all write operations * **Replica nodes**: Read-only copies of your primary database for improved read performance and high availability Each node includes information about the region, instance type, real-time resource utilization (CPU and memory percentage), and cluster size. If you had additional replicas beyond the 2 default, you'll see them in this diagram. ## Database summary The database summary section on the right-hand side displays key statistics about your PostgreSQL environment, including: * **PostgreSQL version**: Shows the current PostgreSQL version (e.g., "17.4") * **Tables**: Total number of tables across all schemas * **Branches**: Count of database branches in your environment * **CPU utilization**: Percentage of CPU currently used * **Next backup**: Shows when the next scheduled backup will occur (e.g., "in 8 hours") * **Total storage**: Amount of storage currently used Production branches are clearly marked with visual indicators and badges to distinguish them from development branches. The summary also shows the current state and health of each branch, making it easy to assess your database environment at a glance. ## Performance metrics The performance metrics section includes a dropdown to select different metrics and a time-series graph showing data over the selected time period. Available metrics include: * Query latency (shown as p95, p99, p50, and p99.9 percentiles) * Queries per second * Rows read * Rows written * Query errors You can select each metric from the dropdown to update the graph. There's also a "View all query insights" link to access more detailed query performance data. ### Slowest queries The "Slowest queries during the last 24 hours" section at the bottom of the dashboard shows a detailed table with: * **Query**: The actual SQL query text * **Count**: Number of times the query was executed * **p50 latency (ms)**: The median query execution time in milliseconds This helps you identify performance bottlenecks and queries that may need optimization. ## Connecting to your database The "**Connect**" button allows you to generate or reset your default credentials for your Postgres database. For more information, see the [Connecting documentation](/docs/postgres/connecting). ## Need help? Get help from [the PlanetScale Support team](https://support.planetscale.com/), or join our [GitHub discussion board](https://github.com/planetscale/discussion/discussions) to see how others are using PlanetScale. --- > To find navigation and other pages in this documentation, fetch the llms.txt file at: https://planetscale.com/llms.txt --- # Source: https://planetscale.com/docs/vitess/schema-changes/data-branching.md # Data branching® export const VimeoEmbed = ({id, title}) => { return ; }; ## Overview The PlanetScale Data Branching® feature allows you to create isolated copies of your database that include both the schema and data. This differs from our [regular branching feature](/docs/vitess/schema-changes/branching), which only includes the schema. ## Enable the Data Branching® feature for your database. Before you can use the feature, you have to enable it in your database settings page.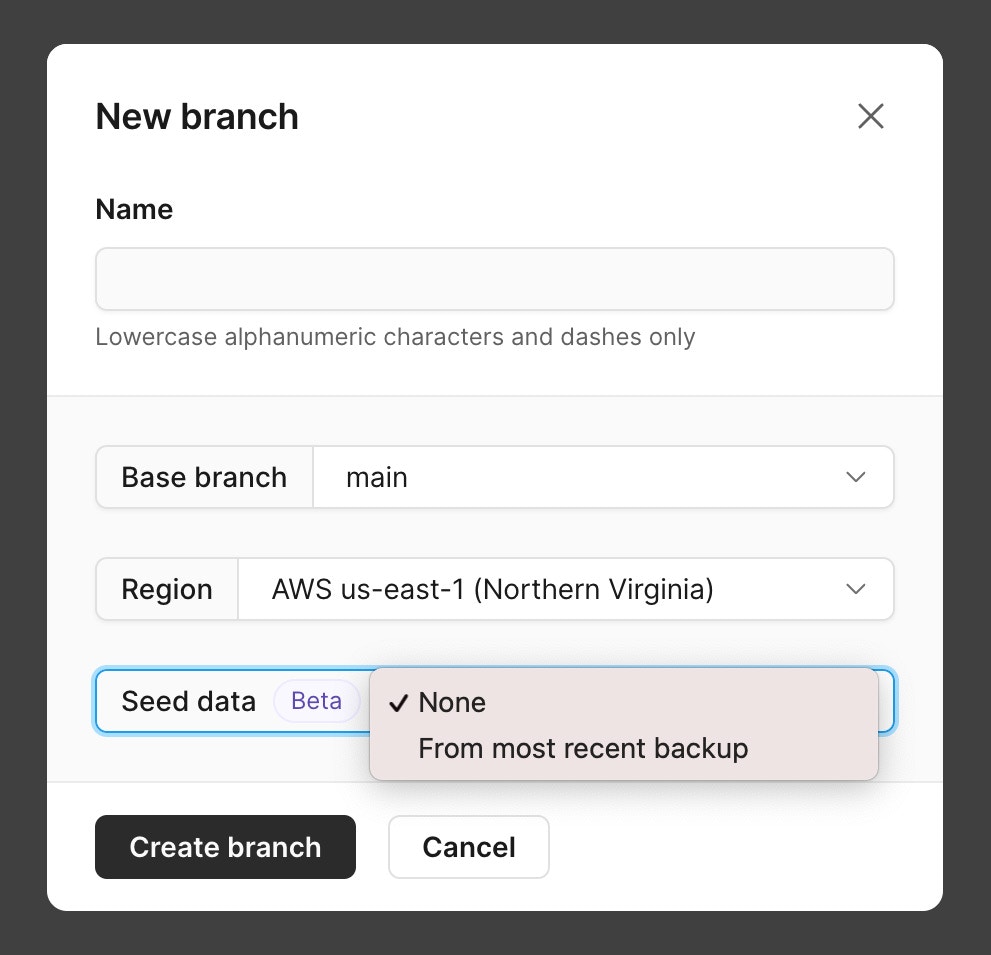
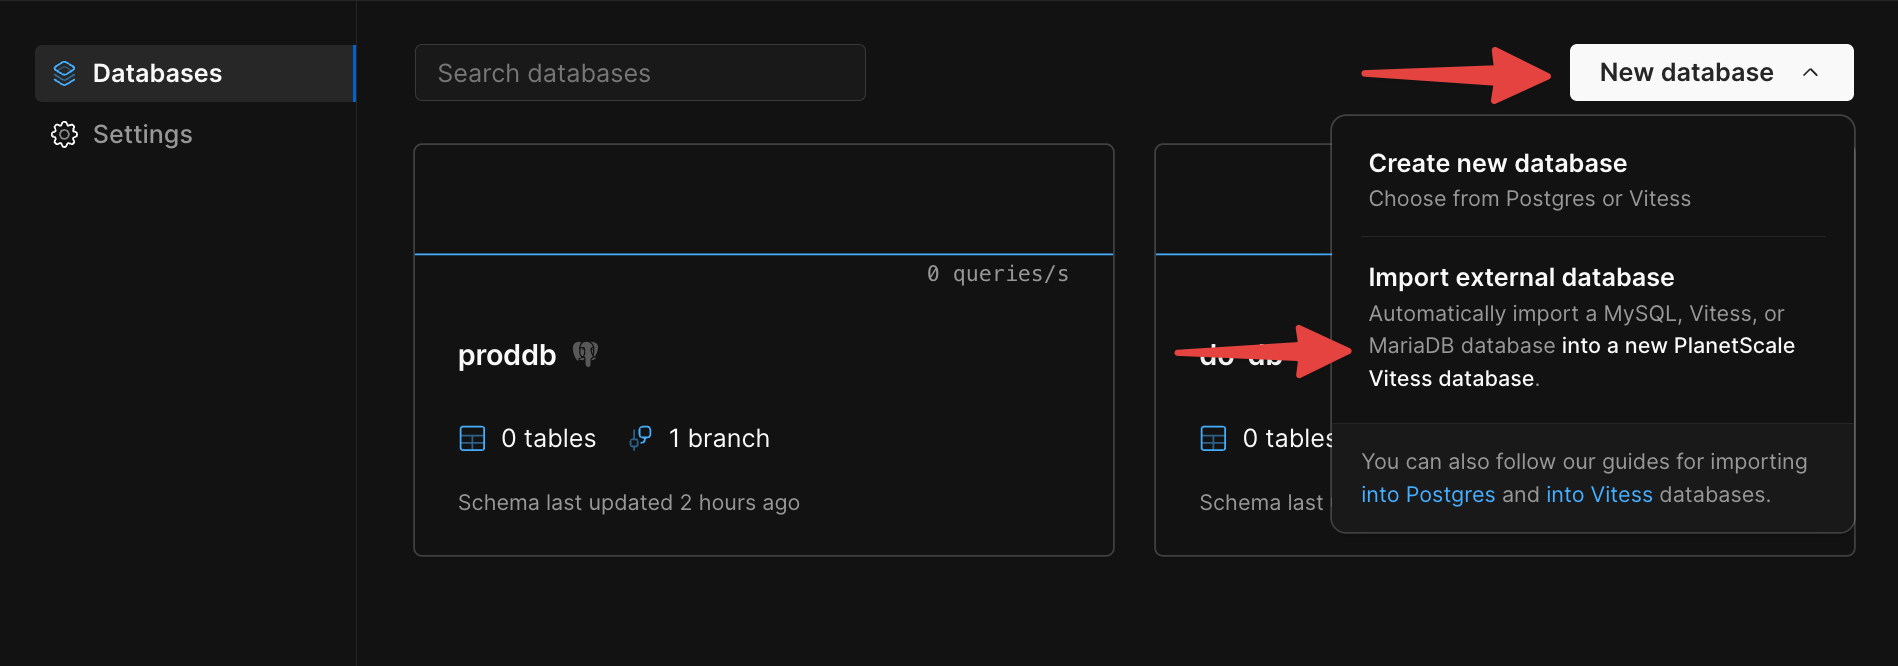
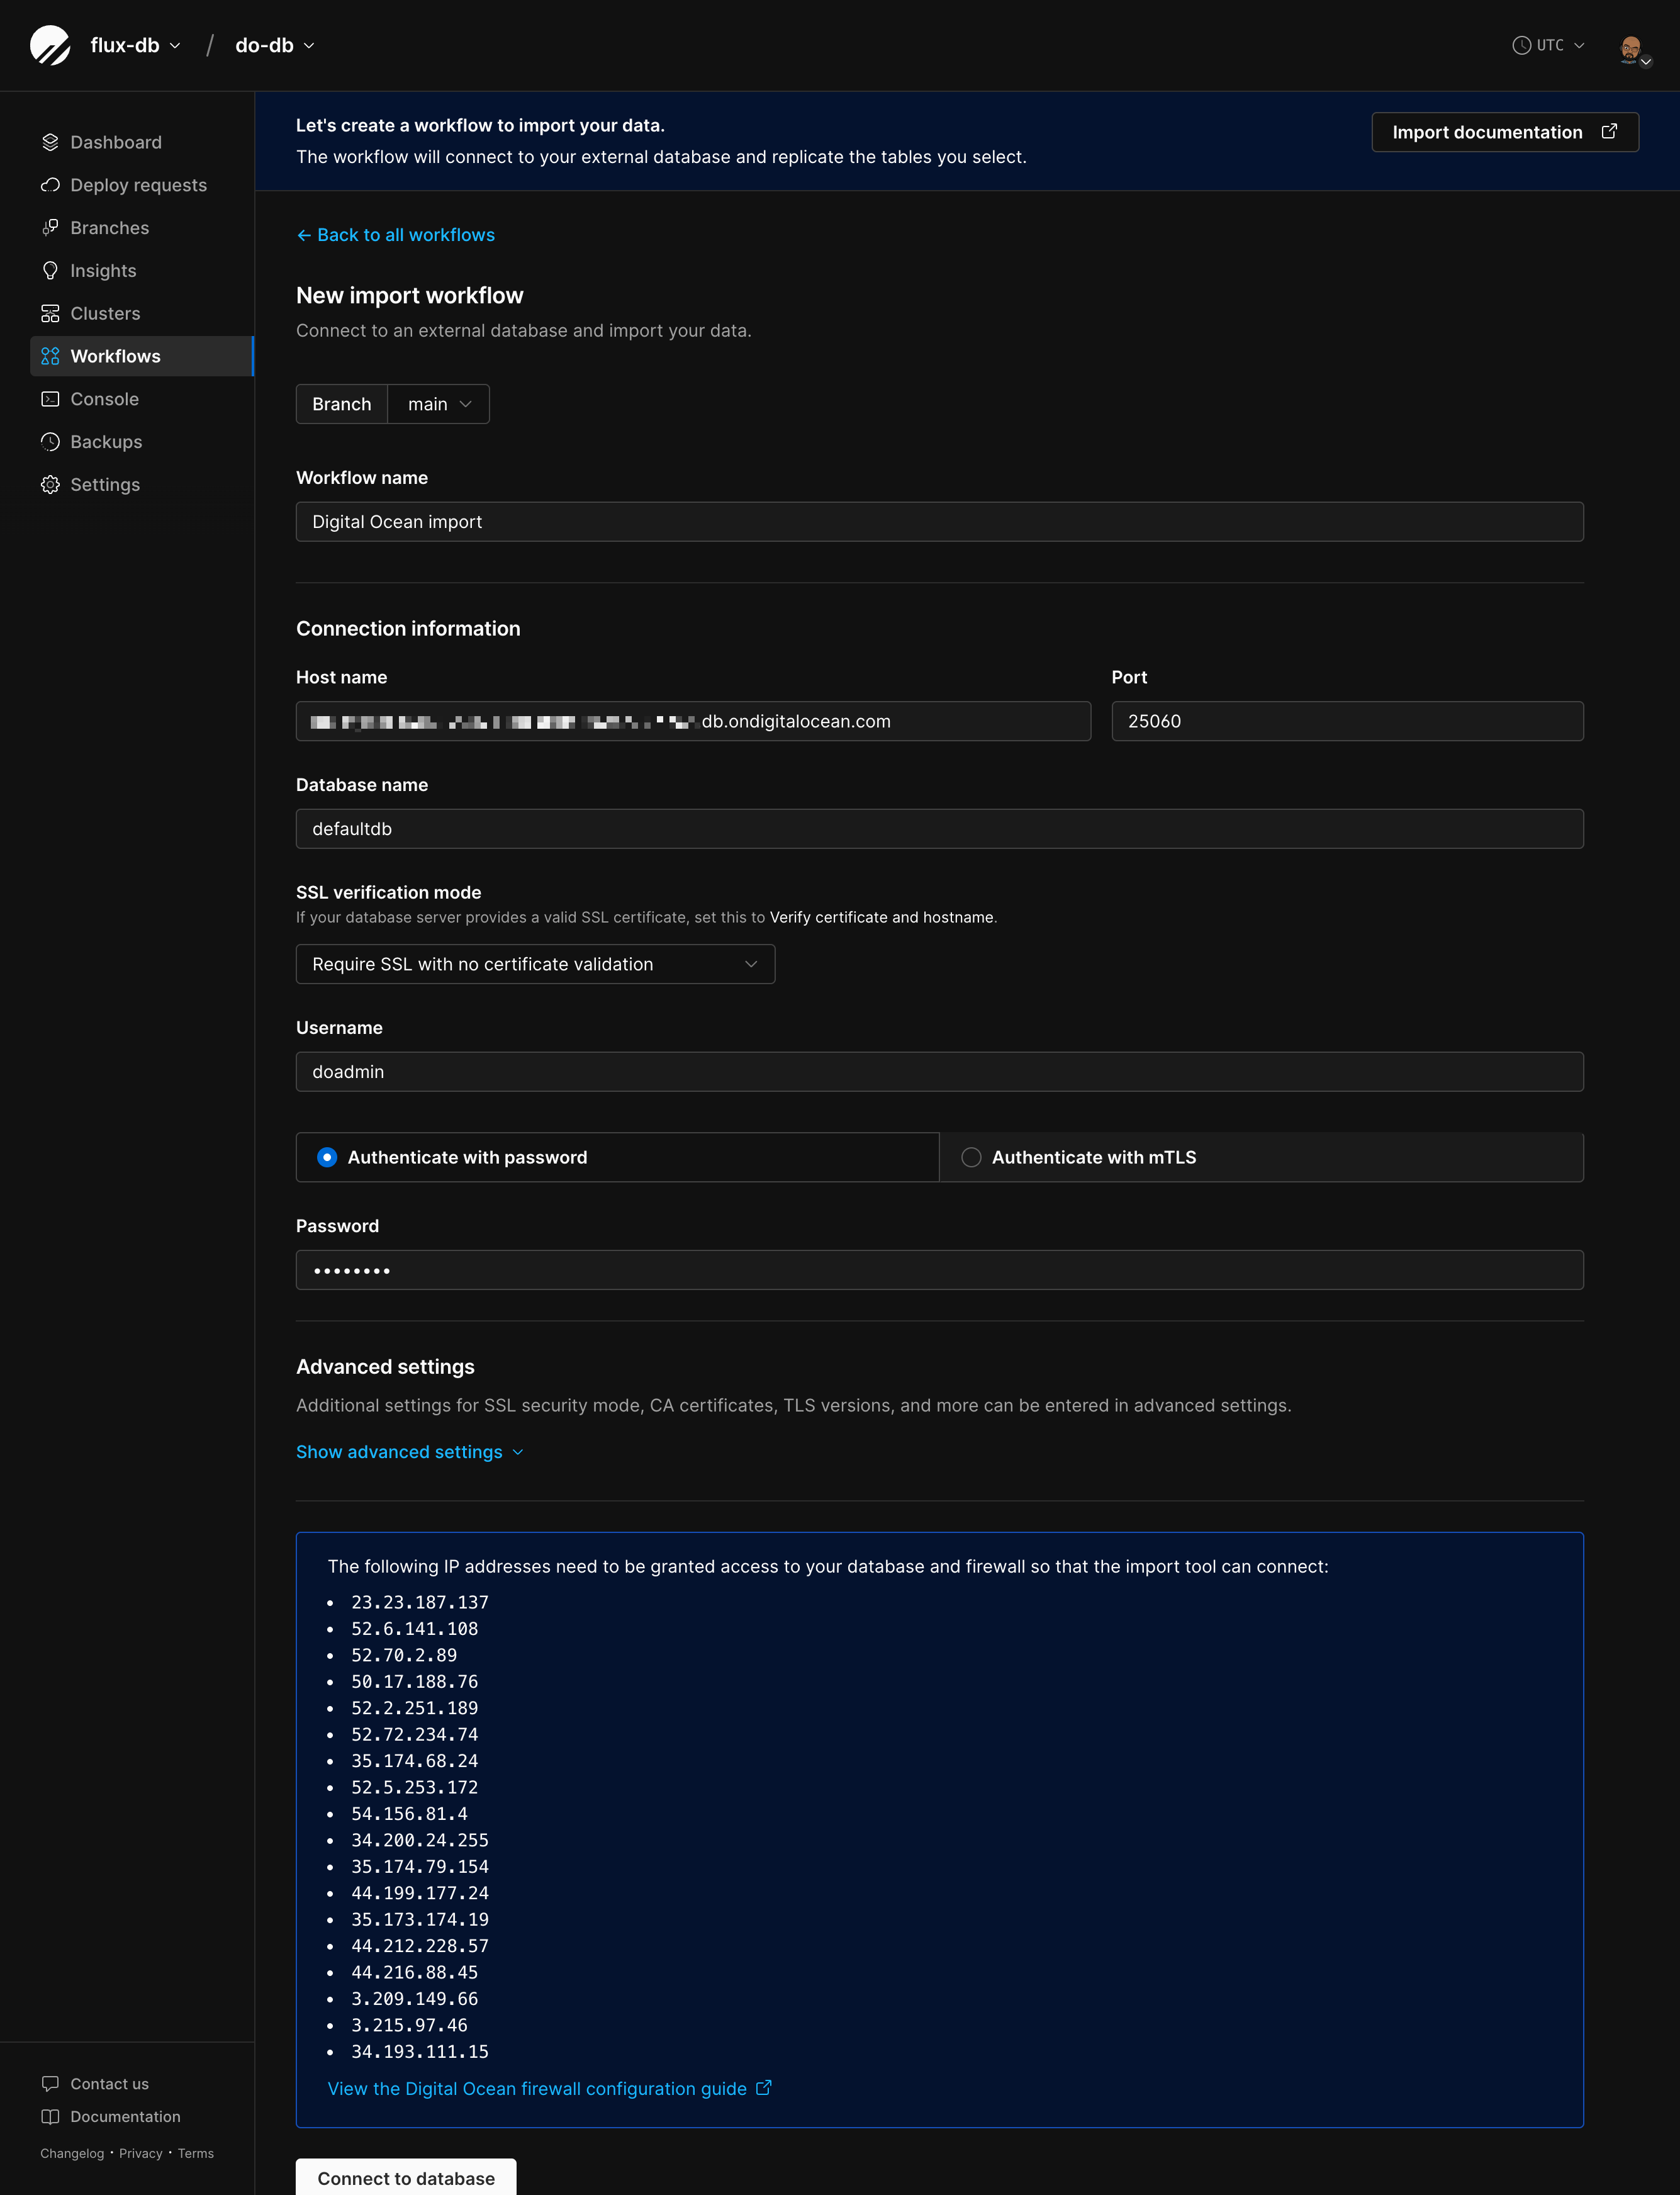 ## Step 3: Validate connection and schema
Once you've filled in your connection info, click "**Connect to database**". PlanetScale will run some checks on your external database.
### Connectivity check
We'll make sure we can connect to your database with the credentials and SSL/TLS settings you provided.
### Server configuration check
These server configuration values need to be set correctly for the import to work:
| Variable | Required Value | Documentation |
| :----------------------------- | :------------- | :----------------------------------------------------------------------------------------------------------------------------- |
| `gtid_mode` | `ON` | [Documentation](https://dev.mysql.com/doc/refman/5.7/en/replication-options-gtids.html#sysvar_gtid_mode) |
| `binlog_format` | `ROW` | [Documentation](https://dev.mysql.com/doc/refman/5.7/en/replication-options-binary-log.html#sysvar_binlog_format) |
| `binlog_row_image` | `FULL` | [Documentation](https://dev.mysql.com/doc/refman/8.0/en/replication-options-binary-log.html#sysvar_binlog_row_image) |
| `expire_logs_days`\* | `> 2` | [Documentation](https://dev.mysql.com/doc/refman/8.0/en/replication-options-binary-log.html#sysvar_expire_logs_days) |
| `binlog_expire_logs_seconds`\* | `> 172800` | [Documentation](https://dev.mysql.com/doc/refman/8.0/en/replication-options-binary-log.html#sysvar_binlog_expire_logs_seconds) |
**\*** Either `expire_logs_days` or `binlog_expire_logs_seconds` needs to be set. If both are set, `binlog_expire_logs_seconds` takes precedence.
### Schema compatibility check
We'll look for any compatibility issues with your schema:
* **Missing unique key** - All tables must have a unique, not-null key. See our [Changing unique keys documentation](/docs/vitess/schema-changes/onlineddl-change-unique-keys) for more info.
* **Invalid charset** - We support `utf8`, `utf8mb4`, `utf8mb3`, `latin1`, and `ascii`. Tables with other charsets will be flagged.
* **Table names with special characters** - Tables with characters outside the standard ASCII set aren't supported.
* **Views** - Views are detected but won't be imported. You can create them manually after the import finishes.
* **Unsupported storage engines** - Only `InnoDB` is supported.
* **Foreign key constraints** - Detected and flagged for special handling (see below).
### Handling validation errors
If validation fails, you'll see error messages with links to troubleshooting docs. You have two options:
1. **Fix the issues** - Go back to your external database, fix the configuration or schema issues, and try connecting again. [Contact support](https://planetscale.com/contact?initial=support) if you encounter trouble addressing the incompatibilities.
2. **Skip and continue** - For certain failures, you can proceed anyway. Not recommended since this may cause the import to fail later.
## Step 3: Validate connection and schema
Once you've filled in your connection info, click "**Connect to database**". PlanetScale will run some checks on your external database.
### Connectivity check
We'll make sure we can connect to your database with the credentials and SSL/TLS settings you provided.
### Server configuration check
These server configuration values need to be set correctly for the import to work:
| Variable | Required Value | Documentation |
| :----------------------------- | :------------- | :----------------------------------------------------------------------------------------------------------------------------- |
| `gtid_mode` | `ON` | [Documentation](https://dev.mysql.com/doc/refman/5.7/en/replication-options-gtids.html#sysvar_gtid_mode) |
| `binlog_format` | `ROW` | [Documentation](https://dev.mysql.com/doc/refman/5.7/en/replication-options-binary-log.html#sysvar_binlog_format) |
| `binlog_row_image` | `FULL` | [Documentation](https://dev.mysql.com/doc/refman/8.0/en/replication-options-binary-log.html#sysvar_binlog_row_image) |
| `expire_logs_days`\* | `> 2` | [Documentation](https://dev.mysql.com/doc/refman/8.0/en/replication-options-binary-log.html#sysvar_expire_logs_days) |
| `binlog_expire_logs_seconds`\* | `> 172800` | [Documentation](https://dev.mysql.com/doc/refman/8.0/en/replication-options-binary-log.html#sysvar_binlog_expire_logs_seconds) |
**\*** Either `expire_logs_days` or `binlog_expire_logs_seconds` needs to be set. If both are set, `binlog_expire_logs_seconds` takes precedence.
### Schema compatibility check
We'll look for any compatibility issues with your schema:
* **Missing unique key** - All tables must have a unique, not-null key. See our [Changing unique keys documentation](/docs/vitess/schema-changes/onlineddl-change-unique-keys) for more info.
* **Invalid charset** - We support `utf8`, `utf8mb4`, `utf8mb3`, `latin1`, and `ascii`. Tables with other charsets will be flagged.
* **Table names with special characters** - Tables with characters outside the standard ASCII set aren't supported.
* **Views** - Views are detected but won't be imported. You can create them manually after the import finishes.
* **Unsupported storage engines** - Only `InnoDB` is supported.
* **Foreign key constraints** - Detected and flagged for special handling (see below).
### Handling validation errors
If validation fails, you'll see error messages with links to troubleshooting docs. You have two options:
1. **Fix the issues** - Go back to your external database, fix the configuration or schema issues, and try connecting again. [Contact support](https://planetscale.com/contact?initial=support) if you encounter trouble addressing the incompatibilities.
2. **Skip and continue** - For certain failures, you can proceed anyway. Not recommended since this may cause the import to fail later.
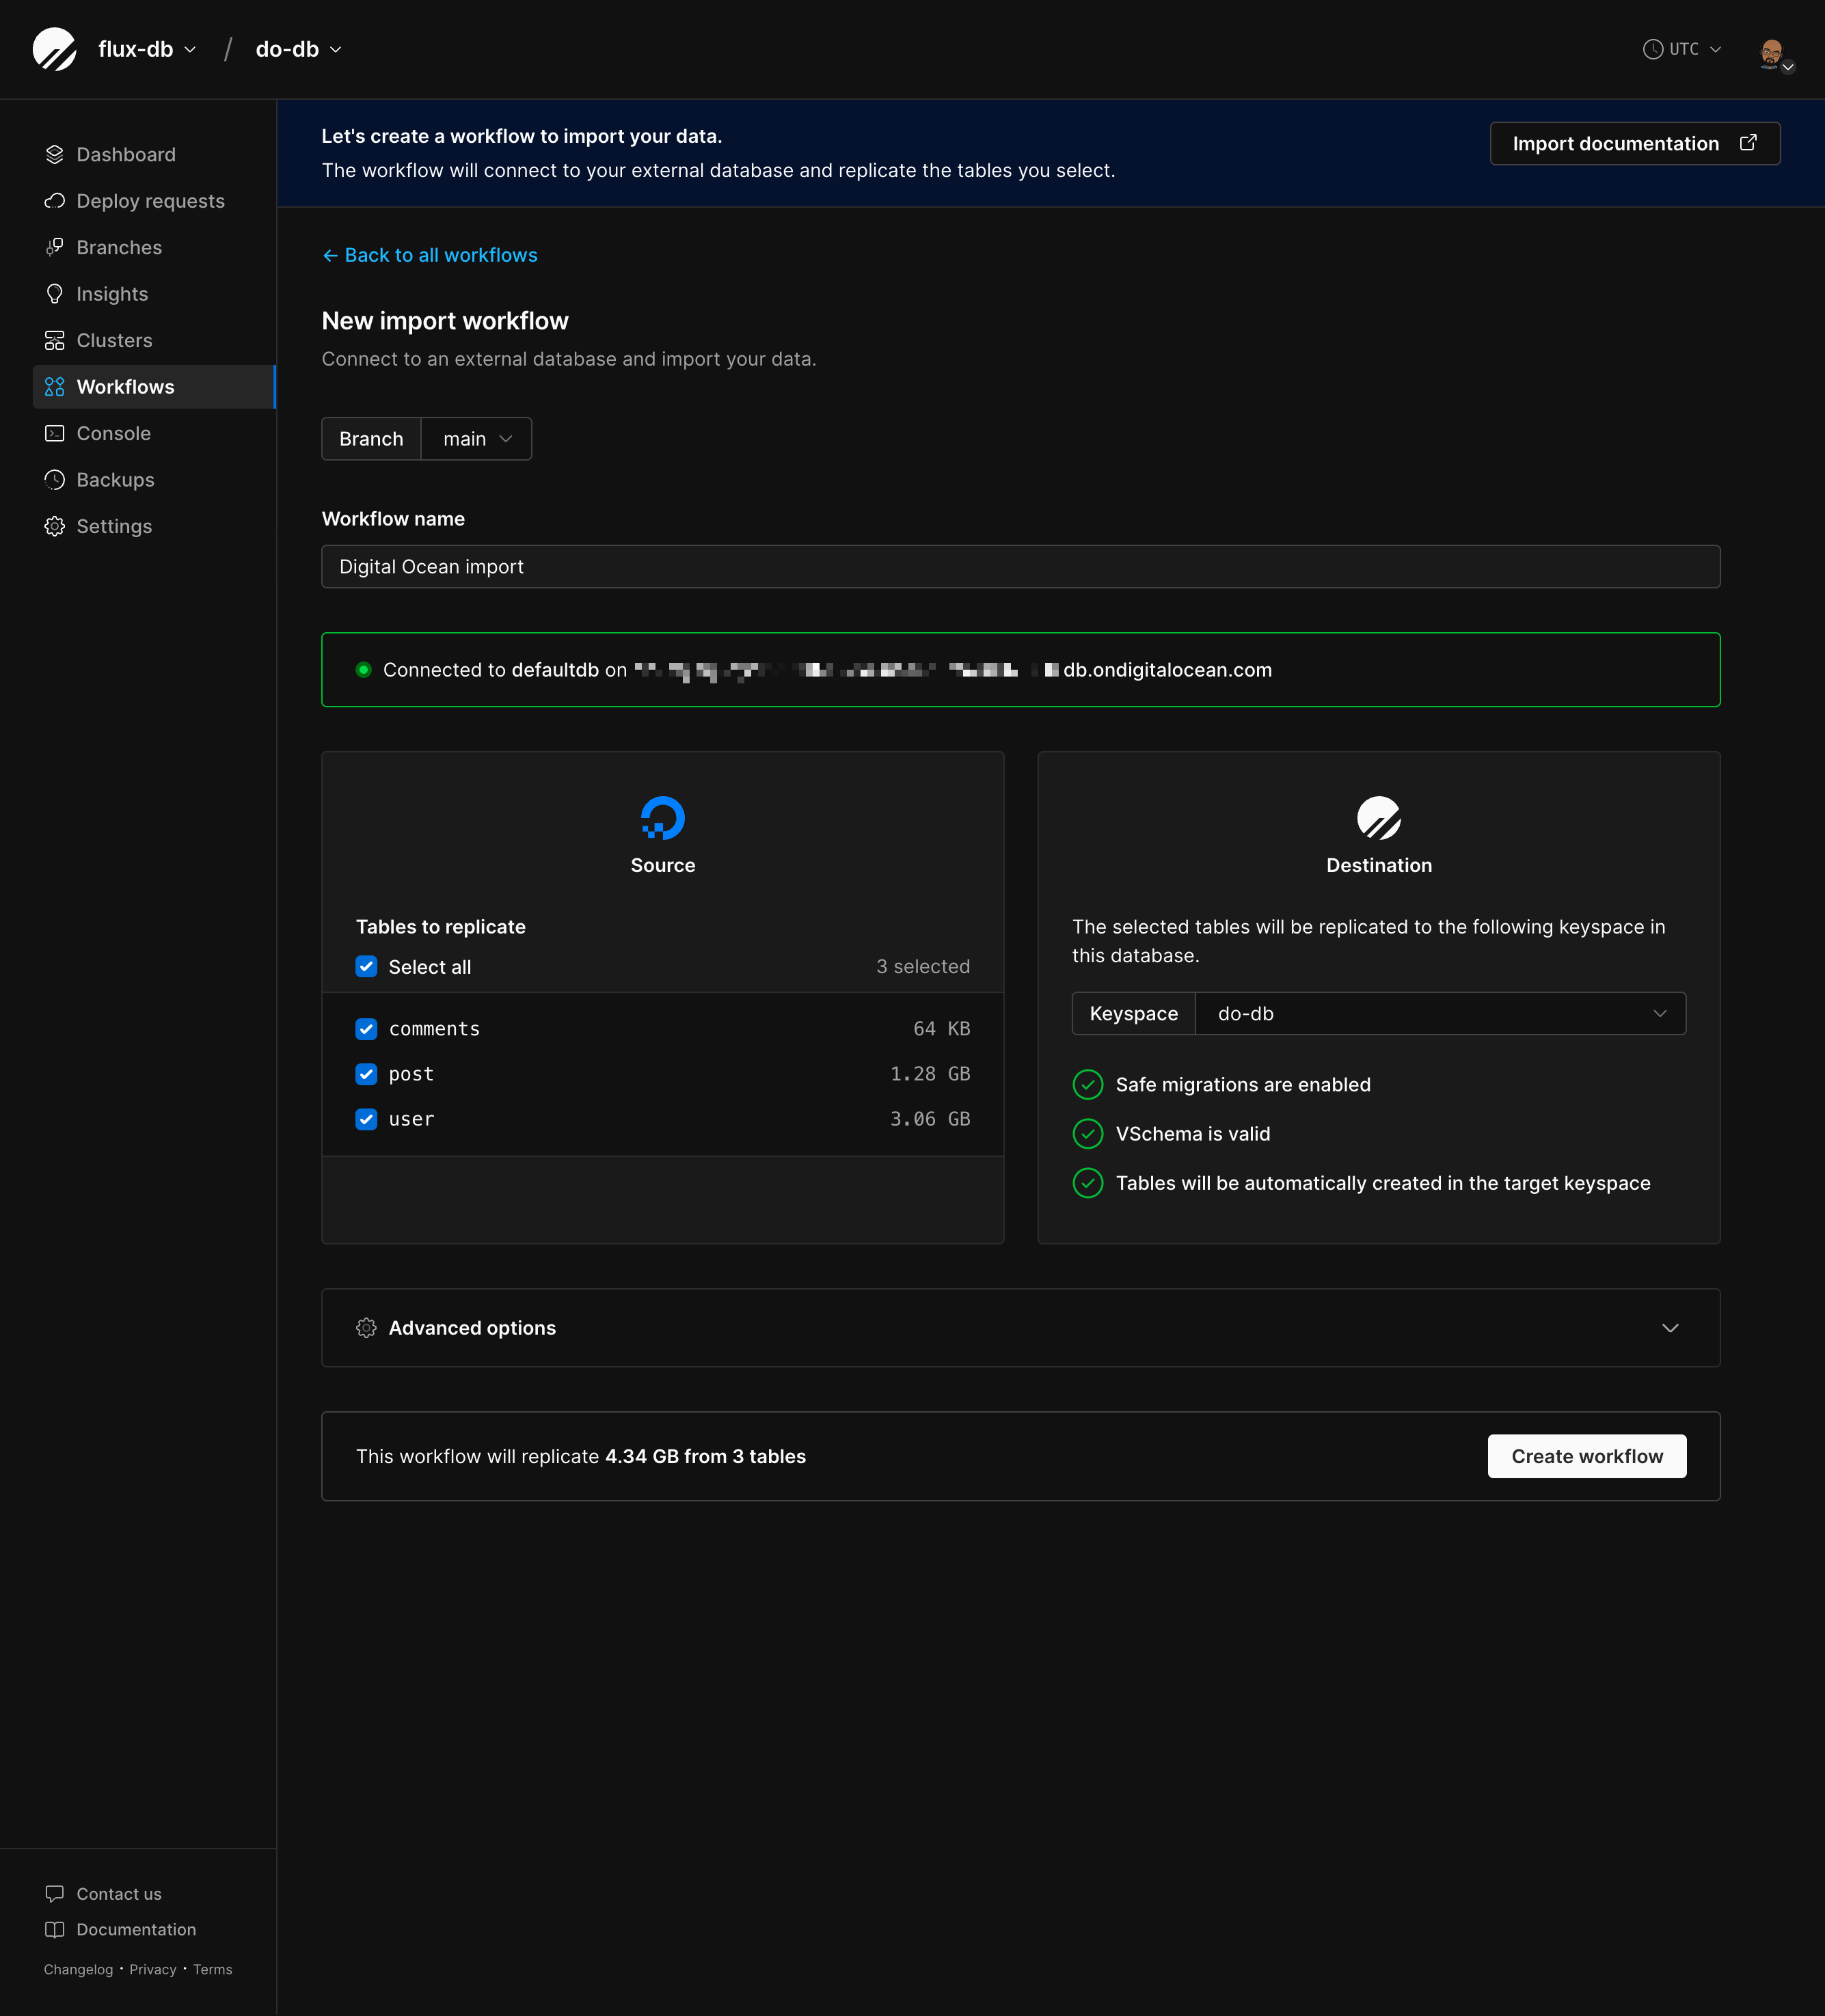 ### Advanced options
Click "**Advanced options**" to see additional settings that can optimize your import:
**Defer secondary index creation**
Checked by default. Creates secondary indexes (non-primary indexes) after copying data instead of during the initial copy.
* Why this helps: Maintaining many indexes while inserting data is slow. By deferring index creation until after all data is copied, your import can be significantly faster (often 2-3x faster for tables with multiple indexes).
* When it's disabled: Import will run slower. Automatically disabled for imports with foreign keys, since foreign key constraints require indexes to exist during the copy phase.
**DDL handling**
Controls what happens if schema changes (like `ALTER TABLE`, `ADD INDEX`, etc.) occur on your external database while the import is running.
* **STOP** (default, recommended) - The workflow stops immediately when schema changes are detected. You'll need to manually restart the workflow after reviewing the changes. This is the safest option because it lets you verify the schema changes won't cause issues before continuing.
* **IGNORE** - Schema changes are skipped and won't be applied to your PlanetScale database. Your import continues without interruption, but your schemas will diverge. Only use this if you're confident you don't need these changes or plan to apply them manually to your PlanetScale database later.
* **EXEC** - Schema changes are automatically applied to your PlanetScale database while the import continues running. If applying a schema change fails (for example, if it's not compatible with Vitess), the workflow stops and you'll need to restart it. Use this if you need schema changes to sync automatically but want safety checks.
* **EXEC\_IGNORE** - Attempts to apply schema changes but keeps running even if they fail.
### Advanced options
Click "**Advanced options**" to see additional settings that can optimize your import:
**Defer secondary index creation**
Checked by default. Creates secondary indexes (non-primary indexes) after copying data instead of during the initial copy.
* Why this helps: Maintaining many indexes while inserting data is slow. By deferring index creation until after all data is copied, your import can be significantly faster (often 2-3x faster for tables with multiple indexes).
* When it's disabled: Import will run slower. Automatically disabled for imports with foreign keys, since foreign key constraints require indexes to exist during the copy phase.
**DDL handling**
Controls what happens if schema changes (like `ALTER TABLE`, `ADD INDEX`, etc.) occur on your external database while the import is running.
* **STOP** (default, recommended) - The workflow stops immediately when schema changes are detected. You'll need to manually restart the workflow after reviewing the changes. This is the safest option because it lets you verify the schema changes won't cause issues before continuing.
* **IGNORE** - Schema changes are skipped and won't be applied to your PlanetScale database. Your import continues without interruption, but your schemas will diverge. Only use this if you're confident you don't need these changes or plan to apply them manually to your PlanetScale database later.
* **EXEC** - Schema changes are automatically applied to your PlanetScale database while the import continues running. If applying a schema change fails (for example, if it's not compatible with Vitess), the workflow stops and you'll need to restart it. Use this if you need schema changes to sync automatically but want safety checks.
* **EXEC\_IGNORE** - Attempts to apply schema changes but keeps running even if they fail.
 ### Workflow phases
Your import will go through these states:
1. **Pending** - Workflow created, not started yet
2. **Copying** - Copying initial data (you'll see per-table progress here)
3. **Running** - Replicating changes to keep databases in sync
4. **Verifying data** - Optional data verification
5. **Verified data** - Verification complete
6. **Switching replicas** - Moving replica traffic to PlanetScale
7. **Switched replicas** - Replica traffic now on PlanetScale
8. **Switching primaries** - Moving primary traffic to PlanetScale
9. **Switched primaries** - Primary traffic now on PlanetScale
10. **Completed** - Import done
11. **Error** - Something went wrong, check error messages or logs
**You can now connect your application to PlanetScale**
Once the workflow enters the **Running** (replication) phase, bidirectional replication is active. This means you can safely connect your application to PlanetScale for testing while your external database remains the authoritative source. Any writes to either database will be replicated to the other, allowing you to validate your application's behavior against PlanetScale without risk.
This is the ideal time to test your application end-to-end before switching traffic.
### Adding a replica host name (optional)
If your external database has read replicas, you can route read traffic to them instead of your primary database. This helps reduce load on your primary during the import.
**How this works:**
If your application is configured to send read traffic to replicas, you can continue this pattern while testing PlanetScale. Adding a replica hostname allows PlanetScale to proxy traffic to your external replicas during the import. This is useful when you want to test PlanetScale with read traffic going to your replicas while writes continue to your primary.
### Workflow phases
Your import will go through these states:
1. **Pending** - Workflow created, not started yet
2. **Copying** - Copying initial data (you'll see per-table progress here)
3. **Running** - Replicating changes to keep databases in sync
4. **Verifying data** - Optional data verification
5. **Verified data** - Verification complete
6. **Switching replicas** - Moving replica traffic to PlanetScale
7. **Switched replicas** - Replica traffic now on PlanetScale
8. **Switching primaries** - Moving primary traffic to PlanetScale
9. **Switched primaries** - Primary traffic now on PlanetScale
10. **Completed** - Import done
11. **Error** - Something went wrong, check error messages or logs
**You can now connect your application to PlanetScale**
Once the workflow enters the **Running** (replication) phase, bidirectional replication is active. This means you can safely connect your application to PlanetScale for testing while your external database remains the authoritative source. Any writes to either database will be replicated to the other, allowing you to validate your application's behavior against PlanetScale without risk.
This is the ideal time to test your application end-to-end before switching traffic.
### Adding a replica host name (optional)
If your external database has read replicas, you can route read traffic to them instead of your primary database. This helps reduce load on your primary during the import.
**How this works:**
If your application is configured to send read traffic to replicas, you can continue this pattern while testing PlanetScale. Adding a replica hostname allows PlanetScale to proxy traffic to your external replicas during the import. This is useful when you want to test PlanetScale with read traffic going to your replicas while writes continue to your primary.
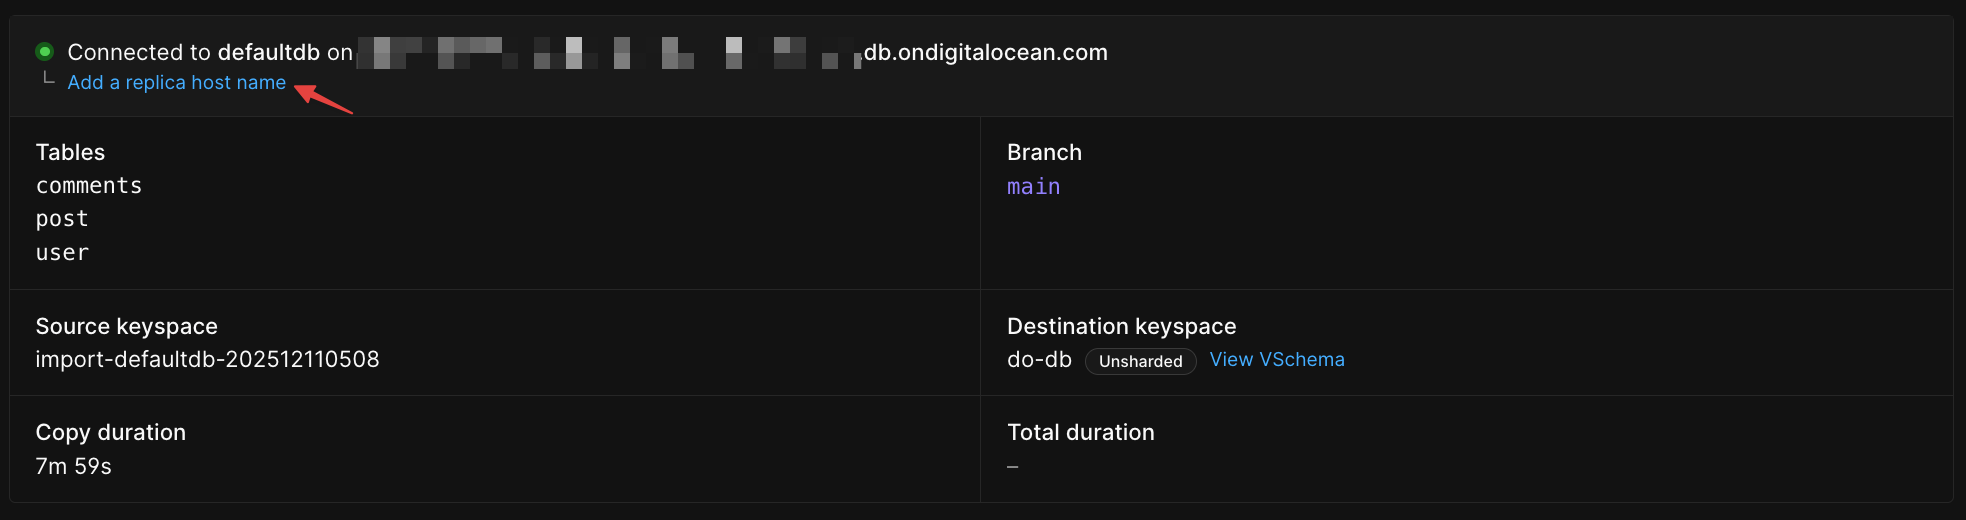 ### Verify data (optional)
Once the initial copy completes and replication catches up, you can optionally verify that your data matches between the external database and PlanetScale.
Click "**Verify data**" on the workflow monitoring page to run a comparison. This checks that the copied data is identical between your external database and PlanetScale, giving you confidence before switching traffic.
### Switching traffic
Once you've verified your data, you can control how traffic is routed between your external database and PlanetScale:
1. **Switch replica traffic** - Serve read queries from PlanetScale while writes still go to your external database. This is an optional intermediate step that lets you test read traffic separately.
2. **Switch primary traffic** - Serve both reads and writes from PlanetScale. This switches all traffic at once, so you don't need to switch replica traffic first.
3. **Complete** - Finalize the migration
### Verify data (optional)
Once the initial copy completes and replication catches up, you can optionally verify that your data matches between the external database and PlanetScale.
Click "**Verify data**" on the workflow monitoring page to run a comparison. This checks that the copied data is identical between your external database and PlanetScale, giving you confidence before switching traffic.
### Switching traffic
Once you've verified your data, you can control how traffic is routed between your external database and PlanetScale:
1. **Switch replica traffic** - Serve read queries from PlanetScale while writes still go to your external database. This is an optional intermediate step that lets you test read traffic separately.
2. **Switch primary traffic** - Serve both reads and writes from PlanetScale. This switches all traffic at once, so you don't need to switch replica traffic first.
3. **Complete** - Finalize the migration
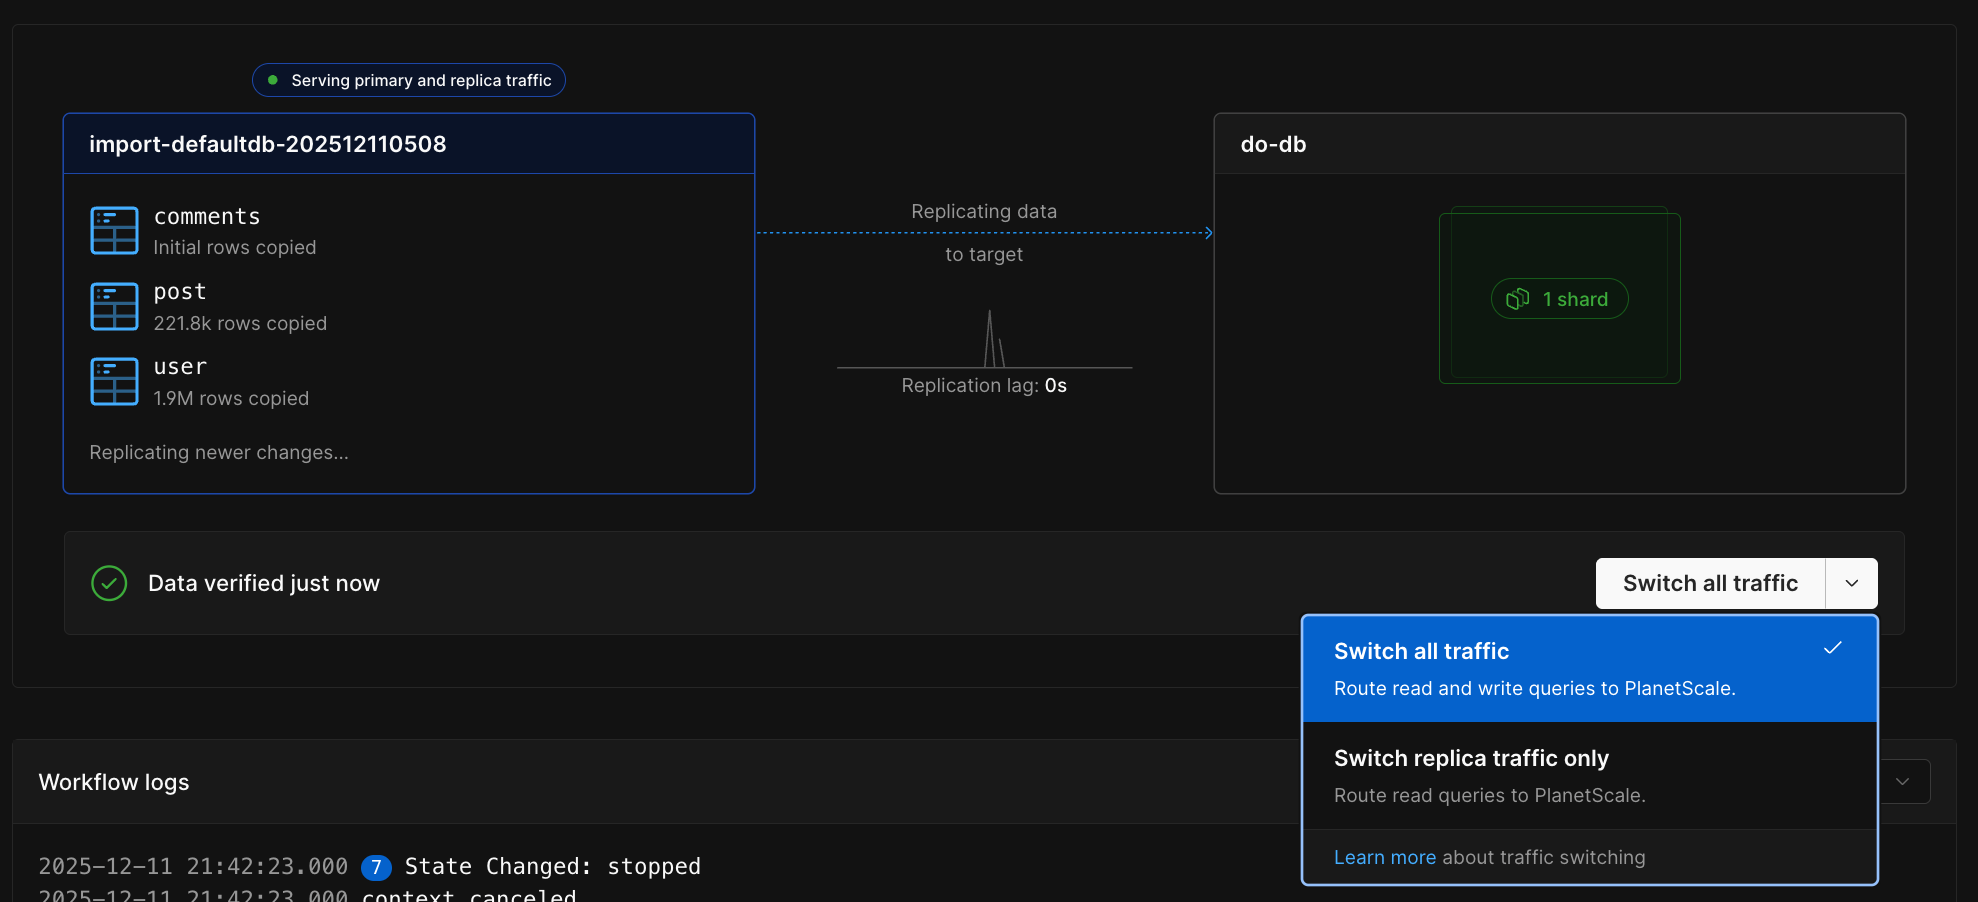 ### Monitoring replication lag
The lag graph shows how far behind PlanetScale is from your external database. During the initial copy, lag will be high. Once the copy finishes and replication catches up, lag should drop.
### Monitoring replication lag
The lag graph shows how far behind PlanetScale is from your external database. During the initial copy, lag will be high. Once the copy finishes and replication catches up, lag should drop.
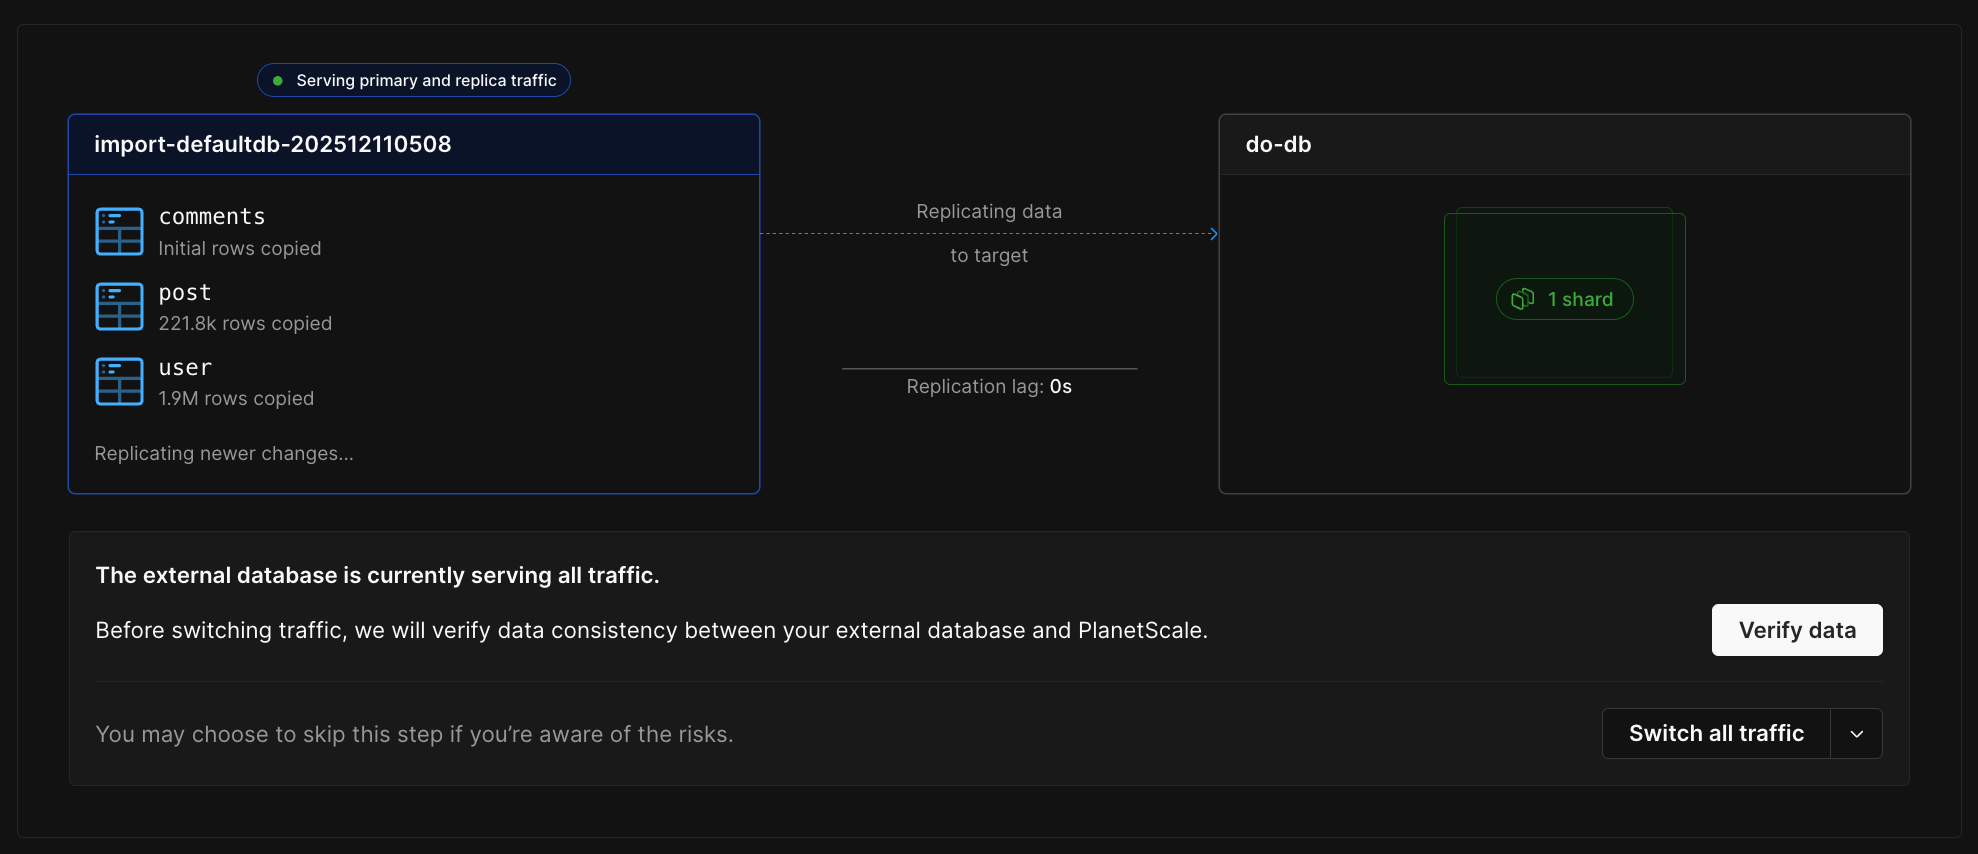 ## Step 8: Complete the import
Once you've switched all traffic to PlanetScale and verified everything is working:
## Step 8: Complete the import
Once you've switched all traffic to PlanetScale and verified everything is working: