# Pipecat > ## Documentation Index --- # Source: https://docs.pipecat.ai/deployment/pipecat-cloud/fundamentals/accounts-and-organizations.md > ## Documentation Index > Fetch the complete documentation index at: https://docs.pipecat.ai/llms.txt > Use this file to discover all available pages before exploring further. # Accounts and Organizations > Managing your account and collaborating on agents as part of a team Pipecat Cloud accounts are issued a personal workspace where you can deploy agents independently. User workspaces are unique and isolated from one another, making them unsuitable for collaboration. ## Authentication Before you can issue any commands via the CLI, you must authenticate with your Pipecat Cloud account. ```bash theme={null} pipecat cloud auth login ``` This command will open a browser window and prompt you to authenticate with your Pipecat Cloud account. You can verify a login was successful by running the `whoami` command: ```bash theme={null} pipecat cloud auth whoami ``` You can sign out of your account by running the following: ```bash theme={null} pipecat cloud auth logout ``` **Credentials** Access tokens are stored locally on your device at `~/.config/pipecatcloud/pipecatcloud.toml`. You can override the default location by setting the `PIPECAT_CONFIG_PATH` environment variable. If you need to revoke access to your account, please sign out of the Pipecat Cloud dashboard to invalidate your access token. ## Organizations Working as part of a team requires creating an organization. Organizations are multi-tenant workspaces that enable collaboration on deployments. * Billing and integrations are managed at the organization level. * Agents and secrets are shared across the organization, with varying roles and privileges. * Organizations have dedicated access tokens for initializing agent instances. Deployments cannot be shared or moved between organizations or user accounts. If you plan to collaborate with others, we recommend creating a new organization. ### Creating organizations Organization creation must be done via the [Pipecat Cloud dashboard](https://pipecat.daily.co/). ### Inviting accounts to your organization You can invite a user to your organization by their email address using the [Pipecat Cloud dashboard](https://pipecat.daily.co/). ### Working with organizations You can get a list of available organizations that your account is a member of by running the following: ```bash theme={null} pipecat cloud organizations list ``` You can switch to a different organization by running the following: ```bash theme={null} pipecat cloud organizations select ``` Switching organizations will target all CLI commands to the selected organization. For example, `pipecat cloud deploy` will issue the deployment request to your select organization. Alternatively, you issue commands with the optional `--org` flag, for example: ```bash theme={null} pipecat cloud deploy my-agent image-name --org my-organization ``` ## API keys Pipecat Cloud requires using an API key for some CLI commands or interfacing via the REST API. API keys are issued at the user workspace and organization level. You can create up to 5 private and 5 public API keys for different agents / purposes. ### Private API keys Used to authenticate with private REST API endpoints. Private API keys are typically used for administrative tasks and should not be shared or used by end-user applications. Examples of where you may want to use private API keys include: * Managing organizations and users via the REST API * Server-to-server deployment scripts * GitHub actions You should not share your private API key with anyone. ### Public API keys Public API keys are suitable for CLI usage for commands that could be invoked by end-user actions on the platform. Examples of where you may want to use public API keys include: * [Starting an agent instance](./active-sessions) (via the CLI or REST API) * Server-to-server end-user applications * Client-side while developing / iterating Public API keys allow starting new agent processes, so while they are generally safe to share, you should still be cautious to avoid malicious use (i.e. triggering your account rate limit.) We recommend keeping your public API key server-side and not sharing it in public repositories. ### Managing API keys You can create, cycle, revoke or delete API keys via the [Pipecat Cloud dashboard ](https://pipecat.daily.co) and CLI. ```bash theme={null} # Create a new API key pipecat cloud organizations keys create # List available keys pipecat cloud organizations keys list ``` When using the CLI, you can specify a default API key to use for all commands that require it: ```bash theme={null} pipecat cloud organizations keys use ``` Selecting a key will modify your local configuration file and use it for all subsequent commands. Please be aware that if the key is cycled or revoked, you will need to run the `keys use` command again to update your local configuration file with a new key. --- # Source: https://docs.pipecat.ai/deployment/pipecat-cloud/fundamentals/active-sessions.md > ## Documentation Index > Fetch the complete documentation index at: https://docs.pipecat.ai/llms.txt > Use this file to discover all available pages before exploring further. # Starting Sessions > Serving user requests with active sessions. Once you have made a successful deployment, you can start on-demand sessions to begin interacting with your agent. An active session is a running instance of your agent code that connects with you or your end-users. Sessions are created in response to a request and scaled up or down based on your deployment configuration (see [Scaling](./scaling)). You must have an active billing account to start sessions. Usage is billed for the duration of each session, please refer to [pricing](https://www.daily.co/pricing/pipecat-cloud) for more information. Starting active sessions can be achieved programmatically via the REST API and Python library or directly via the CLI. ## Running an agent Requests to start an agent requires passing a [public API key](./accounts-and-organizations#api-keys). Keys are used to ensure that only authorized users or apps can start sessions and can be cycled or revoked at any time. ### Development pattern A typical application will start a session in response to a user request (via a web UI, mobile app, phone call or other client). Pipecat Cloud takes care of your session infrastructure and scaling, so you can focus on building your application logic. Developers should: 1. Provide a secure endpoint to receive requests that keeps your API key secret 2. Pass any required data to the agent when starting a session (such as pipeline configuration, transport session data, etc.) 3. Handle any errors that may occur during the start process ### Using REST The Pipecat Cloud REST API provides an endpoint to start a session with your agent over HTTP: ```bash cURL theme={null} curl --location --request POST 'https://api.pipecat.daily.co/v1/public/{agent_name}/start' \ --header 'Authorization: Bearer PUBLIC_API_KEY' \ --header 'Content-Type: application/json' \ --data-raw '{ "createDailyRoom": true, "body": {"custom": "data"} }' ``` ```python Python theme={null} endpoint = "https://api.pipecat.daily.co/v1/public/{service}/start" agent_name = "my-first-agent" api_key = "pk_..." async with aiohttp.ClientSession() as session: response = await session.post( f"{endpoint.format(service=agent_name)}", headers={"Authorization": f"Bearer {api_key}"}, json={ "createDailyRoom": True, # Creates a Daily room "body": {"custom": "data"} # Data to pass to your agent } ) ``` ### Using Python The Pipecat Cloud Python library (`pip install pipecatcloud`) provides helper methods to start a session with your agent: ```python theme={null} import asyncio from pipecatcloud.exception import AgentStartError from pipecatcloud.session import Session, SessionParams async def main(): try: # Create session object session = Session( agent_name="my-first-agent", api_key=API_KEY, # Replace with your actual API key params=SessionParams( use_daily=True, # Optional: Creates a Daily room daily_room_properties={"start_video_off": False}, data={"key": "value"}, ), ) # Start the session response = await session.start() # Get Daily room URL daily_url = f"{response['dailyRoom']}?t={response['dailyToken']}" print(f"Join Daily room: {daily_url}") except AgentStartError as e: print(f"Error starting agent: {e}") except Exception as e: print(f"Unexpected error: {e}") # Run the async function if __name__ == "__main__": asyncio.run(main()) ``` ### Using the CLI To start an agent via the command line interface: ```shell theme={null} pipecat cloud agent start my-first-agent --api-key pk_... ``` You can select and use a default API key for the agent start command: ```shell theme={null} pipecat cloud organizations keys use my-default-key ``` See the [CLI reference](../cli-reference/agent#start) for more information. ## Passing data Most agents will require some initial data, such pipeline configuration, transport session credentials, etc. For sensitive data, we recommend using [secrets](./secrets) to store and access your data securely. You pass a data blob through to the start request (please note that the data must be JSON-serializable): ```bash theme={null} pipecat cloud agent start my-first-agent --data '{"room": "my-room"}' # or from a file pipecat cloud agent start my-first-agent --data-file data.json ``` Data passed to your session can be accessed in your agent code via the `bot()` method, which receives session arguments: ```python theme={null} # bot.py from pipecat.runner.types import PipecatRunnerArguments async def bot(args: PipecatRunnerArguments): # Access the session ID logger.info(f"Session started with ID: {args.session_id}") # Access the custom data passed to the session logger.info(f"Session data: {args.body}") # ... ``` ```python theme={null} # bot.py for voice agent from loguru import logger from pipecat.runner.types import DailyRunnerArguments async def bot(args: DailyRunnerArguments): """Main bot entry point compatible with the FastAPI route handler. Args: room_url: The Daily room URL token: The Daily room token body: The configuration object from the request body """ logger.info(f"Bot process initialized {args.room_url} {args.token}") logger.info(f"Custom data: {args.body}") logger.info(f"Session ID: {args.session_id}") try: await main(args.room_url, args.token) logger.info("Bot process completed") except Exception as e: logger.exception(f"Error in bot process: {str(e)}") raise ``` ```python theme={null} # bot.py for WebSocket agent from loguru import logger from pipecat.runner.types import WebSocketRunnerArguments async def bot(args: WebSocketRunnerArguments): """Main bot entry point for WebSocket connections. Args: ws: The WebSocket connection """ logger.info("WebSocket bot process initialized") logger.info(f"Custom data: {args.body}") logger.info(f"Session ID: {args.session_id}") try: await main(args.websocket) logger.info("WebSocket bot process completed") except Exception as e: logger.exception(f"Error in WebSocket bot process: {str(e)}") raise ``` For more advanced data requirements, your application should run its own data fetching logic before a session request is made. If you require your agent to fetch it's own data, be mindful of any blocking requests that could slow down the start process. ## Agent capacity Deployments have an upper limit for the number of sessions that can be started concurrently. This helps developers implement cost control and workload management and can be adjusted per deployment. See [Scaling](./scaling) for more information. The default instance pool capacity is **50 active sessions per deployment**. Please contact us at [help@daily.co](mailto:help@daily.co) or via [Discord](https://discord.gg/dailyco) if you require more capacity. Developers are responsible for handling capacity errors when starting sessions. When your instance pool is at capacity, the start request will fail with a `429` status and code. Here is a simple example of how to handle a capacity error: ```bash REST theme={null} curl --location --request POST 'https://api.pipecat.daily.co/v1/public/{agent_name}/start' \ --header 'Authorization: Bearer PUBLIC_API_KEY' \ --header 'Content-Type: application/json' \ --data-raw '{}' >> { >> "status": 429, >> "code": "429", >> "message": "Rate limit exceeded. Please try again later" >> } ``` ```python Python theme={null} from pipecatcloud import Session, SessionParams from pipecatcloud.exception import AgentStartError try: session = Session( agent_name="my-first-agent", api_key="pk_...", params=SessionParams( use_daily=False, data={} ) ) except AgentStartError as e: # This will catch capacity errors and other start failures print(f"Error starting agent: {e}") except Exception as e: print(f"Unexpected error: {e}") ``` ## Logging and monitoring Session observability can be accessed via the [Dashboard ](https://pipecat.daily.co) or from the CLI. ### Active sessions To view active sessions via the CLI: ```shell theme={null} pipecat cloud agent sessions [my-first-agent] ``` This command will list all active sessions for the specified agent, alongside a session ID. ### Session logs To view individual session logs, use the following command: ```shell theme={null} pipecat cloud agent logs [my-first-agent] --session [session-id] ``` For more information, see [Logging and Observability](./logging). ## Stopping sessions You can issue a termination request to stop an active session. This will immediately stop the instance so be aware of disrupting any ongoing user interactions. ```shell theme={null} pipecat cloud agent stop my-first-agent --session [session-id] ``` Deleting an agent deployment will block any new sessions from starting, but will not stop any active sessions. You must stop each session individually. ## Usage You are charged for the duration of each session, see [pricing](https://www.daily.co/pricing/pipecat-cloud). The exact duration of session is calculated based on: * Time spent instantiating the agent * Time spent running the agent * Time spent tearing down the agent You can monitor your usage on your [Dashboard ](https://pipecat.daily.co). --- # Source: https://docs.pipecat.ai/deployment/pipecat-cloud/rest-reference/endpoint/agent-create.md > ## Documentation Index > Fetch the complete documentation index at: https://docs.pipecat.ai/llms.txt > Use this file to discover all available pages before exploring further. # Create an Agent > Create a new agent with a container image and configuration settings. ## OpenAPI ````yaml POST /agents openapi: 3.0.0 info: title: Pipecat Cloud version: 1.0.0 description: Private API for Pipecat Cloud agent management servers: - url: https://api.pipecat.daily.co/v1 description: API server security: - PrivateKeyAuth: [] paths: /agents: post: summary: Create a new agent operationId: createService requestBody: required: true content: application/json: schema: $ref: '#/components/schemas/CreateServiceRequest' example: serviceName: voice-starter image: your-dockername/voice-starter:0.1 region: us-west nodeType: arm imagePullSecretSet: dockerhub-credentials secretSet: voice-starter-secrets autoScaling: minAgents: 1 maxAgents: 20 krispViva: audioFilter: tel agentProfile: agent-1x enableManagedKeys: false responses: '200': description: Agent created successfully content: application/json: schema: $ref: '#/components/schemas/ServiceDetailsResponse' example: name: voice-starter region: us-west ready: false createdAt: '2025-04-19T01:20:27.564Z' updatedAt: '2025-04-19T01:20:27.572Z' activeDeploymentId: 13c0be89-5ae8-4b0b-ad22-79565e11de3b activeDeploymentReady: false autoScaling: maxReplicas: 20 minReplicas: 1 activeSessionCount: 0 deployment: id: 13c0be89-5ae8-4b0b-ad22-79565e11de3b manifest: apiVersion: pipecatcloud.daily.co/v1 kind: PCService metadata: name: voice-starter namespace: tiny-ferret-maroon-123 spec: dailyNodeType: arm deploymentMode: keda clusterLocal: true image: your-dockername/voice-starter:0.1 autoScaling: minReplicas: 1 maxReplicas: 20 envFromSecretNames: - voice-starter-secrets krispModels: enabled: false krispViva: audioFilters: true version: '20251010' modelVars: KRISP_VIVA_MODEL_PATH: audio_filters/krisp-viva-tel-v2.kef integratedKeysProxy: enabled: false resources: cpu: 500m memory: 1Gi serviceId: b59a68ee-61c8-4d99-9ceb-e99a3953bdac createdAt: '2025-04-19T01:20:27.569Z' updatedAt: '2025-04-19T01:20:27.569Z' agentProfile: agent-1x krispViva: audioFilter: tel '400': description: Invalid request or agent already exists content: application/json: schema: $ref: '#/components/schemas/ErrorResponse' examples: serviceExists: summary: Service already exists value: error: Service already exists code: GENERIC_BAD_REQUEST secretRegionMismatch: summary: Secret set region mismatch value: error: >- Secret set 'my-secrets' is in region 'us-east' but service will be created in region 'us-west'. Secrets must be in the same region as the service. code: GENERIC_BAD_REQUEST imagePullSecretRegionMismatch: summary: Image pull secret region mismatch value: error: >- Image pull secret set 'dockerhub-creds' is in region 'us-east' but service will be created in region 'us-west'. Image pull secrets must be in the same region as the service. code: GENERIC_BAD_REQUEST '404': description: Secret set or image pull secret set not found content: application/json: schema: $ref: '#/components/schemas/ErrorResponse' example: error: Secret set not found code: NOT_FOUND '500': description: Internal server error content: application/json: schema: $ref: '#/components/schemas/ErrorResponse' example: error: Internal server error code: INTERNAL_SERVER_ERROR security: - PrivateKeyAuth: [] components: schemas: CreateServiceRequest: type: object required: - serviceName - image properties: serviceName: type: string description: >- Name of the agent to create. Must start with a lowercase letter or number, can include hyphens, and must end with a lowercase letter or number. No uppercase letters or special characters allowed. example: my-voice-agent pattern: ^[a-z0-9]([-a-z0-9]*[a-z0-9])$ image: type: string description: The container image to use for the agent example: your-username/my-agent:latest region: type: string description: >- The region where the agent will be deployed. If not specified, defaults to `us-west`. All secrets and image pull secrets referenced by this agent must be in the same region. default: us-west example: us-west nodeType: type: string description: >- The type of node to run the agent on. Only `arm` is supported at this time. default: arm example: arm imagePullSecretSet: type: string description: The name of the image pull secret set to use example: dockerhub-credentials secretSet: type: string description: The name of the secret set to use example: my-agent-secrets autoScaling: type: object description: Auto-scaling configuration for the agent properties: minAgents: type: integer description: Minimum number of agents example: 1 maxAgents: type: integer description: 'Maximum number of agents (Default: 50)' example: 20 enableKrisp: type: boolean deprecated: true description: >- Whether to enable Krisp noise cancellation. **Deprecated:** Use `krispViva` instead for the latest Krisp VIVA models. default: false example: false krispViva: type: object description: >- Krisp VIVA noise cancellation configuration. [Learn more](/deployment/pipecat-cloud/guides/krisp-viva). properties: audioFilter: type: string nullable: true description: >- The Krisp VIVA audio filter model to use: - `tel`: Optimized for telephony, cellular, landline, mobile, desktop, and browser (up to 16kHz) - `pro`: Optimized for mobile, desktop, and browser with WebRTC (up to 32kHz) - `null`: Disables Krisp VIVA By default, Pipecat processes input audio at 16kHz, making `tel` appropriate for most use cases. enum: - tel - pro - null example: tel agentProfile: type: string description: >- The agent profile to use for resource allocation. Valid values are: - `agent-1x`: 0.5 vCPU and 1 GB of memory. Best for voice agents. - `agent-2x`: 1 vCPU and 2 GB of memory. Well suited for voice and video agents or voice agents requiring extra processing. - `agent-3x`: 1.5 vCPU and 3 GB of memory. Best for voice and video agents requiring extra processing or multiple video inputs. enum: - agent-1x - agent-2x - agent-3x default: agent-1x example: agent-1x enableManagedKeys: type: boolean description: >- Pipecat Cloud provides API keys for some Pipecat services that you can use directly in your applications. [Learn more](/deployment/pipecat-cloud/guides/managed-api-keys). default: false example: false ServiceDetailsResponse: type: object properties: name: type: string description: Name of the agent region: type: string description: The region where the agent is deployed ready: type: boolean description: Whether the agent is ready to accept sessions createdAt: type: string format: date-time description: Creation timestamp of the agent updatedAt: type: string format: date-time description: Last update timestamp activeDeploymentId: type: string description: ID of the active deployment activeDeploymentReady: type: boolean description: Whether the active deployment is ready autoScaling: type: object properties: maxReplicas: type: integer description: Maximum number of replicas minReplicas: type: integer description: Minimum number of replicas activeSessionCount: type: integer description: Number of active sessions deployment: type: object nullable: true description: Details of the current deployment properties: id: type: string description: Unique identifier for the deployment manifest: type: object description: Kubernetes manifest for the deployment properties: apiVersion: type: string description: API version of the manifest kind: type: string description: Kind of Kubernetes resource metadata: type: object description: Metadata for the resource properties: name: type: string description: Name of the agent namespace: type: string description: Kubernetes namespace spec: type: object description: Specification for the agent deployment properties: dailyNodeType: type: string description: Type of node to run on clusterLocal: type: boolean description: Whether the service is cluster-local image: type: string description: Container image used autoScaling: type: object description: Auto-scaling configuration properties: minReplicas: type: integer description: Minimum number of replicas maxReplicas: type: integer description: Maximum number of replicas envFromSecretNames: type: array description: Names of secrets to use as environment variables items: type: string krispModels: type: object description: Krisp noise cancellation configuration (deprecated) properties: enabled: type: boolean description: Whether Krisp is enabled krispViva: type: object description: >- Krisp VIVA noise cancellation configuration in the deployment manifest properties: audioFilters: type: boolean description: Whether Krisp VIVA audio filters are enabled version: type: string description: Version of the Krisp VIVA models modelVars: type: object description: >- Environment variables for Krisp VIVA model configuration properties: KRISP_VIVA_MODEL_PATH: type: string description: Path to the Krisp VIVA model file enableManagedKeys: type: object description: Managed API keys configuration properties: enabled: type: boolean description: Whether managed keys are enabled serviceId: type: string description: ID of the service this deployment belongs to createdAt: type: string format: date-time description: Creation timestamp of the deployment updatedAt: type: string format: date-time description: Last update timestamp of the deployment agentProfile: type: string description: The agent profile used for resource allocation nullable: true krispViva: type: object nullable: true description: Krisp VIVA noise cancellation status properties: audioFilter: type: string nullable: true description: >- The currently configured Krisp VIVA audio filter model (tel, pro, or null if disabled) ErrorResponse: type: object properties: error: type: string description: Error message code: type: string description: Error code securitySchemes: PrivateKeyAuth: type: http scheme: bearer description: >- Authentication requires a Pipecat Cloud Private API token. Generate a Private API key from your Dashboard (Settings > API Keys > Private > Create key) and include it as a Bearer token in the Authorization header. ```` --- # Source: https://docs.pipecat.ai/deployment/pipecat-cloud/rest-reference/endpoint/agent-delete.md > ## Documentation Index > Fetch the complete documentation index at: https://docs.pipecat.ai/llms.txt > Use this file to discover all available pages before exploring further. # Delete an Agent > Permanently delete an agent and its associated resources. ## OpenAPI ````yaml DELETE /agents/{agentName} openapi: 3.0.0 info: title: Pipecat Cloud version: 1.0.0 description: Private API for Pipecat Cloud agent management servers: - url: https://api.pipecat.daily.co/v1 description: API server security: - PrivateKeyAuth: [] paths: /agents/{agentName}: delete: summary: Delete an agent description: Permanently removes an agent and its associated Kubernetes resources. operationId: deleteService parameters: - name: agentName in: path required: true description: Name of the agent to delete schema: type: string responses: '200': description: Agent successfully deleted content: application/json: schema: type: object properties: status: type: string enum: - OK description: Status of the deletion operation example: status: OK '404': description: Agent not found content: application/json: schema: $ref: '#/components/schemas/ErrorResponse' example: error: Not found code: NOT_FOUND '500': description: Internal server error content: application/json: schema: $ref: '#/components/schemas/ErrorResponse' example: error: Internal server error code: INTERNAL_SERVER_ERROR security: - PrivateKeyAuth: [] components: schemas: ErrorResponse: type: object properties: error: type: string description: Error message code: type: string description: Error code securitySchemes: PrivateKeyAuth: type: http scheme: bearer description: >- Authentication requires a Pipecat Cloud Private API token. Generate a Private API key from your Dashboard (Settings > API Keys > Private > Create key) and include it as a Bearer token in the Authorization header. ```` --- # Source: https://docs.pipecat.ai/deployment/pipecat-cloud/rest-reference/endpoint/agent-get-logs.md > ## Documentation Index > Fetch the complete documentation index at: https://docs.pipecat.ai/llms.txt > Use this file to discover all available pages before exploring further. # Retrieve Agent Logs > Get execution logs for an agent with filtering and pagination options. ## OpenAPI ````yaml GET /agents/{agentName}/logs openapi: 3.0.0 info: title: Pipecat Cloud version: 1.0.0 description: Private API for Pipecat Cloud agent management servers: - url: https://api.pipecat.daily.co/v1 description: API server security: - PrivateKeyAuth: [] paths: /agents/{agentName}/logs: get: summary: Get agent logs description: >- Retrieves logs for the specified agent with optional filtering and pagination. operationId: getLogs parameters: - name: agentName in: path required: true description: Name of the agent to retrieve logs for schema: type: string - name: limit in: query required: false description: Maximum number of log entries to return schema: type: integer default: 10 - name: offset in: query required: false description: Number of log entries to skip schema: type: integer default: 0 - name: deploymentId in: query required: false description: Filter logs to a specific deployment ID schema: type: string - name: sessionId in: query required: false description: Filter logs to a specific session ID schema: type: string - name: query in: query required: false description: Free-text search query to filter logs schema: type: string - name: order in: query required: false description: Sort order for logs schema: type: string enum: - asc - desc default: desc - name: startTime in: query required: false description: Filter logs to those after this Unix timestamp schema: type: integer - name: endTime in: query required: false description: Filter logs to those before this Unix timestamp schema: type: integer responses: '200': description: Agent logs retrieved successfully content: application/json: schema: type: object properties: total: type: object properties: value: type: integer description: Total number of log entries matching the query relation: type: string enum: - eq - gte description: >- Relation type for the total count (eq = exact, gte = greater than or equal) logs: type: array description: List of log entries items: type: object properties: log: type: string description: Log message content timestamp: type: string format: date-time description: Timestamp when the log was generated deploymentId: type: string description: ID of the deployment that generated the log nullable: true example: total: value: 79 relation: eq logs: - log: 'INFO: Finished server process [1]' timestamp: '2025-04-18T20:34:17.153744602Z' - log: 'INFO: Application shutdown complete.' timestamp: '2025-04-18T20:34:17.153706059Z' - log: 'INFO: Waiting for application shutdown.' timestamp: '2025-04-18T20:34:17.153611029Z' - log: >- INFO: Uvicorn running on http://0.0.0.0:8080 (Press CTRL+C to quit) timestamp: '2025-04-18T20:32:42.246099974Z' - log: 'INFO: Application startup complete.' timestamp: '2025-04-18T20:32:42.245760327Z' '400': description: Invalid query parameters content: application/json: schema: $ref: '#/components/schemas/ErrorResponse' example: error: Invalid timestamp format code: GENERIC_BAD_REQUEST '404': description: Agent not found content: application/json: schema: $ref: '#/components/schemas/ErrorResponse' example: error: Not found code: NOT_FOUND '500': description: Internal server error content: application/json: schema: $ref: '#/components/schemas/ErrorResponse' example: error: Internal server error code: INTERNAL_SERVER_ERROR security: - PrivateKeyAuth: [] components: schemas: ErrorResponse: type: object properties: error: type: string description: Error message code: type: string description: Error code securitySchemes: PrivateKeyAuth: type: http scheme: bearer description: >- Authentication requires a Pipecat Cloud Private API token. Generate a Private API key from your Dashboard (Settings > API Keys > Private > Create key) and include it as a Bearer token in the Authorization header. ```` --- # Source: https://docs.pipecat.ai/deployment/pipecat-cloud/rest-reference/endpoint/agent-get-sessions.md > ## Documentation Index > Fetch the complete documentation index at: https://docs.pipecat.ai/llms.txt > Use this file to discover all available pages before exploring further. # Retrieve Agent Sessions > Get sessions for an agent with filtering and pagination options. ## OpenAPI ````yaml GET /agents/{agentName}/sessions openapi: 3.0.0 info: title: Pipecat Cloud version: 1.0.0 description: Private API for Pipecat Cloud agent management servers: - url: https://api.pipecat.daily.co/v1 description: API server security: - PrivateKeyAuth: [] paths: /agents/{agentName}/sessions: get: summary: Get agent sessions description: >- Retrieves sessions for the specified agent with optional filtering and pagination. operationId: getSessions parameters: - name: agentName in: path required: true description: Name of the agent to retrieve sessions for schema: type: string - name: limit in: query required: false description: Maximum number of sessions to return schema: type: integer default: 10 - name: offset in: query required: false description: Number of sessions to skip schema: type: integer default: 0 - name: deploymentId in: query required: false description: Filter sessions to a specific deployment ID schema: type: string - name: startTime in: query required: false description: Filter sessions to those after this Unix timestamp schema: type: integer - name: endTime in: query required: false description: Filter sessions to those before this Unix timestamp schema: type: integer - name: status in: query required: false description: Filter sessions to those with this status schema: type: string enum: - active - ended - all default: all - name: startType in: query required: false description: Filter sessions to those with this start type schema: type: string enum: - cold - warm - all default: all - name: startTimeMin in: query required: false description: >- Filter sessions to those whose start times are greater than this value in seconds schema: type: integer default: 0 - name: startTimeMax in: query required: false description: >- Filter sessions to those whose start times are less than this value in seconds schema: type: integer default: 0 responses: '200': description: Agent sessions retrieved successfully content: application/json: schema: type: object properties: total_count: type: integer description: Total number of sessions matching the parameters sessions: type: array description: List of sessions items: type: object properties: sessionId: type: string description: ID of the session serviceId: type: string description: ID of the service for this session organizationId: type: string description: >- ID of the organization that this session is associated with deploymentId: type: string description: >- ID of the deployment that this session is associated with endedAt: type: string format: date-time description: Timestamp when the log was generated botStartSeconds: type: integer description: >- Number of seconds between bot start request and bot start nullable: true coldStart: type: boolean description: >- Whether the bot start was a cold start (see https://docs.pipecat.ai/deployment/pipecat-cloud/fundamentals/scaling#cold-starts) nullable: true completionStatus: type: string description: >- The completion status of the session. This can be an http return code or a string like `HTTP_COMPLETED`, `HTTP_ERROR`, `WS_CONNECTION_CLOSED`, among others nullable: true createdAt: type: string format: date-time description: Timestamp when the session was created updatedAt: type: string format: date-time description: Timestamp when the session was last updated example: total_count: 330 sessions: - sessionId: 800d444a-e67e-4686-afb3-b0de509cccb3 serviceId: b900ae4a-f710-4ef1-95d8-c5f5b2789da9 organizationId: cc71b52d-4271-46c9-87be-cac600fd821a deploymentId: 81f4da55-106d-401f-b069-a1f1992f871a endedAt: '2025-10-22T08:39:26.000Z' botStartSeconds: 0 coldStart: false completionStatus: HTTP_COMPLETED createdAt: '2025-10-22T08:39:26.000Z' updatedAt: '2025-10-22T08:39:26.000Z' - sessionId: 803349cc-2ae0-437a-9a72-408817299e43 serviceId: b900ae4a-f710-4ef1-95d8-c5f5b2789da9 organizationId: cc71b52d-4271-46c9-87be-cac600fd821a deploymentId: 81f4da55-106d-401f-b069-a1f1992f871a endedAt: '2025-10-22T08:38:09.000Z' botStartSeconds: 2 coldStart: true completionStatus: HTTP_COMPLETED createdAt: '2025-10-22T08:38:09.000Z' updatedAt: '2025-10-22T08:38:09.000Z' - sessionId: 44003e83-b679-46ef-88ec-18e9ea9dd81d serviceId: b900ae4a-f710-4ef1-95d8-c5f5b2789da9 organizationId: cc71b52d-4271-46c9-87be-cac600fd821a deploymentId: f76bae42-5ce8-4ae3-8a75-0349bfd7ec63 endedAt: '2025-10-21T08:17:47.000Z' botStartSeconds: 0 coldStart: false completionStatus: HTTP_ERROR createdAt: '2025-10-21T08:17:22.000Z' updatedAt: '2025-10-21T08:17:38.000Z' '400': description: Invalid query parameters content: application/json: schema: $ref: '#/components/schemas/ErrorResponse' example: error: Invalid parameters err: issues: - received: bad_value code: invalid_enum_value options: - active - ended - all path: - status message: >- Invalid enum value. Expected 'active' | 'ended' | 'all', received 'bad_value' name: ZodError code: '400' '404': description: Agent not found content: application/json: schema: $ref: '#/components/schemas/ErrorResponse' example: error: >- API endpoint not found / agent deployment not found / Organization not found code: '404' '500': description: Internal server error content: application/json: schema: $ref: '#/components/schemas/ErrorResponse' example: error: >- Internal server error. Please check logs for more information or contact support. code: '500' security: - PrivateKeyAuth: [] components: schemas: ErrorResponse: type: object properties: error: type: string description: Error message code: type: string description: Error code securitySchemes: PrivateKeyAuth: type: http scheme: bearer description: >- Authentication requires a Pipecat Cloud Private API token. Generate a Private API key from your Dashboard (Settings > API Keys > Private > Create key) and include it as a Bearer token in the Authorization header. ```` --- # Source: https://docs.pipecat.ai/deployment/pipecat-cloud/fundamentals/agent-images.md > ## Documentation Index > Fetch the complete documentation index at: https://docs.pipecat.ai/llms.txt > Use this file to discover all available pages before exploring further. # Agent Images > How to containerize your agent project Pipecat Cloud agents are designed to be run from containerized images. This allows you to run the agent in a controlled environment, with all the dependencies and configurations needed. Your project defines the environment that your agent will run using Docker and built using a Dockerfile in the root directory of the project. For example, your Dockerfile might look like this: ```dockerfile theme={null} FROM dailyco/pipecat-base:latest # Enable bytecode compilation ENV UV_COMPILE_BYTECODE=1 # Copy from the cache instead of linking since it's a mounted volume ENV UV_LINK_MODE=copy # Uncomment this if you wish to print a summary of the features available in the base image. # ENV PCC_LOG_FEATURES_SUMMARY=true # Install the project's dependencies using the lockfile and settings RUN --mount=type=cache,target=/root/.cache/uv \ --mount=type=bind,source=uv.lock,target=uv.lock \ --mount=type=bind,source=pyproject.toml,target=pyproject.toml \ uv sync --locked --no-install-project --no-dev # Copy the application code COPY ./bot.py bot.py ``` ```dockerfile theme={null} FROM dailyco/pipecat-base:latest COPY ./requirements.txt requirements.txt # Uncomment this if you wish to print a summary of the features available in the base image. # ENV PCC_LOG_FEATURES_SUMMARY=true RUN pip install --no-cache-dir --upgrade -r requirements.txt COPY ./bot.py bot.py ``` ## 
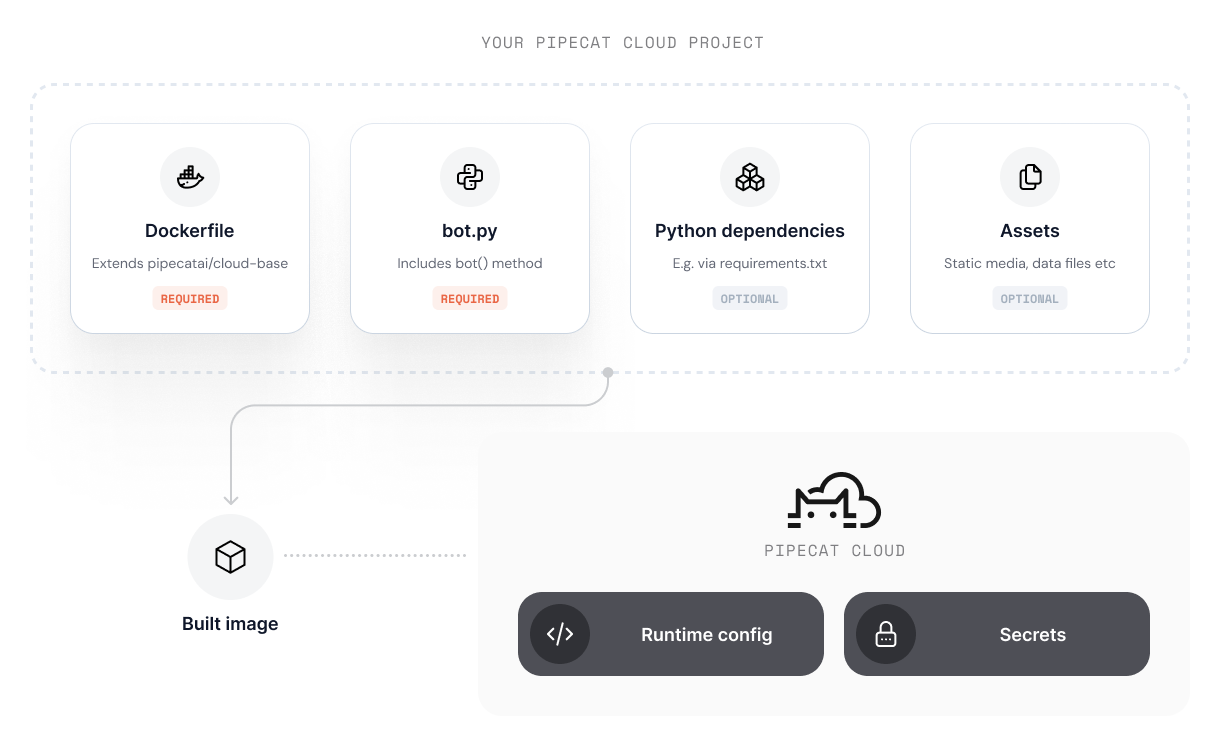
Using an official base image Pipecat Cloud provides a series of base images that we recommend for most use-cases. Base images provide: * Simplified development and deployment * Optimizations for performance and security * Pre-installed system dependencies for most multi-modal agent use-cases Using a base image reduces complexity in your project but requires you to adhere to a specific project structure. * Your project must contain a `bot.py` file that defines the agent pipeline * The `bot.py` must contain a `bot()` method that is the entry point for your agent pipeline * The `bot()` method must be asynchronous, e.g. `async def bot():` You do not need to specify a `CMD` as part of your Dockerfile - the base image is configured to run your `bot.py` module. You can browse available base images in the [Pipecat Cloud Docker Hub ](https://hub.docker.com/u/dailyco). ### Reserved paths The base image uses the `/app` directory for its internal operation. **Avoid copying files to `/app`** in your Dockerfile to prevent conflicts with system files. Writing to `/app` may overwrite critical system files and cause your deployment to fail. Your agent code should be placed in `bot.py` (required) and any additional modules, which the base image handles automatically. ### Reserved HTTP routes The base image exposes the following HTTP routes for Pipecat Cloud platform integration: | Route | Method | Description | | ------------ | --------- | ----------------------------------------------------------------------------- | | `/bot` | POST | Main entry point called by Pipecat Cloud to start agent sessions | | `/ws` | WebSocket | WebSocket endpoint for real-time communication (e.g., telephony integrations) | | `/api/offer` | POST | SmallWebRTC offer handling for peer-to-peer connections | | `/api/offer` | PATCH | SmallWebRTC ICE candidate handling | | `/whatsapp` | POST | WhatsApp Business webhook endpoint | These routes are automatically configured based on available features. For example, the `/whatsapp` route is only available when WhatsApp environment variables are configured. ### Reserved environment variables The base image uses the following environment variables for configuration: | Variable | Description | | -------------------------- | --------------------------------------------------------------------------- | | `PORT` | HTTP server port (default: `8080`) | | `SHUTDOWN_TIMEOUT` | Server shutdown timeout in seconds (default: `7200`) | | `PIPECAT_LOG_LEVEL` | Pipecat logging level: `TRACE`, `DEBUG`, `INFO`, `WARNING`, `ERROR`, `NONE` | | `PCC_LOG_FEATURES_SUMMARY` | Set to `true` to log available features on startup | | `IMAGE_VERSION` | Set automatically during build to track image versions | | `ESP32_ENABLED` | Enable ESP32 mode for SmallWebRTC | | `ESP32_HOST` | ESP32 host address | | `ICE_CONFIG_URL` | ICE server configuration endpoint | For WhatsApp integration, the following environment variables are required: | Variable | Description | | -------------------------- | -------------------------------------------- | | `WHATSAPP_TOKEN` | WhatsApp API access token | | `WHATSAPP_PHONE_NUMBER_ID` | WhatsApp Business phone number ID | | `WHATSAPP_APP_SECRET` | WhatsApp app secret for webhook verification | ### Logging available features To see which features are available in the base image at startup, set `PCC_LOG_FEATURES_SUMMARY=true`. This outputs a summary like: ``` 2025-10-22 22:04:41.411 | INFO | feature_manager:log_features_summary:287 - ============================================================ 2025-10-22 22:04:41.411 | INFO | feature_manager:log_features_summary:288 - Features available in this base image: 2025-10-22 22:04:41.412 | INFO | feature_manager:log_features_summary:289 - ============================================================ 2025-10-22 22:04:41.412 | INFO | feature_manager:log_features_summary:299 - ✅ Daily Transport: ENABLED 2025-10-22 22:04:41.412 | INFO | feature_manager:log_features_summary:299 - ✅ Websocket Transport: ENABLED 2025-10-22 22:04:41.412 | INFO | feature_manager:log_features_summary:299 - ✅ SmallWebRTC Session Arguments: ENABLED 2025-10-22 22:04:41.412 | INFO | feature_manager:log_features_summary:299 - ✅ SmallWebRTC Transport: ENABLED 2025-10-22 22:04:41.412 | INFO | feature_manager:log_features_summary:299 - ✅ SmallWebRTC ICE Candidates: ENABLED 2025-10-22 22:04:41.412 | INFO | feature_manager:log_features_summary:299 - ✅ WhatsApp Integration: ENABLED 2025-10-22 22:04:41.412 | INFO | feature_manager:log_features_summary:314 - ============================================================ ``` ### Available base images | Name | Description | | ---------------------- | --------------------------------------------------------- | | `dailyco/pipecat-base` | Multi-modal Pipecat optimized, suitable for most use-case | The base image supports multiple Python versions. Starting with version 0.1.0, the default Python version is 3.12 (previously 3.10). **Latest tags:** * `dailyco/pipecat-base:latest` (Python 3.12, default) * `dailyco/pipecat-base:latest-py3.10` (Python 3.10) * `dailyco/pipecat-base:latest-py3.11` (Python 3.11) * `dailyco/pipecat-base:latest-py3.12` (Python 3.12) * `dailyco/pipecat-base:latest-py3.13` (Python 3.13) **Versioned tags:** * `dailyco/pipecat-base:0.1.0` (Python 3.12, default) * `dailyco/pipecat-base:0.1.0-py3.10` (Python 3.10) * `dailyco/pipecat-base:0.1.0-py3.11` (Python 3.11) * `dailyco/pipecat-base:0.1.0-py3.12` (Python 3.12) * `dailyco/pipecat-base:0.1.0-py3.13` (Python 3.13) For production use, we recommend pinning to specific versions. ## Using a custom image For more complex use-cases, you can use a custom image. When doing so, we recommend following best practices to ensure your agent instance runs optimally on the platform. Our [base image](https://github.com/daily-co/pipecat-cloud-images/tree/main/pipecat-base) is open source and serves as a useful blueprint for configuring your custom agent image. ### Agent image structure Custom agent images are for advanced use cases. For most teams, we recommend using our base images. If needed, consult the base image code as a reference. For unsupported use cases, contact us at [help@daily.co](mailto:help@daily.co) or via [Discord](https://discord.gg/dailyco). Pipecat Cloud agent images must adhere to a specific structure to run on the platform. Our base images abstract away much of this complexity, but if you are building a custom image, you must ensure your agent adheres to the following: * HTTP API that can handle requests from the platform to configure and run agent instances. * The necessary system level dependencies (such as Python.) In order to start an instance of your custom agent, you must expose a HTTP `POST /bot` route that will be called by the platform. We recommend using FastAPI to create this route. Please refer to the base image code for an example of how to do this. ## Building the image Pipecat Cloud requires all images to be built to target Linux on ARM. This is the most common platform for cloud deployments. ```bash theme={null} docker build --platform linux/arm64 -t my-agent:latest . ``` Your agent image should include: * All dependencies required for your agent to run. * Assets (such as images or models) available in the container filesystem * The entry point for your agent (usually a Python script) * Additional system dependencies (if required) ### Best practices * Keep your image as small as possible. Use multi-stage builds to reduce the size of the final image. * Use a `.dockerignore` file to exclude unnecessary files from the image. * Pipecat Cloud will automatically restart your agent if it crashes. Ensure your agent can handle this gracefully. * Use [Secrets](./secrets) to securely store sensitive information in your agent image. * To optimize for fast start-ups, avoid long running or blocking processes during initialization. --- # Source: https://docs.pipecat.ai/deployment/pipecat-cloud/rest-reference/endpoint/agent-list-all.md > ## Documentation Index > Fetch the complete documentation index at: https://docs.pipecat.ai/llms.txt > Use this file to discover all available pages before exploring further. # List All Agents > Retrieve a list of all agents in your organization with their status and configuration. ## OpenAPI ````yaml GET /agents openapi: 3.0.0 info: title: Pipecat Cloud version: 1.0.0 description: Private API for Pipecat Cloud agent management servers: - url: https://api.pipecat.daily.co/v1 description: API server security: - PrivateKeyAuth: [] paths: /agents: get: summary: List all agents operationId: listServices parameters: - name: includeActiveDeployment in: query required: false description: Whether to include the active deployment details in the response schema: type: boolean - name: region in: query required: false description: >- Filter agents by region. If not specified, returns agents from all regions. schema: type: string example: us-west responses: '200': description: List of agents retrieved successfully content: application/json: schema: type: object properties: services: type: array items: $ref: '#/components/schemas/ServiceListItem' example: services: - id: c359e1ea-64d6-4bcf-a7c6-28d3bd1c8909 name: voice-starter region: us-west activeDeploymentId: 4cab03c7-8f53-418d-9c3c-91a1265d179e organizationId: 7c489df3-7d1d-482f-b1ed-51300f630645 createdAt: '2025-04-09T15:01:17.414Z' updatedAt: '2025-04-18T20:29:19.181Z' deletedAt: null - id: 4e0d1f30-77a8-4283-a054-14a63b06720f name: voice-starter-krisp region: us-west activeDeploymentId: 62e89096-23c6-4265-984b-f419696c58da organizationId: 7c489df3-7d1d-482f-b1ed-51300f630645 createdAt: '2025-04-09T15:59:50.465Z' updatedAt: '2025-04-11T16:54:54.246Z' deletedAt: null '500': description: Internal server error content: application/json: schema: $ref: '#/components/schemas/ErrorResponse' security: - PrivateKeyAuth: [] components: schemas: ServiceListItem: type: object properties: id: type: string description: Unique identifier for the agent name: type: string description: Name of the agent region: type: string description: The region where the agent is deployed activeDeploymentId: type: string description: ID of the active deployment organizationId: type: string description: Organization ID this agent belongs to createdAt: type: string format: date-time description: Creation timestamp of the agent updatedAt: type: string format: date-time description: Last update timestamp deletedAt: type: string format: date-time description: Deletion timestamp, if the agent has been deleted nullable: true deployment: type: object description: >- Details of the active deployment (only included when includeActiveDeployment=true) properties: id: type: string description: Deployment ID serviceId: type: string description: Service ID manifest: type: object description: Kubernetes manifest for the deployment createdAt: type: string format: date-time description: Creation timestamp of the deployment updatedAt: type: string format: date-time description: Last update timestamp of the deployment ErrorResponse: type: object properties: error: type: string description: Error message code: type: string description: Error code securitySchemes: PrivateKeyAuth: type: http scheme: bearer description: >- Authentication requires a Pipecat Cloud Private API token. Generate a Private API key from your Dashboard (Settings > API Keys > Private > Create key) and include it as a Bearer token in the Authorization header. ```` --- # Source: https://docs.pipecat.ai/deployment/pipecat-cloud/rest-reference/endpoint/agent-list-one.md > ## Documentation Index > Fetch the complete documentation index at: https://docs.pipecat.ai/llms.txt > Use this file to discover all available pages before exploring further. # Get Agent Details > Retrieve detailed information about a specific agent including its deployment status. ## OpenAPI ````yaml GET /agents/{agentName} openapi: 3.0.0 info: title: Pipecat Cloud version: 1.0.0 description: Private API for Pipecat Cloud agent management servers: - url: https://api.pipecat.daily.co/v1 description: API server security: - PrivateKeyAuth: [] paths: /agents/{agentName}: get: summary: Get agent details operationId: getService parameters: - name: agentName in: path required: true description: Name of the agent to retrieve schema: type: string responses: '200': description: Agent details retrieved successfully content: application/json: schema: $ref: '#/components/schemas/ServiceDetailsResponse' example: name: voice-starter region: us-west ready: true createdAt: '2025-04-09T15:01:17.414Z' updatedAt: '2025-04-18T20:29:19.181Z' activeDeploymentId: 4cab03c7-8f53-418d-9c3c-91a1265d179e activeDeploymentReady: true autoScaling: maxReplicas: 10 minReplicas: 1 activeSessionCount: 0 deployment: id: 4cab03c7-8f53-418d-9c3c-91a1265d179e manifest: apiVersion: pipecatcloud.daily.co/v1 kind: PCService metadata: name: voice-starter namespace: tiny-ferret-maroon-123 spec: dailyNodeType: arm clusterLocal: true image: your-dockername/voice-starter:0.1 autoScaling: minReplicas: 1 maxReplicas: 10 envFromSecretNames: - voice-starter-secrets krispModels: enabled: false krispViva: audioFilters: true version: '20251010' enableManagedKeys: enabled: false serviceId: c359e1ea-64d6-4bcf-a7c6-28d3bd1c8909 createdAt: '2025-04-18T20:29:19.177Z' updatedAt: '2025-04-18T20:29:19.177Z' agentProfile: agent-1x '404': description: Agent not found content: application/json: schema: $ref: '#/components/schemas/ErrorResponse' '500': description: Internal server error content: application/json: schema: $ref: '#/components/schemas/ErrorResponse' security: - PrivateKeyAuth: [] components: schemas: ServiceDetailsResponse: type: object properties: name: type: string description: Name of the agent region: type: string description: The region where the agent is deployed ready: type: boolean description: Whether the agent is ready to accept sessions createdAt: type: string format: date-time description: Creation timestamp of the agent updatedAt: type: string format: date-time description: Last update timestamp activeDeploymentId: type: string description: ID of the active deployment activeDeploymentReady: type: boolean description: Whether the active deployment is ready autoScaling: type: object properties: maxReplicas: type: integer description: Maximum number of replicas minReplicas: type: integer description: Minimum number of replicas activeSessionCount: type: integer description: Number of active sessions deployment: type: object description: Details of the current deployment properties: id: type: string description: Deployment ID manifest: type: object description: Kubernetes manifest for the deployment properties: apiVersion: type: string description: API version of the manifest kind: type: string description: Kind of Kubernetes resource metadata: type: object description: Metadata for the resource properties: name: type: string description: Name of the agent namespace: type: string description: Kubernetes namespace spec: type: object description: Specification for the agent deployment properties: dailyNodeType: type: string description: Type of node to run on clusterLocal: type: boolean description: Whether the service is cluster-local image: type: string description: Container image used autoScaling: type: object description: Auto-scaling configuration properties: minReplicas: type: integer description: Minimum number of replicas maxReplicas: type: integer description: Maximum number of replicas envFromSecretNames: type: array description: Names of secrets to use as environment variables items: type: string krispModels: type: object description: Krisp noise cancellation configuration properties: enabled: type: boolean description: Whether Krisp is enabled krispViva: type: object description: Krisp VIVA noise cancellation configuration properties: audioFilters: type: boolean description: Whether Krisp VIVA audio filters are enabled version: type: string description: Version of the Krisp VIVA models enableManagedKeys: type: object description: Managed API keys configuration properties: enabled: type: boolean description: Whether managed keys are enabled serviceId: type: string description: Service ID createdAt: type: string format: date-time description: Creation timestamp of the deployment updatedAt: type: string format: date-time description: Last update timestamp of the deployment agentProfile: type: string description: The agent profile used for resource allocation nullable: true ErrorResponse: type: object properties: error: type: string description: Error message code: type: string description: Error code securitySchemes: PrivateKeyAuth: type: http scheme: bearer description: >- Authentication requires a Pipecat Cloud Private API token. Generate a Private API key from your Dashboard (Settings > API Keys > Private > Create key) and include it as a Bearer token in the Authorization header. ```` --- # Source: https://docs.pipecat.ai/deployment/pipecat-cloud/rest-reference/endpoint/agent-update.md > ## Documentation Index > Fetch the complete documentation index at: https://docs.pipecat.ai/llms.txt > Use this file to discover all available pages before exploring further. # Update an Agent > Update an existing agent's configuration or deploy a new version. ## OpenAPI ````yaml POST /agents/{agentName} openapi: 3.0.0 info: title: Pipecat Cloud version: 1.0.0 description: Private API for Pipecat Cloud agent management servers: - url: https://api.pipecat.daily.co/v1 description: API server security: - PrivateKeyAuth: [] paths: /agents/{agentName}: post: summary: Update an agent deployment operationId: updateService parameters: - name: agentName in: path required: true description: Name of the agent to update schema: type: string requestBody: required: true content: application/json: schema: $ref: '#/components/schemas/UpdateServiceRequest' example: image: your-dockername/voice-starter:0.1 nodeType: arm imagePullSecretSet: dockerhub-credentials secretSet: voice-starter-secrets autoScaling: minAgents: 1 maxAgents: 10 krispViva: audioFilter: tel agentProfile: agent-1x enableManagedKeys: false responses: '200': description: Agent deployment updated successfully content: application/json: schema: $ref: '#/components/schemas/ServiceDetailsResponse' example: name: voice-starter region: us-west ready: true createdAt: '2025-04-19T01:20:27.564Z' updatedAt: '2025-04-19T01:25:47.229Z' activeDeploymentId: 19db578d-808c-420a-a047-87edde4410c1 activeDeploymentReady: false autoScaling: maxReplicas: 10 minReplicas: 1 activeSessionCount: 0 agentProfile: agent-1x deployment: id: 19db578d-808c-420a-a047-87edde4410c1 manifest: apiVersion: pipecatcloud.daily.co/v1 kind: PCService metadata: name: voice-starter namespace: tiny-ferret-maroon-123 spec: dailyNodeType: arm deploymentMode: keda clusterLocal: true image: your-dockername/voice-starter:0.1 autoScaling: minReplicas: 1 maxReplicas: 10 envFromSecretNames: - voice-starter-secrets krispModels: enabled: false krispViva: audioFilters: true version: '20251010' modelVars: KRISP_VIVA_MODEL_PATH: audio_filters/krisp-viva-tel-v2.kef integratedKeysProxy: enabled: false resources: cpu: 500m memory: 1Gi serviceId: b59a68ee-61c8-4d99-9ceb-e99a3953bdac createdAt: '2025-04-19T01:25:47.225Z' updatedAt: '2025-04-19T01:25:47.225Z' krispViva: audioFilter: tel '400': description: Invalid request content: application/json: schema: $ref: '#/components/schemas/ErrorResponse' examples: invalidParameters: summary: Invalid parameters value: error: Invalid parameters code: GENERIC_BAD_REQUEST secretRegionMismatch: summary: Secret set region mismatch value: error: >- Secret set 'my-secrets' is in region 'us-east' but service is in region 'us-west'. Secrets must be in the same region as the service. code: GENERIC_BAD_REQUEST imagePullSecretRegionMismatch: summary: Image pull secret region mismatch value: error: >- Image pull secret set 'dockerhub-creds' is in region 'us-east' but service is in region 'us-west'. Image pull secrets must be in the same region as the service. code: GENERIC_BAD_REQUEST '404': description: Agent or referenced secret not found content: application/json: schema: $ref: '#/components/schemas/ErrorResponse' example: error: Service not found code: NOT_FOUND '500': description: Internal server error content: application/json: schema: $ref: '#/components/schemas/ErrorResponse' example: error: Internal server error code: INTERNAL_SERVER_ERROR security: - PrivateKeyAuth: [] components: schemas: UpdateServiceRequest: type: object properties: image: type: string description: The container image to use for the agent example: your-username/my-agent:latest nodeType: type: string description: >- The type of node to run the agent on. Only `arm` is supported at this time. default: arm example: arm imagePullSecretSet: type: string description: The name of the image pull secret set to use example: dockerhub-credentials secretSet: type: string description: The name of the secret set to use example: my-agent-secrets autoScaling: type: object description: Auto-scaling configuration for the agent properties: minAgents: type: integer description: Minimum number of agents example: 1 maxAgents: type: integer description: 'Maximum number of agents (Default: 50)' example: 10 enableKrisp: type: boolean deprecated: true description: >- Whether to enable Krisp noise cancellation. **Deprecated:** Use `krispViva` instead for the latest Krisp VIVA models. example: false krispViva: type: object description: >- Krisp VIVA noise cancellation configuration. [Learn more](/deployment/pipecat-cloud/guides/krisp-viva). properties: audioFilter: type: string nullable: true description: >- The Krisp VIVA audio filter model to use: - `tel`: Optimized for telephony, cellular, landline, mobile, desktop, and browser (up to 16kHz) - `pro`: Optimized for mobile, desktop, and browser with WebRTC (up to 32kHz) - `null`: Disables Krisp VIVA By default, Pipecat processes input audio at 16kHz, making `tel` appropriate for most use cases. enum: - tel - pro - null example: tel agentProfile: type: string description: >- The agent profile to use for resource allocation. Valid values are: - `agent-1x`: 0.5 vCPU and 1 GB of memory. Best for voice agents. - `agent-2x`: 1 vCPU and 2 GB of memory. Well suited for voice and video agents or voice agents requiring extra processing. - `agent-3x`: 1.5 vCPU and 3 GB of memory. Best for voice and video agents requiring extra processing or multiple video inputs. enum: - agent-1x - agent-2x - agent-3x default: agent-1x example: agent-1x enableManagedKeys: type: boolean description: >- Pipecat Cloud provides API keys for some Pipecat services that you can use directly in your applications. [Learn more](/deployment/pipecat-cloud/guides/managed-api-keys). default: false example: false ServiceDetailsResponse: type: object properties: name: type: string description: Name of the agent region: type: string description: The region where the agent is deployed ready: type: boolean description: Whether the agent is ready to accept sessions createdAt: type: string format: date-time description: Creation timestamp of the agent updatedAt: type: string format: date-time description: Last update timestamp activeDeploymentId: type: string description: ID of the active deployment activeDeploymentReady: type: boolean description: Whether the active deployment is ready autoScaling: type: object properties: maxReplicas: type: integer description: Maximum number of agent replicas minReplicas: type: integer description: Minimum number of agent replicas activeSessionCount: type: integer description: Number of active sessions deployment: type: object nullable: true description: Details of the current deployment properties: id: type: string description: Unique identifier for the deployment manifest: type: object description: Kubernetes manifest for the deployment properties: apiVersion: type: string description: API version of the manifest kind: type: string description: Kind of Kubernetes resource metadata: type: object description: Metadata for the resource properties: name: type: string description: Name of the agent namespace: type: string description: Kubernetes namespace spec: type: object description: Specification for the agent deployment properties: dailyNodeType: type: string description: Type of node to run on clusterLocal: type: boolean description: Whether the service is cluster-local image: type: string description: Container image used autoScaling: type: object description: Auto-scaling configuration properties: minReplicas: type: integer description: Minimum number of replicas maxReplicas: type: integer description: Maximum number of replicas envFromSecretNames: type: array description: Names of secrets to use as environment variables items: type: string krispModels: type: object description: Krisp noise cancellation configuration (deprecated) properties: enabled: type: boolean description: Whether Krisp is enabled krispViva: type: object description: >- Krisp VIVA noise cancellation configuration in the deployment manifest properties: audioFilters: type: boolean description: Whether Krisp VIVA audio filters are enabled version: type: string description: Version of the Krisp VIVA models modelVars: type: object description: >- Environment variables for Krisp VIVA model configuration properties: KRISP_VIVA_MODEL_PATH: type: string description: Path to the Krisp VIVA model file enableManagedKeys: type: object description: Managed API keys configuration properties: enabled: type: boolean description: Whether managed keys are enabled serviceId: type: string description: ID of the service this deployment belongs to createdAt: type: string format: date-time description: Creation timestamp of the deployment updatedAt: type: string format: date-time description: Last update timestamp of the deployment agentProfile: type: string description: The agent profile used for resource allocation nullable: true krispViva: type: object nullable: true description: Krisp VIVA noise cancellation status properties: audioFilter: type: string nullable: true description: >- The currently configured Krisp VIVA audio filter model (tel, pro, or null if disabled) ErrorResponse: type: object properties: error: type: string description: Error message code: type: string description: Error code securitySchemes: PrivateKeyAuth: type: http scheme: bearer description: >- Authentication requires a Pipecat Cloud Private API token. Generate a Private API key from your Dashboard (Settings > API Keys > Private > Create key) and include it as a Bearer token in the Authorization header. ```` --- # Source: https://docs.pipecat.ai/cli/cloud/agent.md > ## Documentation Index > Fetch the complete documentation index at: https://docs.pipecat.ai/llms.txt > Use this file to discover all available pages before exploring further. # agent > Manage agent deployments The `agent` command provides sub-commands for managing your deployed agents. These commands allow you to view status, start agents, see logs, and manage deployments. ## start Start a deployed agent instance, creating an active session. **Usage:** ```shell theme={null} pipecat cloud agent start [ARGS] [OPTIONS] ``` **Arguments:** Unique string identifier for the agent deployment. Must not contain spaces. **Options:** Public API key to authenticate the agent deployment. Will default to any key set in your config. For more information, see [API keys](/deployment/pipecat-cloud/fundamentals/accounts-and-organizations#api-keys). Stringified JSON object to pass to the agent deployment. This data will be available to the agent as a `data` parameter in your `bot()` method. More information [here](/deployment/pipecat-cloud/fundamentals/active-sessions#running-an-agent). Skip summary confirmation before issuing start request. Create a Daily WebRTC session for the agent. Stringified JSON object with Daily room properties to customize the WebRTC session. Only used when `--use-daily` is set to true. See [Daily API documentation](https://docs.daily.co/reference/rest-api/rooms/config) for available properties. Organization to start the agent for. If not provided, uses the current organization from your configuration. ## stop Stop an active agent session and clean up its resources. **Usage:** ```shell theme={null} pcc agent stop [ARGS] [OPTIONS] ``` **Arguments:** Name of the agent. Must not contain spaces. **Options:** ID of the session to stop. Organization which the agent belongs to. If not provided, uses the current organization from your configuration. Bypass prompt for confirmation before stopping the session. ## status Shows the current status of an agent deployment, including health and conditions. **Usage:** ```shell theme={null} pipecat cloud agent status [ARGS] ``` **Arguments:** Unique string identifier for the agent deployment. Must not contain spaces. ## deployments Lists deployment history for an agent, including image versions and timestamps. **Usage:** ```shell theme={null} pipecat cloud agent deployments [ARGS] ``` **Arguments:** Unique string identifier for the agent deployment. Must not contain spaces. ## logs Displays combined logs from all agent instances, useful for debugging issues. **Usage:** ```shell theme={null} pipecat cloud agent logs [ARGS] [OPTIONS] ``` **Arguments:** Unique string identifier for the agent deployment. Must not contain spaces. **Options:** Filter logs by severity: `ALL`, `DEBUG`, `INFO`, `WARNING`, `ERROR`, `CRITICAL`. Limit the number of log lines to display. Filter results for specific agent deployment ID (obtainable from `pipecat cloud agent deployments [agent-name]`). Filter results for specific session ID (obtainable from `pipecat cloud agent sessions [agent-name]`). ## list Lists all agents in an organization with their details. **Usage:** ```shell theme={null} pipecat cloud agent list [OPTIONS] ``` **Options:** Organization to list agents for. If not provided, uses the current organization from your configuration. Filter agents by region. Only agents deployed in the specified region will be shown. If not provided, agents from all regions are listed. ## sessions Lists active sessions for a specified agent. When there are no active sessions, it suggests how to start a new session. When used with the `--id` option, displays detailed information about a specific session including CPU and memory usage with sparkline visualizations and percentile summaries. **Usage:** ```shell theme={null} pipecat cloud agent sessions [ARGS] [OPTIONS] ``` **Arguments:** Name of the agent to list active sessions for. **Options:** Session ID to view detailed metrics for. When provided, displays CPU and memory usage statistics including sparkline visualizations and percentile summaries (p50, p90, p99). Organization to list sessions for. If not provided, uses the current organization from your configuration. ## delete Deletes an agent deployment. This will prevent starting new agents and remove all associated data. This action is irreversible. All data will be lost. **Usage:** ```shell theme={null} pipecat cloud agent delete [ARGS] [OPTIONS] ``` **Arguments:** Unique string identifier for the agent deployment. Must not contain spaces. **Options:** Do not prompt for confirmation before deleting the agent. --- # Source: https://docs.pipecat.ai/server/utilities/audio/aic-filter.md > ## Documentation Index > Fetch the complete documentation index at: https://docs.pipecat.ai/llms.txt > Use this file to discover all available pages before exploring further. # AICFilter > Speech enhancement using ai-coustics' SDK ## Overview `AICFilter` is an audio processor that enhances user speech by reducing background noise and improving speech clarity. It inherits from `BaseAudioFilter` and processes audio frames in real-time using ai-coustics' speech enhancement technology. To use AIC, you need a license key. Get started at [ai-coustics.com](https://ai-coustics.com/pipecat). This documentation covers **aic-sdk v2.x**. If you're using aic-sdk v1.x, please see the [Migration Guide](#migration-guide-v1-to-v2) section below for upgrading instructions. ## Installation The AIC filter requires additional dependencies: ```bash theme={null} pip install "pipecat-ai[aic]" ``` ## Constructor Parameters ai-coustics license key for authentication. Get your key at [developers.ai-coustics.io](https://developers.ai-coustics.io). Model identifier to download from CDN. Required if `model_path` is not provided. See [artifacts.ai-coustics.io](https://artifacts.ai-coustics.io/) for available models. See the [documentation](https://docs.ai-coustics.com/guides/models) for more detailed information about the models. Examples: `"quail-vf-l-16khz"`, `"quail-s-16khz"`, `"quail-l-8khz"` Path to a local `.aicmodel` file. If provided, `model_id` is ignored and no download occurs. Useful for offline deployments or custom models. Directory for downloading and caching models. Defaults to a cache directory in the user's home folder. ## Methods ### create\_vad\_analyzer Creates an `AICVADAnalyzer` that uses the AIC model's built-in voice activity detection. ```python theme={null} def create_vad_analyzer( *, speech_hold_duration: Optional[float] = None, minimum_speech_duration: Optional[float] = None, sensitivity: Optional[float] = None, ) -> AICVADAnalyzer ``` #### VAD Parameters Controls for how long the VAD continues to detect speech after the audio signal no longer contains speech (in seconds). Range: `0.0` to `100x model window length`, Default (in SDK): `0.05s` Controls for how long speech needs to be present in the audio signal before the VAD considers it speech (in seconds). Range: `0.0` to `1.0`, Default (in SDK): `0.0s` Controls the sensitivity (energy threshold) of the VAD. This value is used by the VAD as the threshold a speech audio signal's energy has to exceed in order to be considered speech. Formula: `Energy threshold = 10 ** (-sensitivity)` Range: `1.0` to `15.0`, Default (in SDK): `6.0` ### get\_vad\_context Returns the VAD context once the processor is initialized. Can be used to dynamically adjust VAD parameters at runtime. ```python theme={null} vad_ctx = aic_filter.get_vad_context() vad_ctx.set_parameter(VadParameter.Sensitivity, 8.0) ``` ## Input Frames Specific control frame to toggle filtering on/off ```python theme={null} from pipecat.frames.frames import FilterEnableFrame # Disable speech enhancement await task.queue_frame(FilterEnableFrame(False)) # Re-enable speech enhancement await task.queue_frame(FilterEnableFrame(True)) ``` ## Usage Examples ### Basic Usage with AIC VAD The recommended approach is to use `AICFilter` with its built-in VAD analyzer: ```python theme={null} from pipecat.audio.filters.aic_filter import AICFilter from pipecat.processors.aggregators.llm_response_universal import ( LLMContextAggregatorPair, LLMUserAggregatorParams, ) from pipecat.transports.services.daily import DailyTransport, DailyParams # Create the AIC filter aic_filter = AICFilter( license_key=os.environ["AIC_SDK_LICENSE"], model_id="quail-vf-l-16khz", ) # Use AIC's integrated VAD transport = DailyTransport( room_url, token, "Bot", DailyParams( audio_in_enabled=True, audio_out_enabled=True, audio_in_filter=aic_filter, ), ) user_aggregator, assistant_aggregator = LLMContextAggregatorPair( context, user_params=LLMUserAggregatorParams( vad_analyzer=aic_filter.create_vad_analyzer( speech_hold_duration=0.05, minimum_speech_duration=0.0, sensitivity=6.0, ), ), ) ``` ### Using a Local Model For offline deployments or when you want to manage model files yourself: ```python theme={null} from pipecat.audio.filters.aic_filter import AICFilter aic_filter = AICFilter( license_key=os.environ["AIC_SDK_LICENSE"], model_path="/path/to/your/model.aicmodel", ) ``` ### Custom Cache Directory Specify a custom directory for model downloads: ```python theme={null} from pipecat.audio.filters.aic_filter import AICFilter aic_filter = AICFilter( license_key=os.environ["AIC_SDK_LICENSE"], model_id="quail-s-16khz", model_download_dir="/opt/aic-models", ) ``` ### With Other Transports The AIC filter works with any Pipecat transport: ```python theme={null} from pipecat.audio.filters.aic_filter import AICFilter from pipecat.processors.aggregators.llm_response_universal import ( LLMContextAggregatorPair, LLMUserAggregatorParams, ) from pipecat.transports.websocket import FastAPIWebsocketTransport, FastAPIWebsocketParams aic_filter = AICFilter( license_key=os.environ["AIC_SDK_LICENSE"], model_id="quail-vf-l-16khz", ) transport = FastAPIWebsocketTransport( params=FastAPIWebsocketParams( audio_in_enabled=True, audio_out_enabled=True, audio_in_filter=aic_filter, ), ) user_aggregator, assistant_aggregator = LLMContextAggregatorPair( context, user_params=LLMUserAggregatorParams( vad_analyzer=aic_filter.create_vad_analyzer( speech_hold_duration=0.05, sensitivity=6.0, ), ), ) ``` See the [AIC filter example](https://github.com/pipecat-ai/pipecat/blob/main/examples/foundational/07zd-interruptible-aicoustics.py) for a complete working example. ## Models For detailed information about the available models, take a look at the [Models documentation](https://docs.ai-coustics.com/guides/models). ## Audio Flow ```mermaid theme={null} graph TD A[AudioRawFrame] --> B[AICFilter] B --> C[AICVADAnalyzer] C --> D[STT] ``` The AIC filter enhances audio before it reaches the VAD and STT stages, improving transcription accuracy in noisy environments. ## Migration Guide (v1 to v2) For the complete aic-sdk migration guide including all API changes, see the official [Python 1.3 to 2.0 Migration Guide](https://docs.ai-coustics.com/guides/migrations/python-1-3-to-2-0#quick-migration-checklist). ### Migration Steps 1. Update Pipecat to the latest version (aic-sdk v2.x is included automatically). 2. Remove deprecated constructor parameters (`model_type`, `enhancement_level`, `voice_gain`, `noise_gate_enable`). 3. Add `model_id` parameter with an appropriate model (e.g., `"quail-vf-l-16khz"`). 4. Update any runtime VAD adjustments to use the new VAD context API. 5. We recommend to use `aic_filter.create_vad_analyzer()` for improved accuracy. ### Breaking Changes | v1 Parameter | v2 Replacement | | ------------------- | ----------------------------------------- | | `model_type` | `model_id` (string-based model selection) | | `enhancement_level` | Removed (model-specific behavior) | | `voice_gain` | Removed | | `noise_gate_enable` | Removed | ## Notes * Requires ai-coustics license key (get one at [developers.ai-coustics.io](https://developers.ai-coustics.io)) * Models are automatically downloaded and cached on first use * Supports real-time audio processing with low latency * Handles PCM\_16 audio format (int16 samples) * Thread-safe for pipeline processing * Can be dynamically enabled/disabled via `FilterEnableFrame` * Integrated VAD provides better accuracy than standalone VAD when using enhancement * For available models, visit [artifacts.ai-coustics.io](https://artifacts.ai-coustics.io/) --- # Source: https://docs.pipecat.ai/server/services/llm/anthropic.md > ## Documentation Index > Fetch the complete documentation index at: https://docs.pipecat.ai/llms.txt > Use this file to discover all available pages before exploring further. # Anthropic > Large Language Model service implementation using Anthropic's Claude API ## Overview `AnthropicLLMService` provides integration with Anthropic's Claude models, supporting streaming responses, function calling, and prompt caching with specialized context handling for Anthropic's message format and advanced reasoning capabilities. Pipecat's API methods for Anthropic Claude integration Complete example with function calling Official Anthropic API documentation and features Access Claude models and API keys ## Installation To use Anthropic services, install the required dependency: ```bash theme={null} pip install "pipecat-ai[anthropic]" ``` ## Prerequisites ### Anthropic Account Setup Before using Anthropic LLM services, you need: 1. **Anthropic Account**: Sign up at [Anthropic Console](https://console.anthropic.com/) 2. **API Key**: Generate an API key from your console dashboard 3. **Model Selection**: Choose from available Claude models (Claude 3.5 Sonnet, Claude 3 Opus, etc.) ### Required Environment Variables * `ANTHROPIC_API_KEY`: Your Anthropic API key for authentication --- # Source: https://docs.pipecat.ai/client/react-native/api-reference.md > ## Documentation Index > Fetch the complete documentation index at: https://docs.pipecat.ai/llms.txt > Use this file to discover all available pages before exploring further. # API Reference > API reference for the Pipecat React Native SDK The Pipecat React Native SDK leverages the Pipecat JavaScript SDK for seamless integration with React Native applications. For detailed information, please reference to the [Javascript SDK docs](/client/js/api-reference/client-constructor). **Just ensure you use the appropriate transport layer for React Native.** --- # Source: https://docs.pipecat.ai/server/services/stt/assemblyai.md > ## Documentation Index > Fetch the complete documentation index at: https://docs.pipecat.ai/llms.txt > Use this file to discover all available pages before exploring further. # AssemblyAI > Speech-to-text service implementation using AssemblyAI's real-time transcription API ## Overview `AssemblyAISTTService` provides real-time speech recognition using AssemblyAI's WebSocket API with support for interim results, end-of-turn detection, and configurable audio processing parameters for accurate transcription in conversational AI applications. Pipecat's API methods for AssemblyAI STT integration Complete example with interruption handling Official AssemblyAI documentation and features Access API keys and transcription features ## Installation To use AssemblyAI services, install the required dependency: ```bash theme={null} pip install "pipecat-ai[assemblyai]" ``` ## Prerequisites ### AssemblyAI Account Setup Before using AssemblyAI STT services, you need: 1. **AssemblyAI Account**: Sign up at [AssemblyAI Console](https://www.assemblyai.com/dashboard/signup) 2. **API Key**: Generate an API key from your dashboard 3. **Model Selection**: Choose from available transcription models and features ### Required Environment Variables * `ASSEMBLYAI_API_KEY`: Your AssemblyAI API key for authentication --- # Source: https://docs.pipecat.ai/server/services/tts/asyncai.md > ## Documentation Index > Fetch the complete documentation index at: https://docs.pipecat.ai/llms.txt > Use this file to discover all available pages before exploring further. # Async > Text-to-speech services using Async's WebSocket and HTTP APIs ## Overview Async provides high-quality text-to-speech synthesis with two service implementations: `AsyncAITTSService` (WebSocket-based) for real-time streaming with interruption support, and `AsyncAIHttpTTSService` (HTTP-based) for simpler synthesis. `AsyncAITTSService` is recommended for interactive applications requiring low latency. Pipecat's API methods for AsyncAI TTS integration Complete example with WebSocket streaming Official Async API documentation Explore available voice models and features ## Installation To use Async services, install the required dependencies: ```bash theme={null} pip install "pipecat-ai[asyncai]" ``` ## Prerequisites ### Async Account Setup Before using Async TTS services, you need: 1. **Async Account**: Sign up at [Async](https://async.ai) 2. **API Key**: Generate an API key from your account dashboard 3. **Voice Selection**: Choose from available voice models ### Required Environment Variables * `ASYNCAI_API_KEY`: Your Async API key for authentication --- # Source: https://docs.pipecat.ai/server/utilities/audio/audio-buffer-processor.md > ## Documentation Index > Fetch the complete documentation index at: https://docs.pipecat.ai/llms.txt > Use this file to discover all available pages before exploring further. # AudioBufferProcessor > Process and buffer audio frames from conversations with flexible event handling ## Overview The `AudioBufferProcessor` captures and buffers audio frames from both input (user) and output (bot) sources during conversations. It provides synchronized audio streams with configurable sample rates, supports both mono and stereo output, and offers flexible event handlers for various audio processing workflows. ## Constructor ```python theme={null} AudioBufferProcessor( sample_rate=None, num_channels=1, buffer_size=0, enable_turn_audio=False, **kwargs ) ``` ### Parameters The desired output sample rate in Hz. If `None`, uses the transport's sample rate from the `StartFrame`. Number of output audio channels: * `1`: Mono output (user and bot audio are mixed together) * `2`: Stereo output (user audio on left channel, bot audio on right channel) Buffer size in bytes that triggers audio data events: * `0`: Events only trigger when recording stops * `>0`: Events trigger whenever buffer reaches this size (useful for chunked processing) Whether to enable per-turn audio event handlers (`on_user_turn_audio_data` and `on_bot_turn_audio_data`). ## Properties ### sample\_rate ```python theme={null} @property def sample_rate(self) -> int ``` The current sample rate of the audio processor in Hz. ### num\_channels ```python theme={null} @property def num_channels(self) -> int ``` The number of channels in the audio output (1 for mono, 2 for stereo). ## Methods ### start\_recording() ```python theme={null} async def start_recording() ``` Start recording audio from both user and bot sources. Initializes recording state and resets audio buffers. ### stop\_recording() ```python theme={null} async def stop_recording() ``` Stop recording and trigger final audio data handlers with any remaining buffered audio. ### has\_audio() ```python theme={null} def has_audio() -> bool ``` Check if both user and bot audio buffers contain data. **Returns:** `True` if both buffers contain audio data. ## Event Handlers The processor supports multiple event handlers for different audio processing workflows. Register handlers using the `@processor.event_handler()` decorator. ### on\_audio\_data Triggered when `buffer_size` is reached or recording stops, providing merged audio. ```python theme={null} @audiobuffer.event_handler("on_audio_data") async def on_audio_data(buffer, audio: bytes, sample_rate: int, num_channels: int): # Handle merged audio data pass ``` **Parameters:** * `buffer`: The AudioBufferProcessor instance * `audio`: Merged audio data (format depends on `num_channels` setting) * `sample_rate`: Sample rate in Hz * `num_channels`: Number of channels (1 or 2) ### on\_track\_audio\_data Triggered alongside `on_audio_data`, providing separate user and bot audio tracks. ```python theme={null} @audiobuffer.event_handler("on_track_audio_data") async def on_track_audio_data(buffer, user_audio: bytes, bot_audio: bytes, sample_rate: int, num_channels: int): # Handle separate audio tracks pass ``` **Parameters:** * `buffer`: The AudioBufferProcessor instance * `user_audio`: Raw user audio bytes (always mono) * `bot_audio`: Raw bot audio bytes (always mono) * `sample_rate`: Sample rate in Hz * `num_channels`: Always 1 for individual tracks ### on\_user\_turn\_audio\_data Triggered when a user speaking turn ends. Requires `enable_turn_audio=True`. ```python theme={null} @audiobuffer.event_handler("on_user_turn_audio_data") async def on_user_turn_audio_data(buffer, audio: bytes, sample_rate: int, num_channels: int): # Handle user turn audio pass ``` **Parameters:** * `buffer`: The AudioBufferProcessor instance * `audio`: Audio data from the user's speaking turn * `sample_rate`: Sample rate in Hz * `num_channels`: Always 1 (mono) ### on\_bot\_turn\_audio\_data Triggered when a bot speaking turn ends. Requires `enable_turn_audio=True`. ```python theme={null} @audiobuffer.event_handler("on_bot_turn_audio_data") async def on_bot_turn_audio_data(buffer, audio: bytes, sample_rate: int, num_channels: int): # Handle bot turn audio pass ``` **Parameters:** * `buffer`: The AudioBufferProcessor instance * `audio`: Audio data from the bot's speaking turn * `sample_rate`: Sample rate in Hz * `num_channels`: Always 1 (mono) ## Audio Processing Features * **Automatic resampling**: Converts incoming audio to the specified sample rate * **Buffer synchronization**: Aligns user and bot audio streams temporally * **Silence insertion**: Fills gaps in non-continuous audio streams to maintain timing * **Turn tracking**: Monitors speaking turns when `enable_turn_audio=True` ## Integration Notes ### STT Audio Passthrough If using an STT service in your pipeline, enable audio passthrough to make audio available to the AudioBufferProcessor: ```python theme={null} stt = DeepgramSTTService( api_key=os.getenv("DEEPGRAM_API_KEY"), audio_passthrough=True, ) ``` `audio_passthrough` is enabled by default. ### Pipeline Placement Add the AudioBufferProcessor after `transport.output()` to capture both user and bot audio: ```python theme={null} pipeline = Pipeline([ transport.input(), # ... other processors ... transport.output(), audiobuffer, # Place after audio output # ... remaining processors ... ]) ``` --- # Source: https://docs.pipecat.ai/cli/cloud/auth.md > ## Documentation Index > Fetch the complete documentation index at: https://docs.pipecat.ai/llms.txt > Use this file to discover all available pages before exploring further. # auth > Authentication and authorization commands The `auth` command group manages authentication with Pipecat Cloud, allowing you to login, logout, and check your current account identity. ## login Begins an authorization flow to authenticate with Pipecat Cloud. **Usage:** ```shell theme={null} pipecat cloud auth login [OPTIONS] ``` **Options:** Skip opening a browser window for authentication and print the URL instead. Useful for remote or containerized environments. This command initiates the authentication process by: 1. Generating a unique authentication URL 2. Opening your default web browser (if available) 3. Waiting for you to complete the sign-in process in the browser 4. Retrieving and storing your access token locally If the browser doesn't open automatically, or if you use the `--headless` option, you can copy and paste the displayed URL into your browser manually. On successful login, the CLI will store the access token in the local configuration file (defaults to `~/.config/pipecatcloud/pipecatcloud.toml`). This token will be used for all subsequent requests to the Pipecat Cloud API. You can override the default location by setting the `PIPECAT_CONFIG_PATH` environment variable. ## logout Signs out of the current Pipecat Cloud account by removing the access token from your local configuration file. **Usage:** ```shell theme={null} pipecat cloud auth logout ``` ## whoami Displays information about the currently authenticated user, including user ID, active organization, and Daily API key. **Usage:** ```shell theme={null} pipecat cloud auth whoami ``` ## Configuration CLI configuration is stored in `~/.config/pipecatcloud/pipecatcloud.toml`. You can override this location by setting the `PIPECAT_CONFIG_PATH` environment variable. The configuration stores your access token, active organization, and default API keys. **View current configuration:** ```shell theme={null} pipecat cloud --config ``` We do not recommend manually editing the configuration file. Should the file become malformed, please run `pipecat cloud auth logout` to reset. ```toml theme={null} token = "..." org = "user-namespace" [another-user-org] default_public_key = "pk_..." default_public_key_name = "Test Key" [futher-user-org] default_public_key = "pk_..." default_public_key_name = "Pipecat Cloud Public Key" ``` *** Managing your account and collaborating on agents as part of a team --- # Source: https://docs.pipecat.ai/deployment/pipecat-cloud/guides/container-registries/aws-ecr.md > ## Documentation Index > Fetch the complete documentation index at: https://docs.pipecat.ai/llms.txt > Use this file to discover all available pages before exploring further. # AWS ECR > Deploy Pipecat Cloud agents using Amazon Elastic Container Registry If you're using AWS ECR with private repositories for Pipecat Cloud deployments, you'll need to configure image pull secrets to authenticate with your registry. **ECR tokens expire every 12 hours**, so you'll also need to set up automatic token refresh. ## Authenticate Docker First, authenticate Docker with ECR: ```bash theme={null} aws ecr get-login-password --region | docker login --username AWS --password-stdin .dkr.ecr..amazonaws.com ``` ## Configure Image Pull Secrets Use the Pipecat Cloud REST API to store your ECR registry credentials: ```bash theme={null} # Get ECR login token ECR_TOKEN=$(aws ecr get-login-password --region ) # Create image pull secret using REST API curl --request PUT \ --url https://api.pipecat.daily.co/v1/secrets/my-ecr-credentials \ --header 'Authorization: Bearer ' \ --header 'Content-Type: application/json' \ --data '{ "secretValue": "'"$(echo -n "AWS:$ECR_TOKEN" | base64)"'", "host": "https://.dkr.ecr..amazonaws.com", "isImagePullSecret": true }' ``` Replace: * `` with your AWS region (e.g., `us-east-1`, `us-west-2`) * `` with your AWS account ID * `` with your Pipecat Cloud private API token ## Configure Your Deployment Create a `pcc-deploy.toml` file with your ECR image configuration: ```toml theme={null} agent_name = "my-ecr-agent" image = ".dkr.ecr..amazonaws.com/your-repo:tag" secret_set = "my-agent-secrets" image_credentials = "my-ecr-credentials" [scaling] min_instances = 0 ``` ## Build and Push to ECR Build and push your agent image to ECR using the Pipecat Cloud CLI: ```bash theme={null} # Build and push using your pcc-deploy.toml configuration pipecat cloud docker build-push ``` This command automatically builds for the correct platform (`linux/arm64`) and pushes to your configured ECR repository. Pipecat Cloud may pull your image on deploy and again during scale-outs, so credentials must be valid whenever new pods start. ## Deploy Your Agent Deploy using your configured `pcc-deploy.toml`: ```bash theme={null} pipecat cloud deploy ``` ## Automatic Token Refresh (Required) **ECR passwords expire every 12 hours**, so set up a scheduled job to refresh the token: ```bash theme={null} #!/bin/bash # refresh-ecr-token.sh # Get fresh ECR token ECR_TOKEN=$(aws ecr get-login-password --region ) # Update the existing image pull secret curl --request PUT \ --url https://api.pipecat.daily.co/v1/secrets/my-ecr-credentials \ --header 'Authorization: Bearer ' \ --header 'Content-Type: application/json' \ --data '{ "secretValue": "'"$(echo -n "AWS:$ECR_TOKEN" | base64)"'", "host": "https://.dkr.ecr..amazonaws.com", "isImagePullSecret": true }' ``` Schedule this script to run every 6-8 hours using cron or your preferred scheduler. ## Operational Considerations **Critical operational tips:** * **Image pulls can happen during scale-outs**, not just at initial deploy—keep the secret valid continuously * **If you see agents failing to become ready with no logs**, check that your ECR credentials aren't expired * **Consider setting up monitoring alerts** for ECR token expiration * **Test your refresh script** to ensure it works before relying on it in production Ensure your AWS credentials have the necessary permissions to access ECR, including `ecr:GetAuthorizationToken` and `ecr:BatchGetImage` policies. --- # Source: https://docs.pipecat.ai/server/services/tts/aws.md # Source: https://docs.pipecat.ai/server/services/stt/aws.md # Source: https://docs.pipecat.ai/server/services/s2s/aws.md # Source: https://docs.pipecat.ai/server/services/llm/aws.md > ## Documentation Index > Fetch the complete documentation index at: https://docs.pipecat.ai/llms.txt > Use this file to discover all available pages before exploring further. # AWS Bedrock > Large Language Model service implementation using Amazon Bedrock API ## Overview `AWSBedrockLLMService` provides access to Amazon's foundation models including Anthropic Claude and Amazon Nova, with streaming responses, function calling, and multimodal capabilities through Amazon's managed AI service for enterprise-grade LLM deployment. Pipecat's API methods for AWS Bedrock integration Complete example with function calling Official AWS Bedrock documentation and features Access foundation models and manage IAM ## Installation To use AWS Bedrock services, install the required dependencies: ```bash theme={null} pip install "pipecat-ai[aws]" ``` ## Prerequisites ### AWS Account Setup Before using AWS Bedrock LLM services, you need: 1. **AWS Account**: Sign up at [AWS Console](https://console.aws.amazon.com/) 2. **IAM User**: Create an IAM user with Amazon Bedrock permissions 3. **Model Access**: Request access to foundation models in your AWS region 4. **Credentials**: Set up AWS access keys and region configuration ### Required Environment Variables * `AWS_ACCESS_KEY_ID`: Your AWS access key ID * `AWS_SECRET_ACCESS_KEY`: Your AWS secret access key * `AWS_SESSION_TOKEN`: Session token (if using temporary credentials) * `AWS_REGION`: AWS region (defaults to "us-east-1") --- # Source: https://docs.pipecat.ai/server/services/tts/azure.md # Source: https://docs.pipecat.ai/server/services/stt/azure.md # Source: https://docs.pipecat.ai/server/services/llm/azure.md > ## Documentation Index > Fetch the complete documentation index at: https://docs.pipecat.ai/llms.txt > Use this file to discover all available pages before exploring further. # Azure > Large Language Model service implementation using Azure OpenAI API ## Overview `AzureLLMService` provides access to Azure OpenAI's language models through an OpenAI-compatible interface. It inherits from `OpenAILLMService` and supports streaming responses, function calling, and context management with enterprise-grade security and compliance. Pipecat's API methods for Azure OpenAI integration Complete example with function calling Official Azure OpenAI documentation and setup Create OpenAI resources and get credentials ## Installation To use Azure OpenAI services, install the required dependency: ```bash theme={null} pip install "pipecat-ai[azure]" ``` ## Prerequisites ### Azure OpenAI Setup Before using Azure OpenAI LLM services, you need: 1. **Azure Account**: Sign up at [Azure Portal](https://portal.azure.com/) 2. **OpenAI Resource**: Create an Azure OpenAI resource in your subscription 3. **Model Deployment**: Deploy your chosen model (GPT-4, GPT-3.5-turbo, etc.) 4. **Credentials**: Get your API key, endpoint, and deployment name ### Required Environment Variables * `AZURE_CHATGPT_API_KEY`: Your Azure OpenAI API key * `AZURE_CHATGPT_ENDPOINT`: Your Azure OpenAI endpoint URL * `AZURE_CHATGPT_MODEL`: Your model deployment name --- # Source: https://docs.pipecat.ai/getting-started/build-your-next-bot.md > ## Documentation Index > Fetch the complete documentation index at: https://docs.pipecat.ai/llms.txt > Use this file to discover all available pages before exploring further. # Build Your Next Bot > Scaffold a new Pipecat project with the CLI Ready to build your own bot? The Pipecat CLI scaffolds complete projects tailored to your platform and use case. **New to Pipecat?** We recommend completing the [Quickstart](/getting-started/quickstart) first to understand Pipecat basics before scaffolding your own project. ## Install the Pipecat CLI Install the CLI globally using [uv](https://docs.astral.sh/uv/) or [pipx](https://pipx.pypa.io/): ```bash theme={null} uv tool install pipecat-ai-cli # or pipx install pipecat-ai-cli ``` Verify installation: ```bash theme={null} pipecat --version ``` ## Create Your Project Run the interactive setup wizard: ```bash theme={null} pipecat init ``` The CLI will guide you through selecting your platform (phone or web/mobile), transport provider, AI services (STT, LLM, TTS), and deployment target. See detailed options and generated project structure ## Next Steps Once `pipecat init` completes, the CLI will provide specific instructions for your generated project, including: * How to configure your API keys * Installing dependencies * Running your bot locally * Customizing the bot logic and behavior Follow the instructions displayed by the CLI to get your bot up and running! ## Deploy to Production Ready to deploy your bot? Choose between managed cloud hosting or self-hosted infrastructure. Deploy and manage your agents with the CLI - purpose-built for Pipecat Deploy to Fly.io, Modal, AWS, or your own infrastructure ## Learn More Understand pipelines, processors, and transports 30+ production-ready examples for inspiration --- # Source: https://docs.pipecat.ai/client/js/api-reference/callbacks.md > ## Documentation Index > Fetch the complete documentation index at: https://docs.pipecat.ai/llms.txt > Use this file to discover all available pages before exploring further. # Callbacks and events export const TransportTable = rows => { const headers = ["", "DailyTransport", "SmallWebRTCTransport", "RNDailyTransport", "WebSocketTransport", "OpenAIRealTimeWebRTCTransport", "GeminiLiveWebsocketTransport"]; if (!rows || !rows.rows || !Array.isArray(rows.rows)) { return
Error: Invalid rows data
; } return {headers.map(header => )} {rows.rows.map(entry => )}
{header}
{entry.name}() {entry.deprecated ? "⚠️ DEPRECATED" : ""} {entry.dt || "❌"} {entry.swrtc || "❌"} {entry.rn || "❌"} {entry.ws || "❌"} {entry.oai || "❌"} {entry.gem || "❌"}
; }; export const callbacks = () => { return [{ name: "onConnected", dt: "1.0.0", swrtc: "1.0.0", rn: "1.0.0", ws: "1.0.0", oai: "1.0.0", gem: "1.0.0" }, { name: "onDisconnected", dt: "1.0.0", swrtc: "1.0.0", rn: "1.0.0", ws: "1.0.0", oai: "1.0.0", gem: "1.0.0" }, { name: "onTransportStateChanged", dt: "1.0.0", swrtc: "1.0.0", rn: "1.0.0", ws: "1.0.0", oai: "1.0.0", gem: "1.0.0" }, { name: "onBotReady", dt: "1.0.0", swrtc: "1.0.0", rn: "1.0.0", ws: "1.0.0", oai: "1.0.0", gem: "1.0.0" }, { name: "onBotConnected", dt: "1.0.0" }, { name: "onBotDisconnected", dt: "1.0.0" }, { name: "onParticipantJoined", dt: "1.0.0" }, { name: "onParticipantLeft", dt: "1.0.0" }, { name: "onServerMessage", dt: "1.0.0", swrtc: "1.0.0", rn: "1.0.0", ws: "1.0.0" }, { name: "onMessageError", dt: "1.0.0", swrtc: "1.0.0", rn: "1.0.0", ws: "1.0.0", oai: "1.0.0", gem: "1.0.0" }, { name: "onError", dt: "1.0.0", swrtc: "1.0.0", rn: "1.0.0", ws: "1.0.0", oai: "1.0.0", gem: "1.0.0" }, { name: "onAvailableMicsUpdated", dt: "1.0.0", swrtc: "1.0.0", rn: "1.0.0", ws: "1.0.0", oai: "1.0.0", gem: "1.0.0" }, { name: "onAvailableCamsUpdated", dt: "1.0.0", swrtc: "1.0.0", rn: "1.0.0", oai: "1.0.0" }, { name: "onAvailableSpeakersUpdated", dt: "1.0.0", swrtc: "1.0.0", rn: "1.0.0", ws: "1.0.0", oai: "1.0.0", gem: "1.0.0" }, { name: "onMicUpdated", dt: "1.0.0", swrtc: "1.0.0", rn: "1.0.0", ws: "1.0.0", oai: "1.0.0", gem: "1.0.0" }, { name: "onCamUpdated", dt: "1.0.0", swrtc: "1.0.0", rn: "1.0.0", oai: "1.0.0" }, { name: "onSpeakerUpdated", dt: "1.0.0", swrtc: "1.0.0", rn: "1.0.0", ws: "1.0.0", oai: "1.0.0", gem: "1.0.0" }, { name: "onDeviceError", dt: "1.0.0", swrtc: "1.0.0", rn: "1.0.0", ws: "1.0.0", oai: "1.0.0", gem: "1.0.0" }, { name: "onTrackStarted", dt: "1.0.0", swrtc: "1.0.0", rn: "1.0.0", ws: "1.0.0", oai: "1.0.0", gem: "1.0.0" }, { name: "onTrackStopped", dt: "1.0.0", swrtc: "1.0.0", rn: "1.0.0", ws: "1.0.0", oai: "1.0.0", gem: "1.0.0" }, { name: "onScreenTrackStarted", dt: "1.0.0", swrtc: "1.3.0", rn: "1.0.0" }, { name: "onScreenTrackStopped", dt: "1.0.0", swrtc: "1.3.0", rn: "1.0.0" }, { name: "onLocalAudioLevel", dt: "1.0.0", swrtc: "1.0.0", rn: "1.0.0", ws: "1.0.0", oai: "1.0.0", gem: "1.0.0" }, { name: "onRemoteAudioLevel", dt: "1.0.0", swrtc: "1.0.0", rn: "1.0.0", ws: "1.0.0", oai: "1.0.0", gem: "1.0.0" }, { name: "onBotStartedSpeaking", dt: "1.0.0", swrtc: "1.0.0", rn: "1.0.0", ws: "1.0.0", oai: "1.0.0", gem: "1.0.0" }, { name: "onBotStoppedSpeaking", dt: "1.0.0", swrtc: "1.0.0", rn: "1.0.0", ws: "1.0.0", oai: "1.0.0", gem: "1.0.0" }, { name: "onUserStartedSpeaking", dt: "1.0.0", swrtc: "1.0.0", rn: "1.0.0", ws: "1.0.0", oai: "1.0.0", gem: "1.0.0" }, { name: "onUserStoppedSpeaking", dt: "1.0.0", swrtc: "1.0.0", rn: "1.0.0", ws: "1.0.0", oai: "1.0.0", gem: "1.0.0" }, { name: "onUserTranscript", dt: "1.0.0", swrtc: "1.0.0", rn: "1.0.0", ws: "1.0.0", oai: "1.0.0", gem: "1.0.0" }, { name: "onBotOutput", dt: "1.5.0", swrtc: "1.8.0", ws: "1.5.0" }, { name: "onBotTranscript", deprecated: true, dt: "1.0.0", swrtc: "1.0.0", rn: "1.0.0", ws: "1.0.0", oai: "1.0.0" }, { name: "onBotLlmSearchResponse", dt: "1.0.0", swrtc: "1.0.0", rn: "1.0.0", ws: "1.0.0" }, { name: "onBotLlmText", dt: "1.0.0", swrtc: "1.0.0", rn: "1.0.0", ws: "1.0.0" }, { name: "onBotLlmStarted", dt: "1.0.0", swrtc: "1.0.0", rn: "1.0.0", ws: "1.0.0" }, { name: "onBotLlmStopped", dt: "1.0.0", swrtc: "1.0.0", rn: "1.0.0", ws: "1.0.0" }, { name: "onBotTtsText", dt: "1.0.0", swrtc: "1.0.0", rn: "1.0.0", ws: "1.0.0", oai: "1.0.0", gem: "1.0.0" }, { name: "onBotTtsStarted", dt: "1.0.0", swrtc: "1.0.0", rn: "1.0.0", ws: "1.0.0" }, { name: "onBotTtsStopped", dt: "1.0.0", swrtc: "1.0.0", rn: "1.0.0", ws: "1.0.0" }, { name: "onMetrics", dt: "1.0.0", swrtc: "1.0.0", rn: "1.0.0", ws: "1.0.0" }]; }; The Pipecat JavaScript client listens for messages and events from the bot via the transport layer. This allows you to respond to changes in state, errors, and other events. The client implements the RTVI standard for these communications. ## Event Handling Options You can handle events in two ways: ### 1. Callbacks Define handlers in the client constructor: ```typescript theme={null} const pcClient = new PipecatClient({ callbacks: { onBotReady: () => console.log("Bot ready via callback"), // ... other callbacks }, }); ``` ### 2. Event Listeners Add handlers using the event emitter pattern: ```typescript theme={null} pcClient.on(RTVIEvent.BotReady, () => console.log("Bot ready via event")); ``` Events and callbacks provide the same functionality. Choose the pattern that best fits your application's architecture. ## Callbacks ### State and connectivity Local user successfully established a connection to the transport. Local user disconnected from the transport, either intentionally by calling `pcClient.disconnect()` or due to an error. Provides a `TransportState` string representing the connectivity state of the local client. See [transports](../transports/transport) for state explanation. A call to [`startBot()`](./client-methods#startbot) (i.e. a pre-connection REST endpoint) was successful and the bot should now be started or in the process of starting. The callback receives any data returned from your endpoint. The bot has been instantiated, its pipeline is configured, and it is receiving user media and interactions. This method is passed a `BotReadyData` object, which contains the RTVI `version` number. Since the bot is remote and may be using a different version of RTVI than the client, you can use the passed `version` string to check for compatibility. Bot connected to the transport and is configuring. Note: bot connectivity does not infer that its pipeline is yet ready to run. Please use `onBotReady` instead. Bot disconnected from the transport. This may occur due to session expiry, a pipeline error or for any reason the server deems the session over. A non-bot participant joined the session. A non-bot participant left the session. Note: excluded local participant. ### Messages and errors Receives custom messages sent from the server to the client. This provides a generic channel for server-to-client communication. The data structure is flexible and defined by the server implementation. Response error when an action fails or an unknown message type is sent from the client. Error signalled by the bot. This could be due to a malformed config update or an unknown action dispatch or the inability to complete a client request. The message parameter is of type `error` and matches [the RTVI standard](/client/rtvi-standard#error-%F0%9F%A4%96). Its `data` field includes a `message` string that describes the error and a `fatal` boolean indicating if the error is unrecoverable and resulted in a bot disconnection. If `fatal` is true, the client will automatically disconnect. ### Media and devices Lists available local media microphone devices. Triggered when a new device becomes available, a device is removed, or in response to `pcClient.initDevices()`. Lists available local media camera devices. Triggered when a new device becomes available, a device is removed, or in response to `pcClient.initDevices()`. Lists available local speaker devices. Triggered when a new device becomes available, a device is removed, or in response to `pcClient.initDevices()`. User selected a new microphone as their selected/active device. User selected a new camera as their selected/active device. User selected a new speaker as their selected/active device. Error related to media devices, such as camera or microphone issues. This could be due to permissions, device unavailability, or other related problems. See the [DeviceError](./errors#deviceerror) section for more details about the return type. Media track from a local or remote participant/bot was started and playable. Can be either an audio or video track. Media track from a local or remote participant/bot was stopped and no longer playable. Media track from a local or remote participant's screenshare was started and playable. Can be either an audio or video track. Media track from a local or remote participant's screenshare was stopped and no longer playable. ### Audio and Voice Activity Local audio gain level (0 to 1). Remote audio gain level (0 to 1). Note: if more than one participant is connected to the transport, the `participant` property details the associated peer/bot. The bot started speaking/sending speech audio. The bot stopped speaking/sending speech audio. The local user started speaking. This method is more reliable than using audio gain and is the result of the bot's VAD (voice activity detection) model. This provides a more accurate result in noisy environments. The local user stopped speaking, indicated by the VAD model. ### Transcription Transcribed local user input (both partial and final). Callback receives a `TranscriptData` object: The transcribed text. Indicates if the text is final (true) or partial (false). The timestamp of the transcription. The ID of the user the transcription is for. A best-effort stream of the bot's output text, including both spoken and unspoken content. This callback is triggered as the bot aggregates the LLM's response into sentences or other logical text blocks as well as word-by-word during TTS synthesis. The callback receives a `BotOutputData` object: The aggregated output text from the bot. Indicates if the text has been spoken by the bot. The aggregation type used for this output (e.g., "sentence", "code"). "sentence" and "word" are reserved aggregation types defined by the RTVI standard. Other aggregation types may be defined by custom text aggregators used by the server. "word" aggregated outputs are sent at the time of TTS synthesis for real-time word-level streaming and can be used in lieu of `onBotTtsText` if desired. DEPRECATED in favor of `onBotOutput` in Pipecat version 0.0.95 and client-js version 1.5.0 Finalized bot output text generated by the LLM. Sentence aggregated. ### Service-specific Events Bot LLM search response text generated by the LLM service. This is typically used for search or retrieval tasks. Search capabilities are currently only supported by Google Gemini. To take advantage of this event, your pipeline must include a [`GoogleLLMService`](/server/services/llm/gemini) and your pipeline task should include the [`GoogleRTVIObserver`](/server/frameworks/rtvi/google-rtvi-observer) in lieu of the typical `RTVIObserver`. The search result text. The rendered content of the search result. The origins of the search result. The URI of the site where the search result was found. The title of the site where the search result was found. The individual search results. The text of the search result. The confidence scores for the search result. Streamed LLM token response text generated by the LLM service. The text of the LLM response. LLM service inference started. LLM service inference concluded. If your TTS service supports streamed responses over sockets, the text parameter contains the words from TTS service as they are spoken. If you are using a HTTP based TTS service, the text parameter will contain the full text of the TTS response. The text of the LLM response. TTS service started inference. TTS service inference concluded. ### Other Pipeline mterics data provided by Pipecat. [Learn more](/guides/fundamentals/metrics). ## Events Each callback described above has a corresponding event that can be listened for using the `.on()` method. This allows you to handle the same functionality using either callbacks or event listeners, depending on your preferred architecture. Here's the complete reference mapping events to their corresponding callbacks: ### State and connectivity Events | Event Name | Callback Name | Data Type | | ----------------------- | ------------------------- | ---------------- | | `Connected` | `onConnected` | - | | `Disconnected` | `onDisconnected` | - | | `TransportStateChanged` | `onTransportStateChanged` | `TransportState` | | `BotReady` | `onBotReady` | `BotReadyData` | | `BotConnected` | `onBotConnected` | - | | `BotDisconnected` | `onBotDisconnected` | `Participant` | | `ParticipantConnected` | `onParticipantJoined` | `Participant` | | `ParticipantLeft` | `onParticipantLeft` | `Participant` | ### Message and Error Events | Event Name | Callback Name | Data Type | | --------------- | ----------------- | ------------- | | `ServerMessage` | `onServerMessage` | `any` | | `MessageError` | `onMessageError` | `RTVIMessage` | | `Error` | `onError` | `RTVIMessage` | ### Media Events | Event Name | Callback Name | Data Type | | ---------------------- | ------------------------ | ------------------------------- | | `TrackStarted` | `onTrackStarted` | `MediaStreamTrack, Participant` | | `TrackStopped` | `onTrackStopped` | `MediaStreamTrack, Participant` | | `AvailableMicsUpdated` | `onAvailableMicsUpdated` | `MediaDeviceInfo[]` | | `AvailableCamsUpdated` | `onAvailableCamsUpdated` | `MediaDeviceInfo[]` | | `MicUpdated` | `onMicUpdated` | `MediaDeviceInfo` | | `CamUpdated` | `onCamUpdated` | `MediaDeviceInfo` | | `SpeakerUpdated` | `onSpeakerUpdated` | `MediaDeviceInfo` | | `DeviceError` | `onDeviceError` | `DeviceError` | ### Audio Activity Events | Event Name | Callback Name | Data Type | | --------------------- | ----------------------- | --------------------- | | `LocalAudioLevel` | `onLocalAudioLevel` | `number` | | `RemoteAudioLevel` | `onRemoteAudioLevel` | `number, Participant` | | `BotStartedSpeaking` | `onBotStartedSpeaking` | - | | `BotStoppedSpeaking` | `onBotStoppedSpeaking` | - | | `UserStartedSpeaking` | `onUserStartedSpeaking` | - | | `UserStoppedSpeaking` | `onUserStoppedSpeaking` | - | ### Text and Transcription Events | Event Name | Callback Name | Data Type | | ------------------- | --------------------- | ---------------- | | `UserTranscript` | `onUserTranscript` | `TranscriptData` | | `BotOutput` | `onBotOutput` | `BotOutputData` | | ~~`BotTranscript`~~ | ~~`onBotTranscript`~~ | `BotLLMTextData` | | `BotLlmText` | `onBotLlmText` | `BotLLMTextData` | | `BotTtsText` | `onBotTtsText` | `BotTTSTextData` | ### Service State Events | Event Name | Callback Name | Data Type | | ---------------------- | ------------------------ | -------------------------- | | `BotLlmSearchResponse` | `onBotLlmSearchResponse` | `BotLLMSearchResponseData` | | `BotLlmStarted` | `onBotLlmStarted` | - | | `BotLlmStopped` | `onBotLlmStopped` | - | | `BotTtsStarted` | `onBotTtsStarted` | - | | `BotTtsStopped` | `onBotTtsStopped` | - | ### Other Events | Event Name | Callback Name | Data Type | | ---------- | ------------- | -------------------- | | `Metrics` | `onMetrics` | `PipecatMetricsData` | ## Usage Example ```typescript theme={null} import { PipecatClient, RTVIEvent } from "@pipecat-ai/client-js"; // Using callbacks const pcClient = new PipecatClient({ callbacks: { onBotReady: () => console.log("Bot ready via callback"), onUserTranscript: (data) => console.log("Transcript:", data.text), }, }); // Alternate approach: Using event listeners pcClient.on(RTVIEvent.BotReady, () => { console.log("Bot ready via event"); }); ``` ## Transport Compatibility --- # Source: https://docs.pipecat.ai/server/services/tts/camb.md > ## Documentation Index > Fetch the complete documentation index at: https://docs.pipecat.ai/llms.txt > Use this file to discover all available pages before exploring further. # Camb AI > Text-to-speech service using Camb AI's MARS models for high-quality speech synthesis ## Overview `CambTTSService` provides high-quality text-to-speech synthesis using Camb AI's MARS model family with streaming capabilities. The service offers multiple model options optimized for different use cases: `mars-flash` for fast inference and `mars-pro` for high-quality output. Pipecat's API methods for Camb AI TTS integration Complete example with interruption handling Official Camb AI API documentation Access the Camb AI studio platform ## Installation To use Camb AI services, install the required dependencies: ```bash theme={null} pip install "pipecat-ai[camb]" ``` ## Prerequisites ### Camb AI Account Setup Before using Camb AI TTS services, you need: 1. **Camb AI Account**: Sign up at [Camb AI](https://studio.camb.ai/) 2. **API Key**: Generate an API key from your account dashboard 3. **Voice Selection**: Choose voice IDs from the platform ### Required Environment Variables * `CAMB_API_KEY`: Your Camb AI API key for authentication ## Notes Set the `audio_out_sample_rate` in `PipelineParams` to match the model's sample rate (22050 for `mars-flash`, 48000 for `mars-pro`) for optimal quality. See the [example implementation](https://github.com/pipecat-ai/pipecat/blob/main/examples/foundational/07zg-interruptible-camb.py) for usage. --- # Source: https://docs.pipecat.ai/deployment/pipecat-cloud/guides/capacity-planning.md > ## Documentation Index > Fetch the complete documentation index at: https://docs.pipecat.ai/llms.txt > Use this file to discover all available pages before exploring further. # Capacity Planning > Optimize your agent deployments to minimize cold starts ## Overview By default, Pipecat Cloud auto-scales your agent to help minimize the likelihood that your agents experience a cold start. For many applications, you can simply set the `--min-agents` parameter to 1 in order to avoid scaling from zero and let Pipecat Cloud handle the rest. However, for applications where traffic can fluctuate, you may need to plan for additional warm capacity to ensure your agents are always ready to respond immediately. For those cases, this guide will help you understand how warm capacity works in Pipecat Cloud, when you need to plan to use reserves, and how you can optimize your plan for both performance and cost. ## Agent Types Before discussing capacity planning, it's important to understand the different types of agent instances in Pipecat Cloud: * **Active Agents**: Agent instances currently running and handling user sessions. * **Idle Agents**: When you start an active agent, Pipecat Cloud automatically provisions an additional idle agent to help with scaling. These take approximately 30 seconds to become available, though this time may vary based on system load and image size. You are not charged for these idle agents. * **Reserved Agents**: Agent instances maintained according to your `--min-agents` deployment setting, ensuring immediate availability regardless of current traffic. ## Understanding Warm Capacity Your "warm capacity" represents agent instances that are immediately available to handle new sessions without a cold start. Pipecat Cloud automatically manages this based on: 1. Your configured **reserved agents** (`min-agents`) 2. Your current **active sessions** 3. Automatically provisioned **idle agents** The system ensures you always have the following warm capacity available: * When **Reserved > Active**: Your warm capacity equals the number of **Reserved Agents** * When **Active ≥ Reserved**: Your warm capacity equals the number of **Active Agents** (through automatically provisioned idle agents) To illustrate the point, here are a few scenarios showing how warm capacity works: | Reserved | Active | Warm Capacity | | -------- | ------ | ------------- | | 10 | 1 | 10 | | 10 | 10 | 10 | | 1 | 10 | 10 | This shows how: * Reserved agents provide a guaranteed minimum warm capacity * As active sessions increase beyond your reserved count, your warm capacity grows to match through automatically provisioned idle agents ## Agent Cooldown When an active session ends, the agent instance behavior is governed by a cooldown period: * The agent instance remains available in your warm capacity pool for a 5-minute cooldown period * During this time, it can immediately serve another request without any cold start * After the 5-minute cooldown expires, if the agent instance hasn't been used, it will be terminated * This cooldown provides a buffer in your warm capacity pool, helping to smooth transitions between traffic peaks ## Planning for Traffic Patterns To determine the optimal reserved instance count for your deployment, consider: 1. **Peak Concurrent Sessions**: How many simultaneous sessions do you expect during peak periods? 2. **Growth Rate**: How quickly do new sessions start during peak periods? * If new sessions start faster than the \~30 second warm-up time for auto-scaled agent instances, you'll need more reserved capacity 3. **Cold Start Tolerance**: How important is immediate response for your use case? Completely avoiding cold starts may not be practical for all applications. We strongly recommend considering longer or variable start up times when building your application. For phone use cases, consider a hold message or for web apps, consider a waiting UX or message. ## Cost-Efficient Scaling Strategies * **Development/Testing**: Use `min-agents: 0` to minimize costs during development * **Production Voice AI**: Set `min-agents` to cover your baseline traffic to avoid cold starts * **Time-Based Scaling**: Consider modifying your reserved count for known high-traffic periods * **Monitoring**: Regularly review your warm capacity utilization to optimize your configuration A cold start typically takes around 10 seconds. ## Calculating Optimal Reserved Agents For production deployments where immediate response is essential, you can calculate your optimal reserved agent count using a growth rate approach: ``` Optimal Reserved = MAX(Baseline Sessions, CPS × Idle Creation Delay) ``` Where: * **Baseline Sessions**: Minimum concurrent sessions you typically maintain * **CPS (Calls Per Second)**: Your expected session growth rate during peak periods * **Idle Creation Delay**: Time for new idle agents to become available (\~30 seconds) This formula addresses the fundamental challenge: "Can our warm capacity creation keep pace with our call growth rate?" By reserving capacity based on your growth rate and the idle creation delay, you ensure sufficient capacity is available during the critical period before auto-scaling can catch up. ### Growth Rate Examples Here's how the formula works with different growth rates: | Scenario | Baseline | CPS | Idle Creation Delay | Calculation | Optimal Reserved | | ------------- | -------- | ------------------ | ------------------- | ----------------- | ---------------- | | High volume | 10 | 1.0 (1 call/sec) | 30s | MAX(10, 1.0 × 30) | 30 | | Medium volume | 10 | 0.5 (1 call/2sec) | 30s | MAX(10, 0.5 × 30) | 15 | | Low volume | 10 | 0.1 (1 call/10sec) | 30s | MAX(10, 0.1 × 30) | 10 | ### Call Center Example Consider a voice AI call center that: * Normally handles 10 concurrent calls (baseline) * During promotions, receives new calls at a rate of 1 call per second * Has a 30-second idle creation delay Applying our formula: ``` Optimal Reserved = MAX(10, 1 × 30) = MAX(10, 30) = 30 ``` With 30 reserved agents: * You can handle the growth rate of 1 call per second for the full 30 seconds until new idle agents start becoming available * This prevents any cold starts during the critical catch-up period * Auto-scaling will create additional idle agents to handle continued growth ### Understanding the Growth Rate Approach This approach works because: 1. When your call volume starts increasing, you immediately begin consuming your warm capacity 2. At the same time, each new active call triggers the creation of a new idle agent 3. However, these new idle agents take \~30 seconds to become available 4. Your reserved capacity must be sufficient to handle all calls during this 30-second "catch-up period" ### Trading Cost for Performance The formula provides a starting point, which you can adjust based on your specific needs: * **Cost-sensitive**: Use a lower reserved count and accept some cold starts during traffic spikes * **Performance-sensitive**: Use the calculated reserved count to ensure zero cold starts * **Hybrid approach**: Monitor your actual traffic patterns and adjust based on real-world performance For most production voice AI applications, we recommend using at least the calculated optimal reserved agent count during business hours or peak usage periods, and then scaling down during off-hours to optimize costs. ## Summary and Next Steps Proper capacity planning ensures your agents are always ready to respond immediately, providing the best possible user experience while optimizing costs: 1. **Understand your traffic patterns**: Baseline sessions, peak sessions, and growth rate 2. **Calculate your optimal reserved agents**: Use the formula to determine the right level of warm capacity 3. **Monitor and adjust**: Refine your capacity planning based on real-world performance and costs Learn more about scaling configuration options and deployment strategies. Apply your capacity planning knowledge to your agent deployment. --- # Source: https://docs.pipecat.ai/server/services/tts/cartesia.md # Source: https://docs.pipecat.ai/server/services/stt/cartesia.md > ## Documentation Index > Fetch the complete documentation index at: https://docs.pipecat.ai/llms.txt > Use this file to discover all available pages before exploring further. # Cartesia > Speech-to-text service implementation using Cartesia's real-time transcription API ## Overview `CartesiaSTTService` provides real-time speech recognition using Cartesia's WebSocket API with the `ink-whisper` model, supporting streaming transcription with both interim and final results for low-latency applications. Pipecat's API methods for Cartesia STT integration Complete example with transcription logging Official Cartesia STT documentation and features Access API keys and transcription models ## Installation To use Cartesia services, install the required dependency: ```bash theme={null} pip install "pipecat-ai[cartesia]" ``` ## Prerequisites ### Cartesia Account Setup Before using Cartesia STT services, you need: 1. **Cartesia Account**: Sign up at [Cartesia](https://cartesia.ai/) 2. **API Key**: Generate an API key from your account dashboard 3. **Model Access**: Ensure access to the ink-whisper transcription model ### Required Environment Variables * `CARTESIA_API_KEY`: Your Cartesia API key for authentication --- # Source: https://docs.pipecat.ai/server/services/llm/cerebras.md > ## Documentation Index > Fetch the complete documentation index at: https://docs.pipecat.ai/llms.txt > Use this file to discover all available pages before exploring further. # Cerebras > LLM service implementation using Cerebras's API with OpenAI-compatible interface ## Overview `CerebrasLLMService` provides access to Cerebras's language models through an OpenAI-compatible interface. It inherits from `OpenAILLMService` and supports streaming responses, function calling, and context management with ultra-fast inference speeds. Pipecat's API methods for Cerebras integration Complete example with function calling Official Cerebras inference API documentation Access models and manage API keys ## Installation To use Cerebras services, install the required dependency: ```bash theme={null} pip install "pipecat-ai[cerebras]" ``` ## Prerequisites ### Cerebras Account Setup Before using Cerebras LLM services, you need: 1. **Cerebras Account**: Sign up at [Cerebras Cloud](https://cloud.cerebras.ai/) 2. **API Key**: Generate an API key from your account dashboard 3. **Model Selection**: Choose from available Cerebras models with ultra-fast inference ### Required Environment Variables * `CEREBRAS_API_KEY`: Your Cerebras API key for authentication --- # Source: https://docs.pipecat.ai/deployment/platforms/cerebrium.md > ## Documentation Index > Fetch the complete documentation index at: https://docs.pipecat.ai/llms.txt > Use this file to discover all available pages before exploring further. # Cerebrium > Deploy Pipecat applications to Cerebrium [Cerebrium](https://www.cerebrium.ai) is a serverless Infrastructure platform that makes it easy for companies to build, deploy and scale AI applications. Cerebrium offers both CPUs and GPUs (H100s, A100s etc) with extremely low cold start times allowing us to create highly performant applications in the most cost efficient manner. ### Install the Cerebrium CLI To get started, let us run the following commands: 1. Run `pip install cerebrium` to install the Python package. 2. Run `cerebrium login` to authenticate yourself. If you don't have a Cerebrium account, you can create one and get started with \$30 in free credits. ### Create a Cerebrium project 1. Create a new Cerebrium project: ```bash theme={null} cerebrium init pipecat-agent ``` 2. This will create two key files: * `main.py` - Your application entrypoint * `cerebrium.toml` - Configuration for build and environment settings Update your `cerebrium.toml` with the necessary configuration: ```toml theme={null} [cerebrium.hardware] region = "us-east-1" provider = "aws" compute = "CPU" cpu = 4 memory = 18.0 [cerebrium.dependencies.pip] torch = ">=2.0.0" "pipecat-ai[silero, daily, openai, cartesia]" = "latest" aiohttp = "latest" torchaudio = "latest" ``` In order for our application to work, we need to copy our API keys from the various platforms. Navigate to the Secrets section in your Cerebrium dashboard to store your API keys: * `OPENAI_API_KEY` - We use OpenAI For the LLM. You can get your API key from [here](https://platform.openai.com/api-keys) * `DAILY_TOKEN` - For WebRTC communication. You can get your token from [here](https://dashboard.daily.co/developers) * `CARTERSIA_API_KEY` - For text-to-speech services. You can get your API key from [here](https://play.cartesia.ai/keys) We access these secrets in our code as if they are normal ENV vars. For the above, You can swap in any LLM or TTS service you wish to use. ### Agent setup We create a basic pipeline setup in our `main.py` that combines our LLM, TTS and Daily WebRTC transport layer. ```python theme={null} import os import sys import time import aiohttp from loguru import logger from pipecat.audio.vad.silero import SileroVADAnalyzer from pipecat.audio.vad.vad_analyzer import VADParams from pipecat.frames.frames import EndFrame, LLMMessagesAppendFrame from pipecat.pipeline.pipeline import Pipeline from pipecat.pipeline.runner import PipelineRunner from pipecat.pipeline.task import PipelineParams, PipelineTask from pipecat.processors.aggregators.llm_context import LLMContext from pipecat.processors.aggregators.llm_response_universal import LLMContextAggregatorPair from pipecat.services.cartesia.tts import CartesiaTTSService from pipecat.services.openai.llm import OpenAILLMService from pipecat.transports.daily.transport import DailyParams, DailyTransport logger.remove(0) logger.add(sys.stderr, level="DEBUG") async def main(room_url: str, token: str): async with aiohttp.ClientSession() as session: transport = DailyTransport( room_url, token, "Friendly bot", DailyParams( audio_in_enabled=True, audio_out_enabled=True, transcription_enabled=True, ), ) messages = [ { "role": "system", "content": "You are a helpful AI assistant that can switch between two services to showcase the difference in performance and cost: 'openai_realtime' and 'custom'. Respond to user queries and switch services when asked.", }, ] llm = OpenAILLMService( name="LLM", api_key=os.environ.get("OPENAI_API_KEY"), model="gpt-4", ) tts = CartesiaTTSService( api_key=os.getenv("CARTESIA_API_KEY"), voice_id="79a125e8-cd45-4c13-8a67-188112f4dd22", # British Lady ) vad_processor = VADProcessor(vad_analyzer=SileroVADAnalyzer(params=VADParams(stop_secs=0.2))) custom_context = LLMContext(messages) custom_user_aggregator, custom_assistant_aggregator = LLMContextAggregatorPair(context) context_aggregator_custom = LLMContextAggregatorPair(custom_context) pipeline = Pipeline( [ transport.input(), # Transport user input vad_processor, custom_user_aggregator, llm, tts, custom_assistant_aggregator, transport.output(), # Transport bot output ] ) task = PipelineTask( pipeline, params=PipelineParams( enable_metrics=True, enable_usage_metrics=True, ), ) @transport.event_handler("on_first_participant_joined") async def on_first_participant_joined(transport, participant): transport.capture_participant_transcription(participant["id"]) time.sleep(1.5) await task.queue_frame( LLMMessagesAppendFrame( [ { "role": "system", "content": "Introduce yourself.", } ], run_llm=True, ) ) @transport.event_handler("on_participant_left") async def on_participant_left(transport, participant, reason): await task.queue_frame(EndFrame()) @transport.event_handler("on_call_state_updated") async def on_call_state_updated(transport, state): if state == "left": await task.queue_frame(EndFrame()) runner = PipelineRunner() await runner.run(task) await session.close() ``` First, in our main function, we initialize the daily transport layer to receive/send the audio/video data from the Daily room we will connect to. You can see we pass the room\_url we would like to join as well as a token to authenticate us programmatically joining. We also set our VAD stop seconds which is the amount of time we wait for a pause before our bot will respond - in this example, we set it to 600 milliseconds. Next we connect to our LLM (OpenAI) as well as our TTS model (Cartesia). By setting 'transcription\_enabled=true' we are using the STT from Daily itself. This is where the Pipecat framework helps convert audio data to text and vice versa. We then put this all together as a PipelineTask which is what Pipecat runs all together. The make up of a task is completely customizable and has support for Image and Vision use cases. Lastly, we have some event handlers for when a user joins/leaves the room. ### Deploy bot Deploy your application to Cerebrium: ```bash theme={null} cerebrium deploy ``` You will then see that an endpoint is created for your bot at `POST \/main` that you can call with your room\_url and token. Let us test it. ### Test it out ```python theme={null} def create_room(): url = "https://api.daily.co/v1/rooms/" headers = { "Content-Type": "application/json", "Authorization": f"Bearer {os.environ.get('DAILY_TOKEN')}", } data = { "properties": { "exp": int(time.time()) + 60 * 5, ##5 mins "eject_at_room_exp": True, } } response = requests.post(url, headers=headers, json=data) if response.status_code == 200: room_info = response.json() token = create_token(room_info["name"]) if token and "token" in token: room_info["token"] = token["token"] else: logger.error("Failed to create token") return { "message": "There was an error creating your room", "status_code": 500, } return room_info else: logger.error(f"Failed to create room: {response.status_code}") return {"message": "There was an error creating your room", "status_code": 500} def create_token(room_name: str): url = "https://api.daily.co/v1/meeting-tokens" headers = { "Content-Type": "application/json", "Authorization": f"Bearer {os.environ.get('DAILY_TOKEN')}", } data = {"properties": {"room_name": room_name, "is_owner": True}} response = requests.post(url, headers=headers, json=data) if response.status_code == 200: token_info = response.json() return token_info else: logger.error(f"Failed to create token: {response.status_code}") return None if __name__ == "__main__": room_info = create_room() print(f"Join room: {room_info["url"]}") asyncio.run(main(room_info["url"], room_info["token"])) ``` ## Future Considerations Since Cerebrium supports both CPU and GPU workloads if you would like to lower the latency of your application then the best would be to get model weights from various providers and run them locally. You can do this for: * LLM: Run any OpenSource model using a framework such as vLLM * TTS: Both PlayHt and Deepgram offer TTS models that can be run locally * STT: Deepgram offers a local model that can be run locally If you implement all three models locally, you should have much better performance. We have been able to get \~300ms voice-to-voice responses. ## Examples * [Fastest voice agent](https://docs.cerebrium.ai/v4/examples/realtime-voice-agents): Local only implementation * [RAG voice agent](https://www.cerebrium.ai/blog/creating-a-realtime-rag-voice-agent): Create a voice agent that can do RAG using Cerebrium + OpenAI + Pinecone * [Twilio voice agent](https://docs.cerebrium.ai/v4/examples/twilio-voice-agent): Create a voice agent that can receive phone calls via Twilio * [OpenAI Realtime API implementation](https://www.cerebrium.ai/blog/an-alternative-to-openai-realtime-api-for-voice-capabilities): Create a voice agent that can receive phone calls via OpenAI Realtime API --- # Source: https://docs.pipecat.ai/deployment/pipecat-cloud/guides/ci-with-github-actions.md > ## Documentation Index > Fetch the complete documentation index at: https://docs.pipecat.ai/llms.txt > Use this file to discover all available pages before exploring further. # CI with GitHub Actions > Automate image builds and deploys for continuous integration Automate your Pipecat Cloud deployment workflow using GitHub Actions. This guide shows you how to automatically build and deploy your agent whenever you push changes to your main branch. ## Prerequisites Before setting up your GitHub Actions workflow, ensure you have: * A Pipecat Cloud account with an API token * A Docker Hub account (or another container registry) * An image pull secret configured in Pipecat Cloud * A secret set configured for your agent ## Configure GitHub Secrets Add the following secrets to your GitHub repository settings (Settings → Secrets and variables → Actions): * `DOCKERHUB_USERNAME`: Your Docker Hub username * `DOCKERHUB_TOKEN`: Your Docker Hub access token * `PCC_API_KEY`: Your Pipecat Cloud private API token For Docker Hub access tokens, create a personal access token from your Docker Hub account settings rather than using your password. ## Basic Workflow Configuration Create a file at `.github/workflows/deploy.yml` in your repository: ```yml theme={null} name: Docker Image CI on: push: branches: ["main"] jobs: deploy: runs-on: ubuntu-latest steps: - name: Checkout uses: actions/checkout@v4 - name: Get date id: date run: echo "date=$(date +'%F')" >> $GITHUB_OUTPUT - name: Set up QEMU uses: docker/setup-qemu-action@v3 - name: Login to Docker Hub uses: docker/login-action@v3 with: username: ${{ secrets.DOCKERHUB_USERNAME }} password: ${{ secrets.DOCKERHUB_TOKEN }} - name: Build and Push uses: docker/build-push-action@v5 with: platforms: linux/arm64 context: . push: true tags: | ${{ secrets.DOCKERHUB_USERNAME }}/${{ github.event.repository.name }}:latest ${{ secrets.DOCKERHUB_USERNAME }}/${{ github.event.repository.name }}:${{ steps.date.outputs.date }} - name: Deploy to Pipecat Cloud run: | curl -X POST https://api.pipecat.daily.co/v1/agents/${{ github.event.repository.name }} \ -H "Authorization: Bearer ${{ secrets.PCC_API_KEY }}" \ -H "Content-Type: application/json" \ -d '{ "image": "${{ secrets.DOCKERHUB_USERNAME }}/${{ github.event.repository.name }}:${{ steps.date.outputs.date }}", "imagePullSecretSet": "my-image-pull-secret", "secretSet": "my-secret-set", "krispViva": { "audioFilter": "tel" }, "autoScaling": { "minAgents": 0, "maxAgents": 10 } }' ``` This workflow will: 1. Trigger on every push to the `main` branch 2. Build your Docker image for `linux/arm64` platform 3. Push the image with both `latest` and date-based tags 4. Deploy the new image to Pipecat Cloud ## Image Tagging Strategy The example workflow creates two tags for each build: * `latest`: Always points to the most recent build * Date-based (e.g., `2025-10-30`): Specific version tied to the build date Avoid pushing multiple builds to the same image tag. Pipecat Cloud instances may cache older versions of an image tag, which can cause running agents to use outdated code even after redeployment. Use unique tags (like date-based or commit SHA tags) for each build. If you deploy more frequently than once per day, consider using commit SHA-based tags instead: ```yml theme={null} - name: Build and Push uses: docker/build-push-action@v5 with: platforms: linux/arm64 context: . push: true tags: | ${{ secrets.DOCKERHUB_USERNAME }}/${{ github.event.repository.name }}:latest ${{ secrets.DOCKERHUB_USERNAME }}/${{ github.event.repository.name }}:${{ github.sha }} ``` Then update the deployment step to use `${{ github.sha }}` as the tag. ## Monorepo Configuration If your agent code lives in a subdirectory (e.g., `/server`, like code generated from the Pipecat CLI), modify the workflow to set the working directory and build context: ```yml theme={null} name: Docker Image CI on: push: branches: ["main"] paths: - "server/**" jobs: deploy: runs-on: ubuntu-latest defaults: run: working-directory: ./server steps: - name: Checkout uses: actions/checkout@v4 - name: Get date id: date run: echo "date=$(date +'%F')" >> $GITHUB_OUTPUT - name: Set up QEMU uses: docker/setup-qemu-action@v3 - name: Login to Docker Hub uses: docker/login-action@v3 with: username: ${{ secrets.DOCKERHUB_USERNAME }} password: ${{ secrets.DOCKERHUB_TOKEN }} - name: Build and Push uses: docker/build-push-action@v5 with: platforms: linux/arm64 context: ./server push: true tags: | ${{ secrets.DOCKERHUB_USERNAME }}/${{ github.event.repository.name }}:latest ${{ secrets.DOCKERHUB_USERNAME }}/${{ github.event.repository.name }}:${{ steps.date.outputs.date }} - name: Deploy to Pipecat Cloud run: | curl -X POST https://api.pipecat.daily.co/v1/agents/${{ github.event.repository.name }} \ -H "Authorization: Bearer ${{ secrets.PCC_API_KEY }}" \ -H "Content-Type: application/json" \ -d '{ "image": "${{ secrets.DOCKERHUB_USERNAME }}/${{ github.event.repository.name }}:${{ steps.date.outputs.date }}", "imagePullSecretSet": "my-image-pull-secret", "secretSet": "my-secret-set", "krispViva": { "audioFilter": "tel" }, "autoScaling": { "minAgents": 0, "maxAgents": 10 } }' ``` The `paths` filter ensures the workflow only runs when files in the `server/` directory change, preventing unnecessary builds. ## Platform Considerations Pipecat Cloud requires images built for the `linux/arm64` platform. The workflow uses QEMU to enable ARM64 builds on GitHub's x64 runners. As of October 2025, GitHub still does not provide ARM runners for private repositories. The workflow uses QEMU emulation, which can significantly increase build times. If you have a public repository or when GitHub makes ARM runners available, you can remove the QEMU setup step and use native ARM runners for faster builds. To use native ARM runners when available: ```yml theme={null} jobs: deploy: runs-on: ubuntu-24.04-arm # Use ARM runner steps: - name: Checkout uses: actions/checkout@v4 # Remove the "Set up QEMU" step entirely - name: Login to Docker Hub uses: docker/login-action@v3 # ... rest of workflow ``` ## Customizing Deployment Configuration The deployment step in the workflow configures your agent using the Pipecat Cloud REST API. You can customize the following parameters: * `image`: The Docker image tag to deploy * `imagePullSecretSet`: Reference to your image pull credentials (replace `my-image-pull-secret` with your actual secret name) * `secretSet`: Reference to your environment secrets (replace `my-secret-set` with your actual secret set name) * `krispViva.audioFilter`: The Krisp VIVA audio filter model to use (replace `tel` with your actual filter model) * `autoScaling.minAgents`: Minimum number of agent instances to maintain * `autoScaling.maxAgents`: Maximum number of agent instances allowed Adjust the `minAgents` and `maxAgents` values based on your expected traffic patterns. See our [Capacity Planning guide](./capacity-planning) for guidance on optimizing these settings. ## Next Steps Learn how to securely manage image pull secrets and environment variables. Configure auto-scaling to handle varying traffic loads. --- # Source: https://docs.pipecat.ai/client/js/api-reference/client-constructor.md > ## Documentation Index > Fetch the complete documentation index at: https://docs.pipecat.ai/llms.txt > Use this file to discover all available pages before exploring further. # PipecatClient Constructor > Setting up the PipecatClient ```javascript theme={null} import { PipecatClient } from "@pipecat-ai/client-js"; ``` `PipecatClient` is the primary component for building the client-side portion of a client-bot interaction. It is designed to work with various transport layers, such as WebRTC, WebSockets, or HTTP, allowing you to pick and choose the communication layer that best suits your application while maintaining a consistent API. When initializing the `PipecatClient`, you must provide a transport instance to the constructor for your chosen protocol or provider. See [Transport](/client/js/transports) for more information. For the purpose of this guide, we'll demonstrate using the [Daily WebRTC transport](/client/js/transports/daily). ## Example ```typescript theme={null} import { RTVIEvent, RTVIMessage, PipecatClient } from "@pipecat-ai/client-js"; import { DailyTransport } from "@pipecat-ai/daily-transport"; const PipecatClient = new PipecatClient({ transport: new DailyTransport(), enableMic: true, enableCam: false, enableScreenShare: false, timeout: 15 * 1000, callbacks: { onConnected: () => { console.log("[CALLBACK] User connected"); }, onDisconnected: () => { console.log("[CALLBACK] User disconnected"); }, onTransportStateChanged: (state: string) => { console.log("[CALLBACK] State change:", state); }, onBotConnected: () => { console.log("[CALLBACK] Bot connected"); }, onBotDisconnected: () => { console.log("[CALLBACK] Bot disconnected"); }, onBotReady: () => { console.log("[CALLBACK] Bot ready to chat!"); }, }, }); ``` *** ## API reference ### transport An instance of the `Transport` type you will use to connect to your bot service (`PipecatClient.connect()`). Transports implement the underlying device management, connectivity, media transmission, and state logic that manage the lifecycle of your session. As a best practice, we recommend you construct the transport inline in the client constructor, as opposed to holding a reference to it. Access to the transport is typically unnecessary. For advanced use cases that do require access to the transport, we recommend doing so via the `PipecatClient.transport` property, which provides some additional safeguards. ```typescript theme={null} import { PipecatClient } from "@pipecat-ai/client-js"; import { DailyTransport } from "@pipecat-ai/daily-transport"; const pcClient = new PipecatClient({ transport: new DailyTransport(), }); ``` ### callbacks Map of callback functions. See [callbacks](./callbacks). ### Media Initialization Enable user's local microphone device. Enable user's local webcam device. Note: Not all transports support video. Setting this value in that case will have no effect. Enable user's local screen share. Note: Not all transports support screen sharing. Setting this value in that case will have no effect. --- # Source: https://docs.pipecat.ai/client/js/api-reference/client-methods.md > ## Documentation Index > Fetch the complete documentation index at: https://docs.pipecat.ai/llms.txt > Use this file to discover all available pages before exploring further. # Client Methods export const TransportTable = rows => { const headers = ["", "DailyTransport", "SmallWebRTCTransport", "RNDailyTransport", "WebSocketTransport", "OpenAIRealTimeWebRTCTransport", "GeminiLiveWebsocketTransport"]; if (!rows || !rows.rows || !Array.isArray(rows.rows)) { return
Error: Invalid rows data
; } return {headers.map(header => )} {rows.rows.map(entry => )}
{header}
{entry.name}() {entry.deprecated ? "⚠️ DEPRECATED" : ""} {entry.dt || "❌"} {entry.swrtc || "❌"} {entry.rn || "❌"} {entry.ws || "❌"} {entry.oai || "❌"} {entry.gem || "❌"}
; }; export const methods = () => { return [{ name: "startBot", dt: "1.2.0", swrtc: "1.2.0", rn: "1.2.0", ws: "1.2.0" }, { name: "connect", dt: "1.0.0", swrtc: "1.0.0", rn: "1.0.0", ws: "1.0.0", oai: "1.0.0", gem: "1.0.0" }, { name: "startBotAndConnect", dt: "1.2.0", swrtc: "1.2.0", rn: "1.2.0", ws: "1.2.0" }, { name: "disconnect", dt: "1.0.0", swrtc: "1.0.0", rn: "1.0.0", ws: "1.0.0", oai: "1.0.0", gem: "1.0.0" }, { name: "disconnectBot", dt: "1.0.0", swrtc: "1.0.0", rn: "1.0.0", ws: "1.0.0" }, { name: "sendClientMessage", dt: "1.0.0", swrtc: "1.0.0", rn: "1.0.0", ws: "1.0.0" }, { name: "sendClientRequest", dt: "1.0.0", swrtc: "1.0.0", rn: "1.0.0", ws: "1.0.0" }, { name: "initDevices", dt: "1.0.0", swrtc: "1.0.0", rn: "1.0.0", ws: "1.0.0", oai: "1.0.0", gem: "1.0.0" }, { name: "getAllMics", dt: "1.0.0", swrtc: "1.0.0", rn: "1.0.0", ws: "1.0.0", oai: "1.0.0", gem: "1.0.0" }, { name: "getAllCams", dt: "1.0.0", swrtc: "1.0.0", rn: "1.0.0", oai: "1.0.0" }, { name: "getAllSpeakers", dt: "1.0.0", swrtc: "1.0.0", rn: "1.0.0", ws: "1.0.0", oai: "1.0.0", gem: "1.0.0" }, { name: "selectedMic", dt: "1.0.0", swrtc: "1.0.0", rn: "1.0.0", ws: "1.0.0", oai: "1.0.0", gem: "1.0.0" }, { name: "selectedCam", dt: "1.0.0", swrtc: "1.0.0", rn: "1.0.0", oai: "1.0.0" }, { name: "selectedSpeaker", dt: "1.0.0", swrtc: "1.0.0", rn: "1.0.0", ws: "1.0.0", oai: "1.0.0", gem: "1.0.0" }, { name: "updateMic", dt: "1.0.0", swrtc: "1.0.0", rn: "1.0.0", ws: "1.0.0", oai: "1.0.0", gem: "1.0.0" }, { name: "updateCam", dt: "1.0.0", swrtc: "1.0.0", rn: "1.0.0", oai: "1.0.0" }, { name: "updateSpeaker", dt: "1.0.0", swrtc: "1.0.0", rn: "1.0.0", ws: "1.0.0", oai: "1.0.0", gem: "1.0.0" }, { name: "enableMic", dt: "1.0.0", swrtc: "1.0.0", rn: "1.0.0", ws: "1.0.0", oai: "1.0.0", gem: "1.0.0" }, { name: "enableCam", dt: "1.0.0", swrtc: "1.0.0", rn: "1.0.0", oai: "1.0.0" }, { name: "enableScreenShare", dt: "1.0.0", swrtc: "1.3.0", rn: "1.0.0" }, { name: "isMicEnabled", dt: "1.0.0", swrtc: "1.0.0", rn: "1.0.0", ws: "1.0.0", oai: "1.0.0", gem: "1.0.0" }, { name: "isCamEnabled", dt: "1.0.0", swrtc: "1.0.0", rn: "1.0.0", oai: "1.0.0" }, { name: "isSharingScreen", dt: "1.0.0", swrtc: "1.3.0", rn: "1.0.0" }, { name: "tracks", dt: "1.0.0", swrtc: "1.0.0", rn: "1.0.0", ws: "1.0.0", oai: "1.0.0", gem: "1.0.0" }, { name: "sendText", dt: "1.4.0", swrtc: "1.5.0", ws: "1.4.0", oai: "1.3.0", gem: "1.3.0" }, { name: "appendToContext", dt: "1.0.0", swrtc: "1.0.0", rn: "1.0.0", ws: "1.0.0", oai: "1.0.0", gem: "1.0.0" }, { name: "registerFunctionCallHandler", dt: "1.0.0", swrtc: "1.0.0", rn: "1.0.0", ws: "1.0.0", oai: "1.0.0" }, { name: "transport", dt: "1.0.0", swrtc: "1.0.0", rn: "1.0.0", ws: "1.0.0", oai: "1.0.0", gem: "1.0.0" }, { name: "setLogLevel", dt: "1.0.0", swrtc: "1.0.0", rn: "1.0.0", ws: "1.0.0", oai: "1.0.0", gem: "1.0.0" }]; }; The Pipecat JavaScript client provides a comprehensive set of methods for managing bot interactions and media handling. These core methods are documented below. ## Session connectivity ### startBot() `async startBot(startBotParams: APIEndpoint): Promise` This method hits your server endpoint to start the bot and optionally obtain the connection parameters needed for `connect()` to connect the `Transport`. It returns a Promise that resolves with the response from the server. The `APIEndpoint` object should have the following shape: The URL of the endpoint to connect to. This should be a valid REST endpoint. Optional headers to include in the request to the endpoint. This can be used to pass authentication tokens or other necessary headers. Optional request data to include in the request to the endpoint. This can be used to pass additional data to your server-side endpoint. Oftentimes, this is used to pass the initial prompt or other configuration data to initialize the bot. Optional timeout in milliseconds for the request to the endpoint. During the `startBot()` process, the transport state will transition through the states: "authenticating" and "authenticated". ```javascript theme={null} try { await pcClient.startBot({ endpoint: "/api/start", // Your server endpoint to start the bot requestData: { initial_prompt: "You are a pirate captain", llm_provider: "openai" } }); } catch (error) { console.error("Error starting the bot:", error); } ``` ### connect() `async connect(connectParams): Promise` This method initiates the connection process, optionally passing parameters that your transport class requires to establish a connection or an endpoint to your server for obtaining those parameters. An object containing the `TransportConnectionParams` your Transport expects. Check your transport class documentation for the expected shape of `TransportConnectionParams`. For example, the DailyTransport expects a `url` and `token`. In 1.2.0 we deprecated support for passing a `ConnectionEndpoint` object directly to `connect()`. Instead, you should use the `startBot()` or `startBotAndConnect()` methods to fetch connection parameters from your server endpoint and then pass those parameters directly to `connect()`. This method can be try / catched to handle errors at startup: ```typescript theme={null} try { await pcClient.connect({ webrtcUrl: "http://my-server/api/offer" }); } catch (error) { console.error("Error connecting to the bot:", error); } ``` During the connection process, the transport state will transition through the following states: "connecting", "connected", "ready". Calling `connect()` asynchronously will resolve when the bot and client signal that they are ready. See [messages and events](./messages). If you want to call `connect()` without `await`, you can use the `onBotReady` callback or `BotReady` event to know when you can interact with the bot. Attempting to call `connect()` when the transport is already in a 'connected' or 'ready' state will throw an error. You should [disconnect](#disconnect) from a session first before attempting to connect again. ### startBotAndConnect() `async startBotAndConnect(startBotParams: APIEndpoint): Promise` This method combines the functionality of `startBot()` and `connect()`. It first starts the bot by hitting your server endpoint and then connects the transport passing the response from the endpoint to the transport as connection parameters. ```javascript theme={null} try { await pcClient.startBotAndConnect({ endpoint: "/api/start", // Your server endpoint to start the bot requestData: { initial_prompt: "You are a pirate captain", llm_provider: "openai" } }); } catch (error) { console.error("Error starting up:", error); } ``` It's equivalent to: `pcClient.startBot(...).then((resp) => pcClient.connect(resp))`. ### disconnect() `async disconnect(): Promise` Disconnects from the active session. The transport state will transition to "disconnecting" and then "disconnected". It is common practice for bots to exit and cleanup when the client disconnects. ```typescript theme={null} await pcClient.disconnect(); ``` ### disconnectBot() `disconnectBot(): void` Triggers the bot to disconnect from the session, leaving the client connected. ```typescript theme={null} await pcClient.disconnectBot(); ``` ## Messages Custom messaging between the client and the bot. This is useful for sending data to the bot, triggering specific actions, reacting to server events, or querying the server. For more, see: [messages and events](./messages). ### sendClientMessage() `sendClientMessage(msgType: string, data?: unknown): void` Sends a custom message to the bot and does not expect a response. This is useful for sending data to the bot or triggering specific actions. A string identifying the message. Optional data to send with the message. This can be any JSON-serializable object. ### sendClientRequest() `async sendClientRequest(msgType: string, data: unknown, timeout?: number): Promise` Sends a custom request to the bot and expects a response. This is useful for querying the server or triggering specific actions that require a response. The method returns a Promise that resolves with the data from response. A string identifying the message. Optional data to send with the message. This can be any JSON-serializable object. Optional timeout in milliseconds for the request. If the request does not receive a response within this time, it will reject with an RTVIMessage of type `'error-response'`. ## Devices ### initDevices() `async initDevices(): Promise` Initializes the media device selection machinery, based on `enableCam`/`enableMic` selections and defaults (i.e. turns on the local cam/mic). This method can be called before `connect()` to test and switch between camera and microphone sources. ```typescript theme={null} await pcClient.initDevices(); ``` ### getAllMics() `async getAllMics(): Promise` Returns a list of available microphones in the form of [`MediaDeviceInfo[]`](https://developer.mozilla.org/en-US/docs/Web/API/MediaDeviceInfo). ```typescript theme={null} mic_device_list = pcClient.getAllMics(); ``` ### getAllCams() `async getAllCams(): Promise` Returns a list of available cameras in the form of [`MediaDeviceInfo[]`](https://developer.mozilla.org/en-US/docs/Web/API/MediaDeviceInfo). ```typescript theme={null} cam_device_list = pcClient.getAllCams(); ``` ### getAllSpeakers() `async getAllSpeakers(): Promise` Returns a list of available speakers in the form of [`MediaDeviceInfo[]`](https://developer.mozilla.org/en-US/docs/Web/API/MediaDeviceInfo). ```typescript theme={null} speaker_device_list = pcClient.getAllSpeakers(); ``` ### selectedMic `selectedMic: MediaDeviceInfo | {}` The currently selected microphone, represented as a `MediaDeviceInfo` object. If no microphone is selected, it returns an empty object. ```typescript theme={null} current_mic = pcClient.selectedMic; ``` ### selectedCam `selectedCam: MediaDeviceInfo | {}` The currently selected camera, represented as a `MediaDeviceInfo` object. If no camera is selected, it returns an empty object. ```typescript theme={null} current_cam = pcClient.selectedCam; ``` ### selectedSpeaker `selectedSpeaker: MediaDeviceInfo | {}` The currently selected speaker, represented as a `MediaDeviceInfo` object. If no speaker is selected, it returns an empty object. ```typescript theme={null} current_speaker = pcClient.selectedSpeaker; ``` ### updateMic() `updateMic(micId: string): void` Switches to the microphone identified by the provided `micId`, which should match a `deviceId` in the list returned from [`getAllMics()`](#getAllMics). deviceId ```typescript theme={null} pcClient.updateMic(deviceId); ``` ### updateCam() `updateCam(camId: string): void` Switches to the camera identified by the provided `camId`, which should match a `deviceId` in the list returned from [`getAllCams()`](#getAllCams). deviceId ```typescript theme={null} pcClient.updateCam(deviceId); ``` ### updateSpeaker() `updateSpeaker(speakerId: string): void` Switches to the speaker identified by the provided `speakerId`, which should match a `deviceId` in the list returned from [`getAllSpeakers()`](#getAllSpeakers). deviceId ```typescript theme={null} pcClient.updateSpeaker(deviceId); ``` ### enableMic(enable: boolean) `enableMic(enable: boolean): void` Turn on or off (unmute or mute) the client mic input. A boolean indicating whether to enable (`true`) or disable (`false`) the microphone. ```typescript theme={null} pcClient.enableMic(true); ``` ### enableCam(enable: boolean) `enableCam(enable: boolean): void` Turn on or off the client cam input. A boolean indicating whether to enable (`true`) or disable (`false`) the camera. ```typescript theme={null} pcClient.enableCam(true); ``` ### enableScreenShare(enable: boolean) `enableScreenShare(enable: boolean): void` Start a screen share from the client's device. A boolean indicating whether to enable (`true`) or disable (`false`) screen sharing. ```typescript theme={null} pcClient.enableScreenShare(true); ``` ### isMicEnabled `isMicEnabled: boolean` An accessor to determine if the client's microphone is enabled. ```typescript theme={null} mic_enabled = pcClient.isMicEnabled; ``` ### isCamEnabled `isCamEnabled: boolean` An accessor to determine if the client's camera is enabled. ```typescript theme={null} cam_enabled = pcClient.isCamEnabled; ``` ### isSharingScreen An accessor to determine if the client is sharing their screen. ```typescript theme={null} screen_sharing = pcClient.isSharingScreen; ``` ## Tracks (audio and video) ### tracks() `tracks(): Tracks` Returns a `Tracks` object with available `MediaStreamTrack` objects for both the client and the bot. ```typescript theme={null} live_tracks_list = pcClient.tracks() ``` **Tracks Type** ```typescript theme={null} { local: { audio?: MediaStreamTrack; video?: MediaStreamTrack; }, bot?: { audio?: MediaStreamTrack; video?: MediaStreamTrack; } } ``` ## Advanced LLM Interactions ### sendText() `async sendText(content: string, options?: SendTextOptions = {}): void` A method to append text to the user's context. This is useful for providing text input as an alternative to audio input for the user. The text content to send to the bot. An optional set of options for how the bot should handle the text input. Whether to immediately run the bot with the updated context. If `false`, the context will be updated but the bot will not be run until the next message or action that triggers the bot to run (like the user speaking). Whether the bot should respond with audio. If `true`, the bot's response will be processed by TTS and be spoken. If `false`, the bot will bypass the TTS and respond with text only. ### appendToContext() `async appendToContext(context: LLMContextMessage): boolean` In 0.0.4, we deprecated `appendToContext` in favor of `send-text` to close a security vulnerability as well as lay the groundwork for proper support of passing other types of context, like images and files. A method to append data to the bot's context. This is useful for providing additional information or context to the bot during the conversation. The context to append. This should be an object with the following shape: The role to append the context to. Currently only "user" or "assistant" are supported. The content to append to the context. This can be any JSON-serializable object. Whether to immediately run the bot with the updated context. If `false`, the context will be updated but the bot will not be run until the next message or action that triggers the bot to run (like the user speaking). ### registerFunctionCallHandler() `registerFunctionCallHandler(functionName: string, callback: FunctionCallCallback): void` Registers a function call handler that will be called when the bot requests a function call. This is useful for when the server-side function handler needs information from the client to execute the function call or when the client needs to perform some action based on the running of function call. The name of the function to handle. This should match the function name in the bot's context. `type FunctionCallCallback = (fn: FunctionCallParams) => Promise` The callback function to call when the bot sends a function call request. This function should accept the following parameters: The name of the function being called. It should always match the name you registered the handler under. The arguments passed to the function call. This is a key-value object where the keys are the argument names and the values are the argument values. The callback should return a Promise that resolves with the result of the function call or void if no result is needed. If returning a result, it should be a `string` or `Record`. ## Other ### transport `transport: Transport` A safe accessor for the transport instance used by the client. This is useful for accessing transport-specific methods or properties that are not exposed directly on the client. ```typescript theme={null} const transport = pcClient.transport as DailyTransport; transport.getSessionInfo(); ``` ### setLogLevel() `setLogLevel(level: LogLevel): void` Sets the log level for the client. This is useful for debugging and controlling the verbosity of logs. The log levels are defined in the `LogLevel` enum: ```typescript theme={null} export enum LogLevel { NONE = 0, ERROR = 1, WARN = 2, INFO = 3, DEBUG = 4, } ``` By default, the log level is set to `LogLevel.DEBUG`. ```typescript theme={null} pcClient.setLogLevel(LogLevel.INFO); ``` ## Transport Compatibility --- # Source: https://docs.pipecat.ai/server/services/community-integrations.md > ## Documentation Index > Fetch the complete documentation index at: https://docs.pipecat.ai/llms.txt > Use this file to discover all available pages before exploring further. # Community Integrations > Community-maintained service integrations for Pipecat Community Integrations are service integrations built and maintained by developers in the Pipecat community. These are not officially supported by the Pipecat team but are listed here to help you discover what's available. Want to add your integration? See our [Community Integrations Guide](https://github.com/pipecat-ai/pipecat/blob/main/COMMUNITY_INTEGRATIONS.md). *** ## Knowledge Retrieval Semantic retrieval services enable context-aware search and retrieval of relevant information. | Service | Repository | Maintainer(s) | | -------------------------------- | ---------------------------------------------------------------------------------- | ---------------------------------- | | [Moss](https://www.usemoss.dev/) | [https://github.com/usemoss/pipecat-moss](https://github.com/usemoss/pipecat-moss) | [Moss](https://github.com/usemoss) | ## Large Language Models LLMs receive text or audio based input and output a streaming text response. | Service | Repository | Maintainer(s) | | -------------------------------- | ---------------------------------------------------------------------------------------------------------------------- | --------------------------------------- | | [Anannas AI](https://anannas.ai) | [https://github.com/Anannas-AI/anannas-pipecat-integration](https://github.com/Anannas-AI/anannas-pipecat-integration) | [Haleshot](https://github.com/Haleshot) | ## Observability Observability services enable telemetry and metrics data to be passed to a Open Telemetry backend or another service. | Service | Repository | Maintainer(s) | | ---------------------------------------------------------- | --------------------------------------------------------------------------------------------------------------------------------------------------------- | ------------------------------------------------------------------------- | | [OpenInference](https://arize-ai.github.io/openinference/) | [openinference-instrumentation-pipecat](https://github.com/Arize-ai/openinference/tree/main/python/instrumentation/openinference-instrumentation-pipecat) | [Arize-ai](https://github.com/Arize-ai/openinference/graphs/contributors) | | [Finchvox](https://finchvox.dev/) | [https://github.com/finchvox/finchvox](https://github.com/finchvox/finchvox) | [Finchvox](https://github.com/finchvox) | ## Telephony Serializers Serializers convert between frames and media streams, enabling real-time communication over a websocket. | Service | Repository | Maintainer(s) | | -------------------------------- | ---------------------------------------------------------------------------------------- | ------------------------------------- | | [AwaazAI](https://www.awaaz.ai/) | [https://github.com/awaazde/pipecat-awaazai](https://github.com/awaazde/pipecat-awaazai) | [AwaazAI](https://github.com/awaazde) | ## Text-to-Speech Text-to-Speech services receive text input and output audio streams or chunks. | Service | Repository | Maintainer(s) | | ---------------------------------------------------------------- | ------------------------------------------------------------------------------------------------------ | ----------------------------------------------- | | [Murf AI](https://murf.ai/api) | [https://github.com/murf-ai/pipecat-murf-tts](https://github.com/murf-ai/pipecat-murf-tts) | [murf-ai](https://github.com/murf-ai) | | [Pipecat TTS Cache](https://pypi.org/project/pipecat-tts-cache/) | [https://github.com/omChauhanDev/pipecat-tts-cache](https://github.com/omChauhanDev/pipecat-tts-cache) | [omChauhanDev](https://github.com/omChauhanDev) | | [Respeecher](https://www.respeecher.com/real-time-tts-api) | [https://github.com/respeecher/pipecat-respeecher](https://github.com/respeecher/pipecat-respeecher) | [respeecher](https://github.com/respeecher) | | [Typecast](https://typecast.ai/) | [https://github.com/neosapience/pipecat-typecast](https://github.com/neosapience/pipecat-typecast) | [neosapience](https://github.com/neosapience) | | [Voice.ai](https://voice.ai/) | [https://github.com/voice-ai/voice-ai-pipecat-tts](https://github.com/voice-ai/voice-ai-pipecat-tts) | [voice-ai](https://github.com/voice-ai) | ## Video Video services enable you to build an avatar where audio and video are synchronized. | Service | Repository | Maintainer(s) | | ------------------------------------------------- | -------------------------------------------------------------------------------- | ------------------------------------- | | [Beyond Presence](https://www.beyondpresence.ai/) | [https://github.com/bey-dev/pipecat-bey](https://github.com/bey-dev/pipecat-bey) | [bey-dev](https://github.com/bey-dev) | ## Image Generation Image generation services receive text inputs and output images. | Service | Repository | Maintainer(s) | | ------------------------------- | ---------- | ------------- | | *No community integrations yet* | | | ## Speech-to-Text Speech-to-Text services receive and audio input and output transcriptions. | Service | Repository | Maintainer(s) | | ------------------------------- | ---------- | ------------- | | *No community integrations yet* | | | ## Vision Vision services receive a streaming video input and output text describing the video input. | Service | Repository | Maintainer(s) | | ------------------------------- | ---------- | ------------- | | *No community integrations yet* | | | --- # Source: https://docs.pipecat.ai/client/react/components.md > ## Documentation Index > Fetch the complete documentation index at: https://docs.pipecat.ai/llms.txt > Use this file to discover all available pages before exploring further. # Components > Ready-to-use React components for Pipecat applications The Pipecat React SDK provides several components for handling audio, video, and visualization in your application. ## PipecatClientProvider The root component for providing Pipecat client context to your application. ```jsx theme={null} {/* Child components */} ``` **Props** A singleton instance of `PipecatClient` ## PipecatClientAudio Creates a new `