` to render each of the card fields.
The JavaScript file included in the sample code includes reference routes on the server that you’ll add in a later step.
Include the `
```
This table lists the parameters you pass to the JavaScript SDK.
| **Query param** | **Default** | **Description** |
| --- | --- | --- |
| client-id | none | Your PayPal REST client ID. This identifies your PayPal account and determines where transactions are paid. |
| components | buttons | A comma-separated list of components to enable. The buttons,payment-fields,marks, and funding-eligibility components are required for payment fields components. |
| enable-funding | none | The enabled payment methods to show in buttons and marks. **Note:** By default, PayPal JavaScript SDK provides smart logic to display only appropriate marks and buttons for the current buyer. This optional parameter bypasses the buyer country check for desired payment methods. For example: src="[https://www.paypal.com/sdk/js ?client-id=YOUR_CLIENT_ID&enable-funding=venmo](https://www.paypal.com/sdk/js?client-id=YOUR_CLIENT_ID&enable-funding=venmo)" |
| currency | USD | This is the currency for the payment. This value needs to match the currency used when creating the order. |
| locale | automatic | The locale renders components. By default PayPal detects the correct locale for the buyer based on their geolocation and browser preferences. It is recommended to pass this parameter with a [supported locale](https://developer.paypal.com/sdk/js/configuration/#link-locale) if you need the PayPal buttons to render in the same language as the rest of your site. |
| intent | capture | The intent for the transaction. This determines whether the funds are captured immediately while the buyer is present on the page. |
| commit | true | This indicates that the final amount won't change after the buyer returns to your site from PayPal. |
| vault | false | Whether the payment information in the transaction will be saved. Save your customers' payment information for billing agreements, subscriptions, or recurring payments. Marking this parameter false shows all funding sources, including payment methods that can't be saved. |
## Render Payment Mark
```javascript
paypal.Marks({
fundingSource: paypal.FUNDING.BANCONTACT
}).render('#bancontact-mark')
```
## Render Payment Fields
Use payment fields to collect payment information from buyers. Fields dynamically render based on the selected funding source and you can customize the fields to align with your brand.
You can choose from the following checkout flows:
- [Single Page](#singleCheckout)
- [Multi-Page](#multiCheckout)
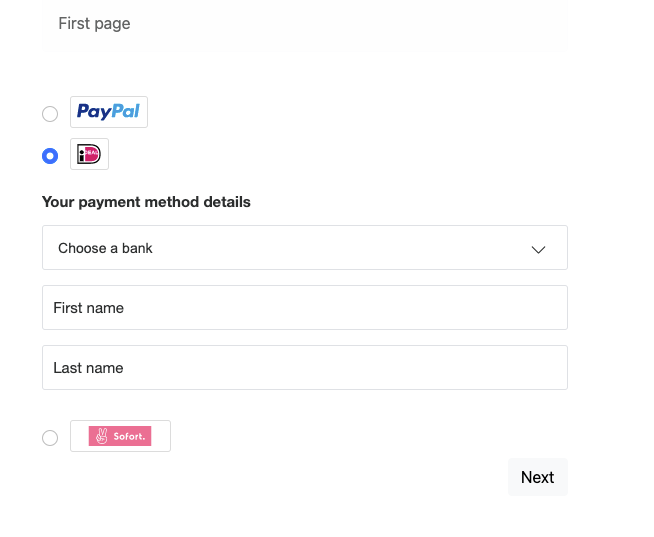
### Single Page Checkout
For Bancontact, payment fields collect first name and last name.
If there are validation errors in the input fields, they'll show on the click of the button.
### First Page of the Checkout Flow
This example renders the mark and payment fields, but not the payment button, on your checkout page.
### Payment Mark
```javascript
paypal.Marks({
fundingSource: paypal.FUNDING.BANCONTACT
}).render('#bancontact-mark')
```
### Payment Fields
```javascript
paypal.PaymentFields({
fundingSource: paypal.FUNDING.BANCONTACT,
style: {
/* customize field attributes (optional) */
variables: {},
/* set custom rules to apply to fields classes (optional) */
rules: {},
},
onInit: (data, actions) => {
const form = document.querySelector("form.paypal-payment-form");
form.addEventListener("submit", (e) => {
const formData = new FormData(form);
const paymentSource = formData.get("payment-option");
if (paymentSource === paypal.FUNDING.BANCONTACT) {
e.preventDefault();
actions.validate().then((valid) => {
if (valid) {
window.location.href = `/second-page.html?payment-option=${paypal.FUNDING.BANCONTACT}`;
}
});
}
});
},
fields: {
/* fields prefill info (optional) */
name: {
value: "John Doe",
},
},
})
.render("#bancontact-container");
```
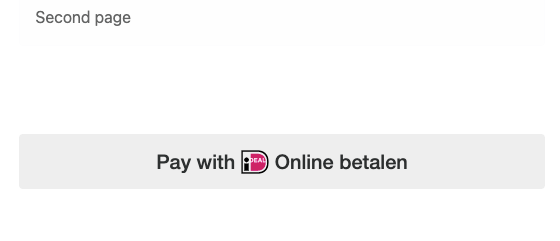
### Second Page of the Checkout Flow
Based on the payment method selected on the first page, the payment button displays along with the order details on the second page. To complete checkout, your buyer clicks the payment button, authorizes, and confirms payment. You get the code to render the payment button in [step 4](#render-payment-button).
For style parameters, please reference this style page: [Custom style for payment fields](/docs/checkout/apm/reference/style/)
## Render Payment Button
```javascript
paypal.Buttons({
fundingSource: paypal.FUNDING.BANCONTACT,
style: {
label: "pay",
},
createOrder() {
return fetch("/my-server/create-paypal-order", {
method: "POST",
headers: {
"Content-Type": "application/json",
},
// use the "body" param to optionally pass additional order information
// like product skus and quantities
body: JSON.stringify({
cart: [
{
sku: "YOUR_PRODUCT_STOCK_KEEPING_UNIT",
quantity: "YOUR_PRODUCT_QUANTITY",
},
],
}),
})
.then((response) => response.json())
.then((order) => order.id);
},
onApprove(data) {
return fetch("/my-server/capture-paypal-order", {
method: "POST",
headers: {
"Content-Type": "application/json",
},
body: JSON.stringify({
orderID: data.orderID
})
})
.then((response) => response.json())
.then((orderData) => {
// Successful capture! For dev/demo purposes:
console.log('Capture result', orderData, JSON.stringify(orderData, null, 2));
const transaction = orderData.purchase_units[0].payments.captures[0];
console.log('Transaction Status:', transaction.status);
console.log('Transaction ID:', transaction.id);
// When ready to go live, remove the alert and show a success message within this page. For example:
// const element = document.getElementById('paypal-button-container');
// element.innerHTML = '
Thank you for your payment!
';
// Or go to another URL: window.location.href = 'thank_you.html';
});
},
onCancel(data, actions) {
console.log(`Order Canceled - ID: ${data.orderID}`);
},
onError(err) {
console.error(err);
}
})
.render("#bancontact-btn");
```
For the capture call details and example responses, see [Capture payment for order](/docs/api/orders/v2/#orders_capture) in the Orders API reference.
If order capture fails, the Orders API can [return an error](https://developer.paypal.com/api/rest/reference/orders/v2/errors/) in the console.
## Handle Webhook Events
A webhook handler is a script you create on your server that completes specific actions on webhooks that hit your listener URL.
- We recommend subscribing to the CHECKOUT.ORDER.APPROVED webhook event in case a customer accidentally closes the browser and exits the checkout process after approving the transaction through their APM but before finalizing the transaction on your site.
- We also recommend subscribing to the CHECKOUT.ORDER.DECLINED webhook event to receive notifications of any other failure scenarios. This webhook event passes a failure reason code and error message to indicate what caused the error.
- Listen for the CHECKOUT.PAYMENT-APPROVAL.REVERSED webhook as an indication that an approved order wasn't captured within the capture window resulting in a cancellation of the order and a refund the buyer's account. Then notify your buyer of the problem and the reversed order.
- PAYMENT.CAPTURE.PENDING , PAYMENT.CAPTURE.COMPLETED , and PAYMENT.CAPTURE.DENIED webhooks indicate capture status.
See [Subscribe to checkout webhooks](/docs/checkout/apm/reference/subscribe-to-webhooks/) for more information.
Here are some additional resources as you create webhook handler code:
- [Webhook Management API](https://developer.paypal.com/api/webhooks/v1/) - Manage webhooks, list event notifications, and more.
- Webhook events - [Checkout webhook events](https://developer.paypal.com/api/rest/webhooks/event-names/#checkout-buyer-approval) - Checkout buyer approval-related webhooks.
- [Order webhook events](https://developer.paypal.com/api/rest/webhooks/event-names/) - Other order-related webhooks.
- [Show order details endpoint](/docs/api/orders/v2/#orders_get) - Determine the status of an order.
## Sample Integration
See a sample Bancontact integration in the [PayPal GitHub repository](https://github.com/paypal-examples/bancontact).
---
# Large Batch Payouts | PayPal Developer
## If you accept cookies, we’ll use them to improve and customize your experience and enable our partners to show you personalized PayPal ads when you visit other sites. [Manage cookies and learn more](https://www.paypal.com/myaccount/privacy/cookiePrefs?locale=en_US)
## Accept
## Decline
## Close
---
## Large Batch Payouts
Large batch payouts help you send payouts to an unlimited amount of recipients at once. Large batch payouts are recommended for more than 15,000 payouts in one batch. For fewer payouts in a batch, use [Standard Payouts](/docs/payouts/standard/) or [Payouts Web](/docs/payouts/standard/payouts-web/).
## How it works

- Create a payouts input file and share it in a folder tied to your account on PayPal's secure DropZone server.
- Payouts validates the input file and returns one of the following reports:
- ACK (acknowledgment) report. The file passed validations. PayPal begins processing the file.
- NACK (negative acknowledgement) report. The file failed validations, and the report explains the errors.
- DUPS (duplicate filenames) report. The file name is identical to a previous file.
- Large files are processed in parts of up to 500,000 individual records. After each part of the input file is processed, payouts provides a Part File report. When the entire file is processed, you receive an Out File report. The reports are available in your DropZone account.
**Note**: After 30 days, you receive a Final report that contains the status for each individual record.
- Recipients are notified of the payout.
## 1. Set up DropZone account
You can choose to first test your integration in the PayPal sandbox and send mock payouts or go straight to production and send live payouts. Follow the steps to set up a [sandbox environment](#sandbox-environment) or [production environment](#production-environment).
### Sandbox environment
Use the PayPal sandbox to:
- Simulate file transfer to a designated folder on PayPal’s DropZone server via SFTP.
- Validate the file name, file format, checksum and file integrity.
- Test Out File reports and reconciliations.
To set up your sandbox environment:
- Contact [PayPal](https://www.paypal-support.com/) to have your PayPal account enabled for report access.
- [Create an SFTP account](/docs/reports/sftp-reports/access-sftp-reports/).
- To access your sandbox SFTP account, use the SFTP tool of your choice and include this information:
- Sandbox endpoint/URL: dropzone.es-ext.paypalcorp.com
- Destination host port: 22
- Sandbox user name
- Public ssh key
Next, set up your production environment to send live payouts or [create an input file](#2-create-input-file).
### Production environment
Transactions performed in the production environment are live. Money is debited from your PayPal balance and credited to each recipient’s PayPal or Venmo account. If the recipient doesn't claim the money within 30 days from the payout date, the money is returned to your account.
**Note**: Create a new set of ssh keys for your live environment.
To set up your production environment:
- Contact [PayPal](https://www.paypal-support.com/) to have your PayPal account enabled for report access.
- [Create an SFTP account](/docs/reports/sftp-reports/access-sftp-reports/).
- To access your production SFTP account, use the SFTP tool of your choice and include this information:
- Production endpoint/URL for the SFTP login: dropzone.paypal.com
- Destination host port: 22
- Production user name
- Public ssh key
Next, create an input file and place it in your Incoming folder.
## 2. Create input file
Create a comma separated value (.csv) input file that includes a summary line and information for each individual payout item.
The following sample .csv sends a payout to 3 PayPal recipients and 2 Venmo recipients:
**Note**: Payments to Venmo recipients require a US mobile number and information in the note.
```
PAYOUT_SUMMARY,17.9,USD,5,"You got paid",Payout for
PAYOUT,test-1@paypal.com,4.82,USD,REF_ID_1,NOTE_1
PAYOUT_VENMO,5551232368,4.93,USD,REF_ID_2,NOTE_2
PAYOUT_VENMO,5551232369,2.77,USD,REF_ID_3,NOTE_3
PAYOUT,test-4@paypal.com,3.51,USD,REF_ID_4,NOTE_4
PAYOUT,test-5paypal.com,1.87,USD,REF_ID_5,NOTE_5
```
### Add Summary line
The first line of the input file must contain a PAYOUT_SUMMARY as shown in this example:
```
PAYOUT_SUMMARY,TOTAL_PAYOUT_AMOUNT,CURRENCY_CODE,TOTAL_NO_OF_PAYMENTS,EMAIL_SUBJECT,EMAIL_MESSAGE
```
Use this information to complete each field of the summary:
| Field | Description |
| --- | --- |
| PAYOUT_SUMMARY | - Static value. - Must be upper case. |
| TOTAL_PAYOUT_AMOUNT | - Value of all individual payout items. - Must be in decimal format. |
| CURRENCY_CODE | - [Currency](/reference/currency-codes/) for the payout, such as USD , EUR , and so on. Only one currency type is supported per input file. |
| TOTAL_NO_OF_PAYMENTS | - The number of payout items in the file. - In the example above, the item count is 5 . |
| EMAIL_SUBJECT | - The subject of the email that recipients receive as a payout notification. - For txt input files: - If an email subject contains a comma or other special character, enclose the subject in double quotes. - If an email subject contains a double quote, enclose the double quote with an additional set of double quotes and enclose the subject in double quotes. Example double quote subject: "Our way of saying "Thanks"" |
| EMAIL_MESSAGE | - A common note in the email notification sent to all recipients for all payout items. - For txt input files: - If a note contains a comma or other special character, enclose the note in double quotes. - If a note contains a double quote, enclose the double quote with an additional set of double quotes and enclose the entire note with double quotes. Example double quote note: "Our way of saying "Thanks"" |
### Add individual item records
Beginning with the second line of the input file, add a record for each individual payout item as shown in this example:
```
PAYOUT,RECIPIENT,PAYOUT_AMOUNT,CURRENCY_CODE,UNIQUE_REF_ID, ITEM_LEVEL_NOTE
```
Use this information to complete each field for an individual item record:
| Field | Description |
| --- | --- |
| PAYOUT | - Set to PAYOUT for a PayPal recipient or PAYOUT_VENMO for a Venmo recipient. - Must be upper case. |
| RECIPIENT | - The recipient identifier. - Use the recipient's email address, phone number, Venmo handle, or their encrypted PayPal account number. |
| PAYOUT_AMOUNT | - Value of individual payout item. - Only use decimal format. Localized currency formats are not supported. - Must not be empty or a zero amount. |
| CURRENCY_CODE | - Currency in which the payouts are sent. - Use a single currency per input file. Multiple currencies are not supported in a single input file. - In the example above, the currency code is USD . |
| UNIQUE_REF_ID | - Unique identifier for a payout item. - Must also be unique within the input file. - Must be alphanumeric [0-9 , a-z , A-Z ] . Only use the underscore ( _ ) and hyphen ( - ) as special characters. - Maximum character length: 30. |
| ITEM_LEVEL_NOTE | - Customized note that can be sent in email notification for every payout item. - Use any special character or alphanumeric character. - For txt input files: - If a note contains a comma or other special character, enclose the note in double quotes. - If the note contains a double quote, enclose the double quote with an additional set of double quotes and enclose the entire note with double quotes. Example double quote note: "Our way of saying "Thanks"" |
### Save input file
Use this naming convention to save the file:
```
pp_payouts_
_.format
```
Where `pp_payouts` is static and lowercase. Variable fields in the file name include:
| Field | Description |
| --- | --- |
| epoch_time | Use an [epoch timestamp](https://www.epochconverter.com/). Timestamps in the past are acceptable. Future timestamps must be within seven days from the time that you place the file on the DropZone server. |
| reference_name | Must be alphanumeric [0-9,a-z,A-Z]. Only use the underscore (_) and hyphen (-) as special characters. Other special characters are not allowed. Maximum character length: 63. |
| format | Either .csv or .csv.gz. |
## 3. Upload input file
You can upload and test your input file in your [sandbox environment](#sandbox-environment) or upload your input file to your [production environment](#production-environment) and make live payouts. Once you upload the file, Payouts validates the file.
### File validation
Payouts performs the following validations on your input file:
| Validation | Fails if |
| --- | --- |
| Currency mismatch | The input file contains more than one currency. |
| Duplicate file | The input file name isn't unique. The file can't match a previous input file name. |
| File empty | The file is empty or corrupt. |
| File encoding format | The file isn't in UTF-8 format. |
| File existence | The file doesn't exist in the source folder. |
| File format | The file contains characters, columns, or details not required for processing payouts. |
| File integrity | The payout summary doesn't match the payout item record details. |
| File name | The input file doesn't use the correct file naming convention. |
| Sandbox items limit | The number of items in the file exceeds the sandbox file limit (sandbox only). |
| Summary and line item | Any of these conditions exist: - Character length surpasses the maximum values - Contains an invalid currency code - Contains multiple summary records - Currency field is empty or missing - Currency uses a localized format - Invalid payout summary format - The file is missing a PAYOUT_SUMMARY - The PAYOUT_SUMMARY is not in the first line of the file - Total number of payments field is - Empty - Mismatched to the total number of payments in the file - Missing - Contains an invalid purpose value. |
When the validation is complete, you receive an acknowledgment report.
### Acknowledgment reports
After Payouts validates your input file, you receive one of these acknowledgment reports:
- ACK report - Validation passed.
- NACK report - Validation failed.
#### ACK report
If your input file passes validation, Payouts places an ACK report in your Outgoing folder. The ACK report name matches the input file name, as shown in this example:
| Input file name | ACK report name |
| --- | --- |
| pp_payouts_6627887729_testfile.csv | pp_payouts_6627887729_testfile_ack.csv |
The file is formatted as follows:
```
DATE_TIME_STAMP_IN_UTC,ORIGINAL_FILE_NAME,ACCEPTED_FOR_PROCESSING
```
Where the date is the time of acknowledgment, as shown in this example:
```
2018-02-26T05:48:53Z,pp_payouts_6627887729_testfile,ACCEPTED_FOR_PROCESSING
```
When you receive an ACK report, Payouts begins processing the input file. You can then [view reports](#4-view-reports) to see the payout status.
#### NACK report
If your input file fails validation, PayPal places a NACK report in your Outgoing folder.
**Tip**: If you send a file with content that matches a file you sent within seven days, you receive a NACK file. You can contact your PayPal account manager and ask to override this feature.
The NACK report name matches the input file name:
| Input file name | NACK report name |
| --- | --- |
| pp_payouts_6627887729_testfile.csv | pp_payouts_6627887729_testfile_nack.csv |
The file contains the errors found and is formatted as follows:
| Line | Contents |
| --- | --- |
| Summary line | PAYOUT_SUMMARY,CURRENCY_CODE,ERROR_ENUM,ERROR_DESCRIPTION |
| Individual item records | PAYOUT,LINE_NO,REF_ID,ERROR_ENUM,ERROR_DESCRIPTION |
This example shows a NACK file with errors:
```
PAYOUT_SUMMARY,ASD,CURRENCY_INVALID,Currency is not valid
PAYOUT_SUMMARY,USD,SUMMARY_AND_PAYOUT_MATCH_CONFLICT,Summary and Payout details must match
PAYOUT,4,fourth-ref-id,PAYOUT_AMOUNT_INVALID_FORMAT,Invalid Payout amount format
```
## 4. View reports
Payouts generates reports at three different file processing stages. This table describes the reports and shows the example report name for an input file named PP_PAYOUTS_1517395059_ABC123.csv :
| Report | Description | Example report name |
| --- | --- | --- |
| Part File report | Generated after a part of an input file is processed. In the case of multiple part files, the payout items are mutually exclusive across each part file. The Part File report contains the start and end row number in the file name. For example, if a part file name contains 1_350, items 1 through 350 were processed. | PP_PAYOUTS_1517395059_ABC123_1_350.csv |
| Out / Interim report | Generated after all parts of an input file are processed. | PP_PAYOUTS_1517395059_ABC123_OUT.csv |
| Final report | Generated 31 days after the Interim report. Includes the final status of unclaimed transactions. | PP_PAYOUTS_1517395059_ABC123_FINAL.csv |
### Report format
The Part, Out/Interim, and Final reports all use the same format:
```
REF_ID,PAYOUT_ITEM_ID,TRANSACTION_ID,RECIPIENT_NAME,RECIPIENT,CURRENCY_CODE,PAYOUT_AMOUNT,FEE,TOTAL,TRANSACTION_STATUS,ERROR_ENUM,ERROR_MESSAGE,TIME_PROCESSED,TIME_CLAIMED[Applicable for Unilateral Case]
```
### Sample report
```
REF_ID_1,SX3QT8QVBVE4L,35P324312A142790D,,test-1@paypal.com,USD,4.82,0.25,5.07,UNCLAIMED,RECEIVER_UNREGISTERED,Receiver is unregistered,2018-01-16T10:33:22Z
REF_ID_2,HP3B9BRJYMKRU,1H080416VK328525U,,bjonny-us4@paypal.com,USD,4.93,0.25,5.18,SUCCESS,,,2018-01-16T10:33:20Z
REF_ID_3,BUPR735Z5CJBJ,7FB53422KY616915S,,test-3@paypal.com,USD,2.77,0.25,3.02,UNCLAIMED,RECEIVER_UNREGISTERED,Receiver is unregistered,2018-01-16T10:33:19Z
REF_ID_6,AU49JFTXWUQ8Q,7RG81691FV520321P,,test-1@paypal.com,USD,0.86,0.25,1.11,UNCLAIMED,RECEIVER_UNREGISTERED,Receiver is unregistered,2018-01-16T10:33:20Z
REF_ID_7,C5USHNEDMCXWL,,,bjonny-us9@paypal.com,USD,1.71,0,1.71,FAILED,ACCOUNT_RESTRICTED,User is restricted,2018-01-16T10:33:16Z
```
## Next
Learn about [file validation errors](/docs/payouts/standard/large-batch/file-validation-errors).
---
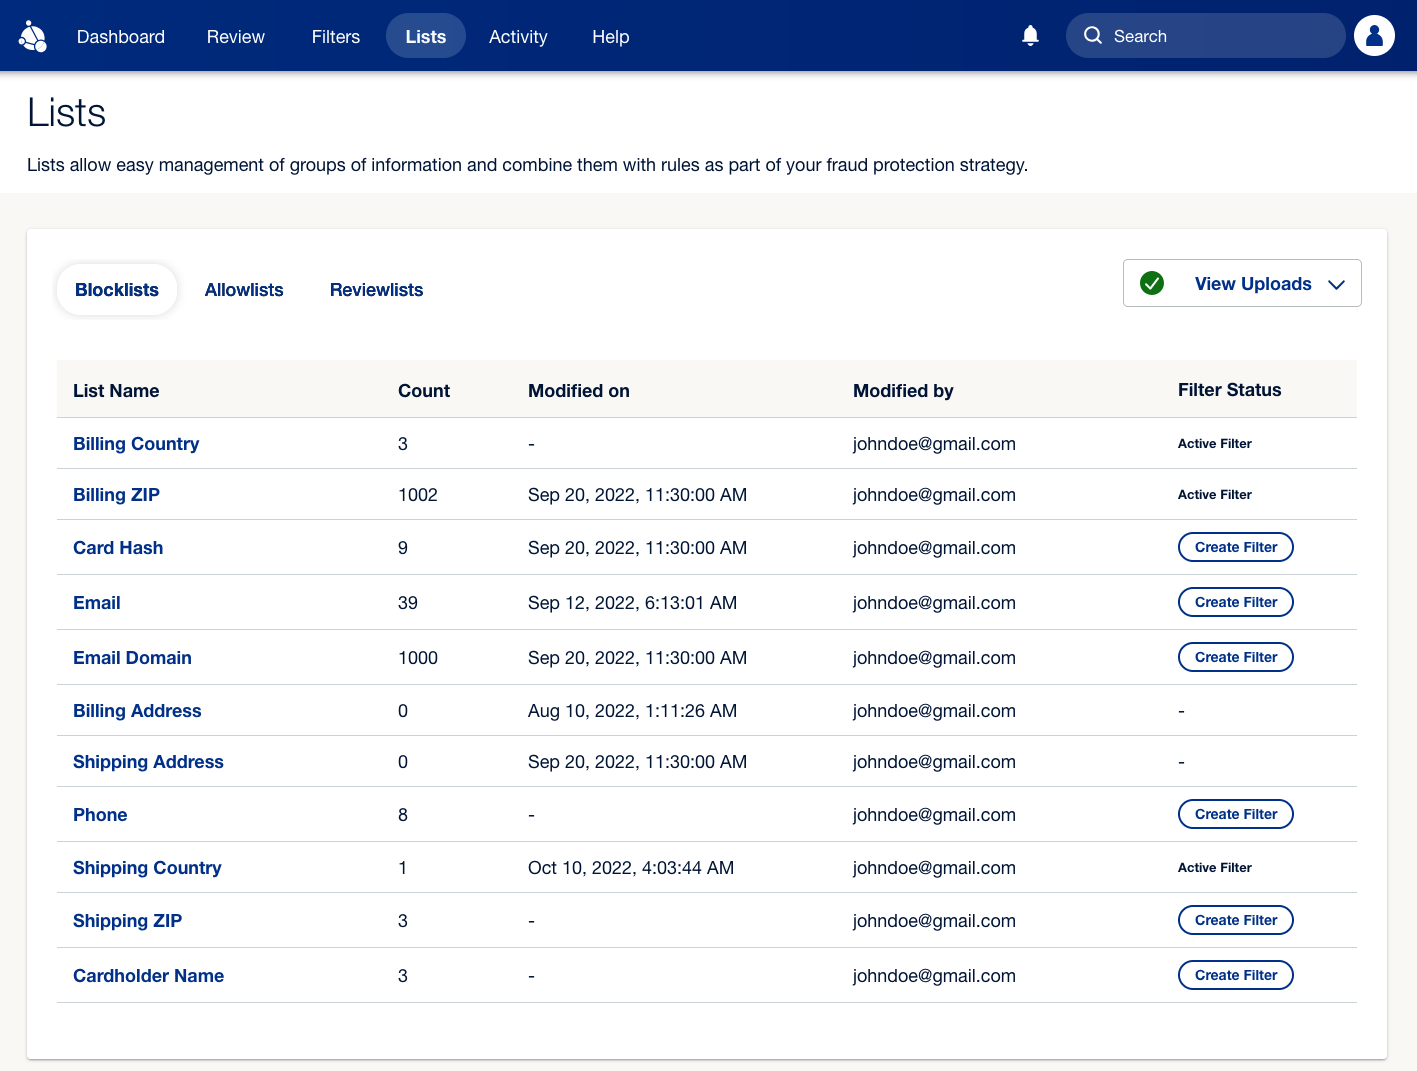
# Manage lists
The **Lists** tab shows the attributes for which you can create lists, the number of items on each attribute list, and whether an active filter is associated with each list.
You can use **Blocklists** to prevent known bad actors and **Allowlists** to ensure your trusted customers can check out smoothly. **Reviewlists** automatically queue transactions with specific attributes for manual review, allowing your team to decide whether to approve or reject them.
## Default lists
Fraud Protection Advanced (FPA) provides **Blocklists**, **Allowlists**, and **Reviewlists** by default for each of the following attributes:
- Billing Country
- Billing ZIP
- Card Hash
- Email
- Email Domain
- Billing Address
- Shipping Address
- Phone
- Shipping Country
- Shipping ZIP
- Cardholder Name
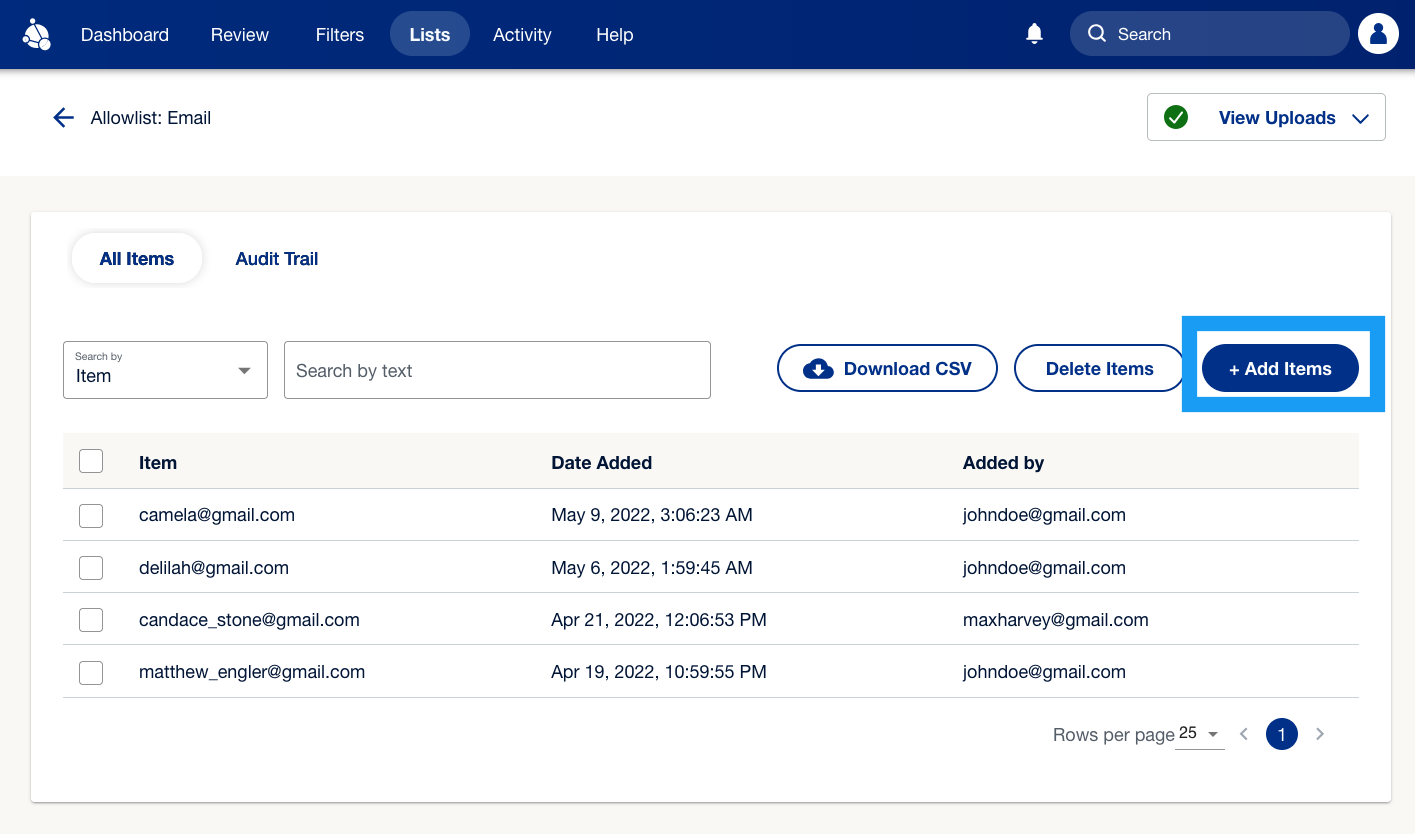
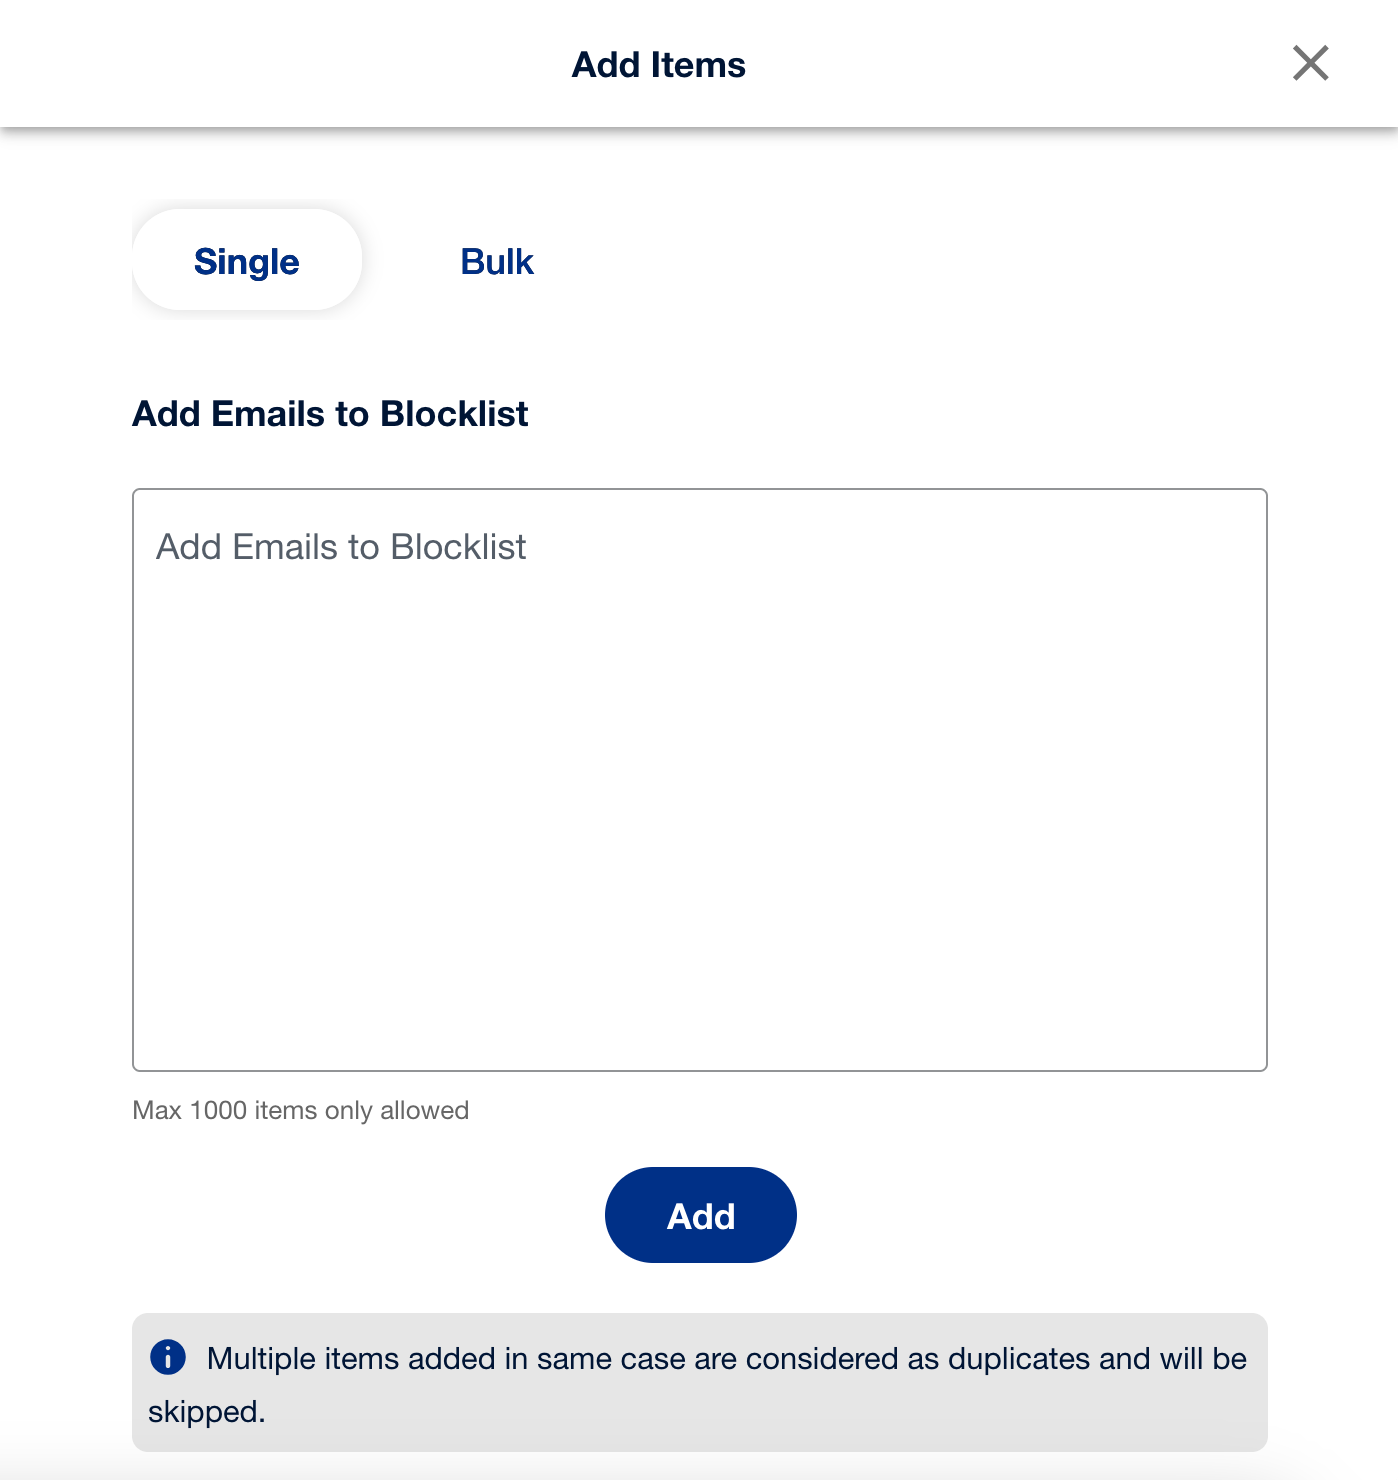
## Add items to lists
You can add items to lists using the following steps:
1. On the **Lists** tab, select one of the following categories you want to add items to: **Blocklists**, **Allowlists**, or **Reviewlists**.
2. Choose the specific list you want to add items to, such as **Email**, and then select **+Add Items**.
3. A pop-up window will appear, where you can enter comma-separated individual email addresses or upload a `.csv` file to add multiple emails in bulk. Select **Add** to proceed.
4. You’ll see another pop-up window. Select **Confirm**. Your data will get added to your chosen list. You will then see the list updated on the **Lists** tab.

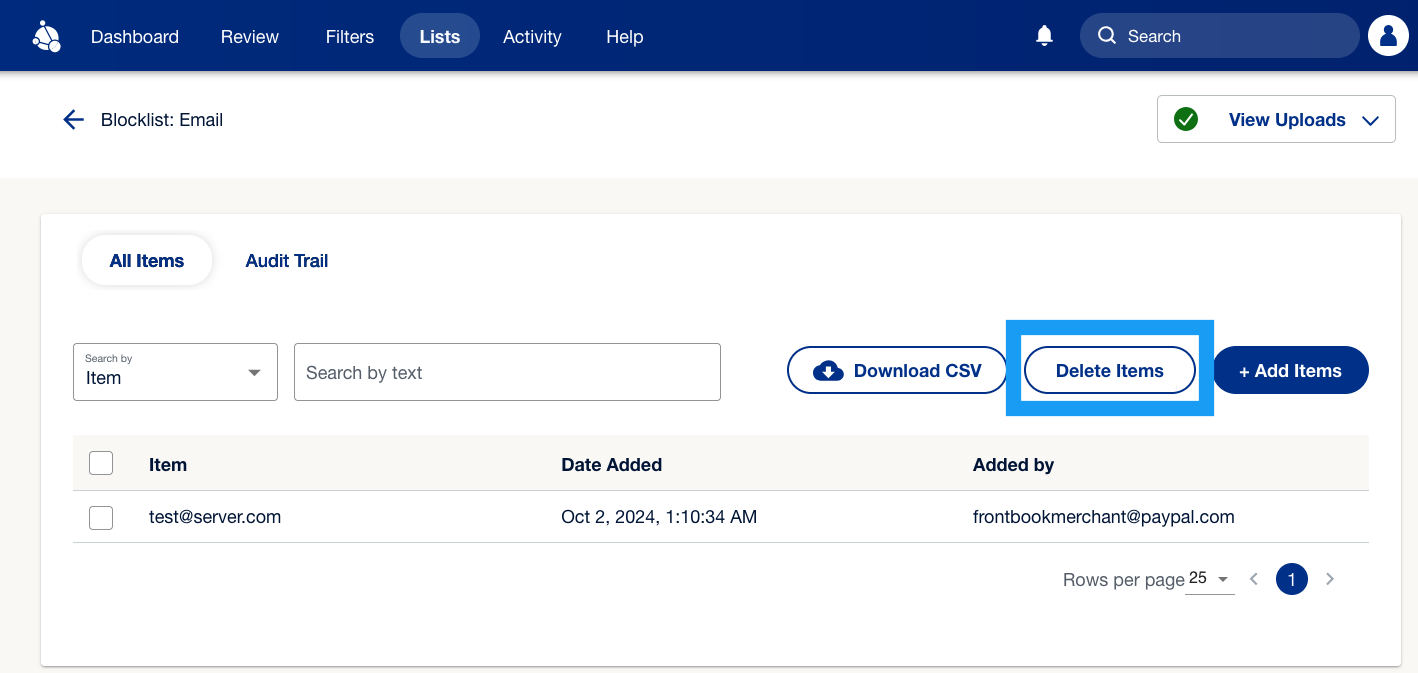
## Delete items from lists
You can delete items as well by selecting an item from the respective list and then selecting **Delete Items**.
## Related resources
### Create and set up filters
Use filters to decide whether FPA approves, rejects, or puts a transaction into a review queue.
### Review transactions
Review transactions that are flagged for review.
### Monitor FPA activity
You can track which users made changes and when these changes occurred.
---
# Log in with PayPal for Payouts
To simplify payouts, Assisted Account Creation (AAC) enables customers to use their PayPal account to log in or sign up to a merchant site. This can accelerate and increase creation of customer accounts on the merchant site.
The merchant receives the payer ID and email address of each customer who completes the onboarding flow. Barring compliance or fraud issues, payer IDs are the most reliable way to send payouts.
AAC can also:
- Identify users with PayPal accounts and display a **Log in with PayPal** button.
- Enable merchants to customize rewards for PayPal users.
- Enable customers to connect their PayPal account at the merchant site's payment settings screen.
Use AAC with these payouts integration methods:
- [Large Batch Payouts](/docs/payouts/standard/large-batch/)
- [API Integration](/docs/payouts/standard/integrate-api/)
- [Payouts Web](/docs/payouts/standard/payouts-web/)
## Prerequisites
Before you integrate AAC, you'll need to:
- Be sure you get your OAuth and secret credentials. If not, [get started](/docs/api/overview/).
- Contact your PayPal account manager to enable identity services. Your PayPal account manager adds:
| App settings | Return URL |
| --- | --- |
| Sandbox | [https://www.sandbox.paypal.com/conex/ac/add-offer-recipient](https://www.sandbox.paypal.com/conex/ac/add-offer-recipient) |
| Live | [https://www.paypal.com/conex/ac/add-offer-recipient](https://www.paypal.com/conex/ac/add-offer-recipient) |
- In your sandbox app settings, select **Log in with PayPal**.
- Click **Advanced Options** and select **Email address**, **Account status (verified)**, and **PayPal account ID (payer ID)**. Based on your company’s requirements, you can **Enable customers who have not yet confirmed their email address with PayPal to log in to your app**. For details, see [Enable Log in with PayPal](/docs/log-in-with-paypal/).
- Get your merchant account ID from the Settings page of your PayPal business account.
## Integrate assisted account creation
You can use AAC to acquire customers’ email addresses and Payer IDs, which are encrypted PayPal account numbers, at sign up, log in, or payment set up on a merchant or partner website.
AAC requires client-side and server-side integration. For client-side integration, AAC uses [Zoid](https://github.com/krakenjs/zoid) , PayPal’s open-source cross-domain-component library. Server-side integration includes two PayPal API calls.
To integrate AAC:
- [Integrate the AAC SDK](/docs/payouts/standard/login-with-payouts/#integrate-client-side) on your client-side application.
- [Add PayPal’s server-side API calls](/docs/payouts/standard/login-with-payouts/#integrate-server-side) to your server-side application.
### Integrate client side
Drop the AAC SDK onto your applicable pages as follows:
**Note:** In the client side scripts, information you need to fill in (for example, container , client_id , or signup/login ) has quotation marks and angled brackets around it.
#### `Integrate client side`
```javascript
```
Use this code to integrate AAC if your client-side application runs on React or Angular.
#### `React`
```javascript
import React from 'react';
import ReactDOM from 'react-dom';
const AACComponent = paypal.PayoutsAAC.driver('react', {
React,
ReactDOM
});
class OtherReactComponent extends React.Component {
render() {
return (
);
}
}
```
#### `Angular`
```javascript
// Specify the component name as a dependency to your angular app:
angular.module('myapp', ['payouts-aac'])
// Include the tag in one of your templates (don't forget to use spine case prop names):
```
## Integrate server side
Server-side integration includes two PayPal API calls.
- Use the authorization code returned in the client-side integration to obtain an access token.
- Use the access token to get the customer's email address and Payer ID.
## Integrate on Node or Python
Use this code to install AAC if your server runs on Node or Python.
### Node
```javascript
npm install paypal-rest-sdk
var paypal = require('paypal-rest-sdk');
paypal.configure({
mode: 'sandbox', // sandbox or live
client_id: '',
client_secret: ''
});
// Get tokeninfo with Authorize code
paypal.openIdConnect.tokeninfo.create("Replace with authorize code", function(error, tokeninfo){
console.log(tokeninfo);
});
// Get userinfo with Access code
paypal.openIdConnect.userinfo.get("Replace with access_code", function(error, userinfo){
console.log(userinfo);
});
```
### Python
```python
apt-get install libssl-dev libffi-dev
pip install paypalrestsdk
import paypalrestsdk
from paypalrestsdk.openid_connect import Tokeninfo, Userinfo
paypalrestsdk.configure({
mode: 'sandbox', # sandbox or live
client_id: '',
client_secret: '' })
tokeninfo = Tokeninfo.create("Replace with Authorize code")
userinfo = tokeninfo.userinfo()
```
---
# Messaging with buttons
Integrate messaging directly with your buttons to promote Pay Later offers and other PayPal value propositions to your customers. Adding messaging can help improve conversion and attract new customers.

**info**
**Note:** Messaging is currently only supported for US merchants and US customers. Merchants must be eligible for Pay Later to display Pay Later offers with buttons. Other PayPal value propositions will still show, if ineligible for Pay Later.
## Know before you code
### Prerequisites
This feature modifies an existing [checkout integration](/docs/checkout/standard/) and uses the following:
- [PayPal JavaScript SDK](/sdk/js/configuration/)
- [Orders REST API - Create order endpoint](/docs/api/orders/v2/#orders_create)
### Explore PayPal APIs with Postman
You can use Postman to explore and test PayPal APIs. Learn more in our [Postman guide](/api/rest/postman).
Include your messaging options to the buttons configuration object. Learn more about the full list of available options by reviewing the [JavaScript SDK reference](https://developer.paypal.com/sdk/js/) page. To display the strongest message to the customer, use `message.amount` with the current total based on the product or cart.
**Note:** The message.amount option functions independently from the captured order total and has no impact on it.
#### Button Examples
The message content adapts to the buttons that are displayed:
| Description | Options | Buttons |
| --- | --- | --- |
| Vertical Stack | `paypal.Buttons({
style: { layout: "vertical" },
message: { amount: 100 }
})`
**Note:** The message is positioned to the top to make room for the text that accompanies the debit/credit Card button. | 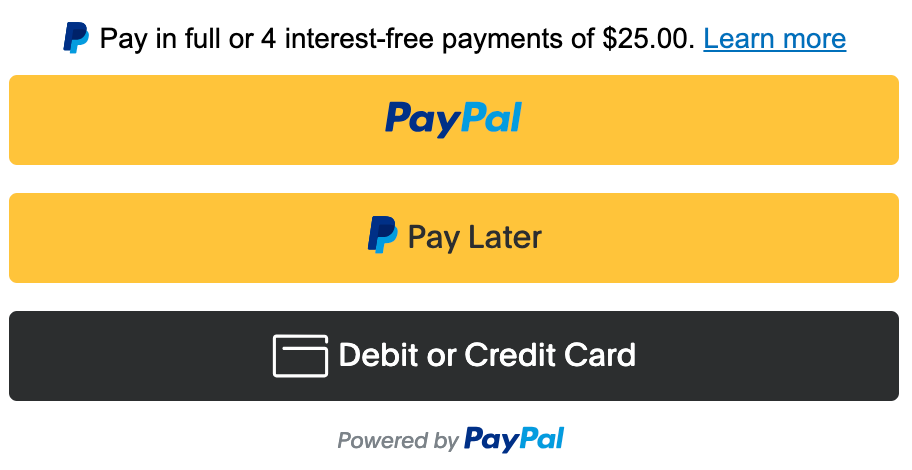 |
| Horizontal Stack | `paypal.Buttons({
style: { layout: "horizontal" },
message: { amount: 100 }
})` |  |
| Standalone PayPal | `paypal.Buttons({
fundingSource: paypal.FUNDING.PAYPAL,
message: { amount: 20 }
})` |  |
| Standalone Pay Later | `paypal.Buttons({
fundingSource: paypal.FUNDING.PAYLATER,
message: { amount: 100 }
})` |  |
Learn more about standalone button integration best practices by reviewing the [Standalone Buttons](/docs/checkout/standard/customize/standalone-buttons/) page.
## Update the message amount
As the product count or cart total changes, you can update the `message.amount` to reflect the latest total.
```javascript
buttons.updateProps({
message: {
amount: 200, // Update to your cart or product total amount
align: 'center',
color: 'black',
}
});
```
**info**
**Note:** Ensure that all previously specified message options are passed into `updateProps` including any options that have not changed; otherwise, they will be overwritten with default values.
## Complete your integration
Return to the [Set up standard payments](/docs/checkout/standard/) guide to create and capture the order.
## See also
### Pay Later messaging
Learn more about adding messaging next to your product price and cart totals by reviewing the [Pay Later Messages](/docs/checkout/pay-later/us/integrate/) page.
### Javascript SDK
Learn more about passing parameters to customize your integration by reviewing the [JavaScript SDK](/docs/checkout/advanced/customize/3d-secure/sdk/) page.
---
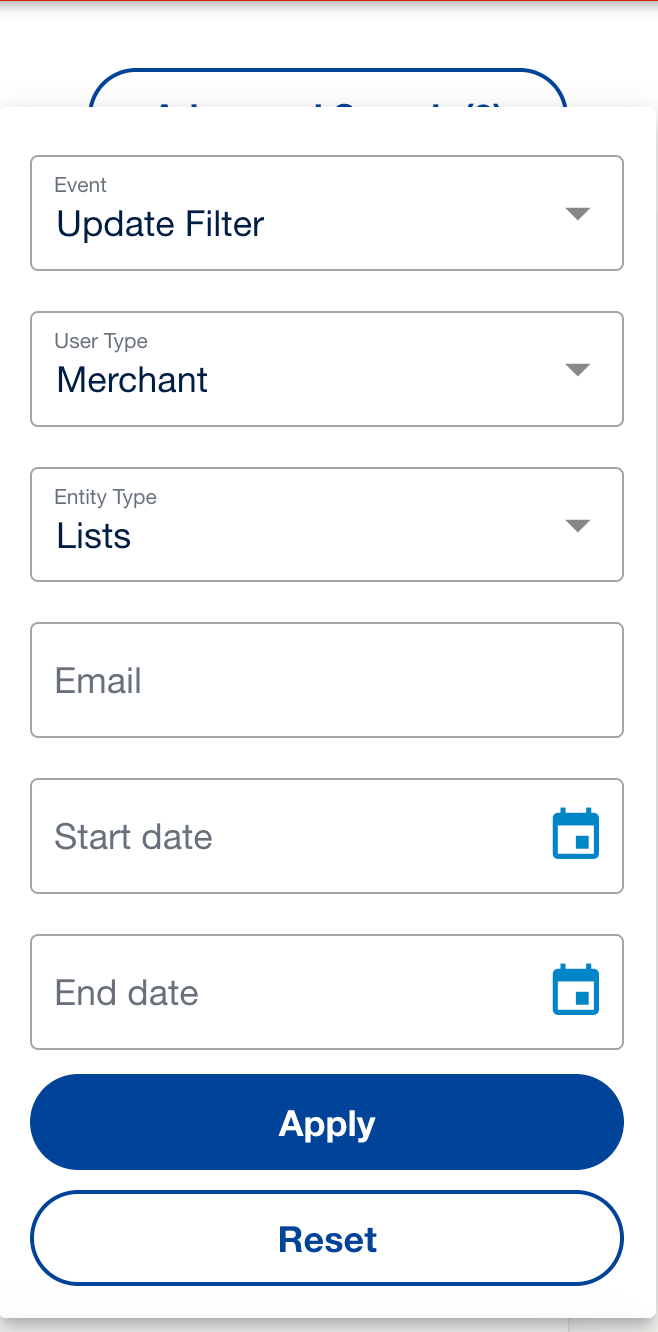
# Monitor FPA Activity
The **Activity** tab logs all updates made to the tool, including changes to filters, lists, and case reviews. This feature allows you to see which users made changes and when they occurred.

Select the expand icon to see the details of any item.

You can also select **Advanced Search** to search for specific audit changes.
---
# Accept Multibanco payments
Multibanco is an interbank network in Portugal.
| Country | Payment type | Payment flow | Currency | Maximum amount | Refunds |
| --- | --- | --- | --- | --- | --- |
| Portugal (PT) | voucher | redirect | EUR | 99,999.99 | N/A |
## How it works

1. The buyer chooses to pay with Multibanco.
2. The buyer provides their first name and last name.
3. The payment instruction is presented to the buyer.
4. The buyer completes the payment via online banking or at a Multibanco ATM.
5. The merchant receives the successful payment completion webhook notification and PayPal moves the funds to the merchant account.
6. The merchant ships the goods.
## Integration methods
### JavaScript SDK
Use PayPal-hosted UI components called payment fields to collect payment information for alternative payment methods.
### Orders REST API
Integrate directly using the Orders API to fully customize the checkout experience.
---
# Multiple subscription buttons
You can let your buyers choose a subscription plan from multiple plans available from a single page of your website.

## 1. Modify JavaScript SDK code
Modify the JavaScript SDK code to render multiple buttons on a single webpage.
Add the SDK script before the first PayPal button `div`. Add the SDK script only once on your web page ensure that the SDK doesn't render multiple times on your webpage.
```html
```
## 2. Add ID for each button
Add a unique container HTML `id` for each button code.
**Tip:** Use the same ID for the container ID that you used for the plan ID.
```html
// A unique ID for each button
```
### Example
This sample creates 2 different plans:
- Basic plan priced at $5 per month with plan ID `P-89K58960WT101463BMA2QTGQ`.
- Premium plan priced at $10 per month with plan ID `P-8D325842DA922762MMA2QT6Q`.
```html