 ```
### Add titles to embedded content
Iframes and video embeds require descriptive titles:
```html theme={null}
```
## Design for readability
Visual design choices affect how accessible your documentation is to users with low vision, color blindness, or other visual disabilities.
### Ensure sufficient color contrast
If you customize your theme colors, verify the contrast ratios meet WCAG requirements:
* Body text: minimum 4.5:1 contrast ratio
* Large text: minimum 3:1 contrast ratio
* Interactive elements: minimum 3:1 contrast ratio
Test both light and dark mode. The `mint a11y` command checks for color contrast.
### Don't rely on color alone
If you use color to convey information, include a text label or icon as well. For example, don't mark errors only with red text. Include an error icon or the word "Error."
### Use clear, concise language
* Write in plain language.
* Define technical terms when first used.
* Avoid run-on sentences.
* Use active voice.
## Make code examples accessible
Code blocks are a core part of technical documentation, but they require specific accessibility considerations to ensure screen reader users can understand them. In general, follow these guidelines:
* Break long code examples into smaller, logical chunks.
* Comment complex logic within the code.
* Consider providing a text description for complex algorithms.
* When showing file structure, use actual code blocks with language labels rather than ASCII art.
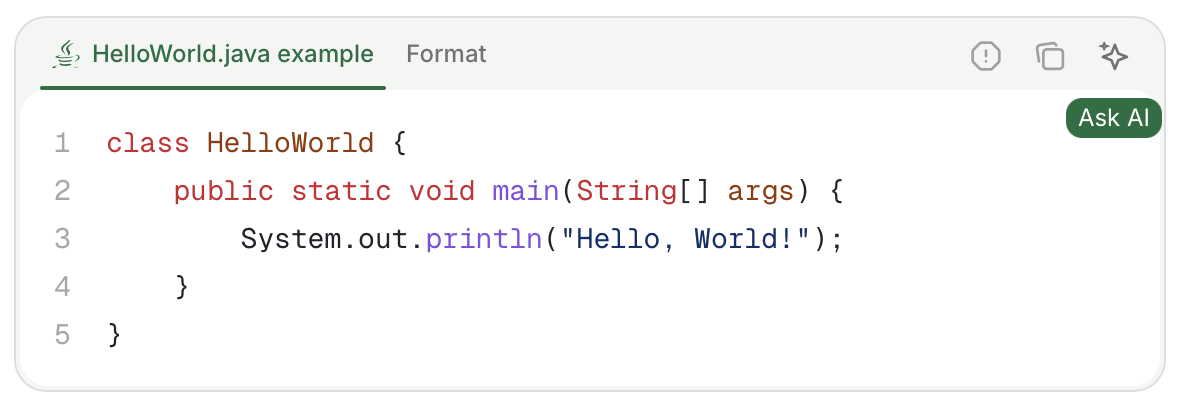
### Specify the programming language
Always declare the language for syntax highlighting. This helps screen readers announce the code context to users:
````mdx theme={null}
```javascript
function getUserData(id) {
return fetch(`/api/users/${id}`);
}
```
````
### Provide context around code
Provide clear context for code blocks:
````mdx theme={null}
The following function fetches user data from the API:
```javascript
function getUserData(id) {
return fetch(`/api/users/${id}`);
}
```
This returns a promise that resolves to the user object.
````
## Video and multimedia accessibility
Videos, animations, and other multimedia content need text alternatives so all users can access the information they contain.
### Add captions to videos
Captions make video content accessible to users who are deaf or hard of hearing. They also help users in sound-sensitive environments and non-native speakers:
* Use captions for all spoken content in videos.
* Include relevant sound effects in captions.
* Ensure captions are synchronized with the audio.
* Use proper punctuation and speaker identification when multiple people speak.
Most video hosting platforms support adding captions. Upload caption files or use auto-generated captions as a starting point, then review for accuracy.
### Provide transcripts
Transcripts offer an alternative way to access video content. They're searchable, easier to reference, and accessible to screen readers:
```mdx theme={null}
```
### Add titles to embedded content
Iframes and video embeds require descriptive titles:
```html theme={null}
```
## Design for readability
Visual design choices affect how accessible your documentation is to users with low vision, color blindness, or other visual disabilities.
### Ensure sufficient color contrast
If you customize your theme colors, verify the contrast ratios meet WCAG requirements:
* Body text: minimum 4.5:1 contrast ratio
* Large text: minimum 3:1 contrast ratio
* Interactive elements: minimum 3:1 contrast ratio
Test both light and dark mode. The `mint a11y` command checks for color contrast.
### Don't rely on color alone
If you use color to convey information, include a text label or icon as well. For example, don't mark errors only with red text. Include an error icon or the word "Error."
### Use clear, concise language
* Write in plain language.
* Define technical terms when first used.
* Avoid run-on sentences.
* Use active voice.
## Make code examples accessible
Code blocks are a core part of technical documentation, but they require specific accessibility considerations to ensure screen reader users can understand them. In general, follow these guidelines:
* Break long code examples into smaller, logical chunks.
* Comment complex logic within the code.
* Consider providing a text description for complex algorithms.
* When showing file structure, use actual code blocks with language labels rather than ASCII art.
### Specify the programming language
Always declare the language for syntax highlighting. This helps screen readers announce the code context to users:
````mdx theme={null}
```javascript
function getUserData(id) {
return fetch(`/api/users/${id}`);
}
```
````
### Provide context around code
Provide clear context for code blocks:
````mdx theme={null}
The following function fetches user data from the API:
```javascript
function getUserData(id) {
return fetch(`/api/users/${id}`);
}
```
This returns a promise that resolves to the user object.
````
## Video and multimedia accessibility
Videos, animations, and other multimedia content need text alternatives so all users can access the information they contain.
### Add captions to videos
Captions make video content accessible to users who are deaf or hard of hearing. They also help users in sound-sensitive environments and non-native speakers:
* Use captions for all spoken content in videos.
* Include relevant sound effects in captions.
* Ensure captions are synchronized with the audio.
* Use proper punctuation and speaker identification when multiple people speak.
Most video hosting platforms support adding captions. Upload caption files or use auto-generated captions as a starting point, then review for accuracy.
### Provide transcripts
Transcripts offer an alternative way to access video content. They're searchable, easier to reference, and accessible to screen readers:
```mdx theme={null}

 When you change the traffic source, the analytics page only displays relevant metrics to that traffic source. For AI traffic, the analytics page only displays visitors and MCP searches. For human traffic, the analytics page displays visitors, assistant insights, searches, and feedback.
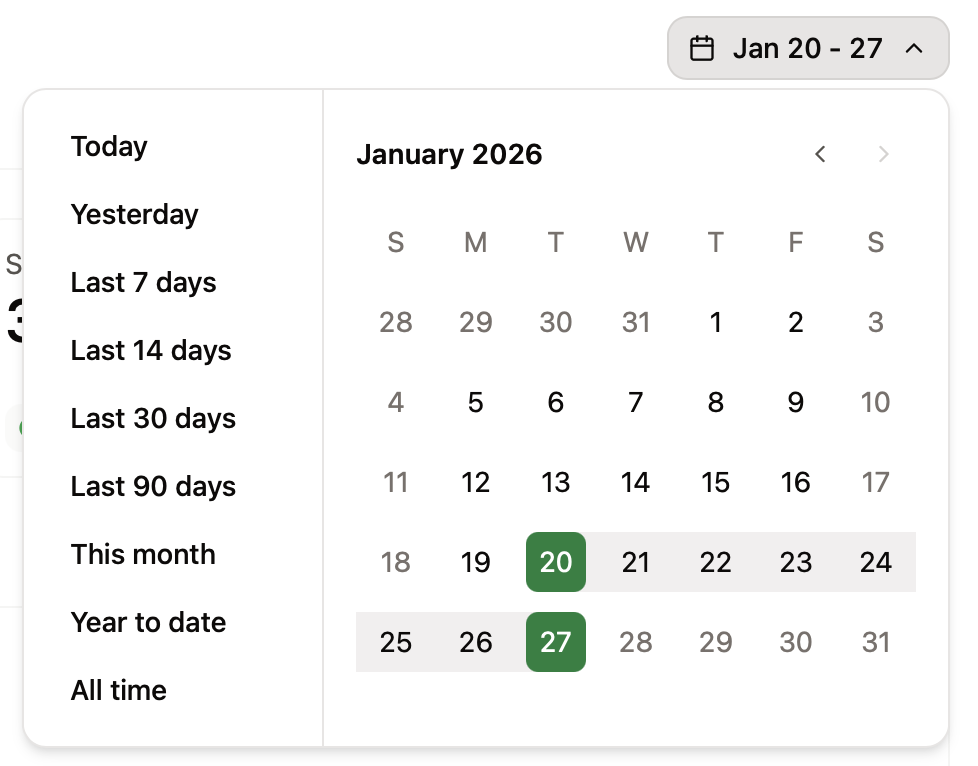
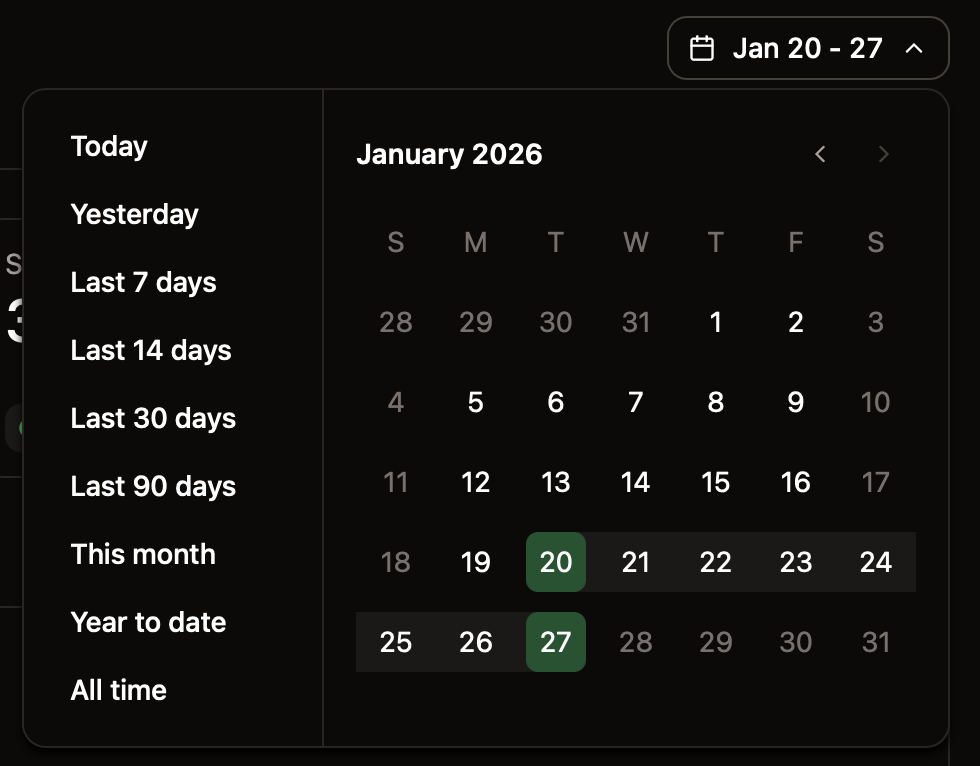
## Filter time period
Use the range selector to adjust the time period for displayed data.
When you change the traffic source, the analytics page only displays relevant metrics to that traffic source. For AI traffic, the analytics page only displays visitors and MCP searches. For human traffic, the analytics page displays visitors, assistant insights, searches, and feedback.
## Filter time period
Use the range selector to adjust the time period for displayed data.
 ## Visitors
The visitors tab displays a bar chart of visitors over time, a list of popular pages, and referral sources.
Review your visitors analytics to:
* **Monitor traffic trends**: Observe changes in traffic after updates or new content to understand the impact of your changes.
* **Identify popular pages**: Use popular pages to understand what content is most important to your users so that you can make sure it is up to date and comprehensive.
* **Track traffic sources**: Understand where your users are coming from to help you optimize your content for the right audience.
### Top agents
When viewing AI traffic, top agents replaces referrals in the visitors tab. Top agents shows which AI agents are visiting your documentation. Use this information to help determine:
* **AI agent distribution**: See which AI platforms are accessing your docs to learn which tools your users prefer.
* **Integration opportunities**: Identify which AI platforms to prioritize for optimization and testing.
* **AI traffic patterns**: Monitor which agents are most active and how their usage changes over time.
## Assistant
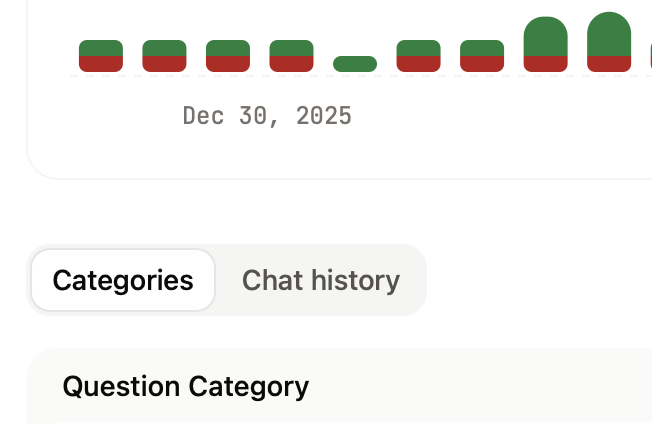
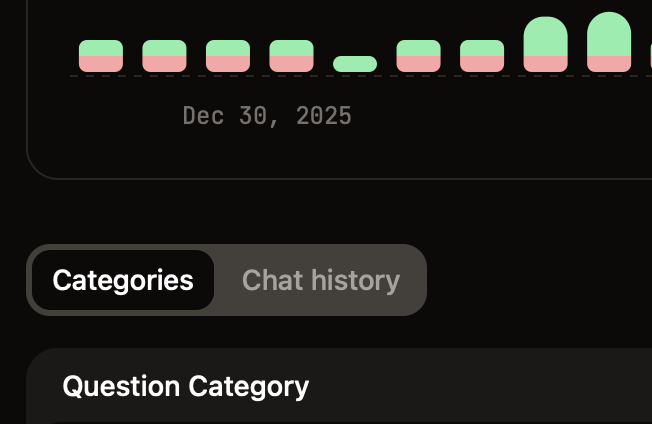
The assistant tab displays a bar chart of assistant usage over time, a list of categories, and chat history.
Review your assistant analytics to:
* **Monitor assistant usage**: Observe changes in assistant usage to understand how your users engage with your content.
* **Identify frequent categories**: Use high occurrence categories to understand what topics are most important to your users. Identify gaps in coverage and prioritize content updates.
* **Review chat history**: Get detailed high intent data about how your users think about your product by reviewing their chat history with the assistant. See what terms they use, what they need help with, and what tasks they try to accomplish.
### Categories
The categories tab uses LLMs to automatically group conversations by topic or theme.
## Visitors
The visitors tab displays a bar chart of visitors over time, a list of popular pages, and referral sources.
Review your visitors analytics to:
* **Monitor traffic trends**: Observe changes in traffic after updates or new content to understand the impact of your changes.
* **Identify popular pages**: Use popular pages to understand what content is most important to your users so that you can make sure it is up to date and comprehensive.
* **Track traffic sources**: Understand where your users are coming from to help you optimize your content for the right audience.
### Top agents
When viewing AI traffic, top agents replaces referrals in the visitors tab. Top agents shows which AI agents are visiting your documentation. Use this information to help determine:
* **AI agent distribution**: See which AI platforms are accessing your docs to learn which tools your users prefer.
* **Integration opportunities**: Identify which AI platforms to prioritize for optimization and testing.
* **AI traffic patterns**: Monitor which agents are most active and how their usage changes over time.
## Assistant
The assistant tab displays a bar chart of assistant usage over time, a list of categories, and chat history.
Review your assistant analytics to:
* **Monitor assistant usage**: Observe changes in assistant usage to understand how your users engage with your content.
* **Identify frequent categories**: Use high occurrence categories to understand what topics are most important to your users. Identify gaps in coverage and prioritize content updates.
* **Review chat history**: Get detailed high intent data about how your users think about your product by reviewing their chat history with the assistant. See what terms they use, what they need help with, and what tasks they try to accomplish.
### Categories
The categories tab uses LLMs to automatically group conversations by topic or theme.
 Use categories to identify common topics, patterns in user needs and behavior, and areas where documentation might need expansion or clarification.
Click a category row to expand it and view related conversations grouped under that category.
Click an individual conversation to view the complete chat thread, including the user's question, the assistant's response, and any sources cited.
### Chat history
The chat history tab displays chronological records of all assistant conversations.
Click any message to view the complete chat thread, including the user's question, the assistant's response, and any sources cited.
### Export queries
For deeper analysis, export a CSV file of your queries, responses, and sources. Use your preferred tools to analyze the exported data.
Use categories to identify common topics, patterns in user needs and behavior, and areas where documentation might need expansion or clarification.
Click a category row to expand it and view related conversations grouped under that category.
Click an individual conversation to view the complete chat thread, including the user's question, the assistant's response, and any sources cited.
### Chat history
The chat history tab displays chronological records of all assistant conversations.
Click any message to view the complete chat thread, including the user's question, the assistant's response, and any sources cited.
### Export queries
For deeper analysis, export a CSV file of your queries, responses, and sources. Use your preferred tools to analyze the exported data.
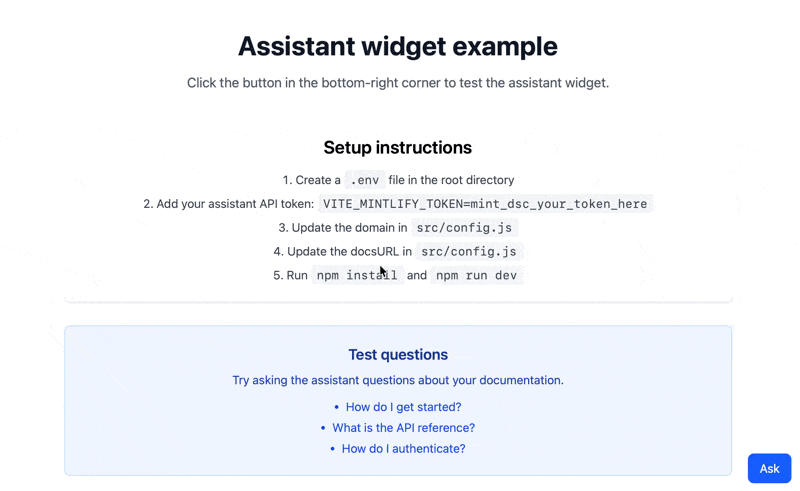 ## Prerequisites
* [Mintlify Pro or Enterprise plan](https://mintlify.com/pricing)
* Your domain name, which appears at the end of your dashboard URL. For example, if your dashboard URL is `https://dashboard.mintlify.com/org-name/domain-name`, your domain name is `domain-name`
* An [assistant API key](https://dashboard.mintlify.com/settings/organization/api-keys)
* Node.js v18 or higher and npm installed
* Basic React knowledge
### Get your assistant API key
1. Navigate to the [API keys](https://dashboard.mintlify.com/settings/organization/api-keys) page in your dashboard.
2. Click **Create Assistant API Key**.
3. Copy the assistant API key (starts with `mint_dsc_`) and save it securely.
## Prerequisites
* [Mintlify Pro or Enterprise plan](https://mintlify.com/pricing)
* Your domain name, which appears at the end of your dashboard URL. For example, if your dashboard URL is `https://dashboard.mintlify.com/org-name/domain-name`, your domain name is `domain-name`
* An [assistant API key](https://dashboard.mintlify.com/settings/organization/api-keys)
* Node.js v18 or higher and npm installed
* Basic React knowledge
### Get your assistant API key
1. Navigate to the [API keys](https://dashboard.mintlify.com/settings/organization/api-keys) page in your dashboard.
2. Click **Create Assistant API Key**.
3. Copy the assistant API key (starts with `mint_dsc_`) and save it securely.
{/* message content */}
{sources.length > 0 && (
)}
);
})}
```
### Track conversation thread IDs
Store thread IDs to maintain conversation history across sessions:
```jsx theme={null}
import { useState, useEffect } from 'react';
export function AssistantWidget({ domain, docsURL }) {
const [threadId, setThreadId] = useState(null);
useEffect(() => {
// Retrieve saved thread ID from localStorage
const saved = localStorage.getItem('assistant-thread-id');
if (saved) {
setThreadId(saved);
}
}, []);
const { messages, input, handleInputChange, handleSubmit, isLoading } = useChat({
api: `https://api.mintlify.com/discovery/v1/assistant/${domain}/message`,
headers: {
'Authorization': `Bearer ${import.meta.env.VITE_MINTLIFY_TOKEN}`,
},
body: {
fp: 'anonymous',
retrievalPageSize: 5,
...(threadId && { threadId }), // Include thread ID if available
},
streamProtocol: 'data',
sendExtraMessageFields: true,
fetch: async (url, options) => {
const response = await fetch(url, options);
const newThreadId = response.headers.get('x-thread-id');
if (newThreadId) {
setThreadId(newThreadId);
localStorage.setItem('assistant-thread-id', newThreadId);
}
return response;
},
});
// ... rest of component
}
```
### Add keyboard shortcuts
Allow users to open the widget and submit messages with keyboard shortcuts:
```jsx theme={null}
useEffect(() => {
const handleKeyDown = (e) => {
// Cmd/Ctrl + Shift + I to toggle widget
if ((e.metaKey || e.ctrlKey) && e.shiftKey && e.key === 'I') {
e.preventDefault();
setIsOpen((prev) => !prev);
}
// Enter (when widget is focused) to submit
if (e.key === 'Enter' && !e.shiftKey && document.activeElement.id === 'assistant-input') {
e.preventDefault();
handleSubmit();
}
};
window.addEventListener('keydown', handleKeyDown);
return () => window.removeEventListener('keydown', handleKeyDown);
}, [handleSubmit]);
```
---
# Source: https://www.mintlify.com/docs/ai/assistant.md
> ## Documentation Index
> Fetch the complete documentation index at: https://www.mintlify.com/docs/llms.txt
> Use this file to discover all available pages before exploring further.
# Assistant
> Add AI-powered chat to your docs that answers questions, cites sources, and generates code examples.
Sources:
{sources.map((s, i) => ( {s.title} ))}
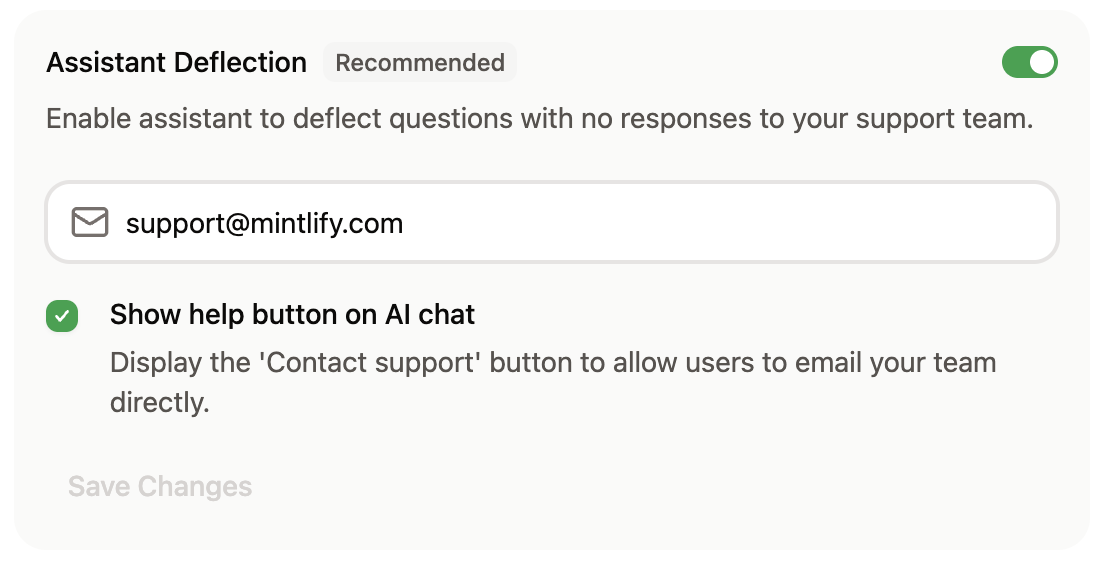
 ### Set deflection email
In the Response Handling section, enable the assistant to redirect unanswered questions to your support team.
Specify an email address for the assistant to give to users if it cannot answer their question. You can also enable a "Contact support" button to appear in the assistant chat panel.
### Set deflection email
In the Response Handling section, enable the assistant to redirect unanswered questions to your support team.
Specify an email address for the assistant to give to users if it cannot answer their question. You can also enable a "Contact support" button to appear in the assistant chat panel.
 ### Search domains
In the Response Handling section, configure domains that the assistant can search for additional context when answering questions.
* Domains must be publicly available.
* Domains that require JavaScript to load are not supported.
### Search domains
In the Response Handling section, configure domains that the assistant can search for additional context when answering questions.
* Domains must be publicly available.
* Domains that require JavaScript to load are not supported.
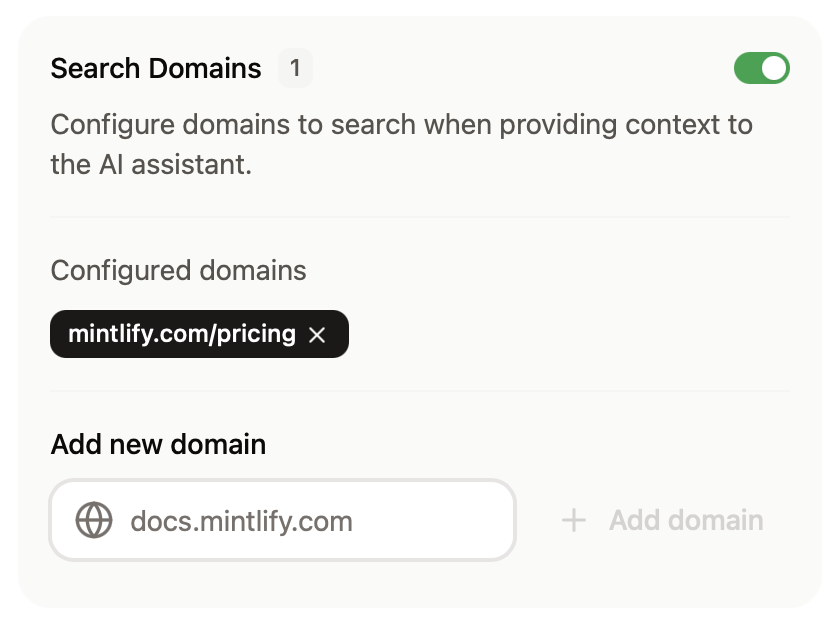
 For more precise control over what the assistant can search, use filtering syntax.
* **Domain-level filtering**
* `example.com`: Search only the `example.com` domain
* `docs.example.com`: Search only the `docs.example.com` subdomain
* `*.example.com`: Search all subdomains of `example.com`
* **Path-level filtering**
* `docs.example.com/api`: Search all pages under the `/api` subpath
* **Multiple patterns**
* Add multiple entries to target different sections of sites
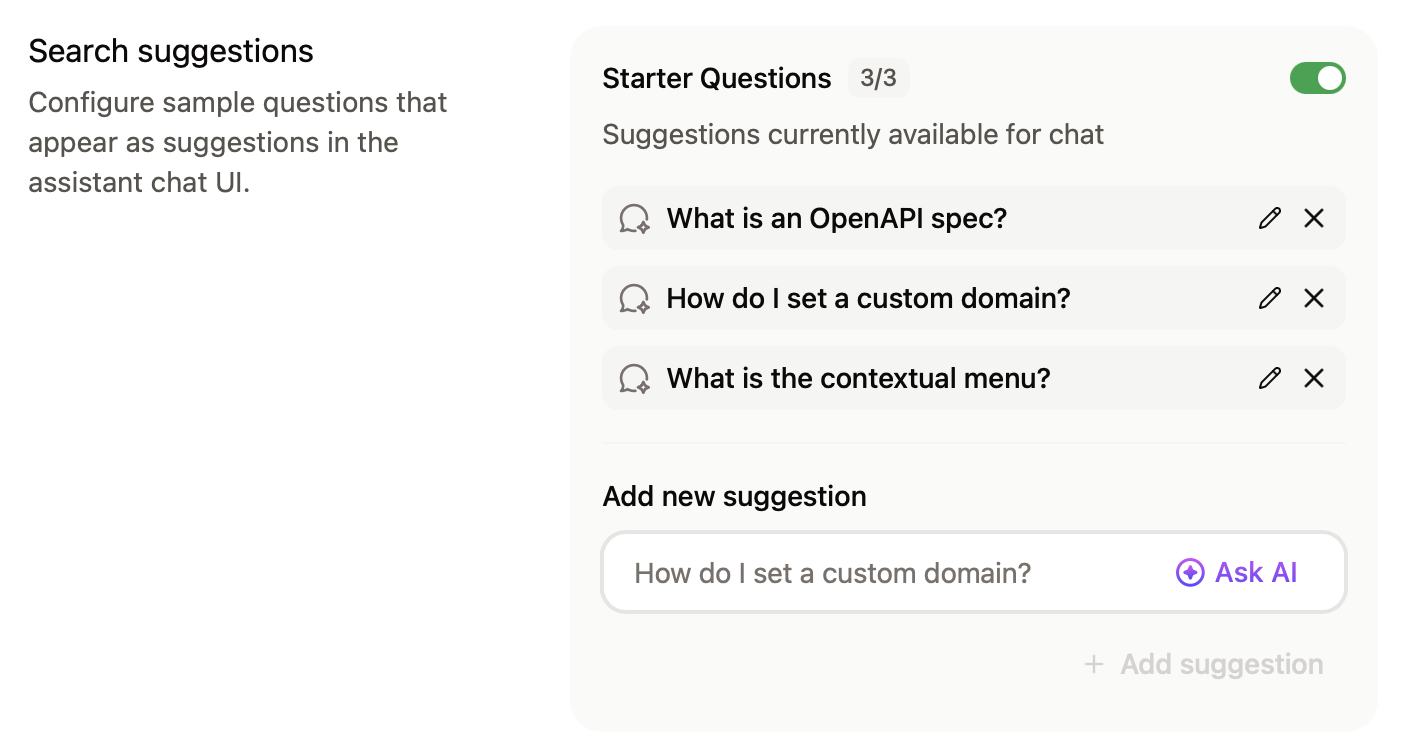
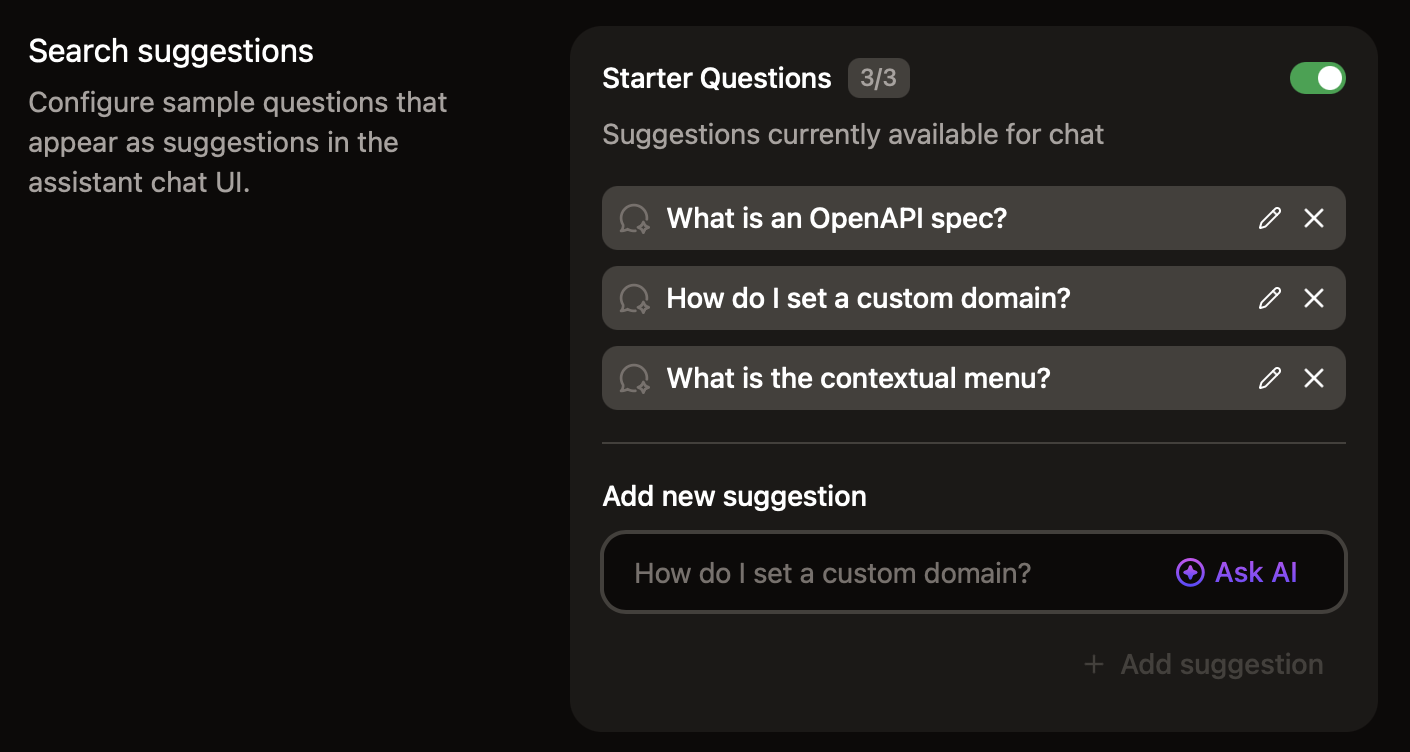
### Add sample questions
Help your users begin conversations with the assistant by adding starter questions. Add commonly asked questions or questions about topics that you want your users to know about. Click **Ask AI** for recommended questions based on your documentation.
For more precise control over what the assistant can search, use filtering syntax.
* **Domain-level filtering**
* `example.com`: Search only the `example.com` domain
* `docs.example.com`: Search only the `docs.example.com` subdomain
* `*.example.com`: Search all subdomains of `example.com`
* **Path-level filtering**
* `docs.example.com/api`: Search all pages under the `/api` subpath
* **Multiple patterns**
* Add multiple entries to target different sections of sites
### Add sample questions
Help your users begin conversations with the assistant by adding starter questions. Add commonly asked questions or questions about topics that you want your users to know about. Click **Ask AI** for recommended questions based on your documentation.
 ## Manage billing
The assistant uses tiered message allowances. A message is any user interaction with the assistant that receives a correct response. If you have unused messages, up to half of your message allowance can carry over to the next billing cycle. For example, if you have a 1,000 message allowance and you use 300 messages, 500 messages carry over to the next billing cycle giving you a total of 1,500 messages for the next billing cycle.
By default, the assistant allows overages. You can disable overages to avoid incurring additional costs for usage beyond your tier. If you reach your message allowance with overages disabled, the assistant is unavailable until your message allowance resets. If you allow overages, each message beyond your allowance incurs an overage charge, but occasional overages may be cheaper than upgrading to a higher tier depending on your usage.
### Change your assistant tier
Assistant tiers determine your monthly message allowance and pricing.
View and change your current tier on the [Billing tab](https://dashboard.mintlify.com/products/assistant/settings/billing) of the assistant page in your dashboard.
In the **Spending Controls** section, select your preferred tier from the dropdown menu.
**Upgrade your tier:**
* Your new message allowance is available immediately.
* You pay a prorated difference for the current billing cycle.
**Downgrade your tier:**
* Your message allowance updates immediately.
* Pricing changes take effect at the start of your next billing cycle.
* Unused messages from your current tier **do not** carry over.
### Allow overages
If you want to disallow overages, disable them in the **Billing Controls** section of the [Billing tab](https://dashboard.mintlify.com/products/assistant/settings/billing) of the assistant page in your dashboard.
### Set usage alerts
In the Billing Controls section, set usage alerts to receive an email when you reach a certain percentage of your message allowance.
## Connect apps
In the connect apps section, add the assistant to your [Discord](/ai/discord) server and [Slack](/ai/slack-bot) workspace to allow users to get answers from your documentation on those platforms.
## Assistant insights
Use assistant insights to understand how users interact with your documentation and identify improvement opportunities.
The [assistant page](https://dashboard.mintlify.com/products/assistant) shows usage trends for the month to date. View more detailed insights on the [analytics](/optimize/analytics#assistant) page.
## Make content AI ingestible
Structure your documentation to help the assistant provide accurate, relevant answers. Clear organization and comprehensive context benefit both human readers and AI understanding.
## Manage billing
The assistant uses tiered message allowances. A message is any user interaction with the assistant that receives a correct response. If you have unused messages, up to half of your message allowance can carry over to the next billing cycle. For example, if you have a 1,000 message allowance and you use 300 messages, 500 messages carry over to the next billing cycle giving you a total of 1,500 messages for the next billing cycle.
By default, the assistant allows overages. You can disable overages to avoid incurring additional costs for usage beyond your tier. If you reach your message allowance with overages disabled, the assistant is unavailable until your message allowance resets. If you allow overages, each message beyond your allowance incurs an overage charge, but occasional overages may be cheaper than upgrading to a higher tier depending on your usage.
### Change your assistant tier
Assistant tiers determine your monthly message allowance and pricing.
View and change your current tier on the [Billing tab](https://dashboard.mintlify.com/products/assistant/settings/billing) of the assistant page in your dashboard.
In the **Spending Controls** section, select your preferred tier from the dropdown menu.
**Upgrade your tier:**
* Your new message allowance is available immediately.
* You pay a prorated difference for the current billing cycle.
**Downgrade your tier:**
* Your message allowance updates immediately.
* Pricing changes take effect at the start of your next billing cycle.
* Unused messages from your current tier **do not** carry over.
### Allow overages
If you want to disallow overages, disable them in the **Billing Controls** section of the [Billing tab](https://dashboard.mintlify.com/products/assistant/settings/billing) of the assistant page in your dashboard.
### Set usage alerts
In the Billing Controls section, set usage alerts to receive an email when you reach a certain percentage of your message allowance.
## Connect apps
In the connect apps section, add the assistant to your [Discord](/ai/discord) server and [Slack](/ai/slack-bot) workspace to allow users to get answers from your documentation on those platforms.
## Assistant insights
Use assistant insights to understand how users interact with your documentation and identify improvement opportunities.
The [assistant page](https://dashboard.mintlify.com/products/assistant) shows usage trends for the month to date. View more detailed insights on the [analytics](/optimize/analytics#assistant) page.
## Make content AI ingestible
Structure your documentation to help the assistant provide accurate, relevant answers. Clear organization and comprehensive context benefit both human readers and AI understanding.


 ### Code blocks
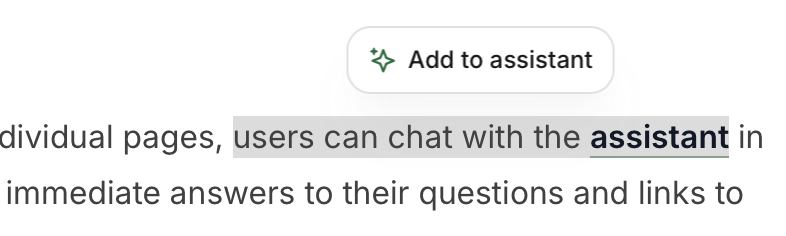
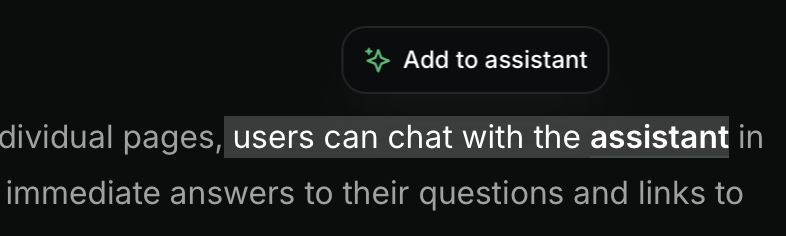
Click the **Ask AI** button in a code block to open the assistant chat panel and add the code block as context. You can add multiple code blocks or text snippets to the assistant's context.
### Code blocks
Click the **Ask AI** button in a code block to open the assistant chat panel and add the code block as context. You can add multiple code blocks or text snippets to the assistant's context.
 ### URLs
Open the assistant with a URL query parameter to create deep links that guide users to specific information or share assistant conversations with pre-filled questions.
* **Open the assistant**: Append `?assistant=open` to open the assistant chat panel when the page loads.
* Example: [https://mintlify.com/docs?assistant=open](https://mintlify.com/docs?assistant=open)
* **Open with a pre-filled query**: Append `?assistant=YOUR_QUERY` to open the assistant and automatically submit a question.
* Example: [https://mintlify.com/docs?assistant=explain webhooks](https://mintlify.com/docs?assistant=explain%20webhooks)
## Troubleshooting
### URLs
Open the assistant with a URL query parameter to create deep links that guide users to specific information or share assistant conversations with pre-filled questions.
* **Open the assistant**: Append `?assistant=open` to open the assistant chat panel when the page loads.
* Example: [https://mintlify.com/docs?assistant=open](https://mintlify.com/docs?assistant=open)
* **Open with a pre-filled query**: Append `?assistant=YOUR_QUERY` to open the assistant and automatically submit a question.
* Example: [https://mintlify.com/docs?assistant=explain webhooks](https://mintlify.com/docs?assistant=explain%20webhooks)
## Troubleshooting
 2. Click the **Settings** button.

 3. Click **Add to New Organization**. This will take you to the app installation page on GitHub.
4. Select the repositories you want to grant access to from the list.
5. Save your changes.
### Get your admin API key
1. Navigate to the [API keys](https://dashboard.mintlify.com/settings/organization/api-keys) page in your dashboard.
2. Select **Create Admin API Key**.
3. Copy the key and save it securely.
## Build the workflow
### Create the workflow file
1. In your code repository, create a new file: `.github/workflows/update-docs.yml`
2. Add this workflow:
```yaml theme={null}
name: Update Docs
on:
push:
branches:
- main
jobs:
update-docs:
runs-on: ubuntu-latest
steps:
- uses: actions/github-script@v8
env:
MINTLIFY_API_KEY: ${{ secrets.MINTLIFY_API_KEY }}
PROJECT_ID: ${{ secrets.MINTLIFY_PROJECT_ID }}
with:
script: |
const { owner, repo } = context.repo;
const projectId = process.env.PROJECT_ID;
const apiKey = process.env.MINTLIFY_API_KEY;
if (!projectId || !apiKey) {
core.setFailed('Missing MINTLIFY_PROJECT_ID or MINTLIFY_API_KEY secrets');
return;
}
const url = `https://api.mintlify.com/v1/agent/${projectId}/job`;
const payload = {
branch: `mintlify/docs-update-${Date.now()}`,
messages: [
{
role: 'system',
content: 'You are an action runner that updates documentation based on code changes. You should never ask questions. If you are not able to access the repository, report the error and exit.'
},
{
role: 'user',
content: `Update the documentation for our recent pushes to main:\n\nRepository: ${owner}/${repo}`
}
],
asDraft: false
};
try {
const response = await fetch(url, {
method: 'POST',
headers: {
'Authorization': `Bearer ${apiKey}`,
'Content-Type': 'application/json'
},
body: JSON.stringify(payload)
});
if (!response.ok) {
throw new Error(`API request failed with status ${response.status}: ${await response.text()}`);
}
const reader = response.body.getReader();
const decoder = new TextDecoder();
let buffer = '';
while (true) {
const { done, value } = await reader.read();
if (done) break;
buffer += decoder.decode(value, { stream: true });
const lines = buffer.split('\n');
buffer = lines.pop() || '';
for (const line of lines) {
if (line.trim()) {
console.log(line);
}
}
}
if (buffer.trim()) {
console.log(buffer);
}
core.notice(`Documentation update job triggered for ${owner}/${repo}`);
} catch (error) {
core.setFailed(`Failed to create documentation update job: ${error.message}`);
}
```
### Add secrets
1. In your code repository, go to **Settings** → **Secrets and variables** → **Actions**.
2. Click **New repository secret**.
3. Add the following secrets:
* Name: `MINTLIFY_API_KEY`, Secret: Your Mintlify admin API key
* Name: `MINTLIFY_PROJECT_ID`, Secret: Your Mintlify project ID (found on the [API keys](https://dashboard.mintlify.com/settings/organization/api-keys) page of your dashboard)
For more information, see [Using secrets in GitHub Actions](https://docs.github.com/en/actions/how-tos/write-workflows/choose-what-workflows-do/use-secrets) in the GitHub documentation.
## Test the automation
1. Make a small change in your code repository and push to main:
```bash theme={null}
git add .
git commit -m "Test: trigger docs automation"
git push origin main
```
2. Check the **Actions** tab in your code repository to see the workflow running.
3. After the workflow runs, check your documentation repository for a new branch and pull request with documentation updates.
## Troubleshooting
### Workflow not running
* Verify GitHub Actions is enabled in your code repository.
* Check the **Actions** tab for error messages.
* Ensure the workflow file is in `.github/workflows/` with a `.yml` extension.
### 401 error from agent API
* Verify your API key starts with `mint_`.
* Check the Authorization header is formatted as `Bearer mint_yourkey`.
* Confirm the API key is for the correct Mintlify organization.
### No documentation updates appearing
* Check that the documentation repository is connected to your Mintlify project.
* Verify the agent has write access to the documentation repository.
* Check the workflow logs for error messages from the agent.
2. Click the **Settings** button.
3. Click **Add to New Organization**. This will take you to the app installation page on GitHub.
4. Select the repositories you want to grant access to from the list.
5. Save your changes.
### Get your admin API key
1. Navigate to the [API keys](https://dashboard.mintlify.com/settings/organization/api-keys) page in your dashboard.
2. Select **Create Admin API Key**.
3. Copy the key and save it securely.
### Get your GitHub personal access token
1. In GitHub, navigate to **Settings**.
2. Click **Developer settings**.
3. Click **Personal access tokens**.
4. Click **Tokens (classic)**.
5. Click **Generate new token (classic)**.
6. Select these scopes:
* `repo` (full control of private repositories)
* `admin:repo_hook` (if you want n8n to create webhooks)
7. Generate and save the token securely.
For more information, see [Creating a personal access token (classic)](https://docs.github.com/en/authentication/keeping-your-account-and-data-secure/managing-your-personal-access-tokens?versionId=free-pro-team%40latest\&productId=account-and-profile#creating-a-personal-access-token-classic) in the GitHub documentation.
## Build the workflow
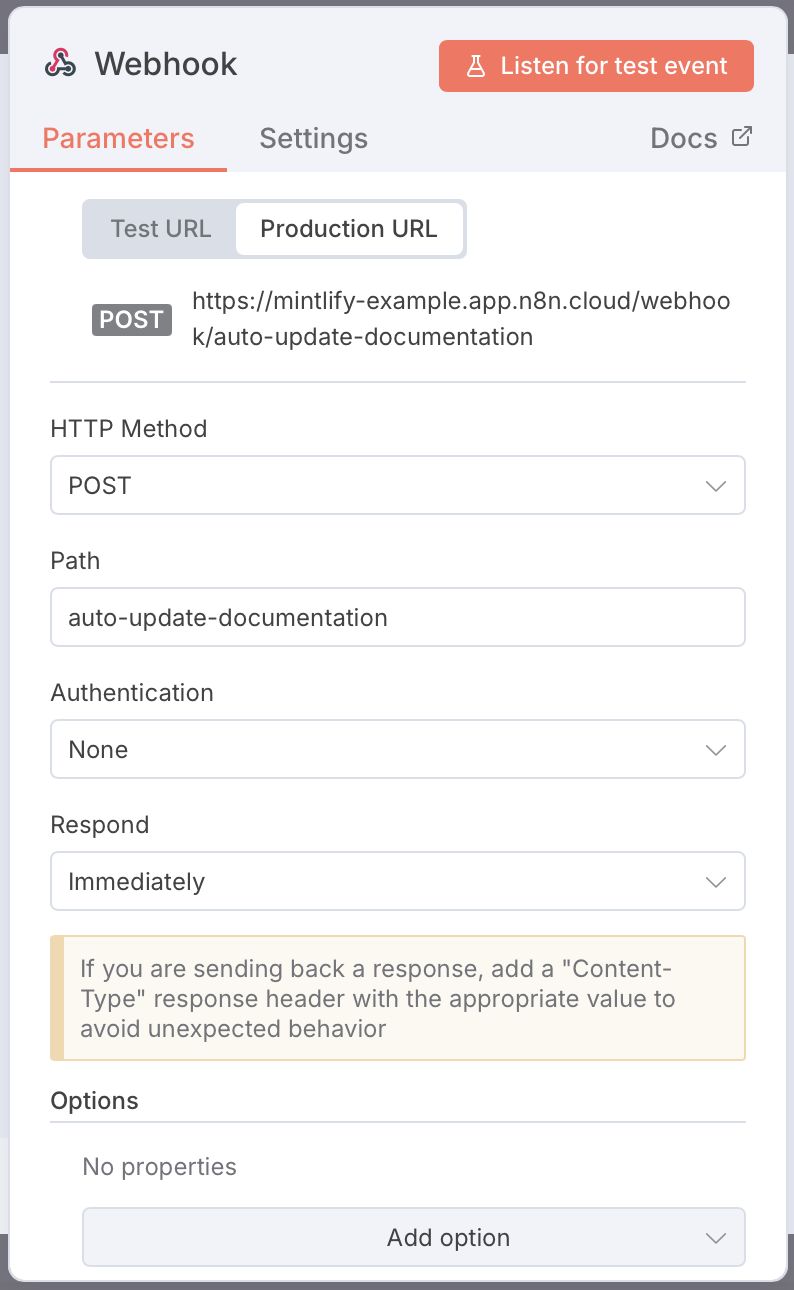
### Create the webhook trigger
1. In n8n, create a new workflow.
2. Add a webhook node.
3. Configure the webhook:
* HTTP Method: `POST`
* Path: `auto-update-documentation` (or any unique path)
* Authentication: None
* Respond: Immediately
4. Save the workflow.
5. Copy the production webhook URL. It looks like: `https://your-n8n-instance.app.n8n.cloud/webhook/auto-update-documentation`
3. Click **Add to New Organization**. This will take you to the app installation page on GitHub.
4. Select the repositories you want to grant access to from the list.
5. Save your changes.
### Get your admin API key
1. Navigate to the [API keys](https://dashboard.mintlify.com/settings/organization/api-keys) page in your dashboard.
2. Select **Create Admin API Key**.
3. Copy the key and save it securely.
## Build the workflow
### Create the workflow file
1. In your code repository, create a new file: `.github/workflows/update-docs.yml`
2. Add this workflow:
```yaml theme={null}
name: Update Docs
on:
push:
branches:
- main
jobs:
update-docs:
runs-on: ubuntu-latest
steps:
- uses: actions/github-script@v8
env:
MINTLIFY_API_KEY: ${{ secrets.MINTLIFY_API_KEY }}
PROJECT_ID: ${{ secrets.MINTLIFY_PROJECT_ID }}
with:
script: |
const { owner, repo } = context.repo;
const projectId = process.env.PROJECT_ID;
const apiKey = process.env.MINTLIFY_API_KEY;
if (!projectId || !apiKey) {
core.setFailed('Missing MINTLIFY_PROJECT_ID or MINTLIFY_API_KEY secrets');
return;
}
const url = `https://api.mintlify.com/v1/agent/${projectId}/job`;
const payload = {
branch: `mintlify/docs-update-${Date.now()}`,
messages: [
{
role: 'system',
content: 'You are an action runner that updates documentation based on code changes. You should never ask questions. If you are not able to access the repository, report the error and exit.'
},
{
role: 'user',
content: `Update the documentation for our recent pushes to main:\n\nRepository: ${owner}/${repo}`
}
],
asDraft: false
};
try {
const response = await fetch(url, {
method: 'POST',
headers: {
'Authorization': `Bearer ${apiKey}`,
'Content-Type': 'application/json'
},
body: JSON.stringify(payload)
});
if (!response.ok) {
throw new Error(`API request failed with status ${response.status}: ${await response.text()}`);
}
const reader = response.body.getReader();
const decoder = new TextDecoder();
let buffer = '';
while (true) {
const { done, value } = await reader.read();
if (done) break;
buffer += decoder.decode(value, { stream: true });
const lines = buffer.split('\n');
buffer = lines.pop() || '';
for (const line of lines) {
if (line.trim()) {
console.log(line);
}
}
}
if (buffer.trim()) {
console.log(buffer);
}
core.notice(`Documentation update job triggered for ${owner}/${repo}`);
} catch (error) {
core.setFailed(`Failed to create documentation update job: ${error.message}`);
}
```
### Add secrets
1. In your code repository, go to **Settings** → **Secrets and variables** → **Actions**.
2. Click **New repository secret**.
3. Add the following secrets:
* Name: `MINTLIFY_API_KEY`, Secret: Your Mintlify admin API key
* Name: `MINTLIFY_PROJECT_ID`, Secret: Your Mintlify project ID (found on the [API keys](https://dashboard.mintlify.com/settings/organization/api-keys) page of your dashboard)
For more information, see [Using secrets in GitHub Actions](https://docs.github.com/en/actions/how-tos/write-workflows/choose-what-workflows-do/use-secrets) in the GitHub documentation.
## Test the automation
1. Make a small change in your code repository and push to main:
```bash theme={null}
git add .
git commit -m "Test: trigger docs automation"
git push origin main
```
2. Check the **Actions** tab in your code repository to see the workflow running.
3. After the workflow runs, check your documentation repository for a new branch and pull request with documentation updates.
## Troubleshooting
### Workflow not running
* Verify GitHub Actions is enabled in your code repository.
* Check the **Actions** tab for error messages.
* Ensure the workflow file is in `.github/workflows/` with a `.yml` extension.
### 401 error from agent API
* Verify your API key starts with `mint_`.
* Check the Authorization header is formatted as `Bearer mint_yourkey`.
* Confirm the API key is for the correct Mintlify organization.
### No documentation updates appearing
* Check that the documentation repository is connected to your Mintlify project.
* Verify the agent has write access to the documentation repository.
* Check the workflow logs for error messages from the agent.
2. Click the **Settings** button.
3. Click **Add to New Organization**. This will take you to the app installation page on GitHub.
4. Select the repositories you want to grant access to from the list.
5. Save your changes.
### Get your admin API key
1. Navigate to the [API keys](https://dashboard.mintlify.com/settings/organization/api-keys) page in your dashboard.
2. Select **Create Admin API Key**.
3. Copy the key and save it securely.
### Get your GitHub personal access token
1. In GitHub, navigate to **Settings**.
2. Click **Developer settings**.
3. Click **Personal access tokens**.
4. Click **Tokens (classic)**.
5. Click **Generate new token (classic)**.
6. Select these scopes:
* `repo` (full control of private repositories)
* `admin:repo_hook` (if you want n8n to create webhooks)
7. Generate and save the token securely.
For more information, see [Creating a personal access token (classic)](https://docs.github.com/en/authentication/keeping-your-account-and-data-secure/managing-your-personal-access-tokens?versionId=free-pro-team%40latest\&productId=account-and-profile#creating-a-personal-access-token-classic) in the GitHub documentation.
## Build the workflow
### Create the webhook trigger
1. In n8n, create a new workflow.
2. Add a webhook node.
3. Configure the webhook:
* HTTP Method: `POST`
* Path: `auto-update-documentation` (or any unique path)
* Authentication: None
* Respond: Immediately
4. Save the workflow.
5. Copy the production webhook URL. It looks like: `https://your-n8n-instance.app.n8n.cloud/webhook/auto-update-documentation`
 ### Set up the GitHub webhook
1. Navigate to your code repository on GitHub.
2. Click **Settings**.
3. Click **Webhooks**.
4. Click **Add webhook**.
5. Configure the webhook:
* Payload URL: Paste your n8n webhook URL
* Content type: `application/json`
* Which events would you like to trigger this webhook?
* Select **Let me select individual events.**
* Select only **Push events**.
* Select **Active**
6. Click **Add webhook**.
### Filter for main branch pushes
Add a code node after the webhook to filter for pushes to main and extract the relevant information.
1. Add a code node.
2. Name it "Filter main pushes."
3. Set mode to **Run Once for All Items**.
4. Add this JavaScript:
```javascript theme={null}
const webhookData = $input.first().json.body;
// Only continue if this is a push to main
if (webhookData.ref !== "refs/heads/main") {
return [];
}
// Extract information
const repository = webhookData.repository;
const pusher = webhookData.pusher;
// Build message for agent
const agentMessage = `Update documentation for changes pushed to main in ${repository.name}. Always edit files and create a pull request.`;
return {
json: {
codeRepoName: repository.full_name,
codeRepoShortName: repository.name,
agentMessage: agentMessage
}
};
```
### Set up the GitHub webhook
1. Navigate to your code repository on GitHub.
2. Click **Settings**.
3. Click **Webhooks**.
4. Click **Add webhook**.
5. Configure the webhook:
* Payload URL: Paste your n8n webhook URL
* Content type: `application/json`
* Which events would you like to trigger this webhook?
* Select **Let me select individual events.**
* Select only **Push events**.
* Select **Active**
6. Click **Add webhook**.
### Filter for main branch pushes
Add a code node after the webhook to filter for pushes to main and extract the relevant information.
1. Add a code node.
2. Name it "Filter main pushes."
3. Set mode to **Run Once for All Items**.
4. Add this JavaScript:
```javascript theme={null}
const webhookData = $input.first().json.body;
// Only continue if this is a push to main
if (webhookData.ref !== "refs/heads/main") {
return [];
}
// Extract information
const repository = webhookData.repository;
const pusher = webhookData.pusher;
// Build message for agent
const agentMessage = `Update documentation for changes pushed to main in ${repository.name}. Always edit files and create a pull request.`;
return {
json: {
codeRepoName: repository.full_name,
codeRepoShortName: repository.name,
agentMessage: agentMessage
}
};
```
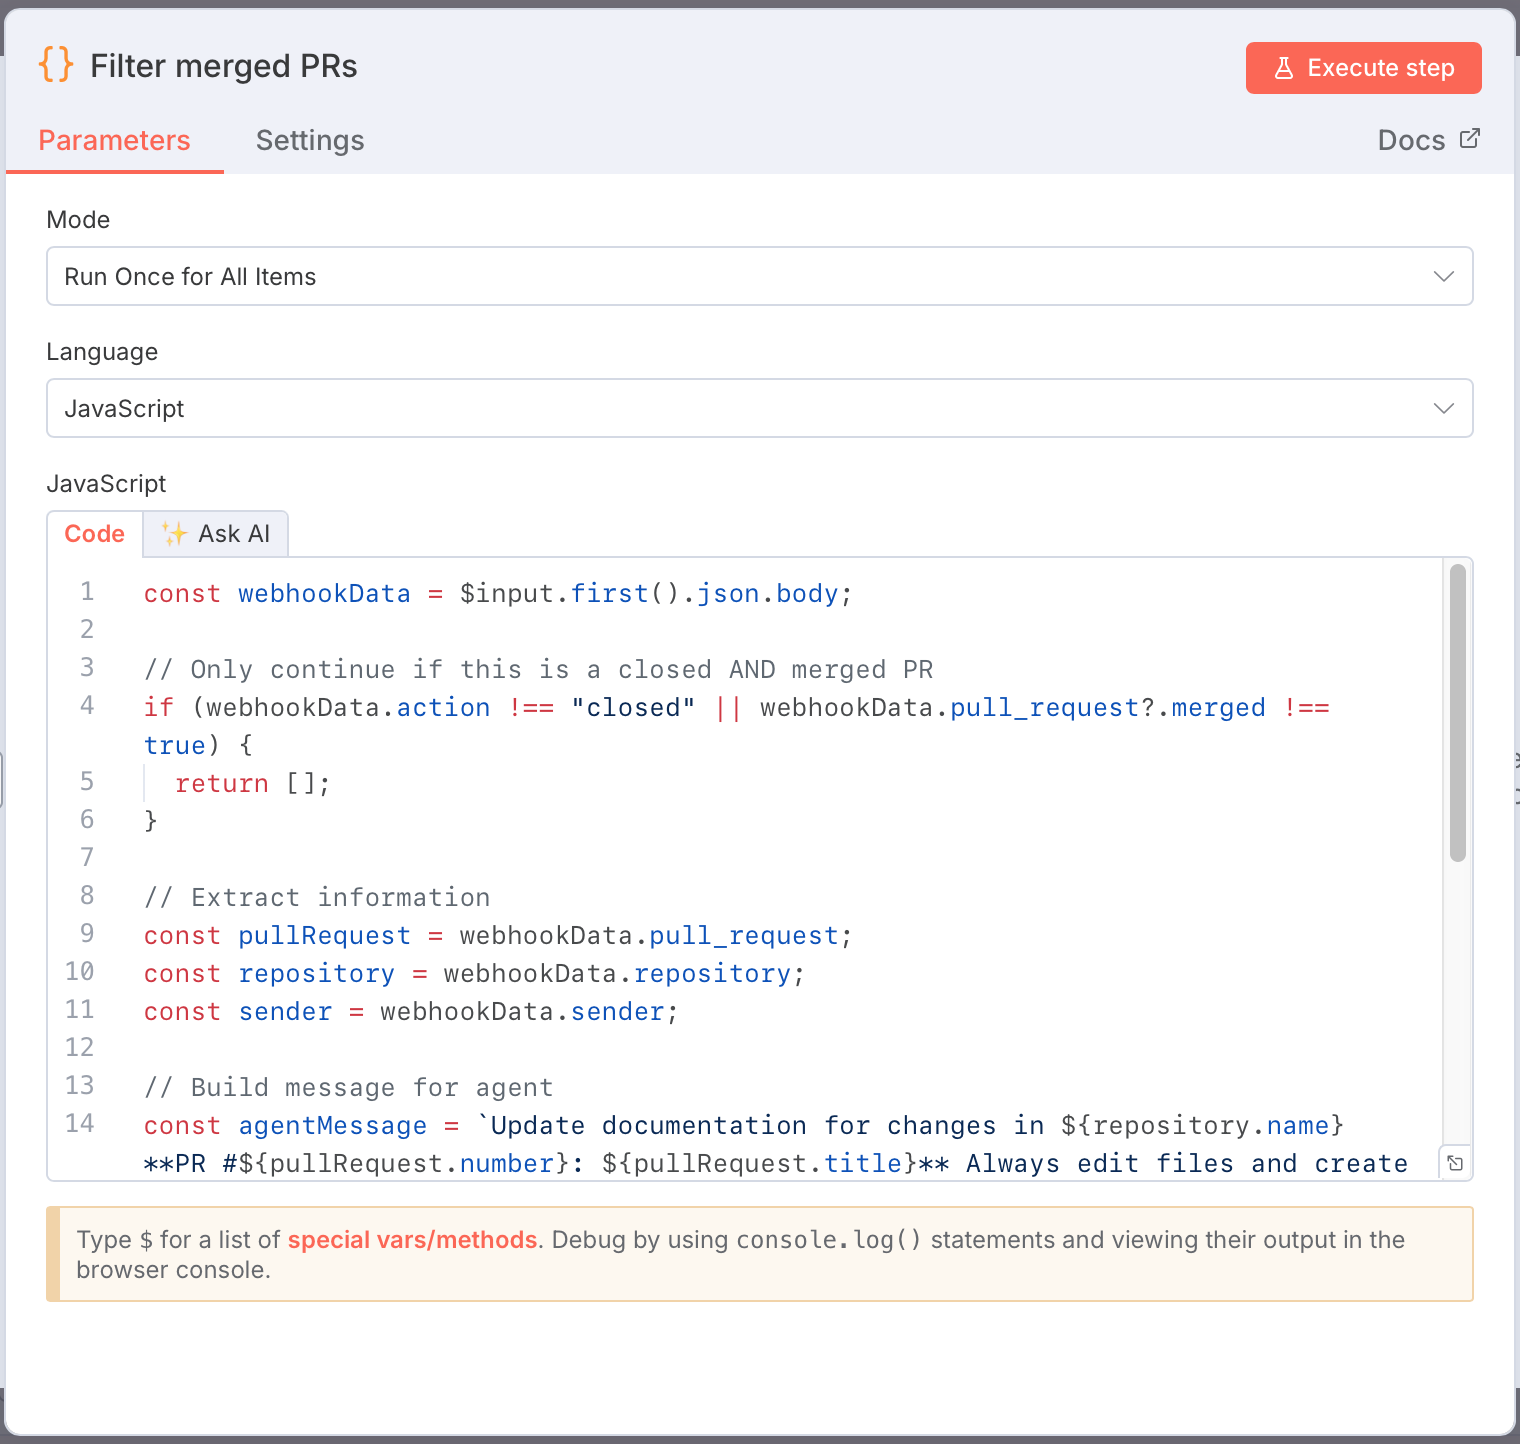 This code stops the workflow if the push wasn't to main, extracts all relevant information from the GitHub webhook, and creates a message for the agent API.
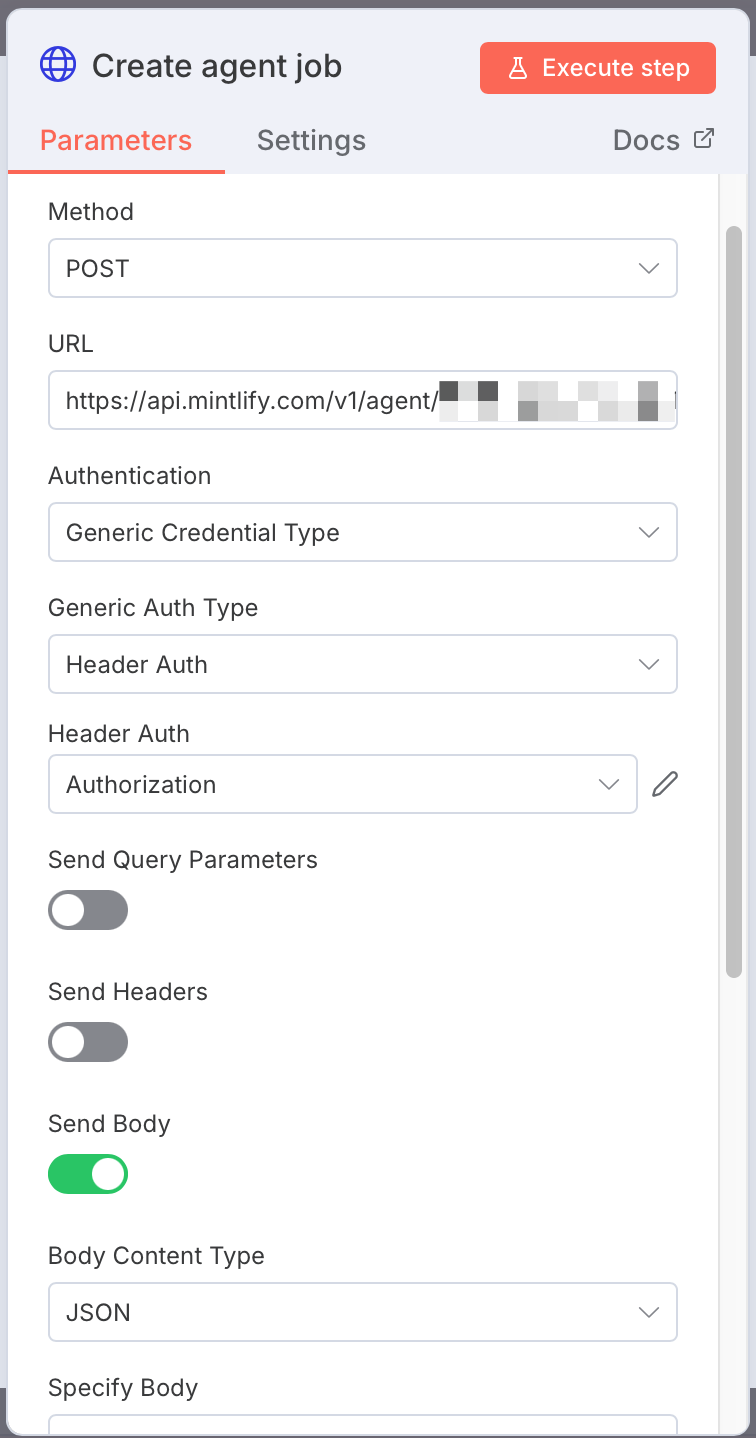
### Call the agent API
Add an HTTP request node to create a documentation job.
1. Add an HTTP request node.
2. Name it "Create agent job."
3. Configure the request:
* Method: `POST`
* URL: `https://api.mintlify.com/v1/agent/YOUR_PROJECT_ID/job` (replace `YOUR_PROJECT_ID` with your project ID from the [API keys](https://dashboard.mintlify.com/settings/organization/api-keys) page)
* Authentication: Generic Credential Type → Header Auth
* Create a new credential:
* Name: `Authorization`
* Value: `Bearer mint_YOUR_API_KEY` (replace with your API key)
* Send Body: On
* Body Content Type: JSON
* Specify Body: Using JSON
* Add this JSON:
```json theme={null}
{
"branch": "docs-update-from-{{ $json.codeRepoShortName }}-{{ $now.toISOString() }}",
"messages": [
{
"role": "system",
"content": "{{ $json.agentMessage }}"
}
],
"asDraft": false
}
```
This code stops the workflow if the push wasn't to main, extracts all relevant information from the GitHub webhook, and creates a message for the agent API.
### Call the agent API
Add an HTTP request node to create a documentation job.
1. Add an HTTP request node.
2. Name it "Create agent job."
3. Configure the request:
* Method: `POST`
* URL: `https://api.mintlify.com/v1/agent/YOUR_PROJECT_ID/job` (replace `YOUR_PROJECT_ID` with your project ID from the [API keys](https://dashboard.mintlify.com/settings/organization/api-keys) page)
* Authentication: Generic Credential Type → Header Auth
* Create a new credential:
* Name: `Authorization`
* Value: `Bearer mint_YOUR_API_KEY` (replace with your API key)
* Send Body: On
* Body Content Type: JSON
* Specify Body: Using JSON
* Add this JSON:
```json theme={null}
{
"branch": "docs-update-from-{{ $json.codeRepoShortName }}-{{ $now.toISOString() }}",
"messages": [
{
"role": "system",
"content": "{{ $json.agentMessage }}"
}
],
"asDraft": false
}
```
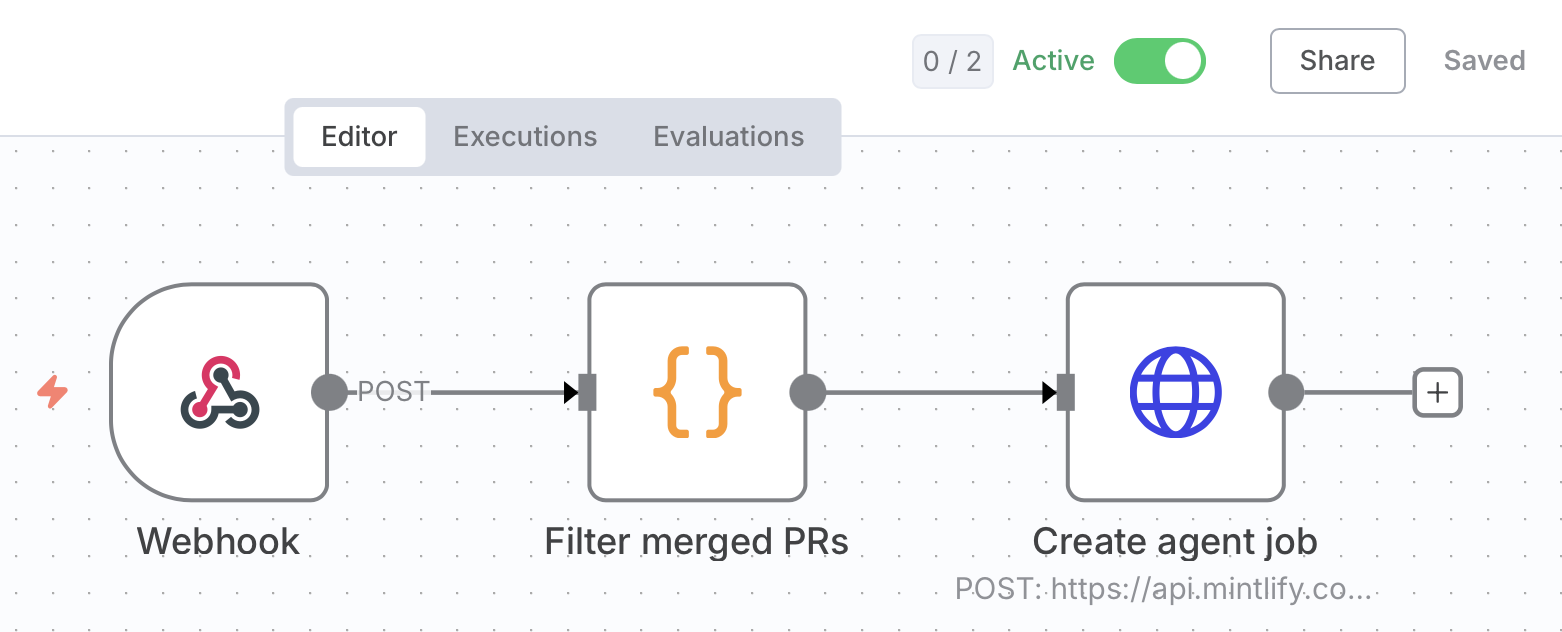
 The agent creates a pull request in your documentation repository using a descriptive branch name that includes the source repository name and timestamp.
### Activate the workflow
1. Save your workflow.
2. Set it to active.
Your workflow is now monitoring your code repository for pushes to main.
The agent creates a pull request in your documentation repository using a descriptive branch name that includes the source repository name and timestamp.
### Activate the workflow
1. Save your workflow.
2. Set it to active.
Your workflow is now monitoring your code repository for pushes to main.
 ## Test the automation
1. Create a test branch in your code repository:
```bash theme={null}
git checkout -b test-docs-automation
```
2. Make a small change and commit it:
```bash theme={null}
git add .
git commit -m "Test: trigger docs automation"
git push origin test-docs-automation
```
3. Open a pull request on GitHub.
4. Merge the pull request.
### Verify the automation
You should see a new n8n execution with all nodes completed successfully, and a new branch and pull request in your documentation repository.
## Troubleshooting
### Webhook not triggering
* Verify the workflow is active in n8n.
* Check GitHub repository Settings → Webhooks → Recent Deliveries for the response code.
* Confirm the webhook URL matches your n8n webhook URL exactly.
### 401 error from agent API
* Verify your API key starts with `mint_`.
* Check the Authorization header is formatted as `Bearer mint_yourkey`.
* Confirm the API key is for the correct Mintlify organization.
### 401 error from GitHub
* Verify your token has the `repo` scope.
* Check that the token hasn't expired.
* Confirm you included the `User-Agent` header in the GitHub request.
## Test the automation
1. Create a test branch in your code repository:
```bash theme={null}
git checkout -b test-docs-automation
```
2. Make a small change and commit it:
```bash theme={null}
git add .
git commit -m "Test: trigger docs automation"
git push origin test-docs-automation
```
3. Open a pull request on GitHub.
4. Merge the pull request.
### Verify the automation
You should see a new n8n execution with all nodes completed successfully, and a new branch and pull request in your documentation repository.
## Troubleshooting
### Webhook not triggering
* Verify the workflow is active in n8n.
* Check GitHub repository Settings → Webhooks → Recent Deliveries for the response code.
* Confirm the webhook URL matches your n8n webhook URL exactly.
### 401 error from agent API
* Verify your API key starts with `mint_`.
* Check the Authorization header is formatted as `Bearer mint_yourkey`.
* Confirm the API key is for the correct Mintlify organization.
### 401 error from GitHub
* Verify your token has the `repo` scope.
* Check that the token hasn't expired.
* Confirm you included the `User-Agent` header in the GitHub request.
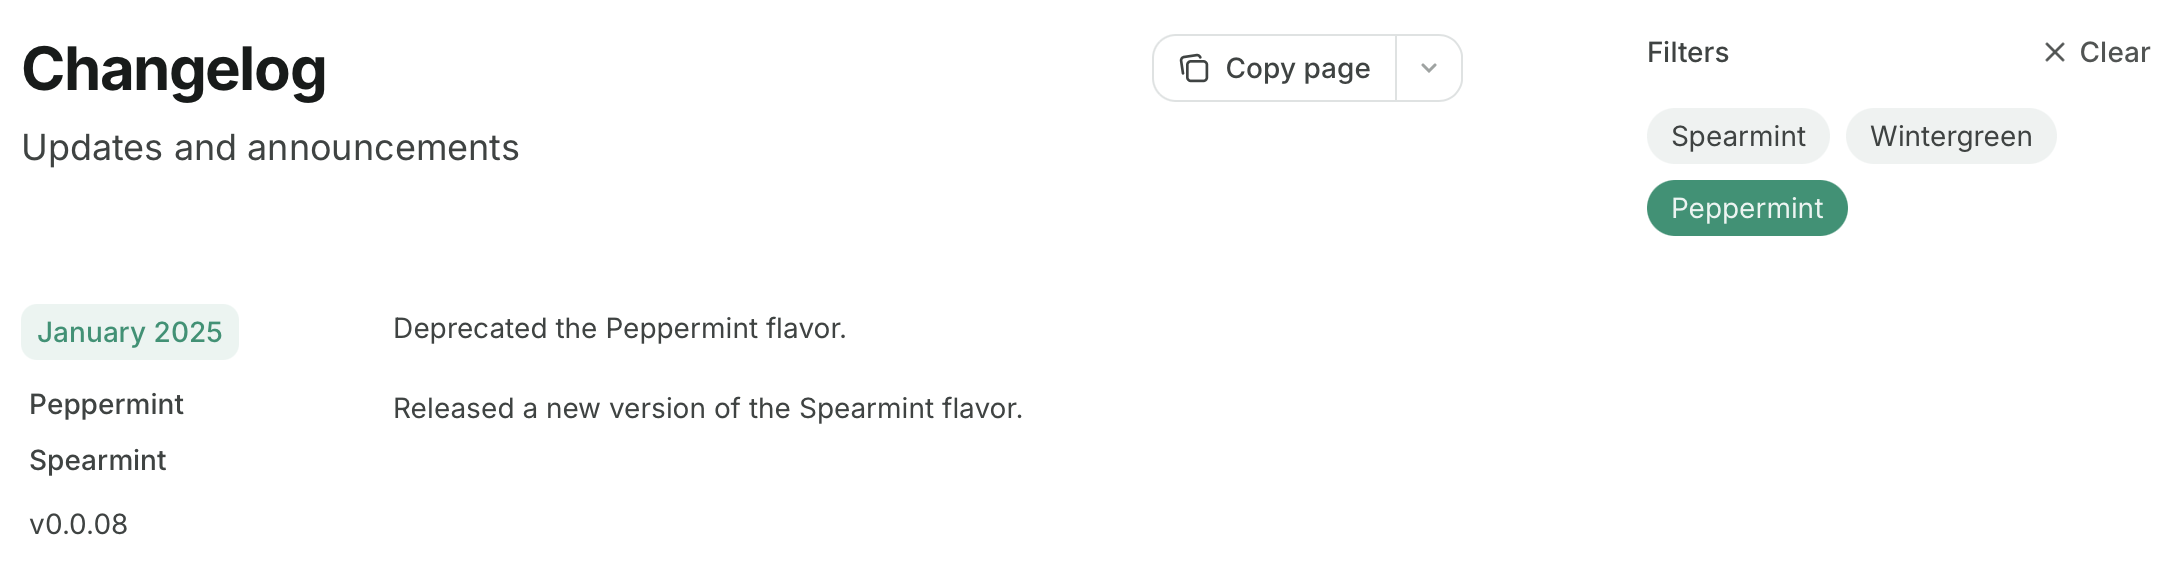
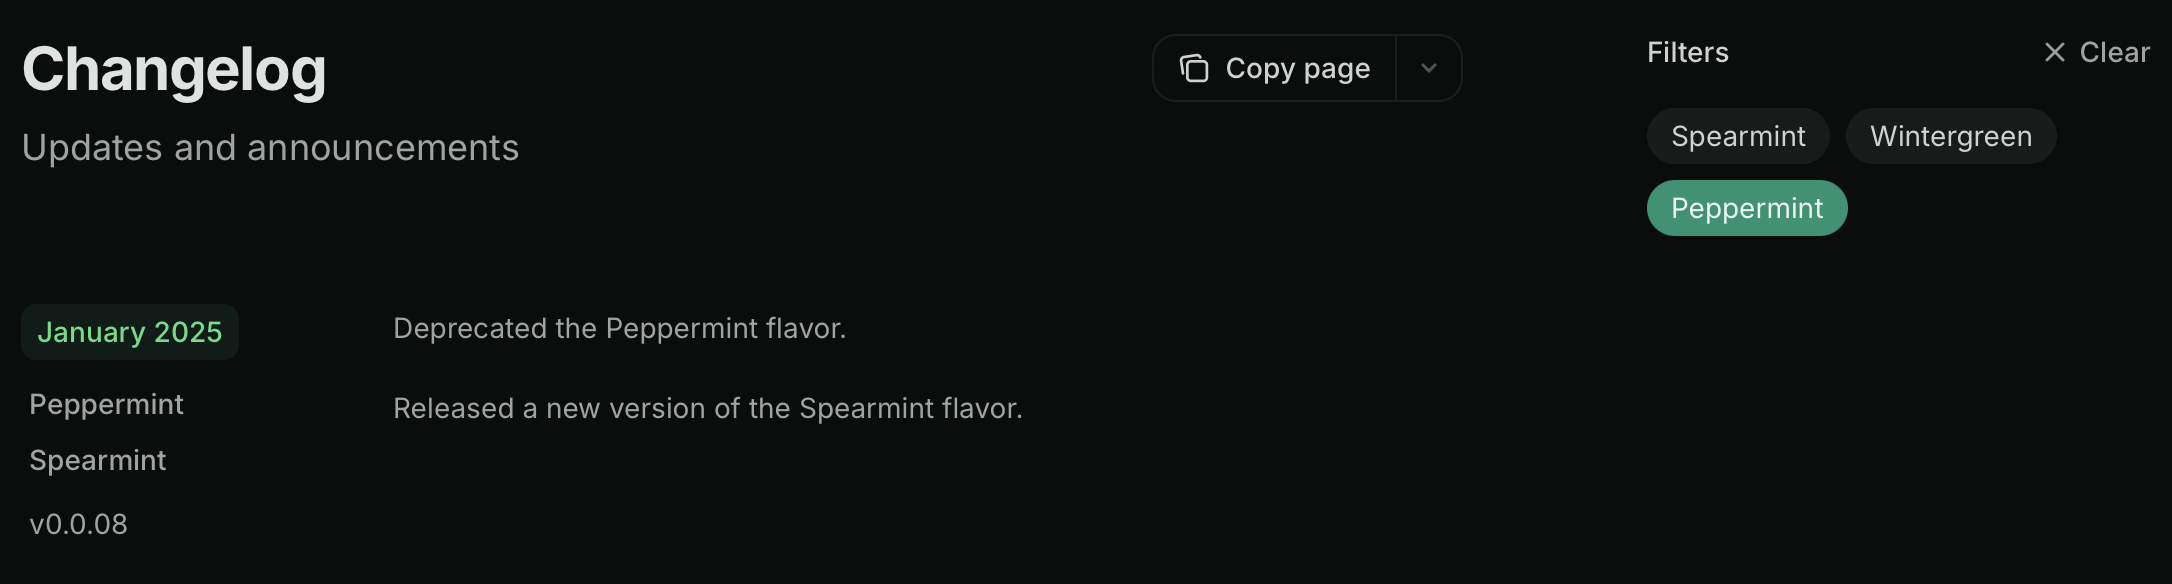
 ### Tag filters
Add `tags` to your `Update` components to replace the table of contents with tag filters. Users can filter the changelog by selecting one or more tags:
```mdx Tag filters example wrap theme={null}
### Tag filters
Add `tags` to your `Update` components to replace the table of contents with tag filters. Users can filter the changelog by selecting one or more tags:
```mdx Tag filters example wrap theme={null}
 ---
# Source: https://www.mintlify.com/docs/deploy/ci.md
> ## Documentation Index
> Fetch the complete documentation index at: https://www.mintlify.com/docs/llms.txt
> Use this file to discover all available pages before exploring further.
# CI checks
> Automate broken link checks, linting, and grammar validation in CI/CD.
---
# Source: https://www.mintlify.com/docs/deploy/ci.md
> ## Documentation Index
> Fetch the complete documentation index at: https://www.mintlify.com/docs/llms.txt
> Use this file to discover all available pages before exploring further.
# CI checks
> Automate broken link checks, linting, and grammar validation in CI/CD.
 ### Share previews
Share the preview deployment URL with team members to gather feedback. Previews update automatically when you save additional changes.
### Preview authentication
Preview URLs are publicly accessible by default. Enable preview authentication in the [Add-ons](https://dashboard.mintlify.com/products/addons) page of your dashboard to restrict access to authenticated organization members.
---
# Source: https://www.mintlify.com/docs/components/color.md
> ## Documentation Index
> Fetch the complete documentation index at: https://www.mintlify.com/docs/llms.txt
> Use this file to discover all available pages before exploring further.
# Color
> Display color palettes with click-to-copy functionality.
Use the Color component to showcase color palettes in your documentation. Colors can be displayed in a compact grid or organized in a table with labeled rows.
## Compact variant
Display colors in a simple grid layout with color names and values.
### Share previews
Share the preview deployment URL with team members to gather feedback. Previews update automatically when you save additional changes.
### Preview authentication
Preview URLs are publicly accessible by default. Enable preview authentication in the [Add-ons](https://dashboard.mintlify.com/products/addons) page of your dashboard to restrict access to authenticated organization members.
---
# Source: https://www.mintlify.com/docs/components/color.md
> ## Documentation Index
> Fetch the complete documentation index at: https://www.mintlify.com/docs/llms.txt
> Use this file to discover all available pages before exploring further.
# Color
> Display color palettes with click-to-copy functionality.
Use the Color component to showcase color palettes in your documentation. Colors can be displayed in a compact grid or organized in a table with labeled rows.
## Compact variant
Display colors in a simple grid layout with color names and values.
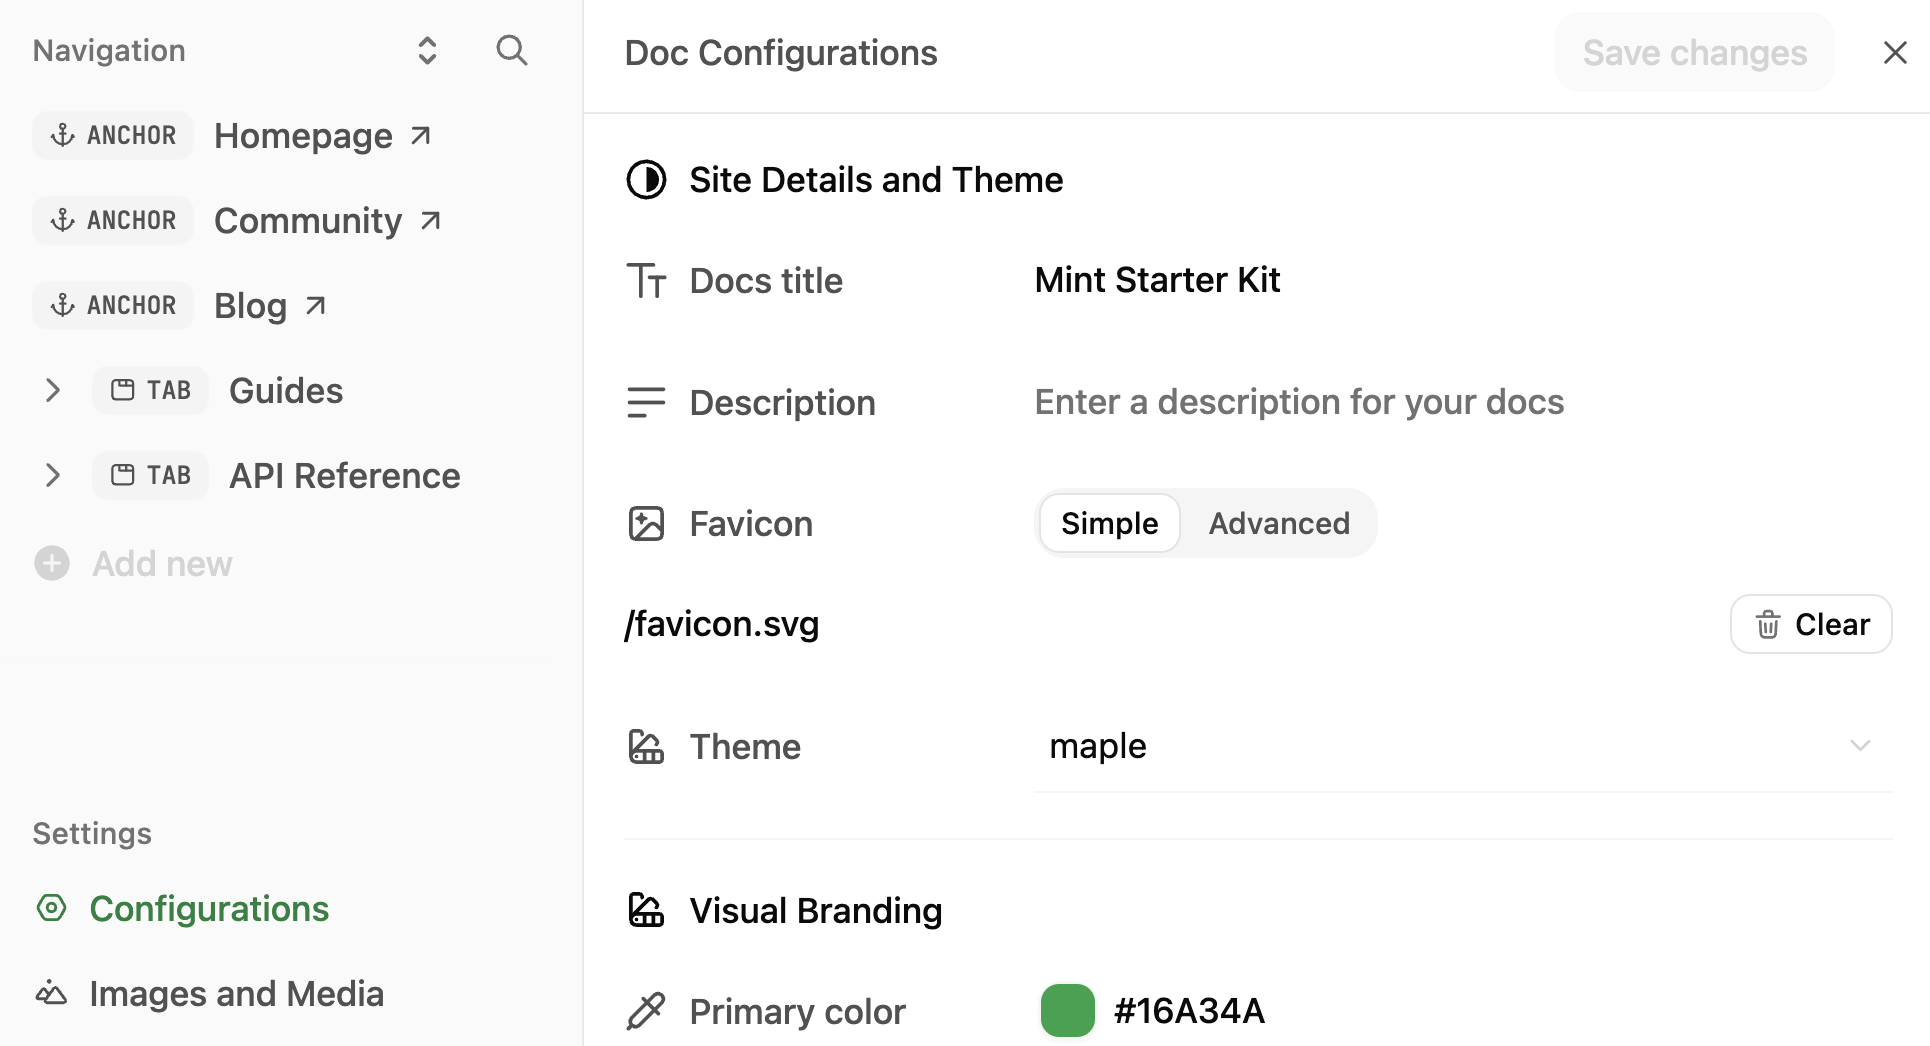
 ## Brand your site
Set your site's identity and how it appears to visitors.
* **Docs title**: The name of your documentation. Appears in browser tabs and search results.
* **Description**: Brief summary of your documentation. Used for SEO and site metadata.
* **Favicon**: Small icon that appears in browser tabs. Upload ICO, PNG, GIF, or JPG files.
* **Theme**: Choose a [theme](/customize/themes) for your documentation's overall appearance.
## Customize colors and appearance
Control your site's visual identity and color scheme.
* **Primary color**: The main accent color used throughout your site for links, buttons, and highlights.
* **Light mode color**: Accent color variation for light mode. How themes apply this varies by theme.
* **Dark mode color**: Accent color variation for dark mode. How themes apply this varies by theme.
* **Logo**: Your brand logo. Upload SVG, PNG, or JPG files. You can set different logos for light and dark modes.
* **Logo link**: Where users go when they click your logo. Typically your homepage or marketing site.
* **Background colors**: Set custom background colors for light and dark modes separately.
* **Background image**: Add a background image to your site. Upload PNG, GIF, or JPG files.
* **Background decoration**: Apply visual styles to your background image.
* **Theme toggle**: Show or hide the light/dark mode switcher for users.
* **Default theme**: Set whether your site loads in light or dark mode by default.
## Set custom fonts
Replace default fonts with your brand's typography.
* **Default font**: The base font family and weight for all text. Provide a source URL and format (WOFF or WOFF2).
* **Heading font**: Font family and weight specifically for headings (h1, h2, etc.). Set separately from body text.
* **Body font**: Font family and weight for body text and paragraphs.
For each font, specify the family name, weight, source URL (like Google Fonts), and format.
## Configure header
Add navigation elements to the top of your site.
* **Navbar button**: Add a primary call-to-action button in your header. Set the button type, label, and destination URL.
* **Navbar links**: Add additional navigation links in your header. Each link includes text and a URL.
## Configure footer
Add links and social media handles to your site footer.
* **Social links**: Add your profiles on platforms like GitHub, X (Twitter), LinkedIn, Discord, YouTube, Slack, and more.
* **Footer columns**: Organize footer links into columns with custom headings and link groups.
## Enhance content
Customize how content appears on your site.
* **Thumbnail background**: Set a custom background image for page thumbnails and social previews.
* **Thumbnail appearance**: Control how thumbnails display.
* **Thumbnail font**: Set a custom font for text in thumbnails.
* **Page eyebrow**: Add small labels above page titles.
* **Code block theme**: Choose the syntax highlighting theme for code blocks.
* **LaTeX support**: Enable mathematical notation rendering with LaTeX.
## Set up AI chat and search
Customize the search experience.
* **Search placeholder**: The text that appears in the search box before users type. Default is "Search or ask...".
## Configure API specifications
Add [OpenAPI](/api-playground/openapi-setup) or [AsyncAPI](/api-playground/asyncapi-setup) specification files to document endpoints.
* **OpenAPI specs**: Upload an OpenAPI specification file or enter a URL to an external OpenAPI file.
* **AsyncAPI specs**: Upload an AsyncAPI specification file or enter a URL to an external AsyncAPI file.
* **Playground display**: Choose to display the [interactive API playground](/api-playground/overview#visibility-modes), simple API playground, or no API playground.
* **Proxy server**: Enable or disable the proxy server for API requests.
## Add analytics and integrations
Connect analytics and third-party tools to your documentation.
Track visitor behavior with:
* **Amplitude, Mixpanel, Heap**: Product analytics platforms
* **Google Analytics, Google Tag Manager**: Web analytics
* **PostHog, Plausible, Fathom**: Privacy-focused analytics
* **Segment, Hightouch**: Customer data platforms
* **Hotjar, LogRocket**: Session replay and heatmaps
* **Microsoft Clarity**: User behavior analytics
* **Intercom**: Customer messaging
* **Clearbit, Koala**: Visitor identification
Additional integrations:
* **Telemetry**: Enable or disable usage telemetry
* **Cookies**: Set custom cookie key and value pairs
---
# Source: https://www.mintlify.com/docs/guides/content-templates.md
> ## Documentation Index
> Fetch the complete documentation index at: https://www.mintlify.com/docs/llms.txt
> Use this file to discover all available pages before exploring further.
# Content templates
> Copy and modify these templates to quickly create documentation for different content types.
Use these templates as starting points for creating documentation. Customize the templates for your documentation and your audience.
1. Copy the template that matches your content type.
2. Replace placeholders and example content with your actual content.
3. Adjust sections as needed.
4. Remove any sections that don't apply.
## Brand your site
Set your site's identity and how it appears to visitors.
* **Docs title**: The name of your documentation. Appears in browser tabs and search results.
* **Description**: Brief summary of your documentation. Used for SEO and site metadata.
* **Favicon**: Small icon that appears in browser tabs. Upload ICO, PNG, GIF, or JPG files.
* **Theme**: Choose a [theme](/customize/themes) for your documentation's overall appearance.
## Customize colors and appearance
Control your site's visual identity and color scheme.
* **Primary color**: The main accent color used throughout your site for links, buttons, and highlights.
* **Light mode color**: Accent color variation for light mode. How themes apply this varies by theme.
* **Dark mode color**: Accent color variation for dark mode. How themes apply this varies by theme.
* **Logo**: Your brand logo. Upload SVG, PNG, or JPG files. You can set different logos for light and dark modes.
* **Logo link**: Where users go when they click your logo. Typically your homepage or marketing site.
* **Background colors**: Set custom background colors for light and dark modes separately.
* **Background image**: Add a background image to your site. Upload PNG, GIF, or JPG files.
* **Background decoration**: Apply visual styles to your background image.
* **Theme toggle**: Show or hide the light/dark mode switcher for users.
* **Default theme**: Set whether your site loads in light or dark mode by default.
## Set custom fonts
Replace default fonts with your brand's typography.
* **Default font**: The base font family and weight for all text. Provide a source URL and format (WOFF or WOFF2).
* **Heading font**: Font family and weight specifically for headings (h1, h2, etc.). Set separately from body text.
* **Body font**: Font family and weight for body text and paragraphs.
For each font, specify the family name, weight, source URL (like Google Fonts), and format.
## Configure header
Add navigation elements to the top of your site.
* **Navbar button**: Add a primary call-to-action button in your header. Set the button type, label, and destination URL.
* **Navbar links**: Add additional navigation links in your header. Each link includes text and a URL.
## Configure footer
Add links and social media handles to your site footer.
* **Social links**: Add your profiles on platforms like GitHub, X (Twitter), LinkedIn, Discord, YouTube, Slack, and more.
* **Footer columns**: Organize footer links into columns with custom headings and link groups.
## Enhance content
Customize how content appears on your site.
* **Thumbnail background**: Set a custom background image for page thumbnails and social previews.
* **Thumbnail appearance**: Control how thumbnails display.
* **Thumbnail font**: Set a custom font for text in thumbnails.
* **Page eyebrow**: Add small labels above page titles.
* **Code block theme**: Choose the syntax highlighting theme for code blocks.
* **LaTeX support**: Enable mathematical notation rendering with LaTeX.
## Set up AI chat and search
Customize the search experience.
* **Search placeholder**: The text that appears in the search box before users type. Default is "Search or ask...".
## Configure API specifications
Add [OpenAPI](/api-playground/openapi-setup) or [AsyncAPI](/api-playground/asyncapi-setup) specification files to document endpoints.
* **OpenAPI specs**: Upload an OpenAPI specification file or enter a URL to an external OpenAPI file.
* **AsyncAPI specs**: Upload an AsyncAPI specification file or enter a URL to an external AsyncAPI file.
* **Playground display**: Choose to display the [interactive API playground](/api-playground/overview#visibility-modes), simple API playground, or no API playground.
* **Proxy server**: Enable or disable the proxy server for API requests.
## Add analytics and integrations
Connect analytics and third-party tools to your documentation.
Track visitor behavior with:
* **Amplitude, Mixpanel, Heap**: Product analytics platforms
* **Google Analytics, Google Tag Manager**: Web analytics
* **PostHog, Plausible, Fathom**: Privacy-focused analytics
* **Segment, Hightouch**: Customer data platforms
* **Hotjar, LogRocket**: Session replay and heatmaps
* **Microsoft Clarity**: User behavior analytics
* **Intercom**: Customer messaging
* **Clearbit, Koala**: Visitor identification
Additional integrations:
* **Telemetry**: Enable or disable usage telemetry
* **Cookies**: Set custom cookie key and value pairs
---
# Source: https://www.mintlify.com/docs/guides/content-templates.md
> ## Documentation Index
> Fetch the complete documentation index at: https://www.mintlify.com/docs/llms.txt
> Use this file to discover all available pages before exploring further.
# Content templates
> Copy and modify these templates to quickly create documentation for different content types.
Use these templates as starting points for creating documentation. Customize the templates for your documentation and your audience.
1. Copy the template that matches your content type.
2. Replace placeholders and example content with your actual content.
3. Adjust sections as needed.
4. Remove any sections that don't apply.
![Diagram showing how [concept] works](/path/to/diagram.png) Break down complex ideas into digestible sections.
## Why [design decision or approach]
Provide context about why things work the way they do.
Discuss trade-offs, alternatives that were considered, or constraints that influenced the design.
## When to use [concept]
Help users understand when this concept or approach is most appropriate.
- **Use case 1**: When this approach makes sense
- **Use case 2**: Another scenario where this is the right choice
- **Not recommended for**: Situations where alternatives are better
## Relationship to other features
Draw connections to related concepts or features in your product.
Explain how this concept fits into the broader system or workflow.
## Common misconceptions
Address misunderstandings or clarify subtle distinctions.
## Further reading
Link to related explanations, tutorials, or reference documentation.
```
## Reference template
Use reference documentation when users need to look up specific details about your product's functionality. Reference docs prioritize accuracy, consistency, and scannability.
````mdx Reference template theme={null}
---
title: "[Feature or API name] reference"
description: "Complete reference for [feature or API] properties, parameters, and options."
---
Provide a one-sentence description of what this feature or API does.
## Properties
Break down complex ideas into digestible sections.
## Why [design decision or approach]
Provide context about why things work the way they do.
Discuss trade-offs, alternatives that were considered, or constraints that influenced the design.
## When to use [concept]
Help users understand when this concept or approach is most appropriate.
- **Use case 1**: When this approach makes sense
- **Use case 2**: Another scenario where this is the right choice
- **Not recommended for**: Situations where alternatives are better
## Relationship to other features
Draw connections to related concepts or features in your product.
Explain how this concept fits into the broader system or workflow.
## Common misconceptions
Address misunderstandings or clarify subtle distinctions.
## Further reading
Link to related explanations, tutorials, or reference documentation.
```
## Reference template
Use reference documentation when users need to look up specific details about your product's functionality. Reference docs prioritize accuracy, consistency, and scannability.
````mdx Reference template theme={null}
---
title: "[Feature or API name] reference"
description: "Complete reference for [feature or API] properties, parameters, and options."
---
Provide a one-sentence description of what this feature or API does.
## Properties
 ## Picking a type
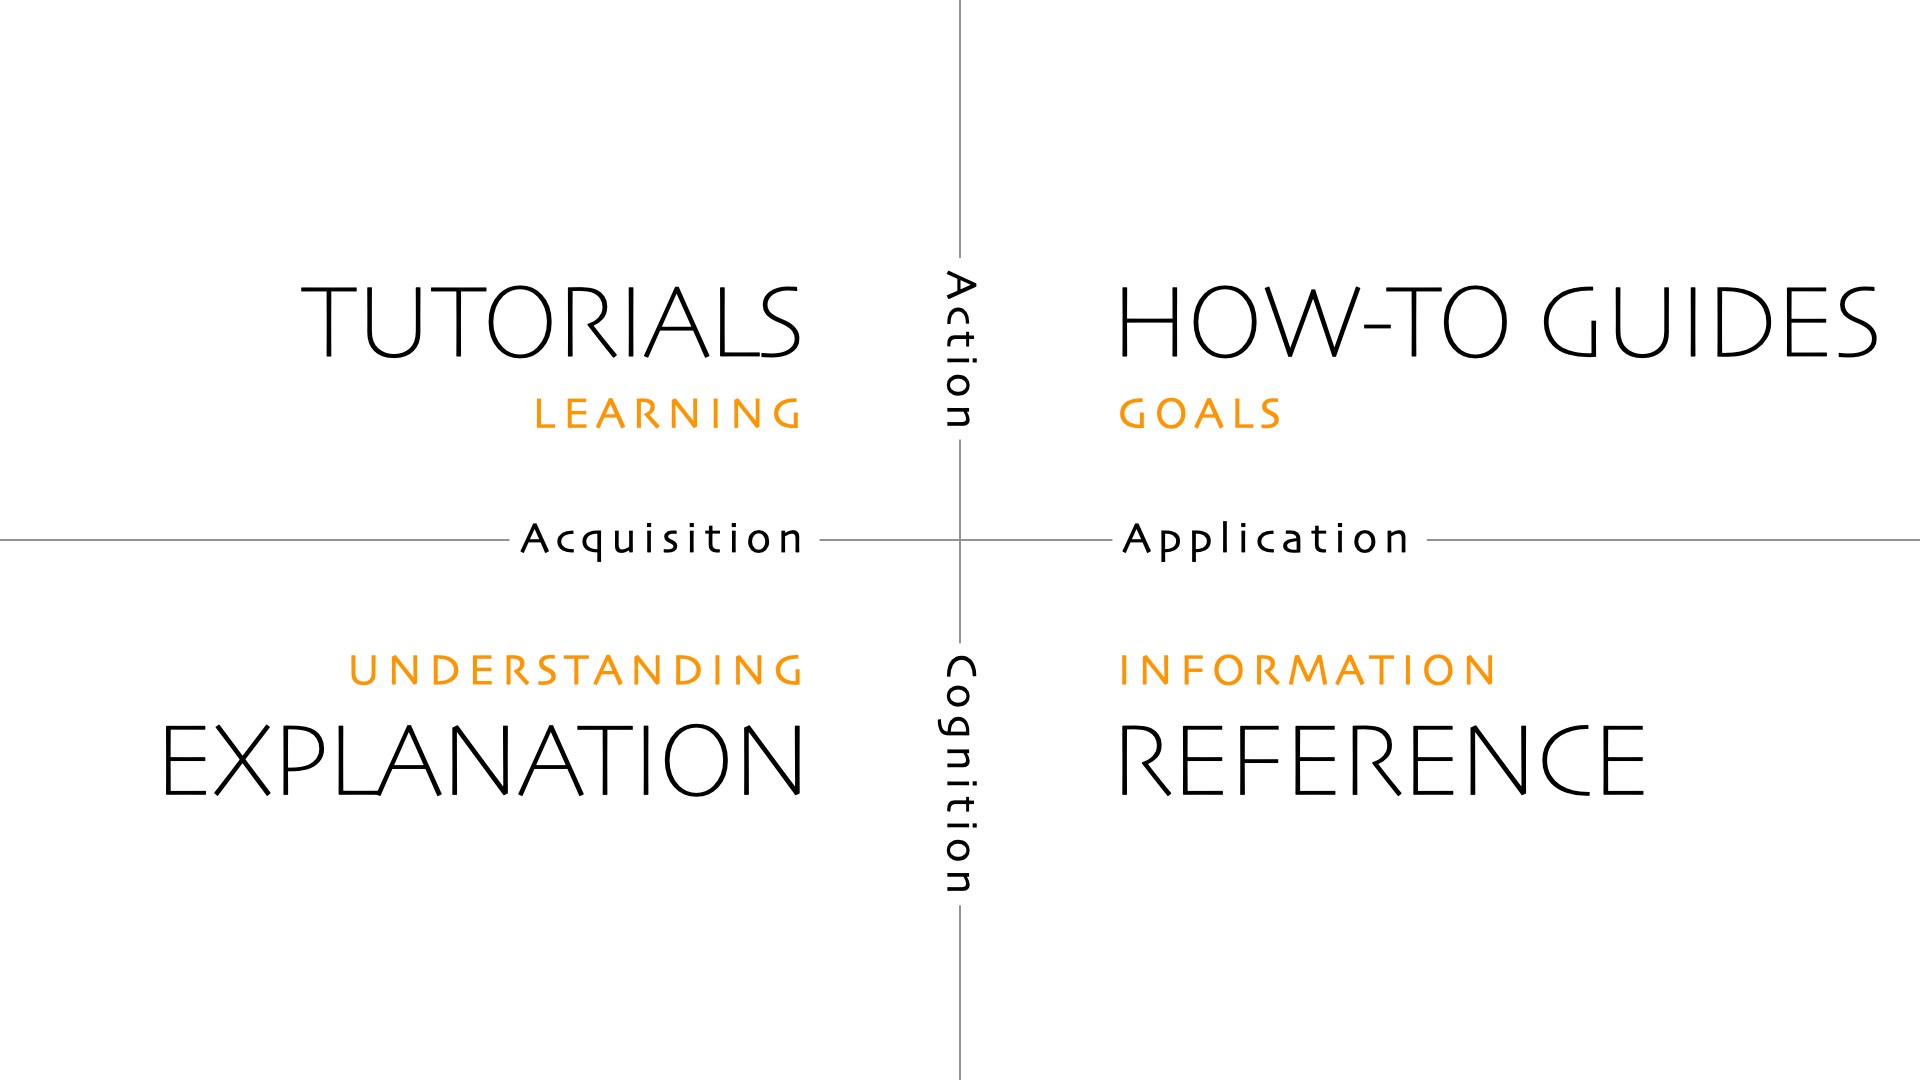
| Question | Tutorial | How-To | Reference | Explanation |
| :------------------------------------- | :--------------------- | :----------------------- | :----------------------- | :---------------------- |
| What is the user's goal? | Learn through practice | Solve a specific problem | Find precise information | Understand concepts |
| What is the user's knowledge? | Beginner | Intermediate | Experienced | Any level |
| What is the primary focus? | Learning by doing | Achieving a goal | Providing information | Deepening understanding |
| How is the content structured? | Step-by-step | Problem-solution | Organized facts | Conceptual discussions |
| Is it task-oriented? | Yes, guided tasks | Yes, specific tasks | No, informational | No, conceptual |
| Is it designed for linear progression? | Yes | No | No | No |
## Writing for each type
### Tutorials (Learning-oriented)
* **Audience goal**: Learn something new through step-by-step instructions.
* **Characteristics**: Sequential and assumes no prior knowledge.
* **Writing approach**:
* Set expectations of what the user will achieve after reading.
* Use clear, incremental steps. Minimize choices that need to be made by the user.
* Point out milestones along the way.
* Minimize theory and focus on concrete actions.
### How-To Guides (Problem-oriented)
* **Audience goal**: Perform a specific task correctly.
* **Characteristics**: Goal-driven and assumes some prior knowledge.
* **Writing approach**:
* Write from the perspective of the user, not the product.
* Describe a logical sequence and omit unnecessary details.
* Minimize context beyond what is necessary.
### Reference (Information-oriented)
* **Audience goal**: Find details about a product's functionality.
* **Characteristics**: Unambiguous, product-focused, scannable.
* **Writing approach**:
* Be scannable and concise.
* Prioritize consistency.
* Avoid explanatory content. Focus on examples that are easy to copy and modify.
### Explanation (Understanding-oriented)
* **Audience goal**: Expand general understanding of a concept or highly complex feature.
* **Characteristics**: Theoretical, potentially opinionated, broad in scope.
* **Writing approach**:
* Provide background context, such as design decisions or technical constraints.
* Acknowledge opinions and alternatives.
* Draw connections to other areas in the product or industry.
## Tips and tricks
1. **Maintain purpose**: Before writing, assign each page a specific content type and make it top of mind in the doc throughout your writing.
2. **Consider content freshness**: Regardless of content type, try to optimize for evergreen documentation. If something represents a moment in time of what a feature looks like on a specific date, it's probably better suited for a changelog or blog post than in your documentation. Or if something changes very frequently avoid putting it in your docs.
3. **Think like your users**: Consider different user personas when organizing content. See [Understand your audience](/guides/understand-your-audience) for more information.
4. **Use templates**: Start with [content templates](/guides/content-templates) that provide the basic structure for each content type.
While the Diátaxis framework provides a starting point, successful documentation requires contextual adaptation to your product. Start by understanding the framework's principles, then adjust them to serve your users' needs.
## Related pages
## Picking a type
| Question | Tutorial | How-To | Reference | Explanation |
| :------------------------------------- | :--------------------- | :----------------------- | :----------------------- | :---------------------- |
| What is the user's goal? | Learn through practice | Solve a specific problem | Find precise information | Understand concepts |
| What is the user's knowledge? | Beginner | Intermediate | Experienced | Any level |
| What is the primary focus? | Learning by doing | Achieving a goal | Providing information | Deepening understanding |
| How is the content structured? | Step-by-step | Problem-solution | Organized facts | Conceptual discussions |
| Is it task-oriented? | Yes, guided tasks | Yes, specific tasks | No, informational | No, conceptual |
| Is it designed for linear progression? | Yes | No | No | No |
## Writing for each type
### Tutorials (Learning-oriented)
* **Audience goal**: Learn something new through step-by-step instructions.
* **Characteristics**: Sequential and assumes no prior knowledge.
* **Writing approach**:
* Set expectations of what the user will achieve after reading.
* Use clear, incremental steps. Minimize choices that need to be made by the user.
* Point out milestones along the way.
* Minimize theory and focus on concrete actions.
### How-To Guides (Problem-oriented)
* **Audience goal**: Perform a specific task correctly.
* **Characteristics**: Goal-driven and assumes some prior knowledge.
* **Writing approach**:
* Write from the perspective of the user, not the product.
* Describe a logical sequence and omit unnecessary details.
* Minimize context beyond what is necessary.
### Reference (Information-oriented)
* **Audience goal**: Find details about a product's functionality.
* **Characteristics**: Unambiguous, product-focused, scannable.
* **Writing approach**:
* Be scannable and concise.
* Prioritize consistency.
* Avoid explanatory content. Focus on examples that are easy to copy and modify.
### Explanation (Understanding-oriented)
* **Audience goal**: Expand general understanding of a concept or highly complex feature.
* **Characteristics**: Theoretical, potentially opinionated, broad in scope.
* **Writing approach**:
* Provide background context, such as design decisions or technical constraints.
* Acknowledge opinions and alternatives.
* Draw connections to other areas in the product or industry.
## Tips and tricks
1. **Maintain purpose**: Before writing, assign each page a specific content type and make it top of mind in the doc throughout your writing.
2. **Consider content freshness**: Regardless of content type, try to optimize for evergreen documentation. If something represents a moment in time of what a feature looks like on a specific date, it's probably better suited for a changelog or blog post than in your documentation. Or if something changes very frequently avoid putting it in your docs.
3. **Think like your users**: Consider different user personas when organizing content. See [Understand your audience](/guides/understand-your-audience) for more information.
4. **Use templates**: Start with [content templates](/guides/content-templates) that provide the basic structure for each content type.
While the Diátaxis framework provides a starting point, successful documentation requires contextual adaptation to your product. Start by understanding the framework's principles, then adjust them to serve your users' needs.
## Related pages
 ## Enabling the contextual menu
Add the `contextual` field to your `docs.json` file and specify which options you want to include.
```json theme={null}
{
"contextual": {
"options": [
"copy",
"view",
"chatgpt",
"claude",
"perplexity",
"grok",
"mcp",
"cursor",
"vscode"
]
}
}
```
## Adding custom options
Create custom options in the contextual menu by adding an object to the `options` array. Each custom option requires these properties:
## Enabling the contextual menu
Add the `contextual` field to your `docs.json` file and specify which options you want to include.
```json theme={null}
{
"contextual": {
"options": [
"copy",
"view",
"chatgpt",
"claude",
"perplexity",
"grok",
"mcp",
"cursor",
"vscode"
]
}
}
```
## Adding custom options
Create custom options in the contextual menu by adding an object to the `options` array. Each custom option requires these properties:
{messages.map((message) => (
);
}
```
**Required configuration:**
* `transport` - Use `DefaultChatTransport` to configure the API connection.
* `body.fp` - Fingerprint identifier (use `'anonymous'` or a unique user identifier).
* `body.retrievalPageSize` - Number of search results to use (recommended: 5).
**Optional configuration:**
* `body.context` - Array of contextual information to provide to the assistant. Each context object contains:
* `type` - Either `'code'` or `'textSelection'`.
* `value` - The code snippet or selected text content.
* `path` (optional) - Path to the source file or page.
* `elementId` (optional) - Identifier for the UI element containing the context.
{message.role === "user" ? "User: " : "Assistant: "}
{message.parts
.filter((part) => part.type === "text")
.map((part) => part.text)
.join("")}
))}
{messages.map((message) => (
);
}
```
**Required configuration for Mintlify:**
* `streamProtocol: 'data'` - Required for streaming responses.
* `sendExtraMessageFields: true` - Required to send message metadata.
* `body.fp` - Fingerprint identifier (use 'anonymous' or a user identifier).
* `body.retrievalPageSize` - Number of search results to use (recommended: 5).
**Optional configuration:**
* `body.context` - Array of contextual information to provide to the assistant. Each context object contains:
* `type` - Either `'code'` or `'textSelection'`.
* `value` - The code snippet or selected text content.
* `elementId` (optional) - Identifier for the UI element containing the context.
{message.role === 'user' ? 'User: ' : 'Assistant: '}
{message.content}
))}

 #### Videos
Use the HTML video element for self-hosted video content:
Embed YouTube videos using iframe elements:
#### Tooltips
Example of tooltip usage:
#### Videos
Use the HTML video element for self-hosted video content:
Embed YouTube videos using iframe elements:
#### Tooltips
Example of tooltip usage:
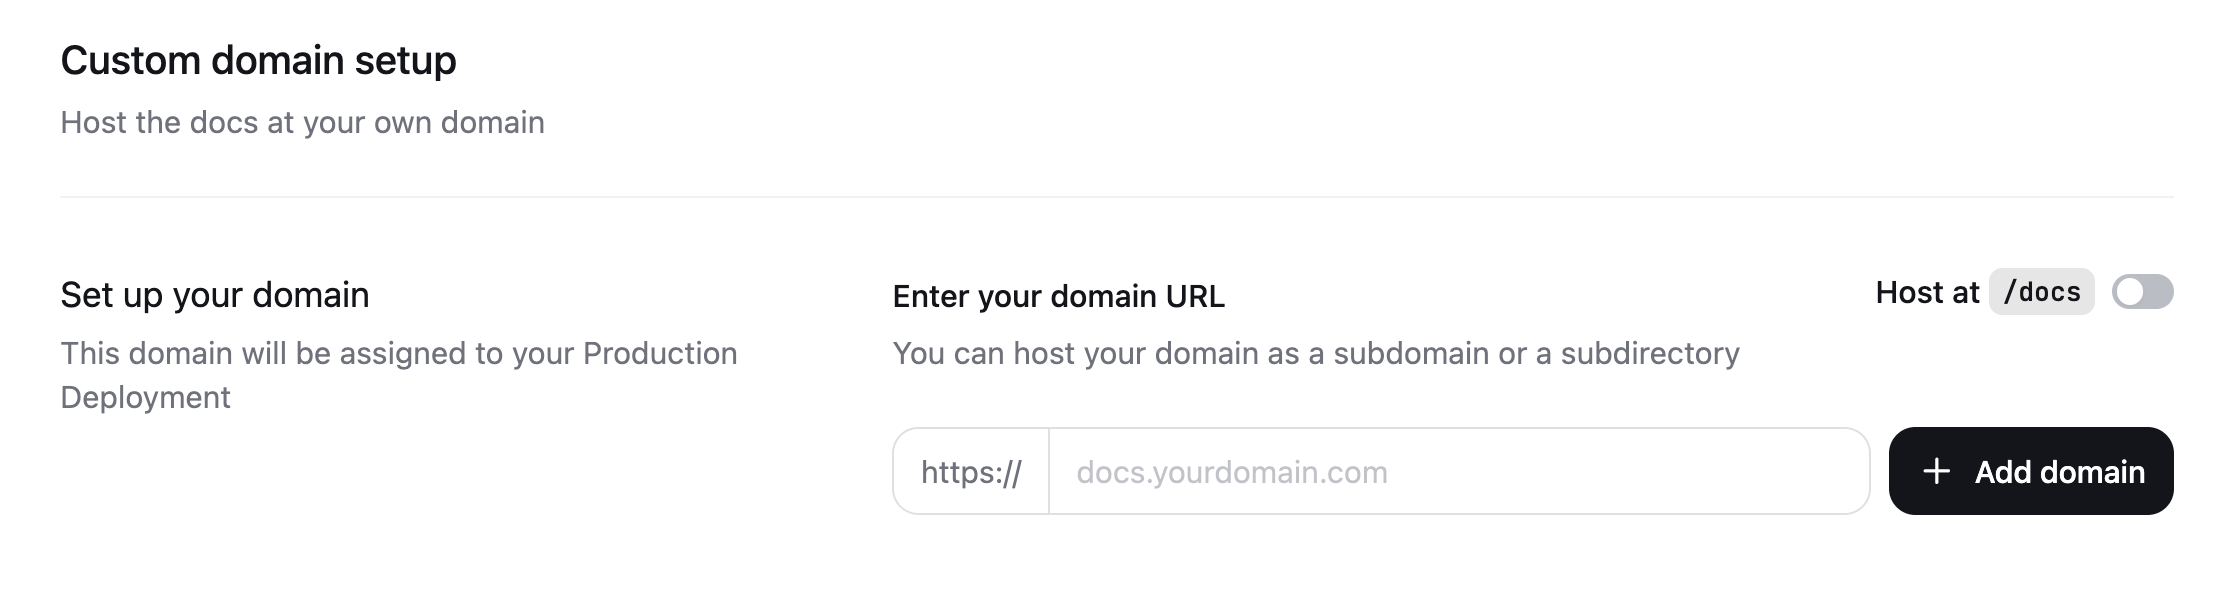
 ## Configure your DNS
1. On your domain provider's website, navigate to your domain's DNS settings.
2. Create a new DNS record with the following values:
```text theme={null}
CNAME | docs | cname.mintlify-dns.com.
```
## Configure your DNS
1. On your domain provider's website, navigate to your domain's DNS settings.
2. Create a new DNS record with the following values:
```text theme={null}
CNAME | docs | cname.mintlify-dns.com.
```
 ```
```