# Lmdeploy
> .. autoclass:: PytorchEngineConfig
---
inference pipeline
==================
.. currentmodule:: lmdeploy
pipeline
--------
.. autofunction:: pipeline
serving
--------
.. autofunction:: serve
.. autofunction:: client
PytorchEngineConfig
-------------------
.. autoclass:: PytorchEngineConfig
TurbomindEngineConfig
---------------------
.. autoclass:: TurbomindEngineConfig
GenerationConfig
----------------
.. autoclass:: GenerationConfig
ChatTemplateConfig
------------------
.. autoclass:: ChatTemplateConfig
---
On Other Platforms
=================================
.. toctree::
:maxdepth: 1
:caption: OtherPF
ascend/get_started.md
maca/get_started.md
camb/get_started.md
---
Welcome to LMDeploy's tutorials!
====================================
.. figure:: ./_static/image/lmdeploy-logo.svg
:width: 50%
:align: center
:alt: LMDeploy
:class: no-scaled-link
.. raw:: html
LMDeploy is a toolkit for compressing, deploying, and serving LLM.
Star
Watch
Fork
LMDeploy has the following core features:
* **Efficient Inference**: LMDeploy delivers up to 1.8x higher request throughput than vLLM, by introducing key features like persistent batch(a.k.a. continuous batching), blocked KV cache, dynamic split&fuse, tensor parallelism, high-performance CUDA kernels and so on.
* **Effective Quantization**: LMDeploy supports weight-only and k/v quantization, and the 4-bit inference performance is 2.4x higher than FP16. The quantization quality has been confirmed via OpenCompass evaluation.
* **Effortless Distribution Server**: Leveraging the request distribution service, LMDeploy facilitates an easy and efficient deployment of multi-model services across multiple machines and cards.
* **Excellent Compatibility**: LMDeploy supports `KV Cache Quant `_, `AWQ `_ and `Automatic Prefix Caching `_ to be used simultaneously.
Documentation
-------------
.. _get_started:
.. toctree::
:maxdepth: 1
:caption: Get Started
get_started/installation.md
get_started/get_started.md
get_started/index.rst
.. _supported_models:
.. toctree::
:maxdepth: 1
:caption: Models
supported_models/supported_models.md
supported_models/reward_models.md
.. _llm_deployment:
.. toctree::
:maxdepth: 1
:caption: Large Language Models(LLMs) Deployment
llm/pipeline.md
llm/api_server.md
llm/api_server_tools.md
llm/api_server_reasoning.md
llm/api_server_lora.md
llm/proxy_server.md
.. _vlm_deployment:
.. toctree::
:maxdepth: 1
:caption: Vision-Language Models(VLMs) Deployment
multi_modal/vl_pipeline.md
multi_modal/api_server_vl.md
multi_modal/index.rst
.. _quantization:
.. toctree::
:maxdepth: 1
:caption: Quantization
quantization/w4a16.md
quantization/w8a8.md
quantization/kv_quant.md
.. _benchmark:
.. toctree::
:maxdepth: 1
:caption: Benchmark
benchmark/benchmark.md
benchmark/evaluate_with_opencompass.md
benchmark/evaluate_with_vlmevalkit.md
.. toctree::
:maxdepth: 1
:caption: Advanced Guide
inference/turbomind.md
inference/pytorch.md
advance/pytorch_new_model.md
advance/long_context.md
advance/chat_template.md
advance/debug_turbomind.md
advance/structed_output.md
advance/pytorch_multinodes.md
advance/pytorch_profiling.md
advance/metrics.md
advance/context_parallel.md
advance/spec_decoding.md
advance/update_weights.md
.. toctree::
:maxdepth: 1
:caption: API Reference
api/pipeline.rst
Indices and tables
==================
* :ref:`genindex`
* :ref:`search`
---
Vision-Language Models
=================================
.. toctree::
:maxdepth: 2
:caption: Examples
deepseek_vl2.md
llava.md
internvl.md
xcomposer2d5.md
cogvlm.md
minicpmv.md
phi3.md
mllama.md
qwen2_vl.md
qwen2_5_vl.md
molmo.md
gemma3.md
---
# Customized chat template
The effect of the applied chat template can be observed by **setting log level** `INFO`.
LMDeploy supports two methods of adding chat templates:
- One approach is to utilize an existing conversation template by directly configuring a JSON file like the following.
```json
{
"model_name": "your awesome chat template name",
"system": "<|im_start|>system\n",
"meta_instruction": "You are a robot developed by LMDeploy.",
"eosys": "<|im_end|>\n",
"user": "<|im_start|>user\n",
"eoh": "<|im_end|>\n",
"assistant": "<|im_start|>assistant\n",
"eoa": "<|im_end|>",
"separator": "\n",
"capability": "chat",
"stop_words": ["<|im_end|>"]
}
```
`model_name` is a required field and can be either the name of an LMDeploy built-in chat template (which can be viewed through `lmdeploy list`), or a new name. Other fields are optional.
1. When `model_name` is the name of a built-in chat template, the non-null fields in the JSON file will override the corresponding attributes of the original chat template.
2. However, when `model_name` is a new name, it will register `BaseChatTemplate` directly as a new chat template. The specific definition can be referred to [BaseChatTemplate](https://github.com/InternLM/lmdeploy/blob/24bd4b9ab6a15b3952e62bcfc72eaba03bce9dcb/lmdeploy/model.py#L113-L188).
The new chat template would be like this:
```
{system}{meta_instruction}{eosys}{user}{user_content}{eoh}{assistant}{assistant_content}{eoa}{separator}{user}...
```
When using the CLI tool, you can pass in a custom chat template with `--chat-template`, for example.
```shell
lmdeploy serve api_server internlm/internlm2_5-7b-chat --chat-template ${JSON_FILE}
```
You can also pass it in through the interface function, for example.
```python
from lmdeploy import ChatTemplateConfig, serve
serve('internlm/internlm2_5-7b-chat',
chat_template_config=ChatTemplateConfig.from_json('${JSON_FILE}'))
```
- Another approach is to customize a Python chat template class like the existing LMDeploy chat templates. It can be used directly after successful registration. The advantages are a high degree of customization and strong controllability. Below is an example of registering an LMDeploy chat template.
```python
from lmdeploy.model import MODELS, BaseChatTemplate
@MODELS.register_module(name='customized_model')
class CustomizedModel(BaseChatTemplate):
"""A customized chat template."""
def __init__(self,
system='<|im_start|>system\n',
meta_instruction='You are a robot developed by LMDeploy.',
user='<|im_start|>user\n',
assistant='<|im_start|>assistant\n',
eosys='<|im_end|>\n',
eoh='<|im_end|>\n',
eoa='<|im_end|>',
separator='\n',
stop_words=['<|im_end|>', '<|action_end|>']):
super().__init__(system=system,
meta_instruction=meta_instruction,
eosys=eosys,
user=user,
eoh=eoh,
assistant=assistant,
eoa=eoa,
separator=separator,
stop_words=stop_words)
from lmdeploy import ChatTemplateConfig, pipeline
messages = [{'role': 'user', 'content': 'who are you?'}]
pipe = pipeline('internlm/internlm2_5-7b-chat',
chat_template_config=ChatTemplateConfig('customized_model'))
for response in pipe.stream_infer(messages):
print(response.text, end='')
```
In this example, we register a LMDeploy chat template that sets the model to be created by LMDeploy, so when the user asks who the model is, the model will answer that it was created by LMDeploy.
---
# Context Parallel
When the memory on a single GPU is insufficient to deploy a model, it is often deployed using tensor parallelism (TP), which generally requires `num_key_value_heads` to be divisible by `TP`. If you want to deploy with `TP > num_key_value_heads`, the kv-heads should be duplicated to meet the divisibility requirement. However, this has two disadvantages:
1. The amount of available kv_cache is halved, which reducing the maximum supported session length.
2. The maximum inference batch size is reduced, leading to lower throughput.
To address this issue, the TurboMind inference backend supports setting `attn_dp_size`, which avoids creating copies of kv-heads, but this introduces data imbalance. To eliminate data imbalance, TurboMind supports sequence parallelism, which allowing kv_cache to be stored interleaved on different cp_ranks. See the example below:
```
cp_rank=2, prompt_len=5, generation_len=4
kv_cache stored on cp_rank0: 0, 2, 4, 6, 8
kv_cache stored on cp_rank1: 1, 3, 5, 7
```
## Usage
Taking Intern-S1 / Qwen3-235B-A22B as an example, their `num_key_value_heads` is 4. If you want to deploy with `TP=8` and avoid duplication of kv_cache, you can deploy in the following way:
```
lmdeploy serve api_server internlm/Intern-S1 --tp 8 --cp 2
lmdeploy serve api_server Qwen/Qwen3-235B-A22B --tp 8 --cp 2
```
---
# How to debug Turbomind
Turbomind is implemented in C++, which is not as easy to debug as Python. This document provides basic methods for debugging Turbomind.
## Prerequisite
First, complete the local compilation according to the commands in [Install from source](../get_started/installation.md).
## Configure Python debug environment
Since many large companies currently use Centos 7 for online production environments, we will use Centos 7 as an example to illustrate the process.
### Obtain `glibc` and `python3` versions
```bash
rpm -qa | grep glibc
rpm -qa | grep python3
```
The result should be similar to this:
```
[username@hostname workdir]# rpm -qa | grep glibc
glibc-2.17-325.el7_9.x86_64
glibc-common-2.17-325.el7_9.x86_64
glibc-headers-2.17-325.el7_9.x86_64
glibc-devel-2.17-325.el7_9.x86_64
[username@hostname workdir]# rpm -qa | grep python3
python3-pip-9.0.3-8.el7.noarch
python3-rpm-macros-3-34.el7.noarch
python3-rpm-generators-6-2.el7.noarch
python3-setuptools-39.2.0-10.el7.noarch
python3-3.6.8-21.el7_9.x86_64
python3-devel-3.6.8-21.el7_9.x86_64
python3.6.4-sre-1.el6.x86_64
```
Based on the information above, we can see that the version of `glibc` is `2.17-325.el7_9.x86_64` and the version of `python3` is `3.6.8-21.el7_9.x86_64`.
### Download and install `debuginfo` library
Download `glibc-debuginfo-common-2.17-325.el7.x86_64.rpm`, `glibc-debuginfo-2.17-325.el7.x86_64.rpm`, and `python3-debuginfo-3.6.8-21.el7.x86_64.rpm` from http://debuginfo.centos.org/7/x86_64.
```bash
rpm -ivh glibc-debuginfo-common-2.17-325.el7.x86_64.rpm
rpm -ivh glibc-debuginfo-2.17-325.el7.x86_64.rpm
rpm -ivh python3-debuginfo-3.6.8-21.el7.x86_64.rpm
```
### Upgrade GDB
```bash
sudo yum install devtoolset-10 -y
echo "source scl_source enable devtoolset-10" >> ~/.bashrc
source ~/.bashrc
```
### Verification
```bash
gdb python3
```
The output should be similar to this:
```
[username@hostname workdir]# gdb python3
GNU gdb (GDB) Red Hat Enterprise Linux 9.2-10.el7
Copyright (C) 2020 Free Software Foundation, Inc.
License GPLv3+: GNU GPL version 3 or later
This is free software: you are free to change and redistribute it.
There is NO WARRANTY, to the extent permitted by law.
Type "show copying" and "show warranty" for details.
This GDB was configured as "x86_64-redhat-linux-gnu".
Type "show configuration" for configuration details.
For bug reporting instructions, please see:
.
Find the GDB manual and other documentation resources online at:
.
For help, type "help".
Type "apropos word" to search for commands related to "word"...
Reading symbols from python3...
(gdb)
```
If it shows `Reading symbols from python3`, the configuration has been successful.
For other operating systems, please refer to [DebuggingWithGdb](https://wiki.python.org/moin/DebuggingWithGdb).
## Set up symbolic links
After setting up symbolic links, there is no need to install it locally with `pip` every time.
```bash
# Change directory to lmdeploy, e.g.
cd /workdir/lmdeploy
# Since it has been built in the build directory
# Link the lib directory
cd lmdeploy && ln -s ../build/lib . && cd ..
# (Optional) Link compile_commands.json for clangd index
ln -s build/compile_commands.json .
```
## Start debugging
````bash
# Use gdb to start the API server with Llama-2-13b-chat-hf, e.g.
gdb --args python3 -m lmdeploy serve api_server /workdir/Llama-2-13b-chat-hf
# Set directories in gdb
Reading symbols from python3...
(gdb) set directories /workdir/lmdeploy
# Set a breakpoint using the relative path, e.g.
(gdb) b src/turbomind/models/llama/BlockManager.cc:104
# When it shows
# ```
# No source file named src/turbomind/models/llama/BlockManager.cc.
# Make breakpoint pending on future shared library load? (y or [n])
# ```
# Just type `y` and press enter
# Run
(gdb) r
# (Optional) Use https://github.com/InternLM/lmdeploy/blob/main/benchmark/profile_restful_api.py to send a request
python3 profile_restful_api.py --backend lmdeploy --dataset-path /workdir/ShareGPT_V3_unfiltered_cleaned_split.json --num_prompts 1
````
## Using GDB
Refer to [GDB Execution Commands](https://lldb.llvm.org/use/map.html) and happy debugging.
---
# Context length extrapolation
Long text extrapolation refers to the ability of LLM to handle data longer than the training text during inference. TurboMind engine now support [LlamaDynamicNTKScalingRotaryEmbedding](https://github.com/huggingface/transformers/blob/main/src/transformers/models/llama/modeling_llama.py#L178) and the implementation is consistent with huggingface.
## Usage
You can enable the context length extrapolation abality by modifying the TurbomindEngineConfig. Edit the `session_len` to the expected length and change `rope_scaling_factor` to a number no less than 1.0.
Take `internlm2_5-7b-chat-1m` as an example, which supports a context length of up to **1 million tokens**:
```python
from lmdeploy import pipeline, GenerationConfig, TurbomindEngineConfig
backend_config = TurbomindEngineConfig(
rope_scaling_factor=2.5,
session_len=1000000,
max_batch_size=1,
cache_max_entry_count=0.7,
tp=4)
pipe = pipeline('internlm/internlm2_5-7b-chat-1m', backend_config=backend_config)
prompt = 'Use a long prompt to replace this sentence'
gen_config = GenerationConfig(top_p=0.8,
top_k=40,
temperature=0.8,
max_new_tokens=1024)
response = pipe(prompt, gen_config=gen_config)
print(response)
```
## Evaluation
We use several methods to evaluate the long-context-length inference ability of LMDeploy, including [passkey retrieval](#passkey-retrieval), [needle in a haystack](#needle-in-a-haystack) and computing [perplexity](#perplexity)
### Passkey Retrieval
You can try the following code to test how many times LMDeploy can retrieval the special key.
```python
import numpy as np
from lmdeploy import pipeline
from lmdeploy import TurbomindEngineConfig
import time
session_len = 1000000
backend_config = TurbomindEngineConfig(
rope_scaling_factor=2.5,
session_len=session_len,
max_batch_size=1,
cache_max_entry_count=0.7,
tp=4)
pipe = pipeline('internlm/internlm2_5-7b-chat-1m', backend_config=backend_config)
def passkey_retrieval(session_len, n_round=5):
# create long context input
tok = pipe.tokenizer
task_description = 'There is an important info hidden inside a lot of irrelevant text. Find it and memorize them. I will quiz you about the important information there.'
garbage = 'The grass is green. The sky is blue. The sun is yellow. Here we go. There and back again.'
for _ in range(n_round):
start = time.perf_counter()
n_times = (session_len - 1000) // len(tok.encode(garbage))
n_garbage_prefix = np.random.randint(0, n_times)
n_garbage_suffix = n_times - n_garbage_prefix
garbage_prefix = ' '.join([garbage] * n_garbage_prefix)
garbage_suffix = ' '.join([garbage] * n_garbage_suffix)
pass_key = np.random.randint(1, 50000)
information_line = f'The pass key is {pass_key}. Remember it. {pass_key} is the pass key.' # noqa: E501
final_question = 'What is the pass key? The pass key is'
lines = [
task_description,
garbage_prefix,
information_line,
garbage_suffix,
final_question,
]
# inference
prompt = ' '.join(lines)
response = pipe([prompt])
print(pass_key, response)
end = time.perf_counter()
print(f'duration: {end - start} s')
passkey_retrieval(session_len, 5)
```
This test takes approximately 364 seconds per round when conducted on A100-80G GPUs
### Needle In A Haystack
[OpenCompass](https://github.com/open-compass/opencompass) offers very useful tools to perform needle-in-a-haystack evaluation. For specific instructions, please refer to the [guide](https://github.com/open-compass/opencompass/blob/main/docs/en/advanced_guides/needleinahaystack_eval.md).
### Perplexity
The following codes demonstrate how to use LMDeploy to calculate perplexity.
```python
from transformers import AutoTokenizer
from lmdeploy import TurbomindEngineConfig, pipeline
import numpy as np
# load model and tokenizer
model_repoid_or_path = 'internlm/internlm2_5-7b-chat-1m'
backend_config = TurbomindEngineConfig(
rope_scaling_factor=2.5,
session_len=1000000,
max_batch_size=1,
cache_max_entry_count=0.7,
tp=4)
pipe = pipeline(model_repoid_or_path, backend_config=backend_config)
tokenizer = AutoTokenizer.from_pretrained(model_repoid_or_path, trust_remote_code=True)
# get perplexity
text = 'Use a long prompt to replace this sentence'
input_ids = tokenizer.encode(text)
ppl = pipe.get_ppl(input_ids)[0]
print(ppl)
```
---
# Production Metrics
LMDeploy exposes a set of metrics via Prometheus, and provides visualization via Grafana.
## Setup Guide
This section describes how to set up the monitoring stack (Prometheus + Grafana) provided in the `lmdeploy/monitoring` directory.
## Prerequisites
- [Docker](https://docs.docker.com/engine/install/) and [Docker Compose](https://docs.docker.com/compose/install/) installed
- LMDeploy server running with metrics system enabled
## Usage (DP = 1)
1. **Start your LMDeploy server with metrics enabled**
```
lmdeploy serve api_server Qwen/Qwen2.5-7B-Instruct --enable-metrics
```
Replace the model path according to your needs.
By default, the metrics endpoint will be available at `http://:23333/metrics`.
2. **Navigate to the monitoring directory**
```
cd lmdeploy/monitoring
```
3. **Start the monitoring stack**
```
docker compose up
```
This command will start Prometheus and Grafana in the background.
4. **Access the monitoring interfaces**
- Prometheus: Open your web browser and go to http://localhost:9090.
- Grafana: Open your web browser and go to http://localhost:3000.
5. **Log in to Grafana**
- Default Username: `admin`
- Default Password: `admin` You will be prompted to change the password upon your first login.
6. **View the Dashboard**
The LMDeploy dashboard is pre-configured and should be available automatically.
## Usage (DP > 1)
1. **Start your LMDeploy server with metrics enabled**
As an example, we use the model `Qwen/Qwen2.5-7B-Instruct` with `DP=2, TP=2`. Start the service as follows:
```bash
# Proxy server
lmdeploy serve proxy --server-port 8000 --routing-strategy 'min_expected_latency' --serving-strategy Hybrid --log-level INFO
# API server
LMDEPLOY_DP_MASTER_ADDR=127.0.0.1 \
LMDEPLOY_DP_MASTER_PORT=29555 \
lmdeploy serve api_server \
Qwen/Qwen2.5-7B-Instruct \
--backend pytorch \
--tp 2 \
--dp 2 \
--proxy-url http://0.0.0.0:8000 \
--nnodes 1 \
--node-rank 0 \
--enable-metrics
```
You should be able to see multiple API servers added to the proxy server list. Details can be found in `lmdeploy/serve/proxy/proxy_config.json`.
For example, you may have the following API servers:
```
http://$host_ip:$api_server_port1
http://$host_ip:$api_server_port2
```
2. **Modify the Prometheus configuration**
When `DP > 1`, LMDeploy will launch one API server for each DP rank. If you want to monitor a specific API server, e.g. `http://$host_ip:$api_server_port1`, modify the configuration file `lmdeploy/monitoring/prometheus.yaml` as follows.
> Note that you should use the actual host machine IP instead of `127.0.0.1` here, since LMDeploy starts the API server using the actual host IP when `DP > 1`
```
global:
scrape_interval: 5s
evaluation_interval: 30s
scrape_configs:
- job_name: lmdeploy
static_configs:
- targets:
- '$host_ip:$api_server_port1' # <= Modify this
```
3. **Navigate to the monitoring folder and perform the same steps as described above**
## Troubleshooting
1. **Port conflicts**
Check if any services are occupying ports `23333` (LMDeploy server port), `9090` (Prometheus port), or `3000` (Grafana port). You can either stop the conflicting running ports or modify the config files as follows:
- Modify LMDeploy server port for Prometheus scrape
In `lmdeploy/monitoring/prometheus.yaml`
```
global:
scrape_interval: 5s
evaluation_interval: 30s
scrape_configs:
- job_name: lmdeploy
static_configs:
- targets:
- '127.0.0.1:23333' # <= Modify this LMDeploy server port 23333, need to match the running server port
```
- Modify Prometheus port
In `lmdeploy/monitoring/grafana/datasources/datasource.yaml`
```
apiVersion: 1
datasources:
- name: Prometheus
type: prometheus
access: proxy
url: http://localhost:9090 # <= Modify this Prometheus interface port 9090
isDefault: true
editable: false
```
- Modify Grafana port:
In `lmdeploy/monitoring/docker-compose.yaml`, for example, change the port to `3090`
Option 1: Add `GF_SERVER_HTTP_PORT` to the environment section.
```
environment:
- GF_AUTH_ANONYMOUS_ENABLED=true
- GF_SERVER_HTTP_PORT=3090 # <= Add this line
```
Option 2: Use port mapping.
```
grafana:
image: grafana/grafana:latest
container_name: grafana
ports:
- "3090:3000" # <= Host:Container port mapping
```
2. **No data on the dashboard**
- Create traffic
Try to send some requests to the LMDeploy server to create certain traffic
```
python3 benchmark/profile_restful_api.py --backend lmdeploy --num-prompts 5000 --dataset-path ShareGPT_V3_unfiltered_cleaned_split.json
```
After refreshing, you should be able to see data on the dashboard.
---
# PyTorchEngine Multi-Node Deployment Guide
To support larger-scale model deployment requirements, PyTorchEngine provides multi-node deployment support. Below are the detailed steps for deploying a `tp=16` model across two 8-GPU nodes.
## 1. Create Docker Containers (Optional)
To ensure consistency across the cluster environment, it is recommended to use Docker to set up the cluster. Create containers on each node as follows:
```bash
docker run -it \
--network host \
-v $MODEL_PATH:$CONTAINER_MODEL_PATH \
openmmlab/lmdeploy:latest
```
> \[!IMPORTANT\]
> Ensure that the model is placed in the same directory on all node containers.
## 2. Set Up the Cluster Using Ray
### 2.1 Start the Head Node
Select one node as the **head node** and run the following command in its container:
```bash
ray start --head --port=$DRIVER_PORT
```
### 2.2 Join the Cluster
On the other nodes, use the following command in their containers to join the cluster created by the head node:
```bash
ray start --address=$DRIVER_NODE_ADDR:$DRIVER_PORT
```
run `ray status` on head node to check the cluster.
> \[!IMPORTANT\]
> Ensure that `DRIVER_NODE_ADDR` is the address of the head node and `DRIVER_PORT` matches the port number used during the head node initialization.
## 3. Use LMDeploy Interfaces
In the head node's container, you can use all functionalities of PyTorchEngine as usual.
### 3.1 Start the Server
```bash
lmdeploy serve api_server \
$CONTAINER_MODEL_PATH \
--backend pytorch \
--tp 16
```
### 3.2 Use the Pipeline
```python
from lmdeploy import pipeline, PytorchEngineConfig
if __name__ == '__main__':
model_path = '/path/to/model'
backend_config = PytorchEngineConfig(tp=16)
with pipeline(model_path, backend_config=backend_config) as pipe:
outputs = pipe('Hakuna Matata')
```
> \[!NOTE\]
> PyTorchEngine will automatically choose the appropriate launch method (single-node/multi-node) based on the `tp` parameter and the number of devices available in the cluster. If you want to enforce the use of the Ray cluster, you can configure `distributed_executor_backend='ray'` in `PytorchEngineConfig` or use the environment variable `LMDEPLOY_EXECUTOR_BACKEND=ray`.
______________________________________________________________________
By following the steps above, you can successfully deploy PyTorchEngine in a multi-node environment and leverage the Ray cluster for distributed computing.
> \[!WARNING\]
> To achieve better performance, we recommend users to configure a higher-quality network environment (such as using [InfiniBand](https://en.wikipedia.org/wiki/InfiniBand)) to improve engine efficiency.
---
# PyTorchEngine Multithread
We have removed `thread_safe` mode from PytorchEngine since [PR2907](https://github.com/InternLM/lmdeploy/pull/2907). We encourage users to achieve high concurrency by using **service API** or **coroutines** whenever possible, for example:
```python
import asyncio
from lmdeploy import pipeline, PytorchEngineConfig
event_loop = asyncio.new_event_loop()
asyncio.set_event_loop(event_loop)
model_path = 'Llama-3.2-1B-Instruct'
pipe = pipeline(model_path, backend_config=PytorchEngineConfig())
async def _gather_output():
tasks = [
pipe.async_batch_infer('Hakuna Matata'),
pipe.async_batch_infer('giraffes are heartless creatures'),
]
return await asyncio.gather(*tasks)
output = asyncio.run(_gather_output())
print(output[0].text)
print(output[1].text)
```
If you do need multithreading, it would be easy to warp it like below:
```python
import threading
from queue import Queue
import asyncio
from lmdeploy import pipeline, PytorchEngineConfig
model_path = 'Llama-3.2-1B-Instruct'
async def _batch_infer(inque: Queue, outque: Queue, pipe):
while True:
if inque.empty():
await asyncio.sleep(0)
continue
input = inque.get_nowait()
output = await pipe.async_batch_infer(input)
outque.put(output)
def server(inques, outques):
event_loop = asyncio.new_event_loop()
asyncio.set_event_loop(event_loop)
pipe = pipeline(model_path, backend_config=PytorchEngineConfig())
for inque, outque in zip(inques, outques):
event_loop.create_task(_batch_infer(inque, outque, pipe))
event_loop.run_forever()
def client(inque, outque, message):
inque.put(message)
print(outque.get().text)
inques = [Queue(), Queue()]
outques = [Queue(), Queue()]
t_server = threading.Thread(target=server, args=(inques, outques))
t_client0 = threading.Thread(target=client, args=(inques[0], outques[0], 'Hakuna Matata'))
t_client1 = threading.Thread(target=client, args=(inques[1], outques[1], 'giraffes are heartless creatures'))
t_server.start()
t_client0.start()
t_client1.start()
t_client0.join()
t_client1.join()
```
> \[!WARNING\]
> This is NOT recommended, as multithreading introduces additional overhead, leading to unstable inference performance.
---
# lmdeploy.pytorch New Model Support
lmdeploy.pytorch is designed to simplify the support for new models and the development of prototypes. Users can adapt new models according to their own needs.
## Model Support
### Configuration Loading (Optional)
lmdeploy.pytorch initializes the engine based on the model's config file. If the parameter naming of the model to be integrated differs from common models in transformers, parsing errors may occur. A custom ConfigBuilder can be added to parse the configuration.
```python
# lmdeploy/pytorch/configurations/gemma.py
from lmdeploy.pytorch.config import ModelConfig
from .builder import AutoModelConfigBuilder
class GemmaModelConfigBuilder(AutoModelConfigBuilder):
@classmethod
def condition(cls, hf_config):
# Check if hf_config is suitable for this builder
return hf_config.model_type in ['gemma', 'gemma2']
@classmethod
def build(cls, hf_config, model_path: str = None):
# Use the hf_config loaded by transformers
# Construct the ModelConfig for the pytorch engine
return ModelConfig(hidden_size=hf_config.hidden_size,
num_layers=hf_config.num_hidden_layers,
num_attention_heads=hf_config.num_attention_heads,
num_key_value_heads=hf_config.num_key_value_heads,
bos_token_id=hf_config.bos_token_id,
eos_token_id=hf_config.eos_token_id,
head_dim=hf_config.head_dim,
vocab_size=hf_config.vocab_size)
```
The `lmdeploy.pytorch.check_env.check_model` function can be used to verify if the configuration can be parsed correctly.
### Implementing the Model
After ensuring that the configuration can be parsed correctly, you can start implementing the model logic. Taking the implementation of llama as an example, we need to create the model using the configuration file from transformers.
```python
class LlamaForCausalLM(nn.Module):
# Constructor, builds the model with the given config
# ctx_mgr is the context manager, which can be used to pass engine configurations or additional parameters
def __init__(self,
config: LlamaConfig,
ctx_mgr: StepContextManager,
dtype: torch.dtype = None,
device: torch.device = None):
super().__init__()
self.config = config
self.ctx_mgr = ctx_mgr
# build LLamaModel
self.model = LlamaModel(config, dtype=dtype, device=device)
# build lm_head
self.lm_head = build_rowwise_linear(config.hidden_size,
config.vocab_size,
bias=False,
dtype=dtype,
device=device)
# Model inference function
# It is recommended to use the same parameters as below
def forward(
self,
input_ids: torch.Tensor,
position_ids: torch.Tensor,
past_key_values: List[List[torch.Tensor]],
attn_metadata: Any = None,
inputs_embeds: torch.Tensor = None,
**kwargs,
):
hidden_states = self.model(
input_ids=input_ids,
position_ids=position_ids,
past_key_values=past_key_values,
attn_metadata=attn_metadata,
inputs_embeds=inputs_embeds,
)
logits = self.lm_head(hidden_states)
logits = logits.float()
return logits
```
In addition to these, the following content needs to be added:
```python
class LlamaForCausalLM(nn.Module):
...
# Indicates whether the model supports cudagraph
# Can be a callable object, receiving forward inputs
# Dynamically determines if cudagraph is supported
support_cuda_graph = True
# Builds model inputs
# Returns a dictionary, the keys of which must be inputs to forward
def prepare_inputs_for_generation(
self,
past_key_values: List[List[torch.Tensor]],
inputs_embeds: Optional[torch.Tensor] = None,
context: StepContext = None,
):
...
# Loads weights
# The model's inputs are key-value pairs of the state dict
def load_weights(self, weights: Iterable[Tuple[str, torch.Tensor]]):
...
```
We have encapsulated many fused operators to simplify the model construction. These operators better support various functions such as tensor parallelism and quantization. We encourage developers to use these ops as much as possible.
```python
# Using predefined build_merged_colwise_linear, SiluAndMul, build_rowwise_linear
# Helps us build the model faster and without worrying about tensor concurrency, quantization, etc.
class LlamaMLP(nn.Module):
def __init__(self,
config: LlamaConfig,
dtype: torch.dtype = None,
device: torch.device = None):
super().__init__()
quantization_config = getattr(config, 'quantization_config', None)
# gate up
self.gate_up_proj = build_merged_colwise_linear(
config.hidden_size,
[config.intermediate_size, config.intermediate_size],
bias=config.mlp_bias,
dtype=dtype,
device=device,
quant_config=quantization_config,
is_tp=True,
)
# silu and mul
self.act_fn = SiluAndMul(inplace=True)
# down
self.down_proj = build_rowwise_linear(config.intermediate_size,
config.hidden_size,
bias=config.mlp_bias,
quant_config=quantization_config,
dtype=dtype,
device=device,
is_tp=True)
def forward(self, x):
"""forward."""
gate_up = self.gate_up_proj(x)
act = self.act_fn(gate_up)
return self.down_proj(act)
```
### Model Registration
To ensure that the developed model implementation can be used normally, we also need to register the model in `lmdeploy/pytorch/models/module_map.py`
```python
MODULE_MAP.update({
'LlamaForCausalLM':
f'{LMDEPLOY_PYTORCH_MODEL_PATH}.llama.LlamaForCausalLM',
})
```
If you do not wish to modify the model source code, you can also pass a custom module map from the outside, making it easier to integrate into other projects.
```
from lmdeploy import PytorchEngineConfig, pipeline
backend_config = PytorchEngineConfig(custom_module_map='/path/to/custom/module_map.py')
generator = pipeline(model_path, backend_config=backend_config)
```
---
# PyTorchEngine Profiling
We provide multiple profiler to analysis the performance of PyTorchEngine.
## PyTorch Profiler
We have integrated the PyTorch Profiler. You can enable it by setting environment variables when launching the pipeline or API server:
```bash
# enable profile cpu
export LMDEPLOY_PROFILE_CPU=1
# enable profile cuda
export LMDEPLOY_PROFILE_CUDA=1
# profile would start after 3 seconds
export LMDEPLOY_PROFILE_DELAY=3
# profile 10 seconds
export LMDEPLOY_PROFILE_DURATION=10
# prefix path to save profile files
export LMDEPLOY_PROFILE_OUT_PREFIX="/path/to/save/profile_"
```
After the program exits, the profiling data will be saved to the path specified by `LMDEPLOY_PROFILE_OUT_PREFIX` for performance analysis.
## Nsight System
We also support using Nsight System to profile NVIDIA devices.
### Single GPU
For single-GPU scenarios, simply use `nsys profile`:
```bash
nsys profile python your_script.py
```
### Multi-GPU
When using multi-GPU solutions like DP/TP/EP, set the following environment variables:
```bash
# enable nsight system
export LMDEPLOY_RAY_NSYS_ENABLE=1
# prefix path to save profile files
export LMDEPLOY_RAY_NSYS_OUT_PREFIX="/path/to/save/profile_"
```
Then launch the script or API server as usual (Do **NOT** use nsys profile here).
The profiling results will be saved under `LMDEPLOY_RAY_NSYS_OUT_PREFIX`. If `LMDEPLOY_RAY_NSYS_OUT_PREFIX` is not configured, you can find the results in `/tmp/ray/session_xxx/nsight`.
## Ray timeline
We use `ray` to support multi-device deployment. You can get the ray timeline with the environments below.
```bash
export LMDEPLOY_RAY_TIMELINE_ENABLE=1
export LMDEPLOY_RAY_TIMELINE_OUT_PATH="/path/to/save/timeline.json"
```
---
# Speculative Decoding
Speculative decoding is an optimization technique that introcude a lightweight draft model to propose multiple next tokens and then, the main model verify and choose the longest matched tokens in a forward pass. Compared with standard auto-regressive decoding, this methold lets the system generate multiple tokens at once.
> \[!NOTE\]
> This is an experimental feature in lmdeploy.
## Examples
Here are some examples.
### Eagle 3
#### Prepare
Install [flash-atten3 ](https://github.com/Dao-AILab/flash-attention?tab=readme-ov-file#flashattention-3-beta-release)
```shell
git clone --depth=1 https://github.com/Dao-AILab/flash-attention.git
cd flash-attention/hopper
python setup.py install
```
#### pipeline
```python
from lmdeploy import PytorchEngineConfig, pipeline
from lmdeploy.messages import SpeculativeConfig
if __name__ == '__main__':
model_path = 'meta-llama/Llama-3.1-8B-Instruct'
spec_cfg = SpeculativeConfig(
method='eagle3',
num_speculative_tokens=3,
model='yuhuili/EAGLE3-LLaMA3.1-Instruct-8B',
)
pipe = pipeline(model_path, backend_config=PytorchEngineConfig(max_batch_size=128), speculative_config=spec_cfg)
response = pipe(['Hi, pls intro yourself', 'Shanghai is'])
print(response)
```
#### serving
```shell
lmdeploy serve api_server \
meta-llama/Llama-3.1-8B-Instruct \
--backend pytorch \
--server-port 24545 \
--speculative-draft-model yuhuili/EAGLE3-LLaMA3.1-Instruct-8B \
--speculative-algorithm eagle3 \
--speculative-num-draft-tokens 3 \
--max-batch-size 128 \
--enable-metrics
```
### Deepseek MTP
#### Prepare
Install [FlashMLA](https://github.com/deepseek-ai/FlashMLA?tab=readme-ov-file#installation)
```shell
git clone https://github.com/deepseek-ai/FlashMLA.git flash-mla
cd flash-mla
git submodule update --init --recursive
pip install -v .
```
#### pipeline
```python
from lmdeploy import PytorchEngineConfig, pipeline
from lmdeploy.messages import SpeculativeConfig
if __name__ == '__main__':
model_path = 'deepseek-ai/DeepSeek-V3'
spec_cfg = SpeculativeConfig(
method='deepseek_mtp',
num_speculative_tokens=3,
)
pipe = pipeline(model_path,
backend_config=PytorchEngineConfig(tp=16, max_batch_size=128),
speculative_config=spec_cfg)
response = pipe(['Hi, pls intro yourself', 'Shanghai is'])
print(response)
```
#### serving
```shell
lmdeploy serve api_server \
deepseek-ai/DeepSeek-V3 \
--backend pytorch \
--server-port 24545 \
--tp 16 \
--speculative-algorithm deepseek_mtp \
--speculative-num-draft-tokens 3 \
--max-batch-size 128 \
--enable-metrics
```
---
# Structured output
Structured output, also known as guided decoding, forces the model to generate text that exactly matches a user-supplied JSON schema, grammar, or regex.
Both the PyTorch and Turbomind backends now support structured (schema-constrained) generation.
Below are examples for the pipeline API and the API server.
## pipeline
```python
from lmdeploy import pipeline
from lmdeploy.messages import GenerationConfig, PytorchEngineConfig
model = 'internlm/internlm2-chat-1_8b'
guide = {
'type': 'object',
'properties': {
'name': {
'type': 'string'
},
'skills': {
'type': 'array',
'items': {
'type': 'string',
'maxLength': 10
},
'minItems': 3
},
'work history': {
'type': 'array',
'items': {
'type': 'object',
'properties': {
'company': {
'type': 'string'
},
'duration': {
'type': 'string'
}
},
'required': ['company']
}
}
},
'required': ['name', 'skills', 'work history']
}
pipe = pipeline(model, backend_config=PytorchEngineConfig(), log_level='INFO')
gen_config = GenerationConfig(
response_format=dict(type='json_schema', json_schema=dict(name='test', schema=guide)))
response = pipe(['Make a self introduction please.'], gen_config=gen_config)
print(response)
```
## api_server
Firstly, start the api_server service for the InternLM2 model.
```shell
lmdeploy serve api_server internlm/internlm2-chat-1_8b --backend pytorch
```
The client can test using OpenAI’s python package: The output result is a response in JSON format.
```python
from openai import OpenAI
guide = {
'type': 'object',
'properties': {
'name': {
'type': 'string'
},
'skills': {
'type': 'array',
'items': {
'type': 'string',
'maxLength': 10
},
'minItems': 3
},
'work history': {
'type': 'array',
'items': {
'type': 'object',
'properties': {
'company': {
'type': 'string'
},
'duration': {
'type': 'string'
}
},
'required': ['company']
}
}
},
'required': ['name', 'skills', 'work history']
}
response_format=dict(type='json_schema', json_schema=dict(name='test',schema=guide))
messages = [{'role': 'user', 'content': 'Make a self-introduction please.'}]
client = OpenAI(api_key='YOUR_API_KEY', base_url='http://0.0.0.0:23333/v1')
model_name = client.models.list().data[0].id
response = client.chat.completions.create(
model=model_name,
messages=messages,
temperature=0.8,
response_format=response_format,
top_p=0.8)
print(response)
```
---
# Update Weights
LMDeploy supports update model weights online for scenes such as RL training. Here are the steps to do so.
## Step 1: Launch server
For pytorch backend you have to add `--distributed-executor-backend ray`.
```shell
lmdeploy serve api_server internlm/internlm2_5-7b-chat --server-port 23333 --distributed-executor-backend ray # for pytorch backend
```
## Step 2: Offloads weights & kv cache
Before update model weights, the server should offloads weights and kv cache.
```python
from lmdeploy.utils import serialize_state_dict
import requests
BASE_URL = 'http://0.0.0.0:23333'
api_key = 'sk-xxx'
headers = {
"Content-Type": "application/json",
"Authorization": f"Bearer {api_key}",
}
# offloads weights and kv cache with level=2
response = requests.post(f"{BASE_URL}/sleep", headers=headers, params=dict(tags=['weights', 'kv_cache'], level=2))
assert response.status_code == 200, response.status_code
# wake up weights, the server is ready for update weights
response = requests.post(f"{BASE_URL}/wakeup", headers=headers, params=dict(tags=['weights']))
assert response.status_code == 200, response.status_code
```
## Step 3: Update weights
Split model weights into multi segments and update through `update_weights` endpoint.
```python
segmented_state_dict: List[Dict[str, torch.Tensor]] = ...
num_segment = len(segmented_state_dict)
for seg_idx in range(num_segment):
serialized_data = serialize_state_dict(segmented_state_dict[seg_idx])
data = dict(serialized_named_tensors=serialized_data, finished=seg_idx == num_segment-1)
response = requests.post(f"{BASE_URL}/update_weights", headers=headers, json=data)
assert response.status_code == 200, f"response.status_code = {response.status_code}"
```
**Note**: For pytorch backend, lmdeploy also supports flattened bucket tensors:
```python
from lmdeploy.utils import serialize_state_dict, FlattenedTensorBucket, FlattenedTensorMetadata
segmented_state_dict: List[Dict[str, torch.Tensor]] = ...
num_segment = len(segmented_state_dict)
for seg_idx in range(num_segment):
named_tensors = list(segmented_state_dict[seg_idx].items())
bucket = FlattenedTensorBucket(named_tensors=named_tensors)
metadata = bucket.get_metadata()
flattened_tensor_data = dict(flattened_tensor=bucket.get_flattened_tensor(), metadata=metadata)
serialized_data = serialize_state_dict(flattened_tensor_data)
data = dict(serialized_named_tensors=serialized_data, finished=seg_idx == num_segment-1, load_format='flattened_bucket')
response = requests.post(f"{BASE_URL}/update_weights", headers=headers, json=data)
assert response.status_code == 200, f"response.status_code = {response.status_code}"
```
## Step 4: Wakeup server
After update model weights, the server should onloads kv cache and provide serving again with the new updated weights.
```python
response = requests.post(f"{BASE_URL}/wakeup", headers=headers, params=dict(tags=['kv_cache']))
assert response.status_code == 200, response.status_code
```
---
# TurboMind Benchmark on A100
All the following results are tested on A100-80G(x8) CUDA 11.8.
The tested lmdeploy version is `v0.2.0`
## Request Throughput Benchmark
- `batch`: the max batch size during inference
- `tp`: the number of GPU cards for tensor parallelism
- `num_prompts`: the number of prompts, i.e. the number of requests
- `PRS`: **R**equest **P**er **S**econd
- `FTL`: **F**irst **T**oken **L**atency
### FP16
| model | batch | tp | num_promts | RPS | FTL(ave)(s) | FTL(min)(s) | FTL(max)(s) | 50%(s) | 75%(s) | 95%(s) | 99%(s) | throughput(out tok/s) | throughput(total tok/s) |
| ------------ | ----- | --- | ---------- | ------ | ----------- | ----------- | ----------- | ------ | ------ | ------ | ------ | --------------------- | ----------------------- |
| llama2-7b | 256 | 1 | 3000 | 14.556 | 0.526 | 0.092 | 4.652 | 0.066 | 0.101 | 0.155 | 0.220 | 3387.419 | 6981.159 |
| llama2-13b | 128 | 1 | 3000 | 7.950 | 0.352 | 0.075 | 4.193 | 0.051 | 0.067 | 0.138 | 0.202 | 1850.145 | 3812.978 |
| internlm-20b | 128 | 2 | 3000 | 10.291 | 0.287 | 0.073 | 3.845 | 0.053 | 0.072 | 0.113 | 0.161 | 2053.266 | 4345.057 |
| llama2-70b | 256 | 4 | 3000 | 7.231 | 1.075 | 0.139 | 14.524 | 0.102 | 0.153 | 0.292 | 0.482 | 1682.738 | 3467.969 |
## Static Inference Benchmark
- `batch`: the max batch size during inference
- `tp`: the number of GPU cards for tensor parallelism
- `prompt_tokens`: the number of input tokens
- `output_tokens`: the number of generated tokens
- `throughput`: the number of generated tokens per second
- `FTL`: **F**irst **T**oken **L**atency
### FP16 llama2-7b
| batch | tp | prompt_tokens | output_tokens | throughput(out tok/s) | mem(GB) | FTL(ave)(s) | FTL(min)(s) | FTL(max)(s) | 50%(s) | 75%(s) | 95%(s) | 99%(s) |
| ----- | --- | ------------- | ------------- | --------------------- | ------- | ----------- | ----------- | ----------- | ------ | ------ | ------ | ------ |
| 1 | 1 | 1 | 128 | 100.02 | 76.55 | 0.011 | 0.01 | 0.011 | 0.009 | 0.009 | 0.01 | 0.011 |
| 1 | 1 | 128 | 128 | 102.21 | 76.59 | 0.022 | 0.022 | 0.022 | 0.01 | 0.01 | 0.01 | 0.01 |
| 1 | 1 | 128 | 2048 | 98.92 | 76.59 | 0.022 | 0.022 | 0.022 | 0.01 | 0.01 | 0.01 | 0.01 |
| 1 | 1 | 2048 | 128 | 86.1 | 76.77 | 0.139 | 0.139 | 0.14 | 0.01 | 0.01 | 0.01 | 0.011 |
| 1 | 1 | 2048 | 2048 | 93.78 | 76.77 | 0.14 | 0.139 | 0.141 | 0.011 | 0.011 | 0.011 | 0.011 |
| 16 | 1 | 1 | 128 | 1504.72 | 76.59 | 0.021 | 0.011 | 0.031 | 0.01 | 0.011 | 0.011 | 0.013 |
| 16 | 1 | 128 | 128 | 1272.47 | 76.77 | 0.129 | 0.023 | 0.149 | 0.011 | 0.011 | 0.012 | 0.014 |
| 16 | 1 | 128 | 2048 | 1010.62 | 76.77 | 0.13 | 0.023 | 0.144 | 0.015 | 0.018 | 0.02 | 0.021 |
| 16 | 1 | 2048 | 128 | 348.87 | 78.3 | 2.897 | 0.143 | 3.576 | 0.02 | 0.021 | 0.022 | 0.025 |
| 16 | 1 | 2048 | 2048 | 601.63 | 78.3 | 2.678 | 0.142 | 3.084 | 0.025 | 0.028 | 0.03 | 0.031 |
| 32 | 1 | 1 | 128 | 2136.73 | 76.62 | 0.079 | 0.014 | 0.725 | 0.011 | 0.012 | 0.013 | 0.021 |
| 32 | 1 | 128 | 128 | 2125.47 | 76.99 | 0.214 | 0.022 | 0.359 | 0.012 | 0.013 | 0.014 | 0.035 |
| 32 | 1 | 128 | 2048 | 1462.12 | 76.99 | 0.2 | 0.026 | 0.269 | 0.021 | 0.026 | 0.031 | 0.033 |
| 32 | 1 | 2048 | 128 | 450.43 | 78.3 | 4.288 | 0.143 | 5.267 | 0.031 | 0.032 | 0.034 | 0.161 |
| 32 | 1 | 2048 | 2048 | 733.34 | 78.34 | 4.118 | 0.19 | 5.429 | 0.04 | 0.045 | 0.05 | 0.053 |
| 64 | 1 | 1 | 128 | 4154.81 | 76.71 | 0.042 | 0.013 | 0.21 | 0.012 | 0.018 | 0.028 | 0.041 |
| 64 | 1 | 128 | 128 | 3024.07 | 77.43 | 0.44 | 0.026 | 1.061 | 0.014 | 0.018 | 0.026 | 0.158 |
| 64 | 1 | 128 | 2048 | 1852.06 | 77.96 | 0.535 | 0.027 | 1.231 | 0.03 | 0.041 | 0.048 | 0.053 |
| 64 | 1 | 2048 | 128 | 493.46 | 78.4 | 6.59 | 0.142 | 16.235 | 0.046 | 0.049 | 0.055 | 0.767 |
| 64 | 1 | 2048 | 2048 | 755.65 | 78.4 | 39.105 | 0.142 | 116.285 | 0.047 | 0.049 | 0.051 | 0.207 |
---
# Benchmark
Please install the lmdeploy precompiled package and download the script and the test dataset:
```shell
pip install lmdeploy
# clone the repo to get the benchmark script
git clone --depth=1 https://github.com/InternLM/lmdeploy
cd lmdeploy
# switch to the tag corresponding to the installed version:
git fetch --tags
# Check the installed lmdeploy version:
pip show lmdeploy | grep Version
# Then, check out the corresponding tag (replace with the version string):
git checkout
# download the test dataset
wget https://huggingface.co/datasets/anon8231489123/ShareGPT_Vicuna_unfiltered/resolve/main/ShareGPT_V3_unfiltered_cleaned_split.json
```
## Benchmark offline pipeline API
```shell
python3 benchmark/profile_pipeline_api.py ShareGPT_V3_unfiltered_cleaned_split.json meta-llama/Meta-Llama-3-8B-Instruct
```
For a comprehensive list of available arguments, please execute `python3 benchmark/profile_pipeline_api.py -h`
## Benchmark offline engine API
```shell
python3 benchmark/profile_throughput.py ShareGPT_V3_unfiltered_cleaned_split.json meta-llama/Meta-Llama-3-8B-Instruct
```
Detailed argument specification can be retrieved by running `python3 benchmark/profile_throughput.py -h`
## Benchmark online serving
Launch the server first (you may refer [here](../llm/api_server.md) for guide) and run the following command:
```shell
python3 benchmark/profile_restful_api.py --backend lmdeploy --num-prompts 5000 --dataset-path ShareGPT_V3_unfiltered_cleaned_split.json
```
For detailed argument specification of `profile_restful_api.py`, please run the help command `python3 benchmark/profile_restful_api.py -h`.
---
# Model Evaluation Guide
This document describes how to evaluate a model's capabilities on academic datasets using OpenCompass and LMDeploy. The complete evaluation process consists of two main stages: inference stage and evaluation stage.
During the inference stage, the target model is first deployed as an inference service using LMDeploy. OpenCompass then sends dataset content as requests to this service and collects the generated responses.
In the evaluation stage, the OpenCompass evaluation model `opencompass/CompassVerifier-32B` is deployed as a service via LMDeploy. OpenCompass subsequently submits the inference results to this service to obtain final evaluation scores.
If sufficient computational resources are available, please refer to the [End-to-End Evaluation](#end-to-end-evaluation) section for complete workflow execution. Otherwise, we recommend following the [Step-by-Step Evaluation](#step-by-step-evaluation) section to execute both stages sequentially.
## Environment Setup
```shell
pip install lmdeploy
pip install "opencompass[full]"
# Download the lmdeploy source code, which will be used in subsequent steps to access eval script and configuration
git clone --depth=1 https://github.com/InternLM/lmdeploy.git
```
It is recommended to install LMDeploy and OpenCompass in separate Python virtual environments to avoid potential dependency conflicts.
## End-to-End Evaluation
1. **Deploy Target Model**
```shell
lmdeploy serve api_server --server-port 10000 <--other-options>
```
2. **Deploy Evaluation Model (Judger)**
```shell
lmdeploy serve api_server opencompass/CompassVerifier-32B --server-port 20000 --tp 2
```
3. **Generate Evaluation Configuration and Execute**
```shell
cd {the/root/path/of/lmdeploy/repo}
## Specify the dataset path. OC will download the datasets automatically if they are
## not found in the path
export HF_DATASETS_CACHE=/nvme4/huggingface_hub/datasets
export COMPASS_DATA_CACHE=/nvme1/shared/opencompass/.cache
python eval/eval.py {task_name} \
--mode all \
--api-server http://{api-server-ip}:10000 \
--judger-server http://{judger-server-ip}:20000 \
-w {oc_output_dir}
```
For detailed usage instructions about `eval.py`, such as specifying evaluation datasets, please run `python eval/eval.py --help`.
After evaluation completion, results are saved in `{oc_output_dir}/{yyyymmdd_hhmmss}`, where `{yyyymmdd_hhmmss}` represents the task timestamp.
## Step-by-Step Evaluation
### Inference Stage
This stage generates model responses for the dataset.
1. **Deploy Target Model**
```shell
lmdeploy serve api_server --server-port 10000 <--other-options>
```
2. **Generate Inference Configuration and Execute**
```shell
cd {the/root/path/of/lmdeploy/repo}
## Specify the dataset path. OC will download the datasets automatically if they are
## not found in the path
export COMPASS_DATA_CACHE=/nvme1/shared/opencompass/.cache
export HF_DATASETS_CACHE=/nvme4/huggingface_hub/datasets
# Run inference task
python eval/eval.py {task_name} \
--mode infer \
--api-server http://{api-server-ip}:10000 \
-w {oc_output_dir}
```
For detailed usage instructions about `eval.py`, such as specifying evaluation datasets, please run `python eval/eval.py --help`.
### Evaluation Stage
This stage uses the evaluation model (Judger) to assess the quality of inference results.
1. **Deploy Evaluation Model (Judger)**
```shell
lmdeploy serve api_server opencompass/CompassVerifier-32B --server-port 20000 --tp 2 --session-len 65536
```
2. **Generate Evaluation Configuration and Execute**
```shell
cd {the/root/path/of/lmdeploy/repo}
## Specify the dataset path. OC will download the datasets automatically if they are
## not found in the path
export COMPASS_DATA_CACHE=/nvme1/shared/opencompass/.cache
export HF_DATASETS_CACHE=/nvme4/huggingface_hub/datasets
# Run evaluation task
opencompass /path/to/judger_config.py -m eval -w {oc_output_dir} -r {yyyymmdd_hhmmss}
```
Important Notes:
- `task_name` must be identical to the one used in the inference stage
- The `oc_output_dir` specified with `-w` must match the directory used in the inference stage
- The `-r` parameter indicates "previous outputs & results" and should specify the timestamp directory generated during the inference stage (the subdirectory under `{oc_output_dir}`)
For detailed usage instructions about `eval.py`, such as specifying evaluation datasets, please run `python eval/eval.py --help`.
---
# Multi-Modal Model Evaluation Guide
This document describes how to evaluate multi-modal models' capabilities using VLMEvalKit and LMDeploy.
## Environment Setup
```shell
pip install lmdeploy
git clone https://github.com/open-compass/VLMEvalKit.git
cd VLMEvalKit && pip install -e .
```
It is recommended to install LMDeploy and VLMEvalKit in separate Python virtual environments to avoid potential dependency conflicts.
## Evaluations
1. **Deploy Large Multi-Modality Models (LMMs)**
```shell
lmdeploy serve api_server --server-port 23333 <--other-options>
```
2. **Config the Evaluation Settings**
Modify `VLMEvalKit/vlmeval/config.py`, add following LMDeploy API configurations in the `api_models` dictionary.
The `` is a custom name for your evaluation task (e.g., `lmdeploy_qwen3vl-4b`). The `model` parameter should match the `` used in the `lmdeploy serve` command.
```python
// filepath: VLMEvalKit/vlmeval/config.py
// ...existing code...
api_models = {
# lmdeploy api
...,
"": partial(
LMDeployAPI,
api_base="http://0.0.0.0:23333/v1/chat/completions",
model="",
retry=4,
timeout=1200,
temperature=0.7, # modify if needed
max_new_tokens=16384, # modify if needed
),
...
}
// ...existing code...
```
3. **Start Evaluations**
```shell
cd VLMEvalKit
python run.py --data OCRBench --model --api-nproc 16 --reuse --verbose --api 123
```
The `` should match the one used in the above config file.
Parameter explanations:
- `--data`: Specify the dataset for evaluation (e.g., `OCRBench`).
- `--model`: Specify the model name, which must match the `` in your `config.py`.
- `--api-nproc`: Specify the number of parallel API calls.
- `--reuse`: Reuse previous inference results to avoid re-running completed evaluations.
- `--verbose`: Enable verbose logging.
---
# FAQ
## ModuleNotFoundError
### No module named 'mmengine.config.lazy'
There is probably a cached mmengine in your local host. Try to install its latest version.
```shell
pip install --upgrade mmengine
```
### No module named '\_turbomind'
It may have been caused by the following reasons.
1. You haven't installed lmdeploy's precompiled package. `_turbomind` is the pybind package of c++ turbomind, which involves compilation. It is recommended that you install the precompiled one.
```shell
pip install lmdeploy[all]
```
2. If you have installed it and still encounter this issue, it is probably because you are executing turbomind-related command in the root directory of lmdeploy source code. Switching to another directory will fix it.
But if you are a developer, you often need to develop and compile locally. The efficiency of installing whl every time is too low. You can specify the path of lib after compilation through symbolic links.
```shell
# mkdir and build locally
mkdir bld && cd bld && bash ../generate.sh && ninja -j$(nproc)
# go to the lmdeploy subdirectory from bld and set symbolic links
cd ../lmdeploy && ln -s ../bld/lib .
# go to the lmdeploy root directory
cd ..
# use the python command such as check_env
python3 -m lmdeploy check_env
```
If you still encounter problems finding turbomind so, it means that maybe there are multiple Python environments on your local machine, and the version of Python does not match during compilation and execution. In this case, you need to set `PYTHON_EXECUTABLE` in `lmdeploy/generate.sh` according to the actual situation, such as `-DPYTHON_EXECUTABLE=/usr/local/bin/python3`. And it needs to be recompiled.
## Libs
### libnccl.so.2 not found
Make sure you have install lmdeploy (>=v0.0.5) through `pip install lmdeploy[all]`.
If the issue still exists after lmdeploy installation, add the path of `libnccl.so.2` to environment variable LD_LIBRARY_PATH.
```shell
# Get the location of nvidia-nccl-cu11 package
pip show nvidia-nccl-cu11|grep Location
# insert the path of "libnccl.so.2" to LD_LIBRARY_PATH
export LD_LIBRARY_PATH={Location}/nvidia/nccl/lib:$LD_LIBRARY_PATH
```
### symbol cudaFreeAsync version libcudart.so.11.0 not defined in file libcudart.so.11.0 with link time reference
It's probably due to a low-version cuda toolkit. LMDeploy runtime requires a minimum CUDA version of 11.2
## Inference
### RuntimeError: \[TM\]\[ERROR\] CUDA runtime error: out of memory /workspace/lmdeploy/src/turbomind/utils/allocator.h
This is usually due to a disproportionately large memory ratio for the k/v cache, which is dictated by `TurbomindEngineConfig.cache_max_entry_count`.
The implications of this parameter have slight variations in different versions of lmdeploy. For specifics, please refer to the source code for the \[detailed notes\] (https://github.com/InternLM/lmdeploy/blob/52419bd5b6fb419a5e3aaf3c3b4dea874b17e094/lmdeploy/messages.py#L107)
If you encounter this issue while using the pipeline interface, please reduce the `cache_max_entry_count` in `TurbomindEngineConfig` like following:
```python
from lmdeploy import pipeline, TurbomindEngineConfig
backend_config = TurbomindEngineConfig(cache_max_entry_count=0.2)
pipe = pipeline('internlm/internlm2_5-7b-chat',
backend_config=backend_config)
response = pipe(['Hi, pls intro yourself', 'Shanghai is'])
print(response)
```
If OOM occurs when you run CLI tools, please pass `--cache-max-entry-count` to decrease k/v cache memory ratio. For example:
```shell
# chat command
lmdeploy chat internlm/internlm2_5-7b-chat --cache-max-entry-count 0.2
# server command
lmdeploy serve api_server internlm/internlm2_5-7b-chat --cache-max-entry-count 0.2
```
## Serve
### Api Server Fetch Timeout
The image URL fetch timeout for the API server can be configured via the environment variable `LMDEPLOY_FETCH_TIMEOUT`.
By default, requests may take up to 10 seconds before timing out. See [lmdeploy/vl/utils.py](https://github.com/InternLM/lmdeploy/blob/7b6876eafcb842633e0efe8baabe5906d7beeeea/lmdeploy/vl/utils.py#L31) for usage.
## Quantization
### RuntimeError: \[enforce fail at inline_container.cc:337\] . unexpected pos 4566829760 vs 4566829656
Please check your disk space. This error is due to insufficient disk space when saving weights, which might be encountered when quantizing the 70B model
### ModuleNotFoundError: No module named 'flash_attn'
Quantizing `qwen` requires the installation of `flash-attn`. But based on feedback from community users, `flash-attn` can be challenging to install. Therefore, we have removed it from lmdeploy dependencies and now recommend that users install it it manually as needed.
---
# Get Started with Huawei Ascend
We currently support running lmdeploy on **Atlas 800T A3, Atlas 800T A2 and Atlas 300I Duo**.
The usage of lmdeploy on a Huawei Ascend device is almost the same as its usage on CUDA with PytorchEngine in lmdeploy.
Please read the original [Get Started](../get_started.md) guide before reading this tutorial.
Here is the [supported model list](../../supported_models/supported_models.md#PyTorchEngine-on-Other-Platforms).
> \[!IMPORTANT\]
> We have uploaded a docker image with KUNPENG CPU to aliyun.
> Please try to pull the image by following command:
>
> Atlas 800T A3:
>
> `docker pull crpi-4crprmm5baj1v8iv.cn-hangzhou.personal.cr.aliyuncs.com/lmdeploy_dlinfer/ascend:a3-latest`
>
> (Atlas 800T A3 currently supports only the Qwen-series with eager mode.)
>
> Atlas 800T A2:
>
> `docker pull crpi-4crprmm5baj1v8iv.cn-hangzhou.personal.cr.aliyuncs.com/lmdeploy_dlinfer/ascend:a2-latest`
>
> 300I Duo:
>
> `docker pull crpi-4crprmm5baj1v8iv.cn-hangzhou.personal.cr.aliyuncs.com/lmdeploy_dlinfer/ascend:300i-duo-latest`
>
> (Atlas 300I Duo currently works only with graph mode.)
>
> To build the environment yourself, refer to the Dockerfiles [here](../../../../docker).
## Offline batch inference
### LLM inference
Set `device_type="ascend"` in the `PytorchEngineConfig`:
```python
from lmdeploy import pipeline
from lmdeploy import PytorchEngineConfig
pipe = pipeline("internlm/internlm2_5-7b-chat",
backend_config=PytorchEngineConfig(tp=1, device_type="ascend"))
question = ["Shanghai is", "Please introduce China", "How are you?"]
response = pipe(question)
print(response)
```
### VLM inference
Set `device_type="ascend"` in the `PytorchEngineConfig`:
```python
from lmdeploy import pipeline, PytorchEngineConfig
from lmdeploy.vl import load_image
pipe = pipeline('OpenGVLab/InternVL2-2B',
backend_config=PytorchEngineConfig(tp=1, device_type='ascend'))
image = load_image('https://raw.githubusercontent.com/open-mmlab/mmdeploy/main/tests/data/tiger.jpeg')
response = pipe(('describe this image', image))
print(response)
```
## Online serving
### Serve a LLM model
Add `--device ascend` in the serve command.
```bash
lmdeploy serve api_server --backend pytorch --device ascend internlm/internlm2_5-7b-chat
```
Run the following commands to launch docker container for lmdeploy LLM serving:
```bash
docker run -it --net=host crpi-4crprmm5baj1v8iv.cn-hangzhou.personal.cr.aliyuncs.com/lmdeploy_dlinfer/ascend:a2-latest \
bash -i -c "lmdeploy serve api_server --backend pytorch --device ascend internlm/internlm2_5-7b-chat"
```
### Serve a VLM model
Add `--device ascend` in the serve command
```bash
lmdeploy serve api_server --backend pytorch --device ascend OpenGVLab/InternVL2-2B
```
Run the following commands to launch docker container for lmdeploy VLM serving:
```bash
docker run -it --net=host crpi-4crprmm5baj1v8iv.cn-hangzhou.personal.cr.aliyuncs.com/lmdeploy_dlinfer/ascend:a2-latest \
bash -i -c "lmdeploy serve api_server --backend pytorch --device ascend OpenGVLab/InternVL2-2B"
```
## Inference with Command line Interface
Add `--device ascend` in the serve command.
```bash
lmdeploy chat internlm/internlm2_5-7b-chat --backend pytorch --device ascend
```
Run the following commands to launch lmdeploy chatting after starting container:
```bash
docker run -it crpi-4crprmm5baj1v8iv.cn-hangzhou.personal.cr.aliyuncs.com/lmdeploy_dlinfer/ascend:a2-latest \
bash -i -c "lmdeploy chat --backend pytorch --device ascend internlm/internlm2_5-7b-chat"
```
## Quantization
### w4a16 AWQ
Run the following commands to quantize weights on Atlas 800T A2.
```bash
lmdeploy lite auto_awq $HF_MODEL --work-dir $WORK_DIR --device npu
```
Please check [supported_models](../../supported_models/supported_models.md) before use this feature.
### w8a8 SMOOTH_QUANT
Run the following commands to quantize weights on Atlas 800T A2.
```bash
lmdeploy lite smooth_quant $HF_MODEL --work-dir $WORK_DIR --device npu
```
Please check [supported_models](../../supported_models/supported_models.md) before use this feature.
### int8 KV-cache Quantization
Ascend backend has supported offline int8 KV-cache Quantization on eager mode.
Please refer this [doc](https://github.com/DeepLink-org/dlinfer/blob/main/docs/quant/ascend_kv_quant.md) for details.
## Limitations on 300I Duo
1. only support dtype=float16.
2. only support graph mode, please do not add --eager-mode.
---
# Cambricon
The usage of lmdeploy on a Cambricon device is almost the same as its usage on CUDA with PytorchEngine in lmdeploy.
Please read the original [Get Started](../get_started.md) guide before reading this tutorial.
Here is the [supported model list](../../supported_models/supported_models.md#PyTorchEngine-on-Other-Platforms).
> \[!IMPORTANT\]
> We have uploaded a docker image to aliyun.
> Please try to pull the image by following command:
>
> `docker pull crpi-4crprmm5baj1v8iv.cn-hangzhou.personal.cr.aliyuncs.com/lmdeploy_dlinfer/camb:latest`
> \[!IMPORTANT\]
> Currently, launching multi-device inference on Cambricon accelerators requires manually starting Ray.
>
> Below is an example for a 2-devices setup:
>
> ```shell
> export MLU_VISIBLE_DEVICES=0,1
> ray start --head --resources='{"MLU": 2}'
> ```
## Offline batch inference
### LLM inference
Set `device_type="camb"` in the `PytorchEngineConfig`:
```python
from lmdeploy import pipeline
from lmdeploy import PytorchEngineConfig
pipe = pipeline("internlm/internlm2_5-7b-chat",
backend_config=PytorchEngineConfig(tp=1, device_type="camb"))
question = ["Shanghai is", "Please introduce China", "How are you?"]
response = pipe(question)
print(response)
```
### VLM inference
Set `device_type="camb"` in the `PytorchEngineConfig`:
```python
from lmdeploy import pipeline, PytorchEngineConfig
from lmdeploy.vl import load_image
pipe = pipeline('OpenGVLab/InternVL2-2B',
backend_config=PytorchEngineConfig(tp=1, device_type='camb'))
image = load_image('https://raw.githubusercontent.com/open-mmlab/mmdeploy/main/tests/data/tiger.jpeg')
response = pipe(('describe this image', image))
print(response)
```
## Online serving
### Serve a LLM model
Add `--device camb` in the serve command.
```bash
lmdeploy serve api_server --backend pytorch --device camb internlm/internlm2_5-7b-chat
```
Run the following commands to launch docker container for lmdeploy LLM serving:
```bash
docker run -it --net=host crpi-4crprmm5baj1v8iv.cn-hangzhou.personal.cr.aliyuncs.com/lmdeploy_dlinfer/camb:latest \
bash -i -c "lmdeploy serve api_server --backend pytorch --device camb internlm/internlm2_5-7b-chat"
```
### Serve a VLM model
Add `--device camb` in the serve command
```bash
lmdeploy serve api_server --backend pytorch --device camb OpenGVLab/InternVL2-2B
```
Run the following commands to launch docker container for lmdeploy VLM serving:
```bash
docker run -it --net=host crpi-4crprmm5baj1v8iv.cn-hangzhou.personal.cr.aliyuncs.com/lmdeploy_dlinfer/camb:latest \
bash -i -c "lmdeploy serve api_server --backend pytorch --device camb OpenGVLab/InternVL2-2B"
```
## Inference with Command line Interface
Add `--device camb` in the serve command.
```bash
lmdeploy chat internlm/internlm2_5-7b-chat --backend pytorch --device camb
```
Run the following commands to launch lmdeploy chatting after starting container:
```bash
docker run -it crpi-4crprmm5baj1v8iv.cn-hangzhou.personal.cr.aliyuncs.com/lmdeploy_dlinfer/camb:latest \
bash -i -c "lmdeploy chat --backend pytorch --device camb internlm/internlm2_5-7b-chat"
```
---
# Quick Start
This tutorial shows the usage of LMDeploy on CUDA platform:
- Offline inference of LLM model and VLM model
- Serve a LLM or VLM model by the OpenAI compatible server
- Console CLI to interactively chat with LLM model
Before reading further, please ensure that you have installed lmdeploy as outlined in the [installation guide](installation.md)
## Offline batch inference
### LLM inference
```python
from lmdeploy import pipeline
pipe = pipeline('internlm/internlm2_5-7b-chat')
response = pipe(['Hi, pls intro yourself', 'Shanghai is'])
print(response)
```
When constructing the `pipeline`, if an inference engine is not designated between the TurboMind Engine and the PyTorch Engine, LMDeploy will automatically assign one based on [their respective capabilities](../supported_models/supported_models.md), with the TurboMind Engine taking precedence by default.
However, you have the option to manually select an engine. For instance,
```python
from lmdeploy import pipeline, TurbomindEngineConfig
pipe = pipeline('internlm/internlm2_5-7b-chat',
backend_config=TurbomindEngineConfig(
max_batch_size=32,
enable_prefix_caching=True,
cache_max_entry_count=0.8,
session_len=8192,
))
```
or,
```python
from lmdeploy import pipeline, PytorchEngineConfig
pipe = pipeline('internlm/internlm2_5-7b-chat',
backend_config=PytorchEngineConfig(
max_batch_size=32,
enable_prefix_caching=True,
cache_max_entry_count=0.8,
session_len=8192,
))
```
```{note}
The parameter "cache_max_entry_count" significantly influences the GPU memory usage.
It means the proportion of FREE GPU memory occupied by the K/V cache after the model weights are loaded.
The default value is 0.8. The K/V cache memory is allocated once and reused repeatedly, which is why it is observed that the built pipeline and the "api_server" mentioned later in the next consumes a substantial amount of GPU memory.
If you encounter an Out-of-Memory(OOM) error, you may need to consider lowering the value of "cache_max_entry_count".
```
When use the callable `pipe()` to perform token generation with given prompts, you can set the sampling parameters via `GenerationConfig` as below:
```python
from lmdeploy import GenerationConfig, pipeline
pipe = pipeline('internlm/internlm2_5-7b-chat')
prompts = ['Hi, pls intro yourself', 'Shanghai is']
response = pipe(prompts,
gen_config=GenerationConfig(
max_new_tokens=1024,
top_p=0.8,
top_k=40,
temperature=0.6
))
```
In the `GenerationConfig`, `top_k=1` or `temperature=0.0` indicates greedy search.
For more information about pipeline, please read the [detailed tutorial](../llm/pipeline.md)
### VLM inference
The usage of VLM inference pipeline is akin to that of LLMs, with the additional capability of processing image data with the pipeline.
For example, you can utilize the following code snippet to perform the inference with an InternVL model:
```python
from lmdeploy import pipeline
from lmdeploy.vl import load_image
pipe = pipeline('OpenGVLab/InternVL2-8B')
image = load_image('https://raw.githubusercontent.com/open-mmlab/mmdeploy/main/tests/data/tiger.jpeg')
response = pipe(('describe this image', image))
print(response)
```
In VLM pipeline, the default image processing batch size is 1. This can be adjusted by `VisionConfig`. For instance, you might set it like this:
```python
from lmdeploy import pipeline, VisionConfig
from lmdeploy.vl import load_image
pipe = pipeline('OpenGVLab/InternVL2-8B',
vision_config=VisionConfig(
max_batch_size=8
))
image = load_image('https://raw.githubusercontent.com/open-mmlab/mmdeploy/main/tests/data/tiger.jpeg')
response = pipe(('describe this image', image))
print(response)
```
However, the larger the image batch size, the greater risk of an OOM error, because the LLM component within the VLM model pre-allocates a massive amount of memory in advance.
We encourage you to manually choose between the TurboMind Engine and the PyTorch Engine based on their respective capabilities, as detailed in [the supported-models matrix](../supported_models/supported_models.md).
Additionally, follow the instructions in [LLM Inference](#llm-inference) section to reduce the values of memory-related parameters
## Serving
As demonstrated in the previous [offline batch inference](#offline-batch-inference) section, this part presents the respective serving methods for LLMs and VLMs.
### Serve a LLM model
```shell
lmdeploy serve api_server internlm/internlm2_5-7b-chat
```
This command will launch an OpenAI-compatible server on the localhost at port `23333`. You can specify a different server port by using the `--server-port` option.
For more options, consult the help documentation by running `lmdeploy serve api_server --help`. Most of these options align with the engine configuration.
To access the service, you can utilize the official OpenAI Python package `pip install openai`. Below is an example demonstrating how to use the entrypoint `v1/chat/completions`
```python
from openai import OpenAI
client = OpenAI(
api_key='YOUR_API_KEY',
base_url="http://0.0.0.0:23333/v1"
)
model_name = client.models.list().data[0].id
response = client.chat.completions.create(
model=model_name,
messages=[
{"role": "system", "content": "You are a helpful assistant."},
{"role": "user", "content": " provide three suggestions about time management"},
],
temperature=0.8,
top_p=0.8
)
print(response)
```
We encourage you to refer to the detailed guide for more comprehensive information about [serving with Docker](../llm/api_server.md), [function calls](../llm/api_server_tools.md) and other topics
### Serve a VLM model
```shell
lmdeploy serve api_server OpenGVLab/InternVL2-8B
```
```{note}
LMDeploy reuses the vision component from upstream VLM repositories. Each upstream VLM model may have different dependencies.
Consequently, LMDeploy has decided not to include the dependencies of the upstream VLM repositories in its own dependency list.
If you encounter an "ImportError" when using LMDeploy for inference with VLM models, please install the relevant dependencies yourself.
```
After the service is launched successfully, you can access the VLM service in a manner similar to how you would access the `gptv4` service by modifying the `api_key` and `base_url` parameters:
```python
from openai import OpenAI
client = OpenAI(api_key='YOUR_API_KEY', base_url='http://0.0.0.0:23333/v1')
model_name = client.models.list().data[0].id
response = client.chat.completions.create(
model=model_name,
messages=[{
'role':
'user',
'content': [{
'type': 'text',
'text': 'Describe the image please',
}, {
'type': 'image_url',
'image_url': {
'url':
'https://raw.githubusercontent.com/open-mmlab/mmdeploy/main/tests/data/tiger.jpeg',
},
}],
}],
temperature=0.8,
top_p=0.8)
print(response)
```
## Inference with Command line Interface
LMDeploy offers a very convenient CLI tool for users to chat with the LLM model locally. For example:
```shell
lmdeploy chat internlm/internlm2_5-7b-chat --backend turbomind
```
It is designed to assist users in checking and verifying whether LMDeploy supports their model, whether the chat template is applied correctly, and whether the inference results are delivered smoothly.
Another tool, `lmdeploy check_env`, aims to gather the essential environment information. It is crucial when reporting an issue to us, as it helps us diagnose and resolve the problem more effectively.
If you have any doubt about their usage, you can try using the `--help` option to obtain detailed information.
---
# Installation
LMDeploy is a python library for compressing, deploying, and serving Large Language Models(LLMs) and Vision-Language Models(VLMs).
Its core inference engines include TurboMind Engine and PyTorch Engine. The former is developed by C++ and CUDA, striving for ultimate optimization of inference performance, while the latter, developed purely in Python, aims to decrease the barriers for developers.
It supports LLMs and VLMs deployment on both Linux and Windows platform, with minimum requirement of CUDA version 11.3. Furthermore, it is compatible with the following NVIDIA GPUs:
- Volta(sm70): V100
- Turing(sm75): 20 series, T4
- Ampere(sm80,sm86): 30 series, A10, A16, A30, A100
- Ada Lovelace(sm89): 40 series
## Install with pip (Recommend)
It is recommended installing lmdeploy using pip in a conda environment (python 3.9 - 3.13):
```shell
conda create -n lmdeploy python=3.10 -y
conda activate lmdeploy
pip install lmdeploy
```
The default prebuilt package is compiled on **CUDA 12**. If CUDA 11+ (>=11.3) is required, you can install lmdeploy by:
```shell
export LMDEPLOY_VERSION=0.11.1
export PYTHON_VERSION=310
pip install https://github.com/InternLM/lmdeploy/releases/download/v${LMDEPLOY_VERSION}/lmdeploy-${LMDEPLOY_VERSION}+cu118-cp${PYTHON_VERSION}-cp${PYTHON_VERSION}-manylinux2014_x86_64.whl --extra-index-url https://download.pytorch.org/whl/cu118
```
## Install from source
By default, LMDeploy will build with NVIDIA CUDA support, utilizing both the Turbomind and PyTorch backends. Before installing LMDeploy, ensure you have successfully installed the CUDA Toolkit.
Once the CUDA toolkit is successfully set up, you can build and install LMDeploy with a single command:
```shell
pip install git+https://github.com/InternLM/lmdeploy.git
```
You can also explicitly disable the Turbomind backend to avoid CUDA compilation by setting the `DISABLE_TURBOMIND` environment variable:
```shell
DISABLE_TURBOMIND=1 pip install git+https://github.com/InternLM/lmdeploy.git
```
If you prefer a specific version instead of the `main` branch of LMDeploy, you can specify it in your command:
```shell
pip install https://github.com/InternLM/lmdeploy/archive/refs/tags/v0.11.0.zip
```
If you want to build LMDeploy with support for Ascend, Cambricon, or MACA, install LMDeploy with the corresponding `LMDEPLOY_TARGET_DEVICE` environment variable.
LMDeploy also supports installation on AMD GPUs with ROCm.
```shell
#The recommended way is to use the official ROCm PyTorch Docker image with pre-installed dependencies:
docker run -it \
--cap-add=SYS_PTRACE \
--security-opt seccomp=unconfined \
--device=/dev/kfd \
--device=/dev/dri \
--group-add video \
--ipc=host \
--network=host \
--shm-size 32G \
-v /root:/workspace \
rocm/pytorch:latest
#Once inside the container, install LMDeploy with ROCm support:
LMDEPLOY_TARGET_DEVICE=rocm pip install git+https://github.com/InternLM/lmdeploy.git
```
---
# MetaX-tech
The usage of lmdeploy on a MetaX-tech device is almost the same as its usage on CUDA with PytorchEngine in lmdeploy.
Please read the original [Get Started](../get_started.md) guide before reading this tutorial.
Here is the [supported model list](../../supported_models/supported_models.md#PyTorchEngine-on-Other-Platforms).
> \[!IMPORTANT\]
> We have uploaded a docker image to aliyun.
> Please try to pull the image by following command:
>
> `docker pull crpi-4crprmm5baj1v8iv.cn-hangzhou.personal.cr.aliyuncs.com/lmdeploy_dlinfer/maca:latest`
## Offline batch inference
### LLM inference
Set `device_type="maca"` in the `PytorchEngineConfig`:
```python
from lmdeploy import pipeline
from lmdeploy import PytorchEngineConfig
pipe = pipeline("internlm/internlm2_5-7b-chat",
backend_config=PytorchEngineConfig(tp=1, device_type="maca"))
question = ["Shanghai is", "Please introduce China", "How are you?"]
response = pipe(question)
print(response)
```
### VLM inference
Set `device_type="maca"` in the `PytorchEngineConfig`:
```python
from lmdeploy import pipeline, PytorchEngineConfig
from lmdeploy.vl import load_image
pipe = pipeline('OpenGVLab/InternVL2-2B',
backend_config=PytorchEngineConfig(tp=1, device_type='maca'))
image = load_image('https://raw.githubusercontent.com/open-mmlab/mmdeploy/main/tests/data/tiger.jpeg')
response = pipe(('describe this image', image))
print(response)
```
## Online serving
### Serve a LLM model
Add `--device maca` in the serve command.
```bash
lmdeploy serve api_server --backend pytorch --device maca internlm/internlm2_5-7b-chat
```
Run the following commands to launch docker container for lmdeploy LLM serving:
```bash
docker run -it --net=host crpi-4crprmm5baj1v8iv.cn-hangzhou.personal.cr.aliyuncs.com/lmdeploy_dlinfer/maca:latest \
bash -i -c "lmdeploy serve api_server --backend pytorch --device maca internlm/internlm2_5-7b-chat"
```
### Serve a VLM model
Add `--device maca` in the serve command
```bash
lmdeploy serve api_server --backend pytorch --device maca OpenGVLab/InternVL2-2B
```
Run the following commands to launch docker container for lmdeploy VLM serving:
```bash
docker run -it --net=host crpi-4crprmm5baj1v8iv.cn-hangzhou.personal.cr.aliyuncs.com/lmdeploy_dlinfer/maca:latest \
bash -i -c "lmdeploy serve api_server --backend pytorch --device maca OpenGVLab/InternVL2-2B"
```
## Inference with Command line Interface
Add `--device maca` in the serve command.
```bash
lmdeploy chat internlm/internlm2_5-7b-chat --backend pytorch --device maca
```
Run the following commands to launch lmdeploy chatting after starting container:
```bash
docker run -it crpi-4crprmm5baj1v8iv.cn-hangzhou.personal.cr.aliyuncs.com/lmdeploy_dlinfer/maca:latest \
bash -i -c "lmdeploy chat --backend pytorch --device maca internlm/internlm2_5-7b-chat"
```
---
# Load huggingface model directly
Starting from v0.1.0, Turbomind adds the ability to pre-process the model parameters on-the-fly while loading them from huggingface style models.
## Supported model type
Currently, Turbomind support loading three types of model:
1. A lmdeploy-quantized model hosted on huggingface.co, such as [llama2-70b-4bit](https://huggingface.co/lmdeploy/llama2-chat-70b-4bit), [internlm-chat-20b-4bit](https://huggingface.co/internlm/internlm-chat-20b-4bit), etc.
2. Other LM models on huggingface.co like Qwen/Qwen-7B-Chat
## Usage
### 1) A lmdeploy-quantized model
For models quantized by `lmdeploy.lite` such as [llama2-70b-4bit](https://huggingface.co/lmdeploy/llama2-chat-70b-4bit), [internlm-chat-20b-4bit](https://huggingface.co/internlm/internlm-chat-20b-4bit), etc.
```
repo_id=internlm/internlm-chat-20b-4bit
model_name=internlm-chat-20b
# or
# repo_id=/path/to/downloaded_model
# Inference by TurboMind
lmdeploy chat $repo_id --model-name $model_name
# Serving with Restful API
lmdeploy serve api_server $repo_id --model-name $model_name --tp 1
```
### 2) Other LM models
For other LM models such as Qwen/Qwen-7B-Chat or baichuan-inc/Baichuan2-7B-Chat. LMDeploy supported models can be viewed through `lmdeploy list`.
```
repo_id=Qwen/Qwen-7B-Chat
model_name=qwen-7b
# or
# repo_id=/path/to/Qwen-7B-Chat/local_path
# Inference by TurboMind
lmdeploy chat $repo_id --model-name $model_name
# Serving with Restful API
lmdeploy serve api_server $repo_id --model-name $model_name --tp 1
```
---
# Architecture of lmdeploy.pytorch
`lmdeploy.pytorch` is an inference engine in LMDeploy that offers a developer-friendly framework to users interested in deploying their own models and developing new features.
## Design
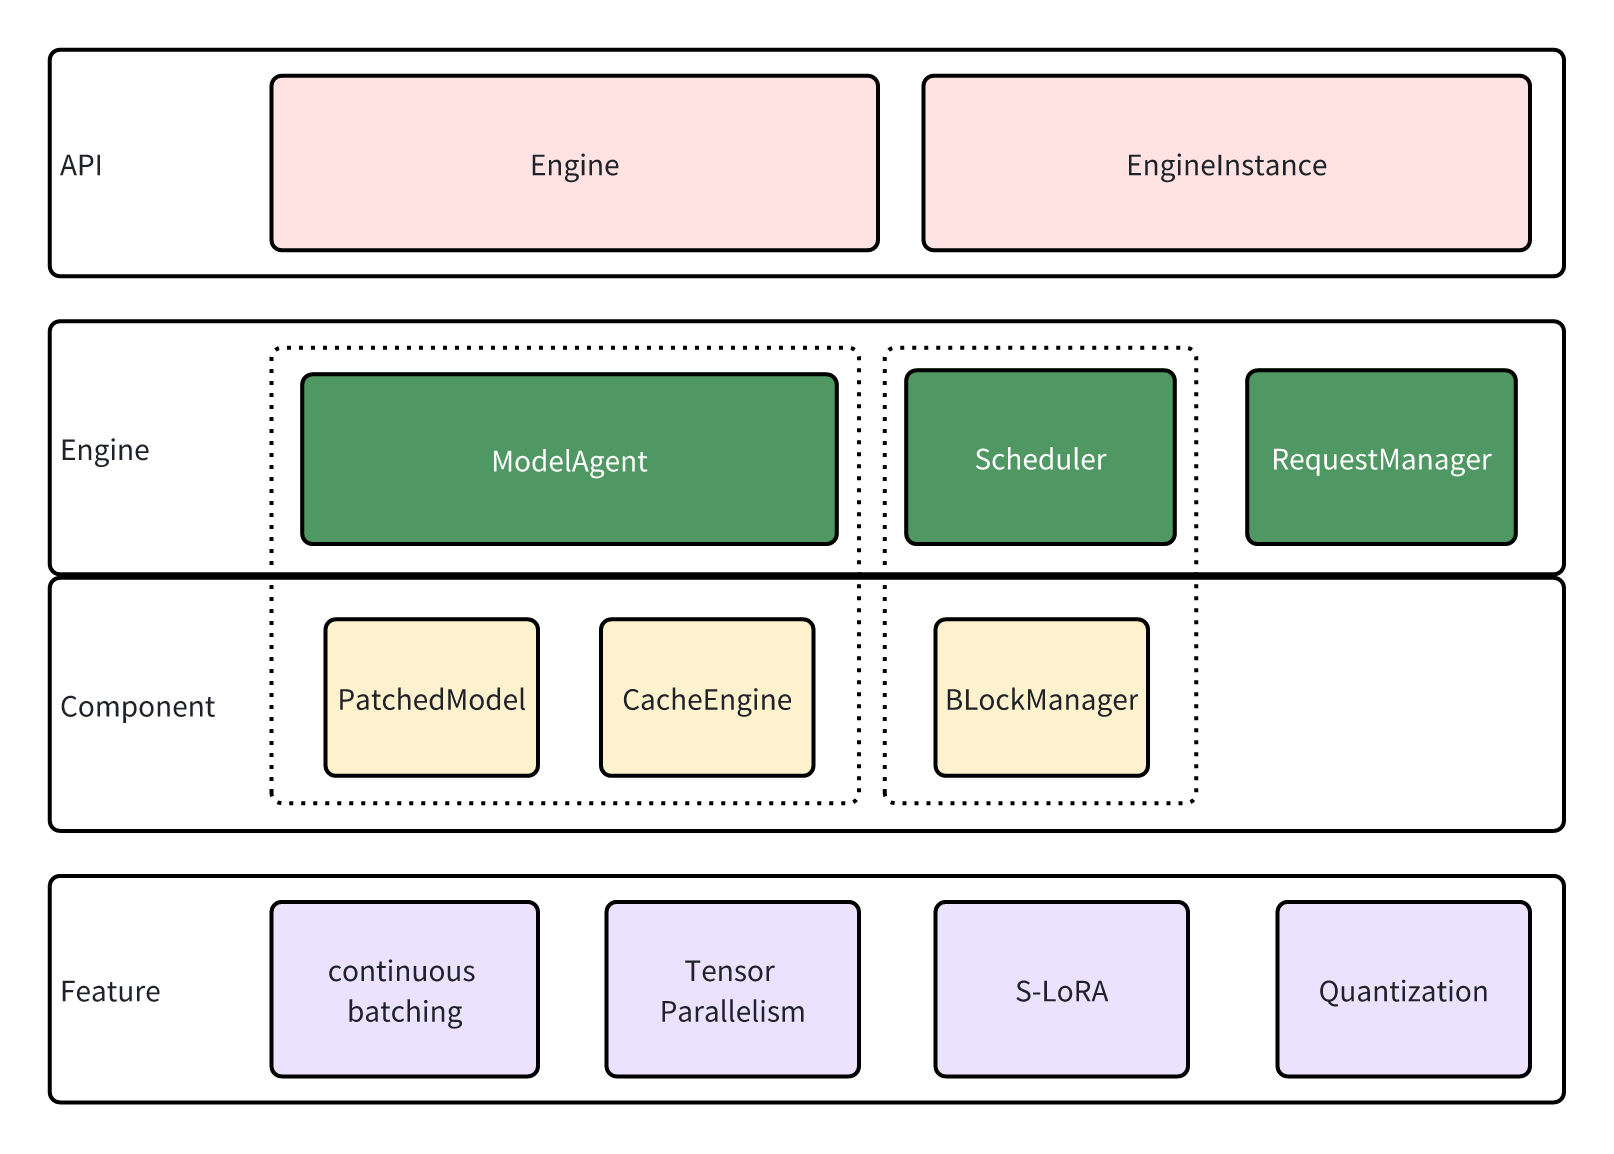
## API
`lmdeploy.pytorch` shares service interfaces with `Turbomind`, and the inference service is implemented by `Engine` and `EngineInstance`.
`EngineInstance` acts as the sender of inference requests, encapsulating and sending requests to the `Engine` to achieve streaming inference. The inference interface of `EngineInstance` is thread-safe, allowing instances in different threads to initiate requests simultaneously. The `Engine` will automatically perform batch processing based on the current system resources.
Engine is the request receiver and executor. It contain modules:
- `ModelAgent` serves as a wrapper for the model, handling tasks such as loading model/adapters, managing the cache, and implementing tensor parallelism.
- The `Scheduler` functions as the sequence manager, determining the sequences and adapters to participate in the current step, and subsequently allocating resources for them.
- `RequestManager` is tasked with sending and receiving requests. acting as the bridge between the `Engine` and `EngineInstance`.
## Engine
The Engine responses to requests in a sub-thread, following this looping sequence:
1. Get new requests through `RequestManager`. These requests are cached for now.
2. The `Scheduler` performs scheduling, deciding which cached requests should be processed and allocating resources for them.
3. `ModelAgent` swaps the caches according to the information provided by the Scheduler, then performs inference with the patched model.
4. The `Scheduler` updates the status of requests based to the inference results from `ModelAgent`.
5. `RequestManager` responds to the sender (`EngineInstance`), and the process return to step 1.
Now, Let's delve deeper into the modules that participate in these steps.
### Scheduler
In LLM inference, caching history key and value states is a common practice to prevent redundant computation. However, as history lengths vary in a batch of sequences, we need to pad the caches to enable batching inference. Unfortunately, this padding can lead to significant memory wastage, limiting the transformer's performance.
[vLLM](https://docs.vllm.ai) employs a paging-based strategy, allocating caches in page blocks to minimize extra memory usage. Our Scheduler module in the Engine shares a similar design, allocating resources based on sequence length in blocks and evicting unused blocks to support larger batching and longer session lengths.
Additionally, we support [S-LoRA](https://github.com/S-LoRA/S-LoRA), which enables the use of multiple LoRA adapters on limited memory.
### ModelAgent
`lmdeploy.pytorch` supports Tensor Parallelism, which leads to complex model initialization, cache allocation, and weight partitioning. ModelAgent is designed to abstract these complexities, allowing the Engine to focus solely on maintaining the pipeline.
ModelAgent consists of two components:
1. \`**patched_model**: : This is the transformer model after patching. In comparison to the original model, the patched model incorporates additional features such as Tensor Parallelism, quantization, and high-performance kernels.
2. **cache_engine**: This component manages the caches. It receives commands from the Scheduler and performs host-device page swaps. Only GPU blocks are utilized for caching key/value pairs and adapters.
## Features
`lmdeploy.pytorch` supports new features including:
- **Continuous Batching**: As the sequence length in a batch may vary, padding is often necessary for batching inference. However, large padding can lead to additional memory usage and unnecessary computation. To address this, we employ continuous batching, where all sequences are concatenated into a single long sequence to avoid padding.
- **Tensor Parallelism**: The GPU memory usage of LLM might exceed the capacity of a single GPU. Tensor parallelism is utilized to accommodate such models on multiple devices. Each device handles parts of the model simultaneously, and the results are gathered to ensure correctness.
- **S-LoRA**: LoRA adapters can be used to train LLM on devices with limited memory. While it's common practice to merge adapters into the model weights before deployment, loading multiple adapters in this way can consume a significant amount of memory. We support S-LoRA, where adapters are paged and swapped in when necessary. Special kernels are developed to support inference with unmerged adapters, enabling the loading of various adapters efficiently.
- **Quantization**: Model quantization involves performing computations with low precision. `lmdeploy.pytorch` supports w8a8 quantization. For more details, refer to [w8a8](../quantization/w8a8.md).
---
# Architecture of TurboMind
TurboMind is an inference engine that supports high throughput inference for conversational LLMs. It's based on NVIDIA's [FasterTransformer](https://github.com/NVIDIA/FasterTransformer). Major features of TurboMind include an efficient LLaMa implementation, the persistent batch inference model and an extendable KV cache manager.
## High level overview of TurboMind
```
+--------------------+
| API |
+--------------------+
| ^
request | | stream callback
v |
+--------------------+ fetch +-------------------+
| Persistent Batch | <-------> | KV Cache Manager |
+--------------------+ update +-------------------+
^
|
v
+------------------------+
| LLaMA implementation |
+------------------------+
| FT kernels & utilities |
+------------------------+
```
## Persistent Batch
You may recognize this feature as "continuous batching" in other repos. But during the concurrent development of the feature, we modeled the inference of a conversational LLM as a persistently running batch whose lifetime spans the entire serving process, hence the name "persistent batch". To put it simply
- The persistent batch as N pre-configured batch slots.
- Requests join the batch when there are free slots available. A batch slot is released and can be reused once the generation of the requested tokens is finished.
- __On cache-hits (see below), history tokens don't need to be decoded in every round of a conversation; generation of response tokens will start instantly.__
- The batch grows or shrinks automatically to minimize unnecessary computations.
## KV Cache Manager
The [KV cache manager](https://github.com/InternLM/lmdeploy/blob/main/src/turbomind/models/llama/SequenceManager.h) of TurboMind is a memory-pool-liked object that also implements LRU policy so that it can be viewed as a form of __cache of KV caches__. It works in the following way
- All device memory required for KV cache is allocated by the manager. A fixed number of slots is pre-configured to match the memory size of the system. Each slot corresponds to the memory required by the KV cache of a single sequence. Allocation chunk-size can be configure to implement pre-allocate/on-demand style allocation policy (or something in-between).
- When space for the KV cache of a new sequence is requested but no free slots left in the pool, the least recently used sequence is evicted from the cache and its device memory is directly reused by the new sequence. However, this is not the end of the story.
- Fetching sequence currently resides in one of the slots resembles a _cache-hit_, the history KV cache is returned directly and no context decoding is needed.
- Victim (evicted) sequences are not erased entirely but converted to its most compact form, i.e. token IDs. When the same sequence id is fetched later (_cache-miss_) the token IDs will be decoded by FMHA backed context decoder and converted back to KV cache.
- The eviction and conversion are handled automatically inside TurboMind and thus transparent to the users. __From the user's aspect, system that use TurboMind has access to infinite device memory.__
## LLaMa implementation
Our implementation of the LLaMa family models is modified from Gpt-NeoX model in FasterTransformer. In addition to basic refactoring and modifications to support the LLaMa family, we made some improvements to enable high performance inference of conversational models, most importantly:
- To support fast context decoding in multi-round conversations. We replaced the attention implementation in context decoder with a [cutlass](https://github.com/NVIDIA/cutlass)-based FMHA implementation that supports mismatched Q/K lengths.
- We introduced indirect buffer pointers in both context FMHA and generation FMHA to support the discontinuity in KV cache within the batch.
- To support concurrent inference with persistent batch, new synchronization mechanism was designed to orchestrate the worker threads running in tensor parallel mode.
- To maximize the throughput, we implement INT8 KV cache support to increase the max batch size. It's effective because in real-world serving scenarios, KV cache costs more memory and consumes more memory bandwidth than weights or other activations.
- We resolved an NCCL hang issue when running multiple model instances in TP mode within a single process, NCCL APIs are now guarded by host-side synchronization barriers.
## API
TurboMind supports a Python API that enables streaming output and tensor parallel mode.
## Difference between FasterTransformer and TurboMind
Apart of the features described above, there are still many minor differences that we don't cover in this document. Notably, many capabilities of FT are dropped in TurboMind because of the difference in objectives (e.g. prefix prompt, beam search, context embedding, sparse GEMM, GPT/T5/other model families, etc)
## FAQ
### Supporting Huggingface models
For historical reasons, TurboMind's weight layout is based on [the original LLaMa implementation](https://github.com/facebookresearch/llama) (differ only by a transpose). The implementation in huggingface transformers uses a [different layout](https://github.com/huggingface/transformers/blob/45025d92f815675e483f32812caa28cce3a960e7/src/transformers/models/llama/convert_llama_weights_to_hf.py#L123C76-L123C76) for `W_q` and `W_k` which is handled in [deploy.py](https://github.com/InternLM/lmdeploy/blob/ff4648a1d09e5aec74cf70efef35bfaeeac552e0/lmdeploy/serve/turbomind/deploy.py#L398).
---
# TurboMind Config
TurboMind is one of the inference engines of LMDeploy. When using it to do model inference, you need to convert the input model into a TurboMind model. In the TurboMind model folder, besides model weight files, the TurboMind model also includes some other files, among which the most important is the configuration file `triton_models/weights/config.ini` that is closely related to inference performance.
If you are using LMDeploy version 0.0.x, please refer to the [turbomind 1.0 config](#turbomind-10-config) section to learn the relevant content in the configuration. Otherwise, please read [turbomind 2.0 config](#turbomind-2x-config) to familiarize yourself with the configuration details.
## TurboMind 2.x config
Take the `llama-2-7b-chat` model as an example. In TurboMind 2.x, its config.ini content is as follows:
```toml
[llama]
model_name = llama2
tensor_para_size = 1
head_num = 32
kv_head_num = 32
vocab_size = 32000
num_layer = 32
inter_size = 11008
norm_eps = 1e-06
attn_bias = 0
start_id = 1
end_id = 2
session_len = 4104
weight_type = fp16
rotary_embedding = 128
rope_theta = 10000.0
size_per_head = 128
group_size = 0
max_batch_size = 64
max_context_token_num = 1
step_length = 1
cache_max_entry_count = 0.5
cache_block_seq_len = 128
cache_chunk_size = 1
enable_prefix_caching = False
quant_policy = 0
max_position_embeddings = 2048
rope_scaling_factor = 0.0
use_logn_attn = 0
```
These parameters are composed of model attributes and inference parameters. Model attributes include the number of layers, the number of heads, dimensions, etc., and they are **not modifiable**.
```toml
model_name = llama2
head_num = 32
kv_head_num = 32
vocab_size = 32000
num_layer = 32
inter_size = 11008
norm_eps = 1e-06
attn_bias = 0
start_id = 1
end_id = 2
rotary_embedding = 128
rope_theta = 10000.0
size_per_head = 128
```
Comparing to TurboMind 1.0, the model attribute part in the config remains the same with TurboMind 1.0, while the inference parameters have changed
In the following sections, we will focus on introducing the inference parameters.
### data type
`weight_type` and `group_size` are the relevant parameters, **which cannot be modified**.
`weight_type` represents the data type of weights. Currently, `fp16` and `int4` are supported. `int4` represents 4bit weights. When `weight_type` is `int4`, `group_size` means the group size used when quantizing weights with `awq`. In LMDeploy prebuilt package, kernels with `group size = 128` are included.
### batch size
The maximum batch size is still set through `max_batch_size`. But its default value has been changed from 32 to 64, and `max_batch_size` is no longer related to `cache_max_entry_count`.
### k/v cache size
k/v cache memory is determined by `cache_block_seq_len` and `cache_max_entry_count`.
TurboMind 2.x has implemented Paged Attention, managing the k/v cache in blocks.
`cache_block_seq_len` represents the length of the token sequence in a k/v block with a default value 128. TurboMind calculates the memory size of the k/v block according to the following formula:
```
cache_block_seq_len * num_layer * kv_head_num * size_per_head * 2 * sizeof(kv_data_type)
```
For the llama2-7b model, when storing k/v as the `half` type, the memory of a k/v block is: `128 * 32 * 32 * 128 * 2 * sizeof(half) = 64MB`
The meaning of `cache_max_entry_count` varies depending on its value:
- When it's a decimal between (0, 1), `cache_max_entry_count` represents the percentage of memory used by k/v blocks. For example, if turbomind launches on a A100-80G GPU with `cache_max_entry_count` being `0.5`, the total memory used by the k/v blocks is `80 * 0.5 = 40G`.
- When lmdeploy is greater than v0.2.1, `cache_max_entry_count` determines the percentage of **free memory** for k/v blocks, defaulting to `0.8`. For example, with Turbomind on an A100-80G GPU running a 13b model, the memory for k/v blocks would be `(80 - 26) * 0.8 = 43.2G`, utilizing 80% of the free 54G.
- When it's an integer > 0, it represents the total number of k/v blocks
The `cache_chunk_size` indicates the size of the k/v cache chunk to be allocated each time new k/v cache blocks are needed. Different values represent different meanings:
- When it is an integer > 0, `cache_chunk_size` number of k/v cache blocks are allocated.
- When the value is -1, `cache_max_entry_count` number of k/v cache blocks are allocated.
- When the value is 0, `sqrt(cache_max_entry_count)` number of k/v cache blocks are allocated.
### prefix caching switch
Prefix caching feature can be controlled by setting the `enable_prefix_caching` parameter. When set to `True`, it indicates that the feature is enabled, and when set to `False`, it indicates that the feature is disabled. The default value is `False`.
Prefix caching feature is mainly applicable to scenarios where multiple requests have the same prompt prefix (such as system prompt). The k/v blocks of this identical prefix part will be cached and reused by multiple requests, thereby saving the overhead of redundant computations and improving inference performance. The longer the identical prompt prefix, the greater the performance improvement.
Since k/v block is the smallest granularity for reuse in prefix caching, if the identical prompt prefix is less than one block (prefix length \< cache_block_seq_len), there will be no improvement in inference performance.
### kv quantization and inference switch
- `quant_policy=4` means 4bit k/v quantization and inference
- `quant_policy=8` indicates 8bit k/v quantization and inference
Please refer to [kv quant](../quantization/kv_quant.md) for detailed guide.
### long context switch
By setting `rope_scaling_factor = 1.0`, you can enable the Dynamic NTK option of RoPE, which allows the model to use long-text input and output.
Regarding the principle of Dynamic NTK, please refer to:
1. https://www.reddit.com/r/LocalLLaMA/comments/14mrgpr/dynamically_scaled_rope_further_increases
2. https://kexue.fm/archives/9675
You can also turn on [LogN attention scaling](https://kexue.fm/archives/8823) by setting `use_logn_attn = 1`.
## TurboMind 1.0 config
Taking the `llama-2-7b-chat` model as an example, in TurboMind 1.0, its `config.ini` content is as follows:
```toml
[llama]
model_name = llama2
tensor_para_size = 1
head_num = 32
kv_head_num = 32
vocab_size = 32000
num_layer = 32
inter_size = 11008
norm_eps = 1e-06
attn_bias = 0
start_id = 1
end_id = 2
session_len = 4104
weight_type = fp16
rotary_embedding = 128
rope_theta = 10000.0
size_per_head = 128
group_size = 0
max_batch_size = 32
max_context_token_num = 4
step_length = 1
cache_max_entry_count = 48
cache_chunk_size = 1
use_context_fmha = 1
quant_policy = 0
max_position_embeddings = 2048
use_dynamic_ntk = 0
use_logn_attn = 0
```
These parameters are composed of model attributes and inference parameters. Model attributes include the number of layers, the number of heads, dimensions, etc., and they are **not modifiable**.
```toml
model_name = llama2
head_num = 32
kv_head_num = 32
vocab_size = 32000
num_layer = 32
inter_size = 11008
norm_eps = 1e-06
attn_bias = 0
start_id = 1
end_id = 2
rotary_embedding = 128
rope_theta = 10000.0
size_per_head = 128
```
In the following sections, we will focus on introducing the inference parameters.
### data type
`weight_type` and `group_size` are the relevant parameters, **which cannot be modified**.
`weight_type` represents the data type of weights. Currently, `fp16` and `int4` are supported. `int4` represents 4bit weights. When `weight_type` is `int4`, `group_size` means the group size used when quantizing weights with `awq`. In LMDeploy prebuilt package, kernels with `group size = 128` are included.
### batch size
`max_batch_size` determines the max size of a batch during inference. In general, the larger the batch size is, the higher the throughput is. But make sure that `max_batch_size <= cache_max_entry_count`
### k/v cache size
TurboMind allocates k/v cache memory based on `session_len`, `cache_chunk_size`, and `cache_max_entry_count`.
- `session_len` denotes the maximum length of a sequence, i.e., the size of the context window.
- `cache_chunk_size` indicates the size of k/v sequences to be allocated when new sequences are added.
- `cache_max_entry_count` signifies the maximum number of k/v sequences that can be cached.
### kv int8 switch
When initiating 8bit k/v inference, change `quant_policy = 4` and `use_context_fmha = 0`. Please refer to [kv int8](../quantization/kv_quant.md) for a guide.
### long context switch
By setting `use_dynamic_ntk = 1`, you can enable the Dynamic NTK option of RoPE, which allows the model to use long-text input and output.
Regarding the principle of Dynamic NTK, please refer to:
1. https://www.reddit.com/r/LocalLLaMA/comments/14mrgpr/dynamically_scaled_rope_further_increases
2. https://kexue.fm/archives/9675
You can also turn on [LogN attention scaling](https://kexue.fm/archives/8823) by setting `use_logn_attn = 1`.
---
# OpenAI Compatible Server
This article primarily discusses the deployment of a single LLM model across multiple GPUs on a single node, providing a service that is compatible with the OpenAI interface, as well as the usage of the service API.
For the sake of convenience, we refer to this service as `api_server`. Regarding parallel services with multiple models, please refer to the guide about [Request Distribution Server](proxy_server.md).
In the following sections, we will first introduce methods for starting the service, choosing the appropriate one based on your application scenario.
Next, we focus on the definition of the service's RESTful API, explore the various ways to interact with the interface, and demonstrate how to try the service through the Swagger UI or LMDeploy CLI tools.
## Launch Service
Take the [internlm2_5-7b-chat](https://huggingface.co/internlm/internlm2_5-7b-chat) model hosted on huggingface hub as an example, you can choose one the following methods to start the service.
### Option 1: Launching with lmdeploy CLI
```shell
lmdeploy serve api_server internlm/internlm2_5-7b-chat --server-port 23333
```
The arguments of `api_server` can be viewed through the command `lmdeploy serve api_server -h`, for instance, `--tp` to set tensor parallelism, `--session-len` to specify the max length of the context window, `--cache-max-entry-count` to adjust the GPU mem ratio for k/v cache etc.
### Option 2: Deploying with docker
With LMDeploy [official docker image](https://hub.docker.com/r/openmmlab/lmdeploy/tags), you can run OpenAI compatible server as follows:
```shell
docker run --runtime nvidia --gpus all \
-v ~/.cache/huggingface:/root/.cache/huggingface \
--env "HUGGING_FACE_HUB_TOKEN=" \
-p 23333:23333 \
--ipc=host \
openmmlab/lmdeploy:latest \
lmdeploy serve api_server internlm/internlm2_5-7b-chat
```
The parameters of `api_server` are the same with that mentioned in "[option 1](#option-1-launching-with-lmdeploy-cli)" section
### Option 3: Deploying to Kubernetes cluster
Connect to a running Kubernetes cluster and deploy the internlm2_5-7b-chat model service with [kubectl](https://kubernetes.io/docs/reference/kubectl/) command-line tool (replace `` with your huggingface hub token):
```shell
sed 's/{{HUGGING_FACE_HUB_TOKEN}}//' k8s/deployment.yaml | kubectl create -f - \
&& kubectl create -f k8s/service.yaml
```
In the example above the model data is placed on the local disk of the node (hostPath). Consider replacing it with high-availability shared storage if multiple replicas are desired, and the storage can be mounted into container using [PersistentVolume](https://kubernetes.io/docs/concepts/storage/persistent-volumes/).
## RESTful API
LMDeploy's RESTful API is compatible with the following three OpenAI interfaces:
- /v1/chat/completions
- /v1/models
- /v1/completions
You can overview and try out the offered RESTful APIs by the website `http://0.0.0.0:23333` as shown in the below image after launching the service successfully.
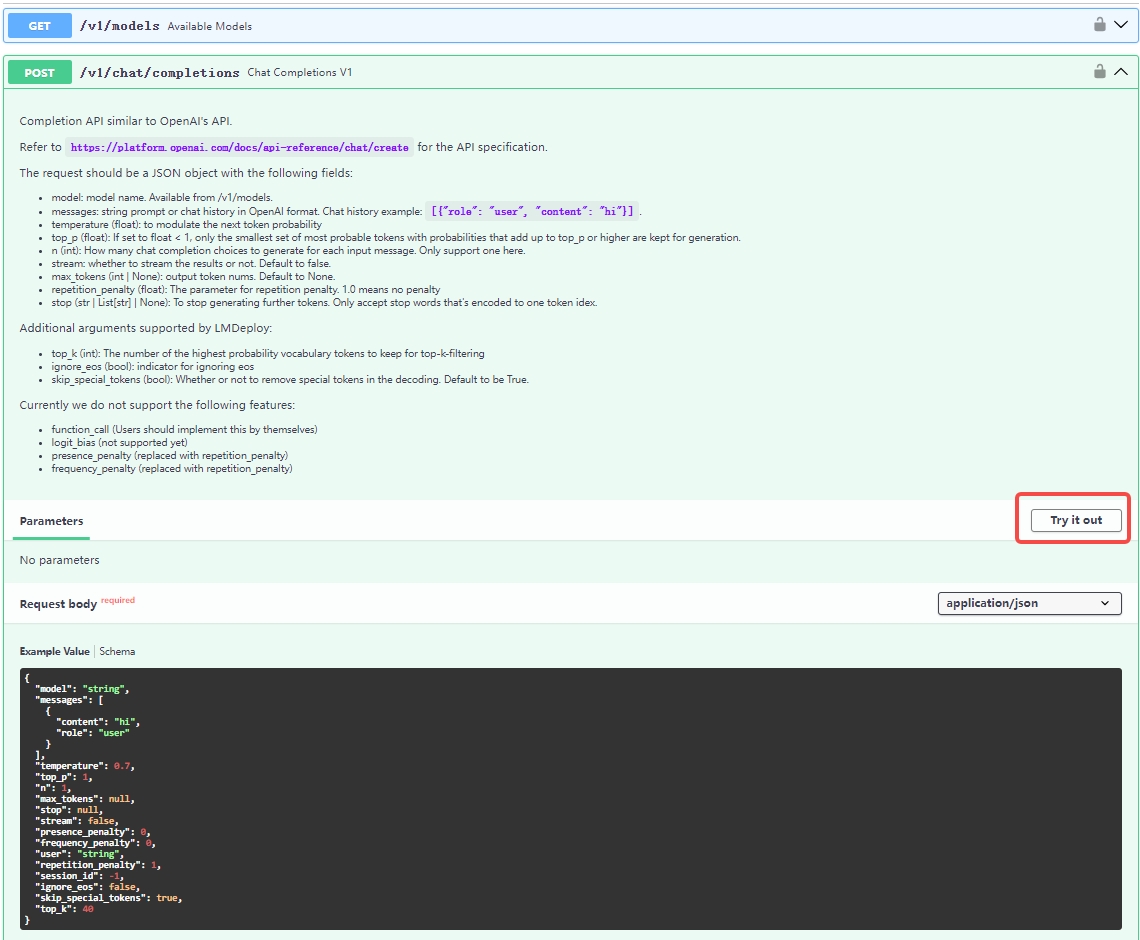
If you need to integrate the service into your own projects or products, we recommend the following approach:
### Integrate with `OpenAI`
Here is an example of interaction with the endpoint `v1/chat/completions` service via the openai package.
Before running it, please install the openai package by `pip install openai`
```python
from openai import OpenAI
client = OpenAI(
api_key='YOUR_API_KEY',
base_url="http://0.0.0.0:23333/v1"
)
model_name = client.models.list().data[0].id
response = client.chat.completions.create(
model=model_name,
messages=[
{"role": "system", "content": "You are a helpful assistant."},
{"role": "user", "content": " provide three suggestions about time management"},
],
temperature=0.8,
top_p=0.8
)
print(response)
```
If you want to use async functions, may try the following example:
```python
import asyncio
from openai import AsyncOpenAI
async def main():
client = AsyncOpenAI(api_key='YOUR_API_KEY',
base_url='http://0.0.0.0:23333/v1')
model_cards = await client.models.list()._get_page()
response = await client.chat.completions.create(
model=model_cards.data[0].id,
messages=[
{
'role': 'system',
'content': 'You are a helpful assistant.'
},
{
'role': 'user',
'content': ' provide three suggestions about time management'
},
],
temperature=0.8,
top_p=0.8)
print(response)
asyncio.run(main())
```
You can invoke other OpenAI interfaces using similar methods. For more detailed information, please refer to the [OpenAI API guide](https://platform.openai.com/docs/guides/text-generation)
### Integrate with lmdeploy `APIClient`
Below are some examples demonstrating how to visit the service through `APIClient`
If you want to use the `/v1/chat/completions` endpoint, you can try the following code:
```python
from lmdeploy.serve.openai.api_client import APIClient
api_client = APIClient('http://{server_ip}:{server_port}')
model_name = api_client.available_models[0]
messages = [{"role": "user", "content": "Say this is a test!"}]
for item in api_client.chat_completions_v1(model=model_name, messages=messages):
print(item)
```
For the `/v1/completions` endpoint, you can try:
```python
from lmdeploy.serve.openai.api_client import APIClient
api_client = APIClient('http://{server_ip}:{server_port}')
model_name = api_client.available_models[0]
for item in api_client.completions_v1(model=model_name, prompt='hi'):
print(item)
```
### Tools
May refer to [api_server_tools](./api_server_tools.md).
### Integrate with Java/Golang/Rust
May use [openapi-generator-cli](https://github.com/OpenAPITools/openapi-generator-cli) to convert `http://{server_ip}:{server_port}/openapi.json` to java/rust/golang client.
Here is an example:
```shell
$ docker run -it --rm -v ${PWD}:/local openapitools/openapi-generator-cli generate -i /local/openapi.json -g rust -o /local/rust
$ ls rust/*
rust/Cargo.toml rust/git_push.sh rust/README.md
rust/docs:
ChatCompletionRequest.md EmbeddingsRequest.md HttpValidationError.md LocationInner.md Prompt.md
DefaultApi.md GenerateRequest.md Input.md Messages.md ValidationError.md
rust/src:
apis lib.rs models
```
### Integrate with cURL
cURL is a tool for observing the output of the RESTful APIs.
- list served models `v1/models`
```bash
curl http://{server_ip}:{server_port}/v1/models
```
- chat `v1/chat/completions`
```bash
curl http://{server_ip}:{server_port}/v1/chat/completions \
-H "Content-Type: application/json" \
-d '{
"model": "internlm-chat-7b",
"messages": [{"role": "user", "content": "Hello! How are you?"}]
}'
```
- text completions `v1/completions`
```shell
curl http://{server_ip}:{server_port}/v1/completions \
-H 'Content-Type: application/json' \
-d '{
"model": "llama",
"prompt": "two steps to build a house:"
}'
```
## Launch multiple api servers
Following are two steps to launch multiple api servers through torchrun. Just create a python script with the following codes.
1. Launch the proxy server through `lmdeploy serve proxy`. Get the correct proxy server url.
2. Launch the script through `torchrun --nproc_per_node 2 script.py InternLM/internlm2-chat-1_8b --proxy_url http://{proxy_node_name}:{proxy_node_port}`.**Note**: Please do not use `0.0.0.0:8000` here, instead, we input the real ip name, `11.25.34.55:8000` for example.
```python
import os
import socket
from typing import List, Literal
import fire
def get_host_ip():
try:
s = socket.socket(socket.AF_INET, socket.SOCK_DGRAM)
s.connect(('8.8.8.8', 80))
ip = s.getsockname()[0]
finally:
s.close()
return ip
def main(model_path: str,
tp: int = 1,
proxy_url: str = 'http://0.0.0.0:8000',
port: int = 23333,
backend: Literal['turbomind', 'pytorch'] = 'turbomind'):
local_rank = int(os.environ.get('LOCAL_RANK', -1))
world_size = int(os.environ.get('WORLD_SIZE', -1))
local_ip = get_host_ip()
if isinstance(port, List):
assert len(port) == world_size
port = port[local_rank]
else:
port += local_rank * 10
if (world_size - local_rank) % tp == 0:
rank_list = ','.join([str(local_rank + i) for i in range(tp)])
command = f'CUDA_VISIBLE_DEVICES={rank_list} lmdeploy serve api_server {model_path} '\
f'--server-name {local_ip} --server-port {port} --tp {tp} '\
f'--proxy-url {proxy_url} --backend {backend}'
print(f'running command: {command}')
os.system(command)
if __name__ == '__main__':
fire.Fire(main)
```
## FAQ
1. When user got `"finish_reason":"length"`, it means the session is too long to be continued. The session length can be
modified by passing `--session_len` to api_server.
2. When OOM appeared at the server side, please reduce the `cache_max_entry_count` of `backend_config` when launching the service.
3. Regarding the stop words, we only support characters that encode into a single index. Furthermore, there may be multiple indexes that decode into results containing the stop word. In such cases, if the number of these indexes is too large, we will only use the index encoded by the tokenizer. If you want use a stop symbol that encodes into multiple indexes, you may consider performing string matching on the streaming client side. Once a successful match is found, you can then break out of the streaming loop.
4. To customize a chat template, please refer to [chat_template.md](../advance/chat_template.md).
---
# Serving LoRA
## Launch LoRA
LoRA is currently only supported by the PyTorch backend. Its deployment process is similar to that of other models, and you can view the commands using lmdeploy `serve api_server -h`. Among the parameters supported by the PyTorch backend, there are configuration options for LoRA.
```txt
PyTorch engine arguments:
--adapters [ADAPTERS [ADAPTERS ...]]
Used to set path(s) of lora adapter(s). One can input key-value pairs in xxx=yyy format for multiple lora adapters. If only have one adapter, one can only input the path of the adapter.. Default:
None. Type: str
```
The user only needs to pass the Hugging Face model path of the LoRA weights in the form of a dictionary to `--adapters`.
```shell
lmdeploy serve api_server THUDM/chatglm2-6b --adapters mylora=chenchi/lora-chatglm2-6b-guodegang
```
After the service starts, you can find two available model names in the Swagger UI: ‘THUDM/chatglm2-6b’ and ‘mylora’. The latter is the key in the `--adapters` dictionary.
## Client usage
### CLI
When using the OpenAI endpoint, the `model` parameter can be used to select either the base model or a specific LoRA weight for inference. The following example chooses to use the provided `chenchi/lora-chatglm2-6b-guodegang` for inference.
```shell
curl -X 'POST' \
'http://localhost:23334/v1/chat/completions' \
-H 'accept: application/json' \
-H 'Content-Type: application/json' \
-d '{
"model": "mylora",
"messages": [
{
"content": "hi",
"role": "user"
}
]
}'
```
And here is the output:
```json
{
"id": "2",
"object": "chat.completion",
"created": 1721377275,
"model": "mylora",
"choices": [
{
"index": 0,
"message": {
"role": "assistant",
"content": " 很高兴哪有什么赶凳儿?(按东北语说的“起早哇”),哦,东北人都学会外语了?",
"tool_calls": null
},
"logprobs": null,
"finish_reason": "stop"
}
],
"usage": {
"prompt_tokens": 17,
"total_tokens": 43,
"completion_tokens": 26
}
}
```
### python
```python
from openai import OpenAI
client = OpenAI(
api_key='YOUR_API_KEY',
base_url="http://0.0.0.0:23333/v1"
)
model_name = 'mylora'
response = client.chat.completions.create(
model=model_name,
messages=[
{"role": "user", "content": "hi"},
],
temperature=0.8,
top_p=0.8
)
print(response)
```
The printed response content is:
```txt
ChatCompletion(id='4', choices=[Choice(finish_reason='stop', index=0, logprobs=None, message=ChatCompletionMessage(content=' 很高兴能够见到你哪,我也在辐射区开了个愣儿,你呢,还活着。', role='assistant', function_call=None, tool_calls=None))], created=1721377497, model='mylora', object='chat.completion', service_tier=None, system_fingerprint=None, usage=CompletionUsage(completion_tokens=22, prompt_tokens=17, total_tokens=39))
```
---
# Reasoning Outputs
For models that support reasoning capabilities, such as [DeepSeek R1](https://huggingface.co/deepseek-ai/DeepSeek-R1), LMDeploy supports parsing the reasoning results in the service and separately records the reasoning content using `reasoning_content`.
## Examples
### DeepSeek R1
We can start the DeepSeek R1 model's api_server service just like launching other models. The difference is that we need to specify --reasoning-parser\` parameter.
```
lmdeploy serve api_server deepseek-ai/DeepSeek-R1-Distill-Qwen-1.5B --reasoning-parser deepseek-r1
```
Then, we can call the service's functionality from the client:
```python
from openai import OpenAI
openai_api_key = "Your API key"
openai_api_base = "http://0.0.0.0:23333/v1"
client = OpenAI(
api_key=openai_api_key,
base_url=openai_api_base,
)
models = client.models.list()
model = models.data[0].id
messages = [{"role": "user", "content": "9.11 and 9.8, which is greater?"}]
response = client.chat.completions.create(model=model, messages=messages, stream=True)
for stream_response in response:
print('reasoning content: ',stream_response.choices[0].delta.reasoning_content)
print('content: ', stream_response.choices[0].delta.content)
response = client.chat.completions.create(model=model, messages=messages, stream=False)
reasoning_content = response.choices[0].message.reasoning_content
content = response.choices[0].message.content
print("reasoning_content:", reasoning_content)
print("content:", content)
```
## Custom parser
You only need to add a similar parser class in `lmdeploy/serve/openai/reasoning_parser/reasoning_parser.py`.
```python
# import the required packages
from typing import Sequence, Union, Tuple, Optional
from lmdeploy.serve.openai.reasoning_parser import (
ReasoningParser, ReasoningParserManager)
from lmdeploy.serve.openai.protocol import (ChatCompletionRequest,
DeltaMessage)
# define a reasoning parser and register it to lmdeploy
# the name list in register_module can be used
# in --reasoning-parser.
@ReasoningParserManager.register_module(["example"])
class ExampleParser(ReasoningParser):
def __init__(self, tokenizer: object):
super().__init__(tokenizer)
def extract_reasoning_content_streaming(
self,
previous_text: str,
current_text: str,
delta_text: str,
previous_token_ids: Sequence[int],
current_token_ids: Sequence[int],
delta_token_ids: Sequence[int],
) -> Union[DeltaMessage, None]:
"""
Instance method that should be implemented for extracting reasoning
from an incomplete response; for use when handling reasoning calls and
streaming. Has to be an instance method because it requires state -
the current tokens/diffs, but also the information about what has
previously been parsed and extracted (see constructor)
"""
def extract_reasoning_content(
self, model_output: str, request: ChatCompletionRequest
) -> Tuple[Optional[str], Optional[str]]:
"""
Extract reasoning content from a complete model-generated string.
Used for non-streaming responses where we have the entire model response
available before sending to the client.
Args:
model_output (str): The model-generated string to extract reasoning content from.
request (ChatCompletionRequest): he request object that was used to generate the model_output.
Returns:
reasoning_content (str | None): The reasoning content.
final_output (str | None): The content.
"""
```
Similarly, the command to start the service becomes:
```
lmdeploy serve api_server $model_path --reasoning-parser example
```
---
# Tools Calling
LMDeploy supports tools for InternLM2, InternLM2.5, llama3.1 and Qwen2.5 models. Please use `--tool-call-parser` to specify
which parser to use when launching the api_server. Supported names are:
1. internlm
2. qwen
3. llama3
## Single Round Invocation
Please start the service of models before running the following example.
```python
from openai import OpenAI
tools = [
{
"type": "function",
"function": {
"name": "get_current_weather",
"description": "Get the current weather in a given location",
"parameters": {
"type": "object",
"properties": {
"location": {
"type": "string",
"description": "The city and state, e.g. San Francisco, CA",
},
"unit": {"type": "string", "enum": ["celsius", "fahrenheit"]},
},
"required": ["location"],
},
}
}
]
messages = [{"role": "user", "content": "What's the weather like in Boston today?"}]
client = OpenAI(api_key='YOUR_API_KEY',base_url='http://0.0.0.0:23333/v1')
model_name = client.models.list().data[0].id
response = client.chat.completions.create(
model=model_name,
messages=messages,
temperature=0.8,
top_p=0.8,
stream=False,
tools=tools)
print(response)
```
## Multiple Round Invocation
### InternLM
A complete toolchain invocation process can be demonstrated through the following example.
```python
from openai import OpenAI
def add(a: int, b: int):
return a + b
def mul(a: int, b: int):
return a * b
tools = [{
'type': 'function',
'function': {
'name': 'add',
'description': 'Compute the sum of two numbers',
'parameters': {
'type': 'object',
'properties': {
'a': {
'type': 'int',
'description': 'A number',
},
'b': {
'type': 'int',
'description': 'A number',
},
},
'required': ['a', 'b'],
},
}
}, {
'type': 'function',
'function': {
'name': 'mul',
'description': 'Calculate the product of two numbers',
'parameters': {
'type': 'object',
'properties': {
'a': {
'type': 'int',
'description': 'A number',
},
'b': {
'type': 'int',
'description': 'A number',
},
},
'required': ['a', 'b'],
},
}
}]
messages = [{'role': 'user', 'content': 'Compute (3+5)*2'}]
client = OpenAI(api_key='YOUR_API_KEY', base_url='http://0.0.0.0:23333/v1')
model_name = client.models.list().data[0].id
response = client.chat.completions.create(
model=model_name,
messages=messages,
temperature=0.8,
top_p=0.8,
stream=False,
tools=tools)
print(response)
func1_name = response.choices[0].message.tool_calls[0].function.name
func1_args = response.choices[0].message.tool_calls[0].function.arguments
func1_out = eval(f'{func1_name}(**{func1_args})')
print(func1_out)
messages.append(response.choices[0].message)
messages.append({
'role': 'tool',
'content': f'3+5={func1_out}',
'tool_call_id': response.choices[0].message.tool_calls[0].id
})
response = client.chat.completions.create(
model=model_name,
messages=messages,
temperature=0.8,
top_p=0.8,
stream=False,
tools=tools)
print(response)
func2_name = response.choices[0].message.tool_calls[0].function.name
func2_args = response.choices[0].message.tool_calls[0].function.arguments
func2_out = eval(f'{func2_name}(**{func2_args})')
print(func2_out)
```
Using the InternLM2-Chat-7B model to execute the above example, the following results will be printed.
```
ChatCompletion(id='1', choices=[Choice(finish_reason='tool_calls', index=0, logprobs=None, message=ChatCompletionMessage(content='', role='assistant', function_call=None, tool_calls=[ChatCompletionMessageToolCall(id='0', function=Function(arguments='{"a": 3, "b": 5}', name='add'), type='function')]))], created=1722852901, model='/nvme/shared_data/InternLM/internlm2-chat-7b', object='chat.completion', system_fingerprint=None, usage=CompletionUsage(completion_tokens=25, prompt_tokens=263, total_tokens=288))
8
ChatCompletion(id='2', choices=[Choice(finish_reason='tool_calls', index=0, logprobs=None, message=ChatCompletionMessage(content='', role='assistant', function_call=None, tool_calls=[ChatCompletionMessageToolCall(id='1', function=Function(arguments='{"a": 8, "b": 2}', name='mul'), type='function')]))], created=1722852901, model='/nvme/shared_data/InternLM/internlm2-chat-7b', object='chat.completion', system_fingerprint=None, usage=CompletionUsage(completion_tokens=25, prompt_tokens=293, total_tokens=318))
16
```
### Llama 3.1
Meta announces in [Llama3's official user guide](https://llama.meta.com/docs/model-cards-and-prompt-formats/llama3_1) that,
```{note}
There are three built-in tools (brave_search, wolfram_alpha, and code interpreter) can be turned on using the system prompt:
1. Brave Search: Tool call to perform web searches.
2. Wolfram Alpha: Tool call to perform complex mathematical calculations.
3. Code Interpreter: Enables the model to output python code.
```
Additionally, it cautions: "**Note:** We recommend using Llama 70B-instruct or Llama 405B-instruct for applications that combine conversation and tool calling. Llama 8B-Instruct can not reliably maintain a conversation alongside tool calling definitions. It can be used for zero-shot tool calling, but tool instructions should be removed for regular conversations between the model and the user."
Therefore, we utilize [Meta-Llama-3.1-70B-Instruct](https://huggingface.co/meta-llama/Meta-Llama-3.1-70B-Instruct) to show how to invoke the tool calling by LMDeploy `api_server`.
On a A100-SXM-80G node, you can start the service as follows:
```shell
lmdeploy serve api_server /the/path/of/Meta-Llama-3.1-70B-Instruct/model --tp 4
```
For an in-depth understanding of the api_server, please refer to the detailed documentation available [here](./api_server.md).
The following code snippet demonstrates how to utilize the 'Wolfram Alpha' tool. It is assumed that you have already registered on the [Wolfram Alpha](https://www.wolframalpha.com) website and obtained an API key. Please ensure that you have a valid API key to access the services provided by Wolfram Alpha
```python
from openai import OpenAI
import requests
def request_llama3_1_service(messages):
client = OpenAI(api_key='YOUR_API_KEY',
base_url='http://0.0.0.0:23333/v1')
model_name = client.models.list().data[0].id
response = client.chat.completions.create(
model=model_name,
messages=messages,
temperature=0.8,
top_p=0.8,
stream=False)
return response.choices[0].message.content
# The role of "system" MUST be specified, including the required tools
messages = [
{
"role": "system",
"content": "Environment: ipython\nTools: wolfram_alpha\n\n Cutting Knowledge Date: December 2023\nToday Date: 23 Jul 2024\n\nYou are a helpful Assistant." # noqa
},
{
"role": "user",
"content": "Can you help me solve this equation: x^3 - 4x^2 + 6x - 24 = 0" # noqa
}
]
# send request to the api_server of llama3.1-70b and get the response
# the "assistant_response" is supposed to be:
# <|python_tag|>wolfram_alpha.call(query="solve x^3 - 4x^2 + 6x - 24 = 0")
assistant_response = request_llama3_1_service(messages)
print(assistant_response)
# Call the API of Wolfram Alpha with the query generated by the model
app_id = 'YOUR-Wolfram-Alpha-API-KEY'
params = {
"input": assistant_response,
"appid": app_id,
"format": "plaintext",
"output": "json",
}
wolframalpha_response = requests.get(
"https://api.wolframalpha.com/v2/query",
params=params
)
wolframalpha_response = wolframalpha_response.json()
# Append the contents obtained by the model and the wolframalpha's API
# to "messages", and send it again to the api_server
messages += [
{
"role": "assistant",
"content": assistant_response
},
{
"role": "ipython",
"content": wolframalpha_response
}
]
assistant_response = request_llama3_1_service(messages)
print(assistant_response)
```
### Qwen2.5
Qwen2.5 supports multi tool calling, which means that multiple tool requests can be initiated in one request
```python
from openai import OpenAI
import json
def get_current_temperature(location: str, unit: str = "celsius"):
"""Get current temperature at a location.
Args:
location: The location to get the temperature for, in the format "City, State, Country".
unit: The unit to return the temperature in. Defaults to "celsius". (choices: ["celsius", "fahrenheit"])
Returns:
the temperature, the location, and the unit in a dict
"""
return {
"temperature": 26.1,
"location": location,
"unit": unit,
}
def get_temperature_date(location: str, date: str, unit: str = "celsius"):
"""Get temperature at a location and date.
Args:
location: The location to get the temperature for, in the format "City, State, Country".
date: The date to get the temperature for, in the format "Year-Month-Day".
unit: The unit to return the temperature in. Defaults to "celsius". (choices: ["celsius", "fahrenheit"])
Returns:
the temperature, the location, the date and the unit in a dict
"""
return {
"temperature": 25.9,
"location": location,
"date": date,
"unit": unit,
}
def get_function_by_name(name):
if name == "get_current_temperature":
return get_current_temperature
if name == "get_temperature_date":
return get_temperature_date
tools = [{
'type': 'function',
'function': {
'name': 'get_current_temperature',
'description': 'Get current temperature at a location.',
'parameters': {
'type': 'object',
'properties': {
'location': {
'type': 'string',
'description': 'The location to get the temperature for, in the format \'City, State, Country\'.'
},
'unit': {
'type': 'string',
'enum': [
'celsius',
'fahrenheit'
],
'description': 'The unit to return the temperature in. Defaults to \'celsius\'.'
}
},
'required': [
'location'
]
}
}
}, {
'type': 'function',
'function': {
'name': 'get_temperature_date',
'description': 'Get temperature at a location and date.',
'parameters': {
'type': 'object',
'properties': {
'location': {
'type': 'string',
'description': 'The location to get the temperature for, in the format \'City, State, Country\'.'
},
'date': {
'type': 'string',
'description': 'The date to get the temperature for, in the format \'Year-Month-Day\'.'
},
'unit': {
'type': 'string',
'enum': [
'celsius',
'fahrenheit'
],
'description': 'The unit to return the temperature in. Defaults to \'celsius\'.'
}
},
'required': [
'location',
'date'
]
}
}
}]
messages = [{'role': 'user', 'content': 'Today is 2024-11-14, What\'s the temperature in San Francisco now? How about tomorrow?'}]
client = OpenAI(api_key='YOUR_API_KEY', base_url='http://0.0.0.0:23333/v1')
model_name = client.models.list().data[0].id
response = client.chat.completions.create(
model=model_name,
messages=messages,
temperature=0.8,
top_p=0.8,
stream=False,
tools=tools)
print(response.choices[0].message.tool_calls)
messages.append(response.choices[0].message)
for tool_call in response.choices[0].message.tool_calls:
tool_call_args = json.loads(tool_call.function.arguments)
tool_call_result = get_function_by_name(tool_call.function.name)(**tool_call_args)
messages.append({
'role': 'tool',
'name': tool_call.function.name,
'content': tool_call_result,
'tool_call_id': tool_call.id
})
response = client.chat.completions.create(
model=model_name,
messages=messages,
temperature=0.8,
top_p=0.8,
stream=False,
tools=tools)
print(response.choices[0].message.content)
```
Using the Qwen2.5-14B-Instruct, similar results can be obtained as follows
```
[ChatCompletionMessageToolCall(id='0', function=Function(arguments='{"location": "San Francisco, California, USA"}', name='get_current_temperature'), type='function'),
ChatCompletionMessageToolCall(id='1', function=Function(arguments='{"location": "San Francisco, California, USA", "date": "2024-11-15"}', name='get_temperature_date'), type='function')]
The current temperature in San Francisco, California, USA is 26.1°C. For tomorrow, 2024-11-15, the temperature is expected to be 25.9°C.
```
It is important to note that in scenarios involving multiple tool calls, the order of the tool call results can affect the response quality. The tool_call_id has not been correctly provided to the LLM.
---
# codellama
## Introduction
[codellama](https://github.com/facebookresearch/codellama) features enhanced coding capabilities. It can generate code and natural language about code, from both code and natural language prompts (e.g., “Write me a function that outputs the fibonacci sequence”). It can also be used for code completion and debugging. It supports many of the most popular programming languages used today, including Python, C++, Java, PHP, Typescript (Javascript), C#, Bash and more.
There are three sizes (7b, 13b, 34b) as well as three flavours (base model, Python fine-tuned, and instruction tuned) released on [HuggingFace](https://huggingface.co/codellama).
| Base Model | Python | Instruct |
| ------------------------------------------------------------------------------- | --------------------------------------------------------------------------------------------- | ------------------------------------------------------------------------------------------------- |
| [codellama/CodeLlama-7b-hf](https://huggingface.co/codellama/CodeLlama-7b-hf) | [codellama/CodeLlama-7b-Python-hf](https://huggingface.co/codellama/CodeLlama-7b-Python-hf) | [codellama/CodeLlama-7b-Instruct-hf](https://huggingface.co/codellama/CodeLlama-7b-Instruct-hf) |
| [codellama/CodeLlama-13b-hf](https://huggingface.co/codellama/CodeLlama-13b-hf) | [codellama/CodeLlama-13b-Python-hf](https://huggingface.co/codellama/CodeLlama-13b-Python-hf) | [codellama/CodeLlama-13b-Instruct-hf](https://huggingface.co/codellama/CodeLlama-13b-Instruct-hf) |
| [codellama/CodeLlama-34b-hf](https://huggingface.co/codellama/CodeLlama-34b-hf) | [codellama/CodeLlama-34b-Python-hf](https://huggingface.co/codellama/CodeLlama-34b-Python-hf) | [codellama/CodeLlama-34b-Instruct-hf](https://huggingface.co/codellama/CodeLlama-34b-Instruct-hf) |
The correspondence between the model and capabilities is:
| models | code completion | infilling | instructions / chat | python specialist |
| ---------- | --------------- | ----------------- | ------------------- | ----------------- |
| Base Model | Y | Y(7B,13B), N(34B) | N | N |
| Python | Y | N | N | Y |
| Instruct | Y | Y(7B,13B), N(34B) | Y | N |
## Inference
Based on the above table, this section shows how to utilize CodeLlama's capabilities by examples
### Completion
```python
from lmdeploy import pipeline, GenerationConfig, ChatTemplateConfig
pipe = pipeline('meta-llama/CodeLlama-7b-hf',
chat_template_config=ChatTemplateConfig(
model_name='codellama',
capability='completion'
))
response = pipe(
'import socket\n\ndef ping_exponential_backoff(host: str):',
gen_config=GenerationConfig(
top_k=10,
temperature=0.1,
top_p=0.95
)
)
print(response.text)
```
### Infilling
```python
from lmdeploy import pipeline, GenerationConfig, ChatTemplateConfig
pipe = pipeline('meta-llama/CodeLlama-7b-hf',
chat_template_config=ChatTemplateConfig(
model_name='codellama',
capability='infilling'
))
prompt = """
def remove_non_ascii(s: str) -> str:
\"\"\"
\"\"\"
return result
"""
response = pipe(
prompt,
gen_config=GenerationConfig(
top_k=10,
temperature=0.1,
top_p=0.95,
max_new_tokens=500
)
)
print(response.text)
```
### Chat
```python
from lmdeploy import pipeline, GenerationConfig, ChatTemplateConfig
pipe = pipeline('meta-llama/CodeLlama-7b-Instruct-hf',
chat_template_config=ChatTemplateConfig(
model_name='codellama',
capability='chat'
))
response = pipe(
'implement quick sort in C++',
gen_config=GenerationConfig(
top_k=10,
temperature=0.1,
top_p=0.95
)
)
print(response.text)
```
### Python specialist
```python
from lmdeploy import pipeline, GenerationConfig, ChatTemplateConfig
pipe = pipeline('meta-llama/CodeLlama-7b-Python-hf',
chat_template_config=ChatTemplateConfig(
model_name='codellama',
capability='python'
))
response = pipe(
'implement quick sort',
gen_config=GenerationConfig(
top_k=10,
temperature=0.1,
top_p=0.95
)
)
print(response.text)
```
## Quantization
TBD
## Serving
Prepare a chat template json file, for instance "codellama.json", with the following content:
```json
{
"model_name": "codellama",
"capability": "completion"
}
```
Then launch the service as follows:
```shell
lmdeploy serve api_server meta-llama/CodeLlama-7b-Instruct-hf --chat-template codellama.json
```
After the service is launched successfully, you can access the service with `openai` package:
```python
from openai import OpenAI
client = OpenAI(
api_key='YOUR_API_KEY',
base_url="http://0.0.0.0:23333/v1"
)
model_name = client.models.list().data[0].id
response = client.chat.completions.create(
model=model_name,
messages=[
{"role": "user", "content": "import socket\n\ndef ping_exponential_backoff(host: str):"},
],
temperature=0.1,
top_p=0.95,
max_tokens=500
)
print(response)
```
Regarding the detailed information of the api_server, you can refer to the [guide](../llm/api_server.md).
---
# Offline Inference Pipeline
In this tutorial, We will present a list of examples to introduce the usage of `lmdeploy.pipeline`.
You can overview the detailed pipeline API in [this](https://lmdeploy.readthedocs.io/en/latest/api/pipeline.html) guide.
## Usage
### A 'Hello, world' example
```python
from lmdeploy import pipeline
pipe = pipeline('internlm/internlm2_5-7b-chat')
response = pipe(['Hi, pls intro yourself', 'Shanghai is'])
print(response)
```
In this example, the pipeline by default allocates a predetermined percentage of GPU memory for storing k/v cache. The ratio is dictated by the parameter `TurbomindEngineConfig.cache_max_entry_count`.
There have been alterations to the strategy for setting the k/v cache ratio throughout the evolution of LMDeploy. The following are the change histories:
1. `v0.2.0 <= lmdeploy <= v0.2.1`
`TurbomindEngineConfig.cache_max_entry_count` defaults to 0.5, indicating 50% GPU **total memory** allocated for k/v cache. Out Of Memory (OOM) errors may occur if a 7B model is deployed on a GPU with memory less than 40G. If you encounter an OOM error, please decrease the ratio of the k/v cache occupation as follows:
```python
from lmdeploy import pipeline, TurbomindEngineConfig
# decrease the ratio of the k/v cache occupation to 20%
backend_config = TurbomindEngineConfig(cache_max_entry_count=0.2)
pipe = pipeline('internlm/internlm2_5-7b-chat',
backend_config=backend_config)
response = pipe(['Hi, pls intro yourself', 'Shanghai is'])
print(response)
```
2. `lmdeploy > v0.2.1`
The allocation strategy for k/v cache is changed to reserve space from the **GPU free memory** proportionally. The ratio `TurbomindEngineConfig.cache_max_entry_count` has been adjusted to 0.8 by default. If OOM error happens, similar to the method mentioned above, please consider reducing the ratio value to decrease the memory usage of the k/v cache.
### Set tensor parallelism
```python
from lmdeploy import pipeline, TurbomindEngineConfig
backend_config = TurbomindEngineConfig(tp=2)
pipe = pipeline('internlm/internlm2_5-7b-chat',
backend_config=backend_config)
response = pipe(['Hi, pls intro yourself', 'Shanghai is'])
print(response)
```
### Set sampling parameters
```python
from lmdeploy import pipeline, GenerationConfig, TurbomindEngineConfig
backend_config = TurbomindEngineConfig(tp=2)
gen_config = GenerationConfig(top_p=0.8,
top_k=40,
temperature=0.8,
max_new_tokens=1024)
pipe = pipeline('internlm/internlm2_5-7b-chat',
backend_config=backend_config)
response = pipe(['Hi, pls intro yourself', 'Shanghai is'],
gen_config=gen_config)
print(response)
```
### Apply OpenAI format prompt
```python
from lmdeploy import pipeline, GenerationConfig, TurbomindEngineConfig
backend_config = TurbomindEngineConfig(tp=2)
gen_config = GenerationConfig(top_p=0.8,
top_k=40,
temperature=0.8,
max_new_tokens=1024)
pipe = pipeline('internlm/internlm2_5-7b-chat',
backend_config=backend_config)
prompts = [[{
'role': 'user',
'content': 'Hi, pls intro yourself'
}], [{
'role': 'user',
'content': 'Shanghai is'
}]]
response = pipe(prompts,
gen_config=gen_config)
print(response)
```
### Apply streaming output
```python
from lmdeploy import pipeline, GenerationConfig, TurbomindEngineConfig
backend_config = TurbomindEngineConfig(tp=2)
gen_config = GenerationConfig(top_p=0.8,
top_k=40,
temperature=0.8,
max_new_tokens=1024)
pipe = pipeline('internlm/internlm2_5-7b-chat',
backend_config=backend_config)
prompts = [[{
'role': 'user',
'content': 'Hi, pls intro yourself'
}], [{
'role': 'user',
'content': 'Shanghai is'
}]]
for item in pipe.stream_infer(prompts, gen_config=gen_config):
print(item)
```
### Get logits for generated tokens
```python
from lmdeploy import pipeline, GenerationConfig
pipe = pipeline('internlm/internlm2_5-7b-chat')
gen_config=GenerationConfig(output_logits='generation'
max_new_tokens=10)
response = pipe(['Hi, pls intro yourself', 'Shanghai is'],
gen_config=gen_config)
logits = [x.logits for x in response]
```
### Get last layer's hidden states for generated tokens
```python
from lmdeploy import pipeline, GenerationConfig
pipe = pipeline('internlm/internlm2_5-7b-chat')
gen_config=GenerationConfig(output_last_hidden_state='generation',
max_new_tokens=10)
response = pipe(['Hi, pls intro yourself', 'Shanghai is'],
gen_config=gen_config)
hidden_states = [x.last_hidden_state for x in response]
```
### Calculate ppl
```python
from transformers import AutoTokenizer
from lmdeploy import pipeline
model_repoid_or_path = 'internlm/internlm2_5-7b-chat'
pipe = pipeline(model_repoid_or_path)
tokenizer = AutoTokenizer.from_pretrained(model_repoid_or_path, trust_remote_code=True)
messages = [
{"role": "user", "content": "Hello, how are you?"},
]
input_ids = tokenizer.apply_chat_template(messages)
# ppl is a list of float numbers
ppl = pipe.get_ppl(input_ids)
print(ppl)
```
```{note}
- When input_ids is too long, an OOM (Out Of Memory) error may occur. Please apply it with caution
- get_ppl returns the cross entropy loss without applying the exponential operation afterwards
```
### Use PyTorchEngine
```shell
pip install triton>=2.1.0
```
```python
from lmdeploy import pipeline, GenerationConfig, PytorchEngineConfig
backend_config = PytorchEngineConfig(session_len=2048)
gen_config = GenerationConfig(top_p=0.8,
top_k=40,
temperature=0.8,
max_new_tokens=1024)
pipe = pipeline('internlm/internlm2_5-7b-chat',
backend_config=backend_config)
prompts = [[{
'role': 'user',
'content': 'Hi, pls intro yourself'
}], [{
'role': 'user',
'content': 'Shanghai is'
}]]
response = pipe(prompts, gen_config=gen_config)
print(response)
```
### Inference with LoRA
```python
from lmdeploy import pipeline, GenerationConfig, PytorchEngineConfig
backend_config = PytorchEngineConfig(session_len=2048,
adapters=dict(lora_name_1='chenchi/lora-chatglm2-6b-guodegang'))
gen_config = GenerationConfig(top_p=0.8,
top_k=40,
temperature=0.8,
max_new_tokens=1024)
pipe = pipeline('THUDM/chatglm2-6b',
backend_config=backend_config)
prompts = [[{
'role': 'user',
'content': '您猜怎么着'
}]]
response = pipe(prompts, gen_config=gen_config, adapter_name='lora_name_1')
print(response)
```
### Release pipeline
You can release the pipeline explicitly by calling its `close()` method, or alternatively, use the `with` statement as demonstrated below:
```python
from lmdeploy import pipeline
with pipeline('internlm/internlm2_5-7b-chat') as pipe:
response = pipe(['Hi, pls intro yourself', 'Shanghai is'])
print(response)
```
## FAQs
- **RuntimeError: An attempt has been made to start a new process before the current process has finished its bootstrapping phase**.
If you got this for tp>1 in pytorch backend. Please make sure the python script has following
```python
if __name__ == '__main__':
```
Generally, in the context of multi-threading or multi-processing, it might be necessary to ensure that initialization code is executed only once. In this case, `if __name__ == '__main__':` can help to ensure that these initialization codes are run only in the main program, and not repeated in each newly created process or thread.
- To customize a chat template, please refer to [chat_template.md](../advance/chat_template.md).
- If the weight of lora has a corresponding chat template, you can first register the chat template to lmdeploy, and then use the chat template name as the adapter name.
---
# Request Distributor Server
The request distributor service can parallelize multiple api_server services. Users only need to access the proxy URL, and they can indirectly access different api_server services. The proxy service will automatically distribute requests internally, achieving load balancing.
## Startup
Start the proxy service:
```shell
lmdeploy serve proxy --server-name {server_name} --server-port {server_port} --routing-strategy "min_expected_latency" --serving-strategy Hybrid
```
After startup is successful, the URL of the proxy service will also be printed by the script. Access this URL in your browser to open the Swagger UI.
Subsequently, users can add it directly to the proxy service when starting the `api_server` service by using the `--proxy-url` command. For example:
`lmdeploy serve api_server InternLM/internlm2-chat-1_8b --proxy-url http://0.0.0.0:8000`。
In this way, users can access the services of the `api_server` through the proxy node, and the usage of the proxy node is exactly the same as that of the `api_server`, both of which are compatible with the OpenAI format.
- /v1/models
- /v1/chat/completions
- /v1/completions
## Node Management
Through Swagger UI, we can see multiple APIs. Those related to api_server node management include:
- /nodes/status
- /nodes/add
- /nodes/remove
They respectively represent viewing all api_server service nodes, adding a certain node, and deleting a certain node.
### Node Management through curl
```shell
curl -X 'GET' \
'http://localhost:8000/nodes/status' \
-H 'accept: application/json'
```
```shell
curl -X 'POST' \
'http://localhost:8000/nodes/add' \
-H 'accept: application/json' \
-H 'Content-Type: application/json' \
-d '{
"url": "http://0.0.0.0:23333"
}'
```
```shell
curl -X 'POST' \
'http://localhost:8000/nodes/remove?node_url=http://0.0.0.0:23333' \
-H 'accept: application/json' \
-d ''
```
### Node Management through python
```python
# query all nodes
import requests
url = 'http://localhost:8000/nodes/status'
headers = {'accept': 'application/json'}
response = requests.get(url, headers=headers)
print(response.text)
```
```python
# add a new node
import requests
url = 'http://localhost:8000/nodes/add'
headers = {
'accept': 'application/json',
'Content-Type': 'application/json'
}
data = {"url": "http://0.0.0.0:23333"}
response = requests.post(url, headers=headers, json=data)
print(response.text)
```
```python
# delete a node
import requests
url = 'http://localhost:8000/nodes/remove'
headers = {'accept': 'application/json',}
params = {'node_url': 'http://0.0.0.0:23333',}
response = requests.post(url, headers=headers, data='', params=params)
print(response.text)
```
## Serving Strategy
LMDeploy currently supports two serving strategies:
- Hybrid: Does not distinguish between Prefill and Decoding instances, following the traditional inference deployment mode.
- DistServe: Separates Prefill and Decoding instances, deploying them on different service nodes to achieve more flexible and efficient resource scheduling and scalability.
## Dispatch Strategy
The current distribution strategies of the proxy service are as follows:
- random: dispatches based on the ability of each api_server node provided by the user to process requests. The greater the request throughput, the more likely it is to be allocated. Nodes that do not provide throughput are treated according to the average throughput of other nodes.
- min_expected_latency: allocates based on the number of requests currently waiting to be processed on each node, and the throughput capability of each node, calculating the expected time required to complete the response. The shortest one gets allocated. Nodes that do not provide throughput are treated similarly.
- min_observed_latency: allocates based on the average time required to handle a certain number of past requests on each node. The one with the shortest time gets allocated.
---
# OpenAI Compatible Server
This article primarily discusses the deployment of a single large vision language model across multiple GPUs on a single node, providing a service that is compatible with the OpenAI interface, as well as the usage of the service API.
For the sake of convenience, we refer to this service as `api_server`. Regarding parallel services with multiple models, please refer to the guide about [Request Distribution Server](../llm/proxy_server.md).
In the following sections, we will first introduce two methods for starting the service, choosing the appropriate one based on your application scenario.
Next, we focus on the definition of the service's RESTful API, explore the various ways to interact with the interface, and demonstrate how to try the service through the Swagger UI or LMDeploy CLI tools.
## Launch Service
Take the [llava-v1.6-vicuna-7b](https://huggingface.co/liuhaotian/llava-v1.6-vicuna-7b) model hosted on huggingface hub as an example, you can choose one the following methods to start the service.
### Option 1: Launching with lmdeploy CLI
```shell
lmdeploy serve api_server liuhaotian/llava-v1.6-vicuna-7b --server-port 23333
```
The arguments of `api_server` can be viewed through the command `lmdeploy serve api_server -h`, for instance, `--tp` to set tensor parallelism, `--session-len` to specify the max length of the context window, `--cache-max-entry-count` to adjust the GPU mem ratio for k/v cache etc.
### Option 2: Deploying with docker
With LMDeploy [official docker image](https://hub.docker.com/r/openmmlab/lmdeploy/tags), you can run OpenAI compatible server as follows:
```shell
docker run --runtime nvidia --gpus all \
-v ~/.cache/huggingface:/root/.cache/huggingface \
--env "HUGGING_FACE_HUB_TOKEN=" \
-p 23333:23333 \
--ipc=host \
openmmlab/lmdeploy:latest \
lmdeploy serve api_server liuhaotian/llava-v1.6-vicuna-7b
```
The parameters of `api_server` are the same with that mentioned in "[option 1](#option-1-launching-with-lmdeploy-cli)" section
Each model may require specific dependencies not included in the Docker image. If you run into issues, you may need to install those yourself
on a case-by-case basis. If in doubt, refer to the specific model's project for documentation.
For example, for Llava:
```
FROM openmmlab/lmdeploy:latest
RUN apt-get update && apt-get install -y python3 python3-pip git
WORKDIR /app
RUN pip3 install --upgrade pip
RUN pip3 install timm
RUN pip3 install git+https://github.com/haotian-liu/LLaVA.git --no-deps
COPY . .
CMD ["lmdeploy", "serve", "api_server", "liuhaotian/llava-v1.6-34b"]
```
## RESTful API
LMDeploy's RESTful API is compatible with the following three OpenAI interfaces:
- /v1/chat/completions
- /v1/models
- /v1/completions
The interface for image interaction is `/v1/chat/completions`, which is consistent with OpenAI.
You can overview and try out the offered RESTful APIs by the website `http://0.0.0.0:23333` as shown in the below image after launching the service successfully.

If you need to integrate the service into your own projects or products, we recommend the following approach:
### Integrate with `OpenAI`
Here is an example of interaction with the endpoint `v1/chat/completions` service via the openai package.
Before running it, please install the openai package by `pip install openai`
```python
from openai import OpenAI
client = OpenAI(api_key='YOUR_API_KEY', base_url='http://0.0.0.0:23333/v1')
model_name = client.models.list().data[0].id
response = client.chat.completions.create(
model=model_name,
messages=[{
'role':
'user',
'content': [{
'type': 'text',
'text': 'Describe the image please',
}, {
'type': 'image_url',
'image_url': {
'url':
'https://raw.githubusercontent.com/open-mmlab/mmdeploy/main/tests/data/tiger.jpeg',
},
}],
}],
temperature=0.8,
top_p=0.8)
print(response)
```
### Integrate with lmdeploy `APIClient`
Below are some examples demonstrating how to visit the service through `APIClient`
If you want to use the `/v1/chat/completions` endpoint, you can try the following code:
```python
from lmdeploy.serve.openai.api_client import APIClient
api_client = APIClient(f'http://0.0.0.0:23333')
model_name = api_client.available_models[0]
messages = [{
'role':
'user',
'content': [{
'type': 'text',
'text': 'Describe the image please',
}, {
'type': 'image_url',
'image_url': {
'url':
'https://raw.githubusercontent.com/open-mmlab/mmdeploy/main/tests/data/tiger.jpeg',
},
}]
}]
for item in api_client.chat_completions_v1(model=model_name,
messages=messages):
print(item)
```
### Integrate with Java/Golang/Rust
May use [openapi-generator-cli](https://github.com/OpenAPITools/openapi-generator-cli) to convert `http://{server_ip}:{server_port}/openapi.json` to java/rust/golang client.
Here is an example:
```shell
$ docker run -it --rm -v ${PWD}:/local openapitools/openapi-generator-cli generate -i /local/openapi.json -g rust -o /local/rust
$ ls rust/*
rust/Cargo.toml rust/git_push.sh rust/README.md
rust/docs:
ChatCompletionRequest.md EmbeddingsRequest.md HttpValidationError.md LocationInner.md Prompt.md
DefaultApi.md GenerateRequest.md Input.md Messages.md ValidationError.md
rust/src:
apis lib.rs models
```
---
# CogVLM
## Introduction
CogVLM is a powerful open-source visual language model (VLM). LMDeploy supports CogVLM-17B models like [THUDM/cogvlm-chat-hf](https://huggingface.co/THUDM/cogvlm-chat-hf) and CogVLM2-19B models like [THUDM/cogvlm2-llama3-chat-19B](https://huggingface.co/THUDM/cogvlm2-llama3-chat-19B) in PyTorch engine.
## Quick Start
Install LMDeploy by following the [installation guide](../get_started/installation.md)
### Prepare
When deploying the **CogVLM** model using LMDeploy, it is necessary to download the model first, as the **CogVLM** model repository does not include the tokenizer model.
However, this step is not required for **CogVLM2**.
Taking one **CogVLM** model `cogvlm-chat-hf` as an example, you can prepare it as follows:
```shell
huggingface-cli download THUDM/cogvlm-chat-hf --local-dir ./cogvlm-chat-hf --local-dir-use-symlinks False
huggingface-cli download lmsys/vicuna-7b-v1.5 special_tokens_map.json tokenizer.model tokenizer_config.json --local-dir ./cogvlm-chat-hf --local-dir-use-symlinks False
```
### Offline inference pipeline
The following sample code shows the basic usage of VLM pipeline. For more examples, please refer to [VLM Offline Inference Pipeline](./vl_pipeline.md)
```python
from lmdeploy import pipeline
from lmdeploy.vl import load_image
if __name__ == "__main__":
pipe = pipeline('cogvlm-chat-hf')
image = load_image('https://raw.githubusercontent.com/open-mmlab/mmdeploy/main/tests/data/tiger.jpeg')
response = pipe(('describe this image', image))
print(response)
```
---
# DeepSeek-VL2
## Introduction
DeepSeek-VL2, an advanced series of large Mixture-of-Experts (MoE) Vision-Language Models that significantly improves upon its predecessor, DeepSeek-VL.
DeepSeek-VL2 demonstrates superior capabilities across various tasks, including but not limited to visual question answering, optical character recognition, document/table/chart understanding, and visual grounding.
LMDeploy supports [deepseek-vl2-tiny](https://huggingface.co/deepseek-ai/deepseek-vl2-tiny), [deepseek-vl2-small](https://huggingface.co/deepseek-ai/deepseek-vl2-small) and [deepseek-vl2](https://huggingface.co/deepseek-ai/deepseek-vl2) in PyTorch engine.
## Quick Start
Install LMDeploy by following the [installation guide](../get_started/installation.md).
### Prepare
When deploying the **DeepSeek-VL2** model using LMDeploy, you must install the official GitHub repository and related 3-rd party libs. This is because LMDeploy reuses the image processing functions provided in the official repository.
```
pip install git+https://github.com/deepseek-ai/DeepSeek-VL2.git --no-deps
pip install attrdict timm 'transformers<4.48.0'
```
Worth noticing that it may fail with `transformers>=4.48.0`, as known in this [issue](https://github.com/deepseek-ai/DeepSeek-VL2/issues/45).
### Offline inference pipeline
The following sample code shows the basic usage of VLM pipeline. For more examples, please refer to [VLM Offline Inference Pipeline](./vl_pipeline.md).
To construct valid DeepSeek-VL2 prompts with image inputs, users should insert `` manually.
```python
from lmdeploy import pipeline
from lmdeploy.vl import load_image
if __name__ == "__main__":
pipe = pipeline('deepseek-ai/deepseek-vl2-tiny')
image = load_image('https://raw.githubusercontent.com/open-mmlab/mmdeploy/main/tests/data/tiger.jpeg')
response = pipe(('describe this image', image))
print(response)
```
---
# Gemma3
## Introduction
Gemma is a family of lightweight, state-of-the-art open models from Google, built from the same research and technology used to create the Gemini models. Gemma 3 models are multimodal, handling text and image input and generating text output, with open weights for both pre-trained variants and instruction-tuned variants. Gemma 3 has a large, 128K context window, multilingual support in over 140 languages, and is available in more sizes than previous versions. Gemma 3 models are well-suited for a variety of text generation and image understanding tasks, including question answering, summarization, and reasoning. Their relatively small size makes it possible to deploy them in environments with limited resources such as laptops, desktops or your own cloud infrastructure, democratizing access to state of the art AI models and helping foster innovation for everyone.
## Quick Start
Install LMDeploy by following the [installation guide](../get_started/installation.md).
### Prepare
When deploying the **Gemma3** model using LMDeploy, please install the latest transformers.
### Offline inference pipeline
The following sample code shows the basic usage of VLM pipeline. For more examples, please refer to [VLM Offline Inference Pipeline](./vl_pipeline.md).
```python
from lmdeploy import pipeline
from lmdeploy.vl import load_image
if __name__ == "__main__":
pipe = pipeline('google/gemma-3-12b-it')
image = load_image('https://raw.githubusercontent.com/open-mmlab/mmdeploy/main/tests/data/tiger.jpeg')
response = pipe(('describe this image', image))
print(response)
```
---
# InternVL
LMDeploy supports the following InternVL series of models, which are detailed in the table below:
| Model | Size | Supported Inference Engine |
| :-------------------: | :-----------: | :------------------------: |
| InternVL | 13B-19B | TurboMind |
| InternVL1.5 | 2B-26B | TurboMind, PyTorch |
| InternVL2 | 4B | PyTorch |
| InternVL2 | 1B-2B, 8B-76B | TurboMind, PyTorch |
| InternVL2.5/2.5-MPO/3 | 1B-78B | TurboMind, PyTorch |
| Mono-InternVL | 2B | PyTorch |
The next chapter demonstrates how to deploy an InternVL model using LMDeploy, with [InternVL2-8B](https://huggingface.co/OpenGVLab/InternVL2-8B) as an example.
## Installation
Please install LMDeploy by following the [installation guide](../get_started/installation.md), and install other packages that InternVL2 needs
```shell
pip install timm
# It is recommended to find the whl package that matches the environment from the releases on https://github.com/Dao-AILab/flash-attention.
pip install flash-attn
```
Or, you can build a docker image to set up the inference environment. If the CUDA version on your host machine is `>=12.4`, you can run:
```
docker build --build-arg CUDA_VERSION=cu12 -t openmmlab/lmdeploy:internvl . -f ./docker/InternVL_Dockerfile
```
Otherwise, you can go with:
```shell
git clone https://github.com/InternLM/lmdeploy.git
cd lmdeploy
docker build --build-arg CUDA_VERSION=cu11 -t openmmlab/lmdeploy:internvl . -f ./docker/InternVL_Dockerfile
```
## Offline inference
The following sample code shows the basic usage of VLM pipeline. For detailed information, please refer to [VLM Offline Inference Pipeline](./vl_pipeline.md)
```python
from lmdeploy import pipeline
from lmdeploy.vl import load_image
pipe = pipeline('OpenGVLab/InternVL2-8B')
image = load_image('https://raw.githubusercontent.com/open-mmlab/mmdeploy/main/tests/data/tiger.jpeg')
response = pipe((f'describe this image', image))
print(response)
```
More examples are listed below:
multi-image multi-round conversation, combined images
```python
from lmdeploy import pipeline, GenerationConfig
from lmdeploy.vl.constants import IMAGE_TOKEN
pipe = pipeline('OpenGVLab/InternVL2-8B', log_level='INFO')
messages = [
dict(role='user', content=[
dict(type='text', text=f'{IMAGE_TOKEN}{IMAGE_TOKEN}\nDescribe the two images in detail.'),
dict(type='image_url', image_url=dict(max_dynamic_patch=12, url='https://raw.githubusercontent.com/OpenGVLab/InternVL/main/internvl_chat/examples/image1.jpg')),
dict(type='image_url', image_url=dict(max_dynamic_patch=12, url='https://raw.githubusercontent.com/OpenGVLab/InternVL/main/internvl_chat/examples/image2.jpg'))
])
]
out = pipe(messages, gen_config=GenerationConfig(top_k=1))
messages.append(dict(role='assistant', content=out.text))
messages.append(dict(role='user', content='What are the similarities and differences between these two images.'))
out = pipe(messages, gen_config=GenerationConfig(top_k=1))
```
multi-image multi-round conversation, separate images
```python
from lmdeploy import pipeline, GenerationConfig
from lmdeploy.vl.constants import IMAGE_TOKEN
pipe = pipeline('OpenGVLab/InternVL2-8B', log_level='INFO')
messages = [
dict(role='user', content=[
dict(type='text', text=f'Image-1: {IMAGE_TOKEN}\nImage-2: {IMAGE_TOKEN}\nDescribe the two images in detail.'),
dict(type='image_url', image_url=dict(max_dynamic_patch=12, url='https://raw.githubusercontent.com/OpenGVLab/InternVL/main/internvl_chat/examples/image1.jpg')),
dict(type='image_url', image_url=dict(max_dynamic_patch=12, url='https://raw.githubusercontent.com/OpenGVLab/InternVL/main/internvl_chat/examples/image2.jpg'))
])
]
out = pipe(messages, gen_config=GenerationConfig(top_k=1))
messages.append(dict(role='assistant', content=out.text))
messages.append(dict(role='user', content='What are the similarities and differences between these two images.'))
out = pipe(messages, gen_config=GenerationConfig(top_k=1))
```
video multi-round conversation
```python
import numpy as np
from lmdeploy import pipeline, GenerationConfig
from decord import VideoReader, cpu
from lmdeploy.vl.constants import IMAGE_TOKEN
from lmdeploy.vl.utils import encode_image_base64
from PIL import Image
pipe = pipeline('OpenGVLab/InternVL2-8B', log_level='INFO')
def get_index(bound, fps, max_frame, first_idx=0, num_segments=32):
if bound:
start, end = bound[0], bound[1]
else:
start, end = -100000, 100000
start_idx = max(first_idx, round(start * fps))
end_idx = min(round(end * fps), max_frame)
seg_size = float(end_idx - start_idx) / num_segments
frame_indices = np.array([
int(start_idx + (seg_size / 2) + np.round(seg_size * idx))
for idx in range(num_segments)
])
return frame_indices
def load_video(video_path, bound=None, num_segments=32):
vr = VideoReader(video_path, ctx=cpu(0), num_threads=1)
max_frame = len(vr) - 1
fps = float(vr.get_avg_fps())
pixel_values_list, num_patches_list = [], []
frame_indices = get_index(bound, fps, max_frame, first_idx=0, num_segments=num_segments)
imgs = []
for frame_index in frame_indices:
img = Image.fromarray(vr[frame_index].asnumpy()).convert('RGB')
imgs.append(img)
return imgs
video_path = 'red-panda.mp4'
imgs = load_video(video_path, num_segments=8)
question = ''
for i in range(len(imgs)):
question = question + f'Frame{i+1}: {IMAGE_TOKEN}\n'
question += 'What is the red panda doing?'
content = [{'type': 'text', 'text': question}]
for img in imgs:
content.append({'type': 'image_url', 'image_url': {'max_dynamic_patch': 1, 'url': f'data:image/jpeg;base64,{encode_image_base64(img)}'}})
messages = [dict(role='user', content=content)]
out = pipe(messages, gen_config=GenerationConfig(top_k=1))
messages.append(dict(role='assistant', content=out.text))
messages.append(dict(role='user', content='Describe this video in detail. Don\'t repeat.'))
out = pipe(messages, gen_config=GenerationConfig(top_k=1))
```
## Online serving
You can launch the server by the `lmdeploy serve api_server` CLI:
```shell
lmdeploy serve api_server OpenGVLab/InternVL2-8B
```
You can also start the service using the aforementioned built docker image:
```shell
docker run --runtime nvidia --gpus all \
-v ~/.cache/huggingface:/root/.cache/huggingface \
--env "HUGGING_FACE_HUB_TOKEN=" \
-p 23333:23333 \
--ipc=host \
openmmlab/lmdeploy:internvl \
lmdeploy serve api_server OpenGVLab/InternVL2-8B
```
The docker compose is another option. Create a `docker-compose.yml` configuration file in the root directory of the lmdeploy project as follows:
```yaml
version: '3.5'
services:
lmdeploy:
container_name: lmdeploy
image: openmmlab/lmdeploy:internvl
ports:
- "23333:23333"
environment:
HUGGING_FACE_HUB_TOKEN:
volumes:
- ~/.cache/huggingface:/root/.cache/huggingface
stdin_open: true
tty: true
ipc: host
command: lmdeploy serve api_server OpenGVLab/InternVL2-8B
deploy:
resources:
reservations:
devices:
- driver: nvidia
count: "all"
capabilities: [gpu]
```
Then, you can execute the startup command as below:
```shell
docker-compose up -d
```
If you find the following logs after running `docker logs -f lmdeploy`, it means the service launches successfully.
```text
HINT: Please open http://0.0.0.0:23333 in a browser for detailed api usage!!!
HINT: Please open http://0.0.0.0:23333 in a browser for detailed api usage!!!
HINT: Please open http://0.0.0.0:23333 in a browser for detailed api usage!!!
INFO: Started server process [2439]
INFO: Waiting for application startup.
INFO: Application startup complete.
INFO: Uvicorn running on http://0.0.0.0:23333 (Press CTRL+C to quit)
```
The arguments of `lmdeploy serve api_server` can be reviewed in detail by `lmdeploy serve api_server -h`.
More information about `api_server` as well as how to access the service can be found from [here](api_server_vl.md)
---
# LLaVA
LMDeploy supports the following llava series of models, which are detailed in the table below:
| Model | Size | Supported Inference Engine |
| :----------------------------------: | :--: | :------------------------: |
| llava-hf/Llava-interleave-qwen-7b-hf | 7B | TurboMind, PyTorch |
| llava-hf/llava-1.5-7b-hf | 7B | TurboMind, PyTorch |
| llava-hf/llava-v1.6-mistral-7b-hf | 7B | PyTorch |
| llava-hf/llava-v1.6-vicuna-7b-hf | 7B | PyTorch |
| liuhaotian/llava-v1.6-mistral-7b | 7B | TurboMind |
| liuhaotian/llava-v1.6-vicuna-7b | 7B | TurboMind |
The next chapter demonstrates how to deploy an Llava model using LMDeploy, with [llava-hf/llava-interleave](https://huggingface.co/llava-hf/llava-interleave-qwen-7b-hf) as an example.
```{note}
PyTorch engine removes the support of original llava models after v0.6.4. Please use their corresponding transformers models instead, which can be found in https://huggingface.co/llava-hf
```
## Installation
Please install LMDeploy by following the [installation guide](../get_started/installation.md).
Or, you can go with office docker image:
```shell
docker pull openmmlab/lmdeploy:latest
```
## Offline inference
The following sample code shows the basic usage of VLM pipeline. For detailed information, please refer to [VLM Offline Inference Pipeline](./vl_pipeline.md)
```python
from lmdeploy import GenerationConfig, TurbomindEngineConfig, pipeline
from lmdeploy.vl import load_image
pipe = pipeline("llava-hf/llava-interleave-qwen-7b-hf", backend_config=TurbomindEngineConfig(cache_max_entry_count=0.5),
gen_config=GenerationConfig(max_new_tokens=512))
image = load_image('https://qianwen-res.oss-cn-beijing.aliyuncs.com/Qwen-VL/assets/demo.jpeg')
prompt = 'Describe the image.'
print(f'prompt:{prompt}')
response = pipe((prompt, image))
print(response)
```
More examples are listed below:
multi-image multi-round conversation, combined images
```python
from lmdeploy import pipeline, GenerationConfig
pipe = pipeline('llava-hf/llava-interleave-qwen-7b-hf', log_level='INFO')
messages = [
dict(role='user', content=[
dict(type='text', text='Describe the two images in detail.'),
dict(type='image_url', image_url=dict(url='https://raw.githubusercontent.com/QwenLM/Qwen-VL/master/assets/mm_tutorial/Beijing_Small.jpeg')),
dict(type='image_url', image_url=dict(url='https://raw.githubusercontent.com/QwenLM/Qwen-VL/master/assets/mm_tutorial/Chongqing_Small.jpeg'))
])
]
out = pipe(messages, gen_config=GenerationConfig(top_k=1))
messages.append(dict(role='assistant', content=out.text))
messages.append(dict(role='user', content='What are the similarities and differences between these two images.'))
out = pipe(messages, gen_config=GenerationConfig(top_k=1))
```
## Online serving
You can launch the server by the `lmdeploy serve api_server` CLI:
```shell
lmdeploy serve api_server llava-hf/llava-interleave-qwen-7b-hf
```
You can also start the service using the aforementioned built docker image:
```shell
docker run --runtime nvidia --gpus all \
-v ~/.cache/huggingface:/root/.cache/huggingface \
--env "HUGGING_FACE_HUB_TOKEN=" \
-p 23333:23333 \
--ipc=host \
openmmlab/lmdeploy:latest \
lmdeploy serve api_server llava-hf/llava-interleave-qwen-7b-hf
```
The docker compose is another option. Create a `docker-compose.yml` configuration file in the root directory of the lmdeploy project as follows:
```yaml
version: '3.5'
services:
lmdeploy:
container_name: lmdeploy
image: openmmlab/lmdeploy:latest
ports:
- "23333:23333"
environment:
HUGGING_FACE_HUB_TOKEN:
volumes:
- ~/.cache/huggingface:/root/.cache/huggingface
stdin_open: true
tty: true
ipc: host
command: lmdeploy serve api_server llava-hf/llava-interleave-qwen-7b-hf
deploy:
resources:
reservations:
devices:
- driver: nvidia
count: "all"
capabilities: [gpu]
```
Then, you can execute the startup command as below:
```shell
docker-compose up -d
```
If you find the following logs after running `docker logs -f lmdeploy`, it means the service launches successfully.
```text
HINT: Please open http://0.0.0.0:23333 in a browser for detailed api usage!!!
HINT: Please open http://0.0.0.0:23333 in a browser for detailed api usage!!!
HINT: Please open http://0.0.0.0:23333 in a browser for detailed api usage!!!
INFO: Started server process [2439]
INFO: Waiting for application startup.
INFO: Application startup complete.
INFO: Uvicorn running on http://0.0.0.0:23333 (Press CTRL+C to quit)
```
The arguments of `lmdeploy serve api_server` can be reviewed in detail by `lmdeploy serve api_server -h`.
More information about `api_server` as well as how to access the service can be found from [here](api_server_vl.md)
---
# MiniCPM-V
LMDeploy supports the following MiniCPM-V series of models, which are detailed in the table below:
| Model | Supported Inference Engine |
| :------------------: | :------------------------: |
| MiniCPM-Llama3-V-2_5 | TurboMind |
| MiniCPM-V-2_6 | TurboMind |
The next chapter demonstrates how to deploy an MiniCPM-V model using LMDeploy, with [MiniCPM-V-2_6](https://huggingface.co/openbmb/MiniCPM-V-2_6) as an example.
## Installation
Please install LMDeploy by following the [installation guide](../get_started/installation.md).
## Offline inference
The following sample code shows the basic usage of VLM pipeline. For detailed information, please refer to [VLM Offline Inference Pipeline](./vl_pipeline.md)
```python
from lmdeploy import pipeline
from lmdeploy.vl import load_image
pipe = pipeline('openbmb/MiniCPM-V-2_6')
image = load_image('https://raw.githubusercontent.com/open-mmlab/mmdeploy/main/tests/data/tiger.jpeg')
response = pipe(('describe this image', image))
print(response)
```
More examples are listed below:
Chat with multiple images
```python
from lmdeploy import pipeline, GenerationConfig
pipe = pipeline('openbmb/MiniCPM-V-2_6', log_level='INFO')
messages = [
dict(role='user', content=[
dict(type='text', text='Describe the two images in detail.'),
dict(type='image_url', image_url=dict(max_slice_nums=9, url='https://raw.githubusercontent.com/OpenGVLab/InternVL/main/internvl_chat/examples/image1.jpg')),
dict(type='image_url', image_url=dict(max_slice_nums=9, url='https://raw.githubusercontent.com/OpenGVLab/InternVL/main/internvl_chat/examples/image2.jpg'))
])
]
out = pipe(messages, gen_config=GenerationConfig(top_k=1))
print(out.text)
messages.append(dict(role='assistant', content=out.text))
messages.append(dict(role='user', content='What are the similarities and differences between these two images.'))
out = pipe(messages, gen_config=GenerationConfig(top_k=1))
print(out.text)
```
In-context few-shot learning
```python
from lmdeploy import pipeline, GenerationConfig
pipe = pipeline('openbmb/MiniCPM-V-2_6', log_level='INFO')
question = "production date"
messages = [
dict(role='user', content=[
dict(type='text', text=question),
dict(type='image_url', image_url=dict(url='example1.jpg')),
]),
dict(role='assistant', content='2023.08.04'),
dict(role='user', content=[
dict(type='text', text=question),
dict(type='image_url', image_url=dict(url='example2.jpg')),
]),
dict(role='assistant', content='2007.04.24'),
dict(role='user', content=[
dict(type='text', text=question),
dict(type='image_url', image_url=dict(url='test.jpg')),
])
]
out = pipe(messages, gen_config=GenerationConfig(top_k=1))
print(out.text)
```
Chat with video
```python
from lmdeploy import pipeline, GenerationConfig
from lmdeploy.vl.utils import encode_image_base64
import torch
from PIL import Image
from transformers import AutoModel, AutoTokenizer
from decord import VideoReader, cpu # pip install decord
pipe = pipeline('openbmb/MiniCPM-V-2_6', log_level='INFO')
MAX_NUM_FRAMES=64 # if cuda OOM set a smaller number
def encode_video(video_path):
def uniform_sample(l, n):
gap = len(l) / n
idxs = [int(i * gap + gap / 2) for i in range(n)]
return [l[i] for i in idxs]
vr = VideoReader(video_path, ctx=cpu(0))
sample_fps = round(vr.get_avg_fps() / 1) # FPS
frame_idx = [i for i in range(0, len(vr), sample_fps)]
if len(frame_idx) > MAX_NUM_FRAMES:
frame_idx = uniform_sample(frame_idx, MAX_NUM_FRAMES)
frames = vr.get_batch(frame_idx).asnumpy()
frames = [Image.fromarray(v.astype('uint8')) for v in frames]
print('num frames:', len(frames))
return frames
video_path="video_test.mp4"
frames = encode_video(video_path)
question = "Describe the video"
content=[dict(type='text', text=question)]
for frame in frames:
content.append(dict(type='image_url', image_url=dict(use_image_id=False, max_slice_nums=2,
url=f'data:image/jpeg;base64,{encode_image_base64(frame)}')))
messages = [dict(role='user', content=content)]
out = pipe(messages, gen_config=GenerationConfig(top_k=1))
print(out.text)
```
## Online serving
You can launch the server by the `lmdeploy serve api_server` CLI:
```shell
lmdeploy serve api_server openbmb/MiniCPM-V-2_6
```
You can also start the service using the official lmdeploy docker image:
```shell
docker run --runtime nvidia --gpus all \
-v ~/.cache/huggingface:/root/.cache/huggingface \
--env "HUGGING_FACE_HUB_TOKEN=" \
-p 23333:23333 \
--ipc=host \
openmmlab/lmdeploy:latest \
lmdeploy serve api_server openbmb/MiniCPM-V-2_6
```
The docker compose is another option. Create a `docker-compose.yml` configuration file in the root directory of the lmdeploy project as follows:
```yaml
version: '3.5'
services:
lmdeploy:
container_name: lmdeploy
image: openmmlab/lmdeploy:latest
ports:
- "23333:23333"
environment:
HUGGING_FACE_HUB_TOKEN:
volumes:
- ~/.cache/huggingface:/root/.cache/huggingface
stdin_open: true
tty: true
ipc: host
command: lmdeploy serve api_server openbmb/MiniCPM-V-2_6
deploy:
resources:
reservations:
devices:
- driver: nvidia
count: "all"
capabilities: [gpu]
```
Then, you can execute the startup command as below:
```shell
docker-compose up -d
```
If you find the following logs after running `docker logs -f lmdeploy`, it means the service launches successfully.
```text
HINT: Please open http://0.0.0.0:23333 in a browser for detailed api usage!!!
HINT: Please open http://0.0.0.0:23333 in a browser for detailed api usage!!!
HINT: Please open http://0.0.0.0:23333 in a browser for detailed api usage!!!
INFO: Started server process [2439]
INFO: Waiting for application startup.
INFO: Application startup complete.
INFO: Uvicorn running on http://0.0.0.0:23333 (Press CTRL+C to quit)
```
The arguments of `lmdeploy serve api_server` can be reviewed in detail by `lmdeploy serve api_server -h`.
More information about `api_server` as well as how to access the service can be found from [here](api_server_vl.md)
---
# Mllama
## Introduction
[Llama3.2-VL](https://huggingface.co/collections/meta-llama/llama-32-66f448ffc8c32f949b04c8cf) is a family of large language and multi-modal models from Meta.
We will demonstrate how to deploy an Llama3.2-VL model using LMDeploy, with [meta-llama/Llama-3.2-11B-Vision-Instruct](https://huggingface.co/meta-llama/Llama-3.2-11B-Vision-Instruct) as an example.
## Installation
Please install LMDeploy by following the [installation guide](../get_started/installation.md).
## Offline inference
The following sample code shows the basic usage of VLM pipeline. For more examples, please refer to [VLM Offline Inference Pipeline](./vl_pipeline.md)
```python
from lmdeploy import pipeline
from lmdeploy.vl import load_image
pipe = pipeline('meta-llama/Llama-3.2-11B-Vision-Instruct')
image = load_image('https://raw.githubusercontent.com/open-mmlab/mmdeploy/main/tests/data/tiger.jpeg')
response = pipe(('describe this image', image))
print(response)
```
## Online serving
### Launch Service
You can launch the server by the `lmdeploy serve api_server` CLI:
```shell
lmdeploy serve api_server meta-llama/Llama-3.2-11B-Vision-Instruct
```
### Integrate with `OpenAI`
Here is an example of interaction with the endpoint `v1/chat/completions` service via the openai package.
Before running it, please install the openai package by `pip install openai`
```python
from openai import OpenAI
client = OpenAI(api_key='YOUR_API_KEY', base_url='http://0.0.0.0:23333/v1')
model_name = client.models.list().data[0].id
response = client.chat.completions.create(
model=model_name,
messages=[{
'role':
'user',
'content': [{
'type': 'text',
'text': 'Describe the image please',
}, {
'type': 'image_url',
'image_url': {
'url':
'https://raw.githubusercontent.com/open-mmlab/mmdeploy/main/tests/data/tiger.jpeg',
},
}],
}],
temperature=0.8,
top_p=0.8)
print(response)
```
---
# Molmo
LMDeploy supports the following molmo series of models, which are detailed in the table below:
| Model | Size | Supported Inference Engine |
| :-------------: | :--: | :------------------------: |
| Molmo-7B-D-0924 | 7B | TurboMind |
| Molmo-72-0924 | 72B | TurboMind |
The next chapter demonstrates how to deploy a molmo model using LMDeploy, with [Molmo-7B-D-0924](https://huggingface.co/allenai/Molmo-7B-D-0924) as an example.
## Installation
Please install LMDeploy by following the [installation guide](../get_started/installation.md)
## Offline inference
The following sample code shows the basic usage of VLM pipeline. For detailed information, please refer to [VLM Offline Inference Pipeline](./vl_pipeline.md)
```python
from lmdeploy import pipeline
from lmdeploy.vl import load_image
pipe = pipeline('allenai/Molmo-7B-D-0924')
image = load_image('https://raw.githubusercontent.com/open-mmlab/mmdeploy/main/tests/data/tiger.jpeg')
response = pipe((f'describe this image', image))
print(response)
```
More examples are listed below:
multi-image multi-round conversation, combined images
```python
from lmdeploy import pipeline, GenerationConfig
pipe = pipeline('allenai/Molmo-7B-D-0924', log_level='INFO')
messages = [
dict(role='user', content=[
dict(type='text', text='Describe the two images in detail.'),
dict(type='image_url', image_url=dict(url='https://raw.githubusercontent.com/QwenLM/Qwen-VL/master/assets/mm_tutorial/Beijing_Small.jpeg')),
dict(type='image_url', image_url=dict(url='https://raw.githubusercontent.com/QwenLM/Qwen-VL/master/assets/mm_tutorial/Chongqing_Small.jpeg'))
])
]
out = pipe(messages, gen_config=GenerationConfig(do_sample=False))
messages.append(dict(role='assistant', content=out.text))
messages.append(dict(role='user', content='What are the similarities and differences between these two images.'))
out = pipe(messages, gen_config=GenerationConfig(do_sample=False))
```
## Online serving
You can launch the server by the `lmdeploy serve api_server` CLI:
```shell
lmdeploy serve api_server allenai/Molmo-7B-D-0924
```
You can also start the service using the docker image:
```shell
docker run --runtime nvidia --gpus all \
-v ~/.cache/huggingface:/root/.cache/huggingface \
--env "HUGGING_FACE_HUB_TOKEN=" \
-p 23333:23333 \
--ipc=host \
openmmlab/lmdeploy:latest \
lmdeploy serve api_server allenai/Molmo-7B-D-0924
```
If you find the following logs, it means the service launches successfully.
```text
HINT: Please open http://0.0.0.0:23333 in a browser for detailed api usage!!!
HINT: Please open http://0.0.0.0:23333 in a browser for detailed api usage!!!
HINT: Please open http://0.0.0.0:23333 in a browser for detailed api usage!!!
INFO: Started server process [2439]
INFO: Waiting for application startup.
INFO: Application startup complete.
INFO: Uvicorn running on http://0.0.0.0:23333 (Press CTRL+C to quit)
```
The arguments of `lmdeploy serve api_server` can be reviewed in detail by `lmdeploy serve api_server -h`.
More information about `api_server` as well as how to access the service can be found from [here](api_server_vl.md)
---
# Phi-3 Vision
## Introduction
[Phi-3](https://huggingface.co/collections/microsoft/phi-3-6626e15e9585a200d2d761e3) is a family of small language and multi-modal models from MicroSoft. LMDeploy supports the multi-modal models as below.
| Model | Size | Supported Inference Engine |
| :-------------------------------------------------------------------------------------------------: | :--: | :------------------------: |
| [microsoft/Phi-3-vision-128k-instruct](https://huggingface.co/microsoft/Phi-3-vision-128k-instruct) | 4.2B | PyTorch |
| [microsoft/Phi-3.5-vision-instruct](https://huggingface.co/microsoft/Phi-3.5-vision-instruct) | 4.2B | PyTorch |
The next chapter demonstrates how to deploy an Phi-3 model using LMDeploy, with [microsoft/Phi-3.5-vision-instruct](https://huggingface.co/microsoft/Phi-3.5-vision-instruct) as an example.
## Installation
Please install LMDeploy by following the [installation guide](../get_started/installation.md) and install the dependency [Flash-Attention](https://github.com/Dao-AILab/flash-attention)
```shell
# It is recommended to find the whl package that matches the environment from the releases on https://github.com/Dao-AILab/flash-attention.
pip install flash-attn
```
## Offline inference
The following sample code shows the basic usage of VLM pipeline. For more examples, please refer to [VLM Offline Inference Pipeline](./vl_pipeline.md)
```python
from lmdeploy import pipeline
from lmdeploy.vl import load_image
pipe = pipeline('microsoft/Phi-3.5-vision-instruct')
image = load_image('https://raw.githubusercontent.com/open-mmlab/mmdeploy/main/tests/data/tiger.jpeg')
response = pipe(('describe this image', image))
print(response)
```
## Online serving
### Launch Service
You can launch the server by the `lmdeploy serve api_server` CLI:
```shell
lmdeploy serve api_server microsoft/Phi-3.5-vision-instruct
```
### Integrate with `OpenAI`
Here is an example of interaction with the endpoint `v1/chat/completions` service via the openai package.
Before running it, please install the openai package by `pip install openai`
```python
from openai import OpenAI
client = OpenAI(api_key='YOUR_API_KEY', base_url='http://0.0.0.0:23333/v1')
model_name = client.models.list().data[0].id
response = client.chat.completions.create(
model=model_name,
messages=[{
'role':
'user',
'content': [{
'type': 'text',
'text': 'Describe the image please',
}, {
'type': 'image_url',
'image_url': {
'url':
'https://raw.githubusercontent.com/open-mmlab/mmdeploy/main/tests/data/tiger.jpeg',
},
}],
}],
temperature=0.8,
top_p=0.8)
print(response)
```
---
# Qwen2.5-VL
LMDeploy supports the following Qwen-VL series of models, which are detailed in the table below:
| Model | Size | Supported Inference Engine |
| :--------: | :--------------: | :------------------------: |
| Qwen2.5-VL | 3B, 7B, 32B, 72B | PyTorch |
The next chapter demonstrates how to deploy a Qwen-VL model using LMDeploy, with [Qwen2.5-VL-7B-Instruct](https://huggingface.co/Qwen/Qwen2.5-VL-7B-Instruct) as an example.
## Installation
Please install LMDeploy by following the [installation guide](../get_started/installation.md), and install other packages that Qwen2.5-VL needs
```shell
# Qwen2.5-VL requires the latest transformers (transformers >= 4.49.0)
pip install git+https://github.com/huggingface/transformers
# It's highly recommended to use `[decord]` feature for faster video loading.
pip install qwen-vl-utils[decord]==0.0.8
```
## Offline inference
The following sample code shows the basic usage of the VLM pipeline. For detailed information, please refer to [VLM Offline Inference Pipeline](./vl_pipeline.md)
```python
from lmdeploy import pipeline
from lmdeploy.vl import load_image
pipe = pipeline('Qwen/Qwen2.5-VL-7B-Instruct')
image = load_image('https://raw.githubusercontent.com/open-mmlab/mmdeploy/main/tests/data/tiger.jpeg')
response = pipe((f'describe this image', image))
print(response)
```
More examples are listed below:
multi-image multi-round conversation, combined images
```python
from lmdeploy import pipeline, GenerationConfig
pipe = pipeline('Qwen/Qwen2.5-VL-7B-Instruct', log_level='INFO')
messages = [
dict(role='user', content=[
dict(type='text', text='Describe the two images in detail.'),
dict(type='image_url', image_url=dict(url='https://raw.githubusercontent.com/QwenLM/Qwen-VL/master/assets/mm_tutorial/Beijing_Small.jpeg')),
dict(type='image_url', image_url=dict(url='https://raw.githubusercontent.com/QwenLM/Qwen-VL/master/assets/mm_tutorial/Chongqing_Small.jpeg'))
])
]
out = pipe(messages, gen_config=GenerationConfig(top_k=1))
messages.append(dict(role='assistant', content=out.text))
messages.append(dict(role='user', content='What are the similarities and differences between these two images.'))
out = pipe(messages, gen_config=GenerationConfig(top_k=1))
```
image resolution for performance boost
```python
from lmdeploy import pipeline, GenerationConfig
pipe = pipeline('Qwen/Qwen2.5-VL-7B-Instruct', log_level='INFO')
min_pixels = 64 * 28 * 28
max_pixels = 64 * 28 * 28
messages = [
dict(role='user', content=[
dict(type='text', text='Describe the two images in detail.'),
dict(type='image_url', image_url=dict(min_pixels=min_pixels, max_pixels=max_pixels, url='https://raw.githubusercontent.com/QwenLM/Qwen-VL/master/assets/mm_tutorial/Beijing_Small.jpeg')),
dict(type='image_url', image_url=dict(min_pixels=min_pixels, max_pixels=max_pixels, url='https://raw.githubusercontent.com/QwenLM/Qwen-VL/master/assets/mm_tutorial/Chongqing_Small.jpeg'))
])
]
out = pipe(messages, gen_config=GenerationConfig(top_k=1))
messages.append(dict(role='assistant', content=out.text))
messages.append(dict(role='user', content='What are the similarities and differences between these two images.'))
out = pipe(messages, gen_config=GenerationConfig(top_k=1))
```
video multi-round conversation
```python
import numpy as np
from lmdeploy import pipeline, GenerationConfig
from decord import VideoReader, cpu
from lmdeploy.vl.constants import IMAGE_TOKEN
from lmdeploy.vl.utils import encode_image_base64
from PIL import Image
pipe = pipeline('Qwen/Qwen2.5-VL-7B-Instruct', log_level='INFO')
def get_index(bound, fps, max_frame, first_idx=0, num_segments=32):
if bound:
start, end = bound[0], bound[1]
else:
start, end = -100000, 100000
start_idx = max(first_idx, round(start * fps))
end_idx = min(round(end * fps), max_frame)
seg_size = float(end_idx - start_idx) / num_segments
frame_indices = np.array([
int(start_idx + (seg_size / 2) + np.round(seg_size * idx))
for idx in range(num_segments)
])
return frame_indices
def load_video(video_path, bound=None, num_segments=32):
vr = VideoReader(video_path, ctx=cpu(0), num_threads=1)
max_frame = len(vr) - 1
fps = float(vr.get_avg_fps())
pixel_values_list, num_patches_list = [], []
frame_indices = get_index(bound, fps, max_frame, first_idx=0, num_segments=num_segments)
imgs = []
for frame_index in frame_indices:
img = Image.fromarray(vr[frame_index].asnumpy()).convert('RGB')
imgs.append(img)
return imgs
video_path = 'red-panda.mp4'
imgs = load_video(video_path, num_segments=8)
question = ''
for i in range(len(imgs)):
question = question + f'Frame{i+1}: {IMAGE_TOKEN}\n'
question += 'What is the red panda doing?'
content = [{'type': 'text', 'text': question}]
for img in imgs:
content.append({'type': 'image_url', 'image_url': {'max_dynamic_patch': 1, 'url': f'data:image/jpeg;base64,{encode_image_base64(img)}'}})
messages = [dict(role='user', content=content)]
out = pipe(messages, gen_config=GenerationConfig(top_k=1))
messages.append(dict(role='assistant', content=out.text))
messages.append(dict(role='user', content='Describe this video in detail. Don\'t repeat.'))
out = pipe(messages, gen_config=GenerationConfig(top_k=1))
```
---
# Qwen2-VL
LMDeploy supports the following Qwen-VL series of models, which are detailed in the table below:
| Model | Size | Supported Inference Engine |
| :----------: | :----: | :------------------------: |
| Qwen-VL-Chat | - | TurboMind |
| Qwen2-VL | 2B, 7B | PyTorch |
The next chapter demonstrates how to deploy an Qwen-VL model using LMDeploy, with [Qwen2-VL-7B-Instruct](https://huggingface.co/Qwen/Qwen2-VL-7B-Instruct) as an example.
## Installation
Please install LMDeploy by following the [installation guide](../get_started/installation.md), and install other packages that Qwen2-VL needs
```shell
pip install qwen_vl_utils
```
Or, you can build a docker image to set up the inference environment. If the CUDA version on your host machine is `>=12.4`, you can run:
```
git clone https://github.com/InternLM/lmdeploy.git
cd lmdeploy
docker build --build-arg CUDA_VERSION=cu12 -t openmmlab/lmdeploy:qwen2vl . -f ./docker/Qwen2VL_Dockerfile
```
Otherwise, you can go with:
```shell
docker build --build-arg CUDA_VERSION=cu11 -t openmmlab/lmdeploy:qwen2vl . -f ./docker/Qwen2VL_Dockerfile
```
## Offline inference
The following sample code shows the basic usage of VLM pipeline. For detailed information, please refer to [VLM Offline Inference Pipeline](./vl_pipeline.md)
```python
from lmdeploy import pipeline
from lmdeploy.vl import load_image
pipe = pipeline('Qwen/Qwen2-VL-2B-Instruct')
image = load_image('https://raw.githubusercontent.com/open-mmlab/mmdeploy/main/tests/data/tiger.jpeg')
response = pipe((f'describe this image', image))
print(response)
```
More examples are listed below:
multi-image multi-round conversation, combined images
```python
from lmdeploy import pipeline, GenerationConfig
pipe = pipeline('Qwen/Qwen2-VL-2B-Instruct', log_level='INFO')
messages = [
dict(role='user', content=[
dict(type='text', text='Describe the two images in detail.'),
dict(type='image_url', image_url=dict(url='https://raw.githubusercontent.com/QwenLM/Qwen-VL/master/assets/mm_tutorial/Beijing_Small.jpeg')),
dict(type='image_url', image_url=dict(url='https://raw.githubusercontent.com/QwenLM/Qwen-VL/master/assets/mm_tutorial/Chongqing_Small.jpeg'))
])
]
out = pipe(messages, gen_config=GenerationConfig(top_k=1))
messages.append(dict(role='assistant', content=out.text))
messages.append(dict(role='user', content='What are the similarities and differences between these two images.'))
out = pipe(messages, gen_config=GenerationConfig(top_k=1))
```
image resolution for performance boost
```python
from lmdeploy import pipeline, GenerationConfig
pipe = pipeline('Qwen/Qwen2-VL-2B-Instruct', log_level='INFO')
min_pixels = 64 * 28 * 28
max_pixels = 64 * 28 * 28
messages = [
dict(role='user', content=[
dict(type='text', text='Describe the two images in detail.'),
dict(type='image_url', image_url=dict(min_pixels=min_pixels, max_pixels=max_pixels, url='https://raw.githubusercontent.com/QwenLM/Qwen-VL/master/assets/mm_tutorial/Beijing_Small.jpeg')),
dict(type='image_url', image_url=dict(min_pixels=min_pixels, max_pixels=max_pixels, url='https://raw.githubusercontent.com/QwenLM/Qwen-VL/master/assets/mm_tutorial/Chongqing_Small.jpeg'))
])
]
out = pipe(messages, gen_config=GenerationConfig(top_k=1))
messages.append(dict(role='assistant', content=out.text))
messages.append(dict(role='user', content='What are the similarities and differences between these two images.'))
out = pipe(messages, gen_config=GenerationConfig(top_k=1))
```
## Online serving
You can launch the server by the `lmdeploy serve api_server` CLI:
```shell
lmdeploy serve api_server Qwen/Qwen2-VL-2B-Instruct
```
You can also start the service using the aforementioned built docker image:
```shell
docker run --runtime nvidia --gpus all \
-v ~/.cache/huggingface:/root/.cache/huggingface \
--env "HUGGING_FACE_HUB_TOKEN=" \
-p 23333:23333 \
--ipc=host \
openmmlab/lmdeploy:qwen2vl \
lmdeploy serve api_server Qwen/Qwen2-VL-2B-Instruct
```
The docker compose is another option. Create a `docker-compose.yml` configuration file in the root directory of the lmdeploy project as follows:
```yaml
version: '3.5'
services:
lmdeploy:
container_name: lmdeploy
image: openmmlab/lmdeploy:qwen2vl
ports:
- "23333:23333"
environment:
HUGGING_FACE_HUB_TOKEN:
volumes:
- ~/.cache/huggingface:/root/.cache/huggingface
stdin_open: true
tty: true
ipc: host
command: lmdeploy serve api_server Qwen/Qwen2-VL-2B-Instruct
deploy:
resources:
reservations:
devices:
- driver: nvidia
count: "all"
capabilities: [gpu]
```
Then, you can execute the startup command as below:
```shell
docker-compose up -d
```
If you find the following logs after running `docker logs -f lmdeploy`, it means the service launches successfully.
```text
HINT: Please open http://0.0.0.0:23333 in a browser for detailed api usage!!!
HINT: Please open http://0.0.0.0:23333 in a browser for detailed api usage!!!
HINT: Please open http://0.0.0.0:23333 in a browser for detailed api usage!!!
INFO: Started server process [2439]
INFO: Waiting for application startup.
INFO: Application startup complete.
INFO: Uvicorn running on http://0.0.0.0:23333 (Press CTRL+C to quit)
```
The arguments of `lmdeploy serve api_server` can be reviewed in detail by `lmdeploy serve api_server -h`.
More information about `api_server` as well as how to access the service can be found from [here](api_server_vl.md)
---
# Offline Inference Pipeline
LMDeploy abstracts the complex inference process of multi-modal Vision-Language Models (VLM) into an easy-to-use pipeline, similar to the Large Language Model (LLM) inference [pipeline](../llm/pipeline.md).
The supported models are listed [here](../supported_models/supported_models.md). We genuinely invite the community to contribute new VLM support to LMDeploy. Your involvement is truly appreciated.
This article showcases the VLM pipeline using the [OpenGVLab/InternVL2_5-8B](https://huggingface.co/OpenGVLab/InternVL2_5-8B) model as a case study.
You'll learn about the simplest ways to leverage the pipeline and how to gradually unlock more advanced features by adjusting engine parameters and generation arguments, such as tensor parallelism, context window sizing, random sampling, and chat template customization.
Moreover, we will provide practical inference examples tailored to scenarios with multiple images, batch prompts etc.
Using the pipeline interface to infer other VLM models is similar, with the main difference being the configuration and installation dependencies of the models. You can read [here](https://lmdeploy.readthedocs.io/en/latest/multi_modal/index.html) for environment installation and configuration methods for different models.
## A 'Hello, world' example
```python
from lmdeploy import pipeline
from lmdeploy.vl import load_image
pipe = pipeline('OpenGVLab/InternVL2_5-8B')
image = load_image('https://raw.githubusercontent.com/open-mmlab/mmdeploy/main/tests/data/tiger.jpeg')
response = pipe(('describe this image', image))
print(response)
```
If `ImportError` occurs while executing this case, please install the required dependency packages as prompted.
In the above example, the inference prompt is a tuple structure consisting of (prompt, image). Besides this structure, the pipeline also supports prompts in the OpenAI format:
```python
from lmdeploy import pipeline
pipe = pipeline('OpenGVLab/InternVL2_5-8B')
prompts = [
{
'role': 'user',
'content': [
{'type': 'text', 'text': 'describe this image'},
{'type': 'image_url', 'image_url': {'url': 'https://raw.githubusercontent.com/open-mmlab/mmdeploy/main/tests/data/tiger.jpeg'}}
]
}
]
response = pipe(prompts)
print(response)
```
### Set tensor parallelism
Tensor paramllelism can be activated by setting the engine parameter `tp`
```python
from lmdeploy import pipeline, TurbomindEngineConfig
from lmdeploy.vl import load_image
pipe = pipeline('OpenGVLab/InternVL2_5-8B',
backend_config=TurbomindEngineConfig(tp=2))
image = load_image('https://raw.githubusercontent.com/open-mmlab/mmdeploy/main/tests/data/tiger.jpeg')
response = pipe(('describe this image', image))
print(response)
```
### Set context window size
When creating the pipeline, you can customize the size of the context window by setting the engine parameter `session_len`.
```python
from lmdeploy import pipeline, TurbomindEngineConfig
from lmdeploy.vl import load_image
pipe = pipeline('OpenGVLab/InternVL2_5-8B',
backend_config=TurbomindEngineConfig(session_len=8192))
image = load_image('https://raw.githubusercontent.com/open-mmlab/mmdeploy/main/tests/data/tiger.jpeg')
response = pipe(('describe this image', image))
print(response)
```
### Set sampling parameters
You can change the default sampling parameters of pipeline by passing `GenerationConfig`
```python
from lmdeploy import pipeline, GenerationConfig, TurbomindEngineConfig
from lmdeploy.vl import load_image
pipe = pipeline('OpenGVLab/InternVL2_5-8B',
backend_config=TurbomindEngineConfig(tp=2, session_len=8192))
gen_config = GenerationConfig(top_k=40, top_p=0.8, temperature=0.6)
image = load_image('https://raw.githubusercontent.com/open-mmlab/mmdeploy/main/tests/data/tiger.jpeg')
response = pipe(('describe this image', image), gen_config=gen_config)
print(response)
```
### Customize image token position
By default, LMDeploy inserts the special image token into the user prompt following the chat template defined by the upstream algorithm repository. However, for certain models where the image token's position is unrestricted, such as deepseek-vl, or when users require a customized image token placement, manual insertion of the special image token into the prompt is necessary. LMDeploy use `` as the special image token.
```python
from lmdeploy import pipeline
from lmdeploy.vl import load_image
from lmdeploy.vl.constants import IMAGE_TOKEN
pipe = pipeline('deepseek-ai/deepseek-vl-1.3b-chat')
image = load_image('https://raw.githubusercontent.com/open-mmlab/mmdeploy/main/tests/data/tiger.jpeg')
response = pipe((f'describe this image{IMAGE_TOKEN}', image))
print(response)
```
### Set chat template
While performing inference, LMDeploy identifies an appropriate chat template from its builtin collection based on the model path and subsequently applies this template to the input prompts. However, when a chat template cannot be told from its model path, users have to specify it. For example, [liuhaotian/llava-v1.5-7b](https://huggingface.co/liuhaotian/llava-v1.5-7b) employs the ['llava-v1'](https://github.com/haotian-liu/LLaVA/blob/v1.2.2/llava/conversation.py#L325-L335) chat template, if user have a custom folder name instead of the official 'llava-v1.5-7b', the user needs to specify it by setting 'llava-v1' to `ChatTemplateConfig` as follows:
```python
from lmdeploy import pipeline, ChatTemplateConfig
from lmdeploy.vl import load_image
pipe = pipeline('local_model_folder',
chat_template_config=ChatTemplateConfig(model_name='llava-v1'))
image = load_image('https://raw.githubusercontent.com/open-mmlab/mmdeploy/main/tests/data/tiger.jpeg')
response = pipe(('describe this image', image))
print(response)
```
For more information about customizing a chat template, please refer to [this](../advance/chat_template.md) guide
### Setting vision model parameters
The default parameters of the visual model can be modified by setting `VisionConfig`.
```python
from lmdeploy import pipeline, VisionConfig
from lmdeploy.vl import load_image
vision_config=VisionConfig(max_batch_size=16)
pipe = pipeline('liuhaotian/llava-v1.5-7b', vision_config=vision_config)
image = load_image('https://raw.githubusercontent.com/open-mmlab/mmdeploy/main/tests/data/tiger.jpeg')
response = pipe(('describe this image', image))
print(response)
```
### Output logits for generated tokens
```python
from lmdeploy import pipeline, GenerationConfig
from lmdeploy.vl import load_image
pipe = pipeline('OpenGVLab/InternVL2_5-8B')
image = load_image('https://raw.githubusercontent.com/open-mmlab/mmdeploy/main/tests/data/tiger.jpeg')
response = pipe(('describe this image', image),
gen_config=GenerationConfig(output_logits='generation'))
logits = response.logits
print(logits)
```
## Multi-images inference
When dealing with multiple images, you can put them all in one list. Keep in mind that multiple images will lead to a higher number of input tokens, and as a result, the size of the [context window](#set-context-window-size) typically needs to be increased.
```python
from lmdeploy import pipeline, TurbomindEngineConfig
from lmdeploy.vl import load_image
pipe = pipeline('OpenGVLab/InternVL2_5-8B',
backend_config=TurbomindEngineConfig(session_len=8192))
image_urls=[
'https://raw.githubusercontent.com/open-mmlab/mmdeploy/main/demo/resources/human-pose.jpg',
'https://raw.githubusercontent.com/open-mmlab/mmdeploy/main/demo/resources/det.jpg'
]
images = [load_image(img_url) for img_url in image_urls]
response = pipe(('describe these images', images))
print(response)
```
## Batch prompts inference
Conducting inference with batch prompts is quite straightforward; just place them within a list structure:
```python
from lmdeploy import pipeline, TurbomindEngineConfig
from lmdeploy.vl import load_image
pipe = pipeline('OpenGVLab/InternVL2_5-8B',
backend_config=TurbomindEngineConfig(session_len=8192))
image_urls=[
"https://raw.githubusercontent.com/open-mmlab/mmdeploy/main/demo/resources/human-pose.jpg",
"https://raw.githubusercontent.com/open-mmlab/mmdeploy/main/demo/resources/det.jpg"
]
prompts = [('describe this image', load_image(img_url)) for img_url in image_urls]
response = pipe(prompts)
print(response)
```
## Multi-turn conversation
There are two ways to do the multi-turn conversations with the pipeline. One is to construct messages according to the format of OpenAI and use above introduced method, the other is to use the `pipeline.chat` interface.
```python
from lmdeploy import pipeline, TurbomindEngineConfig, GenerationConfig
from lmdeploy.vl import load_image
pipe = pipeline('OpenGVLab/InternVL2_5-8B',
backend_config=TurbomindEngineConfig(session_len=8192))
image = load_image('https://raw.githubusercontent.com/open-mmlab/mmdeploy/main/demo/resources/human-pose.jpg')
gen_config = GenerationConfig(top_k=40, top_p=0.8, temperature=0.8)
sess = pipe.chat(('describe this image', image), gen_config=gen_config)
print(sess.response.text)
sess = pipe.chat('What is the woman doing?', session=sess, gen_config=gen_config)
print(sess.response.text)
```
## Release pipeline
You can release the pipeline explicitly by calling its `close()` method, or alternatively, use the `with` statement as demonstrated below:
```python
from lmdeploy import pipeline
from lmdeploy import pipeline
from lmdeploy.vl import load_image
with pipeline('OpenGVLab/InternVL2_5-8B') as pipe:
image = load_image('https://raw.githubusercontent.com/open-mmlab/mmdeploy/main/tests/data/tiger.jpeg')
response = pipe(('describe this image', image))
print(response)
# Clear the torch cache and perform garbage collection if needed
import torch
import gc
torch.cuda.empty_cache()
gc.collect()
```
---
# InternLM-XComposer-2.5
## Introduction
[InternLM-XComposer-2.5](https://github.com/InternLM/InternLM-XComposer) excels in various text-image comprehension and composition applications, achieving GPT-4V level capabilities with merely 7B LLM backend. IXC-2.5 is trained with 24K interleaved image-text contexts, it can seamlessly extend to 96K long contexts via RoPE extrapolation. This long-context capability allows IXC-2.5 to perform exceptionally well in tasks requiring extensive input and output contexts. LMDeploy supports model [internlm/internlm-xcomposer2d5-7b](https://huggingface.co/internlm/internlm-xcomposer2d5-7b) in TurboMind engine.
## Quick Start
### Installation
Please install LMDeploy by following the [installation guide](../get_started/installation.md), and install other packages that InternLM-XComposer-2.5 needs
```shell
pip install decord
```
### Offline inference pipeline
The following sample code shows the basic usage of VLM pipeline. For more examples, please refer to [VLM Offline Inference Pipeline](./vl_pipeline.md)
```python
from lmdeploy import pipeline
from lmdeploy.vl import load_image
from lmdeploy.vl.constants import IMAGE_TOKEN
pipe = pipeline('internlm/internlm-xcomposer2d5-7b')
image = load_image('https://raw.githubusercontent.com/open-mmlab/mmdeploy/main/tests/data/tiger.jpeg')
response = pipe((f'describe this image', image))
print(response)
```
## Lora Model
InternLM-XComposer-2.5 trained the LoRA weights for webpage creation and article writing. As TurboMind backend doesn't support slora, only one LoRA model can be deployed at a time, and the LoRA weights need to be merged when deploying the model. LMDeploy provides the corresponding conversion script, which is used as follows:
```
export HF_MODEL=internlm/internlm-xcomposer2d5-7b
export WORK_DIR=internlm/internlm-xcomposer2d5-7b-web
export TASK=web
python -m lmdeploy.vl.tools.merge_xcomposer2d5_task $HF_MODEL $WORK_DIR --task $TASK
```
## Quantization
The following takes the base model as an example to show the quantization method. If you want to use the LoRA model, please merge the LoRA model according to the previous section.
```shell
export HF_MODEL=internlm/internlm-xcomposer2d5-7b
export WORK_DIR=internlm/internlm-xcomposer2d5-7b-4bit
lmdeploy lite auto_awq \
$HF_MODEL \
--work-dir $WORK_DIR
```
## More examples
Video Understanding
The following uses the `pipeline.chat` interface api as an example to demonstrate its usage. Other interfaces apis also support inference but require manually splicing of conversation content.
```python
from lmdeploy import pipeline, GenerationConfig
from transformers.dynamic_module_utils import get_class_from_dynamic_module
HF_MODEL = 'internlm/internlm-xcomposer2d5-7b'
load_video = get_class_from_dynamic_module('ixc_utils.load_video', HF_MODEL)
frame2img = get_class_from_dynamic_module('ixc_utils.frame2img', HF_MODEL)
Video_transform = get_class_from_dynamic_module('ixc_utils.Video_transform', HF_MODEL)
get_font = get_class_from_dynamic_module('ixc_utils.get_font', HF_MODEL)
video = load_video('liuxiang.mp4') # https://github.com/InternLM/InternLM-XComposer/raw/main/examples/liuxiang.mp4
img = frame2img(video, get_font())
img = Video_transform(img)
pipe = pipeline(HF_MODEL)
gen_config = GenerationConfig(top_k=50, top_p=0.8, temperature=1.0)
query = 'Here are some frames of a video. Describe this video in detail'
sess = pipe.chat((query, img), gen_config=gen_config)
print(sess.response.text)
query = 'tell me the athlete code of Liu Xiang'
sess = pipe.chat(query, session=sess, gen_config=gen_config)
print(sess.response.text)
```
Multi-Image
```python
from lmdeploy import pipeline, GenerationConfig
from lmdeploy.vl.constants import IMAGE_TOKEN
from lmdeploy.vl import load_image
query = f'Image1 {IMAGE_TOKEN}; Image2 {IMAGE_TOKEN}; Image3 {IMAGE_TOKEN}; I want to buy a car from the three given cars, analyze their advantages and weaknesses one by one'
urls = ['https://raw.githubusercontent.com/InternLM/InternLM-XComposer/main/examples/cars1.jpg',
'https://raw.githubusercontent.com/InternLM/InternLM-XComposer/main/examples/cars2.jpg',
'https://raw.githubusercontent.com/InternLM/InternLM-XComposer/main/examples/cars3.jpg']
images = [load_image(url) for url in urls]
pipe = pipeline('internlm/internlm-xcomposer2d5-7b', log_level='INFO')
output = pipe((query, images), gen_config=GenerationConfig(top_k=0, top_p=0.8, random_seed=89247526689433939))
```
Since LMDeploy does not support beam search, the generated results will be quite different from those using beam search with transformers. It is recommended to turn off top_k or use a larger top_k sampling to increase diversity.
Instruction to Webpage
Please first convert the web model using the instructions above.
```python
from lmdeploy import pipeline, GenerationConfig
pipe = pipeline('/nvme/shared/internlm-xcomposer2d5-7b-web', log_level='INFO')
pipe.chat_template.meta_instruction = None
query = 'A website for Research institutions. The name is Shanghai AI lab. Top Navigation Bar is blue.Below left, an image shows the logo of the lab. In the right, there is a passage of text below that describes the mission of the laboratory.There are several images to show the research projects of Shanghai AI lab.'
output = pipe(query, gen_config=GenerationConfig(max_new_tokens=2048))
```
When using transformers for testing, it is found that if repetition_penalty is set, there is a high probability that the decode phase will not stop if `num_beams` is set to 1. As LMDeploy does not support beam search, it is recommended to turn off repetition_penalty when using LMDeploy for inference.
Write Article
Please first convert the write model using the instructions above.
```python
from lmdeploy import pipeline, GenerationConfig
pipe = pipeline('/nvme/shared/internlm-xcomposer2d5-7b-write', log_level='INFO')
pipe.chat_template.meta_instruction = None
query = 'Please write a blog based on the title: French Pastries: A Sweet Indulgence'
output = pipe(query, gen_config=GenerationConfig(max_new_tokens=8192))
```
---
# INT4/INT8 KV Cache
Since v0.4.0, LMDeploy has supported **online** key-value (kv) cache quantization with int4 and int8 numerical precision, utilizing an asymmetric quantization method that is applied on a per-head, per-token basis. The original kv offline quantization method has been removed.
Intuitively, quantization is beneficial for increasing the number of kv block. Compared to fp16, the number of kv block for int4/int8 kv can be increased by 4 times and 2 times respectively. This means that under the same memory conditions, the system can support a significantly increased number of concurrent operations after kv quantization, thereby ultimately enhancing throughput.
However, quantization typically brings in some loss of model accuracy. We have used OpenCompass to evaluate the accuracy of several models after applying int4/int8 quantization. int8 kv keeps the accuracy while int4 kv has slight loss. The detailed results are presented in the [Evaluation](#evaluation) section. You can refer to the information and choose wisely based on your requirements.
LMDeploy inference with quantized kv supports the following NVIDIA GPU models:
- Volta architecture (sm70): V100
- Turing architecture (sm75): 20 series, T4
- Ampere architecture (sm80, sm86): 30 series, A10, A16, A30, A100
- Ada Lovelace architecture (sm89): 40 series
- Hopper architecture (sm90): H100, H200
In summary, LMDeploy kv quantization has the following advantages:
1. data-free online quantization
2. Supports all nvidia GPU models with Volta architecture (sm70) and above
3. KV int8 quantization has almost lossless accuracy, and KV int4 quantization accuracy is within an acceptable range
4. Efficient inference, with int8/int4 kv quantization applied to llama2-7b, RPS is improved by round 30% and 40% respectively compared to fp16
In the next section, we will take `internlm2-chat-7b` model as an example, introducing the usage of kv quantization and inference of lmdeploy. But before that, please ensure that lmdeploy is installed.
```shell
pip install lmdeploy
```
## Usage
Applying kv quantization and inference via LMDeploy is quite straightforward. Simply set the `quant_policy` parameter.
**LMDeploy specifies that `quant_policy=4` stands for 4-bit kv, whereas `quant_policy=8` indicates 8-bit kv.**
### Offline inference
```python
from lmdeploy import pipeline, TurbomindEngineConfig
engine_config = TurbomindEngineConfig(quant_policy=8)
pipe = pipeline("internlm/internlm2_5-7b-chat", backend_config=engine_config)
response = pipe(["Hi, pls intro yourself", "Shanghai is"])
print(response)
```
### Serving
```shell
lmdeploy serve api_server internlm/internlm2_5-7b-chat --quant-policy 8
```
## Evaluation
We apply kv quantization of LMDeploy to several LLM models and utilize OpenCompass to evaluate the inference accuracy. The results are shown in the table below:
| - | - | - | llama2-7b-chat | - | - | internlm2-chat-7b | - | - | internlm2.5-chat-7b | - | - | qwen1.5-7b-chat | - | - |
| ----------- | ------- | ------------- | -------------- | ------- | ------- | ----------------- | ------- | ------- | ------------------- | ------- | ------- | --------------- | ------- | ------- |
| dataset | version | metric | kv fp16 | kv int8 | kv int4 | kv fp16 | kv int8 | kv int4 | kv fp16 | kv int8 | kv int4 | fp16 | kv int8 | kv int4 |
| ceval | - | naive_average | 28.42 | 27.96 | 27.58 | 60.45 | 60.88 | 60.28 | 78.06 | 77.87 | 77.05 | 70.56 | 70.49 | 68.62 |
| mmlu | - | naive_average | 35.64 | 35.58 | 34.79 | 63.91 | 64 | 62.36 | 72.30 | 72.27 | 71.17 | 61.48 | 61.56 | 60.65 |
| triviaqa | 2121ce | score | 56.09 | 56.13 | 53.71 | 58.73 | 58.7 | 58.18 | 65.09 | 64.87 | 63.28 | 44.62 | 44.77 | 44.04 |
| gsm8k | 1d7fe4 | accuracy | 28.2 | 28.05 | 27.37 | 70.13 | 69.75 | 66.87 | 85.67 | 85.44 | 83.78 | 54.97 | 56.41 | 54.74 |
| race-middle | 9a54b6 | accuracy | 41.57 | 41.78 | 41.23 | 88.93 | 88.93 | 88.93 | 92.76 | 92.83 | 92.55 | 87.33 | 87.26 | 86.28 |
| race-high | 9a54b6 | accuracy | 39.65 | 39.77 | 40.77 | 85.33 | 85.31 | 84.62 | 90.51 | 90.42 | 90.42 | 82.53 | 82.59 | 82.02 |
For detailed evaluation methods, please refer to [this](../benchmark/evaluate_with_opencompass.md) guide. Remember to pass `quant_policy` to the inference engine in the config file.
## Performance
| model | kv type | test settings | RPS | v.s. kv fp16 |
| ----------------- | ------- | ---------------------------------------- | ----- | ------------ |
| llama2-chat-7b | fp16 | tp1 / ratio 0.8 / bs 256 / prompts 10000 | 14.98 | 1.0 |
| - | int8 | tp1 / ratio 0.8 / bs 256 / prompts 10000 | 19.01 | 1.27 |
| - | int4 | tp1 / ratio 0.8 / bs 256 / prompts 10000 | 20.81 | 1.39 |
| llama2-chat-13b | fp16 | tp1 / ratio 0.9 / bs 128 / prompts 10000 | 8.55 | 1.0 |
| - | int8 | tp1 / ratio 0.9 / bs 256 / prompts 10000 | 10.96 | 1.28 |
| - | int4 | tp1 / ratio 0.9 / bs 256 / prompts 10000 | 11.91 | 1.39 |
| internlm2-chat-7b | fp16 | tp1 / ratio 0.8 / bs 256 / prompts 10000 | 24.13 | 1.0 |
| - | int8 | tp1 / ratio 0.8 / bs 256 / prompts 10000 | 25.28 | 1.05 |
| - | int4 | tp1 / ratio 0.8 / bs 256 / prompts 10000 | 25.80 | 1.07 |
The performance data is obtained by `benchmark/profile_throughput.py`
---
# AWQ/GPTQ
LMDeploy TurboMind engine supports the inference of 4bit quantized models that are quantized both by [AWQ](https://arxiv.org/abs/2306.00978) and [GPTQ](https://github.com/AutoGPTQ/AutoGPTQ), but its quantization module only supports the AWQ quantization algorithm.
The following NVIDIA GPUs are available for AWQ/GPTQ INT4 inference:
- V100(sm70): V100
- Turing(sm75): 20 series, T4
- Ampere(sm80,sm86): 30 series, A10, A16, A30, A100
- Ada Lovelace(sm89): 40 series
Before proceeding with the quantization and inference, please ensure that lmdeploy is installed by following the [installation guide](../get_started/installation.md)
The remainder of this article is structured into the following sections:
- [Quantization](#quantization)
- [Evaluation](#evaluation)
- [Inference](#inference)
- [Service](#service)
- [Performance](#performance)
## Quantization
A single command execution is all it takes to quantize the model. The resulting quantized weights are then stored in the $WORK_DIR directory.
```shell
export HF_MODEL=internlm/internlm2_5-7b-chat
export WORK_DIR=internlm/internlm2_5-7b-chat-4bit
lmdeploy lite auto_awq \
$HF_MODEL \
--calib-dataset 'ptb' \
--calib-samples 128 \
--calib-seqlen 2048 \
--w-bits 4 \
--w-group-size 128 \
--batch-size 1 \
--work-dir $WORK_DIR
```
Typically, the above command doesn't require filling in optional parameters, as the defaults usually suffice. For instance, when quantizing the [internlm/internlm2_5-7b-chat](https://huggingface.co/internlm/internlm2_5-7b-chat) model, the command can be condensed as:
```shell
lmdeploy lite auto_awq internlm/internlm2_5-7b-chat --work-dir internlm2_5-7b-chat-4bit
```
**Note:**
- We recommend that you specify the --work-dir parameter, including the model name as demonstrated in the example above. This facilitates LMDeploy in fuzzy matching the --work-dir with an appropriate built-in chat template. Otherwise, you will have to designate the chat template during inference.
- If the quantized model’s accuracy is compromised, it is recommended to enable --search-scale for re-quantization and increase the --batch-size, for example, to 8. When search_scale is enabled, the quantization process will take more time. The --batch-size affects the amount of memory used, which can be adjusted according to actual conditions as needed.
Upon completing quantization, you can engage with the model efficiently using a variety of handy tools.
For example, you can initiate a conversation with it via the command line:
```shell
lmdeploy chat ./internlm2_5-7b-chat-4bit --model-format awq
```
## Evaluation
Please refer to [OpenCompass](https://opencompass.readthedocs.io/en/latest/index.html) about model evaluation with LMDeploy. Here is the [guide](https://opencompass.readthedocs.io/en/latest/advanced_guides/evaluation_lmdeploy.html)
## Inference
Trying the following codes, you can perform the batched offline inference with the quantized model:
```python
from lmdeploy import pipeline, TurbomindEngineConfig
engine_config = TurbomindEngineConfig(model_format='awq')
pipe = pipeline("./internlm2_5-7b-chat-4bit", backend_config=engine_config)
response = pipe(["Hi, pls intro yourself", "Shanghai is"])
print(response)
```
For more information about the pipeline parameters, please refer to [here](../llm/pipeline.md).
In addition to performing inference with the quantized model on localhost, LMDeploy can also execute inference for the 4bit quantized model derived from AWQ algorithm available on Huggingface Hub, such as models from the [lmdeploy space](https://huggingface.co/lmdeploy) and [TheBloke space](https://huggingface.co/TheBloke)
```python
# inference with models from lmdeploy space
from lmdeploy import pipeline, TurbomindEngineConfig
pipe = pipeline("lmdeploy/llama2-chat-70b-4bit",
backend_config=TurbomindEngineConfig(model_format='awq', tp=4))
response = pipe(["Hi, pls intro yourself", "Shanghai is"])
print(response)
# inference with models from thebloke space
from lmdeploy import pipeline, TurbomindEngineConfig, ChatTemplateConfig
pipe = pipeline("TheBloke/LLaMA2-13B-Tiefighter-AWQ",
backend_config=TurbomindEngineConfig(model_format='awq'),
chat_template_config=ChatTemplateConfig(model_name='llama2')
)
response = pipe(["Hi, pls intro yourself", "Shanghai is"])
print(response)
```
## Service
LMDeploy's `api_server` enables models to be easily packed into services with a single command. The provided RESTful APIs are compatible with OpenAI's interfaces. Below are an example of service startup:
```shell
lmdeploy serve api_server ./internlm2_5-7b-chat-4bit --backend turbomind --model-format awq
```
The default port of `api_server` is `23333`. After the server is launched, you can communicate with server on terminal through `api_client`:
```shell
lmdeploy serve api_client http://0.0.0.0:23333
```
You can overview and try out `api_server` APIs online by swagger UI at `http://0.0.0.0:23333`, or you can also read the API specification from [here](../llm/api_server.md).
## Performance
We benchmarked the Llama-2-7B-chat and Llama-2-13B-chat models with 4-bit quantization on NVIDIA GeForce RTX 4090. And we measure the token generation throughput (tokens/s) by setting a single prompt token and generating 512 tokens. All the results are measured for single batch inference.
| model | llm-awq | mlc-llm | turbomind |
| ---------------- | ------- | ------- | --------- |
| Llama-2-7B-chat | 112.9 | 159.4 | 206.4 |
| Llama-2-13B-chat | N/A | 90.7 | 115.8 |
## FAQs
1. Out of Memory error during quantization due to insufficient GPU memory: This can be addressed by reducing the parameter `--calib-seqlen`, increasing the parameter `--calib-samples`, and set `--batch-size` to 1.
---
# SmoothQuant
LMDeploy provides functions for quantization and inference of large language models using 8-bit integers(INT8). For GPUs such as Nvidia H100, lmdeploy also supports 8-bit floating point(FP8).
And the following NVIDIA GPUs are available for INT8/FP8 inference respectively:
- INT8
- V100(sm70): V100
- Turing(sm75): 20 series, T4
- Ampere(sm80,sm86): 30 series, A10, A16, A30, A100
- Ada Lovelace(sm89): 40 series
- Hopper(sm90): H100
- FP8
- Ada Lovelace(sm89): 40 series
- Hopper(sm90): H100
First of all, run the following command to install lmdeploy:
```shell
pip install lmdeploy[all]
```
## 8-bit Weight Quantization
Performing 8-bit weight quantization involves three steps:
1. **Smooth Weights**: Start by smoothing the weights of the Language Model (LLM). This process makes the weights more amenable to quantizing.
2. **Replace Modules**: Locate DecoderLayers and replace the modules RSMNorm and nn.Linear with QRSMNorm and QLinear modules respectively. These 'Q' modules are available in the lmdeploy/pytorch/models/q_modules.py file.
3. **Save the Quantized Model**: Once you've made the necessary replacements, save the new quantized model.
lmdeploy provides `lmdeploy lite smooth_quant` command to accomplish all three tasks detailed above. Note that the argument `--quant-dtype` is used to determine if you are doing int8 or fp8 weight quantization. To get more info about usage of the cli, run `lmdeploy lite smooth_quant --help`
Here are two examples:
- int8
```shell
lmdeploy lite smooth_quant internlm/internlm2_5-7b-chat --work-dir ./internlm2_5-7b-chat-int8 --quant-dtype int8
```
- fp8
```shell
lmdeploy lite smooth_quant internlm/internlm2_5-7b-chat --work-dir ./internlm2_5-7b-chat-fp8 --quant-dtype fp8
```
## Inference
Trying the following codes, you can perform the batched offline inference with the quantized model:
```python
from lmdeploy import pipeline, PytorchEngineConfig
engine_config = PytorchEngineConfig(tp=1)
pipe = pipeline("internlm2_5-7b-chat-int8", backend_config=engine_config)
response = pipe(["Hi, pls intro yourself", "Shanghai is"])
print(response)
```
## Service
LMDeploy's `api_server` enables models to be easily packed into services with a single command. The provided RESTful APIs are compatible with OpenAI's interfaces. Below are an example of service startup:
```shell
lmdeploy serve api_server ./internlm2_5-7b-chat-int8 --backend pytorch
```
The default port of `api_server` is `23333`. After the server is launched, you can communicate with server on terminal through `api_client`:
```shell
lmdeploy serve api_client http://0.0.0.0:23333
```
You can overview and try out `api_server` APIs online by swagger UI at `http://0.0.0.0:23333`, or you can also read the API specification from [here](../llm/api_server.md).
---
# Reward Models
LMDeploy supports reward models, which are detailed in the table below:
| Model | Size | Supported Inference Engine |
| :--------------: | :-----------: | :------------------------: |
| Qwen2.5-Math-RM | 72B | PyTorch |
| InternLM2-Reward | 1.8B, 7B, 20B | PyTorch |
| POLAR | 1.8B, 7B | PyTorch |
## Offline Inference
We take `internlm/internlm2-1_8b-reward` as an example:
```python
from transformers import AutoTokenizer
from lmdeploy import pipeline, PytorchEngineConfig
model_path = "internlm/internlm2-1_8b-reward"
chat = [
{"role": "system", "content": "Please reason step by step, and put your final answer within \\boxed{}."},
{"role": "user", "content": "Janet’s ducks lay 16 eggs per day. She eats three for breakfast every morning and bakes muffins for her friends every day with four. She sells the remainder at the farmers' market daily for $2 per fresh duck egg. How much in dollars does she make every day at the farmers' market?"},
{"role": "assistant", "content": "To determine how much Janet makes from selling the duck eggs at the farmers' market, we need to follow these steps:\n\n1. Calculate the total number of eggs laid by the ducks each day.\n2. Determine how many eggs Janet eats and bakes for herself each day.\n3. Find out how many eggs are left to be sold.\n4. Calculate the revenue from selling the remaining eggs at $2 per egg.\n\nLet's start with the first step:\n\n1. Janet's ducks lay 16 eggs per day.\n\nNext, we calculate how many eggs Janet eats and bakes for herself each day:\n\n2. Janet eats 3 eggs for breakfast every morning.\n3. Janet bakes 4 eggs for her friends every day.\n\nSo, the total number of eggs Janet eats and bakes for herself each day is:\n\\[ 3 + 4 = 7 \\text{ eggs} \\]\n\nNow, we find out how many eggs are left to be sold:\n\\[ 16 - 7 = 9 \\text{ eggs} \\]\n\nFinally, we calculate the revenue from selling the remaining eggs at $2 per egg:\n\\[ 9 \\times 2 = 18 \\text{ dollars} \\]\n\nTherefore, Janet makes 18 dollars every day at the farmers' market."}
]
tokenizer = AutoTokenizer.from_pretrained(model_path, trust_remote_code=True)
conversation_str = tokenizer.apply_chat_template(
chat,
tokenize=False,
add_generation_prompt=False
)
input_ids = tokenizer.encode(
conversation_str,
add_special_tokens=False
)
if __name__ == '__main__':
engine_config = PytorchEngineConfig(tp=tp)
with pipeline(model_path, backend_config=engine_config) as pipe:
score = pipe.get_reward_score(input_ids)
print(f'score: {score}')
```
## Online Inference
Start the API server:
```bash
lmdeploy serve api_server internlm/internlm2-1_8b-reward --backend pytorch
```
Get the reward score from the `/pooling` API endpoint:
```
curl http://0.0.0.0:23333/pooling \
-H "Content-Type: application/json" \
-d '{
"model": "internlm/internlm2-1_8b-reward",
"input": "Who are you?"
}'
```
---
# Supported Models
The following tables detail the models supported by LMDeploy's TurboMind engine and PyTorch engine across different platforms.
## TurboMind on CUDA Platform
| Model | Size | Type | FP16/BF16 | KV INT8 | KV INT4 | W4A16 |
| :------------------------------: | :--------------: | :--: | :-------: | :-----: | :-----: | :---: |
| Llama | 7B - 65B | LLM | Yes | Yes | Yes | Yes |
| Llama2 | 7B - 70B | LLM | Yes | Yes | Yes | Yes |
| Llama3 | 8B, 70B | LLM | Yes | Yes | Yes | Yes |
| Llama3.1 | 8B, 70B | LLM | Yes | Yes | Yes | Yes |
| Llama3.2\[2\] | 1B, 3B | LLM | Yes | Yes\* | Yes\* | Yes |
| InternLM | 7B - 20B | LLM | Yes | Yes | Yes | Yes |
| InternLM2 | 7B - 20B | LLM | Yes | Yes | Yes | Yes |
| InternLM2.5 | 7B | LLM | Yes | Yes | Yes | Yes |
| InternLM3 | 8B | LLM | Yes | Yes | Yes | Yes |
| InternLM-XComposer2 | 7B, 4khd-7B | MLLM | Yes | Yes | Yes | Yes |
| InternLM-XComposer2.5 | 7B | MLLM | Yes | Yes | Yes | Yes |
| Intern-S1 | 241B | MLLM | Yes | Yes | Yes | No |
| Intern-S1-mini | 8.3B | MLLM | Yes | Yes | Yes | No |
| Qwen | 1.8B - 72B | LLM | Yes | Yes | Yes | Yes |
| Qwen1.5\[1\] | 1.8B - 110B | LLM | Yes | Yes | Yes | Yes |
| Qwen2\[2\] | 0.5B - 72B | LLM | Yes | Yes\* | Yes\* | Yes |
| Qwen2-MoE | 57BA14B | LLM | Yes | Yes | Yes | Yes |
| Qwen2.5\[2\] | 0.5B - 72B | LLM | Yes | Yes\* | Yes\* | Yes |
| Qwen3 | 0.6B-235B | LLM | Yes | Yes | Yes\* | Yes\* |
| Mistral\[1\] | 7B | LLM | Yes | Yes | Yes | No |
| Mixtral | 8x7B, 8x22B | LLM | Yes | Yes | Yes | Yes |
| DeepSeek-V2 | 16B, 236B | LLM | Yes | Yes | Yes | No |
| DeepSeek-V2.5 | 236B | LLM | Yes | Yes | Yes | No |
| Qwen-VL | 7B | MLLM | Yes | Yes | Yes | Yes |
| DeepSeek-VL | 7B | MLLM | Yes | Yes | Yes | Yes |
| Baichuan | 7B | LLM | Yes | Yes | Yes | Yes |
| Baichuan2 | 7B | LLM | Yes | Yes | Yes | Yes |
| Code Llama | 7B - 34B | LLM | Yes | Yes | Yes | No |
| YI | 6B - 34B | LLM | Yes | Yes | Yes | Yes |
| LLaVA(1.5,1.6) | 7B - 34B | MLLM | Yes | Yes | Yes | Yes |
| InternVL | v1.1 - v1.5 | MLLM | Yes | Yes | Yes | Yes |
| InternVL2\[2\] | 1 - 2B, 8B - 76B | MLLM | Yes | Yes\* | Yes\* | Yes |
| InternVL2.5(MPO)\[2\] | 1 - 78B | MLLM | Yes | Yes\* | Yes\* | Yes |
| InternVL3\[2\] | 1 - 78B | MLLM | Yes | Yes\* | Yes\* | Yes |
| InternVL3.5\[3\] | 1 - 241BA28B | MLLM | Yes | Yes\* | Yes\* | No |
| ChemVLM | 8B - 26B | MLLM | Yes | Yes | Yes | Yes |
| MiniCPM-Llama3-V-2_5 | - | MLLM | Yes | Yes | Yes | Yes |
| MiniCPM-V-2_6 | - | MLLM | Yes | Yes | Yes | Yes |
| GLM4 | 9B | LLM | Yes | Yes | Yes | Yes |
| CodeGeeX4 | 9B | LLM | Yes | Yes | Yes | - |
| Molmo | 7B-D,72B | MLLM | Yes | Yes | Yes | No |
| gpt-oss | 20B,120B | LLM | Yes | Yes | Yes | Yes |
"-" means not verified yet.
```{note}
* [1] The TurboMind engine doesn't support window attention. Therefore, for models that have applied window attention and have the corresponding switch "use_sliding_window" enabled, such as Mistral, Qwen1.5 and etc., please choose the PyTorch engine for inference.
* [2] When the head_dim of a model is not 128, such as llama3.2-1B, qwen2-0.5B and internvl2-1B, turbomind doesn't support its kv cache 4/8 bit quantization and inference
```
## PyTorchEngine on CUDA Platform
| Model | Size | Type | FP16/BF16 | KV INT8 | KV INT4 | W8A8 | W4A16 |
| :----------------------------: | :-------------: | :--: | :-------: | :-----: | :-----: | :--: | :---: |
| Llama | 7B - 65B | LLM | Yes | Yes | Yes | Yes | Yes |
| Llama2 | 7B - 70B | LLM | Yes | Yes | Yes | Yes | Yes |
| Llama3 | 8B, 70B | LLM | Yes | Yes | Yes | Yes | Yes |
| Llama3.1 | 8B, 70B | LLM | Yes | Yes | Yes | Yes | Yes |
| Llama3.2 | 1B, 3B | LLM | Yes | Yes | Yes | Yes | Yes |
| Llama3.2-VL | 11B, 90B | MLLM | Yes | Yes | Yes | - | - |
| Llama4 | Scout, Maverick | MLLM | Yes | Yes | Yes | - | - |
| InternLM | 7B - 20B | LLM | Yes | Yes | Yes | Yes | Yes |
| InternLM2 | 7B - 20B | LLM | Yes | Yes | Yes | Yes | Yes |
| InternLM2.5 | 7B | LLM | Yes | Yes | Yes | Yes | Yes |
| InternLM3 | 8B | LLM | Yes | Yes | Yes | Yes | Yes |
| Intern-S1 | 241B | MLLM | Yes | Yes | Yes | Yes | - |
| Intern-S1-mini | 8.3B | MLLM | Yes | Yes | Yes | Yes | - |
| Baichuan2 | 7B | LLM | Yes | Yes | Yes | Yes | No |
| Baichuan2 | 13B | LLM | Yes | Yes | Yes | No | No |
| ChatGLM2 | 6B | LLM | Yes | Yes | Yes | No | No |
| YI | 6B - 34B | LLM | Yes | Yes | Yes | Yes | Yes |
| Mistral | 7B | LLM | Yes | Yes | Yes | Yes | Yes |
| Mixtral | 8x7B, 8x22B | LLM | Yes | Yes | Yes | No | No |
| QWen | 1.8B - 72B | LLM | Yes | Yes | Yes | Yes | Yes |
| QWen1.5 | 0.5B - 110B | LLM | Yes | Yes | Yes | Yes | Yes |
| QWen1.5-MoE | A2.7B | LLM | Yes | Yes | Yes | No | No |
| QWen2 | 0.5B - 72B | LLM | Yes | Yes | No | Yes | Yes |
| Qwen2.5 | 0.5B - 72B | LLM | Yes | Yes | No | Yes | Yes |
| Qwen3 | 0.6B - 235B | LLM | Yes | Yes | Yes\* | - | Yes\* |
| QWen3-Next | 80B | LLM | Yes | No | No | No | No |
| QWen2-VL | 2B, 7B | MLLM | Yes | Yes | No | No | Yes |
| QWen2.5-VL | 3B - 72B | MLLM | Yes | No | No | No | No |
| QWen3-VL | 2B - 235B | MLLM | Yes | No | No | No | No |
| DeepSeek-MoE | 16B | LLM | Yes | No | No | No | No |
| DeepSeek-V2 | 16B, 236B | LLM | Yes | No | No | No | No |
| DeepSeek-V2.5 | 236B | LLM | Yes | No | No | No | No |
| DeepSeek-V3 | 685B | LLM | Yes | No | No | No | No |
| DeepSeek-V3.2 | 685B | LLM | Yes | No | No | No | No |
| DeepSeek-VL2 | 3B - 27B | MLLM | Yes | No | No | No | No |
| MiniCPM3 | 4B | LLM | Yes | Yes | Yes | No | No |
| MiniCPM-V-2_6 | 8B | LLM | Yes | No | No | No | Yes |
| Gemma | 2B-7B | LLM | Yes | Yes | Yes | No | No |
| StarCoder2 | 3B-15B | LLM | Yes | Yes | Yes | No | No |
| Phi-3-mini | 3.8B | LLM | Yes | Yes | Yes | Yes | Yes |
| Phi-3-vision | 4.2B | MLLM | Yes | Yes | Yes | - | - |
| Phi-4-mini | 3.8B | LLM | Yes | Yes | Yes | Yes | Yes |
| CogVLM-Chat | 17B | MLLM | Yes | Yes | Yes | - | - |
| CogVLM2-Chat | 19B | MLLM | Yes | Yes | Yes | - | - |
| LLaVA(1.5,1.6)\[2\] | 7B-34B | MLLM | No | No | No | No | No |
| InternVL(v1.5) | 2B-26B | MLLM | Yes | Yes | Yes | No | Yes |
| InternVL2 | 1B-76B | MLLM | Yes | Yes | Yes | - | - |
| InternVL2.5(MPO) | 1B-78B | MLLM | Yes | Yes | Yes | - | - |
| InternVL3 | 1B-78B | MLLM | Yes | Yes | Yes | - | - |
| InternVL3.5 | 1B-241BA28B | MLLM | Yes | Yes | Yes | No | No |
| Mono-InternVL\[1\] | 2B | MLLM | Yes | Yes | Yes | - | - |
| ChemVLM | 8B-26B | MLLM | Yes | Yes | No | - | - |
| Gemma2 | 9B-27B | LLM | Yes | Yes | Yes | - | - |
| Gemma3 | 1B-27B | MLLM | Yes | Yes | Yes | - | - |
| GLM-4 | 9B | LLM | Yes | Yes | Yes | No | No |
| GLM-4-0414 | 9B | LLM | Yes | Yes | Yes | - | - |
| GLM-4V | 9B | MLLM | Yes | Yes | Yes | No | Yes |
| GLM-4.1V-Thinking | 9B | MLLM | Yes | Yes | Yes | - | - |
| GLM-4.5 | 355B | LLM | Yes | Yes | Yes | - | - |
| GLM-4.5-Air | 106B | LLM | Yes | Yes | Yes | - | - |
| CodeGeeX4 | 9B | LLM | Yes | Yes | Yes | - | - |
| Phi-3.5-mini | 3.8B | LLM | Yes | Yes | No | - | - |
| Phi-3.5-MoE | 16x3.8B | LLM | Yes | Yes | No | - | - |
| Phi-3.5-vision | 4.2B | MLLM | Yes | Yes | No | - | - |
| SDAR | 1.7B-30B | LLM | Yes | Yes | No | - | - |
```{note}
* [1] Currently Mono-InternVL does not support FP16 due to numerical instability. Please use BF16 instead.
* [2] PyTorch engine removes the support of original llava models after v0.6.4. Please use their corresponding transformers models instead, which can be found in https://huggingface.co/llava-hf
```
## PyTorchEngine on Other Platforms
| | | | Atlas 800T A2 | Atlas 800T A2 | Atlas 800T A2 | Atlas 800T A2 | Atlas 300I Duo | Atlas 800T A3 | Maca C500 | Cambricon |
| :------------: | :-------: | :--: | :--------------: | :--------------: | :-----------: | :-----------: | :------------: | :--------------: | :-------: | :-------: |
| Model | Size | Type | FP16/BF16(eager) | FP16/BF16(graph) | W8A8(graph) | W4A16(eager) | FP16(graph) | FP16/BF16(eager) | BF/FP16 | BF/FP16 |
| Llama2 | 7B - 70B | LLM | Yes | Yes | Yes | Yes | - | Yes | Yes | Yes |
| Llama3 | 8B | LLM | Yes | Yes | Yes | Yes | Yes | Yes | Yes | Yes |
| Llama3.1 | 8B | LLM | Yes | Yes | Yes | Yes | Yes | Yes | Yes | Yes |
| InternLM2 | 7B - 20B | LLM | Yes | Yes | Yes | Yes | Yes | Yes | Yes | Yes |
| InternLM2.5 | 7B - 20B | LLM | Yes | Yes | Yes | Yes | Yes | Yes | Yes | Yes |
| InternLM3 | 8B | LLM | Yes | Yes | Yes | Yes | Yes | Yes | Yes | Yes |
| Mixtral | 8x7B | LLM | Yes | Yes | No | No | Yes | - | Yes | Yes |
| QWen1.5-MoE | A2.7B | LLM | Yes | - | No | No | - | - | Yes | - |
| QWen2(.5) | 7B | LLM | Yes | Yes | Yes | Yes | Yes | - | Yes | Yes |
| QWen2-VL | 2B, 7B | MLLM | Yes | Yes | - | - | - | - | Yes | No |
| QWen2.5-VL | 3B - 72B | MLLM | Yes | Yes | - | - | Yes | - | Yes | No |
| QWen2-MoE | A14.57B | LLM | Yes | - | No | No | - | - | Yes | - |
| QWen3 | 0.6B-235B | LLM | Yes | Yes | No | No | Yes | Yes | Yes | Yes |
| DeepSeek-V2 | 16B | LLM | No | Yes | No | No | - | - | - | - |
| InternVL(v1.5) | 2B-26B | MLLM | Yes | - | Yes | Yes | - | - | Yes | - |
| InternVL2 | 1B-40B | MLLM | Yes | Yes | Yes | Yes | Yes | - | Yes | Yes |
| InternVL2.5 | 1B-78B | MLLM | Yes | Yes | Yes | Yes | Yes | - | Yes | Yes |
| InternVL3 | 1B-78B | MLLM | Yes | Yes | Yes | Yes | Yes | - | Yes | Yes |
| CogVLM2-chat | 19B | MLLM | Yes | No | - | - | - | - | Yes | - |
| GLM4V | 9B | MLLM | Yes | No | - | - | - | - | - | - |