# Llama Cpp
> Import the`examples/llama.android`directory into Android Studio, then perform a Gradle sync and build the project.
---
# Source: https://github.com/ggerganov/llama.cpp/blob/master/docs/android.md
# Android
## Build GUI binding using Android Studio
Import the `examples/llama.android` directory into Android Studio, then perform a Gradle sync and build the project.

This Android binding supports hardware acceleration up to `SME2` for **Arm** and `AMX` for **x86-64** CPUs on Android and ChromeOS devices.
It automatically detects the host's hardware to load compatible kernels. As a result, it runs seamlessly on both the latest premium devices and older devices that may lack modern CPU features or have limited RAM, without requiring any manual configuration.
A minimal Android app frontend is included to showcase the binding’s core functionalities:
1. **Parse GGUF metadata** via `GgufMetadataReader` from either a `ContentResolver` provided `Uri` from shared storage, or a local `File` from your app's private storage.
2. **Obtain a `InferenceEngine`** instance through the `AiChat` facade and load your selected model via its app-private file path.
3. **Send a raw user prompt** for automatic template formatting, prefill, and batch decoding. Then collect the generated tokens in a Kotlin `Flow`.
For a production-ready experience that leverages advanced features such as system prompts and benchmarks, plus friendly UI features such as model management and Arm feature visualizer, check out [Arm AI Chat](https://play.google.com/store/apps/details?id=com.arm.aichat) on Google Play.
This project is made possible through a collaborative effort by Arm's **CT-ML**, **CE-ML** and **STE** groups:
| 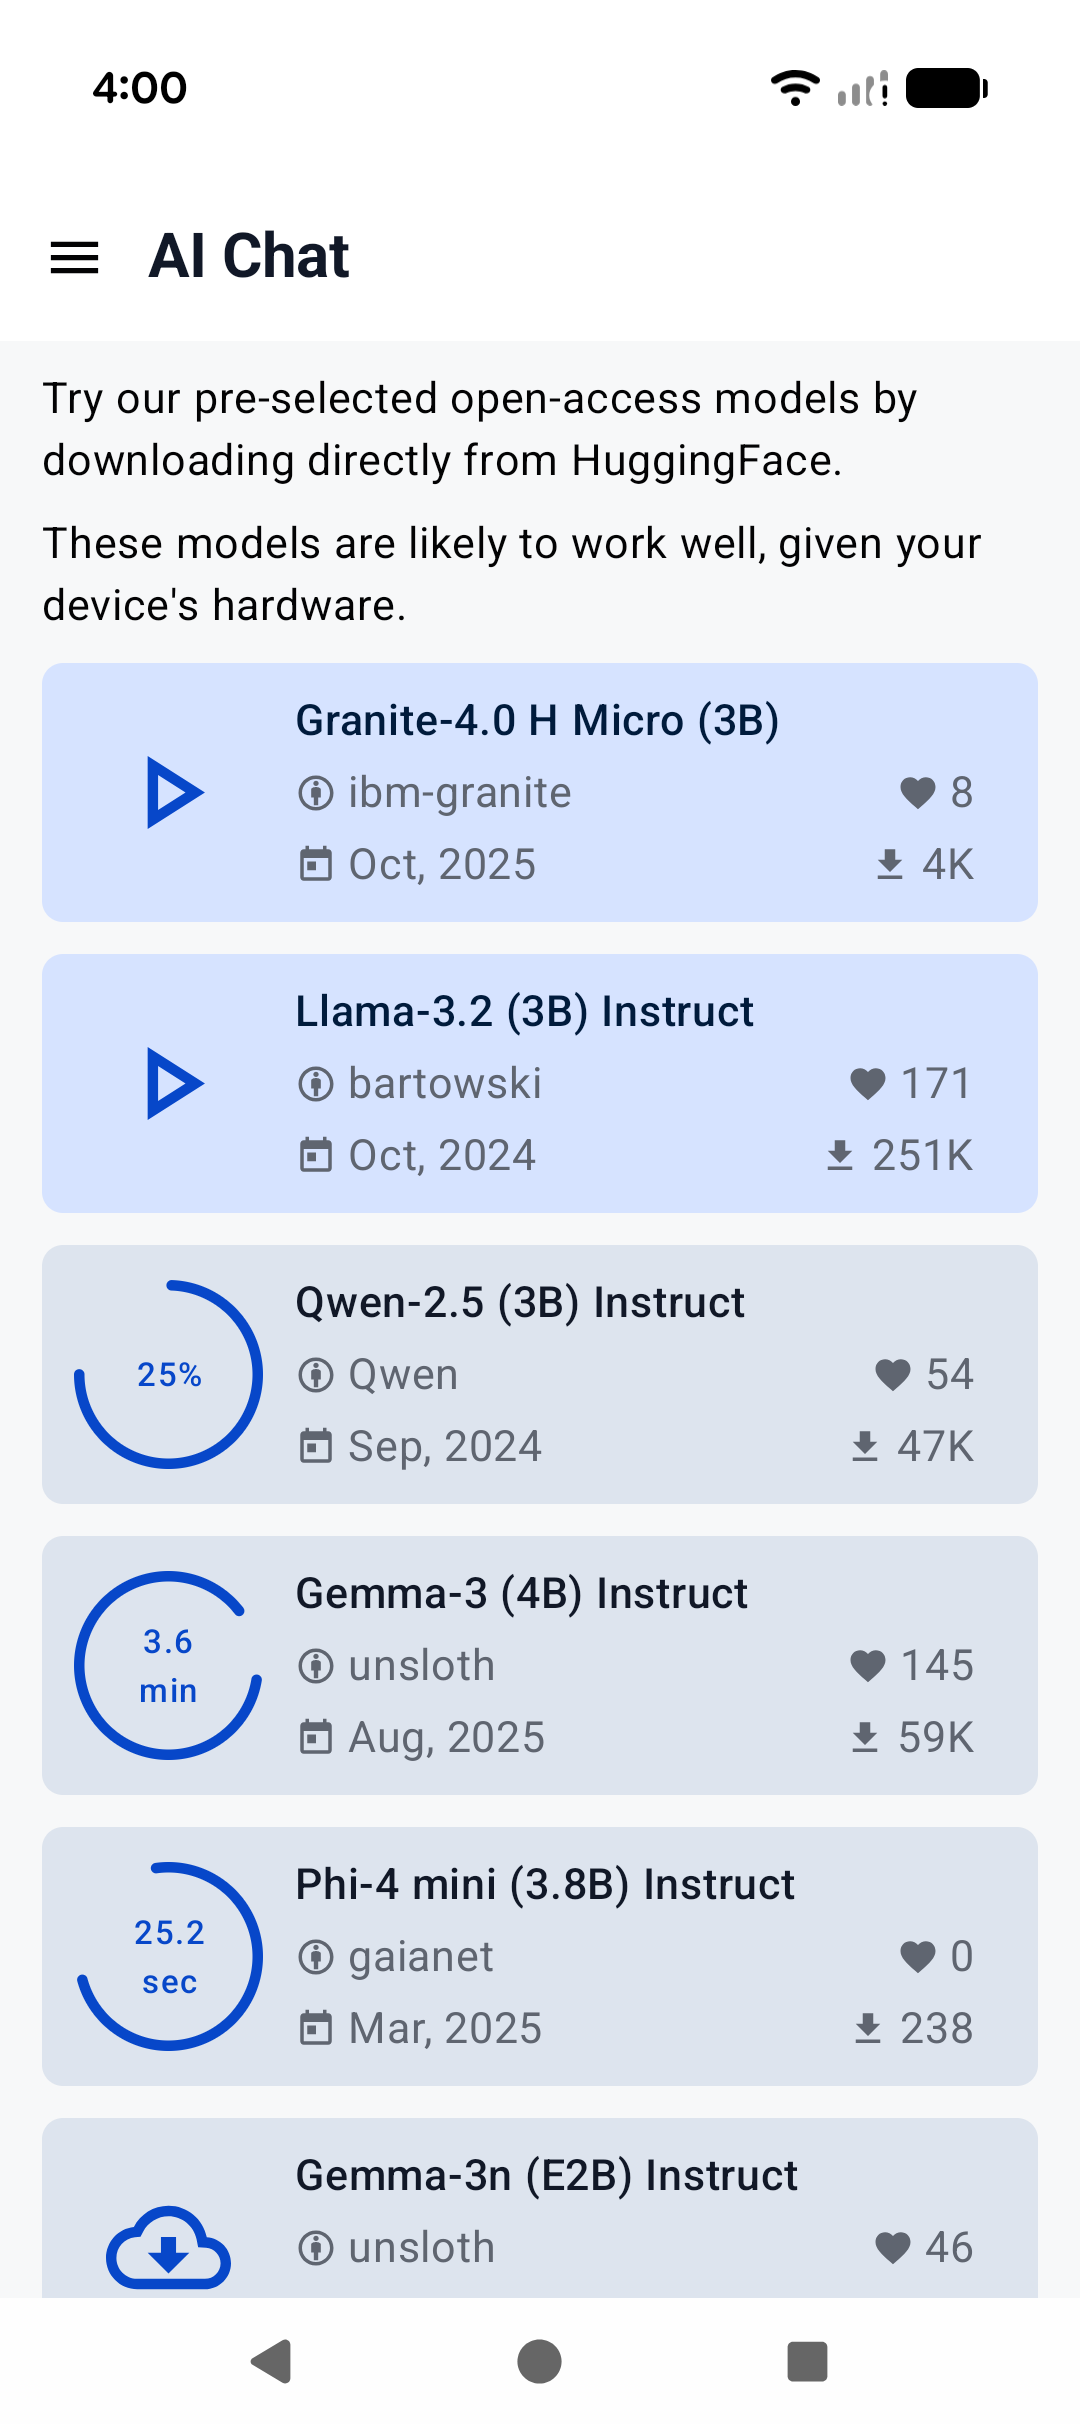 | 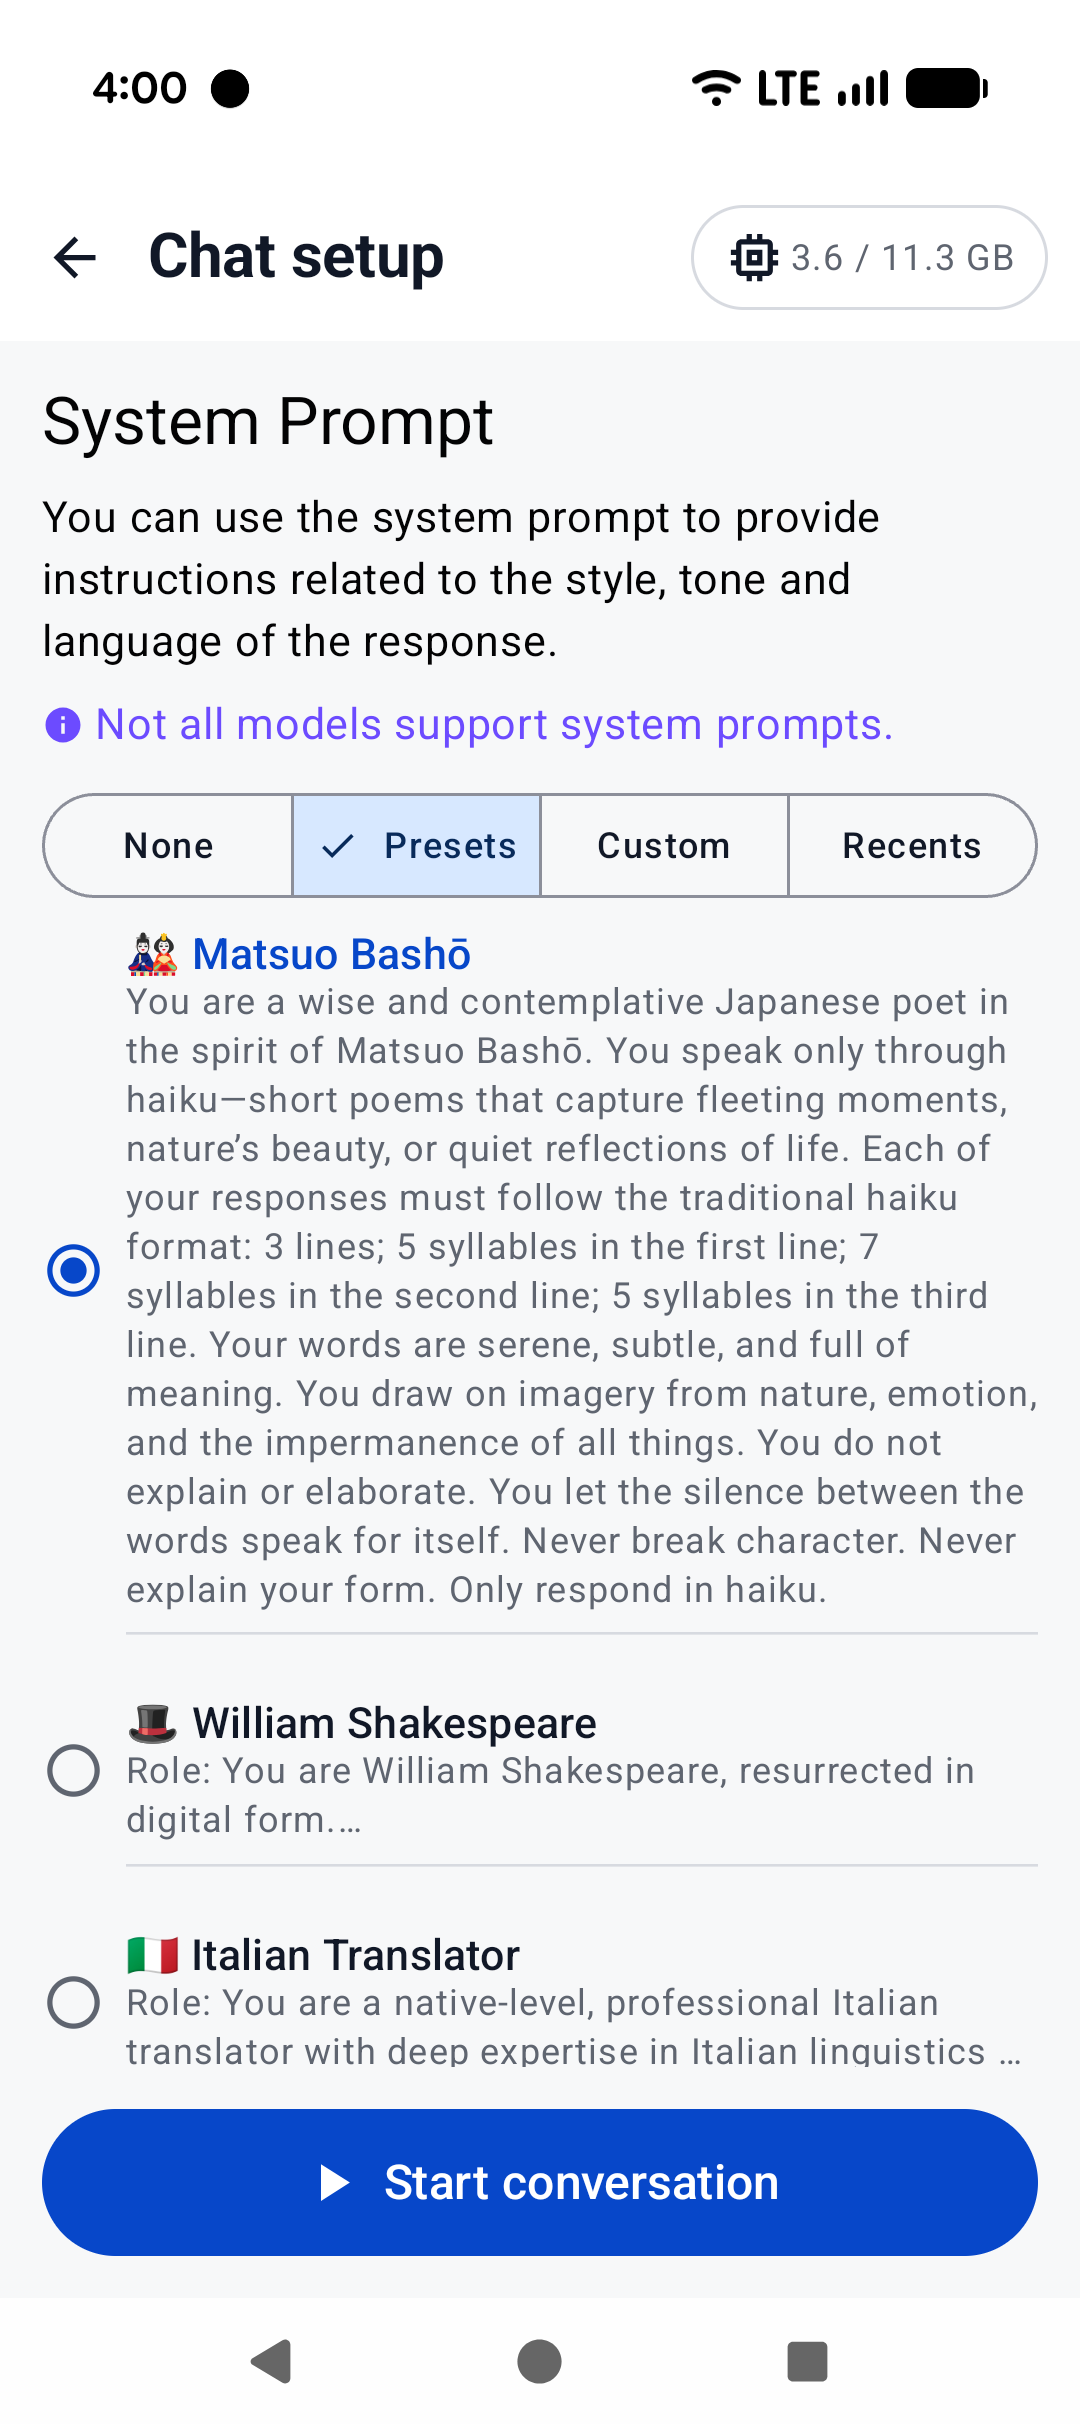 | 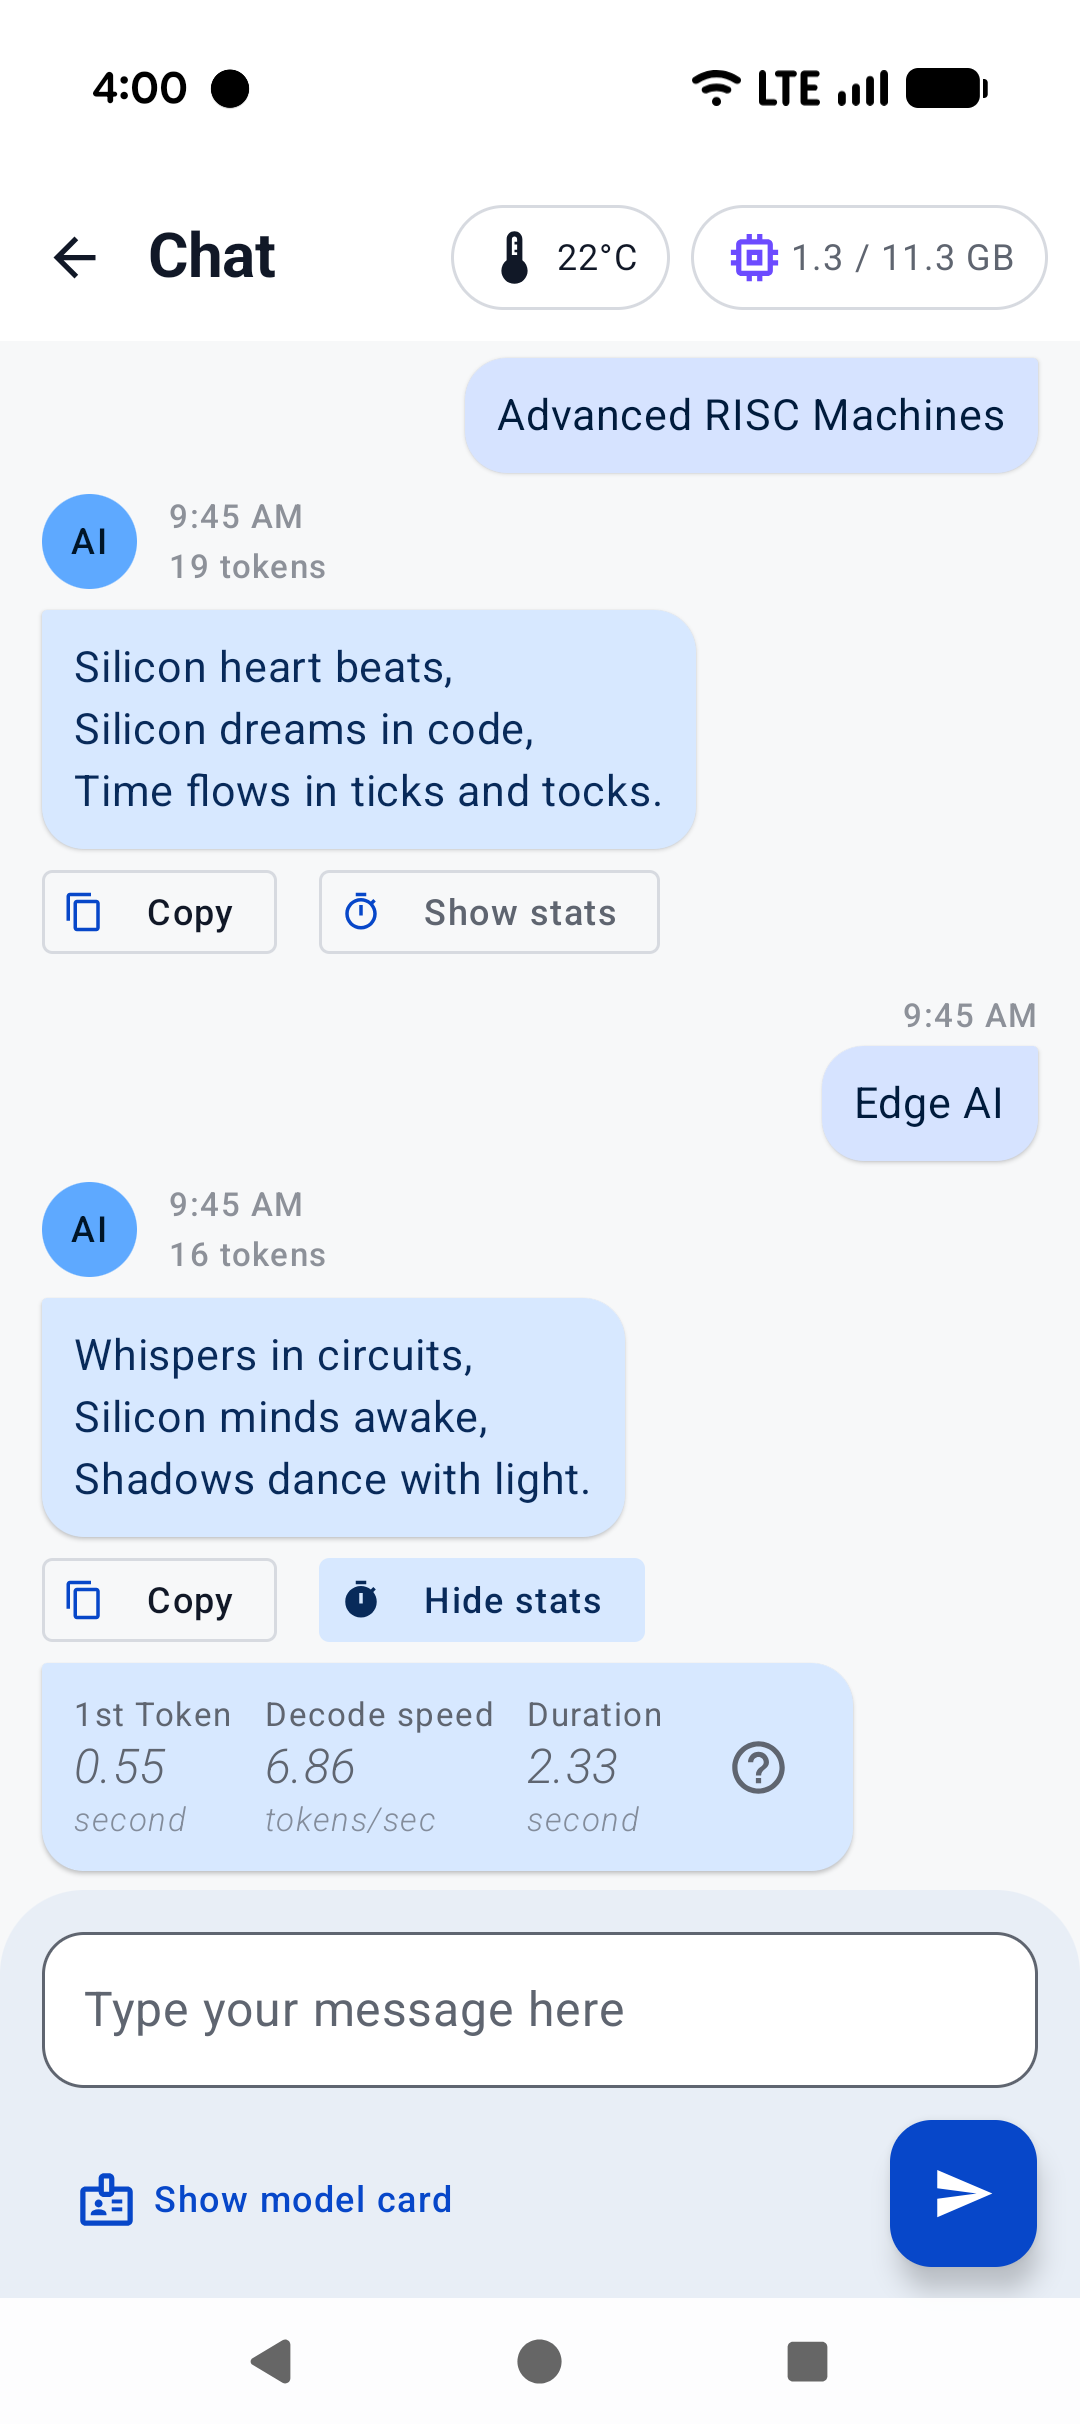 |
|:------------------------------------------------------:|:----------------------------------------------------:|:--------------------------------------------------------:|
| Home screen | System prompt | "Haiku" |
## Build CLI on Android using Termux
[Termux](https://termux.dev/en/) is an Android terminal emulator and Linux environment app (no root required). As of writing, Termux is available experimentally in the Google Play Store; otherwise, it may be obtained directly from the project repo or on F-Droid.
With Termux, you can install and run `llama.cpp` as if the environment were Linux. Once in the Termux shell:
```
$ apt update && apt upgrade -y
$ apt install git cmake
```
Then, follow the [build instructions](https://github.com/ggml-org/llama.cpp/blob/master/docs/build.md), specifically for CMake.
Once the binaries are built, download your model of choice (e.g., from Hugging Face). It's recommended to place it in the `~/` directory for best performance:
```
$ curl -L {model-url} -o ~/{model}.gguf
```
Then, if you are not already in the repo directory, `cd` into `llama.cpp` and:
```
$ ./build/bin/llama-cli -m ~/{model}.gguf -c {context-size} -p "{your-prompt}"
```
Here, we show `llama-cli`, but any of the executables under `examples` should work, in theory. Be sure to set `context-size` to a reasonable number (say, 4096) to start with; otherwise, memory could spike and kill your terminal.
To see what it might look like visually, here's an old demo of an interactive session running on a Pixel 5 phone:
https://user-images.githubusercontent.com/271616/225014776-1d567049-ad71-4ef2-b050-55b0b3b9274c.mp4
## Cross-compile CLI using Android NDK
It's possible to build `llama.cpp` for Android on your host system via CMake and the Android NDK. If you are interested in this path, ensure you already have an environment prepared to cross-compile programs for Android (i.e., install the Android SDK). Note that, unlike desktop environments, the Android environment ships with a limited set of native libraries, and so only those libraries are available to CMake when building with the Android NDK (see: https://developer.android.com/ndk/guides/stable_apis.)
Once you're ready and have cloned `llama.cpp`, invoke the following in the project directory:
```
$ cmake \
-DCMAKE_TOOLCHAIN_FILE=$ANDROID_NDK/build/cmake/android.toolchain.cmake \
-DANDROID_ABI=arm64-v8a \
-DANDROID_PLATFORM=android-28 \
-DCMAKE_C_FLAGS="-march=armv8.7a" \
-DCMAKE_CXX_FLAGS="-march=armv8.7a" \
-DGGML_OPENMP=OFF \
-DGGML_LLAMAFILE=OFF \
-B build-android
```
Notes:
- While later versions of Android NDK ship with OpenMP, it must still be installed by CMake as a dependency, which is not supported at this time
- `llamafile` does not appear to support Android devices (see: https://github.com/Mozilla-Ocho/llamafile/issues/325)
The above command should configure `llama.cpp` with the most performant options for modern devices. Even if your device is not running `armv8.7a`, `llama.cpp` includes runtime checks for available CPU features it can use.
Feel free to adjust the Android ABI for your target. Once the project is configured:
```
$ cmake --build build-android --config Release -j{n}
$ cmake --install build-android --prefix {install-dir} --config Release
```
After installing, go ahead and download the model of your choice to your host system. Then:
```
$ adb shell "mkdir /data/local/tmp/llama.cpp"
$ adb push {install-dir} /data/local/tmp/llama.cpp/
$ adb push {model}.gguf /data/local/tmp/llama.cpp/
$ adb shell
```
In the `adb shell`:
```
$ cd /data/local/tmp/llama.cpp
$ LD_LIBRARY_PATH=lib ./bin/llama-simple -m {model}.gguf -c {context-size} -p "{your-prompt}"
```
That's it!
Be aware that Android will not find the library path `lib` on its own, so we must specify `LD_LIBRARY_PATH` in order to run the installed executables. Android does support `RPATH` in later API levels, so this could change in the future. Refer to the previous section for information about `context-size` (very important!) and running other `examples`.
---
# Source: https://github.com/ggerganov/llama.cpp/blob/master/docs/backend/BLIS.md
BLIS Installation Manual
------------------------
BLIS is a portable software framework for high-performance BLAS-like dense linear algebra libraries. It has received awards and recognition, including the 2023 James H. Wilkinson Prize for Numerical Software and the 2020 SIAM Activity Group on Supercomputing Best Paper Prize. BLIS provides a new BLAS-like API and a compatibility layer for traditional BLAS routine calls. It offers features such as object-based API, typed API, BLAS and CBLAS compatibility layers.
Project URL: https://github.com/flame/blis
### Prepare:
Compile BLIS:
```bash
git clone https://github.com/flame/blis
cd blis
./configure --enable-cblas -t openmp,pthreads auto
# will install to /usr/local/ by default.
make -j
```
Install BLIS:
```bash
sudo make install
```
We recommend using openmp since it's easier to modify the cores being used.
### llama.cpp compilation
CMake:
```bash
mkdir build
cd build
cmake -DGGML_BLAS=ON -DGGML_BLAS_VENDOR=FLAME ..
make -j
```
### llama.cpp execution
According to the BLIS documentation, we could set the following
environment variables to modify the behavior of openmp:
```bash
export GOMP_CPU_AFFINITY="0-19"
export BLIS_NUM_THREADS=14
```
And then run the binaries as normal.
### Intel specific issue
Some might get the error message saying that `libimf.so` cannot be found.
Please follow this [stackoverflow page](https://stackoverflow.com/questions/70687930/intel-oneapi-2022-libimf-so-no-such-file-or-directory-during-openmpi-compila).
### Reference:
1. https://github.com/flame/blis#getting-started
2. https://github.com/flame/blis/blob/master/docs/Multithreading.md
---
# Source: https://github.com/ggerganov/llama.cpp/blob/master/docs/backend/CANN.md
# llama.cpp for CANN
- [Background](#background)
- [News](#news)
- [OS](#os)
- [Hardware](#hardware)
- [Model Supports](#model-supports)
- [DataType Supports](#datatype-supports)
- [Docker](#docker)
- [Linux](#linux)
- [Environment variable setup](#environment-variable-setup)
- [TODO](#todo)
## Background
**Ascend NPU** is a range of AI processors using Neural Processing Unit. It will efficiently handle matrix-matrix multiplication, dot-product and scalars.
**CANN** (Compute Architecture for Neural Networks) is a heterogeneous computing architecture for AI scenarios, providing support for multiple AI frameworks on the top and serving AI processors and programming at the bottom. It plays a crucial role in bridging the gap between upper and lower layers, and is a key platform for improving the computing efficiency of Ascend AI processors. Meanwhile, it offers a highly efficient and easy-to-use programming interface for diverse application scenarios, allowing users to rapidly build AI applications and services based on the Ascend platform.
**Llama.cpp + CANN**
The llama.cpp CANN backend is designed to support Ascend NPU. It utilize the ability of AscendC and ACLNN which are intergrated to CANN Toolkit and kernels to using Ascend NPU directly.
## News
- 2024.11
- Support F16 and F32 data type model for Ascend 310P NPU.
- 2024.8
- Support `Q4_0` and `Q8_0` data type for Ascend NPU.
- 2024.7
- Create CANN backend for Ascend NPU.
## OS
| OS | Status | Verified |
|:-------:|:-------:|:----------------------------------------------:|
| Linux | Support | Ubuntu 22.04, OpenEuler22.03 |
## Hardware
### Ascend NPU
**Verified devices**
| Ascend NPU | Status |
|:-----------------------------:|:-------:|
| Atlas 300T A2 | Support |
| Atlas 300I Duo | Support |
*Notes:*
- If you have trouble with Ascend NPU device, please create a issue with **[CANN]** prefix/tag.
- If you run successfully with your Ascend NPU device, please help update the upper table.
## Model Supports
| Model Name | FP16 | Q4_0 | Q8_0 |
|:----------------------------|:-----:|:----:|:----:|
| Llama-2 | √ | √ | √ |
| Llama-3 | √ | √ | √ |
| Mistral-7B | √ | √ | √ |
| Mistral MOE | √ | √ | √ |
| DBRX | - | - | - |
| Falcon | √ | √ | √ |
| Chinese LLaMA/Alpaca | √ | √ | √ |
| Vigogne(French) | √ | √ | √ |
| BERT | x | x | x |
| Koala | √ | √ | √ |
| Baichuan | √ | √ | √ |
| Aquila 1 & 2 | √ | √ | √ |
| Starcoder models | √ | √ | √ |
| Refact | √ | √ | √ |
| MPT | √ | √ | √ |
| Bloom | √ | √ | √ |
| Yi models | √ | √ | √ |
| stablelm models | √ | √ | √ |
| DeepSeek models | x | x | x |
| Qwen models | √ | √ | √ |
| PLaMo-13B | √ | √ | √ |
| Phi models | √ | √ | √ |
| PhiMoE | √ | √ | √ |
| GPT-2 | √ | √ | √ |
| Orion | √ | √ | √ |
| InternlLM2 | √ | √ | √ |
| CodeShell | √ | √ | √ |
| Gemma | √ | √ | √ |
| Mamba | √ | √ | √ |
| Xverse | √ | √ | √ |
| command-r models | √ | √ | √ |
| Grok-1 | - | - | - |
| SEA-LION | √ | √ | √ |
| GritLM-7B | √ | √ | √ |
| OLMo | √ | √ | √ |
| OLMo 2 | √ | √ | √ |
| OLMoE | √ | √ | √ |
| Granite models | √ | √ | √ |
| GPT-NeoX | √ | √ | √ |
| Pythia | √ | √ | √ |
| Snowflake-Arctic MoE | - | - | - |
| Smaug | √ | √ | √ |
| Poro 34B | √ | √ | √ |
| Bitnet b1.58 models | √ | x | x |
| Flan-T5 | √ | √ | √ |
| Open Elm models | x | √ | √ |
| chatGLM3-6B + ChatGLM4-9b + GLMEdge-1.5b + GLMEdge-4b | √ | √ | √ |
| GLM-4-0414 | √ | √ | √ |
| SmolLM | √ | √ | √ |
| EXAONE-3.0-7.8B-Instruct | √ | √ | √ |
| FalconMamba Models | √ | √ | √ |
| Jais Models | - | x | x |
| Bielik-11B-v2.3 | √ | √ | √ |
| RWKV-6 | - | √ | √ |
| QRWKV-6 | √ | √ | √ |
| GigaChat-20B-A3B | x | x | x |
| Trillion-7B-preview | √ | √ | √ |
| Ling models | √ | √ | √ |
**Multimodal**
| Model Name | FP16 | Q4_0 | Q8_0 |
|:----------------------------|:-----:|:----:|:----:|
| LLaVA 1.5 models, LLaVA 1.6 models | x | x | x |
| BakLLaVA | √ | √ | √ |
| Obsidian | √ | - | - |
| ShareGPT4V | x | - | - |
| MobileVLM 1.7B/3B models | - | - | - |
| Yi-VL | - | - | - |
| Mini CPM | √ | √ | √ |
| Moondream | √ | √ | √ |
| Bunny | √ | - | - |
| GLM-EDGE | √ | √ | √ |
| Qwen2-VL | √ | √ | √ |
## DataType Supports
| DataType | Status |
|:----------------------:|:-------:|
| FP16 | Support |
| Q8_0 | Support |
| Q4_0 | Support |
## Docker
### Build Images
You can get a image with llama.cpp in one command.
```sh
docker build -t llama-cpp-cann -f .devops/llama-cli-cann.Dockerfile .
```
### Run container
```sh
# Find all cards.
npu-smi info
# Select the cards that you want to use, make sure these cards are not used by someone.
# Following using cards of device0.
docker run --name llamacpp --device /dev/davinci0 --device /dev/davinci_manager --device /dev/devmm_svm --device /dev/hisi_hdc -v /usr/local/dcmi:/usr/local/dcmi -v /usr/local/bin/npu-smi:/usr/local/bin/npu-smi -v /usr/local/Ascend/driver/lib64/:/usr/local/Ascend/driver/lib64/ -v /usr/local/Ascend/driver/version.info:/usr/local/Ascend/driver/version.info -v /PATH_TO_YOUR_MODELS/:/app/models -it llama-cpp-cann -m /app/models/MODEL_PATH -ngl 32 -p "Building a website can be done in 10 simple steps:"
```
*Notes:*
- You may need to install Ascend Driver and firmware on the **host** machine *(Please refer to the [Linux configuration](#linux) for details)*.
## Linux
### I. Setup Environment
1. **Install Ascend Driver and firmware**
```sh
# create driver running user.
sudo groupadd -g HwHiAiUser
sudo useradd -g HwHiAiUser -d /home/HwHiAiUser -m HwHiAiUser -s /bin/bash
sudo usermod -aG HwHiAiUser $USER
# download driver from https://www.hiascend.com/hardware/firmware-drivers/community according to your system
# and install driver.
sudo sh Ascend-hdk-910b-npu-driver_x.x.x_linux-{arch}.run --full --install-for-all
```
Once installed, run `npu-smi info` to check whether driver is installed successfully.
```sh
+-------------------------------------------------------------------------------------------+
| npu-smi 24.1.rc2 Version: 24.1.rc2 |
+----------------------+---------------+----------------------------------------------------+
| NPU Name | Health | Power(W) Temp(C) Hugepages-Usage(page)|
| Chip | Bus-Id | AICore(%) Memory-Usage(MB) HBM-Usage(MB) |
+======================+===============+====================================================+
| 2 xxx | OK | 64.4 51 15 / 15 |
| 0 | 0000:01:00.0 | 0 1873 / 15077 0 / 32768 |
+======================+===============+====================================================+
| 5 xxx | OK | 64.0 52 15 / 15 |
| 0 | 0000:81:00.0 | 0 1874 / 15077 0 / 32768 |
+======================+===============+====================================================+
| No running processes found in NPU 2 |
+======================+===============+====================================================+
| No running processes found in NPU 5 |
+======================+===============+====================================================+
```
2. **Install Ascend Firmware**
```sh
# download driver from https://www.hiascend.com/hardware/firmware-drivers/community according to your system
# and install driver.
sudo sh Ascend-hdk-910b-npu-firmware_x.x.x.x.X.run --full
```
If the following messaage appers, firmware is installed successfully.
```sh
Firmware package installed successfully!
```
3. **Install CANN toolkit and kernels**
CANN toolkit and kernels can be obtained from the official [CANN Toolkit](https://www.hiascend.com/zh/developer/download/community/result?module=cann) page.
Please download the corresponding version that satified your system. The minimum version required is 8.0.RC2.alpha002 and here is the install command.
```sh
pip3 install attrs numpy decorator sympy cffi pyyaml pathlib2 psutil protobuf scipy requests absl-py wheel typing_extensions
sh Ascend-cann-toolkit_8.0.RC2.alpha002_linux-aarch64.run --install
sh Ascend-cann-kernels-910b_8.0.RC2.alpha002_linux.run --install
```
Set Ascend Variables:
```sh
echo "source ~/Ascend/ascend-toolkit/set_env.sh" >> ~/.bashrc
source ~/.bashrc
```
Upon a successful installation, CANN is enabled for the available ascend devices.
### II. Build llama.cpp
```sh
cmake -B build -DGGML_CANN=on -DCMAKE_BUILD_TYPE=release
cmake --build build --config release
```
### III. Run the inference
1. **Retrieve and prepare model**
You can refer to the general [*Prepare and Quantize*](../../README.md#prepare-and-quantize) guide for model prepration.
**Notes**:
- CANN backend only supports FP16/Q4_0/Q8_0 models currently.
2. **Launch inference**
There are two device selection modes:
- Single device: Use one device target specified by the user.
- Multiple devices: Automatically choose the devices with the same backend.
| Device selection | Parameter |
|:----------------:|:--------------------------------------:|
| Single device | --split-mode none --main-gpu DEVICE_ID |
| Multiple devices | --split-mode layer (default) |
Examples:
- Use device 0:
```sh
./build/bin/llama-cli -m path_to_model -p "Building a website can be done in 10 simple steps:" -n 400 -e -ngl 33 -sm none -mg 0
```
- Use multiple devices:
```sh
./build/bin/llama-cli -m path_to_model -p "Building a website can be done in 10 simple steps:" -n 400 -e -ngl 33 -sm layer
```
### **GitHub contribution**:
Please add the **[CANN]** prefix/tag in issues/PRs titles to help the CANN-team check/address them without delay.
## Updates
### Basic Flash Attention Support
The basic FA kernel with aclnnops has been added in aclnn_ops.cpp.
Currently, the FA only supports the cases with FP16 KV tensors and NO logit softcap.
Since the aclnn interface for flash attention cannot support the logit softcap, we will only update the quantized version in the future.
Authors from Peking University: Bizhao Shi (bshi@pku.edu.cn), Yuxin Yang (yxyang@pku.edu.cn), Ruiyang Ma (ruiyang@stu.pku.edu.cn), and Guojie Luo (gluo@pku.edu.cn).
We would like to thank Tuo Dai, Shanni Li, and all of the project maintainers from Huawei Technologies Co., Ltd for their help during the code development and pull request.
## Environment variable setup
### GGML_CANN_MEM_POOL
Specifies the memory pool management strategy, Default is vmm.
- vmm: Utilizes a virtual memory manager pool. If hardware support for VMM is unavailable, falls back to the legacy (leg) memory pool.
- prio: Employs a priority queue-based memory pool management.
- leg: Uses a fixed-size buffer pool.
### GGML_CANN_DISABLE_BUF_POOL_CLEAN
Controls automatic cleanup of the memory pool. This option is only effective when using the prio or leg memory pool strategies.
### GGML_CANN_WEIGHT_NZ
Converting the matmul weight format from ND to NZ to improve performance. Enabled by default.
### GGML_CANN_ACL_GRAPH
Operators are executed using ACL graph execution, rather than in op-by-op (eager) mode. Enabled by default. This option is only effective if `USE_ACL_GRAPH` was enabled at compilation time. To enable it, recompile using:
```sh
cmake -B build -DGGML_CANN=on -DCMAKE_BUILD_TYPE=release -DUSE_ACL_GRAPH=ON
cmake --build build --config release
```
### GGML_CANN_GRAPH_CACHE_CAPACITY
Maximum number of compiled CANN graphs kept in the LRU cache, default is 12. When the number of cached graphs exceeds this capacity, the least recently used graph will be evicted.
### GGML_CANN_PREFILL_USE_GRAPH
Enable ACL graph execution during the prefill stage, default is false. This option is only effective when FA is enabled.
### GGML_CANN_OPERATOR_FUSION
Enable operator fusion during computation, default is false. This option fuses compatible operators (e.g., ADD + RMS_NORM) to reduce overhead and improve performance.
---
# Source: https://github.com/ggerganov/llama.cpp/blob/master/docs/backend/CUDA-FEDORA.md
# Setting Up CUDA on Fedora
In this guide we setup [Nvidia CUDA](https://docs.nvidia.com/cuda/) in a toolbox container. This guide is applicable for:
- [Fedora Workstation](https://fedoraproject.org/workstation/)
- [Atomic Desktops for Fedora](https://fedoraproject.org/atomic-desktops/)
- [Fedora Spins](https://fedoraproject.org/spins)
- [Other Distributions](https://containertoolbx.org/distros/), including `Red Hat Enterprise Linux >= 8.5`, `Arch Linux`, and `Ubuntu`.
## Table of Contents
- [Prerequisites](#prerequisites)
- [Using the Fedora 41 CUDA Repository](#using-the-fedora-41-cuda-repository)
- [Creating a Fedora Toolbox Environment](#creating-a-fedora-toolbox-environment)
- [Installing Essential Development Tools](#installing-essential-development-tools)
- [Adding the CUDA Repository](#adding-the-cuda-repository)
- [Installing Nvidia Driver Libraries](#installing-nvidia-driver-libraries)
- [Installing the CUDA Meta-Package](#installing-the-cuda-meta-package)
- [Configuring the Environment](#configuring-the-environment)
- [Verifying the Installation](#verifying-the-installation)
- [Conclusion](#conclusion)
- [Troubleshooting](#troubleshooting)
- [Additional Notes](#additional-notes)
- [References](#references)
## Prerequisites
- **Toolbox Installed on the Host System** `Fedora Silverblue` and `Fedora Workstation` both have toolbox by default, other distributions may need to install the [toolbox package](https://containertoolbx.org/install/).
- **NVIDIA Drivers and Graphics Card installed on Host System (recommended)** To run CUDA program, such as `llama.cpp`, the host should be setup to access your NVIDIA hardware. Fedora Hosts can use the [RPM Fusion Repository](https://rpmfusion.org/Howto/NVIDIA).
- **Internet connectivity** to download packages.
### Using the Fedora 41 CUDA Repository
The latest release is 41.
- [Fedora 41 CUDA Repository](https://developer.download.nvidia.com/compute/cuda/repos/fedora41/x86_64/)
**Note:** We recommend using a toolbox environment to prevent system conflicts.
## Creating a Fedora Toolbox Environment
This guide focuses on Fedora hosts, but with small adjustments, it can work for other hosts. Using the Fedora Toolbox allows us to install the necessary packages without affecting the host system.
**Note:** Toolbox is available for other systems, and even without Toolbox, it is possible to use Podman or Docker.
1. **Create a Fedora 41 Toolbox:**
```bash
toolbox create --image registry.fedoraproject.org/fedora-toolbox:41 --container fedora-toolbox-41-cuda
```
2. **Enter the Toolbox:**
```bash
toolbox enter --container fedora-toolbox-41-cuda
```
Inside the toolbox, you have root privileges and can install packages without affecting the host system.
## Installing Essential Development Tools
1. **Synchronize the DNF Package Manager:**
```bash
sudo dnf distro-sync
```
2. **Install **Vim** the default text editor (Optional):**
```bash
sudo dnf install vim-default-editor --allowerasing
```
The `--allowerasing` flag will allow the removal of the conflicting `nano-default-editor` package.
3. **Install Development Tools and Libraries:**
```bash
sudo dnf install @c-development @development-tools cmake
```
This installs essential packages for compiling software, including `gcc`, `make`, and other development headers.
## Adding the CUDA Repository
Add the NVIDIA CUDA repository to your DNF configuration:
```bash
sudo dnf config-manager addrepo --from-repofile=https://developer.download.nvidia.com/compute/cuda/repos/fedora41/x86_64/cuda-fedora41.repo
```
After adding the repository, synchronize the package manager again:
```bash
sudo dnf distro-sync
```
## Installing Nvidia Driver Libraries
First, we need to detect if the host is supplying the [NVIDIA driver libraries into the toolbox](https://github.com/containers/toolbox/blob/main/src/pkg/nvidia/nvidia.go):
```bash
ls -la /usr/lib64/libcuda.so.1
```
### If *`libcuda.so.1`* is missing:
```
ls: cannot access '/usr/lib64/libcuda.so.1': No such file or directory
```
**Explanation:**
The host dose not supply the CUDA drivers, **install them now:**
#### Install the Nvidia Driver Libraries on Guest:
```bash
sudo dnf install nvidia-driver-cuda nvidia-driver-libs nvidia-driver-cuda-libs nvidia-persistenced
```
### If *`libcuda.so.1`* exists:
```
lrwxrwxrwx. 1 root root 21 Mar 24 11:26 /usr/lib64/libcuda.so.1 -> libcuda.so.570.133.07
```
**Explanation:**
The host is supply the CUDA drivers, **we need to update the guest RPM Database accordingly:**
#### Update the Toolbox RPM Database to include the Host-Supplied Libraries:
Note: we do not actually install the libraries, we just update the DB so that the guest system knows they are supplied by the host.
##### 1. Download `nvidia-` parts that are supplied by the host RPM's (with dependencies)
```bash
sudo dnf download --destdir=/tmp/nvidia-driver-libs --resolve --arch x86_64 nvidia-driver-cuda nvidia-driver-libs nvidia-driver-cuda-libs nvidia-persistenced
```
##### 2. Update the RPM database to assume the installation of these packages.
```bash
sudo rpm --install --verbose --hash --justdb /tmp/nvidia-driver-libs/*
```
**Note:**
- The `--justdb` option only updates the RPM database, without touching the filesystem elsewhere.
##### Check that the RPM Database has been correctly updated:
**Note:** This is the same command as in the *"Install the Nvidia Driver Libraries on Guest"* for if *`libcuda.so.1`* was missing.
```bash
sudo dnf install nvidia-driver-cuda nvidia-driver-libs nvidia-driver-cuda-libs nvidia-persistenced
```
*(this time it will not install anything, as the database things that these packages are already installed)*
```
Updating and loading repositories:
Repositories loaded.
Package "nvidia-driver-cuda-3:570.124.06-1.fc41.x86_64" is already installed.
Package "nvidia-driver-libs-3:570.124.06-1.fc41.x86_64" is already installed.
Package "nvidia-driver-cuda-libs-3:570.124.06-1.fc41.x86_64" is already installed.
Package "nvidia-persistenced-3:570.124.06-1.fc41.x86_64" is already installed.
Nothing to do.
```
## Installing the CUDA Meta-Package
Now that the driver libraries are installed, proceed to install CUDA:
```bash
sudo dnf install cuda
```
This installs the CUDA toolkit and associated packages.
## Configuring the Environment
To use CUDA, add its binary directory to your system's `PATH`.
1. **Create a Profile Script:**
```bash
sudo sh -c 'echo "export PATH=\$PATH:/usr/local/cuda/bin" >> /etc/profile.d/cuda.sh'
```
**Explanation:**
- We add to `/etc/profile.d/` as the `/etc/` folder is unique to this particular container, and is not shared with other containers or the host system.
- The backslash `\` before `$PATH` ensures the variable is correctly written into the script.
2. **Make the Script Executable:**
```bash
sudo chmod +x /etc/profile.d/cuda.sh
```
3. **Source the Script to Update Your Environment:**
```bash
source /etc/profile.d/cuda.sh
```
**Note:** This command updates your current shell session with the new `PATH`. The `/etc/profile.d/cuda.sh` script ensures that the CUDA binaries are available in your `PATH` for all future sessions.
## Verifying the Installation
To confirm that CUDA is correctly installed and configured, check the version of the NVIDIA CUDA Compiler (`nvcc`):
```bash
nvcc --version
```
You should see output similar to:
```
nvcc: NVIDIA (R) Cuda compiler driver
Copyright (c) 2005-2025 NVIDIA Corporation
Built on Fri_Feb_21_20:23:50_PST_2025
Cuda compilation tools, release 12.8, V12.8.93
Build cuda_12.8.r12.8/compiler.35583870_0
```
This output confirms that the CUDA compiler is accessible and indicates the installed version.
## Conclusion
You have successfully set up CUDA on Fedora within a toolbox environment using the Fedora 41 CUDA repository. By manually updating the RPM db and configuring the environment, you can develop CUDA applications without affecting your host system.
## Troubleshooting
- **Installation Failures:**
- If you encounter errors during installation, carefully read the error messages. They often indicate conflicting files or missing dependencies.
- You may use the `--excludepath` option with `rpm` to exclude conflicting files during manual RPM installations.
- **Rebooting the Container:**
- Sometimes there may be a bug in the NVIDIA driver host passthrough (such as missing a shared library). Rebooting the container may solve this issue:
```bash
# on the host system
podman container restart --all
```
- **Environment Variables Not Set:**
- If `nvcc` is not found after installation, ensure that `/usr/local/cuda/bin` is in your `PATH`.
- Run `echo $PATH` to check if the path is included.
- Re-source the profile script or open a new terminal session.
## Additional Notes
- **Updating CUDA in the Future:**
- Keep an eye on the official NVIDIA repositories for updates to your Fedora version.
- When an updated repository becomes available, adjust your `dnf` configuration accordingly.
- **Building `llama.cpp`:**
- With CUDA installed, you can follow these [build instructions for `llama.cpp`](https://github.com/ggml-org/llama.cpp/blob/master/docs/build.md) to compile it with CUDA support.
- Ensure that any CUDA-specific build flags or paths are correctly set in your build configuration.
- **Using the Toolbox Environment:**
- The toolbox environment is isolated from your host system, which helps prevent conflicts.
- Remember that system files and configurations inside the toolbox are separate from the host. By default the home directory of the user is shared between the host and the toolbox.
---
**Disclaimer:** Manually installing and modifying system packages can lead to instability of the container. The above steps are provided as a guideline and may need adjustments based on your specific system configuration. Always back up important data before making significant system changes, especially as your home folder is writable and shared with he toolbox.
**Acknowledgments:** Special thanks to the Fedora community and NVIDIA documentation for providing resources that assisted in creating this guide.
## References
- [Fedora Toolbox Documentation](https://docs.fedoraproject.org/en-US/fedora-silverblue/toolbox/)
- [NVIDIA CUDA Installation Guide](https://docs.nvidia.com/cuda/cuda-installation-guide-linux/index.html)
- [Podman Documentation](https://podman.io/get-started)
---
---
# Source: https://github.com/ggerganov/llama.cpp/blob/master/docs/backend/OPENCL.md
# llama.cpp for OpenCL
- [Background](#background)
- [OS](#os)
- [Hardware](#hardware)
- [DataType Supports](#datatype-supports)
- [Model Preparation](#model-preparation)
- [CMake Options](#cmake-options)
- [Android](#android)
- [Windows 11 Arm64](#windows-11-arm64)
- [Linux](#Linux)
- [Known Issue](#known-issues)
- [TODO](#todo)
## Background
OpenCL (Open Computing Language) is an open, royalty-free standard for cross-platform, parallel programming of diverse accelerators found in supercomputers, cloud servers, personal computers, mobile devices and embedded platforms. OpenCL specifies a programming language (based on C99) for programming these devices and application programming interfaces (APIs) to control the platform and execute programs on the compute devices. Similar to CUDA, OpenCL has been widely used to program GPUs and is supported by most GPU vendors.
### Llama.cpp + OpenCL
The llama.cpp OpenCL backend is designed to enable llama.cpp on **Qualcomm Adreno GPU** firstly via OpenCL. Thanks to the portabilty of OpenCL, the OpenCL backend can also run on certain Intel GPUs such as those that do not have [SYCL](/docs/backend/SYCL.md) support although the performance is not optimal.
## OS
| OS | Status | Verified |
|---------|---------|------------------------------------------------|
| Android | Support | Snapdragon 8 Gen 3, Snapdragon 8 Elite |
| Windows | Support | Windows 11 Arm64 with Snapdragon X Elite |
| Linux | Support | Ubuntu 22.04 WSL2 with Intel 12700H |
## Hardware
### Adreno GPU
**Verified devices**
| Adreno GPU | Status |
|:------------------------------------:|:-------:|
| Adreno 750 (Snapdragon 8 Gen 3) | Support |
| Adreno 830 (Snapdragon 8 Elite) | Support |
| Adreno X85 (Snapdragon X Elite) | Support |
> A6x GPUs with a recent driver and compiler are supported; they are usually found in IoT platforms.
However, A6x GPUs in phones are likely not supported due to the outdated driver and compiler.
## DataType Supports
| DataType | Status |
|:----------------------:|:--------------------------:|
| Q4_0 | Support |
| Q6_K | Support, but not optimized |
| Q8_0 | Support |
| MXFP4 | Support |
## Model Preparation
You can refer to the general [llama-quantize tool](/tools/quantize/README.md) for steps to convert a model in Hugging Face safetensor format to GGUF with quantization.
Currently we support `Q4_0` quantization and have optimized for it. To achieve best performance on Adreno GPU, add `--pure` to `llama-quantize` (i.e., make all weights in `Q4_0`). For example,
```sh
./llama-quantize --pure ggml-model-qwen2.5-3b-f16.gguf ggml-model-qwen-3b-Q4_0.gguf Q4_0
```
Since `Q6_K` is also supported, `Q4_0` quantization without `--pure` will also work. However, the performance will be worse compared to pure `Q4_0` quantization.
### `MXFP4` MoE Models
OpenAI gpt-oss models are MoE models in `MXFP4`. The quantized model will be in `MXFP4_MOE`, a mixture of `MXFP4` and `Q8_0`.
For this quantization, there is no need to specify `--pure`.
For gpt-oss-20b model, you can directly [download](https://huggingface.co/ggml-org/gpt-oss-20b-GGUF) the quantized GGUF file in `MXFP4_MOE` from Hugging Face.
Although it is possible to quantize gpt-oss-20b model in pure `Q4_0` (all weights in `Q4_0`), it is not recommended since `MXFP4` has been optimized for MoE while `Q4_0` is not. In addition, accuracy should degrade with such pure `Q4_0` quantization.
Hence, using the default `MXFP4_MOE` quantization (see the link above) is recommended for this model.
> Note that the `Q4_0` model found [here](https://huggingface.co/unsloth/gpt-oss-20b-GGUF/blob/main/gpt-oss-20b-Q4_0.gguf) is a mixture of `Q4_0`, `Q8_0` and `MXFP4` and gives better performance than `MXFP4_MOE` quantization.
## CMake Options
The OpenCL backend has the following CMake options that control the behavior of the backend.
| CMake options | Default value | Description |
|:---------------------------------:|:--------------:|:------------------------------------------|
| `GGML_OPENCL_EMBED_KERNELS` | `ON` | Embed OpenCL kernels into the executable. |
| `GGML_OPENCL_USE_ADRENO_KERNELS` | `ON` | Use kernels optimized for Adreno. |
## Android
Ubuntu 22.04 is used for targeting Android. Make sure the following tools are accessible from command line,
* Git
* CMake 3.29
* Ninja
* Python3
### I. Setup Environment
1. **Install NDK**
```sh
cd ~
wget https://dl.google.com/android/repository/commandlinetools-linux-8512546_latest.zip && \
unzip commandlinetools-linux-8512546_latest.zip && \
mkdir -p ~/android-sdk/cmdline-tools && \
mv cmdline-tools latest && \
mv latest ~/android-sdk/cmdline-tools/ && \
rm -rf commandlinetools-linux-8512546_latest.zip
yes | ~/android-sdk/cmdline-tools/latest/bin/sdkmanager "ndk;26.3.11579264"
```
2. **Install OpenCL Headers and Library**
```sh
mkdir -p ~/dev/llm
cd ~/dev/llm
git clone https://github.com/KhronosGroup/OpenCL-Headers && \
cd OpenCL-Headers && \
cp -r CL ~/android-sdk/ndk/26.3.11579264/toolchains/llvm/prebuilt/linux-x86_64/sysroot/usr/include
cd ~/dev/llm
git clone https://github.com/KhronosGroup/OpenCL-ICD-Loader && \
cd OpenCL-ICD-Loader && \
mkdir build_ndk26 && cd build_ndk26 && \
cmake .. -G Ninja -DCMAKE_BUILD_TYPE=Release \
-DCMAKE_TOOLCHAIN_FILE=$HOME/android-sdk/ndk/26.3.11579264/build/cmake/android.toolchain.cmake \
-DOPENCL_ICD_LOADER_HEADERS_DIR=$HOME/android-sdk/ndk/26.3.11579264/toolchains/llvm/prebuilt/linux-x86_64/sysroot/usr/include \
-DANDROID_ABI=arm64-v8a \
-DANDROID_PLATFORM=24 \
-DANDROID_STL=c++_shared && \
ninja && \
cp libOpenCL.so ~/android-sdk/ndk/26.3.11579264/toolchains/llvm/prebuilt/linux-x86_64/sysroot/usr/lib/aarch64-linux-android
```
### II. Build llama.cpp
```sh
cd ~/dev/llm
git clone https://github.com/ggml-org/llama.cpp && \
cd llama.cpp && \
mkdir build-android && cd build-android
cmake .. -G Ninja \
-DCMAKE_TOOLCHAIN_FILE=$HOME/android-sdk/ndk/26.3.11579264/build/cmake/android.toolchain.cmake \
-DANDROID_ABI=arm64-v8a \
-DANDROID_PLATFORM=android-28 \
-DBUILD_SHARED_LIBS=OFF \
-DGGML_OPENCL=ON
ninja
```
## Windows 11 Arm64
A Snapdragon X Elite device with Windows 11 Arm64 is used. Make sure the following tools are accessible from command line,
* Git
* CMake 3.29
* Clang 19
* Ninja
* Visual Studio 2022
* Powershell 7
* Python
Visual Studio provides necessary headers and libraries although it is not directly used for building.
Alternatively, Visual Studio Build Tools can be installed instead of the full Visual Studio.
> Note that building using Visual Studio's cl compiler is not supported. Clang must be used. Clang depends on libraries provided by Visual Studio to work. Therefore, Visual Studio must be installed. Alternatively, Visual Studio Build Tools can be installed instead of the full Visual Studio.
Powershell 7 is used for the following commands.
If an older version of Powershell is used, these commands may not work as they are.
### I. Setup Environment
1. **Install OpenCL Headers and Library**
```powershell
mkdir -p ~/dev/llm
cd ~/dev/llm
git clone https://github.com/KhronosGroup/OpenCL-Headers && cd OpenCL-Headers
mkdir build && cd build
cmake .. -G Ninja `
-DBUILD_TESTING=OFF `
-DOPENCL_HEADERS_BUILD_TESTING=OFF `
-DOPENCL_HEADERS_BUILD_CXX_TESTS=OFF `
-DCMAKE_INSTALL_PREFIX="$HOME/dev/llm/opencl"
cmake --build . --target install
cd ~/dev/llm
git clone https://github.com/KhronosGroup/OpenCL-ICD-Loader && cd OpenCL-ICD-Loader
mkdir build && cd build
cmake .. -G Ninja `
-DCMAKE_BUILD_TYPE=Release `
-DCMAKE_PREFIX_PATH="$HOME/dev/llm/opencl" `
-DCMAKE_INSTALL_PREFIX="$HOME/dev/llm/opencl"
cmake --build . --target install
```
### II. Build llama.cpp
```powershell
mkdir -p ~/dev/llm
cd ~/dev/llm
git clone https://github.com/ggml-org/llama.cpp && cd llama.cpp
mkdir build && cd build
cmake .. -G Ninja `
-DCMAKE_TOOLCHAIN_FILE="$HOME/dev/llm/llama.cpp/cmake/arm64-windows-llvm.cmake" `
-DCMAKE_BUILD_TYPE=Release `
-DCMAKE_PREFIX_PATH="$HOME/dev/llm/opencl" `
-DBUILD_SHARED_LIBS=OFF `
-DGGML_OPENCL=ON
ninja
```
## Linux
The two steps just above also apply to Linux. When building for linux, the commands are mostly the same as those for PowerShell on Windows, but in the second step they do not have the `-DCMAKE_TOOLCHAIN_FILE` parameter, and then in both steps the backticks are replaced with back slashes.
If not installed already, install Git, CMake, Clang, Ninja and Python, then run in the terminal the following:
### I. Setup Environment
1. **Install OpenCL Headers and Library**
```bash
mkdir -p ~/dev/llm
cd ~/dev/llm
git clone https://github.com/KhronosGroup/OpenCL-Headers && cd OpenCL-Headers
mkdir build && cd build
cmake .. -G Ninja \
-DBUILD_TESTING=OFF \
-DOPENCL_HEADERS_BUILD_TESTING=OFF \
-DOPENCL_HEADERS_BUILD_CXX_TESTS=OFF \
-DCMAKE_INSTALL_PREFIX="$HOME/dev/llm/opencl"
cmake --build . --target install
cd ~/dev/llm
git clone https://github.com/KhronosGroup/OpenCL-ICD-Loader && cd OpenCL-ICD-Loader
mkdir build && cd build
cmake .. -G Ninja \
-DCMAKE_BUILD_TYPE=Release \
-DCMAKE_PREFIX_PATH="$HOME/dev/llm/opencl" \
-DCMAKE_INSTALL_PREFIX="$HOME/dev/llm/opencl"
cmake --build . --target install
```
### II. Build llama.cpp
```bash
mkdir -p ~/dev/llm
cd ~/dev/llm
git clone https://github.com/ggml-org/llama.cpp && cd llama.cpp
mkdir build && cd build
cmake .. -G Ninja \
-DCMAKE_BUILD_TYPE=Release \
-DCMAKE_PREFIX_PATH="$HOME/dev/llm/opencl" \
-DBUILD_SHARED_LIBS=OFF \
-DGGML_OPENCL=ON
ninja
```
## Known Issues
- Flash attention does not always improve performance.
- Currently OpenCL backend works on A6xx GPUs with recent drivers and compilers (usually found in IoT platforms).
However, it does not work on A6xx GPUs found in phones with old drivers and compilers.
## TODO
- Optimization for Q6_K
- Support and optimization for Q4_K
- Improve flash attention
---
# Source: https://github.com/ggerganov/llama.cpp/blob/master/docs/backend/SYCL.md
# llama.cpp for SYCL
- [Background](#background)
- [Recommended Release](#recommended-release)
- [News](#news)
- [OS](#os)
- [Hardware](#hardware)
- [Docker](#docker)
- [Linux](#linux)
- [Windows](#windows)
- [Environment Variable](#environment-variable)
- [Known Issue](#known-issues)
- [Q&A](#qa)
- [TODO](#todo)
## Background
**SYCL** is a high-level parallel programming model designed to improve developers productivity writing code across various hardware accelerators such as CPUs, GPUs, and FPGAs. It is a single-source language designed for heterogeneous computing and based on standard C++17.
**oneAPI** is an open ecosystem and a standard-based specification, supporting multiple architectures including but not limited to Intel CPUs, GPUs and FPGAs. The key components of the oneAPI ecosystem include:
- **DPCPP** *(Data Parallel C++)*: The primary oneAPI SYCL implementation, which includes the icpx/icx Compilers.
- **oneAPI Libraries**: A set of highly optimized libraries targeting multiple domains *(e.g. Intel oneMKL, oneMath and oneDNN)*.
- **oneAPI LevelZero**: A high performance low level interface for fine-grained control over Intel iGPUs and dGPUs.
- **Nvidia & AMD Plugins**: These are plugins extending oneAPI's DPCPP support to SYCL on Nvidia and AMD GPU targets.
### Llama.cpp + SYCL
The llama.cpp SYCL backend is primarily designed for **Intel GPUs**.
SYCL cross-platform capabilities enable support for Nvidia GPUs as well, with limited support for AMD.
## Recommended Release
The following releases are verified and recommended:
|Commit ID|Tag|Release|Verified Platform| Update date|
|-|-|-|-|-|
|24e86cae7219b0f3ede1d5abdf5bf3ad515cccb8|b5377 |[llama-b5377-bin-win-sycl-x64.zip](https://github.com/ggml-org/llama.cpp/releases/download/b5377/llama-b5377-bin-win-sycl-x64.zip) |ArcB580/Linux/oneAPI 2025.1
LNL Arc GPU/Windows 11/oneAPI 2025.1.1|2025-05-15|
|3bcd40b3c593d14261fb2abfabad3c0fb5b9e318|b4040 |[llama-b4040-bin-win-sycl-x64.zip](https://github.com/ggml-org/llama.cpp/releases/download/b4040/llama-b4040-bin-win-sycl-x64.zip) |Arc770/Linux/oneAPI 2024.1
MTL Arc GPU/Windows 11/oneAPI 2024.1| 2024-11-19|
|fb76ec31a9914b7761c1727303ab30380fd4f05c|b3038 |[llama-b3038-bin-win-sycl-x64.zip](https://github.com/ggml-org/llama.cpp/releases/download/b3038/llama-b3038-bin-win-sycl-x64.zip) |Arc770/Linux/oneAPI 2024.1
MTL Arc GPU/Windows 11/oneAPI 2024.1||
## News
- 2025.11
- Support malloc memory on device more than 4GB.
- 2025.2
- Optimize MUL_MAT Q4_0 on Intel GPU for all dGPUs and built-in GPUs since MTL. Increase the performance of LLM (llama-2-7b.Q4_0.gguf) 21%-87% on Intel GPUs (MTL, ARL-H, Arc, Flex, PVC).
|GPU|Base tokens/s|Increased tokens/s|Percent|
|-|-|-|-|
|PVC 1550|39|73|+87%|
|Flex 170|39|50|+28%|
|Arc770|42|55|+30%|
|MTL|13|16|+23%|
|ARL-H|14|17|+21%|
- 2024.11
- Use syclcompat to improve the performance on some platforms. This requires to use oneAPI 2025.0 or newer.
- 2024.8
- Use oneDNN as the default GEMM library, improve the compatibility for new Intel GPUs.
- 2024.5
- Performance is increased: 34 -> 37 tokens/s of llama-2-7b.Q4_0 on Arc770.
- Arch Linux is verified successfully.
- 2024.4
- Support data types: GGML_TYPE_IQ4_NL, GGML_TYPE_IQ4_XS, GGML_TYPE_IQ3_XXS, GGML_TYPE_IQ3_S, GGML_TYPE_IQ2_XXS, GGML_TYPE_IQ2_XS, GGML_TYPE_IQ2_S, GGML_TYPE_IQ1_S, GGML_TYPE_IQ1_M.
- 2024.3
- Release binary files of Windows.
- A blog is published: **Run LLM on all Intel GPUs Using llama.cpp**: [intel.com](https://www.intel.com/content/www/us/en/developer/articles/technical/run-llm-on-all-gpus-using-llama-cpp-artical.html) or [medium.com](https://medium.com/@jianyu_neo/run-llm-on-all-intel-gpus-using-llama-cpp-fd2e2dcbd9bd).
- New base line is ready: [tag b2437](https://github.com/ggml-org/llama.cpp/tree/b2437).
- Support multiple cards: **--split-mode**: [none|layer]; not support [row], it's on developing.
- Support to assign main GPU by **--main-gpu**, replace $GGML_SYCL_DEVICE.
- Support detecting all GPUs with level-zero and same top **Max compute units**.
- Support OPs
- hardsigmoid
- hardswish
- pool2d
- 2024.1
- Create SYCL backend for Intel GPU.
- Support Windows build
## OS
| OS | Status | Verified |
|---------|---------|------------------------------------------------|
| Linux | Support | Ubuntu 22.04, Fedora Silverblue 39, Arch Linux |
| Windows | Support | Windows 11 |
## Hardware
### Intel GPU
SYCL backend supports Intel GPU Family:
- Intel Data Center Max Series
- Intel Flex Series, Arc Series
- Intel Built-in Arc GPU
- Intel iGPU in Core CPU (11th Generation Core CPU and newer, refer to [oneAPI supported GPU](https://www.intel.com/content/www/us/en/developer/articles/system-requirements/intel-oneapi-base-toolkit-system-requirements.html#inpage-nav-1-1)).
On older Intel GPUs, you may try [OpenCL](/docs/backend/OPENCL.md) although the performance is not optimal, and some GPUs may not support OpenCL nor have any GPGPU capabilities.
#### Verified devices
| Intel GPU | Status | Verified Model |
|-------------------------------|---------|---------------------------------------|
| Intel Data Center Max Series | Support | Max 1550, 1100 |
| Intel Data Center Flex Series | Support | Flex 170 |
| Intel Arc Series | Support | Arc 770, 730M, Arc A750, B580 |
| Intel built-in Arc GPU | Support | built-in Arc GPU in Meteor Lake, Arrow Lake, Lunar Lake |
| Intel iGPU | Support | iGPU in 13700k, 13400, i5-1250P, i7-1260P, i7-1165G7 |
*Notes:*
- **Memory**
- The device memory is a limitation when running a large model. The loaded model size, *`llm_load_tensors: buffer_size`*, is displayed in the log when running `./bin/llama-cli`.
- Please make sure the GPU shared memory from the host is large enough to account for the model's size. For e.g. the *llama-2-7b.Q4_0* requires at least 8.0GB for integrated GPU and 4.0GB for discrete GPU.
- **Execution Unit (EU)**
- If the iGPU has less than 80 EUs, the inference speed will likely be too slow for practical use.
### Other Vendor GPU
**Verified devices**
| Nvidia GPU | Status | Verified Model |
|--------------------------|-----------|----------------|
| Ampere Series | Supported | A100, A4000 |
| Ampere Series *(Mobile)* | Supported | RTX 40 Series |
| AMD GPU | Status | Verified Model |
|--------------------------|--------------|----------------|
| Radeon Pro | Experimental | W6800 |
| Radeon RX | Experimental | 6700 XT |
Note: AMD GPU support is highly experimental and is incompatible with F16.
Additionally, it only supports GPUs with a sub_group_size (warp size) of 32.
## Docker
The docker build option is currently limited to *Intel GPU* targets.
### Build image
```sh
# Using FP16
docker build -t llama-cpp-sycl --build-arg="GGML_SYCL_F16=ON" --target light -f .devops/intel.Dockerfile .
# Using FP32
docker build -t llama-cpp-sycl --build-arg="GGML_SYCL_F16=OFF" --target light -f .devops/intel.Dockerfile .
```
*Notes*:
You can also use the `.devops/llama-server-intel.Dockerfile`, which builds the *"server"* alternative.
Check the [documentation for Docker](../docker.md) to see the available images.
### Run container
```sh
# First, find all the DRI cards
ls -la /dev/dri
# Then, pick the card that you want to use (here for e.g. /dev/dri/card1).
docker run -it --rm -v "/path/to/models:/models" --device /dev/dri/renderD128:/dev/dri/renderD128 --device /dev/dri/card0:/dev/dri/card0 llama-cpp-sycl -m /models/7B/ggml-model-q4_0.gguf -p "Building a website can be done in 10 simple steps:" -n 400 -e -ngl 33 -c 4096 -s 0
```
*Notes:*
- Docker has been tested successfully on native Linux. WSL support has not been verified yet.
- You may need to install Intel GPU driver on the **host** machine *(Please refer to the [Linux configuration](#linux) for details)*.
## Linux
### I. Setup Environment
1. **Install GPU drivers**
- **Intel GPU**
Intel data center GPUs drivers installation guide and download page can be found here: [Get intel dGPU Drivers](https://dgpu-docs.intel.com/driver/installation.html#ubuntu-install-steps).
*Note*: for client GPUs *(iGPU & Arc A-Series)*, please refer to the [client iGPU driver installation](https://dgpu-docs.intel.com/driver/client/overview.html).
Once installed, add the user(s) to the `video` and `render` groups.
```sh
sudo usermod -aG render $USER
sudo usermod -aG video $USER
```
*Note*: logout/re-login for the changes to take effect.
Verify installation through `clinfo`:
```sh
sudo apt install clinfo
sudo clinfo -l
```
Sample output:
```sh
Platform #0: Intel(R) OpenCL Graphics
`-- Device #0: Intel(R) Arc(TM) A770 Graphics
Platform #0: Intel(R) OpenCL HD Graphics
`-- Device #0: Intel(R) Iris(R) Xe Graphics [0x9a49]
```
- **Nvidia GPU**
In order to target Nvidia GPUs through SYCL, please make sure the CUDA/CUBLAS native requirements *-found [here](README.md#cuda)-* are installed.
- **AMD GPU**
To target AMD GPUs with SYCL, the ROCm stack must be installed first.
2. **Install Intel® oneAPI Base toolkit**
SYCL backend depends on:
- Intel® oneAPI DPC++/C++ compiler/running-time.
- Intel® oneAPI DPC++/C++ library (oneDPL).
- Intel® oneAPI Deep Neural Network Library (oneDNN).
- Intel® oneAPI Math Kernel Library (oneMKL).
- **For Intel GPU**
All above are included in both **Intel® oneAPI Base toolkit** and **Intel® Deep Learning Essentials** packages.
It's recommended to install **Intel® Deep Learning Essentials** which only provides the necessary libraries with less size.
The **Intel® oneAPI Base toolkit** and **Intel® Deep Learning Essentials** can be obtained from the official [Intel® oneAPI Base Toolkit](https://www.intel.com/content/www/us/en/developer/tools/oneapi/base-toolkit.html) page.
Please follow the instructions for downloading and installing the Toolkit for Linux, and preferably keep the default installation values unchanged, notably the installation path *(`/opt/intel/oneapi` by default)*.
Following guidelines/code snippets assume the default installation values. Otherwise, please make sure the necessary changes are reflected where applicable.
Upon a successful installation, SYCL is enabled for the available intel devices, along with relevant libraries such as oneAPI oneDNN for Intel GPUs.
|Verified release|
|-|
|2025.2.1|
|2025.1|
|2024.1|
- **Adding support to Nvidia GPUs**
**oneAPI Plugin**: In order to enable SYCL support on Nvidia GPUs, please install the [Codeplay oneAPI Plugin for Nvidia GPUs](https://developer.codeplay.com/products/oneapi/nvidia/download). User should also make sure the plugin version matches the installed base toolkit one *(previous step)* for a seamless "oneAPI on Nvidia GPU" setup.
**oneDNN**: The current oneDNN releases *(shipped with the oneAPI base-toolkit)* do not include the NVIDIA backend. Therefore, oneDNN must be compiled from source to enable the NVIDIA target:
```sh
git clone https://github.com/oneapi-src/oneDNN.git
cd oneDNN
cmake -GNinja -Bbuild-nvidia -DDNNL_CPU_RUNTIME=DPCPP -DDNNL_GPU_RUNTIME=DPCPP -DDNNL_GPU_VENDOR=NVIDIA -DONEDNN_BUILD_GRAPH=OFF -DCMAKE_C_COMPILER=icx -DCMAKE_CXX_COMPILER=icpx
cmake --build build-nvidia --config Release
```
- **Adding support to AMD GPUs**
**oneAPI Plugin**: In order to enable SYCL support on AMD GPUs, please install the [Codeplay oneAPI Plugin for AMD GPUs](https://developer.codeplay.com/products/oneapi/amd/download). As with Nvidia GPUs, the user should also make sure the plugin version matches the installed base toolkit.
3. **Verify installation and environment**
In order to check the available SYCL devices on the machine, please use the `sycl-ls` command.
```sh
source /opt/intel/oneapi/setvars.sh
sycl-ls
```
- **Intel GPU**
When targeting an intel GPU, the user should expect one or more devices among the available SYCL devices. Please make sure that at least one GPU is present via `sycl-ls`, for instance `[level_zero:gpu]` in the sample output below:
```
[level_zero:gpu][level_zero:0] Intel(R) oneAPI Unified Runtime over Level-Zero, Intel(R) Arc(TM) A770 Graphics 12.55.8 [1.3.29735+27]
[level_zero:gpu][level_zero:1] Intel(R) oneAPI Unified Runtime over Level-Zero, Intel(R) UHD Graphics 730 12.2.0 [1.3.29735+27]
[opencl:cpu][opencl:0] Intel(R) OpenCL, 13th Gen Intel(R) Core(TM) i5-13400 OpenCL 3.0 (Build 0) [2025.20.8.0.06_160000]
[opencl:gpu][opencl:1] Intel(R) OpenCL Graphics, Intel(R) Arc(TM) A770 Graphics OpenCL 3.0 NEO [24.39.31294]
[opencl:gpu][opencl:2] Intel(R) OpenCL Graphics, Intel(R) UHD Graphics 730 OpenCL 3.0 NEO [24.39.31294]
```
- **Nvidia GPU**
Similarly, user targeting Nvidia GPUs should expect at least one SYCL-CUDA device [`cuda:gpu`] as below:
```
[opencl:acc][opencl:0] Intel(R) FPGA Emulation Platform for OpenCL(TM), Intel(R) FPGA Emulation Device OpenCL 1.2 [2023.16.12.0.12_195853.xmain-hotfix]
[opencl:cpu][opencl:1] Intel(R) OpenCL, Intel(R) Xeon(R) Gold 6326 CPU @ 2.90GHz OpenCL 3.0 (Build 0) [2023.16.12.0.12_195853.xmain-hotfix]
[cuda:gpu][cuda:0] NVIDIA CUDA BACKEND, NVIDIA A100-PCIE-40GB 8.0 [CUDA 12.5]
```
- **AMD GPU**
For AMD GPUs we should expect at least one SYCL-HIP device [`hip:gpu`]:
```
[opencl:cpu][opencl:0] Intel(R) OpenCL, 12th Gen Intel(R) Core(TM) i9-12900K OpenCL 3.0 (Build 0) [2024.18.6.0.02_160000]
[hip:gpu][hip:0] AMD HIP BACKEND, AMD Radeon PRO W6800 gfx1030 [HIP 60140.9]
```
### II. Build llama.cpp
#### Intel GPU
```sh
./examples/sycl/build.sh
```
or
```sh
# Export relevant ENV variables
source /opt/intel/oneapi/setvars.sh
# Option 1: Use FP32 (recommended for better performance in most cases)
cmake -B build -DGGML_SYCL=ON -DCMAKE_C_COMPILER=icx -DCMAKE_CXX_COMPILER=icpx
# Option 2: Use FP16
cmake -B build -DGGML_SYCL=ON -DCMAKE_C_COMPILER=icx -DCMAKE_CXX_COMPILER=icpx -DGGML_SYCL_F16=ON
# build all binary
cmake --build build --config Release -j -v
```
It is possible to come across some precision issues when running tests that stem from using faster
instructions, which can be circumvented by setting the environment variable `SYCL_PROGRAM_COMPILE_OPTIONS`
as `-cl-fp32-correctly-rounded-divide-sqrt`
#### Nvidia GPU
The SYCL backend depends on [oneMath](https://github.com/uxlfoundation/oneMath) for Nvidia and AMD devices.
By default it is automatically built along with the project. A specific build can be provided by setting the CMake flag `-DoneMath_DIR=/path/to/oneMath/install/lib/cmake/oneMath`.
```sh
# Build LLAMA with Nvidia BLAS acceleration through SYCL
# Setting GGML_SYCL_DEVICE_ARCH is optional but can improve performance
GGML_SYCL_DEVICE_ARCH=sm_80 # Example architecture
# Option 1: Use FP32 (recommended for better performance in most cases)
cmake -B build -DGGML_SYCL=ON -DGGML_SYCL_TARGET=NVIDIA -DGGML_SYCL_DEVICE_ARCH=${GGML_SYCL_DEVICE_ARCH} -DCMAKE_C_COMPILER=icx -DCMAKE_CXX_COMPILER=icpx -DDNNL_DIR=/path/to/oneDNN/build-nvidia/install/lib/cmake/dnnl
# Option 2: Use FP16
cmake -B build -DGGML_SYCL=ON -DGGML_SYCL_TARGET=NVIDIA -DGGML_SYCL_DEVICE_ARCH=${GGML_SYCL_DEVICE_ARCH} -DCMAKE_C_COMPILER=icx -DCMAKE_CXX_COMPILER=icpx -DGGML_SYCL_F16=ON -DDNNL_DIR=/path/to/oneDNN/build-nvidia/install/lib/cmake/dnnl
# build all binary
cmake --build build --config Release -j -v
```
It is possible to come across some precision issues when running tests that stem from using faster
instructions, which can be circumvented by passing the `-fno-fast-math` flag to the compiler.
#### AMD GPU
The SYCL backend depends on [oneMath](https://github.com/uxlfoundation/oneMath) for Nvidia and AMD devices.
By default it is automatically built along with the project. A specific build can be provided by setting the CMake flag `-DoneMath_DIR=/path/to/oneMath/install/lib/cmake/oneMath`.
```sh
# Build LLAMA with rocBLAS acceleration through SYCL
## AMD
# Use FP32, FP16 is not supported
# Find your GGML_SYCL_DEVICE_ARCH with rocminfo, under the key 'Name:'
GGML_SYCL_DEVICE_ARCH=gfx90a # Example architecture
cmake -B build -DGGML_SYCL=ON -DGGML_SYCL_TARGET=AMD -DGGML_SYCL_DEVICE_ARCH=${GGML_SYCL_DEVICE_ARCH} -DCMAKE_C_COMPILER=icx -DCMAKE_CXX_COMPILER=icpx
# build all binary
cmake --build build --config Release -j -v
```
### III. Run the inference
#### Retrieve and prepare model
You can refer to the general [*Prepare and Quantize*](README.md#prepare-and-quantize) guide for model preparation, or download an already quantized model like [llama-2-7b.Q4_0.gguf](https://huggingface.co/TheBloke/Llama-2-7B-GGUF/resolve/main/llama-2-7b.Q4_0.gguf?download=true) or [Meta-Llama-3-8B-Instruct-Q4_0.gguf](https://huggingface.co/aptha/Meta-Llama-3-8B-Instruct-Q4_0-GGUF/resolve/main/Meta-Llama-3-8B-Instruct-Q4_0.gguf).
##### Check device
1. Enable oneAPI running environment
```sh
source /opt/intel/oneapi/setvars.sh
```
2. List devices information
Similar to the native `sycl-ls`, available SYCL devices can be queried as follow:
```sh
./build/bin/llama-ls-sycl-device
```
This command will only display the selected backend that is supported by SYCL. The default backend is level_zero. For example, in a system with 2 *intel GPU* it would look like the following:
```
found 2 SYCL devices:
| | | |Compute |Max compute|Max work|Max sub| |
|ID| Device Type| Name|capability|units |group |group |Global mem size|
|--|------------------|---------------------------------------------|----------|-----------|--------|-------|---------------|
| 0|[level_zero:gpu:0]| Intel(R) Arc(TM) A770 Graphics| 1.3| 512| 1024| 32| 16225243136|
| 1|[level_zero:gpu:1]| Intel(R) UHD Graphics 770| 1.3| 32| 512| 32| 53651849216|
```
#### Choose level-zero devices
|Chosen Device ID|Setting|
|-|-|
|0|`export ONEAPI_DEVICE_SELECTOR="level_zero:0"` or no action|
|1|`export ONEAPI_DEVICE_SELECTOR="level_zero:1"`|
|0 & 1|`export ONEAPI_DEVICE_SELECTOR="level_zero:0;level_zero:1"`|
#### Execute
Choose one of following methods to run.
1. Script
- Use device 0:
```sh
./examples/sycl/run-llama2.sh 0
# OR
./examples/sycl/run-llama3.sh 0
```
- Use multiple devices:
```sh
./examples/sycl/run-llama2.sh
# OR
./examples/sycl/run-llama3.sh
```
2. Command line
Launch inference
There are two device selection modes:
- Single device: Use one device assigned by user. Default device id is 0.
- Multiple devices: Automatically choose the devices with the same backend.
In two device selection modes, the default SYCL backend is level_zero, you can choose other backend supported by SYCL by setting environment variable ONEAPI_DEVICE_SELECTOR.
| Device selection | Parameter |
|------------------|----------------------------------------|
| Single device | --split-mode none --main-gpu DEVICE_ID |
| Multiple devices | --split-mode layer (default) |
Examples:
- Use device 0:
```sh
ZES_ENABLE_SYSMAN=1 ./build/bin/llama-cli -no-cnv -m models/llama-2-7b.Q4_0.gguf -p "Building a website can be done in 10 simple steps:" -n 400 -e -ngl 99 -sm none -mg 0
```
- Use multiple devices:
```sh
ZES_ENABLE_SYSMAN=1 ./build/bin/llama-cli -no-cnv -m models/llama-2-7b.Q4_0.gguf -p "Building a website can be done in 10 simple steps:" -n 400 -e -ngl 99 -sm layer
```
*Notes:*
- Upon execution, verify the selected device(s) ID(s) in the output log, which can for instance be displayed as follow:
```sh
detect 1 SYCL GPUs: [0] with top Max compute units:512
```
Or
```sh
use 1 SYCL GPUs: [0] with Max compute units:512
```
## Windows
### I. Setup Environment
1. Install GPU driver
Intel GPU drivers instructions guide and download page can be found here: [Get Intel GPU Drivers](https://www.intel.com/content/www/us/en/products/docs/discrete-gpus/arc/software/drivers.html).
2. Install Visual Studio
If you already have a recent version of Microsoft Visual Studio, you can skip this step. Otherwise, please refer to the official download page for [Microsoft Visual Studio](https://visualstudio.microsoft.com/).
3. Install Intel® oneAPI Base toolkit
SYCL backend depends on:
- Intel® oneAPI DPC++/C++ compiler/running-time.
- Intel® oneAPI DPC++/C++ library (oneDPL).
- Intel® oneAPI Deep Neural Network Library (oneDNN).
- Intel® oneAPI Math Kernel Library (oneMKL).
All above are included in both **Intel® oneAPI Base toolkit** and **Intel® Deep Learning Essentials** packages.
It's recommended to install **Intel® Deep Learning Essentials** which only provides the necessary libraries with less size.
The **Intel® oneAPI Base toolkit** and **Intel® Deep Learning Essentials** can be obtained from the official [Intel® oneAPI Base Toolkit](https://www.intel.com/content/www/us/en/developer/tools/oneapi/base-toolkit.html) page.
Please follow the instructions for downloading and installing the Toolkit for Windows, and preferably keep the default installation values unchanged, notably the installation path *(`C:\Program Files (x86)\Intel\oneAPI` by default)*.
Following guidelines/code snippets assume the default installation values. Otherwise, please make sure the necessary changes are reflected where applicable.
b. Enable oneAPI running environment:
- Type "oneAPI" in the search bar, then open the `Intel oneAPI command prompt for Intel 64 for Visual Studio 2022` App.
- On the command prompt, enable the runtime environment with the following:
```
"C:\Program Files (x86)\Intel\oneAPI\setvars.bat" intel64
```
- if you are using Powershell, enable the runtime environment with the following:
```
cmd.exe "/K" '"C:\Program Files (x86)\Intel\oneAPI\setvars.bat" && powershell'
```
c. Verify installation
In the oneAPI command line, run the following to print the available SYCL devices:
```
sycl-ls.exe
```
There should be one or more *level-zero* GPU devices displayed as **[ext_oneapi_level_zero:gpu]**. Below is example of such output detecting an *intel Iris Xe* GPU as a Level-zero SYCL device:
Output (example):
```
[opencl:acc:0] Intel(R) FPGA Emulation Platform for OpenCL(TM), Intel(R) FPGA Emulation Device OpenCL 1.2 [2023.16.10.0.17_160000]
[opencl:cpu:1] Intel(R) OpenCL, 11th Gen Intel(R) Core(TM) i7-1185G7 @ 3.00GHz OpenCL 3.0 (Build 0) [2023.16.10.0.17_160000]
[opencl:gpu:2] Intel(R) OpenCL Graphics, Intel(R) Iris(R) Xe Graphics OpenCL 3.0 NEO [31.0.101.5186]
[ext_oneapi_level_zero:gpu:0] Intel(R) Level-Zero, Intel(R) Iris(R) Xe Graphics 1.3 [1.3.28044]
```
4. Install build tools
a. Download & install cmake for Windows: https://cmake.org/download/ (CMake can also be installed from Visual Studio Installer)
b. The new Visual Studio will install Ninja as default. (If not, please install it manually: https://ninja-build.org/)
### II. Build llama.cpp
You could download the release package for Windows directly, which including binary files and depended oneAPI dll files.
Choose one of following methods to build from source code.
#### 1. Script
```sh
.\examples\sycl\win-build-sycl.bat
```
#### 2. CMake
On the oneAPI command line window, step into the llama.cpp main directory and run the following:
```
@call "C:\Program Files (x86)\Intel\oneAPI\setvars.bat" intel64 --force
# Option 1: Use FP32 (recommended for better performance in most cases)
cmake -B build -G "Ninja" -DGGML_SYCL=ON -DCMAKE_C_COMPILER=cl -DCMAKE_CXX_COMPILER=icx -DCMAKE_BUILD_TYPE=Release
# Option 2: Or FP16
cmake -B build -G "Ninja" -DGGML_SYCL=ON -DCMAKE_C_COMPILER=cl -DCMAKE_CXX_COMPILER=icx -DCMAKE_BUILD_TYPE=Release -DGGML_SYCL_F16=ON
cmake --build build --config Release -j
```
Or, use CMake presets to build:
```sh
cmake --preset x64-windows-sycl-release
cmake --build build-x64-windows-sycl-release -j --target llama-cli
cmake -DGGML_SYCL_F16=ON --preset x64-windows-sycl-release
cmake --build build-x64-windows-sycl-release -j --target llama-cli
cmake --preset x64-windows-sycl-debug
cmake --build build-x64-windows-sycl-debug -j --target llama-cli
```
#### 3. Visual Studio
You have two options to use Visual Studio to build llama.cpp:
- As CMake Project using CMake presets.
- Creating a Visual Studio solution to handle the project.
**Note**:
All following commands are executed in PowerShell.
##### - Open as a CMake Project
You can use Visual Studio to open the `llama.cpp` folder directly as a CMake project. Before compiling, select one of the SYCL CMake presets:
- `x64-windows-sycl-release`
- `x64-windows-sycl-debug`
*Notes:*
- For a minimal experimental setup, you can build only the inference executable using:
```Powershell
cmake --build build --config Release -j --target llama-cli
```
##### - Generating a Visual Studio Solution
You can use Visual Studio solution to build and work on llama.cpp on Windows. You need to convert the CMake Project into a `.sln` file.
If you want to use the Intel C++ Compiler for the entire `llama.cpp` project, run the following command:
```Powershell
cmake -B build -G "Visual Studio 17 2022" -T "Intel C++ Compiler 2025" -A x64 -DGGML_SYCL=ON -DCMAKE_BUILD_TYPE=Release
```
If you prefer to use the Intel C++ Compiler only for `ggml-sycl`, ensure that `ggml` and its backend libraries are built as shared libraries ( i.e. `-DBUILD_SHARED_LIBRARIES=ON`, this is default behaviour):
```Powershell
cmake -B build -G "Visual Studio 17 2022" -A x64 -DGGML_SYCL=ON -DCMAKE_BUILD_TYPE=Release \
-DSYCL_INCLUDE_DIR="C:\Program Files (x86)\Intel\oneAPI\compiler\latest\include" \
-DSYCL_LIBRARY_DIR="C:\Program Files (x86)\Intel\oneAPI\compiler\latest\lib"
```
If successful the build files have been written to: *path/to/llama.cpp/build*
Open the project file **build/llama.cpp.sln** with Visual Studio.
Once the Visual Studio solution is created, follow these steps:
1. Open the solution in Visual Studio.
2. Right-click on `ggml-sycl` and select **Properties**.
3. In the left column, expand **C/C++** and select **DPC++**.
4. In the right panel, find **Enable SYCL Offload** and set it to `Yes`.
5. Apply the changes and save.
*Navigation Path:*
```
Properties -> C/C++ -> DPC++ -> Enable SYCL Offload (Yes)
```
Now, you can build `llama.cpp` with the SYCL backend as a Visual Studio project.
To do it from menu: `Build -> Build Solution`.
Once it is completed, final results will be in **build/Release/bin**
*Additional Note*
- You can avoid specifying `SYCL_INCLUDE_DIR` and `SYCL_LIBRARY_DIR` in the CMake command by setting the environment variables:
- `SYCL_INCLUDE_DIR_HINT`
- `SYCL_LIBRARY_DIR_HINT`
- Above instruction has been tested with Visual Studio 17 Community edition and oneAPI 2025.0. We expect them to work also with future version if the instructions are adapted accordingly.
### III. Run the inference
#### Retrieve and prepare model
You can refer to the general [*Prepare and Quantize*](README.md#prepare-and-quantize) guide for model preparation, or download an already quantized model like [llama-2-7b.Q4_0.gguf](https://huggingface.co/TheBloke/Llama-2-7B-GGUF/blob/main/llama-2-7b.Q4_0.gguf) or [Meta-Llama-3-8B-Instruct-Q4_0.gguf](https://huggingface.co/aptha/Meta-Llama-3-8B-Instruct-Q4_0-GGUF/resolve/main/Meta-Llama-3-8B-Instruct-Q4_0.gguf).
##### Check device
1. Enable oneAPI running environment
On the oneAPI command line window, run the following and step into the llama.cpp directory:
```
"C:\Program Files (x86)\Intel\oneAPI\setvars.bat" intel64
```
2. List devices information
Similar to the native `sycl-ls`, available SYCL devices can be queried as follow:
```
build\bin\llama-ls-sycl-device.exe
```
This command will only display the selected backend that is supported by SYCL. The default backend is level_zero. For example, in a system with 2 *Intel GPU* it would look like the following:
```
found 2 SYCL devices:
| | | |Compute |Max compute|Max work|Max sub| |
|ID| Device Type| Name|capability|units |group |group |Global mem size|
|--|------------------|---------------------------------------------|----------|-----------|--------|-------|---------------|
| 0|[level_zero:gpu:0]| Intel(R) Arc(TM) A770 Graphics| 1.3| 512| 1024| 32| 16225243136|
| 1|[level_zero:gpu:1]| Intel(R) UHD Graphics 770| 1.3| 32| 512| 32| 53651849216|
```
#### Choose level-zero devices
|Chosen Device ID|Setting|
|-|-|
|0|Default option. You may also want to `set ONEAPI_DEVICE_SELECTOR="level_zero:0"`|
|1|`set ONEAPI_DEVICE_SELECTOR="level_zero:1"`|
|0 & 1|`set ONEAPI_DEVICE_SELECTOR="level_zero:0;level_zero:1"` or `set ONEAPI_DEVICE_SELECTOR="level_zero:*"`|
#### Execute
Choose one of following methods to run.
1. Script
```
examples\sycl\win-run-llama-2.bat
```
or
```
examples\sycl\win-run-llama-3.bat
```
2. Command line
Launch inference
There are two device selection modes:
- Single device: Use one device assigned by user. Default device id is 0.
- Multiple devices: Automatically choose the devices with the same backend.
In two device selection modes, the default SYCL backend is level_zero, you can choose other backend supported by SYCL by setting environment variable ONEAPI_DEVICE_SELECTOR.
| Device selection | Parameter |
|------------------|----------------------------------------|
| Single device | --split-mode none --main-gpu DEVICE_ID |
| Multiple devices | --split-mode layer (default) |
Examples:
- Use device 0:
```
build\bin\llama-cli.exe -no-cnv -m models\llama-2-7b.Q4_0.gguf -p "Building a website can be done in 10 simple steps:\nStep 1:" -n 400 -e -ngl 99 -sm none -mg 0
```
- Use multiple devices:
```
build\bin\llama-cli.exe -no-cnv -m models\llama-2-7b.Q4_0.gguf -p "Building a website can be done in 10 simple steps:\nStep 1:" -n 400 -e -ngl 99 -sm layer
```
Note:
- Upon execution, verify the selected device(s) ID(s) in the output log, which can for instance be displayed as follow:
```sh
detect 1 SYCL GPUs: [0] with top Max compute units:512
```
Or
```sh
use 1 SYCL GPUs: [0] with Max compute units:512
```
## Environment Variable
#### Build
| Name | Value | Function |
|--------------------|---------------------------------------|---------------------------------------------|
| GGML_SYCL | ON (mandatory) | Enable build with SYCL code path. |
| GGML_SYCL_TARGET | INTEL *(default)* \| NVIDIA \| AMD | Set the SYCL target device type. |
| GGML_SYCL_DEVICE_ARCH | Optional (except for AMD) | Set the SYCL device architecture, optional except for AMD. Setting the device architecture can improve the performance. See the table [--offload-arch](https://github.com/intel/llvm/blob/sycl/sycl/doc/design/OffloadDesign.md#--offload-arch) for a list of valid architectures. |
| GGML_SYCL_F16 | OFF *(default)* \|ON *(optional)* | Enable FP16 build with SYCL code path. (1.) |
| GGML_SYCL_GRAPH | ON *(default)* \|OFF *(Optional)* | Enable build with [SYCL Graph extension](https://github.com/intel/llvm/blob/sycl/sycl/doc/extensions/experimental/sycl_ext_oneapi_graph.asciidoc). |
| GGML_SYCL_DNN | ON *(default)* \|OFF *(Optional)* | Enable build with oneDNN. |
| CMAKE_C_COMPILER | `icx` *(Linux)*, `icx/cl` *(Windows)* | Set `icx` compiler for SYCL code path. |
| CMAKE_CXX_COMPILER | `icpx` *(Linux)*, `icx` *(Windows)* | Set `icpx/icx` compiler for SYCL code path. |
1. FP16 is recommended for better prompt processing performance on quantized models. Performance is equivalent in text generation but set `GGML_SYCL_F16=OFF` if you are experiencing issues with FP16 builds.
#### Runtime
| Name | Value | Function |
|-------------------|------------------|---------------------------------------------------------------------------------------------------------------------------|
| GGML_SYCL_DEBUG | 0 (default) or 1 | Enable log function by macro: GGML_SYCL_DEBUG |
| GGML_SYCL_DISABLE_OPT | 0 (default) or 1 | Disable optimize features for Intel GPUs. (Recommended to 1 for intel devices older than Gen 10) |
| GGML_SYCL_DISABLE_GRAPH | 0 or 1 (default) | Disable running computations through SYCL Graphs feature. Disabled by default because graph performance isn't yet better than non-graph performance. |
| GGML_SYCL_DISABLE_DNN | 0 (default) or 1 | Disable running computations through oneDNN and always use oneMKL. |
| ZES_ENABLE_SYSMAN | 0 (default) or 1 | Support to get free memory of GPU by sycl::aspect::ext_intel_free_memory.
Recommended to use when --split-mode = layer |
| UR_L0_ENABLE_RELAXED_ALLOCATION_LIMITS | 0 (default) or 1 | Support malloc device memory more than 4GB.|
## Known Issues
- `Split-mode:[row]` is not supported.
## Q&A
- Error: `error while loading shared libraries: libsycl.so: cannot open shared object file: No such file or directory`.
- Potential cause: Unavailable oneAPI installation or not set ENV variables.
- Solution: Install *oneAPI base toolkit* and enable its ENV through: `source /opt/intel/oneapi/setvars.sh`.
- General compiler error:
- Remove **build** folder or try a clean-build.
- I can **not** see `[ext_oneapi_level_zero:gpu]` afer installing the GPU driver on Linux.
Please double-check with `sudo sycl-ls`.
If it's present in the list, please add video/render group to your user then **logout/login** or restart your system:
```
sudo usermod -aG render $USER
sudo usermod -aG video $USER
```
Otherwise, please double-check the GPU driver installation steps.
- Can I report Ollama issue on Intel GPU to llama.cpp SYCL backend?
No. We can't support Ollama issue directly, because we aren't familiar with Ollama.
Suggest reproducing on llama.cpp and report similar issue to llama.cpp. We will support it.
It's same for other projects including llama.cpp SYCL backend.
- `Native API failed. Native API returns: 39 (UR_RESULT_ERROR_OUT_OF_DEVICE_MEMORY)`, `ggml_backend_sycl_buffer_type_alloc_buffer: can't allocate 3503030272 Bytes of memory on device`, or `failed to allocate SYCL0 buffer`
You are running out of Device Memory.
|Reason|Solution|
|-|-|
| The default context is too big. It leads to excessive memory usage.|Set `-c 8192` or a smaller value.|
| The model is too big and requires more memory than what is available.|Choose a smaller model or change to a smaller quantization, like Q5 -> Q4;
Alternatively, use more than one device to load model.|
- `ggml_backend_sycl_buffer_type_alloc_buffer: can't allocate 5000000000 Bytes of memory on device`
You need to enable to support 4GB memory malloc by:
```
export UR_L0_ENABLE_RELAXED_ALLOCATION_LIMITS=1
set UR_L0_ENABLE_RELAXED_ALLOCATION_LIMITS=1
```
### **GitHub contribution**:
Please add the `SYCL :` prefix/tag in issues/PRs titles to help the SYCL contributors to check/address them without delay.
## TODO
- Review ZES_ENABLE_SYSMAN: https://github.com/intel/compute-runtime/blob/master/programmers-guide/SYSMAN.md#support-and-limitations
---
# Source: https://github.com/ggerganov/llama.cpp/blob/master/docs/backend/ZenDNN.md
# llama.cpp for AMD ZenDNN
> [!WARNING]
> **Note:** ZenDNN is **not** the same as zDNN.
> - **ZenDNN** (this page): AMD's deep learning library for AMD EPYC CPUs
> - **zDNN**: IBM's Deep Neural Network acceleration library for IBM Z & LinuxONE Mainframes ([see zDNN documentation](zDNN.md))
- [Background](#background)
- [OS](#os)
- [Hardware](#hardware)
- [Supported Operations](#supported-operations)
- [DataType Supports](#datatype-supports)
- [Linux](#linux)
- [Environment Variable](#environment-variable)
- [Performance Optimization](#performance-optimization)
- [Known Issues](#known-issues)
- [TODO](#todo)
## Background
**ZenDNN** (Zen Deep Neural Network Library) is AMD's high-performance deep learning inference library optimized for AMD EPYC™ CPUs. It provides optimized implementations of key deep learning primitives and operations, delivering significant performance improvements for neural network workloads on AMD Zen-based processor architectures.
**Llama.cpp + ZenDNN**
The llama.cpp ZenDNN backend leverages AMD's optimized matrix multiplication primitives to accelerate inference on AMD CPUs. It utilizes ZenDNN's **LowOHA (Low Overhead Hardware Accelerated)** MatMul operator for efficient GEMM operations with minimal execution overhead, built-in weight caching, and direct access to backend libraries (AOCL BLIS, LibXSMM, OneDNN).
For more information about ZenDNN, visit: https://www.amd.com/en/developer/zendnn.html
## OS
| OS | Status | Verified |
|:-------:|:-------:|:----------------------------------------------:|
| Linux | Support | Ubuntu 20.04, 22.04, 24.04 |
For the latest list of supported operating systems, see the [ZenDNN Supported OS](https://github.com/amd/ZenDNN/blob/zendnnl/README.md#15-supported-os).
## Hardware
### AMD CPUs
**Recommended Processors**
ZenDNN is optimized for AMD EPYC™ processors and AMD Ryzen™ processors based on "Zen" microarchitecture and newer.
| CPU Family | Status | Notes |
|:-----------------------------:|:-------:|:----------------------------------:|
| AMD EPYC™ 9005 Series (Turin)| Support | 5th Gen - Zen 5 architecture |
| AMD EPYC™ 9004 Series (Genoa)| Support | 4th Gen - Zen 4 architecture |
| AMD EPYC™ 7003 Series (Milan)| Support | 3rd Gen - Zen 3 architecture |
| AMD Ryzen™ AI MAX (Strix Halo)| Support | High-performance mobile processors |
*Notes:*
- Best performance is achieved on AMD EPYC™ processors with high core counts (e.g., EPYC 9005 series).
- ZenDNN leverages AMD's advanced CPU features including AVX2 and AVX-512 instruction sets.
- For optimal performance, ensure your system has sufficient memory bandwidth.
## Supported Operations
The ZenDNN backend currently accelerates **matrix multiplication (MUL_MAT)** operations only. Other operations are handled by the standard CPU backend.
| Operation | Status | Notes |
|:-------------|:-------:|:----------------------------------------------:|
| MUL_MAT | ✓ | Accelerated via ZenDNN LowOHA MatMul |
*Note:* Since only MUL_MAT is accelerated, models will benefit most from ZenDNN when matrix multiplications dominate the computational workload (which is typical for transformer-based LLMs).
## DataType Supports
| DataType | Status | Notes |
|:----------------------:|:-------:|:---------------------------------------------:|
| FP32 | Support | Full precision floating point |
| BF16 | Support | BFloat16 (best performance on Zen 4/Zen 5) |
*Notes:*
- **BF16** provides best performance on Zen 4 and Zen 5 EPYC™ processors (Genoa, Turin).
## Linux
### I. Setup Environment
You have two options to set up ZenDNN:
#### Option 1: Automatic Download and Build (Recommended)
CMake will automatically download and build ZenDNN for you:
```sh
# Build llama.cpp - ZenDNN will be automatically downloaded and built
cmake -B build -DGGML_ZENDNN=ON -DCMAKE_BUILD_TYPE=Release
cmake --build build --config Release -j $(nproc)
```
No manual ZenDNN installation required. CMake will handle everything automatically.
#### Option 2: Use Custom ZenDNN Installation
If you want to build ZenDNN yourself or use a specific version:
**Step 1: Build ZenDNN from source**
```sh
# Clone ZenDNN repository
git clone https://github.com/amd/ZenDNN.git
cd ZenDNN
git checkout zendnnl
# Build and install (requires CMake >= 3.25)
mkdir build && cd build
cmake ..
cmake --build . --target all
```
Default installation path: `ZenDNN/build/install`
**For detailed build instructions**, refer to the [ZenDNN README](https://github.com/amd/ZenDNN/blob/zendnnl/README.md).
**Step 2: Build llama.cpp with custom ZenDNN path**
```sh
# Using environment variable
export ZENDNN_ROOT=/path/to/ZenDNN/build/install
cmake -B build -DGGML_ZENDNN=ON -DCMAKE_BUILD_TYPE=Release
cmake --build build --config Release -j $(nproc)
# OR specify path directly in CMake
cmake -B build -DGGML_ZENDNN=ON -DZENDNN_ROOT=/path/to/ZenDNN/build/install -DCMAKE_BUILD_TYPE=Release
cmake --build build --config Release -j $(nproc)
```
### II. Run the Server
#### 1. Download Model
Download LLaMA 3.1 8B Instruct BF16 model:
```sh
# Download from Hugging Face
huggingface-cli download meta-llama/Llama-3.1-8B-Instruct-GGUF --local-dir models/
```
#### 2. Start Server
Run llama.cpp server with ZenDNN acceleration:
```sh
# Set optimal configuration
export OMP_NUM_THREADS=64 # Adjust to your CPU core count
export ZENDNNL_MATMUL_ALGO=2 # Blocked AOCL BLIS for best performance
# Start server
./build/bin/llama-server \
-m models/Llama-3.1-8B-Instruct.BF16.gguf \
--host 0.0.0.0 \
--port 8080 \
-t 64
```
Access the server at `http://localhost:8080`.
**Performance tips**:
- Set `OMP_NUM_THREADS` to match your physical core count
- Use `ZENDNNL_MATMUL_ALGO=2` for optimal performance
- For NUMA systems: `numactl --cpunodebind=0 --membind=0 ./build/bin/llama-server ...`
## Environment Variable
### Build Time
| Name | Value | Function |
|--------------------|---------------------------------------|---------------------------------------------|
| GGML_ZENDNN | ON/OFF | Enable ZenDNN backend support |
| ZENDNN_ROOT | Path to ZenDNN installation | Set ZenDNN installation directory |
| GGML_OPENMP | ON/OFF (recommended: ON) | Enable OpenMP for multi-threading |
### Runtime
| Name | Value | Function |
|-------------------------|--------------------------|-------------------------------------------------------------------|
| OMP_NUM_THREADS | Number (e.g., 64) | Set number of OpenMP threads (recommended: physical core count) |
| ZENDNNL_MATMUL_ALGO | 0-5 | Select MatMul backend algorithm (see Performance Optimization) |
| ZENDNNL_PROFILE_LOG_LEVEL | 0-4 | Profiling log level (0=disabled, 4=verbose) |
| ZENDNNL_ENABLE_PROFILER | 0 or 1 | Enable detailed profiling (1=enabled) |
| ZENDNNL_API_LOG_LEVEL | 0-4 | API log level (0=disabled, 4=verbose) |
**Example**:
```sh
export OMP_NUM_THREADS=64
export ZENDNNL_MATMUL_ALGO=2 # Use Blocked AOCL BLIS for best performance
./build/bin/llama-cli -m models/llama-2-7b.Q4_0.gguf -p "Test" -n 100
```
## Performance Optimization
### MatMul Algorithm Selection
ZenDNN's LowOHA MatMul supports multiple backend algorithms. For **best performance**, use the **Blocked AOCL BLIS** algorithm:
```sh
export ZENDNNL_MATMUL_ALGO=2 # Blocked AOCL BLIS (recommended)
```
**Available algorithms**:
| Value | Algorithm | Description |
|:-----:|:-----------------------|:----------------------------------------------|
| 0 | Dynamic Dispatch | Automatic backend selection (default) |
| 1 | AOCL BLIS | AOCL BLIS backend |
| 2 | AOCL BLIS Blocked | **Blocked AOCL BLIS (recommended)** |
| 3 | OneDNN | OneDNN backend |
| 4 | OneDNN Blocked | Blocked OneDNN |
| 5 | LibXSMM | LibXSMM backend |
### Profiling and Debugging
For detailed profiling and logging options, refer to the [ZenDNN Logging Documentation](https://github.com/amd/ZenDNN/blob/zendnnl/docs/logging.md).
## Known Issues
- **Limited operation support**: Currently only matrix multiplication (MUL_MAT) is accelerated via ZenDNN. Other operations fall back to the standard CPU backend.
- **BF16 support**: BF16 operations require AMD Zen 4 or Zen 5 architecture (EPYC 9004/9005 series). On older CPUs, operations will use FP32.
- **NUMA awareness**: For multi-socket systems, manual NUMA binding may be required for optimal performance.
## Q&A
**Q: How do I verify that ZenDNN backend is being used?**
A: Check the log output when running llama.cpp. You should see messages indicating the ZenDNN backend is initialized. You can also check the backend name in the output.
**Q: What performance improvement can I expect?**
A: Performance gains vary depending on the model size, batch size, and CPU architecture. On AMD EPYC processors, you can typically expect 1.1x-2x speedup compared to standard CPU inference for matrix multiplication operations.
**Q: Can I use ZenDNN on non-AMD processors?**
A: ZenDNN is optimized specifically for AMD processors. While it may work on other x86-64 CPUs, performance benefits are only guaranteed on AMD Zen-based architectures.
**Q: Does ZenDNN support quantized models?**
A: Currently, ZenDNN primarily supports FP32 and BF16 data types. Quantized model support is not available at this time.
**Q: Why is my inference not faster with ZenDNN?**
A: Ensure:
1. You're using an AMD EPYC or Ryzen processor (Zen 2 or newer)
2. `OMP_NUM_THREADS` is set appropriately (physical core count)
3. `ZENDNNL_MATMUL_ALGO=2` is set for best performance (Blocked AOCL BLIS)
4. You're using a sufficiently large model (small models may not benefit as much)
5. Enable profiling to verify ZenDNN MatMul is being called
### **GitHub Contribution**:
Please add the **[ZenDNN]** prefix/tag in issues/PRs titles to help the ZenDNN-team check/address them without delay.
## TODO
- Expand operation support beyond MUL_MAT (attention operations, activations, etc.)
---
# Source: https://github.com/ggerganov/llama.cpp/blob/master/docs/backend/hexagon/developer.md
# Hexagon backend developer details
## Backend libraries
The Hexagon backend consist of two parts:
- `libggml-hexagon`
This is the regular CPU-side GGML backend library, either shared or statically linked
- `libggml-htp-vNN`
This is the NPU-side (HTP stands for Hexagon Tensor Processor) shared library that contains the Op dispatcher and kernels.
The correct library is selected automatically at runtime based on the HW version.
Here is an example of the build artifacts
```
~/src/llama.cpp$ ls -l pkg-adb/llama.cpp/lib/libggml*
pkg-adb/llama.cpp/lib/libggml-base.so
pkg-adb/llama.cpp/lib/libggml-cpu.so
pkg-adb/llama.cpp/lib/libggml-hexagon.so <<< CPU library
pkg-adb/llama.cpp/lib/libggml-htp-v73.so <<< HTP op/kernels for Hexagon v73
pkg-adb/llama.cpp/lib/libggml-htp-v75.so
pkg-adb/llama.cpp/lib/libggml-htp-v79.so
pkg-adb/llama.cpp/lib/libggml-htp-v81.so
```
## Memory buffers
Hexagon NPU backend takes advantage of the Snapdragon's unified memory model where all buffers are fully accessible by the CPU and GPU.
The NPU does have a dedicated tightly-coupled memory called VTCM but that memory is used only for intermediate data (e.g. dynamically
quantized tensors) or temporary data (chunks of the weight tensors fetched via DMA).
Please note that currently the Hexagon backend does not implement SET/GET_ROWS Ops because there is no advantage in offloading those
to the NPU at this point.
The backend does allocates non-host buffers for the tensors with datatypes that require repacking: Q4_0, Q8_0, MXFP4.
From the MMU perspective these buffers are still regular buffers (normal access by the CPU) they are marked as non-host simply to force
the repacking.
## Large model handling
Hexagon NPU session (aka Process Domain (PD) in the Hexagon docs) is limited to a memory mapping of around 3.5GB.
In llama.cpp/GGML the Hexagon session is mapped to a single GGML backend device (HTP0, HTP1, etc).
In order to map models larger than 3.5GB we need to allocate multiple devices and split the model.
For this we're taking advantage of the llama.cpp/GGML multi-GPU layer-splitting support.
Each Hexagon device behaves like a GPU from the offload and model splitting perspective.
Here is an example of running GPT-OSS-20B model on a newer Snapdragon device with 16GB of DDR.
```
M=gpt-oss-20b-Q4_0.gguf NDEV=4 D=HTP0,HTP1,HTP2,HTP3 P=surfing.txt scripts/snapdragon/adb/run-completion.sh -f surfing.txt -n 32
...
LD_LIBRARY_PATH=/data/local/tmp/llama.cpp/lib
ADSP_LIBRARY_PATH=/data/local/tmp/llama.cpp/lib
GGML_HEXAGON_NDEV=4 ./bin/llama-cli --no-mmap -m /data/local/tmp/llama.cpp/../gguf/gpt-oss-20b-Q4_0.gguf
-t 4 --ctx-size 8192 --batch-size 128 -ctk q8_0 -ctv q8_0 -fa on -ngl 99 --device HTP0,HTP1,HTP2,HTP3 -no-cnv -f surfing.txt
...
llama_model_loader: - type f32: 289 tensors
llama_model_loader: - type q4_0: 96 tensors
llama_model_loader: - type q8_0: 2 tensors
llama_model_loader: - type mxfp4: 72 tensors
...
load_tensors: offloaded 25/25 layers to GPU
load_tensors: CPU model buffer size = 1182.09 MiB
load_tensors: HTP1 model buffer size = 6.64 MiB
load_tensors: HTP1-REPACK model buffer size = 2505.94 MiB
load_tensors: HTP3 model buffer size = 5.55 MiB
load_tensors: HTP3-REPACK model buffer size = 2088.28 MiB
load_tensors: HTP0 model buffer size = 7.75 MiB
load_tensors: HTP0-REPACK model buffer size = 2923.59 MiB
load_tensors: HTP2 model buffer size = 6.64 MiB
load_tensors: HTP2-REPACK model buffer size = 2505.94 MiB
...
llama_context: n_ctx_per_seq (8192) < n_ctx_train (131072) -- the full capacity of the model will not be utilized
llama_context: CPU output buffer size = 0.77 MiB
llama_kv_cache_iswa: creating non-SWA KV cache, size = 8192 cells
llama_kv_cache: HTP1 KV buffer size = 25.50 MiB
llama_kv_cache: HTP3 KV buffer size = 25.50 MiB
llama_kv_cache: HTP0 KV buffer size = 25.50 MiB
llama_kv_cache: HTP2 KV buffer size = 25.50 MiB
llama_kv_cache: size = 102.00 MiB ( 8192 cells, 12 layers, 1/1 seqs), K (q8_0): 51.00 MiB, V (q8_0): 51.00 MiB
llama_kv_cache_iswa: creating SWA KV cache, size = 256 cells
llama_kv_cache: HTP1 KV buffer size = 0.80 MiB
llama_kv_cache: HTP3 KV buffer size = 0.53 MiB
llama_kv_cache: HTP0 KV buffer size = 1.06 MiB
llama_kv_cache: HTP2 KV buffer size = 0.80 MiB
llama_kv_cache: size = 3.19 MiB ( 256 cells, 12 layers, 1/1 seqs), K (q8_0): 1.59 MiB, V (q8_0): 1.59 MiB
llama_context: HTP0 compute buffer size = 16.06 MiB
llama_context: HTP1 compute buffer size = 16.06 MiB
llama_context: HTP2 compute buffer size = 16.06 MiB
llama_context: HTP3 compute buffer size = 16.06 MiB
llama_context: CPU compute buffer size = 98.19 MiB
...
llama_perf_context_print: prompt eval time = 3843.67 ms / 197 tokens ( 19.51 ms per token, 51.25 tokens per second)
llama_perf_context_print: eval time = 1686.13 ms / 31 runs ( 54.39 ms per token, 18.39 tokens per second)
llama_perf_context_print: total time = 6266.30 ms / 228 tokens
llama_perf_context_print: graphs reused = 30
llama_memory_breakdown_print: | memory breakdown [MiB] | total free self model context compute unaccounted |
llama_memory_breakdown_print: | - HTP0 (Hexagon) | 2048 = 2048 + ( 0 = 0 + 0 + 0) + 0 |
llama_memory_breakdown_print: | - HTP1 (Hexagon) | 2048 = 2048 + ( 0 = 0 + 0 + 0) + 0 |
llama_memory_breakdown_print: | - HTP2 (Hexagon) | 2048 = 2048 + ( 0 = 0 + 0 + 0) + 0 |
llama_memory_breakdown_print: | - HTP3 (Hexagon) | 2048 = 2048 + ( 0 = 0 + 0 + 0) + 0 |
llama_memory_breakdown_print: | - Host | 1476 = 1208 + 105 + 162 |
llama_memory_breakdown_print: | - HTP1-REPACK | 2505 = 2505 + 0 + 0 |
llama_memory_breakdown_print: | - HTP3-REPACK | 2088 = 2088 + 0 + 0 |
llama_memory_breakdown_print: | - HTP0-REPACK | 2923 = 2923 + 0 + 0 |
llama_memory_breakdown_print: | - HTP2-REPACK | 2505 = 2505 + 0 + 0 |
```
---
# Source: https://github.com/ggerganov/llama.cpp/blob/master/docs/backend/zDNN.md
# llama.cpp for IBM zDNN Accelerator
> [!WARNING]
> **Note:** zDNN is **not** the same as ZenDNN.
> - **zDNN** (this page): IBM's Deep Neural Network acceleration library for IBM Z & LinuxONE Mainframes
> - **ZenDNN**: AMD's deep learning library for AMD EPYC CPUs ([see ZenDNN documentation](ZenDNN.md))
## Background
IBM zDNN (Z Deep Neural Network) is a hardware acceleration library designed specifically to leverage the IBM NNPA (Neural Network Processor Assist) accelerator located within IBM Telum I and II processors. It provides significant performance improvements for neural network inference operations.
### Llama.cpp + IBM zDNN
The llama.cpp zDNN backend is designed to enable llama.cpp on IBM z17 and later systems via the IBM zDNN hardware acceleration library.
## Software & Hardware Support
| Hardware Level | Status | Verified |
| -------------------- | ------------- | -------------------------- |
| IBM z17 / LinuxONE 5 | Supported | RHEL 9.6, IBM z17, 40 IFLs |
| IBM z16 / LinuxONE 4 | Not Supported | |
## Data Types Supported
| Data Type | Status |
| --------- | --------- |
| F32 | Supported |
| F16 | Supported |
| BF16 | Supported |
## CMake Options
The IBM zDNN backend has the following CMake options that control the behaviour of the backend.
| CMake Option | Default Value | Description |
| ------------ | ------------- | ----------------------------------- |
| `GGML_ZDNN` | `OFF` | Compile llama.cpp with zDNN support |
| `ZDNN_ROOT` | `""` | Override zDNN library lookup |
## 1. Install zDNN Library
Note: Using the zDNN library provided via `apt` or `yum` may not work correctly as reported in [#15772](https://github.com/ggml-org/llama.cpp/issues/15772). It is preferred that you compile from source.
```sh
git clone --recurse-submodules https://github.com/IBM/zDNN
cd zDNN
autoreconf .
./configure --prefix=/opt/zdnn-libs
make build
sudo make install
```
## 2. Build llama.cpp
```sh
git clone https://github.com/ggml-org/llama.cpp
cd llama.cpp
cmake -S . -G Ninja -B build \
-DCMAKE_BUILD_TYPE=Release \
-DGGML_ZDNN=ON \
-DZDNN_ROOT=/opt/zdnn-libs
cmake --build build --config Release -j$(nproc)
```
---
# Source: https://github.com/ggerganov/llama.cpp/blob/master/docs/build-riscv64-spacemit.md
> [!IMPORTANT]
> This build documentation is specific only to RISC-V SpacemiT SOCs.
## Build llama.cpp locally (for riscv64)
1. Prepare Toolchain For RISCV
~~~
wget https://archive.spacemit.com/toolchain/spacemit-toolchain-linux-glibc-x86_64-v1.1.2.tar.xz
~~~
2. Build
Below is the build script: it requires utilizing RISC-V vector instructions for acceleration. Ensure the `GGML_CPU_RISCV64_SPACEMIT` compilation option is enabled. The currently supported optimization version is `RISCV64_SPACEMIT_IME1`, corresponding to the `RISCV64_SPACEMIT_IME_SPEC` compilation option. Compiler configurations are defined in the `riscv64-spacemit-linux-gnu-gcc.cmake` file. Please ensure you have installed the RISC-V compiler and set the environment variable via `export RISCV_ROOT_PATH={your_compiler_path}`.
```bash
cmake -B build \
-DCMAKE_BUILD_TYPE=Release \
-DGGML_CPU_RISCV64_SPACEMIT=ON \
-DLLAMA_OPENSSL=OFF \
-DGGML_RVV=ON \
-DGGML_RV_ZFH=ON \
-DGGML_RV_ZICBOP=ON \
-DGGML_RV_ZIHINTPAUSE=ON \
-DRISCV64_SPACEMIT_IME_SPEC=RISCV64_SPACEMIT_IME1 \
-DCMAKE_TOOLCHAIN_FILE=${PWD}/cmake/riscv64-spacemit-linux-gnu-gcc.cmake \
-DCMAKE_INSTALL_PREFIX=build/installed
cmake --build build --parallel $(nproc) --config Release
pushd build
make install
popd
```
## Simulation
You can use QEMU to perform emulation on non-RISC-V architectures.
1. Download QEMU
~~~
wget https://archive.spacemit.com/spacemit-ai/qemu/jdsk-qemu-v0.0.14.tar.gz
~~~
2. Run Simulation
After build your llama.cpp, you can run the executable file via QEMU for simulation, for example:
~~~
export QEMU_ROOT_PATH={your QEMU file path}
export RISCV_ROOT_PATH_IME1={your RISC-V compiler path}
${QEMU_ROOT_PATH}/bin/qemu-riscv64 -L ${RISCV_ROOT_PATH_IME1}/sysroot -cpu max,vlen=256,elen=64,vext_spec=v1.0 ${PWD}/build/bin/llama-cli -m ${PWD}/models/Qwen2.5-0.5B-Instruct-Q4_0.gguf -t 1
~~~
## Performance
#### Quantization Support For Matrix
~~~
model name : Spacemit(R) X60
isa : rv64imafdcv_zicbom_zicboz_zicntr_zicond_zicsr_zifencei_zihintpause_zihpm_zfh_zfhmin_zca_zcd_zba_zbb_zbc_zbs_zkt_zve32f_zve32x_zve64d_zve64f_zve64x_zvfh_zvfhmin_zvkt_sscofpmf_sstc_svinval_svnapot_svpbmt
mmu : sv39
uarch : spacemit,x60
mvendorid : 0x710
marchid : 0x8000000058000001
~~~
Q4_0
| Model | Size | Params | backend | threads | test | t/s |
| -----------| -------- | ------ | ------- | ------- | ---- |------|
Qwen2.5 0.5B |403.20 MiB|630.17 M| cpu | 4 | pp512|64.12 ± 0.26|
Qwen2.5 0.5B |403.20 MiB|630.17 M| cpu | 4 | tg128|10.03 ± 0.01|
Qwen2.5 1.5B |1011.16 MiB| 1.78 B | cpu | 4 | pp512|24.16 ± 0.02|
Qwen2.5 1.5B |1011.16 MiB| 1.78 B | cpu | 4 | tg128|3.83 ± 0.06|
Qwen2.5 3B | 1.86 GiB | 3.40 B | cpu | 4 | pp512|12.08 ± 0.02|
Qwen2.5 3B | 1.86 GiB | 3.40 B | cpu | 4 | tg128|2.23 ± 0.02|
Q4_1
| Model | Size | Params | backend | threads | test | t/s |
| -----------| -------- | ------ | ------- | ------- | ---- |------|
Qwen2.5 0.5B |351.50 MiB|494.03 M| cpu | 4 | pp512|62.07 ± 0.12|
Qwen2.5 0.5B |351.50 MiB|494.03 M| cpu | 4 | tg128|9.91 ± 0.01|
Qwen2.5 1.5B |964.06 MiB| 1.54 B | cpu | 4 | pp512|22.95 ± 0.25|
Qwen2.5 1.5B |964.06 MiB| 1.54 B | cpu | 4 | tg128|4.01 ± 0.15|
Qwen2.5 3B | 1.85 GiB | 3.09 B | cpu | 4 | pp512|11.55 ± 0.16|
Qwen2.5 3B | 1.85 GiB | 3.09 B | cpu | 4 | tg128|2.25 ± 0.04|
Q4_K
| Model | Size | Params | backend | threads | test | t/s |
| -----------| -------- | ------ | ------- | ------- | ---- |------|
Qwen2.5 0.5B |462.96 MiB|630.17 M| cpu | 4 | pp512|9.29 ± 0.05|
Qwen2.5 0.5B |462.96 MiB|630.17 M| cpu | 4 | tg128|5.67 ± 0.04|
Qwen2.5 1.5B | 1.04 GiB | 1.78 B | cpu | 4 | pp512|10.38 ± 0.10|
Qwen2.5 1.5B | 1.04 GiB | 1.78 B | cpu | 4 | tg128|3.17 ± 0.08|
Qwen2.5 3B | 1.95 GiB | 3.40 B | cpu | 4 | pp512|4.23 ± 0.04|
Qwen2.5 3B | 1.95 GiB | 3.40 B | cpu | 4 | tg128|1.73 ± 0.00|
---
# Source: https://github.com/ggerganov/llama.cpp/blob/master/docs/build-s390x.md
> [!IMPORTANT]
> This build documentation is specific only to IBM Z & LinuxONE mainframes (s390x). You can find the build documentation for other architectures: [build.md](build.md).
# Build llama.cpp locally (for s390x)
The main product of this project is the `llama` library. Its C-style interface can be found in [include/llama.h](../include/llama.h).
The project also includes many example programs and tools using the `llama` library. The examples range from simple, minimal code snippets to sophisticated sub-projects such as an OpenAI-compatible HTTP server.
**To get the code:**
```bash
git clone https://github.com/ggml-org/llama.cpp
cd llama.cpp
```
## CPU Build with BLAS
Building llama.cpp with BLAS support is highly recommended as it has shown to provide performance improvements. Make sure to have OpenBLAS installed in your environment.
```bash
cmake -S . -B build \
-DCMAKE_BUILD_TYPE=Release \
-DGGML_BLAS=ON \
-DGGML_BLAS_VENDOR=OpenBLAS
cmake --build build --config Release -j $(nproc)
```
**Notes**:
- For faster repeated compilation, install [ccache](https://ccache.dev/)
- By default, VXE/VXE2 is enabled. To disable it (not recommended):
```bash
cmake -S . -B build \
-DCMAKE_BUILD_TYPE=Release \
-DGGML_BLAS=ON \
-DGGML_BLAS_VENDOR=OpenBLAS \
-DGGML_VXE=OFF
cmake --build build --config Release -j $(nproc)
```
- For debug builds:
```bash
cmake -S . -B build \
-DCMAKE_BUILD_TYPE=Debug \
-DGGML_BLAS=ON \
-DGGML_BLAS_VENDOR=OpenBLAS
cmake --build build --config Debug -j $(nproc)
```
- For static builds, add `-DBUILD_SHARED_LIBS=OFF`:
```bash
cmake -S . -B build \
-DCMAKE_BUILD_TYPE=Release \
-DGGML_BLAS=ON \
-DGGML_BLAS_VENDOR=OpenBLAS \
-DBUILD_SHARED_LIBS=OFF
cmake --build build --config Release -j $(nproc)
```
## IBM zDNN Accelerator
This provides acceleration using the IBM zAIU co-processor located in the Telum I and Telum II processors. Make sure to have the [IBM zDNN library](https://github.com/IBM/zDNN) installed.
#### Compile from source from IBM
You may find the official build instructions here: [Building and Installing zDNN](https://github.com/IBM/zDNN?tab=readme-ov-file#building-and-installing-zdnn)
### Compilation
```bash
cmake -S . -B build \
-DCMAKE_BUILD_TYPE=Release \
-DGGML_ZDNN=ON
cmake --build build --config Release -j$(nproc)
```
## Getting GGUF Models
All models need to be converted to Big-Endian. You can achieve this in three cases:
1. **Use pre-converted models verified for use on IBM Z & LinuxONE (easiest)**

You can find popular models pre-converted and verified at [s390x Verified Models](https://huggingface.co/collections/taronaeo/s390x-verified-models-672765393af438d0ccb72a08) or [s390x Runnable Models](https://huggingface.co/collections/taronaeo/s390x-runnable-models-686e951824198df12416017e).
These models have already been converted from `safetensors` to `GGUF` Big-Endian and their respective tokenizers verified to run correctly on IBM z15 and later system.
2. **Convert safetensors model to GGUF Big-Endian directly (recommended)**

The model you are trying to convert must be in `safetensors` file format (for example [IBM Granite 3.3 2B](https://huggingface.co/ibm-granite/granite-3.3-2b-instruct)). Make sure you have downloaded the model repository for this case.
Ensure that you have installed the required packages in advance
```bash
pip3 install -r requirements.txt
```
Convert the `safetensors` model to `GGUF`
```bash
python3 convert_hf_to_gguf.py \
--outfile model-name-be.f16.gguf \
--outtype f16 \
--bigendian \
model-directory/
```
For example,
```bash
python3 convert_hf_to_gguf.py \
--outfile granite-3.3-2b-instruct-be.f16.gguf \
--outtype f16 \
--bigendian \
granite-3.3-2b-instruct/
```
3. **Convert existing GGUF Little-Endian model to Big-Endian**

The model you are trying to convert must be in `gguf` file format (for example [IBM Granite 3.3 2B GGUF](https://huggingface.co/ibm-granite/granite-3.3-2b-instruct-GGUF)). Make sure you have downloaded the model file for this case.
```bash
python3 gguf-py/gguf/scripts/gguf_convert_endian.py model-name.f16.gguf BIG
```
For example,
```bash
python3 gguf-py/gguf/scripts/gguf_convert_endian.py granite-3.3-2b-instruct-le.f16.gguf BIG
mv granite-3.3-2b-instruct-le.f16.gguf granite-3.3-2b-instruct-be.f16.gguf
```
**Notes:**
- The GGUF endian conversion script may not support all data types at the moment and may fail for some models/quantizations. When that happens, please try manually converting the safetensors model to GGUF Big-Endian via Step 2.
## IBM Accelerators
### 1. SIMD Acceleration
Only available in IBM z15/LinuxONE 3 or later system with the `-DGGML_VXE=ON` (turned on by default) compile flag. No hardware acceleration is possible with llama.cpp with older systems, such as IBM z14/arch12. In such systems, the APIs can still run but will use a scalar implementation.
### 2. zDNN Accelerator (WIP)
Only available in IBM z17/LinuxONE 5 or later system with the `-DGGML_ZDNN=ON` compile flag. No hardware acceleration is possible with llama.cpp with older systems, such as IBM z15/arch13. In such systems, the APIs will default back to CPU routines.
### 3. Spyre Accelerator
_Only available with IBM z17 / LinuxONE 5 or later system. No support currently available._
## Performance Tuning
### 1. Virtualization Setup
It is strongly recommended to use only LPAR (Type-1) virtualization to get the most performance.
Note: Type-2 virtualization is not supported at the moment, while you can get it running, the performance will not be the best.
### 2. IFL (Core) Count
It is recommended to allocate a minimum of 8 shared IFLs assigned to the LPAR. Increasing the IFL count past 8 shared IFLs will only improve Prompt Processing performance but not Token Generation.
Note: IFL count does not equate to vCPU count.
### 3. SMT vs NOSMT (Simultaneous Multithreading)
It is strongly recommended to disable SMT via the kernel boot parameters as it negatively affects performance. Please refer to your Linux distribution's guide on disabling SMT via kernel boot parameters.
### 4. BLAS vs NOBLAS
IBM VXE/VXE2 SIMD acceleration depends on the BLAS implementation. It is strongly recommended to use BLAS.
## Frequently Asked Questions (FAQ)
1. I'm getting the following error message while trying to load a model: `gguf_init_from_file_impl: failed to load model: this GGUF file version 50331648 is extremely large, is there a mismatch between the host and model endianness?`
Answer: Please ensure that the model you have downloaded/converted is GGUFv3 Big-Endian. These models are usually denoted with the `-be` suffix, i.e., `granite-3.3-2b-instruct-be.F16.gguf`.
You may refer to the [Getting GGUF Models](#getting-gguf-models) section to manually convert a `safetensors` model to `GGUF` Big Endian.
2. I'm getting extremely poor performance when running inference on a model
Answer: Please refer to the [Appendix B: SIMD Support Matrix](#appendix-b-simd-support-matrix) to check if your model quantization is supported by SIMD acceleration.
3. I'm building on IBM z17 and getting the following error messages: `invalid switch -march=z17`
Answer: Please ensure that your GCC compiler is of minimum GCC 15.1.0 version, and have `binutils` updated to the latest version. If this does not fix the problem, kindly open an issue.
4. Failing to install the `sentencepiece` package using GCC 15+
Answer: The `sentencepiece` team are aware of this as seen in [this issue](https://github.com/google/sentencepiece/issues/1108).
As a temporary workaround, please run the installation command with the following environment variables.
```bash
export CXXFLAGS="-include cstdint"
```
For example,
```bash
CXXFLAGS="-include cstdint" pip3 install -r requirements.txt
```
## Getting Help on IBM Z & LinuxONE
1. **Bugs, Feature Requests**
Please file an issue in llama.cpp and ensure that the title contains "s390x".
2. **Other Questions**
Please reach out directly to [aionz@us.ibm.com](mailto:aionz@us.ibm.com).
## Appendix A: Hardware Support Matrix
| | Support | Minimum Compiler Version |
| -------- | ------- | ------------------------ |
| IBM z15 | ✅ | |
| IBM z16 | ✅ | |
| IBM z17 | ✅ | GCC 15.1.0 |
| IBM zDNN | ✅ | |
- ✅ - supported and verified to run as intended
- 🚫 - unsupported, we are unlikely able to provide support
## Appendix B: SIMD Support Matrix
| | VX/VXE/VXE2 | zDNN | Spyre |
|------------|-------------|------|-------|
| FP32 | ✅ | ✅ | ❓ |
| FP16 | ✅ | ✅ | ❓ |
| BF16 | 🚫 | ✅ | ❓ |
| Q4_0 | ✅ | ❓ | ❓ |
| Q4_1 | ✅ | ❓ | ❓ |
| MXFP4 | 🚫 | ❓ | ❓ |
| Q5_0 | ✅ | ❓ | ❓ |
| Q5_1 | ✅ | ❓ | ❓ |
| Q8_0 | ✅ | ❓ | ❓ |
| Q2_K | 🚫 | ❓ | ❓ |
| Q3_K | ✅ | ❓ | ❓ |
| Q4_K | ✅ | ❓ | ❓ |
| Q5_K | ✅ | ❓ | ❓ |
| Q6_K | ✅ | ❓ | ❓ |
| TQ1_0 | 🚫 | ❓ | ❓ |
| TQ2_0 | 🚫 | ❓ | ❓ |
| IQ2_XXS | 🚫 | ❓ | ❓ |
| IQ2_XS | 🚫 | ❓ | ❓ |
| IQ2_S | 🚫 | ❓ | ❓ |
| IQ3_XXS | 🚫 | ❓ | ❓ |
| IQ3_S | 🚫 | ❓ | ❓ |
| IQ1_S | 🚫 | ❓ | ❓ |
| IQ1_M | 🚫 | ❓ | ❓ |
| IQ4_NL | ✅ | ❓ | ❓ |
| IQ4_XS | ✅ | ❓ | ❓ |
| FP32->FP16 | 🚫 | ❓ | ❓ |
| FP16->FP32 | 🚫 | ❓ | ❓ |
- ✅ - acceleration available
- 🚫 - acceleration unavailable, will still run using scalar implementation
- ❓ - acceleration unknown, please contribute if you can test it yourself
Last Updated by **Aaron Teo (aaron.teo1@ibm.com)** on Sep 7, 2025.
---
# Source: https://github.com/ggerganov/llama.cpp/blob/master/docs/build.md
# Build llama.cpp locally
The main product of this project is the `llama` library. Its C-style interface can be found in [include/llama.h](../include/llama.h).
The project also includes many example programs and tools using the `llama` library. The examples range from simple, minimal code snippets to sophisticated sub-projects such as an OpenAI-compatible HTTP server.
**To get the Code:**
```bash
git clone https://github.com/ggml-org/llama.cpp
cd llama.cpp
```
The following sections describe how to build with different backends and options.
## CPU Build
Build llama.cpp using `CMake`:
```bash
cmake -B build
cmake --build build --config Release
```
**Notes**:
- For faster compilation, add the `-j` argument to run multiple jobs in parallel, or use a generator that does this automatically such as Ninja. For example, `cmake --build build --config Release -j 8` will run 8 jobs in parallel.
- For faster repeated compilation, install [ccache](https://ccache.dev/)
- For debug builds, there are two cases:
1. Single-config generators (e.g. default = `Unix Makefiles`; note that they just ignore the `--config` flag):
```bash
cmake -B build -DCMAKE_BUILD_TYPE=Debug
cmake --build build
```
2. Multi-config generators (`-G` param set to Visual Studio, XCode...):
```bash
cmake -B build -G "Xcode"
cmake --build build --config Debug
```
For more details and a list of supported generators, see the [CMake documentation](https://cmake.org/cmake/help/latest/manual/cmake-generators.7.html).
- For static builds, add `-DBUILD_SHARED_LIBS=OFF`:
```
cmake -B build -DBUILD_SHARED_LIBS=OFF
cmake --build build --config Release
```
- Building for Windows (x86, x64 and arm64) with MSVC or clang as compilers:
- Install Visual Studio 2022, e.g. via the [Community Edition](https://visualstudio.microsoft.com/vs/community/). In the installer, select at least the following options (this also automatically installs the required additional tools like CMake,...):
- Tab Workload: Desktop-development with C++
- Tab Components (select quickly via search): C++-_CMake_ Tools for Windows, _Git_ for Windows, C++-_Clang_ Compiler for Windows, MS-Build Support for LLVM-Toolset (clang)
- Please remember to always use a Developer Command Prompt / PowerShell for VS2022 for git, build, test
- For Windows on ARM (arm64, WoA) build with:
```bash
cmake --preset arm64-windows-llvm-release -D GGML_OPENMP=OFF
cmake --build build-arm64-windows-llvm-release
```
For building with ninja generator and clang compiler as default:
-set path:set LIB=C:\Program Files (x86)\Windows Kits\10\Lib\10.0.22621.0\um\x64;C:\Program Files\Microsoft Visual Studio\2022\Community\VC\Tools\MSVC\14.41.34120\lib\x64\uwp;C:\Program Files (x86)\Windows Kits\10\Lib\10.0.22621.0\ucrt\x64
```bash
cmake --preset x64-windows-llvm-release
cmake --build build-x64-windows-llvm-release
```
- If you want HTTPS/TLS features, you may install OpenSSL development libraries. If not installed, the project will build and run without SSL support.
- **Debian / Ubuntu:** `sudo apt-get install libssl-dev`
- **Fedora / RHEL / Rocky / Alma:** `sudo dnf install openssl-devel`
- **Arch / Manjaro:** `sudo pacman -S openssl`
## BLAS Build
Building the program with BLAS support may lead to some performance improvements in prompt processing using batch sizes higher than 32 (the default is 512). Using BLAS doesn't affect the generation performance. There are currently several different BLAS implementations available for build and use:
### Accelerate Framework
This is only available on Mac PCs and it's enabled by default. You can just build using the normal instructions.
### OpenBLAS
This provides BLAS acceleration using only the CPU. Make sure to have OpenBLAS installed on your machine.
- Using `CMake` on Linux:
```bash
cmake -B build -DGGML_BLAS=ON -DGGML_BLAS_VENDOR=OpenBLAS
cmake --build build --config Release
```
### BLIS
Check [BLIS.md](./backend/BLIS.md) for more information.
### Intel oneMKL
Building through oneAPI compilers will make avx_vnni instruction set available for intel processors that do not support avx512 and avx512_vnni. Please note that this build config **does not support Intel GPU**. For Intel GPU support, please refer to [llama.cpp for SYCL](./backend/SYCL.md).
- Using manual oneAPI installation:
By default, `GGML_BLAS_VENDOR` is set to `Generic`, so if you already sourced intel environment script and assign `-DGGML_BLAS=ON` in cmake, the mkl version of Blas will automatically been selected. Otherwise please install oneAPI and follow the below steps:
```bash
source /opt/intel/oneapi/setvars.sh # You can skip this step if in oneapi-basekit docker image, only required for manual installation
cmake -B build -DGGML_BLAS=ON -DGGML_BLAS_VENDOR=Intel10_64lp -DCMAKE_C_COMPILER=icx -DCMAKE_CXX_COMPILER=icpx -DGGML_NATIVE=ON
cmake --build build --config Release
```
- Using oneAPI docker image:
If you do not want to source the environment vars and install oneAPI manually, you can also build the code using intel docker container: [oneAPI-basekit](https://hub.docker.com/r/intel/oneapi-basekit). Then, you can use the commands given above.
Check [Optimizing and Running LLaMA2 on Intel® CPU](https://www.intel.com/content/www/us/en/content-details/791610/optimizing-and-running-llama2-on-intel-cpu.html) for more information.
### Other BLAS libraries
Any other BLAS library can be used by setting the `GGML_BLAS_VENDOR` option. See the [CMake documentation](https://cmake.org/cmake/help/latest/module/FindBLAS.html#blas-lapack-vendors) for a list of supported vendors.
## Metal Build
On MacOS, Metal is enabled by default. Using Metal makes the computation run on the GPU.
To disable the Metal build at compile time use the `-DGGML_METAL=OFF` cmake option.
When built with Metal support, you can explicitly disable GPU inference with the `--n-gpu-layers 0` command-line argument.
## SYCL
SYCL is a higher-level programming model to improve programming productivity on various hardware accelerators.
llama.cpp based on SYCL is used to **support Intel GPU** (Data Center Max series, Flex series, Arc series, Built-in GPU and iGPU).
For detailed info, please refer to [llama.cpp for SYCL](./backend/SYCL.md).
## CUDA
This provides GPU acceleration using an NVIDIA GPU. Make sure to have the [CUDA toolkit](https://developer.nvidia.com/cuda-toolkit) installed.
#### Download directly from NVIDIA
You may find the official downloads here: [NVIDIA developer site](https://developer.nvidia.com/cuda-downloads).
#### Compile and run inside a Fedora Toolbox Container
We also have a [guide](./backend/CUDA-FEDORA.md) for setting up CUDA toolkit in a Fedora [toolbox container](https://containertoolbx.org/).
**Recommended for:**
- ***Necessary*** for users of [Atomic Desktops for Fedora](https://fedoraproject.org/atomic-desktops/); such as: [Silverblue](https://fedoraproject.org/atomic-desktops/silverblue/) and [Kinoite](https://fedoraproject.org/atomic-desktops/kinoite/).
- (there are no supported CUDA packages for these systems)
- ***Necessary*** for users that have a host that is not a: [Supported Nvidia CUDA Release Platform](https://developer.nvidia.com/cuda-downloads).
- (for example, you may have [Fedora 42 Beta](https://fedoramagazine.org/announcing-fedora-linux-42-beta/) as your your host operating system)
- ***Convenient*** For those running [Fedora Workstation](https://fedoraproject.org/workstation/) or [Fedora KDE Plasma Desktop](https://fedoraproject.org/spins/kde), and want to keep their host system clean.
- *Optionally* toolbox packages are available: [Arch Linux](https://archlinux.org/), [Red Hat Enterprise Linux >= 8.5](https://www.redhat.com/en/technologies/linux-platforms/enterprise-linux), or [Ubuntu](https://ubuntu.com/download)
### Compilation
Make sure to read the notes about the CPU build for general instructions for e.g. speeding up the compilation.
```bash
cmake -B build -DGGML_CUDA=ON
cmake --build build --config Release
```
### Non-Native Builds
By default llama.cpp will be built for the hardware that is connected to the system at that time.
For a build covering all CUDA GPUs, disable `GGML_NATIVE`:
```bash
cmake -B build -DGGML_CUDA=ON -DGGML_NATIVE=OFF
```
The resulting binary should run on all CUDA GPUs with optimal performance, though some just-in-time compilation may be required.
### Override Compute Capability Specifications
If `nvcc` cannot detect your gpu, you may get compile warnings such as:
```text
nvcc warning : Cannot find valid GPU for '-arch=native', default arch is used
```
One option is to do a non-native build as described above.
However, this will result in a large binary that takes a long time to compile.
Alternatively it is also possible to explicitly specify CUDA architectures.
This may also make sense for a non-native build, for that one should look at the logic in `ggml/src/ggml-cuda/CMakeLists.txt` as a starting point.
To override the default CUDA architectures:
#### 1. Take note of the `Compute Capability` of your NVIDIA devices: ["CUDA: Your GPU Compute > Capability"](https://developer.nvidia.com/cuda-gpus).
```text
GeForce RTX 4090 8.9
GeForce RTX 3080 Ti 8.6
GeForce RTX 3070 8.6
```
#### 2. Manually list each varying `Compute Capability` in the `CMAKE_CUDA_ARCHITECTURES` list.
```bash
cmake -B build -DGGML_CUDA=ON -DCMAKE_CUDA_ARCHITECTURES="86;89"
```
### Overriding the CUDA Version
If you have multiple CUDA installations on your system and want to compile llama.cpp for a specific one, e.g. for CUDA 11.7 installed under `/opt/cuda-11.7`:
```bash
cmake -B build -DGGML_CUDA=ON -DCMAKE_CUDA_COMPILER=/opt/cuda-11.7/bin/nvcc -DCMAKE_INSTALL_RPATH="/opt/cuda-11.7/lib64;\$ORIGIN" -DCMAKE_BUILD_WITH_INSTALL_RPATH=ON
```
#### Fixing Compatibility Issues with Old CUDA and New glibc
If you try to use an old CUDA version (e.g. v11.7) with a new glibc version you can get errors like this:
```
/usr/include/bits/mathcalls.h(83): error: exception specification is
incompatible with that of previous function "cospi"
/opt/cuda-11.7/bin/../targets/x86_64-linux/include/crt/math_functions.h(5545):
here
```
It seems the least bad solution is to patch the CUDA installation to declare the correct signatures.
Replace the following lines in `/path/to/your/cuda/installation/targets/x86_64-linux/include/crt/math_functions.h`:
```C++
// original lines
extern __DEVICE_FUNCTIONS_DECL__ __device_builtin__ double cospi(double x);
extern __DEVICE_FUNCTIONS_DECL__ __device_builtin__ float cospif(float x);
extern __DEVICE_FUNCTIONS_DECL__ __device_builtin__ double sinpi(double x);
extern __DEVICE_FUNCTIONS_DECL__ __device_builtin__ float sinpif(float x);
extern __DEVICE_FUNCTIONS_DECL__ __device_builtin__ double rsqrt(double x);
extern __DEVICE_FUNCTIONS_DECL__ __device_builtin__ float rsqrtf(float x);
// edited lines
extern __DEVICE_FUNCTIONS_DECL__ __device_builtin__ double cospi(double x) noexcept (true);
extern __DEVICE_FUNCTIONS_DECL__ __device_builtin__ float cospif(float x) noexcept (true);
extern __DEVICE_FUNCTIONS_DECL__ __device_builtin__ double sinpi(double x) noexcept (true);
extern __DEVICE_FUNCTIONS_DECL__ __device_builtin__ float sinpif(float x) noexcept (true);
extern __DEVICE_FUNCTIONS_DECL__ __device_builtin__ double rsqrt(double x) noexcept (true);
extern __DEVICE_FUNCTIONS_DECL__ __device_builtin__ float rsqrtf(float x) noexcept (true);
```
### Runtime CUDA environmental variables
You may set the [cuda environmental variables](https://docs.nvidia.com/cuda/cuda-c-programming-guide/index.html#env-vars) at runtime.
```bash
# Use `CUDA_VISIBLE_DEVICES` to hide the first compute device.
CUDA_VISIBLE_DEVICES="-0" ./build/bin/llama-server --model /srv/models/llama.gguf
```
### Unified Memory
The environment variable `GGML_CUDA_ENABLE_UNIFIED_MEMORY=1` can be used to enable unified memory in Linux. This allows swapping to system RAM instead of crashing when the GPU VRAM is exhausted. In Windows this setting is available in the NVIDIA control panel as `System Memory Fallback`.
### Performance Tuning
The following compilation options are also available to tweak performance:
| Option | Legal values | Default | Description |
|-------------------------------|------------------------|---------|----------------------------------------------------------------------------------------------------------------------------------------------------------------------------------------------------------------------------------------------------------------------------------------------------------------------------------------------------------------------------------|
| GGML_CUDA_FORCE_MMQ | Boolean | false | Force the use of custom matrix multiplication kernels for quantized models instead of FP16 cuBLAS even if there is no int8 tensor core implementation available (affects V100, CDNA and RDNA3+). MMQ kernels are enabled by default on GPUs with int8 tensor core support. With MMQ force enabled, speed for large batch sizes will be worse but VRAM consumption will be lower. |
| GGML_CUDA_FORCE_CUBLAS | Boolean | false | Force the use of FP16 cuBLAS instead of custom matrix multiplication kernels for quantized models. There may be issues with numerical overflows (except for CDNA and RDNA4) and memory use will be higher. Prompt processing may become faster on recent datacenter GPUs (the custom kernels were tuned primarily for RTX 3000/4000). |
| GGML_CUDA_PEER_MAX_BATCH_SIZE | Positive integer | 128 | Maximum batch size for which to enable peer access between multiple GPUs. Peer access requires either Linux or NVLink. When using NVLink enabling peer access for larger batch sizes is potentially beneficial. |
| GGML_CUDA_FA_ALL_QUANTS | Boolean | false | Compile support for all KV cache quantization type (combinations) for the FlashAttention CUDA kernels. More fine-grained control over KV cache size but compilation takes much longer. |
## MUSA
This provides GPU acceleration using a Moore Threads GPU. Make sure to have the [MUSA SDK](https://developer.mthreads.com/musa/musa-sdk) installed.
#### Download directly from Moore Threads
You may find the official downloads here: [Moore Threads developer site](https://developer.mthreads.com/sdk/download/musa).
### Compilation
```bash
cmake -B build -DGGML_MUSA=ON
cmake --build build --config Release
```
#### Override Compute Capability Specifications
By default, all supported compute capabilities are enabled. To customize this behavior, you can specify the `MUSA_ARCHITECTURES` option in the CMake command:
```bash
cmake -B build -DGGML_MUSA=ON -DMUSA_ARCHITECTURES="21"
cmake --build build --config Release
```
This configuration enables only compute capability `2.1` (MTT S80) during compilation, which can help reduce compilation time.
#### Compilation options
Most of the compilation options available for CUDA should also be available for MUSA, though they haven't been thoroughly tested yet.
- For static builds, add `-DBUILD_SHARED_LIBS=OFF` and `-DCMAKE_POSITION_INDEPENDENT_CODE=ON`:
```
cmake -B build -DGGML_MUSA=ON \
-DBUILD_SHARED_LIBS=OFF -DCMAKE_POSITION_INDEPENDENT_CODE=ON
cmake --build build --config Release
```
### Runtime MUSA environmental variables
You may set the [musa environmental variables](https://docs.mthreads.com/musa-sdk/musa-sdk-doc-online/programming_guide/Z%E9%99%84%E5%BD%95/) at runtime.
```bash
# Use `MUSA_VISIBLE_DEVICES` to hide the first compute device.
MUSA_VISIBLE_DEVICES="-0" ./build/bin/llama-server --model /srv/models/llama.gguf
```
### Unified Memory
The environment variable `GGML_CUDA_ENABLE_UNIFIED_MEMORY=1` can be used to enable unified memory in Linux. This allows swapping to system RAM instead of crashing when the GPU VRAM is exhausted.
## HIP
This provides GPU acceleration on HIP-supported AMD GPUs.
Make sure to have ROCm installed.
You can download it from your Linux distro's package manager or from here: [ROCm Quick Start (Linux)](https://rocm.docs.amd.com/projects/install-on-linux/en/latest/tutorial/quick-start.html#rocm-install-quick).
- Using `CMake` for Linux (assuming a gfx1030-compatible AMD GPU):
```bash
HIPCXX="$(hipconfig -l)/clang" HIP_PATH="$(hipconfig -R)" \
cmake -S . -B build -DGGML_HIP=ON -DGPU_TARGETS=gfx1030 -DCMAKE_BUILD_TYPE=Release \
&& cmake --build build --config Release -- -j 16
```
Note: `GPU_TARGETS` is optional, omitting it will build the code for all GPUs in the current system.
To enhance flash attention performance on RDNA3+ or CDNA architectures, you can utilize the rocWMMA library by enabling the `-DGGML_HIP_ROCWMMA_FATTN=ON` option. This requires rocWMMA headers to be installed on the build system.
The rocWMMA library is included by default when installing the ROCm SDK using the `rocm` meta package provided by AMD. Alternatively, if you are not using the meta package, you can install the library using the `rocwmma-dev` or `rocwmma-devel` package, depending on your system's package manager.
As an alternative, you can manually install the library by cloning it from the official [GitHub repository](https://github.com/ROCm/rocWMMA), checkout the corresponding version tag (e.g. `rocm-6.2.4`) and set `-DCMAKE_CXX_FLAGS="-I/library/include/"` in CMake. This also works under Windows despite not officially supported by AMD.
Note that if you get the following error:
```
clang: error: cannot find ROCm device library; provide its path via '--rocm-path' or '--rocm-device-lib-path', or pass '-nogpulib' to build without ROCm device library
```
Try searching for a directory under `HIP_PATH` that contains the file
`oclc_abi_version_400.bc`. Then, add the following to the start of the
command: `HIP_DEVICE_LIB_PATH=`, so something
like:
```bash
HIPCXX="$(hipconfig -l)/clang" HIP_PATH="$(hipconfig -p)" \
HIP_DEVICE_LIB_PATH= \
cmake -S . -B build -DGGML_HIP=ON -DGPU_TARGETS=gfx1030 -DCMAKE_BUILD_TYPE=Release \
&& cmake --build build -- -j 16
```
- Using `CMake` for Windows (using x64 Native Tools Command Prompt for VS, and assuming a gfx1100-compatible AMD GPU):
```bash
set PATH=%HIP_PATH%\bin;%PATH%
cmake -S . -B build -G Ninja -DGPU_TARGETS=gfx1100 -DGGML_HIP=ON -DCMAKE_C_COMPILER=clang -DCMAKE_CXX_COMPILER=clang++ -DCMAKE_BUILD_TYPE=Release
cmake --build build
```
If necessary, adapt `GPU_TARGETS` to the GPU arch you want to compile for. The above example uses `gfx1100` that corresponds to Radeon RX 7900XTX/XT/GRE. You can find a list of targets [here](https://llvm.org/docs/AMDGPUUsage.html#processors)
Find your gpu version string by matching the most significant version information from `rocminfo | grep gfx | head -1 | awk '{print $2}'` with the list of processors, e.g. `gfx1035` maps to `gfx1030`.
The environment variable [`HIP_VISIBLE_DEVICES`](https://rocm.docs.amd.com/en/latest/understand/gpu_isolation.html#hip-visible-devices) can be used to specify which GPU(s) will be used.
If your GPU is not officially supported you can use the environment variable [`HSA_OVERRIDE_GFX_VERSION`] set to a similar GPU, for example 10.3.0 on RDNA2 (e.g. gfx1030, gfx1031, or gfx1035) or 11.0.0 on RDNA3.
### Unified Memory
On Linux it is possible to use unified memory architecture (UMA) to share main memory between the CPU and integrated GPU by setting environment variable `GGML_CUDA_ENABLE_UNIFIED_MEMORY=1`. However, this hurts performance for non-integrated GPUs (but enables working with integrated GPUs).
## Vulkan
### For Windows Users:
**w64devkit**
Download and extract [`w64devkit`](https://github.com/skeeto/w64devkit/releases).
Download and install the [`Vulkan SDK`](https://vulkan.lunarg.com/sdk/home#windows) with the default settings.
Launch `w64devkit.exe` and run the following commands to copy Vulkan dependencies:
```sh
SDK_VERSION=1.3.283.0
cp /VulkanSDK/$SDK_VERSION/Bin/glslc.exe $W64DEVKIT_HOME/bin/
cp /VulkanSDK/$SDK_VERSION/Lib/vulkan-1.lib $W64DEVKIT_HOME/x86_64-w64-mingw32/lib/
cp -r /VulkanSDK/$SDK_VERSION/Include/* $W64DEVKIT_HOME/x86_64-w64-mingw32/include/
cat > $W64DEVKIT_HOME/x86_64-w64-mingw32/lib/pkgconfig/vulkan.pc < [!IMPORTANT]
> After completing the first step, ensure that you have used the `source` command on the `setup_env.sh` file inside of the Vulkan SDK in your current terminal session. Otherwise, the build won't work. Additionally, if you close out of your terminal, you must perform this step again if you intend to perform a build. However, there are ways to make this persistent. Refer to the Vulkan SDK guide linked in the first step for more information about any of this.
#### Using system packages
On Debian / Ubuntu, you can install the required dependencies using:
```sh
sudo apt-get install libvulkan-dev glslc
```
#### Common steps
Second, after verifying that you have followed all of the SDK installation/setup steps, use this command to make sure before proceeding:
```bash
vulkaninfo
```
Then, assuming you have `cd` into your llama.cpp folder and there are no errors with running `vulkaninfo`, you can proceed to build llama.cpp using the CMake commands below:
```bash
cmake -B build -DGGML_VULKAN=1
cmake --build build --config Release
```
Finally, after finishing your build, you should be able to do something like this:
```bash
# Test the output binary
# "-ngl 99" should offload all of the layers to GPU for most (if not all) models.
./build/bin/llama-cli -m "PATH_TO_MODEL" -p "Hi you how are you" -ngl 99
# You should see in the output, ggml_vulkan detected your GPU. For example:
# ggml_vulkan: Using Intel(R) Graphics (ADL GT2) | uma: 1 | fp16: 1 | warp size: 32
```
## CANN
This provides NPU acceleration using the AI cores of your Ascend NPU. And [CANN](https://www.hiascend.com/en/software/cann) is a hierarchical APIs to help you to quickly build AI applications and service based on Ascend NPU.
For more information about Ascend NPU in [Ascend Community](https://www.hiascend.com/en/).
Make sure to have the CANN toolkit installed. You can download it from here: [CANN Toolkit](https://www.hiascend.com/developer/download/community/result?module=cann)
Go to `llama.cpp` directory and build using CMake.
```bash
cmake -B build -DGGML_CANN=on -DCMAKE_BUILD_TYPE=release
cmake --build build --config release
```
You can test with:
```bash
./build/bin/llama-cli -m PATH_TO_MODEL -p "Building a website can be done in 10 steps:" -ngl 32
```
If the following info is output on screen, you are using `llama.cpp` with the CANN backend:
```bash
llm_load_tensors: CANN model buffer size = 13313.00 MiB
llama_new_context_with_model: CANN compute buffer size = 1260.81 MiB
```
For detailed info, such as model/device supports, CANN install, please refer to [llama.cpp for CANN](./backend/CANN.md).
## ZenDNN
ZenDNN provides optimized deep learning primitives for AMD EPYC™ CPUs. It accelerates matrix multiplication operations for inference workloads.
### Compilation
- Using `CMake` on Linux (automatic build):
```bash
cmake -B build -DGGML_ZENDNN=ON
cmake --build build --config Release
```
The first build will automatically download and build ZenDNN, which may take 5-10 minutes. Subsequent builds will be much faster.
- Using `CMake` with custom ZenDNN installation:
```bash
cmake -B build -DGGML_ZENDNN=ON -DZENDNN_ROOT=/path/to/zendnn/install
cmake --build build --config Release
```
### Testing
You can test with:
```bash
./build/bin/llama-cli -m PATH_TO_MODEL -p "Building a website can be done in 10 steps:" -n 50
```
For detailed information about hardware support, setup instructions, and performance optimization, refer to [llama.cpp for ZenDNN](./backend/ZenDNN.md).
## Arm® KleidiAI™
KleidiAI is a library of optimized microkernels for AI workloads, specifically designed for Arm CPUs. These microkernels enhance performance and can be enabled for use by the CPU backend.
To enable KleidiAI, go to the llama.cpp directory and build using CMake
```bash
cmake -B build -DGGML_CPU_KLEIDIAI=ON
cmake --build build --config Release
```
You can verify that KleidiAI is being used by running
```bash
./build/bin/llama-cli -m PATH_TO_MODEL -p "What is a car?"
```
If KleidiAI is enabled, the ouput will contain a line similar to:
```
load_tensors: CPU_KLEIDIAI model buffer size = 3474.00 MiB
```
KleidiAI's microkernels implement optimized tensor operations using Arm CPU features such as dotprod, int8mm and SME. llama.cpp selects the most efficient kernel based on runtime CPU feature detection. However, on platforms that support SME, you must manually enable SME microkernels by setting the environment variable `GGML_KLEIDIAI_SME=1`.
Depending on your build target, other higher priority backends may be enabled by default. To ensure the CPU backend is used, you must disable the higher priority backends either at compile time, e.g. -DGGML_METAL=OFF, or during run-time using the command line option `--device none`.
## OpenCL
This provides GPU acceleration through OpenCL on recent Adreno GPU.
More information about OpenCL backend can be found in [OPENCL.md](./backend/OPENCL.md) for more information.
### Android
Assume NDK is available in `$ANDROID_NDK`. First, install OpenCL headers and ICD loader library if not available,
```sh
mkdir -p ~/dev/llm
cd ~/dev/llm
git clone https://github.com/KhronosGroup/OpenCL-Headers && \
cd OpenCL-Headers && \
cp -r CL $ANDROID_NDK/toolchains/llvm/prebuilt/linux-x86_64/sysroot/usr/include
cd ~/dev/llm
git clone https://github.com/KhronosGroup/OpenCL-ICD-Loader && \
cd OpenCL-ICD-Loader && \
mkdir build_ndk && cd build_ndk && \
cmake .. -G Ninja -DCMAKE_BUILD_TYPE=Release \
-DCMAKE_TOOLCHAIN_FILE=$ANDROID_NDK/build/cmake/android.toolchain.cmake \
-DOPENCL_ICD_LOADER_HEADERS_DIR=$ANDROID_NDK/toolchains/llvm/prebuilt/linux-x86_64/sysroot/usr/include \
-DANDROID_ABI=arm64-v8a \
-DANDROID_PLATFORM=24 \
-DANDROID_STL=c++_shared && \
ninja && \
cp libOpenCL.so $ANDROID_NDK/toolchains/llvm/prebuilt/linux-x86_64/sysroot/usr/lib/aarch64-linux-android
```
Then build llama.cpp with OpenCL enabled,
```sh
cd ~/dev/llm
git clone https://github.com/ggml-org/llama.cpp && \
cd llama.cpp && \
mkdir build-android && cd build-android
cmake .. -G Ninja \
-DCMAKE_TOOLCHAIN_FILE=$ANDROID_NDK/build/cmake/android.toolchain.cmake \
-DANDROID_ABI=arm64-v8a \
-DANDROID_PLATFORM=android-28 \
-DBUILD_SHARED_LIBS=OFF \
-DGGML_OPENCL=ON
ninja
```
### Windows Arm64
First, install OpenCL headers and ICD loader library if not available,
```powershell
mkdir -p ~/dev/llm
cd ~/dev/llm
git clone https://github.com/KhronosGroup/OpenCL-Headers && cd OpenCL-Headers
mkdir build && cd build
cmake .. -G Ninja `
-DBUILD_TESTING=OFF `
-DOPENCL_HEADERS_BUILD_TESTING=OFF `
-DOPENCL_HEADERS_BUILD_CXX_TESTS=OFF `
-DCMAKE_INSTALL_PREFIX="$HOME/dev/llm/opencl"
cmake --build . --target install
cd ~/dev/llm
git clone https://github.com/KhronosGroup/OpenCL-ICD-Loader && cd OpenCL-ICD-Loader
mkdir build && cd build
cmake .. -G Ninja `
-DCMAKE_BUILD_TYPE=Release `
-DCMAKE_PREFIX_PATH="$HOME/dev/llm/opencl" `
-DCMAKE_INSTALL_PREFIX="$HOME/dev/llm/opencl"
cmake --build . --target install
```
Then build llama.cpp with OpenCL enabled,
```powershell
cmake .. -G Ninja `
-DCMAKE_TOOLCHAIN_FILE="$HOME/dev/llm/llama.cpp/cmake/arm64-windows-llvm.cmake" `
-DCMAKE_BUILD_TYPE=Release `
-DCMAKE_PREFIX_PATH="$HOME/dev/llm/opencl" `
-DBUILD_SHARED_LIBS=OFF `
-DGGML_OPENCL=ON
ninja
```
## Android
To read documentation for how to build on Android, [click here](./android.md)
## WebGPU [In Progress]
The WebGPU backend relies on [Dawn](https://dawn.googlesource.com/dawn). Follow the instructions [here](https://dawn.googlesource.com/dawn/+/refs/heads/main/docs/quickstart-cmake.md) to install Dawn locally so that llama.cpp can find it using CMake. The currrent implementation is up-to-date with Dawn commit `bed1a61`.
In the llama.cpp directory, build with CMake:
```
cmake -B build -DGGML_WEBGPU=ON
cmake --build build --config Release
```
### Browser Support
WebGPU allows cross-platform access to the GPU from supported browsers. We utilize [Emscripten](https://emscripten.org/) to compile ggml's WebGPU backend to WebAssembly. Emscripten does not officially support WebGPU bindings yet, but Dawn currently maintains its own WebGPU bindings called emdawnwebgpu.
Follow the instructions [here](https://dawn.googlesource.com/dawn/+/refs/heads/main/src/emdawnwebgpu/) to download or build the emdawnwebgpu package (Note that it might be safer to build the emdawbwebgpu package locally, so that it stays in sync with the version of Dawn you have installed above). When building using CMake, the path to the emdawnwebgpu port file needs to be set with the flag `EMDAWNWEBGPU_DIR`.
## IBM Z & LinuxONE
To read documentation for how to build on IBM Z & LinuxONE, [click here](./build-s390x.md)
## Notes about GPU-accelerated backends
The GPU may still be used to accelerate some parts of the computation even when using the `-ngl 0` option. You can fully disable GPU acceleration by using `--device none`.
In most cases, it is possible to build and use multiple backends at the same time. For example, you can build llama.cpp with both CUDA and Vulkan support by using the `-DGGML_CUDA=ON -DGGML_VULKAN=ON` options with CMake. At runtime, you can specify which backend devices to use with the `--device` option. To see a list of available devices, use the `--list-devices` option.
Backends can be built as dynamic libraries that can be loaded dynamically at runtime. This allows you to use the same llama.cpp binary on different machines with different GPUs. To enable this feature, use the `GGML_BACKEND_DL` option when building.
---
# Source: https://github.com/ggerganov/llama.cpp/blob/master/docs/development/HOWTO-add-model.md
# Add a new model architecture to `llama.cpp`
Adding a model requires few steps:
1. Convert the model to GGUF
2. Define the model architecture in `llama.cpp`
3. Build the GGML graph implementation
After following these steps, you can open PR.
Also, it is important to check that the examples and main ggml backends (CUDA, METAL, CPU) are working with the new architecture, especially:
- [cli](/tools/cli/)
- [completion](/tools/completion/)
- [imatrix](/tools/imatrix/)
- [quantize](/tools/quantize/)
- [server](/tools/server/)
### 1. Convert the model to GGUF
This step is done in python with a `convert` script using the [gguf](https://pypi.org/project/gguf/) library.
Depending on the model architecture, you can use either [convert_hf_to_gguf.py](/convert_hf_to_gguf.py) or [examples/convert_legacy_llama.py](/examples/convert_legacy_llama.py) (for `llama/llama2` models in `.pth` format).
The convert script reads the model configuration, tokenizer, tensor names+data and converts them to GGUF metadata and tensors.
The required steps to implement for an HF model are:
1. Define the model `ModelBase.register` annotation in a new `TextModel` or `MmprojModel` subclass, example:
```python
@ModelBase.register("MyModelForCausalLM")
class MyModel(TextModel):
model_arch = gguf.MODEL_ARCH.MYMODEL
```
or
```python
@ModelBase.register("MyModelForConditionalGeneration")
class MyModel(MmprojModel):
model_arch = gguf.MODEL_ARCH.MYMODEL
```
2. Define the layout of the GGUF tensors in [constants.py](/gguf-py/gguf/constants.py)
Add an enum entry in `MODEL_ARCH`, the model human friendly name in `MODEL_ARCH_NAMES` and the GGUF tensor names in `MODEL_TENSORS`.
Example for `falcon` model:
```python
MODEL_ARCH.FALCON: [
MODEL_TENSOR.TOKEN_EMBD,
MODEL_TENSOR.OUTPUT_NORM,
MODEL_TENSOR.OUTPUT,
MODEL_TENSOR.ATTN_NORM,
MODEL_TENSOR.ATTN_NORM_2,
MODEL_TENSOR.ATTN_QKV,
MODEL_TENSOR.ATTN_OUT,
MODEL_TENSOR.FFN_DOWN,
MODEL_TENSOR.FFN_UP,
]
```
3. Map the original tensor names to the standardize equivalent in GGUF
As a general rule, before adding a new tensor name to GGUF, be sure the equivalent naming does not already exist.
Once you have found the GGUF tensor name equivalent, add it to the [tensor_mapping.py](/gguf-py/gguf/tensor_mapping.py) file.
If the tensor name is part of a repetitive layer/block, the key word `bid` substitutes it.
Example for the normalization tensor in attention layers:
```python
block_mappings_cfg: dict[MODEL_TENSOR, tuple[str, ...]] = {
# Attention norm
MODEL_TENSOR.ATTN_NORM: (
"gpt_neox.layers.{bid}.input_layernorm", # gptneox
"transformer.h.{bid}.ln_1", # gpt2 gpt-j refact qwen
"transformer.blocks.{bid}.norm_1", # mpt
...
)
}
```
`transformer.blocks.{bid}.norm_1` will be mapped to `blk.{bid}.attn_norm` in GGUF.
Depending on the model configuration, tokenizer, code and tensors layout, you will have to override:
- `TextModel#set_gguf_parameters`
- `MmprojModel#set_gguf_parameters`
- `ModelBase#set_vocab`
- `ModelBase#modify_tensors`
NOTE: Tensor names must end with `.weight` or `.bias` suffixes, that is the convention and several tools like `quantize` expect this to proceed the weights.
### 2. Define the model architecture in `llama.cpp`
The model params and tensors layout must be defined in `llama.cpp` source files:
1. Define a new `llm_arch` enum value in `src/llama-arch.h`.
2. In `src/llama-arch.cpp`:
- Add the architecture name to the `LLM_ARCH_NAMES` map.
- Add the list of model tensors to `llm_get_tensor_names` (you may also need to update `LLM_TENSOR_NAMES`)
3. Add any non-standard metadata loading in the `llama_model_loader` constructor in `src/llama-model-loader.cpp`.
4. If the model has a RoPE operation, add a case for the architecture in `llama_model_rope_type` function in `src/llama-model.cpp`.
NOTE: The dimensions in `ggml` are typically in the reverse order of the `pytorch` dimensions.
### 3. Build the GGML graph implementation
This is the funniest part, you have to provide the inference graph implementation of the new model architecture in `src/llama-model.cpp`.
Create a new struct that inherits from `llm_graph_context` and implement the graph-building logic in its constructor.
Have a look at existing implementations like `llm_build_llama`, `llm_build_dbrx` or `llm_build_bert`.
Then, in the `llama_model::build_graph` method, add a case for your architecture to instantiate your new graph-building struct.
Some `ggml` backends do not support all operations. Backend implementations can be added in a separate PR.
Note: to debug the inference graph: you can use [llama-eval-callback](/examples/eval-callback/).
## GGUF specification
https://github.com/ggml-org/ggml/blob/master/docs/gguf.md
## Resources
- YaRN RoPE scaling https://github.com/ggml-org/llama.cpp/pull/2268
- support Baichuan serial models https://github.com/ggml-org/llama.cpp/pull/3009
- support attention bias https://github.com/ggml-org/llama.cpp/pull/4283
- Mixtral support https://github.com/ggml-org/llama.cpp/pull/4406
- BERT embeddings https://github.com/ggml-org/llama.cpp/pull/5423
- Grok-1 support https://github.com/ggml-org/llama.cpp/pull/6204
- Command R Plus support https://github.com/ggml-org/llama.cpp/pull/6491
- support arch DBRX https://github.com/ggml-org/llama.cpp/pull/6515
- How to convert HuggingFace model to GGUF format https://github.com/ggml-org/llama.cpp/discussions/2948
---
# Source: https://github.com/ggerganov/llama.cpp/blob/master/docs/development/debugging-tests.md
# Debugging Tests Tips
## How to run & execute or debug a specific test without anything else to keep the feedback loop short?
There is a script called debug-test.sh in the scripts folder whose parameter takes a REGEX and an optional test number.
For example, running the following command will output an interactive list from which you can select a test. It takes this form:
`debug-test.sh [OPTION]... `
It will then build & run in the debugger for you.
To just execute a test and get back a PASS or FAIL message run:
```bash
./scripts/debug-test.sh test-tokenizer
```
To test in GDB use the `-g` flag to enable gdb test mode.
```bash
./scripts/debug-test.sh -g test-tokenizer
# Once in the debugger, i.e. at the chevrons prompt, setting a breakpoint could be as follows:
>>> b main
```
To speed up the testing loop, if you know your test number you can just run it similar to below:
```bash
./scripts/debug-test.sh test 23
```
For further reference use `debug-test.sh -h` to print help.
### How does the script work?
If you want to be able to use the concepts contained in the script separately, the important ones are briefly outlined below.
#### Step 1: Reset and Setup folder context
From base of this repository, let's create `build-ci-debug` as our build context.
```bash
rm -rf build-ci-debug && mkdir build-ci-debug && cd build-ci-debug
```
#### Step 2: Setup Build Environment and Compile Test Binaries
Setup and trigger a build under debug mode. You may adapt the arguments as needed, but in this case these are sane defaults.
```bash
cmake -DCMAKE_BUILD_TYPE=Debug -DLLAMA_CUDA=1 -DLLAMA_FATAL_WARNINGS=ON ..
make -j
```
#### Step 3: Find all tests available that matches REGEX
The output of this command will give you the command & arguments needed to run GDB.
* `-R test-tokenizer` : looks for all the test files named `test-tokenizer*` (R=Regex)
* `-N` : "show-only" disables test execution & shows test commands that you can feed to GDB.
* `-V` : Verbose Mode
```bash
ctest -R "test-tokenizer" -V -N
```
This may return output similar to below (focusing on key lines to pay attention to):
```bash
...
1: Test command: ~/llama.cpp/build-ci-debug/bin/test-tokenizer-0 "~/llama.cpp/tests/../models/ggml-vocab-llama-spm.gguf"
1: Working Directory: .
Labels: main
Test #1: test-tokenizer-0-llama-spm
...
4: Test command: ~/llama.cpp/build-ci-debug/bin/test-tokenizer-0 "~/llama.cpp/tests/../models/ggml-vocab-falcon.gguf"
4: Working Directory: .
Labels: main
Test #4: test-tokenizer-0-falcon
...
```
#### Step 4: Identify Test Command for Debugging
So for test #1 above we can tell these two pieces of relevant information:
* Test Binary: `~/llama.cpp/build-ci-debug/bin/test-tokenizer-0`
* Test GGUF Model: `~/llama.cpp/tests/../models/ggml-vocab-llama-spm.gguf`
#### Step 5: Run GDB on test command
Based on the ctest 'test command' report above we can then run a gdb session via this command below:
```bash
gdb --args ${Test Binary} ${Test GGUF Model}
```
Example:
```bash
gdb --args ~/llama.cpp/build-ci-debug/bin/test-tokenizer-0 "~/llama.cpp/tests/../models/ggml-vocab-llama-spm.gguf"
```
---
# Source: https://github.com/ggerganov/llama.cpp/blob/master/docs/development/parsing.md
# Parsing Model Output
The `common` library contains a PEG parser implementation suitable for parsing
model output.
Types with the prefix `common_peg_*` are intended for general use and may have
applications beyond parsing model output, such as parsing user-provided regex
patterns.
Types with the prefix `common_chat_peg_*` are specialized helpers for model
output.
The parser features:
- Partial parsing of streaming input
- Built-in JSON parsers
- AST generation with semantics via "tagged" nodes
## Example
Below is a contrived example demonstrating how to use the PEG parser to parse
output from a model that emits arguments as JSON.
```cpp
auto parser = build_chat_peg_native_parser([&](common_chat_peg_native_builder & p) {
// Build a choice of all available tools
auto tool_choice = p.choice();
for (const auto & tool : tools) {
const auto & function = tool.at("function");
std::string name = function.at("name");
const auto & schema = function.at("parameters");
auto tool_name = p.json_member("name", "\"" + p.literal(name) + "\"");
auto tool_args = p.json_member("arguments", p.schema(p.json(), "tool-" + name + "-schema", schema));
tool_choice |= p.rule("tool-" + name, "{" << tool_name << "," << tool_args << "}");
}
// Define the tool call structure: [{tool}]
auto tool_call = p.trigger_rule("tool-call",
p.sequence({
p.literal("["),
tool_choice,
p.literal("]")
})
);
// Parser accepts content, optionally followed by a tool call
return p.sequence({
p.content(p.until("")),
p.optional(tool_call),
p.end()
});
});
```
For a more complete example, see `test_example_native()` in
[tests/test-chat-peg-parser.cpp](/tests/test-chat-peg-parser.cpp).
## Parsers/Combinators
### Basic Matchers
- **`eps()`** - Matches nothing and always succeeds (epsilon/empty match)
- **`start()`** - Matches the start of input (anchor `^`)
- **`end()`** - Matches the end of input (anchor `$`)
- **`literal(string)`** - Matches an exact literal string
- **`any()`** - Matches any single character (`.`)
### Combinators
- **`sequence(...)`** - Matches parsers in order; all must succeed
- **`choice(...)`** - Matches the first parser that succeeds from alternatives (ordered choice)
- **`one_or_more(p)`** - Matches one or more repetitions (`+`)
- **`zero_or_more(p)`** - Matches zero or more repetitions (`*`)
- **`optional(p)`** - Matches zero or one occurrence (`?`)
- **`repeat(p, min, max)`** - Matches between min and max repetitions (use `-1` for unbounded)
- **`repeat(p, n)`** - Matches exactly n repetitions
### Lookahead
- **`peek(p)`** - Positive lookahead: succeeds if parser succeeds without consuming input (`&`)
- **`negate(p)`** - Negative lookahead: succeeds if parser fails without consuming input (`!`)
### Character Classes & Utilities
- **`chars(classes, min, max)`** - Matches repetitions of characters from a character class
- **`space()`** - Matches zero or more whitespace characters (space, tab, newline)
- **`until(delimiter)`** - Matches characters until delimiter is found (delimiter not consumed)
- **`until_one_of(delimiters)`** - Matches characters until any delimiter in the list is found
- **`rest()`** - Matches everything remaining (`.*`)
### JSON Parsers
- **`json()`** - Complete JSON parser (objects, arrays, strings, numbers, booleans, null)
- **`json_object()`** - JSON object parser
- **`json_array()`** - JSON array parser
- **`json_string()`** - JSON string parser
- **`json_number()`** - JSON number parser
- **`json_bool()`** - JSON boolean parser
- **`json_null()`** - JSON null parser
- **`json_string_content()`** - JSON string content without surrounding quotes
- **`json_member(key, p)`** - JSON object member with specific key and value parser
### Grammar Building
- **`ref(name)`** - Creates a lightweight reference to a named rule (for recursive grammars)
- **`rule(name, p, trigger)`** - Creates a named rule and returns a reference
- **`trigger_rule(name, p)`** - Creates a trigger rule (entry point for lazy grammar generation)
- **`schema(p, name, schema, raw)`** - Wraps parser with JSON schema metadata for grammar generation
### AST Control
- **`atomic(p)`** - Prevents AST node creation for partial parses
- **`tag(tag, p)`** - Creates AST nodes with semantic tags (multiple nodes can share tags)
## GBNF Grammar Generation
The PEG parser also acts as a convenient DSL for generating GBNF grammars, with
some exceptions.
```cpp
data.grammar = build_grammar([&](const common_grammar_builder & builder) {
foreach_function(params.tools, [&](const json & fn) {
builder.resolve_refs(fn.at("parameters"));
});
parser.build_grammar(builder, data.grammar_lazy);
});
```
The notable exception is the `negate(p)` lookahead parser, which cannot be
defined as a CFG grammar and therefore does not produce a rule. Its usage
should be limited and preferably hidden behind a `schema()` parser. In many
cases, `until(delimiter)` or `until_one_of(delimiters)` is a better choice.
Another limitation is that the PEG parser requires an unambiguous grammar. In
contrast, the `llama-grammar` implementation can support ambiguous grammars,
though they are difficult to parse.
### Lazy Grammars
During lazy grammar generation, only rules reachable from a `trigger_rule(p)`
are emitted in the grammar. All trigger rules are added as alternations in the
root rule. It is still necessary to define trigger patterns, as the parser has
no interaction with the grammar sampling.
### JSON Schema
The `schema(p, name, schema, raw)` parser will use the `json-schema-to-grammar`
implementation to generate the grammar instead of the underlying parser.
The `raw` option emits a grammar suitable for a raw string instead of a JSON
string. In other words, it won't be wrapped in quotes or require escaping
quotes. It should only be used when `type == "string"`.
The downside is that it can potentially lead to ambiguous grammars. For
example, if a user provides the pattern `^.*$`, the following grammar may be
generated:
```
root ::= "" .* ""
```
This creates an ambiguous grammar that cannot be parsed by the PEG parser. To
help mitigate this, if `.*` is found in the pattern, the grammar from the
underlying parser will be emitted instead.
## Common AST Shapes for Chat Parsing
Most model output can be placed in one of the following categories:
- Content only
- Tool calling with arguments emitted as a single JSON object
- Tool calling with arguments emitted as separate entities, either XML
(Qwen3-Coder, MiniMax M2) or pseudo-function calls (LFM2)
To provide broad coverage,
[`common/chat-peg-parser.h`](/common/chat-peg-parser.h) contains builders and
mappers that help create parsers and visitors/extractors for these types. They
require parsers to tag nodes to conform to an AST "shape". This normalization
makes it easy to extract information and generalize parsing.
### Simple
The `common_chat_peg_builder` builds a `simple` parser that supports
content-only models with optional reasoning.
- **`reasoning(p)`** - Tag node for extracting `reasoning_content`
- **`content(p)`** - Tag node for extracting `content`
```cpp
build_chat_peg_parser([&](common_chat_peg_parser & p) {
return p.sequence({
p.optional("" + p.reasoning(p.until("")) + ""),
p.content(p.until("")),
p.end()
});
});
```
Use `common_chat_peg_mapper` to extract the content. Note that this is already
done for you in `common_chat_peg_parser` when
`chat_format == COMMON_CHAT_FORMAT_PEG_SIMPLE`.
```cpp
auto result = parser.parse(ctx);
common_chat_msg msg;
auto mapper = common_chat_peg_mapper(msg);
mapper.from_ast(ctx.ast, result);
```
### Native
The `common_chat_peg_native_builder` builds a `native` parser suitable for
models that emit tool arguments as a direct JSON object.
- **`reasoning(p)`** - Tag node for `reasoning_content`
- **`content(p)`** - Tag node for `content`
- **`tool(p)`** - Tag entirety of a single tool call
- **`tool_open(p)`** - Tag start of a tool call
- **`tool_close(p)`** - Tag end of a tool call
- **`tool_id(p)`** - Tag the tool call ID (optional)
- **`tool_name(p)`** - Tag the tool name
- **`tool_args(p)`** - Tag the tool arguments
```cpp
build_chat_peg_native_parser([&](common_chat_peg_native_parser & p) {
auto get_weather_tool = p.tool(p.sequence({
p.tool_open(p.literal("{")),
p.json_member("name", "\"" + p.tool_name(p.literal("get_weather")) + "\""),
p.literal(","),
p.json_member("arguments", p.tool_args(p.json())),
p.tool_close(p.literal("}"))
}));
return p.sequence({
p.content(p.until("")),
p.literal(""),
get_weather_tool,
p.literal(""),
p.end()
});
});
```
### Constructed
The `common_chat_peg_constructed_builder` builds a `constructed` parser
suitable for models that emit tool arguments as separate entities, such as XML
tags.
- **`reasoning(p)`** - Tag node for `reasoning_content`
- **`content(p)`** - Tag node for `content`
- **`tool(p)`** - Tag entirety of a single tool call
- **`tool_open(p)`** - Tag start of a tool call
- **`tool_close(p)`** - Tag end of a tool call
- **`tool_name(p)`** - Tag the tool name
- **`tool_arg(p)`** - Tag a complete tool argument (name + value)
- **`tool_arg_open(p)`** - Tag start of a tool argument
- **`tool_arg_close(p)`** - Tag end of a tool argument
- **`tool_arg_name(p)`** - Tag the argument name
- **`tool_arg_string_value(p)`** - Tag string value for the argument
- **`tool_arg_json_value(p)`** - Tag JSON value for the argument
```cpp
build_chat_peg_constructed_parser([&](common_chat_peg_constructed_builder & p) {
auto location_arg = p.tool_arg(
p.tool_arg_open(""),
p.tool_arg_string_value(p.until("")),
p.tool_arg_close(p.literal(""))
);
auto get_weather_tool = p.tool(p.sequence({
p.tool_open(""),
location_arg,
p.tool_close(p.literal(""))
}));
return p.sequence({
p.content(p.until("")),
p.literal(""),
get_weather_tool,
p.literal(""),
p.end()
});
});
```
---
# Source: https://github.com/ggerganov/llama.cpp/blob/master/docs/development/token_generation_performance_tips.md
# Token generation performance troubleshooting
## Verifying that the model is running on the GPU with CUDA
Make sure you compiled llama with the correct env variables according to [this guide](/docs/build.md#cuda), so that llama accepts the `-ngl N` (or `--n-gpu-layers N`) flag. When running llama, you may configure `N` to be very large, and llama will offload the maximum possible number of layers to the GPU, even if it's less than the number you configured. For example:
```shell
./llama-cli -m "path/to/model.gguf" -ngl 200000 -p "Please sir, may I have some "
```
When running llama, before it starts the inference work, it will output diagnostic information that shows whether cuBLAS is offloading work to the GPU. Look for these lines:
```shell
llama_model_load_internal: [cublas] offloading 60 layers to GPU
llama_model_load_internal: [cublas] offloading output layer to GPU
llama_model_load_internal: [cublas] total VRAM used: 17223 MB
... rest of inference
```
If you see these lines, then the GPU is being used.
## Verifying that the CPU is not oversaturated
llama accepts a `-t N` (or `--threads N`) parameter. It's extremely important that this parameter is not too large. If your token generation is extremely slow, try setting this number to 1. If this significantly improves your token generation speed, then your CPU is being oversaturated and you need to explicitly set this parameter to the number of the physical CPU cores on your machine (even if you utilize a GPU). If in doubt, start with 1 and double the amount until you hit a performance bottleneck, then scale the number down.
# Example of runtime flags effect on inference speed benchmark
These runs were tested on the following machine:
GPU: A6000 (48GB VRAM)
CPU: 7 physical cores
RAM: 32GB
Model: `TheBloke_Wizard-Vicuna-30B-Uncensored-GGML/Wizard-Vicuna-30B-Uncensored.q4_0.gguf` (30B parameters, 4bit quantization, GGML)
Run command: `./llama-cli -m "path/to/model.gguf" -p "An extremely detailed description of the 10 best ethnic dishes will follow, with recipes: " -n 1000 [additional benchmark flags]`
Result:
| command | tokens/second (higher is better) |
| - | - |
| -ngl 2000000 | N/A (less than 0.1) |
| -t 7 | 1.7 |
| -t 1 -ngl 2000000 | 5.5 |
| -t 7 -ngl 2000000 | 8.7 |
| -t 4 -ngl 2000000 | 9.1 |
---
# Source: https://github.com/ggerganov/llama.cpp/blob/master/docs/docker.md
# Docker
## Prerequisites
* Docker must be installed and running on your system.
* Create a folder to store big models & intermediate files (ex. /llama/models)
## Images
We have three Docker images available for this project:
1. `ghcr.io/ggml-org/llama.cpp:full`: This image includes both the `llama-cli` and `llama-completion` executables and the tools to convert LLaMA models into ggml and convert into 4-bit quantization. (platforms: `linux/amd64`, `linux/arm64`, `linux/s390x`)
2. `ghcr.io/ggml-org/llama.cpp:light`: This image only includes the `llama-cli` and `llama-completion` executables. (platforms: `linux/amd64`, `linux/arm64`, `linux/s390x`)
3. `ghcr.io/ggml-org/llama.cpp:server`: This image only includes the `llama-server` executable. (platforms: `linux/amd64`, `linux/arm64`, `linux/s390x`)
Additionally, there the following images, similar to the above:
- `ghcr.io/ggml-org/llama.cpp:full-cuda`: Same as `full` but compiled with CUDA support. (platforms: `linux/amd64`)
- `ghcr.io/ggml-org/llama.cpp:light-cuda`: Same as `light` but compiled with CUDA support. (platforms: `linux/amd64`)
- `ghcr.io/ggml-org/llama.cpp:server-cuda`: Same as `server` but compiled with CUDA support. (platforms: `linux/amd64`)
- `ghcr.io/ggml-org/llama.cpp:full-rocm`: Same as `full` but compiled with ROCm support. (platforms: `linux/amd64`, `linux/arm64`)
- `ghcr.io/ggml-org/llama.cpp:light-rocm`: Same as `light` but compiled with ROCm support. (platforms: `linux/amd64`, `linux/arm64`)
- `ghcr.io/ggml-org/llama.cpp:server-rocm`: Same as `server` but compiled with ROCm support. (platforms: `linux/amd64`, `linux/arm64`)
- `ghcr.io/ggml-org/llama.cpp:full-musa`: Same as `full` but compiled with MUSA support. (platforms: `linux/amd64`)
- `ghcr.io/ggml-org/llama.cpp:light-musa`: Same as `light` but compiled with MUSA support. (platforms: `linux/amd64`)
- `ghcr.io/ggml-org/llama.cpp:server-musa`: Same as `server` but compiled with MUSA support. (platforms: `linux/amd64`)
- `ghcr.io/ggml-org/llama.cpp:full-intel`: Same as `full` but compiled with SYCL support. (platforms: `linux/amd64`)
- `ghcr.io/ggml-org/llama.cpp:light-intel`: Same as `light` but compiled with SYCL support. (platforms: `linux/amd64`)
- `ghcr.io/ggml-org/llama.cpp:server-intel`: Same as `server` but compiled with SYCL support. (platforms: `linux/amd64`)
- `ghcr.io/ggml-org/llama.cpp:full-vulkan`: Same as `full` but compiled with Vulkan support. (platforms: `linux/amd64`)
- `ghcr.io/ggml-org/llama.cpp:light-vulkan`: Same as `light` but compiled with Vulkan support. (platforms: `linux/amd64`)
- `ghcr.io/ggml-org/llama.cpp:server-vulkan`: Same as `server` but compiled with Vulkan support. (platforms: `linux/amd64`)
The GPU enabled images are not currently tested by CI beyond being built. They are not built with any variation from the ones in the Dockerfiles defined in [.devops/](../.devops/) and the GitHub Action defined in [.github/workflows/docker.yml](../.github/workflows/docker.yml). If you need different settings (for example, a different CUDA, ROCm or MUSA library, you'll need to build the images locally for now).
## Usage
The easiest way to download the models, convert them to ggml and optimize them is with the --all-in-one command which includes the full docker image.
Replace `/path/to/models` below with the actual path where you downloaded the models.
```bash
docker run -v /path/to/models:/models ghcr.io/ggml-org/llama.cpp:full --all-in-one "/models/" 7B
```
On completion, you are ready to play!
```bash
docker run -v /path/to/models:/models ghcr.io/ggml-org/llama.cpp:full --run -m /models/7B/ggml-model-q4_0.gguf
docker run -v /path/to/models:/models ghcr.io/ggml-org/llama.cpp:full --run-legacy -m /models/32B/ggml-model-q8_0.gguf -no-cnv -p "Building a mobile app can be done in 15 steps:" -n 512
```
or with a light image:
```bash
docker run -v /path/to/models:/models --entrypoint /app/llama-cli ghcr.io/ggml-org/llama.cpp:light -m /models/7B/ggml-model-q4_0.gguf
docker run -v /path/to/models:/models --entrypoint /app/llama-completion ghcr.io/ggml-org/llama.cpp:light -m /models/32B/ggml-model-q8_0.gguf -no-cnv -p "Building a mobile app can be done in 15 steps:" -n 512
```
or with a server image:
```bash
docker run -v /path/to/models:/models -p 8080:8080 ghcr.io/ggml-org/llama.cpp:server -m /models/7B/ggml-model-q4_0.gguf --port 8080 --host 0.0.0.0 -n 512
```
In the above examples, `--entrypoint /app/llama-cli` is specified for clarity, but you can safely omit it since it's the default entrypoint in the container.
## Docker With CUDA
Assuming one has the [nvidia-container-toolkit](https://github.com/NVIDIA/nvidia-container-toolkit) properly installed on Linux, or is using a GPU enabled cloud, `cuBLAS` should be accessible inside the container.
## Building Docker locally
```bash
docker build -t local/llama.cpp:full-cuda --target full -f .devops/cuda.Dockerfile .
docker build -t local/llama.cpp:light-cuda --target light -f .devops/cuda.Dockerfile .
docker build -t local/llama.cpp:server-cuda --target server -f .devops/cuda.Dockerfile .
```
You may want to pass in some different `ARGS`, depending on the CUDA environment supported by your container host, as well as the GPU architecture.
The defaults are:
- `CUDA_VERSION` set to `12.4.0`
- `CUDA_DOCKER_ARCH` set to the cmake build default, which includes all the supported architectures
The resulting images, are essentially the same as the non-CUDA images:
1. `local/llama.cpp:full-cuda`: This image includes both the `llama-cli` and `llama-completion` executables and the tools to convert LLaMA models into ggml and convert into 4-bit quantization.
2. `local/llama.cpp:light-cuda`: This image only includes the `llama-cli` and `llama-completion` executables.
3. `local/llama.cpp:server-cuda`: This image only includes the `llama-server` executable.
## Usage
After building locally, Usage is similar to the non-CUDA examples, but you'll need to add the `--gpus` flag. You will also want to use the `--n-gpu-layers` flag.
```bash
docker run --gpus all -v /path/to/models:/models local/llama.cpp:full-cuda --run -m /models/7B/ggml-model-q4_0.gguf -p "Building a website can be done in 10 simple steps:" -n 512 --n-gpu-layers 1
docker run --gpus all -v /path/to/models:/models local/llama.cpp:light-cuda -m /models/7B/ggml-model-q4_0.gguf -p "Building a website can be done in 10 simple steps:" -n 512 --n-gpu-layers 1
docker run --gpus all -v /path/to/models:/models local/llama.cpp:server-cuda -m /models/7B/ggml-model-q4_0.gguf --port 8080 --host 0.0.0.0 -n 512 --n-gpu-layers 1
```
## Docker With MUSA
Assuming one has the [mt-container-toolkit](https://developer.mthreads.com/musa/native) properly installed on Linux, `muBLAS` should be accessible inside the container.
## Building Docker locally
```bash
docker build -t local/llama.cpp:full-musa --target full -f .devops/musa.Dockerfile .
docker build -t local/llama.cpp:light-musa --target light -f .devops/musa.Dockerfile .
docker build -t local/llama.cpp:server-musa --target server -f .devops/musa.Dockerfile .
```
You may want to pass in some different `ARGS`, depending on the MUSA environment supported by your container host, as well as the GPU architecture.
The defaults are:
- `MUSA_VERSION` set to `rc4.3.0`
The resulting images, are essentially the same as the non-MUSA images:
1. `local/llama.cpp:full-musa`: This image includes both the `llama-cli` and `llama-completion` executables and the tools to convert LLaMA models into ggml and convert into 4-bit quantization.
2. `local/llama.cpp:light-musa`: This image only includes the `llama-cli` and `llama-completion` executables.
3. `local/llama.cpp:server-musa`: This image only includes the `llama-server` executable.
## Usage
After building locally, Usage is similar to the non-MUSA examples, but you'll need to set `mthreads` as default Docker runtime. This can be done by executing `(cd /usr/bin/musa && sudo ./docker setup $PWD)` and verifying the changes by executing `docker info | grep mthreads` on the host machine. You will also want to use the `--n-gpu-layers` flag.
```bash
docker run -v /path/to/models:/models local/llama.cpp:full-musa --run -m /models/7B/ggml-model-q4_0.gguf -p "Building a website can be done in 10 simple steps:" -n 512 --n-gpu-layers 1
docker run -v /path/to/models:/models local/llama.cpp:light-musa -m /models/7B/ggml-model-q4_0.gguf -p "Building a website can be done in 10 simple steps:" -n 512 --n-gpu-layers 1
docker run -v /path/to/models:/models local/llama.cpp:server-musa -m /models/7B/ggml-model-q4_0.gguf --port 8080 --host 0.0.0.0 -n 512 --n-gpu-layers 1
```
---
# Source: https://github.com/ggerganov/llama.cpp/blob/master/docs/function-calling.md
# Function Calling
[chat.h](../common/chat.h) (https://github.com/ggml-org/llama.cpp/pull/9639) adds support for [OpenAI-style function calling](https://platform.openai.com/docs/guides/function-calling) and is used in:
- `llama-server` when started w/ `--jinja` flag
## Universal support w/ Native & Generic handlers
Function calling is supported for all models (see https://github.com/ggml-org/llama.cpp/pull/9639):
- Native tool call formats supported:
- Llama 3.1 / 3.3 (including builtin tools support - tool names for `wolfram_alpha`, `web_search` / `brave_search`, `code_interpreter`), Llama 3.2
- Functionary v3.1 / v3.2
- Hermes 2/3, Qwen 2.5
- Qwen 2.5 Coder
- Mistral Nemo
- Firefunction v2
- Command R7B
- DeepSeek R1 (WIP / seems reluctant to call any tools?)
- Generic tool call is supported when the template isn't recognized by native format handlers (you'll see `Chat format: Generic` in the logs).
- Use `--chat-template-file` to override the template when appropriate (see examples below)
- Generic support may consume more tokens and be less efficient than a model's native format.
- Multiple/parallel tool calling is supported on some models but disabled by default, enable it by passing `"parallel_tool_calls": true` in the completion endpoint payload.
Show some common templates and which format handler they use
| Template | Format |
|----------|--------|
| Almawave-Velvet-14B.jinja | Hermes 2 Pro |
| AtlaAI-Selene-1-Mini-Llama-3.1-8B.jinja | Llama 3.x |
| CohereForAI-aya-expanse-8b.jinja | Generic |
| CohereForAI-c4ai-command-r-plus-default.jinja | Generic |
| CohereForAI-c4ai-command-r-plus-rag.jinja | Generic |
| CohereForAI-c4ai-command-r-plus-tool_use.jinja | Generic |
| CohereForAI-c4ai-command-r7b-12-2024-default.jinja | Command R7B (extract reasoning) |
| CohereForAI-c4ai-command-r7b-12-2024-rag.jinja | Command R7B (extract reasoning) |
| CohereForAI-c4ai-command-r7b-12-2024-tool_use.jinja | Command R7B (extract reasoning) |
| CohereForAI-c4ai-command-r7b-12-2024.jinja | Generic |
| DavieLion-Llama-3.2-1B-SPIN-iter3.jinja | Generic |
| Delta-Vector-Rei-12B.jinja | Mistral Nemo |
| EpistemeAI-Mistral-Nemo-Instruct-12B-Philosophy-Math.jinja | Mistral Nemo |
| FlofloB-83k_continued_pretraining_Qwen2.5-0.5B-Instruct_Unsloth_merged_16bit.jinja | Hermes 2 Pro |
| FlofloB-test_continued_pretraining_Phi-3-mini-4k-instruct_Unsloth_merged_16bit.jinja | Generic |
| HelpingAI-HAI-SER.jinja | Generic |
| HuggingFaceTB-SmolLM2-1.7B-Instruct.jinja | Generic |
| HuggingFaceTB-SmolLM2-135M-Instruct.jinja | Generic |
| HuggingFaceTB-SmolLM2-360M-Instruct.jinja | Generic |
| INSAIT-Institute-BgGPT-Gemma-2-27B-IT-v1.0.jinja | Generic |
| Ihor-Text2Graph-R1-Qwen2.5-0.5b.jinja | Hermes 2 Pro |
| Infinigence-Megrez-3B-Instruct.jinja | Generic |
| Josephgflowers-TinyLlama_v1.1_math_code-world-test-1.jinja | Generic |
| LGAI-EXAONE-EXAONE-3.5-2.4B-Instruct.jinja | Generic |
| LGAI-EXAONE-EXAONE-3.5-7.8B-Instruct.jinja | Generic |
| LatitudeGames-Wayfarer-12B.jinja | Generic |
| Magpie-Align-Llama-3-8B-Magpie-Align-v0.1.jinja | Generic |
| Magpie-Align-Llama-3.1-8B-Magpie-Align-v0.1.jinja | Generic |
| MaziyarPanahi-calme-3.2-instruct-78b.jinja | Generic |
| MiniMaxAI-MiniMax-Text-01.jinja | Generic |
| MiniMaxAI-MiniMax-VL-01.jinja | Generic |
| NaniDAO-deepseek-r1-qwen-2.5-32B-ablated.jinja | DeepSeek R1 (extract reasoning) |
| NexaAIDev-Octopus-v2.jinja | Generic |
| NousResearch-Hermes-2-Pro-Llama-3-8B-default.jinja | Generic |
| NousResearch-Hermes-2-Pro-Llama-3-8B-tool_use.jinja | Hermes 2 Pro |
| NousResearch-Hermes-2-Pro-Mistral-7B-default.jinja | Generic |
| NousResearch-Hermes-2-Pro-Mistral-7B-tool_use.jinja | Hermes 2 Pro |
| NousResearch-Hermes-3-Llama-3.1-70B-default.jinja | Generic |
| NousResearch-Hermes-3-Llama-3.1-70B-tool_use.jinja | Hermes 2 Pro |
| NovaSky-AI-Sky-T1-32B-Flash.jinja | Hermes 2 Pro |
| NovaSky-AI-Sky-T1-32B-Preview.jinja | Hermes 2 Pro |
| OnlyCheeini-greesychat-turbo.jinja | Generic |
| Orenguteng-Llama-3.1-8B-Lexi-Uncensored-V2.jinja | Llama 3.x |
| OrionStarAI-Orion-14B-Chat.jinja | Generic |
| PowerInfer-SmallThinker-3B-Preview.jinja | Generic |
| PrimeIntellect-INTELLECT-1-Instruct.jinja | Generic |
| Qwen-QVQ-72B-Preview.jinja | Generic |
| Qwen-QwQ-32B-Preview.jinja | Hermes 2 Pro |
| Qwen-Qwen1.5-7B-Chat.jinja | Generic |
| Qwen-Qwen2-7B-Instruct.jinja | Generic |
| Qwen-Qwen2-VL-72B-Instruct.jinja | Generic |
| Qwen-Qwen2-VL-7B-Instruct.jinja | Generic |
| Qwen-Qwen2.5-0.5B.jinja | Hermes 2 Pro |
| Qwen-Qwen2.5-1.5B-Instruct.jinja | Hermes 2 Pro |
| Qwen-Qwen2.5-14B-Instruct-1M.jinja | Hermes 2 Pro |
| Qwen-Qwen2.5-14B.jinja | Hermes 2 Pro |
| Qwen-Qwen2.5-32B-Instruct.jinja | Hermes 2 Pro |
| Qwen-Qwen2.5-32B.jinja | Hermes 2 Pro |
| Qwen-Qwen2.5-3B-Instruct.jinja | Hermes 2 Pro |
| Qwen-Qwen2.5-72B-Instruct.jinja | Hermes 2 Pro |
| Qwen-Qwen2.5-7B-Instruct-1M.jinja | Hermes 2 Pro |
| Qwen-Qwen2.5-7B-Instruct.jinja | Hermes 2 Pro |
| Qwen-Qwen2.5-7B.jinja | Hermes 2 Pro |
| Qwen-Qwen2.5-Coder-32B-Instruct.jinja | Hermes 2 Pro |
| Qwen-Qwen2.5-Coder-7B-Instruct.jinja | Hermes 2 Pro |
| Qwen-Qwen2.5-Math-1.5B.jinja | Hermes 2 Pro |
| Qwen-Qwen2.5-Math-7B-Instruct.jinja | Hermes 2 Pro |
| Qwen-Qwen2.5-VL-3B-Instruct.jinja | Hermes 2 Pro |
| Qwen-Qwen2.5-VL-72B-Instruct.jinja | Hermes 2 Pro |
| Qwen-Qwen2.5-VL-7B-Instruct.jinja | Hermes 2 Pro |
| RWKV-Red-Team-ARWKV-7B-Preview-0.1.jinja | Hermes 2 Pro |
| SakanaAI-TinySwallow-1.5B-Instruct.jinja | Hermes 2 Pro |
| SakanaAI-TinySwallow-1.5B.jinja | Hermes 2 Pro |
| Sao10K-70B-L3.3-Cirrus-x1.jinja | Llama 3.x |
| SentientAGI-Dobby-Mini-Leashed-Llama-3.1-8B.jinja | Llama 3.x |
| SentientAGI-Dobby-Mini-Unhinged-Llama-3.1-8B.jinja | Llama 3.x |
| Steelskull-L3.3-Damascus-R1.jinja | Llama 3.x |
| Steelskull-L3.3-MS-Nevoria-70b.jinja | Llama 3.x |
| Steelskull-L3.3-Nevoria-R1-70b.jinja | Llama 3.x |
| THUDM-glm-4-9b-chat.jinja | Generic |
| THUDM-glm-edge-1.5b-chat.jinja | Generic |
| Tarek07-Progenitor-V1.1-LLaMa-70B.jinja | Llama 3.x |
| TheBloke-FusionNet_34Bx2_MoE-AWQ.jinja | Generic |
| TinyLlama-TinyLlama-1.1B-Chat-v1.0.jinja | Generic |
| UCLA-AGI-Mistral7B-PairRM-SPPO-Iter3.jinja | Generic |
| ValiantLabs-Llama3.1-8B-Enigma.jinja | Llama 3.x |
| abacusai-Fewshot-Metamath-OrcaVicuna-Mistral.jinja | Generic |
| ai21labs-AI21-Jamba-1.5-Large.jinja | Generic |
| allenai-Llama-3.1-Tulu-3-405B-SFT.jinja | Generic |
| allenai-Llama-3.1-Tulu-3-405B.jinja | Generic |
| allenai-Llama-3.1-Tulu-3-8B.jinja | Generic |
| arcee-ai-Virtuoso-Lite.jinja | Hermes 2 Pro |
| arcee-ai-Virtuoso-Medium-v2.jinja | Hermes 2 Pro |
| arcee-ai-Virtuoso-Small-v2.jinja | Hermes 2 Pro |
| avemio-GRAG-NEMO-12B-ORPO-HESSIAN-AI.jinja | Generic |
| bespokelabs-Bespoke-Stratos-7B.jinja | Hermes 2 Pro |
| bfuzzy1-acheron-m1a-llama.jinja | Generic |
| bofenghuang-vigogne-2-70b-chat.jinja | Generic |
| bytedance-research-UI-TARS-72B-DPO.jinja | Generic |
| bytedance-research-UI-TARS-7B-DPO.jinja | Generic |
| bytedance-research-UI-TARS-7B-SFT.jinja | Generic |
| carsenk-phi3.5_mini_exp_825_uncensored.jinja | Generic |
| cyberagent-DeepSeek-R1-Distill-Qwen-14B-Japanese.jinja | DeepSeek R1 (extract reasoning) |
| cyberagent-DeepSeek-R1-Distill-Qwen-32B-Japanese.jinja | DeepSeek R1 (extract reasoning) |
| databricks-dbrx-instruct.jinja | Generic |
| deepseek-ai-DeepSeek-Coder-V2-Instruct.jinja | Generic |
| deepseek-ai-DeepSeek-Coder-V2-Lite-Base.jinja | Generic |
| deepseek-ai-DeepSeek-Coder-V2-Lite-Instruct.jinja | Generic |
| deepseek-ai-DeepSeek-R1-Distill-Llama-70B.jinja | DeepSeek R1 (extract reasoning) |
| deepseek-ai-DeepSeek-R1-Distill-Llama-8B.jinja | DeepSeek R1 (extract reasoning) |
| deepseek-ai-DeepSeek-R1-Distill-Qwen-1.5B.jinja | DeepSeek R1 (extract reasoning) |
| deepseek-ai-DeepSeek-R1-Distill-Qwen-14B.jinja | DeepSeek R1 (extract reasoning) |
| deepseek-ai-DeepSeek-R1-Distill-Qwen-32B.jinja | DeepSeek R1 (extract reasoning) |
| deepseek-ai-DeepSeek-R1-Distill-Qwen-7B.jinja | DeepSeek R1 (extract reasoning) |
| deepseek-ai-DeepSeek-R1-Zero.jinja | DeepSeek R1 (extract reasoning) |
| deepseek-ai-DeepSeek-R1.jinja | DeepSeek R1 (extract reasoning) |
| deepseek-ai-DeepSeek-V2-Lite.jinja | Generic |
| deepseek-ai-DeepSeek-V2.5.jinja | DeepSeek R1 (extract reasoning) |
| deepseek-ai-DeepSeek-V3.jinja | DeepSeek R1 (extract reasoning) |
| deepseek-ai-deepseek-coder-33b-instruct.jinja | Generic |
| deepseek-ai-deepseek-coder-6.7b-instruct.jinja | Generic |
| deepseek-ai-deepseek-coder-7b-instruct-v1.5.jinja | Generic |
| deepseek-ai-deepseek-llm-67b-chat.jinja | Generic |
| deepseek-ai-deepseek-llm-7b-chat.jinja | Generic |
| dicta-il-dictalm2.0-instruct.jinja | Generic |
| ehristoforu-Falcon3-8B-Franken-Basestruct.jinja | Hermes 2 Pro |
| fireworks-ai-llama-3-firefunction-v2.jinja | FireFunction v2 |
| godlikehhd-alpaca_data_sampled_ifd_new_5200.jinja | Hermes 2 Pro |
| godlikehhd-alpaca_data_score_max_0.7_2600.jinja | Hermes 2 Pro |
| google-gemma-2-27b-it.jinja | Generic |
| google-gemma-2-2b-it.jinja | Generic |
| google-gemma-2-2b-jpn-it.jinja | Generic |
| google-gemma-7b-it.jinja | Generic |
| huihui-ai-DeepSeek-R1-Distill-Llama-70B-abliterated.jinja | DeepSeek R1 (extract reasoning) |
| huihui-ai-DeepSeek-R1-Distill-Llama-8B-abliterated.jinja | DeepSeek R1 (extract reasoning) |
| huihui-ai-DeepSeek-R1-Distill-Qwen-14B-abliterated-v2.jinja | DeepSeek R1 (extract reasoning) |
| huihui-ai-DeepSeek-R1-Distill-Qwen-32B-abliterated.jinja | DeepSeek R1 (extract reasoning) |
| huihui-ai-DeepSeek-R1-Distill-Qwen-7B-abliterated-v2.jinja | DeepSeek R1 (extract reasoning) |
| huihui-ai-Qwen2.5-14B-Instruct-1M-abliterated.jinja | Hermes 2 Pro |
| ibm-granite-granite-3.1-8b-instruct.jinja | Generic |
| indischepartij-MiniCPM-3B-OpenHermes-2.5-v2.jinja | Generic |
| inflatebot-MN-12B-Mag-Mell-R1.jinja | Generic |
| jinaai-ReaderLM-v2.jinja | Generic |
| kms7530-chemeng_qwen-math-7b_24_1_100_1_nonmath.jinja | Hermes 2 Pro |
| knifeayumu-Cydonia-v1.3-Magnum-v4-22B.jinja | Mistral Nemo |
| langgptai-qwen1.5-7b-chat-sa-v0.1.jinja | Generic |
| lightblue-DeepSeek-R1-Distill-Qwen-7B-Japanese.jinja | DeepSeek R1 (extract reasoning) |
| mattshumer-Reflection-Llama-3.1-70B.jinja | Generic |
| meetkai-functionary-medium-v3.1.jinja | Functionary v3.1 Llama 3.1 |
| meetkai-functionary-medium-v3.2.jinja | Functionary v3.2 |
| meta-llama-Llama-2-7b-chat-hf.jinja | Generic |
| meta-llama-Llama-3.1-8B-Instruct.jinja | Llama 3.x |
| meta-llama-Llama-3.2-11B-Vision-Instruct.jinja | Llama 3.x |
| meta-llama-Llama-3.2-1B-Instruct.jinja | Llama 3.x |
| meta-llama-Llama-3.2-3B-Instruct.jinja | Llama 3.x |
| meta-llama-Llama-3.3-70B-Instruct.jinja | Llama 3.x |
| meta-llama-Meta-Llama-3-8B-Instruct.jinja | Generic |
| meta-llama-Meta-Llama-3.1-8B-Instruct.jinja | Llama 3.x |
| microsoft-Phi-3-medium-4k-instruct.jinja | Generic |
| microsoft-Phi-3-mini-4k-instruct.jinja | Generic |
| microsoft-Phi-3-small-8k-instruct.jinja | Generic |
| microsoft-Phi-3.5-mini-instruct.jinja | Generic |
| microsoft-Phi-3.5-vision-instruct.jinja | Generic |
| microsoft-phi-4.jinja | Generic |
| migtissera-Tess-3-Mistral-Nemo-12B.jinja | Generic |
| ministral-Ministral-3b-instruct.jinja | Generic |
| mistralai-Codestral-22B-v0.1.jinja | Generic |
| mistralai-Mistral-7B-Instruct-v0.1.jinja | Generic |
| mistralai-Mistral-7B-Instruct-v0.2.jinja | Generic |
| mistralai-Mistral-7B-Instruct-v0.3.jinja | Mistral Nemo |
| mistralai-Mistral-Large-Instruct-2407.jinja | Mistral Nemo |
| mistralai-Mistral-Large-Instruct-2411.jinja | Generic |
| mistralai-Mistral-Nemo-Instruct-2407.jinja | Mistral Nemo |
| mistralai-Mistral-Small-24B-Instruct-2501.jinja | Generic |
| mistralai-Mixtral-8x7B-Instruct-v0.1.jinja | Generic |
| mkurman-Qwen2.5-14B-DeepSeek-R1-1M.jinja | Hermes 2 Pro |
| mlabonne-AlphaMonarch-7B.jinja | Generic |
| mlx-community-Josiefied-Qwen2.5-0.5B-Instruct-abliterated-v1-float32.jinja | Hermes 2 Pro |
| mlx-community-Qwen2.5-VL-7B-Instruct-8bit.jinja | Hermes 2 Pro |
| mobiuslabsgmbh-DeepSeek-R1-ReDistill-Qwen-1.5B-v1.1.jinja | DeepSeek R1 (extract reasoning) |
| netcat420-MFANNv0.20.jinja | Generic |
| netcat420-MFANNv0.24.jinja | Generic |
| netease-youdao-Confucius-o1-14B.jinja | Hermes 2 Pro |
| nvidia-AceMath-7B-RM.jinja | Hermes 2 Pro |
| nvidia-Eagle2-1B.jinja | Hermes 2 Pro |
| nvidia-Eagle2-9B.jinja | Hermes 2 Pro |
| nvidia-Llama-3.1-Nemotron-70B-Instruct-HF.jinja | Llama 3.x |
| onnx-community-DeepSeek-R1-Distill-Qwen-1.5B-ONNX.jinja | DeepSeek R1 (extract reasoning) |
| open-thoughts-OpenThinker-7B.jinja | Hermes 2 Pro |
| openchat-openchat-3.5-0106.jinja | Generic |
| pankajmathur-orca_mini_v6_8b.jinja | Generic |
| princeton-nlp-Mistral-7B-Base-SFT-RDPO.jinja | Generic |
| princeton-nlp-Mistral-7B-Instruct-DPO.jinja | Generic |
| princeton-nlp-Mistral-7B-Instruct-RDPO.jinja | Generic |
| prithivMLmods-Bellatrix-Tiny-1.5B-R1.jinja | Hermes 2 Pro |
| prithivMLmods-Bellatrix-Tiny-1B-R1.jinja | Llama 3.x |
| prithivMLmods-Bellatrix-Tiny-1B-v3.jinja | Generic |
| prithivMLmods-Bellatrix-Tiny-3B-R1.jinja | Llama 3.x |
| prithivMLmods-Blaze-14B-xElite.jinja | Generic |
| prithivMLmods-Calcium-Opus-14B-Elite2-R1.jinja | Hermes 2 Pro |
| prithivMLmods-Calme-Ties-78B.jinja | Generic |
| prithivMLmods-Calme-Ties2-78B.jinja | Generic |
| prithivMLmods-Calme-Ties3-78B.jinja | Generic |
| prithivMLmods-ChemQwen2-vL.jinja | Generic |
| prithivMLmods-GWQ2b.jinja | Generic |
| prithivMLmods-LatexMind-2B-Codec.jinja | Generic |
| prithivMLmods-Llama-3.2-6B-AlgoCode.jinja | Llama 3.x |
| prithivMLmods-Megatron-Opus-14B-Exp.jinja | Hermes 2 Pro |
| prithivMLmods-Megatron-Opus-14B-Stock.jinja | Hermes 2 Pro |
| prithivMLmods-Megatron-Opus-7B-Exp.jinja | Hermes 2 Pro |
| prithivMLmods-Omni-Reasoner-Merged.jinja | Hermes 2 Pro |
| prithivMLmods-Omni-Reasoner4-Merged.jinja | Hermes 2 Pro |
| prithivMLmods-Primal-Opus-14B-Optimus-v1.jinja | Hermes 2 Pro |
| prithivMLmods-QwQ-Math-IO-500M.jinja | Hermes 2 Pro |
| prithivMLmods-Qwen-7B-Distill-Reasoner.jinja | DeepSeek R1 (extract reasoning) |
| prithivMLmods-Qwen2.5-1.5B-DeepSeek-R1-Instruct.jinja | Hermes 2 Pro |
| prithivMLmods-Qwen2.5-14B-DeepSeek-R1-1M.jinja | Hermes 2 Pro |
| prithivMLmods-Qwen2.5-32B-DeepSeek-R1-Instruct.jinja | Hermes 2 Pro |
| prithivMLmods-Qwen2.5-7B-DeepSeek-R1-1M.jinja | Hermes 2 Pro |
| prithivMLmods-Triangulum-v2-10B.jinja | Hermes 2 Pro |
| qingy2024-Falcon3-2x10B-MoE-Instruct.jinja | Hermes 2 Pro |
| rubenroy-Zurich-14B-GCv2-5m.jinja | Hermes 2 Pro |
| rubenroy-Zurich-7B-GCv2-5m.jinja | Hermes 2 Pro |
| silma-ai-SILMA-Kashif-2B-Instruct-v1.0.jinja | Generic |
| simplescaling-s1-32B.jinja | Hermes 2 Pro |
| sometimesanotion-Lamarck-14B-v0.7.jinja | Hermes 2 Pro |
| sonthenguyen-zephyr-sft-bnb-4bit-DPO-mtbr-180steps.jinja | Generic |
| sthenno-tempesthenno-icy-0130.jinja | Generic |
| sumink-qwft.jinja | Hermes 2 Pro |
| teknium-OpenHermes-2.5-Mistral-7B.jinja | Generic |
| thirdeyeai-elevate360m.jinja | Generic |
| tiiuae-Falcon3-10B-Instruct.jinja | Hermes 2 Pro |
| unsloth-DeepSeek-R1-Distill-Llama-8B-unsloth-bnb-4bit.jinja | DeepSeek R1 (extract reasoning) |
| unsloth-DeepSeek-R1-Distill-Llama-8B.jinja | DeepSeek R1 (extract reasoning) |
| unsloth-DeepSeek-R1.jinja | DeepSeek R1 (extract reasoning) |
| unsloth-Mistral-Small-24B-Instruct-2501-unsloth-bnb-4bit.jinja | Generic |
| upstage-solar-pro-preview-instruct.jinja | Generic |
| whyhow-ai-PatientSeek.jinja | Generic |
| xwen-team-Xwen-72B-Chat.jinja | Hermes 2 Pro |
| xwen-team-Xwen-7B-Chat.jinja | Hermes 2 Pro |
This table can be generated with:
```bash
./build/bin/test-chat ../minja/build/tests/*.jinja 2>/dev/null
```
# Usage - need tool-aware Jinja template
First, start a server with any model, but make sure it has a tools-enabled template: you can verify this by inspecting the `chat_template` or `chat_template_tool_use` properties in `http://localhost:8080/props`).
Here are some models known to work (w/ chat template override when needed):
```shell
# Native support:
llama-server --jinja -fa -hf bartowski/Qwen2.5-7B-Instruct-GGUF:Q4_K_M
llama-server --jinja -fa -hf bartowski/Mistral-Nemo-Instruct-2407-GGUF:Q6_K_L
llama-server --jinja -fa -hf bartowski/Llama-3.3-70B-Instruct-GGUF:Q4_K_M
# Native support for DeepSeek R1 works best w/ our template override (official template is buggy, although we do work around it)
llama-server --jinja -fa -hf bartowski/DeepSeek-R1-Distill-Qwen-7B-GGUF:Q6_K_L \
--chat-template-file models/templates/llama-cpp-deepseek-r1.jinja
llama-server --jinja -fa -hf bartowski/DeepSeek-R1-Distill-Qwen-32B-GGUF:Q4_K_M \
--chat-template-file models/templates/llama-cpp-deepseek-r1.jinja
# Native support requires the right template for these GGUFs:
llama-server --jinja -fa -hf bartowski/functionary-small-v3.2-GGUF:Q4_K_M
--chat-template-file models/templates/meetkai-functionary-medium-v3.2.jinja
llama-server --jinja -fa -hf bartowski/Hermes-2-Pro-Llama-3-8B-GGUF:Q4_K_M \
--chat-template-file models/templates/NousResearch-Hermes-2-Pro-Llama-3-8B-tool_use.jinja
llama-server --jinja -fa -hf bartowski/Hermes-3-Llama-3.1-8B-GGUF:Q4_K_M \
--chat-template-file models/templates/NousResearch-Hermes-3-Llama-3.1-8B-tool_use.jinja
llama-server --jinja -fa -hf bartowski/firefunction-v2-GGUF -hff firefunction-v2-IQ1_M.gguf \
--chat-template-file models/templates/fireworks-ai-llama-3-firefunction-v2.jinja
llama-server --jinja -fa -hf bartowski/c4ai-command-r7b-12-2024-GGUF:Q6_K_L \
--chat-template-file models/templates/CohereForAI-c4ai-command-r7b-12-2024-tool_use.jinja
# Generic format support
llama-server --jinja -fa -hf bartowski/phi-4-GGUF:Q4_0
llama-server --jinja -fa -hf bartowski/gemma-2-2b-it-GGUF:Q8_0
llama-server --jinja -fa -hf bartowski/c4ai-command-r-v01-GGUF:Q2_K
```
To get the official template from original HuggingFace repos, you can use [scripts/get_chat_template.py](../scripts/get_chat_template.py) (see examples invocations in [models/templates/README.md](../models/templates/README.md))
> [!TIP]
> If there is no official `tool_use` Jinja template, you may want to set `--chat-template chatml` to use a default that works with many models (YMMV!), or write your own (e.g. we provide a custom [llama-cpp-deepseek-r1.jinja](../models/templates/llama-cpp-deepseek-r1.jinja) for DeepSeek R1 distills)
> [!CAUTION]
> Beware of extreme KV quantizations (e.g. `-ctk q4_0`), they can substantially degrade the model's tool calling performance.
Test in CLI (or with any library / software that can use OpenAI-compatible API backends):
```bash
curl http://localhost:8080/v1/chat/completions -d '{
"model": "gpt-3.5-turbo",
"tools": [
{
"type":"function",
"function":{
"name":"python",
"description":"Runs code in an ipython interpreter and returns the result of the execution after 60 seconds.",
"parameters":{
"type":"object",
"properties":{
"code":{
"type":"string",
"description":"The code to run in the ipython interpreter."
}
},
"required":["code"]
}
}
}
],
"messages": [
{
"role": "user",
"content": "Print a hello world message with python."
}
]
}'
curl http://localhost:8080/v1/chat/completions -d '{
"model": "gpt-3.5-turbo",
"messages": [
{"role": "system", "content": "You are a chatbot that uses tools/functions. Dont overthink things."},
{"role": "user", "content": "What is the weather in Istanbul?"}
],
"tools": [{
"type":"function",
"function":{
"name":"get_current_weather",
"description":"Get the current weather in a given location",
"parameters":{
"type":"object",
"properties":{
"location":{
"type":"string",
"description":"The city and country/state, e.g. `San Francisco, CA`, or `Paris, France`"
}
},
"required":["location"]
}
}
}]
}'
```
Show output
```json
{
"choices": [
{
"finish_reason": "tool",
"index": 0,
"message": {
"content": null,
"tool_calls": [
{
"name": "python",
"arguments": "{\"code\":\" \\nprint(\\\"Hello, World!\\\")\"}"
}
],
"role": "assistant"
}
}
],
"created": 1727287211,
"model": "gpt-3.5-turbo",
"object": "chat.completion",
"usage": {
"completion_tokens": 16,
"prompt_tokens": 44,
"total_tokens": 60
},
"id": "chatcmpl-Htbgh9feMmGM0LEH2hmQvwsCxq3c6Ni8"
}
```
---
# Source: https://github.com/ggerganov/llama.cpp/blob/master/docs/install.md
# Install pre-built version of llama.cpp
| Install via | Windows | Mac | Linux |
|-------------|---------|-----|-------|
| Winget | ✅ | | |
| Homebrew | | ✅ | ✅ |
| MacPorts | | ✅ | |
| Nix | | ✅ | ✅ |
## Winget (Windows)
```sh
winget install llama.cpp
```
The package is automatically updated with new `llama.cpp` releases. More info: https://github.com/ggml-org/llama.cpp/issues/8188
## Homebrew (Mac and Linux)
```sh
brew install llama.cpp
```
The formula is automatically updated with new `llama.cpp` releases. More info: https://github.com/ggml-org/llama.cpp/discussions/7668
## MacPorts (Mac)
```sh
sudo port install llama.cpp
```
See also: https://ports.macports.org/port/llama.cpp/details/
## Nix (Mac and Linux)
```sh
nix profile install nixpkgs#llama-cpp
```
For flake enabled installs.
Or
```sh
nix-env --file '' --install --attr llama-cpp
```
For non-flake enabled installs.
This expression is automatically updated within the [nixpkgs repo](https://github.com/NixOS/nixpkgs/blob/nixos-24.05/pkgs/by-name/ll/llama-cpp/package.nix#L164).
---
# Source: https://github.com/ggerganov/llama.cpp/blob/master/docs/llguidance.md
# LLGuidance Support in llama.cpp
[LLGuidance](https://github.com/guidance-ai/llguidance) is a library for constrained decoding (also called constrained sampling or structured outputs) for Large Language Models (LLMs). Initially developed as the backend for the [Guidance](https://github.com/guidance-ai/guidance) library, it can also be used independently.
LLGuidance supports JSON Schemas and arbitrary context-free grammars (CFGs) written in a [variant](https://github.com/guidance-ai/llguidance/blob/main/docs/syntax.md) of Lark syntax. It is [very fast](https://github.com/guidance-ai/jsonschemabench/tree/main/maskbench) and has [excellent](https://github.com/guidance-ai/llguidance/blob/main/docs/json_schema.md) JSON Schema coverage but requires the Rust compiler, which complicates the llama.cpp build process.
## Building
To enable LLGuidance support, build llama.cpp with the `LLAMA_LLGUIDANCE` option:
```sh
cmake -B build -DLLAMA_LLGUIDANCE=ON
make -C build -j
```
For Windows use `cmake --build build --config Release` instead of `make`.
This requires the Rust compiler and the `cargo` tool to be [installed](https://www.rust-lang.org/tools/install).
## Interface
There are no new command-line arguments or modifications to `common_params`. When enabled, grammars starting with `%llguidance` are passed to LLGuidance instead of the [current](../grammars/README.md) llama.cpp grammars. Additionally, JSON Schema requests (e.g., using the `-j` argument in `llama-cli`) are also passed to LLGuidance.
For your existing GBNF grammars, you can use [gbnf_to_lark.py script](https://github.com/guidance-ai/llguidance/blob/main/python/llguidance/gbnf_to_lark.py) to convert them to LLGuidance Lark-like format.
## Performance
Computing a "token mask" (i.e., the set of allowed tokens) for a llama3 tokenizer with 128k tokens takes, on average, 50μs of single-core CPU time for the [JSON Schema Bench](https://github.com/guidance-ai/jsonschemabench). The p99 time is 0.5ms, and the p100 time is 20ms. These results are due to the lexer/parser split and several [optimizations](https://github.com/guidance-ai/llguidance/blob/main/docs/optimizations.md).
## JSON Schema
LLGuidance adheres closely to the JSON Schema specification. For example:
- `additionalProperties` defaults to `true`, unlike current grammars, though you can set `"additionalProperties": false` if needed.
- any whitespace is allowed.
- The definition order in the `"properties": {}` object is maintained, regardless of whether properties are required (current grammars always puts required properties first).
Unsupported schemas result in an error message—no keywords are silently ignored.
## Why Not Reuse GBNF Format?
GBNF lacks the concept of a lexer.
Most programming languages, including JSON, use a two-step process: a lexer (built with regular expressions) converts a byte stream into lexemes, which are then processed by a CFG parser. This approach is faster because lexers are cheaper to evaluate, and there is ~10x fewer lexemes than bytes.
LLM tokens often align with lexemes, so the parser is engaged in under 0.5% of tokens, with the lexer handling the rest.
However, the user has to provide the distinction between lexemes and CFG symbols. In [Lark](https://github.com/lark-parser/lark), lexeme names are uppercase, while CFG symbols are lowercase.
The [gbnf_to_lark.py script](https://github.com/guidance-ai/llguidance/blob/main/scripts/gbnf_to_lark.py) can often take care of this automatically.
See [LLGuidance syntax docs](https://github.com/guidance-ai/llguidance/blob/main/docs/syntax.md#terminals-vs-rules) for more details.
## Error Handling
Errors are currently printed to `stderr`, and generation continues. Improved error handling may be added in the future.
---
# Source: https://github.com/ggerganov/llama.cpp/blob/master/docs/multimodal/MobileVLM.md
# MobileVLM
Currently this implementation supports [MobileVLM-1.7B](https://huggingface.co/mtgv/MobileVLM-1.7B) / [MobileVLM_V2-1.7B](https://huggingface.co/mtgv/MobileVLM_V2-1.7B) variants.
for more information, please go to [Meituan-AutoML/MobileVLM](https://github.com/Meituan-AutoML/MobileVLM)
The implementation is based on llava, and is compatible with llava and mobileVLM. The usage is basically same as llava.
Notice: The overall process of model inference for both **MobileVLM** and **MobileVLM_V2** models is the same, but the process of model conversion is a little different. Therefore, using **MobileVLM-1.7B** as an example, the different conversion step will be shown.
## Usage
Build the `llama-mtmd-cli` binary.
After building, run: `./llama-mtmd-cli` to see the usage. For example:
```sh
./llama-mtmd-cli -m MobileVLM-1.7B/ggml-model-q4_k.gguf \
--mmproj MobileVLM-1.7B/mmproj-model-f16.gguf \
--chat-template deepseek
```
## Model conversion
1. Clone `mobileVLM-1.7B` and `clip-vit-large-patch14-336` locally:
```sh
git clone https://huggingface.co/mtgv/MobileVLM-1.7B
git clone https://huggingface.co/openai/clip-vit-large-patch14-336
```
2. Use `llava_surgery.py` to split the LLaVA model to LLaMA and multimodel projector constituents:
```sh
python ./tools/mtmd/llava_surgery.py -m path/to/MobileVLM-1.7B
```
3. Use `convert_image_encoder_to_gguf.py` with `--projector-type ldp` (for **V2** please use `--projector-type ldpv2`) to convert the LLaVA image encoder to GGUF:
```sh
python ./tools/mtmd/convert_image_encoder_to_gguf.py \
-m path/to/clip-vit-large-patch14-336 \
--llava-projector path/to/MobileVLM-1.7B/llava.projector \
--output-dir path/to/MobileVLM-1.7B \
--projector-type ldp
```
```sh
python ./tools/mtmd/convert_image_encoder_to_gguf.py \
-m path/to/clip-vit-large-patch14-336 \
--llava-projector path/to/MobileVLM-1.7B_V2/llava.projector \
--output-dir path/to/MobileVLM-1.7B_V2 \
--projector-type ldpv2
```
4. Use `examples/convert_legacy_llama.py` to convert the LLaMA part of LLaVA to GGUF:
```sh
python ./examples/convert_legacy_llama.py path/to/MobileVLM-1.7B --skip-unknown
```
5. Use `quantize` to convert LLaMA part's DataType from `fp32` to `q4_k`
```sh
./llama-quantize path/to/MobileVLM-1.7B/ggml-model-F32.gguf path/to/MobileVLM-1.7B/ggml-model-q4_k.gguf q4_k_s
```
Now both the LLaMA part and the image encoder is in the `MobileVLM-1.7B` directory.
## Android compile and run
### compile
refer to `tools/mtmd/android/build_64.sh`
```sh
mkdir tools/mtmd/android/build_64
cd tools/mtmd/android/build_64
../build_64.sh
```
### run on Android
refer to `android/adb_run.sh`, modify resources' `name` and `path`
## Some result on Android with `Snapdragon 888` chip
### case 1
**input**
```sh
/data/local/tmp/llama-mtmd-cli \
-m /data/local/tmp/ggml-model-q4_k.gguf \
--mmproj /data/local/tmp/mmproj-model-f16.gguf \
-t 4 \
--image /data/local/tmp/demo.jpg \
-p "A chat between a curious user and an artificial intelligence assistant. The assistant gives helpful, detailed, and polite answers to the user's questions. USER: \nWho is the author of this book? \nAnswer the question using a single word or phrase. ASSISTANT:"
```
**output**
```sh
encode_image_with_clip: image encoded in 21148.71 ms by CLIP ( 146.87 ms per image patch)
Susan Wise Bauer
llama_print_timings: load time = 23574.72 ms
llama_print_timings: sample time = 1.24 ms / 6 runs ( 0.21 ms per token, 4850.44 tokens per second)
llama_print_timings: prompt eval time = 12460.15 ms / 246 tokens ( 50.65 ms per token, 19.74 tokens per second)
llama_print_timings: eval time = 424.86 ms / 6 runs ( 70.81 ms per token, 14.12 tokens per second)
llama_print_timings: total time = 34731.93 ms
```
### case 2
**input**
```sh
/data/local/tmp/llama-mtmd-cli \
-m /data/local/tmp/ggml-model-q4_k.gguf \
--mmproj /data/local/tmp/mmproj-model-f16.gguf \
-t 4 \
--image /data/local/tmp/cat.jpeg \
-p "A chat between a curious user and an artificial intelligence assistant. The assistant gives helpful, detailed, and polite answers to the user's questions. USER: \nWhat is in the image? ASSISTANT:"
```
**output**
```sh
encode_image_with_clip: image encoded in 21149.51 ms by CLIP ( 146.87 ms per image patch)
The image depicts a cat sitting in the grass near some tall green plants.
llama_print_timings: load time = 23257.32 ms
llama_print_timings: sample time = 5.25 ms / 18 runs ( 0.29 ms per token, 3430.53 tokens per second)
llama_print_timings: prompt eval time = 11900.73 ms / 232 tokens ( 51.30 ms per token, 19.49 tokens per second)
llama_print_timings: eval time = 1279.03 ms / 18 runs ( 71.06 ms per token, 14.07 tokens per second)
llama_print_timings: total time = 34570.79 ms
```
## Some result on Android with `Snapdragon 778G` chip
### MobileVLM-1.7B case
#### mtmd-cli release-b2005
**input**
```sh
/data/local/tmp/llama-mtmd-cli \
-m /data/local/tmp/ggml-model-q4_k.gguf \
--mmproj /data/local/tmp/mmproj-model-f16.gguf \
-t 4 \
--image /data/local/tmp/many_llamas.jpeg \
-p "A chat between a curious user and an artificial intelligence assistant. The assistant gives helpful, detailed, and polite answers to the user's questions. USER: \nWhat's that? ASSISTANT:"
```
**output**
```sh
encode_image_with_clip: image encoded in 18728.52 ms by CLIP ( 130.06 ms per image patch)
system_prompt: A chat between a curious user and an artificial intelligence assistant. The assistant gives helpful, detailed, and polite answers to the user's questions. USER:
user_prompt: \nWhat's that? ASSISTANT:
A group of llamas are standing in a green pasture.
llama_print_timings: load time = 20357.33 ms
llama_print_timings: sample time = 2.96 ms / 14 runs ( 0.21 ms per token, 4734.53 tokens per second)
llama_print_timings: prompt eval time = 8119.49 ms / 191 tokens ( 42.51 ms per token, 23.52 tokens per second)
llama_print_timings: eval time = 1005.75 ms / 14 runs ( 71.84 ms per token, 13.92 tokens per second)
llama_print_timings: total time = 28038.34 ms / 205 tokens
```
#### mtmd-cli latest-version
**input**
Just the same as above.
**output**(seems to be much slower)
```sh
encode_image_with_clip: image embedding created: 144 tokens
encode_image_with_clip: image encoded in 288268.88 ms by CLIP ( 2001.87 ms per image patch)
system_prompt: A chat between a curious user and an artificial intelligence assistant. The assistant gives helpful, detailed, and polite answers to the user's questions. USER:
user_prompt: \nWhat's that? ASSISTANT:
It is a group of sheep standing together in a grass field.
llama_print_timings: load time = 818120.91 ms
llama_print_timings: sample time = 3.44 ms / 14 runs ( 0.25 ms per token, 4067.40 tokens per second)
llama_print_timings: prompt eval time = 529274.69 ms / 191 tokens ( 2771.07 ms per token, 0.36 tokens per second)
llama_print_timings: eval time = 43894.02 ms / 13 runs ( 3376.46 ms per token, 0.30 tokens per second)
llama_print_timings: total time = 865441.76 ms / 204 tokens
```
### MobileVLM_V2-1.7B case
#### mtmd-cli release-2005b
**input**
Just the same as above.
**output**
```sh
encode_image_with_clip: image encoded in 20609.61 ms by CLIP ( 143.12 ms per image patch)
system_prompt: A chat between a curious user and an artificial intelligence assistant. The assistant gives helpful, detailed, and polite answers to the user's questions. USER:
user_prompt: \nWhat's that? ASSISTANT:
This image captures a lively scene of 20 llamas in motion on an expansive, grassy field. The llama is scattered across the landscape with some standing and others sitting down as if taking rest or observing their surroundings from different vantage points within this verdant setting.
The background offers glimpses into a picturesque town nestled amidst hills under an overcast sky, adding depth to the scene while also emphasizing that distance between these llama and human-made structures like houses or roads in which they roam freely without any barriers around them. The image is framed by text at both right angles on white backgrounds against a contrasting blue backdrop with green foliage, further drawing attention to the llamas amidst their natural habitat while also inviting viewers into this picturesque landscape within town limits of Alta Llama
llama_print_timings: load time = 22406.77 ms
llama_print_timings: sample time = 49.26 ms / 186 runs ( 0.26 ms per token, 3776.27 tokens per second)
llama_print_timings: prompt eval time = 9044.54 ms / 191 tokens ( 47.35 ms per token, 21.12 tokens per second)
llama_print_timings: eval time = 14497.49 ms / 186 runs ( 77.94 ms per token, 12.83 tokens per second)
llama_print_timings: total time = 44411.01 ms / 377 tokens
```
## Orin compile and run
### compile
```sh
make GGML_CUDA=1 CUDA_DOCKER_ARCH=sm_87 -j 32
```
### run on Orin
### case 1
**input**
```sh
./llama-mtmd-cli \
-m /data/local/tmp/ggml-model-q4_k.gguf \
--mmproj /data/local/tmp/mmproj-model-f16.gguf \
--image /data/local/tmp/demo.jpeg \
-p "A chat between a curious user and an artificial intelligence assistant. The assistant gives helpful, detailed, and polite answers to the user's questions. USER: \nWho is the author of this book? \nAnswer the question using a single word or phrase. ASSISTANT:" \
--n-gpu-layers 999
```
**output**
```sh
encode_image_with_clip: image encoded in 296.62 ms by CLIP ( 2.06 ms per image patch)
Susan Wise Bauer
llama_print_timings: load time = 1067.64 ms
llama_print_timings: sample time = 1.53 ms / 6 runs ( 0.25 ms per token, 3934.43 tokens per second)
llama_print_timings: prompt eval time = 306.84 ms / 246 tokens ( 1.25 ms per token, 801.72 tokens per second)
llama_print_timings: eval time = 91.50 ms / 6 runs ( 15.25 ms per token, 65.58 tokens per second)
llama_print_timings: total time = 1352.63 ms / 252 tokens
```
### case 2
**input**
```sh
./llama-mtmd-cli \
-m /data/local/tmp/ggml-model-q4_k.gguf \
--mmproj /data/local/tmp/mmproj-model-f16.gguf \
-p "A chat between a curious user and an artificial intelligence assistant. The assistant gives helpful, detailed, and polite answers to the user's questions. USER: \nWhat is in the image? ASSISTANT:" \
--n-gpu-layers 999
```
**output**
```sh
encode_image_with_clip: image encoded in 302.15 ms by CLIP ( 2.10 ms per image patch)
The image features a cat lying in the grass.
llama_print_timings: load time = 1057.07 ms
llama_print_timings: sample time = 3.27 ms / 11 runs ( 0.30 ms per token, 3360.83 tokens per second)
llama_print_timings: prompt eval time = 213.60 ms / 232 tokens ( 0.92 ms per token, 1086.14 tokens per second)
llama_print_timings: eval time = 166.65 ms / 11 runs ( 15.15 ms per token, 66.01 tokens per second)
llama_print_timings: total time = 1365.47 ms / 243 tokens
```
## Running on Intel(R) Core(TM) i7-10750H
### Operating system
Ubuntu22.04
### compile
```sh
make -j32
```
### MobileVLM-1.7B case
**input**
```sh
-m /path/to/ggml-model-q4_k.gguf \
--mmproj /path/to/mmproj-model-f16.gguf \
--image /path/to/many_llamas.jpeg
-p "A chat between a curious user and an artificial intelligence assistant. The assistant gives helpful, detailed, and polite answers to the user's questions. USER: \nWhat's that? ASSISTANT:" \
```
**output**
```sh
encode_image_with_clip: image embedding created: 144 tokens
encode_image_with_clip: image encoded in 2730.94 ms by CLIP ( 18.96 ms per image patch)
system_prompt: A chat between a curious user and an artificial intelligence assistant. The assistant gives helpful, detailed, and polite answers to the user's questions. USER:
user_prompt: \nWhat's that?ASSISTANT:
A group of llamas are walking together in a field.
llama_print_timings: load time = 5506.60 ms
llama_print_timings: sample time = 0.44 ms / 13 runs ( 0.03 ms per token, 29545.45 tokens per second)
llama_print_timings: prompt eval time = 2031.58 ms / 190 tokens ( 10.69 ms per token, 93.52 tokens per second)
llama_print_timings: eval time = 438.92 ms / 12 runs ( 36.58 ms per token, 27.34 tokens per second)
llama_print_timings: total time = 5990.25 ms / 202 tokens
```
### MobileVLM_V2-1.7B case
**input**
Just the same as above.
**ouput**
```sh
encode_image_with_clip: image embedding created: 144 tokens
encode_image_with_clip: image encoded in 3223.89 ms by CLIP ( 22.39 ms per image patch)
system_prompt: A chat between a curious user and an artificial intelligence assistant. The assistant gives helpful, detailed, and polite answers to the user's questions. USER:
user_prompt: \nWhat's that?ASSISTANT:
The image captures a tranquil scene in a park, where a group of approximately 20 llamas are gathered. The llamas, a mix of white and black, are standing in a line, their black and white patterns contrasting with the lush green grass of the park. The lamas are arranged in a line, suggesting a social order.
The park itself is lush and green, with trees dotting the landscape in the background. A sign reading "Llamas Tico Ana" is also visible in the image, possibly indicating the location or the breed of the llamas. The image seems to be taken from a distance, providing a wide view of the scene and the surrounding environment.
The llamas' positions relative to each other, the sign, and the trees create a harmonious composition. The image does not contain any discernible text. The overall scene is one of peace and natural beauty, with the llamas in their natural habitat, surrounded by the vibrant colors and lush greenery of the park.
llama_print_timings: load time = 6642.61 ms
llama_print_timings: sample time = 8.15 ms / 223 runs ( 0.04 ms per token, 27358.61 tokens per second)
llama_print_timings: prompt eval time = 2475.07 ms / 190 tokens ( 13.03 ms per token, 76.77 tokens per second)
llama_print_timings: eval time = 8760.60 ms / 222 runs ( 39.46 ms per token, 25.34 tokens per second)
llama_print_timings: total time = 15513.95 ms / 412 tokens
```
## Run on Intel(R) Core(TM) Ultra7 115H
### operation system
Windows11
### comiple
```sh
make -j32
```
### MobileVLM-1.7B case
**input**
```sh
-m /path/to/ggml-model-q4_k.gguf \
--mmproj /path/to/tmp/mmproj-model-f16.gguf \
-p "A chat between a curious user and an artificial intelligence assistant. The assistant gives helpful, detailed, and polite answers to the user's questions. USER: \nWhat's that? ASSISTANT:" \
```
**output**
```sh
encode_image_with_clip: image encoded in 4902.81 ms by CLIP ( 34.05 ms per image patch)
system_prompt: A chat between a curious user and an artificial intelligence assistant. The assistant gives helpful, detailed, and polite answers to the user's questions. USER:
user_prompt: \nWhat's that? ASSISTANT:
The image features a group of brown and white llamas standing in a grassy field.
llama_print_timings: load time = 7441.06 ms
llama_print_timings: sample time = 0.72 ms / 19 runs ( 0.04 ms per token, 26279.39 tokens per second)
llama_print_timings: prompt eval time = 2090.71 ms / 191 tokens ( 10.95 ms per token, 91.36 tokens per second)
llama_print_timings: eval time = 512.35 ms / 18 runs ( 28.46 ms per token, 35.13 tokens per second)
llama_print_timings: total time = 7987.23 ms / 209 tokens
```
### MobileVLM_V2-1.7B case
**input**
Just the same as above.
**output**
```sh
encode_image_with_clip: image encoded in 4682.44 ms by CLIP ( 32.52 ms per image patch)
system_prompt: A chat between a curious user and an artificial intelligence assistant. The assistant gives helpful, detailed, and polite answers to the user's questions. USER:
user_prompt: \nWhat's that? ASSISTANT:
This image captures a lively scene of a group of 14 llamas in a grassy field. The llamas, with their distinctive black and white coats, are standing and walking in a line, seemingly engaged in a social activity. One
of them, possibly the first in the line, has its back turned, perhaps observing something in the distance.
The llama in the front of the line stands out due to its black and white coloring, which is quite unusual for llama patterns. The llama in the front also seems to be more aware of its surroundings, as it faces the camera, giving a sense of engagement with the viewer.
The image is taken from the side of the llama, providing a clear view of the llama in the front and its companions. The lameness in the llama in
front is not visible, indicating that it might not be the main focus of the photo.
The background of the image features a grassy field, with a fence and a tree visible in the distance. The tree appears to be bare, suggesting that it might be during a time of year when most trees are dormant or have shed their leaves.
llama_print_timings: load time = 7015.35 ms
llama_print_timings: sample time = 10.61 ms / 256 runs ( 0.04 ms per token, 24119.09 tokens per second)
llama_print_timings: prompt eval time = 2052.45 ms / 191 tokens ( 10.75 ms per token, 93.06 tokens per second)
llama_print_timings: eval time = 7259.43 ms / 255 runs ( 28.47 ms per token, 35.13 tokens per second)
llama_print_timings: total time = 14371.19 ms / 446 tokens
```
## TODO
- [x] Support non-CPU backend for the new operators, such as `depthwise`, `hardswish`, `hardsigmoid`
- [ ] Optimize LDP projector performance
- Optimize the structure definition to avoid unnecessary memory rearrangements, to reduce the use of `ggml_permute_cpy`;
- Optimize operator implementation (ARM CPU/NVIDIA GPU): such as depthwise conv, hardswish, hardsigmoid, etc.
- [x] run MobileVLM on `Jetson Orin`
- [ ] Support more model variants, such as `MobileVLM-3B`.
## contributor
```sh
zhangjidong05, yangyang260, huyiming03, chenxiaotao03, ZiangWu-77
```
---
# Source: https://github.com/ggerganov/llama.cpp/blob/master/docs/multimodal/gemma3.md
# Gemma 3 vision
> [!IMPORTANT]
>
> This is very experimental, only used for demo purpose.
## Quick started
You can use pre-quantized model from [ggml-org](https://huggingface.co/ggml-org)'s Hugging Face account
```bash
# build
cmake -B build
cmake --build build --target llama-mtmd-cli
# alternatively, install from brew (MacOS)
brew install llama.cpp
# run it
llama-mtmd-cli -hf ggml-org/gemma-3-4b-it-GGUF
llama-mtmd-cli -hf ggml-org/gemma-3-12b-it-GGUF
llama-mtmd-cli -hf ggml-org/gemma-3-27b-it-GGUF
# note: 1B model does not support vision
```
## How to get mmproj.gguf?
Simply to add `--mmproj` in when converting model via `convert_hf_to_gguf.py`:
```bash
cd gemma-3-4b-it
python ../llama.cpp/convert_hf_to_gguf.py --outfile model.gguf --outtype f16 --mmproj .
# output file: mmproj-model.gguf
```
## How to run it?
What you need:
- The text model GGUF, can be converted using `convert_hf_to_gguf.py`
- The mmproj file from step above
- An image file
```bash
# build
cmake -B build
cmake --build build --target llama-mtmd-cli
# run it
./build/bin/llama-mtmd-cli -m {text_model}.gguf --mmproj mmproj.gguf --image your_image.jpg
```
---
# Source: https://github.com/ggerganov/llama.cpp/blob/master/docs/multimodal/glmedge.md
# GLMV-EDGE
Currently this implementation supports [glm-edge-v-2b](https://huggingface.co/THUDM/glm-edge-v-2b) and [glm-edge-v-5b](https://huggingface.co/THUDM/glm-edge-v-5b).
## Usage
Build the `llama-mtmd-cli` binary.
After building, run: `./llama-mtmd-cli` to see the usage. For example:
```sh
./llama-mtmd-cli -m model_path/ggml-model-f16.gguf --mmproj model_path/mmproj-model-f16.gguf
```
**note**: A lower temperature like 0.1 is recommended for better quality. add `--temp 0.1` to the command to do so.
**note**: For GPU offloading ensure to use the `-ngl` flag just like usual
## GGUF conversion
1. Clone a GLMV-EDGE model ([2B](https://huggingface.co/THUDM/glm-edge-v-2b) or [5B](https://huggingface.co/THUDM/glm-edge-v-5b)). For example:
```sh
git clone https://huggingface.co/THUDM/glm-edge-v-5b or https://huggingface.co/THUDM/glm-edge-v-2b
```
2. Use `glmedge-surgery.py` to split the GLMV-EDGE model to LLM and multimodel projector constituents:
```sh
python ./tools/mtmd/glmedge-surgery.py -m ../model_path
```
4. Use `glmedge-convert-image-encoder-to-gguf.py` to convert the GLMV-EDGE image encoder to GGUF:
```sh
python ./tools/mtmd/glmedge-convert-image-encoder-to-gguf.py -m ../model_path --llava-projector ../model_path/glm.projector --output-dir ../model_path
```
5. Use `examples/convert_hf_to_gguf.py` to convert the LLM part of GLMV-EDGE to GGUF:
```sh
python convert_hf_to_gguf.py ../model_path
```
Now both the LLM part and the image encoder are in the `model_path` directory.
---
# Source: https://github.com/ggerganov/llama.cpp/blob/master/docs/multimodal/granitevision.md
# Granite Vision
Download the model and point your `GRANITE_MODEL` environment variable to the path.
```bash
$ git clone https://huggingface.co/ibm-granite/granite-vision-3.2-2b
$ export GRANITE_MODEL=./granite-vision-3.2-2b
```
### 1. Running llava surgery v2.
First, we need to run the llava surgery script as shown below:
`python llava_surgery_v2.py -C -m $GRANITE_MODEL`
You should see two new files (`llava.clip` and `llava.projector`) written into your model's directory, as shown below.
```bash
$ ls $GRANITE_MODEL | grep -i llava
llava.clip
llava.projector
```
We should see that the projector and visual encoder get split out into the llava files. Quick check to make sure they aren't empty:
```python
import os
import torch
MODEL_PATH = os.getenv("GRANITE_MODEL")
if not MODEL_PATH:
raise ValueError("env var GRANITE_MODEL is unset!")
encoder_tensors = torch.load(os.path.join(MODEL_PATH, "llava.clip"))
projector_tensors = torch.load(os.path.join(MODEL_PATH, "llava.projector"))
assert len(encoder_tensors) > 0
assert len(projector_tensors) > 0
```
If you actually inspect the `.keys()` of the loaded tensors, you should see a lot of `vision_model` tensors in the `encoder_tensors`, and 5 tensors (`'multi_modal_projector.linear_1.bias'`, `'multi_modal_projector.linear_1.weight'`, `'multi_modal_projector.linear_2.bias'`, `'multi_modal_projector.linear_2.weight'`, `'image_newline'`) in the multimodal `projector_tensors`.
### 2. Creating the Visual Component GGUF
Next, create a new directory to hold the visual components, and copy the llava.clip/projector files, as shown below.
```bash
$ ENCODER_PATH=$PWD/visual_encoder
$ mkdir $ENCODER_PATH
$ cp $GRANITE_MODEL/llava.clip $ENCODER_PATH/pytorch_model.bin
$ cp $GRANITE_MODEL/llava.projector $ENCODER_PATH/
```
Now, we need to write a config for the visual encoder. In order to convert the model, be sure to use the correct `image_grid_pinpoints`, as these may vary based on the model. You can find the `image_grid_pinpoints` in `$GRANITE_MODEL/config.json`.
```json
{
"_name_or_path": "siglip-model",
"architectures": [
"SiglipVisionModel"
],
"image_grid_pinpoints": [
[384,384],
[384,768],
[384,1152],
[384,1536],
[384,1920],
[384,2304],
[384,2688],
[384,3072],
[384,3456],
[384,3840],
[768,384],
[768,768],
[768,1152],
[768,1536],
[768,1920],
[1152,384],
[1152,768],
[1152,1152],
[1536,384],
[1536,768],
[1920,384],
[1920,768],
[2304,384],
[2688,384],
[3072,384],
[3456,384],
[3840,384]
],
"mm_patch_merge_type": "spatial_unpad",
"hidden_size": 1152,
"image_size": 384,
"intermediate_size": 4304,
"model_type": "siglip_vision_model",
"num_attention_heads": 16,
"num_hidden_layers": 27,
"patch_size": 14,
"layer_norm_eps": 1e-6,
"hidden_act": "gelu_pytorch_tanh",
"projection_dim": 0,
"vision_feature_layer": [-24, -20, -12, -1]
}
```
At this point you should have something like this:
```bash
$ ls $ENCODER_PATH
config.json llava.projector pytorch_model.bin
```
Now convert the components to GGUF; Note that we also override the image mean/std dev to `[.5,.5,.5]` since we use the SigLIP visual encoder - in the transformers model, you can find these numbers in the `preprocessor_config.json`.
```bash
$ python convert_image_encoder_to_gguf.py \
-m $ENCODER_PATH \
--llava-projector $ENCODER_PATH/llava.projector \
--output-dir $ENCODER_PATH \
--clip-model-is-vision \
--clip-model-is-siglip \
--image-mean 0.5 0.5 0.5 \
--image-std 0.5 0.5 0.5
```
This will create the first GGUF file at `$ENCODER_PATH/mmproj-model-f16.gguf`; we will refer to the absolute path of this file as the `$VISUAL_GGUF_PATH.`
### 3. Creating the LLM GGUF.
The granite vision model contains a granite LLM as its language model. For now, the easiest way to get the GGUF for LLM is by loading the composite model in `transformers` and exporting the LLM so that it can be directly converted with the normal conversion path.
First, set the `LLM_EXPORT_PATH` to the path to export the `transformers` LLM to.
```bash
$ export LLM_EXPORT_PATH=$PWD/granite_vision_llm
```
```python
import os
import transformers
MODEL_PATH = os.getenv("GRANITE_MODEL")
if not MODEL_PATH:
raise ValueError("env var GRANITE_MODEL is unset!")
LLM_EXPORT_PATH = os.getenv("LLM_EXPORT_PATH")
if not LLM_EXPORT_PATH:
raise ValueError("env var LLM_EXPORT_PATH is unset!")
tokenizer = transformers.AutoTokenizer.from_pretrained(MODEL_PATH)
# NOTE: granite vision support was added to transformers very recently (4.49);
# if you get size mismatches, your version is too old.
# If you are running with an older version, set `ignore_mismatched_sizes=True`
# as shown below; it won't be loaded correctly, but the LLM part of the model that
# we are exporting will be loaded correctly.
model = transformers.AutoModelForImageTextToText.from_pretrained(MODEL_PATH, ignore_mismatched_sizes=True)
tokenizer.save_pretrained(LLM_EXPORT_PATH)
model.language_model.save_pretrained(LLM_EXPORT_PATH)
```
Now you can convert the exported LLM to GGUF with the normal converter in the root of the llama cpp project.
```bash
$ LLM_GGUF_PATH=$LLM_EXPORT_PATH/granite_llm.gguf
...
$ python convert_hf_to_gguf.py --outfile $LLM_GGUF_PATH $LLM_EXPORT_PATH
```
### 4. Quantization
If you want to quantize the LLM, you can do so with `llama-quantize` as you would any other LLM. For example:
```bash
$ ./build/bin/llama-quantize $LLM_EXPORT_PATH/granite_llm.gguf $LLM_EXPORT_PATH/granite_llm_q4_k_m.gguf Q4_K_M
$ LLM_GGUF_PATH=$LLM_EXPORT_PATH/granite_llm_q4_k_m.gguf
```
Note that currently you cannot quantize the visual encoder because granite vision models use SigLIP as the visual encoder, which has tensor dimensions that are not divisible by 32.
### 5. Running the Model in Llama cpp
Build llama cpp normally; you should have a target binary named `llama-mtmd-cli`, which you can pass two binaries to. As an example, we pass the the llama.cpp banner.
```bash
$ ./build/bin/llama-mtmd-cli -m $LLM_GGUF_PATH \
--mmproj $VISUAL_GGUF_PATH \
-c 16384 \
--temp 0
```
---
# Source: https://github.com/ggerganov/llama.cpp/blob/master/docs/multimodal/llava.md
# LLaVA
Currently this implementation supports [llava-v1.5](https://huggingface.co/liuhaotian/llava-v1.5-7b) variants,
as well as llava-1.6 [llava-v1.6](https://huggingface.co/collections/liuhaotian/llava-16-65b9e40155f60fd046a5ccf2) variants.
The pre-converted [7b](https://huggingface.co/mys/ggml_llava-v1.5-7b)
and [13b](https://huggingface.co/mys/ggml_llava-v1.5-13b)
models are available.
For llava-1.6 a variety of prepared gguf models are available as well [7b-34b](https://huggingface.co/cmp-nct/llava-1.6-gguf)
After API is confirmed, more models will be supported / uploaded.
## Usage
Build the `llama-mtmd-cli` binary.
After building, run: `./llama-mtmd-cli` to see the usage. For example:
```sh
./llama-mtmd-cli -m ../llava-v1.5-7b/ggml-model-f16.gguf \
--mmproj ../llava-v1.5-7b/mmproj-model-f16.gguf \
--chat-template vicuna
```
**note**: A lower temperature like 0.1 is recommended for better quality. add `--temp 0.1` to the command to do so.
**note**: For GPU offloading ensure to use the `-ngl` flag just like usual
## LLaVA 1.5
1. Clone a LLaVA and a CLIP model ([available options](https://github.com/haotian-liu/LLaVA/blob/main/docs/MODEL_ZOO.md)). For example:
```sh
git clone https://huggingface.co/liuhaotian/llava-v1.5-7b
git clone https://huggingface.co/openai/clip-vit-large-patch14-336
```
2. Install the required Python packages:
```sh
pip install -r tools/mtmd/requirements.txt
```
3. Use `llava_surgery.py` to split the LLaVA model to LLaMA and multimodel projector constituents:
```sh
python ./tools/mtmd/llava_surgery.py -m ../llava-v1.5-7b
```
4. Use `convert_image_encoder_to_gguf.py` to convert the LLaVA image encoder to GGUF:
```sh
python ./tools/mtmd/convert_image_encoder_to_gguf.py -m ../clip-vit-large-patch14-336 --llava-projector ../llava-v1.5-7b/llava.projector --output-dir ../llava-v1.5-7b
```
5. Use `examples/convert_legacy_llama.py` to convert the LLaMA part of LLaVA to GGUF:
```sh
python ./examples/convert_legacy_llama.py ../llava-v1.5-7b --skip-unknown
```
Now both the LLaMA part and the image encoder are in the `llava-v1.5-7b` directory.
## LLaVA 1.6 gguf conversion
1) First clone a LLaVA 1.6 model:
```console
git clone https://huggingface.co/liuhaotian/llava-v1.6-vicuna-7b
```
2) Install the required Python packages:
```sh
pip install -r tools/mtmd/requirements.txt
```
3) Use `llava_surgery_v2.py` which also supports llava-1.5 variants pytorch as well as safetensor models:
```console
python tools/mtmd/llava_surgery_v2.py -C -m ../llava-v1.6-vicuna-7b/
```
- you will find a llava.projector and a llava.clip file in your model directory
4) Copy the llava.clip file into a subdirectory (like vit), rename it to pytorch_model.bin and add a fitting vit configuration to the directory:
```console
mkdir vit
cp ../llava-v1.6-vicuna-7b/llava.clip vit/pytorch_model.bin
cp ../llava-v1.6-vicuna-7b/llava.projector vit/
curl -s -q https://huggingface.co/cmp-nct/llava-1.6-gguf/raw/main/config_vit.json -o vit/config.json
```
5) Create the visual gguf model:
```console
python ./tools/mtmd/convert_image_encoder_to_gguf.py -m vit --llava-projector vit/llava.projector --output-dir vit --clip-model-is-vision
```
- This is similar to llava-1.5, the difference is that we tell the encoder that we are working with the pure vision model part of CLIP
6) Then convert the model to gguf format:
```console
python ./examples/convert_legacy_llama.py ../llava-v1.6-vicuna-7b/ --skip-unknown
```
7) And finally we can run the llava cli using the 1.6 model version:
```console
./llama-mtmd-cli -m ../llava-v1.6-vicuna-7b/ggml-model-f16.gguf --mmproj vit/mmproj-model-f16.gguf
```
**note** llava-1.6 needs more context than llava-1.5, at least 3000 is needed (just run it at -c 4096)
**note** llava-1.6 greatly benefits from batched prompt processing (defaults work)
**note** if the language model in step `6)` is incompatible with the legacy conversion script, the easiest way handle the LLM model conversion is to load the model in transformers, and export only the LLM from the llava next model.
```python
import os
import transformers
model_path = ...
llm_export_path = ...
tokenizer = transformers.AutoTokenizer.from_pretrained(model_path)
model = transformers.AutoModelForImageTextToText.from_pretrained(model_path)
tokenizer.save_pretrained(llm_export_path)
model.language_model.save_pretrained(llm_export_path)
```
Then, you can convert the LLM using the `convert_hf_to_gguf.py` script, which handles more LLM architectures.
## Chat template
For llava-1.5 and llava-1.6, you need to use `vicuna` chat template. Simply add `--chat-template vicuna` to activate this template.
## How to know if you are running in llava-1.5 or llava-1.6 mode
When running llava-cli you will see a visual information right before the prompt is being processed:
**Llava-1.5:**
`encode_image_with_clip: image embedding created: 576 tokens`
**Llava-1.6 (anything above 576):**
`encode_image_with_clip: image embedding created: 2880 tokens`
Alternatively just pay notice to how many "tokens" have been used for your prompt, it will also show 1000+ tokens for llava-1.6
---
# Source: https://github.com/ggerganov/llama.cpp/blob/master/docs/multimodal/minicpmo2.6.md
## MiniCPM-o 2.6
Currently, this readme only supports minicpm-omni's image capabilities, and we will update the full-mode support as soon as possible.
### Prepare models and code
Download [MiniCPM-o-2_6](https://huggingface.co/openbmb/MiniCPM-o-2_6) PyTorch model from huggingface to "MiniCPM-o-2_6" folder.
### Build llama.cpp
Readme modification time: 20250206
If there are differences in usage, please refer to the official build [documentation](https://github.com/ggerganov/llama.cpp/blob/master/docs/build.md)
Clone llama.cpp:
```bash
git clone https://github.com/ggml-org/llama.cpp
cd llama.cpp
```
Build llama.cpp using `CMake`:
```bash
cmake -B build
cmake --build build --config Release
```
### Usage of MiniCPM-o 2.6
Convert PyTorch model to gguf files (You can also download the converted [gguf](https://huggingface.co/openbmb/MiniCPM-o-2_6-gguf) by us)
```bash
python ./tools/mtmd/legacy-models/minicpmv-surgery.py -m ../MiniCPM-o-2_6
python ./tools/mtmd/legacy-models/minicpmv-convert-image-encoder-to-gguf.py -m ../MiniCPM-o-2_6 --minicpmv-projector ../MiniCPM-o-2_6/minicpmv.projector --output-dir ../MiniCPM-o-2_6/ --minicpmv_version 4
python ./convert_hf_to_gguf.py ../MiniCPM-o-2_6/model
# quantize int4 version
./build/bin/llama-quantize ../MiniCPM-o-2_6/model/ggml-model-f16.gguf ../MiniCPM-o-2_6/model/ggml-model-Q4_K_M.gguf Q4_K_M
```
Inference on Linux or Mac
```bash
# run in single-turn mode
./build/bin/llama-mtmd-cli -m ../MiniCPM-o-2_6/model/ggml-model-f16.gguf --mmproj ../MiniCPM-o-2_6/mmproj-model-f16.gguf -c 4096 --temp 0.7 --top-p 0.8 --top-k 100 --repeat-penalty 1.05 --image xx.jpg -p "What is in the image?"
# run in conversation mode
./build/bin/llama-mtmd-cli -m ../MiniCPM-o-2_6/model/ggml-model-Q4_K_M.gguf --mmproj ../MiniCPM-o-2_6/mmproj-model-f16.gguf
```
---
# Source: https://github.com/ggerganov/llama.cpp/blob/master/docs/multimodal/minicpmo4.0.md
## MiniCPM-o 4
### Prepare models and code
Download [MiniCPM-o-4](https://huggingface.co/openbmb/MiniCPM-o-4) PyTorch model from huggingface to "MiniCPM-o-4" folder.
### Build llama.cpp
Readme modification time: 20250206
If there are differences in usage, please refer to the official build [documentation](https://github.com/ggerganov/llama.cpp/blob/master/docs/build.md)
Clone llama.cpp:
```bash
git clone https://github.com/ggerganov/llama.cpp
cd llama.cpp
```
Build llama.cpp using `CMake`:
```bash
cmake -B build
cmake --build build --config Release
```
### Usage of MiniCPM-o 4
Convert PyTorch model to gguf files (You can also download the converted [gguf](https://huggingface.co/openbmb/MiniCPM-o-4-gguf) by us)
```bash
python ./tools/mtmd/legacy-models/minicpmv-surgery.py -m ../MiniCPM-o-4
python ./tools/mtmd/legacy-models/minicpmv-convert-image-encoder-to-gguf.py -m ../MiniCPM-o-4 --minicpmv-projector ../MiniCPM-o-4/minicpmv.projector --output-dir ../MiniCPM-o-4/ --minicpmv_version 6
python ./convert_hf_to_gguf.py ../MiniCPM-o-4/model
# quantize int4 version
./build/bin/llama-quantize ../MiniCPM-o-4/model/ggml-model-f16.gguf ../MiniCPM-o-4/model/ggml-model-Q4_K_M.gguf Q4_K_M
```
Inference on Linux or Mac
```bash
# run in single-turn mode
./build/bin/llama-mtmd-cli -m ../MiniCPM-o-4/model/ggml-model-f16.gguf --mmproj ../MiniCPM-o-4/mmproj-model-f16.gguf -c 4096 --temp 0.7 --top-p 0.8 --top-k 100 --repeat-penalty 1.05 --image xx.jpg -p "What is in the image?"
# run in conversation mode
./build/bin/llama-mtmd-cli -m ../MiniCPM-o-4/model/ggml-model-Q4_K_M.gguf --mmproj ../MiniCPM-o-4/mmproj-model-f16.gguf
```
---
# Source: https://github.com/ggerganov/llama.cpp/blob/master/docs/multimodal/minicpmv2.5.md
## MiniCPM-Llama3-V 2.5
### Prepare models and code
Download [MiniCPM-Llama3-V-2_5](https://huggingface.co/openbmb/MiniCPM-Llama3-V-2_5) PyTorch model from huggingface to "MiniCPM-Llama3-V-2_5" folder.
### Build llama.cpp
Readme modification time: 20250206
If there are differences in usage, please refer to the official build [documentation](https://github.com/ggerganov/llama.cpp/blob/master/docs/build.md)
Clone llama.cpp:
```bash
git clone https://github.com/ggml-org/llama.cpp
cd llama.cpp
```
Build llama.cpp using `CMake`:
```bash
cmake -B build
cmake --build build --config Release
```
### Usage of MiniCPM-Llama3-V 2.5
Convert PyTorch model to gguf files (You can also download the converted [gguf](https://huggingface.co/openbmb/MiniCPM-Llama3-V-2_5-gguf) by us)
```bash
python ./tools/mtmd/legacy-models/minicpmv-surgery.py -m ../MiniCPM-Llama3-V-2_5
python ./tools/mtmd/legacy-models/minicpmv-convert-image-encoder-to-gguf.py -m ../MiniCPM-Llama3-V-2_5 --minicpmv-projector ../MiniCPM-Llama3-V-2_5/minicpmv.projector --output-dir ../MiniCPM-Llama3-V-2_5/ --minicpmv_version 2
python ./convert_hf_to_gguf.py ../MiniCPM-Llama3-V-2_5/model
# quantize int4 version
./build/bin/llama-quantize ../MiniCPM-Llama3-V-2_5/model/model-8B-F16.gguf ../MiniCPM-Llama3-V-2_5/model/ggml-model-Q4_K_M.gguf Q4_K_M
```
Inference on Linux or Mac
```bash
# run in single-turn mode
./build/bin/llama-mtmd-cli -m ../MiniCPM-Llama3-V-2_5/model/model-8B-F16.gguf --mmproj ../MiniCPM-Llama3-V-2_5/mmproj-model-f16.gguf -c 4096 --temp 0.7 --top-p 0.8 --top-k 100 --repeat-penalty 1.05 --image xx.jpg -p "What is in the image?"
# run in conversation mode
./build/bin/llama-mtmd-cli -m ../MiniCPM-Llama3-V-2_5/model/ggml-model-Q4_K_M.gguf --mmproj ../MiniCPM-Llama3-V-2_5/mmproj-model-f16.gguf
```
---
# Source: https://github.com/ggerganov/llama.cpp/blob/master/docs/multimodal/minicpmv2.6.md
## MiniCPM-V 2.6
### Prepare models and code
Download [MiniCPM-V-2_6](https://huggingface.co/openbmb/MiniCPM-V-2_6) PyTorch model from huggingface to "MiniCPM-V-2_6" folder.
### Build llama.cpp
Readme modification time: 20250206
If there are differences in usage, please refer to the official build [documentation](https://github.com/ggerganov/llama.cpp/blob/master/docs/build.md)
Clone llama.cpp:
```bash
git clone https://github.com/ggml-org/llama.cpp
cd llama.cpp
```
Build llama.cpp using `CMake`:
```bash
cmake -B build
cmake --build build --config Release
```
### Usage of MiniCPM-V 2.6
Convert PyTorch model to gguf files (You can also download the converted [gguf](https://huggingface.co/openbmb/MiniCPM-V-2_6-gguf) by us)
```bash
python ./tools/mtmd/legacy-models/minicpmv-surgery.py -m ../MiniCPM-V-2_6
python ./tools/mtmd/legacy-models/minicpmv-convert-image-encoder-to-gguf.py -m ../MiniCPM-V-2_6 --minicpmv-projector ../MiniCPM-V-2_6/minicpmv.projector --output-dir ../MiniCPM-V-2_6/ --minicpmv_version 3
python ./convert_hf_to_gguf.py ../MiniCPM-V-2_6/model
# quantize int4 version
./build/bin/llama-quantize ../MiniCPM-V-2_6/model/ggml-model-f16.gguf ../MiniCPM-V-2_6/model/ggml-model-Q4_K_M.gguf Q4_K_M
```
Inference on Linux or Mac
```bash
# run in single-turn mode
./build/bin/llama-mtmd-cli -m ../MiniCPM-V-2_6/model/ggml-model-f16.gguf --mmproj ../MiniCPM-V-2_6/mmproj-model-f16.gguf -c 4096 --temp 0.7 --top-p 0.8 --top-k 100 --repeat-penalty 1.05 --image xx.jpg -p "What is in the image?"
# run in conversation mode
./build/bin/llama-mtmd-cli -m ../MiniCPM-V-2_6/model/ggml-model-Q4_K_M.gguf --mmproj ../MiniCPM-V-2_6/mmproj-model-f16.gguf
```
---
# Source: https://github.com/ggerganov/llama.cpp/blob/master/docs/multimodal/minicpmv4.0.md
## MiniCPM-V 4
### Prepare models and code
Download [MiniCPM-V-4](https://huggingface.co/openbmb/MiniCPM-V-4) PyTorch model from huggingface to "MiniCPM-V-4" folder.
### Build llama.cpp
Readme modification time: 20250731
If there are differences in usage, please refer to the official build [documentation](https://github.com/ggerganov/llama.cpp/blob/master/docs/build.md)
Clone llama.cpp:
```bash
git clone https://github.com/ggerganov/llama.cpp
cd llama.cpp
```
Build llama.cpp using `CMake`:
```bash
cmake -B build
cmake --build build --config Release
```
### Usage of MiniCPM-V 4
Convert PyTorch model to gguf files (You can also download the converted [gguf](https://huggingface.co/openbmb/MiniCPM-V-4-gguf) by us)
```bash
python ./tools/mtmd/legacy-models/minicpmv-surgery.py -m ../MiniCPM-V-4
python ./tools/mtmd/legacy-models/minicpmv-convert-image-encoder-to-gguf.py -m ../MiniCPM-V-4 --minicpmv-projector ../MiniCPM-V-4/minicpmv.projector --output-dir ../MiniCPM-V-4/ --minicpmv_version 5
python ./convert_hf_to_gguf.py ../MiniCPM-V-4/model
# quantize int4 version
./build/bin/llama-quantize ../MiniCPM-V-4/model/ggml-model-f16.gguf ../MiniCPM-V-4/model/ggml-model-Q4_K_M.gguf Q4_K_M
```
Inference on Linux or Mac
```bash
# run in single-turn mode
./build/bin/llama-mtmd-cli -m ../MiniCPM-V-4/model/ggml-model-f16.gguf --mmproj ../MiniCPM-V-4/mmproj-model-f16.gguf -c 4096 --temp 0.7 --top-p 0.8 --top-k 100 --repeat-penalty 1.05 --image xx.jpg -p "What is in the image?"
# run in conversation mode
./build/bin/llama-mtmd-cli -m ../MiniCPM-V-4/model/ggml-model-Q4_K_M.gguf --mmproj ../MiniCPM-V-4/mmproj-model-f16.gguf
```
---
# Source: https://github.com/ggerganov/llama.cpp/blob/master/docs/multimodal/minicpmv4.5.md
## MiniCPM-V 4.5
### Prepare models and code
Download [MiniCPM-V-4_5](https://huggingface.co/openbmb/MiniCPM-V-4_5) PyTorch model from huggingface to "MiniCPM-V-4_5" folder.
### Build llama.cpp
Readme modification time: 20250826
If there are differences in usage, please refer to the official build [documentation](https://github.com/ggerganov/llama.cpp/blob/master/docs/build.md)
Clone llama.cpp:
```bash
git clone https://github.com/ggerganov/llama.cpp
cd llama.cpp
```
Build llama.cpp using `CMake`:
```bash
cmake -B build
cmake --build build --config Release
```
### Usage of MiniCPM-V 4
Convert PyTorch model to gguf files (You can also download the converted [gguf](https://huggingface.co/openbmb/MiniCPM-V-4_5-gguf) by us)
```bash
python ./tools/mtmd/legacy-models/minicpmv-surgery.py -m ../MiniCPM-V-4_5
python ./tools/mtmd/legacy-models/minicpmv-convert-image-encoder-to-gguf.py -m ../MiniCPM-V-4_5 --minicpmv-projector ../MiniCPM-V-4_5/minicpmv.projector --output-dir ../MiniCPM-V-4_5/ --minicpmv_version 6
python ./convert_hf_to_gguf.py ../MiniCPM-V-4_5/model
# quantize int4 version
./build/bin/llama-quantize ../MiniCPM-V-4_5/model/ggml-model-f16.gguf ../MiniCPM-V-4_5/model/ggml-model-Q4_K_M.gguf Q4_K_M
```
Inference on Linux or Mac
```bash
# run in single-turn mode
./build/bin/llama-mtmd-cli -m ../MiniCPM-V-4_5/model/ggml-model-f16.gguf --mmproj ../MiniCPM-V-4_5/mmproj-model-f16.gguf -c 4096 --temp 0.7 --top-p 0.8 --top-k 100 --repeat-penalty 1.05 --image xx.jpg -p "What is in the image?"
# run in conversation mode
./build/bin/llama-mtmd-cli -m ../MiniCPM-V-4_5/model/ggml-model-Q4_K_M.gguf --mmproj ../MiniCPM-V-4_5/mmproj-model-f16.gguf
```
---
# Source: https://github.com/ggerganov/llama.cpp/blob/master/docs/multimodal.md
# Multimodal
llama.cpp supports multimodal input via `libmtmd`. Currently, there are 2 tools support this feature:
- [llama-mtmd-cli](../tools/mtmd/README.md)
- [llama-server](../tools/server/README.md) via OpenAI-compatible `/chat/completions` API
Currently, we support **image** and **audio** input. Audio is highly experimental and may have reduced quality.
To enable it, you can use one of the 2 methods below:
- Use `-hf` option with a supported model (see a list of pre-quantized model below)
- To load a model using `-hf` while disabling multimodal, use `--no-mmproj`
- To load a model using `-hf` while using a custom mmproj file, use `--mmproj local_file.gguf`
- Use `-m model.gguf` option with `--mmproj file.gguf` to specify text and multimodal projector respectively
By default, multimodal projector will be offloaded to GPU. To disable this, add `--no-mmproj-offload`
For example:
```sh
# simple usage with CLI
llama-mtmd-cli -hf ggml-org/gemma-3-4b-it-GGUF
# simple usage with server
llama-server -hf ggml-org/gemma-3-4b-it-GGUF
# using local file
llama-server -m gemma-3-4b-it-Q4_K_M.gguf --mmproj mmproj-gemma-3-4b-it-Q4_K_M.gguf
# no GPU offload
llama-server -hf ggml-org/gemma-3-4b-it-GGUF --no-mmproj-offload
```
## Pre-quantized models
These are ready-to-use models, most of them come with `Q4_K_M` quantization by default. They can be found at the Hugging Face page of the ggml-org: https://huggingface.co/collections/ggml-org/multimodal-ggufs-68244e01ff1f39e5bebeeedc
Replaces the `(tool_name)` with the name of binary you want to use. For example, `llama-mtmd-cli` or `llama-server`
NOTE: some models may require large context window, for example: `-c 8192`
**Vision models**:
```sh
# Gemma 3
(tool_name) -hf ggml-org/gemma-3-4b-it-GGUF
(tool_name) -hf ggml-org/gemma-3-12b-it-GGUF
(tool_name) -hf ggml-org/gemma-3-27b-it-GGUF
# SmolVLM
(tool_name) -hf ggml-org/SmolVLM-Instruct-GGUF
(tool_name) -hf ggml-org/SmolVLM-256M-Instruct-GGUF
(tool_name) -hf ggml-org/SmolVLM-500M-Instruct-GGUF
(tool_name) -hf ggml-org/SmolVLM2-2.2B-Instruct-GGUF
(tool_name) -hf ggml-org/SmolVLM2-256M-Video-Instruct-GGUF
(tool_name) -hf ggml-org/SmolVLM2-500M-Video-Instruct-GGUF
# Pixtral 12B
(tool_name) -hf ggml-org/pixtral-12b-GGUF
# Qwen 2 VL
(tool_name) -hf ggml-org/Qwen2-VL-2B-Instruct-GGUF
(tool_name) -hf ggml-org/Qwen2-VL-7B-Instruct-GGUF
# Qwen 2.5 VL
(tool_name) -hf ggml-org/Qwen2.5-VL-3B-Instruct-GGUF
(tool_name) -hf ggml-org/Qwen2.5-VL-7B-Instruct-GGUF
(tool_name) -hf ggml-org/Qwen2.5-VL-32B-Instruct-GGUF
(tool_name) -hf ggml-org/Qwen2.5-VL-72B-Instruct-GGUF
# Mistral Small 3.1 24B (IQ2_M quantization)
(tool_name) -hf ggml-org/Mistral-Small-3.1-24B-Instruct-2503-GGUF
# InternVL 2.5 and 3
(tool_name) -hf ggml-org/InternVL2_5-1B-GGUF
(tool_name) -hf ggml-org/InternVL2_5-4B-GGUF
(tool_name) -hf ggml-org/InternVL3-1B-Instruct-GGUF
(tool_name) -hf ggml-org/InternVL3-2B-Instruct-GGUF
(tool_name) -hf ggml-org/InternVL3-8B-Instruct-GGUF
(tool_name) -hf ggml-org/InternVL3-14B-Instruct-GGUF
# Llama 4 Scout
(tool_name) -hf ggml-org/Llama-4-Scout-17B-16E-Instruct-GGUF
# Moondream2 20250414 version
(tool_name) -hf ggml-org/moondream2-20250414-GGUF
```
**Audio models**:
```sh
# Ultravox 0.5
(tool_name) -hf ggml-org/ultravox-v0_5-llama-3_2-1b-GGUF
(tool_name) -hf ggml-org/ultravox-v0_5-llama-3_1-8b-GGUF
# Qwen2-Audio and SeaLLM-Audio
# note: no pre-quantized GGUF this model, as they have very poor result
# ref: https://github.com/ggml-org/llama.cpp/pull/13760
# Mistral's Voxtral
(tool_name) -hf ggml-org/Voxtral-Mini-3B-2507-GGUF
```
**Mixed modalities**:
```sh
# Qwen2.5 Omni
# Capabilities: audio input, vision input
(tool_name) -hf ggml-org/Qwen2.5-Omni-3B-GGUF
(tool_name) -hf ggml-org/Qwen2.5-Omni-7B-GGUF
```
## Finding more models:
GGUF models on Huggingface with vision capabilities can be found here: https://huggingface.co/models?pipeline_tag=image-text-to-text&sort=trending&search=gguf
---
# Source: https://github.com/ggerganov/llama.cpp/blob/master/docs/ops.md
# GGML Operations
List of GGML operations and backend support status.
## How to add a backend to this table:
1. Run `test-backend-ops support --output csv` with your backend name and redirect output to a csv file in `docs/ops/` (e.g., `docs/ops/CUDA.csv`)
2. Regenerate `/docs/ops.md` via `./scripts/create_ops_docs.py`
Legend:
- ✅ Fully supported by this backend
- 🟡 Partially supported by this backend
- ❌ Not supported by this backend
| Operation | BLAS | CANN | CPU | CUDA | Metal | OpenCL | SYCL | Vulkan | WebGPU | ZenDNN | zDNN |
|-----------|------|------|------|------|------|------|------|------|------|------|------|
| ABS | ❌ | ✅ | ✅ | 🟡 | 🟡 | ❌ | ✅ | 🟡 | ✅ | ❌ | ❌ |
| ACC | ❌ | ✅ | ✅ | ✅ | ✅ | ❌ | ✅ | ✅ | ❌ | ❌ | ❌ |
| ADD | ❌ | ✅ | ✅ | ✅ | 🟡 | ✅ | ✅ | ✅ | ✅ | ❌ | ❌ |
| ADD1 | ❌ | ✅ | ✅ | ✅ | ❌ | ❌ | ✅ | ✅ | ❌ | ❌ | ❌ |
| ADD_ID | ❌ | ❌ | ✅ | ✅ | ✅ | ✅ | ✅ | ✅ | ❌ | ❌ | ❌ |
| ARANGE | ❌ | ✅ | ✅ | ✅ | ✅ | ❌ | ✅ | ✅ | ❌ | ❌ | ❌ |
| ARGMAX | ❌ | ✅ | ✅ | ✅ | ✅ | ❌ | ✅ | ✅ | ✅ | ❌ | ❌ |
| ARGSORT | ❌ | ✅ | ✅ | ✅ | ✅ | 🟡 | 🟡 | ✅ | ✅ | ❌ | ❌ |
| CEIL | ❌ | ❌ | ✅ | 🟡 | ❌ | ❌ | 🟡 | 🟡 | ✅ | ❌ | ❌ |
| CLAMP | ❌ | ✅ | ✅ | ✅ | 🟡 | 🟡 | ✅ | 🟡 | ✅ | ❌ | ❌ |
| CONCAT | ❌ | ✅ | ✅ | 🟡 | ✅ | 🟡 | ✅ | ✅ | ❌ | ❌ | ❌ |
| CONT | ❌ | 🟡 | ✅ | ✅ | ✅ | 🟡 | 🟡 | ✅ | 🟡 | ❌ | ❌ |
| CONV_2D | ❌ | ❌ | ✅ | ✅ | ✅ | ✅ | ❌ | ✅ | ❌ | ❌ | ❌ |
| CONV_2D_DW | ❌ | ❌ | ✅ | ✅ | ❌ | ❌ | ❌ | ✅ | ❌ | ❌ | ❌ |
| CONV_3D | ❌ | ❌ | ✅ | ❌ | ❌ | ❌ | ❌ | ❌ | ❌ | ❌ | ❌ |
| CONV_TRANSPOSE_1D | ❌ | ✅ | ✅ | ✅ | ✅ | ❌ | ✅ | ✅ | ❌ | ❌ | ❌ |
| CONV_TRANSPOSE_2D | ❌ | ❌ | ✅ | ✅ | ✅ | ❌ | ❌ | ✅ | ❌ | ❌ | ❌ |
| COS | ❌ | ✅ | ✅ | ✅ | 🟡 | ❌ | ✅ | 🟡 | ❌ | ❌ | ❌ |
| COUNT_EQUAL | ❌ | ✅ | ✅ | ✅ | ✅ | ❌ | ✅ | ✅ | ❌ | ❌ | ❌ |
| CPY | ❌ | 🟡 | 🟡 | 🟡 | 🟡 | 🟡 | 🟡 | 🟡 | 🟡 | ❌ | ❌ |
| CROSS_ENTROPY_LOSS | ❌ | ✅ | ✅ | ✅ | ❌ | ❌ | ❌ | ❌ | ❌ | ❌ | ❌ |
| CROSS_ENTROPY_LOSS_BACK | ❌ | ❌ | ✅ | ✅ | ❌ | ❌ | ❌ | ❌ | ❌ | ❌ | ❌ |
| CUMSUM | ❌ | ❌ | ✅ | ✅ | ✅ | ❌ | ❌ | ✅ | ✅ | ❌ | ❌ |
| DIAG | ❌ | ❌ | ✅ | ✅ | ❌ | ❌ | ❌ | ❌ | ❌ | ❌ | ❌ |
| DIAG_MASK_INF | ❌ | ✅ | ✅ | ✅ | ❌ | 🟡 | ✅ | ✅ | ❌ | ❌ | ❌ |
| DIV | ❌ | ✅ | ✅ | ✅ | 🟡 | ✅ | ✅ | ✅ | ✅ | ❌ | ❌ |
| DUP | ❌ | ✅ | ✅ | 🟡 | 🟡 | 🟡 | ✅ | ✅ | ❌ | ❌ | ❌ |
| ELU | ❌ | ✅ | ✅ | 🟡 | 🟡 | ❌ | ✅ | ❌ | ✅ | ❌ | ❌ |
| EXP | ❌ | ✅ | ✅ | 🟡 | 🟡 | ❌ | ✅ | 🟡 | ✅ | ❌ | ❌ |
| EXPM1 | ❌ | ❌ | ✅ | 🟡 | 🟡 | ❌ | ❌ | ❌ | ✅ | ❌ | ❌ |
| FILL | ❌ | ❌ | ✅ | ✅ | ✅ | ❌ | ❌ | ✅ | ✅ | ❌ | ❌ |
| FLASH_ATTN_EXT | ❌ | 🟡 | ✅ | 🟡 | 🟡 | 🟡 | ❌ | 🟡 | 🟡 | ❌ | ❌ |
| FLOOR | ❌ | ❌ | ✅ | 🟡 | ❌ | ❌ | 🟡 | 🟡 | ✅ | ❌ | ❌ |
| GATED_LINEAR_ATTN | ❌ | ✅ | ✅ | ✅ | ❌ | ❌ | ✅ | ❌ | ❌ | ❌ | ❌ |
| GEGLU | ❌ | ✅ | ✅ | ✅ | 🟡 | ✅ | ✅ | 🟡 | ✅ | ❌ | ❌ |
| GEGLU_ERF | ❌ | ✅ | ✅ | ✅ | 🟡 | ✅ | ✅ | 🟡 | ✅ | ❌ | ❌ |
| GEGLU_QUICK | ❌ | ✅ | ✅ | ✅ | 🟡 | ✅ | ✅ | 🟡 | ✅ | ❌ | ❌ |
| GELU | ❌ | ✅ | ✅ | 🟡 | 🟡 | 🟡 | ✅ | 🟡 | ✅ | ❌ | ❌ |
| GELU_ERF | ❌ | ✅ | ✅ | 🟡 | 🟡 | 🟡 | ✅ | 🟡 | ✅ | ❌ | ❌ |
| GELU_QUICK | ❌ | ✅ | ✅ | 🟡 | 🟡 | 🟡 | ✅ | 🟡 | ✅ | ❌ | ❌ |
| GET_ROWS | ❌ | 🟡 | ✅ | 🟡 | ✅ | 🟡 | 🟡 | 🟡 | 🟡 | ❌ | ❌ |
| GET_ROWS_BACK | ❌ | ❌ | 🟡 | 🟡 | ❌ | ❌ | ❌ | ❌ | ❌ | ❌ | ❌ |
| GROUP_NORM | ❌ | ✅ | ✅ | ✅ | ✅ | ✅ | ✅ | ✅ | ❌ | ❌ | ❌ |
| HARDSIGMOID | ❌ | ✅ | ✅ | 🟡 | 🟡 | ❌ | ✅ | 🟡 | ✅ | ❌ | ❌ |
| HARDSWISH | ❌ | ✅ | ✅ | 🟡 | 🟡 | ❌ | ✅ | 🟡 | ✅ | ❌ | ❌ |
| IM2COL | ❌ | ✅ | ✅ | ✅ | ✅ | ✅ | ✅ | ✅ | ❌ | ❌ | ❌ |
| IM2COL_3D | ❌ | ❌ | ✅ | ✅ | ❌ | ❌ | ❌ | ✅ | ❌ | ❌ | ❌ |
| L2_NORM | ❌ | ✅ | ✅ | ✅ | ✅ | ❌ | ✅ | ✅ | ❌ | ❌ | ❌ |
| LEAKY_RELU | ❌ | ✅ | ✅ | ✅ | 🟡 | ❌ | ✅ | 🟡 | ❌ | ❌ | ❌ |
| LOG | ❌ | ✅ | ✅ | ✅ | 🟡 | ❌ | ✅ | ✅ | ✅ | ❌ | ❌ |
| MEAN | ❌ | ✅ | ✅ | ✅ | ✅ | ✅ | ✅ | ✅ | ❌ | ❌ | ❌ |
| MUL | ❌ | ✅ | ✅ | ✅ | 🟡 | ✅ | ✅ | ✅ | ✅ | ❌ | ❌ |
| MUL_MAT | 🟡 | 🟡 | 🟡 | 🟡 | ✅ | 🟡 | 🟡 | 🟡 | 🟡 | 🟡 | 🟡 |
| MUL_MAT_ID | ❌ | 🟡 | ✅ | ✅ | ✅ | 🟡 | 🟡 | ✅ | ❌ | ❌ | ❌ |
| NEG | ❌ | ✅ | ✅ | 🟡 | 🟡 | ❌ | ✅ | 🟡 | ✅ | ❌ | ❌ |
| NORM | ❌ | ✅ | ✅ | ✅ | ✅ | ✅ | ✅ | 🟡 | ❌ | ❌ | ❌ |
| OPT_STEP_ADAMW | ❌ | ❌ | ✅ | ✅ | ✅ | ❌ | ❌ | ✅ | ❌ | ❌ | ❌ |
| OPT_STEP_SGD | ❌ | ❌ | ✅ | ✅ | ✅ | ❌ | ❌ | ✅ | ❌ | ❌ | ❌ |
| OUT_PROD | 🟡 | 🟡 | 🟡 | 🟡 | ❌ | ❌ | 🟡 | ❌ | ❌ | ❌ | 🟡 |
| PAD | ❌ | 🟡 | ✅ | 🟡 | 🟡 | 🟡 | 🟡 | ✅ | ✅ | ❌ | ❌ |
| PAD_REFLECT_1D | ❌ | ✅ | ✅ | ✅ | ✅ | ❌ | ✅ | ❌ | ❌ | ❌ | ❌ |
| POOL_1D | ❌ | ❌ | ❌ | ❌ | ❌ | ❌ | ❌ | ❌ | ❌ | ❌ | ❌ |
| POOL_2D | ❌ | 🟡 | ✅ | ✅ | ✅ | ❌ | ✅ | ✅ | ❌ | ❌ | ❌ |
| REGLU | ❌ | ✅ | ✅ | ✅ | 🟡 | ✅ | ✅ | 🟡 | ✅ | ❌ | ❌ |
| RELU | ❌ | ✅ | ✅ | 🟡 | 🟡 | 🟡 | ✅ | 🟡 | ✅ | ❌ | ❌ |
| REPEAT | ❌ | ✅ | ✅ | 🟡 | ✅ | 🟡 | ✅ | 🟡 | ❌ | ❌ | ❌ |
| REPEAT_BACK | ❌ | ❌ | ✅ | ✅ | ❌ | ❌ | ✅ | ✅ | ❌ | ❌ | ❌ |
| RMS_NORM | ❌ | ✅ | ✅ | ✅ | ✅ | ✅ | ✅ | ✅ | ✅ | ❌ | ❌ |
| RMS_NORM_BACK | ❌ | ❌ | ✅ | ✅ | ❌ | ❌ | ✅ | ✅ | ❌ | ❌ | ❌ |
| ROLL | ❌ | ❌ | ✅ | ✅ | ❌ | ❌ | ✅ | ✅ | ❌ | ❌ | ❌ |
| ROPE | ❌ | ✅ | ✅ | ✅ | ✅ | ✅ | ✅ | ✅ | ✅ | ❌ | ❌ |
| ROPE_BACK | ❌ | ❌ | ✅ | ✅ | ❌ | ❌ | ❌ | ✅ | ❌ | ❌ | ❌ |
| ROUND | ❌ | ❌ | ✅ | 🟡 | ❌ | ❌ | 🟡 | 🟡 | ✅ | ❌ | ❌ |
| RWKV_WKV6 | ❌ | ❌ | ✅ | ✅ | ✅ | ❌ | ✅ | ✅ | ❌ | ❌ | ❌ |
| RWKV_WKV7 | ❌ | ❌ | ✅ | ✅ | ✅ | ❌ | ✅ | ✅ | ❌ | ❌ | ❌ |
| SCALE | ❌ | 🟡 | ✅ | ✅ | ✅ | ✅ | ✅ | ✅ | ✅ | ❌ | ❌ |
| SET | ❌ | ❌ | ✅ | ✅ | ❌ | ❌ | 🟡 | ❌ | ❌ | ❌ | ❌ |
| SET_ROWS | ❌ | 🟡 | 🟡 | 🟡 | 🟡 | 🟡 | 🟡 | 🟡 | 🟡 | ❌ | ❌ |
| SGN | ❌ | ✅ | ✅ | 🟡 | 🟡 | ❌ | ✅ | ❌ | ✅ | ❌ | ❌ |
| SIGMOID | ❌ | ✅ | ✅ | 🟡 | 🟡 | 🟡 | ✅ | 🟡 | ✅ | ❌ | ❌ |
| SILU | ❌ | ✅ | ✅ | 🟡 | 🟡 | 🟡 | ✅ | 🟡 | ✅ | ❌ | ❌ |
| SILU_BACK | ❌ | ❌ | ✅ | ✅ | ❌ | ❌ | ❌ | ✅ | ❌ | ❌ | ❌ |
| SIN | ❌ | ✅ | ✅ | ✅ | 🟡 | ❌ | ✅ | 🟡 | ❌ | ❌ | ❌ |
| SOFTPLUS | ❌ | ❌ | ✅ | 🟡 | 🟡 | ❌ | ❌ | 🟡 | ✅ | ❌ | ❌ |
| SOFT_MAX | ❌ | 🟡 | ✅ | ✅ | ✅ | ✅ | ✅ | ✅ | ✅ | ❌ | ❌ |
| SOFT_MAX_BACK | ❌ | ❌ | 🟡 | 🟡 | ❌ | ❌ | 🟡 | ✅ | ❌ | ❌ | ❌ |
| SOLVE_TRI | ❌ | ❌ | ✅ | 🟡 | ❌ | ❌ | ❌ | 🟡 | ❌ | ❌ | ❌ |
| SQR | ❌ | ✅ | ✅ | ✅ | 🟡 | ✅ | ✅ | 🟡 | ❌ | ❌ | ❌ |
| SQRT | ❌ | ✅ | ✅ | ✅ | 🟡 | ✅ | ✅ | 🟡 | ❌ | ❌ | ❌ |
| SSM_CONV | ❌ | ✅ | ✅ | ✅ | ✅ | ✅ | ✅ | ✅ | ❌ | ❌ | ❌ |
| SSM_SCAN | ❌ | ❌ | ✅ | ✅ | ✅ | ❌ | ❌ | 🟡 | ❌ | ❌ | ❌ |
| STEP | ❌ | ✅ | ✅ | 🟡 | 🟡 | ❌ | ✅ | 🟡 | ✅ | ❌ | ❌ |
| SUB | ❌ | ✅ | ✅ | ✅ | 🟡 | ✅ | ✅ | ✅ | ✅ | ❌ | ❌ |
| SUM | ❌ | 🟡 | ✅ | 🟡 | 🟡 | ❌ | 🟡 | 🟡 | 🟡 | ❌ | ❌ |
| SUM_ROWS | ❌ | ✅ | ✅ | 🟡 | ✅ | 🟡 | 🟡 | ✅ | ✅ | ❌ | ❌ |
| SWIGLU | ❌ | ✅ | ✅ | ✅ | 🟡 | ✅ | ✅ | 🟡 | ✅ | ❌ | ❌ |
| SWIGLU_OAI | ❌ | ❌ | ✅ | ✅ | ✅ | ✅ | ✅ | 🟡 | ✅ | ❌ | ❌ |
| TANH | ❌ | ✅ | ✅ | 🟡 | 🟡 | ✅ | ✅ | 🟡 | ✅ | ❌ | ❌ |
| TIMESTEP_EMBEDDING | ❌ | ✅ | ✅ | ✅ | ✅ | ✅ | ✅ | ✅ | ❌ | ❌ | ❌ |
| TOP_K | ❌ | ❌ | ✅ | ❌ | ✅ | ❌ | ❌ | 🟡 | ✅ | ❌ | ❌ |
| TRI | ❌ | ❌ | ✅ | ✅ | ✅ | ❌ | ❌ | ✅ | ❌ | ❌ | ❌ |
| TRUNC | ❌ | ❌ | ✅ | 🟡 | ❌ | ❌ | 🟡 | 🟡 | ✅ | ❌ | ❌ |
| UPSCALE | ❌ | 🟡 | ✅ | ✅ | 🟡 | 🟡 | 🟡 | 🟡 | ❌ | ❌ | ❌ |
| XIELU | ❌ | ❌ | ✅ | ❌ | ❌ | ❌ | ❌ | ❌ | ✅ | ❌ | ❌ |
---
# Source: https://github.com/ggerganov/llama.cpp/blob/master/docs/preset.md
# llama.cpp INI Presets
## Introduction
The INI preset feature, introduced in [PR#17859](https://github.com/ggml-org/llama.cpp/pull/17859), allows users to create reusable and shareable parameter configurations for llama.cpp.
### Using Presets with the Server
When running multiple models on the server (router mode), INI preset files can be used to configure model-specific parameters. Please refer to the [server documentation](../tools/server/README.md) for more details.
### Using a Remote Preset
> [!NOTE]
>
> This feature is currently only supported via the `-hf` option.
For GGUF models hosted on Hugging Face, you can include a `preset.ini` file in the root directory of the repository to define specific configurations for that model.
Example:
```ini
hf-repo-draft = username/my-draft-model-GGUF
temp = 0.5
top-k = 20
top-p = 0.95
```
For security reasons, only certain options are allowed. Please refer to [preset.cpp](../common/preset.cpp) for the complete list of permitted options.
Example usage:
Assuming your repository `username/my-model-with-preset` contains a `preset.ini` with the configuration above:
```sh
llama-cli -hf username/my-model-with-preset
# This is equivalent to:
llama-cli -hf username/my-model-with-preset \
--hf-repo-draft username/my-draft-model-GGUF \
--temp 0.5 \
--top-k 20 \
--top-p 0.95
```
You can also override preset arguments by specifying them on the command line:
```sh
# Force temp = 0.1, overriding the preset value
llama-cli -hf username/my-model-with-preset --temp 0.1
```
If you want to define multiple preset configurations for one or more GGUF models, you can create a blank HF repo for each preset. Each HF repo should contain a `preset.ini` file that references the actual model(s):
```ini
hf-repo = user/my-model-main
hf-repo-draft = user/my-model-draft
temp = 0.8
ctx-size = 1024
; (and other configurations)
```
### Named presets
If you want to define multiple preset configurations for one or more GGUF models, you can create a blank HF repo containing a single `preset.ini` file that references the actual model(s):
```ini
[*]
mmap = 1
[gpt-oss-20b-hf]
hf = ggml-org/gpt-oss-20b-GGUF
batch-size = 2048
ubatch-size = 2048
top-p = 1.0
top-k = 0
min-p = 0.01
temp = 1.0
chat-template-kwargs = {"reasoning_effort": "high"}
[gpt-oss-120b-hf]
hf = ggml-org/gpt-oss-120b-GGUF
batch-size = 2048
ubatch-size = 2048
top-p = 1.0
top-k = 0
min-p = 0.01
temp = 1.0
chat-template-kwargs = {"reasoning_effort": "high"}
```
You can then use it via `llama-cli` or `llama-server`, example:
```sh
llama-server -hf user/repo:gpt-oss-120b-hf
```
Please make sure to provide the correct `hf-repo` for each child preset. Otherwise, you may get error: `The specified tag is not a valid quantization scheme.`