# Kaisar
> Manage AI agents, their configurations, and monitoring.
---
# Source: https://docs.kaisar.io/kaisar-network/kaisar-ai-ops/organization/agents.md
# Agents
Manage AI agents, their configurations, and monitoring.
## Overview
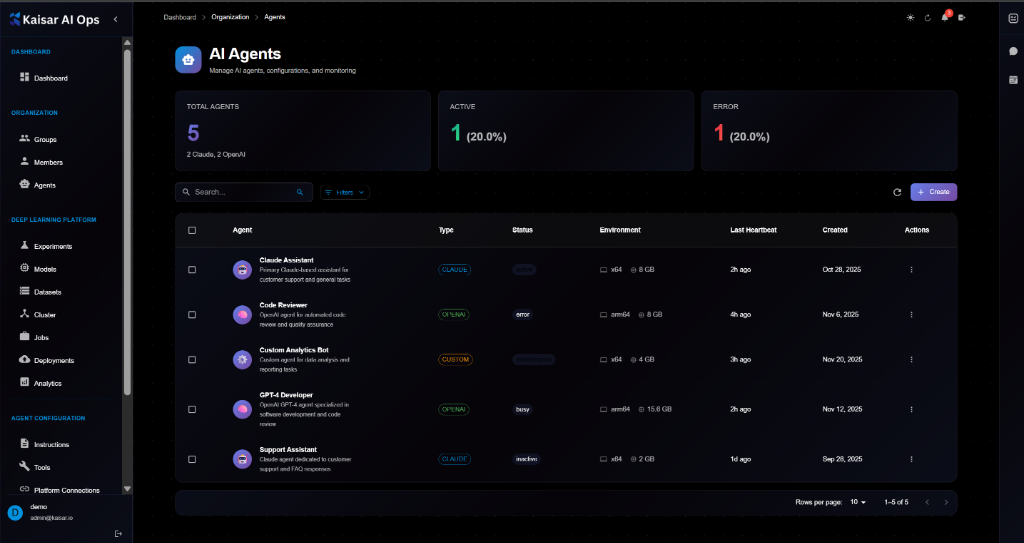
Agents are autonomous AI entities configured to perform specific tasks. This section allows you to manage their lifecycle, monitor their performance, and configure their behaviors.
**Dashboard Summary**:
* **Total Agents**: Total number of agents configured
* **Active**: Number of agents currently active
* **Error**: Number of agents in error state
## Agents List
The agents table displays:
* **Agent**: Name and description (e.g., "Claude Assistant", "Code Reviewer")
* **Type**: AI Provider (e.g., CLAUDE, OPENAI, CUSTOM)
* **Status**: Current state (Active, Error, Maintenance, Busy, Inactive)
* **Environment**: Runtime environment (e.g., x64 @ 8 GB)
* **Last Heartbeat**: Time since last signal
* **Created**: Creation date
* **Actions**: Edit, Delete, etc.
## Creating an Agent
Navigate to **Organization** → **Agents** → Click **+ Create**

### Basic Information
**Agent Name**\* (Required)
* A unique name to identify this agent
* Example: `Claude Assistant`
**Agent Type**\* (Required)
* Select the AI provider for this agent
* Options: `Claude (Anthropic)`, `OpenAI`, `Custom`
**Description**\* (Required)
* Brief description of what this agent does
**Workspace Path**\* (Required)
* File system path where agent files are stored
* Example: `/workspace/agents/claude-assistant`
### System Prompt
**System Prompt**\* (Required)
* Instructions that define the agent's behavior and personality
* Example: "You are a helpful AI assistant. Always be professional and accurate."
### Configuration
**Model**
* Model identifier (e.g., `claude-3-sonnet`, `gpt-4-turbo`)
**Temperature**
* Controls randomness (0 = deterministic, 1 = creative)
**Max Tokens**
* Maximum response length in tokens
**Anthropic API Version** / **OpenAI Organization**
* Provider-specific settings
**Custom API Endpoint**
* Full URL to your custom AI endpoint (if applicable)
### Environment
* Configure runtime environment variables and resources
### Actions
* **Cancel**: Discard changes
* **Create Agent**: Submit and create the agent
## Viewing Agent Details
To view detailed information about an agent:
1. Navigate to **Organization** → **Agents**
2. Click on an agent from the list
3. View details in the modal dialog
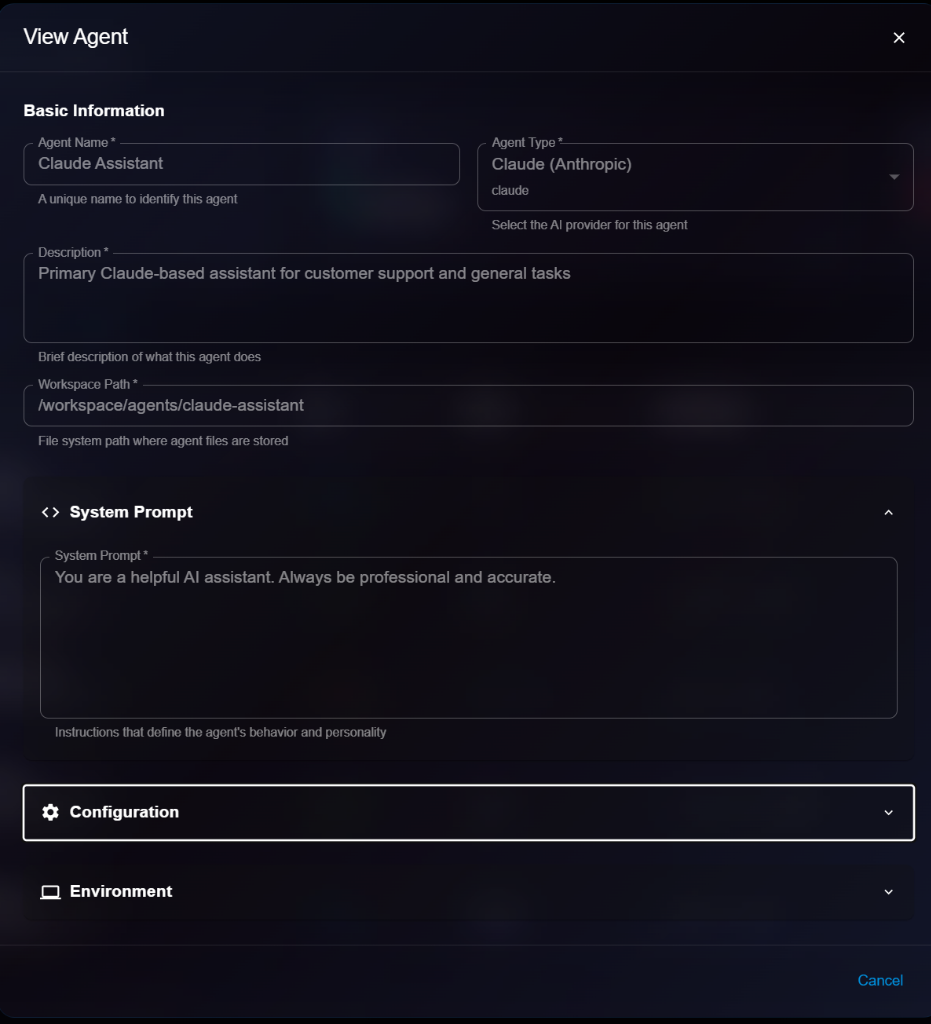
**Details Panel**:
* **Basic Information**: Name, Type, Description, Workspace Path
* **System Prompt**: View the current system prompt
* **Configuration**: View model settings
* **Environment**: View environment settings
## Editing an Agent
To update an agent's configuration:
1. Open agent details
2. Click **Edit** button (or select Edit from list actions)
3. Modify editable fields in the Edit Agent modal
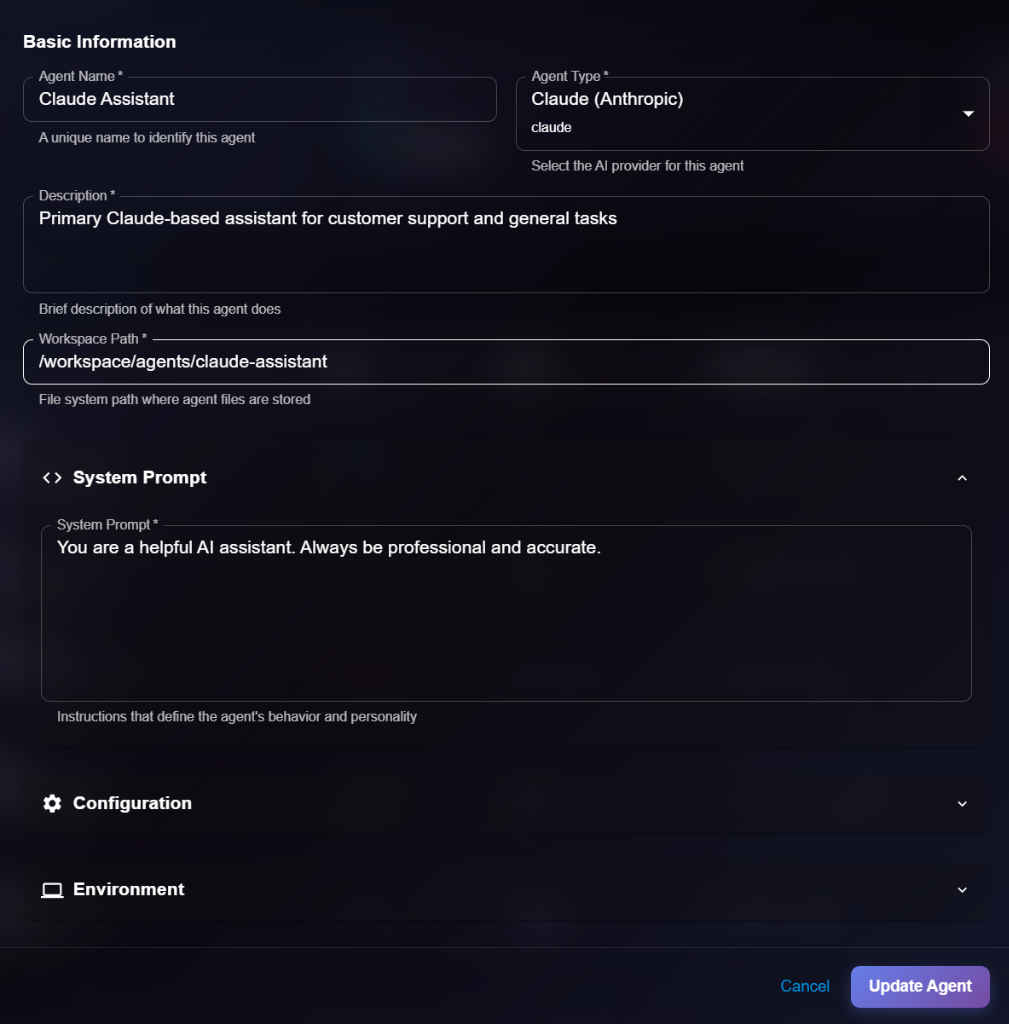
4. Click **Update Agent** to save changes
**Editable Fields**:
* ✅ Basic Information (Name, Description, Workspace Path)
* ✅ System Prompt
* ✅ Configuration (Model, Temperature, etc.)
* ✅ Environment
## Best Practices
* **Specific Prompts**: Write clear, specific system prompts to guide agent behavior
* **Resource Allocation**: Monitor environment usage and adjust resources as needed
* **Error Monitoring**: Check "Error" status agents immediately to resolve issues
* **Version Control**: Keep track of changes to system prompts and configurations
## Next Steps
* Configure [Platform Connections](https://docs.kaisar.io/kaisar-network/kaisar-ai-ops/agent-configuration/platform-connections) for your agents
* Set up [Tools](https://docs.kaisar.io/kaisar-network/kaisar-ai-ops/agent-configuration/tools) for your agents to use
* Monitor agent activity in [Analytics](https://docs.kaisar.io/kaisar-network/kaisar-ai-ops/deep-learning-platform/analytics)
---
# Source: https://docs.kaisar.io/kaisar-network/kaisar-ai-ops/deep-learning-platform/analytics.md
# Analytics
Monitor and analyze your ML operations with comprehensive analytics and insights.
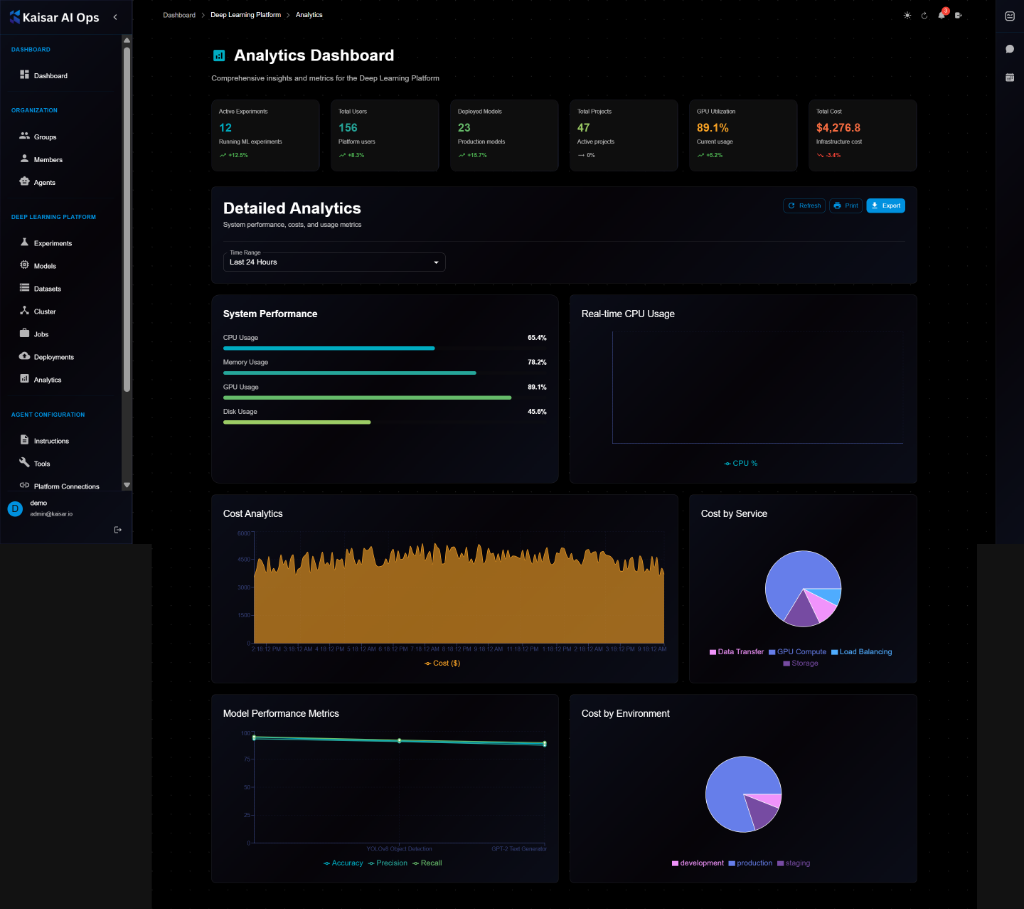
## Overview
The Analytics Dashboard provides comprehensive insights and metrics for the Deep Learning Platform, helping you track performance, costs, and usage across all your ML operations.
## Dashboard Summary Cards
At the top of the dashboard, you'll see key metrics at a glance:
**Active Experiments**
* **Count**: Number of currently running ML experiments
* **Trend**: Percentage change from previous period
**Total Users**
* **Count**: Total number of platform users
* **Trend**: Percentage change from previous period
**Deployed Models**
* **Count**: Number of models in production
* **Trend**: Percentage change from previous period
**Total Projects**
* **Count**: Number of active projects
* **Trend**: Percentage change from previous period
**GPU Utilization**
* **Percentage**: Current GPU usage percentage
* **Status**: Infrastructure cost with trend indicators
**Total Cost** **Total Cost**
* **Amount**: Total infrastructure cost
* **Trend**: Percentage change from previous period
## Detailed Analytics
The dashboard provides detailed analytics with customizable time ranges (Last 24 Hours, Last 7 Days, Last 30 Days, etc.).
**Available Actions**:
* **Refresh**: Update data
* **Print**: Print dashboard
* **Export**: Export analytics data
### System Performance
Real-time monitoring of system resources:
**CPU Usage**
* Current utilization: 83.4%
* Visual progress bar indicator
* Color-coded (cyan)
**Memory Usage**
* Current utilization: 71.2%
* Visual progress bar indicator
* Color-coded (purple)
**GPU Usage**
* Current utilization: 89.1%
* Visual progress bar indicator
* Color-coded (green)
**Disk Usage**
* Current utilization: 45.0%
* Visual progress bar indicator
* Color-coded (lime green)
### Real-time CPU Usage
Interactive line chart showing CPU usage over time:
* Time-series visualization
* Real-time updates
* Hover for detailed values
* CPU % on Y-axis
### Cost Analytics
**Cost Analytics Chart**:
* Area chart showing cost trends over time
* Time-series data (hourly/daily)
* Cost ($) on Y-axis
* Visual trend analysis
**Cost by Service** (Pie Chart):
* **Data Transfer**: Largest portion (blue)
* **GPU Compute**: Second largest (purple/pink)
* **Load Balancing**: Smaller portion (cyan)
* **Storage**: Smallest portion (pink)
* Interactive legend
### Model Performance Metrics
Line chart tracking model performance:
* **Accuracy**: Green line
* **Precision**: Cyan line
* **Recall**: Purple line
* Time-series visualization
* Performance trends over time
### Cost by Environment
Pie chart showing cost distribution:
* **Development**: Largest portion (blue)
* **Production**: Medium portion (purple/pink)
* **Staging**: Smallest portion (pink)
* Interactive breakdown
## Key Features
### Experiment Analytics
* Training metrics over time
* Hyperparameter impact analysis
* Experiment comparison dashboards
* Success/failure rates
* Active experiment tracking
### Model Performance
* Model accuracy trends
* Inference latency tracking
* Model drift detection
* Performance metrics visualization
* Multi-metric comparison
### Resource Usage
* GPU/CPU utilization monitoring
* Memory consumption tracking
* Storage usage analysis
* Real-time performance graphs
* Resource optimization insights
### Deployment Metrics
* Request rate and throughput
* Error rates and types
* Latency percentiles (p50, p95, p99)
* Uptime and availability
* Deployment health status
### Cost Analysis
* Total infrastructure cost tracking
* Cost breakdown by service
* Cost by environment
* Trend analysis
* Budget monitoring
## Using the Dashboard
**Time Range Selection**:
1. Click the time range dropdown (default: "Last 24 Hours")
2. Select desired range:
* Last 24 Hours
* Last 7 Days
* Last 30 Days
* Custom range
**Refreshing Data**:
* Click **Refresh** button to update all metrics
* Dashboard auto-refreshes periodically
**Exporting Data**:
1. Click **Export** button
2. Choose export format
3. Download analytics report
**Printing**:
* Click **Print** button to print current dashboard view
## Monitoring Best Practices
**Regular Monitoring**:
* Check dashboard daily for anomalies
* Monitor GPU utilization for optimization
* Track cost trends to manage budget
* Review model performance metrics
**Setting Baselines**:
* Establish normal ranges for metrics
* Set up alerts for deviations
* Track trends over time
**Cost Optimization**:
* Identify high-cost services
* Optimize resource allocation
* Monitor environment-specific costs
* Review and adjust as needed
## Next Steps
* View detailed [Experiments](https://docs.kaisar.io/kaisar-network/kaisar-ai-ops/deep-learning-platform/experiments) metrics
* Monitor [Deployments](https://docs.kaisar.io/kaisar-network/kaisar-ai-ops/deep-learning-platform/deployments) performance
* Track [Models](https://docs.kaisar.io/kaisar-network/kaisar-ai-ops/deep-learning-platform/models) accuracy
* Optimize resource usage based on insights
---
# Source: https://docs.kaisar.io/kaisar-network/kaisar-architecture/architecture-overview.md
# Architecture Overview
## 1. Overview
### 1.1 Key Components
Kaisar Network mainly comprises of three components:
* **Kaisar Zero Node:** Kaisar’s Chrome extension, enables users to track key metrics like location and uptime while contributing to the decentralized AI compute layer Allowing users to monetize their hardware and support decentralized infrastructure.
* **Kaisar OneNode:** Kaisar OneNode optimizes GPU use for AI through a decentralized, transparent system. With Providers, Checkers, and Explorer on PEAQ Blockchain, ensure performance and reliability.
* **Kaisar Provider**: Provider offer GPU computing resources and report their status to the PEAQ Blockchain, receiving rewards for their contributions.
* **Kaisar Checker**: The Kaisar Checker ( Kaisar Checker Node) ensures resource integrity and functionality by performing checks and submitting Proof of Physical Work, earning rewards from the PEAQ Blockchain.
* **Kaisar Explorer**: An advanced web platform provides real-time visibility into Kaisar’s on-chain metrics and operations for seamless navigation. Kaisar leverages PEAQ Blockchain, a multi-chain layer-one blockchain optimized for DePIN. It supports over 100,000 transactions per second (TPS) with minimal costs and enables seamless interaction with Polkadot, Cosmos, Solana, Binance, and Ethereum via Wormhole.
* **Kaisar Cloud (End-Users):** End-users seek to rent GPUs within the Kaisar Network, directly engaging with the blockchain to access GPU rental, payment processing, and cancellation services.
### 1.2 Kaisar Network Overview
**1.2.1 - Kaisar Cloud *****(End-Users)***
* **Order & Payment** : End-users place an order and make a payment for utilizing GPU compute resources.The payment process will require connecting a wallet and completing the transaction through the wallet.
* **Connect Container/Cluster** : After the payment, the end-users are connected to the required container or cluster provided by the Providers.
* **Reporting**: End-users usage of the GPU computing resources is reported to the PEAQ Blockchain.
* **Refund**: If needed, end-users can get refunds via PEAQ Blockchain consensus. The refund is converted into points, which users can then use for discounts or promotions when purchasing new services.
**1.2.2 - Kaisar Provider**
* **Register :** Provider register their computing resources (PC, Laptop, Server, Bare metal with GPU) on the PEAQ Blockchain.When providers register, they will need to connect their wallet and make a payment in order to register a worker. These processes are connected with Peaq.
* **Providing Services to Network:** Providers make their registered resources available to end-users for connection and usage.
* **Report:** Providers report status and usage of their GPU computing resources to the PEAQ Blockchain.
* **Reward:** Providers receive rewards from the PEAQ Blockchain based on the reports.
**1.2.3 - Kaisar Checker**
* **Checking:** Kaisar Checker (Nodes) perform checks on the computing resources provided by the Providers.
* **Proof of Work (PoPW):** After performing checks, Kaisar Checkers provide Proof of Physical Work (PoPW) to the PEAQ Blockchain.The checker will send performance evaluation tasks to the worker, and then update the results on the chain.
* **Report:** Kaisar Checkers report provider findings and the status of the resources to the PEAQ Blockchain.
* **Reward:** Kaisar Checkers receive rewards from the PEAQ Blockchain for their services based on the reports.
## 2. Detailted Architecture
### 2.1 Kaisar Process: From Wallet Connection to Container Service Utilization
The Kaisar process covers the entire journey from wallet connection to end-user utilization of the container service. Each step involves specific entities and actions to ensure secure, verified, and efficient deployment and interaction with the service.
**2.1.1 - Initiating the Deployment**
1. **Connect to Wallet**
* Entity Involved: End-user
* Action: The end-user connects their wallet to the Console Portal to begin the deployment process.
2. **Buy New Container**
* Entity Involved: End-user
* Action: The end-user purchases a new container through the Console Portal
**2.1.2 - Transaction Handling**
1. **Issue Transaction**
* **Entities Involved:** Console Portal, Blockchain
* **Action:** The Console Portal issues a transaction to the Blockchain to record the purchase.
2. **Transaction Details**
* **Entities Involved**: Blockchain
* **Action:** The Blockchain records the transaction details, ensuring transaction integrity.
**2.1.3 - Port Exposure and Container Deployment**
1. **Request to Expose New Ports**
* **Entities Involved:** Console Portal, VPN
* **Action:** The Console Portal sends a request to the VPN to expose new ports for the container.
2. **Request Results**
* **Entities Involved:** VPN
* **Action:** The VPN processes the request and returns the results to the Console Portal.
3. **Deploy New Container**
* **Entities Involved:** Console Portal, Checkers
* **Action:** The Console Portal commands the Checkers to deploy the container.
4. **Deploy Container**
* **Entities Involved:** Checkers, Worker Node
* **Action:** The Checkers send the deployment command to the Worker Node where the container will be deployed.
**2.1.4 - Notification and Service Connection**
1. **Event Notification**
* **Entities Involved:** End-user
* **Action:** The end-user is notified of the deployment event.
2. **Container Deployment Confirmation**
* **Entities Involved:** End-user
* **Action:** The end-user receives confirmation of the container deployment.
3. **Connect to Container Service**
* **Entities Involved:** End-user
* **Action:** The end-user connects to the newly deployed container service.
**2.1.5 - Service Utilization**
1. **Request to Container Service**
* **Entities Involved:** End-user
* **Action:** The end-user makes requests to the container service.
2. **Request Result**
* **Entities Involved:** Container Service
* **Action:** The container service processes the requests and returns the results to the end-user.
### 2.2 Architecture Layers
***Step-by-Step Flow:***\
\
1\. Users interact through the Explorer, Kaisar Cloud Portal, or Worker Portal, depending on their role and requirements. -> Explorer is a public site, for viewing the summaries, reports of Network Capacity. Kaisar Cloud Portal is for End User (GPU Consumer). and Worker Portal is for (GPU Provider).
2\. All incoming connections pass through the VPN and Firewall for secure access. The IAM system verifies user credentials and permissions.
3\. Requests are routed to the API Gateway, which is running in a cluster mode to ensure high availability and load balancing.
4.The API Gateway uses a round-robin rule to distribute incoming requests to instances of the Backend( Service Management, Worker Management, Billing, Monitoring & Alert, Logging, and Analytics modules). Each of these modules runs multiple instances to handle the load efficiently.
5\. Depending on the request type, it's processed by the relevant backend service. For instance, compute jobs might be directed to the GPU Cluster through Worker Management.
6\. Some operations, those requiring immutable records or enhanced security, interact with the PEAQ Blockchain.
7\. After processing, responses are sent back through the API Gateway to the respective frontend interface, providing users with the needed information. -> For asynchronous requests, the Portal will connect to a WebSocket endpoint on the API Gateway. Once the process is completed, the result will be returned to the Portal through WebSocket events.
*Below is the detailed working of the Kaisar Network, organized into architecture layers:*
#### 2.2.1 - Security Layer
The security layer ensures that the network is secure and accessible only by authorized entities.
**Tech Stack:**
* MESH VPN for secure communication
* Firewall for network traffic control
* Authentication Service via Wallet login for user authentication and authorization\
\
Here are some features of MESH VPN :
1\. Robustness: The network is highly resilient to individual node failures, thanks to multiple pathways for data transfer.
2\. Scalability: Adding new nodes does not significantly impact the overall network performance.
3\. Low Latency: Direct connections between nodes help minimize the number of transmission steps, reducing delays.
4\. Optimal Load Distribution: Traffic is evenly distributed, avoiding congestion and ensuring optimal performance.
#### 2.2.2 - Backend Layer
The backend layer comprises of core backend services supporting the Kaisar Network operations.
* Providers (GPU Providers) : Offers GPU compute resources as worker Nodes.
* Tech Stack: Docker, Kubernetes
* Cluster / GPU Management: Management of Worker Node Cluster.
* Tech Stack: Kubernetes,
* Fault Monitoring: Monitoring for faults using Kaisar Checker Nodes..
* Autoscaling: Automatically adjusting GPU compute resources based on demand.
* Tech Stack: Kubernetes, HPA (Horizontal Pod Autoscaler)
#### 2.2.3 - Infrastructure Layer
**Manages computational resources and task orchestration.**
* GPU Pool: Collection of GPUs available for compute tasks.
* Tech Stack: Nvidia GPUs, CUDA
* List of GPUs is available in GPU Model Scoring Page .
* Orchestration: Tools for managing GPU pools
* Tech Stack: Kubernetes, Docker
#### 2.2.4 - Frontend Layer
* Authentication Service : Manages user authentication and authorization via wallet integration.
* Logging Service: Records system activities on blockchain
* Console Portal: Front end interface for user interaction.
## 3. Core Workflows
### 3.1 - Kaisar Checkers
#### Overview
Kaisar Checkers assesses the uptime, bandwidth, and performance of physical devices provided by Providers within the VPN network. Checkers transmit proof of device functionality to the blockchain and receive rewards based on their performance.
Checker is designed to ensure the integrity and performance of Containers in the Kaisar Network. Verifying the technical specifications of the Containers provided is essential to maintain service quality and network transparency.
**Testing procedure:**
* At registration: A container will be checked when it is registered on the Kaisar Network.
* In standby state: For containers in standby mode, checks will be conducted randomly.
* During rendering state: Service information is collected and examined in detail to evaluate the actual state and quality of the service.
**Evaluation method:**
* Performance parameters: Checker will directly read data about Container performance.
* Simulation testing: Checker will act as a real user to run test applications and analyze received data to ensure the Container is always interactive and complies with set technical requirements.
**Test results:**
* Registration authentication: Checker will confirm the Container's specifications to authenticate the registration of that Container on the Kaisar system.
* Impact on scheduling: Test results directly affect the Manager's scheduling and priority for that Container.
* Quality control: If a certain Container provides services with unsecured quality, Checker will determine the penalty for that Container.
After a Checker Node completes a task, it signs the results with its private key and sends them to Kaisar Blockchain. Each node that delivers the same results as the majority will be rewarded with tokens.
**Workflow**
* The Checker initiates the process by connecting to a wallet that holds an NFT license. This license is essential for authenticating the Checker within the Kaisar Network.
* The Checker stakes KAI tokens. Staking KAI is a prerequisite to access Kaisar's resources and services.
* Upon staking KAI, the Kaisar system provides authentication information back to the Checker. This information is used to verify the Checker’s identity and permission to use the network.
* With the authentication information, the Checker connects to the Kaisar VPN. This connection allows the Checker to securely interact with the Kaisar Network.
* Once connected to the VPN, the Checker queries the Kaisar system to check the usage and workload of various Worker Nodes. This step involves retrieving data on how much work each Worker Node is handling and their availability.
* The results of the Worker Node usage and workload check are returned to the Checker. This information helps the Checker decide which Worker Node to use.
* The Checker submits Proof of Physical Work (PoPW) of the selected Worker Node to the Kaisar Blockchain. This submission records the Checker's findings and the performance of the Worker Node on the blockchain.
* After submitting the PoPW, the Checker receives a reward. This reward is an incentive for the Checker to accurately monitor and report on Worker Node performance.
### 3.2 - Kaisar Cloud (End-User) Workflow
1. End Users initiates the process by connecting their wallet to the Console Portal of Kaisar to pay for GPU resources.
2. After connecting the wallet, the end-user buys a new container through the Console Portal.
3. The Console Portal issues a transaction that involves multiple Kaisar components like VPN and Blockchain.
4. The VPN processes the transaction details and communicates with the Blockchain.
5. The Blockchain component handles the request to expose new ports to the Proxy/Gateway for accessing the container services.
6. The Kaisar Checkers is responsible for deploying the new container. It sends the deployment request to the Provider's Worker Node.
7. The Worker Node in the Provider's infrastructure deploys the container.An event is triggered once the container is deployed, which is communicated back through the Checkers component.
8. The Console Portal updates the end-user with the status: "Container is deploying..." and eventually, "Your Container has been deployed successfully.".
9. Finally the GPU resources are available as Container services by the Providers
* Types of Container Services:
\- Worker Node (Container): Hardware: CPU, RAM, GPU, storage.( By Q2 2024 )
\- Worker Cluster: Comprises multiple Worker Nodes to allows pooling of resources from multiple nodes.(Available by Q4 2024)
\- End users rent resources from mobile nodes provided by Providers.(Available by Q3 2025)
### 3.3 - Kaisar Providers
#### Overview
Providers offer CPU/GPU physical devices for the Kaisar Network, also known as Containers. This is where the actual usage of the cloud takes place, including application execution and rendering. The purpose of Containers is to ensure a seamless experience in the cloud, delivering an optimal user experience.
**Notes on Activities:**
* Availability: Containers must always be in a high state of availability, ready to be activated immediately upon consumer request.
* Usability: Each Container must have the necessary applications or services installed and configured to allow users to access and start up as quickly as possible.
* Processing capacity: Containers need to meet specific computing power and graphics requirements to handle the unique demands of applications or services.
* Network efficiency: Containers must have stable bandwidth and network infrastructure to support high-speed data transmission and low-latency interactions.
**Container Selection Process:**
* Performance-based: Containers are randomly selected based on their ability to provide the highest quality of service with the lowest possible latency and cost.
* Experience optimization: Containers are evaluated for their ability to deliver the best possible user experience, considering factors such as processing speed and uptime.
#### Workflow
*Worker Node Provision*
*Steps:*
1. Provider registers a new worker node.
2. Registration request sent to Kaisar Network.
3. Console Portal responds with setup scripts.
4. Worker node runs setup scripts.
5. Worker node connects to a wallet.
6. Worker node requests a new peer node from blockchain.
7. Connection established.
8. Worker node executes a benchmark job.
9. Benchmark job result sent to Kaisar Network.
10. Worker node registered successfully.
---
# Source: https://docs.kaisar.io/kaisar-network/kaisar-architecture/products/kaisar-onenode/kaisar-checker/what-is-the-kaisar-checker-node/benefits-of-owning-a-checker-node.md
# Benefits of Owning a Checker Node
Owning a Checker Node offers several key advantages:
* **Rewards**: Earn regular incentives by contributing to network verification.
* **Empowerment**: Help decentralize AI infrastructure and create alternatives to traditional tech monopolies.
* **Community Impact**: Drive the growth of the Kaisar ecosystem while supporting global AI innovation.
---
# Source: https://docs.kaisar.io/kaisar-network/kaisar-architecture/products/kaisar-onenode/kaisar-provider/what-is-kaisar-provider/benefits-of-running-a-kaisar-provider.md
# Benefits of Running a Kaisar Provider
**Operating as a Kaisar Provider: Empowering a Distributed Cloud Network**\
Running a Kaisar Provider offers a unique opportunity to contribute to a state-of-the-art distributed cloud network that powers artificial intelligence (AI) and advanced computational workloads. Below are the key benefits of becoming a Kaisar Provider (Worker Node Operator):
1. **Financial Rewards**\
Earn substantial revenue by providing GPU computing power to businesses and developers who require scalable infrastructure for AI, machine learning, and other resource-intensive applications.
2. **Scalable and Flexible Operations**\
Effortlessly expand your resource pool by integrating additional nodes as demand increases, enabling you to enhance both your earnings and your impact within the network.
3. **Secure and Decentralized Ecosystem**\
Participate in a transparent and secure framework where your contributions are safeguarded, and compensation is equitably distributed across the network.
4. **Sustainable Computing Infrastructure**\
Support a shift away from large, centralized data centers, contributing to a more energy-efficient and environmentally responsible cloud computing ecosystem.
5. [Kaisar Provider Rewards Mechanism](https://docs.kaisar.io/kaisar-network/kaisar-rewards-mechanism/rewards-for-kaisar-providers)
These core advantages underscore the value of participation, delivering both operational and societal impact in a concise and compelling manner.
---
# Source: https://docs.kaisar.io/kaisar-network/origins/challenges/building-the-kaisar-network.md
# Building the Kaisar Network
At Kaisar Network we are focused on developing a slew of innovative tools that mitigate the challenges above.
Our network intelligently aggregates and redistributes new and idle GPUs from enterprises, data centers, cryptocurrency mining operations, and single vendors. This emerging approach, called Decentralized Physical Infrastructure Network (DePIN), is poised to disrupt traditional business practices.
This decentralized network enables easy comparison, selection, and utilization of GPUs, for consolidating geographically dispersed resources to handle large-scale AI workloads.
Kaisar's approach will reduce global dependence on centralized cloud providers and pave the way for a more efficient and connected global GPU cloud economy.
For more information on Kaisar solutions please check the Problem Statement/Solution page.
---
# Source: https://docs.kaisar.io/kaisar-network/origins/faq/can-i-contribute-my-gpu-resources-to-kaisar.md
# Can I contribute my GPU resources to Kaisar?
Yes, Kaisar Worker allows users to contribute their GPUs to the network. Whether you have a PC, laptop, or server with GPUs, you can join the network and earn rewards for your contributions
---
# Source: https://docs.kaisar.io/kaisar-network/origins/challenges/centralized-gpu-computing-challenges.md
# Centralized GPU Computing Challenges
The compute challenges associated with centralized cloud GPU providers are plenty. Below are some statements from prominent publications:
* As demand for GPU compute grows, scaling centralized infrastructure can be challenging. According to Gartner, "GPU-accelerated computing is becoming more prevalent, but scaling GPU resources efficiently remains complex."(Source: Gartner, "Disaggregate Compute and Storage to Enable Scalable, Flexible, and Cost-Effective Data Centers" (2020))
* High-performance GPUs are expensive, and centralizing them can lead to significant upfront costs. A Springer publication notes that "the capital expenditure for large GPU clusters can be prohibitive for many organizations."(Source: Springer, "A Survey on GPU-Based Cloud Computing" (2019))
* GPUs consume substantial power and generate significant heat. Centralizing many GPUs intensifies these challenges. Gartner highlights that "power and cooling requirements for dense GPU deployments are a major consideration in data center design."(Source: Gartner, "Data Center Infrastructure Planning Tool" (2020))
* Network latency: For some applications, network latency between centralized GPUs and distributed data sources can be problematic. Gartner points out that "data locality and network performance are critical factors in GPU-accelerated computing architectures."(Source: Gartner, "Best Practices for Building a Scalable Data Science Platform" (2020))
* Centralized GPU computing requires specialized software stacks and tools. Gartner notes that "the rapidly evolving GPU software ecosystem can create integration and compatibility challenges."(Source: Gartner, "Magic Quadrant for High-Performance Computing" (2020))
---
# Source: https://docs.kaisar.io/kaisar-network/origins/challenges.md
# Challenges
- [Exponential Change in Spending and Compute Requirements](/kaisar-network/origins/challenges/exponential-change-in-spending-and-compute-requirements.md)
- [Cost challenges with traditional cloud GPU providers.](/kaisar-network/origins/challenges/cost-challenges-with-traditional-cloud-gpu-providers..md)
- [Centralized GPU Computing Challenges](/kaisar-network/origins/challenges/centralized-gpu-computing-challenges.md)
- [Building the Kaisar Network](/kaisar-network/origins/challenges/building-the-kaisar-network.md)
---
# Source: https://docs.kaisar.io/kaisar-network/kaisar-ai-ops/deep-learning-platform/cluster.md
# Cluster
Manage and monitor your compute cluster nodes for ML workloads.
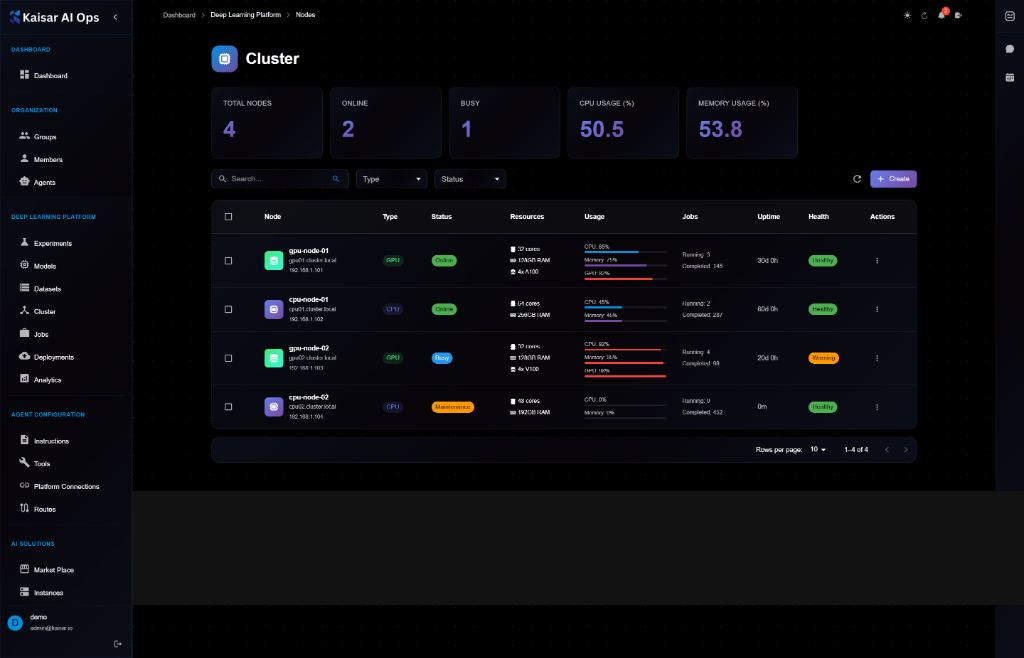
## Overview
The Cluster section provides comprehensive management of compute nodes that power your ML experiments, training jobs, and deployments. Monitor resource utilization, manage node configurations, and ensure optimal cluster health.
## Cluster Dashboard
The dashboard displays key cluster metrics at a glance:
**Summary Cards**:
* **Total Nodes**: Total number of nodes in the cluster
* **Online**: Number of nodes currently online
* **Busy**: Number of nodes actively processing workloads
* **CPU Usage (%)**: Average CPU usage across cluster
* **Memory Usage (%)**: Average memory usage across cluster
## Node List View
The cluster table shows all nodes with the following information:
**Columns**:
* **Node**: Node name and details (hostname, IP address)
* **Type**: Node type (GPU, CPU)
* **Status**: Current status (Online, Offline, Maintenance)
* **Resources**: Available resources (CPU cores, RAM, GPU)
* **Usage**: Real-time CPU and Memory usage with progress bars
* **Jobs**: Running jobs count
* **Uptime**: Node uptime duration
* **Health**: Health status (Healthy, Warning, Critical)
* **Actions**: Quick actions menu
**Filtering and Search**:
* Search by node name or IP
* Filter by Type (GPU, CPU, All)
* Filter by Status (Online, Offline, Busy, Maintenance)
## Creating a Cluster Node
Navigate to **Deep Learning Platform** → **Cluster** → Click **Create**

### Basic Information
**Node Name**\* (Required)
* Unique identifier for the cluster node
* Example: `gpu-node-01`, `cpu-node-high-mem`
**Hostname**\* (Required)
* Network hostname
* Example: `gpu01.cluster.local`
**IP Address**\* (Required)
* IPv4 address of the node
* Example: `192.168.1.101`
**Node Type**\* (Required)
* Select from dropdown: GPU, CPU
* Default: `GPU`
**Status**\* (Required)
* Select from dropdown: Online, Offline
* Default: `Online`
### CPU Resources
**CPU Cores**\* (Required)
* Total number of CPU cores
* Example: `16`
**Total number of CPU Cores** (Helper text)
**Available CPU Cores**\* (Required)
* Number of available CPU cores
* Example: `8`
**Number of available CPU cores** (Helper text)
### Memory Resources
**Total Memory (GB)**\* (Required)
* Total RAM in GB
* Example: `64`
**Total RAM in GB** (Helper text)
**Available Memory (GB)**\* (Required)
* Available RAM in GB
* Example: `32`
**Available memory (GB)** (Helper text)
### GPU Resources (Optional)
**GPU Count**
* Number of GPUs (0 for CPU-only nodes)
* Example: `0`, `4`, `8`
**Number of GPUs (0 for CPU-only nodes)** (Helper text)
**GPU Type**
* Select GPU model from dropdown
* Options: NVIDIA A100, NVIDIA V100, NVIDIA T4, etc.
**GPU Memory per GPU (GB)**
* Memory per GPU in GB
* Example: `80` (for A100)
**VRAM per GPU in GB** (Helper text)
### Storage & Network
**Total Storage (GB)**\* (Required)
* Total disk storage in GB
* Example: `1000`
**Total disk space in GB** (Helper text)
**Network Bandwidth (Mbps)**\* (Required)
* Network bandwidth in Mbps
* Example: `10000` (10 Gbps)
**Network speed in Mbps** (Helper text)
**Network Latency (ms)**\* (Required)
* Average network latency in milliseconds
* Example: `1`
**Average network latency** (Helper text)
### Configuration
**Max Concurrent Jobs**\* (Required)
* Maximum number of jobs that can run simultaneously
* Example: `4`
**Maximum number of jobs that can run simultaneously** (Helper text)
**Priority**
* Node priority (1-10, higher is better)
* Example: `5`
**Node priority (1-10, higher is better)** (Helper text)
**Tags**
* Comma-separated tags for categorization
* Example: `production,high-memory,gpu`
### Location (Optional)
**Datacenter**
* Datacenter location
* Example: `Datacenter`
**Rack**
* Rack identifier
* Example: `R-10`
**Zone**
* Availability zone
* Example: `Zone-A`
### Actions
* **Cancel**: Discard and close
* **Create Cluster Node**: Submit and create the node
## Viewing Node Details
To view detailed information about a cluster node:
1. Navigate to **Deep Learning Platform** → **Cluster**
2. Click on a node from the list
3. View comprehensive details in the modal dialog
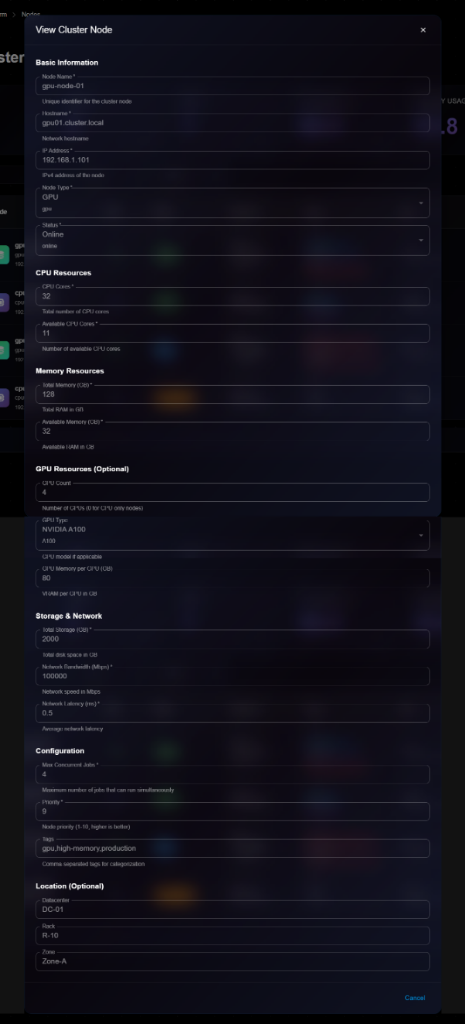
**Details Panel Sections**:
**Basic Information**:
* Node Name: e.g., "gpu-node-01"
* Hostname: e.g., "gpu01.cluster.local"
* IP Address: e.g., "192.168.1.101"
* Node Type: GPU or CPU
* Status: Online, Offline, Busy, Maintenance
**CPU Resources**:
* CPU Cores: Total cores (e.g., 32)
* Total number of CPU cores
* Available CPU Cores: Available cores (e.g., 11)
* Number of available CPU cores
**Memory Resources**:
* Total Memory (GB): Total RAM (e.g., 128)
* Total RAM in GB
* Available Memory (GB): Available RAM (e.g., 32)
* Available memory (GB)
**GPU Resources (Optional)**:
* GPU Count: Number of GPUs (e.g., 4)
* Number of GPUs (0 for CPU-only nodes)
* GPU Type: GPU model (e.g., A100)
* GPU Memory per GPU (GB): VRAM per GPU (e.g., 80)
* VRAM per GPU in GB
**Storage & Network**:
* Total Storage (GB): Total disk space
* Total disk space in GB
* Network Bandwidth (Mbps): Network speed
* Network speed in Mbps
* Network Latency (ms): Average latency
* Network speed in Mbps
**Configuration**:
* Max Concurrent Jobs: Maximum simultaneous jobs
* Maximum number of jobs that can run simultaneously
* Priority: Node priority
* Node priority (1-10, higher is better)
* Tags: Comma-separated tags for categorization
**Location (Optional)**:
* Datacenter: Datacenter location
* Rack: Rack identifier
* Zone: Availability zone
## Editing a Node
To update node configuration:
1. Open node details page
2. Click **Edit** button (or three-dot menu → Edit)
3. Modify editable fields in the Edit Cluster Node modal
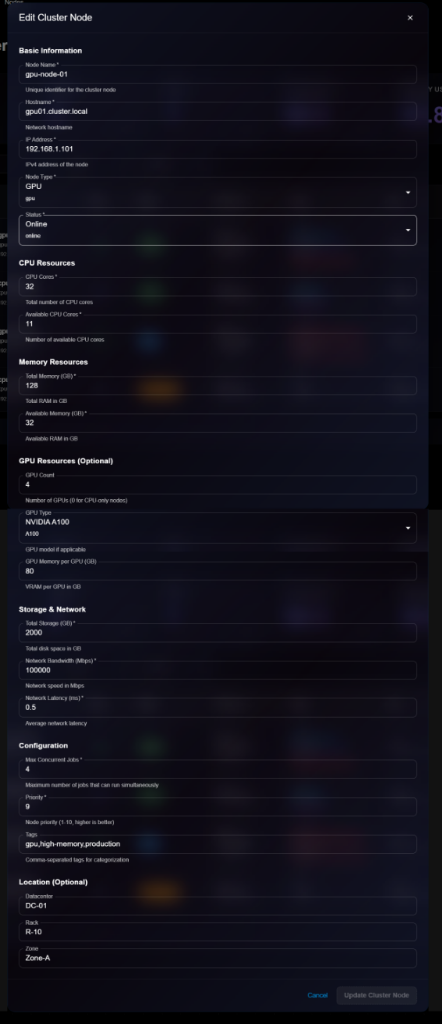
4. Click **Update Cluster Node** to save changes
> \[!NOTE] The Edit form is identical to the View form, but with editable fields and an "Update Cluster Node" button.
**Editable Fields**:
* ✅ Hostname
* ✅ Status (Online, Offline, Maintenance)
* ✅ Available CPU Cores
* ✅ Available Memory (GB)
* ✅ GPU configuration
* ✅ Storage & Network settings
* ✅ Max Concurrent Jobs
* ✅ Priority
* ✅ Tags
* ✅ Location information
* ❌ Node Name (cannot edit)
* ❌ IP Address (cannot edit)
* ❌ Node Type (cannot edit)
* ❌ Total CPU Cores (cannot edit)
* ❌ Total Memory (cannot edit)
## Node Management
### Changing Node Status
**Setting to Maintenance**:
1. Open node details
2. Click **Edit**
3. Change Status to "Maintenance"
4. Save changes
5. Node will stop accepting new jobs
**Bringing Node Online**:
1. Open node details
2. Click **Edit**
3. Change Status to "Online"
4. Save changes
5. Node will start accepting jobs
### Monitoring Node Health
**Health Indicators**:
* **Healthy** (Green): All systems normal
* **Warning** (Orange): High resource usage or minor issues
* **Critical** (Red): Node failure or severe issues
**When to Check**:
* High CPU/Memory usage (>90%)
* Jobs failing frequently
* Network connectivity issues
* Hardware errors
### Deleting a Node
To remove a node from the cluster:
1. Navigate to node details
2. Click **Delete** button
3. Confirm deletion
> \[!WARNING] You cannot delete a node with running jobs. Stop or migrate jobs first.
**Before Deleting**:
* Ensure no jobs are running
* Migrate important jobs to other nodes
* Backup any local data
* Update cluster capacity planning
## Best Practices
**Resource Allocation**:
* Reserve some resources for system overhead
* Don't allocate 100% of available resources
* Monitor usage patterns and adjust
**Node Naming**:
* Use descriptive names: `gpu-node-01`, `cpu-highmem-02`
* Include node type in name
* Use consistent naming convention
**Maintenance**:
* Schedule regular maintenance windows
* Update node status before maintenance
* Monitor health indicators
* Keep firmware and drivers updated
**Tagging Strategy**:
* Use tags for organization: `production`, `development`
* Tag by capability: `high-memory`, `gpu`, `fast-storage`
* Tag by location: `datacenter-a`, `rack-10`
## Next Steps
* Submit [Jobs](https://docs.kaisar.io/kaisar-network/kaisar-ai-ops/deep-learning-platform/jobs) to cluster nodes
* Run [Experiments](https://docs.kaisar.io/kaisar-network/kaisar-ai-ops/deep-learning-platform/experiments) on GPU nodes
* Monitor resource usage in [Analytics](https://docs.kaisar.io/kaisar-network/kaisar-ai-ops/deep-learning-platform/analytics)
* Deploy models via [Deployments](https://docs.kaisar.io/kaisar-network/kaisar-ai-ops/deep-learning-platform/deployments)
---
# Source: https://docs.kaisar.io/kaisar-network/kaisar-architecture/products/kaisar-onenode/kaisar-provider/how-to-manage-kaisar-provider/connect-wallet.md
# Connect wallet
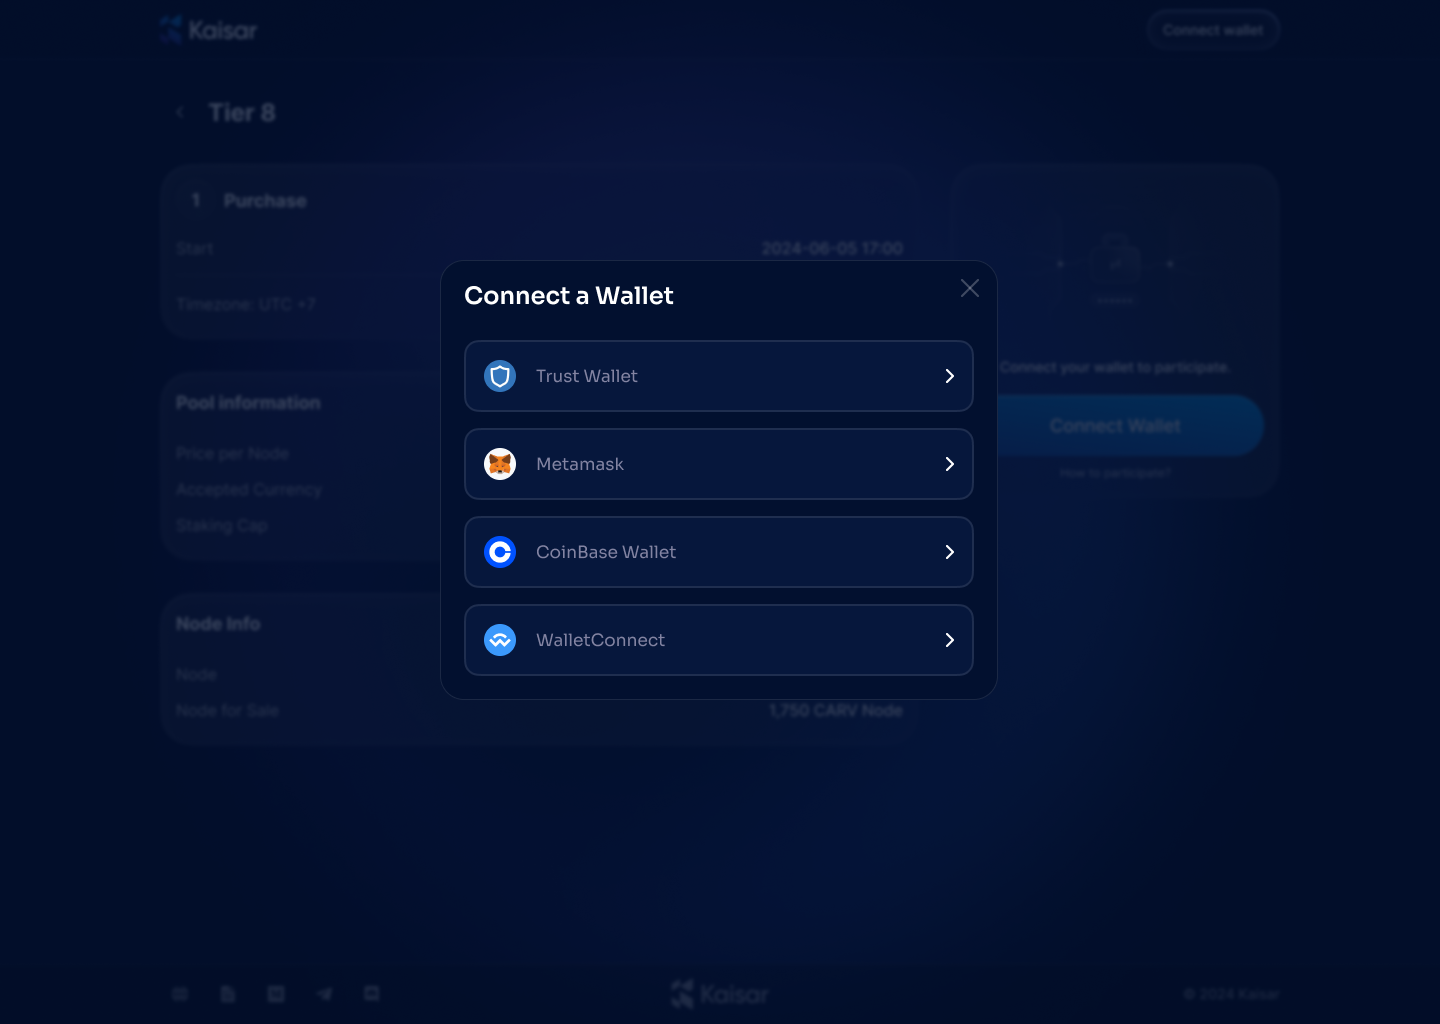
1. **Connect Wallet**: Click the **"Connect Wallet"** button on the interface.
2. **Select Wallet:** Choose your preferred wallet and connect to it.
3. **Sign In:** Click the **"Sign In"** button to confirm and complete the login process with your wallet.
---
# Source: https://docs.kaisar.io/kaisar-network/contact-and-support.md
# Contact and Support
For any queries or assistance during the sale, please contact:
* **Email**:
* **Support Portal**: [nodes.kaisar.io](http://nodes.kaisar.io)
* **Official Channels**:
* **X (formerly Twitter)**:
* **Telegram**:
* **Discord**:
* **LinkedIn**:
---
# Source: https://docs.kaisar.io/kaisar-network/origins/challenges/cost-challenges-with-traditional-cloud-gpu-providers..md
# Cost challenges with traditional cloud GPU providers.
The cost challenges associated with cloud GPU providers is highlighted by [Splunk](https://www.splunk.com/en_us/blog/learn/cloud-cost-trends.html) where the demand for GPUs, especially for training large AI models, has surged, leading to capacity constraints. Instances where multiple users require a large number of GPUs simultaneously can lead to contention and underutilization, driving up costs as cloud providers struggle to balance supply and demand efficiently.
Other prominent reasons for cost challenges are:
* Hidden costs such as egress fees also contribute significantly to the overall expense, often catching businesses by surprise (Source:[Splunk](https://www.splunk.com/en_us/blog/learn/cloud-cost-trends.html)).
* The methods for deploying GPU resources in the cloud, such as pass-through can be wasteful for smaller applications. GPU virtualization.(Source: [SpringerLink](https://link.springer.com/article/10.1007/s00170-023-11252-0)).
* Use of advanced technologies in AI models has introduced new costs in compute. While these technologies improve the performance of AI models they still require significant investment in infrastructure.(Source: [ar5iv](https://ar5iv.org/pdf/2401.12230)).
The plot from [ar5iv](https://ar5iv.org/pdf/2401.12230) below shows how the number of GPUs provisioned scales with the fluctuating request rate over time. As the request rate increases or decreases, the number of GPUs provisioned also adjusts accordingly to match the demand, demonstrating elastic resource scheduling.
---
# Source: https://docs.kaisar.io/kaisar-network/kaisar-ai-ops/dashboard/dashboard.md
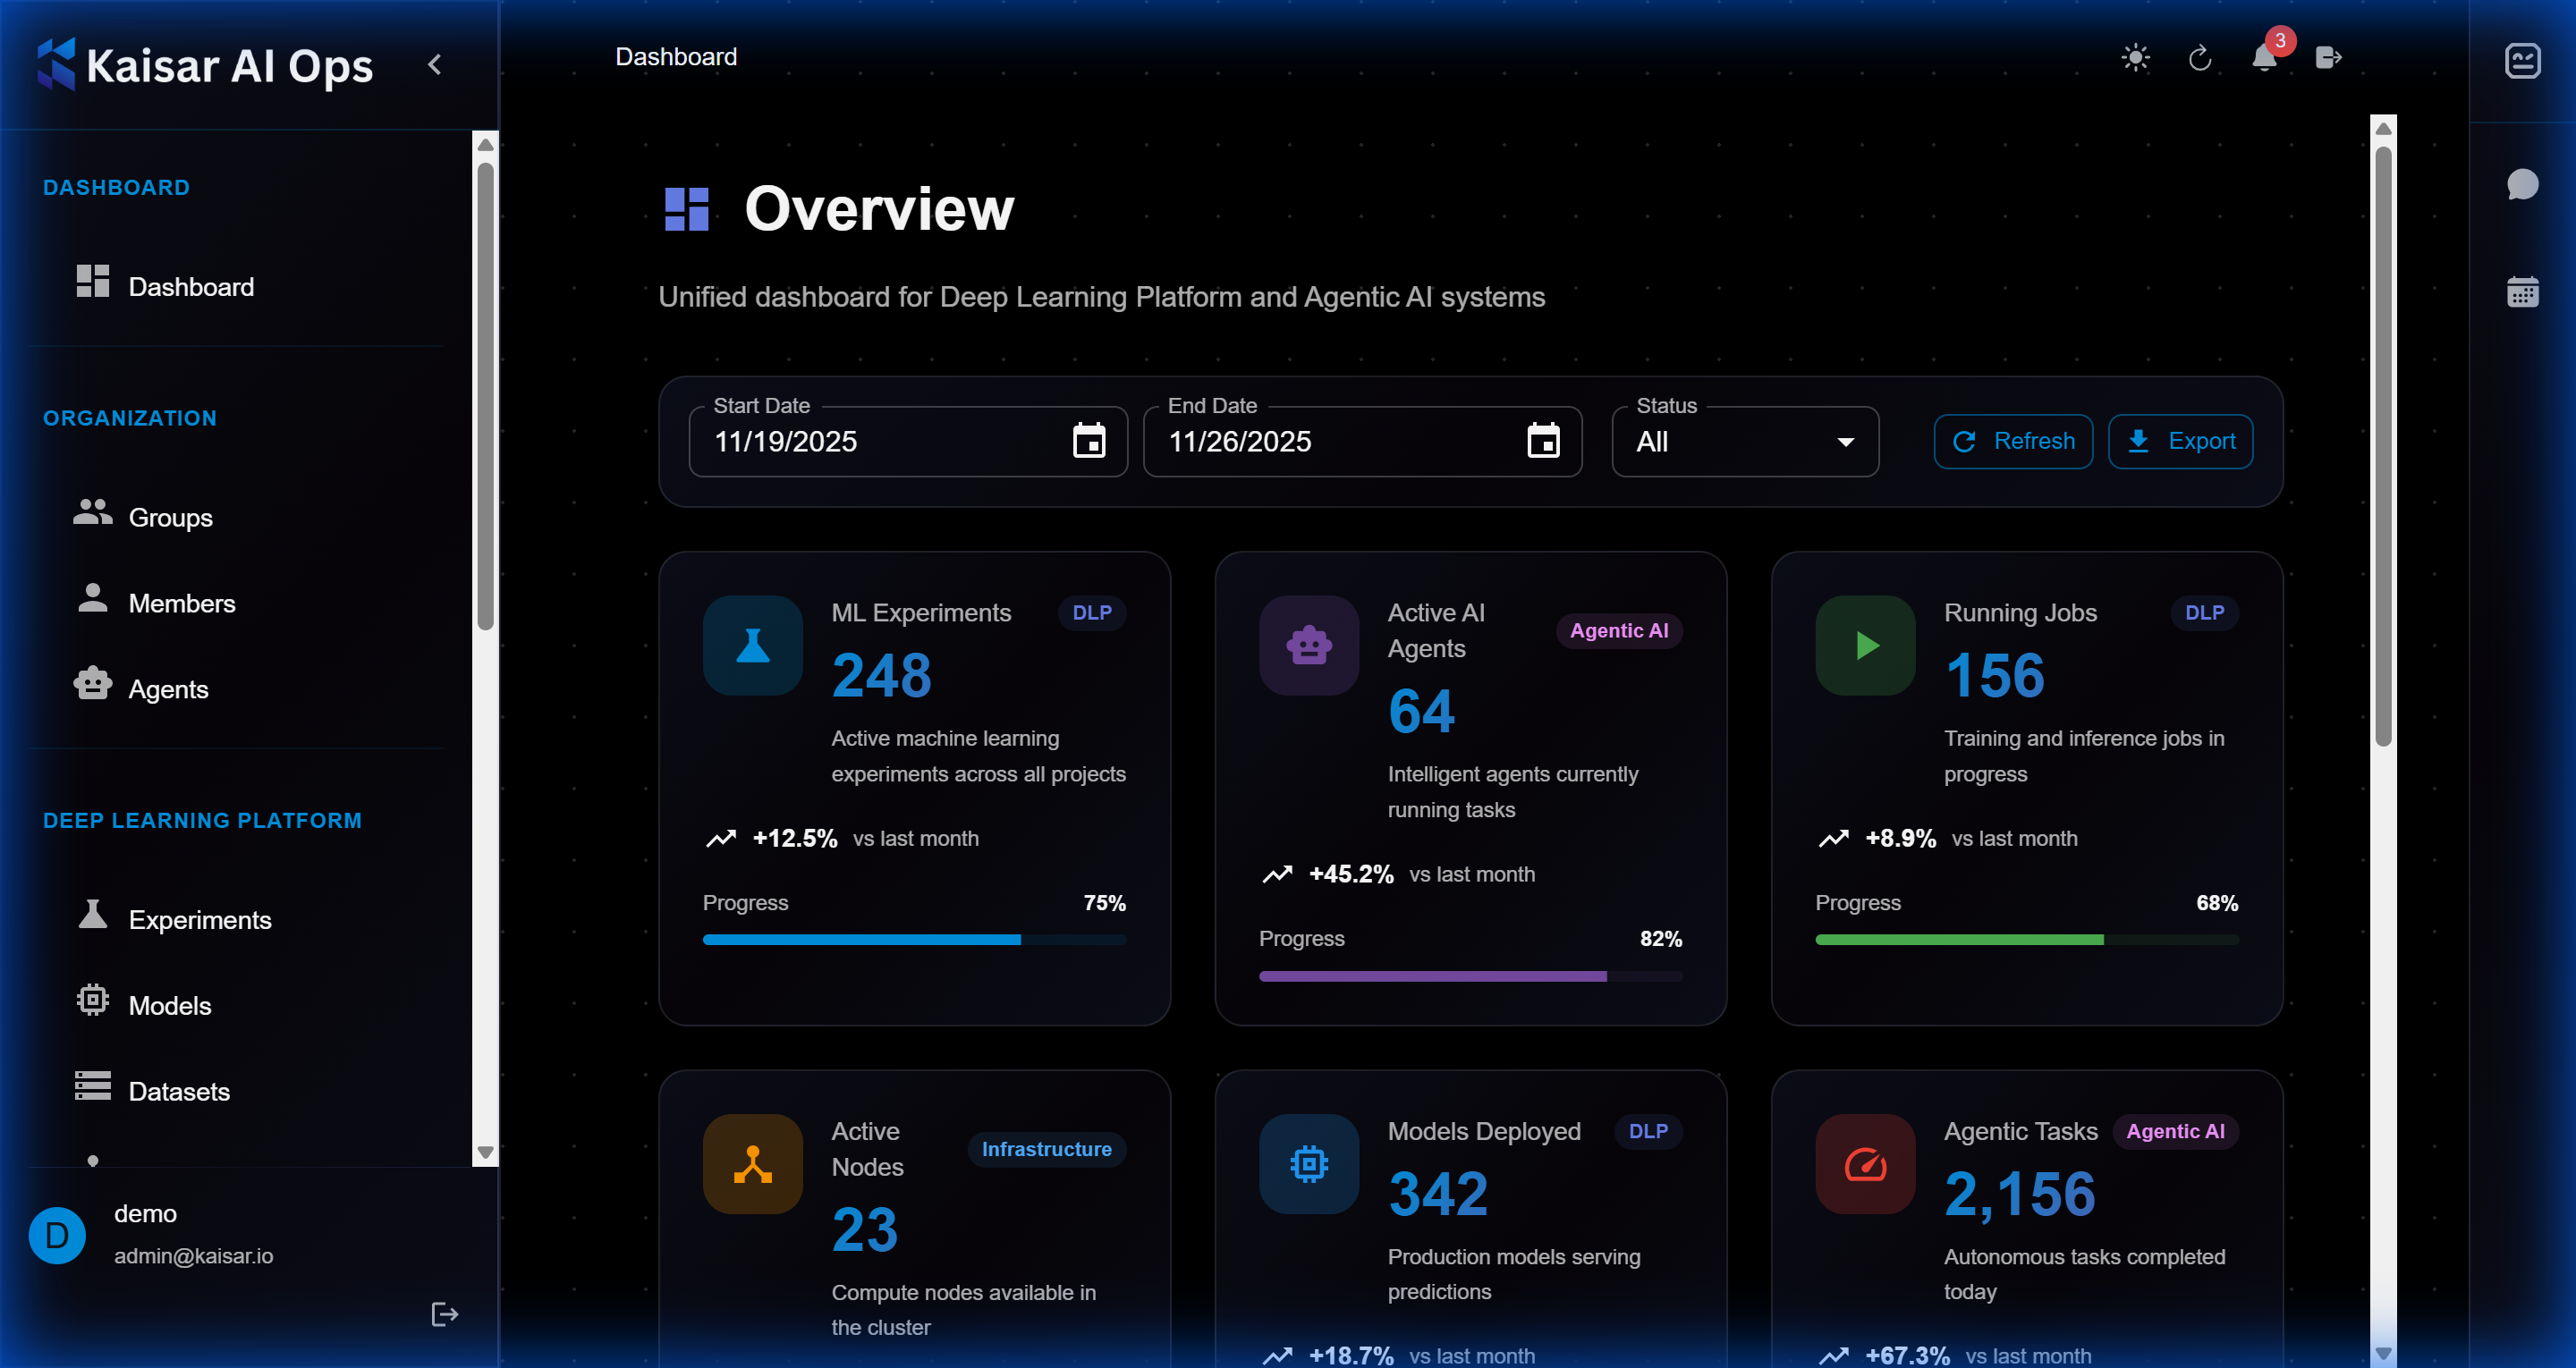
# Dashboard
The Dashboard is your central hub for monitoring and managing all AI operations in Kaisar AI Ops.
## Overview
The dashboard provides a comprehensive view of:
* Recent experiments and their status
* Active deployments and health metrics
* System resource usage
* Quick access to common actions
## Dashboard Components
### 1. Navigation Sidebar
Located on the left side, the sidebar provides access to:
* **Dashboard**: Main overview (current page)
* **Organization**: Team and access management
* **Deep Learning Platform**: Experiments, Models, Datasets
* **Deployments**: Production model deployments
### 2. Main Content Area
The central area displays:
* **Activity Feed**: Recent experiments, deployments, and updates
* **Status Cards**: Quick metrics and summaries
* **Charts and Graphs**: Visual representation of performance metrics
### 3. Top Bar
The top navigation bar includes:
* **Search**: Find experiments, models, datasets, or deployments
* **Notifications**: System alerts and updates
* **User Profile**: Access settings and logout
## Key Features
### Recent Activity
View your most recent:
* Experiment runs and their status (running, completed, failed)
* Model deployments and updates
* Dataset uploads and modifications
* Team member activities
### Quick Actions
Common tasks accessible from the dashboard:
* **Create Experiment**: Start a new ML training run
* **Deploy Model**: Push a model to production
* **Upload Dataset**: Add new training data
* **View Metrics**: Check system performance
### Metrics Overview
Monitor key performance indicators:
* **Active Experiments**: Number of currently running experiments
* **Total Models**: Registered models in your organization
* **Deployments**: Active production deployments
* **Resource Usage**: Compute and storage utilization
## Customization
### Filtering and Sorting
* Filter by date range, status, or owner
* Sort by creation time, name, or status
* Save custom views for quick access
### Widgets
Customize your dashboard by:
* Adding or removing metric widgets
* Rearranging layout
* Setting default views
## Navigation Tips
### Keyboard Shortcuts
* `Ctrl/Cmd + K`: Open search
* `Ctrl/Cmd + N`: Create new experiment
* `Ctrl/Cmd + D`: Go to dashboard
### Quick Search
Use the search bar to quickly find:
* Experiments by name or ID
* Models by version or tag
* Datasets by name
* Deployments by status
## Best Practices
1. **Check Daily**: Review your dashboard daily for updates and alerts
2. **Monitor Failures**: Address failed experiments or deployments promptly
3. **Track Resources**: Keep an eye on resource usage to avoid limits
4. **Stay Organized**: Use tags and naming conventions for easy filtering
---
# Source: https://docs.kaisar.io/kaisar-network/kaisar-ai-ops/deep-learning-platform/datasets.md
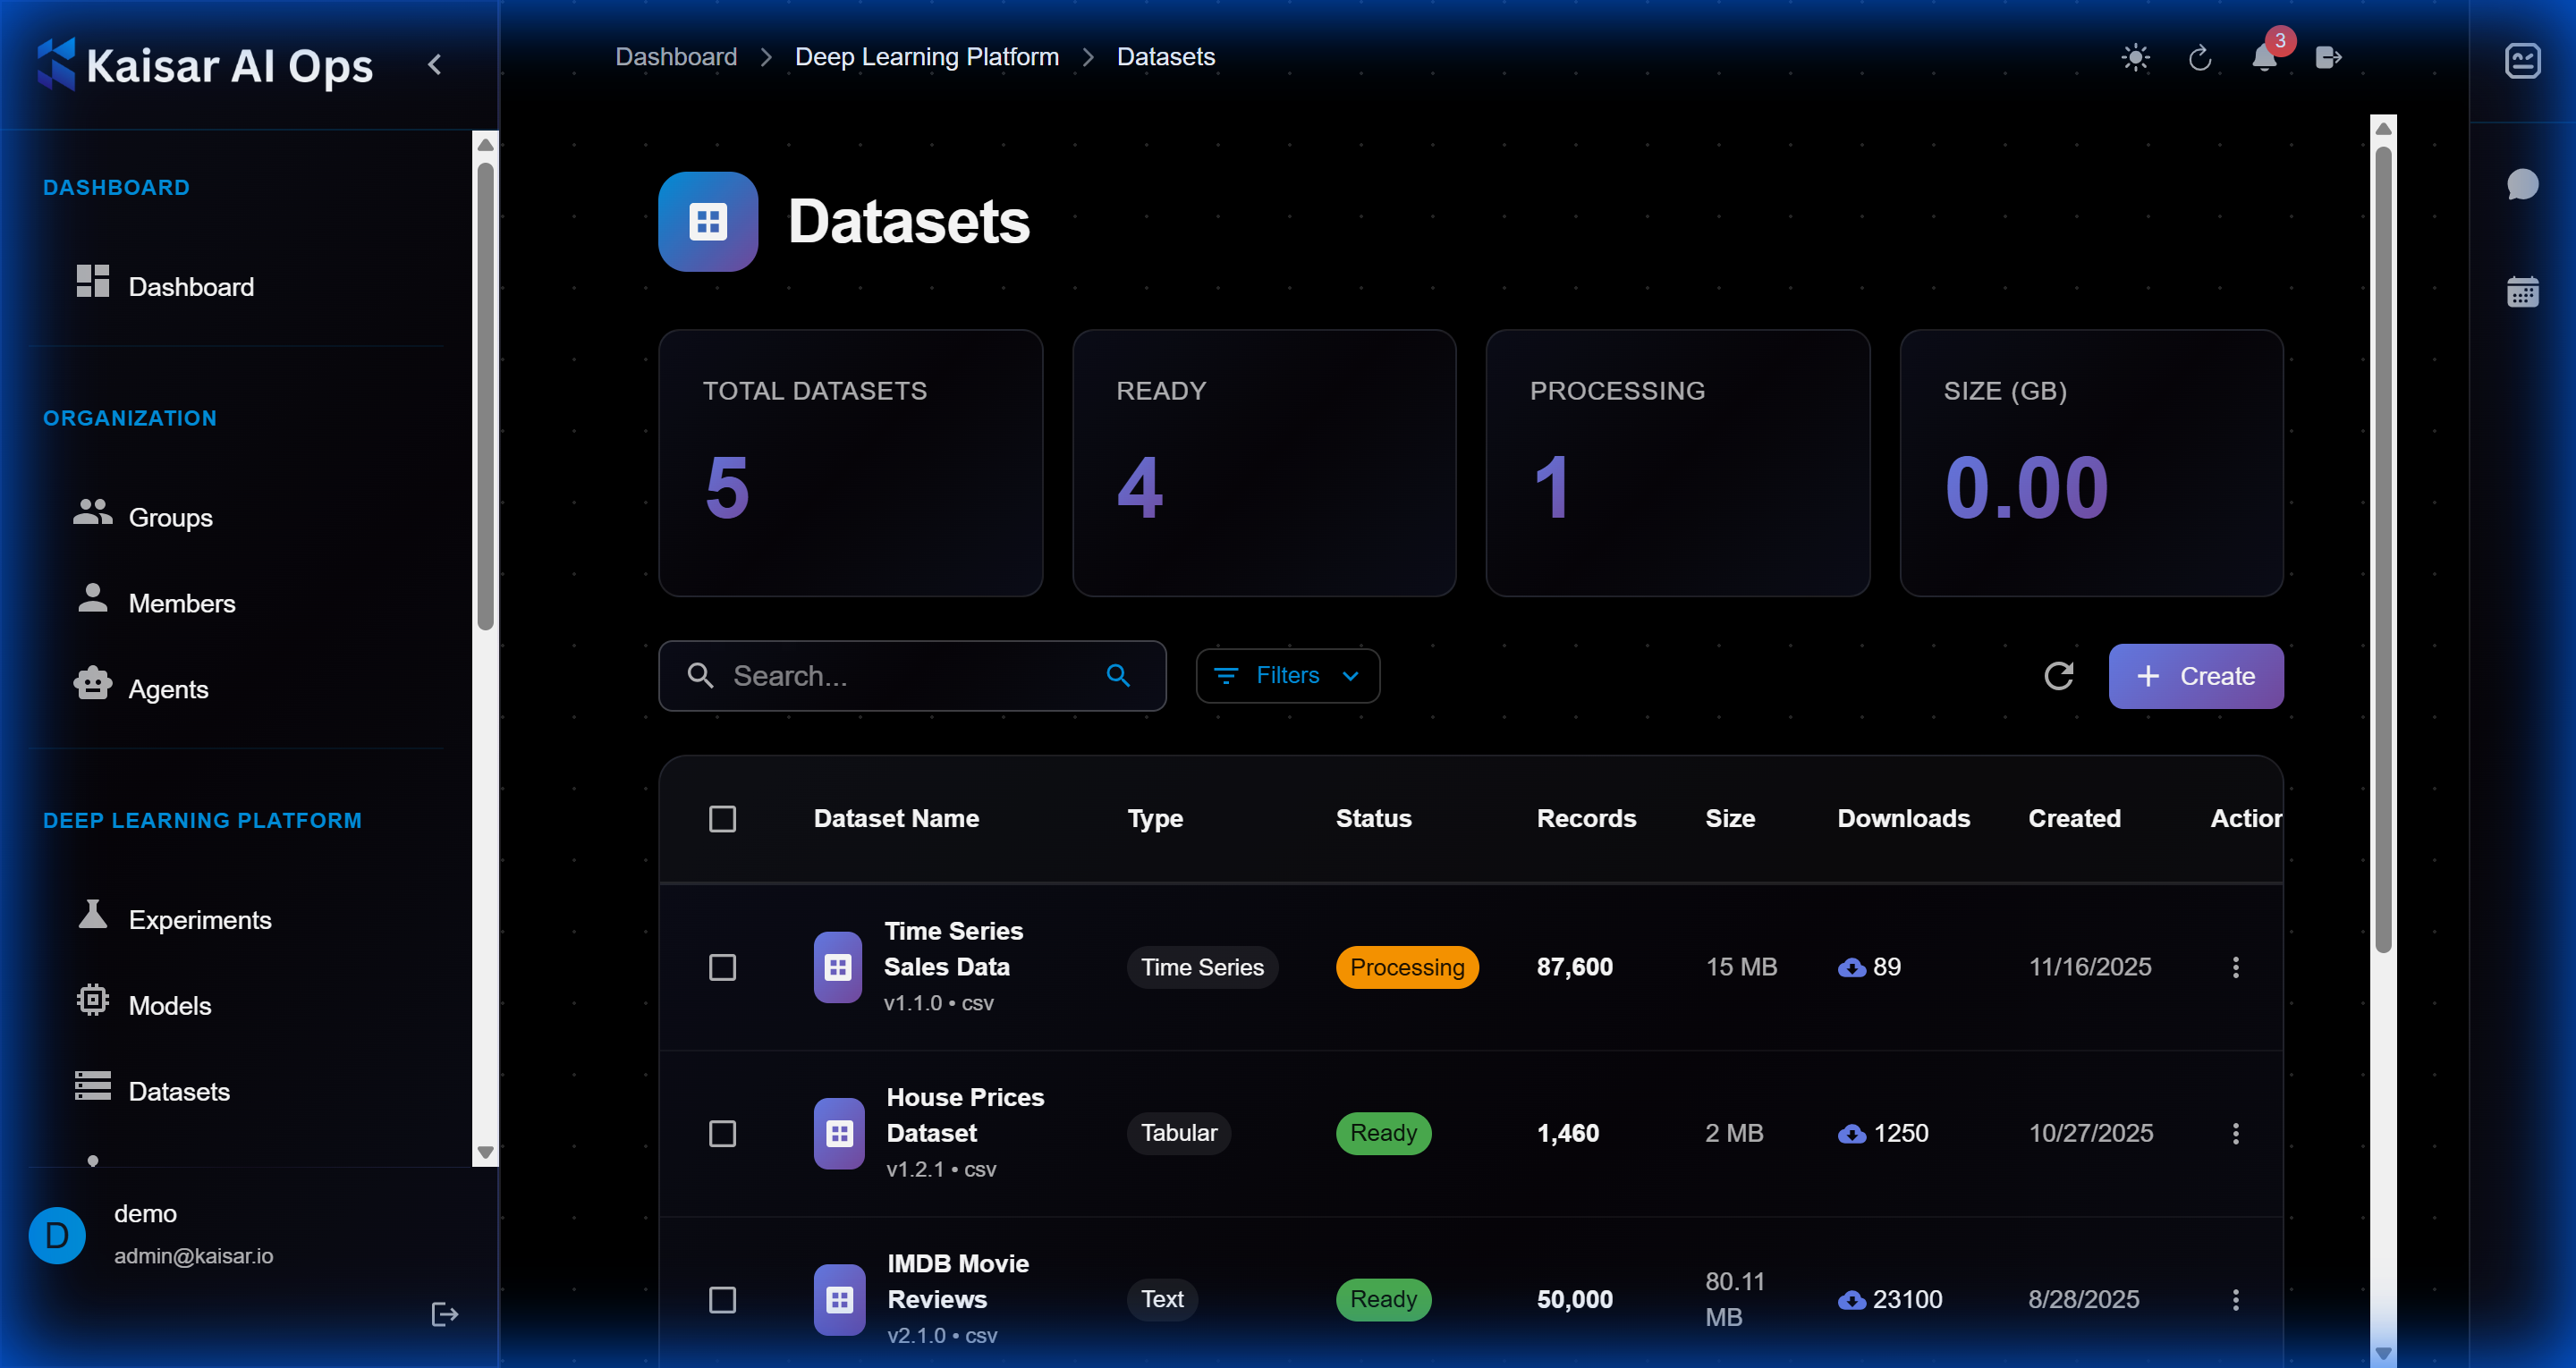
# Datasets
Organize and version your training data.
## Creating a Dataset
Navigate to **Deep Learning Platform** → **Datasets** → Click **Create**
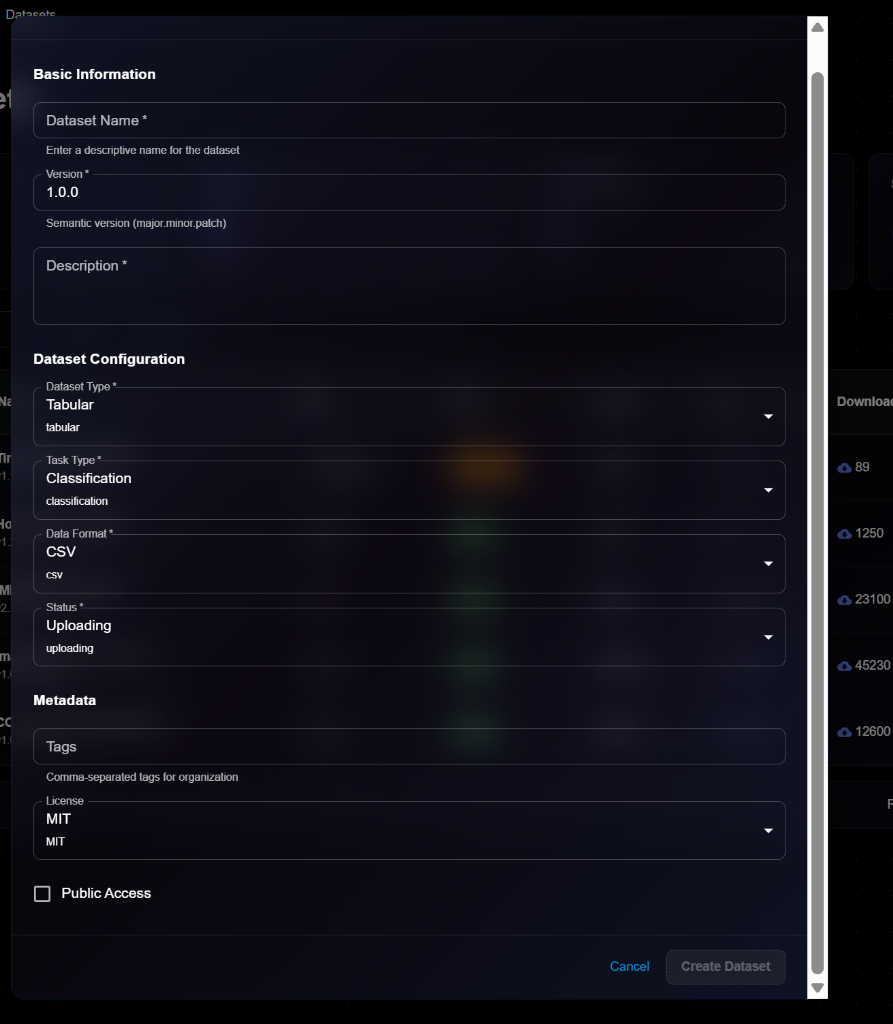
### Basic Information
**Dataset Name**\* (Required)
* Enter a descriptive name for the dataset
* Example: `imagenet-1k`, `coco-2017`, `custom-dataset`
**Version**\* (Required)
* Semantic version (major.minor.patch)
* Default: `1.0.0`
* Helper text: "Semantic version (major.minor.patch)"
**Description**\* (Required)
* Detailed description of dataset contents and purpose
### Dataset Configuration
**Dataset Type**\* (Required)
* Select data type from dropdown:
* Tabular
* Image
* Text
* Audio
* Video
* Others
* Default: `tabular`
**Task Type**\* (Required)
* Select task type:
* Classification
* Regression
* Detection
* Segmentation
* Others
* Default: `classification`
**Data Format**\* (Required)
* Select file format:
* CSV
* JSON
* Parquet
* TFRecord
* Others
* Default: `csv`
**Status**\* (Required)
* Current dataset status:
* Uploading
* Processing
* Ready
* Failed
* Default: `uploading`
### Metadata
**Tags** (Optional)
* Comma-separated tags for organization
* Example: `computer-vision, training, augmented`
**License** (Required)
* Select license:
* MIT
* CC BY 4.0
* CC0
* Apache 2.0
* Proprietary
* Default: `MIT`
**Public Access** (Checkbox)
* Make dataset accessible to all organization members
### Actions
* **Cancel**: Discard and close
* **Create Dataset**: Submit and create the dataset
## Example Configuration
```yaml
Dataset Name: imagenet-subset-2024
Version: 1.0.0
Description: ImageNet subset with 100 classes for quick experimentation
Dataset Type: Tabular
Task Type: Classification
Data Format: CSV
Status: Uploading
Tags: computer-vision, subset, training
License: MIT
Public Access: ✓
```
## Viewing Dataset Details
To view detailed information about a dataset:
1. Navigate to **Deep Learning Platform** → **Datasets**
2. Click on a dataset from the list
3. View comprehensive details in the modal dialog
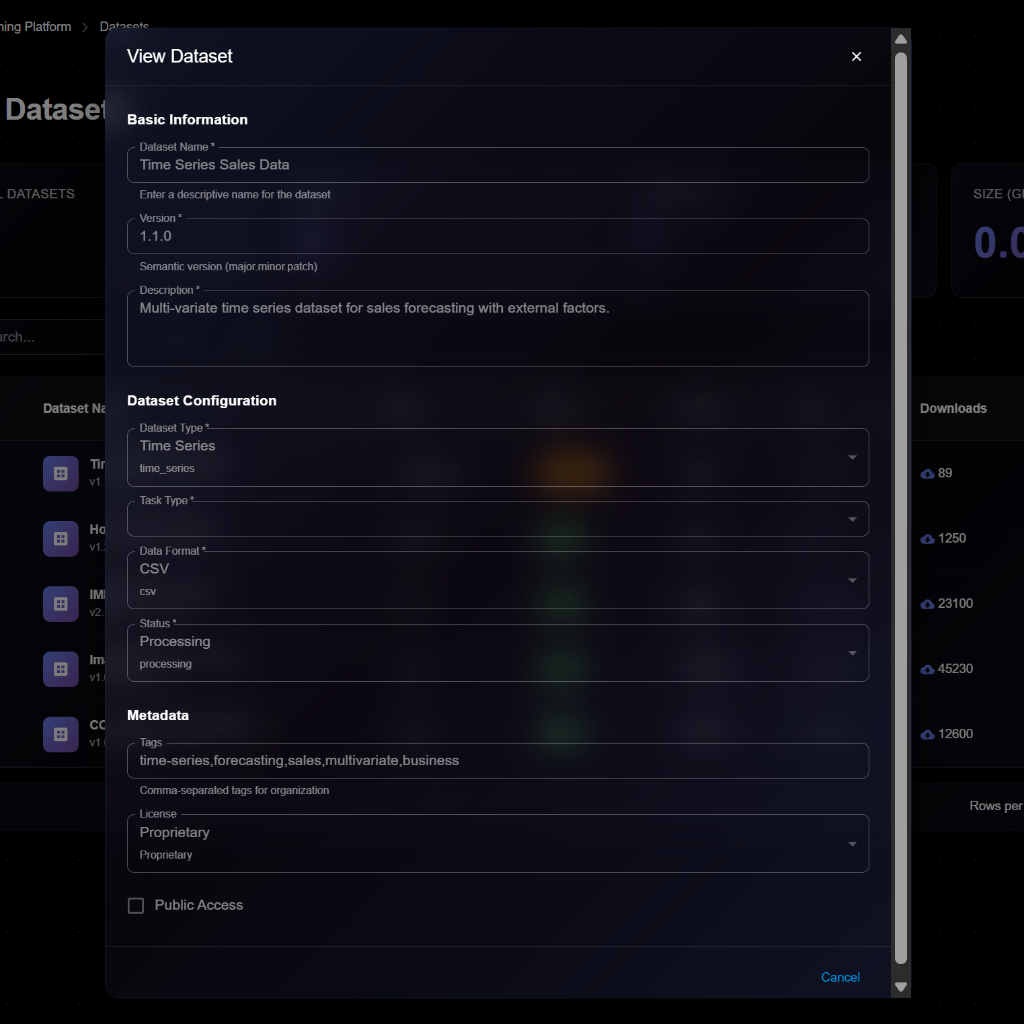
**Details Panel Sections**:
**Basic Information**:
* **Dataset Name**: e.g., "Time Series Sales Data"
* **Version**: Semantic version (e.g., 1.1.0)
* **Description**: Full description of the dataset
**Dataset Configuration**:
* **Dataset Type**: Time Series, Tabular, Image, Text, Audio, Video
* **Task Type**: Forecasting, Classification, Regression, etc.
* **Data Format**: CSV, JSON, Parquet, TFRecord, etc.
* **Status**: Processing, Uploading, Ready, Failed
**Metadata**:
* **Tags**: Comma-separated tags (e.g., "time-series,forecasting,sales,multivariate,business")
* **License**: Proprietary, MIT, CC BY 4.0, etc.
* **Public Access**: Checkbox for visibility
## Editing a Dataset
To update dataset information:
1. Open dataset details page
2. Click **Edit** button (or three-dot menu → Edit)
3. Modify editable fields in the Edit Dataset modal
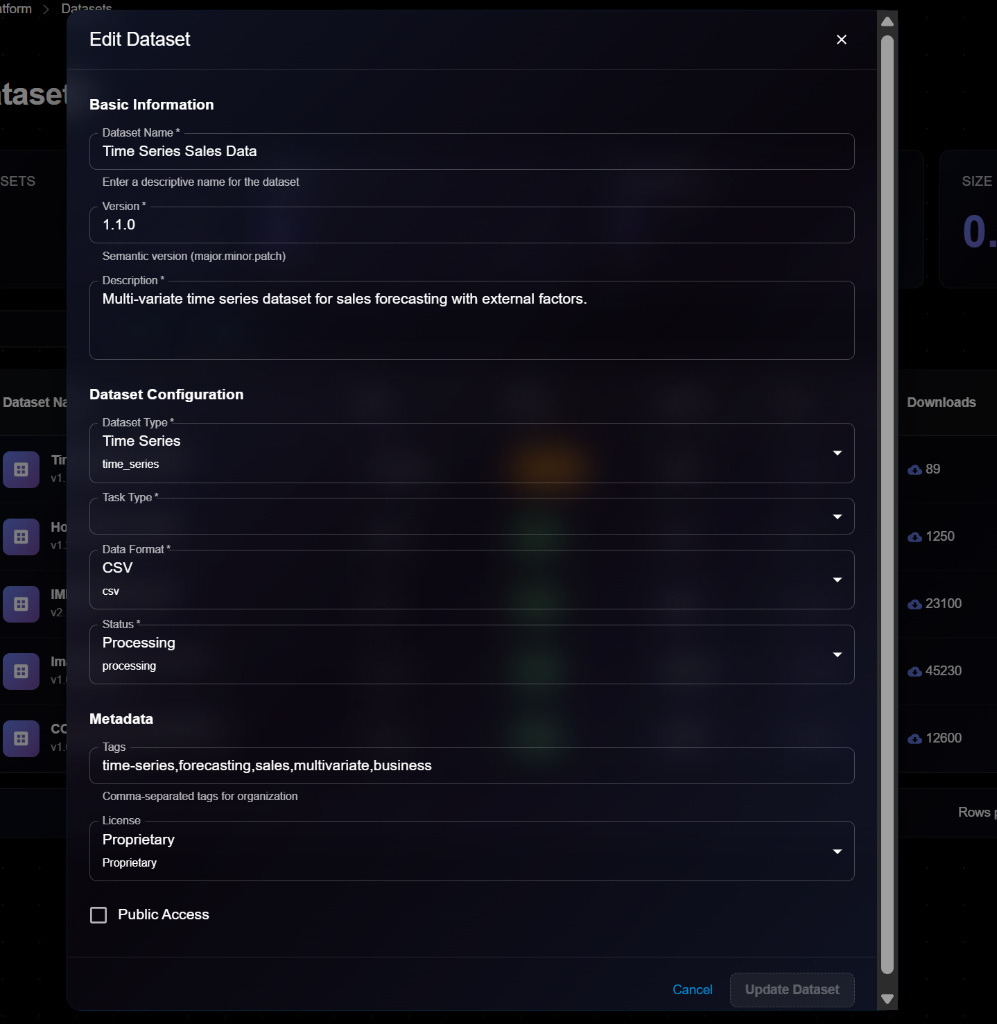
4. Click **Update Dataset** to save changes
> \[!NOTE] The Edit form is identical to the View form, but with editable fields and an "Update Dataset" button.
**Editable Fields**:
* ✅ Description
* ✅ Tags
* ✅ License
* ✅ Public Access
* ❌ Dataset Name (cannot edit)
* ❌ Version (create new version instead)
* ❌ Data Type (cannot edit)
* ❌ Data Format (cannot edit)
## Downloading Dataset
To download dataset files:
1. Open dataset details
2. Click **Download** button
3. Select download format:
* Original format
* Compressed archive
* Specific splits (train/val/test)
4. Download will start
**Download Options**:
* Full dataset
* Specific splits only
* Sample subset
* Metadata only
## Creating a New Version
To create a new version of a dataset:
1. Open dataset details
2. Click **New Version** button
3. Enter new version number
4. Upload updated data
5. Document changes in description
6. Click **Create**
**When to Version**:
* Added new samples
* Fixed data errors
* Changed preprocessing
* Updated annotations
* Removed corrupted files
## Deleting a Dataset
To remove a dataset:
1. Navigate to dataset details
2. Click **Delete** button
3. Confirm deletion
> \[!WARNING] You cannot delete a dataset that is being used by running experiments. Stop experiments first.
**Before Deleting**:
* Check for experiments using this dataset
* Download data if needed
* Update documentation
* Consider archiving instead
## Dataset Versioning
**When to Create New Version**:
* Added new samples
* Fixed annotation errors
* Changed preprocessing
* Updated splits
* Removed corrupted data
## Best Practices
**Organization**:
* Use consistent naming conventions
* Document data collection process
* Include data cards/datasheets
* Provide sample data for preview
**Quality Control**:
* Validate data integrity
* Check for label errors
* Monitor class balance
* Document known issues
## Next Steps
* Use dataset in [Experiments](https://docs.kaisar.io/kaisar-network/kaisar-ai-ops/deep-learning-platform/experiments)
* Track data lineage
* Monitor usage in [Analytics](https://docs.kaisar.io/kaisar-network/kaisar-ai-ops/deep-learning-platform/analytics)
---
# Source: https://docs.kaisar.io/kaisar-network/kaisar-ai-ops/deep-learning-platform/deployments.md
# Deployments
Deploy your models to production with auto-scaling and load balancing.
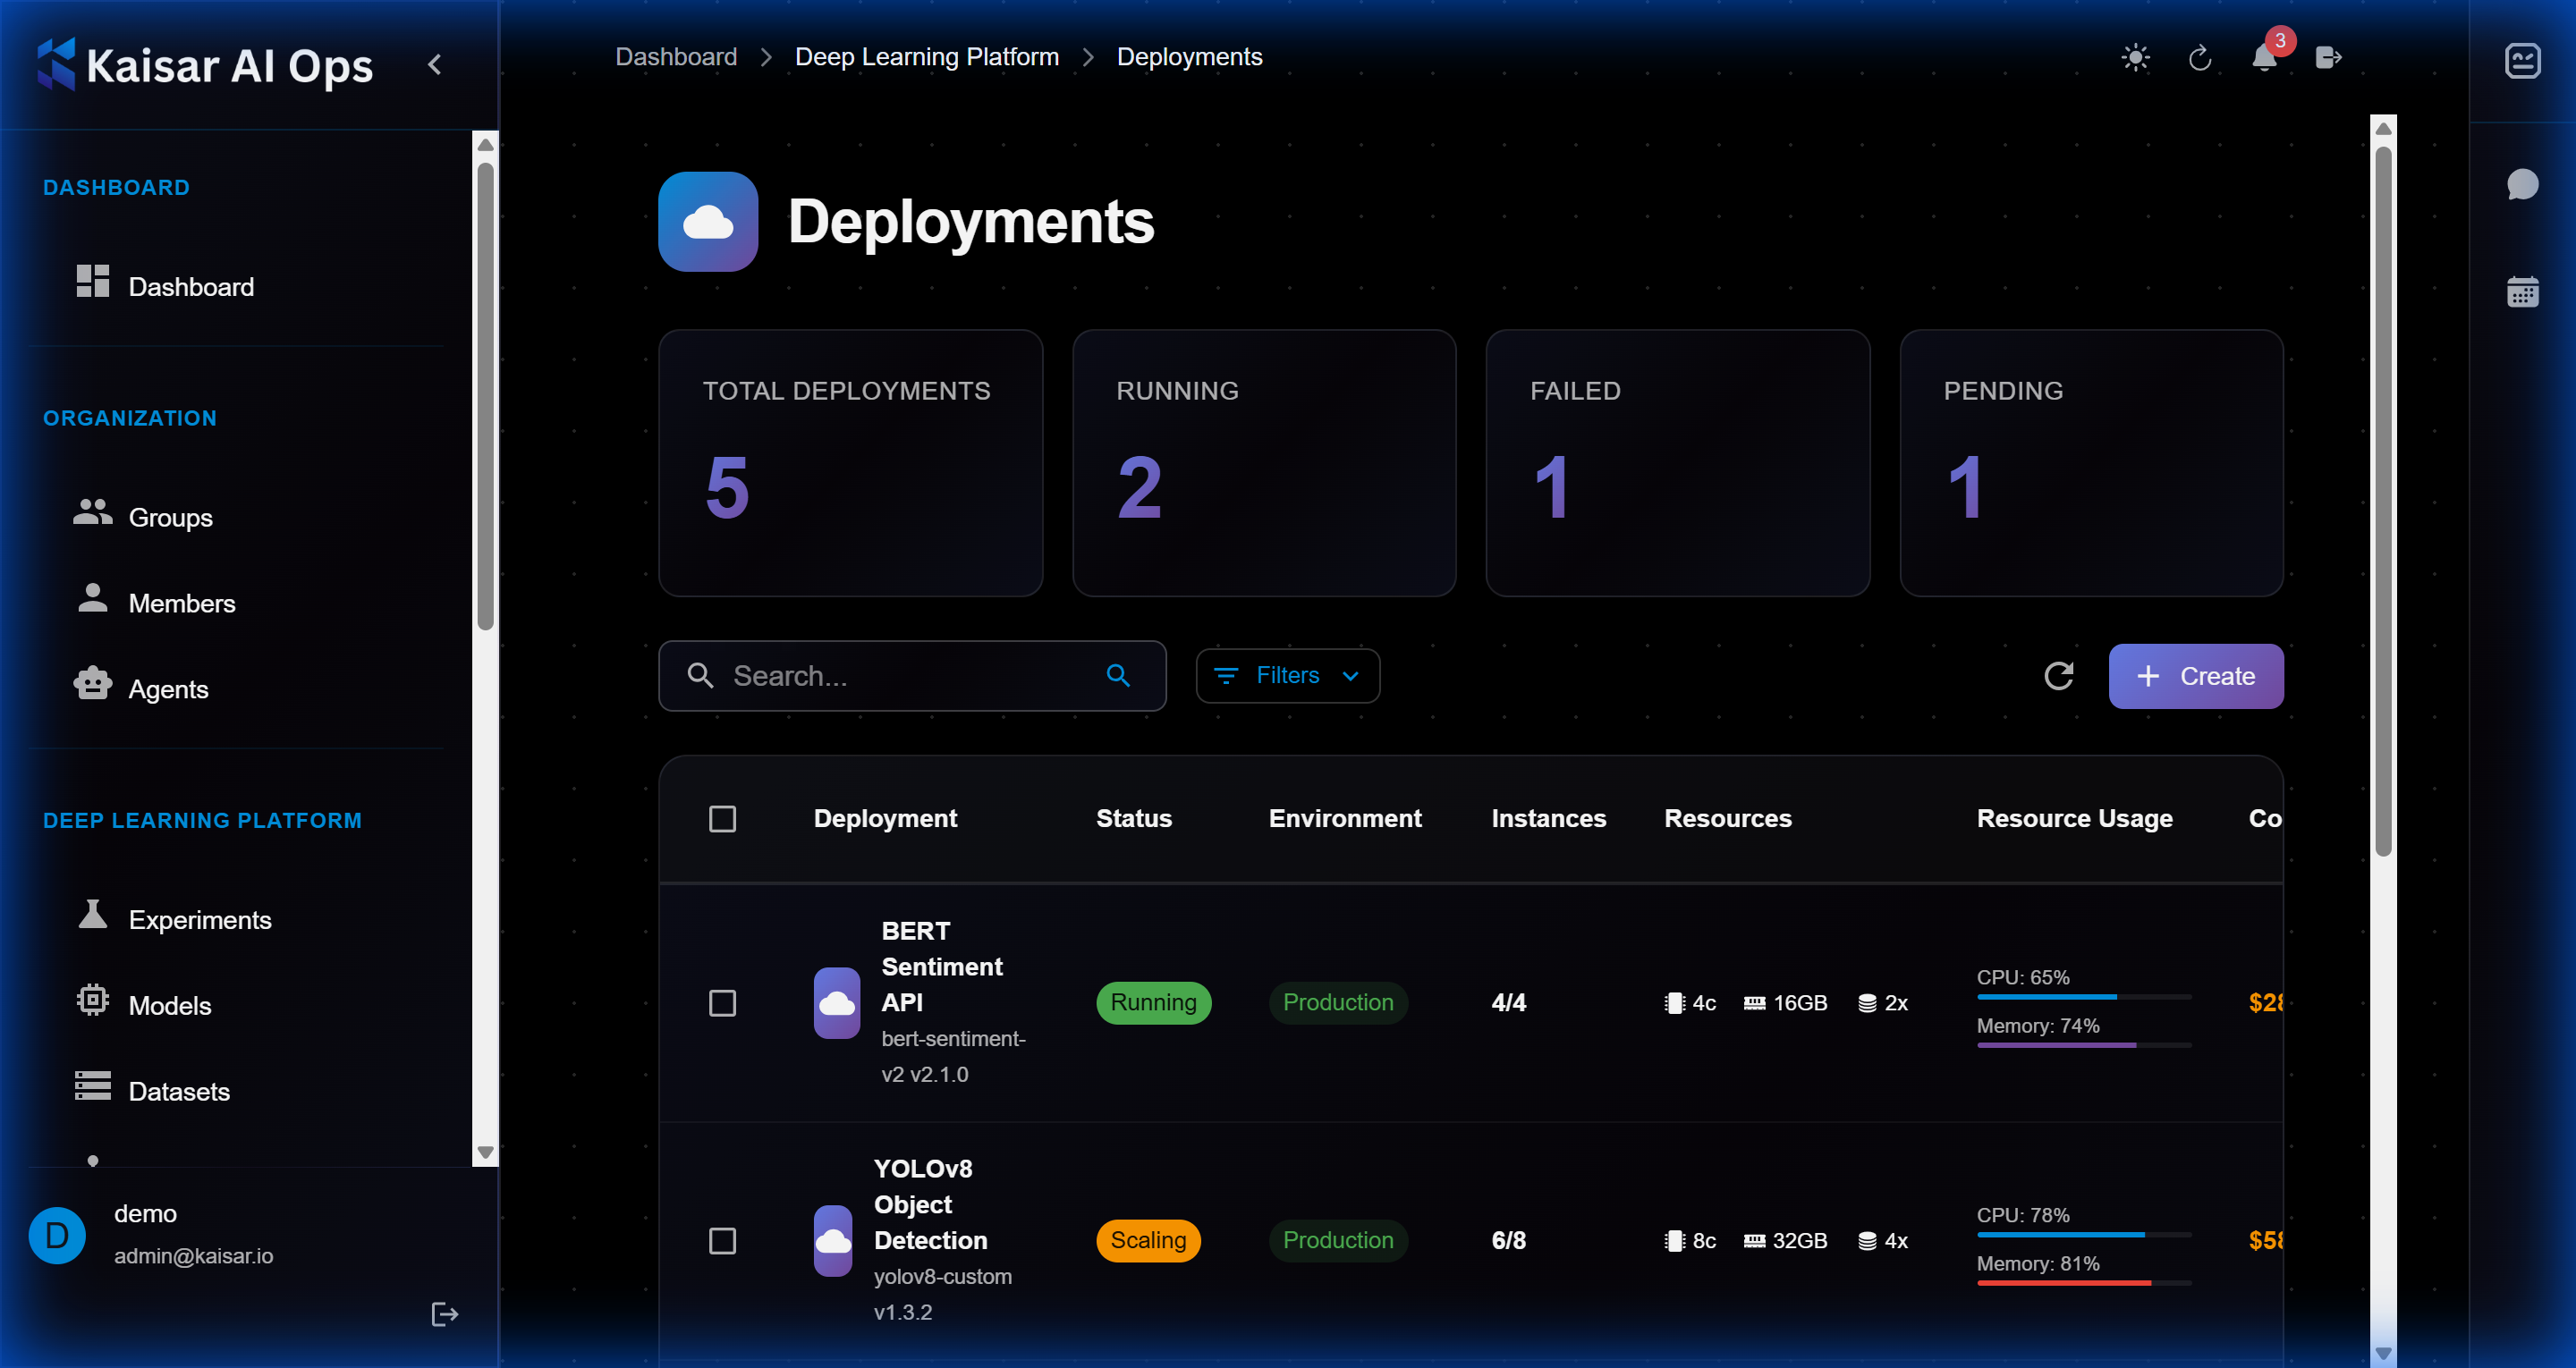
## Creating a Deployment
Navigate to **Deployments** → Click **Create**
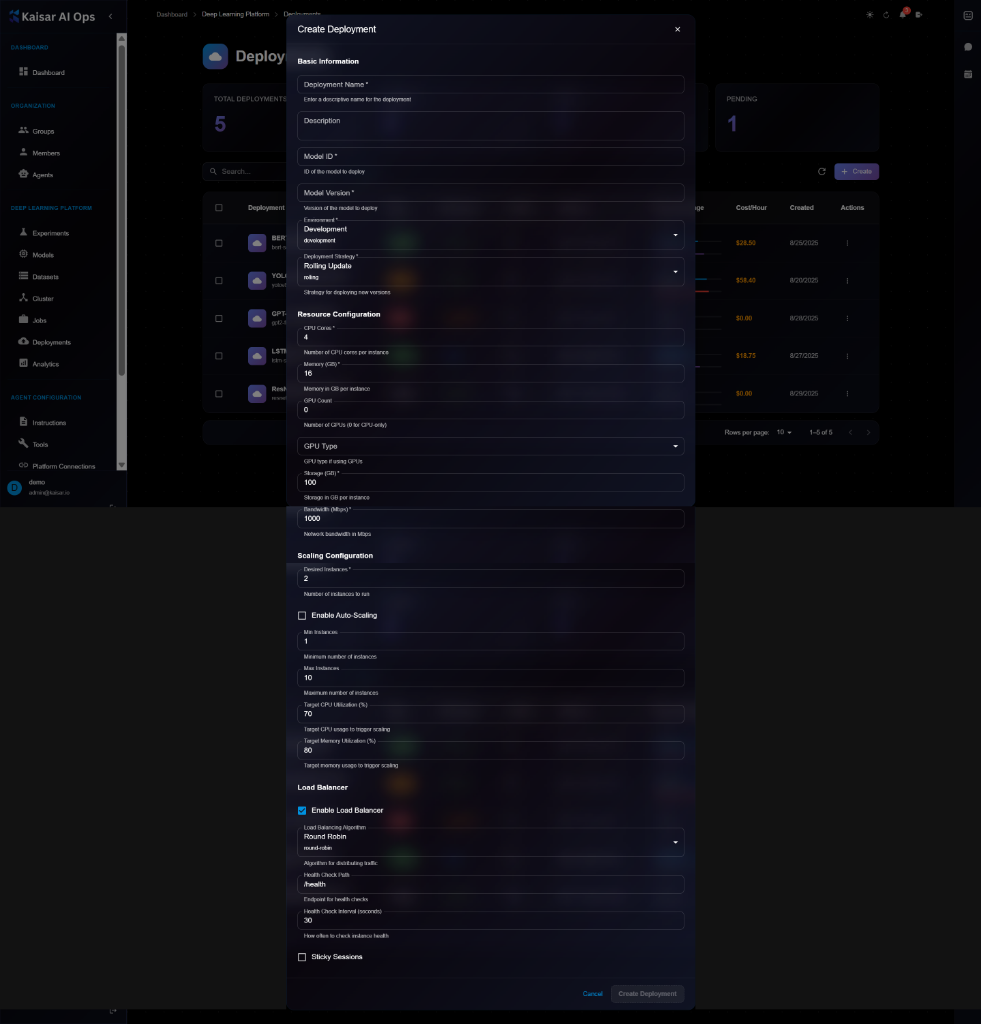
### Basic Information
**Deployment Name**\* (Required)
* Enter a descriptive name for the deployment
* Example: `resnet-prod`, `bert-api-v1`
**Description** (Optional)
* Deployment purpose and details
**Model ID**\* (Required)
* ID of the model to deploy
* Helper text: "ID of the model to deploy"
**Model Version**\* (Required)
* Version of the model to deploy
* Helper text: "Version of the model to deploy"
**Environment**\* (Required)
* Select deployment environment:
* Development
* Staging
* Production
* Default: `development`
### Resource Configuration
**CPU Cores**\* (Required)
* Number of CPU cores per instance
* Example: `4`, `8`, `16`
**Memory (GB)**\* (Required)
* Memory allocation per instance in GB
* Example: `8`, `16`, `32`
**GPU Count** (Optional)
* Number of GPUs (0 or GPU Count)
* Default: `0`
**GPU Type** (Optional)
* Select GPU type if GPU Count > 0:
* NVIDIA T4
* NVIDIA V100
* NVIDIA A100
**Min Replicas**\* (Required)
* Minimum number of instances
* Example: `1`, `2`
**Max Replicas**\* (Required)
* Maximum number of instances
* Example: `10`, `20`
**Target CPU Utilization (%)**\* (Required)
* CPU threshold for scaling
* Example: `70`, `80`
**Target Memory Utilization (%)**\* (Required)
* Memory threshold for scaling
* Example: `80`, `90`
### Scaling Configuration
**Enable Auto-Scaling** (Checkbox)
* Enable automatic scaling based on metrics
When enabled:
* **Min Instances**\*: Minimum instances to maintain
* **Max Instances**\*: Maximum instances allowed
* **Target GPU Utilization (%)**: GPU threshold
* **Target Memory Utilization (%)**: Memory threshold
### Load Balancer
**Enable Load Balancer** (Checkbox)
* Enable load balancing across instances
When enabled:
* **Service Type**\*: Round Robin, Least Connections, IP Hash
* **Health Check URL**\*: Endpoint for health checks (e.g., `/health`)
* **Health Check Interval (seconds)**\*: Frequency of health checks
* **Sticky Sessions**: Enable session affinity
### Actions
* **Cancel**: Discard and close
* **Create Deployment**: Submit and create the deployment
## Example Configuration
```yaml
Deployment Name: resnet-production-v1
Model ID: model_abc123
Model Version: 1.0.0
Environment: Development
Resource Configuration:
CPU Cores: 4
Memory (GB): 16
GPU Count: 0
Min Replicas: 2
Max Replicas: 10
Scaling:
Enable Auto-Scaling: ✓
Min Instances: 2
Max Instances: 10
Target CPU: 70%
Load Balancer:
Enable: ✓
Service Type: Round Robin
Health Check URL: /health
Health Check Interval: 30s
Sticky Sessions: ✓
```
## Viewing Deployment Details
To view detailed information about a deployment:
1. Navigate to **Deployments**
2. Click on a deployment from the list
3. View comprehensive details in the modal dialog
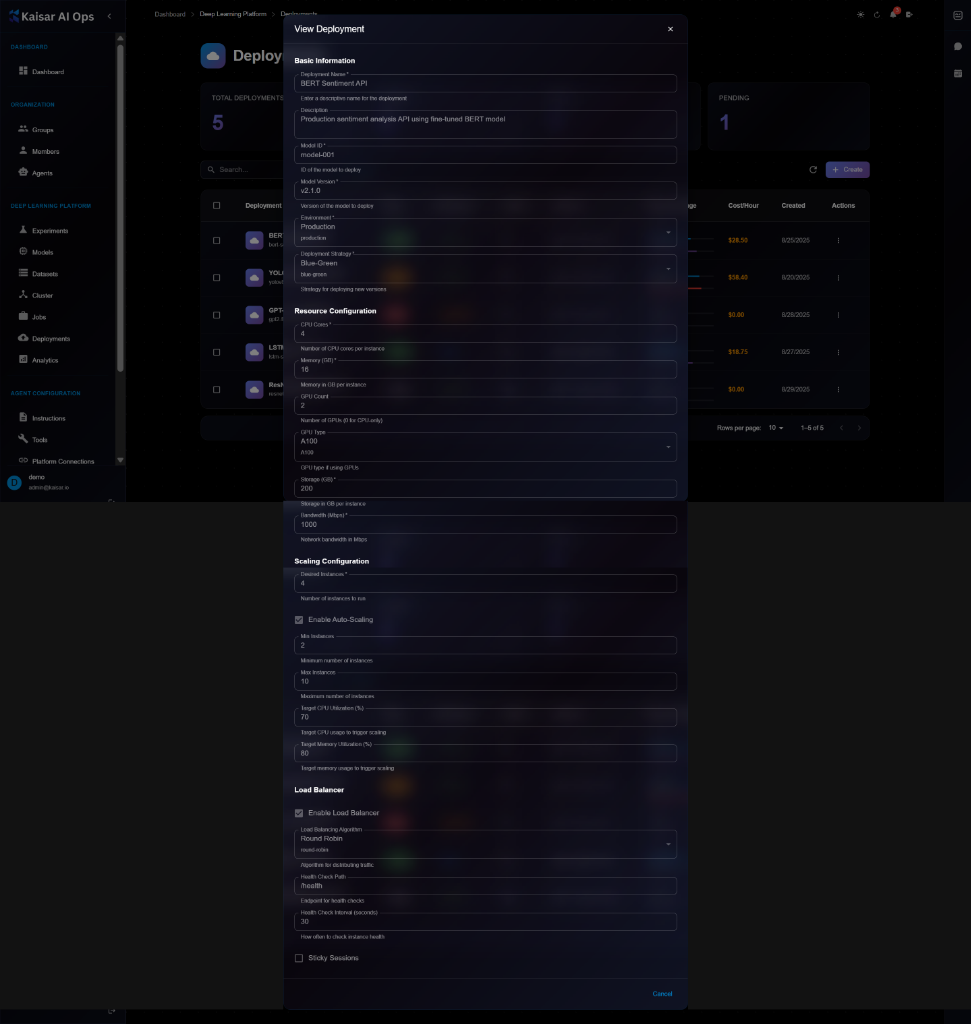
**Details Panel Sections**:
**Basic Information**:
* **Deployment Name**: e.g., "BERT Sentiment API"
* **Description**: Full description of the deployment
* **Model ID**: ID of the deployed model (e.g., "model-001")
* **Model Version**: Version being deployed (e.g., "v2.1.0")
* **Environment**: Production, Staging, or Development
* **Deployment Strategy**: Blue-Green, Rolling Update, Canary
**Resource Configuration**:
* **CPU Cores**: Number of CPU cores per instance (e.g., 4)
* **Memory (GB)**: Memory allocation (e.g., 16 GB)
* **GPU Count**: Number of GPUs (e.g., 2)
* **GPU Type**: GPU model (e.g., A100, V100)
* **Storage (GB)**: Storage allocation (e.g., 200 GB)
* **Network Bandwidth (Mbps)**: Network bandwidth (e.g., 1000 Mbps)
**Scaling Configuration**:
* **Current Instances**: Number of running instances (e.g., 2)
* **Enable Auto-Scaling**: Checkbox status
* **Min Instances**: Minimum replicas (e.g., 2)
* **Max Instances**: Maximum replicas (e.g., 10)
* **Target CPU Utilization (%)**: CPU scaling threshold (e.g., 70%)
* **Target GPU usage for trigger scaling**: GPU threshold
* **Target Memory Utilization (%)**: Memory threshold (e.g., 80%)
* **Target memory usage for trigger scaling**: Memory threshold
**Load Balancer**:
* **Enable Load Balancer**: Checkbox status
* **Load Balancing Algorithm**: Round Robin, Least Connections, IP Hash
* **Health Check Path**: Endpoint for health checks (e.g., "/health")
* **Health Check Interval (seconds)**: Check frequency (e.g., 30)
* **Sticky Sessions**: Checkbox for session affinity
## Editing a Deployment
To update deployment configuration:
1. Open deployment details page
2. Click **Edit** button (or three-dot menu → Edit)
3. Modify editable fields in the Edit Deployment modal
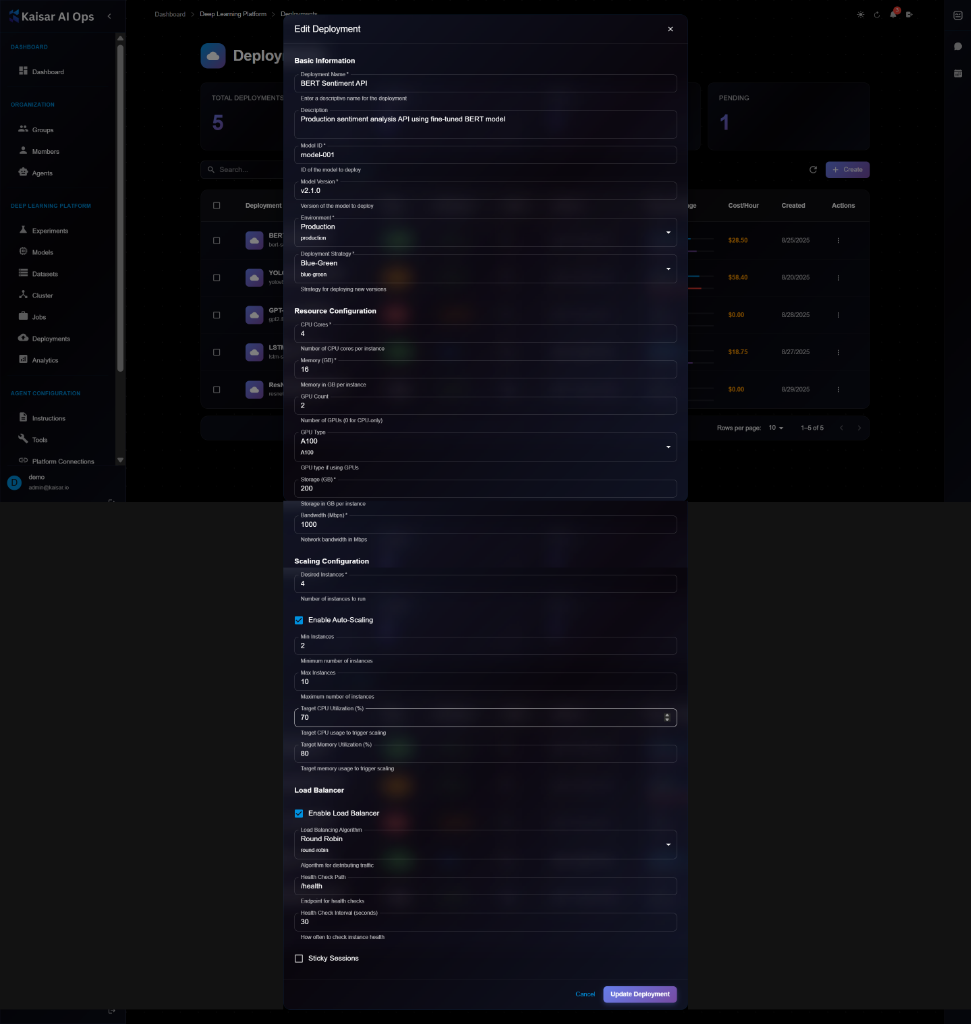
4. Click **Update Deployment** to save changes
> \[!NOTE] The Edit form is identical to the View form, but with editable fields and an "Update Deployment" button. Some changes may require a deployment restart.
> \[!NOTE] Some changes may require a deployment restart to take effect.
**Editable Fields**:
* ✅ Description
* ✅ Environment variables
* ✅ Min/Max replicas
* ✅ Auto-scaling thresholds
* ✅ Health check settings
* ✅ Load balancer configuration
* ⚠️ CPU/Memory (requires restart)
* ❌ Model ID (use Update Model instead)
* ❌ Deployment name (cannot edit)
## Updating Model Version
To deploy a new model version:
1. Open deployment details
2. Click **Update Model** button
3. Select new model version
4. Choose update strategy:
* **Rolling Update**: Gradual replacement (zero downtime)
* **Blue-Green**: Switch all at once
* **Canary**: Test with small percentage first
5. Click **Update**
**Update Strategies**:
**Rolling Update** (Recommended):
* Gradually replaces old instances
* Zero downtime
* Automatic rollback on failure
**Blue-Green**:
* Deploys new version alongside old
* Switches traffic all at once
* Quick rollback possible
**Canary**:
* Routes small % of traffic to new version
* Monitor performance
* Gradually increase if successful
## Scaling a Deployment
**Manual Scaling**:
1. Open deployment details
2. Click **Scale** button
3. Adjust number of replicas
4. Click **Apply**
**Auto-scaling**:
1. Open deployment details
2. Click **Edit**
3. Enable auto-scaling
4. Set min/max replicas
5. Configure scaling triggers
6. Save changes
## Stopping a Deployment
To temporarily stop a deployment:
1. Open deployment details
2. Click **Stop** button
3. Confirm action
4. All instances will shut down
5. Endpoint will become unavailable
**Use Cases**:
* Maintenance window
* Cost optimization
* Testing in isolation
## Restarting a Deployment
To restart a stopped deployment:
1. Open deployment details
2. Click **Start** button
3. Deployment will resume with previous configuration
## Deleting a Deployment
To permanently remove a deployment:
1. Navigate to deployment details
2. Click **Delete** button
3. Confirm deletion
> \[!WARNING] Deleting a deployment will:
>
> * Shut down all instances
> * Remove the endpoint
> * Delete deployment configuration
> * This action cannot be undone!
**Before Deleting**:
* Stop sending traffic to the endpoint
* Update client applications
* Export logs if needed
* Verify you have the correct deployment
## Monitoring Deployments
**Real-time Metrics**:
* Request rate
* Latency (p50, p95, p99)
* Error rate
* Resource usage
**Actions**:
* Scale up/down
* Update model version
* View logs
* Rollback
## Best Practices
* Set appropriate min/max replicas
* Configure auto-scaling thresholds
* Enable health checks
* Use load balancing for high traffic
* Monitor performance continuously
## Next Steps
* Monitor in [Analytics](https://docs.kaisar.io/kaisar-network/kaisar-ai-ops/deep-learning-platform/analytics)
* View logs and metrics
* Set up alerts
---
# Source: https://docs.kaisar.io/kaisar-network/origins/faq/does-kaisar-use-blockchain-technology.md
# Does Kaisar use blockchain technology?
Kaisar operates on the peaq blockchain, which is optimized for Decentralized Physical Infrastructure Networks. The peaq blockchain supports scalable, decentralized AI/ML model training and provides a secure, cost-effective environment for managing GPU resources.
---
# Source: https://docs.kaisar.io/kaisar-network/kaisar-ai-ops/deep-learning-platform/experiments.md
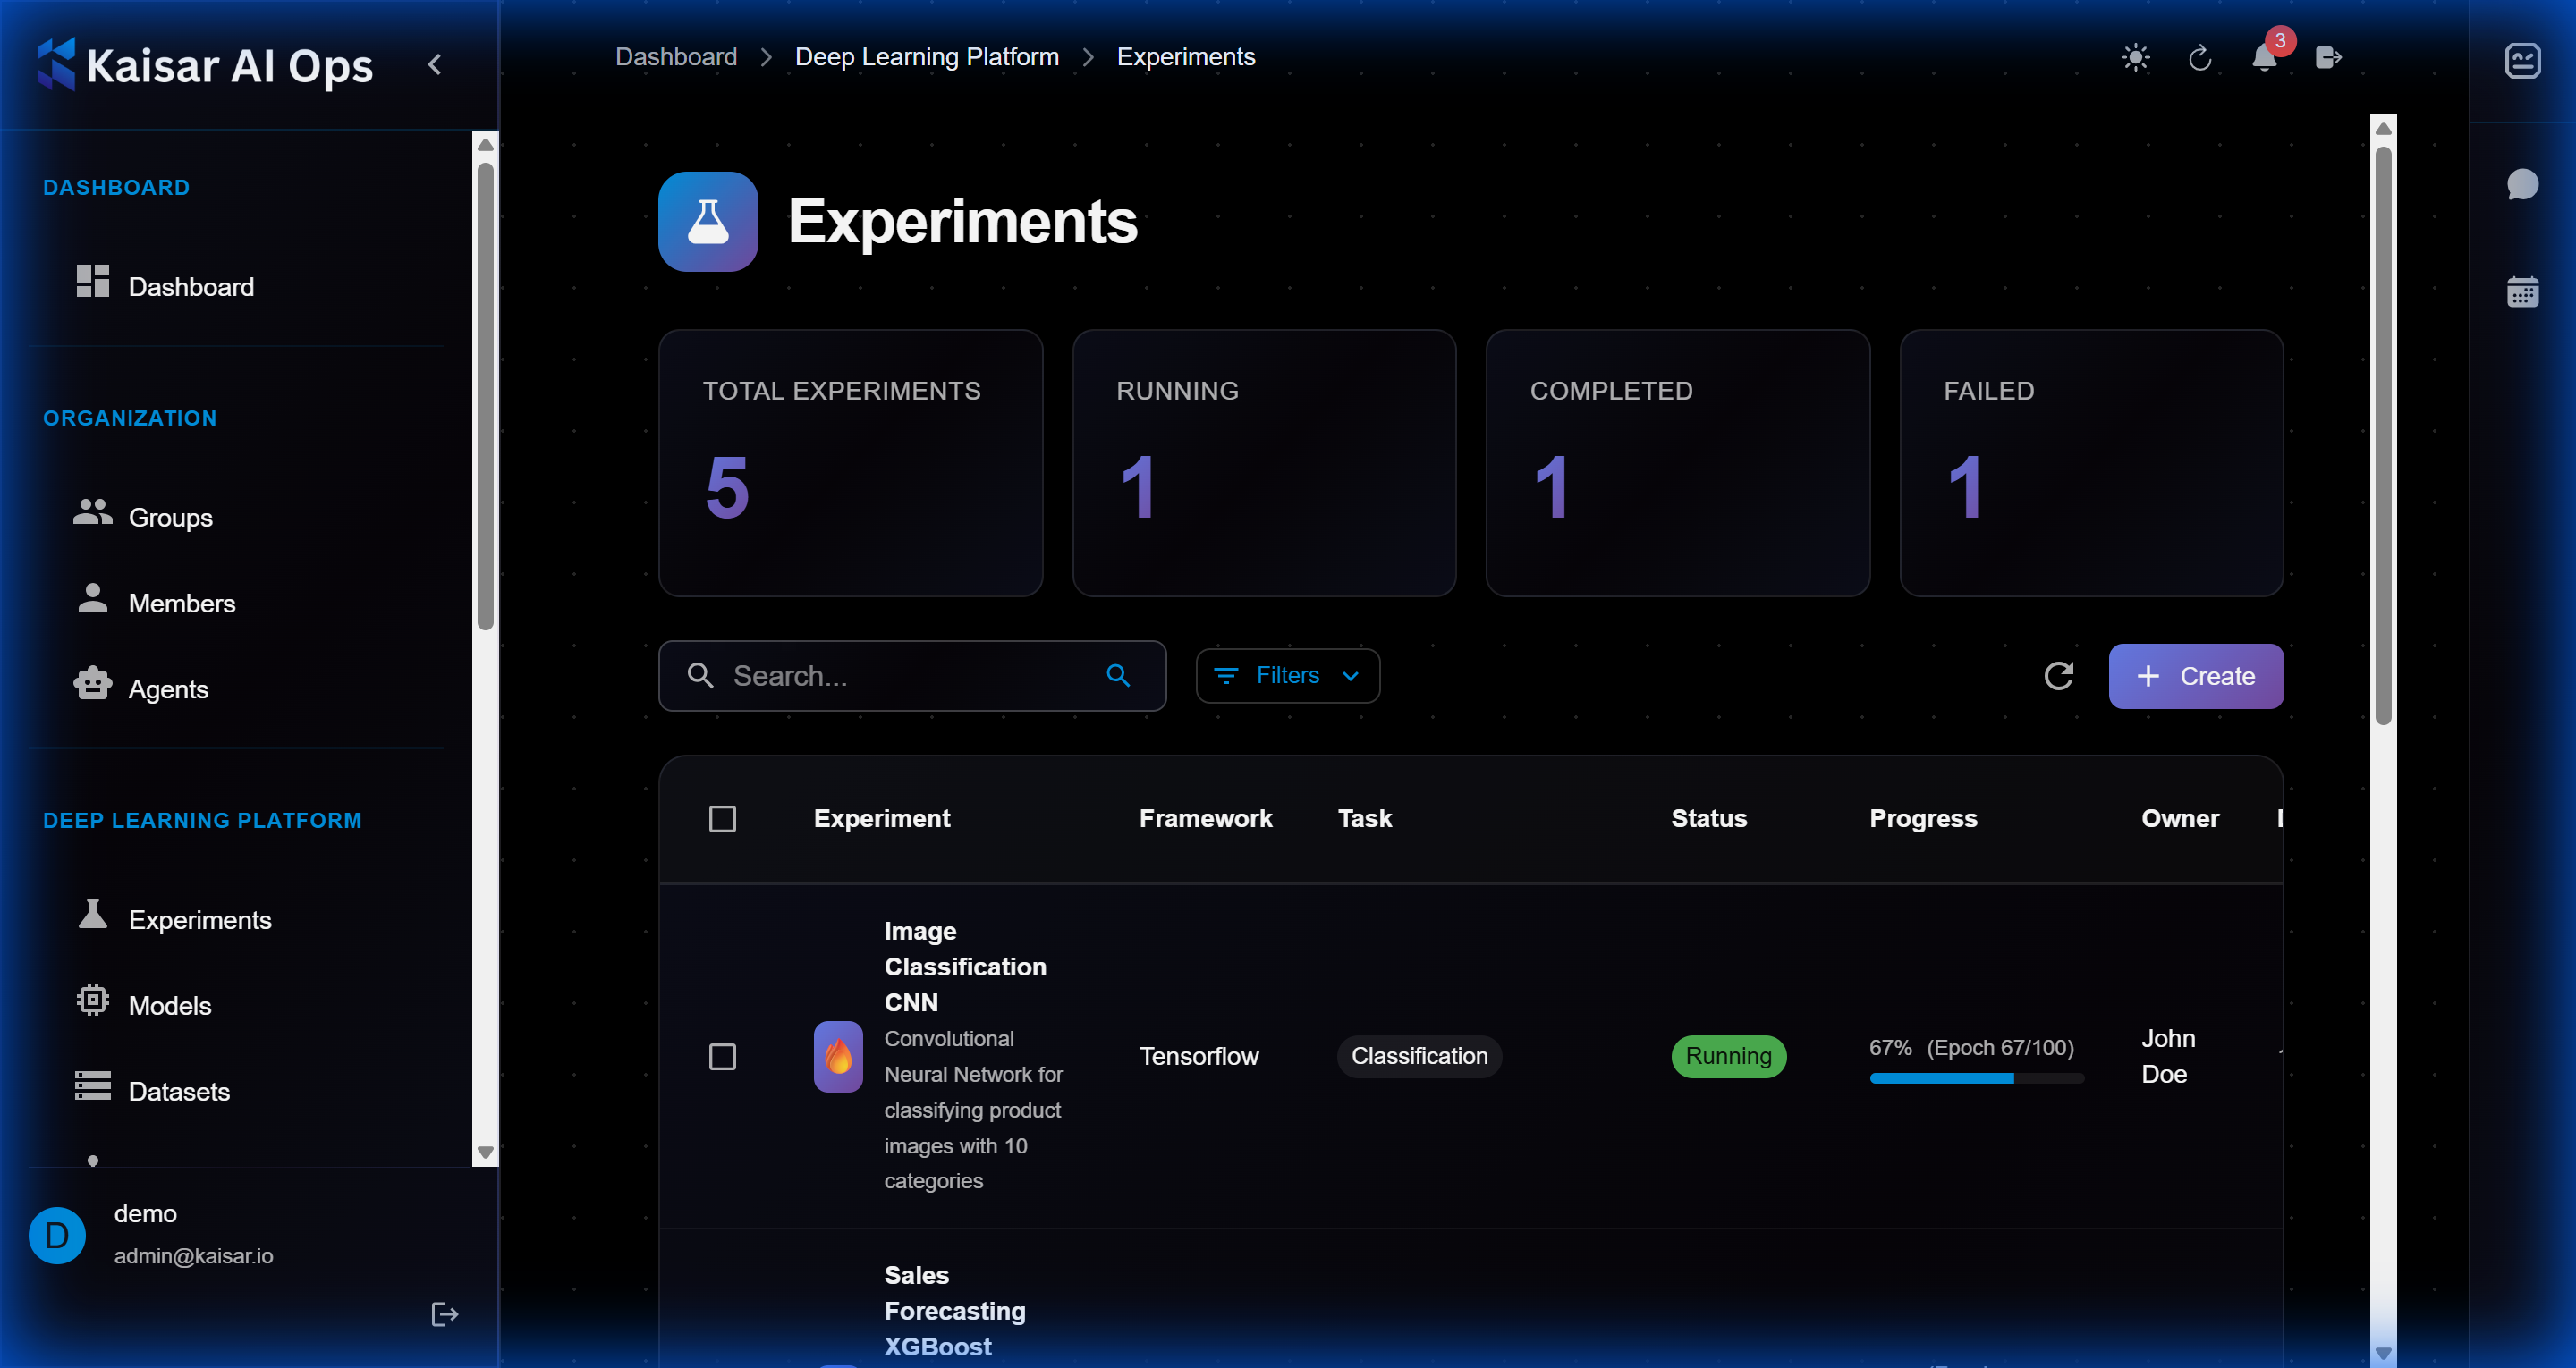
# Experiments
Track your machine learning experiments with detailed logging and comparison tools.
## Creating an Experiment
Navigate to **Deep Learning Platform** → **Experiments** → Click **Create**
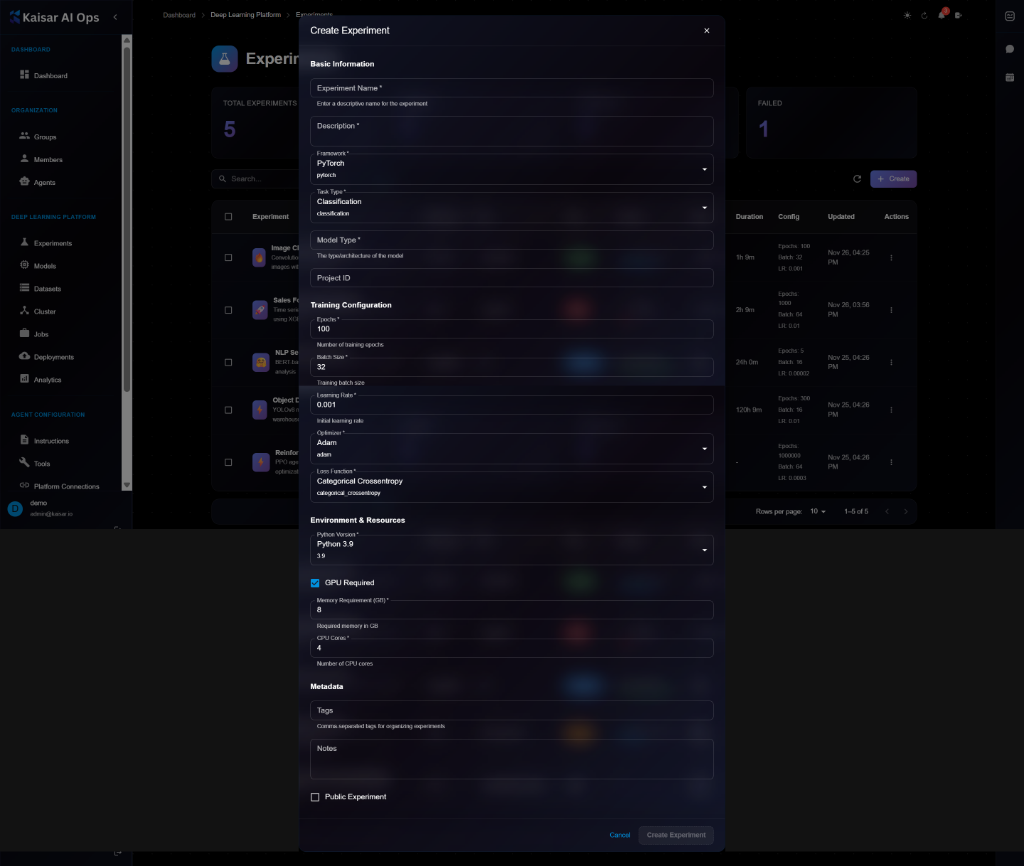
### Basic Information
**Experiment Name**\* (Required)
* Enter a descriptive name for the experiment
* Example: `image-classification-resnet`, `nlp-sentiment-bert`
**Description** (Optional)
* Detailed description of experiment purpose and goals
**Framework**\* (Required)
* Select your ML framework from dropdown:
* PyTorch
* TensorFlow
* Scikit-learn
* Keras
* Others
* Default: `pytorch`
**Task Type**\* (Required)
* Select the ML task type:
* Classification
* Regression
* Detection
* Segmentation
* Others
* Default: `classification`
**Model Type**\* (Required)
* Specify the model architecture
* Examples: ResNet, BERT, YOLO, Custom
**Project ID** (Optional)
* Link experiment to a specific project
### Training Configuration
**Epochs**\* (Required)
* Number of training epochs
* Example: `100`
**Number of training epochs** (Helper text)
* Additional context for epochs setting
**Staging batch size** (Optional)
* Batch size for staging/validation
**Learning Rate**\* (Required)
* Initial learning rate for training
* Example: `0.001`
* Helper text: "Valid learning rate"
**Loss Function**\* (Required)
* Select optimizer from dropdown:
* Adam
* SGD
* RMSprop
* Others
* Default: `adam`
**Loss Function**\* (Required)
* Select loss function:
* Categorical Crossentropy
* Binary Crossentropy
* MSE
* Others
* Default: `categorical_crossentropy`
### Environment & Resources
**Python Version**\* (Required)
* Select Python version:
* Python 3.9
* Python 3.10
* Python 3.11
* Default: `python`
**GPU Required** (Checkbox)
* Check if GPU is required for training
**Memory Requirement (GB)**\* (Required)
* Required memory in GB
* Example: `8`, `16`, `32`
**Required memory in GB** (Helper text)
**CPU Cores**\* (Required)
* Number of CPU cores needed
* Example: `4`, `8`, `16`
**Number of CPU cores** (Helper text)
### Metadata
**Tags** (Optional)
* Comma-separated tags for organizing experiments
* Example: `computer-vision, production, baseline`
**Notes** (Optional)
* Additional notes or comments about the experiment
**Public Experiment** (Checkbox)
* Make experiment visible to all organization members
### Actions
* **Cancel**: Discard and close the form
* **Create Experiment**: Submit and create the experiment
## Example Configuration
```yaml
Experiment Name: resnet50-imagenet-baseline
Description: Baseline training of ResNet50 on ImageNet dataset
Framework: PyTorch
Task Type: Classification
Model Type: ResNet50
Epochs: 90
Learning Rate: 0.1
Loss Function: Adam
Loss Function: Categorical Crossentropy
Python Version: Python 3.9
GPU Required: ✓
Memory Requirement: 32 GB
CPU Cores: 16
Tags: computer-vision, classification, baseline
Public Experiment: ✓
```
## Viewing Experiment Details
To view detailed information about an experiment:
1. Navigate to **Deep Learning Platform** → **Experiments**
2. Click on an experiment from the list
3. View comprehensive details in the modal dialog
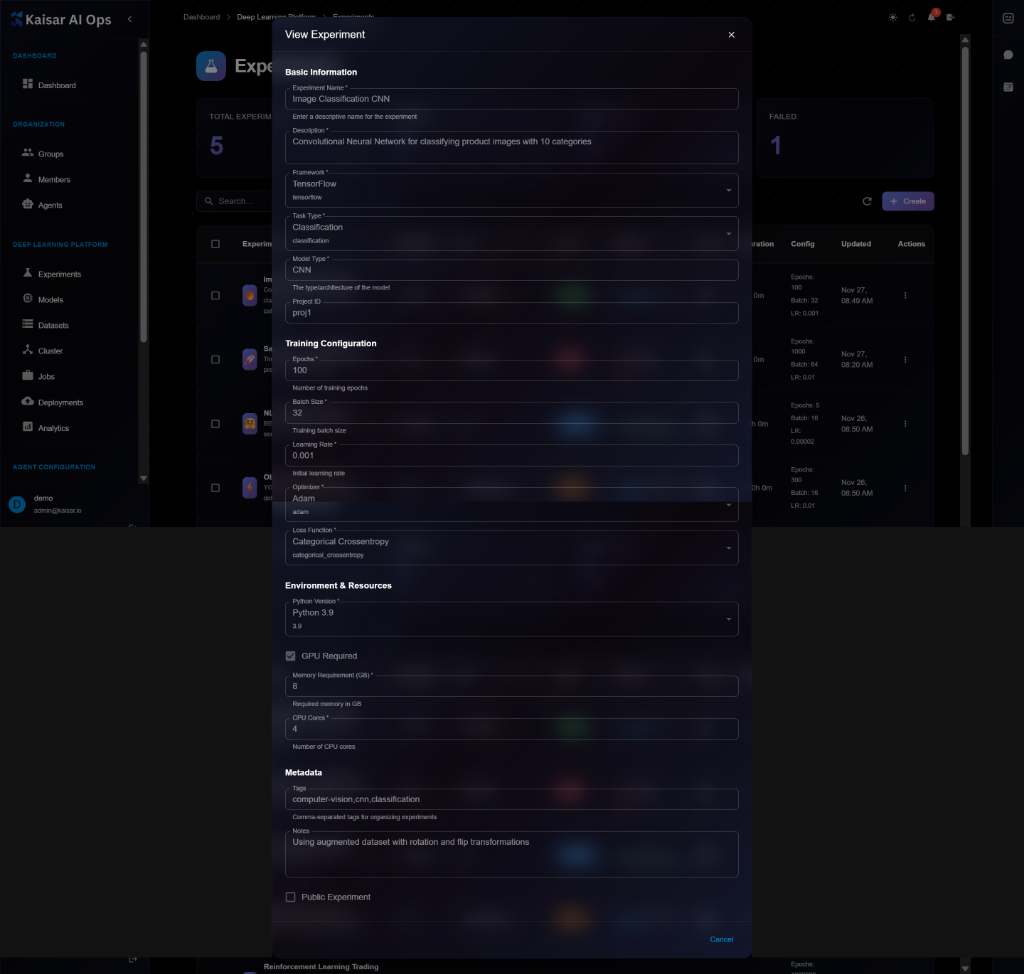
**Details Panel Sections**:
* **Basic Information**:
* Experiment Name: e.g., "Image Classification CNN"
* Description: Full description of the experiment
* Framework: TensorFlow, PyTorch, etc.
* Task Type: Classification, Regression, etc.
* Model Type: CNN, ResNet, Custom, etc.
* Project ID: Associated project
* **Training Configuration**:
* Epochs: Number of training epochs (e.g., 100)
* Batch Size: Training batch size (e.g., 32)
* Learning Rate: Initial learning rate (e.g., 0.001)
* Optimizer: Adam, SGD, etc.
* Loss Function: Categorical Crossentropy, MSE, etc.
* **Environment & Resources**:
* Python Version: e.g., Python 3.9
* GPU Required: Checkbox status
* Memory Requirement (GB): e.g., 8 GB
* CPU Cores: e.g., 4 cores
* **Metadata**:
* Tags: Comma-separated tags
* Notes: Additional notes
* Public Experiment: Visibility status
* Creator and timestamps
## Editing an Experiment
To modify an experiment configuration:
1. Navigate to the experiment details page
2. Click **Edit** button (or three-dot menu → Edit)
3. Modify editable fields in the Edit Experiment modal
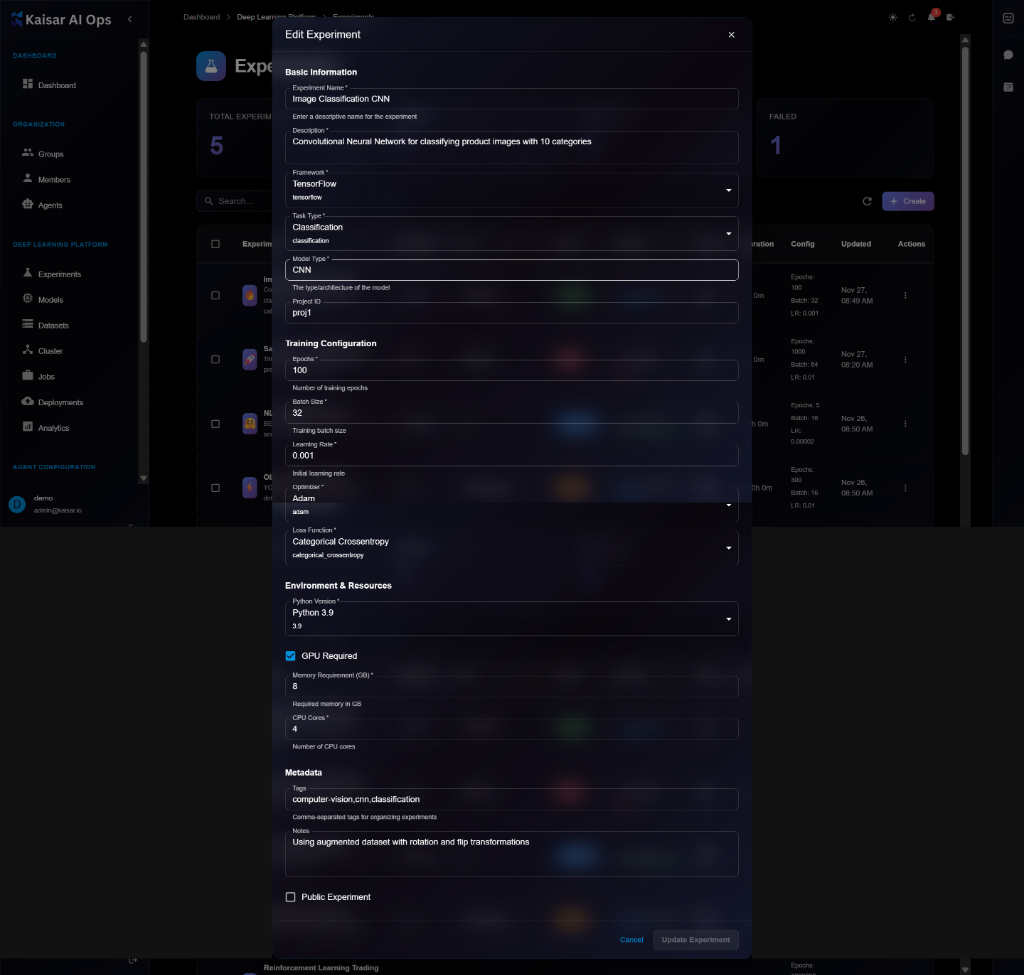
4. Click **Update Experiment** to save changes
> \[!NOTE] The Edit form looks very similar to the View form, but fields become editable and you'll see an "Update Experiment" button instead of just "Cancel".
> \[!NOTE] You cannot edit core configuration (framework, resources, hyperparameters) of a running or completed experiment. To try different settings, clone the experiment instead.
**Editable Fields**:
* ✅ Description
* ✅ Tags
* ✅ Notes
* ✅ Public/Private status
* ❌ Framework (cannot edit)
* ❌ Resources (cannot edit while running)
* ❌ Hyperparameters (cannot edit)
## Cloning an Experiment
To create a copy of an experiment with modified settings:
1. Open experiment details
2. Click **Clone** button
3. Modify configuration as needed
4. Give it a new name
5. Click **Create Experiment**
**Use Cases**:
* Try different hyperparameters
* Run with more/less resources
* Test on different datasets
* Reproduce results
## Deleting an Experiment
To remove an experiment:
1. Navigate to experiment details or list
2. Click **Delete** button (trash icon)
3. Confirm deletion in the dialog
4. Experiment and associated data will be removed
> \[!WARNING] Deleting an experiment will permanently remove:
>
> * Experiment configuration
> * Training logs
> * Metrics and charts
> * Saved checkpoints (unless linked to a registered model)
> * This action cannot be undone!
**Before Deleting**:
* Export important logs or metrics
* Register any valuable models
* Download artifacts if needed
* Verify you have the correct experiment selected
## Monitoring Experiments
Once submitted, track your experiment:
**Real-time Monitoring**
* View live logs
* Monitor resource utilization (CPU, GPU, memory)
* Track metrics as they're logged
* Receive alerts on failures
**Experiment Status**
* **Pending**: Waiting for resources
* **Running**: Currently executing
* **Completed**: Finished successfully
* **Failed**: Encountered an error
* **Stopped**: Manually stopped
* **Cancelled**: Cancelled before starting
**Actions Available**
* **View Logs**: See stdout/stderr
* **View Metrics**: Charts and graphs
* **Stop**: Terminate running experiment
* **Clone**: Create a copy with same config
* **Compare**: Compare with other experiments
* **Export**: Download results and artifacts
## Comparing Experiments
Compare multiple experiments side-by-side:
1. **Select Experiments**: Check boxes for 2+ experiments
2. **Click Compare**: Opens comparison view
3. **View Differences**:
* Hyperparameters table
* Metrics charts (overlaid)
* Resource usage comparison
* Final results summary
## Best Practices
**Naming Conventions**
```
{model}-{dataset}-{variant}-{version}
Examples:
- resnet50-imagenet-baseline-v1
- bert-squad-finetuned-v2
```
**Tagging Strategy**
* **Domain**: `computer-vision`, `nlp`, `audio`
* **Task**: `classification`, `detection`, `segmentation`
* **Stage**: `exploration`, `tuning`, `production`
**Resource Optimization**
* Start with minimal resources, scale up as needed
* Use GPU only when necessary
* Monitor resource utilization
## Next Steps
* Register your trained model in [Models](https://docs.kaisar.io/kaisar-network/kaisar-ai-ops/deep-learning-platform/models)
* Deploy to production via [Deployments](https://docs.kaisar.io/kaisar-network/kaisar-ai-ops/deep-learning-platform/deployments)
* Monitor performance in [Analytics](https://docs.kaisar.io/kaisar-network/kaisar-ai-ops/deep-learning-platform/analytics)
---
# Source: https://docs.kaisar.io/kaisar-network/origins/challenges/exponential-change-in-spending-and-compute-requirements.md
# Exponential Change in Spending and Compute Requirements
According to [GlobalTechCouncil](https://www.globaltechcouncil.org/artificial-intelligence/global-spending-on-ai-expected-to-double-in-four-years/), global spending on AI-centric systems is forecast to reach $154 billion in 2023 and is expected to continue growing rapidly, driven by increasing investments in AI by various industries such as banking, retail, and professional services.
Key areas of AI hardware spending include GPUs, TPUs, and custom AI chips. The broader IT spending landscape also highlights significant growth in data center systems, with spending projected to increase from $237 billion in 2023 to $260 billion in 2024. This growth is part of a broader trend of increasing investment in software, IT services, and communications services driven by the adoption of AI and other emerging technologies (Source: [Splunk](https://www.splunk.com/en_us/blog/learn/it-tech-spending.html)).
To gain insights into projected hardware use by AI Systems, [Stanford AI Index Report 2024](https://aiindex.stanford.edu/report/)) highlights the economic impact of AI, showing a significant increase in the use of training compute for notable machine learning models
---
# Source: https://docs.kaisar.io/kaisar-network/kaisar-ai-ops/troubleshooting/troubleshooting/faq.md
# Source: https://docs.kaisar.io/kaisar-network/origins/faq.md
# FAQ
- [What is Kaisar?](/kaisar-network/origins/faq/what-is-kaisar.md)
- [Does Kaisar use blockchain technology?](/kaisar-network/origins/faq/does-kaisar-use-blockchain-technology.md)
- [What are the main products offered by Kaisar?](/kaisar-network/origins/faq/what-are-the-main-products-offered-by-kaisar.md)
- [Can I contribute my GPU resources to Kaisar?](/kaisar-network/origins/faq/can-i-contribute-my-gpu-resources-to-kaisar.md)
- [What is Proof of Physical Work (PoPW)?](/kaisar-network/origins/faq/what-is-proof-of-physical-work-popw.md)
- [How does Kaisar GPU Container work?](/kaisar-network/origins/faq/how-does-kaisar-gpu-container-work.md)
- [What frameworks are supported by Kaisar GPU Container?](/kaisar-network/origins/faq/what-frameworks-are-supported-by-kaisar-gpu-container.md)
- [How do I deploy a GPU Container?](/kaisar-network/origins/faq/how-do-i-deploy-a-gpu-container.md)
- [What payment methods are accepted?](/kaisar-network/origins/faq/what-payment-methods-are-accepted.md)
- [How is pricing determined?](/kaisar-network/origins/faq/how-is-pricing-determined.md)
- [What GPUs are supported?](/kaisar-network/origins/faq/what-gpus-are-supported.md)
- [How do I monitor my GPU container?](/kaisar-network/origins/faq/how-do-i-monitor-my-gpu-container.md)
- [How does Kaisar ensure security of containers?](/kaisar-network/origins/faq/how-does-kaisar-ensure-security-of-containers.md)
- [How do I get started with Kaisar?](/kaisar-network/origins/faq/how-do-i-get-started-with-kaisar.md)
---
# Source: https://docs.kaisar.io/kaisar-network/kaisar-architecture/products/kaisar-onenode/kaisar-checker/how-to-purchase-checker-nodes/faqs.md
# Source: https://docs.kaisar.io/kaisar-network/kaisar-architecture/products/kaisar-onenode/kaisar-checker/what-is-the-kaisar-checker-node/faqs.md
# FAQs
* **What are Checker Nodes?**
Checker Nodes validate transactions, monitor uptime, and ensure system reliability within the Kaisar DePIN protocol.
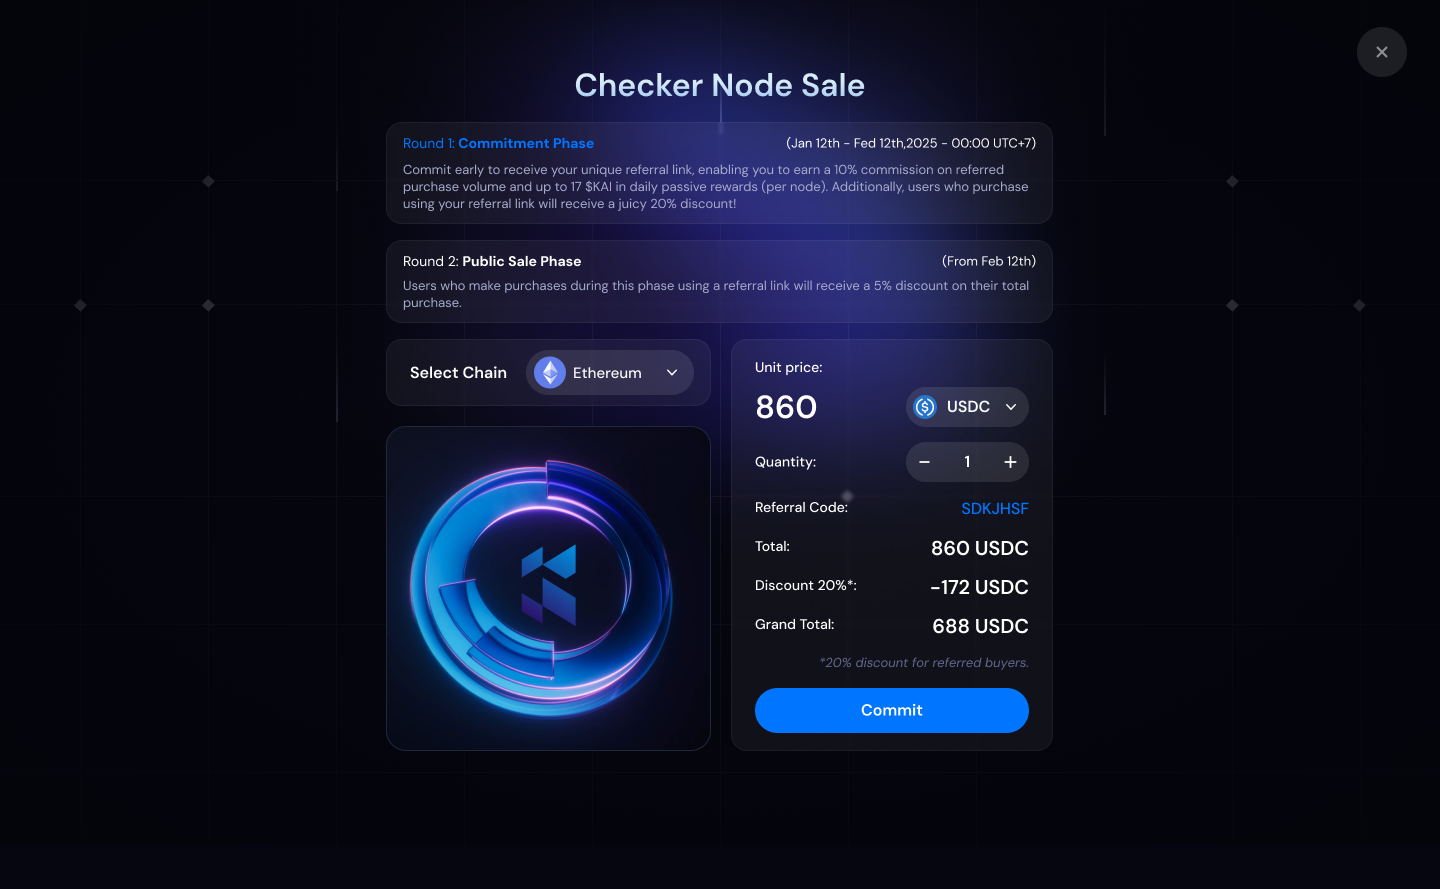
* **How does the two-phase sale work?**
Participants reserve funds during the Fund Commitment Phase, which determines their priority for the Node Sale Phase. Additional benefits include $KAI rewards, tier-based pricing discounts, and referral bonuses.
* **What is the relationship between a KaiNode NFT owner and a Checker Node Operator?**
A Checker Node Operator can operate multiple Kaisar NFTs and claim rewards from a single machine through the Checker Node Client.
To become a KaiNode NFT owner, you can purchase your NFT from [nodes.kaisar.io](https://nodes.kaisar.io) or through the secondary market in the future. Contracts will be released soon, so stay tuned for further updates.
* **Who can run a checker node?**
A Checker Node Operator owns Kaisar Node NFTs and can run the checker node client on their own machine, through a Virtual Machine, through Node-as-a-Service, or by delegating to another user's machine.
* **What rewards can I expect as a Checker Node operator?**
Rewards are distributed based on your node’s performance and uptime contributions.
* **Can I purchase multiple Checker Nodes?**
Yes, subject to purchase limits to ensure decentralization.
* **How does the referral program work?**
Referrers earn 10% cashback for purchases made through their referral link, while buyers receive a 10% discount.
* **What happens to unallocated $KAI rewards?**
Any remaining $KAI rewards will be redistributed among early participants at the end of the Fund Commitment phase.
---
# Source: https://docs.kaisar.io/kaisar-network/get-real-campaign.md
# Get Real Campaign
**Get Real is Peaq’s growth campaign that rewards participants for joining as Kaisar Network providers**
**🚀 Join Kaisar Network:**
The Get Real campaign leverages 5% of peaq’s initial supply (210,000,000 PEAQ) to incentivize the community to join the Machine Economy on peaq. Spanning across 12 seasons, the year-long campaign will reward real people for creating real value. The participants will also receive their own unique, customizable NFTs, which will evolve as they create real-world value. Get Real empowers people from around the world to join the movement and help build the Machine Economy — and the future where the world runs on Web3. Access the Get Real campaign [here](https://portal.peaq.network/portal/campaign/introduction).
### How to Complete Kaisar Network’s Quest in the Get Real Campaign and Unlock $PEAQ
To participate and earn rewards, follow these simple steps:
1️⃣ **Download Kaisar Provider App** – Coming Soon.[ ](https://drive.usercontent.google.com/download?id=1CpBXl2kGfWs9F9zjwQXab8ctxlG8EbWe)2️⃣ I**nstall and run the app** – Coming Soon.\
3️⃣ **Complete the Quest** – Follow the necessary steps as outlined in the campaign.\
4️⃣ **Unlock Your Rewards** – Receive $PEAQ as a reward for successfully becoming a provider.
Ready to get started? 🚀
📌Please contact the admin of Kaisar Network for a comprehensive step-by-step guide to install and run the Kaisar Provider App
---
# Source: https://docs.kaisar.io/kaisar-network/kaisar-architecture/products/kaisar-onenode/kaisar-provider/how-to-manage-kaisar-provider/get-started.md
# Get started
**Step 1:** Go to [Kaisar Explorer](https://onenode.kaisar.io/explorer) and click on "Provider".
**Step 2:** Browse the list of Providers and choose one to stake with.
**Step 3:** Click on any Providers to view detailed information.
---
# Source: https://docs.kaisar.io/kaisar-network/kaisar-ai-ops/getting-started/getting-started.md
# Getting Started
Welcome to Kaisar AI Ops! This section will guide you through the initial setup and help you get started with the platform.
## What You'll Learn
* System prerequisites and requirements
* How to access the platform
* Initial onboarding steps
* Basic navigation and interface overview
## Quick Links
* [Prerequisites](https://docs.kaisar.io/kaisar-network/kaisar-ai-ops/getting-started/getting-started/prerequisites) - System requirements and access setup
* [Quick Start](https://docs.kaisar.io/kaisar-network/kaisar-ai-ops/getting-started/getting-started/quick-start) - Get up and running in minutes
* [Onboarding](https://docs.kaisar.io/kaisar-network/kaisar-ai-ops/getting-started/getting-started/onboarding) - Complete onboarding guide
## Overview
Kaisar AI Ops is a unified platform for managing Deep Learning workflows and AI operations. The platform provides:
* **Centralized Dashboard**: Monitor all your AI operations in one place
* **Experiment Management**: Track and compare ML experiments
* **Model Registry**: Version and deploy your models
* **Dataset Management**: Organize and version your datasets
* **Deployment Tools**: Deploy models to production environments
Let's get started!
---
# Source: https://docs.kaisar.io/kaisar-network/kaisar-ai-ops/organization/groups.md
# Groups
Manage groups within your organization for team-based access control and hierarchy.
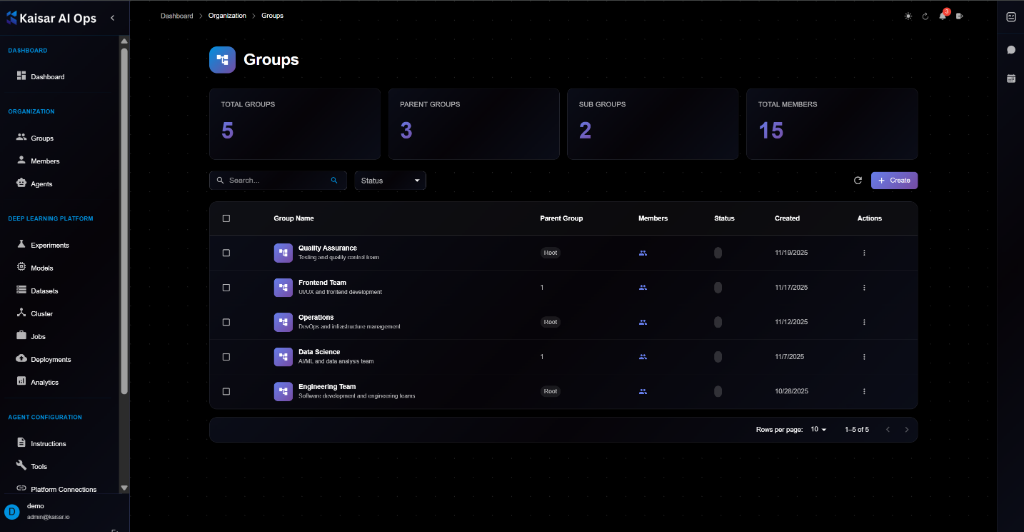
## Overview
Groups allow you to organize members into logical units (e.g., teams, departments, projects) and assign permissions or resources to them collectively. Groups can be nested to create an organizational hierarchy.
**Dashboard Summary**:
* **Total Groups**: Total number of groups configured
* **Parent Groups**: Number of root-level groups
* **Sub Groups**: Number of nested groups
* **Total Members**: Total users assigned to groups
## Groups List
The groups table displays:
* **Group Name**: Name and description (e.g., "Quality Assurance", "Frontend Team")
* **Parent Group**: The parent group name or "Root" if top-level
* **Members**: Number of members in the group
* **Status**: Active (green) or Inactive (gray)
* **Created**: Date of creation
* **Actions**: Edit, Delete, etc.
## Creating a Group
Navigate to **Organization** → **Groups** → Click **+ Create**
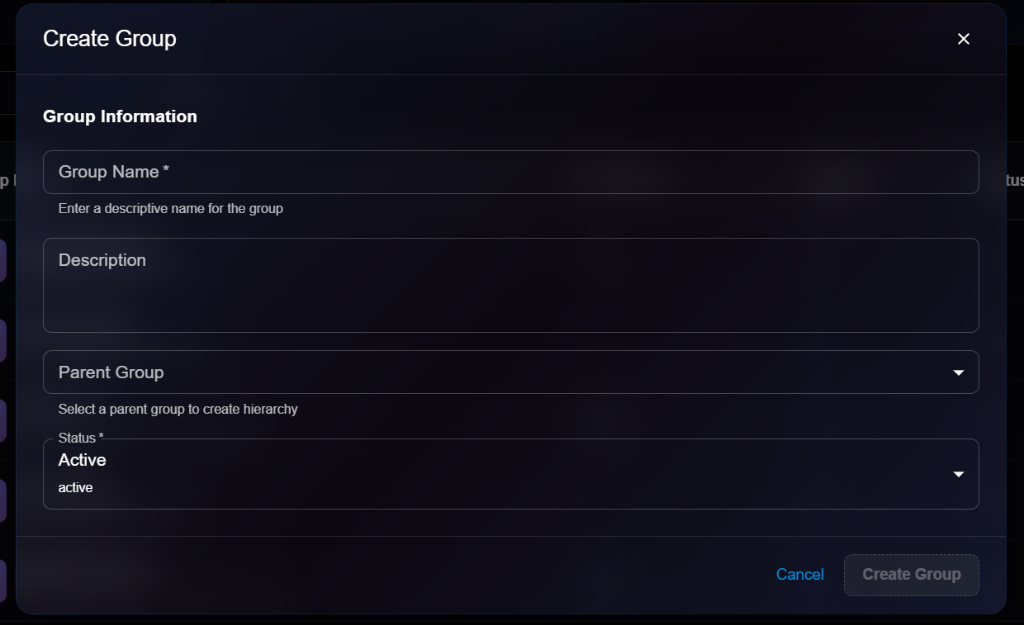
### Group Information
**Group Name**\* (Required)
* Enter a descriptive name for the group
* Example: `Quality Assurance`, `Engineering`, `Sales`
* Helper text: "Enter a descriptive name for the group"
**Description**
* Optional description of the group's purpose
* Example: "Testing and quality control team"
**Parent Group**
* Select a parent group to create hierarchy
* Dropdown selection of existing groups
* Helper text: "Select a parent group to create hierarchy"
**Status**\* (Required)
* Current status of the group
* Options: `Active`, `Inactive`
* Default: `Active`
### Actions
* **Cancel**: Discard changes
* **Create Group**: Save the new group
## Viewing Group Details
To view detailed information about a group:
1. Navigate to **Organization** → **Groups**
2. Click on a group from the list
3. View details in the modal dialog
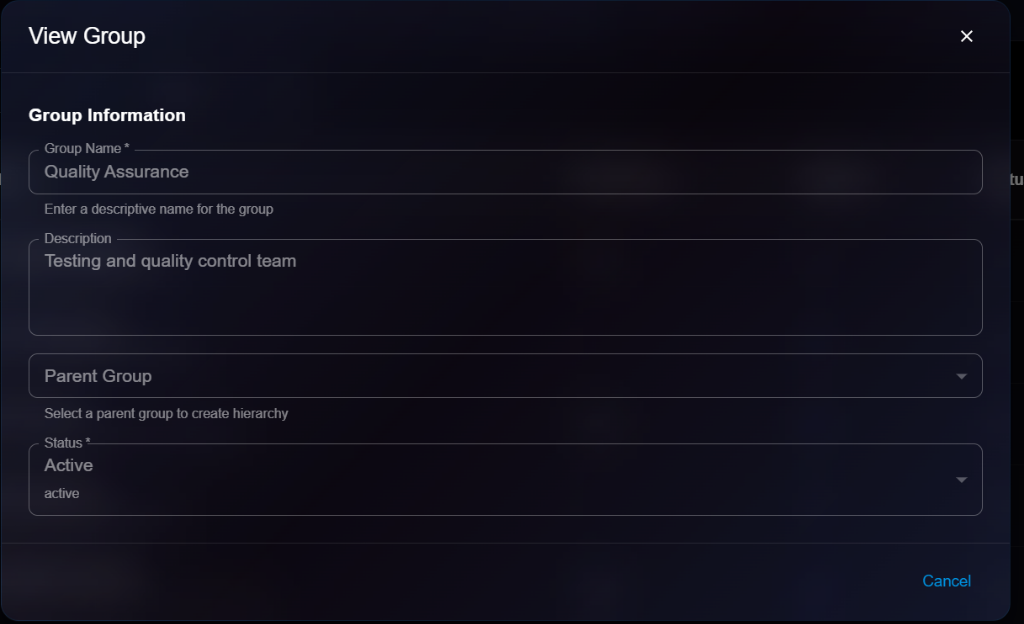
**Details Panel**:
* **Group Name**: e.g., "Quality Assurance"
* **Description**: e.g., "Testing and quality control team"
* **Parent Group**: Shows selected parent if any
* **Status**: Active or Inactive
## Editing a Group
To update a group:
1. Open group details
2. Click **Edit** button
3. Modify editable fields in the Edit Group modal
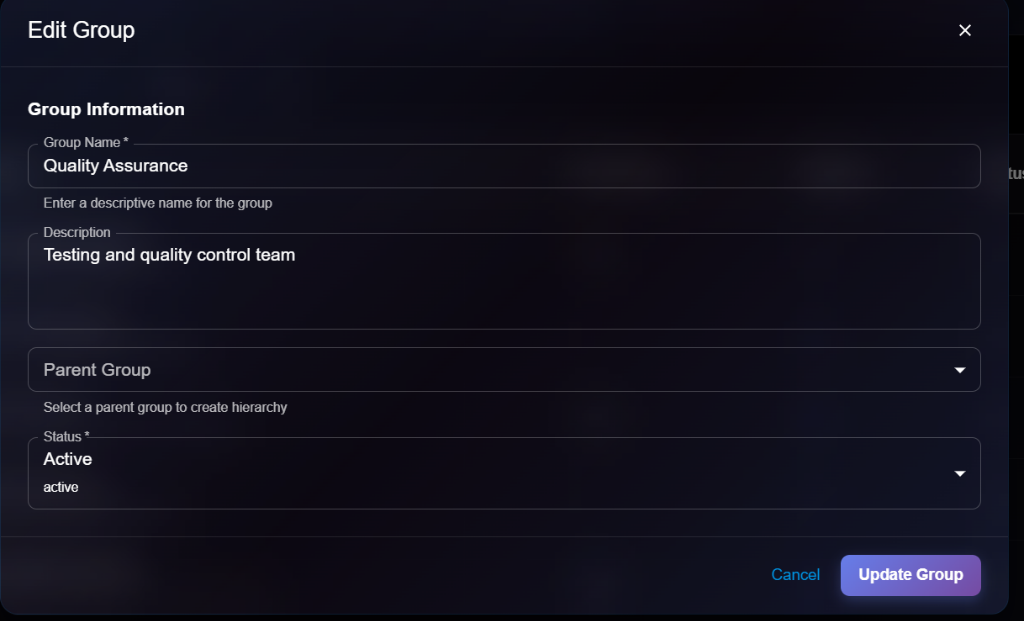
4. Click **Update Group** to save changes
**Editable Fields**:
* ✅ Group Name
* ✅ Description
* ✅ Parent Group
* ✅ Status
## Group Hierarchy
**Parent-Child Relationships**:
* Groups can have one parent group
* A parent group can have multiple child groups
* Permissions and access can be inherited (depending on configuration)
**Example Structure**:
* **Engineering** (Parent)
* **Backend Team** (Child)
* **Frontend Team** (Child)
* **QA Team** (Child)
## Managing Group Members
(See [Members](https://docs.kaisar.io/kaisar-network/kaisar-ai-ops/organization/members) for details on adding users to groups)
## Best Practices
* **Naming**: Use clear, consistent naming conventions
* **Hierarchy**: Reflect your actual organizational structure
* **Descriptions**: Provide clear descriptions for easier management
* **Maintenance**: Deactivate groups that are no longer in use instead of deleting them immediately to preserve history
## Next Steps
* Add [Members](https://docs.kaisar.io/kaisar-network/kaisar-ai-ops/organization/members) to your groups
* Assign [Agents](https://docs.kaisar.io/kaisar-network/kaisar-ai-ops/organization/agents) to groups
* Configure group-level permissions
---
# Source: https://docs.kaisar.io/kaisar-network/kaisar-architecture/products/kaisar-onenode/kaisar-checker/what-is-the-kaisar-checker-node/how-do-checker-nodes-work.md
# How do Checker Nodes Work
The Kaisar Checker evaluates the uptime, bandwidth, and performance of physical devices that Providers supply to the VPN network. It sends proof of device functionality to the blockchain and earns rewards based on its performance.
The Checker's primary role is to verify the integrity and performance of Containers in the Kaisar Network. This verification of technical specifications ensures high service quality and network transparency.
#### Testing procedure
* At registration: The Container undergoes verification when registered on the Kaisar Network.
* In standby state: Random checks are performed on idle Containers.
* During rendering state: Detailed service information is collected to assess operational quality and status.
#### Evaluation method
* Performance parameters: The Checker directly monitors Container performance metrics.
* Simulation testing: The Checker simulates user behavior by running test applications, analyzing the data to verify Container responsiveness and compliance with technical requirements.
#### Test results
* Registration authentication: The Checker validates Container specifications during system registration.
* Impact on scheduling: Test outcomes directly influence the Manager's Container prioritization and scheduling.
* Quality control: The Checker assigns penalties to Containers that deliver substandard service quality.
Upon task completion, the Checker Node digitally signs the results with its private key and submits them to the Kaisar Blockchain. Nodes whose results align with the majority receive token rewards.
Workflow
1. The Checker starts by connecting to a wallet containing an NFT license, which authenticates it within the Kaisar Network.
2. After connecting a wallet, the Kaisar system sends back authentication credentials to verify the Checker's identity and network permissions.
3. Using these credentials, the Checker establishes a secure connection to the Kaisar VPN.
4. Through the VPN, the Checker queries the system for Worker Node status, gathering data about current workloads and availability.
5. The system returns Worker Node status information, helping the Checker determine which node to utilize.
6. The Checker then submits Proof of Physical Work (PoPW) for the chosen Worker Node to the Kaisar Blockchain, documenting its performance assessment.
7. Upon successful PoPW submission, the Checker earns a reward for its accurate monitoring and reporting.
## Banning Scenarios
* A Checker Node will be banned from receiving rewards for one month (no task assignments) if it makes 2 or more incorrect calculations within a week.
* A Checker Node will be banned from receiving rewards for six months (no task assignments) if it makes 5 or more incorrect calculations within a month.
* A Checker Node will be permanently banned and lose its Checker qualification if its total incorrect calculations exceed 10.
## Checker Node Status
Checker Nodes operate in one of five statuses. Each status reflects the node's current operational state, which is essential for effective management and troubleshooting within the Kaisar Network.
* **Checking**: Actively performing verification tasks.
* **Ready**: Prepared to receive new tasks, but not currently checking.
* **Offline**: Not operational due to network issues or maintenance.
* **Banned**: Disqualified from earning rewards due to repeated failures or policy violations.
* **Pending**: Awaiting approval for delegation.
---
# Source: https://docs.kaisar.io/kaisar-network/origins/faq/how-do-i-deploy-a-gpu-container.md
# How do I deploy a GPU Container?
To deploy a GPU container follow step-by-step instructions from the Guides section. Here is an overview of 5 step Deployment process.
1. Log in/Signup to the Kaisar portal.
2. Select a pre-built template from GPU frameworks.
3. Set Parameters.
4. Choose a pricing model (e.g., on-demand, 1 month, 3 months).
5. Review and finalize the deployment details, then proceed with payment.
---
# Source: https://docs.kaisar.io/kaisar-network/origins/faq/how-do-i-get-started-with-kaisar.md
# How do I get started with Kaisar?
To get started, create an account on the [Kaisar portal](http://cloud.kaisar.io), log in, and explore the dashboard. You can deploy GPU containers, manage your account settings, and monitor your resources through the portal.
---
# Source: https://docs.kaisar.io/kaisar-network/origins/faq/how-do-i-monitor-my-gpu-container.md
# How do I monitor my GPU container?
You can monitor your GPU container from the dashboard, which displays metrics such as CPU, memory, network usage, and more.
---
# Source: https://docs.kaisar.io/kaisar-network/origins/faq/how-does-kaisar-ensure-security-of-containers.md
# How does Kaisar ensure security of containers?
* Kaisar uses multiple layers of security, including robust access control and a secure cloud option for highly sensitive workloads.
* Kaisar transactions are facilitated through smart contracts on the peaq blockchain. Customers pay for compute clusters using KAI tokens, and providers receive rewards based on their GPU contributions.
---
# Source: https://docs.kaisar.io/kaisar-network/origins/faq/how-does-kaisar-gpu-container-work.md
# How does Kaisar GPU Container work?
* Kaisar GPU Container allows users to run GPU-intensive applications within containers, providing easy access to GPU resources.
* Users can customize their container environments, monitor GPU usage in real-time, and manage their deployments through a user-friendly dashboard.
* The service supports popular AI/ML frameworks like TensorFlow and PyTorch.
---
# Source: https://docs.kaisar.io/kaisar-network/origins/faq/how-is-pricing-determined.md
# How is pricing determined?
Pricing is based on the selected GPU model, the duration of use, and the pricing plan (on-demand, monthly, etc.).
---
# Source: https://docs.kaisar.io/kaisar-network/kaisar-architecture/products/kaisar-onenode/kaisar-provider/how-to-manage-kaisar-provider.md
# How to Manage Kaisar Provider
- [Get started](/kaisar-network/kaisar-architecture/products/kaisar-onenode/kaisar-provider/how-to-manage-kaisar-provider/get-started.md)
- [Connect wallet](/kaisar-network/kaisar-architecture/products/kaisar-onenode/kaisar-provider/how-to-manage-kaisar-provider/connect-wallet.md)
---
# Source: https://docs.kaisar.io/kaisar-network/kaisar-architecture/products/kaisar-onenode/kaisar-checker/how-to-purchase-checker-nodes.md
# How to Purchase Checker Nodes
- [Step 1 - Connect wallet](/kaisar-network/kaisar-architecture/products/kaisar-onenode/kaisar-checker/how-to-purchase-checker-nodes/step-1-connect-wallet.md)
- [Step 2 - Choose the Network](/kaisar-network/kaisar-architecture/products/kaisar-onenode/kaisar-checker/how-to-purchase-checker-nodes/step-2-choose-the-network.md)
- [Step 3 - Commitment Submission](/kaisar-network/kaisar-architecture/products/kaisar-onenode/kaisar-checker/how-to-purchase-checker-nodes/step-3-commitment-submission.md)
- [Step 4 - Referral Link Sharing](/kaisar-network/kaisar-architecture/products/kaisar-onenode/kaisar-checker/how-to-purchase-checker-nodes/step-4-referral-link-sharing.md)
- [Step 5 - Confirmation](/kaisar-network/kaisar-architecture/products/kaisar-onenode/kaisar-checker/how-to-purchase-checker-nodes/step-5-confirmation.md)
- [What’s Next?](/kaisar-network/kaisar-architecture/products/kaisar-onenode/kaisar-checker/how-to-purchase-checker-nodes/whats-next.md)
- [FAQs](/kaisar-network/kaisar-architecture/products/kaisar-onenode/kaisar-checker/how-to-purchase-checker-nodes/faqs.md)
---
# Source: https://docs.kaisar.io/kaisar-network/kaisar-architecture/products/kaisar-onenode/kaisar-provider/how-to-run-kaisar-provider-app.md
# How to run Kaisar Provider App
- [Linux CLI](/kaisar-network/kaisar-architecture/products/kaisar-onenode/kaisar-provider/how-to-run-kaisar-provider-app/linux-cli.md)
- [MacOS & Windows GUI](/kaisar-network/kaisar-architecture/products/kaisar-onenode/kaisar-provider/how-to-run-kaisar-provider-app/macos-and-windows-gui.md)
---
# Source: https://docs.kaisar.io/kaisar-network/kaisar-ai-ops/ai-solutions/instances.md
# Instances
Manage your deployed AI solution instances.
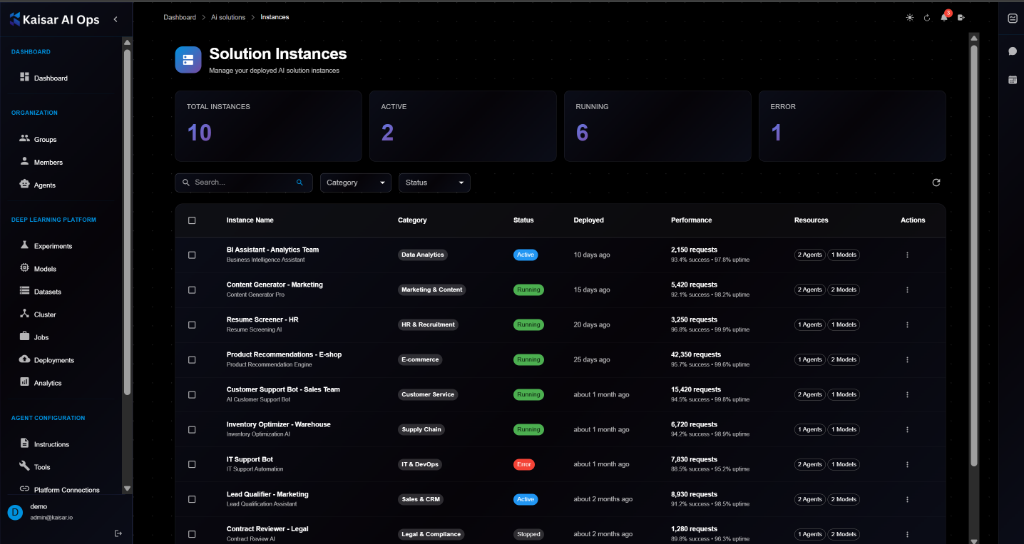
## Overview
The Solution Instances section allows you to manage, monitor, and configure all deployed AI solutions in your organization. Track performance, resource usage, and status of your AI assistants and tools.
## Instances Dashboard
The dashboard displays key metrics at a glance:
**Summary Cards**:
* **Total Instances**: Total number of deployed solution instances
* **Active**: Number of instances currently active
* **Running**: Number of instances currently running
* **Error**: Number of instances experiencing errors
## Instance List View
The instances table shows all deployed solutions with the following information:
**Columns**:
* **Instance Name**: Name and description
* **Category**: Solution category (e.g., Data Analytics, Marketing & Content)
* **Status**: Current status (Active, Running, Error, Stopped)
* **Deployed**: Deployment time
* **Performance**: Request count and success rate
* **Resources**: Agents and models used
* **Actions**: Quick actions menu
**Filtering and Search**:
* Search by instance name
* Filter by Category
* Filter by Status
## Viewing Instance Details
To view detailed information about an instance:
1. Navigate to **AI Solutions** → **Instances**
2. Click on an instance from the list
3. View comprehensive details in the modal dialog
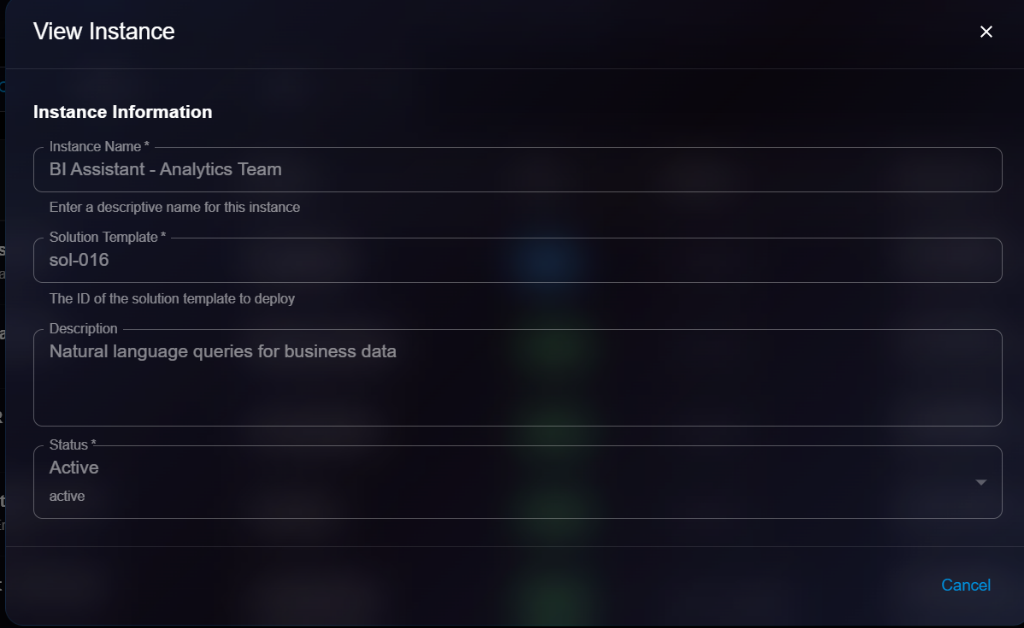
**Instance Information**:
**Instance Name**\*
* Descriptive name for the instance
* Example: `BI Assistant - Analytics Team`
* Helper text: "Enter a descriptive name for this instance"
**Solution Template**\*
* ID of the solution template deployed
* Example: `sol-016`
* Helper text: "The ID of the solution template to deploy"
**Description**
* Description of the instance purpose
* Example: "Natural language queries for business data"
**Status**\*
* Current operational status
* Dropdown selection: Active, Running, Stopped, Error
* Example: `Active`
## Managing Instances
### Starting and Stopping
To change instance state:
1. Edit the instance
2. Change Status field (Running ↔ Stopped)
3. Save changes
**Running**: Instance is processing requests **Stopped**: Instance is paused and not consuming compute resources
### Monitoring Performance
**Key Metrics**:
* **Requests**: Total number of requests processed
* **Success Rate**: Percentage of successful requests
* **Uptime**: Percentage of time available
**Performance Analysis**:
* Check error rates for debugging
* Monitor request volume for scaling
* Review uptime for SLA compliance
### Resource Usage
**Agents**:
* Number of active agents in the instance
* Affects concurrency and capability
**Models**:
* Number of AI models loaded
* Affects memory usage and latency
## Best Practices
**Naming Conventions**:
* Use descriptive names (e.g., "Department - Function")
* Include environment (e.g., "Dev - Support Bot")
**Resource Management**:
* Stop unused instances to save costs
* Monitor resource usage regularly
* Scale resources based on demand
**Maintenance**:
* Update solution templates when available
* Review error logs for "Error" status instances
* Archive or delete obsolete instances
## Next Steps
* Browse [Market Place](https://docs.kaisar.io/kaisar-network/kaisar-ai-ops/ai-solutions/market-place) for new solutions
* Monitor in [Analytics](https://docs.kaisar.io/kaisar-network/kaisar-ai-ops/deep-learning-platform/analytics)
* Configure [Agents](https://docs.kaisar.io/kaisar-network/kaisar-ai-ops/organization/agents)
---
# Source: https://docs.kaisar.io/kaisar-network/kaisar-ai-ops/agent-configuration/instructions.md
# Instructions
Configure instructions and prompts for your AI agents.
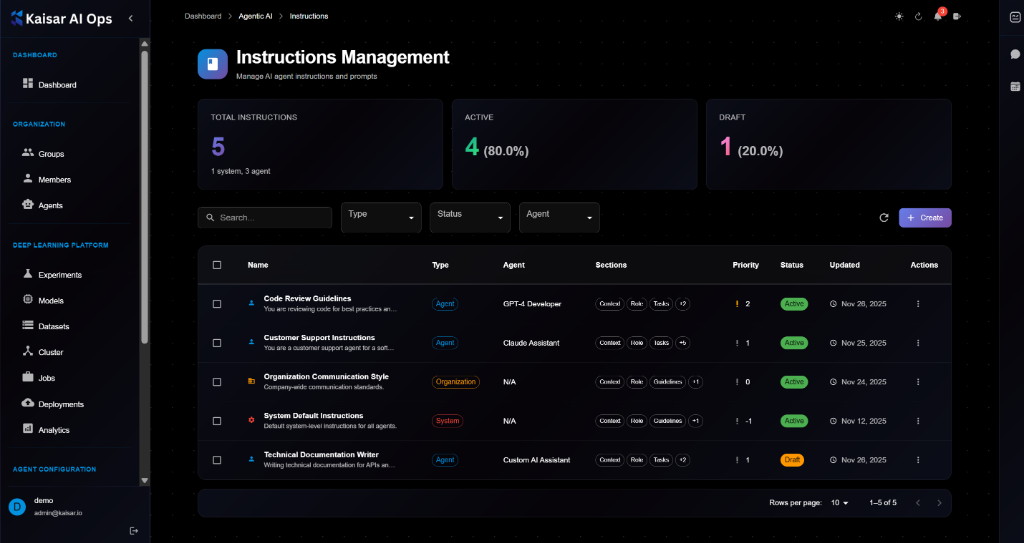
## Overview
The Instructions Management section allows you to create, manage, and organize instruction sets that define how your AI agents behave. Instructions include system prompts, role definitions, tasks, guidelines, and constraints.
## Instructions Dashboard
The dashboard displays key metrics at a glance:
**Summary Cards**:
* **Total Instructions**: Total number of instructions configured (system and agent-level)
* **Active**: Number of active instructions
* **Draft**: Number of draft instructions
## Instruction List View
The instructions table shows all instruction sets with the following information:
**Columns**:
* **Name**: Instruction name and description
* **Type**: Instruction type with color-coded badges (Agent, System, Organization)
* **Agent**: Associated agent name
* **Sections**: Section badges (Context, Role, Tasks, Guidelines, Questions, Examples, Constraints)
* **Priority**: Priority level (1-10)
* **Status**: Current status (Active, Draft)
* **Updated**: Last update date
* **Actions**: Quick actions menu
**Filtering and Search**:
* Search by instruction name
* Filter by Type (Agent, System, Organization)
* Filter by Status (Active, Draft)
* Filter by Agent
## Creating an Instruction
Navigate to **Agent Configuration** → **Instructions** → Click **Create**
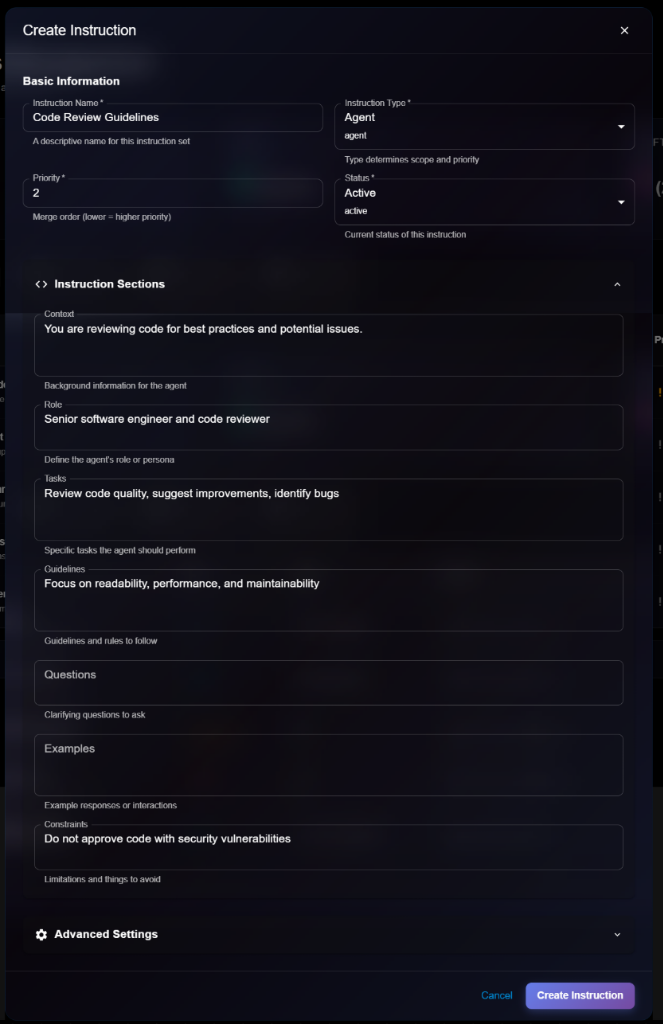
### Basic Information
**Instruction Name**\* (Required)
* A descriptive name for this instruction set
* Example: `Code Review Guidelines`
**Instruction Type**\* (Required)
* Select from dropdown: Agent, System, Organization
* Default: `Agent`
* Helper text: "Type determines scope and priority"
**Priority**\* (Required)
* Merge order (lower = higher priority)
* Example: `2`
* Helper text: "Merge order (lower = higher priority)"
**Status**\* (Required)
* Select from dropdown: Active, Draft
* Default: `Active`
* Helper text: "Current status of this instruction"
### Instruction Sections
The instruction sections define the complete behavior and guidelines for the agent. Click to expand/collapse each section.
**Context**
* Background information for the agent
* Example: "You are reviewing code for best practices and potential issues."
* Helper text: "Background information for the agent"
**Role**
* Define the agent's role or persona
* Example: "Senior software engineer and code reviewer"
* Helper text: "Define the agent's role or persona"
**Tasks**
* Specific tasks the agent should perform
* Example: "Review code quality, suggest improvements, identify bugs"
* Helper text: "Specific tasks the agent should perform"
**Guidelines**
* Guidelines and rules to follow
* Example: "Focus on readability, performance, and maintainability"
* Helper text: "Guidelines and rules to follow"
**Questions**
* Clarifying questions to ask
* Example: (empty or specific questions)
* Helper text: "Clarifying questions to ask"
**Examples**
* Example responses or interactions
* Example: (empty or specific examples)
* Helper text: "Example responses or interactions"
**Constraints**
* Limitations and things to avoid
* Example: "Do not approve code with security vulnerabilities"
* Helper text: "Limitations and things to avoid"
### Advanced Settings
Click to expand for additional configuration options (collapsed by default).
### Actions
* **Cancel**: Discard and close
* **Create Instruction**: Save the instruction
## Viewing Instruction Details
To view detailed information about an instruction:
1. Navigate to **Agent Configuration** → **Instructions**
2. Click on an instruction from the list
3. View comprehensive details in the modal dialog

**Details Panel Sections**:
**Basic Information**:
* **Instruction Name**: e.g., "Code Review Guidelines"
* **Instruction Type**: Agent, System, or Organization
* **Priority**: Merge order number
* **Status**: Active or Draft
**Instruction Sections** (Expandable): All sections are displayed in read-only mode:
* Context
* Role
* Tasks
* Guidelines
* Questions
* Examples
* Constraints
**Advanced Settings** (Expandable): Additional configuration options if set.
## Editing an Instruction
To update an instruction:
1. Open instruction details page
2. Click **Edit** button (or three-dot menu → Edit)
3. Modify editable fields in the Edit Instruction modal
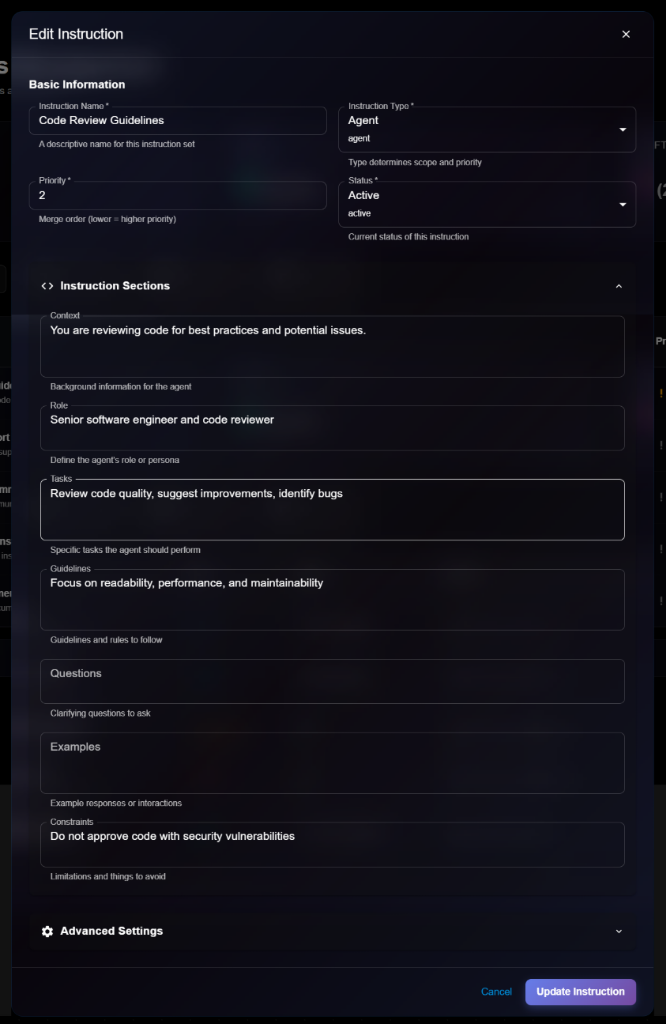
4. Click **Update Instruction** to save changes
> \[!NOTE] The Edit form is identical to the Create/View form, but with an "Update Instruction" button.
**Editable Fields**:
* ✅ Instruction Name
* ✅ Priority
* ✅ Status (Active ↔ Draft)
* ✅ All instruction sections (Context, Role, Tasks, Guidelines, Questions, Examples, Constraints)
* ✅ Advanced Settings
* ❌ Instruction Type (cannot edit after creation)
## Instruction Types
**Agent Instructions**:
* Specific to individual agents
* Define agent-specific behavior
* Override system defaults
* Blue badge in list view
**System Instructions**:
* Apply to all agents by default
* Lowest priority (merged first)
* Define baseline behavior
* Red badge in list view
**Organization Instructions**:
* Company-wide standards
* Apply across all agents
* Medium priority
* Orange badge in list view
## Priority and Merging
**How Priority Works**:
* Lower number = Higher priority
* Instructions are merged in priority order
* Higher priority instructions override lower ones
**Merge Order**:
1. System instructions (priority: -1)
2. Organization instructions (priority: 0)
3. Agent instructions (priority: 1, 2, 3, etc.)
**Example**:
* System Default: Priority -1 (applied first)
* Organization Style: Priority 0 (overrides system)
* Code Review: Priority 2 (final overrides)
## Instruction Sections Explained
**Context**:
* Sets the scene for the agent
* Provides background information
* Explains the situation or environment
**Role**:
* Defines who the agent is
* Sets the persona or character
* Establishes expertise level
**Tasks**:
* Specific actions to perform
* Clear, actionable items
* What the agent should do
**Guidelines**:
* Rules and best practices
* How to approach tasks
* Quality standards
**Questions**:
* Clarifying questions to ask users
* Information gathering prompts
* Validation questions
**Examples**:
* Sample interactions
* Expected responses
* Format examples
**Constraints**:
* What NOT to do
* Limitations and boundaries
* Safety guidelines
## Managing Instructions
### Activating/Deactivating
To change instruction status:
1. Edit the instruction
2. Change Status field
3. Save changes
**Active**: Instruction is in use **Draft**: Instruction is saved but not applied
### Deleting an Instruction
To remove an instruction:
1. Navigate to instruction details or list
2. Click **Delete** button
3. Confirm deletion
> \[!WARNING] Deleting an instruction will affect any agents using it. Make sure to update agent configurations before deleting.
## Best Practices
**Clear and Specific**:
* Be explicit about expected behavior
* Use clear, unambiguous language
* Provide concrete examples
**Structured Sections**:
* Use all relevant sections
* Keep sections focused
* Avoid redundancy between sections
**Priority Management**:
* Use system instructions for defaults
* Use organization instructions for company standards
* Use agent instructions for specific behaviors
* Keep priority numbers organized
**Testing**:
* Test instructions with agents
* Verify behavior matches expectations
* Iterate based on results
**Version Control**:
* Keep drafts for testing
* Document changes in descriptions
* Maintain instruction history
**Security**:
* Include safety constraints
* Define boundaries clearly
* Specify what agents should NOT do
## Next Steps
* Configure [Tools](https://docs.kaisar.io/kaisar-network/kaisar-ai-ops/agent-configuration/tools) for your agents
* Set up [Platform Connections](https://docs.kaisar.io/kaisar-network/kaisar-ai-ops/agent-configuration/platform-connections)
* Define [Routes](https://docs.kaisar.io/kaisar-network/kaisar-ai-ops/agent-configuration/routes) for agent workflows
* Link instructions to agents in [Organization → Agents](https://docs.kaisar.io/kaisar-network/kaisar-ai-ops/organization/agents)
---
# Source: https://docs.kaisar.io/kaisar-network/kaisar-architecture/products/kaisar-onenode/kaisar-checker/what-is-the-kaisar-checker-node/introduction.md
# Source: https://docs.kaisar.io/kaisar-network/kaisar-architecture/products/kaisar-onenode/kaisar-provider/what-is-kaisar-provider/introduction.md
# Introduction
As a Kaisar Provider on Kaisar Network, you contribute to supporting and expanding the network, ensuring businesses and developers have reliable access to the computational power they need to run their workloads seamlessly and efficiently.
1. **Provide GPU Power** – Connect your GPU servers to Kaisar Network, making them available for businesses and developers who require high-performance computing for their workloads.
2. **Ensure Performance** – Provide your GPUs to support network reliability and security. Regularly monitor server performance to meet operational standards, prevent downtime, and ensure a smooth and efficient computing experience for users.
3. **Manage & Earn** – Track your earnings from providing GPU resources, manage your servers efficiently, and oversee financial transactions with security. Use the platform’s tools to monitor service fees, claim rewards, and ensure smooth and transparent financial operations.
Your contribution helps power a reliable and efficient cloud ecosystem.
---
# Source: https://docs.kaisar.io/kaisar-network/kaisar-ai-ops/deep-learning-platform/jobs.md
# Jobs
Submit and manage training jobs on cluster resources.

## Overview
The Jobs section allows you to submit, monitor, and manage ML training jobs that run on cluster nodes. Track job status, progress, and resource utilization in real-time.
## Jobs Dashboard
The dashboard displays key job metrics at a glance:
**Summary Cards**:
* **Total Jobs**: Total number of jobs in the system
* **Running**: Number of jobs currently running
* **Completed**: Number of jobs completed successfully
* **Failed**: Number of jobs that failed
## Job List View
The jobs table shows all submitted jobs with the following information:
**Columns**:
* **Job Name**: Job name and type (Training, Inference, etc.)
* **Status**: Current status with color-coded badges
* **Priority**: Job priority (High, Medium, Low)
* **Experiment**: Associated experiment name
* **Progress**: Progress bar with percentage
* **Created**: Job creation date
* **Actions**: Quick actions menu
**Filtering and Search**:
* Search by job name
* Filter by status, priority, or experiment
## Creating a Job
Navigate to **Deep Learning Platform** → **Jobs** → Click **Create**

### Basic Information
**Job Name**\* (Required)
* Enter a descriptive name for the job
* Example: `BERT Fine-tuning - Sentiment Analysis`
* Helper text: "Enter a descriptive name for the job"
**Description**
* Detailed description of the job
* Example: "Fine-tuning BERT-base model for sentiment analysis on IMDB movie reviews"
**Job Type**\* (Required)
* Select from dropdown: Training, Inference, Hyperparameter Tuning, etc.
* Default: `Training`
* Helper text: "training"
**Priority**\* (Required)
* Select priority level: High, Medium, Low
* Default: `High`
* Helper text: "high"
### Configuration
**Epochs**
* Number of training epochs
* Example: `3`
* Helper text: "Number of training epochs"
**Batch Size**
* Training batch size
* Example: `16`
* Helper text: "Training batch size"
**Learning Rate**
* Initial learning rate
* Example: `0.00002`
* Helper text: "Initial learning rate"
**Optimizer**
* Select optimizer from dropdown
* Options: AdamW, Adam, SGD, etc.
* Default: `AdamW`
* Helper text: "adamw"
### Resources
**CPU Cores**
* Number of CPU cores required
* Example: `4`
**Memory (GB)**
* Memory allocation in GB
* Example: `16`
**GPU Count**
* Number of GPUs required
* Example: `0` (for CPU-only jobs)
### Actions
* **Cancel**: Discard and close
* **Create Job**: Submit the job to the queue
## Viewing Job Details
To view detailed information about a job:
1. Navigate to **Deep Learning Platform** → **Jobs**
2. Click on a job from the list
3. View comprehensive details in the modal dialog
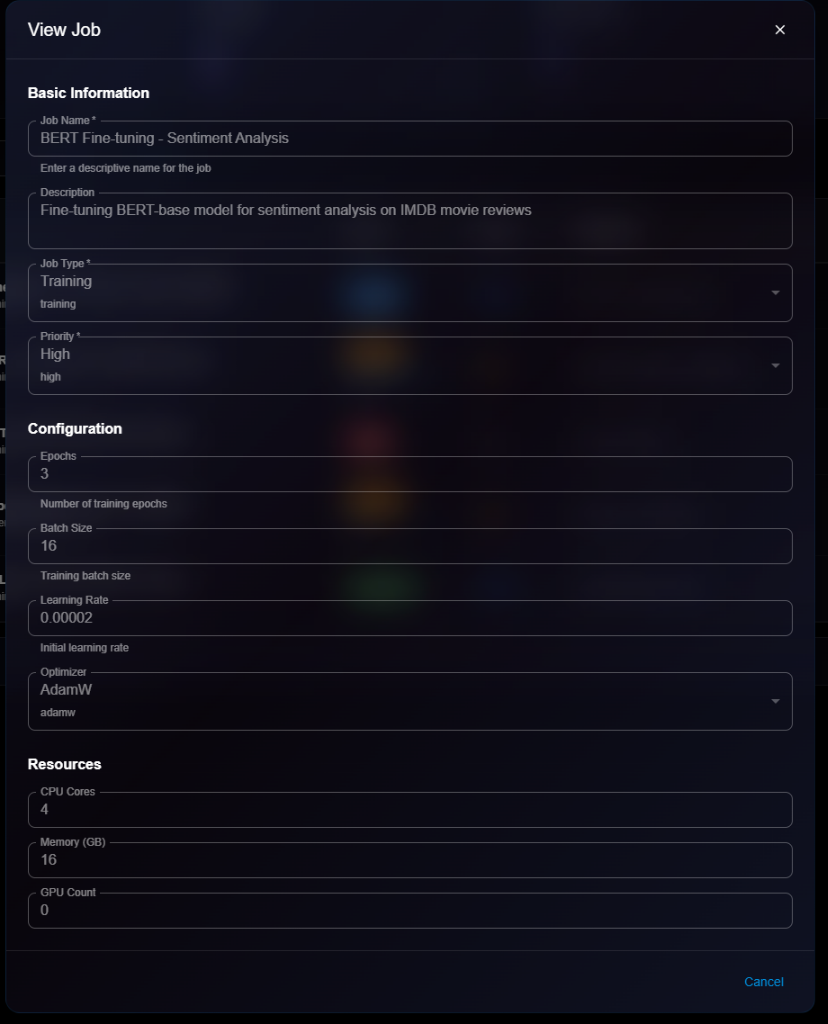
**Details Panel Sections**:
**Basic Information**:
* **Job Name**: e.g., "BERT Fine-tuning - Sentiment Analysis"
* **Description**: Full description of the job
* **Job Type**: Training, Inference, etc.
* **Priority**: High, Medium, Low
**Configuration**:
* **Epochs**: Number of training epochs (e.g., 3)
* **Batch Size**: Training batch size (e.g., 16)
* **Learning Rate**: Initial learning rate (e.g., 0.00002)
* **Optimizer**: Optimizer used (e.g., AdamW)
**Resources**:
* **CPU Cores**: Allocated CPU cores (e.g., 4)
* **Memory (GB)**: Allocated memory (e.g., 16)
* **GPU Count**: Number of GPUs (e.g., 0)
## Editing a Job
To update job configuration:
1. Open job details page
2. Click **Edit** button (or three-dot menu → Edit)
3. Modify editable fields in the Edit Job modal
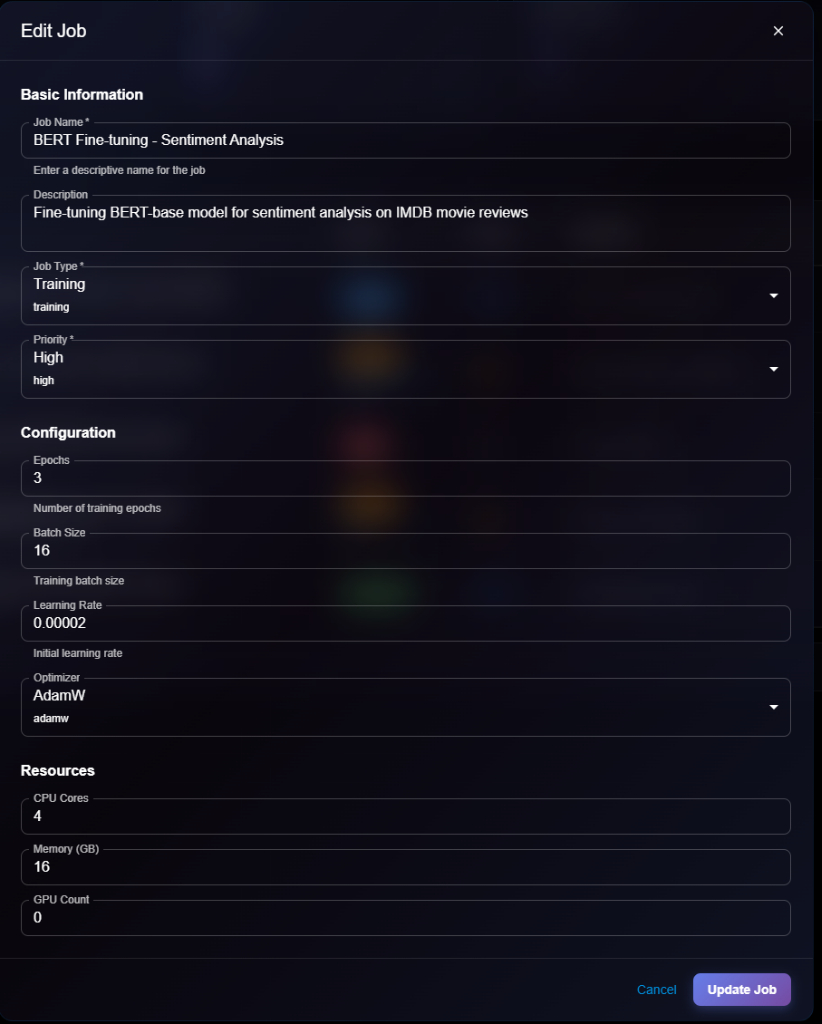
4. Click **Update Job** to save changes
> \[!NOTE] You can only edit jobs that are in Pending or Failed status. Running or Completed jobs cannot be edited.
**Editable Fields**:
* ✅ Job Name
* ✅ Description
* ✅ Priority (can change to expedite or delay)
* ✅ Configuration (epochs, batch size, learning rate, optimizer)
* ✅ Resources (CPU, memory, GPU)
* ❌ Job Type (cannot edit)
* ❌ Status (managed by system)
## Job Status
**Status Types**:
**Pending** (Orange):
* Job is queued, waiting for resources
* Will start when cluster resources become available
**Running** (Blue):
* Job is actively executing
* Resources are allocated
* Progress is being tracked
**Completed** (Green):
* Job finished successfully
* Results are available
* Resources have been released
**Failed** (Red):
* Job encountered an error
* Check logs for error details
* Can be restarted or debugged
## Managing Jobs
### Stopping a Running Job
To stop a job that's currently running:
1. Open job details or click actions menu
2. Click **Stop** button
3. Confirm action
4. Job will be terminated and resources released
> \[!WARNING] Stopping a job will lose all progress. Consider checkpointing your training jobs.
### Restarting a Failed Job
To restart a job that failed:
1. Open failed job details
2. Click **Restart** button
3. Job will be resubmitted to the queue
4. Monitor for success
### Deleting a Job
To remove a job:
1. Navigate to job details or list
2. Click **Delete** button
3. Confirm deletion
> \[!WARNING] Deleting a job will permanently remove:
>
> * Job configuration
> * Training logs
> * Checkpoints and outputs
> * This action cannot be undone!
**Before Deleting**:
* Download important logs
* Save model checkpoints
* Export results if needed
## Job Monitoring
### Real-time Progress
Monitor job progress in real-time:
* Progress bar shows completion percentage
* View live logs in job details
* Track resource utilization
* Monitor metrics and loss curves
### Job Logs
Access job logs:
1. Open job details
2. Navigate to **Logs** tab
3. View stdout/stderr output
4. Filter by log level
5. Download logs for offline analysis
### Resource Usage
Monitor resource consumption:
* CPU utilization
* Memory usage
* GPU utilization (if applicable)
* Network I/O
* Disk I/O
## Job Scheduling
**Priority-based Scheduling**:
* **High** priority jobs run first
* **Medium** priority jobs run when high-priority queue is empty
* **Low** priority jobs run when resources are available
**Resource Allocation**:
* Jobs are matched to suitable cluster nodes
* GPU jobs require GPU-enabled nodes
* CPU/Memory requirements must be met
**Queue Management**:
* View pending jobs in queue
* Estimate wait time based on current load
* Adjust priority if needed
## Best Practices
**Job Naming**:
* Use descriptive names: `bert-sentiment-imdb-v1`
* Include model, task, and version
* Keep names concise but informative
**Resource Requests**:
* Request only what you need
* Don't over-allocate resources
* Monitor actual usage and adjust
**Checkpointing**:
* Save checkpoints regularly
* Enable auto-save in training code
* Store checkpoints in persistent storage
**Error Handling**:
* Implement retry logic
* Log errors comprehensively
* Set up failure notifications
**Priority Usage**:
* Use High priority sparingly
* Reserve for urgent production jobs
* Most jobs should be Medium priority
## Next Steps
* Run jobs on [Cluster](https://docs.kaisar.io/kaisar-network/kaisar-ai-ops/deep-learning-platform/cluster) nodes
* Link jobs to [Experiments](https://docs.kaisar.io/kaisar-network/kaisar-ai-ops/deep-learning-platform/experiments)
* Monitor performance in [Analytics](https://docs.kaisar.io/kaisar-network/kaisar-ai-ops/deep-learning-platform/analytics)
* Deploy successful models via [Deployments](https://docs.kaisar.io/kaisar-network/kaisar-ai-ops/deep-learning-platform/deployments)
---
# Source: https://docs.kaisar.io/kaisar-network/kaisar-architecture/products/kaisar-onenode/kaisar-checker.md
# Kaisar Checker
- [What is the Kaisar Checker Node](/kaisar-network/kaisar-architecture/products/kaisar-onenode/kaisar-checker/what-is-the-kaisar-checker-node.md)
- [Introduction](/kaisar-network/kaisar-architecture/products/kaisar-onenode/kaisar-checker/what-is-the-kaisar-checker-node/introduction.md)
- [How do Checker Nodes Work](/kaisar-network/kaisar-architecture/products/kaisar-onenode/kaisar-checker/what-is-the-kaisar-checker-node/how-do-checker-nodes-work.md)
- [Benefits of Owning a Checker Node](/kaisar-network/kaisar-architecture/products/kaisar-onenode/kaisar-checker/what-is-the-kaisar-checker-node/benefits-of-owning-a-checker-node.md)
- [Node Sale Information](/kaisar-network/kaisar-architecture/products/kaisar-onenode/kaisar-checker/what-is-the-kaisar-checker-node/node-sale-information.md)
- [Referral Mechanism](/kaisar-network/kaisar-architecture/products/kaisar-onenode/kaisar-checker/what-is-the-kaisar-checker-node/referral-mechanism.md)
- [What is the Checker Node License (NFT)](/kaisar-network/kaisar-architecture/products/kaisar-onenode/kaisar-checker/what-is-the-kaisar-checker-node/what-is-the-checker-node-license-nft.md)
- [Reward Unlock Period](/kaisar-network/kaisar-architecture/products/kaisar-onenode/kaisar-checker/what-is-the-kaisar-checker-node/reward-unlock-period.md)
- [FAQs](/kaisar-network/kaisar-architecture/products/kaisar-onenode/kaisar-checker/what-is-the-kaisar-checker-node/faqs.md)
- [How to Purchase Checker Nodes](/kaisar-network/kaisar-architecture/products/kaisar-onenode/kaisar-checker/how-to-purchase-checker-nodes.md)
- [Step 1 - Connect wallet](/kaisar-network/kaisar-architecture/products/kaisar-onenode/kaisar-checker/how-to-purchase-checker-nodes/step-1-connect-wallet.md)
- [Step 2 - Choose the Network](/kaisar-network/kaisar-architecture/products/kaisar-onenode/kaisar-checker/how-to-purchase-checker-nodes/step-2-choose-the-network.md)
- [Step 3 - Commitment Submission](/kaisar-network/kaisar-architecture/products/kaisar-onenode/kaisar-checker/how-to-purchase-checker-nodes/step-3-commitment-submission.md)
- [Step 4 - Referral Link Sharing](/kaisar-network/kaisar-architecture/products/kaisar-onenode/kaisar-checker/how-to-purchase-checker-nodes/step-4-referral-link-sharing.md)
- [Step 5 - Confirmation](/kaisar-network/kaisar-architecture/products/kaisar-onenode/kaisar-checker/how-to-purchase-checker-nodes/step-5-confirmation.md)
- [What’s Next?](/kaisar-network/kaisar-architecture/products/kaisar-onenode/kaisar-checker/how-to-purchase-checker-nodes/whats-next.md)
- [FAQs](/kaisar-network/kaisar-architecture/products/kaisar-onenode/kaisar-checker/how-to-purchase-checker-nodes/faqs.md)
---
# Source: https://docs.kaisar.io/kaisar-network/kaisar-architecture/products/kaisar-onenode/kaisar-explorer.md
# Kaisar Explorer
**Discover the Kaisar Network through Explorer. Go to**
Kaisar Explorer, an advanced web platform, provides real-time visibility into Kaisar on-chain metrics and operations for seamless navigation.
* **Operational Insights**: Access detailed information about the Checkers and Providers actively powering the Kaisar Network, ensuring transparency and operational awareness.
* **Network Metrics**:
* **Earnings Overview**: Monitor the financial performance with real-time network earnings data.
* **Connected Entities**: Track the number of active providers and checkers contributing to the network.
* **Resource Availability**: Assess the scope of resources accessible across the network.
* **Provider Capabilities**: Gain comprehensive insights into the aggregate offerings of online providers, including total CPU cores, memory allocation, and storage capacity.
* **Real-Time Monitoring**: Leverage cutting-edge real-time tracking to observe provider performance and activity as it unfolds, enabling informed decision-making.
* **Unlocking Potential**: Engage with Explorer to delve into the robust infrastructure and continuous evolution of the Kaisar Network, unlocking a deeper understanding of its capabilities and growth trajectory.
**Detailed information about the Providers actively**
---
# Source: https://docs.kaisar.io/kaisar-network/kaisar-architecture/products/kaisar-onenode.md
# Kaisar OneNode
**Kaisar OneNode** is a decentralized infrastructure that optimizes GPU resource use through a trustless, transparent system, ensuring efficient allocation, secure validation, and fair rewards, built on the PEAQ Blockchain.
* **Network Integrity**: Providers supply GPU power while Checkers validate their contributions, with status updates and audits maintaining reliability in a scalable ecosystem.
* **Explorer Platform**: Explorer, an advanced web platform, provides real-time visibility into Kaisar OneNode’s operations for seamless navigation.
* **Key Insights**:
* Track network earnings, connected providers/checkers, and available resources.
* Access details on GPU power, CPU cores, memory, and capacity.
* Monitor provider and checker activity live for oversight.
* **Synergy**: Kaisar OneNode deliver a robust, transparent computing network with actionable insights for efficiency and growth.
---
# Source: https://docs.kaisar.io/kaisar-network/kaisar-architecture/products/kaisar-onenode/kaisar-provider.md
# Kaisar Provider
- [What is Kaisar Provider](/kaisar-network/kaisar-architecture/products/kaisar-onenode/kaisar-provider/what-is-kaisar-provider.md)
- [Introduction](/kaisar-network/kaisar-architecture/products/kaisar-onenode/kaisar-provider/what-is-kaisar-provider/introduction.md)
- [Benefits of Running a Kaisar Provider](/kaisar-network/kaisar-architecture/products/kaisar-onenode/kaisar-provider/what-is-kaisar-provider/benefits-of-running-a-kaisar-provider.md)
- [How to Manage Kaisar Provider](/kaisar-network/kaisar-architecture/products/kaisar-onenode/kaisar-provider/how-to-manage-kaisar-provider.md)
- [Get started](/kaisar-network/kaisar-architecture/products/kaisar-onenode/kaisar-provider/how-to-manage-kaisar-provider/get-started.md)
- [Connect wallet](/kaisar-network/kaisar-architecture/products/kaisar-onenode/kaisar-provider/how-to-manage-kaisar-provider/connect-wallet.md)
- [How to run Kaisar Provider App](/kaisar-network/kaisar-architecture/products/kaisar-onenode/kaisar-provider/how-to-run-kaisar-provider-app.md)
- [Linux CLI](/kaisar-network/kaisar-architecture/products/kaisar-onenode/kaisar-provider/how-to-run-kaisar-provider-app/linux-cli.md)
- [MacOS & Windows GUI](/kaisar-network/kaisar-architecture/products/kaisar-onenode/kaisar-provider/how-to-run-kaisar-provider-app/macos-and-windows-gui.md)
---
# Source: https://docs.kaisar.io/kaisar-network/kaisar-rewards-mechanism.md
# Kaisar Rewards Mechanism
- [Rewards for Kaisar Providers](/kaisar-network/kaisar-rewards-mechanism/rewards-for-kaisar-providers.md)
- [Rewards for Kaisar Checkers Node](/kaisar-network/kaisar-rewards-mechanism/rewards-for-kaisar-checkers-node.md)
---
# Source: https://docs.kaisar.io/kaisar-network/kaisar-architecture/products/kaisar-zeronode.md
# Kaisar ZeroNode
## 1. What is Kaisar ZeroNode
Kaisar is a DePIN protocol uniting global GPU and CPU resources into a universal AI compute layer. It enables individuals to connect devices, earn rewards, and access decentralized infrastructure, offering AI developers and businesses a scalable, affordable alternative to traditional cloud services.
ZeroNode, Kaisar’s Chrome extension, empowers users to contribute to this next-gen computing layer by tracking key metrics like location and uptime. Your participation supports the upcoming launch of the worker node (Kaisar OneNode), allowing you to further monetize your hardware and drive the shift toward decentralized infrastructure.
## 2. ZeroNode Rewards
ZeroNode rewards are derived from four key components:
### 2.1. Running a ZeroNode
Rewards for running a ZeroNode are tied to its uptime—the time your node is online and operational. You can earn up to **300 points daily** for maintaining 24 hours of uptime, incentivizing consistent participation and ensuring network reliability.
**Kaisar NFT holders** enjoy a significant advantage: owning a Kaisar NFT doubles your earnings. For example, if your node earns 300 points daily, NFT holders will earn **600 points**, highlighting their integral role in the Kaisar ecosystem.
[**Download the ZeroNode extension now**](https://chromewebstore.google.com/detail/kaisar-zeronode/mmlnljdcfjnfeikeioghbkobdcmnhgko) to start earning rewards and contributing to the decentralized future!
### 2.2. Referrals
Both the referrer and the referee receive one ticket when you invite a new member to the network. Additionally, the referrer earns an extra 10% reward from the earnings of their referrals. Tickets earned from referrals can be used to participate in lucky draws.
Please note that the referrer will only receive the bonus once the referee’s node has been running for 6 consecutive hours.
### 2.3. Missions
A wide array of missions will be introduced upon launch, and we’ll continue to roll out new challenges weekly, ranging from easy to difficult.
To kick things off, we’ll offer tasks such as completing daily check-ins and engaging in various social activities to earn additional points. Your rewards for daily check-ins will grow with each consecutive day of check-in, culminating in a maximum payout on the seventh day. The cycle then repeats.
We’ll unveil more missions in the future, so be sure to follow Kaisar closely for the latest updates.
### 2.4. Lucky Draw
Our innovative Lucky Draw feature sets us apart, offering you a unique opportunity to win exciting rewards. To participate, simply collect tickets. Here are the primary ways to acquire tickets:
* **Referrals:** Invite your friends and earn tickets for each successful referral. The more referrals you make, the more tickets you’ll receive.
* **Points Burning:** Burn 300 points from your active ZeroNode to receive a ticket. You can burn unlimited points to get as many tickets as possible.
* **Campaign Participation:** Keep an eye out for our ongoing campaigns and giveaways, where you can earn tickets by completing specific tasks.
* **Future Initiatives:** As we continue to evolve, we may introduce additional ways to earn tickets, such as through limited-time events or community challenges.
The rewards and mechanics of our Lucky Draw are subject to change, ensuring that there are always fresh and exciting opportunities for our community.
## 3. Empowering the Future of advanced and decentralized AI
Kaisar envisions a future where individuals can reclaim control over their computing resources, breaking free from centralized monopolies that have dominated the infrastructure landscape. By participating in the Kaisar ecosystem, you are not only contributing to a more equitable distribution of computing power but also helping to shape the future of decentralized AI.
---
# Source: https://docs.kaisar.io/kaisar-network/origins/the-solution-kaisars-decentralized-gpu-network/kaisars-competitive-edge.md
# Kaisar's Competitive Edge
* Kaisar offers a fundamentally different approach to cloud computing. We leverage a distributed and decentralized model that provides increased control and flexibility for users. Kaisar's services don't involve complicated permission models and are cost-efficient. The combination of all these factors sets Kaisar in its own league of decentralized providers.
* Kaisar is a GPU DePIN, or Decentralized Physical Infrastructure Network that leverages blockchains, IoT, and the greater Web3 ecosystem to create, operate, and maintain real-world physical infrastructure. These networks use token incentives to coordinate, reward, and safeguard members of the network.
Kaisar leverages [the peaq blockchain](https://www.peaq.network/), a multi-chain layer one blockchain specifically designed and optimized for DePIN. The network can scale beyond 100,000 transactions per second (TPS) (pending upgrade) while maintaining a minimal transaction cost of approximately $0.00025
---
# Source: https://docs.kaisar.io/kaisar-network/kaisar-ai-ops/troubleshooting/troubleshooting/known-issues.md
# Known Issues
Current limitations and known issues in Kaisar AI Ops.
> \[!NOTE] This page is regularly updated. Last updated: 2024-01-15
## Platform Issues
### Cluster and Jobs Sections Not Accessible
**Status**: Under Development **Severity**: Low **Description**: The "Cluster" and "Jobs" menu items are visible in the sidebar but not currently clickable or functional. **Workaround**: Use the Experiments feature for job submission. **ETA**: Q2 2024
### Large Dataset Upload Timeout
**Status**: Known Issue **Severity**: Medium **Description**: Uploading datasets larger than 10GB may timeout in the browser. **Workaround**: Use the CLI or API for large uploads, or split datasets into smaller chunks. **Fix**: Planned for next release
### Dashboard Refresh Delay
**Status**: Known Issue **Severity**: Low **Description**: Dashboard metrics may take up to 60 seconds to refresh. **Workaround**: Manually refresh the page for latest data. **Fix**: Under investigation
## Experiments
### GPU Memory Not Released
**Status**: Known Issue **Severity**: Medium **Description**: In some cases, GPU memory is not fully released after experiment completion. **Workaround**: Restart the experiment or wait for automatic cleanup (5 minutes). **Fix**: Planned for v1.5
### Experiment Logs Truncated
**Status**: Known Issue **Severity**: Low **Description**: Experiment logs longer than 10MB may be truncated in the UI. **Workaround**: Download full logs via API or CLI. **Fix**: Improved log viewer in development
### Concurrent Experiment Limit
**Status**: By Design **Severity**: Low **Description**: Maximum 50 concurrent experiments per organization. **Workaround**: Queue additional experiments or request quota increase. **Note**: This is a configurable limit
## Models
### ONNX Model Preview Not Supported
**Status**: Feature Request **Severity**: Low **Description**: ONNX models cannot be previewed in the UI. **Workaround**: Download and inspect locally. **ETA**: Q3 2024
### Model Download Speed
**Status**: Known Issue **Severity**: Low **Description**: Large model downloads (>5GB) may be slow. **Workaround**: Use direct S3/GCS access if configured. **Fix**: CDN integration planned
## Deployments
### Cold Start Latency
**Status**: Known Issue **Severity**: Medium **Description**: First request to a deployment may take 30-60 seconds (cold start). **Workaround**: Configure minimum instances > 0 to keep instances warm. **Fix**: Improved cold start optimization in progress
### Auto-scaling Delay
**Status**: By Design **Severity**: Low **Description**: Auto-scaling takes 2-3 minutes to provision new instances. **Workaround**: Set appropriate min/max instances based on expected traffic. **Note**: This is normal cloud provider behavior
## API
### Rate Limit Headers Missing
**Status**: Known Issue **Severity**: Low **Description**: Some API endpoints don't return rate limit headers. **Workaround**: Monitor 429 responses. **Fix**: Planned for v1.4
### Webhook Retry Logic
**Status**: Known Issue **Severity**: Medium **Description**: Failed webhooks are retried only 3 times. **Workaround**: Implement your own retry logic or use a message queue. **Fix**: Configurable retry policy in development
## Browser Compatibility
### Safari Private Mode Issues
**Status**: Known Issue **Severity**: Low **Description**: Some features may not work in Safari Private Mode due to cookie restrictions. **Workaround**: Use normal browsing mode or a different browser. **Fix**: Under investigation
### Internet Explorer Not Supported
**Status**: By Design **Severity**: N/A **Description**: Internet Explorer is not supported. **Workaround**: Use Chrome, Firefox, Safari, or Edge. **Note**: No plans to support IE
## Integrations
### GitHub Enterprise Server
**Status**: Limited Support **Severity**: Medium **Description**: GitHub Enterprise Server integration has limited functionality. **Workaround**: Use GitHub.com or manual Git integration. **Fix**: Full support planned for Q2 2024
### Slack Notification Delays
**Status**: Known Issue **Severity**: Low **Description**: Slack notifications may be delayed by 1-2 minutes. **Workaround**: Use email for time-critical notifications. **Fix**: Under investigation
## Performance
### Large Organization Slowdown
**Status**: Known Issue **Severity**: Medium **Description**: Organizations with >10,000 experiments may experience slow dashboard loading. **Workaround**: Use filters and pagination, or archive old experiments. **Fix**: Database optimization in progress
### Search Performance
**Status**: Known Issue **Severity**: Low **Description**: Search may be slow for organizations with many resources. **Workaround**: Use specific filters to narrow results. **Fix**: Search index optimization planned
## Security
### MFA Recovery Codes
**Status**: Known Issue **Severity**: Medium **Description**: Recovery codes are shown only once and cannot be regenerated. **Workaround**: Save recovery codes securely when first generated. **Fix**: Recovery code regeneration feature planned
## Reporting Issues
If you encounter an issue not listed here:
1. Check the [FAQ](https://docs.kaisar.io/kaisar-network/kaisar-ai-ops/troubleshooting/troubleshooting/faq)
2. Review [Troubleshooting](https://docs.kaisar.io/kaisar-network/kaisar-ai-ops/troubleshooting/troubleshooting)
3. Search existing issues
4. Submit a new issue via [Support](https://docs.kaisar.io/kaisar-network/kaisar-ai-ops/troubleshooting/troubleshooting/support)
When reporting, include:
* Steps to reproduce
* Expected vs. actual behavior
* Error messages and logs
* Browser/OS information
* Screenshots if applicable
## Workaround Index
Quick reference for common workarounds:
| Issue | Workaround |
| ----------------------- | -------------------------- |
| Large dataset upload | Use CLI/API |
| GPU memory not released | Wait 5 minutes or restart |
| Slow dashboard | Use filters and pagination |
| Cold start latency | Set min instances > 0 |
| Webhook failures | Implement retry logic |
| Safari private mode | Use normal mode |
## Next Steps
* Review [FAQ](https://docs.kaisar.io/kaisar-network/kaisar-ai-ops/troubleshooting/troubleshooting/faq) for common questions
* Check [Troubleshooting](https://docs.kaisar.io/kaisar-network/kaisar-ai-ops/troubleshooting/troubleshooting) for solutions
* Contact [Support](https://docs.kaisar.io/kaisar-network/kaisar-ai-ops/troubleshooting/troubleshooting/support) for assistance
---
# Source: https://docs.kaisar.io/kaisar-network/contact-and-support/legal-and-compliance.md
# Legal and Compliance
* Participants are responsible for ensuring compliance with local regulations.
* Kaisar holds the right to amend sale details as necessary.
* Terms and conditions apply; refer to the official Kaisar website for more information.
---
# Source: https://docs.kaisar.io/kaisar-network/kaisar-architecture/products/kaisar-onenode/kaisar-provider/how-to-run-kaisar-provider-app/linux-cli.md
# Linux CLI
## Kaisar Provider CLI Installation Guide for Contributing to Kaisar Network
### Requirements
To run the Kaisar Provider, ensure your system meets the following specifications:
* **Operating System:** Ubuntu 20.04+, CentOS 8+, or compatible 64-bit Linux distribution
* **Memory:** 4GB RAM
* **Processor:** 64-bit CPU with virtualization support
* **Storage:** 100GB HDD/SSD
* **Internet Speed:** 100Mbps or higher
### Dependencies
The following packages and libraries are required (the setup script will install them automatically if missing):
* Node.js (v18 or higher recommended)
* npm
* pm2
* curl
* tar
* git (for some operations)
***
### 1. Download the Setup Script
Download the latest setup script from the Kaisar releases repository:
```bash
curl -O https://raw.githubusercontent.com/Kaisar-Network/kaisar-releases/main/kaisar-provider-setup.sh
```
***
### 2. Make the Script Executable
```bash
chmod +x kaisar-provider-setup.sh
```
***
### 3. Run the Setup Script with Root Privileges
```bash
sudo ./kaisar-provider-setup.sh
```
The script will automatically:
* Install Node.js, npm, and pm2 if not already present
* Download the latest release of Kaisar Provider CLI
* Install all required dependencies
* Set up the CLI globally on your system
***
### 4. Verify the Installation
After installation, verify by running:
```bash
kaisar
```
If you see a welcome message, the installation was successful!
kaisar command result
***
### 5. Start Using the CLI
You can now join the network with the following commands:
```bash
kaisar start # Start the Provider App
kaisar create-wallet -e # Create Wallet
kaisar import-wallet -e -k # Import your existed wallet
kaisar status # Check node status
kaisar log # Check details log of Provider App
```
***
**Notes:**
* Wallet and configuration data are stored in `/var/lib/kaisar-provider-cli`, so your data will not be lost when updating to a new version.
* To earn rewards, follow the instructions to create a wallet and connect your account to the Kaisar Network.
***
Good luck and enjoy earning rewards with Kaisar Network!
---
# Source: https://docs.kaisar.io/kaisar-network/kaisar-architecture/products/kaisar-onenode/kaisar-provider/how-to-run-kaisar-provider-app/macos-and-windows-gui.md
# MacOS & Windows GUI
Follow these steps to set up the Kaisar Provider application on your system and start operating as a Kaisar Provider Node.
### 1. Download and Install
Download and install Kaisar Provider app from link below base on your OS (operating system)
* MacOS for Apple Silicon (M1, M2, M3): [Download here](https://drive.usercontent.google.com/download?id=1Ljcgd60HlXcQQ555hfq5KrUqEtUZDLcV\&export=download\&authuser=0\&confirm=t\&uuid=0dc925d1-371b-44e3-8c44-f132133cce4c\&at=AN8xHorpw6X_hRKxZWWYp9576mu1:1754592127732)
* MacOS for Intel-based Macs: [Download here](https://drive.usercontent.google.com/download?id=1myQNB9wCIN3rw-_wy91_Q1m7IySRc0De\&export=download\&authuser=0\&confirm=t\&uuid=710b7751-bd90-436b-885e-87b330d916fd\&at=AN8xHoq-q42nEhORRugwcgBPEhwE:1754592137742)
* Windows version: [Download here](https://drive.usercontent.google.com/download?id=1gsnJ3eKsirqEPRE5bshT6J4rJOmG4QH9\&export=download\&authuser=0\&confirm=t\&uuid=45191f6e-bdfe-4927-b8f1-9c14b9b185ed\&at=AN8xHorpYIrYc_s2dOSoxBTcSHTC:1754592241608)
**Installing Docker (Optional)**
To support development or deployment tasks, you may need to install Docker. Follow the steps below based on your operating system:
* **For MacOS (Apple Silicon or Intel-based Macs)**: [Docker Desktop for Mac installation](https://docs.docker.com/desktop/install/mac-install/).
* **For Windows**: [Docker Desktop for Windows installation](https://docs.docker.com/desktop/install/windows-install/).
### 2. Create or import an existing wallet
* Create a new wallet or import a wallet by click on button **"Create"** or **"Import Wallet"**
#### Create a New Wallet
1. Enter your email address.
2. Set a secure wallet password.
3. Click **"Create Wallet"** to generate a new wallet.
* In the app, click **"Create Smart Account"** to initialize your smart account.
If the registration fails, click **"Retry"** to attempt again, or select **"Create Smart Account"** to start over.
* Once successful, click **"Complete"** to finalize the device registration.
#### Import an Existing Wallet
1. Follow the prompts to import your existing wallet using your recovery phrase or private key.
2. Enter your email address
3. Set a secure wallet password
4. Click **"Import Wallet"** to import your wallet
* Congratulations! Your Kaisar Provider Node is now registered and ready to operate.
### 3. Access Wallet Management
1. Open the **Kaisar Provider** application.
2. On the main interface, look at the top right corner where your wallet address is displayed.
3. Click on the wallet address to open the options menu. The menu will show two options:
* **Export Private Key**
* **Disconnect Wallet**
### 4. Export Private Key
1. In the options menu, select **Export Private Key**.
2. A window titled **"Export Private Key"** will appear, prompting you to enter your password:
* Enter your wallet password in the **Password** field.
* Click the eye icon (if needed) to reveal the entered password.
3. Click **Export** to proceed.
If the password is correct, a new window will display your private key\
\&#xNAN;**"Keep your private key secure. Do not share or reveal it to anyone."**
4. Click **Copy** to copy the private key to your clipboard, then store it securely.
5. Click **Close** to exit the window.
**Note:** The private key is highly sensitive information. Losing it or exposing it could result in loss of access to your wallet and its assets.
### 5. Remove Wallet (Disconnect Wallet)
1. In the options menu, select **Disconnect Wallet**.
2. A window titled **"Remove Wallet"** will appear with a warning:\
\&#xNAN;**"Warning: This action will remove your wallet and all associated data. This action cannot be undone."**
3. Enter your wallet password in the **Confirm Password** field.
4. Click the **Remove Wallet** button (in red) to confirm wallet removal.
If you change your mind, click **Cancel** to abort the action.
---
# Source: https://docs.kaisar.io/kaisar-network/kaisar-ai-ops/ai-solutions/market-place.md
# Market Place
Browse and deploy ready-to-use AI solution templates.
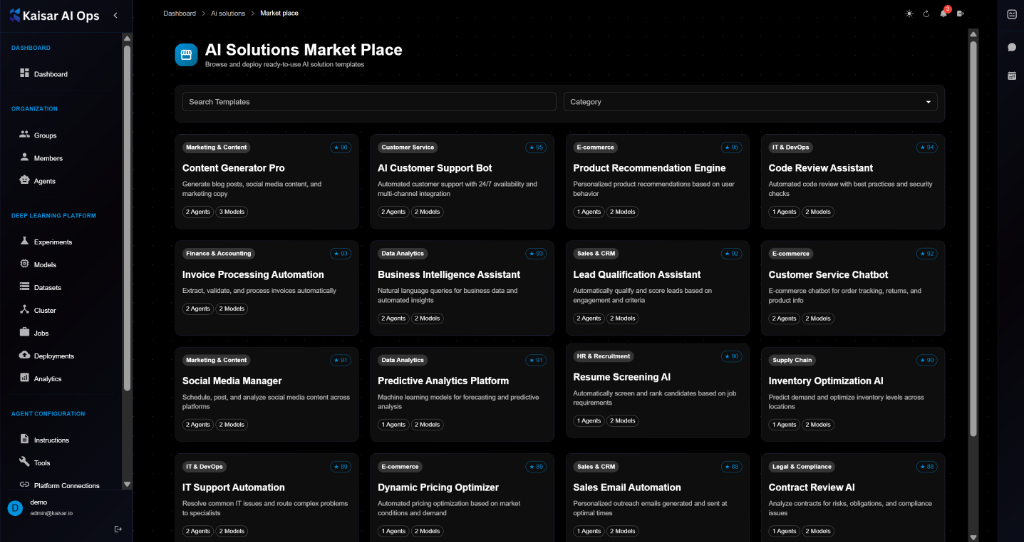
## Overview
The AI Solutions Market Place provides a curated collection of pre-built AI solution templates that you can browse, customize, and deploy instantly. Each solution is production-ready and includes all necessary configurations, integrations, and best practices.
## Market Place Interface
**Search and Filter**:
* **Search Templates**: Search by name, description, or keywords
* **Category Filter**: Filter by solution category
**Solution Categories**:
* Marketing & Content
* Customer Service
* E-commerce
* IT & DevOps
* Finance & Accounting
* Data Analytics
* Sales & CRM
* HR & Recruitment
* Supply Chain
* Legal & Compliance
## Available Solutions
The marketplace displays solutions in a grid layout with the following information for each:
**Solution Card**:
* **Category Badge**: Category name with rating (e.g., "Marketing & Content ⭐ 10")
* **Solution Name**: Descriptive title
* **Description**: Brief overview of capabilities
* **Agents**: Number of agents included (e.g., "2 Agents")
* **Models**: Number of models included (e.g., "2 Models")
### Example Solutions
**Marketing & Content**:
1. **Content Generator Pro** ⭐ 10
* Generate blog posts, social media content, and marketing copy
* 2 Agents • 2 Models
2. **Social Media Manager** ⭐ 8
* Schedule, post, and analyze social media content across platforms
* 2 Agents • 2 Models
**Customer Service**:
3. **AI Customer Support Bot** ⭐ 25
* Automated customer support with 24/7 availability and personalized responses
* 2 Agents • 2 Models
4. **Customer Service Chatbot** ⭐ 12
* E-commerce chatbot for order tracking, returns, and product info
* 2 Agents • 2 Models
**E-commerce**:
5. **Product Recommendation Engine** ⭐ 20
* Personalized product recommendations based on user behavior and preferences
* 1 Agents • 2 Models
6. **Lead Qualification Assistant** ⭐ 82
* Automatically qualify and score leads based on engagement and criteria
* 2 Agents • 2 Models
**IT & DevOps**:
7. **Code Review Assistant** ⭐ 21
* Automated code review with best practices and security checks
* 1 Agents • 2 Models
8. **IT Support Automation** ⭐ 15
* Intelligent chatbot to resolve and route complex problems to specialists
* 2 Agents • 2 Models
**Finance & Accounting**:
9. **Invoice Processing Automation** ⭐ 7
* Extract, validate, and process invoices automatically
* 2 Agents • 2 Models
**Data Analytics**:
10. **Business Intelligence Assistant** ⭐ 23
* Natural language queries for business data and automated insights
* 2 Agents • 2 Models
11. **Predictive Analytics Platform** ⭐ 8
* Machine learning models for forecasting and predictive analysis
* 1 Agents • 2 Models
**Sales & CRM**:
12. **Sales Email Automation** ⭐ 8
* Personalized outreach emails generated and sent at optimal times
* 1 Agents • 2 Models
**HR & Recruitment**:
13. **Resume Screening AI** ⭐ 10
* Automatically screen and rank candidates based on job requirements
* 1 Agents • 2 Models
**Supply Chain**:
14. **Inventory Optimization AI** ⭐ 10
* Predict demand and optimize inventory levels across locations
* 1 Agents • 2 Models
**E-commerce**:
15. **Dynamic Pricing Optimizer** ⭐ 18
* Real-time pricing optimization based on market conditions and demand
* 1 Agents • 2 Models
**Legal & Compliance**:
16. **Contract Review AI** ⭐ 14
* Analyze contracts for risks, obligations, and compliance issues
* 1 Agents • 2 Models
## Viewing Solution Details
Click on any solution card to view detailed information:
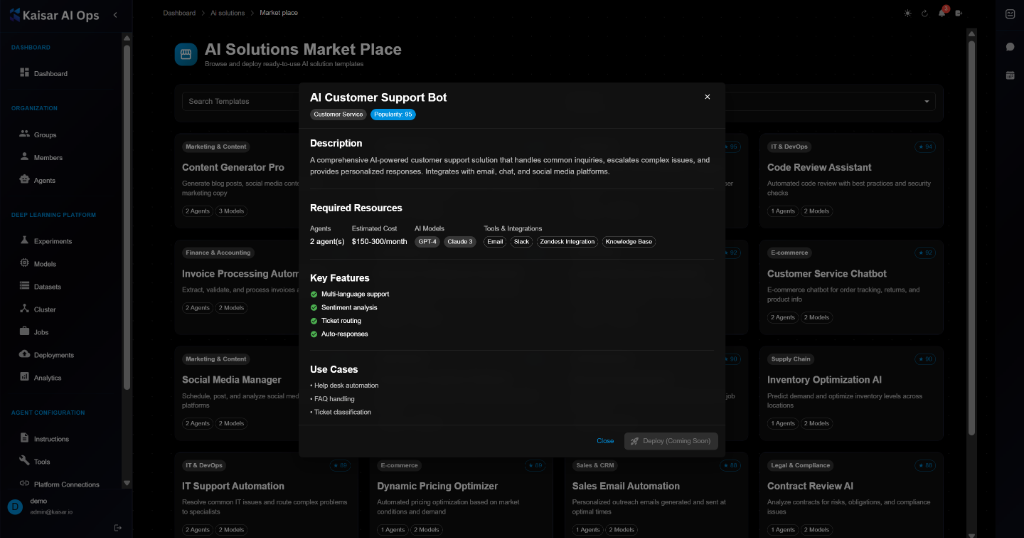
**Solution Details Modal**:
**Header**:
* Solution name: e.g., "AI Customer Support Bot"
* Service type badge: e.g., "Customer Service" (blue badge)
* Status badge: e.g., "Productive v3" (green badge)
**Description**:
* Full description of the solution
* Example: "A comprehensive AI-powered customer support solution that handles common inquiries, escalates complex issues, and provides personalized responses. Integrates with email, chat, and social media platforms."
**Required Resources**:
* **Agents**: Number and type (e.g., "Estimated Cost")
* **Expertise**: Skill level required (e.g., "$150-300/month")
* **AI Models**: Models included (e.g., "GPT-4, Claude 3")
* **Tools & Integrations**: Required tools (e.g., "Email, Slack, Zendesk Integration, Knowledge Base")
**Key Features**:
* ✅ Multi-language support
* ✅ Sentiment analysis
* ✅ Ticket routing
* ✅ Auto-responses
**Use Cases**:
* Help desk automation
* FAQ handling
* Ticket classification
**Actions**:
* **Close**: Close the modal
* **Deploy (Coming Soon)**: Deploy the solution (button disabled)
## Deploying Solutions
> \[!NOTE] Deployment functionality is coming soon. Currently, you can browse and review solution details.
**Planned Deployment Process**:
1. Click **Deploy** button on solution details
2. Review required resources and costs
3. Configure deployment settings:
* Select agents
* Configure integrations
* Set environment variables
4. Review and confirm
5. Deploy to your organization
## Solution Ratings
**Rating System**:
* ⭐ 1-10: New or niche solutions
* ⭐ 11-20: Popular solutions
* ⭐ 21-50: Highly popular solutions
* ⭐ 50+: Most popular solutions
Ratings indicate popularity and usage across the platform.
## Solution Components
**Agents**:
* Pre-configured AI agents
* Ready-to-use instructions
* Optimized prompts
**Models**:
* Pre-trained models
* Fine-tuned for specific tasks
* Production-ready
**Integrations**:
* Platform connections
* Third-party services
* API integrations
**Tools**:
* Custom tools
* Built-in capabilities
* MCP integrations
## Customization
**After Deployment** (Coming Soon):
* Modify agent instructions
* Adjust model parameters
* Configure integrations
* Add custom tools
* Update routes
## Best Practices
**Choosing Solutions**:
* Review description and use cases
* Check required resources
* Verify integrations match your needs
* Consider rating and popularity
**Before Deployment**:
* Understand resource requirements
* Plan integration points
* Prepare credentials
* Review pricing
**After Deployment**:
* Test thoroughly
* Monitor performance
* Customize as needed
* Gather feedback
## Categories Explained
**Marketing & Content**:
* Content generation
* Social media management
* Marketing automation
* SEO optimization
**Customer Service**:
* Support chatbots
* Ticket automation
* Customer engagement
* Help desk solutions
**E-commerce**:
* Product recommendations
* Pricing optimization
* Order processing
* Customer analytics
**IT & DevOps**:
* Code review
* IT support
* Infrastructure automation
* DevOps workflows
**Finance & Accounting**:
* Invoice processing
* Expense management
* Financial analysis
* Compliance automation
**Data Analytics**:
* Business intelligence
* Predictive analytics
* Data visualization
* Reporting automation
**Sales & CRM**:
* Lead qualification
* Email automation
* Sales forecasting
* CRM integration
**HR & Recruitment**:
* Resume screening
* Candidate matching
* Interview scheduling
* Onboarding automation
**Supply Chain**:
* Inventory optimization
* Demand forecasting
* Logistics automation
* Supplier management
**Legal & Compliance**:
* Contract review
* Compliance checking
* Legal research
* Document analysis
## Next Steps
* Deploy solutions to [Instances](https://docs.kaisar.io/kaisar-network/kaisar-ai-ops/ai-solutions/instances) (Coming Soon)
* Monitor performance in [Analytics](https://docs.kaisar.io/kaisar-network/kaisar-ai-ops/deep-learning-platform/analytics)
* Configure agents in [Organization → Agents](https://docs.kaisar.io/kaisar-network/kaisar-ai-ops/organization/agents)
* Set up integrations in [Platform Connections](https://docs.kaisar.io/kaisar-network/kaisar-ai-ops/agent-configuration/platform-connections)
---
# Source: https://docs.kaisar.io/kaisar-network/kaisar-ai-ops/organization/members.md
# Members
Manage organization members, their roles, and access permissions.
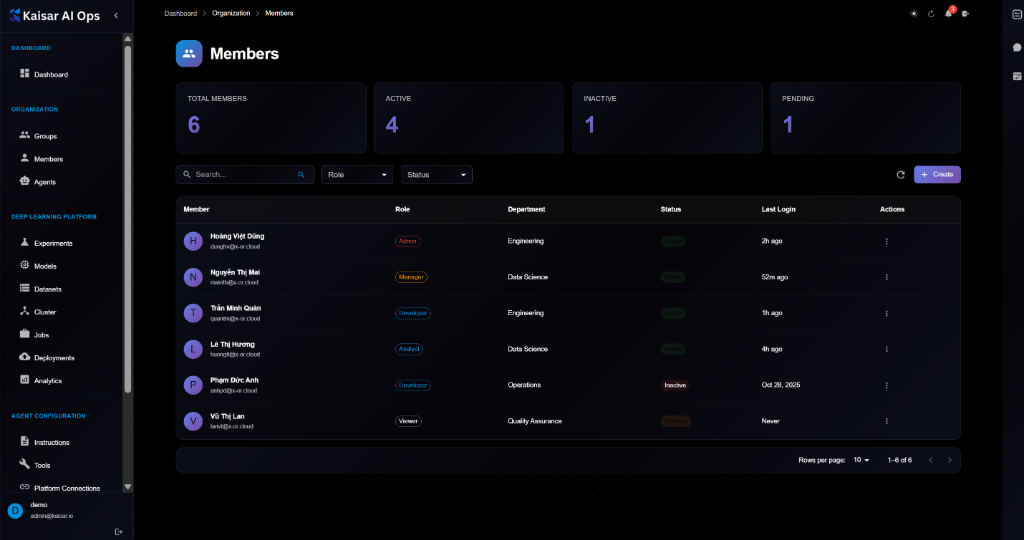
## Overview
The Members section allows you to invite users to your organization, assign them roles, and manage their access to resources.
**Dashboard Summary**:
* **Total Members**: Total number of registered members
* **Active**: Number of members with active status
* **Inactive**: Number of members with inactive status
* **Pending**: Number of invitations sent but not yet accepted
## Members List
The members table displays:
* **Member**: Name and email address
* **Role**: Assigned role (Admin, Manager, Developer, Analyst, Viewer)
* **Department**: Assigned department (e.g., Engineering, Data Science)
* **Status**: Active (green), Inactive (red), Pending (orange)
* **Last Login**: Time since last activity
* **Actions**: Edit, Delete, etc.
## Creating a Member
Navigate to **Organization** → **Members** → Click **+ Create**

### Basic Information
**Full Name**\* (Required)
* Enter the member's full name
**Email Address**\* (Required)
* Enter the member's email address for invitation
**Phone Number**
* Optional contact number
**Department**\* (Required)
* Select or enter department name
* Example: `Engineering`, `Data Science`
**Job Title**
* Optional job title
### Role & Permissions
**Role**\* (Required)
* Select role from dropdown:
* **Admin**: Full access
* **Manager**: Manage resources and members
* **Developer**: Create and deploy resources
* **Analyst**: View and analyze data
* **Viewer**: Read-only access
**Status**\* (Required)
* Initial status: `Active` or `Inactive`
**Permissions**
* Granular permissions (e.g., `Manage Users`)
### Group Assignments
**Groups**
* Assign member to specific groups for access control
### Actions
* **Cancel**: Discard changes
* **Create Member**: Send invitation and create member
## Viewing Member Details
To view detailed information about a member:
1. Navigate to **Organization** → **Members**
2. Click on a member from the list
3. View details in the modal dialog
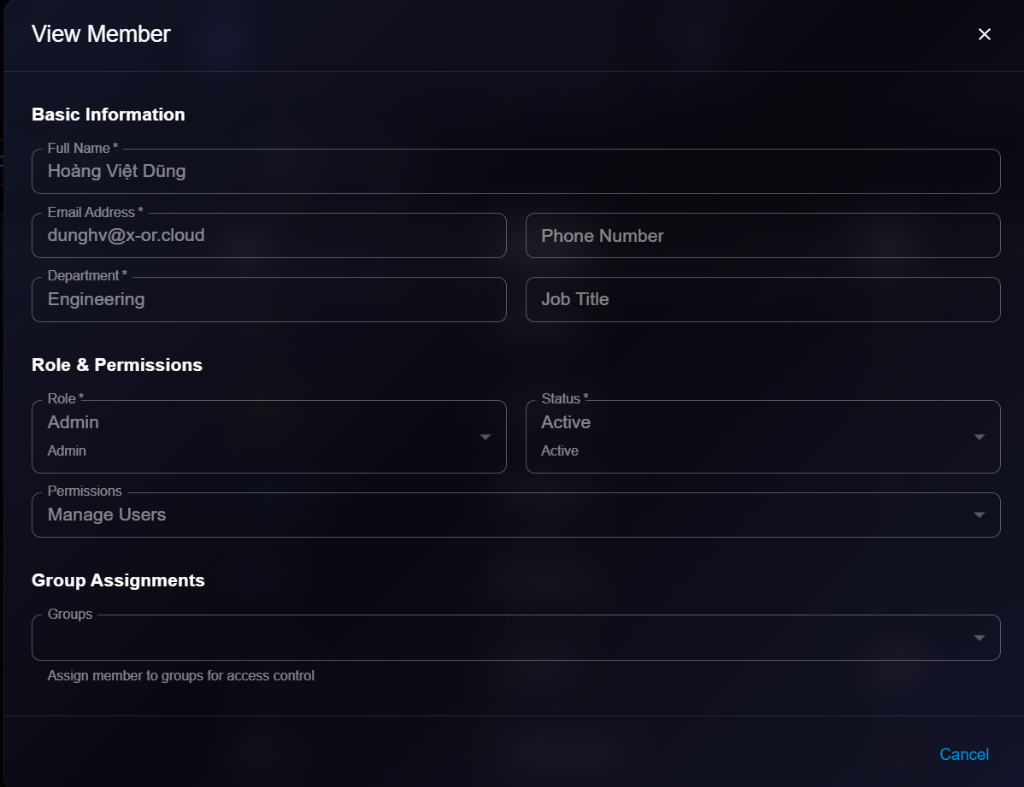
**Details Panel**:
* **Basic Information**: Name, Email, Phone, Department, Job Title
* **Role & Permissions**: Role, Status, Permissions
* **Group Assignments**: Assigned groups
## Editing a Member
To update a member's information or role:
1. Open member details
2. Click **Edit** button (or select Edit from list actions)
3. Modify editable fields in the Edit Member modal

4. Click **Update Member** to save changes
**Editable Fields**:
* ✅ Basic Information (Name, Email, Phone, Department, Job Title)
* ✅ Role & Permissions (Role, Status, Permissions)
* ✅ Group Assignments
## Member Roles Explained
| Role | Description | Key Permissions |
| ------------- | ------------------ | ---------------------------------------------- |
| **Admin** | Full system access | Manage users, billing, settings, all resources |
| **Manager** | Team management | Manage team members, view all resources |
| **Developer** | Builder access | Create/Edit experiments, models, deployments |
| **Analyst** | Data access | View analytics, experiments, datasets |
| **Viewer** | Read-only | View resources only, no editing |
## Best Practices
* **Least Privilege**: Assign the lowest role necessary for the user's tasks
* **Groups**: Use groups for managing permissions at scale rather than individual assignments
* **Regular Audits**: Periodically review member list and remove inactive users
* **Department Tagging**: Use accurate department tags for better reporting and organization
## Next Steps
* Organize members into [Groups](https://docs.kaisar.io/kaisar-network/kaisar-ai-ops/organization/groups)
* Assign [Agents](https://docs.kaisar.io/kaisar-network/kaisar-ai-ops/organization/agents) to members or groups
---
# Source: https://docs.kaisar.io/kaisar-network/kaisar-ai-ops/deep-learning-platform/models.md
# Models
Manage your trained models with versioning and metadata.
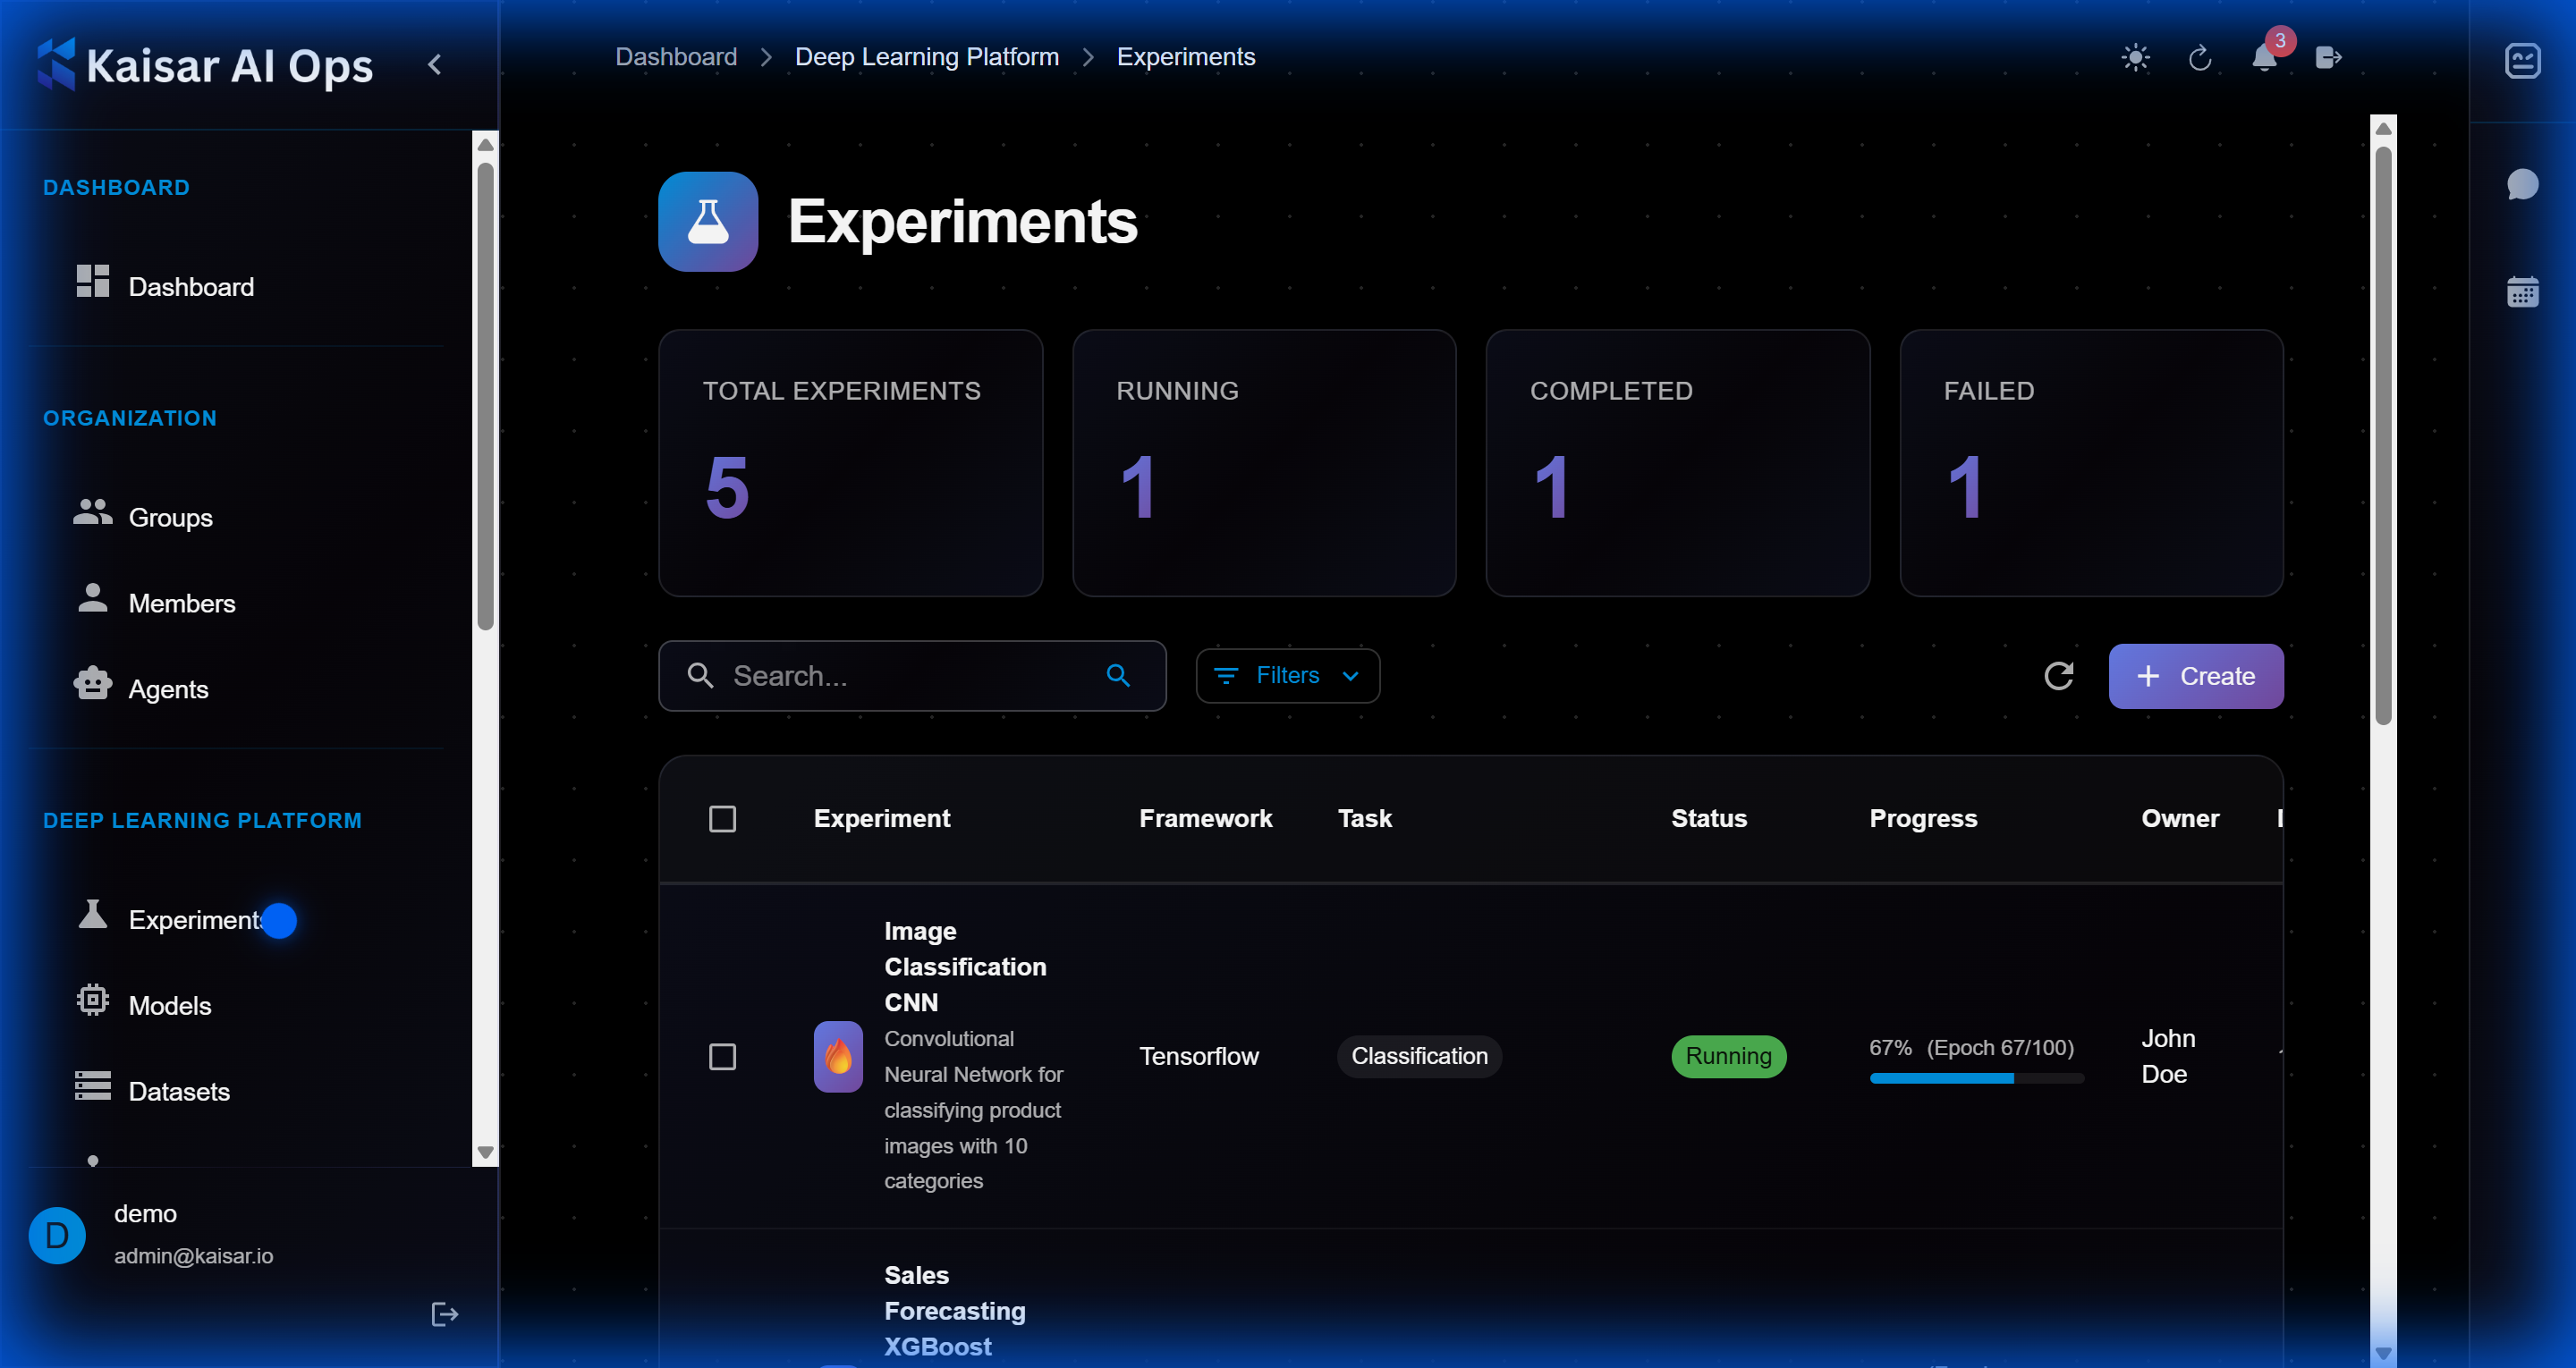
## Registering a Model
Navigate to **Deep Learning Platform** → **Models** → Click **Create**

### Basic Information
**Model Name**\* (Required)
* Enter a descriptive name for the model
* Example: `resnet50-imagenet`, `bert-sentiment`
**Version**\* (Required)
* Semantic version (major.minor.patch)
* Default: `1.0.0`
* Helper text: "Semantic version (major.minor.patch)"
**Description** (Optional)
* Detailed description of the model
### Model Configuration
**Framework**\* (Required)
* Select framework from dropdown:
* PyTorch
* TensorFlow
* ONNX
* Scikit-learn
* Others
**Task Type**\* (Required)
* Select task type:
* Classification
* Regression
* Detection
* Segmentation
* Others
* Default: `classification`
**Model Type**\* (Required)
* Select model architecture:
* Custom
* ResNet
* BERT
* YOLO
* Others
* Default: `custom`
**Status**\* (Required)
* Select model status:
* Draft
* Training
* Completed
* Deployed
* Archived
* Default: `draft`
### Metadata
**Tags** (Optional)
* Comma-separated tags for organization
* Example: `production, v1, optimized`
**Author** (Optional)
* Model creator or team name
**License** (Optional)
* Select license from dropdown:
* MIT
* Apache 2.0
* GPL
* Proprietary
* Others
**Public Access** (Checkbox)
* Make model accessible to all organization members
### Actions
* **Cancel**: Discard and close
* **Create Model**: Submit and register the model
## Example Configuration
```yaml
Model Name: resnet50-imagenet-v1
Version: 1.0.0
Description: ResNet50 trained on ImageNet-1K, 76.5% top-1 accuracy
Framework: PyTorch
Task Type: Classification
Model Type: Custom
Status: Draft
Tags: computer-vision, production
Author: ML Team
License: MIT
Public Access: ✓
```
## Viewing Model Details
To view detailed information about a model:
1. Navigate to **Deep Learning Platform** → **Models**
2. Click on a model from the list
3. View comprehensive details in the modal dialog
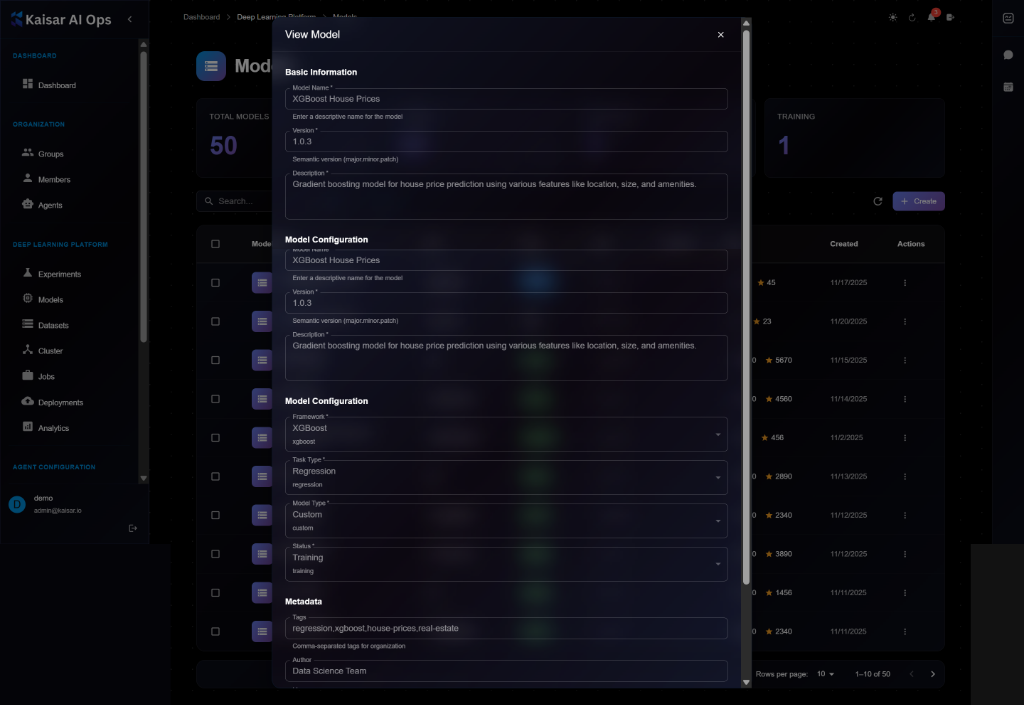
**Details Panel Sections**:
**Basic Information**:
* **Model Name**: e.g., "XGBoost House Prices"
* **Version**: Semantic version (e.g., 1.0.3)
* **Description**: Full description of the model and its purpose
**Model Configuration** (First Section):
* **Model Name**: Display name
* **Version**: Current version number
* **Description**: Detailed model description
**Model Configuration** (Second Section):
* **Framework**: XGBoost, PyTorch, TensorFlow, etc.
* **Task Type**: Regression, Classification, etc.
* **Model Type**: Custom, ResNet, BERT, etc.
* **Status**: Training, Draft, Completed, Deployed
**Metadata**:
* **Tags**: Comma-separated tags for organization
* **Author**: Model creator or team name
* **License**: Model license information
## Editing a Model
To update model information:
1. Open model details page
2. Click **Edit** button (or three-dot menu → Edit)
3. Modify editable fields in the Edit Model modal

4. Click **Update Model** to save changes
> \[!NOTE] The Edit form is identical to the View form, but with editable fields and an "Update Model" button.
**Editable Fields**:
* ✅ Description
* ✅ Tags
* ✅ Status (Draft, Training, Completed, Deployed, Archived)
* ✅ Author
* ✅ License
* ✅ Public Access
* ❌ Model Name (cannot edit)
* ❌ Version (create new version instead)
* ❌ Framework (cannot edit)
## Creating a New Version
To create a new version of an existing model:
1. Open model details
2. Click **New Version** button
3. Enter new version number (e.g., 1.1.0 → 1.2.0)
4. Upload new model artifacts
5. Update description and metrics
6. Click **Create**
**Version Guidelines**:
* **Major** (2.0.0): Breaking changes, new architecture
* **Minor** (1.1.0): Improvements, new features
* **Patch** (1.0.1): Bug fixes, minor updates
## Downloading Model Artifacts
To download model files:
1. Open model details
2. Navigate to **Artifacts** section
3. Click **Download** on desired files:
* Model weights (.pt, .h5, .onnx)
* Configuration files
* Tokenizers/preprocessors
* README and documentation
4. Files will be downloaded to your local machine
## Deleting a Model
To remove a model:
1. Navigate to model details
2. Click **Delete** button
3. Confirm deletion
> \[!WARNING] You cannot delete a model that is currently deployed. Stop all deployments first.
**Before Deleting**:
* Check for active deployments
* Download artifacts if needed
* Update dependent systems
* Archive instead of delete if uncertain
## Model Lifecycle Management
**Model Stages**:
1. **Development**: Under active development
2. **Staging**: Ready for testing
3. **Production**: Deployed to production
4. **Archived**: No longer in use
## Model Versioning Best Practices
**Version Numbering**:
* `1.0.0`: Initial production release
* `1.1.0`: New features, improved accuracy
* `1.1.1`: Bug fix, no architecture change
* `2.0.0`: New architecture, breaking changes
## Next Steps
* Deploy your model via [Deployments](https://docs.kaisar.io/kaisar-network/kaisar-ai-ops/deep-learning-platform/deployments)
* Link to training [Experiments](https://docs.kaisar.io/kaisar-network/kaisar-ai-ops/deep-learning-platform/experiments)
* Monitor in [Analytics](https://docs.kaisar.io/kaisar-network/kaisar-ai-ops/deep-learning-platform/analytics)
---
# Source: https://docs.kaisar.io/kaisar-network/kaisar-architecture/products/kaisar-onenode/kaisar-checker/what-is-the-kaisar-checker-node/node-sale-information.md
# Node Sale Information
## **1. Checker Node Overview**
**Kaisar Checker Node General Information**
* Total supply: 29998 KaiNodes
* Total reward pool for Checker Nodes: 20% of total supply
* Round 1 price: 0,208 ETH ( Fund Commitment Phase)
* Round 2 price: 0,26 ETH ( Public Node Sale)
* **Node sale platform:** [**nodes.kaisar.io**](http://nodes.kaisar.io)
Early purchasers from Phase 1: Fund Commitment Phase will receive:
* Reward Pool: 10 million $KAI (for Round 1 only)
* Daily Reward: 17 $KAI (per node) - up to 510 $KAI per node during the Round 1\*
*\*This is a special BONUS daily reward exclusively for early purchasers. It will be available for 30 days starting from the launch of the Phase 1 sale. The earlier you purchase, the more $KAI rewards you will receive during the commitment phase.*
## **2. Sale Mechanism**
The Kaisar Checker Node Sale is divided into two parts: Fund Commitment and Node Sale.
#### **2.1 Fund Commitment Phase (1 month)**
* Participants deposit funds as a commitment to purchase Checker Nodes, positioning themselves as early purchasers and gaining the following benefits:
* Whitelists:
* **20% Discount**: Commit early to secure a 20% discount on your Node purchase (ensure you're whitelisted or buying through a referral link)
* **Referral Link**: Receive a referral link to earn a 10% commission fee on referred purchase volumes.
* **Referral Link Activation**: Buy at least one node to activate your referral link.
* **Benefits**:
* Earn $KAI rewards during this phase.
* A total of **10 million $KAI** will be airdropped to participants during the Fund Commitment phase.
* From the moment funds are deposited into the vault, participants will receive a maximum of **17 $KAI daily**, up to the end of the commitment phase.
* **Referral Program**: Each participant who deposits will receive a referral link. When others use this link to purchase, the referrer will receive **10% cashback**, and the buyers will enjoy a **20% discount** on their purchases.
* From the moment funds are deposited into the vault, participants will receive a maximum of **17 $KAI daily**, up to the end of the commitment phase.
* Over the full duration of the phase, participants can earn a total of **510 $KAI**.
* **Late buyers** will receive proportionally fewer $KAI rewards.
* **Redistribution Bonus**: Any unallocated $KAI will be redistributed among early participants at the end of the phase.
* **Start Date**: 14/1/2025
* **End Date**: 14/2/2025
#### **2.2 Public Node Sale Phase**
* Checker Nodes are distributed in two tiers based on fund commitment and availability:
* After Tier 1 purchases, remaining nodes will be available for public participants on a first-come, first-served (FCFS) basis at the full price of **0.26 ETH (Full Price)**.
* **Discount Opportunity**: Buyers during the Phase 2 Public Sale can still receive a **5% discount** on their purchases if they use a referral link. Additionally, the person providing the referral link will earn a **10% commission fee** from the referred purchase volume.
* **Referral Link Activation**: Buy at least one node to activate your referral link.
* **Start Date**: 15/2/2025
* **End Date**: up until all nodes are sold out.
* **Number of Nodes Available**: 29 998 Nodes will be made available for this phase.
#### **2.3 Whitelist Eligibility Criteria**
* **NFT Holders**: Users who hold specific Kaisar NFTs.
* **Kaisock Event Winners**: Participants who won the whitelist from the Kaisock event.
* **Early community members:** Ambassadors, Kaisar OG and Fan badges, the most active users (≥ level 20 on Discord) …
* **Giveaway Winners**: Winners from giveaways hosted by Kaisar or our partners.
#### **2.4 Payment Methods**
* Accepted payment options: Users can use **ETH**, **USDC**, and **PEAQ** from the following networks:
* **Ethereum Mainnet**
* **Arbitrum**
* **Base**
* **Optimism**
* **PEAQ Mainnet**
* Supported payment gateways: Transactions will be facilitated via integrated blockchain wallet platforms supporting these networks.
* **Wallets**: Users can use **MetaMask** for the sale. Please ensure you have sufficient **ETH** for blockchain gas fees and **PEAQ** for transactions on the PEAQ mainnet.
* **Conversion Rates**: The conversion between ETH and USDC prices will be determined one day before the sale begins to ensure accurate pricing.
## 3. Sale Dynamics
**3.1 Distribution Strategy**
| Tier | Access | Price | Availability |
| ------- | ------------------------------------- | --------------------- | ----------------------- |
| Round 1 | Whitelisted (Commitment Phase Buyers) | 0.208 ETH (20% Off) | Early Access |
| Round 2 | Public (FCFS Basis) | 0.26 ETH (Full Price) | After Tier 1 Completion |
#### **3.2 Allocation Priority**
* Both rounds will be conducted on a first-come, first-served (FCFS) basis. Make sure to secure your node as soon as possible to take advantage of the limited availability and benefits!
#### **3.3 Refund and Dispute Policy**
* Refunds available for failed transactions.
---
# Source: https://docs.kaisar.io/kaisar-network/kaisar-ai-ops/getting-started/getting-started/onboarding.md
# Onboarding
This guide will walk you through the complete onboarding process for Kaisar AI Ops.
## Initial Setup
### 1. Account Activation
After receiving your account credentials:
1. Navigate to
2. Log in with your provided credentials
3. Update your profile information (if prompted)
4. Set up multi-factor authentication (if required)
### 2. Profile Configuration
1. Click on your profile icon (top-right corner)
2. Navigate to **Settings**
3. Update:
* Display name
* Email preferences
* Notification settings
* Time zone
### 3. Join Your Organization
1. Navigate to **Organization** in the sidebar
2. You should see your assigned organization(s)
3. Verify your role and permissions
4. Explore team members and groups

## Understanding Your Workspace
### Dashboard Overview
The dashboard provides:
* **Recent Activity**: Your latest experiments and deployments
* **Quick Stats**: Summary of resources and usage
* **Notifications**: System alerts and updates
* **Quick Actions**: Shortcuts to common tasks
### Navigation Structure
Familiarize yourself with the main sections:
#### Deep Learning Platform
* **Experiments**: Track ML training runs
* **Models**: Manage trained models
* **Datasets**: Organize training data
#### Deployments
* Deploy models to production
* Monitor deployment health
* Manage scaling and versions
## First Tasks
### Create Your First Experiment
1. Go to **Deep Learning Platform** → **Experiments**
2. Click **Create**
3. Configure your experiment:
* Name and description
* Framework (PyTorch, TensorFlow, etc.)
* Compute resources
* Hyperparameters
4. Submit the experiment

### Upload a Dataset
1. Go to **Deep Learning Platform** → **Datasets**
2. Click **Create**
3. Upload your dataset or connect to external storage
4. Add metadata and tags

### Register a Model
1. Go to **Deep Learning Platform** → **Models**
2. Click **Create**
3. Upload or link your trained model
4. Add version information and documentation

## Best Practices
### Organization
* Use clear, descriptive names for experiments, models, and datasets
* Add tags for easy filtering and search
* Document your work with descriptions and README files
### Collaboration
* Share experiments with team members
* Use groups to organize team access
* Comment on experiments for knowledge sharing
### Security
* Never share your credentials
* Use API tokens for programmatic access
* Review permissions regularly
## Next Steps
Now that you're onboarded:
1. Explore the [User Guide](https://github.com/Kaisar-Network/docs/blob/kaisar-ai-ops/kaisar-ai-ops/user-guide/README.md) for detailed features
2. Review [IAM & Security](https://github.com/Kaisar-Network/docs/blob/kaisar-ai-ops/kaisar-ai-ops/user-guide/iam-security.md) for access management
3. Check [Troubleshooting](https://docs.kaisar.io/kaisar-network/kaisar-ai-ops/troubleshooting/troubleshooting) for common issues
## Getting Help
If you need assistance:
* Check the [FAQ](https://docs.kaisar.io/kaisar-network/kaisar-ai-ops/troubleshooting/troubleshooting/faq)
* Contact your team administrator
* Reach out to [Support](https://docs.kaisar.io/kaisar-network/kaisar-ai-ops/troubleshooting/troubleshooting/support)
---
# Source: https://docs.kaisar.io/kaisar-network/origins/overview-and-mission.md
# Overview & Mission
Kaisar is a decentralized GPU network designed to provide unlimited computing power to machine learning (ML) and AI applications.
Our mission is to make computing scalable, accessible, and efficient by leveraging underutilized GPU resources from independent data centers, crypto miners, and consumer households. We aim to assemble over a million GPUs from these diverse sources to create a robust and decentralized computing infrastructure.
---
# Source: https://docs.kaisar.io/kaisar-network/kaisar-ai-ops/agent-configuration/platform-connections.md
# Platform Connections
Connect your AI agents to external platforms and services.
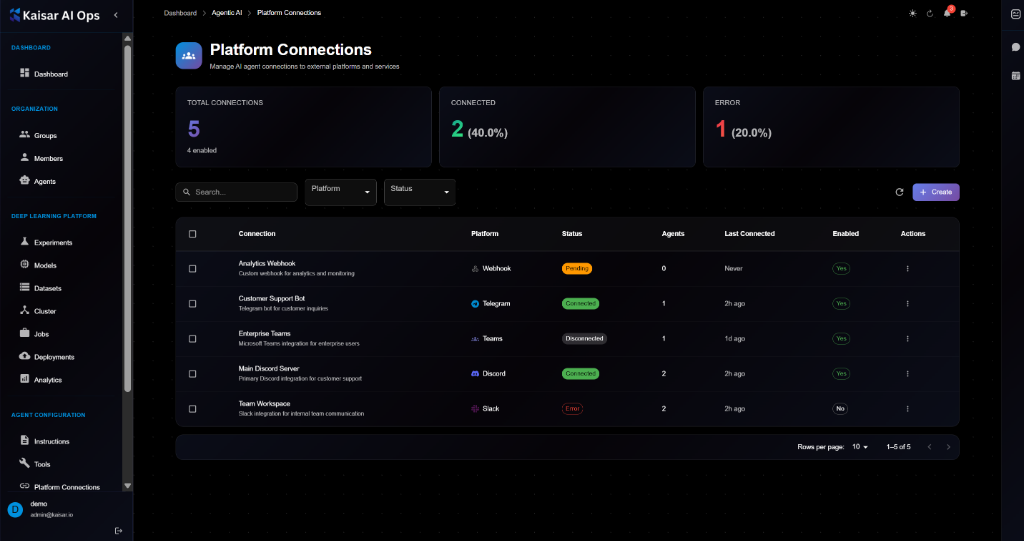
## Overview
Platform Connections allow you to integrate your AI agents with external platforms and services such as Discord, Telegram, Slack, webhooks, and more. Manage connections, credentials, and configurations in one centralized location.
## Platform Connections Dashboard
The dashboard displays key metrics at a glance:
**Summary Cards**:
* **Total Connections**: Total number of platform connections configured
* **Connected**: Number of connections currently active and working
* **Error**: Number of connections experiencing errors
## Connection List View
The connections table shows all platform connections with the following information:
**Columns**:
* **Connection**: Connection name and description
* **Platform**: Platform type with icon (Webhook, Telegram, Teams, Discord, Slack)
* **Status**: Current status (Active, Connected, Disconnected, Error)
* **Agents**: Number of agents using this connection
* **Last Connected**: Last connection time
* **Enabled**: Enable/disable toggle
* **Actions**: Quick actions menu
**Filtering and Search**:
* Search by connection name
* Filter by Platform (Webhook, Telegram, Slack, Discord, Teams, etc.)
* Filter by Status (Active, Connected, Disconnected, Error)
## Creating a Platform Connection
Navigate to **Agent Configuration** → **Platform Connections** → Click **Create**
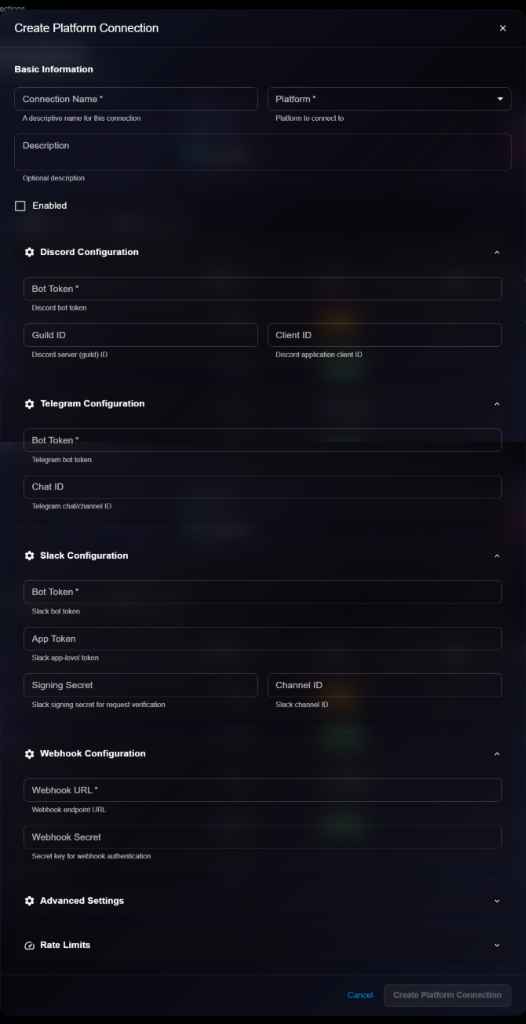
### Basic Information
**Connection Name**\* (Required)
* A descriptive name for this connection
* Example: `Analytics Webhook`
* Helper text: "A descriptive name for this connection"
**Platform**\* (Required)
* Select platform from dropdown: Webhook, Discord, Telegram, Slack, Teams, etc.
* Helper text: "Platform to connect to"
**Description**
* Optional description
* Example: "Custom webhook for analytics and monitoring"
* Helper text: "Optional description"
**Enabled**
* Checkbox to enable/disable the connection
* Default: Unchecked
### Discord Configuration
Expandable section for Discord-specific settings.
**Bot Token**\* (Required)
* Discord bot token
* Helper text: "Discord bot token"
**Guild ID**
* Discord server (guild) ID
* Helper text: "Discord server (guild) ID"
**Client ID**
* Discord application client ID
* Helper text: "Discord application client ID"
### Telegram Configuration
Expandable section for Telegram-specific settings.
**Bot Token**\* (Required)
* Telegram bot token
* Helper text: "Telegram bot token"
**Chat ID**
* Telegram chat/channel ID
* Helper text: "Telegram chat/channel ID"
### Slack Configuration
Expandable section for Slack-specific settings.
**Bot Token**\* (Required)
* Slack bot token
* Helper text: "Slack bot token"
**App Token**
* Slack app-level token
* Helper text: "Slack app-level token"
**Signing Secret**
* Slack signing secret for request verification
* Helper text: "Slack signing secret for request verification"
**Channel ID**
* Slack channel ID
* Helper text: "Slack channel ID"
### Webhook Configuration
Expandable section for Webhook-specific settings.
**Webhook URL**\* (Required)
* Webhook endpoint URL
* Example: `https://analytics.company.com/webhook/dp`
* Helper text: "Webhook endpoint URL"
**Webhook Secret**
* Secret key for webhook authentication
* Example: `webhook_secret_key_encrypted`
* Helper text: "Secret key for webhook authentication"
### Advanced Settings
Expandable section for advanced configuration options.
### Rate Limits
Expandable section for rate limiting configuration.
### Actions
* **Cancel**: Discard and close
* **Create Platform Connection**: Save the connection
## Viewing Connection Details
To view detailed information about a connection:
1. Navigate to **Agent Configuration** → **Platform Connections**
2. Click on a connection from the list
3. View comprehensive details in the modal dialog

**Details Panel Sections**:
**Basic Information**:
* **Connection Name**: e.g., "Analytics Webhook"
* **Platform**: Webhook, Discord, Telegram, Slack, Teams, etc.
* **Description**: Full description
* **Enabled**: Checkbox status
**Platform-Specific Configuration** (Expandable): All configuration fields are displayed in read-only mode based on the selected platform:
* Discord: Bot Token, Guild ID, Client ID
* Telegram: Bot Token, Chat ID
* Slack: Bot Token, App Token, Signing Secret, Channel ID
* Webhook: Webhook URL, Webhook Secret
**Advanced Settings** (Expandable): Additional configuration options if set.
**Rate Limits** (Expandable): Rate limiting configuration if set.
## Editing a Connection
To update a connection:
1. Open connection details page
2. Click **Edit** button (or three-dot menu → Edit)
3. Modify editable fields in the Edit Platform Connection modal

4. Click **Update Platform Connection** to save changes
> \[!NOTE] The Edit form is identical to the Create/View form, but with an "Update Platform Connection" button.
**Editable Fields**:
* ✅ Connection Name
* ✅ Description
* ✅ Enabled (checkbox)
* ✅ All platform-specific configuration fields
* ✅ Advanced Settings
* ✅ Rate Limits
* ❌ Platform (cannot edit after creation)
## Supported Platforms
**Communication Platforms**:
* **Discord**: Bot integration for Discord servers
* **Telegram**: Bot integration for Telegram chats
* **Slack**: Bot integration for Slack workspaces
* **Microsoft Teams**: Integration for Teams channels
**Webhooks**:
* **Custom Webhooks**: HTTP endpoints for custom integrations
* **Outgoing Webhooks**: Send data to external services
* **Incoming Webhooks**: Receive data from external services
**Other Platforms**:
* Additional platforms may be available based on your configuration
## Connection Status
**Active** (Orange):
* Connection is configured but not yet connected
* Waiting for first connection
**Connected** (Green):
* Connection is active and working
* Successfully communicating with platform
**Disconnected** (Gray):
* Connection was previously active but is now disconnected
* May need reconfiguration or credential refresh
**Error** (Red):
* Connection has errors
* Check credentials and configuration
* Review error logs
## Managing Connections
### Enabling/Disabling Connections
To change connection status:
1. Toggle the **Enabled** switch in the list view, OR
2. Edit the connection and check/uncheck the **Enabled** checkbox
**Enabled**: Connection is active and available for agents **Disabled**: Connection is not available for use
### Testing Connections
To test a connection:
1. Open connection details
2. Click **Test Connection** button (if available)
3. Verify connection status
### Rotating Credentials
To update credentials:
1. Edit the connection
2. Update bot tokens, secrets, or API keys
3. Save changes
4. Test the connection
### Deleting a Connection
To remove a connection:
1. Navigate to connection details or list
2. Click **Delete** button
3. Confirm deletion
> \[!WARNING] Deleting a connection will affect any agents using it. Make sure to update agent configurations before deleting.
## Security Best Practices
**Credential Management**:
* Store credentials securely
* Rotate tokens regularly
* Use environment-specific credentials
* Never share credentials
**Access Control**:
* Grant minimum required permissions
* Use service accounts where possible
* Monitor access logs
* Audit connection usage
**Network Security**:
* Use HTTPS for webhooks
* Validate webhook signatures
* Implement rate limiting
* Monitor for suspicious activity
## Platform-Specific Guides
### Discord Setup
1. Create a Discord application at [Discord Developer Portal](https://discord.com/developers/applications)
2. Create a bot and copy the bot token
3. Copy the application client ID
4. Copy the server (guild) ID
5. Invite the bot to your server
6. Configure the connection in Kaisar AI Ops
### Telegram Setup
1. Create a bot using [@BotFather](https://t.me/botfather)
2. Copy the bot token
3. Get the chat ID (use [@userinfobot](https://t.me/userinfobot))
4. Configure the connection in Kaisar AI Ops
### Slack Setup
1. Create a Slack app at [Slack API](https://api.slack.com/apps)
2. Enable Socket Mode and get app-level token
3. Add bot token scopes
4. Install app to workspace
5. Copy bot token, app token, and signing secret
6. Get channel ID
7. Configure the connection in Kaisar AI Ops
### Webhook Setup
1. Set up an HTTP endpoint to receive webhooks
2. Implement signature verification
3. Copy the webhook URL
4. Generate a secret key
5. Configure the connection in Kaisar AI Ops
## Troubleshooting
**Connection Errors**:
* Verify credentials are correct
* Check platform API status
* Review error logs
* Test connection manually
**Authentication Issues**:
* Rotate credentials
* Check token expiration
* Verify permissions
* Update scopes if needed
**Rate Limiting**:
* Configure rate limits
* Monitor usage
* Implement backoff strategies
* Contact platform support if needed
## Next Steps
* Configure [Instructions](https://docs.kaisar.io/kaisar-network/kaisar-ai-ops/agent-configuration/instructions) for platform-specific behavior
* Enable [Tools](https://docs.kaisar.io/kaisar-network/kaisar-ai-ops/agent-configuration/tools) for platform interactions
* Define [Routes](https://docs.kaisar.io/kaisar-network/kaisar-ai-ops/agent-configuration/routes) that use these connections
* Assign connections to agents in [Organization → Agents](https://docs.kaisar.io/kaisar-network/kaisar-ai-ops/organization/agents)
---
# Source: https://docs.kaisar.io/kaisar-network/kaisar-ai-ops/getting-started/getting-started/prerequisites.md
# Prerequisites
Before you start using Kaisar AI Ops, ensure you meet the following requirements.
## System Requirements
### Browser Compatibility
* **Recommended**: Chrome 90+, Firefox 88+, Safari 14+, Edge 90+
* **JavaScript**: Must be enabled
* **Cookies**: Must be enabled for authentication
### Network Requirements
* Stable internet connection
* Access to `https://ai.kaisar.io`
* Firewall rules allowing HTTPS traffic
## Access Requirements
### User Account
You need a valid user account to access Kaisar AI Ops. Contact your system administrator to:
* Create your account
* Assign appropriate roles and permissions
* Provide login credentials
### Authentication
Kaisar AI Ops uses a centralized **Identity Provider** for authentication:
* Single Sign-On (SSO) support
* Multi-factor authentication (if enabled)
* Role-based access control (RBAC)
## Recommended Knowledge
To get the most out of Kaisar AI Ops, familiarity with the following is helpful:
* **Machine Learning Basics**: Understanding of ML workflows, training, and deployment
* **Python**: For creating experiments and models
* **Docker**: For containerized deployments
* **REST APIs**: For programmatic access (optional)
## Next Steps
Once you have met the prerequisites, proceed to:
* [Quick Start Guide](https://docs.kaisar.io/kaisar-network/kaisar-ai-ops/getting-started/getting-started/quick-start)
* [Onboarding](https://docs.kaisar.io/kaisar-network/kaisar-ai-ops/getting-started/getting-started/onboarding)
---
# Source: https://docs.kaisar.io/kaisar-network/origins/problem-statement.md
# Problem Statement
The escalating demand for GPU computing power, driven by the increasing complexity and volume of AI/ML workloads, presents significant challenges for organizations. Major cloud providers impose complex permission models, long-term contracts, and high costs, making it difficult to quickly scale capacity to meet demand. This gap is expected to widen as the need for GPU computing continues to grow, necessitating a 2-3-fold increase in cloud GPU capacity in the near future.
Meanwhile, a substantial portion of global GPU capacity remains underutilized:
* Independent Data Centers: The average server utilization rate in US data centers was around 18% in 2019, indicating a significant amount of idle capacity (Source: DatacenterDynamics, 2019).
* Crypto Miners: The Ethereum transition has left many crypto miners with idle GPUs, resulting in a surplus of mining hardware (Source: TechSpot, 2022).
* Consumer GPUs: Many consumers use their GPUs for low-intensity tasks, leaving a significant portion of GPU capacity underutilized (Source: Tom's Hardware, 2020).
To address this imbalance, there is a critical need for solutions that can efficiently leverage this underutilized GPU capacity, integrating it seamlessly into existing workflows and meeting the surging demand for compute power without the prohibitive costs and constraints imposed by major cloud providers.
---
# Source: https://docs.kaisar.io/kaisar-network/kaisar-architecture/products.md
# Products
- [Kaisar ZeroNode](/kaisar-network/kaisar-architecture/products/kaisar-zeronode.md)
- [Kaisar OneNode](/kaisar-network/kaisar-architecture/products/kaisar-onenode.md)
- [Kaisar Provider](/kaisar-network/kaisar-architecture/products/kaisar-onenode/kaisar-provider.md)
- [What is Kaisar Provider](/kaisar-network/kaisar-architecture/products/kaisar-onenode/kaisar-provider/what-is-kaisar-provider.md)
- [Introduction](/kaisar-network/kaisar-architecture/products/kaisar-onenode/kaisar-provider/what-is-kaisar-provider/introduction.md)
- [Benefits of Running a Kaisar Provider](/kaisar-network/kaisar-architecture/products/kaisar-onenode/kaisar-provider/what-is-kaisar-provider/benefits-of-running-a-kaisar-provider.md)
- [How to Manage Kaisar Provider](/kaisar-network/kaisar-architecture/products/kaisar-onenode/kaisar-provider/how-to-manage-kaisar-provider.md)
- [Get started](/kaisar-network/kaisar-architecture/products/kaisar-onenode/kaisar-provider/how-to-manage-kaisar-provider/get-started.md)
- [Connect wallet](/kaisar-network/kaisar-architecture/products/kaisar-onenode/kaisar-provider/how-to-manage-kaisar-provider/connect-wallet.md)
- [How to run Kaisar Provider App](/kaisar-network/kaisar-architecture/products/kaisar-onenode/kaisar-provider/how-to-run-kaisar-provider-app.md)
- [Linux CLI](/kaisar-network/kaisar-architecture/products/kaisar-onenode/kaisar-provider/how-to-run-kaisar-provider-app/linux-cli.md)
- [MacOS & Windows GUI](/kaisar-network/kaisar-architecture/products/kaisar-onenode/kaisar-provider/how-to-run-kaisar-provider-app/macos-and-windows-gui.md)
- [Kaisar Checker](/kaisar-network/kaisar-architecture/products/kaisar-onenode/kaisar-checker.md)
- [What is the Kaisar Checker Node](/kaisar-network/kaisar-architecture/products/kaisar-onenode/kaisar-checker/what-is-the-kaisar-checker-node.md)
- [Introduction](/kaisar-network/kaisar-architecture/products/kaisar-onenode/kaisar-checker/what-is-the-kaisar-checker-node/introduction.md)
- [How do Checker Nodes Work](/kaisar-network/kaisar-architecture/products/kaisar-onenode/kaisar-checker/what-is-the-kaisar-checker-node/how-do-checker-nodes-work.md)
- [Benefits of Owning a Checker Node](/kaisar-network/kaisar-architecture/products/kaisar-onenode/kaisar-checker/what-is-the-kaisar-checker-node/benefits-of-owning-a-checker-node.md)
- [Node Sale Information](/kaisar-network/kaisar-architecture/products/kaisar-onenode/kaisar-checker/what-is-the-kaisar-checker-node/node-sale-information.md)
- [Referral Mechanism](/kaisar-network/kaisar-architecture/products/kaisar-onenode/kaisar-checker/what-is-the-kaisar-checker-node/referral-mechanism.md)
- [What is the Checker Node License (NFT)](/kaisar-network/kaisar-architecture/products/kaisar-onenode/kaisar-checker/what-is-the-kaisar-checker-node/what-is-the-checker-node-license-nft.md)
- [Reward Unlock Period](/kaisar-network/kaisar-architecture/products/kaisar-onenode/kaisar-checker/what-is-the-kaisar-checker-node/reward-unlock-period.md)
- [FAQs](/kaisar-network/kaisar-architecture/products/kaisar-onenode/kaisar-checker/what-is-the-kaisar-checker-node/faqs.md)
- [How to Purchase Checker Nodes](/kaisar-network/kaisar-architecture/products/kaisar-onenode/kaisar-checker/how-to-purchase-checker-nodes.md)
- [Step 1 - Connect wallet](/kaisar-network/kaisar-architecture/products/kaisar-onenode/kaisar-checker/how-to-purchase-checker-nodes/step-1-connect-wallet.md)
- [Step 2 - Choose the Network](/kaisar-network/kaisar-architecture/products/kaisar-onenode/kaisar-checker/how-to-purchase-checker-nodes/step-2-choose-the-network.md)
- [Step 3 - Commitment Submission](/kaisar-network/kaisar-architecture/products/kaisar-onenode/kaisar-checker/how-to-purchase-checker-nodes/step-3-commitment-submission.md)
- [Step 4 - Referral Link Sharing](/kaisar-network/kaisar-architecture/products/kaisar-onenode/kaisar-checker/how-to-purchase-checker-nodes/step-4-referral-link-sharing.md)
- [Step 5 - Confirmation](/kaisar-network/kaisar-architecture/products/kaisar-onenode/kaisar-checker/how-to-purchase-checker-nodes/step-5-confirmation.md)
- [What’s Next?](/kaisar-network/kaisar-architecture/products/kaisar-onenode/kaisar-checker/how-to-purchase-checker-nodes/whats-next.md)
- [FAQs](/kaisar-network/kaisar-architecture/products/kaisar-onenode/kaisar-checker/how-to-purchase-checker-nodes/faqs.md)
- [Kaisar Explorer](/kaisar-network/kaisar-architecture/products/kaisar-onenode/kaisar-explorer.md)
---
# Source: https://docs.kaisar.io/kaisar-network/kaisar-ai-ops/getting-started/getting-started/quick-start.md
# Quick Start
Get up and running with Kaisar AI Ops in just a few minutes.
## Step 1: Access the Platform
1. Navigate to
2. Click **"Access Dashboard"**
3. Log in with your credentials
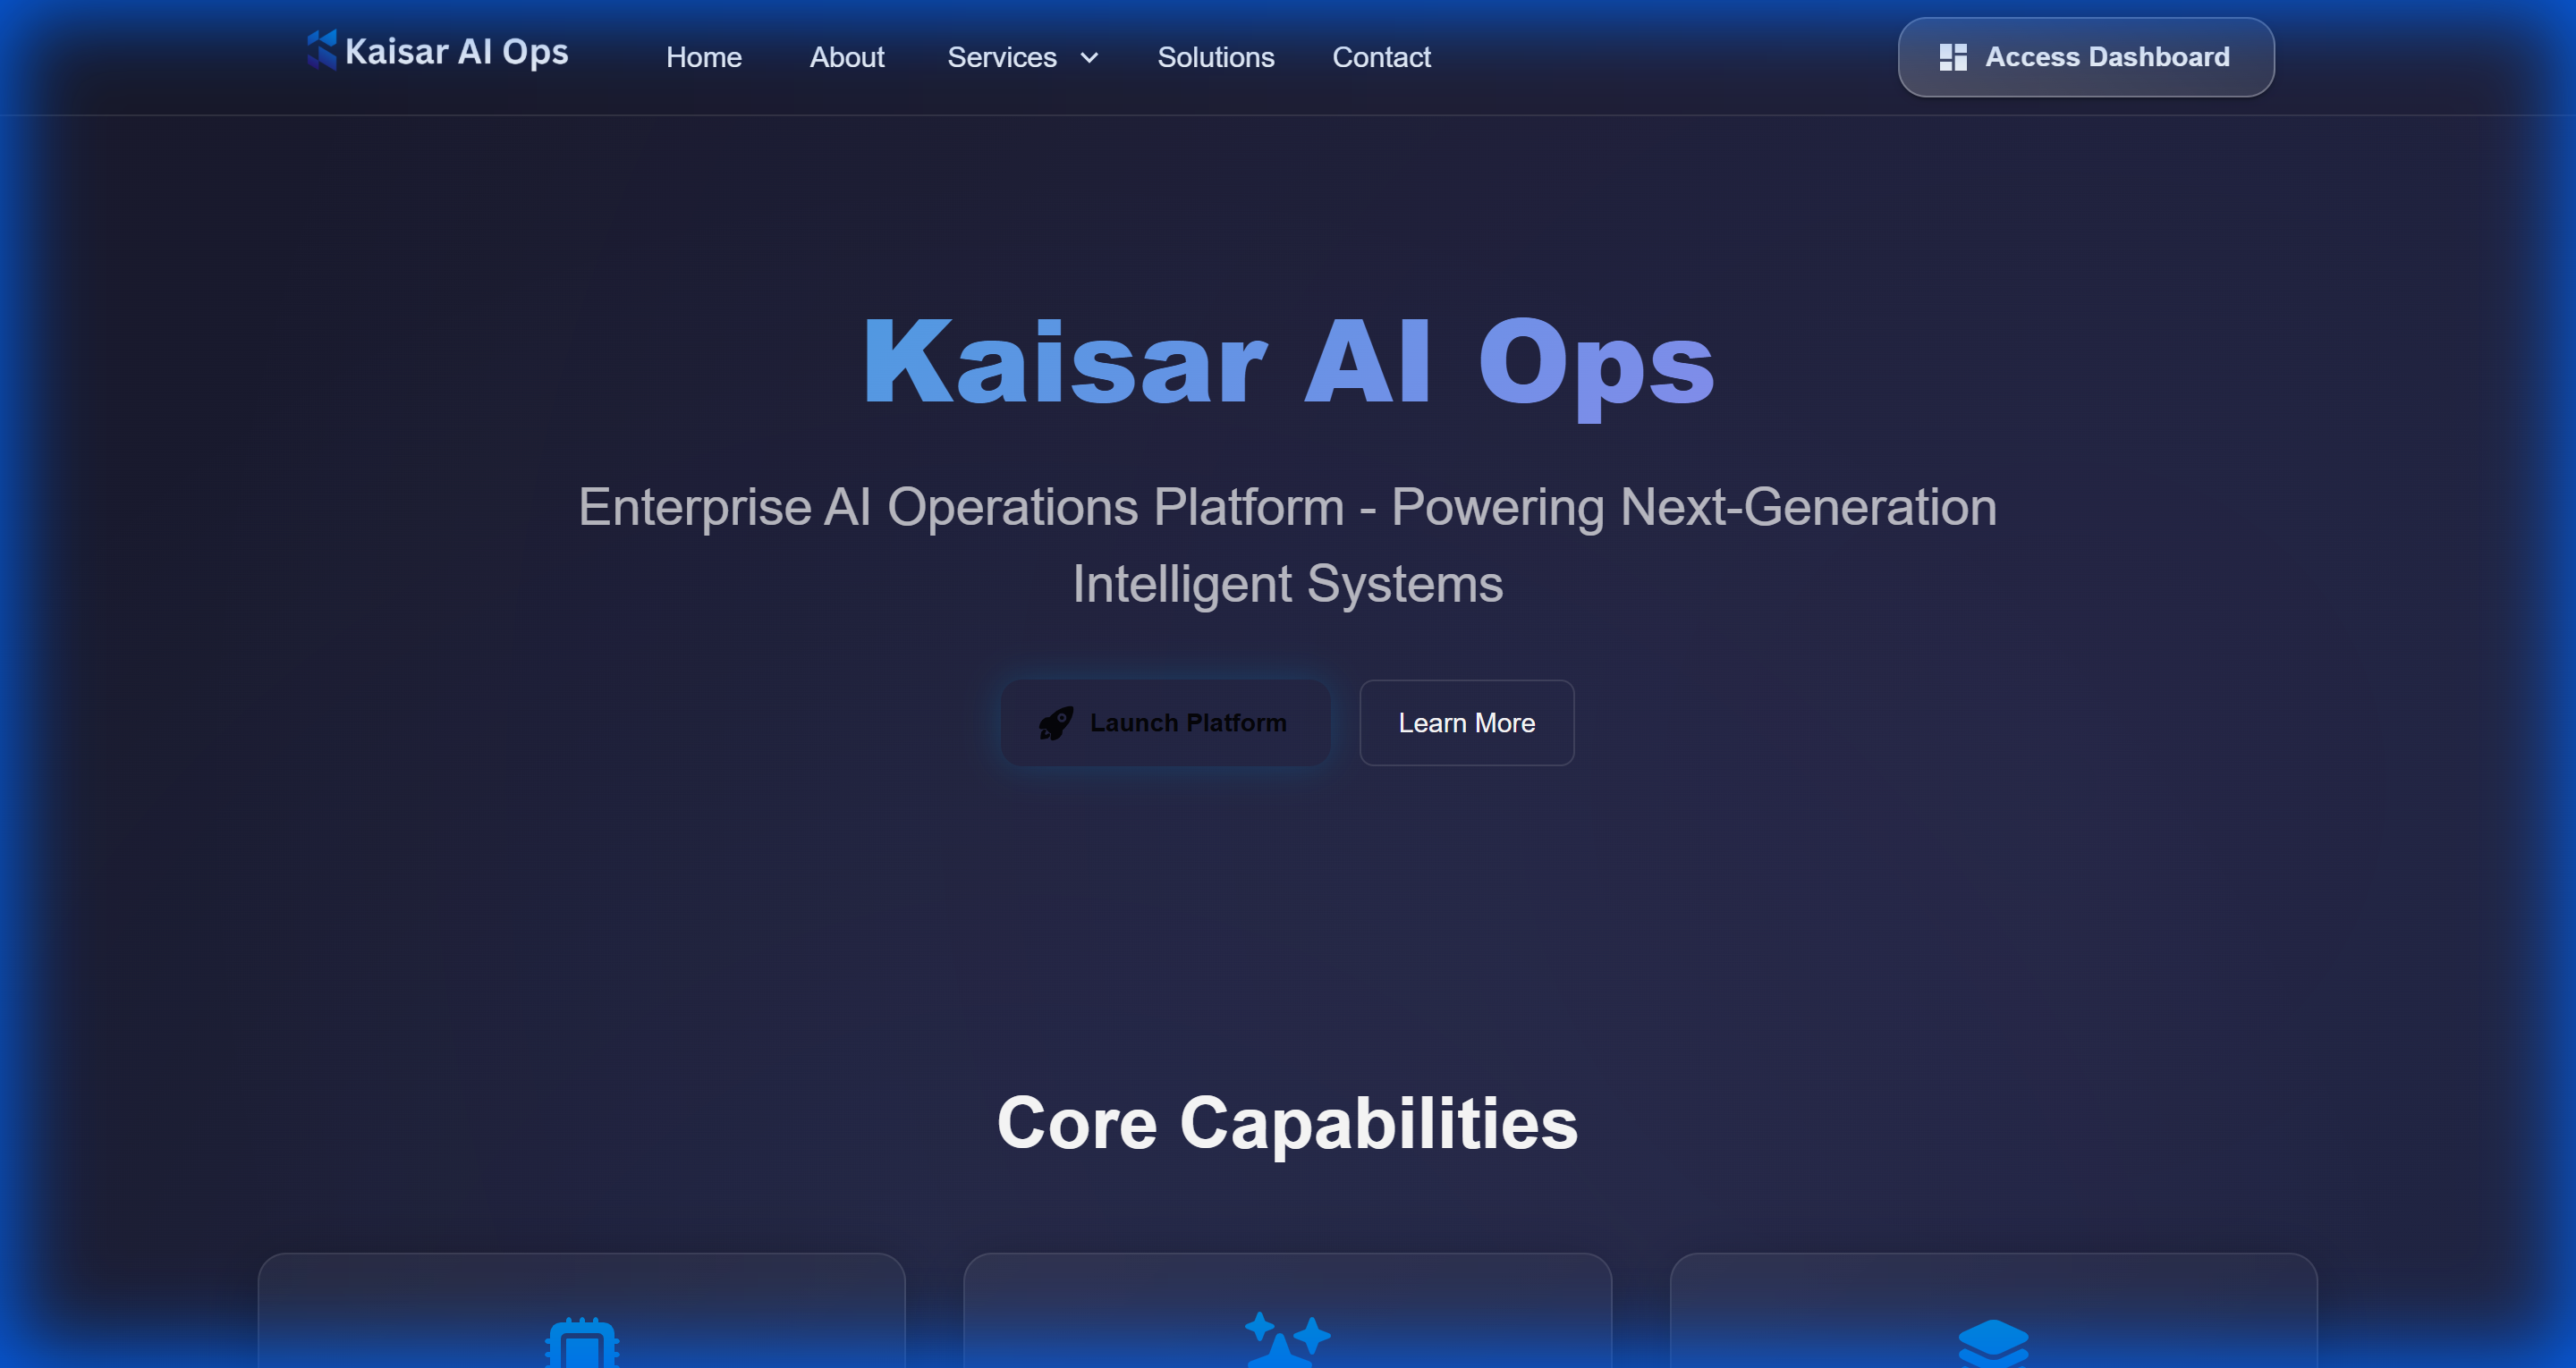
## Step 2: Explore the Dashboard
After logging in, you'll see the main dashboard with an overview of your:
* Recent experiments
* Active deployments
* System metrics
* Quick actions

## Step 3: Navigate the Interface
The main navigation menu is located on the left sidebar:
* **Dashboard**: Overview and quick access
* **Organization**: Manage groups, members, and agents
* **Deep Learning Platform**:
* Experiments
* Models
* Datasets
* **Deployments**: Manage model deployments
## Step 4: Create Your First Experiment
1. Click **Deep Learning Platform** → **Experiments**
2. Click the **Create** button
3. Fill in the experiment details:
* Name
* Description
* Configuration
4. Click **Save**
## Step 5: Explore Other Features
Now that you're familiar with the basics, explore:
* [User Guide](https://github.com/Kaisar-Network/docs/blob/kaisar-ai-ops/kaisar-ai-ops/user-guide/README.md) for detailed feature documentation
* [Organization Management](https://github.com/Kaisar-Network/docs/blob/kaisar-ai-ops/kaisar-ai-ops/user-guide/iam-security.md) to manage team access
* [Deployments](https://github.com/Kaisar-Network/docs/blob/kaisar-ai-ops/kaisar-ai-ops/user-guide/README.md) to deploy your models
## Need Help?
* Check the [Troubleshooting](https://docs.kaisar.io/kaisar-network/kaisar-ai-ops/troubleshooting/troubleshooting) section
* Contact support via the [Support](https://docs.kaisar.io/kaisar-network/kaisar-ai-ops/troubleshooting/troubleshooting/support) page
---
# Source: https://docs.kaisar.io/kaisar-network/kaisar-ai-ops/readme.md
# Introduction
Welcome to the **Kaisar AI Ops** documentation.
> Last updated: Nov 27, 2025
## Overview
Kaisar AI Ops is a comprehensive platform designed to streamline AI operations, monitoring, and management.
## Key Features
* **Dashboard**: Centralized view of your AI infrastructure.
* **AI Tools**: Suite of tools for AI development and deployment.
* **Monitoring**: Real-time insights and alerts.
* **IAM & Security**: Robust role-based access control.
## Architecture
(Architecture diagram and description to be added)
---
# Source: https://docs.kaisar.io/kaisar-network/kaisar-architecture/products/kaisar-onenode/kaisar-checker/what-is-the-kaisar-checker-node/referral-mechanism.md
# Referral Mechanism
**10%** commission fee is reserved for all referrers. Participants in the Node Sale will receive a referral code. When friends join the Node Sale using your code, you will earn 10% of their contribution amount.
**For referral purchasers:**
Round 1: 20% discount
Round 2: 5% discount
---
# Source: https://docs.kaisar.io/kaisar-network/kaisar-architecture/products/kaisar-onenode/kaisar-checker/what-is-the-kaisar-checker-node/reward-unlock-period.md
# Reward Unlock Period
Checker nodes will receive $vKAI tokens. These tokens can be converted to $KAI according to this unlocking schedule:
* **Unlock within 30 days**: Receive 25% of your total $vKAI
* **Unlock within 90 days**: Receive 50% of your total $vKAI
* **Unlock within 180 days**: Receive 100% of your total $vKAI
**Example**: Converting 10,000 $vKAI to $KAI:
* 30-day unlock: Receive 2,500 $KAI
* 90-day unlock: Receive 5,000 $KAI
* 180-day unlock: Receive 10,000 $KAI
---
# Source: https://docs.kaisar.io/kaisar-network/kaisar-rewards-mechanism/rewards-for-kaisar-checkers-node.md
# Rewards for Kaisar Checkers Node
Rewards are distributed to all Checkers who successfully complete tasks. The rewards are proportional to the number of tasks correctly completed by a Checker relative to the total tasks completed across the network.
### 1. Formula for Determining Checker Node Rewards
For a given Checker Node *i*, rewards are calculated per epoch (*1 Epoch = 2 weeks*) based on the following general formula:
$$
\text{Checker\_Reward} = \frac{\text{Checker\_Score} \times \text{Epoch\_Total\_Reward} \times ( 1- \text{Commission})}{\text{Total\_Score}}
$$
* **Checker\_Score**: The score of the Checker Node in a given epoch.
* **Epoch\_Total\_Reward**: The total reward allocated to all Checkers in an epoch.
* **Commission**: The reward commission rate for Delegators.
* **Total\_Score**: The cumulative score of all Checkers.
At the end of each epoch, after reward calculations, a portion of the tokens allocated to Checkers is distributed into the reward pool for supporting Delegators. The Delegator reward pool for each epoch is calculated as follows:
$$
\text{Delegator\_Total\_Reward} = \frac{\text{Checker\_Score} \times \text{Epoch\_Total\_Reward} \times \text{Commission}}{\text{Total\_Score}}
$$
For a Delegator, rewards are calculated per epoch based on the following factors:
$$
\text{Delegator\_Reward} = \frac{\text{Delegator\_Total\_Reward} \times \text{Delegator\_Stake}}{\text{Total\_Stake}}
$$
### 2. Formula for Calculating Checker Node Points
The score of Checker node in one epoch is calculated according to the following formula:
$$
\text{Checker\_Score} = \text{Work\_Contribution} \times \text{Checker\_Stake} \times (1 - \text{Error\_Rate)}
$$
* **Work\_Contribution**: The workload of verifications performed by the Checker, which may be the number of valid verifications completed.
* **Error\_Rate**: The error rate of the Checker (ranging from 0 to 1).
* **Checker\_Stake**: The number of NFT Licenses staked for the Node.
**Example:**
* A = 50 (50 valid verification completed)
* B = 0.9 (Checker node has a 10% error rate)
* S = 2 (2 NFT Licenses Delegators staked for Checker)
$$
\text {Checker\_Score} = 50 \times 0.9 \times 2 = 90
$$
This formula guarantees fair compensation for the Checker by accounting for workload, verification accuracy, and staking commitment.
---
# Source: https://docs.kaisar.io/kaisar-network/kaisar-rewards-mechanism/rewards-for-kaisar-providers.md
# Rewards for Kaisar Providers
The Kaisar network uses a reward system to encourage participation and maintain efficient network operations. Users who run workers and provide GPU resources are rewarded with KAI tokens. The amount of rewards receive is calculated as described below.
In the Kaisar network, rewards for computing resource providers (workers) are distributed based on two main mechanisms: Proof of Capacity (PoC) and Proof of Delivery (PoD). Both mechanisms are designed to incentivize maintaining online resources and completing rendering tasks.
### 1. Proof of Capacity (PoC)
**Purpose:** Incentivize workers to keep computing resources (containers) online and ready for tasks, even when there are no specific jobs. This ensures the network maintains a stable and reliable pool of available resources.
**Eligibility:** Any container that remains online and meets the network’s uptime requirements qualifies for PoC rewards.
**Total PoC rewards in one Epoch**
$$
\text {PoC\_Total\_Reward} = (1- \text{Ratio} ) \times \text{Epoch\_Total\_Reward}
$$
**PoC reward for Worker node in one Epoch**
$$
\text{PoC\_Worker\_Reward} = \frac {\text{PoC\_Worker\_Score} \times \text{PoC\_Total\_Reward}}{\text{PoC\_Total\_Score}}
$$
### 2. Proof of Delivery (PoD)
**Purpose:** To reward the successful completion of rendering tasks, incentivizing workers to actively contribute computational power to process workloads and deliver high-quality results.
**Conditions:** Containers that participate in rendering tasks and successfully complete them within the stipulated timeframe will be eligible to receive the PoD reward.
**Total PoD rewards in one Epoch**
$$
\text{PoD\_Total\_Reward} =\text{Ratio} \times \text{Epoch\_Total\_Reward}
$$
**PoD reward for Worker node in one Epoch**
$$
\text{PoD\_Worker\_Reward} =\frac { \text{PoD\_Worker\_Score} \times \text{PoD\_Total\_Reward}}{\text{PoD\_Total\_Score}}
$$
### 3. Worker Node Reward
For a given worker node 𝑖, the reward calculated per epoch is the total aggregated PoC and PoD rewards of the worker node, determined according to the following formula:
$$
\text{Worker\_Reward} = \frac{\text{Worker\_Score} \times \text{Epoch\_Total\_Reward} \times (1- \text{Commission)}}{\text{Total\_Score}}
$$
* **Worker\_Score**: The score of the worker in the epoch.
* **Epoch\_Total\_Reward**: The total reward allocated to all workers in one epoch.
* **Commission**: The commission rate rewarded to the delegator.
* **Total\_Score**: The total score of all workers.
### 4. Reward calculation for Delegator
At the end of each epoch, after reward calculations, a portion of the tokens allocated to Workers is distributed into the reward pool for supporting Delegators. The Delegator reward pool for each epoch is calculated as follows:
$$
\text{Delegator\_Total\_Reward} = \frac{\text{Worker\_Score} \times \text{Epoch\_Total\_Reward} \times \text{Commission}}{\text{Total\_Score}}
$$
For a Delegator, rewards are calculated per epoch based on the following factors:
$$
\text{Delegator\_Reward} = \frac{\text{Delegator\_Total\_Reward} \times \text{Delegator\_Stake}}{\text{Total\_Stake}}
$$
### 5. Formula for Calculating Worker Node Points
The score of the node in one epoch is calculated according to the following formula:
$$
\begin{aligned}
\text{Worker\_Score} &= (Uptime + Jobtime \times W\_j) \\
&\quad \times \left( 1 + \frac{\text{Worker\_Stake}}{\text{Max\_Stake}} \right) \\
&\quad \times \left( A \times W\_a + B \times W\_b + C \times W\_c + D \times W\_d + E \times W\_e \right)
\end{aligned}
$$
* **Uptime**: The total operational time of the Worker, measured in hours.
* **Jobtime**: The time taken to complete a Job, measured in hours.
* **Worker\_Stake**: The amount of KAI tokens staked for the Worker Node.
* **Stake\_Max**: The maximum amount of KAI tokens that can be staked for the Worker Node.
* **A:** The bandwidth score of the node (0-1)
* **B:** The CPU score of the node (0-1)
* **C:** The GPU score of the node (0-10)
* **D:** The Disk score of the node (0-1
* **E:** The Memory score of the node (0-1)
Balancing weights are assigned to each factor:
Wa = 2 , Wb = 1, Wc = 3, Wd = 1, We = 1, Wj = 3
**Bandwidth scoring system**
| Tier | Speed | Score |
| ------------ | ------------------------------------------------- | ----- |
| Ultra Speed | Download: 1600 mb/s Upload: 1200 mb/s | 0.8 |
| High Speed |
Download: 800 mb/s
Upload: 600 mb/s
| 0.6 |
| Medium Speed |
Download: 400 mb/s
Upload: 300 mb/s
| 0.4 |
| Low Speed |
Download: 75 mb/s
Upload: 75 mb/s
| 0.2 |
**CPU scoring system**
| Tier | Cores (GB) | Score |
| ------------ | ----------- | ----- |
| Ultra Cores | >128 | 0.8 |
| High Cores | 64-128 | 0.6 |
| Medium Cores | 32-64 | 0.4 |
| Low Cores | <32 | 0.2 |
**Disk scoring system**
| Tier | Capacity | Score |
| --------------- | ------------ | ----- |
| Ultra Capacity | >1024 | 0.8 |
| High Capacity | 5120 - 10240 | 0.6 |
| Medium Capacity | 512 - 5120 | 0.4 |
| Low Capacity | <512 | 0.2 |
**Memory scoring system**
| Tier | Memory | Score |
| ---------- | --------- | ----- |
| Ultra Mem | >512 | 0.8 |
| High Mem | 128 - 512 | 0.6 |
| Medium Mem | 32 - 128 | 0.4 |
| Low Mem | <32 | 0.2 |
**GPU scoring system**
| Supplier | GPU Model | Score |
| -------- | ------------------------ | ----- |
| NVIDIA | GPU\_H100\_80GB\_SXM | 10 |
| NVIDIA | GPU\_H100\_80GB\_PCIE | 10 |
| NVIDIA | GPU\_A100\_80GB\_PCIE | 5 |
| NVIDIA | GPU\_A100\_80GB\_NVLINK | 5 |
| NVIDIA | GPU\_RTX\_A6000 | 1.5 |
| NVIDIA | GPU\_RTX\_A8000 | 1 |
| NVIDIA | GPU\_RTX\_A5000 | 0.75 |
| NVIDIA | GPU\_RTX\_A4000 | 0.4 |
| NVIDIA | GPU\_A40 | 2 |
| NVIDIA | GPU\_A10 | 0.75 |
| NVIDIA | GPU\_RTX\_4090 | 0.75 |
| NVIDIA | GPU\_RTX\_4080 | 0.5 |
| NVIDIA | GPU\_RTX\_4070S\_TI | 0.25 |
| NVIDIA | GPU\_RTX\_4070 | 0.25 |
| NVIDIA | GPU\_RTX\_4060\_TI | 0.25 |
| NVIDIA | GPU\_RTX\_3090 | 0.5 |
| NVIDIA | GPU\_RTX\_3080 | 0.25 |
| NVIDIA | GPU\_RTX\_3070 | 0.25 |
| NVIDIA | GPU\_RTX\_3060\_TI | 0.25 |
| NVIDIA | GPU\_NVIDIA\_TESLA\_T4 | 0.4 |
| NVIDIA | GPU\_NVIDIA\_TESLA\_P4 | 0.25 |
| NVIDIA | GPU\_NVIDIA\_TESLA\_P40 | 0.25 |
| NVIDIA | GPU\_NVIDIA\_TESLA\_P100 | 0.25 |
| NVIDIA | GPU\_GTX\_1080 | 0.25 |
| NVIDIA | GPU\_NVIDIA\_TESLA\_V100 | 0.75 |
---
# Source: https://docs.kaisar.io/kaisar-network/kaisar-ai-ops/agent-configuration/routes.md
# Routes
Define workflows and routing logic for your AI agents.
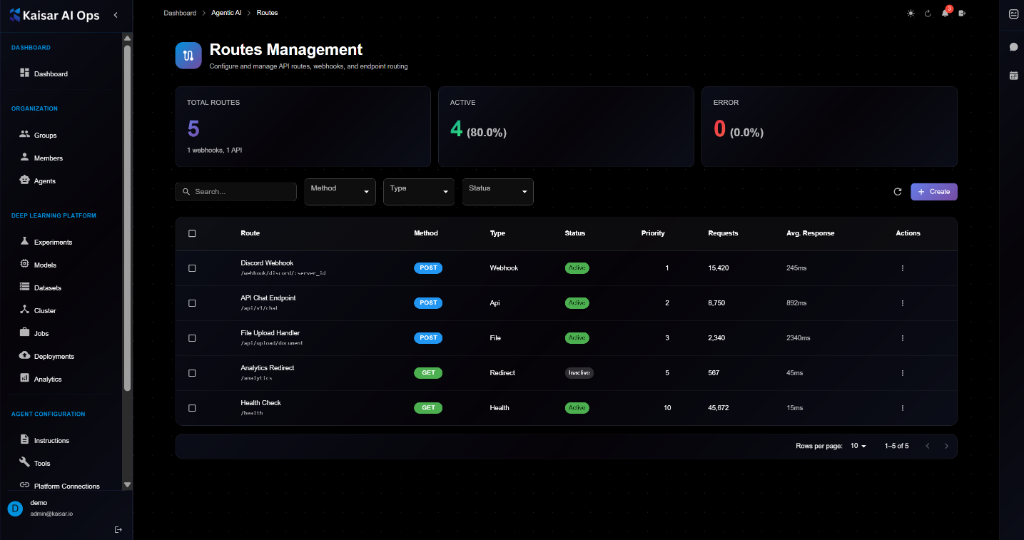
## Overview
Routes Management allows you to configure and manage API routes, webhooks, and endpoint routing for your AI agents. Define how incoming requests are handled, processed, and responded to.
## Routes Dashboard
The dashboard displays key metrics at a glance:
**Summary Cards**:
* **Total Routes**: Total number of routes configured
* **Active**: Number of active routes
* **Error**: Number of routes with errors
## Route List View
The routes table shows all configured routes with the following information:
**Columns**:
* **Route**: Route name and path
* **Method**: HTTP method (POST, GET, etc.)
* **Type**: Route type (Webhook, API, File, Redirect, Health)
* **Status**: Current status (Active, Inactive)
* **Priority**: Priority level (1-10)
* **Requests**: Total number of requests
* **Avg Response**: Average response time
* **Actions**: Quick actions menu
**Filtering and Search**:
* Search by route name or path
* Filter by Method (POST, GET, PUT, DELETE, etc.)
* Filter by Type (Webhook, API, File, Redirect, Health)
* Filter by Status (Active, Inactive)
## Creating a Route
Navigate to **Agent Configuration** → **Routes** → Click **Create**

### Basic Information
**Route Name**\* (Required)
* Descriptive name for this route
* Example: `Discord Webhook`
* Helper text: "Descriptive name for this route"
**Path**\* (Required)
* URL path pattern (use {param} for variables)
* Example: `/webhook/discord/{server_id}`
* Helper text: "URL path pattern (use {param} for variables)"
**HTTP Method**\* (Required)
* Select from dropdown: POST, GET, PUT, DELETE, PATCH
* Helper text: "HTTP method for this route"
**Route Type**\* (Required)
* Select from dropdown: Webhook, API, File, Redirect, Health
* Helper text: "Type of route endpoint"
**Description**
* Optional description
* Example: "Webhook endpoint for Discord bot integration"
* Helper text: "Optional description"
### Configuration
Expandable section for route configuration.
**Priority**\* (Required)
* Route matching priority (lower = higher priority)
* Example: `1`
* Helper text: "Route matching priority (lower = higher priority)"
**Timeout (ms)**\* (Required)
* Request timeout in milliseconds
* Example: `30000`
* Helper text: "Request timeout in milliseconds"
**Retry Attempts**\* (Required)
* Number of retry attempts on failure
* Example: `3`
* Helper text: "Number of retry attempts on failure"
**Enabled**
* Checkbox to enable/disable the route
* Default: Unchecked
**Authentication Required**
* Checkbox to require authentication
* Default: Unchecked
### Handler Configuration
Expandable section for handler-specific settings.
**Response Type**
* Type of response to return
* Dropdown selection: JSON, Text, HTML, XML, etc.
* Helper text: "Type of response to return"
**Status Code**
* HTTP status code for success
* Example: `200`
* Helper text: "HTTP status code for success"
**Agent Prompt**
* Prompt for AI agent processing
* Large text area
* Example: "You are a helpful Discord bot assistant. Respond professionally and concisely."
* Helper text: "Prompt for AI agent processing"
### Security
Expandable section for security settings.
**Require Authentication**
* Checkbox to require authentication
**Enable Rate Limiting**
* Checkbox to enable rate limiting
**Requests Limit**
* Number of requests allowed
* Example: `100`
* Helper text: "Number of requests allowed"
**Time Window (ms)**
* Time window in milliseconds
* Example: `60000`
* Helper text: "Time window in milliseconds"
### Rate Limits
Expandable section for detailed rate limiting.
**Requests per Minute**
* Maximum requests per minute
* Example: `100`
* Helper text: "Maximum requests per minute"
**Requests per Hour**
* Maximum requests per hour
* Example: `2000`
* Helper text: "Maximum requests per hour"
**Requests per Day**
* Maximum requests per day
* Example: `10000`
* Helper text: "Maximum requests per day"
**Burst Limit**
* Maximum burst of requests
* Example: `10`
* Helper text: "Maximum burst of requests"
### Actions
* **Cancel**: Discard and close
* **Create Route**: Save the route
## Viewing Route Details
To view detailed information about a route:
1. Navigate to **Agent Configuration** → **Routes**
2. Click on a route from the list
3. View comprehensive details in the modal dialog
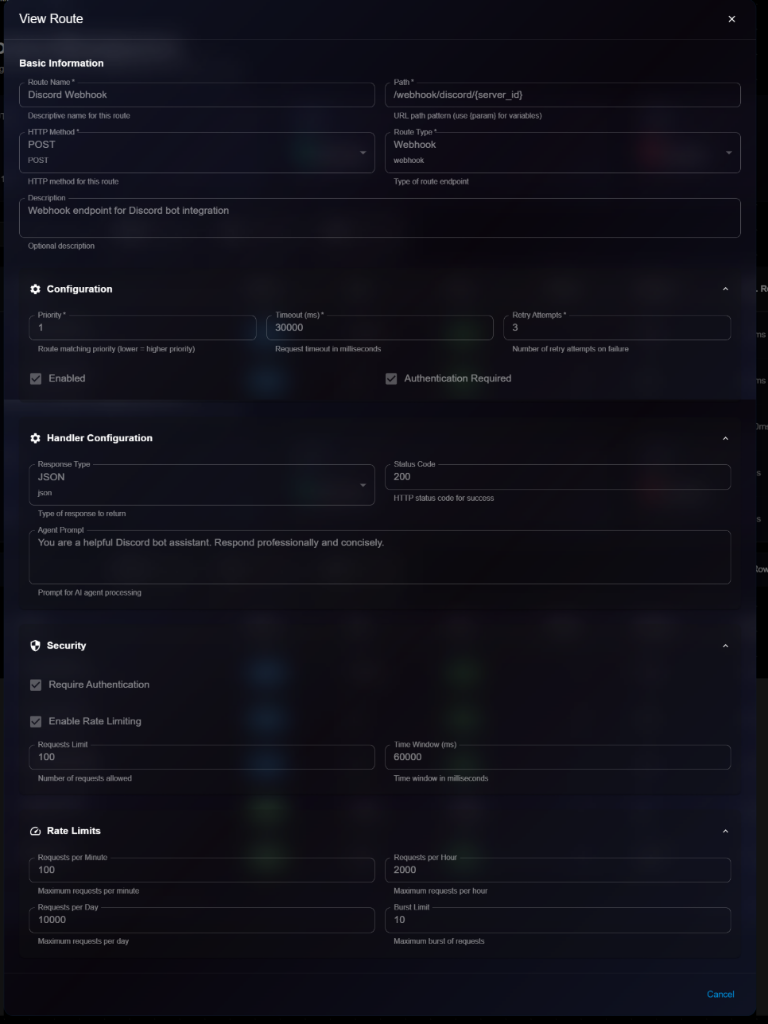
**Details Panel Sections**:
**Basic Information**:
* **Route Name**: e.g., "Discord Webhook"
* **Path**: e.g., `/webhook/discord/{server_id}`
* **HTTP Method**: POST, GET, etc.
* **Route Type**: Webhook, API, File, etc.
* **Description**: Full description
**Configuration**:
* **Priority**: Route matching priority
* **Timeout (ms)**: Request timeout
* **Retry Attempts**: Number of retry attempts
* **Enabled**: Checkbox status
* **Authentication Required**: Checkbox status
**Handler Configuration**:
* **Response Type**: JSON, Text, HTML, etc.
* **Status Code**: HTTP status code
* **Agent Prompt**: Full prompt text
**Security**:
* **Require Authentication**: Checkbox status
* **Enable Rate Limiting**: Checkbox status
* **Requests Limit**: Number of requests allowed
* **Time Window (ms)**: Time window
**Rate Limits**:
* **Requests per Minute**: Maximum per minute
* **Requests per Hour**: Maximum per hour
* **Requests per Day**: Maximum per day
* **Burst Limit**: Maximum burst
## Editing a Route
To update a route:
1. Open route details page
2. Click **Edit** button (or three-dot menu → Edit)
3. Modify editable fields in the Edit Route modal
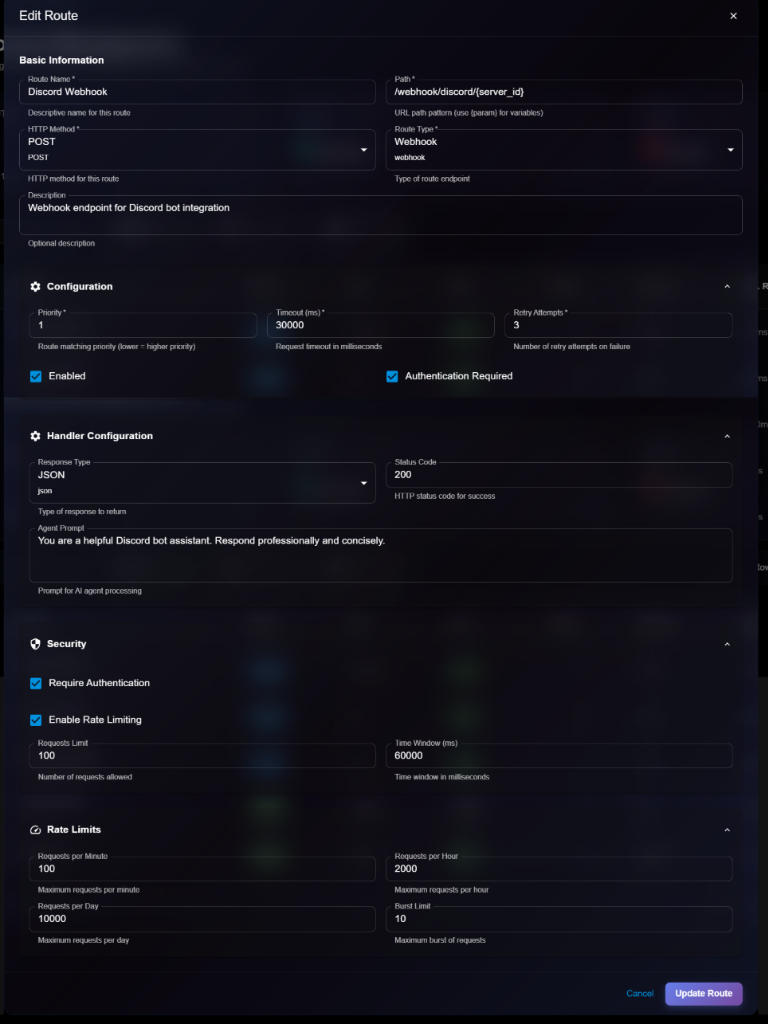
4. Click **Update Route** to save changes
> \[!NOTE] The Edit form is identical to the Create/View form, but with an "Update Route" button.
**Editable Fields**:
* ✅ Route Name
* ✅ Description
* ✅ Priority
* ✅ Timeout
* ✅ Retry Attempts
* ✅ Enabled (checkbox)
* ✅ Authentication Required (checkbox)
* ✅ Handler Configuration (Response Type, Status Code, Agent Prompt)
* ✅ Security settings
* ✅ Rate Limits
* ❌ Path (cannot edit after creation)
* ❌ HTTP Method (cannot edit after creation)
* ❌ Route Type (cannot edit after creation)
## Route Types
**Webhook**:
* Receive webhooks from external services
* Process incoming webhook payloads
* Respond with custom data
**API**:
* RESTful API endpoints
* Handle API requests and responses
* Integrate with agent processing
**File**:
* File upload/download endpoints
* Handle file operations
* Process file content
**Redirect**:
* URL redirection routes
* Forward requests to other endpoints
* Handle legacy URLs
**Health**:
* Health check endpoints
* Monitor service status
* Return system health information
## HTTP Methods
**POST** (Blue badge):
* Create new resources
* Submit data
* Trigger actions
**GET** (Green badge):
* Retrieve data
* Read resources
* Query information
**PUT**:
* Update entire resources
* Replace data
**PATCH**:
* Partial updates
* Modify specific fields
**DELETE**:
* Remove resources
* Delete data
## Route Priority
**How Priority Works**:
* Lower number = Higher priority
* Routes are matched in priority order
* First matching route handles the request
**Priority Guidelines**:
* 1-3: Critical routes (webhooks, authentication)
* 4-6: Standard API routes
* 7-9: Utility routes (redirects, static files)
* 10+: Health checks, monitoring
## Managing Routes
### Enabling/Disabling Routes
To change route status:
1. Edit the route
2. Check/uncheck the **Enabled** checkbox
3. Save changes
**Enabled**: Route is active and accepting requests **Disabled**: Route is not available
### Testing Routes
To test a route:
1. Use API testing tools (Postman, curl)
2. Send requests to the route path
3. Verify response and behavior
4. Check logs for errors
**Example curl command**:
```bash
curl -X POST https://ai.kaisar.io/webhook/discord/12345 \
-H "Content-Type: application/json" \
-d '{"message": "Hello from Discord"}'
```
### Monitoring Route Performance
**Metrics to Track**:
* Total requests
* Average response time
* Error rate
* Success rate
**Performance Optimization**:
* Set appropriate timeouts
* Configure retry logic
* Implement caching
* Use rate limiting
### Deleting a Route
To remove a route:
1. Navigate to route details or list
2. Click **Delete** button
3. Confirm deletion
> \[!WARNING] Deleting a route will break any integrations using it. Make sure to update external services before deleting.
## Security Best Practices
**Authentication**:
* Enable authentication for sensitive routes
* Use API keys or tokens
* Validate credentials on every request
**Rate Limiting**:
* Protect against abuse
* Prevent DDoS attacks
* Set reasonable limits
**Input Validation**:
* Validate all input data
* Sanitize user input
* Reject malformed requests
**Error Handling**:
* Don't expose sensitive information in errors
* Log errors securely
* Return appropriate status codes
## Rate Limiting Configuration
**Per Minute Limits**:
* For high-frequency endpoints
* Quick burst protection
* Example: 100 requests/minute
**Per Hour Limits**:
* For moderate usage
* Sustained traffic control
* Example: 2000 requests/hour
**Per Day Limits**:
* For overall usage caps
* Prevent excessive usage
* Example: 10000 requests/day
**Burst Limits**:
* Allow temporary spikes
* Handle sudden traffic
* Example: 10 concurrent requests
## Troubleshooting
**Route Not Responding**:
* Check if route is enabled
* Verify path pattern
* Check authentication settings
* Review error logs
**Timeout Errors**:
* Increase timeout value
* Optimize agent processing
* Check external dependencies
* Review retry settings
**Rate Limit Exceeded**:
* Adjust rate limits
* Implement request queuing
* Contact administrator
* Review usage patterns
**Authentication Failures**:
* Verify credentials
* Check authentication settings
* Review API keys
* Update tokens if expired
## Next Steps
* Configure [Instructions](https://docs.kaisar.io/kaisar-network/kaisar-ai-ops/agent-configuration/instructions) for route handlers
* Enable [Tools](https://docs.kaisar.io/kaisar-network/kaisar-ai-ops/agent-configuration/tools) for route processing
* Set up [Platform Connections](https://docs.kaisar.io/kaisar-network/kaisar-ai-ops/agent-configuration/platform-connections) for webhooks
* Link routes to agents in [Organization → Agents](https://docs.kaisar.io/kaisar-network/kaisar-ai-ops/organization/agents)
---
# Source: https://docs.kaisar.io/kaisar-network/contact-and-support/sale-disclaimer.md
# Sale Disclaimer
* The Checker Node Sale is not an investment offering or securities sale. Participation is purely voluntary and is intended for individuals or entities seeking to actively support and contribute to the Kaisar ecosystem.
* Rewards and incentives are subject to change based on the discretion of Kaisar, market conditions, and participation levels.
* Funds committed during the Fund Commitment Phase are non-refundable unless otherwise stated in the Refund Policy.
* Kaisar is not liable for any financial losses, technical issues, or regulatory non-compliance arising from participation in the sale.
* Participants are advised to perform due diligence and seek independent advice before committing funds.
* By participating, individuals acknowledge and accept all terms and conditions outlined by Kaisar for the Checker Node Sale.
---
# Source: https://docs.kaisar.io/kaisar-network/kaisar-architecture/products/kaisar-onenode/kaisar-checker/how-to-purchase-checker-nodes/step-1-connect-wallet.md
# Step 1 - Connect wallet
Connect wallet at [nodes.kaisar.io](http://nodes.kaisar.io/)
---
# Source: https://docs.kaisar.io/kaisar-network/kaisar-architecture/products/kaisar-onenode/kaisar-checker/how-to-purchase-checker-nodes/step-2-choose-the-network.md
# Step 2 - Choose the Network
Connect your Metamask wallet and select the appropriate blockchain network (Ethereum Mainnet, Arbitrum, Base, Optimism, or PEAQ Mainnet).
---
# Source: https://docs.kaisar.io/kaisar-network/kaisar-architecture/products/kaisar-onenode/kaisar-checker/how-to-purchase-checker-nodes/step-3-commitment-submission.md
# Step 3 - Commitment Submission
Deposit funds to reserve your position in the Checker Node Sale.
---
# Source: https://docs.kaisar.io/kaisar-network/kaisar-architecture/products/kaisar-onenode/kaisar-checker/how-to-purchase-checker-nodes/step-4-referral-link-sharing.md
# Step 4 - Referral Link Sharing
Share your unique referral link to earn cash back rewards and provide discounts to buyers.
---
# Source: https://docs.kaisar.io/kaisar-network/kaisar-architecture/products/kaisar-onenode/kaisar-checker/how-to-purchase-checker-nodes/step-5-confirmation.md
# Step 5 - Confirmation
Receive confirmation of your commitment and eligibility for rewards.
Congratulations you have now successfully purchased your Checker Node License!
---
# Source: https://docs.kaisar.io/kaisar-network/kaisar-ai-ops/troubleshooting/troubleshooting/support.md
# Support
Get help with Kaisar AI Ops.
## Support Channels
### Self-Service Resources
**Documentation**:
* [User Guide](https://github.com/Kaisar-Network/docs/blob/kaisar-ai-ops/kaisar-ai-ops/user-guide/README.md) - Feature documentation
* [Admin Guide](https://github.com/Kaisar-Network/docs/blob/kaisar-ai-ops/kaisar-ai-ops/admin-guide/README.md) - Administration
* [API Reference](https://github.com/Kaisar-Network/docs/blob/kaisar-ai-ops/kaisar-ai-ops/api-reference/README.md) - API documentation
* [FAQ](https://docs.kaisar.io/kaisar-network/kaisar-ai-ops/troubleshooting/troubleshooting/faq) - Common questions
* [Troubleshooting](https://docs.kaisar.io/kaisar-network/kaisar-ai-ops/troubleshooting/troubleshooting) - Issue resolution
**Community**:
* GitHub Discussions: [github.com/kaisar-ai-ops/discussions](https://github.com/kaisar-ai-ops/discussions)
* Stack Overflow: Tag questions with `kaisar-ai-ops`
* Community Forum: [community.kaisar.io](https://community.kaisar.io)
### Direct Support
**Support Portal**:
* URL: [support.kaisar.io](https://support.kaisar.io)
* Submit tickets for technical issues
* Track ticket status
* View support history
**Email Support**:
* Email:
* Response time: 24-48 hours (business days)
* Include: Issue description, steps to reproduce, error messages
**Slack Support** (Enterprise customers):
* Channel: #kaisar-support
* Response time: 4-8 hours (business hours)
* For urgent issues
**Phone Support** (Enterprise customers):
* Available 24/7 for critical issues
* Contact your account manager for phone number
## Support Tiers
### Community Support
* Access to documentation
* Community forums
* GitHub Discussions
* Stack Overflow
### Standard Support
* Email support (24-48 hour response)
* Support portal access
* Bug fixes and patches
* Documentation updates
### Premium Support
* Priority email support (4-8 hour response)
* Slack support channel
* Phone support for critical issues
* Dedicated support engineer
* Quarterly business reviews
### Enterprise Support
* 24/7 phone support
* 1-hour response for critical issues
* Dedicated account manager
* Custom SLAs
* On-site support (if needed)
* Training and onboarding
## Submitting a Support Ticket
### Before Submitting
1. Check [FAQ](https://docs.kaisar.io/kaisar-network/kaisar-ai-ops/troubleshooting/troubleshooting/faq) for common questions
2. Review [Troubleshooting](https://docs.kaisar.io/kaisar-network/kaisar-ai-ops/troubleshooting/troubleshooting) guide
3. Search [Known Issues](https://docs.kaisar.io/kaisar-network/kaisar-ai-ops/troubleshooting/troubleshooting/known-issues)
4. Try basic troubleshooting steps
### Required Information
Include in your ticket:
* **Summary**: Brief description of the issue
* **Description**: Detailed explanation
* **Steps to Reproduce**: How to recreate the issue
* **Expected Behavior**: What should happen
* **Actual Behavior**: What actually happens
* **Error Messages**: Full error text
* **Screenshots**: Visual evidence
* **Environment**: Browser, OS, version
* **Impact**: How it affects your work
### Priority Levels
**Critical (P1)**:
* Production system down
* Data loss or corruption
* Security vulnerability
* Response: 1 hour (Enterprise), 4 hours (Premium)
**High (P2)**:
* Major feature not working
* Significant performance degradation
* Workaround available
* Response: 4 hours (Enterprise), 8 hours (Premium), 24 hours (Standard)
**Medium (P3)**:
* Minor feature issue
* Workaround available
* Non-critical bug
* Response: 24 hours (Enterprise/Premium), 48 hours (Standard)
**Low (P4)**:
* Feature request
* Documentation issue
* Cosmetic bug
* Response: 48 hours (Enterprise/Premium), 5 business days (Standard)
## Support Ticket Template
```
Subject: [Component] Brief description
Priority: [Critical/High/Medium/Low]
Environment:
- Browser: Chrome 120
- OS: macOS 14.0
- Kaisar AI Ops Version: 1.3.0
Issue Description:
[Detailed description of the issue]
Steps to Reproduce:
1. Navigate to...
2. Click on...
3. Observe...
Expected Behavior:
[What should happen]
Actual Behavior:
[What actually happens]
Error Messages:
[Copy/paste any error messages]
Screenshots:
[Attach screenshots]
Impact:
[How this affects your work]
Additional Context:
[Any other relevant information]
```
## Emergency Support
For critical production issues (Enterprise customers only):
1. **Call emergency hotline**: \[Contact your account manager]
2. **Describe the issue**: Be clear and concise
3. **Follow instructions**: Support engineer will guide you
4. **Stay available**: Be ready for follow-up questions
## Feature Requests
### Submitting Feature Requests
1. Check if feature already requested
2. Submit via support portal or GitHub Discussions
3. Include:
* Use case and business value
* Proposed solution
* Alternative solutions considered
* Impact on your workflow
### Feature Request Process
1. **Submitted**: Feature request received
2. **Under Review**: Product team evaluates
3. **Planned**: Added to roadmap
4. **In Development**: Being built
5. **Released**: Available in platform
## Training & Onboarding
### Self-Paced Learning
* Documentation and guides
* Video tutorials (coming soon)
* Sample projects and notebooks
### Instructor-Led Training
* Live webinars (monthly)
* Custom training sessions (Enterprise)
* On-site training (Enterprise)
### Certification Program
* Kaisar AI Ops Certified User
* Kaisar AI Ops Certified Administrator
* Contact
## Feedback
We value your feedback:
* **Product Feedback**:
* **Documentation**:
* **General**:
## Service Status
Check system status:
* Status Page: [status.kaisar.io](https://status.kaisar.io)
* Subscribe to status updates
* View incident history
* Planned maintenance schedule
## Contact Information
**General Inquiries**:
* Email:
* Website: [kaisar.io](https://kaisar.io)
**Sales**:
* Email:
* Phone: Contact via website
**Partnerships**:
* Email:
**Security**:
* Email:
* PGP Key: Available on website
## Next Steps
* Submit a ticket via [Support Portal](https://support.kaisar.io)
* Join [Community Forum](https://community.kaisar.io)
* Review [FAQ](https://docs.kaisar.io/kaisar-network/kaisar-ai-ops/troubleshooting/troubleshooting/faq) for quick answers
---
# Source: https://docs.kaisar.io/kaisar-network/origins/the-solution-kaisars-decentralized-gpu-network/kaisars-competitive-edge/technical-specifications.md
# Technical Specifications
* Kaisar utilizes peaq Blockchain which boasts the most environmentally friendly blockchain architecture and boasts the second-largest developer ecosystem in Web3.
* Blockchain technology allows for a clear record of data origin, processing, and ownership, enabling the tracking of data lineage and provenance, which is crucial in AI/ML applications where data quality and integrity are paramount.
* Peaq's blockchain enables decentralized AI/ML model training while allowing for a more distributed and collaborative approach to AI development.
* Peaq's sharded architecture allows for parallel processing of AI/ML tasks across multiple nodes, reducing training times and increasing the overall efficiency of the AI computing tasks.
* Kaisar connects a global network of customers to GPU providers. Our network facilitates the seamless exchange of computational resources through smart contracts. Customers can request compute clusters tailored to their specific requirements, paying with KAI tokens. Providers, on the other hand, can share their underutilized processors and earn rewards through our platform.
* With Kaisar, customers can choose a list of GPU providers/containers with unmatched flexibility, a list of randomly selected GPU containers is rendered to the customer based on their ability to provide the highest quality of service with the lowest possible latency and cost.
* GPU providers are evaluated for their ability to deliver the best possible user experience, considering factors such as processing speed and uptime.
* Kaisar offers a wide range of GPU rig rentals including the NVIDIA RTX series and AMD Ryzen series to join as GPU providers/containers for providing services to customers (Coming Soon).
* Kaisar automatically detects risks and blocks unauthorized GPU containers. Operating in a multi-tenant environment Kaisar ensures that your data remains highly secure and inaccessible to other clients. For highly sensitive workloads, we recommend our Secure Cloud option that complies with industry standards and regulations and meets your high security and privacy demands.
* Kaisar leverages an innovative concept of Proof: Proof of Physical Work (PoPW). This provides a token distribution mechanism that rewards participants of Kaisar Network for completing verifiable physical work in the real world. PoPW utilizes checkers that verify GPU Providers' device info, uptime, and performance. The work done by GPU Providers is submitted as proof which is validated and submitted to the blockchain. At the end, the blockchain calculates and distributes rewards to GPU Providers based on scores.
* From the start of the GPU rental period until the reward distribution, the GPUs are always committed to the AI/ML jobs. The containers are monitored in real time to eliminate GPU processes that do not comply with the concept of Proof.
---
# Source: https://docs.kaisar.io/kaisar-network/origins/the-solution-kaisars-decentralized-gpu-network.md
# The Solution: Kaisar's Decentralized GPU Network
Kaisar addresses the problem statement by creating a decentralized network of GPUs sourced from independent data centers, crypto miners, and consumer households. Kaisar enables you to do the following:
1. **Cost Efficiency:** By leveraging underutilized GPUs, Kaisar can offer computing power at a lower price than traditional cloud providers.
2. **Speed:** Users can access GPU supply and deploy clusters in seconds, compared to the weeks-long process required by traditional providers.
3. **Flexibility and Control:** Kaisar provides users with exceptional flexibility and control over their GPU allocations based on specific project needs.
---
# Source: https://docs.kaisar.io/kaisar-network/kaisar-ai-ops/agent-configuration/tools.md
# Tools
Configure tools and capabilities available to your AI agents.
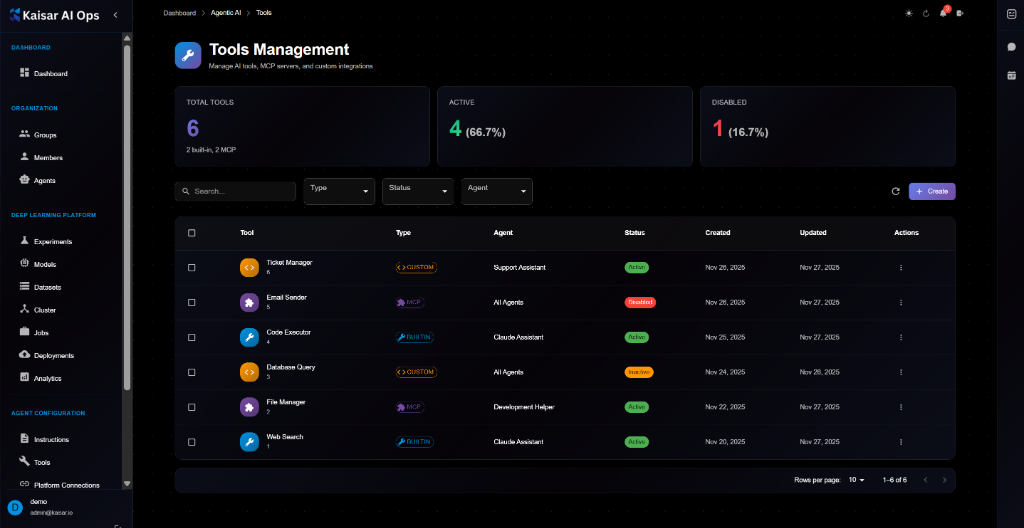
## Overview
The Tools Management section allows you to manage AI tools, MCP servers, and custom integrations that your agents can use to perform tasks and interact with external systems.
## Tools Dashboard
The dashboard displays key metrics at a glance:
**Summary Cards**:
* **Total Tools**: Total number of tools configured
* **Active**: Number of active tools
* **Disabled**: Number of disabled tools
## Tool List View
The tools table shows all available tools with the following information:
**Columns**:
* **Tool**: Tool name and icon
* **Type**: Tool type with color-coded badges (Custom, MCP, Built-in)
* **Agent**: Associated agent name
* **Status**: Current status (Active, Disabled, Pending)
* **Created**: Creation date
* **Updated**: Last update date
* **Actions**: Quick actions menu
**Filtering and Search**:
* Search by tool name
* Filter by Type (Custom, MCP, Built-in)
* Filter by Status (Active, Disabled, Pending)
* Filter by Agent
## Creating a Tool
Navigate to **Agent Configuration** → **Tools** → Click **Create**

### Basic Information
**Tool Name**\* (Required)
* A descriptive name for this tool
* Example: `Ticket Manager`
* Helper text: "A descriptive name for this tool"
**Tool Type**\* (Required)
* Select from dropdown: Custom, MCP, Built-in
* Default: `Custom`
* Helper text: "Type of tool integration"
**Status**\* (Required)
* Select from dropdown: Active, Disabled, Pending
* Default: `Active`
* Helper text: "Current status of this tool"
### Configuration
Click to expand the Configuration section for tool-specific settings.
**Search Engine**
* Search engine to use
* Dropdown selection
* Helper text: "Search engine to use"
**Max Results**
* Maximum number of search results
* Example: (empty or numeric value)
* Helper text: "Maximum number of search results"
**Allowed File Extensions**
* Comma-separated list of allowed file extensions
* Example: (empty or ".pdf,.doc,.txt")
* Helper text: "Comma-separated list of allowed file extensions"
**Max File Size (bytes)**
* Maximum file size in bytes (e.g., 10485760 = 10MB)
* Example: (empty or numeric value)
* Helper text: "Maximum file size in bytes (e.g., 10485760 = 10MB)"
**Base Path**
* Base directory path for file operations
* Example: (empty or "/path/to/directory")
* Helper text: "Base directory path for file operations"
**Connection String**
* Database connection string
* Example: (empty or connection string)
* Helper text: "Database connection string"
**Timeout (ms)**
* Operation timeout in milliseconds
* Example: (empty or numeric value)
* Helper text: "Operation timeout in milliseconds"
**API Endpoint**
* External API endpoint URL
* Example: `https://api.zendesk.com/v2`
* Helper text: "External API endpoint URL"
**Rate Limit (per minute)**
* Maximum requests per minute
* Example: `100`
* Helper text: "Maximum requests per minute"
**Retry Count**
* Number of retry attempts on failure
* Example: `3`
* Helper text: "Number of retry attempts on failure"
### Actions
* **Cancel**: Discard and close
* **Create Tool**: Save the tool
## Viewing Tool Details
To view detailed information about a tool:
1. Navigate to **Agent Configuration** → **Tools**
2. Click on a tool from the list
3. View comprehensive details in the modal dialog
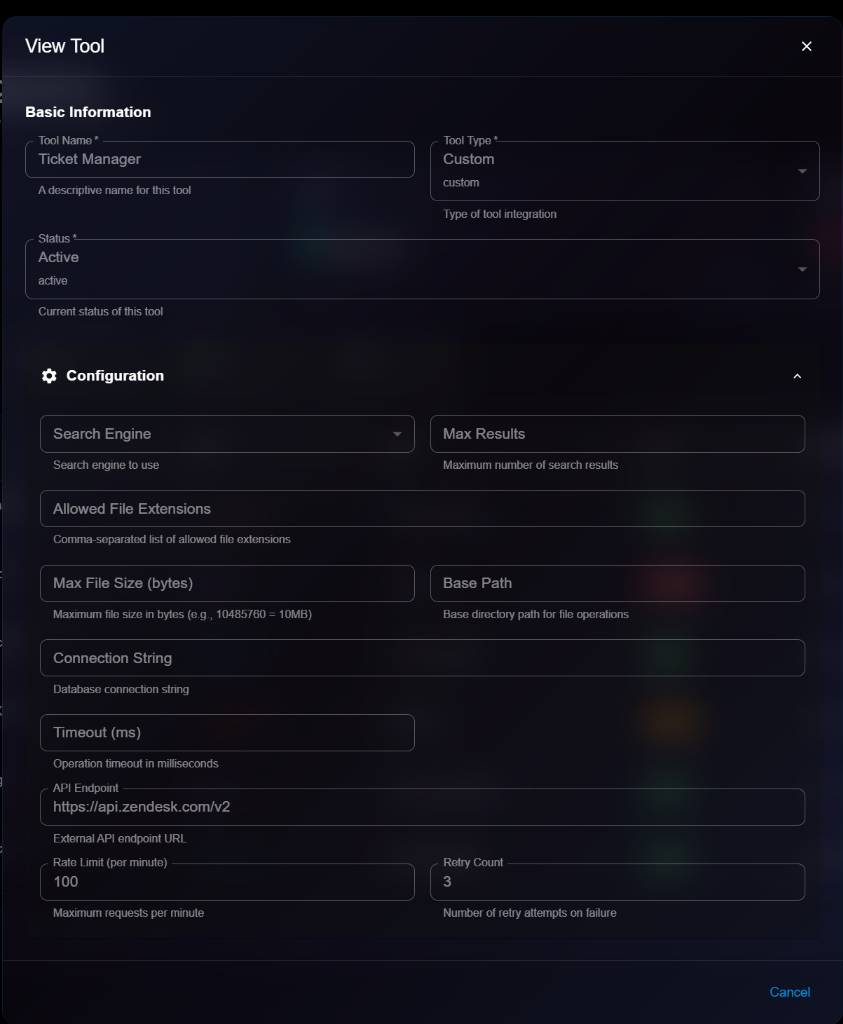
**Details Panel Sections**:
**Basic Information**:
* **Tool Name**: e.g., "Ticket Manager"
* **Tool Type**: Custom, MCP, or Built-in
* **Status**: Active, Disabled, or Pending
**Configuration** (Expandable): All configuration fields are displayed in read-only mode:
* Search Engine
* Max Results
* Allowed File Extensions
* Max File Size (bytes)
* Base Path
* Connection String
* Timeout (ms)
* API Endpoint
* Rate Limit (per minute)
* Retry Count
## Editing a Tool
To update a tool:
1. Open tool details page
2. Click **Edit** button (or three-dot menu → Edit)
3. Modify editable fields in the Edit Tool modal
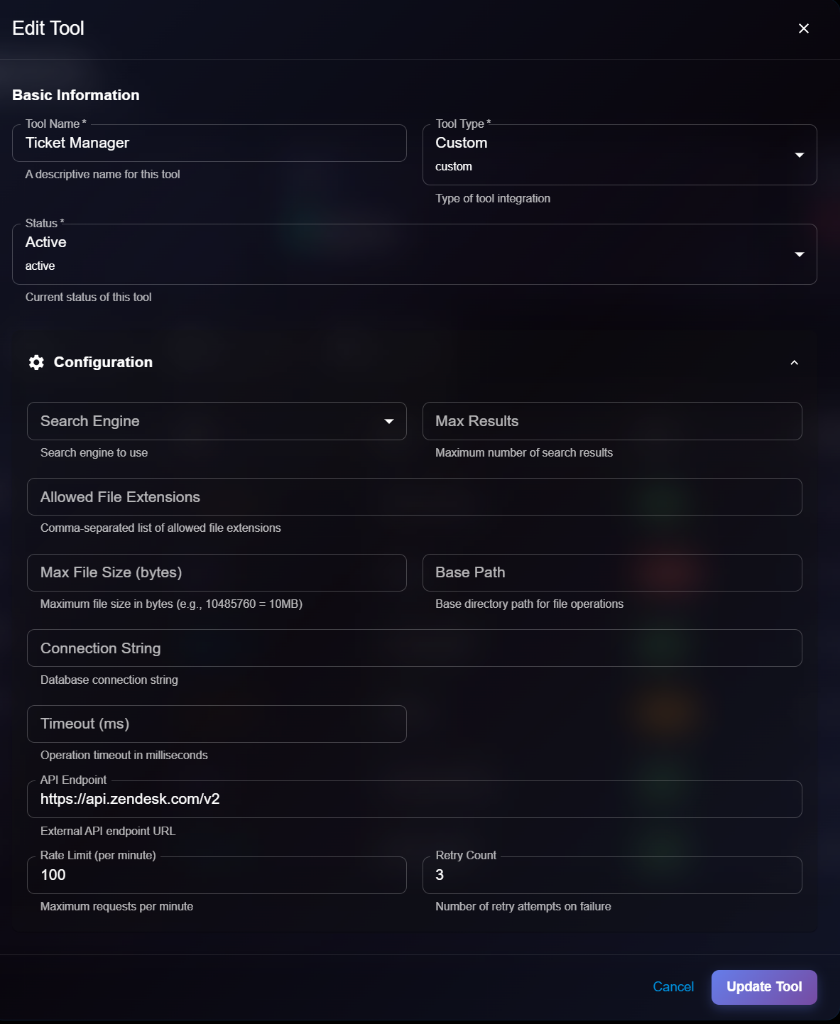
4. Click **Update Tool** to save changes
> \[!NOTE] The Edit form is identical to the Create/View form, but with an "Update Tool" button.
**Editable Fields**:
* ✅ Tool Name
* ✅ Status (Active ↔ Disabled ↔ Pending)
* ✅ All configuration fields
* ❌ Tool Type (cannot edit after creation)
## Tool Types
**Custom Tools**:
* User-defined integrations
* Custom API connections
* Specific business logic
* Orange badge in list view
**MCP (Model Context Protocol) Tools**:
* Standardized protocol tools
* Pre-built integrations
* Community-maintained
* Purple badge in list view
**Built-in Tools**:
* Platform-provided tools
* Core functionality
* Maintained by Kaisar AI
* Blue badge in list view
## Tool Configuration Fields
Different tool types may have different configuration fields:
**API Integration Tools**:
* API Endpoint
* Rate Limit
* Retry Count
* Timeout
**File Management Tools**:
* Base Path
* Allowed File Extensions
* Max File Size
**Database Tools**:
* Connection String
* Timeout
* Retry Count
**Search Tools**:
* Search Engine
* Max Results
## Managing Tools
### Enabling/Disabling Tools
To change tool status:
1. Edit the tool
2. Change Status field
3. Save changes
**Active**: Tool is available for agents to use **Disabled**: Tool is not available **Pending**: Tool is being configured or tested
### Assigning Tools to Agents
Tools can be assigned to:
* **Specific agents**: Only that agent can use the tool
* **All Agents**: Available to all agents in the organization
### Deleting a Tool
To remove a tool:
1. Navigate to tool details or list
2. Click **Delete** button
3. Confirm deletion
> \[!WARNING] Deleting a tool will affect any agents using it. Make sure to update agent configurations before deleting.
## Best Practices
**Tool Configuration**:
* Set appropriate rate limits
* Configure timeouts properly
* Validate API endpoints
* Test before enabling
**Security**:
* Use secure API endpoints (HTTPS)
* Store credentials securely
* Limit file access paths
* Validate file extensions
**Performance**:
* Set reasonable timeouts
* Configure retry logic
* Monitor tool usage
* Optimize rate limits
**Maintenance**:
* Keep tools updated
* Monitor error rates
* Review logs regularly
* Disable unused tools
**Testing**:
* Test tools before activation
* Verify error handling
* Check rate limits
* Validate outputs
## Tool Usage Monitoring
**Metrics to Track**:
* Number of calls per tool
* Success/failure rates
* Average response time
* Error types and frequency
**Alerts**:
* Rate limit exceeded
* High error rates
* Timeout issues
* API endpoint failures
## Next Steps
* Configure [Instructions](https://docs.kaisar.io/kaisar-network/kaisar-ai-ops/agent-configuration/instructions) for tool usage
* Set up [Platform Connections](https://docs.kaisar.io/kaisar-network/kaisar-ai-ops/agent-configuration/platform-connections) for API access
* Define [Routes](https://docs.kaisar.io/kaisar-network/kaisar-ai-ops/agent-configuration/routes) that use these tools
* Assign tools to agents in [Organization → Agents](https://docs.kaisar.io/kaisar-network/kaisar-ai-ops/organization/agents)
---
# Source: https://docs.kaisar.io/kaisar-network/kaisar-ai-ops/troubleshooting/troubleshooting.md
# Troubleshooting
Common issues and solutions for Kaisar AI Ops.
## Overview
This section covers:
* [FAQ](https://docs.kaisar.io/kaisar-network/kaisar-ai-ops/troubleshooting/troubleshooting/faq) - Frequently asked questions
* [Known Issues](https://docs.kaisar.io/kaisar-network/kaisar-ai-ops/troubleshooting/troubleshooting/known-issues) - Current limitations
* [Support](https://docs.kaisar.io/kaisar-network/kaisar-ai-ops/troubleshooting/troubleshooting/support) - How to get help
## Quick Troubleshooting
### Cannot Log In
**Symptoms**: Login page shows error or redirects back
**Solutions**:
1. Clear browser cache and cookies
2. Try incognito/private mode
3. Verify credentials with admin
4. Check if MFA is required
5. Try password reset
### Experiment Won't Start
**Symptoms**: Experiment stuck in "pending" status
**Solutions**:
1. Check resource quotas
2. Verify compute resources are available
3. Review experiment configuration
4. Check cluster capacity
5. View experiment logs for errors
### Slow Dashboard Loading
**Symptoms**: Dashboard takes long to load
**Solutions**:
1. Check internet connection
2. Clear browser cache
3. Reduce number of displayed items
4. Check system status page
5. Try different browser
### API Requests Failing
**Symptoms**: 401, 403, or 500 errors
**Solutions**:
1. Verify API token is valid
2. Check token permissions
3. Review rate limits
4. Check API endpoint URL
5. Verify request format
## Common Error Messages
### "Quota Exceeded"
**Cause**: Resource limit reached
**Solution**:
1. Check current usage
2. Clean up unused resources
3. Request quota increase
4. Optimize resource allocation
### "Permission Denied"
**Cause**: Insufficient permissions
**Solution**:
1. Check your role
2. Request access from admin
3. Verify resource sharing settings
4. Check organization membership
### "Resource Not Found"
**Cause**: Invalid ID or deleted resource
**Solution**:
1. Verify resource ID
2. Check if resource was deleted
3. Ensure you have access
4. Try listing resources first
## Performance Issues
### Slow Experiment Training
**Possible Causes**:
* Inefficient data loading
* Suboptimal batch size
* CPU bottleneck
* Network I/O issues
**Solutions**:
1. Profile your code
2. Optimize data pipeline
3. Increase batch size
4. Use data caching
5. Check GPU utilization
### High Memory Usage
**Possible Causes**:
* Large batch size
* Memory leaks
* Inefficient model architecture
**Solutions**:
1. Reduce batch size
2. Use gradient accumulation
3. Enable mixed precision training
4. Profile memory usage
5. Clear unused variables
## Integration Issues
### Authentication Service Failing
**Solutions**:
1. Verify Authentication Service is running
2. Check client configuration
3. Review realm settings
4. Verify redirect URIs
5. Check SSL certificates
### Storage Connection Failed
**Solutions**:
1. Verify credentials
2. Check bucket/container exists
3. Review IAM permissions
4. Test network connectivity
5. Verify endpoint URL
## Getting Help
### Self-Service Resources
* [FAQ](https://docs.kaisar.io/kaisar-network/kaisar-ai-ops/troubleshooting/troubleshooting/faq) - Common questions
* [User Guide](https://github.com/Kaisar-Network/docs/blob/kaisar-ai-ops/kaisar-ai-ops/user-guide/README.md) - Feature documentation
* [API Reference](https://github.com/Kaisar-Network/docs/blob/kaisar-ai-ops/kaisar-ai-ops/api-reference/README.md) - API documentation
### Contact Support
* [Support Portal](https://docs.kaisar.io/kaisar-network/kaisar-ai-ops/troubleshooting/troubleshooting/support) - Submit tickets
* Email:
* Slack: #kaisar-support
### Community
* GitHub Discussions
* Stack Overflow (tag: kaisar-ai-ops)
* Community Forum
## Diagnostic Tools
### Health Check
Check system health:
```bash
curl https://ai.kaisar.io/health
```
### API Verification
Verify API access:
```bash
curl -X GET https://ai.kaisar.io/api/v1/auth/verify \
-H "Authorization: Bearer YOUR_TOKEN"
```
### Network Test
Test connectivity:
```bash
ping ai.kaisar.io
traceroute ai.kaisar.io
```
## Best Practices
* ✅ Check system status before reporting issues
* ✅ Collect error messages and logs
* ✅ Try basic troubleshooting first
* ✅ Document steps to reproduce
* ✅ Include relevant screenshots
* ✅ Provide system information
## Next Steps
* Review [FAQ](https://docs.kaisar.io/kaisar-network/kaisar-ai-ops/troubleshooting/troubleshooting/faq) for common questions
* Check [Known Issues](https://docs.kaisar.io/kaisar-network/kaisar-ai-ops/troubleshooting/troubleshooting/known-issues)
* Contact [Support](https://docs.kaisar.io/kaisar-network/kaisar-ai-ops/troubleshooting/troubleshooting/support) if needed
---
# Source: https://docs.kaisar.io/kaisar-network/origins/faq/what-are-the-main-products-offered-by-kaisar.md
# What are the main products offered by Kaisar?
Kaisar offers several key products designed for high-performance computing and AI applications:
* **Kaisar GPU Container:** Encapsulates GPU workloads in containers for efficient GPU resource utilization.
* **Kaisar Ray Node & Ray Cluster:** Tools for managing and scaling Ray clusters, enabling distributed AI/ML tasks.
* **Kaisar K8s:** A fully managed Kubernetes service tailored for GPU container deployment.
* **Kaisar Worker:** Allows users to contribute their GPU resources to the Kaisar network and earn rewards.
---
# Source: https://docs.kaisar.io/kaisar-network/origins/faq/what-frameworks-are-supported-by-kaisar-gpu-container.md
# What frameworks are supported by Kaisar GPU Container?
Kaisar GPU Container supports several major frameworks, including:
* TensorFlow
* PyTorch
* Jupyter Notebook
* Stable Diffusion
* NVIDIA CUDA
* Visual Studio Code
These frameworks can be deployed using pre-built templates provided in the Kaisar portal.
---
# Source: https://docs.kaisar.io/kaisar-network/origins/faq/what-gpus-are-supported.md
# What GPUs are supported?
Kaisar supports a range of GPUs, including the NVIDIA RTX series and AMD Ryzen series.
---
# Source: https://docs.kaisar.io/kaisar-network/kaisar-architecture/products/kaisar-onenode/kaisar-provider/what-is-kaisar-provider.md
# What is Kaisar Provider
- [Introduction](/kaisar-network/kaisar-architecture/products/kaisar-onenode/kaisar-provider/what-is-kaisar-provider/introduction.md)
- [Benefits of Running a Kaisar Provider](/kaisar-network/kaisar-architecture/products/kaisar-onenode/kaisar-provider/what-is-kaisar-provider/benefits-of-running-a-kaisar-provider.md)
---
# Source: https://docs.kaisar.io/kaisar-network/origins/faq/what-is-kaisar.md
# What is Kaisar?
Kaisar is a Decentralized Physical Infrastructure Network (DePIN) optimized for decentralized computing and AI. It aggregates spare GPU resources using AI and blockchain, offering scalable, secure, and cost-efficient cloud computing services.
---
# Source: https://docs.kaisar.io/kaisar-network/origins/faq/what-is-proof-of-physical-work-popw.md
# What is Proof of Physical Work (PoPW)?
Proof of Physical Work (PoPW) is a token distribution mechanism used by Kaisar to reward GPU providers for completing verifiable physical work in the real world. It involves validating the performance, uptime, and device info of GPU providers through checkers, with rewards distributed based on these scores.
---
# Source: https://docs.kaisar.io/kaisar-network/kaisar-architecture/products/kaisar-onenode/kaisar-checker/what-is-the-kaisar-checker-node/what-is-the-checker-node-license-nft.md
# What is the Checker Node License (NFT)
The Checker Node License is an ERC721 NFT that lets you earn rewards by running a Checker Node Client. You can run your Client on your own machine, through a Virtual Private Server (VPS), through a Node-as-a-Service (NaaS) Provider, or delegate it to another user's machine.
You can purchase your NFT from [nodes.kaisar.io](https://nodes.kaisar.io) or through the secondary market in the future. Contracts will be released soon, so stay tuned for updates.
Checker Node NFT Licenses cannot be transferred from the purchase wallet during the first year.
---
# Source: https://docs.kaisar.io/kaisar-network/kaisar-architecture/products/kaisar-onenode/kaisar-checker/what-is-the-kaisar-checker-node.md
# What is the Kaisar Checker Node
- [Introduction](/kaisar-network/kaisar-architecture/products/kaisar-onenode/kaisar-checker/what-is-the-kaisar-checker-node/introduction.md)
- [How do Checker Nodes Work](/kaisar-network/kaisar-architecture/products/kaisar-onenode/kaisar-checker/what-is-the-kaisar-checker-node/how-do-checker-nodes-work.md)
- [Benefits of Owning a Checker Node](/kaisar-network/kaisar-architecture/products/kaisar-onenode/kaisar-checker/what-is-the-kaisar-checker-node/benefits-of-owning-a-checker-node.md)
- [Node Sale Information](/kaisar-network/kaisar-architecture/products/kaisar-onenode/kaisar-checker/what-is-the-kaisar-checker-node/node-sale-information.md)
- [Referral Mechanism](/kaisar-network/kaisar-architecture/products/kaisar-onenode/kaisar-checker/what-is-the-kaisar-checker-node/referral-mechanism.md)
- [What is the Checker Node License (NFT)](/kaisar-network/kaisar-architecture/products/kaisar-onenode/kaisar-checker/what-is-the-kaisar-checker-node/what-is-the-checker-node-license-nft.md)
- [Reward Unlock Period](/kaisar-network/kaisar-architecture/products/kaisar-onenode/kaisar-checker/what-is-the-kaisar-checker-node/reward-unlock-period.md)
- [FAQs](/kaisar-network/kaisar-architecture/products/kaisar-onenode/kaisar-checker/what-is-the-kaisar-checker-node/faqs.md)
---
# Source: https://docs.kaisar.io/kaisar-network/origins/faq/what-payment-methods-are-accepted.md
# What payment methods are accepted?
Kaisar accepts payments via USDT (Tether), and will soon support credit card payments for purchase of KAI tokens to use in Kaisar Decentralized Physical Infrastructure Network (DePIN).
---
# Source: https://docs.kaisar.io/kaisar-network/kaisar-architecture/products/kaisar-onenode/kaisar-checker/how-to-purchase-checker-nodes/whats-next.md
# What’s Next?
After purchasing an Kaisar node, investors will receive an ERC-721 NFT to the wallet addresses used during the Kaisar node sale. The NFT symbolizes ownership of the purchased Kaisar node. Keep in mind that there's no cap on the number of nodes you can buy.
You can purchase as many nodes as you want, if available. The Checker Node license gives buyers lifetime access. The NFTs will be non-transferable for the first year after the node sale.
The NFTs will be airdropped to buyer wallets directly at a later date. There's no claiming process. There will be sufficient time between the NFT airdrop and time for us
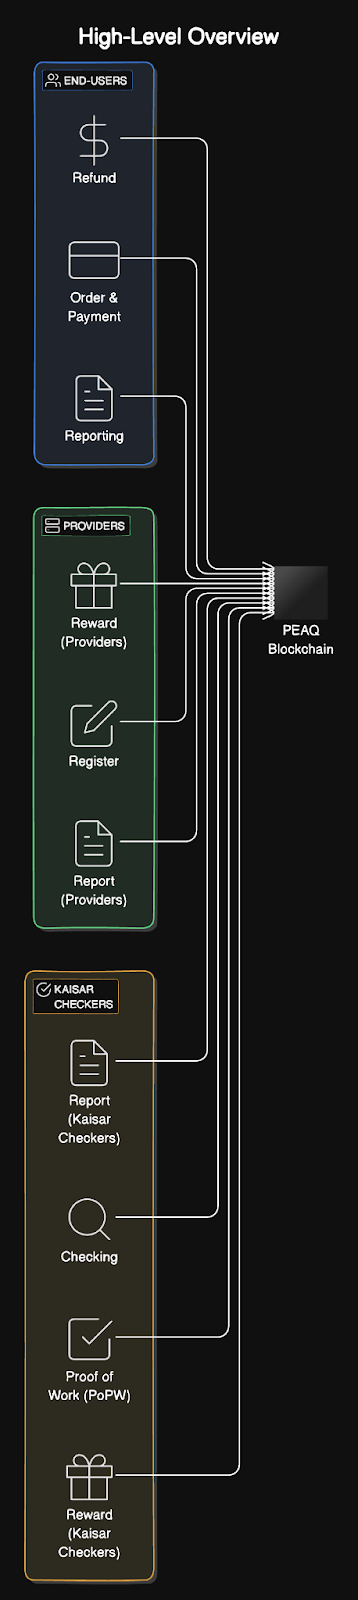

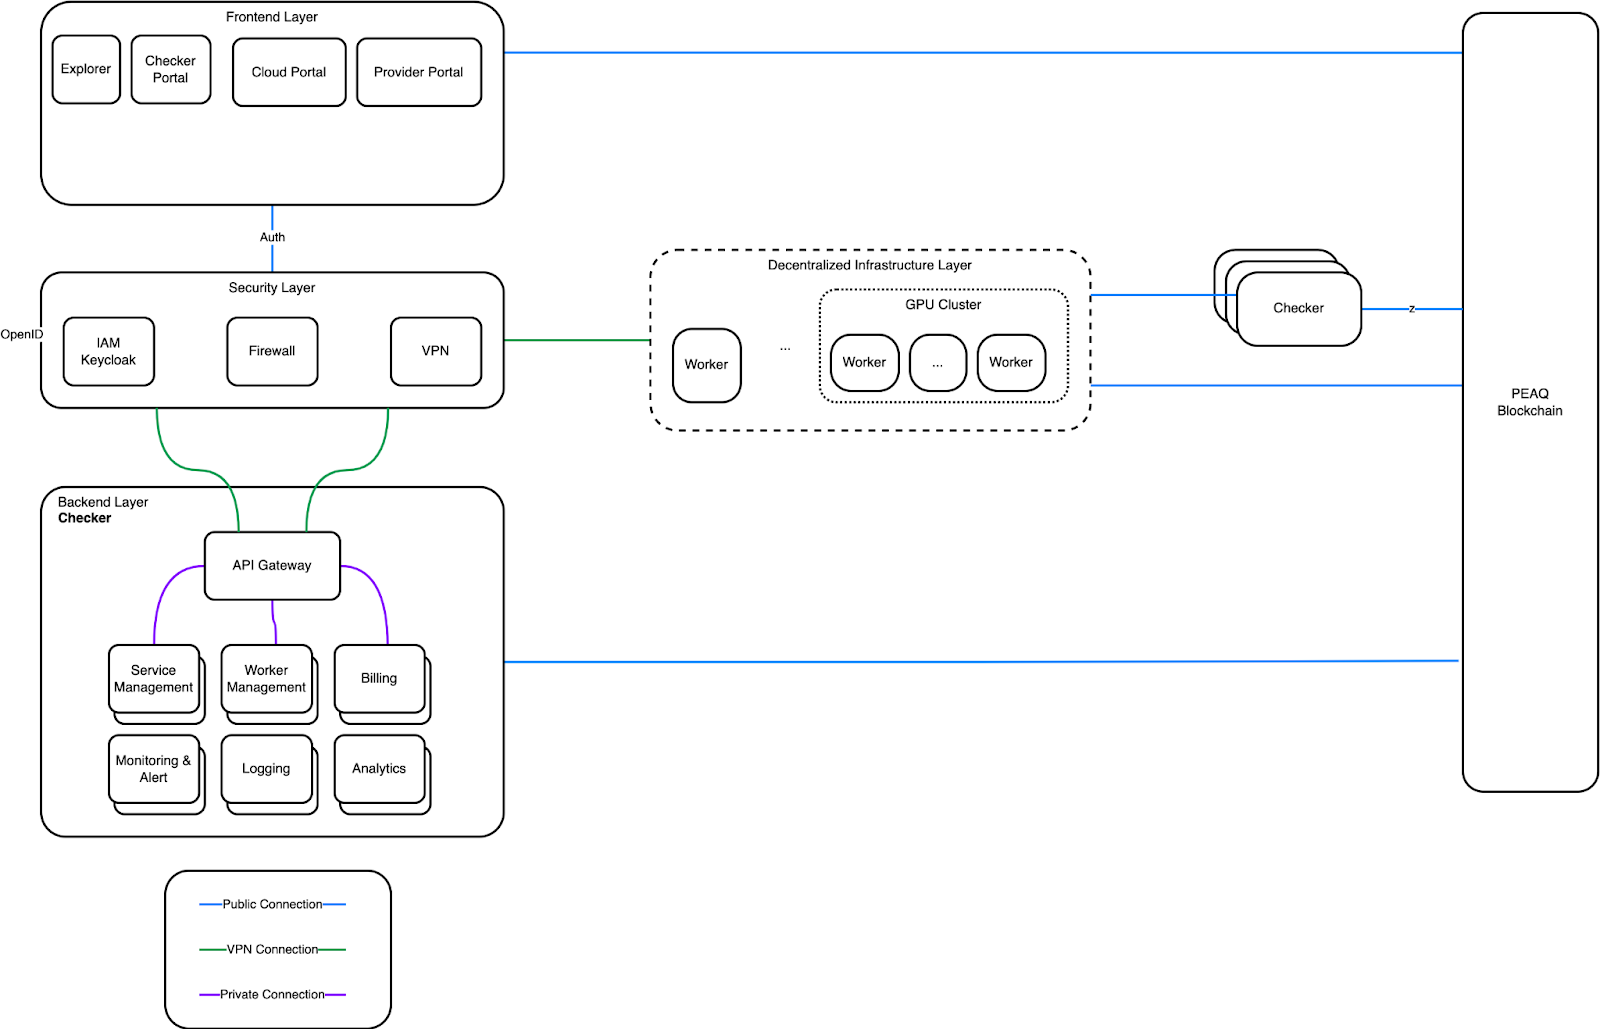
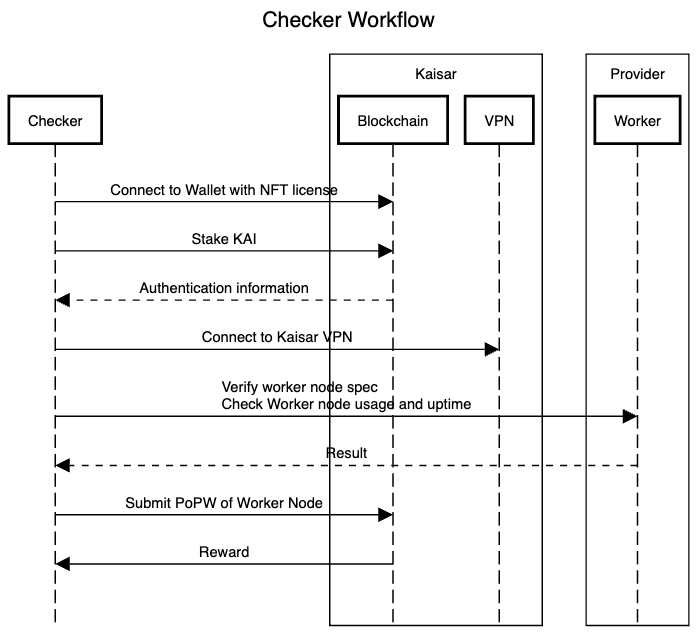
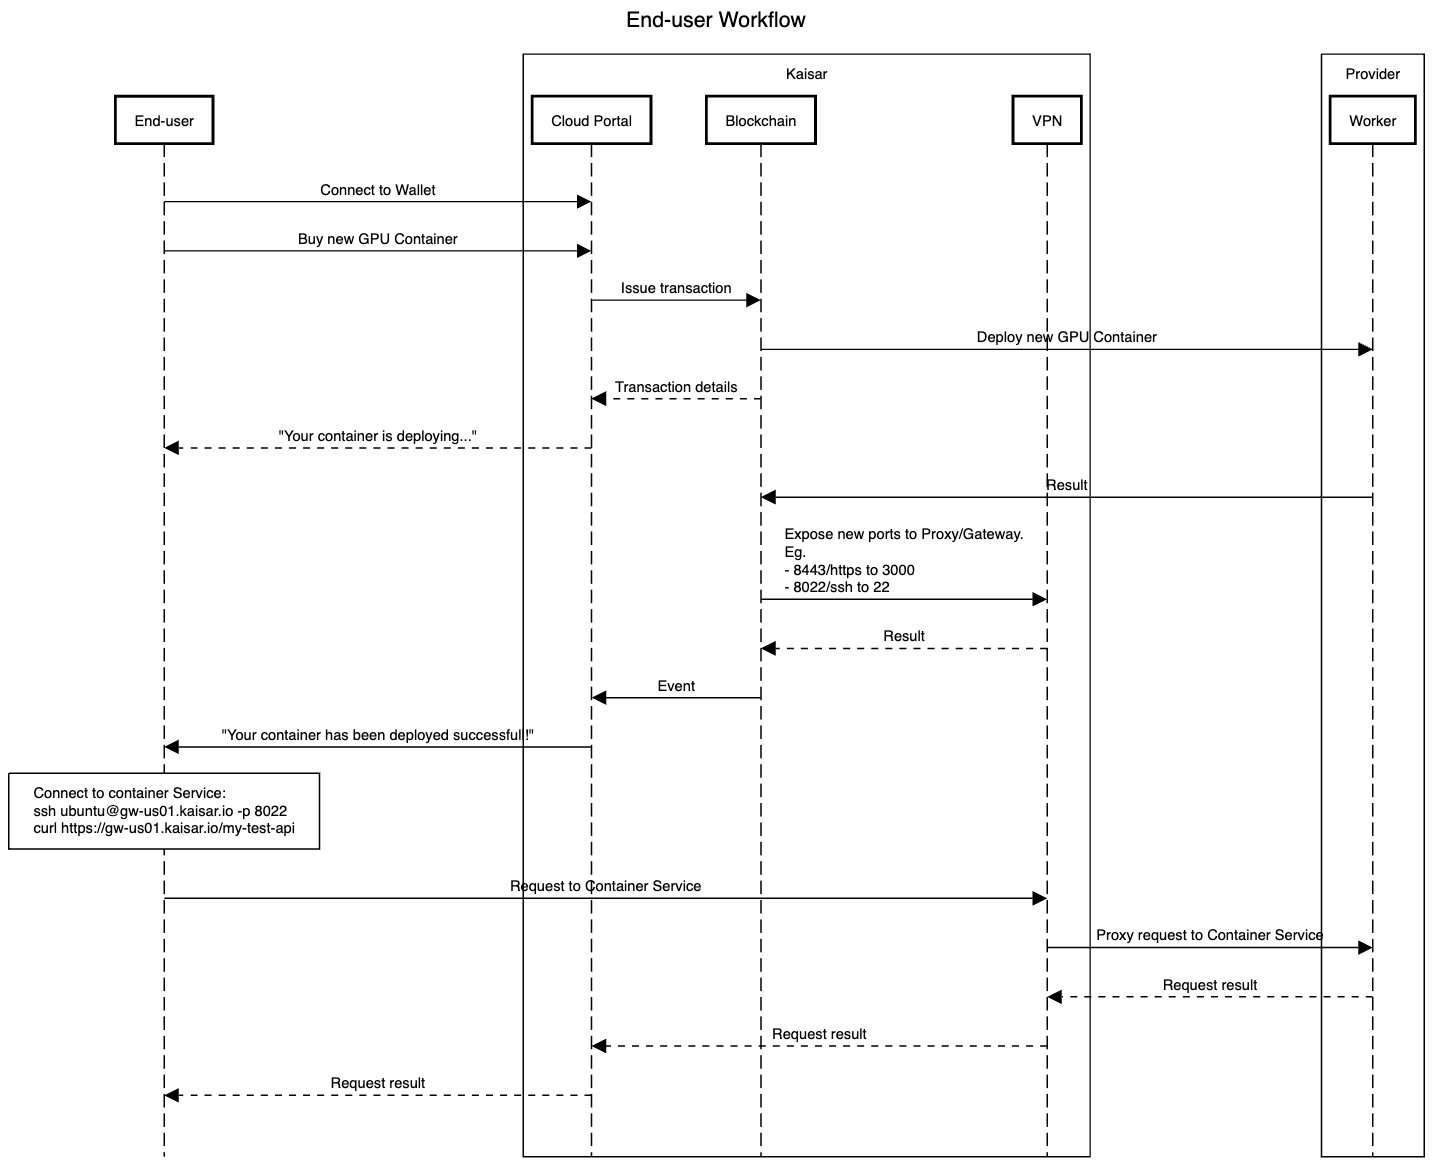
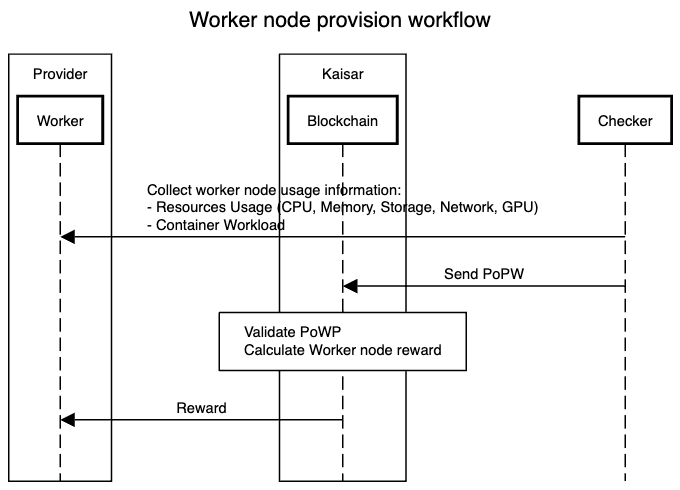
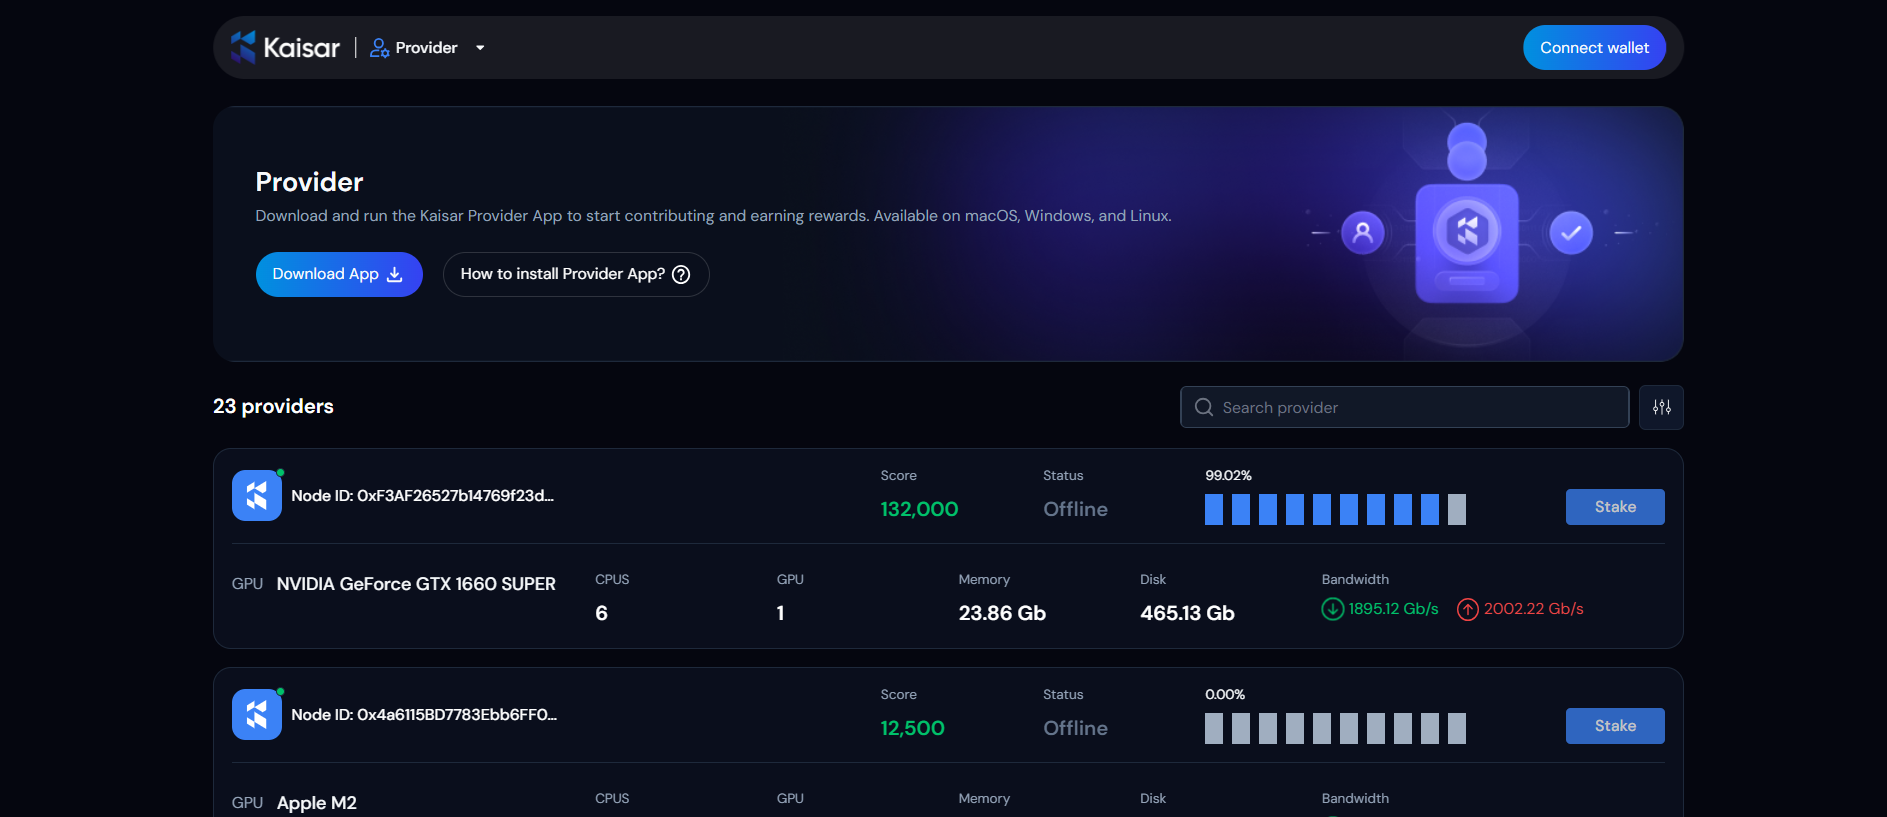
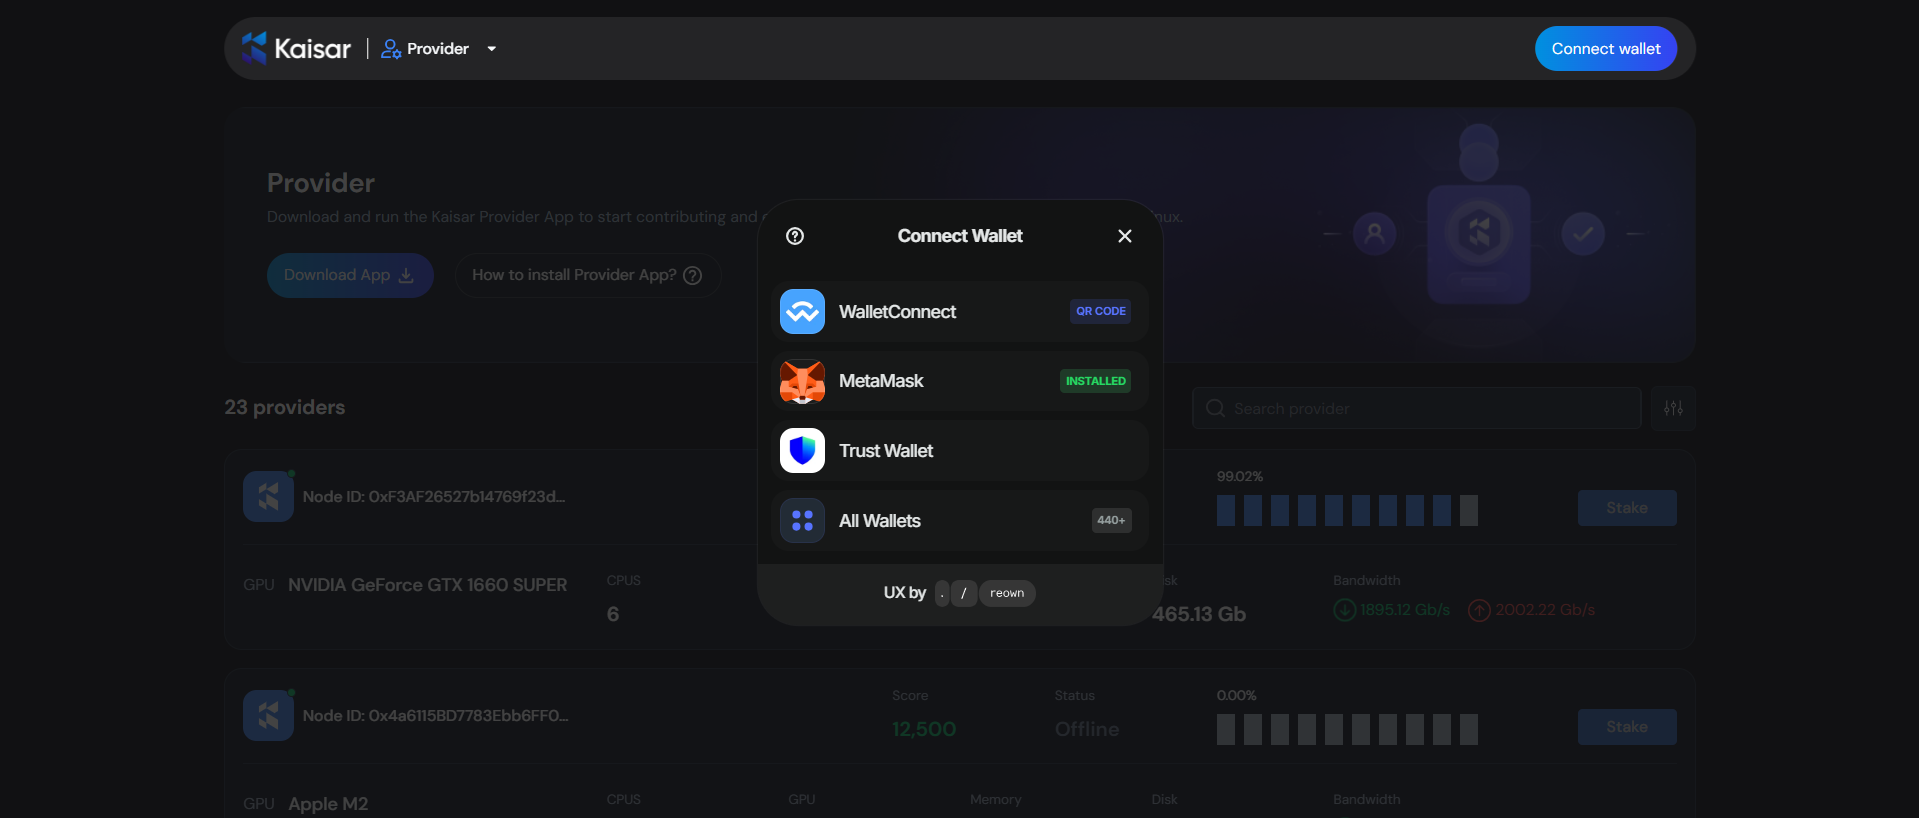
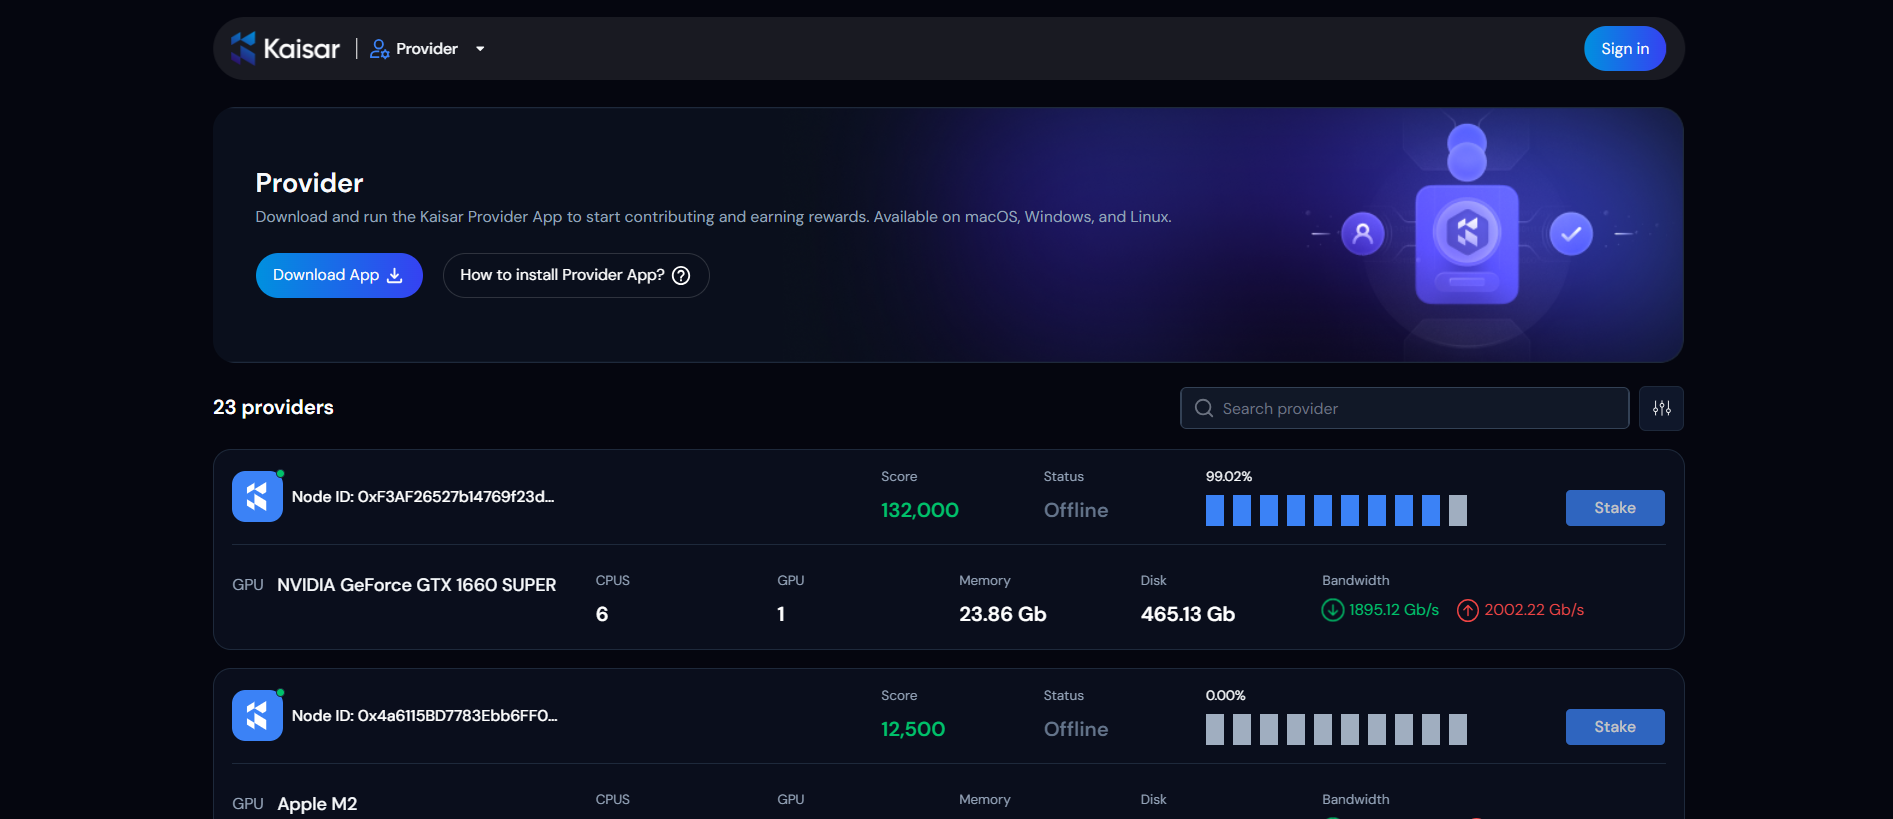


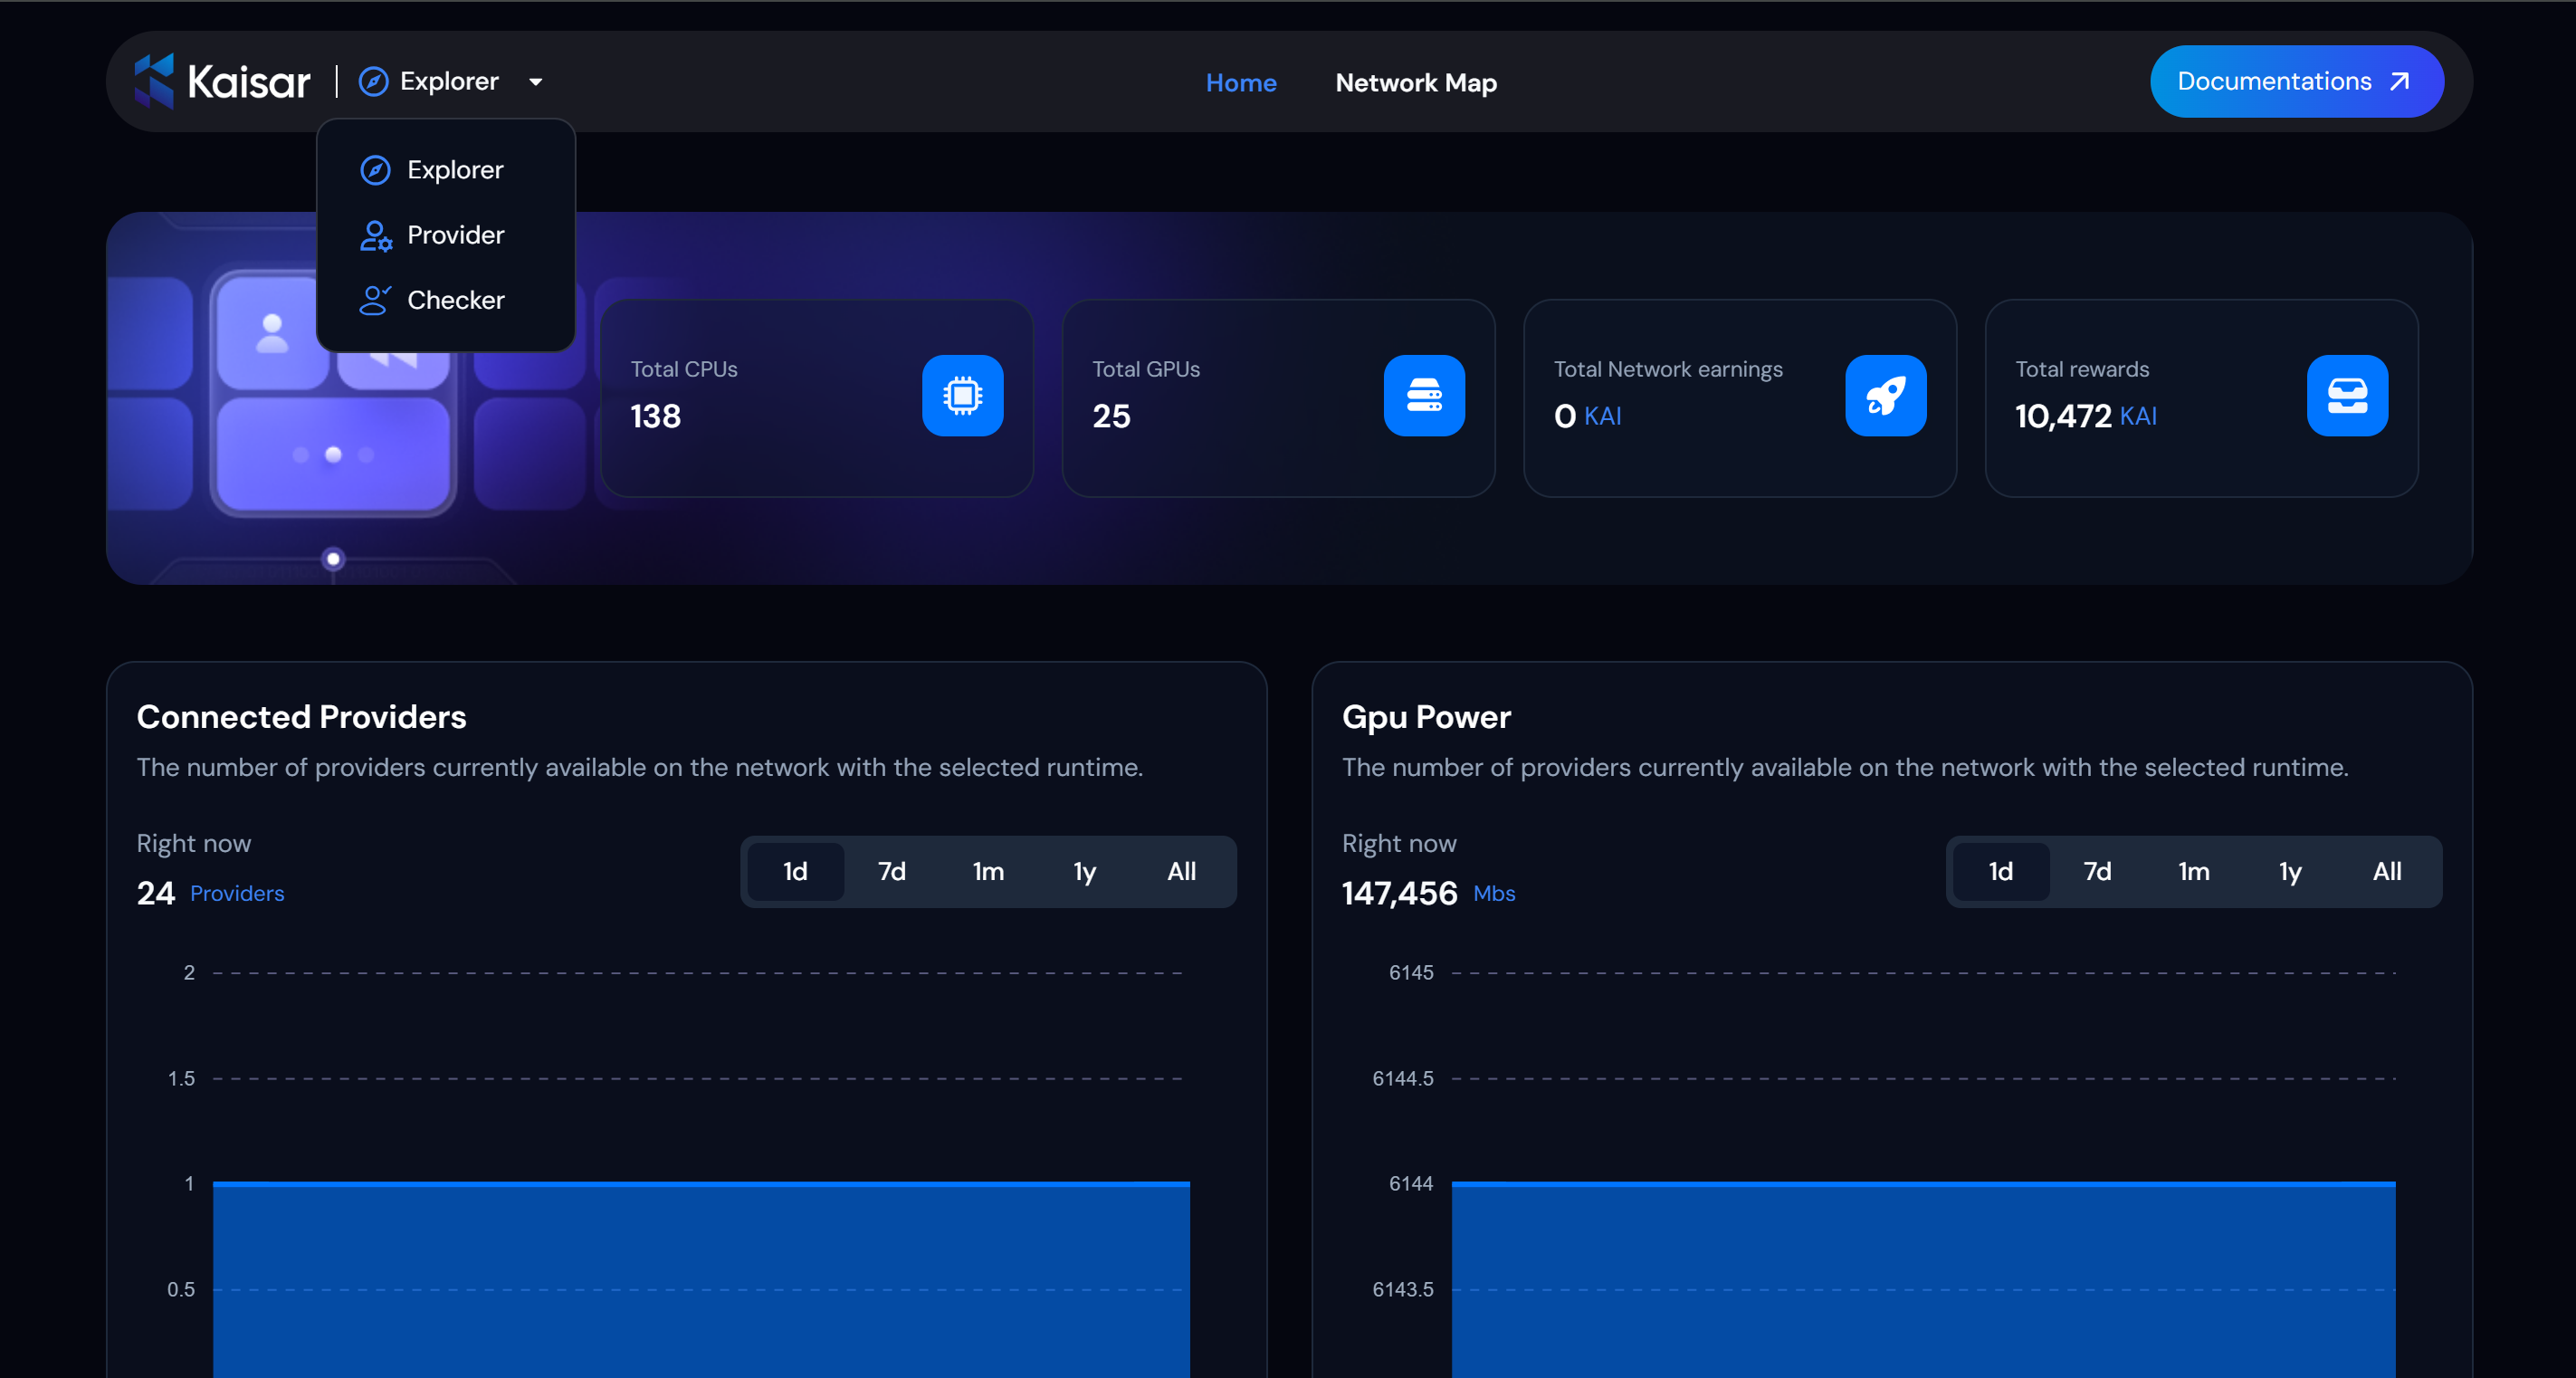
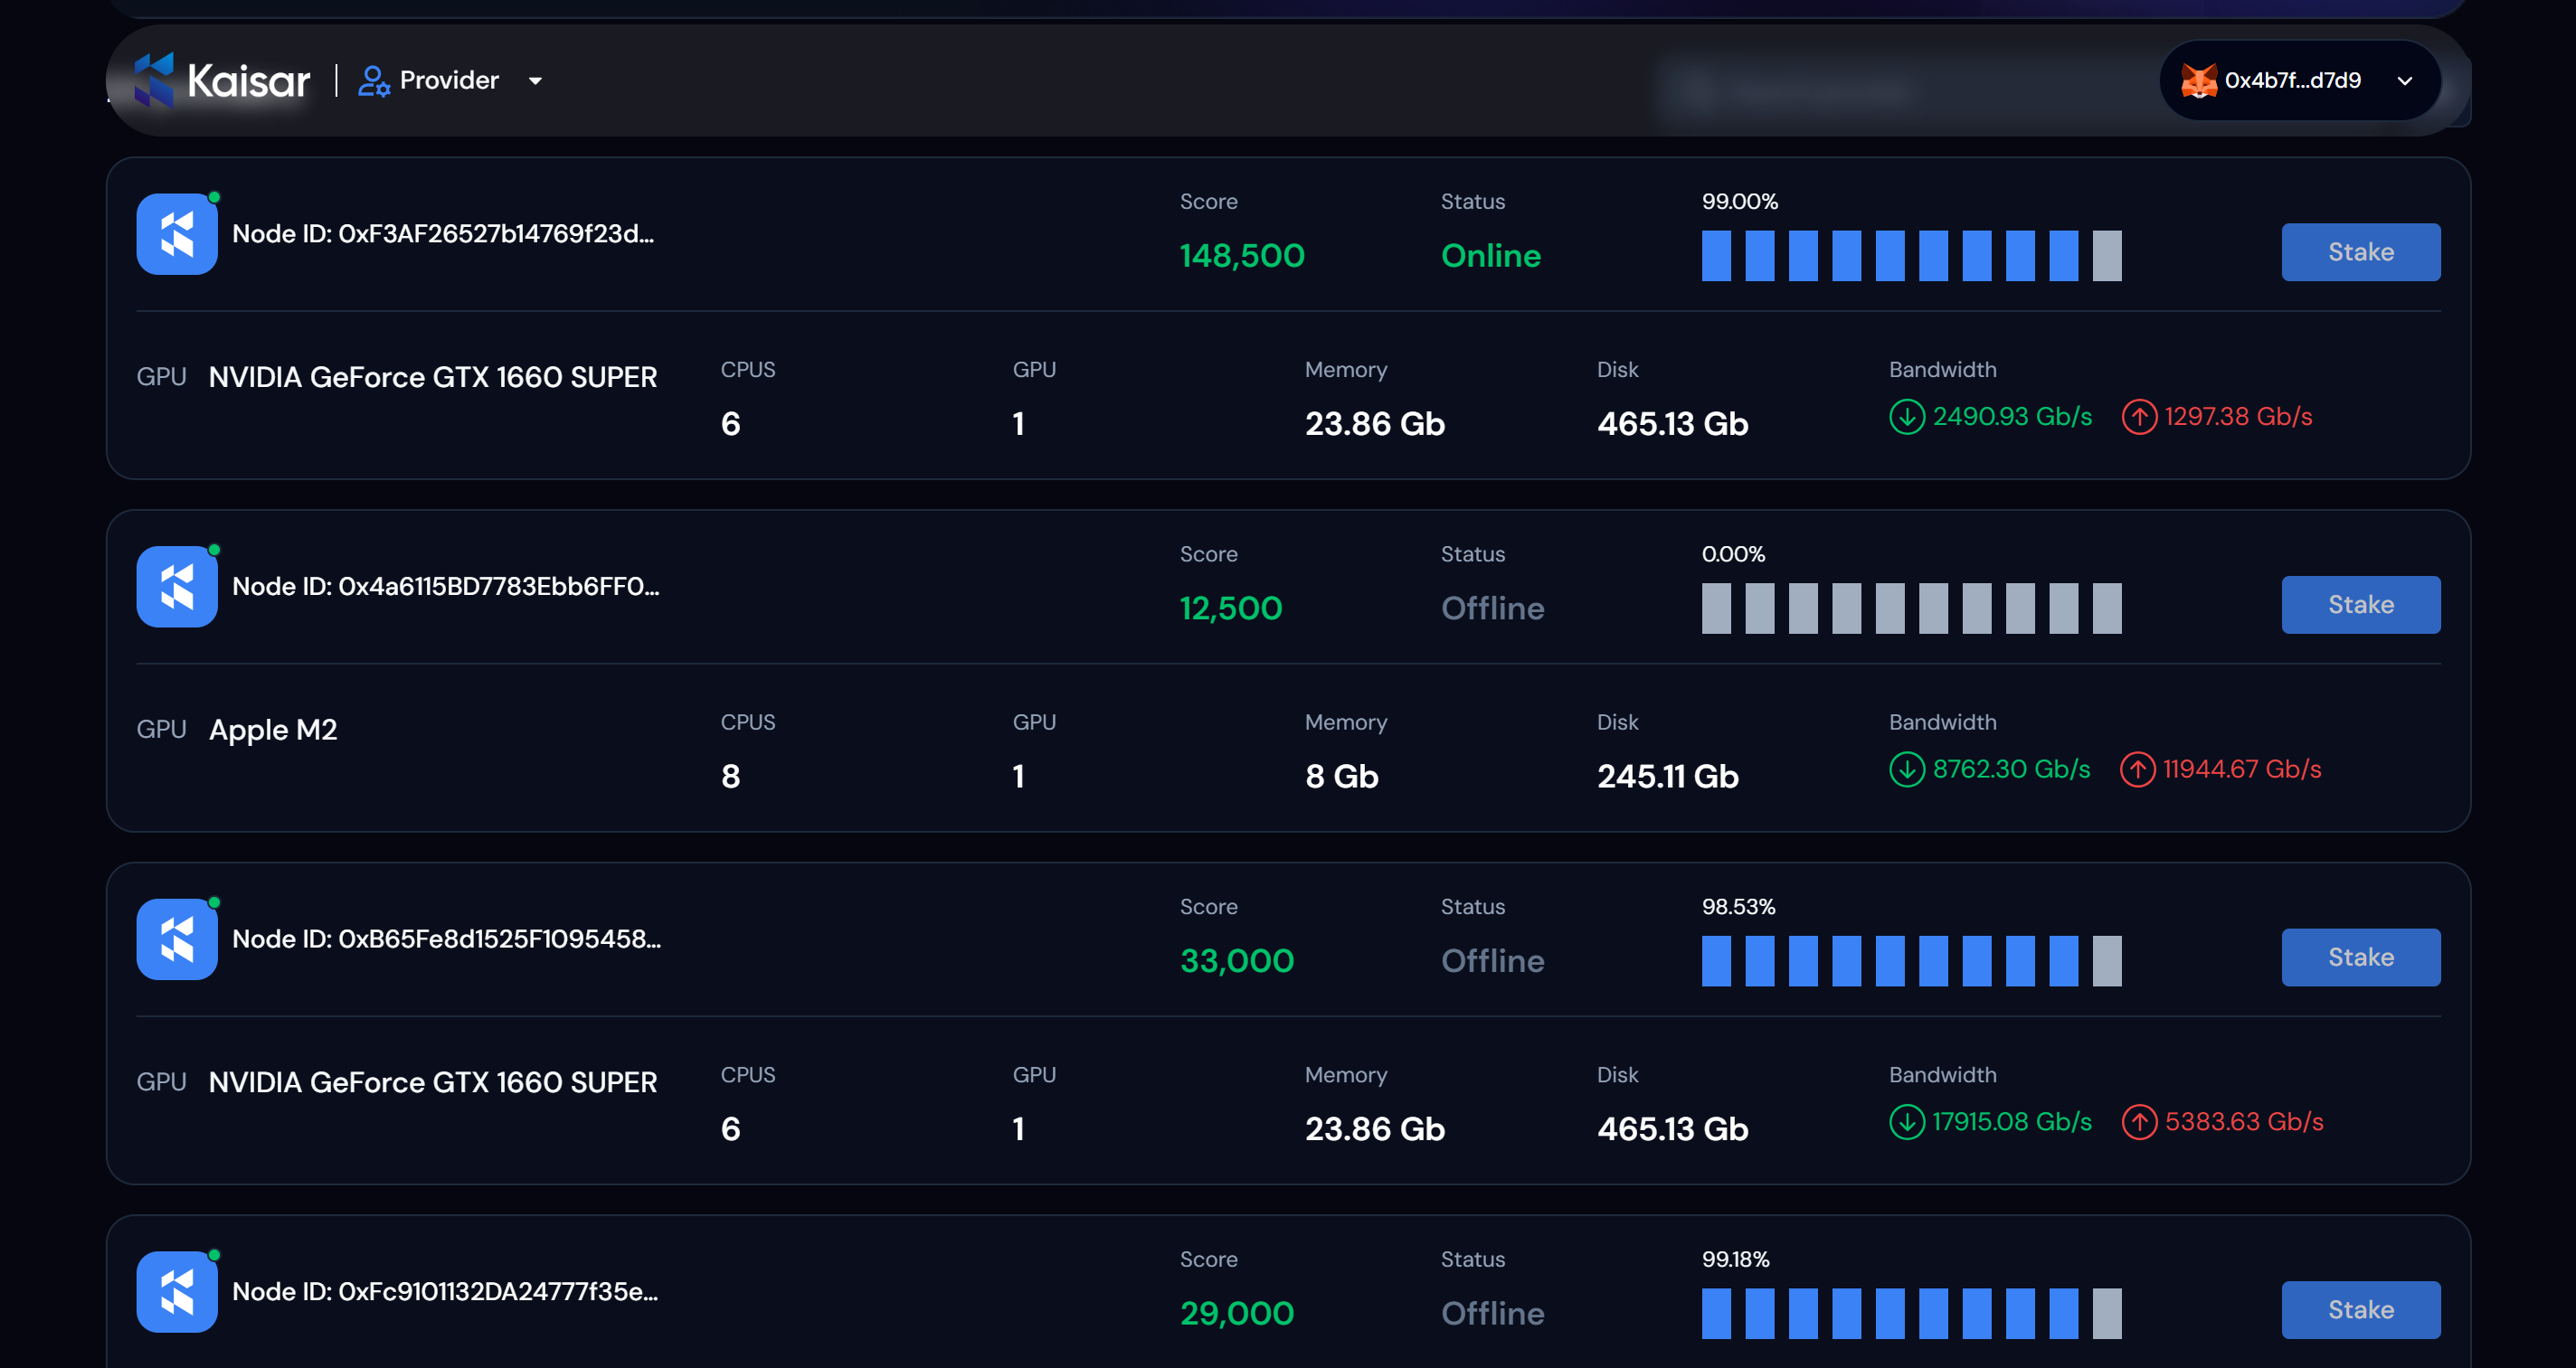
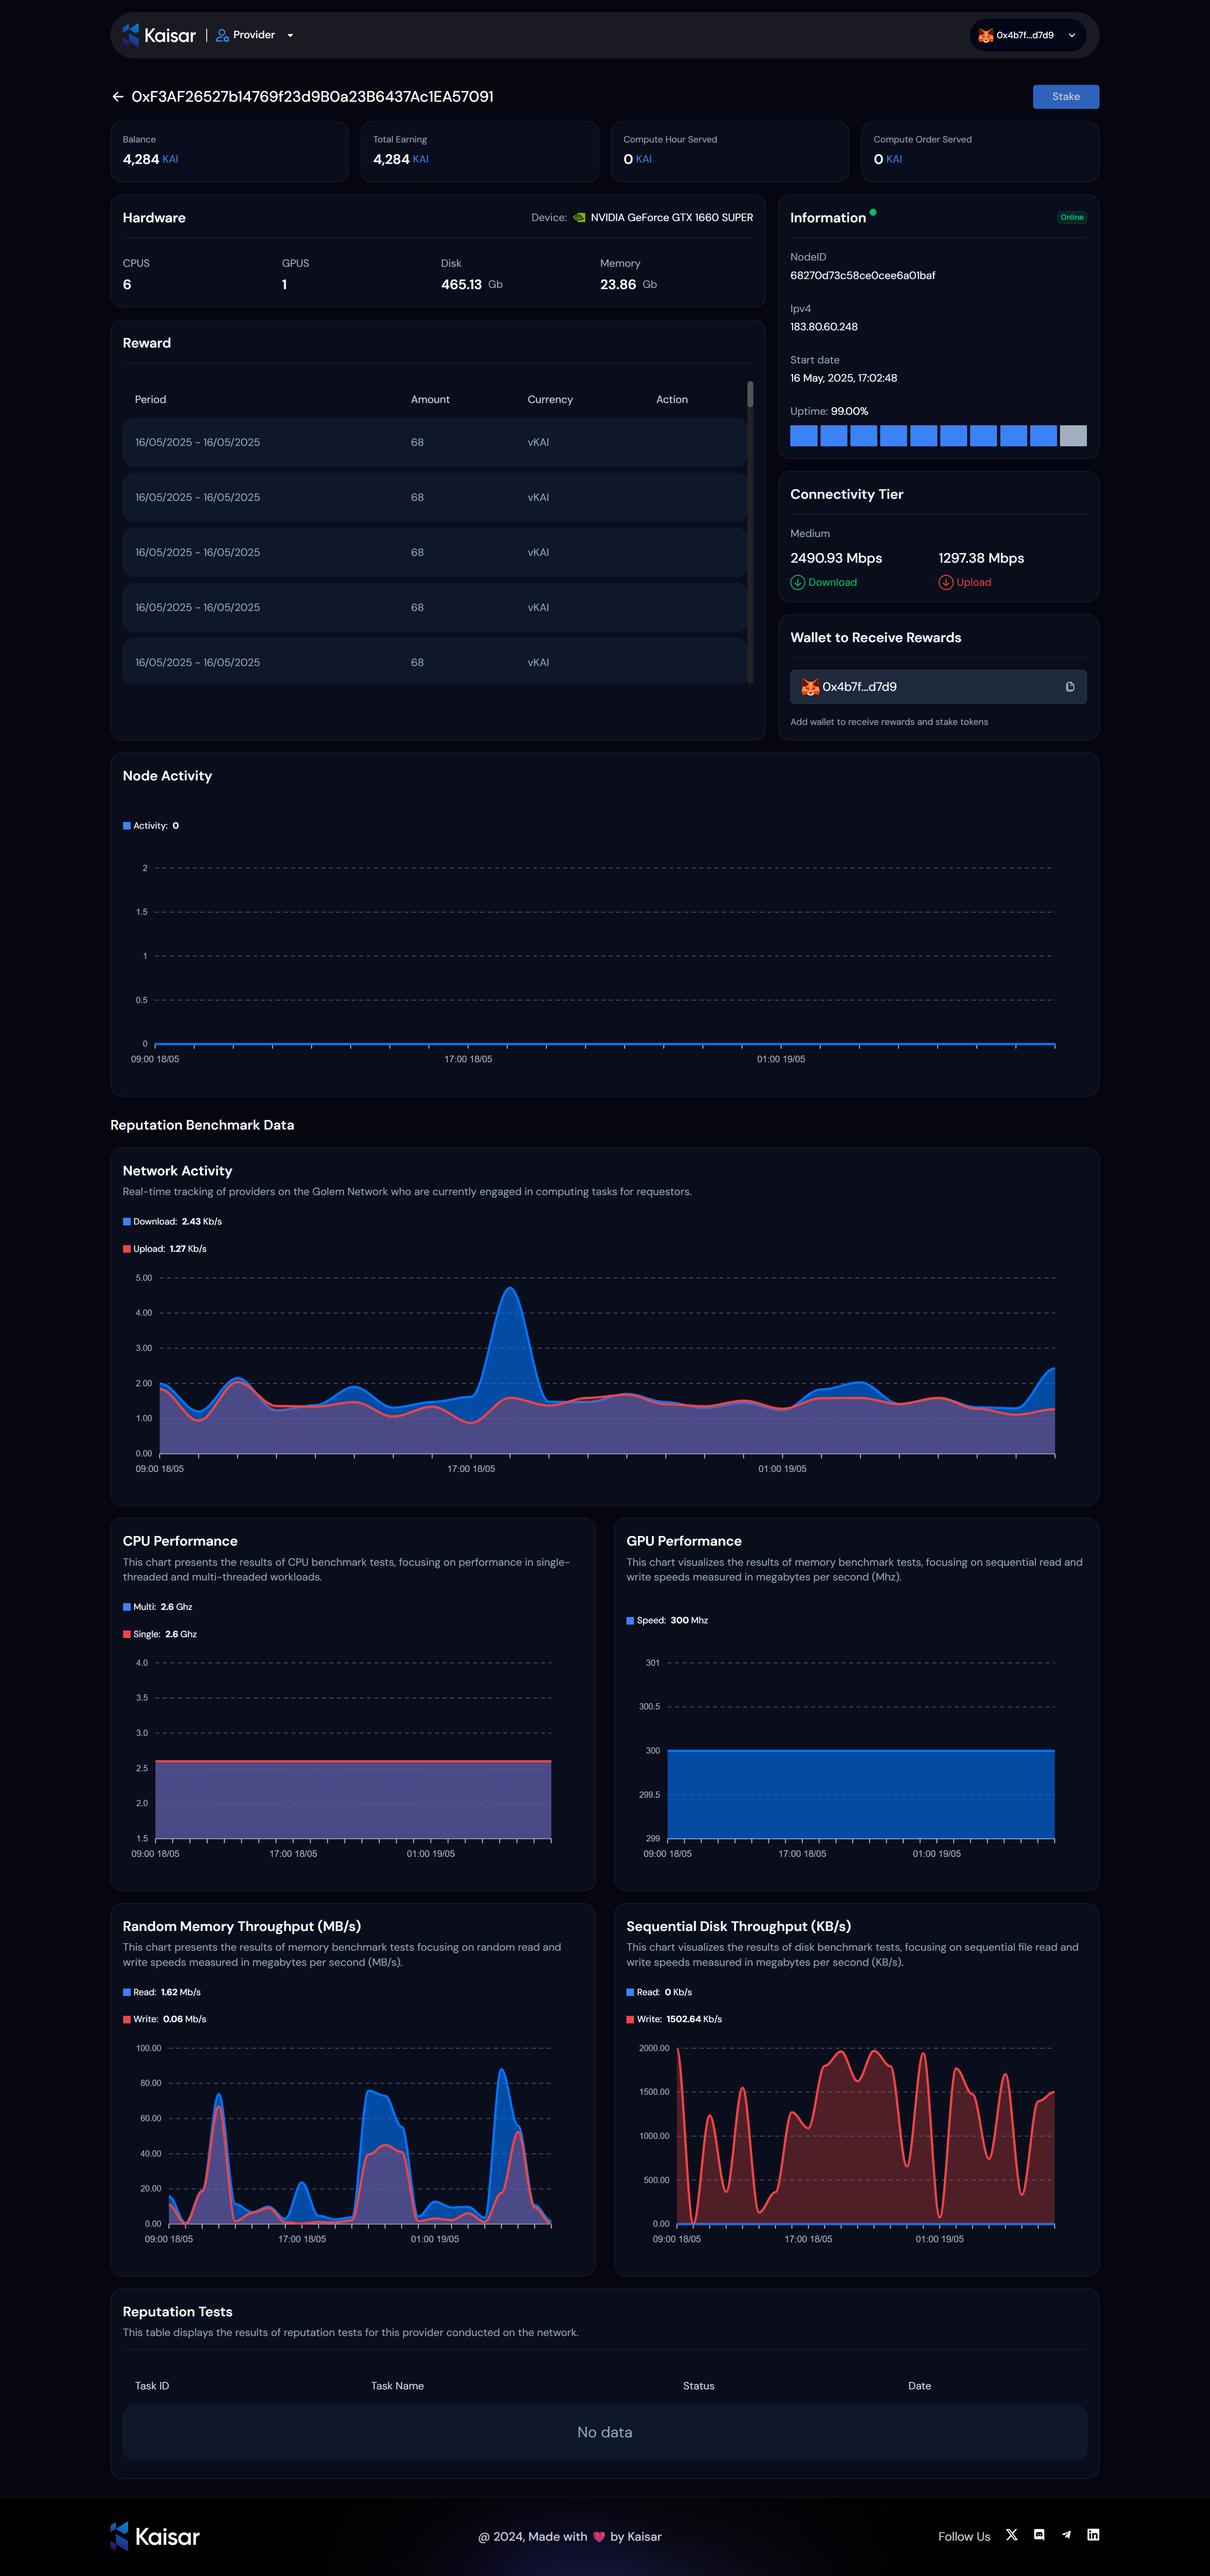
.png?alt=media&token=8f63b338-7688-421f-b2eb-01d88b752a8d)